Post Syndicated from Brian Jarvis original https://aws.amazon.com/blogs/security/how-to-tune-tls-for-hybrid-post-quantum-cryptography-with-kyber/
We are excited to offer hybrid post-quantum TLS with Kyber for AWS Key Management Service (AWS KMS) and AWS Certificate Manager (ACM). In this blog post, we share the performance characteristics of our hybrid post-quantum Kyber implementation, show you how to configure a Maven project to use it, and discuss how to prepare your connection settings for Kyber post-quantum cryptography (PQC).
After five years of intensive research and cryptanalysis among partners from academia, the cryptographic community, and the National Institute of Standards and Technology (NIST), NIST has selected Kyber for post-quantum key encapsulation mechanism (KEM) standardization. This marks the beginning of the next generation of public key encryption. In time, the classical key establishment algorithms we use today, like RSA and elliptic curve cryptography (ECC), will be replaced by quantum-secure alternatives. At AWS Cryptography, we’ve been researching and analyzing the candidate KEMs through each round of the NIST selection process. We began supporting Kyber in round 2 and continue that support today.
A cryptographically relevant quantum computer that is capable of breaking RSA and ECC does not yet exist. However, we are offering hybrid post-quantum TLS with Kyber today so that customers can see how the performance differences of PQC affect their workloads. We also believe that the use of PQC raises the already-high security bar for connecting to AWS KMS and ACM, making this feature attractive for customers with long-term confidentiality needs.
Performance of hybrid post-quantum TLS with Kyber
Hybrid post-quantum TLS incurs a latency and bandwidth overhead compared to classical crypto alone. To quantify this overhead, we measured how long S2N-TLS takes to negotiate hybrid post-quantum (ECDHE + Kyber) key establishment compared to ECDHE alone. We performed the tests with the Linux perf subsystem on an Amazon Elastic Compute Cloud (Amazon EC2) c6i.4xlarge instance in the US East (Northern Virginia) AWS Region, and we initiated 2,000 TLS connections to a test server running in the US West (Oregon) Region, to include typical internet latencies.
Figure 1 shows the latencies of a TLS handshake that uses classical ECDHE and hybrid post-quantum (ECDHE + Kyber) key establishment. The columns are separated to illustrate the CPU time spent by the client and server compared to the time spent sending data over the network.

Figure 1: Latency of classical compared to hybrid post-quantum TLS handshake
Figure 2 shows the bytes sent and received during the TLS handshake, as measured by the client, for both classical ECDHE and hybrid post-quantum (ECDHE + Kyber) key establishment.

Figure 2: Bandwidth of classical compared to hybrid post-quantum TLS handshake
This data shows that the overhead for using hybrid post-quantum key establishment is 0.25 ms on the client, 0.23 ms on the server, and an additional 2,356 bytes on the wire. Intra-Region tests would result in lower network latency. Your latencies also might vary depending on network conditions, CPU performance, server load, and other variables.
The results show that the performance of Kyber is strong; the additional latency is one of the top contenders among the NIST PQC candidates that we analyzed in a previous blog post. In fact, the performance of these ciphers has improved during our latest test, because x86-64 assembly-optimized versions of these ciphers are now available for use.
Configure a Maven project for hybrid post-quantum TLS
In this section, we provide a Maven configuration and code example that will show you how to get started using our assembly-optimized, hybrid post-quantum TLS configuration with Kyber.
To configure a Maven project for hybrid post-quantum TLS
- Get the preview release of the AWS Common Runtime HTTP client for the AWS SDK for Java 2.x. Your Maven dependency configuration should specify version 2.17.69-PREVIEW or newer, as shown in the following code sample.
- Configure the desired cipher suite in your code’s initialization. The following code sample configures an AWS KMS client to use the latest hybrid post-quantum cipher suite.
With that, all calls made with your AWS KMS client will use hybrid post-quantum TLS. You can use the latest hybrid post-quantum cipher suite with ACM by following the preceding example but using an AcmAsyncClient instead.
Tune connection settings for hybrid post-quantum TLS
Although hybrid post-quantum TLS has some latency and bandwidth overhead on the initial handshake, that cost is amortized over the duration of the TLS session, and you can fine-tune your connection settings to help further reduce the cost. In this section, you learn three ways to reduce the impact of hybrid PQC on your TLS connections: connection pooling, connection timeouts, and TLS session resumption.
Connection pooling
Connection pools manage the number of active connections to a server. They allow a connection to be reused without closing and reopening it, which amortizes the cost of connection establishment over time. Part of a connection’s setup time is the TLS handshake, so you can use connection pools to help reduce the impact of an increase in handshake latency.
To illustrate this, we wrote a test application that generates approximately 200 transactions per second to a test server. We varied the maximum concurrency setting of the HTTP client and measured the latency of the test request. In the AWS CRT HTTP client, this is the maxConcurrency setting. If the connection pool doesn’t have an idle connection available, the request latency includes establishing a new connection. Using Wireshark, we captured the network traffic to observe the number of TLS handshakes that took place over the duration of the application. Figure 3 shows the request latency and number of TLS handshakes as the maxConcurrency setting is increased.
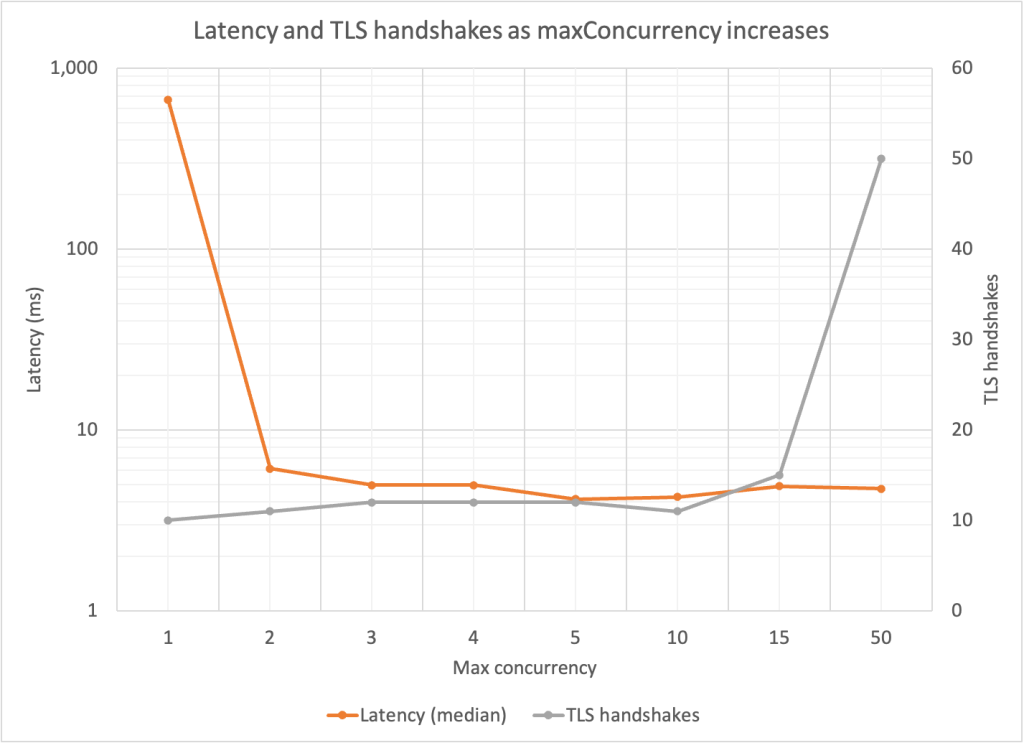
Figure 3: Median request latency and number of TLS handshakes as concurrency pool size increases
The biggest latency benefit occurred with a maxConcurrency value greater than 1. Beyond that, the latencies were past the point of diminishing returns. For all maxConcurrency values of 10 and below, additional TLS handshakes took place within the connections, but they didn’t have much impact on median latency. These inflection points will depend on your application’s request volume. The takeaway is that connection pooling allows connections to be reused, thereby spreading the cost of any increased TLS negotiation time over many requests.
More detail about using the maxConcurrency option can be found in the AWS SDK for Java API Reference.
Connection timeouts
Connection timeouts work in conjunction with connection pooling. Even if you use a connection pool, there is a limit to how long idle connections stay open before the pool closes them. You can adjust this time limit to save on connection establishment overhead.
A nice way to visualize this setting is to imagine bursty traffic patterns. Despite tuning the connection pool concurrency, your connections keep closing because the burst period is longer than the idle time limit. By increasing the maximum idle time, you can reuse these connections despite bursty behavior.
To simulate the impact of connection timeouts, we wrote a test application that starts 10 threads, each of which activate at the same time on a periodic schedule every 5 seconds for a minute. We set maxConcurrency to 10 to allow each thread to have its own connection. We set connectionMaxIdleTime of the AWS CRT HTTP client to 1 second for the first test; and to 10 seconds for the second test.
When the maximum idle time was 1 second, the connections for all 10 threads closed during the time between each burst. As a result, 100 total connections were formed over the life of the test, causing a median request latency of 20.3 ms. When we changed the maximum idle time to 10 seconds, the 10 initial connections were reused by each subsequent burst, reducing the median request latency to 5.9 ms.
By setting the connectionMaxIdleTime appropriately for your application, you can reduce connection establishment overhead, including TLS negotiation time, to help achieve time savings throughout the life of your application.
More detail about using the connectionMaxIdleTime option can be found in the AWS SDK for Java API Reference.
TLS session resumption
TLS session resumption allows a client and server to bypass the key agreement that is normally performed to arrive at a new shared secret. Instead, communication quickly resumes by using a shared secret that was previously negotiated, or one that was derived from a previous secret (the implementation details depend on the version of TLS in use). This feature requires that both the client and server support it, but if available, TLS session resumption allows the TLS handshake time and bandwidth increases associated with hybrid PQ to be amortized over the life of multiple connections.
Conclusion
As you learned in this post, hybrid post-quantum TLS with Kyber is available for AWS KMS and ACM. This new cipher suite raises the security bar and allows you to prepare your workloads for post-quantum cryptography. Hybrid key agreement has some additional overhead compared to classical ECDHE, but you can mitigate these increases by tuning your connection settings, including connection pooling, connection timeouts, and TLS session resumption. Begin using hybrid key agreement today with AWS KMS and ACM.
If you have feedback about this post, submit comments in the Comments section below.
Want more AWS Security news? Follow us on Twitter.