Tag Archives: launch

Network Address Management and Auditing at Scale with Amazon VPC IP Address Manager

Post Syndicated from Steve Roberts original https://aws.amazon.com/blogs/aws/network-address-management-and-auditing-at-scale-with-amazon-vpc-ip-address-manager/

Managing, monitoring, and auditing IP address allocation for at-scale networks, as the growth in cloud workloads and connected devices continues at a rapid pace, is a complex, time-consuming, and potentially error-prone task. Traditionally, network administrators have resorted to using combinations of spreadsheets, home-grown tools, and scripts to track address assignments across multiple accounts, virtual private clouds (VPCs), and Regions. Manually updating spreadsheets when application development teams request IP address assignments takes time, and care, to avoid errors. Errors which, should they go unnoticed, can lead to address conflicts and subsequent downtime, causing serious operational and business issues. In turn, the time taken to make these updates, sometimes several days, causes delays in onboarding new applications or expanding existing applications, impacting the velocity of development teams. The need to keep those home-grown tools and scripts up-to-date and error-free also results in taking staff hours away from more strategic and business-impacting projects.

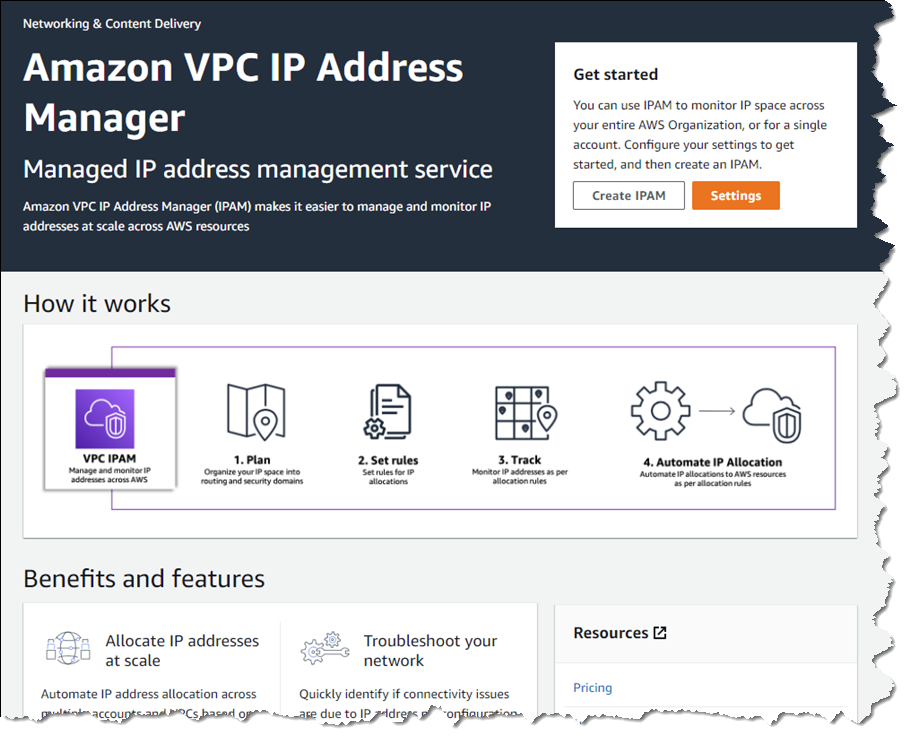
Today, I’m happy to announce Amazon VPC IP Address Manager, a new feature that provides network administrators with an automated IP management workflow. IPAM makes it easier for network administrators to organize, assign, monitor, and audit IP addresses in at-scale networks, lowering the management and monitoring burden and eliminating the manual processes that can lead to delays and unintended errors.

Amazon VPC IP Address Manager dashboard homepage

Introducing Amazon VPC IP Address Manager
IPAM enables management and auditing of IP address assignments across an organization’s accounts, Amazon Virtual Private Cloud (VPC)‘s, and AWS Regions, using a single operational dashboard. From this centralized view, you can manage your IP addresses across AWS.

In each Region in which you have resources needing IP addresses, you create a regional pool. Pools are collections of CIDRs and help you to organize your IP space. Unused address space from your top-level pools can be used to fill your regional pools. Further, if you have applications or environments with different security needs, you can create additional pools. For example, you could create different pools for ‘dev’ and ‘prod’ environments if they are subject to different connectivity requirements. The screenshots below illustrate the process of creating a global pool and, from it, three regional pools. Although my example stops after configuring regional pools, in production, you would continue subdividing the regional pools further as needed.

Creating the global IPAM pool

Next, I configure a set of regional pools. Below, I’m creating a regional pool for my US East (N. Virginia) Region resources, scoped within my global pool.

Creating a regional pool, step 1

As part of configuring a regional pool, I must specify the CIDRs to provision from the global pool and can optionally enable automatic discovery of resources and rules for allocation.

Configuring a regional pool

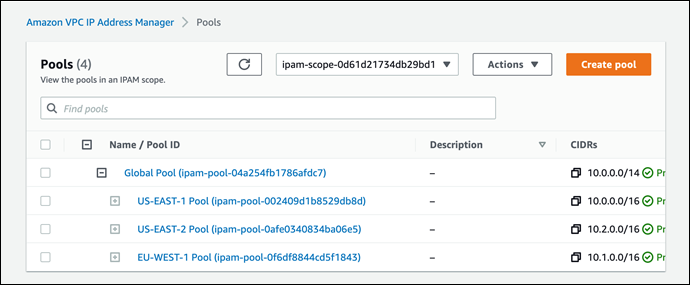
After repeating the process of creating and configuring regional pools for my two remaining Regions, US East (Ohio) and Europe (Ireland) in this example, this is my final pool hierarchy. As I noted above, this hierarchy ends at a regional set of pools but could be subdivided further.

IPAM pool hierarchy

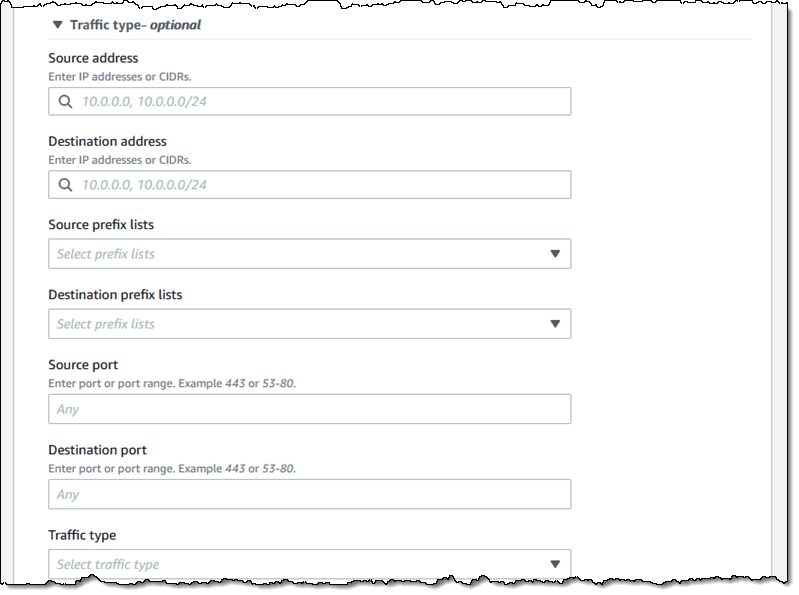
Once the IPAM pools have been configured, development teams and resources needing new IP address assignments are able to make use of an automated, self-service process, unblocking the developers, and eliminating errors from using manual processes that can lead to connectivity issues. To govern IP address assignments, you can make use of automated and simple business rules. With IPAM‘s self-service model, developers can now directly create resources and receive IP addresses based on business rules in seconds, removing the delays in onboarding applications and improving the velocity of the development team. In the screenshot below, I’m referencing my pools to set the address ranges to be used when creating a new VPC.

Assigning address ranges for a new VPC from IPAM pools

You can also share your IPAM with your organization, created using AWS Organizations, and AWS Resource Access Manager (RAM). When you share your IPAM, you gain fully automated CIDR allocation to your Amazon VPCs across member accounts in your organization and Regions.

For network administrators, IPAM provides observability and auditing capabilities, helping to speed up troubleshooting, and providing oversight and monitoring of the used and unused addresses across an organization’s global network address pool using a single dashboard. For each assigned address, IPAM tracks critical information, for example, the AWS account, the VPC, routing, and the security domain, eliminating the bookkeeping work that burdens administrators. Having used IPAM to eliminate IP assignment errors, customers can use IPAM to monitor assigned addresses and receive alerts when potential issues are detected – for example, depleting IP addresses that can stall their network’s growth or overlapping IP addresses that can result in erroneous routing. You can proactively act on those alerts and fix issues before they can become major outages.

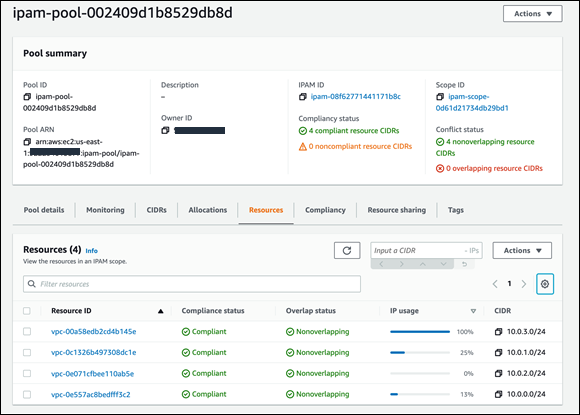
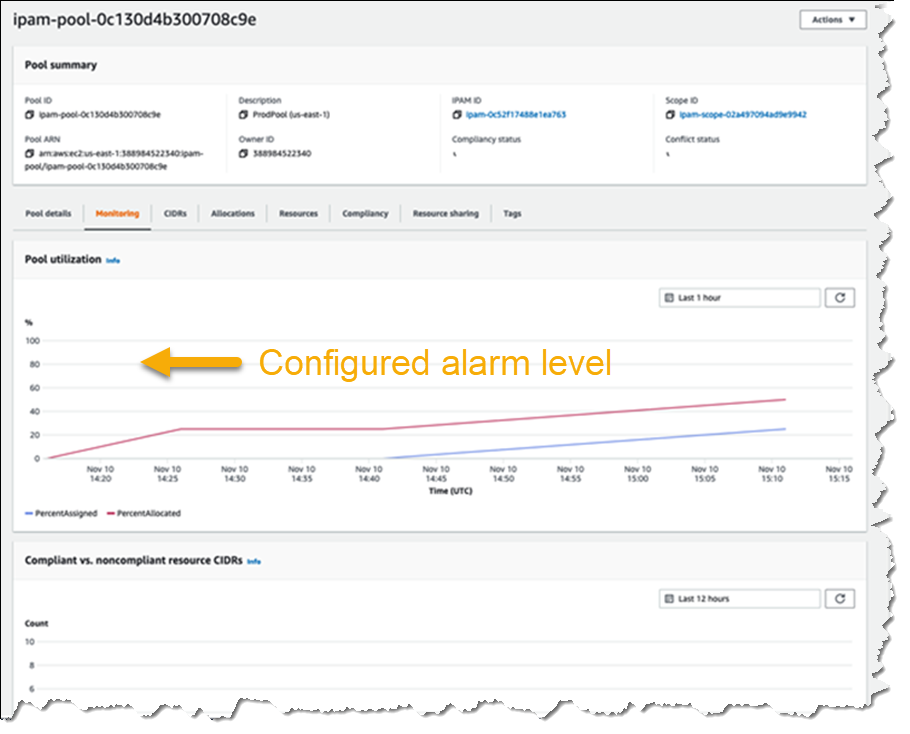
The screenshot below illustrates monitoring pool utilization across a set of VPCs.

Monitoring an IPAM pool

Utilization of address space within a pool can also be monitored. You can add Amazon CloudWatch Alarms that you can configure to trigger at your chosen utilization percentage value so that you can take proactive action before the address space is exhausted.

Monitoring pool utilization with alarms

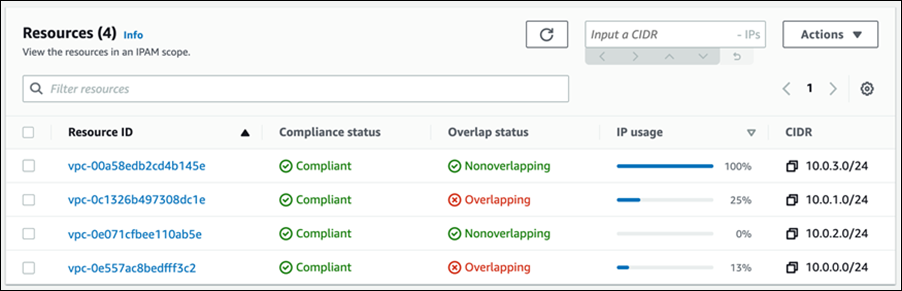
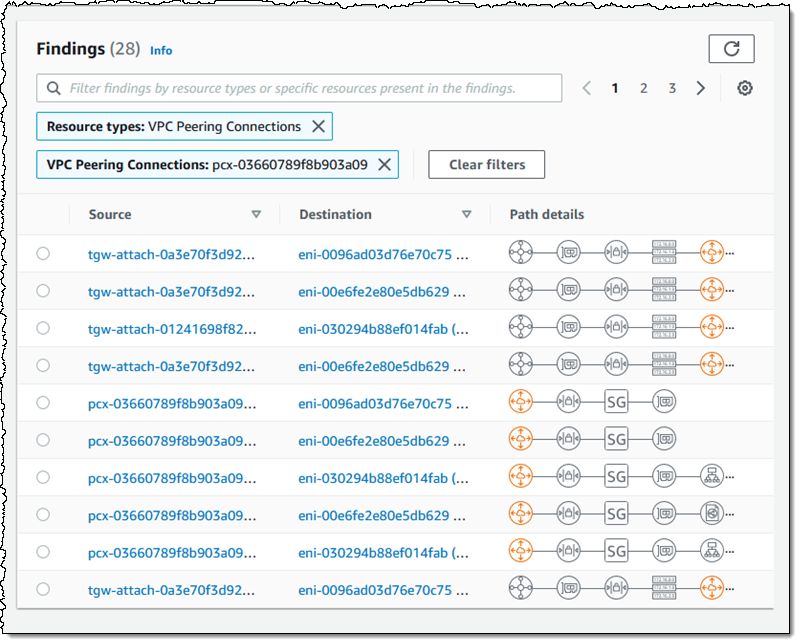
Overlapping address spaces are another headache that network administrators need to manage, usually discovered after the fact during an outage. IPAM can help lower the burden here, too, providing a view of resources that warns of overlapping address ranges.

Detecting overlapping address spaces

To further help troubleshoot network issues and audits of network security and routing policies, network administrators can also take advantage of the current and historical data that IPAM makes available to gain usage insights.

IPAM historical insights

IPAM works with any VPC resource where an IP address needs to be assigned, including public and private addresses and Elastic IP Addresses (EIP), and also supports bring your own IP (BYOIP) for both IPv4 and IPv6 addresses.

Start managing and auditing your IP addresses at scale today
Amazon VPC IP Address Manager is available today in all commercial AWS Regions. Get started today, first creating your IPAM for all Regions and accounts, then creating your pools, and finally setting application policy. Then, you can take advantage of IPAM to automate IP address assignment, monitor, troubleshoot, and audit your network addresses assignments.

For those of you with existing VPCs, after you create IPAM it will start monitoring, without any action on your part, to create an inventory of all your VPCs and EIPs. Once you create pools, IPAM will then backfill your VPCs into the pool. This means you can create VPCs today, using your existing workflow, and use IPAM for monitoring and audit only. Later on, you can switch your workflow to IPAM-based automated VPC assignment.

— Steve

New – Amazon VPC Network Access Analyzer

Post Syndicated from Jeff Barr original https://aws.amazon.com/blogs/aws/new-amazon-vpc-network-access-analyzer/

If you are a member of your organization’s networking, cloud operations, or security teams, you are going to love this new feature. The new Amazon VPC Network Access Analyzer helps you identify network configurations that lead to unintended network access. As you will see in a moment, it will point out ways that you can improve your security posture while still letting you and your organization be agile and flexible. In contrast to manual checking of network configurations, which is error prone and hard to scale, this tool lets you analyze your AWS networks of any size and complexity.

Introducing Network Access Analyzer
Network Access Analyzer takes advantage of our automated reasoning technology that already powers AWS IAM Access Analyzer, Amazon VPC Reachability Analyzer, Amazon Inspector Network Reachability, and other provable security tools.

This new tool uses Network Access Scopes to specify the desired connectivity between your AWS resources. You can get started with a set of Amazon-created scopes, and then either copy & customize them, or create your own from scratch. The scopes are high-level and independent of any particular network architecture or configuration, and can be thought of as a language for specifying the proper level of access & connectivity for your network. You can, for example, create a scope to verify that all web apps use a firewall to access Internet resources, or to indicate that AWS resources used by your Finance team are separate, distinct, and unreachable from the resources used by your Development team.

To evaluate your network against a particular scope, you select it and initiate an analysis. It runs for a few minutes and then generates a set of findings, each of which indicates an unexpected network path between the AWS resources defined in the scope. You can analyze the findings, adjust your configuration or modify the scope in response to the findings, and re-run the analysis, all in just a few minutes.

The analysis process examines a very wide range of AWS resources including Security Groups, CIDR blocks, prefix lists, Elastic Network Interfaces, EC2 instances, Load Balancers, VPC, VPC subnets, VPC endpoints, VPC endpoint services, Transit Gateways, NAT Gateways, Internet Gateways, VPN Gateways, Peering Connections, and Network Firewalls. Your scopes can use Resource Groups to reference all resources that are tagged in a particular way.

Using Network Access Analyzer
To get started, I open the VPC Console, find the Network Analysis section on the left-side navigation, and click Network Access Analyzer:

I can see all of my scopes. Initially, I have four, all created by Amazon and ready to use:

To conduct an analysis, I select a scope (AWS-VPC-Ingress (Amazon created)) and click Analyze. The scope’s description reads:

“Identify ingress paths into your VPCs from Internet Gateways, Peering Connections, VPC Service Endpoints, VPN and Transit Gateways.”

The analysis runs for a couple of minutes and displays the findings as soon as it is done:

There’s a lot of very useful information here! The spectrum chart provides an overview of the resources that are in the findings. I can hover my mouse over any of the segments to learn more, or click on one in order to filter the findings and show only those that reference a particular resource or resource type:

For example, I click VPC Peering Connections and I can see all of the findings that reference the VPC peering connection:

As you can see, the Path details highlight the VPC peering connection in the path! The next step is to examine the findings, decide which ones are expected, and to add them to the scope so that they are excluded from future findings (more on that in a bit).

Inside a Network Access Scope
Let’s take a quick look inside of the Network Access Scope that I used above, and then build another scope from scratch using the visual builder. Each scope is represented in JSON format, and indicates what is considered in-scope (acceptable) traffic between sources and destinations:

{
          "networkInsightsAccessScopeId": "nis-070dc1d37ca315e86",
          "matchPaths": [
                    {
                              "source": {
                                        "resourceStatement": {
                                                  "resources": [],
                                                  "resourceTypes": [
                                                            "AWS::EC2::InternetGateway",
                                                            "AWS::EC2::VPCPeeringConnection",
                                                            "AWS::EC2::VPCEndpointService",
                                                            "AWS::EC2::TransitGatewayAttachment",
                                                            "AWS::EC2::VPNGateway"
                                                  ]
                                        }
                              },
                              "destination": {
                                        "resourceStatement": {
                                                  "resources": [],
                                                  "resourceTypes": [
                                                            "AWS::EC2::NetworkInterface"
                                                  ]
                                        }
                              }
                    }
          ],
          "excludePaths": []
}

The matchPaths element contains source and destination elements. Each of these elements, in turn, identifies AWS resource types and specific resources. While not shown here, scopes can also contain source and destination IP addresses, ports, prefix lists, and traffic types (TCP or UDP). The excludePaths can contain resource types, specific resources, and so forth. I could, for example, define sources and destinations that match all Internet Gateway ingress traffic, but exclude traffic that flows through a Load Balancer, or I could exclude SSH traffic destined for my bastion instances.

Building a Network Access Scope
I can build a new scope in three ways. I can Duplicate and modify an existing one, I can start from scratch and use the visual builder, or I can write my own JSON and use either the CLI or the API to create a scope. I click Create Network Access Scope to use the builder:

I can start with one of five predefined templates, or I can build my own:

I enter a name and a description:

Then I define the source and destinations by resource type, id, traffic type, and so forth:

I have many options for matching the traffic type. This allows me to create scopes for very specific purposes:

I can use a similar interface to add any optional exclusions.

Things to Know
This is a very powerful tool and one that I think you are going to love. Here are a couple of things to know about it:

Pricing – You pay $0.002 for each Elastic Network Interface (ENI) analyzed as part of an assessment.

Regions – Network Access Analyzer is available in the US East (N. Virginia), US East (Ohio), US West (N. California), US West (Oregon), Africa (Cape Town), Asia Pacific (Hong Kong), Asia Pacific (Mumbai), Asia Pacific (Seoul), Asia Pacific (Singapore), Asia Pacific (Sydney), Asia Pacific (Tokyo), Canada (Central), Europe (Frankfurt), Europe (Ireland), Europe (London), Europe (Milan), Europe (Paris), Europe (Stockholm), South America (São Paulo), and Middle East (Bahrain) Regions.

In the Works – We have lots of additional features on the product roadmap including support for AWS Organizations, the ability to run your analyses on a regular schedule, and support for IPv6 address ranges and resources.

Jeff;

AWS Shield Advanced Update – Automatic Application Layer DDoS Mitigation

Post Syndicated from Channy Yun original https://aws.amazon.com/blogs/aws/aws-shield-advanced-update-automatic-application-layer-ddos-mitigation/

In 2016, we launched AWS Shield, a managed Distributed Denial of Service (DDoS) protection service that safeguards applications running on AWS. AWS Shield provides always-on detection and automatic inline mitigations that minimize application downtime and latency without needing to contact AWS Support.

There are two tiers of AWS Shield: Standard and Advanced. All AWS customers benefit from the automatic network layer protections of AWS Shield Standard and at no cost. AWS Shield Standard defends against the most common, frequently occurring network and transport layer (Layer 3 and 4) DDoS attacks to maximize the availability of AWS services.

For customized protection against sophisticated (Layer 3 to 7) threats targeting your applications, you can subscribe to AWS Shield Advanced. AWS Shield Advanced provides more sensitive detection and tailored mitigations against large and complex DDoS attacks, near real-time visibility into attacks, and integration with AWS WAF, a web application firewall for defense against Layer 7 attacks. AWS Shield Advanced also gives you 24-7 access to the AWS Shield Response Team (SRT) and cost protection against scaling costs stemming from DDoS attacks.

AWS Shield Advanced establishes a traffic baseline for each protected resource. Significant deviations from this baseline are flagged as DDoS events and trigger alerts through Amazon CloudWatch. However, mitigating these events still requires manually crafting an AWS WAF rule that isolates the malicious traffic, deploying it through the AWS WAF console or API, and evaluating the rule’s effectiveness. AWS Shield Advanced customers can utilize the SRT to create such AWS WAF rules or rely on their own expertise, but the process is time-consuming, which increases the time it takes to mitigate a DDoS attack and prevent availability impact to applications.

Today, we are announcing Automatic Application Layer DDoS Mitigation for AWS Shield Advanced. This is a new set of capabilities included for all Shield Advanced customers that automatically mitigate malicious web traffic that threatens to impact application availability. This feature automatically creates, tests, and deploys AWS WAF rules to mitigate layer 7 DDoS events on behalf of customers.

Enabling Automatic Application Layer DDoS Mitigation
Visit the AWS Shield console to get started with automatic application layer DDoS mitigation. To get the benefits of Shield Advanced, you must subscribe to an annual subscription.

After you subscribe to AWS Shield Advanced, you specify the resources that you want to protect, configure a layer 7 DDoS mitigation, AWS SRT supports, and a dashboard in CloudWatch to monitor DDoS events. To learn more, see Getting started with AWS Shield Advanced in the AWS documentation.

To enable Shield Advanced automatic application layer DDoS mitigation, select your layer 7 AWS resources (e.g. CloudFront), and choose Configure protections from the drop down list.

Next, in Edit protection, choose if you would like to enable automatic mitigation of layer 7 events and select if whether WAF rules should be created in Count or Block mode in Automatic response. Placing WAF rules in Count mode allows you to observe how resource traffic would be affected before deploying them in Block mode. Please note that a WebACL must be associated with a Shield protected resource in order to enable automatic layer 7 mitigation.

Mitigation actions can be changed to count or block mode at any time. Navigate to the Events tab of the console to view detected DDoS events, and select a detected event to see detection, mitigation, and top contributor metrics.

How to Mitigate Application Layer DDoS Automatically
When you want to protect layer 7 resources, such as CloudFront distributions, AWS Shield Advanced will establish a 30-day traffic baseline into each protected resource.

When automatic mitigation is enabled, only then will we create a Shield managed rule group in which AWS Shield Advanced will create AWS WAF rules in response to DDoS events.

Traffic that significantly deviates from the established baseline will be flagged as a potential DDoS event. After an event is detected, Shield Advanced will attempt to identify a signature based on offending request patterns. If a signature is identified, WAF rules will be created to mitigate traffic with that signature.

Once rules are confirmed to be safe, they will be added to the Shield-managed rule group, and customers can choose whether the rules are deployed in count or block mode. Customers can also create CloudWatch alerts based on when requests are being blocked or counted.

Customers can change the action that automatic mitigation takes (count or block) or disable it entirely at any time. Shield Advanced will automatically remove AWS WAF rules after it has determined that an event has fully subsided. To learn more, see Shield Advanced automatic application layer DDoS mitigation in the AWS Shield Developer Guide.

Available Now
Automatic Application Layer DDoS Mitigation is now available in all AWS regions where AWS Shield Advanced is available, and it can be enabled at no additional cost.

You can send feedback to the AWS forum for AWS Shield or through your usual AWS Support contacts.

Channy

New – Introducing SageMaker Training Compiler

Post Syndicated from Sean M. Tracey original https://aws.amazon.com/blogs/aws/new-introducing-sagemaker-training-compiler/

An image explaining the benefits of using Amazon SageMaker Training CompilerToday, we’re pleased to announce Amazon SageMaker Training Compiler, a new Amazon SageMaker capability that can accelerate the training of deep learning (DL) models by up to 50%.

As DL models grow in complexity, so too does the time it can take to optimize and train them. For example, it can take 25,000 GPU-hours to train popular natural language processing (NLP) model “RoBERTa“. Although there are techniques and optimizations that customers can apply to reduce the time it can take to train a model, these also take time to implement and require a rare skillset. This can impede innovation and progress in the wider adoption of artificial intelligence (AI).

How has this been done to date?
Typically, there are three ways to speed up training:

  1. Using more powerful, individual machines to process the calculations
  2. Distributing compute across a cluster of GPU instances to train the model in parallel
  3. Optimizing model code to run more efficiently on GPUs by utilizing less memory and compute.

In practice, optimizing machine learning (ML) code is difficult, time-consuming, and a rare skill set to acquire. Data scientists typically write their training code in a Python-based ML framework, such as TensorFlow or PyTorch, relying on ML frameworks to convert their Python code into mathematical functions that can run on GPUs, commonly known as kernels. However, this translation from the Python code of a user is often inefficient because ML frameworks use pre-built, generic GPU kernels, instead of creating kernels specific to the code and model of the user.

It can take even the most skilled GPU programmers months to create custom kernels for each new model and optimize them. We built SageMaker Training Compiler to solve this problem.

Today’s launch lets SageMaker Training Compiler automatically compile your Python training code and generate GPU kernels specifically for your model. Consequently, the training code will use less memory and compute, and therefore train faster. For example, when fine-tuning Hugging Face’s GPT-2 model, SageMaker Training Compiler reduced training time from nearly 3 hours to 90 minutes.

Automatically Optimizing Deep Learning Models
So, how have we achieved this acceleration? SageMaker Training Compiler accelerates training jobs by converting DL models from their high-level language representation to hardware-optimized instructions that train faster than jobs with off-the-shelf frameworks. Under the hood, SageMaker Training Compiler makes incremental optimizations beyond what the native PyTorch and TensorFlow frameworks offer to maximize compute and memory utilization on SageMaker GPU instances.

More specifically, SageMaker Training Compiler uses graph-level optimization (operator fusion, memory planning, and algebraic simplification), data flow-level optimizations (layout transformation, common sub-expression elimination), and back-end optimizations (memory latency hiding, loop oriented optimizations) to produce an optimized model that efficiently uses hardware resources. As a result, training is accelerated by up to 50%, and the returned model is the same as if SageMaker Training Compiler had not been used.

But how do you use SageMaker Training Compiler with your models? It can be as simple as adding two lines of code!

SageMaker Training Compiler Code Changes

The shortened training times mean that customers gain more time for innovating and deploying their newly-trained models at a reduced cost and a greater ability to experiment with larger models and more data.

Getting the most from SageMaker Training Compiler
Although many DL models can benefit from SageMaker Training Compiler, larger models with longer training will realize the greatest time and cost savings. For example, training time and costs fell by 30% on a long-running RoBERTa-base fine-tuning exercise.

Jorge Lopez Grisman, a Senior Data Scientist at Quantum Health – an organization on a mission to “make healthcare navigation smarter, simpler, and more cost-effective for everyone” – said:

“Iterating with NLP models can be a challenge because of their size: long training times bog down workflows and high costs can discourage our team from trying larger models that might offer better performance. Amazon SageMaker Training Compiler is exciting because it has the potential to alleviate these frictions. Achieving a speedup with SageMaker Training Compiler is a real win for our team that will make us more agile and innovative moving forward.”

Further Resources
To learn more about how Amazon SageMaker Training Compiler can benefit you, you can visit our page here. And to get started see our technical documentation here.

New – Amazon RDS Custom for SQL Server Is Generally Available

Post Syndicated from Channy Yun original https://aws.amazon.com/blogs/aws/new-amazon-rds-custom-for-sql-server-is-generally-available/

On October 26, 2021, we launched Amazon RDS Custom for Oracle, a managed database service for applications that require customization of the underlying operating system and database environment. RDS Custom lets you access and customize your database server host and operating system, for example, by applying special patches and changing the database software settings to support third-party applications that require privileged access.

Today, I am happy to announce the general availability of Amazon RDS Custom for SQL Server to support applications that have dependencies on specific configurations and third-party applications that require customizations in corporate, e-commerce, and content management systems, such as Microsoft SharePoint.

With RDS Custom for SQL Server, you can enable features that require elevated privileges like SQL Common Language Runtime (CLR), install specific drivers to enable heterogenous linked servers, or have more than 100 databases per instance.

Through the time-saving benefits of a managed service, RDS Custom for SQL Server frees you up to focus on more business-impacting, strategic activities. The use of automating backups and other operational tasks let you rest easy, knowing your data is safe and ready to be recovered if needed.

Getting Started with RDS Custom for SQL Server
Get started by creating a DB instance of RDS Custom for SQL Server from an orderable engine version offered by RDS Custom. You can optionally access the server host to customize your software via AWS Systems Manager or a remote desktop client. Your application connects to the RDS Custom DB instance endpoint.

Before creating and connecting your custom DB instance for SQL Server, make sure that you meet some prerequisites, such as configuring the AWS Identity and Access Management (IAM) role and Amazon Virtual Private Cloud  (Amazon VPC).

Choose Create database in the Databases menu to create your custom DB instance for SQL Server in the RDS Console. When you choose a database creation method, select Standard create. You can set Engine options to Microsoft SQL Server and choose Amazon RDS Custom in the database management type.

For Edition, choose the DB engine edition that you want to use in the choices of Enterprise, Standard, and Web with the Version of default SQL Server 2019.

For Settings, enter your favorite unique name for the DB instance identifier and your master username and password. By default, the new instance uses an automatically generated password for the master user.

In DB instance size, choose a DB instance class optimized to each DB engine edition.

SQL Server edition RDS Custom support
Enterprise Edition db.r5.xlarge – db.r5.24xlarge
db.m5.xlarge – db.m5.24xlarge
Standard Edition db.r5.large – db.r5.24xlarge
db.m5.large – db.m5.24xlarge
Web Edition db.r5.large – db.r5.4xlarge
db.m5.large – db.m5.4xlarge

See Settings for DB instances in the Amazon RDS User Guide to learn more about the remaining settings. Choose Create database. After creating the DB instance, the details for the new RDS Custom DB instance appear on the RDS console.

Alternatively, you can create an RDS Custom DB instance by using the create-db-instance command in the AWS Command Line Interface (AWS CLI).

$ aws rds create-db-instance \
	--engine custom-sqlserver-se \
	--engine-version 15.00.4073.23.v1 \
	--db-instance-identifier channy-custom-db \
	--db-instance-class db.m5.xlarge \
	--allocated-storage 20 \
	--db-subnet-group mydbsubnetgroup \
	--master-username myuser \
	--master-user-password mypassword \
	--backup-retention-period 3 \
	--no-multi-az \
	--port 8200 \
	--kms-key-id mykmskey \
	--custom-iam-instance-profile AWSRDSCustomInstanceProfile

After you create your RDS Custom DB instance, you can connect to it using AWS Systems Manager Session Manager or an RDP client. Make sure that the Amazon VPC security group associated with your DB instance permits inbound connections on port 3389 for TCP to allow RDP connections.

You need the key pair associated with the instance to connect to the custom DB instance via RDP. RDS Custom creates the key pair for you. The pair name uses the prefix do-not-delete-rds-custom-DBInstanceIdentifier. AWS Secrets Manager stores your private key as a secret. Choose the secret that has the same name as your key pair and retrieve the secret value to decrypt the password later.

In the EC2 console, look for the name of your EC2 instance, and then choose the instance ID associated with your DB instance ID, for example, channy-custom-db-*. Select your custom DB instance, and then choose Connect. On the Connect to instance page, choose the RDP client tab, and then choose Get password with your private key as a secret.

When you connect an RDP client with a downloaded remote desktop file and decrypted password, you can log in to the Windows Server and customize your SQL Server.

You can use AWS Systems Manager Session Manager to start a session with an instance in your account. After the session is started, you can run PowerShell commands as you would for any other connection type. See Connect to your Windows instance in the Amazon EC2 User Guide for more information.

Things to Know
Here are a couple of things to keep in mind about managing your DB instance:

Pausing RDS Custom Automation: RDS Custom for SQL Server automatically provides monitoring and instance recovery for your RDS Custom DB instance. If you need to customize the instance, then pause RDS Custom automation for a specified period. The pause makes sure that your customizations don’t interfere with RDS Custom automation. To pause or resume RDS Custom automation, you can set RDS Custom automation mode to Paused with the pause duration that you want (in minutes, default 60 minutes to 1,440 minutes maximum).

High Availability (HA): To support replication between RDS Custom for SQL Server instances, you can configure HA with Always On Availability Groups (AGs). We recommend that you set up the primary DB instance to synchronously replicate data to the standby instances in different Availability Zones (AZs) to be resilient to AZ failures. Moreover, you can migrate data by configuring HA for your on-premises instance and then failing over or switching over to the RDS Custom standby database.

Custom DB Management: Just like Amazon RDS, RDS Custom for SQL Server creates automated backups taking a snapshot of an Amazon RDS DB instance. Incremental snapshots are used to restore DB instances to a specific point in time. Furthermore, all changes and customizations to the underlying operating system are automatically logged for audit purposes using Systems Manager and AWS CloudTrail. See Troubleshooting an Amazon RDS Custom for DB instance in the Amazon RDS User Guide to learn more.

Available Now
Amazon RDS Custom for SQL Server is now available in the US East (Ohio), US East (N. Virginia), US West (Oregon), Asia Pacific (Singapore), Asia Pacific (Sydney), Asia Pacific (Tokyo), EU (Frankfurt), EU (Ireland), and EU (Stockholm) Regions.

Look at the product page and documentation of Amazon RDS Custom to learn more. Please send us feedback either in the AWS forum for Amazon RDS or through your usual AWS support contacts.

Channy

New – Offline Tape Migration Using AWS Snowball Edge

Post Syndicated from Jeff Barr original https://aws.amazon.com/blogs/aws/new-offline-tape-migration-using-aws-snowball-edge/

Over the years, we have given you a succession of increasingly powerful tools to help you migrate your data to the AWS Cloud. Starting with AWS Import/Export back in 2009, followed by Snowball in 2015, Snowmobile and Snowball Edge in 2016, and Snowcone in 2020, each new device has given you additional features to simplify and expedite the migration process. All of the devices are designed to operate in environments that suffer from network constraints such as limited bandwidth, high connections costs, or high latency.

Offline Tape Migration
Today, we are taking another step forward by making it easier for you to migrate data stored offline on physical tapes. You can get rid of your large and expensive storage facility, send your tape robots out to pasture, and eliminate all of the time & effort involved in moving archived data to new formats and mediums every few years, all while retaining your existing tape-centric backup & recovery utilities and workflows.

This launch brings a tape migration capability to AWS Snowball Edge devices, and allows you to migrate up to 80 TB of data per device, making it suitable for your petabyte-scale migration efforts. Tapes can be stored in the Amazon S3 Glacier Flexible Retrieval or Amazon S3 Glacier Deep Archive storage classes, and then accessed from on-premises and cloud-based backup and recovery utilities.

Back in 2013 I showed you how to Create a Virtual Tape Library Using the AWS Storage Gateway. Today’s launch builds on that capability in two different ways. First, you create a Virtual Tape Library (VTL) on a Snowball Edge and copy your physical tapes to it. Second, after your tapes are in the cloud, you create a VTL on a Storage Gateway and use it to access your virtual tapes.

Getting Started
To get started, I open the Snow Family Console and create a new job. Then I select Import virtual tapes into AWS Storage Gateway and click Next:

Then I go through the remainder of the ordering sequence (enter my shipping address, name my job, choose a KMS key, and set up notification preferences), and place my order. I can track the status of the job in the console:

When my device arrives I tell the somewhat perplexed delivery person about data transfer, carry it down to my basement office, and ask Luna to check it out:

Back in the Snow Family console, I download the manifest file and copy the unlock code:

I connect the Snowball Edge to my “corporate” network:

Then I install AWS OpsHub for Snow Family on my laptop, power on the Snowball Edge, and wait for it to obtain & display an IP address:

I launch OpsHub, sign in, and accept the default name for my device:

I confirm that OpsHub has access to my device, and that the device is unlocked:

I view the list of services running on the device, and note that Tape Gateway is not running:

Before I start Tape Gateway, I create a Virtual Network Interface (VNI):

And then I start the Tape Gateway service on the Snow device:

Now that the service is running on the device, I am ready to create the Storage Gateway. I click Open Storage Gateway console from within OpsHub:

I select Snowball Edge as my host platform:

Then I give my gateway a name (MyTapeGateway), select my backup application (Veeam Backup & Replication in this case), and click Activate Gateway:

Then I configure CloudWatch logging:

And finally, I review the settings and click Finish to activate my new gateway:

The activation process takes a few minutes, just enough time to take Luna for a quick walk. When I return, the console shows that the gateway is activated and running, and I am all set:

Creating Tapes
The next step is to create some virtual tapes. I click Create tapes and enter the requested information, including the pool (Deep Archive or Glacier), and click Create tapes:

The next step is to copy data from my physical tapes to the Snowball Edge. I don’t have a data center and I don’t have any tapes, so I can’t show you how to do this part. The data is stored on the device, and my Internet connection is used only for management traffic between the Snowball Edge device and AWS. To learn more about this part of the process, check out our new animated explainer.

After I have copied the desired tapes to the device, I prepare it for shipment to AWS. I make sure that all of the virtual tapes in the Storage Gateway Console have the status In Transit to VTS (Virtual Tape Shelf), and then I power down the device.

The display on the device updates to show the shipping address, and I wait for the shipping company to pick up the device.

When the device arrives at AWS, the virtual tapes are imported, stored in the S3 storage class associated with the pool that I chose earlier, and can be accessed by retrieving them using an online tape gateway. The gateway can be deployed as a virtual machine or a hardware appliance.

Now Available
You can use AWS Snowball Edge for offline tape migration in the US East (N. Virginia), US East (Ohio), US West (Oregon), US West (N. California), Europe (Ireland), Europe (Frankfurt), Europe (London), Asia Pacific (Sydney) Regions. Start migrating petabytes of your physical tape data to AWS, today!

Jeff;

New for AWS Backup – Support for VMware and VMware Cloud on AWS

Post Syndicated from Danilo Poccia original https://aws.amazon.com/blogs/aws/new-for-aws-backup-support-for-vmware-and-vmware-cloud-on-aws/

Today, I am happy to announce AWS Backup support for VMware, a new capability that enables you to centralize and automate data protection of virtual machines (VMs) running on VMware on premises and VMware CloudTM on AWS. You can now use a single, centrally managed policy in AWS Backup to protect these VMware environments together with 12 AWS compute, storage, and database services already supported by AWS Backup. You can then use AWS Backup to restore VMware workloads to on-premises data centers and VMware Cloud on AWS.

While doing so, AWS Backup Audit Manager lets you consistently demonstrate compliance by monitoring backup, copy, and restore operations and generating auditor-ready reports to satisfy your data governance and regulatory requirements.

Let’s see how this works in practice.

Using AWS Backup Support for VMware
There are three steps to back up VMware virtual machines (VMs) with AWS Backup:

  1. Create a gateway to connect AWS Backup to your hypervisor.
  2. Connect to your hypervisor through the gateway.
  3. Assign virtual machines managed by your hypervisor to a backup plan.

AWS Back Support for VMware diagram

On the left pane of the AWS Backup console, there is a new External resources section. There, I choose Gateways and then Create gateway. This AWS Backup gateway helps with discovery of the on-premises VMware environment and acts as a cloud gateway to send and receive data.

I download the Open Virtualization Format (OVF) file of the AWS Backup gateway and follow the instructions to deploy the gateway using the VMware vSphere client. I am using an internal test and development VMware environment for this walkthrough.

VMware vCenter screenshot.

After deploying the gateway in my VMware environment, I come back to the AWS Backup console. I write a name for the gateway (for simplicity, I use the same name of the gateway VM) and the IP address of the gateway VM. Optionally, I can add tags to help organize and track my setup. I go on and create the gateway.

Console screenshot.

Now, I choose Add hypervisor. I write a name for the hypervisor and the IP address of the VMware vCenter server host.

Console screenshot.

I enter the username and password of a service account that I created for AWS Backup on the Active Directory domain. The username should include the domain (for example, username@domain). Then, I choose the encryption key to protect the service account credentials. If I don’t choose my own AWS Key Management Service (KMS) key, AWS Backup encrypts the username and password using a key that AWS owns and manages.

Console screenshot.

I select the gateway to connect to the hypervisor and choose Test gateway connection. This test helps ensure that the gateway can communicate with the hypervisor before I complete the configuration. Optionally, I can add tags to help organize and track my setup. I go on and add the hypervisor.

Console screenshot.

After a few minutes, the hypervisor is online, and I see the VMs managed by vCenter in the AWS Backup console. I can now use these virtual machines as resources in my backup plans in the same way as the other AWS compute, storage, and database resources supported by AWS Backup.

Console screenshot.

I create a new backup plan and start with a template. The rules of the template enforce daily backups with five weeks of retention and monthly backups with one year of retention. I can customize these rules based on my requirements.

Console screenshot.

Then, I choose to assign resources to the backup plan, and I select three VMs.

Console screenshot.

If you need, you can create an on-demand backup in the Protected resources section of the console. For example, here I am starting the on-demand backup for one of the VMs.

Console screenshot.

When a backup is complete, VMs are added to the list of the protected resources, and I can initiate a restore.

Console screenshot.

I select the backup and choose Restore. Then, I enter the restore location, which can be the same VMware environment I used for the backup or another (for example, on VMware Cloud on AWS). Below, I specify name, path, compute resource name, and datastore to use for the restore. Then, I choose Restore backup.

Console screenshot.

I monitor the status of my backup and restore jobs from the AWS Backup console. To monitor backup and restore metrics over a period of time, I can use Amazon CloudWatch metrics, logs, and alarms. I can also send events to Amazon EventBridge to receive notifications once a job completes or fails.

Availability and Pricing
AWS Backup support for VMware is available in the US East (N. Virginia, Ohio), US West (N. California, Oregon), GovCloud (US-East, US-West), Canada (Central), Europe (Frankfurt, Ireland, London, Milan, Paris, Stockholm), South America (São Paulo), Asia Pacific (Hong Kong, Mumbai, Seoul, Singapore, Sydney, Tokyo, Osaka), Middle East (Bahrain), and Africa (Cape Town) Regions. Please see the AWS Regional Services List for more information.

AWS Backup supports VMware ESXi 6.7.x and 7.0.x VMs running on NFS, VMFS, and VSAN data stores on premises and in VMware Cloud on AWS. In addition, AWS Backup supports both SCSI Hot-Add and Network Block Device (NBD) transport modes for copying data from source VMs to AWS.

With AWS Backup support for VMware, you pay using the same dimensions that AWS Backup uses today: backup storage, restore, and cross-region data transfer. For more information, see the AWS Backup pricing page.

Your VM backups are stored in a backup vault. All backups stored and managed by AWS Backup are replicated to 3 Availability Zones (AZs) in the Region and designed for 99.999999999 percent (11 9s) durability and 99.99 percent (4 9s) of service availability.

AWS Backup supports first full, then incremental-forever, backups of VMs that you can create on-demand or via a schedule configured in your backup plan. AWS Backup always does full restores even though backups are stored as incremental, enabling you to benefit from storage efficiency cost savings while easily performing restores.

Centrally protect your VMware environments and your AWS compute, storage, and database resources with AWS Backup.

Danilo

New – Amazon FSx for OpenZFS

Post Syndicated from Jeff Barr original https://aws.amazon.com/blogs/aws/new-amazon-fsx-for-openzfs/

Last month, my colleague Bill Vass said that we are “slowly adding additional file systems” to Amazon FSx. I’d question Bill’s definition of slow, given that his team has launched Amazon FSx for Lustre, Amazon FSx for Windows File Server, and Amazon FSx for NetApp ONTAP in less than three years.

Amazon FSx for OpenZFS
Today I am happy to announce Amazon FSx for OpenZFS, the newest addition to the Amazon FSx family. Just like the other members of the family, this new addition lets you use a popular file system without having to deal with hardware provisioning, software configuration, patching, backups, and the like. You can create a file system in minutes and begin to enjoy the benefits of OpenZFS right away: transparent compression, continuous integrity verification, snapshots, and copy-on-write. Even better, you get all of these benefits without having to develop the specialized expertise that has traditionally been needed to set up and administer OpenZFS.

FSx for OpenZFS is powered by the AWS Graviton family processors and AWS SRD (Scalable Reliable Datagram) Networking, and can deliver up to 1 million IOPS with latencies of 100-200 microseconds, along with up to 4 GB/second of uncompressed throughput, up to 12 GB/second of compressed throughput, and up to 12.5 GB/second throughput to cached data. FSx for OpenZFS supports the OpenZFS Adaptive Replacement Cache (ARC) and uses memory in the file server to provide faster performance. It also supports advanced NFS performance features such as session trunking and NFS delegation, allowing you to get very high throughput and IOPS from a single client, while still safely caching frequently accessed data on the client side.

FSx for OpenZFS volumes can be accessed from cloud or on-premises Linux, MacOS, and Windows clients via industry-standard NFS protocols (v3, v4, v4.1, and v4.2). Cloud clients can be Amazon Elastic Compute Cloud (Amazon EC2) instances, Amazon Elastic Container Service (Amazon ECS) and Amazon Elastic Kubernetes Service (EKS) clusters, Amazon WorkSpaces virtual desktops, and VMware Cloud on AWS. Your data is stored in encrypted form and replicated within an AWS Availability Zone, with components replaced automatically and transparently as necessary.

You can use FSx for OpenZFS to address your highly demanding machine learning, EDA (Electronic Design Automation), media processing, financial analytics, code repository, DevOps, and web content management workloads. With performance that is close to local storage, FSx for OpenZFS is great for these and other latency-sensitive workloads that manipulate and sequentially access many small files. Finally, because you can create, mount, use, and delete file systems as needed, you can now use OpenZFS in a dynamic, agile fashion.

Using Amazon FSx for OpenZFS
I can create an OpenZFS file system using the AWS Management Console, CLI, APIs, or AWS CloudFormation. From the FSx Console I click Create file system and choose Amazon FSx for OpenZFS:

I can choose Quick create (and use recommended best-practice configurations), or Standard create (and set all of the configuration options myself). I’ll take the easy route and use the recommended best practices to get started. I enter a name (Jeff-OpenZFS) select the amount of SSD storage that I need, choose a VPC & subnet, and click Next:

The console shows me that I can edit many of the attributes of my file system later if necessary. I review the settings and click Create file system:

My file system is ready within a minute or two, and I click Attach to get the proper commands to mount it to my client:

To be more precise, I am mounting the root volume (/fsx) of my file system. Once it is mounted, I can use it as I would any other file system. After I add some files to it, I can use the Action menu in the console to create a backup:

I can restore the backup to a new file system:

As I noted earlier, each file system can deliver up to 4 gigabytes per second of throughput for uncompressed data. I can look at total throughput and other metrics in the console:

I can set throughput capacity of each volume when I create it, and then change it later if necessary:

Changes take effect within minutes. The file system remains active and mounted while the change is put into effect, but some operations may pause momentarily:

A single OpenZFS file system can contain multiple volumes, each with separate quotas (overall volume storage, per-user storage, and per-group storage) and compression settings. When I use the quick create option a root volume named fsx is created for me; I can click Create volume to create more volumes at any time:

The new volume exists within the namespace hierarchy of the parent, and can be mounted separately or accessed from the parent.

Things to Know
Here are a couple of quick facts and to wrap up this post:

Pricing – Pricing is based on the provisioned storage capacity, throughput, and IOPS.

Regions – Amazon FSx for OpenZFS is available in the US East (N. Virginia), US East (Ohio), US West (Oregon), Europe (Ireland), Canada (Central), Asia Pacific (Tokyo), and Europe (Frankfurt) Regions.

In the Works – We are working on additional features including storage scaling, IOPS scaling, a high availability option and another storage class.

Now Available
Amazon FSx for OpenZFS is available now and you can start using it today!

Jeff;

AWS Nitro SSD – High Performance Storage for your I/O-Intensive Applications

Post Syndicated from Jeff Barr original https://aws.amazon.com/blogs/aws/aws-nitro-ssd-high-performance-storage-for-your-i-o-intensive-applications/

We love to solve difficult problems for our customers! As you have seen through the years, innovation at AWS takes many forms, and encompasses both hardware and software.

One of my favorite examples of customer-driven innovation is AWS Nitro System, which I first wrote about back in mid-2018. In that post I told you how Nitro System would allow us to innovate more quickly than ever, with the goal of creating instances that would run even more types of workloads. I also shared the basic building blocks, as they existed at that time, including Nitro Cards to accelerate and offload network and storage I/O, the Nitro Security Chip to monitor and protect hardware resources, and the Nitro Hypervisor to manage memory and CPU allocation with very low overhead.

Today I would like to tell you about one more building block!

AWS Nitro SSD
For decades, traditional hard drives (sometimes jokingly referred to as spinning rust) were the primary block storage devices. Today, while spinning rust still has its place, most high-performance storage is based on more modern Solid State Drives (SSD). Open up an SSD and you will find lots of flash memory and a firmware-driven processor that manages access to the memory and supports higher-level functions such as block mapping, encryption, caching, wear leveling, and so forth.

The scale of the AWS Cloud and the range of customer use cases that it supports gives us some valuable insights into the ways that today’s applications, database engines, and operating systems make use of block storage. As a result, after delivering several generations of EC2 instances we saw an opportunity to do better. Our goal was to allow I/O-intensive workloads (relational databases, NoSQL databases, data warehouses, search engines, and analytics engines to name a few) to run faster and with more predictable performance.

Today I would like to tell you about the AWS Nitro SSD. The first generation of these devices were used to power io2 Block Express EBS volumes, and allow us to give you EBS volumes with lots of IOPS, plenty of throughput, and a maximum volume size of 64 TiB. The Im4gn and Is4gen instances that I wrote about earlier today make use of the second generation of AWS Nitro SSDs, as will many future EC2 instances, including the I4i instances that we preannounced today.

The AWS Nitro SSDs are designed to be installed and to operate at cloud scale. While this sounds like a simple exercise in manufacturing and installing more devices, the reality is a lot more complex and a lot more interesting. As I noted earlier, the firmware inside of each device is responsible for implementing many lower-level functions. As our customers push the devices to their limits, they expect us to be able to diagnose and resolve any performance inconsistencies they observe. Building our own devices allows us to design in operational telemetry and diagnostics, along with mechanisms that enable us to install firmware updates at cloud scale & at cloud speed. Taking this even further, we developed our own code to manage the instance-level storage in order to further improve the reliability and debug-ability, and to deliver consistent performance.

On the performance side, our deep understanding of cloud workloads led us to engineer the devices so that they can deliver maximum performance under a sustained, continuous load. SSDs are built from fast, dense flash memory. Due to the characteristics of this semiconductor memory, each cell can only be written, erased, and then rewritten a limited number of times. In order to make the devices last as long as possible, the firmware is responsible for a process known as wear leveling. I don’t understand the details, but I assume that this includes some sort of mapping from logical block numbers to physical cells in a way that evens out the number of cycles over time. There’s some housekeeping (a form of garbage collection) involved in this process, and garden-variety SSDs can slow down (creating latency spikes) at unpredictable times when dealing with a barrage of writes. We also took advantage of our database expertise and built a very sophisticated, power-fail-safe journal-based database into the SSD firmware.

The second generation of AWS Nitro SSDs were designed to avoid latency spikes and deliver great I/O performance on real-world workloads. Our benchmarks show instances that use the AWS Nitro SSDs, such as the new Im4gn and Is4gen, deliver 75% lower latency variability than I3 instances, giving you more consistent performance.

Putting all of this together, there’s a very tight, rapidly rotating flywheel in action here because the team that builds the Nitro SSDs is part of the AWS storage team, and also has operational responsibilities. Like all teams at AWS, they watch the metrics day-in and day-out, and can efficiently deploy new firmware using a CI/CD model.

Join the Team
As is always the case, there’s always more innovation ahead, and we have some awesome positions on the teams that design the AWS Nitro SSDs. For example:

Jeff;

New Storage-Optimized Amazon EC2 Instances (Im4gn and Is4gen) Powered by AWS Graviton2 Processors

Post Syndicated from Jeff Barr original https://aws.amazon.com/blogs/aws/new-storage-optimized-amazon-ec2-instances-im4gn-and-is4gen-powered-by-aws-graviton2-processors/

EC2 storage-optimized instances are designed to deliver high disk I/O performance, and plenty of storage. Our customers use them to host high-performance real-time databases, distributed file systems, data warehouses, key-value stores, and more. Over the years we have released multiple generations of storage-optimized instances including the HS1 (2012) , D2 (2015), I2 (2013) , I3 (2017), I3en (2019), and D3/D3en (2020).

As I look back on all of these launches, it is interesting to see how we continue to provide an ever-increasing set of options that make each successive generation an even better fit for the diverse (and also ever-increasing) needs of our customers. HS1 instances were available in just one size, D2 and I2 in four, I3 in six, and I3en in eight. These instances give our customers the freedom to choose the size that best meets their current needs while also giving them room to scale up or down if those needs happen to change.

Im4gn and Is4gen
Today I am happy to introduce the two newest families of storage-optimized instances, Im4gn and Is4gen, powered by Graviton2 processors. Both instances offer up to 30 TB of NVMe storage using AWS Nitro SSD devices that are custom-built by AWS. As part of our drive to innovate on behalf of our customers, we turned our attention to storage and designed devices that were optimized to support high-speed access to large amounts of data. The AWS Nitro SSDs reduce I/O latency by up to 60% and also reduce latency variability by up to 75% when compared to the third generation of storage-optimized instances. As a result you get faster and more predictable performance for your I/O-intensive EC2 workloads.

Im4gn instances are a great fit for applications that require large amounts of dense SSD storage and high compute performance, but are not especially memory intensive such as social games, session storage, chatbots, and search engines. Here are the specs:

Instance Name vCPUs
Memory Local NVMe Storage
(AWS Nitro SSD)
Read Throughput
(128 KB Blocks)
EBS-Optimized Bandwidth Network Bandwidth
im4gn.large 2 8 GiB 937 GB 250 MB/s Up to 9.5 Gbps Up to 25 Gbps
im4gn.xlarge 4 16 GiB 1.875 TB 500 MB/s Up to 9.5 Gbps Up to 25 Gbps
im4gn.2xlarge 8 32 GiB 3.75 TB 1 GB/s Up to 9.5 Gbps Up to 25 Gbps
im4gn.4xlarge 16 64 GiB 7.5 TB 2 GB/s 9.5 Gbps 25 Gbps
im4gn.8xlarge 32 128 GiB 15 TB
(2 x 7.5 TB)
4 GB/s 19 Gbps 50 Gbps
im4gn.16xlarge 64 256 GiB 30 TB
(4 x 7.5 TB)
8 GB/s 38 Gbps 100 Gbps

Im4gn instances provide up to 40% better price performance and up to 44% lower cost per TB of storage compared to I3 instances. The new instances are available in the AWS US West (Oregon), US East (Ohio), US East (N. Virginia), and Europe (Ireland) Regions as On-Demand, Spot, Savings Plan, and Reserved instances.

Is4gen instances are a great fit for applications that do large amounts of random I/O to large amounts of SSD storage. This includes shared file systems, stream processing, social media monitoring, and streaming platforms, all of which can use the increased storage density to retain more data locally. Here are the specs:

Instance Name vCPUs
Memory Local NVMe Storage
(AWS Nitro SSD)
Read Throughput
(128 KB Blocks)
EBS-Optimized Bandwidth Network Bandwidth
is4gen.medium 1 6 GiB 937 GB 250 MB/s Up to 9.5 Gbps Up to 25 Gbps
is4gen.large 2 12 GiB 1.875 TB 500 MB/s Up to 9.5 Gbps Up to 25 Gbps
is4gen.xlarge 4 24 GiB 3.75 TB 1 GB/s Up to 9.5 Gbps Up to 25 Gbps
is4gen.2xlarge 8 48 GiB 7.5 TB 2 GB /s Up to 9.5 Gbps Up to 25 Gbps
is4gen.4xlarge 16 96 GiB 15 TB
(2 x 7.5 TB)
4 GB/s 9.5 Gbps 25 Gbps
is4gen.8xlarge 32 192 GiB 30 TB
(4 x 7.5 TB)
8 GB/s 19 Gbps 50 Gbps

Is4gen instances provide 15% lower cost per TB of storage and up to 48% better compute performance compared to I3en instances. The new instances are available in the AWS US West (Oregon), US East (Ohio), US East (N. Virginia), and Europe (Ireland) Regions as On-Demand, Spot, Savings Plan, and Reserved instances.

Available Now
As I never get tired of saying, these new instances are available now and you can start using them today. You can use Amazon Linux 2, Ubuntu 18.04.05 (and newer), Red Hat Enterprise Linux 8.0, and SUSE Enterprise Server 15 (and newer) AMIs, along with the container-optimized ECS and EKS AMIs. Learn more about the Im4gn and Is4gen instances.

Jeff;

PS – As of this launch twelve EC2 instance types are now powered by Graviton2 processors! To learn more, visit the Graviton2 page.

Machine Learning-Powered Amazon Connect, Now With Call Summarization

Post Syndicated from Sébastien Stormacq original https://aws.amazon.com/blogs/aws/machine-learning-powered-amazon-connect-now-with-call-summarization/

At AWS our mission is to make machine learning (ML) accessible to data scientists, developers, and business users. To help businesses easily leverage the power of ML, we create purpose-built solutions that embed ML and deep learning technologies directly into a business process to address real customer needs, rather than leaving companies to sort it out on their own.

One place where we have seen ML have an impact is within the contact center—the place you receive and respond to customer inquiries and issues. Because of the growing role of customer experience (CX) and the increase in contact less commerce via phone or email, contact centers are essentials to maintaining the human connections that businesses depend on. However, analog or outdated methods make it difficult to address every customer need in an effective way that delivers timely resolutions, delivers great experiences, and fosters customer loyalty.

Embedding AWS ML technologies into a cloud contact center solution helps decrease the friction of calls, chats, and other engagements. It also makes it possible to automate outdated processes.

Amazon Connect is an easy-to-use, cloud-based, ML-powered contact center service that helps companies of any size deliver superior customer service at a lower cost.

Let me take three examples with Voice ID, Wisdom, and Contact Lens.

Amazon Connect Voice ID
ML capabilities might help streamline customer experience for authentication. Instead of asking customers to repeat their email address and their mother’s maiden name several times, ML-powered voice identification can establish a digital voice print associated with each customer’s unique voice. Then, it can recognize it at the beginning of each subsequent call. Voice identification provides a confidence score that may be used to automate authentication workflows.

Amazon Connect Wisdom
ML might also help search the vast documentation and knowledge base to find the most relevant answers to the questions raised by the customer. ML helps resolve customer issues faster and better.

Contact Lens for Amazon Connect
ML technologies also shine at analyzing the tone and content of a conversation, capturing customer sentiment in the moment, and learning from it. ML can help transcribe calls, track customer sentiment, detect common issues and customer trends, or even pinpoint discrepancies.

At just about the same time last year, I announced the addition of real-time capabilities for Contact Lens. This lets supervisors identify when to assist an agent on live calls so that they can provide guidance via chat or have the agent transfer the call. Last September, we added support for eight new languages, ending up with a total of 21 languages for post-call analytics and 12 languages for both post-call and real-time analytics.

Contact Lens Adds Call Summarization
But we didn’t stop there. Today, I am pleased to announce the addition of a new capability that helps you improve customer experience and agent and supervisor productivity by automatically summarizing the important aspects of each customer call.

You told us that keeping notes of customer conversations is time consuming, especially, for agents that must take notes during the call and import them manually in your CRM tool afterward. In the end, this is more time for us, the customers, waiting in queue for an agent to become available. Likewise, using automatically generated call transcripts doesn’t save time for supervisors. It is time consuming for supervisors to read these full call transcripts to understand what happened during customer conversations.

How it Works
Starting today, Contact Lens has added a summary of the key moments in a conversation. It is enabled by default, and there is no additional configuration step. You may toggle the Show transcript summary button to show or hide the summary when you don’t need it.

Contac Lens - Show Transcript Summary - Toggle button

Once a call is analyzed, the summary is available on the contact detail page.

Contact Lens identifies and summarizes the sections corresponding to Issue (e.g., lost package), Outcome (e.g., customer refund), and Action item (e.g., send a follow-up mail confirming the refund was processed). A manager can quickly see where there’s an action to send a customer a follow-up email and take action to ensure it happens.

Contact Lens Call Summary Example

The call summary is also available in JSON format. Contact Lens uploads these in the S3 bucket of your choice. Having access to the JSON file lets you import the summaries programmatically in your CRM or other tools.

... redacted for brevity ...

"IssuesDetected": [
{
   "CharacterOffsets": {
      "BeginOffsetChar": 31,
      "EndOffsetChar": 73
   },
   "Text": "I would like to cancel my subscription"
}
]
...
"ActionItemsDetected": [
 {
   "CharacterOffsets": {
      "BeginOffsetChar": 32,
      "EndOffsetChar": 116
   },
   "Text": "I will send you an email with details"
 }
 ]

Availability and Pricing
Call summarization by Contact Lens is available in all AWS Regions where Contact Lens is available today. We support post-call analytics in the US West (Oregon), US East (N. Virginia), Canada (Central), Europe (London), Europe (Frankfurt), Asia Pacific (Singapore), Asia Pacific (Seoul), Asia Pacific (Tokyo), and Asia Pacific (Sydney) regions. We support real-time analytics in the US West (Oregon), US East (N. Virginia), Canada (Central), Europe (London), Europe (Frankfurt), Asia Pacific (Seoul), Asia Pacific (Tokyo), and Asia Pacific (Sydney) regions.

Call summary comes at no additional cost on top of the usual charges for Contact Lens. This is why we choose to enable it by default. Contact Lens is charged $0.015 per minute of voice conversation analyzed. Most of our Contact Lens customers analyze millions of conversation minutes per month. The price is $0.0125 per minute when you analyze more than 5 millions minutes per month.

If you do not have Contact Lens enabled on your call center, go ahead and start using it today.

— seb

New for AWS Control Tower – Region Deny and Guardrails to Help You Meet Data Residency Requirements

Post Syndicated from Danilo Poccia original https://aws.amazon.com/blogs/aws/new-for-aws-control-tower-region-deny-and-guardrails-to-help-you-meet-data-residency-requirements/

Many customers, such as those in highly regulated industries and the public sector, want to have control over where their data is stored and processed. AWS already offers many tools and features to comply with local laws and regulations, but we want to provide a simplified way to translate data residency requirements into controls that can be applied to single- and multi-account environments.

Starting today, you can use AWS Control Tower to deploy data residency preventive and detective controls, referred to as guardrails. These guardrails will prevent provisioning resources in unwanted AWS Regions by restricting access to AWS APIs through service control policies (SCPs) built and managed by AWS Control Tower. In this way, content cannot be created or transferred outside of your selected Regions at the infrastructure level. In this context, content can be software (including machine images), data, text, audio, video, or images hosted on AWS for processing or storage. For example, AWS customers in Germany can deny access to AWS services in Regions outside of Frankfurt with the exception of global services such as AWS Identity and Access Management (IAM) and AWS Organizations.

AWS Control Tower also offers guardrails to further control data residency in underlying AWS service options, for example, blocking Amazon Simple Storage Service (Amazon S3) cross-region replication or blocking the creation of internet gateways.

The AWS account used for managing AWS Control Tower is not restricted by the new Region deny settings. That account can be used for remediation if you have data in an unwanted Region before enabling Region deny.

Detective guardrails are implemented via AWS Config rules and can further detect unexpected configuration changes that should not be allowed.

You still retain a shared responsibility model for data residency at the application level, but these controls can help you restrict what infrastructure and application teams can do on AWS.

Using Data Residency Guardrails in AWS Control Tower
To use the new data residency guardrails, you need to have created a landing zone using AWS Control Tower. See Plan your AWS Control Tower landing zone for more information.

To see all the new controls that are available, I select Guardrails on the left pane of the AWS Control Tower console and then find those in the Data Residency category. I sort results by Behavior. Guardrails that have a Prevention behavior are implemented as SCPs. Those that have a Detection behavior are implemented as AWS Config rules.

Console screenshot.

The most interesting guardrail is probably the one denying access to AWS based on the requested AWS Region. I choose it from the list and find that it is different from the other guardrails because it affects all Organizational Units (OUs) and cannot be activated here but must be activated in the landing zone settings.

Console screenshot.

Below the Overview, in the Guardrail components, there is a link to the full SCP for this guardrail, and I can see the list of the AWS APIs that, when this setting is enabled, are still going to be allowed towards non-governed Regions. Depending on your requirements, some of those services, such as Amazon CloudFront or AWS Global Accelerator, can be further limited by a custom SCP.

In the Landing zone settings, the Region deny guardrail is currently not enabled. I choose Modify settings and then enable the Region deny settings.

Console screenshot.

Below the Region deny settings, there is the list of AWS Regions governed by the landing zone. Those will be the regions allowed when I enable Region deny.

Console screenshot.

In my case, I have four governed Regions, two in the US and two in Europe:

  • US East (N. Virginia), which is also the home Region for the landing zone
  • US West (Oregon)
  • Europe (Ireland)
  • Europe (Frankfurt)

I choose Update landing zone at the bottom. The update of the landing zone takes a few minutes to complete. Now, the vast majority of the AWS APIs are blocked if they are not directed to one of those governed Regions. Let’s do a few tests.

Testing Region Deny in a Sandbox Account
Using AWS Single Sign-On, I copy the AWS credentials to use the sandbox account with AWSAdministratorAccess permissions. In a terminal, I paste the commands setting the environment variables to use those credentials.

Console screenshot.

Now, I try to start a new Amazon Elastic Compute Cloud (Amazon EC2) instance in US East (Ohio), one of the non-governed Regions. In a landing zone, the default VPC is replaced by a VPC managed by AWS Control Tower. To start the instance, I need to specify a VPC subnet. Let’s find a subnet ID that I can use.

aws ec2 describe-subnets --query 'Subnets[0].SubnetId' --region us-east-2

An error occurred (UnauthorizedOperation) when calling the DescribeSubnets operation:
You are not authorized to perform this operation.

As expected, I am not authorized to perform this operation in US East (Ohio). Let’s try to start an EC2 instance without passing the subnet ID.

aws ec2 run-instances --image-id ami-0dd0ccab7e2801812 --region us-east-2 \
    --instance-type t3.small                                     

An error occurred (UnauthorizedOperation) when calling the RunInstances operation:
You are not authorized to perform this operation.
Encoded authorization failure message: <ENCODED MESSAGE>

Again, I am not authorized. More information is included in the encoded authorization failure message that I can decode as described in this article:

aws sts decode-authorization-message --encoded-message <ENCODED MESSAGE>

The decoded message (that I have omitted for brevity) tells me that there was an explicit deny to my request and includes the full SCP that caused the deny. This information is really useful for debugging these kind of errors.

Now, let’s try in US East (N. Virginia), one of the four governed regions.

aws ec2 describe-subnets --query 'Subnets[0].SubnetId' --region us-east-1
"subnet-0f3580c0c5e56c210"

This time, the command returns the subnet ID of the first subnet returned by the request. Let’s start an instance in US East (N. Virginia) using this subnet.

aws ec2 run-instances --image-id  ami-04ad2567c9e3d7893 --region us-east-1 \
    --instance-type t3.small --subnet-id subnet-0f3580c0c5e56c210

As expected, it works, and I can see the EC2 instance running in the console.

Console screenshot.

Similarly, APIs for other AWS services are limited by the Region deny settings. For example, I can’t create an S3 bucket in a non-governed Region.

Console screenshot.

When I try to create the bucket, I get an access denied error.

Console screenshot.

As expected, the creation of an S3 bucket works in a governed Region.

Even if someone gives this account access to a bucket in a non-governed Region, I would not be able to copy any data into that bucket.

Other preventive guardrails can enforce data residency, for example:

  • Disallow cross-region networking for Amazon EC2, Amazon CloudFront, and AWS Global Accelerator
  • Disallow internet access for an Amazon VPC instance managed by a customer
  • Disallow Amazon Virtual Private Network (VPN) connections

Now, let’s see how detective guardrails work.

Testing Detective Guardrails in a Sandbox Account
I enable the following guardrails for all accounts in the sandbox OU:

  • Detect whether Amazon EBS snapshots are restorable by all AWS accounts
  • Detect whether public routes exist in the route table for an internet gateway

Now, I want to see what happens if I go against these guardrails. In the EC2 console, I create an EBS snapshot for the volume of the EC2 instance I started before. Then, I modify permissions to share it with all AWS accounts.

Console screenshot.

Then, in the VPC console, I create an internet gateway, attach it to the AWS Control Tower managed VPC, and update the route table of one of the private subnets to use the internet gateway.

Console screenshot.

After a few minutes, the noncompliant resources in the sandbox account are found by the detective guardrails.

Console screenshot.

I look at the information provided by the guardrails and update my configuration to fix the issues. In a multi-account setup I’d contact the account owner and ask for remediation.

Availability and Pricing
You can use data-residency guardrails to control resources in any AWS Region. To create a landing zone, you should start from one of the Regions where AWS Control Tower is offered. For more information, see the AWS Regional Services List. There is no additional cost for this feature. You pay the costs of other services used, such as AWS Config.

This feature provides you with a framework of controls and guidance for setting up a multi-account environment that addresses data residency requirements. Depending on your use case, you may use any subset of the new data residency guardrails.

Set up guardrails based on your data residency requirements with AWS Control Tower.

Danilo

New – AWS Outposts Servers in Two Form Factors

Post Syndicated from Jeff Barr original https://aws.amazon.com/blogs/aws/new-aws-outposts-servers-in-two-form-factors/

AWS Outposts gives you on-premises compute and storage that is monitored and managed by AWS, and controlled by the same, familiar AWS APIs. You may already know about the AWS Outposts rack, which occupies a full 42U rack.

Last year I told you that we were working on new sizes of Outposts suitable for locations such as branch offices, factories, retail stores, health clinics, hospitals, and cell sites that are space-constrained and need access to low-latency compute capacity. Today we are launching three AWS Outposts servers, all powered by AWS Nitro System and with your choice of x86 or Arm/Graviton2 processors. Here’s an overview:

Name/Rack Size/Catalog ID
EC2 Instance Capacity
Processor / Architecture
vCPUs Memory
Local NVMe
SSD Storage
Outposts 1U
(STBKRBE)
c6gd.16xlarge Graviton2 / Arm 64 128 GiB 3.8 TB
( 2x 1.9 TB)
Outposts 2U
(LMXAD41)
c6id.16xlarge Intel Ice Lake / x86 64 128 GiB 3.8 TB
(2 x 1.9 TB)
Outposts 2U
(KOSKFSF)
c6id.32xlarge Intel Ice Lake / x86 128 256 GiB 7.6 TB
(4 x 1.9 GB)

You can create VPC subnets on each Outpost, and you can launch Amazon Elastic Compute Cloud (Amazon EC2) instances from EBS-backed AMIs in the parent region. The c6gd.16xlarge model supports six instance sizes, as follows:

Instance Name vCPUs Memory Local Storage
c6gd.large 2 4 GiB 118 GB
c6gd.xlarge 4 8 GiB 237 GB
c6gd.2xlarge 8 16 GiB 474 GB
c6gd.4xlarge 16 32 GiB 950 GB
c6gd.8xlarge 32 64 GiB 1.9 TB
c6gd.16xlarge 64 128 GiB 3.8 TB

The c6id.16xlarge model supports all but the largest of the following instance sizes, and the c6id.32xlarge supports all of them:

Instance Name vCPUs Memory Local Storage
c6id.large 2 4 GiB 118 GB
c6id.xlarge 4 8 GiB 237 GB
c6id.2xlarge 8 16 GiB 474 GB
c6id.4xlarge 16 32 GiB 950 GB
c6id.8xlarge 32 64 GiB 1.9 TB
c6id.16xlarge 64 128 GiB 3.8 TB
c6id.32xlarge 128 256 GiB 7.6 TB

Within each of your Outposts servers, you can launch any desired mix of instance sizes as long as you remain within the overall processing and storage available. You can create Amazon Elastic Container Service (Amazon ECS) clusters (Amazon Elastic Kubernetes Service (EKS) is coming soon) , and the code you run on-premises can make use of the entire lineup of services in the AWS Cloud.

Each Outposts server connects to the cloud via the public Internet or across a private AWS Direct Connect line. Additionally, each Outpost server supports a Local Network Interface (LNI) that provides a Level 2 presence on your local network for AWS service endpoints.

Outposts servers incorporate many powerful Nitro features including high speed networking and enhanced security. The security model is locked-down and prevents administrative access, preventing tampering or human error. Additionally, data at rest is protected by a NIST-compliant physical security key.

While I was writing this post, I stopped in to say hello to the design and development team, and met with my colleague Bianca Nagy to learn more about the Outposts server:

Ordering Outposts Servers
Let’s walk through the process of ordering an Outposts server from the AWS Management Console. I visit the AWS Outposts Console, make sure that I am in the desired AWS Region, and click Place order to get started:

I click Servers, and then choose the desired configuration. I pick the c6gd.16xlarge, and click Next to proceed:

Then I create a new Outpost:

And a new Site:

Then I review my payment options and select my shipping address:

On the next page I review all of my options, click Place order, and await delivery:

In general, we expect to be able to deliver Outposts servers in two to six weeks, starting in the first quarter of 2022. After you receive yours, you or a member of your IT team can mount it in a 19″ rack or position it on a flat surface, cable it to power and networking, and power the device on. You then use a set of temporary AWS credentials to confirm the identity of the device, and to verify that the device is able to use DHCP to obtain an IP address. Once the device has established connectivity to the designated AWS parent region, we will finalize the provisioning of EC2 instance capacity and make it available to you.

After that, you are ready to launch instances and to deploy your on-premises applications.

We will monitor hardware performance and will contact you if your device is in need of maintenance. We will ship a replacement device for arrival within 2 business days. You can migrate your workloads to a redundant device, and use tracking information & notifications to track delivery status. When the replacement arrives, you install it and then destroy the physical security key in the old one before shipping it back to AWS.

Outposts API Update
We are also enhancing the Outposts API as part of this launch. Here are some of the new functions:

ListCatalogItem – Get a list of items in the Outposts catalog, with optional filtering by EC2 family or supported storage options.

GetCatalogItem – Get full information about a single item in the Outposts catalog.

GetSiteAddress – Get the physical address of a site where an Outposts rack or server is installed.

You can use the information returned by GetCatalogItem to place an order that contains the desired quantity of one or more catalog items.

Things to Know
Here are a couple of important things to know about Outposts servers:

Availability – Outposts servers are available for order to most locations where Outposts racks are available (currently 23 regions and 49 countries), with more to follow in 2022.

Ordering at Scale – I showed you the console-based ordering process above, and also gave you a glimpse at the Outposts API. If you need hundreds or thousands of devices, get in touch and we will give you a template that you can fill in and then upload.

re:Invent 2021 Outposts Server Selfie Challenge
If you attend AWS re:Invent, be sure to visit the AWS Hybrid kiosk in the AWS Booth (#1719) to see the new Outposts Servers up close and personal. While you are there, take a fun & creative selfie, tag it with #AWSOutposts & #AWSPromotion, and share it on Twitter. I will post my three favorites at the end of the show!

Jeff;

Introducing Amazon Redshift Serverless – Run Analytics At Any Scale Without Having to Manage Data Warehouse Infrastructure

Post Syndicated from Danilo Poccia original https://aws.amazon.com/blogs/aws/introducing-amazon-redshift-serverless-run-analytics-at-any-scale-without-having-to-manage-infrastructure/

We’re seeing the use of data analytics expanding among new audiences within organizations, for example with users like developers and line of business analysts who don’t have the expertise or the time to manage a traditional data warehouse. Also, some customers have variable workloads with unpredictable spikes, and it can be very difficult for them to constantly manage capacity.

With Amazon Redshift, you use SQL to analyze structured and semi-structured data across data warehouses, operational databases, and data lakes. Today, I am happy to introduce the public preview of Amazon Redshift Serverless, a new capability that makes it super easy to run analytics in the cloud with high performance at any scale. Just load your data and start querying. There is no need to set up and manage clusters. You pay for the duration in seconds when your data warehouse is in use, for example, while you are querying or loading data. There is no charge when your data warehouse is idle.

Amazon Redshift Serverless automatically provisions the right compute resources for you to get started. As your demand evolves with more concurrent users and new workloads, your data warehouse scales seamlessly and automatically to adapt to the changes. You can optionally specify the base data warehouse size to have additional control on cost and application-specific SLAs.

With the new serverless option, you can continue to query data in other AWS data stores, such as Amazon Simple Storage Service (Amazon S3) data lakes and Amazon Aurora and Amazon Relational Database Service (RDS) databases.

Amazon Redshift Serverless is ideal when it is difficult to predict compute needs such as variable workloads, periodic workloads with idle time, and steady-state workloads with spikes. This approach is also a good fit for ad-hoc analytics needs that need to get started quickly and for test and development environments.

Let’s see how this works in practice.

Using Amazon Redshift Serverless
I go to the Amazon Redshift console and choose the new serverless option. The first time, I set up the serverless endpoint and configure networking and security.

I confirm the default settings that use all subnets in my default Amazon Virtual Private Cloud (VPC) and its default security group. Data is always encrypted, and I use the default AWS-owned key. Optionally, I can customize all settings. I can associate now or later the AWS Identity and Access Management (IAM) roles to give permissions to access other AWS resources, for example, to be able to load data from an S3 bucket. The configuration of the serverless endpoint will be shared by all my serverless data warehouses in the same AWS account and Region.

Console screenshot.

To query data, I use Amazon Redshift Query Editor V2, a new free web-based tool that we made available a few months back. The query editor provides quick access to a few sample datasets to make it easy to learn Amazon Redshift’s SQL capabilities: TPC-H, TPC-DS, and tickit, a dataset containing information on ticket sales for events.

For a quick test, I use the tickit sample dataset so I don’t need to load any data. I prepare a query to get the list of tickets sold per date, sorted to see the dates with more sales first:

SELECT caldate, sum(qtysold) as sumsold
FROM   tickit.sales, tickit.date
WHERE  sales.dateid = date.dateid 
GROUP BY caldate
ORDER BY sumsold DESC;

By using the web-based query editor, I don’t need to configure a SQL client or set up the network permissions to reach the serverless endpoint. Instead, I just write my SQL query and run it.

Console screenshot.

I am a visual person. I enable the Chart option on the right of the result table and select a bar chart.

Console screenshot.

Satisfied with the clarity of the chart, I export it as an image file. In this way, I can quickly share it or include it in a report.

Bar chart

Amazon Redshift Serverless supports all rich SQL functionality of Amazon Redshift such as semi-structured data support. I can use any JDBC/ODBC-compliant tool or the Amazon Redshift Data API to query my data. To migrate data, I can take a snapshot of an Amazon Redshift provisioned cluster and restore it as serverless. Then, I just need to update my SQL applications to use the new serverless endpoint.

Availability and Pricing
Amazon Redshift Serverless is available in public preview in the following AWS Regions: US East (N. Virginia), US West (N. California, Oregon), Europe (Frankfurt, Ireland), Asia Pacific (Tokyo).

With Amazon Redshift Serverless, you pay separately for the compute and storage you use. Compute capacity is measured in Redshift Processing Units (RPUs), and you pay for the workloads in RPU-hours with per-second billing. For storage, you pay for data stored in Amazon Redshift-managed storage and storage used for snapshots, similar to what you’d pay with a provisioned cluster using RA3 instances.

To control your costs, you can specify usage limits and define actions that Amazon Redshift automatically takes if those limits are reached. You can specify usage limits in RPU-hours and associated with a daily, weekly, or monthly duration. Setting higher usage limits can improve the overall throughput of the system, especially for workloads that need to handle high concurrency while maintaining consistently high performance.

Compute resources automatically shutdown behind the scenes when there is no activity and resume when you are loading data, or there are queries coming in. When accessing your S3 data lake via the new serverless endpoint, you do not pay for Amazon Redshift Spectrum separately. You have a unified serverless experience and pay for data lake queries also in RPU-seconds. For more information, see the Amazon Redshift pricing page.

The serverless end point is configured at the AWS account level. If you have multiple teams or projects and want to manage costs separately, you can use separate AWS accounts. You can share data between your provisioned clusters and serverless endpoint and between serverless endpoints across accounts.

To help you get practice, we provide you upfront with $500 in AWS credits to try the Amazon Redshift Serverless public preview. You get the credits when you first create a database with Amazon Redshift Serverless. These credits are used to cover your costs for compute, storage, and snapshot usage of Amazon Redshift Serverless only.

Start using Amazon Redshift Serverless today to run and scale analytics without having to provision and manage data warehouse clusters.

Danilo

AWS Lake Formation – General Availability of Cell-Level Security and Governed Tables with Automatic Compaction

Post Syndicated from Danilo Poccia original https://aws.amazon.com/blogs/aws/aws-lake-formation-general-availability-of-cell-level-security-and-governed-tables-with-automatic-compaction/

A data lake can help you break down data silos and combine different types of analytics into a centralized repository. You can store all of your structured and unstructured data in this repository. However, setting up and managing data lakes involve a lot of manual, complicated, and time-consuming tasks. AWS Lake Formation makes it easy to set up a secure data lake in days instead of weeks or months.

Today, I am excited to share the general availability of some new features that simplify even further loading data, optimizing storage, and managing access to a data lake:

  • Governed Tables – A new type of Amazon Simple Storage Service (Amazon S3) tables that makes it simple and reliable to ingest and manage data at any scale. Governed tables support ACID transactions that let multiple users concurrently and reliably insert and delete data across multiple governed tables. ACID transactions also let you run queries that return consistent and up-to-date data. In case of errors in your extract, transform, and load (ETL) processes, or during an update, changes are not committed and will not be visible.
  • Storage Optimization with Automatic Compaction for governed tables – When this option is enabled, Lake Formation automatically compacts small S3 objects in your governed tables into larger objects to optimize access via analytics engines, such as Amazon Athena and Amazon Redshift Spectrum. By using automatic compaction, you don’t have to implement custom ETL jobs that read, merge, and compress data into new files, and then replace the original files.
  • Granular Access Control with Row and Cell-Level Security – You can control access to specific rows and columns in query results and within AWS Glue ETL jobs based on the identity of who is performing the action. In this way, you don’t have to create (and keep updated) subsets of your data for different roles and legislations. This works for both governed and traditional S3 tables.

Using Governed Tables, ACID Transactions, and Automatic Compaction
In the Lake Formation console, I can enable governed data access and management at table creation. Automatic compaction is enabled by default, and it can be disabled using the AWS Command Line Interface (CLI) or AWS SDKs.

Console screenshot.

Governed tables have a manifest that tracks the S3 objects that are part of the table’s data. I can use the UpdateTableObjects API to keep the manifest updated when adding new objects to the table, and I can call it using the AWS CLI and SDKs. This API is implicitly used by the AWS Glue ETL library.

Moreover, I have access to new Lake Formation APIs to start, commit, or cancel a transaction. I can use these APIs to wrap data loading, data transformation, and output consistent and up-to-date data.

Using Row and Cell-Level Security
There are many use cases where, for a table, you want to restrict access to specific columns, rows, or a combination that depends on the role of the user accessing the data. For example, a company with offices in the US, Germany, and France can create a filter for analysts based in the European Union (EU) to limit access to EU-based customers.

Console screenshot.

The filter can enforce that some columns, such as date of birth (dob) and phone, are not accessible to those analysts. Moreover, access to individual rows can be filtered by using filter expressions. You can configure row filter expressions with a SQL-compatible syntax based on the open-source PartiQL language. In this case, only rows with country equal to Germany or France (country='DE' OR country='FR') are visible.

Console screenshot.

Availability and Pricing
These new features are available today in the following AWS Regions: US East (N. Virginia), US West (Oregon), Europe (Ireland), US East (Ohio), and Asia Pacific (Tokyo).

When querying governed tables, or tables secured with row and cell-level security, you pay by the amount of data scanned (with a 10MB minimum). When using governed tables, transaction metadata is charged by the number of S3 objects tracked, and you pay for the number of transaction requests. Automatic compaction is charged based on the data processed. For more information, see the AWS Lake Formation pricing page.

While implementing these features, we introduced a new Lake Formation Storage API that is integrated with tools such as AWS Glue, Amazon Athena, Amazon Redshift Spectrum, and Amazon QuickSight. You can use this storage API directly in your applications to query tables with a SQL-like syntax (joins are not supported) and get the benefits of governed tables and cell-level security.

See the detailed blog series published during the preview to learn more:

Effective data lakes using AWS Lake Formation

Take advantage of these new features to simplify the creation and management of your data lake.

Danilo

Join the Preview – Amazon EC2 C7g Instances Powered by New AWS Graviton3 Processors

Post Syndicated from Jeff Barr original https://aws.amazon.com/blogs/aws/join-the-preview-amazon-ec2-c7g-instances-powered-by-new-aws-graviton3-processors/

We announced the first generation AWS-designed Graviton processor in late 2018, and followed it up with the second generation Graviton2 a year later. Today, AWS customers make use of twelve different Graviton2-powered instances including the new X2gd instances that are designed for memory-intensive workloads. All Graviton processors include dedicated cores & caches for each vCPU, along with additional security features courtesy of AWS Nitro System; the Graviton2 processors add support for always-on memory encryption.

C7g in the Works
I am thrilled to tell you about our upcoming C7g instances. Powered by new Graviton3 processors, these instances are going to be a great match for your compute-intensive workloads: HPC, batch processing, electronic design automation (EDA), media encoding, scientific modeling, ad serving, distributed analytics, and CPU-based machine learning inferencing.

While we are still optimizing these instances, it is clear that the Graviton3 is going to deliver amazing performance. In comparison to the Graviton2, the Graviton3 will deliver up to 25% more compute performance and up to twice as much floating point & cryptographic performance. On the machine learning side, Graviton3 includes support for bfloat16 data and will be able to deliver up to 3x better performance.

Graviton3 processors also include a new pointer authentication feature that is designed to improve security. Before return addresses are pushed on to the stack, they are first signed with a secret key and additional context information, including the current value of the stack pointer. When the signed addresses are popped off the stack, they are validated before being used. An exception is raised if the address is not valid, thereby blocking attacks that work by overwriting the stack contents with the address of harmful code. We are working with operating system and compiler developers to add additional support for this feature, so please get in touch if this is of interest to you.

C7g instances will be available in multiple sizes (including bare metal), and are the first in the cloud industry to be equipped with DDR5 memory. In addition to drawing less power, this memory delivers 50% higher bandwidth than the DDR4 memory used in the current generation of EC2 instances.

On the network side, C7g instances will offer up to 30 Gbps of network bandwidth and Elastic Fabric Adapter (EFA) support.

Join the Preview
We are now running a preview of the C7g instances so that you can be among the first to experience all of this power. Sign up now, take an instance for a spin, and let me know what you think!

Jeff;

New – Use Amazon S3 Event Notifications with Amazon EventBridge

Post Syndicated from Jeff Barr original https://aws.amazon.com/blogs/aws/new-use-amazon-s3-event-notifications-with-amazon-eventbridge/

We launched Amazon EventBridge in mid-2019 to make it easy for you to build powerful, event-driven applications at any scale. Since that launch, we have added several important features including a Schema Registry, the power to Archive and Replay Events, support for Cross-Region Event Bus Targets, and API Destinations to allow you to send events to any HTTP API. With support for a very long list of destinations and the ability to do pattern matching, filtering, and routing of events, EventBridge is an incredibly powerful and flexible architectural component.

S3 Event Notifications
Today we are making it even easier for you to use EventBridge to build applications that react quickly and efficiently to changes in your S3 objects. This is a new, “directly wired” model that is faster, more reliable, and more developer-friendly than ever. You no longer need to make additional copies of your objects or write specialized, single-purpose code to process events.

At this point you might be thinking that you already had the ability to react to changes in your S3 objects, and wondering what’s going on here. Back in 2014 we launched S3 Event Notifications to SNS Topics, SQS Queues, and Lambda functions. This was (and still is) a very powerful feature, but using it at enterprise-scale can require coordination between otherwise-independent teams and applications that share an interest in the same objects and events. Also, EventBridge can already extract S3 API calls from CloudTrail logs and use them to do pattern matching & filtering. Again, very powerful and great for many kinds of apps (with a focus on auditing & logging), but we always want to do even better.

Net-net, you can now configure S3 Event Notifications to directly deliver to EventBridge! This new model gives you several benefits including:

Advanced Filtering – You can filter on many additional metadata fields, including object size, key name, and time range. This is more efficient than using Lambda functions that need to make calls back to S3 to get additional metadata in order to make decisions on the proper course of action. S3 only publishes events that match a rule, so you save money by only paying for events that are of interest to you.

Multiple Destinations – You can route the same event notification to your choice of 18 AWS services including Step Functions, Kinesis Firehose, Kinesis Data Streams, and HTTP targets via API Destinations. This is a lot easier than creating your own fan-out mechanism, and will also help you to deal with those enterprise-scale situations where independent teams want to do their own event processing.

Fast, Reliable Invocation – Patterns are matched (and targets are invoked) quickly and directly. Because S3 provides at-least-once delivery of events to EventBridge, your applications will be more reliable.

You can also take advantage of other EventBridge features, including the ability to archive and then replay events. This allows you to reprocess events in case of an error or if you add a new target to an event bus.

Getting Started
I can get started in minutes. I start by enabling EventBridge notifications on one of my S3 buckets (jbarr-public in this case). I open the S3 Console, find my bucket, open the Properties tab, scroll down to Event notifications, and click Edit:

I select On, click Save changes, and I’m ready to roll:

Now I use the EventBridge Console to create a rule. I start, as usual, by entering a name and a description:

Then I define a pattern that matches the bucket and the events of interest:

One pattern can match one or more buckets and one or more events; the following events are supported:

  • Object Created
  • Object Deleted
  • Object Restore Initiated
  • Object Restore Completed
  • Object Restore Expired
  • Object Tags Added
  • Object Tags Deleted
  • Object ACL Updated
  • Object Storage Class Changed
  • Object Access Tier Changed

Then I choose the default event bus, and set the target to an SNS topic (BucketAction) which publishes the messages to my Amazon email address:

I click Create, and I am all set. To test it out, I simply upload some files to my bucket and await the messages:

The message contains all of the interesting and relevant information about the event, and (after some unquoting and formatting), looks like this:

{
    "version": "0",
    "id": "2d4eba74-fd51-3966-4bfa-b013c9da8ff1",
    "detail-type": "Object Created",
    "source": "aws.s3",
    "account": "348414629041",
    "time": "2021-11-13T00:00:59Z",
    "region": "us-east-1",
    "resources": [
        "arn:aws:s3:::jbarr-public"
    ],
    "detail": {
        "version": "0",
        "bucket": {
            "name": "jbarr-public"
        },
        "object": {
            "key": "eb_create_rule_mid_1.png",
            "size": 99797,
            "etag": "7a72374e1238761aca7778318b363232",
            "version-id": "a7diKodKIlW3mHIvhGvVphz5N_ZcL3RG",
            "sequencer": "00618F003B7286F496"
        },
        "request-id": "4Z2S00BKW2P1AQK8",
        "requester": "348414629041",
        "source-ip-address": "72.21.198.68",
        "reason": "PutObject"
    }

My initial event pattern was very simple, and matched only the bucket name. I can use content-based filtering to write more complex and more interesting patterns. For example, I could use numeric matching to set up a pattern that matches events for objects that are smaller than 1 megabyte:

{
    "source": [
        "aws.s3"
    ],
    "detail-type": [
        "Object Created",
        "Object Deleted",
        "Object Tags Added",
        "Object Tags Deleted"
    ],

    "detail": {
        "bucket": {
            "name": [
                "jbarr-public"
            ]
        },
        "object" : {
            "size": [{"numeric" :["<=", 1048576 ] }]
        }
    }
}

Or, I could use prefix matching to set up a pattern that looks for objects uploaded to a “subfolder” (which doesn’t really exist) of a bucket:

"object": {
  "key" : [{"prefix" : "uploads/"}]
  }]
}

You can use all of this in conjunction with all of the existing EventBridge features, including Archive/Replay. You can also access the CloudWatch metrics for each of your rules:

Available Now
This feature is available now and you can start using it today in all commercial AWS Regions. You pay $1 for every 1 million events that match a rule; check out the EventBridge Pricing page for more information.

Jeff;

New – AWS Control Tower Account Factory for Terraform

Post Syndicated from Danilo Poccia original https://aws.amazon.com/blogs/aws/new-aws-control-tower-account-factory-for-terraform/

AWS Control Tower makes it easier to set up and manage a secure, multi-account AWS environment. AWS Control Tower uses AWS Organizations to create what is called a landing zone, bringing ongoing account management and governance based on our experience working with thousands of customers.

If you use AWS CloudFormation to manage your infrastructure as code, you can customize your AWS Control Tower landing zone using Customizations for AWS Control Tower, a solution that helps you deploy custom templates and policies to individual accounts and organizational units (OUs) within your organization.

But what if you use Terraform to manage your AWS infrastructure?

Today, I am happy to share the availability of AWS Control Tower Account Factory for Terraform (AFT), a new Terraform module maintained by the AWS Control Tower team that allows you to provision and customize AWS accounts through Terraform using a deployment pipeline. The source code for the development pipeline can be stored in AWS CodeCommit, GitHub, GitHub Enterprise, or BitBucket. With AFT, you can automate the creation of fully functional accounts that have access to all the resources they need to be productive. The module works with Terraform open source, Terraform Enterprise, and Terraform Cloud.

Architectural diagram.

Let’s see how this works in practice.

Using AWS Control Tower Account Factory for Terraform
First, I create a main.tf file that uses the AWS Control Tower Account Factory for Terraform (AFT) module:

module "aft" {
  source = "[email protected]:aws-ia/terraform-aws-control_tower_account_factory.git"

  # Required Parameters
  ct_management_account_id    = "123412341234"
  log_archive_account_id      = "234523452345"
  audit_account_id            = "345634563456"
  aft_management_account_id   = "456745674567"
  ct_home_region              = "us-east-1"
  tf_backend_secondary_region = "us-west-2"

  # Optional Parameters
  terraform_distribution = "oss"
  vcs_provider           = "codecommit"

  # Optional Feature Flags
  aft_feature_delete_default_vpcs_enabled = false
  aft_feature_cloudtrail_data_events      = false
  aft_feature_enterprise_support          = false
}

The first six parameters are required. As a prerequisite, I need to pass the ID of four AWS accounts in my AWS organization:

  • ct_management_account_id – AWS Control Tower management account
  • log_archive_account_id – Log Archive account
  • audit_account_id – Audit account
  • aft_management_account_id – AFT management account

Then, I have to pass two AWS Regions:

  • ct_home_region – The Region from which this module will be executed. This must be the same Region where AWS Control Tower is deployed.
  • tf_backend_secondary_region – The backend primary Region is the same as the AFT Region. This parameter defines the secondary Region to replicate to. AFT creates a backend for state tracking for its own state. It is also used for Terraform when using the open-source version.

The other parameters are optional and are set to their default value in the previous main.tf file:

  • terraform_distribution – To select between Terraform open source (default), Enterprise, or Cloud
  • vcs_provider – To choose the version control system to use between AWS CodeCommit (default), GitHub, GitHub Enterprise, or BitBucket.

These feature flags are disabled by default and can be omitted unless you want to enable them:

  • aft_feature_delete_default_vpcs_enabled – To automatically delete the default VPC for new accounts.
  • aft_feature_cloudtrail_data_events – To enable AWS CloudTrail data events for new accounts. Be aware that this option, usually required for compliance in highly regulated environments, can have an impact on your costs.
  • aft_feature_enterprise_support – To automatically enroll new accounts with Enterprise Support (if you have an Enterprise Support Plan).

First, I initialize the project and download the plugins:

terraform init

Then, I use AWS Single Sign-On to log in with the AWS Control Tower management account and start the deployment:

terraform apply

I confirm with a yes and, after some time, the deployment is complete.

Now, I use AWS SSO again to log in with the AFT management account. In the AWS CodeCommit console, I find four repositories that I can use to customize the accounts created with AFT.

Console screenshot.

These repositories are used by pipelines managed by AWS CodePipeline to automate the account creation:

  • xaft-account-request – This is where I place requests for accounts provisioned and managed by AFT.
  • aft-global-customizations – I can use this repository to customize all provisioned accounts with customer-defined resources. The resources can be created through Terraform or through Python.
  • aft-account-customizations – Here, I can customize provisioned accounts depending on the value of the account_customizations_name parameter in the aft-account-request repository. In this way, I can create different sets of customizations depending on the role the account will be used for.
  • aft-account-provisioning-customizations – This repository uses AWS Step Functions to customize the provisioning process for new accounts and simplify the integration with additional environments. State machines can use AWS Lambda functions, Amazon Elastic Container Service (Amazon ECS) or AWS Fargate tasks, custom activities hosted either on AWS or on-premises, or Amazon Simple Notification Service (SNS) and Amazon Simple Queue Service (SQS) to communicate with external applications.

Currently, these four repositories are all empty. To start, I use the code in the sources/aft-customizations-repos folder in the GitHub repo of the AFT Terraform module.

Using the example in the aft-account-request repository, I prepare a template to create a couple of AWS accounts. One of the two accounts is for a software developer.

To help software developers be productive quickly, I create a specific account customization. In the template, I set the parameter account_customizations_name equal to developer-customization.

Then, in the aft-account-customizations repository, I create a developer-customization folder where I put a Terraform template to automatically create an AWS Cloud9 EC2-based development environment for new accounts of that type. Optionally, I can extend that with my Python code, for example, to invoke internal or external APIs. Using this approach, all new accounts for software developers will have their development environment ready as they go through the delivery pipeline.

I push the changes to the main branch (first for the aft-account-customizations repository, then for the aft-account-request). This triggers the execution of the pipeline. After a few minutes, the two new accounts are ready to be used.

You can customize accounts created by AFT based on your unique requirements. For example, you can provide each account with its own specific security setup (such as IAM roles or security groups) and storage (for example, pre-configured Amazon Simple Storage Service (Amazon S3) buckets).

Availability and Pricing
AWS Control Tower Account Factory for Terraform (AFT) works in any Region where AWS Control Tower is available. There are no additional costs when using AFT. You pay for the services used by the solution. For example, when you set up AWS Control Tower, you will begin to incur costs for AWS services configured to set up your landing zone and mandatory guardrails.

When building this solution, we worked together with HashiCorp. Armon Dadgar, HashiCorp Co-Founder and CTO, told us: “Managing cloud environments with hundreds or thousands of users can be a complex and time-consuming process. Using a software delivery pipeline integrating Terraform and AWS Control Tower makes it easier to achieve consistent governance and compliance requirements across all accounts.”

The pipeline provides an account creation process that monitors when account provisioning is complete and then triggers additional Terraform modules to enhance the account with further customizations. You can configure the pipeline to use your own custom Terraform modules or pick from pre-published Terraform modules for common products and configurations.

Simplify and standardize AWS account creation using AWS Control Tower Account Factory for Terraform.

Danilo

New – Recycle Bin for EBS Snapshots

Post Syndicated from Jeff Barr original https://aws.amazon.com/blogs/aws/new-recycle-bin-for-ebs-snapshots/

It is easy to create EBS Snapshots, and just as easy to either delete them manually or to use the Data Lifecycle Manager to delete them automatically in accord with your organization’s retention model. Sometimes, as it turns out, it is a bit too easy to delete snapshots, and a well-intended cleanup effort or a wayward script can sometimes go a bit overboard!

New Recycle Bin
In order to give you more control over the deletion process, we are launching a Recycle Bin for EBS Snapshots. As you will see in a moment, you can now set up rules to retain deleted snapshots so that you can recover them after an accidental deletion. You can think of this as a two-level model, where individual AWS users are responsible for the initial deletion, and then a designated “Recycle Bin Administrator” (as specified by an IAM role) manages retention and recovery.

Rules can apply to all snapshots, or to snapshots that include a specified set of tag/value pairs. Each rule specifies a retention period (between one day and one year), after which the snapshot is permanently deleted.

Let’s Recycle!
I open the Recycle Bin Console, select the region of interest, and click Create retention rule to begin:

I call my first rule KeepAll, and set it to retain all deleted EBS snapshots for 4 days:

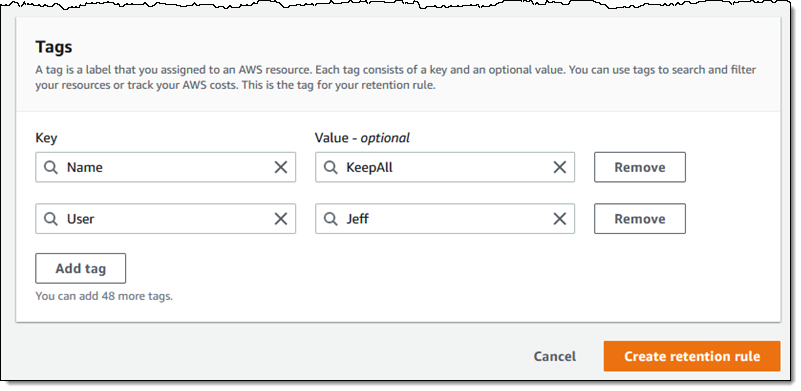
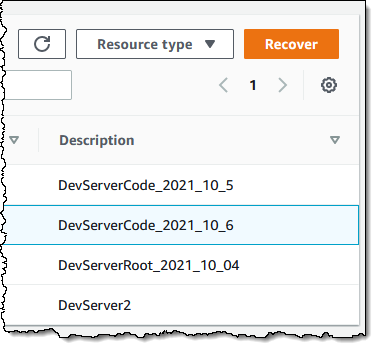
I add a tag (User) to the rule, and click Create retention rule:

Because Apply to all resources is checked, this is a general rule that applies when there are no applicable rules that specify one or more tags.

Then I create a second rule (KeepDev) that retains snapshots tagged with a Mode of Dev for just one day:

If two different tag-based rules match the same resource, then the one with the longer retention period applies.

Here are my retention rules:

Here are my EBS snapshots. As you can see, the first three are tagged with a Mode of Dev:

In an effort to save several cents per month, I impulsively delete them all:

And they are gone:

Later in the day, a member of my developer team messages me in a panic and lets me know that they desperately need the latest snapshot of the development server’s code. I open the Recycle Bin and I locate the snapshot (DevServer_2021_10_6):

I select the snapshot and click Recover:

Then I confirm my intent:

And the snapshot is available once again:

As has always been the case, Fast Snapshot Restore is disabled when a snapshot is deleted. With this launch, it will remain disabled when a snapshot is restored.

All of this functionality (creating rules, listing resources in the Recycle Bin, and restoring them) is also available from the CLI and via the Recycle Bin APIs.

Things to Know
Here are a couple of things to know about the new Recycle Bin:

IAM Support – As I mentioned earlier, you can use AWS Identity and Access Management (IAM) to grant access to this feature, and should consider creating an empowered user known as the Recycle Bin Administrator.

Rule Changes – You can make changes to your retention rules at any time, but be aware that the rules are evaluated (and the retention period is set) when you delete a snapshot. Changing a rule after an item has been deleted will not alter the retention period for the item.

Pricing – Resources that are in the Recycle Bin are charged the usual price, but be aware that creating rules with long retention periods could increase your AWS bill. On a related note, be sure that keeping deleted snapshots around does not violate your organization’s data retention policies. There is no charge for deleting or recovering a resource.

In the Bin – Resources in the Recycle Bin are immutable. If a resource is recovered, all of its existing metadata (tags and so forth) is also recovered intact.

Recycling  – We will do our best to recycle all of the zeroes and all of the ones once when a resource in your Recycle Bin reaches the end of its retention period!

Jeff;

Introducing Karpenter – An Open-Source High-Performance Kubernetes Cluster Autoscaler

Post Syndicated from Channy Yun original https://aws.amazon.com/blogs/aws/introducing-karpenter-an-open-source-high-performance-kubernetes-cluster-autoscaler/

Today we are announcing that Karpenter is ready for production. Karpenter is an open-source, flexible, high-performance Kubernetes cluster autoscaler built with AWS. It helps improve your application availability and cluster efficiency by rapidly launching right-sized compute resources in response to changing application load. Karpenter also provides just-in-time compute resources to meet your application’s needs and will soon automatically optimize a cluster’s compute resource footprint to reduce costs and improve performance.

Before Karpenter, Kubernetes users needed to dynamically adjust the compute capacity of their clusters to support applications using Amazon EC2 Auto Scaling groups and the Kubernetes Cluster Autoscaler. Nearly half of Kubernetes customers on AWS report that configuring cluster auto scaling using the Kubernetes Cluster Autoscaler is challenging and restrictive.

When Karpenter is installed in your cluster, Karpenter observes the aggregate resource requests of unscheduled pods and makes decisions to launch new nodes and terminate them to reduce scheduling latencies and infrastructure costs. Karpenter does this by observing events within the Kubernetes cluster and then sending commands to the underlying cloud provider’s compute service, such as Amazon EC2.

Karpenter is an open-source project licensed under the Apache License 2.0. It is designed to work with any Kubernetes cluster running in any environment, including all major cloud providers and on-premises environments. We welcome contributions to build additional cloud providers or to improve core project functionality. If you find a bug, have a suggestion, or have something to contribute, please engage with us on GitHub.

Getting Started with Karpenter on AWS
To get started with Karpenter in any Kubernetes cluster, ensure there is some compute capacity available, and install it using the Helm charts provided in the public repository. Karpenter also requires permissions to provision compute resources on the provider of your choice.

Once installed in your cluster, the default Karpenter provisioner will observe incoming Kubernetes pods, which cannot be scheduled due to insufficient compute resources in the cluster and automatically launch new resources to meet their scheduling and resource requirements.

I want to show a quick start using Karpenter in an Amazon EKS cluster based on Getting Started with Karpenter on AWS. It requires the installation of AWS Command Line Interface (AWS CLI), kubectl, eksctl, and Helm (the package manager for Kubernetes). After setting up these tools, create a cluster with eksctl. This example configuration file specifies a basic cluster with one initial node.

cat <<EOF > cluster.yaml
---
apiVersion: eksctl.io/v1alpha5
kind: ClusterConfig
metadata:
  name: eks-karpenter-demo
  region: us-east-1
  version: "1.20"
managedNodeGroups:
  - instanceType: m5.large
    amiFamily: AmazonLinux2
    name: eks-kapenter-demo-ng
    desiredCapacity: 1
    minSize: 1
    maxSize: 5
EOF
$ eksctl create cluster -f cluster.yaml

Karpenter itself can run anywhere, including on self-managed node groups, managed node groups, or AWS Fargate. Karpenter will provision EC2 instances in your account.

Next, you need to create necessary AWS Identity and Access Management (IAM) resources using the AWS CloudFormation template and IAM Roles for Service Accounts (IRSA) for the Karpenter controller to get permissions like launching instances following the documentation. You also need to install the Helm chart to deploy Karpenter to your cluster.

$ helm repo add karpenter https://charts.karpenter.sh
$ helm repo update
$ helm upgrade --install --skip-crds karpenter karpenter/karpenter --namespace karpenter \
  --create-namespace --set serviceAccount.create=false --version 0.5.0 \
  --set controller.clusterName=eks-karpenter-demo
  --set controller.clusterEndpoint=$(aws eks describe-cluster --name eks-karpenter-demo --query "cluster.endpoint" --output json) \
  --wait # for the defaulting webhook to install before creating a Provisioner

Karpenter provisioners are a Kubernetes resource that enables you to configure the behavior of Karpenter in your cluster. When you create a default provisioner, without further customization besides what is needed for Karpenter to provision compute resources in your cluster, Karpenter automatically discovers node properties such as instance types, zones, architectures, operating systems, and purchase types of instances. You don’t need to define these spec:requirements if there is no explicit business requirement.

cat <<EOF | kubectl apply -f -
apiVersion: karpenter.sh/v1alpha5
kind: Provisioner
metadata:
name: default
spec:
#Requirements that constrain the parameters of provisioned nodes. 
#Operators { In, NotIn } are supported to enable including or excluding values
  requirements:
    - key: node.k8s.aws/instance-type #If not included, all instance types are considered
      operator: In
      values: ["m5.large", "m5.2xlarge"]
    - key: "topology.kubernetes.io/zone" #If not included, all zones are considered
      operator: In
      values: ["us-east-1a", "us-east-1b"]
    - key: "kubernetes.io/arch" #If not included, all architectures are considered
      values: ["arm64", "amd64"]
    - key: " karpenter.sh/capacity-type" #If not included, the webhook for the AWS cloud provider will default to on-demand
      operator: In
      values: ["spot", "on-demand"]
  provider:
    instanceProfile: KarpenterNodeInstanceProfile-eks-karpenter-demo
  ttlSecondsAfterEmpty: 30  
EOF

The ttlSecondsAfterEmpty value configures Karpenter to terminate empty nodes. If this value is disabled, nodes will never scale down due to low utilization. To learn more, see Provisioner custom resource definitions (CRDs) on the Karpenter site.

Karpenter is now active and ready to begin provisioning nodes in your cluster. Create some pods using a deployment, and watch Karpenter provision nodes in response.

$ kubectl create deployment --name inflate \
          --image=public.ecr.aws/eks-distro/kubernetes/pause:3.2

Let’s scale the deployment and check out the logs of the Karpenter controller.

$ kubectl scale deployment inflate --replicas 10
$ kubectl logs -f -n karpenter $(kubectl get pods -n karpenter -l karpenter=controller -o name)
2021-11-23T04:46:11.280Z        INFO    controller.allocation.provisioner/default       Starting provisioning loop      {"commit": "abc12345"}
2021-11-23T04:46:11.280Z        INFO    controller.allocation.provisioner/default       Waiting to batch additional pods        {"commit": "abc123456"}
2021-11-23T04:46:12.452Z        INFO    controller.allocation.provisioner/default       Found 9 provisionable pods      {"commit": "abc12345"}
2021-11-23T04:46:13.689Z        INFO    controller.allocation.provisioner/default       Computed packing for 10 pod(s) with instance type option(s) [m5.large]  {"commit": " abc123456"}
2021-11-23T04:46:16.228Z        INFO    controller.allocation.provisioner/default       Launched instance: i-01234abcdef, type: m5.large, zone: us-east-1a, hostname: ip-192-168-0-0.ec2.internal    {"commit": "abc12345"}
2021-11-23T04:46:16.265Z        INFO    controller.allocation.provisioner/default       Bound 9 pod(s) to node ip-192-168-0-0.ec2.internal  {"commit": "abc12345"}
2021-11-23T04:46:16.265Z        INFO    controller.allocation.provisioner/default       Watching for pod events {"commit": "abc12345"}

The provisioner’s controller listens for Pods changes, which launched a new instance and bound the provisionable Pods into the new nodes.

Now, delete the deployment. After 30 seconds (ttlSecondsAfterEmpty = 30), Karpenter should terminate the empty nodes.

$ kubectl delete deployment inflate
$ kubectl logs -f -n karpenter $(kubectl get pods -n karpenter -l karpenter=controller -o name)
2021-11-23T04:46:18.953Z        INFO    controller.allocation.provisioner/default       Watching for pod events {"commit": "abc12345"}
2021-11-23T04:49:05.805Z        INFO    controller.Node Added TTL to empty node ip-192-168-0-0.ec2.internal {"commit": "abc12345"}
2021-11-23T04:49:35.823Z        INFO    controller.Node Triggering termination after 30s for empty node ip-192-168-0-0.ec2.internal {"commit": "abc12345"}
2021-11-23T04:49:35.849Z        INFO    controller.Termination  Cordoned node ip-192-168-116-109.ec2.internal   {"commit": "abc12345"}
2021-11-23T04:49:36.521Z        INFO    controller.Termination  Deleted node ip-192-168-0-0.ec2.internal    {"commit": "abc12345"}

If you delete a node with kubectl, Karpenter will gracefully cordon, drain, and shut down the corresponding instance. Under the hood, Karpenter adds a finalizer to the node object, which blocks deletion until all pods are drained, and the instance is terminated.

Things to Know
Here are a couple of things to keep in mind about Kapenter features:

Accelerated Computing: Karpenter works with all kinds of Kubernetes applications, but it performs particularly well for use cases that require rapid provisioning and deprovisioning large numbers of diverse compute resources quickly. For example, this includes batch jobs to train machine learning models, run simulations, or perform complex financial calculations. You can leverage custom resources of nvidia.com/gpu, amd.com/gpu, and aws.amazon.com/neuron for use cases that require accelerated EC2 instances.

Provisioners Compatibility: Kapenter provisioners are designed to work alongside static capacity management solutions like Amazon EKS managed node groups and EC2 Auto Scaling groups. You may choose to manage the entirety of your capacity using provisioners, a mixed model with both dynamic and statically managed capacity, or a fully static approach. We recommend not using Kubernetes Cluster Autoscaler at the same time as Karpenter because both systems scale up nodes in response to unschedulable pods. If configured together, both systems will race to launch or terminate instances for these pods.

Join our Karpenter Community
Karpenter’s community is open to everyone. Give it a try, and join our working group meeting, or follow our roadmap for future releases that interest you. As I said, we welcome any contributions such as bug reports, new features, corrections, or additional documentation.

To learn more about Karpenter, see the documentation and demo video from AWS Container Day.

Channy