The Application Security teams at Netflix are responsible for securing the software footprint that we create to run the Netflix product, the Netflix studio, and the business. Our customers are product and engineering teams at Netflix that build these software services and platforms. The Netflix cultural values of ‘Context not Control’ and ‘Freedom and Responsibility’ strongly influence how we do Security at Netflix. Our goal is to manage security risks to Netflix via clear, opinionated security guidance, and by providing risk context to Netflix engineering teams to make pragmatic risk decisions at scale.
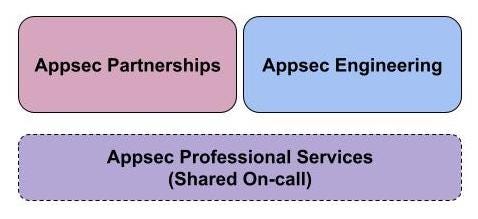
A few years ago, we published this blog post about how we had organized our team to focus our bandwidth on scalable investments as opposed to just traditional Appsec functions, which were not scaling well in our rapidly growing environment. We leaned into the idea of strategic security partnerships and automation investments to create more leverage for application security. This became the foundation for our current org structure with teams focused on Appsec Partnerships and Appsec Engineering. In this operating model, we provided critical Appsec operational services to Netflix — including bug bounty, pentesting, PSIRT (product security incident response), security reviews, and developer security education — via a shared on-call rotation.
Over the past few years, this model has allowed us to focus on investments like Secure by Default for baseline security controls, Security Self-Service for clear actionable guidance and Vulnerability Scanning at scale for software supply chain security. We wanted to share an update on learnings from this model, how our needs have evolved, and where we expect to go from here.
Among the most notable wins, we have been able to utilize this scale focused approach to productize application security for our rapidly growing studio engineering ecosystem, standardize security baseline for all Enterprise apps, and build paved roads to provide Secure by Default Authentication & Authorization capabilities for central data engineering tools. Our focus has been on improving overall security assurance as opposed to just vulnerability prevention. We are now expanding this approach to more parts of our ecosystem. This mindset has also allowed us to invest our capacity for white-glove service towards reasonable residual risk and standard guidance so we can reduce the need for white-glove engagements in the long term (e.g., investment in an API proxy that provides baseline security controls for free as opposed to pentesting all applications that would eventually sit behind that API proxy). This approach has also allowed us to build strong relationships with central engineering teams at Netflix (Data Platform, Developer Tools, Cloud Infrastructure, IAM Product Engineering) that will continue to serve as central points of leverage for security in the long term.
However, it has not been all sunshine and rainbows. On the partnership side, the bespoke nature of each partnership means that there isn’t consistency and redundancy built into the operating model and the related partnership artifacts (e.g., Security Strategy and Roadmap, Threat Model, Deliverable Tracking, Residual Risk Criteria, etc). This leads to insufficient context sharing and high operational churn every time we have personnel changes. The partnership charter has also grown laterally into the infrastructure space as we stack our leverage bets on infrastructure components (like Service Mesh, Container Platform, etc). The skill sets and domain depth in those partnerships has further diversified the skills on the team. But this is a tradeoff on our ability to serve generalized Appsec oncall needs like bug bounty triage with high consistency. Given that partnerships focus on long-running strategic initiatives, the wins can be few and far between and that can be difficult for team motivation. We also found various areas in which security partnership work bleeds into security product solutioning and it can be difficult to identify the appropriate handoff points.
Additionally, as the complexity of our ecosystem grows, the goal of “single PoC into information security” becomes increasingly more difficult to maintain. The team is now investing in consistency and scalability of partnership artifacts and communication channels, better redundancy and context sharing on the team through squad operating models, crisper engagement criteria, and definition of done for partnership engagements.
Our Appsec Engineering team builds products to help us scale, e.g.: a dynamic Asset Inventory that understands the nuances of our bespoke engineering ecosystem and how our applications and data relate to each other. This has evolved their identity to be a software engineering team that focuses on security problems as opposed to a security engineering team that writes code/software. Our hiring has reflected that shift, and we’ve added more dedicated software engineers (SWEs) to the team to help us build out software. With this shift, we’ve incorporated engineering best practices, and our products have appropriate investments toward reliability and sustainability. As the team skews towards more software engineering focused talent, ramping up to support the shared Appsec-focused on-call has been challenging.
While originally built to support AppSec use cases around providing guidance to developers in a self-service way, interest in the rich data and relationships we have in our tools, especially our Asset Inventory, has grown. As a result, we’ve continued to invest in making our solutions scalable and accessible, so security engineers can get the data they need more easily to drive security use cases. We’ve also discovered, through interviews with engineers, that self-service guidance doesn’t stand on its own. Moving forward, the team is investing in understanding our customer use cases better, and shifting our self-service story toward higher-context, more opinionated automated guidance to ensure developers have everything they need to make truly informed decisions about the security of their applications (similar to how they might make resiliency or other product decisions).
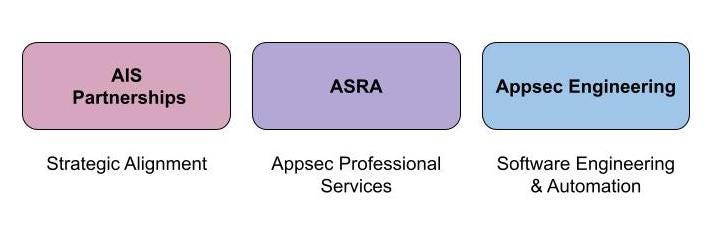
As the Netflix business and engineering workforce has grown, our software footprint has also grown and become more heterogeneous. At the same time, partnerships have grown more and more strategic, and engineering has grown more and more software-focused. As our team specialized, what emerged was a loss of strategic focus for our AppSec Professional Services charter. These services now need more dedicated strategic investment as the volume and support needs have grown. So, we are now building out a dedicated capability focused on these critical services that are important investments to be made and can no longer be served effectively via a shared Appsec on-call. This will be our “Appsec Reviews and Assessments” function and we are hiring for passionate, early career Appsec engineers to join this group.
We will continue to learn as we go through this next phase of evolution of our program. We hope to continue to share these learnings with the broader community interested in scalable product and application security.
In this blog post, we will walk you through a scenario and explain when you should use which policy type, and who should own and manage the policy. You will learn when to use the more common policy types: identity-based policies, resource-based policies, permissions boundaries, and AWS Organizations service control policies (SCPs).
Different policy types and when to use them
AWS has different policy types that provide you with powerful flexibility, and it’s important to know how and when to use each policy type. It’s also important for you to understand how to structure your IAM policy ownership to avoid a centralized team from becoming a bottleneck. Explicit policy ownership can allow your teams to move more quickly, while staying within the secure guardrails that are defined centrally.
Service control policies overview
Service control policies (SCPs) are a feature of AWS Organizations. AWS Organizations is a service for grouping and centrally managing the AWS accounts that your business owns. SCPs are policies that specify the maximum permissions for an organization, organizational unit (OU), or an individual account. An SCP can limit permissions for principals in member accounts, including the AWS account root user.
Permissions boundaries are an advanced IAM feature in which you set the maximum permissions that an identity-based policy can grant to an IAM principal. When you set a permissions boundary for a principal, the principal can perform only the actions that are allowed by both its identity-based policies and its permissions boundaries.
A permissions boundary is a type of identity-based policy that doesn’t directly grant access. Instead, like an SCP, a permissions boundary acts as a guardrail for your IAM principals that allows you to set coarse-grained access controls. A permissions boundary is typically used to delegate the creation of IAM principals. Delegation enables other individuals in your accounts to create new IAM principals, but limits the permissions that can be granted to the new IAM principals.
Identity-based policies overview
Identity-based policies are policy documents that you attach to a principal (roles, users, and groups of users) to control what actions a principal can perform, on which resources, and under what conditions. Identity-based policies can be further categorized into AWS managed policies, customer managed policies, and inline policies. AWS managed policies are reusable identity-based policies that are created and managed by AWS. You can use AWS managed policies as a starting point for building your own identity-based policies that are specific to your organization. Customer managed policies are reusable identity-based policies that can be attached to multiple identities. Customer managed policies are useful when you have multiple principals with identical access requirements. Inline policies are identity-based policies that are attached to a single principal. Use inline-policies when you want to create least-privilege permissions that are specific to a particular principal.
You will have many identity-based policies in your AWS account that are used to enable access in scenarios such as human access, application access, machine learning workloads, and deployment pipelines. These policies should be fine-grained. You use these policies to directly apply least privilege permissions to your IAM principals. You should write the policies with permissions for the specific task that the principal needs to accomplish.
Resource-based policies overview
Resource-based policies are policy documents that you attach to a resource such as an S3 bucket. These policies grant the specified principal permission to perform specific actions on that resource and define under what conditions this permission applies. Resource-based policies are inline policies. For a list of AWS services that support resource-based policies, see AWS services that work with IAM.
Resource-based policies are optional for many workloads that don’t span multiple AWS accounts. Fine-grained access within a single AWS account is typically granted with identity-based policies. AWS Key Management Service (AWS KMS)keys and IAM role trust policies are two exceptions, and both of these resources must have a resource-based policy even when the principal and the KMS key or IAM role are in the same account. IAM roles and KMS keys behave this way as an extra layer of protection that requires the owner of the resource (key or role) to explicitly allow or deny principals from using the resource. For other resources that support resource-based policies, here are some use cases where they are most commonly used:
Applying an additional layer of protection for resources that store sensitive data, such as AWS Secrets Manager secrets or an S3 bucket with sensitive data. You can use a resource-based policy to deny access to IAM principals that shouldn’t have access to sensitive data, even if granted access by an identity-based policy. An explicit deny in an IAM policy always overrides an allow.
How to implement different policy types
In this section, we will walk you through an example of a design that includes all four of the policy types explained in this post.
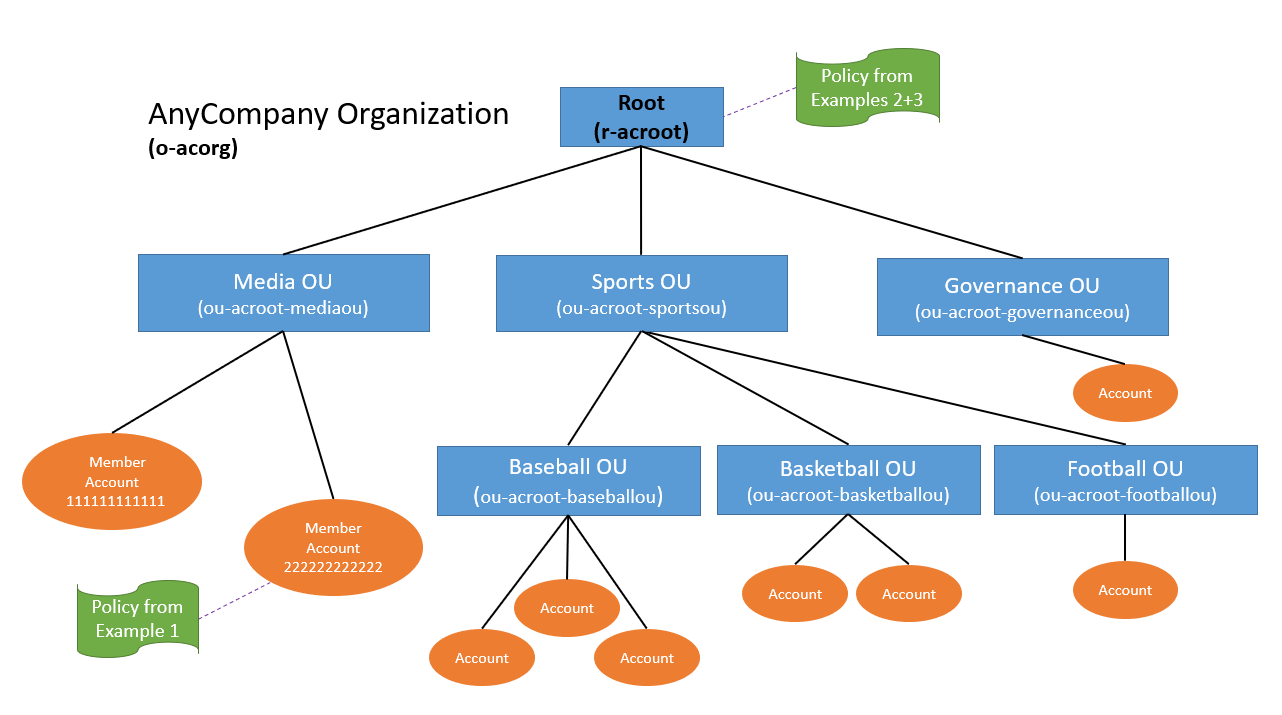
The example that follows shows an application that runs on an Amazon Elastic Compute Cloud (Amazon EC2) instance and needs to read from and write files to an S3 bucket in the same account. The application also reads (but doesn’t write) files from an S3 bucket in a different account. The company in this example, Example Corp, uses a multi-account strategy, and each application has its own AWS account. The architecture of the application is shown in Figure 1.
Figure 1: Sample application architecture that needs to access S3 buckets in two different AWS accounts
There are three teams that participate in this example: the Central Cloud Team, the Application Team, and the Data Lake Team. The Central Cloud Team is responsible for the overall security and governance of the AWS environment across all AWS accounts at Example Corp. The Application Team is responsible for building, deploying, and running their application within the application account (111111111111) that they own and manage. Likewise, the Data Lake Team owns and manages the data lake account (222222222222) that hosts a data lake at Example Corp.
With that background in mind, we will walk you through an implementation for each of the four policy types and include an explanation of which team we recommend own each policy. The policy owner is the team that is responsible for creating and maintaining the policy.
Service control policies
The Central Cloud Team owns the implementation of the security controls that should apply broadly to all of Example Corp’s AWS accounts. At Example Corp, the Central Cloud Team has two security requirements that they want to apply to all accounts in their organization:
All AWS API calls must be encrypted in transit.
Accounts can’t leave the organization on their own.
The Central Cloud Team chooses to implement these security invariants using SCPs and applies the SCPs to the root of the organization. The first statement in Policy 1 denies all requests that are not sent using SSL (TLS). The second statement in Policy 1 prevents an account from leaving the organization.
This is only a subset of the SCP statements that Example Corp uses. Example Corp uses a deny list strategy, and there must also be an accompanying statement with an Effect of Allow at every level of the organization that isn’t shown in the SCP in Policy 1.
Policy 1: SCP attached to AWS Organizations organization root
The Central Cloud Team wants to make sure that they don’t become a bottleneck for the Application Team. They want to allow the Application Team to deploy their own IAM principals and policies for their applications. The Central Cloud Team also wants to make sure that any principals created by the Application Team can only use AWS APIs that the Central Cloud Team has approved.
At Example Corp, the Application Team deploys to their production AWS environment through a continuous integration/continuous deployment (CI/CD) pipeline. The pipeline itself has broad access to create AWS resources needed to run applications, including permissions to create additional IAM roles. The Central Cloud Team implements a control that requires that all IAM roles created by the pipeline must have a permissions boundary attached. This allows the pipeline to create additional IAM roles, but limits the permissions that the newly created roles can have to what is allowed by the permissions boundary. This delegation strikes a balance for the Central Cloud Team. They can avoid becoming a bottleneck to the Application Team by allowing the Application Team to create their own IAM roles and policies, while ensuring that those IAM roles and policies are not overly privileged.
An example of the permissions boundary policy that the Central Cloud Team attaches to IAM roles created by the CI/CD pipeline is shown below. This same permissions boundary policy can be centrally managed and attached to IAM roles created by other pipelines at Example Corp. The policy describes the maximum possible permissions that additional roles created by the Application Team are allowed to have, and it limits those permissions to some Amazon S3 and Amazon Simple Queue Service (Amazon SQS) data access actions. It’s common for a permissions boundary policy to include data access actions when used to delegate role creation. This is because most applications only need permissions to read and write data (for example, writing an object to an S3 bucket or reading a message from an SQS queue) and only sometimes need permission to modify infrastructure (for example, creating an S3 bucket or deleting an SQS queue). As Example Corp adopts additional AWS services, the Central Cloud Team updates this permissions boundary with actions from those services.
Policy 2: Permissions boundary policy attached to IAM roles created by the CI/CD pipeline
In the next section, you will learn how to enforce that this permissions boundary is attached to IAM roles created by your CI/CD pipeline.
Identity-based policies
In this example, teams at Example Corp are only allowed to modify the production AWS environment through their CI/CD pipeline. Write access to the production environment is not allowed otherwise. To support the different personas that need to have access to an application account in Example Corp, three baseline IAM roles with identity-based policies are created in the application accounts:
A role for the CI/CD pipeline to use to deploy application resources.
A read-only role for the Central Cloud Team, with a process for temporary elevated access.
A read-only role for members of the Application Team.
All three of these baseline roles are owned, managed, and deployed by the Central Cloud Team.
The Central Cloud Team is given a default read-only role (CentralCloudTeamReadonlyRole) that allows read access to all resources within the account. This is accomplished by attaching the AWS managed ReadOnlyAccess policy to the Central Cloud Team role. You can use the IAM console to attach the ReadOnlyAccess policy, which grants read-only access to all services. When a member of the team needs to perform an action that is not covered by this policy, they follow a temporary elevated access process to make sure that this access is valid and recorded.
A read-only role is also given to developers in the Application Team (DeveloperReadOnlyRole) for analysis and troubleshooting. At Example Corp, developers are allowed to have read-only access to Amazon EC2, Amazon S3, Amazon SQS, AWS CloudFormation, and Amazon CloudWatch. Your requirements for read-only access might differ. Several AWS services offer their own read-only managed policies, and there is also the previously mentioned AWS managed ReadOnlyAccess policy that grants read only access to all services. To customize read-only access in an identity-based policy, you can use the AWS managed policies as a starting point and limit the actions to the services that your organization uses. The customized identity-based policy for Example Corp’s DeveloperReadOnlyRole role is shown below.
Policy 3: Identity-based policy attached to a developer read-only role to support human access and troubleshooting
The CI/CD pipeline role has broad access to the account to create resources. Access to deploy through the CI/CD pipeline should be tightly controlled and monitored. The CI/CD pipeline is allowed to create new IAM roles for use with the application, but those roles are limited to only the actions allowed by the previously discussed permissions boundary. The roles, policies, and EC2 instance profiles that the pipeline creates should also be restricted to specific role paths. This enables you to enforce that the pipeline can only modify roles and policies or pass roles that it has created. This helps prevent the pipeline, and roles created by the pipeline, from elevating privileges by modifying or passing a more privileged role. Pay careful attention to the role and policy paths in the Resource element of the following CI/CD pipeline role policy (Policy 4). The CI/CD pipeline role policy also provides some example statements that allow the passing and creation of a limited set of service-linked roles (which are created in the path /aws-service-role/). You can add other service-linked roles to these statements as your organization adopts additional AWS services.
Policy 4: Identity-based policy attached to CI/CD pipeline role
In addition to the three baseline roles with identity-based policies in place that you’ve seen so far, there’s one additional IAM role that the Application Team creates using the CI/CD pipeline. This is the role that the application running on the EC2 instance will use to get and put objects from the S3 buckets in Figure 1. Explicit ownership allows the Application Team to create this identity-based policy that fits their needs without having to wait and depend on the Central Cloud Team. Because the CI/CD pipeline can only create roles that have the permissions boundary policy attached, Policy 5 cannot grant more access than the permissions boundary policy allows (Policy 2).
If you compare the identity-based policy attached to the EC2 instance’s role (Policy 5 on left) with the permissions boundary policy described previously (Policy 2 on the right), you can see that the actions allowed by the EC2 instance’s role are also allowed by the permissions boundary policy. Actions must be allowed by both policies for the EC2 instance to perform the s3:GetObject and s3:PutObject actions. Access to create a bucket would be denied even if the role attached to the EC2 instance was given permission to perform the s3:CreateBucket action because the s3:CreateBucket action exceeds the permissions allowed by the permissions boundary.
Policy 5: Identity-based policy bound by permissions boundary and attached to the application’s EC2 instance
The only resource-based policy needed in this example is attached to the bucket in the account external to the application account (DOC-EXAMPLE-BUCKET2 in the data lake account in Figure 1). Both the identity-based policy and resource-based policy must grant access to an action on the S3 bucket for access to be allowed in a cross-account scenario. The bucket policy below only allows the GetObject action to be performed on the bucket, regardless of what permissions the application’s role (ApplicationRole) is granted from its identity-based policy (Policy 5).
This resource-based policy is owned by the Data Lake Team that owns and manages the data lake account (222222222222) and the policy (Policy 6). This allows the Data Lake Team to have complete control over what teams external to their AWS account can access their S3 bucket.
Policy 6: Resource-based policy attached to S3 bucket in external data lake account (222222222222)
No resource-based policy is needed on the S3 bucket in the application account (DOC-EXAMPLE-BUCKET1 in Figure 1). Access for the application is granted to the S3 bucket in the application account by the identity-based policy on its own. Access can be granted by either an identity-based policy or a resource-based policy when access is within the same AWS account.
Putting it all together
Figure 2 shows the architecture and includes the seven different policies and the resources they are attached to. The table that follows summarizes the various IAM policies that are deployed to the Example Corp AWS environment, and specifies what team is responsible for each of the policies.
Figure 2: Sample application architecture with CI/CD pipeline used to deploy infrastructure
The numbered policies in Figure 2 correspond to the policy numbers in the following table.
Policy number
Policy description
Policy type
Policy owner
Attached to
1
Enforce SSL and prevent member accounts from leaving the organization for all principals in the organization
Service control policy (SCP)
Central Cloud Team
Organization root
2
Restrict maximum permissions for roles created by CI/CD pipeline
Permissions boundary
Central Cloud Team
All roles created by the pipeline (ApplicationRole)
3
Scoped read-only policy
Identity-based policy
Central Cloud Team
DeveloperReadOnlyRole IAM role
4
CI/CD pipeline policy
Identity-based policy
Central Cloud Team
CICDPipelineRole IAM role
5
Policy used by running application to read and write to S3 buckets
Identity-based policy
Application Team
ApplicationRole on EC2 instance
6
Bucket policy in data lake account that grants access to a role in application account
Resource-based policy
Data Lake Team
S3 Bucket in data lake account
7
Broad read-only policy
Identity-based policy
Central Cloud Team
CentralCloudTeamReadonlyRole IAM role
Conclusion
In this blog post, you learned about four different policy types: identity-based policies, resource-based policies, service control policies (SCPs), and permissions boundary policies. You saw examples of situations where each policy type is commonly applied. Then, you walked through a real-life example that describes an implementation that uses these policy types.
You can use this blog post as a starting point for developing your organization’s IAM strategy. You might decide that you don’t need all of the policy types explained in this post, and that’s OK. Not every organization needs to use every policy type. You might need to implement policies differently in a production environment than a sandbox environment. The important concepts to take away from this post are the situations where each policy type is applicable, and the importance of explicit policy ownership. We also recommend taking advantage of policy validation in AWS IAM Access Analyzer when writing IAM policies to validate your policies against IAM policy grammar and best practices.
For more information, including the policies described in this solution and the sample application, see the how-and-when-to-use-aws-iam-policy-blog-samples GitHub respository. The repository walks through an example implementation using a CI/CD pipeline with AWS CodePipeline.
In an introductory article, we talked about the importance of Graph Networks in fraud detection. In this article, we will be adding some further context on graphs, graph technology and some common use cases.
Connectivity is the most prominent feature of today’s networks and systems. From molecular interactions, social networks and communication systems to power grids, shopping experiences or even supply chains, networks relating to real-world systems are not random. This means that these connections are not static and can be displayed differently at different times. Simple statistical analysis is insufficient to effectively characterise, let alone forecast, networked system behaviour.
As the world becomes more interconnected and systems become more complex, it is more important to employ technologies that are built to take advantage of relationships and their dynamic properties. There is no doubt that graphs have sparked a lot of attention because they are seen as a means to get insights from related data. Graph theory-based approaches show the concepts underlying the behaviour of massively complex systems and networks.
What are graphs?
Graphs are mathematical models frequently used in network science, which is a set of technological tools that may be applied to almost any subject. To put it simply, graphs are mathematical representations of complex systems.
Origin of graphs
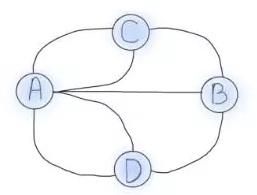
The first graph was produced in 1736 in the city of Königsberg, now known as Kaliningrad, Russia. In this city, there were two islands with two mainland sections that were connected by seven different bridges.
Famed mathematician Euler wanted to plot a journey through the entire city by crossing each bridge only once. Euler proceeded to abstract the four regions of the city and the seven bridges into edges but he demonstrated that the problem was unsolvable. A simplified abstract graph is shown in Fig 1.
Fig 1 Abstraction graph
The graph’s four dots represent Königsberg’s four zones, while the lines represent the seven bridges that connect them. Zones connected by an even number of bridges is clearly navigable because several paths to enter and exit are available. Zones connected by an odd number of bridges can only be used as starting or terminating locations because the same route can only be taken once.
The number of edges associated with a node is known as the node degree. If two nodes have odd degrees and the rest have even degrees, the Königsberg problem could be solved. For example, exactly two regions must have an even number of bridges while the rest have an odd number of bridges. However, as illustrated in Fig 1, no Königsberg location has an even number of bridges, rendering this problem unsolvable.
Definition of graphs
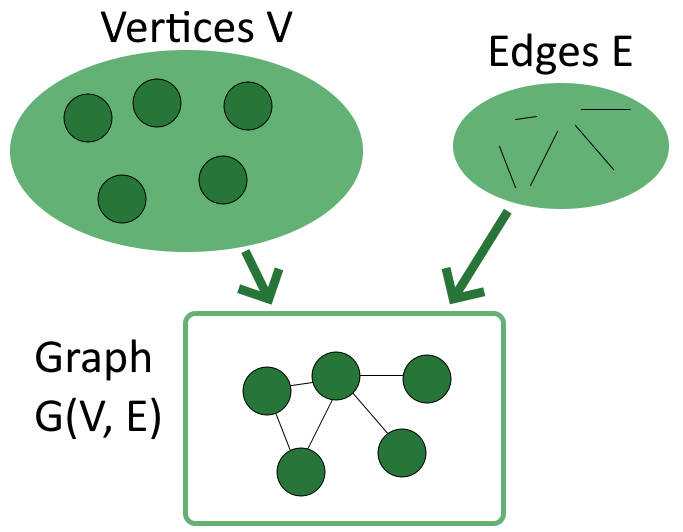
A graph is a structure that consists of vertices and edges. Vertices, or nodes, are the objects in a problem, while edges are the links that connect vertices in a graph.
Vertices are the fundamental elements that a graph requires to function; there should be at least one in a graph. Vertices are mathematical abstractions that refer to objects that are linked by a condition.
On the other hand, edges are optional as graphs can still be defined without any edges. An edge is a link or connection between any two vertices in a graph, including a connection between a vertex and itself. The idea is that if two vertices are present, there is a relationship between them.
We usually indicate V={v1, v2, …, vn} as the set of vertices, and E = {e1, e2, …, em} as the set of edges. From there, we can define a graph G as a structure G(V, E) which models the relationship between the two sets:
Fig 2 Graph structure
It is worth noting that the order of the two sets within parentheses matters, because we usually express the vertices first, followed by the edges. A graph H(X, Y) is therefore a structure that models the relationship between the set of vertices X and the set of edges Y, not the other way around.
Graph data model
Now that we have covered graphs and their typical components, let us move on to graph data models, which help to translate a conceptual view of your data to a logical model. Two common graph data formats are Resource Description Framework (RDF) and Labelled Property Graph (LPG).
Resource Description Framework (RDF)
RDF is typically used for metadata and facilitates standardised exchange of data based on their relationships. RDFs typically consist of a triple: a subject, a predicate, and an object. A collection of such triples is an RDF graph. This can be depicted as a node and a directed edge diagram, with each triple representing a node-edge-node graph, as shown in Fig 3.
Literals – data type value, i.e. text, integer, etc.
Blank nodes – have no identification; similar to anonymous or existential variables.
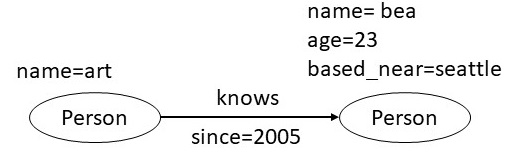
Let us use an example to illustrate this. We have a person with the name Art and we want to plot all his relationships. In this case, the IRI is http://example.org/art and this can be shortened by defining a prefix like ex.
In this example, the IRI http://xmlns.com/foaf/0.1/knows defines the relationship knows. We define foaf as the prefix for http://xmlns.com/foaf/0.1/. The following code snippet shows how a graph like this will look.
In the last two lines, you can see how a literal and blank node would be depicted in an RDF graph. The variable foaf:age is a literal node with the integer value of 23, while foaf:based_near is an anonymous spatial entity with a node identifier of underscore. Outside the context of this graph, o1 is a data identifier with no meaning.
Multiple IRIs, intended for use in RDF graphs, are typically stored in an RDF vocabulary. These IRIs often begin with a common substring known as a namespace IRI. In some cases, namespace IRIs are also associated with a short name known as a namespace prefix. In the example above, http://xmlns.com/foaf/0.1/ is the namespace IRI and foaf and ex are namespace prefixes.
Note: RDF graphs are considered atemporal as they provide a static snapshot of data. They can use appropriate language extensions to communicate information about events or other dynamic properties of entities.
An RDF dataset is a set of RDF graphs that includes one or more named graphs as well as exactly one default graph. A default graph is one that can be empty, and has no associated IRI or name, while each named graph has an IRI or a blank node corresponding to the RDF graph and its name. If there is no named graph specified in a query, the default graph is queried (hence its name).
Labelled Property Graph (LPG)
A labelled property graph is made up of nodes, links, and properties. Each node is given a label and a set of characteristics in the form of arbitrary key-value pairs. The keys are strings, and the values can be any data type. A relationship is then defined by adding a directed edge that is labelled and connects two nodes with a set of properties.
In Fig 4, we have an LPG that shows two nodes: art and bea. The bea node has two characteristics, age and proximity, that are connected by a known edge. This edge has the attribute since because it commemorates the year that art and bea first met.
Fig 4 Labelled Property Graph: Example 1
Nodes, edges and properties must be defined when designing an LPG data model. In this scenario, based_near might not be applicable to all vertices, but they should be defined. You might be wondering, why not represent the city Seattle as a node and add an edge marked as based_near that connects a person and the city?
In general, if there is a value linked to a large number of other nodes in the network and it requires additional properties to correlate with other nodes, it should be represented as a node. In this scenario, the architecture defined in Fig 5 is more appropriate for traversing based_near connections. It also gives us the ability to link any new attributes to the based_near relationship.
Fig 5 Labelled Property Graph: Example 2
Now that we have the context of graphs, let us talk about graph databases, how they help with large data queries and the part they play in Graph Technology.
Graph database
A graph database is a type of NoSQL database that stores data using network topology. The idea is derived from LPG, which represents data sets with vertices, edges, and attributes.
Vertices are instances or entities of data that represent any object to be tracked, such as people, accounts, locations, etc.
Edges are the critical concepts in graph databases which represent relationships between vertices. The connections have a direction that can be unidirectional (one-way) or bidirectional (two-way).
Properties represent descriptive information associated with vertices. In some cases, edges have properties as well.
Graph databases provide a more conceptual view of data that is closer to reality. Modelling complex linkages becomes simpler because interconnections between data points are given the same weight as the data itself.
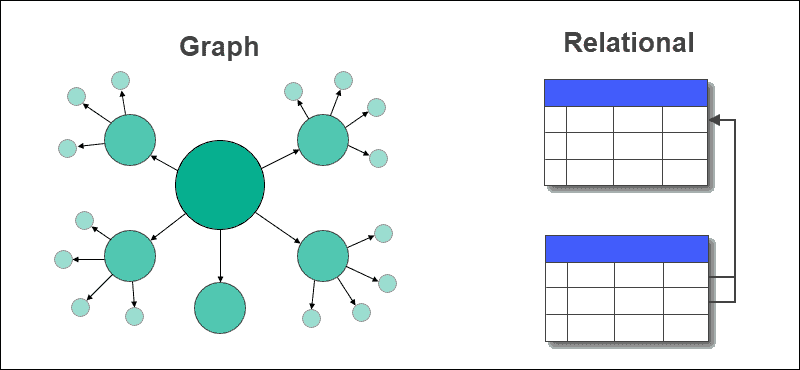
Graph database vs. relational database
Relational databases are currently the industry norm and take a structured approach to data, usually in the form of tables. On the other hand, graph databases are agile and focus on immediate relationship understanding. Neither type is designed to replace the other, so it is important to know what each database type has to offer.
Fig 6 Graph database vs relational database
There is a domain for both graph and relational databases. Graph databases outperform typical relational databases, especially in use cases involving complicated relationships, as they take a more naturalistic and flowing approach to data.
The key distinctions between graph and relational databases are summarised in the following table:
Type
Graph
Relational
Format
Nodes and edges with properties
Tables with rows and columns
Relationships
Represented with edges between nodes
Created using foreign keys between tables
Flexibility
Flexible
Rigid
Complex queries
Quick and responsive
Requires complex joins
Use case
Systems with highly connected relationships
Transaction focused systems with more straightforward relationships
Table. 1 Graph vs. Relational Databases
Advantages and disadvantages
Every database type has its advantages and disadvantages; knowing the distinctions as well as potential options for specific challenges is crucial. Graph databases are a rapidly evolving technology with improved functions compared with other database types.
Advantages
Some advantages of graph databases include:
Agile and flexible structures.
Explicit relationship representation between entities.
Real-time query output – speed depends on the number of relationships.
Disadvantages
The general disadvantages of graph databases are:
No standardised query language; depends on the platform used.
Not suitable for transactional-based systems.
Small user base, making it hard to find troubleshooting support.
Graph technology
Graph technology is the next step in improving analytics delivery. Traditional analytics is insufficient to meet complicated business operations, distribution, and analytical concerns as data quantities expand.
Graph technology aids in the discovery of unknown correlations in data that would otherwise go undetected or unanalysed. When the term graph is used to describe a topic, three distinct concepts come to mind: graph theory, graph analytics, and graph data management.
Graph theory – A mathematical notion that uses stack ordering to find paths, linkages, and networks of logical or physical objects, as well as their relationships. Can be used to model molecules, telephone lines, transport routes, manufacturing processes, and many other things.
Graph analytics – The application of graph theory to uncover nodes, edges, and data linkages that may be assigned semantic attributes. Can examine potentially interesting connections in data found in traditional analysis solutions, using node and edge relationships.
Graph database – A type of storage for data generated by graph analytics. Filling a knowledge graph, which is a model in data that indicates a common usage of acquired knowledge or data sets expressing a frequently held notion, is a typical use case for graph analytics output.
While the architecture and terminology are sometimes misunderstood, graph analytics’ output can be viewed through visualisation tools, knowledge graphs, particular applications, and even some advanced dashboard capabilities of business intelligence tools. All three concepts above are frequently used to improve system efficiency and even to assist in dynamic data management. In this approach, graph theory and analysis are inextricably linked, and analysis may always rely on graph databases.
Graph-centric user stories
Fraud detection
Traditional fraud prevention methods concentrate on discrete data points such as individual accounts, devices, or IP addresses. However, today’s sophisticated fraudsters avoid detection by building fraud rings using stolen and fake identities. To detect such fraud rings, we need to look beyond individual data points to the linkages that connect them.
Graph technology greatly transcends the capabilities of a relational database, by revealing hard-to-find patterns. Enterprise businesses also employ Graph technology to supplement their existing fraud detection skills to tackle a wide range of financial crimes, including first-party bank fraud, fraud, and money laundering.
Real-time recommendations
An online business’s success depends on systems that can generate meaningful recommendations in real time. To do so, we need the capacity to correlate product, customer, inventory, supplier, logistical, and even social sentiment data in real time. Furthermore, a real-time recommendation engine must be able to record any new interests displayed during the consumer’s current visit in real time, which batch processing cannot do.
Graph databases outperform relational and other NoSQL data stores in terms of delivering real-time suggestions. Graph databases can easily integrate different types of data to get insights into consumer requirements and product trends, making them an increasingly popular alternative to traditional relational databases.
Supply chain management
With complicated scenarios like supply chains, there are many different parties involved and companies need to stay vigilant in detecting issues like fraud, contamination, high-risk areas or unknown product sources. This means that there is a need to efficiently process large amounts of data and ensure transparency throughout the supply chain.
To have a transparent supply chain, relationships between each product and party need to be mapped out, which means there will be deep linkages. Graph databases are great for these as they are designed to search and analyse data with deep links. This means they can process enormous amounts of data without performance issues.
Identity and access management
Managing multiple changing roles, groups, products and authorisations can be difficult, especially in large organisations. Graph technology integrates your data and allows quick and effective identity and access control. It also allows you to track all identity and access authorisations and inheritances with significant depth and real-time insights.
Network and IT operations
Because of the scale and complexity of network and IT infrastructure, you need a configuration management database (CMDB) that is far more capable than relational databases. Neptune is an example of a CMDB and graph database that allows you to correlate your network, data centre, and IT assets to aid troubleshooting, impact analysis, and capacity or outage planning.
A graph database allows you to integrate various monitoring tools and acquire important insights into the complicated relationships that exist between various network or data centre processes. Possible applications of graphs in network and IT operations range from dependency management to automated microservice monitoring.
Risk assessment and monitoring
Risk assessment is crucial in the fintech business. With multiple sources of credit data such as ecommerce sites, mobile wallets and loan repayment records, it can be difficult to accurately assess an individual’s credit risk. Graph Technology makes it possible to combine these data sources, quantify an individual’s fraud risk and even generate full credit reviews.
One clear example of this is IceKredit, which employs artificial intelligence (AI) and machine learning (ML) techniques to make better risk-based decisions. With Graph technology, IceKredit has also successfully detected unreported links and increased efficiency of financial crime investigations.
Social network
Whether you’re using stated social connections or inferring links based on behaviour, social graph databases like Neptune introduce possibilities for building new social networks or integrating existing social graphs into commercial applications.
Having a data model that is identical to your domain model allows you to better understand your data, communicate more effectively, and save time. By decreasing the time spent data modelling, graph databases increase the quality and speed of development for your social network application.
Artificial intelligence (AI) and machine learning (ML)
AI and ML use statistical and analytical approaches to find patterns in data and provide insights. However, there are two prevalent concerns that arise – the quality of data and effectiveness of the analytics. Some AI and ML solutions have poor accuracy because there is not enough training data or variants that have a high correlation to the outcome.
These ML data issues can be solved with graph databases as it’s possible to connect and traverse links, as well as supplement raw data. With Graph technology, ML systems can recognise each column as a “feature” and each connection as a distinct characteristic, and then be able to identify data patterns and train themselves to recognise these relationships.
Conclusion
Graphs are a great way to visually represent complex systems and can be used to easily detect patterns or relationships between entities. To help improve graphs’ ability to detect patterns early, businesses should consider using Graph technology, which is the next step in improving analytics delivery.
Graph technology typically consists of:
Graph theory – Used to find paths, linkages and networks of logical or physical objects.
Graph analytics – Application of graph theory to uncover nodes, edges, and data linkages.
Graph database – Storage for data generated by graph analytics.
Although predominantly used in fraud detection, Graph technology has many other use cases such as making real-time recommendations based on consumer behaviour, identity and access control, risk assessment and monitoring, AI and ML, and many more.
Check out our next blog article, where we will be talking about how our Graph Visualisation Platform enhances Grab’s fraud detection methods.
Grab is the leading superapp platform in Southeast Asia, providing everyday services that matter to consumers. More than just a ride-hailing and food delivery app, Grab offers a wide range of on-demand services in the region, including mobility, food, package and grocery delivery services, mobile payments, and financial services across 428 cities in eight countries.
Powered by technology and driven by heart, our mission is to drive Southeast Asia forward by creating economic empowerment for everyone. If this mission speaks to you, join our team today!
Customers often ask for guidance on permissions boundaries in AWS Identity and Access Management (IAM) and when, where, and how to use them. A permissions boundary is an IAM feature that helps your centralized cloud IAM teams to safely empower your application developers to create new IAM roles and policies in Amazon Web Services (AWS). In this blog post, we cover this common use case for permissions boundaries, some best practices to consider, and a few things to avoid.
Background
Developers often need to create new IAM roles and policies for their applications because these applications need permissions to interact with AWS resources. For example, a developer will likely need to create an IAM role with the correct permissions for an Amazon Elastic Compute Cloud (Amazon EC2) instance to report logs and metrics to Amazon CloudWatch. Similarly, a role with accompanying permissions is required for an AWS Glue job to extract, transform, and load data to an Amazon Simple Storage Service (Amazon S3) bucket, or for an AWS Lambda function to perform actions on the data loaded to Amazon S3.
Before the launch of IAM permissions boundaries, central admin teams, such as identity and access management or cloud security teams, were often responsible for creating new roles and policies. But using a centralized team to create and manage all IAM roles and policies creates a bottleneck that doesn’t scale, especially as your organization grows and your centralized team receives an increasing number of requests to create and manage new downstream roles and policies. Imagine having teams of developers deploying or migrating hundreds of applications to the cloud—a centralized team won’t have the necessary context to manually create the permissions for each application themselves.
Because the use case and required permissions can vary significantly between applications and workloads, customers asked for a way to empower their developers to safely create and manage IAM roles and policies, while having security guardrails in place to set maximum permissions. IAM permissions boundaries are designed to provide these guardrails so that even if your developers created the most permissive policy that you can imagine, such broad permissions wouldn’t be functional.
By setting up permissions boundaries, you allow your developers to focus on tasks that add value to your business, while simultaneously freeing your centralized security and IAM teams to work on other critical tasks, such as governance and support. In the following sections, you will learn more about permissions boundaries and how to use them.
Permissions boundaries
A permissions boundary is designed to restrict permissions on IAM principals, such as roles, such that permissions don’t exceed what was originally intended. The permissions boundary uses an AWS or customer managed policy to restrict access, and it’s similar to other IAM policies you’re familiar with because it has resource, action, and effect statements. A permissions boundary alone doesn’t grant access to anything. Rather, it enforces a boundary that can’t be exceeded, even if broader permissions are granted by some other policy attached to the role. Permissions boundaries are a preventative guardrail, rather than something that detects and corrects an issue. To grant permissions, you use resource-based policies (such as S3 bucket policies) or identity-based policies (such as managed or in-line permissions policies).
The predominant use case for permissions boundaries is to limit privileges available to IAM roles created by developers (referred to as delegated administrators in the IAM documentation) who have permissions to create and manage these roles. Consider the example of a developer who creates an IAM role that can access all Amazon S3 buckets and Amazon DynamoDB tables in their accounts. If there are sensitive S3 buckets in these accounts, then these overly broad permissions might present a risk.
To limit access, the central administrator can attach a condition to the developer’s identity policy that helps ensure that the developer can only create a role if the role has a permissions boundary policy attached to it. The permissions boundary, which AWS enforces during authorization, defines the maximum permissions that the IAM role is allowed. The developer can still create IAM roles with permissions that are limited to specific use cases (for example, allowing specific actions on non-sensitive Amazon S3 buckets and DynamoDB tables), but the attached permissions boundary prevents access to sensitive AWS resources even if the developer includes these elevated permissions in the role’s IAM policy. Figure 1 illustrates this use of permissions boundaries.
Figure 1: Implementing permissions boundaries
The central IAM team adds a condition to the developer’s IAM policy that allows the developer to create a role only if a permissions boundary is attached to the role.
The developer creates a role with accompanying permissions to allow access to an application’s Amazon S3 bucket and DynamoDB table. As part of this step, the developer also attaches a permissions boundary that defines the maximum permissions for the role.
Resource access is granted to the application’s resources.
Resource access is denied to the sensitive S3 bucket.
You can use the following policy sample for your developers to allow the creation of roles only if a permissions boundary is attached to them. Make sure to replace <YourAccount_ID> with an appropriate AWS account ID; and the <DevelopersPermissionsBoundary>, with your permissions boundary policy.
Put together, you can use the following permissions policy for your developers to get started with permissions boundaries. This policy allows your developers to create downstream roles with an attached permissions boundary. The policy further denies permissions to detach, delete, or modify the attached permissions boundary policy. Remember, nothing is implicitly allowed in IAM, so you need to allow access permissions for any other actions that your developers require. To learn about allowing access permissions for various scenarios, see Example IAM identity-based policies in the documentation.
You can build on these concepts and apply permissions boundaries to different organizational structures and functional units. In the example shown in Figure 2, the developer can only create IAM roles if a permissions boundary associated to the business function is attached to the IAM roles. In the example, IAM roles in function A can only perform Amazon EC2 actions and Amazon DynamoDB actions, and they don’t have access to the Amazon S3 or Amazon Relational Database Service (Amazon RDS) resources of function B, which serve a different use case. In this way, you can make sure that roles created by your developers don’t exceed permissions outside of their business function requirements.
Figure 2: Implementing permissions boundaries in multiple organizational functions
Best practices
You might consider restricting your developers by directly applying permissions boundaries to them, but this presents the risk of you running out of policy space. Permissions boundaries use a managed IAM policy to restrict access, so permissions boundaries can only be up to 6,144 characters long. You can have up to 10 managed policies and 1 permissions boundary attached to an IAM role. Developers often need larger policy spaces because they perform so many functions. However, the individual roles that developers create—such as a role for an AWS service to access other AWS services, or a role for an application to interact with AWS resources—don’t need those same broad permissions. Therefore, it is generally a best practice to apply permissions boundaries to the IAM roles created by developers, rather than to the developers themselves.
There are better mechanisms to restrict developers, and we recommend that you use IAM identity policies and AWS Organizations service control policies (SCPs) to restrict access. In particular, the Organizations SCPs are a better solution here because they can restrict every principal in the account through one policy, rather than separately restricting individual principals, as permissions boundaries and IAM identity policies are confined to do.
You should also avoid replicating the developer policy space to a permissions boundary for a downstream IAM role. This, too, can cause you to run out of policy space. IAM roles that developers create have specific functions, and the permissions boundary can be tailored to common business functions to preserve policy space. Therefore, you can begin to group your permissions boundaries into categories that fit the scope of similar application functions or use cases (such as system automation and analytics), and allow your developers to choose from multiple options for permissions boundaries, as shown in the following policy sample.
Finally, it is important to understand the differences between the various IAM resources available. The following table lists these IAM resources, their primary use cases and managing entities, and when they apply. Even if your organization uses different titles to refer to the personas in the table, you should have separation of duties defined as part of your security strategy.
IAM resource
Purpose
Owner/maintainer
Applies to
Federated roles and policies
Grant permissions to federated users for experimentation in lower environments
Central team
People represented by users in the enterprise identity provider
IAM workload roles and policies
Grant permissions to resources used by applications, services
Developer
IAM roles representing specific tasks performed by applications
Permissions boundaries
Limit permissions available to workload roles and policies
Central team
Workload roles and policies created by developers
IAM users and policies
Allowed only by exception when there is no alternative that satisfies the use case
Central team plus senior leadership approval
Break-glass access; legacy workloads unable to use IAM roles
Conclusion
This blog post covered how you can use IAM permissions boundaries to allow your developers to create the roles that they need and to define the maximum permissions that can be given to the roles that they create. Remember, you can use AWS Organizations SCPs or deny statements in identity policies for scenarios where permissions boundaries are not appropriate. As your organization grows and you need to create and manage more roles, you can use permissions boundaries and follow AWS best practices to set security guard rails and decentralize role creation and management. Get started using permissions boundaries in IAM.
If you have feedback about this post, submit comments in the Comments section below. If you have questions about this post, contact AWS Support.
Want more AWS Security news? Follow us on Twitter.
Infrastructure as Code (IaC) is an important part of Cloud Applications. Developers rely on various Static Application Security Testing (SAST) tools to identify security/compliance issues and mitigate these issues early on, before releasing their applications to production. Additionally, SAST tools often provide reporting mechanisms that can help developers verify compliance during security reviews.
This post demonstrates how to integrate cdk-nag into an AWS CDK application to provide continual feedback and help align your applications with best practices.
Overview of cdk-nag
cdk-nag (inspired by cfn_nag) validates that the state of constructs within a given scope comply with a given set of rules. Additionally, cdk-nag provides a rule suppression and compliance reporting system. cdk-nag validates constructs by extending AWS CDK Aspects. If you’re interested in learning more about the AWS CDK Aspect system, then you should check out this post.
cdk-nag includes several rule sets (NagPacks) to validate your application against. As of this post, cdk-nag includes the AWS Solutions, HIPAA Security, NIST 800-53 rev 4, NIST 800-53 rev 5, and PCI DSS 3.2.1 NagPacks. You can pick and choose different NagPacks and apply as many as you wish to a given scope.
cdk-nag rules can either be warnings or errors. Both warnings and errors will be displayed in the console and compliance reports. Only unsuppressed errors will prevent applications from deploying with the cdk deploy command.
You can see which rules are implemented in each of the NagPacks in the Rules Documentation in the GitHub repository.
Walkthrough
This walkthrough will setup a minimal AWS CDK v2 application, as well as demonstrate how to apply a NagPack to the application, how to suppress rules, and how to view a report of the findings. Although cdk-nag has support for Python, TypeScript, Java, and .NET AWS CDK applications, we’ll use TypeScript for this walkthrough.
Prerequisites
For this walkthrough, you should have the following prerequisites:
A local installation of and experience using the AWS CDK.
Create a baseline AWS CDK application
In this section you will create and synthesize a small AWS CDK v2 application with an Amazon Simple Storage Service (Amazon S3) bucket. If you are unfamiliar with using the AWS CDK, then learn how to install and setup the AWS CDK by looking at their open source GitHub repository.
Run the following commands to create the AWS CDK application:
mkdir CdkTest
cd CdkTest
cdk init app --language typescript
Replace the contents of the lib/cdk_test-stack.ts with the following:
import { Stack, StackProps } from 'aws-cdk-lib';
import { Construct } from 'constructs';
import { Bucket } from 'aws-cdk-lib/aws-s3';

export class CdkTestStack extends Stack {
  constructor(scope: Construct, id: string, props?: StackProps) {
    super(scope, id, props);
    const bucket = new Bucket(this, 'Bucket')
  }
}
Run the following commands to install dependencies and synthesize our sample app:
npm install
npx cdk synth
You should see an AWS CloudFormation template with an S3 bucket both in your terminal and in cdk.out/CdkTestStack.template.json.
Apply a NagPack in your application
In this section, you’ll install cdk-nag, include the AwsSolutions NagPack in your application, and view the results.
Run the following command to install cdk-nag:
npm install cdk-nag
Replace the contents of the bin/cdk_test.ts with the following:
#!/usr/bin/env node
import 'source-map-support/register';
import * as cdk from 'aws-cdk-lib';
import { CdkTestStack } from '../lib/cdk_test-stack';
import { AwsSolutionsChecks } from 'cdk-nag'
import { Aspects } from 'aws-cdk-lib';

const app = new cdk.App();
// Add the cdk-nag AwsSolutions Pack with extra verbose logging enabled.
Aspects.of(app).add(new AwsSolutionsChecks({ verbose: true }))
new CdkTestStack(app, 'CdkTestStack', {});
Run the following command to view the output and generate the compliance report:
npx cdk synth
The output should look similar to the following (Note: SSE stands for Server-side encryption):
[Error at /CdkTestStack/Bucket/Resource] AwsSolutions-S1: The S3 Bucket has server access logs disabled. The bucket should have server access logging enabled to provide detailed records for the requests that are made to the bucket.

[Error at /CdkTestStack/Bucket/Resource] AwsSolutions-S2: The S3 Bucket does not have public access restricted and blocked. The bucket should have public access restricted and blocked to prevent unauthorized access.

[Error at /CdkTestStack/Bucket/Resource] AwsSolutions-S3: The S3 Bucket does not default encryption enabled. The bucket should minimally have SSE enabled to help protect data-at-rest.

[Error at /CdkTestStack/Bucket/Resource] AwsSolutions-S10: The S3 Bucket does not require requests to use SSL. You can use HTTPS (TLS) to help prevent potential attackers from eavesdropping on or manipulating network traffic using person-in-the-middle or similar attacks. You should allow only encrypted connections over HTTPS (TLS) using the aws:SecureTransport condition on Amazon S3 bucket policies.

Found errors
Note that applying the AwsSolutions NagPack to the application rendered several errors in the console (AwsSolutions-S1, AwsSolutions-S2, AwsSolutions-S3, and AwsSolutions-S10). Furthermore, the cdk.out/AwsSolutions-CdkTestStack-NagReport.csv contains the errors as well:
Rule ID,Resource ID,Compliance,Exception Reason,Rule Level,Rule Info
"AwsSolutions-S1","CdkTestStack/Bucket/Resource","Non-Compliant","N/A","Error","The S3 Bucket has server access logs disabled."
"AwsSolutions-S2","CdkTestStack/Bucket/Resource","Non-Compliant","N/A","Error","The S3 Bucket does not have public access restricted and blocked."
"AwsSolutions-S3","CdkTestStack/Bucket/Resource","Non-Compliant","N/A","Error","The S3 Bucket does not default encryption enabled."
"AwsSolutions-S5","CdkTestStack/Bucket/Resource","Compliant","N/A","Error","The S3 static website bucket either has an open world bucket policy or does not use a CloudFront Origin Access Identity (OAI) in the bucket policy for limited getObject and/or putObject permissions."
"AwsSolutions-S10","CdkTestStack/Bucket/Resource","Non-Compliant","N/A","Error","The S3 Bucket does not require requests to use SSL."
Remediating and suppressing errors
In this section, you’ll remediate the AwsSolutions-S10 error, suppress the AwsSolutions-S1 error on a Stack level, suppress the AwsSolutions-S2error on a Resource level errors, and not remediate the AwsSolutions-S3 error and view the results.
Replace the contents of the lib/cdk_test-stack.ts with the following:
import { Stack, StackProps } from 'aws-cdk-lib';
import { Construct } from 'constructs';
import { Bucket } from 'aws-cdk-lib/aws-s3';
import { NagSuppressions } from 'cdk-nag'

export class CdkTestStack extends Stack {
  constructor(scope: Construct, id: string, props?: StackProps) {
    super(scope, id, props);
    // The local scope 'this' is the Stack.
    NagSuppressions.addStackSuppressions(this, [
      {
        id: 'AwsSolutions-S1',
        reason: 'Demonstrate a stack level suppression.'
      },
    ])
    // Remediating AwsSolutions-S10 by enforcing SSL on the bucket.
    const bucket = new Bucket(this, 'Bucket', { enforceSSL: true })
    NagSuppressions.addResourceSuppressions(bucket, [
      {
        id: 'AwsSolutions-S2',
        reason: 'Demonstrate a resource level suppression.'
      },
    ])
  }
}
Run the cdk synth command again:
npx cdk synth
The output should look similar to the following:
[Error at /CdkTestStack/Bucket/Resource] AwsSolutions-S3: The S3 Bucket does not default encryption enabled. The bucket should minimally have SSE enabled to help protect data-at-rest.

Found errors
The cdk.out/AwsSolutions-CdkTestStack-NagReport.csv contains more details about rule compliance, non-compliance, and suppressions.
Rule ID,Resource ID,Compliance,Exception Reason,Rule Level,Rule Info
"AwsSolutions-S1","CdkTestStack/Bucket/Resource","Suppressed","Demonstrate a stack level suppression.","Error","The S3 Bucket has server access logs disabled."
"AwsSolutions-S2","CdkTestStack/Bucket/Resource","Suppressed","Demonstrate a resource level suppression.","Error","The S3 Bucket does not have public access restricted and blocked."
"AwsSolutions-S3","CdkTestStack/Bucket/Resource","Non-Compliant","N/A","Error","The S3 Bucket does not default encryption enabled."
"AwsSolutions-S5","CdkTestStack/Bucket/Resource","Compliant","N/A","Error","The S3 static website bucket either has an open world bucket policy or does not use a CloudFront Origin Access Identity (OAI) in the bucket policy for limited getObject and/or putObject permissions."
"AwsSolutions-S10","CdkTestStack/Bucket/Resource","Compliant","N/A","Error","The S3 Bucket does not require requests to use SSL."
Moreover, note that the resultant cdk.out/CdkTestStack.template.json template contains the cdk-nag suppression data. This provides transparency with what rules weren’t applied to an application, as the suppression data is included in the resources.
In this section, you learned how to apply a NagPack to your application, remediate/suppress warnings and errors, and review the compliance reports. The reporting and suppression systems provide mechanisms for the development and security teams within organizations to work together to identify and mitigate potential security/compliance issues. Security can choose which NagPacks developers should apply to their applications. Then, developers can use the feedback to quickly remediate issues. Security can use the reports to validate compliances. Furthermore, developers and security can work together to use suppressions to transparently document exceptions to rules that they’ve decided not to follow.
Advanced usage and further reading
This section briefly covers some advanced options for using cdk-nag.
Unit Testing with the AWS CDK Assertions Library
The Annotations submodule of the AWS CDK assertions library lets you check for cdk-nagwarnings and errors without AWS credentials by integrating a NagPack into your application unit tests. Read this post for further information about the AWS CDK assertions module. The following is an example of using assertions with a TypeScript AWS CDK application and Jest for unit testing.
import { Annotations, Match } from 'aws-cdk-lib/assertions';
import { App, Aspects, Stack } from 'aws-cdk-lib';
import { AwsSolutionsChecks } from 'cdk-nag';
import { CdkTestStack } from '../lib/cdk_test-stack';

describe('cdk-nag AwsSolutions Pack', () => {
  let stack: Stack;
  let app: App;
  // In this case we can use beforeAll() over beforeEach() since our tests
  // do not modify the state of the application
  beforeAll(() => {
    // GIVEN
    app = new App();
    stack = new CdkTestStack(app, 'test');

    // WHEN
    Aspects.of(stack).add(new AwsSolutionsChecks());
  });

  // THEN
  test('No unsuppressed Warnings', () => {
    const warnings = Annotations.fromStack(stack).findWarning(
      '*',
      Match.stringLikeRegexp('AwsSolutions-.*')
    );
    expect(warnings).toHaveLength(0);
  });

  test('No unsuppressed Errors', () => {
    const errors = Annotations.fromStack(stack).findError(
      '*',
      Match.stringLikeRegexp('AwsSolutions-.*')
    );
    expect(errors).toHaveLength(0);
  });
});
Additionally, many testing frameworks include watch functionality. This is a background process that reruns all of the tests when files in your project have changed for fast feedback. For example, when using the AWS CDK in JavaScript/Typescript, you can use the Jest CLI watch commands. When Jest watch detects a file change, it attempts to run unit tests related to the changed file. This can be used to automatically run cdk-nag-related tests when making changes to your AWS CDK application.
CDK Watch
When developing in non-production environments, consider using AWS CDK Watch with a NagPack for fast feedback. AWS CDK Watch attempts to synthesize and then deploy changes whenever you save changes to your files. Aspects are run during synthesis. Therefore, any NagPacks applied to your application will also run on save. As in the walkthrough, all of the unsuppressed errors will prevent deployments, all of the messages will be output to the console, and all of the compliance reports will be generated. Read this post for further information about AWS CDK Watch.
Conclusion
In this post, you learned how to use cdk-nag in your AWS CDK applications. To learn more about using cdk-nag in your applications, check out the README in the GitHub Repository. If you would like to learn how to create your own rules and NagPacks, then check out the developer documentation. The repository is open source and welcomes community contributions and feedback.
Back in the early days of the Internet, you could physically see the hardware where your data was stored. You knew where your data was and what kind of locks and security protections you had in place. Fast-forward a few decades, and data is all “in the cloud”. Now, you have to trust that your cloud services provider is putting security precautions in place just as you would have if your data was still sitting on your hardware. The good news is, you don’t have to merely trust your provider anymore. There are a number of ways a cloud services provider can prove it has robust privacy and security protections in place.
Today, we are excited to announce that Cloudflare has taken three major steps forward in proving the security and privacy protections we provide to customers of our cloud services: we achieved a key cloud services certification, ISO/IEC 27018:2019; we completed our independent audit and received our Cloud Computing Compliance Criteria Catalog (“C5”) attestation; and we have joined the EU Cloud Code of Conduct General Assembly to help increase the impact of the trusted cloud ecosystem and encourage more organizations to adopt GDPR-compliant cloud services.
Cloudflare has been committed to data privacy and security since our founding, and it is important to us that we can demonstrate these commitments. Certification provides assurance to our customers that a third party has independently verified that Cloudflare meets the requirements set out in the standard.
ISO/IEC 27018:2019 – Cloud Services Certification
2022 has been a big year for people who like the number ‘two’. February marked the second when the 22nd Feb 2022 20:22:02 passed: the second second of the twenty-second minute of the twentieth hour of the twenty-second day of the second month, of the year twenty-twenty-two! As well as the date being a palindrome — something that reads the same forwards and backwards — on an vintage ‘80s LCD clock, the date and time could be written as an ambigram too — something that can be read upside down as well as the right way up:
When we hit 2022 02 22, our team was busy completing our second annual audit to certify to ISO/IEC 27701:2019, having been one of the first organizations in our industry to have achieved this new ISO privacy certification in 2021, and the first Internet performance & security company to be certified to it. And now Cloudflare has now been certified to a second international privacy standard related to the processing of personal data — ISO/IEC 27018:2019.1
ISO 27018 is a privacy extension to the widespread industry standards ISO/IEC 27001 and ISO/IEC 27002, which describe how to establish and run an Information Security Management System. ISO 27018 extends the standards into a code of practice for how any personal information should be protected when processed in a public cloud, such as Cloudflare’s.
What does ISO 27018 mean for Cloudflare customers?
Put simply, with Cloudflare’s certifications to both ISO 27701 and ISO 27018, customers can be assured that Cloudflare both has a privacy program that meets GDPR-aligned industry standards and also that Cloudflare protects the personal data processed in our network as part of that privacy program.
These certifications, in addition to the Data Processing Addendum (“DPA”) we make available to our customers, offer our customers multiple layers of assurance that any personal data that Cloudflare processes on their behalf will be handled in a way that meets the GDPR’s requirements.
The ISO 271018 standard contains enhancements to existing ISO 27002 controls and an additional set of 25 controls identified for organizations that are personal data processors. Controls are essentially a set of best practices that processors must meet in terms of data handling practices and transparency about those practices, protecting and encrypting the personal data processed, and handling data subject rights, among others. As an example, one of the ISO 27018 requirements is:
Where the organization is contracted to process personal data, that personal data may not be used for the purpose of marketing and advertising without establishing that prior consent was obtained from the appropriate data subject. Such consent shall not be a condition for receiving the service.
When Cloudflare acts as a data processor for our customers’ data, that data (and any personal data it may contain) belongs to our customers, not to us. Cloudflare does not track our customers’ end users for marketing or advertising purposes, and we never will. We even went beyond what the ISO control required and added this commitment to our customer DPA:
“… Cloudflare shall not use the Personal Data for the purposes of marketing or advertising…” – 3.1(b), Cloudflare Data Protection Addendum
Cloudflare achieves ISO 27018:2019 Certification
For ISO 27018, Cloudflare was assessed by a third-party auditor, Schellman, between December 2021 and February 2022. Certifying to an ISO privacy standard is a multi-step process that includes an internal and an external audit, before finally being certified against the standard by the independent auditor. Cloudflare’s new single joint certificate, covering ISO 27001:2013, ISO 27018:2019, and ISO 27701:2019 is now available to download from the Cloudflare Dashboard.
ISO 27108 isn’t all we’re announcing: as we blogged in February, Cloudflare has also been undergoing a separate independent audit for the Cloud Computing Compliance Criteria Catalog certification — also known as C5 — which was introduced by the German government’s Federal Office for Information Security (“BSI”) in 2016 and updated in 2020. C5 evaluates an organization’s security program against a standard of robust cloud security controls. Both German government agencies and private companies place a high level of importance on aligning their cloud computing requirements with these standards. Learn more about C5 here.
Today, we’re excited to announce that we have completed our independent audit and received our C5 attestation from our third-party auditors. The C5 attestation report is now available to download from the Cloudflare Dashboard.
And we’re not done yet…
When the European Union’s benchmark-setting General Data Protection Regulation (“GDPR”) was adopted four years ago this week, Article 40 encouraged:
“…the drawing up of codes of conduct intended to contribute to the proper application of this Regulation, taking account of the specific features of the various processing sectors and the specific needs of micro, small and medium-sized enterprises.”
The first code officially approved as GDPR-compliant by the EU one year ago this past weekend is ‘The EU Cloud Code of Conduct’. This code is designed to help cloud service providers demonstrate the protections they provide for the personal data they process on behalf of their customers. It covers all cloud service layers, and its compliance is overseen by accredited monitoring body SCOPE Europe. Initially, cloud service providers join as members of the code’s General Assembly, and then the second step is to undergo an audit to validate their adherence to the code.
Today, we are pleased to announce today that Cloudflare has joined the General Assembly of the EU Cloud Code of Conduct. We look forward to the second stage in this process, undertaking our audit and publicly affirming our compliance to the GDPR as a processor of personal data.
Cloudflare Certifications
Customers may now download a copy of Cloudflare’s certifications and reports from the Cloudflare Dashboard; new customers may request these from your sales representative. For the latest information about our certifications and reports, please visit our Trust Hub.
… 1The International Organization for Standardization (“ISO”) is an international, nongovernmental organization made up of national standards bodies that develops and publishes a wide range of proprietary, industrial, and commercial standards.
In computing, Trusted Platform Module (TPM) technology is designed to provide hardware-based, security-related functions. A TPM chip is a secure crypto-processor that is designed to carry out cryptographic operations. There are three key advantages of using TPM technology. First, you can generate, store, and control access to encryption keys outside of the operating system. Second, you can use a TPM module to perform platform device authentication by using the TPM’s unique RSA key, which is burned into it. And third, it may help to ensure platform integrity by taking and storing security measurements.
I am happy to announce you can start to use both NitroTPM and Secure Boot today in all AWS Regions outside of China, including the AWS GovCloud (US) Regions.
You can use NitroTPM to store secrets, such as disk encryption keys or SSH keys, outside of the EC2 instance memory, protecting them from applications running on the instance. NitroTPM leverages the isolation and security properties of the Nitro System to ensure only the instance can access these secrets. It provides the same functions as a physical or discrete TPM. NitroTPM follows the ISO TPM 2.0 specification, allowing you to migrate existing on-premises workloads that leverage TPMs to EC2.
The availability of NitroTPM unlocks a couple of use cases to strengthen the security posture of your EC2 instances, such as secured key storage and access for OS-level volume encryption or platform attestation for measured boot or identity access.
Secured Key Storage and Access NitroTPM can create and store keys that are wrapped and tied to certain platform measurements (known as Platform Configuration Registers – PCR). NitroTPM unwraps the key only when those platform measurements have the same value as they had at the moment the key was created. This process is referred to as “sealing the key to the TPM.” Decrypting the key is called unsealing. NitroTPM only unseals keys when the instance and the OS are in a known good state. Operating systems compliant with TPM 2.0 specifications use this mechanism to securely unseal volume encryption keys. You can use NitroTPM to store encryption keys for BitLocker on Microsoft Windows. Linux Unified Key Setup (LUKS) or dm-verity on Linux are examples of OS-level applications that can leverage NitroTPM too.
Platform Attestation Another key feature that NitroTPM provides is “measured boot” a process where the bootloader and operating system extend PCRs with measurements of the software or configuration that they load during the boot process. This improves security in the event that, for example, a malicious program overwrites part of your kernel with malware. With measured boot, you can also obtain signed PCR values from the TPM and use them to prove to remote servers that the boot state is valid, enabling remote attestation support.
How to Use NitroTPM There are three prerequisites to start using NitroTPM:
You must use an operating system that has Command Response Buffer (CRB) drivers for TPM 2.0, such as recent versions of Windows or Linux. We tested the following OSes: Red Hat Enterprise Linux 8, SUSE Linux Enterprise Server 15, Ubuntu 18.04, Ubuntu 20.04, and Windows Server 2016, 2019, and 2022.
You must deploy it on a Nitro-based EC2 instance. At the moment, we support all Intel and AMD instance types that support UEFI boot mode. Graviton1, Graviton2, Xen-based, Mac, and bare-metal instances are not supported.
Note that NitroTPM does not work today with some additional instance types, but support for these instance types will come soon after the launch. The list is: C6a, C6i, G4ad, G4dn, G5, Hpc6a, I4i, M6a, M6i, P3dn, R6i, T3, T3a, U-12tb1, U-3tb1, U-6tb1, U-9tb1, X2idn, X2iedn, and X2iezn.
When you create your own AMI, it must be flagged to use UEFI as boot mode and NitroTPM. Windows AMIs provided by AWS are flagged by default. Linux-based AMI are not flagged by default; you must create your own.
How to Create an AMI with TPM Enabled AWS provides AMIs for multiple versions of Windows with TPM enabled. I can verify if an AMI supports NitroTPM using the DescribeImagesAPI call. For example:
Now that you know how to create an AMI with TPM enabled, let’s create a Windows instance and configure BitLocker to encrypt the root volume.
A Walk Through: Using NitroTPM with BitLocker BitLocker automatically detects and uses NitroTPM when available. There is no extra configuration step beyond what you do today to install and configure BitLocker. Upon installation, BitLocker recognizes the TPM module and starts to use it automatically.
Let’s go through the installation steps. I start the instance as usual, using an AMI that has both uefi and TPM v2.0 enabled. I make sure I use a supported version of Windows. Here I am using Windows Server 2022 04.13.
Once connected to the instance, I verify that Windows recognizes the TPM module. To do so, I launch the tpm.msc application, and the Trusted Platform Module (TPM) Management window opens. When everything goes well, it shows Manufacturer Name: AMZN under TPM Manufacturer Information.
Next, I install BitLocker.
I open the servermanager.exe application and select Manage at the top right of the screen. In the dropdown menu, I select Add Roles and Features.
I select Role-based or feature-based installation from the wizard.
I select Next multiple times until I reach the Features section. I select BitLocker Drive Encryption, and I select Install.
I wait a bit for the installation and then restart the server at the end of the installation.
After reboot, I reconnect to the server and open the control panel. I select BitLocker Drive Encryption under the System and Security section.
I select Turn on BitLocker, and then I select Next and wait for the verification of the system and the time it takes to encrypt my volume’s data.
Just for extra safety, I decide to reboot at the end of the encryption. It is not strictly necessary. But I encrypted the root volume of the machine (C:) so I am wondering if the machine can still boot.
After the reboot, I reconnect to the instance, and I verify the encryption status.
I also verify BitLocker’s status and key protection method enabled on the volume. To do so, I open PowerShell and type
manage-bde -protectors -get C:
I can see on the resulting screen that the C: volume encryption key is coming from the NitroTPM module and the instance used Secure Boot for integrity validation. I can also view the recovery key.
I left the recovery key in plain text in the previous screenshot because the instance and volume I used for this demo will not exist anymore by the time you will read this. Do not share your recovery keys publicly otherwise.
Important Considerations Now that I have shown how to use NitroTPM to protect BitLocker’s volume encryption key, I’ll go through a couple of additional considerations:
You can only enable an AMI for NitroTPM support by using the RegisterImage API via the AWS CLI and not via the Amazon EC2 console.
NitroTPM support is enabled by setting a flag on an AMI. After you launch an instance with the AMI, you can’t modify the attributes on the instance. The ModifyInstanceAttribute API is not supported on running or stopped instances.
Importing or exporting EC2 instances with NitroTPM, such as with the ImportImage API, will omit NitroTPM data.
The NitroTPM state is not included in EBS snapshots. You can only restore an EBS snapshot to the same EC2 instance.
BitLocker volumes that are encrypted with TPM-based keys cannot be restored on a different instance. It is possible to change the instance type (stop, change instance type, and restart it).
At the moment, we support all Intel and AMD instance types that supports UEFI boot mode. Graviton1, Graviton2, Xen-based, Mac, and bare-metal instances are not supported. Some additional instance types are not supported at launch (I shared the exact list previously). We will add support for these soon after launch.
There is no additional cost for using NitroTPM. It is available today in all AWS Regions, including the AWS GovCloud (US) Regions, except in China.
Music is flowing through your headphones. Your hands are flying across the keyboard. You’re stringing together a masterpiece of code. The momentum is building up as you put on the finishing touches of your project. And at last, it’s ready for the world to see. Heart pounding with excitement and the feeling of victory, you push changes to the main branch…. only to end up waiting for the build to execute each step and spit out the build logs.
Starting afresh
Since the launch of Cloudflare Pages, there is no doubt that the build experience has been its biggest source of criticism. From the amount of waiting to inflexibility of CI workflow, Pages had a lot of opportunity for growth and improvement. With Pages, our North Star has always been designing a developer platform that fits right into your workflow and oozes simplicity. User pain points have been and always will be our priority, which is why today we are thrilled to share a list of exciting updates to our build times, logs and settings!
Over the last three quarters, we implemented a new build infrastructure that speeds up Pages builds, so you can iterate quickly and efficiently. In February, we soft released the Pages Fast Builds Beta, allowing you to opt in to this new infrastructure on a per-project basis. This not only allowed us to test our implementation, but also gave our community the opportunity to try it out and give us direct feedback in Discord. Today we are excited to announce the new build infrastructure is now generally available and automatically enabled for all existing and new projects!
Faster build times
As a developer, your time is extremely valuable, and we realize Pages builds were slow. It was obvious that creating an infrastructure that built projects faster and smarter was one of our top requirements.
Looking at a Pages build, there are four main steps: (1) initializing the build environment, (2) cloning your git repository, (3) building the application, and (4) deploying to Cloudflare’s global network. Each of these steps is a crucial part of the build process, and upon investigating areas suitable for optimization, we directed our efforts to cutting down on build initialization time.
In our old infrastructure, every time a build job was submitted, we created a new virtual machine to run that build, costing our users precious dev time. In our new infrastructure, we start jobs on machines that are ready and waiting to be used, taking a major chunk of time away from the build initialization step. This step previously ran for 2+ minutes, but with our new infrastructure update, projects are expected to see a build initialization time cut down to 2-3 SECONDS.
This means less time waiting and more time iterating on your code.
Fast and secure
In our old build infrastructure, because we spun up a new virtual machine (VM) for every build, it would take several minutes to boot up and initialize with the Pages build image needed to execute the build. Alternatively, one could reuse a collection of VMs, assigning a new build to the next available VM, but containers share a kernel with the host operating system, making them far less isolated, posing a huge security risk. This could allow a malicious actor to perform a “container escape” to break out of their sandbox. We wanted the best of both worlds: the speed of a container with the isolation of a virtual machine.
Enter gVisor, a container sandboxing technology that drastically limits the attack surface of a host. In the new infrastructure, each container running with gVisor is given its own independent application “kernel,” instead of directly sharing the kernel with its host. Then, to address the speed, we keep a cluster of virtual machines warm and ready to execute builds so that when a new Pages deployment is triggered, it takes just a few seconds for a new gVisor container to start up and begin executing meaningful work in a secure sandbox with near native performance.
Stream your build logs
After we solidified a fast and secure build, we wanted to enhance the user facing build experience. Because a build may not be successful every time, providing you with the tools you need to debug and access that information as fast as possible is crucial. While we have a long list of future improvements for a better logging experience, today we are starting by enabling you to stream your build logs.
Prior to today, with the aforementioned build steps required to complete a Pages build, you were required to wait until the build completed in order to view the resulting build logs. Easily addressable issues like incorrectly inputting the build command or specifying an environment variable would have required waiting for the entire build to finish before understanding the problem.
Today, we’re giving you the power to understand your build issues as soon as they happen. Spend less time waiting for your logs and start debugging the events of your builds within a second or less after they happen!
Control Branch Builds
Finally, the build experience does not just include the events during execution but everything leading up to the trigger of a build. For our final trick, we’re enabling our users to have full control of the precise branches they’d like to include and exclude for automatic deployments.
Before today, Pages submitted builds for every commit in both production and preview environments, which led to queued builds and even more waiting if you exceeded your concurrent build limit. We wanted to provide even more flexibility to control your CI workflow. Now you can configure your build settings to specify branches to build, as well as skip ad hoc commits.
Specify branches to build
While “unlimited staging” is one of Pages’ greatest advantages, depending on your setup, sometimes automatic deployments to the preview environment can cause extra noise.
In the Pages build configuration setting, you can specify automatic deployments to be turned off for the production environment, the preview environment, or specific preview branches. In a more extreme case, you can even pause all deployments so that any commit sent to your git source will not trigger a new Pages build.
Additionally, in your project’s settings, you can now configure the specific Preview branches you would like to include and exclude for automatic deployments. To make this configuration an even more powerful tool, you can use wildcard syntax to set rules for existing branches as well as any newly created preview branches.
Read more in our Pages docs on how to get started with configuring automatic deployments with Wildcard Syntax.
Using CI Skip
Sometimes commits need to be skipped on an ad hoc basis. A small update to copy or a set of changes within a small timespan don’t always require an entire site rebuild. That’s why we also implemented a CI Skip command for your commit message, signaling to Pages that the update should be skipped by our builder.
With both CI Skip and configured build rules, you can keep track of your site changes in Pages’ deployment history.
Where we’re going
We’re extremely excited to bring these updates to you today, but of course, this is only the beginning of improving our build experience. Over the next few quarters, we will be bringing more to the build experience to create a seamless developer journey from site inception to launch.
Incremental builds and caching
From beta testing, we noticed that our new infrastructure can be less impactful on larger projects that use heavier frameworks such as Gatsby. We believe that every user on our developer platform, regardless of their use case, has the right to fast builds. Up next, we will be implementing incremental builds to help Pages identify only the deltas between commits and rebuild only files that were directly updated. We will also be implementing other caching strategies such as caching external dependencies to save time on subsequent builds.
Build image updates
Because we’ve been using the same build image we launched Pages with back in 2021, we are going to make some major updates. Languages release new versions all the time, and we want to make sure we update and maintain the latest versions. An updated build image will mean faster builds, more security and of course supporting all the latest versions of languages and tools we provide. With new build image versions being released, we will allow users to opt in to the updated builds in order to maintain compatibility with all existing projects.
Productive error messaging
Lastly, while streaming build logs helps you to identify those easily addressable issues, the infamous “Internal error occurred” is sometimes a little more cryptic to decipher depending on the failure. While we recently published a “Debugging Cloudflare Pages” guide, in the future we’d like to provide the error feedback in a more productive manner, so you can easily identify the issue.
Have feedback?
As always, your feedback defines our roadmap. With all the updates we’ve made to our build experience, it’s important we hear from you! You can get in touch with our team directly through Discord. Navigate to our Pages specific section and check out our various channels specific to different parts of the product!
Join us at Cloudflare Connect!
Interested in learning more about building with Cloudflare Pages? If you’re based in the New York City area, join us on Thursday, May 12th for a series of workshops on how to build a full stack application on Pages! Follow along with a fully hands-on lab, featuring Pages in conjunction with other products like Workers, Images and Cloudflare Gateway, and hear directly from our product managers. Register now!
In early 2020, we sat down and tried thinking if there’s a way to load third-party tools on the Internet without slowing down websites, without making them less secure, and without sacrificing users’ privacy. In the evening, after scanning through thousands of websites, our answer was “well, sort of”. It seemed possible: many types of third-party tools are merely collecting information in the browser and then sending it to a remote server. We could theoretically figure out what it is that they’re collecting, and then instead just collect it once efficiently, and send it server-side to their servers, mimicking their data schema. If we do this, we can get rid of loading their JavaScript code inside websites completely. This means no more risk of malicious scripts, no more performance losses, and fewer privacy concerns.
But the answer wasn’t a definite “YES!” because we realized this is going to be very complicated. We looked into the network requests of major third-party scripts, and often it seemed cryptic. We set ourselves up for a lot of work, looking at the network requests made by tools and trying to figure out what they are doing – What is this parameter? When is this network request sent? How is this value hashed? How can we achieve the same result more securely, reliably and efficiently? Our team faced these questions on a daily basis.
When we joined Cloudflare, the scale of everything changed. Suddenly we were on thousands of websites, serving more than 10,000 requests per second. Users are writing to us every single day over our Discord channel, the community forum, and sometimes even directly on Twitter. More often than not, their messages would be along the lines of “Hi! Can you please add support for X?” Cloudflare Zaraz launched with around 30 tools in its library, but this market is vast and new tools are popping up all the time.
Changing our trust model
In my previous blog post on how Zaraz uses Cloudflare Workers, I included some examples of how tool integrations are written in Zaraz today. Usually, a “tool” in Zaraz would be a function that prepares a payload and sends it. This function could return one thing – clientJS, JavaScript code that the browser would later execute. We’ve done our best so that tools wouldn’t use clientJS, if it wasn’t really necessary, and in reality most Zaraz-built tool integrations are not using clientJS at all.
This worked great, as long as we were the ones coding all tool integrations. Customers trusted us that we’d write code that is performant and safe, and they trusted the results they saw when trying Zaraz. Upon joining Cloudflare, many third-party tool vendors contacted us and asked to write a Zaraz integration. We quickly realized that our system wasn’t enforcing speed and safety – vendors could literally just dump their old browser-side JavaScript into our clientJS variable, and say “We have a Cloudflare Zaraz integration!”, and that wasn’t our vision at all.
We want third-party tool vendors to be able to write their own performant, safe server-side integrations. We want to make it possible for them to reimagine their tools in a better way. We also want website owners to have transparency into what is happening on their website, to be able to manage and control it, and to trust that if a tool is running through Zaraz, it must be a good tool — not because of who wrote it, but because of the technology it is constructed within. We realized that to achieve that we needed a new format for defining third-party tools.
Introducing Managed Components
We started rethinking how third-party code should be written. Today, it’s a black box – you usually add a script to your site, and you have zero clue what it does and when. You can’t properly read or analyze the minified code. You don’t know if the way it behaves for you is the same way it behaves for everyone else. You don’t know when it might change. If you’re a website owner, you’re completely in the dark.
Tools do many different things. The simple ones just collected information and sent it somewhere. Often, they’d set some cookies. Sometimes, they’d install some event listeners on the page. And widget-based tools can literally manipulate the page DOM, providing new functionality like a social media embed or a chatbot. Our new format needed to support all of this.
Managed Components is how we imagine the future of third-party tools online. It provides vendors with an API that allows them to do much more than a normal script can, including keeping code execution outside the browser. We designed this format together with vendors, for vendors, while having in mind that users’ best interest is everyone’s best interest long-term.
From the get-go, we built Managed Components to use a permission-based system. We want to provide even more transparency than Zaraz does today. As the new API allows tools to set cookies, change the DOM or collect IP addresses, all those abilities require being granted a permission. Installing a third-party tool on your site is similar to installing an app on your phone – you get an explanation of what the tool can and can’t do, and you can allow or disallow features to a granular level. We previously wrote about how you can use Zaraz to not send IP addresses to Google Analytics, and now we’re doubling down in this direction. It’s your website, and it’s your decision to make.
Every Managed Component is a JavaScript module at its core. Unlike today, this JavaScript code isn’t sent to the browser. Instead, it is executed by a Components Manager. This manager implements the APIs that are then used by the component. It dispatches server-side events that originate in the browser, providing the components with access to information while keeping them sandboxed and performant. It handles caching, storage and more — all so that the Managed Components can implement their logic without worrying so much about the surrounding.
An example analytics Managed Component can look something like this:
The above component gets notified whenever a page view occurs, and it then creates some payload with the visitor user-agent and page URL and sends that as a POST request to the vendor’s server. This is very similar to how things are done today, except this doesn’t require running any code at all in the browser.
But Managed Components aren’t just doing what was previously possible but better, they also provide dramatic new functionality. See for example how we’re exposing server-side endpoints:
export default function (manager) {
  const api = manager.proxy("/api", "https://api.example.com");
  const assets = manager.serve("/assets", "assets");
  const ping = manager.route("/ping", (request) => new Response(204));
}
These three lines are a complete shift in what’s possible for third-parties. If granted the permissions, they can proxy some content, serve and expose their own endpoints – all under the same domain as the one running the website. If a tool needs to do some processing, it can now off-load that from the browser completely without forcing the browser to communicate with a third-party server.
Exciting new capabilities
Every third-party tool vendor should be able to use the Managed Components API to build a better version of their tool. The API we designed is comprehensive, and the benefits for vendors are huge:
Same domain: Managed Components can serve assets from the same domain as the website itself. This allows a faster and more secure execution, as the browser needs to trust and communicate with only one server instead of many. This can also reduce costs for vendors as their bandwidth will be lowered.
Website-wide events system: Managed Components can hook to a pre-existing events system that is used by the website for tracking events. Not only is there no need to provide a browser-side API to your tool, it’s also easier for your users to send information to your tool because they don’t need to learn your methods.
Server logic: Managed Components can provide server-side logic on the same domain as the website. This includes proxying a different server, or adding endpoints that generate dynamic responses. The options are endless here, and this, too, can reduce the load on the vendor servers.
Server-side rendered widgets and embeds: Did you ever notice how when you’re loading an article page online, the content jumps when some YouTube or Twitter embed suddenly appears between the paragraphs? Managed Components provide an API for registering widgets and embed that render server-side. This means that when the page arrives to the browser, it already includes the widget in its code. The browser doesn’t need to communicate with another server to fetch some tweet information or styling. It’s part of the page now, so expect a better CLS score.
Reliable cross-platform events: Managed Components can subscribe to client-side events such as clicks, scroll and more, without needing to worry about browser or device support. Not only that – those same events will work outside the browser too – but we’ll get to that later.
Pre-Response Actions: Managed Components can execute server-side actions before the network response even arrives in the browser. Those actions can access the response object, reading it or altering it.
Integrated Consent Manager support: Managed Components are predictable and scoped. The Component Manager knows what they’ll need and can predict what kind of consent is needed to run them.
The right choice: open source
As we started working with vendors on creating a Managed Component for their tool, we heard a repeating concern – “What Components Managers are there? Will this only be useful for Cloudflare Zaraz customers?”. While Cloudflare Zaraz is indeed a Components Manager, and it has a generous free tier plan, we realized we need to think much bigger. We want to make Managed Components available for everyone on the Internet, because we want the Internet as a whole to be better.
Today, we’re announcing much more than just a new format.
WebCM is a reference implementation of the Managed Components API. It is a complete Components Manager that we will soon release and maintain. You will be able to use it as an SDK when building your Managed Component, and you will also be able to use it in production to load Managed Components on your website, even if you’re not a Cloudflare customer. WebCM works as a proxy – you place it before your website, and it rewrites your pages when necessary and adds a couple of endpoints. This makes WebCM 100% framework-agnostic – it doesn’t matter if your website uses Node.js, Python or Ruby behind the scenes: as long as you’re sending out HTML, it supports that.
That’s not all though! We’re also going to open source a few Managed Components of our own. We converted some of our classic Zaraz integrations to Managed Components, and they will soon be available for you to use and improve. You will be able to take our Google Analytics Managed Component, for example, and use WebCM to run Google Analytics on your website, 100% server-side, without Cloudflare.
Tech-leading vendors are already joining
Revolutionizing third-party tools on the internet is something we could only do together with third-party vendors. We love third-party tools, and we want them to be even more popular. That’s why we worked very closely with a few leading companies on creating their own Managed Components. These new Managed Components extend Zaraz capabilities far beyond what’s possible now, and will provide a safe and secure onboarding experience for new users of these tools.
Drift – Drift helps businesses connect with customers in moments that matter most. Drift’s integration will let customers use their fully-featured conversation solution while also keeping it completely sandboxed and without making third-party network connections, increasing privacy and security for our users.
CrazyEgg – Crazy Egg helps customers make their websites better through visual heatmaps, A/B testing, detailed recordings, surveys and more. Website owners, Cloudflare, and Crazy Egg all care deeply about performance, security and privacy. Managed Components have enabled Crazy Egg to do things that simply aren’t possible with third-party JavaScript, which means our mutual customers will get one of the most performant and secure website optimization tools created.
We also already have customers that are eager to implement Managed Components:
Hopin Quote:
“I have been really impressed with Cloudflare’s Zaraz ability to move Drift’s JS library to an Edge Worker while loading it off the DOM. My work is much more effective due to the savings in page load time. It’s a pleasure to work with two companies that actively seek better ways to increase both page speed and load times with large MarTech stacks.” – Sean Gowing, Front End Engineer, Hopin
If you’re a third-party vendor, and you want to join these tech-leading companies, do reach out to us, and we’d be happy to support you on writing your own Managed Component.
What’s next for Managed Components
We’re working on Managed Components on many fronts now. While we develop and maintain WebCM, work with vendors and integrate Managed Components into Cloudflare Zaraz, we’re already thinking about what’s possible in the future.
We see a future where many open source runtimes exist for Managed Components. Perhaps your infrastructure doesn’t allow you to use WebCM? We want to see Managed Components runtimes created as service workers, HTTP servers, proxies and framework plugins. We’re also working on making Managed Components available on mobile applications. We’re working on allowing unofficial Managed Components installs on Cloudflare Zaraz. We’re fixing a long-standing issue of the WWW, and there’s so much to do.
We will very soon publish the full specs of Managed Components. We will also open source WebCM, the reference implementation server, as well as many components you can use yourself. If this is interesting to you, reach out to us at [email protected], or join us on Discord.
Many organizations restrict permissions to create and manage AWS Identity and Access Management (IAM) resources to a group of privileged users or a central team. This post explains how you can safely grant these permissions to builders – the people who are developing, testing, launching, and managing cloud infrastructure – to speed up your development, increase your agility, and improve your application security. In addition, you will use an example application stack to see how IAM permissions boundaries can help establish a secure, yet agile work environment for builders.
An example application stack
Defining and creating IAM resources within the application stack allows your builders to craft policies and roles that grant least privilege to application resources. When builders are entitled to create IAM resources, it is straightforward for them to scope policies by referencing the application resources directly in the IAM policies in the same template.
To illustrate this point you will build a simple “hello world” serverless application. The application includes an AWS Step Functions state machine that, once executed, will invoke an AWS Lambda function. You will use this example application along with some IAM policies and IAM roles to illustrate how you can use permissions boundaries to safely grant IAM privileges to builders.
In this example AWS CloudFormation template, the Resource element in MyStateMachineExecutionRole, which is specified as the role for MyStateMachine, includes a reference to the Amazon Resource Name (ARN) of MyLambdaFunction. This is a great example of the principle of least privilege as MyStateMachine will only have permissions to invoke MyLambdaFunction. Making this association is straightforward because the IAM, Step Functions, and Lambda resources are defined together in the same template.
In an organization that uses a centralized approach to IAM management, a builder would not be able to deploy this example application because the roles the builders are granted prohibit IAM actions related to creating and managing roles and policies. This creates three key challenges for the organization:
Builders often rely on a security or cloud team to create IAM resources. This approach adds an additional burden to that team which slows down development while builders wait for the roles and policies to be created, and encourages the team to grant overly-broad permissions so that they don’t have to be involved in the precise details of changes on a daily basis.
IAM resources must be created before the rest of the stack, which makes it much more difficult to create least-privilege policies and roles.
The code for IAM and application infrastructure is maintained separately, which requires extra coordination when creating and updating workloads.
Removing these challenges can simplify your cloud development, lower the amount of overhead and coordination required across your organization, and improve your security posture. Further, reducing the burden on your security team can free up time for them to focus on enforcing additional data perimeters and implementing best practices from the security pillar of the AWS Well-Architected Framework.
Use permissions boundaries on application roles created by builders
So how can your organization shift to a decentralized approach to IAM management and allow builders to safely create application IAM policies and roles, as well as prevent builders from being able to escalate their own privileges? This is a scenario where permissions boundaries should be used.
Permissions boundaries allow an IAM policy to be attached to an IAM role to enforce limits on the permissions that role can be granted. The permissions boundary itself does not grant any permissions – it’s just a guardrail that defines the maximum entitlements. You can create a builder policy that requires a specified permissions boundary be attached to any application roles that a builder creates, effectively setting the maximum permissions on any role that a builder can generate. The permissions for any application roles created will be the intersection of the application policies and the permissions boundary associated with the application role. Said another way, a permission granted in the application policy must also be granted in the permissions boundary, or else it will be implicitly denied according to the policy evaluation logic.
The set of permissions required for builder roles (assumed by actual people or CI/CD pipelines) to deploy infrastructure and develop applications are different than those required for application roles (assumed by workloads/applications) to execute within applications and workflows. If you think of permissions in terms of control plane actions involved in creating, deleting, and modifying resources, versus data plane actions needed to execute the daily business of those resources, builder and application roles typically operate more on the control plane and data plane, respectively. While permissions policies attached to application roles should be tightly scoped to include only those actions needed to perform a specific task, policies for permissions boundaries should be highly reusable and include a broad set of permissions across a suite of services that a variety of applications might need. In addition, it is a best practice to not share roles between humans and services. To summarize, policies for builder and application roles should be designed with the following criteria in mind:
Policy
Role
Permissions
Scope
Reusability
User
builder
builder
control plane
broad
high
human
application
application
data plane
specific
low
service
application-boundary
application
data plane
broad
high
application role
Following the steps in this section, you will create:
A builder policy that grants builders permissions for services needed to deploy and manage applications, and to create and manage IAM policies and roles for those applications.
An application-boundary policy that defines the extent of the permissions any application role created by a builder can have.
A builder role with the builder policy attached as the permissions policy, the application-boundary policy attached as a permissions boundary, and a trust policy that allows anyone in the account to assume the builder role.
Create the builder IAM resources
In this first procedure, you will use CloudFormation to create the builder and application-boundary IAM policies, and the builder IAM role.
To launch the builder IAM stack
Open a Linux terminal with the AWS Command Line Interface (CLI) installed and AWS credentials configured for a user or role that has permissions to create IAM resources.
Launch the builder IAM stack by using the following command:
The builder policy you created uses paths to organize IAM policies and roles into isolated “spaces” that can be specified as resource constraints. It also requires roles to have a permissions boundary attached. This approach helps manage role delegation and prevents builders from escalating their privileges or modifying roles that may be used by other teams.
Note that paths can only be added to IAM resources using the AWS CLI or APIs – not via the console. If this is an issue, another option is to specify that policies and roles start with a specific phrase, for example “application-roles-*”. Just be sure to use different phrases for the builder, application, and permissions boundaries resources to maintain isolation and prevent builders from being able to escalate their privileges.
The builder policy also includes some basic control plane permissions, while the application-boundary policy you created includes permissions used across a suite of services that a typical serverless application might need. However, both policies are only meant to demonstrate the concepts in this blog post. In practice, you will need to create policies that more accurately reflect the permissions needed by builder and application roles in your organization. See the example-permissions-boundaries repository on the AWS Samples GitHub site for more ideas.
Use the builder role to launch an application stack
In this section you will assume the builder role and verify that you can launch the application stack, including the application roles, but only if the required permissions boundary and path are specified.
To test launching a stack that creates application roles
Assume the builder role by using the following set of commands (copy and paste into the terminal as a single block). This step uses the jq program, which is available in most operating system package repositories.
You will use this role for all of the following procedures up until the “Clean up” section. If, during the course of this exercise, you get an error that “The security token included in the request is expired”, create a new terminal and repeat this step to get a fresh set of credentials.
The trust policy for the builder role allows any principal in the account to assume it. You can use a combination of the Principal and Condition attributes to further reduce its scope. Normally builder roles are assumed directly via federation or AWS SSO.
Check that the you have now assumed the builder role by using the following command:
aws sts get-caller-identity
Launch the example application stack by using the following command:
If things are set up correctly, the stack will fail. To confirm, check the StackStatus by using the following command – it should show ROLLBACK_IN_PROGRESS or ROLLBACK_COMPLETE.
The stack failed to create because the builder role you assumed does not have permissions to create the two application roles without specifying the /application_roles/ path and attaching a permissions boundary with /permissions_boundaries/ in the path. To see the details, use the following command:
If the original stack did not create successfully, you will not be able to update it, so you will need to delete it instead by using the following command:
Start an execution of the state machine and verify the application is working by using the following commands. Run them one at a time to allow the execution to finish.
If the output is “\”Hello Builder!\””, then the application is working.
Test that a builder can’t escalate their privileges
In this section, you will test scenarios where a builder attempts, intentionally or not, to escalate their privileges by first modifying the policies attached to the builder role and then extending the permissions of an application role beyond the permissions boundary.
To test updating a builder policy attached to the builder role
Create an environment variable for your AWS account number, which will be used in several of the steps below, using the following command:
You should not get an error in this step because you are creating a new policy that complies with the resource constraint for the statement that includes the iam:CreatePolicy permission in the builder policy. But, it’s just a policy for now – it can’t have any effect unless attached to a role.
Now try to attach this new policy to the builder role by using the following command:
aws iam attach-role-policy \
--role-name builder \
--policy-arn arn:aws:iam::$AWS_ACCOUNT:policy/application_policies/sneaky-policy
You should get an error because you’re attempting to attach a policy to a role that’s not in the /application-roles/ space, in this case the builder role.
To test modifying an application role with actions outside the permissions boundary
In this procedure, you will attempt to escalate the privileges of the MyLambdaFunctionExecutionRole by adding an action (s3:CreateBucket) that is outside of the permissions boundary attached to the role and then attempting to execute that action when MyLambdaFunction is invoked.
Update the builder-application stack by using the following command:
Start an execution of the state machine and verify the result by using the following commands. Run them one at a time to allow the execution to finish.
The status should be FAILED. Remember – the effective permissions for any application roles will be the intersection of the attached permissions policies and the permissions boundary. Thus, this execution failed because even though you were able to modify the inline policy of the Lambda function to add s3:CreateBucket, since that action is not allowed in the application-boundary policy attached to the Lambda as a permissions boundary, the request to create an S3 bucket was denied.
Get the name of the latest log stream by using the following commands:
To verify the actual error was due to a lack of permissions, get the event message by using the following command, replacing <value> with the value of the log stream copied in the step above. If using a bash terminal, you will need to escape any dollar signs in <value> with a backslash character:
The error should read [ERROR] ClientError: An error occurred (AccessDenied) when calling the CreateBucket operation: Access Denied, which confirms that the permissions boundary prevented you from escalating your privileges as a builder via an application role.
You have now verified that you can safely allow builders to create IAM policies and roles!
Clean up
After you have finished testing, clean up the resources created in this example. Because the builder role does not have permissions to delete builder policies and roles, you will need to assume a different role that can manage IAM resources to complete step 3 below. If you create a new terminal session, make sure the AWS_ACCOUNT environment variable is set.
To clean up
Delete the builder-application stack by using the following command:
Permissions boundaries are applied to individual IAM users or roles within an account. If your organization has multiple accounts, you must create and maintain these boundaries in each account for each individual user or role. But what if you’d like to apply a subset of these rules or others across some or all of your accounts? In this case, you could use service control policies (SCPs), which are a feature of AWS Organizations, to provide central control over the maximum available permissions for multiple accounts in your organization. By organizing accounts into organizational units (OUs), which are groups of accounts that serve an application or service, you can apply service control policies (SCPs) to create targeted governance boundaries for your OUs. To learn more about creating SCPs, see Get more out of service control policies in a multi-account environment in the AWS Security Blog.
Additional tools
Creating and managing tightly scoped policies and roles is an ongoing process that requires a lot of thought and attention to detail. AWS IAM enables fine-grained access control to AWS services, and permissions boundaries are an advanced feature. There is no substitute for actual testing like you performed in the “Test that a builder can’t escalate their privileges” section above, however you can also use the IAM Policy Simulator as a tool to test policies and determine whether or not specific actions are allowed for a given user, group, or role. Additional tools you can use to create, audit, and update IAM policies include:
Access Advisor – to review when services and actions were last accessed.
Access Analyzer – to help identify resources in your organization and accounts that are shared with an external identity, validate IAM policies against policy grammar and best practices, and generate IAM policies based on access activity in your AWS CloudTrail logs.
AWS Cloud Development Kit (CDK) – has built-in convenience methods to help you follow best practices, including the ability to generate least-privilege policies for cloud applications with a single line of code.
Open Source tools like cfn-nag and cdk-nag – to inspect CloudFormation templates and CDK applications for patterns that may indicate insecure infrastructure, for example IAM policies that are too permissive.
Conclusion
In this post, you learned how to put policies and guardrails in place that will allow your organization to grant IAM permissions to builders. These changes will enable your builders to develop and deploy cloud infrastructure and applications more rapidly, and will help strengthen your organization’s security culture by extending the responsibility to a broader group. To learn more about creating, testing, and refining IAM policies and permissions boundaries, see Creating IAM policies, Testing IAM policies, and Refining permissions using access information in the IAM User Guide, and IAM policy types: How and when to use them in the AWS Security Blog.
The Cloudflare Pages team recently collaborated closely with security researchers at Assetnote through our Public Bug Bounty. Throughout the process we found and have fully patched vulnerabilities discovered in Cloudflare Pages. You can read their detailed write-up here. There is no outstanding risk to Pages customers. In this post we share information about the research that could help others make their infrastructure more secure, and also highlight our bug bounty program that helps to make our product more secure.
Cloudflare cares deeply about security and protecting our users and customers — in fact, it’s a big part of the reason we’re here. But how does this manifest in terms of how we run our business? There are a number of ways. One very important prong of this is our bug bounty program that facilitates and rewards security researchers for their collaboration with us.
But we don’t just fix the security issues we learn about — in order to build trust with our customers and the community more broadly, we are transparent about incidents and bugs that we find.
Recently, we worked with a group of researchers on improving the security of Cloudflare Pages. This collaboration resulted in several security vulnerability discoveries that we quickly fixed. We have no evidence that malicious actors took advantage of the vulnerabilities found. Regardless, we notified the limited number of customers that might have been exposed.
In this post we are publicly sharing what we learned, and the steps we took to remediate what was identified. We are thankful for the collaboration with the researchers, and encourage others to use the bounty program to work with us to help us make our services — and by extension the Internet — more secure!
What happens when a vulnerability is reported?
Once a vulnerability has been reported via HackerOne, it flows into our vulnerability management process:
We investigate the issue to understand the criticality of the report.
We work with the engineering teams to scope, implement, and validate a fix to the problem. For urgent problems we start working with engineering immediately, and less urgent issues we track and prioritize alongside engineering’s normal bug fixing cadences.
Our Detection and Response team investigates high severity issues to see whether the issue was exploited previously.
This process is flexible enough that we can prioritize important fixes same-day, but we never lose track of lower criticality issues.
What was discovered in Cloudflare Pages?
The Pages team had to solve a pretty difficult problem for Cloudflare Builds (our CI/CD build pipeline): how can we run untrusted code safely in a multi-tenant environment? Like all complex engineering problems, getting this right has been an iterative process. In all cases, we were able to quickly and definitively address bugs reported by security researchers. However, as we continued to work through reports by the researchers, it became clear that our initial build architecture decisions provided too large an attack surface. The Pages team pivoted entirely and re-architected our platform in order to use gVisor and further isolate builds.
When determining impact, it is not enough to find no evidence that a bug was exploited, we must conclusively prove that it was not exploited. For almost all the bugs reported, we found definitive signals in audit logs and were able to correlate that data exclusively against activity by trusted security researchers.
However, for one bug, while we found no evidence that the bug was exploited beyond the work of security researchers, we were not able meaningfully prove that it was not. In the spirit of full transparency, we notified all Pages users that may have been impacted.
Now that all the issues have been remedied, and individual customers have been notified, we’d like to share more information about the issues.
Bug 1: Command injection in CLONE_REPO
With a flaw in our logic during build initialization, it was possible to execute arbitrary code, echo environment variables to a file and then read the contents of that file.
The crux of the bug was that root_dir in this line of code was attacker controlled. After gaining control the researcher was able to specially craft a malicious root_dir to dump the environment variables of the process to a file. Those environment variables contained our GitHub bot’s authorization key. This would have allowed the attacker to read the repositories of other Pages’ customers, and many of those repositories are private.
After fixing the input validation for this field to prevent the bug, and rolling the disclosed keys, we investigated all other paths that had ever been set by our Pages customers to see if this attack had ever been performed by any other (potentially malicious) security researchers. We had logs showing that this was the first this particular attack had ever been performed, and responsibly reported.
Bug 2: Command injection in PUBLISH_ASSETS
This bug is nearly identical to the first one, but on the publishing step instead of the clone step. We went to work rotating the secrets that were exposed, fixing the input validation issues, and rotating the exposed secrets. We investigated the Cloudflare audit logs to confirm that the sensitive credentials had not been used by anyone other than our build infrastructure, and within the scope of the security research being performed.
Bug 3: Cloudflare API key disclosure in the asset publishing process
While building customer pages, a program called /opt/pages/bin/pages-metadata-generator is involved. This program had the Linux permissions of 777, allowing all users on the machine to read the program, execute the program, but most importantly overwrite the program. If you can overwrite the program prior to its invocation, the program might run with higher permissions when the next user comes along and wants to use it.
In this case the attack is simple. When a Pages build runs, the following build.sh is specified to run, and it can overwrite the executable with a new one.
This allows the attacker to provide their own pages-metadata-generator program that is run with a populated set of environment variables. The proof of concept provided to Cloudflare was this minimal reverse shell.
With a reverse shell, the attackers only need to run `env` to see a list of environment variables that the program was invoked with. We fixed the file permissions of the process, rotated the credentials, and investigated in Cloudflare audit logs to confirm that the sensitive credentials had not been used by anyone other than our build infrastructure, and within the scope of the security research.
Bug 4: Bash path injection
This issue was very similar to Bug 3. The PATH environment variable contained a large set of directories for maximum compatibility with different developer tools.
Unfortunately not all of these directories were set to the proper filesystem permissions allowing a malicious version of the program bash to be written to them, and later invoked by the Pages build process. We patched this bug, rotated the impacted credentials, and investigated in Cloudflare audit logs to confirm that the sensitive credentials had not been used by anyone other than our build infrastructure, and within the scope of the security research.
Bug 5: Azure pipelines escape
Back when this research was conducted we were running Cloudflare Pages on Azure Pipelines. Builds were taking place in highly privileged containers and the containers had the docker socket available to them. Once the researchers had root within these containers, escaping them was trivial after installing docker and mounting the root directory of the host machine.
Once they had root on the host machine, they were able to recover Azure DevOps credentials from the host which gave access to the Azure Organization that Cloudflare Pages was running within.
The credentials that were recovered gave access to highly audited APIs where we could validate that this issue was not previously exploited outside this security research.
Bug 6: Pages on Kubernetes
After receipt of the above bugs, we decided to change the architecture of Pages. One of these changes was migration of the product from Azure to Kubernetes, and simplifying the workflow, so the attack surface was smaller and defensive programming practices were easier to implement. After the change, Pages builds are within Kubernetes Pods and are seeded with the minimum set of credentials needed.
As part of this migration, we left off a very important iptables rule in our Kubernetes control plane, making it easy to curl the Kubernetes API and read secrets related to other Pods in the cluster (each Pod representing a separate Pages build).
We quickly patched this issue with iptables rules to block network connections to the Kubernetes control plane. One of the secrets available to each Pod was the GitHub OAuth secret which would have allowed someone who exploited this issue to read the GitHub repositories of other Pages’ customers.
In the previously reported issues we had robust logs that showed us that the attacks that were being performed had never been performed by anyone else. The logs related to inspecting Pods were not available to us, so we decided to notify all Cloudflare Pages customers that had ever had a build run on our Kubernetes-based infrastructure. After patching the issue and investigating which customers were impacted, we emailed impacted customers on February 3 to tell them that it’s possible someone other than the researcher had exploited this issue, because our logs couldn’t prove otherwise.
Takeaways
We are thankful for all the security research performed on our Pages product, and done so at such an incredible depth. CI/CD and build infrastructure security problems are notoriously hard to prevent. A bug bounty that incentivizes researchers to keep coming back is invaluable, and we appreciate working with researchers who were flexible enough to perform great research, and work with us as we re-architected the product for more robustness. An in-depth write-up of these issues is available from the Assetnote team on their website.
More than this, however, the work of all these researchers is one of the best ways to test the security architecture of any product. While it might seem counter-intuitive after a post listing out a number of bugs, all these diligent eyes on our products allow us to feel much more confident in the security architecture of Cloudflare Pages. We hope that our transparency, and our description of the work done on our security posture, enables you to feel more confident, too.
Finally: if you are a security researcher, we’d love to work with you to make our products more secure. Check out hackerone.com/cloudflare for more info!
Many applications these days require authentication to external systems with resources, such as users and passwords to access databases and service accounts to access cloud services, and so on. In such cases, private information, like passwords and keys, becomes necessary. It is essential to take extra care in managing such sensitive data. For example, if you write your AWS key information or password in a script for deployment and then push it to a Git repository, all users who can read it will also be able to access it, and you could be in trouble. Even if it’s an internal repository, you run the risk of a potential leak.
How we were managing secrets in the service
Before we talk about Vault, let’s take a look at how we’ve used to manage secrets.
Salt
We use SaltStack as a bare-metal configuration management tool. The core of the Salt ecosystem consists of two major components: the Salt Master and the Salt Minion. The configuration state is owned by Salt Master, and thousands of Salt Minions automatically install packages, generate configuration files, and start services to the node based on the state. The state may contain secrets, such as passwords and API keys. When we deploy secrets to the node, we encrypt plaintext using a Salt Master owned GPG key and fill an ASCII-armored secret into the state file. Once it is applied, the Salt Master decrypts the PGP message using its own key, then the Salt Minion retrieves rendered data from the Master.
Kubernetes
We were using Lockbox, a secure way to store your Kubernetes secrets offline. The secret is asymmetrically encrypted and can only be decrypted with the Lockbox Kubernetes controller. The controller synchronizes with Secret objects. A Secret generated from Lockbox will also be created in the corresponding namespace. Since namespaces have been assigned administrator privileges by each engineering team, ordinary users cannot read Secret objects.
Why these secrets management were insufficient
Prior to Vault, GnuPG and Lockbox were used in this way to encrypt and decrypt most secrets in the data center. Nevertheless, they were inadequate in certain cases:
Lack of scoping secrets: The secret data in ASCII-armor could only be decrypted by a specific node when the client read it. This was still not enough control. Salt owns a GPG key for each Salt Master, and Core services (k8s, Databases, Storage, Logging, Tracing, Monitoring, etc) are deployed to hundreds of Salt Minions by a few Salt Masters. Nodes are often reused as different services after repairing hardware failure, so we use the same GPG key to decrypt the secrets of various services. Therefore, having a GPG key for each service is complicated. Also, a specific secret is used only for a specific service. For example, an access key for object storage is needed to back up the repository. In previous configurations, the API key is decrypted by a common Salt Master, so there is a risk that the API key will be referenced by another service or for another purpose. It is impossible to scope secret access, as long as we use the same GPG key.
Another case is Kubernetes. Namespace-scoped access control and API access restrictions by the RBAC model are excellent. And the etcd used by Kubernetes as storage is not encrypted by default, and the Secret object is also saved. We need to think about encryption-at-rest by a third party KMS, or how to prevent Secrets from being stored in etcd. In other words, it is also required to properly control access to the secret for the secret itself.
Rotation and static secret: Anyone who has access to the Salt Master GPG key can theoretically decrypt all current and future secrets. And as long as we have many secrets, it’s impossible to rotate the encryption of all the secrets. Current and future secret management requires a process for easy rotation and using dynamically generated secrets instead.
Session management: Users/Services with GPG keys can decrypt secrets at any time. So GPG secret decryption is like having no TTL. (You can set an expiration date against the GPG key, but it’s just metadata. If you try to encrypt a new secret, after the expiration date, you’ll get a warning, but you can decrypt the existing secret). A temporary session is required to limit access when not needed.
Audit: GPG doesn’t have a way to keep an audit trail. Audit trails help us to trace the event who/when/where read secrets. The audit trail should contain details including the date, time, and user information associated with the secret read (and login), which is required regardless of user or service.
HashiCorp Vault
Armed with our set of requirements, we chose HashiCorp Vault to make better secret management with a better security model.
Scoping secrets: When a client logs in, a Vault token is generated through the Auth method (backend). This token has a policy that defines access policies, so it is clear what the client can access the data after logging in.
Rotation and dynamic secret: Version-controlled static secret with KV V2 Secret Engine helps us to easily update/rollback secrets with a single request. In addition, dynamic secrets and credentials are available to eliminate manual rotation. Ideally, these are required to be short-lived and have frequent rotation. Service should have restricted access. These are essential to reduce the impact of an attack, but they are operationally difficult, and it is impossible to satisfy them without automation. Vault can solve this problem by allowing operators to provide dynamically generated credentials to their services. Vault manages the credential lifecycle and rotates and revokes it as needed.
Session management: Vault provides a login process to get the token and various auth methods are provided. It is possible to link with an Identity Provider and authenticate using JWT. Since the vault token has a TTL, it can be managed as a short-lived credential to access secrets.
Audit: Vault supports audit that records who accessed which Vault API, when, and from where.
We also built Vault clusters for HA, Reliability, and handling large numbers of requests.
Use Integrated Storage that every node in the Vault cluster has a duplicate copy of Vault’s data. A client can retrieve the same result from any node.
Requests from clients are routed from a single Service IP to one of the Clusters. Anycast routes incoming traffic to the nearest cluster that handles requests efficiently. If one cluster goes down, the request will be automatically routed to another available cluster.
Service integrations
Use the appropriate Auth backend and Secret Engine to integrate the Service and Vault that are responsible for each core component.
Salt
The configuration state is owned by Salt Master, and hundreds of Salt Minions automatically install packages, generate configuration files, and start services to the node based on the role. The state data may contain secrets, such as API keys, and Salt Minion retrieves them from Vault. Salt uses a JWT signed by the Salt Master to log in to the vault using the JWT Auth method.
Kubernetes
Kubernetes reads Vault secrets through an operator that synchronizes with Secret objects. The Kubernetes Auth method uses the Service Account token JWT to login, just like the JWT Auth method. This JWT contains the service account name, UID, and namespace. Vault can scope namespace based on dynamic policy.
Identity Provider – User login
Additionally, Vault can work with the Identity Provider through a delegated authorization method based on OAuth 2.0 so that users can get tokens with the right policies. The JWT issued by the Identity Provider contains the group or user ID to which it belongs, and this metadata can be used to assign a Vault policy.
Integrated ecosystem – Auth x Secret
Vault provides a plugin system for two major components: authentication (Auth method) and secret management (Secret Engine). Vault can enable the officially provided plugins and the custom plugins you can build. The Auth method provides authentication for obtaining a Vault token by various methods. As mentioned in the service integration example above, we mainly use JWT, OIDC, and Kubernetes for login. On the other hand, the secret engine provides secrets in various ways, such as KV for a static secret, PKI for certificate signing, issuing, etc.
And they have an ecosystem. Vault can easily integrate auth methods and secret engines with each other. For instance, if we add a DB dynamic credential secret engine, all existing platforms will instantly be supported, without needing to reinvent the wheel, on how they will auth to a separate service. Similarly, we can add a platform into the mix, and it would instantly have access to all the existing secret engines and their functionalities. Additionally, the Vault can perform permission to the arbitrary endpoint path provided by secret engines based on the authentication method and policies.
Wrap up
Vault integration for the core component is already ongoing and many GPG secrets have been migrated to Vault. We aim to make service integrations in our data centers, dynamic credentials, and improve CI/CD for Vault. Interested? We’re hiring for security platform engineering!
As a leading superapp in Southeast Asia, Grab serves millions of consumers daily. This naturally makes us a target for fraudsters and to enhance our defences, the Integrity team at Grab has launched several hyper-scaled services, such as the Griffin real-time rule engine and Advanced Feature Engineering. These systems enable data scientists and risk analysts to develop real-time scoring, and take fraudsters out of our ecosystems.
Apart from individual fraudsters, we have also observed the fast evolution of the dark side over time. We have had to evolve our defences to deal with professional syndicates that use advanced equipment such as device farms and GPS spoofing apps to perform fraud at scale. These professional fraudsters are able to camouflage themselves as normal users, making it significantly harder to identify them with rule-based detection.
Since 2020, Grab’s Integrity team has been advancing fraud detection with more sophisticated techniques and experimenting with a range of graph network technologies such as graph visualisations, graph neural networks and graph analytics. We’ve seen a lot of progress in this journey and will be sharing some key learnings that might help other teams who are facing similar issues.
What are Graph-based Prediction Platforms?
“You can fool some of the people all of the time, and all of the people some of the time, but you cannot fool all of the people all of the time.” – Abraham Lincoln
A Graph-based Prediction Platform connects multiple entities through one or more common features. When such entities are viewed as a macro graph network, we uncover new patterns that are otherwise unseen to the naked eye. For example, when investigating if two users are sharing IP addresses or devices, we might not be able to tell if they are fraudulent or just family members sharing a device.
However, if we use a graph system and look at all users sharing this device or IP address, it could show us if these two users are part of a much larger syndicate network in a device farming operation. In operations like these, we may see up to hundreds of other fake accounts that were specifically created for promo and payment fraud. With graphs, we can identify fraudulent activity more easily.
Grab’s Graph-based Prediction Platform
Leveraging the power of graphs, the team has primarily built two types of systems:
Graph Database Platform: An ultra-scalable storage system with over one billion nodes that powers:
Graph Visualisation: Risk specialists and data analysts can review user connections real-time and are able to quickly capture new fraud patterns with over 10 dimensions of features (see Fig 1).
Fig 1: Graph visualisation
Network-based feature system: A configurable system for engineers to adjust machine learning features based on network connectivity, e.g. number of hops between two users, numbers of shared devices between two IP addresses.
Graph-based Machine Learning: Unlike traditional fraud detection models, Graph Neural Networks (GNN) are able to utilise the structural correlations on the graph and act as a sustainable foundation to combat many different kinds of fraud. The data science team has built large-scale GNN models for scenarios like anti-money laundering and fraud detection.
Fig 2 shows a Money Laundering Network where hundreds of accounts coordinate the placement of funds, layering the illicit monies through a complex web of transactions making funds hard to trace, and consolidate funds into spending accounts.
Fig 2: Money Laundering Network
What’s next?
In the next article of our Graph Network blog series, we will dive deeper into how we develop the graph infrastructure and database using AWS Neptune. Stay tuned for the next part.
Join us
Grab is the leading superapp platform in Southeast Asia, providing everyday services that matter to consumers. More than just a ride-hailing and food delivery app, Grab offers a wide range of on-demand services in the region, including mobility, food, package and grocery delivery services, mobile payments, and financial services across 428 cities in eight countries.
Powered by technology and driven by heart, our mission is to drive Southeast Asia forward by creating economic empowerment for everyone. If this mission speaks to you, join our team today!
AWS Identity and Access Management (IAM) recently launched new condition keys to make it simpler to control access to your resources along your Amazon Web Services (AWS) organizational boundaries. AWS recommends that you set up multiple accounts as your workloads grow, and you can use multiple AWS accounts to isolate workloads or applications that have specific security requirements. By using the new conditions, aws:ResourceOrgID, aws:ResourceOrgPaths, and aws:ResourceAccount, you can define access controls based on an AWS resource’s organization, organizational unit (OU), or account. These conditions make it simpler to require that your principals (users and roles) can only access resources inside a specific boundary within your organization. You can combine the new conditions with other IAM capabilities to restrict access to and from AWS accounts that are not part of your organization.
This post will help you get started using the new condition keys. We’ll show the details of the new condition keys and walk through a detailed example based on the following scenario. We’ll also provide references and links to help you learn more about how to establish access control perimeters around your AWS accounts.
Consider a common scenario where you would like to prevent principals in your AWS organization from adding objects to Amazon Simple Storage Service (Amazon S3) buckets that don’t belong to your organization. To accomplish this, you can configure an IAM policy to deny access to S3 actions unless aws:ResourceOrgID matches your unique AWS organization ID. Because the policy references your entire organization, rather than individual S3 resources, you have a convenient way to maintain this security posture across any number of resources you control. The new conditions give you the tools to create a security baseline for your IAM principals and help you prevent unintended access to resources in accounts that you don’t control. You can attach this policy to an IAM principal to apply this rule to a single user or role, or use service control policies (SCPs) in AWS Organizations to apply the rule broadly across your AWS accounts. IAM principals that are subject to this policy will only be able to perform S3 actions on buckets and objects within your organization, regardless of their other permissions granted through IAM policies or S3 bucket policies.
New condition key details
You can use the aws:ResourceOrgID, aws:ResourceOrgPaths, and aws:ResourceAccount condition keys in IAM policies to place controls on the resources that your principals can access. The following table explains the new condition keys and what values these keys can take.
Condition key
Description
Operator
Single/multi value
Value
aws:ResourceOrgID
AWS organization ID of the resource being accessed
Note: Of the three keys, only aws:ResourceOrgPaths is a multi-value condition key, while aws:ResourceAccount and aws:ResourceOrgID are single-value keys. For information on how to use multi-value keys, see Creating a condition with multiple keys or values in the IAM documentation.
Resource owner keys compared to principal owner keys
The new IAM condition keys complement the existing principal condition keys aws:PrincipalAccount, aws:PrincipalOrgPaths, and aws:PrincipalOrgID. The principal condition keys help you define which AWS accounts, organizational units (OUs), and organizations are allowed to access your resources. For more information on the principal conditions, see Use IAM to share your AWS resources with groups of AWS accounts in AWS Organizations on the AWS Security Blog.
Using the principal and resource keys together helps you establish permission guardrails around your AWS principals and resources, and makes it simpler to keep your data inside the organization boundaries you define as you continue to scale. For example, you can define identity-based policies that prevent your IAM principals from accessing resources outside your organization (by using the aws:ResourceOrgID condition). Next, you can define resource-based policies that prevent IAM principals outside your organization from accessing resources that are inside your organization boundary (by using the aws:PrincipalOrgID condition). The combination of both policies prevents any access to and from AWS accounts that are not part of your organization. In the next sections, we’ll walk through an example of how to configure the identity-based policy in your organization. For the resource-based policy, you can follow along with the example in An easier way to control access to AWS resources by using the AWS organization of IAM principals on the AWS Security blog.
Setup for the examples
In the following sections, we’ll show an example IAM policy for each of the new conditions. To follow along with Example 1, which uses aws:ResourceAccount, you’ll just need an AWS account.
To follow along with Examples 2 and 3 that use aws:ResourceOrgPaths and aws:ResourceOrgID respectively, you’ll need to have an organization in AWS Organizations and at least one OU created. This blog post assumes that you have some familiarity with the basic concepts in IAM and AWS Organizations. If you need help creating an organization or want to learn more about AWS Organizations, visit Getting Started with AWS Organizations in the AWS documentation.
Which IAM policy type should I use?
You can implement the following examples as identity-based policies, or in SCPs that are managed in AWS Organizations. If you want to establish a boundary for some of your IAM principals, we recommend that you use identity-based policies. If you want to establish a boundary for an entire AWS account or for your organization, we recommend that you use SCPs. Because SCPs apply to an entire AWS account, you should take care when you apply the following policies to your organization, and account for any exceptions to these rules that might be necessary for some AWS services to function properly.
Example 1: Restrict access to AWS resources within a specific AWS account
Let’s look at an example IAM policy that restricts access along the boundary of a single AWS account. For this example, say that you have an IAM principal in account 222222222222, and you want to prevent the principal from accessing S3 objects outside of this account. To create this effect, you could attach the following IAM policy.
Note: This policy is not meant to replace your existing IAM access controls, because it does not grant any access. Instead, this policy can act as an additional guardrail for your other IAM permissions. You can use a policy like this to prevent your principals from access to any AWS accounts that you don’t know or control, regardless of the permissions granted through other IAM policies.
This policy uses a Deny effect to block access to S3 actions unless the S3 resource being accessed is in account 222222222222. This policy prevents S3 access to accounts outside of the boundary of a single AWS account. You can use a policy like this one to limit your IAM principals to access only the resources that are inside your trusted AWS accounts. To implement a policy like this example yourself, replace account ID 222222222222 in the policy with your own AWS account ID. For a policy you can apply to multiple accounts while still maintaining this restriction, you could alternatively replace the account ID with the aws:PrincipalAccount condition key, to require that the principal and resource must be in the same account (see example #3 in this post for more details how to accomplish this).
Organization setup: Welcome to AnyCompany
For the next two examples, we’ll use an example organization called AnyCompany that we created in AWS Organizations. You can create a similar organization to follow along directly with these examples, or adapt the sample policies to fit your own organization. Figure 1 shows the organization structure for AnyCompany.
Figure 1: Organization structure for AnyCompany
Like all organizations, AnyCompany has an organization root. Under the root are three OUs: Media, Sports, and Governance. Under the Sports OU, there are three more OUs: Baseball, Basketball, and Football. AWS accounts in this organization are spread across all the OUs based on their business purpose. In total, there are six OUs in this organization.
Example 2: Restrict access to AWS resources within my organizational unit
Now that you’ve seen what the AnyCompany organization looks like, let’s walk through another example IAM policy that you can use to restrict access to a specific part of your organization. For this example, let’s say you want to restrict S3 object access within the following OUs in the AnyCompany organization:
Media
Sports
Baseball
Basketball
Football
To define a boundary around these OUs, you don’t need to list all of them in your IAM policy. Instead, you can use the organization structure to your advantage. The Baseball, Basketball, and Football OUs share a parent, the Sports OU. You can use the new aws:ResourceOrgPaths key to prevent access outside of the Media OU, the Sports OU, and any OUs under it. Here’s the IAM policy that achieves this effect.
Note: Like the earlier example, this policy does not grant any access. Instead, this policy provides a backstop for your other IAM permissions, preventing your principals from accessing S3 objects outside an OU-defined boundary. If you want to require that your IAM principals consistently follow this rule, we recommend that you apply this policy as an SCP. In this example, we attached this policy to the root of our organization, applying it to all principals across all accounts in the AnyCompany organization.
The policy denies access to S3 actions unless the S3 resource being accessed is in a specific set of OUs in the AnyCompany organization. This policy is identical to Example 1, except for the condition block: The condition requires that aws:ResourceOrgPaths contains any of the listed OU paths. Because aws:ResourceOrgPaths is a multi-value condition, the policy uses the ForAllValues:StringNotLike operator to compare the values of aws:ResourceOrgPaths to the list of OUs in the policy.
The first OU path in the list is for the Media OU. The second OU path is the Sports OU, but it also adds the wildcard character * to the end of the path. The wildcard * matches any combination of characters, and so this condition matches both the Sports OU and any other OU further down its path. Using wildcards in the OU path allows you to implicitly reference other OUs inside the Sports OU, without having to list them explicitly in the policy. For more information about wildcards, refer to Using wildcards in resource ARNs in the IAM documentation.
Example 3: Restrict access to AWS resources within my organization
Finally, we’ll look at a very simple example of a boundary that is defined at the level of an entire organization. This is the same use case as the preceding two examples (restrict access to S3 object access), but scoped to an organization instead of an account or collection of OUs.
Note: Like the earlier examples, this policy does not grant any access. Instead, this policy provides a backstop for your other IAM permissions, preventing your principals from accessing S3 objects outside your organization regardless of their other access permissions. If you want to require that your IAM principals consistently follow this rule, we recommend that you apply this policy as an SCP. As in the previous example, we attached this policy to the root of our organization, applying it to all accounts in the AnyCompany organization.
The policy denies access to S3 actions unless the S3 resource being accessed is in the same organization as the IAM principal that is accessing it. This policy is identical to Example 1, except for the condition block: The condition requires that aws:ResourceOrgID and aws:PrincipalOrgID must be equal to each other. With this requirement, the principal making the request and the resource being accessed must be in the same organization. This policy also applies to S3 resources that are created after the policy is put into effect, so it is simple to maintain the same security posture across all your resources.
In this post, we explored the new conditions, and walked through a few examples to show you how to restrict access to S3 objects across the boundary of an account, OU, or organization. These tools work for more than just S3, though: You can use the new conditions to help you protect a wide variety of AWS services and actions. Here are a few links that you may want to look at:
Whitepaper: Building an AWS Perimeter provides an in-depth overview of how to use these keys as part of a broader strategy to secure your AWS resources.
If you have any questions, comments, or concerns, contact AWS Support or start a new thread on the AWS Identity and Access Management forum. Thanks for reading about this new feature. If you have feedback about this post, submit comments in the Comments section below.
Want more AWS Security news? Follow us on Twitter.
We built Cloudflare’s Zero Trust platform to help companies rely on our network to connect their private networks securely, while improving performance and reducing operational burden. With it, you could build a single virtual private network, where all your connected private networks had to be uniquely identifiable.
Starting today, we are thrilled to announce that you can start building many segregated virtual private networks over Cloudflare Zero Trust, beginning with virtualized connectivity for the connectors Cloudflare WARP and Cloudflare Tunnel.
Connecting your private networks through Cloudflare
Consider your team, with various services hosted across distinct private networks, and employees accessing those resources. More than ever, those employees may be roaming, remote, or actually in a company office. Regardless, you need to ensure only they can access your private services. Even then, you want to have granular control over what each user can access within your network.
This is where Cloudflare can help you. We make our global, performant network available to you, acting as a virtual bridge between your employees and private services. With your employees’ devices running Cloudflare WARP, their traffic egresses through Cloudflare’s network. On the other side, your private services are behind Cloudflare Tunnel, accessible only through Cloudflare’s network. Together, these connectors protect your virtual private network end to end.
The beauty of this setup is that your traffic is immediately faster and more secure. But you can then take it a step further and extract value from many Cloudflare services for your private network routed traffic: auditing, fine-grained filtering, data loss protection, malware detection, safe browsing, and many others.
Our customers are already in love with our Zero Trust private network routing solution. However, like all things we love, they can still improve.
The problem of overlapping networks
In the image above, the user can access any private service as if they were physically located within the network of that private service. For example, this means typing jira.intra in the browser or SSH-ing to a private IP 10.1.2.3 will work seamlessly despite neither of those private services being exposed to the Internet.
However, this has a big assumption in place: those underlying private IPs are assumed to be unique in the private networks connected to Cloudflare in the customer’s account.
Suppose now that your Team has two (or more) data centers that use the same IP space — usually referred to as a CIDR — such as 10.1.0.0/16. Maybe one is the current primary and the other is the secondary, replicating one another. In such an example situation, there would exist a machine in each of those two data centers, both with the same IP, 10.1.2.3.
Until today, you could not set up that via Cloudflare. You would connect data center 1 with a Cloudflare Tunnel responsible for traffic to 10.1.0.0/16. You would then do the same in data center 2, but receive an error forbidding you to create an ambiguous IP route:
$ cloudflared tunnel route ip add 10.1.0.0/16 dc-2-tunnel

API error: Failed to add route: code: 1014, reason: You already have a route defined for this exact IP subnet
In an ideal world, a team would not have this problem: every private network would have unique IP space. But that is just not feasible in practice, particularly for large enterprises. Consider the case where two companies merge: it is borderline impossible to expect them to rearrange their private networks to preserve IP addressing uniqueness.
Getting started on your new virtual networks
You can now overcome the problem above by creating unique virtual networks that logically segregate your overlapping IP routes. You can think of a virtual network as a group of IP subspaces. This effectively allows you to compose your overall infrastructure into independent (virtualized) private networks that are reachable by your Cloudflare Zero Trust organization through Cloudflare WARP.
Let us set up this scenario.
We start by creating two virtual networks, with one being the default:
$ cloudflared tunnel vnet add —-default vnet-frankfurt "For London and Munich employees primarily"

Successfully added virtual network vnet-frankfurt with ID: 8a6ea860-cd41-45eb-b057-bb6e88a71692 (as the new default for this account)

$ cloudflared tunnel vnet add vnet-sydney "For APAC employees primarily"

Successfully added virtual network vnet-sydney with ID: e436a40f-46c4-496e-80a2-b8c9401feac7
We can then create the Tunnels and route the CIDRs to them:
$ cloudflared tunnel create tunnel-fra

Created tunnel tunnel-fra with id 79c5ba59-ce90-4e91-8c16-047e07751b42

$ cloudflared tunnel create tunnel-syd

Created tunnel tunnel-syd with id 150ef29f-2fb0-43f8-b56f-de0baa7ab9d8

$ cloudflared tunnel route ip add --vnet vnet-frankfurt 10.1.0.0/16 tunnel-fra

Successfully added route for 10.1.0.0/16 over tunnel 79c5ba59-ce90-4e91-8c16-047e07751b42

$ cloudflared tunnel route ip add --vnet vnet-sydney 10.1.0.0/16 tunnel-syd

Successfully added route for 10.1.0.0/16 over tunnel 150ef29f-2fb0-43f8-b56f-de0baa7ab9d8
And that’s it! Both your Tunnels can now be run and they will connect your private data centers to Cloudflare despite having overlapping IPs.
Your users will now be routed through the virtual network vnet-frankfurt by default. Should any user want otherwise, they could choose on the WARP client interface settings, for example, to be routed via vnet-sydney.
When the user changes the virtual network chosen, that informs Cloudflare’s network of the routing decision. This will propagate that knowledge to all our data centers via Quicksilver in a matter of seconds. The WARP client then restarts its connectivity to our network, breaking existing TCP connections that were being routed to the previously selected virtual network. This may be perceived as if you were disconnecting and reconnecting the WARP client.
Every current Cloudflare Zero Trust organization using private network routing will now have a default virtual network encompassing the IP Routes to Cloudflare Tunnels. You can start using the commands above to expand your private network to have overlapping IPs and reassign a default virtual network if desired.
If you do not have overlapping IPs in your private infrastructure, no action will be required.
What’s next
This is just the beginning of our support for distinct virtual networks at Cloudflare. As you may have seen, last week we announced the ability to create, deploy, and manage Cloudflare Tunnels directly from the Zero Trust dashboard. Today, virtual networks are only supported through the cloudflared CLI, but we are looking to integrate virtual network management into the dashboard as well.
Our next step will be to make Cloudflare Gateway aware of these virtual networks so that Zero Trust policies can be applied to these overlapping IP ranges. Once Gateway is aware of these virtual networks, we will also surface this concept with Network Logging for auditability and troubleshooting moving forward.
The General Data Protection Law (LGPD) in Brazil was first published on 14 August 2018, and started its applicability on 18 August 2020. Companies that manage personally identifiable information (PII) in Brazil as defined by LGPD will have to comply with and attend to the law.
To better help customers prepare and implement controls that focus on LGPD Chapter VII Security and Best Practices, AWS created a workbook based on industry best practices, AWS service offerings, and controls.
Amongst other topics, this workbook covers information security and AWS controls from:
AWS adheres to a shared responsibility model. Customers will have to observe which services offer privacy features and determine their applicability to their specific compliance requirements. Further information about data privacy at AWS can be found at our Data Privacy Center. Specific information about LGPD and data privacy at AWS in Brazil can be found on our Brazil Data Privacy page.
To learn more about our compliance and security programs, see AWS Compliance Programs. As always, we value your feedback and questions; reach out to the AWS Compliance team through the Contact Us page.
If you have feedback about this post, submit comments in the Comments section below. Want more AWS Security news? Follow us on Twitter.
Portuguese
Workbook da LGPD para Clientes AWS que gerenciam Informações de Identificação Pessoal no Brasil
A Lei Geral de Proteção de Dados (LGPD) teve sua primeira publicação em 14 de agosto de 2018 no Brasil e iniciou sua aplicabilidade em 18 de agosto de 2020. Empresas que gerenciam informações pessoais identificáveis (PII) conforme definido na LGPD terão que cumprir e atender às cláusulas da lei.
Para ajudar melhor os clientes a preparar e implementar controles que se concentram no Capítulo VII da LGPD “da Segurança e Boas Práticas”, a AWS criou uma pasta de trabalho com base nas melhores práticas do setor, ofertas de serviços e controles da AWS.
Entre outros tópicos, esta pasta de trabalho aborda a segurança da informação e os controles da AWS de:
CIS v8.0 – framework contendo 18 domínios de controles
NIST Cybersecurity Framework (CSF) – informações adicionais sobre NIST CSF disponíveis para consulta
Para saber mais sobre nossos programas de conformidade e segurança, consulte Programas de conformidade da AWS. Como sempre, valorizamos seus comentários e perguntas; entre em contato com a equipe de conformidade da AWS por meio da página Fale conosco.
Se você tiver feedback sobre esta postagem, envie comentários na seção Comentários abaixo.
Quer mais notícias sobre segurança da AWS? Siga-nos no Twitter.
At Amazon Web Services (AWS), we are committed to providing continued assurance to our customers through assessments, certifications, and attestations that support the adoption of AWS services. We are pleased to announce the availability of the Canadian Centre for Cyber Security (CCCS) assessment summary report for AWS, which you can view and download on demand through AWS Artifact.
The CCCS is Canada’s authoritative source of cyber security expert guidance for the Canadian government, industry, and the general public. Public and commercial sector organizations across Canada rely on CCCS’s rigorous Cloud Service Provider (CSP) IT Security (ITS) assessment in their decision to use CSP services. In addition, CCCS’s ITS assessment process is a mandatory requirement for AWS to provide cloud services to Canadian federal government departments and agencies.
The CCCS Cloud Service Provider Information Technology Security Assessment Process determines if the Government of Canada (GC) ITS requirements for the CCCS Medium Cloud Security Profile (previously referred to as GC’s PROTECTED B/Medium Integrity/Medium Availability [PBMM] profile) are met as described in ITSG-33 (IT Security Risk Management: A Lifecycle Approach, Annex 3 – Security Control Catalogue). As of September, 2021, 120 AWS services in the Canada (Central) Region have been assessed by the CCCS, and meet the requirements for medium cloud security profile. Meeting the medium cloud security profile is required to host workloads that are classified up to and including medium categorization. On a periodic basis, CCCS assesses new or previously unassessed services and re-assesses the AWS services that were previously assessed to verify that they continue to meet the GC’s requirements. CCCS prioritizes the assessment of new AWS services based on their availability in Canada, and customer demand for the AWS services. The full list of AWS services that have been assessed by CCCS is available on our Services in Scope by Compliance Program page.
To learn more about the CCCS assessment or our other compliance and security programs, visit AWS Compliance Programs. If you have questions about this blog post, please start a new thread on the AWS Artifact forum or contact AWS Support.
If you have feedback about this post, submit comments in the Comments section below. Want more AWS Security news? Follow us on Twitter.
.
Rapport sommaire de l’évaluation du Centre canadien pour la cybersécurité disponible sur AWS Artifact
Par Robert Samuel, Naranjan Goklani et Brian Mycroft Amazon Web Services (AWS) s’engage à fournir à ses clients une assurance continue à travers des évaluations, des certifications et des attestations qui appuient l’adoption des services proposés par AWS. Nous avons le plaisir d’annoncer la mise à disposition du rapport sommaire de l’évaluation du Centre canadien pour la cybersécurité (CCCS) pour AWS, que vous pouvez dès à présent consulter et télécharger à la demande sur AWS Artifact.
Le CCC est l’autorité canadienne qui met son expertise en matière de cybersécurité au service du gouvernement canadien, du secteur privé et du grand public. Les organisations des secteurs public et privé établies au Canada dépendent de la rigoureuse évaluation de la sécurité des technologies de l’information s’appliquant aux fournisseurs de services infonuagiques conduite par le CCC pour leur décision relative à l’utilisation de ces services infonuagiques. De plus, le processus d’évaluation de la sécurité des technologies de l’information est une étape obligatoire pour permettre à AWS de fournir des services infonuagiques aux agences et aux ministères du gouvernement fédéral canadien.
Le Processus d’évaluation de la sécurité des technologies de l’information s’appliquant aux fournisseurs de services infonuagiques détermine si les exigences en matière de technologie de l’information du Gouvernement du Canada (GC) pour le profil de contrôle de la sécurité infonuagique moyen (précédemment connu sous le nom de Protégé B/Intégrité moyenne/Disponibilité moyenne) sont satisfaites conformément à l’ITSG-33 (Gestion des risques liés à la sécurité des TI : Une méthode axée sur le cycle de vie, Annexe 3 – Catalogue des contrôles de sécurité). En date de septembre 2021, 120 services AWS de la région (centrale) du Canada ont été évalués par le CCC et satisfont aux exigences du profil de sécurité moyen du nuage. Satisfaire les exigences du niveau moyen du nuage est nécessaire pour héberger des applications classées jusqu’à la catégorie moyenne incluse. Le CCC évalue périodiquement les nouveaux services, ou les services qui n’ont pas encore été évalués, et réévalue les services AWS précédemment évalués pour s’assurer qu’ils continuent de satisfaire aux exigences du Gouvernement du Canada. Le CCC priorise l’évaluation des nouveaux services AWS selon leur disponibilité au Canada et en fonction de la demande des clients pour les services AWS. La liste complète des services AWS évalués par le CCC est consultable sur notre page Services AWS concernés par le programme de conformité.
Pour en savoir plus sur l’évaluation du CCC ainsi que sur nos autres programmes de conformité et de sécurité, visitez la page Programmes de conformité AWS. Comme toujours, nous accordons beaucoup de valeur à vos commentaires et à vos questions; vous pouvez communiquer avec l’équipe Conformité AWS via la page Communiquer avec nous.
Si vous avez des commentaires sur cette publication, n’hésitez pas à les partager dans la section Commentaires ci-dessous. Vous souhaitez en savoir plus sur AWS Security? Retrouvez-nous sur Twitter.
Biographies des auteurs :
Rob Samuel : Rob Samuel est responsable technique principal d’AWS Security Assurance. Il collabore avec les équipes AWS pour traduire les principes de protection des données en recommandations techniques, aligne la direction technique et les priorités, met en œuvre les nouvelles solutions techniques, aide à intégrer les solutions de sécurité et de confidentialité aux services et fonctionnalités proposés par AWS et répond aux exigences et aux attentes en matière de confidentialité et de sécurité transversale. Rob a plus de 20 ans d’expérience dans le secteur de la technologie et a déjà occupé des fonctions dirigeantes, comme directeur de l’assurance sécurité pour AWS Canada, responsable de la cybersécurité et des systèmes d’information (RSSI) pour la province de la Nouvelle-Écosse, divers postes à responsabilités en tant que fonctionnaire et a servi dans les Forces armées canadiennes en tant qu’officier du génie électronique et des communications.
Naranjan Goklani : Naranjan Goklani est responsable des audits de sécurité pour AWS, il est basé à Toronto (Canada). Il est responsable des audits, des attestations, des certifications et des évaluations pour l’Amérique du Nord et l’Europe. Naranjan a plus de 12 ans d’expérience dans la gestion des risques, l’assurance de la sécurité et la réalisation d’audits de technologie. Naranjan a exercé dans l’une des quatre plus grandes sociétés de comptabilité et accompagné des clients des industries de la distribution, du commerce en ligne et des services publics.
Brian Mycroft : Brian Mycroft est technologue en chef pour AWS, il est basé à Ottawa (Canada) et se spécialise dans la sécurité nationale, le renseignement et le gouvernement fédéral du Canada. Brian est l’architecte principal de l’AWS Secure Environment Accelerator (ASEA) et s’intéresse principalement à la suppression des barrières à l’adoption du nuage pour le secteur public.
Today AWS Key Management Service (AWS KMS) is introducing new APIs to generate and verify hash-based message authentication codes (HMACs) using the Federal Information Processing Standard (FIPS) 140-2 validated hardware security modules (HSMs) in AWS KMS. HMACs are a powerful cryptographic building block that incorporate secret key material in a hash function to create a unique, keyed message authentication code.
In this post, you will learn the basics of the HMAC algorithm as a cryptographic building block, including how HMACs are used. In the second part of this post, you will see a few real-world use cases that show an application builder’s perspective on using the AWS KMS HMAC APIs.
HMACs provide a fast way to tokenize or sign data such as web API requests, credit cards, bank routing information, or personally identifiable information (PII).They are commonly used in several internet standards and communication protocols such as JSON Web Tokens (JWT), and are even an important security component for how you sign AWS API requests.
HMAC as a cryptographic building block
You can consider an HMAC, sometimes referred to as a keyed hash, to be a combination function that fuses the following elements:
A standard hash function such as SHA-256 to produce a message authentication code (MAC).
A secret key that binds this MAC to that key’s unique value.
Combining these two elements creates a unique, authenticated version of the digest of a message. Because the HMAC construction allows interchangeable hash functions as well as different secret key sizes, one of the benefits of HMACs is the easy replaceability of the underlying hash function (in case faster or more secure hash functions are required), as well as the ability to add more security by lengthening the size of the secret key used in the HMAC over time. The AWS KMS HMAC API is launching with support for SHA-224, SHA-256, SHA-384, and SHA-512 algorithms to provide a good balance of key sizes and performance trade-offs in the implementation. For more information about HMAC algorithms supported by AWS KMS, see HMAC keys in AWS KMS in the AWS KMS Developer Guide.
HMACs offer two distinct benefits:
Message integrity: As with all hash functions, the output of an HMAC will result in precisely one unique digest of the message’s content. If there is any change to the data object (for example you modify the purchase price in a contract by just one digit: from “$350,000” to “$950,000”), then the verification of the original digest will fail.
Message authenticity: What distinguishes HMAC from other hash methods is the use of a secret key to provide message authenticity. Only message hashes that were created with the specific secret key material will produce the same HMAC output. This dependence on secret key material ensures that no third party can substitute their own message content and create a valid HMAC without the intended verifier detecting the change.
HMAC in the real world
HMACs have widespread applications and industry adoption because they are fast, high performance, and simple to use. HMACs are particularly popular in the JSON Web Token (JWT) open standard as a means of securing web applications, and have replaced older technologies such as cookies and sessions. In fact, Amazon implements a custom authentication scheme, Signature Version 4 (SigV4), to sign AWS API requests based on a keyed-HMAC. To authenticate a request, you first concatenate selected elements of the request to form a string. You then use your AWS secret key material to calculate the HMAC of that string. Informally, this process is called signing the request, and the output of the HMAC algorithm is informally known as the signature, because it simulates the security properties of a real signature in that it represents your identity and your intent.
Advantages of using HMACs in AWS KMS
AWS KMS HMAC APIs provide several advantages over implementing HMACs in application software because the key material for the HMACs is generated in AWS KMS hardware security modules (HSMs) that are certified under the FIPS 140-2 program and never leave AWS KMS unencrypted. In addition, the HMAC keys in AWS KMS can be managed with the same access control mechanisms and auditing features that AWS KMS provides on all AWS KMS keys. These security controls ensure that any HMAC created in AWS KMS can only ever be verified in AWS KMS using the same KMS key. Lastly, the HMAC keys and the HMAC algorithms that AWS KMS uses conform to industry standards defined in RFC 2104 HMAC: Keyed-Hashing for Message Authentication.
Use HMAC keys in AWS KMS to create JSON Web Tokens
The JSON Web Token (JWT) open standard is a common use of HMAC. The standard defines a portable and secure means to communicate a set of statements, known as claims, between parties. HMAC is useful for applications that need an authorization mechanism, in which claims are validated to determine whether an identity has permission to perform some action. Such an application can only work if a validator can trust the integrity of claims in a JWT. Signing JWTs with an HMAC is one way to assert their integrity. Verifiers with access to an HMAC key can cryptographically assert that the claims and signature of a JWT were produced by an issuer using the same key.
This section will walk you through an example of how you can use HMAC keys from AWS KMS to sign JWTs. The example uses the AWS SDK for Python (Boto3) and implements simple JWT encoding and decoding operations. This example shows the ease with which you can integrate HMAC keys in AWS KMS into your JWT application, even if your application is in another language or uses a more formal JWT library.
Create an HMAC key in AWS KMS
Begin by creating an HMAC key in AWS KMS. You can use the AWS KMS console or call the CreateKey API action. The following example shows creation of a 256-bit HMAC key:
import boto3

kms = boto3.client('kms')

# Use CreateKey API to create a 256-bit key for HMAC
key_id = kms.create_key(
	KeySpec='HMAC_256',
	KeyUsage='GENERATE_VERIFY_MAC'
)['KeyMetadata']['KeyId']
Use the HMAC key to encode a signed JWT
Next, you use the HMAC key to encode a signed JWT. There are three components to a JWT token: the set of claims, header, and signature. The claims are the very application-specific statements to be authenticated. The header describes how the JWT is signed. Lastly, the MAC (signature) is the output of applying the header’s described operation to the message (the combination of the claims and header). All these are packed into a URL-safe string according to the JWT standard.
The following example uses the previously created HMAC key in AWS KMS within the construction of a JWT. The example’s claims simply consist of a small claim and an issuance timestamp. The header contains key ID of the HMAC key and the name of the HMAC algorithm used. Note that HS256 is the JWT convention used to represent HMAC with SHA-256 digest. You can generate the MAC using the new GenerateMac API action in AWS KMS.
import base64
import json
import time

def base64_url_encode(data):
	return base64.b64encode(data, b'-_').rstrip(b'=')

# Payload contains simple claim and an issuance timestamp
payload = json.dumps({
	"does_kms_support_hmac": "yes",
	"iat": int(time.time())
}).encode("utf8")

# Header describes the algorithm and AWS KMS key ID to be used for signing
header = json.dumps({
	"typ": "JWT",
	"alg": "HS256",
	"kid": key_id #This key_id is from the “Create an HMAC key in AWS KMS” #example. The “Verify the signed JWT” example will later #assert that the input header has the same value of the #key_id
}).encode("utf8")

# Message to sign is of form <header_b64>.<payload_b64>
message = base64_url_encode(header) + b'.' + base64_url_encode(payload)

# Generate MAC using GenerateMac API of AWS KMS
MAC = kms.generate_mac(
	KeyId=key_id, #This key_id is from the “Create an HMAC key in AWS KMS”
				 #example
	MacAlgorithm='HMAC_SHA_256',
	Message=message
)['Mac']

# Form JWT token of form <header_b64>.<payload_b64>.<mac_b64>
jwt_token = message + b'.' + base64_url_encode(mac)
Verify the signed JWT
Now that you have a signed JWT, you can verify it using the same KMS HMAC key. The example below uses the new VerifyMac API action to validate the MAC (signature) of the JWT. If the MAC is invalid, AWS KMS returns an error response and the AWS SDK throws an exception. If the MAC is valid, the request succeeds and the application can continue to do further processing on the token and its claims.
def base64_url_decode(data):
	return base64.b64decode(data + b'=' * (4 - len(data) % 4), b'-_')

# Parse out encoded header, payload, and MAC from the token
message, mac_b64 = jwt_token.rsplit(b'.', 1)
header_b64, payload_b64 = message.rsplit(b'.', 1)

# Decode header and verify its contents match expectations
header_map = json.loads(base64_url_decode(header_b64).decode("utf8"))
assert header_map == {
	"typ": "JWT",
	"alg": "HS256",
	"kid": key_id #This key_id is from the “Create an HMAC key in AWS KMS”
				 #example
}

# Verify the MAC using VerifyMac API of AWS KMS. # If the verification fails, this will throw an error.
kms.verify_mac(
	KeyId=key_id, #This key_id is from the “Create an HMAC key in AWS KMS”
				 #example
	MacAlgorithm='HMAC_SHA_256',
	Message=message,
	Mac=base64_url_decode(mac_b64)
)

# Decode payload for use application-specific validation/processing
payload_map = json.loads(base64_url_decode(payload_b64).decode("utf8"))
Create separate roles to control who has access to generate HMACs and who has access to validate HMACs
It’s often helpful to have separate JWT creators and validators so that you can distinguish between the roles that are allowed to create tokens and the roles that are allowed to verify tokens. HMAC signatures performed outside of AWS-KMS don’t work well for this because you can’t isolate creators and verifiers if they both must have a copy of the same key. However, this is not an issue for HMAC keys in AWS KMS. You can use key policies to separate out who has permission to ask AWS KMS to generate HMACs and who has permission to ask AWS KMS to validate. Each party uses their own unique access keys to access the HMAC key in AWS KMS. Only HSMs in AWS KMS will ever have access to the actual key material. See the following example key policy statements that separate out GenerateMac and VerifyMac permissions:
{
	"Id": "example-jwt-policy",
	"Version": "2012-10-17",
	"Statement": [
		{
			"Sid": "Allow use of the key for creating JWTs",
			"Effect": "Allow",
			"Principal": {
				"AWS": "arn:aws:iam::111122223333:role/JwtProducer"
			},
			"Action": [
				"kms:GenerateMac"
			],
			"Resource": "*"
		},
		{
			"Sid": "Allow use of the key for validating JWTs",
			"Effect": "Allow",
			"Principal": {
				"AWS": "arn:aws:iam::111122223333:role/JwtConsumer"
			},
			"Action": [
				"kms:VerifyMac"
			],
			"Resource": "*"
		}
	]
}
Conclusion
In this post, you learned about the new HMAC APIs in AWS KMS (GenerateMac and VerifyMac). These APIs complement existing AWS KMS cryptographic operations: symmetric key encryption, asymmetric key encryption and signing, and data key creation and key enveloping. You can use HMACs for JWTs, tokenization, URL and API signing, as a key derivation function (KDF), as well as in new designs that we haven’t even thought of yet. To learn more about HMAC functionality and design, see HMAC keys in AWS KMS in the AWS KMS Developer Guide.
If you have feedback about this post, submit comments in the Comments section below. If you have questions about this post, start a new thread on the KMS re:Post or contact AWS Support. Want more AWS Security news? Follow us on Twitter.
Congratulations! You’ve discovered a security bug in your own code before anyone has exploited it. It’s a big relief. You’ve created a CodeQL query to find other places where this happens and ensure this will never happen again, and you’ve deployed your new query to be run on every pull request in your repo to prevent similar mistakes from ever being made again.
What’s the best way to share this knowledge with the community to help protect the open source ecosystem by making sure that the same vulnerability is never introduced into anyone’s codebase, ever?
The short answer: produce a CodeQL pack containing your queries, and publish them to GitHub. CodeQL packaging is a beta feature in the CodeQL ecosystem. With CodeQL packaging, your expertise is documented, concise, executable, and easily shareable.
This is the first post of a two-part series on CodeQL packaging. In this post, we show how to use CodeQL packs to share security expertise. In the next post, we will discuss some of our implementation and design decisions.
The purpose of this query is to detect executables that are potentially vulnerable to Windows binary planting, an exploit where an attacker could inject a malicious executable into a pull request. This query is meant to be evaluated on JavaScript code that is run inside of a GitHub Action. It matches all arguments to calls to the ToolRunner (a GitHub Action API) where the argument has not been sanitized (that is, ensured to be safe) by having been wrapped in a call to safeWhich. The implementation details of this query are not relevant to this post, but you can explore this query and other domain-specific queries like it in the repository.
This query is currently protecting us on every pull request, but in its current form, it is not easily available for others to use. Even though this vulnerability is relatively difficult to attack, the surface area is large, and it could affect any GitHub Action running on Windows in public repositories that accept pull requests. You could write a stern blog post on the dangers of invoking unqualified Windows executables in untrusted pull requests (maybe you’re even reading such a post right now!), but your impact will be much higher if you could share the query to help anyone find the bug in their code. This is where CodeQL packaging comes in. Using CodeQL packaging, not only can developers easily learn about the binary planting pattern, but they can also automatically apply the pattern to find the bug in their own code.
Sharing queries through CodeQL packs
If you think that your query is general purpose and applicable to all repositories in all situations, then it is best to contribute it to our open source CodeQL query repository (and collect a bounty in the process!). That way, your query will be run on every pull request on every repository that has GitHub code scanning enabled.
However, many (if not most) queries are domain specific and not applicable to all repositories. For example, this particular binary planting query is only applicable to GitHub Actions implemented in JavaScript. The best way to share such queries query is by creating a CodeQL pack and publishing it to the CodeQL package registry to make it available to the world. Once published, CodeQL packs are easily shared with others and executed in their CI/CD pipeline.
There are two kinds of CodeQL packs:
Query packs, which contain a set of pre-compiled queries that can be easily evaluated on a CodeQL database.
Library packs, which contain CodeQL libraries (*.qll files), but do not contain any runnable queries. Library packs are meant to be used as building blocks to produce other query packs or library packs.
In the rest of this post, we will show you how to create, share, and consume a CodeQL query pack. Library packs will be introduced in a future blog post.
To create a CodeQL pack, you’ll need to make sure that you’ve installed and set up the CodeQL CLI. You can follow the instructions here.
The next step is to create a qlpack.yml file. This file declares the CodeQL pack and information about it. Any *.ql files in the same directory (or sub-directory) as a qlpack.yml file are considered part of the package. In this case, you can place binary-planting.ql next to the qlpack.yml file.
All CodeQL packs must have a name property. If they are going to be published to the CodeQL registry, then they must have a scope as part of the name. The scope is the part of the package name before the slash (in this example: aeisenberg). It should be the username or organization on github.com that will own this package. Anyone publishing a package must have the proper privileges to do so for that scope. The name part of the package name must be unique within the scope. Additionally, a version, following standard semver rules, is required for publishing.
The dependencies block lists all of the dependencies of this package and their compatible version ranges. Each dependency is referenced as the scope/name of a CodeQL library pack, and each library pack may in turn depend on other library packs declared in their qlpack.yml files. Each query pack must (transitively) depend on exactly one of the core language packs (for example, JavaScript, C#, Ruby, etc.), which determines the language your query can analyze.
In this query pack, the standard JavaScript libraries, codeql/javascript-all, is the only dependency and the semver range ~0.0.10 means any version >= 0.0.10 and < 0.1.0 suffices.
With the qlpack.yml defined, you can now install all of your declared dependencies. Run the codeql pack install command in the root directory of the CodeQL pack:
After making any changes to the query, you can then publish the query to the GitHub registry. You do this by running the codeql pack publish command in the root of the CodeQL pack.
Here is the output of the command:
$ codeql pack publish
Running on packs: aeisenberg/codeql-actions-queries.
Bundling and then publishing qlpack located at '/Users/andrew.eisenberg/git-repos/codeql-actions-queries'.
Bundled qlpack created at '/var/folders/41/kxmfbgxj40dd2l_x63x9fw7c0000gn/T/codeql-docker17755193287422157173/.Docker Package Manager/codeql-actions-queries.1.0.1.tgz'.
Packaging> Package 'aeisenberg/codeql-actions-queries' will be published to registry 'https://ghcr.io/v2/' as 'aeisenberg/codeql-actions-queries'.
Packaging> Package 'aeisenberg/[email protected]' will be published locally to /Users/andrew.eisenberg/.codeql/packages/aeisenberg/codeql-actions-queries/1.0.1
Publish successful.
You have successfully published your first CodeQL pack! It is now available in the registry on GitHub.com for anyone else to run using the CodeQL CLI. You can view your newly-published package on github.com:
At the time of this writing, packages are initially uploaded as private packages. If you want to make it public, you must explicitly change the permissions. To do this, go to the package page, click on package settings, then scroll down to the Danger Zone:
And click Change visibility.
Running queries from CodeQL packs using the CodeQL CLI
Running the queries in a CodeQL pack is simple using the CodeQL CLI. If you already have a database created, just call the codeql database analyze command with the --download option, passing a reference to the package you want to use in your analysis:
The --download option asks CodeQL to download any CodeQL packs that aren’t already available. The ^1.0,0 is optional and specifies that you want to run the latest version of the package that is compatible with ^1.0.1. If no version range is specified, then the latest version is always used. You can also pass a list of packages to evaluate. The CodeQL CLI will download and cache each specified package and then run all queries in their default query suite.
To run a subset of queries in a pack, add a : and a path after it:
Everything after the : is interpreted as a path relative to the root of the pack, and you can specify a single query, a query directory, or a query suite (.qls file).
Evaluating CodeQL packs from code scanning
Run the queries from your CodeQL pack in GitHub code scanning is easy! In your code scanning workflow, in the github/codeql-action/init step, add packs entry to list the packs you want to run:
Note that specifying a path after a colon is not yet supported in the codeql-action, so using this approach, you can only run the default query suite of a pack in this manner.
Conclusion
We’ve shown how easy it is to share your CodeQL queries with the world using two CLI commands: the first resolves and retrieves your dependencies and the second compiles, bundles, and publishes your package.
To recap:
Publishing a CodeQL query pack consists of:
Create the qlpack.yml file.
Run codeql pack install to download dependencies.
Write and test your queries.
Run codeql pack publish to share your package in GHCR.
Using a CodeQL query pack from GHCR on the command line consists of:
Using a CodeQL query pack from GHCR in code-scanning consists of:
Adding a config-file input to the github/codeql-action/init action
Adding a packs block in the config file
The CodeQL Team has already published all of our standard queries as query packs, and all of our core libraries as library packs. Any pack named {*}-queries is a query pack and contains queries that can be used to scan your code. Any pack named {*}-all is a library pack and contains CodeQL libraries (*.qll files) that can be used as the building blocks for your queries. When you are creating your own query packs, you should be adding as a dependency the library pack for the language that your query will scan.
If you are interested in understanding more about how we’ve implemented packaging and some of our design decisions, please check out our second post in this series. Also, if you are interested in learning more or contributing to CodeQL, get involved with the Security Lab.
Sharing your security expertise has never been easier!
GitHub is unaffected by these vulnerabilities1. However, you should be aware of them and upgrade your local installation of Git, especially if you are using Git for Windows, or you use Git on a multi-user machine.
CVE-2022-24765
This vulnerability affects users working on multi-user machines where a malicious actor could create a .git directory in a shared location above a victim’s current working directory. On Windows, for example, an attacker could create C:\.git\config, which would cause all git invocations that occur outside of a repository to read its configured values.
Since some configuration variables (such as core.fsmonitor) cause Git to execute arbitrary commands, this can lead to arbitrary command
execution when working on a shared machine.
The most effective way to protect against this vulnerability is to upgrade to Git v2.35.2. This version changes Git’s behavior when looking for a top-level .git directory to stop when its directory traversal changes ownership from the current user. (If you wish to make an exception to this behavior, you can use the new multi-valued safe.directory configuration).
If you can’t upgrade immediately, the most effective ways to reduce your risk are the following:
Avoid running Git on multi-user machines when your current working directory is not within a trusted repository.
Note that many tools (such as the Git for Windows installation of Git Bash, posh-git, and Visual Studio) run Git commands under the hood. If you are on a multi-user machine, avoid using these tools until you have upgraded to the latest release.
Credit for finding this vulnerability goes to 俞晨东.
This vulnerability affects the Git for Windows uninstaller, which runs in the user’s temporary directory. Because the SYSTEM user account inherits the
default permissions of C:\Windows\Temp (which is world-writable), any authenticated user can place malicious .dll files which are loaded when
running the Git for Windows uninstaller when run via the SYSTEM account.
The most effective way to protect against this vulnerability is to upgrade to Git for Windows v2.35.2. If you can’t upgrade
immediately, reduce your risk with the following:
Avoid running the uninstaller until after upgrading
Override the SYSTEM user’s TMP environment variable to a directory which can only be written to by the SYSTEM user
Remove unknown .dll files from C:\Windows\Temp before running the
uninstaller
Run the uninstaller under an administrator account rather than as the SYSTEM user
Credit for finding this vulnerability goes to the Lockheed Martin Red Team.
GitHub does not run git outside of known repositories, so is not susceptible to the attack described by CVE-2022-24765. Likewise, GitHub does not use Git for Windows, and so is unaffected by CVE-2022-24767 entirely. ↩
The collective thoughts of the interwebz
Manage Consent
To provide the best experiences, we use technologies like cookies to store and/or access device information. Consenting to these technologies will allow us to process data such as browsing behavior or unique IDs on this site. Not consenting or withdrawing consent, may adversely affect certain features and functions.
Functional
Always active
The technical storage or access is strictly necessary for the legitimate purpose of enabling the use of a specific service explicitly requested by the subscriber or user, or for the sole purpose of carrying out the transmission of a communication over an electronic communications network.
Preferences
The technical storage or access is necessary for the legitimate purpose of storing preferences that are not requested by the subscriber or user.
Statistics
The technical storage or access that is used exclusively for statistical purposes.The technical storage or access that is used exclusively for anonymous statistical purposes. Without a subpoena, voluntary compliance on the part of your Internet Service Provider, or additional records from a third party, information stored or retrieved for this purpose alone cannot usually be used to identify you.
Marketing
The technical storage or access is required to create user profiles to send advertising, or to track the user on a website or across several websites for similar marketing purposes.