The JavaScript community downloads over 5 billion packages from npm a day, and we at GitHub recognize how important it is that developers can do so with confidence. As stewards of the npm registry, it’s important that we continue to invest in improvements that increase developer trust and the overall security of the registry itself.
Today, we are announcing the general availability of an enhanced 2FA experience on npm, as well as sharing additional investments we’ve made to the verification process of accounts and packages.
The following improvements to npm are available today, including:
A streamlined login and publishing experience with the npm CLI.
The ability to connect GitHub and Twitter accounts to npm.
All packages on npm have been re-signed and we’ve added a new npm CLI command to audit package integrity.
Streamlined login and publishing experience
Account security is significantly improved by adopting 2FA, but if the experience adds too much friction, we can’t expect customers to adopt it. We recently announced a variety of enhancements to the npm registry to make 2FA adoption easier for developers—in a public beta release. Early adopters of our new 2FA experience shared feedback around the process of logging in and publishing with the npm CLI, and we recognized there was room for improvement. Our initial design was created to be backwards compatible with npm 6 and other clients; in fact the Yarn project was able to backport support for our new experience to Yarn 1 in less than 10 lines of code!
We’ve been hard at work making the CLI experience better than ever based on this feedback, and the improved login and publish experience is now available in npm 8.15.0 today. With the new experience, users will benefit from:
Login and publish authentication are managed in the browser.
Login can use an existing session only prompting for your second factor or email verification OTP to create a new session.
Publish now supports “remember me for 5 minutes” and allows for subsequent publishes from the same IP + access token to avoid the 2FA prompt for a 5-minute period. This is especially useful when publishing from a npm workspace.
It is currently opt-in with the --auth-type=web flag and will be the default experience in npm 9.
These improved experiences will make it easier for users to secure their accounts. A secure account is the beginning of a secure ecosystem. Check out our documentation to learn more about 2FA in npm.
Connecting GitHub and Twitter Accounts to npm
Developers have been able to include their GitHub and Twitter handles on their npm profiles for almost as long as npm accounts have been available. This data has been helpful to connect the identity of an account on npm to an identity on other platforms; however this data has historically been a free-form text field that wasn’t validated or verified.
That’s why today we are launching the ability to link your npm account to your GitHub and Twitter accounts. Linking of these accounts is performed via official integrations with both GitHub and Twitter and ensures that verified account data are included on npm profiles moving forward. We will no longer be showing the previously unverified GitHub or Twitter data on public user profiles, making it possible for developers to audit identities and trust that an account is who they say they are.
Having a verified link between your identities across platforms significantly improves our ability to do account recovery. This new verified data lays the foundation for automating identity verification as part of account recovery. Over time, we will deprecate this legacy data, but we will continue to honor it for now to ensure that customers do not get locked out of their accounts.
You can verify your packages locally with npm audit signatures
Until today npm users have had to rely on a multi-step process to validate the signature of npm packages. This PGP based process was both complex and required users to have knowledge on cryptographic tools which provided a poor developer experience. Developers relying on this existing process should soon start using the new “audit signatures” command. The PGP keys are set to expire early next year with more details to follow.
Recently, we began work to re-sign all npm packages with new signatures relying on the secure ECDSA algorithm and using an HSM for key management, and you can now rely on this signature to verify the integrity of the packages you install from npm.
We have introduced a new audit signatures command in npm CLI version 8.13.0 and above.
Example of a successful audit signature verification
The below sample GitHub Actions workflow with audit signature in action.
Our primary goal continues to be protecting the npm registry, and our next major milestone will be enforcing 2FA for all high-impact accounts, those that manage packages with more than 1 million weekly downloads or 500 dependents, tripling the number of accounts we will require to adopt a second factor. Prior to this enforcement we will be making even more improvements to our account recovery process, including introducing additional forms of identity verification and automating as much of the process as possible.
Learn more about these features by visiting our documentation:
With Amazon GuardDuty, you can monitor your AWS accounts and workloads to detect malicious activity. Today, we are adding to GuardDuty the capability to detect malware. Malware is malicious software that is used to compromise workloads, repurpose resources, or gain unauthorized access to data. When you have GuardDuty Malware Protection enabled, a malware scan is initiated when GuardDuty detects that one of your EC2 instances or container workloads running on EC2 is doing something suspicious. For example, a malware scan is triggered when an EC2 instance is communicating with a command-and-control server that is known to be malicious or is performing denial of service (DoS) or brute-force attacks against other EC2 instances.
GuardDuty supports many file system types and scans file formats known to be used to spread or contain malware, including Windows and Linux executables, PDF files, archives, binaries, scripts, installers, email databases, and plain emails.
When potential malware is identified, actionable security findings are generated with information such as the threat and file name, the file path, the EC2 instance ID, resource tags and, in the case of containers, the container ID and the container image used. GuardDuty supports container workloads running on EC2, including customer-managed Kubernetes clusters or individual Docker containers. If the container is managed by Amazon Elastic Kubernetes Service (EKS) or Amazon Elastic Container Service (Amazon ECS), the findings also include the cluster name and the task or pod ID so application and security teams can quickly find the affected container resources.
As with all other GuardDuty findings, malware detections are sent to the GuardDuty console, pushed through Amazon EventBridge, routed to AWS Security Hub, and made available in Amazon Detective for incident investigation.
How GuardDuty Malware Protection Works When you enable malware protection, you set up an AWS Identity and Access Management (IAM)service-linked role that grants GuardDuty permissions to perform malware scans. When a malware scan is initiated for an EC2 instance, GuardDuty Malware Protection uses those permissions to take a snapshot of the attached Amazon Elastic Block Store (EBS) volumes that are less than 1 TB in size and then restore the EBS volumes in an AWS service account in the same AWS Region to scan them for malware. You can use tagging to include or exclude EC2 instances from those permissions and from scanning. In this way, you don’t need to deploy security software or agents to monitor for malware, and scanning the volumes doesn’t impact running workloads. The EBS volumes in the service account and the snapshots in your account are deleted after the scan. Optionally, you can preserve the snapshots when malware is detected.
The service-linked role grants GuardDuty access to AWS Key Management Service (AWS KMS) keys used to encrypt EBS volumes. If the EBS volumes attached to a potentially compromised EC2 instance are encrypted with a customer-managed key, GuardDuty Malware Protection uses the same key to encrypt the replica EBS volumes as well. If the volumes are not encrypted, GuardDuty uses its own key to encrypt the replica EBS volumes and ensure privacy. Volumes encrypted with EBS-managed keys are not supported.
Security in cloud is a shared responsibility between you and AWS. As a guardrail, the service-linked role used by GuardDuty Malware Protection cannot perform any operation on your resources (such as EBS snapshots and volumes, EC2 instances, and KMS keys) if it has the GuardDutyExcluded tag. Once you mark your snapshots with GuardDutyExcluded set to true, the GuardDuty service won’t be able to access these snapshots. The GuardDutyExcluded tag supersedes any inclusion tag. Permissions also restrict how GuardDuty can modify your snapshot so that they cannot be made public while shared with the GuardDuty service account.
The EBS volumes created by GuardDuty are always encrypted. GuardDuty can use KMS keys only on EBS snapshots that have a GuardDuty scan ID tag. The scan ID tag is added by GuardDuty when snapshots are created after an EC2 finding. The KMS keys that are shared with GuardDuty service account cannot be invoked from any other context except the Amazon EBS service. Once the scan completes successfully, the KMS key grant is revoked and the volume replica in GuardDuty service account is deleted, making sure GuardDuty service cannot access your data after completing the scan operation.
Enabling Malware Protection for an AWS Account If you’re not using GuardDuty yet, Malware Protection is enabled by default when you activate GuardDuty for your account. Because I am already using GuardDuty, I need to enable Malware Protection from the console. If you’re using AWS Organizations, your delegated administrator accounts can enable this for existing member accounts and configure if new AWS accounts in the organization should be automatically enrolled.
In the GuardDuty console, I choose Malware Protection under Settings in the navigation pane. There, I choose Enable and then Enable Malware Protection.
Snapshots are automatically deleted after they are scanned. In General settings, I have the option to retain in my AWS account the snapshots where malware is detected and have them available for further analysis.
In Scan options, I can configure a list of inclusion tags, so that only EC2 instances with those tags are scanned, or exclusion tags, so that EC2 instances with tags in the list are skipped.
Testing Malware Protection GuardDuty Findings To generate several Amazon GuardDuty findings, including the new Malware Protection findings, I clone the Amazon GuardDuty Tester repo:
First, I create an AWS CloudFormation stack using the guardduty-tester.template file. When the stack is ready, I follow the instructions to configure my SSH client to log in to the tester instance through the bastion host. Then, I connect to the tester instance:
$ ssh tester
From the tester instance, I start the guardduty_tester.sh script to generate the findings:
$ ./guardduty_tester.sh

***********************************************************************
* Test #1 - Internal port scanning                                    *
* This simulates internal reconaissance by an internal actor or an   *
* external actor after an initial compromise. This is considered a    *
* low priority finding for GuardDuty because its not a clear indicator*
* of malicious intent on its own.                                     *
***********************************************************************


Starting Nmap 6.40 ( http://nmap.org ) at 2022-05-19 09:36 UTC
Nmap scan report for ip-172-16-0-20.us-west-2.compute.internal (172.16.0.20)
Host is up (0.00032s latency).
Not shown: 997 filtered ports
PORT     STATE  SERVICE
22/tcp   open   ssh
80/tcp   closed http
5050/tcp closed mmcc
MAC Address: 06:25:CB:F4:E0:51 (Unknown)

Nmap done: 1 IP address (1 host up) scanned in 4.96 seconds

-----------------------------------------------------------------------

***********************************************************************
* Test #2 - SSH Brute Force with Compromised Keys                     *
* This simulates an SSH brute force attack on an SSH port that we    *
* can access from this instance. It uses (phony) compromised keys in  *
* many subsequent attempts to see if one works. This is a common      *
* techique where the bad actors will harvest keys from the web in     *
* places like source code repositories where people accidentally leave*
* keys and credentials (This attempt will not actually succeed in     *
* obtaining access to the target linux instance in this subnet)       *
***********************************************************************

2022-05-19 09:36:29 START
2022-05-19 09:36:29 Crowbar v0.4.3-dev
2022-05-19 09:36:29 Trying 172.16.0.20:22
2022-05-19 09:36:33 STOP
2022-05-19 09:36:33 No results found...
2022-05-19 09:36:33 START
2022-05-19 09:36:33 Crowbar v0.4.3-dev
2022-05-19 09:36:33 Trying 172.16.0.20:22
2022-05-19 09:36:37 STOP
2022-05-19 09:36:37 No results found...
2022-05-19 09:36:37 START
2022-05-19 09:36:37 Crowbar v0.4.3-dev
2022-05-19 09:36:37 Trying 172.16.0.20:22
2022-05-19 09:36:41 STOP
2022-05-19 09:36:41 No results found...
2022-05-19 09:36:41 START
2022-05-19 09:36:41 Crowbar v0.4.3-dev
2022-05-19 09:36:41 Trying 172.16.0.20:22
2022-05-19 09:36:45 STOP
2022-05-19 09:36:45 No results found...
2022-05-19 09:36:45 START
2022-05-19 09:36:45 Crowbar v0.4.3-dev
2022-05-19 09:36:45 Trying 172.16.0.20:22
2022-05-19 09:36:48 STOP
2022-05-19 09:36:48 No results found...
2022-05-19 09:36:49 START
2022-05-19 09:36:49 Crowbar v0.4.3-dev
2022-05-19 09:36:49 Trying 172.16.0.20:22
2022-05-19 09:36:52 STOP
2022-05-19 09:36:52 No results found...
2022-05-19 09:36:52 START
2022-05-19 09:36:52 Crowbar v0.4.3-dev
2022-05-19 09:36:52 Trying 172.16.0.20:22
2022-05-19 09:36:56 STOP
2022-05-19 09:36:56 No results found...
2022-05-19 09:36:56 START
2022-05-19 09:36:56 Crowbar v0.4.3-dev
2022-05-19 09:36:56 Trying 172.16.0.20:22
2022-05-19 09:37:00 STOP
2022-05-19 09:37:00 No results found...
2022-05-19 09:37:00 START
2022-05-19 09:37:00 Crowbar v0.4.3-dev
2022-05-19 09:37:00 Trying 172.16.0.20:22
2022-05-19 09:37:04 STOP
2022-05-19 09:37:04 No results found...
2022-05-19 09:37:04 START
2022-05-19 09:37:04 Crowbar v0.4.3-dev
2022-05-19 09:37:04 Trying 172.16.0.20:22
2022-05-19 09:37:08 STOP
2022-05-19 09:37:08 No results found...
2022-05-19 09:37:08 START
2022-05-19 09:37:08 Crowbar v0.4.3-dev
2022-05-19 09:37:08 Trying 172.16.0.20:22
2022-05-19 09:37:12 STOP
2022-05-19 09:37:12 No results found...
2022-05-19 09:37:12 START
2022-05-19 09:37:12 Crowbar v0.4.3-dev
2022-05-19 09:37:12 Trying 172.16.0.20:22
2022-05-19 09:37:16 STOP
2022-05-19 09:37:16 No results found...
2022-05-19 09:37:16 START
2022-05-19 09:37:16 Crowbar v0.4.3-dev
2022-05-19 09:37:16 Trying 172.16.0.20:22
2022-05-19 09:37:20 STOP
2022-05-19 09:37:20 No results found...
2022-05-19 09:37:20 START
2022-05-19 09:37:20 Crowbar v0.4.3-dev
2022-05-19 09:37:20 Trying 172.16.0.20:22
2022-05-19 09:37:23 STOP
2022-05-19 09:37:23 No results found...
2022-05-19 09:37:23 START
2022-05-19 09:37:23 Crowbar v0.4.3-dev
2022-05-19 09:37:23 Trying 172.16.0.20:22
2022-05-19 09:37:27 STOP
2022-05-19 09:37:27 No results found...
2022-05-19 09:37:27 START
2022-05-19 09:37:27 Crowbar v0.4.3-dev
2022-05-19 09:37:27 Trying 172.16.0.20:22
2022-05-19 09:37:31 STOP
2022-05-19 09:37:31 No results found...
2022-05-19 09:37:31 START
2022-05-19 09:37:31 Crowbar v0.4.3-dev
2022-05-19 09:37:31 Trying 172.16.0.20:22
2022-05-19 09:37:34 STOP
2022-05-19 09:37:34 No results found...
2022-05-19 09:37:35 START
2022-05-19 09:37:35 Crowbar v0.4.3-dev
2022-05-19 09:37:35 Trying 172.16.0.20:22
2022-05-19 09:37:38 STOP
2022-05-19 09:37:38 No results found...
2022-05-19 09:37:38 START
2022-05-19 09:37:38 Crowbar v0.4.3-dev
2022-05-19 09:37:38 Trying 172.16.0.20:22
2022-05-19 09:37:42 STOP
2022-05-19 09:37:42 No results found...
2022-05-19 09:37:42 START
2022-05-19 09:37:42 Crowbar v0.4.3-dev
2022-05-19 09:37:42 Trying 172.16.0.20:22
2022-05-19 09:37:46 STOP
2022-05-19 09:37:46 No results found...

-----------------------------------------------------------------------

***********************************************************************
* Test #3 - RDP Brute Force with Password List                        *
* This simulates an RDP brute force attack on the internal RDP port  *
* of the windows server that we installed in the environment.  It uses*
* a list of common passwords that can be found on the web. This test  *
* will trigger a detection, but will fail to get into the target      *
* windows instance.                                                   *
***********************************************************************

Sending 250 password attempts at the windows server...
Hydra v9.4-dev (c) 2022 by van Hauser/THC & David Maciejak - Please do not use in military or secret service organizations, or for illegal purposes (this is non-binding, these *** ignore laws and ethics anyway).

Hydra (https://github.com/vanhauser-thc/thc-hydra) starting at 2022-05-19 09:37:46
[WARNING] rdp servers often don't like many connections, use -t 1 or -t 4 to reduce the number of parallel connections and -W 1 or -W 3 to wait between connection to allow the server to recover
[INFO] Reduced number of tasks to 4 (rdp does not like many parallel connections)
[WARNING] the rdp module is experimental. Please test, report - and if possible, fix.
[DATA] max 4 tasks per 1 server, overall 4 tasks, 1792 login tries (l:7/p:256), ~448 tries per task
[DATA] attacking rdp://172.16.0.24:3389/
[STATUS] 1099.00 tries/min, 1099 tries in 00:01h, 693 to do in 00:01h, 4 active
1 of 1 target completed, 0 valid password found
Hydra (https://github.com/vanhauser-thc/thc-hydra) finished at 2022-05-19 09:39:23

-----------------------------------------------------------------------

***********************************************************************
* Test #4 - CryptoCurrency Mining Activity                            *
* This simulates interaction with a cryptocurrency mining pool which *
* can be an indication of an instance compromise. In this case, we are*
* only interacting with the URL of the pool, but not downloading      *
* any files. This will trigger a threat intel based detection.        *
***********************************************************************

Calling bitcoin wallets to download mining toolkits

-----------------------------------------------------------------------

***********************************************************************
* Test #5 - DNS Exfiltration                                          *
* A common exfiltration technique is to tunnel data out over DNS      *
* to a fake domain.  Its an effective technique because most hosts    *
* have outbound DNS ports open.  This test wont exfiltrate any data,  *
* but it will generate enough unusual DNS activity to trigger the     *
* detection.                                                          *
***********************************************************************

Calling large numbers of large domains to simulate tunneling via DNS

***********************************************************************
* Test #6 - Fake domain to prove that GuardDuty is working            *
* This is a permanent fake domain that customers can use to prove that*
* GuardDuty is working.  Calling this domain will always generate the *
* Backdoor:EC2/C&CActivity.B!DNS finding type                         *
***********************************************************************

Calling a well known fake domain that is used to generate a known finding

; <<>> DiG 9.11.4-P2-RedHat-9.11.4-26.P2.amzn2.5.2 <<>> GuardDutyC2ActivityB.com any
;; global options: +cmd
;; Got answer:
;; ->>HEADER<<- opcode: QUERY, status: NOERROR, id: 11495
;; flags: qr rd ra; QUERY: 1, ANSWER: 8, AUTHORITY: 0, ADDITIONAL: 1

;; OPT PSEUDOSECTION:
; EDNS: version: 0, flags:; udp: 4096
;; QUESTION SECTION:
;GuardDutyC2ActivityB.com.	IN	ANY

;; ANSWER SECTION:
GuardDutyC2ActivityB.com. 6943	IN	SOA	ns1.markmonitor.com. hostmaster.markmonitor.com. 2018091906 86400 3600 2592000 172800
GuardDutyC2ActivityB.com. 6943	IN	NS	ns3.markmonitor.com.
GuardDutyC2ActivityB.com. 6943	IN	NS	ns5.markmonitor.com.
GuardDutyC2ActivityB.com. 6943	IN	NS	ns7.markmonitor.com.
GuardDutyC2ActivityB.com. 6943	IN	NS	ns2.markmonitor.com.
GuardDutyC2ActivityB.com. 6943	IN	NS	ns4.markmonitor.com.
GuardDutyC2ActivityB.com. 6943	IN	NS	ns6.markmonitor.com.
GuardDutyC2ActivityB.com. 6943	IN	NS	ns1.markmonitor.com.

;; Query time: 27 msec
;; SERVER: 172.16.0.2#53(172.16.0.2)
;; WHEN: Thu May 19 09:39:23 UTC 2022
;; MSG SIZE  rcvd: 238


*****************************************************************************************************
Expected GuardDuty Findings

Test 1: Internal Port Scanning
Expected Finding: EC2 Instance  i-011e73af27562827b  is performing outbound port scans against remote host. 172.16.0.20
Finding Type: Recon:EC2/Portscan

Test 2: SSH Brute Force with Compromised Keys
Expecting two findings - one for the outbound and one for the inbound detection
Outbound:  i-011e73af27562827b  is performing SSH brute force attacks against  172.16.0.20
Inbound:  172.16.0.25  is performing SSH brute force attacks against  i-0bada13e0aa12d383
Finding Type: UnauthorizedAccess:EC2/SSHBruteForce

Test 3: RDP Brute Force with Password List
Expecting two findings - one for the outbound and one for the inbound detection
Outbound:  i-011e73af27562827b  is performing RDP brute force attacks against  172.16.0.24
Inbound:  172.16.0.25  is performing RDP brute force attacks against  i-0191573dec3b66924
Finding Type : UnauthorizedAccess:EC2/RDPBruteForce

Test 4: Cryptocurrency Activity
Expected Finding: EC2 Instance  i-011e73af27562827b  is querying a domain name that is associated with bitcoin activity
Finding Type : CryptoCurrency:EC2/BitcoinTool.B!DNS

Test 5: DNS Exfiltration
Expected Finding: EC2 instance  i-011e73af27562827b  is attempting to query domain names that resemble exfiltrated data
Finding Type : Trojan:EC2/DNSDataExfiltration

Test 6: C&C Activity
Expected Finding: EC2 instance  i-011e73af27562827b  is querying a domain name associated with a known Command & Control server.
Finding Type : Backdoor:EC2/C&CActivity.B!DNS
After a few minutes, the findings appear in the GuardDuty console. At the top, I see the malicious files found by the new Malware Protection capability. One of the findings is related to an EC2 instance, the other to an ECS cluster.
First, I select the finding related to the EC2 instance. In the panel, I see the information on the instance and the malicious file, such as the file name and path. In the Malware scan details section, the Trigger finding ID points to the original GuardDuty finding that triggered the malware scan. In my case, the original finding was that this EC2 instance was performing RDP brute force attacks against another EC2 instance.
Here, I choose Investigate with Detective and, directly from the GuardDuty console, I go to the Detective console to visualize AWS CloudTrail and Amazon Virtual Private Cloud (Amazon VPC) flow data for the EC2 instance, the AWS account, and the IP address affected by the finding. Using Detective, I can analyze, investigate, and identify the root cause of suspicious activities found by GuardDuty.
When I select the finding related to the ECS cluster, I have more information on the resource affected, such as the details of the ECS cluster, the task, the containers, and the container images.
Using the GuardDuty tester scripts makes it easier to test the overall integration of GuardDuty with other security frameworks you use so that you can be ready when a real threat is detected.
Comparing GuardDuty Malware Protection with Amazon Inspector At this point, you might ask yourself how GuardDuty Malware Protection relates to Amazon Inspector, a service that scans AWS workloads for software vulnerabilities and unintended network exposure. The two services complement each other and offer different layers of protection:
Amazon Inspector offers proactive protection by identifying and remediating known software and application vulnerabilities that serve as an entry point for attackers to compromise resources and install malware.
GuardDuty Malware Protection detects malware that is found to be present on actively running workloads. At that point, the system has already been compromised, but GuardDuty can limit the time of an infection and take action before a system compromise results in a business-impacting event.
Availability and Pricing Amazon GuardDuty Malware Protection is available today in all AWS Regions where GuardDuty is available, excluding the AWS China (Beijing), AWS China (Ningxia), AWS GovCloud (US-East), and AWS GovCloud (US-West) Regions.
At launch, GuardDuty Malware Protection is integrated with these partner offerings:
With GuardDuty, you don’t need to deploy security software or agents to monitor for malware. You only pay for the amount of GB scanned in the file systems (not for the size of the EBS volumes) and for the EBS snapshots during the time they are kept in your account. All EBS snapshots created by GuardDuty are automatically deleted after they are scanned unless you enable snapshot retention when malware is found. For more information, see GuardDuty pricing and EBS pricing. Note that GuardDuty only scans EBS volumes less than 1 TB in size. To help you control costs and avoid repeating alarms, the same volume is not scanned more often than once every 24 hours.
We’re excited to announce the completion of the Trusted Information Security Assessment Exchange (TISAX) certification on June 30, 2022 for 19 AWS Regions. These Regions achieved the Information with Very High Protection Needs (AL3) label for the control domains Information Handling and Data Protection. This alignment with TISAX requirements demonstrates our continued commitment to adhere to the heightened expectations for cloud service providers. AWS automotive customers can run their applications in the AWS Cloud certified Regions in confidence.
The following 19 Regions are currently TISAX certified:
US East (Ohio)
US East (Northern Virginia)
US West (Oregon)
Africa (Cape Town)
Asia Pacific (Hong Kong)
Asia Pacific (Mumbai)
Asia Pacific (Osaka)
Asia Pacific (Korea)
Asia Pacific (Singapore)
Asia Pacific (Sydney)
Asia Pacific (Tokyo)
Canada (Central)
Europe (Frankfurt)
Europe (Ireland)
Europe (London)
Europe (Milan)
Europe (Paris)
Europe (Stockholm)
South America (Sao Paulo)
TISAX is a European automotive industry-standard information security assessment (ISA) catalog based on key aspects of information security, such as data protection and connection to third parties.
AWS was evaluated and certified by independent third-party auditors on June 30, 2022. The Certificate of Compliance demonstrating the AWS compliance status is available on the European Network Exchange (ENX) Portal (the scope ID and assessment ID are SM22TH and AYA2D4-1, respectively) and through AWS Artifact. AWS Artifact is a self-service portal for on-demand access to AWS compliance reports. Sign in to AWS Artifact in the AWS Management Console, or learn more at Getting Started with AWS Artifact.
For up-to-date information, including when additional Regions are added, see the AWS Compliance Program, and choose TISAX.
AWS strives to continuously bring services into scope of its compliance programs to help you meet your architectural and regulatory needs. Please reach out to your AWS account team if you have questions or feedback about TISAX compliance.
To learn more about our compliance and security programs, see AWS Compliance Programs. As always, we value your feedback and questions; reach out to the AWS Compliance team through the Contact Us page.
If you have feedback about this post, submit comments in the Comments section below.
Want more AWS Security how-to content, news, and feature announcements? Follow us on Twitter.
We’re excited to announce that three additional AWS Regions—Asia Pacific (Korea), Europe (London), and Europe (Stockholm)—have been granted the Health Data Hosting (Hébergeur de Données de Santé, HDS) certification. This alignment with the HDS requirements demonstrates our continued commitment to adhere to the heightened expectations for cloud service providers. AWS customers who handle personal health data can be hosted in the AWS Cloud certified Regions with confidence.
The following 16 Regions are now in scope of this certification:
US East (Ohio)
US East (Northern Virginia)
US West (Northern California)
US West (Oregon)
Asia Pacific (Mumbai)
Asia Pacific (Korea)
Asia Pacific (Singapore)
Asia Pacific (Sydney)
Asia Pacific (Tokyo)
Canada (Central)
Europe (Frankfurt)
Europe (Ireland)
Europe (London)
Europe (Paris)
Europe (Stockholm)
South America (Sao Paulo)
Introduced by the French governmental agency for health, Agence Française de la Santé Numérique (ASIP Santé), HDS certification aims to strengthen the security and protection of personal health data. Achieving this certification demonstrates that AWS provides a framework for technical and governance measures to secure and protect personal health data, governed by French law.
AWS was evaluated and certified by independent third-party auditors on June 30, 2022. The Certificate of Compliance demonstrating the AWS compliance status is available on the Agence du Numérique en Santé (ANS) website and through AWS Artifact. AWS Artifact is a self-service portal for on-demand access to AWS compliance reports. Sign in to AWS Artifact in the AWS Management Console, or learn more at Getting Started with AWS Artifact.
For up-to-date information, including when additional Regions are added, see the AWS Compliance Program, and choose HDS.
AWS strives to continuously bring services into scope of its compliance programs to help you meet your architectural and regulatory needs. Please reach out to your AWS account team if you have questions or feedback about HDS compliance.
To learn more about our compliance and security programs, see AWS Compliance Programs. As always, we value your feedback and questions; reach out to the AWS Compliance team through the Contact Us page.
If you have feedback about this post, submit comments in the Comments section below.
Want more AWS Security how-to content, news, and feature announcements? Follow us on Twitter.
AWS Identity and Access Management (IAM) has now made it easier for you to use IAM roles for your workloads that are running outside of AWS, with the release of IAM Roles Anywhere. This feature extends the capabilities of IAM roles to workloads outside of AWS. You can use IAM Roles Anywhere to provide a secure way for on-premises servers, containers, or applications to obtain temporary AWS credentials and remove the need for creating and managing long-term AWS credentials.
In this post, I will briefly discuss how IAM Roles Anywhere works. I’ll mention some of the common use cases for IAM Roles Anywhere. And finally, I’ll walk you through an example scenario to demonstrate how the implementation works.
Background
To enable your applications to access AWS services and resources, you need to provide the application with valid AWS credentials for making AWS API requests. For workloads running on AWS, you do this by associating an IAM role with Amazon Elastic Compute Cloud (Amazon EC2), Amazon Elastic Container Service (Amazon ECS), Amazon Elastic Kubernetes Service (Amazon EKS), or AWS Lambda resources, depending on the compute platform hosting your application. This is secure and convenient, because you don’t have to distribute and manage AWS credentials for applications running on AWS. Instead, the IAM role supplies temporary credentials that applications can use when they make AWS API calls.
IAM Roles Anywhere enables you to use IAM roles for your applications outside of AWS to access AWS APIs securely, the same way that you use IAM roles for workloads on AWS. With IAM Roles Anywhere, you can deliver short-term credentials to your on-premises servers, containers, or other compute platforms. When you use IAM Roles Anywhere to vend short-term credentials you can remove the need for long-term AWS access keys and secrets, which can help improve security, and remove the operational overhead of managing and rotating the long-term credentials. You can also use IAM Roles Anywhere to provide a consistent experience for managing credentials across hybrid workloads.
In this post, I assume that you have a foundational knowledge of IAM, so I won’t go into the details here about IAM roles. For more information on IAM roles, see the IAM documentation.
How does IAM Roles Anywhere work?
IAM Roles Anywhere relies on public key infrastructure (PKI) to establish trust between your AWS account and certificate authority (CA) that issues certificates to your on-premises workloads. Your workloads outside of AWS use IAM Roles Anywhere to exchange X.509 certificates for temporary AWS credentials. The certificates are issued by a CA that you register as a trust anchor (root of trust) in IAM Roles Anywhere. The CA can be part of your existing PKI system, or can be a CA that you created with AWS Certificate Manager Private Certificate Authority (ACM PCA).
Your application makes an authentication request to IAM Roles Anywhere, sending along its public key (encoded in a certificate) and a signature signed by the corresponding private key. Your application also specifies the role to assume in the request. When IAM Roles Anywhere receives the request, it first validates the signature with the public key, then it validates that the certificate was issued by a trust anchor previously configured in the account. For more details, see the signature validation documentation.
After both validations succeed, your application is now authenticated and IAM Roles Anywhere will create a new role session for the role specified in the request by calling AWS Security Token Service (AWS STS). The effective permissions for this role session are the intersection of the target role’s identity-based policies and the session policies, if specified, in the profile you create in IAM Roles Anywhere. Like any other IAM role session, it is also subject to other policy types that you might have in place, such as permissions boundaries and service control policies (SCPs).
There are typically three main tasks, performed by different personas, that are involved in setting up and using IAM Roles Anywhere:
Initial configuration of IAM Roles Anywhere – This task involves creating a trust anchor, configuring the trust policy of the role that IAM Roles Anywhere is going to assume, and defining the role profile. These activities are performed by the AWS account administrator and can be limited by IAM policies.
Provisioning of certificates to workloads outside AWS – This task involves ensuring that the X.509 certificate, signed by the CA, is installed and available on the server, container, or application outside of AWS that needs to authenticate. This is performed in your on-premises environment by an infrastructure admin or provisioning actor, typically by using existing automation and configuration management tools.
Using IAM Roles Anywhere – This task involves configuring the credential provider chain to use the IAM Roles Anywhere credential helper tool to exchange the certificate for session credentials. This is typically performed by the developer of the application that interacts with AWS APIs.
I’ll go into the details of each task when I walk through the example scenario later in this post.
Common use cases for IAM Roles Anywhere
You can use IAM Roles Anywhere for any workload running in your data center, or in other cloud providers, that requires credentials to access AWS APIs. Here are some of the use cases we think will be interesting to customers based on the conversations and patterns we have seen:
Send security findings from on-premises sources to AWS Security Hub
Enable hybrid workloads to access AWS services over the course of phased migrations
Example scenario and walkthrough
To demonstrate how IAM Roles Anywhere works in action, let’s walk through a simple scenario where you want to call S3 APIs to upload some data from a server in your data center.
Prerequisites
Before you set up IAM Roles Anywhere, you need to have the following requirements in place:
The certificate bundle of your own CA, or an active ACM PCA CA in the same AWS Region as IAM Roles Anywhere
An end-entity certificate and associated private key available on the on-premises server
Administrator permissions for IAM roles and IAM Roles Anywhere
Setup
Here I demonstrate how to perform the setup process by using the IAM Roles Anywhere console. Alternatively, you can use the AWS API or Command Line Interface (CLI) to perform these actions. There are three main activities here:
Create a trust anchor
Create and configure a role that trusts IAM Roles Anywhere
Under Trust anchors, choose Create a trust anchor.
On the Create a trust anchor page, enter a name for your trust anchor and select the existing AWS Certificate Manager Private CA from the list. Alternatively, if you want to use your own external CA, choose External certificate bundle and provide the certificate bundle.
Figure 1: Create a trust anchor in IAM Roles Anywhere
To create and configure a role that trusts IAM Roles Anywhere
Using the AWS Command Line Interface (AWS CLI), you are going to create an IAM role with appropriate permissions that you want your on-premises server to assume after authenticating to IAM Roles Anywhere. Save the following trust policy as rolesanywhere-trust-policy.json on your computer.
Save the following identity-based policy as onpremsrv-permissions-policy.json. This grants the role permissions to write objects into the specified S3 bucket.
You can optionally use condition statements based on the attributes extracted from the X.509 certificate to further restrict the trust policy to control the on-premises resources that can obtain credentials from IAM Roles Anywhere. IAM Roles Anywhere sets the SourceIdentity value to the CN of the subject (onpremsrv01 in my example). It also sets individual session tags (PrincipalTag/) with the derived attributes from the certificate. So, you can use the principal tags in the Condition clause in the trust policy as additional authorization constraints.
For example, the Subject for the certificate I use in this post is as follows.
Subject: … O = Example Corp., OU = SecOps, CN = onpremsrv01
So, I can add condition statements like the following into the trust policy (rolesanywhere-trust-policy.json):
On the Create a profile page, enter a name for the profile.
For Roles, select the role that you created in the previous step (ExampleS3WriteRole).
5. Optionally, you can define session policies to further scope down the sessions delivered by IAM Roles Anywhere. This is particularly useful when you configure the profile with multiple roles and want to restrict permissions across all the roles. You can add the desired session polices as managed policies or inline policy. Here, for demonstration purpose, I add an inline policy to only allow requests coming from my specified IP address.
Figure 2: Create a profile in IAM Roles Anywhere
At this point, IAM Roles Anywhere setup is complete and you can start using it.
Use IAM Roles Anywhere
IAM Roles Anywhere provides a credential helper tool that can be used with the process credentials functionality that all current AWS SDKs support. This simplifies the signing process for the applications. See the IAM Roles Anywhere documentation to learn how to get the credential helper tool.
To test the functionality first, run the credential helper tool (aws_signing_helper) manually from the on-premises server, as follows.
Figure 3: Running the credential helper tool manually
You should successfully receive session credentials from IAM Roles Anywhere, similar to the example in Figure 3. Once you’ve confirmed that the setup works, update or create the ~/.aws/config file and add the signing helper as a credential_process. This will enable unattended access for the on-premises server. To learn more about the AWS CLI configuration file, see Configuration and credential file settings.
To verify that the config works as expected, call the aws sts get-caller-identity AWS CLI command and confirm that the assumed role is what you configured in IAM Roles Anywhere. You should also see that the role session name contains the Serial Number of the certificate that was used to authenticate (cc:c3:…:85:37 in this example). Finally, you should be able to copy a file to the S3 bucket, as shown in Figure 4.
Figure 4: Verify the assumed role
Audit
As with other AWS services, AWS CloudTrail captures API calls for IAM Roles Anywhere. Let’s look at the corresponding CloudTrail log entries for the activities we performed earlier.
The first log entry I’m interested in is CreateSession, when the on-premises server called IAM Roles Anywhere through the credential helper tool and received session credentials back.
You can see that the cert, along with other parameters, is sent to IAM Roles Anywhere and a role session along with temporary credentials is sent back to the server.
The next log entry we want to look at is the one for the s3:PutObject call we made from our on-premises server.
In addition to the CloudTrail logs, there are several metrics and events available for you to use for monitoring purposes. To learn more, see Monitoring IAM Roles Anywhere.
Additional notes
You can disable the trust anchor in IAM Roles Anywhere to immediately stop new sessions being issued to your resources outside of AWS. Certificate revocation is supported through the use of imported certificate revocation lists (CRLs). You can upload a CRL that is generated from your CA, and certificates used for authentication will be checked for their revocation status. IAM Roles Anywhere does not support callbacks to CRL Distribution Points (CDPs) or Online Certificate Status Protocol (OCSP) endpoints.
Another consideration, not specific to IAM Roles Anywhere, is to ensure that you have securely stored the private keys on your server with appropriate file system permissions.
Conclusion
In this post, I discussed how the new IAM Roles Anywhere service helps you enable workloads outside of AWS to interact with AWS APIs securely and conveniently. When you extend the capabilities of IAM roles to your servers, containers, or applications running outside of AWS you can remove the need for long-term AWS credentials, which means no more distribution, storing, and rotation overheads.
I mentioned some of the common use cases for IAM Roles Anywhere. You also learned about the setup process and how to use IAM Roles Anywhere to obtain short-term credentials.
If you have any questions, you can start a new thread on AWS re:Post or reach out to AWS Support.
Last year during CIO week, we announced Page Shield in general availability. Today, we talk about improvements we’ve made to help Page Shield users focus on the highest impact scripts and get more value out of the product. In this post we go over improvements to script status, metadata and categorization.
What is Page Shield?
Page Shield protects website owners and visitors against malicious 3rd party JavaScript. JavaScript can be leveraged in a number of malicious ways: browser-side crypto mining, data exfiltration and malware injection to mention a few.
For example a single hijacked JavaScript can expose millions of user’s credit card details across a range of websites to a malicious actor. The bad actor would scrape details by leveraging a compromised JavaScript library, skimming inputs to a form and exfiltrating this to a 3rd party endpoint under their control.
Today Page Shield partially relies on Content Security Policies (CSP), a browser native framework that can be used to control and gain visibility of which scripts are allowed to load on pages (while also reporting on any violations). We use these violation reports to provide detailed information in the Cloudflare dashboard regarding scripts being loaded by end-user browsers.
Page Shield users, via the dashboard, can see which scripts are active on their website and on which pages. Users can be alerted in case a script performs malicious activity, and monitor code changes of the script.
Script status
To help identify malicious scripts, and make it easier to take action on live threats, we have introduced a status field.
When going to the Page Shield dashboard, the customer will now only see scripts with a status of active. Active scripts are those that were seen in the last seven days and didn’t get served through the “cdn-cgi” endpoint (which is managed by Cloudflare).
We also introduced other statuses:
infrequent scripts are scripts that have only been seen in a negligible amount of CSP reports over a period of time. TThey normally indicate a single user’s browser using a compromised browser extension. The goal of this status is to reduce noise caused by browser plugins that inject their JavaScript in the HTML.
inactive scripts are those that have not been reported for seven days and therefore have likely since been removed or replaced.
cdn-cgi are scripts served from the ‘/cdn-cgi/’ endpoint which is managed by Cloudflare. These scripts are related to Cloudflare products like our analytics or Bot Management features. Cloudflare closely monitors these scripts, they are fairly static, so they shouldn’t require close monitoring by a customer and therefore are hidden by default unless our detections find anything suspicious.
If the customer wishes to see the full list of scripts including the non-active scripts they can still do so by clicking ‘All scripts’.
Script metadata in alerts
Customers that opt into the enterprise add-on version of Page Shield can also choose to set up notifications for malicious scripts. In the previous version, we offered the script URL, first seen on and last seen on data. These alerts have been revamped to improve the experience for security analysts. Our goal is to provide all data a security analyst would manually look-up in order to validate a script. With this update we’ve made a significant step in that direction through using insights delivered by Cloudflare Radar.
At the top of the email alert you will now find where the script was seen along with other information regarding when the script was seen and the full URL (not clickable for security purposes).
As part of the enterprise add-on version of Page Shield we review the scripts through a custom machine learning classifier and a range of domain and URL threat feeds. A very common question with any machine learning scoring system is “why did it score the way it scored”. Because of this, the machine learning score generated by our system has now been split up to show the components that made up the score; currently: obfuscation and data exfiltration values. This should help to improve the ability for a customer to review a script in case of a false positive.
Threat feeds can be very helpful in detecting new attack styles that our classifier hasn’t been trained for yet. Some of these feeds offer us a range of categories of malicious endpoints such as ‘malware’, ‘spyware’ or ‘phishing’. Our enterprise add-on customers will now be able to see the categorization in our alerts (as shown above) and on the dashboard. The goal is to provide more context on why a script is considered malicious.
We also now provide information on script changes along with the “malicious code score” for each version.
Right below the most essential information we have added WHOIS information on the party domain that is providing the script. In some cases the registrar may hide relevant information such as the organization’s name, however, information on the date of registration and expiration can be very useful in detecting unexpected changes in ownership. For example, we often see malicious scripts being hosted under newly registered domains.
We also now offer details regarding the SSL certificates issued for this domain through certificate transparency monitoring. This can be useful in detecting a potential take over. For example, if a 3rd party script endpoint usually uses a Digicert certificate, but recently a Let’s Encrypt certificate has been issued this could be an indicator that another party is trying to take over the domain.
Last but not least, we have improved our dashboard link to take users directly to the specific script details page provided by the Page Shield UI.
What’s next?
There are many ways to perform malicious activity through JavaScript. Because of this it is important that we build attack type specific detection mechanisms as well as overarching tools that will help detect anomalies. We are currently building a new component purpose built to look for signs of malicious intent in data endpoints by leveraging the connect-src CSP directive. The goal is to improve the accuracy of our Magecart-style attack detection.
We are also working on providing the ability to generate CSP policies directly through Page Shield making it easy to perform positive blocking and maintain rules over time.
Another feature we are working on is offering the ability to block scripts from accessing a user’s webcam, microphone or location through a single click.
More about this in future blog posts. Many more features to come!
Detecting fraud schemes used to require investigations using large amounts and varying types of data that come from many different anti-fraud systems. Investigators then need to combine the different types of data and use statistical methods to uncover suspicious claims, which is time consuming and inefficient in most cases.
We are always looking for ways to improve fraud investigation methods and stay one step ahead of our ever-growing fraudsters. In the introductory blog of this series, we’ve mentioned experimenting with a set of Graph Network technologies, including Graph Visualisation.
In this post, we will introduce our Graph Visualisation Platform and briefly illustrate how it makes fraud investigations easier and more effective.
Why visualise a graph?
If you’re a fan of crime shows, you would have come across scenes like a detective putting together evidence, such as pictures, notes and articles, on a board and connecting them with thumb tacks and yarn. When you look at the board, it’s easy to see the relationships between the different pieces of evidence. That’s what graphs do, especially in fraud detection.
In the same way, while graph data is the raw material of an investigation, some of the most interesting relationships are often inferred rather than modelled directly in the data. Visualising these relationships can give a unique “big picture” of the data that is difficult or impossible to obtain with traditional relational tables and business intelligence tools.
On the other hand, graph visualisation enhances the quick identification of relationships and significant structures because it is an intuitive way to help detect patterns. Plus, the human brain processes visual information much faster; that’s where our Graph Visualisation platform comes in.
What is the Graph Visualisation platform?
Graph Visualisation platform is a full-featured investigation platform that can reveal hidden connections and context in data by transforming raw records into highly visual and interactive maps. From there, investigators can grab any data point and quickly see relationships, patterns, and anomalies, and if necessary, drill down to investigate further.
This is all done without writing a manual query, switching between anti-fraud systems, or having to think about data science! These are some of the interactions on the platform that easily make anomalies or relevant patterns stand out.
Expanding the data
To date, we have over three billion nodes and edges in our storage system. It is not possible (nor necessary) to show all of the data at once. The platform allows the user to grab any data point and easily expand to view the relationships.
Timeline tracking and history replay
The Graph Visualisation platform’s interactive time filter lets you see temporal relationships within your data and clearly reveals the chronological progression of events. You can start with a specific time of interest, track everything that happens after, then quickly focus on the time and relationships that matter most.
10X investigations
Here are a few examples of how the Graph Visualisation platform facilitates fraud investigations.
Appeal confirmation
The following image shows the difference between a true fraudster and a falsely identified one. On the left, we have a Grab rental corporate account that was falsely detected by a fraud rule. Upon review, we discovered that there is no suspicious connection to this account, thus the account got unblocked.
On the right, we have a passenger that was blocked by the system and they appealed. Investigations showed that the passenger is, in fact, part of an extremely dense device-sharing network, so we maintained our decision to block.
Modus operandi discovery
Passenger sharing device
Fraudsters tend to share physical resources to maximise their revenue. With our Graph Visualisation platform, you can see exactly how this pattern looks like. The image below shows a device that is shared by a lot of fraudsters.
Anti-money laundering (AML)
On the left, we see a pattern of healthy spending on Grab. However, on the right, we can see that passengers are highly connected, and it has frequent large amount transfers to other payment providers.
Closing thoughts
Graph Visualisation is an intuitive way to investigate suspicious connections and potential patterns of crime. Investigators can directly interact with any data point to get the details they need and literally view the relationships in the data to make fast, accurate, and defensible decisions.
While fraud detection is a good use case for Graph Visualisation, it’s not the only possibility. Graph Visualisation can help make anything more efficient and intelligent, especially if you have highly connected data.
In the next part of this blog series, we will talk about the Graph service platform and the importance of building graph services with graph databases. Check out the other articles in this series:
Grab is the leading superapp platform in Southeast Asia, providing everyday services that matter to consumers. More than just a ride-hailing and food delivery app, Grab offers a wide range of on-demand services in the region, including mobility, food, package and grocery delivery services, mobile payments, and financial services across 428 cities in eight countries.
Powered by technology and driven by heart, our mission is to drive Southeast Asia forward by creating economic empowerment for everyone. If this mission speaks to you, join our team today!
Linux Security Modules (LSM) is a hook-based framework for implementing security policies and Mandatory Access Control in the Linux kernel. Until recently users looking to implement a security policy had just two options. Configure an existing LSM module such as AppArmor or SELinux, or write a custom kernel module.
Linux 5.7 introduced a third way: LSM extended Berkeley Packet Filters (eBPF) (LSM BPF for short). LSM BPF allows developers to write granular policies without configuration or loading a kernel module. LSM BPF programs are verified on load, and then executed when an LSM hook is reached in a call path.
Let’s solve a real-world problem
Modern operating systems provide facilities allowing “partitioning” of kernel resources. For example FreeBSD has “jails”, Solaris has “zones”. Linux is different – it provides a set of seemingly independent facilities each allowing isolation of a specific resource. These are called “namespaces” and have been growing in the kernel for years. They are the base of popular tools like Docker, lxc or firejail. Many of the namespaces are uncontroversial, like the UTS namespace which allows the host system to hide its hostname and time. Others are complex but straightforward – NET and NS (mount) namespaces are known to be hard to wrap your head around. Finally, there is this very special very curious USER namespace.
USER namespace is special, since it allows the owner to operate as “root” inside it. How it works is beyond the scope of this blog post, however, suffice to say it’s a foundation to having tools like Docker to not operate as true root, and things like rootless containers.
Due to its nature, allowing unpriviledged users access to USER namespace always carried a great security risk. One such risk is privilege escalation.
Privilege escalation is a common attack surface for operating systems. One way users may gain privilege is by mapping their namespace to the root namespace via the unshare syscall and specifying the CLONE_NEWUSER flag. This tells unshare to create a new user namespace with full permissions, and maps the new user and group ID to the previous namespace. You can use the unshare(1) program to map root to our original namespace:
$ id
uid=1000(fred) gid=1000(fred) groups=1000(fred) …
$ unshare -rU
# id
uid=0(root) gid=0(root) groups=0(root),65534(nogroup)
# cat /proc/self/uid_map
         0       1000          1
In most cases using unshare is harmless, and is intended to run with lower privileges. However, this syscall has been known to be used to escalate privileges.
Syscalls clone and clone3 are worth looking into as they also have the ability to CLONE_NEWUSER. However, for this post we’re going to focus on unshare.
Since upstreaming code that restricts USER namespace seem to not be an option, we decided to use LSM BPF to circumvent these issues. This requires no modifications to the kernel and allows us to express complex rules guarding the access.
Track down an appropriate hook candidate
First, let us track down the syscall we’re targeting. We can find the prototype in the include/linux/syscalls.h file. From there, it’s not as obvious to track down, but the line:
/* kernel/fork.c */
Gives us a clue of where to look next in kernel/fork.c. There a call to ksys_unshare() is made. Digging through that function, we find a call to unshare_userns(). This looks promising.
Up to this point, we’ve identified the syscall implementation, but the next question to ask is what hooks are available for us to use? Because we know from the man-pages that unshare is used to mutate tasks, we look at the task-based hooks in include/linux/lsm_hooks.h. Back in the function unshare_userns()we saw a call to prepare_creds(). This looks very familiar to the cred_prepare hook. To verify we have our match via prepare_creds(), we see a call to the security hook security_prepare_creds()which ultimately calls the hook:
Without going much further down this rabbithole, we know this is a good hook to use because prepare_creds() is called right before create_user_ns() in unshare_userns() which is the operation we’re trying to block.
LSM BPF solution
We’re going to compile with the eBPF compile once-run everywhere (CO-RE) approach. This allows us to compile on one architecture and load on another. But we’re going to target x86_64 specifically. LSM BPF for ARM64 is still in development, and the following code will not run on that architecture. Watch the BPF mailing list to follow the progress.
This solution was tested on kernel versions >= 5.15 configured with the following:
Next we set up our necessary structures for CO-RE relocation in the following way:
deny_unshare.bpf.c:
…

typedef unsigned int gfp_t;

struct pt_regs {
	long unsigned int di;
	long unsigned int orig_ax;
} __attribute__((preserve_access_index));

typedef struct kernel_cap_struct {
	__u32 cap[_LINUX_CAPABILITY_U32S_3];
} __attribute__((preserve_access_index)) kernel_cap_t;

struct cred {
	kernel_cap_t cap_effective;
} __attribute__((preserve_access_index));

struct task_struct {
    unsigned int flags;
    const struct cred *cred;
} __attribute__((preserve_access_index));

char LICENSE[] SEC("license") = "GPL";

…
We don’t need to fully-flesh out the structs; we just need the absolute minimum information a program needs to function. CO-RE will do whatever is necessary to perform the relocations for your kernel. This makes writing the LSM BPF programs easy!
deny_unshare.bpf.c:
SEC("lsm/cred_prepare")
int BPF_PROG(handle_cred_prepare, struct cred *new, const struct cred *old,
             gfp_t gfp, int ret)
{
    struct pt_regs *regs;
    struct task_struct *task;
    kernel_cap_t caps;
    int syscall;
    unsigned long flags;

    // If previous hooks already denied, go ahead and deny this one
    if (ret) {
        return ret;
    }

    task = bpf_get_current_task_btf();
    regs = (struct pt_regs *) bpf_task_pt_regs(task);
    // In x86_64 orig_ax has the syscall interrupt stored here
    syscall = regs->orig_ax;
    caps = task->cred->cap_effective;

    // Only process UNSHARE syscall, ignore all others
    if (syscall != UNSHARE_SYSCALL) {
        return 0;
    }

    // PT_REGS_PARM1_CORE pulls the first parameter passed into the unshare syscall
    flags = PT_REGS_PARM1_CORE(regs);

    // Ignore any unshare that does not have CLONE_NEWUSER
    if (!(flags & CLONE_NEWUSER)) {
        return 0;
    }

    // Allow tasks with CAP_SYS_ADMIN to unshare (already root)
    if (caps.cap[CAP_TO_INDEX(CAP_SYS_ADMIN)] & CAP_TO_MASK(CAP_SYS_ADMIN)) {
        return 0;
    }

    return -EPERM;
}
Creating the program is the first step, the second is loading and attaching the program to our desired hook. There are several ways to do this: Cilium ebpf project, Rust bindings, and several others on the ebpf.io project landscape page. We’re going to use native libbpf.
deny_unshare.c:
#include <bpf/libbpf.h>
#include <unistd.h>
#include "deny_unshare.skel.h"

static int libbpf_print_fn(enum libbpf_print_level level, const char *format, va_list args)
{
    return vfprintf(stderr, format, args);
}

int main(int argc, char *argv[])
{
    struct deny_unshare_bpf *skel;
    int err;

    libbpf_set_strict_mode(LIBBPF_STRICT_ALL);
    libbpf_set_print(libbpf_print_fn);

    // Loads and verifies the BPF program
    skel = deny_unshare_bpf__open_and_load();
    if (!skel) {
        fprintf(stderr, "failed to load and verify BPF skeleton\n");
        goto cleanup;
    }

    // Attaches the loaded BPF program to the LSM hook
    err = deny_unshare_bpf__attach(skel);
    if (err) {
        fprintf(stderr, "failed to attach BPF skeleton\n");
        goto cleanup;
    }

    printf("LSM loaded! ctrl+c to exit.\n");

    // The BPF link is not pinned, therefore exiting will remove program
    for (;;) {
        fprintf(stderr, ".");
        sleep(1);
    }

cleanup:
    deny_unshare_bpf__destroy(skel);
    return err;
}
Lastly, to compile, we use the following Makefile:
Makefile:
CLANG ?= clang-13
LLVM_STRIP ?= llvm-strip-13
ARCH := x86
INCLUDES := -I/usr/include -I/usr/include/x86_64-linux-gnu
LIBS_DIR := -L/usr/lib/lib64 -L/usr/lib/x86_64-linux-gnu
LIBS := -lbpf -lelf

.PHONY: all clean run

all: deny_unshare.skel.h deny_unshare.bpf.o deny_unshare

run: all
	sudo ./deny_unshare

clean:
	rm -f *.o
	rm -f deny_unshare.skel.h

#
# BPF is kernel code. We need to pass -D__KERNEL__ to refer to fields present
# in the kernel version of pt_regs struct. uAPI version of pt_regs (from ptrace)
# has different field naming.
# See: https://git.kernel.org/pub/scm/linux/kernel/git/torvalds/linux.git/commit/?id=fd56e0058412fb542db0e9556f425747cf3f8366
#
deny_unshare.bpf.o: deny_unshare.bpf.c
	$(CLANG) -g -O2 -Wall -target bpf -D__KERNEL__ -D__TARGET_ARCH_$(ARCH) $(INCLUDES) -c $< -o $@
	$(LLVM_STRIP) -g $@ # Removes debug information

deny_unshare.skel.h: deny_unshare.bpf.o
	sudo bpftool gen skeleton $< > $@

deny_unshare: deny_unshare.c deny_unshare.skel.h
	$(CC) -g -Wall -c $< -o [email protected]
	$(CC) -g -o $@ $(LIBS_DIR) [email protected] $(LIBS)

.DELETE_ON_ERROR:
Result
In a new terminal window run:
$ make run
…
LSM loaded! ctrl+c to exit.
In another terminal window, we’re successfully blocked!
$ sudo su
# cd /sys/kernel/debug/tracing
# echo 1 > events/syscalls/sys_enter_unshare/enable ; echo 1 > events/syscalls/sys_exit_unshare/enable
At this point, we’re enabling tracing for the syscall enter and exit for unshare specifically. Now we set the time-resolution of our enter/exit calls to count CPU cycles:
unshare-92014 used 63294 cycles. unshare-92019 used 70138 cycles.
We have a 6,844 (~10%) cycle penalty between the two measurements. Not bad!
These numbers are for a single syscall, and add up the more frequently the code is called. Unshare is typically called at task creation, and not repeatedly during normal execution of a program. Careful consideration and measurement is needed for your use case.
Outro
We learned a bit about what LSM BPF is, how unshare is used to map a user to root, and how to solve a real-world problem by implementing a solution in eBPF. Tracking down the appropriate hook is not an easy task, and requires a bit of playing and a lot of kernel code. Fortunately, that’s the hard part. Because a policy is written in C, we can granularly tweak the policy to our problem. This means one may extend this policy with an allow-list to allow certain programs or users to continue to use an unprivileged unshare. Finally, we looked at the performance impact of this program, and saw the overhead is worth blocking the attack vector.
“Cannot allocate memory” is not a clear error message for denying permissions. We proposed a patch to propagate error codes from the cred_prepare hook up the call stack. Ultimately we came to the conclusion that a new hook is better suited to this problem. Stay tuned!
Throughout Cloudflare One week, we provided playbooks on how to replace your legacy appliances with Zero Trust services. Using our own products is part of our team’s culture, and we want to share our experiences when we implemented Zero Trust.
Our journey was similar to many of our customers. Not only did we want better security solutions, but the tools we were using made our work more difficult than it needed to be. This started with just a search for an alternative to remotely connecting on a clunky VPN, but soon we were deploying Zero Trust solutions to protect our employees’ web browsing and email. Next, we are looking forward to upgrading our SaaS security with our new CASB product.
We know that getting started with Zero Trust can seem daunting, so we hope that you can learn from our own journey and see how it benefited us.
Replacing a VPN: launching Cloudflare Access
Back in 2015, all of Cloudflare’s internally-hosted applications were reached via a hardware-based VPN. On-call engineers would fire up a client on their laptop, connect to the VPN, and log on to Grafana. This process was frustrating and slow.
Many of the products we build are a direct result of the challenges our own team is facing, and Access is a perfect example. Launching as an internal project in 2015, Access enabled employees to access internal applications through our identity provider. We started with just one application behind Access with the goal of improving incident response times. Engineers who received a notification on their phones could tap a link and, after authenticating via their browser, would immediately have the access they needed. As soon as people started working with the new authentication flow, they wanted it everywhere. Eventually our security team mandated that we move our apps behind Access, but for a long time it was totally organic: teams were eager to use it.
With authentication occuring at our network edge, we were able to support a globally-distributed workforce without the latency of a VPN, and we were able to do so securely. Moreover, our team is committed to protecting our internal applications with the most secure and usable authentication mechanisms, and two-factor authentication is one of the most important security controls that can be implemented. With Cloudflare Access, we’re able to rely on the strong two-factor authentication mechanisms of our identity provider.
Not all second factors of authentication deliver the same level of security. Some methods are still vulnerable to man-in-the-middle (MITM) attacks. These attacks often feature bad actors stealing one-time passwords, commonly through phishing, to gain access to private resources. To eliminate that possibility, we implemented FIDO2 supported security keys. FIDO2 is an authenticator protocol designed to prevent phishing, and we saw it as an improvement to our reliance on soft tokens at the time.
While the implementation of FIDO2 can present compatibility challenges, we were enthusiastic to improve our security posture. Cloudflare Access enabled us to limit access to our systems to only FIDO2. Cloudflare employees are now required to use their hardware keys to reach our applications. The onboarding of Access was not only a huge win for ease of use, the enforcement of security keys was a massive improvement to our security posture.
Mitigate threats & prevent data exfiltration: Gateway and Remote Browser Isolation
Deploying secure DNS in our offices
A few years later, in 2020, many customers’ security teams were struggling to extend the controls they had enabled in the office to their remote workers. In response, we launched Cloudflare Gateway, offering customers protection from malware, ransomware, phishing, command & control, shadow IT, and other Internet risks over all ports and protocols. Gateway directs and filters traffic according to the policies implemented by the customer.
Our security team started with Gateway to implement DNS filtering in all of our offices. Since Gateway was built on top of the same network as 1.1.1.1, the world’s fastest DNS resolver, any current or future Cloudflare office will have DNS filtering without incurring additional latency. Each office connects to the nearest data center and is protected.
Deploying secure DNS for our remote users
Cloudflare’s WARP client was also built on top of our 1.1.1.1 DNS resolver. It extends the security and performance offered in offices to remote corporate devices. With the WARP client deployed, corporate devices connect to the nearest Cloudflare data center and are routed to Cloudflare Gateway. By sitting between the corporate device and the Internet, the entire connection from the device is secure, while also offering improved speed and privacy.
We sought to extend secure DNS filtering to our remote workforce and deployed the Cloudflare WARP client to our fleet of endpoint devices. The deployment enabled our security teams to better preserve our privacy by encrypting DNS traffic over DNS over HTTPS (DoH). Meanwhile, Cloudflare Gateway categorizes domains based on Radar, our own threat intelligence platform, enabling us to block high risk and suspicious domains for users everywhere around the world.
Adding on HTTPS filtering and Browser Isolation
DNS filtering is a valuable security tool, but it is limited to blocking entire domains. Our team wanted a more precise instrument to block only malicious URLs, not the full domain. Since Cloudflare One is an integrated platform, most of the deployment was already complete. All we needed was to add the Cloudflare Root CA to our endpoints and then enable HTTP filtering in the Zero Trust dashboard. With those few simple steps, we were able to implement more granular blocking controls.
In addition to precision blocking, HTTP filtering enables us to implement tenant control. With tenant control, Gateway HTTP policies regulate access to corporate SaaS applications. Policies are implemented using custom HTTP headers. If the custom request header is present and the request is headed to an organizational account, access is granted. If the request header is present and the request goes to a non-organizational account, such as a personal account, the request can be blocked or opened in an isolated browser.
After protecting our users’ traffic at the DNS and HTTP layers, we implemented Browser Isolation. When Browser Isolation is implemented, all browser code executes in the cloud on Cloudflare’s network. This isolates our endpoints from malicious attacks and common data exfiltration techniques. Some remote browser isolation products introduce latency and frustrate users. Cloudflare’s Browser Isolation uses the power of our network to offer a seamless experience for our employees. It quickly improved our security posture without compromising user experience.
Preventing phishing attacks: Onboarding Area 1 email security
Also in early 2020, we saw an uptick in employee-reported phishing attempts. Our cloud-based email provider had strong spam filtering, but they fell short at blocking malicious threats and other advanced attacks. As we experienced increasing phishing attack volume and frequency we felt it was time to explore more thorough email protection options.
The team looked for four main things in a vendor: the ability to scan email attachments, the ability to analyze suspected malicious links, business email compromise protection, and strong APIs into cloud-native email providers. After testing many vendors, Area 1 became the clear choice to protect our employees. We implemented Area 1’s solution in early 2020, and the results have been fantastic.
Given the overwhelmingly positive response to the product and the desire to build out our Zero Trust portfolio, Cloudflare acquired Area 1 Email Security in April 2022. We are excited to offer the same protections we use to our customers.
What’s next: Getting started with Cloudflare’s CASB
Cloudflare acquired Vectrix in February 2022. Vectrix’s CASB offers functionality we are excited to add to Cloudflare One. SaaS security is an increasing concern for many security teams. SaaS tools are storing more and more sensitive corporate data, so misconfigurations and external access can be a significant threat. However, securing these platforms can present a significant resource challenge. Manual reviews for misconfigurations or externally shared files are time consuming, yet necessary processes for many customers. CASB reduces the burden on teams by ensuring security standards by scanning SaaS instances and identifying vulnerabilities with just a few clicks.
We want to ensure we maintain the best practices for SaaS security, and like many of our customers, we have many SaaS applications to secure. We are always seeking opportunities to make our processes more efficient, so we are excited to onboard one of our newest Zero Trust products.
Always striving for improvement
Cloudflare takes pride in deploying and testing our own products. Our security team works directly with Product to “dog food” our own products first. It’s our mission to help build a better Internet — and that means providing valuable feedback from our internal teams. As the number one consumer of Cloudflare’s products, the Security team is not only helping keep the company safer, but also contributing to build better products for our customers.
We hope you have enjoyed Cloudflare One week. We really enjoyed sharing our stories with you. To check out our recap of the week, please visit our Cloudflare TV segment.
Cloudflare is a heavy user of Kubernetes for engineering workloads: it’s used to power the backend of our APIs, to handle batch-processing such as analytics aggregation and bot detection, and engineering tools such as our CI/CD pipelines. But between load balancers, API servers, etcd, ingresses, and pods, the surface area exposed by Kubernetes can be rather large.
In this post, we share a little bit about how our engineering team dogfoods Cloudflare Zero Trust to secure Kubernetes — and enables kubectl without proxies.
Our General Approach to Kubernetes Security
As part of our security measures, we heavily limit what can access our clusters over the network. Where a network service is exposed, we add additional protections, such as requiring Cloudflare Access authentication or Mutual TLS (or both) to access ingress resources.
These network restrictions include access to the cluster’s API server. Without access to this, engineers at Cloudflare would not be able to use tools like kubectl to introspect their team’s resources. While we believe Continuous Deployments and GitOps are best practices, allowing developers to use the Kubernetes API aids in troubleshooting and increasing developer velocity. Not having access would have been a deal breaker.
To satisfy our security requirements, we’re using Cloudflare Zero Trust, and we wanted to share how we’re using it, and the process that brought us here.
Before Zero Trust
In the world before Zero Trust, engineers could access the Kubernetes API by connecting to a VPN appliance. While this is common across the industry, and it does allow access to the API, it also dropped engineers as clients into the internal network: they had much more network access than necessary.
We weren’t happy with this situation, but it was the status quo for several years. At the beginning of 2020, we retired our VPN and thus the Kubernetes team needed to find another solution.
Kubernetes with Argo Tunnels
At the time we worked closely with the team developing Cloudflare Tunnels to add support for handling kubectl connections using Access and cloudflared tunnels.
While this worked for our engineering users, it was a significant hurdle to on-boarding new employees. Each Kubernetes cluster required its own tunnel connection from the engineer’s device, which made shuffling between clusters annoying. While kubectl supported connecting through SOCKS proxies, this support was not universal to all tools in the Kubernetes ecosystem.
We continued using this solution internally while we worked towards a better solution.
Kubernetes with Zero Trust
Since the launch of Cloudflare One, we’ve been dogfooding the Zero Trust agent in various configurations. At first we’d been using it to implement secure DNS with 1.1.1.1. As time went on, we began to use it to dogfood additional Zero Trust features.
We’re now leveraging the private network routing in Cloudflare Zero Trust to allow engineers to access the Kubernetes APIs without needing to setup cloudflared tunnels or configure kubectl and other Kubernetes ecosystem tools to use tunnels. This isn’t something specific to Cloudflare, you can do this for your team today!
Configuring Zero Trust
We use a configuration management tool for our Zero Trust configuration to enable infrastructure-as-code, which we’ve adapted below. However, the same configuration can be achieved using the Cloudflare Zero Trust dashboard.
The first thing we need to do is create a new tunnel. This tunnel will be used to connect the Cloudflare edge network to the Kubernetes API. We run the tunnel endpoints within Kubernetes, using configuration shown later in this post.
The “tunnel_secret” secret should be a 32-byte random number, which you should temporarily save as we’ll reuse it later for the Kubernetes setup later.
After we’ve created the tunnel, we need to create the routes so the Cloudflare network knows what traffic to send through the tunnel.
resource "cloudflare_tunnel_route" "k8s_zero_trust_tunnel_ipv4" {
  account_id = var.account_id
  tunnel_id  = cloudflare_argo_tunnel.k8s_zero_trust_tunnel.id
  network    = "198.51.100.101/32"
  comment    = "Kubernetes API Server (IPv4)"
}

resource "cloudflare_tunnel_route" "k8s_zero_trust_tunnel_ipv6" {
  account_id = var.account_id
  tunnel_id  = cloudflare_argo_tunnel.k8s_zero_trust_tunnel.id
  network    = "2001:DB8::101/128"
  comment    = "Kubernetes API Server (IPv6)"
}
We support accessing the Kubernetes API via both IPv4 and IPv6 addresses, so we configure routes for both. If you’re connecting to your API server via a hostname, these IP addresses should match what is returned via a DNS lookup.
Next we’ll configure settings for Cloudflare Gateway so that it’s compatible with the API servers and clients.
resource "cloudflare_teams_list" "k8s_apiserver_ips" {
  account_id = var.account_id
  name       = "Kubernetes API IPs"
  type       = "IP"
  items      = ["198.51.100.101/32", "2001:DB8::101/128"]
}

resource "cloudflare_teams_rule" "k8s_apiserver_zero_trust_http" {
  account_id  = var.account_id
  name        = "Don't inspect Kubernetes API"
  description = "Allow connections from kubectl to API"
  precedence  = 10000
  action      = "off"
  enabled     = true
  filters     = ["http"]
  traffic     = format("any(http.conn.dst_ip[*] in $%s)", replace(cloudflare_teams_list.k8s_apiserver_ips.id, "-", ""))
}
As we use mutual TLS between clients and the API server, and not all the traffic between kubectl and the API servers are HTTP, we’ve disabled HTTP inspection for these connections.
Once you have your tunnels created and configured, you can deploy their endpoints into your network. We’ve chosen to deploy the tunnels as pods, as this allows us to use Kubernetes’s deployment strategies for rolling out upgrades and handling node failures.
This creates a Kubernetes ConfigMap with a basic configuration that enables WARP routing for the tunnel ID specified. You can get this tunnel ID from your configuration management system, the Cloudflare Zero Trust dashboard, or by running the following command from another device logged into the same account.
cloudflared tunnel list
Next, we’ll need to create a secret for our tunnel credentials. While you should use a secret management system, for simplicity we’ll create one directly here.
After deploying the Cloudflare Zero Trust agent, members of your team can now access the Kubernetes API without needing to set up any special SOCKS tunnels!
kubectl version --short
Client Version: v1.24.1
Server Version: v1.24.1
What’s next?
If you try this out, send us your feedback! We’re continuing to improve Zero Trust for non-HTTP workflows.
This blog offers Cloudflare’s perspective on how remote browser isolation can help organizations offload internal web application use cases currently secured by virtual desktop infrastructure (VDI). VDI has historically been useful to secure remote work, particularly when users relied on desktop applications. However, as web-based apps have become more popular than desktop apps, the drawbacks of VDI – high costs, unresponsive user experience, and complexity – have become harder to ignore. In response, we offer practical recommendations and a phased approach to transition away from VDI, so that organizations can lower cost and unlock productivity by improving employee experiences and simplifying administrative overhead.
Modern Virtual Desktop usage
Background on Virtual Desktop Infrastructure (VDI)
Virtual Desktop Infrastructure describes running desktop environments on virtual computers hosted in a data center. When users access resources within VDI, video streams from those virtual desktops are delivered securely to endpoint devices over a network. Today, VDI is predominantly hosted on-premise in data centers and either managed directly by organizations themselves or by third-party Desktop-as-a-Service (DaaS) providers. In spite of web application usage growing in favor of desktop applications, DaaS is growing, with Gartner® recently projecting DaaS spending to double by 2024.
Both flavors of VDI promise benefits to support remote work. For security, VDI offers a way to centralize configuration for many dispersed users and to keep sensitive data far away from devices. Business executives are often attracted to VDI because of potential cost savings over purchasing and distributing devices to every user. The theory is that when processing is shifted to centralized servers, IT teams can save money shipping out fewer managed laptops and instead support bring-your-own-device (BYOD). When hardware is needed, they can purchase less expensive devices and even extend the lifespan of older devices.
Challenges with VDI
High costs
The reality of VDI is often quite different. In particular, it ends up being much more costly than organizations anticipate for both capital and operational expenditures. Gartner® projects that “by 2024, more than 90% of desktop virtualization projects deployed primarily to save cost will fail to meet their objectives.”
The reasons are multiple. On-premise VDI comes with significant upfront capital expenditures (CapEx) in servers. DaaS deployments require organizations to make opaque decisions about virtual machines (e.g. number, region, service levels, etc.) and their specifications (e.g. persistent vs. pooled, always-on vs. on-demand, etc.). In either scenario, the operational expenditures (OpEx) from maintenance and failing to rightsize capacity can lead to surprises and overruns. For both flavors, the more organizations commit to virtualization, the more they are locked into high ongoing compute expenses, particularly as workforces grow remotely.
Poor user experience
VDI also delivers a subpar user experience. Expectations for frictionless IT experiences have only increased during remote work, and users can still tell the difference between accessing apps directly versus from within a virtual desktop. VDI environments that are not rightsized can lead to clunky, latent, and unresponsive performance. Poor experiences can negatively impact productivity, security (as users seek workarounds outside of VDI), and employee retention (as users grow disaffected).
Complexity
Overall, VDI is notoriously complex. Initial setup is multi-faceted and labor-intensive, with steps including investing in servers and end user licenses, planning VM requirements and capacity, virtualizing apps, setting up network connectivity, and rolling out VDI thin clients. Establishing security policies is often the last step, and for this reason, can sometimes be overlooked, leading to security gaps.
Moving VDI into full production not only requires cross-functional coordination across typical teams like IT, security, and infrastructure & operations, but also typically requires highly specialized talent, often known as virtual desktop administrators. These skills are hard to find and retain, which can be risky to rely on during this current high-turnover labor market.
Even still, administrators often need to build their own logging, auditing, inspection, and identity-based access policies on top of these virtualized environments. This means additional overhead of configuring separate services like secure web gateways.
Some organizations deploy VDI primarily to avoid the shipping costs, logistical hassles, and regulatory headaches of sending out managed laptops to their global workforce. But with VDI, what seemed like a fix for one problem can quickly create more overhead and frustration. Wrestling with VDI’s complexity is likely not worthwhile, particularly if users only need to access a select few internal web services.
Offloading Virtual Desktop use cases with Remote Browser Isolation
To avoid these frictions, organizations are exploring ways to shift use cases away from VDI, particularly when on-prem. Most applications that workforces rely on today are accessible via the browser and are hosted in public or hybrid cloud or SaaS environments, and even occasionally in legacy data centers. As a result, modern services like remote browser isolation (RBI) increasingly make sense as alternatives to begin offloading VDI workloads and shift security to the cloud.
Like VDI, Cloudflare Browser Isolation minimizes attack surface by running all app and web code away from endpoints — in this case, on Cloudflare’s global network. In the process, Cloudflare can secure data-in-use within a browser from untrusted users and devices, plus insulate those endpoints from threats like ransomware, phishing and even zero-day attacks. Within an isolated browser, administrators can set policies to protect sensitive data on any web-based or SaaS app, just as they would with VDI. Sample controls include restrictions on file uploads / downloads, copy and paste, keyboard inputs, and printing functionality.
This comparable security comes with more achievable business benefits, starting with helping employees be more productive:
End users benefit from a faster and more transparent experience than with VDI. Our browser isolation is designed to run across our 270+ locations, so that isolated sessions are served as close to end users as possible. Unlike with VDI, there is no backhauling user traffic to centralized data centers. Plus, Cloudflare’s Network Vector Rendering (NVR) approach ensures that the in-app experience feels like a native, local browser – without bandwidth intensive pixel pushing techniques.
Administrators benefit because they can skip all the up-front planning, ongoing overhead, and scaling pains associated with VDI. Instead, administrators turn on isolation policies from a single dashboard and let Cloudflare handle scaling to users and devices. Plus, native integrations with ZTNA, SWG, CASB, and other security services make it easy to begin modernizing VDI-adjacent use cases.
On the cost side, expenses associated with browser isolation are overall lower, smoother, and more predictable than with VDI. In fact, Gartner® recently highlighted that “RBI is cheaper than using VDI for isolation if the only application being isolated is the browser.”
Unlike on-prem VDI, there are no capital expenditures on VM capacity, and unlike DaaS subscriptions, Cloudflare offers simple, seat-based pricing with no add-on fees for configurations. Organizations also can skip purchasing standalone point solutions because Cloudflare’s RBI comes natively integrated with other services in the Cloudflare Zero Trust platform. Most notably, we do not charge for cloud consumption, which is a common source of VDI surprise.
Transitioning to Cloudflare Browser Isolation
Note: Above diagram includes this table below
Customer story: PensionBee
PensionBee, a leading online pension provider in the UK, recognized this opportunity to offload virtual desktop use cases and switch to RBI. As a reaction to the pandemic, PensionBee initially onboarded a DaaS solution (Amazon WorkSpaces) to help employees access internal resources remotely. Specifically, CTO Jonathan Lister Parsons was most concerned about securing Salesforce, where PensionBee held its customers’ sensitive pension data.
The DaaS supported access controls similar to PensionBee configured for employees when they previously were in the office (e.g. allowlisting the IPs of the virtual desktops). But shortly after rollout, Lister Parsons began developing concerns about the unresponsive user experience. In this recent webinar, he in fact guesstimated that “users are generally about 10% less productive when they’re using the DaaS to do their work.” This negative experience increased the support burden on PensionBee’s IT staff to the point where they had to build an automated tool to reboot an employee’s DaaS service whenever it was acting up.
“From a usability perspective, it’s clearly better if employees can have a native browsing experience that people are used to compared to a remote desktop. That’s sort of a no-brainer,” Lister Parsons said. “But typically, it’s been hard to deliver that while keeping security in place, costs low, and setup complexity down.”
When Lister Parsons encountered Cloudflare Browser Isolation, he was impressed with the service’s performance and lightweight user experience. Because PensionBee employees accessed the vast majority of their apps (including Salesforce) via a browser, RBI was a strong fit. Cloudflare’s controls over copy/paste and file downloads reduced the risk of customer pension details in Salesforce reaching local devices.
“We started using Cloudflare Zero Trust with Browser Isolation to help provide the best security for our customers’ data and protect employees from malware,” he said. “It worked so well I forgot it was on.”
PensionBee is just one of many organizations developing a roadmap for this transition from VDI. In the next section, we provide Cloudflare’s recommendations for planning and executing that journey.
Practical recommendations
Pre-implementation planning
Understanding where to start this transition some forethought. Specifically, cross-functional teams – across groups like IT, security, and infrastructure & operations (IO) – should develop a collective understanding of how VDI is used today, what use cases should be offloaded first, and what impact any changes will have across both end users and administrators.
In our own consultations, we start by asking about the needs and expectations of end users because their consistent adoption will dictate an initiative’s success. Based on that foundation, we then typically help organizations map out and prioritize the applications and data they need to secure. Last but not least, we strategize around the ‘how:’ what administrators and expertise will be needed not only for the initial configuration of new services, but also for the ongoing improvement. Below are select questions we ask customers to consider across those key dimensions to help them navigate their VDI transition.
Questions to consider
Migration from VDI to RBI
Organizations can leverage Cloudflare Browser Isolation and other Zero Trust services to begin offloading VDI use cases and realize cost savings and productivity gains within days of rollout. Our recommended three-phase approach focuses on securing the most critical services with the least disruption to user experience, while also prioritizing quick time-to-value.
Phase 1: Configure clientless web isolation for web-based applications
Using our clientless web isolation approach, administrators can send users to their private web application served in an isolated browser environment with just a hyperlink – without any software needed on endpoints. Then, administrators can build data protection rules preventing risky user actions within these isolated browser-based apps. Plus, because administrators avoid rolling out endpoint clients, scaling access to employees, contractors, or third parties even on unmanaged devices is as easy as sending a link.
These isolated links can exist in parallel with your existing VDI, enabling a graceful migration to this new approach longer term. Comparing the different experiences side by side can help your internal stakeholders evangelize the RBI-based approach over time. Cross-functional communication is critical throughout this phased rollout: for example, in prioritizing what web apps to isolate before configuration, and after configuration, articulating how those changes will affect end users.
Phase 2: Shift SSH- and VNC-based apps from VDI to Cloudflare
Clientless isolation is a great fit to secure web apps. This next phase helps secure non-web apps within VDI environments, which are commonly accessed via an SSH or VNC connection. For example, privileged administrators often use SSH to control remote desktops and fulfill service requests. Other less technical employees may need the VNC’s graphical user interface to work in legacy apps inaccessible via a modern operating system.
Cloudflare enables access to these SSH and VNC environments through a browser – again without requiring any software installed on endpoints. Both the SSH and VNC setups are similar in that administrators create a secure outbound-only connection between a machine and Cloudflare’s network before a terminal is rendered in a browser. By sending traffic to our network, Cloudflare can authenticate access to apps based on identity check and other granular policies and can provide detailed audits of each user session. (You can read more about the SSH and VNC experience in prior blog posts.)
We recommend first securing SSH apps to support privileged administrators, who can provide valuable feedback. Then, move to support the broader range of users who rely on VNC. Administrators will set up connections and policies using our ZTNA service from the same management panel used for RBI. Altogether, this browser-based experience should reduce latency and have users feeling more at home and productive than in their virtualized desktops.
Phase 3: Progress towards Zero Trust security posture
Step 3A: Set up identity verification policies per application With phases 1 and 2, you have been using Cloudflare to progressively secure access to web and non-app apps for select VDI use cases. In phase 3, build on that foundation by adopting ZTNA for all your applications, not just ones accessed through VDI.
Administrators use the same Cloudflare policy builder to add more granular conditional access rules in line with Zero Trust security best practices, including checking for an identity provider (IdP). Cloudflare integrates with multiple IdPs simultaneously and can federate multiple instances of the same IdP, enabling flexibility to support any variety of users. After setting up IdP verification, we see administrators often enhance security by requiring MFA. These types of identity checks can also be set up within VDI environments, which can build confidence in adopting Zero Trust before deprecating VDI entirely.
Step 3B: Rebuild confidence in user devices by layering in device posture checks So far, the practical steps we’ve recommended do not require any Cloudflare software on endpoints – which optimizes for deployment speed in offloading VDI use cases. But longer term, there are security, visibility, and productivity benefits to deploying Cloudflare’s device client where it makes sense.
Cloudflare’s device client (aka WARP) works across all major operating systems and is optimized for flexible deployment. For managed devices, use any script-based method with popular mobile device management (MDM) software, and self-enrollment is a useful option for third-party users. With WARP deployed, administrators can enhance application access policies by first checking for the presence of specific programs or files, disk encryption status, the right OS version, and other additional attributes. Plus, if your organization uses endpoint protection (EPP) providers like Crowdstrike, SentinelOne, and more, verify access by first checking for the presence of that software or examining device health.
Altogether, adding device posture signals both levels up security and enables more granular visibility for both managed and BYOD devices. As with identity verification, administrators can start by enabling device posture checks for users still using virtual desktops. Over time, as administrators build more confidence in user devices, they should begin routing users on managed devices to apps directly, as opposed to through the slower VDI experience.
Step 3C: Progressively shift security services away from virtualized environments to Zero Trust Rethinking application access use cases in prior phases has reduced reliance on complex VDI. By now, Administrators should already be building comfort with Zero Trust policies, as enabled by Cloudflare. Our final recommendation in this article is to continue that journey away from virtualization and towards Zero Trust Network Access.
Instead of sending any users into virtualized apps in virtualized desktops, organizations can reduce their overhead entirely and embrace cloud-delivered ZTNA to protect one-to-one connections between all users and all apps in any cloud environment. The more apps secured with Cloudflare vs. VDI, the greater consistency of controls, visibility, and end user experience.
Virtualization has provided a powerful technology to bridge the gap between our hardware-centric legacy investments and IT’s cloud-first future. At this point, however, reliance on virtualization puts undue pressure on your administrators and risks diminishing end user productivity. As apps, users, and data accelerate their migration to the cloud, it only makes sense to shift security controls there too with cloud-native, not virtualized services.
As longer term steps, organizations can explore taking advantage of Cloudflare’s other natively-integrated services, such as our Secure Web Gateway (SWG), Cloud Access Security Broker (CASB), and email security. Other blogs this week outline how to transition to these Cloudflare services from other legacy technologies.
Summary table
Best practices and progress metrics
Below are sample best practices we recommend achieving as smooth a transition as possible, followed by sample metrics to track progress on your initiative:
Be attuned to end user experiences: Whatever replaces VDI needs to perform better than what came before. When trying to change user habits and drive adoption, administrators must closely track what users like and dislike about the new services.
Prioritize cross-functional collaboration: Sunsetting VDI will inevitably involve coordination across diverse teams across IT, security, infrastructure, and virtual desktop administrators. It is critical to establish shared ways of working and trust to overcome any road bumps.
Roll out incrementally and learn: Test out each step with a subset of users and apps before rolling out more widely to figure out what works (and does not). Start by testing out clientless web isolation for select apps to gain buy-in from users and executives.
Sample progress metrics
Explore your VDI transition
Cloudflare Zero Trust makes it easy to begin sunsetting your VDI, beginning with leveraging our clientless browser isolation to secure web apps.
To learn more about how to move towards Zero Trust and away from virtualized desktops, request a consultation today.Replacing your VDI is a great project to fit into your overall Zero Trust roadmap. For a full summary of Cloudflare One Week and what’s new, tune in to our recap webinar.
One of the foundations of Zero Trust is determining if a user’s device is “healthy” — that it has its operating system up-to-date with the latest security patches, that it’s not jailbroken, that it doesn’t have malware installed, and so on. Traditionally, determining this has required installing software directly onto a user’s device.
Earlier this month, Cloudflare participated in the announcement of an open source standard called a Private Attestation Token. Device manufacturers who support the standard can now supply a Private Attestation Token with any request made by one of their devices. On the IT Administration side, Private Attestation Tokens means that security teams can verify a user’s device before they access a sensitive application — without the need to install any software or collect a user’s device data.
At WWDC 2022, Apple announced Private Attestation Tokens. Today, we’re announcing that Cloudflare Access will support verifying a Private Attestation token. This means that security teams that rely on Cloudflare Access can verify a user’s Apple device before they access a sensitive application — no additional software required.
Determining a “healthy” device
There are many solutions on the market that help security teams determine if a device is “healthy” and corporately managed. What the majority of these solutions have in common is that they require software to be installed directly on the user’s machine. This comes with challenges associated with client software including compatibility issues, version management, and end user support. Many companies have dedicated Mobile Device Management (MDM) tools to manage the software installed on employee machines.
MDM is a proven model, but it is also a challenge to manage — taking a dedicated team in many cases. What’s more, installing client or MDM software is not always possible for contractors, vendors or employees using personal machines. Security teams have to resort to VDI or VPN solutions for external users to securely access corporate applications.
How Private Attestation Tokens verify a device
Private Attestation Tokens leverage the Privacy Pass Protocol, which Cloudflare authored with major device manufacturers, to attest to a device’s health and integrity.
In order for Private Attestation Tokens to work, four parties agree to work in concert with a common framework to generate and exchange anonymous, unforgeable tokens. Without all four parties in the process, PATs won’t work.
An Origin. A website, application, or API that receives requests from a client. When a website receives a request to their origin, the origin must know to look for and request a token from the client making the request. For Cloudflare customers, Cloudflare acts as the origin (on behalf of customers) and handles the requesting and processing of tokens.
A Client. Whatever tool the visitor is using to attempt to access the Origin. This will usually be a web browser or mobile application. In our example, let’s say the client is a mobile Safari Browser.
An Attester. The Attester is who the client asks to prove something (i.e that a mobile device has a valid IMEI) before a token can be issued. In our example below, the Attester is Apple, the device vendor.
An Issuer. The issuer is the only one in the process that actually generates, or issues, a token. The Attester makes an API call to whatever Issuer the Origin has chosen to trust, instructing the Issuer to produce a token. In our case, Cloudflare will also be the Issuer.
We are then able to rely on the attestation from the device manufacturer as a form of validation that a device is in a “healthy” enough state to be allowed access to a sensitive application.
Checking device health without client software
Private Attestation Tokens do not require any additional software to be installed on the user’s device. This is because the “attestation” of device health and validity is attested directly by the device operating system’s manufacturer — in this case, Apple.
This means that a security team can use Cloudflare Access and Private Attestation Tokens to verify if a user is accessing from a “healthy” Apple device before allowing access to a sensitive corporate application. Some checks as part of the attestation include:
Is the device on the latest OS version?
Is the device jailbroken?
Is the window attempting to log in, in focus?
And much more.
Over time, we are working with other device manufacturers to expand device support and what is verified as part of the device attestation process. The attributes that are attested will also continue to expand over time, which means the device verification in Access will only strengthen.
In the next few months, we will move Private Attestation Support in Cloudflare Access to a closed beta. The first version will work for iOS devices and support will expand from there. The only change required will be an updated Access policy, no software will need to be installed. If you would like to be part of the beta program, sign up here today!
Over the last several years, both Area 1 and Cloudflare built pipelines for ingesting threat indicator data, for use within our products. During the acquisition process we compared notes, and we discovered that the overlap of indicators between our two respective systems was smaller than we expected. This presented us with an opportunity: as one of our first tasks in bringing the two companies together, we have started bringing Area 1’s threat indicator data into the Cloudflare suite of products. This means that all the products today that use indicator data from Cloudflare’s own pipeline now get the benefit of Area 1’s data, too.
Area 1 built a data pipeline focused on identifying new and active phishing threats, which now supplements the Phishing category available today in Gateway. If you have a policy that references this category, you’re already benefiting from this additional threat coverage.
How Cloudflare identifies potential phishing threats
Cloudflare is able to combine the data, procedures and techniques developed independently by both the Cloudflare team and the Area 1 team prior to acquisition. Customers are able to benefit from the work of both teams across the suite of Cloudflare products.
Cloudflare curates a set of data feeds both from our own network traffic, OSINT sources, and numerous partnerships, and applies custom false positive control. Customers who rely on Cloudflare are spared the software development effort as well as the operational workload to distribute and update these feeds. Cloudflare handles this automatically, with updates happening as often as every minute.
Cloudflare is able to go beyond this and work to proactively identify phishing infrastructure in multiple ways. With the Area 1 acquisition, Cloudflare is now able to apply the adversary-focused threat research approach of Area1 across our network. A team of threat researchers track state-sponsored and financially motivated threat actors, newly disclosed CVEs, and current phishing trends.
Cloudflare now operates mail exchange servers for hundreds of organizations around the world, in addition to its DNS resolvers, Zero Trust suite, and network services. Each of these products generates data that is used to enhance the security of all of Cloudflare’s products. For example, as part of mail delivery, the mail engine performs domain lookups, scores potential phishing indicators via machine learning, and fetches URLs. Data which can now be used through Cloudflare’s offerings.
How Cloudflare Area 1 identifies potential phishing threats
The Cloudflare Area 1 team operates a suite of web crawling tools designed to identify phishing pages, capture phishing kits, and highlight attacker infrastructure. In addition, Cloudflare Area 1 threat models assess campaigns based on signals gathered from threat actor campaigns; and the associated IOCs of these campaign messages are further used to enrich Cloudflare Area 1 threat data for future campaign discovery. Together these techniques give Cloudflare Area 1 a leg up on identifying the indicators of compromise for an attacker prior to their attacks against our customers. As part of this proactive approach, Cloudflare Area 1 also houses a team of threat researchers that track state-sponsored and financially motivated threat actors, newly disclosed CVEs, and current phishing trends. Through this research, analysts regularly insert phishing indicators into an extensive indicator management system that may be used for our email product or any other product that may query it.
Cloudflare Area 1 also collects information about phishing threats during our normal operation as the mail exchange server for hundreds of organizations across the world. As part of that role, the mail engine performs domain lookups, scores potential phishing indicators via machine learning, and fetches URLs. For those emails found to be malicious, the indicators associated with the email are inserted into our indicator management system as part of a feedback loop for subsequent message evaluation.
How Cloudflare data will be used to improve phishing detection
In order to support Cloudflare products, including Gateway and Page Shield, Cloudflare has a data pipeline that ingests data from partnerships, OSINT sources, as well as threat intelligence generated in-house at Cloudflare. We are always working to curate a threat intelligence data set that is relevant to our customers and actionable in the products Cloudflare supports. This is our North star: what data can we provide that enhances our customer’s security without requiring our customers to manage the complexity of data, relationships, and configuration. We offer a variety of security threat categories, but some major focus areas include:
Malware distribution
Malware and Botnet Command & Control
Phishing,
New and newly seen domains
Phishing is a threat regardless of how the potential phishing link gets entry into an organization, whether via email, SMS, calendar invite or shared document, or other means. As such, detecting and blocking phishing domains has been an area of active development for Cloudflare’s threat data team since almost its inception.
Looking forward, we will be able to incorporate that work into Cloudflare Area 1’s phishing email detection process. Cloudflare’s list of phishing domains can help identify malicious email when those domains appear in the sender, delivery headers, message body or links of an email.
1+1 = 3: Greater dataset sharing between Cloudflare and Area 1
Threat actors have long had an unfair advantage — and that advantage is rooted in the knowledge of their target, and the time they have to set up specific campaigns against their targets. That dimension of time allows threat actors to set up the right infrastructure, perform reconnaissance, stage campaigns, perform test probes, observe their results, iterate, improve and then launch their ‘production’ campaigns. This precise element of time gives us the opportunity to discover, assess and proactively filter out campaign infrastructure prior to campaigns reaching critical mass. But to do that effectively, we need visibility and knowledge of threat activity across the public IP space.
With Cloudflare’s extensive network and global insight into the origins of DNS, email or web traffic, combined with Cloudflare Area 1’s datasets of campaign tactics, techniques, and procedures (TTPs), seed infrastructure and threat models — we are now better positioned than ever to help organizations secure themselves against sophisticated threat actor activity, and regain the advantage that for so long has been heavily weighted towards the bad guys.
If you’d like to extend Zero Trust to your email security to block advanced threats, contact your Customer Success manager, or request a Phishing Risk Assessment here.
Last week, Cloudflare automatically detected and mitigated a 26 million request per second DDoS attack — the largest HTTPS DDoS attack on record.
The attack targeted a customer website using Cloudflare’s Free plan. Similar to the previous 15M rps attack, this attack also originated mostly from Cloud Service Providers as opposed to Residential Internet Service Providers, indicating the use of hijacked virtual machines and powerful servers to generate the attack — as opposed to much weaker Internet of Things (IoT) devices.
The 26M rps DDoS attack originated from a small but powerful botnet of 5,067 devices. On average, each node generated approximately 5,200 rps at peak. To contrast the size of this botnet, we’ve been tracking another much larger but less powerful botnet of over 730,000 devices. The latter, larger botnet wasn’t able to generate more than one million requests per second, i.e. roughly 1.3 requests per second on average per device. Putting it plainly, this botnet was, on average, 4,000 times stronger due to its use of virtual machines and servers.
Also, worth noting that this attack was over HTTPS. HTTPS DDoS attacks are more expensive in terms of required computational resources because of the higher cost of establishing a secure TLS encrypted connection. Therefore, it costs the attacker more to launch the attack, and for the victim to mitigate it. We’ve seen very large attacks in the past over (unencrypted) HTTP, but this attack stands out because of the resources it required at its scale.
Within less than 30 seconds, this botnet generated more than 212 million HTTPS requests from over 1,500 networks in 121 countries. The top countries were Indonesia, the United States, Brazil and Russia. About 3% of the attack came through Tor nodes.
The top source networks were the French-based OVH (Autonomous System Number 16276), the Indonesian Telkomnet (ASN 7713), the US-based iboss (ASN 137922) and the Libyan Ajeel (ASN 37284).
The DDoS threat landscape
It’s important to understand the attack landscape when thinking about DDoS protection. When looking at our recent DDoS Trends report, we can see that most of the attacks are small, e.g. cyber vandalism. However, even small attacks can severely impact unprotected Internet properties. On the other hand, large attacks are growing in size and frequency — but remain short and rapid. Attackers concentrate their botnet’s power to try and wreak havoc with a single quick knockout blow — trying to avoid detection.
DDoS attacks might be initiated by humans, but they are generated by machines. By the time humans can respond to the attack, it may be over. And even if the attack was quick, the network and application failure events can extend long after the attack is over — costing you revenue and reputation. For this reason, it is recommended to protect your Internet properties with an automated always-on protection service that does not rely on humans to detect and mitigate attacks.
Helping build a better Internet
At Cloudflare, everything we do is guided by our mission to help build a better Internet. The DDoS team’s vision is derived from this mission: our goal is to make the impact of DDoS attacks a thing of the past. The level of protection that we offer is unmetered and unlimited — It is not bounded by the size of the attack, the number of the attacks, or the duration of the attacks. This is especially important these days because as we’ve recently seen, attacks are getting larger and more frequent.
Not using Cloudflare yet? Start now with our Free and Pro plans to protect your websites, or contact us for comprehensive DDoS protection for your entire network using Magic Transit.
In this post, we show how you can use the AWS Certificate Manager Private Certificate Authority (ACM Private CA) to help follow security best practices when you build a CA hierarchy. This blog post walks through certificate authority (CA) lifecycle management topics, including an architecture overview, centralized security, separation of duties, certificate issuance auditing, and certificate sharing by means of templates. These topics provide best practices surrounding your ACM Private CA hierarchy so that you can build the right CA hierarchy for your organization.
With ACM Private CA, you can create private certificate authority hierarchies, including root and subordinate CAs, without the upfront investment and ongoing maintenance costs of operating your own private CA. You can issue certificates for authenticating internal users, computers, applications, services, servers or other devices, and code signing.
In this blog post, you’ll see an example automotive manufacturing company and their supplier companies. Each will have associated AWS accounts, which we will call Manufacturer Account(s) and Supplier Account(s), respectively.
Automotive manufacturing companies usually have modules that come from different suppliers. Modules, in the automotive context, are embedded systems that control electrical systems in the vehicle. These modules might be interconnected throughout the in-vehicle network or provide connectivity external to the vehicle, for example, for navigation or sending telemetry to off-board systems.
The architecture needs to allow the Manufacturer to retain control of their CA hierarchy, while giving their external Suppliers limited access to sign the certificates on these modules with the Manufacturer’s CA hierarchy. The architecture we provide here gives you the basic information you need to cover the following objectives:
IAM role creation for specific personas to manage the CA lifecycle
Auditing the CA hierarchy by using audit reports
Cross-account sharing by using AWS RAM with certificate template scoping
Architecture overview
Figure 1 shows the solution architecture.
Figure 1: Multi-account certificate authority hierarchy using ACM Private CA
The Manufacturer has two categories of AWS accounts:
A dedicated account to hold the Manufacturer’s root CA
An account to hold their subordinate CA
Note: The diagram shows two subordinate CAs in the Manufacturer account. However, depending on your security needs, you can have a subordinate CA per account per supplier.
Additionally, each Supplier has one AWS account. These accounts will have the Manufacturer’s subordinate CA shared by using AWS RAM. The Manufacturer will have a subordinate CA for each Supplier.
Logically separate accounts
In order to minimize the scope of impact and scope users to actions within their duties, it’s critical that you logically separate AWS accounts based on workload within the CA hierarchy. The following section shows a recommendation for how to do that.
AWS account that holds the root CA
You, the Manufacturer, should place the ACM Private root CA within its own dedicated AWS account to segment and tightly control access to the root CA. This limits access at the account level and only uses the dedicated account for a single purpose: holding the root CA for your organization. This account will only have access from IAM principals that maintain the CA hierarchy through a federation service like AWS Single Sign-On (AWS SSO) or direct federation to IAM through an existing identity provider. This account also has AWS CloudTrail enabled and configured for business-specific alerting, including actions like creation, updating, or deletion of the root CA.
AWS account that holds the subordinate CAs
You, the Manufacturer, will have a dedicated account where the entire CA hierarchy below the root will be located. You should have a separate subordinate CA for each Supplier, and in some cases a separate subordinate CA for each hardware module the Supplier is building. The subordinate CAs can issue certificates for specific hardware modules within the Supplier account.
This Manufacturer account shares each subordinate CA to the respective Supplier’s AWS account by using AWS RAM. This provides joint control to the shared subordinate CA, creating isolation between individual Suppliers. AWS RAM allows Suppliers to control certificate issuance and revocation if this is allowed by the Manufacturer. Each Supplier is only shared certificate provisioning access through AWS RAM configuration, which means that you can tightly monitor and revoke access through AWS RAM. Given this sharing through AWS RAM, the Suppliers don’t have access to modify or delete the CA hierarchy itself and can only provision certificates from it.
Supplier AWS account(s)
These AWS accounts are owned by each respective Supplier. For example, you might partner with radio, navigation system, and telemetry suppliers. Each Supplier would have their own AWS account, which they control. The Supplier accepts an invitation from the manufacturer through AWS RAM, sharing the subordinate CA. The subordinate is allowed to take only certain actions, based on how the Manufacturer configured the share (more on this later in the post).
Separation of duties by means of IAM role creation
In this flow, one IAM role is able to disable the CA, and a second principal can delete the CA. This enables two-person control for this highly privileged action—meaning that you need a two-person quorum to rotate the CA certificate.
We recommend that you, the Manufacturer, create a two-person process for highly privileged events like CA certificate rotation ceremonies. The preceding policies serve two purposes. First, they allow you to designate separation of management duties between day-to-day CA admin tasks and infrequent root CA rotation ceremonies. The day-to-day CA admin policy allows all ACM Private CA actions except the ability to delete the root CA. This is because the day-to-day CA admin should not be deleting the root CA. Meanwhile, the privileged CA admin policy has the ability to call DeleteCertificateAuthority. However, in order to call DeleteCertificateAuthority, you first need to have the day-to-day CA admin role disable the root CA.
This means that both roles listed here are necessary to perform a root CA deletion for a rotation or replacement ceremony. This arrangement creates a way to control the deletion of the CA resource by requiring two separate actors to disable and delete. It’s crucial that the two roles are assumed by two different people at the identity provider. Having one person assume both of these roles negates the increased security created by each role.
Your Suppliers should also follow least privilege when creating IAM roles within their own accounts. However, as we’ll see in the Cross-account sharing by using AWS RAM section, even if the Suppliers don’t follow best practices, the Manufacturer’s ACM Private CA hierarchy is still isolated and secure.
That being said, here are common IAM roles that your Suppliers should create within their own accounts:
Developers who provision certificates for development and QA workloads
Developers who provision certificates for production
These certificate issuing roles give the Supplier the ability to issue end-entity certificates from the CA hierarchy. In this use case, the Supplier needs two different levels of permissions: non-production certificates and production certificates. To simplify the roles within IAM, the Supplier decided to use ABAC. These ABAC policies allow operations when the principal’s tag matches the resource tag. Because the Supplier has many similar policies, each with a different set of users, they use ABAC to create a single IAM policy that uses principal tags rather than creating multiple slightly different IAM policies.
This single policy enables all personas to be scoped to least privilege access. If you look at the Condition portion of the IAM policy, you can see the power of ABAC. This condition verifies that the PrincipalTag matches the ResourceTag. The Supplier is federating into IAM roles through AWS SSO and tagging the Supplier’s principals within its selected identity providers.
Because you as the Manufacturer have tagged the subordinate CAs that are shared with the Supplier, the Supplier can use identity provider (IdP) attributes as tags to simplify the Supplier’s IAM strategy. In this example, the Supplier configures each relevant user in the IdP with the attribute (tag) key: access-team. This tag matches the tagging strategy used by the Manufacturer. Here’s the mapping for each persona within the use case:
Dev environment:
access-team: DevTeam
Production environment:
access-team: ProdTeam
You can choose to add or remove tags depending on your use case, and the preceding scenario serves as a simple example. This offloads the need to create new IAM policies as the number of subordinate CAs grow. If you decide to use ABAC, make sure that you require both principal tagging and resource tagging upon creation of each, because these tags become your authorization mechanism.
CA lifecycle: Audit report published by the Manufacturer
In terms of auditing and monitoring, we recommend that the Manufacturer have a mechanism to track how many certificates were issued for a specific Supplier or module. Within the Manufacturer accounts, you can generate audit reports through the console or CLI. This allows you, the manufacturer, to gather metrics on certificate issuance and revocation. Following is an example of a certificate issuance.
Figure 2: Audit report output for certificate issuance
With AWS RAM, you can share CAs with another account. We recommend that you, as a Manufacturer, use AWS RAM to share CAs with Suppliers so that they can issue certificates without administrator access to the CA. This arrangement allows you as the Manufacturer to more easily limit and revoke access if you change Suppliers. The Suppliers can create certificates through the ACM console or through the CLI, API, or AWS CloudFormation. Manufacturers are only sharing the ability to create, manage, bind, and export certificates from the CA hierarchy. The CA hierarchy itself is contained within the Manufacturers’ accounts, and not within the Suppliers’ accounts. By using AWS RAM, the Suppliers don’t have any administrator access to the CA hierarchy. From a cost perspective, you can centrally control and monitor the costs of your private CA hierarchy without having to deal with cost-sharing across Suppliers.
Certificate templates with AWS RAM managed permissions
AWS RAM has the ability to create managed permissions in order to define the actions that can be performed on shared resources. For each shareable resource type, you can use AWS RAM managed permissions to define which permissions to grant to whom for shared resource types that support additional managed permissions. This means that when you use AWS RAM to share a resource (in this case ACM Private CA), you can now specify which IAM actions can take place on that resource. AWS RAM managed permissions integrate with the following ACM Private CA certificate templates:
These five certificate templates allow a Manufacturer to scope its Suppliers to the certificate template provisioning level. This means that you can limit which certificate templates can be issued by the Suppliers.
Let’s assume you have a Supplier that is supplying a module that has infotainment media capability, and you, the manufacturer, want the Supplier to provision the end-entity client certificate but you don’t want them to be able to revoke that certificate. You can use AWS RAM managed permissions to scope that Supplier’s shared private CA to allow the EndEntityClientAuthCertificate issuance template, which implicitly denies RevokeCertificate template actions. This further scopes down what the Supplier is authorized to issue on the shared CA, gives the responsibility for revoking infotainment device certificates to the Manufacturer, but still allows the Supplier to load devices with a certificate upon creation.
Example of creating a resource share in AWS RAM by using the AWS CLI
This walkthrough shows you the general process of sharing a private CA by using AWS RAM and then accepting that shared resource in the partner account.
Create your shared resource in AWS RAM from the Manufacturer subordinate CA account. Notice that in the example that follows, we selected one of the certificate templates within the managed permissions option. This limits the shared CA so that it can only issue certain types of certificate templates.
Note: Replace the <variable> placeholders with your own values.
In this blog post, you learned about the various considerations for building a secure public key infrastructure (PKI) hierarchy by using ACM Private CA through an example customer’s prescriptive setup. You learned how you can use AWS RAM to share CAs across accounts easily and securely. You also learned about sharing specific CAs through the ability to define permissions to specific principals across accounts, allowing for granular control of permissions on principals that might act on those resources.
The main takeaways of this post are how to create least privileged roles within IAM in order to scope down the activities of each persona and limit the potential scope of impact for your organization’s private CA hierarchy. Although these best practices are specific to manufacturer business requirements, you can alter them based on your business needs. With the managed permissions in AWS RAM, you can further scope down the actions that principals can perform with your CA by limiting the certificate templates allowed on that CA when you share it. Using all of these tools, you can help your PKI hierarchy to have a high level of security. To learn more, see the other ACM Private CA posts on the AWS Security Blog.
If you have feedback about this post, submit comments in the Comments section below. If you have questions about this post, contact AWS Support.
Want more AWS Security news? Follow us on Twitter.
Facial recognition technology is one of the many modern technologies that previously only appeared in science fiction movies. The roots of this technology can be traced back to the 1960s and have since grown dramatically due to the rise of deep learning techniques and accelerated digital transformation in recent years.
In this blog post, we will talk about the various applications of facial recognition technology in Grab, as well as provide details of the technical components that build up this technology.
Application of facial recognition technology
At Grab, we believe in prevention, protection, and action to create a safer every day for our consumers, partners, and the community as a whole. All selfies collected by Grab are handled according to Grab’s Privacy Policy and securely protected under privacy legislation in the countries in which we operate. We will elaborate in detail in a section further below.
One key incident prevention method is to verify the identity of both our consumers and partners:
From the perspective of protecting the safety of passengers, having a reliable driver authentication process can avoid unauthorized people from delivering a ride. This ensures that trips on Grab are only completed by registered licensed driver-partners that have passed our comprehensive background checks.
From the perspective of protecting the safety of driver-partners, verifying the identity of new passengers using facial recognition technology helps to deter crimes targeting our driver-partners and make incident investigations easier.
Safety incidents that arise from lack of identity verification
Facial recognition technology is also leveraged to improve Grab digital financial services, particularly in facilitating the “electronic Know Your Customer” (e-KYC) process. KYC is a standard regulatory requirement in the financial services industry to verify the identity of customers, which commonly serves to deter financial crime, such as money laundering.
Traditionally, customers are required to visit a physical counter to verify their government-issued ID as proof of identity. Today, with the widespread use of mobile devices, coupled with the maturity of facial recognition technologies, the process has become much more seamless and can be done entirely digitally.
Figure 1: GrabPay wallet e-KYC regulatory requirements in the Philippines
Overview of facial recognition technology
Figure 2: Face recognition flow
The typical facial recognition pipeline involves multiple stages, which starts with image preprocessing, face anti-spoof, followed by feature extraction, and finally the downstream applications – face verification or face search.
The most common image preprocessing techniques for face recognition tasks are face detection and face alignment. The face detection algorithm locates the face region in an image, and is usually followed by face alignment, which identifies the key facial landmarks (e.g. left eye, right eye, nose, etc.) and transforms them into a standardised coordinate space. Both of these preprocessing steps aim to ensure a consistent quality of input data for downstream applications.
Face anti-spoof refers to the process of ensuring that the user-submitted facial image is legitimate. This is to prevent fraudulent users from stealing identities (impersonating someone else by using a printed photo or replaying videos from mobile screens) or hiding identities (e.g. wearing a mask). The main approach here is to extract low-level spoofing cues, such as the moiré pattern, using various machine learning techniques to determine whether the image is spoofed.
After passing the anti-spoof checks, the user-submitted images are sent for face feature extraction, where important features that can be used to distinguish one person from another are extracted. Ideally, we want the feature extraction model to produce embeddings (i.e. high-dimensional vectors) with small intra-class distance (i.e. faces of the same person) and large inter-class distance (i.e. faces of different people), so that the aforementioned downstream applications (i.e. face verification and face search) become a straightforward task – thresholding the distance between embeddings.
Face verification is one of the key applications of facial recognition and it answers the question, “Is this the same person?”. As previously alluded to, this can be achieved by comparing the distance between embeddings generated from a template image (e.g. government-issued ID or profile picture) and a query image submitted by the user. A short distance indicates that both images belong to the same person, whereas a large distance indicates that these images are taken from different people.
Face search, on the other hand, tackles the question, “Who is this person?”, which can be framed as a vector/embedding similarity search problem. Image embeddings belonging to the same person would be highly similar, thus ranked higher, in search results. This is particularly useful for deterring criminals from re-onboarding to our platform by blocking new selfies that match a criminal profile in our criminal denylist database.
Face anti-spoof
For face anti-spoof, the most common methods used to attack the facial recognition system are screen replay and printed paper. To distinguish these spoof attacks from genuine faces, we need to solve two main challenges.
The first challenge is to obtain enough data of spoof attacks to enable the training of models. The second challenge is to carefully train the model to focus on the subtle differences between spoofed and genuine cases instead of overfitting to other background information.
Figure 3: Original face (left), screen replay attack (middle), synthetic data with a moiré pattern (right)
Collecting large volumes of spoof data is naturally hard since spoof cases in product flows are very rare. To overcome this problem, one option is to synthesise large volumes of spoof data instead of collecting the real spoof data. More specifically, we synthesise moiré patterns on genuine face images that we have, and use the synthetic data as the screen replay attack data. This allows our model to use small amounts of real spoof data and sufficiently identify spoofing, while collecting more data to train the model.
Figure 4: Data preparation with patch data
On the other hand, a spoofed face image contains lots of information with subtle spoof cues such as moiré patterns that cannot be detected by the naked eye. As such, it’s important to train the model to identify spoof cues instead of focusing on the possible domain bias between the spoof data and genuine data. To achieve this, we need to change the way we prepare the training data.
Instead of using the entire selfie image as the model input, we firstly detect and crop the face area, then evenly split the cropped face area into several patches. These patches are used as input to train the model. During inference, images are also split into patches the same way and the final result will be the average of outputs from all patches. After this data preprocessing, the patches will contain less global semantic information and more local structure features, making it easier for the model to learn and distinguish spoofed and genuine images.
Face verification
“Data is food for AI.” – Andrew Ng, founder of Google Brain
The key success factors of artificial intelligence (AI) models are undoubtedly driven by the volume and quality of data we hold. At Grab, we have one of the largest and most comprehensive face datasets, covering a wide range of demographic groups in Southeast Asia. This gives us a strong advantage to build a highly robust and unbiased facial recognition model that serves the region better.
As mentioned earlier, all selfies collected by Grab are securely protected under privacy legislation in the countries in which we operate. We take reasonable legal, organisational and technical measures to ensure that your Personal Data is protected, which includes measures to prevent Personal Data from getting lost, or used or accessed in an unauthorised way. We limit access to these Personal Data to our employees on a need to know basis. Those processing any Personal Data will only do so in an authorised manner and are required to treat the information with confidentiality.
Also, selfie data will not be shared with any other parties, including our driver, delivery partners or any other third parties without proper authorisation from the account holder. They are strictly used to improve and enhance our products and services, and not used as a means to collect personal identifiable data. Any disclosure of personal data will be handled in accordance with Grab Privacy Policy.
Other than data, model architecture also plays an important role, especially when handling less common face verification scenarios, such as ”selfie to ID photo” and “selfie to masked selfie” verifications.
The main challenge of “selfie to ID photo” verification is the shallow nature of the dataset, i.e. a large number of unique identities, but a low number of image samples per identity. This type of dataset lacks representation in intra-class diversity, which would commonly lead to model collapse during model training. Besides, “selfie to ID photo” verification also poses numerous challenges that are different from general facial recognition, such as aging (old ID photo), attrited ID card (normal wear and tear), and domain difference between printed ID photo and real-life selfie photo.
To address these issues, we leveraged a novel training method named semi-Siamese training (SST) 2, which is proposed by Du et al. (2020). The key idea is to enlarge intra-class diversity by ensuring that the backbone Siamese networks have similar parameters, but are not entirely identical, hence the name “semi-Siamese”.
Just like typical Siamese network architecture, feature vectors generated by the subnetworks are compared to compute the loss functions, such as Arc-softmax, Triplet loss, and Large margin cosine loss, all of which aim to reduce intra-class distance while increasing the inter-class distances. With the usage of the semi-Siamese backbone network, intra-class diversity is further promoted as it is guaranteed by the difference between the subnetworks, making the training convergence more stable.
Figure 6: Masked face verification
Another type of face verification problem we need to solve these days is the “selfie to masked selfie” verification. To pass this type of face verification, users are required to take off their masks as previous face verification models are unable to verify people with masks on. However, removing face masks to do face verification is inconvenient and risky in a crowded environment, which is a pain for many of our driver-partners who need to do verification from time to time.
To help ease this issue, we developed a face verification model that can verify people even while they are wearing masks. This is done by adding masked selfies into the training data and training the model with both masked and unmasked selfies. This not only enables the model to perform verification for people with masks on, but also helps to increase the accuracy of verifying those without masks. On top of that, masked selfies act as data augmentation and help to train the model with stronger ability of extracting features from the face.
Face search
As previously mentioned, once embeddings are produced by the facial recognition models, face search is fundamentally no different from face verification. Both processes use the distance between embeddings to decide whether the faces belong to the same person. The only difference here is that face search is more computationally expensive, since face verification is a 1-to-1 comparison, whereas face search is a 1-to-N comparison (N=size of the database).
In practice, there are many ways to significantly reduce the complexity of the search algorithm from O(N), such as using Inverted File Index (IVF) and Hierarchical Navigable Small World (HNSW) graphs. Besides, there are also various methods to increase the query speed, such as accelerating the distance computation using GPU, or approximating the distances using compressed vectors. This problem is also commonly known as Approximate Nearest Neighbor (ANN). Some of the great open-sourced vector similarity search libraries that can help to solve this problem are ScaNN3 (by Google), FAISS4(by Facebook), and Annoy (by Spotify).
What’s next?
In summary, facial recognition technology is an effective crime prevention and reduction tool to strengthen the safety of our platform and users. While the enforcement of selfie collection by itself is already a strong deterrent against fraudsters misusing our platform, leveraging facial recognition technology raises the bar by helping us to quickly and accurately identify these offenders.
As technologies advance, face spoofing patterns also evolve. We need to continuously monitor spoofing trends and actively improve our face anti-spoof algorithms to proactively ensure our users’ safety.
With the rapid growth of facial recognition technology, there is also a growing concern regarding data privacy issues. At Grab, consumer privacy and safety remain our top priorities and we continuously look for ways to improve our existing safeguards.
In May 2022, Grab was recognised by the Infocomm Media Development Authority in Singapore for its stringent data protection policies and processes through the award of Data Protection Trustmark (DPTM) certification. This recognition reinforces our belief that we can continue to draw the benefits from facial recognition technology, while avoiding any misuse of it. As the saying goes, “Technology is not inherently good or evil. It’s all about how people choose to use it”.
Join us
Grab is the leading superapp platform in Southeast Asia, providing everyday services that matter to consumers. More than just a ride-hailing and food delivery app, Grab offers a wide range of on-demand services in the region, including mobility, food, package and grocery delivery services, mobile payments, and financial services across 428 cities in eight countries.
Powered by technology and driven by heart, our mission is to drive Southeast Asia forward by creating economic empowerment for everyone. If this mission speaks to you, join our team today!
References
Niu, D., Guo R., and Wang, Y. (2021). Moiré Attack (MA): A New Potential Risk of Screen Photos. Advances in Neural Information Processing Systems. https://papers.nips.cc/paper/2021/hash/db9eeb7e678863649bce209842e0d164-Abstract.html ↩
Du, H., Shi, H., Liu, Y., Wang, J., Lei, Z., Zeng, D., & Mei, T. (2020). Semi-Siamese Training for Shallow Face Learning. European Conference on Computer Vision, 36–53. Springer. ↩
Guo, R., Sun, P., Lindgren, E., Geng, Q., Simcha, D., Chern, F., & Kumar, S. (2020). Accelerating Large-Scale Inference with Anisotropic Vector Quantization. International Conference on Machine Learning. https://arxiv.org/abs/1908.10396 ↩
Johnson, J., Douze, M., & Jégou, H. (2019). Billion-scale similarity search with GPUs. IEEE Transactions on Big Data, 7(3), 535–547. ↩
Today we’re announcing Private Access Tokens, a completely invisible, private way to validate that real users are visiting your site. Visitors using operating systems that support these tokens, including the upcoming versions of macOS or iOS, can now prove they’re human without completing a CAPTCHA or giving up personal data. This will eliminate nearly 100% of CAPTCHAs served to these users.
What does this mean for you?
If you’re an Internet user:
We’re making your mobile web experience more pleasant and more private than other networks at the same time.
You won’t see a CAPTCHA on a supported iOS or Mac device (other devices coming soon!) accessing the Cloudflare network.
If you’re a web or application developer:
Know your user is coming from an authentic device and signed application, verified by the device vendor directly.
Validate users without maintaining a cumbersome SDK.
If you’re a Cloudflare customer:
You don’t have to do anything! Cloudflare will automatically ask for and utilize Private Access Tokens
Your visitors won’t see a CAPTCHA and we’ll ask for less data from their devices.
Introducing Private Access Tokens
Over the past year, Cloudflare has collaborated with Apple, Google, and other industry leaders to extend the Privacy Pass protocol with support for a new cryptographic token. These tokens simplify application security for developers and security teams, and obsolete legacy, third-party SDK based approaches to determining if a human is using a device. They work for browsers, APIs called by browsers, and APIs called within apps. We call these new tokens Private Access Tokens (PATs). This morning, Apple announced that PATs will be incorporated into iOS 16, iPad 16, and macOS 13, and we expect additional vendors to announce support in the near future.
Cloudflare has already incorporated PATs into our Managed Challenge platform, so any customer using this feature will automatically take advantage of this new technology to improve the browsing experience for supported devices.
CAPTCHAs don’t work in mobile environments, PATs remove the need for them
We’ve writtennumeroustimes about how CAPTCHAs are a terrible user experience. However, we haven’t discussed specifically how much worse the user experience is on a mobile device. CAPTCHA as a technology was built and optimized for a browser-based world. They are deployed via a widget or iframe that is generally one size fits all, leading to rendering issues, or the input window only being partially visible on a device. The smaller real estate on mobile screens inherently makes the technology less accessible and solving any CAPTCHA more difficult, and the need to render JavaScript and image files slows down image loads while consuming excess customer bandwidth.
Usability aside, mobile environments present an additional challenge in that they are increasingly API-driven. CAPTCHAs simply cannot work in an API environment where JavaScript can’t be rendered, or a WebView can’t be called. So, mobile app developers often have no easy option for challenging a user when necessary. They sometimes resort to using a clunky SDK to embed a CAPTCHA directly into an app. This requires work to embed and customize the CAPTCHA, continued maintenance and monitoring, and results in higher abandonment rates. For these reasons, when our customers choose to show a CAPTCHA today, it’s only shown on mobile 20% of the time.
We recently posted about how we used our Managed Challenge platform to reduce our CAPTCHA use by 91%. But because the CAPTCHA experience is so much worse on mobile, we’ve been separately working on ways we can specifically reduce CAPTCHA use on mobile even further.
When sites can’t challenge a visitor, they collect more data
So, you either can’t use CAPTCHA to protect an API, or the UX is too terrible to use on your mobile website. What options are left for confirming whether a visitor is real? A common one is to look at client-specific data, commonly known as fingerprinting.
You could ask for device IMEI and security patch versions, look at screen sizes or fonts, check for the presence of APIs that indicate human behavior, like interactive touch screen events and compare those to expected outcomes for the stated client. However, all of this data collection is expensive and, ultimately, not respectful of the end user. As a company that deeply cares about privacy and helping make the Internet better, we want to use as little data as possible without compromising the security of the services we provide.
Another alternative is to use system-level APIs that offer device validation checks. This includes DeviceCheck on Apple platforms and SafetyNet on Android. Application services can use these client APIs with their own services to assert that the clients they’re communicating with are valid devices. However, adopting these APIs requires both application and server changes, and can be just as difficult to maintain as SDKs.
Private Access Tokens vastly improve privacy by validating without fingerprinting
This is the most powerful aspect of PATs. By partnering with third parties like device manufacturers, who already have the data that would help us validate a device, we are able to abstract portions of the validation process, and confirm datawithout actually collecting, touching, or storing that data ourselves. Rather than interrogating a device directly, we ask the device vendor to do it for us.
In a traditional website setup, using the most common CAPTCHA provider:
The website you visit knows the URL, your IP, and some additional user agent data.
The CAPTCHA provider knows what website you visit, your IP, your device information, collects interaction data on the page, AND ties this data back to other sites where Google has seen you. This builds a profile of your browsing activity across both sites and devices, plus how you personally interact with a page.
When PATs are used, device data is isolated and explicitly NOT exchanged between the involved parties (the manufacturer and the Cloudflare)
The website knows only your URL and IP, which it has to know to make a connection.
The device manufacturer (attester) knows only the device data required to attest your device, but can’t tell what website you visited, and doesn’t know your IP.
Cloudflare knows the site you visited, but doesn’t know any of your device or interaction information.
We don’t actually need or want the underlying data that’s being collected for this process, we just want to verify if a visitor is faking their device or user agent. Private Access Tokens allow us to capture that validation state directly, without needing any of the underlying data. They allow us to be more confident in the authenticity of important signals, without having to look at those signals directly ourselves.
How Private Access Tokens compartmentalize data
With Private Access Tokens, four parties agree to work in concert with a common framework to generate and exchange anonymous, unforgeable tokens. Without all four parties in the process, PATs won’t work.
An Origin. A website, application, or API that receives requests from a client. When a website receives a request to their origin, the origin must know to look for and request a token from the client making the request. For Cloudflare customers, Cloudflare acts as the origin (on behalf of customers) and handles the requesting and processing of tokens.
A Client. Whatever tool the visitor is using to attempt to access the Origin. This will usually be a web browser or mobile application. In our example, let’s say the client is a mobile Safari Browser.
An Attester. The Attester is who the client asks to prove something (i.e that a mobile device has a valid IMEI) before a token can be issued. In our example below, the Attester is Apple, the device vendor. An Issuer. The issuer is the only one in the process that actually generates, or issues, a token. The Attester makes an API call to whatever Issuer the Origin has chosen to trust, instructing the Issuer to produce a token. In our case, Cloudflare will also be the Issuer.
In the example above, a visitor opens the Safari browser on their iPhone and tries to visit example.com.
Since Example uses Cloudflare to host their Origin, Cloudflare will ask the browser for a token.
Safari supports PATs, so it will make an API call to Apple’s Attester, asking them to attest.
The Apple attester will check various device components, confirm they are valid, and then make an API call to the Cloudflare Issuer (since Cloudflare acting as an Origin chooses to use the Cloudflare Issuer).
The Cloudflare Issuer generates a token, sends it to the browser, which in turn sends it to the origin.
Cloudflare then receives the token, and uses it to determine that we don’t need to show this user a CAPTCHA.
This probably sounds a bit complicated, but the best part is that the website took no action in this process. Asking for a token, validation, token generation, passing, all takes place behind the scenes by third parties that are invisible to both the user and the website. By working together, Apple and Cloudflare have just made this request more secure, reduced the data passed back and forth, and prevented a user from having to see a CAPTCHA. And we’ve done it by both collecting and exchanging less user data than we would have in the past.
Most customers won’t have to do anything to utilize Private Access Tokens
To take advantage of PATs, all you have to do is choose Managed Challenge rather than Legacy CAPTCHA as a response option in a Firewall rule. More than 65% of Cloudflare customers are already doing this. Our Managed Challenge platform will automatically ask every request for a token, and when the client is compatible with Private Access Tokens, we’ll receive one. Any of your visitors using an iOS or macOS device will automatically start seeing fewer CAPTCHAs once they’ve upgraded their OS.
This is just step one for us. We are actively working to get other clients and device makers utilizing the PAT framework as well. Any time a new client begins utilizing the PAT framework, traffic coming to your site from that client will automatically start asking for tokens, and your visitors will automatically see fewer CAPTCHAs.
We will be incorporating PATs into other security products very soon. Stay tuned for some announcements in the near future.
If you’re like me, you’re still excited by last week’s news that Dependabot is generally available on GitHub Enterprise Server (GHES). Developers using GHES can now let Dependabot secure their dependencies and keep them up-to-date. You know who would have loved that? Me at my last job.
Before joining GitHub, I spent five years working on teams that relied on GHES to host our code. As a GHES user, I really, really wanted Dependabot. Here’s why.
Dependencies
One constant pain point for my previous teams was staying on top of dependencies. Creating a Rails project with rails new results in an app with 74 dependencies, Django apps start with 88 dependencies, and a project initialized with Create React App will have 1,432 dependencies!
Unfortunately, security vulnerabilities happen, and they can expose your customers to existential risk, so it’s important they are handled as soon as they’re published.
As I’m most familiar with the Ruby ecosystem, I’ll use Nokogiri, a gem for parsing XML and HTML, to illustrate the process of manually resolving a vulnerability. Nokogiri has been a dependency of every Rails app I’ve maintained. It’s also seen seven vulnerabilities since 2019. To fix these manually, we’ve had to:
Patch Nokogiri in `my_rails_app` to a non-vulnerable version
Push the changes and open a pull request
Wait for CI to pass
Get the necessary reviews
Deploy, observe, and merge
This is just one of (at least) 74 dependencies in one Rails app. My team maintained 14 Rails apps in our microservices-based architecture, so we needed to repeat the process for each app. A single vulnerability would eat up days of engineering time. That’s just one dependency in one ecosystem. We also worked on apps written in Elixir, Python, JavaScript, and PHP.
If an engineer was patching vulnerabilities, they couldn’t pursue feature work, the thing our customers could actually see. This would, understandably, lead to conversations about which vulnerabilities were most likely to be exploited and which we could tolerate for now.
If we had Dependabot security updates, that process would have started with a pull request. What took an engineer days to complete on their own could have been done before lunch.
We could have invested in keeping all of our dependencies up-to-date. Incremental upgrades are typically easier to perform and pose less risk. They also give bad actors less time to find and exploit vulnerabilities. One of my previous teams was still running Rails 3.2, which was no longer maintained when Rails 6 was released six years later. As support phased out, we had to apply our own security patches to our codebase instead of getting them from the framework. This made upgrading even harder. We spent years trying to get to a supported version, but other product priorities always won out.
If my team had Dependabot version updates, Dependabot would have opened pull requests each time a new version of Rails was released. We’d still need to make changes to ensure our apps were compliant with the new versions, but the changes would be made incrementally, making the lift much lighter. But we didn’t have Dependabot. We had to upgrade manually, and that meant upgrading didn’t happen until it became a P0.
A new home
I joined GitHub in 2021 to work on Dependabot. Being intimately familiar with the challenges Dependabot could help address, I wanted to be part of the solution. Little did I know, the team was just starting the process of bringing Dependabot to GHES. Call it serendipity, a dream come true, or tea leaves arranged just so.
I quickly realized why Dependabot wasn’t already on GHES. GitHub acquired Dependabot in 2019, and it took some time to scale Dependabot to be able to secure GitHub’s millions of repositories. To achieve this, we ported the service’s backend to run on Moda, GitHub’s internal Kubernetes-based platform. The dependency update jobs that result in pull requests were updated to run on lightweight Firecracker VMs, allowing Dependabot to create millions of pull requests in just hours. It was an impressive effort by a small team.
That effort, however, didn’t lend itself to the architecture of GHES, where everything runs on a single server with limited resources. An auto-scaling backend and network of VMs wasn’t an option. Instead, we needed to port Dependabot’s backend to run on Nomad, the container orchestration option on GHES. The jobs running on Firecracker VMs needed to run on our customers’ hardware. Fortunately, organizations can self-host GitHub Actions runners in GHES, so we adapted them to run on GitHub Actions. We also had to adjust our development processes to support continuous delivery in the cloud and less frequent GHES releases.
The result is that developers relying on GHES now have the option to have their dependencies updated for them. Now, my former teammates can update their dependencies by:
Viewing the already opened pull request
Reviewing the pull request and the included release notes
Deploying, observing, and merging
We’re really proud of that. As for me, I get the immense satisfaction of knowing that I built something that will directly benefit my former teammates. It doesn’t get much better than that!
Guess what? GitHub is hiring. What would you like to make better?
If you’re inspired to work at GitHub, we’d love for you to join us. Check out our Careers page to see all of our current job openings.
Dedicated remote-first company with flexible hours
Building great products used by tens of millions of people and companies around the world
Committed to nurturing a diverse and inclusive workplace
Today, a cluster of Internet standards were published that rationalize and modernize the definition of HTTP – the application protocol that underpins the web. This work includes updates to, and refactoring of, HTTP semantics, HTTP caching, HTTP/1.1, HTTP/2, and the brand-new HTTP/3. Developing these specifications has been no mean feat and today marks the culmination of efforts far and wide, in the Internet Engineering Task Force (IETF) and beyond. We thought it would be interesting to celebrate the occasion by sharing some analysis of Cloudflare’s view of HTTP traffic over the last 12 months.
However, before we get into the traffic data, for quick reference, here are the new RFCs that you should make a note of and start using:
HTTP’s overall architecture, common terminology and shared protocol aspects such as request and response messages, methods, status codes, header and trailer fields, message content, representation data, content codings and much more. Obsoletes RFCs 2818, 7231, 7232, 7233, 7235, 7538, 7615, 7694, and portions of 7230.
A syntax of HTTP that uses a binary framing format, which provides streams to support concurrent requests and responses. Message fields can be compressed using HPACK. Typically used over TCP and TLS. Obsoletes RFCs 7540 and 8740.
A variation of HPACK field compression that is optimized for the QUIC transport protocol.
On May 28, 2021, we enabled QUIC version 1 and HTTP/3 for all Cloudflare customers, using the final “h3” identifier that matches RFC 9114. So although today’s publication is an occasion to celebrate, for us nothing much has changed, and it’s business as usual.
A browser and web server typically automatically negotiate the highest HTTP version available. Thus, HTTP/3 takes precedence over HTTP/2. We looked back over the last year to understand HTTP/3 usage trends across the Cloudflare network, as well as analyzing HTTP versions used by traffic from leading browser families (Google Chrome, Mozilla Firefox, Microsoft Edge, and Apple Safari), major search engine indexing bots, and bots associated with some popular social media platforms. The graphs below are based on aggregate HTTP(S) traffic seen globally by the Cloudflare network, and include requests for website and application content across the Cloudflare customer base between May 7, 2021, and May 7, 2022. We used Cloudflare bot scores to restrict analysis to “likely human” traffic for the browsers, and to “likely automated” and “automated” for the search and social bots.
Traffic by HTTP version
Overall, HTTP/2 still comprises the majority of the request traffic for Cloudflare customer content, as clearly seen in the graph below. After remaining fairly consistent through 2021, HTTP/2 request volume increased by approximately 20% heading into 2022. HTTP/1.1 request traffic remained fairly flat over the year, aside from a slight drop in early December. And while HTTP/3 traffic initially trailed HTTP/1.1, it surpassed it in early July, growing steadily and roughly doubling in twelve months.
HTTP/3 traffic by browser
Digging into just HTTP/3 traffic, the graph below shows the trend in daily aggregate request volume over the last year for HTTP/3 requests made by the surveyed browser families. Google Chrome (orange line) is far and away the leading browser, with request volume far outpacing the others.
Below, we remove Chrome from the graph to allow us to more clearly see the trending across other browsers. Likely because it is also based on the Chromium engine, the trend for Microsoft Edge closely mirrors Chrome. As noted above, Mozilla Firefox first enabled production support in version 88 in April 2021, making it available by default by the end of May. The increased adoption of that updated version during the following month is clear in the graph as well, as HTTP/3 request volume from Firefox grew rapidly. HTTP/3 traffic from Apple Safari increased gradually through April, suggesting growth in the number of users enabling the experimental feature or running a Technology Preview version of the browser. However, Safari’s HTTP/3 traffic has subsequently dropped over the last couple of months. We are not aware of any specific reasons for this decline, but our most recent observations indicate HTTP/3 traffic is recovering.
Looking at the lines in the graph for Chrome, Edge, and Firefox, a weekly cycle is clearly visible in the graph, suggesting greater usage of these browsers during the work week. This same pattern is absent from Safari usage.
Across the surveyed browsers, Chrome ultimately accounts for approximately 80% of the HTTP/3 requests seen by Cloudflare, as illustrated in the graphs below. Edge is responsible for around another 10%, with Firefox just under 10%, and Safari responsible for the balance.
We also wanted to look at how the mix of HTTP versions has changed over the last year across each of the leading browsers. Although the percentages vary between browsers, it is interesting to note that the trends are very similar across Chrome, Firefox and Edge. (After Firefox turned on default HTTP/3 support in May 2021, of course.) These trends are largely customer-driven – that is, they are likely due to changes in Cloudflare customer configurations.
Most notably we see an increase in HTTP/3 during the last week of September, and a decrease in HTTP/1.1 at the beginning of December. For Safari, the HTTP/1.1 drop in December is also visible, but the HTTP/3 increase in September is not. We expect that over time, once Safari supports HTTP/3 by default that its trends will become more similar to those seen for the other browsers.
Traffic by search indexing bot
Back in 2014, Google announced that it would start to consider HTTPS usage as a ranking signal as it indexed websites. However, it does not appear that Google, or any of the other major search engines, currently consider support for the latest versions of HTTP as a ranking signal. (At least not directly – the performance improvements associated with newer versions of HTTP could theoretically influence rankings.) Given that, we wanted to understand which versions of HTTP the indexing bots themselves were using.
Despite leading the charge around the development of QUIC, and integrating HTTP/3 support into the Chrome browser early on, it appears that on the indexing/crawling side, Google still has quite a long way to go. The graph below shows that requests from GoogleBot are still predominantly being made over HTTP/1.1, although use of HTTP/2 has grown over the last six months, gradually approaching HTTP/1.1 request volume. (A blog post from Google provides some potential insights into this shift.) Unfortunately, the volume of requests from GoogleBot over HTTP/3 has remained extremely limited over the last year.
Microsoft’s BingBot also fails to use HTTP/3 when indexing sites, with near-zero request volume. However, in contrast to GoogleBot, BingBot prefers to use HTTP/2, with a wide margin developing in mid-May 2021 and remaining consistent across the rest of the past year.
Traffic by social media bot
Major social media platforms use custom bots to retrieve metadata for shared content, improve language models for speech recognition technology, or otherwise index website content. We also surveyed the HTTP version preferences of the bots deployed by three of the leading social media platforms.
Although Facebook supports HTTP/3 on their main website (and presumably their mobile applications as well), their back-end FacebookBot crawler does not appear to support it. Over the last year, on the order of 60% of the requests from FacebookBot have been over HTTP/1.1, with the balance over HTTP/2. Heading into 2022, it appeared that HTTP/1.1 preference was trending lower, with request volume over the 25-year-old protocol dropping from near 80% to just under 50% during the fourth quarter. However, that trend was abruptly reversed, with HTTP/1.1 growing back to over 70% in early February. The reason for the reversal is unclear.
Similar to FacebookBot, it appears TwitterBot’s use of HTTP/3 is, unfortunately, pretty much non-existent. However, TwitterBot clearly has a strong and consistent preference for HTTP/2, accounting for 75-80% of its requests, with the balance over HTTP/1.1.
In contrast, LinkedInBot has, over the last year, been firmly committed to making requests over HTTP/1.1, aside from the apparently brief anomalous usage of HTTP/2 last June. However, in mid-March, it appeared to tentatively start exploring the use of other HTTP versions, with around 5% of requests now being made over HTTP/2, and around 1% over HTTP/3, as seen in the upper right corner of the graph below.
Conclusion
We’re happy that HTTP/3 has, at long last, been published as RFC 9114. More than that, we’re super pleased to see that regardless of the wait, browsers have steadily been enabling support for the protocol by default. This allows end users to seamlessly gain the advantages of HTTP/3 whenever it is available. On Cloudflare’s global network, we’ve seen continued growth in the share of traffic speaking HTTP/3, demonstrating continued interest from customers in enabling it for their sites and services. In contrast, we are disappointed to see bots from the major search and social platforms continuing to rely on aging versions of HTTP. We’d like to build a better understanding of how these platforms chose particular HTTP versions and welcome collaboration in exploring the advantages that HTTP/3, in particular, could provide.
Current statistics on HTTP/3 and QUIC adoption at a country and autonomous system (ASN) level can be found on Cloudflare Radar.
Running HTTP/3 and QUIC on the edge for everyone has allowed us to monitor a wide range of aspects related to interoperability and performance across the Internet. Stay tuned for future blog posts that explore some of the technical developments we’ve been making.
And this certainly isn’t the end of protocol innovation, as HTTP/3 and QUIC provide many exciting new opportunities. The IETF and wider community are already underway building new capabilities on top, such as MASQUE and WebTransport. Meanwhile, in the last year, the QUIC Working Group has adopted new work such as QUIC version 2, and the Multipath Extension to QUIC.
The Application Security teams at Netflix are responsible for securing the software footprint that we create to run the Netflix product, the Netflix studio, and the business. Our customers are product and engineering teams at Netflix that build these software services and platforms. The Netflix cultural values of ‘Context not Control’ and ‘Freedom and Responsibility’ strongly influence how we do Security at Netflix. Our goal is to manage security risks to Netflix via clear, opinionated security guidance, and by providing risk context to Netflix engineering teams to make pragmatic risk decisions at scale.
A few years ago, we published this blog post about how we had organized our team to focus our bandwidth on scalable investments as opposed to just traditional Appsec functions, which were not scaling well in our rapidly growing environment. We leaned into the idea of strategic security partnerships and automation investments to create more leverage for application security. This became the foundation for our current org structure with teams focused on Appsec Partnerships and Appsec Engineering. In this operating model, we provided critical Appsec operational services to Netflix — including bug bounty, pentesting, PSIRT (product security incident response), security reviews, and developer security education — via a shared on-call rotation.
Over the past few years, this model has allowed us to focus on investments like Secure by Default for baseline security controls, Security Self-Service for clear actionable guidance and Vulnerability Scanning at scale for software supply chain security. We wanted to share an update on learnings from this model, how our needs have evolved, and where we expect to go from here.
Among the most notable wins, we have been able to utilize this scale focused approach to productize application security for our rapidly growing studio engineering ecosystem, standardize security baseline for all Enterprise apps, and build paved roads to provide Secure by Default Authentication & Authorization capabilities for central data engineering tools. Our focus has been on improving overall security assurance as opposed to just vulnerability prevention. We are now expanding this approach to more parts of our ecosystem. This mindset has also allowed us to invest our capacity for white-glove service towards reasonable residual risk and standard guidance so we can reduce the need for white-glove engagements in the long term (e.g., investment in an API proxy that provides baseline security controls for free as opposed to pentesting all applications that would eventually sit behind that API proxy). This approach has also allowed us to build strong relationships with central engineering teams at Netflix (Data Platform, Developer Tools, Cloud Infrastructure, IAM Product Engineering) that will continue to serve as central points of leverage for security in the long term.
However, it has not been all sunshine and rainbows. On the partnership side, the bespoke nature of each partnership means that there isn’t consistency and redundancy built into the operating model and the related partnership artifacts (e.g., Security Strategy and Roadmap, Threat Model, Deliverable Tracking, Residual Risk Criteria, etc). This leads to insufficient context sharing and high operational churn every time we have personnel changes. The partnership charter has also grown laterally into the infrastructure space as we stack our leverage bets on infrastructure components (like Service Mesh, Container Platform, etc). The skill sets and domain depth in those partnerships has further diversified the skills on the team. But this is a tradeoff on our ability to serve generalized Appsec oncall needs like bug bounty triage with high consistency. Given that partnerships focus on long-running strategic initiatives, the wins can be few and far between and that can be difficult for team motivation. We also found various areas in which security partnership work bleeds into security product solutioning and it can be difficult to identify the appropriate handoff points.
Additionally, as the complexity of our ecosystem grows, the goal of “single PoC into information security” becomes increasingly more difficult to maintain. The team is now investing in consistency and scalability of partnership artifacts and communication channels, better redundancy and context sharing on the team through squad operating models, crisper engagement criteria, and definition of done for partnership engagements.
Our Appsec Engineering team builds products to help us scale, e.g.: a dynamic Asset Inventory that understands the nuances of our bespoke engineering ecosystem and how our applications and data relate to each other. This has evolved their identity to be a software engineering team that focuses on security problems as opposed to a security engineering team that writes code/software. Our hiring has reflected that shift, and we’ve added more dedicated software engineers (SWEs) to the team to help us build out software. With this shift, we’ve incorporated engineering best practices, and our products have appropriate investments toward reliability and sustainability. As the team skews towards more software engineering focused talent, ramping up to support the shared Appsec-focused on-call has been challenging.
While originally built to support AppSec use cases around providing guidance to developers in a self-service way, interest in the rich data and relationships we have in our tools, especially our Asset Inventory, has grown. As a result, we’ve continued to invest in making our solutions scalable and accessible, so security engineers can get the data they need more easily to drive security use cases. We’ve also discovered, through interviews with engineers, that self-service guidance doesn’t stand on its own. Moving forward, the team is investing in understanding our customer use cases better, and shifting our self-service story toward higher-context, more opinionated automated guidance to ensure developers have everything they need to make truly informed decisions about the security of their applications (similar to how they might make resiliency or other product decisions).
As the Netflix business and engineering workforce has grown, our software footprint has also grown and become more heterogeneous. At the same time, partnerships have grown more and more strategic, and engineering has grown more and more software-focused. As our team specialized, what emerged was a loss of strategic focus for our AppSec Professional Services charter. These services now need more dedicated strategic investment as the volume and support needs have grown. So, we are now building out a dedicated capability focused on these critical services that are important investments to be made and can no longer be served effectively via a shared Appsec on-call. This will be our “Appsec Reviews and Assessments” function and we are hiring for passionate, early career Appsec engineers to join this group.
We will continue to learn as we go through this next phase of evolution of our program. We hope to continue to share these learnings with the broader community interested in scalable product and application security.
To provide the best experiences, we use technologies like cookies to store and/or access device information. Consenting to these technologies will allow us to process data such as browsing behavior or unique IDs on this site. Not consenting or withdrawing consent, may adversely affect certain features and functions.
Functional
Always active
The technical storage or access is strictly necessary for the legitimate purpose of enabling the use of a specific service explicitly requested by the subscriber or user, or for the sole purpose of carrying out the transmission of a communication over an electronic communications network.
Preferences
The technical storage or access is necessary for the legitimate purpose of storing preferences that are not requested by the subscriber or user.
Statistics
The technical storage or access that is used exclusively for statistical purposes.The technical storage or access that is used exclusively for anonymous statistical purposes. Without a subpoena, voluntary compliance on the part of your Internet Service Provider, or additional records from a third party, information stored or retrieved for this purpose alone cannot usually be used to identify you.
Marketing
The technical storage or access is required to create user profiles to send advertising, or to track the user on a website or across several websites for similar marketing purposes.
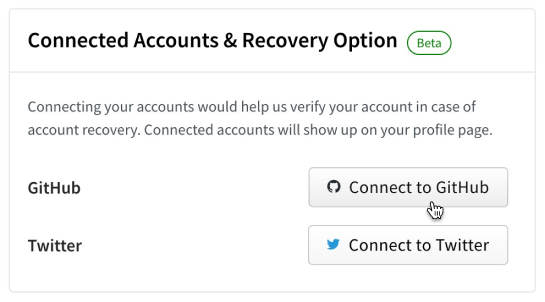


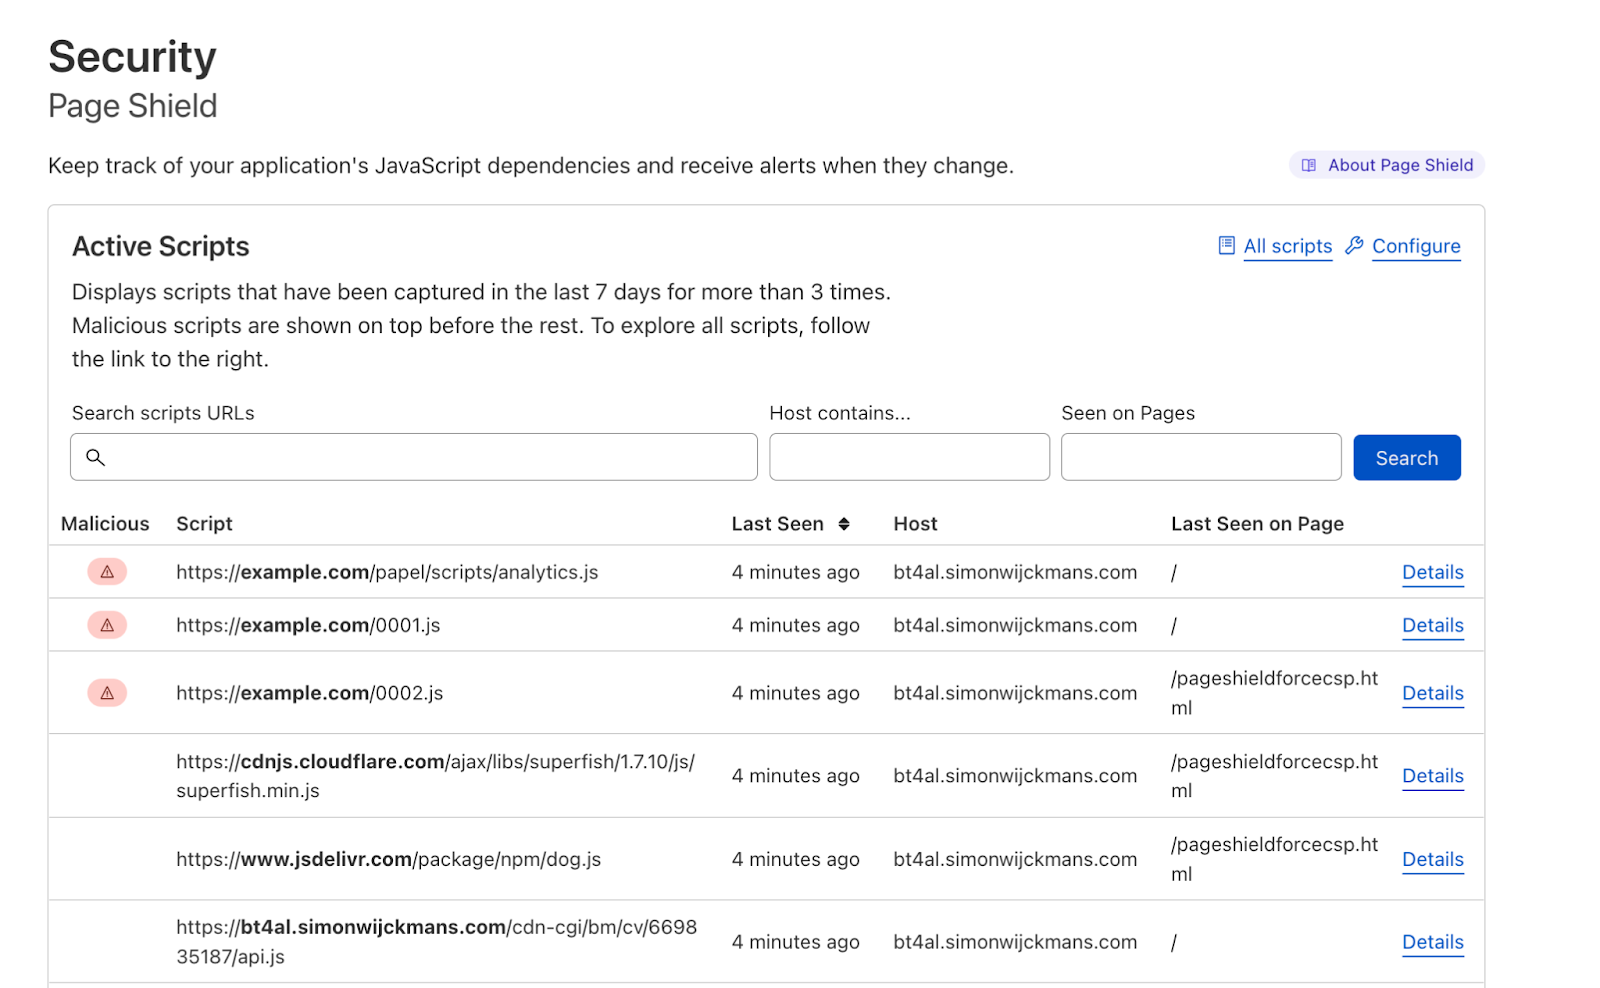
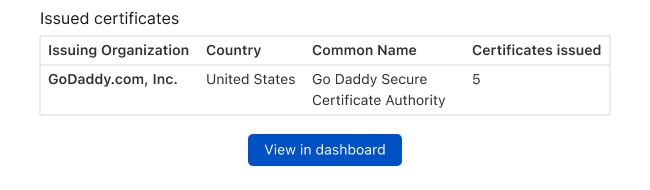
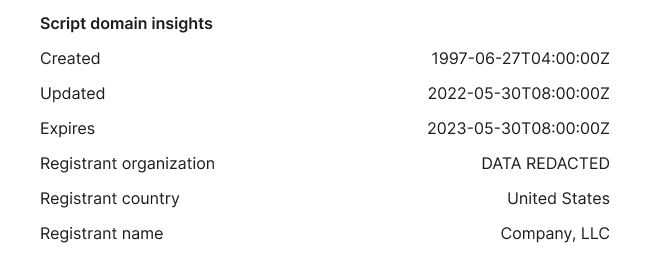
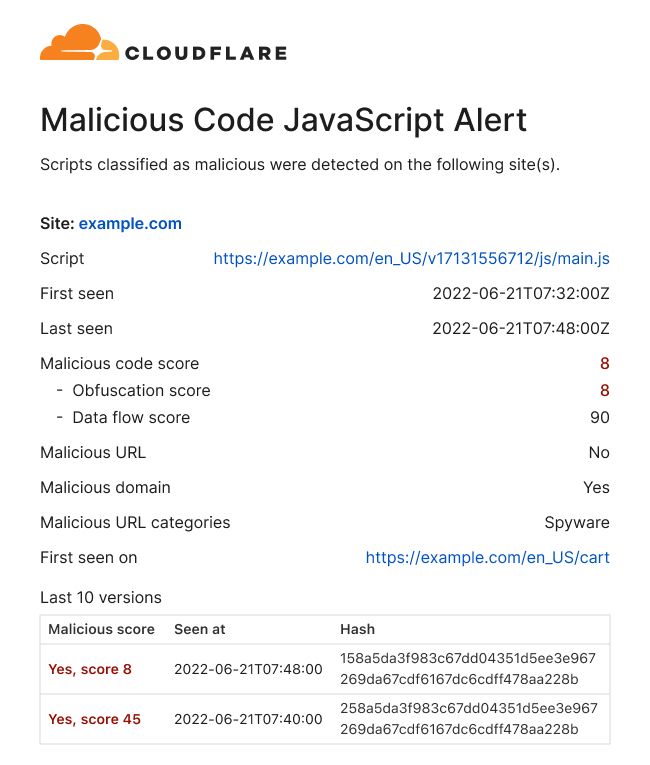
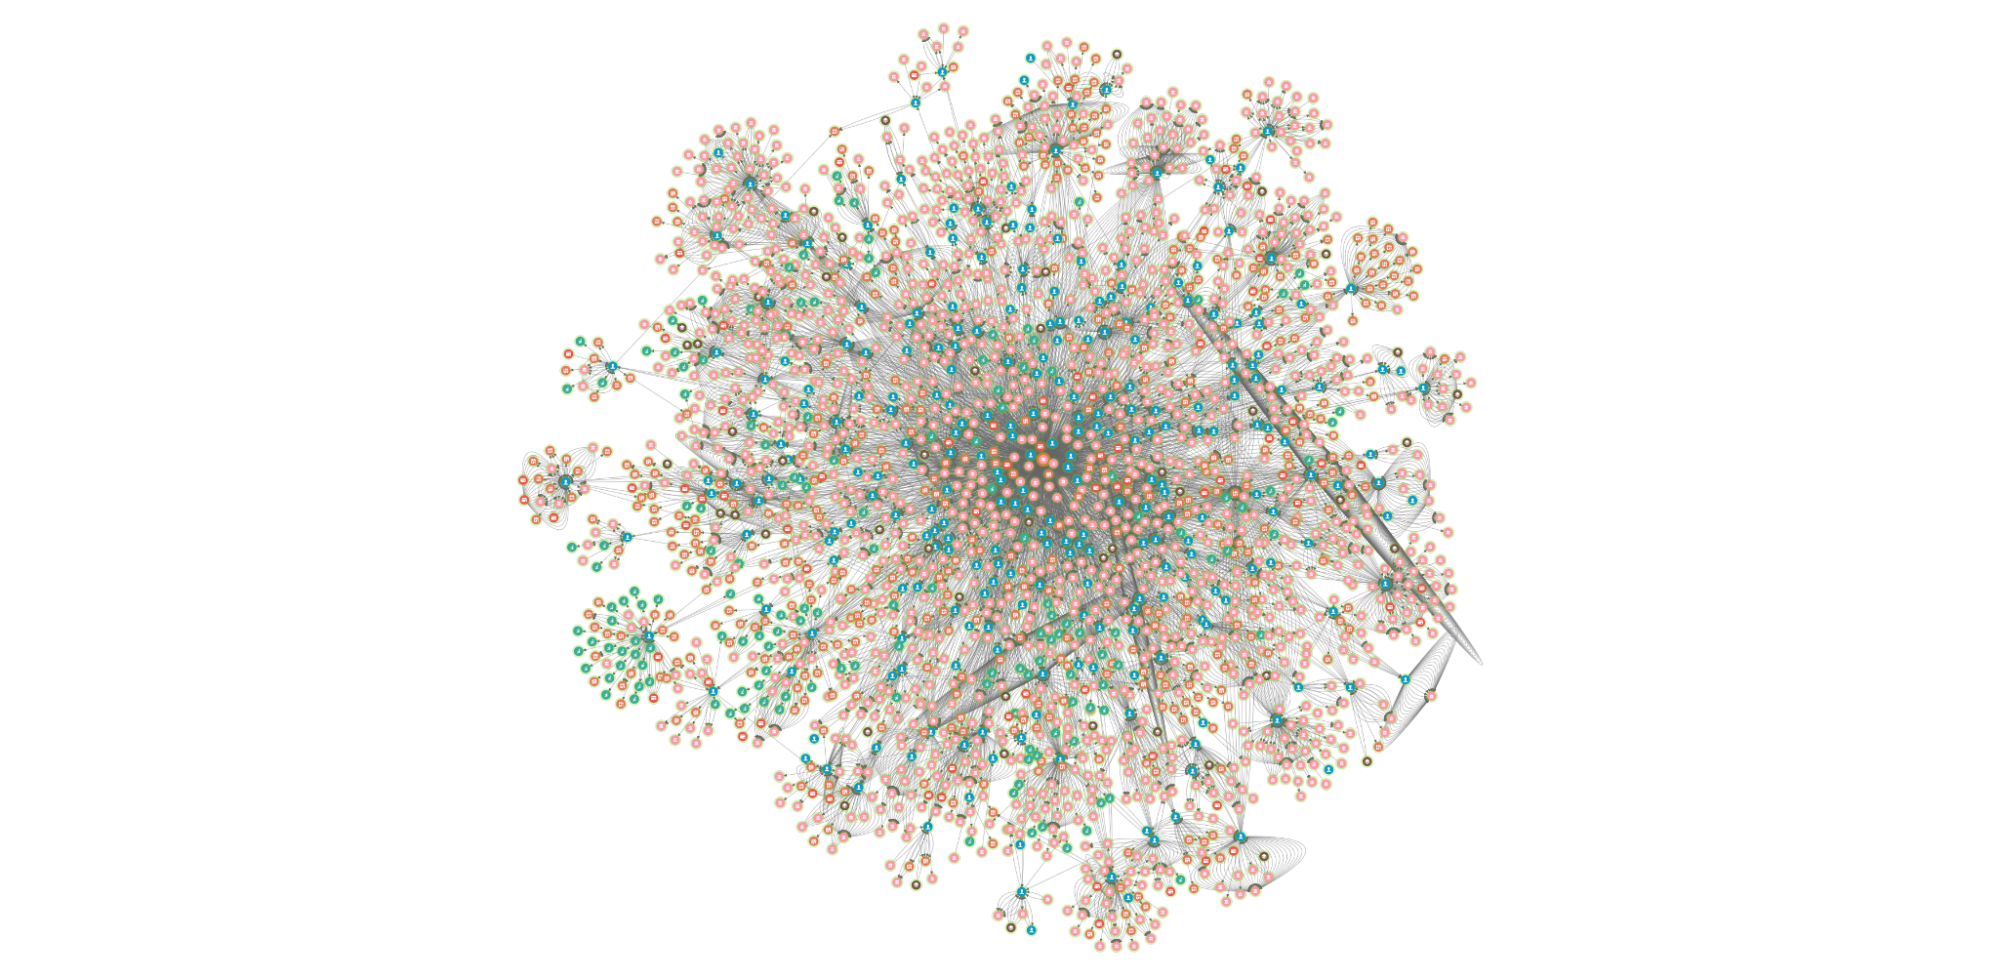
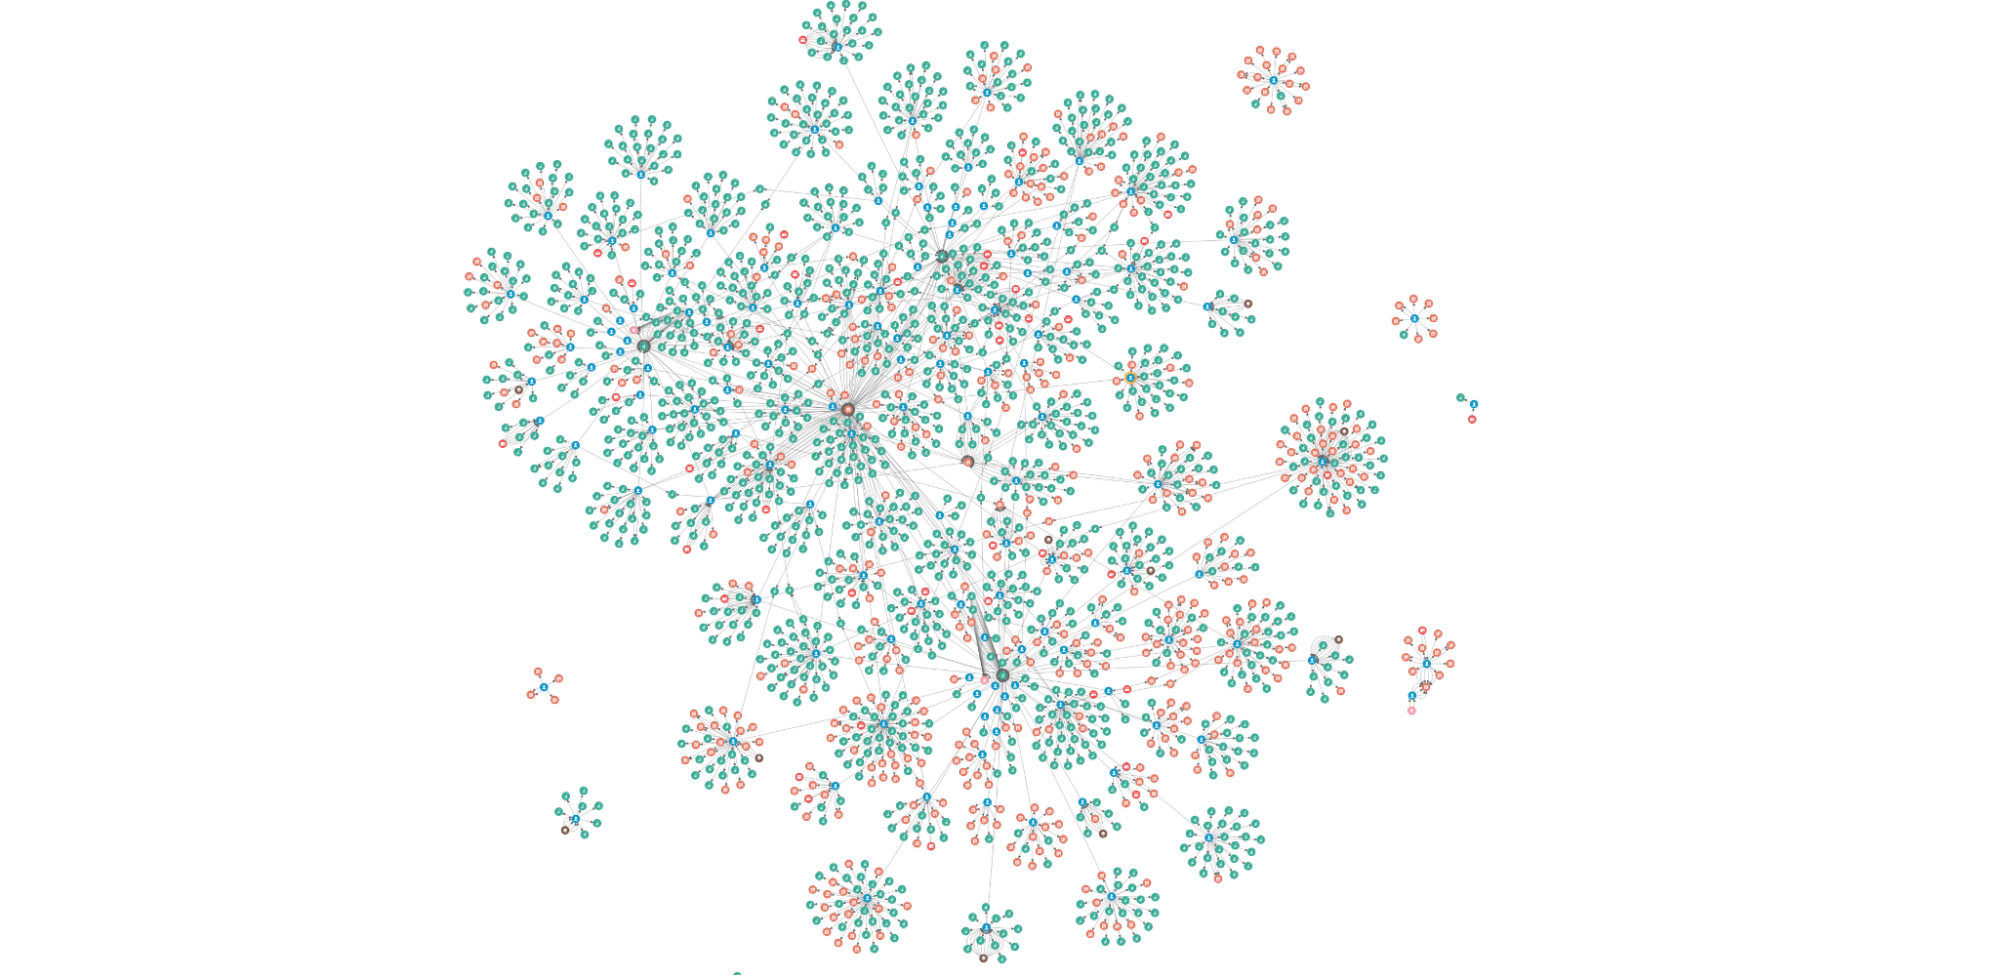

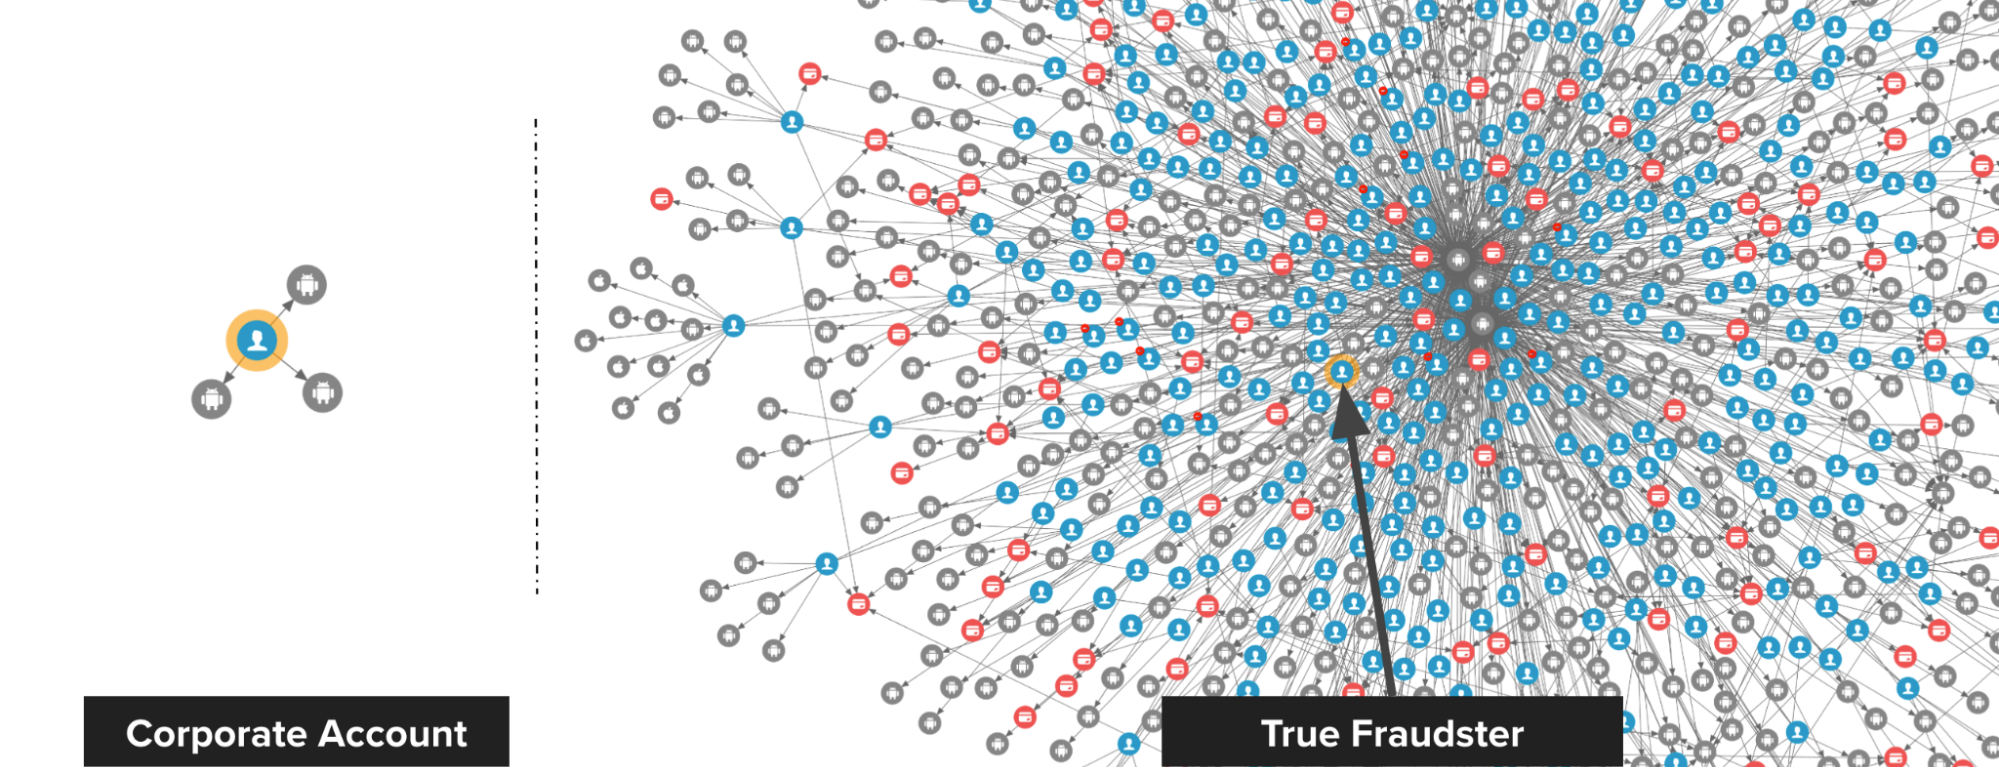
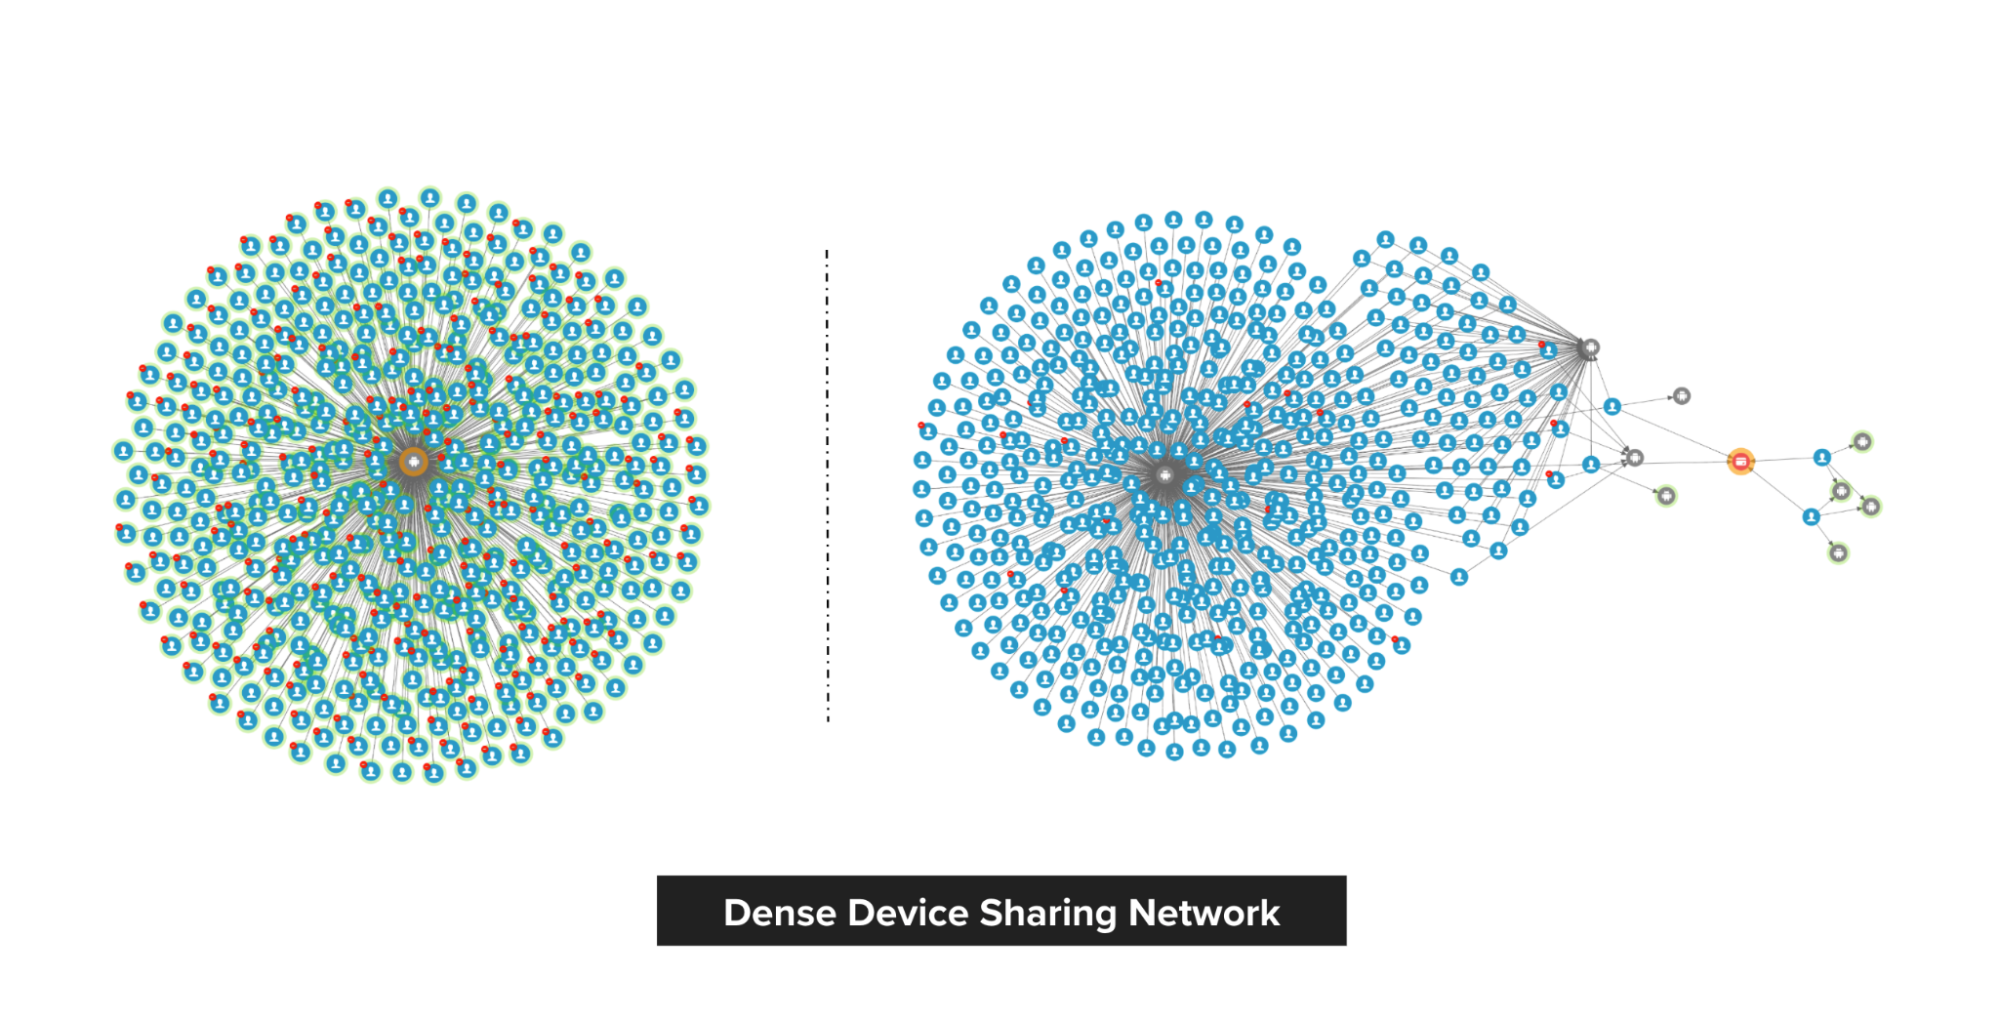
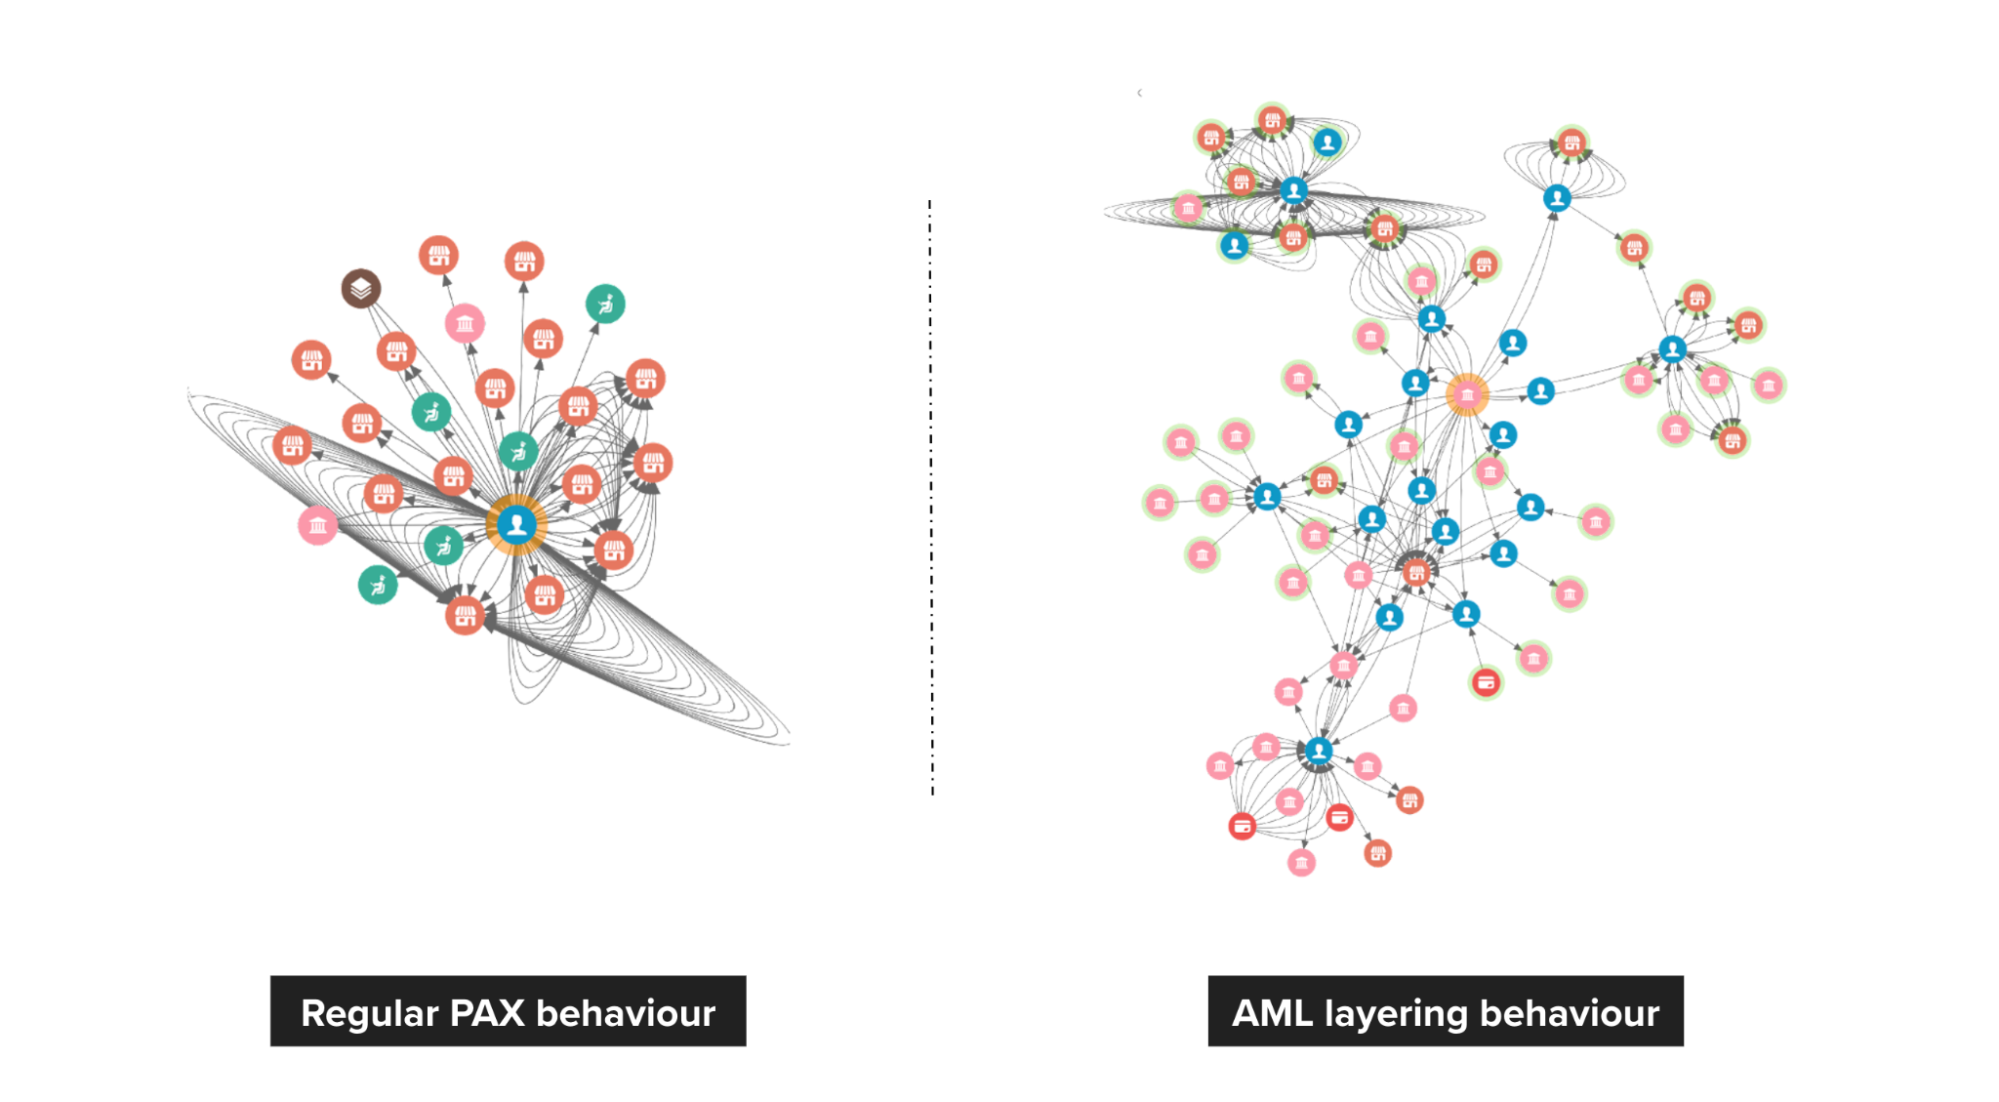


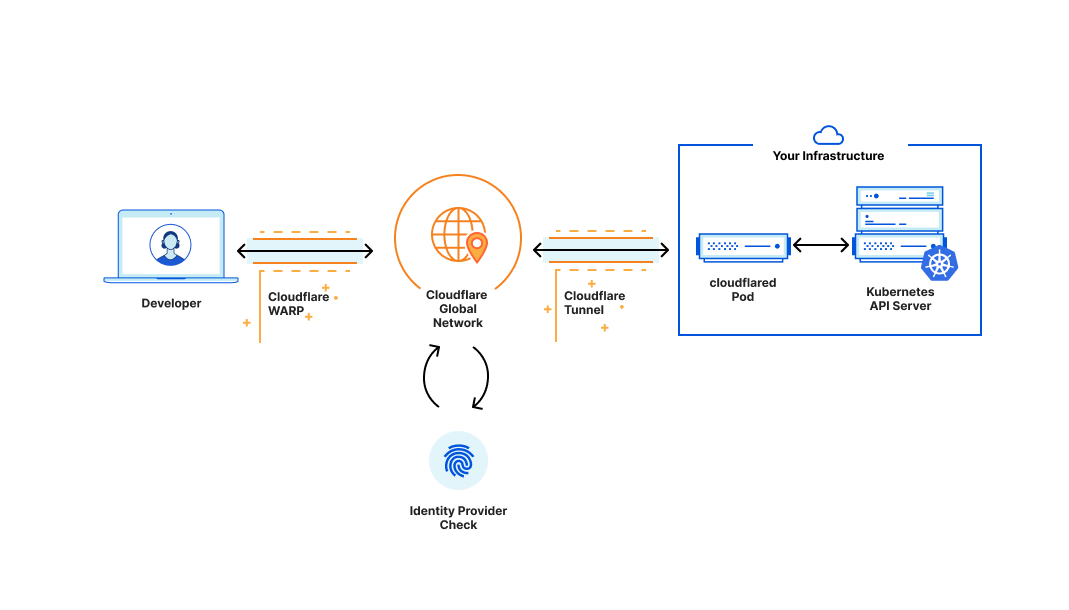
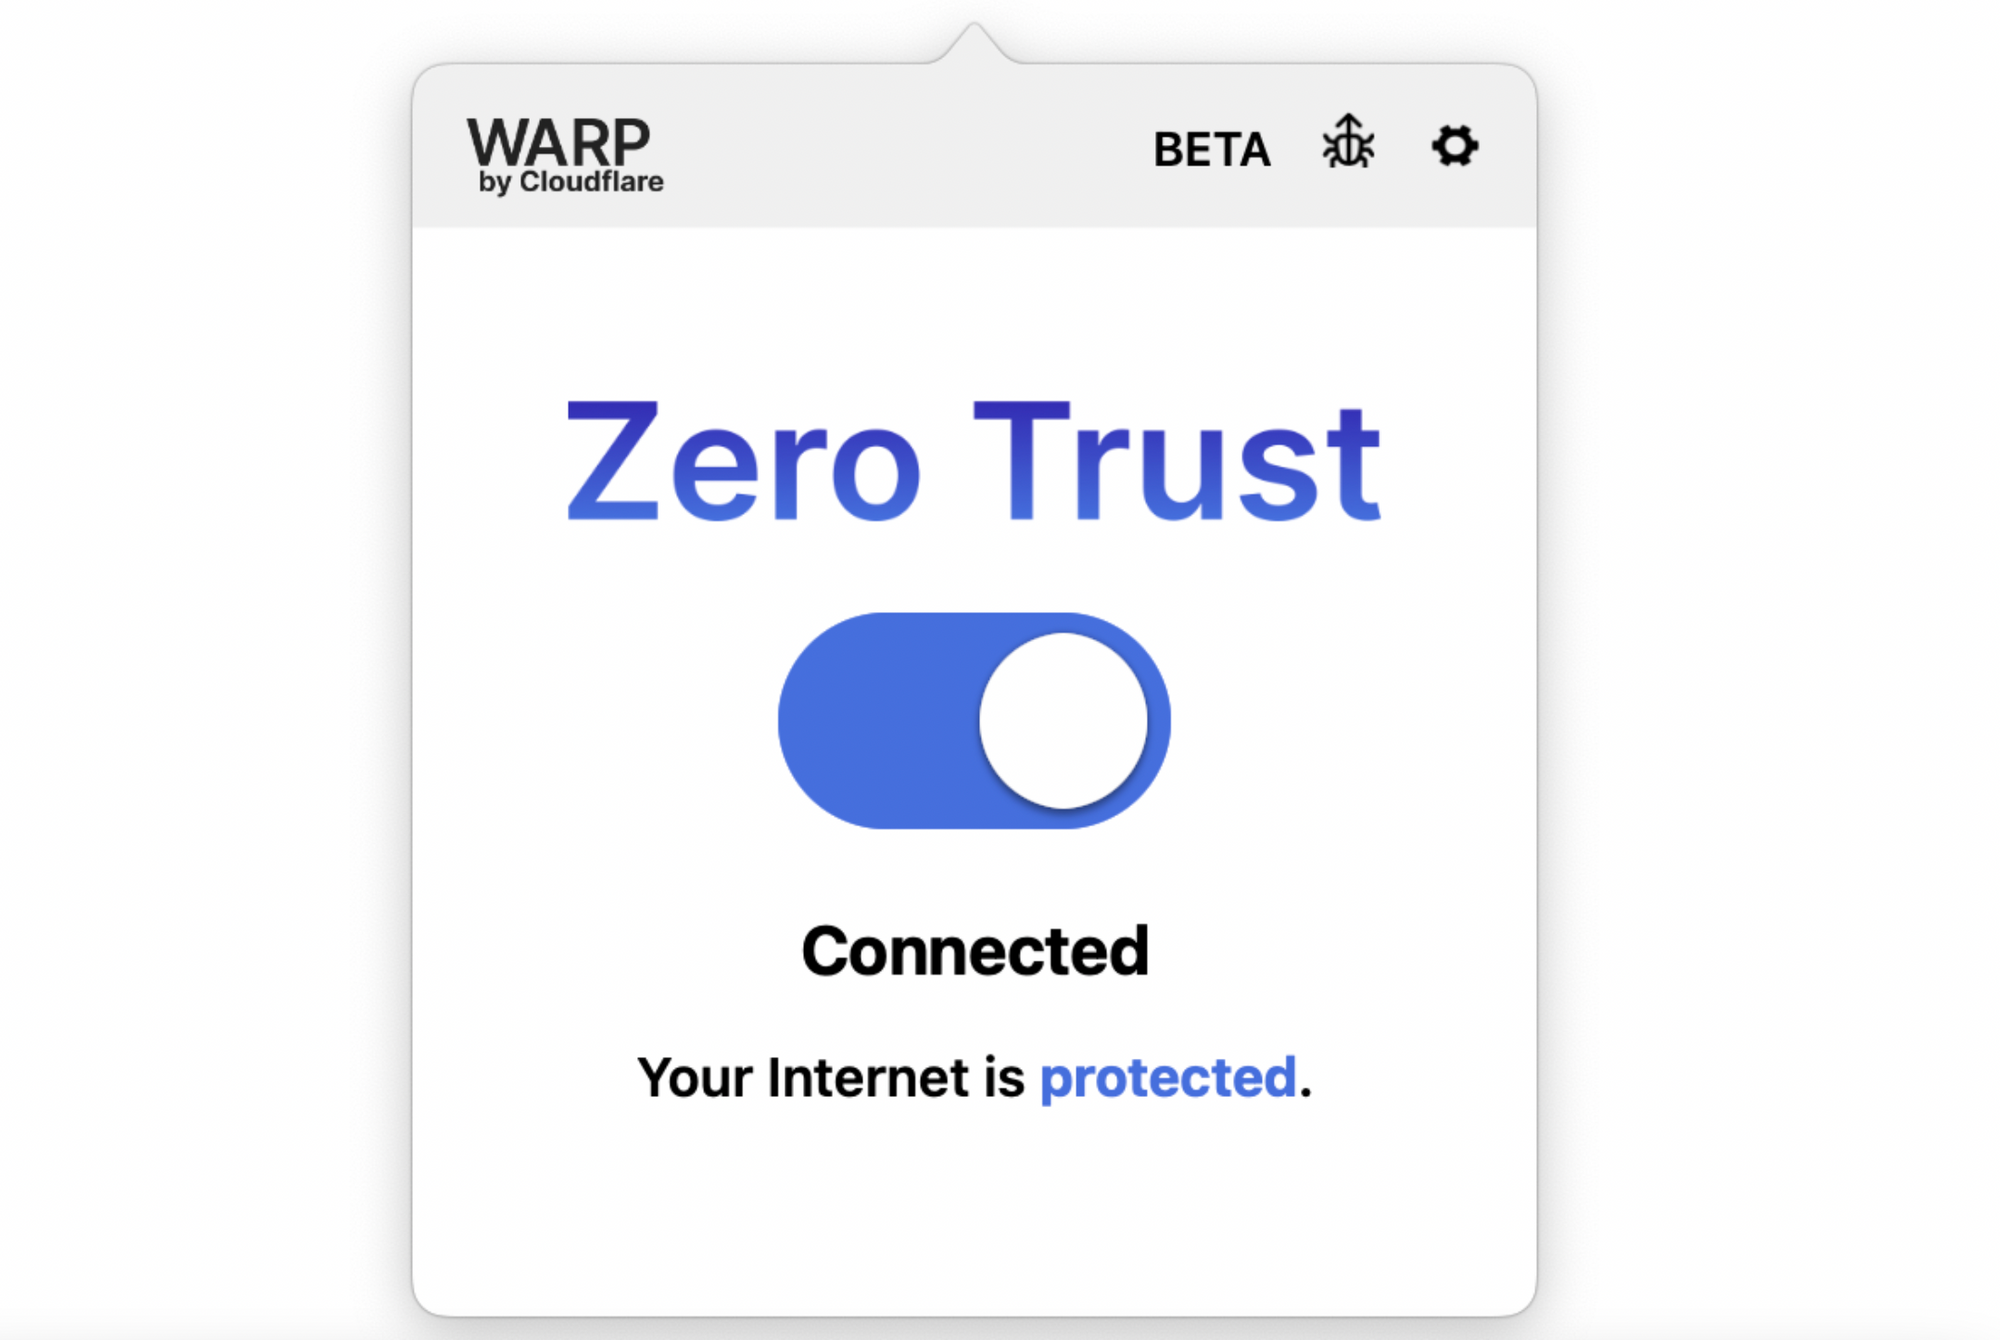

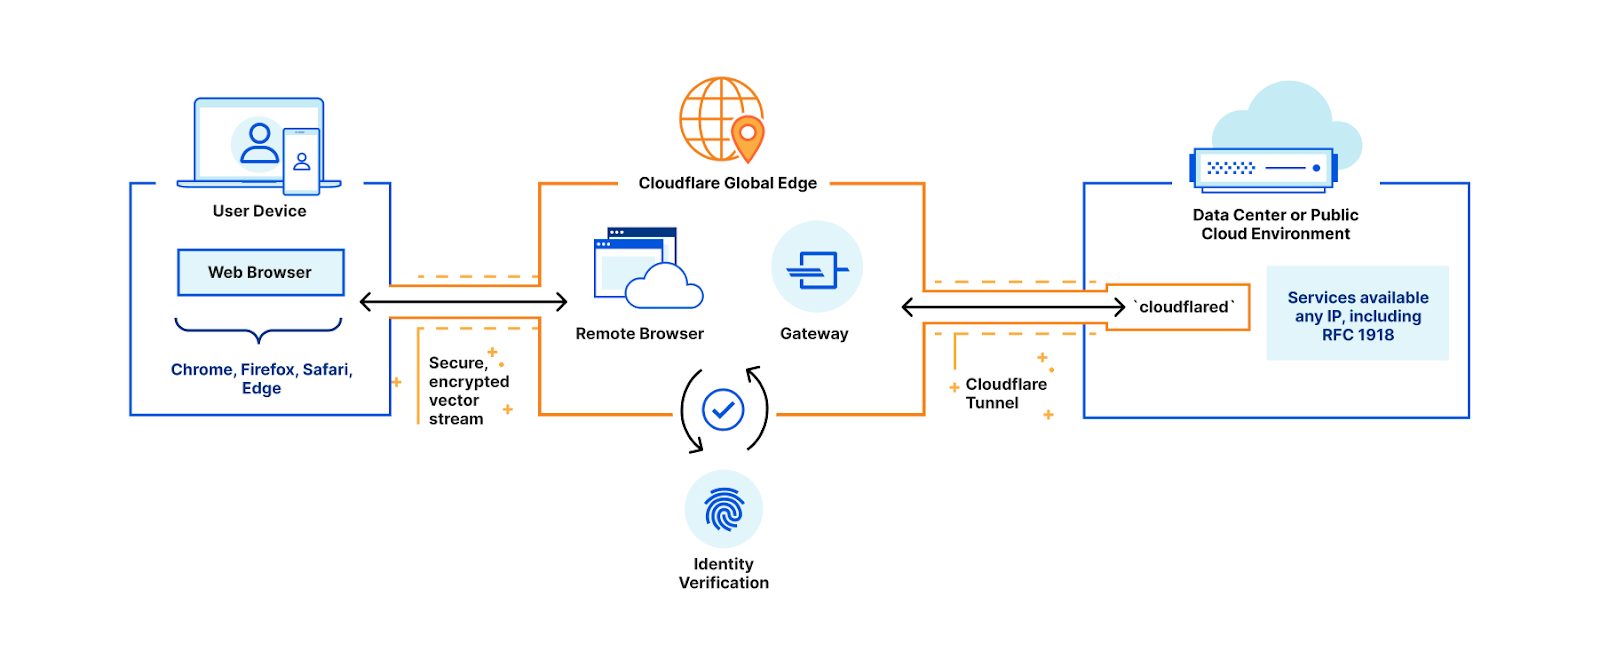
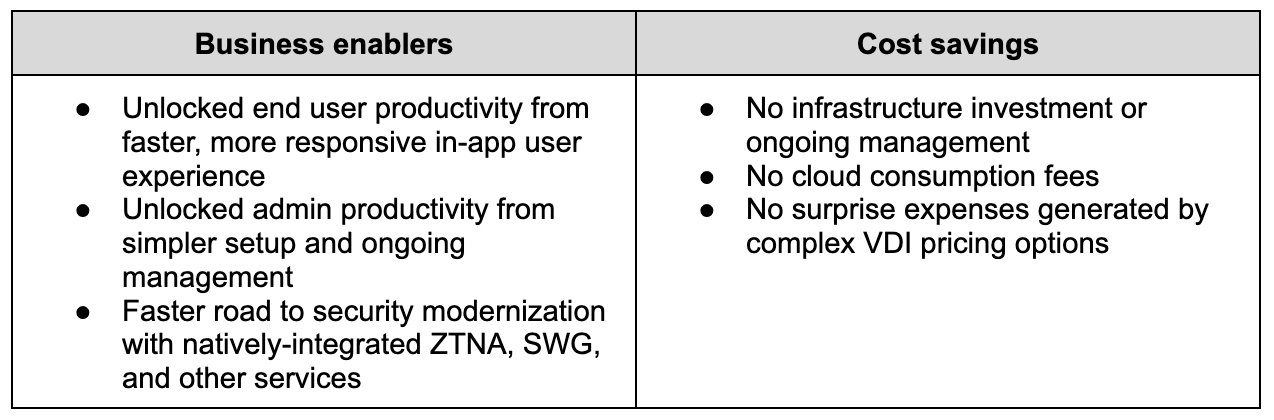
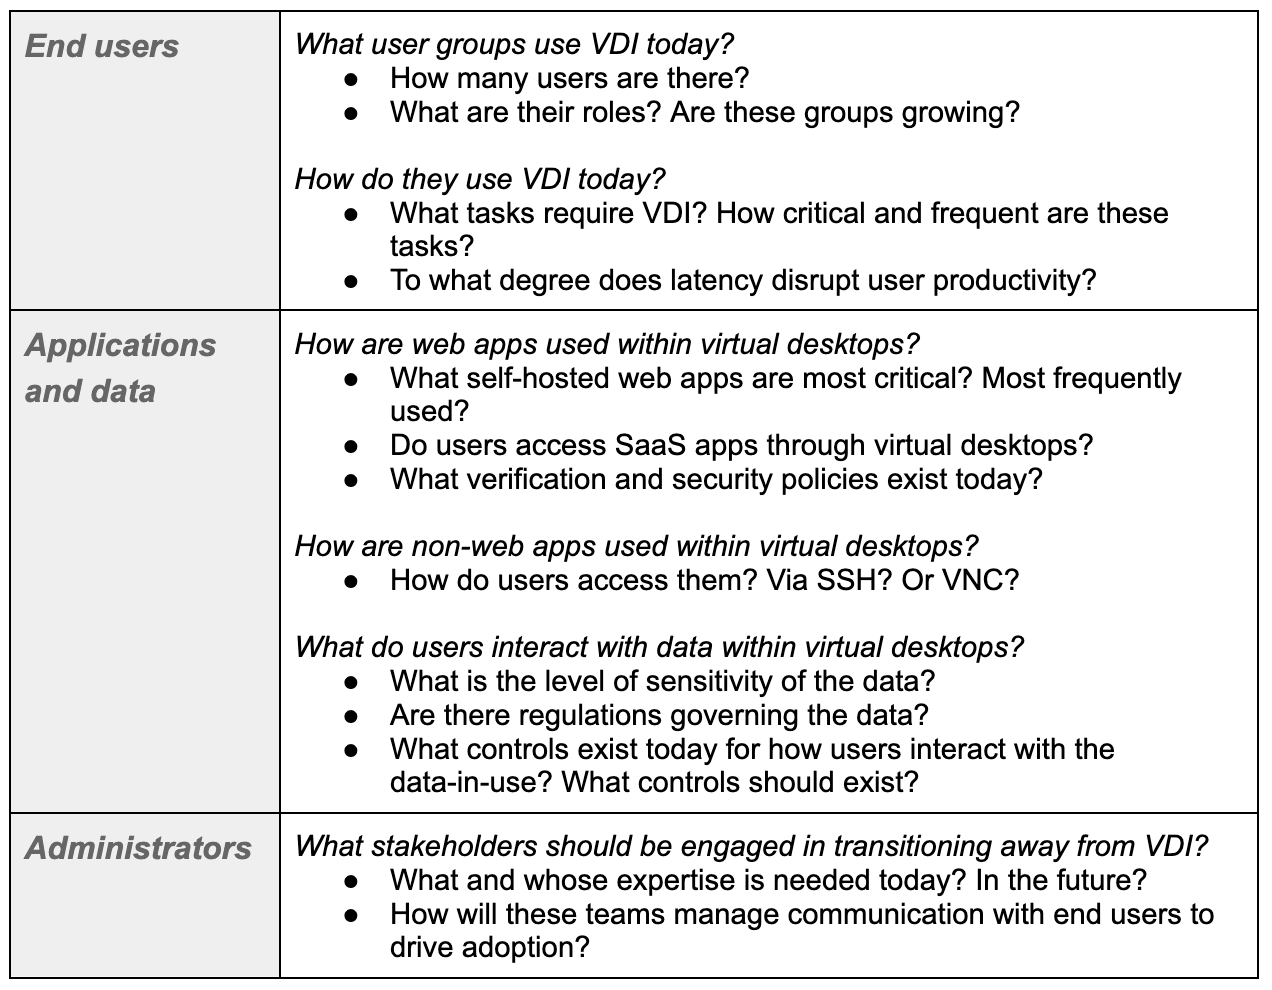
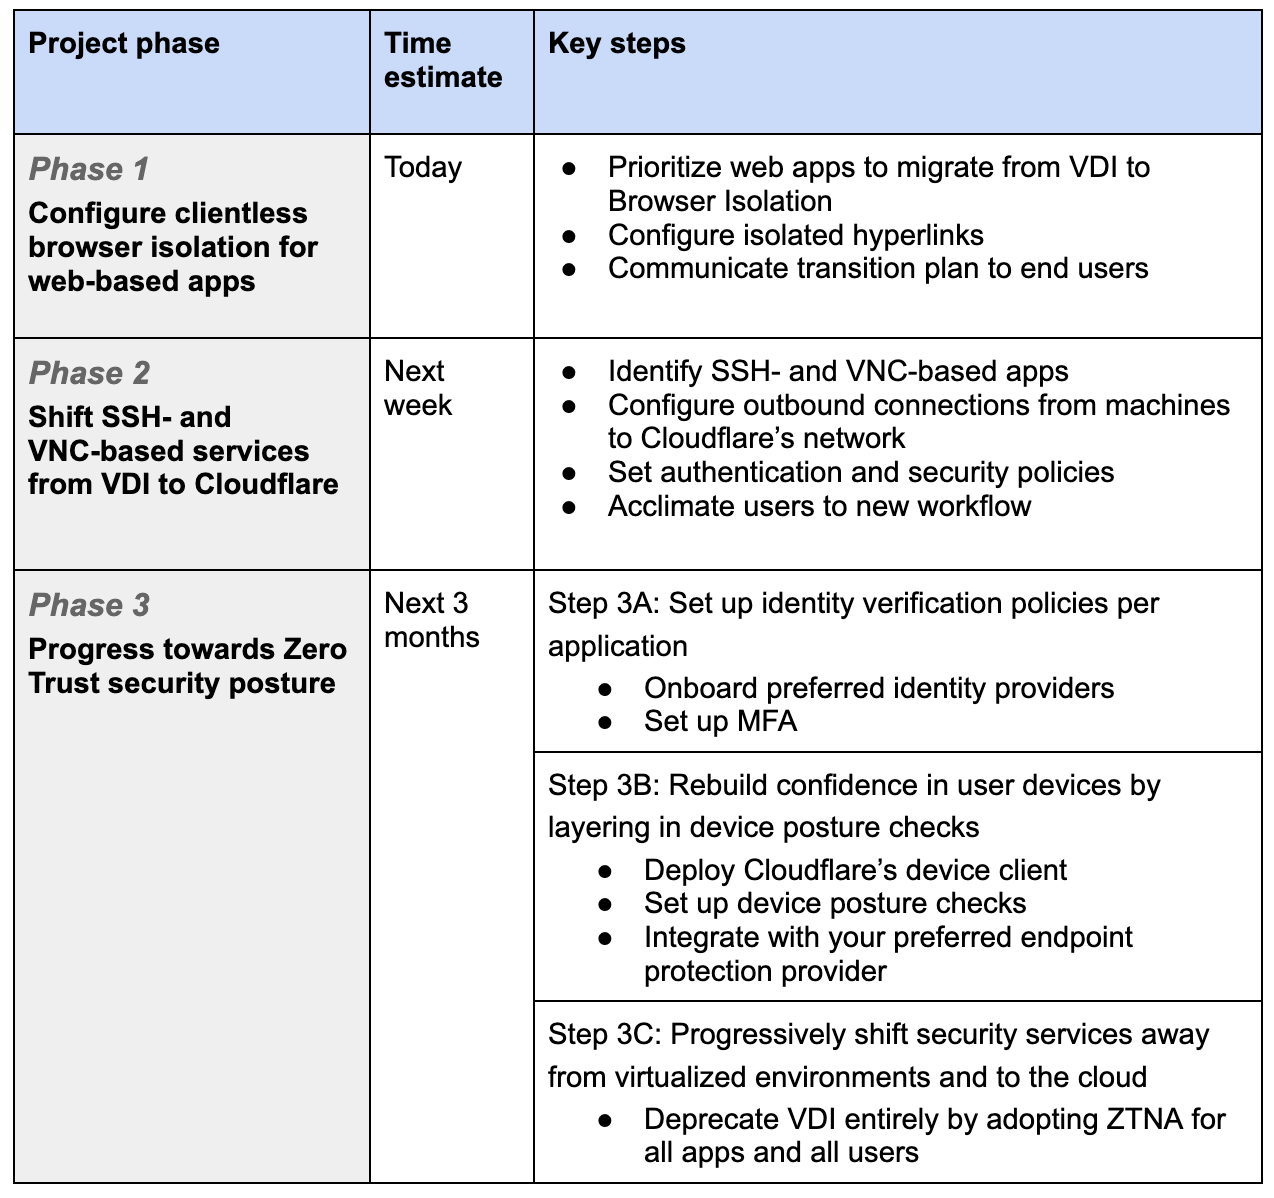
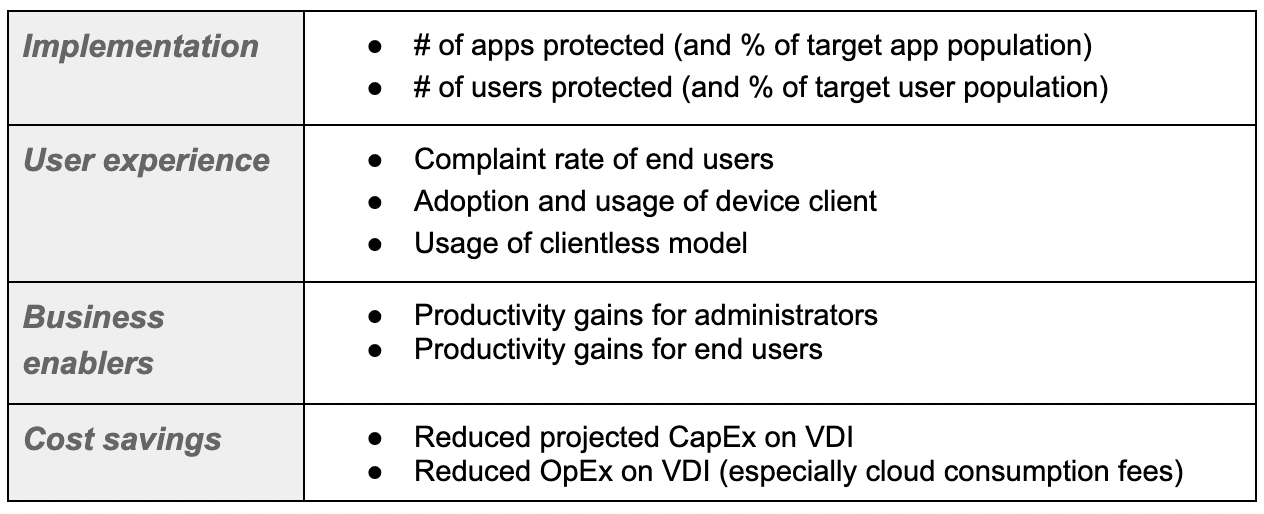

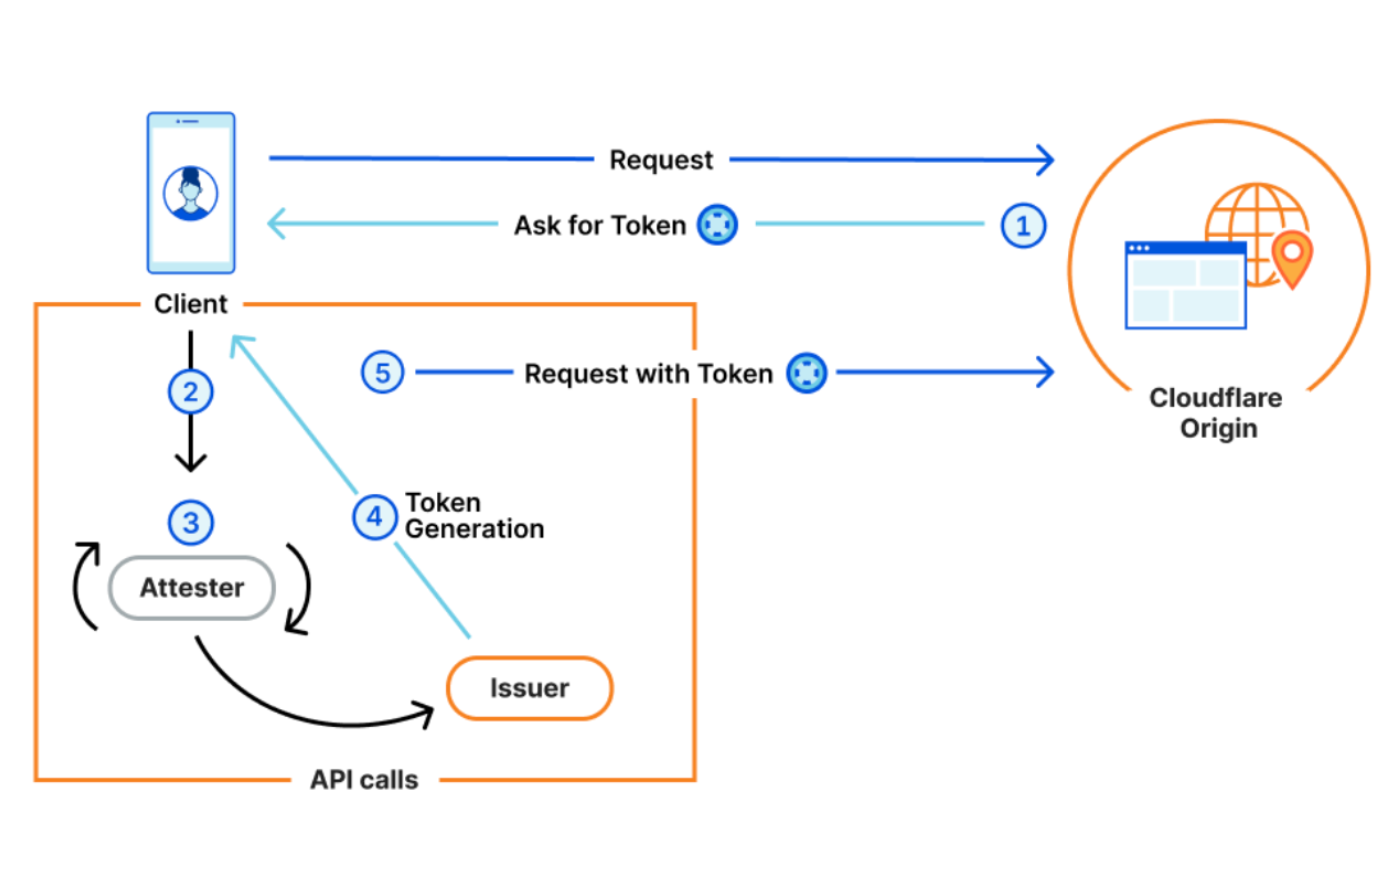

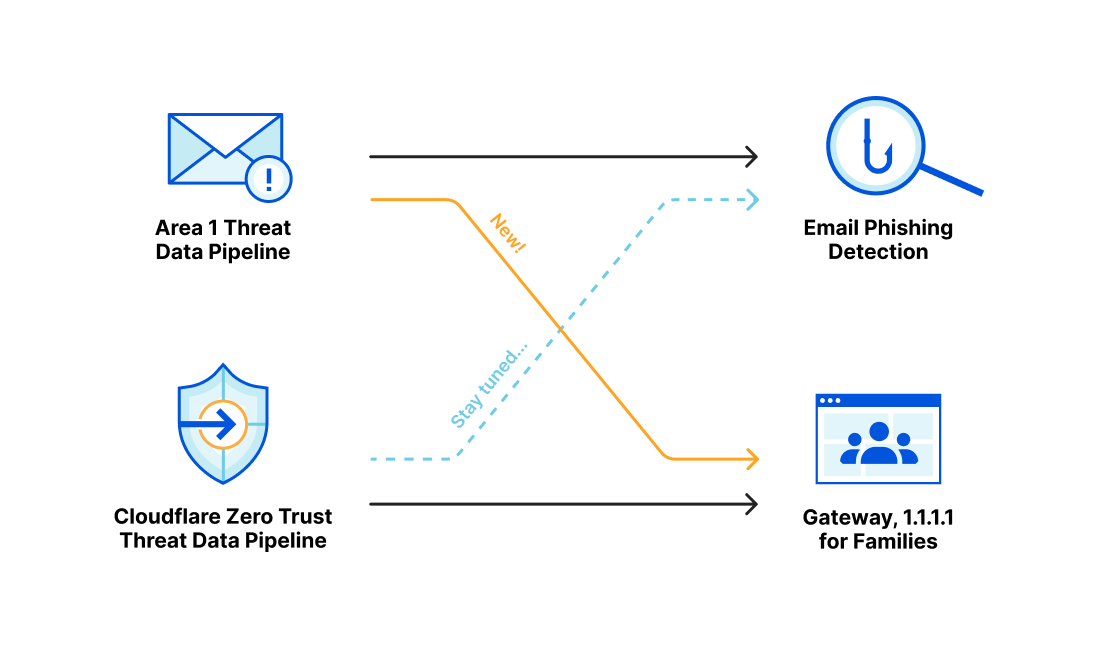
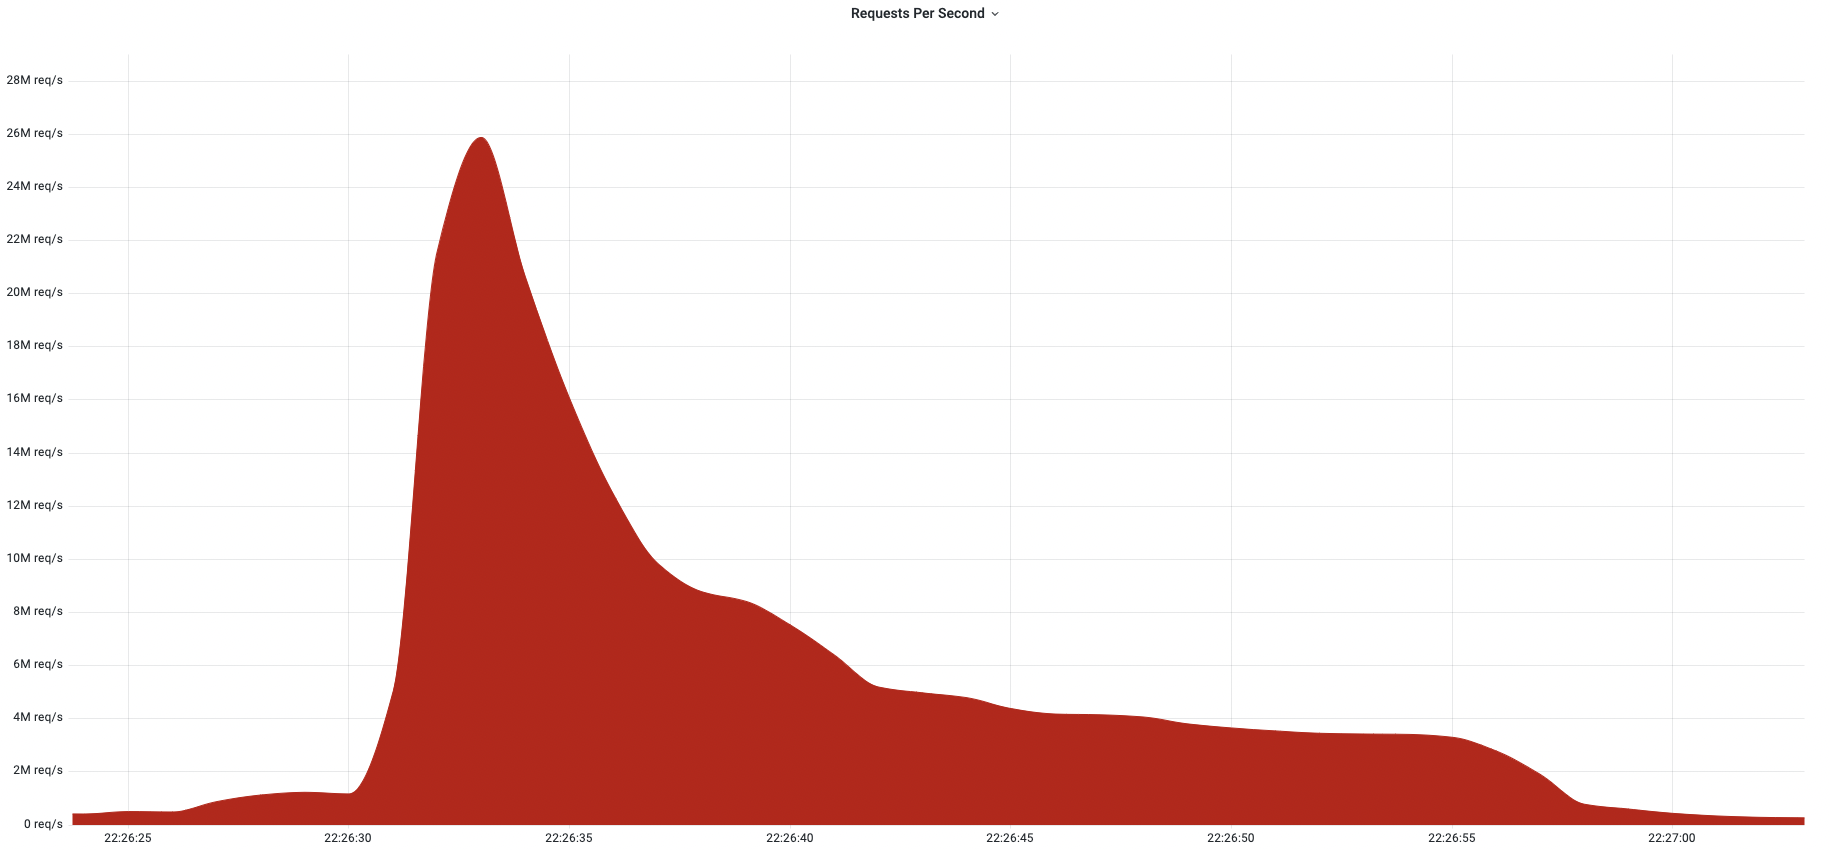
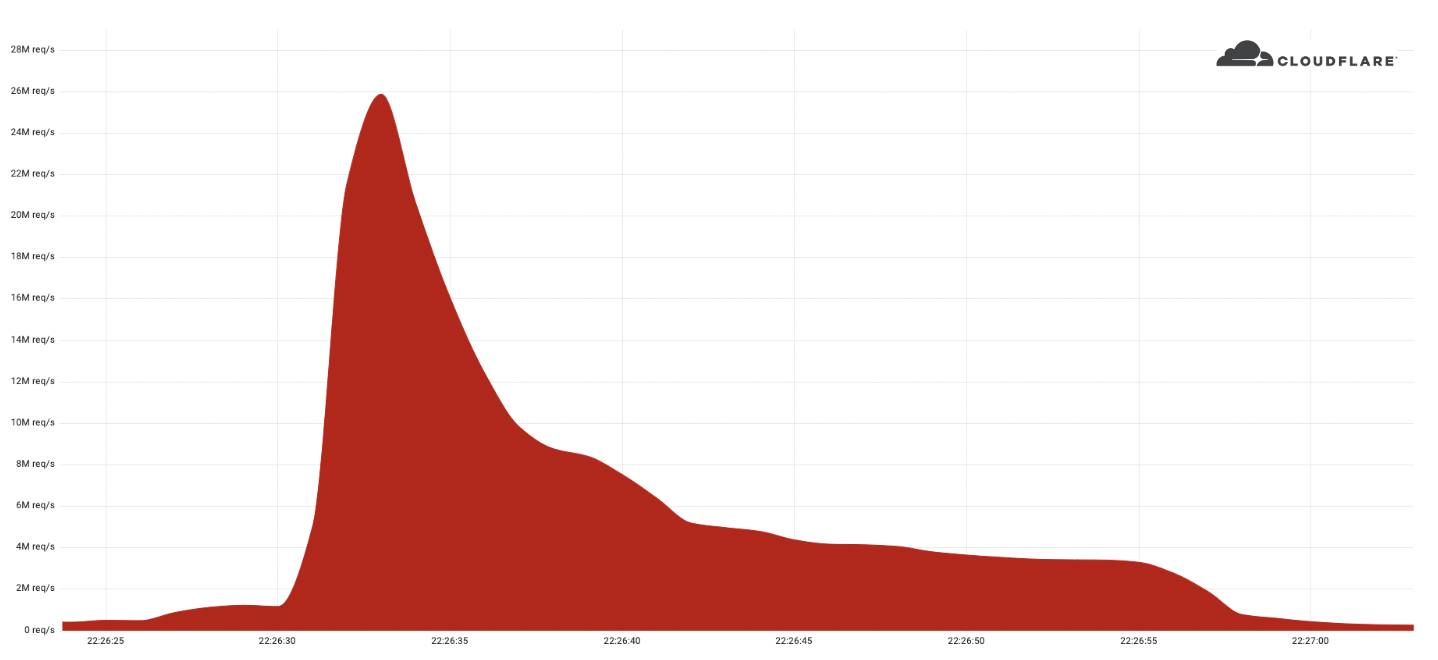


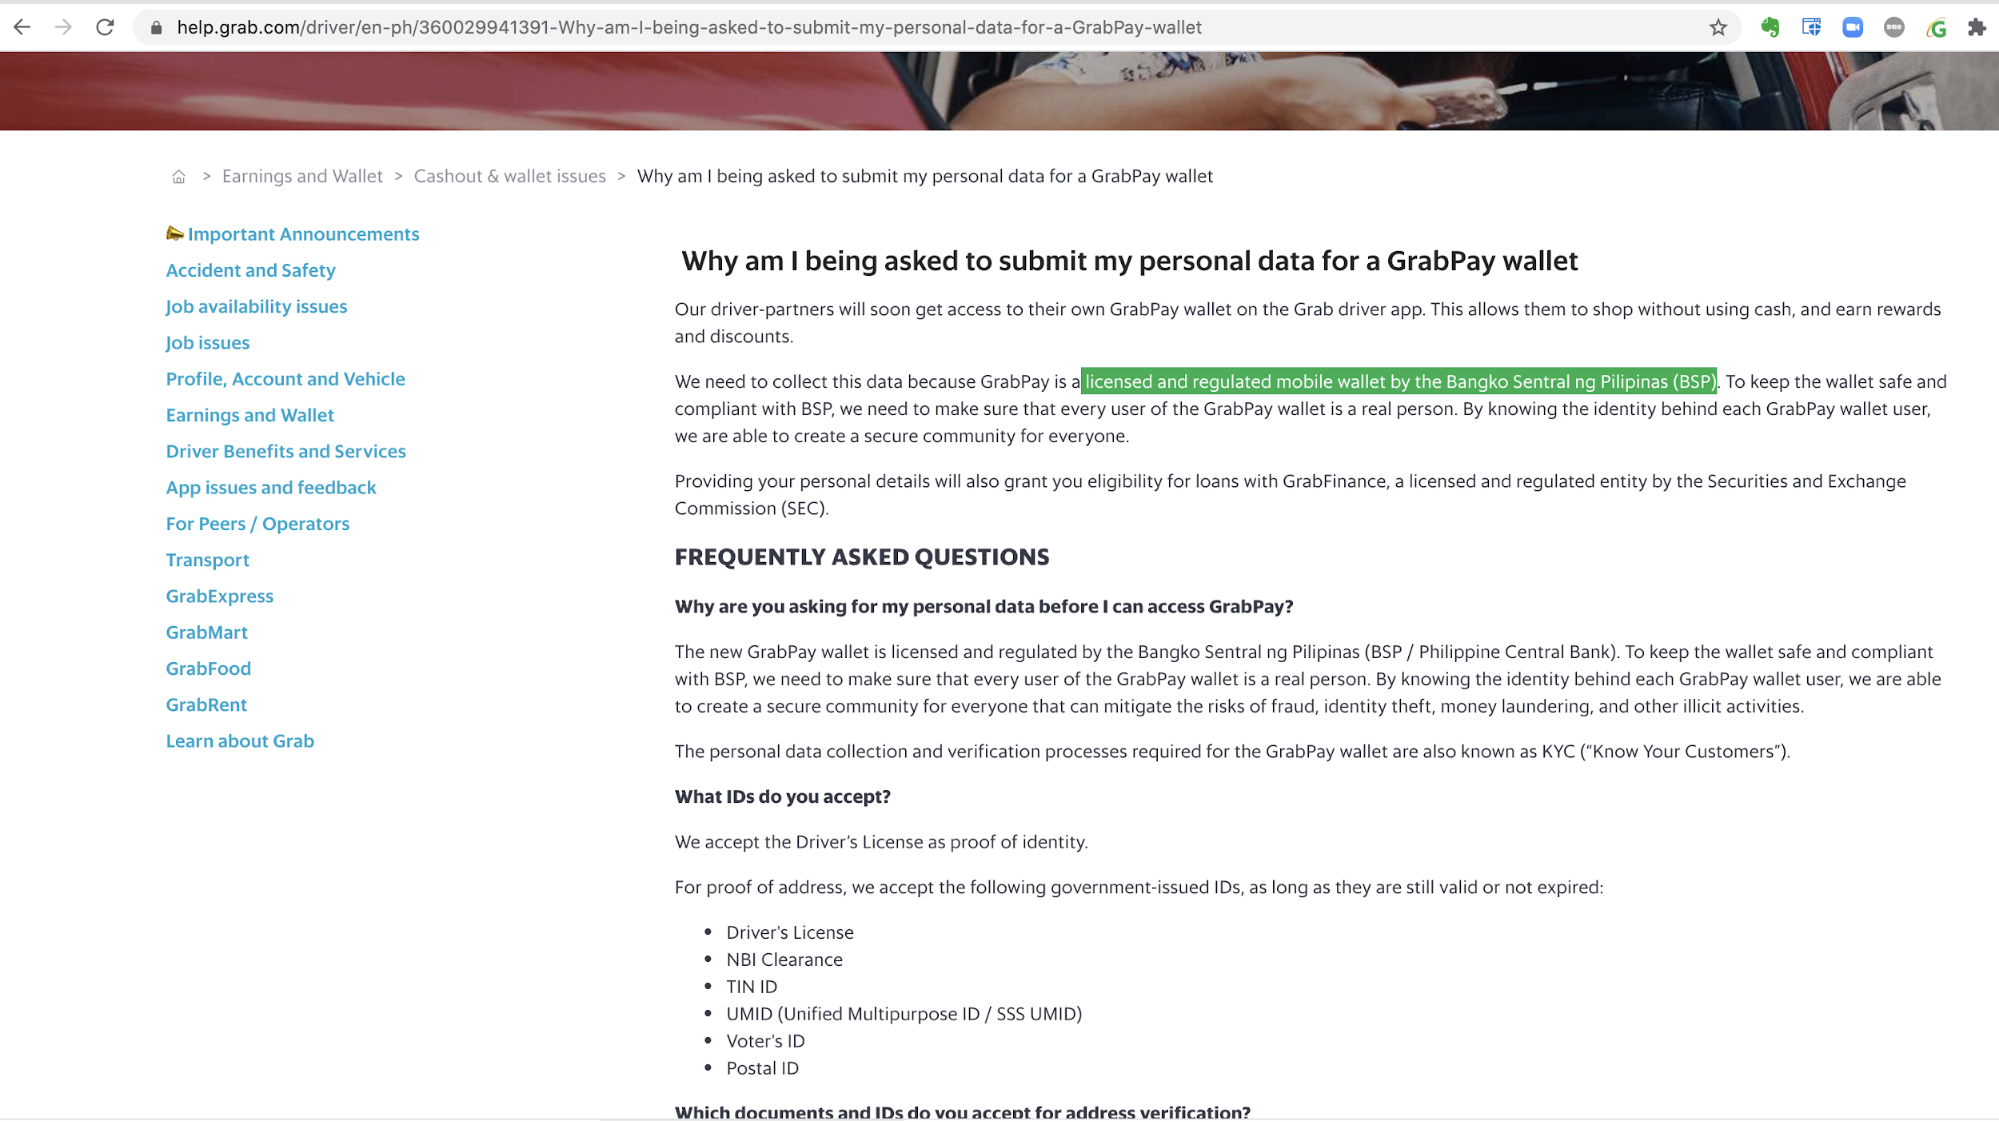
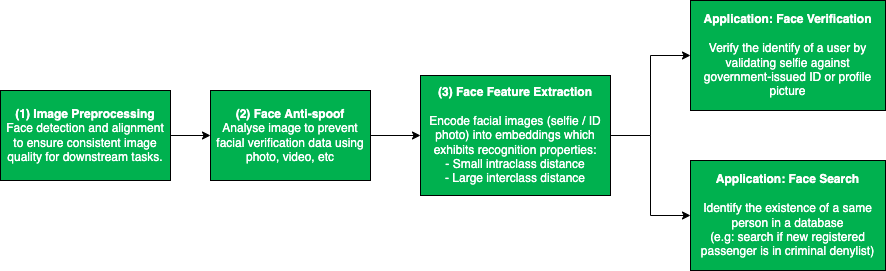


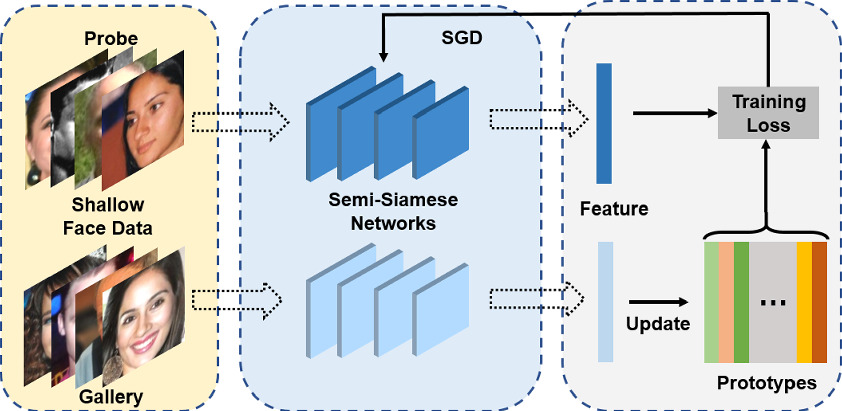
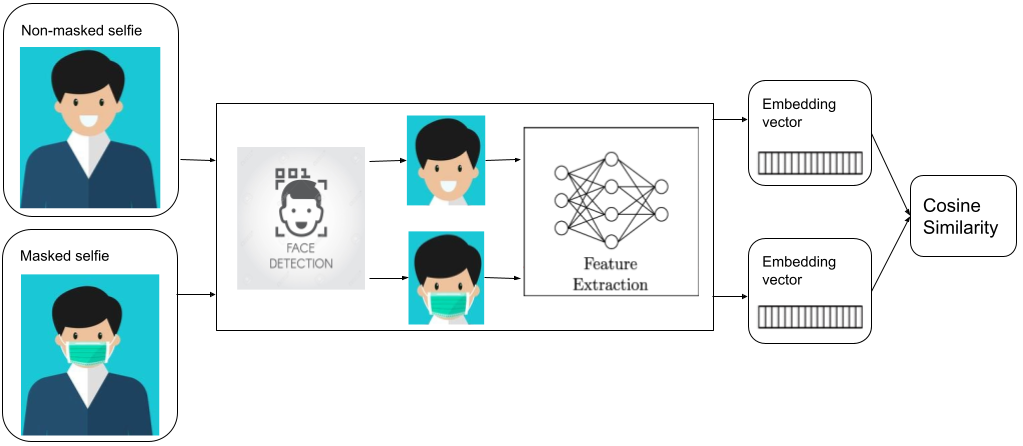

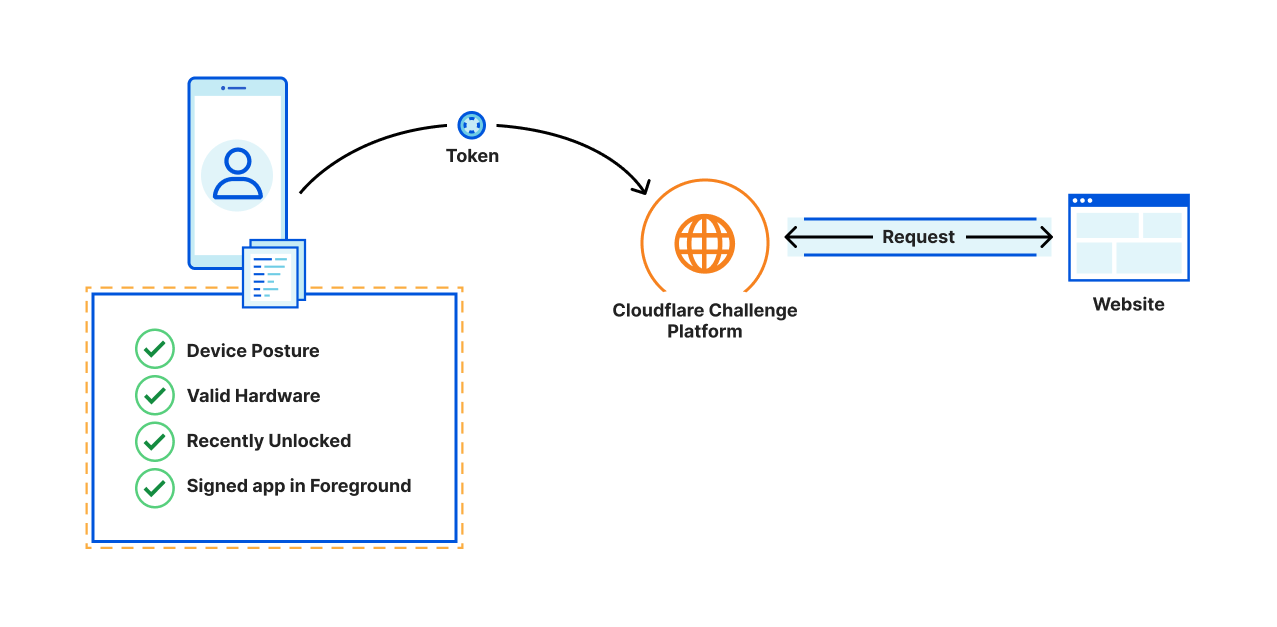
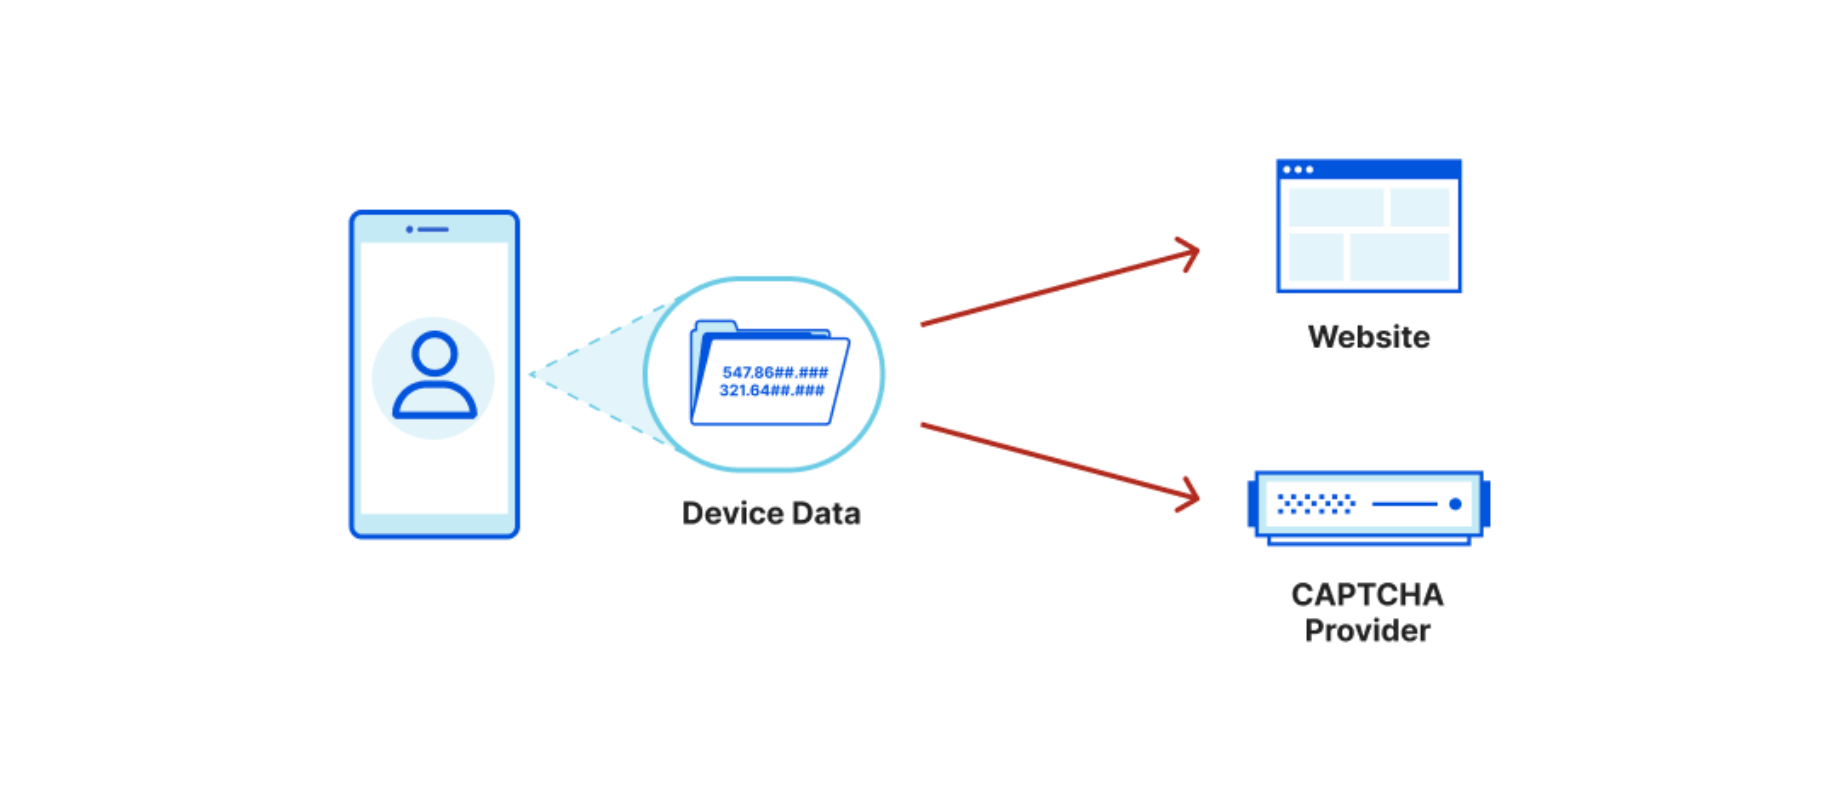
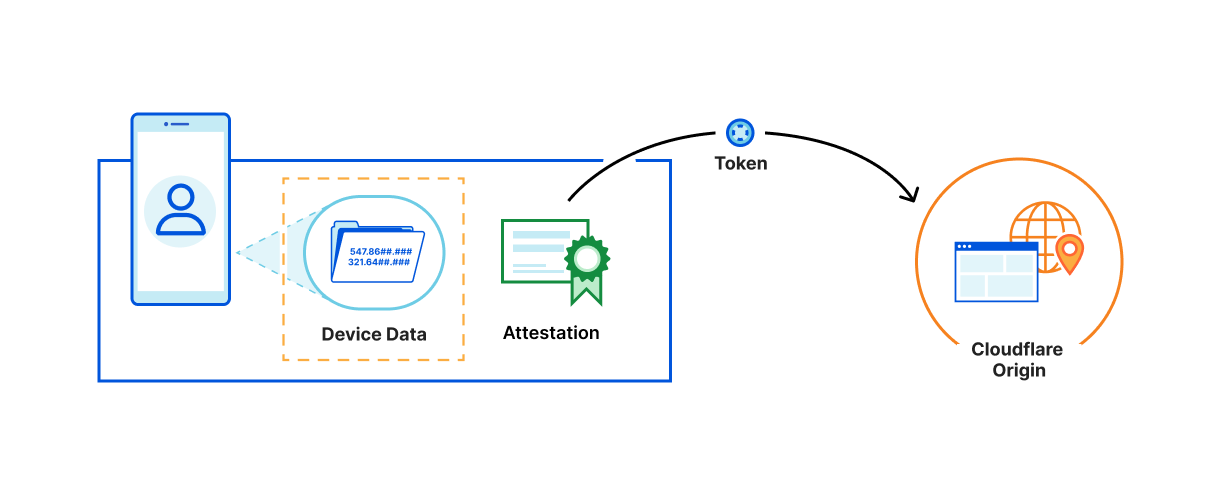

 Dependencies