Post Syndicated from James Beswick original https://aws.amazon.com/blogs/compute/handling-lambda-functions-idempotency-with-aws-lambda-powertools/
This post is written by Jerome Van Der Linden, Solutions Architect Builder and Dariusz Osiennik, Sr Cloud Application Architect.
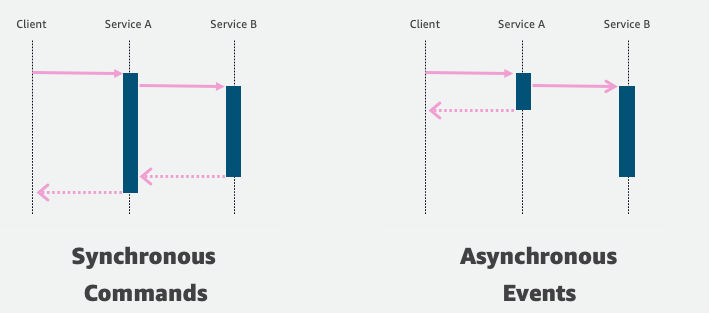
One of the advantages of using AWS Lambda is its integration with messaging services like Amazon SQS or Amazon EventBridge. The integration is managed and can also handle the retrying of failed messages. If there’s an error within the Lambda function, the failed message is sent again and the function is re-invoked.
This feature increases the resilience of the application but also means that a message can be processed multiple times by the function. This is important when managing orders, payments, or any kind of transaction that must be handled only once.
As mentioned in the design principles of Lambda, “since the same event may be received more than once, functions should be designed to be idempotent”. This article explains what idempotency is and how to implement it more easily with Lambda Powertools.
Understanding idempotency
Idempotency is the property of an operation whereby it can be applied multiple times without changing the result beyond the initial application. You can run an idempotent operation safely multiple times without any side effects like duplicates or inconsistent data. For example, this is a key principle for infrastructure as code, where you don’t want to double the number of resources each time you apply a template.
Applied to Lambda, a function is idempotent when it can be invoked multiple times with the same event with no risk of side effects. To make a function idempotent, it must first identify that an event has already been processed. Therefore, it must extract a unique identifier, called an “idempotency key”.
This identifier may be in the event payload (for example, orderId), a combination of multiple fields in the payload (for example, customerId, and orderId), or even a hash of the full payload. If using the full payload, fields such as dates, timestamps, or random elements may affect the hash and lead to changing values.
The function then checks in a persistence layer (for example, Amazon DynamoDB or Amazon ElastiCache):
- If the key is not there, then the Lambda function can proceed normally, perform the transaction, and save the idempotency key in the persistence layer. You can potentially add the result of the function in the persistence layer too, so that subsequent calls can retrieve this result directly.
- If the key is there, then the function can return and avoid applying the transaction again.
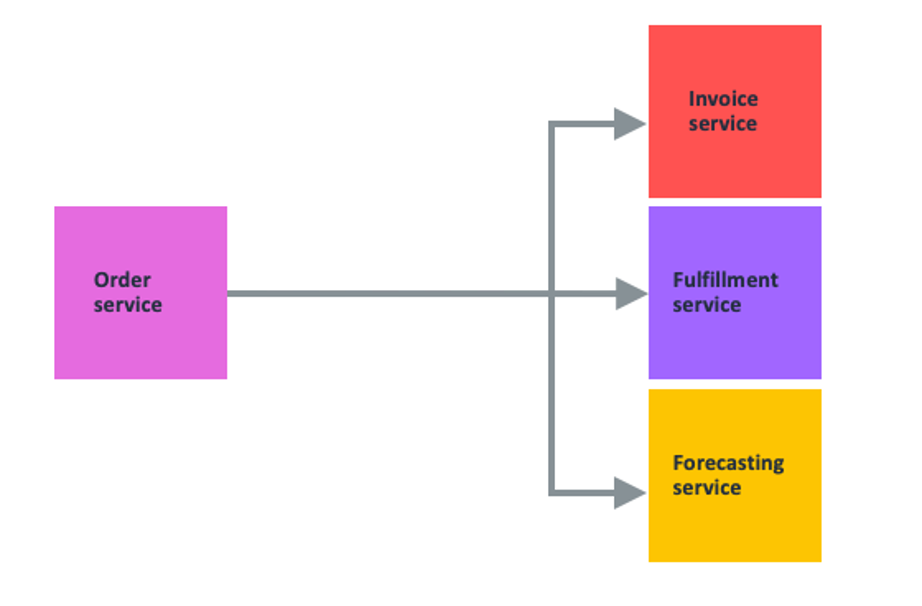
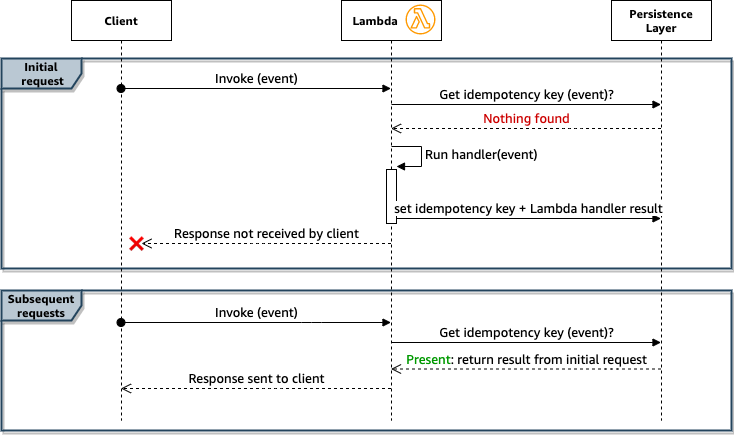
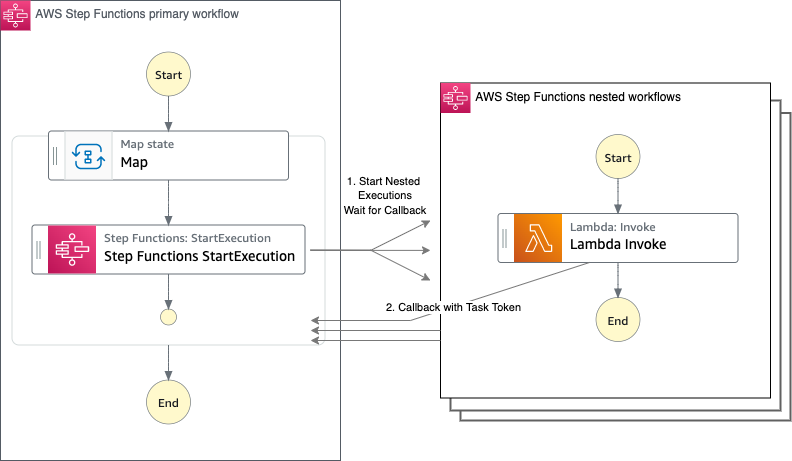
The following diagram shows the sequence of events with this idempotency scenario:

There are edge cases in this example:
- You can invoke the function twice with the same event within a few milliseconds. In that case, each function acts as if it’s the first time this event is received and processes it, resulting in inconsistencies.
- The function may perform several operations that are not idempotent. If the first operation is successful and then an error happens, the idempotency key won’t be saved. Subsequent calls redo the first operation, resulting in inconsistencies.
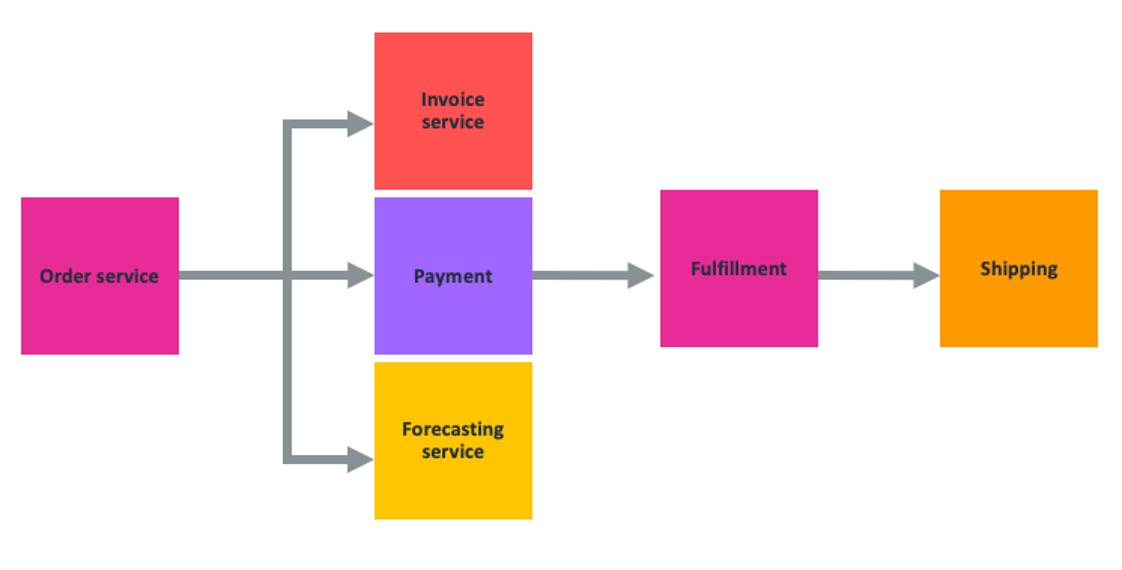
You can guard against these edge cases by inserting a lock as soon as the event is received:

There are other questions and edge cases that you must consider when implementing idempotency on your Lambda functions. Read Making retries safe with idempotent APIs from the Builder’s Library to dive into the details. You can choose to implement idempotency by yourself or you can use a library that handles it and takes care of these edge cases for you. This is what Lambda Powertools (for Python and Java) proposes.
Idempotency with Lambda Powertools
Lambda Powertools is a library, available in Python, Java, and TypeScript. It provides utilities for Lambda functions to ease the adoption of best practices and to reduce the amount of code to perform recurring tasks. In particular, it provides a module to handle idempotency (in the Java and Python versions).
This post shows examples using the Java version. To get started with the Lambda Powertools idempotency module, you must install the library and configure it within your build process. For more details, follow AWS Lambda Powertools documentation.
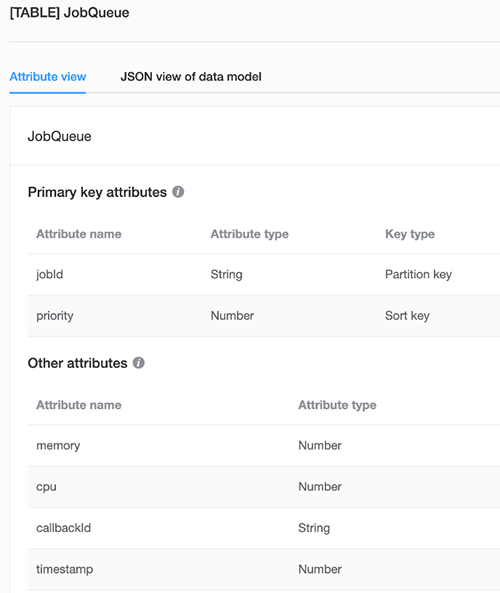
Next, you must configure a persistence storage layer where the idempotency feature can store its state. You can use the built-in support for DynamoDB or you can create your own implementation for the database of your choice. This example creates a new table in DynamoDB.
The following AWS Serverless Application Model (AWS SAM) template creates a suitable table to store the state:
Resources:
  IdempotencyTable:
    Type: AWS::DynamoDB::Table
    Properties:
      AttributeDefinitions:
        - AttributeName: id
          AttributeType: S
      KeySchema:
        - AttributeName: id
          KeyType: HASH
      TimeToLiveSpecification:
        AttributeName: expiration
        Enabled: true
      BillingMode: PAY_PER_REQUEST
In this definition:
- The table is multi-tenant and can be reused by multiple Lambda functions that use the Powertools idempotency module.
- The DynamoDB time-to-live configuration helps keep idempotency limited in time. You can configure the duration, which is 1 hour by default.
Configure the idempotency module’s behavior in the init phase of the function’s lifecycle, before the handleRequest method gets called:
public class SubscriptionHandler implements RequestHandler<Subscription, SubscriptionResult> {

  public SubscriptionHandler() {
    Idempotency.config().withPersistenceStore(
      DynamoDBPersistenceStore.builder()
        .withTableName(System.getenv("TABLE_NAME"))
        .build()
      ).configure();
  }
}
Lambda Powertools follows the paradigm of convention over configuration and provides default values for many parameters. The persistence store is the only required element. To use the DynamoDB implementation, you must specify a table name. In the previous sample, the name is provided by the environment variable TABLE_NAME.
Adding the @Idempotent annotation to the handleRequest method enables the idempotency functionality. It uses a hash of the Subscription event as the idempotency key.
@Idempotent
  public SubscriptionResult handleRequest(final Subscription event, final Context context) {
    SubscriptionPayment payment = createSubscriptionPayment(
      event.getUsername(),
      event.getProductId()
    );

    return new SubscriptionResult(payment.getId(), "success", 200);
  }
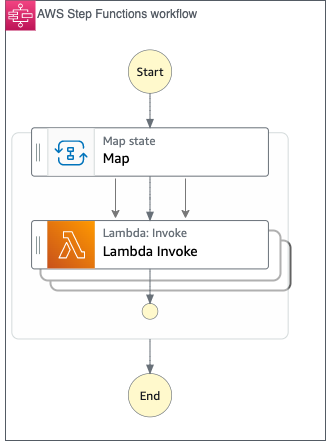
Creating orders
The example is about creating an order for a user for a list of products. Orders should not be duplicated if the client repeats the request. API consumers can safely retry a create order request in case of issues (such as a timeout or networking disruption). The application should also allow the user to buy the same products in a short period of time if that is the user’s intention.
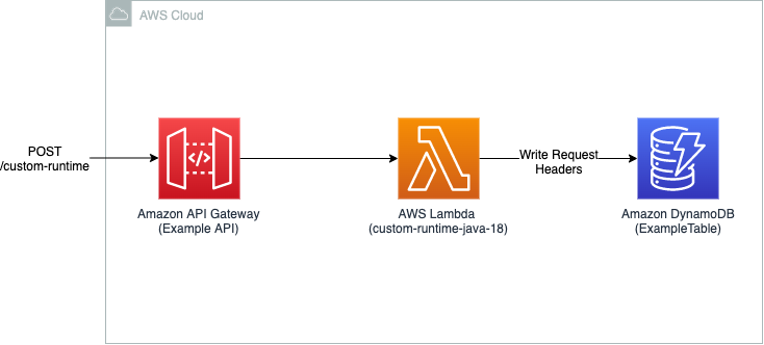
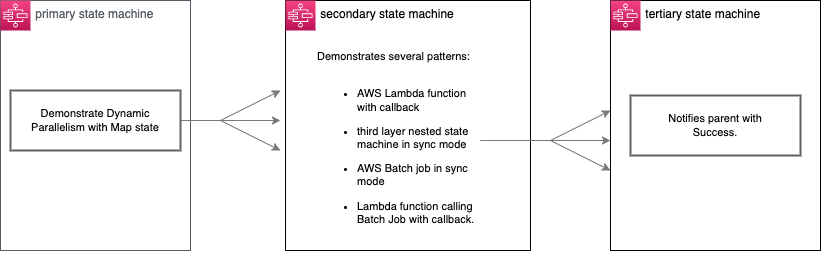
The following architecture diagram consists of an Amazon API Gateway REST API, the idempotent Lambda function, and a DynamoDB table for storing orders.

The Orders API allows creating a new order by calling its POST /orders endpoint with the following sample payload:
{
  "requestToken": "260d2efe-af84-11ec-b909-0242ac120002",
  "userId": "user1",
  "items": [
    {
      "productId": "product1",
      "price": 6.50,
      "quantity": 5
    },
    {
      "productId": "product2",
      "price": 13.50,
      "quantity": 2
    }
  ],
  "comment": "AWSome Order"
}
Lambda Powertools uses JMESPath to extract the important fields from the request that uniquely identify it. It then calculates a hash of these fields to constitute the idempotency key.
In the example, the important fields are the userId and the items, to avoid duplicated orders. But the user can also buy the same list of products in a short period of time. To allow this, the API consumer can generate a client-side token and assign its value to the requestToken field. For each unique order, the token has a different value. If a request is retried by the client, it uses the same token.
This leads to the following configuration for the idempotency key:
Idempotency.config()
  .withConfig(
    IdempotencyConfig.builder()
    .withEventKeyJMESPath("powertools_json(body).[requestToken,userId,items]")
    .build())
If the same request is sent more than once, only the first call results in a new order created in the DynamoDB table. The same order identifier is returned by the endpoint for all the subsequent calls. In this way, the API consumer can safely retry the requests without worrying about duplicating the order.
You can find the source code of the example on GitHub.
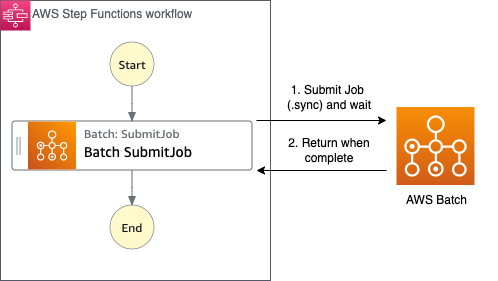
Processing payments
This example shows asynchronous batch processing of payment messages from a queue. Messages must not be processed more than once to avoid charging users multiple times for the same order. You must consider edge cases like at-least-once message delivery, an error response returned by the third party payment API or retrying the batch of messages.
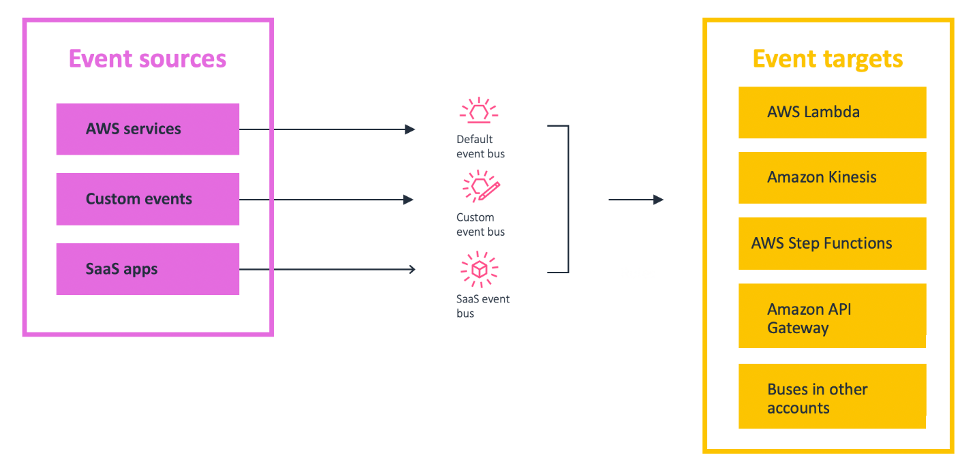
The following architecture diagram shows an Amazon SQS queue, the idempotent Lambda function, and a third-party API that the function calls for payment.

This is the body of a single payment SQS message:
{
    "orderId": "order1",
    "userId": "user1",
    "amount": "50.25"
}
In this example, the process method is annotated as idempotent, not the handleRequest. The method is responsible for processing a single payment record from the SQS batch. It uses @IdempotencyKey annotation to specify which parameter to use as the idempotency key.
@Override
public List<String> handleRequest(SQSEvent sqsEvent, Context context) {
return sqsEvent.getRecords()
  .stream()
  .map(record -> process(record.getMessageId(),record.getBody()))
  .collect(Collectors.toList());
}

@Idempotent
private String process(String messageId, @IdempotencyKey String messageBody) {
    logger.info("Processing messageId: {}", messageId);
    PaymentRequest request =
extractDataFrom(messageBody).as(PaymentRequest.class);
    return paymentService.process(request);
}
If an SQS record with the same payload is received more than once, the third-party API is not called multiple times. All the subsequent calls return before calling the process method.
If an exception is thrown from the process method, the idempotency feature does not store the idempotency state in the persistence layer. The payment is treated as unprocessed and can be retried safely. This may happen if the third-party API returns a server-side error.
By default, if one message from a batch fails, all the messages in the batch are retried. Lambda Powertools also offers the SQS Batch Processing module which can help in handling partial failures.
You can find the source code of this example in the GitHub repo.
Conclusion
Idempotency is a critical piece of serverless architectures and can be difficult to implement. If not done correctly, it can lead to inconsistent data and other issues. This post shows how you can use Lambda Powertools to make Lambda functions idempotent and ensure that critical transactions are handled only once.
For more details about the Lambda Powertools idempotency feature and its configuration options, refer to the full documentation.
For more serverless learning resources, visit Serverless Land.
 ” to my colleagues, and have a coffee while asking all your serverless questions. You can find all the upcoming AWS Summits in the events section at the end of this post.