Post Syndicated from The History Guy: History Deserves to Be Remembered original https://www.youtube.com/watch?v=RiD7R7vA5eE
FBI Seizes Stolen Cryptocurrencies
Post Syndicated from Bruce Schneier original https://www.schneier.com/blog/archives/2022/09/fbi-seizes-stolen-cryptocurrencies.html
The Wall Street Journal is reporting that the FBI has recovered over $30 million in cryptocurrency stolen by North Korean hackers earlier this year. It’s only a fraction of the $540 million stolen, but it’s something.
The Axie Infinity recovery represents a shift in law enforcement’s ability to trace funds through a web of so-called crypto addresses, the virtual accounts where cryptocurrencies are stored. These addresses can be created quickly without them being linked to a cryptocurrency company that could freeze the funds.
In its effort to mask the stolen crypto, Lazarus Group used more than 12,000 different addresses, according to Chainalysis. Unlike bank transactions that happen through private networks, movement between crypto accounts is visible to the world on the blockchain.
Advanced blockchain-monitoring tools and cooperation from centralized crypto exchanges enabled the FBI to trace the crypto to where Lazarus Group tried to cash out, investigators said.
The money was laundered through the Tornado Cash mixer.
Join the UK Bebras Challenge 2022 for schools
Post Syndicated from Dan Fisher original https://www.raspberrypi.org/blog/uk-bebras-challenge-2022/
The UK Bebras Challenge is back and ready to accept entries from schools for its annual event from 7 to 18 November.

More than 3 million students from 54 countries took part in the Bebras Challenge in 2021. Read on to find out how you can get your school involved.
What is Bebras?
Bebras a free, annual challenge that helps schools introduce computational thinking to their students. No programming is involved, and it’s completely free for schools to take part. All Bebras questions are self-marking. Schools can enter students from age 6 to 18 and know they’ll get interesting and challenging (but not too challenging) activities.
“This has been a really positive experience. Thank you. Shared results with head and Head of KS3. Really useful for me when assessing KS4 options.” – Secondary teacher, North Yorkshire
We’re making Bebras accessible by offering age-appropriate challenges for different school levels, and a challenge tailored for visually impaired students.
What is the idea behind Bebras?
We want young people to get excited about computing. Through Bebras, they will learn about computational and logical thinking by answering questions and solving puzzles.


Bebras questions are based on classic computing problems and presented in friendly, age-appropriate contexts. For example, an algorithm-based puzzle for learners aged 6 to 8 is presented in terms of a hungry tortoise find an efficient eating path across a lawn; for 16- to 18-year-olds, a difficult question based on graph theory asks students to sort out some quiz teams by linking quizzers who know each other.
Can you solve the example puzzle?
Here’s a question from the 2021 challenge for the Junior category (ages 10 to 12). You’ll find the correct answer at the bottom of this blog post.
Science Fair
- Bebras High School is having a science fair.
- All the events in the fair need to follow a specific order, and only one event can be held at a time.
- The diagram below shows all the events that must be included in the flow of the science fair.
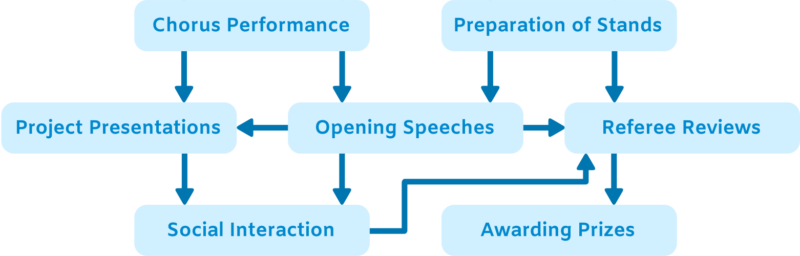
- The arrows between events indicate that the event the arrow is drawn from has to occur before the event the arrow points to. For example, ‘Social Interaction’ can only happen after both ‘Opening Speeches’ and ‘Project Presentations’ have finished.
Question: What is the correct order of events for the science fair?
How do I get my school involved?
The Bebras challenge for UK schools takes place from 7 to 18 November. Register at bebras.uk/admin to get full access to the challenge.
By registering, you also get access to the back catalogue of questions, from which you can build your own quizzes to use in your school at any time during the year. All the quizzes are self-marking, and you can download your students’ results for your mark book. Schools have reported using the back catalogue of questions for end-of-term activities, lesson starters, and schemes of lessons about computational thinking.
You can also see more of our free resources for Computing and Computer Science teachers, and find out about our newest research project, which you can get involved in if you teach primary Computing.
There are actually two possible answers to the example puzzle:
| Option 1 | Option 2 |
| Chorus Performance Preparation of Stands Opening Speeches Project Presentations Social Interaction Referee Reviews Awarding Prizes |
Preparation of Stands Chorus Performance Opening Speeches Project Presentations Social Interaction Referee Reviews Awarding Prizes |
The post Join the UK Bebras Challenge 2022 for schools appeared first on Raspberry Pi.
What If? 2 Flowchart
Post Syndicated from original https://xkcd.com/2672/

AWS Week In Review – September 12, 2022
Post Syndicated from Sébastien Stormacq original https://aws.amazon.com/blogs/aws/aws-week-in-review-september-12-2022/
I am working from London, UK, this week to record sessions for the upcoming Innovate EMEA online conference—more about this in a future Week In Review. While I was crossing the channel, I took the time to review what happened on AWS last week.
Last Week’s Launches
Here are some launches that got my attention:
Seekable OCI for lazy loading container images. Seekable OCI (SOCI) is a technology open sourced by AWS that enables containers to launch faster by lazily loading the container image. SOCI works by creating an index of the files within an existing container image. This index is a key enabler to launching containers faster, providing the capability to extract an individual file from a container image before downloading the entire archive. Check out the source code on GitHub.
Amazon Lookout for Metrics now lets you filter data by dimensions and increased the limits on the number of measures and dimensions. Lookout for Metrics uses machine learning (ML) to automatically detect and diagnose anomalies (i.e., outliers from the norm) in business and operational data, such as a sudden dip in sales revenue or customer acquisition rates.
Amazon SageMaker has three new capabilities. First, SageMaker Canvas added additional capabilities to explore and analyze data with advanced visualizations. Second, SageMaker Studio now sends API user identity data to AWS CloudTrail. And third, SageMaker added TensorFlow image classification to its list of builtin algorithms.
The AWS console launches a widget to display the most recent AWS blog posts on the console landing page. Being part of the AWS News Blog team, I couldn’t be more excited about a launch this week. 

Other AWS News
Some other updates and news that you may have missed:
The Amazon Science blog published an article on the design of a pinch grasping robot. It is one of the many areas where we try to improve the efficiency of our fulfillment centers. A must-read if you’re into robotics or logistics.
The Public Sector blog has an article on how Satellogic and AWS are harnessing the power of space and cloud. Satellogic is creating a live catalog of Earth and delivering daily updates to create a complete picture of changes to our planet for decision-makers. Satellogic is generating massive volumes of data, with each of its satellites collecting an average of 50GB of data daily. They are using compute, storage, analytics, and ground station infrastructure in support of their growth.
Event Ruler is now open-source. Talking about open-source, the source code of the core rule engine built first for Amazon CloudWatch Events, and now the core of Amazon Event Bridge, is newly available on GitHub. This is a Java library that allows applications to identify events that match a set of rules. Events and rules are expressed as JSON documents. Rules are compiled for fast evaluation by a finite state engine. Read the announcement blog post to understand how Event Bridge works under the hood.
HP Anyware (formerly Teradici CAS) is now available for Amazon EC2 Mac instances, from the AWS Marketplace. HP Anyware is a remote access solution that provides pixel-perfect rendering for your remote Mac Mini running in the AWS cloud. It uses PCoIP to securely and efficiently access the remote macOS machines. You can connect from anywhere, using a PCoIP client application or from thin terminals such as Thin Clients or Zero Clients workstations.
Upcoming AWS Events
Check your calendars and sign up for these AWS events that are happening all over the world:
AWS Summits – Come together to connect, collaborate, and learn about AWS. Registration is open for the following in-person AWS Summits: Mexico City (September 21–22), Bogotá (October 4), and Singapore (October 6).
AWS Community Days – AWS Community Day events are community-led conferences to share and learn with one another. In September, the AWS community in the US will run events in Arlington, Virginia (September 30). In Europe, Community Day events will be held in October. Join us in Amersfoort, Netherlands (October 3), Warsaw, Poland (October 14), and Dresden, Germany (October 19).
That’s all from me for this week. Come back next Monday for another Week in Review!
DevOps with serverless Jenkins and AWS Cloud Development Kit (AWS CDK)
Post Syndicated from sangusah original https://aws.amazon.com/blogs/devops/devops-with-serverless-jenkins-and-aws-cloud-development-kit-aws-cdk/
The objective of this post is to walk you through how to set up a completely serverless Jenkins environment on AWS Fargate using AWS Cloud Development Kit (AWS CDK).
Jenkins is a popular open-source automation server that provides hundreds of plugins to support building, testing, deploying, and automation. Jenkins uses a controller-agent architecture in which the controller is responsible for serving the web UI, stores the configurations and related data on disk, and delegates the jobs to the worker agents that run these jobs as their primary responsibility.
Amazon Elastic Container Service (Amazon ECS) using Fargate is a fully-managed container orchestration service that helps you easily deploy, manage, and scale containerized applications. It deeply integrates with the rest of the AWS platform to provide a secure and easy-to-use solution for running container workloads in the cloud and now on your infrastructure. Fargate is a serverless, pay-as-you-go compute engine that lets you focus on building applications without managing servers. Fargate is compatible with both Amazon ECS and Amazon Elastic Kubernetes Service (Amazon EKS).
Solution overview
The following diagram illustrates the solution architecture. The dashed lines indicate the AWS CDK deployment.
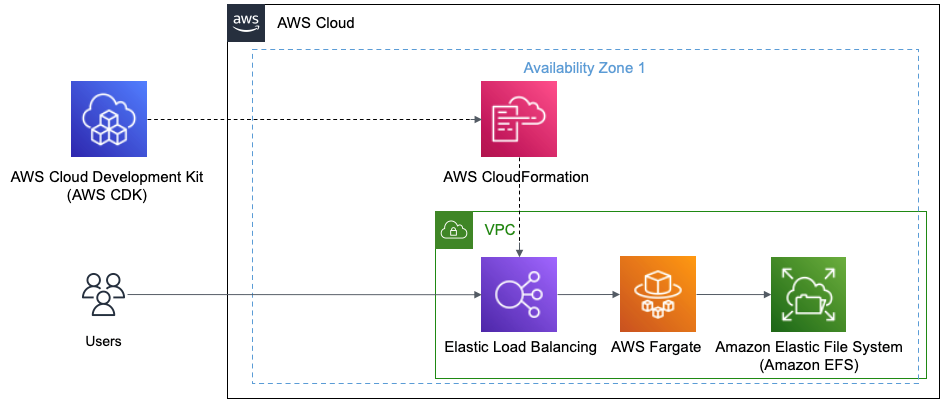
Figure 1 This diagram shows AWS CDK and how it deploys using AWS CloudFormation to create the Elastic Load Balancer, AWS Fargate, and Amazon EFS
You’ll be using the following:
- The Jenkins controller URL backed by an Application Load Balancer (ALB).
- You’ll be using your default Amazon Virtual Private Cloud (Amazon VPC) for this example.
- The Jenkins controller runs as a service in Amazon ECS using Fargate as the launch type. You’ll use Amazon Elastic File System (Amazon EFS) as the persistent backing store for the Jenkins controller task. The Jenkins controller and Amazon EFS are launched in private subnets.
Prerequisites
For this post, you’ll utilize AWS CDK using TypeScript.
Follow the guide on Getting Started for AWS CDK to:
- Get your local environment setup
- Bootstrap your development account
Code
Let’s review the code used to define the Jenkins environment in AWS using the AWS CDK.
Setup your imports
Setup your Amazon ECS, which is a logical grouping of tasks or services and set vpc
Setup Amazon EFS to store the data
Setup Access Point, which are application-specific entry points into an Amazon EFS file system that makes it easier to manage application access to shared datasets
Setup Task Definition to run Docker containers in Amazon ECS
Setup a Volume mapping the Amazon EFS from above to the Task Definition
Setup the Container using the Task Definition and the Jenkins image from the registry
Setup Mount Points to bind ephemeral storage to the container
Setup Fargate Service to run the container serverless
Setup ALB and add listener to checks for connection requests, using the protocol and port that you configure.
Setup Target to route requests to Jenkins running on Amazon ECS using Fargate
Jenkins Deployment
Now that you have all the code, let’s deploy the AWS CDK definition:
- Make sure that you have done the Prerequisite steps from earlier.
- Install packages by running the following command in your IDE CLI:
- Now you’ll deploy your AWS CDK definition to your dev account:
Let’s now login to Jenkins
- In your browser, use the DNS Name from the deployed Load Balancer
- In Amazon CloudWatch, there will be a Log group that will be created that is associated to Cluster Service.
- Go into that log and you’ll see it output the Password to login to Jenkins
- In Jenkins, follow the wizard to continue the setup
Cleaning up
To avoid incurring future charges, delete the resources.
Let’s destroy our deploy solution
- In your IDE CLI:
Conclusion
With this overview we were able to cover the following:
- Build an Elastic Load Balancer
- Use AWS Fargate with a Jenkins AMI
- All resources running serverlessly
- All build using the AWS CDK
About the author:
Use AWS Network Firewall to filter outbound HTTPS traffic from applications hosted on Amazon EKS and collect hostnames provided by SNI
Post Syndicated from Kirankumar Chandrashekar original https://aws.amazon.com/blogs/security/use-aws-network-firewall-to-filter-outbound-https-traffic-from-applications-hosted-on-amazon-eks/
This blog post shows how to set up an Amazon Elastic Kubernetes Service (Amazon EKS) cluster such that the applications hosted on the cluster can have their outbound internet access restricted to a set of hostnames provided by the Server Name Indication (SNI) in the allow list in the AWS Network Firewall rules. For encrypted web traffic, SNI can be used for blocking access to specific sites in the network firewall. SNI is an extension to TLS that remains unencrypted in the traffic flow and indicates the destination hostname a client is attempting to access over HTTPS.
This post also shows you how to use Network Firewall to collect hostnames of the specific sites that are being accessed by your application. Securing outbound traffic to specific hostnames is called egress filtering. In computer networking, egress filtering is the practice of monitoring and potentially restricting the flow of information outbound from one network to another. Securing outbound traffic is usually done by means of a firewall that blocks packets that fail to meet certain security requirements. One such firewall is AWS Network Firewall, a managed service that you can use to deploy essential network protections for all of your VPCs that you create with Amazon Virtual Private Cloud (Amazon VPC).
Example scenario
You have the option to scan your application traffic by the identifier of the requested SSL certificate, which makes you independent from the relationship of the IP address to the certificate. The certificate could be served from any IP address. Traditional stateful packet filters are not able to follow the changing IP address of the endpoints. Therefore, the host name information that you get from the SNI becomes important in making security decisions. Amazon EKS has gained popularity for running containerized workloads in the AWS Cloud, and you can restrict outbound traffic to only the known hostnames provided by SNI. This post will walk you through the process of setting up the EKS cluster in two different subnets so that your software can use the additional traffic routing in the VPC and traffic filtering through Network Firewall.
Solution architecture
The architecture illustrated in Figure 1 shows a VPC with three subnets in Availability Zone A, and three subnets in Availability Zone B. There are two public subnets where Network Firewall endpoints are deployed, two private subnets where the worker nodes for the EKS cluster are deployed, and two protected subnets where NAT gateways are deployed.

Figure 1: Outbound internet access through Network Firewall from Amazon EKS worker nodes
The workflow in the architecture for outbound access to a third-party service is as follows:
- The outbound request originates from the application running in the private subnet (for example, to https://aws.amazon.com) and is passed to the NAT gateway in the protected subnet.
- The HTTPS traffic received in the protected subnet is routed to the AWS Network Firewall endpoint in the public subnet.
- The network firewall computes the rules, and either accepts or declines the request to pass to the internet gateway.
- If the request is passed, the application-requested URL (provided by SNI in the non-encrypted HTTPS header) is allowed in the network firewall, and successfully reaches the third-party server for access.
The VPC settings for this blog post follow the recommendation for using public and private subnets described in Creating a VPC for your Amazon EKS cluster in the Amazon EKS User Guide, but with additional subnets called protected subnets. Instead of placing the NAT gateway in a public subnet, it will be placed in the protected subnet, and the Network Firewall endpoints in the public subnet will filter the egress traffic that flows through the NAT gateway. This design pattern adds further checks and could be a recommendation for your VPC setup.
As suggested in Creating a VPC for your Amazon EKS cluster, using the Public and private subnets option allows you to deploy your worker nodes to private subnets, and allows Kubernetes to deploy load balancers to the public subnets. This arrangement can load-balance traffic to pods that are running on nodes in the private subnets. As shown in Figure 1, the solution uses an additional subnet named the protected subnet, apart from the public and private subnets. The protected subnet is a VPC subnet deployed between the public subnet and private subnet. The outbound internet traffic that is routed through the protected subnet is rerouted to the Network Firewall endpoint hosted within the public subnet. You can use the same strategy mentioned in Creating a VPC for your Amazon EKS cluster to place different AWS resources within private subnets and public subnets. The main difference in this solution is that you place the NAT gateway in a separate protected subnet, between private subnets, and place Network Firewall endpoints in the public subnets to filter traffic in the network firewall. The NAT gateway’s IP address is still preserved, and could still be used for adding to the allow list of third-party entities that need connectivity for the applications running on the EKS worker nodes.
To see a practical example of how the outbound traffic is filtered based on the hosted names provided by SNI, follow the steps in the following Deploy a sample section. You will deploy an AWS CloudFormation template that deploys the solution architecture, consisting of the VPC components, EKS cluster components, and the Network Firewall components. When that’s complete, you can deploy a sample app running on Amazon EKS to test egress traffic filtering through AWS Network Firewall.
Deploy a sample to test the network firewall
Follow the steps in this section to perform a sample app deployment to test the use case of securing outbound traffic through AWS Network Firewall.
Prerequisites
The prerequisite actions required for the sample deployment are as follows:
- Make sure you have the AWS CLI installed, and configure access to your AWS account.
- Install and set up the eksctl tool to create an Amazon EKS cluster.
- Copy the necessary CloudFormation templates and the sample eksctl config files from the blog’s Amazon S3 bucket to your local file system. You can do this by using the following AWS CLI S3 cp command.
aws s3 cp s3://awsiammedia/public/sample/803-network-firewall-to-filter-outbound-traffic/config.yaml .
 aws s3 cp s3://awsiammedia/public/sample/803-network-firewall-to-filter-outbound-traffic/lambda_function.py .
 aws s3 cp s3://awsiammedia/public/sample/803-network-firewall-to-filter-outbound-traffic/network-firewall-eks-collect-all.yaml .
 aws s3 cp s3://awsiammedia/public/sample/803-network-firewall-to-filter-outbound-traffic/network-firewall-eks.yaml .
Important: This command will download the S3 bucket contents to the current directory on your terminal, so the “.” (dot) in the command is very important.
- Once this is complete, you should be able to see the list of files shown in Figure 2. (The list includes config.yaml, lambda_function.py, network-firewall-eks-collect-all.yaml, and network-firewall-eks.yaml.)

Figure 2: Files downloaded from the S3 bucket

Deploy the VPC architecture with AWS Network Firewall
In this procedure, you’ll deploy the VPC architecture by using a CloudFormation template.
To deploy the VPC architecture (AWS CLI)
- Deploy the CloudFormation template
network-firewall-eks.yaml, which you previously downloaded to your local file system from the Amazon S3 bucket.You can do this through the AWS CLI by using the create-stack command, as follows.
aws cloudformation create-stack --stack-name AWS-Network-Firewall-Multi-AZ \
 --template-body file://network-firewall-eks.yaml \
 --parameters ParameterKey=NetworkFirewallAllowedWebsites,ParameterValue=".amazonaws.com\,.docker.io\,.docker.com" \
 --capabilities CAPABILITY_NAMED_IAM
Note: The initially allowed hostnames for egress filtering are passed to the network firewall by using the parameter key
NetworkFirewallAllowedWebsitesin the CloudFormation stack. In this example, the allowed hostnames are.amazonaws.com,.docker.io, anddocker.com. - Make a note of the subnet IDs from the stack outputs of the CloudFormation stack after the status goes to
Create_Complete.
aws cloudformation describe-stacks \
 --stack-name AWS-Network-Firewall-Multi-AZ
Note: For simplicity, the CloudFormation stack name is AWS-Network-Firewall-Multi-AZ, but you can change this name to according to your needs and follow the same naming throughout this post.
To deploy the VPC architecture (console)
In your account, launch the AWS CloudFormation template by choosing the following Launch Stack button. It will take approximately 10 minutes for the CloudFormation stack to complete.
![]()
Note: The stack will launch in the N. Virginia (us-east-1) Region. To deploy this solution into other AWS Regions, download the solution’s CloudFormation template, modify it, and deploy it to the selected Region.
Deploy and set up access to the EKS cluster
In this step, you’ll use the eksctl CLI tool to create an EKS cluster.
To deploy an EKS cluster by using the eksctl tool
There are two methods for creating an EKS cluster. Method A uses the eksctl create cluster command without a configuration (config) file. Method B uses a config file.
Note: Before you start, make sure you have the VPC subnet details available from the previous procedure.
Method A: No config file
You can create an EKS cluster without a config file by using the eksctl create cluster command.
- From the CLI, enter the following commands.
eksctl create cluster \
 --vpc-private-subnets=<private-subnet-A>,<private-subnet-B> \
--vpc-public-subnets=<public-subnet-A>,<public-subnet-B> - Make sure that the subnets passed to the
--vpc-public-subnetsparameter are protected subnets taken from the VPC architecture CloudFormation stack output. You can verify the subnet IDs by looking at step 2 in the To deploy the VPC architecture section.
Method B: With config file
Another way to create an EKS cluster is by using the following config file, with more options with the name (cluster.yaml in this example).
- Create a file named
cluster.yamlby adding the following contents to it. - Run the following command to create an EKS cluster using the eksctl tool and the
cluster.yamlconfig file.
eksctl create cluster -f cluster.yaml
To set up access to the EKS cluster
-
Before you deploy a sample Kubernetes Pod, make sure you have the
kubeconfigfile set up for the EKS cluster that you created in step 2 of To deploy an EKS cluster by using the eksctl tool. For more information, see Create a kubeconfig for Amazon EKS. You can useeksctlto do this, as follows.eksctl utils write-kubeconfig —cluster filter-egress-traffic-test -
Set the
kubectl contextto the EKS cluster you just created, by using the following command.kubectl config get-contextsFigure 3 shows an example of the output from this command.

Figure 3: kubectl config get-contexts command output
-
Copy the context name from the command output and set the context by using the following command.
kubectl config use-context <NAME-OF-CONTEXT>

To deploy a sample Pod on the EKS cluster
-
Next, deploy a sample Kubernetes Pod in the EKS cluster.
kubectl run -i --tty amazon-linux —image=public.ecr.aws/amazonlinux/amazonlinux:latest shIf you already have a Pod, you can use the following command to get a shell to a running container.
kubectl attach amazon-linux -c alpine -i -t - Now you can test access to a non-allowed website in the AWS Network Firewall stateful rules, using these steps.
- First, install the cURL tool on the sample Pod you created previously. cURL is a command-line tool for getting or sending data, including files, using URL syntax. Because cURL uses the libcurl library, it supports every protocol libcurl supports. On the Pod where you have obtained a shell to a running container, run the following command to install cURL.
apk install curl - Access a website using cURL.
curl -I https://aws.amazon.comThis gives a timeout error similar to the following.
curl -I https://aws.amazon.com
curl: (28) Operation timed out after 300476 milliseconds with 0 out of 0 bytes received - Navigate to the AWS CloudWatch console and check the alert logs for Network Firewall. You will see a log entry like the following sample, indicating that the access to https://aws.amazon.com was blocked.
The error shown here occurred because the hostname
www.amazon.comwas not added to the Network Firewall stateful rules allow list.When you deployed the network firewall in step 1 of the To deploy the VPC architecture procedure, the values provided for the CloudFormation parameter
NetworkFirewallAllowedWebsiteswere just.amazonaws.com,.docker.io,.docker.comand notaws.amazon.com.
- First, install the cURL tool on the sample Pod you created previously. cURL is a command-line tool for getting or sending data, including files, using URL syntax. Because cURL uses the libcurl library, it supports every protocol libcurl supports. On the Pod where you have obtained a shell to a running container, run the following command to install cURL.
Update the Network Firewall stateful rules
In this procedure, you’ll update the Network Firewall stateful rules to allow the aws.amazon.com domain name.
To update the Network Firewall stateful rules (console)
- In the AWS CloudFormation console, locate the stack you used to create the network firewall earlier in the To deploy the VPC architecture procedure.
- Select the stack you want to update, and choose Update. In the Parameters section, update the stack by adding the hostname
aws.amazon.comto the parameterNetworkFirewallAllowedWebsitesas a comma-separated value. See Updating stacks directly in the AWS CloudFormation User Guide for more information on stack updates.
Re-test from the sample pod
In this step, you’ll test the outbound access once again from the sample Pod you created earlier in the To deploy a sample Pod on the EKS cluster procedure.
To test the outbound access to the aws.amazon.com hostname
- Get a shell to a running container in the sample Pod that you deployed earlier, by using the following command.
kubectl attach amazon-linux -c alpine -i -t - On the terminal where you got a shell to a running container in the sample Pod, run the following cURL command.
curl -I https://aws.amazon.com - The response should be a success HTTP 200 OK message similar to this one.
curl -Ik https://aws.amazon.com
 HTTP/2 200
 content-type: text/html;charset=UTF-8
 server: Server
If the VPC subnets are organized according to the architecture suggested in this solution, outbound traffic from the EKS cluster can be sent to the network firewall and then filtered based on hostnames provided by SNI.
Collecting hostnames provided by the SNI
In this step, you’ll see how to configure the network firewall to collect all the hostnames provided by SNI that are accessed by an already running application—without blocking any access—by making use of CloudWatch and alert logs.
To configure the network firewall (console)
- In the AWS CloudFormation console, locate the stack that created the network firewall earlier in the To deploy the VPC architecture procedure.
- Select the stack to update, and then choose Update.
- Choose Replace current template and upload the template network-firewall-eks-collect-all.yaml. (This template should be available from the files that you downloaded earlier from the S3 bucket in the Prerequisites section.) Choose Next. See Updating stacks directly for more information.
To configure the network firewall (AWS CLI)
- Update the CloudFormation stack by using the
network-firewall-eks-collect-all.yamltemplate file that you previously downloaded from the S3 bucket in the Prerequisites section, using the update-stack command as follows.
aws cloudformation update-stack --stack-name AWS-Network-Firewall-Multi-AZ \
 --template-body file://network-firewall-eks-collect-all.yaml \
 --capabilities CAPABILITY_NAMED_IAM
To check the rules in the AWS Management Console
- In the AWS Management Console, navigate to the Amazon VPC console and locate the AWS Network Firewall tab.
- Select the network firewall that you created earlier, and then select the stateful rule with the name log-all-tls.
- The rule group should appear as shown in Figure 4, indicating that the logs are captured and sent to the Alert logs.
Figure 4: Network Firewall rule groups

To test based on stateful rule
- On the terminal, get the shell for the running container in the Pod you created earlier. If this Pod is not available, follow the instructions in the To deploy a sample Pod on the EKS cluster procedure to create a new sample Pod.
- Run the cURL command to
aws.amazon.com. It should returnHTTP 200 OK, as follows.
curl -Ik https://aws.amazon.com/
 HTTP/2 200
 content-type: text/html;charset=UTF-8
 server: Server
 date:
 ------
 ----------
-------------- - Navigate to the AWS CloudWatch Logs console and look up the Alert logs log group with the name
/AWS-Network-Firewall-Multi-AZ/anfw/alert.You can see the hostnames provided by SNI within the TLS protocol passing through the network firewall. The CloudWatch Alert logs for allowed hostnames in the SNI looks like the following example.
Optionally, you can also create an AWS Lambda function to collect the hostnames that are passed through the network firewall.
To create a Lambda function to collect hostnames provided by SNI (optional)
- Create subscriptions for one or more log streams to invoke a function when logs are created or match an optional pattern.
For more information, see Using Lambda with CloudWatch Logs. Figure 5 is an example architecture in which a Lambda code extracts the hostnames provided by SNI, which can be sent to an Amazon Simple Notification Service (Amazon SNS) topic to send an alert to subscriptions.

Figure 5: Architecture to collect and capture hostnames by using Network Firewall

Sample Lambda code
The sample Lambda code from Figure 5 is shown following, and is written in Python 3. The sample collects the hostnames that are provided by SNI and captured in Network Firewall. Network Firewall logs the hostnames provided by SNI in the CloudWatch Alert logs. Then, by creating a CloudWatch logs subscription filter, you can send logs to the Lambda function for further processing, for example to invoke SNS notifications.
Clean up
In this step, you’ll clean up the infrastructure that was created as part of this solution.
To delete the Kubernetes workloads
- On the terminal, using the kubectl CLI tool, run the following command to delete the sample Pod that you created earlier.
kubectl delete pods amazon-linuxNote: Clean up all the Kubernetes workloads running on the EKS cluster. For example, if the Kubernetes service of type LoadBalancer is deployed, and if the EKS cluster where it exists is deleted, the LoadBalancer will not be deleted. The best practice is to clean up all the deployed workloads.
- On the terminal, using the eksctl CLI tool, delete the created EKS cluster by using the following command.
eksctl delete cluster --name filter-egress-traffic-test
To delete the CloudFormation stack and AWS Network Firewall
- Navigate to the AWS CloudFormation console and choose the stack with the name AWS-Network-Firewall-Multi-AZ.
- Choose Delete, and then at the prompt choose Delete Stack. For more information, see Deleting a stack on the AWS CloudFormation console.
Conclusion
By following the VPC architecture explained in this blog post, you can protect the applications running on an Amazon EKS cluster by filtering the outbound traffic based on the approved hostnames that are provided by SNI in the Network Firewall Allow list.
Additionally, with a simple Lambda function, CloudWatch Logs, and an SNS topic, you can get readable hostnames provided by the SNI. Using these hostnames, you can learn about the traffic pattern for the applications that are running within the EKS cluster, and later create a strict list to allow only the required outbound traffic. To learn more about Network Firewall stateful rules, see Working with stateful rule groups in AWS Network Firewall in the AWS Network Firewall Developer Guide.
If you have feedback about this post, submit comments in the Comments section below. If you have questions about this post, contact AWS Support.
Want more AWS Security news? Follow us on Twitter.
Fine-grained entitlements in Amazon Redshift: A case study from TrustLogix
Post Syndicated from Srikanth Sallaka original https://aws.amazon.com/blogs/big-data/fine-grained-entitlements-in-amazon-redshift-a-case-study-from-trustlogix/
This post is co-written with Srikanth Sallaka from TrustLogix as the lead author.
TrustLogix is a cloud data access governance platform that monitors data usage to discover patterns, provide insights on least privileged access controls, and manage fine-grained data entitlements across data lake storage solutions like Amazon Simple Storage Service (Amazon S3), data warehouses like Amazon Redshift, and transactional databases like Amazon Relational Database Service (Amazon RDS) and Amazon Aurora.
In this post, we discuss how TrustLogix integrates with Amazon Redshift row-level security (RLS) to help data owners express granular data entitlements in business terms and consistently enforce them.
The challenge: Dynamic data authorization
In this post, we discuss two customer use cases:
- Data access based on enterprise territory assignments – Sales representatives should only be able to access data in the opportunities dataset for their assigned territories. This customer wants to grant access to the dataset based on a criteria, an attribute of dataset, such as geographic area, industry, and revenue. The criteria is an attribute of the dataset. The challenge is that this access control policy should be applied by Amazon Redshift regardless of the platform from where the data is accessed.
- Entitlement-based data access – One of TrustLogix’s customers is a fortune 500 financial services firm. They use Amazon Redshift to store and perform analysis on a wide range of datasets, like advertising research, pricing to customers, and equity markets. They share this data with traders, quants, and risk managers. This internal data is also consumed by various users across the firm, but not every user is entitled to see all the data. To track this data and access requests, this firm spent a great deal of resources in building a comprehensive list of permissions that define which business user is entitled to what data. A simple scenario is that this entitlement table contains the customer_id and Book_id values assigned to specific user_id values. Any queries on the trade data table, which is tagged as sensitive data, should enforce this policy. The challenge is that these data entitlements should be enforced centrally in Amazon Redshift regardless of the tool from which they are accessed. Data owners should be able to manage this policy with a simple access control policy management interface and shouldn’t be required to know the internals of Amazon Redshift to implement complex procedures.
User-defined function (UDF) and secure view-based implementation
At present, to define fine-grained access controls in Amazon Redshift, TrustLogix is using custom Amazon Redshift user-defined functions (UDFs) and views to author policies from the TrustLogix policy management console and granting users access to the view.
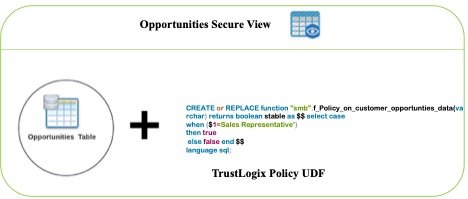
This process involves three steps:
- Create a user-defined function that returns a Boolean whenever the conditions of the policy match.
- Create a view by joining the UDF and base table.
- Grant access to the new view to the appropriate users or groups.
- Block direct table access to all users.
Native row-level security (RLS) policies in Amazon Redshift
The row-level security (RLS) feature in Amazon Redshift simplifies design and implementation of fine-grained access to the rows in tables. With RLS, you can restrict access to a subset of rows within a table based on the user’s job role or permissions and level of data sensitivity with SQL commands. By combining column-level access control and RLS, you can provide comprehensive protection by enforcing granular access to your data. TrustLogix integrates with this feature to let their customers specify custom SQL queries and dictate what sets of data are accessible by which users.
TrustLogix is now using the RLS feature to address both use cases mentioned earlier. This reduces the complexity of managing additional UDF functions or secure views and additional grants.
“We’re excited about this deeper level of integration with Amazon Redshift. Our joint customers in security-forward and highly regulated sectors including financial services, healthcare, and pharmaceutical need to have incredibly fine-grained control over which users are allowed to access what data, and under which specific contexts. The new row-level security capabilities will allow our customers to precisely dictate data access controls based on their business entitlements while abstracting them away from the technical complexities. The new Amazon Redshift RLS capability will enable our joint customers to model policies at the business level, deploy and enforce them via a security-as-code model, ensuring secure and consistent access to their sensitive data.”
– Ganesh Kirti, Founder & CEO, TrustLogix Inc.
TrustLogix integration with RLS
Let’s look at our two use cases and how to implement TrustLogix integration with RLS.
Data access based on territories
The data owner logs in to the TrustLogix control plane and authors a data access policy using the business-friendly UI.
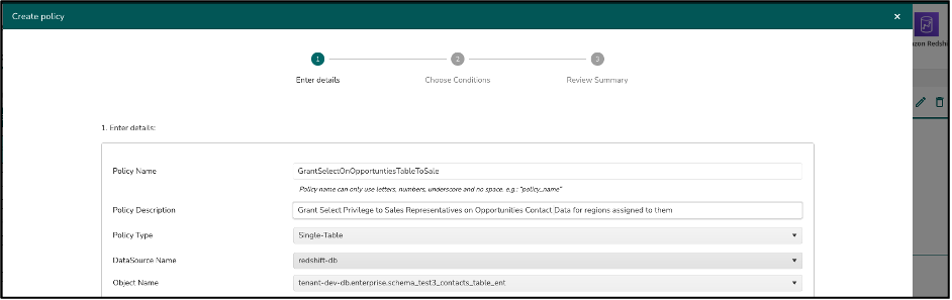
TrustLogix auto-generates the following Amazon Redshift RLS policy, attaches it to the appropriate table, and turns on the RLS on this table.
Then you can use the following grant statement on the table:
After this policy is deployed into the Amazon Redshift data warehouse, any user who queries this table automatically gets only authorized data.
Entitlement-based data access
Similar to the first use case, TrustLogix creates two separate RLS policies, one on the book_id and another with customer_id, attaching both the policies on the trade details table.
In this case, Amazon Redshift evaluates both attached policies using the AND operator, with the effect that users with the Trader role get view-only access for only those customers and books that the Trader role is granted.
Additional TrustLogix and Amazon Redshift integration benefits
The following diagram illustrates how TrustLogix integrates with Amazon Redshift.
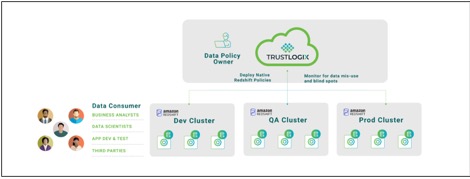
This robust new integration offers many powerful security, productivity, and collaboration benefits to joint Amazon Redshift and TrustLogix customers:
- A single pane of glass to monitor and manage fine-grained data entitlements across multiple Amazon Redshift data warehouses, AWS data stores including Amazon S3 and Aurora, and other cloud data repositories such as Snowflake and Databricks
- Monitoring of data access down to the user and tool level to prevent shadow IT, identify overly granted access permissions, discover dark data, and ensure compliance with legislative mandates like GDPR, HIPAA, SOX, and PCI
- A no-code model that enables security as code, ensures consistency, reduces work, and eliminates errors
Summary
The RLS capability in Amazon Redshift delivers granular controls for restricting data. TrustLogix has delivered an integration that reduces the effort, complexity, and dependency of creating and managing complex user-defined functions to fully take advantage of this capability.
Furthermore, TrustLogix doesn’t need to create additional views, which reduces management of user grants on other derived objects. By using the RLS policies, TrustLogix has simplified creating authorization policies for fine-grained data entitlements in Amazon Redshift. You can now provision both coarse-grained and granular access controls within minutes to enable businesses to deliver faster access to analytics while simultaneously tightening your data access controls.
About the authors
 Srikanth Sallaka is Head of Product at TrustLogix. Prior to this he has built multiple SaaS and on-premise Data Security and Identity Management solutions. He has honed his Product Management and technical skills working at large enterprise like Oracle, SAP & multiple startups.
 Yanzhu Ji is a Product Manager on the Amazon Redshift team. She worked on the Amazon Redshift team as a Software Engineer before becoming a Product Manager. She has rich experience of how the customer-facing Amazon Redshift features are built from planning to launching, and always treats customers’ requirements as first priority. In her personal life, Yanzhu likes painting, photography, and playing tennis.
Quest Integrates Backblaze into Rapid Recovery Version 6.7
Post Syndicated from Jennifer Newman original https://www.backblaze.com/blog/quest-integrates-backblaze-into-rapid-recovery-version-6-7/
It’s the classic “tree falls in the woods” scenario: if your company experiences data loss, but your users never feel it, did it even happen? That’s the value proposition our friends over at Quest—an IT platform that solves complex problems with simple software solutions—present with their popular Rapid Recovery tool:
Back up and quickly recover anything — systems, apps, and data — anywhere, whether it’s physical, virtual, or in the cloud. This data recovery software allows you to run without restore, with zero impact on your users, and as if the outage or data loss never happened.
Quest Rapid Recovery Version 6.7 Adds Backblaze B2 in Cloud Tier
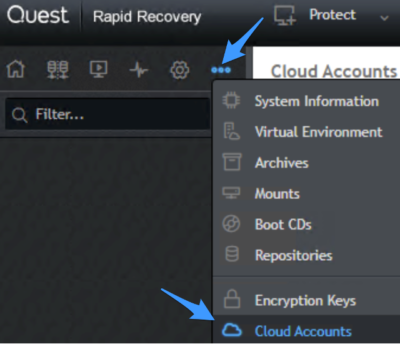
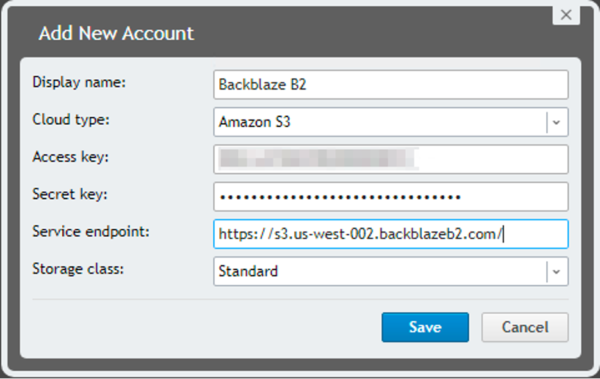
As of today—whether you’re a Quest customer or a Backblaze B2 Cloud Storage user—you can combine all this value with the astonishingly easy cloud storage we’re known for here at Backblaze. In Quest’s 6.7 release of Rapid Recovery, navigate to Cloud Accounts in the menu (see screenshot below for menu location), click Add New Account.
Enter a display name, select B2 Cloud Storage, and choose Amazon S3 as the cloud type. Then you just need to enter your Access key (keyID), Secret Key (applicationKey), and your service endpoint URL.
Your data will be safe, useful, and affordable at a quarter of the price of legacy cloud providers. Try it out today or contact our sales team to learn more.
So, What’s Changed?
If you’re already a Quest Rapid Recovery user, you may notice that setup hasn’t changed. What’s changed is actually in the code—Rapid Recovery will now work more seamlessly and more efficiently. Bug fixes have been baked into version 6.7 and their support will be more robust. We love a seamless partnership—and stay tuned for more integrations between Quest and Backblaze in the future!
More About Quest’s Rapid Recovery Tool
If you’re a Backblaze B2 Cloud Storage user who is in the market for a recovery solution for your business, you can dig into the details about Rapid Recovery here. Here’s a brief primer of the solutions capabilities:
- Simplify backup and restore: One cloud-based management console allows you to restore lost or damaged systems and data with near-zero recovery time and no impact to users—an advanced, admin-friendly solution.
- Address demanding recovery point objectives (RPO): Leverage image-based snapshots for RPOs and reduce risk of data loss and downtime with tracked change blocks to accelerate backups and reduce storage.
- Wide application support: Lightning-fast recovery for file servers and applications on both Microsoft Windows and Linux systems gets business-critical applications online to keep your business rolling.
- Cloud-based backup, archive, and disaster recovery: (This is where we come in…) Point-and-click cloud connectivity makes for easy replication of application backups for no-stress cloud backup.
- Virtual environment protection: Agentless backup and recovery for Microsoft Exchange and SQL databases residing on your virtual machines and low-cost VM-only tiered licensing for on-premises and cloud virtual environments.
- Data deduplication and replication: With B2 Cloud storage, you’ll already save upwards of 75% versus other cloud storage solutions, but you can reduce costs further by leveraging built-in compression and deduplication. Nice.
More about Backblaze B2 Cloud Storage
Backblaze B2 Cloud Storage is purpose-built for ease, instant access to files and data, and infinite scalability. Backblaze B2 is priced so users don’t have to choose between what matters and what doesn’t when it comes to backup, archive, data organization, workflow streamlining, and more. Signing up couldn’t be more simple: a few clicks and you’re storing data. The first 10GB is free, and if you need more capacity to run a proof of concept you can talk to our sales team. Otherwise, when you’re ready to store data, you can pay one of two ways:
- Our per-byte consumption pricing: Only pay for what you store. It’s $5 TB/month, no hidden delete fees or gotchas. What you see is what you get.
- Our B2 Reserve capacity pricing: If you’d like to by predictable blocks of storage, you can work with any of our reseller partners to unlock the following benefits:
- Free egress up to the amount of storage purchased per month.
- Free transaction calls.
- Enhanced migration services.
- No delete penalties.
- Tera support.
The Answer to the Question
You all can debate the philosophical implications of trees falling in woods and the sound they make. But when it comes to Rapid Recovery, it seems like we can guarantee one thing: your users might not hear the data loss when it happens, but you can bet the sight of relief your IT team breathes when they rapidly recover will be audible.
The post Quest Integrates Backblaze into Rapid Recovery Version 6.7 appeared first on Backblaze Blog | Cloud Storage & Cloud Backup.
M.I Abaga | The Guy – M.I’s New Album | Talks at Google
Post Syndicated from Talks at Google original https://www.youtube.com/watch?v=kGoG0PxRx4E
InsightVM: Best Practices to Improve Your Console
Post Syndicated from Shane Queeney original https://blog.rapid7.com/2022/09/12/insightvm-best-practices-to-improve-your-console/

Over the years, our recommendations and best practices for the InsightVM console have changed with the improvements and updates we’ve made to the system. Here are some of the most common improvements to help you get the most out of your InsightVM console in 2022.
Ensure everything is up to date
The first step to ensuring the health of your console is ensuring it is up to date. For InsightVM product updates, the typical release schedule is weekly on Wednesday, with the occasional out-of-band update. To stay on the latest version, you can set the update frequency to every 24 hours and set it to off-hours to perform that check. This will ensure the latest update is being applied and the console isn’t rebooting in the middle of the workday.
The InsightVM content updates include new vulnerabilities updated every 2 hours. As these don’t require a system reboot, it is recommended to leave them set to automatically update.
Make sure your scan engines are properly updated as well. As long as the scan engine has enough storage space and can reach the InsightVM console, it should be able to receive the latest update.
Unless you are on a Rapid7-hosted console, you are also in charge of updating the underlying operating system. That means not just applying the latest security patch, but also making sure the OS version itself is not end-of-life.
Lastly, you want to make sure you’re running the latest version of the InsightVM postgreSQL database — version 11.7. If you are still running version 9.4, this can cause some potential issues with the database, as well as general slowdown in the console and running reports.
With the latest InsightVM product updates, we also have a database auto-tune feature which automatically tunes based on the amount of RAM on the console server. This feature does not work if you are still on version 9.4. If you are on version 11.7, to activate it, go to Administration -> Run and then run the command tune assistant to make sure everything is tuned correctly. This will have a greater impact if you have 64GB RAM or above.
Check out this doc on tuning the PostgreSQL database for more detail. If you don’t feel comfortable tuning your own database, you can always contact Rapid7 support for assistance.
Reduce the number of sites
One of the largest improvements to the console is the increase in scan efficiency. Before October 2020, the discovery portion of the scan would only hit 1,024 assets simultaneously. Now, we are running discovery against 65,535 IPs at once. This leads to much faster discovery of larger IP ranges. Because of this, we recommend having fewer sites with larger IP scopes, such as /16 or /8 CIDR ranges.
The best way to organize these new, larger sites is based around function or geographical region – for example, having a separate site for all stores and one for all corporate ranges. Another example would be to break up the sites based on continents, or as large of a geographical region as possible.
Having fewer sites with a larger scope will help reduce the micromanagement of schedules and allow for ease of scalability when scanning more devices. For granular reporting, use asset groups, which are much more flexible than IP ranges and are designed to let you set the scope for reports and access management.
Prevent scan overlap
Besides having too many sites, the next-largest problem most consoles face is when scans overlap on the same scan engine. Having fewer sites helps with having fewer scheduled scans, but you should still be aware what scan engine is being used for those sites. Running a scan uses up RAM on the scan engine, and having too many scans running at once can cause scan slowdown or potentially engine crashes due to lack of memory.
The best-case scenario is to have one scan engine per site. That way, your sites can be scanned at the same time without any chance of them overloading a single engine. If you have some sites or locations that are much larger than others, you can always deploy more engines to that location and pool them together for even greater scan efficiency.
And remember, if you’re scanning more than 2,000 devices or have a segmented network, you should not be using the local scan engine, as that takes away resources from the console and PostgreSQL database.
Optimize scan templates
After making sure your scans aren’t overlapping on the same engine, the next step is to speed up the scans by optimizing your scan template. My colleague Landon Dalke wrote a great blog post documenting the best practices for your scan templates. Here are a few highlights from his post:
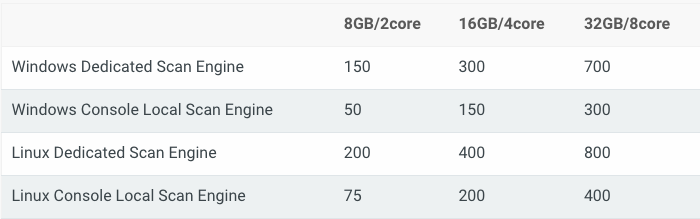
Assets scanned simultaneously per scan engine: Please use the following table for reference depending on how much CPU and RAM your scan engines have. Make sure your engines have a 1:4 ratio of CPU to memory for the best performance. Also, if your scan engines are virtual, make sure to reserve the allocated memory to avoid insufficient memory issues.
Send UDP packets to ports: We recommend disabling. It’s unlikely a device will be reachable that doesn’t respond to ICMP, ARP, or TCP but is somehow found only using UDP.
Do not treat TCP reset responses as live assets: We recommend enabling. This will help prevent “ghost assets” with no hostname or operating system from appearing, as some routers or IDS/IPS send TCP reset responses.
Nmap Services Detection: We recommend disabling this, as it can cause scans to take five to 10 times longer to run. Having a credential or agent on a device gives the same information.
Skip checks performed by the Insight Agent: We recommend enabling. If the agent is detected on a device, it will skip the vulnerability checks the agent is already performing, reducing scan time.
If all of your scan engines have the same resources, you can get away with needing one optimized scan template, reducing potential confusion and further simplifying your scan configurations.
After following these steps, your console should be in a much better place to reduce micromanagement and improve overall efficiency. If you need continued help and support, don’t hesitate to reach out to Rapid7 Support or your Customer Success Manager.
Additional reading:
New Linux Cryptomining Malware
Post Syndicated from Bruce Schneier original https://www.schneier.com/blog/archives/2022/09/new-linux-cryptomining-malware.html
It’s pretty nasty:
The malware was dubbed “Shikitega” for its extensive use of the popular Shikata Ga Nai polymorphic encoder, which allows the malware to “mutate” its code to avoid detection. Shikitega alters its code each time it runs through one of several decoding loops that AT&T said each deliver multiple attacks, beginning with an ELF file that’s just 370 bytes.
Shikitega also downloads Mettle, a Metasploit interpreter that gives the attacker the ability to control attached webcams and includes a sniffer, multiple reverse shells, process control, shell command execution and additional abilities to control the affected system.
[…]
The final stage also establishes persistence, which Shikitega does by downloading and executing five shell scripts that configure a pair of cron jobs for the current user and a pair for the root user using crontab, which it can also install if not available.
Shikitega also uses cloud hosting solutions to store parts of its payload, which it further uses to obfuscate itself by contacting via IP address instead of domain name. “Without [a] domain name, it’s difficult to provide a complete list of indicators for detections since they are volatile and they will be used for legitimate purposes in a short period of time,” AT&T said.
Bottom line: Shikitega is a nasty piece of code. AT&T recommends Linux endpoint and IoT device managers keep security patches installed, keep EDR software up to date and make regular backups of essential systems.
Another article.
Slashdot thread.
Choosing an AWS container service to run your modern application
Post Syndicated from Lewis Tang original https://aws.amazon.com/blogs/architecture/choosing-an-aws-container-service-to-run-your-modern-application/
Businesses want to innovate quickly and deliver value even faster. To achieve these goals, the platform needs to enable teams to focus on delivering applications that are reliable, secure, highly available, cost-efficient, and scalable to required sizes.
Consider including containers on AWS in your platform, whether you are trying containers for the first time, spinning out parts of an on-premises solution to microservices in the cloud, or are new to the cloud. Containers can help you achieving a range of business benefits, including increased scalability, agility, flexibility, and cost efficiency.
In this post, we discuss three sets of builder expectations and how AWS container services can help to meet with your application delivery requirements and choose the appropriate container platform service on AWS.
Decrease container platform operations management overhead
If managing a platform is not your business’s strategic focus (for example, if most of your engineers are code developers), it can be preferable to only manage application development.
Amazon Lightsail containers offer a simple way for developers to deploy their containers to the cloud. With a Docker image you provide for your containers, AWS automatically deploys containerized workloads for you.
Lightsail assigns an HTTPS endpoint that is ready to serve your web application running in the cloud container. It automatically sets up a load-balanced Transport Layer Security (TLS) endpoint and takes care of the TLS certificate. This service replaces unresponsive containers for you automatically; by assigning a Domain Name System to your endpoint, Lightsail maintains the old version until the new version is healthy and ready to go live (Figure 1).

Figure 1. Amazon Lightsail containers
Another simple way to build and run your containerized web application in AWS is using AWS App Runner, which provides a fully managed container-native service.
Without orchestrators to configure, build pipelines to set up, or load balancers to optimize, you can bring existing containers or use the integrated container build service to go directly from the code repository to deployed application.
The build service can connect to a GitHub repository, providing a Git push workflow that deploys changes automatically. App Runner orchestration workflow take cares of the build, deployment, and configuration tasks, such as host, runtime patching, monitoring load balancing, and auto scaling (Figure 2). Explore AWS App Runner documentation and workshop for more details about the service.

Figure 2. AWS App Runner
When designing an application, you often start with a whiteboard or mental model that has representations of each service and lines for how they interact with each other. When considering an application’s platform architecture, the cloud components are not limited to virtual private cloud (VPC) subnets, load balancers, deployment pipelines, and durable storage for your application’s stateful data. Bringing all underlying cloud components together and making sure the design is well architected can be challenging.
AWS Copilot can provide guided best practices when deploying a microservice architecture that includes multiple services deployed as containers. You can use Copliot to handle cloud component details for you. By providing a container image, Copilot works with App Runner or Amazon Elastic Container Service (Amazon ECS) to provision cloud components, like VPC and having Copilot handle high-availability deployment, load balancer creation, and configuration.
To automate application deployment and new version release, Copilot can create a deployment pipeline so that the latest version of your application is automatically deployed every time you push a new commit to your code repository (as demonstrated in Figure 3).

Figure 3. AWS Copilot pipeline
Full-control application deployment with container orchestration
As business grows, your application portfolio grows. Some applications may require the selection of Microsoft Windows containers or deep customizations on container-resource scheduling, monitoring, and logging. To accommodate this, you need the flexibility of configuring the required underlying container services while still using the efficient container orchestrator to automate the common processes to achieve operation efficiency. This is where Amazon ECS and Amazon Elastic Kubernetes Service (Amazon EKS) can help.
Using Amazon ECS
As demonstrated in Figure 4, Amazon ECS is a highly scalable, high-performance container management service that supports containers and allows you to easily run applications on a managed cluster of Amazon Elastic Compute Cloud instances with Amazon Fargate (a serverless compute engine for containers). With this, you can launch and stop containerized applications and query the complete state of your cluster. You have the ability to access and configure many familiar features, like security groups and Elastic Load Balancing (ELB), by sending simple API calls.
Amazon ECS can be used to schedule container placement across your cluster based on resource needs and availability requirements. You can also integrate your own scheduler or third-party schedulers to meet business- or application-specific requirements.

Figure 4. Amazon ECS using AWS Fargate
Using Amazon EKS
Amazon EKS is a managed service that can be used to run Kubernetes on AWS, without installing, operating, and maintaining your own Kubernetes control plane or nodes. For many developers who have experience using Kubernetes, running Amazon EKS for application container workload is a preferred option because Amazon EKS provides the flexibility of Kubernetes with the scalability, security and resiliency of being an AWS managed service.
Amazon EKS runs and automatically scales the Kubernetes control plane across multiple AWS availability zones to ensure high availability, as in Figure 5. The control plane instances are automatically scaled based on load. Amazon EKS detects and replaces unhealthy control plane instances and provides automated version updates and patching. Amazon EKS enables developers to run up-to-date versions of the open-source Kubernetes software, the existing or new third-party plugins, and tooling. This means you can more easily migrate any standard Kubernetes application to Amazon EKS without code modification.
Scalability and security are essential to your business-critical workloads. Amazon EKS is integrated with many AWS services, including Amazon Elastic Container Registry for container images, ELB for load distribution, IAM for authentication, and Amazon Virtual Private Cloud for isolation.

Figure 5. Amazon EKS scales Kubernetes across multiple availability zones
Conclusion
To innovate and respond to changes faster, businesses need to build modern applications quickly and manage them efficiently. AWS provides container services to run your most sensitive, secure, and business-critical workloads reliably and to-scale.
With little-to-no prior container experience, developers can use Lightsail containers to run web application container workloads with easy-to-use interface. App Runner simplifies application deployment and management down into one particular service for running web applications. With Copilot, you can get step-by-step best practice guidance when you need to deploy microservice architecture with multiple services deployed as containers. Amazon ECS and Amazon EKS give the flexibility of configuring container workloads while maintaining the application deployment and operational efficiency.
Further reading
- Amazon ECS vs Amazon EKS: making sense of AWS container services
In this post, AWS VP of Compute Services, Deepak Singh, shared his thought of choosing between Amazon ECS and Amazon EKS. - Best practices for managing container platforms
Please find out from this AWS Prescriptive Guidance covering the best practice for managing container platforms.
The European Astro Pi Challenge is back for 2022/23
Post Syndicated from Sam Duffy original https://www.raspberrypi.org/blog/the-european-astro-pi-challenge-is-back-for-2022-23/
The European Astro Pi Challenge is back for another year. This is young people’s chance to write computer programs that run on board the International Space Station.
Young people can take part in two Astro Pi challenges: Mission Zero and Mission Space Lab. Participation is free and open for young people up to age 19 in ESA Member States (see more details about eligibility on the Astro Pi website). Young people can participate in one or both of the challenges.
Their programs will run on the two new upgraded Astro Pi computers, which launched into space in December 2021. The Astro Pis were named after the two inspirational European scientists Nikola Tesla and Marie Skłodowska-Curie by Mission Zero participants. For the 2021/22 European Astro Pi Challenge, these new computers ran over 17,000 programs written by young people from 26 countries.
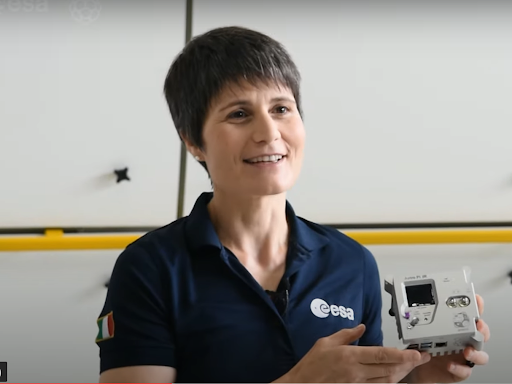
Here is ESA astronaut Matthias Maurer getting the new Astro Pis ready for young people’s experiments.
You can register for Mission Space Lab from today
In Mission Space Lab, teams of young people work together with a mentor who supports them, as they design a scientific experiment to be run on the Astro Pis in space.
Teams write programs that use an Astro Pi’s sensors and camera to collect data from the International Space Station, which the teams then analyse. This video has more information about the Astro Pi computers and how teams can choose an experiment idea:
Registration for Mission Space Lab is now open, and participation takes place over eight months. Mentors need to register their team and submit the team’s experiment idea by 28 October 2022. For more details on how to register, visit the Mission Space Lab webpages.
For inspiration, you can read the reports written by the winning teams for Mission Space Lab 2021/22. What will your team’s experiment idea be? We can’t wait to hear about it.
Mission Zero is starting soon
Mission Zero is the beginners’ challenge where young people write a simple program and get a taste of space science.
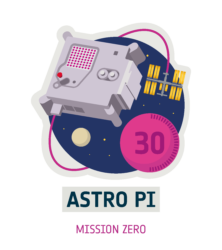
All eligible programs that follow the official guidelines will run in space for up to 30 seconds. The young people who participate receive a certificate they can download which shows their program’s exact start and end time, and the position of the ISS when their program ran — a piece of space science history to keep!
Mission Zero opens on 22 September 2022. Watch this space for more details on launch day.
Stay up to date
The European Astro Pi Challenge is an ESA Education project run in collaboration with us here at the Raspberry Pi Foundation.
You can stay up to date with all of the latest Astro Pi news by following the Astro Pi Twitter account or signing up to the newsletter at astro-pi.org
The post The European Astro Pi Challenge is back for 2022/23 appeared first on Raspberry Pi.
To Choose a Queen
Post Syndicated from The History Guy: History Deserves to Be Remembered original https://www.youtube.com/watch?v=jTQetvu2Xn0
[$] A pair of Rust kernel modules
Post Syndicated from original https://lwn.net/Articles/907685/
The idea of being able to write kernel code in the Rust language has a
certain appeal, but it is hard to judge how well that would actually work
in the absence of examples to look at. Those examples, especially for
modules beyond the “hello world” level of complexity, have been somewhat
scarce, but that is beginning to change. At the 2022 Kangrejos gathering
in Oviedo, Spain, two developers presented the modules they have developed
and some lessons that have been learned from this exercise.
Security updates for Monday
Post Syndicated from original https://lwn.net/Articles/907770/
Security updates have been issued by Debian (gdk-pixbuf, libxslt, linux-5.10, paramiko, and zlib), Fedora (webkit2gtk3), Mageia (gstreamer1.0-plugins-good, jupyter-notebook, kernel, and rpm), Slackware (vim), SUSE (bluez, clamav, freetype2, frr, gdk-pixbuf, keepalived, libyang, nodejs16, python-PyYAML, qpdf, samba, and vim), and Ubuntu (linux-azure-fde and tiff).
Kernel prepatch 6.0-rc5
Post Syndicated from original https://lwn.net/Articles/907729/
Linus has released 6.0-rc5 for testing.
“Nothing looks particularly scary, so jump right in
“.
Law & Order: Last Week Tonight with John Oliver (HBO)
Post Syndicated from LastWeekTonight original https://www.youtube.com/watch?v=DNy6F7ZwX8I
Remembering Peter Eckersley
Post Syndicated from Let's Encrypt original https://letsencrypt.org/2022/09/12/remembering-peter-eckersley.html

Artwork by Hugh D’Andrade
Peter Eckersley, a Let’s Encrypt co-founder, passed away unexpectedly on September 2nd from complications of cancer treatment. As an incredibly kind, bright, and energetic person, he was a beloved member of the community of people working to make the Internet a better place. He played an important role in the founding of Let’s Encrypt and his loss is felt deeply by many in our organization.
Peter met Alex Halderman at the RSA Conference in 2012 and the two of them started to make plans for technology to automate the process of acquiring HTTPS certificates. This work included early designs for what would become the ACME protocol. Peter and Alex later teamed up with a parallel effort by Josh Aas and Eric Rescorla at Mozilla, and the four of us worked together to create a new automated public benefit CA. The result was Let’s Encrypt, which began service in 2015.
Peter also led the development of the initial ACME client, which would eventually become Certbot. In a reflection of Peter’s vision for making the Internet secure by default, Certbot aims to fully automate HTTPS deployment, rather than simply procure a certificate. Today, Certbot is among the most popular ACME clients, and it is developed and maintained by Peter’s former team at the Electronic Frontier Foundation (EFF).
Peter was a member of our Board of Directors for several years. We greatly valued his contributions as a Director, but one of the memories from that time that makes us smile the most is Peter’s habit of showing up to board meetings with a messenger bag over his shoulder, helmet hair, and rosy cheeks from arriving by bike.
Making change at scale on the Internet is not easy. One way to get it done is to be both a dreamer and someone who possesses the deep technical knowledge necessary to bring dreams to reality. Peter was one of those people, and we’re grateful to have been able to work with him.
We hope to honor Peter’s life by letting the qualities we admired so much in him – his energy, optimism, kindness, and pursuit of knowledge – inspire our efforts going forward.
Peter’s longtime friend and colleague Seth Schoen, who was among the earliest contributors to Let’s Encrypt and Certbot, further memorializes Peter in a post on our community forum.