Bookblaze: First Annual Backblaze Book Guide

Post Syndicated from Molly Clancy original https://www.backblaze.com/blog/bookblaze-first-annual-backblaze-book-guide/

Fact: Books are the best gifts to give friends and family this time of year. At least we think so here at Backblaze (second to the gift of Backblaze, of course). This post is your case in point—we got so many book recommendations when we put together our annual holiday gift guide that we thought they deserved their own post. So, we’re introducing the very first annual Bookblaze Book List.

For the readers in your lives, here’s a list of books that come highly recommended from the Backblaze team. (And it’s worth noting that we don’t get any affiliate or sponsorship income for these recommendations. They’re just the books our colleagues read and loved this year.) Let’s dive in.

Cozy Reads for Your Winter Needs

Jeremy Milk, Head of Product Marketing

Inspired: How to Create Tech Products Customers Love by Marty Cagan

“Inspired” presents a thoughtful deep dive and actionable steps for how anyone and everyone within an organization can operate to better serve customers with ever better products and services. The book was written in 2018 (I think) but remains a go-to for the customer-obsessed among us.

Andy Klein, Principal Cloud Storage Storyteller

Chaos: Making a New Science by James Gleick

“Chaos” was printed back in 1987, but is still available on Amazon and some bookstores. Why is this my choice? I read the book hoping to understand the burgeoning field of chaos theory, the science of seeing patterns and order in the randomness of the everyday world we live in. The book was amazingly readable. The author takes a subject that could easily be three hundred pages of math, science, and history, swirling down a rabbit hole, and keeps the book approachable and within the grasp of the audience. It won’t change your world, but you’ll look at many things a little differently.

Yev Pusin, Computer Backup Steward

The 7 ½ Deaths of Evelyn Hardcastle by Stuart Turton

One of my favorite books of the last few years. This period piece murder mystery takes place in a Victorian house and from the perspectives of various house party guests. No spoilers!

Gideon The Ninth by Tamsyn Muir

This series is all the rage in a lot of different circles. If you’re interested in space, necromancy, or mysteries (who isn’t)—this one’s for you!

Kari Rivas, Product Marketing Manager

The Seven Husbands of Evelyn Hugo by Taylor Jenkins Reid

I have not yet read a book by Taylor Jenkins Reid that I haven’t loved, but this one is top of the list for 2022. In “Seven Husbands,” Reid paints a picture of a complex and not immediately likable character living a fascinating life. Each chapter (read: husband) of Evelyn’s life marks a point in Evelyn’s evolution from ambitious starlet to mature grande dame who can (nearly) accept herself as she is. Modern themes of how we define family, love, and relationships intersect with this tale of old Hollywood.

Nicole Gale, Marketing Operations Manager

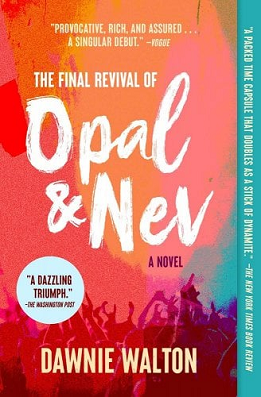
The Final Revival of Opal & Nev by Dawnie Walton

For your friend patiently waiting for the TV adaptation of Taylor Jenkins Jones’ “Daisy Jones and the Six,” the book “The Final Revival of Opal & Nev” by Dawnie Walton is also based on faux music history and is, dare I say, even better. Follow Opal Jewel and Nev Charles, an Afropunk rock ’n’ roll duo who find fame and notoriety in the 1970’s after a tragic incident at a concert in 1973. The band splits, but a reunion concert is planned in 2026—which is when S. Sunny Shelton, a music editor at Aural Magazine, takes the chance to record interviews with the duo and those connected to them.

Lessons in Chemistry by Bonnie Garmus

This book is perfect for anyone in your life that is looking for a book they will read and re-read again. This book is a historical fiction book about Elizabeth Zott who only ever wanted to be a scientist—but because she’s a woman in the 1960s, she has to go begging for beakers despite being the smartest researcher in the building. After reading 50 books this year, this one is by far my favorite, and I still quote Elizabeth Zott in my head. I love her (and her dog 6:30), and you will too.

Caitlin Bryson, Marketing Events Manager

This is How You Lose the Time War by Amal El-Mohtar and Max Gladstone

Two time-traveling spies on opposite sides of a multiverse-spanning war make contact and begin to write letters to each other across time and space. Time travel, suspense, romance, and absolutely GORGEOUS writing—what more could you ask for?

Pat Patterson, Chief Technical Evangelist

Saga of the Swamp Thing by Alan Moore

Alan Moore and Dave Gibbons’s graphic novel “Watchmen” was a phenomenon, from its publication in the late 80s to the 2009 movie and 2019 spin-off TV series. I’d like to direct your attention, though, to Moore’s earlier work, specifically on the DC title, “Saga of the Swamp Thing,” available as a series of six trade paperbacks collecting over 40 issues of the monthly comic, originally published between 1984 and 1987. Nearly 40 years on, the story of the Swamp Thing’s discovery of his true nature and role in DC’s supernatural universe has lost none of its power. Not at all a kid’s comic book, Moore’s “Swamp Thing” paved the way for later generations of visual storytelling aimed at a mature audience.

Stephanie Doyle, Associate Editor and Writer

Cost of Living by Emily Maloney

I’m not usually one for memoirs; oftentimes they seem self-serving, or not relevant to larger stories. “Cost of Living” is very much the opposite of that. This book ruminates on the cost of medical debt in America from the perspective of someone struggling with it—while simultaneously working as a medical assistant and medical biller. It also touches on the variability in quality of mental health treatment, overmedication, the opioid epidemic, crazy families, and much more. Bonus: It’s a collection of essays, so you can digest it in big or small doses (if you’ll pardon the pun).

Patrick Thomas, Head of Publishing

All the World by Liz Garton Scanlon

It turns out, when you have kids, you don’t read less, you just read a lot of the same books over and over again by popular demand of your child. During some stretches, my two year old and I read the same books 40 or 50 times in a single week. I’ve learned, quickly, to guide her toward books with beautiful sentences, because if I don’t I’ll be forced to suffer through the bad ones again and again…. and again. I’ll never tire of the sentences in this little beauty, though—and the illustrations are endlessly engaging for young eyes. “All the World” is a must have for parents. But I’ll warn you, it’s going to make you cry fairly regularly.

Molly Clancy, Senior Content Editor

Bad Manners: The Official Cookbook

Do you need some more gosh dang vegetables in your life? Ever thought about giving an ever lovin’ vegan diet a try? This is the cookbook for you. Even if you’re just doing Meatless Mondays, you could always use a couple of freakin’ tasty vegan recipes, and this cookbook delivers those in spades. I’m a big fan of the coconut lime rice with red beans and mango. Holy shish kebabs, that’s good.

Happy Reading from Backblaze

Hopefully this book list sparks some inspiration for your holiday shopping list or your own 2023 reading list. What are you planning to read next year? Let us know in the comments.

The post Bookblaze: First Annual Backblaze Book Guide appeared first on Backblaze Blog | Cloud Storage & Cloud Backup.

Migrate a large data warehouse from Greenplum to Amazon Redshift using AWS SCT – Part 3

Post Syndicated from Jon Roberts original https://aws.amazon.com/blogs/big-data/part-3-migrate-a-large-data-warehouse-from-greenplum-to-amazon-redshift-using-aws-sct/

In this third post of a multi-part series, we explore some of the edge cases in migrating a large data warehouse from Greenplum to Amazon Redshift using AWS Schema Conversion Tool (AWS SCT) and how to handle these challenges. Challenges include how best to use virtual partitioning, edge cases for numeric and character fields, and arrays.

You can check out the first post of this series for guidance on planning, running, and validating the migration. You can also check out the second post for best practices for choosing the optimal Amazon Redshift cluster, data architecture, converting stored procedures, compatible functions and queries widely used for SQL conversions, and recommendations for optimizing the length of data types for table columns.

Unbounded character data type

Greenplum supports creating columns as text and varchar without specifying the length of the field. This works without an issue in Greenplum but doesn’t work well in migrating to Amazon Redshift. Amazon Redshift stores data in columnar format and gets better compression when using shorter column lengths. Therefore, the Amazon Redshift best practice is to use the smallest character length possible.

AWS SCT will convert these unbounded fields as large objects (LOBs) instead of treating the columns as character fields with a specified length. LOBs are implemented differently in each database product on the market, but in general, a LOB is not stored with the rest of the table data. Instead, there is a pointer to the location of the data. When the LOB is queried, the database reconstitutes the data automatically for you, but this typically requires more resources.

Amazon Redshift doesn’t support LOBs, so AWS SCT resolves this by loading the data into Amazon Simple Storage Service (Amazon S3) and in the column, it stores the S3 URL. When you need to retrieve this data, you have to query the table, get the S3 URL, and then fetch the data from Amazon S3. This isn’t ideal because most of the time, the actual maximum length of the field doesn’t require it to be treated as a LOB, and storing the data remotely means it will take much longer to fetch the data for queries.

The current resolution is to calculate the maximum length of these columns and update the Greenplum tables before converting to Amazon Redshift with AWS SCT.

Note that in a future release of AWS SCT, the collection of statistics will include calculating the maximum length for each column, and the conversion of unbounded varchar and text will set the length in Amazon Redshift automatically.

The following code is an example of an unbounded character data type:

CREATE TABLE public.mytable 
(description1 text NOT NULL PRIMARY KEY, description2 varchar);
CREATE INDEX ON public.mytable (description2);

This table uses a primary key column on an unbounded text column. This needs to be converted to varchar(n), where n is the maximum length found in this column.

  1. Drop unique constraints on affected columns:
    ALTER TABLE public.mytable DROP CONSTRAINT mytable_pkey;

  2. Drop indexes on affected columns:
    DROP INDEX public.mytable_description2_idx;

  3. Calculate maximum length of affected columns:
    select coalesce(max(length(description1)), 10),
    coalesce(max(length(description2)), 10) 
    from public.mytable;

Note that in this example, the description1 and description2 columns only contain NULL values, or the table doesn’t have any data in it, or the calculated length of the columns is 10.

  1. Alter the length of the affected columns:
    ALTER TABLE public.mytable ALTER COLUMN description1 TYPE varchar(10);
    ALTER TABLE public.mytable ALTER COLUMN description2 TYPE varchar(10);

You can now proceed with using AWS SCT to convert the Greenplum schema to Amazon Redshift and avoiding using LOBs to store the column values.

GitHub help

If you have many tables to update and want an automated solution, you can use the add_varchar_lengths.sh script found in the GitHub repo to fix all of the unbounded varchar and text columns in a given schema in Greenplum. The script calculates the appropriate maximum length and then alters the Greenplum tables so the varchar data type is bounded by a length.

Please note that the script also will drop any constraints or indexes on the affected columns.

Empty character data

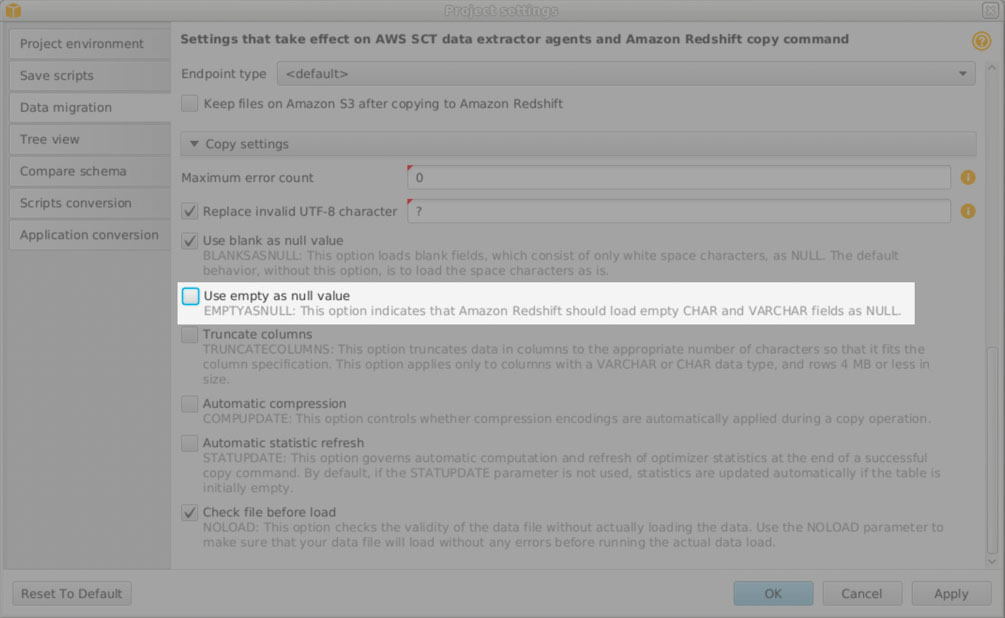
Greenplum and Amazon Redshift support an empty string value in a field that is different from NULL. The behavior is the same between the two databases. However, AWS SCT defaults to convert empty strings to NULL. This simply needs to be disabled to avoid problems.

  1. In AWS SCT, open your project, choose Settings, Project settings, and Data migration.
  2. Scroll to the bottom and find Use empty as null value.
  3. Deselect this so that AWS SCT doesn’t convert empty strings to NULL.

NaN and Infinity numeric data type

Greenplum supports NaN and Infinity in a numeric field to represent an undefined calculation result and infinity. NaN is very uncommon because when using aggregate functions on a column with a NaN row, the result will also be NaN. Infinity is also uncommon and not useful when aggregating data. However, you may encounter these values in a Greenplum database.

Amazon Redshift doesn’t support NaN and Infinity, and AWS SCT doesn’t check for this in your data. If you do encounter this when using AWS SCT, the task will fail with a numeric conversion error.

To resolve this, it’s suggested to use NULL instead of NaN and Infinity. This allows you to aggregate data and get results other than NaN and, importantly, allow you to convert the Greenplum data to Amazon Redshift.

The following code is an example NaN numeric value:

CREATE TABLE public.mytable2 (id int NOT NULL, amount numeric NOT NULL);
INSERT INTO public.mytable2 VALUES (1, 10), (2, 'NaN'), (3, 20);
  1. Drop the NOT NULL constraint:
    ALTER TABLE public.mytable2 ALTER COLUMN amount DROP NOT NULL;

  2. Update the table:
    UPDATE public.mytable2 SET amount = NULL where amount = 'NaN';

You can now proceed with using AWS SCT to migrate the Greenplum data to Amazon Redshift.

Note that in a future release of AWS SCT, there will be an option to convert NaN and Infinity to NULL so that you won’t have to update your Greenplum data to migrate to Amazon Redshift.

Virtual partitioning on GP_SEGMENT_ID

For large tables, it’s recommended to use virtual partitioning to extract data from Greenplum. Without virtual partitioning, AWS SCT will run a single query to unload data from Greenplum. For example:

SELECT * FROM store_sales;

If this table is very large, it will take a long time to extract the data because this is a single process querying the data. With virtual partitioning, multiple queries are run in parallel so that the extraction of data is completed faster. It also makes it easier to recover if there is an issue with the task.

Virtual partitioning is very flexible, but a simple way to do this in Amazon Redshift is to utilize the Greenplum hidden column gp_segment_id. This column identifies which segment in Greenplum has the data, and each segment should have an equal number of rows. Therefore, creating partitions for each gp_segment_id is an easy way to implement virtual partitioning.

If you’re not familiar with the term segment, it’s similar to an Amazon Redshift slice.

For example:

SELECT * FROM store_sales WHERE gp_segment_id = 0;
SELECT * FROM store_sales WHERE gp_segment_id = 1;
SELECT * FROM store_sales WHERE gp_segment_id = 2;
...
  1. First, determine the number of segments in Greenplum:
    SELECT count(*) 
    FROM gp_segment_configuration 
    WHERE content >= 0 AND preferred_role = 'p';

Now you can configure AWS SCT.

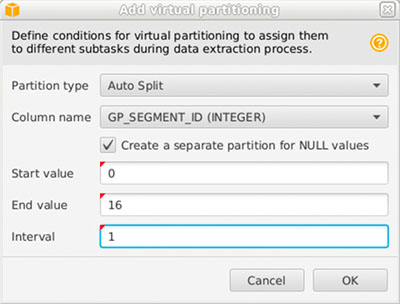
  1. In AWS SCT, go to Data Migration view (other) and choose (right-click) a large table.
  2. Scroll down to Add virtual partitioning.
  3. For the partition type, choose Auto Split and change the column name to GP_SEGMENT_ID.
  4. Use 0 for Start value, the number of segments found in Step 1 as End value, and Interval of 1.

When you create a local task to load this table, the task will have a sub-task for each gp_segment_id value.

Note that in a future release of AWS SCT, there will be an option to automatically virtually partition tables based on GP_SEGMENT_ID. This option will also retrieve the number of segments automatically.

Arrays

Greenplum supports arrays such as bigint[] that are unbounded. Typically, arrays are kept relatively small in Greenplum because arrays consume more memory in Greenplum than using an alternative strategy. However, it’s possible to have a very large array in Greenplum that isn’t supported by Amazon Redshift.

AWS SCT converts a Greenplum array to varchar(65535), but if the converted array is longer than 65,535 characters, then the load will fail.

The following code is an example of a large array:

CREATE TABLE public.sales 
(sales_id int NOT NULL,
customer_id int NOT NULL,
sales_item_ids bigint[]) 
DISTRIBUTED BY (sales_id);

INSERT INTO public.sales values (1, 100, '{1,2,3}'), (2, 100, '{1,2,3}');

In this example, the sales items are stored in an array for each sales_id. If you encounter an error while loading that the length is too long to load this data into Amazon Redshift with AWS SCT, then this is the solution. It’s also a more efficient pattern to store data in both Greenplum and Amazon Redshift!

  1. Create a new sales table that has all columns from the existing sales table, but exclude the array column:
    CREATE TABLE public.sales_new 
    (sales_id int NOT NULL,
    customer_id int NOT NULL) 
    DISTRIBUTED BY (sales_id);

  2. Populate the new sales table with the existing data except for the array column:
    INSERT INTO public.sales_new (sales_id, customer_id) 
    SELECT sales_id, customer_id FROM public.sales;

We create a new table that is a cross-reference of sales IDs with the sales items. Instead of having a single row for this association, now there will be a row for each relationship.

  1. Create a new sales item table:
    CREATE TABLE public.sales_items 
    (sales_id int NOT NULL, 
    sales_item_id bigint NOT NULL) 
    DISTRIBUTED BY (sales_id);

  2. To unnest the array, create a row for each array element:
    INSERT INTO public.sales_items 
    (sales_id, sales_item_id) 
    SELECT sales_id, unnest(sales_item_ids) 
    FROM public.sales;

  3. Rename the sales tables:
    ALTER TABLE public.sales RENAME TO sales_old;
    ALTER TABLE public.sales_new RENAME TO sales;

In AWS SCT, refresh the tables and migrate the revised sales and the new sales_items table.

The following are some example queries before and after.

Before:

SELECT s.sales_id, unnest(s.sales_item_ids) 
FROM public.sales s 
WHERE s.sales_id = 1;

After:

SELECT s.sales_id, i.sales_item_id 
FROM public.sales s 
JOIN public.sales_items i ON s.sales_id = i.sales_id 
WHERE s.sales_id = 1;

Before:

SELECT s.sales_id 
FROM public.sales s 
WHERE s.customer_id = 100
AND 10 = ANY(s.sales_item_ids);

After:

SELECT s.sales_id
FROM public.sales s 
JOIN public.sales_items i ON s.sales_id = i.sales_id 
WHERE s.customer_id = 100
AND i.sales_item_id = 10;

VACUUM ANALYZE

Greenplum, like Amazon Redshift, supports the VACUUM command, which reclaims storage space after UPDATE and DELETE commands are run on a table. Greenplum also allows you to add the ANALYZE option to run both statements with a single command.

The following code is the Greenplum command:

VACUUM ANALYZE table;

This is not very common, but you’ll see this from time to time. If you’re just inserting data into a table, there is no need to run VACUUM, but for ease of use, sometimes developers will use VACUUM ANALYZE.

The following are the Amazon Redshift commands:

VACUUM table;
ANALYZE table;

Amazon Redshift doesn’t support adding ANALYZE to the VACUUM command, so instead, this needs to be two different statements. Also note that Amazon Redshift performs VACUUM and ANALYZE automatically for you so in most cases, you can remove these commands from your scripts entirely.

DISTINCT ON query

Greenplum supports an unusual shortcut for eliminating duplicates in a table. This feature keeps the first row for each set of rows based on the order of the data being fetched. It’s easiest to understand by looking at an example:

CREATE TABLE customer 
(customer_name varchar(100) not null, 
customer_address varchar(1000) not null, 
lastupdate timestamp not null);

INSERT INTO customer VALUES
('ACME', '123 Main St', '2022-01-01'), 
('ACME', '456 Market St', '2022-05-01'), 
('ACME', '789 Broadway', '2022-08-01');

SELECT DISTINCT ON (customer_name) customer_name, customer_address 
FROM customer 
ORDER BY customer_name, lastupdate DESC;

We get the following results:

customer_name | customer_address 
---------------+------------------
 ACME          | 789 Broadway

The solution for running this in Amazon Redshift is to use the ANSI standard row_number() analytical function, as shown in the following code:

SELECT sub.customer_name, sub.customer_address 
FROM (SELECT customer_name, customer_address, row_number() over (partition by customer_name ORDER BY lastupdate DESC) AS row_number FROM customer) AS sub 
WHERE sub.row_number = 1;

Clean up

The examples in this post create tables in Greenplum. To remove these example tables, run the following commands:

DROP TABLE IF EXISTS public.mytable;
DROP TABLE IF EXISTS public.mytable2;
DROP TABLE IF EXISTS public.sales;
DROP TABLE IF EXISTS public.sales_new;
DROP TABLE IF EXISTS public.sales_items;
DROP TABLE IF EXISTS public.customer;

Conclusion

In this post, we covered some of the edge cases when migrating Greenplum to Amazon Redshift and how to handle these challenges, including easy virtual partitioning, edge cases for numeric and character fields, and arrays. This is not an exhaustive list of migrating Greenplum to Amazon Redshift, but this series should help you navigate modernizing your data platform by moving to Amazon Redshift.

For additional details, see the Amazon Redshift Getting Started Guide and the AWS SCT User Guide.


About the Authors

Jon Roberts is a Sr. Analytics Specialist based out of Nashville, specializing in Amazon Redshift. He has over 27 years of experience working in relational databases. In his spare time, he runs.

Nelly Susanto is a Senior Database Migration Specialist of AWS Database Migration Accelerator. She has over 10 years of technical experience focusing on migrating and replicating databases along with data warehouse workloads. She is passionate about helping customers in their cloud journey.

Suresh Patnam is a Principal BDM – GTM AI/ML Leader at AWS. He works with customers to build IT strategy, making digital transformation through the cloud more accessible by leveraging Data & AI/ML. In his spare time, Suresh enjoys playing tennis and spending time with his family.

Build an AWS Lake Formation permissions inventory dashboard using AWS Glue and Amazon QuickSight

Post Syndicated from Srividya Parthasarathy original https://aws.amazon.com/blogs/big-data/build-an-aws-lake-formation-permissions-inventory-dashboard-using-aws-glue-and-amazon-quicksight/

AWS Lake Formation is an integrated data lake service that makes it easy for you to ingest, clean, catalog, transform, and secure your data and make it available for analysis and machine learning (ML). Lake Formation provides a single place to define fine-grained access control on catalog resources. These permissions are granted to the principals by a data lake admin, and integrated engines like Amazon Athena, AWS Glue, Amazon EMR, and Amazon Redshift Spectrum enforce the access controls defined in Lake Formation. It also allows principals to securely share data catalog resources across multiple AWS accounts and AWS organizations through a centralized approach.

As organizations are adopting Lake Formation for scaling their permissions, there is steady increase in the access policies established and managed within the enterprise. However, it becomes more difficult to analyze and understand the permissions for auditing. Therefore, customers are looking for a simple way to collect, analyze, and visualize permissions data so that they can inspect and validate the policies. It also enables organizations to take actions that help them with compliance requirements.

This solution offers the ability to consolidate and create a central inventory of Lake Formation permissions that are registered in the given AWS account and Region. It provides a high-level view of various permissions that Lake Formation manages and aims at answering questions like:

  • Who has select access on given table
  • Which tables have delete permission granted
  • Which databases or tables does the given principal have select access to

In this post, we walk through how to set up and collect the permissions granted on resources in a given account using the Lake Formation API. AWS Glue makes it straightforward to set up and run jobs for collecting the permission data and creating an external table on the collected data. We use Amazon QuickSight to create a permissions dashboard using an Athena data source and dataset.

Overview of solution

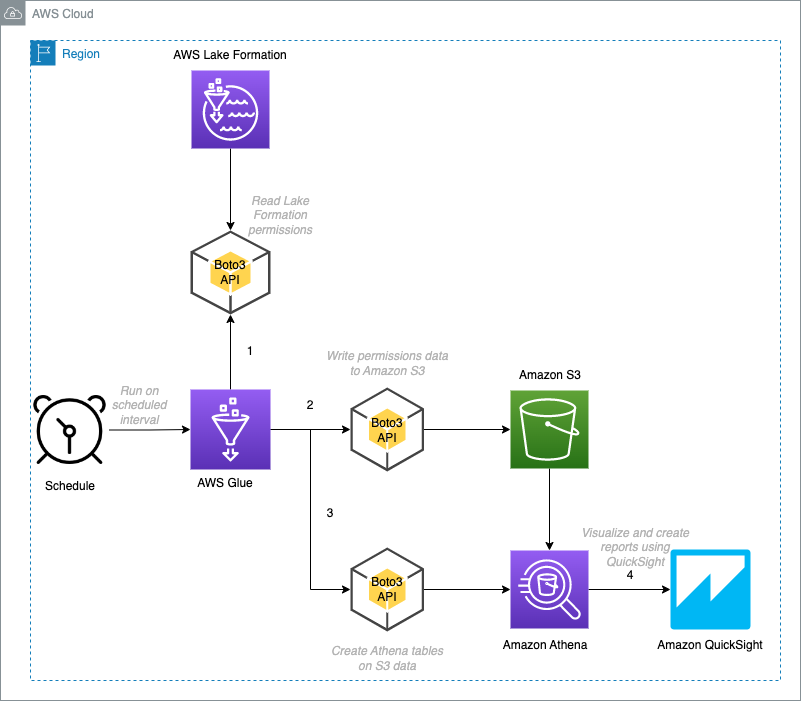
The following diagram illustrates the architecture of this solution.

In this solution, we walk through the following tasks:

  1. Create an AWS Glue job to collect and store permissions data, and create external tables using Boto3.
  2. Verify the external tables created using Athena.
  3. Sign up for a QuickSight Enterprise account and enable Athena access.
  4. Create a dataset using an Athena data source.
  5. Use the datasets for analysis.
  6. Publish the analyses as a QuickSight dashboard.

The collected JSON data is flattened and written into an Amazon Simple Storage Service (Amazon S3) bucket as Parquet files partitioned by account ID, date, and resource type. After the data is stored in Amazon S3, external tables are created on them and filters are added for different types of resource permissions. These datasets can be imported into SPICE, an in-memory query engine that is part of QuickSight, or queried directly from QuickSight to create analyses. Later, you can publish these analyses as a dashboard and share it with other users.

Dashboards are created for the following use cases:

  • Database permissions
  • Table permissions
  • Principal permissions

Prerequisites

You should have the following prerequisites:

  • An S3 bucket to store the permissions inventory data
  • An AWS Glue database for permissions inventory metadata
  • An AWS Identity and Access Management (IAM) role for the AWS Glue job with access to the inventory AWS Glue database and S3 bucket and added as a data lake admin
  • A QuickSight account with access to Athena
  • An IAM role for QuickSight with access to the inventory AWS Glue database and S3 bucket

Set up and run the AWS Glue job

We create an AWS Glue job to collect Lake Formation permissions data for the given account and Region that is provided as job parameters, and the collected data is flattened before storage. Data is partitioned by account ID, date, and permissions type, and is stored as Parquet in an S3 bucket using Boto3. We create external tables on the data and add filters for different types of resource permissions.

To create the AWS Glue job, complete the following steps:

  1. Download the Python script file to local.
  2. On the AWS Glue console, under Data Integration and ETL in the navigation pane, choose Jobs.
  3. Under Create job, select Python Shell script editor.
  4. For Options, select Upload and edit an existing script.
  5. For File upload, choose Choose file.
  6. Choose the downloaded file (lf-permissions-inventory.py).
  7. Choose Create.

GlueJob

  1. After the job is created, enter a name for the job (for this post, lf-inventory-builder) and choose Save.

Glue Job save

  1. Choose the Job details tab.
  2. For Name, enter a name for the job.
  3. For IAM Role¸ choose an IAM role that has access to the inventory S3 bucket and inventory schema and registered as data lake admin.
  4. For Type, choose Python Shell.
  5. For Python version, choose Python 3.9.

Glue Job Details

  1. You can leave other property values at their default.
  2. Under Advanced properties¸ configure the following job parameters and values:
    1. catalog-id: with the value as the current AWS account ID whose permissions data are collected.
    2. databasename: with the value as the AWS Glue database where the inventory-related schema objects are created.
    3. region: with the value as the current Region where the job is configured and whose permissions data is collected.
    4. s3bucket: with the value as the S3 bucket where the collected permissions data is written.
    5. createtable: with the value yes, which enables external table creation on the data.

Job Parameters

  1. Choose Save to save the job settings.

Glue Job Save

  1. Choose Run to start the job.

When the job is complete, the run status changes to Succeeded. You can view the log messages in Amazon CloudWatch Logs.

Job Run

Permissions data is collected and stored in the S3 bucket (under lfpermissions-data) that you provided in the job parameters.

S3 Structure

The following external tables are created on the permissions data and can be queried using Athena:

  • lfpermissions – A summary of resource permissions
  • lfpermissionswithgrant – A summary of grantable resource permissions

For both tables, the schema structure is the same and the lftype column indicates what type of permissions the row applies to.

Athena Table Schema

Verify the tables using Athena

You can use Athena to verify the data using the following queries.

For more information, refer to Running SQL queries using Amazon Athena

  • List the database permissions:
Select * from lfpermissions where lftype=’DATABASE’
  • List the table permissions:
Select * from lfpermissions where lftype= ‘TABLE’
  • List the data lake permissions:
Select * from lfpermissions where lftype= ‘DATA_LOCATION’
  • List the grantable database permissions:
Select * from lfpermissionswithgrant where lftype=’DATABASE’
  • List the grantable table permissions:
Select * from lfpermissionswithgrant where lftype= ‘TABLE’
  • List grantable data lake permissions:
Select * from lfpermissionswithgrant where lftype= ‘DATA_LOCATION’

As the next step, we create a QuickSight dashboard with three sheets, each focused on different sets of permissions (database, table, principal) to slice and dice the data.

Sign up for a QuickSight account

If you haven’t signed up for QuickSight, complete the following steps:

  1. Sign in to the AWS Management Console as Admin, search for QuickSight and choose Sign up for QuickSight.

QuickSight signup

  1. For Edition, select Enterprise.
  2. Choose Continue.
  3. For Authentication method, select Use IAM federated identities & QuickSight-managed users.
  4. Under QuickSight Region, choose the same Region as your inventory S3 bucket.
  5. Under Account info, enter a QuickSight account name and email address for notification.

QuickSight Form

  1. In the Quick access to AWS services section, for IAM Role, select Use QuickSight-managed role (default).
  2. Allow access to IAM, Athena, and Amazon S3.
  3. Specify the S3 bucket that contains the permissions data.
  4. Choose Finish to complete the signup process.

QuickSight configuration

Note: If the inventory bucket and database is managed by Lake Formation, grant database and table access to the created QuickSight IAM role. For instructions, refer to Granting and revoking permissions on Data Catalog resources.

Configure your dataset in QuickSight

QuickSight is configured with an Athena data source the same Region as the S3 bucket. To set up your dataset, complete the following steps:

  1. On the QuickSight console, choose Datasets in the navigation pane.
  2. Choose New dataset.

Quicksight DataSet

  1. Choose Athena as your data source.

QuickSight Datasource

  1. Enter LF_DASHBOARD_DS as the name of your data source.
  2. Choose Create data source.
  3. For Catalog, leave it as AwsDataCatalog.
  4. For Database, choose database name provided as parameter to the Job.
  5. For Tables, select lfpermissions.
  6. Choose Select.

QuickSight Catalog Info

  1. Select Directly query your data and choose Visualize to take you to the analysis.

Quicksight data mode

Create analyses

We create three sheets for our dashboard to view different levels of permissions.

Sheet 1: Database permission view

To view database permissions, complete the following steps:

  1. On the QuickSight console, choose the plus sign to create a new sheet.
  2. Choose Add, then choose Add title.

QuickSight Title

  1. Name the sheet Database Permissions.
  2. Repeat steps (5-7) to add the following parameters:
    • catalogid
    • databasename
    • permission
    • tablename
  3. On the Add menu, choose Add parameter.
  4. Enter a name for the parameter.
  5. Leave the other values as default and choose Create.
  6. Choose Insights in the navigation pane, then choose Add control.

QuickSight Control

  1. Add a control for each parameter:
    1. For each parameter, for Style¸ choose List, and for Values, select Link to a dataset field.
      QuickSight Dependency
    2. Provide additional information for each parameter according to the following table.
Parameter Display Name Dataset Field
catalogid AccountID lfpermissions catalog_id
databasename DatabaseName lfpermissions databasename
permission Permission lfpermissions permission
  1. Add a control dependency and for Database, choose the options menu and choose Edit.

QuickSight Dependency

  1. Under Format control, choose Control options.
  2. Change the relevant values, choose AccountID, and choose Update.
  3. Similarly, under Permission control, choose Control options.
  4. Change the relevant values, choose AccountID, and choose Update.

We create two visuals for this view.

  1. For the first visual, choose Visualize and choose pivot table as the visual type.
  2. Drag and drop catalog_id and databasename into Rows.
  3. Drag and drop permission into Column.
  4. Drag and drop principal into Values and change the aggregation to Count distinct.

QuickSight Database View1

  1. Add a filter on the lftype field with the following options:
    1. Custom filter as the filter type.
    2. Equals as the filter condition.
    3. DATABASE as the value.
  2. Add a filter on catalog_id the following options:
    1. Custom filter as the filter type.
    2. Equals as the filter condition.
    3. Select Use parameters and choose catalogid.
  3. Add a filter on databasename with the following options:
    1. Custom filter as the filter type.
    2. Equals as the filter condition.
    3. Select Use parameters and choose databasename.
  4. Add a filter on permission with the following options:
    1. Custom filter as the filter type.
    2. Equals as the filter condition.
    3. Select Use parameters and choose permission.
  5. Choose Actions in the navigation pane.
  6. Define a new action with the following parameters:
    1. For Activation, select Select.
    2. For Filter action, select All fields.
    3. For Target visuals, select Select visuals and Check principal.

Now we add our second visual.

  1. Add a second visual and choose the table visual type.
  2. Drag and drop principal to Group by.
  3. Add a filter on the lftype field with the following options:
    1. Custom filter as the filter type.
    2. Equals as the filter condition.
    3. DATABASE as the value.
  4. Add a filter on catalog_id the following options:
    1. Custom filter as the filter type.
    2. Equals as the filter condition.
    3. Select Use parameters and choose catalogid.
  5. Add a filter on databasename the following options:
    1. Custom filter as the filter type.
    2. Equals as the filter condition.
    3. Select Use parameters and choose databasename.
  6. Add a filter on permission with the following options:
    1. Custom filter as the filter type.
    2. Equals as the filter condition.
    3. Select Use parameters and choose permission.

Now the Database and Permission drop-down menus are populated based on the relevant attributes and changes dynamically.

QuickSight Database View2

Sheet 2: Table permission view

Now that we have created the database permissions sheet, we can add a table permissions sheet.

  1. Choose the plus sign to add a new sheet.
  2. On the QuickSight console, choose Add, then choose Add title.
  3. Name the sheet Table Permissions.
  4. Choose Insights in the navigation pane, then choose Add control.
  5. Add a control for each parameter:
    1. For each parameter, for Style¸ choose List, and for Values, select Link to a dataset field.
    2. Provide the additional information for each parameter according to the following table.
Parameter Display Name Dataset Field
catalogid AccountID lfpermissions catalog_id
databasename DatabaseName lfpermissions databasename
permission Permission lfpermissions permission
tablename TableName lfpermissions tablename

We create two visuals for this view.

  1. For the first visual, choose Visualize and choose pivot table as the visual type.
  2. Drag and drop catalog_id, databasename, and tablename into Rows.
  3. Drag and drop permission into Column.
  4. Drag and drop principal into Values and change the aggregation to Count distinct.
  5. Add a filter on the lftype field with the following options:
    1. Custom filter as the filter type.
    2. Equals as the filter condition.
    3. TABLE as the value.
  6. Add a filter on catalog_id the following options:
    1. Custom filter as the filter type.
    2. Equals as the filter condition.
    3. Select Use parameters and choose catalogid.
  7. Add a filter on the databasename with the following options:
    1. Custom filter as the filter type.
    2. Equals as the filter condition.
    3. Select Use parameters and choose databasename.
  8. Add a filter on tablename with the following options:
    1. Custom filter as the filter type.
    2. Equals as the filter condition.
    3. Select Use parameters and choose tablename.
  9. Add a filter on permission with the following options:
    1. Custom filter as the filter type.
    2. Equals as the filter condition.
    3. Select Use parameters and choose permission.
  10. Choose Actions in the navigation pane.
  11. Define a new action with the following parameters:
    1. For Activation, select Select.
    2. For Filter action, select All fields.
    3. For Target visuals, select Select visuals and Check principal.

Now we add our second visual.

  1. Add a second visual and choose the table visual type.
  2. Drag and drop principal to Group by.
  3. Add a filter on the lftype field with the following options:
    1. Custom filter as the filter type.
    2. Equals as the filter condition.
    3. TABLE as the value.
  4. Add a filter on catalog_id the following options:
    1. Custom filter as the filter type.
    2. Equals as the filter condition.
    3. Select Use parameters and choose catalogid.
  5. Add a filter on the databasename with the following options:
    1. Custom filter as the filter type.
    2. Equals as the filter condition.
    3. Select Use parameters and choose databasename.
  6. Add a filter on tablename with the following options:
    1. Custom filter as the filter type.
    2. Equals as the filter condition.
    3. Select Use parameters and choose tablename.
  7. Add a filter on permission with the following options:
    1. Custom filter as the filter type.
    2. Equals as the filter condition.
    3. Select Use parameters and choose permission.

Now the Databasename, Tablename, and Permission drop-down menus are populated based on the relevant attributes.

QuickSight Table Permissions

Sheet 3: Principal permission view

Now we add a third sheet for principal permissions.

  1. Choose the plus sign to add a new sheet.
  2. On the QuickSight console, choose Add, then choose Add title.
  3. Name the sheet Principal Permissions.
  4. Choose Insights in the navigation pane, then choose Add control.
  5. Add a control for the catalogid parameter:
    1. For Style¸ choose List, and for Values, select Link to a dataset field.
    2. Provide the additional information for the parameter according to the following table.
Parameter Display Name Dataset Field
catalogid AccountID lfpermissions catalog_id

We create four visuals for this view.

  1. For the first visual, choose Visualize and choose pivot table as the visual type.
  2. Drag and drop catalog_id and principal into Rows.
  3. Drag and drop permission into Column.
  4. Drag and drop databasename into Values and change the aggregation to Count distinct.
  5. Add a filter on the lftype field with the following options:
    1. Custom filter as the filter type.
    2. Equals as the filter condition.
    3. DATABASE as the value.
  6. Add a filter on the catalog_id field with the following options:
    1. Custom filter as the filter type.
    2. Equals as the filter condition.
    3. Select Use parameters and choose catalogid.
  7. Choose Actions in the navigation pane.
  8. Define a new action with the following parameters:
    1. For Activation, select Select.
    2. For Filter action, select All fields.
    3. For Target visuals, select Select visuals and Check Databasename.
  9. For the second visual, choose Visualize and choose table as the visual type.
  10. Drag and drop databasename into Group by.
  11. Add a filter on the lftype field with the following options:
    1. Custom filter as the filter type.
    2. Equals as the filter condition.
    3. DATABASE as the value.
  12. Add a filter on the catalog_id field with the following options:
    1. Custom filter as the filter type.
    2. Equals as the filter condition.
    3. Select Use parameters and choose catalogid.
  13. For the third visual, choose Visualize and choose pivot table as the visual type.
  14. Drag and drop catalog_id and principal into Rows.
  15. Drag and drop permission into Column.
  16. Drag and drop tablename into Values and change the aggregation to Count distinct.
  17. Add a filter on the lftype field with the following options:
    1. Custom filter as the filter type.
    2. Equals as the filter condition.
    3. TABLE as the value.
  18. Add a filter on the catalog_id field with the following options:
    1. Custom filter as the filter type.
    2. Equals as the filter condition.
    3. Select Use parameters and choose catalogid.
  19. Choose Actions in the navigation pane.
  20. Define a new action with the following parameters:
    1. For Activation, select Select.
    2. For Filter action, select All fields.
    3. For Target visuals, select Select visuals and Check Tablename.
  21. For the final visual, choose Visualize and choose table as the visual type.
  22. Drag and drop tablename into Group by.
  23. Add a filter on the lftype field with the following options:
    1. Custom filter as the filter type.
    2. Equals as the filter condition.
    3. TABLE as the value.
  24. Add a filter on the catalog_id field with the following options:
    1. Custom filter as the filter type.
    2. Equals as the filter condition.
    3. Select Use parameters and choose catalogid.

The following screenshot shows our sheet.

QuickSight Prinicipal View

Create a dashboard

Now that the analysis is ready, you can publish it as a dashboard and share it with other users. For instructions, refer to the tutorial Create an Amazon QuickSight dashboard.

Clean up

To clean up the resources created in this post, complete the following steps:

  1. Delete the AWS Glue job lf-inventory-builder.
  2. Delete the data stored under the bucket provided as the value of the s3bucket job parameter.
  3. Drop the external tables created under the schema provided as the value of the databasename job parameter.
  4. If you signed up for QuickSight to follow along with this post, you can delete the account.
  5. For an existing QuickSight account, delete the following resources:
    1. lfpermissions dataset
    2. lfpermissions analysis
    3. lfpermissions dashboard

Conclusion

In this post, we provided a design and implementation steps for a solution to collect Lake Formation permissions in a given Region of an account and consolidate them for analysis. We also walked through the steps to create a dashboard using Amazon QuickSight. You can utilize other QuickSight visuals to create more sophisticated dashboards based on your requirements.

You can also expand this solution to consolidate permissions for a multi-account setup. You can use a shared bucket across organizations and accounts and configure an AWS Glue job in each account or organization to write their permission data. With this solution, you can maintain a unified dashboard view of all the Lake Formation permissions within your organization, thereby providing a central audit mechanism to comply with business requirements.

Thanks for reading this post! If you have any comments or questions, please don’t hesitate to leave them in the comments section.


About the Author

Srividya Parthasarathy is a Senior Big Data Architect on the AWS Lake Formation team. She enjoys building analytics and data mesh solutions on AWS and sharing them with the community.

How to use Amazon Verified Permissions for authorization

Post Syndicated from Jeremy Ware original https://aws.amazon.com/blogs/security/how-to-use-amazon-verified-permissions-for-authorization/

Applications with multiple users and shared data require permissions management. The permissions describe what each user of an application is permitted to do. Permissions are defined as allow or deny decisions for resources in the application.

To manage permissions, developers often combine attribute-based access control (ABAC) and role-based access control (RBAC) models with custom code coupled with business logic. This requires a review of the code to understand the permissions, and changes to the code to modify the permissions. Auditing permissions within an application can require the same level of time and effort as a full application code review. This can cause delays to deliver and require additional time and resources to ascertain permissions across your application.

In this post, I will show you how to use Amazon Verified Permissions to define permissions within custom applications using the Cedar policy language. I’ll also show you how authorization requests are made.

Overview of Amazon Verified Permissions

Amazon Verified Permissions provides a prebuilt, flexible permissions system that you can use to build permissions based on both ABAC and RBAC in your applications. You define and manage fine-grained permissions using both permit policies, that grant permissions, and forbid policies, that restrict an action. This lets you focus on building or modernizing the application.

Amazon Verified Permissions maintains a centralized policy store, which helps you manage permissions throughout an application, authorize actions, and analyze permissions with automated reasoning. It also has an evaluation simulator tool to help you test your authorization decisions and author policies.

Policy creation

To author policies with Amazon Verified Permissions, use the purpose-built Cedar policy language to create specific permission policies that include traits of ABAC and RBAC. This allows you to apply granularity with least privilege in mind.

The following figure shows a permission policy for a document management application. In the figure, between the set of parentheses on lines 1-4 of the policy, RBAC is used, based on the principal’s UserGroup, to limit the permit action to registered users—and not guest or machine principals, for example. Between the brackets on lines 5–7 of the policy, ABAC is used, where resource.owner == principal limits access to the resource to only the owner.

Figure 1: Using the Cedar policy language to create permissions

Figure 1: Using the Cedar policy language to create permissions

Policies are developed in two ways:

  • Developers build out policies as part of the deployment of the application – Policy permissions that are defined as part of deployment are a great way for developers to set up guardrails on actions that should not cross set boundaries.
  • Policies are created through the use of the application by end users – Policy permissions that are configurable within the application provide the freedom for data to be shared between users.

We will walk you through these two approaches in the following sections.

Create policies as part of the deployment of the application

The following figure shows how a developer can configure a permit policy as part of the deployment of an application.

Figure 2: Creating policies as part of the deployment of the application

Figure 2: Creating policies as part of the deployment of the application

Policies configured by developers with pre-defined permissions that are deployed alongside the application is a familiar method for setting up guardrails in an application. Consider the document management application shown in Figure 3. There is a permit policy in place that allows users to view their own documents. Without a policy, the default result is a deny. You should also configure explicit forbid policies to act as guardrails to prevent overly permissive policies. In Figure 3, the policy restricts a user to only GET documents that they own or that are not tagged as private.

Figure 3: Example of a permit policy using Cedar

Figure 3: Example of a permit policy using Cedar

Create policies within the application by end users

The following figure shows how end users can apply policies within the application.

Figure 4: How permissions can be applied using policies for application end users

Figure 4: How permissions can be applied using policies for application end users

In a document sharing application, the application usually provides a simple end-user experience with a menu containing point-and-click actions that allow the user to select predefined permissions, such as read, write, or delete. Abstracted by the application, these permissions are transformed into Amazon Verified Permissions policy statements and stored in the designated policy location for the application. When an end user tries to take actions protected by these permissions, the application queries the Amazon Verified Permissions backend to determine if the principal in question has permissions to do so.

You can allow users of the application to create policies directly with respect to their given environments or current permissions. For example, if the application is targeted to system administrators or engineers who are technically proficient, you might choose not to hide the policy generation process behind a UI. The Amazon Verified Permissions policy grammar is designed for users comfortable with text-based query languages. Figure 5 shows an example policy that allows a user to GET or POST documents that they own.

Figure 5: Amazon Verified Permissions policy grammar written with Cedar to define permissions

Figure 5: Amazon Verified Permissions policy grammar written with Cedar to define permissions

Conclusion

Amazon Verified Permissions is a scalable, fine-grained permissions management and authorization service that helps you build and modernize applications without relying heavily on coding authorization within your applications. By using the Cedar policy language, you can define granular access controls that use both RBAC and ABAC and help end users create policies within the application. This allows for alignment of authorization standards across applications and provides clear visibility into existing permissions for review and audibility.

To learn more about ABAC and RBAC and how to design policy statements, see the blog post Get the best out of Amazon Verified Permissions by using fine-grained authorization methods.

 
If you have feedback about this post, submit comments in the Comments section below. If you have questions about this post, contact AWS Support.

Want more AWS Security news? Follow us on Twitter.

Jeremy Wave

Jeremy Ware

Jeremy is a Security Specialist Solutions Architect focused on Identity and Access Management. Jeremy and his team enable AWS customers to implement sophisticated, scalable, and secure IAM architecture and Authentication workflows to solve business challenges. With a background in Security Engineering, Jeremy has spent many years working to raise the Security Maturity gap at numerous global enterprises. Outside of work, Jeremy loves to explore the mountainous outdoors participate in sports such as Snowboarding, Wakeboarding, and Dirt bike riding.

Generating Zabbix Health CSV reports with custom frontend module

Post Syndicated from Aigars Kadiķis original https://blog.zabbix.com/generating-zabbix-health-csv-reports-with-custom-frontend-module/24369/

Have you ever wanted a button to export specific data to CSV directly from Zabbix frontend? My friend Gregory and I have solved this problem.

In this blog post, I will show you how with the help of a custom Zabbix frontend module, you can add an “Export to CSV” button and use it to export custom information. This can be installed as a frontend module. It’s applicable for versions Zabbix 5.0 LTS and Zabbix 6.0 LTS. As an additional benefit, we can use this module to polish our Zabbix instance, find misconfiguration, summarize existing configuration and locate potential bottlenecks.

Characteristics of the module

  • Define and store custom SQL queries in the user profile. It uses the “profiles” database table, specifically the columns “idx” and “value_str” to store the settings/data. We are not changing the database structure but using what’s available already.
  • Export an unlimited amount of rows via the CSV button.
  • Compatible with MySQL and PostgreSQL and general SQL syntax. Use the same language as you use directly in the SQL client.
  • SQL highlighter. It’s based on a well-known CodeMirror product. The Zabbix module is still completely standalone.
  • Protection to disallow running UPDATE, DELETE, INSERT, CREATE, ALTER, DROP commands.
  • Hyperlink support in the SQL output. Useful to generate a link used to navigate closer to the problem. Only hyperlinks which are related to zabbix sections (items.php, triggers.php) are supported.

What is it NOT?

  • The module does not provide an environment for “Zabbix User” or “Zabbix Admin” types of users to perform any reporting. Only users of “Zabbix Super Admin” type can use this module.

Install

Below you can find a sequence of commands used to download and install the “Export to CSV” module

Navigate to default directory of frontend modules:
cd /usr/share/zabbix/modules
Pick and create a name of directory:
mkdir -p zabbix-module-sqlexplorer
Navigate inside:
cd zabbix-module-sqlexplorer
Download version 1.4 of module:
wget https://github.com/gr8b/zabbix-module-sqlexplorer/releases/download/v1.6/v1.6.zip
Extract the archive:
unzip v1.6.zip
Remove the original source file, it is unnecessary:
rm v1.6.zip

Enable

Open “Administration” => “General” => “Modules” => click on “Scan directory“. After that, click “Enable“:

A new menu is available:

Now we can run an SQL query, see the result on the screen, and export the data to CSV:

Let’s talk about 5 beneficial use cases that this module can enable. Here Zabbix technical support engineers are sharing a few frequently used SQL commands.

1) Ensure the basic data collection works

This section would be the basic minimum to maintain. In a perfect world, every host object (a device, a server) must be online 24/7. For each category (ZBX, SNMP, IPMI, JMX) we need to use a dedicated query. Let’s work with the 2 most popular categories – ZBX and SNMP.

Unreachable Zabbix agent (ZBX) hosts

Zabbix 5.0:

SELECT proxy.host AS proxy, hosts.host, hosts.error AS hostError, CONCAT('hosts.php?form=update&hostid=',hosts.hostid) AS goTo FROM hosts LEFT JOIN hosts proxy ON (hosts.proxy_hostid=proxy.hostid) WHERE hosts.status=0 AND LENGTH(hosts.error) > 0;

Zabbix 6.0:

SELECT proxy.host AS proxy, hosts.host, interface.error FROM hosts LEFT JOIN hosts proxy ON (hosts.proxy_hostid=proxy.hostid) JOIN interface ON (interface.hostid=hosts.hostid) WHERE LENGTH(interface.error) > 0 AND interface.type=1;

In the output, we receive a proxy object, host title, an error message, a clickable link to navigate immediately to the object.
Per every row in output, either we need to: 1) Fix the issue. Most likely it is a firewall/DNS/credential/timeout or network quality issue; 2) Delete host object; or 3) Disable host object.

Unreachable network (SNMP) devices

On Zabbix 5.0 use:

SELECT proxy.host AS proxy, hosts.host, hosts.snmp_error AS hostError, CONCAT('hosts.php?form=update&hostid=',hosts.hostid) AS goTo FROM hosts LEFT JOIN hosts proxy ON (hosts.proxy_hostid=proxy.hostid) WHERE hosts.status=0 AND LENGTH(hosts.snmp_error) > 0;

On Zabbix 6.0 use:

SELECT proxy.host AS proxy, hosts.host, interface.error, CONCAT('zabbix.php?action=host.edit&hostid=',hosts.hostid) AS goTo FROM hosts LEFT JOIN hosts proxy ON (hosts.proxy_hostid=proxy.hostid) JOIN interface ON (interface.hostid=hosts.hostid) WHERE LENGTH(interface.error) > 0 AND interface.type=2;

We receive the proxy title, host object, reason the host is not working and a clickable link to the object.

2) Improve speed of frontend

Ensure we have the best response time for all sections in GUI. If tables contain “unnecessary” data, the user experience will suffer for it. Nowadays, no one wants to spend longer than a few seconds waiting for data to be displayed on the screen.

Amount of user sessions

Zabbix 5.0:

SELECT COUNT(*) AS count, users.alias FROM sessions JOIN users ON (users.userid=sessions.userid) GROUP BY 2 ORDER BY 1 DESC;

Zabbix 6.0:

SELECT COUNT(*) AS count, users.username FROM sessions JOIN users ON (users.userid=sessions.userid) GROUP BY 2 ORDER BY 1 DESC;

The total number of sessions should not exceed 1000; it’s hard to imagine why it should be over 100. It is OK to delete all data in the “sessions” table and optimize/vacuum the table. This will improve the overall Zabbix GUI responsiveness and performance.

Don’t keep too many open problems onboard

Every monitoring tool is about identifying problems. If you keep too many open problems, then frontend will be slow. The following query will print trigger problems (the ones we receive in email) and so as internal problems, which reflect the health of the monitoring tool.

SELECT COUNT(*) AS count, CASE WHEN source=0 THEN 'surface' WHEN source>0 THEN 'internal' END AS level, CASE WHEN source=0 AND object=0 THEN 'trigger in a problem state' WHEN source=3 AND object=0 THEN 'cannot evaluate trigger expression' WHEN source=3 AND object=4 THEN 'data collection not working' WHEN source=3 AND object=5 THEN 'low level discovery not perfect' END AS problemCategory FROM problem GROUP BY 2,3 ORDER BY 2 DESC;

To decrease the number of “internal” problems, have a study on the point nr. 5 in this blog post.

3) Identify exceptions

Monitoring administrators can change item update frequency at a host level, can install a different trigger threshold at the host level, or install a different threshold inside a nested template tree. This section will highlight all overrides.

Item update interval differs between host/template levels

This query will print items and LLD rules with different update frequencies on the host level while comparing them with the template level. Most of the time,  having different update interval at the host level is done by accident.

SELECT h2.host AS Source, i2.name AS itemName, i2.key_ AS itemKey, i2.delay AS OriginalUpdateFrequency,h1.host AS exceptionInstalledOn, i1.delay AS FrequencyChild, CASE WHEN i1.flags=1 THEN 'LLD rule' WHEN i1.flags IN (0,4) THEN 'data collection' END AS itemCategory , CASE WHEN i1.flags=1 THEN CONCAT('host_discovery.php?form=update&context=host&itemid=',i1.itemid) WHEN i1.flags IN (0,4) THEN CONCAT('items.php?form=update&context=host&hostid=',h1.hostid,'&itemid=',i1.itemid) END AS goTo FROM items i1 JOIN items i2 ON (i2.itemid=i1.templateid) JOIN hosts h1 ON (h1.hostid=i1.hostid) JOIN hosts h2 ON (h2.hostid=i2.hostid) WHERE i1.delay <> i2.delay;

In the output, the “Source” column is a host object (a device) or a template object. The “Source” column is heavily related to “exceptionInstalledOn” column. “Source” VS “exceptionInstalledOn” practically tells there is a relation between a host and a template or between a template and another template.

“FrequencyChild” column is the most important field, which describes an exception installed which differs from the original object.

The output allows navigating directly to the item where the update frequency stands out.

Connection characteristics and custom trigger thresholds

The query will show every installed override between host and template object or between template and parent template object. If template nesting is used at multiple levels, it will highlight if an overriding value if that is installed somewhere in the middle.

SELECT hm1.macro AS Macro, child.host AS owner, hm2.value AS defaultValue, parent.host AS OverrideInstalled, hm1.value AS OverrideValue FROM hosts parent, hosts child, hosts_templates rel, hostmacro hm1, hostmacro hm2 WHERE parent.hostid=rel.hostid AND child.hostid=rel.templateid AND hm1.hostid = parent.hostid AND hm2.hostid = child.hostid AND hm1.macro = hm2.macro AND parent.flags=0 AND child.flags=0 AND hm1.value <> hm2.value;

Abandoned items

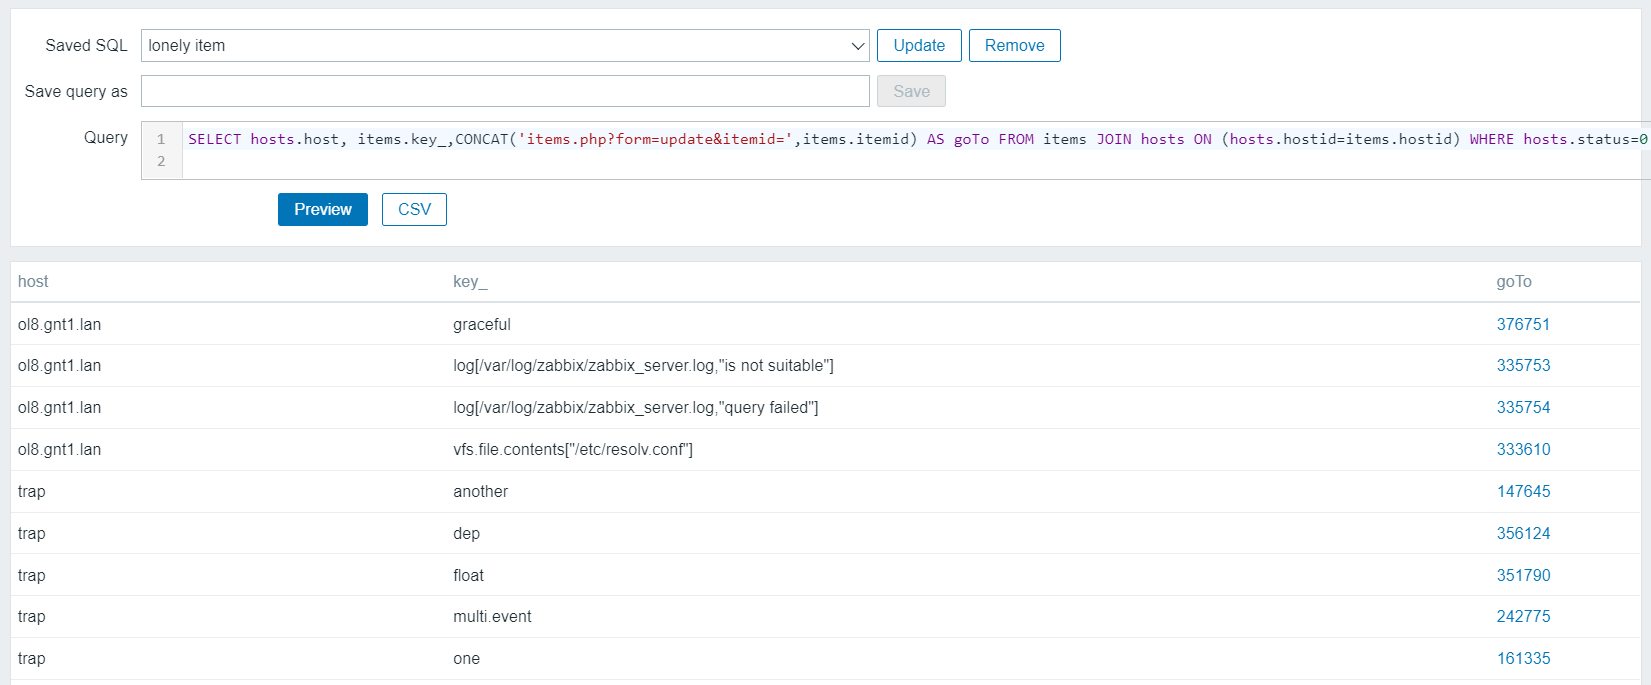
A very lonely item that does not belong to any template.

SELECT hosts.host, items.key_,CONCAT('items.php?form=update&context=host&itemid=',items.itemid) AS goTo FROM items JOIN hosts ON (hosts.hostid=items.hostid) WHERE hosts.status=0 AND hosts.flags=0 AND items.status=0 AND items.templateid IS NULL AND items.flags=0;

To keep up centralized management, it would be better to move and maintain the definition of the item to the template level.

4) Reporting

We can summarize an item and host configurations, enabled and disabled data collector items, and linked templates.

What data collection method is used?

To summarize all data collection techniques and see the membership by Zabbix proxy use the following command:

SELECT proxy.host AS proxy, CASE items.type WHEN 0 THEN 'Zabbix agent' WHEN 1 THEN 'SNMPv1 agent' WHEN 2 THEN 'Zabbix trapper' WHEN 3 THEN 'Simple check' WHEN 4 THEN 'SNMPv2 agent' WHEN 5 THEN 'Zabbix internal' WHEN 6 THEN 'SNMPv3 agent' WHEN 7 THEN 'Zabbix agent (active) check' WHEN 8 THEN 'Aggregate' WHEN 9 THEN 'HTTP test (web monitoring scenario step)' WHEN 10 THEN 'External check' WHEN 11 THEN 'Database monitor' WHEN 12 THEN 'IPMI agent' WHEN 13 THEN 'SSH agent' WHEN 14 THEN 'TELNET agent' WHEN 15 THEN 'Calculated' WHEN 16 THEN 'JMX agent' WHEN 17 THEN 'SNMP trap' WHEN 18 THEN 'Dependent item' WHEN 19 THEN 'HTTP agent' WHEN 20 THEN 'SNMP agent' WHEN 21 THEN 'Script item' END AS type,COUNT(*) FROM items JOIN hosts ON (hosts.hostid=items.hostid) LEFT JOIN hosts proxy ON (hosts.proxy_hostid=proxy.hostid) WHERE hosts.status=0 AND items.status=0 GROUP BY proxy.host, items.type ORDER BY 1,2,3 DESC;

Devices and linked templates

If one server runs as a database server, a web server, and an application server, there must be multiple templates linked. The following query can help to detect the linked templates.

MySQL:

SELECT proxy.host AS proxy, hosts.host, GROUP_CONCAT(template.host SEPARATOR ', ') AS templates FROM hosts JOIN hosts_templates ON (hosts_templates.hostid=hosts.hostid) LEFT JOIN hosts proxy ON (hosts.proxy_hostid=proxy.hostid) LEFT JOIN hosts template ON (hosts_templates.templateid=template.hostid) WHERE hosts.status IN (0,1) AND hosts.flags=0 GROUP BY 1,2 ORDER BY 1,3,2;

PostgreSQL:

SELECT proxy.host AS proxy, hosts.host, ARRAY_TO_STRING(ARRAY_AGG(template.host),', ') AS templates FROM hosts JOIN hosts_templates ON (hosts_templates.hostid=hosts.hostid) LEFT JOIN hosts proxy ON (hosts.proxy_hostid=proxy.hostid) LEFT JOIN hosts template ON (hosts_templates.templateid=template.hostid) WHERE hosts.status IN (0,1) AND hosts.flags=0 GROUP BY 1,2 ORDER BY 1,3,2;
Devices and all inventory fields
SELECT h.host,i.type,i.type_full,i.name,i.alias,i.os,i.os_full,i.os_short,i.serialno_a,i.serialno_b,i.tag,i.asset_tag,i.macaddress_a,i.macaddress_b,i.hardware,i.hardware_full,i.software,i.software_full,i.software_app_a,i.software_app_b,i.software_app_c,i.software_app_d,i.software_app_e,i.contact,i.location,i.location_lat,i.location_lon,i.notes,i.chassis,i.model,i.hw_arch,i.vendor,i.contract_number,i.installer_name,i.deployment_status,i.url_a,i.url_b,i.url_c,i.host_networks,i.host_netmask,i.host_router,i.oob_ip,i.oob_netmask,i.oob_router,i.date_hw_purchase,i.date_hw_install,i.date_hw_expiry,i.date_hw_decomm,i.site_address_a,i.site_address_b,i.site_address_c,i.site_city,i.site_state,i.site_country,i.site_zip,i.site_rack,i.site_notes,i.poc_1_name,i.poc_1_email,i.poc_1_phone_a,i.poc_1_phone_b,i.poc_1_cell,i.poc_1_screen,i.poc_1_notes,i.poc_2_name,i.poc_2_email,i.poc_2_phone_a,i.poc_2_phone_b,i.poc_2_cell,i.poc_2_screen,i.poc_2_notes FROM host_inventory i, hosts h WHERE i.hostid=h.hostid AND h.flags=0;

By default, it prints all columns. You can cut away the unnecessary ones. You can use the extracted data for analytics in other software, e.g., MS Excel.

External scripts in use

When migrating to the next release of Zabbix, it’s better to be aware of all external scripts and ensure the new server will support that. An external script is a custom solution for how you collect data. For example, a Python 2 language is not available on a newer operating system out of box.

SELECT items.key_,COUNT(*) FROM items JOIN hosts ON (hosts.hostid=items.hostid) WHERE hosts.status=0 AND items.status=0 AND items.type=10 GROUP BY 1 ORDER BY 2;


5) Polish your Zabbix instance

This section will require more work. Being a non-perfectionist is an advantage.

To work with internal events (data collection not working, trigger not working), we have to have a least one internal action enabled. It can be an action with a condition that will never be true:

Be careful, if you have huge infrastructure and currently everything is disabled, then don’t enable! Or enable only for 4h to generate some statistics and then turn it off. If you keep internal events ON and a lot of things are not working, it will create frontend very slow. And it will get even slower every day.

Data collection

Monitoring is based on data collection. If new data does not come in, we cannot detect if the service is up or down. The following query will list all data collector items which cannot receive the data.

SELECT hosts.name, items.key_ AS keyName, problem.name AS error, CONCAT('items.php?form=update&itemid=',objectid) AS goTo FROM problem JOIN items ON (items.itemid=problem.objectid) JOIN hosts ON (hosts.hostid=items.hostid) WHERE problem.source>0 AND problem.object=4;

The output provides a clickable link to navigate to the item and investigate. Common issues can be a timeout, wrong credentials, and permissions.

Trigger evaluation

When data is collected and if an item has a trigger linked, it’s possible that there is a problem in evaluating trigger logic. The result of the following query will show you why it’s impossible to detect the problem.

SELECT DISTINCT CONCAT('triggers.php?form=update&triggerid=',problem.objectid) AS goTo, hosts.name AS hostName, triggers.description AS triggerTitle, problem.name AS error FROM problem JOIN triggers ON (triggers.triggerid=problem.objectid) JOIN functions ON (functions.triggerid=triggers.triggerid) JOIN items ON (items.itemid=functions.itemid) JOIN hosts ON (hosts.hostid=items.hostid) WHERE problem.source > 0 AND problem.object=0;

Low-level discovery

The purpose of low-level discovery is to find all elements which exist in a particular system. For example, find all services on a windows system. If discovery is not working, then additional elements will not get covered, which means no data collection, no trigger, and no notification. The following query will show all erroneous LLD rules and the reason there is a problem:

SELECT hosts.name AS hostName, items.key_ AS itemKey, problem.name AS LLDerror, CONCAT('host_discovery.php?form=update&itemid=',problem.objectid) AS goTo FROM problem JOIN items ON (items.itemid=problem.objectid) JOIN hosts ON (hosts.hostid=items.hostid) WHERE problem.source > 0 AND problem.object=5;

That is it for today.

In the comments section below, let us know what kind of report your company desires to see.

Appendix

Know issues of the module:
  • When linking tables in SQL output, if there are multiple columns with the same name, only the first column will be printed. As a workaround, always use “AS ColumnName” directive to specify unique column names in the output.


Highlights from Git 2.39

Post Syndicated from Taylor Blau original https://github.blog/2022-12-12-highlights-from-git-2-39/

The open source Git project just released Git 2.39, with features and bug fixes from over 86 contributors, 31 of them new. We last caught up with you on the latest in Git back when 2.38 was released.

To celebrate this most recent release, here’s GitHub’s look at some of the most interesting features and changes introduced since last time.


If you use Git on the command-line, you have almost certainly used git log to peruse your project’s history. But you may not be as familiar with its cousin, git shortlog.

git shortlog is used to summarize the output produced by git log. For example, many projects (including Git1) use git shortlog -ns to produce a list of unique contributors in a release, along with the number of commits they authored, like this:

$ git shortlog -ns v2.38.0.. | head -10
   166  Junio C Hamano
   118  Taylor Blau
   115  Ævar Arnfjörð Bjarmason
    43  Jeff King
    26  Phillip Wood
    21  René Scharfe
    15  Derrick Stolee
    11  Johannes Schindelin
     9  Eric Sunshine
     9  Jeff Hostetler
  [...]

We’ve talked about git shortlog in the past, most recently when 2.29 was released to show off its more flexible --group option, which allows you to group commits by fields other than their author or committer. For example, something like:

$ git shortlog -ns --group=author --group=trailer:co-authored-by

would count each commit to its author as well as any individuals in the Co-authored-by trailer.

This release, git shortlog became even more flexible by learning how to aggregate commits based on arbitrary formatting specifiers, like the ones mentioned in the pretty formats section of Git’s documentation.

One neat use is being able to get a view of how many commits were committed each month during a release cycle. Before, you might have written something like this monstrosity:

$ git log v2.38.0.. --date='format:%Y-%m' --format='%cd' | sort | uniq -c

There, --date='format:%Y-%m' tells Git to output each date field like YYYY-MM, and --format='%cd' tells Git to output only the committer date (using the aforementioned format) when printing each commit. Then, we sort the output, and count the number of unique values.

Now, you can ask Git to do all of that for you, by writing:

$ git shortlog v2.38.0.. --date='format:%Y-%m' --group='%cd' -s
     2  2022-08
    47  2022-09
   405  2022-10
   194  2022-11
     5  2022-12

Where -s tells git shortlog output a summary where the left-hand column is the number of commits attributed to each unique group (in this case, the year and month combo), and the right-hand column is the identity of each group itself.

Since you can pass any format specifier to the --group option, the flexibility here is limited only by the pretty formats available, and your own creativity.

[source]


Returning readers may remember our discussion on Git’s new object pruning mechanism, cruft packs. In case you’re new around here, no problem: here’s a refresher.

When you want to tell Git to remove unreachable objects (those which can’t be found by walking along the history of any branch or tag), you might run something like:

$ git gc --cruft --prune=5.minutes.ago

That instructs Git to divvy your repository’s objects into two packs: one containing reachable objects, and another2 containing unreachable objects modified within the last five minutes. This makes sure that a git gc process doesn’t race with incoming reference updates that might leave the repository in a corrupt state. As those objects continue to age, they will be removed from the repository via subsequent git gc invocations. For (many) more details, see our post, Scaling Git’s garbage collection.

Even though the --prune=<date> mechanism of adding a grace period before permanently removing objects from the repository is relatively effective at avoiding corruption in practice, it is not completely fool-proof. And when we do encounter repository corruption, it is useful to have the missing objects close by to allow us to recover a corrupted repository.

In Git 2.39, git repack learned a new option to create an external copy of any objects removed from the repository: --expire-to. When combined with --cruft options like so:

$ git repack --cruft --cruft-expiration=5.minutes.ago -d --expire-to=../backup.git

any unreachable objects which haven’t been modified in the last five minutes are collected together and stored in a packfile that is written to ../backup.git. Then, objects you may be missing after garbage collection are readily available in the pack stored in ../backup.git.

These ideas are identical to the ones described in the “limbo repository” section of our Scaling Git’s garbage collection blog post. At the time of writing that post, those patches were still under review. Thanks to careful feedback from the Git community, the same tools that power GitHub’s own garbage collection are now available to you via Git 2.39.

On a related note, careful readers may have noticed that in order to write a cruft pack, you have to explicitly pass --cruft to both git gc and git repack. This is still the case. But in Git 2.39, users who enable the feature.experimental configuration and are running the bleeding edge of Git will now use cruft packs by default when running git gc.

[source, source]


If you’ve been following along with the gradual introduction of sparse index compatibility in Git commands, this one’s for you.

In previous versions of Git, using git grep --cached (to search through the index instead of the blobs in your working copy) you might have noticed that Git first has to expand your index when using the sparse index feature.

In large repositories where the sparse portion of the repository is significantly smaller than the repository as a whole, this adds a substantial delay before git grep --cached outputs any matches.

Thanks to the work of Google Summer of Code student, Shaoxuan Yuan, this is no longer the case. This can lead to some dramatic performance enhancements: when searching in a location within your sparse cone (for example., git grep --cached $pattern -- 'path/in/sparse/cone'), Git 2.39 outperforms the previous version by nearly 70%.

[source]


This one is a little bit technical, but bear with us, since it ends with a nifty performance optimization that may be coming to a Git server near you.

Before receiving a push, a Git server must first tell the pusher about all of the branches and tags it already knows about. This lets the client omit any objects that it knows the server already has, and results in less data being transferred overall.

Once the server has all of the new objects, it ensures that they are “connected” before entering them into the repository. Generally speaking, this “connectivity check” ensures that none of the new objects mention nonexistent objects; in other words, that the push will not corrupt the repository.

One additional factor worth noting is that some Git servers are configured to avoid advertising certain references. But those references are still used as part of the connectivity check. Taking into account the extra work necessary to incorporate those hidden references into the connectivity check, the additional runtime adds up, especially if there are a large number of hidden references.

In Git 2.39, the connectivity check was enhanced to only consider the references that were advertised, in addition to those that were pushed. In a test repository with nearly 7 million references (only ~3% of which are advertised), the resulting speed-up makes Git 2.39 outperform the previous version by roughly a factor of 4.5.

As your server operators upgrade to the latest version of Git, you should notice an improvement in how fast they are able to process incoming pushes.

[source]


Last but not least, let’s round out our recap of some of the highlights from Git 2.39 with a look at a handful of new security measures.

Git added two new “defense-in-depth” changes in the latest release. First, git apply was updated to refuse to apply patches larger than ~1 GiB in size to avoid potential integer overflows in the apply code. Git was also updated to correctly redact sensitive header information with GIT_TRACE_CURL=1 or GIT_CURL_VERBOSE=1 when using HTTP/2.

If you happen to notice a security vulnerability in Git, you can follow Git’s own documentation on how to responsibly report the issue. Most importantly, if you’ve ever been curious about how Git handles coordinating and disclosing embargoed releases, this release cycle saw a significant effort to codify and write down exactly how Git handles these types of issues.

To read more about Git’s disclosure policy (and learn about how to participate yourself!), you can find more in the repository.

[source, source, source]

The rest of the iceberg

That’s just a sample of changes from the latest release. For more, check out the release notes for 2.39, or any previous version in the Git repository.

Notes


  1. It’s true. In fact, the list at the bottom of the release announcement is generated by running git shortlog on the git log --no-merges between the last and current release. Calculating the number of new and existing contributors in each release is also powered by git shortlog. ↩
  2. This is a bit of an oversimplification. In addition to storing the object modification times in an adjacent *.mtimes file, the cruft pack also contains unreachable objects that are reachable from anything modified within the last five minutes, regardless of its age. See the “mitigating object deletion raciness” section for more. ↩

Configuration driven dynamic multi-account CI/CD solution on AWS

Post Syndicated from Anshul Saxena original https://aws.amazon.com/blogs/devops/configuration-driven-dynamic-multi-account-ci-cd-solution-on-aws/

Many organizations require durable automated code delivery for their applications. They leverage multi-account continuous integration/continuous deployment (CI/CD) pipelines to deploy code and run automated tests in multiple environments before deploying to Production. In cases where the testing strategy is release specific, you must update the pipeline before every release. Traditional pipeline stages are predefined and static in nature, and once the pipeline stages are defined it’s hard to update them. In this post, we present a configuration driven dynamic CI/CD solution per repository. The pipeline state is maintained and governed by configurations stored in Amazon DynamoDB. This gives you the advantage of automatically customizing the pipeline for every release based on the testing requirements.

By following this post, you will set up a dynamic multi-account CI/CD solution. Your pipeline will deploy and test a sample pet store API application. Refer to Automating your API testing with AWS CodeBuild, AWS CodePipeline, and Postman for more details on this application. New code deployments will be delivered with custom pipeline stages based on the pipeline configuration that you create. This solution uses services such as AWS Cloud Development Kit (AWS CDK), AWS CloudFormation, Amazon DynamoDB, AWS Lambda, and AWS Step Functions.

Solution overview

The following diagram illustrates the solution architecture:

The image represents the solution workflow, highlighting the integration of the AWS components involved.

Figure 1: Architecture Diagram

  1. Users insert/update/delete entry in the DynamoDB table.
  2. The Step Function Trigger Lambda is invoked on all modifications.
  3. The Step Function Trigger Lambda evaluates the incoming event and does the following:
    1. On insert and update, triggers the Step Function.
    2. On delete, finds the appropriate CloudFormation stack and deletes it.
  4. Steps in the Step Function are as follows:
    1. Collect Information (Pass State) – Filters the relevant information from the event, such as repositoryName and referenceName.
    2. Get Mapping Information (Backed by CodeCommit event filter Lambda) – Retrieves the mapping information from the Pipeline config stored in the DynamoDB.
    3. Deployment Configuration Exist? (Choice State) – If the StatusCode == 200, then the DynamoDB entry is found, and Initiate CloudFormation Stack step is invoked, or else StepFunction exits with Successful.
    4. Initiate CloudFormation Stack (Backed by stack create Lambda) – Constructs the CloudFormation parameters and creates/updates the dynamic pipeline based on the configuration stored in the DynamoDB via CloudFormation.

Code deliverables

The code deliverables include the following:

  1. AWS CDK app – The AWS CDK app contains the code for all the Lambdas, Step Functions, and CloudFormation templates.
  2. sample-application-repo – This directory contains the sample application repository used for deployment.
  3. automated-tests-repo– This directory contains the sample automated tests repository for testing the sample repo.

Deploying the CI/CD solution

  1. Clone this repository to your local machine.
  2. Follow the README to deploy the solution to your main CI/CD account. Upon successful deployment, the following resources should be created in the CI/CD account:
    1. A DynamoDB table
    2. Step Function
    3. Lambda Functions
  3. Navigate to the Amazon Simple Storage Service (Amazon S3) console in your main CI/CD account and search for a bucket with the name: cloudformation-template-bucket-<AWS_ACCOUNT_ID>. You should see two CloudFormation templates (templates/codepipeline.yaml and templates/childaccount.yaml) uploaded to this bucket.
  4. Run the childaccount.yaml in every target CI/CD account (Alpha, Beta, Gamma, and Prod) by going to the CloudFormation Console. Provide the main CI/CD account number as the “CentralAwsAccountId” parameter, and execute.
  5. Upon successful creation of Stack, two roles will be created in the Child Accounts:
    1. ChildAccountFormationRole
    2. ChildAccountDeployerRole

Pipeline configuration

Make an entry into devops-pipeline-table-info for the Repository name and branch combination. A sample entry can be found in sample-entry.json.

The pipeline is highly configurable, and everything can be configured through the DynamoDB entry.

The following are the top-level keys:

RepoName: Name of the repository for which AWS CodePipeline is configured.
RepoTag: Name of the branch used in CodePipeline.
BuildImage: Build image used for application AWS CodeBuild project.
BuildSpecFile: Buildspec file used in the application CodeBuild project.
DeploymentConfigurations: This key holds the deployment configurations for the pipeline. Under this key are the environment specific configurations. In our case, we’ve named our environments Alpha, Beta, Gamma, and Prod. You can configure to any name you like, but make sure that the entries in json are the same as in the codepipeline.yaml CloudFormation template. This is because there is a 1:1 mapping between them. Sub-level keys under DeploymentConfigurations are as follows:

  • EnvironmentName. This is the top-level key for environment specific configuration. In our case, it’s Alpha, Beta, Gamma, and Prod. Sub level keys under this are:
    • <Env>AwsAccountId: AWS account ID of the target environment.
    • Deploy<Env>: A key specifying whether or not the artifact should be deployed to this environment. Based on its value, the CodePipeline will have a deployment stage to this environment.
    • ManualApproval<Env>: Key representing whether or not manual approval is required before deployment. Enter your email or set to false.
    • Tests: Once again, this is a top-level key with sub-level keys. This key holds the test related information to be run on specific environments. Each test based on whether or not it will be run will add an additional step to the CodePipeline. The tests’ related information is also configurable with the ability to specify the test repository, branch name, buildspec file, and build image for testing the CodeBuild project.

Execute

  1. Make an entry into the devops-pipeline-table-info DynamoDB table in the main CI/CD account. A sample entry can be found in sample-entry.json. Make sure to replace the configuration values with appropriate values for your environment. An explanation of the values can be found in the Pipeline Configuration section above.
  2. After the entry is made in the DynamoDB table, you should see a CloudFormation stack being created. This CloudFormation stack will deploy the CodePipeline in the main CI/CD account by reading and using the entry in the DynamoDB table.

Customize the solution for different combinations such as deploying to an environment while skipping for others by updating the pipeline configurations stored in the devops-pipeline-table-info DynamoDB table. The following is the pipeline configured for the sample-application repository’s main branch.

The image represents the dynamic CI/CD pipeline deployed in your account.

The image represents the dynamic CI/CD pipeline deployed in your account.

The image represents the dynamic CI/CD pipeline deployed in your account.

The image represents the dynamic CI/CD pipeline deployed in your account.

Figure 2: Dynamic Multi-Account CI/CD Pipeline

Clean up your dynamic multi-account CI/CD solution and related resources

To avoid ongoing charges for the resources that you created following this post, you should delete the following:

  1. The pipeline configuration stored in the DynamoDB
  2. The CloudFormation stacks deployed in the target CI/CD accounts
  3. The AWS CDK app deployed in the main CI/CD account
  4. Empty and delete the retained S3 buckets.

Conclusion

This configuration-driven CI/CD solution provides the ability to dynamically create and configure your pipelines in DynamoDB. IDEMIA, a global leader in identity technologies, adopted this approach for deploying their microservices based application across environments. This solution created by AWS Professional Services allowed them to dynamically create and configure their pipelines per repository per release. As Kunal Bajaj, Tech Lead of IDEMIA, states, “We worked with AWS pro-serve team to create a dynamic CI/CD solution using lambdas, step functions, SQS, and other native AWS services to conduct cross-account deployments to our different environments while providing us the flexibility to add tests and approvals as needed by the business.”

About the authors:

Anshul Saxena

Anshul is a Cloud Application Architect at AWS Professional Services and works with customers helping them in their cloud adoption journey. His expertise lies in DevOps, serverless architectures, and architecting and implementing cloud native solutions aligning with best practices.

Libin Roy

Libin is a Cloud Infrastructure Architect at AWS Professional Services. He enjoys working with customers to design and build cloud native solutions to accelerate their cloud journey. Outside of work, he enjoys traveling, cooking, playing sports and weight training.

Rapid7 Recognized as a Top Place to Work in for 11th Consecutive Year

Post Syndicated from Rapid7 original https://blog.rapid7.com/2022/12/12/rapid7-recognized-as-a-top-place-to-work-in-for-11th-consecutive-year/

Rapid7 Recognized as a Top Place to Work in for 11th Consecutive Year

On November 30th, 2022, Rapid7 was again recognized by The Boston Globe as a Top Place to Work in Massachusetts. This marks the 11th consecutive year Rapid7 has made the list, this time coming in at #3 in the large company category. Top Places to Work rankings are based on a Globe survey that measures worker opinions about their company’s direction, management, pay and benefits, culture, engagement, and more.

Christina Luconi, Chief People Officer at Rapid7, is proud that the company has maintained such a consistent place in one of the most prestigious workplace award programs in the region—especially as the company has grown and scaled over more than a decade.

“We started participating when Rapid7 had less than 100 employees. Since then, we’ve scaled the size categories from small, to medium, to large, and still maintained that ‘great place to work’ status,” she said. “Today, we have nearly 2,700 people in offices around the world, with 735 in our Boston headquarters.”

Luconi believes it’s more than office perks that keep people engaged and ensure long term company success. “The companies that stand the test of time as truly amazing places to work are those that unite employees around a shared mission of customer success,” she said. “From there, these organizations are able map their business strategy back to an environment where their people are inspired, motivated, and thrive.”

To create an environment that fosters innovation and success, Rapid7’s people development team empowers employees to take ownership of their career trajectory and goals. This includes programs at every stage of the employee lifecycle, from onboarding to management and leadership positions.

“Rapid7’s strong sense of core values, impactful company mission, and alignment between business and people strategy is what makes the company special,” said Luconi.

For more information about working at Rapid7, please visit our careers page.

[$] Development statistics for the 6.1 kernel (and beyond)

Post Syndicated from original https://lwn.net/Articles/915435/

The 6.1 kernel was released
on December 11; by the time of this release, 13,942 non-merge
changesets had been pulled into the mainline, growing the kernel by 412,000
lines of code. This is thus not the busiest development cycle ever, but
neither is it the slowest, and those changesets contained a number of
fundamental changes. This release will also be the long-term-support
kernel for 2022. Read on for a look at where the work in 6.1 came from.

The challenges of sanctioning the Internet

Post Syndicated from Laura Klick original https://blog.cloudflare.com/the-challenges-of-sanctioning-the-internet/

The challenges of sanctioning the Internet

The challenges of sanctioning the Internet

Following Russia’s invasion of Ukraine, governments around the world, including the US, UK, and EU announced sweeping sanctions targeting the Russian and Belarussian economies. These sanctions prohibit a specified level of economic activity in an effort to use economic influences to punish targeted countries. Almost overnight, we saw unprecedented restrictions put in place for multinational companies doing business in Russia or Belarus.

Separately, recent events in Iran led the US government to authorize additional Internet/communications activities, which were being used widely by average Iranians protesting against the government. This was done by expanding some existing licenses, or exceptions, to sanctions the US has imposed on Iran.

While the use of sanctions as a tool for responding to foreign relations crises is nothing new, the wide-ranging multilateral sanctions that have been imposed on Russia and the recent authorizations in Iran are significant and provide fresh examples of how sanctions can affect access to a free and open global Internet.

Balancing interests in sanctions policy

Cloudflare is committed to complying with all applicable sanctions, including US, UK, and EU sanctions, and we have put in place programs to ensure that compliance. At the same time, we recognize the important role we and other Internet infrastructure companies play in protecting a key human right and principle also supported by the US, UK, and EU governments: free expression online.

One overarching principle of sanctions policy is that sanctions are intended to increase the cost of violating international norms and ultimately force authoritarian regimes and malicious actors to change behavior. The purpose of sanctions is not to punish or isolate ordinary citizens of a particular country or region. In fact, ordinary citizens can be powerful catalysts for the policy changes that sanctions are seeking to achieve. However, as we’ve seen over and over again, changes in policy, particularly in countries that have authoritarian regimes, do not happen overnight, and they often depend on the ability of individuals to communicate with each other and with the rest of the world. For example, in Iran, we’ve witnessed the important role that social media has played in helping support and spread the protest movement sparked by the killing of Mahsa Amini. Similarly, in the wake of Russia’s invasion of Ukraine, ordinary Russians continue to look for ways to access non-Russian news sources via private Internet access tools and VPNs.

It’s a tricky balance to impose costs on bad actors while maintaining open lines of communication for ordinary citizens, but it’s a balance that we’ve seen the US Government take a leading role in preserving, even in areas where most other transactions/activities might otherwise be prohibited. For example, the key US law authorizing the executive branch to deploy sanctions exempts “any postal, telegraphic, telephonic or other personal communication, which does not involve a transfer of anything of value.” The US government also has a long tradition of issuing authorizations, also known as General Licenses, permitting additional telecommunications and Internet-related activities, including in Cuba, Iran, Russia, Syria, and certain restricted regions of Ukraine. This means that US companies, like Cloudflare, can continue to provide many products and services that support free and secure Internet communications.

Although these exemptions and licenses can help the US Government establish the policy goal of supporting Internet freedom, they are only effective if private sector companies make use of them. That may be easier said than done. Because of the financial and reputational penalties that can be imposed if a company violates sanctions, even inadvertently, companies often have an incentive to take a simple and blunt approach to sanctions compliance without trying to do the nuanced thing and availing themselves of the exceptions in the General Licenses. Companies have to invest significant time and money into understanding the legal requirements and applicable exemptions and licenses when deciding whether to provide services in high risk countries. Cloudflare has made these investments because they align with our goal of helping build a better Internet and making a free and secure Internet accessible to all.

As governments continue to use sanctions as a foreign policy tool, we think it’s important that Internet infrastructure companies discuss how the legal framework is impacting their ability to support a global Internet. Described below are some of the key issues we’ve identified and ways that regulators can help balance the policy goals of sanctions with the need to support the free flow of communications for ordinary citizens around the world.

There are two broad categories of sanctions: (1) country-/region-based, and (2) individual/entity list-based. Sanctions can vary across jurisdictions, meaning that US sanctions look different from EU and UK sanctions and there can be significant differences. Companies that operate around the world have to pay close attention to individual rules and regulations to ensure compliance with sanctions.

Country-/region-based sanctions

With respect to country-/region-based sanctions, the US government has imposed comprehensive sanctions on doing business in Cuba, Iran, North Korea, Syria, and certain restricted regions of Ukraine (Crimea, Luhansk, and Donetsk). The purpose of comprehensive sanctions is to impose severe punishments on state actors in these countries by denying them access to valuable US goods/services. You might think that this means that Internet companies are therefore barred from providing services to these countries/regions, but that’s where things get complicated. The US government has issued General Licenses, which authorize US companies to engage in certain Internet- and telecommunications-related activities.

While these General Licenses are helpful in that they may authorize peering services, VPN, SSL certificates, and other services incident to the exchange of communications over the Internet, the activities authorized vary across sanctioned jurisdictions. In some countries/regions (e.g., Cuba, Iran, and the Donetsk and Luhansk regions), except for government parties, some free and paid services are authorized, but in other instances (e.g., Crimea and Syria), all authorized services must be available at no cost to the user. Along the same lines, some General Licenses list specific types of services/products that may be provided, while others leave it up to a company to make their own determination whether a product/service is authorized by the terms of the license. Neither the UK nor the EU has issued any Internet-related General Licenses, which has become a particular issue in the context of Russia where there are now significant restrictions in place.

With respect to Iran, the US government recently issued a new General License that broadens the products/services authorized and provides other clarifications to make it easier for companies to provide Internet services to ordinary Iranians. The new General License is encouraging for companies, like Cloudflare, that would like to help support access to the broader Internet for ordinary Iranian citizens. But as with any new policy, it takes time for companies to understand the changes and make decisions about whether to invest additional time and resources to expand services offerings in a high risk country like Iran. Given the significant restrictions that have been imposed on doing business in Iran over the years, there are a number of logistical challenges with seeking to enter a market where so many activities remain prohibited. Moreover, there is always a risk that sanctions policies can change, so companies will take this into account when weighing whether to deploy expensive hardware/equipment or make other long-term investments.

Party-based sanctions

Apart from country-based sanctions, many governments, including the US, UK, and EU maintain list-based sanctions, which prohibit dealings with specific listed parties. Like many multinational companies, Cloudflare screens customers and other third parties to identify links to sanctioned parties. We do not engage in any transactions with or provide services to any parties that have been listed on applicable sanctions lists or any parties that are owned or controlled by such parties and our Terms of Service prohibit sanctioned parties from using our services.

Over the years, the US government has continued to add parties to its sanctions list. Notably, when the US government adds a party to the sanctions list, it will include corresponding identifying information, including possible aliases, physical address, as well as email address and domain names to the extent they are known. The UK has also started adding domains and email addresses, but those domains and email addresses do not always align with what is on the US list, creating further complexities for multinational companies in this space.

While there are a number of sanctions screening providers that will help companies conduct due diligence on third parties they are considering doing business with, email addresses and domains are not automatically screened. This can be challenging for Internet infrastructure companies for whom email addresses and domain names are critical pieces of data when onboarding a customer. With limited automated solutions, companies must invest significant time and resources building proprietary tools that block sanctioned domains and email addresses from signing up for their services.

Cloudflare may also receive abuse reports alleging that domains are operated by sanctioned parties. However, unless a domain is listed on a sanctions list, it can be challenging to determine if a domain is subject to sanctions. Without clear guidance from regulators, companies must develop their own processes for reviewing these reports. While it is important that companies terminate services to domains owned or operated by a sanctioned party, it’s also critical that they do so in a way that is fair and consistent.

Implications for a free and open Internet

Sanctions are an important tool for responding to geopolitical challenges, and they can help impose economic costs on parties that violate international norms, including human rights. However, sanctions can also have unintended consequences when they are not properly deployed. While regulators have learned a number of lessons over the years when imposing sanctions on more traditional sanctions targets, like the financial and energy sectors, the global Internet remains a complicated area that has only recently become a more prominent focus of sanctions. With the technology constantly evolving and a number of different parties involved in maintaining a secure and reliable Internet, it is critical that regulators are clear about their expectations and seek to minimize any chilling effects.

Key stakeholders involved in maintaining a free and open Internet are likely to continue exiting sensitive markets in the absence of clear guidance from regulators. This will only lead to further fragmentation of the global Internet and open the door for authoritarian governments to monitor and control global communications – an outcome that clearly undermines the policy goals of the sanctions. These are complicated issues, and we don’t pretend to have all the answers. But, there are things that regulators can do to mitigate unintended consequences of sanctions policies and promote a free and open Internet. Here are a few key points that we advocate to policymakers:

  • Continue partnering with stakeholders to understand practical implications before imposing new sanctions and determine where additional clarifying guidance might be helpful.
  • Apply a consistent and coordinated approach to exemptions/authorizations to make it easier for multinational companies to provide services in challenging jurisdictions.
  • Provide clear guidelines for Internet-related companies as to when a domain or user may be subject to sanctions (i.e., adding domain names and email addresses to applicable sanctions lists) and ensure consistency across jurisdictions.

Looking forward

An integral part of Cloudflare’s mission to help build a better Internet involves making sure that ordinary individuals have access to a free and secure Internet. While global sanctions will continue to present challenges to Internet infrastructure companies, like Cloudflare, we are committed to both compliance with applicable sanctions and helping to maintain open lines of communication around the world–and we will continue to advocate for policies that do the same.

The challenges of sanctioning the Internet

How Cloudflare helps secure the inboxes of democracy

Post Syndicated from Ayush Kumar original https://blog.cloudflare.com/securing-the-inboxes-of-democracy/

How Cloudflare helps secure the inboxes of democracy

How Cloudflare helps secure the inboxes of democracy

We at Cloudflare believe that every candidate, no matter their political affiliation, should be able to operate their campaign without having to worry about the risk of cyberattacks. Malicious attackers such as nation-state threat actors, those seeking monetary reward, or those with too much time on their hands often disagree with our mission and aim to wreak havoc on the democratic process.

Protecting Email Inboxes Is Key In Stopping Attacks

In the past years, malicious actors have used email as their primary threat vector when trying to disrupt election campaigns. A quick search online shows how active attackers still are in trying to compromise election official’s email inboxes.1 Over 90% of damages done to any organization are caused by a phishing attack, making protecting email inboxes a key focus. A well crafted phishing email paired, or an errant click could give an attacker the opportunity to see sensitive information, disseminate false information to voters, or steal campaign donations.

For the United States 2022 midterm elections, Cloudflare protected the inboxes of over 100 campaigns, election officials and public organizations supporting elections. These campaigns ranged from new officials seeking spots in their local elections to incumbents in the national government. In the three months leading up to the recent elections, Cloudflare processed over 20 million emails and stopped around 150K phishing attacks from making their way into campaign officials’ email inboxes.

Political Campaigns Are Attacked Consistently

Some campaigns were targeted more than others. For example, the campaign of a specific incumbent seeking re-election in the US Senate saw their staff members receiving over 35 malicious emails on average every day. And attackers were not just phishing for credentials but also trying to impersonate officials. We saw over 10 thousand emails sent in the three-month span that were using the names of those running for office without their permission.

Below are the metrics we saw from a senator’s campaign who attackers frequently tried to phish.

How Cloudflare helps secure the inboxes of democracy

A candidate for the US House of Representatives saw their staff members receive an email with the subject “Staff Payroll Review” that asked them to access a document link.

Looking at the email, it would be tough to distinguish it from a valid internal email. It contained a valid email footer and branding that is consistent with the campaign. However, Area 1 models found several discrepancies within the metadata of the email and marked it as malicious.

Our models found that the domain sending these emails was suspicious based on how similar it was to the representative’s actual campaign email. We refer to this as domain proximity. Also analyzing the link found in the email found that it was recently registered, further adding suspicion to the validity of the email.

Taking in all the data points, Area 1 made sure that the email never made it to any campaign staff’s mailbox and prevented the loss of data and money.

How Cloudflare helps secure the inboxes of democracy

Another common attack campaigns see is the use of malicious attachments. These attachments can range from containing ransomware to data uploaders. The goal is to either slow down the politician’s campaign or exfiltrate sensitive information.

Attackers will use misdirection by either changing the extension of the attached file or by mentioning in the body of the email that the attachment is something more innocuous. We saw this in action for another campaign where a staffer was sent a targeted email asking them to download a purchase order.

Someone who processes hundreds of purchase orders a day does not have the time to thoroughly scrutinize every email and instead will focus on getting the money paid, so operations are not halted. Area 1’s models saved the staffer time and assessed this email to be malicious.

Our models first noticed that the attachment was a 7-Zip file called PO567.7z. Most purchase orders are sent via PDF so seeing it being sent as a 7z compressed file was concerning. Another data point the models assessed as being anomalous was the poor sentiment. The email not only has a glaring  grammatical mistake (i.e. “Dear Info,”) but also had poor message tone since it lacked common information found in legitimate purchase order emails.

How Cloudflare helps secure the inboxes of democracy

All these signals, combined with the fact that this is the first time the recipient has ever received communications from the sender, triggered Area 1 to stop the email from making it into any mailbox.

These examples speak about the trust that campaigns place in Cloudflare. Our ability to scan millions of emails and prevent dangerous ones from making it into mailboxes while allowing safe ones to reach their intended recipients with no interruptions is why so many campaigns chose Cloudflare’s Area 1 product to secure their mailboxes and by extension secure our democratic institutions.

Cloudflare’s Area 1 Solution

All this is possible because of Area 1’s preemptive campaign discovery and machine learning algorithms which analyze various threat signals, from email attachments, to the sender’s domain, to sentiment within the email itself in order to assess whether an email is malicious or not.

We also made Area 1 easily deployable, ensuring that campaigns are protected right away rather than having to spend time configuring hardware, agents, or appliances. Cloudflare also knows that election campaigns struggle to apply the appropriate email hygiene and authentication controls, stipulated by industry standards (such as SPF / DKIM / DMARC).

These can be complex and take time to implement. The rapid cycle of new campaigns makes it harder to set up the right email authentication controls that conform with industry best practices. Given that, it is all the more vital to ensure there are strong inbound technical controls against phishing and email-based attacks; letting campaigns focus on what’s most important – spreading their message to their constituents in the most effective & secure manner possible.
We know that those who seek to become political leaders have a target on their backs from attackers looking to disrupt the democratic process.

At Cloudflare, we believe in creating a better Internet and that means ensuring that inboxes remain secure. If you would like to learn more about how Area 1 works and other ways we protect email inboxes, please check out the Area 1 product page here.

…
1) https://www.cbsnews.com/feature/election-hacking/

The latest on attacks, traffic patterns and cyber protection in Ukraine

Post Syndicated from Alissa Starzak original https://blog.cloudflare.com/ukraine-update/

The latest on attacks, traffic patterns and cyber protection in Ukraine

The latest on attacks, traffic patterns and cyber protection in Ukraine

On February 24, 2022, when Russia invaded Ukraine, Cloudflare jumped into action to provide services that could help prevent potentially destructive cyber attacks and keep the global Internet flowing. In the nearly 10 months since that day, we’ve posted about our actions, network traffic patterns, cyberattacks and network outages we’ve seen during the conflict.

During Impact Week, we want to provide an update on where things currently stand, the role of security companies like Cloudflare, and some of our takeaways from the conflict so far.

Cyberattacks on Ukrainian infrastructure and Cloudflare’s assistance

Since the time of the invasion, Ukrainian government and civilian infrastructure has come under a barrage of DDoS and other common cyberattacks. Although the public perception has been that cyberattacks have not played a significant role in the conflict, cyberspace has been an active battlefield. Ukrainian websites saw a significant spike in application layer firewall mitigated attacks in March 2022 and another spike in mid-September. Ukrainian sites have also seen a significant increase in the percentage of requests that were mitigated as attack traffic on a daily average, when compared with Q4 2021.  Those spikes are shown below, using a seven-day rolling average:

The latest on attacks, traffic patterns and cyber protection in Ukraine
Note: our Firewall blocks malicious HTTP requests: e.g. L7 DDoS requests, hacking attempts, vulnerability scanning, brute force login attempts

Nor have the attacks abated as the conflict has worn on. Although we’ve seen a reduction in firewall mitigations, in recent months we have seen spikes in DDoS attacks. On a number of occasions in September and October, DDoS attack traffic amounted to more than 80 percent of all traffic to sites on the .ua top level domain, as shown in the chart below.

The latest on attacks, traffic patterns and cyber protection in Ukraine

Cloudflare was proud to play a role in ensuring that these types of widespread DDoS and other cyberattacks did not disrupt the Ukrainian Internet. Cloudflare has offered free services and support to a wide variety of Ukrainian government and infrastructure providers to help address those attacks since the beginning of the conflict. We currently protect approximately 130 Ukrainian domains in this program, run by more than 50 different Ukrainian government agencies and companies.

Many nonprofit groups trying to operate in the region by helping refugees, documenting war crimes, sharing information and providing local services have also had to contend with cyberattacks. We expedited the onboarding of these groups onto Cloudflare’s Project Galileo, Cloudflare’s project to provide free services to vulnerable non-profits and human rights defenders. Since the invasion, we have onboarded 54 organizations in Ukraine to Project Galileo. Overall, we protect 79 organizations in Ukraine. We currently protect 130 organizations in the broader region, with 77 organizations (including those in Ukraine) onboarded to the project during the crisis.

New models of security

As Russian troops advanced deep into Ukraine earlier this year, the physical security of Ukrainian Internet infrastructure became as much a concern as the digital security. Companies and data centers operating in the region had to plan for possible degradation of the infrastructure through power outages or bombings as well as the possibility that Russian forces might get physical access to their offices or equipment. This reality raised both security and data destruction concerns.

Cloudflare took steps to secure our infrastructure in the region, configuring our machines to brick themselves if they lost power or connectivity. We carefully monitored activity in the region, ensuring that we would be aware of any notable changes in circumstances. We also secured our customers’ data, moving customer key material out of our data centers in the region. We’ve continued to operate our services in the region with Keyless SSL.

The Russian occupation of Ukraine highlighted the importance of having networks and digital defense systems that extend beyond a single country’s borders. Ukrainian government agencies and companies looking to make sure they could continue to provide vital services migrated their data to public clouds, allowing them to move it to safety in data centers throughout Europe. Cloudflare’s massive global network allowed those same entities to easily mitigate cyberattacks in the country where the attacks originated, rather than battling massive influxes of traffic and attacks inside Ukraine.

The possibility that Russian troops would get physical access to work locations also brought into sharp view the need for entities to have granular control over access to internal systems and applications. Companies needed to be able to quickly and efficiently withdraw access for those who might have remained in the region. Cloudflare saw a spike in demand for our zero trust solutions, prompted by those concerns about possible lateral movement in the event of a breach, as well as the need for VPN availability and performance.

Internet disruptions and routing as tools in armed conflict

The world has been watching as the Ukrainian Internet has become a tool in the ongoing conflict. Internet shutdowns in war torn areas disrupt critical communications, making it challenging for people to learn about the safety of their loved ones and to disseminate information about events on the ground to the world.

At Cloudflare, we have tracked dozens of Internet outages in Ukraine since the beginning of the conflict, caused by power outages and Russian attacks. We continue to publicly report on outages in the Cloudflare Radar Outages Center.

Some of these outages also raise significant questions. On September 1, 2022, for example, the day the International Atomic Energy Agency (IAEA) inspectors arrived at the Zaporizhzhia Nuclear Power Plant, there were Internet outages in two local ISPs that service the area. Those outages lasted until September 10, as shown in the charts below.

The latest on attacks, traffic patterns and cyber protection in Ukraine

The latest on attacks, traffic patterns and cyber protection in Ukraine

The Russian military also took advantage of its occupation of parts of Ukraine to manipulate Internet access. In multiple instances, they took charge of local telecoms, forcing the rerouting of Internet traffic through Russia or even a complete change of traffic to a Russian Internet service provider. Between May 1, 2022, and September 1, 2022, Cloudflare tracked more than 20 networks whose routing was altered to a Russian Internet service provider. Eleven of those networks had routes altered between May 29, 2022, and May 31, 2022, just as Ukraine announced its counteroffensive in Kherson. Those actions resulted in imposition of the same Russian controls, surveillance, and censorship as the Internet within Russia, giving Russia significant control over the information environment in the affected areas.

What’s next?

We can’t predict how long the war in Ukraine will last, but we do know that the need for a secure and reliable Internet there is as critical as ever. At Cloudflare, we’re committed to continue providing tools that protect critical services from cyber attack, improve security for those operating in the region, and share information about what is happening with the Internet inside Ukraine.

Two months later: Internet use in Iran during the Mahsa Amini Protests

Post Syndicated from James Allworth original https://blog.cloudflare.com/two-months-later-internet-use-in-iran-during-the-mahsa-amini-protests/

Two months later: Internet use in Iran during the Mahsa Amini Protests

Two months later: Internet use in Iran during the Mahsa Amini Protests

A series of protests began in Iran on September 16, following the death in custody of Mahsa Amini — a 22-year-old who had been arrested for violating Iran’s mandatory hijab law. The protests and civil unrest have continued to this day. But the impact hasn’t just been on the ground in Iran — the impact of the civil unrest can be seen in Internet usage inside the country, as well.

With the proliferation of smartphones and the ubiquity of the Internet that has resulted, it’s no longer simply the offline world impacting the Internet; what happens on the Internet is impacting the offline world, too. For that reason, it’s not surprising that in order to limit the spread of the protests — both news of it happening and the further organization of civil unrest — the Iranian government introduced limits on the Internet. This included banning certain social media and communications tools: most notably including Instagram and WhatsApp, which are estimated to be used by over 50% of the Iranian population.

But despite the threat that the protests pose, and the Internet’s enabling role in them, it has not been cut off altogether. In fact, from the perspective of Cloudflare, Internet use in Iran has surged since the beginning of the protests.

This is a story of how critical the Internet has become to life, even in authoritarian regimes — and how even, after 12 years of planning, Iran has been unable to consistently cut off access to the Internet outside the country.

A history of control

Kafinet — Internet cafés — emerged in Iran in the late 90s and early 2000s. Internet use became prolific. But in 2005, it began to change under the election of the conservative President Ahmadinejad. The idea of an “Iranian Internet” was proposed — one that was consistent with the policies and principles of the Iranian government, and able to be controlled and regulated domestically — as opposed to how the Internet operated overseas. From a technical perspective, the hope was an Iranian Internet would still be able to work inside the country, even if it was fully disconnected from the outside world. While the idea was discussed, no real work on it truly began until 2009, when the Green protests — a series of mass protests following the disputed reelection of President Ahmadinejad — caused the government to appreciate the potential risk that the Internet posed. It was around this time that ISPs needed approval from the government to operate, and were required to filter content in order to continue to gain that approval.

In 2013, Iran took things a step further, and began work on a National Infrastructure Network (NIN), with the aim of recreating within Iran all the essential Internet services like search and messaging that had traditionally been provided by organizations outside of Iran. It was coupled with policies that subsidized and encouraged the use of these local services; which, as they were hosted domestically, made monitoring and filtering much more feasible.

It was not quite as extreme as the Chinese approach to the Internet, where similar overseas services were banned altogether, but it was certainly a shift in that direction. And given the limited number of physical network connections from Iran to the outside world, it was much more feasible for the government to take the step of cutting off Internet outside the country — while allowing select infrastructure within it (such as banking and government services) to remain online.

Iran has deployed such tactics previously: most notably during protests in November 2019, triggered by an increase in fuel prices.

The initial response

Our earlier blog covered the initial response to the protests extensively.

To provide context (measured over the last week) four providers in Iran account for 85% of traffic in Iran: three mobile and one fixed/wireline.

Two months later: Internet use in Iran during the Mahsa Amini Protests

As a baseline, the following traffic mix is what Cloudflare saw from these four major network providers in Iran the week before the protests started:

Two months later: Internet use in Iran during the Mahsa Amini Protests

The protests began on September 16. You can see the government’s response in the Internet traffic, with a shutdown implemented that lasts the better part of a day:

Two months later: Internet use in Iran during the Mahsa Amini Protests

However, the following days, it appears to return to a somewhat normal pattern.

What happened subsequently

Looking after that week, however, shows Internet usage picks up massively from the baseline as the protests spread across the country. Also of note: the “curfews” on the mobile networks that were implemented in that first week continued. You can see the troughs for all but the fixed Internet provider as traffic drops to near zero.

Two months later: Internet use in Iran during the Mahsa Amini Protests

What traffic looks like now

Looking at a more recent week, two things stand out: the level of network activity across the major providers in Iran remains much higher than it was previously. Also, the curfews appear to have been lifted, with Internet traffic declining overnight, but not “flatlining” as it was in the graphs above.

Two months later: Internet use in Iran during the Mahsa Amini Protests

The web persists, even in Iran

While the initial response of the Iranian government to the protests was to dramatically scale back access to the Internet, the government did not persist with the policy. Our hypothesis is that the Internet has become too important to economic activity and also everyday life for the country to be able to continue to operate without it. Despite having spent almost 10 years developing a NIN — an Iranian Internet — it appears that, in part because of the protests, traffic from the major Iranian networks to Cloudflare has picked up substantially, and the curfews have ceased.

Two months later: Internet use in Iran during the Mahsa Amini Protests

While certain Internet properties continue to be blocked without access to a VPN — WhatsApp, for example — the idea that a country can simply disconnect itself from the Internet into a country-specific “splinternet” is being further and further tested. Even in a country like Iran, subject to sanctions and with a government-led policy of attempting to recreate core services within a country, access to the broader Internet is too important to simply shut off.

Democratizing access to Zero Trust with Project Galileo

Post Syndicated from Jocelyn Woolbright original https://blog.cloudflare.com/democratizing-access-to-zero-trust-with-project-galileo/

Democratizing access to Zero Trust with Project Galileo

Democratizing access to Zero Trust with Project Galileo

Project Galileo was started in 2014 to protect free expression from cyber attacks. Many of the organizations in the world that champion new ideas are underfunded and lack the resources to properly secure themselves. This means they are exposed to Internet attacks aimed at thwarting and suppressing legitimate free speech.

In the last eight years, we have worked with 50 partners across civil society to onboard more than 2,000 organizations in 111 countries to provide our powerful cyber security products to those who work in sensitive yet critical areas of human rights and democracy building.

New security needs for a new threat environment

As Cloudflare has grown as a company, we have adapted and evolved Project Galileo especially amid global events such as COVID-19, social justice movements after the death of George Floyd, the war in Ukraine, and emerging threats to these groups intended to silence them. Early in the pandemic, as organizations had to quickly implement work-from-home solutions, new risks stemmed from this shift.

In our conversations with partners and participants, we noticed a theme. The digital divide in terms of cyber security products on the market and the “one size fits all” model mean that only large enterprises with a dedicated security team and extensive budgets have the ability to keep their internal resources and data secure. For Project Galileo, we work with a range of organizations that vary in size, internal capacity, and technical expertise. Especially since many of these groups rely on their online presence to collect donations, organize volunteers, and promote their mission, one size fits all security products do not match the needs and expertise for these groups.

Announcing new Zero Trust tools for Project Galileo participants

With this, we have extended our Zero Trust products to all domains under Project Galileo, as we want organizations to have access to Enterprise-level cyber security products no matter their size and budgets. Zero Trust security means that no one is trusted by default from inside or outside the network, and verification is required from everyone trying to gain access to resources on the network. This allows organizations of any size to solve the common security problems such as data loss, malware and phishing so these organizations can focus on their unique missions.

For Impact Week, we are excited to share how Project Galileo participants and partners use Cloudflare’s Zero Trust products to keep their operations running smoothly.

CyberPeace Institute

Democratizing access to Zero Trust with Project Galileo

We started partnering with the CyberPeace Institute for Project Galileo in 2022. As part of our partnership, we have worked to provide our cyber security services to at-risk organizations around the world.

Established in 2019, the CyberPeace Institute is an independent and neutral nongovernmental organization, headquartered in Switzerland, whose mission is to ensure the rights of people to security, dignity and equity in cyberspace. The Institute works in close collaboration with relevant partners to reduce the harms from cyberattacks on people’s lives worldwide. By analyzing cyberattacks, the Institute exposes their societal impact, how international laws and norms are being violated, and advances responsible behavior to enforce cyberpeace.
Since our partnership, we’ve been working to onboard their organization to Cloudflare Zero Trust, to secure critical applications and protect employees from online threats.

“The CyberPeace Institute works with humanitarian non-governmental organizations (NGOs) to protect their operations and build their cyber capabilities, data and resources in an increasingly complex digital environment. Both the Institute and Cloudflare share a core motivation to ensure the rights of people to security, dignity and equity in cyberspace. This alignment gives us confidence that Cloudflare is the right strategic partner as we evolve with our mission. We are grateful for the support of Project Galileo” stated Stéphane Duguin, Chief Executive Officer, CyberPeace Institute.

The Information Technology Disaster Resource Center

Democratizing access to Zero Trust with Project Galileo

The Information Technology Disaster Resource Center is a nonprofit composed of thousands of service oriented technical professionals and private sector partners that assist in disaster response operations in the United States. These teams train and work in collaboration with NGOs and first responders to deliver emergency communications and technical solutions to aid communities in crisis. ITDRC provides connectivity, Wi-Fi hotspots, cell phone charging stations, and Internet-enabled computers for shelters, fire camps, and community recovery. A key part of their mission is to leverage technology to connect survivors and responders amid crises.

ITDRC started using Cloudflare in 2020 when they were accepted to Project Galileo. Since then, they have implemented many Zero Trust products to secure their volunteers and employees.

Chris Hillis, Co-founder at ITDRC says, “Cloudflare Zero Trust is essential to securing our employees, volunteers, and disaster survivors on site and in the field. Cloudflare delivers secure, reliable, and fast connectivity to the Internet and critical applications that our teams need to respond to disasters effectively. Setting up policies has been simple for our administrators, and our team benefits from a safer, faster experience, whether accessing internally hosted applications, or the broader Internet. With Cloudflare Access, we are able to ensure that team members receive a consistent user experience accessing internal applications based on their role, all while utilizing our existing identity provider and securing our infrastructure. Utilizing Cloudflare Gateway adds an additional layer of security to our networks and devices, helping to protect our users from external threats, and themselves.”

Meedan

Democratizing access to Zero Trust with Project Galileo

Meedan is a global technology not-for-profit that builds software and programmatic initiatives to strengthen journalism, digital literacy, and accessibility of information online and off. They develop open-source tools for creating and sharing context on digital media through crowdsourcing, annotation, verification, archival, and translation. Their projects span issues including election monitoring, pandemic response, and human rights documentation.

Aaron Huslage, Director of Systems and Security at Meedan says, “Meedan and Cloudflare both share a vision of a more equitable, safer Internet. We were proud to be a founding member of Project Galileo in 2014 and support the work that program has done to protect Human Rights Defenders around the world. Closer to home Cloudflare helps our employees be more secure and productive when creating and distributing our open source software.”

Organization of American States

Democratizing access to Zero Trust with Project Galileo

The Organization of American States is the world’s oldest regional organization, dating back to the First International Conference of American States, held in Washington, D.C., from October 1889 to April 1890. Its 35 members focus on four main pillars — democracy, human rights, security, and development. It serves as a home for multilateral dialogue on topics such as the rights of indigenous peoples, territorial disputes, and regional goals for education.

“The partnership with Cloudflare will help the Organization of American States (OAS) democratize best-in-class security to modernize and strengthen our internal cybersecurity posture with a Zero Trust approach, delivered in the cloud, without sacrificing our workforce performance.” Andrew Vanjani, OAS Chief Information Officer.

How do I get started?

First, we want to thank all of our civil society partners that we work alongside to offer Cloudflare protection and work with us to extend even more products to organizations around the world. If you are an organization looking for protection under Project Galileo, please visit our website: cloudflare.com/galileo.

Expanding Area 1 email security to the Athenian Project

Post Syndicated from Jocelyn Woolbright original https://blog.cloudflare.com/expanding-area-1-email-security-to-the-athenian-project/

Expanding Area 1 email security to the Athenian Project

This post is also available in 简体中文, Deutsch, Français and Español.

Expanding Area 1 email security to the Athenian Project

Election security encompasses a wide variety of measures, including the protection of voting machines, election office networks, voter registration databases, and other systems that manage the electoral process. At Cloudflare, we have reported on threats to state and local governments under the Athenian Project, how we prepare political campaigns and state parties under Cloudflare for Campaigns for election season, and our work with organizations that report on election results and voting rights groups under Project Galileo.

Since the 2022 US midterm elections, we have been thinking about how we help state and local governments deflect larger cyber threats that target the election community and have been analyzing the biggest problems they are facing. In October 2022, Jen Easterly, the director of the Cybersecurity and Infrastructure Security Agency, said, “The current election threat environment is more complex than it has ever been.” Amid threats, intimidation toward election workers, and cyber attacks against election infrastructure and operations, preparing for elections is no easy task.

At Cloudflare, our mission is to help build a better Internet. The Internet plays a key role in promoting democracy and ensuring constituents’ access to information. With this, we are excited to share that we have grown our offering under the Athenian Project to include Cloudflare’s Area 1 email security suite to help state and local governments protect against a broad spectrum of phishing attacks to keep voter data safe and secure.

Our work in protecting elections

To understand why we have expanded our product set, we need to look back on how our services have helped state and local governments during election time. Under the Athenian Project, we have provided our highest level of Cloudflare services—the Enterprise plan—for free to state and governments that run elections. The idea originally was that, just like every other Internet property, election websites need to be fast, they need to be reliable, and they need to be secure. Yet, scarce budgets too often prevent governments from getting the right resources to prevent attacks and stay online.

With this, we launched the Athenian Project in 2017. It includes many of our core web services, such as DDoS protection, Web Application Firewall, SSL encryption, and more security features that focus on web applications. We have been able to provide these services to local governments in 31 states and currently protect 359 election entities in the United States.

We have expanded our product set at Cloudflare with Workers, Pages, Zero Trust, and network security solutions. With this, we wanted to understand how we can better support the election community that we work with every day on the Athenian Project.

We knew we could provide more

Internally, we brainstormed on the most pressing issues that face the election community and overall Internet ecosystem. We also asked new and existing Athenian participants on the largest pain points they have when it comes to securing their internal networks and applications. We received a range of answers, from fears of a DDoS attack on election night, to zero-day exploits, on-path attacks, and malware attacks. Many of the same themes came up, especially for small counties that run elections with a huge fear of phishing and ransomware attacks.

Despite email’s importance as a communication method, many types of email security still are not built into email by default. As a result, email is a major attack vector for organizations large and small, and for individual people as well. We have seen firsthand phishing attempts that take advantage of human psychology to encourage quick —and unfortunate— decision-making. Once an attacker has infiltrated a network, they can easily move laterally undetected and impact a wide range of sensitive internal systems.

That is why email security plays a critical role in preemptive defenses against ransomware attacks. Since many of these attacks start with a malicious or phishing email, effective email security can act as a frontline defense against ransomware, and stop these attacks before they reach inboxes. Due to the ease with which threats can be blocked before they reach an election official’s inbox, we were excited to work with those in the election space to find the best way to make these products available.

Typically, when we offer new security products under our Impact projects, we collaborate with external stakeholders. One example is the civil society groups that we partner with under Project Galileo; many of them work in the election community and at government agencies, such as CISA’s Joint Cyber Defense Collaborative (JCDC). These partnerships help us understand how to provide these security tools in a responsible and sustainable way.

How one North Carolina county uses Area 1 email security

Months before the 2022 US midterm elections, we reached out to a few state and local governments that currently use Zero Trust products, such as Access and Gateway, to discuss email security.

Expanding Area 1 email security to the Athenian Project

One of our Athenian participants that was eager to work with us on this expansion was Rowan County, North Carolina. For Randy Cress, CIO for Rowan County, election season means all hands on deck for IT staff in order to secure their .gov site that provides accurate, secure information to voters.

In 2020, Rowan County reported that Cloudflare helped them tackle a 400% increase in traffic on a limited budget which allowed them to refocus resources on other county initiatives. When it comes to phishing attacks, Randy wanted to shield county employees from phishing attacks and block malicious threats automatically.

“Prior to Area 1 Security, we were using Office 365 email protection with limited insight for the specifics for messages that were quarantined. While cloud services from Microsoft are continually evolving, we were looking to reduce complexity to support security functions within our environment, allowing us to continue implementing new layers of defense.”

Deploying Area 1 gave the county the ability to preemptively discover and eliminate phishing attacks before they inflict damage in their environment. Randy added, “Our team was able to fully onboard prior to the official onboarding call in less than 30 minutes with Cloudflare. We were able to focus on features and specifics of the product offering in lieu of time spent in configuration mode and troubleshooting. Since we are using Cloudflare for DNS and DDoS protection, the changes were extremely easy and there were no interruptions to our mail delivery process.”

For the 2022 US midterm elections, Randy reported, “Leading up to the elections, reports within our Area 1 dashboard indicated 2x as many inbound malicious emails from the same time period in October 2022. We saw credential harvesting as the top threat, and we are easily able to see which users are targeted for email compromise. With Area 1 Security under the Athenian Project, we were able to add additional layers of security to our organization, as it allowed us to preemptively defend against malicious messages before an employee can click on a malicious link. This gives us comfort knowing that Cloudflare is our first line of defense, so we can focus on providing a secure voting process for the constituents of Rowan County.”

Area 1 and the Athenian Project

Cloudflare Area 1 email security is a cloud-native service that stops phishing attacks and can be used with Enterprise accounts under the Athenian Project. If you are a state or local government that is interested in learning more about the Athenian Project, please apply on our website: https://www.cloudflare.com/athenian/.

Security updates for Monday

Post Syndicated from original https://lwn.net/Articles/917690/

Security updates have been issued by Debian (cacti, grub2, hsqldb, node-eventsource, and openexr), Fedora (bcel, keylime, rust-capnp, rust-sequoia-octopus-librnp, xfce4-screenshooter, and xfce4-settings), Oracle (nodejs:18), Scientific Linux (grub2), Slackware (libarchive), SUSE (go1.18, go1.19, nautilus, opera, python-slixmpp, and samba), and Ubuntu (python2.7, python3.5, qemu, and squid3).

Quick update on Pluton and Linux

Post Syndicated from original https://mjg59.dreamwidth.org/63219.html

I’ve been ridiculously burned out for a while now but I’m taking the month off to recover and that’s giving me an opportunity to catch up on a lot of stuff. This has included me actually writing some code to work with the Pluton in my Thinkpad Z13. I’ve learned some more stuff in the process, but based on everything I know I’d still say that in its current form Pluton isn’t a threat to free software.

So, first up: by default on the Z13, Pluton is disabled. It’s not obviously exposed to the OS at all, which also means there’s no obvious mechanism for Microsoft to push out a firmware update to it via Windows Update. The Windows drivers that bind to Pluton don’t load in this configuration. It’s theoretically possible that there’s some hidden mechanism to re-enable it at runtime, but that code doesn’t seem to be in Windows at the moment. I’m reasonably confident that “Disabled” is pretty genuinely disabled.

Second, when enabled, Pluton exposes two separate devices. The first of these has an MSFT0101 identifier in ACPI, which is the ID used for a TPM 2 device. The Pluton TPM implementation doesn’t work out of the box with existing TPM 2 drivers, though, because it uses a custom start method. TPM 2 devices commonly use something called a “Command Response Buffer” architecture, where a command is written into a buffer, the TPM is told to do a thing, and the response to the command ends up in another buffer. The mechanism to tell the TPM to do a thing varies, and an ACPI table exposed to the OS defines which of those various things should be used for a given TPM. Pluton systems have a mechanism that isn’t defined in the existing version of the spec (1.3 rev 8 at the time of writing), so I had to spend a while staring hard at the Windows drivers to figure out how to implement it. The good news is that I now have a patch that successfully gets the existing Linux TPM driver code work correctly with the Pluton implementation.

The second device has an MSFT0200 identifier, and is entirely not a TPM. The Windows driver appears to be a relatively thin layer that simply takes commands from userland and passes them on to the chip – I haven’t found any userland applications that make use of this, so it’s tough to figure out what functionality is actually available. But what does seem pretty clear from the code I’ve looked at is that it’s a component that only responds when it’s asked – if the OS never sends it any commands, it’s not able to do anything.

One key point from this recently published Microsoft doc is that the whole “Microsoft can update Pluton firmware” thing does just seem to be the ability for the OS to push new code to the chip at runtime. That means Microsoft can’t arbitrarily push new firmware to the chip – the OS needs to be involved. This is unsurprising, but it’s nice to see some stronger confirmation of that.

Anyway. tl;dr – Pluton can (now) be used as a regular TPM. Pluton also exposes some additional functionality which is not yet clear, but there’s no obvious mechanism for it to compromise user privacy or restrict what users can run on a Free operating system. The Pluton firmware update mechanism appears to be OS mediated, so users who control their OS can simply choose not to opt in to that.

comment count unavailable comments

Apple Is Finally Encrypting iCloud Backups

Post Syndicated from Bruce Schneier original https://www.schneier.com/blog/archives/2022/12/apple-is-finally-encrypting-icloud-backups.html

After way too many years, Apple is finally encrypting iCloud backups:

Based on a screenshot from Apple, these categories are covered when you flip on Advanced Data Protection: device backups, messages backups, iCloud Drive, Notes, Photos, Reminders, Safari bookmarks, Siri Shortcuts, Voice Memos, and Wallet Passes. Apple says the only “major” categories not covered by Advanced Data Protection are iCloud Mail, Contacts, and Calendar because “of the need to interoperate with the global email, contacts, and calendar systems,” according to its press release.

You can see the full list of data categories and what is protected under standard data protection, which is the default for your account, and Advanced Data Protection on Apple’s website.

With standard data protection, Apple holds the encryption keys for things that aren’t end-to-end encrypted, which means the company can help you recover that data if needed. Data that’s end-to-end encrypted can only be encrypted on “your trusted devices where you’re signed in with your Apple ID,” according to Apple, meaning that the company—or law enforcement or hackers—cannot access your data from Apple’s databases.

Note that this system doesn’t have the backdoor that was in Apple’s previous proposal, the one put there under the guise of detecting CSAM.

Apple says that it will roll out worldwide by the end of next year. I wonder how China will react to this.

Computational thinking all year round with UK Bebras

Post Syndicated from Chris Roffey original https://www.raspberrypi.org/blog/computational-thinking-resources-uk-bebras-2022/

This November, teachers across the UK helped 367,023 learners participate in the annual free UK Bebras Challenge of computational thinking.

Bebras UK logo
‘Bebras’ is Lithuanian and means ‘beaver’.

We support this challenge in the UK, together with Oxford University, and Bebras Challenges run across the world, with more than 3 million learners from schools in 54 countries taking part in 2021. Bebras encourages a love of computational thinking, computer science, and problem solving, especially among learners who haven’t yet realised they have these skills.

More and more schools are taking part in the UK Bebras Challenge

Nearly every year since 2013, more UK schools have been participating in Bebras. We think this is because for teachers, registering and entering learners is easy, the online system does all the marking automatically, and teachers receive comprehensive results that can be helpful for assessment.

A line graph showing the number of annual participants in the UK Bebras Challenge, from less than 50,000 in 2013 to over 350,000 in 2022.

The computational thinking problems within Bebras are tailored for different age groups, use clear language, and are accessible to colour-blind learners. There is also a challenge for learners with visual impairments. Teachers who run Bebras in their schools seem to love it and regularly tell colleagues about it. 

“Our pupils really enjoy [Bebras] and I find it so helpful to teach computational thinking with real-life strategies. We also find the data and information about our pupils’ performance extremely helpful.” — Teacher in London

Age-appropriate computational thinking problems

In the UK Bebras Challenge, the younger learners aged 6 to 10 usually take part in teams and have plenty of time to discuss how to solve the computational thinking problems they are presented with.

Older learners, aged 10 to 18, try to solve as many problems as they can in 40 minutes. The problems they are presented with start off easy and get increasingly difficult. The 10% of participants who solve the most problems are then invited to take part in the Oxford University Computing Challenge (OUCC), an annual programming challenge.

Year-round free resources for teachers

Although the OUCC is only open to some Bebras participants, all of the OUCC problems are archived and teachers registered with Bebras can use them to make auto-marking quizzes for all of their learners at any time of the year. Part of the goal of UK Bebras is to support teachers with free resources, and the UK Bebras online quizzes facility now has computational thinking tasks from the Bebras archive, plus auto-marking Blockly programming problems and text-based programming problems, which can be solved using commonly taught programming languages.

If you want to get a taste of Bebras, check out some of the interactive challenges that require no registration. And if you’d like to register to make quizzes for your learners and find out about next year’s challenge, you can do so at bebras.uk/admin.

The post Computational thinking all year round with UK Bebras appeared first on Raspberry Pi.

The collective thoughts of the interwebz