In the weeks leading up to AWS re:Invent 2022, I’m interviewing some of the humans who work in AWS Security, help keep our customers safe and secure, and also happen to be speaking at re:Invent. This interview is with Param Sharma, principal software engineer for AWS Private Certificate Authority (AWS Private CA). AWS Private CA enables you to create private certificate authority (CA) hierarchies, including root and subordinate CAs, without the investment and maintenance costs of operating an on-premises CA.
How long have you been at AWS and what do you do in your current role?
I’ve been here for more than eight years—I joined AWS in July 2014, working in AWS Security. These days, I work on public key infrastructure (PKI) and cryptography, focusing on products like AWS Certificate Manager (ACM) and AWS Private CA.
How did you get started in the world of security, specifically cryptography?
I had a very short stint with crypto during my university days—I presented a paper on steganography and cryptography back in 2002 or 2003. Security has been an integral part of developing and deploying large-scale web applications, which I’ve done throughout my career. But security took center stage in 2014 when I heard from an AWS recruiter about a new service being built that would make certificates easier. I had no clue what that service was, since it was confidential and hadn’t been launched yet, but it brought cryptography back into my life. I started working on this brand-new service, AWS Certificate Manager. I designed the operational security aspect of it and worked to make sure it could be used by millions of our customers and could be available and secure at the same time. I was the second person hired on the ACM team, and since then the team has grown significantly.
What was the most surprising or interesting thing you’ve worked on in your time at AWS?
It might not be surprising, but certainly interesting to me: I was the first engineer to be hired on the AWS Private CA team and I started studying the problem of how certificate authorities would work in the cloud. I had to think about how the customer experience would look, the service architecture design, the operational side of things like availability and security of customer data. Doing a 360-degree review of the service and writing the design document for a service that was eventually deployed in a multitude of AWS Regions was one of the most interesting things I have worked on at AWS. It continues to be an interesting challenge as we add new features—which tend to be like smaller AWS services in their own right even though they are features of AWS Private CA.
How do you explain to customers how to use AWS Private CA?
I start by explaining what a private certificate is. A private certificate provides a flexible way to identify almost anything in an organization without disclosing the name publicly. With AWS Private CA, AWS takes care of the undifferentiated heavy lifting involved in operating a private CA. We provide security configuration, management, and monitoring of highly available private CAs. The service also helps organizations avoid spending money on servers, hardware security modules (HSMs), operations, personnel, infrastructure, software training, and maintenance. Maintaining PKI administrators, for example, can cost hundreds or thousands of dollars per year. AWS Private CA simplifies the process of creating and managing these private CAs and certificates that are used to identify resources and provide a basis for trusted identity in communications.
In your opinion, what is the coolest feature of AWS Private CA?
That’s going to be really hard to pick! To me, the coolest feature is root CA, which gives customers the ability to create and manage root CAs in the cloud. Root CAs are used to create subordinate CAs for issuing identity certificates. And these private CAs can be used to identify resources in a private network within an organization. You can use these private certs on application services, devices, or even for identifying users for identity certificates.
AWS Private CA has evolved since its launch in 2018. What are some of the new ways you see customers using the service?
When AWS Private CA was launched in 2018, the primary feature was to create and manage subordinate CAs, which were signed offline outside of AWS Private CA. The secondary feature was to issue certificates for identifying endpoints for TLS/SSL communication. Over the last four or five years, I’ve seen use cases become more diversified, and the service has evolved as the customers’ needs have evolved. The biggest paradigm shift that I’ve seen is that customers are customizing certificates and using them to identify IoT devices or customer-managed Kubernetes clusters. The certificates can even be used on-premises for your Amazon Elastic Compute Cloud (Amazon EC2) instances or your on-premises servers, where you can use these services to encrypt the traffic in transit or at rest in certain cases. The other more recent use case I’ve started to see is customers using AWS Private CA with AWS Identity and Access Management Roles Anywhere, which launched in July 2022. Customers are using this combination to issue certificates for identity, which is tied to the credentials themselves.
I understand you’ll be speaking at re:Invent 2022. Can you tell us about your session there? What do you hope customers take away from your session?
I am doing two sessions at re:Invent this year. The first one, Understanding the evolution of cloud-based PKI use cases, is a chalk talk about how cloud-based PKI use cases have evolved over the last 5–10 years. This talk is mainly for PKI administrators, information security engineers, developers, managers, directors, and IoT security professionals who want to learn more about how X.509 digital certificates are used in the cloud. We will dive deep into how these certs are being used for normal TLS communication, device certificates, containers, or even certificates used for identity like in IAM Roles Anywhere. The second session is a breakout session called AWS data protection: Using locks, keys, signatures, and certificates. It puts a spotlight on what AWS offers in terms of cryptographic tools and PKI platforms that help our customers navigate their data protection and digital signing needs. This session will provide a ground-floor understanding of how to get this protection by default or when needed, and how can you build your own logs, keys, and signatures for you own cloud application.
What’s the thing you’re most proud of in your career?
I’m proud to work with some of the smartest people who, at the same time, are very humble and genuinely believe in making this world a better place for everyone.
Outside of your work in tech, what is something you’re interested in that might surprise people?
I have a five-year-old and a three-year-old, so whenever I get some time to myself between those two, I love to read and take long strolls. I’m a passionate advocate that every voice is unique and has value to share. I’m a diversity and inclusion ambassador at Amazon and as part of this program, I mentor underrepresented groups and help build a community with integrity and a willingness to listen to others, which provides a space for us to be ourselves without fear of judgement. I try to do volunteer work whenever possible, being involved in community service programs organized through my children’s school activities, or even participating in local community kitchens by cooking and serving food that is distributed through a local non-profit organization.
If you had to pick an industry outside of security, what would you want to do?
I would’ve been a teacher or worked with a non-profit organization mentoring and volunteering. I think volunteering gives me a sense of peace.
If you have feedback about this post, submit comments in the Comments section below. If you have questions about this post, contact AWS Support.
Want more AWS Security news? Follow us on Twitter.
Customers using Amazon DevOps Guru often wants to publish operational insights to chat collaboration platforms, such as Slack and Amazon Chime. Amazon DevOps Guru offers a fully managed AIOps platform service that enables developers and operators to improve application availability and resolve operational issues faster. It minimizes manual effort by leveraging machine learning (ML) powered recommendations. DevOps Guru automatically detects operational insights, predicts impending resource exhaustion, details likely cause, and recommends remediation actions. For customers running critical applications, having access to these operational insights and real-time alerts are key aspects to improve their overall incident remediation processes and maintain operational excellence. Customers use chat collaboration platforms to monitor operational insights and respond to events, which reduces context switching between applications and provides opportunities to respond faster.
This post walks you through how to integrate DevOps Guru with Slack channel to receive notifications for new operational insights detected by DevOps Guru. It doesn’t talk about enabling Amazon DevOps Guru and generating operational insights. You can refer to Gaining operational insights with AIOps using Amazon DevOps Guru to know more about this.
Solution overview
Amazon DevOps Guru integrates with Amazon EventBridge to notify you of events relating to insights and corresponding insight updates. To receive operational insight notifications in Slack channels, you configure routing rules to determine where to send notifications and use pre-defined DevOps Guru patterns to only send notifications or trigger actions that match that pattern. You can select any of the following pre-defined patterns to filter events to trigger actions in a supported AWS resource. For this post, we will send events only for “New Insights Open”.
DevOps Guru New Insight Open
DevOps Guru New Anomaly Association
DevOps Guru Insight Severity Upgraded
DevOps Guru New Recommendation Created
DevOps Guru Insight Closed
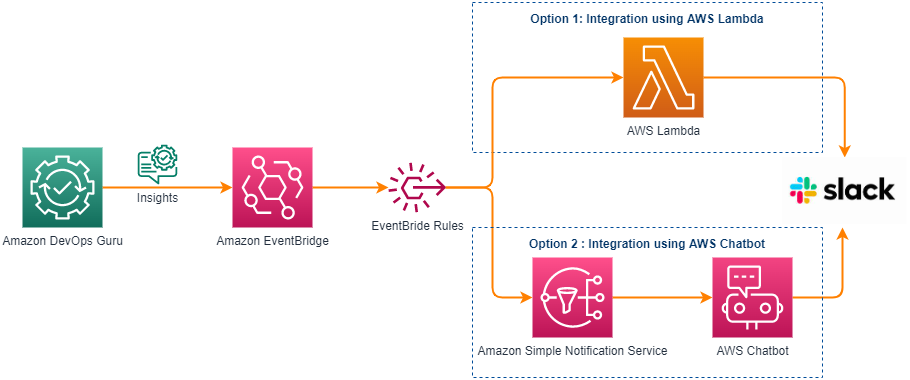
When EventBridge receives an event from DevOps Guru, the event rule fires and the event notification is sent to Slack channel by using AWS Lambda or AWS Chatbot. Chatbot is easier to configure and deploy. However, if you want more customization, we have also written a Lambda function that allows additional formatting options.
Figure 1: Amazon EventBridge Integration with Slack using AWS Lambda or AWS Chatbot
The goal of this tutorial is to show a technical walkthrough of integration of DevOps Guru with Slack using the following options:
Publish using AWS Lambda
Publish using AWS Chatbot
Prerequisites
For this walkthrough, you should have the following prerequisites:
We recommend using AWS Cloud9 to create an environment to get access to the AWS Serverless Application Model (SAM) CLI or AWS Command Line Interface (CLI) from a bash terminal. AWS Cloud9 is a browser-based IDE that provides a development environment in the cloud. While creating the new environment, ensure you choose Linux2 as the operating system. Alternatively, you can use your bash terminal in your favorite IDE, configure your AWS credentials, and install AWS SAM or AWS CLI
Publish using AWS Lambda
In this tutorial, you will perform the following steps:
Create a Slack Webhook URL
Launch SAM template to deploy the solution
Test the solution
Create a Slack Webhook URL
This step configures Slack workflow and creates a Webhook URL used for API call. You will need to have access to add a new channel and app to your Slack Workspace.
Create a new channel for events (i.e. devopsguru_events).
Within Slack, click on your workspace name drop-down arrow in the upper left.
Choose Tools > Workflow Builder.
Click Create in the upper right-hand corner of the Workflow Builder and give your workflow a name.
Click Next.
Click Select next to Webhook.
Click Add variable and add the following variables one at a time in the Key section. All data types will be text.
text
account
region
startTime
insightType
severity
description
insightUrl
numOfAnomalies
When done, you should have 9 variables, double check them as they are case sensitive and will be referenced.
Click Add Step.
On the Add a workflow step window, click Add next to send a message.
Under Send this message to select the channel you created in earlier step.
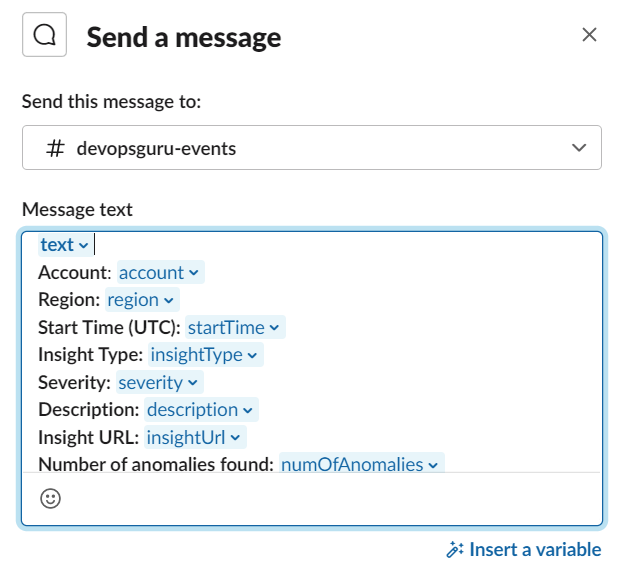
In Message text, create the following.
Figure 2: Message text configuration in Slack
Click Save.
Click Publish.
For the deployment, we will need the Webhook URL. Copy it in the notepad.
Launch SAM template to deploy the solution
In this step, you will launch the SAM template. This template deploys an AWS Lambda function that is triggered by an Amazon EventBridge rule when Amazon DevOps Guru notifies event relating to “DevOps Guru New Insight Open”. It also deploys AWS Secret Manager, Amazon EventBridge Rule and required permission to invoke this specific function. The AWS Lambda function retrieves the Slack Webhook URL from AWS Secret Manager and posts a message to Slack using webhook API call.
Create a new directory, navigate to that directory in a terminal and clone the GitHub repository using the below command.
Change directory to the directory where you cloned the GitHub repository.
cd devops-guru-integration-with-slack
From the command line, use AWS SAM to build the serverless application with its dependencies.
sam build
From the command line, use AWS SAM to deploy the AWS resources for the pattern as specified in the template.yml file.
sam deploy --guided
During the prompts.
enter a stack name.
enter the desired AWS Region.
enter the Secret name to store Slack Channel Webhook URL.
enter the Slack Channel Webhook URL that you copied in an earlier step.
allow SAM CLI to create IAM roles with the required permissions.
Once you have run sam deploy --guided mode once and saved arguments to a configuration file (samconfig.toml), you can use sam deploy in future to use these defaults.
Test the solution
Follow this blog to enable DevOps Guru and generate operational insights.
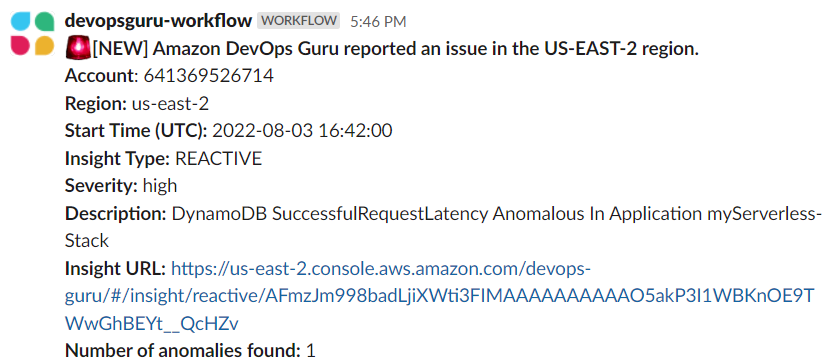
When DevOps Guru detects a new insight, it generates events in EventBridge. EventBridge then triggers Lambda that sends it to a Slack channel as below.
Figure 3. Message published to Slack
Cleaning up
To avoid incurring future charges, delete the resources.
Delete resources deployed from this blog.
From the command line, use AWS SAM to delete the serverless application with its dependencies.
sam delete
Publish using AWS Chatbot
In this tutorial, you will perform the following steps:
Configure Amazon Simple Notification Service (SNS) and Amazon EventBridge using the AWS Command Line Interface (CLI)
Configure AWS Chatbot to a Slack workspace
Test the solution
Configure Amazon SNS and Amazon Eventbridge
We will now configure and deploy an SNS topic and an Eventbridge rule. This EventBridge rule will be triggered by DevOps Guru when “DevOps Guru New Insight Open” events are generated. The event will then be sent to the SNS topic which we will configure as a target for the Eventbridge rule.
Using CLI, create an SNS topic running the following command in the CLI. Alternatively, you can configure and create an SNS topic in the AWS management console.
Save the SNS topic ARN that is generated in the CLI for a later step in this walkthrough.
Now we will create the Eventbridge rule. Run the following command to create the Eventbridge rule. Alternatively, you can configure and create the rule in the AWS management console.
aws events put-rule --name "devops-guru-insights-chatbot-rule" -
-event-pattern "{\"source\":[\"aws.devops-guru\"],\"detail-type\":[\"DevOps
 Guru New Insight Open\"]}"
We now want to add targets to the rule we just created. Use the ARN of the SNS topic we created in step one.
Under Configure a chat client, select Slack from the dropdown and click Configure Client.
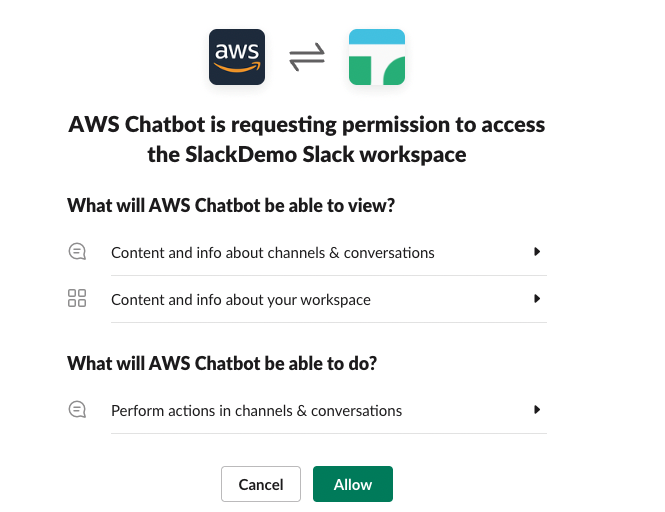
You will then need to give AWS Chatbot permission to access your workspace, click Allow.
Figure 4. AWS Chatbot requesting permission
Once configured, you’ll be redirected to the AWS management console. You’ll now want to click Configure new channel.
Use the follow configurations for the setup of the Slack channel.
Configuration Name: aws-chatbot-devops-guru
Channel Type: Public or Private
If adding Chatbot to a private channel, you will need the Channel ID. One way you can get this is by going to your slack channel and copying the link, the last set of unique characters will be your Channel ID.
Region: us-east-1 (Select the region you created the SNS topic in)
Topics: devops-guru-insights-chatbot-topic
Click Configure.
You should now have your slack channel configured for AWS Chatbot.
Finally, we just need to invite AWS Chatbot to our slack channel.
Type /invite in your slack channel and it will show different options.
Select Add apps to this channel and invite AWS Chatbot to the channel.
Now your solution is fully integrated and ready for testing.
Test the solution
Follow this blog to enable DevOps Guru and generate operational insights.
When DevOps Guru detects a new insight, it generates events in EventBridge, it will send those events to SNS. AWS Chatbot receives the notification from SNS and publishes the notification to your slack channel.
Figure 5. Message published to Slack
Cleaning up
To avoid incurring future charges, delete the resources.
When ready, delete the EventBridge rule, SNS topic, and channel configuration on Chatbot.
Conclusion
In this post, you learned how Amazon DevOps Guru integrates with Amazon EventBridge and publishes insights into Slack channel using AWS Lambda or AWS Chatbot. “Publish using AWS Lambda” option gives more flexibility to customize the message that you want to publish to Slack channel. Using “Publish using AWS Chabot”, you can add AWS Chatbot to your Slack channel in just a few clicks. However, the message is not customizable, unlike the first option. DevOps users can now monitor all reactive and proactive insights into Slack channels. This post talked about publishing new DevOps Guru insight to Slack. However, you can expand it to publish other events like new recommendations created, new anomaly associated, insight severity upgraded or insight closed.
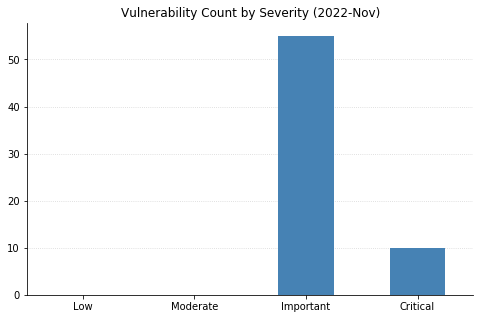
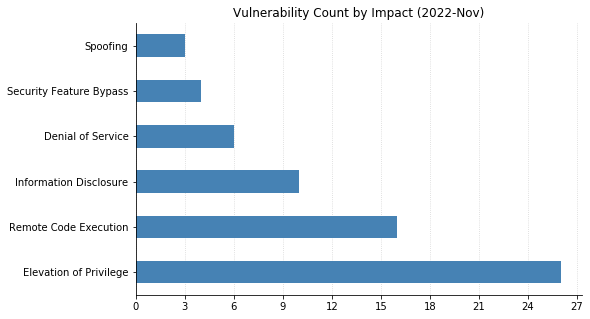
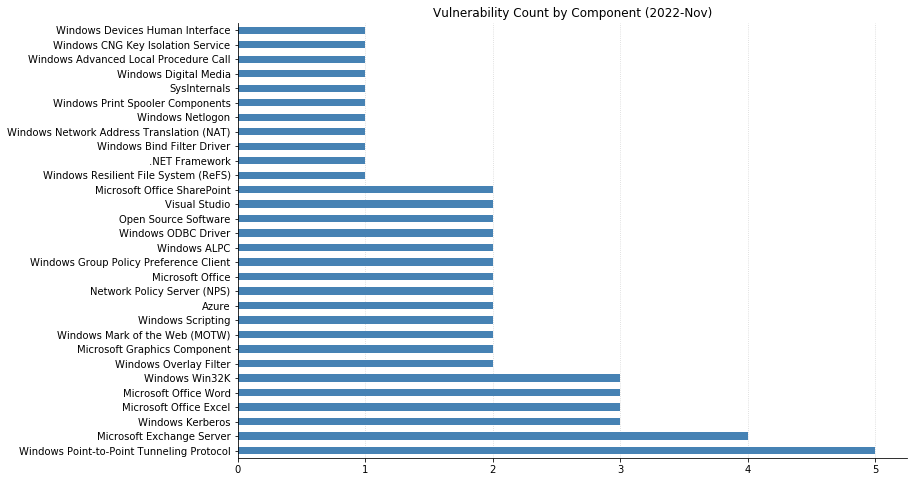
It’s a relatively light Patch Tuesday this month by the numbers – Microsoft has only published 67 new CVEs, most of which affect their flagship Windows operating system. However, four of these are zero-days, having been observed as exploited in the wild.
The big news is that two older zero-day CVEs affecting Exchange Server, made public at the end of September, have finally been fixed. CVE-2022-41040 is a “Critical” elevation of privilege vulnerability, and CVE-2022-41082 is considered Important, allowing Remote Code Execution (RCE) when PowerShell is accessible to the attacker. Both vulnerabilities have been exploited in the wild. Four other CVEs affecting Exchange Server have also been addressed this month. Three are rated as Important, and CVE-2022-41080 is another privilege escalation vulnerability considered Critical. Customers are advised to update their Exchange Server systems immediately, regardless of whether any previously recommended mitigation steps have been applied. The mitigation rules are no longer recommended once systems have been patched.
Three of the new zero-day vulnerabilities are:
CVE-2022-41128, a Critical RCE affecting the JScript9 scripting language (Microsoft’s legacy JavaScript dialect, used by their Internet Explorer browser).
CVE-2022-41073 is the latest in a storied history of vulnerabilities affecting the Windows Print Spooler, allowing privilege escalation and considered Important.
CVE-2022-41125 is also an Important privilege escalation vulnerability, affecting the Windows Next-generation Cryptography (CNG) Key Isolation service.
The fourth zero-day, CVE-2022-41091, was previously disclosed and widely reported on in October. It is a Security Feature Bypass of “Windows Mark of the Web” – a mechanism meant to flag files that have come from an untrusted source.
Exchange Server admins are not the only ones on the hook this month: SharePoint Server is affected by CVE-2022-41062, an Important RCE that could allow an attacker who has Site Member privileges to execute code remotely on the server. CVE-2022-41122, a Spoofing vulnerability that Microsoft rates as “Exploitation more likely” than not, was actually addressed in September’s SharePoint patches but not included in their Security Update Guide at the time.
This month also sees Microsoft’s third non-CVE security advisory of the year, ADV220003, which is a “defense-in-depth” update for older versions of Microsoft Office (2013 and 2016) that improves validation of documents protected via Microsoft’s Information Rights Management (IRM) technology – a feature of somewhat dubious value, meant to help prevent sensitive information from being printed, forwarded, or copied without authorization.
Welcome back to our blog series on Rapid7’s IoT Village exercise from DEF CON 30. In our previous posts, we covered how to achieve access to flash memory, how to extract file system data from the device, and how to modify the data we’ve extracted. In this post, we’ll cover how to gain root access over the device’s secure shell protocol (SSH).
Gaining root access over SSH
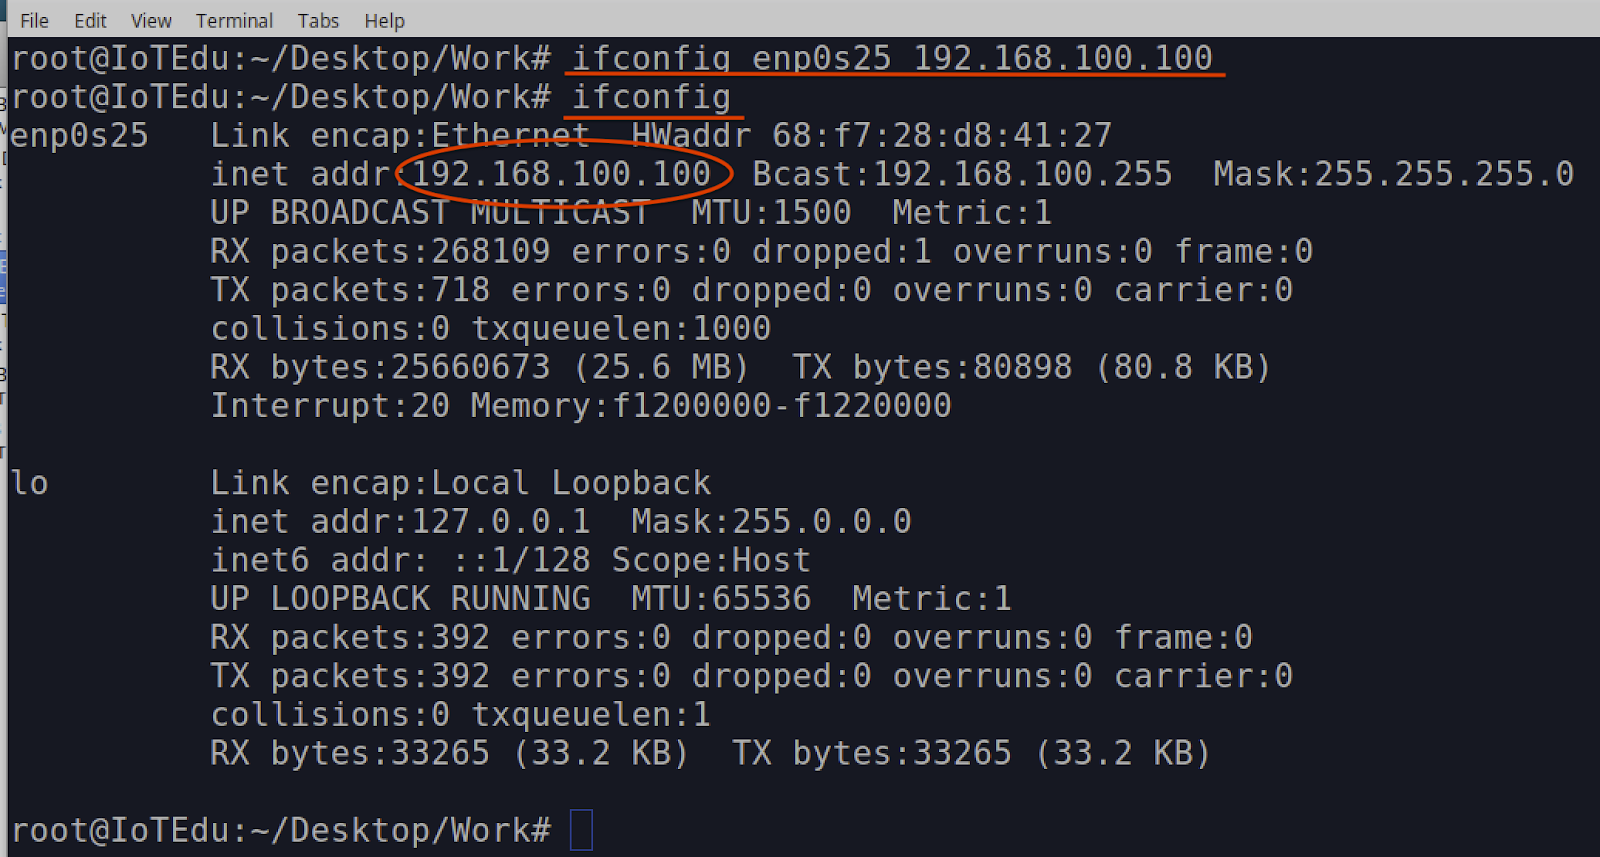
Before we move on to establishing SSH connect as root, you may need to set the local IP address on your local host to allow you to access the cable modem at its default IP address of 192.168.100.1. In our example, we set the local IP address to 192.168.100.100 to allow this connection.
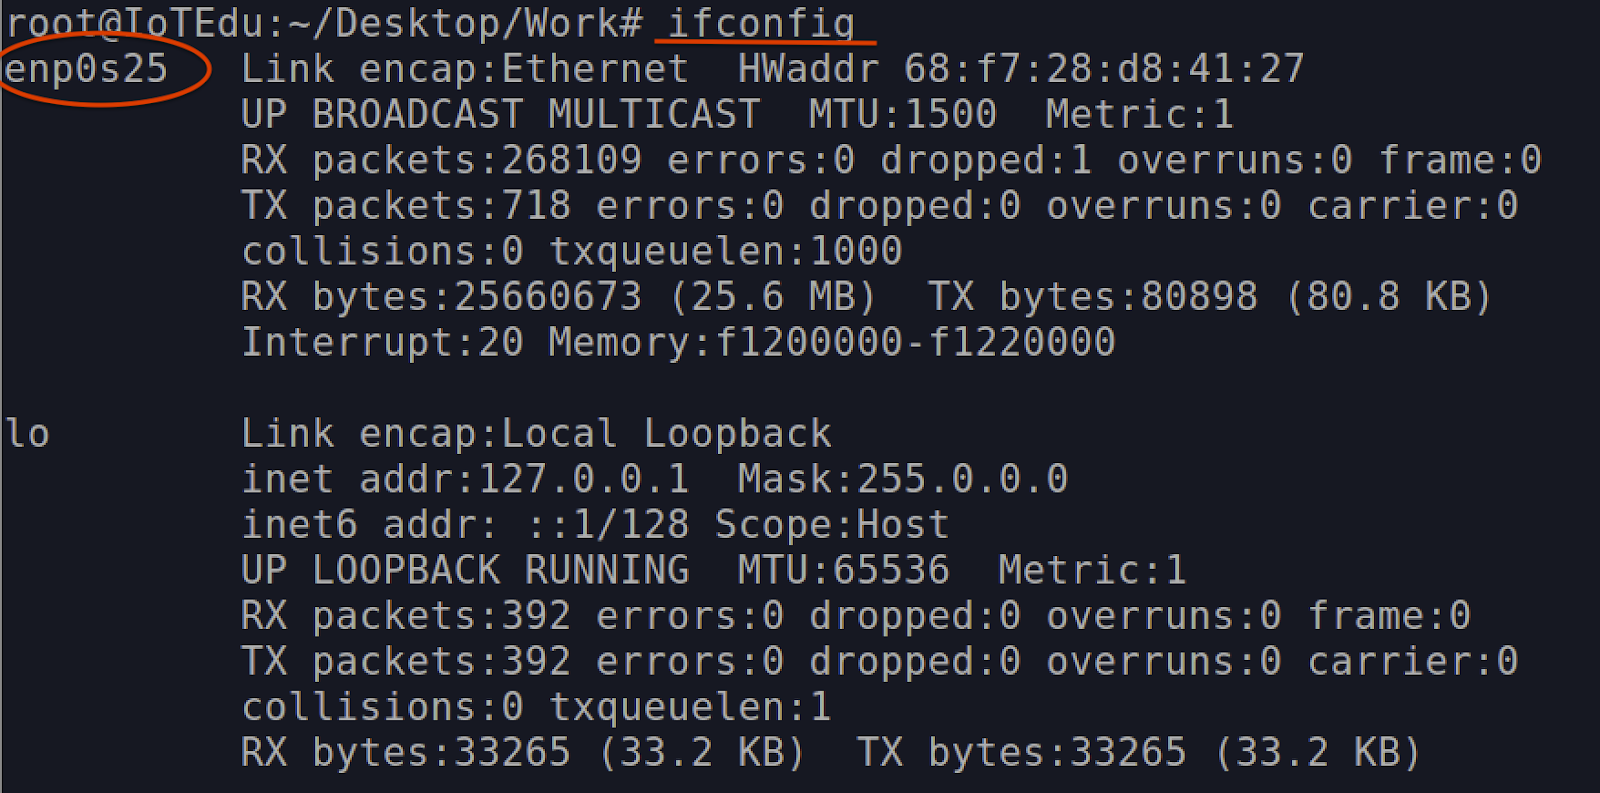
To set the local IP address on your host, the first thing is to identify the local ethernet interface. You can do this from the Linux CLE terminal by running the ifconfig command:
ifconfig
Figure 10: IFCONFIG showing Local Ethernet Interfaces
In our example, the ethernet interface is enp0s25, as shown above. Using that interface name (enp0s25), we can set the local IP address to 192.168.100.100 using the following command
ifconfig enp0s25 192.168.100.100
To validate that you’ve set the correct IP address, you can rerun the ifconfig command and examine the results to confirm:
Figure 11: Ethernet Interface Set To 192.168.100.100
It’s also possible to connect your host system directly to the cable modem’s ethernet port and have your host interface setup for DHCP – the cable modem should assign an IP address to your host device.
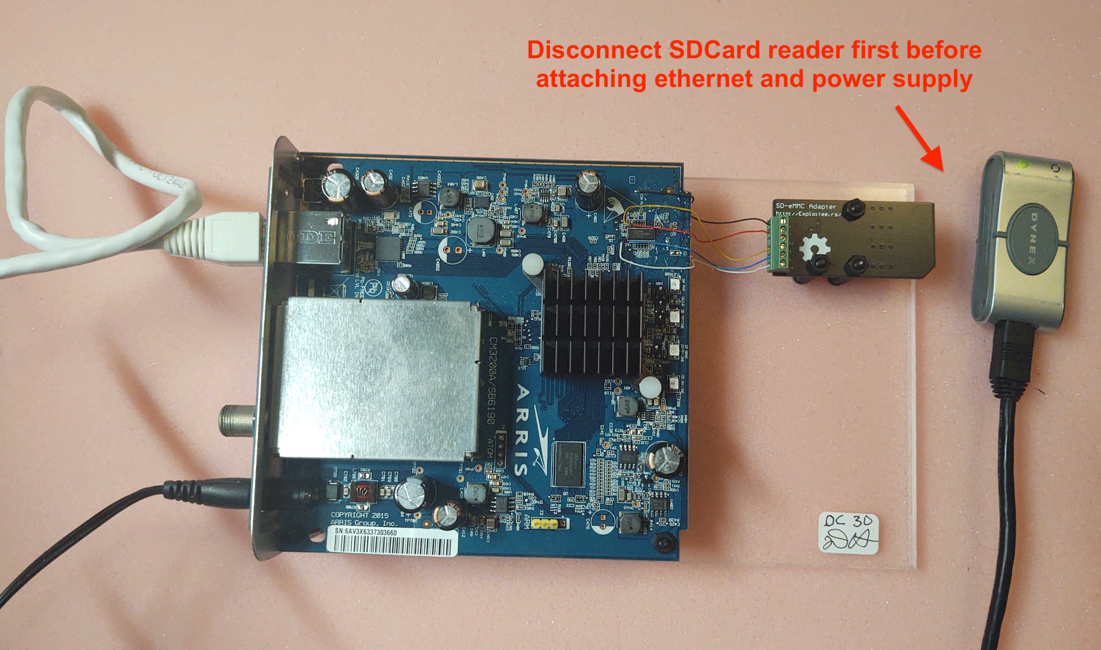
Once you have a valid IP address assigned and/or configured on your host system, power up the cable modem and see if your changes were made correctly and if you now have root access. Again, ensure the SD Card reader is disconnected before plugging 12v power supply into the cable modem.
Once you’ve confirmed that the SD Card reader is disconnected, power up the cable modem and wait for the boot-up sequence to complete. Boot-up is complete when only the top LED is lit and the second LED is flashing:
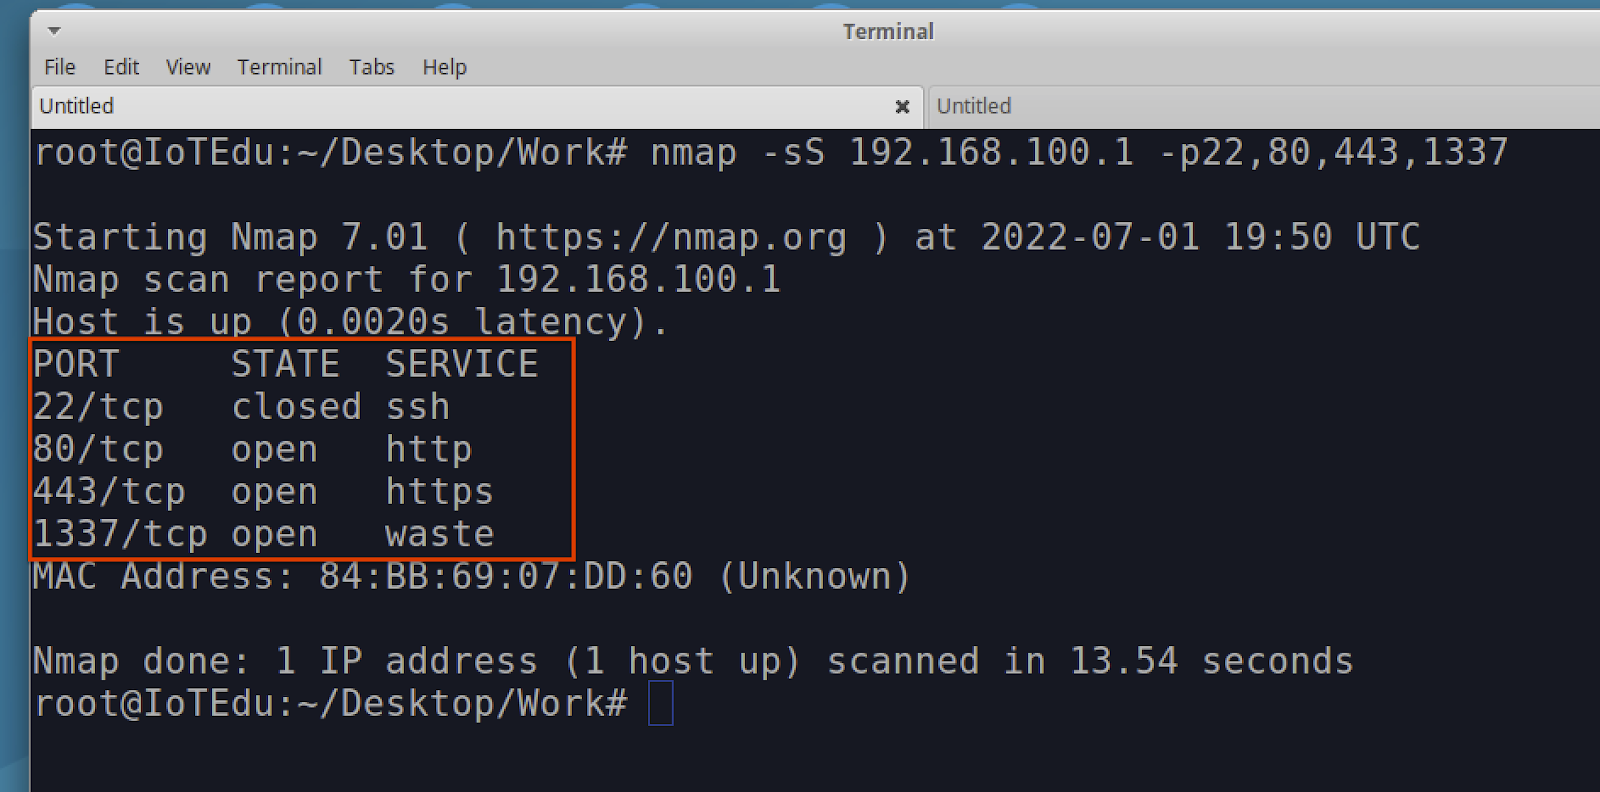
From the CLI terminal on your host, you can run the nmap command to show the open ports on the cable modem. This will also show if your changes to the cable modem firmware were made correctly.
nmap -sS 192.168.100.1 -p 22,80,443,1337
Figure 12: NMAP Scan Results
At a minimum, you should see TCP port 1337 as open as shown above in Figure 12. If not, then most likely an error was made either when copying the dropbear_rsa_key file or making changes to the inittab file.
If the TCP port 1337 is open, the next step is to attempt to login to the cable modem with the following SSH command as root. When prompted for password, use “arris” in all lower case.
Note: Since the kernel on this device is believed to have created an environment restriction to prevent console access, we were only successful in getting around that restriction with the -T switch. This -T switch in SSH disables all pseudo-terminal allocation, and without using it, no functioning console can be established. Also, when connected, you will not receive a typical command line interface prompt, but the device should still accept and execute commands properly.
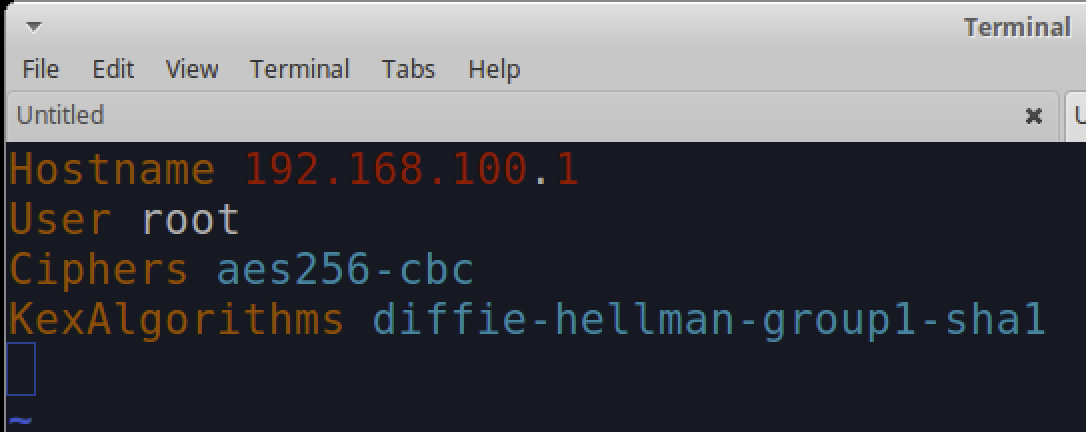
If you receive a “no matching key exchange method found” error (Figure 13), you will need to either define that Diffie-hellman-group-sha1 in the SSH command or create a config file to do this automatically.
Figure 13: Key Exchange Error
Defining a config file is the easier method. We did this prior to the DEF CON IoT Village, so participants in the exercise would not need to. Since others may be using this writeup to recreate the exercise, I decided to add this to prevent any unnecessary confusion.
To create a config file to support SSH login to this cable modem, without error, you will need to create the following folder “.ssh” and file “config” within the home directory of the user you are logging as. In our example, we were logged in as root. To get to the home folder, the simplest method is to enter the “cd” command without any arguments. This will take you to the home directory of the logged in user.
cd
Once in your home directory, try to change directory “cd” to the “.ssh” folder to see if one exists:
cd .ssh
If it does, you won’t need to create one and can skip over the creation steps below. If not, then you will need to create that folder in your home directory with the following command:
mkdir .ssh
Once you have changed directory “cd” to the .ssh folder, you can use vi to create and edit a config file.
vi config
Once in vi, make the following entries in the config file shown below in Figure 14. These entries will enable support for access to cable modem at 192.168.100.1, for the user root, a Cipher of aes256-cbd, and the Diffie-hellman key exchange.
Figure 14: Config File
Once the config is created and saved, you should be able to login over SSH to the cable modem and not receive any more errors.
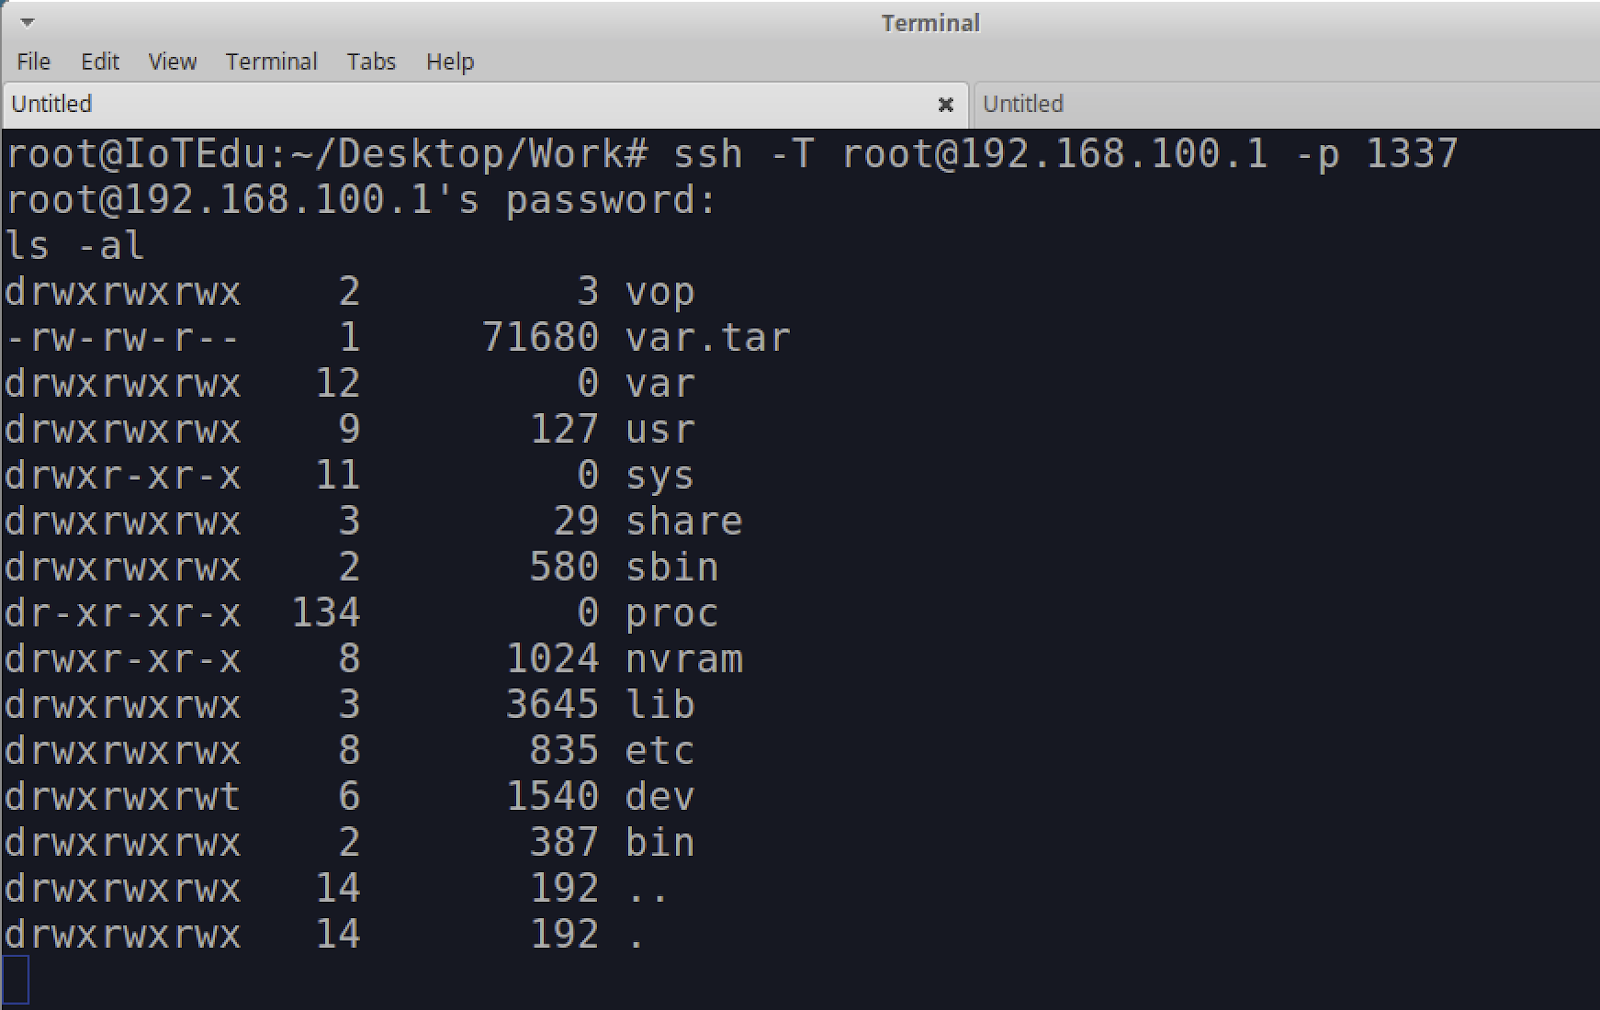
When you connect and log in, the SSH console will not show you a typical command prompt. So, once you hit the return key after the above SSH command, run the command “ls -al” to show a directory and file listing on the cable modem as shown below in Figure 15. This should indicate whether you successfully logged in or not.
Figure 15: Cable Modem Root Console
At this point, you should now have root-level access to the cable modem over SSH.
You may ask, “What do I gain from getting this level of root access to an IoT device?” This level of access allows us to do more advanced and detailed security testing on a device. This is not as easily done when sitting on the outside of the IoT device or attempting to emulate on some virtual machine, because often, the original hardware contains components and features that are difficult to emulate. With root-level access, we can interact more directly with running services and applications and better monitor the results of any testing we may be conducting.
Amazon OpenSearch Service is fully open-source search and analytics engine that securely unlocks real-time search, monitoring, and analysis of business and operational data for use cases like application monitoring, log analytics, observability, and website search.
But what if you have personal identifiable information (PII) data in your log data? How do you control and audit access to that data? For example, what if you need to exclude fields from log search results or anonymize them? Fine-grained access control can manage access to your data depending on the use case—to return results from only one index, hide certain fields in your documents, or exclude certain documents altogether.
Let’s say you have users that work on the logistics of online orders placed on Sunday. The users must not have the access to a customer’s PII data and must be restricted from seeing the customer’s email. Additionally, the customer’s full name and first name must be anonymized. The post demonstrates implementing this field-level security with OpenSearch Service security controls.
Solution overview
The solution has the following steps to provision OpenSearch Service with Amazon Cognito federation within Amazon Virtual Private Cloud (Amazon VPC), use a proxy server to sign in to OpenSearch Dashboards, and demonstrate the field-level security:
Create an OpenSearch Service domain with VPC access and fine-grained access enabled.
Access OpenSearch Service from outside the VPC and load the sample data.
Create an OpenSearch Service role for field-level security and map it to a backend role.
OpenSearch Service security has three main layers:
Network – Determines whether a request can reach an OpenSearch Service domain. Placing an OpenSearch Service domain within a VPC enables secure communication between OpenSearch Service and other services within the VPC without the need for an internet gateway, NAT device, or VPN connection. The associated security groups must permit clients to reach the OpenSearch Service endpoint.
Domain access policy – After a request reaches a domain endpoint, the domain access policy allows or denies the request access to a given URI at the edge of the domain. The domain access policy specifies which actions a principal can perform on the domain’s sub-resources, which include OpenSearch Service indexes and APIs. If a domain access policy contains AWS Identity and Access Management (IAM) users or roles, clients must send signed requests using AWS Signature Version 4.
Fine-grained access control – After the domain access policy allows a request to reach a domain endpoint, fine-grained access control evaluates the user credentials and either authenticates the user or denies the request. If fine-grained access control authenticates the user, the request is handled based on the OpenSearch Service roles mapped to the user. Additional security levels include:
Cluster-level security – To make broad requests such as _mget, _msearch, and _bulk, monitor health, take snapshots, and more. For details, see Cluster permissions.
Index-level security – To create new indexes, search indexes, read and write documents, delete documents, manage aliases, and more. For details, see Index permissions.
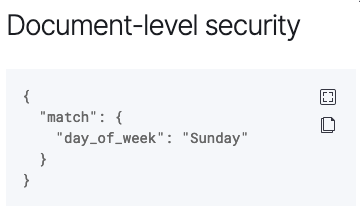
Document-level security – To restrict the documents in an index that a user can see. For details, see Document-level security.
Field-level security – To control the document fields a user can see. When creating a role, add a list of fields to either include or exclude. If you include fields, any users you map to that role can see only those fields. If you exclude fields, they can see all fields except the excluded ones. Field-level security affects the number of fields included in hits when you search. For details, see Field-level security.
Field masking – To anonymize the data in a field. If you apply the standard masking to a field, OpenSearch Service uses a secure, random hash that can cause inaccurate aggregation results. To perform aggregations on masked fields, use pattern-based masking instead. For details, see Field masking.
The following figure illustrates these layers.
Prerequisites
For this walkthrough, you should have the following prerequisites:
Create an OpenSearch Service domain with VPC access
You first create an OpenSearch Service domain with VPC access, enabling fine-grained access control and choosing the IAM ARN as the master user.
When you use IAM for the master user, all requests to the cluster must be signed using AWS Signature Version 4. For sample code, see Signing HTTP requests to Amazon OpenSearch Service. IAM is recommended if you want to use the same users on multiple clusters, to use Amazon Cognito to access OpenSearch Dashboards, or if you have OpenSearch Service clients that support Signature Version 4 signing.
Fine-grained access control requires HTTPS, node-to-node encryption, and encryption at rest. Node-to-node encryption enables TLS 1.2 encryption for all communications within the VPC. If you send data to OpenSearch Service over HTTPS, node-to-node encryption helps ensure that your data remains encrypted as OpenSearch Service distributes (and redistributes) it throughout the cluster.
Add a domain access policy to allow the specified IAM ARNs to the URI at the edge of the domain.
Set up Amazon Cognito to federate into OpenSearch Service
You can authenticate and protect your OpenSearch Service default installation of OpenSearch Dashboards using Amazon Cognito. If you don’t configure Amazon Cognito authentication, you can still protect Dashboards using an IP-based access policy and a proxy server, HTTP basic authentication, or SAML. For more details, see Amazon Cognito authentication for OpenSearch Dashboards.
Create a user called masteruser in the Amazon Cognito user pool that was configured for the OpenSearch Service domain and associate the user with the IAM role Cognito_<Cognito User Pool>Auth_Role, which is a master user in OpenSearch Service. Create another user called ecomuser1 and associate it with a different IAM role, for example OpenSearchFineGrainedAccessRole. Note that ecomuser1 doesn’t have any access by default.
When you place your OpenSearch Service domain within a VPC, your computer must be able to connect to the VPC. This connection can be VPN, transit gateway, managed network, or proxy server.
Fine-grained access control has an OpenSearch Dashboards plugin that simplifies management tasks. You can use Dashboards to manage users, roles, mappings, action groups, and tenants. The Dashboards sign-in page and underlying authentication method differs depending on how you manage users and configured your domain.
Load sample data into OpenSearch
Sign in as masteruser to access OpenSearch Dashboards and load the sample data for ecommerce orders, flight data, and web logs.
Create an OpenSearch Service role and user mapping
OpenSearch Service roles are the core ways of controlling access to your cluster. Roles contain any combination of cluster-wide permissions, index-specific permissions, document-level and field-level security, and tenants.
You can create new roles for fine-grained access control and map roles to users using OpenSearch Dashboards or the _plugins/_security operation in the REST API. For more information, see Create roles and Map users to roles. Fine-grained access control also includes a number of predefined roles.
Backend roles offer another way of mapping OpenSearch Service roles to users. Rather than mapping the same role to dozens of different users, you can map the role to a single backend role, and then make sure that all users have that backend role. Note that the master user ARN is mapped to the all_access and security_manager roles by default to give the user full access to the data.
Create an OpenSearch Service role for field-level security
For our use case, an ecommerce company has requirements for certain users to see the online orders placed on Sunday. The users need to look at the order fulfilment logistics for only those orders. They don’t need to see customer’s email. They also don’t have to know the actual first name and last name of the customer; the customer’s first name and last name must be anonymized when displayed to the user.
Create a role in OpenSearch Service with the following steps:
Log in to OpenSearch Dashboards as masteruser.
Choose Security, Roles, and Create role.
Name the role Orders-placed-on-Sunday.
For Index permissions, specify opensearch_dashboards_sample_data_ecommerce.
For the action group, choose read.
For Document-level security, specify the following query:
{
  "match": {
    "day_of_week" : "Sunday"
  }
}
For Field-level security, choose Exclude and specify email.
For Anonymization, specify customer_first_name and customer_full_name.
Choose Create.
You can see the following permissions to the role Orders-placed-on-Sunday.
Choose View expression to see the document-level security.
Map the OpenSearch Service role to the backend role of the Amazon Cognito group
To perform user mapping, complete the following steps:
Go to the OpenSearch Service role Orders-placed-on-Sunday.
Choose Mapped users, Manage mapping.
For Backend roles, enter arn:aws:iam::<account-id>:role/OpenSearchFineGrainedAccessRole.
Choose Map.
Return to the list of roles and choose the predefined role opensearch_dashboards_user, which includes the permissions a user needs to work with index patterns, visualizations, dashboards, and tenants.
Map the opensearch_dashboards_user role to arn:aws:iam::<account-id>:role/OpenSearchFineGrainedAccessRole.
Test the solution
To test your fine-grained access control, complete the following steps:
Log in to the OpenSearch Dashboards URL as ecomuser1.
Go to OpenSearch Plugins and choose Query Workbench.
Run the following SQL queries in OpenSearch Workbench to verify the fine-grained access applied to ecomuser1 as compared to the same queries run by masteruser.
SELECT COUNT(*) FROM opensearch_dashboards_sample_data_flights ;
13059
SELECT day_of_week, count(*) AS total_records FROM opensearch_dashboards_sample_data_ecommerce GROUP BY day_of_week_i,day_of_week ORDER BY day_of_week_i;
day_of_week
total_records
Monday
579
Tuesday
609
Wednesday
592
Thursday
775
Friday
770
Saturday
736
Sunday
614
SELECT customer_last_name AS last_name, customer_full_name AS full_name, email FROM opensearch_dashboards_sample_data_ecommerce WHERE day_of_week = ‘Sunday’ AND order_id = ‘582936’;
no permissions for [indices:admin/get] and User [name=Cognito/<cognito pool-id>/ecomuser1, backend_roles=[arn:aws:iam::<account-id>:role/OpenSearchFineGrainedAccessRole]
ecomuser1 can’t list tables.
SELECT COUNT(*) FROM opensearch_dashboards_sample_data_flights ;
no permissions for [indices:data/read/search] and User [name=Cognito/<cognito pool-id>/ecomuser1, backend_roles=[arn:aws:iam::<account-id>:role/OpenSearchFineGrainedAccessRole]
ecomuser1 can’t see flights data.
SELECT day_of_week, count(*) AS total_records FROM opensearch_dashboards_sample_data_ecommerce GROUP BY day_of_week_i,day_of_week ORDER BY day_of_week_i;
day_of_week
total_records
Sunday
614
ecomuser1 can see ecommerce orders placed on Sunday only.
SELECT customer_last_name AS last_name, customer_full_name AS full_name, email FROM opensearch_dashboards_sample_data_ecommerce WHERE day_of_week = ‘Sunday’ AND order_id = ‘582936’;
For ecomuser1, customer’s email is excluded and customer_full_name is anonymized.
From these results, you can see OpenSearch Service field-level access controls were applied to ecomuser1, restricting the user from seeing the customer’s email. Additionally, the customer’s full name and first name were anonymized when displayed to the user.
Conclusion
When OpenSearch Service fine-grained access control authenticates a user, the request is handled based on the OpenSearch Service roles mapped to the user. This post demonstrated fine-grained access control restricting a user from seeing a customer’s PII data, as per the business requirements.
Role-based fine-grained access control enables you to control access to your data on OpenSearch Service at the index level, document level, and field level. When your logs or applications data has sensitive data, the field-level security permissions can help you provision the right level of access for your users.
About the author
Satya Adimula is a Senior Data Architect at AWS based in Boston. With extensive experience in data and analytics, Satya helps organizations derive their business insights from the data at scale.
Amazon Athena is an interactive query service that makes it easy to analyze data in Amazon Simple Storage Service (Amazon S3) using standard SQL. Athena is serverless, so there is no infrastructure to manage, and you pay only for the queries that you run on datasets at petabyte scale. You can use Athena to query your S3 data lake for use cases such as data exploration for machine learning (ML) and AI, business intelligence (BI) reporting, and ad hoc querying.
It’s not uncommon for datasets in data lakes to update only daily, or at most a few times per day, yet queries running on these datasets may be repeated more frequently. Previously, all queries resulted in a data scan, even if the same query was repeated again. When the source data hasn’t changed, repeat queries run needlessly, leading to the same results with higher data scan costs and query latency. Wouldn’t it be better if the results of a recent query could be reused instead?
Query Result Reuse is a new feature available in Athena engine version 3 that makes it possible to reuse the results of a previous query. This can improve performance and reduce cost for frequently run queries, by skipping scanning the source data and instead returning a previously calculated result directly. With Query Result Reuse, you can tell Athena that you want to reuse results of a previous query run, with a maximum age setting that controls how recent a previous result has to be.
Athena automatically reuses any previous results that match your query and maximum age setting, or transparently runs the query again if no match is found. If you know that a dataset changes a few times per day, you can, for example, tell Athena to reuse results that are up to an hour old to avoid rerunning most queries, but still get new results when you run a query soon after new data has become available.
In this post, we demonstrate how to reduce cost and improve query performance with the new Query Result Reuse feature.
When should you use Query Result Reuse?
We recommend using Query Result Reuse for every query where the source data doesn’t change frequently. You can configure the maximum age of results to reuse per query, or use the default, which is 60 minutes. In certain cases where queries include non-deterministic functions such as RAND(), the query fetches fresh data from the input source even if the Query Result Reuse feature is enabled.
Query Result Reuse allows results to be shared among users in a workgroup, as long as they have access to the tables and data. This means Query Result Reuse can benefit not only a single user, but also other users in the workgroup who might be running the same queries. One example where this may be especially beneficial is when you have dashboards that are viewed by many users. The dashboard widgets run the same queries for all users, and are therefore accelerated by Query Result Reuse, when enabled.
Another example is if you have a dataset that is updated daily, and many users who all query the most recent data to create reports. Different people might run the same queries as part of their work; with Query Result Reuse, they can collectively avoid running the same query more than once, making everyone more productive and lowering overall cost by avoiding repeated scans of the same data.
Finally, if you have a historical dataset that is frequently queried, but never or very rarely updated, you can configure queries to reuse results that are up to 7 days old to maximize the chances of reusing results and avoid unnecessary costs.
How does Query Result Reuse work?
Query Result Reuse takes advantage of the fact that Athena writes query results to Amazon S3 as a CSV file. Before the introduction of Query Result Reuse, it was possible to reuse query results by reading these files directly. You could also use the ClientRequestToken parameter of the StartQueryExecution API to ensure queries are run only once, and subsequent runs return the same results. With Query Result Reuse, the process of reusing query results is easier and more versatile.
When Athena receives a query with Query Result Reuse enabled, it looks for a result for a query with the same query string that was run in the same workgroup. The query string has to be identical in order to match.
Query Result Reuse is enabled on a per query basis. When you run a query, you specify how old a result can be for it to be reused, from 1 minute up to 7 days. If the query has been run before, and a result exists that matches the request, it’s returned, otherwise the query is run and a new result is calculated. This new result is then available to be reused by subsequent queries.
You can run the query multiple times with different settings for how old a result you can accept. Results can be reused within the same workgroup, even if a different user ran the query previously.
Before a query result is reused, Athena does a few checks to make sure that the user is still allowed to see the results. It checks that the user has access to the tables involved in the query and permission to read the result file on Amazon S3.
There are some situations where query results can’t be reused, for example if the query uses non-deterministic functions, or has AWS Lake Form ation fine-grained access controls enabled. These limitations are described in more detail later in this post.
Run queries with Query Result Reuse
In this section, we demonstrate how to run queries with the Query Result Reuse feature via the Athena API, the Athena console, and the JDBC and ODBC drivers.
Run queries using the Athena API
For applications that use the Athena API through the AWS Command Line Interface (AWS CLI) or the AWS SDKs, the StartQueryExecution API call now has the additional parameter ResultReuseConfiguration, where you can enable Query Result Reuse and specify the maximum age of results. For example, when using the AWS CLI, you can run a query with Query Result Reuse enabled as follows:
These examples assume that my_work_group uses Athena engine v3, that the workgroup has an output location configured, and that the AWS Region has been set in the AWS CLI configuration.
When a query result is reused, you can see in the statistics section of the response from the GetQueryExecution API call that no data was scanned and that results were reused:
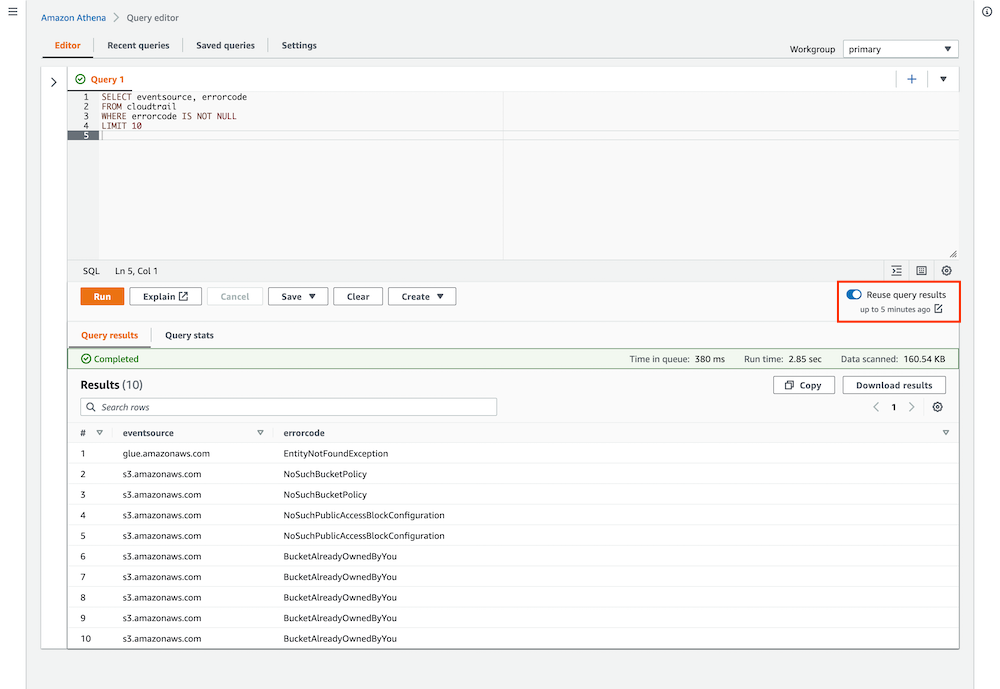
When you run queries on the Athena console, Query Result Reuse is now enabled by default. You can enable and disable Query Result Reuse in the query editor. You can also choose the pen icon to change the maximum age of results. This setting applies to all queries run on the Athena console.
The following screenshot shows an example query run against AWS CloudTrail logs with Query Result Reuse enabled.
When we ran the query again, the results showed up immediately, and we could see the message “using reused query results” in the Query results pane as a confirmation that the results of our first query had been reused. The Data scanned statistic also showed “-” to indicate that no data was scanned.
Run queries using the JDBC and ODBC drivers
If you use the JDBC or ODBC driver to query Athena, you can now add enableResultReuse=1 to your connection parameters to enable Query Result Reuse, and use ageforResultReuse=60 to set the maximum age to 60 minutes. The drivers automatically apply the setting to all queries running in the context of the connection.
Query Result Reuse is supported for most Athena queries, but there are some limitations. We want to ensure that reusing results doesn’t create surprising situations, or expose results that a user shouldn’t have access to. For that reason, Athena always runs a fresh query in the following situations:
Non-deterministic functions – Some functions and expressions produce different results from query to query, such as CURRENT_TIME and RAND(). Results for queries that use temporal and non-deterministic expressions and functions aren’t reusable because that could create surprising and inconsistent results.
Fine-grained access controls – Row-level and column-level permissions are configured in Lake Formation, and Athena can’t know if these have changed since a previous query result was created. Users using the same workgroup can also have different permissions, and checking all permissions would undo many of the cost and performance savings you get from Query Result Reuse.
Federated queries, user-defined functions (UDFs), and external Hive metastores – Users using the same workgroup can have different permissions to invoke the AWS Lambda functions that these features rely on. Athena isn’t able to check that a user that wants to reuse a result has permission to invoke these Lambda functions without running the query, which would negate the cost and performance savings.
Athena detects these conditions automatically and runs the query as if Query Result Reuse wasn’t enabled. You won’t get errors, but you can determine that Query Result Reuse wasn’t in effect by inspecting the query status (see our earlier examples).
Query Result Reuse is available in Athena engine version 3 only.
Conclusion
Query Result Reuse is a new feature in Athena that aims to reduce cost and query response times for datasets that change less frequently than they are queried. For teams that often run the same query, or have dashboards that are used more often than the data changes, Query Result Reuse can result in lower costs and faster results. It’s easy to get started with Query Result Reuse via the Athena console, API, and JDBC/ODBC; all you have to do is set the maximum age of results, and run your queries as usual.
We hope that you will like this new feature, and that it will save cost and improve performance for you and your team!
About the authors
Theo Tolv is a Senior Big Data Architect in the Athena team. He’s worked with small and big data for most of his career and often hangs out on Stack Overflow answering questions about Athena.
Vijay Jain is a Senior Product Manager in Amazon Web Services (AWS) Athena team. He is passionate about building scalable analytics technologies and products working closely with enterprise customers. Outside of work, Vijay likes running and spending time with his family.
SSH is a
well-known mechanism for accessing remote computers in a
secure way; thanks to its use of cryptography, nobody can alter or
eavesdrop on the
communication. Unfortunately, SSH is somewhat
cumbersome when
connecting to a host for the first time; it’s also tricky for a
server administrator to provide time-limited access to the server. SSH
certificates can solve these problems.
AWS Certificate Manager (ACM) is a managed service that enables you to provision, manage, and deploy public and private SSL/TLS certificates that you can use to securely encrypt network traffic. You can now use ACM to request Elliptic Curve Digital Signature Algorithm (ECDSA) certificates and associate the certificates with AWS services like Application Load Balancer (ALB) or Amazon CloudFront. As a result, you get the benefit of managed renewal, where ACM can automatically renew ECDSA certificates before they expire. Previously, you could only request certificates with an RSA 2048 key algorithm from ACM. ECDSA certificates could be imported to ACM, but imported certificates cannot use managed renewal.
You can request both ECDSA P-256 and P-384 certificates from ACM. If you do not request an ECDSA certificate, ACM will issue an RSA 2048 certificate by default.
In this blog post, we will briefly examine the differences between RSA and ECDSA certificates, discuss some important considerations when evaluating which certificate type to use, and walk through how you can request an ECDSA certificate and associate it with an application load balancer in AWS.
Cryptographic certificates overview
TLS certificates are used to secure network communications and establish the identity of websites over the internet, as well as the identity of resources on private networks. Public certificates that you request through ACM are obtained from Amazon Trust Services, which is an Amazon managed public certificate authority (CA).
Both public and private certificates can help customers identify resources on networks and secure communication between these resources. Public certificates identify resources on the public internet, whereas private certificates do the same for private networks. One key difference is that applications and browsers trust public certificates by default, but an administrator must explicitly configure applications and devices to trust private certificates.
RSA and ECDSA primer
RSA and ECDSA are two widely used public-key cryptographic algorithms—algorithms that use two different keys to encrypt and decrypt data. In the case of TLS, a public key is used to encrypt data, and a private key is used to decrypt data. Public key (or asymmetric key) algorithms are not as computationally efficient as symmetric key algorithms like AES. For this reason, public key algorithms like RSA and ECDSA are primarily used to exchange secrets between two parties initiating a TLS connection. These secrets are then used by both parties to decipher the same symmetric key that actually encrypts the data in transit.
RSA stands for Rivest, Shamir, and Adleman: the researchers who first publicly described this algorithm in 1977. The basic functionality of RSA relies on the idea that large prime numbers are very difficult to efficiently factor. ECDSA, or Elliptic Curve Digital Signature Algorithm, is based on certain unique mathematical properties of elliptic curves that make them very useful for cryptographic operations. The cryptographic utility of ECDSA comes from a concept called the discrete logarithm problem.
Considerations when choosing between RSA and ECDSA
What are the important differences between RSA and ECDSA certificates? When should you choose ECDSA certificates to encrypt network traffic? In this section, we’ll examine the security and performance considerations that help to determine whether ECDSA or RSA certificates are the best choice for your workload.
Security
In cryptography, security is measured as the computational work it takes to exhaust all possible values of a symmetric key in an ideal cipher. An ideal cipher is a theoretical algorithm that has no weaknesses, so you must try every possible key to discover which is the correct key. This is similar to the idea of “brute forcing” a password: trying every possible character combination to find the correct password.
Let’s imagine you have a 112-bit key ideal cipher, which means it would take 2112 tries to exhaust the key space—we would say this cipher has a 112-bit security strength. However, it is important to realize that security strength and key length are not always equal—meaning that an encryption key with a length of 112 bits will not always have a 112-bit security strength.
ECDSA provides higher security strength for lower computational cost. ECDSA P-256, for example, provides 128-bit security strength and is equivalent to an RSA 3072 key. Meanwhile, ECDSA P-384 provides 192-bit security strength, equivalent to the key associated with an RSA 7680 certificate. In other words, an ECDSA P-384 key would require 2192 tries to exhaust the key space.
The following table provides an in-depth comparison of the different security strengths for RSA key lengths and ECDSA curve types. Note that only RSA 2048 and ECDSA P-256 and P-384 are currently issued by ACM. However, ACM does support the import and usage of the other certificate types listed in the table. For more information, see Importing certificates into AWS Certificate Manager.
Security strength
RSA key length
ECDSA curve type
80-bit
1024
160
112-bit
2048
224
128-bit
3072
256
192-bit
7680
384
256-bit
15360
512
Performance
ECDSA provides a higher security strength (for a given key length) than RSA but does not add performance overhead. For example, ECDSA P-256 is as performant as RSA 2048 while providing security strength that is comparable to RSA 3072.
ECDSA certificates also have up to a 50% smaller certificate size when compared to RSA certificates, and are therefore more suitable to protect data-in-transit over low bandwidth or for applications with limited memory and storage, such as Internet of Things (IoT) devices.
Take a look at the following certificate examples; you can see the size difference between RSA and ECDSA certificates.
Consider a small IoT sensor device that tracks temperature in an office building. This device typically has very low storage capacity and compute power, so the smaller ECDSA certificate will be easier to process and store. In the case of an IoT device, you might not be able to store the entire RSA certificate chain on the device due to memory limitations and the larger size of RSA certificates. This can make it more difficult to validate the chain of trust for that certificate.
Using ECDSA, customers can take advantage of the smaller size of the certificates (and the certificate trust chain) and store the entire chain of trust on the IoT device itself, enabling the IoT device to more easily validate the certificate.
When should I use ECDSA certificates from ACM?
In general, you should consider using ECDSA certificates wherever possible, because they provide stronger security (for a given key length) compared to RSA, without impacting performance. You can also choose to issue ECDSA certificates from ACM to implement 128-bit or 192-bit TLS security, where previously you could request up to 112-bit security from ACM by using RSA 2048 certificates.
ECDSA certificates are strongly recommended for applications that need to securely send data over low-bandwidth connections, or when you are using IoT devices that might not have much memory or computational power to store and process the larger certificate sizes that RSA offers.
If your application is not ECDSA compatible, you will need to continue using RSA certificates. RSA 2048 remains the default certificate type issued by ACM, in order to prevent compatibility issues with legacy applications or with applications that do not support ECDSA certificate types. We will provide links to check if your application is compatible with ECDSA certificate types in the next section of this blog.
Getting started with ECDSA certificates
Modern browsers and operating systems are ECDSA compatible. That said, some custom applications might not be ECDSA compatible. You can check whether your calling application is ECDSA compatible by accessing the following links from your application:
When you access one of these links, you should see a message stating “Expected Status: good”. This indicates that the application is ECDSA compatible. See Figure 1 for an example of a successful result.
Figure 1: ECDSA application compatibility example
When you terminate your TLS traffic with ALB, you can work around compatibility concerns by binding both ECDSA and RSA certificates for a given domain. ALB will prioritize and present the ECDSA certificate when the calling application is ECDSA compatible and will use the RSA certificate if the calling application is not ECDSA compatible. We’ll walk through this configuration in the demonstration portion of this post.
How to request an ECDSA certificate from ACM
You can use the ACM console, APIs, or AWS Command Line Interface (AWS CLI) to issue public or private ECDSA P-256 and P-384 TLS certificates. When you request certificates by using the API or AWS CLI, you can use the request-certificate API action with either EC_prime256v1 or EC_secp384r1 as the key-algorithm parameter to request a P-256 or P-384 ECDSA certificate, respectively.
Certificates have a defined validity period, and ACM will attempt to renew certificates that were issued by ACM and that are in use before they expire. ACM will also attempt to automatically bind the renewed certificates with an integrated service. ACM issued private ECDSA certificates can also be exported and used on other workloads to terminate TLS traffic.
Associate an ECDSA certificate with an Application Load Balancer for TLS
To demonstrate how to request and use ECDSA certificates from ACM, let’s examine a common use case: requesting a public certificate from ACM and associating it with an ALB. This walkthrough will also include requesting an RSA 2048 certificate and associating it with the same ALB, to facilitate TLS connections for applications that do not support ECDSA. ALB will prioritize and present the ECDSA certificate when the calling application is ECDSA compatible, and will use the RSA certificate if the calling application is not ECDSA compatible.
Navigate to the ACM console and choose Request a certificate.
Choose Request a public certificate, and then choose Next.
For Fully qualified domain name, enter your domain name.
Choose DNS validation. DNS validation is recommended wherever possible, because it enables automatic renewal of ACM issued certificates with no action required by the domain owner. If you use Amazon Route 53, you can use ACM to directly update your DNS records. DNS-validated certificates will be renewed by ACM as long as the certificate is in use and the DNS record is in place.
Figure 2: Requesting a public ECDSA certificate
In the Key algorithm options section, select your preferred algorithm based on your security requirements:
ECDSA P-256 — Equivalent in security strength to RSA 3072
ECDSA P-384 — Equivalent in security strength to RSA 7680
Figure 3: Key algorithms
(Optional) Add tags to help you identify and manage your certificate. You can find more information on using tags in Tagging AWS resources in the AWS General Reference.
Choose Request to request the public certificate.
The certificate will now be in the Pending Validation state until the domain can be validated, either through DNS or email validation, depending on your selection in the previous steps. For information on how to validate ownership of the domain name or names, see Validating domain ownership in the AWS Certificate Manager User Guide.
Take note of the certificate ARN; you will need this later to identify the certificate.
To request an RSA 2048 certificate from ACM
To request a public RSA 2048 certificate, use the same steps noted in the preceding section, but select RSA 2048 in the Key algorithm options section.
Make sure that both certificates you request have the same fully qualified domain name.
For this post, we will use an Application Load Balancer. You can view more details on each type of Load Balancer, and see a feature-to-feature breakdown, on the Elastic Load Balancing features page.
For the Application Load Balancer type, choose Create.
Enter a name for your load balancer.
Select the scheme and IP address type of the application load balancer. For this post, we will choose Internet-facing for the scheme and use the IPv4 address type.
Under Default SSL/TLS certificate, verify thatFrom ACM is selected, and then in the drop-down list, select the RSA certificate you requested earlier.
Note: We are using the RSA certificate as the default so that the ALB will use this certificate if the connecting client does not support ECDSA or the Server Name Indication (SNI) protocol. This is to maximize availability and compatibility with legacy applications.
Figure 6: Secure listener settings
(Optional) Add tags to the Application Load Balancer.
Review your selections, and then choose Create load balancer.
Figure 7: Review and create load balancer
To associate the ECDSA certificate with the Application Load Balancer
In the EC2 console, select the new ALB you just created, and choose the Listeners tab.
In the SSL Certificate column, you should see the default certificate you added when you created the ALB. Choose View/edit certificates to see the full list of certificates associated with this ALB.
Figure 8: ALB listeners
Under Listener certificates for SNI, choose Add certificate.
Figure 9: Listener certificates for SNI
Under ACM and IAM certificates, select the ECDSA certificate you requested earlier.
Note: You can use the certificate ARN to identify the appropriate certificate.
Choose Include as pending below to add the ECDSA certificate to the listener.
Figure 10: Adding the ECDSA certificate to the load balancer listener
Under Listener certificates for SNI, confirm that the ECDSA certificate is listed as pending, and choose Add pending certificates.
Figure 11: Confirm addition of pending certificates
Great! We’ve used ACM to request a public ECDSA certificate and a public RSA 2048 certificate. Next, we associated both of these certificates with an Application Load Balancer to facilitate TLS communications between the load balancer and client devices.
If clients support the SNI protocol, the ALB uses a smart certificate selection algorithm. The load balancer will select the best certificate that the client can support from the certificate list. Certificate selection is based on the following criteria, in the following order:
Public key algorithm (prefer ECDSA over RSA)
Hashing algorithm (prefer SHA over MD5)
Key length (prefer the longest key)
Validity period
In the earlier example, this means if clients support SNI and ECDSA, the ECDSA certificate will be prioritized and presented to the client. If the client does not support SNI or ECDSA, the RSA certificate will be used to maximize compatibility with legacy applications.
Conclusion
In this blog post, we discussed the basic differences between RSA and ECDSA certificates, when you might choose ECDSA over RSA, and how you can use AWS Certificate Manager to request public or private ECDSA certificates. We also covered how to request a public ECDSA certificate from ACM and associate it with an Application Load Balancer. Finally, we showed you how to request an RSA 2048 certificate and associate it with the same load balancer to facilitate TLS for applications that do not support ECDSA certificates.
Support from our partners is part of what makes Backblaze so easy to use for so many folks, and today we’re continuing our efforts to make working with us even easier with the launch of our new Partner Program.
For businesses, it cuts through the complexity and cost that may have stopped them from adopting cloud storage and backup. For partners—including resellers, integrators, managed service providers, and more—it boosts their array of cloud solutions and brings even more value to their clients. The program builds on our long commitment to develop new solutions for partners and help them grow their businesses.
Partner Program Offerings
The program provides new opportunities for four key partner groups: Channel Partners, Technology Partners, Managed Service Providers (MSPs), and Affiliates.
As part of this new program, Channel Partners can take advantage of special capacity-based pricing with B2 Reserve, as well as a self-service resource providing discounts, deal registration, and in-house support. It also offers training and education resources.
Technology Partners can enjoy complimentary solution expertise and joint go-to-market and co-branding opportunities. MSPs will notice the ease of the new admin console and the utility of in-house support, digital assets, training materials, and data sheets, not to mention the recurring 10% commissions on computer backup. And of course, Affiliates, too, can enjoy recurring 10% commissions.
With the launch of the program, Backblaze is doubling down on its commitment to its partners, proving why Backblaze has built its reputation on easy-to-use, affordable cloud storage.
“Ease of use and accessibility can have a significant impact for our partners and their business. We are continuously looking for ways to innovate and develop for our partners. Offering this easy, accessible, and efficient resource will strengthen our relationship with our customers.”
—Nilay Patel, Vice President of Sales, Backblaze
Visit our Partner page to learn more about the Partner Program, visit the Partner Portal, or get started as a new partner.
Version 7.0 of Texinfo, the GNU Project’s documentation system, has been
released. There are a number of changes here, the biggest of which may be
the ability to produce output in the EPUB format.
This technique measures device response time to determine distance:
The scientists tested the exploit by modifying an off-the-shelf drone to create a flying scanning device, the Wi-Peep. The robotic aircraft sends several messages to each device as it flies around, establishing the positions of devices in each room. A thief using the drone could find vulnerable areas in a home or office by checking for the absence of security cameras and other signs that a room is monitored or occupied. It could also be used to follow a security guard, or even to help rival hotels spy on each other by gauging the number of rooms in use.
There have been attempts to exploit similar WiFi problems before, but the team says these typically require bulky and costly devices that would give away attempts. Wi-Peep only requires a small drone and about $15 US in equipment that includes two WiFi modules and a voltage regulator. An intruder could quickly scan a building without revealing their presence.
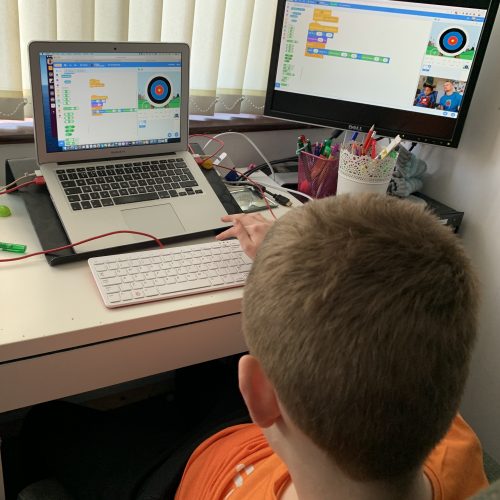
Coding, or computer programming, is a way of writing instructions so that computers can complete tasks. Those instructions can be as simple as ‘move a toy robot forwards for three seconds and then make a beep’, or more complicated instructions, such as ‘check the weather in my local area and then adjust the heating in my house accordingly’.
Why should kids learn to code?
Even if your child never writes computer programs, it is likely they already use software that coders have created, and in the future they may work with, manage, or hire people who write code. This is why it is important that everyone has an understanding of what coding is all about, and why we at the Raspberry Pi Foundation are passionate about inspiring and supporting children to learn to code for free.
When young people are given opportunities to create with code, they can do incredible things — from expressing themselves, to addressing real-world issues, to trying out the newest technologies. Learning to code also helps them develop resilience and problem-solving skills.
But at what age should you start your child on their journey to learn about coding? Is there a too young age? Will they miss out on opportunities if they start too late?
No matter at what age you introduce children to coding, one key element is empowering them to create things that are relevant to them. Above all else, coding should be a fun activity for kids.
Learning programming
You might be surprised how young you can start children on their coding adventure. My own child started to learn when they were about six years old. And you can never be too old to learn to code. I didn’t start learning to program until I was in my late thirties, and I know many learners who decided to take up coding after their retirement.
Acquiring new skills and knowledge is often best accomplished when you are young. Learning a programming language is a little like learning a new spoken or written language. There are strict rules, special words to be used in specific orders and in different contexts, and even different ways of thinking depending on the languages you already know.
When people first introduced computer programming into the world, there were big barriers to entry. People had to pay thousands of dollars for a computer and program it using punch cards. It was very unlikely that any child had access to the money or the skills required to create computer programs. Today’s world is very different, with computers costing as little as $35, companies creating tools and toys aimed at coding for children, and organisations such as ours, the Raspberry Pi Foundation and our children’s coding club networks Code Club and CoderDojo, that have the mission to introduce children to the world of coding for free.
Getting hands-on with coding
By the age of about four, a child is likely to have the motor skills and understanding to begin to interact with simple toys that introduce the very basics of coding. Bee-Bot and Cubelets are both excellent examples of child-friendly toy robots that can be programmed.
Bee-Bot is a small floor robot that children program by pressing simple combinations of direction buttons so that it moves following the instructions provided. This is a great way of introducing children to the concept of sequencing. Sequencing is the way computers follow instructions one after the other, executing each command in turn.
Cubelets can be used to introduce physical computing to children. With Cubelets, children can snap together physical blocks to create their own unique robots. These robots will perform actions such as moving or lighting up, depending on their surroundings, such as the distance your hand is from the robot or the brightness of light in the room. These are a good example of teaching how inputs to a program can affect the outputs — another key concept in coding.
Visual programming
As your child gets older and becomes more used to using technology, and their eye-hand coordination improves, they might want to try out tools for visual programming. They can use free online programming platforms, such as ScratchJr on a tablet or phone or Scratch or Code Club World in a computer’s web browser. To learn more about these visual programming tools and what your child can create with them, read our blog post How do I start my child coding.
Children can begin to explore Scratch or Code Club World from about the age of six, although it is important to understand that all young people develop at different speeds. We offer many free resources to help learners get started with visual, block-based programming languages, and the easiest places to start are our Introduction to Scratch path and the home island on Code Club World. Children and adults of all ages can learn a lot from Scratch, develop their own engaging activities, and most importantly, have fun doing so.
Text-based coding
At around the ages of nine or ten, children’s typing skills are often sufficient for them to start using text-based languages. Again, it is important that they are allowed to have fun and express themselves, especially if they are moving on from Scratch. Our Introduction to Python path allows children to continue creating graphics while they program, as they are used to doing in Scratch; our Introduction to Web path will let them build their own simple websites to allow them to express their creative selves.
Picture: Conor McCabe Photography
There is no correct age to start learning
In my time at the Raspberry Pi Foundation, I have taught children as young as five and adults as old as seventy. There is no correct age at which a child can begin coding, and there are opportunities to begin at almost any age. The key to introducing coding to anyone is to make it engaging, relevant, and most of all fun!
With three weeks to go until AWS re:Invent opens in Las Vegas, the AWS News Blog Team is hard at work creating blog posts to share the latest launches and previews with you. As usual, we have a strong mix of new services, new features, and a surprise or two.
Last Week’s Launches Here are some launches that caught my eye last week:
Amazon SNS Data Protection and Masking – After a quick public preview, this cool feature is now generally available. It uses pattern matching, machine learning models, and content policies to help protect data at scale. You can find many different kinds of personally identifiable information (PII) and protected health information (PHI) in message bodies and either block message delivery or mask (de-identify) the sensitive data, all in real-time and on a per-topic basis. To learn more, read the blog post or the message data protection documentation.
Amazon Textract Updates – This service extracts text, handwriting, and data from any document or image. This past week we updated the AnalyzeID function so that it can now extract the machine readable zone (MRZ) on passports issued by the United States, and we added the entire OCR output to the API response. We also updated the machine learning models that power the AnalyzeDocument function, with a focus on single-character boxed forms commonly found on tax and immigration documents. Finally, we updated the AnalyzeExpense function with support for new fields and higher accuracy for existing fields, bringing the total field count to more than 40.
Another Amazon Braket Processor – Our quantum computing service now supports Aquila, a new 256-qubit quantum computer from QuEra that is based on a programmable array of neutral Rubidium atoms. According to the What’s New, Aquila supports the Analog Hamiltonian Simulation (AHS) paradigm, allowing it to solve for the static and dynamic properties of quantum systems composed of many interacting particles.
Amazon S3 on Outposts – This service now lets you use additional S3 Lifecycle rules to optimize capacity management. You can expire objects as they age or are replaced with newer versions, with control at the bucket level, or for subsets defined by prefixes, object tags, or object sizes. There’s more info in the What’s New and in the S3 documentation.
Amazon MemoryDB for Redis – You can now use data tiering as a lower cost way to to scale your clusters up to hundreds of terabytes of capacity. This new option uses a combination of instance memory and SSD storage in each cluster node, with all data stored durably in a multi-AZ transaction log. There’s more information in the What’s New and the blog post.
Amazon EC2 – You can now remove launch permissions for Amazon Machine Images (AMIs) that are directly shared with your AWS account.
X in Y – We launched existing AWS services and instance types in additional Regions:
Other AWS News Here are some additional news items that you may find interesting:
AWS Open Source News and Updates – My colleague Ricardo Sueiras highlights new open source projects, tools, and demos from the AWS Community. Read Installment 134 to see what’s going on!
New Case Study – A new AWS case study describes how Taggle (a company focused on smart water solutions in Australia) created an IoT platform that runs on AWS and uses Amazon Kinesis Data Streams to store & ingest data in real time. Using AWS allowed them to scale to accommodate 80,000 additional sensors that will roll out in 2022.
Upcoming AWS Events re:Invent 2022 – AWS re:Invent is just three weeks away! Join us live from November 28th to December 2nd for keynotes, training and certification opportunities, and over 1,500 technical sessions. If you cannot make it to Las Vegas you can also join us online to watch the keynotes and leadership sessions live. Be sure to check out the re:Invent 2022 Attendee Guides, each curated by an AWS Hero, AWS industry team, or AWS partner.
PeerTalk – If you will be attending re:Invent in person and are interested in meeting with me or any of our featured experts, be sure to check out PeerTalk, our new onsite networking program.
This post is part of our Week in Review series. Check back each week for a quick roundup of interesting news and announcements from AWS.
The collective thoughts of the interwebz
Manage Consent
To provide the best experiences, we use technologies like cookies to store and/or access device information. Consenting to these technologies will allow us to process data such as browsing behavior or unique IDs on this site. Not consenting or withdrawing consent, may adversely affect certain features and functions.
Functional
Always active
The technical storage or access is strictly necessary for the legitimate purpose of enabling the use of a specific service explicitly requested by the subscriber or user, or for the sole purpose of carrying out the transmission of a communication over an electronic communications network.
Preferences
The technical storage or access is necessary for the legitimate purpose of storing preferences that are not requested by the subscriber or user.
Statistics
The technical storage or access that is used exclusively for statistical purposes.The technical storage or access that is used exclusively for anonymous statistical purposes. Without a subpoena, voluntary compliance on the part of your Internet Service Provider, or additional records from a third party, information stored or retrieved for this purpose alone cannot usually be used to identify you.
Marketing
The technical storage or access is required to create user profiles to send advertising, or to track the user on a website or across several websites for similar marketing purposes.