Post Syndicated from Curious Droid original https://www.youtube.com/watch?v=AgZIM-geRV8
Augmentation patterns to modernize a mainframe on AWS
Post Syndicated from Lewis Tang original https://aws.amazon.com/blogs/architecture/augmentation-patterns-to-modernize-a-mainframe-on-aws/
Customers with mainframes want to use Amazon Web Services (AWS) to increase agility, maximize the value of their investments, and innovate faster. On June 8, 2022, AWS announced the general availability of AWS Mainframe Modernization, a new service that makes it faster and simpler for customers to modernize mainframe-based workloads.
In this post, we discuss the common use cases and the augmentation architecture patterns that help liberate data from mainframe for modern data analytics, get rid of expensive and unsupported tape storage solutions for mainframe, build new capabilities that integrate with core mainframe workloads, and enable agile development and testing by adopting CI/CD for mainframe.
Pattern 1: Augment mainframe data retention with backup and archival on AWS
Mainframes process and generate the most business-critical data. It’s imperative to provide data protection via solutions, such as data backup, archiving, and disaster recovery. Mainframes usually use automated tape libraries—virtual tape libraries for backup and archive. These tapes need to be stored, organized, and transported to vaults and disaster recovery sites. All this can be very expensive and rigid.
There is a more cost-effective approach that helps simplify the operations of tape libraries: leverage AWS partner tools, such as Model9, to transparently migrate the data on tape storage to AWS.
As depicted in Figure 1, mainframe data can be transferred via the secured network connection using AWS Transfer Family services or AWS DataSync to AWS cloud storage services, such as Amazon Elastic File System, Amazon Elastic Block Store, and Amazon Simple Storage Service (S3). After data is stored in AWS cloud, you can configure and move data among these services to meet with the business data processing need. Depending on data storage requirements, data storage costs can be further optimized by configuring S3 Lifecyle policies to move data among Amazon S3 storage classes. For long-term data archiving purpose, you can choose S3 Glacier storage class to achieve durability, resilience, and the optimal cost effectiveness.

Figure 1. Mainframe data backup and archival augmentation
Pattern 2: Augment mainframe with agile development and test environments including CI/CD pipeline on AWS
For any business-critical business application, a typical mainframe workload requires development and test environments to support production workloads. It’s common to see the lengthy application development lifecycle, a lack of automated testing, and an absent CI/CD pipeline with most of mainframes. Furthermore, the existing mainframe development processes and tools are outdated, as they are unable to keep up with the business pace, resulting in a growing backlog. Organizations with mainframes look for application development solutions to solve these challenges.
As demonstrated in Figure 2, AWS developer tools orchestrate code compilation, testing, and deployment among mainframe test environments. Mainframe test environments are either provided by the mainframe vendors as emulators or by AWS partners, such as Micro Focus. You can load the preferred developer tools and run an integrated development environment (IDE) from Amazon WorkSpaces or Amazon AppStream 2.0. Developers create or modify code in the IDE, and then commit and push their code to AWS CodeCommit. As soon as the code is pushed, an event is generated and triggers the pipeline in AWS CodePipeline to build the new code in a compilation environment via AWS CodeBuild. The pipeline pushes the new code to the test environment.
To optimize cost, you can scale the test environment capacity to meet needs. The tests are executed, and the test environment can be shut down when not in use. When the tests are successful, the pipeline pushes the code back to the mainframe via AWS CodeDeploy and an intermediary server. On the mainframe side, the code can go through a recompilation and final testing before being pushed to production.
You can further optimize operations and licensing cost of mainframe emulator by leveraging the managed integrated development and test environment provided by AWS Mainframe Modernization service.

Figure 2. Mainframe CI/CD augmentation
Pattern 3: Augment mainframe with agile data analytics on AWS
Core business applications running on mainframes generate a lot of data throughout the years. Decades of historical business transactions and massive amounts of user data present an opportunity to develop deep business insight. By creating a data lake using the AWS big data services, you can gain faster analytics capabilities and better insight into core business data originated from mainframe applications.
Figure 3 depicts data being pulled from relational, hierarchical, or mainframe file-based data stores on mainframes. These data are presented in various formats and stored as DB2 for z/OS, VSAM, IMS DB, IDMS, DMS, or other formats. You can use AWS partners data replication and change data capture tools from AWS Marketplace or AWS cloud services, such as Amazon Managed Streaming for Apache Kafka for near real-time data streaming, Transfer Family services, and DataSync for moving data in batch from mainframes to AWS.
Once data are replicated to AWS, you can further process data using the services like AWS Lambda, or Amazon Elastic Container Service and store the processed data on various AWS storage services, such as Amazon DynamoDB, Amazon Relational Database Service, and Amazon S3.
By using AWS big data and data analytics services, such as Amazon EMR, Amazon Redshift, Amazon Athena, AWS Glue, and Amazon QuickSight, you can develop deep business insight and present flexible visuals to your customers. Read more about mainframe data integration.

Figure 3. Mainframe data analytics augmentation
Pattern 4: Augment mainframe with new functions and channels on AWS
Organizations with a mainframe use AWS to innovate and iterate quickly, as they often lack agility. For example, a common scenario for a bank could be providing a mobile application for customer engagements, such as supporting a marketing campaign for a new credit card.
As depicted in Figure 4, with the data replicated from mainframes to AWS cloud and analyzed by AWS big data and analytics services, new business functions can be developed on cloud-native applications by using Amazon API Gateway, AWS Lambda, and AWS Fargate. These new business applications can interact with mainframe data, and the combination can give deep business insight.
To add new innovation capabilities, with time-series data generated by the new business function applications, using Amazon Forecast can predict domain-specific metrics, such as inventory, workforce, web traffic, and finances. Amazon Lex can build virtual agents, automate informational response to customer enquiries, and improve business productivity. Adding Amazon SageMaker, you can prepare data gathered from mainframe and new business applications at scale to build, train, and deploy machine learning models for any business cases.
You can further improve customer engagement by incorporating Amazon Connect and Amazon Pinpoint to build multichannel communications.

Figure 4. Mainframe new functions and channels augmentation
Conclusion
To increase agility, maximize the value of investments, and innovate faster, organizations can adopt the patterns discussed in this post to augment mainframes by using AWS services to build resilient data protection solution, provision agile CI/CD integrated development and test environment, liberate mainframe data and developing innovation solutions for new digital customer experience. With AWS Mainframe Modernization service, you can accelerate this journey and innovate faster.
Enable post-quantum key exchange in QUIC with the s2n-quic library
Post Syndicated from Panos Kampanakis original https://aws.amazon.com/blogs/security/enable-post-quantum-key-exchange-in-quic-with-the-s2n-quic-library/
At Amazon Web Services (AWS) we prioritize security, performance, and strong encryption in our cloud services. In order to be prepared for quantum computer advancements, we’ve been investigating the use of quantum-safe algorithms for key exchange in the TLS protocol. In this blog post, we’ll first bring you up to speed on what we’ve been doing on the TLS front. Then, we’ll focus on the QUIC transport protocol and show how you can enable and experiment with the newly released post-quantum (PQ) key exchange by using our s2n-quic library. The s2n-quic library is an open-source implementation of the QUIC protocol.
Why use PQ-hybrid key establishment in s2n-quic?
A large-scale quantum computer could break the current public key cryptography that is used to establish keys for secure communication connections. Although a large-scale quantum computer isn’t available today, traffic that is recorded now could be decrypted by one in the future. With such concerns in mind, the recent US Congress Quantum Computing Cybersecurity Preparedness Act and the White House National Security Memorandum set a goal of a timely and equitable transition of cryptographic systems to quantum-resistant cryptography.
At AWS, we are working to prepare for this future. Recently, AWS Key Management Service (AWS KMS), AWS Certificate Manager (ACM) and AWS Secrets Manager TLS endpoints started supporting post-quantum hybrid (PQ-hybrid) key establishment in TLS connections with three of the post-quantum key encapsulation mechanisms (KEMs) in the NIST Post-Quantum Cryptography (PQC) Project. The three post-quantum KEMs are Kyber (NIST’s Round 3 KEM selection), BIKE and SIKE (NIST’s Round 4 KEM candidates). All three of these AWS services’ support of post-quantum KEMs raises the security bar when making API requests to their endpoints over TLS.
PQ-hybrid key establishment in TLS is a feature that introduces post-quantum KEMs used in conjunction with classical Elliptic Curve Diffie-Hellman (ECDH) key exchange. The client and server still do an ECDH key exchange. Additionally, the server encapsulates a post-quantum shared secret to the client’s post-quantum KEM public key, which is advertised in the ClientHello message. This strategy combines the high assurance of a classical key exchange with the security of the proposed post-quantum key exchanges, to ensure that the handshakes are protected as long as the ECDH or the post-quantum shared secret cannot be broken.
After decapsulating the secret, the client and server have an ECDH and a post-quantum shared secret, which they concatenate and use to derive the symmetric keys that are used in the Authenticated Encryption with Additional Data (AEAD) cipher in TLS. These symmetric keys used by the AEAD cipher for data encryption will be secure against a quantum computer, which means that the TLS communication is secure against a quantum computer. The AWS implementation of TLS is s2n-tls, a streamlined open source implementation of TLS. The s2n-tls implementation already supports PQ-hybrid key exchange with ECDH and three NIST PQC Project KEMs (Kyber, BIKE, and SIKE) for TLS 1.2 and 1.3. The use of KEMs for TLS 1.2 is described in the draft-campagna-tls-bike-sike-hybrid IETF draft, and the use of KEMs for TLS 1.3 is described in the draft-ietf-tls-hybrid-design IETF draft.
Note: The Kyber, BIKE, and SIKE implementations follow the algorithm specifications described in NIST PQ Project Round 3, which are expected to be updated as standardization proceeds.
How PQ-hybrid key exchange works in s2n-quic
AWS recently announced s2n-quic, an open-source Rust implementation of the QUIC protocol. QUIC is an encrypted transport protocol that is designed for performance and is the foundation of HTTP/3. For tunnel establishment, QUIC uses TLS 1.3 carried over QUIC transport. To alleviate the harvest-now-decrypt-later concerns for customers that use s2n-quic, in the next section we show you how to enable PQ-hybrid key establishment in s2n-quic. AWS services and software that use s2n-quic will automatically inherit the ability to support quantum-safe key exchanges in the future when post-quantum algorithms are standardized and are officially supported in s2n-quic.
The s2n-quic implementation is written in the Rust programming language. It can use either s2n-tls (the TLS library for AWS) or rustls (the TLS library in Rust) to perform the TLS handshake. If you build s2n-quic with s2n-tls, then s2n-quic inherits the post-quantum support that is offered in s2n-tls. In turn, s2n-tls is built over other crypto libraries such as the AWS libcrypto (AWS-LC) or alternatively OpenSSL crypto library (libcrypto). AWS-LC is a general-purpose cryptographic library that is maintained by AWS, which will incorporate standardized post-quantum algorithms. Therefore, building s2n-tls with AWS-LC will provide s2n-tls with the post-quantum cryptographic algorithms for use in s2n-quic.
Such a model allows for AWS services and software that use s2n-quic to automatically inherit the standardized post-quantum options as they are implemented in s2n-tls and its underlying crypto libraries. There will be no need to tweak s2n-quic to support post-quantum TLS 1.3 handshakes. The whole stack of protocol implementations is architected in an agile manner without duplication of work.
In the following section, we show you how to run an experimental PQ build of s2n-quic that supports PQ-hybrid key exchange.
Test PQ-hybrid key establishment in s2n-quic
The public s2n-quic GitHub repository includes an example that demonstrates how to build the library with PQ-hybrid key exchange support, along with a server and client to test. The PQ-hybrid key exchange feature test requires CMake in Linux or macOS. The experiments below were run in an Amazon Linux 2 instance with rustc, Cargo, Clang, and CMake installed. Connections that you establish with this experimental build of s2n-quic will support PQ-hybrid key exchange.
To test PQ-hybrid key establishment
- Clone s2n-quic by using the following commands:
git clone https://github.com/aws/s2n-quic
cd s2n-quic - Run the example post-quantum s2n-quic client and server in the post-quantum directory to confirm that they negotiate a PQ-hybrid key by using the following commands:
cd examples/post-quantum
cargo run –bin pq_server
cargo run –bin pq_clientNote: Although these examples with the PQ-hybrid feature experimental build of s2n-quic are self-contained, if you want to manually change and build s2n-quic and s2n-tls to enable PQ-hybrid key exchange, you have to update the default_tls13 policy in s2n-tls to point to security_policy_pq_tls_1_0_2021_05_26 in tls/s2n_security_policies.c. Then you rebuild s2n-tls and override the location that s2n-quic links to by setting the S2N_TLS_DIR, S2N_TLS_LIB_DIR, and S2N_TLS_INCLUDE_DIR environment variables at build time.
- To confirm the PQ-hybrid key establishment, you capture the QUIC negotiation by using the following tcpdump command:
sudo tcpdump -i lo port 4433 -w test.pcap
- Open the capture by using a packet capture visualization application. First you look at the ClientHello message, as shown in the capture in Figure 1 taken from Wireshark.

Figure 1: pq_client ClientHello in QUIC
In the QUIC CRYPTO frame, you can see the TLS 1.3 cipher suites, and that the TLS version is 1.3 while the supported key exchange groups are classical ECDH (with identifiers 0x0017, 0x0018, 0x001d) and 0x2f39, 0x2f3a, 0x2f37…. 0x2f1f. The 0x2f… groups are the agreed upon identifiers (not standardized yet) for PQ-hybrid key exchange. You also see the PQ-hybrid X25519+Kyber512 (with identifier 12089 or 0x2f39) key share that is offered by the client. That key share includes 32 bytes for the Curve25519 ephemeral ECDH client public key, 800 bytes for the ephemeral Kyber512 public key, and 4 bytes for the identifier and the key share length.
Note: The post-quantum KEMs implementations at the time of this writing follow the NIST Round 3 Kyber, BIKE, and SIKE specifications. We expect these specifications to change as the NIST PQC Project proceeds with standardization. Post-quantum support in s2n-tls and s2n-quic will be experimental until NIST has selected and published standardized algorithms and identifiers. Pushing the change to the main branch now would mean that s2n-quic clients would be sending a PQ-hybrid key share that won’t be used until the servers on the internet start supporting it. The actual algorithms and their identifiers will still be integrated in future releases of s2n-tls and AWS-LC. Therefore, s2n-quic will still be able to negotiate the NIST and IETF standardized options. Meanwhile, we will continue to experiment with post-quantum QUIC and its potential challenges.
- Next, take a look at the server-negotiated keys in the ServerHello message, as shown in Figure 2.
Figure 2: pq_server ServerHello in QUIC

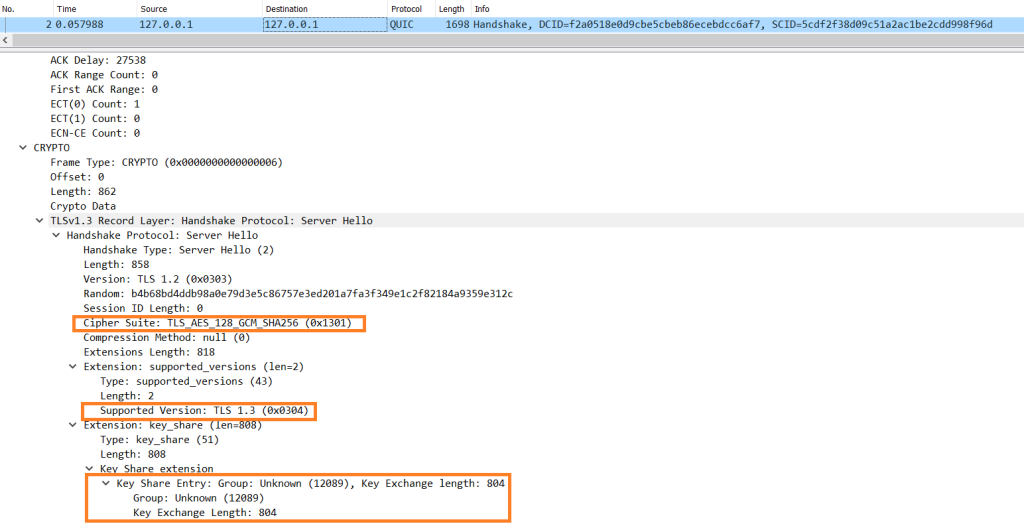
You can again see the TLS 1.3 cipher suite, the TLS version being 1.3, and the picked PQ-hybrid X25519+Kyber512 key share. The key share includes 4 bytes for the identifier and the key share length, 32 bytes for the Curve25519 ephemeral ECDH server public key, and 768 bytes for the Kyber512 ciphertext that encapsulates a post-quantum shared secret to the client’s ephemeral Kyber512 public key (included in its ClientHello message).
The rest of the handshake completes successfully by deriving symmetric keys from the X25519 and Kyber512 post-quantum shared secrets (as defined in the draft-ietf-tls-hybrid-design IETF draft) and encrypting the rest of the messages with Advanced Encryption Standard with Galois/Counter Mode (AES-GCM) by using these symmetric keys over QUIC.
Benchmark
Now you can benchmark the post-quantum QUIC client and server by using netbench, a transport protocol benchmarking tool that is available in the s2n-quic repository.
To benchmark the post-quantum QUIC client and server
- Go in the netbench directory and build it with the correct flags for the experimental post-quantum QUIC examples, by using the following commands:
cd s2n-quic/netbench
RUSTFLAGS=”–cfg s2n_quic_unstable –cfg s2n_quic_enable_pq_tls” cargo build –release - Generate the netbench scenario by using the following commands:
./target/release/netbench-scenarios –request_response.connections 10000 –request_response.request_size 1 –request_response.response_size 1
In this example, you’re trying to create 10,000 sequential QUIC connections. The scenario opens a connection, sends a single byte, receives a single byte, closes it, and repeats 10,000 times.
- Run the server by using the following command:
./target/release/netbench-driver-s2n-quic-server target/netbench/request_response.json
- Run the client by using the following command:
SERVER_0=localhost:4433 ./target/release/netbench-driver-s2n-quic-client target/netbench/request_response.json
The drivers read the request_response.json to run the scenario. Then the driver is wrapped in a collector that outputs statistics to another JSON file. At the end of all of the 10,000 runs, the cli feature is used to generate the report.
Figure 3 shows the performance results for X25519, X25519+Kyber512, X25519+BIKE-1, and X25519+SIKEp434 key exchange. All connections used an ECDSA P256 server certificate for authentication.

Figure 3: PQ-hybrid key exchange impact on QUIC connection rates
The x-axis is time in seconds. The y-axis is the number of times send is called—which, for 1 byte per connection, practically means that the diagram shows the connection establishment rate (per second). The absolute performance numbers in these benchmarks are not important, because the results could change based on the netbench scenario parameters. The performance difference between PQ-hybrid key exchange algorithms is what this graph is highlighting.
You can see that the classical X25519 achieves higher connection rates, because it is the most efficient option (that offers no post-quantum protection). The performance of Kyber is competitive and achieves 8% fewer connections per second when used with X25519 in a PQ-hybrid key exchange. BIKE-1 is relatively efficient, but adds some extra latency and introduces two frames for the ClientHello, which leads to 37% fewer connections per second. SIKEp434, although it offers much smaller public keys and ciphertexts, is orders of magnitude slower, which means it offers 95% fewer connections per second. These results match previous results we have shared before and other research works, where the most efficient signature algorithms ended up with higher connection rates and lower connection failure probabilities due to overload.
Conclusion
In this post, we showed how you can use s2n-quic in conjunction with s2n-tls to enable QUIC connections to negotiate encryption keys in a quantum-resistant manner. If you’re interested in learning more about s2n-quic, join us at AWS re:Inforce in July for the breakout session entitled NIS304: Using s2n-quic: Bringing QUIC, the secure transport protocol, to AWS.
As always, if you’re interested in using or contributing to s2n-quic, the source code and documentation are publicly available under the terms of the Apache Software License 2.0 from our s2n-quic GitHub repository. If you package or distribute s2n-quic or s2n-tls, or use it as part of a large multi-user service, you might be eligible for pre-notification of security issues. Contact [email protected] for more information. If you discover a potential security issue in s2n-quic or s2n-tls, we ask that you notify AWS Security by using our vulnerability reporting page.
If you have feedback about this post, submit comments in the Comments section below. If you have questions about this post, contact AWS Support.
Want more AWS Security news? Follow us on Twitter.
Leverage L2 constructs to reduce the complexity of your AWS CDK application
Post Syndicated from David Boldt original https://aws.amazon.com/blogs/devops/leverage-l2-constructs-to-reduce-the-complexity-of-your-aws-cdk-application/
The AWS Cloud Development Kit (AWS CDK) is an open-source software development framework to define your cloud application resources using familiar programming languages. AWS CDK uses the familiarity and expressive power of programming languages for modeling your applications. Constructs are the basic building blocks of AWS CDK apps. A construct represents a “cloud component” and encapsulates everything that AWS CloudFormation needs to create the component. Furthermore, AWS Construct Library lets you ease the process of building your application using predefined templates and logic. Three levels of constructs exist:
- L1 – These are low-level constructs called Cfn (short for CloudFormation) resources. They’re periodically generated from the AWS CloudFormation Resource Specification. The name pattern is CfnXyz, where Xyz is name of the resource. When using these constructs, you must configure all of the resource properties. This requires a full understanding of the underlying CloudFormation resource model and its corresponding attributes.
- L2 – These represent AWS resources with a higher-level, intent-based API. They provide additional functionality with defaults, boilerplate, and glue logic that you’d be writing yourself with L1 constructs. AWS constructs offer convenient defaults and reduce the need to know all of the details about the AWS resources that they represent. This is done while providing convenience methods that make it simpler to work with the resources and as a result creating your application.
- L3 – These constructs are called patterns. They’re designed to complete common tasks in AWS, often involving multiple types of resources.
In this post, I show a sample architecture and how the complexity of an AWS CDK application is reduced by using L2 constructs.
Overview of the sample architecture
This solution uses Amazon API Gateway, AWS Lambda, and Amazon DynamoDB. I implement a simple serverless web application. The application receives a POST request from a user via API Gateway and forwards it to a Lambda function using proxy integration. The Lambda function writes the request body to a DynamoDB table.

The sample code can be found on GitHub.
Walkthrough
You can follow the instructions in the README file of the GitHub repository to deploy the stack. In the following walkthrough, I explain each logical unit and the differences when implementing it using L1 and L2 constructs. Before each code sample, I’ll show the path in the GitHub repository where you can find its source.
Create the DynamoDB table
First, I create a DynamoDB table to store the request content.
L1 construct
With L1 constructs, I must define each attribute of a table separately. For the DynamoDB table, these are keySchema, attributeDefinitions, and provisionedThroughput. They all require detailed CloudFormation knowledge, for example, how a keyType is defined.
lib/level1/database/infrastructure.ts
L2 construct
The corresponding L2 construct lets me use the default values for readCapacity (5) and writeCapacity (5). To further reduce the complexity, I define the attributes and the partition key simultaneously. In addition, I utilize the dynamodb.AttributeType.STRING enum.
lib/level2/database/infrastructure.ts
Create the Lambda function
Next, I create a Lambda function which receives the request and stores the content in the DynamoDB table. The runtime code uses Node.js.
L1 construct
When creating a Lambda function using L1 construct, I must specify all of the properties at creation time – the business logic code location, runtime, and the function handler. This includes the role for the Lambda function to assume. As a result, I must provide the Attribute Resource Name (ARN) of the role. In the “Granting permissions” sections later in this post, I show how to create this role.
lib/level1/api/infrastructure.ts
L2 construct
I can achieve the same result with less complexity by leveraging the NodejsFunction L2 construct for Lambda function. It sets a default version for Node.js runtime unless another one is explicitly specified. The construct creates a Lambda function with automatic transpiling and bundling of TypeScript or Javascript code. This results in smaller Lambda packages that contain only the code and dependencies needed to run the function, and it uses esbuild under the hood. The Lambda function handler code is located in the runtime directory of the API logical unit. I provide the path to the Lambda handler file in the entry property. I don’t have to specify the handler function name, because the NodejsFunction construct uses the handler name by default. Moreover, a Lambda execution role isn’t required to be provided during L2 Lambda construct creation. If no role is specified, then a default one is generated which has permissions for Lambda execution. In the section ‘Granting Permissions’, I describe how to customize the role after creating the construct.
lib/level2/api/infrastructure.ts
Create API Gateway REST API
Next, I define the API Gateway REST API to receive POST requests with Cross-origin resource sharing (CORS) enabled.
L1 construct
Every step, from creating a new API Gateway REST API, to the deployment process, must be configured individually. With an L1 construct, I must have a good understanding of CORS and the exact configuration of headers and methods.
Furthermore, I must know all of the specifics, such as for the Lambda integration type I must know how to construct the URI.
lib/level1/api/infrastructure.ts
L2 construct
Creating an API Gateway REST API with CORS enabled is simpler with L2 constructs. I can leverage the defaultCorsPreflightOptions property and the construct builds the required options method. To set origins and methods, I can use the apigateway.Cors enum. To configure the Lambda proxy option, all I need to do is to set the proxy variable in the method to true. A default deployment is created automatically.
lib/level2/api/infrastructure.ts
Granting permissions
In the sample application, I must give permissions to two different resources:
- API Gateway REST API to invoke the Lambda function.
- Lambda function to write data to the DynamoDB table.
L1 construct
For both resources, I must define AWS Identity and Access Management (IAM) roles. This requires in-depth knowledge of IAM, how policies are structured, and which actions are required. In the following code snippet, I start by creating the policy documents. Afterward, I create a role for each resource. These are provided at creation time to the corresponding constructs as shown earlier.
lib/level1/api/infrastructure.ts
The database construct exposes a function to grant write access to any IAM role. The function creates a policy, which allows dynamodb:PutItem on the database table and adds it as an additional policy to the role.
lib/level1/database/infrastructure.ts
At this point, all permissions are in place, except that Lambda function doesn’t have permissions to write data to the DynamoDB table yet. To grant write access, I call the grantWriteData function of the Database construct with the IAM role of the Lambda function.
lib/deployment.ts
L2 construct
Creating an API Gateway REST API with the LambdaIntegration construct generates the IAM role and attaches the role to the API Gateway REST API method. Giving the Lambda function permission to write to the DynamoDB table can be achieved with the following single line:
lib/deployment.ts
Using L3 constructs
To reduce complexity even further, I can leverage L3 constructs. In the case of this sample architecture, I can utilize the LambdaRestApi construct. This construct uses a default Lambda proxy integration. It automatically generates a method and a deployment, and grants permissions. As a result, I can achieve the same with even less code.
Cleanup
Many services in this post are available in the AWS Free Tier. However, using this solution may incur costs, and you should tear down the stack if you don’t need it anymore. Cleanup steps are included in the RADME file of the GitHub repository.
Conclusion
In this post, I highlight the difference between using L1 and L2 AWS CDK constructs with an example architecture. Leveraging L2 constructs reduces the complexity of your application by using predefined patterns, boiler plate, and glue logic. They offer convenient defaults and reduce the need to know all of the details about the AWS resources they represent, while providing convenient methods that make it simpler to work with the resource. Additionally, I showed how to reduce complexity for common tasks even further by using an L3 construct.
Visit the AWS CDK documentation to learn more about building resilient, scalable, and cost-efficient architectures with the expressive power of a programming language.
Author:
Process Apache Hudi, Delta Lake, Apache Iceberg dataset at scale, part 2: Using AWS Glue Studio Visual Editor
Post Syndicated from Noritaka Sekiyama original https://aws.amazon.com/blogs/big-data/part-2-integrate-apache-hudi-delta-lake-apache-iceberg-dataset-at-scale-using-aws-glue-studio-visual-editor/
Transactional data lake technologies such as Apache Hudi, Delta Lake, Apache Iceberg, and AWS Lake Formation governed tables is evolving rapidly, and gaining great popularity. These technologies simplified the data processing pipeline significantly, and they provided further useful capabilities like upserts, rolling back, and time travel queries.
In the first post of this series, we went through how to process Apache Hudi, Delta Lake, and Apache Iceberg datasets using AWS Glue connectors. AWS Glue simplifies reading and writing your data in those data lake formats, and building the data lakes on top of those technologies. Running the sample notebooks on AWS Glue Studio notebook, you could interactively develop and run your code, then immediately see the results. The notebooks let you explore how those technologies work when you have coding experience.
This second post focuses on other use cases for customers who prefer visual job authoring without writing custom code. Even without coding experience, you can easily build your transactional data lakes on AWS Glue Studio visual editor, and take advantage of those transactional data lake technologies. In addition, you can also use Amazon Athena to query the data stored using Hudi and Iceberg. This tutorial demonstrates how to read and write each format on AWS Glue Studio visual editor, and then how to query from Athena.
Process Apache Hudi, Delta Lake, Apache Iceberg dataset at scale
|
Prerequisites
The following are the instructions to read/write tables using each data lake format on AWS Glue Studio Visual Editor. You can use any of the marketplace connector or the custom connector based on your requirements.
To continue this tutorial, you must create the following AWS resources in advance:
- AWS Identity and Access Management (IAM) role for your ETL job or notebook as instructed in Set up IAM permissions for AWS Glue Studio.
- Amazon Simple Storage Service (Amazon S3) bucket for storing data.
- AWS Glue connection created in the previous post.
Reads/writes using the connector on AWS Glue Studio Visual Editor
In this tutorial, you read and write each of the transaction data lake format data on the AWS Glue Studio Visual Editor. There are three main configurations: connection, connection options, and job parameters that you must configure per the data lake format. Note that no code is included in this tutorial. Let’s see how it works.
Apache Hudi writes
Complete following steps to write into Apache Hudi table using the connector:
- Open AWS Glue Studio.
- Choose Jobs.
- Choose Visual with a source and target.
- For Source, choose Amazon S3.
- For Target, choose
hudi-0101-byoc-connector. - Choose Create.
- Under Visual, choose Data source – S3 bucket.
- Under Node properties, for S3 source type, choose S3 location.
- For S3 URL, enter
s3://covid19-lake/rearc-covid-19-world-cases-deaths-testing/json/. - Choose Data target – Connector.
- Under Node properties, for Connection, choose hudi-0101-byoc-connection.
- For Connection options, enter the following pairs of Key and Value (choose Add new option to enter a new pair).
- Key:
path. Value: <Your S3 path for Hudi table location> - Key:
hoodie.table.name, Value:test - Key:
hoodie.datasource.write.storage.type, Value:COPY_ON_WRITE - Key:
hoodie.datasource.write.operation, Value:upsert - Key:
hoodie.datasource.write.recordkey.field, Value:location - Key:
hoodie.datasource.write.precombine.field, Value:date - Key:
hoodie.datasource.write.partitionpath.field, Value:iso_code - Key:
hoodie.datasource.write.hive_style_partitioning, Value:true - Key:
hoodie.datasource.hive_sync.enable, Value:true - Key:
hoodie.datasource.hive_sync.database, Value:hudi - Key:
hoodie.datasource.hive_sync.table, Value:test - Key:
hoodie.datasource.hive_sync.partition_fields, Value:iso_code - Key:
hoodie.datasource.hive_sync.partition_extractor_class, Value:org.apache.hudi.hive.MultiPartKeysValueExtractor - Key:
hoodie.datasource.hive_sync.use_jdbc, Value:false - Key:
hoodie.datasource.hive_sync.mode, Value:hms
- Key:
- Under Job details, for IAM Role, choose your IAM role.
- Under Advanced properties, for Job parameters, choose Add new parameter.
- For Key, enter
--conf. - For Value, enter
spark.serializer=org.apache.spark.serializer.KryoSerializer. - Choose Save.
- Choose Run.

Apache Hudi reads
Complete following steps to read from the Apache Hudi table that you created in the previous section using the connector:
- Open AWS Glue Studio.
- Choose Jobs.
- Choose Visual with a source and target.
- For Source, choose
hudi-0101-byoc-connector. - For Target, choose Amazon S3.
- Choose Create.
- Under Visual, choose Data source – Connection.
- Under Node properties, for Connection, choose
hudi-0101-byoc-connection. - For Connection options, choose Add new option.
- For Key, enter
path. For Value, enter your S3 path for your Hudi table that you created in the previous section. - Choose Transform – ApplyMapping, and choose Remove.
- Choose Data target – S3 bucket.
- Under Data target properties, for Format, choose JSON.
- For S3 Target type. choose S3 location.
- For S3 Target Location enter your S3 path for output location.
- Under Job details, for IAM Role, choose your IAM role.
- Choose Save.
- Choose Run.

Delta Lake writes
Complete the following steps to write into the Delta Lake table using the connector:
- Open AWS Glue Studio.
- Choose Jobs.
- Choose Visual with a source and target.
- For Source, choose Amazon S3.
- For Target, choose
delta-100-byoc-connector. - Choose Create.
- Under Visual, choose Data source – S3 bucket.
- Under Node properties, for S3 source type, choose S3 location.
- For S3 URL, enter
s3://covid19-lake/rearc-covid-19-world-cases-deaths-testing/json/. - Choose Data target – Connector.
- Under Node properties, for Connection, choose your
delta-100-byoc-connection. - For Connection options, choose Add new option.
- For Key, enter
path. For Value, enter your S3 path for Delta table location. Choose Add new option. - For Key, enter
partitionKeys. For Value, enteriso_code. - Under Job details, for IAM Role, choose your IAM role.
- Under Advanced properties, for Job parameters, choose Add new parameter.
- For Key, enter
--conf. - For Value, enter
spark.sql.extensions=io.delta.sql.DeltaSparkSessionExtension --conf spark.sql.catalog.spark_catalog=org.apache.spark.sql.delta.catalog.DeltaCatalog. - Choose Save.
- Choose Run.

Delta Lake reads
Complete the following steps to read from the Delta Lake table that you created in the previous section using the connector:
- Open AWS Glue Studio.
- Choose Jobs.
- Choose Visual with a source and target.
- For Source, choose
delta-100-byoc-connector. - For Target, choose Amazon S3.
- Choose Create.
- Under Visual, choose Data source – Connection.
- Under Node properties, for Connection, choose
delta-100-byoc-connection. - For Connection options, choose Add new option.
- For Key, enter
path. For Value, enter your S3 path for Delta table that you created in the previous section. Choose Add new option. - For Key, enter
partitionKeys. For Value, enteriso_code. - Choose Transform – ApplyMapping, and choose Remove.
- Choose Data target – S3 bucket.
- Under Data target properties, for Format, choose JSON.
- For S3 Target type, choose S3 location.
- For S3 Target Location enter your S3 path for output location.
- Under Job details, for IAM Role, choose your IAM role.
- Under Advanced properties, for Job parameters, choose Add new parameter.
- For Key, enter
--conf. - For Value, enter
spark.sql.extensions=io.delta.sql.DeltaSparkSessionExtension --conf spark.sql.catalog.spark_catalog=org.apache.spark.sql.delta.catalog.DeltaCatalog. - Choose Save.
- Choose Run.

Apache Iceberg writes
Complete the following steps to write into Apache Iceberg table using the connector:
- Open AWS Glue console.
- Choose Databases.
- Choose Add database.
- For database name, enter iceberg, and choose Create.
- Open AWS Glue Studio.
- Choose Jobs.
- Choose Visual with a source and target.
- For Source, choose Amazon S3.
- For Target, choose
iceberg-0131-byoc-connector. - Choose Create.
- Under Visual, choose Data source – S3 bucket.
- Under Node properties, for S3 source type, choose S3 location.
- For S3 URL, enter
s3://covid19-lake/rearc-covid-19-world-cases-deaths-testing/json/. - Choose Data target – Connector.
- Under Node properties, for Connection, choose
iceberg-0131-byoc-connection. - For Connection options, choose Add new option.
- For Key, enter
path. For Value, enterglue_catalog.iceberg.test. - Choose SQL under Transform to create a new AWS Glue Studio node.
- Under Node properties, for Node parents, choose ApplyMapping.
- Under Transform, for SQL alias, verify that
myDataSourceis entered. - For SQL query, enter
CREATE TABLE glue_catalog.iceberg.test AS SELECT * FROM myDataSource WHERE 1=2. This is to create a table definition with no records because the Iceberg target requires table definition before data ingestion. - Under Job details, for IAM Role, choose your IAM role.
- Under Advanced properties, for Job parameters, choose Add new parameter.
- For Key, enter
--conf. - For Value, enter the following value (replace the placeholder
your_s3_bucketwith your S3 bucket name):spark.sql.catalog.glue_catalog=org.apache.iceberg.spark.SparkCatalog --conf spark.sql.catalog.glue_catalog.warehouse=s3://your_s3_bucket/iceberg/warehouse --conf spark.sql.catalog.glue_catalog.catalog-impl --conf park.sql.catalog.glue_catalog.io-impl=org.apache.iceberg.aws.s3.S3FileIO --conf spark.sql.catalog.glue_catalog.lock-impl=org.apache.iceberg.aws.glue.DynamoLockManager --conf spark.sql.catalog.glue_catalog.lock.table=iceberg_lock --conf spark.sql.extensions=org.apache.iceberg.spark.extensions.IcebergSparkSessionExtensions - Choose Save.
- Choose Run.

Apache Iceberg reads
Complete the following steps to read from Apache Iceberg table that you created in the previous section using the connector:
- Open AWS Glue Studio.
- Choose Jobs.
- Choose Visual with a source and target.
- For Source, choose Apache Iceberg Connector for AWS Glue 3.0.
- For Target, choose Amazon S3.
- Choose Create.
- Under Visual, choose Data source – Connection.
- Under Node properties, for Connection, choose your Iceberg connection name.
- For Connection options, choose Add new option.
- For Key, enter
path. For Value, enterglue_catalog.iceberg.test. - Choose Transform – ApplyMapping, and choose Remove.
- Choose Data target – S3 bucket.
- Under Data target properties, for Format, choose JSON.
- For S3 Target type, choose S3 location.
- For S3 Target Location enter your S3 path for the output location.
- Under Job details, for IAM Role, choose your IAM role.
- Under Advanced properties, for Job parameters, choose Add new parameter.
- For Key, enter
--conf. - For Value, enter the following value (replace the placeholder
your_s3_bucketwith your S3 bucket name):spark.sql.catalog.glue_catalog=org.apache.iceberg.spark.SparkCatalog --conf spark.sql.catalog.glue_catalog.warehouse=s3://your_s3_bucket/iceberg/warehouse --conf spark.sql.catalog.glue_catalog.catalog-impl --conf park.sql.catalog.glue_catalog.io-impl=org.apache.iceberg.aws.s3.S3FileIO --conf spark.sql.catalog.glue_catalog.lock-impl=org.apache.iceberg.aws.glue.DynamoLockManager --conf spark.sql.catalog.glue_catalog.lock.table=iceberg_lock --conf spark.sql.extensions=org.apache.iceberg.spark.extensions.IcebergSparkSessionExtensions - Choose Save.
- Choose Run.
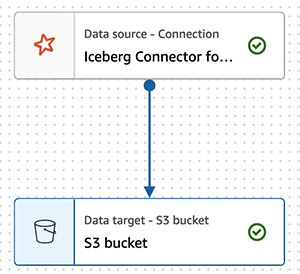
Query from Athena
The Hudi table and the iceberg tables created with the above instructions are also queryable from Athena.
- Open the Athena console.
- Run the following SQL to query the Hudi table:

- Run the following SQL to query the Iceberg table:


If you want to query the Delta table from Athena, follow Presto, Trino, and Athena to Delta Lake integration using manifests.
Conclusion
This post summarized how to utilize Apache Hudi, Delta Lake, and Apache Iceberg on AWS Glue platform, as well as demonstrated how each format works with the AWS Glue Studio Visual Editor. You can start using those data lake formats easily in any of the AWS Glue DynamicFrames, Spark DataFrames, and Spark SQL on the AWS Glue jobs, the AWS Glue Studio notebooks, and the AWS Glue Studio visual editor.
About the Author
 Noritaka Sekiyama is a Principal Big Data Architect on the AWS Glue team. He enjoys collaborating with different teams to deliver results like this post. In his spare time, he enjoys playing video games with his family.
Use AWS Chatbot in Slack to remediate security findings from AWS Security Hub
Post Syndicated from Vikas Purohit original https://aws.amazon.com/blogs/security/use-aws-chatbot-in-slack-to-remediate-security-findings-from-aws-security-hub/
You can use AWS Chatbot and its integration with Slack and Amazon Chime to receive and remediate security findings from AWS Security Hub. To learn about how to configure AWS Chatbot to send findings from Security Hub to Slack, see the blog post Enabling AWS Security Hub integration with AWS Chatbot.
In this blog post, you’ll learn how to extend the solution so you can use AWS Chatbot to remediate the findings in your Slack channel. You’ll receive the findings from Security Hub and then run AWS CLI commands from your Slack channel to remediate the reported security findings.
AWS Chatbot works by acting as a subscriber to an Amazon Simple Notification Service (Amazon SNS) topic that can receive notifications from either Amazon CloudWatch or Amazon EventBridge, and have them delivered to the configured Slack channels or Amazon Chime chat rooms. You can apply standard AWS Identity and Access Management (IAM) permissions to the Slack channel or Amazon Chime chatroom, and you can also associate some channel guardrails to provide granular control on what commands can be run from the channel. For example, you may want to allow running commands that would allow getting more details on findings reported from Security Hub, and remediating and archiving those findings, but use channel guardrails to prevent anyone from disabling Security Hub. Another example is that you might want to allow the channel members to query AWS CloudTrail logs in order to get more details on findings, but you use channel guardrails to prevent them from disabling AWS CloudTrail or changing the destination Amazon Simple Storage Services (Amazon S3) bucket.
Overview of ChatOps and ChatSecOps concepts
ChatOps, also known as Chat Operations, refers to using chatbots, tools, and clients to communicate, notify, assign, and launch operational tasks and issues. You can use your existing Slack channels and Amazon Chime chatrooms to receive alerts and notifications about operational issues or tasks, and you can also respond to those incidents or tasks in real time from the same chat room. SecOps is a philosophy of encouraging collaboration between the ITOps and Security teams of an organization. ChatSecOps, also known as Chat Security Operations, uses the ChatOps technology to enable customers to put SecOps in practice.
ChatSecOps facilitates this collaboration by allowing security-related notifications to be delivered to common chat rooms used by SecOps teams, providing visibility on the issues and actions that are taken to investigate and remediate the reported issues. SecOps teams can share threat analysis reports, compliance finding reports, and information on security vulnerabilities in these channels and work closely with DevOps teams to perform further analysis, investigation, and remediation of the issues and findings. This helps to ensure visibility and collaboration across the SecOps and DevOps teams and promotes the philosophy of DevSecOps.
Prerequisites
To get started, you’ll need the following prerequisites:
- An active AWS account
- Amazon GuardDuty enabled
- AWS Security Hub enabled and configured to ingest findings from GuardDuty
- A Slack account
Set up Slack permissions
You need to grant permissions to the users in Slack channels, which you can do in one of the following ways:
- Associate a channel IAM role with AWS Chatbot. This method provides similar permissions to all the members of the Slack channel. A channel IAM role is more useful if all your channel members require the same set of permissions. The channel IAM role can also be used to restrict the permissions provided by the user IAM role.
- Define user roles. User roles require channel members to choose their own roles. This allows different users in your channel to have different sets of permissions. User roles are also useful when you don’t want new channel members to perform actions as soon as they join the channel.
For detailed instructions about setting up AWS Chatbot and defining permissions, see Getting started with AWS Chatbot. For more information about setting boundaries on the permissions that can be allowed by the channel and user IAM roles, see Channel guardrails.
Integrate the Slack channel with AWS Chatbot
After you set up the Slack channel with required permissions, you integrate the ChatOps for AWS app with your channel by using the following steps.
To integrate the Slack channel with AWS Chatbot
- Log in to Slack by using either the Slack app or web browser.
- In the Slack sidebar, from the Channels section, choose the channel name.
- In the right pane, choose the channel name to open the channel configuration window.
- Choose the Integrations tab, then choose Add an App.
- In the search bar, enter AWS Chatbot. In the search results list, choose the Add button for AWS Chatbot.
- On the Integrations tab, under Apps, you should see ChatOps for AWS, as shown in Figure 1.

Figure 1: Integrate the ChatOps for AWS app with your Slack channel

The step-by-step process for integrating a Slack channel with AWS Chatbot is described in more detail in the blog post Enabling AWS Security Hub integration with AWS Chatbot.
Now you’re ready to start running the commands. Note that you need to add @aws before writing any commands. For more information , see Running AWS CLI commands from Slack channels.
Use case: Amazon S3 Block Public Access enabled at the account level
The Amazon S3 Block Public Access feature provides settings for access points, buckets, and accounts to help you manage public access to Amazon S3 resources. With S3 Block Public Access, account administrators and bucket owners can set up centralized controls to limit public access to your S3 resources. These controls are enforced regardless of how the resources are created.
Amazon GuardDuty tracks and reports S3 Block Public Access feature configurations at the account level, as well as the bucket level. These findings are automatically sent to Security Hub.
For the purpose of this walkthrough, consider the following use case: your organization has compliance requirements to disable public access to all the S3 buckets at the account level. You do not want to allow individual bucket owners to configure this access policy. You get a notification that the S3 Block Public Access feature is disabled at the account level for a specific account. This walkthrough shows how you can run AWS CLI commands from the Slack channel to investigate and remediate this issue.
To remediate finding for Amazon S3 Block Public Access from the Slack channel
- You receive a Security Hub notification that Amazon S3 Block Public Access was disabled for an account in your designated Slack channel.

Figure 2: Notification received from Security Hub in Slack channel
This notification indicates that S3 Block Public Access was disabled for a specific account.
Note: Your Slack channel members require permissions to investigate and remediate the findings received in the Slack channel. As described earlier, you can grant permissions using a channel IAM role or a user IAM role. You should follow the principal of least privilege access when granting access and use IAM Access Analyzer to review the permissions that are granted through the channel or user IAM role.
- Before you take any action, you need to find the current S3 Block Public Access configuration for the account. To do this, run the following AWS CLI command from the Slack channel, replacing <your_account_id> with the AWS account ID you are investigating.
@aws s3control get-public-access-block –account-id <your_account_id>
- Review the response in the Slack channel.

Figure 3: AWS CLI command output in Slack channel indicating that S3 Block Public Access is disabled
You see that the output in Figure 3 shows that all the parameters of PublicAccessBlockConfiguration are set to false, which indicates that the Block Public Access feature is disabled at the account level.
- To remediate this issue, run the following AWS CLI command in your Slack channel, replacing <your_account_id> with the AWS account ID you are investigating.
@aws s3control put-public-access-block –account-id <your_account_id> –public-access-block-configuration {“RestrictPublicBuckets”: true,
“BlockPublicPolicy”: true,
“BlockPublicAcls”: true,
“IgnorePublicAcls”: true - In the response from AWS Chatbot, look for Result was null to verify that the command was run without any errors.

Figure 4: AWS CLI command run from Slack channel to enable S3 Block Public Access
- To check the current status of the configuration, and to validate whether the issue has been resolved, again run the following AWS CLI command from the Slack channel, replacing <your_account_id> with the AWS account ID you are investigating:
@aws s3control get-public-access-block –account-id <your_account_id>
- In the response, you see that all the parameters of PublicAccessBlockConfiguration are set to false, which indicates that the Block Public Access feature is enabled at the account level.
Figure 5: AWS CLI command output in Slack channel indicating S3 Block Public Access is enabled


Another example use case is that you get a security finding notifying you about unencrypted Amazon Elastic Block Store (Amazon EBS) volumes. You can remediate the finding by running AWS CLI commands to encrypt the volume. In addition to interacting with AWS services by running standard AWS CLI commands in the Slack channel, you can further extend this capability to run operating system (OS)-level commands by using AWS Systems Manager runbooks, using the same mechanism described in this post. For more information, see AWS Systems Manager Runbooks in the AWS Chatbot Administrator Guide.
Conclusion
In this blog post, you learned how to run AWS CLI commands from Slack channels to remediate your security findings. This allows you to receive alerts and notifications from Security Hub and other security services such as Amazon GuardDuty, then investigate and remediate the issues from a single platform. You can integrate AWS Chatbot with your security operation team’s Slack channel or Amazon Chime chatroom, and manage your security operations in a more collaborative, transparent, and automated manner.
If you have any questions about this post, let us know in the Comments section below. For more information about AWS Chatbot, see the AWS Chatbot Administrator Guide.
Want more AWS Security news? Follow us on Twitter.
ISO 27002 Emphasizes Need For Threat Intelligence
Post Syndicated from Drew Burton original https://blog.rapid7.com/2022/07/25/iso-27002-emphasizes-need-for-threat-intelligence/

With employees reluctant to return to the office following the COVID-19 pandemic, the concept of a well-defined network perimeter has become a thing of the past for many organizations. Attack surfaces continue to expand, and as a result, threat intelligence has taken on even greater importance.
Earlier this year, the International Organization for Standardization (ISO) released ISO 27002, which features a dedicated threat intelligence control (Control 5.7). This control is aimed at helping organizations collect and analyze threat intelligence data more effectively. It also provides guidelines for creating policies that limit the impact of threats. In short, ISO 27002’s Control 5.7 encourages a proactive approach to threat intelligence.
Control 5.7 specifies that threat intelligence must be “relevant, perceptive, contextual, and actionable” in order to be effective. It also recommends that organizations consider threat intelligence on three levels: strategic, operational, and tactical.
- Strategic threat intelligence is defined as high-level information about the evolving threat landscape (information about threat actors, types of attacks, etc.)
- Operational threat intelligence is information about the tactics, tools, and procedures (TTPs) used by attackers.
- Tactical threat intelligence includes detailed information on particular attacks, including technical indicators.
ISO 27002 is intended to be used with ISO 27001, which provides guidance for establishing and maintaining information security management systems. Many organizations use ISO 27001 and 27002 in conjunction as a framework for showing compliance with regulations where detailed requirements are not provided, for example Sarbanes-Oxley Act (SOX) in the US and the Data Protection Directive in the EU.
How Rapid7 can help
In addition to our threat intelligence and digital risk protection solution Threat Command, there are several Rapid7 products and services that can help you address a variety of controls recommended in ISO 27002.
InsightVM identifies and classifies assets, audits password policies, and identifies and prioritizes vulnerabilities. Metasploit can be used to validate vulnerability exploitability, audit the effectiveness of network segmentation, and conduct technical compliance tests. InsightAppSec tests the security of web applications. InsightIDR monitors user access to the network, collects and analyzes events, and assists in incident response.
Additionally, Rapid7 can provide security consulting services, perform an assessment of your organization’s current state of controls against the ISO 27002 framework, and identify gaps in your security program. We can also develop and review security policies, conduct penetration tests, respond to security incidents, and more.
Addressing ISO 27002 Control 5.7
A dedicated threat intelligence and digital risk protection solution like Rapid7 Threat Command can greatly ease the process of addressing Control 5.7.
Threat Command is designed to simplify the collection and analysis of threat intelligence data — from detection to remediation. It proactively monitors thousands of sources across the clear, deep, and dark web and delivers tailored threat intelligence information specific to your organization. Even better, Threat Command helps reduce the information overload with comprehensive external threat protection from a single pane of glass.
Threat Command enables you to make informed decisions, rapidly detect and mitigate threats, and minimize exposure to your organization. Simply input your digital assets and properties, and you’ll receive relevant alerts categorized by severity, type of threat, and source. Fast detection and integration with SIEM, SOAR, EDR, and firewall allow you to quickly turn threat intelligence into action.
To learn more about how Threat Command fits into your organization’s security strategy, schedule a demo today.
Additional reading:
AWS Week In Review – July 25, 2022
Post Syndicated from Antje Barth original https://aws.amazon.com/blogs/aws/aws-week-in-review-july-25-2022/
A few weeks ago, we hosted the first EMEA AWS Heroes Summit in Milan, Italy. This past week, I had the privilege to join the Americas AWS Heroes Summit in Seattle, Washington, USA. Meeting with our community experts is always inspiring and a great opportunity to learn from each other. During the Summit, AWS Heroes from North America and Latin America shared their thoughts with AWS developer advocates and product teams on topics such as serverless, containers, machine learning, data, and DevTools. You can learn more about the AWS Heroes program here.

Last Week’s Launches
Here are some launches that got my attention during the previous week:
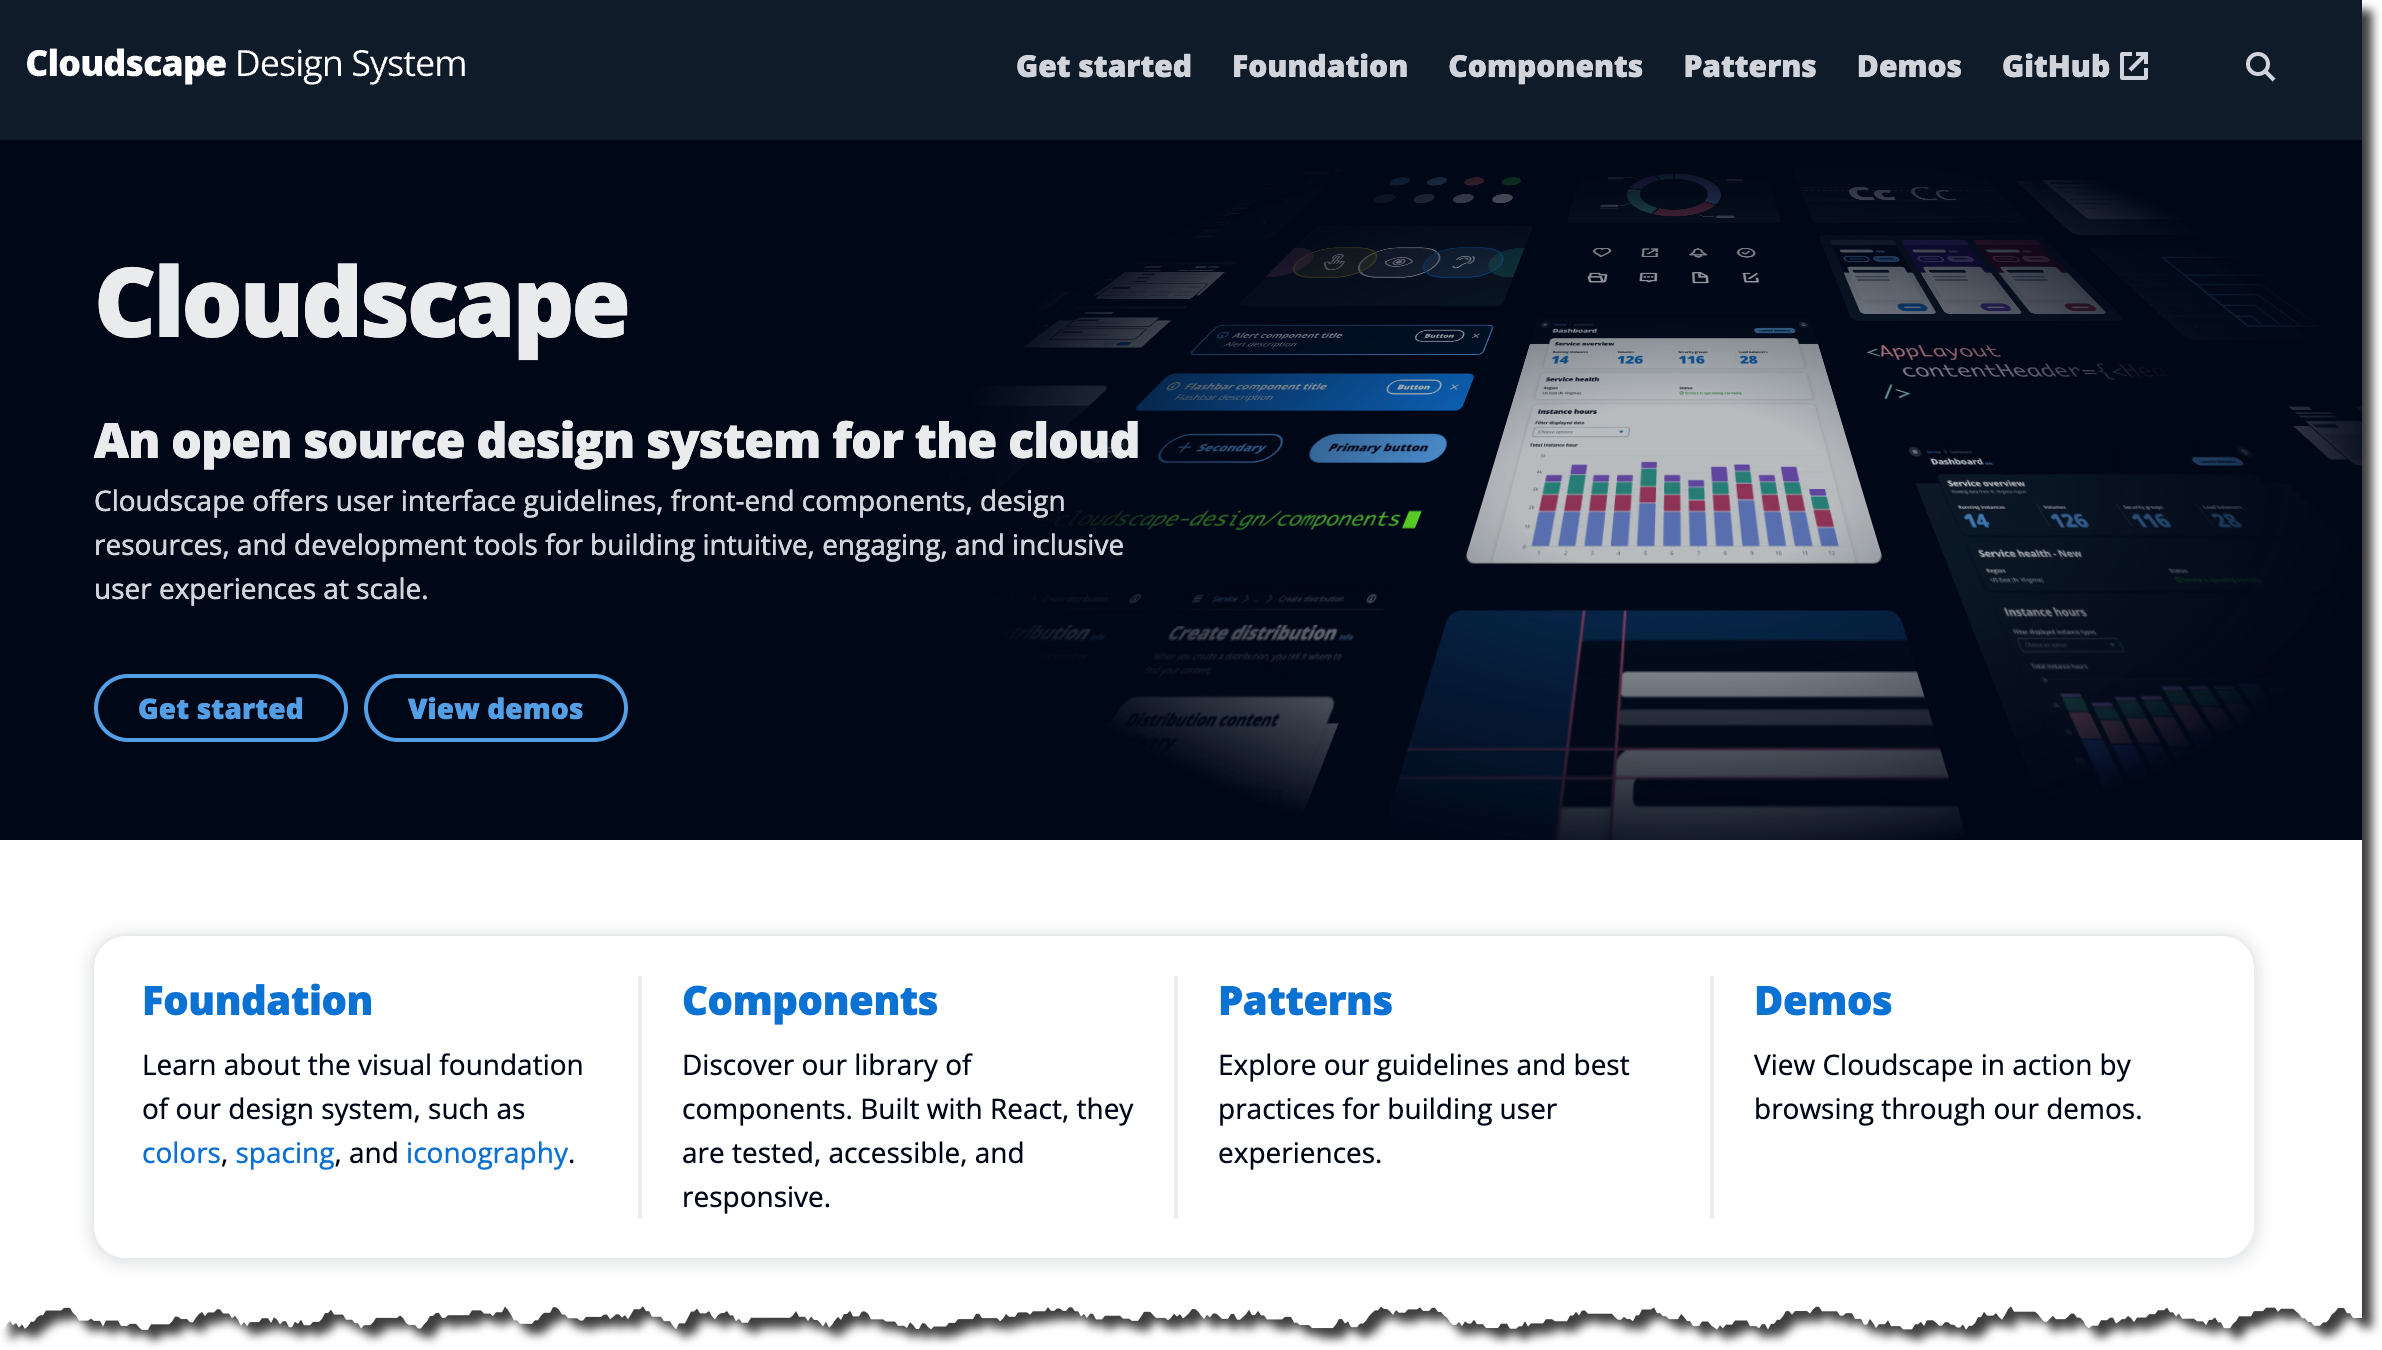
Cloudscape Design System – Cloudscape is an open source design system for creating web applications. It was built for and is used by AWS products and services. We created it in 2016 to improve the user experience across web applications owned by AWS services and also to help teams implement those applications faster. If you’ve ever used the AWS Management Console, you’ve seen Cloudscape in action. If you are building a product that extends the AWS Management Console, designing a user interface for a hybrid cloud management system, or setting up an on-premises solution that uses AWS, have a look at Cloudscape Design System.
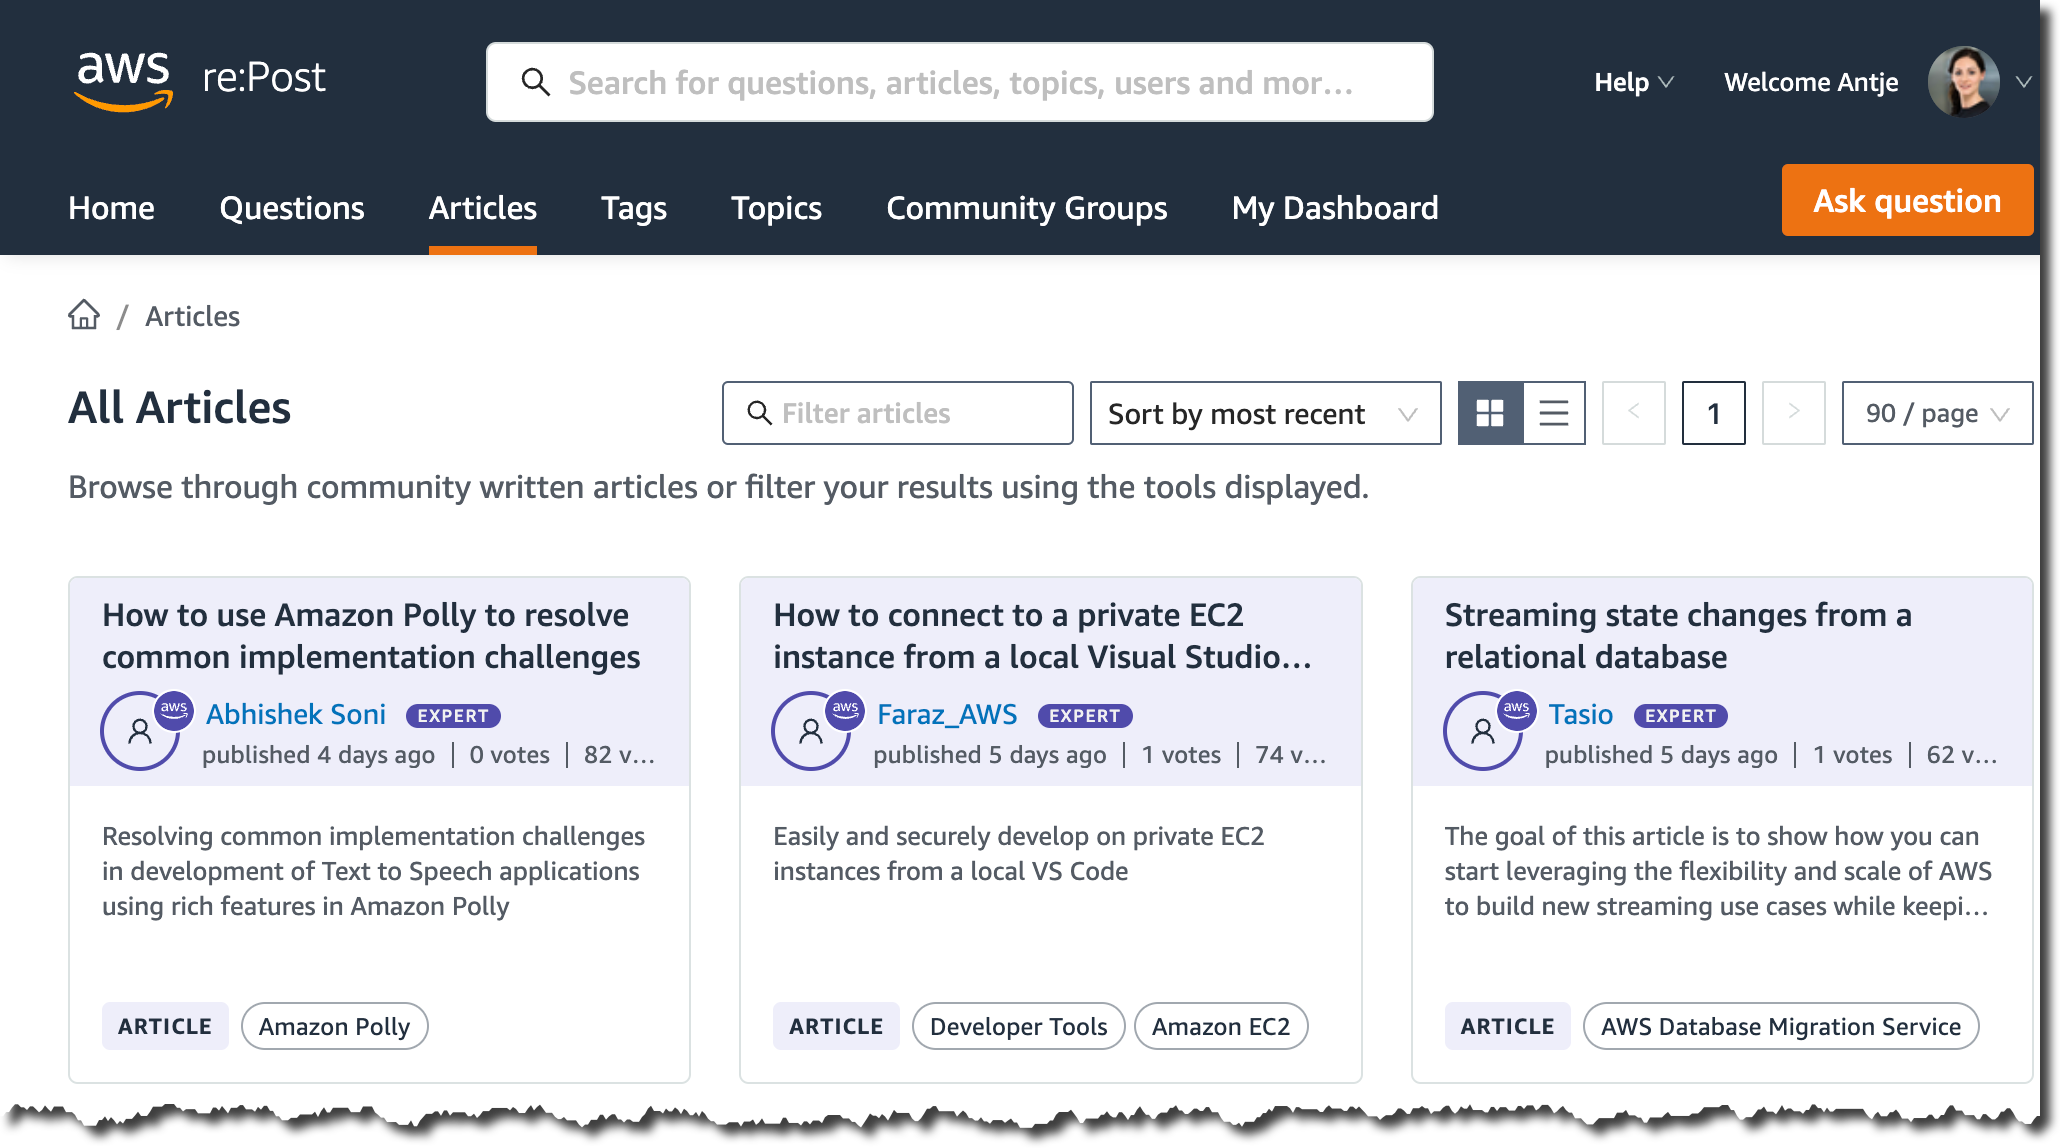
AWS re:Post introduces community-generated articles – AWS re:Post gives you access to a vibrant community that helps you become even more successful on AWS. Expert community members can now share technical guidance and knowledge beyond answering questions through the Articles feature. Using this feature, community members can share best practices and troubleshooting processes and address customer needs around AWS technology in greater depth. The Articles feature is unlocked for community members who have achieved Rising Star status on re:Post or subject matter experts who built their reputation in the community based on their contributions and certifications. If you have a Rising Star status on re:Post, start writing articles now! All other members can unlock Rising Star status through community contributions or simply browse available articles today on re:Post.
AWS Lambda announces support for attribute-based access control (ABAC) and new IAM condition key – You can now use attribute-based access control (ABAC) with AWS Lambda to control access to functions within AWS Identity and Access Management (IAM) using tags. ABAC is an authorization strategy that defines access permissions based on attributes. In AWS, these attributes are called tags. With ABAC, you can scale an access control strategy by setting granular permissions with tags without requiring permissions updates for every new user or resource as your organization scales. Read this blog post by Julian Wood and Chris McPeek to learn more.
AWS Lambda also announced support for lambda:SourceFunctionArn, a new IAM condition key that can be used for IAM policy conditions that specify the Amazon Resource Name (ARN) of the function from which a request is made. You can use the Condition element in your IAM policy to compare the lambda:SourceFunctionArn condition key in the request context with values that you specify in your policy. This allows you to implement advanced security controls for the AWS API calls taken by your Lambda function code. For more details, have a look at the Lambda Developer Guide.
Amazon Fraud Detector launches Account Takeover Insights (ATI) – Amazon Fraud Detector now supports an Account Takeover Insights (ATI) model, a low-latency fraud detection machine learning model specifically designed to detect accounts that have been compromised through stolen credentials, phishing, social engineering, or other forms of account takeover. The ATI model is designed to detect up to four times more ATI fraud than traditional rules-based account takeover solutions while minimizing the level of friction for legitimate users. To learn more, have a look at the Amazon Fraud Detector documentation.
Amazon EMR on EC2 clusters (EMR Clusters) introduces more fine-grained access controls – Previously, all jobs running on an EMR cluster used the IAM role associated with the EMR cluster’s EC2 instances to access resources. This role is called the EMR EC2 instance profile. With the new runtime roles for Amazon EMR Steps, you can now specify a different IAM role for your Apache Spark and Hive jobs, scoping down access at a job level. This simplifies access controls on a single EMR cluster that is shared between multiple tenants, wherein each tenant is isolated using IAM roles. You can now also enforce table and column permissions based on your Amazon EMR runtime role to manage your access to data lakes with AWS Lake Formation. For more details, read the What’s New post.
For a full list of AWS announcements, be sure to keep an eye on the What’s New at AWS page.
Other AWS News
Here are some additional news and customer stories you may find interesting:
AWS open-source news and updates – My colleague Ricardo Sueiras writes this weekly open-source newsletter in which he highlights new open-source projects, tools, and demos from the AWS Community. Read edition #121 here.
AI Use Case Explorer – If you are interested in AI use cases, have a look at the new AI Use Case Explorer. You can search over 100 use cases and 400 customer success stories by industry, business function, and the business outcome you want to achieve.
Bayer centralizes and standardizes data from the carbon program using AWS – To help Brazilian farmers adopt climate-smart agricultural practices and reduce carbon emissions in their activities, Bayer created the Carbon Program, which aims to build carbon-neutral agriculture practices. Learn how Bayer uses AWS to centralize and standardize the data received from the different partners involved in the project in this Bayer case study.
Upcoming AWS Events
Check your calendars and sign up for these AWS events:
 AWS re:Inforce 2022 – The event will be held this week in person on July 26 and 27 in Boston, Massachusetts, USA. You can watch the keynote and leadership sessions online for free. AWS On Air will also stream live from re:Inforce.
 AWS Global Summits – AWS Global Summits are free events that bring the cloud computing community together to connect, collaborate, and learn about AWS. Registrations are open for the following AWS Summits in August:
- AWS Summit São Paulo, August 3–4, at Transamerica Expo Center, São Paulo, Brazil.
- AWS Summit Taiwan, August 10–11, at Taipei Nangang Exhibition Center, Taipei City, Taiwan.
- AWS Summit Anaheim, August 18, at Anaheim Convention Center, Anaheim, California, USA.
- AWS Summit Chicago, August 25, at McCormick Place, Chicago, Illinois, USA.
- AWS Summit Canberra, August 31, at the National Convention Center, Canberra, Australia.
 IMAGINE 2022 – The IMAGINE 2022 conference will take place on August 3 at the Seattle Convention Center, Washington, USA. It’s a no-cost event that brings together education, state, and local leaders to learn about the latest innovations and best practices in the cloud. You can register here.
I’ll be speaking at Data Con LA on August 13–14 in Los Angeles, California, USA. Feel free to say “Hi!” if you’re around. And if you happen to be at Ray Summit on August 23–24 in San Francisco, California, USA, stop by the AWS booth. I’ll be there to discuss all things Ray on AWS.
That’s all for this week. Check back next Monday for another Week in Review!
– Antje
What We’re Looking Forward to at AWS re:Inforce
Post Syndicated from Jesse Mack original https://blog.rapid7.com/2022/07/25/what-were-looking-forward-to-at-aws-re-inforce/

AWS re:Inforce 2022 starts tomorrow — Tuesday, July 26th — and we couldn’t be more excited to gather with the tech, cloud, and security communities in our home city of Boston. Here’s a sneak peek of the highlights to come at re:Inforce and what we’re looking forward to the most this Tuesday and Wednesday.
Expert insights at the Rapid7 booth
After two and half years of limited in-person gatherings, we have kind of a lot to say. That’s why we’re making the Rapid7 booth at AWS re:Inforce a hub for learning and sharing from our cybersecurity experts. Stop by and learn how our team members are tackling a range of topics in cloud and security overall, including:
- Adapting Your VM Program for Cloud-Native Environments — Jimmy Green, VP of Software Engineering for Cloud, will walk through some of the key considerations when building a fully cloud-first approach to vulnerability management.
- Speeding Up Your Adoption of CSP Innovation — Chris DeRamus, VP of Technology – Cloud, will detail how Rapid7 evaluates cloud service providers (CSPs) for risk in order to promote faster, more secure adoption.
- Context Is King: The Future of Cloud Security Operations — Peter Scott, VP of Strategic Engagement for Cloud Security, will discuss why obtaining context around security data is key to managing complexity in cloud environments.
- Hybrid Is Here: Is Your SOC Ready? — Megan Connolly, Senior Security Solutions Engineer, will highlight the role that extended detection and response (XDR) technology can play in helping SOCs move toward a cloud-first model.
- InsightCloudSec Demo — Joe Brumbley, Cloud Security Solutions Engineer, and Sean Healy, Senior Domain Engineer – Enterprise Cloud Security, will show InsightCloudSec in action, taking you through the different use cases and features that enable integrated security for multi-cloud environments.
Sharing how we walk the walk
At Rapid7, we’re laser-focused on helping companies accelerate in the cloud without compromising security. Our technology and expertise help security teams bring that vision to life — and they form the foundation for how we secure our own cloud infrastructure, too.
In the AWS re:Inforce featured session, “Walking the Walk: AWS Security at Rapid7,” Ulrich Dangle (Director, Software Engineering – Platform) and Lauren Clausen Fenton (Manager, Software Engineering – Platform) will share their firsthand experiences developing, scaling, and operationalizing a cloud security program at Rapid7. They’ll talk about how they manage to reduce risk while supporting Rapid7’s business goals, as well as the needs of our fast-moving DevOps team.
Join us on Tuesday, July 26th, at 11:40 AM, or Wednesday, July 27th, at 10:05 AM to learn how our security team is working around-the-clock to keep our large cloud environment secure and compliant, with standardized configurations and a tried-and-true threat response playbook.
Conversations over cloudy beers
It’s no secret that great craft beer is an integral part of tech culture — so where better to talk about all things cloud than a Boston brewery known for the cloudy appearance of its hazy New England IPAs?
On Tuesday, July 26th, from 5:15 PM to 8 PM, we’ll be at Rapid7 Reception at Trillium Fort Point, right in the heart of the Seaport District. It’s a perfect chance to network with your fellow protectors and meet some of our Rapid7 security experts over a double dry-hopped pale ale or a nitro milk stout. (If beer’s not your thing, not to worry — we’ll have wine and seltzer, too.)
If that wasn’t enough…
Last but not least, we’re giving away a vacation of your choice valued at $5,000! The more you engage with us at re:Inforce, the more chances you have to win. You’ll be entered in the drawing when you stop by to see us at Booth 206 to receive a demo or watch a presentation, or when you attend the Rapid7 Reception at Trillium Fort Point.
Check out what we have planned and register with us today!
Fedora to disallow CC0-licensed code
Post Syndicated from original https://lwn.net/Articles/902410/
The Creative
Commons CC0 license is essentially a public-domain declaration (or as
close as is possible in jurisdictions that lack a public domain). The
Fedora project has allowed the distribution of code under this license,
but, as announced
by Richard Fontana, that policy is changing and CC0 will no longer be
allowed for code:
The reason for the change: Over a long period of time a consensus
has been building in FOSS that licenses that preclude any form of
patent licensing or patent forbearance cannot be considered
FOSS. CC0 has a clause that says: “No trademark or patent rights
held by Affirmer are waived, abandoned, surrendered, licensed or
otherwise affected by this document.”
Existing CC0-licensed packages may be grandfathered in, but that evidently
has not yet been decided.
Amazon Prime Day 2022 – AWS for the Win!
Post Syndicated from Jeff Barr original https://aws.amazon.com/blogs/aws/amazon-prime-day-2022-aws-for-the-win/
As part of my annual tradition to tell you about how AWS makes Prime Day possible, I am happy to be able to share some chart-topping metrics (check out my 2016, 2017, 2019, 2020, and 2021 posts for a look back).
My purchases this year included a first aid kit, some wood brown filament for my 3D printer, and a non-stick frying pan! According to our official news release, Prime members worldwide purchased more than 100,000 items per minute during Prime Day, with best-selling categories including Amazon Devices, Consumer Electronics, and Home.
Powered by AWS
As always, AWS played a critical role in making Prime Day a success. A multitude of two-pizza teams worked together to make sure that every part of our infrastructure was scaled, tested, and ready to serve our customers. Here are a few examples:
Amazon Aurora – On Prime Day, 5,326 database instances running the PostgreSQL-compatible and MySQL-compatible editions of Amazon Aurora processed 288 billion transactions, stored 1,849 terabytes of data, and transferred 749 terabytes of data.
Amazon EC2 – For Prime Day 2022, Amazon increased the total number of normalized instances (an internal measure of compute power) on Amazon Elastic Compute Cloud (Amazon EC2) by 12%. This resulted in an overall server equivalent footprint that was only 7% larger than that of Cyber Monday 2021 due to the increased adoption of AWS Graviton2 processors.
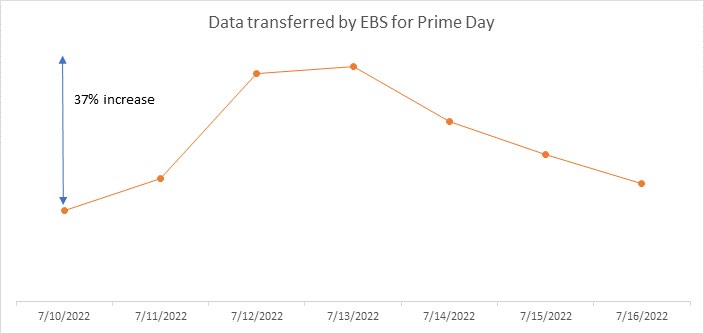
Amazon EBS – For Prime Day, the Amazon team added 152 petabytes of EBS storage. The resulting fleet handled 11.4 trillion requests per day and transferred 532 petabytes of data per day. Interestingly enough, due to increased efficiency of some of the internal Amazon services used to run Prime Day, Amazon actually used about 4% less EBS storage and transferred 13% less data than it did during Prime Day last year. Here’s a graph that shows the increase in data transfer during Prime Day:
Amazon SES – In order to keep Prime Day shoppers aware of the deals and to deliver order confirmations, Amazon Simple Email Service (SES) peaked at 33,000 Prime Day email messages per second.
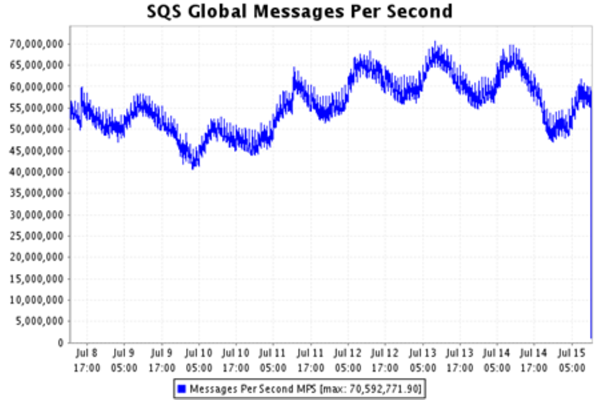
Amazon SQS – During Prime Day, Amazon Simple Queue Service (SQS) set a new traffic record by processing 70.5 million messages per second at peak:
Amazon DynamoDB – DynamoDB powers multiple high-traffic Amazon properties and systems including Alexa, the Amazon.com sites, and all Amazon fulfillment centers. Over the course of Prime Day, these sources made trillions of calls to the DynamoDB API. DynamoDB maintained high availability while delivering single-digit millisecond responses and peaking at 105.2 million requests per second.
Amazon SageMaker – The Amazon Robotics Pick Time Estimator, which uses Amazon SageMaker to train a machine learning model to predict the amount of time future pick operations will take, processed more than 100 million transactions during Prime Day 2022.
Package Planning – In North America, and on the highest traffic Prime 2022 day, package-planning systems performed 60 million AWS Lambda invocations, processed 17 terabytes of compressed data in Amazon Simple Storage Service (Amazon S3), stored 64 million items across Amazon DynamoDB and Amazon ElastiCache, served 200 million events over Amazon Kinesis, and handled 50 million Amazon Simple Queue Service events.
Prepare to Scale
Every year I reiterate the same message: rigorous preparation is key to the success of Prime Day and our other large-scale events. If you are preparing for a similar chart-topping event of your own, I strongly recommend that you take advantage of AWS Infrastructure Event Management (IEM). As part of an IEM engagement, my colleagues will provide you with architectural and operational guidance that will help you to execute your event with confidence!
— Jeff;
[$] Support for Intel’s Linear Address Masking
Post Syndicated from original https://lwn.net/Articles/902094/
A 64-bit pointer can address a lot of memory — far more than just about any
application could ever need. As a result, there are bits within that pointer that
are not really needed to address memory, and which might be put to other
needs. Storing a few bits of metadata within a pointer is a common enough
use case that multiple architectures are adding support for it at the
hardware level. Intel is no exception; support for its “Linear Address
Masking” (LAM) feature has been slowly making its way toward the mainline
kernel.
Security updates for Monday
Post Syndicated from original https://lwn.net/Articles/902400/
Security updates have been issued by Debian (chromium, djangorestframework, gsasl, and openjdk-11), Fedora (giflib, openssl, python-ujson, and xen), Mageia (virtualbox), SUSE (git, gpg2, java-1_7_1-ibm, java-1_8_0-ibm, java-1_8_0-openjdk, mozilla-nspr, mozilla-nss, mozilla-nss, python-M2Crypto, and s390-tools), and Ubuntu (php8.1).
Debian.community domain name seized
Post Syndicated from original https://lwn.net/Articles/902373/
The Debian project, Debian.ch, and Software in the Public Interest recently
filed a WIPO action to take control of the “debian.community” domain name,
which has been used by Daniel Pocock to attack
the Debian project and its members. Red Hat had made a similar attempt to take control of
WeMakeFedora.org earlier this year, but that attempt failed. The Debian
action succeeded, though; on July 19, WIPO decided
in favor of the action and ordered the domain name transferred.
That domain name can no longer be used, but the attacks seem certain to
continue.
Migrating mainframe JCL jobs to serverless using AWS Step Functions
Post Syndicated from James Beswick original https://aws.amazon.com/blogs/compute/migrating-mainframe-jcl-jobs-to-serverless-using-aws-step-functions/
This post is written by Raghuveer Reddy Talakola, Sr. Modernization Architect, Sanjay Rao, Sr. Mainframe Consultant, and Aneel Murari, Solution Architect.
JCL (Job Control Language) is a scripting language used to program batch jobs on mainframe systems. A JCL can contain one to many job control statements. It can be challenging to understand the condition code parameter checking syntax, which determines the order and conditions under which these statements are run.
If a JCL fails midway through execution, mainframe programmers have no visual aids to help them understand the flow of the JCL. They must examine text-based execution logs to manually correlate condition codes in the logs with condition check rules attached to JCL statements to understand the root cause of failure.
This post explains how AWS Step Functions can make it easier to maintain batch jobs migrated from mainframes to AWS.
Overview
The sample application shows how to use AWS Step Functions to address typical challenges when maintaining a batch workflow built using JCL. The sample business case validates a feed of new employee information against an existing employee database. It identifies discrepancies between the feed and the database and sends out notifications if it finds any.
The mainframe JCL supplied with this blog has seven steps. Each step applies condition code rules to check codes emitted by previous steps to decide if it must run. The Step Functions example achieves the same result. Using its graphical user interface, you can develop each step as an independent task, and link them visually. This makes it easier to understand how to decouple, reorder, or scale tasks if needed.
Visual tools for workflow analysis
A JCL controls its flow by using condition code checking or/and using IF-ELSE statements. A JCL condition code check defines the rules under which its associated JCL step will not run. Developers may code compound rules, double negatives, or triple or more negative conditions into the flow.
| Example of condition code check in JCL | What it means |
| //STEPTS2 EXEC PGM=XYZ,COND=(4,GT,STEPTST) | Do not execute PGM XYZ if previous step STEPTST ended execution with a code greater than 4 |
| //STEPTS3 EXEC PGM=XYZ,COND=EVEN | Execute PGM XYZ even if all the previous steps failed |
|
//STEPTS5 EXEC PGM=XYZ, COND=((6,EQ),(8,GT)) |
Do not execute PGM XYZ if any of the preceding steps exited with return code 6 or a code greater than 8 |
The sample JCL illustrates the complexity of setting up a batch workflow using JCL condition code:
- The first step of this JCL deletes files from a previous run. If it ends with code 0, the second JCL step extracts employee data from Db2 using a COBOL program and ends with a return code 0 if it is successful or 4 if no records were found.
- The next step coded with condition check (4,LT), runs if all preceding steps ended with codes less than 5. It checks the external extract and emits a condition code of 8 if the external extract is empty.
- The next step compares the 2 files if the extract validation step produced a return code of zero.
- If this comparison step detects some records that are missing in the employee Db2 database, it creates a file with missing records. If that file is empty, it sets a return code of 8, which ends the program. If the mismatch file has data, it copies the mismatch file over to another system for processing.
With Step Functions, you define the same workflow more easily by using the Amazon States Language (ASL). The Step Functions console provided a graphical representation of that state machine to visualize the application logic using a drag and drop interface.
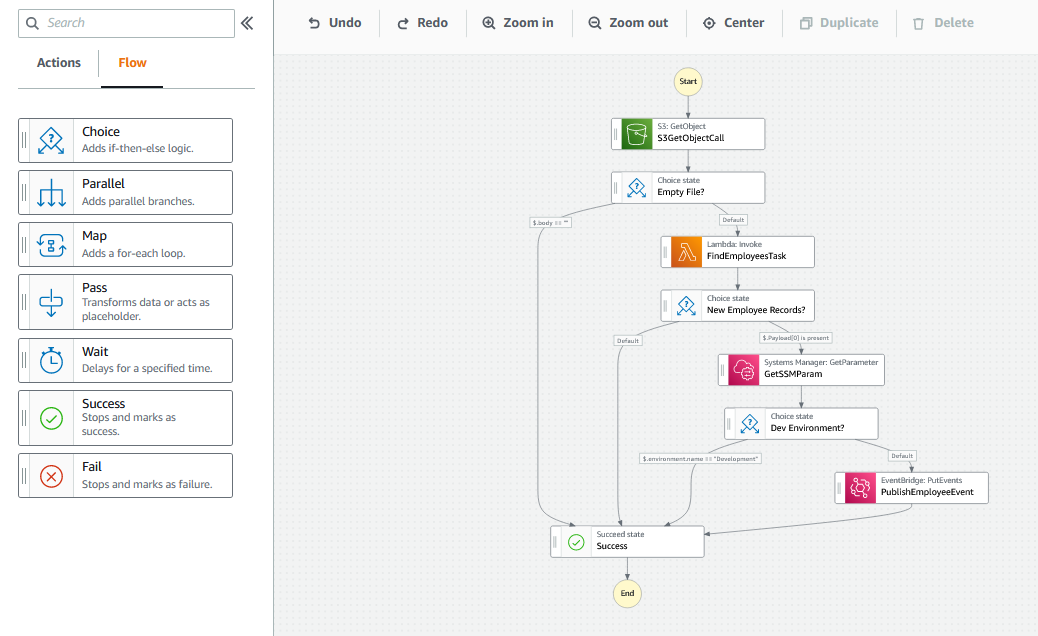
- The first task fetches the employee file from Amazon S3. It does not need a cleanup task as S3 supports versioning.
- If the fetched file is not empty, control passes to the step that runs business logic code inside an AWS Lambda function to validate the employee feed.
- The workflow retrieves an environment variable from an external parameter store. This step shows how environment parameters can be externalized in a Step Functions workflow.
- It publishes an event to Amazon EventBridge to trigger the external processing needed if discrepancies are found and conditions are met.
- The final step is a Succeeded state that marks flow completion.
The following image compares the sample JCL that is converted to a Step Functions workflow:

Using a graphical interface instead of job control statements
In JCL, you define a batch process with a series of job control statements, which run a program, utility, or a nested procedure in a text editor. There is no visual aid. If a batch process becomes complex, it’s harder to understand the dependencies between the steps.
Step Functions makes it simpler for you to set up tasks, which are the equivalents of steps in JCL. It provides you with a graphical user interface (GUI) that enables you to configure and drag-and-drop steps into a state machine.
Decoupling tasks instead of deleting and commenting of code
To disable or change a step in a JCL, you examine the condition code logic associated with all preceding and succeeding steps of the job. Any mistake in editing these codes can lead to unintended consequences.
With Step Functions, removing or changing a step can be done using the visual editor or by updating the ASL code. This can help improve your agility and make it easier to implement change.
Using Parameter Store instead of editing parameters in code
To make JCL behave differently based on parameters, you must edit dynamic variables known as JCL Symbols inside the JCL or in control cards to affect the behavior change. The following JCL code sample shows a parameter called REGN coded to value DEV. At runtime, this REGN parameter is substituted by DEV in every statement that references this parameter. To reuse this JCL in production, you can change the value assigned to REGN to say PROD.
// SET REGN=DEV
// -------
//******************************************************************
//* RUN Db2 COBOL Batch Program
//******************************************************************
//EXTRDB2 EXEC PGM=IKJEFT01,COND=(0,NE)
// -------
//FILEOUT DD DSN=®N..AWS.APG.STEPDB2,
//******************************************************************
//* RUN VSAM COBOL Batch Program
//******************************************************************
// -------
//FILE2 DD DSN=®N..AWS.APG.STEPVSM,
In Step Functions, configuration parameters can be decoupled from state machine code by managing them in an external data source such as the Amazon DynamoDB, AWS Systems Manager Parameter Store. In the Step Functions workflow, the following step demonstrates retrieving a configuration from Parameter Store and using it to perform branching logic:
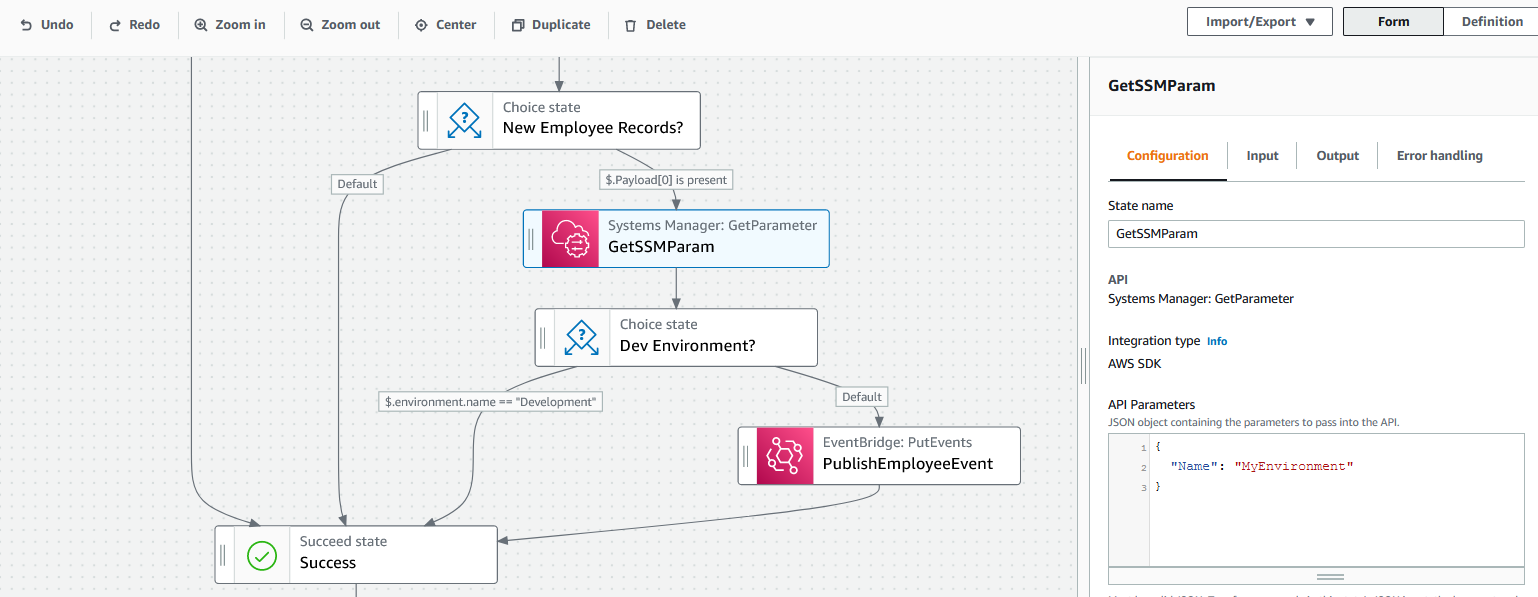
Independent scaling of steps versus splitting and cloning JCLs
When a JCL takes a long time to run, mainframe programmers split the job into multiple jobs or steps. Each job is a replica addressing different ranges of data.
With Step Functions, you can run a step or a group of steps concurrently by using a parallel state or map state, without creating multiple jobs that do the same thing. This can help make maintenance easier.
Improved observability and automated retry
If a JCL fails, there are no visual aids to help debug the errors. On the mainframe, you must log into the mainframe and run through several screens of text on SDSF (System Display and Search Facility) to find the cause of the failure.
Step Functions provide visual information on failures, automated retry capabilities, and native integration with AWS services. This can make it easier to understand and recover from failed jobs compared with reading through lengthy logs.

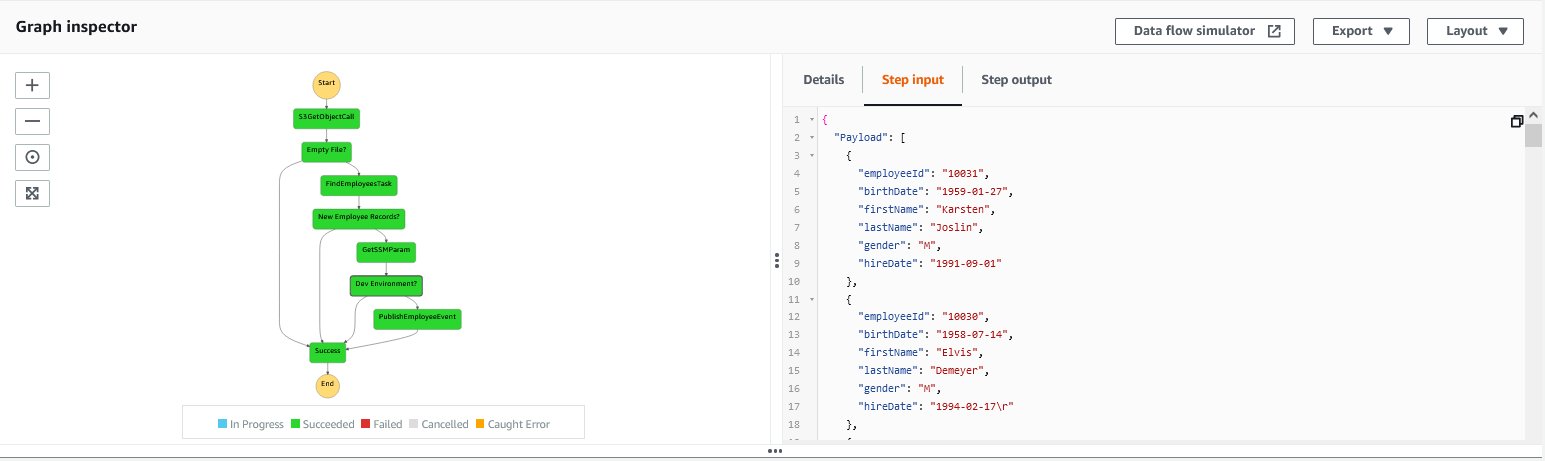
Benefits for developers
Step Functions provides the following improvements over jobs written in JCL or migrated from JCL.
- Visual analysis: Step Functions provide a graphical console that shows the status of each task in a visual presentation that developers and support staff can understand and debug more easily than a failed JCL.
- Decoupling: You can update each component in the workflow independently, unlike in a JCL, where changing a step requires redeployment of the entire batch job to production.
- Low code: Step Functions are defined with minimal code. The workflow editor can be used to drag and drop different steps and visually edit the workflows.
- Independent scaling of steps: Step Functions is a serverless solution, and each step can scale independently. This opens up the possibility of scaling up resources for steps that are resource-intensive.
- Automated retry capabilities: You can configure Step Functions to retry steps and recover from failures. This is much simpler than coding restart conditions in the JCL.
- Improved logging and visibility: Step Functions can integrate with observability tools like Amazon CloudWatch and AWS X-Ray.
Conclusion
This conversion example shows how Step Functions can help you rewrite complex batch processes written in JCL to serverless workflows. It also shows how such a conversion provides maintenance and monitoring features that make it easier to simplify and scale these batch processes.
To learn more, download the sample JCL and Step Functions workflow from the GitHub repository. To learn more about our AWS Mainframe migration and modernization services, go here.
For more serverless learning resources, visit Serverless Land.
Cloudflare deployment in Guam
Post Syndicated from David Antunes original https://blog.cloudflare.com/cloudflare-deployment-in-guam/


Having fast Internet properties means being as few milliseconds as possible away from our customers and their users, no matter where they are on Earth. And because of the design of Cloudflare’s network we don’t just make Internet properties faster by being closer, we bring our Zero Trust services closer too. So whether you’re connecting to a public API, a website, a SaaS application, or your company’s internal applications, we’re close by.
This is possible by adding new cities, partners, capacity, and cables. And we have seen over and over again how making the Internet faster in a region also can have a clear impact on traffic: if the experience is quicker, people usually do more online.
Cloudflare’s network keeps increasing, and its global footprint does so accordingly. In April 2022 we announced that the Cloudflare network now spans 275 cities and the number keeps growing.
In this blog post we highlight the deployment of our data center in Hagatna, Guam.
Why a blog about Guam?
Guam is about 2,400 km from both Tokyo in the north and Manila in the west, and about 6,100 km from Honolulu in the east. Honolulu itself is the most remote major city in the US and one of the most remote in the world, the closest major city from it being San Francisco, California at 3,700 km. From here one can derive how far Guam is from the US to the west and from Asia to the east.

Why is this relevant? As explained here, latency is the time it takes for data to pass from one point on a network to another. And one of the main reasons behind network latency is the distance between client devices — like a browser on a mobile phone — making requests and the servers responding to those requests. So, if we consider where Guam is geographically, we get a good picture about how Guam’s residents can be affected by the long distances their Internet requests, and responses, have to travel.
This is why every time Cloudflare adds a new location, we help make the Internet a bit faster. The reason is that every new location brings Cloudflare’s services closer to the users requested them. As part of Cloudflare’s mission, the Guam deployment is a perfect example of how we are going from being the most global network on Earth to the most local one as well.
Submarine cables
There are 486 active submarine cables and 1,306 landings that are currently active or under construction, running to an estimated 1.3 million km around the globe.
A closer look at specific submarine cables landing in Guam show us that the region is actually well served in terms of submarine cables, with several connections to the mainland such as Japan, Taiwan, Philippines, Australia, Indonesia and Hawaii, therefore making Guam more resilient to matters such as the one that affected Tonga in January 2022 due to the impact of a volcanic eruption on submarine cables – we wrote about it here.
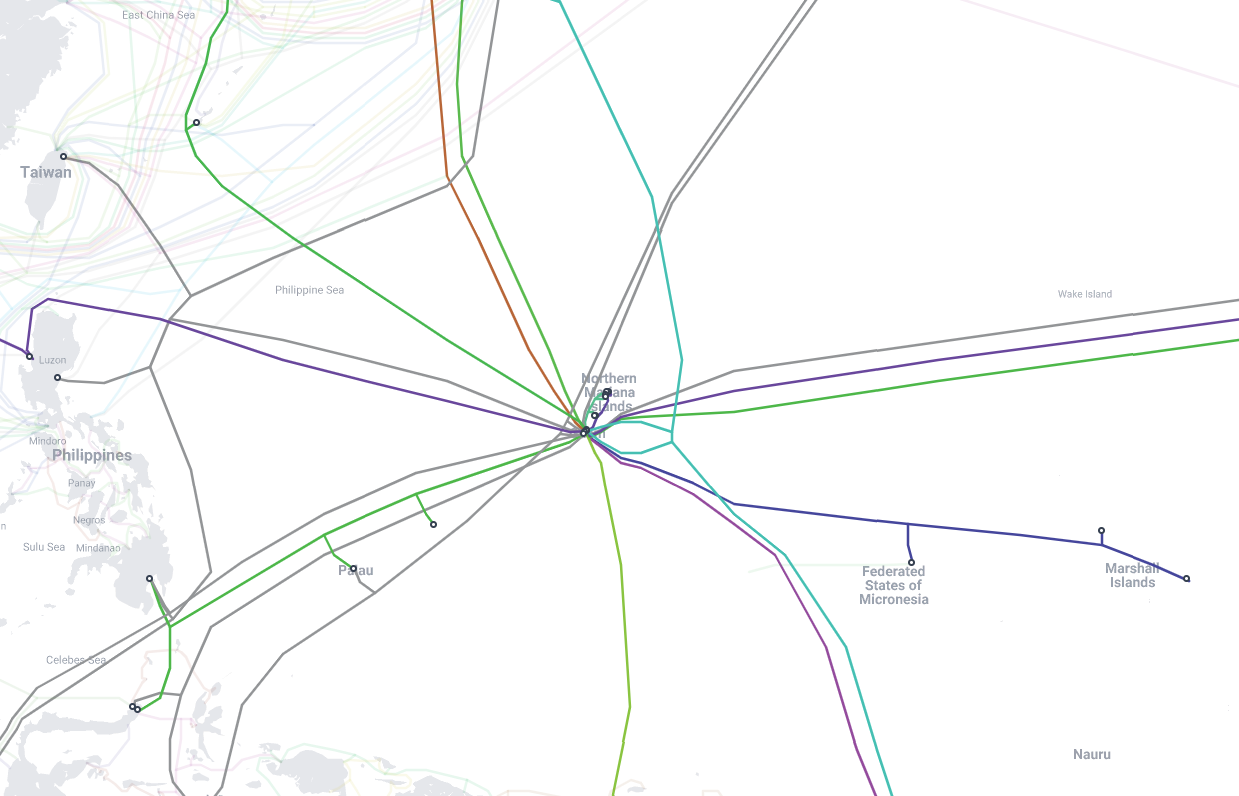
The picture above also shows the relevance of Guam for other even more remote locations, such as the Federated States of Micronesia (FSM) or the Marshall Islands, which have an ‘extra-hop’ to cover when trying to reach the rest of the Internet. Palau also relies on Guam but, from a resilience point of view, has alternatives to locations such as the Philippines or to Australia.
Presence at Mariana Islands Internet Exchange
Cloudflare’s presence in Guam is through Mariana Islands Internet Exchange, or MARIIX, allowing Cloudflare to peer with participants such as:
- AS 395400 – University of Guam
- AS 9246 – GTA Teleguam
- AS 3605 – DoCoMo Pacific
- AS 7131 – IT&E
- AS 17456 – PDS
As there are multiple participants, these are being added gradually. The first was AS 7131, being served from April 2022, and the latest addition is AS 9246, from July 2022.
As some of these ASNs or ASs (autonomous systems — large networks or group of networks) have their own downstream customers, further ASs can leverage Cloudflare’s deployment at Guam, examples being AS 17893 – Palau National Communications Corp – or AS 21996 – Guam Cell.
Therefore, the Cloudflare deployment brings not only a better (and generally faster) Internet to Guam’s residents, but also to residents in nearby archipelagos that are anchored on Guam. In May 2022, according to UN’s forecasts, the covered resident population in the main areas in the region stands around 171k in Guam, 105k in FSM and 60k in the Marshall Islands.
For this deployment, Cloudflare worked with the skilled MARIIX personnel for the physical installations, provisioning and services turn-up. Despite the geographical distance and time zone differences (Hagatna is 9 hours ahead of GMT but only two hours ahead of the Cloudflare office in Singapore, so the time difference wasn’t a big challenge), all the logistics involved and communications went smoothly. A recent blog posted by APNIC, where we can see some personnel with whom Cloudflare worked, reiterates the valuable work being done locally and the increasing importance of Guam in the region.
Performance impact for local/regional habitants
Before Cloudflare’s deployment in Guam, customers of local ASs trying to reach Internet properties via Cloudflare’s network were redirected mainly to Cloudflare’s deployments in Tokyo and Seattle. This is due to the anycast routing used by Cloudflare — as described here; anycast typically routes incoming traffic to the nearest data center. In the case of Guam, and as previously described, these large distances to the nearest locations represents a distance of thousands of kilometers or, in other words, high latency thus affecting user experience badly.
With Cloudflare’s deployment in Guam, Guam’s and nearby archipelagos’ residents are no longer redirected to those faraway locations, instead they are served locally by the new Cloudflare servers. Although a decrease of a few milliseconds may not seem a lot, it actually represents a significant boost in user experience as latency is dramatically reduced. As the total distance between users and servers is reduced, load time is reduced as well. And as users very often quit waiting for a site to load when the load time is high, the opposite occurs as well, i.e., users are more willing to stay within a site if loading times are good. This improvement represents both a better user experience and higher use of the Internet.
In the case of Guam, we use AS 9246 as an example as it was previously served by Seattle but since around 23h00 UTC 14/July/2022 is served by Guam, as illustrated below:
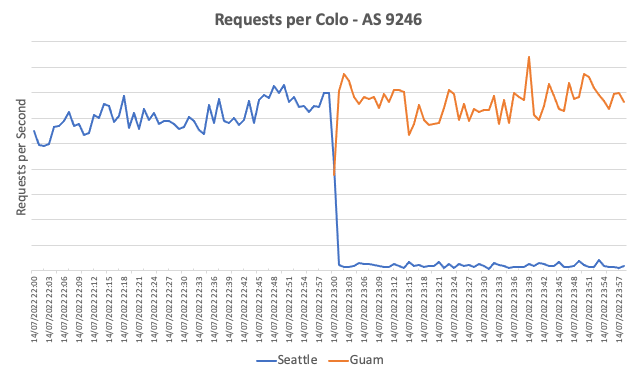
The following chart displays the median and the 90th percentile of the eyeball TCP RTT for AS 9246 immediately before and after AS 9246 users started to use the Guam deployment:
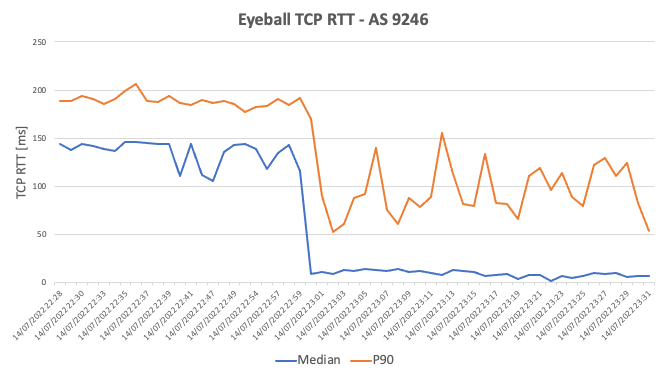
From the chart above we can derive that the overall reduction for the eyeball TCP RTT immediately before and after Guam’s deployment was:
- Median decreased from 136.3ms to 9.3ms, a 93.2% reduction;
- P90 decreased from 188.7ms to 97.0ms, a 48.5% reduction.
When comparing the [12h00 ; 13h00] UTC period of the 14/July/2022 (therefore, AS 9246 still served by Seattle) vs the same hour but for the 15th/July/2022 (thus AS9246 already served by Guam), the differences are also clear. We pick this period as this is a busy hour period locally since local time equals UTC plus 10 hours:
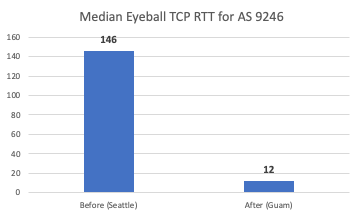
The median eyeball TCP RTT decreased from 146ms to 12ms, i.e., a massive 91.8% reduction and perhaps, due to already mentioned geographical specificities, one of Cloudflare’s deployments representing a larger reduction in latency for the local end users.
Impact on Internet traffic
We can actually see an increase in HTTP requests in Guam since early April, right when we were setting up our Guam data center. The impact of the deployment was more clear after mid-April, with a further step up in mid-June. Comparing March 8 with July 17, there was an 11.5% increase in requests, as illustrated below:
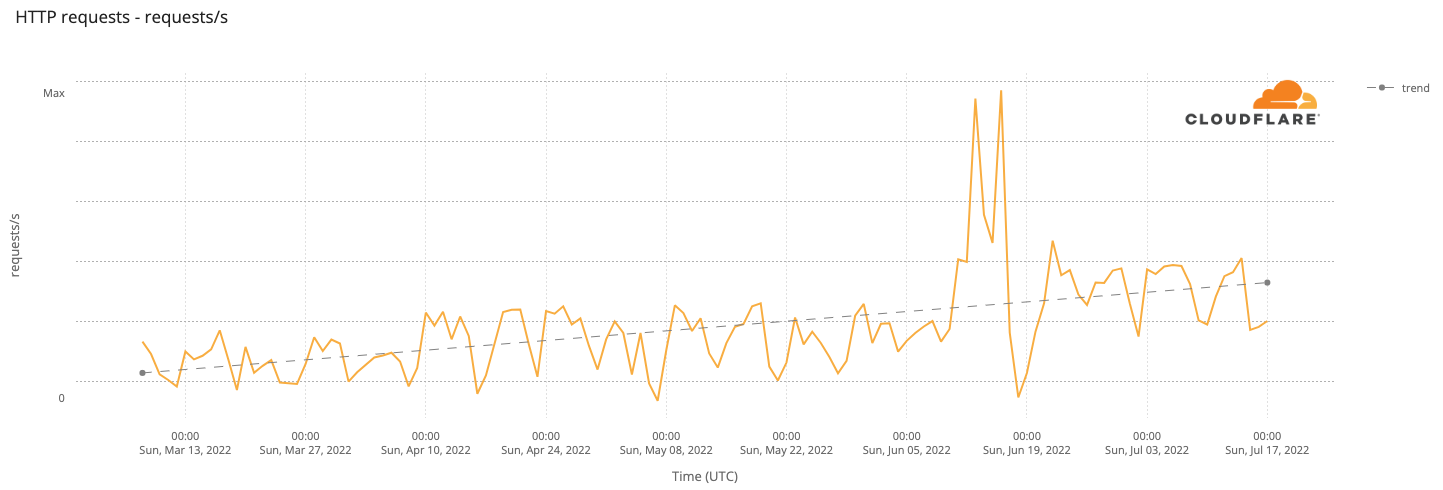
Edge Partnership Program
If you’re an ISP that is interested in hosting a Cloudflare cache to improve performance and reduce backhaul, get in touch on our Edge Partnership Program page. And if you’re a software, data, or network engineer – or just the type of person who is curious and wants to help make the Internet better – consider joining our team.
A Cure for the Plague
Post Syndicated from The History Guy: History Deserves to Be Remembered original https://www.youtube.com/watch?v=nogkYtrVk8k
Inflation: Last Week Tonight with John Oliver (HBO)
Post Syndicated from LastWeekTonight original https://www.youtube.com/watch?v=MBo4GViDxzc
Deepfakes
Post Syndicated from original https://xkcd.com/2650/

Kernel prepatch 5.19-rc8
Post Syndicated from original https://lwn.net/Articles/902349/
The 5.19-rc8 kernel prepatch is out for
testing. “There’s nothing really surprising in here – a few smaller fixups for
”
the retbleed mess as expected, and the usual random one-liners
elsewhere.