Post Syndicated from Matt Granger original https://www.youtube.com/watch?v=69sw0JR86jQ
What If? 2 Countdown
Post Syndicated from original https://xkcd.com/2636/

THG Podcast: 1970s Car Disasters: The Dale and the Vega
Post Syndicated from The History Guy: History Deserves to Be Remembered original https://www.youtube.com/watch?v=wDSNjNLnMI4
Use the AWS Glue connector to read and write Apache Iceberg tables with ACID transactions and perform time travel
Post Syndicated from Tomohiro Tanaka original https://aws.amazon.com/blogs/big-data/use-the-aws-glue-connector-to-read-and-write-apache-iceberg-tables-with-acid-transactions-and-perform-time-travel/
Nowadays, many customers have built their data lakes as the core of their data analytic systems. In a typical use case of data lakes, many concurrent queries run to retrieve consistent snapshots of business insights by aggregating query results. A large volume of data constantly comes from different data sources into the data lakes. There is also a common demand to reflect the changes occurring in the data sources into the data lakes. This means that not only inserts but also updates and deletes need to be replicated into the data lakes.
Apache Iceberg provides the capability of ACID transactions on your data lakes, which allows concurrent queries to add or delete records isolated from any existing queries with read-consistency for queries. Iceberg is an open table format designed for large analytic workloads on huge datasets. You can perform ACID transactions against your data lakes by using simple SQL expressions. It also enables time travel, rollback, hidden partitioning, and schema evolution changes, such as adding, dropping, renaming, updating, and reordering columns.
AWS Glue is one of the key elements to building data lakes. It extracts data from multiple sources and ingests your data to your data lake built on Amazon Simple Storage Service (Amazon S3) using both batch and streaming jobs. To expand the accessibility of your AWS Glue extract, transform, and load (ETL) jobs to Iceberg, AWS Glue provides an Apache Iceberg connector. The connector allows you to build Iceberg tables on your data lakes and run Iceberg operations such as ACID transactions, time travel, rollbacks, and so on from your AWS Glue ETL jobs.
In this post, we give an overview of how to set up the Iceberg connector for AWS Glue and configure the relevant resources to use Iceberg with AWS Glue jobs. We also demonstrate how to run typical Iceberg operations on AWS Glue interactive sessions with an example use case.
Apache Iceberg connector for AWS Glue
With the Apache Iceberg connector for AWS Glue, you can take advantage of the following Iceberg capabilities:
- Basic operations on Iceberg tables – This includes creating Iceberg tables in the AWS Glue Data Catalog and inserting, updating, and deleting records with ACID transactions in the Iceberg tables
- Inserting and updating records – You can run
UPSERT(update and insert) queries for your Iceberg table - Time travel on Iceberg tables – You can read a specific version of an Iceberg table from table snapshots that Iceberg manages
- Rollback of table versions – You can revert an Iceberg table back to a specific version of the table
Iceberg offers additional useful capabilities such as hidden partitioning; schema evolution with add, drop, update, and rename support; automatic data compaction; and more. For more details about Iceberg, refer to the Apache Iceberg documentation.
Next, we demonstrate how the Apache Iceberg connector for AWS Glue works for each Iceberg capability based on an example use case.
Overview of example customer scenario
Let’s assume that an ecommerce company sells products on their online platform. Customers can buy products and write reviews to each product. Customers can add, update, or delete their reviews at any time. The customer reviews are an important source for analyzing customer sentiment and business trends.
In this scenario, we have the following teams in our organization:
- Data engineering team – Responsible for building and managing data platforms.
- Data analyst team – Responsible for analyzing customer reviews and creating business reports. This team queries the reviews daily, creates a business intelligence (BI) report, and shares it with sales team.
- Customer support team – Responsible for replying to customer inquiries. This team queries the reviews when they get inquiries about the reviews.
Our solution has the following requirements:
- Query scalability is important because the website is huge.
- Individual customer reviews can be added, updated, and deleted.
- The data analyst team needs to use both notebooks and ad hoc queries for their analysis.
- The customer support team sometimes needs to view the history of the customer reviews.
- Customer reviews can always be added, updated, and deleted, even while one of the teams is querying the reviews for analysis. This means that any result in a query isn’t affected by uncommitted customer review write operations.
- Any changes in customer reviews that are made by the organization’s various teams need to be reflected in BI reports and query results.
In this post, we build a data lake of customer review data on top of Amazon S3. To meet these requirements, we introduce Apache Iceberg to enable adding, updating, and deleting records; ACID transactions; and time travel queries. We also use an AWS Glue Studio notebook to integrate and query the data at scale. First, we set up the connector so we can create an AWS Glue connection for Iceberg.
Set up the Apache Iceberg connector and create the Iceberg connection
We first set up Apache Iceberg connector for AWS Glue to use Apache Iceberg with AWS Glue jobs. Particularly, in this section, we set up the Apache Iceberg connector for AWS Glue and create an AWS Glue job with the connector. Complete the following steps:
- Navigate to the Apache Iceberg connector for AWS Glue page in AWS Marketplace.
- Choose Continue to Subscribe.

- Review the information under Terms and Conditions, and choose Accept Terms to continue.

- When the subscription is complete, choose Continue to Configuration.

- For Fulfillment option, choose Glue 3.0. (1.0 and 2.0 are also available options.)
- For Software version, choose the latest software version.
As of this writing, 0.12.0-2 is the latest version of the Apache Iceberg connector for AWS Glue.
- Choose Continue to Launch.

- Choose Usage instructions.
- Choose Activate the Glue connector from AWS Glue Studio.
You’re redirected to AWS Glue Studio.
- For Name, enter a name for your connection (for example,
iceberg-connection).
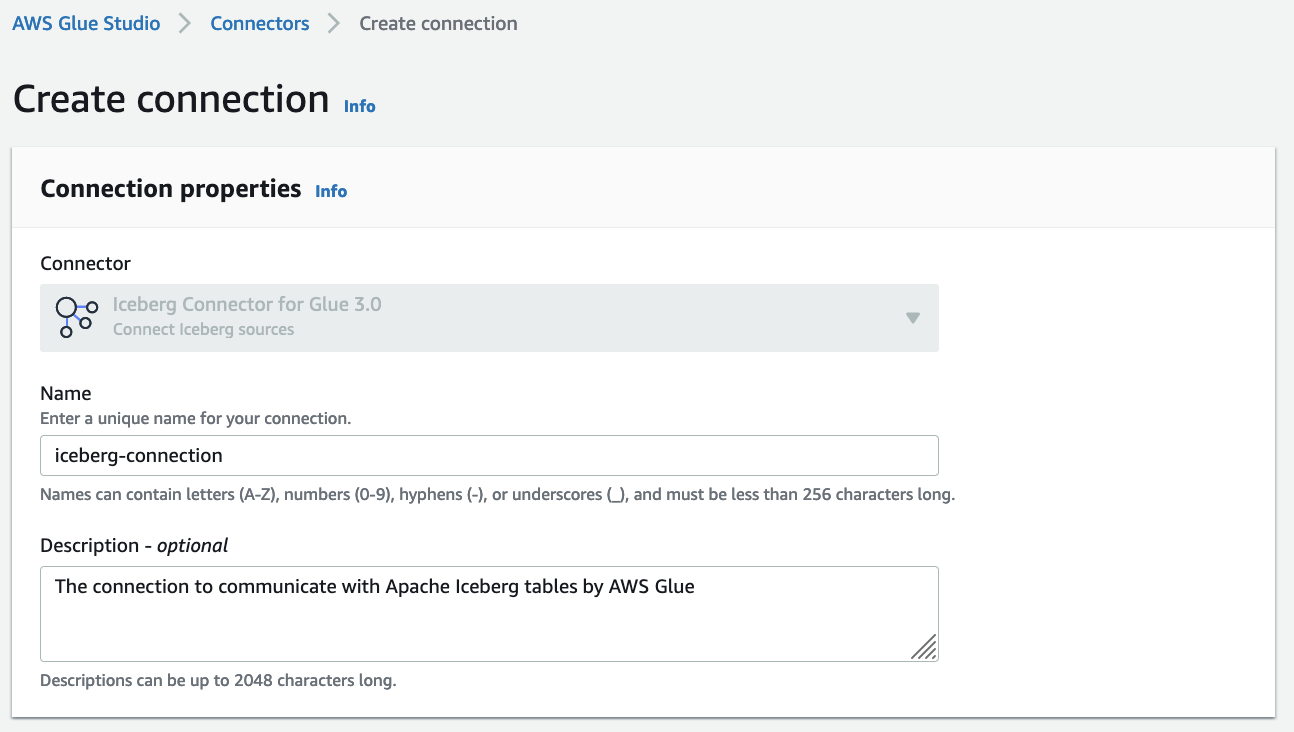
- Choose Create connection and activate connector.
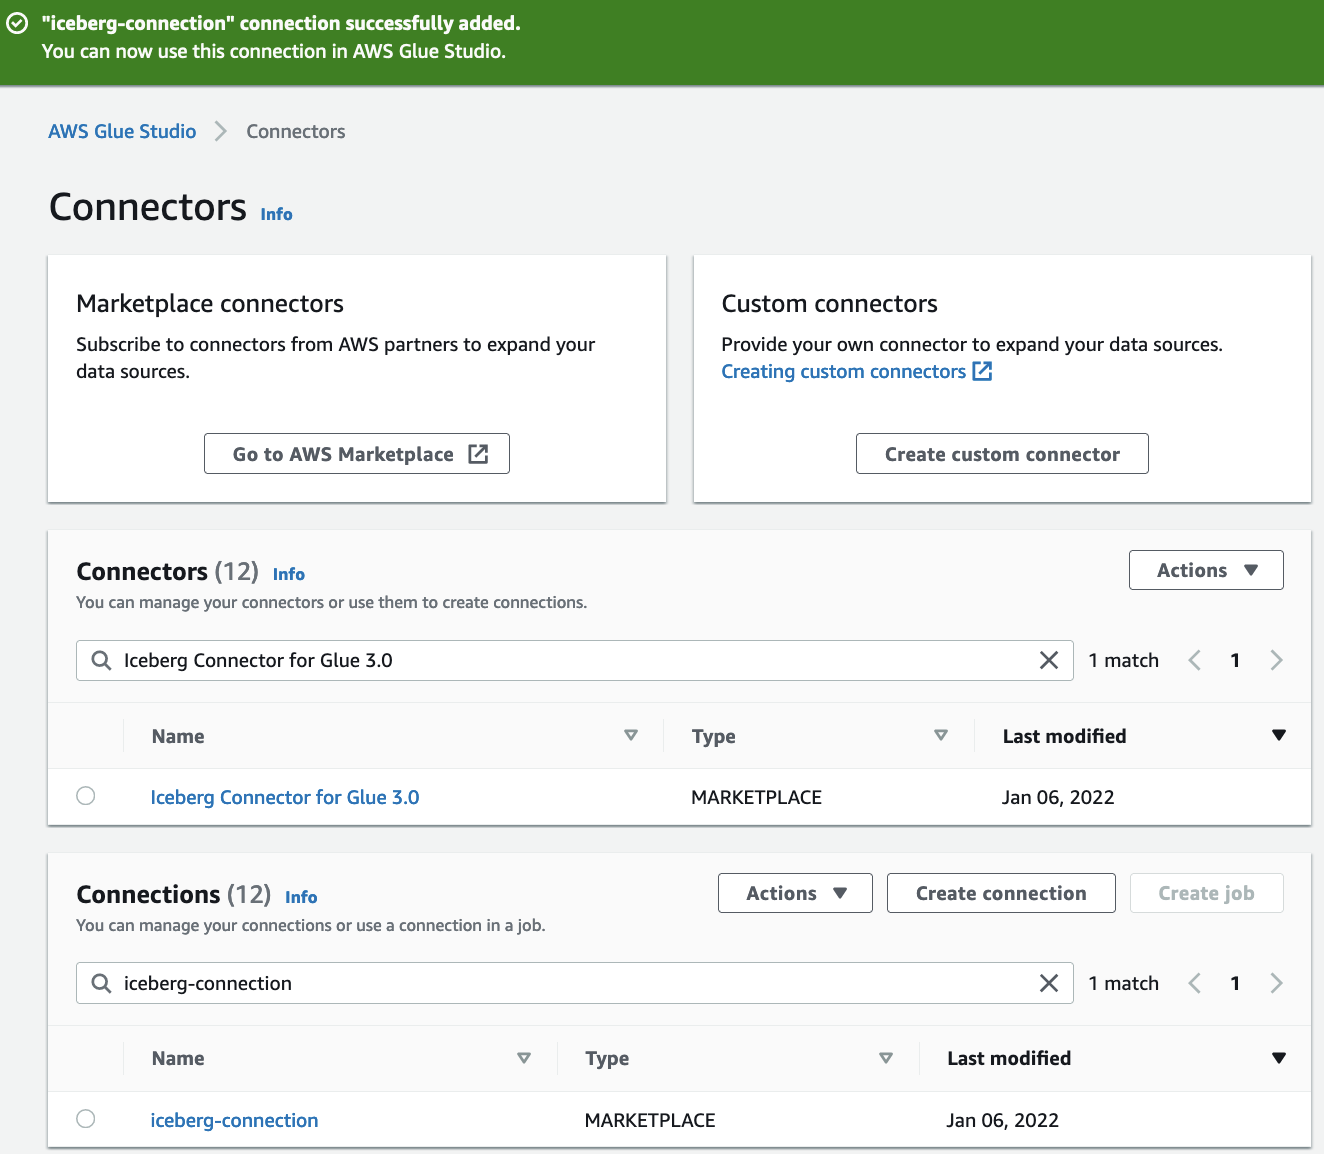
A message appears that the connection was successfully added, and the connection is now visible on the AWS Glue Studio console.
Configure resources and permissions
We use a provided AWS CloudFormation template to set up Iceberg configuration for AWS Glue. AWS CloudFormation creates the following resources:
- An S3 bucket to store an Iceberg configuration file and actual data
- An AWS Lambda function to generate an Iceberg configuration file based on parameters provided by a user for the CloudFormation template, and to clean up the resources created through this post
- AWS Identity and Access Management (IAM) roles and policies with necessary permissions
- An AWS Glue database in the Data Catalog to register Iceberg tables
To deploy the CloudFormation template, complete the following steps:
- Choose Launch Stack:

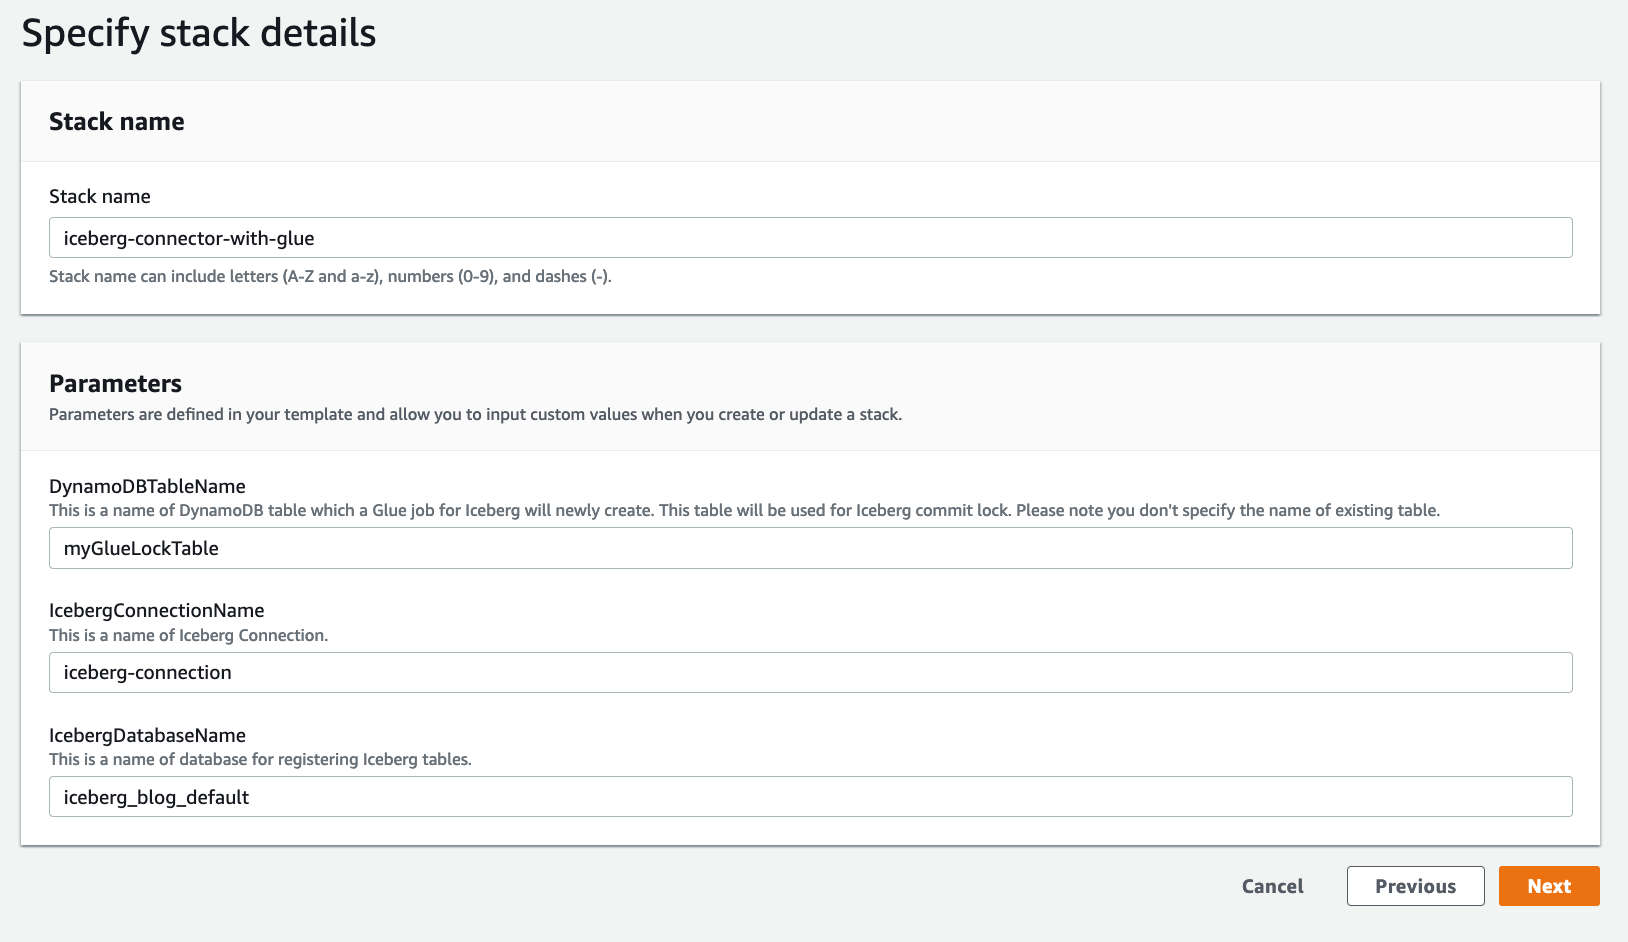
- For DynamoDBTableName, enter a name for an Amazon DynamoDB table that is created automatically when AWS Glue creates an Iceberg table.
This table is used for an AWS Glue job to obtain a commit lock to avoid concurrently modifying records in Iceberg tables. For more details about commit locking, refer to DynamoDB for Commit Locking. Note that you shouldn’t specify the name of an existing table.
- For IcebergDatabaseName, enter a name for the AWS Glue database that is created in the Data Catalog and used for registering Iceberg tables.
- Choose Next.
- Select I acknowledge that AWS CloudFormation might create IAM resources with custom names.
- Choose Create stack.
Start an AWS Glue Studio notebook to use Apache Iceberg
After you launch the CloudFormation stack, you create an AWS Glue Studio notebook to perform Iceberg operations. Complete the following steps:
- Download the Jupyter notebook file.
- On the AWS Glue console, choose Jobs in the navigation pane.
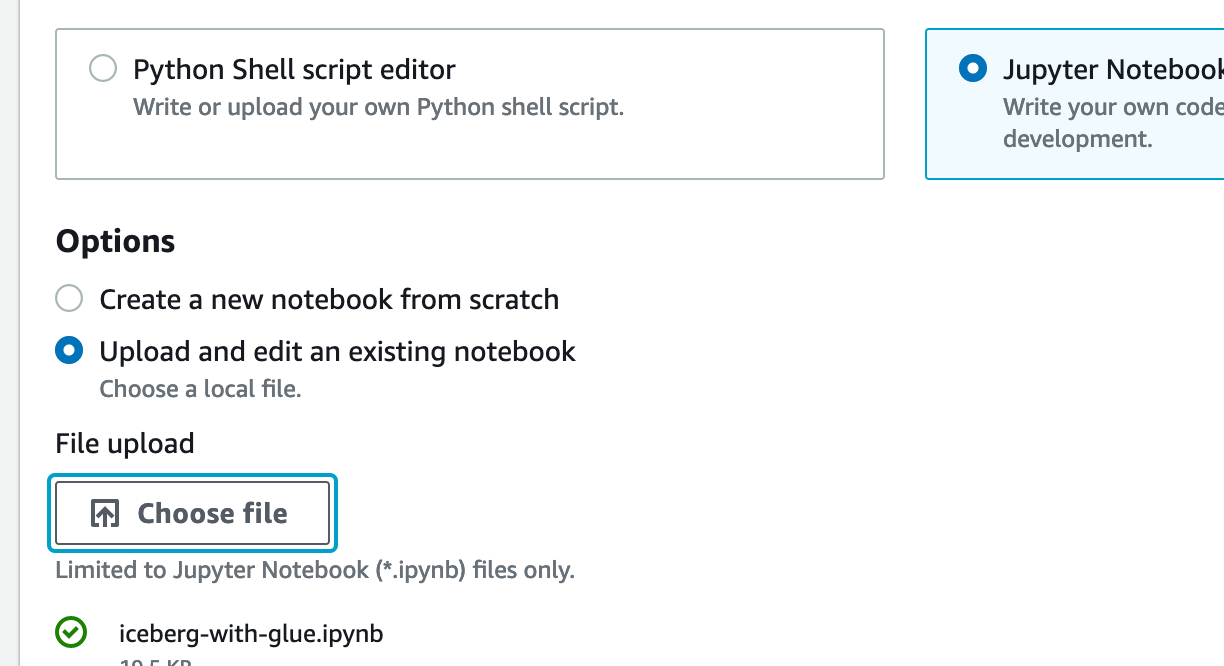
- Under Create job, select Jupyter Notebook.
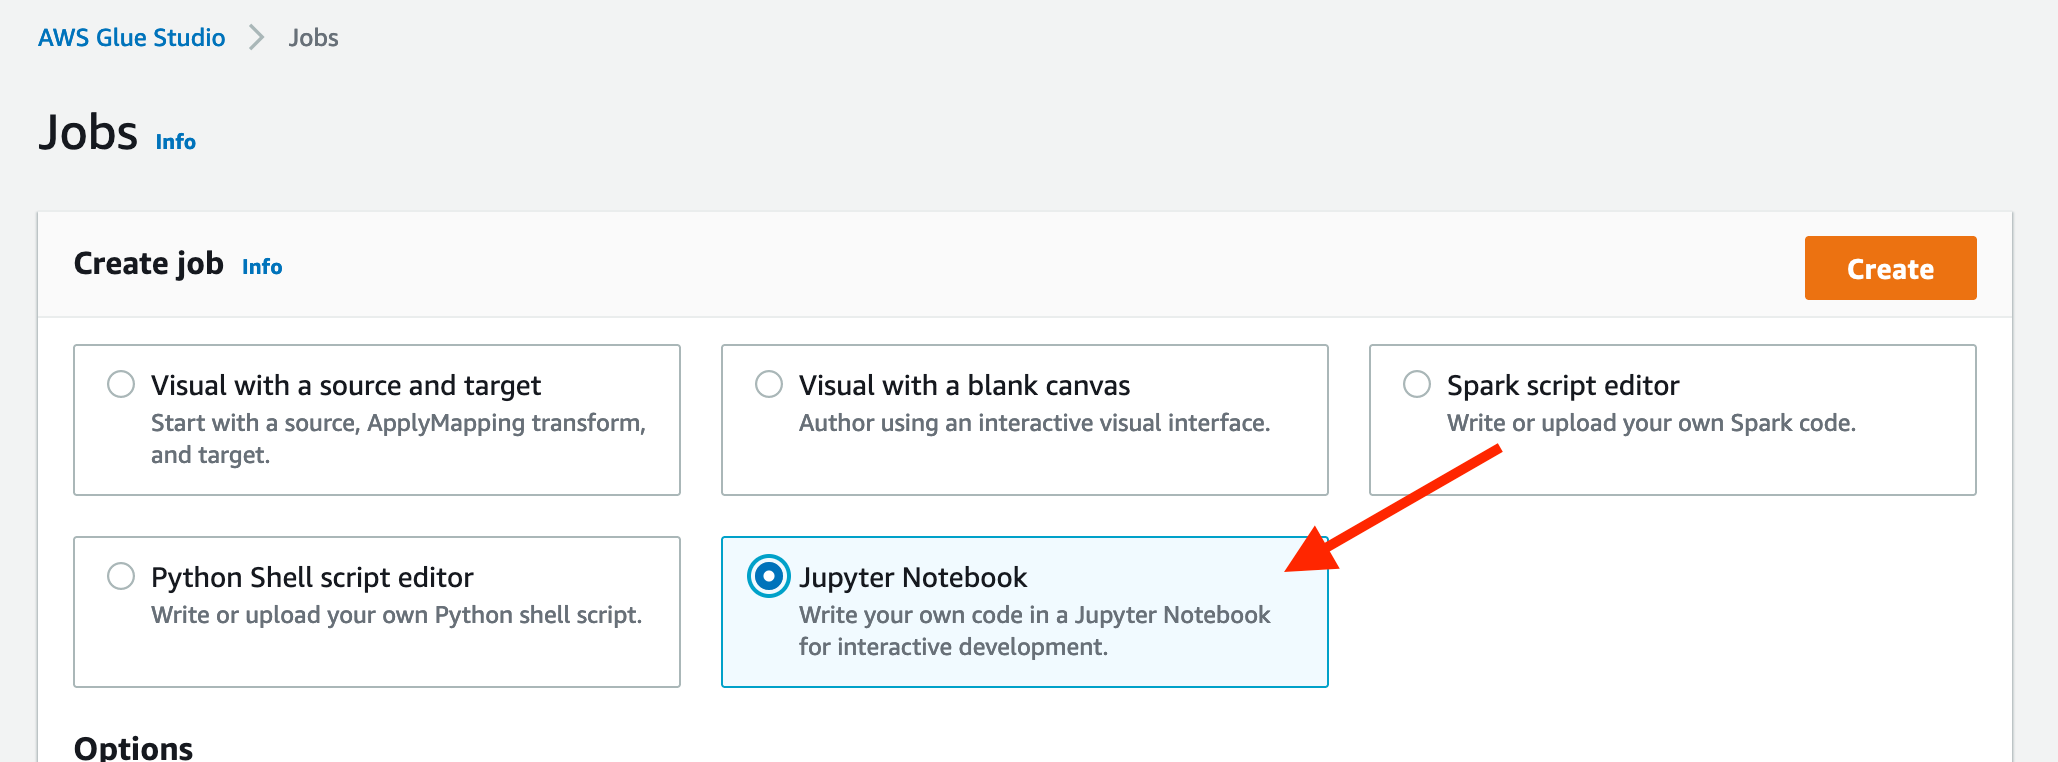
- Select Upload and edit an existing notebook and upload
iceberg-with-glue.ipynb.
- Choose Create.
- For Job name, enter a name.
- For IAM role, choose IcebergConnectorGlueJobRole, which was created via the CloudFormation template.
- Choose Start notebook job.

The process takes a few minutes to complete, after which you can see an AWS Glue Studio notebook view.
- Choose Save to save the notebook.

Set up the Iceberg configuration
To set up the Iceberg configuration, complete the following steps:
- Run the following cells with multiple options (magics). Note that you set your connection name for the
%connectionsmagic in the cell.
For more information, refer to Configuring AWS Glue Interactive Sessions for Jupyter and AWS Glue Studio notebooks.
A message Session <session-id> has been created appears when your AWS Glue Studio notebook is ready.

In the last cell in this section, you load your Iceberg configuration, which you specified when launching the CloudFormation stack. The Iceberg configuration includes a warehouse path for Iceberg actual data, a DynamoDB table name for commit locking, a database name for your Iceberg tables, and more.
To load the configuration, set the S3 bucket name that was created via the CloudFormation stack.
- On the AWS CloudFormation console, choose Stacks in the navigation pane.
- Choose the stack you created.
- On the Outputs tab, copy the S3 bucket name.

- Set the S3 name as the
S3_BUCKETparameter in your notebook.
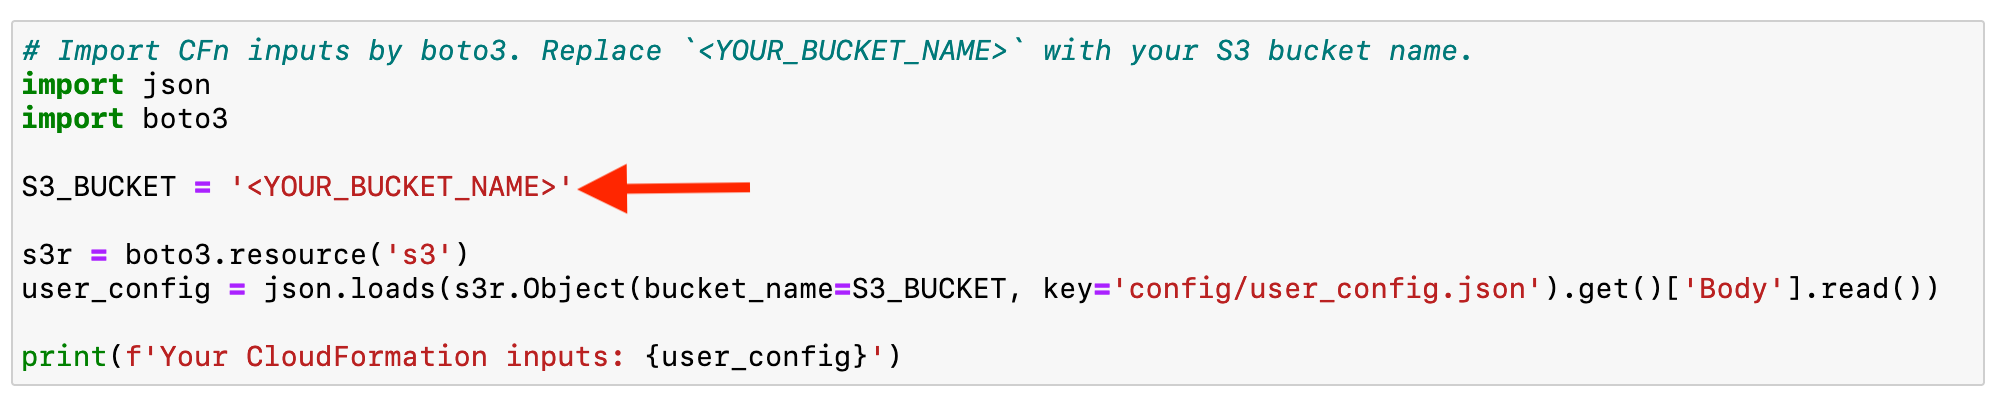
- Run the cell and load the Iceberg configuration that you set.
Initialize the job with Iceberg configurations
We continue to run cells to initiate a SparkSession in this section.
- Set an Iceberg warehouse path and a DynamoDB table name for Iceberg commit locking from the
user_configparameter. - Initialize a
SparkSessionby setting the Iceberg configurations. - With the
SparkSessionobject, createSparkContextandGlueContextobjects.
The following screenshot shows the relevant section in the notebook.

We provide the details of each parameter that you configure for the SparkSession in the appendix of this post.
For this post, we demonstrate setting the Spark configuration for Iceberg. You can also set the configuration as AWS Glue job parameters. For more information, refer to the Usage Information section in the Iceberg connector product page.
Use case walkthrough
To walk through our use case, we use two tables; acr_iceberg and acr_iceberg_report. The table acr_iceberg contains the customer review data. The table acr_iceberg_report contains BI analysis results based on the customer review data. All changes to acr_iceberg also impact acr_iceberg_report. The table acr_iceberg_report needs to be updated daily, right before sharing business reports with stakeholders.
To demonstrate this use case, we walk through the following typical steps:
- A data engineering team registers the
acr_icebergandacr_iceberg_reporttables in the Glue Data Catalog. - Customers (ecommerce users) add reviews to products in the
Industrial_Suppliescategory. These reviews are added to the Iceberg table. - A customer requests to update their reviews. We simulate updating the customer review in the
acr_icebergtable. - We reflect the customer’s request of the updated review in
acr_icebergintoacr_iceberg_report. - We revert the customer’s request of the updated review for the customer review table
acr_iceberg, and reflect the reversion inacr_iceberg_report.
1. Create Iceberg tables of customer reviews and BI reports
In this step, the data engineering team creates the acr_iceberg Iceberg table for customer reviews data (based on the Amazon Customer Reviews Dataset), and the team creates the acr_iceberg_report Iceberg table for BI reports.
Create the acr_iceberg table for customer reviews
The following code initially extracts the Amazon customer reviews, which are stored in a public S3 bucket. Then it creates an Iceberg table of the customer reviews and loads these reviews into your specified S3 bucket (created via CloudFormation stack). Note that the script loads partial datasets to avoid taking a lot of time to load the data.
Regarding the tableProperty parameter, we specify format version 2 to make the table version compatible with Amazon Athena. For more information about Athena support for Iceberg tables, refer to Considerations and limitations. To learn more about the difference between Iceberg table versions 1 and 2, refer to Appendix E: Format version changes.
Let’s run the following cells. Running the second cell takes around 3–5 minutes.

After you run the cells, the acr_iceberg table is available in your specified database in the Glue Data Catalog.

You can also see the actual data and metadata of the Iceberg table in the S3 bucket that is created through the CloudFormation stack. Iceberg creates the table and writes actual data and relevant metadata that includes table schema, table version information, and so on. See the following objects in your S3 bucket:
The job tries to create a DynamoDB table, which you specified in the CloudFormation stack (in the following screenshot, its name is myGlueLockTable), if it doesn’t exist already. As we discussed earlier, the DynamoDB table is used for commit locking for Iceberg tables.

Create the acr_iceberg_report Iceberg table for BI reports
The data engineer team also creates the acr_iceberg_report table for BI reports in the Glue Data Catalog. This table initially has the following records.
| comment_count | avg_star | product_category |
| 1240 | 4.20729367860598 | Camera |
| 95 | 4.80167540490342 | Industrial_Supplies |
| 663 | 3.80123467540571 | PC |
To create the table, run the following cell.

The two Iceberg tables have been created. Let’s check the acr_iceberg table records by running a query.
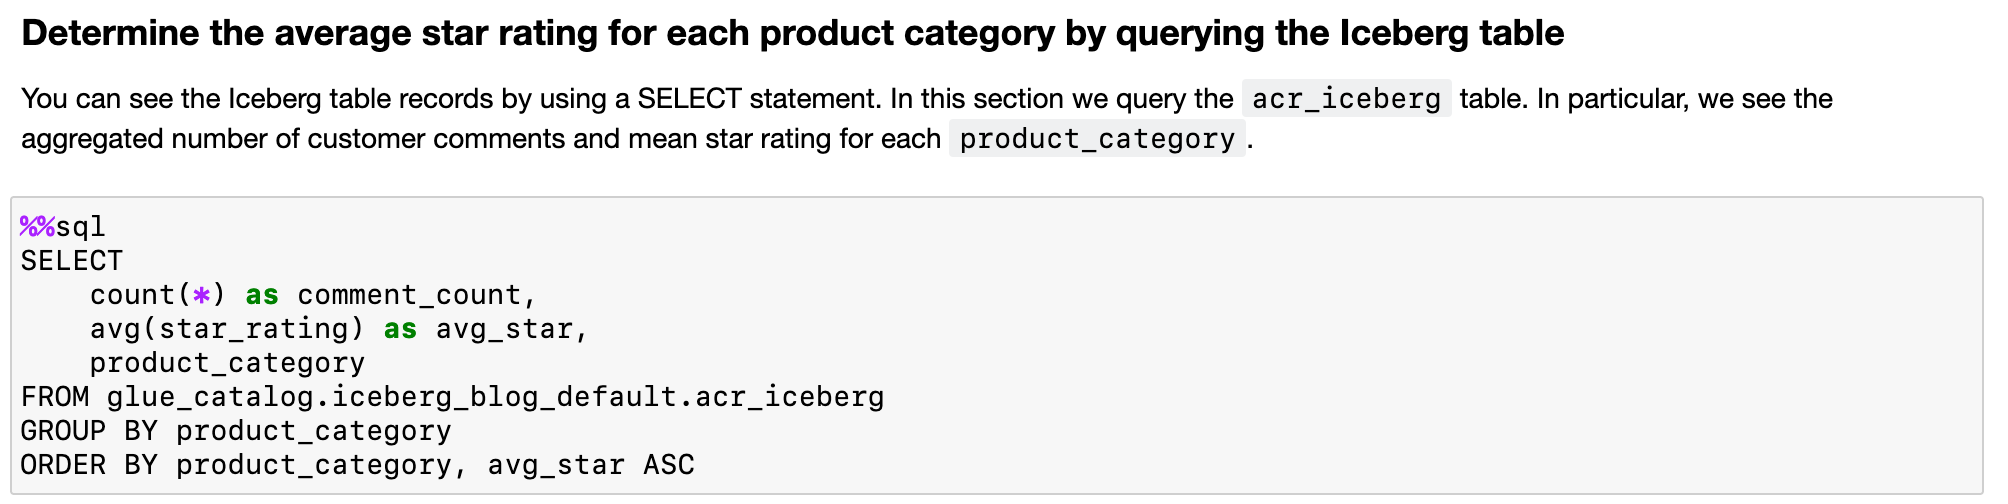
Determine the average star rating for each product category by querying the Iceberg table
You can see the Iceberg table records by using a SELECT statement. In this section, we query the acr_iceberg table to simulate seeing a current BI report data by running an ad hoc query.
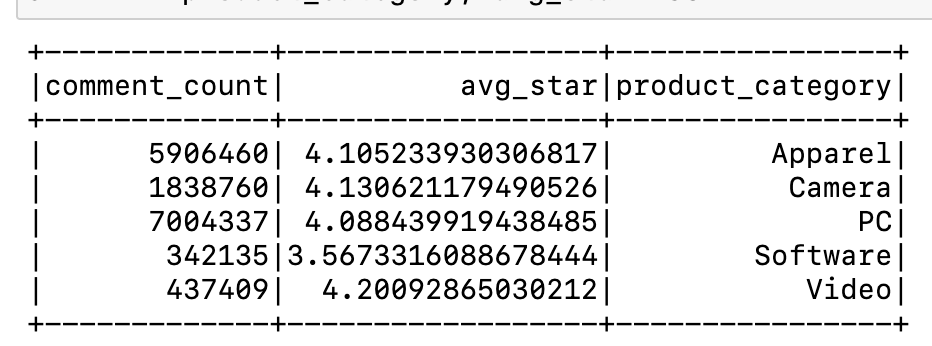
Run the following cell in the notebook to get the aggregated number of customer comments and mean star rating for each product_category.
The cell output has the following results.
Another way to query Iceberg tables is using Amazon Athena (when you use the Athena with Iceberg tables, you need to set up the Iceberg environment) or Amazon EMR.
2. Add customer reviews in the Iceberg table
In this section, customers add comments for some products in the Industrial Supplies product category, and we add these comments to the acr_iceberg table. To demonstrate this scenario, we create a Spark DataFrame based on the following new customer reviews and then add them to the table with an INSERT statement.
| marketplace | customer_id | review_id | product_id | product_ parent |
product_ title |
star_ rating |
helpful_ votes |
total_ votes |
vine | verified_ purchase |
review_ headline |
review_ body |
review_ date |
year | product_ category |
| US | 12345689 | ISB35E4556F144 | I00EDBY7X8 | 989172340 | plastic containers | 5 | 0 | 0 | N | Y | Five Stars | Great product! | 2022-02-01 | 2022 | Industrial_ Supplies |
| US | 78901234 | IS4392CD4C3C4 | I00D7JFOPC | 952000001 | battery tester | 3 | 0 | 0 | N | Y | nice one, but it broke some days later |
nope | 2022-02-01 | 2022 | Industrial_ Supplies |
| US | 12345123 | IS97B103F8B24C | I002LHA74O | 818426953 | spray bottle | 2 | 1 | 1 | N | N | Two Stars | the bottle isn’t as big as pictured. |
2022-02-01 | 2022 | Industrial_ Supplies |
| US | 23000093 | ISAB4268D46F3X | I00ARPLCGY | 562945918 | 3d printer | 5 | 3 | 3 | N | Y | Super great | very useful | 2022-02-01 | 2022 | Industrial_ Supplies |
| US | 89874312 | ISAB4268137V2Y | I80ARDQCY | 564669018 | circuit board | 4 | 0 | 0 | Y | Y | Great, but a little bit expensive |
you should buy this, but note the price |
2022-02-01 | 2022 | Industrial_ Supplies |
Run the following cells in the notebook to insert the customer comments to the Iceberg table. The process takes about 1 minute.

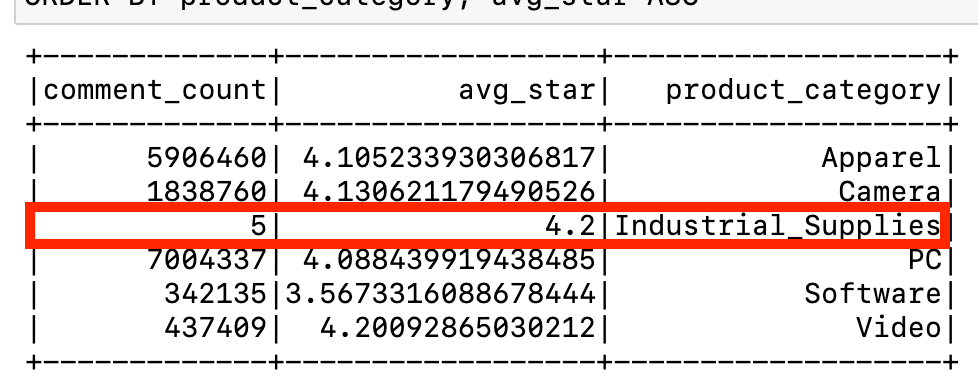
Run the next cell to see an addition to the product category Industrial_Supplies with 5 under comment_count.

3. Update a customer review in the Iceberg table
In the previous section, we added new customer reviews to the acr_iceberg Iceberg table. In this section, a customer requests an update of their review. Specifically, customer 78901234 requests the following update of the review ID IS4392CD4C3C4.
- change
star_ratingfrom 3 to 5 - update the
review_headlinefromnice one, but it broke some days latertovery good
We update the customer comment by using an UPDATE query by running the following cell.

We can review the updated record by running the next cell as follows.

Also, when you run this cell for the reporting table, you can see the updated avg_star column value for the Industrial_Supplies product category. Specifically, the avg_star value has been updated from 3.8 to 4.2 as a result of the star_rating changing from 3 to 5:
4. Reflect changes in the customer reviews table in the BI report table with a MERGE INTO query
In this section, we reflect the changes in the acr_iceberg table into the BI report table acr_iceberg_report. To do so, we run the MERGE INTO query and combine the two tables based on the condition of the product_category column in each table. This query works as follows:
- When the
product_categorycolumn in each table is the same, the query returns the sum of each column record - When the column in each table is not the same, the query just inserts a new record
This MERGE INTO operation is also referred to as an UPSERT (update and insert).
Run the following cell to reflect the update of customer reviews in the acr_iceberg table into the acr_iceberg_report BI table.

After the MERGE INTO query is complete, you can see the updated acr_iceberg_report table by running the following cell.

The MERGE INTO query performed the following changes:
- In the
Camera,Industrial_Supplies, andPCproduct categories, eachcomment_countis the sum between the initial value of theacr_iceberg_reporttable and the aggregated table value. For example, in theIndustrial_Suppliesproduct category row, thecomment_count100is calculated by95(in the initial version ofacr_iceberg_report) +5(in the aggregated report table). - In addition to
comment_count, theavg_starin theCamera,Industrial_Supplies, orPCproduct category row is also computed by averaging between eachavg_starvalue inacr_iceberg_reportand in the aggregated table. - In other product categories, each
comment_countandavg_staris the same as each value in the aggregated table, which means that each value in the aggregated table is inserted into theacr_iceberg_reporttable.
5. Roll back the Iceberg tables and reflect changes in the BI report table
In this section, the customer who requested the update of the review now requests to revert the updated review.
Iceberg stores versioning tables through the operations for Iceberg tables. We can see the information of each version of table by inspecting tables, and we can also time travel or roll back tables to an old table version.
To complete the customer request to revert the updated review, we need to revert the table version of acr_iceberg to the earlier version when we first added the reviews. Additionally, we need to update the acr_iceberg_report table to reflect the rollback of the acr_iceberg table version. Specifically, we need to perform the following three steps to complete these operations:
- Check the history of table changes of
acr_icebergandacr_iceberg_reportto get each table snapshot. - Roll back
acr_icebergto the version when first we inserted records, and also roll back theacr_iceberg_reporttable to the initial version to reflect the customer review update. - Merge the
acr_icebergtable with theacr_iceberg_reporttable again.
Get the metadata of each report table
As a first step, we check table versions by inspecting the table. Run the following cells.

Now you can see the following table versions in acr_iceberg and acr_iceberg_report:
acr_iceberghas three versions:- The oldest one is the initial version of this table, which shows the
appendoperation - The second oldest one is the record insertion, which shows the
appendoperation - The latest one is the update, which shows the
overwriteoperation
- The oldest one is the initial version of this table, which shows the
acr_iceberg_reporthas two versions:- The oldest one is the initial version of this table, which shows the
appendoperation - The other one is from the
MERGE INTOquery in the previous section, which shows theoverwriteoperation
- The oldest one is the initial version of this table, which shows the
As shown in the following screenshot, we roll back to the acr_iceberg table version, inserting records based on the customer revert request. We also roll back to the acr_iceberg_report table version in the initial version to discard the MERGE INTO operation in the previous section.

Roll back the acr_iceberg and acr_iceberg_report tables
Based on your snapshot IDs, you can roll back each table version:
- For
acr_iceberg, use the second-oldestsnapshot_id(in this example,5440744662350048750) and replace<Type snapshot_id in ace_iceberg table>in the following cell with thissnapshot_id. - For
acr_iceberg_reporttable, use the initialsnapshot_id(in this example,7958428388396549892) and replace<Type snaphost_id in ace_iceberg_report table>in the following cell with thissnapshot_id.
After you specify the snapshot_id for each rollback query, run the following cells.

When this step is complete, you can see the previous and current snapshot IDs of each table.

Each Iceberg table has been reverted to the specific version now.
Reflect changes in acr_iceberg into acr_iceberg_report again
We reflect the acr_iceberg table reversion into the current acr_iceberg_report table. To complete this, run the following cell.
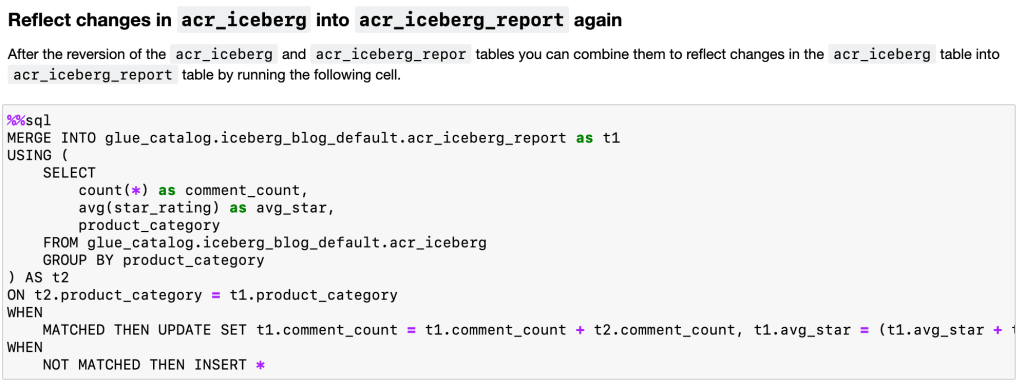
After you rerun the MERGE INTO query, run the following cell to see the new table records. When we compare the table records, we observe that the avg_star value in Industrial_Supplies is lower than the value of the previous table avg_star.

You were able to reflect a customer’s request of reverting their updated review on the BI report table. Specifically, you can get the updated avg_star record in the Industrial_Supplies product category.
Clean up
To clean up all resources that you created, delete the CloudFormation stack.
Conclusion
In this post, we walked through using the Apache Iceberg connector with AWS Glue ETL jobs. We created an Iceberg table built on Amazon S3, and ran queries such as reading the Iceberg table data, inserting a record, merging two tables, and time travel.
The operations for the Iceberg table that we demonstrated in this post aren’t all of the operations Iceberg supports. Refer to the Apache Iceberg documentation for information about more operations.
Appendix: Spark configurations to use Apache Iceberg on AWS Glue
As we mentioned earlier, the notebook sets up a Spark configuration to integrate Iceberg with AWS Glue. The following table shows what each parameter defines.
| Spark configuration key | Value | Description |
spark.sql.catalog.{CATALOG} |
org.apache.iceberg.spark.SparkCatalog |
Specifies a Spark catalog interface that communicates with Iceberg tables. |
spark.sql.catalog.{CATALOG}.warehouse |
{WAREHOUSE_PATH} |
A warehouse path for jobs to write iceberg metadata and actual data. |
spark.sql.catalog.{CATALOG}.catalog-impl |
org.apache.iceberg.aws. |
The implementation of the Spark catalog class to communicate between Iceberg tables and the AWS Glue Data Catalog. |
spark.sql.catalog.{CATALOG}.io-impl |
org.apache.iceberg.aws.s3.S3FileIO |
Used for Iceberg to communicate with Amazon S3. |
spark.sql.catalog.{CATALOG}.lock-impl |
org.apache.iceberg.aws.glue. |
Used for Iceberg to manage table locks. |
spark.sql.catalog.{CATALOG}.lock.table |
{DYNAMODB_TABLE} |
A DynamoDB table name to store table locks. |
spark.sql.extensions |
org.apache.icerberg.spark.extensions. |
The implementation that enables Spark to run Iceberg-specific SQL commands. |
spark.sql.session.timeZone |
UTC |
Sets the time zone of the Spark environment to UTC for further Iceberg time travel queries. The epoch time is in the UTC time zone. |
About the Author
 Tomohiro Tanaka is a Cloud Support Engineer at Amazon Web Services. He builds Glue connectors such as Apache Iceberg connector and TPC-DS connector. He’s passionate about helping customers build data lakes using ETL workloads. In his free time, he also enjoys coffee breaks with his colleagues and making coffee at home.
New AWS whitepaper: AWS User Guide to Financial Services Regulations and Guidelines in New Zealand
Post Syndicated from Julian Busic original https://aws.amazon.com/blogs/security/new-aws-whitepaper-aws-user-guide-to-financial-services-regulations-and-guidelines-in-new-zealand/
Amazon Web Services (AWS) has released a new whitepaper to help financial services customers in New Zealand accelerate their use of the AWS Cloud.
The new AWS User Guide to Financial Services Regulations and Guidelines in New Zealand—along with the existing AWS Workbook for the RBNZ’s Guidance on Cyber Resilience—continues our efforts to help AWS customers navigate the regulatory expectations of the Reserve Bank of New Zealand (RBNZ) in a shared responsibility environment.
This whitepaper is intended for RBNZ-regulated institutions that are looking to run material workloads in the AWS Cloud, and is particularly useful for leadership, security, risk, and compliance teams that need to understand RBNZ requirements and guidance.
The whitepaper summarizes RBNZ requirements and guidance related to outsourcing, cyber resilience, and the cloud. It also gives RBNZ-regulated institutions information they can use to commence their due diligence and assess how to implement the appropriate programs for their use of AWS cloud services.
This document joins existing guides for other jurisdictions in the Asia Pacific region, such as Australia, India, Singapore, and Hong Kong. As the regulatory environment continues to evolve, we’ll provide further updates on the AWS Security Blog and the AWS Compliance page. You can find more information on cloud-related regulatory compliance at the AWS Compliance Center. You can also reach out to your AWS account manager for help finding the resources you need.
If you have feedback about this post, submit comments in the Comments section below. If you have questions about this post, contact AWS Support.
Want more AWS Security news? Follow us on Twitter.
[$] Disabling an extent optimization
Post Syndicated from original https://lwn.net/Articles/898029/
In the final filesystem session at the
2022 Linux Storage,
Filesystem, Memory-management and BPF Summit (LSFMM), David Howells led
a discussion on a filesystem optimization that is causing various kinds of
problems. Extent-based filesystems have data structures that sometimes do
not reflect the holes
that exist in files. Reads from holes in sparse files (i.e. files with
holes) must return zeroes, but filesystems are not obligated to maintain knowledge of
the holes beyond that, which leads to the problems.
This concludes our coverage of LSFMM 2022.
AWS IoT ExpressLink Now Generally Available – Quickly Develop Devices That Connect Securely to AWS Cloud
Post Syndicated from Channy Yun original https://aws.amazon.com/blogs/aws/aws-iot-expresslink-now-generally-available-quickly-develop-devices-that-connect-securely-to-aws-cloud/
At AWS re:Invent 2021, we introduced AWS IoT ExpressLink, software for partner-manufactured connectivity modules that makes it easier and faster for original equipment manufacturers to connect any type of product to the cloud, such as industrial sensors, small and large home appliances, irrigation systems, and medical devices.
Today we announce the general availability of AWS IoT ExpressLink and the related connectivity modules offered by AWS Partners, such as Espressif, Infineon, and u-blox. The modules contain built-in cloud-connectivity software implementing AWS-mandated security requirements. Integrating these wireless modules into the hardware design of your device makes it faster and easier to securely connect Internet of Things (IoT) devices to the AWS Cloud and integrate with a range of AWS services.
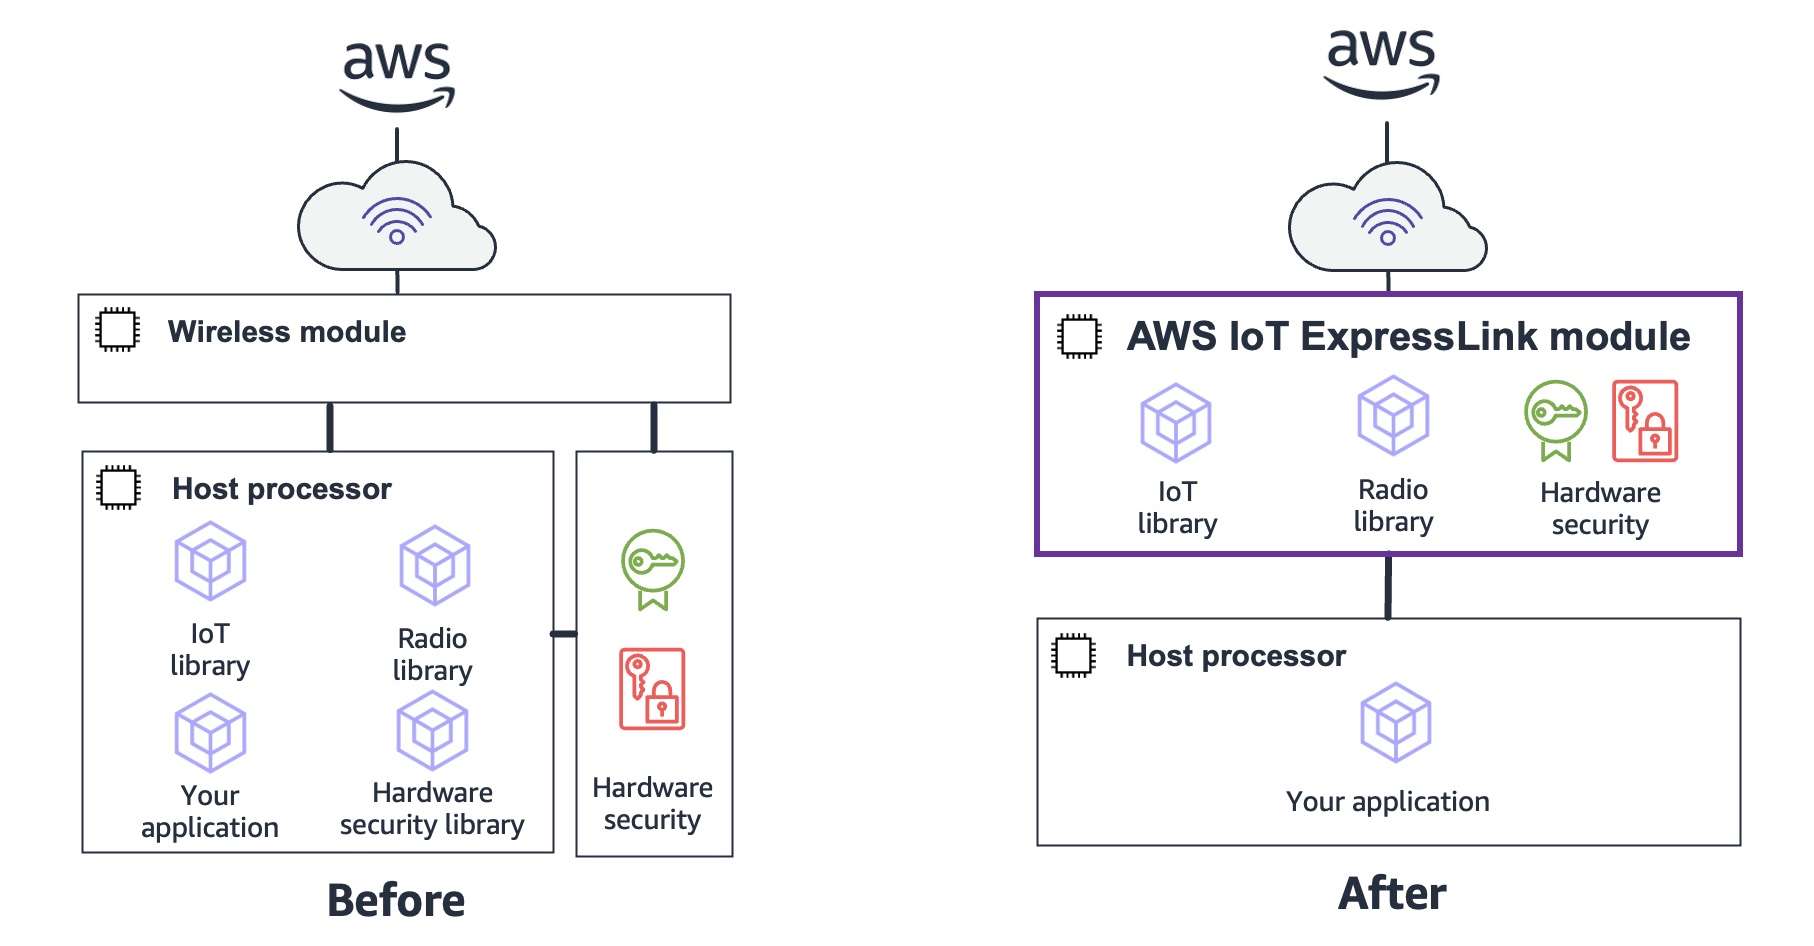
Connecting devices to the AWS cloud requires developers to add tens of thousands of lines of new code to their processor of devices, which demands specialized skills. Merging this new code with their application code also requires a deep understanding of networking and cryptography to ensure the device is both functional and implementing AWS managed security requirements.
Some devices are too resource-constrained to support cloud connectivity, meaning their processors are too small or slow to handle the additional code. For example, a small piece of equipment, like a pool pump, may contain a tiny processor that is optimized to drive a particular type of motor but does not have the memory space or the performance necessary to handle both the motor and a cloud connection.
Modules with AWS IoT ExpressLink include simple codes required to connect the device to the cloud, thereby reducing the development cycle and accelerating time to market. To take the pool pump from the previous example, you can keep the tiny processor in the equipment, and delegate the heavy lifting of connecting to the cloud to AWS IoT ExpressLink, allowing the manufacturer to make the simple application software, and avoid costly redesign.
Modules with AWS IoT ExpressLink feature best practices for device-to-cloud connectivity and security as manufacturing partners incorporate AWS-mandated security requirements designed to help protect devices from remote attacks and to help achieve a secure connection to the AWS Cloud. These include the following provisioning and security procedures:
- Cryptographically signed certificate with unique device ID.
- Cryptographically secured boot based in a hardware root of trust.
- Transport Layer Security (TLS v1.2 or higher) encryption of wireless network connections.
- Encryption of all sensitive data stored on the module, both in transit and at rest.
- Hardware root of trust for secrets storage and application code segregation.
- Compliance with security regression test suite.
- Verification of communication interfaces (Command Line Interface, Wi-Fi, BLE, or Cellular) against memory corruption attacks.
- Support for cryptographically secured AWS IoT over-the-air (OTA) firmware updates to keep the devices up to date with new features and security patches.
AWS IoT ExpressLink natively integrates with AWS IoT services, such as AWS IoT Device Management, to help customers easily monitor and update their device fleets at scale.
How AWS IoT ExpressLink Works
I’ll explain how AWS IoT ExpressLink communicates with AWS partner modules and allows you to simply connect to the cloud.
For example, Infineon’s IFW56810 is a single-band Wi-Fi 4 connectivity module that provides a simple, secure solution for connecting products to AWS IoT cloud services. The IFW56810 module is preprogrammed with a tested secured firmware of AWS IoT ExpressLink implementation and supports an easy-to-use AWS IoT ExpressLink AT command interface for configuration.
To get started, connect the IFW956810 evaluation kit to the PC using either the Type-C connector or Type-A male to Type-C female cable. Run a serial terminal to communicate with the kit over USB by choosing the higher of the two enumerated COM ports on Windows with the following configuration. Once you open the serial terminal after configuring your setting, such as baudrate, type AT in the serial terminal. You should see a response OK.

You can also send AWS IoT ExpressLink commands as simple as CONNECT, SEND, and SUBSCRIBE to start communicating with the cloud. The device will translate these commands, make an MQTT connection, and send messages to AWS IoT Core.
Whether you are using a Wi-Fi or a cellular LTE-M module, you can make the most basic telemetry application that can be expressed in 10 lines of pseudo-code as follows.
int main()
{
    print("AT+CONNECT\n");
    while(1){
        print("AT+SEND data {\"A\"=%d}", getSensorA());
        delays(1);
    }
}
To learn more, visit the AWS IoT ExpressLink programmer’s guide.
Customer Stories
Many of our customers use AWS IoT ExpressLink to offload the complex but undifferentiated work required to securely connect devices to the AWS Cloud, which improves the developer experience by reducing the design effort, and helping them deliver product faster.
 Cardinal Peak is a Colorado-based product engineering services company that reduces the risk of outsourcing an engineering project. Cardinal Peak specializes in developing connected products in multiple markets, including audio, video, security, health care and others. With design skills in hardware, electronics, embedded, cloud and end-user software, Cardinal Peak provides end-to-end design services for its clients.
Keegan Landreth, Embedded Software Engineer at Cardinal Peak said:
“AWS IoT ExpressLink allowed me to put together a WiFi-connected product demo sending sensor data to the cloud in a single afternoon! Secure networking for embedded systems has never been this easy. It’s an almost completely transparent interface between my application and AWS, as simple as printing data to a serial port. Being able to do OTA firmware updates through it is a huge value add-on. The best part is that I can reuse the same code to make a cellular version, which is unheard of!”
 ēdn makes SmallGarden, cloud-powered indoor smart gardening products to let you easily grow plants providing light, water, nutrients, and heat as necessary at home.
Ryan Woltz, CEO of ēdn, said:
“We were looking for a quick and easy way to enable robust cloud capabilities for our indoor gardening product lines. However, from past experience, we knew that doing so adds significant risk in terms of time, money, and overall go-to-market execution. IoT device connectivity is complex, forcing our team to either outsource the development to a costly third party or allocate internal engineering resources, significantly delaying innovative features that differentiate our offerings in the market. Even a small misstep in the implementation of provisioning, security, or over-the-air functionality can set a product back months.
Now, thanks to u-blox’s hardware module with AWS IoT ExpressLink, we can enable secure and reliable cloud connectivity for our devices within days. This not only allows us to accelerate product development, but it ensures our engineering team remains focused on shipping leading-edge technologies that make nature accessible indoors.”
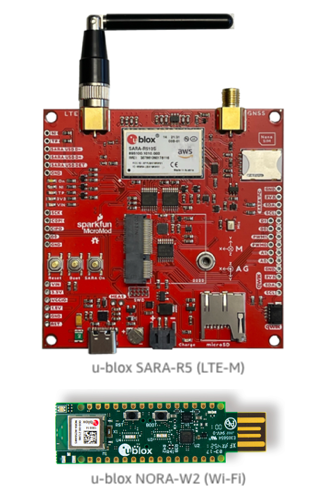 u-blox is an AWS Partner with a broad portfolio of chips, modules, and services. Harald Kroell, Product Manager at u-blox, said:
“At u-blox, with AWS IoT ExpressLink, we strengthen our Wi-Fi and LTE-M portfolio and bring silicon-to-cloud connectivity to the next level. By bridging our hardware and services with the AWS cloud, we progress on our mission to make businesses wirelessly connected and build solutions to last an IoT lifetime.
With the SARA-R5 and NORA-W2 modules with AWS IoT ExpressLink, customers can connect products with two different wireless technologies to AWS with a single homogeneous interface, which significantly reduces development effort. It also enables new business opportunities by lowering the barrier of connecting devices, which previously would have been too expensive to connect.”
To get started, order SARA-R5 Starter Kit and USB-NORA-W256AWS with its development kit user guide, including modules powered by AWS IoT ExpressLink.
AWS IoT ExpressLink Partners
As in the case of u-blox, two other AWS Partners, Infineon Technologies AG and Espressif Systems, have developed wireless modules that support a range of connectivity options, including Wi-Fi and cellular, and are powered by AWS IoT ExpressLink. All qualified devices in the AWS Partner Device Catalog are available for purchase from AWS Partners.
 Infineon Technologies AG specializes in semiconductor solutions the goal of which is to make life easier, safer, and greener. Sivaram Trikutam, Vice President, Wi-Fi Product Line at Infineon Technologies, said:
“We’re excited to be working with AWS on the AIROC
IFW56810 Cloud Connectivity Manager (CCM) solution supporting AWS IoT ExpressLink. With this plug-and-play solution, developers and engineers no longer need to create complex code or possess a wide range of technical competencies in Wi-Fi, embedded systems, antenna design, and cloud configuration.
Now, they can easily, quickly, and securely connect devices at scale to AWS, so they can focus on creating new revenue streams and getting to market faster. We are excited to work with our partner AWS on new business opportunities that help our customers meet their needs.”
 IFW56810 Cloud Connectivity Manager
 Espressif Systems is a multinational, fabless semiconductor company with a strong focus on providing connectivity solutions to internet-connected devices. Amey Inamdar, Director of Technical Marketing, Espressif Systems, said:
“At Espressif, we continuously strive to provide secure, green, versatile, and cost-effective AIoT solutions with a focus on ease of use for our customers. The AWS IoT ExpressLink program fits well into that philosophy, providing a convenient AWS IoT connectivity.
It enables customers to seamlessly transform their offline product into a cloud-connected product by offloading the complexity to the module with AWS IoT ExpressLink, with reduced development costs and a faster time to market and hence lowering the barrier to entry to build secure connected devices. Espressif is proud to participate in this program with Espressif’s module with AWS IoT ExpressLink to provide secure and affordable AWS IoT connectivity.”
Order and Get Started Now
You can discover a range of Partner-provided modules with AWS IoT ExpressLink in the AWS Partner Device Catalog. Order your evaluation kits with AWS IoT ExpressLink today. The kit will include an application processor or will connect to compatible development platforms such as Arduino.
You can then immediately start sending telemetry data to the cloud through the simple AWS IoT ExpressLink serial interface. You can use sample codes for integrating an AWS IoT ExpressLink module into an application. These examples are intended to demonstrate how to perform the common operations for an IoT device.
To learn more, visit the product page. Please send feedback to AWS re:Post for AWS IoT ExpressLink or through your usual AWS support contacts.
– Channy
Infinitely extensible Access policies
Post Syndicated from Kenny Johnson original https://blog.cloudflare.com/access-external-validation-rules/
Zero Trust application security means that every request to an application is denied unless it passes a specific set of defined security policies. Most Zero Trust solutions allow the use of a user’s identity, device, and location as variables to define these security policies.
We heard from customers that they wanted more control and more customizability in defining their Zero Trust policies.
Starting today, we’re excited that Access policies can consider anything before allowing a user access to an application. And by anything, we really do mean absolutely anything. You can now build infinitely customizable policies through the External Evaluation rule option, which allows you to call any API during the evaluation of an Access policy.
Why we built external evaluation rules
Over the past few years we added the ability to check location and device posture information in Access. However, there are always additional signals that can be considered depending on the application and specific requirements of an organization. We set out to give customers the ability to check whatever signal they require without any direct support in Access policies.
The Cloudflare security team, as an example, needed the ability to verify a user’s mTLS certificate against a registry to ensure applications can only be accessed by the right user from a corporate device. Originally, they considered using a Worker to check the user’s certificate after Access evaluated the request. However, this was going to take custom software development and maintenance over time. With External Evaluation rules, an API call can be made to verify whether a user is presenting the correct certificate for their device. The API call is made to a Worker that stores the mapping of mTLS certificates and user devices. The Worker executes the custom logic and then returns a true or false to Access.
How it works
Cloudflare Access is a reverse proxy in front of any web application. If a user has not yet authenticated, they will be presented with a login screen to authenticate. The user must meet the criteria defined in your Access policy. A typical policy would look something like:
- The user’s email ends in @example.com
- The user authenticated with a hardware based token
- The user logged in from the United States
If the user passes the policy, they are granted a cookie that will give them access to the application until their session expires.
To evaluate the user on other custom criteria, you can add an external evaluation rule to the Access policy. The external evaluation rule requires two values: an API endpoint to call and a key to verify that any request response is coming from a trusted source.
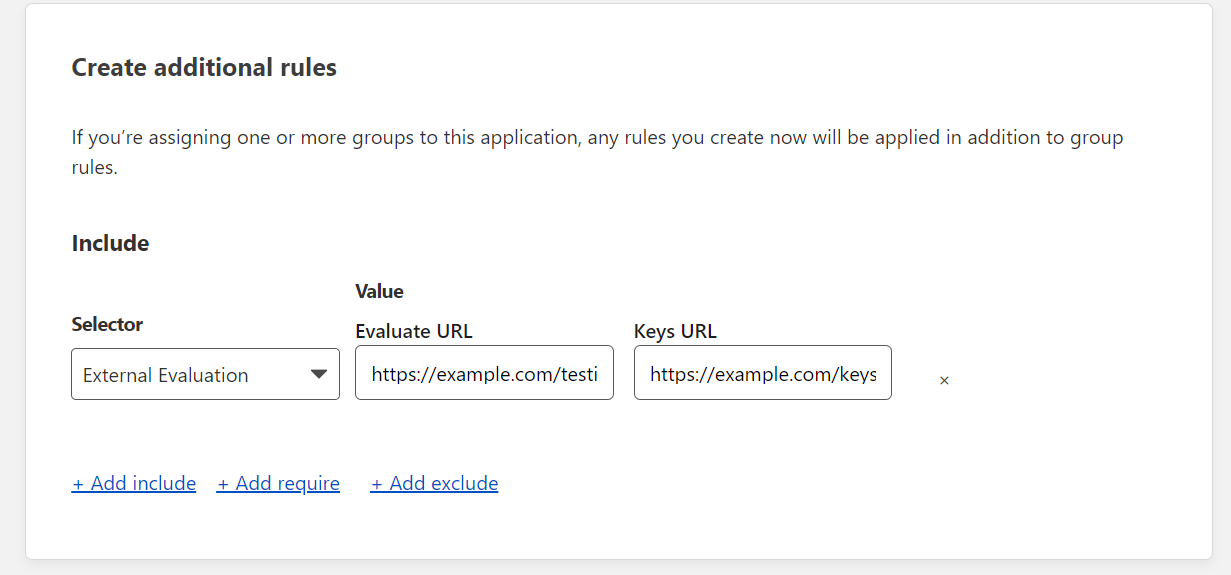
After the user authenticates with your identity provider, all information about the user, device and location is passed to your external API. The API returns a pass or fail response to Access which will then either allow or deny access to the user.
Example logic for the API would look like this:
/**
 * Where your business logic should go
 * @param {*} claims
 * @returns boolean
 */
async function externalEvaluation(claims) {
  return claims.identity.email === '[email protected]'
}
Where the claims object contains all the information about the user, device and network making the request. This externalEvaluation function can be extended to perform any desired business logic. We have made an open-source repository available with example code for consuming the Access claims and verifying the signing keys from Access.
This is really powerful! Any Access policy can now be infinitely extended to consider any information before allowing a user access. Potential examples include:
- Integrating with endpoint protection tools we don’t yet integrate with by building a middleware that checks the endpoint protection tool’s API.
- Checking IP addresses against external threat feeds
- Calling industry-specific user registries
- And much more!
We’re just getting started with extending Access policies. In the future we’ll make it easier to programmatically decide how a user should be treated before accessing an application, not just allow or deny access.
This feature is available in the Cloudflare Zero Trust dashboard today. Follow this guide to get started!
Security updates for Tuesday
Post Syndicated from original https://lwn.net/Articles/898504/
Security updates have been issued by Debian (tzdata), Oracle (cups), and SUSE (atheme, golang-github-prometheus-alertmanager, golang-github-prometheus-node_exporter, node_exporter, python36, release-notes-susemanager, release-notes-susemanager-proxy, SUSE Manager 4.1.15 Release Notes, SUSE Manager Client Tools, and SUSE Manager Server 4.2).
How Cloudflare One solves your observability problems
Post Syndicated from Chris Draper original https://blog.cloudflare.com/cloudflare-one-observability/


Today, we’re excited to announce Cloudflare One Observability. Cloudflare One Observability will help customers work across Cloudflare One applications to troubleshoot network connectivity, security policies, and performance issues to ensure a consistent experience for employees everywhere. Cloudflare One, our comprehensive SASE platform, already includes visibility for individual products; Cloudflare One Observability is the next step in bringing data together across the Cloudflare One platform.
Network taps and legacy enterprise networks
Traditional enterprise networks operated like a castle protected by a moat. Employees working from a physical office location authenticated themselves at the beginning of their session, they were protected by an extensive office firewall, and the majority of the applications they accessed were on-premise.
Many enterprise networks had a strictly defined number of “entrances” for employees at office locations. Network taps (devices used to measure and report events on a local network) monitored each entrance point, and these devices gave network administrators and engineers complete visibility into their operations.
Learn more about the old castle-and-moat network security model.
Incomplete observability in today’s enterprise network
Today’s enterprise networks have expanded beyond the traditional on-premise model and have become extremely fragmented. Now, employees can work from anywhere. People access enterprise networks from across the Internet, and the applications they use every day are a mix of on-premise and SaaS cloud instances.
SaaS applications are hosted outside the enterprise network, leaving your security teams with limited observability into how users access those applications and move data through them. Without observability on the applications your employees are using, you can’t control how sensitive data is stored, shared, or exposed to third parties.
Now that enterprise networks have become more fragmented, it is increasingly difficult to understand how the various fragments are operating. To even gain limited observability, you have to implement a disorganized combination of network taps, flow data, synthetic probes, and dashboards that fail to share data across one another.
Total observability across an enterprise & cloud network built on Cloudflare One
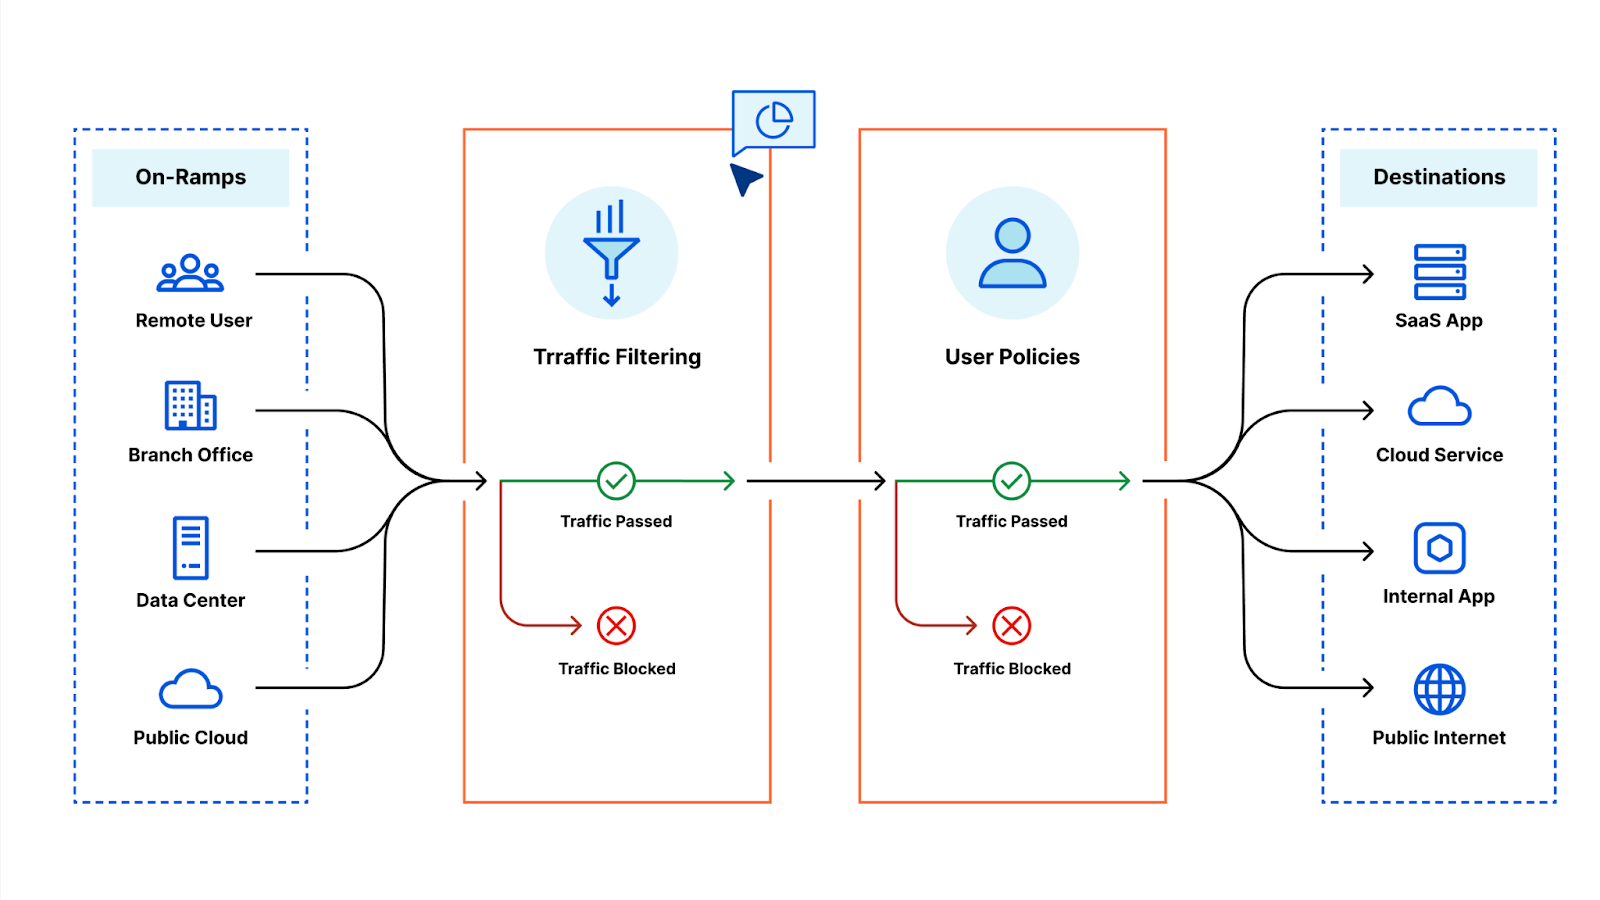
Cloudflare One Observability is built to solve today’s issue of network fragmentation in a zero trust world. Instead of having data spread across multiple network tools, Cloudflare One Observability will combine data from different Cloudflare One functions into a single experience. Customers will be able to go to one place to troubleshoot any issues they’re experiencing with their enterprise applications and networks.
In today’s world of fragmented enterprise networks, there are some questions that can be difficult to answer. Let’s break down a couple of customer examples and walk through how Cloudflare One Observability will simplify the troubleshooting process.
Troubleshooting bandwidth issues across branch locations
A customer may want to know, “What applications are using up the majority of my bandwidth across multiple office locations?” In a typical enterprise network, a network engineer would need to install a network tap or collect flow data at each office location, aggregate the information across separate networks, then build a custom tool to visualize the bandwidth data.
Instead, for Cloudflare One customers, Cloudflare will automatically do all the upfront data collection and aggregation. Customers will be able to skip straight to troubleshooting and solving their bandwidth problem by using Cloudflare One Observability to visualize bandwidth usage across office locations.
Identifying network vulnerabilities
Another challenging question that customers face is, “What attack trends are popular, and is my network vulnerable?” Assessing a network’s vulnerability is time-consuming as administrators dive into separate applications for VPNs, firewalls, user policies, and endpoints to understand their network’s security posture.
Cloudflare One is built from the ground up to simplify this problem. Observability is straightforward when your network on-ramps, firewalls, user policies, and endpoint protection are all managed within the same platform. Customers will be able to go to the Cloudflare One Observability experience to see security patches that are automatically applied by Cloudflare so that customers don’t have to worry. Cloudflare One lets you know whether you’ve been targeted by an attack and gives you confidence that you’re protected.
Troubleshooting slow network performance
Many people have experienced logging into a slow enterprise network. The general problem of “my network is slow when I access an on-premise or SaaS application” can be tough to solve. If employees are working remotely, a network engineer would need to dig through different applications to troubleshoot latency and jitter between VPNs, firewalls, user policies, and endpoint connections.
Cloudflare One Observability simplifies this time-consuming troubleshooting process. When your on-ramps, firewalls, user policies, and endpoint monitoring are all configured on the same platform, you only need to go to one place to troubleshoot these network functions. Cloudflare One’s architecture is built on the concept of single pass inspection. When a request lands on a Cloudflare server, that request passes through instances of Cloudflare One services all on that same single server. This makes it easy to visualize end-to-end network request handling, so customers can seamlessly analyze traffic and identify a network bottleneck or misconfiguration.
Observability powered by Cloudflare’s network
Cloudflare One Observability is built on Cloudflare’s best-in-class network. We have data centers in 270+ cities and over 100 countries. Since every Cloudflare One product runs on every server, we can provide an unparalleled fast and consistent experience to customers everywhere. Cloudflare built its network and security applications from the ground up on the same infrastructure. Unlike our competitors that have strung together a zero trust platform by building siloed applications or through acquisitions, Cloudflare One applications are seamlessly integrated and designed from day one to share data between one another.
As our applications are all built on the same infrastructure, so are our data pipelines and logging services. When you use Cloudflare One, you get the full benefits of our advanced data tools, like Instant Logs for delivering live network data as it arrives and ABR for analyzing network data at scale.
Delivering the Zero Trust observability customers need today
Since 2009, Cloudflare has built one of the fastest, most reliable, and most secure networks in the world. We’ve built Cloudflare One and Cloudflare One Observability on top of this network, and we’re extending its power to meet the challenges of any company. The move to Zero Trust is a paradigm shift, and we believe the security benefits of this new paradigm will make it inevitable for every company. We’re proud of how we have helped and continue to help existing and new customers reinvent their corporate networks.
Construction of Cloudflare One Observability is still in progress. If you’re excited about this new product, you can sign up for our wait list now!
Next generation intrusion detection: an update on Cloudflare’s IDS capabilities
Post Syndicated from Annika Garbers original https://blog.cloudflare.com/intrusion-detection/

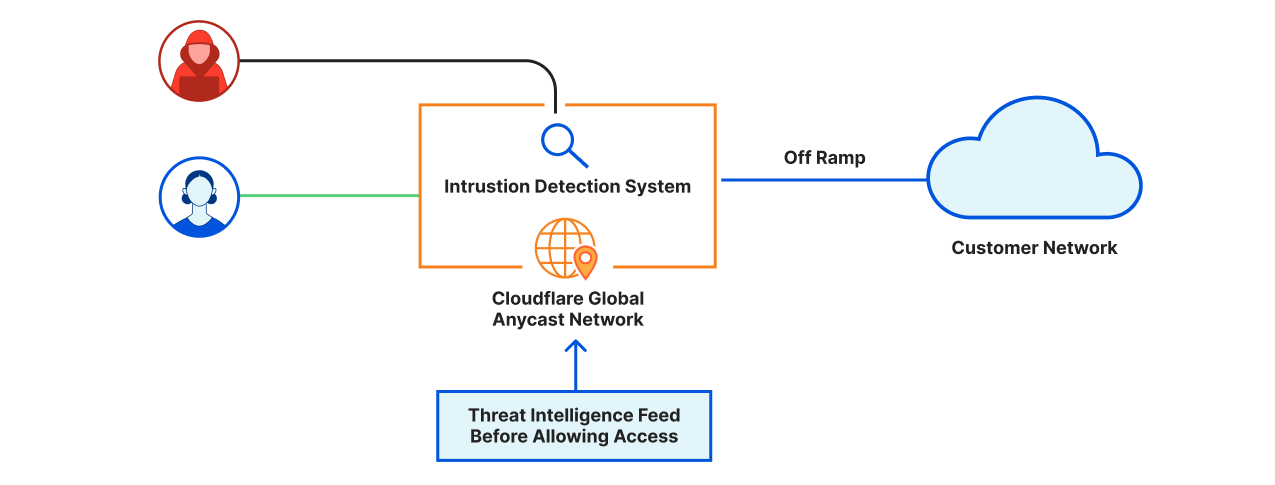
In an ideal world, intrusion detection would apply across your entire network – data centers, cloud properties, and branch locations. It wouldn’t impact the performance of your traffic. And there’d be no capacity constraints. Today, we’re excited to bring this one step closer to reality by announcing the private beta of Cloudflare’s intrusion detection capabilities: live monitoring for threats across all of your network traffic, delivered as-a-service — with none of the constraints of legacy hardware approaches.
Cloudflare’s Network Services, part of Cloudflare One, help you connect and secure your entire corporate network — data center, cloud, or hybrid — from DDoS attacks and other malicious traffic. You can apply Firewall rules to keep unwanted traffic out or enforce a positive security model, and integrate custom or managed IP lists into your firewall policies to block traffic associated with known malware, bots, or anonymizers. Our new Intrusion Detection System (IDS) capabilities expand on these critical security controls by actively monitoring for a wide range of known threat signatures in your traffic.
What is an IDS?
Intrusion Detection Systems are traditionally deployed as standalone appliances but often incorporated as features in more modern or higher end firewalls. They expand the security coverage of traditional firewalls – which focus on blocking traffic you know you don’t want in your network – to analyze traffic against a broader threat database, detecting a variety of sophisticated attacks such as ransomware, data exfiltration, and network scanning based on signatures or “fingerprints” in network traffic. Many IDSs also incorporate anomaly detection, monitoring activity against a baseline to identify unexpected traffic patterns that could indicate malicious activity. (If you’re interested in the evolution of network firewall capabilities, we recommend this where we’ve dived deeper on the topic).
What problems have users encountered with existing IDS solutions?
We’ve interviewed tons of customers about their experiences deploying IDS and the pain points they’re hoping we can solve. Customers have mentioned the full list of historical problems we hear frequently with other hardware-based security solutions, including capacity planning, location planning and back hauling traffic through a central location for monitoring, downtime for installation, maintenance, and upgrades, and vulnerability to congestion or failure with large volumes of traffic (e.g. DDoS attacks).
Customers we talked to also consistently cited challenges making trade off decisions between security and performance for their network traffic. One network engineer explained:
“I know my security team hates me for this, but I can’t let them enable the IDS function on our on-prem firewalls – in the tests my team ran, it cut my throughput by almost a third. I know we have this gap in our security now, and we’re looking for an alternative way to get IDS coverage for our traffic, but I can’t justify slowing down the network for everyone in order to catch some theoretical bad traffic.”
Finally, customers who did choose to take the performance hit and invest in an IDS appliance reported that they often mute or ignore the feed of alerts coming into their SOC after turning it on. With the amount of noise on the Internet and the potential risk of missing an important signal, IDSs can end up generating a lot of false positives or non-actionable notifications. This volume can lead busy SOC teams to get alert fatigue and end up silencing potentially important signals buried in the noise.
How is Cloudflare tackling these problems?
We believe there’s a more elegant, efficient, and effective way to monitor all of your network traffic for threats without introducing performance bottlenecks or burning your team out with non-actionable alerts. Over the past year and a half, we’ve learned from your feedback, experimented with different technology approaches, and developed a solution to take those tough trade off decisions out of the picture.
One interface across all your traffic
Cloudflare’s IDS capabilities operate across all of your network traffic – any IP port or protocol — whether it flows to your IPs that we advertise on your behalf, IPs we lease to you, or soon, traffic within your private network. You can enforce consistent monitoring and security control across your entire network in one place.
No more hardware headaches
Like all of our security functions, we built our IDS from scratch in software, and it is deployed across every server on Cloudflare’s global Anycast network. This means:
- No more capacity planning: Cloudflare’s entire global network capacity is now the capacity of your IDS – currently 142 Tbps and counting.
- No more location planning: No more picking regions, backhauling traffic to central locations, or deploying primary and backup appliances – because every server runs our IDS software and traffic is automatically attracted to the closest network location to its source, redundancy and failover are built in.
- No maintenance downtime: Improvements to Cloudflare’s IDS capabilities, like all of our products, are deployed continuously across our global network.
Threat intelligence from across our interconnected global network
The attack landscape is constantly evolving, and you need an IDS that stays ahead of it. Because Cloudflare’s IDS is delivered in software we wrote from the ground up and maintain, we’re able to continuously feed threat intelligence from the 20+ million Internet properties on Cloudflare back into our policies, keeping you protected from both known and new attack patterns.
Our threat intelligence combines open-source feeds that are maintained and trusted by the security community – like Suricata threat signatures – with information collected from our unique vantage point as an incredibly interconnected network carrying a significant percentage of all Internet traffic. Not only do we share these insights publicly through tools like Cloudflare Radar; we also feed them back into our security tools including IDS so that our customers are protected as quickly as possible from emerging threats. Cloudflare’s newly announced Threat Intel team will augment these capabilities even further, applying additional expertise to understanding and deriving insights from our network data.
Excited to get started?
If you’re an Advanced Magic Firewall customer, you can get access to these features in private beta starting now. You can reach out to your account team to learn more or get started now – we can’t wait to hear your feedback as we continue to develop these capabilities!
Introducing Cloudforce One: our new threat operations and research team
Post Syndicated from Blake Darché original https://blog.cloudflare.com/introducing-cloudforce-one-threat-operations-and-threat-research/

This post is also available in 简体中文, 日本語, Deutsch, Français and Español.
Meet our new threat operations and research team: Cloudforce One. While this team will publish research, that’s not its reason for being. Its primary objective: track and disrupt threat actors.
The security teams we speak with tell us the same thing: they’re inundated with reports from threat intelligence and security product vendors that do little to improve their actual security. The stories are indeed interesting, but they want deeper insights into the techniques and actors targeting their industry—but even more than that, they want to be protected against these threats with minimal to no involvement. That is the mission on which Cloudforce One will deliver.

This team is led by me, Blake Darché, Area 1’s co-founder and former head of Threat Intelligence. Before starting Area 1, which was acquired by Cloudflare earlier this year, I was a founding member of CrowdStrike’s services organization, and before that a Computer Network Exploitation Analyst at the National Security Agency (NSA). My career has focused on identifying and disrupting sophisticated nation-state sponsored cyber threats before they compromise enterprises and governments, and I’m excited to accelerate that work at Cloudflare.
The Cloudforce One team comprises analysts assigned to Threat Research, Malware and Vulnerability Research, and Threat Operations (i.e., disrupting actors once identified). Collectively, members of the team have tracked many of the most sophisticated cyber criminals on the Internet while at the National Security Agency and Area 1 Security, and have worked closely with similar organizations and governments to disrupt these threat actors. They’ve also been prolific in publishing “finished intel” reports on security topics of significant geopolitical importance, such as targeted attacks against governments, technology companies, the energy sector, and law firms, and have regularly briefed top organizations around the world on their efforts. Oh, and we’re growing the team, so please reach out if you’re interested.
How will Cloudforce One work?
First and foremost, the team will help protect all Cloudflare customers by working closely with our existing product, engineering, and security teams to improve our products based on tactics, techniques, and procedures (TTPs) observed in the wild. Customers will get better protection without having to take any action, and will be able to read a subset of research published on our blog and within the Cloudflare Security Center.
Additionally, enterprise customers who wish to receive one-on-one live briefings from the team, submit periodic inquiries for follow-up, and obtain early access to threat research, will soon be able to sign up for our new Threat Intelligence subscription. All other enterprise customers will be invited to join periodic group briefings.
Lastly, new capabilities within Security Center, such as access to historical threat data via API and threat pivoting features, will also be introduced by the dedicated threat intel engineering team paired with Cloudforce One.
Getting started
If you’re looking to benefit from the insights uncovered by Cloudforce One, there is nothing you need to do. But if you’re interested in receiving regular briefings from Cloudforce One tailored to your industry, contact your Customer Success manager today or fill out this form and someone will be in touch. Finally, if you’re interested in joining the team, check out our open job postings here.
Cloudflare outage on June 21, 2022
Post Syndicated from Tom Strickx original https://blog.cloudflare.com/cloudflare-outage-on-june-21-2022/

Introduction

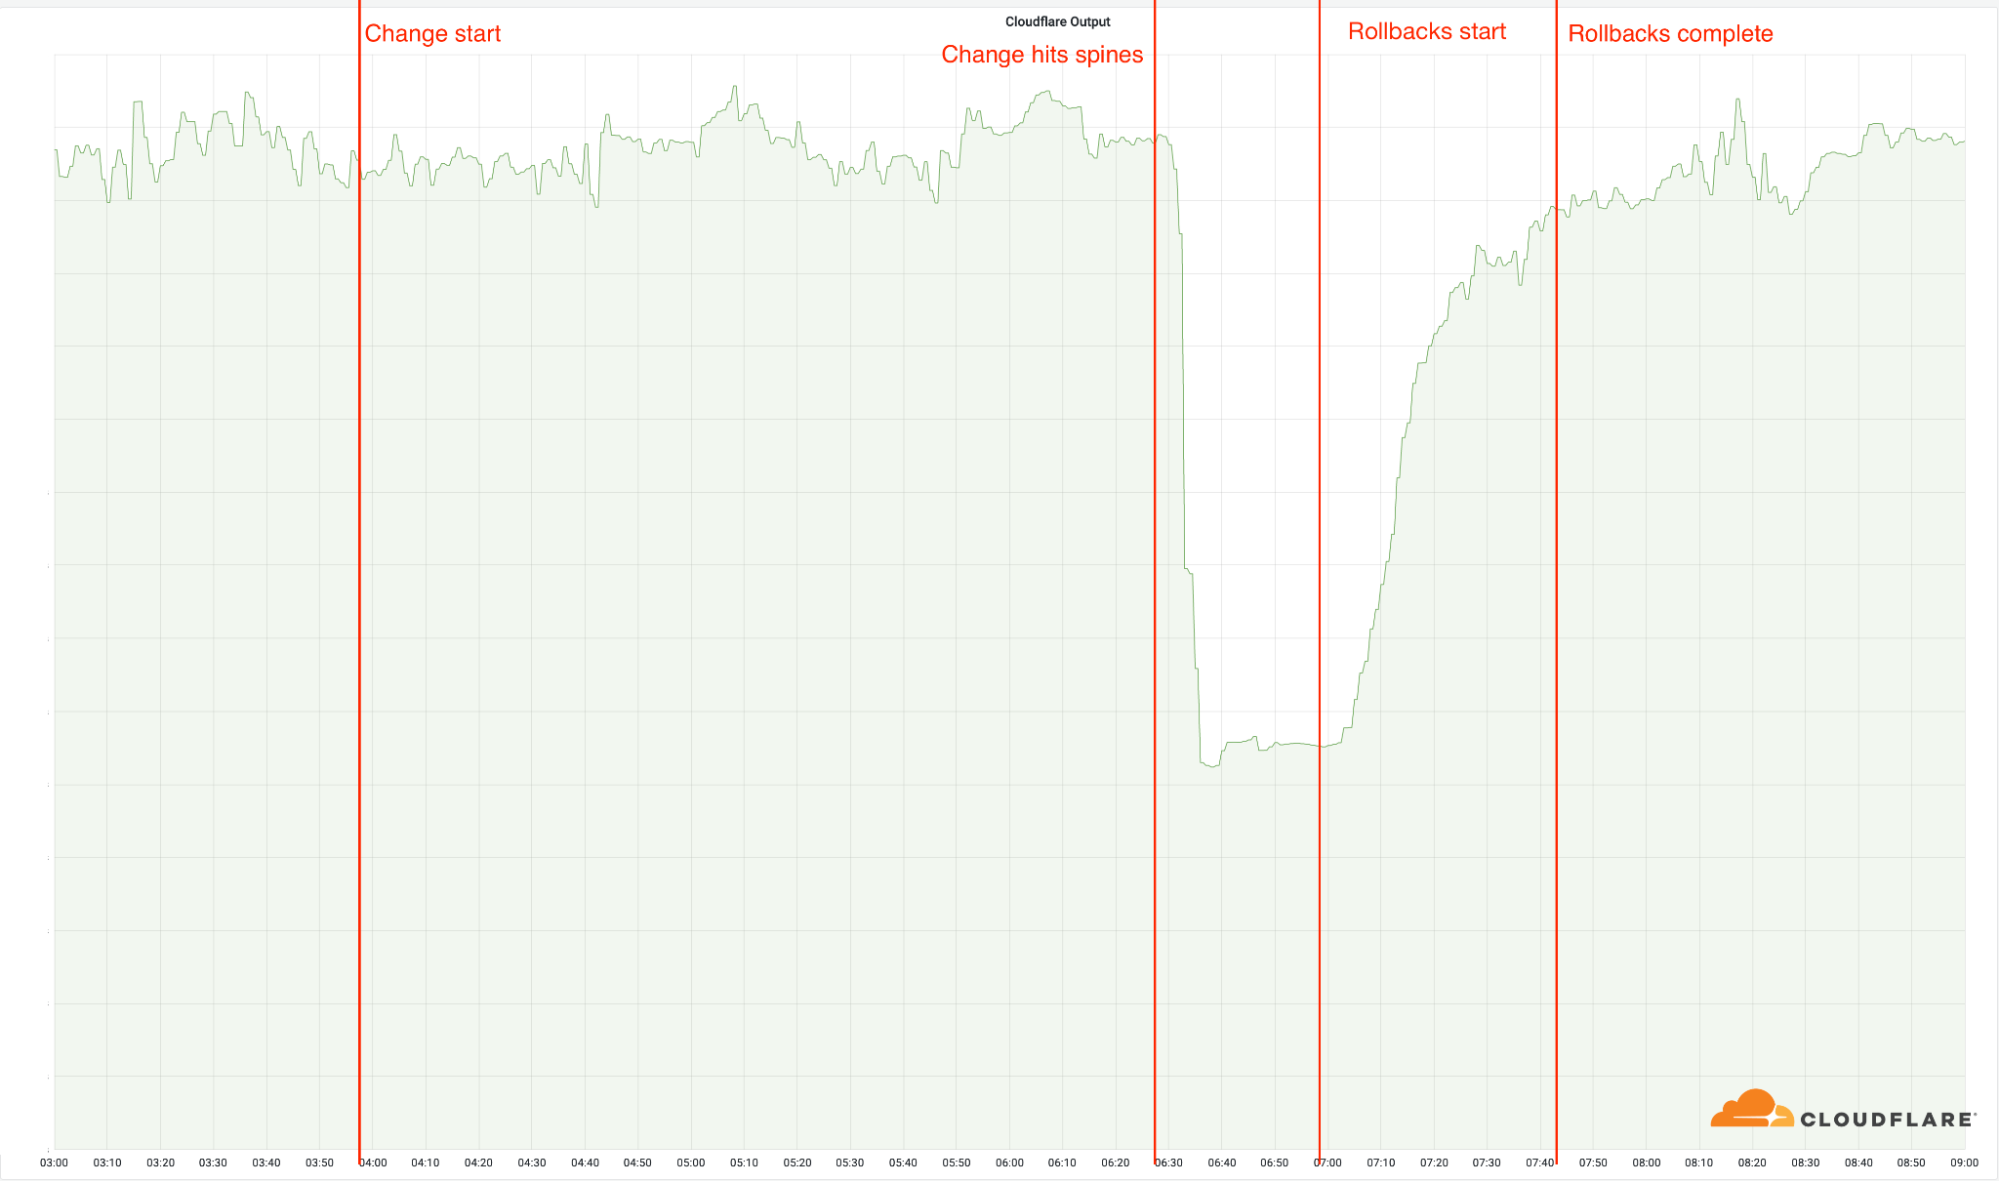
Today, June 21, 2022, Cloudflare suffered an outage that affected traffic in 19 of our data centers. Unfortunately, these 19 locations handle a significant proportion of our global traffic. This outage was caused by a change that was part of a long-running project to increase resilience in our busiest locations. A change to the network configuration in those locations caused an outage which started at 06:27 UTC. At 06:58 UTC the first data center was brought back online and by 07:42 UTC all data centers were online and working correctly.
Depending on your location in the world you may have been unable to access websites and services that rely on Cloudflare. In other locations, Cloudflare continued to operate normally.
We are very sorry for this outage. This was our error and not the result of an attack or malicious activity.
Background
Over the last 18 months, Cloudflare has been working to convert all of our busiest locations to a more flexible and resilient architecture. In this time, we’ve converted 19 of our data centers to this architecture, internally called Multi-Colo PoP (MCP): Amsterdam, Atlanta, Ashburn, Chicago, Frankfurt, London, Los Angeles, Madrid, Manchester, Miami, Milan, Mumbai, Newark, Osaka, São Paulo, San Jose, Singapore, Sydney, Tokyo.
A critical part of this new architecture, which is designed as a Clos network, is an added layer of routing that creates a mesh of connections. This mesh allows us to easily disable and enable parts of the internal network in a data center for maintenance or to deal with a problem. This layer is represented by the spines in the following diagram.
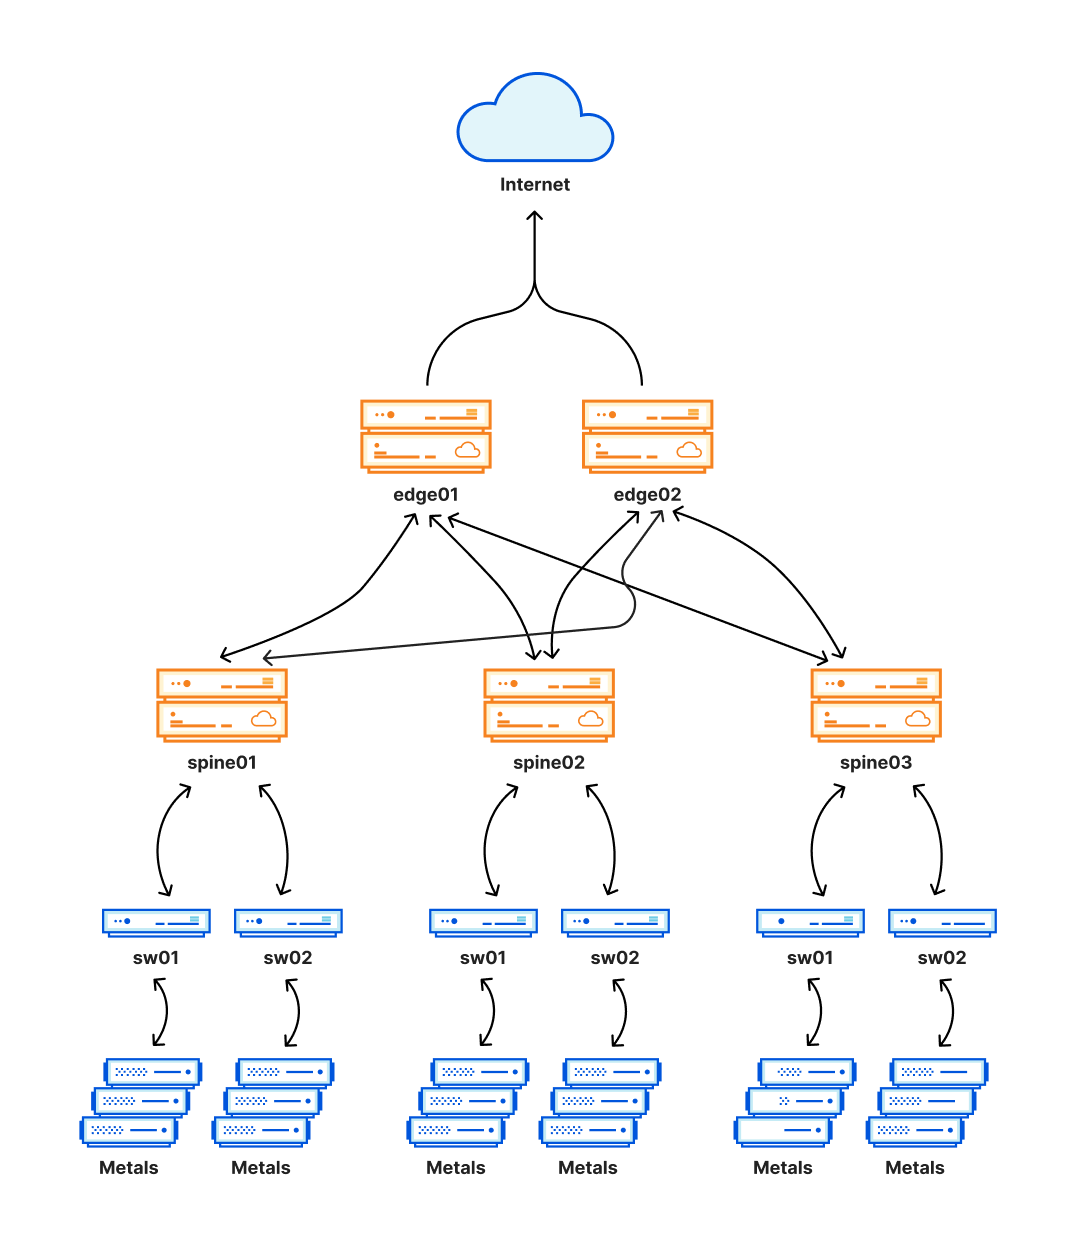
This new architecture has provided us with significant reliability improvements, as well as allowing us to run maintenance in these locations without disrupting customer traffic. As these locations also carry a significant proportion of the Cloudflare traffic, any problem here can have a very wide impact, and unfortunately, that’s what happened today.
Incident timeline and impact
In order to be reachable on the Internet, networks like Cloudflare make use of a protocol called BGP. As part of this protocol, operators define policies which decide which prefixes (a collection of adjacent IP addresses) are advertised to peers (the other networks they connect to), or accepted from peers.
These policies have individual components, which are evaluated sequentially. The end result is that any given prefixes will either be advertised or not advertised. A change in policy can mean a previously advertised prefix is no longer advertised, known as being “withdrawn”, and those IP addresses will no longer be reachable on the Internet.
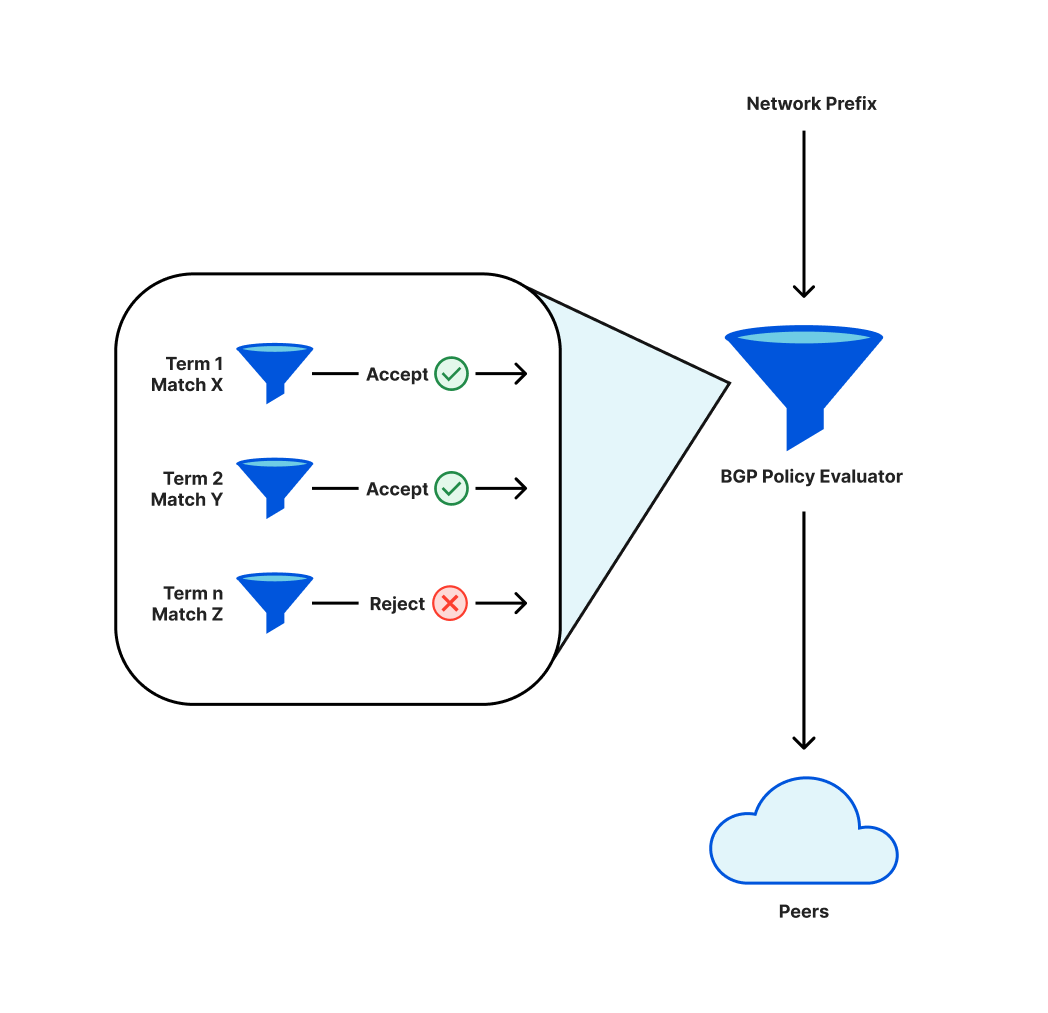
While deploying a change to our prefix advertisement policies, a re-ordering of terms caused us to withdraw a critical subset of prefixes.
Due to this withdrawal, Cloudflare engineers experienced added difficulty in reaching the affected locations to revert the problematic change. We have backup procedures for handling such an event and used them to take control of the affected locations.
03:56 UTC: We deploy the change to our first location. None of our locations are impacted by the change, as these are using our older architecture.
06:17: The change is deployed to our busiest locations, but not the locations with the MCP architecture.
06:27: The rollout reached the MCP-enabled locations, and the change is deployed to our spines. This is when the incident started, as this swiftly took these 19 locations offline.
06:32: Internal Cloudflare incident declared.
06:51: First change made on a router to verify the root cause.
06:58: Root cause found and understood. Work begins to revert the problematic change.
07:42: The last of the reverts has been completed. This was delayed as network engineers walked over each other’s changes, reverting the previous reverts, causing the problem to re-appear sporadically.
09:00: Incident closed.
The criticality of these data centers can clearly be seen in the volume of successful HTTP requests we handled globally:
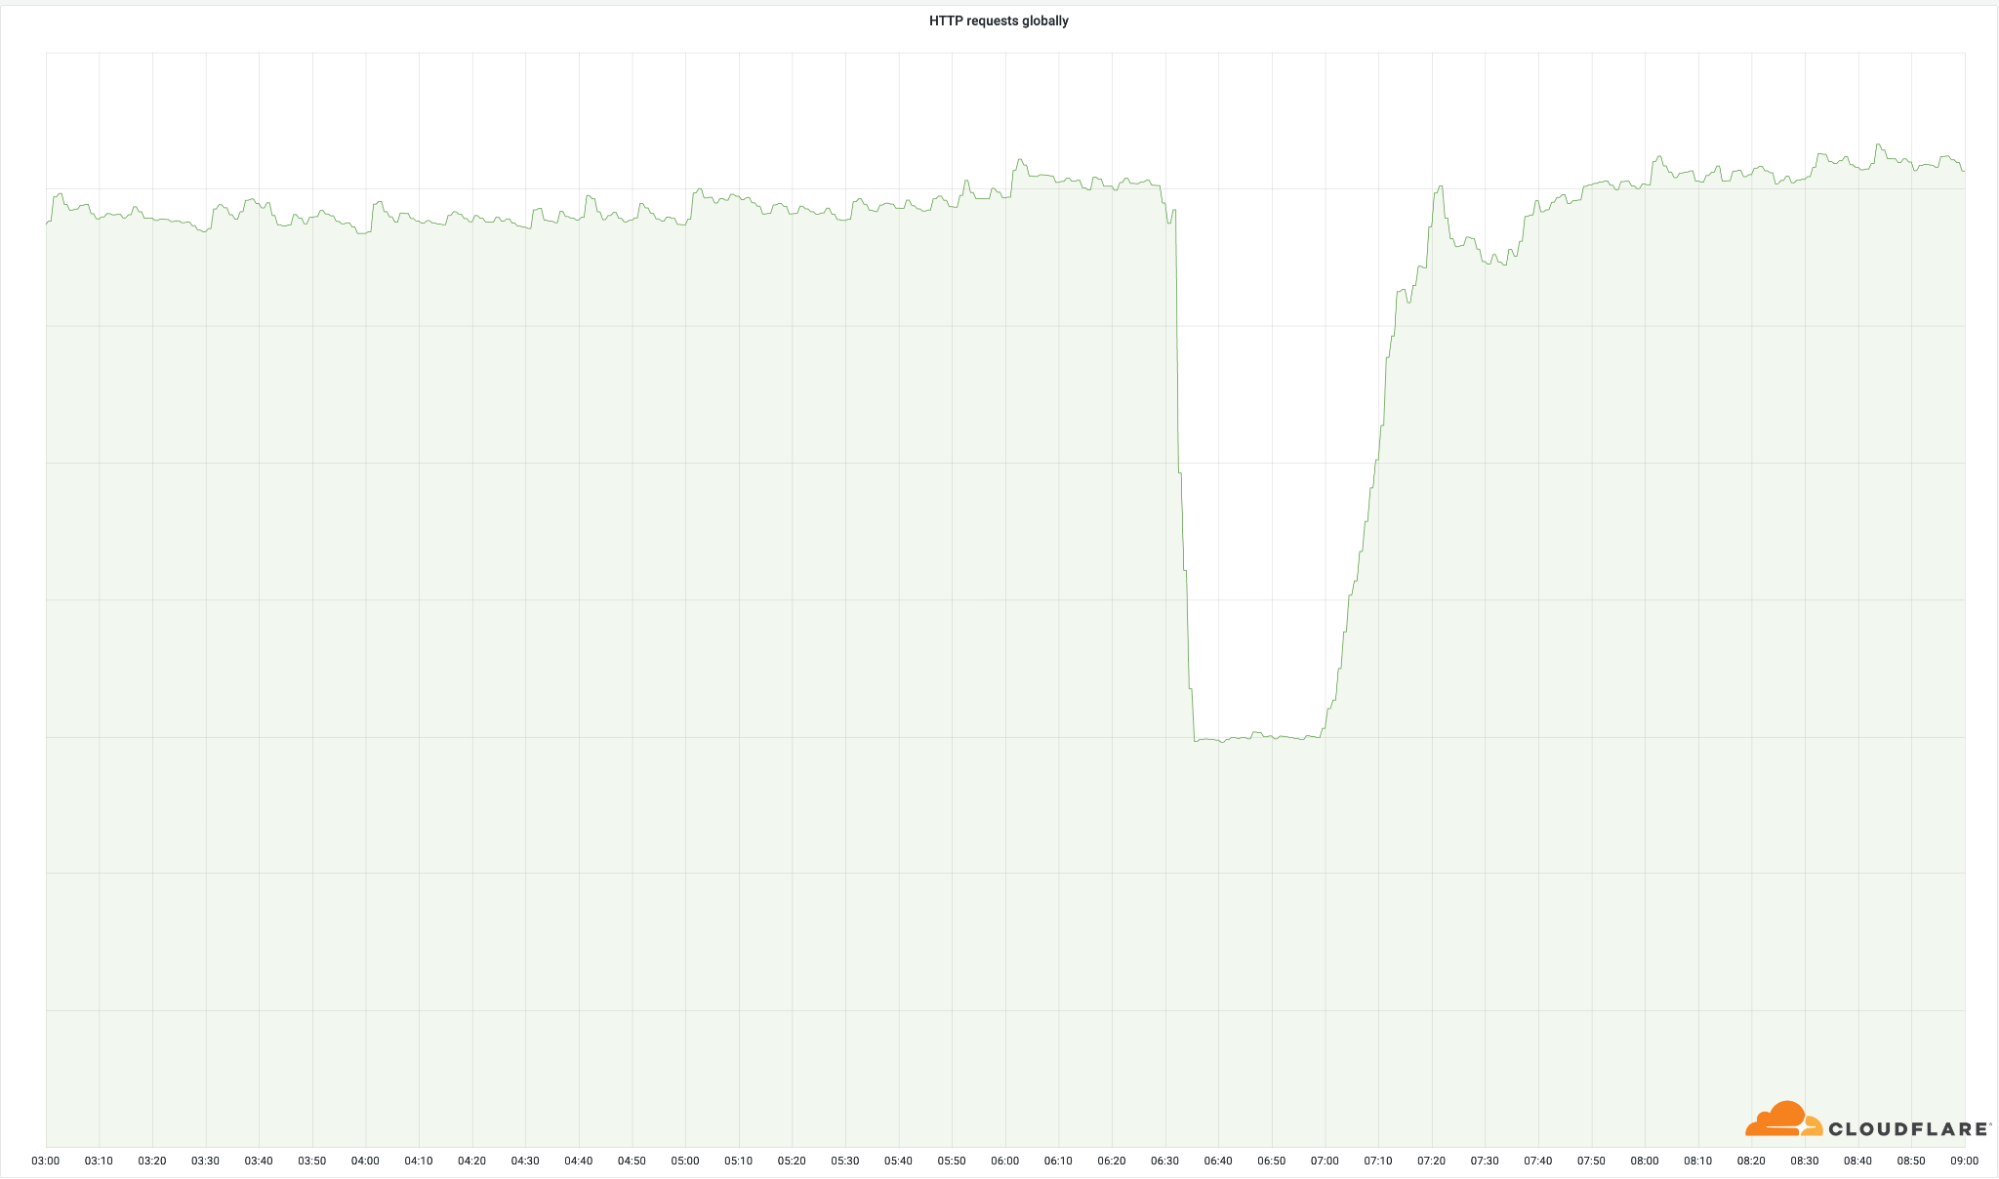
Even though these locations are only 4% of our total network, the outage impacted 50% of total requests. The same can be seen in our egress bandwidth:
Technical description of the error and how it happened
As part of our continued effort to standardize our infrastructure configuration, we were rolling out a change to standardize the BGP communities we attach to a subset of the prefixes we advertise. Specifically, we were adding informational communities to our site-local prefixes.
These prefixes allow our metals to communicate with each other, as well as connect to customer origins. As part of the change procedure at Cloudflare, a Change Request ticket was created, which includes a dry-run of the change, as well as a stepped rollout procedure. Before it was allowed to go out, it was also peer reviewed by multiple engineers. Unfortunately, in this case, the steps weren’t small enough to catch the error before it hit all of our spines.
The change looked like this on one of the routers:
[edit policy-options policy-statement 4-COGENT-TRANSIT-OUT term ADV-SITELOCAL then]
+      community add STATIC-ROUTE;
+      community add SITE-LOCAL-ROUTE;
+      community add TLL01;
+      community add EUROPE;
[edit policy-options policy-statement 4-PUBLIC-PEER-ANYCAST-OUT term ADV-SITELOCAL then]
+      community add STATIC-ROUTE;
+      community add SITE-LOCAL-ROUTE;
+      community add TLL01;
+      community add EUROPE;
[edit policy-options policy-statement 6-COGENT-TRANSIT-OUT term ADV-SITELOCAL then]
+      community add STATIC-ROUTE;
+      community add SITE-LOCAL-ROUTE;
+      community add TLL01;
+      community add EUROPE;
[edit policy-options policy-statement 6-PUBLIC-PEER-ANYCAST-OUT term ADV-SITELOCAL then]
+      community add STATIC-ROUTE;
+      community add SITE-LOCAL-ROUTE;
+      community add TLL01;
+      community add EUROPE;
This was harmless, and just added some additional information to these prefix advertisements. The change on the spines was the following:
[edit policy-options policy-statement AGGREGATES-OUT]
term 6-DISABLED_PREFIXES { ... }
!    term 6-ADV-TRAFFIC-PREDICTOR { ... }
!    term 4-ADV-TRAFFIC-PREDICTOR { ... }
!    term ADV-FREE { ... }
!    term ADV-PRO { ... }
!    term ADV-BIZ { ... }
!    term ADV-ENT { ... }
!    term ADV-DNS { ... }
!    term REJECT-THE-REST { ... }
!    term 4-ADV-SITE-LOCALS { ... }
!    term 6-ADV-SITE-LOCALS { ... }
[edit policy-options policy-statement AGGREGATES-OUT term 4-ADV-SITE-LOCALS then]
community delete NO-EXPORT { ... }
+      community add STATIC-ROUTE;
+      community add SITE-LOCAL-ROUTE;
+      community add AMS07;
+      community add EUROPE;
[edit policy-options policy-statement AGGREGATES-OUT term 6-ADV-SITE-LOCALS then]
community delete NO-EXPORT { ... }
+      community add STATIC-ROUTE;
+      community add SITE-LOCAL-ROUTE;
+      community add AMS07;
+      community add EUROPE;
An initial glance at this diff might give the impression that this change is identical, but unfortunately, that’s not the case. If we focus on one part of the diff, it might become clear why:
!    term REJECT-THE-REST { ... }
!    term 4-ADV-SITE-LOCALS { ... }
!    term 6-ADV-SITE-LOCALS { ... }
In this diff format, the exclamation marks in front of the terms indicate a re-ordering of the terms. In this case, multiple terms moved up, and two terms were added to the bottom. Specifically, the 4-ADV-SITE-LOCALS and 6-ADV-SITE-LOCALS terms moved from the top to the bottom. These terms were now behind the REJECT-THE-REST term, and as might be clear from the name, this term is an explicit reject:
term REJECT-THE-REST {
    then reject;
}
As this term is now before the site-local terms, we immediately stopped advertising our site-local prefixes, removing our direct access to all the impacted locations, as well as removing the ability of our servers to reach origin servers.
On top of the inability to contact origins, the removal of these site-local prefixes also caused our internal load balancing system Multimog (a variation of our Unimog load-balancer) to stop working, as it could no longer forward requests between the servers in our MCPs. This meant that our smaller compute clusters in an MCP received the same amount of traffic as our largest clusters, causing the smaller ones to overload.
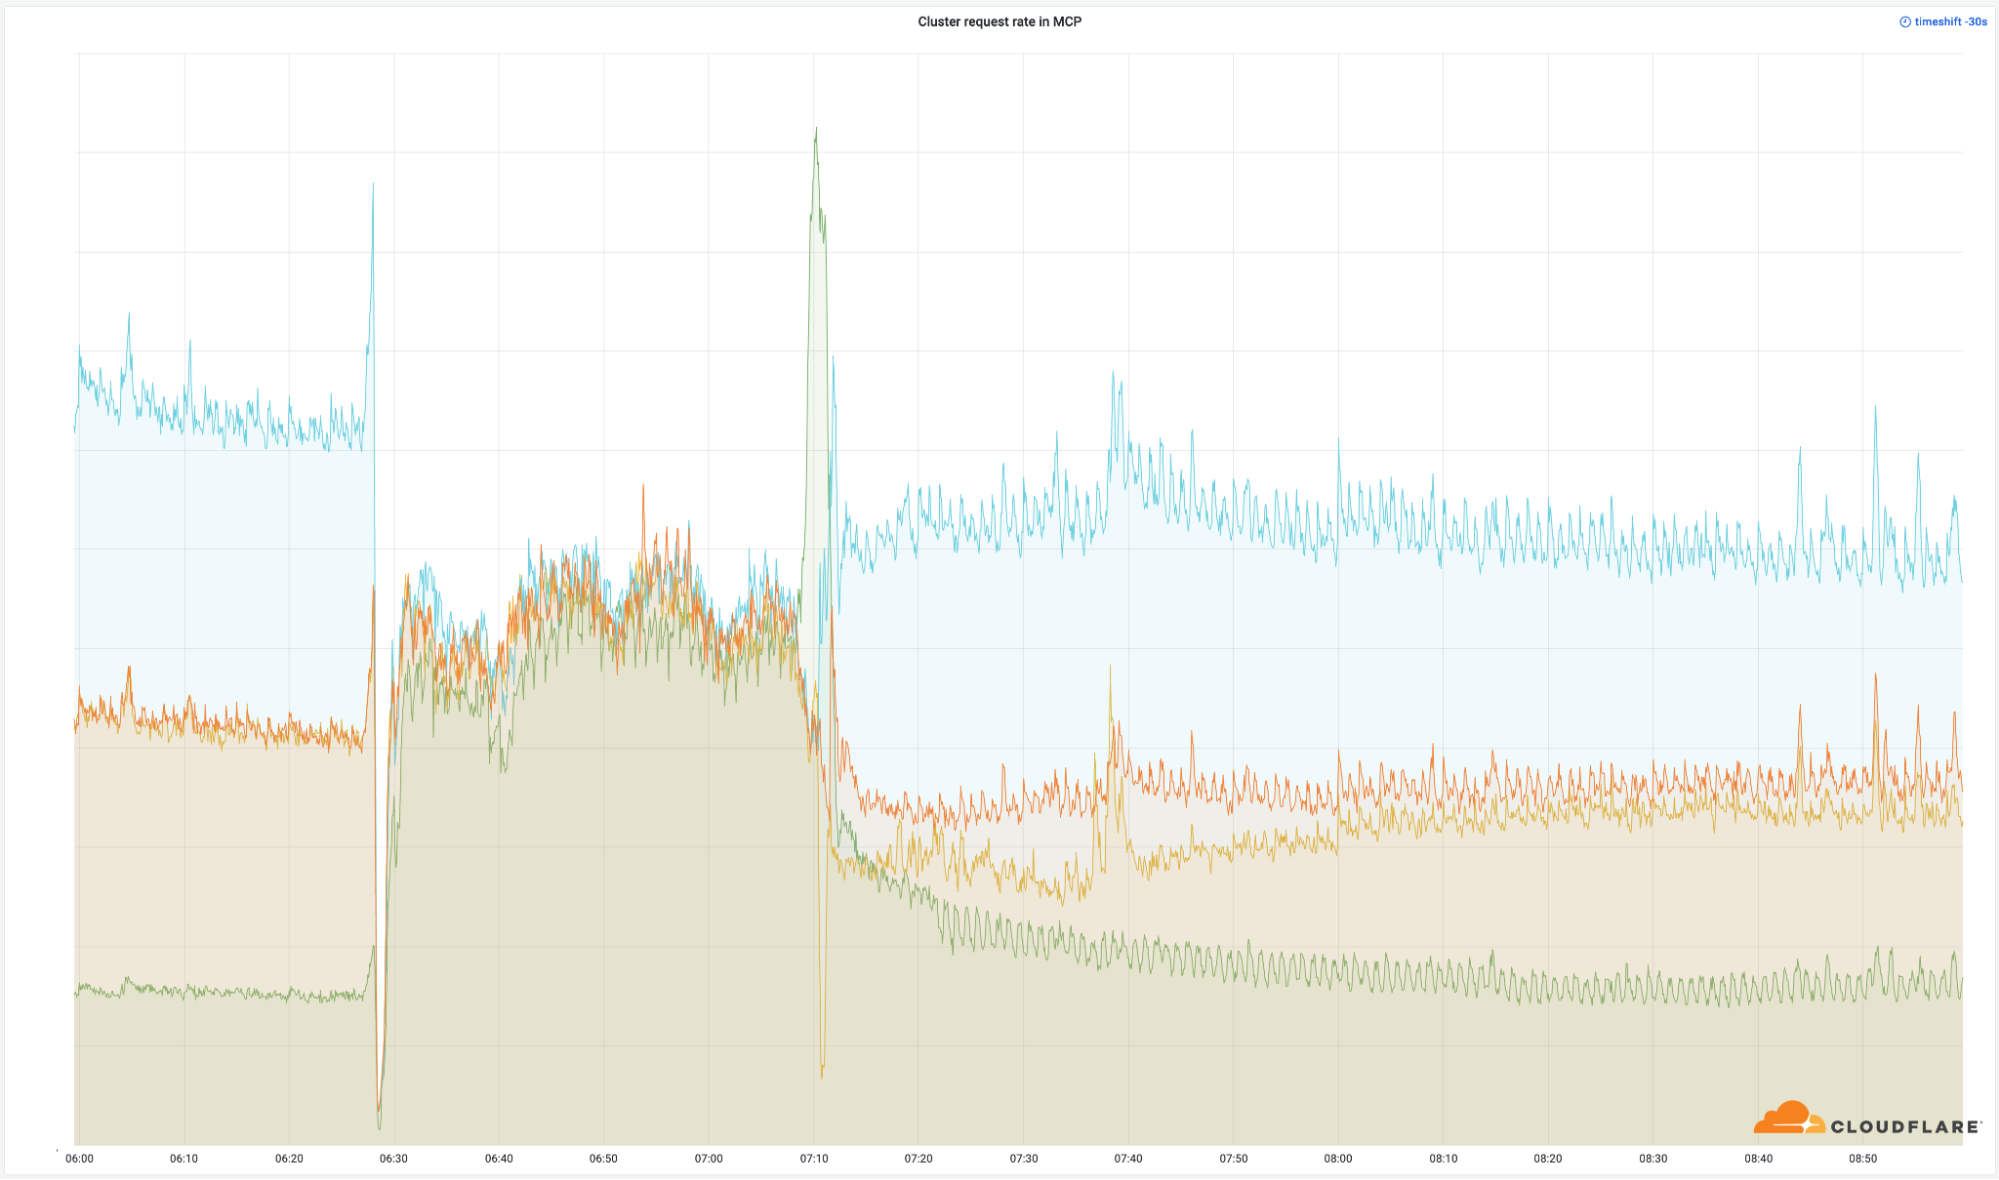
Remediation and follow-up steps
This incident had widespread impact, and we take availability very seriously. We have identified several areas of improvement and will continue to work on uncovering any other gaps that could cause a recurrence.
Here is what we are working on immediately:
Process: While the MCP program was designed to improve availability, a procedural gap in how we updated these data centers ultimately caused a broader impact in MCP locations specifically. While we did use a stagger procedure for this change, the stagger policy did not include an MCP data center until the final step. Change procedures and automation need to include MCP-specific test and deploy procedures to ensure there are no unintended consequences.
Architecture: The incorrect router configuration prevented the proper routes from being announced, preventing traffic from flowing properly to our infrastructure. Ultimately the policy statement that caused the incorrect routing advertisement will be redesigned to prevent an unintentional incorrect ordering.
Automation: There are several opportunities in our automation suite that would mitigate some or all of the impact seen from this event. Primarily, we will be concentrating on automation improvements that enforce an improved stagger policy for rollouts of network configuration and provide an automated “commit-confirm” rollback. The former enhancement would have significantly lessened the overall impact, and the latter would have greatly reduced the Time-to-Resolve during the incident.
Conclusion
Although Cloudflare has invested significantly in our MCP design to improve service availability, we clearly fell short of our customer expectations with this very painful incident. We are deeply sorry for the disruption to our customers and to all the users who were unable to access Internet properties during the outage. We have already started working on the changes outlined above and will continue our diligence to ensure this cannot happen again.
Hidden Anti-Cryptography Provisions in Internet Anti-Trust Bills
Post Syndicated from Bruce Schneier original https://www.schneier.com/blog/archives/2022/06/hidden-anti-cryptography-provisions-in-internet-anti-trust-bills.html
Two bills attempting to reduce the power of Internet monopolies are currently being debated in Congress: S. 2992, the American Innovation and Choice Online Act; and S. 2710, the Open App Markets Act. Reducing the power to tech monopolies would do more to “fix” the Internet than any other single action, and I am generally in favor of them both. (The Center for American Progress wrote a good summary and evaluation of them. I have written in support of the bill that would force Google and Apple to give up their monopolies on their phone app stores.)
There is a significant problem, though. Both bills have provisions that could be used to break end-to-end encryption.
Let’s start with S. 2992. Sec. 3(c)(7)(A)(iii) would allow a company to deny access to apps installed by users, where those app makers “have been identified [by the Federal Government] as national security, intelligence, or law enforcement risks.” That language is far too broad. It would allow Apple to deny access to an encryption service provider that provides encrypted cloud backups to the cloud (which Apple does not currently offer). All Apple would need to do is point to any number of FBI materials decrying the security risks with “warrant proof encryption.”
Sec. 3(c)(7)(A)(vi) states that there shall be no liability for a platform “solely” because it offers “end-to-end encryption.” This language is too narrow. The word “solely” suggests that offering end-to-end encryption could be a factor in determining liability, provided that it is not the only reason. This is very similar to one of the problems with the encryption carve-out in the EARN IT Act. The section also doesn’t mention any other important privacy-protective features and policies, which also shouldn’t be the basis for creating liability for a covered platform under Sec. 3(a).
In Sec. 2(a)(2), the definition of business user excludes any person who “is a clear national security risk.” This term is undefined, and as such far too broad. It can easily be interpreted to cover any company that offers an end-to-end encrypted alternative, or a service offered in a country whose privacy laws forbid disclosing data in response to US court-ordered surveillance. Again, the FBI’s repeated statements about end-to-end encryption could serve as support.
Finally, under Sec. 3(b)(2)(B), platforms have an affirmative defense for conduct that would otherwise violate the Act if they do so in order to “protect safety, user privacy, the security of nonpublic data, or the security of the covered platform.” This language is too vague, and could be used to deny users the ability to use competing services that offer better security/privacy than the incumbent platform—particularly where the platform offers subpar security in the name of “public safety.” For example, today Apple only offers unencrypted iCloud backups, which it can then turn over governments who claim this is necessary for “public safety.” Apple can raise this defense to justify its blocking third-party services from offering competing, end-to-end encrypted backups of iMessage and other sensitive data stored on an iPhone.
S. 2710 has similar problems. Sec 7. (6)(B) contains language specifying that the bill does not “require a covered company to interoperate or share data with persons or business users that…have been identified by the Federal Government as national security, intelligence, or law enforcement risks.” This would mean that Apple could ignore the prohibition against private APIs, and deny access to otherwise private APIs, for developers of encryption products that have been publicly identified by the FBI. That is, end-to-end encryption products.
I want those bills to pass, but I want those provisions cleared up so we don’t lose strong end-to-end encryption in our attempt to reign in the tech monopolies.
EDITED TO ADD (6/23): A few DC insiders have responded to me about this post. Their basic point is this: “Your threat model is wrong. The big tech companies can already break end-to-end encryption if they want. They don’t need any help, and this bill doesn’t give the FBI any new leverage they don’t already have. This bill doesn’t make anything any worse than it is today.” That’s a reasonable response. These bills are definitely a net positive for humanity.
Кирил Петков за ГКПП “Капитан Андреево” Премиерът към „Биволъ“: Ами и Таки вече не отговарят за границата
Post Syndicated from Николай Марченко original https://bivol.bg/%D0%BF%D1%80%D0%B5%D0%BC%D0%B8%D0%B5%D1%80%D1%8A%D1%82-%D0%BA%D1%8A%D0%BC-%D0%B1%D0%B8%D0%B2%D0%BE%D0%BB%D1%8A-%D0%B0%D0%BC%D0%B8-%D0%B8-%D1%82%D0%B0%D0%BA%D0%B8-%D0%B2%D0%B5%D1%87.html
вторник 21 юни 2022

Някакъв си Ами отговаря или е отговарял за тази граница. Ами, Ами (Размиг Чакърян – Ами – бел. ред.) в момента не отговаря за тази граница. Това заяви министър-председателят Кирил…
Meta: Transparent memory offloading
Post Syndicated from original https://lwn.net/Articles/898454/
This
Meta blog post by Johannes Weiner and Dan Schatzberg describes a set of
memory-management changes used there that they call “transparent memory
offloading”.
Transparent Memory Offloading (TMO) is Meta’s solution for
heterogeneous data center environments. It introduces a new Linux
kernel mechanism that measures the lost work due to resource
shortage across CPU, memory, and I/O in real time. Guided by this
information and without any prior application knowledge, TMO
automatically adjusts the amount of memory to offload to a
heterogeneous device, such as compressed memory or an SSD.
The article doesn’t say where to find the relevant code, not all of which
is in the mainline kernel (and some of which runs in user space).
[$] NFS: the early years
Post Syndicated from original https://lwn.net/Articles/897917/
I recently had cause to reflect on the changes to the NFS (Network File
System) protocol over the years and found that it was a story worth
telling. It would be easy for such a story to become swamped by the
details, as there are many of those, but one idea does stand out from
the rest. The earliest version of NFS has been described as a
“stateless” protocol, a term I still hear used occasionally. Much of
the story of NFS follows the growth in the acknowledgment of, and
support for, state. This article looks at the evolution of NFS (and its
handling of state) during the
early part of its life; a second installment will bring the story up to the
present.
New – High Volume Outbound Communication with Amazon Connect Outbound Campaigns
Post Syndicated from Sébastien Stormacq original https://aws.amazon.com/blogs/aws/new-high-volume-outbound-communication-with-amazon-connect-outbound-campaigns/
The new high volume outbound communication capability in Amazon Connect which was announced at Enterprise Connect last year, is now generally available to all. It is named Amazon Connect outbound campaigns.
If you haven’t heard about Amazon Connect, it is an easy-to-use cloud contact center service that helps companies of any size deliver superior customer service at lower cost. You can read the original blog post Jeff wrote at launch in 2017, with amazing Lego art 🙂
Contact centers not only receive calls and communications, but they also send outbound communications to customers. There are a variety of reasons to send outbound communication: appointment reminders, telemarketing, subscription renewals, and billing reminders. The vast majority of these communications are phone calls, and in many contact centers, agents make the calls manually using customer contact lists in external systems. Since customers only answer about ten percent of calls, these agents can spend nearly half of their time dialing and waiting. This can result in millions of dollars in lost productivity each year for a contact center with as few as 200 agents.
To help you to address this challenge, today we are adding to Amazon Connect outbound campaigns a set of high-volume outbound communication capabilities that allows you to proactively reach more of your customers across voice, SMS, and email. When using this capability, you will have a scalable way for proactive outreach for hundreds to millions of your customers, and you will increase your agents’ productivity and lower your operational costs.
Amazon Connect outbound campaigns delivers a predictive phone dialer. The dialer includes an answering machine detection system powered by machine learning. It allows the automatic detection of answering machines for voice calls and passes calls to agents only when the call is answered by a human. The dialer also adjusts the call rate depending on factors such as percentage of human-answered the calls, call duration, and agent availability. There is no integration required to get the benefit of existing Amazon Connect features, such as automated workflows, routing, and machine learning capabilities like Contact Lens. You now have a single system for inbound and outbound communications.
To further refine the customer experience or use multiple channels in your campaigns, for example, to send an SMS or email message to your customers when they do not answer calls, you have the option to use Amazon Pinpoint. Amazon Pinpoint is a flexible and scalable outbound and inbound marketing communications service. It allows you to define customer segments, define the customer journey, define the contact strategy, and more. Amazon Pinpoint is the system handling high-volume SMS and email campaigns.
To better understand how Amazon Connect, Amazon Pinpoint, and other AWS services work together, you can refer to this very detailed blog post.
Let’s show you how it works
Imagine I am a contact center manager, and I want to create an outbound call campaign to target a selected list of customers.
I first import my customer contact list from a spreadsheet on Amazon S3. I may also import it from popular customer relationship management (CRM) and marketing automation applications, such as Marketo, Salesforce, Twilio’s Segment, ServiceNow, Shopify, Zendesk, and Amazon Pinpoint itself.

Then I create a campaign and define some journey parameters: the communication channel, the start time, and the corresponding content, such as a call script, email template, or SMS message. At the scheduled start time, the journey is executed using Amazon Connect for calls or Amazon Pinpoint for SMS or emails, as specified.
When I configure the campaign to run in Predictive dial mode, as I mentioned before, the dialer automatically adjusts the dial rate based on the duration of calls and the real-time availability of agents. Once a call is answered, Amazon Connect distinguishes whether it is a live voice or a recorded message and routes the live customer to an available agent in the Amazon Connect agent application, where the agent can see the call script that I specified during setup, along with relevant customer information.
As explained earlier, I may use Amazon Pinpoint to define the customer journey. By doing so, I can combine voice, email, and SMS channels in the same outbound communication campaign to improve the efficiency of my agents and my customer’s experience. For example, a financial institution can use Amazon Connect to send an SMS notification to remind a customer of a missed payment and include a link to request a call back from an agent. When a call is requested, Amazon Connect automatically queues the call, dials the customer’s number, detects their voice, and connects an available agent to the customer.
Amazon Pinpoint allows you to define the details of the customer journey.
As usual with AWS services, I can analyze contact events sent via Amazon EventBridge. EventBridge is a serverless event bus that makes it easier to build event-driven applications at scale using events generated from your applications, integrated software-as-a-service (SaaS) applications, and AWS service. When filtering or analyzing events posted to EventBridge, I can create metrics such as time to connect to an agent, duration of the contact, and call abandonment rate
These metrics help me understand the status of my campaign and ensure compliance with applicable regulations, such as maximum call abandonment rates. I also can use historical reports of these metrics to understand the effectiveness of all my communications campaigns over time.
Speaking of compliance, we do not want anyone to abuse the system, intentionally or not, or to break any local compliance rules.
Access and Compliance
Using automated services to drive outbound communication campaigns is strictly regulated in several countries and territories. For example, the US adopted the Telephone Consumer Protection Act (TCPA) in 1991, and the United Kingdom’s Office of Communications has similar rules.
Amazon Connect outbound campaigns gives you the tools to stay compliant with these regulations and many others. However, just like with traditional IT security, it is a shared responsibility. It is your responsibility to use the service in a compliant manner. We are happy to assist you in addressing specific use cases.
Let’s share two examples to illustrate how Amazon Connect outbound campaigns can help you meet your compliance status: respect quiet time and monitor call abandonment rate.
The use of quiet times allows contact center managers to configure a schedule for channel communications based on the day of the week and the hours of the day. More precise delivery times means your customers are most likely to engage with the communication and increase metrics such as open rates for SMS and email, as well as pick-up rates for voice calls. It also allows contact center managers to follow country and state-level voice dialing legislation. The following screenshot shows how you can configure quiet times using Amazon Pinpoint.

According to TCPA, call abandonment rate is the percentage of calls picked up by a live customer but not connected to a live agent within two seconds after the customer greeting. I found it interesting that in the UK, the time is measured from the start of your customer greetings, while in the US, it is measured from the end of the greeting. Amazon Connect outbound campaigns provides you with metrics, such as customerGreetingStart, customerGreetingStop, andconnectedToAgent for each outbound communication. Contact center managers can use these to compute the abandonment rate and dial up or down the outgoing communication channel accordingly.
Other metrics, configuration parameters, and AWS Lambda API integration allow contact center managers to consult a Do-Not-Call (DNC) registry or list scrubbing and verify your customer’s local time zone or bank holiday calendars, just to name a few.
Pricing and Availability
Amazon Connect outbound campaigns is available in US East (N. Virginia), US West (Oregon), Asia Pacific (Sydney), and Europe (London) AWS Regions. This allows you to start your outbound campaigns for customers in the USA, UK, Australia, and New Zealand.
As usual, pricing is based on your usage; you only pay for what you use with no upfront or minimum engagement. The key metrics we are using for pricing are the minutes of outbound calls. The pricing page has all the details.
And now, go build your contact centers.
AWS Wickr achieves FedRAMP Moderate authorization
Post Syndicated from Anne Grahn original https://aws.amazon.com/blogs/security/aws-wickr-achieves-fedramp-moderate-authorization/
Amazon Web Services (AWS) is excited to announce that AWS Wickr has achieved Federal Risk and Authorization Management Program (FedRAMP) authorization at the Moderate impact level from the FedRAMP Joint Authorization Board (JAB).
FedRAMP is a U.S. government–wide program that promotes the adoption of secure cloud services by providing a standardized approach to security and risk assessment for cloud technologies and federal agencies.
Customers find security and control in Wickr
AWS Wickr is an end-to-end encrypted messaging and collaboration service with features designed to help keep your communications secure, private, and compliant. Wickr protects one-to-one and group messaging, voice and video calling, file sharing, screen sharing, and location sharing with 256-bit encryption, and provides data retention capabilities.
Administrative controls allow your AWS Wickr administrators to add, remove, and invite users, and organize them into security groups to manage messaging, calling, security, and federation settings. You can reset passwords and delete profiles remotely, helping you reduce the risk of data exposure stemming from a lost or stolen device.
You can log internal and external communications—including conversations with guest users, contractors, and other partner networks—in a private data store that you manage. This allows you to retain messages and files that are sent to and from your organization, to help meet requirements such as those that fall under the Federal Records Act (FRA) and the National Archives and Records Administration (NARA).
The FedRAMP milestone
In obtaining a FedRAMP Moderate authorization, AWS Wickr has been measured against a set of security controls, procedures, and policies established by the U.S. Federal Government, based on National Institute of Standards and Technology (NIST) standards.
“For many federal agencies and organizations, having the ability to securely communicate and share information—whether in an office or out in the field—is key to helping achieve their critical missions. AWS Wickr helps our government customers collaborate securely through messaging, calling, file and screen sharing with end-to-end encryption. The FedRAMP Moderate authorization for Wickr demonstrates our commitment to delivering solutions that give government customers the control and confidence they need to support their sensitive and regulated workloads.” – Christian Hoff, Director, US Federal Civilian & Health at AWS
FedRAMP on AWS
AWS is continually expanding the scope of our compliance programs to help you use authorized services for sensitive and regulated workloads. We now offer148 services authorized in the AWS US East/West Regions under FedRAMP Moderate authorization, and 128 services authorized in the AWS GovCloud (US) Regions under FedRAMP High authorization.
The FedRAMP Moderate authorization of AWS Wickr further validates our commitment at AWS to public-sector customers. With AWS Wickr, you can combine the security of end-to-end encryption with the administrative flexibility you need to secure mission-critical communications, and keep up with recordkeeping requirements. AWS Wickr is available under FedRAMP Moderate in the AWS US East (N. Virginia) Region.
For up-to-date information, see our AWS Services in Scope by Compliance Program page. To learn more about AWS Wickr, visit the AWS Wickr product page, or email [email protected].
If you have feedback about this blog post, let us know in the Comments section below.
AWS Week in Review – June 20, 2022
Post Syndicated from Steve Roberts original https://aws.amazon.com/blogs/aws/aws-week-in-review-june-20-2022/
Last Week’s Launches
It’s been a quiet week on the AWS News Blog, however a glance at What’s New page shows the various service teams have been busy as usual. Here’s a round-up of announcements that caught my attention this past week.
Support for 15 new resource types in AWS Config – AWS Config is a service for assessment, audit, and evaluation of the configuration of resources in your account. You can monitor and review changes in resource configuration using automation against a desired configuration. The newly expanded set of types includes resources from Amazon SageMaker, Elastic Load Balancing, AWS Batch, AWS Step Functions, AWS Identity and Access Management (IAM), and more.
New console experience for AWS Budgets – A new split-view panel allows for viewing details of a budget without needing to leave the overview page. The new panel will save you time (and clicks!) when you’re analyzing performance across a set of budgets. By the way, you can also now select multiple budgets at the same time.
VPC endpoint support is now available in Amazon SageMaker Canvas – SageMaker Canvas is a visual point-and-click service enabling business analysts to generate accurate machine-learning (ML) models without requiring ML experience or needing to write code. The new VPC endpoint support, available in all Regions where SageMaker Canvas is suppported, eliminates the need for an internet gateway, NAT instance, or a VPN connection when connecting from your SageMaker Canvas environment to services such as Amazon Simple Storage Service (Amazon S3), Amazon Redshift, and more.
Additional data sources for Amazon AppFlow – Facebook Ads, Google Ads, and Mixpanel are now supported as data sources, providing the ability to ingest marketing and product analytics for downstream analysis in AppFlow-connected software-as-a-service (SaaS) applications such as Marketo and Salesforce Marketing Cloud.
For a full list of AWS announcements, be sure to keep an eye on the What’s New at AWS page.
Other AWS News
Some other updates you may have missed from the past week:
Amazon Elastic Compute Cloud (Amazon EC2) expanded the Regional availability of AWS Nitro System-based C6 instance types. C6gn instance types, powered by Arm-based AWS Graviton2 processors, are now available in the Asia Pacific (Seoul), Europe (Milan), Europe (Paris), and Middle East (Bahrain) Regions, while C6i instance types, powered by 3rd generation Intel Xeon Scalable processors, are now available in the Europe (Frankfurt) Region.
As a .NET and PowerShell Developer Advocate here at AWS, there are some news and updates related to .NET I want to highlight:
- AWS Elastic Beanstalk released support for applications targeting .NET 6 on Windows Server 2016 and later. Elastic Beanstalk is also now available in the Asia Pacific (Jakarta) Region too.
- AWS CodeBuild has also published images for .NET 6 builds on Windows.
- Did you know that if you’re working on an open-source .NET project that you can apply for AWS credits? Find out more at the .NET on AWS open-source credits request page.
- Some of the breakout session recordings from our .NET Enterprise Developer Day event in EMEA during April are now available on the .NET on AWS YouTube playlist.
Upcoming AWS Events
The AWS New York Summit is approaching quickly, on July 12. Registration is also now open for the AWS Summit Canberra, an in-person event scheduled for August 31.
Microsoft SQL Server users may be interested in registering for the SQL Server Database Modernization webinar on June 21. The webinar will show you how to go about modernizing and how to cost-optimize SQL Server on AWS.
Amazon re:MARS is taking place this week in Las Vegas. I’ll be there as a host of the AWS on Air show, along with special guests highlighting their latest news from the conference. I also have some On Air sessions on using our AI services from .NET lined up! As usual, we’ll be streaming live from the expo hall, so if you’re at the conference, give us a wave. You can watch the show live on Twitch.tv/aws, Twitter.com/AWSOnAir, and LinkedIn Live.
A reminder that if you’re a podcast listener, check out the official AWS Podcast Update Show. There is also the latest installment of the AWS Open Source News and Updates newsletter to help keep you up to date.
No doubt there’ll be a whole new batch of releases and announcements from re:MARS, so be sure to check back next Monday for a summary of the announcements that caught our attention!