Security updates for Wednesday

Post Syndicated from original https://lwn.net/Articles/876327/rss

Security updates have been issued by CentOS (389-ds-base and libxml2), Debian (atftp, axis, and ntfs-3g), Fedora (digikam, freerdp, guacamole-server, and remmina), openSUSE (java-11-openjdk, kernel, samba, and tomcat), SUSE (firefox, java-11-openjdk, kernel, libarchive, samba, and tomcat), and Ubuntu (accountsservice, hivex, and openexr).

2022 Planning: Prioritizing Defense and Mitigation Through Left of Boom

Post Syndicated from boB Rudis original https://blog.rapid7.com/2021/11/17/2022-planning-prioritizing-defense-and-mitigation-through-left-of-boom/

2022 Planning: Prioritizing Defense and Mitigation Through Left of Boom

In the military, the term “left of boom” refers to the strategy and tactics required to prevent — and protect personnel from — explosions by making proactive decisions before the event happens. Unless you’ve been fortunate enough to avoid tech and media press for the past 24 months, it should be clear by now that cyberattacks most certainly qualify as “boom” events, with the potential to cause reputational, financial, and even real-life physical harm to businesses, communities, and individuals, many of whom are truly innocent bystanders.

While telemetry-fueled detection and well-honed response plans are foundational components of truly effective cybersecurity programs, they are definitely “right of boom,” and we should not be so quick to cede ground to attackers with an “assume breach” mindset. Cybersecurity teams have myriad defense and mitigation strategies at their disposal to help ensure a sizable percentage of attackers never even have the chance to waltz their way through the killchain. In this post, we’ll use ransomware as an example for 3 left-of-boom areas to focus on (via the MITRE ATT&CK framework.)

The ransomware “booms”

One might argue that the singular “boom” of ransomware is the encryption of business critical information and assets, but attackers now also hunt for juicy data they can use for many purposes, including to pressure a target to pay or suffer a data disclosure event on top of a business-disrupting lock-up. There is another emerging scenario that adds a compounding denial-of-service attacks (or multiple attacks) into the mix – note that pure denial-of-service extortion, or “RansomDoS” in the modern vernacular, is out of scope for this post.

Knowing the potential negative outcomes, what can teams focus on ahead of time to help prevent these outcomes and protect their organizations? For ransomware (and, really, the vast majority of cyberattacks today), the main goal is to prevent initial access into your environment, so let’s explore what you need to do to stay left of that particular boom. Since there are many techniques used to gain initial access, we’ll focus the rest of the post on 3 areas (T1190, T1133, and T1078) and give you some tips on how to apply the same left-of-boom thinking to other ones.

←💥 Attack surface management: Preventing exploitation

Attack surface management (ASM) is just a 2021 pretty bow wrapped around the term “asset management” in the hopes that organizations will finally recognize the need for it, realizing that they aren’t just deploying cool services and capabilities but also providing potential inroads for attackers. With ASM, your goal is to understand:

  • What devices, operating systems, and software are deployed on your perimeter, intranet, and remote endpoints
  • The safe and resilient configurations required for those elements
  • The current state of those elements

You cannot get left of boom for a ransomware attack, and many other cyberattacks, without a functional ASM practice in place. This requires having a close partnership with your procurement department and IT endpoint/server/cloud operations teams, as well as the tools (proprietary or open-source) to help with organization and verification.

It’s vital to understand what you’re exposing to the internet — since that’s what attackers can directly see and touch — but it’s also critical to know the status of each node that may be involved in initial access attempts, including desktops, laptops, and mobile devices.

If you can stay ahead of exposing unpatched or unsafe services to the internet and keep your workforce systems patched and configured safely in a timely fashion, you’ll make it difficult to impossible for attackers to use known exploits (one of the most common methods in 2021) to achieve the access they need to carry out the rest of their campaign using that technique.

←←💥 Attack surface management: Safeguarding gateways

Even before our brave, newly expanded world of remote work, organizations needed ways for their workforce to access critical systems and applications outside the confines of the intranet. These include solutions such as virtual private networks (VPNs), remote desktop protocol (RDP), Citrix, and similar technologies. By their nature, these systems need to be configured well from the start, patched almost immediately, and require trusted authorized access (more on that in the last “boom”).

Your team needs to monitor each gateway vendor for patch/mitigation announcements and partner with all critical stakeholders to ensure you can change configurations or patch in an expedited fashion — which may mean having enough capacity and redundancy to take one set of systems down for patching but still let work continue. You should also have continuous configuration monitoring to ensure settings stay the way you need them to be.

←←←💥 Credentials, credentials, credentials

We discussed remote access in the previous section, and gaining remote access generally requires some sort of authentication and authorization. No external gateway, and no critical external application, should be accessible without a solid multi-factor authentication solution in place. Credentials are regularly up for sale on criminal marketplaces, and sellers test them regularly to ensure freshness. If you allow gateway or critical application access with just a single factor, you’ve pretty much handed the keys over to your adversaries.

Similarly, when a new breach is disclosed that includes stolen credential databases, it’s important to monitor services such as Have I Been Pwned and have a process in place to quickly reset any potentially compromised accounts (usually based on email address).

Staying left of boom: A general approach

The 3 examples covered here are important, but they’re far from the full picture. We encourage teams to look at all the forms of initial access and examine them through the lens of their threat assessment and remediation analysis library, so they can see all the areas that need to be covered and apply appropriate preventative measures. If your team doesn’t have said library, a good place to start is over at the MITRE bookshelf, where you can find free, vendor-agnostic, detailed resources on how to establish such a program in your organization.

However, a strong public-facing posture, solid service configurations, and multi-factor authentication will have your organization well-positioned to avoid many negative outcomes.

Want more 2022 planning tips from industry experts?

Sign up for our webinar series

Cloudflare Pages Goes Full Stack

Post Syndicated from Nevi Shah original https://blog.cloudflare.com/cloudflare-pages-goes-full-stack/

Cloudflare Pages Goes Full Stack

Cloudflare Pages Goes Full Stack

When we announced Cloudflare Pages as generally available in April, we promised you it was just the beginning. The journey of our platform started with support for static sites with small bits of dynamic functionality like setting redirects and custom headers. But we wanted to give even more power to you and your teams to begin building the unimaginable. We envisioned a future where your entire application — frontend, APIs, storage, data — could all be deployed with a single commit, easily testable in staging and requiring a single merge to deploy to production. So in the spirit of “Full Stack” Week, we’re bringing you the tools to do just that.

Welcome to the future, everyone. We’re thrilled to announce that Pages is now a Full Stack platform with help from But how?

It works the exact same way Pages always has: write your code, git push to your git provider (now supporting GitLab!) and we’ll deploy your entire site for you. The only difference is, it won’t just be your frontend but your backend too using Cloudflare Workers to help deploy serverless functions.

The integration you’ve been waiting for

Cloudflare Workers provides a serverless execution environment that allows you to create entirely new applications or augment existing ones without configuring or maintaining infrastructure. Before today, it was possible to connect Workers to a Pages project—installing Wrangler and manually deploying a Worker by writing your app in both Pages and Workers. But we didn’t just want “possible”, we wanted something that came as second nature to you so you wouldn’t have to think twice about adding dynamic functionality to your site.

How it works

By using your repo’s filesystem convention and exporting one or more function handlers, Pages can leverage Workers to deploy serverless functions on your behalf. To begin, simply add a ./functions directory in the root of your project, and inside a JavaScript or TypeScript file, export a function handler. For example, let’s say in your ./functions directory, you have a file, hello.js, containing:

// GET requests to /filename would return "Hello, world!"
export const onRequestGet = () => {
  return new Response("Hello, world!")
}
 
// POST requests to /filename with a JSON-encoded body would return "Hello, <name>!"
export const onRequestPost = async ({ request }) => {
  const { name } = await request.json()
  return new Response(`Hello, ${name}!`)
}

If you perform a git commit, it will trigger a new Pages build to deploy your dynamic site! During the build pipeline, Pages traverses your directory, mapping the filenames to URLs relative to your repo structure.

Under the hood, Pages generates Workers which include all your routing and functionality from the source.  Functions supports deeply-nested routes, wildcard matching, middleware for things like authentication and error-handling, and more! To demonstrate all of its bells and whistles, we’ve created a blog post to walk through an example full stack application.

Letting you do what you do best

As your site grows in complexity, with Pages’ new full stack functionality, your developer experience doesn’t have to. You can enjoy the workflow you know and love while unlocking even more depth to your site.

Seamlessly build

In the same way we’ve handled builds and deployments with your static sites — with a `git commit` and `git push` — we’ll deploy your functions for you automatically. As long as your directory follows the proper structure, Pages will identify and deploy your functions to our network with your site.

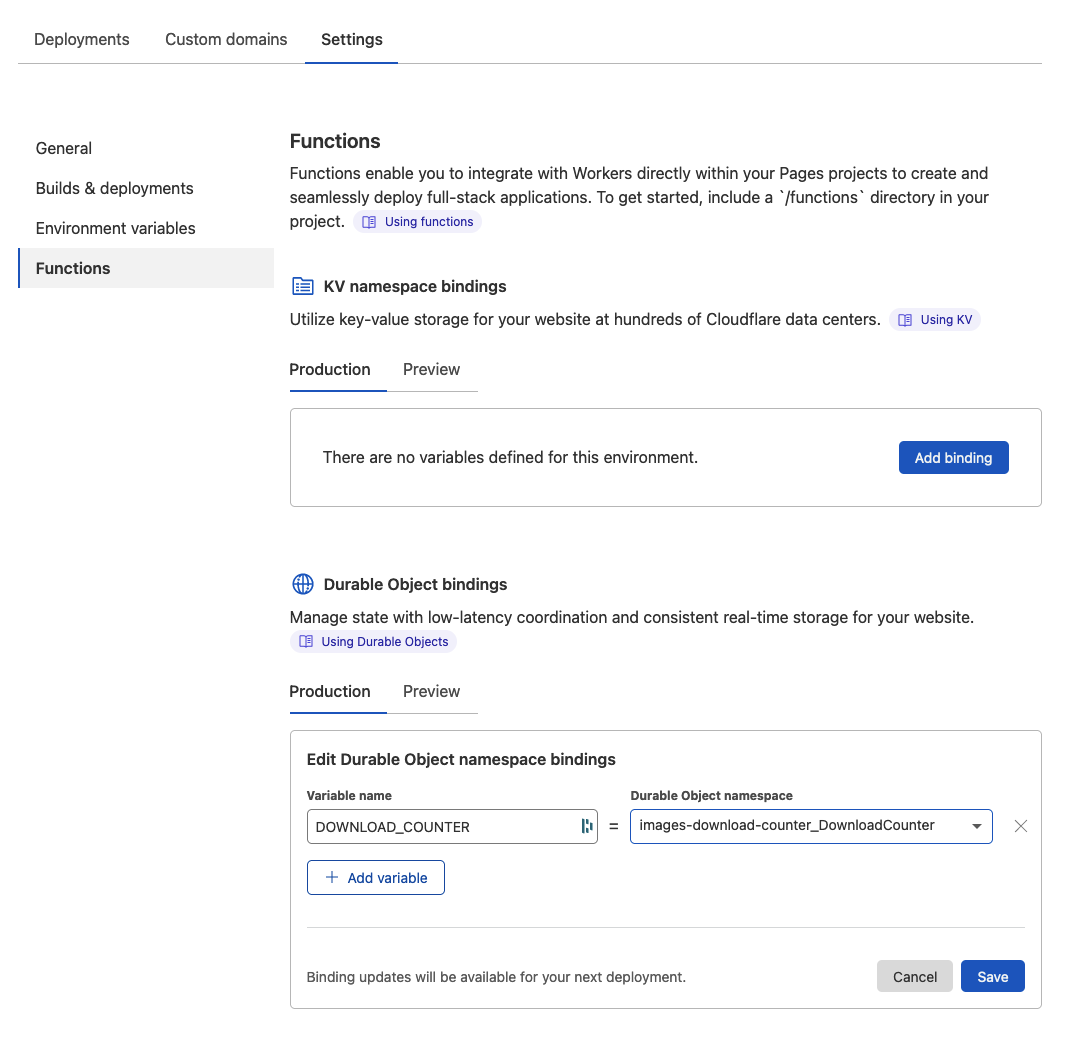
Define your bindings

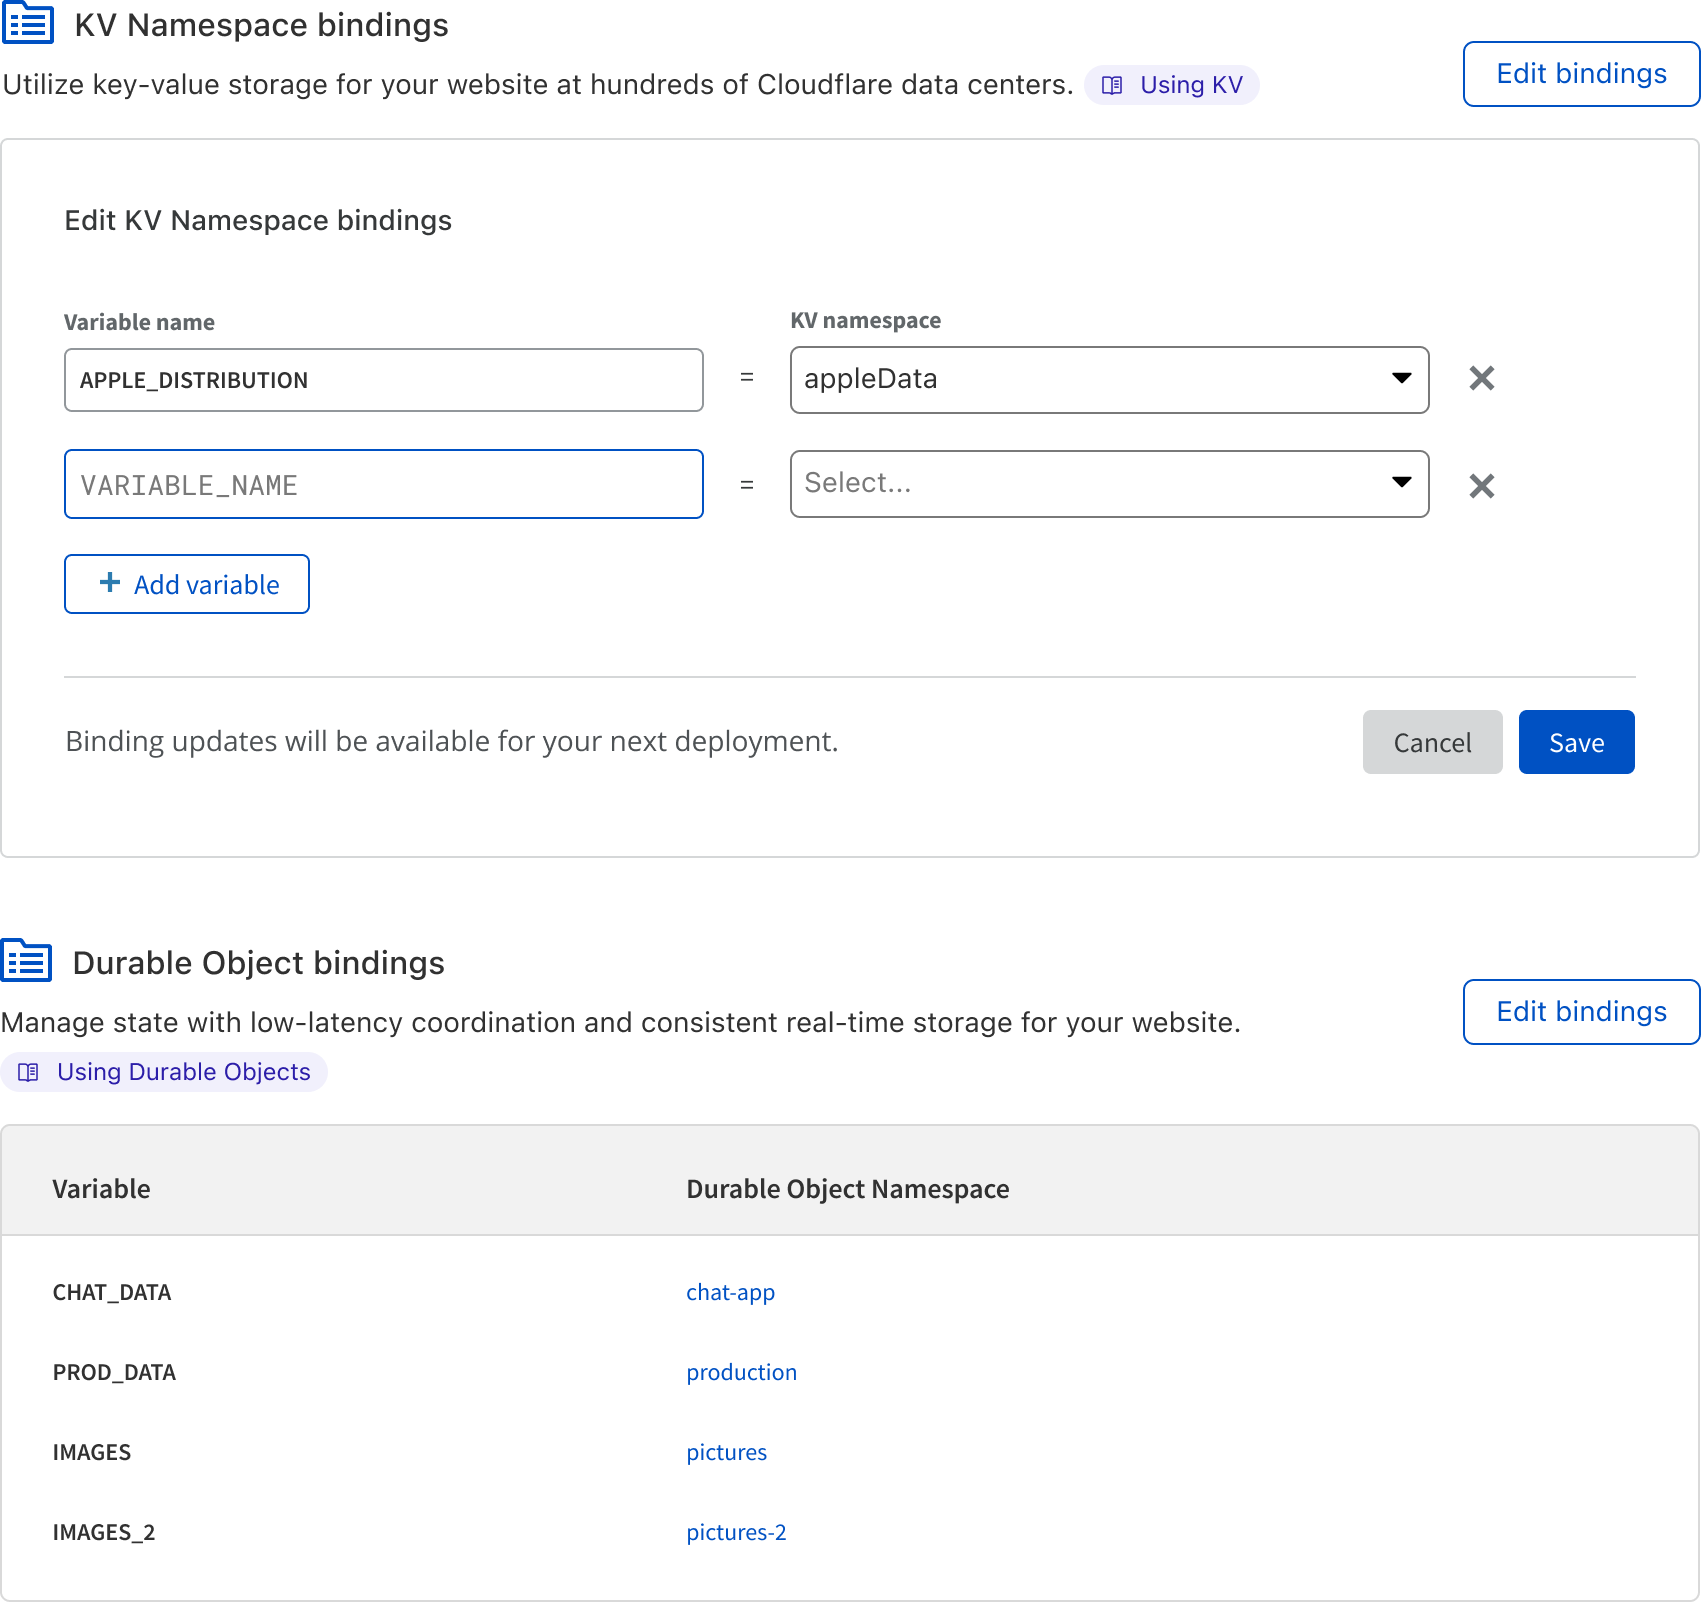
While bringing your Workers to Pages, bindings are a big part of what makes your application a full stack application. We’re so excited to bring to Pages all the bindings you’ve previously used with regular Workers!

  • KV namespace: Our serverless and globally accessible key-value storage solution. Within Pages, you can integrate with any of the KV namespaces you set in your Workers dashboard for your Pages project.
  • Durable Object namespace: Our strongly consistent coordination primitive that makes connecting WebSockets, handling state and building entire applications a breeze. As with KV, you can set your namespaces within the Workers dashboard and choose from that list within the Pages interface.
  • R2 (coming soon!): Our S3-compatible Object Storage solution that’s slashing egress fees to zero.
  • Environment Variable: An injected value that can be accessed by your functions and is stored as plain-text. You can set your environment variables directly within the Pages interface for both your production and preview environments at build-time and run-time.
  • Secret (coming soon!): An encrypted environment variable, which cannot be viewed by wrangler or any dashboard interfaces. Secrets are a great home for sensitive data including passwords and API tokens.
Cloudflare Pages Goes Full Stack

Preview deployments — now for your backend too

With the deployment of your serverless functions, you can still enjoy the ease of collaboration and testing like you did previously. Before you deploy to production, you can easily deploy your project to a preview environment to stage your changes. Even with your functions, Pages lets you keep a version history of every commit with a unique URL for each, making it easy to gather feedback whether it’s from a fellow developer, PM, designer or marketer! You can also enjoy the same infinite staging privileges that you did for static sites, with a consistent URL for the latest changes.

Develop and preview locally too

However, we realize that building and deploying with every small change just to stage your changes can be cumbersome at times if you’re iterating quickly. You can now develop full stack Pages applications with the latest release of our wrangler CLI. Backed by Miniflare, you can run your entire application locally with support for mocked secrets, environment variables, and KV (Durable Objects support coming soon!). Point wrangler at a directory of static assets, or seamlessly connect to your existing tools:

# Install wrangler v2 beta
npm install wrangler@beta

# Serve a folder of static assets
npx wrangler pages dev ./dist

# Or automatically proxy your existing tools
npx wrangler pages dev -- npx react-scripts start

This is just the beginning of Pages’ integrations with wrangler. Stay tuned as we continue to enhance your developer experience.

What else can you do?

Everything you can do with HTTP Workers today!

When deploying a Pages application with functions, Pages is compiling and deploying first class Workers on your behalf. This means there is zero functionality loss when deploying a Worker within your Pages application — instead, there are only new benefits to be gained!

Integrate with SvelteKit — out of the box!

SvelteKit is a web framework for building Svelte applications. It’s built and maintained by the Svelte team, which makes it the Svelte user’s go-to solution for all their application needs. Out of the box, SvelteKit allows users to build projects with complex API backends.

As of today, SvelteKit projects can attach and configure the @sveltejs/adapter-cloudflare package. After doing this, the project can be added to Pages and is ready for its first deployment! With Pages, your SvelteKit project(s) can deploy with API endpoints and full server-side rendering support. Better yet, the entire project — including the API endpoints — can enjoy the benefits of preview deployments, too! This, even on its own, is a huge victory for advanced projects that were previously on the Workers adapter. Check out this example to see the SvelteKit adapter for Pages in action!

Use server-side rendering

You are now able to intercept any request that comes into your Pages project. This means that you can define Workers logic that will receive incoming URLs and, instead of serving static HTML, your Worker can render fresh HTML responses with dynamic data.

For example, an application with a product page can define a single product/[id].js file that will receive the id parameter, retrieve the product information from a Workers KV binding, and then generate an HTML response for that page. Compared to a static-site generator approach, this is more succinct and easier to maintain over time since you do not need to build a static HTML page per product at build-time… which may potentially be tens or even hundreds of thousands of pages!

Already have a Worker? We’ve got you!

If you already have a single Worker and want to bring it right on over to Pages to reap the developer experience benefits of our platform, our announcement today also enables you to do precisely that. Your build can generate an ES module Worker called _worker.js in the output directory of your project, perform your git commands to deploy, and we’ll take care of the rest! This can be especially advantageous to you if you’re a framework author or have a more complex use case that doesn’t follow our provided file structure.

Try it at no cost — for a limited time only

We’re thrilled to be releasing our open beta today for everyone to try at no additional cost to your Cloudflare plan. While we will still have limits in place, we are using this open beta period to learn more about how you and your teams are deploying functions with your Pages projects. For the time being, we encourage you to lean into your creativity and build out that site you’ve been thinking about for a long time — without the worry of getting billed.

In just a few short months, when we announce General Availability, you can expect our billing to reflect that of the Workers Bundled plan — after all, these are just Workers under the hood!

Coming up…

As we’re only announcing this release as an open beta, we have some really exciting things planned for the coming weeks and months. We want to improve on the quick and easy Pages developer experience that you’re already familiar with by adding support for integrated logging and more analytics for your deployed functions.

Beyond that, we’ll be expanding our first-class support for the next generation of frontend frameworks. As we’ve shown with SvelteKit, Pages’ ability to seamlessly deploy both static and dynamic code together enables unbeatable end-user performance & developer ease, and we’re excited to unlock that for more people. Fans of similar frameworks & technologies, such as NextJS, NuxtJS, React Server Components, Remix, Hydrogen, etc., stay tuned to this blog for more announcements. Or better yet, come join us and help make it happen!

Additionally, as we’ve done with SvelteKit, we’re looking to include more first-class integration with existing frameworks, so Pages can become the primary home for your preferred frameworks of choice. Work is underway on making NextJS, NuxtJS, React Server Components, Shopify Hydrogen and more integrate seamlessly as you develop your full stack apps.

Finally, we’re working to speed up those build times, so you can focus on pushing changes and iterating quickly — without the wait!

Getting started

To get started head over to our Pages docs and check out our demo blog to learn more about how to deploy serverless functions to Pages using Cloudflare Workers.

Of course, what we love most is seeing what you build! Pop into our Discord and show us how you’re using Pages to build your full stack apps.

Cloudflare Pages Goes Full Stack

Developer Spotlight: Chris Coyier, CodePen

Post Syndicated from Kristian Freeman original https://blog.cloudflare.com/developer-spotlight-codepen/

Developer Spotlight: Chris Coyier, CodePen

Developer Spotlight: Chris Coyier, CodePen

Chris Coyier has been building on the web for over 15 years. Chris made his mark on the web development world with CSS-Tricks in 2007, one of the web’s leading publications for frontend and full-stack developers.

In 2012, Chris co-founded CodePen, which is an online code editor that lives in the browser and allows developers to collaborate and share code examples written in HTML, CSS, and JavaScript.

Due to the nature of CodePen — namely, hosting code and an incredibly popular embedding feature, allowing developers to share their CodePen “pens” around the world — any sort of optimization can have a massive impact on CodePen’s business. Increasingly, CodePen relies on the ability to both execute code and store data on Cloudflare’s network as a first stop for those optimizations. As Chris puts it, CodePen uses Cloudflare Workers for “so many things”:

“We pull content from an external CMS and use Workers to manipulate HTML before it arrives to the user’s browser. For example, we fetch the original page, fetch the content, then stitch them together for a full response.”

Workers allows you to work with responses directly using the native Request/Response classes and, with the addition of our streaming HTMLRewriter engine, you can modify, combine, and parse HTML without any loss in performance. Because Workers functions are deployed to Cloudflare’s network, CodePen has the ability to instantly deploy highly-intelligent middleware in-between their origin servers and their clients, without needing to spin up any additional infrastructure.

In a popular YouTube video on Chris Coyier’s YouTube channel, he sits down with a front-end engineer at CodePen, and covers how they use Cloudflare Workers to build crucial CodePen features. Here’s Chris:

“Cloudflare Workers are like serverless functions that always run at the edge, making them incredibly fast. Not only that, but the tooling around them is really nice. They can run at particular routes on your own website, removing any awkward CORS troubles, and helping you craft clean APIs. But they also have special superpowers, like access to KV storage (also at the edge), image manipulation and optimization, and HTML rewriting.”

CodePen also leverages Workers KV to store data. This allows them to avoid an immense amount of repetitive processing work by caching results and making them accessible on Cloudflare’s network, geographically near their users:

“We use Workers combined with the KV Store to run expensive jobs. For example, we check the KV Store to see if we need to do some processing work, or if that work has already been done. If we need to do the work, we do it and then update KV to know it’s been done and where the result of that work is.”

In a follow-up video on his YouTube channel, Chris dives into Workers KV and shows how you can build a simple serverless function — with storage — and deploy it to Cloudflare. With the addition of Workers KV, you can persist complex data structures side-by-side with your Workers function, without compromising on performance or scalability.

Chris and the CodePen team are invested in Workers and, most importantly, they enjoy developing with Cloudflare’s developer tooling. “The DX around them is suspiciously nice. Coming from other cloud functions services, there seems to be a just-right amount of tooling to do the things we need to do.”

CodePen is a great example of what’s possible when you integrate the Cloudflare Workers developer environment into your stack. Across all parts of the business, Workers, and tools like Workers KV and HTMLRewriter, allow CodePen to build highly-performant applications that look towards the future.

If you’d like to learn more about Cloudflare Workers, and deploy your own serverless functions to Cloudflare’s network, check out workers.cloudflare.com!

Building a full stack application with Cloudflare Pages

Post Syndicated from Greg Brimble original https://blog.cloudflare.com/building-full-stack-with-pages/

Building a full stack application with Cloudflare Pages

Building a full stack application with Cloudflare Pages

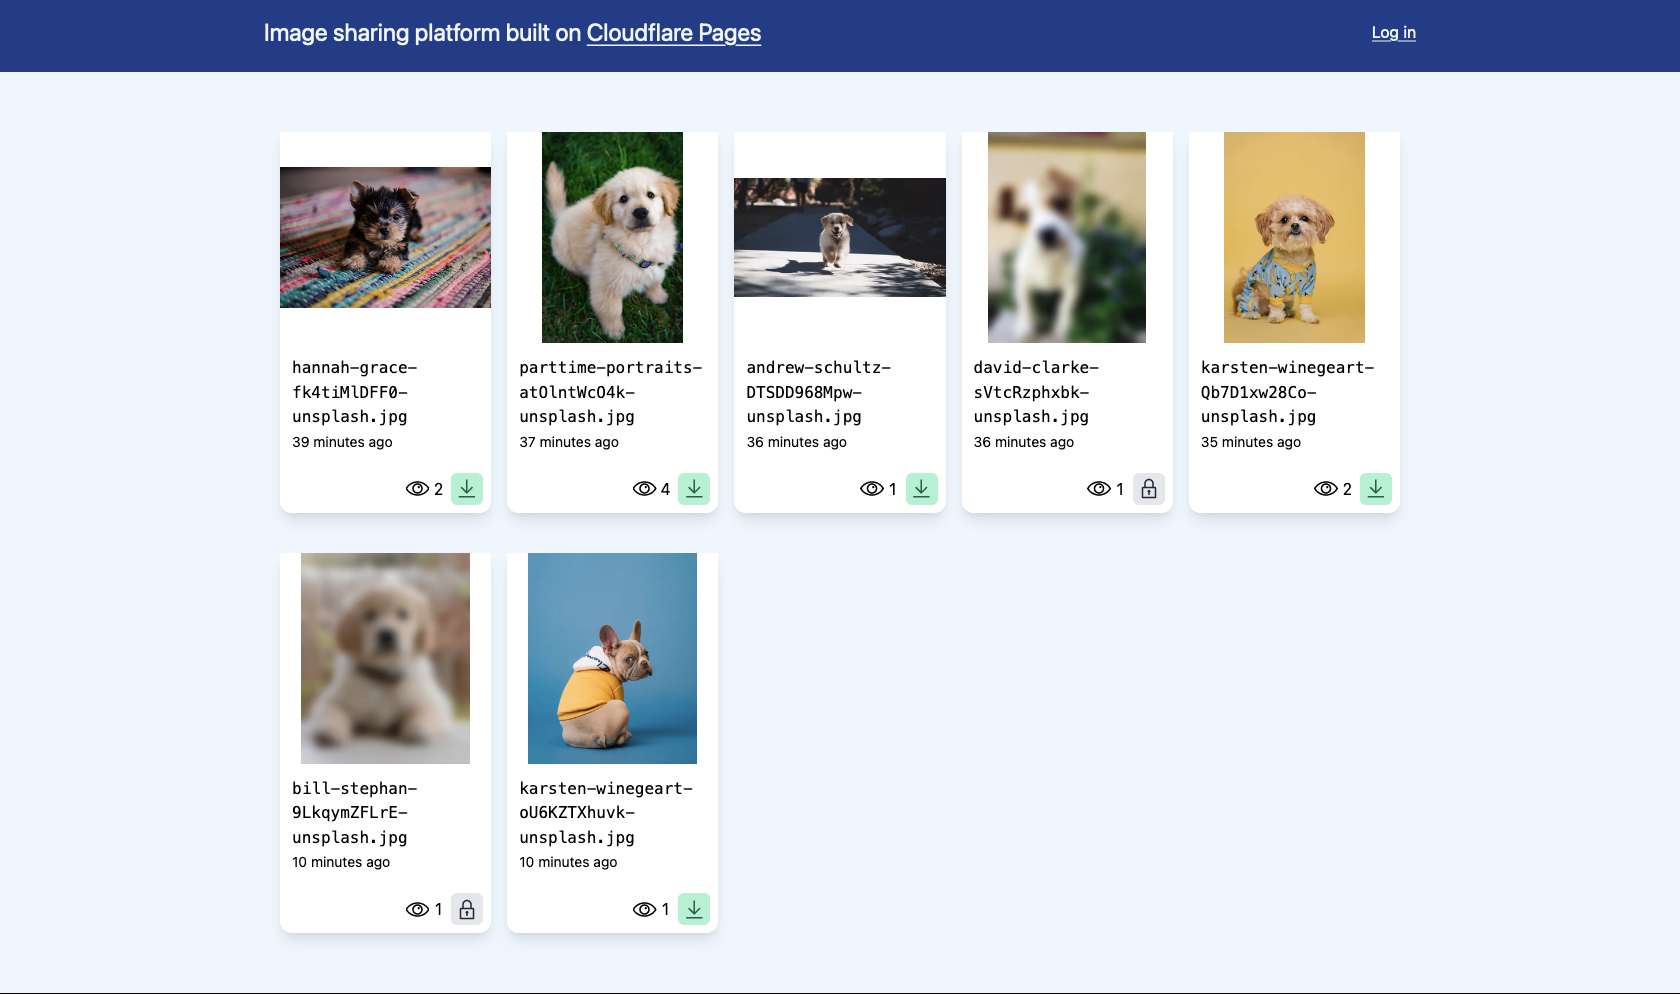
We were so excited to announce support for full stack applications in Cloudflare Pages that we knew we had to show it off in a big way. We’ve built a sample image-sharing platform to demonstrate how you can add serverless functions right from within Pages with help from Cloudflare Workers. With just one new file to your project, you can add dynamic rendering, interact with other APIs, and persist data with KV and Durable Objects. The possibilities for full-stack applications, in combination with Pages’ quick development cycles and unlimited preview environments, gives you the power to create almost any application.

Today, we’re walking through our example image-sharing platform. We want to be able to share pictures with friends while still also keeping some images private. We’ll build a JSON API with Functions (storing data on KV and Durable Objects), integrate with Cloudflare Images and Cloudflare Access, and use React for our front end.

If you’re wanting to dive right into the good stuff, our demo instance is published here, and the code is on GitHub, but stick around for a more gentle approach.

Building a full stack application with Cloudflare Pages

Building serverless functions with Cloudflare Pages

File-based routing

If you’re not already familiar, Cloudflare Pages connects with your git provider (GitHub and GitLab), and automates the deployment of your static site to Cloudflare’s network. Functions lets you enhance these apps by sprinkling in dynamic data. If you haven’t already, you can sign up here.

In our project, let’s create a new function:

// ./functions/time.js


export const onRequest = () => {
  return new Response(new Date().toISOString())
}

git commit-ing and pushing this file should trigger a build and deployment of your first Pages function. Any requests for /time will be served by this function, and all other requests will fall-back to the static assets of your project. Placing Functions files in directories works as you’d expect: ./functions/api/time.js would be available at /api/time and ./functions/some_directory/index.js would be available at /some_directory.

We also support TypeScript (./functions/time.ts would work just the same), as well as parameterized files:

  • ./functions/todos/[id].js with single square brackets will match all requests like /todos/123;
  • and ./functions/todos/[[path]].js with double square brackets, will match requests for any number of path segments (e.g. /todos/123/subtasks).

We declare a PagesFunction type in the @cloudflare/workers-types library which you can use to type-check your Functions.

Dynamic data

So, returning to our image-sharing app, let’s assume we already have some images uploaded, and we want to display them on the homepage. We’ll need an endpoint which will return a list of these images, which the front-end can call:

// ./functions/api/images.ts

export const jsonResponse = (value: any, init: ResponseInit = {}) =>
  new Response(JSON.stringify(value), {
    headers: { "Content-Type": "application/json", ...init.headers },
    ...init,
  });

const generatePreviewURL = ({
  previewURLBase,
  imagesKey,
  isPrivate,
}: {
  previewURLBase: string;
  imagesKey: string;
  isPrivate: boolean;
}) => {
  // If isPrivate, generates a signed URL for the 'preview' variant
  // Else, returns the 'blurred' variant URL which never requires signed URLs
  // https://developers.cloudflare.com/images/cloudflare-images/serve-images/serve-private-images-using-signed-url-tokens

  return "SIGNED_URL";
};

export const onRequestGet: PagesFunction<{
  IMAGES: KVNamespace;
}> = async ({ env }) => {
  const { imagesKey } = (await env.IMAGES.get("setup", "json")) as Setup;

  const kvImagesList = await env.IMAGES.list<ImageMetadata>({
    prefix: `image:uploaded:`,
  });

  const images = kvImagesList.keys
    .map((kvImage) => {
      try {
        const { id, previewURLBase, name, alt, uploaded, isPrivate } =
          kvImage.metadata as ImageMetadata;

        const previewURL = generatePreviewURL({
          previewURLBase,
          imagesKey,
          isPrivate,
        });

        return {
          id,
          previewURL,
          name,
          alt,
          uploaded,
          isPrivate,
        };
      } catch {
        return undefined;
      }
    })
    .filter((image) => image !== undefined);

  return jsonResponse({ images });
};

Eagle-eyed readers will notice we’re exporting onRequestGet which lets us only respond to GET requests.

We’re also using a KV namespace (accessed with env.IMAGES) to store information about images that have been uploaded. To create a binding in your Pages project, navigate to the “Settings” tab.

Building a full stack application with Cloudflare Pages

Interfacing with other APIs

Cloudflare Images is an inexpensive, high-performance, and featureful service for hosting and transforming images. You can create multiple variants to render your images in different ways and control access with signed URLs. We’ll add a function to interface with this service’s API and upload incoming files to Cloudflare Images:

// ./functions/api/admin/upload.ts

export const onRequestPost: PagesFunction<{
  IMAGES: KVNamespace;
}> = async ({ request, env }) => {
  const { apiToken, accountId } = (await env.IMAGES.get(
    "setup",
    "json"
  )) as Setup;

  // Prepare the Cloudflare Images API request body
  const formData = await request.formData();
  formData.set("requireSignedURLs", "true");
  const alt = formData.get("alt") as string;
  formData.delete("alt");
  const isPrivate = formData.get("isPrivate") === "on";
  formData.delete("isPrivate");

  // Upload the image to Cloudflare Images
  const response = await fetch(
    `https://api.cloudflare.com/client/v4/accounts/${accountId}/images/v1`,
    {
      method: "POST",
      body: formData,
      headers: {
        Authorization: `Bearer ${apiToken}`,
      },
    }
  );

  // Store the image metadata in KV
  const {
    result: {
      id,
      filename: name,
      uploaded,
      variants: [url],
    },
  } = await response.json<{
    result: {
      id: string;
      filename: string;
      uploaded: string;
      requireSignedURLs: boolean;
      variants: string[];
    };
  }>();

  const metadata: ImageMetadata = {
    id,
    previewURLBase: url.split("/").slice(0, -1).join("/"),
    name,
    alt,
    uploaded,
    isPrivate,
  };

  await env.IMAGES.put(
    `image:uploaded:${uploaded}`,
    "Values stored in metadata.",
    { metadata }
  );
  await env.IMAGES.put(`image:${id}`, JSON.stringify(metadata));

  return jsonResponse(true);
};

Persisting data

We’re already using KV to store information that is read often but rarely written to. What about features that require a bit more synchronicity?

Let’s add a download counter to each of our images. We can create a highres variant in Cloudflare Images, and increment the counter every time a user requests a link. This requires a bit more setup, but unlocking the power of Durable Objects in your projects is absolutely worth it.

We’ll need to create and publish the Durable Object class capable of maintaining this download count:

// ./durable_objects/downloadCounter.js
ts#example---counter

export class DownloadCounter {
  constructor(state) {
    this.state = state;
    // `blockConcurrencyWhile()` ensures no requests are delivered until initialization completes.
    this.state.blockConcurrencyWhile(async () => {
      let stored = await this.state.storage.get("value");
      this.value = stored || 0;
    });
  }

  async fetch(request) {
    const url = new URL(request.url);
    let currentValue = this.value;

    if (url.pathname === "/increment") {
      currentValue = ++this.value;
      await this.state.storage.put("value", currentValue);
    }

    return jsonResponse(currentValue);
  }
}

Middleware

If you need to execute some code (such as authentication or logging) before you run your function, Pages offers easy-to-use middleware which can be applied at any level in your file-based routing. By creating a _middleware.ts file in a directory, we know to first run this file, and then execute your function when next() is called.

In our application, we want to prevent unauthorized users from uploading images (/api/admin/upload) or deleting images (/api/admin/delete). Cloudflare Access lets us apply role-based access control to all or part of our application, and you only need a single file to integrate it into our serverless functions. We create  ./functions/api/admin/_middleware.ts which will apply to all incoming requests at /api/admin/*:

// ./functions/api/admin/_middleware.ts

const validateJWT = async (jwtAssertion: string | null, aud: string) => {
  // If the JWT is valid, return the JWT payload
  // Else, return false
  // https://developers.cloudflare.com/cloudflare-one/identity/users/validating-json

  return jwtPayload;
};

const cloudflareAccessMiddleware: PagesFunction<{ IMAGES: KVNamespace }> =
  async ({ request, env, next, data }) => {
    const { aud } = (await env.IMAGES.get("setup", "json")) as Setup;

    const jwtPayload = await validateJWT(
      request.headers.get("CF-Access-JWT-Assertion"),
      aud
    );

    if (jwtPayload === false)
      return new Response("Access denied.", { status: 403 });

    // We could also use the data object to pass information between middlewares
    data.user = jwtPayload.email;

    return await next();
  };

export const onRequest = [cloudflareAccessMiddleware];

Middleware is a powerful tool at your disposal allowing you to easily protect parts of your application with Cloudflare Access, or quickly integrate with observability and error logging platforms such as Honeycomb and Sentry.

Integrating as Jamstack

The “Jam” of “Jamstack” stands for JavaScript, API and Markup. Cloudflare Pages previously provided the ‘J’ and ‘M’, and with Workers in the middle, you can truly go full-stack Jamstack.

We’ve built the front end of this image sharing platform with Create React App as an approachable example, but Cloudflare Pages natively integrates with an ever-growing number of frameworks (currently 23), and you can always configure your own entirely custom build command.

Your front end simply needs to make a call to the Functions we’ve already configured, and render out that data. We’re using SWR to simplify things, but you could do this with entirely vanilla JavaScript fetch-es, if that’s your preference.

// ./src/components/ImageGrid.tsx

export const ImageGrid = () => {
  const { data, error } = useSWR<{ images: Image[] }>("/api/images");

  if (error || data === undefined) {
    return <div>An unexpected error has occurred when fetching the list of images. Please try again.</div>;
  }


  return (
    <div>
      {data.images.map((image) => (
        <ImageCard image={image} key={image.id} />
      ))}
    </div>
  );

}

Local development

No matter how fast it is, iterating on a project like this can be painful if you have to push up every change in order to test how it works. We’ve released a first-class integration with wrangler for local development of Pages projects, including full support for Functions, Workers, secrets, environment variables and KV. Durable Objects support is coming soon.

Install from npm:

npm install wrangler@beta

and either serve a folder of static assets, or proxy your existing tooling:

# Serve a directory
npx wrangler pages dev ./public

# or integrate with your other tools
npx wrangler pages dev -- npx react-scripts start

Go forth, and build!

If you like puppies, we’ve deployed our image-sharing application here, and if you like code, that’s over on GitHub. Feel free to fork and deploy it yourself! There’s a five-minute setup wizard, and you’ll need Cloudflare Images, Access, Workers, and Durable Objects.

We are so excited about the future of the Pages platform, and we want to hear what you’re building! Show off your full-stack applications in the #what-i-built channel, or get assistance in the #pages-help channel on our Discord server.

Building a full stack application with Cloudflare Pages

Cloudflare Pages now partners with your favorite CMS

Post Syndicated from Nevi Shah original https://blog.cloudflare.com/cloudflare-pages-headless-cms-partnerships/

Cloudflare Pages now partners with your favorite CMS

Cloudflare Pages now partners with your favorite CMS

Interest in headless CMSes has seen spectacular growth over the past few years with many businesses looking to adopt the tooling. As audiences consume content through new interfaces taking different forms — smartphones, wearables, personal devices — the idea of decoupling content with its backend begins to provide a better experience both for developing teams and end users. Because of this, we believe there are and will be more opportunities in the future to utilize headless CMSes which is why today, we’re thrilled to announce our partnerships with Sanity and Strapi and also share existing integrations with Contentful and WordPress — all your favorite CMS providers.

A little on headless CMSes

Headless CMSes are one of the most common API integrations we’ve seen so far among you and your teams — whether it’s for your marketing site, blog or e-commerce site. It provides your teams the ability to input the contents of your site through a user-friendly interface and store them in a database, so that updates can easily be made to your site without touching the code base. As a Jamstack platform, a big part of our roadmap is understanding how we can build our own tools or provide integrations for tools that fit in with your development ecosystem and Pages, which is why in August this year we announced Pages support for Deploy Hooks.

What’s a hook got to do with it?

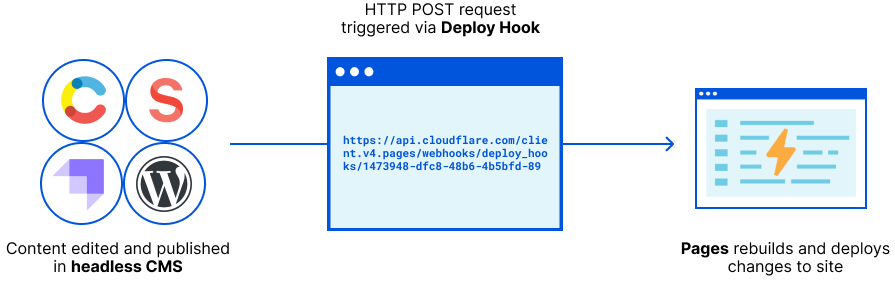
Deploy Hooks are the key to what allows you to connect and trigger deployments in Pages via updates made in your headless CMS. As developers, instead of getting pinged several times a day to make content updates to your site, your marketing team can update the site directly within the headless CMS’s interface by way of a Deploy Hook. This is a URL created on Pages that accepts an HTTP POST request to trigger new deployments outside the realm of your git commands. You can configure settings within your CMS to accept the Deploy Hook so that anytime content is updated within your CMS, a new deployment is started in the Pages dashboard automatically — it couldn’t be any easier!

Cloudflare Pages now partners with your favorite CMS

How can I create a Deploy Hook?

Within the Pages interface, there are two things you need to do to create your Deploy Hook:

  1. Choose your Deploy Hook name: You can name your deploy hook anything you’d like
  2. Select the Branch to Build: You can specify which branch will be built and deployed when the URL is requested with the Deploy Hook.

Once you are given your Deploy Hook, you’re all set to set up a webhook within your chosen CMS where you will paste your Deploy Hook.

That’s it! Now leave it to your marketing team to update their rich content and watch the builds trigger automatically to update your site!

Our partners

Of course, Deploy Hooks is just a starting point of ways we can provide a better dev experience for your team when using the headless CMS of your choice with your Pages site. But our story of integrations does not stop here. Introducing our CMS partners and integrations: Sanity, Strapi, Contentful, and WordPress!

Cloudflare Pages now partners with your favorite CMS

We continue to see the highest usage rates of these four CMSes on Pages among you and your teams, and in the months to come we’ll be working closely with our partners to build even more for you.

We’re delighted to partner with Cloudflare and excited by this new release from Cloudflare Pages. At Sanity, we care deeply about people working with content on our platform. Cloudflare’s new deploy hooks allow developers to automate builds for static sites based on content changes, which is a huge improvement for content creators. Combining these with structured content and our GROQ-powered Webhooks, our customers can be strategic about when these builds should happen. We’re stoked to be part of this release and can’t wait to see what the community will build with Sanity and Cloudflare!
– Even Westvang, Co-founder, Sanity.io

Check out Sanity’s video tutorial on how to build your site using Pages and Sanity!

At Strapi, we’re excited about this partnership with Cloudflare because it enables developers to abstract away the complexity of deploying changes to production for content teams. By using the Deploy Hook for Strapi, everyone can push new content and updates quickly and autonomously.
– Pierre Burgy, CEO, Strapi.io

With this integration, our customers can work more efficiently and cross-functionally with their teams. Marketing teams can update Contentful directly to automatically trigger deployments without relying on their developers to update any of their code base, which results in a better, more productive experience for all teams involved.
– Jeff Blattel, Director of Technical Partnerships at Contentful

Get started

For now, to learn more about how you can connect your Pages project to one of our partner CMSes, check out our Deploy Hooks documentation to deploy your first project today!

Cloudflare Pages now offers Gitlab support

Post Syndicated from Nevi Shah original https://blog.cloudflare.com/cloudflare-pages-partners-with-gitlab/

Cloudflare Pages now offers Gitlab support

Cloudflare Pages now offers Gitlab support

In the early stages of our ideation of Pages, we set out to build a platform with a smooth developer experience that integrates seamlessly with your existing workflow. However, after announcing Pages’ general availability, we realized our platform may not actually be usable by every developer. Before today, only those of you who used GitHub as your source code management tool could take advantage of the Pages experience.

As part of Full Stack Week, we’re opening the doors of our platform to even more users by announcing our integration with GitLab — the DevOps platform! You can now create new Pages projects by connecting your repos stored on GitLab and make site changes there via your usual git commands. And what’s more? We’re also launching an official partnership with GitLab to bring you even better integrations with the git provider in the months to come.

Why GitLab?

As a Jamstack platform, our goal is to enable you, the developer, to focus on what you do best — code, code, code — without the heavy lifting! Not only does this mean giving you all the tools you need to build out a full stack site but also provide you with integrations that fit your development needs. By expanding our platform ecosystem to GitLab, Cloudflare can now serve the needs of a broader developer community collaborating on their sites.

Since our April launch, one of the most common questions and pieces of feedback we’ve received in customer calls, on Discord/Twitter, and on our community threads centered around GitLab. We knew our git integration story couldn’t just stop at one provider, especially given the diversity in tooling we see among our community. So it became glaringly obvious we needed to extend Pages to the GitLab community.

Our partnership

Today, we’re proud to now be official technology partners with GitLab Inc. In addition to our git integration, the goal of our partnership is to improve existing and develop future integrations, so your teams can seamlessly collaborate and accelerate site delivery and updates at scale. As you begin using Pages with GitLab, our teams will be working closely together in a cross-collaborative approach for new integrations.

Developers can be more productive when they create, test, secure and deploy software from a single devops application instead of bouncing between multiple different tools. Cloudflare Pages’ integration with GitLab makes it easier for joint users to develop and deploy new code to Cloudflare’s network using the same syntax and git commands they’re already comfortable using.
— Michael LeBeau, Alliance Manager at GitLab

Get started

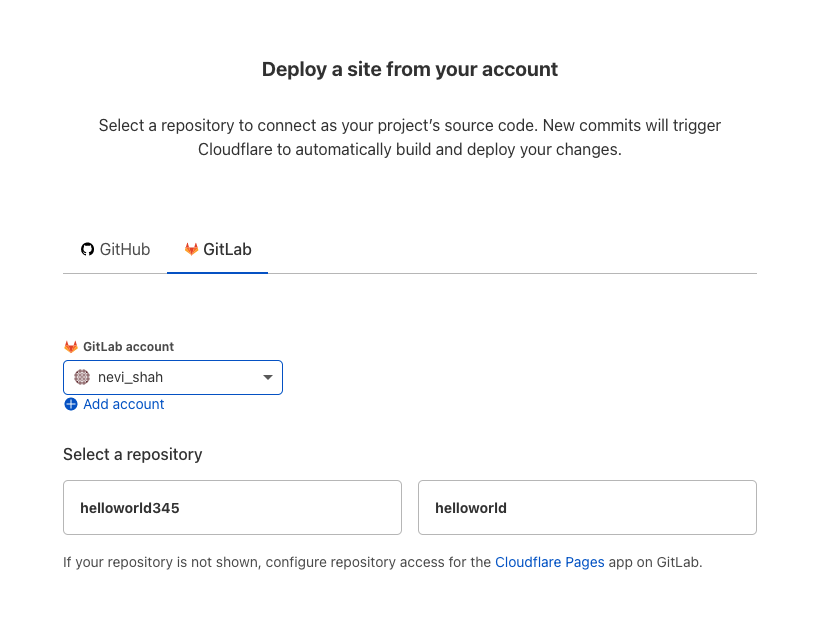
To set up your first project with GitLab, just create a new project in the Pages dashboard. Select “GitLab” and Pages will bring you to your GitLab sign-in screen where you can sign in to your account. Then, select the repo with which you’d like to create your project, configure your build settings, and deploy! From here, you can begin making changes to your site directly via commits to GitLab, triggering a new build every time.

Cloudflare Pages now offers Gitlab support

Have questions? To get started, check out the Pages docs and be sure to leave us some feedback by clicking the “Give Feedback” button there. Show us what you build by joining the chatter in our Discord channel.

Happy developing!

Is Microsoft Stealing People’s Bookmarks?

Post Syndicated from Bruce Schneier original https://www.schneier.com/blog/archives/2021/11/is-microsoft-stealing-peoples-bookmarks.html

I received email from two people who told me that Microsoft Edge enabled synching without warning or consent, which means that Microsoft sucked up all of their bookmarks. Of course they can turn synching off, but it’s too late.

Has this happened to anyone else, or was this user error of some sort? If this is real, can some reporter write about it?

(Not that “user error” is a good justification. Any system where making a simple mistake means that you’ve forever lost your privacy isn’t a good one. We see this same situation with sharing contact lists with apps on smartphones. Apps will repeatedly ask, and only need you to accidentally click “okay” once.)

EDITED TO ADD: It’s actually worse than I thought. Edge urges users to store passwords, ID numbers, and even passport numbers, all of which get uploaded to Microsoft by default when synch is enabled.

The machine learning effect: Magic boxes and computational thinking 2.0

Post Syndicated from Jane Waite original https://www.raspberrypi.org/blog/machine-learning-education-school-computational-thinking-2-0-research-seminar/

How does teaching children and young people about machine learning (ML) differ from teaching them about other aspects of computing? Professor Matti Tedre and Dr Henriikka Vartiainen from the University of Eastern Finland shared some answers at our latest research seminar.

Three smiling young learners in a computing classroom.
We need to determine how to teach young people about machine learning, and what teachers need to know to help their learners form correct mental models.

Their presentation, titled ‘ML education for K-12: emerging trajectories’, had a profound impact on my thinking about how we teach computational thinking and programming. For this blog post, I have simplified some of the complexity associated with machine learning for the benefit of readers who are new to the topic.

a 3D-rendered grey box.
Machine learning is not magic — what needs to change in computing education to make sure learners don’t see ML systems as magic boxes?

Our seminars on teaching AI, ML, and data science

We’re currently partnering with The Alan Turing Institute to host a series of free research seminars about how to teach artificial intelligence (AI) and data science to young people.

The seminar with Matti and Henriikka, the third one of the series, was very well attended. Over 100 participants from San Francisco to Rajasthan, including teachers, researchers, and industry professionals, contributed to a lively and thought-provoking discussion.

Representing a large interdisciplinary team of researchers, Matti and Henriikka have been working on how to teach AI and machine learning for more than three years, which in this new area of study is a long time. So far, the Finnish team has written over a dozen academic papers based on their pilot studies with kindergarten-, primary-, and secondary-aged learners.

Current teaching in schools: classical rule-driven programming

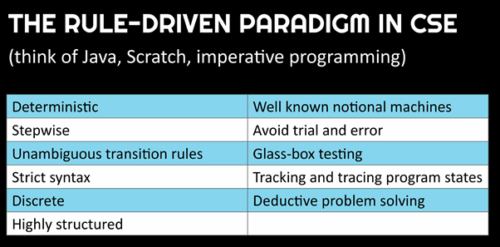
Matti and Henriikka started by giving an overview of classical programming and how it is currently taught in schools. Classical programming can be described as rule-driven. Example features of classical computer programs and programming languages are:

  • A classical language has a strict syntax, and a limited set of commands that can only be used in a predetermined way
  • A classical language is deterministic, meaning we can guarantee what will happen when each line of code is run
  • A classical program is executed in a strict, step-wise order following a known set of rules

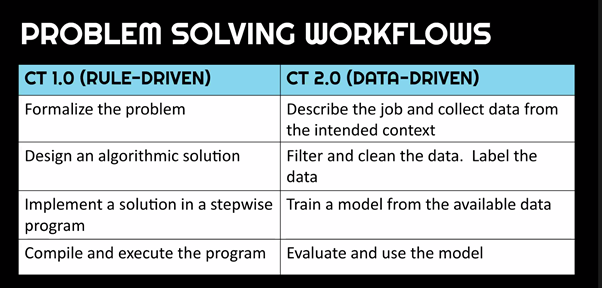
When we teach this type of programming, we show learners how to use a deductive problem solving approach or workflow: defining the task, designing a possible solution, and implementing the solution by writing a stepwise program that is then run on a computer. We encourage learners to avoid using trial and error to write programs. Instead, as they develop and test a program, we ask them to trace it line by line in order to predict what will happen when each line is run (glass-box testing).

A list of features of rule-driven computer programming, also included in the text.
The features of classical (rule-driven) programming approaches as taught in computer science education (CSE) (Tedre & Vartiainen, 2021).

Classical programming underpins the current view of computational thinking (CT). Our speakers called this version of CT ‘CT 1.0’. So what’s the alternative Matti and Henriikka presented, and how does it affect what computational thinking is or may become?

Machine learning (data-driven) models and new computational thinking (CT 2.0) 

Rule-based programming languages are not being eradicated. Instead, software systems are being augmented through the addition of machine learning (data-driven) elements. Many of today’s successful software products, such as search engines, image classifiers, and speech recognition programs, combine rule-driven software and data-driven models. However, the workflows for these two approaches to solving problems through computing are very different.

A table comparing problem solving workflows using computational thinking 1.0 versus computational thinking 2.0, info also included in the text.
Problem solving is very different depending on whether a rule-driven computational thinking (CT 1.0) approach or a data-driven computational thinking (CT 2.0) approach is used (Tedre & Vartiainen,2021).

Significantly, while in rule-based programming (and CT 1.0), the focus is on solving problems by creating algorithms, in data-driven approaches, the problem solving workflow is all about the data. To highlight the profound impact this shift in focus has on teaching and learning computing, Matti introduced us to a new version of computational thinking for machine learning, CT 2.0, which is detailed in a forthcoming research paper.

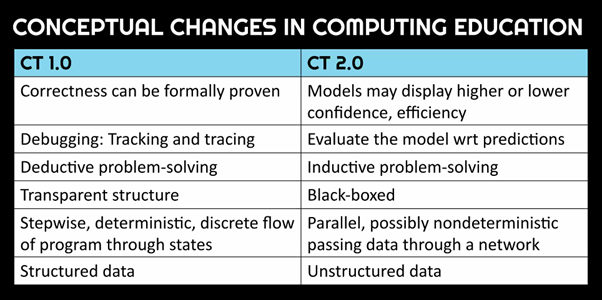
Because of the focus on data rather than algorithms, developing a machine learning model is not at all like developing a classical rule-driven program. In classical programming, programs can be traced, and we can predict what will happen when they run. But in data-driven development, there is no flow of rules, and no absolutely right or wrong answer.

A table comparing conceptual differences between computational thinking 1.0 versus computational thinking 2.0, info also included in the text.
There are major differences between rule-driven computational thinking (CT 1.0) and data-driven computational thinking (CT 2.0), which impact what computing education needs to take into account (Tedre & Vartiainen,2021).

Machine learning models are created iteratively using training data and must be cross-validated with test data. A tiny change in the data provided can make a model useless. We rarely know exactly why the output of an ML model is as it is, and we cannot explain each individual decision that the model might have made. When evaluating a machine learning system, we can only say how well it works based on statistical confidence and efficiency. 

Machine learning education must cover ethical and societal implications 

The ethical and societal implications of computer science have always been important for students to understand. But machine learning models open up a whole new set of topics for teachers and students to consider, because of these models’ reliance on large datasets, the difficulty of explaining their decisions, and their usefulness for automating very complex processes. This includes privacy, surveillance, diversity, bias, job losses, misinformation, accountability, democracy, and veracity, to name but a few.

I see the shift in problem solving approach as a chance to strengthen the teaching of computing in general, because it opens up opportunities to teach about systems, uncertainty, data, and society.

Jane Waite

Teaching machine learning: the challenges of magic boxes and new mental models

For teaching classical rule-driven programming, much time and effort has been put into researching learners’ understanding of what a program will do when it is run. This kind of understanding is called a learner’s mental model or notional machine. An approach teachers often use to help students develop a useful mental model of a program is to hide the detail of how the program works and only gradually reveal its complexity. This approach is described with the metaphor of hiding the detail of elements of the program in a box. 

Data-driven models in machine learning systems are highly complex and make little sense to humans. Therefore, they may appear like magic boxes to students. This view needs to be banished. Machine learning is not magic. We have just not figured out yet how to explain the detail of data-driven models in a way that allows learners to form useful mental models.

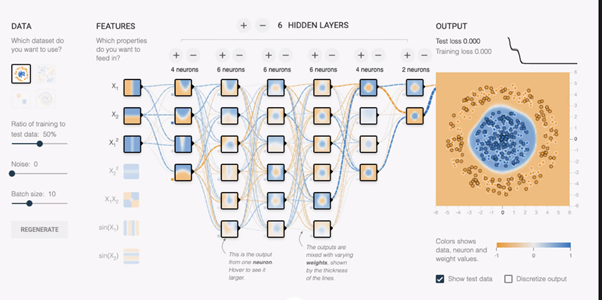
An example of a representation of a machine learning model in TensorFlow, an online machine learning tool (Tedre & Vartiainen,2021).

Some existing ML tools aim to help learners form mental models of ML, for example through visual representations of how a neural network works (see Figure 2). But these explanations are still very complex. Clearly, we need to find new ways to help learners of all ages form useful mental models of machine learning, so that teachers can explain to them how machine learning systems work and banish the view that machine learning is magic.

Some tools and teaching approaches for ML education

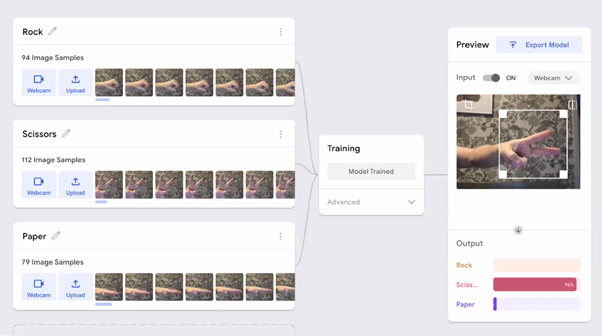
Matti and Henriikka’s team piloted different tools and pedagogical approaches with different age groups of learners. In terms of tools, since large amounts of data are needed for machine learning projects, our presenters suggested that tools that enable lots of data to be easily collected are ideal for teaching activities. Media-rich education tools provide an opportunity to capture still images, movements, sounds, or sense other inputs and then use these as data in machine learning teaching activities. For example, to create a machine learning–based rock-paper-scissors game, students can take photographs of their hands to train a machine learning model using Google Teachable Machine.

Photos of hands are used to train a machine learning model as part of a project to create a rock-paper-scissors game.
Photos of hands are used to train a Teachable Machine machine learning model as part of a project to create a rock-paper-scissors game (Tedre & Vartiainen, 2021).

Similar to tools that teach classic programming to novice students (e.g. Scratch), some of the new classroom tools for teaching machine learning have a drag-and-drop interface (e.g. Cognimates). Using such tools means that in lessons, there can be less focus on one of the more complex aspects of learning to program, learning programming language syntax. However, not all machine learning education products include drag-and-drop interaction, some instead have their own complex languages (e.g. Wolfram Programming Lab), which are less attractive to teachers and learners. In their pilot studies, the Finnish team found that drag-and-drop machine learning tools appeared to work well with students of all ages.

The different pedagogical approaches the Finnish research team used in their pilot studies included an exploratory approach with preschool children, who investigated machine learning recognition of happy or sad faces; and a project-based approach with older students, who co-created machine learning apps with web-based tools such as Teachable Machine and Learn Machine Learning (built by the research team), supported by machine learning experts.

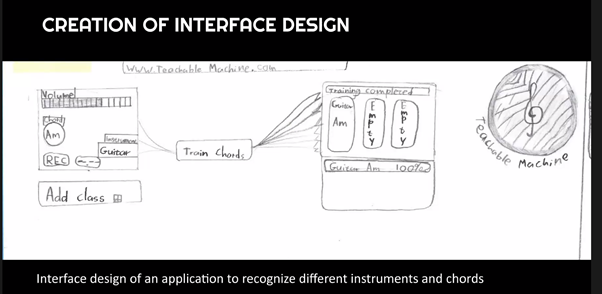
Example of a middle school (age 8 to 11) student’s pen and paper design for a machine learning app that recognises different instruments and chords.
Example of a middle school (age 8 to 11) student’s design for a machine learning app that recognises different instruments and chords (Tedre & Vartiainen, 2021).

What impact these pedagogies have on students’ long-term mental models about machine learning has yet to be researched. If you want to find out more about the classroom pilot studies, the academic paper is a very accessible read.

My take-aways: new opportunities, new research questions

We all learned a tremendous amount from Matti and Henriikka and their perspectives on this important topic. Our seminar participants asked them many questions about the pedagogies and practicalities of teaching machine learning in class, and raised concerns about squeezing more into an already packed computing curriculum.

For me, the most significant take-away from the seminar was the need to shift focus from algorithms to data and from CT 1.0 to CT 2.0. Learning how to best teach classical rule-driven programming has been a long journey that we have not yet completed. We are forming an understanding of what concepts learners need to be taught, the progression of learning, key mental models, pedagogical options, and assessment approaches. For teaching data-driven development, we need to do the same.  

The question of how we make sure teachers have the necessary understanding is key.

Jane Waite

I see the shift in problem solving approach as a chance to strengthen the teaching of computing in general, because it opens up opportunities to teach about systems, uncertainty, data, and society. I think it will help us raise awareness about design, context, creativity, and student agency. But I worry about how we will introduce this shift. In my view, there is a considerable risk that we will be sucked into open-ended, project-based learning, with busy and fun but shallow learning experiences that result in restricted conceptual development for students.

I also worry about how we can best help teachers build up the knowledge and experience to support their students. In the Q&A after the seminar, I asked Matti and Henriikka about the role of their team’s machine learning experts in their pilot studies. It seemed to me that without them, the pilot lessons would not have worked, as the participating teachers and students would not have had the vocabulary to talk about the process and would not have known what was doable given the available time, tools, and student knowledge.

The question of how we make sure teachers have the necessary understanding is key. Many existing professional development resources for teachers wanting to learn about ML seem to imply that teachers will all need a PhD in statistics and neural network optimisation to engage with machine learning education. This is misleading. But teachers do need to understand the machine learning concepts that their students need to learn about, and I think we don’t yet know exactly what these concepts are. 

In summary, clearly more research is needed. There are fundamental questions still to be answered about what, when, and how we teach data-driven approaches to software systems development and how this impacts what we teach about classical, rule-based programming. But to me, that is exciting, and I am very much looking forward to the journey ahead.

Join our next free seminar

To find out what others recommend about teaching AI and ML, catch up on last month’s seminar with Professor Carsten Schulte and colleagues on centring data instead of code in the teaching of AI.

We have another four seminars in our monthly series on AI, machine learning, and data science education. Find out more about them on this page, and catch up on past seminar blogs and recordings here.

At our next seminar on Tuesday 7 December at 17:00–18:30 GMT, we will welcome Professor Rose Luckin from University College London. She will be presenting on what it is about AI that makes it useful for teachers and learners.

We look forward to meeting you there!

PS You can build your understanding of machine learning by joining our latest free online course, where you’ll learn foundational concepts and train your own ML model!

The post The machine learning effect: Magic boxes and computational thinking 2.0 appeared first on Raspberry Pi.

Get started with AWS DevOps Guru Multi-Account Insight Aggregation with AWS Organizations

Post Syndicated from Ifeanyi Okafor original https://aws.amazon.com/blogs/devops/get-started-with-aws-devops-guru-multi-account-insight-aggregation-with-aws-organizations/

Amazon DevOps Guru is a fully managed service that uses machine learning (ML) to continuously analyze and consolidate operational data streams from multiple sources, such as Amazon CloudWatch metrics, AWS Config, AWS CloudFormation, AWS X-Ray, and provide you with a single console dashboard. This dashboard helps customers improve operational performance and avoid expensive downtime by generating actionable insights that flag operational anomalies, identify the likely root cause, and recommend corrective actions.

As customers scale their AWS resources across multiple accounts and deploy DevOps Guru across applications and use cases on these accounts, they get a siloed view of the operational health of their applications. Now you can enable multi-account support with AWS Organizations and designate a member account to manage operational insights across your entire organization. This delegated administrator can get a holistic view of the operational health of their applications across the organization—without the need for any additional customization.

In this post, we will walk through the process of setting up a delegated administrator. We will also explore how to monitor insights across your entire organization from this account.

Overview of the multi-account environment

The multi-account environment operates based on the organizational hierarchy that your organization has defined in AWS Organizations. This AWS service helps you centrally manage and govern your cloud environment. For this reason, you must have an organization set up in AWS Organizations before you can implement multi-account insights visibility. AWS Organizations is available to all AWS customers at no additional charge, and the service user guide has instructions for creating and configuring an organization in your AWS environment.

Understanding the management account, a delegated administrator, and other member accounts is fundamental to the multi-account visibility functionality in DevOps Guru. Before proceeding further, let’s recap these terms.

  • A management account is the AWS account you use to create your organization. You can create other accounts in your organization, invite and manage invitations for other existing accounts to join your organization, and remove accounts from your organization. The management account has wide permissions and access to accounts within the organization. It should only be used for absolutely essential administrative tasks, such as managing accounts, OUs, and organization-level policies. You can refer to the AWS Organizations FAQ for more information on management accounts.
  • When the management account gives a member account service-level administrative permissions, it becomes a delegated administrator. Because the permissions are assigned at the service level, delegated administrator’s privileges are confined to the AWS service in question (DevOps Guru, in this case). The delegated administrator manages the service on behalf of the management account, leaving the management account to focus on administrative tasks, such as account and policy management. Currently, DevOps Guru supports a single delegated administrator, which operates at the root level (i.e., at the organization level). When elevating a member account to a delegated administrator, it must be in the organization. For more information about adding a member account to an organization, see inviting an AWS account to join your organization.
  • Member accounts are accounts without any administrative privilege. An account can be a member of only one organization at a time.

Prerequisites

You must have the following to enable multi-account visibility:

  • An organization already set up in AWS Organizations. AWS Organizations is available to all AWS customers at no additional charge, and the service user guide has instructions for creating and configuring an organization in your AWS environment.
  • A member account that is in your organization and already onboarded in DevOps Guru. This account will be registered as a delegated administrator. For more information about adding a member account to an organization, see inviting an AWS account to join your organization.

Setting up multi-account insights visibility in your organization

In line with AWS Organizations’ best practices, we recommend first assigning a delegated administrator. Although a management account can view DevOps Guru insights across the organization, management accounts should be reserved for organization-level management, while the delegated administrator manages at the service level.

Registering a Delegated Administrator

A delegated administrator must be registered by the management account. The steps below assume that you have a member account to register as a delegated administrator. If your preferred account is not yet in your organization, then invite the account to join your organization.

To register a delegated administrator

  1. Log in to the DevOps Guru Console with the management account.
  2. On the welcome page, under Set up type, select Monitor applications across your organizations. If you select Monitor applications in the current AWS account, then your dashboard will display insights for the management account.
  3. Under Delegated administrator, select Register a delegated administrator (Recommended).
  4. Select Register delegated administrator to complete the process.

Register a delegated administrator. Steps 1-4 highlighted in console screenshot.

To de-register a delegated administrator

  1. Log in to the DevOps Guru Console and navigate to the Management account
  2. On the Management account page, select De-register administrator.

De-register a delegated Administrator. Steps 1 and 2 highlighted on console.

Viewing insights as a Delegated Administrator

As the delegated administrator, you can choose to view insights from

  • specific accounts
  • specific OUs
  • the entire organization

To view insights from specific accounts

  1. Log in to the DevOps Guru console, and select Accounts from the dropdown menu on the dashboard.
  2. Select the search bar to display a list of member accounts.
  3. Select up to five accounts, and select anywhere outside the dropdown menu to apply your selection. Simply select the delegated administrator account from the dropdown menu to view insights from the delegated administrator account.

View Insights from specific account. Steps 1-3 highlighted on dashboard screenshot.

The system health summary now will display information for the selected accounts.

To view insights from specific organizational units

  1. Log in to the DevOps Guru console, and select Organizational Units from the dropdown menu on the dashboard.
  2. Select the search bar to display the list of OUs.
  3. Select up to five OUs, and select anywhere outside of the dropdown menu to apply your selection.

View insights from specific organizational units. Steps 1-3 highlighted in dashboard screenshot.

Now the system health summary will display information for the selected OUs. Nested OUs are currently not supported, so only the accounts directly under the OU are included when an OU is selected. Select the sub-OU in addition to the parent OU to include accounts in a sub-OU,.

To view insights across the entire organization

  1. Log in to the DevOps Guru console and navigate to the Insights
  2. On the Reactive tab, you can see a list of all the reactive insights in the organization. On the Proactive tab, you can also see a list of all the proactive insights in the organization. You will notice that the table displaying the insights now has an Account ID column (highlighted in the snapshot below). This table aggregates insights from different accounts in the organization.

View insights across the entire organization.

  1. Use one or more of the following filters to find the insights that you are looking for
    1. Choose the Reactive or Proactive
    2. In the search bar, you can add an account ID, status, severity, stack, or resource name to specify a filter.

View insights across the entire organization and filter. Steps 1-3 highlighted in Insights summary page.

    1. To search by account ID, select the search bar, select Account, then select an account ID in the submenu.
    2. Choose or specify a time range to filter by insight creation time. For example, 12h shows insights created in the past 12 hours, and 1d shows the insights of the previous day. 1w will show the past week’s insights, and 1m will show the last month’s insights. Custom lets you specify another time range. The maximum time range you can use to filter insights is 180 days.

View insights across the entire organization and fitler by time.

Viewing insights from the Management Account

Viewing insights from the management account is similar to viewing insights from the delegated administrator, so the process listed for the delegated administrator also applies to the management account. Although the management account can view insights across the organization, it should be reserved for running administrative tasks across various AWS services at an organization level.

Important notes

Multi-account insight visibility works at a region level, meaning that you can only view insights across the organization within a single AWS region. You must change the AWS region from the region dropdown menu at the top-right corner of the console to view insights from a different AWS region.

For data security reasons, the delegated administrator can only access insights generated across the organization after the selected member account became the delegated administrator. Insights generated across the organization before the delegated administrator registration will remain inaccessible to the delegated administrator.

Conclusion

The steps detailed above show how you can quickly enable multi-account visibility to monitor application health across your entire organization.

AWS Customers are now using AWS DevOps Guru to monitor and improve application performance, and you too can start monitoring your applications by following the instructions in the product documentation. Head over to the AWS DevOps Guru console to get started today.

About the authors

Ifeanyi Okafor

Ifeanyi Okafor is a Product Manager with AWS. He enjoys building products that solve customer problems at scale.

Haider Naqvi

Haider Naqvi is a Solutions Architect at AWS. He has extensive Software Development and Enterprise Architecture experience. He focuses on enabling customers re:Invent and achieve business outcome with AWS. He is based out of New York.

Nick Ardecky

Nick Ardecky is a Software Engineering working with the AWS DevOps Guru team. Nick enjoys building tools and visualizations that improve products and solve customer problems.

[$] Trojan Source and Python

Post Syndicated from original https://lwn.net/Articles/875964/rss

The Trojan Source vulnerabilities have been
rippling through various development
communities since their disclosure on
November 1. The oddities that can arise when handling Unicode, and
bidirectional Unicode in particular, in a programming
language have led Rust, for
example, to check for
the problematic code points
in strings and comments and, by default,
refuse to compile if they are present. Python has chosen a different path,
but work is underway to help inform programmers of the kinds of pitfalls that
Trojan Source has highlighted.

GraphQL global ID migration update

Post Syndicated from Andrew Hoglund original https://github.blog/2021-11-16-graphql-global-id-migration-update/

We are pleased to announce that we have now completed the first phase of rolling out the new GraphQL global ID format. This means that all newly created GraphQL objects have IDs that conform to a new format, which we refer to as next IDs. It also means we’ve hit a major milestone as we work towards improving our scalability and speed. In this post, we’d like to give you some details as to how you can begin migrating to the next format for older IDs.

Why is this necessary?

The current format of Global IDs in our GraphQL API will not support our projected growth over the coming years due to limitations with the data encoded in the IDs. The next format gives us the ability to handle your requests even faster by being able to build queries that will be optimized for our database clusters. We will continue to support the legacy IDs for the short term, after which we will sunset them. We are asking that you use the provided tools (more on that below) to migrate your implementations, caches, and data records to reference a next ID for older objects. Doing so will ensure that the response times of your requests will remain consistent and small. It will also ensure that nothing in your application will break once we finally sunset usage of the legacy IDs.

Do I need to do anything?

You only need to react to this announcement if you store references to GraphQL IDs, which always correspond to the id field for any object in the schema. If you don’t store these, then you can continue to interact with the API with no effect on your service. If you currently decode IDs, your service may break as the underlying data format of the IDs has changed. We suggest you migrate your service to treat these IDs as opaque strings. We guarantee the IDs will be unique, therefore you can rely on them directly as references.

How do I migrate my service?

If you have determined that you do need to migrate your service to the next IDs, we have introduced new functionality to help you do so. You can now pass a header in your API requests to the GraphQL API to receive updated IDs. This header works by forcing the response payload to always return the next ID for any object in which you’ve requested the id field. The name of the header is:

X-Github-Next-Global-ID

This header can be set to two values, 1 or 0. Setting the value to 1 will force the value for all id fields in your query to return the next ID format. Setting the value to 0 will revert to default behavior, which is to show legacy or next IDs depending on their creation date.

Here is an example request using curl:

$ curl \
  -H "Authorization: token $GITHUB_TOKEN" \
  -H "X-Github-Next-Global-ID: 1" \
  https://api.github.com/graphql \
  -d '{ "query": "{ node(id: \"MDQ6VXNlcjM0MDczMDM=\") { id } }" }'

And the response will contain the next ID:

{"data":{"node":{"id":"U_kgDOADP9xw"}}}

The legacy ID of MDQ6VXNlcjM0MDczMDM= was used in the node query, and the response contains the ID in the next format. Using this mechanism, you will be able to call the API with the legacy IDs you have referenced in your application. The next ID received in the response can then be used to update those references. We suggest that you update all references to legacy IDs and use them for any subsequent requests to the API. Remember that you can submit multiple node queries in one API call (using aliases) to perform bulk operations.

Another option for migrating IDs would be to use the ids returned in the nodes field for a collection of items. For example, if you wanted to convert all the repositories in your organization, you could do something like the following:

{
  organization(login: "github") {
    repositories(last: 10) {
      edges {
        cursor
        node {
          name
          id
        }
      }
    }
  }
}

As long as you have a reference to the name of a repository (or some other unique field on an object), you could use this method to update your references in bulk.

Please also note that setting the X-Github-Next-Global-ID to 1 will affect the return value of every id field in your query. This means that even when you submit a non-node query, you will get back the new format ID if you requested the id field.

Tell us what you think

If you have any concerns about the rollout of this change impacting your app, please contact us and include information, such as your app name so that we can better assist you.

Everything you wanted to know about trusts with AWS Managed Microsoft AD

Post Syndicated from Jeremy Girven original https://aws.amazon.com/blogs/security/everything-you-wanted-to-know-about-trusts-with-aws-managed-microsoft-ad/

Many Amazon Web Services (AWS) customers use Active Directory to centralize user authentication and authorization for a variety of applications and services. For these customers, Active Directory is a critical piece of their IT infrastructure. AWS offers AWS Directory Service for Microsoft Active Directory, also known as AWS Managed Microsoft AD, to provide a highly available and resilient Active Directory service.

One of the most common AWS Managed Microsoft AD use cases is for customers who need to integrate their on-premises Active Directory domain or forest with AWS services like Amazon Relational Database Service (Amazon RDS), Amazon FSx, Amazon WorkSpaces, and other AWS applications and services. This type of integration can require a trust relationship. When it comes to trusts, there are some common misconceptions about what happens and doesn’t happen when a trust is created.

In this post, I’m going to dive deep into various aspects of Active Directory trusts and debunk some common myths along the way. This post will cover the following areas:

Starting with Kerberos

The first part of understanding how trusts work is to understand how authentication flows across a trust, particularly with Kerberos. Kerberos is a subject that, on the surface, is simple enough, but can quickly become much more complex. This post isn’t going to go into detail about Kerberos in Microsoft Windows. If you wish to look further into the topic, see the Microsoft Kerberos documentation. In this post, I’m just going to give you an overview of how Kerberos authentication works across trusts.
 

Figure 1: Kerberos authentication across trusts

Figure 1: Kerberos authentication across trusts

If you only remember one thing about Kerberos and trust, it should be referrals. Let’s look at the workflow in Figure 1, which shows a user from Domain A who is logged into a computer in Domain A and wants to access an Amazon FSx file share in Domain B. For simplicity’s sake, I’ll say there is a two-way trust between Domains A and B.

Note: When a trust is integrated with AWS Managed Microsoft AD, you need to enable Kerberos preauthentication for accounts that traverse the trusts. Disabling Kerberos preauthentication isn’t recommended, because a malicious user can directly send dummy requests for authentication. The key distribution center (KDC) will return an encrypted Ticket-Granting Ticket (TGT), which the malicious user can brute force offline. See Kerberos Pre-Authentication: Why It Should Not Be Disabled for more details.

The steps of the Kerberos authentication process over trusts are as follows:

1. Kerberos authentication service request (KRB_AS_REQ): The client contacts the authentication service (AS) of the KDC (which is running on a domain controller) for Domain A, which the client is a member of, for a short-lived ticket called a Ticket-Granting Ticket (TGT). The default lifetime of the TGT is 10 hours. For Windows clients this happens at logon, but Linux clients might need to run a kinit command.

2. Kerberos authentication service response (KRB_AS_REP): The AS constructs the TGT and creates a session key that the client can use to encrypt communication with the ticket-granting service (TGS). At the time that the client receives the TGT, the client has not been granted access to any resources, even to resources on the local computer.

3. Kerberos ticket-granting service request (KRB_TGS_REQ): The user’s Kerberos client sends a KRB_TGS_REQ message to a local KDC in Domain A, specifying fsx@domainb as the target. The Kerberos client compares the location with its own workstation’s domain. Because these values are different, the client sets a flag in the KDC Options field of the KRB_TGS_REQ message for NAME_CANONICALIZE, which indicates to the KDC that the server might be in another realm (domain).

4. Kerberos ticket-granting service response (KRB_TGS_REP): The user’s local KDC (for Domain A) receives the KRB_TGS_REQ and sends back a TGT referral ticket for Domain B. The TGT is issued for the next intervening domain along the shortest path to Domain B. The TGT also has a referral flag set, so that the KDC will be informed that the KRB_TGS_REQ is coming from another realm. This flag also tells the KDC to fill in the Transited Realms field. The referral ticket is encrypted with the interdomain key that is decrypted by Domain B’s TGS.

Note: When a trust is established between domains or forests, an interdomain key based on the trust password becomes available for authenticating KDC functions and is used to encrypt and decrypt Kerberos tickets.

5. Kerberos ticket-granting service request (KRB_TGS_REQ): The user’s Kerberos client sends a KRB_TGS_REQ along with the TGT it received from the Domain A KDC to a KDC in Domain B.

6. Kerberos ticket-granting service response (KRB_TGS_REP): The TGS in Domain B examines the TGT and the authenticator. If these are acceptable, the TGS creates a service ticket. The client’s identity is taken from the TGT and copied to the service ticket. Then the ticket is sent to the client.

For more details on the authenticator, see How the Kerberos Version 5 Authentication Protocol Works.

7. Application server service request (KRB_TGS_REQ): After the client has the service ticket, the client sends the ticket and a new authenticator to the target server, requesting access. The server will decrypt the ticket, validate the authenticator, and (for Windows services), create an access token for the user based on the SIDs in the ticket.

8. Application server service response (KRB_TGS_REP): Optionally, the client might request that the target server verify its own identity. This is called mutual authentication. If mutual authentication is requested, the target server takes the client computer’s timestamp from the authenticator, encrypts it with the session key the TGS provided for client-target server messages, and sends it to the client.

The basics of trust transitivity, direction, and types

Let’s start off by defining a trust. Active Directory trusts are a relationship between domains, which makes it possible for users in one domain to be authenticated by a domain controller in the other domain. Authenticated users, if given proper permissions, can access resources in the other domain.

Active Directory Domain Services supports four types of trusts: External (Domain), Forest, Realm, and Shortcut. Out of those four types of trusts, AWS Managed Microsoft AD supports the External (Domain) and Forest trust types. I’ll focus on External (Domain) and Forest trust types for this post.

Transitivity: What is it?

Before I dive into the types of trusts, it’s important to understand the concept of transitivity in trusts. A trust that is transitive allows authentication to flow through other domains (Child and Trees) in the trusted forests or domains. In contrast, a non-transitive trust is a point-to-point trust that allows authentication to flow exclusively between the trusted domains.
 

Figure 2: Forest trusts between the Example.local and Example.com forests

Figure 2: Forest trusts between the Example.local and Example.com forests

Don’t worry about the trust types at this point, because I’ll cover those shortly. The example in Figure 2 shows a Forest trust between Example.com and Example.local. The Example.local forest has a child domain named Child. With a transitive trust, users from the Example.local and Child.Example.local domain can be authenticated to resources in the Example.com domain.

If Figure 2 has an External trust, only users from Example.local can be authenticated to resources in the Example.com domain. Users from Child.Example.local cannot traverse the trust to access resources in the Example.com domain.

Trust direction

Two-way trusts are bidirectional trusts that allow authentication referrals from either side of the trust to give users access resources in either domain or forest. If you look in the Active Directory Domains and Trusts area of the Microsoft Management Console (MMC), which provides consoles to manage the hardware, software, and network components of Microsoft Windows operating system, you can see both an incoming and an outgoing trust for the trusted domain.

One-way trusts are a single-direction trust that allows authentication referrals from one side of the trust only. A one-way trust is either outgoing or incoming, but not both (that would be a two-way trust).

  • An outgoing trust allows users from the trusted domain (Example.com) to authenticate in this domain (Example.local).
  • An incoming trust allows users from this domain (Example.local) to authenticate in the trusted domain (Example.com).


Figure 3: One-way trust direction

Figure 3: One-way trust direction

Let’s use a diagram to further explain this concept. Figure 3 shows a one-way trust between Example.com and Example.local. This an outgoing trust from Example.com and an incoming trust on Example.local. Users from Example.local can authenticate and, if given proper permissions, access resources in Example.com. Users from Example.com cannot access or authenticate to resources in Example.local.

Trust types

In this section of the post, I’ll examine the various types of Active Directory trusts and their capabilities.

External trusts

This trust type is used to share resources between two domains. These can be individual domains within or external to a forest. Think of this as a point-to-point trust between two domains. See Understanding When to Create an External Trust for more details on this trust type.

  • Transitivity: Non-transitive
  • Direction: One-way or two-way
  • Authentication types: NTLM Only* (Kerberos is possible with caveats; see the Microsoft Windows Server documentation for details)
  • AWS Managed Microsoft AD support: Yes

Forest trusts

This trust type is used to share resources between two forests. This is the preferred trust model, because it works fully with Kerberos without any caveats. See Understanding When to Create a Forest Trust for more details.

  • Transitivity: Transitive
  • Direction: One-way or two-way
  • Authentication types: Kerberos and NTLM
  • AWS Managed Microsoft AD support: Yes

Realm trusts

This trust type is used to form a trust relationship between a non-Windows Kerberos realm and an Active Directory domain. See Understanding When to Create a Realm Trust for more details.

  • Transitivity: Non-transitive or transitive
  • Direction: One-way or two-way
  • Authentication types: Kerberos Only
  • AWS Managed Microsoft AD support: No

Shortcut trusts

This trust type is used to shorten the authentication path between domains within complex forests. See Understanding When to Create a Shortcut Trust for more details.

  • Transitivity: Transitive
  • Direction: One-way or two-way
  • Authentication types: Kerberos and NTLM
  • AWS Managed Microsoft AD support: No

User Principal Name suffixes

The default User Principal Name (UPN) suffix for a user account is the Domain Name System (DNS) domain name of the domain where the user account resides. In AWS Managed Microsoft AD and self-managed AD, alternative UPN suffixes are added to simplify administration and user logon processes by providing a single UPN suffix for all users. The UPN suffix is used within the Active Directory forest, and is not required to be a valid DNS domain name. See Adding User Principal Name Suffixes for the process to add UPN suffixes to a forest.

For example, if your domain is Example.local but you want your users to sign in with what appears to be another domain name (such as ExampleSuffix.local), you would need to add a new UPN suffix to the domain. Figure 4 shows a user being created with an alternate UPN suffix.
 

Figure 4: UPN selection on object creation

Figure 4: UPN selection on object creation

If you’re logged into a Windows system, you can use the whoami /upn command to see the UPN of the current user.

Forest trusts and name suffix routing

Name suffix routing manages how authentication requests are routed across forest trusts. A unique name suffix is a name suffix within a forest, such as a UPN suffix or DNS forest or domain tree name, that isn’t subordinate to any other name suffix. For example, the DNS forest name Example.com is a unique name suffix within the example.com forest.

All names that are subordinate to unique name suffixes are routed implicitly. For example, if your forest root is named Example.local, authentication requests for all child domains of Example.local (Child.Example.local) will be routed because the child domains are subordinate to the Example.local name suffix. If you want to exclude members of a child domain from authenticating in the specified forest, you can disable name suffix routing for that name. You can also disable routing for the forest name itself, if necessary. With domain trees and additional UPN suffixes, name suffix routing by default is disabled and must be enabled if those suffixes are to be able to traverse the trust.

Note: In AWS Managed Microsoft AD, customers don’t have the ability to create or modify trusts by using the native Microsoft tools. If you need a name suffix route enabled for your trust, open a support case with Premium Support.

A couple of diagrams will make it easier to digest this information. Figure 5 shows the trust configuration. There is a one-way outgoing forest trust from Example.com to Example.local. Example.local has a UPN suffix named ExampleSuffix.local added to it. Example.local also has a child domain named Child and a tree domain named ExampleTree.local. By default, users in Example.local and Child.Example.local will be able to authenticate to resources in Example.com. Users in the ExampleTree.local domain will not be able to authenticate to resources in Example.com, unless the name suffix route for ExampleTree.local is enabled on the trust object in Example.com.
 

Figure 5: Multi-domain and suffix forest with a trust

Figure 5: Multi-domain and suffix forest with a trust

Figure 6 is from the trust properties dialog from the Example.com forest of a trust between Example.com and Example.local. As you can see, *.example.local is enabled. But the custom UPN suffix ExampleSuffix.local and the tree domain ExampleTree.local are disabled by default.
 

Figure 6: Example.local trusts details

Figure 6: Example.local trusts details

Selective authentication

With AWS Managed Microsoft AD and self-managed AD, you have the option of configuring Selective Authentication. This option restricts authentication access over a trust to only the users in a trusted domain or forest who have been explicitly given authentication permissions to computer objects that reside in the trusting domain or forest.

When you use domain or forest-wide authentication, depending on the trust direction, users can authenticate across the trust. Authentication by itself doesn’t provide access—users have to be delegated permissions to access resources. When Selective Authentication is enabled, you must set the Allowed to Authenticate permission on each computer object the trusted user will be accessing, in addition to any other permissions that are required to access the computer object.

While Selective Authentication is a way to provide additional hardening of trusts, it requires a significant amount of planning and delegation, because you have to set the Allowed to Authenticate permission on all computer objects that are being accessed. It can also make troubleshooting permissions and trust issues more difficult.

For more details on Selective Authentication, see Selective Authentication and Configuring Selective Authentication Settings in the Microsoft documentation.

SID filtering

I won’t spend a lot of time on the subject of SID filtering, since this feature is enabled in AWS Managed Microsoft AD and can’t be disabled. SID filtering prevents malicious users who have domain or enterprise administrator level access in a trusted forest from granting elevated user rights to a trusting forest. It does this by preventing misuse of the attributes containing SIDs on security principals in the trusted forest. For example, a malicious user with administrative credentials located in a trusted forest could, through various means, obtain the SID information of a domain or enterprise admin in the trusting forest. After obtaining the SID of an administrator from the trusting forest, a malicious user with administrative credentials can add that SID to the SID history attribute of a security principal in the trusted forest and attempt to gain full access to the trusting forest and the resources within it.

Keeping SID filtering disabled on your on-premises domain can open your domain up to risks from malicious users. We understand that during a domain migration, you may need to disable it to allow an object’s SID from the original domain to be used during the migration. But in AWS Managed Microsoft AD, this filtering cannot be disabled. See SID Filtering for more details.

Network ports that are required to create trusts

The following network ports are required to be open between domain controllers on both domains or forests prior to attempting to create a trust. Note, the Security Group used by your AWS Managed Microsoft AD directory already has these inbound ports open. You will need to adjust the outbound rules of the Security Group to let it communicate with the to be trusted domains or forests. The following table is based on Microsoft’s recommendations. Depending on your use case, some of these ports might not need to be opened. For example, if LDAP over SSL isn’t configured, then TCP 636 isn’t needed.

Port Protocol Service
53 TCP and UDP DNS
88 TCP and UDP Kerberos
123 UDP Windows Time
135 TCP Remote Procedure Call (RPC)
389 TCP and UDP Lightweight Directory Access Protocol (LDAP)
445 TCP Server Message Block (SMB)
464 TCP and UDP Kerberos Password Change
636 TCP LDAP over SSL
3268 TCP LDAP Global Catalog (GC)
3269 TCP LDAP GC over SSL
49152–65535 TCP and UDP RPC

Trust creation process overview

AWS Managed Microsoft AD is based on Windows Server Active Directory Domain Services, which means that Active Directory trusts function the same way they do with self-managed Active Directory. The only difference is how the trust is created. You use the AWS Management Console or APIs to create the trust for the AWS Managed Microsoft AD side. This process has been documented thoroughly in the AWS Directory Service Administration Guide, so I won’t go into detail on the steps.

The high-level overview of the process is:

  1. Ensure that network and DNS name resolution is available and functional between the domains.
  2. Create the trust on the on-premises Active Directory.
  3. Complete the trust on the AWS Managed Microsoft AD in the AWS Directory Service console.

Common trust scenarios with AWS Managed Microsoft AD

When you create trust between an on-premises domain and AWS Managed Microsoft AD, there are some items to take into consideration that will help you decide what direction of trust you need to deploy. In this post, I’ll cover a couple of the most common scenarios.

All scenarios: Selecting a trust type

Let’s start with the choice between a Forest or External trust. We generally recommend using a Forest trust type. The reason for that is that Forest trusts fully support Kerberos without any caveats. With that said, if you have a specific requirement to implement an External trust, you can do so—just be aware of these caveats.

Scenario 1: Use AWS Managed Microsoft AD as a resource forest for Amazon RDS, Amazon FSx for Windows File Server, or Amazon EC2 instances

In this scenario, you might want to use AWS Managed Microsoft AD as a resource forest for Amazon RDS, Amazon FSx for Windows File Server, or Amazon Elastic Compute Cloud (Amazon EC2). AWS Managed Microsoft AD is going to be a resource domain, and user accounts will reside on the on-premises side of the trust and need to be able to access the resources in the AWS Managed Microsoft AD side of the trust.

In this scenario, the AWS applications (Amazon RDS, Amazon FSx for Windows File Server, or Amazon EC2) don’t require a two-way trust to function, because they are natively integrated with Active Directory. This tells you that you only need authentication to flow one way. This scenario requires a one-way incoming trust on the on-premises domain and one-way outgoing trusts on the AWS Managed Microsoft AD domain. Figure 7 demonstrates this.
 

Figure 7: A one-way trust

Figure 7: A one-way trust

Scenario 2: Use AWS Managed Microsoft AD as a resource forest for all other supported AWS applications

In this scenario, you want to use AWS Managed Microsoft AD as a resource domain for all other supported AWS applications that aren’t included in Scenario 1. As the previous scenario stated, AWS Managed Microsoft AD will be a resource domain, and the user accounts will reside on the on-premises side of the trust and need to be able to access the resources in the AWS Managed Microsoft AD.

In this scenario, AWS applications (Amazon Chime, Amazon Connect, Amazon QuickSight, AWS Single Sign-On, Amazon WorkDocs, Amazon WorkMail, Amazon WorkSpaces, AWS Client VPN, AWS Management Console, and AWS Transfer Family) need to be able to look up objects from the on-premises domain in order for them to function. This tells you that authentication needs to flow both ways. This scenario requires a two-way trust between the on-premises and AWS Managed Microsoft AD domains. Figure 8 demonstrates this.
 

Figure 8: A two-way trust

Figure 8: A two-way trust

Common trust myths and misconceptions

I have had many conversations with customers concerning trusts between their on-premises domain and their AWS Managed Microsoft AD domain. These are some of the common myths and misconceptions we’ve come across in our conversations.

Trusts synchronize objects between each domain.

This is false. A trust between domains or forests acts as a bridge that allows validated authentication requests, in the form of Kerberos or NTLM traffic, to travel between domains or forests. Objects are not synchronized between the domains or forests. Only the trust password is synchronized, which is used for Kerberos.

My password is passed over the trust when authenticating.

This is false. As I showed earlier in the Starting with Kerberos section, when authenticating across trusts, the user’s password is not passed between domains. The only things passed between domains are the Ticket Granting Service (TGS) requests and responses, which are generated in real time, are single use, and expire within hours.

A one-way trust allows bidirectional authentication.

This is false. One-way trusts allow authentications to traverse in one direction only. Users or objects from the trusted domain are able to authenticate and, if they are delegated, to access resources in the trusting domain. Users in the trusting domain can’t authenticate into the trusted domain, and aren’t granted permissions to access resources. Let’s say there is an Amazon FSx file system in Example.local and a one-way trust between Example.com (outgoing trust direction) and Example.local (incoming trust direction). A user in Example.com can’t be delegated permission to the Amazon FSx file system Example.local with the current trust configuration. That’s the nature of a one-way trust.

Trusts are inherently insecure by default.

This is false, although an improperly configured trust can increase your risk and exposure. Trusts by themselves do very little to increase an Active Directory’s attack surface. You should always use best practices when creating a trust to minimize risk. For example, a trust without a purpose should be removed. You should disable the SID History unless you’re in the process of migrating domains. See Security Considerations for Trusts for more guidance on securing trusts.

Users in the trusted domain are granted permissions to my domain when a trust is created.

This is false. By default, with two-way trusts, objects have read-only permission to Active Directory in both directions. Objects are not delegated permissions or access to resources or servers by default. For example, if you want a user to log into a computer in another domain, you first must delegate the user access to the resource in the other domain. Without that delegation, the user won’t be able to access the resource.

Troubleshooting trusts

Based on our experience working with many customers, the vast majority of trust configuration issues are either DNS resolution or networking connectivity errors. These are some troubleshooting steps to help you resolve any of these common issues:

  • Check whether you allowed outbound networking traffic on the AWS Managed Microsoft AD. See Step 1: Set up your environment for trusts to learn how to find your directory’s security group and how to modify it.
  • If the DNS server or the network for your on-premises domain uses a public (non-RFC 1918) IP address space, follow these steps:
    1. In the AWS Directory Service console, go to the IP routing section for your directory, choose Actions, and then choose Add route.
    2. Enter the IP address block of your DNS server or on-premises network using CIDR format, for example 203.0.113.0/24.

      This step isn’t necessary if both your DNS server and your on-premises network are using RFC 1918 private IP address spaces.

  • After you verify the security group and check whether any applicable routes are required, launch a Windows Server instance and join it to the AWS Managed Microsoft AD directory. See Step 3: Deploy an EC2 instance to manage your AWS Managed Microsoft AD to learn how to do this. Once the instance is launched, do the following:
    • Run the following PowerShell command to test DNS connectivity:
      Resolve-DnsName -Name 'example.local' -DnsOnly
  • You should also look through the message explanations in the Trust creation status reasons guide in the AWS Directory Service documentation.

Summary of AWS Managed Microsoft AD trust considerations

In this blog post, I covered Kerberos authentication over Active Directory trusts and provided details on what Active Directory trusts are and how they function. Here’s a quick list of items that you should consider when you plan trust creation with AWS Managed Microsoft AD:

  • Ensure that you have a network connection and the appropriate network ports opened between both domains. Note, it is recommended all Active Directory traffic occur over private network connection like a VPN or Direct Connect.
  • Ensure that DNS resolution is working on both sides of the trust.
  • Decide whether you will implement selective authentication. If it will be used, plan your Active Directory access control list (ACL) delegation strategy before implementation.
  • As of this blog’s publication, keep in mind that AWS Managed Microsoft AD currently supports Forest trusts and External trusts only.
  • Ensure that Kerberos preauthentication is enabled for all objects that traverse trusts with AWS Managed Microsoft AD.
  • If you find that you need a name suffix route enabled for your trust, open a support case with AWS Support, requesting that the name suffix route be enabled.
  • Finally, review Security Considerations for Trusts: Domain and Forest Trusts for additional considerations for trust configuration.

If you have feedback about this post, submit comments in the Comments section below. If you have questions about this post, start a new thread on the AWS Directory Service forum.

Want more AWS Security how-to content, news, and feature announcements? Follow us on Twitter.

Author

Jeremy Girven

Jeremy is a solutions architect specializing in Microsoft workloads on AWS. He has over 15 years’ experience with Microsoft Active Directory and over 23 years of industry experience. One of his fun projects is using SSM to automate the Active Directory build processes in AWS. To see more, check out the Active Directory AWS QuickStart.

Catalog and analyze Application Load Balancer logs more efficiently with AWS Glue custom classifiers and Amazon Athena

Post Syndicated from Ray Wang original https://aws.amazon.com/blogs/big-data/catalog-and-analyze-application-load-balancer-logs-more-efficiently-with-aws-glue-custom-classifiers-and-amazon-athena/

You can query Application Load Balancer (ALB) access logs for various purposes, such as analyzing traffic distribution and patterns. You can also easily use Amazon Athena to create a table and query against the ALB access logs on Amazon Simple Storage Service (Amazon S3). (For more information, see How do I analyze my Application Load Balancer access logs using Amazon Athena? and Querying Application Load Balancer Logs.) All queries are run against the whole table because it doesn’t define any partitions. If you have several years of ALB logs, you may want to use a partitioned table instead for better query performance and cost control. In fact, partitioning data is one of the Top 10 performance tuning tips for Athena.

However, because ALB log files aren’t stored in a Hive-style prefix (such as /year=2021/), the process of creating thousands of partitions using ALTER TABLE ADD PARTITION in Athena is cumbersome. This post shows a way to create and schedule an AWS Glue crawler with a Grok custom classifier that infers the schema of all ALB log files under the specified Amazon S3 prefix and populates the partition metadata (year, month, and day) automatically to the AWS Glue Data Catalog.

Prerequisites

To follow along with this post, complete the following prerequisites:

  1. Enable access logging of the ALBs, and have the files already ingested in the specified S3 bucket.
  2. Set up the Athena query result location. For more information, see Working with Query Results, Output Files, and Query History.

Solution overview

The following diagram illustrates the solution architecture.

To implement this solution, we complete the following steps:

  1. Prepare the Grok pattern for our ALB logs, and cross-check with a Grok debugger.
  2. Create an AWS Glue crawler with a Grok custom classifier.

  3. Run the crawler to prepare a table with partitions in the Data Catalog.
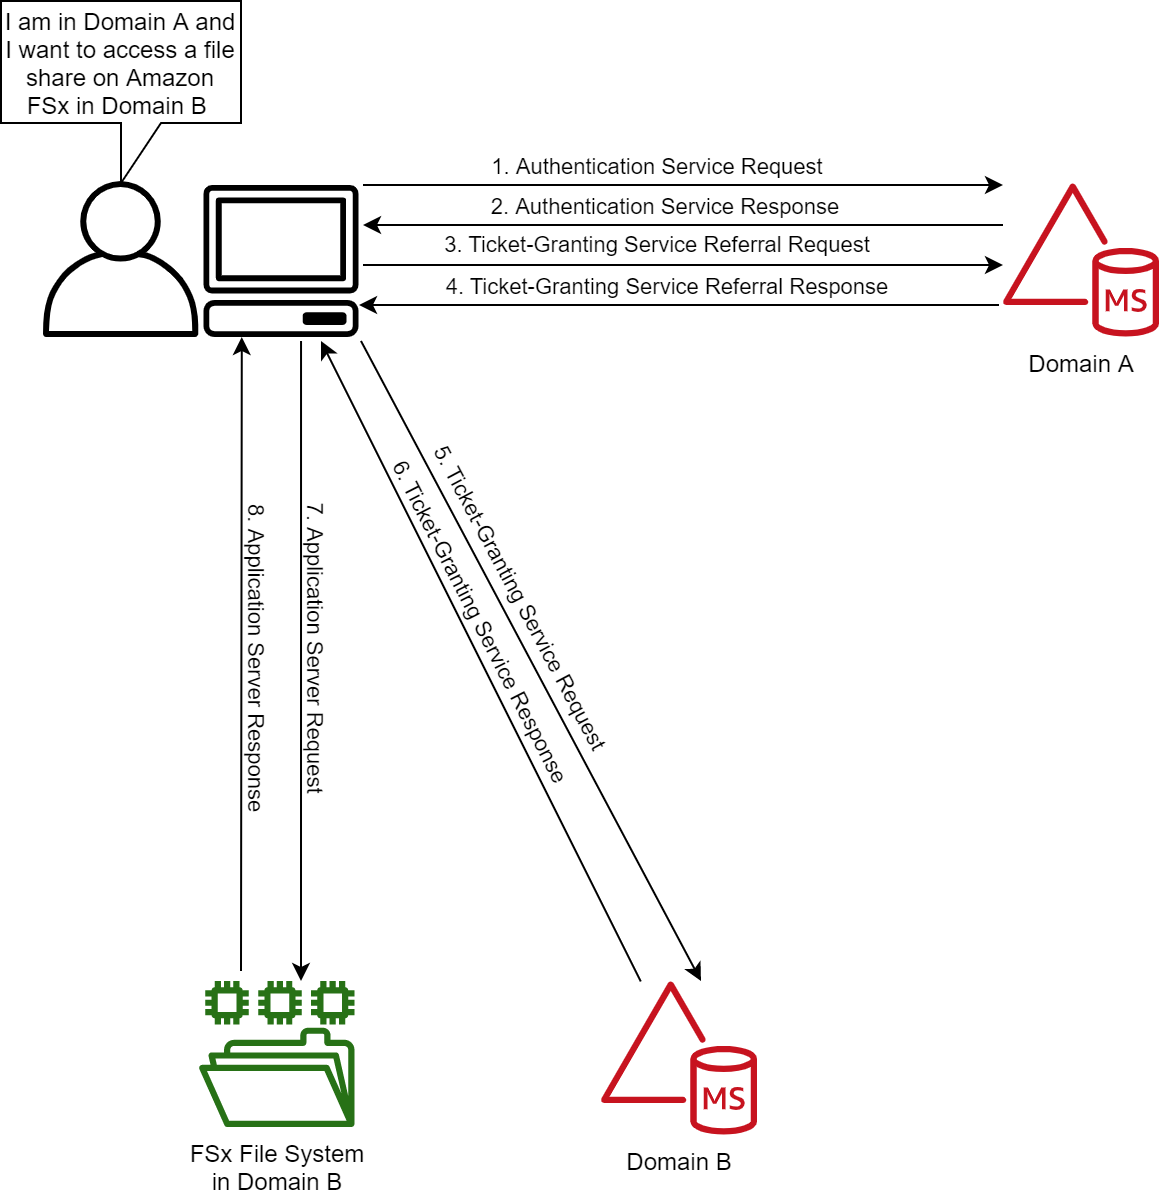
  4. Analyze the partitioned data using Athena and compare query speed vs. a non-partitioned table.

Prepare the Grok pattern for our ALB logs

As a preliminary step, locate the access log files on the Amazon S3 console, and manually inspect the files to observe the format and syntax. To allow an AWS Glue crawler to recognize the pattern, we need to use a Grok pattern to match against an expression and map specific parts into the corresponding fields. Approximately 100 sample Grok patterns are available in the Logstash Plugins GitHub, and we can write our own custom pattern if it’s not listed.

The following the basic syntax format for a Grok pattern %{PATTERN:FieldName}

The following is an example of an ALB access log:

http 2018-07-02T22:23:00.186641Z app/my-loadbalancer/50dc6c495c0c9188 192.168.131.39:2817 10.0.0.1:80 0.000 0.001 0.000 200 200 34 366 "GET http://www.example.com:80/ HTTP/1.1" "curl/7.46.0" - - arn:aws:elasticloadbalancing:us-east-2:123456789012:targetgroup/my-targets/73e2d6bc24d8a067 "Root=1-58337262-36d228ad5d99923122bbe354" "-" "-" 0 2018-07-02T22:22:48.364000Z "forward" "-" "-" "10.0.0.1:80" "200" "-" "-"
https 2018-07-02T22:23:00.186641Z app/my-loadbalancer/50dc6c495c0c9188 192.168.131.39:2817 10.0.0.1:80 0.086 0.048 0.037 200 200 0 57 "GET https://www.example.com:443/ HTTP/1.1" "curl/7.46.0" ECDHE-RSA-AES128-GCM-SHA256 TLSv1.2 arn:aws:elasticloadbalancing:us-east-2:123456789012:targetgroup/my-targets/73e2d6bc24d8a067 "Root=1-58337281-1d84f3d73c47ec4e58577259" "www.example.com" "arn:aws:acm:us-east-2:123456789012:certificate/12345678-1234-1234-1234-123456789012" 1 2018-07-02T22:22:48.364000Z "authenticate,forward" "-" "-" "10.0.0.1:80" "200" "-" "-"
h2 2018-07-02T22:23:00.186641Z app/my-loadbalancer/50dc6c495c0c9188 10.0.1.252:48160 10.0.0.66:9000 0.000 0.002 0.000 200 200 5 257 "GET https://10.0.2.105:773/ HTTP/2.0" "curl/7.46.0" ECDHE-RSA-AES128-GCM-SHA256 TLSv1.2 arn:aws:elasticloadbalancing:us-east-2:123456789012:targetgroup/my-targets/73e2d6bc24d8a067 "Root=1-58337327-72bd00b0343d75b906739c42" "-" "-" 1 2018-07-02T22:22:48.364000Z "redirect" "https://example.com:80/" "-" "10.0.0.66:9000" "200" "-" "-"
ws 2018-07-02T22:23:00.186641Z app/my-loadbalancer/50dc6c495c0c9188 10.0.0.140:40914 10.0.1.192:8010 0.001 0.003 0.000 101 101 218 587 "GET http://10.0.0.30:80/ HTTP/1.1" "-" - - arn:aws:elasticloadbalancing:us-east-2:123456789012:targetgroup/my-targets/73e2d6bc24d8a067 "Root=1-58337364-23a8c76965a2ef7629b185e3" "-" "-" 1 2018-07-02T22:22:48.364000Z "forward" "-" "-" "10.0.1.192:8010" "101" "-" "-"
wss 2018-07-02T22:23:00.186641Z app/my-loadbalancer/50dc6c495c0c9188 10.0.0.140:44244 10.0.0.171:8010 0.000 0.001 0.000 101 101 218 786 "GET https://10.0.0.30:443/ HTTP/1.1" "-" ECDHE-RSA-AES128-GCM-SHA256 TLSv1.2 arn:aws:elasticloadbalancing:us-west-2:123456789012:targetgroup/my-targets/73e2d6bc24d8a067 "Root=1-58337364-23a8c76965a2ef7629b185e3" "-" "-" 1 2018-07-02T22:22:48.364000Z "forward" "-" "-" "10.0.0.171:8010" "101" "-" "-"
http 2018-11-30T22:23:00.186641Z app/my-loadbalancer/50dc6c495c0c9188 192.168.131.39:2817 - 0.000 0.001 0.000 200 200 34 366 "GET http://www.example.com:80/ HTTP/1.1" "curl/7.46.0" - - arn:aws:elasticloadbalancing:us-east-2:123456789012:targetgroup/my-targets/73e2d6bc24d8a067 "Root=1-58337364-23a8c76965a2ef7629b185e3" "-" "-" 0 2018-11-30T22:22:48.364000Z "forward" "-" "-" "-" "-" "-" "-"
http 2018-11-30T22:23:00.186641Z app/my-loadbalancer/50dc6c495c0c9188 192.168.131.39:2817 - 0.000 0.001 0.000 502 - 34 366 "GET http://www.example.com:80/ HTTP/1.1" "curl/7.46.0" - - arn:aws:elasticloadbalancing:us-east-2:123456789012:targetgroup/my-targets/73e2d6bc24d8a067 "Root=1-58337364-23a8c76965a2ef7629b185e3" "-" "-" 0 2018-11-30T22:22:48.364000Z "forward" "-" "LambdaInvalidResponse" "-" "-" "-" "-"

To map the first field, the Grok pattern might look like the following code:

%{DATA:type}\s

The pattern includes the following components:

  • DATA maps to .*?
  • type is the column name
  • \s is the whitespace character

To map the second field, the Grok pattern might look like the following:

%{TIMESTAMP_ISO8601:time}\s

This pattern has the following elements:

  • TIMESTAMP_ISO8601 maps to %{YEAR}-%{MONTHNUM}-%{MONTHDAY}[T ]%{HOUR}:?%{MINUTE}(?::?%{SECOND})?%{ISO8601_TIMEZONE}?
  • time is the column name
  • \s is the whitespace character

When writing Grok patterns, we should also consider corner cases. For example, the following code is a normal case:

%{BASE10NUM:target_processing_time}\s

But when considering the possibility of null value, we should replace the pattern with the following:

%{DATA:target_processing_time}\s

When our Grok pattern is ready, we can test the Grok pattern with sample input using a third-party Grok debugger. The following pattern is a good start, but always remember to test it with the actual ALB logs.

%{DATA:type}\s+%{TIMESTAMP_ISO8601:time}\s+%{DATA:elb}\s+%{DATA:client}\s+%{DATA:target}\s+%{BASE10NUM:request_processing_time}\s+%{DATA:target_processing_time}\s+%{BASE10NUM:response_processing_time}\s+%{BASE10NUM:elb_status_code}\s+%{DATA:target_status_code}\s+%{BASE10NUM:received_bytes}\s+%{BASE10NUM:sent_bytes}\s+\"%{DATA:request}\"\s+\"%{DATA:user_agent}\"\s+%{DATA:ssl_cipher}\s+%{DATA:ssl_protocol}\s+%{DATA:target_group_arn}\s+\"%{DATA:trace_id}\"\s+\"%{DATA:domain_name}\"\s+\"%{DATA:chosen_cert_arn}\"\s+%{DATA:matched_rule_priority}\s+%{TIMESTAMP_ISO8601:request_creation_time}\s+\"%{DATA:actions_executed}\"\s+\"%{DATA:redirect_url}\"\s+\"%{DATA:error_reason}\"\s+\"%{DATA:target_list}\"\s+\"%{DATA:target_status_code_list}\"\s+\"%{DATA:classification}\"\s+\"%{DATA:classification_reason}\"

Keep in mind that when you copy the Grok pattern from your browser, in some cases there are extra spaces in the end of the lines. Make sure to remove these extra spaces.

Create an AWS Glue crawler with a Grok custom classifier

Before you create your crawler, you first create a custom classifier. Complete the following steps:

  1. On the AWS Glue console, under Crawler, choose Classifiers.
  2. Choose Add classifier.
  3. For Classifier name, enter alb-logs-classifier.
  4. For Classifier type¸ select Grok.
  5. For Classification, enter alb-logs.
  6. For Grok pattern, enter the pattern from the previous section.
  7. Choose Create.

Now you can create your crawler.

  1. Choose Crawlers in the navigation pane.
  2. Choose Add crawler.
  3. For Crawler name, enter alb-access-log-crawler.
  4. For Selected classifiers, enter alb-logs-classifier.

  5. Choose Next.
  6. For Crawler source type, select Data stores.
  7. For Repeat crawls of S3 data stores, select Crawl new folders only.
  8. Choose Next.
  9. For Choose a data store, choose S3.
  10. For Crawl data in, select Specified path in my account.
  11. For Include path, enter the path to your ALB logs (for example, s3://alb-logs-directory/AWSLogs/<ACCOUNT-ID>/elasticloadbalancing/<REGION>/).
  12. Choose Next.
  13. When prompted to add another data store, select No and choose Next.
  14. Select Create an IAM role, and give it a name such as AWSGlueServiceRole-alb-logs-crawler.
  15. For Frequency, choose Daily.
  16. Indicate your start hour and minute.
  17. Choose Next.
  18. For Database, enter elb-access-log-db.
  19. For Prefix added to tables, enter alb_logs_.
  20. Expand Configuration options.
  21. Select Update all new and existing partitions with metadata from the table.
  22. Keep the other options at their default.
  23. Choose Next.
  24. Review your settings and choose Finish.

Run your AWS Glue crawler

Next, we run our crawler to prepare a table with partitions in the Data Catalog.

  1. On the AWS Glue console, choose Crawlers.
  2. Select the crawler we just created.
  3. Choose Run crawler.

When the crawler is complete, you receive a notification indicating that a table has been created.

Next, we review and edit the schema.

  1. Under Databases, choose Tables.
  2. Choose the table alb_logs_<region>.
  3. Cross-check the column name and corresponding data type.

The table has three columns: partiion_0, partition_1, and partition_2.

  1. Choose Edit schema.
  2. Rename the columns year, month, and day.
  3. Choose Save.

Analyze the data using Athena

Next, we analyze our data by querying the access logs. We compare the query speed between the following tables:

  • Non-partitioned table – All data is treated as a single table
  • Partitioned table – Data is partitioned by year, month, and day

Query the non-partitioned table

With the non-partitioned table, if we want to query access logs on a specific date, we have to write the WHERE clause using the LIKE operator because the data column was interpreted as a string. See the following code:

SELECT COUNT(1) FROM "elb-access-log-db"."alb_logs" WHERE type='h2' AND time LIKE '2020-12-29%';

The query takes 5.25 seconds to complete, with 3.15 MB data scanned.

Query the partitioned table

With the year, month, and day columns as partitions, we can use the following statement to query access logs on the same day:

SELECT COUNT(1) FROM "elb-access-log-db"."alb_logs" WHERE type='h2' AND year=2020 AND month=12 AND day=29;

This time the query takes only 1.89 seconds to complete, with 25.72 KB data scanned.

This query is faster and costs less (because less data is scanned) due to partition pruning.

Clean up

To avoid incurring future charges, delete the resources created in the Data Catalog, and delete the AWS Glue crawler.

Summary

In this post, we illustrated how to create an AWS Glue crawler that populates ALB logs metadata in the AWS Glue Data Catalog automatically with partitions by year, month, and day. With partition pruning, we can improve query performance and associated costs in Athena.

If you have questions or suggestions, please leave a comment.


About the Authors

Ray Wang is a Solutions Architect at AWS. With 8 years of experience in the IT industry, Ray is dedicated to building modern solutions on the cloud, especially in big data and machine learning. As a hungry go-getter, he passed all 12 AWS certificates to make his technical field not only deep but wide. He loves to read and watch sci-fi movies in his spare time.

Corvus Lee is a Data Lab Solutions Architect at AWS. He enjoys all kinds of data-related discussions with customers, from high-level like white boarding a data lake architecture, to the details of data modeling, writing Python/Spark code for data processing, and more.

The collective thoughts of the interwebz