Post Syndicated from The History Guy: History Deserves to Be Remembered original https://www.youtube.com/watch?v=UCKNyR1K30c
Rahm Emanuel and Trump’s Tariff Chaos | The David Frum Show
Post Syndicated from The Atlantic original https://www.youtube.com/watch?v=aTfVTeHbvxI
How to Leak to a Journalist
Post Syndicated from Bruce Schneier original https://www.schneier.com/blog/archives/2025/04/how-to-leak-to-a-journalist.html
Neiman Lab has some good advice on how to leak a story to a journalist.
Speaking Your Language: Expanded language support in Amazon Q Developer
Post Syndicated from Brian Beach original https://aws.amazon.com/blogs/devops/amazon-q-developer-global-capabilities/
As the world of software development becomes increasingly global, the need for tools that support multiple languages has become paramount. Today, I am excited to announce expanded language support in Amazon Q Developer. In this post, I explore the recent expansion of language support in Amazon Q Developer, a powerful platform used by developers worldwide to discuss architecture, create documentation, design interfaces, and build applications.
While English remains the lingua franca of programming, the reality of modern software development extends far beyond code. Developers worldwide use Amazon Q Developer to discuss architecture decisions, create documentation, design user interfaces, and build applications that serve global audiences. By expanding language support, Amazon Q Developer now enables developers to have more natural, fluid conversations about complex technical concepts in their preferred language, whether they’re designing system architecture, generating documentation, or planning application localization strategies.
The power of this expanded language support is demonstrated in the following image, where I asked the same container hosting question in English, Chinese, Hindi, and Spanish. Not only does Amazon Q Developer now provide complete responses in these languages, but it also maintains technical accuracy while adapting to linguistic nuances. Furthermore, Q Developer now suggests follow-up questions and responses in the user’s chosen language, creating a more intuitive and seamless experience for developers worldwide. This natural flow of conversation in any language helps maintain the developer’s focus and flow, eliminating the mental overhead of constant translation.

Expanded language is available in the integrated development environment (IDE) and command line interface (CLI) with support coming to the AWS Management Console soon. In my IDE, chat, inline chat, inline suggestions, agents, etc. now support additional spoken languages. In the following example, I used inline chat to ask, in French, that Q Developer add TSDocs comments to my code. As you can see, Q Developer added comments, in French, documenting the method.

Whether you’re a developer in Seoul writing documentation in Korean, a startup in Madrid brainstorming architecture in Spanish, or a team in Brazil collaborating in Portuguese, Amazon Q Developer is now ready to support your journey and your preferred language. Expanded language support is available to users of both the Free and Pro Tier starting today. Get started with Amazon Q Developer, and share your feedback. Together, we’re building a more inclusive and accessible future for software development.
The IBM z17 Mainframe Brings AI with Telum II and Spyre
Post Syndicated from Patrick Kennedy original https://www.servethehome.com/the-ibm-z17-mainframe-brings-ai-with-telum-ii-and-spyre/
The IBM z17 mainframe brings new AI capabilities with the Telum II processor and its built-in AI accelerator and the PCIe-based Spyre AI cards
The post The IBM z17 Mainframe Brings AI with Telum II and Spyre appeared first on ServeTheHome.
Comic for 2025.04.09 – Groomers
Post Syndicated from Explosm.net original https://explosm.net/comics/groomers
New Cyanide and Happiness Comic
The Face of Beauty
Post Syndicated from The History Guy: History Deserves to Be Remembered original https://www.youtube.com/watch?v=2l6SDVvJ0sA
Push Notifications
Post Syndicated from xkcd.com original https://xkcd.com/3074/
Enriching and customizing notifications with Amazon EventBridge Pipes
Post Syndicated from Chris McPeek original https://aws.amazon.com/blogs/compute/enriching-and-customizing-notifications-with-amazon-eventbridge-pipes/
This blog post authored by Elie Elmalem, Associate Scale Solutions Architect
When implementing event-driven architectures, customers frequently need to enrich their incoming events with additional information to make them more valuable for downstream consumers. Traditionally, customers using Amazon EventBridge would accomplish this by writing AWS Lambda functions to augment their events with supplementary data. However, this approach requires writing and maintaining custom code, adding complexity to their event processing pipeline.
Amazon EventBridge Pipes simplifies this process by providing a streamlined, managed service for event enrichment without the need to write and manage custom Lambda functions. This blog post demonstrates how you can use EventBridge Pipes’ built-in data enrichment capabilities to dynamically enhance your events with additional context and customer-specific details, making event processing more efficient and easier to maintain.
Amazon EventBridge Pipes
Amazon EventBridge creates a direct connection between sources and targets. Using an EventBridge bus helps you route and fan-out events to services in a pub/sub pattern. EventBridge Pipes on the other hand help you with point-to-point service integrations patterns. What sets it apart from the traditional event bus/rule pattern is its data transformation and enrichment support.
When defining an EventBridge Pipes, you specify the source and the target of the pipe. Pipes support a variety of sources and targets. Between the source and target, EventBridge Pipes supports filtering and enrichment. The filtering enables you to select and process a targeted subset of events. Enrichment allows you to enhance data by adding missing information before sending it to a target. For instance, if an event lacks necessary information, it ensures the target can properly consume the event. Enriching data can be very powerful, as it makes it possible to enhance a generic event and transform it. EventBridge Pipes support enrichment using Lambda functions, AWS Step Functions, Amazon API Gateway and EventBridge API destinations. More details about these concepts can be found in the Amazon EventBridge Pipes concepts documentation.

Figure 1: Representation of EventBridge Pipes showing filter and enrichment steps
This blog post will use the enrichment step of the pipe to create custom notifications.
Overview
To illustrate the functionality, this post uses a use case from a clothing retailer. Businesses such as this retailer want to keep their loyal customers engaged. Often, they rely on bulk promotional emails which lack personalization. In this use case, the retailer wants to send targeted promotion codes. As soon as the 10th order is placed, the code is sent via email or SMS to their customer.
Without EventBridge Pipes, this would be implemented using EventBridge to respond to the order event. All the events are sent to a custom Lambda function to process it. If the order meets the right conditions, the Lambda function sends a notification with the discount code to the customer using Amazon Simple Notification Service (Amazon SNS).

Figure 2: Traditional approach using EventBridge
While this architecture works, it requires you to maintain the integration code as well as the data enriching logic within the Lambda function as the function needs to extract the necessary information from the events and manage routing to SNS. As more microservices follow the same pattern, the code becomes more complex. This can lead to longer execution times along with higher cost and greater maintenance effort.
Simplifying using Amazon EventBridge Pipes
Amazon EventBridge Pipes can be used to simplify the previous implementation by handling the enrichment and integration between services. Amazon EventBridge Pipes take care of sending the event to your configured enrichment step and then routes the enriched event to the target. If the chosen method is a Lambda function, it leaves the function code to only focus on enrichment logic. It eliminates the need for code to extract the necessary fields from the event and to send notifications.

Figure 3: Solution architecture using EventBridge Pipes
As the event comes into the pipe, the enrichment step triggers a Lambda function, which will check eligibility and returns the message to route to SNS. If the customer is not eligible for a discount code, it returns an order confirmed message with the data retrieved from the original order event. If the customer is eligible for a discount, the message also contains the discount code.
This is the architecture for the updated flow:
- A customer orders a new item. The order is sent to a Simple Queue Service (SQS) Orders queue.
- The new message on the Orders queue triggers the EventBridge Pipes.
- The pipe triggers an AWS Lambda function to enrich the data.
- The functions checks if the customer is eligible for a discount code against an Amazon DynamoDB table. The table contains the number of times each customer has ordered.
- The Lambda function returns the custom message that will be sent to the customer, either with or without the discount code.
- The message is routed to an SNS topic by the EventBridge Pipe
- Customer receives the notification via its preferred subscription method.
Building the updated flow
To build the updated flow, I have chosen to use the AWS Cloud Development Kit (CDK) in Python. You can use the code given here to deploy it into your account. The code can also be found on GitHub.
Note: This sample code is for testing purposes only and is not intended to be used in a production account.
For this solution, you need the following prerequisites:
- The AWS Command Line Interface (CLI) installed and configured for use.
- An Identity and Access Management (IAM) role or user with enough permissions to create an IAM policy, DynamoDB table, SQS queue, SNS topic, Lambda Function and EventBridge Pipes.
- AWS CDK
- Python version 3.9 or above, with pip and virtual virtualenv.
Once the prerequisites are met, set up a new Python CDK project in an empty directory:
Then, activate the virtual environment and install the CDK’s dependencies:
The cdk init command creates a blog_code folder. The GitHub repository contains the code for the blog_code_stack.py file inside the blog_code folder.
Then, within the blog_code folder, create a new folder called lambda. Inside this new folder, create a file called index.py. This file will contain the code for the enrichment lambda function. Once again, this code can be found in the GitHub repository. Here is a section of the Lambda code:
def lambda_handler(event, context):

    message = json.loads(event[0]['body'])

    id = message['id']
    order_content = message['order_content']

    nmb_orders = get_number_of_orders(id)

    # Calculate orders left
    orders_left = MAX_ORDERS - nmb_orders

    # Update the DynamoDB table with the new number of orders
    if nmb_orders == MAX_ORDERS:
        update_table(id, 0)
    else:
        update_table(id, nmb_orders)

    if orders_left == 0:
        return [f"Thank you for your order of {order_content}. You have earned a 10% discount code on your next order: XA5GT2SF"]
    else:
        # Return the confirmation message
        return [f"Thank you for your order of {order_content}. This is your confirmation message! Only {orders_left} orders left until a 10% discount!"]
The Lambda function works in the following way:
- It receives an event from the EventBridge Pipe which consists of the order and the ID of the user who made the order
- It gets the number of orders that the user has already placed by calling a GetItem command on the DynamoDB table.
- It calculates how many orders are left before the user gets the discount code.
- It updates the DynamoDB table with the new number of orders to account for the one that was just placed.
- If the user has placed the right number of orders, it returns a confirmation message with the discount code. Otherwise, it notifies the user of the number of orders that still need to be placed to get the discount.
Now, deploy the CDK stack into your account. Make sure that you are in the root directory of your project:
Once the stack has finished deploying, you will find an EventBridge pipe visible on the console by going to the EventBridge service page and clicking on Pipes in the left panel.
Testing the solution
To test the solution, you must first set up a subscription to the SNS topic to receive notifications. It is recommended to set up email notifications for simplicity and testing purposes. To do so, follow the instructions on the Amazon SNS documentation for the topic with name TargetTopic. When the subscription is set up, don’t forget to check your email inbox and confirm the subscription.
Once notifications are set up, visit the DynamoDB console page. You need to manually add an entry to the eligibility table to mimic a real environment:
- Click on Tables in the left panel
- Select the EligibilityTable table.
- Click Explore table items then Create item
- Enter an id with a value of 01.
- Click Add new attribute and select String.
- Under attribute name, enter orders, and under value enter 8.
- Click Create item.
The Items returned table should look like the following. This assumes that the customer has already place 8 orders.

Figure 4: Items returned table after adding a new item
Now, visit the SQS console page. You will need to send a message to the queue to mimic new orders being placed.
- Click on the queue called SourceQueue.
- Click Send and receive messages.
- Under message body, paste in the following message and click Send message:
{
    "order_content": "large shirt",
    "id": "01",
    "username": "johndoe01",
    "transaction_time": "10:04:00"
  }
After a few minutes, you should receive an email confirming your order, as your order message is considered to be the 9th order. Send the message again to place a 10th order and you should receive your discount code!

Figure 5: Email received with a discount code
Cleanup
To delete the resources in your account, run the following command in the root directory of your project:
cdk destroy
Conclusion
This blog post showed how Amazon EventBridge Pipes and its enrichment feature can help you create tailored notifications. First, it discussed how it could be implemented using EventBridge and then presented a simplified implementation using EventBridge Pipes.
For more information on common patterns for EventBridge Pipes, you can check out Implementing architectural patterns with Amazon EventBridge Pipes.
For more serverless learning resources, visit Serverless Land. To find more patterns, go directly to the Serverless Patterns Collection.
AWS announces Pixtral Large 25.02 model in Amazon Bedrock serverless
Post Syndicated from Sébastien Stormacq original https://aws.amazon.com/blogs/aws/aws-announces-pixtral-large-25-02-model-in-amazon-bedrock-serverless/
Today, we announce that the Pixtral Large 25.02 model is now available in Amazon Bedrock as a fully managed, serverless offering. AWS is the first major cloud provider to deliver Pixtral Large as a fully managed, serverless model.
Working with large foundation models (FMs) often requires significant infrastructure planning, specialized expertise, and ongoing optimization to handle the computational demands effectively. Many customers find themselves managing complex environments or making trade-offs between performance and cost when deploying these sophisticated models.
The Pixtral Large model, developed by Mistral AI, represents their first multimodal model that combines advanced vision capabilities with powerful language understanding. A 128K context window makes it ideal for complex visual reasoning tasks. The model delivers exceptional performance on key benchmarks including MathVista, DocVQA, and VQAv2, demonstrating its effectiveness across document analysis, chart interpretation, and natural image understanding.
One of the most powerful aspects of Pixtral Large is its multilingual capability. The model supports dozens of languages including English, French, German, Spanish, Italian, Chinese, Japanese, Korean, Portuguese, Dutch, and Polish, making it accessible to global teams and applications. It’s also trained on more than 80 programming languages including Python, Java, C, C++, JavaScript, Bash, Swift, and Fortran, providing robust code generation and interpretation capabilities.
Developers will appreciate the model’s agent-centric design with built-in function calling and JSON output formatting, which simplifies integration with existing systems. Its strong system prompt adherence improves reliability when working with Retrieval Augmented Generation (RAG) applications and large context scenarios.
With Pixtral Large in Amazon Bedrock, you can now access this advanced model without having to provision or manage any infrastructure. The serverless approach lets you scale usage based on actual demand without upfront commitments or capacity planning. You pay only for what you use, with no idle resources.
Cross-Region inference
Pixtral Large is now available in Amazon Bedrock across multiple AWS Regions through cross-Region inference.
With Amazon Bedrock cross-Region inference, you can access a single FM across multiple geographic Regions while maintaining high availability and low latency for global applications. For example, when a model is deployed in both European and US Regions, you can access it through Region-specific API endpoints using distinct prefixes: eu.model-id for European Regions and us.model-id for US Regions . This approach enables Amazon Bedrock to route inference requests to the geographically closest endpoint, reducing latency while helping to meet regulatory compliance by keeping data processing within desired geographic boundaries. The system automatically handles traffic routing and load balancing across these Regional deployments, providing seamless scalability and redundancy without requiring you to keep track of individual Regions where the model is actually deployed.
See it in action
As a developer advocate, I’m constantly exploring how our newest capabilities can solve real problems. Recently, I had a perfect opportunity to test the new multimodal capabilities in the Amazon Bedrock Converse API when my daughter asked for help with her physics exam preparation.
Last weekend, my kitchen table was covered with practice exams full of complex diagrams, force vectors, and equations. My daughter was struggling with conceptualizing how to approach these problems. That’s when I realized this was the perfect use case for the multimodal capabilities we’d just launched. I snapped photos of a particularly challenging problem sheet containing several graphs and mathematical notation, then used the Converse API to create a simple application that could analyze the images. Together, we uploaded the physics exam materials and asked the model to explain the solution approach.

What happened next impressed both of us—the model interpreted the diagrams, recognized the french language and the mathematical notation, and provided a step-by-step explanation of how to solve each problem. As we asked follow-up questions about specific concepts, the model maintained context across our entire conversation, creating a tutoring experience that felt remarkably natural.
# Effet Doppler avec une Source Sonore en Rotation

## Analyse du problème

Ce problème concerne l'effet Doppler produit par une source sonore en rotation. Une source émettant un son à 1500 Hz tourne sur une table tournante dans le sens antihoraire, et nous devons déterminer comment les fréquences sont perçues par un microphone fixe.

## Concepts clés

L'effet Doppler se produit lorsqu'il y a un mouvement relatif entre une source sonore et un observateur. La fréquence perçue dépend de si la source se rapproche ou s'éloigne de l'observateur.

La formule de l'effet Doppler est:
- Pour une source qui se rapproche: $f_{observée} = f_{source} \cdot \frac{v_{son}}{v_{son} - v_{source}}$
- Pour une source qui s'éloigne: $f_{observée} = f_{source} \cdot \frac{v_{son}}{v_{son} + v_{source}}$

## Solution étape par étape

### Étape 1: Analyser le mouvement de la source
La source tourne sur un cercle et le microphone est fixe à 40 cm du centre de rotation. Aux différentes positions (a, b, c), la source a des vitesses radiales différentes par rapport au microphone:

- Position a: La source se déplace perpendiculairement à la ligne source-microphone (vitesse radiale nulle)
- Position b: La source s'éloigne du microphone (vitesse radiale positive)
- Position c: La source se rapproche du microphone (vitesse radiale négative)

### Étape 2: Déterminer l'effet sur les fréquences perçues

- À la position a: Pas d'effet Doppler car la vitesse radiale est nulle, donc $f_a = f_{source} = 1500$ Hz
- À la position b: La source s'éloigne, donc $f_b < f_{source}$, donc $f_b < 1500$ Hz
- À la position c: La source se rapproche, donc $f_c > f_{source}$, donc $f_c > 1500$ Hz

### Étape 3: Comparer les fréquences

D'après notre analyse:
- $f_a = 1500$ Hz
- $f_b < 1500$ Hz
- $f_c > 1500$ Hz

Donc: $f_c > f_a > f_b$

## Conclusion

La proposition correcte est: $f_c > f_a > f_b$

Cette réponse correspond à la troisième proposition dans l'énoncé. Lorsque la source tourne, la fréquence perçue est plus élevée quand la source se rapproche (position c), égale à la fréquence émise quand la source se déplace perpendiculairement (position a), et plus basse quand la source s'éloigne (position b).
The model uses the language of the question to respond. After a thoughtful analysis, it says that the correct answer is f_c > f_a > f_b (and it is right!)
The beauty of this interaction was how seamlessly the Converse API handled the multimodal inputs. As a builder, I didn’t need to worry about the complexity of processing images alongside text—the API managed that complexity and returned structured responses that my simple application could present directly to my daughter.
Here is the code I wrote. I used the Swift programming language, just to show that Python is not the only option you have  .
.
private let modelId = "us.mistral.pixtral-large-2502-v1:0"

// Define the system prompt that instructs Claude how to respond
let systemPrompt = """
You are a math and physics tutor. Your task is to:
1. Read and understand the math or physics problem in the image
2. Provide a clear, step-by-step solution to the problem
3. Briefly explain any relevant concepts used in solving the problem
4. Be precise and accurate in your calculations
5. Use mathematical notation when appropriate

Format your response with clear section headings and numbered steps.
"""
let system: BedrockRuntimeClientTypes.SystemContentBlock = .text(systemPrompt)

// Create the user message with text prompt and image
let userPrompt = "Please solve this math or physics problem. Show all steps and explain the concepts involved."
let prompt: BedrockRuntimeClientTypes.ContentBlock = .text(userPrompt)
let image: BedrockRuntimeClientTypes.ContentBlock = .image(.init(format: .jpeg, source: .bytes(finalImageData)))

// Create the user message with both text and image content
let userMessage = BedrockRuntimeClientTypes.Message(
    content: [prompt, image],
    role: .user
)

// Initialize the messages array with the user message
var messages: [BedrockRuntimeClientTypes.Message] = []
messages.append(userMessage)

// Configure the inference parameters
let inferenceConfig: BedrockRuntimeClientTypes.InferenceConfiguration = .init(maxTokens: 4096, temperature: 0.0)

// Create the input for the Converse API with streaming
let input = ConverseStreamInput(inferenceConfig: inferenceConfig, messages: messages, modelId: modelId, system: [system])

// Make the streaming request
do {
    // Process the stream
    let response = try await bedrockClient.converseStream(input: input)

    // Iterate through the stream events
    for try await event in stream {
        switch event {
        case .messagestart:
            print("AI-assistant started to stream")

        case let .contentblockdelta(deltaEvent):
            // Handle text content as it arrives
            if case let .text(text) = deltaEvent.delta {
                DispatchQueue.main.async {
                    self.streamedResponse += text
                }
            }

        case .messagestop:
            print("Stream ended")
            // Create a complete assistant message from the streamed response
            let assistantMessage = BedrockRuntimeClientTypes.Message(
                content: [.text(self.streamedResponse)],
                role: .assistant
            )
            messages.append(assistantMessage)

        default:
            break
        }
    }
And the result in the app is stunning.

By the time her exam rolled around, she felt confident and prepared—and I had a compelling real-world example of how our multimodal capabilities in Amazon Bedrock can create meaningful experiences for users.
Get started today
The new model is available through these Regional API endpoints: US East (Ohio, N. Virginia), US West (Oregon), and Europe (Frankfurt, Ireland, Paris, Stockholm). This Regional availability helps you meet data residency requirements while minimizing latency.
You can start using the model through either the AWS Management Console or programmatically through the AWS Command Line Interface (AWS CLI) and AWS SDK using the model ID mistral.pixtral-large-2502-v1:0.
This launch represents a significant step forward in making advanced multimodal AI accessible to developers and organizations of all sizes. By combining Mistral AI’s cutting-edge model with AWS serverless infrastructure, you can now focus on building innovative applications without worrying about the underlying complexity.
Visit the Amazon Bedrock console today to start experimenting with Pixtral Large 25.02 and discover how it can enhance your AI-powered applications.
How is the News Blog doing? Take this 1 minute survey!
(This survey is hosted by an external company. AWS handles your information as described in the AWS Privacy Notice. AWS will own the data gathered via this survey and will not share the information collected with survey respondents.)
Introducing Amazon Nova Sonic: Human-like voice conversations for generative AI applications
Post Syndicated from Danilo Poccia original https://aws.amazon.com/blogs/aws/introducing-amazon-nova-sonic-human-like-voice-conversations-for-generative-ai-applications/
Voice interfaces are essential to enhance customer experience in different areas such as customer support call automation, gaming, interactive education, and language learning. However, there are challenges when building voice-enabled applications.
Traditional approaches in building voice-enabled applications require complex orchestration of multiple models, such as speech recognition to convert speech to text, language models to understand and generate responses, and text-to-speech to convert text back to audio.
This fragmented approach not only increases development complexity but also fails to preserve crucial linguistic context such as tone, prosody, and speaking style that are essential for natural conversations. This can affect conversational AI applications that need low latency and nuanced understanding of verbal and non-verbal cues for fluid dialog handling and natural turn-taking.
To streamline the implementation of speech-enabled applications, today we are introducing Amazon Nova Sonic, the newest addition to the Amazon Nova family of foundation models (FMs) available in Amazon Bedrock.
Amazon Nova Sonic unifies speech understanding and generation into a single model that developers can use to create natural, human-like conversational AI experiences with low latency and industry-leading price performance. This integrated approach streamlines development and reduces complexity when building conversational applications.
Its unified model architecture delivers expressive speech generation and real-time text transcription without requiring a separate model. The result is an adaptive speech response that dynamically adjusts its delivery based on prosody, such as pace and timbre, of input speech.
When using Amazon Nova Sonic, developers have access to function calling (also known as tool use) and agentic workflows to interact with external services and APIs and perform tasks in the customer’s environment, including knowledge grounding with enterprise data using Retrieval-Augmented Generation.
At launch, Amazon Nova Sonic provides robust speech understanding for American and British English across various speaking styles and acoustic conditions, with additional languages coming soon.
Amazon Nova Sonic is developed with responsible AI at the forefront of innovation, featuring built-in protections for content moderation and watermarking.
Amazon Nova Sonic in action
The scenario for this demo is a contact center in the telecommunication industry. A customer reaches out to improve their subscription plan, and Amazon Nova Sonic handles the conversation.
With tool use, the model can interact with other systems and use agentic RAG with Amazon Bedrock Knowledge Bases to gather updated, customer-specific information such as account details, subscription plans, and pricing info.
The demo shows streaming transcription of speech input and displays streaming speech responses as text. The sentiment of the conversation is displayed in two ways: a time chart illustrating how it evolves, and a pie chart representing the overall distribution. There’s also an AI insights section providing contextual tips for a call center agent. Other interesting metrics shown in the web interface are the overall talk time distribution between the customer and the agent, and the average response time.
During the conversation with the support agent, you can observe through the metrics and hear in the voices how customer sentiment improves.
The video includes an example of how Amazon Nova Sonic handles interruptions smoothly, stopping to listen and then continuing the conversation in a natural way.
Now, let’s explore how you can integrate voice capabilities in your applications.
Using Amazon Nova Sonic
To get started with Amazon Nova Sonic, you first need to toggle model access in the Amazon Bedrock console, similar to how you would enable other FMs. Navigate to the Model access section of the navigation pane, find Amazon Nova Sonic under the Amazon models, and enable it for your account.
Amazon Bedrock provides a new bidirectional streaming API (InvokeModelWithBidirectionalStream) to help you implement real-time, low-latency conversational experiences on top of the HTTP/2 protocol. With this API, you can stream audio input to the model and receive audio output in real time, so that the conversation flows naturally.
You can use Amazon Nova Sonic with the new API with this model ID: amazon.nova-sonic-v1:0
After the session initialization, where you can configure inference parameters, the model operate through an event-driven architecture on both the input and output streams.
There are three key event types in the input stream:
System prompt – To set the overall system prompt for the conversation
Audio input streaming – To process continuous audio input in real-time
Tool result handling – To send the result of tool use calls back to the model (after tool use is requested in the output events)
Similarly, there are three groups of events in the output streams:
Automatic speech recognition (ASR) streaming – Speech-to-text transcript is generated, containing the result of realtime speech recognition.
Tool use handling – If there are a tool use events, they need to be handled using the information provided here, and the results sent back as input events.
Audio output streaming – To play output audio in real-time, a buffer is needed, because Amazon Nova Sonic model generates audio faster than real-time playback.
You can find examples of using Amazon Nova Sonic in the Amazon Nova model cookbook repository.
Prompt engineering for speech
When crafting prompts for Amazon Nova Sonic, your prompts should optimize content for auditory comprehension rather than visual reading, focusing on conversational flow and clarity when heard rather than seen.
When defining roles for your assistant, focus on conversational attributes (such as warm, patient, concise) rather than text-oriented attributes (detailed, comprehensive, systematic). A good baseline system prompt might be:
You are a friend. The user and you will engage in a spoken dialog exchanging the transcripts of a natural real-time conversation. Keep your responses short, generally two or three sentences for chatty scenarios.
More generally, when creating prompts for speech models, avoid requesting visual formatting (such as bullet points, tables, or code blocks), voice characteristic modifications (accent, age, or singing), or sound effects.
Things to know
Amazon Nova Sonic is available today in the US East (N. Virginia) AWS Region. Visit Amazon Bedrock pricing to see the pricing models.
Amazon Nova Sonic can understand speech in different speaking styles and generates speech in expressive voices, including both masculine-sounding and feminine-sounding voices, in different English accents, including American and British. Support for additional languages will be coming soon.
Amazon Nova Sonic handles user interruptions gracefully without dropping the conversational context and is robust to background noise. The model supports a context window of 32K tokens for audio with a rolling window to handle longer conversations and has a default session limit of 8 minutes.
The following AWS SDKs support the new bidirectional streaming API:
- AWS SDK for C++
- AWS SDK for Java
- AWS SDK for JavaScript
- AWS SDK for Kotlin
- AWS SDK for Ruby
- AWS SDK for Rust
- AWS SDK for Swift
Python developers can use this new experimental SDK that makes it easier to use the bidirectional streaming capabilities of Amazon Nova Sonic. We’re working to add support to the other AWS SDKs.
I’d like to thank Reilly Manton and Chad Hendren, who set up the demo with the contact center in the telecommunication industry, and Anuj Jauhari, who helped me understand the rich landscape in which speech-to-speech models are being deployed.
To learn more, these articles that enter into the details of how to use the new bidirectional streaming API with compelling demos:
- Build Your Own AI Podcast Co-Host: Step-by-Step with Amazon Q CLI and Amazon Nova Sonic
- Speech-to-Speech AI: From Dr. Sbaitso to Amazon Nova Sonic
Whether you’re creating customer service solutions, language learning applications, or other conversational experiences, Amazon Nova Sonic provides the foundation for natural, engaging voice interactions. To get started, visit the Amazon Bedrock console today. To learn more, visit the Amazon Nova section of the user guide.
– Danilo
How is the News Blog doing? Take this 1 minute survey!
(This survey is hosted by an external company. AWS handles your information as described in the AWS Privacy Notice. AWS will own the data gathered via this survey and will not share the information collected with survey respondents.)
Patch Tuesday – April 2025
Post Syndicated from Adam Barnett original https://blog.rapid7.com/2025/04/08/patch-tuesday-april-2025/

Microsoft is addressing 121 vulnerabilities this April 2025 Patch Tuesday, which is more than twice as many as last month. Microsoft has evidence of in-the-wild exploitation for just one of the vulnerabilities published today, which is already reflected in CISA KEV. Once again, Microsoft has published zero-day vulnerabilities on Patch Tuesday without evaluating any of them as critical severity at time of publication, so that’s now a seven month unbroken streak. Today also sees the publication of 11 critical remote code execution (RCE) vulnerabilities. 13 browser vulnerabilities have already been published separately this month, and are not included in the total.
CLFS: zero-day EoP
The Windows Common Log File System (CLFS) Driver is firmly back on our radar today with CVE-2025-29824, a zero-day local elevation of privilege vulnerability. First, the good news: the Acknowledgements section credits the Microsoft Threat Intelligence Center, so the exploit was successfully reproduced by Microsoft; the less-good news is that someone other than Microsoft was first to discover the exploit, because otherwise Microsoft wouldn’t be listing CVE-2025-29824 as exploited in the wild. The advisory does not specify what privilege level is achieved upon successful exploitation, but it’ll be SYSTEM, because that’s the prize for all the other CLFS elevation of privilege zero-day vulnerabilities. As usual, some form of less-privileged local access is a pre-requisite, but attack complexity is low, so this is the sort of vulnerability which goes into any standard break-and-enter toolkit. Given the long history of similar vulnerabilities, it would be more surprising if exploit code wasn’t publicly available in the not-too-distant future. Although December 2024 Patch Tuesday seems as though it must have been a very long time ago, any standard calendar will tell us that only 119 days have elapsed since the last zero-day CLFS local elevation of privilege. Rapid7 discussed the history of CLFS zero-day elevation of privilege vulnerabilities at the time. All versions of Windows receive a patch, except for the venerable LTSC Windows 10 1507, which is listed on the advisory as vulnerable, but left out in the cold with no update; the FAQ says to check back later. Windows 10 LTSC 1507 is scheduled for end of servicing on 2025-10-14, so the clock is ticking regardless.
LDAP Server: critical RCE
Although it has been many months since we’ve seen a critical zero-day vulnerability from Microsoft, there is no shortage of critical remote code execution (RCE) vulnerabilities published today. Defenders responsible for an LDAP server — which means almost any organization with a non-trivial Microsoft footprint — should add patching for CVE-2025-26663 to their to-do list. With no privileges required, no need for user interaction, and code execution presumably in the context of the LDAP server itself, successful exploitation would be an attractive shortcut to any attacker. Anyone wondering if today is a re-run of December 2024 Patch Tuesday can take some small solace in the fact that the worst of the trio of LDAP critical RCEs published at the end of last year was likely easier to exploit than today’s example, since today’s CVE-2025-26663 requires that an attacker win a race condition. Despite that, Microsoft still expects that exploitation is more likely.
LDAP Client: critical RCE
If you breathe a sigh of relief when you see LDAP server critical RCE vulnerabilities like CVE-2025-26663, because you’re certain that you don’t have any Windows LDAP servers in your estate, how about LDAP clients? CVE-2025-26670 describes a critical RCE in the LDAP client, although the FAQ confusingly states that exploitation would require an attacker to “send specially crafted requests to a vulnerable LDAP server”; this seems like it might be a data entry error on the advisory FAQ, so keep an eye out for an update to that section of the advisory. Assuming the rest of the advisory is all present and correct, exploitation requires that the attacker win a race condition, which keeps the attack complexity higher than it otherwise would be. While we wait for clarification, it’s still a critical RCE which Microsoft rates as “exploitation more likely”. On that basis, patching is always recommended.
RDS: critical RCEs
The prolific Windows vulnerability pioneers at Kunlun Lab are credited with a pair of critical RCE vulnerabilities in Windows Remote Desktop Services. Although both CVE-2025-27480 and CVE-2025-27482 share a CVSSv3 base score of 8.1, Microsoft has ranked them both as critical using its own proprietary severity ranking scale. Both vulnerabilities require that an attacker win a race condition. If you’ve ever read Microsoft’s guide to deploying the Remote Desktop Gateway role, you probably have some systems to patch.
Hyper-V: critical RCE
Some Microsoft security advisory FAQs provide a satisfying level of detail, whereas others raise more questions than they answer. CVE-2025-27491 is a Hyper-V critical RCE which falls into the second category, since it states that an attacker must be authenticated — no need for elevated privileges — but also that the attacker must send the user a malicious site and convince them to open it, and it’s not at all clear why authentication would be required in that case. Also unusual: the remediation table on the advisory lists several 32-bit versions of Windows as receiving patches, although Hyper-V requires a 64-bit processor and a 64-bit host OS.
Microsoft lifecycle update
In Microsoft product lifecycle news, Dynamics GP 2015 moves past the end of extended support today. The next batch of significant lifecycle status changes are due in July 2025, when SQL Server 2012 ESU program draws to a close.
Summary charts
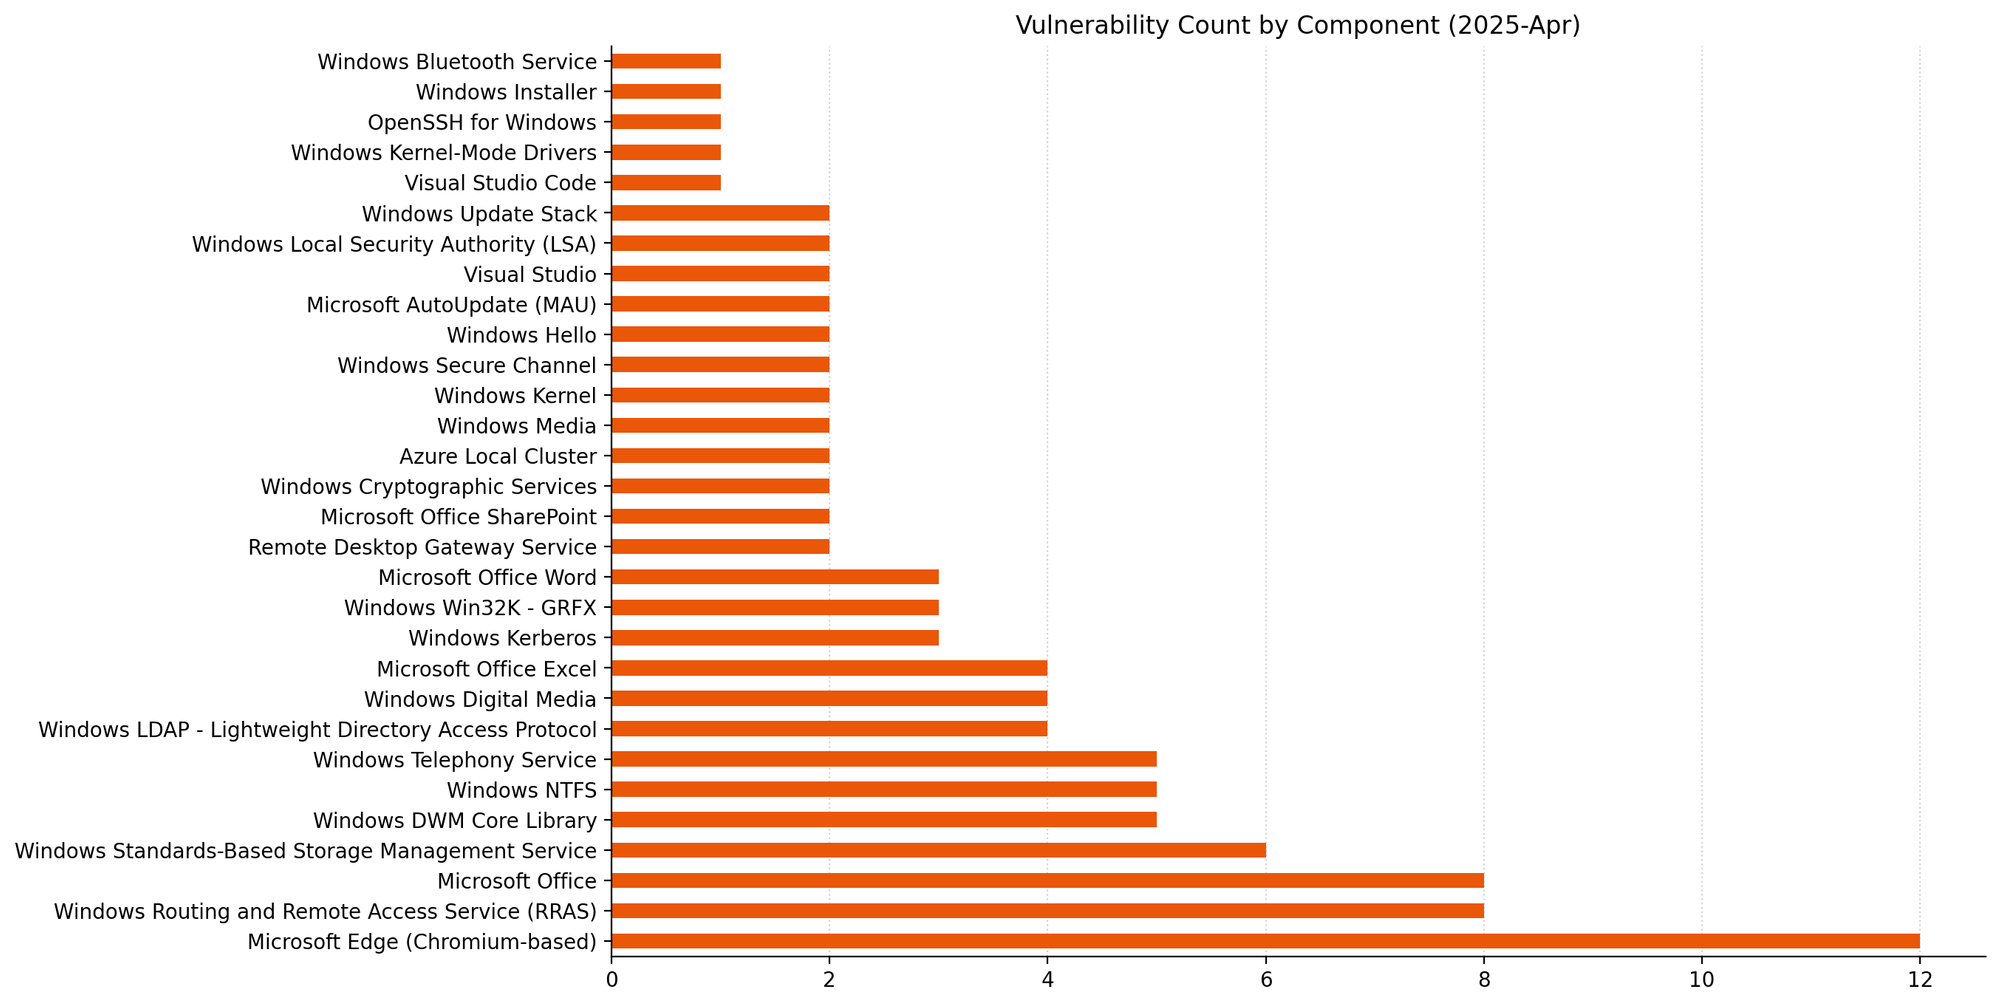
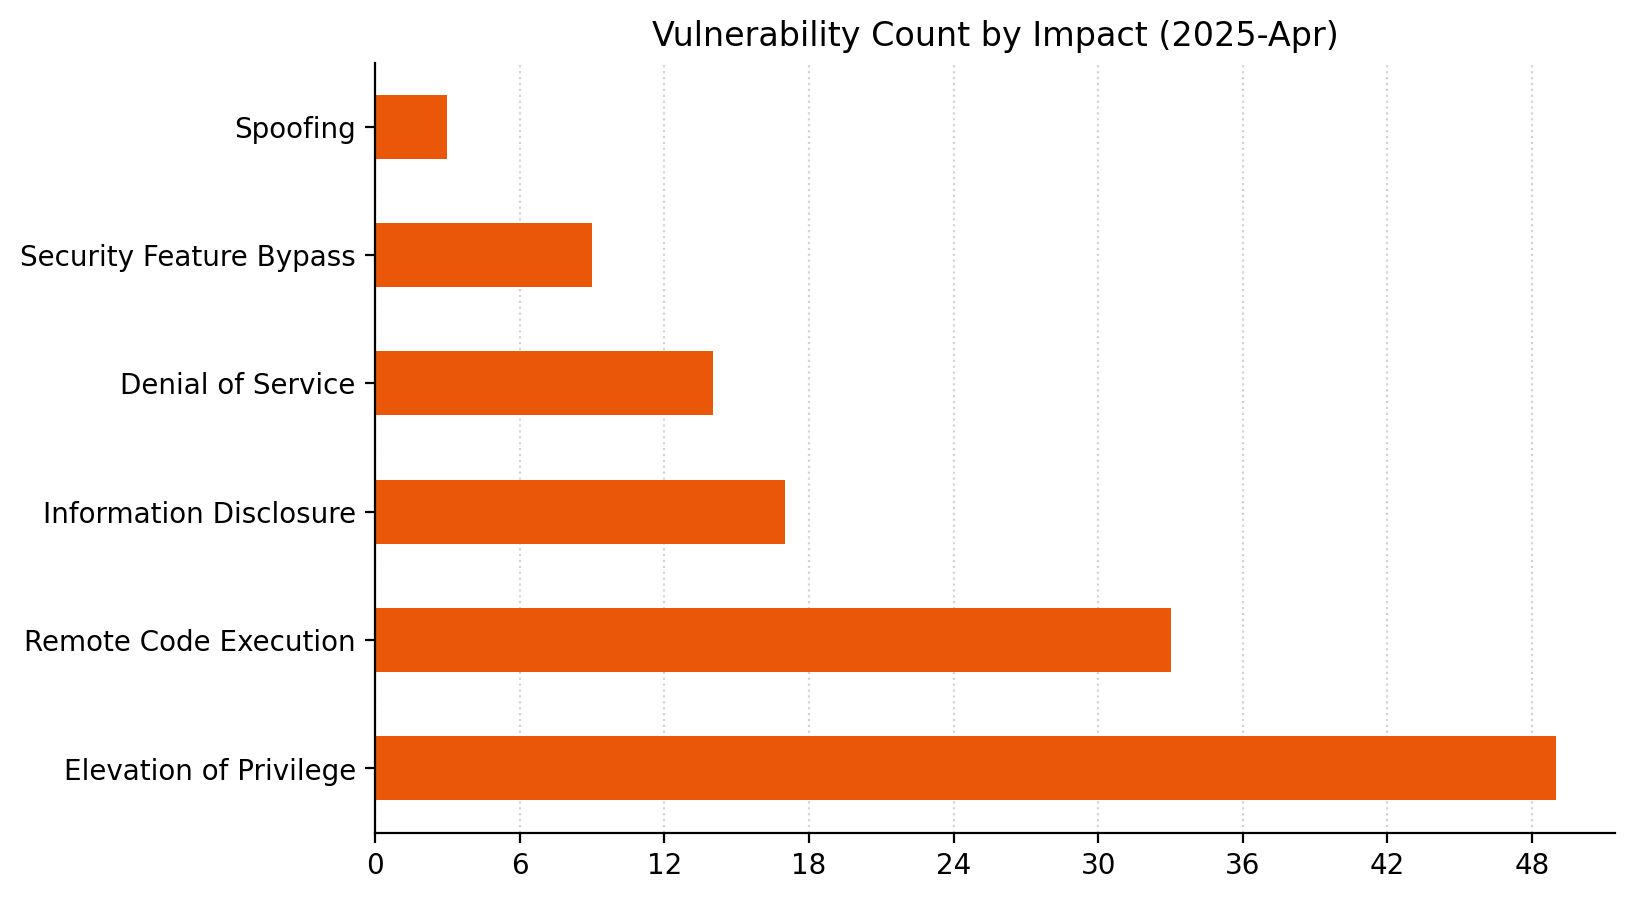
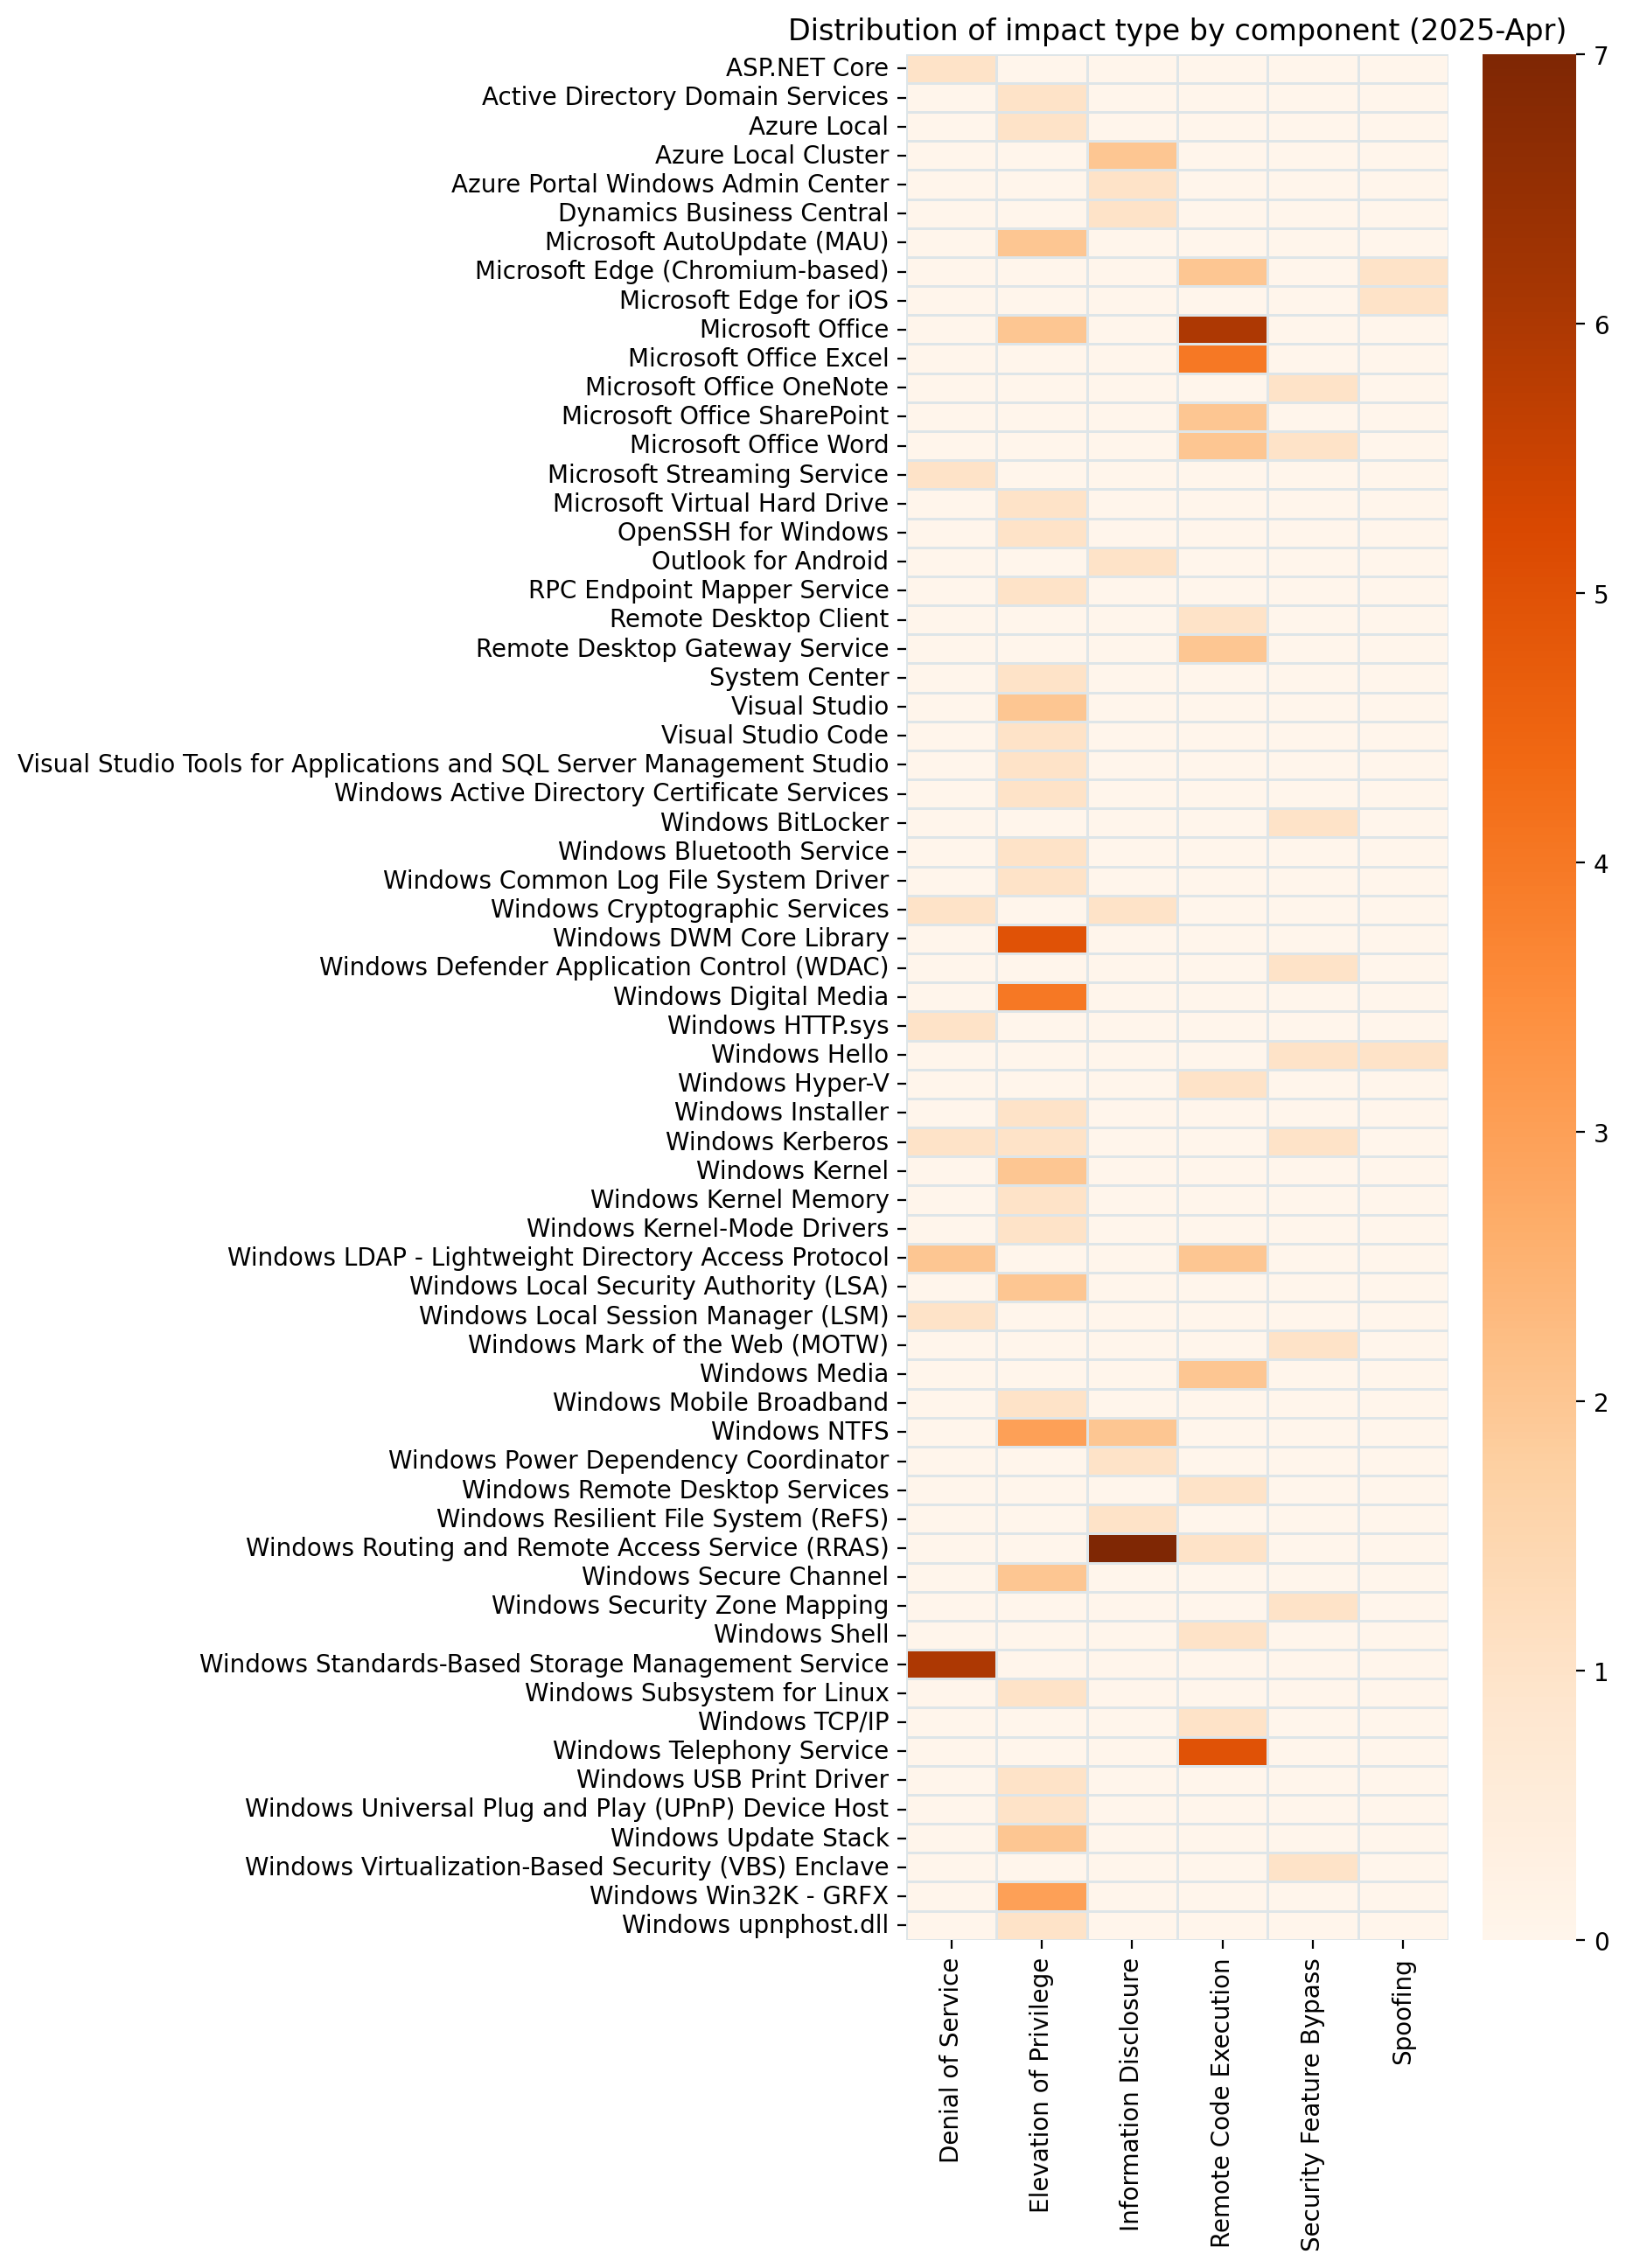
Summary tables
Apps vulnerabilities
| CVE | Title | Exploited? | Publicly disclosed? | CVSSv3 base score |
|---|---|---|---|---|
| CVE-2025-29805 | Outlook for Android Information Disclosure Vulnerability | No | No | 7.5 |
Azure vulnerabilities
| CVE | Title | Exploited? | Publicly disclosed? | CVSSv3 base score |
|---|---|---|---|---|
| CVE-2025-27489 | Azure Local Elevation of Privilege Vulnerability | No | No | 7.8 |
| CVE-2025-26628 | Azure Local Cluster Information Disclosure Vulnerability | No | No | 7.3 |
| CVE-2025-25002 | Azure Local Cluster Information Disclosure Vulnerability | No | No | 6.8 |
Browser vulnerabilities
| CVE | Title | Exploited? | Publicly disclosed? | CVSSv3 base score |
|---|---|---|---|---|
| CVE-2025-25000 | Microsoft Edge (Chromium-based) Remote Code Execution Vulnerability | No | No | 8.8 |
| CVE-2025-29815 | Microsoft Edge (Chromium-based) Remote Code Execution Vulnerability | No | No | 7.6 |
| CVE-2025-29796 | Microsoft Edge for iOS Spoofing Vulnerability | No | No | 4.7 |
| CVE-2025-25001 | Microsoft Edge for iOS Spoofing Vulnerability | No | No | 4.3 |
| CVE-2025-3074 | Chromium: CVE-2025-3074 Inappropriate implementation in Downloads | No | No | N/A |
| CVE-2025-3073 | Chromium: CVE-2025-3073 Inappropriate implementation in Autofill | No | No | N/A |
| CVE-2025-3072 | Chromium: CVE-2025-3072 Inappropriate implementation in Custom Tabs | No | No | N/A |
| CVE-2025-3071 | Chromium: CVE-2025-3071 Inappropriate implementation in Navigations | No | No | N/A |
| CVE-2025-3070 | Chromium: CVE-2025-3070 Insufficient validation of untrusted input in Extensions | No | No | N/A |
| CVE-2025-3069 | Chromium: CVE-2025-3069 Inappropriate implementation in Extensions | No | No | N/A |
| CVE-2025-3068 | Chromium: CVE-2025-3068 Inappropriate implementation in Intents | No | No | N/A |
| CVE-2025-3067 | Chromium: CVE-2025-3067 Inappropriate implementation in Custom Tabs | No | No | N/A |
| CVE-2025-3066 | Chromium: CVE-2025-3066 Use after free in Navigations | No | No | N/A |
Developer Tools vulnerabilities
| CVE | Title | Exploited? | Publicly disclosed? | CVSSv3 base score |
|---|---|---|---|---|
| CVE-2025-26682 | ASP.NET Core and Visual Studio Denial of Service Vulnerability | No | No | 7.5 |
| CVE-2025-29802 | Visual Studio Elevation of Privilege Vulnerability | No | No | 7.3 |
| CVE-2025-29804 | Visual Studio Elevation of Privilege Vulnerability | No | No | 7.3 |
| CVE-2025-20570 | Visual Studio Code Elevation of Privilege Vulnerability | No | No | 6.8 |
Developer Tools SQL Server vulnerabilities
| CVE | Title | Exploited? | Publicly disclosed? | CVSSv3 base score |
|---|---|---|---|---|
| CVE-2025-29803 | Visual Studio Tools for Applications and SQL Server Management Studio Elevation of Privilege Vulnerability | No | No | 7.3 |
Microsoft Dynamics vulnerabilities
| CVE | Title | Exploited? | Publicly disclosed? | CVSSv3 base score |
|---|---|---|---|---|
| CVE-2025-29821 | Microsoft Dynamics Business Central Information Disclosure Vulnerability | No | No | 5.5 |
Microsoft Office vulnerabilities
| CVE | Title | Exploited? | Publicly disclosed? | CVSSv3 base score |
|---|---|---|---|---|
| CVE-2025-29794 | Microsoft SharePoint Remote Code Execution Vulnerability | No | No | 8.8 |
| CVE-2025-27747 | Microsoft Word Remote Code Execution Vulnerability | No | No | 7.8 |
| CVE-2025-29820 | Microsoft Word Remote Code Execution Vulnerability | No | No | 7.8 |
| CVE-2025-29822 | Microsoft OneNote Security Feature Bypass Vulnerability | No | No | 7.8 |
| CVE-2025-27745 | Microsoft Office Remote Code Execution Vulnerability | No | No | 7.8 |
| CVE-2025-27748 | Microsoft Office Remote Code Execution Vulnerability | No | No | 7.8 |
| CVE-2025-27749 | Microsoft Office Remote Code Execution Vulnerability | No | No | 7.8 |
| CVE-2025-27746 | Microsoft Office Remote Code Execution Vulnerability | No | No | 7.8 |
| CVE-2025-26642 | Microsoft Office Remote Code Execution Vulnerability | No | No | 7.8 |
| CVE-2025-27744 | Microsoft Office Elevation of Privilege Vulnerability | No | No | 7.8 |
| CVE-2025-27752 | Microsoft Excel Remote Code Execution Vulnerability | No | No | 7.8 |
| CVE-2025-29791 | Microsoft Excel Remote Code Execution Vulnerability | No | No | 7.8 |
| CVE-2025-27751 | Microsoft Excel Remote Code Execution Vulnerability | No | No | 7.8 |
| CVE-2025-27750 | Microsoft Excel Remote Code Execution Vulnerability | No | No | 7.8 |
| CVE-2025-29823 | Microsoft Excel Remote Code Execution Vulnerability | No | No | 7.8 |
| CVE-2025-29800 | Microsoft AutoUpdate (MAU) Elevation of Privilege Vulnerability | No | No | 7.8 |
| CVE-2025-29801 | Microsoft AutoUpdate (MAU) Elevation of Privilege Vulnerability | No | No | 7.8 |
| CVE-2025-29816 | Microsoft Word Security Feature Bypass Vulnerability | No | No | 7.5 |
| CVE-2025-29792 | Microsoft Office Elevation of Privilege Vulnerability | No | No | 7.3 |
| CVE-2025-29793 | Microsoft SharePoint Remote Code Execution Vulnerability | No | No | 7.2 |
System Center vulnerabilities
| CVE | Title | Exploited? | Publicly disclosed? | CVSSv3 base score |
|---|---|---|---|---|
| CVE-2025-27743 | Microsoft System Center Elevation of Privilege Vulnerability | No | No | 7.8 |
Windows vulnerabilities
| CVE | Title | Exploited? | Publicly disclosed? | CVSSv3 base score |
|---|---|---|---|---|
| CVE-2025-26678 | Windows Defender Application Control Security Feature Bypass Vulnerability | No | No | 8.4 |
| CVE-2025-27482 | Windows Remote Desktop Services Remote Code Execution Vulnerability | No | No | 8.1 |
| CVE-2025-26639 | Windows USB Print Driver Elevation of Privilege Vulnerability | No | No | 7.8 |
| CVE-2025-26675 | Windows Subsystem for Linux Elevation of Privilege Vulnerability | No | No | 7.8 |
| CVE-2025-27729 | Windows Shell Remote Code Execution Vulnerability | No | No | 7.8 |
| CVE-2025-29811 | Windows Mobile Broadband Driver Elevation of Privilege Vulnerability | No | No | 7.8 |
| CVE-2025-26666 | Windows Media Remote Code Execution Vulnerability | No | No | 7.8 |
| CVE-2025-26674 | Windows Media Remote Code Execution Vulnerability | No | No | 7.8 |
| CVE-2025-27728 | Windows Kernel-Mode Driver Elevation of Privilege Vulnerability | No | No | 7.8 |
| CVE-2025-27739 | Windows Kernel Elevation of Privilege Vulnerability | No | No | 7.8 |
| CVE-2025-27476 | Windows Digital Media Elevation of Privilege Vulnerability | No | No | 7.8 |
| CVE-2025-27467 | Windows Digital Media Elevation of Privilege Vulnerability | No | No | 7.8 |
| CVE-2025-27730 | Windows Digital Media Elevation of Privilege Vulnerability | No | No | 7.8 |
| CVE-2025-24058 | Windows DWM Core Library Elevation of Privilege Vulnerability | No | No | 7.8 |
| CVE-2025-27490 | Windows Bluetooth Service Elevation of Privilege Vulnerability | No | No | 7.8 |
| CVE-2025-27731 | Microsoft OpenSSH for Windows Elevation of Privilege Vulnerability | No | No | 7.8 |
| CVE-2025-24074 | Microsoft DWM Core Library Elevation of Privilege Vulnerability | No | No | 7.8 |
| CVE-2025-24073 | Microsoft DWM Core Library Elevation of Privilege Vulnerability | No | No | 7.8 |
| CVE-2025-24060 | Microsoft DWM Core Library Elevation of Privilege Vulnerability | No | No | 7.8 |
| CVE-2025-24062 | Microsoft DWM Core Library Elevation of Privilege Vulnerability | No | No | 7.8 |
| CVE-2025-29812 | DirectX Graphics Kernel Elevation of Privilege Vulnerability | No | No | 7.8 |
| CVE-2025-29809 | Windows Kerberos Security Feature Bypass Vulnerability | No | No | 7.1 |
| CVE-2025-27491 | Windows Hyper-V Remote Code Execution Vulnerability | No | No | 7.1 |
| CVE-2025-27475 | Windows Update Stack Elevation of Privilege Vulnerability | No | No | 7 |
| CVE-2025-26649 | Windows Secure Channel Elevation of Privilege Vulnerability | No | No | 7 |
| CVE-2025-27492 | Windows Secure Channel Elevation of Privilege Vulnerability | No | No | 7 |
| CVE-2025-26640 | Windows Digital Media Elevation of Privilege Vulnerability | No | No | 7 |
| CVE-2025-26681 | Win32k Elevation of Privilege Vulnerability | No | No | 6.7 |
| CVE-2025-26651 | Windows Local Session Manager (LSM) Denial of Service Vulnerability | No | No | 6.5 |
| CVE-2025-26635 | Windows Hello Security Feature Bypass Vulnerability | No | No | 6.5 |
| CVE-2025-27735 | Windows Virtualization-Based Security (VBS) Security Feature Bypass Vulnerability | No | No | 6 |
| CVE-2025-27736 | Windows Power Dependency Coordinator Information Disclosure Vulnerability | No | No | 5.5 |
| CVE-2025-29808 | Windows Cryptographic Services Information Disclosure Vulnerability | No | No | 5.5 |
| CVE-2025-26644 | Windows Hello Spoofing Vulnerability | No | No | 5.1 |
Windows Azure vulnerabilities
| CVE | Title | Exploited? | Publicly disclosed? | CVSSv3 base score |
|---|---|---|---|---|
| CVE-2025-29819 | Windows Admin Center in Azure Portal Information Disclosure Vulnerability | No | No | 6.2 |
Windows ESU vulnerabilities
| CVE | Title | Exploited? | Publicly disclosed? | CVSSv3 base score |
|---|---|---|---|---|
| CVE-2025-27477 | Windows Telephony Service Remote Code Execution Vulnerability | No | No | 8.8 |
| CVE-2025-21205 | Windows Telephony Service Remote Code Execution Vulnerability | No | No | 8.8 |
| CVE-2025-21221 | Windows Telephony Service Remote Code Execution Vulnerability | No | No | 8.8 |
| CVE-2025-21222 | Windows Telephony Service Remote Code Execution Vulnerability | No | No | 8.8 |
| CVE-2025-27481 | Windows Telephony Service Remote Code Execution Vulnerability | No | No | 8.8 |
| CVE-2025-26669 | Windows Routing and Remote Access Service (RRAS) Information Disclosure Vulnerability | No | No | 8.8 |
| CVE-2025-27740 | Active Directory Certificate Services Elevation of Privilege Vulnerability | No | No | 8.8 |
| CVE-2025-27737 | Windows Security Zone Mapping Security Feature Bypass Vulnerability | No | No | 8.6 |
| CVE-2025-27480 | Windows Remote Desktop Services Remote Code Execution Vulnerability | No | No | 8.1 |
| CVE-2025-26671 | Windows Remote Desktop Services Remote Code Execution Vulnerability | No | No | 8.1 |
| CVE-2025-26663 | Windows Lightweight Directory Access Protocol (LDAP) Remote Code Execution Vulnerability | No | No | 8.1 |
| CVE-2025-26647 | Windows Kerberos Elevation of Privilege Vulnerability | No | No | 8.1 |
| CVE-2025-26670 | Lightweight Directory Access Protocol (LDAP) Client Remote Code Execution Vulnerability | No | No | 8.1 |
| CVE-2025-27487 | Remote Desktop Client Remote Code Execution Vulnerability | No | No | 8 |
| CVE-2025-21204 | Windows Process Activation Elevation of Privilege Vulnerability | No | No | 7.8 |
| CVE-2025-26648 | Windows Kernel Elevation of Privilege Vulnerability | No | No | 7.8 |
| CVE-2025-27727 | Windows Installer Elevation of Privilege Vulnerability | No | No | 7.8 |
| CVE-2025-29824 | Windows Common Log File System Driver Elevation of Privilege Vulnerability | Yes | No | 7.8 |
| CVE-2025-26679 | RPC Endpoint Mapper Service Elevation of Privilege Vulnerability | No | No | 7.8 |
| CVE-2025-27741 | NTFS Elevation of Privilege Vulnerability | No | No | 7.8 |
| CVE-2025-27483 | NTFS Elevation of Privilege Vulnerability | No | No | 7.8 |
| CVE-2025-27733 | NTFS Elevation of Privilege Vulnerability | No | No | 7.8 |
| CVE-2025-26688 | Microsoft Virtual Hard Disk Elevation of Privilege Vulnerability | No | No | 7.8 |
| CVE-2025-27484 | Windows Universal Plug and Play (UPnP) Device Host Elevation of Privilege Vulnerability | No | No | 7.5 |
| CVE-2025-26686 | Windows TCP/IP Remote Code Execution Vulnerability | No | No | 7.5 |
| CVE-2025-26680 | Windows Standards-Based Storage Management Service Denial of Service Vulnerability | No | No | 7.5 |
| CVE-2025-27470 | Windows Standards-Based Storage Management Service Denial of Service Vulnerability | No | No | 7.5 |
| CVE-2025-21174 | Windows Standards-Based Storage Management Service Denial of Service Vulnerability | No | No | 7.5 |
| CVE-2025-26652 | Windows Standards-Based Storage Management Service Denial of Service Vulnerability | No | No | 7.5 |
| CVE-2025-27485 | Windows Standards-Based Storage Management Service Denial of Service Vulnerability | No | No | 7.5 |
| CVE-2025-27486 | Windows Standards-Based Storage Management Service Denial of Service Vulnerability | No | No | 7.5 |
| CVE-2025-26668 | Windows Routing and Remote Access Service (RRAS) Remote Code Execution Vulnerability | No | No | 7.5 |
| CVE-2025-26673 | Windows Lightweight Directory Access Protocol (LDAP) Denial of Service Vulnerability | No | No | 7.5 |
| CVE-2025-27469 | Windows Lightweight Directory Access Protocol (LDAP) Denial of Service Vulnerability | No | No | 7.5 |
| CVE-2025-26641 | Microsoft Message Queuing (MSMQ) Denial of Service Vulnerability | No | No | 7.5 |
| CVE-2025-27479 | Kerberos Key Distribution Proxy Service Denial of Service Vulnerability | No | No | 7.5 |
| CVE-2025-27473 | HTTP.sys Denial of Service Vulnerability | No | No | 7.5 |
| CVE-2025-29810 | Active Directory Domain Services Elevation of Privilege Vulnerability | No | No | 7.5 |
| CVE-2025-26665 | Windows upnphost.dll Elevation of Privilege Vulnerability | No | No | 7 |
| CVE-2025-27478 | Windows Local Security Authority (LSA) Elevation of Privilege Vulnerability | No | No | 7 |
| CVE-2025-21191 | Windows Local Security Authority (LSA) Elevation of Privilege Vulnerability | No | No | 7 |
| CVE-2025-27732 | Windows Graphics Component Elevation of Privilege Vulnerability | No | No | 7 |
| CVE-2025-26637 | BitLocker Security Feature Bypass Vulnerability | No | No | 6.8 |
| CVE-2025-26664 | Windows Routing and Remote Access Service (RRAS) Information Disclosure Vulnerability | No | No | 6.5 |
| CVE-2025-26667 | Windows Routing and Remote Access Service (RRAS) Information Disclosure Vulnerability | No | No | 6.5 |
| CVE-2025-27474 | Windows Routing and Remote Access Service (RRAS) Information Disclosure Vulnerability | No | No | 6.5 |
| CVE-2025-21203 | Windows Routing and Remote Access Service (RRAS) Information Disclosure Vulnerability | No | No | 6.5 |
| CVE-2025-26672 | Windows Routing and Remote Access Service (RRAS) Information Disclosure Vulnerability | No | No | 6.5 |
| CVE-2025-26676 | Windows Routing and Remote Access Service (RRAS) Information Disclosure Vulnerability | No | No | 6.5 |
| CVE-2025-27738 | Windows Resilient File System (ReFS) Information Disclosure Vulnerability | No | No | 6.5 |
| CVE-2025-21197 | Windows NTFS Information Disclosure Vulnerability | No | No | 6.5 |
| CVE-2025-27471 | Microsoft Streaming Service Denial of Service Vulnerability | No | No | 5.9 |
| CVE-2025-27742 | NTFS Information Disclosure Vulnerability | No | No | 5.5 |
| CVE-2025-27472 | Windows Mark of the Web Security Feature Bypass Vulnerability | No | No | 5.4 |
Windows ESU Microsoft Office vulnerabilities
| CVE | Title | Exploited? | Publicly disclosed? | CVSSv3 base score |
|---|---|---|---|---|
| CVE-2025-26687 | Win32k Elevation of Privilege Vulnerability | No | No | 7.5 |
Using Amazon Q Developer CLI for custom Java application transformations
Post Syndicated from Dinesh Prabakaran original https://aws.amazon.com/blogs/devops/using-amazon-q-developer-cli-for-custom-java-application-transformations/
In today’s rapidly evolving software landscape, maintaining and modernizing Java applications is a critical challenge for many organizations. As new Java versions are released and best practices evolve, the need for efficient code transformation becomes increasingly important. Amazon Q Developer transformation for Java using the Command Line Interface (CLI) presents a powerful alternative to integrated development environments (IDEs), offering unique advantages in scenarios requiring batch processing, CI/CD integration, headless environments, and custom automation workflows. By leveraging the CLI, development teams can perform consistent, scalable, and easily reproducible transformations across extensive codebases.
One key difference between CLI and IDE-based transformations lies in the standardization and customization capabilities. With CLI transformations, teams can define and enforce standardized transformation rules across the entire organization, ensuring consistency in code modernization efforts. This standardization is particularly valuable for large teams or distributed development environments. Additionally, the CLI approach allows for deeper customization of transformation rules, enabling teams to tailor the modernization process to their specific needs and coding standards. Whether updating deprecated APIs, migrating to newer Java versions, or enforcing coding standards, Amazon Q Developer’s CLI transformations provide a flexible and powerful solution.
This blog will explore how to use Amazon Q Developer’s CLI capabilities to create custom transformations for upgrading Java applications. We’ll dive into the process of defining transformation rules, executing them across your codebase, and demonstrate how to customize these transformations to meet specific requirements. By the end of this blog, you’ll have a clear understanding of how to leverage Amazon Q Developer’s CLI for Java transformations, enabling you to modernize your applications more efficiently and with greater control. You’ll be equipped to standardize your transformation processes across teams and projects while also customizing them to fit your unique requirements.
Pre-requisites
Before you begin a transformation, see the prerequisites for transformation on the command line with Amazon Q Developer.
Note: The Amazon Q Developer command line tool for transformation (qct cli) is distinct from the Amazon Q Developer CLI – while qct cli is specifically designed for code transformations, the Amazon Q Developer CLI provides features such as autocompletion, Amazon Q chat, inline ZShell completion, etc.
These pre-requisites ensure that you have all the necessary tools and permissions to use Amazon Q Developer’s CLI capabilities for custom transformations on your Java applications.
About the Application
This sample project will be used to demonstrate the Amazon Q Developer CLI code transformation feature in action. It’s a Java 1.8 based microservice application that displays a free list of movies for the month using configuration stored in AWS AppConfig service. Originally open sourced in 2020, it intentionally uses legacy versions of libraries (Spring Boot 2.x, Log4j 2.13.x, Mockito 1.x, Javax and Junit 4) to showcase the upgrade process. The application includes a dependency on another module built in both Java 1.8 and 17, specifically to demonstrate how post transformation steps can be used to modernize your application’s internal dependencies. You can download this sample project to experiment with the CLI upgrade feature in your own environment.
Overview
You will use Amazon Q Developer command line tool for transformation to perform custom transformations on a Java application. This will involve:
- Configure Amazon Q command line tool for transformation.
- Use pre-transformation template to identify unused imports and variables and remove them before transformation.
- After pre-transformation, upgrade the application to Java 17 to leverage the latest features.
- Use post transformation template to
-
- Modify the POM file to point internal dependencies to the latest Java 17 or 21 (1p) version.
- Modify your code to replace deprecated methods from internal dependencies.
- Identify System.out.println statements and replace them with a proper logger framework.
Walkthrough
Setting up the transformation environment
First, ensure you have the Amazon Q command line tool for transformation installed. You can verify this by running:


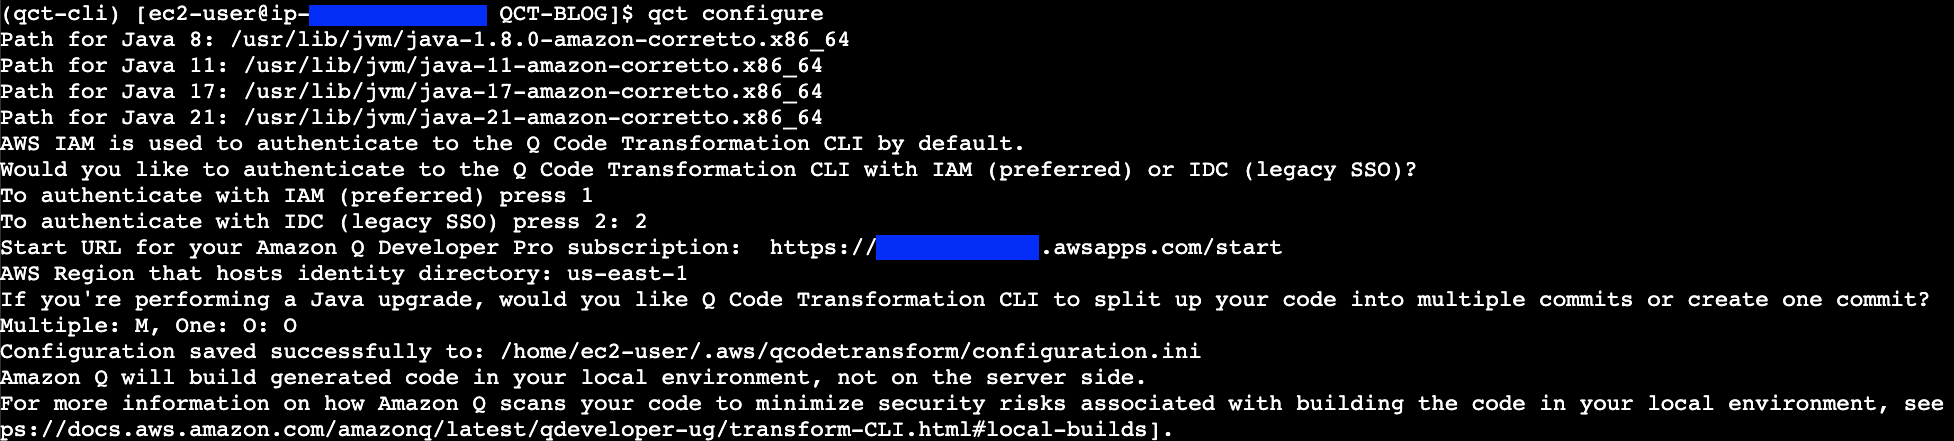


Troubleshooting
When working with Amazon Q Developer CLI transformations, you might encounter some common issues. Here’s how to address them:
- Unstaged Git Commits
- Before running a transformation, make sure to stash or commit any pending changes to your local branch. This ensures a clean working directory for the transformation process.
- Clearing the Working Directory
- If a transformation fails, clear the workspace located at ~/.aws/qcodetransform/transformation_projects/<your project name> before retrying the transformation. This step is only necessary for failed transformations.
OpenSSL 3.5.0 released
Post Syndicated from jzb original https://lwn.net/Articles/1016851/
Version
3.5.0 of OpenSSL has been released. This release adds support for
server-side QUIC (RFC 9000), a
new configuration option (no-tls-deprecated-ec) that disables
support for TLS groups deprecated in RFC 8422, and more.
FreeDOS 1.4 released
Post Syndicated from jzb original https://lwn.net/Articles/1016849/
Version
1.4 of FreeDOS has been
released. This is the first stable release since 2022, and
includes improvements to the Fdisk hard-disk-management program, and
reliability updates for the mTCP set of TCP/IP applications for
DOS.
This version was much smoother because Jerome Shidel, our
distribution manager, had an idea after FreeDOS 1.3 that we could have
a rolling test release that collected all of the changes that people
make over time. Previous to this, each new FreeDOS distribution (like
1.0, 1.1, 1.2, and 1.3) required bundling up packages into a “release
candidate,” and we would go through several iterations of updating the
release candidates.Jerome’s method of building the FreeDOS distribution made it easier
to automate a test release, which we decided to update every month. As
the test releases accumulated enough changes to warrant a release, we
could then make the next test release a “release candidate” which
would iterate to the next version of the FreeDOS distribution. Since
2022, we’ve released monthly test releases. Thanks Jerome!
LWN covered FreeDOS
last year for its 30th anniversary.
How Netflix Accurately Attributes eBPF Flow Logs
Post Syndicated from Netflix Technology Blog original https://netflixtechblog.com/how-netflix-accurately-attributes-ebpf-flow-logs-afe6d644a3bc
By Cheng Xie, Bryan Shultz, and Christine Xu
In a previous blog post, we described how Netflix uses eBPF to capture TCP flow logs at scale for enhanced network insights. In this post, we delve deeper into how Netflix solved a core problem: accurately attributing flow IP addresses to workload identities.
A Brief Recap
FlowExporter is a sidecar that runs alongside all Netflix workloads. It uses eBPF and TCP tracepoints to monitor TCP socket state changes. When a TCP socket closes, FlowExporter generates a flow log record that includes the IP addresses, ports, timestamps, and additional socket statistics. On average, 5 million records are produced per second.
In cloud environments, IP addresses are reassigned to different workloads as workload instances are created and terminated, so IP addresses alone cannot provide insights on which workloads are communicating. To make the flow logs useful, each IP address must be attributed to its corresponding workload identity. FlowCollector, a backend service, collects flow logs from FlowExporter instances across the fleet, attributes the IP addresses, and sends these attributed flows to Netflix’s Data Mesh for subsequent stream and batch processing.
The eBPF flow logs provide a comprehensive view of service topology and network health across Netflix’s extensive microservices fleet, regardless of the programming language, RPC mechanism, or application-layer protocol used by individual workloads.
The Problem with Misattribution
Accurately attributing flow IP addresses to workload identities has been a significant challenge since our eBPF flow logs were introduced.
As noted in our previous blog post, our initial attribution approach relied on Sonar, an internal IP address tracking service that emits an event whenever an IP address in Netflix’s AWS VPCs is assigned or unassigned to a workload. FlowCollector consumes a stream of IP address change events from Sonar and uses this information to attribute flow IP addresses in real-time.
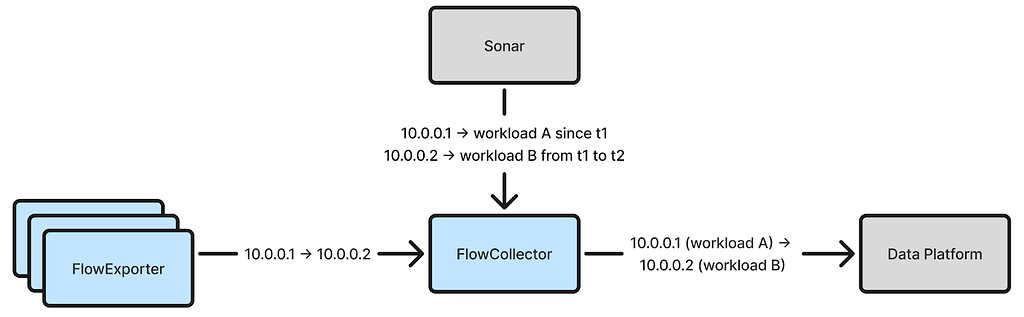
The fundamental drawback of this method is that it can lead to misattribution. Delays and failures are inevitable in distributed systems, which may delay IP address change events from reaching FlowCollector. For instance, an IP address may initially be assigned to workload X but later reassigned to workload Y. However, if the change event for this reassignment is delayed, FlowCollector will continue to assume that the IP address belongs to workload X, resulting in misattributed flows. Additionally, event timestamps may be inaccurate depending on how they are captured.
Misattribution rendered the flow data unreliable for decision-making. Users often depend on flow logs to validate workload dependencies, but misattribution creates confusion. Without expert knowledge of expected dependencies, users would struggle to identify or confirm misattribution. Moreover, misattribution occurred frequently for critical services with a large footprint due to frequent IP address changes. Overall, misattribution makes fleet-wide dependency analysis impractical.
As a workaround, we made FlowCollector hold received flows for 15 minutes before attribution, allowing time for delayed IP address change events. While this approach reduced misattribution, it did not eliminate it. Moreover, the waiting period made the data less fresh, reducing its utility for real-time analysis.
Fully eliminating misattribution is crucial because it only takes a single misattributed flow to produce an incorrect workload dependency. Solving this problem required a complete rethinking of our approach. Over the past year, Netflix developed a new attribution method that has finally eliminated misattribution, as detailed in the rest of this post.
Attributing Local IP Addresses
Each socket has two IP addresses: a local IP address and a remote IP address. Previously, we used the same method to attribute both. However, attributing the local IP address should be a simpler task since the local IP address belongs to the instance where FlowExporter captures the socket. Therefore, FlowExporter should determine the local workload identity from its environment and attribute the local IP address before sending the flow to FlowCollector.
This is straightforward for workloads running directly on EC2 instances, as Netflix’s Metatron provisions workload identity certificates to each EC2 instance at boot time. FlowExporter can simply read these certificates from the local disk to determine the local workload identity.
Attributing local IP addresses for container workloads running on Netflix’s container platform, Titus, is more challenging. FlowExporter runs at the container host level, where each host manages multiple container workloads with different identities. When FlowExporter’s eBPF programs receive a socket event from TCP tracepoints in the kernel, the socket may have been created by one of the container workloads or by the host itself. Therefore, FlowExporter must determine which workload to attribute the socket’s local IP address to. To solve this problem, we leveraged IPMan, Netflix’s container IP address assignment service. IPManAgent, a daemon running on every container host, is responsible for assigning and unassigning IP addresses. As container workloads are launched, IPManAgent writes an IP-address-to-workload-ID mapping to an eBPF map, which FlowExporter’s eBPF programs can then use to look up the workload ID associated with a socket local IP address.

Another challenge was to accommodate Netflix’s IPv6 to IPv4 translation mechanism on Titus. To facilitate IPv6 migration, Netflix developed a mechanism that enables IPv6-only containers to communicate with IPv4 destinations without incurring NAT64 overhead. This mechanism intercepts connect syscalls and replaces the underlying socket with one that uses a shared IPv4 address assigned to the container host. This confuses FlowExporter because the kernel reports the same local IPv4 address for sockets created by different container workloads. To disambiguate, local port information is additionally required. We modified Titus to write a mapping of (local IPv4 address, local port) to the workload ID into an eBPF map whenever a connect syscall is intercepted. FlowExporter’s eBPF programs then use this map to correctly attribute sockets created by the translation mechanism.
With these problems solved, we can now accurately attribute the local IP address of every flow.
Attributing Remote IP Addresses
Once the local IP address attribution problem is solved, accurately attributing remote IP addresses becomes feasible. Now, each flow reported by FlowExporter includes the local IP address, the local workload identity, and connection start/end timestamps. As FlowCollector receives these flows, it can learn the time ranges during which each workload owns a given IP address. For instance, if FlowCollector sees a flow with local IP address 10.0.0.1 associated with workload X that starts at t1 and ends at t2, it can deduce that 10.0.0.1 belonged to workload X from t1 to t2. Since Netflix uses Amazon Time Sync across its fleet, the timestamps (captured by FlowExporter) are reliable.
The FlowCollector service cluster consists of many nodes. Every node must be capable of attributing arbitrary remote IP addresses and, therefore, requires knowledge of all workload IP addresses and their recent ownership records. To represent this knowledge, each node maintains an in-memory hashmap that maps an IP address to a list of time ranges, as illustrated by the following Go structs:
type IPAddressTracker struct {
    ipToTimeRanges map[netip.Addr]timeRanges
}

type timeRanges []timeRange

type timeRange struct {
    workloadID   string
    start        time.Time
    end          time.Time
}
To populate the hashmap, FlowCollector extracts the local IP address, local workload identity, start time, and end time from each received flow and creates/extends the corresponding time ranges in the map. The time ranges for each IP address are sorted in ascending order, and they are non-overlapping since an IP address cannot belong to two different workloads simultaneously.
Since each flow is only sent to one FlowCollector node, each node must share the time ranges it learned from received flows with other nodes. We implemented a broadcasting mechanism using Kafka, where each node publishes learned time ranges to all other nodes. Although more efficient broadcasting implementations exist, the Kafka-based approach is simple and has worked well for us.
Now, FlowCollector can attribute remote IP addresses by looking them up in the populated map, which returns a list of time ranges. It then uses the flow’s start timestamp to determine the corresponding time range and associated workload identity. If the start time does not fall within any time range, FlowCollector will retry after a delay, eventually giving up if the retry fails. Such failures may occur when flows are lost or broadcast messages are delayed. For our use cases, it is acceptable to leave a small percentage of flows unattributed, but any misattribution is unacceptable.
This new method achieves accurate attribution thanks to the continuous heartbeats, each associated with a reliable time range of IP address ownership. It handles transient issues gracefully — a few delayed or lost heartbeats do not lead to misattribution. In contrast, the previous method relied solely on discrete IP address assignment and unassignment events. Lacking heartbeats, it had to presume an IP address remained assigned until notified otherwise (which can be hours or days later), making it vulnerable to misattribution when the notifications were delayed.
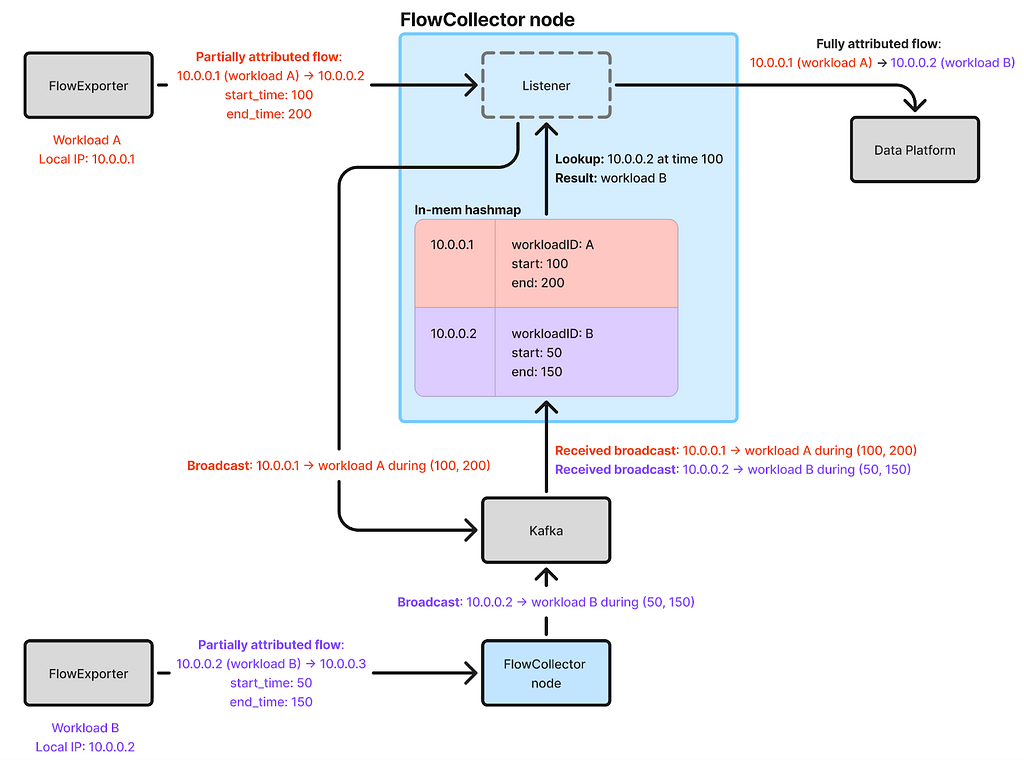
One detail is that when FlowCollector receives a flow, it cannot attribute its remote IP address right away because it requires the latest observed time ranges for the remote IP address. Since FlowExporter reports flows in batches every minute, FlowCollector must wait until it receives the flow batch from the remote workload FlowExporter for the last minute, which may not have arrived yet. To address this, FlowCollector temporarily stores received flows on disk for one minute before attributing their remote IP addresses. This introduces a 1-minute delay, but it is much shorter than the 15-minute delay with the previous approach.
In addition to producing accurate attribution, the new method is also cost-effective thanks to its simplicity and in-memory lookups. Because the in-memory state can be quickly rebuilt when a FlowCollector node starts up, no persistent storage is required. With 30 c7i.2xlarge instances, we can process 5 million flows per second across the entire Netflix fleet.
Attributing Cross-Regional IP Addresses
For simplicity, we have so far glossed over one topic: regionalization. Netflix’s cloud microservices operate across multiple AWS regions. To optimize flow reporting and minimize cross-regional traffic, a FlowCollector cluster runs in each major region, and FlowExporter agents send flows to their corresponding regional FlowCollector. When FlowCollector receives a flow, its local IP address is guaranteed to be within the region.
To minimize cross-region traffic, the broadcasting mechanism is limited to FlowCollector nodes within the same region. Consequently, the IP address time ranges map contains only IP addresses from that region. However, cross-regional flows have a remote IP address in a different region. To attribute these flows, the receiving FlowCollector node forwards them to nodes in the corresponding region. FlowCollector determines the region for a remote IP address by looking up a trie built from all Netflix VPC CIDRs. This approach is more efficient than broadcasting IP address time range updates across all regions, as only 1% of Netflix flows are cross-regional.
Attributing Non-Workload IP Addresses
So far, FlowCollector can accurately attribute IP addresses belonging to Netflix’s cloud workloads. However, not all flow IP addresses fall into this category. For instance, a significant portion of flows goes through AWS ELBs. For these flows, their remote IP addresses are associated with the ELBs, where we cannot run FlowExporter. Consequently, FlowCollector cannot determine their identities by simply observing the received flows. To attribute these remote IP addresses, we continue to use IP address change events from Sonar, which crawls AWS resources to detect changes in IP address assignments. Although this data stream may contain inaccurate timestamps and be delayed, misattribution is not a main concern since ELB IP address reassignment occurs very infrequently.
Verifying Correctness
Verifying that the new method has eliminated misattribution is challenging due to the lack of a definitive source of truth for workload dependencies to validate flow logs against; the flow logs themselves are intended to serve as this source of truth, after all. To build confidence, we analyzed the flow logs of a large service with well-understood dependencies. A large footprint is necessary, as misattribution is more prevalent in services with numerous instances, and there must be a reliable method to determine the dependencies for this service without relying on flow logs.
Netflix’s cloud gateway, Zuul, served this purpose perfectly due to its extensive footprint (handling all cloud ingress traffic), its large number of downstream dependencies, and our ability to derive its dependencies from its routing configurations as the source of truth for comparison with flow logs. We found no misattribution for flows through Zuul over a two-week window. This provided strong confidence that the new attribution method has eliminated misattribution. In the previous approach, approximately 40% of Zuul’s dependencies reported by the flow logs were misattributed.
Conclusion
With misattribution solved, eBPF flow logs now deliver dependable, fleet-wide insights into Netflix’s service topology and network health. This advancement unlocks numerous exciting opportunities in areas such as service dependency auditing, security analysis, and incident triage, while helping Netflix engineers develop a better understanding of our ever-evolving distributed systems.
Acknowledgments
We would like to thank Martin Dubcovsky, Joanne Koong, Taras Roshko, Nabil Schear, Jacob Meyers, Parsha Pourkhomami, Hechao Li, Donavan Fritz, Rob Gulewich, Amanda Li, John Salem, Hariharan Ananthakrishnan, Keerti Lakshminarayan, and other stunning colleagues for their feedback, inspiration, and contributions to the success of this effort.

How Netflix Accurately Attributes eBPF Flow Logs was originally published in Netflix TechBlog on Medium, where people are continuing the conversation by highlighting and responding to this story.
How Baby-Led Weaning Almost Ruined My Life
Post Syndicated from The Atlantic original https://www.youtube.com/watch?v=li5Qyx0Wi1A
How UNiDAYS achieved AWS Region expansion in 3 weeks
Post Syndicated from Sanhawat Taongern original https://aws.amazon.com/blogs/architecture/how-unidays-achieved-aws-region-expansion-in-3-weeks/
UNiDAYS is a fast, free digital platform that provides exclusive student offers and benefits to over 29 million verified members worldwide. With a rapidly growing user base and an increasing number of global partnerships, UNiDAYS recognized the need to enhance its platform’s performance to deliver a seamless consumer experience in geographic regions far from its original base of operations.
In this post, we share how UNiDAYS achieved AWS Region expansion in just 3 weeks using AWS services.
Business challenges
In response to growth opportunities, UNiDAYS faced a pressing business requirement: deliver low-latency responses and provide high availability for users across diverse geographic regions. At the same time, the platform needed to guarantee global data consistency while adhering to tight deadlines—all within just a few weeks. However, the existing monolithic application, although built on Amazon Web Services (AWS), wasn’t optimized for active-active multi-Region deployments.
The challenge was further complicated by the need to extend functionality from this legacy system, which used the AWS global network for improved user experience but fell short of meeting new business requirements. Re-architecting the entire platform to support multi-Region deployments within the given timeframe wasn’t feasible.
Solution overview
UNiDAYS opted to create complementary services tailored to these new requirements, using AWS services for a multi-Region, active-active architecture. The key services used included:
- Amazon CloudFront and Amazon Route 53 – For global delivery and lowest-latency responses
- Amazon DynamoDB – To provide consistent, highly available data across Regions
- Amazon Elastic Container Service (Amazon ECS) – For scalable, deployable containerized resources
- Amazon EventBridge – To enable asynchronous integration with existing systems through event-driven patterns
This approach allowed UNiDAYS to meet its latency, availability, and consistency goals while seamlessly integrating with existing infrastructure. The following diagram is the architecture for the solution.

Global delivery and resiliency
To provide the lowest latency and multi-Region resiliency, CloudFront was used with latency-based routing configured in Route 53. This routing directs requests to the Regional Application Load Balancers with the lowest latency, automatically providing resiliency in the event of Regional issues. Security was a key consideration. AWS WAF integration with CloudFront provided application-layer protection at the edge. Additional security measures included:
- Custom HTTP headers on origin requests, enforced using Application Load Balancer listener rule conditions
- Prefix lists to restrict access to Application Load Balancers, making sure that traffic originated from the intended CloudFront distributions
Rapid Regional deployment
The core infrastructure is deployed through Terraform, and applications are deployed using custom tooling that wraps AWS CloudFormation. This hybrid approach enabled rapid delivery by using existing patterns without disrupting established workflows. Resources were organized into tiers: platform, global, and Regional. Platform and global resources were deployed one time, and Regional resources were rolled out to each activated Region, streamlining expansion efforts.
One technical challenge involved CloudFormation exports, which are Regional by design. To address this, we implemented a custom CloudFormation macro to enable cross-Region access to exported values, providing consistency across deployments.
Amazon ECS enabled progressive application deployments within each Region, allowing teams to focus on scaling applications rather than managing infrastructure. For cost-efficiency, we used Spot Instances. During testing, container start-up latency was observed due to cross-Region image downloads from Amazon Elastic Container Registry (Amazon ECR). This issue was resolved by enabling private image replication in Amazon ECR so that container images were available locally in each Region. This solution significantly reduced start-up times, improving application responsiveness during deployments and scaling events.
Data consistency and performance
DynamoDB global tables were instrumental in providing eventual data consistency and Regional replication. With DynamoDB handling these aspects, we could focus on application logic.
The result was a substantial reduction in latency at key locations. For example, client-experienced latency in one Region dropped from approximately 200 milliseconds to 50 milliseconds upon deployment, as shown in the following screenshot.

Key technical hurdles
We addressed the following technical obstacles while developing the solution:
- Cross-Region CloudFormation exports – CloudFormation exports are Regional by design. We addressed this by creating a custom CloudFormation macro to read exports across Regions.
- Container start-up latency – Latency caused by cross-Region image downloads was mitigated by implementing Amazon ECR private image replication. This meant that container images were readily available in each Region, reducing deployment times and improving overall performance.
- Security assurance – By using CloudFront, AWS WAF, and Application Load Balancer security features, we made sure that traffic and data remained secure.
Why AWS?
UNiDAYS chose AWS due to its comprehensive global infrastructure and robust service offerings, which allowed the platform to:
- Seamlessly expand compute operations to Regions closer to its user base
- Take advantage of a full stack of services for reliable, secure, and low-latency content delivery
- Meet tight delivery deadlines without compromising on performance or security
- Maintain flexibility where required, with the ability to use more managed services, which allowed a focus on our applications
Conclusion
By adopting a multi-Region, active-active architecture on AWS, UNiDAYS successfully met its business goals within only 3 weeks, rapidly expanding to new Regions while promoting platform resiliency. The solution improved latency by 75% in new Regions (from 200 milliseconds to 50 milliseconds), provided Regional data availability through DynamoDB global tables, and maintained 100% service uptime during resiliency tests, even in cases of Regional connectivity loss. Additionally, deployment velocity increased by over 40%, allowing faster feature releases and improved agility. This architecture not only provides a scalable and resilient platform for current operations but also establishes a strong foundation for future global expansion.
Learn more
Is your organization looking to expand into new Regions while maintaining performance and reliability?
- Contact AWS experts to explore tailored solutions for your multi-Region strategy.
- Use AWS Global Infrastructure to optimize your expansion.
- Share your challenges and successes in the comments—we’d love to hear your insights!
About the Authors
Manage concurrent write conflicts in Apache Iceberg on the AWS Glue Data Catalog
Post Syndicated from Sotaro Hikita original https://aws.amazon.com/blogs/big-data/manage-concurrent-write-conflicts-in-apache-iceberg-on-the-aws-glue-data-catalog/
In modern data architectures, Apache Iceberg has emerged as a popular table format for data lakes, offering key features including ACID transactions and concurrent write support. Although these capabilities are powerful, implementing them effectively in production environments presents unique challenges that require careful consideration.
Consider a common scenario: A streaming pipeline continuously writes data to an Iceberg table while scheduled maintenance jobs perform compaction operations. Although Iceberg provides built-in mechanisms to handle concurrent writes, certain conflict scenarios—such as between streaming updates and compaction operations—can lead to transaction failures that require specific handling patterns.
This post demonstrates how to implement reliable concurrent write handling mechanisms in Iceberg tables. We will explore Iceberg’s concurrency model, examine common conflict scenarios, and provide practical implementation patterns of both automatic retry mechanisms and situations requiring custom conflict resolution logic for building resilient data pipelines. We will also cover the pattern with automatic compaction through AWS Glue Data Catalog table optimization.
Common conflict scenarios
The most frequent data conflicts occur in several specific operational scenarios that many organizations encounter in their data pipelines, which we discuss in this section.
Concurrent UPDATE/DELETE on overlapping partitions
When multiple processes attempt to modify the same partition simultaneously, data conflicts can arise. For example, imagine a data quality process updating customer records with corrected addresses while another process is deleting outdated customer records. Both operations target the same partition based on customer_id, leading to potential conflicts because they’re modifying an overlapping dataset. These conflicts are particularly common in large-scale data cleanup operations.
Compaction vs. streaming writes
A classic conflict scenario occurs during table maintenance operations. Consider a streaming pipeline ingesting real-time event data while a scheduled compaction job runs to optimize file sizes. The streaming process might be writing new records to a partition while the compaction job is attempting to combine existing files in the same partition. This scenario is especially common with Data Catalog table optimization, where automatic compaction can run concurrently with continuous data ingestion.
Concurrent MERGE operations
MERGE operations are particularly susceptible to conflicts because they involve both reading and writing data. For instance, an hourly job might be merging customer profile updates from a source system while a separate job is merging preference updates from another system. If both jobs attempt to modify the same customer records, they can conflict because each operation bases its changes on a different view of the current data state.
General concurrent table updates
When multiple transactions occur simultaneously, some transactions might fail to commit to the catalog due to interference from other transactions. Iceberg has mechanisms to handle this scenario, so it can adapt to concurrent transactions in many cases. However, commits can still fail if the latest metadata is updated after the base metadata version is established. This scenario applies to any type of updates on an Iceberg table.
Iceberg’s concurrency model and conflict type
Before diving into specific implementation patterns, it’s essential to understand how Iceberg manages concurrent writes through its table architecture and transaction model. Iceberg uses a layered architecture to manage table state and data:
- Catalog layer – Maintains a pointer to the current table metadata file, serving as the single source of truth for table state. The Data Catalog provides the functionality as the Iceberg catalog.
- Metadata layer – Contains metadata files that track table history, schema evolution, and snapshot information. These files are stored on Amazon Simple Storage Service (Amazon S3).
- Data layer – Stores the actual data files and delete files (for Merge-on-Read operations). These files are also stored on Amazon S3.
The following diagram illustrates this architecture.

This architecture is fundamental to Iceberg’s optimistic concurrency control, where multiple writers can proceed with their operations simultaneously, and conflicts are detected at commit time.
Write transaction flow
A typical write transaction in Iceberg follows these key steps:
- Read current state. In many operations (like OVERWRITE, MERGE, and DELETE), the query engine needs to know which files or rows are relevant, so it reads the current table snapshot. This is optional for operations like INSERT.
- Determine the changes in transaction, and write new data files.
- Load the table’s latest metadata, and determine which metadata version is used as the base for the update.
- Check if the change prepared in Step 2 is compatible with the latest table data in Step 3. If the check failed, the transaction must stop.
- Generate new metadata files.
- Commit the metadata files to the catalog. If the commit failed, retry from Step 3. The number of retries depends on the configuration.
The following diagram illustrates this workflow.

Conflicts can occur at two critical points:
- Data update conflicts – During validation when checking for data conflicts (Step 4)
- Catalog commit conflicts – During the commit when attempting to update the catalog pointer (Step 6)
When working with Iceberg tables, understanding the types of conflicts that can occur and how they’re handled is crucial for building reliable data pipelines. Let’s examine the two primary types of conflicts and their characteristics.
Catalog commit conflicts
Catalog commit conflicts occur when multiple writers attempt to update the table metadata simultaneously. When a commit conflict occurs, Iceberg will automatically retry the operation based on the table’s write properties. The retry process only repeats the metadata commit, not the entire transaction, making it both safe and efficient. When the retries fail, the transaction fails with CommitFailedException.
In the following diagram, two transactions run concurrently. Transaction 1 successfully updates the table’s latest snapshot in the Iceberg catalog from 0 to 1. Meanwhile, transaction 2 attempts to update from Snapshot 0 to 1, but when it tries to commit the changes to the catalog, it finds that the latest snapshot has already been changed to 1 by transaction 1. As a result, transaction 2 needs to retry from Step 3.
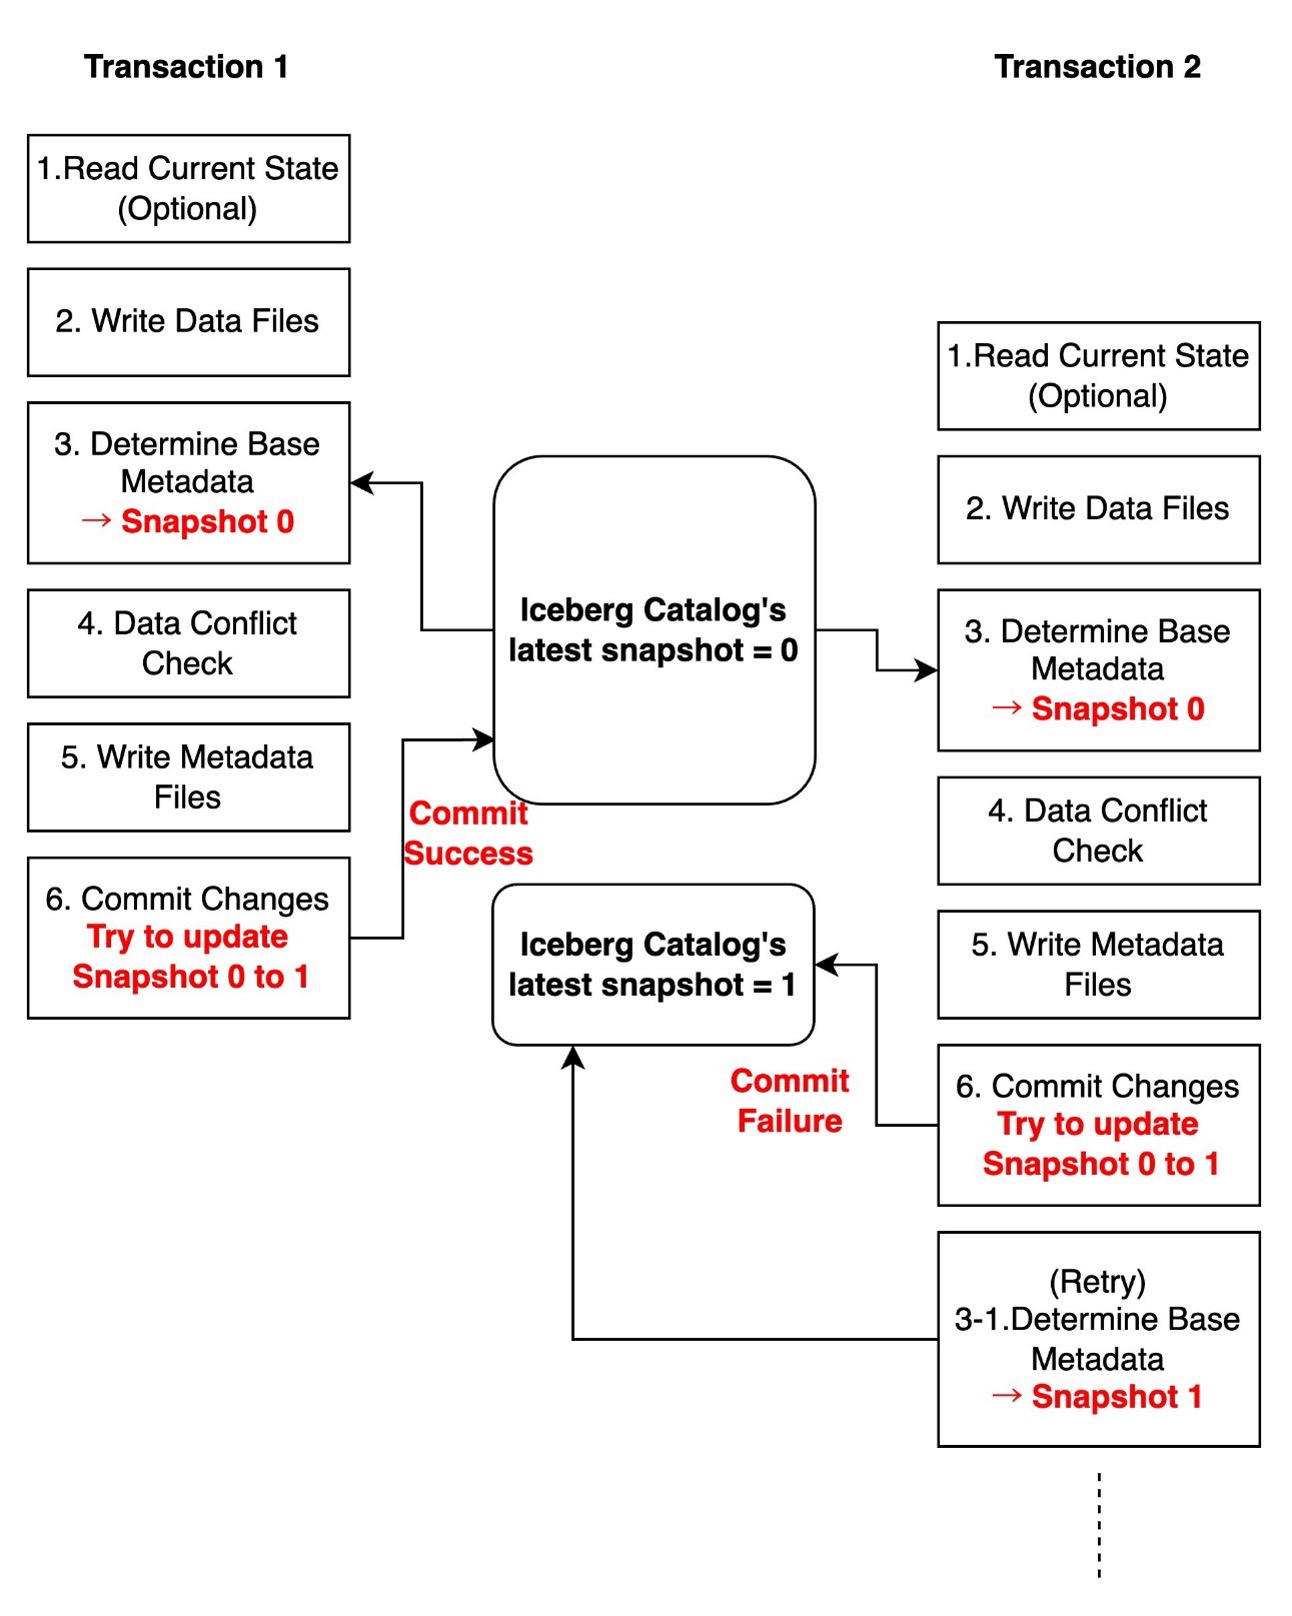
These conflicts are typically transient and can be automatically resolved through retries. You can optionally configure write properties controlling commit retry behavior. For more detailed configuration, refer to Write properties in the Iceberg documentation.
The metadata used when reading the current state (Step 1) and the snapshot used as base metadata for updates (Step 3) can be different. Even if another transaction updates the latest snapshot between Steps 1 and 3, the current transaction can still commit changes to the catalog as long as it passes the data conflict check (Step 4). This means that even when computing changes and writing data files (Step 1 to 2) take a long time, and other transactions make changes during this period, the transaction can still attempt to commit to the catalog. This demonstrates Iceberg’s intelligent concurrency control mechanism.
The following diagram illustrates this workflow.

Data update conflicts
Data update conflicts are more complex and occur when concurrent transactions attempt to modify overlapping data. During a write transaction, the query engine checks consistency between the snapshot being written and the latest snapshot according to transaction isolation rules. When incompatibility is detected, the transaction fails with a ValidationException.
In the following diagram, two transactions run concurrently on an employee table containing id, name, and salary columns. Transaction 1 attempts to update a record based on Snapshot 0 and successfully commits this change, making the latest snapshot version 1. Meanwhile, transaction 2 also attempts to update the same record based on Snapshot 0. When transaction 2 initially scanned the data, the latest snapshot was 0, but it has since been updated to 1 by transaction 1. During the data conflict check, transaction 2 discovers that its changes conflict with Snapshot 1, resulting in the transaction failing.

These conflicts can’t be automatically retried by Iceberg’s library because when data conflicts occur, the table’s state has changed, making it uncertain whether retrying the transaction would maintain overall data consistency. You need to handle this type of conflict based on your specific use case and requirements.
The following table summarizes how different write patterns have varying likelihood of conflicts.
| Write Pattern | Catalog Commit Conflict (Automatically retryable) | Data Conflict (Non-retryable) |
| INSERT (AppendFiles) | Yes | Never |
| UPDATE/DELETE with Copy-on-Write or Merge-on-Read (OverwriteFiles) | Yes | Yes |
| Compaction (RewriteFiles) | Yes | Yes |
Iceberg table’s isolation levels
Iceberg tables support two isolation levels: Serializable and Snapshot isolation. Both provide a read consistent view of the table and ensure readers see only committed data. Serializable isolation guarantees that concurrent operations run as if they were performed in some sequential order. Snapshot isolation provides weaker guarantees but offers better performance in environments with many concurrent writers. Under snapshot isolation, data conflict checks can pass even when concurrent transactions add new files with records that potentially match its conditions.
By default, Iceberg tables use serializable isolation. You can configure isolation levels for specific operations using table properties:
You must choose the appropriate isolation level based on your use case. Note that for conflicts between streaming ingestion and compaction operations, which is one of the most common scenarios, snapshot isolation does not provide any additional benefits to the default serializable isolation. For more detailed configuration, see IsolationLevel.
Implementation patterns
Implementing robust concurrent write handling in Iceberg requires different strategies depending on the conflict type and use case. In this section, we share proven patterns for handling common scenarios.
Manage catalog commit conflicts
Catalog commit conflicts are relatively straightforward to handle through table properties. The following configurations serve as initial baseline settings that you can adjust based on your specific workload patterns and requirements.
For frequent concurrent writes (for example, streaming ingestion):
For maintenance operations (for example, compaction):
Manage data update conflicts
For data update conflicts, which can’t be automatically retried, you need to implement a custom retry mechanism with proper error handling. A common scenario is when stream UPSERT ingestion conflicts with concurrent compaction operations. In such cases, the stream ingestion job should typically implement retries to handle incoming data. Without proper error handling, the job will fail with a ValidationException.
We show two example scripts demonstrating a practical implementation of error handling for data conflicts in Iceberg streaming jobs. The code specifically catches ValidationException through Py4JJavaError handling, which is essential for proper Java-Python interaction. It includes exponential backoff and jitter strategy by adding a random delay of 0–25% to each retry interval. For example, if the base exponential backoff time is 4 seconds, the actual retry delay will be between 4–5 seconds, helping prevent immediate retry storms while maintaining reasonable latency.
In this example, we create a scenario with frequent MERGE operations on the same records by using 'value' as a unique identifier and artificially limiting its range. By applying a modulo operation (value % 20), we constrain all values to fall within 0–19, which means multiple updates will target the same records. For instance, if the original stream contains values 0, 20, 40, and 60, they will all be mapped to 0, resulting in multiple MERGE operations targeting the same record. We then use groupBy and max aggregation to simulate a typical UPSERT pattern where we keep the latest record for each value. The transformed data is stored in a temporary view that serves as the source table in the MERGE statement, allowing us to perform UPDATE operations using 'value' as the matching condition. This setup helps demonstrate how our retry mechanism handles ValidationExceptions that occur when concurrent transactions attempt to modify the same records.
The first example uses Spark Structured Streaming using a rate source with a 20-second trigger interval to demonstrate the retry mechanism’s behavior when concurrent operations cause data conflicts. Replace <database_name> with your database name, <table_name> with your table name, amzn-s3-demo-bucket with your S3 bucket name.
The second example uses GlueContext.forEachBatch available on AWS Glue Streaming jobs. The implementation pattern for the retry mechanism remains the same, but the main differences are the initial setup using GlueContext and how to create a streaming DataFrame. Although our example uses spark.readStream with a rate source for demonstration, in actual AWS Glue Streaming jobs, you would typically create your streaming DataFrame using glueContext.create_data_frame.from_catalog to read from sources like Amazon Kinesis or Kafka. For more details, see AWS Glue Streaming connections. Replace <database_name> with your database name, <table_name> with your table name, amzn-s3-demo-bucket with your S3 bucket name.
Minimize conflict possibility by scoping your operations
When performing maintenance operations like compaction or updates, it’s recommended to narrow down the scope to minimize overlap with other operations. For example, consider a table partitioned by date where a streaming job continuously upserts data for the latest date. The following is the example script to run the rewrite_data_files procedure to compact the entire table:
By narrowing the compaction scope with a date partition filter in the where clause, you can avoid conflicts between streaming ingestion and compaction operations. The streaming job can continue to work with the latest partition while compaction processes historical data.
Conclusion
Successfully managing concurrent writes in Iceberg requires understanding both the table architecture and various conflict scenarios. In this post, we explored how to implement reliable conflict handling mechanisms in production environments.
The most critical concept to remember is the distinction between catalog commit conflicts and data conflicts. Although catalog commit conflicts can be handled through automatic retries and table properties configuration, data conflicts require careful implementation of custom handling logic. This becomes particularly important when implementing maintenance operations like compaction, where using the where clause in rewrite_data_files can significantly minimize conflict potential by reducing the scope of operations.
For streaming pipelines, the key to success lies in implementing proper error handling that can differentiate between conflict types and respond appropriately. This includes configuring suitable retry settings through table properties and implementing backoff strategies that align with your workload characteristics. When combined with well-timed maintenance operations, these patterns help build resilient data pipelines that can handle concurrent writes reliably.
By applying these patterns and understanding the underlying mechanisms of Iceberg’s concurrency model, you can build robust data pipelines that effectively handle concurrent write scenarios while maintaining data consistency and reliability.
About the Authors
 Sotaro Hikita is an Analytics Solutions Architect. He supports customers across a wide range of industries in building and operating analytics platforms more effectively. He is particularly passionate about big data technologies and open source software.
 Noritaka Sekiyama is a Principal Big Data Architect on the AWS Glue team. He works based in Tokyo, Japan. He is responsible for building software artifacts to help customers. In his spare time, he enjoys cycling with his road bike.
Completely Free Advanced Paging Module for FreePBX / TangoPBX!
Post Syndicated from Crosstalk Solutions original https://www.youtube.com/watch?v=OY93u_TmC9E