While it’s still in its infancy, generative AI coding tools are already changing the way developers and companies build software. Generative AI can boost developer and business productivity by automating tasks, improving communication and collaboration, and providing insights that can inform better decision-making.
In this post, we’ll explore the full story of how companies are adopting generative AI to ship software faster, including:
Generative AI refers to a class of artificial intelligence (AI) systems designed to create new content similar to what humans produce. These systems are trained on large datasets of content that include text, images, audio, music, or code.
Generative AI is an extension of traditional machine learning, which trains models to predict or classify data based on existing patterns. But instead of simply predicting the outcome, generative AI models are designed to identify underlying patterns and structures of the data, and then use that knowledge to quickly generate new content. However, the main difference between the two is one of magnitude and the size of the prediction or generation. Machine learning typically predicts the next word. Generative AI can generate the next paragraph.
AI-generated image from Shutterstack of a developer using a generative AI tool to code faster.
Generative AI tools have attracted particular interest in the business world. From marketing to software development, organizational leaders are increasingly curious about the benefits of the new generative AI applications and products.
“I do think that all companies will adopt generative AI tools in the near future, at least indirectly,” said Albert Ziegler, principal machine learning engineer at GitHub. “The bakery around the corner might have a logo that the designer made using a generative transformer. The neighbor selling knitted socks might have asked Bing where to buy a certain kind of wool. My taxi driver might do their taxes with a certain Excel plugin. This adoption will only increase over time.”
What are some business uses of generative AI tools?
Software development: generative AI tools can assist engineers with building, editing, and testing code.
Content creation: writers can use generative AI tools to help personalize product descriptions and write ad copy.
Design creation: from generating layouts to assisting with graphics, generative AI design tools can help designers create entirely new designs.
Video creation: generative AI tools can help videographers with building, editing, or enhancing videos and images.
Language translation: translators can use generative AI tools to create communications in different languages.
Personalization: generative AI tools can assist businesses with personalizing products and services to meet the needs of individual customers.
Operations: from supply chain management to pricing, generative AI tools can help operations professionals drive efficiency.
How generative AI coding tools are changing the developer experience
Generative AI has big implications for developers, as the tools can enable them to code and ship software faster.
How is generative AI affecting software development?
Check out our guide to learn what generative AI coding tools are, what developers are using them for, and how they’re impacting the future of development.
GitHub Copilot is only continuing to improve. When the tool was first launched for individuals in June 2022, more than 27% of developers’ code was generated by GitHub Copilot, on average. Today, that number is 46% across all programming languages—and in Java, that jumps to 61%.
How can generative AI tools help you build software?
These tools can help:
Write boilerplate code for various programming languages and frameworks.
Find information in documentation to understand what the code does.
Identify security vulnerabilities and implement fixes.
Streamline code reviews before merging new or edited code.
Like all technologies, responsibility and ethics are important with generative AI.
In February 2023, a group of 10 companies including OpenAI, Adobe, the BBC, and others agreed upon a new set of recommendations on how to use generative AI content in a responsible way.
The recommendations were put together by the Partnership on AI (PAI), an AI research nonprofit, in consultation with more than 50 organizations. The guidelines call for creators and distributors of generative AI to be transparent about what the technology can and can’t do and disclose when users might be interacting with this type of content (by using watermarks, disclaimers, or traceable elements in an AI model’s training data).
Businesses should be aware that while generative AI tools can speed up the creation of content, they should not be solely relied upon as a source of truth. A recent study suggests that people can identify whether AI-generated content is real or fake only 50% of the time. Here at GitHub, we named our generative AI tool “GitHub Copilot” to signify just this—the tool can help, but at the end of the day, it’s just a copilot. The developer needs to take responsibility for ensuring that the finished code is accurate and complete.
How companies are using generative AI
Even as generative AI models and tools continue to rapidly advance, businesses are already exploring how to incorporate these into their day-to-day operations.
This is particularly true for software development teams.
“Going forward, tech companies that don’t adopt generative AI tools will have a significant productivity disadvantage,” Ziegler said. “Given how much faster this technology can help developers build, organizations that don’t adopt these tools or create their own will have a harder time in the marketplace.”
3 primary generative AI business models for organizations
Enterprises all over the world are using generative AI tools to transform how work gets done. Three of the business models organizations use include:
Model as a Service (MaaS): Companies access generative AI models through the cloud and use them to create new content. OpenAI employs this model, which licenses its GPT-3 AI model, the platform behind ChatGPT. This option offers low-risk, low-cost access to generative AI, with limited upfront investment and high flexibility.
Built-in apps: Companies build new—or existing—apps on top of generative AI models to create new experiences. GitHub Copilot uses this model, which relies on Codex to analyze the context of the code to provide intelligent suggestions on how to complete it. This option offers high customization and specialized solutions with scalability.
Vertical integration: Vertical integration leverages existing systems to enhance the offerings. For instance, companies may use generative AI models to analyze large amounts of data and make predictions about prices or improve the accuracy of their services.
Duolingo, one of the largest language-learning apps in the world, is one company that recently adopted generative AI capabilities. They chose GitHub’s generative AI tool, GitHub Copilot, to help their developers write and ship code faster, while improving test coverage. Duolingo’s CTO Severin Hacker said GitHub Copilot delivered immediate benefits to the team, enabling them to code quickly and deliver their best work.
”[The tool] stops you from getting distracted when you’re doing deep work that requires a lot of your brain power,” Hacker noted. “You spend less time on routine work and more time on the hard stuff. With GitHub Copilot, our developers stay in the flow state and keep momentum instead of clawing through code libraries or documentation.”
After adopting GitHub Copilot and the GitHub platform, Duolingo saw a:
25% increase in developer speed for those who are new to working with a specific repository
10% increase in developer speed for those who are familiar with the respective codebase
67% decrease in median code review turnaround time
“I don’t know of anything available today that’s remotely close to what we can get with GitHub Copilot,” Hacker said.
Looking forward
Generative AI is changing the world of software development. And it’s just getting started. The technology is quickly improving and more use cases are being identified across the software development lifecycle. With the announcement of GitHub Copilot X, our vision for the future of AI-powered software development, we’re committed to installing AI capabilities into every step of the developer workflow. There’s no better time to get started with generative AI at your company.
AWS Glue Studio is a graphical interface that makes it easy to create, run, and monitor extract, transform, and load (ETL) jobs in AWS Glue. It allows you to visually compose data transformation workflows using nodes that represent different data handling steps, which later are converted automatically into code to run.
AWS Glue Studio recently released 10 more visual transforms to allow creating more advanced jobs in a visual way without coding skills. In this post, we discuss potential uses cases that reflect common ETL needs.
The new transforms that will be demonstrated in this post are: Concatenate, Split String, Array To Columns, Add Current Timestamp, Pivot Rows To Columns, Unpivot Columns To Rows, Lookup, Explode Array Or Map Into Columns, Derived Column, and Autobalance Processing.
Solution overview
In this use case, we have some JSON files with stock option operations. We want to make some transformations before storing the data to make it easier to analyze, and we also want to produce a separate dataset summary.
In this dataset, each row represents a trade of option contracts. Options are financial instruments that provide the right—but not the obligation—to buy or sell stock shares at a fixed price (called strike price) before a defined expiration date.
Input data
The data follows the following schema:
order_id – A unique ID
symbol – A code generally based on a few letters to identify the corporation that emits the underlying stock shares
instrument – The name that identifies the specific option being bought or sold
currency – The ISO currency code in which the price is expressed
price – The amount that was paid for the purchase of each option contract (on most exchanges, one contract allows you to buy or sell 100 stock shares)
exchange – The code of the exchange center or venue where the option was traded
sold – A list of the number of contracts that where allocated to fill the sell order when this is a sell trade
bought – A list of the number of contracts that where allocated to fill the buy order when this is buy trade
The following is a sample of the synthetic data generated for this post:
This data has a number of unique characteristics, as often found on older systems, that make the data harder to use.
The following are the ETL requirements:
The instrument name has valuable information that is intended for humans to understand; we want to normalize it into separate columns for easier analysis.
The attributes bought and sold are mutually exclusive; we can consolidate them into a single column with the contract numbers and have another column indicating if the contracts where bought or sold in this order.
We want to keep the information about the individual contract allocations but as individual rows instead of forcing users to deal with an array of numbers. We could add up the numbers, but we would lose information about how the order was filled (indicating market liquidity). Instead, we choose to denormalize the table so each row has a single number of contracts, splitting orders with multiple numbers into separate rows. In a compressed columnar format, the extra dataset size of this repetition is often small when compression is applied, so it’s acceptable to make the dataset easier to query.
We want to generate a summary table of volume for each option type (call and put) for each stock. This provides an indication of the market sentiment for each stock and the market in general (greed vs. fear).
To enable overall trade summaries, we want to provide for each operation the grand total and standardize the currency to US dollars, using an approximate conversion reference.
We want to add the date when these transformations took place. This could be useful, for instance, to have a reference on when was the currency conversion made.
Based on those requirements, the job will produce two outputs:
A CSV file with a summary of the number of contracts for each symbol and type
A catalog table to keep a history of the order, after doing the transformations indicated
Prerequisites
You will need your own S3 bucket to follow along with this use case. To create a new bucket, refer to Creating a bucket.
Generate synthetic data
To follow along with this post (or experiment with this kind of data on your own), you can generate this dataset synthetically. The following Python script can be run on a Python environment with Boto3 installed and access to Amazon Simple Storage Service (Amazon S3).
To generate the data, complete the following steps:
On AWS Glue Studio, create a new job with the option Python shell script editor.
Give the job a name and on the Job details tab, select a suitable role and a name for the Python script.
In the Job details section, expand Advanced properties and scroll down to Job parameters.
Enter a parameter named --bucket and assign as the value the name of the bucket you want to use to store the sample data.
Enter the following script into the AWS Glue shell editor:
import argparse
import boto3
from datetime import datetime
import io
import json
import random
import sys

# Configuration
parser = argparse.ArgumentParser()
parser.add_argument('--bucket')
args, ignore = parser.parse_known_args()
if not args.bucket:
    raise Exception("This script requires an argument --bucket with the value specifying the S3 bucket where to store the files generated")

data_bucket = args.bucket
data_path = "transformsblog/inputdata"
samples_per_file = 1000

# Create a single file with synthetic data samples
s3 = boto3.client('s3')
buff = io.BytesIO()

sample_stocks = [("AMZN", 95, "usd"), ("NKE", 120, "usd"), ("JPM", 130, "usd"), ("KO", 130, "usd"),
                 ("BMW.DE", 95, "eur"), ("SIE.DE", 140, "eur"), ("SAP.DE", 115, "eur")]
option_type = ["PUT", "CALL"]
operations = ["sold", "bought"]
dates = ["MAR 24 23", "APR 28 23", "MAY 26 23", "JUN 30 23"]
for i in range(samples_per_file):
    stock = random.choice(sample_stocks)
    symbol = stock[0]
    ref_price = stock[1]
    currency = stock[2]
    strike_price = round(ref_price * 0.9 + ref_price * random.uniform(0.01, 0.3))
    sample = {
        "order_id": int(datetime.now().timestamp() * 1000) + i,
        "symbol": stock[0],
        "instrument":f"{symbol} {random.choice(dates)} {strike_price} {random.choice(option_type)}",
        "currency": currency,
        "price": round(random.uniform(0.5, 20.1), 2),
        "exchange": "EDGX" if currency == "usd" else "XETR"
     }
    sample[random.choice(operations)] = [random.randrange(1,100) for i in range(random.randrange(1,5))]
    buff.write(json.dumps(sample).encode())
    buff.write("\n".encode())

s3.put_object(Body=buff.getvalue(), Bucket=data_bucket, Key=f"{data_path}/{int(datetime.now().timestamp())}.json")
Run the job and wait until it shows as successfully completed on the Runs tab (it should take just a few seconds).
Each run will generate a JSON file with 1,000 rows under the bucket specified and prefix transformsblog/inputdata/. You can run the job multiple times if you want to test with more input files. Each line in the synthetic data is a data row representing a JSON object like the following:
Add an S3 data source (you can name it JSON files source) and enter the S3 URL under which the files are stored (for example, s3://<your bucket name>/transformsblog/inputdata/), then select JSON as the data format.
Select Infer schema so it sets the output schema based on the data.
From this source node, you’ll keep chaining transforms. When adding each transform, make sure the selected node is the last one added so it gets assigned as the parent, unless indicated otherwise in the instructions.
If you didn’t select the right parent, you can always edit the parent by selecting it and choosing another parent in the configuration pane.
For each node added, you’ll give it a specific name (so the node purpose shows in the graph) and configuration on the Transform tab.
Every time a transform changes the schema (for instance, add a new column), the output schema needs to be updated so it’s visible to the downstream transforms. You can manually edit the output schema, but it’s more practical and safer to do it using the data preview. Additionally, that way you can verify the transformation are working so far as expected. To do so, open the Data preview tab with the transform selected and start a preview session. After you have verified the transformed data looks as expected, go to the Output schema tab and choose Use data preview schema to update the schema automatically.
As you add new kinds of transforms, the preview might show a message about a missing dependency. When this happens, choose End Session and the start a new one, so the preview picks up the new kind of node.
Extract instrument information
Let’s start by dealing with the information on the instrument name to normalize it into columns that are easier to access in the resulting output table.
Add a Split String node and name it Split instrument, which will tokenize the instrument column using a whitespace regex: \s+ (a single space would do in this case, but this way is more flexible and visually clearer).
We want to keep the original instrument information as is, so enter a new column name for the split array: instrument_arr.
Add an Array To Columns node and name it Instrument columns to convert the array column just created into new fields, except for symbol, for which we already have a column.
Select the column instrument_arr, skip the first token and tell it to extract the output columns month, day, year, strike_price, type using indexes 2, 3, 4, 5, 6 (the spaces after the commas are for readability, they don’t impact the configuration).
The year extracted is expressed with two digits only; let’s put a stopgap to assume it’s in this century if they just use two digits.
Add a Derived Column node and name it Four digits year.
Enter year as the derived column so it overrides it, and enter the following SQL expression: CASE WHEN length(year) = 2 THEN ('20' || year) ELSE year END
For convenience, we build an expiration_date field that a user can have as reference of the last date the option can be exercised.
Add a Concatenate Columns node and name it Build expiration date.
Name the new column expiration_date, select the columns year, month, and day (in that order), and a hyphen as spacer.
The diagram so far should look like the following example.
The data preview of the new columns so far should look like the following screenshot.
Normalize the number of contracts
Each of the rows in the data indicates the number of contracts of each option that were bought or sold and the batches on which the orders were filled. Without losing the information about the individual batches, we want to have each amount on an individual row with a single amount value, while the rest of the information is replicated in each row produced.
First, let’s merge the amounts into a single column.
Add an Unpivot Columns Into Rows node and name it Unpivot actions.
Choose the columns bought and sold to unpivot and store the names and values in columns named action and contracts, respectively. Notice in the preview that the new column contracts is still an array of numbers after this transformation.
Add an Explode Array Or Map into Rows row named Explode contracts.
Choose the contracts column and enter contracts as the new column to override it (we don’t need to keep the original array).
The preview now shows that each row has a single contracts amount, and the rest of the fields are the same.
This also means that order_id is no longer a unique key. For your own use cases, you need to decide how to model your data and if you want to denormalize or not.
The following screenshot is an example of what the new columns look like after the transformations so far.
Create a summary table
Now you create a summary table with the number of contracts traded for each type and each stock symbol.
Let’s assume for illustration purposes that the files processed belong to a single day, so this summary gives the business users information about what the market interest and sentiment are that day.
Add a Select Fields node and select the following columns to keep for the summary: symbol, type, and contracts.
Add a Pivot Rows Into Columns node and name it Pivot summary.
Aggregate on the contracts column using sum and choose to convert the type column.
Normally, you would store it on some external database or file for reference; in this example, we save it as a CSV file on Amazon S3.
Add an Autobalance Processing node and name it Single output file.
Although that transform type is normally used to optimize the parallelism, here we use it to reduce the output to a single file. Therefore, enter 1 in the number of partitions configuration.
Add an S3 target and name it CSV Contract summary.
Choose CSV as the data format and enter an S3 path where the job role is allowed to store files.
The last part of the job should now look like the following example.
Save and run the job. Use the Runs tab to check when it has finished successfully. You’ll find a file under that path that is a CSV, despite not having that extension. You’ll probably need to add the extension after downloading it to open it. On a tool that can read the CSV, the summary should look something like the following example.
Clean up temporary columns
In preparation for saving the orders into a historical table for future analysis, let’s clean up some temporary columns created along the way.
Add a Drop Fields node with the Explode contracts node selected as its parent (we are branching the data pipeline to generate a separate output).
Select the fields to be dropped: instrument_arr, month, day, and year. The rest we want to keep so they are saved in the historical table we’ll create later.
Currency standardization
This synthetic data contains fictional operations on two currencies, but in a real system you could get currencies from markets all over the world. It’s useful to standardize the currencies handled into a single reference currency so they can be easily be compared and aggregated for reporting and analysis.
We use Amazon Athena to simulate a table with approximate currency conversions that gets updated periodically (here we assume we process the orders timely enough that the conversion is a reasonable representative for comparison purposes).
Open the Athena console in the same Region where you’re using AWS Glue.
Run the following query to create the table by setting an S3 location where both your Athena and AWS Glue roles can read and write. Also, you might want to store the table in a different database than default (if you do that, update the table qualified name accordingly in the examples provided).
CREATE EXTERNAL TABLE default.exchange_rates(currency string, exchange_rate double)
ROW FORMAT DELIMITED
FIELDS TERMINATED BY ','
STORED AS TEXTFILE
LOCATION 's3://<enter some bucket>/exchange_rates/';
Enter a few sample conversions into the table: INSERT INTO default.exchange_rates VALUES ('usd', 1.0), ('eur', 1.09), ('gbp', 1.24);
You should now be able to view the table with the following query: SELECT * FROM default.exchange_rates
Back on the AWS Glue visual job, add a Lookup node (as a child of Drop Fields) and name it Exchange rate.
Enter the qualitied name of the table you just created, using currency as the key and select the exchange_rate field to use. Because the field is named the same in both the data and the lookup table, we can just enter the name currency and don’t need to define a mapping. At the time of this writing, the Lookup transform is not supported in the data preview and it will show an error that the table doesn’t exist. This is only for the data preview and doesn’t prevent the job from running correctly. The few remaining steps of the post don’t require you to update the schema. If you need to run a data preview on other nodes, you can remove the lookup node temporarily and then put it back.
Add a Derived Column node and name it Total in usd.
Name the derived column total_usd and use the following SQL expression: round(contracts * price * exchange_rate, 2)
Add a Add Current Timestamp node and name the column ingest_date.
Use the format %Y-%m-%d for your timestamp (for demonstration purposes, we are just using the date; you can make it more precise if you want to).
Save the historical orders table
To save the historical orders table, complete the following steps:
Add an S3 target node and name it Orders table.
Configure Parquet format with snappy compression, and provide an S3 target path under which to store the results (separate from the summary).
Select Create a table in the Data Catalog and on subsequent runs, update the schema and add new partitions.
Enter a target database and a name for the new table, for instance: option_orders.
The last part of the diagram should now look similar to the following, with two branches for the two separate outputs.
After you run the job successfully, you can use a tool like Athena to review the data the job has produced by querying the new table. You can find the table on the Athena list and choose Preview table or just run a SELECT query (updating the table name to the name and catalog you used):
SELECT * FROM default.option_orders limit 10
Your table content should look similar to the following screenshot.
Clean up
If you don’t want to keep this example, delete the two jobs you created, the two tables in Athena, and the S3 paths where the input and output files were stored.
Conclusion
In this post, we showed how the new transforms in AWS Glue Studio can help you do more advanced transformation with minimum configuration. This means you can implement more ETL uses cases without having to write and maintain any code. The new transforms are already available on AWS Glue Studio, so you can use the new transforms today in your visual jobs.
About the author
Gonzalo Herreros is a Senior Big Data Architect on the AWS Glue team.
There’s no doubt we’re living in the era of big data. And, as the amount of data we generate grows exponentially, organizing it becomes all the more challenging. If you don’t organize the data well, especially if it resides in cloud storage, it becomes complex to track, manage, and process.
That’s why I’m sharing six strategies you can use to efficiently organize big data in the cloud so things don’t spiral out of control. You can consider how to organize data from different angles, including within a bucket, at the bucket level, and so on. In this article, I’ll primarily focus on how you can efficiently organize data on Backblaze B2 Cloud Storage within a bucket. With the strategies described here, you can consider what information you need about each object you store and how to logically structure an object or file name, which should hopefully equip you to better organize your data.
Before we delve into the topic, let me give a super quick primer on some basics of object storage. Feel free to skip this section if you’re familiar.
First: A Word About Object Storage
Unlike traditional file systems, when you’re using object storage, you have a simple, flat structure with buckets and objects to store your data. It’s designed as a key-value store so that it can scale to the internet.
There are no real folders in the object store file system. The impact of this is data is not separated into a hierarchical structure. That said, there are times that you actually want to limit what you’re querying. In that instance, prefixes provide a folder-like look and feel, which means that you can get all the benefits of having a folder without any major drawbacks. From here onwards, I’ll generally refer to folders as prefixes and files as objects.
With all that out of the way, let’s dive into the ways you can efficiently organize your data within a bucket. You probably don’t have to employ all these guidelines. Rather, you can pick and choose what best fits your requirements.
1. Standardize Object Naming Conventions
Naming conventions, simply put, are rules about what you and others within your organization name your files. For example, you might decide it’s important that the file name describes the type of file, the date created, and the subject. You can combine that information in different ways and even format pieces of information differently. For example, one employee may think it makes more sense to call a file Blog Post_Object Storage_May 6, 2023, while another might think it makes sense to call that same file Object Storage.Blog Post.05062023.
These decisions do have impact. For instance that second date format would confuse the majority of the world who uses the day/month/year format, as opposed to month/day/year as is common in the United States. . And, what if you take a different kind of object as your example, one that versioning becomes important for? When do code fixes for version 1.1.3 actually become version 1.2.0?
Simply put, having a consistent and well thought out naming convention for your objects makes life easy when it comes to organizing data. You can and should derive and follow a pattern while naming the objects. Based on your requirements, a consistent and well thought out pattern for naming your objects makes it easy to find and sort files.
2. Harness The Power of Prefixes
Prefixes provide a folder-like look and feel on object stores (as there are no real folders). The prefixes are powerful and immensely helpful while effectively organizing your data and allow you to make good use of the wildcard function in your command line interface (CLI). A good way to think about a prefix is that it creates hierarchical categories in your object name. So, if you were creating a prefix about locations and using slashes as a delimiter, you’d create something like this:
North America/Canada/British Columbia/Vancouver
Let’s imagine a scenario where you generate multiple objects per day, you can structure your data per year per month and per day. An example prefix would be year=2022/month=12/day=17/ for the multiple objects generated on December 17, 2022. If you queried for all objects created on that day, you might get results that look like this:
On the Backblaze B2 secure web application, you will notice these prefixes create “folders” three levels deep, year=2022, month=12 and day=17. The folder, day=17, will contain all the objects with the example prefix in their names. Partitioning data is helpful to easily track your data. It is also helpful in the processing workflows that use your data after storing it on Backblaze B2.
3. Programatically Separate Data
After ingesting data into B2 Cloud Storage, you may have multiple workflows to make use of data. These workflows are often tied to specific environments and in turn generate more new data. Production, staging, and test are some examples of environments.
We recommend keeping the copy of raw data and the new data generated by a specific environment separate. This lets you keep track of when and how changes were made to your datasets, which in turn means you can roll back to a native state if you need to or replicate the change if it’s producing the results you want. In occasions of undesirable events like a bug in your processing workflow, you can rerun the workflow with a fix in place on the raw copy of data. To illustrate the data specific to the production environment, an example would be /data/env=prod/type=raw, and /data/env=prod/type=new.
4. Leverage Lifecycle Rules
While your data volume is ever increasing, we recommend reviewing and cleaning up unwanted data from time to time. Doing that process manually is very cumbersome, especially when you have large amounts of data. Never fear: Lifecycle rules to the rescue. You can set up lifecycle rules to automatically hide or delete data based on a certain criteria which you can configure on Backblaze B2.
For example, some workflows create temporary objects during processing. It’s useful to briefly retain these temporary objects to diagnose issues, but they have no long-term value. A lifecycle rule could specify that objects with the /tmp prefix are to be deleted two days after they are created.
5. Enable Object Lock
Object Lock makes your data immutable for a specified period of time. Once you set that period of time, even the data owner can’t modify or delete the data. This helps to prevent an accidental overwrite of your data, creates trusted backups, and so on.
Let’s imagine a scenario where you upload data to B2 Cloud Storage and run a workflow to process the data which in turn generates new data, and use our production, staging, and test example again. Due to a bug, your workflow tries to overwrite your raw data. When you have Object Lock set, the rewrite won’t happen, and your workflow will likely error out.
6. Customize Access With Application Keys
There are two types of application keys on B2 Cloud Storage:
Your master application key. This is the first key you have access to and is available on the web application. This key has all capabilities, access to all buckets, and has no file prefix restrictions or expiration. You only have one master application key—if you generate a new one, your old one becomes invalid.
Non-master application key(s). This is every other application key. They can be limited to a bucket, or even files within that bucket using prefixes, can set read-only, read-write, or write-only access, and can expire.
That second type of key is the important one here. Using application keys, you can grant or restrict access to data programmatically. You can make as many application keys in Backblaze B2 as you need (the current limit is 100 million). In short: you can get detailed in customizing access control.
In any organization, it’s always best practice to only grant users and applications as much access as they need, also known as the principle of least privilege. That rule of thumb reduces risk in security situations (of course), but it also reduces the possibility for errors. Extend this logic to our accidental overwrite scenario above: if you only grant access to those who need to (or know how to) use your original dataset, you’re reducing the risk of data being deleted or modified inappropriately.
Conversely, you may be in a situation where you want to grant lots of people access, such as when you’re creating a cell phone app, and you want your customers to review it (read-only access). Or, you may want to create an application key that only allows someone to upload data, not modify existing data (write-only access), which is useful for things like log files.
And, importantly, this type of application key can be set to expire, which means that you will need to actively re-grant access to people. Making granting access your default (as opposed to taking away access) means that you’re forced to review and validate who has access to what at regular intervals, which in turn means you’re less likely to have legacy stakeholders with inappropriate access to your data.
Two great places to start here are restricting the access to specific data by tying application keys to buckets and prefixes and restricting the read and write permissions of your data. You should think carefully before creating an account-wide application key, as it will have access to all of your buckets, including those that you create in the future. Restrict each application key to a single bucket wherever possible.
What’s Next?
Organizing large volumes by putting some guidelines into practice can make it easy to store your data. Pick and choose the ones that best fit your requirements and needs. So far, we have talked about organizing the data within a bucket, and, in the future, I’ll provide some guidance about organizing buckets on B2 Cloud Storage.
This post outlines two methods by which programmatic users can now access OpenSearch using SAML identities. This applies to all identity providers (IdPs) that support SAML 2.0, including prevalent ones like Active Directory Federation Service (ADFS), Okta, AWS IAM Identity Center (Successor to AWS Single Sign-On), KeyCloak, and others. Although we outline the methods as they pertain to OpenSearch Service and AWS Identity and Access Management (IAM), programmatic access to each of these individual providers is outside the scope of this post. Most of these providers do provide such a facility.
Single sign-on methods
When you use single sign-on (SSO), there are two different authentication methods:
Identity provider initiated – This is when a user or a user-agent first authenticates with an IdP and gets a SAML assertion that establishes the identity of the user. This assertion is then passed to a service provider (SP) that provides access to a protected resource.
Service provider initiated – Although the IdP-initiated exchange is straightforward, a more typical sign-on experience is when the protected resource is accessed directly. The SP then redirects the user to the IdP for authentication along with a SAML authentication request. The IdP responds with an authentication assertion inside a SAML response. After that, the SSO experience is the same as that of an IdP-initiated flow.
The following figure shows the sequence of calls to access OpenSearch Service API using AWS STS.
Let’s explore each step in more detail.
Steps 1 and 2
Steps 1 and 2 vary depending upon your chosen IdP. In general, they typically provide an authentication API or session API or another similar API to authenticate and retrieve the SAML authentication assertion response. We use this SAML assertion in the next step.
Steps 3 and 4
Call the AssumeRoleWithSAML AWS STS API to exchange the SAML assertion for temporary credentials associated with your SAML identity. See the following code:
curl --location 'https://sts.amazonaws.com?
Version=2011-06-15&
Action=AssumeRoleWithSAML&
RoleArn=<ARN of the role being assumed>&
PrincipalArn=<ARN of the IdP integrated with IAM>&
SAMLAssertion=<Base-64 encoded SAML assertion>'
The response contains the temporary AWS STS credentials with AccessKeyId, SecretAccessKey, and a SessionToken.
Step 5
Use the temporary credentials from the last step to sign all API requests to OpenSearch Service. Also ensure the role that you assumed with the AssumeRoleWithSAML call has sufficient permission to access the requisite data in OpenSearch Service. Refer to Mapping roles to users for more information about mapping this role as a backend role. As an additional step to ensure consistency, this AWS STS role and any SAML group the user is part of can be mapped to the same role in OpenSearch Service. The following code shows a model to make this call:
Method 2: Use OpenSearch Dashboards’ console proxy
OpenSearch Dashboards has a component called a console proxy that can proxy requests to OpenSearch. This allows OpenSearch clients to make the same API calls in Domain Specific Language (DSL) to this console proxy instead of directly calling OpenSearch. The console proxy forwards these calls to OpenSearch and responds back to the clients in the same format as OpenSearch.
The following figure shows the sequence of calls you can make to the console proxy to gain programmatic access to OpenSearch Service.
Steps 1 and 2
The first two steps are similar to method 1, and they will vary depending on what IdP is chosen. Essentially, you need to obtain a SAML authentication assertion response from the IdP.
Steps 3 and 4
Use the SAML assertion from the previous steps and POST it to the Assertion Consumer Service (ACS) URL, _opendistro/_security/saml/acs/idpinitiated, to exchange the assertion for the security_authentication token. The following code shows the command line for these steps:
If you’re using the OpenSearch engine, the dashboard URL is <domain URL>/_dashboards. If you’re using the Elasticsearch engine, the dashboard URL is <domain URL>/_plugin/kibana. OpenSearch Dashboards processes this and responds with a redirect response with code 302 and an empty body. The response headers now also contain a cookie named security_authentication, which is the token you must use in all subsequent calls.
Steps 5–8
Use the security_authentication cookie in the API calls to the console proxy to perform programmatic API calls. The following code shows a command line for these steps:
Make sure to include a header called osd-xsrf : true for programmatic access to dashboards. The console proxy path is /api/console/proxy for Elasticsearch engines version 6.x and 7.x and OpenSearch engine version 1.x and 2.x.
Similar to method 1, make sure to map roles and groups associated with a particular SAML identity as the correct backend role with requisite permissions.
Comparing these methods
You can use method 1 in any domain regardless of the engine as long as fine-grained access control is enabled. Method 2 only works for domains with Elasticsearch engine versions greater than 6.7 and all OpenSearch engine versions.
The OpenSearch Dashboards process is generally meant for human interactions, which has a lower API call rate and volume than those of programmatic calls. OpenSearch can handle considerably higher API call rates and volume, so take care not to send high-volume API calls using method 2. As a best practice for programmatic access with SAML identities, we recommend method 1 wherever possible to avoid performance bottlenecks.
Conclusion
Both of the methods outlined in this post provide a similar flow to access OpenSearch Service programmatically using SAML identities (exchanging a SAML assertion for an authentication token). AssumeRoleWithSAML is a key and fairly straightforward-to-use API that enables this access and is our recommended method. Try one of OpenSearch Service labs and launch an OpenSearch Service domain to experiment with these methods. Good luck!
About the author
Muthu Pitchaimani is a Search Specialist with Amazon OpenSearch Service. He builds large-scale search applications and solutions. Muthu is interested in the topics of networking and security, and is based out of Austin, Texas.
Two members of the Faster
CPython team, which was put together at Microsoft at the behest of Guido
van Rossum to work on major performance improvements for CPython, came
to PyCon 2023 to report on what the
team has been working on—and its plans for the future. PEP 659 (“Specializing
Adaptive Interpreter”) describes the foundation of the current work, some
of which
has already been released as part of Python 3.11. Brandt Bucher, who
gave a
popular talk on structural pattern matching
at last year’s PyCon, was up first, with a talk on what “adaptive” and
“specializing” mean in the context of Python, which we cover here in part
one. Mark Shannon, whose proposed plan
for performance improvements in 2020 was a major impetus for this work,
presented on the past, present, and future of the Python performance
enhancements,
which will be covered in part two.
Hundreds of thousands of customers use AWS Glue, a serverless data integration service, to discover, prepare, and combine data for analytics, machine learning (ML), and application development. AWS Glue for Apache Spark jobs work with your code and configuration of the number of data processing units (DPU). Each DPU provides 4 vCPU, 16 GB memory, and 64 GB disk. AWS Glue manages running Spark and adjusts workers to achieve the best price performance. For workloads such as data transforms, joins, and queries, you can use G.1X (1 DPU) and G.2X (2 DPU) workers, which offer a scalable and cost-effective way to run most jobs. With exponentially growing data sources and data lakes, customers want to run more data integration workloads, including their most demanding transforms, aggregations, joins, and queries. These workloads require higher compute, memory, and storage per worker.
Today we are pleased to announce the general availability of AWS Glue G.4X (4 DPU) and G.8X (8 DPU) workers, the next series of AWS Glue workers for the most demanding data integration workloads. G.4X and G.8X workers offer increased compute, memory, and storage, making it possible for you to vertically scale and run intensive data integration jobs, such as memory-intensive data transforms, skewed aggregations, and entity detection checks involving petabytes of data. Larger worker types not only benefit the Spark executors, but also in cases where the Spark driver needs larger capacity—for instance, because the job query plan is quite large.
This post demonstrates how AWS Glue G.4X and G.8X workers help you scale your AWS Glue for Apache Spark jobs.
G.4X and G.8X workers
AWS Glue G.4X and G.8X workers give you more compute, memory, and storage to run your most demanding jobs. G.4X workers provide 4 DPU, with 16 vCPU, 64 GB memory, and 256 GB of disk per node. G.8X workers provide 8 DPU, with 32 vCPU, 128 GB memory, and 512 GB of disk per node. You can enable G.4X and G.8X workers with a single parameter change in the API, AWS Command Line Interface (AWS CLI), or visually in AWS Glue Studio. Regardless of the worker used, all AWS Glue jobs have the same capabilities, including auto scaling and interactive job authoring via notebooks. G.4X and G.8X workers are available with AWS Glue 3.0 and 4.0.
The following table shows compute, memory, disk, and Spark configurations per worker type in AWS Glue 3.0 or later.
AWS Glue Worker Type
DPU per Node
vCPU
Memory (GB)
Disk (GB)
Number of Spark Executors per Node
Number of Cores per Spark Executor
G.1X
1
4
16
64
1
4
G.2X
2
8
32
128
1
8
G.4X (new)
4
16
64
256
1
16
G.8X (new)
8
32
128
512
1
32
To use G.4X and G.8X workers on an AWS Glue job, change the setting of the worker type parameter to G.4X or G.8X. In AWS Glue Studio, you can choose G 4X or G 8X under Worker type.
In the AWS API or AWS SDK, you can specify G.4X or G.8X in the WorkerType parameter. In the AWS CLI, you can use the --worker-type parameter in a create-job command.
To use G.4X and G.8X on an AWS Glue Studio notebook or interactive sessions, set G.4X or G.8X in the %worker_type magic:
Performance characteristics using the TPC-DS benchmark
In this section, we use the TPC-DS benchmark to showcase performance characteristics of the new G.4X and G.8X worker types. We used AWS Glue version 4.0 jobs.
G.2X, G.4X, and G.8X results with the same number of workers
Compared to the G.2X worker type, the G.4X worker has 2 times the DPUs and the G.8X worker has 4 times the DPUs. We ran over 100 TPC-DS queries against the 3 TB TPC-DS dataset with the same number of workers but on different worker types. The following table shows the results of the benchmark.
Worker Type
Number of Workers
Number of DPUs
Duration (minutes)
Cost at $0.44/DPU-hour ($)
G.2X
30
60
537.4
$236.46
G.4X
30
120
264.6
$232.85
G.8X
30
240
122.6
$215.78
When running jobs on the same number of workers, the new G.4X and G.8x workers achieved roughly linear vertical scalability.
G.2X, G.4X, and G.8X results with the same number of DPUs
We ran over 100 TPC-DS queries against the 10 TB TPC-DS dataset with the same number of DPUs but on different worker types. The following table shows the results of the experiments.
Worker Type
Number of Workers
Number of DPUs
Duration (minutes)
Cost at $0.44/DPU-hour ($)
G.2X
40
80
1323
$776.16
G.4X
20
80
1191
$698.72
G.8X
10
80
1190
$698.13
When running jobs on the same number of total DPUs, the job performance stayed mostly the same with new worker types.
Example: Memory-intensive transformations
Data transformations are an essential step to preprocess and structure your data into an optimal form. Bigger memory footprints are consumed in some transformations such as aggregation, join, your own custom logic using user-defined functions (UDFs), and so on. The new G.4X and G.8X workers enable you to run larger memory-intensive transformations at scale.
The following example reads large JSON files compressed in GZIP from an input Amazon Simple Storage Service (Amazon S3) location, performs groupBy, calculates groups based on K-means clustering using a Pandas UDF, then shows the results. Note that this UDF-based K-means is used just for illustration purposes; it’s recommended to use native K-means clustering for production purposes.
With G.2X workers
When an AWS Glue job runs on 12 G.2X workers (24 DPU), it failed due to a No space left on device error. On the Spark UI, the Stages tab for the failed stage shows that there were multiple failed tasks in the AWS Glue job due to the error.
The Executor tab shows failed tasks per executor.
Generally, G.2X workers can process memory-intensive workload well. This time, we used a special Pandas UDF that consumes a significant amount of memory, and it caused a failure due to a large amount of shuffle writes.
With G.8X workers
When an AWS Glue job runs on 3 G.8X workers (24 DPU), it succeeded without any failures, as shown on the Spark UI’s Jobs tab.
The Executors tab also explains that there were no failed tasks.
From this result, we observed that G.8X workers processed the same workload without failures.
Conclusion
In this post, we demonstrated how AWS Glue G.4X and G.8X workers can help you vertically scale your AWS Glue for Apache Spark jobs. G.4X and G.8X workers are available today in US East (Ohio), US East (N. Virginia), US West (Oregon), Asia Pacific (Singapore), Asia Pacific (Sydney), Asia Pacific (Tokyo), Canada (Central), Europe (Frankfurt), Europe (Ireland), and Europe (Stockholm). You can start using the new G.4X and G.8X worker types to scale your workload from today. To get started with AWS Glue, visit AWS Glue.
About the authors
Noritaka Sekiyama is a Principal Big Data Architect on the AWS Glue team. He works based in Tokyo, Japan. He is responsible for building software artifacts to help customers. In his spare time, he enjoys cycling with his road bike.
Tomohiro Tanaka is a Senior Cloud Support Engineer on the AWS Support team. He’s passionate about helping customers build data lakes using ETL workloads. In his free time, he enjoys coffee breaks with his colleagues and making coffee at home.
Chuhan Liu is a Software Development Engineer on the AWS Glue team. He is passionate about building scalable distributed systems for big data processing, analytics, and management. In his spare time, he enjoys playing tennis.
Matt Su is a Senior Product Manager on the AWS Glue team. He enjoys helping customers uncover insights and make better decisions using their data with AWS Analytic services. In his spare time, he enjoys skiing and gardening.
This blog post was written By Anthony Liguori, VP/Distinguished Engineer, EC2 AWS.
Customers around the world trust AWS to keep their data safe, and keeping their workloads secure and confidential is foundational to how we operate. Since the inception of AWS, we have relentlessly innovated on security, privacy tools, and practices to meet, and even exceed, our customers’ expectations.
The AWS Nitro System is the underlying platform for all modern AWS compute instances which has allowed us to deliver the data isolation, performance, cost, and pace of innovation that our customers require. It’s a pioneering design of specialized hardware and software that protects customer code and data from unauthorized access during processing.
When we launched the Nitro System in 2017, we delivered a unique architecture that restricts any operator access to customer data. This means no person or even service from AWS, can access data when it is being used in an Amazon EC2 instance. We knew that designing the system this way would present several architectural and operational challenges for us. However, we also knew that protecting customers’ data in this way was the best way to support our customer’s needs.
When AWS made its Digital Sovereignty Pledge last year, we committed to providing greater transparency and assurances to customers about how AWS services are designed and operated, especially when it comes to handling customer data. As part of that increased transparency, we engaged NCC Group, a leading cybersecurity consulting firm based in the United Kingdom, to conduct an independent architecture review of the Nitro System and the security assurances we make to our customers. NCC has now issued its rand affirmed our claims.
The report states, “As a matter of design, NCC Group found no gaps in the Nitro System that would compromise [AWS] security claims.” Specifically, the report validates the following statements about our Nitro System production hosts:
There is no mechanism for a cloud service provider employee to log in to the underlying host.
No administrative API can access customer content on the underlying host.
There is no mechanism for a cloud service provider employee to access customer content stored on instance storage and encrypted EBS volumes.
There is no mechanism for a cloud service provider employee to access encrypted data transmitted over the network.
Access to administrative APIs always requires authentication and authorization.
Access to administrative APIs is always logged.
Hosts can only run tested and signed software that is deployed by an authenticated and authorized deployment service. No cloud service provider employee can deploy code directly onto hosts.
The report details NCC’s analysis for each of these claims. You can also find additional details about the scope, methodology, and steps that NCC used to evaluate the claims.
How Nitro System protects customer data
At AWS, we know that our customers, especially those who have sensitive or confidential data, may have worries about putting that data in the cloud. That’s why we’ve architected the Nitro System to ensure that your confidential information is as secure as possible. We do this in several ways:
There is no mechanism for any system or person to log in to Amazon EC2 servers, read the memory of EC2 instances, or access any data on encrypted Amazon Elastic Block Store (EBS) volumes.
If any AWS operator, including those with the highest privileges, needs to perform maintenance work on the EC2 server, they can do so only by using a strictly limited set of authenticated, authorized, and audited administrative APIs. Critically, none of these APIs have the ability to access customer data on the EC2 server. These restrictions are built into the Nitro System itself, and no AWS operator can circumvent these controls and protections.
The Nitro System also protects customers from AWS system software through the innovative design of our lightweight Nitro Hypervisor, which manages memory and CPU allocation. Typical commercial hypervisors provide administrators with full access to the system, but with the Nitro System, the only interface operators can use is a restricted API. This means that customers and operators cannot interact with the system in unapproved ways and there is no equivalent of a “root” user. This approach enhances security and allows AWS to update systems in the background, fix system bugs, monitor performance, and even perform upgrades without impacting customer operations or customer data. Customers are unaffected during system upgrades, and their data remains protected.
Finally, the Nitro System can also provide customers an extra layer of data isolation from their own operators and software. AWS created , which allow for isolated compute environments, which is ideal for organizations that need to process personally identifiable information, as well as healthcare, financial, and intellectual property data within their compute instances. These enclaves do not share memory or CPU cores with the customer instance. Further, Nitro Enclaves have cryptographic attestation capabilities that let customers verify that all of the software deployed has been validated and not compromised.
All of these prongs of the Nitro System’s security and confidential compute capabilities required AWS to invest time and resources into building the system’s architecture. We did so because we wanted to ensure that our customers felt confident entrusting us with their most sensitive and confidential data, and we have worked to continue earning that trust. We are not done and this is just one step AWS is taking to increase the transparency about how our services are designed and operated. We will continue to innovate on and deliver unique features that further enhance our customers’ security without compromising on performance.
Learn more:
Watch Anthony speak about AWS Nitro System Security here.
In the early stages of the war in Ukraine in 2022, PIPEDREAM, a known malware was quietly on the brink of wiping out a handful of critical U.S. electric and liquid natural gas sites. PIPEDREAM is an attack toolkit with unmatched and unprecedented capabilities developed for use against industrial control systems (ICSs).
The malware was built to manipulate the network communication protocols used by programmable logic controllers (PLCs) leveraged by two critical producers of PLCs for ICSs within the critical infrastructure sector, Schneider Electric and OMRON.
Version
113.0 of the Firefox browser is out. Changes include improved
picture-in-picture support, blocking of third-party cookies in private
windows, some accessibility improvements, and more. “A 13-year-old
feature request was fulfilled and Firefox now supports files being
drag-and-dropped directly from Microsoft Outlook“.
Today we share a guest blog from Chris Roffey, who manages the UK Bebras Challenge, a computational thinking challenge we run every year in partnership with the University of Oxford.
Bebras is a free annual challenge that helps schools introduce computational thinking to their learners through online, self-marking tasks. Taking part in Bebras, students solve accessible, interesting problems using their developing computational thinking skills. No programming is involved in taking part. The UK challenge is for school students aged 6 to 18 years old, with a special category for students with severe visual impairments.
Bebras means ‘beaver’
Preparing the UK Bebras Challenge for schools
While UK schools take part in Bebras throughout two weeks in November, for me the annual cycle starts much earlier. May is the time of the annual Bebras international workshop where the year’s new tasks get decided. In 2022, 60 countries were represented — some online, some in person. For nearly a week, computer scientists and computing teachers met to discuss and work on the new cycle’s task proposals submitted by participating countries a little earlier.
After the workshop, in collaboration with teams from other European countries, the UK Bebras team chose its task sets and then worked to localise, copy-edit, and test them to get them ready for schools participating in Bebras during November. From September, schools across the UK create accounts for their students, with over 360,000 students ultimately taking part in 2022. All in all, more than 3 million students from 59 countries took part in the 2022/2023 Bebras challenge cycle.
An invitation to the Oxford University Computing Challenge
In this cycle, the UK Bebras partnership between the Raspberry Pi Foundation and the University of Oxford has been extended to include the Oxford University Computing Challenge (OUCC). This is an invitation-based, online coding challenge for students aged 10 to 18, offered in the UK as well as Australia, Jamaica, and China. We invited the students with the top 10% best results in the UK Bebras challenge to take part in the OUCC — an exciting opportunity for them.
In contrast to Bebras, which doesn’t require participants to do any coding, the OUCC asks students to create code to solve computational thinking problems. This requires students to prepare and challenges them to develop their computational thinking skills further. The two younger age groups, 10- to 14-year-olds, solve problems using the Blockly programming language. The older two age groups can use one of the 11 programming languages that Bebras supports, including all the most common ones taught in UK schools.
Over 20,000 Bebras participants took up the invitation to the first round of the OUCC in the third week of January. Then in March, the top 20 participants from each of the four OUCC age groups took part in the final round. The finalists all did amazingly well. In the first round, many of them had solved all the available tasks correctly, even though the expectation is that participants only try to solve as many as they can within the round’s time limit. In the final round, a few of the finalists managed to repeat this feat with the even more advanced tasks — which is, in modern parlance, literally impossible!
Celebrating together
Many of the participants are about to take school exams, so the last stage of the annual cycle — the prize winners’ celebration day— takes place when the exam period has ended. This year we are holding this celebration on Friday 30 June at the Raspberry Pi Foundation’s headquarters in Cambridge. It will be a lovely way to finish the annual Bebras cycle and I am looking forward to it immensely.
A full conference pass is $1,099. Register today with the code secure150off to receive a limited time $150 discount, while supplies last.
AWS re:Inforce 2023 is fast approaching, and this post can help you plan your agenda with a look at the sessions in the identity and access management track. AWS re:Inforce is a learning conference where you can learn more about cloud security, compliance, identity, and privacy. You have access to hundreds of technical and non-technical sessions, an AWS Partner expo featuring security partners with AWS Security Competencies, and keynote and leadership sessions featuring AWS Security leadership. AWS re:Inforce 2023 will take place in-person in Anaheim, California, on June 13 and 14. re:Inforce 2023 features content in the following six areas:
The identity and access management track will share recommended practices and learnings for identity management and governance in AWS environments. You will hear from other AWS customers about how they are building customer identity and access management (CIAM) patterns for great customer experiences and new approaches for managing standard, elevated, and privileged workforce access. You will also hear from AWS leaders about accelerating the journey to least privilege with access insights and the role of identity within a Zero Trust architecture.
This post highlights some of the identity and access management sessions that you can sign up for, including breakout sessions, chalk talks, code talks, lightning talks, builders’ sessions, and workshops. For the full catalog, see the AWS re:Inforce catalog preview.
Breakout sessions
Lecture-style presentations that cover topics at all levels and delivered by AWS experts, builders, customers, and partners. Breakout sessions typically include 10–15 minutes of Q&A at the end.
IAM201: A first-principles approach: AWS Identity and Access Management (IAM) Learning how to build effectively and securely on AWS starts with a strong working knowledge of AWS Identity and Access Management (IAM). In this session aimed at engineers who build on AWS, explore a no-jargon, first-principles approach to IAM. Learn the fundamental concepts of IAM authentication and authorization policies as well as concrete techniques that you can immediately apply to the workloads you run on AWS.
IAM301: Establishing a data perimeter on AWS, featuring USAA In this session, dive deep into the data perimeter controls that help you manage your trusted identities and their access to trusted resources from expected networks. USAA shares how they use automation to embed security and AWS Identity and Access Management (IAM) baselines to empower a self-service mindset. Learn how they use data perimeters to support decentralization without compromising on security. Also, discover how USAA uses a threat-based approach to prioritize implementation of specific data perimeters.
IAM302: Create enterprise-wide preventive guardrails, featuring Inter & Co. In this session, learn how to establish permissions guardrails within your multi-account environment with AWS Organizations and service control policies (SCPs). Explore how effective use of SCPs can help your builders innovate on AWS while maintaining a high bar on security. Learn about the strategies to incorporate SCPs at different levels within your organization. In addition, Inter & Co. share their strategies for implementing enterprise-wide guardrails at scale within their multi-account environments. Discover how they use code repositories and CI/CD pipelines to manage approvals and deployments of SCPs.
IAM303: Balance least privilege & agile development, feat. Fidelity & Merck Finding a proper balance between securing multiple AWS accounts and enabling agile development to accelerate business innovation has been key to the cloud adoption journey for AWS customers. In this session, learn how Fidelity and Merck empowered their business stakeholders to quickly develop solutions while still conforming to security standards and operating within the guardrails at scale.
IAM304: Migrating to Amazon Cognito, featuring approaches from Fandango Digital transformation of customer-facing applications often involves changes to identity and access management to help improve security and user experience. This process can benefit from fast-growing technologies and open standards and may involve migration to a modern customer identity and access management solution, such as Amazon Cognito, that offers the security and scale your business requires. There are several ways to approach migrating users to Amazon Cognito. In this session, learn about options and best practices, as well as lessons learned from Fandango’s migration to Amazon Cognito.
IAM305: Scaling access with AWS IAM Identity Center, feat. Allegiant Airlines In this session, learn how to scale assignment of permission sets to users and groups by automating federated role-based access to any AWS accounts in your organization. As a highlight of this session, hear Allegiant Airlines’ success story of how this automation has benefited Allegiant by centralizing management of federated access for their organization of more than 5,000 employees. Additionally, explore how to build this automation in your environment using infrastructure as code tools like Terraform and AWS CloudFormation using a CI/CD pipeline.
IAM306: Managing hybrid workloads with IAM Roles Anywhere, featuring Hertz A key element of using AWS Identity and Access Management (IAM) Roles Anywhere is managing how identities are assigned to your workloads. In this session, learn how you can define and manage identities for your workloads, how to use those identities to control access to an AWS resource via attribute-based access control (ABAC), and how to monitor and audit activities performed by those identities. Discover key concepts, best practices, and troubleshooting tips. Hertz describes how they used IAM Roles Anywhere to secure access to AWS services from Salesforce and how it has improved their overall security posture.
IAM307: Steps towards a Zero Trust architecture on AWS Modern workplaces have evolved beyond traditional network boundaries as they have expanded to hybrid and multi-cloud environments. Identity has taken center stage for information security teams. The need for fine-grained, identity-based authorization, flexible identity-aware networks, and the removal of unneeded pathways to data has accelerated the adoption of Zero Trust principles and architecture. In this session, learn about different architecture patterns and security mechanisms available from AWS that you can apply to secure standard, sensitive, and privileged access to your critical data and workloads.
Builders’ sessions
Small-group sessions led by an AWS expert who guides you as you build the service or product on your own laptop. Use your laptop to experiment and build along with the AWS expert.
IAM351: Sharing resources across accounts with least-privilege permissions Are you looking to manage your resource access control permissions? Learn how you can author customer managed permissions to provide least-privilege access to your resources shared using AWS Resource Access Manager (AWS RAM). Explore how to use customer managed permissions with use cases ranging from managing incident response with AWS Systems Manager Incident Manager to enhancing your IP security posture with Amazon VPC IP Address Manager.
IAM352: Cedar policy language in action Cedar is a language for defining permissions as policies that describe who should have access to what. Amazon Verified Permissions and AWS Verified Access use Cedar to define fine-grained permissions for applications and end users. In this builders’ session, come learn by building Cedar policies for access control.
IAM355: Using passwordless authentication with Amazon Cognito and WebAuthn In recent years, passwordless authentication has been on the rise. The FIDO Alliance, a first-mover for enabling passwordless in 2009, is an open industry association whose stated mission is to develop and promote authentication standards that “help reduce the world’s over-reliance on passwords.” This builders’ session allows participants to learn about and follow the steps to implement a passwordless authentication experience on a web or mobile application using Amazon Cognito.
IAM356: AWS Identity and Access Management (IAM) policies troubleshooting In this builders’ session, walk through practical examples that can help you build, test, and troubleshoot AWS Identity and Access Management (IAM) policies. Utilize a workflow that can help you create fine-grained access policies with the help of the IAM API, the AWS Management Console, and AWS CloudTrail. Also review key concepts of IAM policy evaluation logic.
Chalk talks
Highly interactive sessions with a small audience. Experts lead you through problems and solutions on a digital whiteboard as the discussion unfolds.
IAM231: Lessons learned from AWS IAM Identity Center migrations In this chalk talk, discover best practices and tips to migrate your workforce users’ access from IAM users to AWS IAM Identity Center (successor to AWS Single Sign-On). Learn how to create preventive guardrails, gain visibility into the usage of IAM users across an organization, and apply authentication solutions for common use cases.
IAM331: Leaving IAM access keys behind: A modern path forward Static credentials have been used for a long time to secure multiple types of access, including access keys for AWS Identity and Access Management (IAM) users, command line tools, secure shell access, application API keys, and pre-shared keys for VPN access. However, best practice recommends replacing static credentials with short-term credentials. In this chalk talk, learn how to identify static access keys in your environment, quantify the risk, and then apply multiple available methods to replace them with short-term credentials. The talk also covers prescriptive guidance and best practice advice for improving your overall management of IAM access keys.
IAM332: Practical identity and access management: The basics of IAM on AWS Learn from prescriptive guidance on how to build an Identity and Access Management strategy on AWS. We provide guidance on human access versus machine access using services like IAM Identity Center. You will also learn about the different IAM policy types, where each policy type is useful, and how you should incorporate each policy type in your AWS environment. This session will walk you through what you need to know to build an effective identity and access management baseline.
IAM431: A tour of the world of IAM policy evaluation This session takes you beyond the basics of IAM policy evaluation and focuses on how policy evaluation works with advanced AWS features. Hear about how policies are evaluated alongside AWS Key Management Service (AWS KMS) key grants, Amazon Simple Storage Service (Amazon S3) and Amazon Elastic File System (Amazon EFS) access points, Amazon VPC Lattice, and more. You’ll leave this session with prescriptive guidance on what to do and what to avoid when designing authorization schemes.
Code talks
Engaging, code-focused sessions with a small audience. AWS experts lead an interactive discussion featuring live coding and/or code samples as they explain the “why” behind AWS solutions.
IAM341: Cedar: Fast, safe, and fine-grained access for your applications Cedar is a new policy language that helps you write fine-grained permissions in your applications. With Cedar, you can customize authorization and you can define and enforce who can access what. This code talk explains the design of Cedar, how it was built to a high standard of assurance, and its benefits. Learn what makes Cedar ergonomic, fast, and analyzable: simple syntax for expressing common authorization use cases, policy structure that allows for scalable real-time evaluation, and comprehensive auditing based on automated reasoning. Also find out how Cedar’s implementation was made safer through formal verification and differential testing.
IAM441: Enable new Amazon Cognito use cases with OAuth2.0 flows Delegated authorization without user interaction on a consumer device and reinforced passwordless authentication for higher identity assurance are advanced authentication flows achievable with Amazon Cognito. In this code talk, you can discover new OAuth2.0 flow diagrams, code snippets, and long and short demos that offer different approaches to these authentication use cases. Gain confidence using AWS Lambda triggers with Amazon Cognito, native APIs, and OAuth2.0 endpoints to help ensure greater success in customer identity and access management strategy.
Lightning talks
Short and focused theater presentations that are dedicated to either a specific customer story, service demo, or partner offering (sponsored).
IAM221: Accelerate your business with AWS Directory Service In this lightning talk, explore AWS Directory Service for Microsoft Active Directory and discover a number of use cases that provide flexibility, empower agile application development, and integrate securely with other identity stores. Join the talk to discover how you can take advantage of this managed service and focus on what really matters to your customers.
IAM321: Move toward least privilege with IAM Access Analyzer AWS Identity and Access Management (IAM) Access Analyzer provides tools that simplify permissions management by making it easy for organizations to set, verify, and refine permissions. In this lightning talk, dive into how you can detect resources shared with an external entity across one or multiple AWS accounts with IAM Access Analyzer. Find out how you can activate and use this feature and how it integrates with AWS Security Hub.
Workshops
Interactive learning sessions where you work in small teams to solve problems using AWS Cloud security services. Come prepared with your laptop and a willingness to learn!
IAM371: Building a Customer Identity and Access Management (CIAM) solution How do your customers access your application? Get a head start on customer identity and access management (CIAM) by using Amazon Cognito. Join this workshop to learn how to build CIAM solutions on AWS using Amazon Cognito, Amazon Verified Permissions, and several other AWS services. Start from the basic building blocks of CIAM and build up to advanced user identity and access management use cases in customer-facing applications.
IAM372: Consuming AWS Resources from everywhere with IAM Roles Anywhere If your workload already lives on AWS, then there is a high chance that some temporary AWS credentials have been securely distributed to perform needed tasks. But what happens when your workload is on premises? In this workshop, learn how to use AWS Identity and Access Management (IAM) Roles Anywhere. Start from the basics and create the necessary steps to learn how to use your applications outside of AWS in a safe way using IAM Roles Anywhere in practice.
IAM373: Building a data perimeter to allow access to authorized users In this workshop, learn how to create a data perimeter by building controls that allow access to data only from expected network locations and by trusted identities. The workshop consists of five modules, each designed to illustrate a different AWS Identity and Access Management (IAM) principle or network control. Learn where and how to implement the appropriate controls based on different risk scenarios.
If these sessions look interesting to you, join us in Anaheim by registering for AWS re:Inforce 2023. We look forward to seeing you there!
If you have feedback about this post, submit comments in the Comments section below. If you have questions about this post, contact AWS Support.
Want more AWS Security news? Follow us on Twitter.
At the end of this week, I’m flying to Seattle to take part in the AWS Serverless Innovation Day. Along with many customers and colleagues from AWS, we are going to be live on May 17 at a virtual free event. During the AWS Serverless Innovation Day we will share best practices related to building event-driven applications and using serverless functions and containers. Get a calendar reminder and check the full agenda at the event site.
Last Week’s Launches Here are some launches that got my attention during the previous week.
New Local Zones in Auckland – AWS Local Zones allow you to deliver applications that require single-digit millisecond latency or local data processing. Starting last week, AWS Local Zones is available in Auckland, New Zealand.
AWS AppSync– Now AWS AppSync GraphQL APIs support Private API. With Private APIs, you can now create GraphQL APIs that can only be accessed from your Amazon Virtual Private Cloud (Amazon VPC).
Other AWS News Some other updates and news that you may have missed:
Responsible AI in the Generative Era – Amazon Science published a very interesting blog post this week about the special challenges raised by building a responsible generative AI and the different things builders of applications can do in order to solve these challenges.
Patterns for Building an API to Upload Files to AmazonS3 – Amazon S3 is one of the most used services by our customers, and applications often require a way for users to upload files. In this article, Thomas Moore shows different ways to do this in a secure way.
The Official AWS Podcast– Listen each week for updates on the latest AWS news and deep dives into exciting use cases. There are also official AWS podcasts in your local languages. Check out the ones in French, German, Italian, and Spanish.
AWS Open-Source News and Updates – This is a newsletter curated by my colleague Ricardo to bring you the latest open-source projects, posts, events, and more.
Upcoming AWS Events Check your calendars and sign up for these AWS events:
AWS Serverless Innovation Day – Join us on May 17 for a virtual and free event about AWS Serverless. We will have talks and fireside chats with customers related to AWS Lambda, Amazon ECS with Fargate, AWS Step Functions, and Amazon EventBridge.
AWS re:Inforce 2023 – You can now register for AWS re:Inforce, happening in Anaheim, California, on June 13–14.
AWS Community Day – Join a community-led conference run by AWS user group leaders in your region: Warsaw (June 1), Chicago (June 15), Manila (June 29–30), and Munich (September 14).
AWS User Group Peru Conference – The local AWS User Group announced a one-day cloud event in Spanish and English in Lima on September 23. Seb, Jeff, and I will be attending the event from the AWS News blog team. Register today!
That’s all for this week. Check back next Monday for another Week in Review!
Users often need to extract important components like bucket and key from stored S3 URIs to use in S3Client operations. The new parsing APIs allow users to conveniently do so, bypassing the need for manual parsing or storing the components separately.
Getting Started
To begin, first add the dependency for S3 to your project.
To parse your S3 URI, call parseUri() from S3Utilities, passing in the URI. This will return a parsed S3Uri object. If you have a String of the URI, you’ll need to convert it into an URI object first.
String url = "https://s3.us-west-1.amazonaws.com/myBucket/resources/doc.txt?versionId=abc123&partNumber=77&partNumber=88";
URI uri = URI.create(url);
S3Uri s3Uri = s3Utilities.parseUri(uri);
With the S3Uri, you can call the appropriate getter methods to retrieve the bucket, key, region, style, and query parameters. If the bucket, key, or region is not specified in the URI, an empty Optional will be returned. If query parameters are not specified in the URI, an empty map will be returned. If the field is encoded in the URI, it will be returned decoded.
There are several APIs for retrieving the query parameters. You can return a Map<String, List<String>> of the query parameters. Alternatively, you can specify a query parameter to return the first value for the given query, or return the list of values for the given query.
If you work with object keys or query parameters with reserved or unsafe characters, they must be URL-encoded, e.g., replace whitespace " " with "%20".
In this post, I discussed parsing S3 URIs in the AWS SDK for Java 2.x and provided code examples for retrieving the bucket, key, region, style, and query parameters. To learn more about how to set up and begin using the feature, visit our Developer Guide. If you are curious about how it is implemented, check out the source code on GitHub. As always, the AWS SDK for Java team welcomes bug reports, feature requests, and pull requests on the aws-sdk-java-v2 GitHub repository.
Are you looking to understand the relationships between two numerical variables? Scatter plots are a powerful visual type that allow you to identify patterns, outliers, and strength of relationships between variables. In this post, we walk you through the newly launched scatter plot features in Amazon QuickSight, which will help you take your correlation analysis to the next level.
Feature overview
The scatter plot is undoubtedly one of the most effective visualizations for correlation analysis, helping to identify patterns, outliers, and the strength of the relationship between two or three variables (using a bubble chart). We have improved the performance and versatility of our scatter plots, supporting five additional use cases. The following functionalities have been added in this release:
Display unaggregated values – Previously, when there was no field placed on Color, QuickSight displayed unaggregated values, and when a field was placed on Color, the metrics would be aggregated and grouped by that dimension. Now, you can choose to plot unaggregated values even if you’re using a field on Color by using the new aggregate option called None from the field menu, in addition to aggregation options like Sum, Min, and Max. If one value is set to be aggregated, the other value will be automatically set as aggregated, and the same applies to unaggregated scenarios. Mixed aggregation scenarios are not supported, meaning that one value can’t be set as aggregated while the other is unaggregated. It’s worth noting that the unaggregated scenario (the None option) is only supported for numerical values, whereas categorical values (like dates and dimensions) will only display aggregate values such as Count and Count distinct.
Support for an additional Label field – We’re introducing a new field well called Label alongside the existing Color field. This will allow you to color by one field and label by another, providing more flexibility in data visualization.
Faster load time – The load time is up to six times faster, which impacts both new and existing use cases. Upon launch, you’ll notice that scatter plots render noticeably faster, especially when dealing with larger datasets.
Explore advanced scatter plot use cases
You can choose to set both X and Y values to either aggregated or unaggregated (the None option) from the X and Y axis field menus. This will define if values will be aggregated by dimensions in the Color and Label field wells or not. To get started, add the required fields and choose the appropriate aggregation based on your use case.
Unaggregated use cases
The following screenshot shows an example of unaggregated X and Y value with Color.
The following screenshot shows an example of unaggregated X and Y with Label.
The following screenshot shows an example of unaggregated X and Y with Color and Label.
Aggregated use cases
The following screenshot shows an example of X and Y aggregated by Color.
The following screenshot shows an example of X and Y aggregated by Label.
The following screenshot shows an example of X and Y aggregated by Color and Label.
Conclusion
In summary, our enhanced scatter plots offer users greater performance and versatility, catering to a wider range of use cases than before. The ability to display unaggregated values and support for additional label fields gives users the flexibility they need to visualize the data they want. For further details, refer to Amazon QuickSight Scatterplot. Try out the new scatter plot updates and let us know your feedback in the comments section.
About the authors
Bhupinder Chadha is a senior product manager for Amazon QuickSight focused on visualization and front end experiences. He is passionate about BI, data visualization and low-code/no-code experiences. Prior to QuickSight he was the lead product manager for Inforiver, responsible for building a enterprise BI product from ground up. Bhupinder started his career in presales, followed by a small gig in consulting and then PM for xViz, an add on visualization product.
There’s an important debate happening in Europe that could affect the future of the Internet. The European Commission is considering new rules for how networks connect to each other on the Internet. It’s considering proposals that – no hyperbole – will slow the Internet for consumers and are dangerous for the Internet.
The large incumbent telcos are complaining loudly to anyone who wants to listen that they aren’t being adequately compensated for the capital investments they’re making. These telcos are a set of previously regulated monopolies who still constitute the largest telcos by revenue in Europe in today's competitive market. They say traffic volumes, largely due to video streaming, are growing rapidly, implying they need to make capital investments to keep up. And they call for new charges on big US tech companies: a “fair share” contribution that those networks should make to European Internet infrastructure investment.
In response to this campaign, in February the European Commission released a set of recommended actions and proposals “aimed to make Gigabit connectivity available to all citizens and businesses across the EU by 2030.” The Commission goes on to say that “Reliable, fast and secure connectivity is a must for everybody and everywhere in the Union, including in rural and remote areas.” While this goal is certainly the right one, our agreement with the European Commission’s approach, unfortunately, ends right there. A close reading of the Commission’s exploratory consultation that accompanies the Gigabit connectivity proposals shows that the ultimate goal is to intervene in the market for how networks interconnect, with the intention to extract fees from large tech companies and funnel them to large incumbent telcos.
This debate has been characterised as a fight between Big Tech and Big European Telco. But it’s about much more than that. Contrary to its intent, these proposals would give the biggest technology companies preferred access to the largest European ISPs. European consumers and small businesses, when accessing anything on the Internet outside Big Tech (Netflix, Google, Meta, Amazon, etc), would get the slow lane. Below we’ll explain why Cloudflare, although we are not currently targeted for extra fees, still feels strongly that these fees are dangerous for the Internet:
Network usage fees would create fast lanes for Big Tech content, and slow lanes for everything else, slowing the Internet for European consumers;
Small businesses, Internet startups, and consumers are the beneficiaries of Europe’s low wholesale bandwidth prices. Regulatory intervention in this market would lead to higher prices that would be passed onto SMEs and consumers;
The Internet works best – fastest and most reliably – when networks connect freely and frequently, bringing content and service as close to consumers as possible. Network usage fees artificially disincentivize efforts to bring content close to users, making the Internet experience worse for consumers.
Why network interconnection matters
Understanding why the debate in Europe matters for the future of the Internet requires understanding how Internet traffic gets to end users, as well as the steps that can be taken to improve Internet performance.
At Cloudflare, we know a lot about this. According to Hurricane Electric, Cloudflare connects with other networks at 287 Internet exchange points (IXPs), the second most of any network on the planet. And we’re directly connected to other networks on the Internet in more than 285 cities in over 100 countries. So when we see a proposal to change how networks interconnect, we take notice. What the European Commission is considering might appear to be targeting the direct relationship between telcos and large tech companies, but we know it will have much broader effects.
There are different ways in which networks exchange data on the Internet. In some cases, networks connect directly to exchange data between users of each network. This is called peering. Cloudflare has an open peering policy; we’ll peer with any other network. Peering is one hop between networks – it’s the gold standard. Fewer hops from start to end generally means faster and more reliable data delivery. We peer with more than 12,000 networks around the world on a settlement-free basis, which means neither network pays the other to send traffic. This settlement-free peering is one of the aspects of Cloudflare’s business that allows us to offer a free version of our services to millions of users globally, permitting individuals and small businesses to have websites that load quickly and efficiently and are better protected from cyberattacks. We’ll talk more about the benefits of settlement-free peering below.
Figure 1: Traffic takes one of three paths between an end-user’s ISP and the content or service they are trying to access. Traffic could go over direct peering which is 1:1 between the ISP and the content or service provider; it could go through IX Peering which is a many:many connection between networks; or it could go via a transit provider, which is a network that gets compensated for delivering traffic anywhere on the Internet.
When networks don’t connect directly, they might pay a third-party IP transit network to deliver traffic on their behalf. No network is connected to every other network on the Internet, so transit networks play an important role making sure any network can reach any other network. They’re compensated for doing so; generally a network will pay their transit provider based on how much traffic they ask the transit provider to deliver. Cloudflare is connected to more than 12,000 other networks, but there are over 100,000 Autonomous Systems (networks) on the Internet, so we use transit networks to reach the “long tail”. For example, the Cloudflare network (AS 13335) provides the website cloudflare.com to any network that requests it. If a user of a small ISP with whom Cloudflare doesn’t have direct connections requests cloudflare.com from their browser, it’s likely that their ISP will use a transit provider to send that request to Cloudflare. Then Cloudflare would respond to the request, sending the website content back to the user via a transit provider.
In Europe, transit providers play a critical role because many of the largest incumbent telcos won’t do settlement-free direct peering connections. Therefore, many European consumers that use large incumbent telcos for their Internet service interact with Cloudflare’s services through third party transit networks. It isn’t the gold standard of network interconnection (which is peering, and would be faster and more reliable) but it works well enough most of the time.
Cloudflare would of course be happy to directly connect with EU telcos because we have an open peering policy. As we’ll show, the performance and reliability improvement for their subscribers and our customers’ content and services would significantly improve. And if the telcos offered us transit – the ability to send traffic to their network and onwards to the Internet – at market rates, we would consider use of that service as part of competitive supplier selection. While it’s unfortunate that incumbent telcos haven’t offered services at market-competitive prices, overall the interconnection market in Europe – indeed the Internet itself – currently works well. Others agree. BEREC, the body of European telecommunications regulators, wrote recently in a preliminary assessment:
BEREC's experience shows that the internet has proven its ability to cope with increasing traffic volumes, changes in demand patterns, technology, business models, as well as in the (relative) market power between market players. These developments are reflected in the IP interconnection mechanisms governing the internet which evolved without a need for regulatory intervention. The internet’s ability to self-adapt has been and still is essential for its success and its innovative capability.
There is a competitive market for IP transit. According to market analysis firm Telegeography’s State of the Network 2023 report, “The lowest [prices on offer for] 100 GigE [IP transit services in Europe] were $0.06 per Mbps per month.” These prices are consistent with what Cloudflare sees in the market. In our view, the Commission should be proud of the effective competition in this market, and it should protect it. These prices are comparable to IP transit prices in the United States and signal, overall, a healthy Internet ecosystem. Competitive wholesale bandwidth prices (transit prices) mean it is easier for small independent telcos to enter the market, and lower prices for all types of Internet applications and services. In our view, regulatory intervention in this well-functioning market has significant down-side risks.
Large incumbent telcos are seeking regulatory intervention in part because they are not willing to accept the fair market prices for transit. Very Large Telcos and Content and Application Providers (CAPs) – the term the European Commission uses for networks that have the content and services consumers want to see – negotiate freely for transit and peering. In our experience, large incumbent telcos ask for paid peering fees that are many multiples of what a CAP could pay to transit networks for a similar service. At the prices offered, many networks – including Cloudflare – continue to use transit providers instead of paying incumbent telcos for peering. Telcos are trying to use regulation to force CAPs into these relationships at artificially high prices.
If the Commission’s proposal is adopted, the price for interconnection in Europe would likely be set by this regulation, not the market. Once there’s a price for interconnection between CAPs and telcos, whether that price is found via negotiation, or more likely arbitrators set the price, that is likely to become the de facto price for all interconnection. After all, if telcos can achieve artificially high prices from the largest CAPs, why would they accept much lower rates from any other network – including transits – to connect with them? Instead of falling wholesale prices spurring Internet innovation as is happening now in Europe and the United States, rising wholesale prices will be passed onto small businesses and consumers.
Network usage fees would give Big Tech a fast lane, at the expense of consumers and smaller service providers
If network fees become a reality, the current Internet experience for users in Europe will deteriorate. Notwithstanding existing net neutrality regulations, we already see large telcos relegate content from transit providers to more congested connections. If the biggest CAPs pay for interconnection, consumer traffic to other networks will be relegated to a slow and/or congested lane. Networks that aren’t paying would still use transit providers to reach the large incumbent telcos, but those transit links would be second class citizens to the paid traffic. Existing transit links will become (more) slow and congested. By targeting only the largest CAPs, a proposal based on network fees would perversely, and contrary to intent, cement those CAPs’ position at the top by improving the consumer experience for those networks at the expense of all others. By mandating that the CAPs pay the large incumbent telcos for peering, the European Commission would therefore be facilitating discrimination against services using smaller networks and organisations that cannot match the resources of the large CAPs.
Indeed, we already see evidence that some of the large incumbent telcos treat transit networks as second-class citizens when it comes to Internet traffic. In November 2022, HWSW, a Hungarian tech news site, reported on recurring Internet problems for users of Magyar Telekom, a subsidiary of Deutsche Telekom, because of congestion between Deutsche Telekom and its transit networks:
Network problem that exists during the fairly well-defined period, mostly between 4 p.m. and midnight Hungarian time, … due to congestion in the connection (Level3) between Deutsche Telekom, the parent company that operates Magyar Telekom's international peering routes, and Cloudflare, therefore it does not only affect Hungarian subscribers, but occurs to a greater or lesser extent at all DT subsidiaries that, like Magyar Telekom, are linked to the parent company. (translated by Google Translate)
Going back many years, large telcos have demonstrated that traffic reaching them through transit networks is not a high priority to maintain quality. In 2015, Cogent, a transit provider, sued Deutsche Telekom over interconnection, writing, “Deutsche Telekom has interfered with the free flow of internet traffic between Cogent customers and Deutsche Telekom customers by refusing to increase the capacity of the interconnection ports that allow the exchange of traffic”.
Beyond the effect on consumers, the implementation of Network Usage Fees would seem to violate the European Union’s Open Internet Regulation, sometimes referred to as the net neutrality provision. Article 3(3) of the Open Internet Regulation states:
Providers of internet access services shall treat all traffic equally, when providing internet access services, without discrimination, restriction or interference, and irrespective of the sender and receiver, the content accessed or distributed, the applications or services used or provided, or the terminal equipment used. (emphasis added)
Fees from certain sources of content in exchange for private paths between the CAP and large incumbent telcos would seem to be a plain-language violation of this provision.
Network usage fees would endanger the benefits of Settlement-Free Peering
Let’s now talk about the ecosystem that leads to a thriving Internet. We first talked about transit, now we’ll move on to peering, which is quietly central to how the Internet works. “Peering” is the practice of two networks directly interconnecting (they could be backbones, CDNs, mobile networks or broadband telcos to exchange traffic. Almost always, networks peer without any payments (“settlement-free”) in recognition of the performance benefits and resiliency we’re about to discuss. A recent survey of over 10,000 ISPs shows that 99.99% of their exchanged traffic is on settlement-free terms. The Internet works best when these peering arrangements happen freely and frequently.
These types of peering arrangements and network interconnection also significantly improve latency for the end-user of services delivered via the Internet. The speed of an Internet connection depends more on latency (the time it takes for a consumer to request data and receive the response) than on bandwidth (the maximum amount of data that is flowing at any one time over a connection). Latency is critical to many Internet use-cases. A recent technical paper used the example of a mapping application that responds to user scrolling. The application wouldn’t need to pre-load unnecessary data if it can quickly get a small amount of data in response to a user swiping in a certain direction.
In recognition of the myriad benefits, settlement-free peering between CDNs and terminating ISPs is the global norm in the industry. Most networks understand that through settlement-free peering, (1) customers get the best experience through local traffic delivery, (2) networks have increased resilience through multiple traffic paths, and (3) data is exchanged locally instead of backhauled and aggregated in larger volumes at regional Internet hubs. By contrast, paid peering is rare, and is usually employed by networks that operate in markets without robust competition. Unfortunately, when an incumbent telco achieves a dominant market position or has no significant competition, they may be less concerned about the performance penalty they impose on their own users by refusing to peer directly.
As an example, consider the map in Figure 2. This map shows the situation in Germany, where most traffic is exchanged via transit providers at the Internet hub in Frankfurt. Consumers are losing in this situation for two reasons: First, the farther they are from Frankfurt, the higher latency they will experience for Cloudflare services. For customers in northeast Germany, for example, the distance from Cloudflare’s servers in Frankfurt means they will experience nearly double the latency of consumers closer to Cloudflare geographically. Second, the reliance on a small number of transit providers exposes their traffic to congestion and reliability risks. The remedy is obvious: if large telcos would interconnect (“peer”) with Cloudflare in all five cities where Cloudflare has points of presence, every consumer, regardless of where they are in Germany, would have the same excellent Internet experience.
We’ve shown that local settlement-free interconnection benefits consumers by improving the speed of their Internet experience, but local interconnection also reduces the amount of traffic that aggregates at regional Internet hubs. If a telco interconnects with a large video provider in a single regional hub, the telco needs to carry their subscribers’ request for content through their network to the hub. Data will be exchanged at the hub, then the telco needs to carry the data back through their “backbone” network to the subscriber. (While this situation can result in large traffic volumes, modern networks can easily expand the capacity between themselves at almost no cost by adding additional port capacity. The fibre-optic cable capacity in this “backbone” part of the Internet is not constrained.)
Figure 3. A hypothetical example where a telco only interconnects with a video provider at a regional Internet hub, showing how traffic aggregates at the interconnection point.
Local settlement-free peering is one way to reduce the traffic across those interconnection points. Another way is to use embedded caches, which are offered by most CDNs, including Cloudflare. In this scenario, a CDN sends hardware to the telco, which installs it in their network at local aggregation points that are private to the telco. When their subscriber requests data from the CDN, the telco can find that content at a local infrastructure point and send it back to the subscriber. The data doesn’t need to aggregate on backhaul links, or ever reach a regional Internet hub. This approach is common. Cloudflare has hundreds of these deployments with telcos globally.
Figure 4. A hypothetical example where a telco has deployed embedded caches from a video provider, removing the backhaul and aggregation of traffic across Internet exchange points
Conclusion: make your views known to the European Commission!
In conclusion, it’s our view that despite the unwillingness of many large European incumbents to peer on a settlement-free basis, the IP interconnection market is healthy, which benefits European consumers. We believe regulatory intervention that forces content and application providers into paid peering agreements would have the effect of relegating all other traffic to a slow, congested lane. Further, we fear this intervention will do nothing to meet Europe’s Digital Decade goals, and instead will make the Internet experience worse for consumers and small businesses.
If you agree that major intervention in how networks interconnect in Europe is unnecessary, and even harmful, consider reading more about the European Commission’s consultation. While the consultation itself may look intimidating, anyone can submit a narrative response (deadline: 19 May). Consider telling the European Commission that their goals of ubiquitous connectivity are the right ones but that the approach they are considering is going into the wrong direction.
The collective thoughts of the interwebz
Manage Consent
To provide the best experiences, we use technologies like cookies to store and/or access device information. Consenting to these technologies will allow us to process data such as browsing behavior or unique IDs on this site. Not consenting or withdrawing consent, may adversely affect certain features and functions.
Functional
Always active
The technical storage or access is strictly necessary for the legitimate purpose of enabling the use of a specific service explicitly requested by the subscriber or user, or for the sole purpose of carrying out the transmission of a communication over an electronic communications network.
Preferences
The technical storage or access is necessary for the legitimate purpose of storing preferences that are not requested by the subscriber or user.
Statistics
The technical storage or access that is used exclusively for statistical purposes.The technical storage or access that is used exclusively for anonymous statistical purposes. Without a subpoena, voluntary compliance on the part of your Internet Service Provider, or additional records from a third party, information stored or retrieved for this purpose alone cannot usually be used to identify you.
Marketing
The technical storage or access is required to create user profiles to send advertising, or to track the user on a website or across several websites for similar marketing purposes.


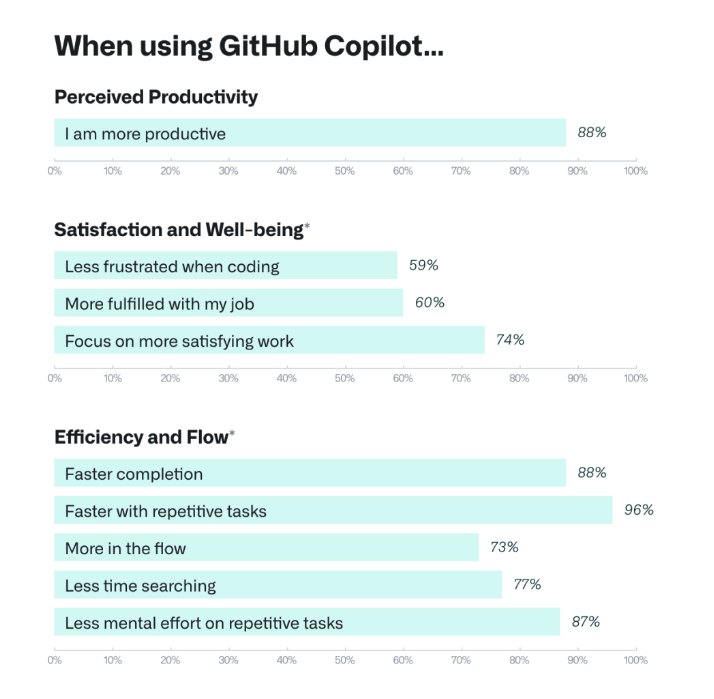


 Gonzalo Herreros is a Senior Big Data Architect on the AWS Glue team.
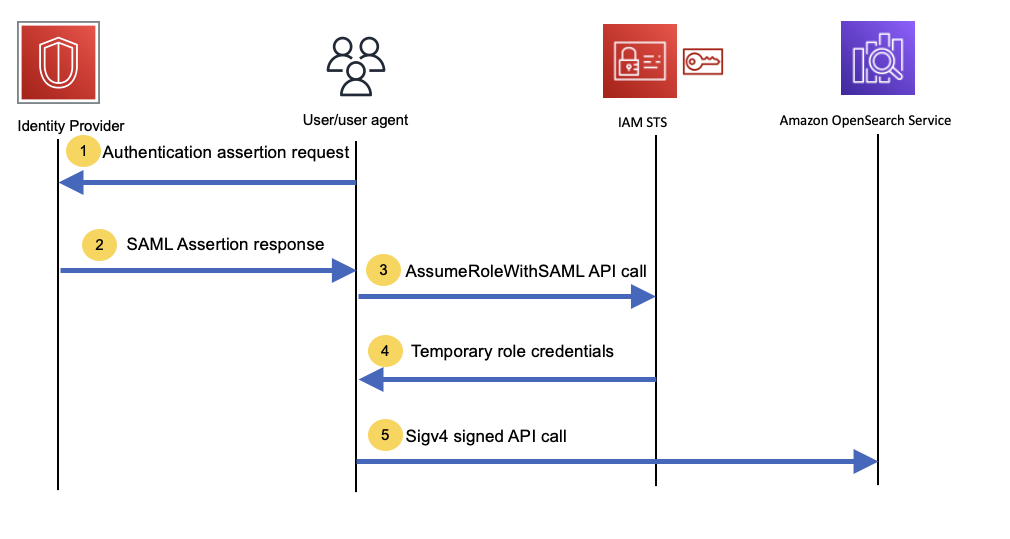
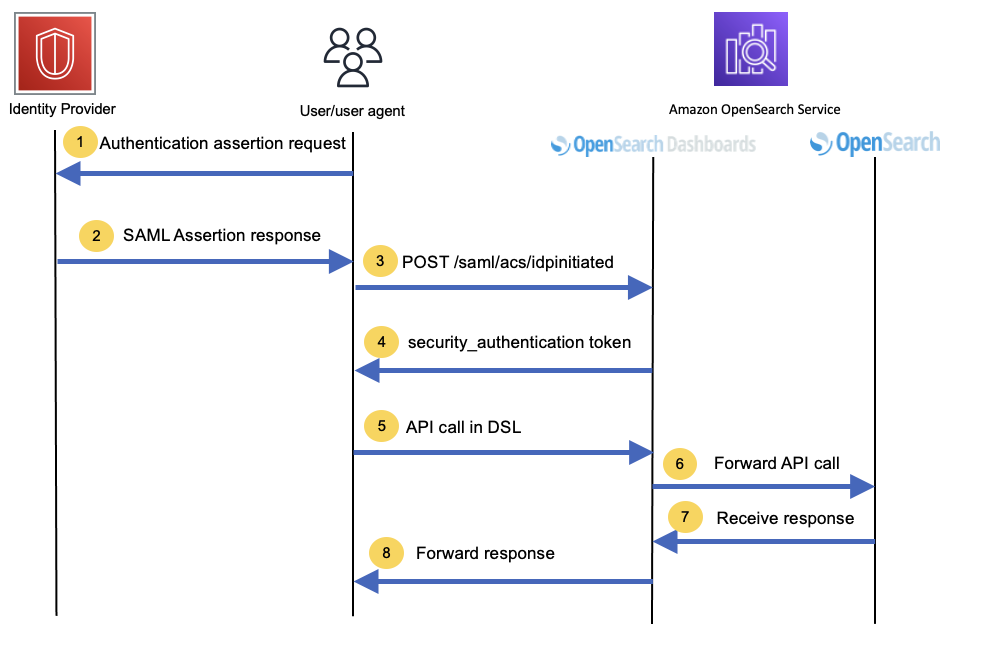
 Muthu Pitchaimani is a Search Specialist with Amazon OpenSearch Service. He builds large-scale search applications and solutions. Muthu is interested in the topics of networking and security, and is based out of Austin, Texas.


 Noritaka Sekiyama is a Principal Big Data Architect on the AWS Glue team. He works based in Tokyo, Japan. He is responsible for building software artifacts to help customers. In his spare time, he enjoys cycling with his road bike.
 Tomohiro Tanaka is a Senior Cloud Support Engineer on the AWS Support team. He’s passionate about helping customers build data lakes using ETL workloads. In his free time, he enjoys coffee breaks with his colleagues and making coffee at home.
 Chuhan Liu is a Software Development Engineer on the AWS Glue team. He is passionate about building scalable distributed systems for big data processing, analytics, and management. In his spare time, he enjoys playing tennis.
 Matt Su is a Senior Product Manager on the AWS Glue team. He enjoys helping customers uncover insights and make better decisions using their data with AWS Analytic services. In his spare time, he enjoys skiing and gardening.


 Bhupinder Chadha is a senior product manager for Amazon QuickSight focused on visualization and front end experiences. He is passionate about BI, data visualization and low-code/no-code experiences. Prior to QuickSight he was the lead product manager for Inforiver, responsible for building a enterprise BI product from ground up. Bhupinder started his career in presales, followed by a small gig in consulting and then PM for xViz, an add on visualization product.