This post is written by Alex Paramonov, Sr. Solutions Architect, ISV, and Pieter Prinsloo, Customer Solutions Manager.
Workloads in AWS sometimes require access to data stored in on-premises databases and storage locations. Traditional solutions to establish connectivity to the on-premises resources require inbound rules to firewalls, a VPN tunnel, or public endpoints.
This blog post demonstrates how to use the MQTT protocol (AWS IoT Core) with AWS Step Functions to dispatch jobs to on-premises workers to access or retrieve data stored on-premises. The state machine can communicate with the on-premises workers without opening inbound ports or the need for public endpoints on on-premises resources. Workers can run behind Network Access Translation (NAT) routers while keeping bidirectional connectivity with the AWS Cloud. This provides a more secure and cost-effective way to access data stored on-premises.
Overview
By using Step Functions with AWS Lambda and AWS IoT Core, you can access data stored on-premises securely without altering the existing network configuration.
AWS IoT Core lets you connect IoT devices and route messages to AWS services without managing infrastructure. By using a Docker container image running on-premises as a proxy IoT Thing, you can take advantage of AWS IoT Core’s fully managed MQTT message broker for non-IoT use cases.
MQTT subscribers receive information via MQTT topics. An MQTT topic acts as a matching mechanism between publishers and subscribers. Conceptually, an MQTT topic behaves like an ephemeral notification channel. You can create topics at scale with virtually no limit to the number of topics. In SaaS applications, for example, you can create topics per tenant. Learn more about MQTT topic design here.
The following reference architecture shown uses the AWS Serverless Application Model (AWS SAM) for deployment, Step Functions to orchestrate the workflow, AWS Lambda to send and receive on-premises messages, and AWS IoT Core to provide the MQTT message broker, certificate and policy management, and publish/subscribe topics.
Start the state machine, either “on demand” or on a schedule.
The state: “Lambda: Invoke Dispatch Job to On-Premises” publishes a message to an MQTT message broker in AWS IoT Core.
The message broker sends the message to the topic corresponding to the worker (tenant) in the on-premises container that runs the job.
The on-premises container receives the message and starts work execution. Authentication is done using client certificates and the attached policy limits the worker access to only the tenant’s topic.
The worker in the on-premises container can access local resources like DBs or storage locations.
The on-premises container sends the results and job status back to another MQTT topic.
The AWS IoT Core rule invokes the “TaskToken Done” Lambda function.
The aws-resources directory contains the required AWS resources including the state machine, Lambda functions, topics, and policies. The directory on-prem-worker contains the Docker container image artifacts. Use it to run the on-premises worker locally.
In this example, the worker container adds two numbers, provided as an input in the following format:
{
  "a": 15,
  "b": 42
}
In a real-world scenario, you can substitute this operation with business logic. For example, retrieving data from on-premises databases, generating aggregates, and then submitting the results back to your state machine.
There are no IoT devices in the example use case. However, the fully managed MQTT message broker in AWS IoT Core lets you route messages to AWS services without managing infrastructure.
AWS IoT Core authenticates clients using X.509 client certificates. You can attach a policy to a client certificate allowing the client to publish and subscribe only to certain topics. This approach does not require IAM credentials inside the worker container on-premises.
AWS IoT Core’s security, cost efficiency, managed infrastructure, and scalability make it a good fit for many hybrid applications beyond typical IoT use cases.
Dispatching jobs from Step Functions and waiting for a response
When the on-premises worker completes the job, it publishes a message to the topic in AWS IoT Core. A rule in AWS IoT Core then invokes a Lambda function, which sends the result back to the state machine by calling either SendTaskSuccess or SendTaskFailure API in Step Functions.
You can prevent the state machine from timing out by adding HeartbeatSeconds to the task in the Amazon States Language (ASL). Timeouts happen if the job freezes and the SendTaskFailure API is not called. HeartbeatSeconds send heartbeats from the worker via the SendTaskHeartbeat API call and should be less than the specified TimeoutSeconds.
To create a task in ASL for your state machine, which waits for a callback token, use the following code:
The .waitForTaskToken suffix indicates that the task must wait for the callback. The state machine generates a unique callback token, accessible via the $$.Task.Token built-in variable, and passes it as an input to the Lambda function defined in FunctionName.
The Lambda function then sends the token to the on-premises worker via an AWS IoT Core topic.
Lambda is not the only service that supports Wait for Callback integration – see the full list of supported services here.
In addition to dispatching tasks and getting the result back, you can implement progress tracking and shut down mechanisms. To track progress, the worker sends metrics via a separate topic.
Depending on your current implementation, you have several options:
Storing progress data from the worker in Amazon DynamoDB and visualizing it via REST API calls to a Lambda function, which reads from the DynamoDB table. Refer to this tutorial on how to store data in DynamoDB directly from the topic.
For a reactive user experience, create a rule to invoke a Lambda function when new progress data arrives. Open a WebSocket connection to your backend. The Lambda function sends progress data via WebSocket directly to the frontend.
To implement a shutdown mechanism, you can run jobs in separate threads on your worker and subscribe to the topic, to which your state machine publishes the shutdown messages. If a shutdown message arrives, end the job thread on the worker and send back the status including the callback token of the task.
Using AWS IoT Core Rules and Lambda Functions
A message with job results from the worker does not arrive to the Step Functions API directly. Instead, an AWS IoT Core Rule and a dedicated Lambda function forward the status message to Step Functions. This allows for more granular permissions in AWS IoT Core policies, which result in improved security because the worker container can only publish and subscribe to specific topics. No IAM credentials exist on-premises.
The Lambda function’s execution role contains the permissions for SendTaskSuccess, SendTaskHeartbeat, and SendTaskFailure API calls only.
Alternatively, a worker can run API calls in Step Functions workflows directly, which replaces the need for a topic in AWS IoT Core, a rule, and a Lambda function to invoke the Step Functions API. This approach requires IAM credentials inside the worker’s container. You can use AWS Identity and Access Management Roles Anywhere to obtain temporary security credentials. As your worker’s functionality evolves over time, you can add further AWS API calls while adding permissions to the IAM execution role.
Cleaning up
The services used in this solution are eligible for AWS Free Tier. To clean up the resources in the aws-resources/ directory of the repository run:
sam delete
This removes all resources provisioned by the template.yml file.
To remove the client certificate from AWS, navigate to AWS IoT Core Certificates and delete the certificate, which you added during the manual deployment steps.
Lastly, stop the Docker container on-premises and remove it:
docker rm --force mqtt-local-client
Finally, remove the container image:
docker rmi mqtt-client-waitfortoken
Conclusion
Accessing on-premises resources with workers controlled via Step Functions using MQTT and AWS IoT Core is a secure, reactive, and cost effective way to run on-premises jobs. Consider updating your hybrid workloads from using inefficient polling or schedulers to the reactive approach described in this post. This offers an improved user experience with fast dispatching and tracking of jobs outside of cloud.
For more serverless learning resources, visit Serverless Land.
In our series of community stories, we celebrate some of the wonderful things young people and educators around the world are achieving through the power of technology.
In our latest story, we’re heading to Vivek High School in Mohali, India, to meet Sahibjot, a 14-year-old coding enthusiast who has taken his hobby to the next level thanks to mentorship, Code Club, and the exciting opportunity to take part in the Coolest Projects 2023 global online showcase.
Introducing Sahibjot
When he was younger, Sahibjot loved playing video games. His interest in gaming led him to discover the world of game development, and he was inspired to find out more and try it out himself. He began to learn to code in his spare time, using tutorials to help him develop his skills.
Keen to share the joy he had experienced from gaming, Sahibjot set himself the challenge of creating a game for his cousin. This project cemented his enthusiasm for coding and developing games of his own.
“I always felt that I have played so many games in my life, why not make one and others will enjoy the same experience that I had as a child.
For my cousin, I made a personal game for him, and he played it and he liked it very much, so once he played it, I felt that, yes, this is what I want to do with my life.” – Sahibjot
Mentorship and collaboration
While continuing to hone his computing skills at home, Sahibjot heard that his school had started a Code Club. After initially feeling nervous about joining, his enthusiasm was bolstered by the club mentor, Rajan, talking about artificial intelligence and other interesting topics during the session, and he soon settled in.
At Code Club, with support and encouragement from Rajan, Sahibjot continued to develop and grow his coding skills. Alongside his technical skills, he also learned about teamwork and working collaboratively. He embraced the opportunity to help his peers, sharing his knowledge with others and becoming a mentor for younger club members.
“Last year, we joined this coding club together and we became friends. He’s a very friendly person. Whenever we need him, he just quickly helps us. He helps us to troubleshoot, find any bugs, or even fix our codes.” – Akshat, fellow Code Club member
A global opportunity
The next step for Sahibjot came when Rajan introduced him and his fellow Code Club members to Coolest Projects. Coolest Projects is a celebration of young digital creators and the amazing things they make with technology. It offers participants the opportunity to share their tech creations in a global, online showcase, and local in-person events celebrating young creators are also held in several countries.
Sahibjot was eager to take part and showcase what he had made. He submitted a Python project, a ping-pong game, to the online showcase, and was very excited to then see his creation receive a special shout-out during the Coolest Projects global livestream event. He was delighted to share this achievement with his friends and family, and he felt proud to be representing his school and his country on a global stage.
“I told everyone around me that there was going to be a livestream and I possibly might be featured in that, so that was really exciting. I learned a lot about just not representing my school and myself as an individual, I learned about representing my whole nation.” — Sahibjot
Sahibjot’s passion for computing has helped shape his aspirations and ambitions. Looking to the future, he hopes to use his technology skills to benefit others and make an impact.
“Using code and technology and all of the things like that, I aspire to make effort to do something with the world, like help out people with technology.” — Sahibjot
Inspire young creators like Sahibjot
To find out how you and young creators you know can get involved in Coolest Projects, visit coolestprojects.org. If the young people in your community are just starting out on their computing journey, visit our projects site for free, fun beginner coding projects.
For more information to help you set up a Code Club in your school, visit codeclub.org.
Join us in celebrating Sahibjot’s inspiring journey by sharing his story on X (formerly Twitter), LinkedIn, and Facebook.
БНБ иска ограничаване на кредитирането, но какви ще са последстията за икономиката, цените на имотите и лихвите по кредитите
———————————————————————————————- Изчезват фаторите, които водеха до ръст в цените на имотите
Първият е голямото количество сиви капитали
Вторият фактор е липсата на алтернатива за инвестиции
Третият фактор който движеше пазара на недвижими имоти бе страха от инфлация и загубата на спестявания.
Четвъртият фактор – ниските лихви
———————————————————————————————————————-Миналата седмица управителят на БНБ Димитър Радев изказа мнение, че кредитирането създава опасности пред развитието на икономиката и увеличава риска от рецесия.
Най-вероятно е прав, но това по-скоро е следствие от водената държавна политика. Едно ограничение на кредитирането ще доведе след себе си достатъчно проблеми, затова трябва да се прави внимателно.
В строителството и недвижимите имоти в България работят над 250 000 души, което определя брашна като структуроопределящ и съответно изключително важен за други индустрии. Евентуален проблем с него ще се отрази на други бизнеси и брашове, примерно на строителните материали и тяхното производство, на мебелната промишленост, че и на застраховането ако щете.
Какво загатнаха от БНБ и какви ще са последствията за лихвите и цените на имотите?
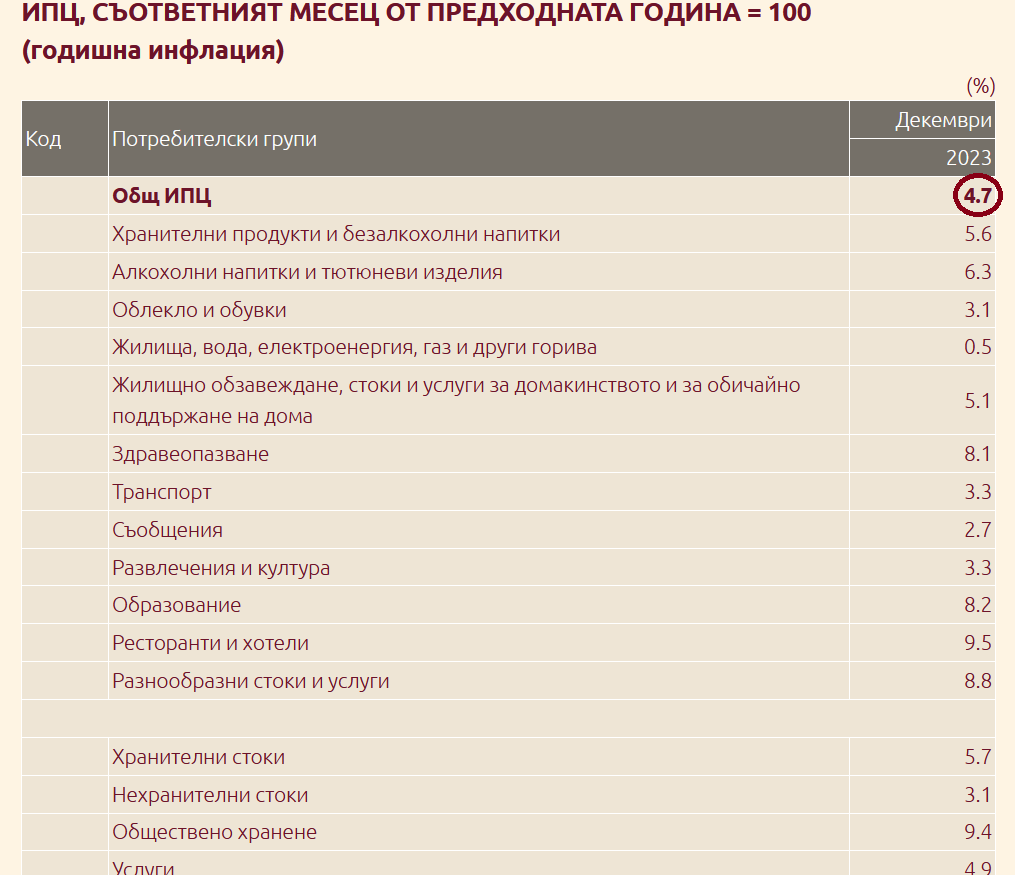
Всички чувстваме инфлацията. Според НСИ тя е в размер на 4.7% през Декември, спрямо декември 2023. Ето писал съм как работи инфлацията тук
Това което БНБ загатва е, че инфлацията се дължи основно на голямата експанзия при кредитите. Чрез тях се влива парична маса в обращение и това вдига цените на всичко, включително и на имотите. Виж заплатите обаче не следват темпа на инфлация НИКОГА!
Те зависят и от ефективността на бизнеса, но това е друга тема. Засега ще се концентрираме върху мотивите на БНБ да иска ограничаване на кредитирането, възможните ходове и последици.
България е поела ангажименти за приемането си в монетарния съюз и един от тях е размера на инфлацията. Но както казахме ако паричната маса в обращение се увеличава, няма как и инфлацията да не расте. БНБ отчита това като проблем и е наясно, че е единствената институция, която може да реагира, макар и с доста ограничен набор от мерки заради валутния борд.
Една от най-„хард“ мерките, за която загатна управителят на БНБ е въвеждането на единни минимални изисквания за кредитоискатели. На практика има 3 основни показателя при отпускането на кредит – съотношенито ДЪЛГ/ДОХОД (какъв % от дохода може да е вноската), минимален разполагаем доход на глава от семейството след вноската по кредита, и така нареченото LTV (Loan to value или % на финансиране). Тези 3 показателя са най-лесни за контрол и проследяване. Също така най-лесно могат да ограничат размера на отпускания кредит, а от там и паричната маса в обращение.
Коментираме кредитите за населението, защото при бизнескредитите няма чак такива ръстове. Фирмите също така доказано управляват по-добре заемния ресурс. Те го използват за закупуването на активи или за генериране на доход, докато покупката на апартамент от доста дълго време се явява ПАСИВ за кредитоискателя, а не актив носещ доход. В повечето случаи отдаването му под наем носи около 4% годишна доходност след приспадане на амортизации и всички останали разходи. Затова и повечето кредитоискатели използват имотите за запазване на стойността на парите си, а не за бизнес. И са прави.
Най-неразумното е да държиш пари в банка по време на инфлация!
Дори да приемам за верен отчетената инфлация на НСИ от 4.7% то пак си е далавера да изтеглиш кредит, защото %-та на годишния процент на разходите (ГПР) е около 3.2% в момента. Окъде идва обаче рискът при покупката на имот?
Изчезват фаторите, които водеха до ръст в цените на имотите
първият е голямото количество сиви капитали
Колкото и невероятно да се струва на повечето хора, ръста на цените в последните години бе мотивиран от инвестирането на сиви капитали. А такива има СТРАШНО МНОГО!
Представете си какво би станало със сивите капитали в лева, ако въведем еврото? Не могат да се внесат в банка, не могат да се обменят на чеийндж бюро, понеже са примерно 5 000 000 лева. Къде да ги „превъртиш“ така, че да е сигурна сделката?
Най-добре юридически са защитени сделките с недвижими имоти. Няма много други алетрнативи на юридическа защита. Ако искате си купете дялово участие в някое предприятие и се включете като съдружник. При първите проблеми ще усетите, че нещата се разпадат и няма кой да Ви защити от съдружника. Поне не законодателно. Затова… недвижимо имотче.
Именно тези сиви капитали вдигнаха цените на недвижимите имоти 2022г. Тогава 55% от сделките бяха в брой и едва 45% с банков кредит. В края на 2023г. По отчети на НСИ нещата са се променили. Около 56% от покупките на недвижими имоти са с банкови кредити, а 44% са в брой. Освен това броя на сделките намалява с 15% на годишна база. Не е малко, но все пак кредитирането расте и това помпа инфлацията като нищо друго. Както казахме тези пари от редитирането стигат до 250 000 души непосредствено заети в строителството и още куп обслужващи странични бизнеси. Това поражда инфлация.
Вторият фактор е липсата на алтернатива за инвестиции
Мантрата на всички финансови „гурута“, че човек трябва да се стреми към „пасивен доход“ поражда една истерия з аполучаване на наем.
Аз не съм съгласен с тези определения за „пасивен доход“, защото имам много клиенти, които получават наеми и тов аопределено не е пасивен доход. То не е чистене след наематели (когато даваш чрез AirBNB), то не е ремонти и майстори след изнасяне на наемател, то не е мебелисти, когато го обазавеждаш, то не е съдебни дела, когато не си случил на наематели и са ти изнесли техника и обазавеждане или са съсипали апартамента.
Естествено на всичко това си има противодейстие, но всяко противодействие изисква време, средства и контрол, което вече започва да се бие с концепцията за «пасивен доход».
Но както казахме алтернативите за спасение на спестяванията по време на инфлация сад оста ограничени и със слаба законодателна защита. При моите клиенти се забелязва склонност за алтернативни инвестиции за защита на спестяванията на борсата, в крипто, в злато или в други активи. Но за това се изискват също определени познания и разбира се време, необходимо за «управление на инвестицията». Иначе – ДА, СТАВА! Става да инвестирате в ценни метали или в крипто, но това вече е доста далеч от определението «пасивен доход». По-скоро бих го нарекъл допълнителен доход. Но това също е предмет на отделна статия, която обмислям да напиша.
Така че – ДА, покупката на недвижим имот е алтернатива на спасение на спестяванията, но ако не е сметната добре, може и ще доведе до загуби в следващите години.
Третият фактор който движеше пазара на недвижими имоти бе страха от инфлация и загубата на спестявания.
Изключително резонна причина да закупиш имот, но и този фактор започна да губи влияние. Темпа на инфлация намаля, а БНБ и ЕЦБ искат да ограничават кредитирането. Моя опит показва, че щом поискат да го правят те ще го направят. Дали ще е с повишение на лихвите или чрез административни мерки по налагане на единна система за оценка на кредитоискателя е без значение. Решили с аи е въпрос на време.
Четвъртият фактор – ниските лихви
Както се казва – „Няма вечно да е така“. Сами разбирате, че няма как за дълго в Австрия лихвите по ипотечни кредити да са 7%, а в България 3%.
Писал съм много за начина на формиране на лихвата по кредитите. В България тя е „вързана“ с лихвата по депозитите. Сега си представете, че влезем в монетарния съюз и въведем еврото. Ами, че то спестяванията веднага заминават за Германия, където лихвата по депозити е 2%, а не 0,1% както е у нас. И тогава добрата капитализация на нашите банки заминава на мига. Единствения начин да съберат средства ще е чрез повишаване на лихвите по депозитите. Може и чрез външен кредит, но няма да е на 0,1%, колкото плащат в момента по депозитите. Имайте предвид, че EURIBOR (1m) в момента е 3.87%. Около тази лихва се рефинансират европейските банки.
Хипотетично правителството може да реши да се финансира не от външните пазари, а да остави доходността от 3-4% на вътрешния пазар и да се финансира от излишните средства от българските банки. Това ще намали ликвидността им допълнително, но пък ще намали и възможността им да кредитират, което е търсена цел от БНБ. Според мен координацията на БНБ и правителството е тази сфера не е най-добрите, но явно има и други политически фактори, които ние не знае. Едно е ясно – БНБ иска да ограничава паричната маса в обращение, а правителството се чуди как да я увеличи. Какво се случва на този етап, ще стане ясно по-натам. Засега действията са разнопосочни.
Ако трябва да обобщя, покупката на недвижим имот в следващите години до влизането в монетарния съюз няма да е най-успешната „инвестиция“ откъм доходност. По-скоро ако се търси спасение за спестяванията ще бъде може би един от малкото добре защитени от закона варианти. Естствено и тук трябва да се внимава какво се купува и на каква цена.
Личните ми очаквания са, че след въвеждането на еврото или по-скоро малко преди това, сивите капитали ще пожелаят да се освободят от недвижимите имоти, в които са в момента и на никой няма да му пука дали е загубил 10-15% от инвестицията в недвижим имот, защото е „изпрал“ парите си. Пак казвам – става въпрос за много големи суми за препиране, които ако останат в левове ще бъдат загубени безвъзвратно. Година след приемането на еврото, цените отново ще тръгнат нагоре, но не и преди това. Преди това ще има спад.
Успех с инвестирането и знайте, че консултацията е нищожна като цена в сравнение с потенциалните пеалби или загуби.
Васил Кендов – финансов консултант
Ако Ви е харесала статята, моля споделете я във ФБ и помогнете на блога да се развие
Моля използвайте приложената форма за записване на час за среща
[contact-form-7]
… И Делян Пеевски застана с вдигнат юмрук срещу президентството и призова прокуратурата да посочи корумпираните на „Дондуков“ 2. А президентът отговори с неизбежна самоотбрана – политическият му проект „Трети март“ е на път. Напомня ли този абсурд на нещо познато, обаче с обратен знак? Под президентския юмрук през 2021 г. се роди „Продължаваме промяната“. Прокуратурата тогава беше бухалка, сега се е смалила до пинчер, но все така е като сляпа къртица за куче-касичките във властта.
Информационната опаковка е следната:
Председателят на ПГ на ДПС Делян Пеевски [отправи] питания към главния прокурор, главния секретар на МВР и шефовете на ДАНС и Комисията за противодействие на корупцията за „Кешгейт“ – пътя на Копринката и „касиерите“ на президента [Сотир Ушев и Николай Копринков – б.а.].
Нито една политическа сила не е питала същите тия служби дали корпулентният разобличител е касиер на Сараите. Но пък той пита прокуратурата защо няма информация за дела с висок обществен интерес. Без майтап.
Знамето
Да видим правилно ли сме разбрали. В страната на лъжците абсурдите са истина.
Един човек, неизвестно как сдобил се с диплома по право от Югозападния университет; неизвестно как станал лидер на партийна младежка фракция (Сакскобургготски така и не обясни механизма); неизвестно как станал заместник-министър, при това най-младият в историята на България, само на 25; неизвестно как – невидим „съдружник“ в банка, предпочитана от куп държавни фирми; неизвестно как свързани с него фирми печелят големи обществени поръчки; неизвестно как станал мултимилионер; неизвестно как за малко да оглави вътрешната сигурност…
Тези и други неизвестни не впечатлиха нито една българска институция, но пък САЩ го удостоиха със санкции за значима корупция, наложени по Глобалния закон „Магнитски“.
Сега същият този човек заплющява като знаме срещу българската корупция. Нищо по-обезсърчаващо за гражданското общество – защото тези, които се самономинираха за знамена срещу корупцията и така влязоха в политиката, мълчат. И мълчейки, си партнират с Пеевски. Ами президентът, комуто гласовете на ДПС помогнаха и който никога не назова – и не назовава – Пеевски като част от „дълбоката държава“?…
Ефектът
Ефектът от акцията на Делян Пеевски е изчислен. На първо място, печелят президентът и неговият политически проект Движение „Трети март“. Такава търговска марка вече е регистрирана преди повече от месец, съобщи „24 часа“.
Да те посочи Пеевски за „мистър Кеш“?! С такива обвинители защитници не са нужни и така за самия Румен Радев случаят беше сгòден да потвърди алтернативата – и той го направи:
Българите очакват реална политическа алтернатива, която да се противопостави на взаимното изпиране и индулгенция на корупционните скандали. Алтернатива, която да върне нормалността и европейската перспектива за България.
Румен Радев е първият президент, чиито съветници биват често замесвани в корупционни и лобистки скандали, също и сочени като активно кадруващи по време на служебните правителства: Пламен Узунов – в МВР, вездесъщият Копринков – първо за втория ешелон, после къде ли не. Но заради брандинга му като „борец срещу статуквото“, с което влезе във втория си мандат, тези афери не го опръскаха особено. Не повече от уклона му към Москва.
Атаката на Пеевски дискредитира онези, които са омразни (и) на Радев – ПП–ДБ, и на практика окарикатури каузата им „Антикорупция“, с която станаха така симпатични на гражданите. Съпредседателят на „Продължаваме промяната“ Кирил Петков единствен от лидерите на управляващото мнозинство направи коментар, но не на действията на Пеевски, а на реакцията на президента:
Чух внимателно думите на президента, той каза, че иска да сезира органите. Моят въпрос към него е: кои органи да сезираме? Ние отдавна искахме да реформираме ДАНС, знаете, че премиерът Денков даже имаше предложение за смяна на шефа на ДАНС, но тази смяна беше блокирана точно от президента. И тук въпросът е как си мисли, че ще бори корупцията със старите нереформирани служби, които реално не са постигнали нищо до този момент.
В действителност от ПП–ДБ нямаше проекти за реформа на службите – освен намерения за смяна на директора. Но не срещнаха и подкрепата на ГЕРБ и ДПС дори и след като един доклад на ДАНС, оказал се справка, бе използван от ГЕРБ, БСП, „Възраждане“ и ИТН като основание за отмяна на машинния вот на първия тур на местните избори. Въпросната справка бе подписана от зам.-председателя на ДАНС Деньо Денев, известен като кадър на ГЕРБ, когото назначеният от президентските управления директор на ДАНС Пламен Тончев отказа да смени.
Псевдонападението на Пеевски над Президентството разсея облаците над главата на министъра на финансите Асен Василев, надвиснали заради „Чаталджагейт“. Председателят на ПГ на ДПС обяви, че държавният глава трябва да се появи на политическия терен и да обяви своя политически проект, както и да се откаже от своя имунитет:
Според мен има много касиери, много касиери. Има много малки кученца, които влачат плячка в тъмната институция. Ако има въпроси, аз съм винаги наличен да отговоря.
Има. Къде са големите песове?
* Думата (англ. whistleblower) стана нарицателно след разкритията, направени преди години от хора като Джулиан Асанж и Едуард Сноудън.
At AWS, security is the highest priority. As customers embrace the scalability and flexibility of AWS, we’re helping them evolve security and compliance into key business enablers. We’re obsessed with earning and maintaining customer trust, and providing our financial services customers and their regulatory bodies with the assurances that AWS has the necessary controls in place to help protect their most sensitive material and regulated workloads.
With the increasing digitalization of the financial industry, and the importance of cloud computing as a key enabling technology for digitalization, the financial services industry is experiencing greater regulatory scrutiny. Our annual audit engagement with CCAG is an example of how AWS supports customers’ risk management and regulatory efforts. For the fifth year, the CCAG pooled audit meticulously assessed the AWS controls that enable us to help protect customers’ data and material workloads, while satisfying strict regulatory obligations.
CCAG represents more than 50 leading European financial services institutions and has grown steadily since its founding in 2017. Based on its mission to provide organizational and logistical support to members so that they can conduct pooled audits with excellence, efficiency, and integrity, the CCAG audit was initiated based on customers’ right to conduct an audit of their service providers under the European Banking Authority (EBA) outsourcing recommendations to cloud service providers (CSPs).
Audit preparations
Using the Cloud Controls Matrix (CCM) of the Cloud Security Alliance (CSA) as the framework of reference for the CCAG audit, auditors scoped in key domains and controls to audit, such as identity and access management, change control and configuration, logging and monitoring, and encryption and key management.
The scope of the audit targeted individual AWS services, such as Amazon Elastic Compute Cloud (Amazon EC2), and specific AWS Regions where financial services institutions run their workloads, such as the Europe (Frankfurt) Region (eu-central-1).
During this phase, to help provide auditors with a common cloud-specific knowledge and language base, AWS gave various educational and alignment sessions. We offered access to our online resources such as Skill Builder, and delivered onsite briefing and orientation sessions in Paris, France; Barcelona, Spain; and London, UK.
Audit fieldwork
This phase started after a joint kick-off in Berlin, Germany, and used a hybrid approach, with work occurring remotely through the use of videoconferencing and a secure audit portal for the inspection of evidence, and onsite at Amazon’s HQ2, in Arlington, Virginia, in the US.
Auditors assessed AWS policies, procedures, and controls, following a risk-based approach and using sampled evidence and access to subject matter experts (SMEs).
Audit results
After a joint closure ceremony onsite in Warsaw, Poland, auditors finalized the audit report, which included the following positive feedback:
“CCAG would like to thank AWS for helping in achieving the audit objectives and to advocate on CCAG’s behalf to obtain the required assurances. In consequence, CCAG was able to execute the audit according to agreed timelines, and exercise audit rights in line with contractual conditions.”
The results of the CCAG pooled audit are available to the participants and their respective regulators only, and provide CCAG members with assurance regarding the AWS controls environment, enabling members to work to remove compliance blockers, accelerate their adoption of AWS services, and obtain confidence and trust in the security controls of AWS.
If you have feedback about this post, submit comments in the Comments section below. If you have questions about this post, contact AWS Support.
Want more AWS Security news? Follow us on Twitter.
This past week our service teams continue to innovate on your behalf, and a lot has happened in the Amazon Web Services (AWS) universe. I’ll also share about all the AWS Community events and initiatives that are happening around the world.
Let’s dive in!
Last week’s launches Here are some launches that got my attention:
Amazon Elastic Container Service (Amazon ECS) Service Connect introduces support for automatic traffic encryption with TLS Certificates – Amazon ECS launches support for automatic traffic encryption with Transport Layer Security (TLS) certificates for its networking capability called ECS Service Connect. With this support, ECS Service Connect allows your applications to establish a secure connection by encrypting your network traffic.
Amazon Elastic Kubernetes Service (Amazon EKS) and Amazon EKS Distro support Kubernetes version 1.29 – Kubernetes version 1.29 introduced several new features and bug fixes. You can create new EKS clusters using v1.29 and upgrade your existing clusters to v1.29 using the Amazon EKS console, the eksctl command line interface, or through an infrastructure-as-code (IaC) tool.
IPv6 instance bundles on Amazon Lightsail – With these new instance bundles, you can get up and running quickly on IPv6-only without the need for a public IPv4 address with the ease of use and simplicity of Amazon Lightsail. If you have existing Lightsail instances with a public IPv4 address, you can migrate your instances to IPv6-only in a few simple steps.
Amazon Virtual Private Cloud (Amazon VPC) supports idempotency for route table and network ACL creation – Idempotent creation of route tables and network ACLs is intended for customers that use network orchestration systems or automation scripts that create route tables and network ACLs as part of a workflow. It allows you to safely retry creation without additional side effects.
Sellers can resell third-party professional services in AWS Marketplace – AWS Marketplace sellers, including independent software vendors (ISVs), consulting partners, and channel partners, can now resell third-party professional services in AWS Marketplace. Services can include implementation, assessments, managed services, training, or premium support.
Introducing the AWS Small and Medium Business (SMB) Competency – This is the first go-to-market AWS Specialization designed for partners who deliver to small and medium-sized customers. The SMB Competency provides enhanced benefits for AWS Partners to invest and focus on SMB customer business, such as becoming the go-to standard for participation in new pilots and sales initiatives and receiving unique access to scale demand generation engines.
X in Y – We launched existing services and instance types in additional Regions:
Amazon Q in QuickSight is now available in Europe (Frankfurt). With Amazon Q in QuickSight, business users can generate compelling data stories that provide narratives of data, create dashboard summaries to share key insights from data in seconds, and confidently answer questions not answered by dashboards and reports.
Amazon RDS Custom for Oracle is now available in Europe (Paris). By using Amazon RDS Custom for Oracle, you can benefit from the agility of a managed database service, with features such as automated backups and point-in-time recovery, and also help meet your database application’s customization requirements.
Amazon EC2 M7a, R7a instances now available in Asia Pacific (Tokyo). M7a and R7a instances, powered by 4th Gen AMD EPYC processors (code-named Genoa) with a maximum frequency of 3.7 GHz, deliver up to 50 percent higher performance compared to M6a and R6a instances, respectively.
Amazon EC2 High Memory instances now available in Europe (Stockholm). Amazon EC2 High Memory instances are certified by SAP for running Business Suite on HANA, SAP S/4HANA, Data Mart Solutions on HANA, Business Warehouse on HANA, and SAP BW/4HANA in production environments.
Other AWS news Here are some additional projects, programs, and news items that you might find interesting:
Export a Software Bill of Materials using Amazon Inspector – Generating an SBOM gives you critical security information that offers you visibility into specifics about your software supply chain, including the packages you use the most frequently and the related vulnerabilities that might affect your whole company. My colleague Varun Sharma in South Africa shows how to export a consolidated SBOM for the resources monitored by Amazon Inspector across your organization in industry standard formats, including CycloneDx and SPDX. It also shares insights and approaches for analyzing SBOM artifacts using Amazon Athena.
AWS open source news and updates – My colleague Ricardo writes this weekly open source newsletter in which he highlights new open source projects, tools, and demos from the AWS Community.
Upcoming AWS events Check your calendars and sign up for these AWS events:
AWS Innovate: AI/ML and Data Edition – Register now for the Asia Pacific & Japan AWS Innovate online conference on February 22, 2024, to explore, discover, and learn how to innovate with artificial intelligence (AI) and machine learning (ML). Choose from over 50 sessions in three languages and get hands-on with technical demos aimed at generative AI builders.
AWS Summit Paris – The AWS Summit Paris is an annual event that is held in Paris, France. It is a great opportunity for cloud computing professionals from all over the world to learn about the latest AWS technologies, network with other professionals, and collaborate on projects. The Summit is free to attend and features keynote presentations, breakout sessions, and hands-on labs. Registrations are open!
AWS Community re:Invent re:Caps – Join a Community re:Cap event organized by volunteers from AWS User Groups and AWS Cloud Clubs around the world to learn about the latest announcements from AWS re:Invent.
Инфлацията – CPI (consumer price index) или на български ИПЦ (индекс на потребителските цени)
Много се радвам когато някой използва инфлацията и качи в нета снимка на билетче за градския транспорт от 6 стотинки, колкото беше по Бай-Тошово време. А сега видиш ли е 1.60 лв.
Всичко е наред по принцип, но тогава се возихме в Чавдари и Икаруси, а днес дори имаме и електрически автобуси. Ако няма климатик, това е повод за скандал. На времето също се правиха скандали, но не за климатика, а когато прозореца не можеше да се отвори.
Но не е само това. Тогава голяма част от петрола идваше без пари от Русия и ние го изнасяхме по второ направление – (износ срещу валута), а цената на билета беше една и съща в цялата държава.
В този ред на мисли, няма как да се сравняват цените от онова време и сегашните цени. Преди цените бяха планови, а днес са „уж“ пазарни. Казвам „уж“ защото сме се засилили с големи крачки към порядките от едно време.
Като пример мога да дам цените на електричеството. Ползваме го всички, но не по пазарни цена. Дори когато България въведе системата за свободен пазар за крайния потребител, пак няма да са пазарни, защото сме отговорили на изискванията на ЕК, където веригата за доставка на ток е прекалено дълга – производители на електричество, задължителен пазарен микс включващ ВЕИ, електропреносни дружества, електроразпределителни… всеки по веригата си иска неговото, а самия той не е пазарен, понеже е създаден административно със закон.
Но нека се върнем на Инфлацията – CPI (ИПЦ)
Ето и нейната формула
Това, което трябва да знаете за инфлацията е, че и тя като БВП (GDP) си има много проявления, което я прави трудна за използване от неспециалисти. Давам пример веднага.
Ето какво пише Европейската Централна Банка (ЕЦБ) за измерването на инфлацията:
„За да поддържаме цените стабилни, ни е необходим надежден измерител на инфлацията, който показва как се променят цените в икономиката. Мярката, която използваме в момента – хармонизираният индекс на потребителските цени – остава най-подходяща за целта. Доколкото е възможно обаче, тя би трябвало да отразява по-добре усещането на хората за покачване на цените.
Затова Управителният съвет подкрепя включването на разходите за собствено жилище в измерителя. Но за да бъде приложено това, ще трябва време. Дотогава ще използваме и други измерители на инфлацията, които включват разходите за собствено жилище, така че да подобрим представата си как се променят цените в икономиката.“
Тоест ЕЦБ приема за измерител на инфлацията „Хармонизирания индекс на
потребителските цени“.
Същият се изчислява и от Националния Статистически Институт (НСИ), но вижте какво пишат за него: „1.2. Разлики между ХИПЦ и националния индекс на потребителските цени (ИПЦ)
Изчисляваният ХИПЦ се различава от националния ИПЦ. Основната причина за разликата между двата индекса е различния обхват на ХИПЦ и на националния ИПЦ по отношение на третирането на потреблението на нерезидентите на територията на страната. Това потребление е обхванато при изчисляването на ХИПЦ, докато при националния ИПЦ е извън обхвата.“
С две думи – изключително важно е когато сравняваме инфлация,
1. тя да бъде изчислена по една и съща методология
2. Да включва в себе си едни и същи продукти.
3. Да използва един и същ базов период
Горните 3 предпоставки могат да изкривят реалната инфлация в която си решат посока. Могат както да я увеличат, така и да я намалят, според поставените от правителството задачи.
Веднага давам примери и обяснявам как се прави
Спомням си в младежките години, когато се ровихме на доста ниско ниво в начините за изчисление на инфлацията, бях много изненадан, че в наблюдаваните стоки влизаха галоши, обувки тип 501 и пиано. Колко често се купува пиано, аз не можех да кажа, но цената на пианото и на обувките тип 501 определяха инфлацията в България.
тези неща вече не влизат в потребителската кошница на българина, но влизат други подобни.
Освен това всяка стока влиза с определено тегло в потребителската кошница (всички стоки и услуги, на базата на които се изчислява инфлацията). Тоест сменяме теглото на сиренето и сметката за инфлацията се попроменя значително. Включваме телевизор, който се купува веднъж на 10 години и инфлацията пада рязко, защото той си е и скъпичък. Както виждате ЕЦБ би желала в инфлацията да се включи и цената на жилищата.
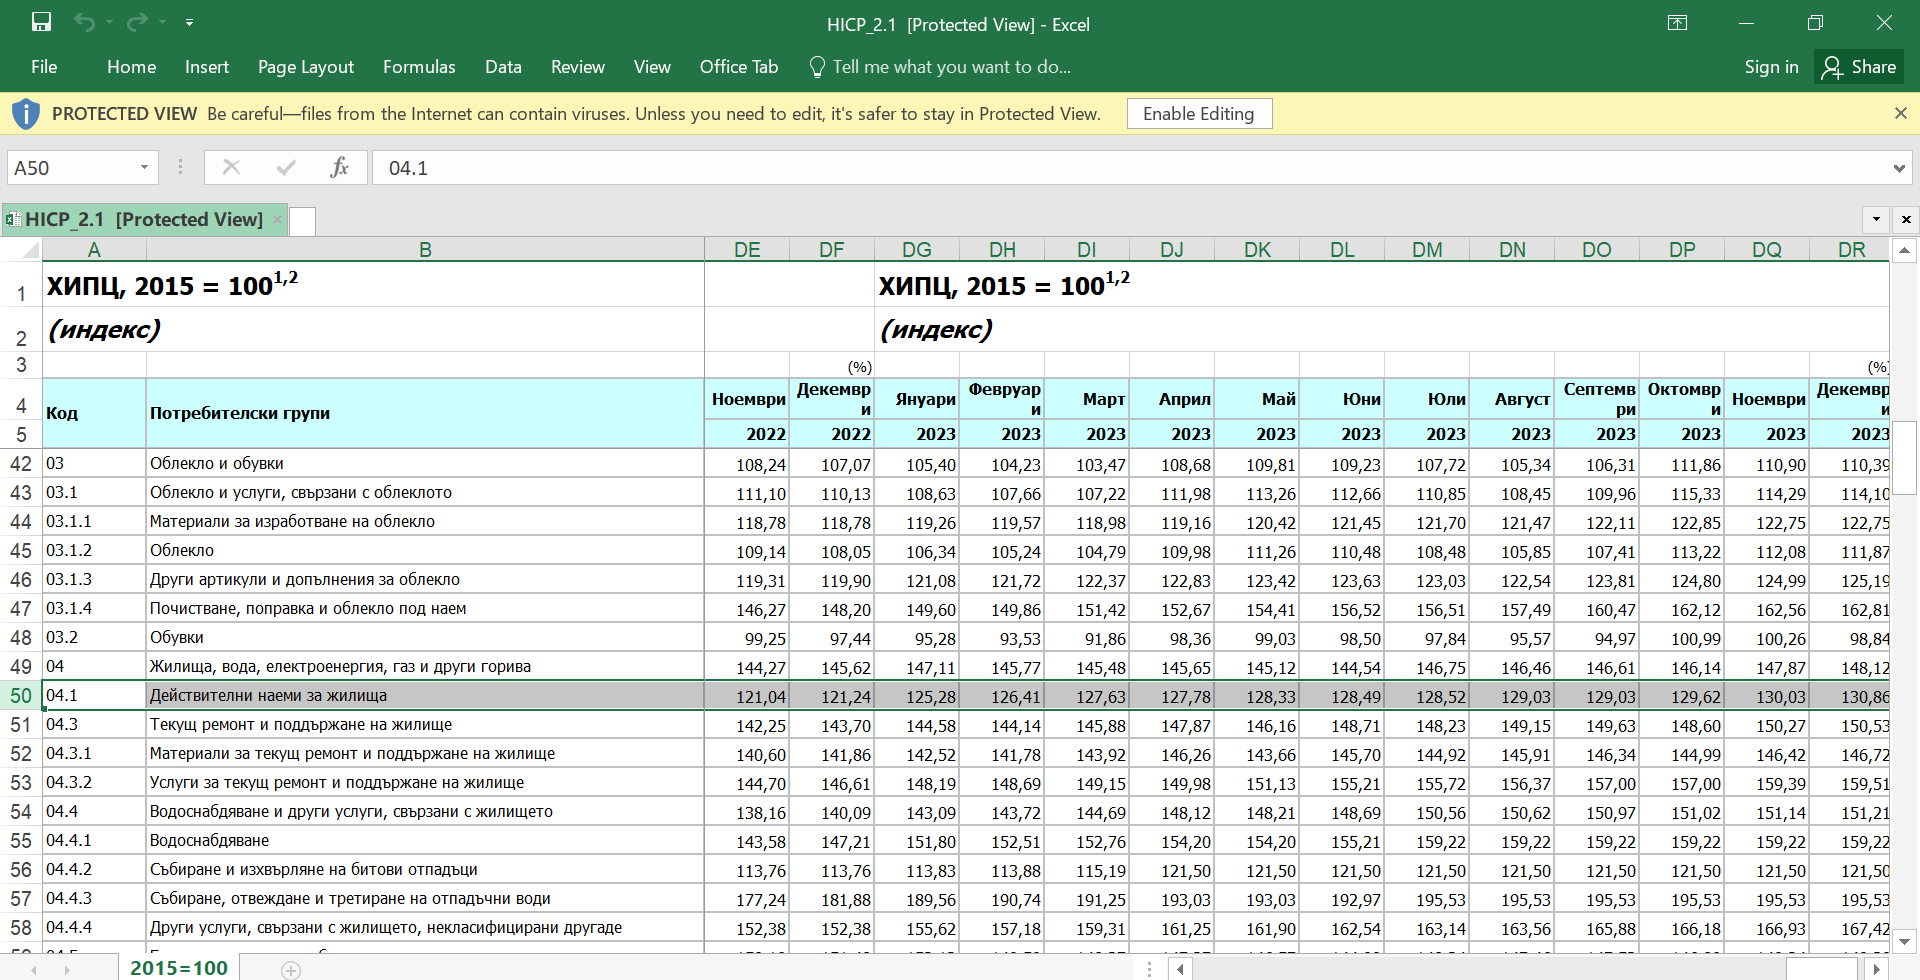
Може би тук е момена да кажем, че всеки НСИ изчислява и цени по групи стоки и сектори. Примерно в България се изчислява индекс на „Действителни наемни цени.“ Ето ги
Има индекси също за транспорт, за цени на имотите, за обзавеждане… Има индекси за всичко.
Най-важна е базата която взимате за изчисляването на инфлацията. Вижте каква разлика има когато за база вземеш осреднения CPI за миналата година или съответно същия месец на предходната година.
Виждате как когато говорите за инфлация, ако не споменете базата тя става 9.5% или съответно 4.7%. Това масово се пропуска, когато се прави пропаганда.
Как се събира обаче информацията за ИПЦ?
Има подбрани средностатистически семейства. Подбрани са така, че да копират структурата на нашето население. Плаща им се за да записват всеки свой разход в рамките на годината. Да, досадно е, но им се плаща (поне когато бях студент). А тази информация е доста точна.
Същото се прави и с фирмите. НСИ им се обажда и им заявява, че са средностатистическа фирма и са длъжни да пращат всеки месец отчети с покупки и разходи, но на тях не им се заплаща.
С две думи информацията, която се събира от НСИ е доста точна, но при нейното интерпретиране и систематизиране има доста възможности за „магии“. Едно обаче е сигурно – както при БВП, така и при инфлацията трябва да се внимава какви периоди се сравняват и изобщо каква информация. Примерно НСИ са публикували калкулатор, ако някой желае да си смята личната инфлация (Има и такъв термин). Ето линк https://www.nsi.bg/nsipic/
Моето лично мнение е, че с въвеждането на CBDC (дигиталните валути на централните банки) всичко за инфлацията ще се знае за части от скундата с точност до стотинка. CBDC на базата на блокчейн технологията и във всяка продажба ще е закодирана цената, продавача, купувача… Но за това в друга статия.
Днес е важно да запомним, че както при БВП, инфлацията за прекалено дълги периоди е практически несравнима, а използваните индекси имат своите методологии, които позволяват по един или друг начин да се варира в изчисленията спрямо целите на управляващите.
Има също така лична инфлация, както и инфлация по групи стоки и браншове. В Австрия и Германия например, не можеш да вдигаш цената на наема с едномесечно предизвестие. Можеш само с размера на инфлацията на наемите, изчислена от тяхните НСИ-та. Има закон, има ред.
От мен на кратко за инфлацията – толкова
Васил Кендов – заклет макроикономист
Ако Ви е харесала статята, моля споделете я във ФБ и помогнете на блога да се развие
Моля използвайте приложената форма за записване на час за среща
[contact-form-7]
A common challenge organizations face is how to gain confidence in and provide evidence for the continuous resilience of their workloads. Using modern chaos engineering principles can help in meeting this challenge, but the practice of chaos engineering can become complex. As a result, both the definition of the inputs and comprehension of the outputs of the process can become inaccessible to non-technical stakeholders.
In this post, we will explore a working example of how you can build chaos experiments using human readable language, AWS Fault Injection Simulator (FIS), and a framework familiar to Developers and Test Engineers. In turn, this will help you to produce auditable evidence of your workload’s continuous resilience in a way that is more engaging and understandable to a wider community of stakeholders.
For a chaos experiment to be considered complete, the experiment should exhibit the following attributes:
Defined steady state
Hypothesis
Defined variables and experiment actions to take
Verification of the hypothesis
Combining FIS and Behave
FIS enables you to create the experiment actions outlined in the list of chaos experiment attributes. You can use the actions in FIS to simulate the effect of disruptions on your workloads so that you can observe the resulting outcome and gain valuable insights into the workload’s resilience. However, there are additional attributes that should be defined when writing a fully featured chaos experiment.
This is what combining Python-style Behave with FIS enables you to do (other behavior-driven development frameworks exist for different languages). By approaching chaos experiments in this way, you get the benefit of codifying all of your chaos experiment attributes, such as the hypothesis, steady state and verification of the hypothesis using human readable Gherkin syntax, then automating the whole experiment in code.
Using Gherkin syntax enables non-technical stakeholders to review, validate, and contribute to chaos experiments, plus it helps to ensure the experiments can be driven by business outcomes and personas. If you have defined everything as code, then the whole process can be wrapped into the appropriate stage of your CI/CD pipelines to ensure existing experiments are always run to avoid regression. You can also iteratively add new chaos experiments as new business features are enabled in your workloads or you become aware of new potential disruptions. In addition, using a behavior-driven development (BDD) framework, like Behave, also enables developers and test engineers to deliver the capability quickly since they are likely already familiar with BDD and Behave.
The remainder of this blog post provides an example of this approach using an experiment that can be built on to create a set of experiments for your own workloads. The code and resources used throughout this blog are available in the AWS Samples aws-fis-behaviour-driven-chaos repository, which provides a CloudFormation template that builds the target workload for our chaos experiment.
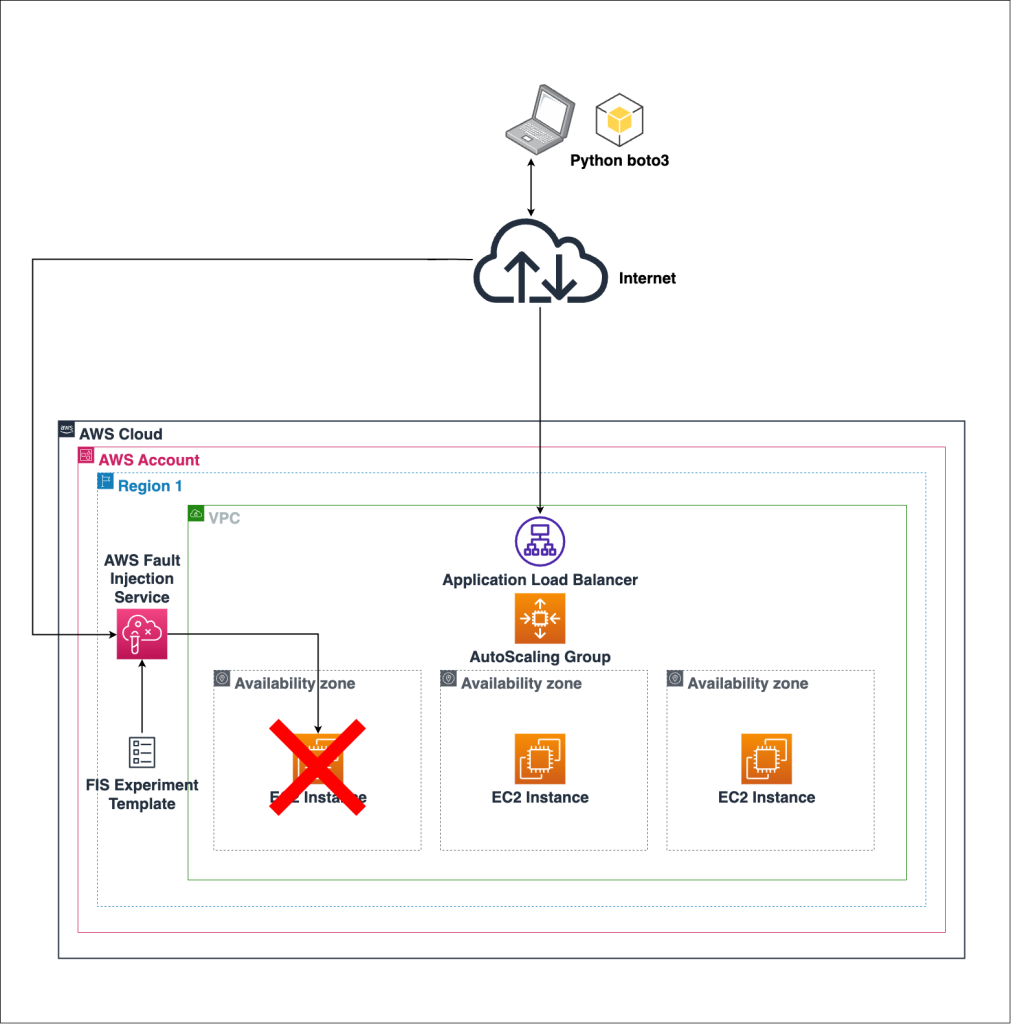
The workload comprises an Amazon Virtual Private Cloud with a public subnet, an EC2 Auto-scaling Group and EC2 instances running NGINX. The CloudFormation template also creates an FIS experiment template, comprising a standard FIS Amazon Elastic Compute Cloud (Amazon EC2) action. For your own implementation, we recommend that you keep the CloudFormation for FIS separate to the CloudFormation, which builds the workload so that it can be maintained independently. Please note, for simplicity, they are together in the same repo for this blog.
Note: The Behave code in the repo is structured in a way we suggest you adopt for your own repo. It keeps the scenario definition separated from the Python-specific implementation of the steps and in turn the outline of the steps is separated from the step helper methods. This will allow you to build a set of re-usable step helper methods that can be dropped-into/called-from any Behave step. This can help keep your test codebase as DRY and efficient as possible as it grows. This can be very challenging for large test frameworks.
Figure 1 shows the AWS services and components we’re interacting with in this post.
Figure 1. Infrastructure for the chaos experiment
Defining and launching the chaos experiment
We start by defining our chaos experiment in Gherkin syntax with the Gherkin’s Scenario being used to articulate the hypothesis for our chaos experiment as follows:
Scenario: My website is resilient to infrastructure failure
Given My website is up and can serve 10 transactions per second And I have an EC2 Auto-Scaling Group with at least 3 running EC2 instances And I have an EC2 Auto-Scaling Group with instances distributed across at least 3 Availability Zones When an EC2 instance is lost Then I can continue to serve 10 transactions per second And 90 percent of transactions to my website succeed
Our initial Given, And steps validate that the conditions and environment that we are launching the Scenario in are sufficient for the experiment to be successful (the steady state). Therefore, if the environment is already out of bounds (read: the website isn’t running) before we begin, then the test will fail anyway, and we don’t want a false positive result. Since the steps are articulated as code using Behave, the test report will demonstrate what caused the experiment to fail and be able to identify if it was an environmental issue (false positive) rather than a true positive failure (the workload didn’t respond as we anticipated) during our chaos experiment.
The Given, And steps are launched using steps like the following example. Steps, in turn, call the relevant step_helper functions. Note how the phrases from the scenario are represented in the decorator for the step_impl function; this is how you link the human readable language in the scenario to the Python code that initiates the test logic.
@step("My website is up and can serve {number} transactions per second")
def step_impl(context, number):

    target = f"http://{context.config.userdata['website_hostname']}"

    logger.info(f'Sending traffic to target website: {target} for the next 60 seconds, please wait....')
    send_traffic_to_website(target, 60, "before_chaos", int(number))

    assert verify_locust_run(int(number), "before_chaos") is True
Once the Given, And steps have initiated successfully, we are satisfied that the conditions for the experiment are appropriate. Next, we launch the chaos actions using the When step. Here, we interact with FIS using boto3 to start the experiment template that was created earlier using CloudFormation. The following code snippet shows the code, which begins this step:
@step("an EC2 instance is lost")
def step_impl(context):

    if "fis" not in context.clients:
        create_client("fis", context)

    state = start_experiment(
        context.clients["fis"], context.config.userdata["fis_experiment_id"]
    )["experiment"]["state"]["status"]
    logger.info(f"FIS experiment state is: {state}")

    assert state in ["running", "initiating"]
The experiment template being used here is intentionally a very simple, single-step experiment as an example for this blog. FIS enables you to create very elaborate multi-step experiments in a straightforward manner, for more information please refer to the AWS FIS actions reference.
The experiment is now in flight! We launched the Then, And steps to validate our hypothesis expressed in the Scenario. Now, we query the website endpoint to see if we get any failed requests:
@step("I can continue to serve {number} transactions per second")
def step_impl(context, number):

    target = f"http://{context.config.userdata['website_hostname']}"

    logger.info(f'Sending traffic to target website {target} for the next 60 seconds, please wait....')
    send_traffic_to_website(target, 60, "after_chaos", int(number))

    assert verify_locust_run(int(number), "after_chaos") is True


@step("{percentage} percent of transactions to my website succeed")
def step_impl(context, percentage):

    assert success_percent(int(percentage), "after_chaos") is True
You can add as many Given, When, Then steps to validate your Scenario (the experiment’s hypothesis) as you need; for example, you can use additional FIS actions to validate what happens if a network failure prevents traffic to a subnet. You can also code your own actions using AWS Systems Manager or boto3 calls of your choice.
In our experiment, the results have validated our hypothesis, as seen in Figure 2.
Figure 2. Hypothesis validation example
There are a few different ways to format your results when using Behave so that they are easier to pull into a report; Allure is a nice example.
To follow along, the steps in the Implementation Details section will help launch the chaos experiment at your CLI. As previously stated, if you were to use this approach in your development lifecycle, you would hoist this into your CI/CD pipeline and tooling and not launch it locally.
Implementation details
Prerequisites
To deploy the chaos experiment and test application, you will need:
Access to AWS CloudShell or have the AWS CLI installed with a configured profile and appropriate AWS Access Keys. Please ensure you have a recent and working version of Python (v3.9 or newer).
Note: Website availability tests are initiated from your CLI in the sample code used in this blog. If you are traversing a busy corporate proxy or a network connection that is not stable, then it may cause the experiment to fail.
Further, to keep the prerequisites as minimal and self-contained as possible for this blog, we are using Locust as a Python library, which is not a robust implementation of Locust. Using a Behave step implementation, we instantiate a local Locust runner to send traffic to the website we want to test before and after the step, which takes the chaos action. For a robust implementation in your own test suite, you could build a Locust implementation behind a REST API or use a load-testing suite with an existing REST API, like Blazemeter, which can be called from a Behave step and run for the full length of the experiment.
The CloudFormation that you will launch with this post creates some public facing EC2 instances. You should restrict access to just your public IP address using the instructions below. You can find your IP at https://checkip.amazonaws.com/. Use the IP address shown with a trailing /32 e.g. 1.2.3.4/32
Environment preparation
Clone the git repository aws-fis-behaviour-driven-chaos that contains the blog resources using the below command:
Install the Python dependencies into your Python environment: pip install -r requirements.txt
Create the test stack and wait for completion (ensure you replace the parameter value for AllowedCidr with your public IP address): aws cloudformation create-stack --stack-name my-chaos-stack --template-body file://cloudformation/infrastructure.yaml --region=eu-west-1 --parameters ParameterKey=AllowedCidr,ParameterValue=1.2.3.4/32 --capabilities CAPABILITY_IAM aws cloudformation wait stack-create-complete --stack-name my-chaos-stack --region=eu-west-1
Once the deployment reaches a create-complete state, retrieve the stack outputs: aws cloudformation describe-stacks --stack-name my-chaos-stack --region=eu-west-1
Copy the OutputValue of the stack Outputs for AlbHostname and FisExperimentId into the behave/userconfig.json file, replacing the placeholder values for website_hostname and fis_experiment_id, respectively.
Replace the region value in the behave/userconfig.json file with the region you built the stack in (if altered in Step 2).
Change directory into behave/. cd behave/
Launch behave: behave Once completed, Locust results will appear inside the behave folder (Figure 3 is an example).
Figure 3. Example CLI output
Cleanup
If you used the CloudFormation templates that we provided to create AWS resources to follow along with this blog post, delete them now to avoid future recurring charges.
This blog post has given usable and actionable insights into how you can wrap FIS actions, plus experiment templates in a way that fully defines and automates a chaos experiment with language that will be accessible to stakeholders outside of the test engineering team. You can extend on what is presented here to test your own workloads with your own methods and metrics through a powerful suite of chaos experiments, which will build confidence in your workload’s continuous resilience and enable you to provide evidence of this to the wider organization.
In December, the Rust project released
a call for proposals for inclusion in the 2024 edition. Rust handles
backward incompatible changes by using Editions,
which permit projects to specify a single stable edition for their code
and allow libraries written
in different editions to be linked together. Proposals for Rust 2024 are
now in, and have until the end of February to be debated and decided on. Once
the proposals are accepted, they have until May to be implemented in time for
the 2024 edition to be released in the second half of the year.
Companies have been collecting user data to offer new products, recommend options more relevant to the user’s profile, or, in the case of financial institutions, to be able to facilitate access to higher credit lines or lower interest rates. However, personal data is sensitive as its use enables identification of the person using a specific system or application and in the wrong hands, this data might be used in unauthorized ways. Governments and organizations have created laws and regulations, such as General Data Protection Regulation (GDPR) in the EU, General Data Protection Law (LGPD) in Brazil, and technical guidance such as the Cloud Computing Implementation Guide published by the Association of Banks in Singapore (ABS), that specify what constitutes sensitive data and how companies should manage it. A common requirement is to ensure that consent is obtained for collection and use of personal data and that any data collected is anonymized to protect consumers from data breach risks.
In this blog post, we walk you through a proposed architecture that implements data anonymization by using granular access controls according to well-defined rules. It covers a scenario where a user might not have read access to data, but an application does. A common use case for this scenario is a data scientist working with sensitive data to train machine learning models. The training algorithm would have access to the data, but the data scientist would not. This approach helps reduce the risk of data leakage while enabling innovation using data.
Note: If there’s a pre-existing Lake Formation configuration, there might be permission issues when testing this solution. We suggest that you test this solution on a development account that doesn’t yet have Lake Formation active. If you don’t have access to a development account, see more details about the permissions required on your role in the Lake Formation documentation.
You must give permission for AWS DMS to create the necessary resources, such as the EC2 instance where you will run DMS tasks. If you have ever worked with DMS, this permission should already exist. Otherwise, you can use CloudFormation to create the necessary roles to deploy the solution. To see if permission already exists, open the AWS Management Console and go to IAM, select Roles, and see if there is a role called dms-vpc-role. If not, you must create the role during deployment.
We use the Faker library to create dummy data consisting of the following tables:
Customer
Bank
Card
Solution overview
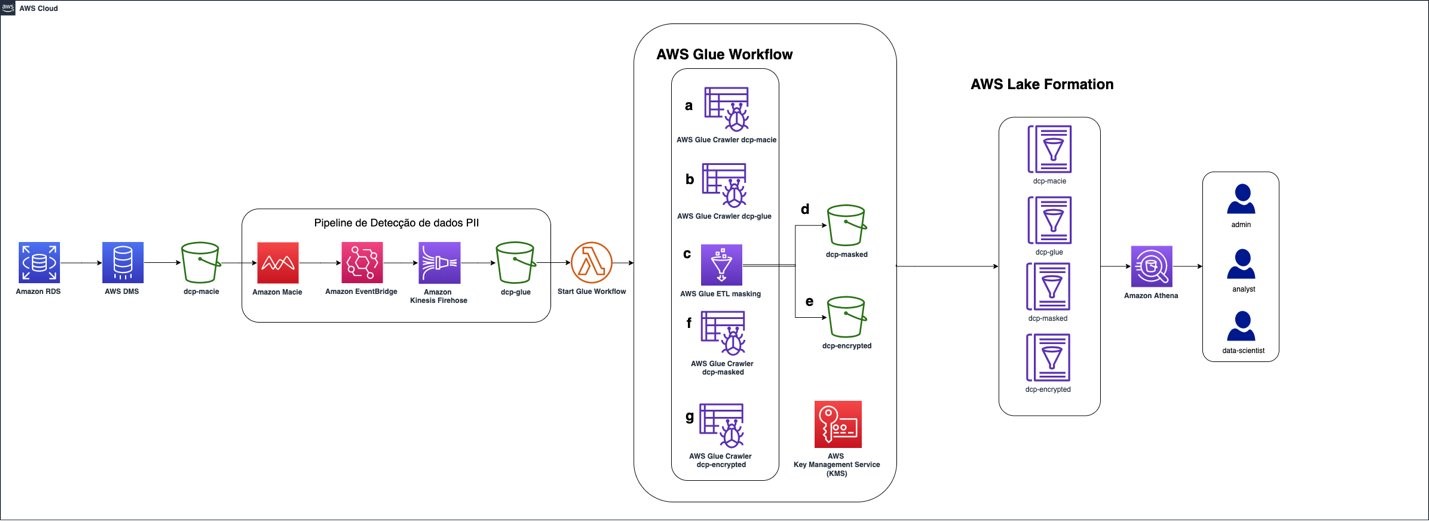
This architecture allows multiple data sources to send information to the data lake environment on AWS, where Amazon S3 is the central data store. After the data is stored in an S3 bucket, Macie analyzes the objects and identifies sensitive data using machine learning (ML) and pattern matching. AWS Glue then uses the information to run a workflow to anonymize the data.
Figure 1: Solution architecture for data ingestion and identification of PII
We will describe two techniques used in the process: data masking and data encryption. After the workflow runs, the data is stored in a separate S3 bucket. This hierarchy of buckets is used to segregate access to data for different user personas.
Figure 1 depicts the solution architecture:
The data source in the solution is an Amazon RDS database. Data can be stored in a database on an EC2 instance, in an on-premises server, or even deployed in a different cloud provider.
AWS DMS uses full load, which allows data migration from the source (an Amazon RDS database) into the target S3 bucket — dcp-macie — as a one-time migration. New objects uploaded to the S3 bucket are automatically encrypted using server-side encryption (SSE-S3).
A personally identifiable information (PII) detection pipeline is invoked after the new Amazon S3 objects are uploaded. Macie analyzes the objects and identifies values that are sensitive. Users can manually identify which fields and values within the files should be classified as sensitive or use the Macie automated sensitive data discovery capabilities.
The sensitive values identified by Macie are sent to EventBridge, invoking Kinesis Data Firehose to store them in the dcp-glue S3 bucket. AWS Glue uses this data to know which fields to mask or encrypt using an encryption key stored in AWS KMS.
Using EventBridge enables an event-based architecture. EventBridge is used as a bridge between Macie and Kinesis Data Firehose, integrating these services.
Kinesis Data Firehose supports data buffering mitigating the risk of information loss when sent by Macie while reducing the overall cost of storing data in Amazon S3. It also allows data to be sent to other locations, such as Amazon Redshift or Splunk, making it available to be analyzed by other products.
At the end of this step, Amazon S3 is invoked from a Lambda function that starts the AWS Glue workflow, which masks and encrypts the identified data.
AWS Glue starts a crawler on the S3 bucket dcp-macie (a) and the bucket dcp-glue (b) to populate two tables, respectively, created as part of the AWS Glue service.
After that, a Python script is run (c), querying the data in these tables. It uses this information to mask and encrypt the data and then store it in the prefixes dcp-masked (d) and dcp-encrypted (e) in the bucket dcp-athena.
The last step in the workflow is to perform a crawler for each of these prefixes (f) and (g) by creating their respective tables in the AWS Glue Data Catalog.
To enable fine-grained access to data, Lake Formation maps permissions to the tags you have configured. The implementation of this part is described further in this post.
Athena can be used to query the data. Other tools, such as Amazon Redshift or Amazon Quicksight can also be used, as well as third-party tools.
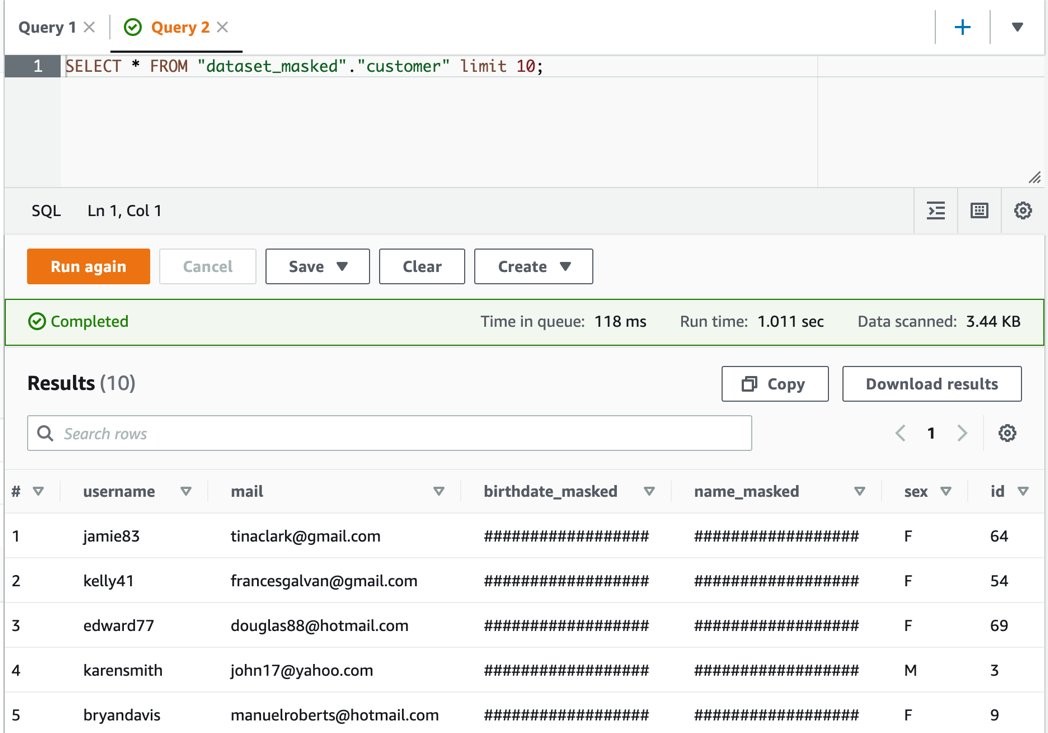
If a user lacks permission to view sensitive data but needs to access it for machine learning model training purposes, AWS KMS can be used. The AWS KMS service manages the encryption keys that are used for data masking and to give access to the training algorithms. Users can see the masked data, but the algorithms can use the data in its original form to train the machine learning models.
This solution uses three personas:
secure-lf-admin: Data lake administrator. Responsible for configuring the data lake and assigning permissions to data administrators. secure-lf-business-analyst: Business analyst. No access to certain confidential information. secure-lf-data-scientist: Data scientist. No access to certain confidential information.
Solution implementation
To facilitate implementation, we created a CloudFormation template. The model and other artifacts produced can be found in this GitHub repository. You can use the CloudFormation dashboard to review the output of all the deployed features.
Choose the following Launch Stack button to deploy the CloudFormation template.
Deploy the CloudFormation template
To deploy the CloudFormation template and create the resources in your AWS account, follow the steps below.
After signing in to the AWS account, deploy the CloudFormation template. On the Create stack window, choose Next.
Figure 2: CloudFormation create stack screen
In the following section, enter a name for the stack. Enter a password in the TestUserPassword field for Lake Formation personas to use to sign in to the console. When finished filling in the fields, choose Next.
On the next screen, review the selected options and choose Next.
In the last section, review the information and select I acknowledge that AWS CloudFormation might create IAM resources with custom names. Choose Create Stack.
Figure 3: List of parameters and values in the CloudFormation stack
Wait until the stack status changes to CREATE_COMPLETE.
The deployment process should take approximately 15 minutes to finish.
Run an AWS DMS task
To extract the data from the Amazon RDS instance, you must run an AWS DMS task. This makes the data available to Macie in an S3 bucket in Parquet format.
On the navigation bar, for the Migrate data option, select Database migration tasks.
Select the task with the name rdstos3task.
Choose Actions.
Choose Restart/Resume. The loading process should take around 1 minute.
When the status changes to Load Complete, you will be able to see the migrated data in the target bucket (dcp-macie-<AWS_REGION>-<ACCOUNT_ID>) in the dataset folder. Within each prefix there will be a parquet file that follows the naming pattern: LOAD00000001.parquet. After this step, use Macie to scan the data for sensitive information in the files.
Run a classification job with Macie
You must create a data classification job before you can evaluate the contents of the bucket. The job you create will run and evaluate the full contents of your S3 bucket to determine the files stored in the bucket contain PII. This job uses the managed identifiers available in Macie and a custom identifier.
Open the Macie Console, on the navigation bar, select Jobs.
Choose Create job.
Select the S3 bucket dcp-macie-<AWS_REGION>-<ACCOUNT_ID> containing the output of the AWS DMS task. Choose Next to continue.
On the Review Bucket page, verify the selected bucket is dcp-macie-<AWS_REGION>-<ACCOUNT_ID>, and then choose Next.
In Refine the scope, create a new job with the following scope:
Sensitive data Discovery options: One-time job (for demonstration purposes, this will be a single discovery job. For production environments, we recommend selecting the Scheduled job option, so Macie can analyze objects following a scheduled).
Sampling Depth: 100 percent.
Leave the other settings at their default values.
On Managed data identifiers options, select All so Macie can use all managed data identifiers. This enables a set of built-in criteria to detect all identified types of sensitive data. Choose Next.
On the Custom data identifiers option, select account_number, and then choose Next. With the custom identifier, you can create custom business logic to look for certain patterns in files stored in Amazon S3. In this example, the task generates a discovery job for files that contain data with the following regular expression format XYZ- followed by numbers, which is the default format of the false account_number generated in the dataset. The logic used for creating this custom data identifier is included in the CloudFormation template file.
On the Select allow lists, choose Next to continue.
Enter a name and description for the job.
Choose Next to continue.
On Review and create step, check the details of the job you created and choose Submit.
Figure 4: List of Macie findings detected by the solution
The amount of data being scanned directly influences how long the job takes to run. You can choose the Update button at the top of the screen, as shown in Figure 4, to see the updated status of the job. This job, based on the size of the test dataset, will take about 10 minutes to complete.
Run the AWS Glue data transformation pipeline
After the Macie job is finished, the discovery results are ingested into the bucket dcp-glue-<AWS_REGION>-<ACCOUNT_ID>, invoking the AWS Glue step of the workflow (dcp-Workflow), which should take approximately 11 minutes to complete.
Next, select History to see the past runs of the dcp-workflow.
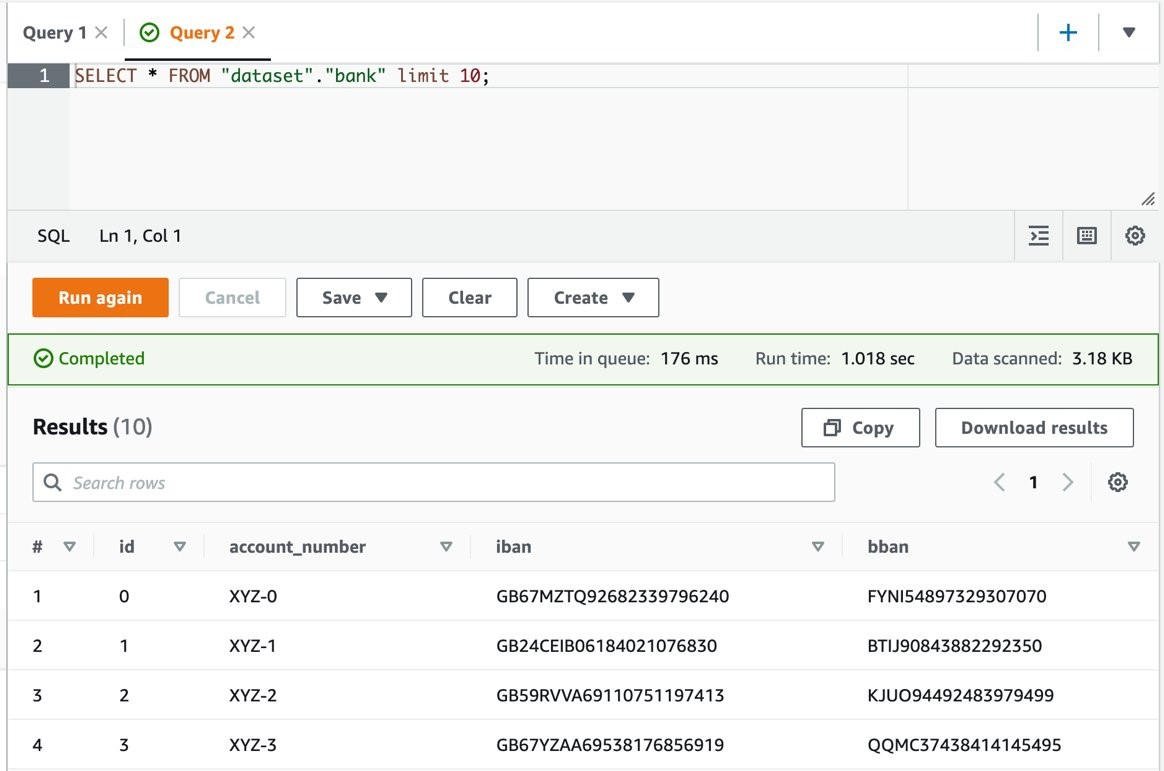
The AWS Glue job, which is launched as part of the workflow (dcp-workflow), reads the Macie findings to know the exact location of sensitive data. For example, in the customer table are name and birthdate. In the bank table are account_number, iban, and bban. And in the card table are card_number, card_expiration, and card_security_code. After this data is found, the job masks and encrypts the information.
Text encryption is done using an AWS KMS key. Here is the code snippet that provides this functionality:
def encrypt_rows(r):
    encrypted_entities = columns_to_be_masked_and_encrypted
    try:
        for entity in encrypted_entities:
            if entity in table_columns:
                encrypted_entity = get_kms_encryption(r[entity])
                r[entity + '_encrypted'] = encrypted_entity.decode("utf-8")
                del r[entity]
    except:
        print ("DEBUG:",sys.exc_info())
    return r

def get_kms_encryption(row):
    # Create a KMS client
    session = boto3.session.Session()
    client = session.client(service_name='kms',region_name=region_name)

    try:
        encryption_result = client.encrypt(KeyId=key_id, Plaintext=row)
        blob = encryption_result['CiphertextBlob']
        encrypted_row = base64.b64encode(blob)
        return encrypted_row

    except:
        return 'Error on get_kms_encryption function'
If your application requires access to the unencrypted text, and because access to the AWS KMS encryption key exists, you can use the following excerpt example to access the information:
After performing all the above steps, the datasets are fully anonymized with tables created in Data Catalog and data stored in the respective S3 buckets. These are the buckets where fine-grained access controls are applied through Lake Formation:
Masked data — s3://dcp-athena-<AWS_REGION>-<ACCOUNT_ID>/masked/
Encrypted data — s3://dcp-athena-<AWS_REGION>-<ACCOUNT_ID>/encrypted/
Now that the tables are defined, you refine the permissions using Lake Formation.
Enable Lake Formation fine-grained access
After the data is processed and stored, you use Lake Formation to define and enforce fine-grained access permissions and provide secure access to data analysts and data scientists.
To enable fine-grained access, you first add a user (secure-lf-admin) to Lake Formation:
In the Lake Formation console, clear Add myself and select Add other AWS users or roles.
From the drop-down menu, select secure-lf-admin.
Choose Get started.
Figure 5: Lake Formation deployment process
Grant access to different personas
Before you grant permissions to different user personas, you must register Amazon S3 locations in Lake Formation so that the personas can access the data. All buckets have been created with the following pattern <prefix>-<bucket_name>-<aws_region>-<account_id>, where <prefix> matches the prefix you selected when you deployed the Cloudformation template and <aws_region> corresponds to the selected AWS Region (for example, ap-southeast-1), and <account_id> is the 12 numbers that match your AWS account (for example, 123456789012). For ease of reading, we left only the initial part of the bucket name in the following instructions.
In the Lake Formation console, on the navigation bar, on the Register and ingest option, select Data Lake locations.
Choose Register location.
Select the dcp-glue bucket and choose Register Location.
Repeat for the dcp-macie/dataset, dcp-athena/masked, and dcp-athena/encrypted prefixes.
Figure 6: Amazon S3 locations registered in the solution
You’re now ready to grant access to different users.
Granting per-user granular access
After successfully deploying the AWS services described in the CloudFormation template, you must configure access to resources that are part of the proposed solution.
Grant read-only accesses to all tables for secure-lf-admin
Before proceeding you must sign in as the secure-lf-admin user. To do this, sign out from the AWS console and sign in again using the secure-lf-admin credential and password that you set in the CloudFormation template.
Now that you’re signed in as the user who administers the data lake, you can grant read-only access to all tables in the dataset database to the secure-lf-admin user.
In the Permissions section, select Data Lake permissions, and then choose Grant.
Select IAM users and roles.
Select the secure-lf-admin user.
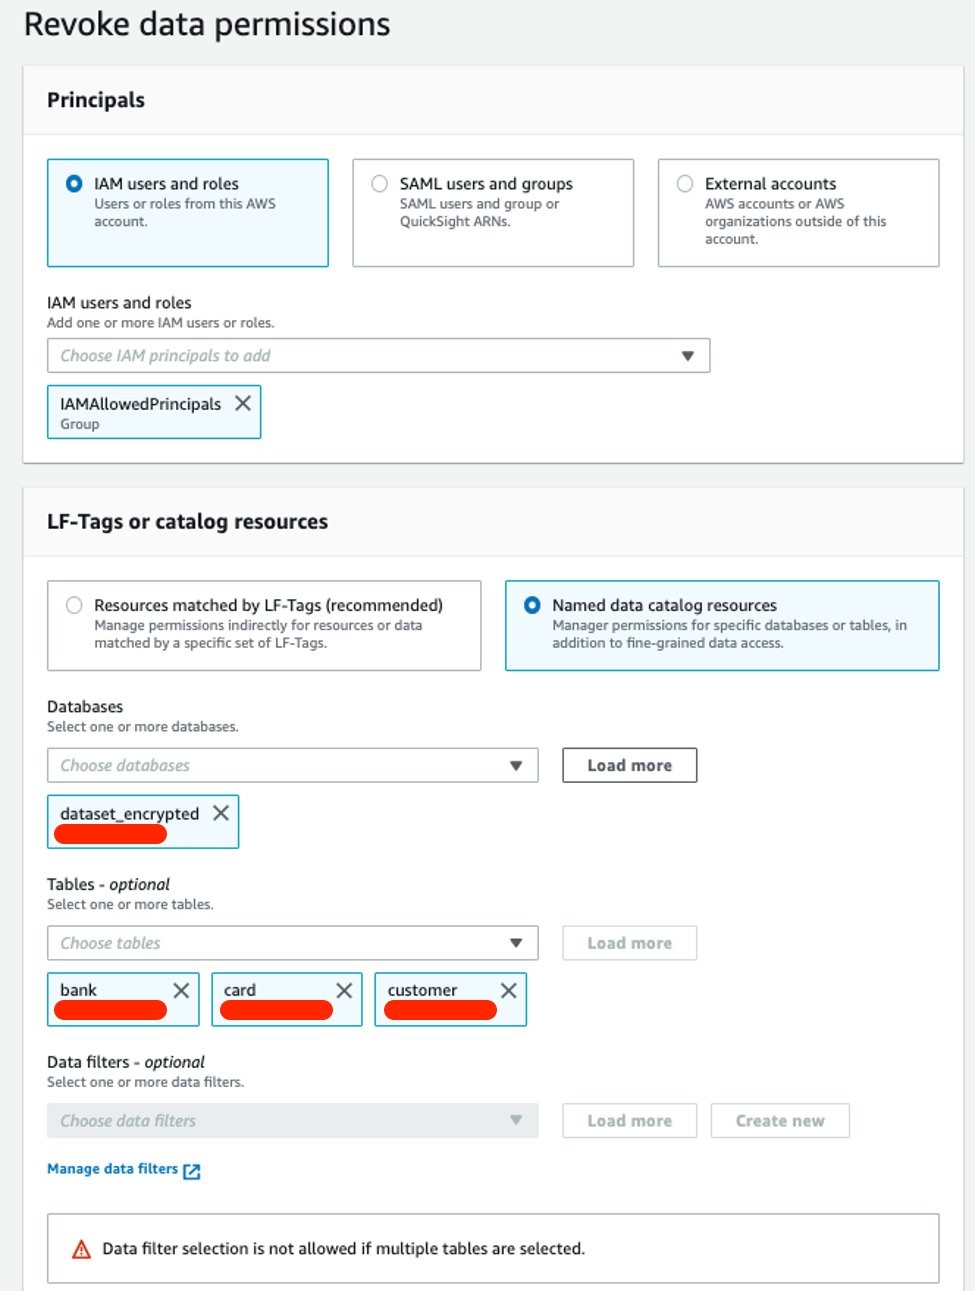
Under LF-Tags or catalog resources, select Named data catalog resources.
Select the database dataset.
For Tables, select All tables.
In the Table permissions section, select Alter and Super.
Under Grantable permissions, select Alter and Super.
Choose Grant.
You can confirm your user permissions on the Data Lake permissions page.
Create tags to grant access
Return to the Lake Formation console to define tag-based access control for users. You can assign policy tags to Data Catalog resources (databases, tables, and columns) to control access to this type of resources. Only users who receive the corresponding Lake Formation tag (and those who receive access with the resource method named) can access the resources.
Open the Lake Formation console, then on the navigation bar, under Permissions, select LF-tags.
Choose Add LF Tag. In the dialog box Add LF-tag, for Key, enter data, and for Values, enter mask. Choose Add, and then choose Add LF-Tag.
Follow the same steps to add a second tag. For Key, enter segment, and for Values enter campaign.
Assign tags to users and databases
Now grant read-only access to the masked data to the secure-lf-data-scientist user.
In the Lake Formation console, on the navigation bar, under Permissions, select Data Lake permissions.
Choose Grant.
Under IAM users and roles, select secure-lf-data-scientist as the user.
In the LF-Tags or catalog resources section, select Resources matched by LF-Tags and choose add LF-Tag. For Key, enter data and for Values, enter mask.
Figure 7: Creating resource tags for Lake Formation
In the section Database permissions, in the Database permissions part and in Grantable permissions, select Describe.
In the section Table permissions, in the Table permissions part and in Grantable permissions, select Select.
Choose Grant.
Figure 8: Database and table permissions granted
To complete the process and give the secure-lf-data-scientist user access to the dataset_masked database, you must assign the tag you created to the database.
On the navigation bar, under Data Catalog, select Databases.
Select dataset_masked and select Actions. From the drop-down menu, select Edit LF-Tags.
In the section Edit LF-Tags: dataset_masked, choose Assign new LF-Tag. For Key, enter data, and for Values, enter mask. Choose Save.
Grant read-only accesses to secure-lf-business-analyst
Now grant the secure-lf-business-analyst user read-only access to certain encrypted columns using column-based permissions.
In the Lake Formation console, under Data Catalog, select Databases.
Select the database dataset_encrypted and then select Actions. From the drop-down menu, choose Grant.
Select IAM users and roles.
Choose secure-lf-business-analyst.
In the LF-Tags or catalog resources section, select Named data catalog resources.
In the Database permissions section, in the Database permissions section and in Grantable permissions, select Describe and Alter.
Choose Grant.
Now give the secure-lf-business-analyst user access to the Customer table, except for the username column.
In the Lake Formation console, under Data Catalog, select Databases.
Select the database dataset_encrypted and then, choose View tables.
From the Actions option in the drop-down menu, select Grant.
Select IAM users and roles.
Select secure-lf-business-analyst.
In the LF-Tags or catalog resources part, select Named data catalog resources.
In the Database section, leave the dataset_encrypted selected.
In the tables section, select the customer table.
In the Table permission section, in the Table permission section and in Grantable permissions, choose Select.
In the Data Permissions section, select Column-based access.
Select Include columns and select the id, username, mail, and gender columns, which are the data-less columns encrypted for the secure-lf-business-analyst user to have access to.
Choose Grant.
Figure 9: Granting access to secure-lf-business-analyst user in the Customer table
Now give the secure-lf-business-analyst user access to the table Card, only for columns that do not contain PII information.
In the Lake Formation console, under Data Catalog, choose Databases.
Select the database dataset_encrypted and choose View tables.
Select the table Card.
In the Schema section, choose Edit schema.
Select the cred_card_provider column, which is the column that has no PII data.
Choose Edit tags.
Choose Assign new LF-Tag.
For Assignedkeys, enter segment and for Values, enter mask.
Figure 10: Editing tags in Lake Formation tables
Choose Save, and then choose Save as new version.
In this step you add the segment tag in the column cred_card_provider to the card table. For the user secure-lf-business-analyst to have access, you need to configure this tag for the user.
In the Lake Formation console, under Permissions, select Data Lake permissions.
Choose Grant.
Under IAM users and roles, select secure-lf-business-analyst as the user.
In the LF-Tags or catalog resources section, select Resources matched by LF-Tags, and choose add LF-tag and for as Key enter segment and for Values, enter campaign.
Figure 11: Configure tag-based access for user secure-lf-business-analyst
In the Database permissions section, in the Database permissions part and in Grantable permissions, select Describe from both options.
In the Table permission section, in the Table permission part as well as in Grantable permissions, choose Select.
Choose Grant.
The next step is to revoke Super access to the IAMAllowedPrincipals group.
The IAMAllowedPrincipals group includes all IAM users and roles that are allowed access to Data Catalog resources using IAM policies. The Super permission allows a principal to perform all operations supported by Lake Formation on the database or table on which it is granted. These settings provide access to Data Catalog resources and Amazon S3 locations controlled exclusively by IAM policies. Therefore, the individual permissions configured by Lake Formation are not considered, so you will remove the concessions already configured by the IAMAllowedPrincipals group, leaving only the Lake Formation settings.
In the Databases menu, select the database dataset, and then select Actions. From the drop-down menu, select Revoke.
In the Principals section, select IAM users and roles, and then select the IAMAllowedPrincipals group as the user.
Under LF-Tags or catalog resources, select Named data catalog resources.
In the Database section, leave the dataset option selected.
Under Tables, select the following tables: bank, card, and customer.
In the Table permissions section, select Super.
Choose Revoke.
Repeat the same steps for the dataset_encrypted and dataset_masked databases.
Figure 12: Revoke SUPER access to the IAMAllowedPrincipals group
You can confirm all user permissions on the Data Permissions page.
Querying the data lake using Athena with different personas
To validate the permissions of different personas, you use Athena to query the Amazon S3 data lake.
Ensure the query result location has been created as part of the CloudFormation stack (secure-athena-query-<ACCOUNT_ID>-<AWS_REGION>).
Sign in to the Athena console with secure-lf-admin (use the password value for TestUserPassword from the CloudFormation stack) and verify that you are in the AWS Region used in the query result location.
On the navigation bar, choose Query editor.
Choose Setting to set up a query result location in Amazon S3, and then choose Browse S3 and select the bucket secure-athena-query-<ACCOUNT_ID>-<AWS_REGION>.
Run a SELECT query on the dataset.
SELECT * FROM "dataset"."bank" limit 10;
The secure-lf-admin user should see all tables in the dataset database and dcp. As for the banks dataset_encrypted and dataset_masked, the user should not have access to the tables.
Figure 13: Athena console with query results in clear text
Finally, validate the secure-lf-data-scientist permissions.
Sign in to the Athena console with secure-lf-data-scientist (use the password value for TestUserPassword from the CloudFormation stack) and verify that you are in the correct Region.
Run the following query:
SELECT * FROM “dataset_masked”.”bank” limit 10;
The user secure-lf-data-scientist will only be able to view all the columns in the database dataset_masked.
Figure 14: Athena query results with masked data
Now, validate the secure-lf-business-analyst user permissions.
Sign in to the Athena console as secure-lf-business-analyst (use the password value for TestUserPassword from the CloudFormation stack) and verify that you are in the correct Region.
Run a SELECT query on the dataset.
SELECT * FROM “dataset_encrypted”.”card” limit 10;
Figure 15: Validating secure-lf-business-analyst user permissions to query data
The user secure-lf-business-analyst should only be able to view the card and customer tables of the dataset_encrypted database. In the table card, you will only have access to the cred_card_provider column and in the table Customer, you will have access only in the username, mail, and sex columns, as previously configured in Lake Formation.
Cleaning up the environment
After testing the solution, remove the resources you created to avoid unnecessary expenses.
Open the Amazon S3 console.
Navigate to each of the following buckets and delete all the objects within:
Choose Delete, and then choose Delete Stack in the pop-up window.
If you also want to delete the bucket that was created, go to Amazon S3 and delete it from the console or by using the AWS CLI.
To remove the settings made in Lake Formation, go to the Lake Formation dashboard, and remove the data lake locales and the Lake Formation administrator.
Conclusion
Now that the solution is implemented, you have an automated anonymization dataflow. This solution demonstrates how you can build a solution using AWS serverless solutions where you only pay for what you use and without worrying about infrastructure provisioning. In addition, this solution is customizable to meet other data protection requirements such as General Data Protection Law (LGPD) in Brazil, General Data Protection Regulation in Europe (GDPR), and the Association of Banks in Singapore (ABS) Cloud Computing Implementation Guide.
We used Macie to identify the sensitive data stored in Amazon S3 and AWS Glue to generate Macie reports to anonymize the sensitive data found. Finally, we used Lake Formation to implement fine-grained data access control to specific information and demonstrated how you can programmatically grant access to applications that need to work with unmasked data.
Microsoft is reporting that a Russian intelligence agency—the same one responsible for SolarWinds—accessed the email system of the company’s executives.
Beginning in late November 2023, the threat actor used a password spray attack to compromise a legacy non-production test tenant account and gain a foothold, and then used the account’s permissions to access a very small percentage of Microsoft corporate email accounts, including members of our senior leadership team and employees in our cybersecurity, legal, and other functions, and exfiltrated some emails and attached documents. The investigation indicates they were initially targeting email accounts for information related to Midnight Blizzard itself.
This is nutty. How does a “legacy non-production test tenant account” have access to executive e-mails? And why no try-factor authentication?
The collective thoughts of the interwebz
Manage Consent
To provide the best experiences, we use technologies like cookies to store and/or access device information. Consenting to these technologies will allow us to process data such as browsing behavior or unique IDs on this site. Not consenting or withdrawing consent, may adversely affect certain features and functions.
Functional
Always active
The technical storage or access is strictly necessary for the legitimate purpose of enabling the use of a specific service explicitly requested by the subscriber or user, or for the sole purpose of carrying out the transmission of a communication over an electronic communications network.
Preferences
The technical storage or access is necessary for the legitimate purpose of storing preferences that are not requested by the subscriber or user.
Statistics
The technical storage or access that is used exclusively for statistical purposes.The technical storage or access that is used exclusively for anonymous statistical purposes. Without a subpoena, voluntary compliance on the part of your Internet Service Provider, or additional records from a third party, information stored or retrieved for this purpose alone cannot usually be used to identify you.
Marketing
The technical storage or access is required to create user profiles to send advertising, or to track the user on a website or across several websites for similar marketing purposes.