Tag Archives: news

Amazon Q brings generative AI-powered assistance to IT pros and developers (preview)

Post Syndicated from Donnie Prakoso original https://aws.amazon.com/blogs/aws/amazon-q-brings-generative-ai-powered-assistance-to-it-pros-and-developers-preview/

Today, we are announcing the preview of Amazon Q, a new type of generative artificial intelligence (AI) powered assistant that is specifically for work and can be tailored to a customer’s business.

Amazon Q brings a set of capabilities to support developers and IT professionals. Now you can use Amazon Q to get started building applications on AWS, research best practices, resolve errors, and get assistance in coding new features for your applications. For example, Amazon Q Code Transformation can perform Java application upgrades now, from version 8 and 11 to version 17.

Amazon Q is available in multiple areas of AWS to provide quick access to answers and ideas wherever you work. Here’s a quick look at Amazon Q, including in integrated development environment (IDE):

Building applications together with Amazon Q
Application development is a journey. It involves a continuous cycle of researching, developing, deploying, optimizing, and maintaining. At each stage, there are many questions—from figuring out the right AWS services to use, to troubleshooting issues in the application code.

Trained on 17 years of AWS knowledge and best practices, Amazon Q is designed to help you at each stage of development with a new experience for building applications on AWS. With Amazon Q, you minimize the time and effort you need to gain the knowledge required to answer AWS questions, explore new AWS capabilities, learn unfamiliar technologies, and architect solutions that fuel innovation.

Let us show you some capabilities of Amazon Q.

1. Conversational Q&A capability
You can interact with the Amazon Q conversational Q&A capability to get started, learn new things, research best practices, and iterate on how to build applications on AWS without needing to shift focus away from the AWS console.

To start using this feature, you can select the Amazon Q icon on the right-hand side of the AWS Management Console.

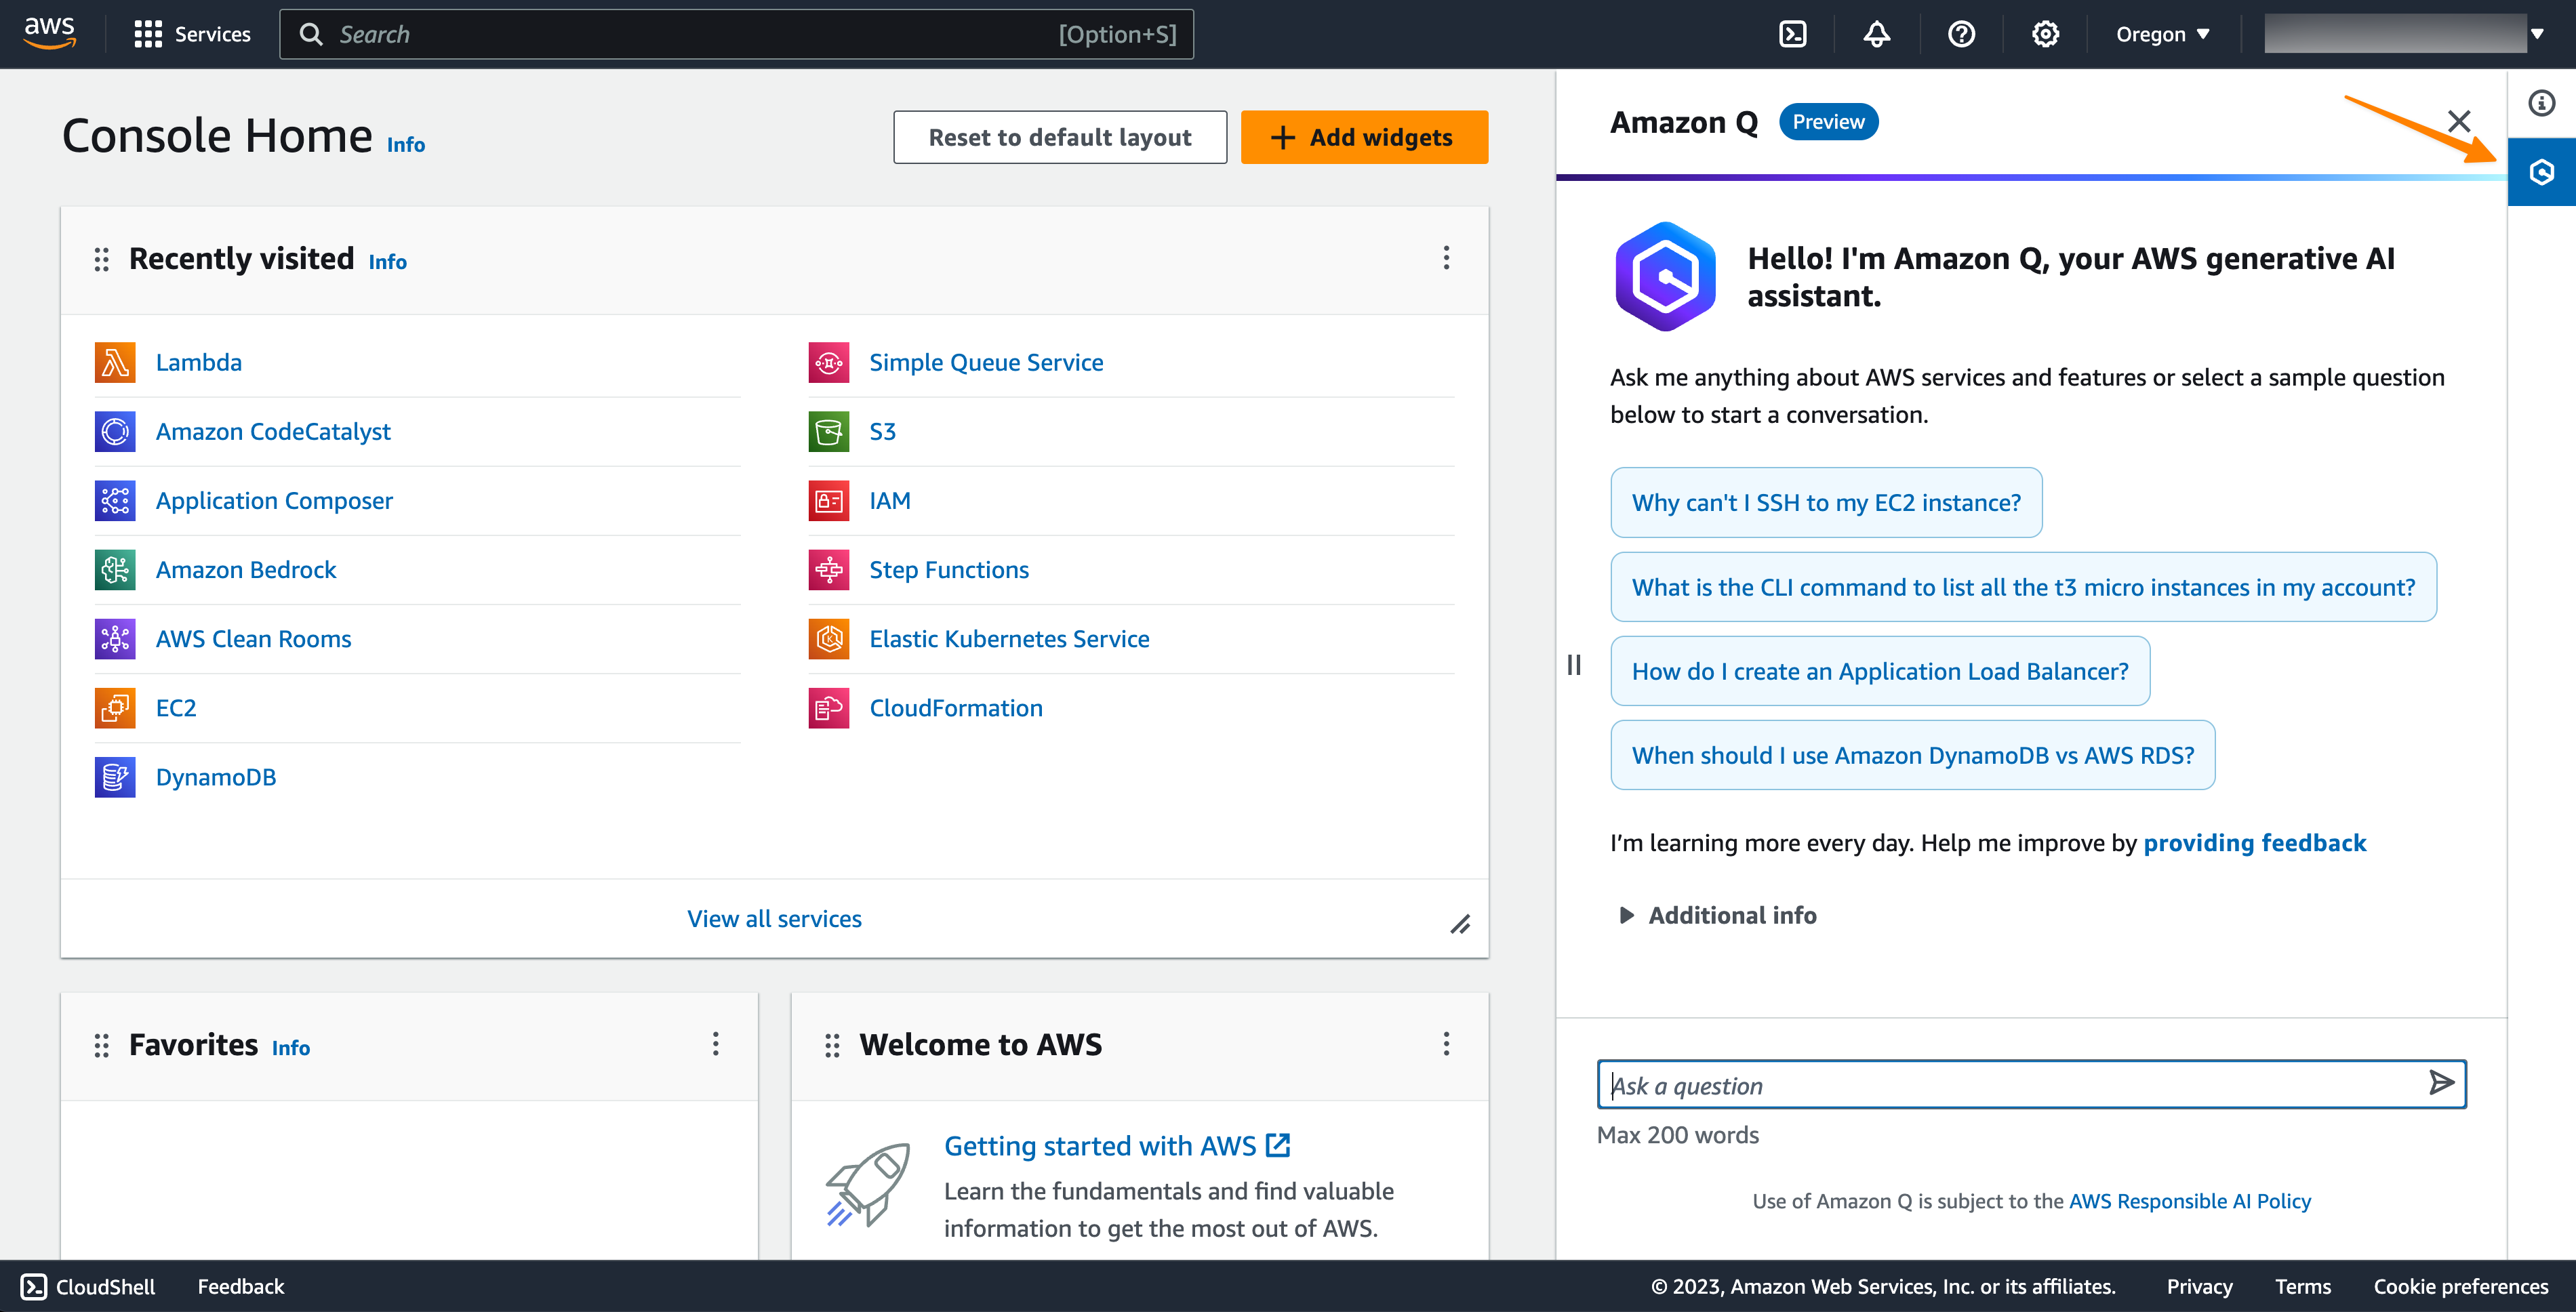
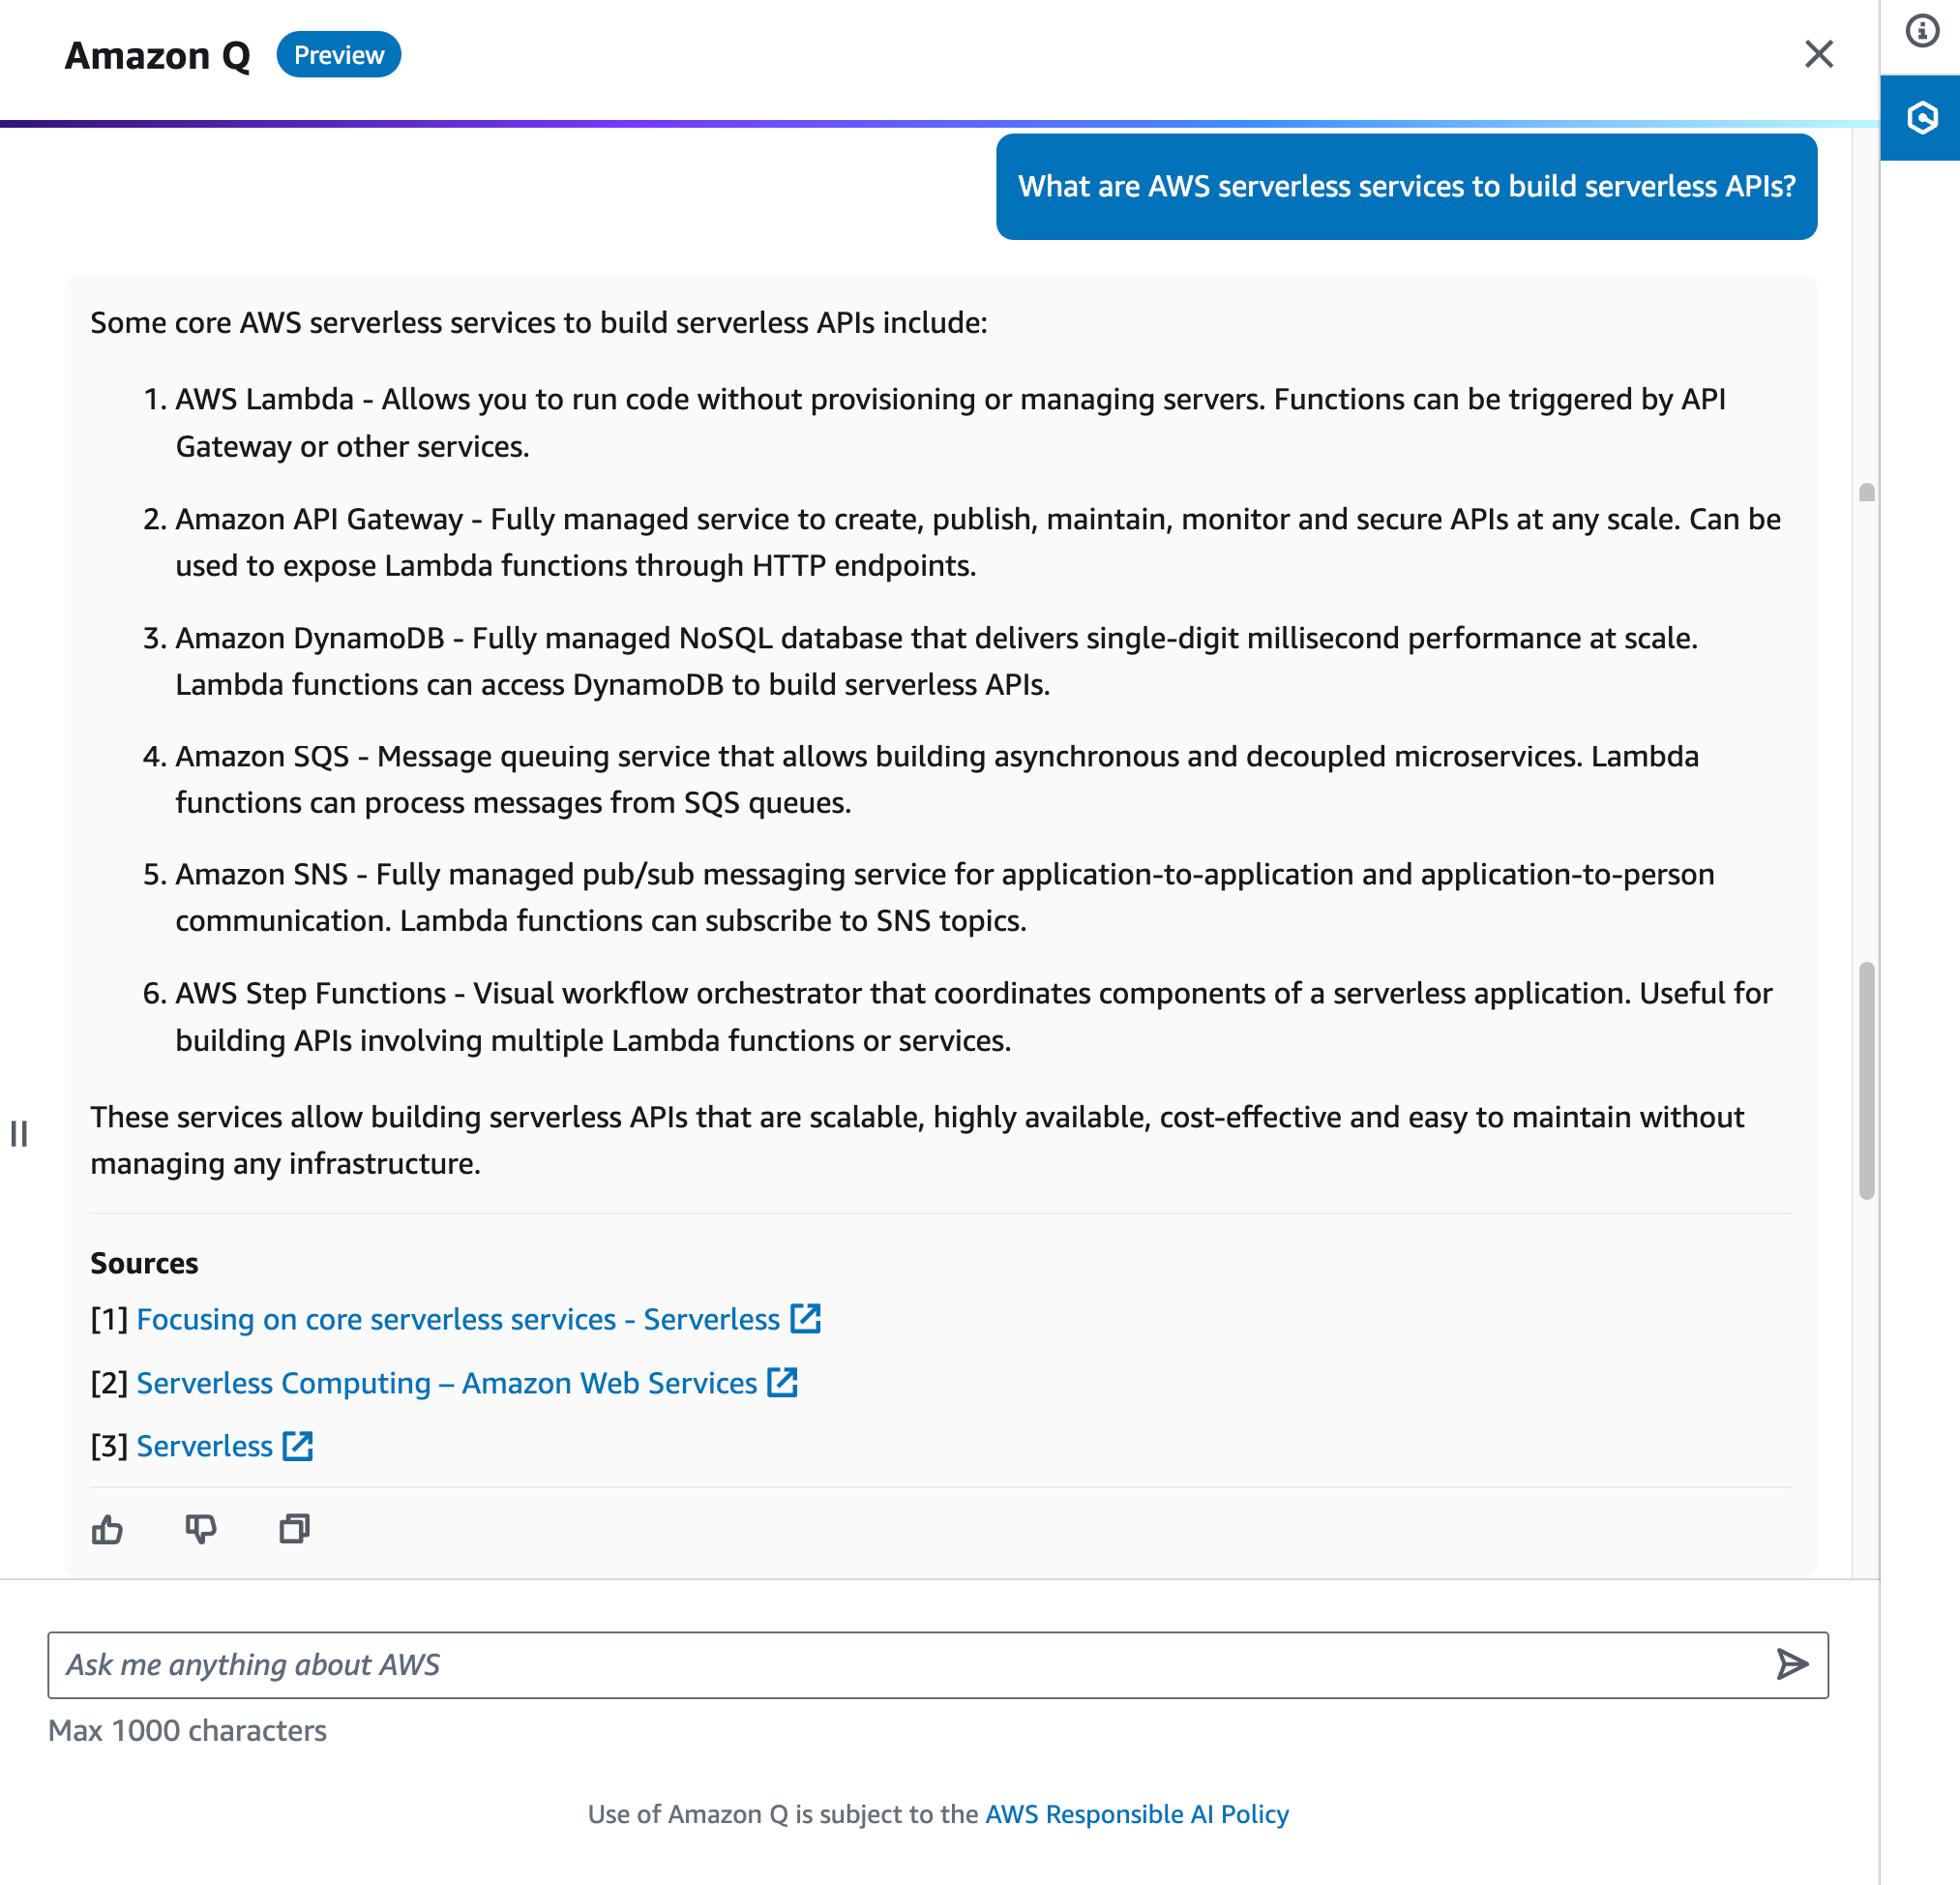
For example, you can ask, “What are AWS serverless services to build serverless APIs?” Amazon Q provides concise explanations along with references you can use to follow up on your questions and validate the guidance. You can also use Amazon Q to follow up on and iterate your questions. Amazon Q will show more deep-dive answers for you with references.

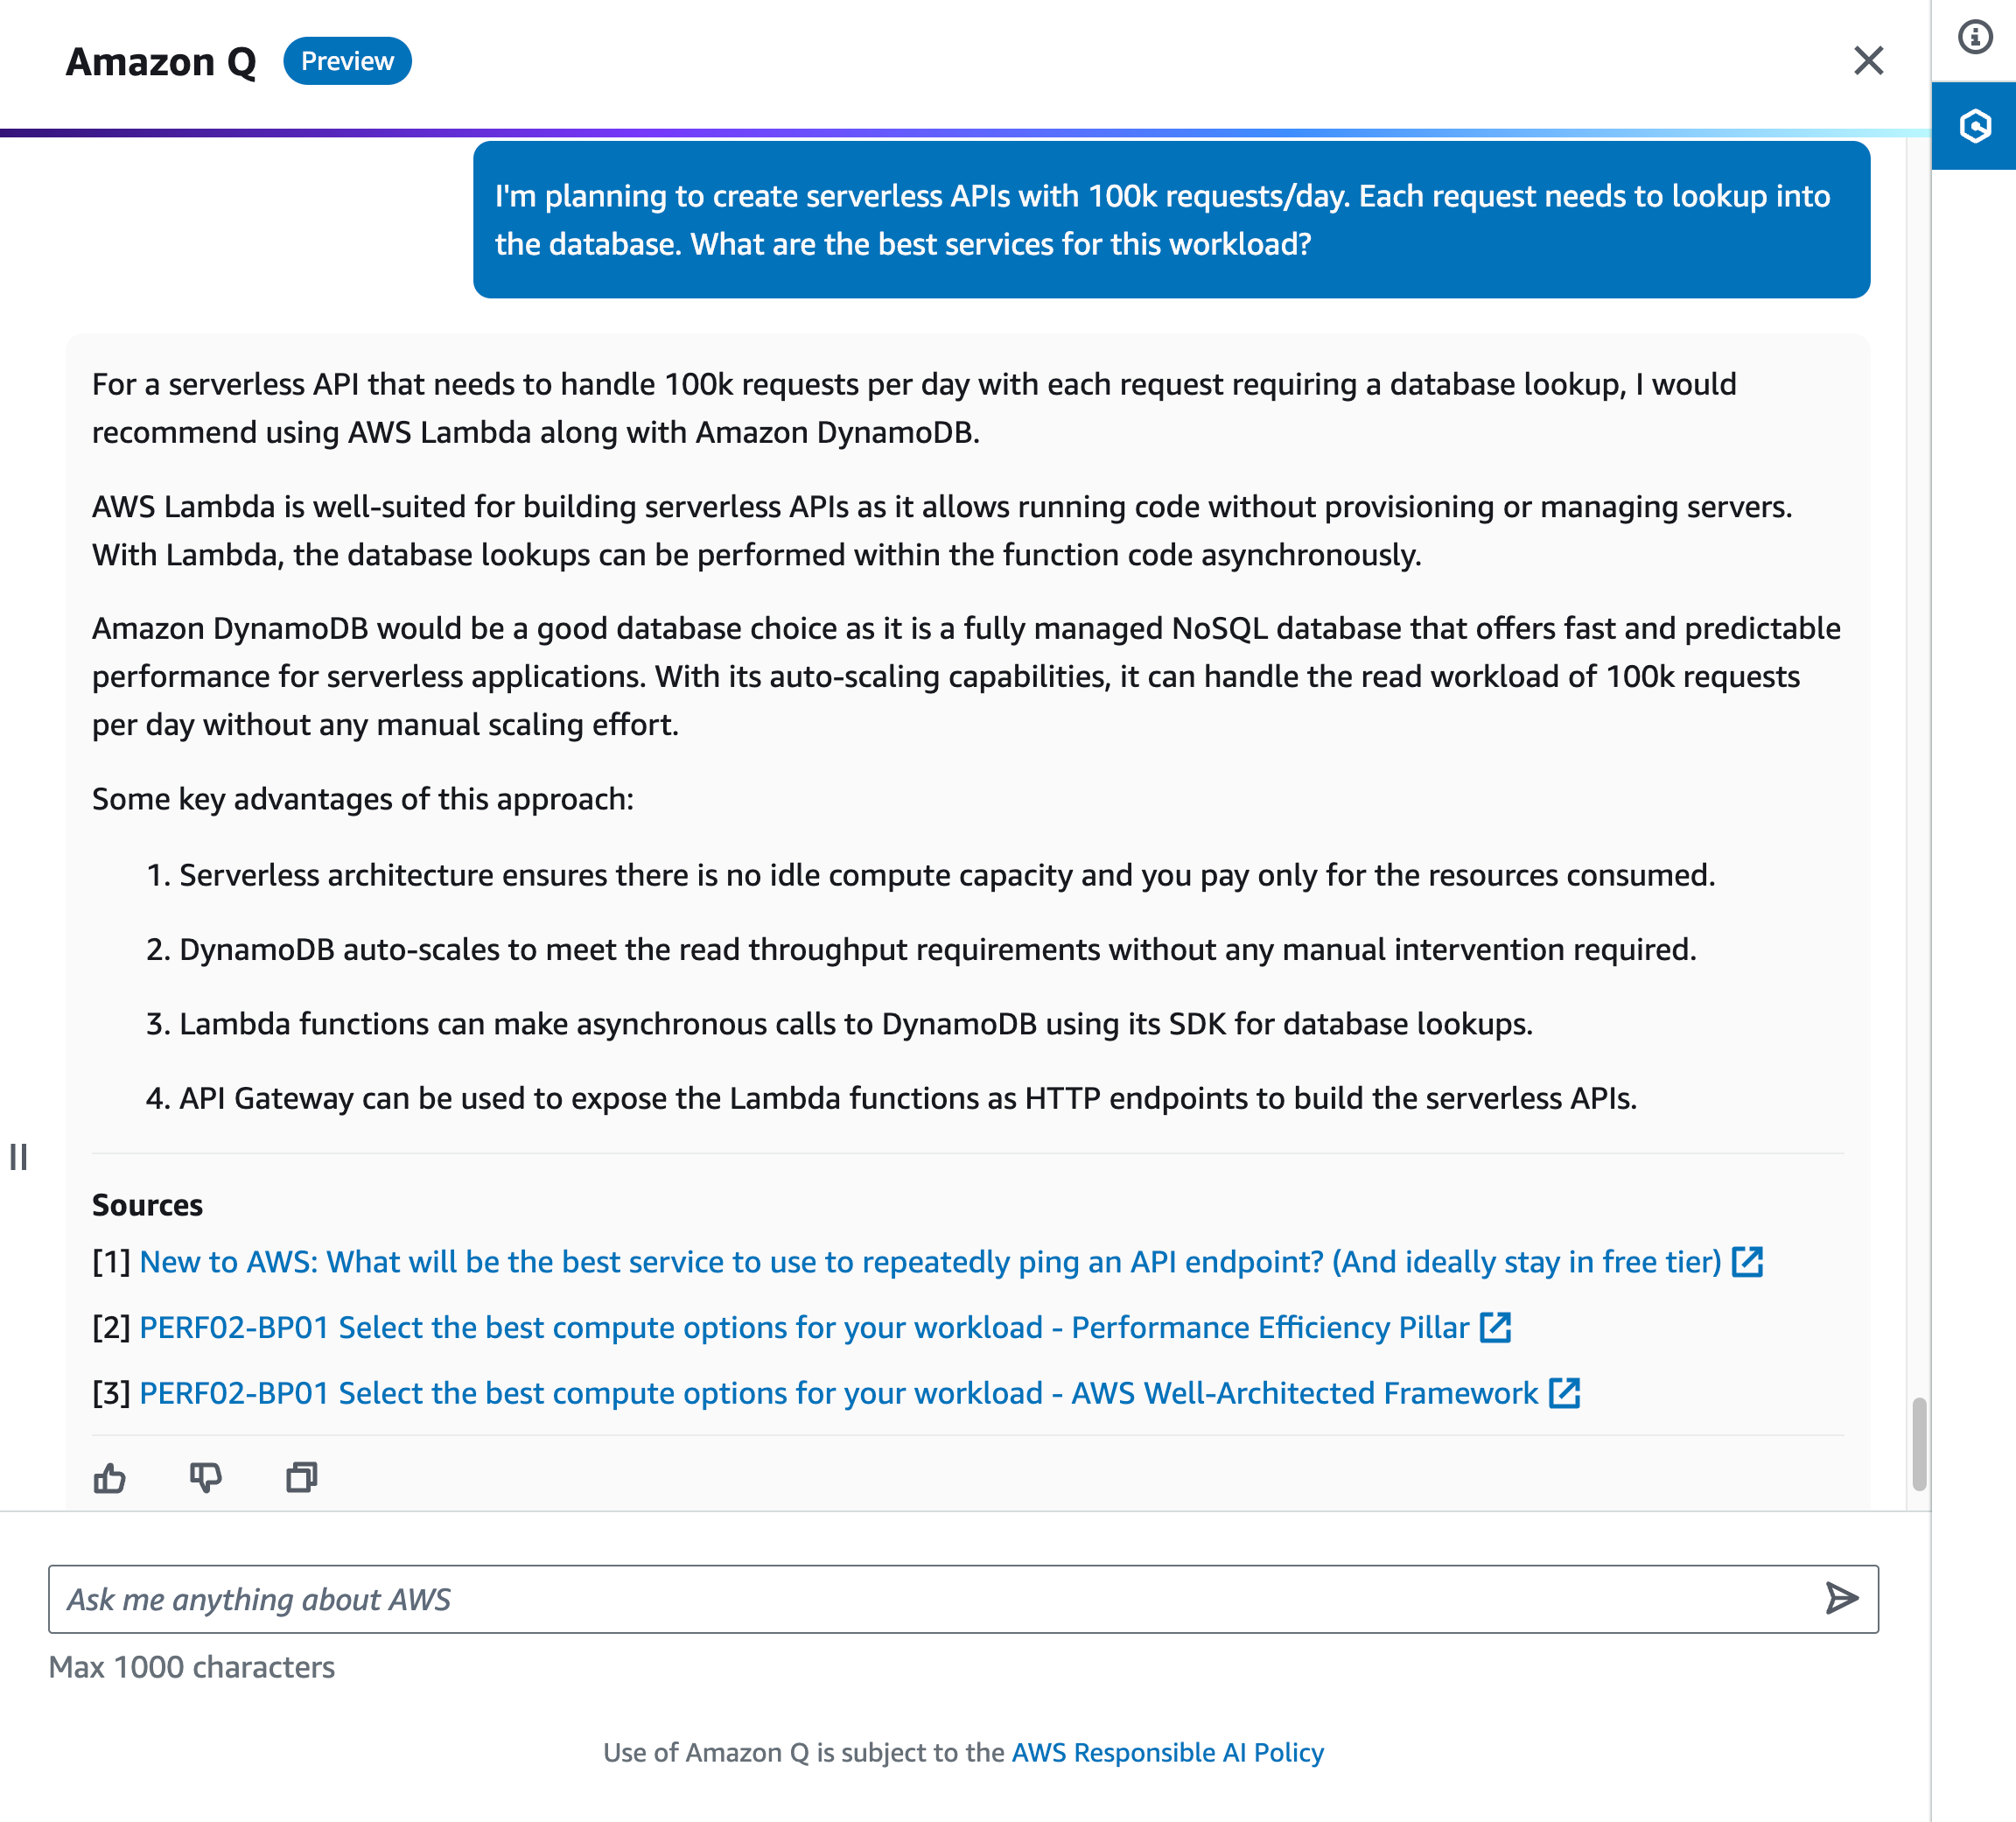
There are times when we have questions for a use case with fairly specific requirements. With Amazon Q, you can elaborate on your use cases in more detail to provide context.

For example, you can ask Amazon Q, “I’m planning to create serverless APIs with 100k requests/day. Each request needs to lookup into the database. What are the best services for this workload?” Amazon Q responds with a list of AWS services you can use and tries to limit the answer results to those that are accurately referenceable and verified with best practices.

Here is some additional information that you might want to note:

2. Optimize Amazon EC2 instance selection
Choosing the right Amazon Elastic Compute Cloud (Amazon EC2) instance type for your workload can be challenging with all the options available. Amazon Q aims to make this easier by providing personalized recommendations.

To use this feature, you can ask Amazon Q, “Which instance families should I use to deploy a Web App Server for hosting an application?” This feature is also available when you choose to launch an instance in the Amazon EC2 console. In Instance type, you can select Get advice on instance type selection. This will show a dialog to define your requirements.

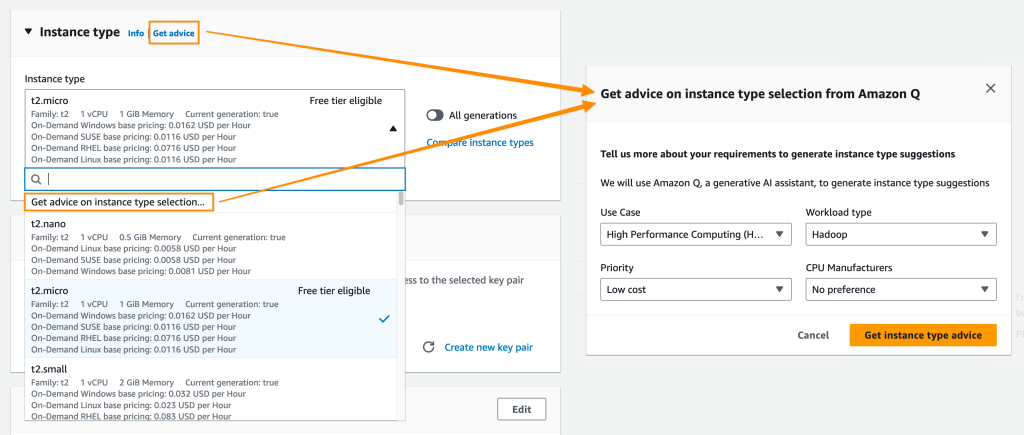
Your requirements are automatically translated into a prompt on the Amazon Q chat panel. Amazon Q returns with a list of suggestions of EC2 instances that are suitable for your use cases. This capability helps you pick the right instance type and settings so your workloads will run smoothly and more cost-efficiently.

This capability to provide EC2 instance type recommendations based on your use case is available in preview in all commercial AWS Regions.

3. Troubleshoot and solve errors directly in the console
Amazon Q can also help you to solve errors for various AWS services directly in the console. With Amazon Q proposed solutions, you can avoid slow manual log checks or research.

Let’s say that you have an AWS Lambda function that tries to interact with an Amazon DynamoDB table. But, for an unknown reason (yet), it fails to run. Now, with Amazon Q, you can troubleshoot and resolve this issue faster by selecting Troubleshoot with Amazon Q.

Amazon Q provides concise analysis of the error which helps you to understand the root cause of the problem and the proposed resolution. With this information, you can follow the steps described by Amazon Q to fix the issue.

In just a few minutes, you will have the solution to solve your issues, saving significant time without disrupting your development workflow. The Amazon Q capability to help you troubleshoot errors in the console is available in preview in the US West (Oregon) for Amazon Elastic Compute Cloud (Amazon EC2), Amazon Simple Storage Service (Amazon S3), Amazon ECS, and AWS Lambda.

4. Network troubleshooting assistance
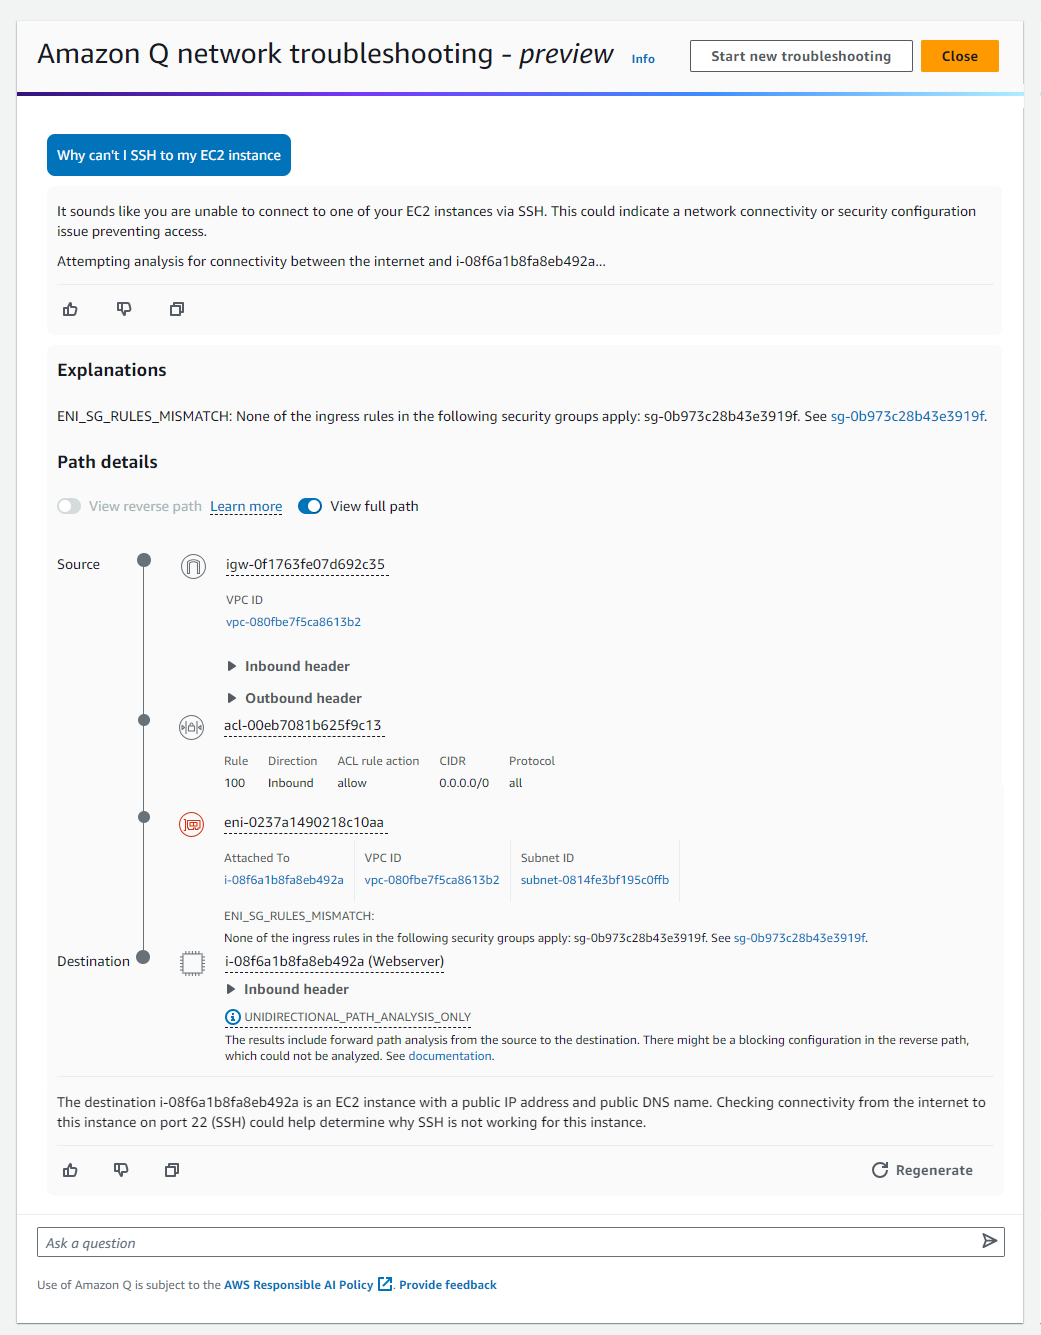
You can also ask Amazon Q to assist you in troubleshooting network connectivity issues caused by network misconfiguration in your current AWS account. For this capability, Amazon Q works with Amazon VPC Reachability Analyzer to check your connections and inspect your network configuration to identify potential issues.

This makes it easy to diagnose and resolve AWS networking problems, such as “Why can’t I SSH to my EC2 instance?” or “Why can’t I reach my web server from the Internet?” which you can ask Amazon Q.

Then, on the response text, you can select preview experience here, which will provide explanations to help you to troubleshoot network connectivity-related issues.

Here are a few things you need to know:

5. Integration and conversational capabilities within your IDEs
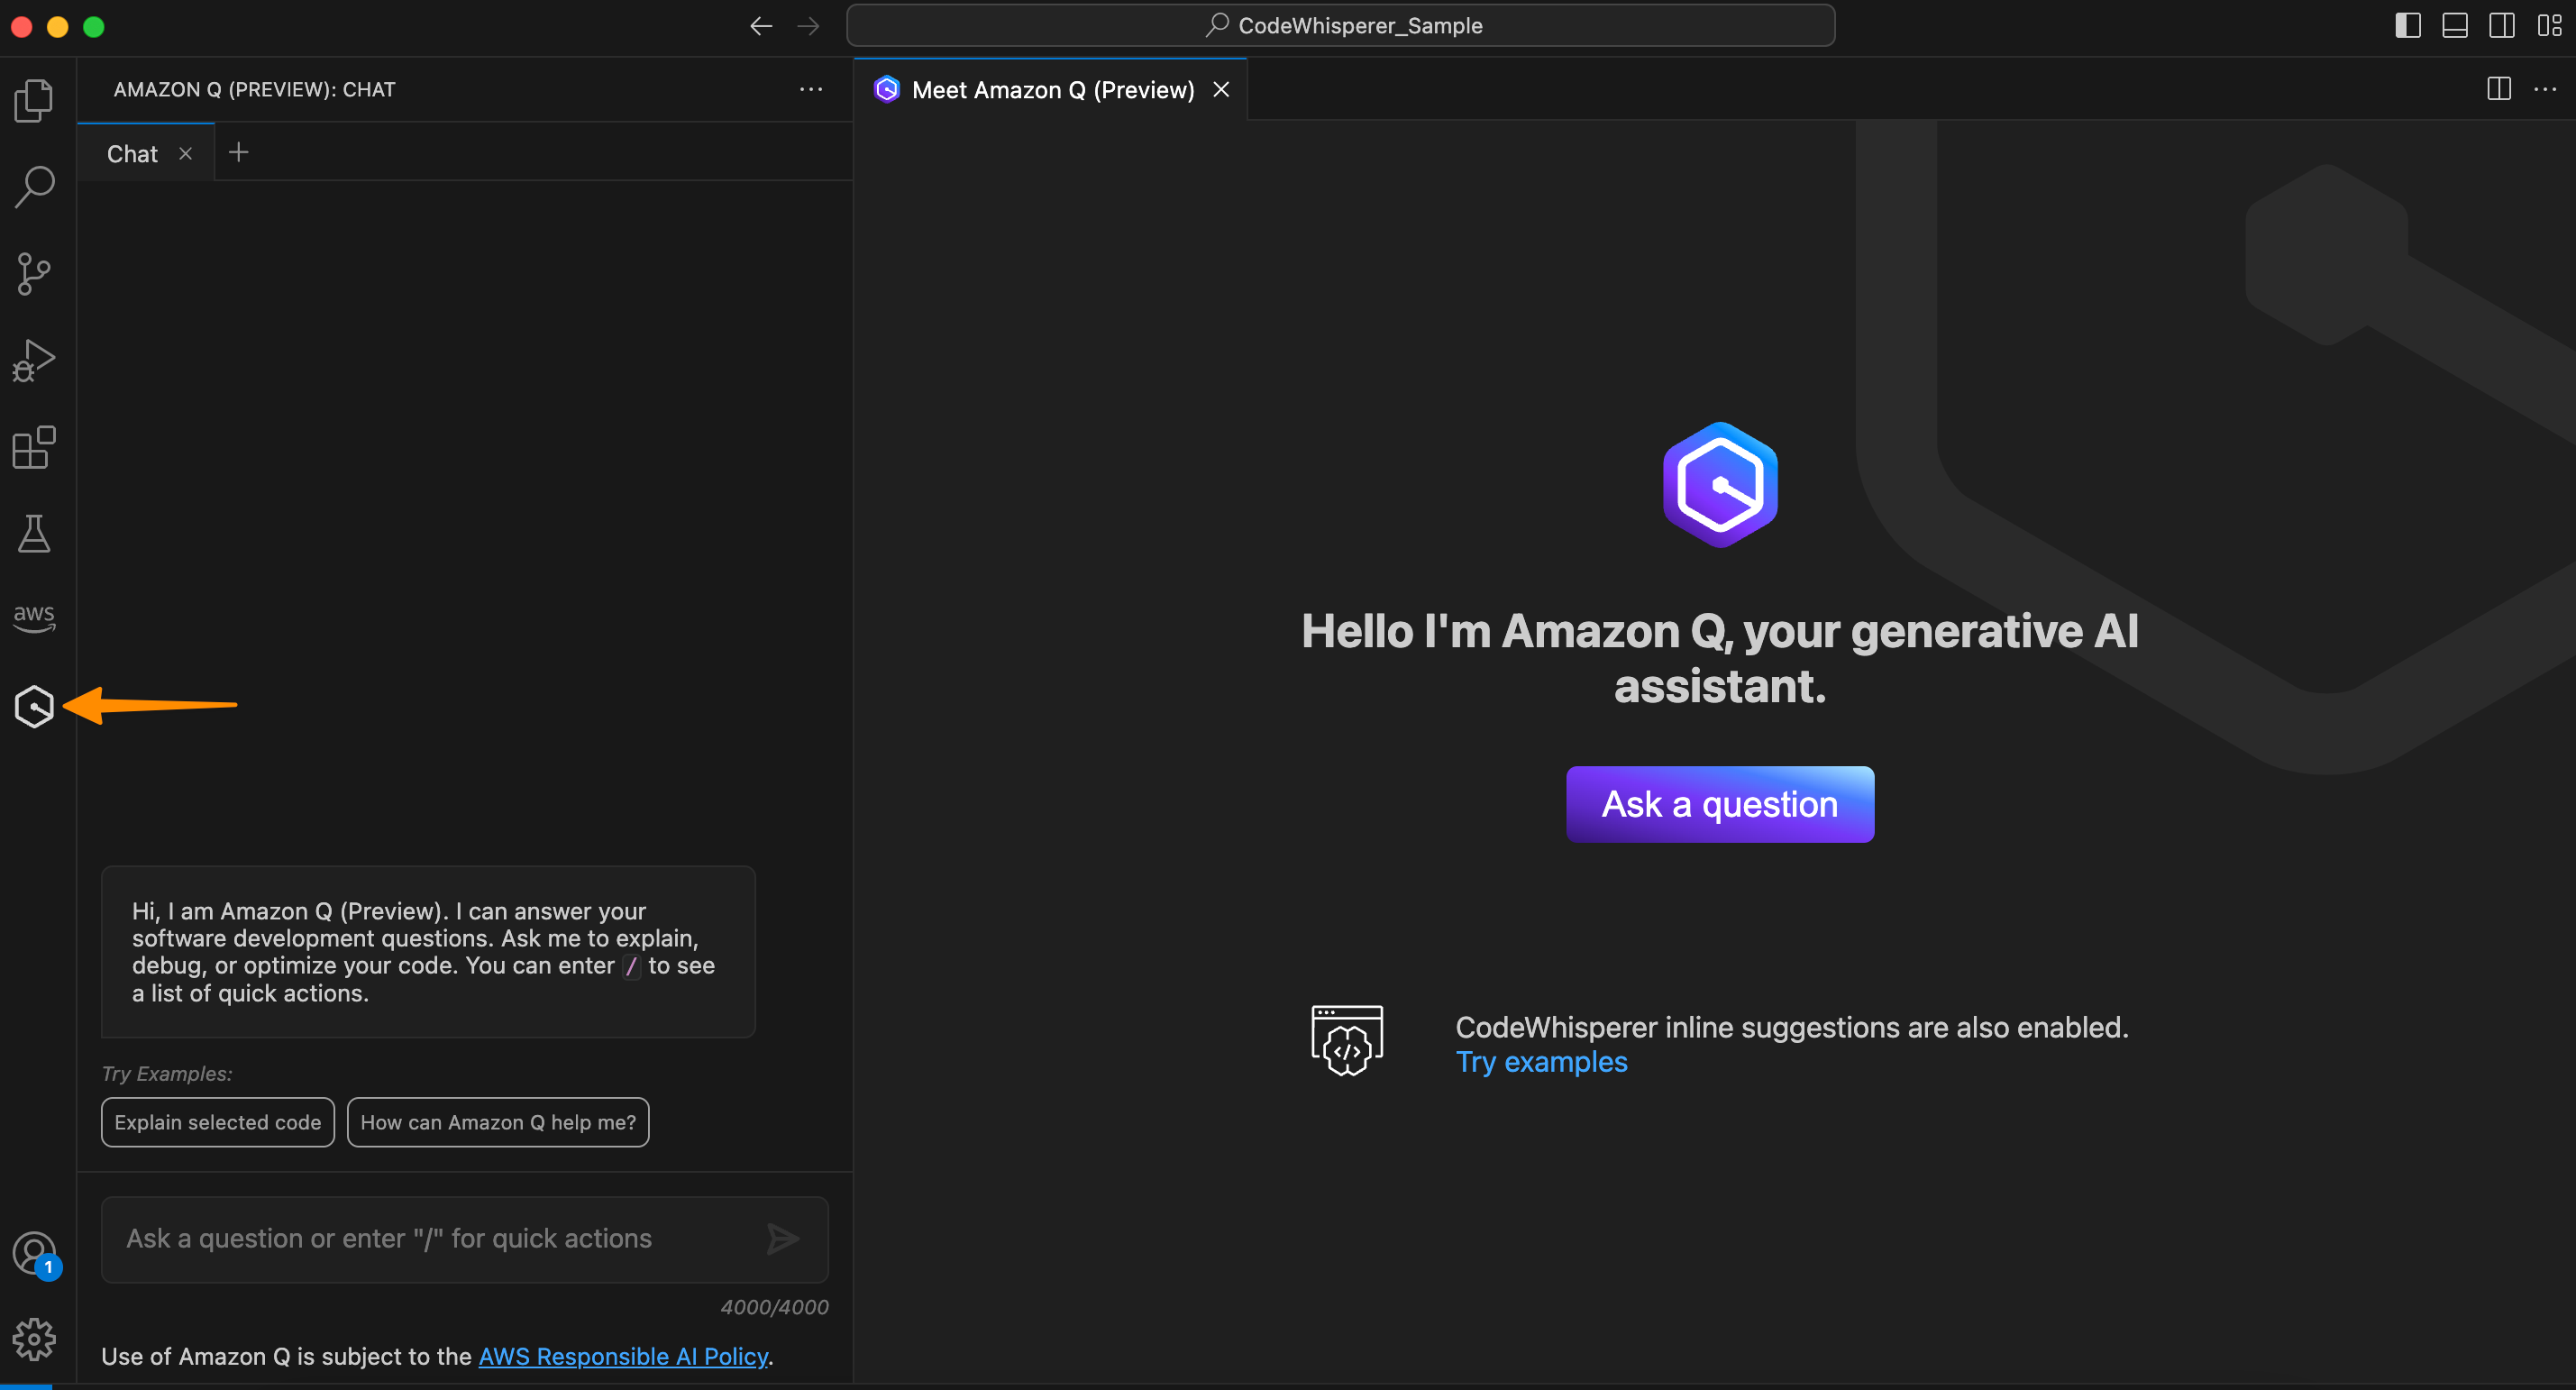
As we mentioned, Amazon Q is also available in supported IDEs. This allows you to ask questions and get help within your IDE by chatting with Amazon Q or invoking actions by typing / in the chat box.

To get started, you need to install or update the latest AWS Toolkit and sign in to Amazon CodeWhisperer. Once you’re signed in to Amazon CodeWhisperer, it will automatically activate the Amazon Q conversational capability in the IDE. With Amazon Q enabled, you can now start chatting to get coding assistance.

You can ask Amazon Q to describe your source code file.

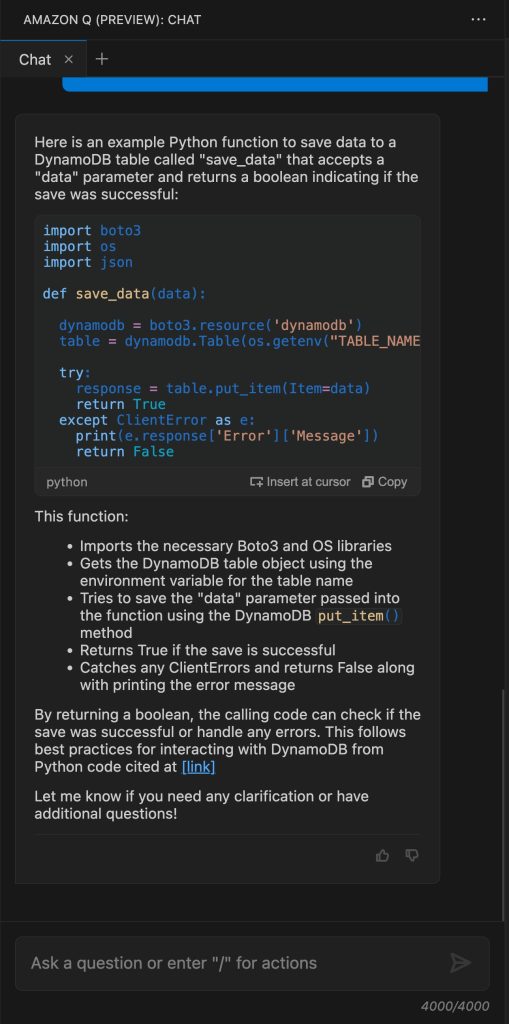
From here, you can improve your application, for example, by integrating it with Amazon DynamoDB. You can ask Amazon Q, “Generate code to save data into DynamoDB table called save_data() accepting data parameter and return boolean status if the operation successfully runs.”

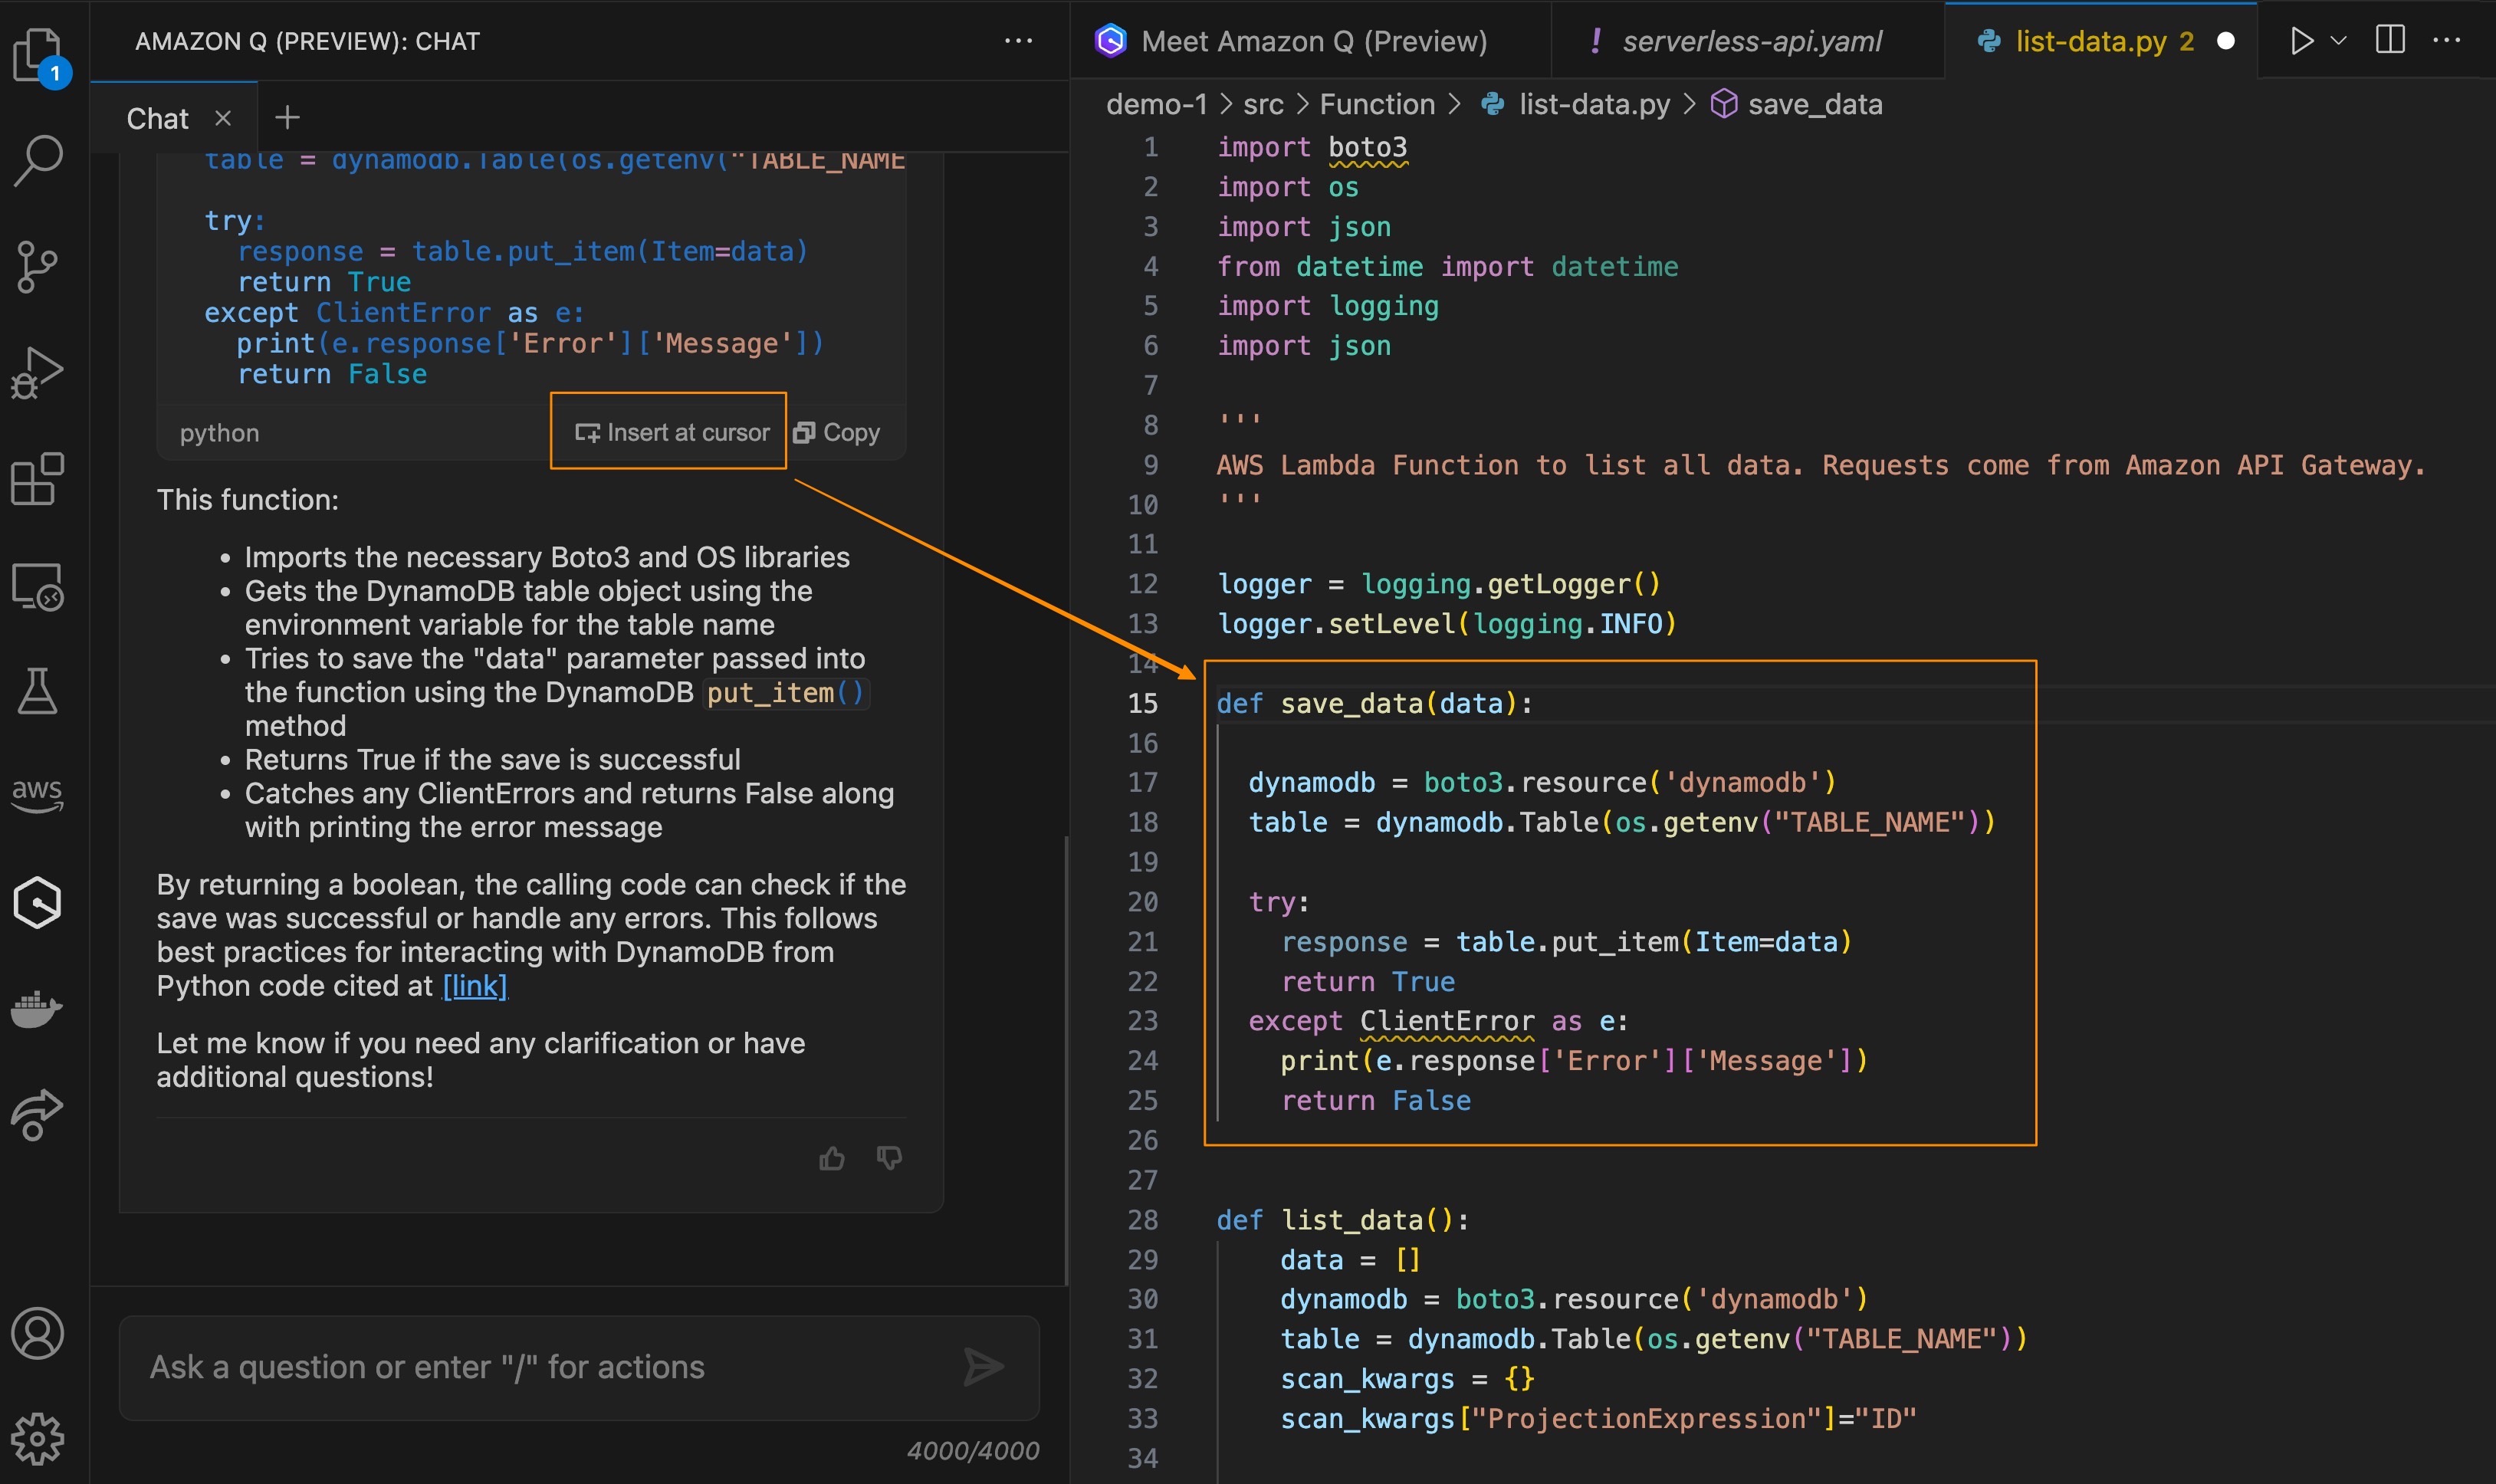
Once you’ve reviewed the generated code, you can do a manual copy and paste into the editor. You can also select Insert at cursor to place the generated code into the source code directly.

This feature makes it really easy to help you focus on building applications because you don’t have to leave your IDE to get answers and context-specific coding guidance. You can try the preview of this feature in Visual Studio Code and JetBrains IDEs.

6. Feature development capability
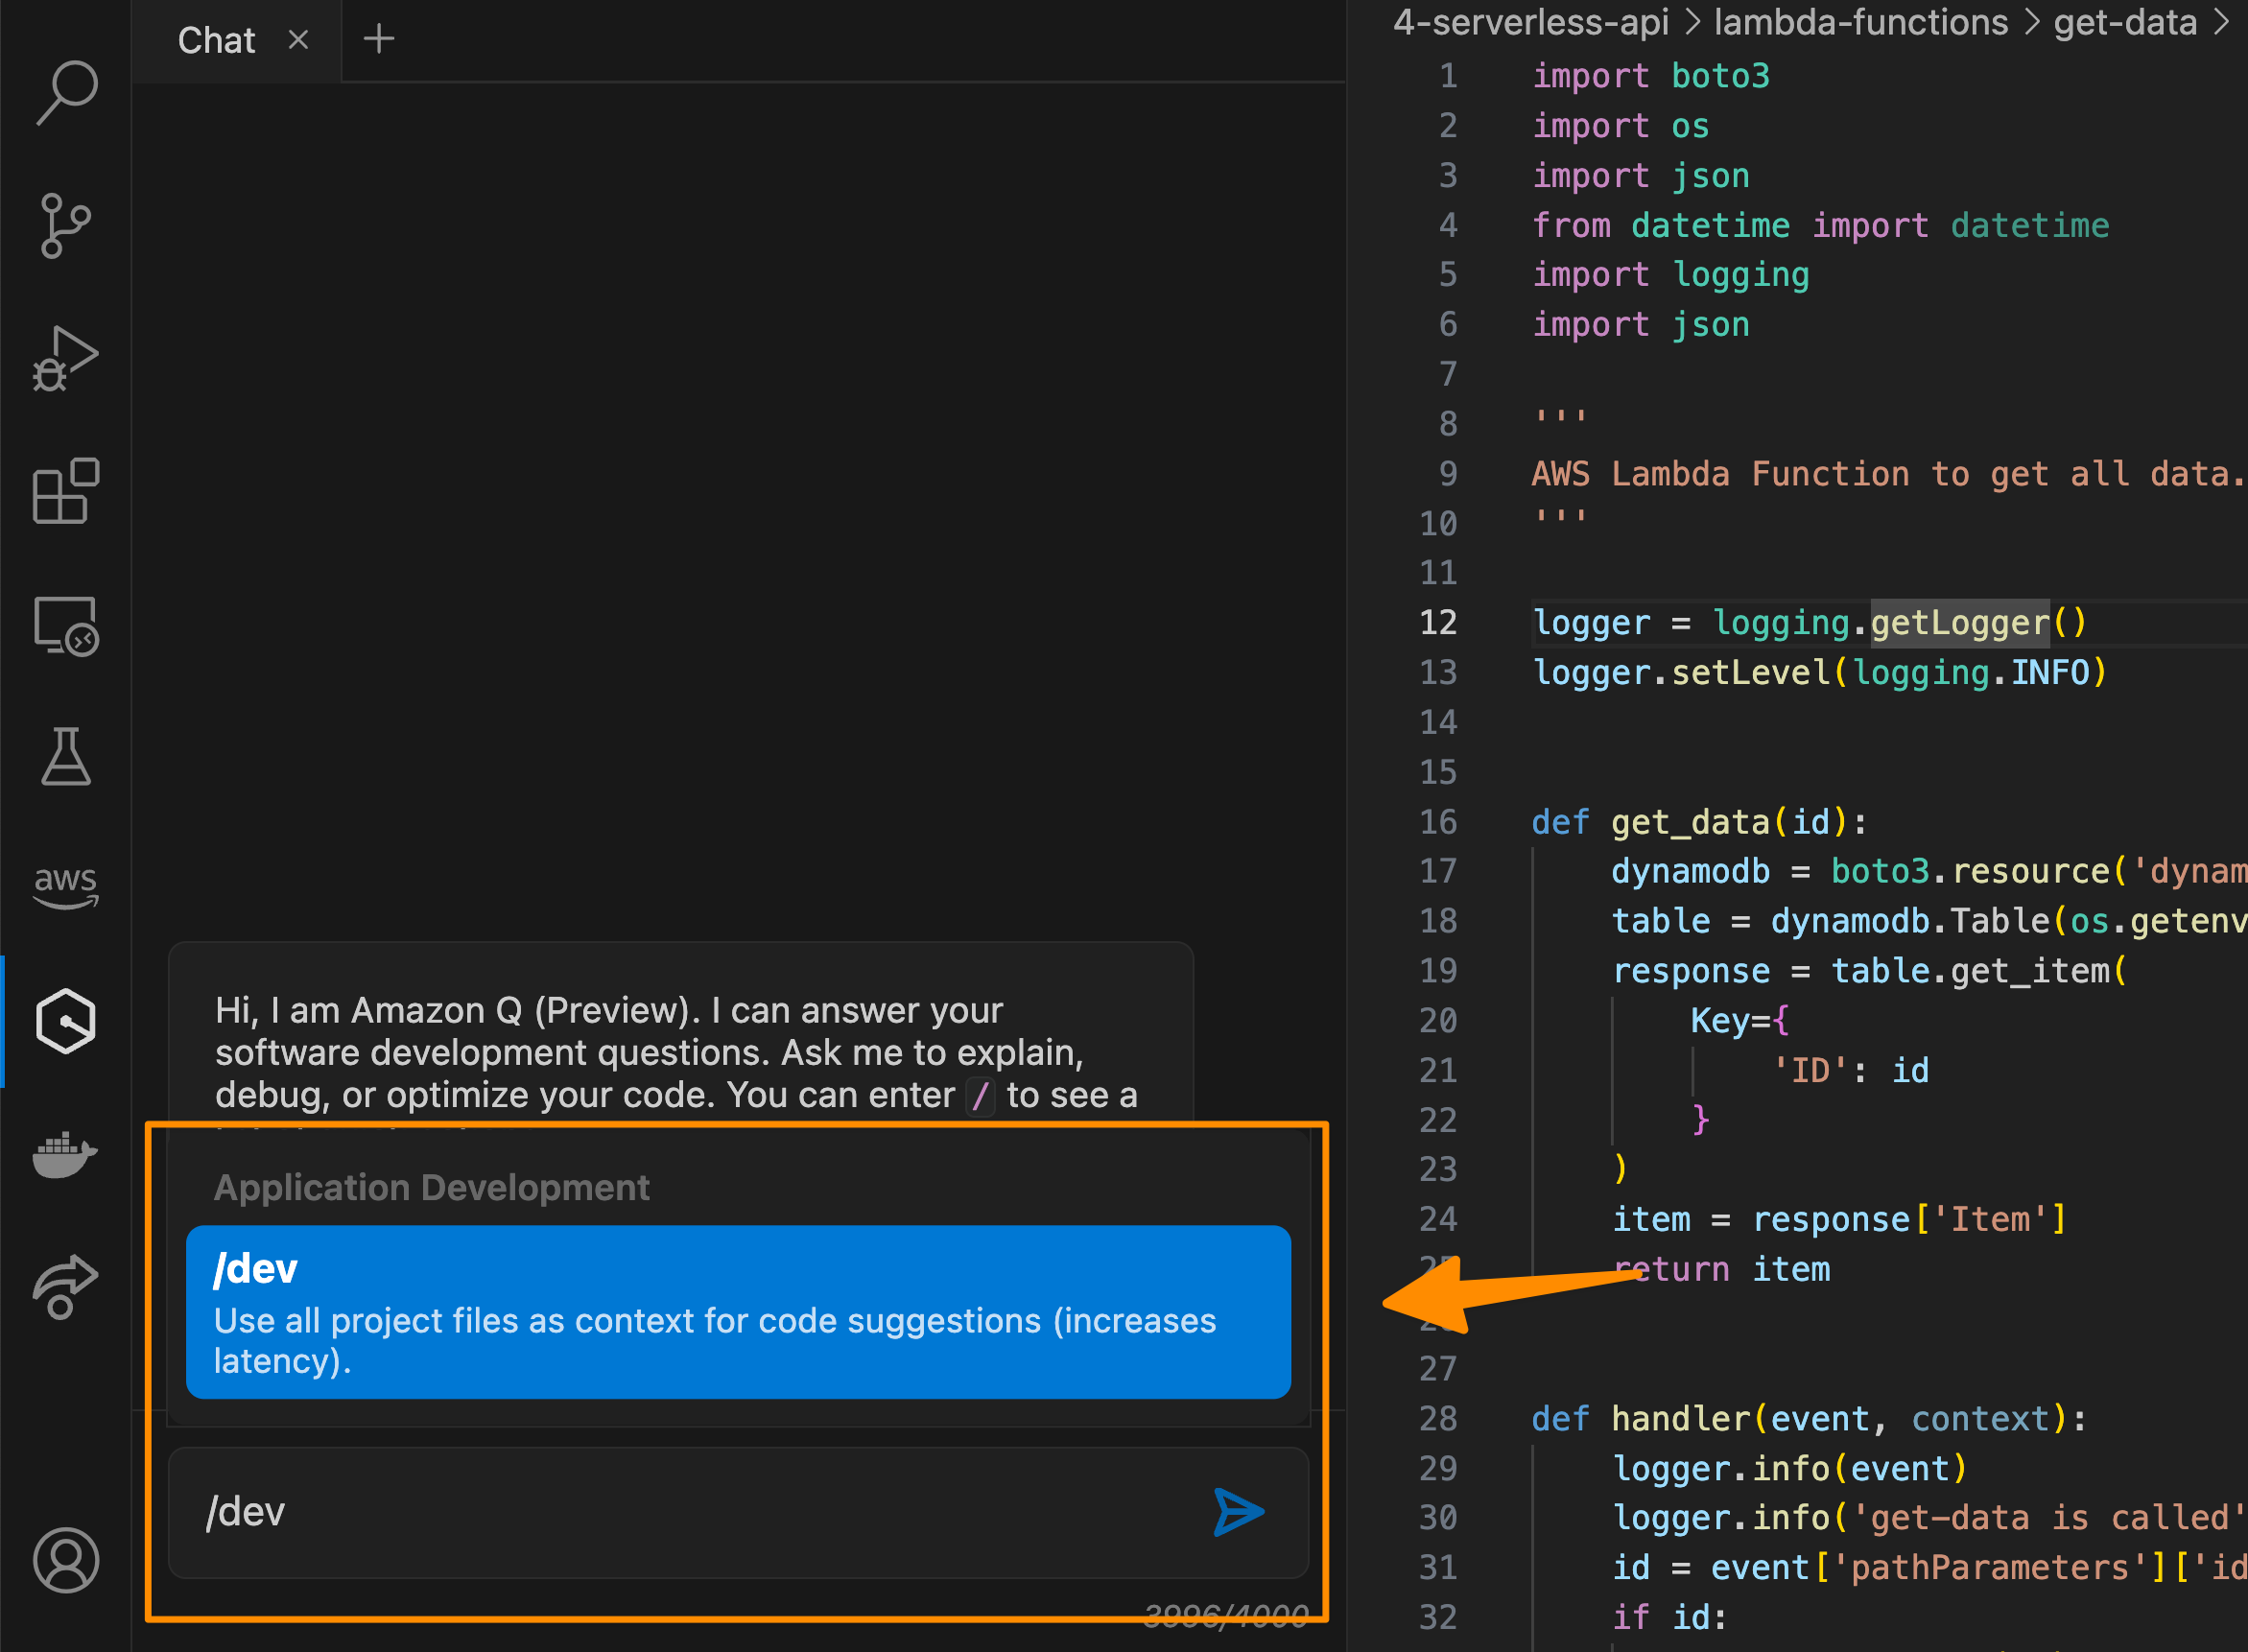
Another exciting feature that Amazon Q provides is guiding you interactively from idea to building new features within your IDE and Amazon CodeCatalyst. You can go from a natural language prompt to application features in minutes, with interactive step-by-step instructions and best practices, right from your IDE. With a prompt, Amazon Q will attempt to understand your application structure and break down your prompt into logical, atomic implementation steps.

To use this capability, you can start by invoking an action command /dev in Amazon Q and describe the task you need Amazon Q to process.

Then, from here, you can review, collaborate and guide Amazon Q in the chat for specific areas that need to be implemented.

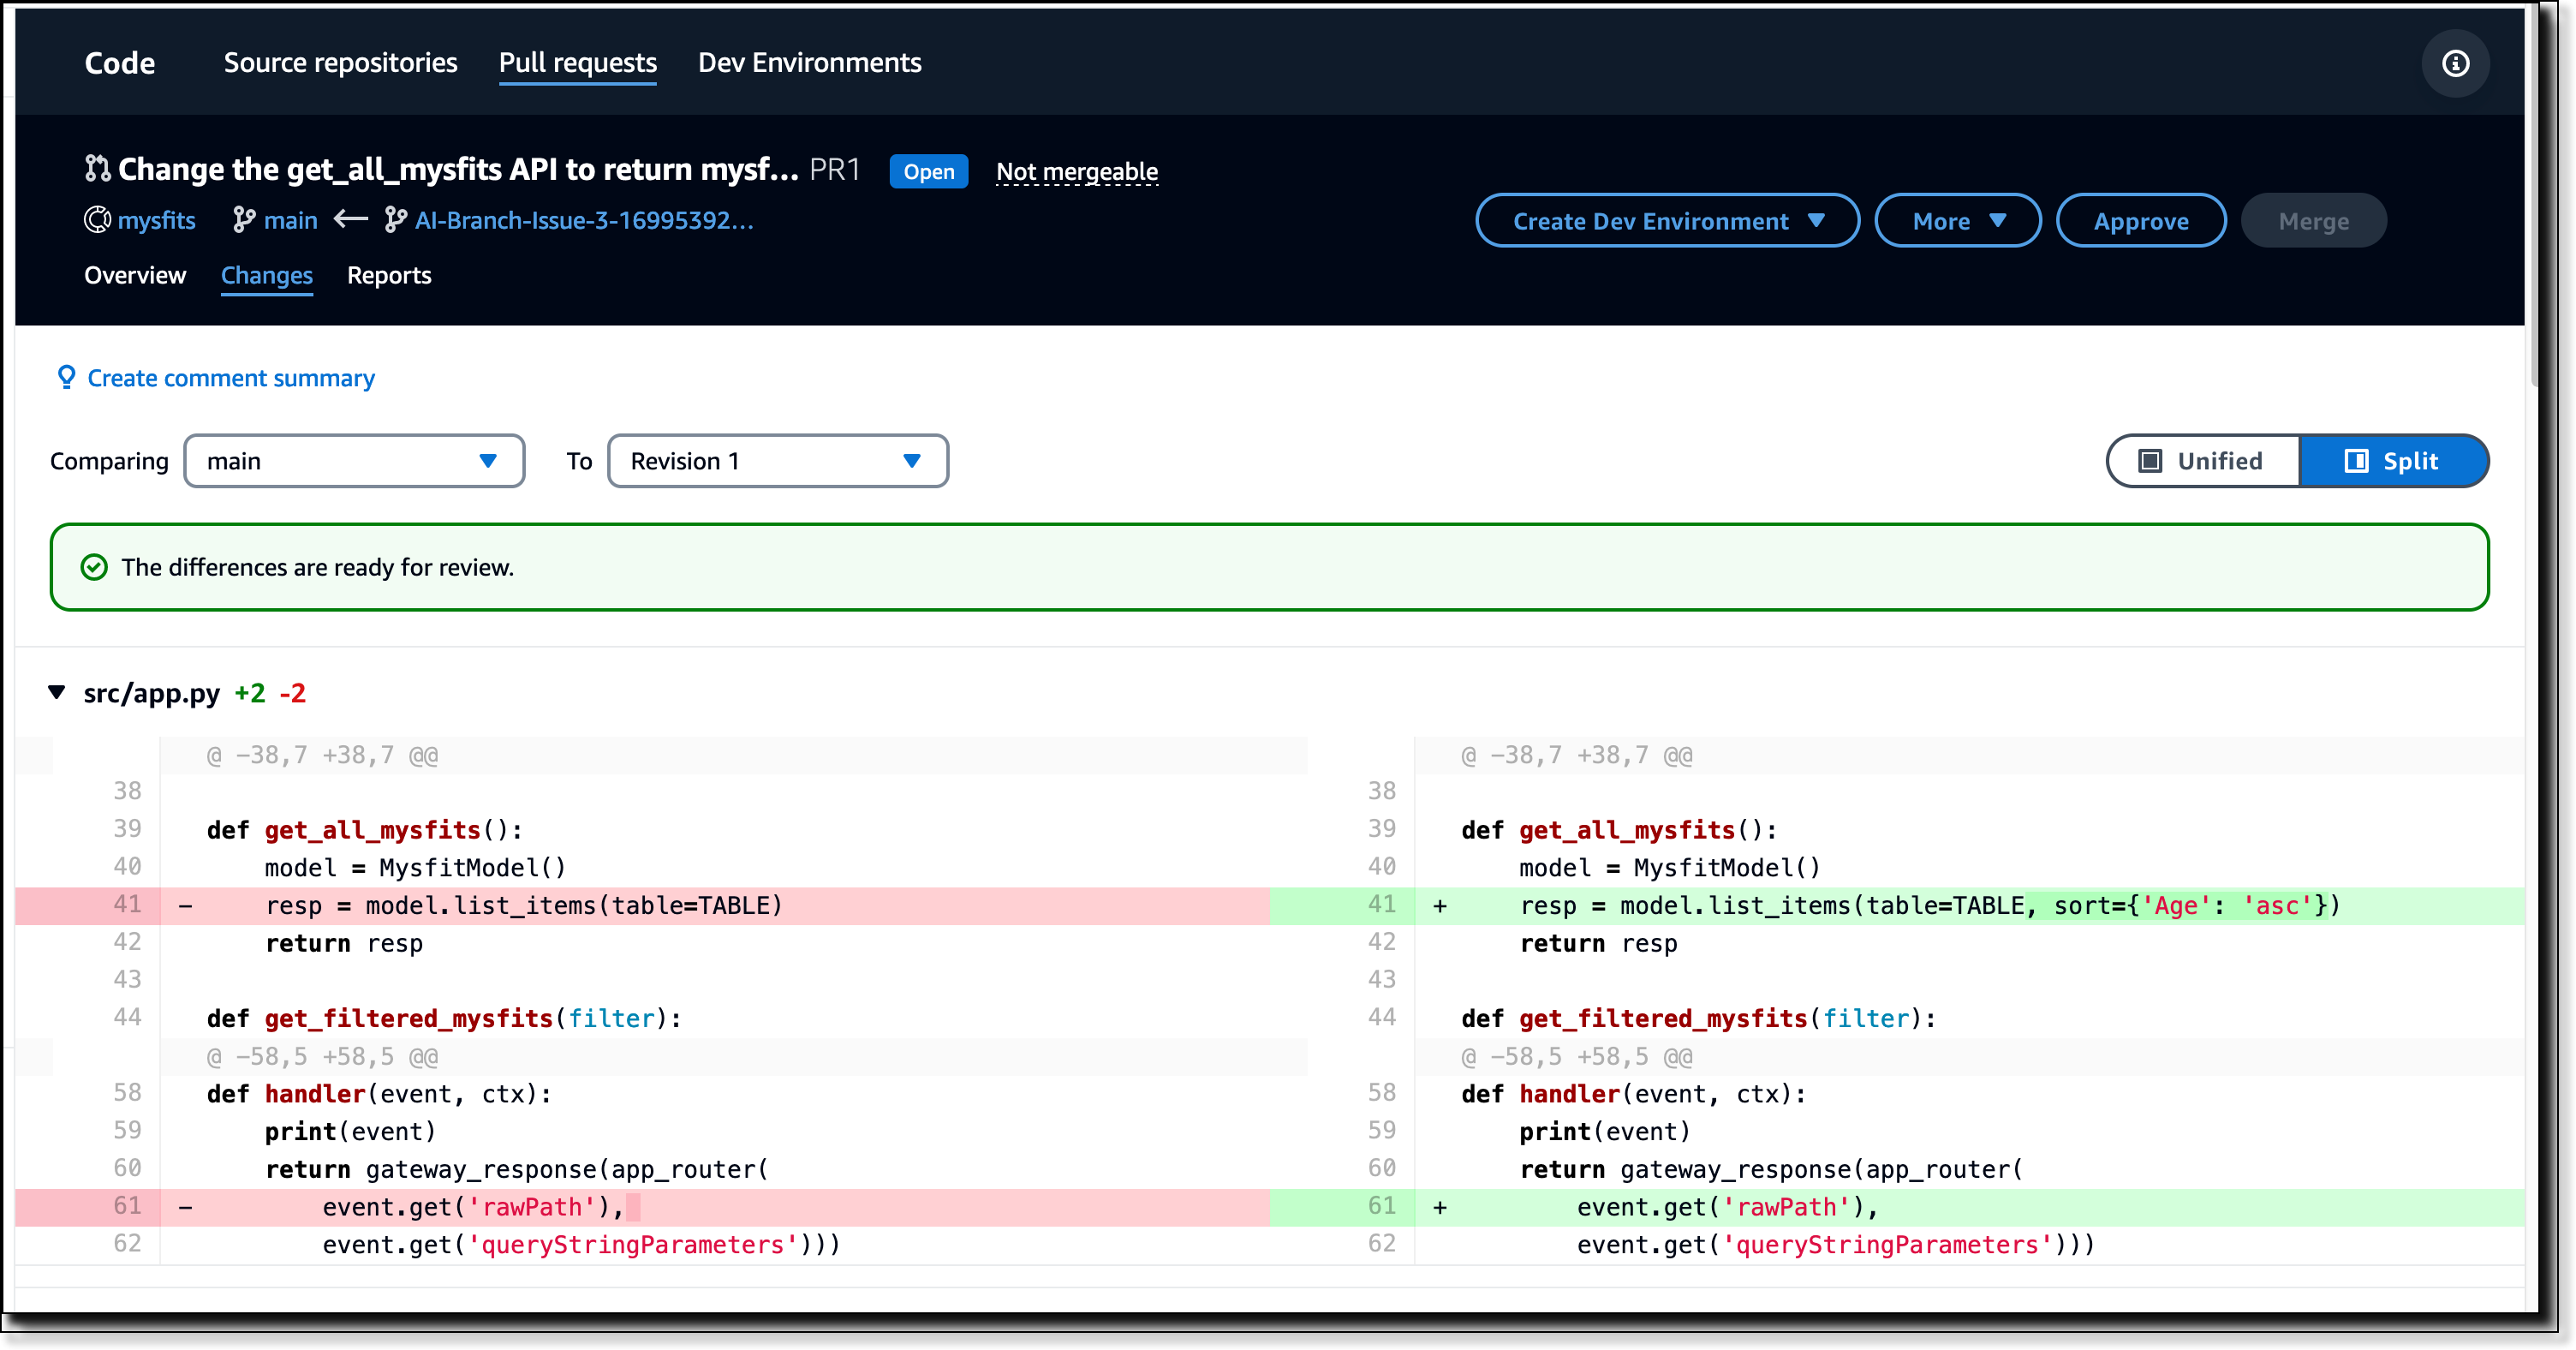
Additional capabilities to help you ship features faster with complete pull requests are available if you’re using Amazon CodeCatalyst. In Amazon CodeCatalyst, you can assign a new or an existing issue to Amazon Q, and it will process an end-to-end development workflow for you. Amazon Q will review the existing code, propose a solution approach, seek feedback from you on the approach, generate merge-ready code, and publish a pull request for review. All you need to do after is to review the proposed solutions from Amazon Q.

The following screenshots show a pull request created by Amazon Q in Amazon CodeCatalyst.

Here are a couple of things that you should know:

  • Amazon Q feature development capability is currently in preview in Visual Studio Code and Amazon CodeCatalyst
  • To use this capability in IDE, you need to have the Amazon CodeWhisperer Professional tier. Learn more on the Amazon CodeWhisperer pricing page.

7. Upgrade applications with Amazon Q Code Transformation
With Amazon Q, you can now upgrade an entire application within a few hours by starting a guided code transformation. This capability, called Amazon Q Code Transformation, simplifies maintaining, migrating, and upgrading your existing applications.

To start, navigate to the CodeWhisperer section and then select Transform. Amazon Q Code Transformation automatically analyzes your existing codebase, generates a transformation plan, and completes the key transformation tasks suggested by the plan.

Some additional information about this feature:

  • Amazon Q Code Transformation is available in preview today in the AWS Toolkit for IntelliJ IDEA and the AWS Toolkit for Visual Studio Code.
  • To use this capability, you need to have the Amazon CodeWhisperer Professional tier during the preview.
  • During preview, you can can upgrade Java 8 and 11 applications to version 17, a Java Long-Term Support (LTS) release.

Get started with Amazon Q today
With Amazon Q, you have an AI expert by your side to answer questions, write code faster, troubleshoot issues, optimize workloads, and even help you code new features. These capabilities simplify every phase of building applications on AWS.

Amazon Q lets you engage with AWS Support agents directly from the Q interface if additional assistance is required, eliminating any dead ends in the customer’s self-service experience. The integration with AWS Support is available in the console and will honor the entitlements of your AWS Support plan.

Learn more

— Donnie & Channy

Guardrails for Amazon Bedrock helps implement safeguards customized to your use cases and responsible AI policies (preview)

Post Syndicated from Antje Barth original https://aws.amazon.com/blogs/aws/guardrails-for-amazon-bedrock-helps-implement-safeguards-customized-to-your-use-cases-and-responsible-ai-policies-preview/

As part of your responsible artificial intelligence (AI) strategy, you can now use Guardrails for Amazon Bedrock (preview) to promote safe interactions between users and your generative AI applications by implementing safeguards customized to your use cases and responsible AI policies.

AWS is committed to developing generative AI in a responsible, people-centric way by focusing on education and science and helping developers to integrate responsible AI across the AI lifecycle. With Guardrails for Amazon Bedrock, you can consistently implement safeguards to deliver relevant and safe user experiences aligned with your company policies and principles. Guardrails help you define denied topics and content filters to remove undesirable and harmful content from interactions between users and your applications. This provides an additional level of control on top of any protections built into foundation models (FMs).

You can apply guardrails to all large language models (LLMs) in Amazon Bedrock, including fine-tuned models, and Agents for Amazon Bedrock. This drives consistency in how you deploy your preferences across applications so you can innovate safely while closely managing user experiences based on your requirements. By standardizing safety and privacy controls, Guardrails for Amazon Bedrock helps you build generative AI applications that align with your responsible AI goals.

Guardrails for Amazon Bedrock

Let me give you a quick tour of the key controls available in Guardrails for Amazon Bedrock.

Key controls
Using Guardrails for Amazon Bedrock, you can define the following set of policies to create safeguards in your applications.

Denied topics – You can define a set of topics that are undesirable in the context of your application using a short natural language description. For example, as a developer at a bank, you might want to set up an assistant for your online banking application to avoid providing investment advice.

I specify a denied topic with the name “Investment advice” and provide a natural language description, such as “Investment advice refers to inquiries, guidance, or recommendations regarding the management or allocation of funds or assets with the goal of generating returns or achieving specific financial objectives.”

Guardrails for Amazon Bedrock

Guardrails for Amazon Bedrock

Content filters – You can configure thresholds to filter harmful content across hate, insults, sexual, and violence categories. While many FMs already provide built-in protections to prevent the generation of undesirable and harmful responses, guardrails give you additional controls to filter such interactions to desired degrees based on your use cases and responsible AI policies. A higher filter strength corresponds to stricter filtering.

Guardrails for Amazon Bedrock

PII redaction (in the works) – You will be able to select a set of personally identifiable information (PII) such as name, e-mail address, and phone number, that can be redacted in FM-generated responses or block a user input if it contains PII.

Guardrails for Amazon Bedrock integrates with Amazon CloudWatch, so you can monitor and analyze user inputs and FM responses that violate policies defined in the guardrails.

Join the preview
Guardrails for Amazon Bedrock is available today in limited preview. Reach out through your usual AWS Support contacts if you’d like access to Guardrails for Amazon Bedrock.

During preview, guardrails can be applied to all large language models (LLMs) available in Amazon Bedrock, including Amazon Titan Text, Anthropic Claude, Meta Llama 2, AI21 Jurassic, and Cohere Command. You can also use guardrails with custom models as well as Agents for Amazon Bedrock.

To learn more, visit the Guardrails for Amazon Bedrock web page.

— Antje

Agents for Amazon Bedrock is now available with improved control of orchestration and visibility into reasoning

Post Syndicated from Antje Barth original https://aws.amazon.com/blogs/aws/agents-for-amazon-bedrock-is-now-available-with-improved-control-of-orchestration-and-visibility-into-reasoning/

Back in July, we introduced Agents for Amazon Bedrock in preview. Today, Agents for Amazon Bedrock is generally available.

Agents for Amazon Bedrock helps you accelerate generative artificial intelligence (AI) application development by orchestrating multistep tasks. Agents uses the reasoning capability of foundation models (FMs) to break down user-requested tasks into multiple steps. They use the developer-provided instruction to create an orchestration plan and then carry out the plan by invoking company APIs and accessing knowledge bases using Retrieval Augmented Generation (RAG) to provide a final response to the end user. If you’re curious how this works, check out my previous posts on agents that include a primer on advanced reasoning and a primer on RAG.

Starting today, Agents for Amazon Bedrock also comes with enhanced capabilities that include improved control of the orchestration and better visibility into the chain of thought reasoning.

Behind the scenes, Agents for Amazon Bedrock automates the prompt engineering and orchestration of user-requested tasks, such as managing retail orders or processing insurance claims. An agent automatically builds the orchestration prompt and, if connected to knowledge bases, augments it with your company-specific information and invokes APIs to provide responses to the user in natural language.

As a developer, you can use the new trace capability to follow the reasoning that’s used as the plan is carried out. You can view the intermediate steps in the orchestration process and use this information to troubleshoot issues.

You can also access and modify the prompt that the agent automatically creates so you can further enhance the end-user experience. You can update this automatically created prompt (or prompt template) to help the FM enhance the orchestration and responses, giving you more control over the orchestration.

Let me show you how to view the reasoning steps and how to modify the prompt.

View reasoning steps
Traces gives you visibility into the agent’s reasoning, known as the chain of thought (CoT). You can use the CoT trace to see how the agent performs tasks step by step. The CoT prompt is based on a reasoning technique called ReAct (synergizing reasoning and acting). Check out the primer on advanced reasoning in my previous blog post to learn more about ReAct and the specific prompt structure.

To get started, navigate to the Amazon Bedrock console and select the working draft of an existing agent. Then, select the Test button and enter a sample user request. In the agent’s response, select Show trace.

Agents for Amazon Bedrock

The CoT trace shows the agent’s reasoning step-by-step. Open each step to see the CoT details.

Agents for Amazon Bedrock

The enhanced visibility helps you understand the rationale used by the agent to complete the task. As a developer, you can use this information to refine the prompts, instructions, and action descriptions to adjust the agent’s actions and responses when iteratively testing and improving the user experience.

Modify agent-created prompts
The agent automatically creates a prompt template from the provided instructions. You can update the preprocessing of user inputs, the orchestration plan, and the postprocessing of the FM response.

To get started, navigate to the Amazon Bedrock console and select the working draft of an existing agent. Then, select the Edit button next to Advanced prompts.

Agents for Amazon Bedrock

Here, you have access to four different types of templates. Preprocessing templates define how an agent
contextualizes and categorizes user inputs. The orchestration template equips an agent with short-term memory, a list of available actions and knowledge bases along with their descriptions, as well as few-shot examples of how to break down the problem and use these actions and knowledge in different sequences or combinations. Knowledge base response generation templates define how knowledge bases will be used and summarized in the response. Postprocessing templates define how an agent will format and present a final response to the end user. You can either keep using the template defaults or edit and override the template defaults.

Things to know
Here are a few best practices and important things to know when you’re working with Agents for Amazon Bedrock.

Agents perform best when you allow them to focus on a specific task. The clearer the objective (instructions) and the more focused the available set of actions (APIs), the easier it will be for the FM to reason and identify the right steps. If you need agents to cover various tasks, consider creating separate, individual agents.

Here are a few additional guidelines:

  • Number of APIs – Use three to five APIs with a couple of input parameters in your agents.
  • API design – Follow general best practices for designing APIs, such as ensuring idempotency.
  • API call validations – Follow best practices of API design by employing exhaustive validation for all API calls. This is particularly important because large language models (LLMs) may generate hallucinated inputs and outputs, and these validations prove helpful during such occurrences.

Availability and pricing
Agents for Amazon Bedrock are available today in AWS Regions US East (N. Virginia) and US West (Oregon). You will be charged for the inference calls (InvokeModel API) made by agents. The InvokeAgent API is not charged separately. Amazon Bedrock Pricing has all the details.

Learn more

— Antje

Customize models in Amazon Bedrock with your own data using fine-tuning and continued pre-training

Post Syndicated from Antje Barth original https://aws.amazon.com/blogs/aws/customize-models-in-amazon-bedrock-with-your-own-data-using-fine-tuning-and-continued-pre-training/

Today, I’m excited to share that you can now privately and securely customize foundation models (FMs) with your own data in Amazon Bedrock to build applications that are specific to your domain, organization, and use case. With custom models, you can create unique user experiences that reflect your company’s style, voice, and services.

With fine-tuning, you can increase model accuracy by providing your own task-specific labeled training dataset and further specialize your FMs. With continued pre-training, you can train models using your own unlabeled data in a secure and managed environment with customer managed keys. Continued pre-training helps models become more domain-specific by accumulating more robust knowledge and adaptability—beyond their original training.

Let me give you a quick tour of both model customization options. You can create fine-tuning and continued pre-training jobs using the Amazon Bedrock console or APIs. In the console, navigate to Amazon Bedrock, then select Custom models.

Amazon Bedrock - Custom Models

Fine-tune Meta Llama 2, Cohere Command Light, and Amazon Titan FMs
Amazon Bedrock now supports fine-tuning for Meta Llama 2, Cohere Command Light, as well as Amazon Titan models. To create a fine-tuning job in the console, choose Customize model, then choose Create Fine-tuning job.

Amazon Bedrock - Custom Models

Here’s a quick demo using the AWS SDK for Python (Boto3). Let’s fine-tune Cohere Command Light to summarize dialogs. For demo purposes, I’m using the public dialogsum dataset, but this could be your own company-specific data.

To prepare for fine-tuning on Amazon Bedrock, I converted the dataset into JSON Lines format and uploaded it to Amazon S3. Each JSON line needs to have both a prompt and a completion field. You can specify up to 10,000 training data records, but you may already see model performance improvements with a few hundred examples.

{"completion": "Mr. Smith's getting a check-up, and Doctor Haw...", "prompt": Summarize the following conversation.\n\n#Pers..."}
{"completion": "Mrs Parker takes Ricky for his vaccines. Dr. P...", "prompt": "Summarize the following conversation.\n\n#Pers..."}
{"completion": "#Person1#'s looking for a set of keys and asks...", "prompt": "Summarize the following conversation.\n\n#Pers..."} 

I redacted the prompt and completion fields for brevity.

You can list available foundation models that support fine-tuning with the following command:

import boto3 
bedrock = boto3.client(service_name="bedrock")
bedrock_runtime = boto3.client(service_name="bedrock-runtime")

for model in bedrock.list_foundation_models(
    byCustomizationType="FINE_TUNING")["modelSummaries"]:
    for key, value in model.items():
        print(key, ":", value)
    print("-----\n")

Next, I create a model customization job. I specify the Cohere Command Light model ID that supports fine-tuning, set customization type to FINE_TUNING, and point to the Amazon S3 location of the training data. If needed, you can also adjust the hyperparameters for fine-tuning.

# Select the foundation model you want to customize
base_model_id = "cohere.command-light-text-v14:7:4k"

bedrock.create_model_customization_job(
    customizationType="FINE_TUNING",
    jobName=job_name,
    customModelName=model_name,
    roleArn=role,
    baseModelIdentifier=base_model_id,
    hyperParameters = {
        "epochCount": "1",
        "batchSize": "8",
        "learningRate": "0.00001",
    },
    trainingDataConfig={"s3Uri": "s3://path/to/train-summarization.jsonl"},
    outputDataConfig={"s3Uri": "s3://path/to/output"},
)

# Check for the job status
status = bedrock.get_model_customization_job(jobIdentifier=job_name)["status"]

Once the job is complete, you receive a unique model ID for your custom model. Your fine-tuned model is stored securely by Amazon Bedrock. To test and deploy your model, you need to purchase Provisioned Throughput.

Let’s see the results. I select one example from the dataset and ask the base model before fine-tuning, as well as the custom model after fine-tuning, to summarize the following dialog:

prompt = """Summarize the following conversation.\\n\\n
#Person1#: Hello. My name is John Sandals, and I've got a reservation.\\n
#Person2#: May I see some identification, sir, please?\\n
#Person1#: Sure. Here you are.\\n
#Person2#: Thank you so much. Have you got a credit card, Mr. Sandals?\\n
#Person1#: I sure do. How about American Express?\\n
#Person2#: Unfortunately, at the present time we take only MasterCard or VISA.\\n
#Person1#: No American Express? Okay, here's my VISA.\\n
#Person2#: Thank you, sir. You'll be in room 507, nonsmoking, with a queen-size bed. Do you approve, sir?\\n
#Person1#: Yeah, that'll be fine.\\n
#Person2#: That's great. This is your key, sir. If you need anything at all, anytime, just dial zero.\\n\\n
Summary: """

Use the Amazon Bedrock InvokeModel API to query the models.

body = {
    "prompt": prompt,
    "temperature": 0.5,
    "p": 0.9,
    "max_tokens": 512,
}

response = bedrock_runtime.invoke_model(
	# Use on-demand inference model ID for response before fine-tuning
    # modelId="cohere.command-light-text-v14",
	# Use ARN of your deployed custom model for response after fine-tuning
	modelId=provisioned_custom_model_arn,
    modelId=base_model_id, 
    body=json.dumps(body)
)

Here’s the base model response before fine-tuning:

#Person2# helps John Sandals with his reservation. John gives his credit card information and #Person2# confirms that they take only MasterCard and VISA. John will be in room 507 and #Person2# will be his host if he needs anything.

Here’s the response after fine-tuning, shorter and more to the point:

John Sandals has a reservation and checks in at a hotel. #Person2# takes his credit card and gives him a key.

Continued pre-training for Amazon Titan Text (preview)
Continued pre-training on Amazon Bedrock is available today in public preview for Amazon Titan Text models, including Titan Text Express and Titan Text Lite. To create a continued pre-training job in the console, choose Customize model, then choose Create Continued Pre-training job.

Amazon Bedrock - Custom Models

Here’s a quick demo again using boto3. Let’s assume you work at an investment company and want to continue pre-training the model with financial and analyst reports to make it more knowledgeable about financial industry terminology. For demo purposes, I selected a collection of Amazon shareholder letters as my training data.

To prepare for continued pre-training, I converted the dataset into JSON Lines format again and uploaded it to Amazon S3. Because I’m working with unlabeled data, each JSON line only needs to have the prompt field. You can specify up to 100,000 training data records and usually see positive effects after providing at least 1 billion tokens.

{"input": "Dear shareholders: As I sit down to..."}
{"input": "Over the last several months, we to..."}
{"input": "work came from optimizing the conne..."}
{"input": "of the Amazon shopping experience f..."}

I redacted the input fields for brevity.

Then, create a model customization job with customization type CONTINUED_PRE_TRAINING that points to the data. If needed, you can also adjust the hyperparameters for continued pre-training.

# Select the foundation model you want to customize
base_model_id = "amazon.titan-text-express-v1"

bedrock.create_model_customization_job(
    customizationType="CONTINUED_PRE_TRAINING",
    jobName=job_name,
    customModelName=model_name,
    roleArn=role,
    baseModelIdentifier=base_model_id,
    hyperParameters = {
        "epochCount": "10",
        "batchSize": "8",
        "learningRate": "0.00001",
    },
    trainingDataConfig={"s3Uri": "s3://path/to/train-continued-pretraining.jsonl"},
    outputDataConfig={"s3Uri": "s3://path/to/output"},
)

Once the job is complete, you receive another unique model ID. Your customized model is securely stored again by Amazon Bedrock. As with fine-tuning, you need to purchase Provisioned Throughput to test and deploy your model.

Things to know
Here are a couple of important things to know:

Data privacy and network security – With Amazon Bedrock, you are in control of your data, and all your inputs and customizations remain private to your AWS account. Your data, such as prompts, completions, custom models, and data used for fine-tuning or continued pre-training, is not used for service improvement and is never shared with third-party model providers. Your data remains in the AWS Region where the API call is processed. All data is encrypted in transit and at rest. You can use AWS PrivateLink to create a private connection between your VPC and Amazon Bedrock.

Billing – Amazon Bedrock charges for model customization, storage, and inference. Model customization is charged per tokens processed. This is the number of tokens in the training dataset multiplied by the number of training epochs. An epoch is one full pass through the training data during customization. Model storage is charged per month, per model. Inference is charged hourly per model unit using provisioned throughput. For detailed pricing information, see Amazon Bedrock Pricing.

Custom models and provisioned throughput – Amazon Bedrock allows you to run inference on custom models by purchasing provisioned throughput. This guarantees a consistent level of throughput in exchange for a term commitment. You specify the number of model units needed to meet your application’s performance needs. For evaluating custom models initially, you can purchase provisioned throughput hourly with no long-term commitment. With no commitment, a quota of one model unit is available per provisioned throughput. You can create up to two provisioned throughputs per account.

Availability
Fine-tuning support on Meta Llama 2, Cohere Command Light, and Amazon Titan Text FMs is available today in AWS Regions US East (N. Virginia) and US West (Oregon). Continued pre-training is available today in public preview in AWS Regions US East (N. Virginia) and US West (Oregon). To learn more, visit the Amazon Bedrock Developer Experience web page and check out the User Guide.

Customize FMs with Amazon Bedrock today!

— Antje

Knowledge Bases now delivers fully managed RAG experience in Amazon Bedrock

Post Syndicated from Antje Barth original https://aws.amazon.com/blogs/aws/knowledge-bases-now-delivers-fully-managed-rag-experience-in-amazon-bedrock/

Back in September, we introduced Knowledge Bases for Amazon Bedrock in preview. Starting today, Knowledge Bases for Amazon Bedrock is generally available.

With a knowledge base, you can securely connect foundation models (FMs) in Amazon Bedrock to your company data for Retrieval Augmented Generation (RAG). Access to additional data helps the model generate more relevant, context-specific, and accurate responses without continuously retraining the FM. All information retrieved from knowledge bases comes with source attribution to improve transparency and minimize hallucinations. If you’re curious how this works, check out my previous post that includes a primer on RAG.

With today’s launch, Knowledge Bases gives you a fully managed RAG experience and the easiest way to get started with RAG in Amazon Bedrock. Knowledge Bases now manages the initial vector store setup, handles the embedding and querying, and provides source attribution and short-term memory needed for production RAG applications. If needed, you can also customize the RAG workflows to meet specific use case requirements or integrate RAG with other generative artificial intelligence (AI) tools and applications.

Fully managed RAG experience
Knowledge Bases for Amazon Bedrock manages the end-to-end RAG workflow for you. You specify the location of your data, select an embedding model to convert the data into vector embeddings, and have Amazon Bedrock create a vector store in your account to store the vector data. When you select this option (available only in the console), Amazon Bedrock creates a vector index in Amazon OpenSearch Serverless in your account, removing the need to manage anything yourself.

Knowledge bases for Amazon Bedrock

Vector embeddings include the numeric representations of text data within your documents. Each embedding aims to capture the semantic or contextual meaning of the data. Amazon Bedrock takes care of creating, storing, managing, and updating your embeddings in the vector store, and it ensures your data is always in sync with your vector store.

Amazon Bedrock now also supports two new APIs for RAG that handle the embedding and querying and provide the source attribution and short-term memory needed for production RAG applications.

With the new RetrieveAndGenerate API, you can directly retrieve relevant information from your knowledge bases and have Amazon Bedrock generate a response from the results by specifying a FM in your API call. Let me show you how this works.

Use the RetrieveAndGenerate API
To give it a try, navigate to the Amazon Bedrock console, create and select a knowledge base, then select Test knowledge base. For this demo, I created a knowledge base that has access to a PDF of Generative AI on AWS. I choose Select Model to specify a FM.

Knowledge Bases for Amazon Bedrock

Then, I ask, “What is Amazon Bedrock?”

Knowledge Bases for Amazon Bedrock

Behind the scenes, Amazon Bedrock converts the queries into embeddings, queries the knowledge base, and then augments the FM prompt with the search results as context information and returns the FM-generated response to my question. For multi-turn conversations, Knowledge Bases manages the short-term memory of the conversation to provide more contextual results.

Here’s a quick demo of how to use the APIs with the AWS SDK for Python (Boto3).

def retrieveAndGenerate(input, kbId):
    return bedrock_agent_runtime.retrieve_and_generate(
        input={
            'text': input
        },
        retrieveAndGenerateConfiguration={
            'type': 'KNOWLEDGE_BASE',
            'knowledgeBaseConfiguration': {
                'knowledgeBaseId': kbId,
                'modelArn': 'arn:aws:bedrock:us-east-1::foundation-model/anthropic.claude-instant-v1'
                }
            }
        )

response = retrieveAndGenerate("What is Amazon Bedrock?", "AES9P3MT9T")["output"]["text"]

The output of the RetrieveAndGenerate API includes the generated response, the source attribution, and the retrieved text chunks. In my demo, the API response looks like this (with some of the output redacted for brevity):


{ ... 
    'output': {'text': 'Amazon Bedrock is a managed service from AWS that ...'}, 
    'citations': 
        [{'generatedResponsePart': 
             {'textResponsePart': 
                 {'text': 'Amazon Bedrock is ...', 'span': {'start': 0, 'end': 241}}
             }, 
	      'retrievedReferences': 
			[{'content':
                 {'text': 'All AWS-managed service API activity...'}, 
				 'location': {'type': 'S3', 's3Location': {'uri': 's3://data-generative-ai-on-aws/gaia.pdf'}}}, 
		     {'content': 
			      {'text': 'Changing a portion of the image using ...'}, 
				  'location': {'type': 'S3', 's3Location': {'uri': 's3://data-generative-ai-on-aws/gaia.pdf'}}}, ...]
        ...}]
}

The generated response looks like this:

Amazon Bedrock is a managed service that offers a serverless experience for generative AI through a simple API. It provides access to foundation models from Amazon and third parties for tasks like text generation, image generation, and building conversational agents. Data processed through Amazon Bedrock remains private and encrypted.

Customize RAG workflows
If you want to process the retrieved text chunks further, see the relevance scores of the retrievals, or develop your own orchestration for text generation, you can use the new Retrieve API. This API converts user queries into embeddings, searches the knowledge base, and returns the relevant results, giving you more control to build custom workflows on top of the semantic search results.

Use the Retrieve API
In the Amazon Bedrock console, I toggle the switch to disable Generate responses.

Knowledge Bases for Amazon Bedrock

Then, I ask again, “What is Amazon Bedrock?” This time, the output shows me the retrieval results with links to the source documents where the text chunks came from.

Knowledge Bases for Amazon Bedrock

Here’s how to use the Retrieve API with boto3.

import boto3

bedrock_agent_runtime = boto3.client(
    service_name = "bedrock-agent-runtime"
)

def retrieve(query, kbId, numberOfResults=5):
    return bedrock_agent_runtime.retrieve(
        retrievalQuery= {
            'text': query
        },
        knowledgeBaseId=kbId,
        retrievalConfiguration= {
            'vectorSearchConfiguration': {
                'numberOfResults': numberOfResults
            }
        }
    )

response = retrieve("What is Amazon Bedrock?", "AES9P3MT9T")["retrievalResults"]

The output of the Retrieve API includes the retrieved text chunks, the location type and URI of the source data, and the scores of the retrievals. The score helps to determine chunks that match more closely with the query.

In my demo, the API response looks like this (with some of the output redacted for brevity):

[{'content': {'text': 'Changing a portion of the image using ...'},
  'location': {'type': 'S3',
   's3Location': {'uri': 's3://data-generative-ai-on-aws/gaia.pdf'}},
  'score': 0.7329834},
 {'content': {'text': 'back to the user in natural language. For ...'},
  'location': {'type': 'S3',
   's3Location': {'uri': 's3://data-generative-ai-on-aws/gaia.pdf'}},
  'score': 0.7331088},
...]
		 

To further customize your RAG workflows, you can define a custom chunking strategy and select a custom vector store.

Custom chunking strategy – To enable effective retrieval from your data, a common practice is to first split the documents into manageable chunks. This enhances the model’s capacity to comprehend and process information more effectively, leading to improved relevant retrievals and generation of coherent responses. Knowledge Bases for Amazon Bedrock manages the chunking of your documents.

When you configure the data source for your knowledge base, you can now define a chunking strategy. Default chunking splits data into chunks of up to 200 tokens and is optimized for question-answer tasks. Use default chunking when you are not sure of the optimal chunk size for your data.

You also have the option to specify a custom chunk size and overlap with fixed-size chunking. Use fixed-size chunking if you know the optimal chunk size and overlap for your data (based on file attributes, accuracy testing, and so on). An overlap between chunks in the recommended range of 0–20 percent can help improve accuracy. Higher overlap can lead to decreased relevancy scores.

If you select to create one embedding per document, Knowledge Bases keeps each file as a single chunk. Use this option if you don’t want Amazon Bedrock to chunk your data, for example, if you want to chunk your data offline using an algorithm that is specific to your use case. Common use cases include code documentation.

Custom vector store – You can also select a custom vector store. The available vector database options include vector engine for Amazon OpenSearch Serverless, Pinecone, and Redis Enterprise Cloud. To use a custom vector store, you must create a new, empty vector database from the list of supported options and provide the vector database index name as well as index field and metadata field mappings. This vector database will need to be for exclusive use with Amazon Bedrock.

Knowledge Bases for Amazon Bedrock

Integrate RAG with other generative AI tools and applications
If you want to build an AI assistant that can perform multistep tasks and access company data sources to generate more relevant and context-aware responses, you can integrate Knowledge Bases with Agents for Amazon Bedrock. You can also use the Knowledge Bases retrieval plugin for LangChain to integrate RAG workflows into your generative AI applications.

Availability
Knowledge bases for Amazon Bedrock is available today in AWS Regions US East (N. Virginia) and US West (Oregon).

Learn more

— Antje

Join the preview for new memory-optimized, AWS Graviton4-powered Amazon EC2 instances (R8g)

Post Syndicated from Jeff Barr original https://aws.amazon.com/blogs/aws/join-the-preview-for-new-memory-optimized-aws-graviton4-powered-amazon-ec2-instances-r8g/

We are opening up a preview of the next generation of Amazon Elastic Compute Cloud (Amazon EC2) instances. Equipped with brand-new Graviton4 processors, the new R8g instances will deliver better price performance than any existing memory-optimized instance. The R8g instances are suitable for your most demanding memory-intensive workloads: big data analytics, high-performance databases, in-memory caches and so forth.

Graviton history
Let’s take a quick look back in time and recap the evolution of the Graviton processors:

November 2018 – The Graviton processor made its debut in the A1 instances, optimized for both performance and cost, and delivering cost reductions of up to 45% for scale-out workloads.

December 2019 – The Graviton2 processor debuted with the announcement of M6g, M6gd, C6g, C6gd, R6g, and R6gd instances with up to 40% better price performance than equivalent non-Graviton instances. The second-generation processor delivered up to 7x performance of the first one, including twice the floating point performance.

November 2021 – The Graviton3 processor made its debut with the announcement of the compute-optimized C7g instances. In addition to up to 25% better compute performance, this generation of processors once again doubled floating point and cryptographic performance when compared to the previous generation.

November 2022 – The Graviton 3E processor was announced, for use in the Hpc7g and C7gn instances, with up to 35% higher vector instruction processing performance than the Graviton3.

Today, every one of the top 100 Amazon Elastic Compute Cloud (EC2) customers makes use of Graviton, choosing between more than 150 Graviton-powered instances.

New Graviton4
I’m happy to be able to tell you about the latest in our series of innovative custom chip designs, the energy-efficient AWS Graviton4 processor.

96 Neoverse V2 cores, 2 MB of L2 cache per core, and 12 DDR5-5600 channels work together to make the Graviton4 up to 40% faster for databases, 30% faster for web applications, and 45% faster for large Java applications than the Graviton3.

Graviton4 processors also support all of the security features from the previous generations, and includes some important new ones including encrypted high-speed hardware interfaces and Branch Target Identification (BTI).

R8g instance sizes
The 8th generation R8g instances will be available in multiple sizes with up to triple the number of vCPUs and triple the amount of memory of the 7th generation (R7g) of memory-optimized, Graviton3-powered instances.

Join the preview
R8g instances with Graviton4 processors

Jeff;

Announcing the new Amazon S3 Express One Zone high performance storage class

Post Syndicated from Jeff Barr original https://aws.amazon.com/blogs/aws/new-amazon-s3-express-one-zone-high-performance-storage-class/

The new Amazon S3 Express One Zone storage class is designed to deliver up to 10x better performance than the S3 Standard storage class while handling hundreds of thousands of requests per second with consistent single-digit millisecond latency, making it a great fit for your most frequently accessed data and your most demanding applications. Objects are stored and replicated on purpose built hardware within a single AWS Availability Zone, allowing you to co-locate storage and compute (Amazon EC2, Amazon ECS, and Amazon EKS) resources to further reduce latency.

Amazon S3 Express One Zone
With very low latency between compute and storage, the Amazon S3 Express One Zone storage class can help to deliver a significant reduction in runtime for data-intensive applications, especially those that use hundreds or thousands of parallel compute nodes to process large amounts of data for AI/ML training, financial modeling, media processing, real-time ad placement, high performance computing, and so forth. These applications typically keep the data around for a relatively short period of time, but access it very frequently during that time.

This new storage class can handle objects of any size, but is especially awesome for smaller objects. This is because for smaller objects the time to first byte is very close to the time for last byte. In all storage systems, larger objects take longer to stream because there is more data to download during the transfer, and therefore the storage latency has less impact on the total time to read the object. As a result, smaller objects receive an outsized benefit from lower storage latency compared to large objects. Because of S3 Express One Zone’s consistent very low latency, small objects can be read up to 10x faster compared to S3 Standard.

The extremely low latency provided by Amazon S3 Express One Zone, combined with request costs that are 50% lower than for the S3 Standard storage class, means that your Spot and On-Demand compute resources are used more efficiently and can be shut down earlier, leading to an overall reduction in processing costs.

Each Amazon S3 Express One Zone directory bucket exists in a single Availability Zone that you choose, and can be accessed using the usual set of S3 API functions: CreateBucket, PutObject, GetObject, ListObjectsV2, and so forth. The buckets also support a carefully chosen set of S3 features including byte-range fetches, multi-part upload, multi-part copy, presigned URLs, and Access Analyzer for S3. You can upload objects directly, write code that uses CopyObject, or use S3 Batch Operations,

In order to reduce latency and to make this storage class as efficient & scalable as possible, we are introducing a new bucket type, a new authentication model, and a bucket naming convention:

New bucket type – The new directory buckets are specific to this storage class, and support hundreds of thousands of requests per second. They have a hierarchical namespace and store object key names in a directory-like manner. The path delimiter must be “/“, and any prefixes that you supply to ListObjectsV2 must end with a delimiter. Also, list operations return results without first sorting them, so you cannot do a “start after” retrieval.

New authentication model – The new CreateSession function returns a session token that grants access to a specific bucket for five minutes. You must include this token in the requests that you make to other S3 API functions that operate on the bucket or the objects in it, with the exception of CopyObject, which requires IAM credentials. The newest versions of the AWS SDKs handle session creation automatically.

Bucket naming – Directory bucket names must be unique within their AWS Region, and must specify an Availability Zone ID in a specially formed suffix. If my base bucket name is jbarr and it exists in Availability Zone use1-az5 (Availability Zone 5 in the US East (N. Virginia) Region) the name that I supply to CreateBucket would be jbarr--use1-az5--x-s3. Although the bucket exists within a specific Availability Zone, it is accessible from the other zones in the region, and there are no data transfer charges for requests from compute resources in one Availability Zone to directory buckets in another one in the same region.

Amazon S3 Express One Zone in action
Let’s put this new storage class to use. I will focus on the command line, but AWS Management Console and API access are also available.

My EC2 instance is running in my us-east-1f Availability Zone. I use jq to map this value to an Availability Zone Id:

$ aws ec2 describe-availability-zones --output json | \
  jq -r  '.AvailabilityZones[] | select(.ZoneName == "us-east-1f") | .ZoneId'
use1-az5

I create a bucket configuration (s3express-bucket-config.json) and include the Id:

{
        "Location" :
        {
                "Type" : "AvailabilityZone",
                "Name" : "use1-az5"
        },
        "Bucket":
        {
                "DataRedundancy" : "SingleAvailabilityZone",
                "Type"           : "Directory"
        }
}

After installing the newest version of the AWS Command Line Interface (AWS CLI), I create my directory bucket:

$ aws s3api create-bucket --bucket jbarr--use1-az5--x-s3 \
  --create-bucket-configuration file://s3express-bucket-config.json \
  --region us-east-1
-------------------------------------------------------------------------------------------
|                                       CreateBucket                                      |
+----------+------------------------------------------------------------------------------+
|  Location|  https://jbarr--use1-az5--x-s3.s3express-use1-az5.us-east-1.amazonaws.com/   |
+----------+------------------------------------------------------------------------------+

Then I can use the directory bucket as the destination for other CLI commands as usual (the second aws is the directory where I unzipped the AWS CLI):

$ aws s3 sync aws s3://jbarr--use1-az5--x-s3

When I list the directory bucket’s contents, I see that the StorageClass is EXPRESS_ONEZONE:

$ aws s3api list-objects-v2 --bucket jbarr--use1-az5--x-s3 --output json | \
  jq -r '.Contents[] | {Key: .Key, StorageClass: .StorageClass}'
...
{
  "Key": "install",
  "StorageClass": "EXPRESS_ONEZONE"
}
...

The Management Console for S3 shows General purpose buckets and Directory buckets on separate tabs:

I can import the contents of an existing bucket (or a prefixed subset of the contents) into a directory bucket using the Import button, as seen above. I select a source bucket, click Import, and enter the parameters that will be used to generate an inventory of the source bucket and to create and an S3 Batch Operations job.

The job is created and begins to execute:

Things to know
Here are some important things to know about this new S3 storage class:

Regions – Amazon S3 Express One Zone is available in the US East (N. Virginia), US West (Oregon), Asia Pacific (Tokyo), and Europe (Stockholm) Regions, with plans to expand to others over time.

Other AWS Services – You can use Amazon S3 Express One Zone with other AWS services including Amazon SageMaker Model Training, Amazon Athena, Amazon EMR, and AWS Glue Data Catalog to accelerate your machine learning and analytics workloads. You can also use Mountpoint for Amazon S3 to process your S3 objects in file-oriented fashion.

Pricing – Pricing, like the other S3 storage classes, is on a pay-as-you-go basis. You pay $0.16/GB/month in the US East (N. Virginia) Region, with a one-hour minimum billing time for each object, and additional charges for certain request types. You pay an additional per-GB fee for the portion of any request that exceeds 512 KB. For more information, see the Amazon S3 Pricing page.

Durability – In the unlikely case of the loss or damage to all or part of an AWS Availability Zone, data in a One Zone storage class may be lost. For example, events like fire and water damage could result in data loss. Apart from these types of events, our One Zone storage classes use similar engineering designs as our Regional storage classes to protect objects from independent disk, host, and rack-level failures, and each are designed to deliver 99.999999999% data durability.

SLA – Amazon S3 Express One Zone is designed to deliver 99.95% availability with an availability SLA of 99.9%; for information see the Amazon S3 Service Level Agreement page.

This new storage class is available now and you can start using it today!

Learn more
Amazon S3 Express One Zone

Jeff;

Reserve quantum computers, get guidance and cutting-edge capabilities with Amazon Braket Direct

Post Syndicated from Channy Yun original https://aws.amazon.com/blogs/aws/reserve-quantum-computers-get-expertise-and-cutting-edge-capabilities-with-amazon-braket-direct/

Today, we are announcing the availability of Braket Direct, a new Amazon Braket program that helps quantum researchers dive deeper into quantum computing. This program lets you get dedicated, private access to the full capacity of various quantum processing units (QPUs) without any queues or wait times, connect with quantum computing specialists to receive expert guidance for your workloads, and get early access to features and devices with limited availability to conduct cutting-edge research on today’s noisy quantum devices.

Since its launch in 2020, Amazon Braket has democratized access to quantum computing by offering on-demand access to various QPUs using shared, public availability windows, where you only pay for the duration of your reservation.

You can now use Braket Direct to reserve the entire dedicated machine for a period of time on IonQ Aria, QuEra Aquila, and Rigetti Aspen-M-3 devices for running your most complex, long-running, time-sensitive workloads, or conducting live events such as training workshops and hackathons, where you pay only for what you reserve.

To further your research, you can now engage directly with Braket’s experts through free office hours or one-on-one, hands-on reservation prep sessions. For deeper research collaborations, you can connect with specialists from quantum hardware providers such as IonQ, Oxford Quantum Circuits, QuEra, Rigetti, or Amazon Quantum Solutions Lab, our dedicated professional services team.

Finally, to truly push the boundaries, you can gain access to experimental capabilities that have limited or reduced availability starting with IonQ’s highest fidelity, 30-qubit Forte device.

Braket Direct expands on our commitment to accelerate research and innovation in quantum computing without requiring any upfront fees or long-term commitments.

Getting started with Braket Direct
To get started, go to the Amazon Braket console and choose Braket Direct in the left pane. You can see new features such as quantum hardware reservation, expert advice and get access to next-generation quantum hardware and features.

1. Request a quantum hardware reservation
To create a reservation, choose Reserve device and select the Device that you would like to reserve. Provide your contact information, including your name and email address, any details about the workload that you would like to execute using your reservation, such as desired reservation length, relevant constraints, and desired schedule.

Braket Direct assures that you have the full capacity of the QPU during your reservation and the predictability that your workloads will execute when your reservation begins.

If you are interested in connecting with a Braket expert for a one-on-one reservation prep session after your reservation is confirmed, you can select that option at no additional cost.

Choose Submit to complete your reservation request. A Braket team member will email you within 2–3 business days, pending request verification. To make the most of your reservation, you can choose to pre-create your tasks and jobs prior to a reservation to maximize use of the time.

To learn more about your quantum tasks and hybrid jobs to execute in a device reservation, see Get started with Braket Direct in the AWS documentation.

2. Get support from quantum computing experts
You can get in touch with quantum experts and get advice about your workload. With Braket office hours, Braket experts can help you go from ideation to execution faster at no additional cost. Explore your device to fit your use case, identify options to make best use of Braket for your algorithm, and get recommendations on how to use certain Braket features like Hybrid Jobs, Braket Pulse, or Analog Hamiltonian Simulation.

To book an upcoming Braket office hours slot, choose Sign up and fill out your contact information, workload details, and any desired discussion topics. You will receive a calendar invitation to the next available slot by email.

To take advantage of experts from quantum hardware providers, choose Connect and browse their professional services listings on AWS Marketplace.

The Amazon Quantum Solutions Lab is a collaborative research and professional services team staffed with quantum computing experts who can assist you in more effectively exploring quantum computing, engaging in quantum research, and assessing the current performance of this technology. To contact the Quantum Solutions Lab, select Connect and fill out contact information and use case details. The team will email you with next steps.

3. Access to cutting-edge capabilities
To move your research quicker, you can get early access to innovative new capabilities. With Braket Direct, you can easily request access to cutting-edge capabilities, such as new quantum devices with limited availability, directly in the Braket console. Today, you can get reservation-only access to IonQ’s highest-fidelity Forte QPU. Due to its limited availability, this device is currently only available through Braket Direct reservations.

Now available
Braket Direct is now generally available in all AWS Regions where Amazon Braket is available. To learn more, see the Braket Direct page and pricing page.

Give it a try and send feedback to AWS re:Post for Amazon Braket, Quantum Computing Stack Exchange, or through your usual AWS Support contacts.

Channy

AWS Step Functions Workflow Studio is now available in AWS Application Composer

Post Syndicated from Donnie Prakoso original https://aws.amazon.com/blogs/aws/aws-step-functions-workflow-studio-is-now-available-in-aws-application-composer/

Today, we’re announcing that AWS Step Functions Workflow Studio is now available in AWS Application Composer. This new integration brings together the development of workflows and application resources into a unified visual infrastructure as code (IaC) builder.

Now, you can have a seamless transition between authoring workflows with AWS Step Functions Workflow Studio and defining resources with AWS Application Composer. This announcement allows you to create and manage all resources at any stage of your development journey. You can visualize the full application in AWS Application Composer, then zoom into the workflow details with AWS Step Functions Workflow Studio—all within a single interface.

Seamlessly build workflow and modern application
To help you design and build modern applications, we launched AWS Application Composer in March 2023. With AWS Application Composer, you can use a visual builder to compose and configure serverless applications from AWS services backed by deployment-ready IaC.

In various use cases of building modern applications, you may also need to orchestrate microservices, automate mission-critical business processes, create event-driven applications that respond to infrastructure changes, or build machine learning (ML) pipelines. To solve these challenges, you can use AWS Step Functions, a fully managed service that makes it easier to coordinate distributed application components using visual workflows. To simplify workflow development, in 2021 we introduced AWS Step Functions Workflow Studio, a low-code visual tool for rapid workflow prototyping and development across 12,000+ API actions from over 220 AWS services.

While AWS Step Functions Workflow Studio brings simplicity to building workflows, customers that want to deploy workflows using IaC had to manually define their state machine resource and migrate their workflow definitions to the IaC template.

Better together: AWS Step Functions Workflow Studio in AWS Application Composer
With this new integration, you can now design AWS Step Functions workflows in AWS Application Composer using a drag-and-drop interface. This accelerates the path from prototyping to production deployment and iterating on existing workflows.

You can start by composing your modern application with AWS Application Composer. Within the canvas, you can add a workflow by adding an AWS Step Functions state machine resource. This new capability provides you with the ability to visually design and build a workflow with an intuitive interface to connect workflow steps to resources.

How it works
Let me walk you through how you can use AWS Step Functions Workflow Studio in AWS Application Composer. For this demo, let’s say that I need to improve handling e-commerce transactions by building a workflow and integrating with my existing serverless APIs.

First, I navigate to AWS Application Composer. Because I already have an existing project that includes application code and IaC templates from AWS Application Composer, I don’t need to build anything from scratch.

I open the menu and select Project folder to open the files in my local development machine.

Then, I select the path of my local folder, and AWS Application Composer automatically detects the IaC template that I currently have.

Then, AWS Application Composer visualizes the diagram in the canvas. What I really like about using this approach is that AWS Application Composer activates Local sync mode, which automatically syncs and saves any changes in IaC templates into my local project.

Here, I have a simple serverless API running on Amazon API Gateway, which invokes an AWS Lambda function and integrates with Amazon DynamoDB.

Now, I’m ready to make some changes to my serverless API. I configure another route on Amazon API Gateway and add AWS Step Functions state machine to start building my workflow.

When I configure my Step Functions state machine, I can start editing my workflow by selecting Edit in Workflow Studio.

This opens Step Functions Workflow Studio within the AWS Application Composer canvas. I have the same experience as Workflow Studio in the AWS Step Functions console. I can use the canvas to add actions, flows , and patterns into my Step Functions state machine.

I start building my workflow, and here’s the result that I exported using Export PNG image in Workflow Studio.

But here’s where this new capability really helps me as a developer. In the workflow definition, I use various AWS resources, such as AWS Lambda functions and Amazon DynamoDB. If I need to reference the AWS resources I defined in AWS Application Composer, I can use an AWS CloudFormation substitution.

With AWS CloudFormation substitutions, I can add a substitution using an AWS CloudFormation convention, which is a dynamic reference to a value that is provided in the IaC template. I am using a placeholder substitution here so I can map it with an AWS resource in the AWS Application Composer canvas in a later step.

I can also define the AWS CloudFormation substitution for my Amazon DynamoDB table.

At this stage, I’m happy with my workflow. To review the Amazon States Language as my AWS Step Functions state machine definition, I can also open the Code tab. Now I don’t need to manually copy and paste this definition into IaC templates. I only need to save my work and choose Return to Application Composer.

Here, I can see that my AWS Step Functions state machine is updated both in the visual diagram and in the state machine definition section.

If I scroll down, I will find AWS Cloudformation Definition Substitutions for resources that I defined in Workflow Studio. I can manually replace the mapping here, or I can use the canvas.

To use the canvas, I simply drag and drop the respective resources in my Step Functions state machine and in the Application Composer canvas. Here, I connect the Inventory Process task state with a new AWS Lambda function. Also, my Step Functions state machine tasks can reference existing resources.

When I choose Template, the state machine definition is integrated with other AWS Application Composer resources. With this IaC template I can easily deploy using AWS Serverless Application Model Command Line Interface (AWS SAM CLI) or CloudFormation.

Things to know
Here is some additional information for you:

Pricing – The AWS Step Functions Workflow Studio in AWS Application Composer comes at no additional cost.

Availability – This feature is available in all AWS Regions where Application Composer is available.

AWS Step Functions Workflow Studio in AWS Application Composer provides you with an easy-to-use experience to integrate your workflow into modern applications. Get started and learn more about this feature on the AWS Application Composer page.

Happy building!
— Donnie

Amazon CodeCatalyst introduces custom blueprints and a new enterprise tier

Post Syndicated from Irshad Buchh original https://aws.amazon.com/blogs/aws/amazon-codecatalyst-introduces-custom-blueprints-and-a-new-enterprise-tier/

Today, I’m excited to introduce the new Amazon CodeCatalyst enterprise tier and custom blueprints.

Amazon CodeCatalyst enterprise tier is a new pricing tier that offers features like custom blueprints and project lifecycle management. The enterprise tier is $20/user per month, and each enterprise tier space gets 1,500 compute minutes, 160 Dev Environment hours, and 64GB of Dev Environment storage per paying user. You can use custom blueprints to define best practices for your application code, workflows, and infrastructure. You can publish these blueprints to your CodeCatalyst space, utilizing them for project creation or applying standards to existing projects.

Blueprints help you set up projects in minutes so you can get to work on code immediately. With just a few clicks, you can set up project files and configure built-in, fully integrated tools (for example, source repository, issue management, and continuous integration and delivery (CI/CD) pipeline) with best practices for your particular type of project. You can swap in popular tools like GitHub if needed, while maintaining the unified experience. You spend less time on building, integrating, or operating developer tools over the project’s lifetime.

With custom blueprints, you can define various elements of your CodeCatalyst project, like workflow definitions, infrastructure as code (IaC), and application code. When custom blueprints are updated, those changes are reflected in any project using the blueprint as a pull request update. This streamlined process reduces overhead in setting up your projects and ensures that best practices are consistently applied across your projects. As an admin, you can easily view details about which projects are using each blueprint in your CodeCatalyst space, giving you visibility into how standards are being applied across your projects.

Creating a custom blueprint in CodeCatalyst
I open the CodeCatalyst console and then I navigate to my space. On the Settings tab, I choose Blueprints on the left navigation pane, and then I select Create blueprint. At this point, I codify my best practices in this blueprint. When ready, I’ll publish it back to my space so my teams can use it to create projects.

create-blueprint

After I publish my blueprint, I can view and manage it in my CodeCatalyst space in the Settings tab. In the left panel, I choose Blueprints. Then I select Space blueprints.

manage-blueprint

I select Create project > Space blueprints to create a CodeCatalyst project from my custom blueprint.

create-project

Availability

The Amazon CodeCatalyst enterprise tier is available in US West (Oregon) and Europe (Ireland) Regions, but you can deploy to any commercial Region. To learn more, visit the Amazon CodeCatalyst webpage.

Go build!

— Irshad

Amazon ElastiCache Serverless for Redis and Memcached is now available

Post Syndicated from Channy Yun original https://aws.amazon.com/blogs/aws/amazon-elasticache-serverless-for-redis-and-memcached-now-generally-available/

Today, we are announcing the availability of Amazon ElastiCache Serverless, a new serverless option that allows customers to create a cache in under a minute and instantly scale capacity based on application traffic patterns. ElastiCache Serverless is compatible with two popular open-source caching solutions, Redis and Memcached.

You can use ElastiCache Serverless to operate a cache for even the most demanding workloads without spending time in capacity planning or requiring caching expertise. ElastiCache Serverless constantly monitors your application’s memory, CPU, and network resource utilization and scales instantly to accommodate changes to the access patterns of workloads it serves. You can create a highly available cache with data automatically replicated across multiple Availability Zones and up to 99.99 percent availability Service Level Agreement (SLA) for all workloads, which saves you time and money.

Customers wanted to get radical simplicity to deploy and operate a cache. ElastiCache Serverless offers a simple endpoint experience abstracting the underlying cluster topology and cache infrastructure. You can reduce application complexity and have more operational excellence without handling reconnects and rediscovering nodes.

With ElastiCache Serverless, there are no upfront costs, and you pay for only the resources you use. You pay for the amount of cache data storage and ElastiCache Processing Units (ECPUs) resources consumed by your applications.

Getting started with Amazon ElastiCache Serverless
To get started, go to the ElastiCache console and choose Redis caches or Memcached caches in the left navigation pane. ElastiCache Serverless supports engine versions of Redis 7.1 or higher and Memcached 1.6 or higher.

For example, in the case of Redis caches, choose Create Redis cache.

You see two deployment options: either Serverless or Design your own cache to create a node-based cache cluster. Choose the Serverless option, the New cache method, and provide a name.

Use the default settings to create a cache in your default VPC, Availability Zones, service-owned encryption key, and security groups. We will automatically set recommended best practices. You don’t have to enter any additional settings.

If you want to customize default settings, you can set your own security groups, or enable automatic backups. You can also set maximum limits for your compute and memory usage to ensure your cache doesn’t grow beyond a certain size. When your cache reaches the memory limit, keys with a time to live (TTL) are evicted according to the least recently used (LRU) logic. When your compute limit is reached, ElastiCache will throttle requests, which will lead to elevated request latencies.

When you create a new serverless cache, you can see the details of settings for connectivity and data protection, including an endpoint and network environment.

Now, you can configure the ElastiCache Serverless endpoint in your application and connect using any Redis client that supports Redis in cluster mode, such as redis-cli.

$ redis-cli -h channy-redis-serverless.elasticache.amazonaws.com --tls -c -p 6379
set x Hello
OK
get x
"Hello"

You can manage the cache using AWS Command Line Interface (AWS CLI) or AWS SDKs. For more information, see Getting started with Amazon ElastiCache for Redis in the AWS documentation.

If you have an existing Redis cluster, you can migrate your data to ElastiCache Serverless by specifying the ElastiCache backups or Amazon S3 location of a backup file in a standard Redis rdb file format when creating your ElastiCache Serverless cache.

For a Memcached cache, you can create and use a new serverless cache in the same way as Redis.

If you use ElastiCache Serverless for Memcached, there are significant benefits of high availability and instant scaling because they are not natively available in the Memcached engine. You no longer have to write custom business logic, manage multiple caches, or use a third-party proxy layer to replicate data to get high availability with Memcached. Now you can get up to 99.99 percent availability SLA and data replication across multiple Availability Zones.

To connect to the Memcached endpoint, run the openssl client and Memcached commands as shown in the following example output:

$ /usr/bin/openssl s_client -connect channy-memcached-serverless.cache.amazonaws.com:11211 -crlf 
set a 0 0 5
hello
STORED
get a
VALUE a 0 5
hello
END

For more information, see Getting started with Amazon ElastiCache Serverless for Memcached in the AWS documentation.

Scaling and performance
ElastiCache Serverless scales without downtime or performance degradation to the application by allowing the cache to scale up and initiating a scale-out in parallel to meet capacity needs just in time.

To show ElastiCache Serverless’ performance we conducted a simple scaling test. We started with a typical Redis workload with an 80/20 ratio between reads and writes with a key size of 512 bytes. Our Redis client was configured to Read From Replica (RFR) using the READONLY Redis command, for optimal read performance. Our goal is to show how fast workloads can scale on ElastiCache Serverless without any impact on latency.

As you can see in the graph above, we were able to double the requests per second (RPS) every 10 minutes up until the test’s target request rate of 1M RPS. During this test, we observed that p50 GET latency remained around 751 microseconds and at all times below 860 microseconds. Similarly, we observed p50 SET latency remained around 1,050 microseconds, not crossing the 1,200 microseconds even during the rapid increase in throughput.

Things to know

  • Upgrading engine version – ElastiCache Serverless transparently applies new features, bug fixes, and security updates, including new minor and patch engine versions on your cache. When a new major version is available, ElastiCache Serverless will send you a notification in the console and an event in Amazon EventBridge. ElastiCache Serverless major version upgrades are designed for no disruption to your application.
  • Performance and monitoring – ElastiCache Serverless publishes a suite of metrics to Amazon CloudWatch, including memory usage (BytesUsedForCache), CPU usage (ElastiCacheProcessingUnits), and cache metrics, including CacheMissRate, CacheHitRate, CacheHits, CacheMisses, and ThrottledRequests. ElastiCache Serverless also publishes Amazon EventBridge events for significant events, including cache creation, deletion, and limit updates. For a full list of available metrics and events, see the documentation.
  • Security and compliance – ElastiCache Serverless caches are accessible from within a VPC. You can access the data plane using AWS Identity and Access Management (IAM). By default, only the AWS account creating the ElastiCache Serverless cache can access it. ElastiCache Serverless encrypts all data at rest and in-transit by transport layer security (TLS) encrypting each connection to ElastiCache Serverless. You can optionally choose to limit access to the cache within your VPCs, subnets, IAM access, and AWS Key Management Service (AWS KMS) key for encryption. ElastiCache Serverless is compliant with PCI-DSS, SOC, and ISO and is HIPAA eligible.

Now available
Amazon ElastiCache Serverless is now available in all commercial AWS Regions, including China. With ElastiCache Serverless, there are no upfront costs, and you pay for only the resources you use. You pay for cached data in GB-hours, ECPUs consumed, and Snapshot storage in GB-months.

To learn more, see the ElastiCache Serverless page and the pricing page. Give it a try, and please send feedback to AWS re:Post for Amazon ElastiCache or through your usual AWS support contacts.

Channy

Join the preview of Amazon Aurora Limitless Database

Post Syndicated from Channy Yun original https://aws.amazon.com/blogs/aws/join-the-preview-amazon-aurora-limitless-database/

Today, we are announcing the preview of Amazon Aurora Limitless Database, a new capability supporting automated horizontal scaling to process millions of write transactions per second and manage petabytes of data in a single Aurora database.

Amazon Aurora read replicas allow you to increase the read capacity of your Aurora cluster beyond the limits of what a single database instance can provide. Now, Aurora Limitless Database scales write throughput and storage capacity of your database beyond the limits of a single Aurora writer instance. The compute and storage capacity that is used for Limitless Database is in addition to and independent of the capacity of your writer and reader instances in the cluster.

With Limitless Database, you can focus on building high-scale applications without having to build and maintain complex solutions for scaling your data across multiple database instances to support your workloads. Aurora Limitless Database scales based on the workload to support write throughput and storage capacity that, until today, would require multiple Aurora writer instances.

The architecture of Amazon Aurora Limitless Database
Limitless Database has a two-layer architecture consisting of multiple database nodes, either transaction routers or shards.

Shards are Aurora PostgreSQL DB instances that each store a subset of the data for your database, allowing for parallel processing to achieve higher write throughput. Transaction routers manage the distributed nature of the database and present a single database image to database clients.

Transaction routers maintain metadata about where data is stored, parse incoming SQL commands and send those commands to shards, aggregate data from shards to return a single result to the client, and manage distributed transactions to maintain consistency across the entire distributed database. All the nodes that make up your Limitless Database architecture are contained in a DB shard group. The DB shard group has a separate endpoint where your access your Limitless Database resources.

Getting started with Aurora Limitless Database
To get started with a preview of Aurora Limitless Database, you can sign up today and will be invited soon. The preview runs in a new Aurora PostgreSQL cluster with version 15 in the AWS US East (Ohio), US East (N. Virginia), US West (Oregon), Asia Pacific (Tokyo), and Europe (Ireland) Regions.

As part of the creation workflow for an Aurora cluster, choose the Limitless Database compatible version in the Amazon RDS console or the Amazon RDS API. Then you can add a DB shard group and create new Limitless Database tables. You can choose the maximum Aurora capacity units (ACUs).

After the DB shard group is created, you can view its details on the Databases page, including its endpoint.

To use Aurora Limitless Database, you should connect to a DB shard group endpoint, also called the limitless endpoint, using psql or any other connection utility that works with PostgreSQL.

There will be two types of tables that contain your data in Aurora Limitless Database:

  • Sharded tables – These tables are distributed across multiple shards. Data is split among the shards based on the values of designated columns in the table, called shard keys.
  • Reference tables – These tables have all their data present on every shard so that join queries can work faster by eliminating unnecessary data movement. They are commonly used for infrequently modified reference data, such as product catalogs and zip codes.

Once you have created a sharded or reference table, you can load massive data into Aurora Limitless Database and manipulate data in those tables using the standard PostgreSQL queries.

Join the preview
You can join the preview of Amazon Aurora Limitless Database to be among the first to experience all of this power.

Sign up now, give it a try, and please send feedback to AWS re:Post for Amazon Aurora or through your usual AWS support contacts.

Channy

Getting started with new Amazon RDS for Db2

Post Syndicated from Sébastien Stormacq original https://aws.amazon.com/blogs/aws/getting-started-with-new-amazon-rds-for-db2/

I am pleased to announce that IBM and AWS have come together to offer Amazon Relational Database Service (Amazon RDS) for Db2, a fully managed Db2 database engine running on AWS infrastructure.

IBM Db2 is an enterprise-grade relational database management system (RDBMS) developed by IBM. It offers a comprehensive set of features, including strong data processing capabilities, robust security mechanisms, scalability, and support for diverse data types. Db2 is a well-established choice among organizations for effectively managing data in various applications and handling data-intensive workloads due to its reliability and performance. Db2 has its roots in the pioneering work around data storage and structured query language (SQL) IBM has done since the 1970s. It has been commercially available since 1983, initially just for mainframes, and was later ported to Linux, Unix, and Windows platforms (LUW). Today, Db2 powers thousands of business-critical applications in all verticals.

With Amazon RDS for Db2, you can now create a Db2 database with just a few clicks in the AWS Management Console, one command to type with the AWS Command Line Interface (AWS CLI), or a few lines of code with the AWS SDKs. AWS takes care of the infrastructure heavy lifting, freeing your time for higher-level tasks such as schema and query optimizations for your applications.

If you are new to Amazon RDS or coming from an on-premises Db2 background, let me quickly recap the benefits of Amazon RDS.

  • Amazon RDS offers the same Db2 database as the one you use on-premises today. Your existing applications will reconnect to RDS for Db2 without changing their code.
  • The database runs on a fully managed infrastructure. You don’t have to provision servers, install the packages, install patches, or maintain the infrastructure in an operational state.
  • The database is also fully managed. We take care of the installation, minor version upgrades, daily backup, scaling, and high availability.
  • The infrastructure can scale up and down as required. You can simply stop and then restart the database to change the underlying hardware and meet changing performance requirements or benefit from last-generation hardware.
  • Amazon RDS offers a choice of storage types designed to deliver fast, predictable, and consistent I/O performance. For new or unpredictable workloads, you can configure the system to automatically scale your storage.
  • Amazon RDS automatically takes care of your backups, and you can restore them to a new database with just a few clicks.
  • Amazon RDS helps to deploy highly available architectures. Amazon RDS synchronously replicates data to a standby database in a different Availability Zone (an Availability Zone is a group of distinct data centers). When a failure is detected with a Multi-AZ deployment, Amazon RDS automatically fails over to the standby instance and routes requests without changing the database endpoint DNS name. This switch happens with minimal downtime and zero data loss.
  • Amazon RDS is built on the secure infrastructure of AWS. It encrypts data in transit using TLS and at rest using keys managed with AWS Key Management Service (AWS KMS). This helps you deploy workloads that are compliant with your company or industry regulations, such as FedRAMP, GDPR, HIPAA, PCI, and SOC.
  • Third-party auditors assess the security and compliance of Amazon RDS as part of multiple AWS compliance programs and you can verify the full list of Amazon RDS compliance validations.

You can migrate your existing on-premises Db2 database to Amazon RDS using native Db2 tools, such as restore and import, or AWS Database Migration Service (AWS DMS). AWS DMS allows you to migrate databases in a single operation or continuously, while your applications continue to update the data on the source database, until you decide on the cut off.

Amazon RDS supports multiple tools for monitoring your database instances, including Amazon RDS Enhanced Monitoring and Amazon CloudWatch, or you can continue to use the IBM Data Management Console or IBM DSMtop.

Let’s see how it works
I always like to get my hands on a new service to learn how it works. Let’s create a Db2 database and connect to it using the standard tool provided by IBM. I assume most of you reading this post come from an IBM Db2 background and don’t know much about Amazon RDS.

First, I create a Db2 database. To do this, I navigate to the Amazon RDS page of the AWS Management Console and select Create database. For this demo, I’ll accept most of the default values. I’ll show you, however, all the sections and will comment on the important configuration points you have to think about.

I select Db2 from among the multiple database engines Amazon RDS offers.

RDS for Db2 - create DB - step 1I scroll down the page and select IBM Db2 Standard and Engine Version 11.5.9. Amazon RDS patches the database instances automatically if you so desire. You can learn more about Amazon RDS database maintenance here.

I select Production. Amazon RDS will deploy a default configuration tuned for high availability and fast, consistent performance.

RDS for Db2 - create DB - step 2

RDS for Db2 - create DB - multi-AZ deployment

Under Settings, I give a name to my RDS instance (this is not the Db2 catalog name!), and I select the master username and password.

Under Instance configuration, I choose the type of node to run my database. This will define the hardware characteristics of the virtual server: the number of vCPUs, quantity of memory, and so on. Depending on the requirements of your application, you can allocate instances offering up to 32 vCPUs and 128 GiB of RAM for IBM Db2 Standard instances. When you select IBM Db2 Advanced instances, you can allocate instances offering up to 128 vCPUs and 1 TiB of RAM. This parameter has a direct impact on the price.

RDS for Db2 - create DB - settings

RDS for Db2 - create DB - instance configuration

Under Storage, I choose the type of Amazon Elastic Block Store (Amazon EBS) volumes, their size, and their IOPS and throughput. For this demo, I accept the values proposed by default. This is also a set of parameters that directly impact the price.

RDS for Db2 - create DB - step 4

Under Connectivity, I select the VPC (in AWS terms, a VPC is a private network) where the database will be deployed. Under Public access, I select No to make sure the database instance is only accessible from my private network. I can’t think of a (good) use case where you want to select Yes for this option.

This is also where you select the VPC security group. A security group is a network filter that defines what IP addresses or networks can access your database instance and on what TCP port. Be sure to select or create a security group with TCP 50000 open to allow applications to connect to your Db2 database.

RDS for Db2 - create DB - step 5

I leave all other options with their default value. It is important to open the Additional configuration section at the very bottom of the page. This is where you can give an Initial database name. If you don’t name your Db2 database here, your only option will be to restore an existing Db2 database backup on that instance.

This section also contains the parameters for the Amazon RDS automatic backup. You can choose a time window and how long we will retain the backups.

I accept all the defaults and select Create database.

RDS for Db2 - create DB - step 6

After a few minutes, you can see your database is available.

I select the DNS name of the database instance Endpoint, and I connect to a Linux machine running in the same network. After installing the Db2 client package that I downloaded from the IBM website, I type the following commands to connect to the database. There is nothing specific to Amazon RDS here.

db2 catalog TCPIP node blognode remote awsnewsblog-demo.abcdef.us-east-2.rds-preview.amazonaws.com server 50000
db2 catalog database NEWSBLOG as blogdb2 at node blognode authentication server_encrypt
db2 connect to blogdb2 user admin using MySuperPassword

Once connected, I download a sample dataset and script from the popular Db2Tutorial website. I run the scripts against the database I just created.

wget https://www.db2tutorial.com/wp-content/uploads/2019/06/books.zip
unzip books.zip 
db2 -stvf ./create.sql 
db2 -stvf ./data.sql 
db2 "select count(*) author_count from authors"

RDS for Db2 - result of query

As you can see, there is nothing specific to Amazon RDS when it comes to connecting and using the database. I use standard Db2 tools and scripts.

One more thing
Amazon RDS for Db2 requires you to bring your own Db2 license. You must enter your IBM customer ID and site number before starting a Db2 instance.

To do so, create a custom DB parameter group and attach it to your database instance at launch time. A DB parameter group acts as a container for engine configuration values that are applied to one or more DB instances. In a Db2 parameter group, there are two parameters specific to IBM Db2 licenses: your IBM Customer Number (rds.ibm_customer_id) and your IBM site number (rds.ibm_site_id).

RDS for IBM Db2 - Parameter Group

If you do not know your site number, reach out to your IBM sales organization for a copy of a recent Proof-of-Entitlement (PoE), invoice, or sales order. All these documents should include your site number.

Pricing and availability
Amazon RDS for Db2 is available in all AWS Regions except China and GovCloud.

Amazon RDS pricing is on demand, and there are no upfront costs or subscriptions. You only pay by the hour when the database is running, plus the GB per month of database storage provisioned and backup storage you use and the number of IOPS you provision. The Amazon RDS for Db2 pricing page has the details of pricing per Region. As I mentioned earlier, Amazon RDS for Db2 requires you to bring your own Db2 license.

If you already know Amazon RDS, you’ll be delighted to have a new database engine available for your application developers. If you’re coming from an on-premises world, you will love the simplicity and automation that Amazon RDS offers.

You can learn many more details on the Amazon RDS for Db2 documentation page. Now go and deploy your first database with Amazon RDS for Db2 today!

— seb

Announcing throughput increase and dead letter queue redrive support for Amazon SQS FIFO queues

Post Syndicated from Danilo Poccia original https://aws.amazon.com/blogs/aws/announcing-throughput-increase-and-dead-letter-queue-redrive-support-for-amazon-sqs-fifo-queues/

With Amazon Simple Queue Service (Amazon SQS), you can send, store, and receive messages between software components at any volume. Today, Amazon SQS has introduced two new capabilities for first-in, first-out (FIFO) queues:

  • Maximum throughput has been increased up to 70,000 transactions per second (TPS) per API action in selected AWS Regions, supporting sending or receiving up to 700,000 messages per second with batching.
  • Dead letter queue (DLQ) redrive support to handle messages that are not consumed after a specific number of retries in a way similar to what was already available for standard queues.

Let’s take a more in-depth look at how these work in practice.

FIFO queues throughput increase up to 70K TPS
FIFO queues are designed for applications that require messages to be processed exactly once and in the order in which they are sent. While standard queues have an unlimited throughput, FIFO queues have an upper quota in the number of TPS per API action.

Standard and FIFO queues support batch actions that can send and receive up to 10 messages with a single API call (up to a maximum total payload of 256 KB). This means that a FIFO queue can process up to 10 times more messages per second than its maximum throughput.

At launch in 2016, FIFO queues supported up to 300 TPS per API action (3,000 messages per second with batching). This was enough for many use cases, but some customers asked for more throughput.

With high throughput mode launched in 2021, FIFO queues introduced a tenfold increase of the maximum throughput and could process up to 3,000 TPS per API action, depending on the Region. One year later, that quota was doubled to up to 6,000 TPS per API action.

This year, Amazon SQS has already increased FIFO queue throughput quota two times, to up to 9,000 TPS per API action in August and up to 18,000 TPS per API action in October (depending on the Region).

Today, the Amazon SQS team has been able to increase the FIFO queue throughput quota again, allowing you to process up to 70,000 TPS per API action (up to 700,000 messages per second with batching) in the US East (N. Virginia), US West (Oregon), and Europe (Ireland) Regions. This is more than two hundred times the maximum throughput at launch.

DLQ redrive support for FIFO queues
With Amazon SQS, messages that are not consumed after a specific number of retries can automatically be moved to a DLQ. There, messages can be analyzed to understand the reason why they have not been processed correctly. Sometimes there is a bug or a misconfiguration in the consumer application. Other times the messages contain invalid data from the source applications that needs to be fixed to allow the messages to be processed again.

Either way, you can define a plan to reprocess these messages. For example, you can fix the consumer application and redrive all messages to the source queue. Or you can create a dedicated queue where a custom application receives the messages, fixes their content, and then sends them to the source queue.

To simplify moving the messages back to the source queue or to a different queue, Amazon SQS allows you to create a redrive task. Redrive tasks are already available for standard queues. Starting today, you can also start a redrive task for FIFO queues.

Using the Amazon SQS console, I create a first queue (my-dlq.fifo) to be used as a DLQ. To redrive messages back to the source FIFO queue, the queue type must match, so this is also a FIFO queue.

Then, I create a source FIFO queue (my-source-queue.fifo) to handle messages as usual. When I create the source queue, I configure the first queue (my-dlq.fifo) as the DLQ and specify 3 as the Maximum receives condition under which messages are moved from the source queue to the DLQ.

Console screenshot.

When a message has been received by a consumer for more than the number of times specified by this condition, Amazon SQS moves the message to the DLQ. The original message ID is retained and can be used to uniquely track the message.

To test this setup, I use the console to send a message to the source queue. Then, I use the AWS Command Line Interface (AWS CLI) to receive the message multiple times without deleting it.

aws sqs receive-message --queue-url https://sqs.eu-west-1.amazonaws.com/123412341234/my-source-queue.fifo
{
    "Messages": [
        {
            "MessageId": "ef2f1c72-4bfe-4093-a451-03fe2dbd4d0f",
            "ReceiptHandle": "...",
            "MD5OfBody": "0f445a578fbcb0c06ca8aeb90a36fcfb",
            "Body": "My important message."
        }
    ]
}

To receive the same message more than once, I wait for the time specified in the queue visibility timeout to pass (30 seconds by default).

After the third time, the message is not in the source queue because it has been moved to the DLQ. When I try to receive messages from the source queue, the list is empty.

aws sqs receive-message --queue-url https://sqs.eu-west-1.amazonaws.com/123412341234/my-source-queue.fifo
{
    "Messages": []
}

To confirm that the message has been moved, I poll the DLQ to see if the message is there.

aws sqs receive-message --queue-url https://sqs.eu-west-1.amazonaws.com/123412341234/my-dlq.fifo  
{
    "Messages": [
        {
            "MessageId": "ef2f1c72-4bfe-4093-a451-03fe2dbd4d0f",
            "ReceiptHandle": "...",
            "MD5OfBody": "0f445a578fbcb0c06ca8aeb90a36fcfb",
            "Body": "My important message."
        }
    ]
}

Now that the message is in the DLQ, I can investigate why the message has not been processed (well, I know the reason this time) and decide whether to redrive messages from the DLQ using the Amazon SQS console or the new redrive API that was introduced a few months ago. For this example, I use the console. Back on the Amazon SQS console, I select the DLQ queue and choose Start DLQ redrive.

In Redrive configuration, I choose to redrive the messages to the source queue. Optionally, I can specify another FIFO queue as a custom destination. I use System optimized in Velocity control settings to redrive messages with the maximum number of messages per second optimized by Amazon SQS. Optionally, if there is a large number of messages in the DLQ, I can configure a custom maximum rate of messages per second to avoid overloading consumers.

Console screenshot.

Before starting the redrive task, I can use the Inspect messages section to poll and check messages. I already decided what to do, so I choose DLQ redrive to start the task. I have only one message to process, so the redrive task completes very quickly.

Console screenshot.

As expected, the message is back in the source queue and is ready to be processed again.

Console screenshot.

Things to know
Dead letter queue (DLQ) support for FIFO queues is available today in all AWS Regions where Amazon SQS is offered with the exception of GovCloud Regions and those based in China.

In the DLQ configuration, the maximum number of receives should be between 1 and 1,000.

There is no additional cost for using high throughput mode or a DLQ. Every Amazon SQS action counts as a request. A single request can send or receive from 1 to 10 messages, up to a maximum total payload of 256 KB. You pay based on the number of requests, and requests are priced differently between standard and FIFO queues.

As part of the AWS Free Tier, there is no cost for the first million requests per month for standard queues and for the first million requests per month for FIFO queues. For more information, see Amazon SQS pricing.

With these updates and the increased throughput, you can cover the vast majority of use cases with FIFO queues.

Use Amazon SQS FIFO queues to have high throughput, exactly-once processing, and first-in-first-out delivery.

Danilo

Replication failback and increased IOPS are new for Amazon EFS

Post Syndicated from Danilo Poccia original https://aws.amazon.com/blogs/aws/replication-failback-and-increased-iops-are-new-for-amazon-efs/

Today, Amazon Elastic File System (Amazon EFS) has introduced two new capabilities:

  • Replication failback – Failback support for EFS replication makes it easier and more cost-effective to synchronize changes between EFS file systems when performing disaster recovery (DR) workflows. You can now quickly replicate incremental changes from your secondary back to your primary file system after disaster events and other DR-related activities.
  • Increased IOPS – Amazon EFS now supports up to 250,000 read IOPS and up to 50,000 write IOPS per file system, making it easier to run more IOPS-heavy workloads at any scale for virtual servers, containers, and serverless functions that require shared storage.

Let’s see more in depth how these work in practice.

Introducing Amazon EFS replication failback
With Amazon EFS replication, you can create a replica of your file system in the same or in another AWS Region. When replication is enabled, Amazon EFS automatically keeps the primary (source) and secondary (destination) file systems synchronized. To help you meet your compliance and business continuity goals, EFS replication is designed to provide a recovery point objective (RPO) and a recovery time objective (RTO) measured in minutes.

Now, with failback support, you can respond to disaster recovery (DR) events, conduct planned business continuity tests, and manage other DR-related activities with greater speed and cost efficiency. Failback support allows you to switch the direction of replication between the primary and secondary file systems. EFS replication keeps the two file systems in sync by copying only incremental changes, eliminating the need to make full copies of your data or use a self-managed, custom solution to complete a recovery workflow.

Using Amazon EFS replication failback
I have a file system replicated to another Region. As part of a periodic DR test, I want to switch to using the secondary file system and then revert back to the primary file system, preserving all the changes made on the secondary file system. To do so, I can use EFS Replication failback in just a few steps.

First, I delete the replication from the primary (source) to the secondary (destination) file system. After this, the secondary file system becomes writable. To do so, in the Amazon EFS console, I check I am in the correct Region and select the secondary file system. In the Replication tab, I choose Delete replication and confirm deletion. I can also start from the primary file system. In that case, the Delete replication link in the Replication tab opens a new browser tab and asks to confirm deletion like before.

I can now use the secondary file system and change its data as needed.

To go back to using the primary file system, I create a “reverse replication” from the secondary to the primary file system. To do so, I check I am in the correct Region and select the secondary file system. In the Replication tab, I choose Create replication and the new option Replicate to existing file system. Then, I select the Region of the primary file system and use the console to browse the EFS file systems in that Region and choose the primary one.

Console screenshot.

The console warns me that Replication overwrite protection is enabled for the primary file system. I follow the Disable protection link to open a new browser tab and edit the primary file system to disable replication overwrite protection.

Console screenshot.

Now, I go back to the browser tab where I am creating the failback replication from the secondary to the primary file system. I refresh the protection check and choose to create the replication.

Console screenshot.

In the following dialog, I confirm that I want Amazon EFS to write to the primary file system.

Console screenshot.

To know when the primary file system is back in sync, I check the Last synced timestamp in the Replication tab, which indicates that all changes made to the source file system before that time are replicated to the destination. Optionally, I can look at the TimeSinceLastSync metric (expressed in minutes) in Amazon CloudWatch to understand how data is being replicated.

Console screenshot.

When the primary file system is back in sync, I delete the replication from the secondary to the primary file system. To complete the restore of the original configuration, I again create the replication from the primary to the secondary file system.

Increased IOPS per file system
The Amazon EFS team has been able to increase IOPS again! The last time they did it was just a few months back. Starting today, an EFS file system can handle up to 50,000 write IOPS (a 2x improvement) and up to 250,000 read IOPS (a 4.5x improvement) when working with frequently-accessed data from a high-performance cache managed by Amazon EFS.

You can monitor the percentage utilization of your file system’s available IOPS using the PercentIOLimit CloudWatch metric. This metric considers the maximum IOPS for writes and uncached reads, including combinations of the two. Reads from the cache are not included in the PercentIOLimit metric.

With these performance improvements, you can run even more IOPS-demanding workloads on Amazon EFS, such as machine learning (ML) training, fine-tuning, and inference. Other use cases that can benefit from the increased IOPS are data science user shares, SaaS applications, and media processing.

Things to know
EFS replication failback is available in all AWS Regions where EFS is available. There are no additional costs for using replication failback. You pay for the usual replication and file system changes as described in Amazon EFS pricing.

The increased IOPS limits are immediately available for all file systems using the Elastic Throughput mode in all Regions where EFS is available. You don’t need to do anything to benefit from these performance improvements. To achieve the maximum IOPS, your application needs sufficient parallelization. For example, using multiple clients and distributing the load across a large number of files. For more information, see the performance tips in the user guide.

Learn more
Amazon EFS product page

Danilo

AWS Control Tower adds new controls to help customers meet digital sovereignty requirements

Post Syndicated from Sébastien Stormacq original https://aws.amazon.com/blogs/aws/aws-control-tower-helps-customers-meet-digital-sovereignty-requirements/

Today, we added to AWS Control Tower a set of 65 purpose-built controls to help you meet your digital sovereignty requirements.

Digital sovereignty is the control of your digital assets: where the data resides, where it flows, and who has control over it. Since the creation of the AWS Cloud 17 years ago, we have been committed to giving you control over your data.

In November last year, we launched the AWS Digital Sovereignty Pledge, our commitment to offering all AWS customers the most advanced set of sovereignty controls and features available in the cloud. Since then, we have announced several steps in that direction. The AWS Nitro System has been validated by an independent third party to confirm that it contains no mechanism that allows anyone at AWS to access your data on AWS hosts. We launched AWS Dedicated Local Zones, a piece of infrastructure that is fully managed by AWS and built for exclusive use by a customer or community and placed in a customer-specified location or data center. And more recently, we announced the construction of a new independent sovereign Region in Europe.

The introduction of AWS Control Tower controls that support digital sovereignty is an additional step in our roadmap of capabilities for data residency, granular access restriction, encryption, and resilience.

AWS Control Tower offers a simple and efficient way to set up and govern a secure, multi-account AWS environment. It establishes a landing zone that is based on best-practices blueprints, and it enables governance using controls you can choose from a prepackaged list. The landing zone is a well-architected, multi-account baseline that follows AWS best practices. Controls implement governance rules for security, compliance, and operations.

The level of control required for digital assets greatly varies across industries and countries. Customers operating in highly regulated sectors might have the obligation to keep their data in a specific country or region, such as the European Union. Others might have obligations related to data encryption and where the encryption keys are kept, and so on. Furthermore, digital sovereignty requirements evolve rapidly, making it challenging to define and implement all the required controls. Many customers have told us they are concerned that they will have to choose between the full power of AWS and a feature-limited sovereign cloud solution that could hamper their ability to innovate, transform, and grow. We firmly believe that you shouldn’t have to make this choice.

AWS Control Tower helps reduce the time it takes to define, implement, and manage controls required to govern where your data is stored, transferred, and processed at scale.

AWS Control Tower offers you a consolidated view of the controls enabled, your compliance status, and controls evidence across your multiple accounts. This information is available on the console and by calling our APIs. As requirements and AWS services evolve, AWS Control Tower provides you with updated controls to help you continually manage your digital sovereignty needs.

Here are a couple of examples of the controls we added:

  • Operator access – Require that an Amazon Elastic Compute Cloud (Amazon EC2) dedicated host uses an AWS Nitro instance type.
  • Controlling access to your data – Require that an Amazon Elastic Block Store (Amazon EBS) snapshot cannot be publicly restorable.
  • Encryption at rest and in transit, including advanced key management strategies – Require an EC2 instance to use an AWS Nitro instance type that supports encryption in-transit between instances when created using the AWS::EC2::Instance resource type. It also requires that an Amazon Relational Database Service (Amazon RDS) database instance has encryption at rest configured to use an AWS KMS key that you specify for supported engine types.

These are just four examples from three categories. We’ve added 65 new controls, with over 245+ controls available under the digital sovereignty category grouping. The full list is available in the AWS Control Tower documentation.

One of the technical mechanisms AWS Control Tower uses to prevent accidental data storage or flow in a Region is the Region deny control. This parameter allows system administrators to deny access to AWS services and operations in selected AWS Regions. Until today, Region deny control could only be applied for an entire landing zone and all its organizational units (OUs) and accounts. With this launch, you can configure a new Region deny control at the organizational unit level and select the services and IAM principals to allow based on your unique business needs.

Let’s see how to get started
For this demo, let’s imagine that I want to restrict access to AWS services in a set of Regions.

I open the AWS Management Console and navigate to the AWS Control Tower page. On the left navigation pane, under Control Library , I select Categories > Groups > Digital Sovereignty.

Control Tower - Digital Sovereignty - 01

I can review the list of controls available.

Control Tower - Digital Sovereignty - 02

I locate and select the control I want to enable: Deny access to AWS based on the requested AWS Region for an organizational unit. There is a description of the control and a list of frameworks it applies to (NIST 800 and PCI DSS). I select Enable control.

Control Tower - Digital Sovereignty - 03

On the next page, I select the Organizational units (OU) for which I want to enable this control.

Control Tower - Digital Sovereignty - 04

I select the AWS Regions where I will allow access. All Regions left unchecked will have their access denied once the control is enforced.

Control Tower - Digital Sovereignty - 05

Then, I review the service control policy (SCP). It contains a Deny statement to prevent access to the services or APIs listed. Optionally, I can add NotActions. This is a list of exceptions. The services or APIs listed under NotActions are authorized. In this example, I deny everything excepted three APIs: sqs:SendMessage, ec2:StartInstances, and s3:GetObject.

Control Tower - Digital Sovereignty - 06

On the last page, I add a list of IAM principals (users or roles) that will be exempted from the control. This is an exception list. I also tag my control as usual with AWS resources.

Control Tower - Digital Sovereignty - 07

On the last screen (not shown here), I review all my parameters and select Enable control.

I can verify the list of OU for which the control is enabled under the OUs enabled tab.

Control Tower - Digital Sovereignty - 08

The summary page shows all Regions, APIs, and IAM principals enabled for this OU. All the rest is denied. I can update the parameters at any time.

Control Tower - Digital Sovereignty - 09

Pricing and availability
AWS Control Tower is available in all commercial Regions and in US GovCloud.

There is no additional charge to use AWS Control Tower. However, when you set up AWS Control Tower, you will begin to incur costs for AWS services configured to set up your landing zone and mandatory controls.

Certain AWS services, such as Organizations and AWS IAM Identity Center, come at no additional charge. However, you will pay for services such as AWS Service Catalog, AWS CloudTrail, AWS Config, Amazon CloudWatch, Amazon Simple Notification Service (Amazon SNS), Amazon Simple Storage Service (Amazon S3), and Amazon Virtual Private Cloud (Amazon VPC) based on your usage of these services. You only pay for what you use, as you use it. The AWS Control Tower pricing page has the details.

The new AWS Control Tower controls alleviate the burden of identifying and deploying safeguards to meet your digital sovereignty requirements. This set of controls is fully managed, and we will update them as AWS services and digital sovereignty requirements evolve over time.

Go and configure the AWS Control Tower controls that help support your digital sovereignty requirements today.

— seb

Announcing new diagnostic tools for AWS Partner-Led Support (PLS) participants

Post Syndicated from Jeff Barr original https://aws.amazon.com/blogs/aws/announcing-new-diagnostic-tools-for-aws-partner-led-support-pls-participants/

We have added a set of diagnostic tools that will give participants in the AWS Partner-Led Support program access to diagnostic tools that will empower them to do an even better job of supporting their customers.

Intro to AWS Partner-Led Support
This AWS Partner Network (APN) program enables AWS Partners to act as the customer’s sole point of contact for technical support. Customers contact their support partner for technical assistance instead of directly contacting AWS. In many cases the partner can resolve the issue directly. If the partner cannot do this, they get guidance from AWS via their AWS Support plan.

Diagnostic tools
These are the same tools that AWS Support Engineers use to assist AWS customers.

When a customer contacts their partner for support, the partner will federate into the customer’s AWS account. Then they will use the new diagnostic tools to access the customer metadata that will help them to identify and diagnose the issue.

The tools are enabled by a set of IAM roles set up by the customer. The tools can access and organize metadata and CloudWatch metrics, but they cannot access customer data and they cannot make any changes to any of the customer’s AWS resources. Here is a small sample of the types of information that partners will be able to access:

  • EC2 Capacity Reservations
  • Lambda Functions List
  • GuardDuty Findings
  • Load Balancer Responses
  • RDS and Redshift Clusters

Each tool operates on a list of regions selected when the tool is run, all invocations of each tool are logged and are easily accessible for review, and the output from each invocation can be directed to one of several different regions.

The tools can be invoked from the AWS Management Console, with API access available in order to support in-house tools, automation, and integration.

Learn more

The service is available today for partners that have joined the Partner-Led Support program. For more information, see the AWS Partner Led Support page.

If you are a current AWS Partner and would like to learn more about this program with an eye toward qualifying and participating, please visit AWS Partner Central.

Learn more about AWS Diagnostic Tools here.

Jeff;

Manage EDI at scale with new AWS B2B Data Interchange

Post Syndicated from Sébastien Stormacq original https://aws.amazon.com/blogs/aws/introducing-aws-b2b-data-interchange-simplified-connections-with-your-trading-partners/

Today we’re launching AWS B2B Data Interchange, a fully managed service allowing organizations to automate and monitor the transformation of EDI-based business-critical transactions at cloud scale. With this launch, AWS brings automation, monitoring, elasticity, and pay-as-you-go pricing to the world of B2B document exchange.

Electronic data interchange (EDI) is the electronic exchange of business documents in a standard electronic format between business partners. While email is also an electronic approach, the documents exchanged via email must still be handled by people rather than computer systems. Having people involved slows down the processing of the documents and also introduces errors. Instead, EDI documents can flow straight through to the appropriate application on the receiver’s system, and processing can begin immediately. Electronic documents exchanged between computer systems help businesses reduce cost, accelerate transactional workflows, reduce errors, and improve relationships with business partners.

Work on EDI started in the 1970s. I remember reading a thesis about EDIFACT, a set of standards defining the structure of business documents, back in 1994. But despite being a more than 50-year-old technology, traditional self-managed EDI solutions deployed to parse, validate, map, and translate data from business applications to EDI data formats are difficult to scale as the volume of business changes. They typically do not provide much operational visibility into communication and content errors. These challenges often oblige businesses to fall back to error-prone email document exchanges, leading to high manual work, increased difficulty controlling compliance, and ultimately constraining growth and agility.

AWS B2B Data Interchange is a fully managed, easy-to-use, and cost-effective service for accelerating your data transformations and integrations. It eliminates the heavy lifting of establishing connections with your business partners and mapping the documents to your system’s data-formats and gives visibility on documents that can’t be processed.

It provides a low-code interface for business partner onboarding and EDI data transformation to easily import the processed data to your business applications and analytics solutions. B2B Data Interchange gives you easy access to monitoring data, allowing you to build dashboards to monitor the volume of documents exchanged and the status of each document transformation. For example, it is easy to create alarms when incorrectly formatted documents can’t be transformed or imported into your business applications.

It is common for large enterprises to have thousands of business partners and hundreds of types of documents exchanged with each partner, leading to millions of combinations to manage. AWS B2B Data Interchange is not only available through the AWS Management Console, it is also accessible with the AWS Command Line Interface (AWS CLI) and AWS SDKs. This allows you to write applications or scripts to onboard new business partners and their specific data transformations and to programmatically add alarms and monitoring logic to new or existing dashboards.

B2B Data Interchange supports the X12 EDI data format. It makes it easier to validate and transform EDI documents to the formats expected by your business applications, such as JSON or XML. The raw documents and the transformed JSON or XML files are stored on Amazon Simple Storage Service (Amazon S3). This allows you to build event-driven applications for real-time business data processing or to integrate business documents with your existing analytics or AI/ML solutions.

For example, when you receive a new EDI business document, you can trigger additional routing, processing, and transformation logic using AWS Step Functions or Amazon EventBridge. When an error is detected in an incoming document, you can configure the sending of alarm messages by email or SMS or trigger an API call or additional processing logic using AWS Lambda.

Let’s see how it works
As usual on this blog, let me show you how it works. Let’s imagine I am in charge of the supply chain for a large retail company, and I have hundreds of business partners to exchange documents such as bills of lading, customs documents, advanced shipment notices, invoices, or receiving advice certificates.

In this demo, I use the AWS Management Console to onboard a new business partner. By onboarding, I mean defining the contact details of the business partner, the type of documents I will exchange with them, the technical data transformation to the JSON formats expected by my existing business apps, and where to receive the documents.

With this launch, the configuration of the transport mechanism for the EDI document is managed outside B2B Data Interchange. Typically, you will configure a transfer gateway and propose that your business partner transfer the document using SFTP or AS2.

There are no servers to manage or application packages to install and configure. I can get started in just four steps.

First, I create a profile for my business partner.

B2B Data Interchange - Create profile

Second, I create a transformer. A transformer defines the source document format and the mapping to my existing business application data format: JSON or XML. I can use the graphical editor to validate a sample document and see the result of the transformation directly from the console. We use the standard JSONATA query and transformation language to define the transformation logic to JSON documents and standard XSLT when transforming to XML documents.

B2B Data Interchange - Create transformer - input

B2B Data Interchange - Create transformer - transformation

I activate the transformer once created.

B2B Data Interchange - Create transformer - activate

Third, I create a trading capability. This defines which Amazon Simple Storage Service (Amazon S3) buckets will receive the documents from a specific business partner and where the transformed data will be stored.

There is a one-time additional configuration to make sure proper permissions are defined on the S3 bucket policy. I select Copy policy and navigate to the Amazon S3 page of the console to apply the policies to the S3 bucket. One policy allows B2B Data Interchange to read from the incoming bucket, and one policy allows it to write to your outgoing bucket.

B2B Data Interchange - Create capability

B2B Data Interchange - Create capability - configure directory

While I am configuring the S3 bucket, it is also important to turn on Amazon EventBridge on the S3 bucket. This is the mechanism we use to trigger the data transformation upon the arrival of a new business document.

B2B Data Interchange - Enbale EventBridge on S3 bucket

Finally, back at the B2B Data Interchange configuration, I create a partnership. Partnerships are dedicated resources that establish a relationship between you and your individual trading partners. Partnerships contain details about a specific trading partner, the types of EDI documents you receive from them, and how those documents should be transformed into custom JSON or XML formats. A partnership links the business profile I created in the first step with one or multiple document types and transformations I defined in step two.

B2B Data Interchange - Create partnership

This is also where I can monitor the status of the last set of documents I received and the status of their transformation. For more historical data, you can navigate to Amazon CloudWatch using the links provided in the console.

B2B Data Interchange - Log group

To test my setup, I upload an EDI 214 document to the incoming bucket and a few seconds later, I can see the transformed JSON document appearing in the destination bucket.

B2B Data Interchange - Transformed document on the bucket

I can observe the status of document processing and transformation using Invocations and TriggeredRules CloudWatch metrics from EventBridge. From there, together with the CloudWatch Logs, I can build dashboards and configure alarms as usual. I can also configure additional enrichment, routing, and processing of the incoming or transformed business documents by writing an AWS Lambda function or a workflow using AWS Step Functions.

Pricing and availability
AWS B2B Data Interchange is available today in three of the AWS Regions: US East (Ohio, N. Virginia) and US West (Oregon).

There is no one-time setup fee or recurring monthly subscription. AWS charges you on demand based on your real usage. There is a price per partnership per month and a price per document transformed. The B2B Data Interchange pricing page has the details.

AWS B2B Data Interchange makes it easy to manage your trading partner relationships so you can automatically exchange, transform, and monitor EDI workflows at cloud scale. It doesn’t require you to install or manage any infrastructure and makes it easy for you to integrate with your existing business applications and systems. You can use the AWS B2B Data Interchange API or the AWS SDK to automate the onboarding of your partners. Combined with a fully managed and scalable infrastructure, AWS B2B Data Interchange helps your business to be more agile and scale your operations.

Learn more:

Go build!

— seb

Automatic restore testing and validation now available in AWS Backup

Post Syndicated from Veliswa Boya original https://aws.amazon.com/blogs/aws/automatic-restore-testing-and-validation-is-now-available-in-aws-backup/

Performing automatic game day testing of all your critical resources is an important step in determining that you are prepared to respond to ransomware or any data loss event. This gives you the opportunity to take appropriate corrective actions based on the results and monitor results such as success or failure from these tests. Ultimately, you will be able to ascertain if the restore times meet your expected organization’s recovery time objective (RTO) goals, helping you develop improved recovery strategies.

Today, we’re announcing restore testing, a new capability in AWS Backup that allows you to perform restore testing of your AWS resources across storage, compute, and databases. With this feature, you can automate the entire restore testing process and avoid surprises later by determining now whether you can successfully recover using your backups in the event of a data loss such as ransomware. As an additional option, to demonstrate compliance with your organizational and regulatory data governance requirements, you can use the restore job results.

How it works
Restore testing in AWS Backup supports restore testing of resources for which the recovery points are created by AWS Backup, and the following services are supported: Amazon Elastic Block Store (Amazon EBS), Amazon Elastic Compute Cloud (Amazon EC2), Amazon Aurora, Amazon Relational Database Service (Amazon RDS), Amazon Elastic File Store (Amazon EFS), Amazon Simple Storage Service (Amazon S3), Amazon DynamoDB, Amazon FSx, Amazon DocumentDB, and Amazon Neptune. You can get started with restore testing from the AWS Backup console, AWS CLI, or AWS SDK.

Earlier, I created EC2 instances and a backup of these instances. Then, I created my restore testing plan in the AWS Backup console.

Create restore testing plan

In this General section, I enter the name of the plan, a test frequency, a Start time, and a Start within. Start time sets the time for the test to begin, for example, if you have a daily test frequency set, you specify what time the plan will run each day. Start within is the period of time in which the restore test is designated to begin. AWS Backup makes a best effort to commence all designated restore jobs during the Start within time window. You have a choice to keep this very minimal or very large based on your preference.

Figure 2: Section 1 Create restore testing plan

In the Recovery point selection section, I specify the vaults that the recovery points should come from, and a timeframe of eligible recovery points as part of this restore testing plan. I left the criteria for a recovery point at the default selection. I also didn’t opt to include recovery points generated by point-in-time recovery (PITR) in this restore testing plan.

section2_create

Tagging is optional so for the purposes of this test I didn’t add a tag. I was then finished with setup, and it was time for me to choose Create restore testing plan to proceed with creating this restore testing plan.

Figure 4: Finalize creation of restore testing plan

Once the restore testing plan has been created, it is time to assign resources. I start by specifying the IAM role that AWS Backup will assume when running the restore test. In terms of retention period before cleanup, I kept the default selection of deleting the restored resources immediately, to optimize costs. Alternatively, by specifying a retention period I could have also configured to integrate my own tests (for example, AWS Lambda) using Amazon EventBridge (CloudWatch Events) and send back validation status using the new PutRestoreValidationResult API so that it is reported in the restore job.

add_resource1

I have EC2 instances that I created and backed up earlier, and I specify that this plan is for Amazon EC2 resource types. I include all protected resources of this EC2 resource type in the selection scope. I have very few resources, so I didn’t add the optional tags.

add_resource2

I opted to use the default instance type for the restore. I also didn’t specify any additional parameters. It’s then time to choose Assign resources.

add_resource3

Once the resources have been assigned, all information related to the restore testing plan will be presented in a summarized form where you’ll be able to see when the restore testing jobs have executed.

Once I have enough restores performed over time, I can also view the Restore time history for every resource restored from the Protected resources tab.

Now available
Restore testing in AWS Backup is available in all AWS Regions where AWS Backup is available except AWS China Regions, AWS GovCloud (US), and Israel (Tel Aviv).
To learn more, visit the AWS Backup user guide. You can submit your questions to AWS re:Post for AWS Backup or through your usual AWS Support contacts.

— Veliswa

Amazon CodeWhisperer offers new AI-powered code remediation, IaC support, and integration with Visual Studio

Post Syndicated from Irshad Buchh original https://aws.amazon.com/blogs/aws/amazon-codewhisperer-offers-new-ai-powered-code-remediation-iac-support-and-integration-with-visual-studio/

Today, we’re announcing the general availability of artificial intelligence (AI)-powered code remediation and infrastructure as code (IaC) support for Amazon CodeWhisperer, an AI-powered productivity tool for the IDE and command line. Amazon CodeWhisperer is also now available in Visual Studio, in preview. These new enhancements to Amazon CodeWhisperer help to enable faster and more efficient software development by offloading undifferentiated work and delivering more automation, security, efficiency, and accelerated code delivery for customers, and provides this support in more places where developers love to work.

AI-powered code remediation – Since its launch, Amazon CodeWhisperer has identified hard-to-find security vulnerabilities with built-in security scans. It now provides generative AI-powered code suggestions to help remediate identified security and code quality issues. Built-in security scanning is designed to detect issues such as exposed credentials and log injection. Generative AI-powered code suggestions are designed to remediate the identified vulnerabilities, and are tailored to your application code so that you can quickly accept fixes with confidence. When a security scan is completed in CodeWhisperer, you are presented with code suggestions that you can simply accept to close the identified vulnerabilities quickly. Generative AI-powered code suggestions speed up the process of addressing security issues, so you can focus on higher-value work instead of manually reviewing code line by line to find the correct solution. You do not need to perform any additional setup in Amazon CodeWhisperer to start using this capability.

Security scanning is available for Java, Python, JavaScript, and now available for TypeScript, C#, AWS CloudFormation (YAML, JSON), AWS CDK (TypeScript, Python), and HashiCorp Terraform (HCL). Code suggestions to remediate vulnerabilities are currently available for code written in Java, Python, and JavaScript.

ACR- image

Infrastructure as code (IaC) – Amazon CodeWhisperer announces support for IaC, now encompassing AWS CloudFormation (YAML, JSON), AWS CDK (Typescript, Python), and HashiCorp Terraform (HCL). This update enhances the efficiency of IaC script development, allowing developers and DevOps teams to write infrastructure code seamlessly. With support for multiple IaC languages, CodeWhisperer promotes collaboration and consistency across diverse teams. This marks a significant advancement in cloud infrastructure development, offering a more streamlined and productive coding experience for users.

IaC

Visual Studio – Amazon CodeWhisperer is now available in Visual Studio 2022 (preview). Developers can build applications faster with real-time code suggestions for C#. Get started with the Individual Tier for free by installing the AWS Toolkit extension and signing in with an AWS Builder ID.

reference-tracker-vs

CodeWhisperer also helps developers code responsibly by flagging code suggestions that may resemble publicly available code. CodeWhisperer will provide the repository URL and license when code similar to public code.

code-suggestion-vs

Finally, Amazon CodeWhisperer recently previewed (11/20) a new time-saving capability for the command line interface. Now, Amazon CodeWhisperer adds typeahead code completions and inline documentation for hundreds of popular CLIs like Git, npm, AWS CLI, and Docker. It also adds the ability for you to translate natural language to shell code. For more details, read Introducing Amazon CodeWhisperer for command line.

Learn more
Amazon CodeWhisperer

Go build!

— Irshad