Tag Archives: news

AWS Week in Review – December 19, 2022

Post Syndicated from Sébastien Stormacq original https://aws.amazon.com/blogs/aws/aws-week-in-review-december-19-2022/

We are half way between the re:Invent conference and the end-of-year holidays, and I did expect the cadence of releases and news to slow down a bit, but nothing is further away from reality. Our teams continue to listen to your feedback and release new capabilities and incremental improvements.

This week, many items caught my attention. Here is my summary.

The AWS Pricing Calculator for Amazon EC2 is getting a redesign to provide you with a simplified, consistent, and efficient calculator to estimate costs. It also added a way to bulk estimate costs for EC2 instances, EC2 Dedicated Hosts, and Amazon EBS services. Try it for yourself today.

AWS Pricing Calculator

Amazon CloudWatch Metrics Insights alarms now enables you to trigger alarms on entire fleets of dynamically changing resources (such as automatically scaling EC2 instances) with a single alarm using standard SQL queries. For example, you can now write a query like this to collect data about CPU utilization over your entire dynamic fleet of EC2 instances.

SELECT AVG(CPUUtilization) FROM SCHEMA("AWS/EC2", InstanceId)

AWS Amplify is a command line tool and a set of libraries to help you to build web and mobile applications connected to a cloud backend. We released Amplify Library for Android 2.0, with improvements and simplifications for user authentication. The team also released Amplify JavaScript library version 5, with improvements for React and React Native developers, such as a new notifications channel, also known as in-app messaging, that developers can use to display contextual messages to their users based on their behavior. The Amplify JavaScript library has also received improvements to reduce the overall bundle size and installation size.

Amazon Connect added granular access control based on resource tags for routing profiles, security profiles, users, and queues. It also adds bulk import for user hierarchy tags. This allows you to use attribute-based access control policies for Amazon Connect resources.

Amazon RDS Proxy now supports PostgreSQL major version 14. RDS Proxy is a fully managed, highly available database proxy for Amazon Relational Database Service (Amazon RDS) that makes applications more scalable, more resilient to database failures, and more secure. It is typically used by serverless applications that can have a large number of open connections to the database server and may open and close database connections at a high rate, exhausting database memory and compute resources.

AWS Gateway Load Balancer endpoints now support Ipv6 addresses. You can now send IPv6 traffic through Gateway Load Balancers and its endpoints to distribute traffic flows to dual stack appliance targets.

Amazon Location Service now provides Open Data Maps maps, in addition to ESRI and Here maps. I also noticed that Amazon is a core member of the new Overture Maps Foundation, officially hosted by the Linux Foundation. The mission of the Overture Maps Foundation is to power new map products through openly available datasets that can be used and reused across applications and businesses. The program is driven by Amazon Web Services (AWS), Facebook’s parent company Meta, Microsoft, and Dutch mapping company TomTom.

AWS Mainframe Modernization is a set of managed tools providing infrastructure and software for migrating, modernizing, and running mainframe applications. It is now available in three additional AWS Regions and supports AWS CloudFormation, AWS PrivateLink, AWS Key Management Service.

X in Y. Jeff started this section a while ago to list the expansion of new services and capabilities to additional Regions. I noticed 11 Regional expansions this week:

Other AWS News
This week, I also noticed these AWS news items:

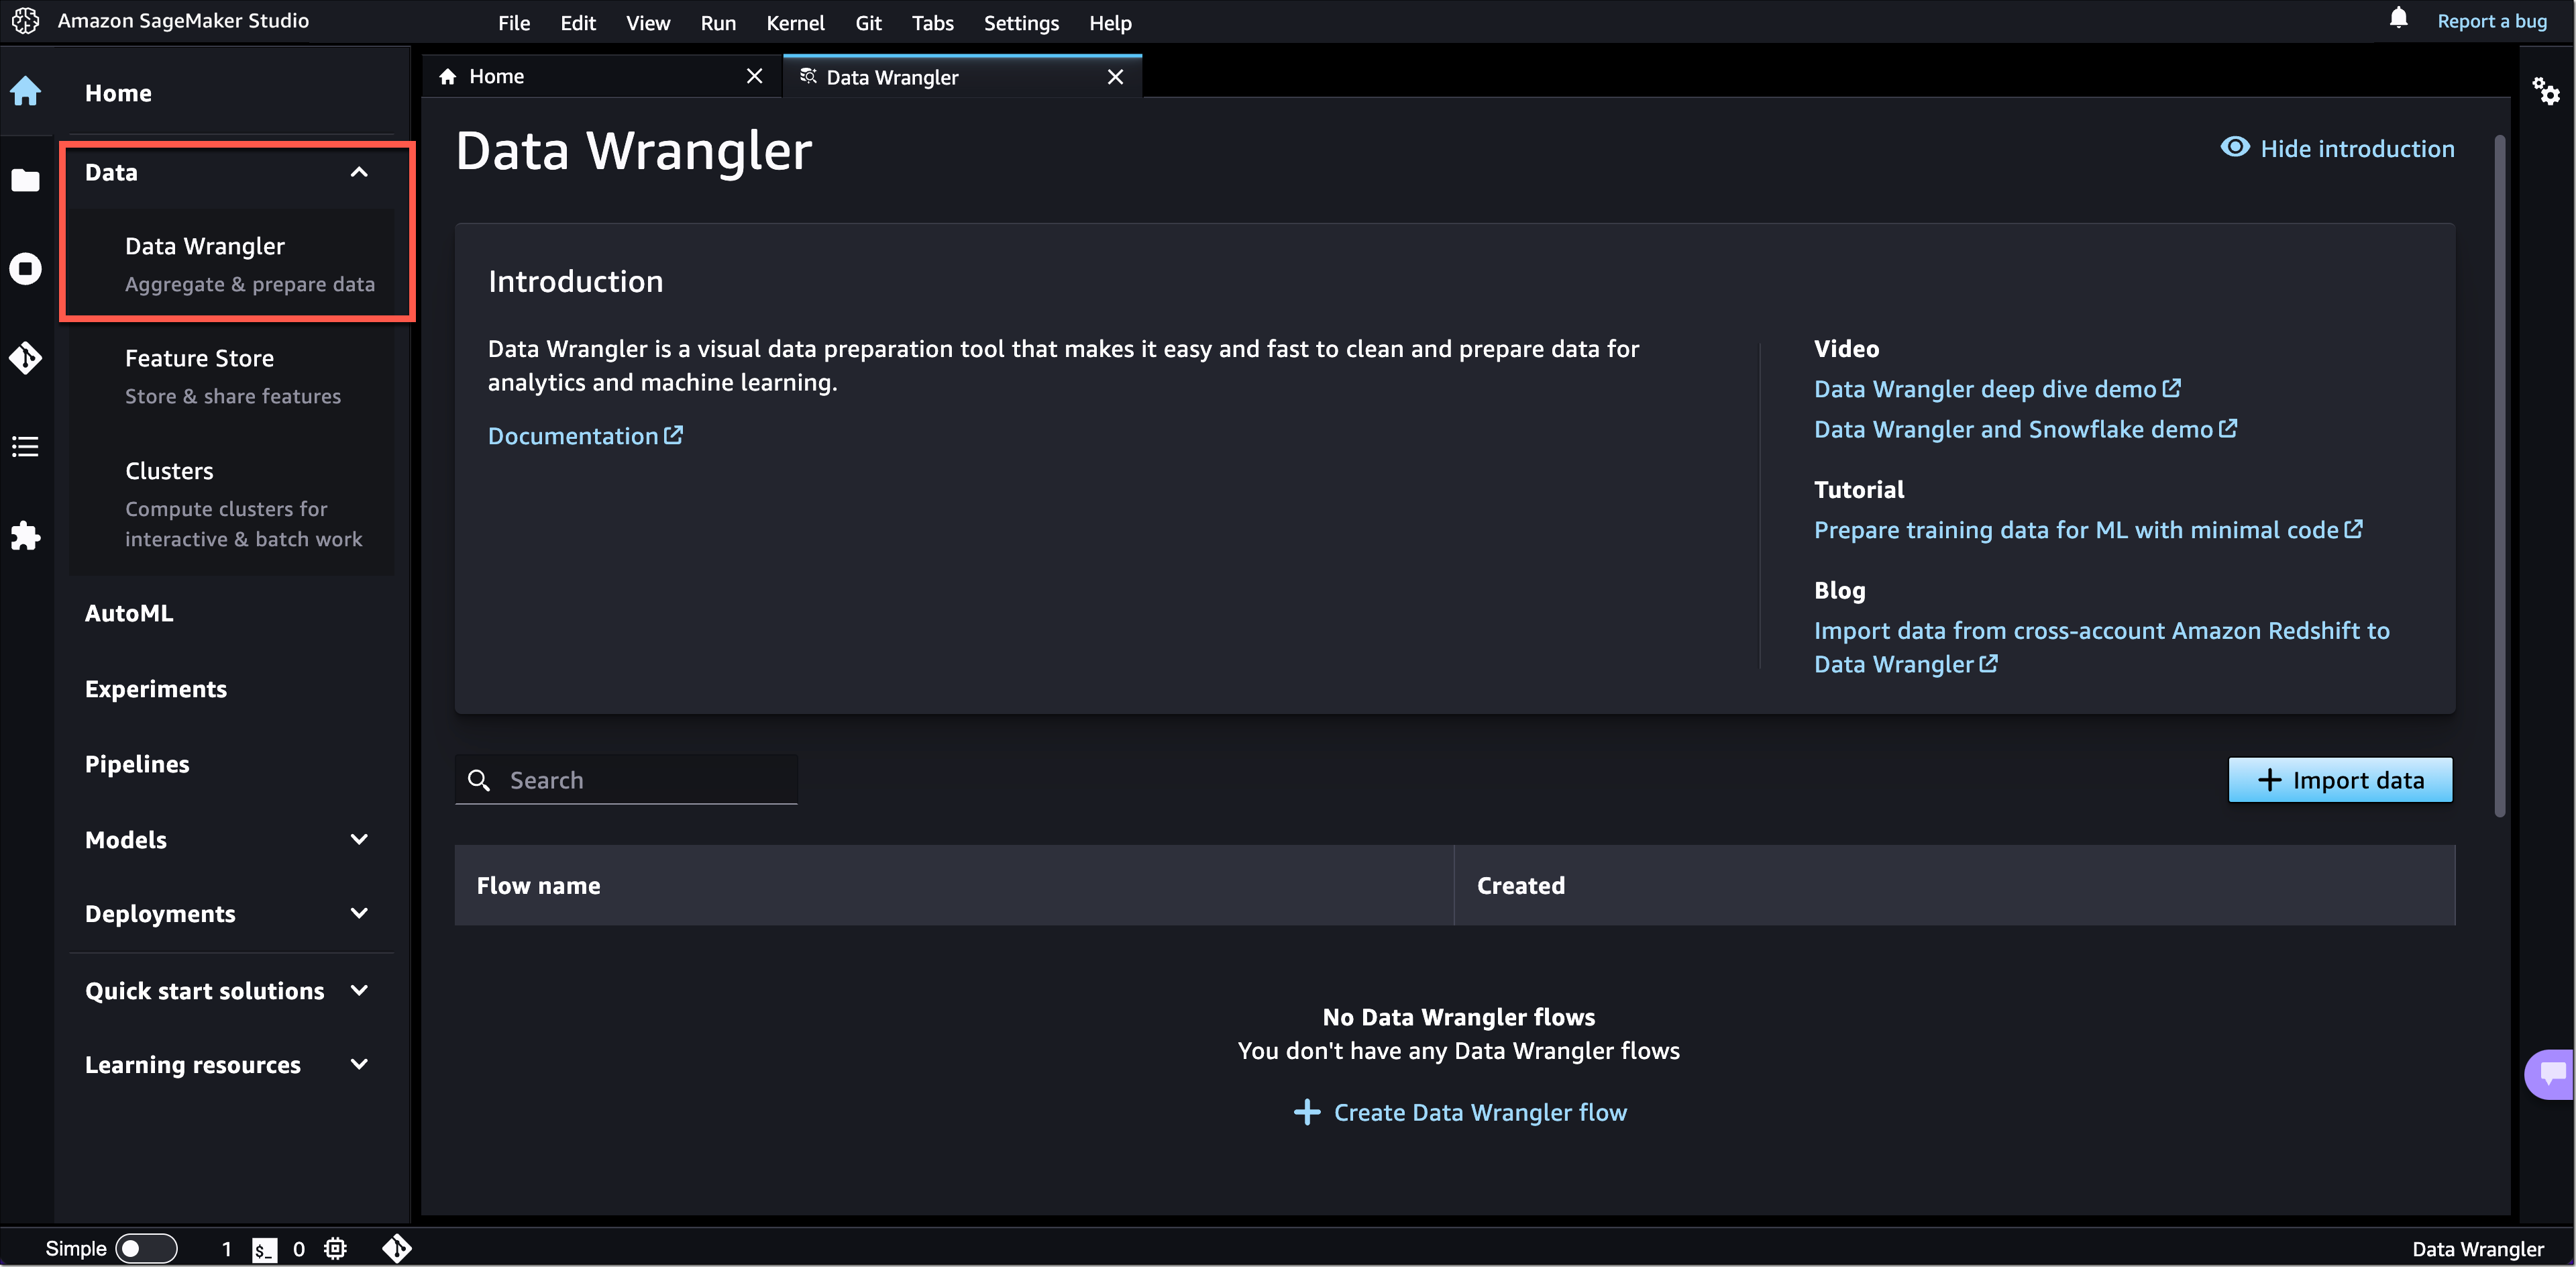
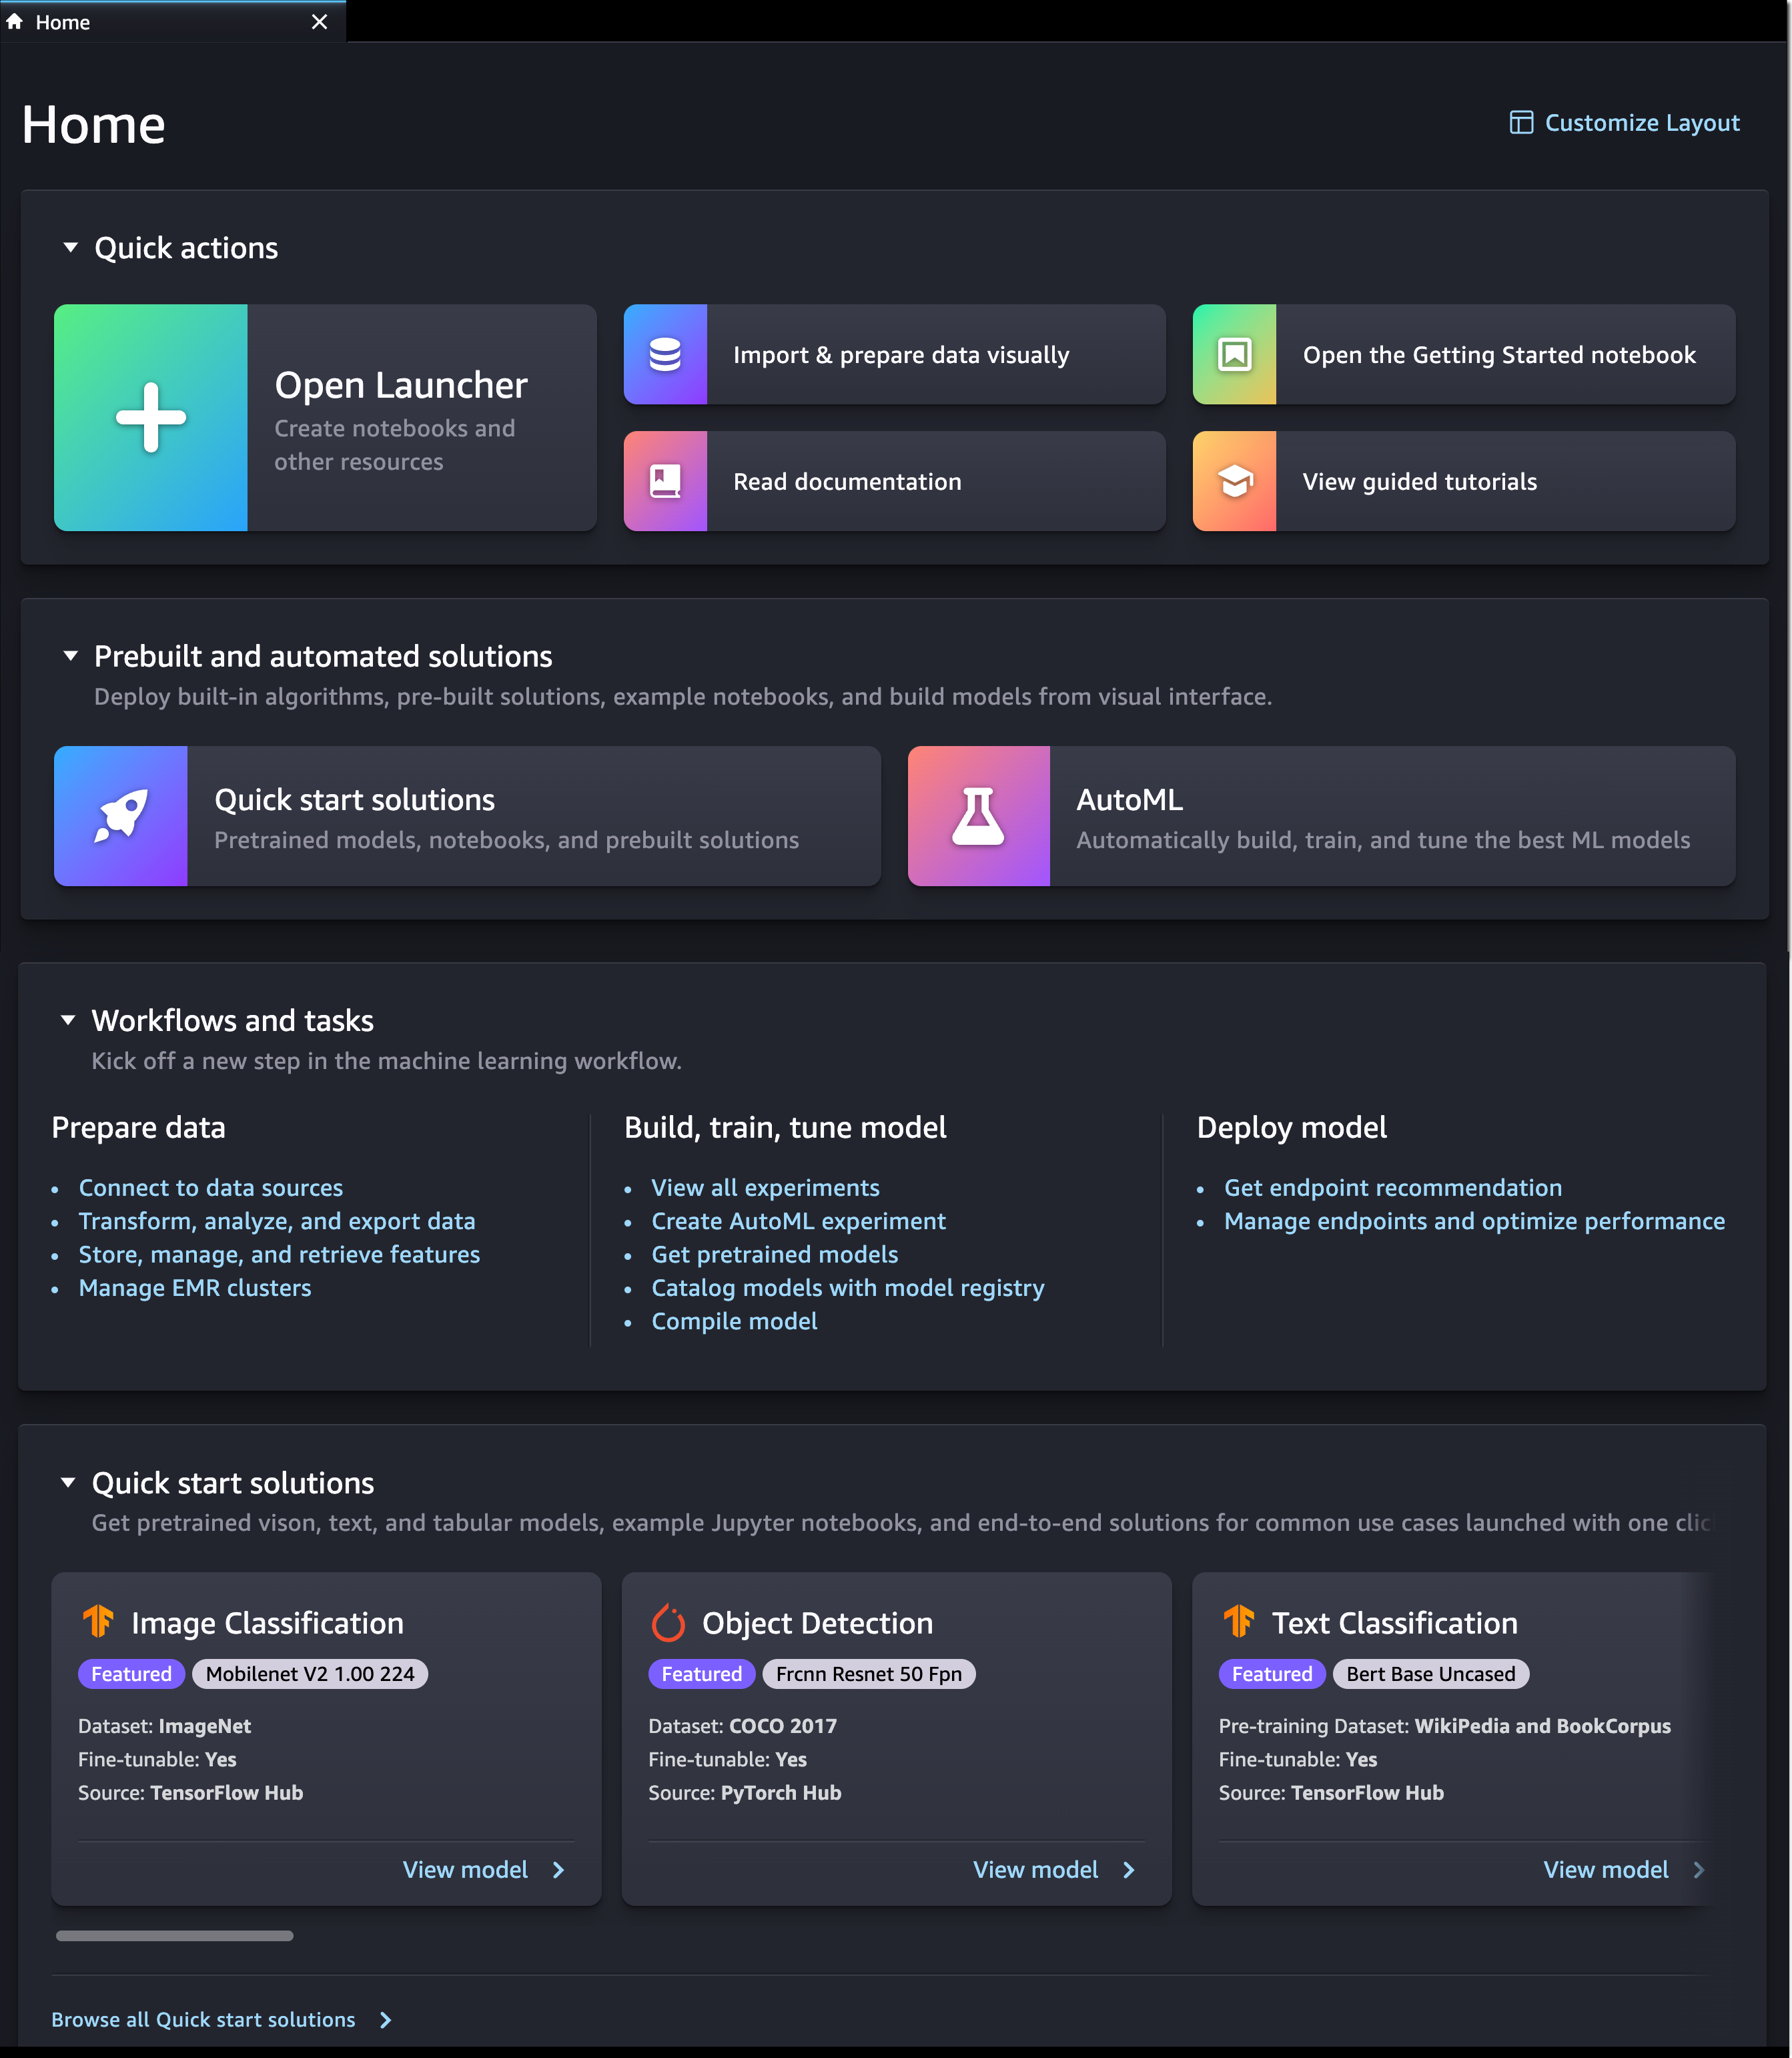
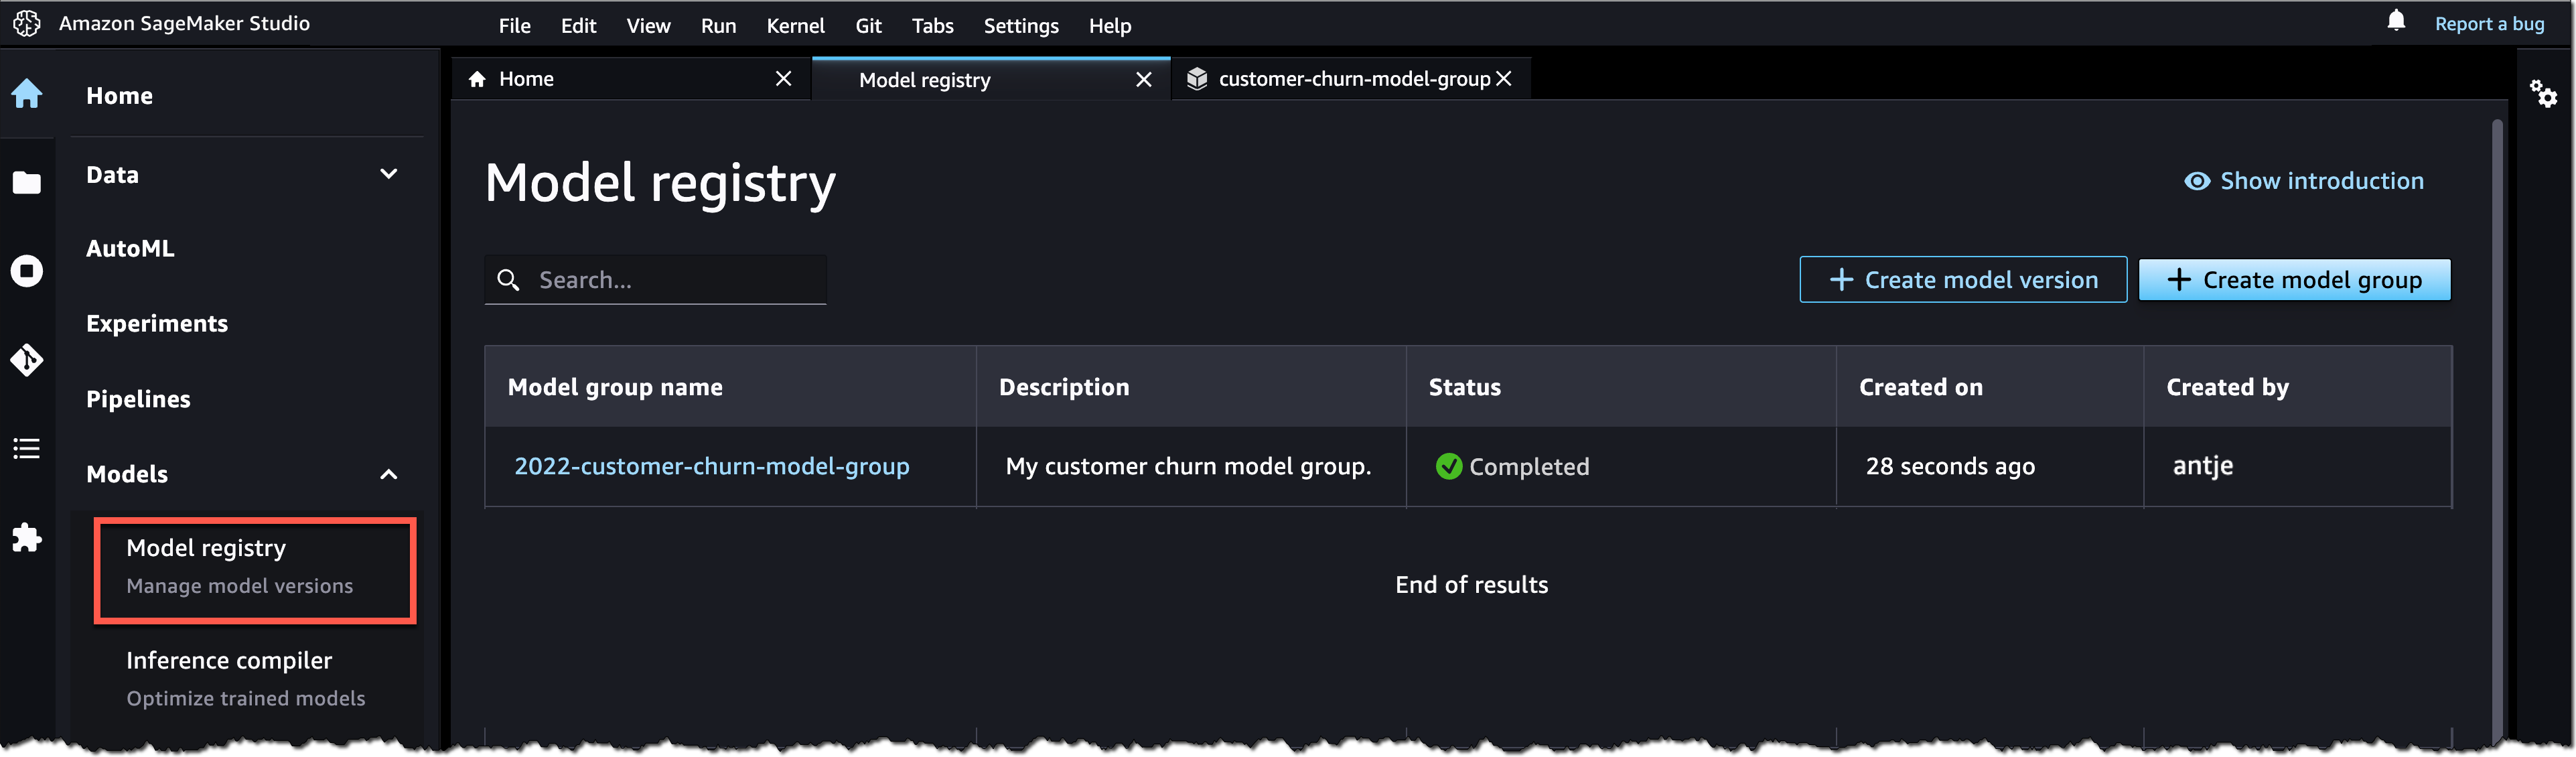
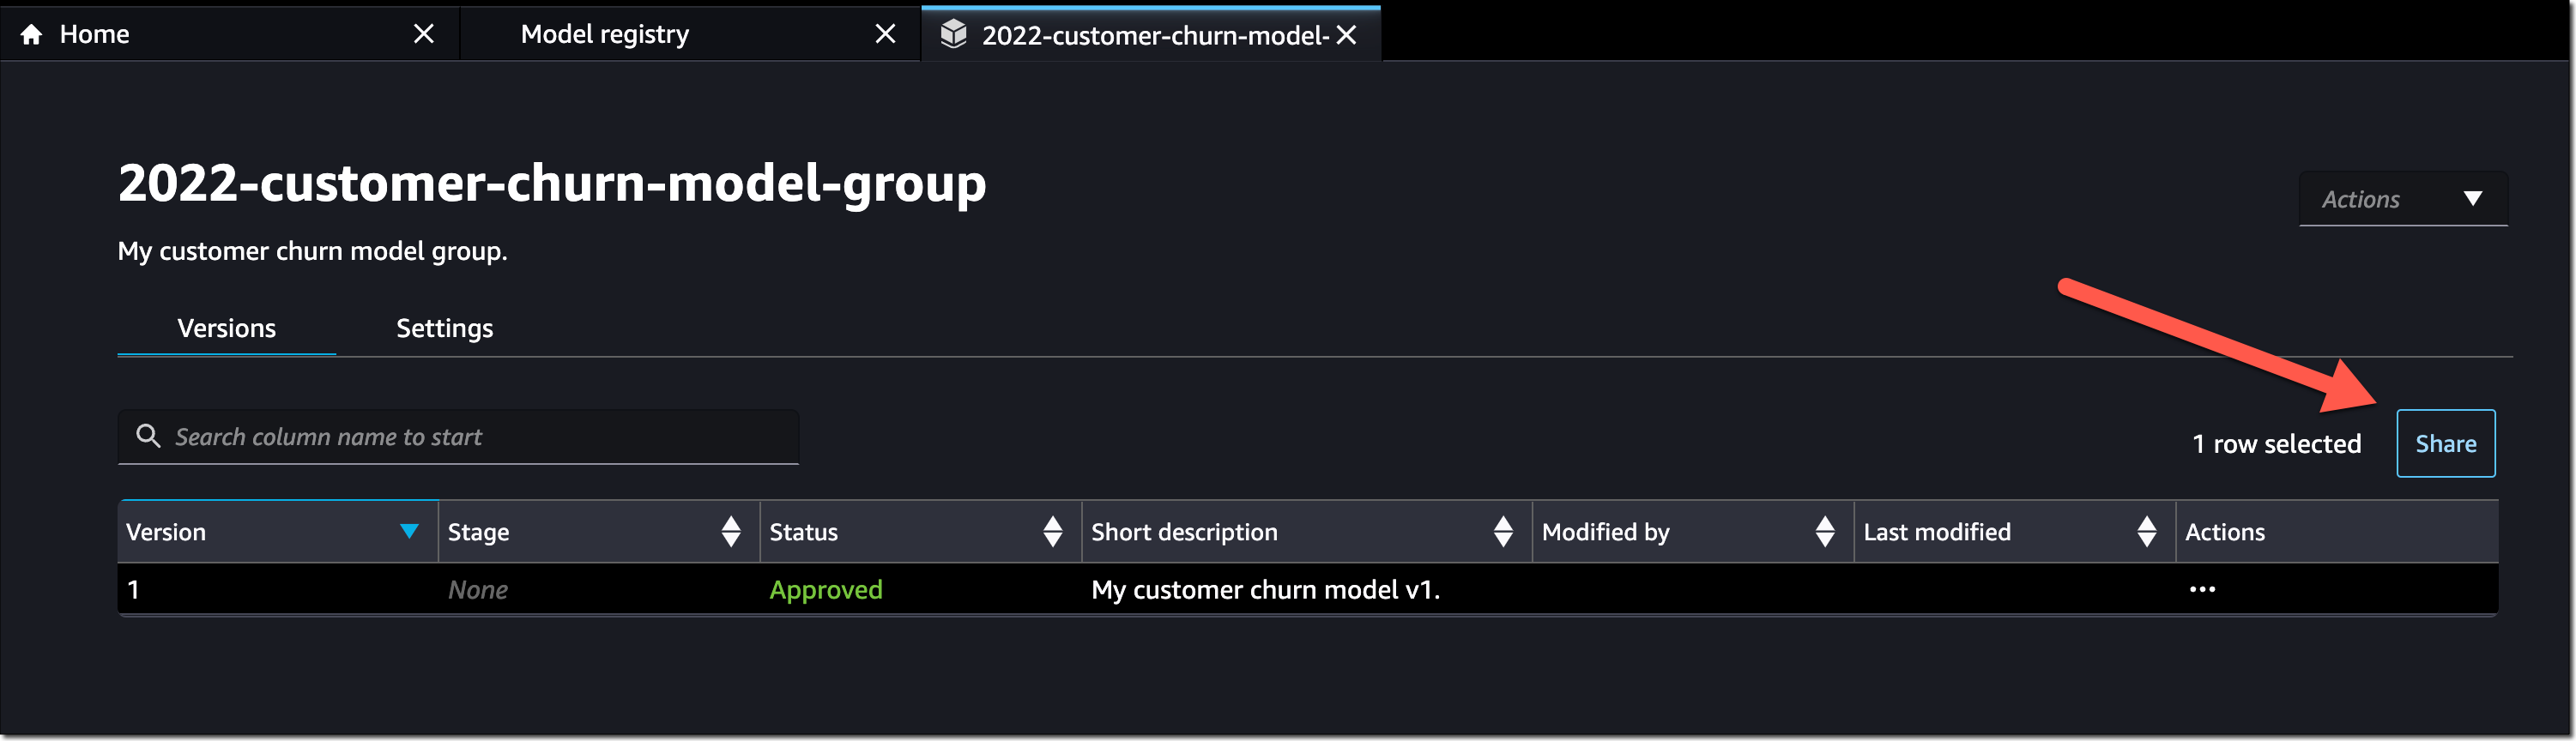
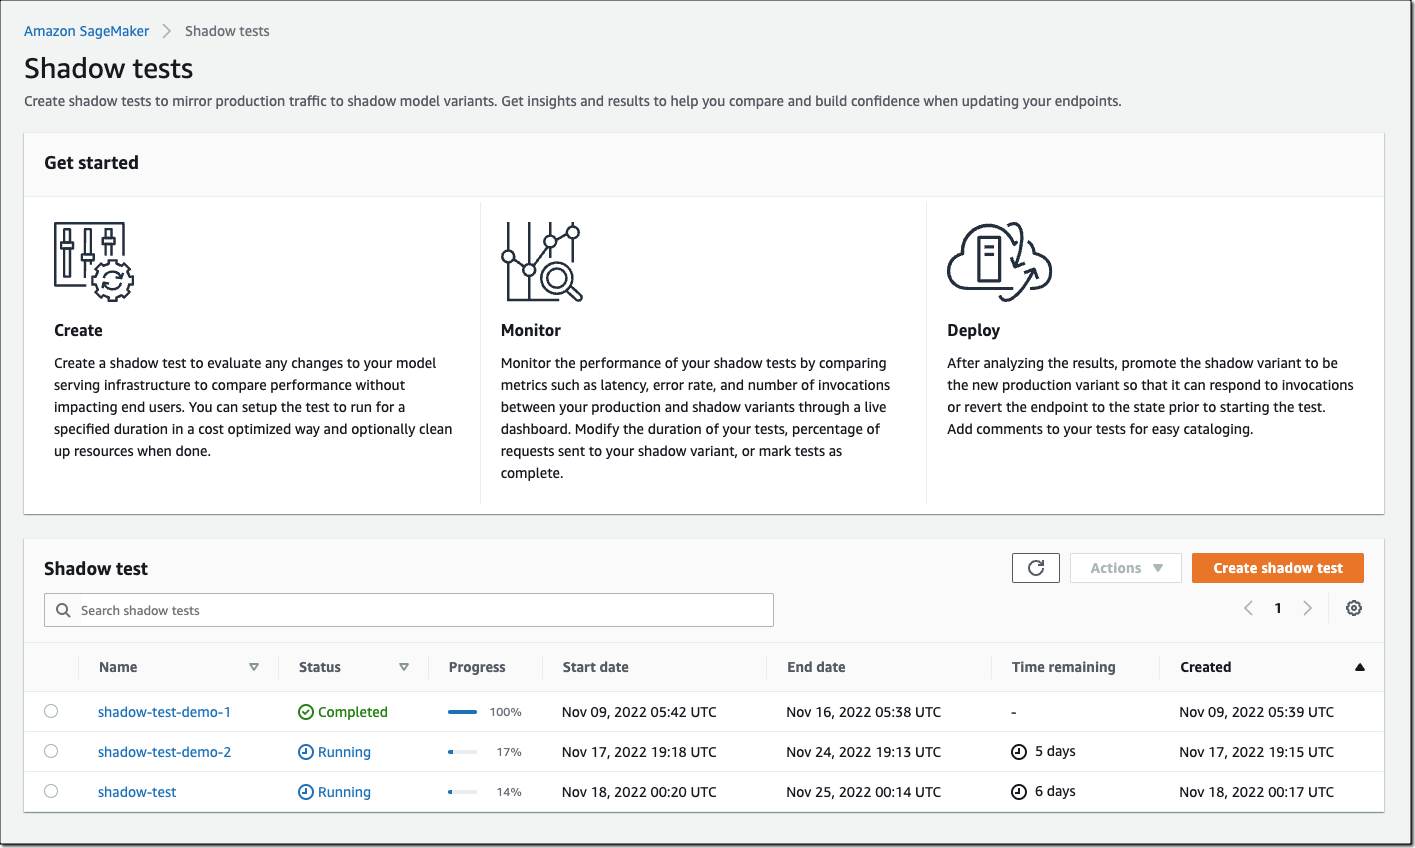
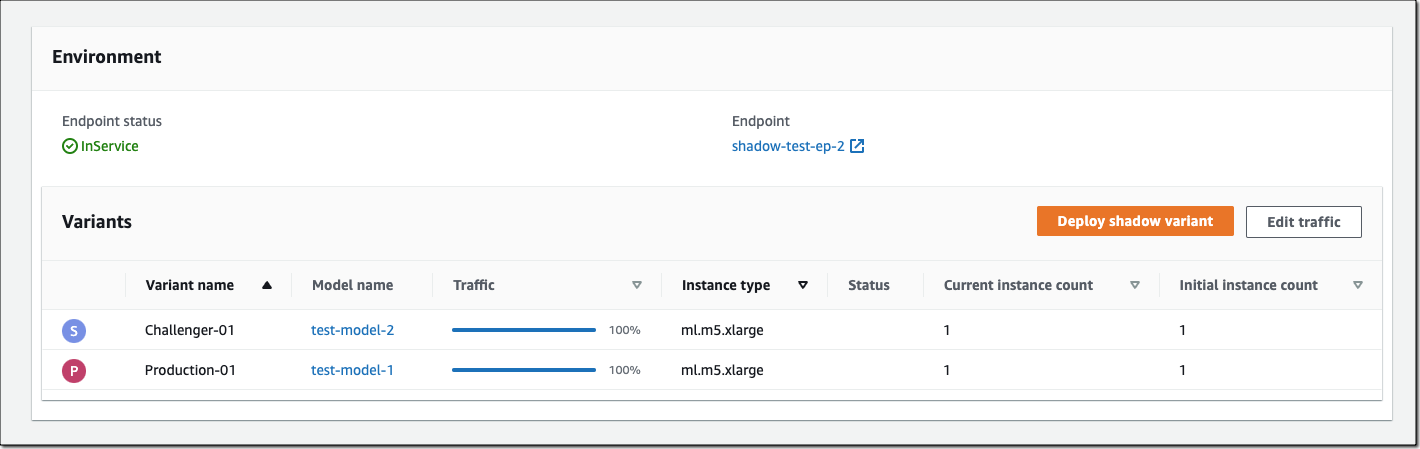
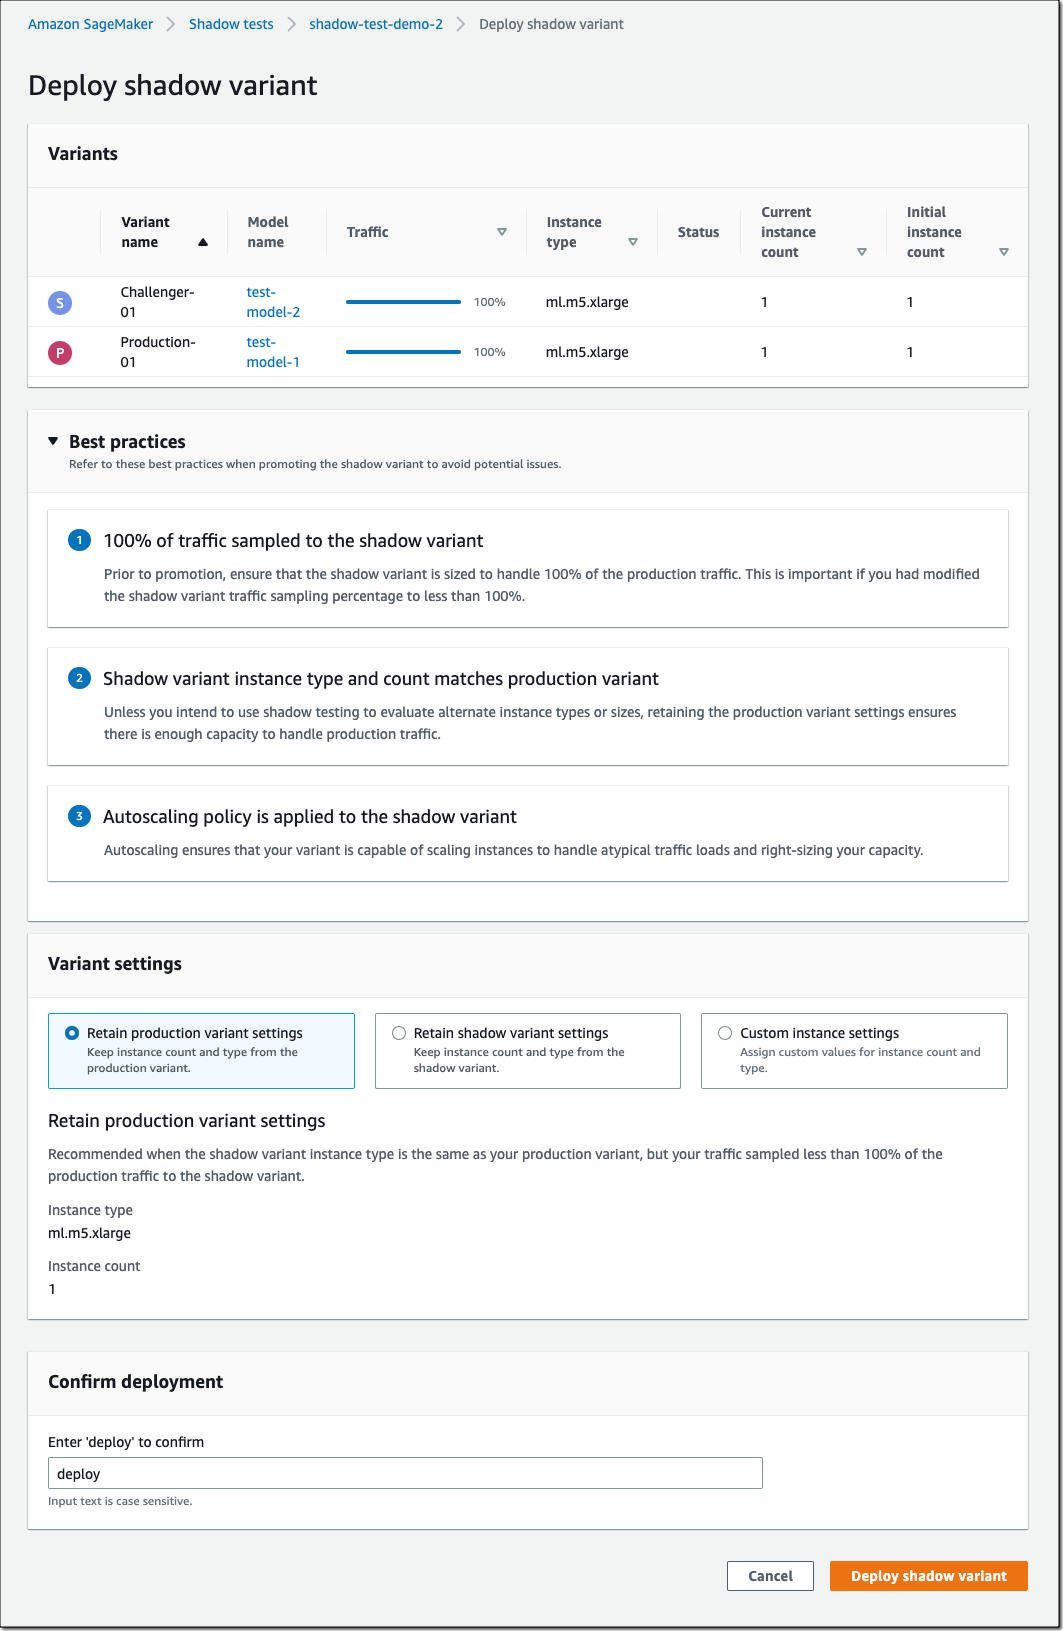
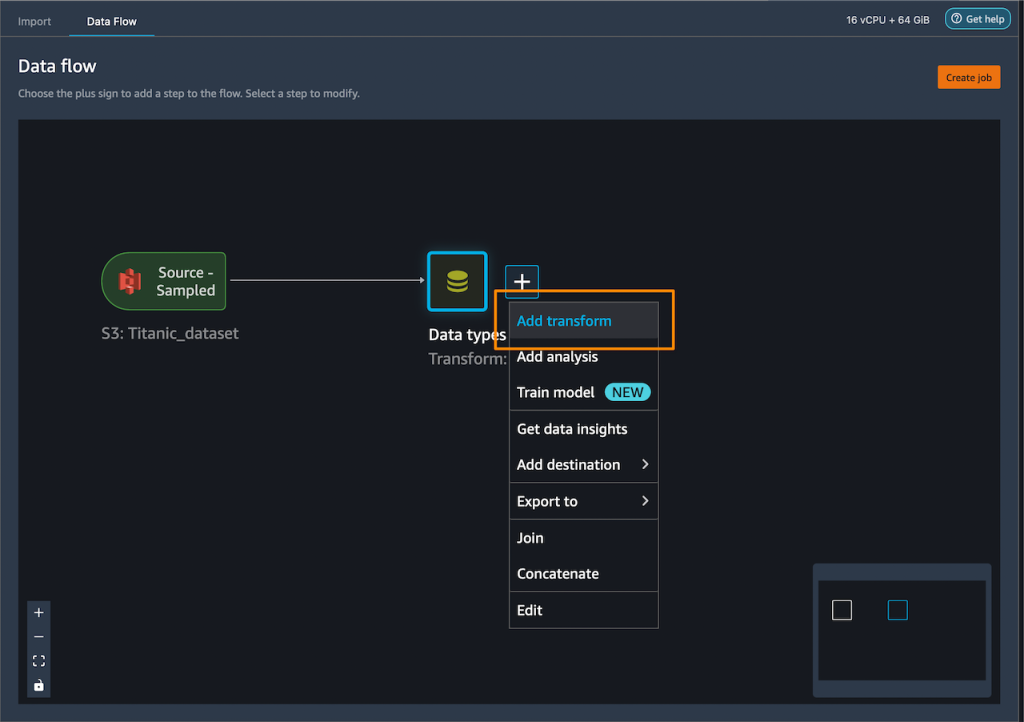
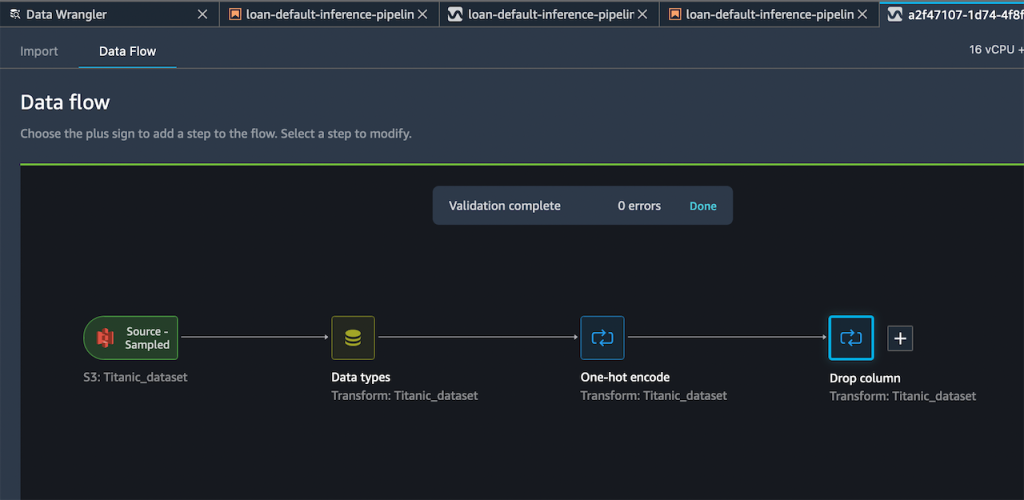
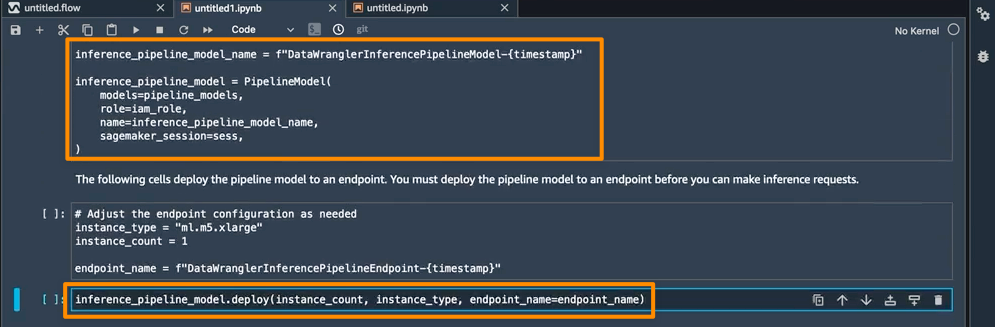
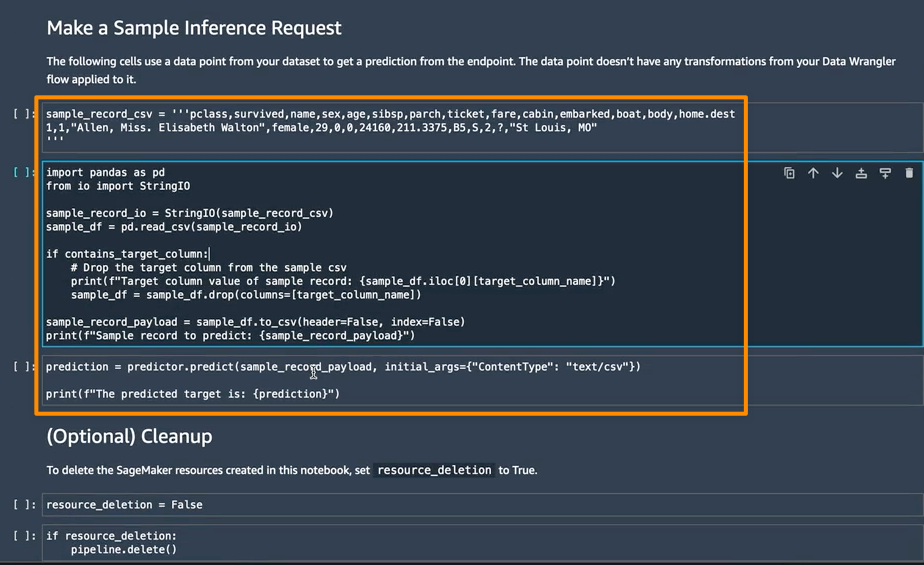
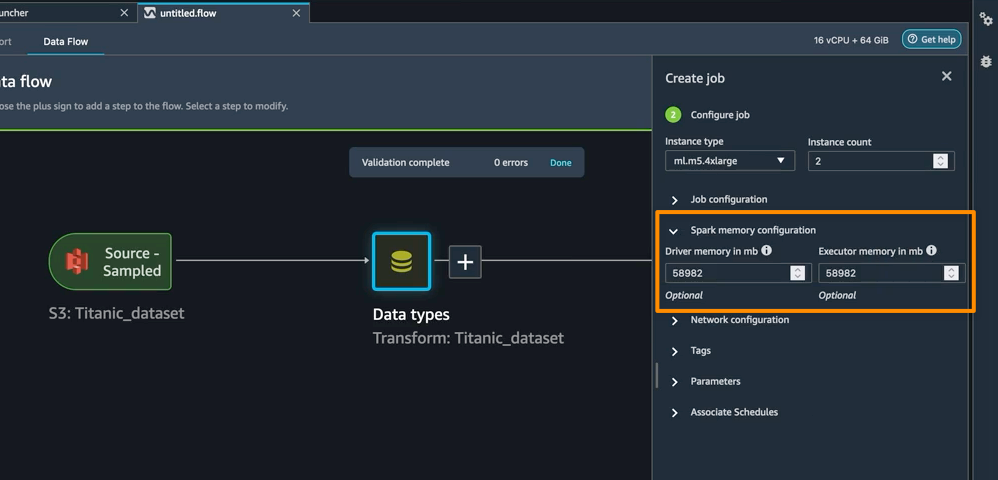
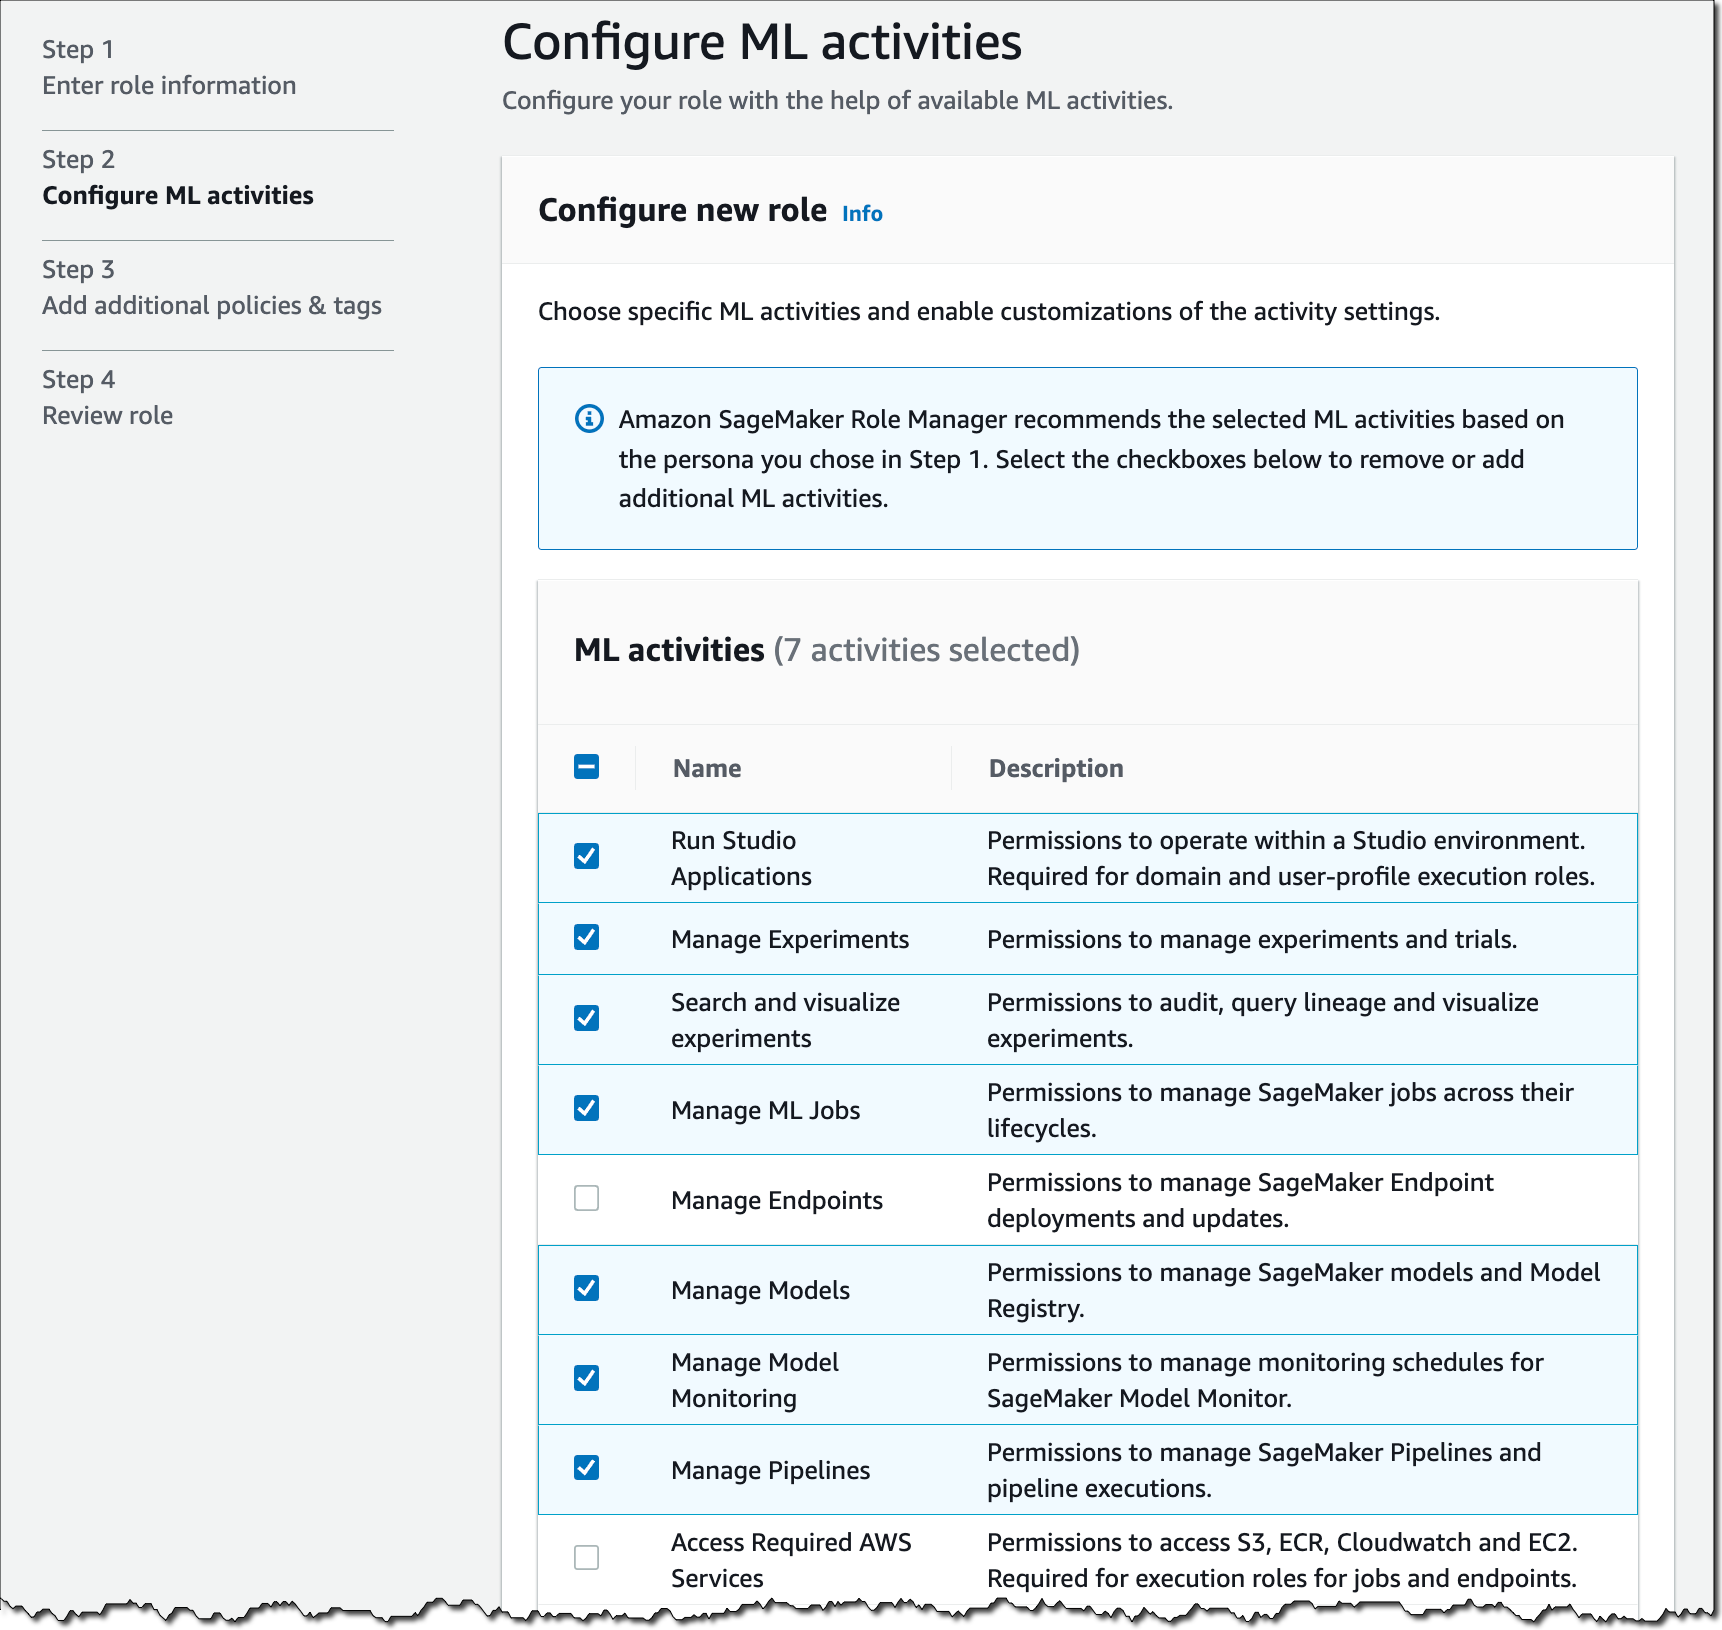
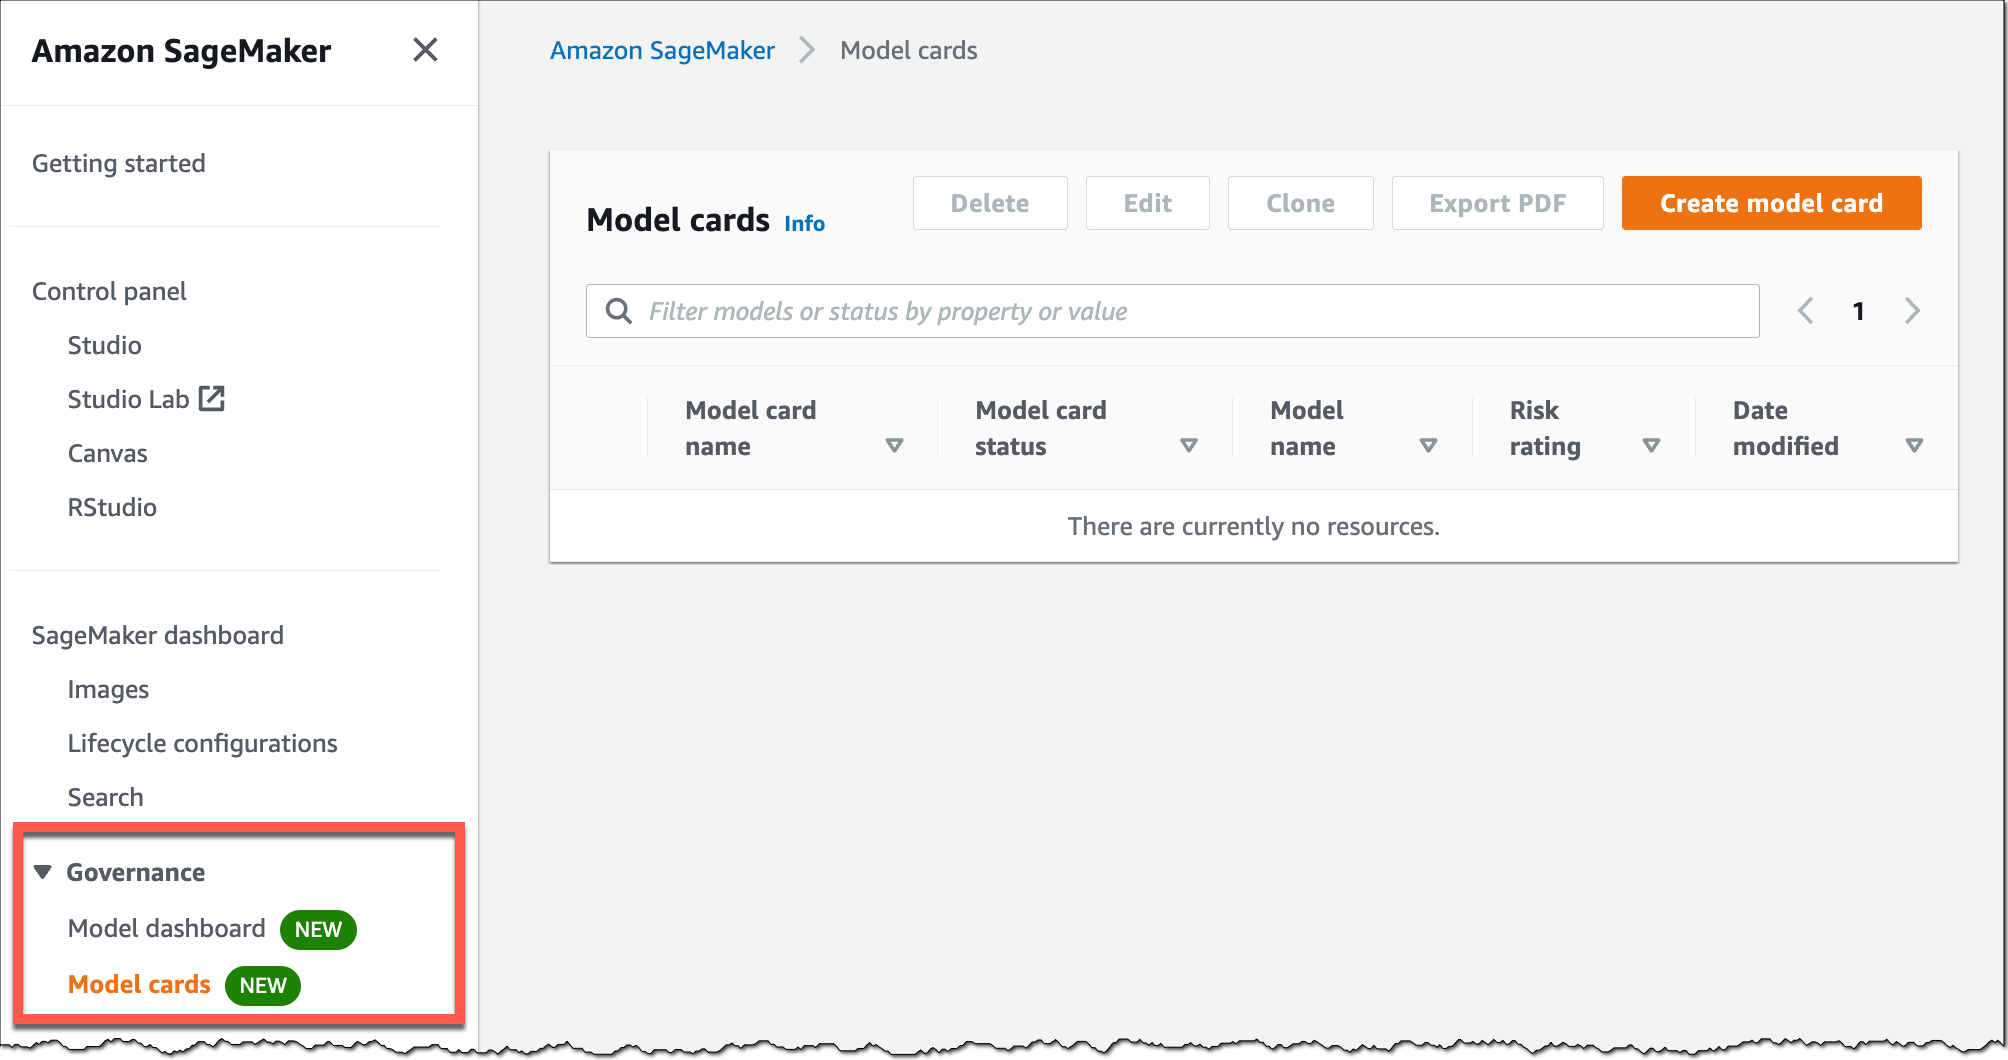
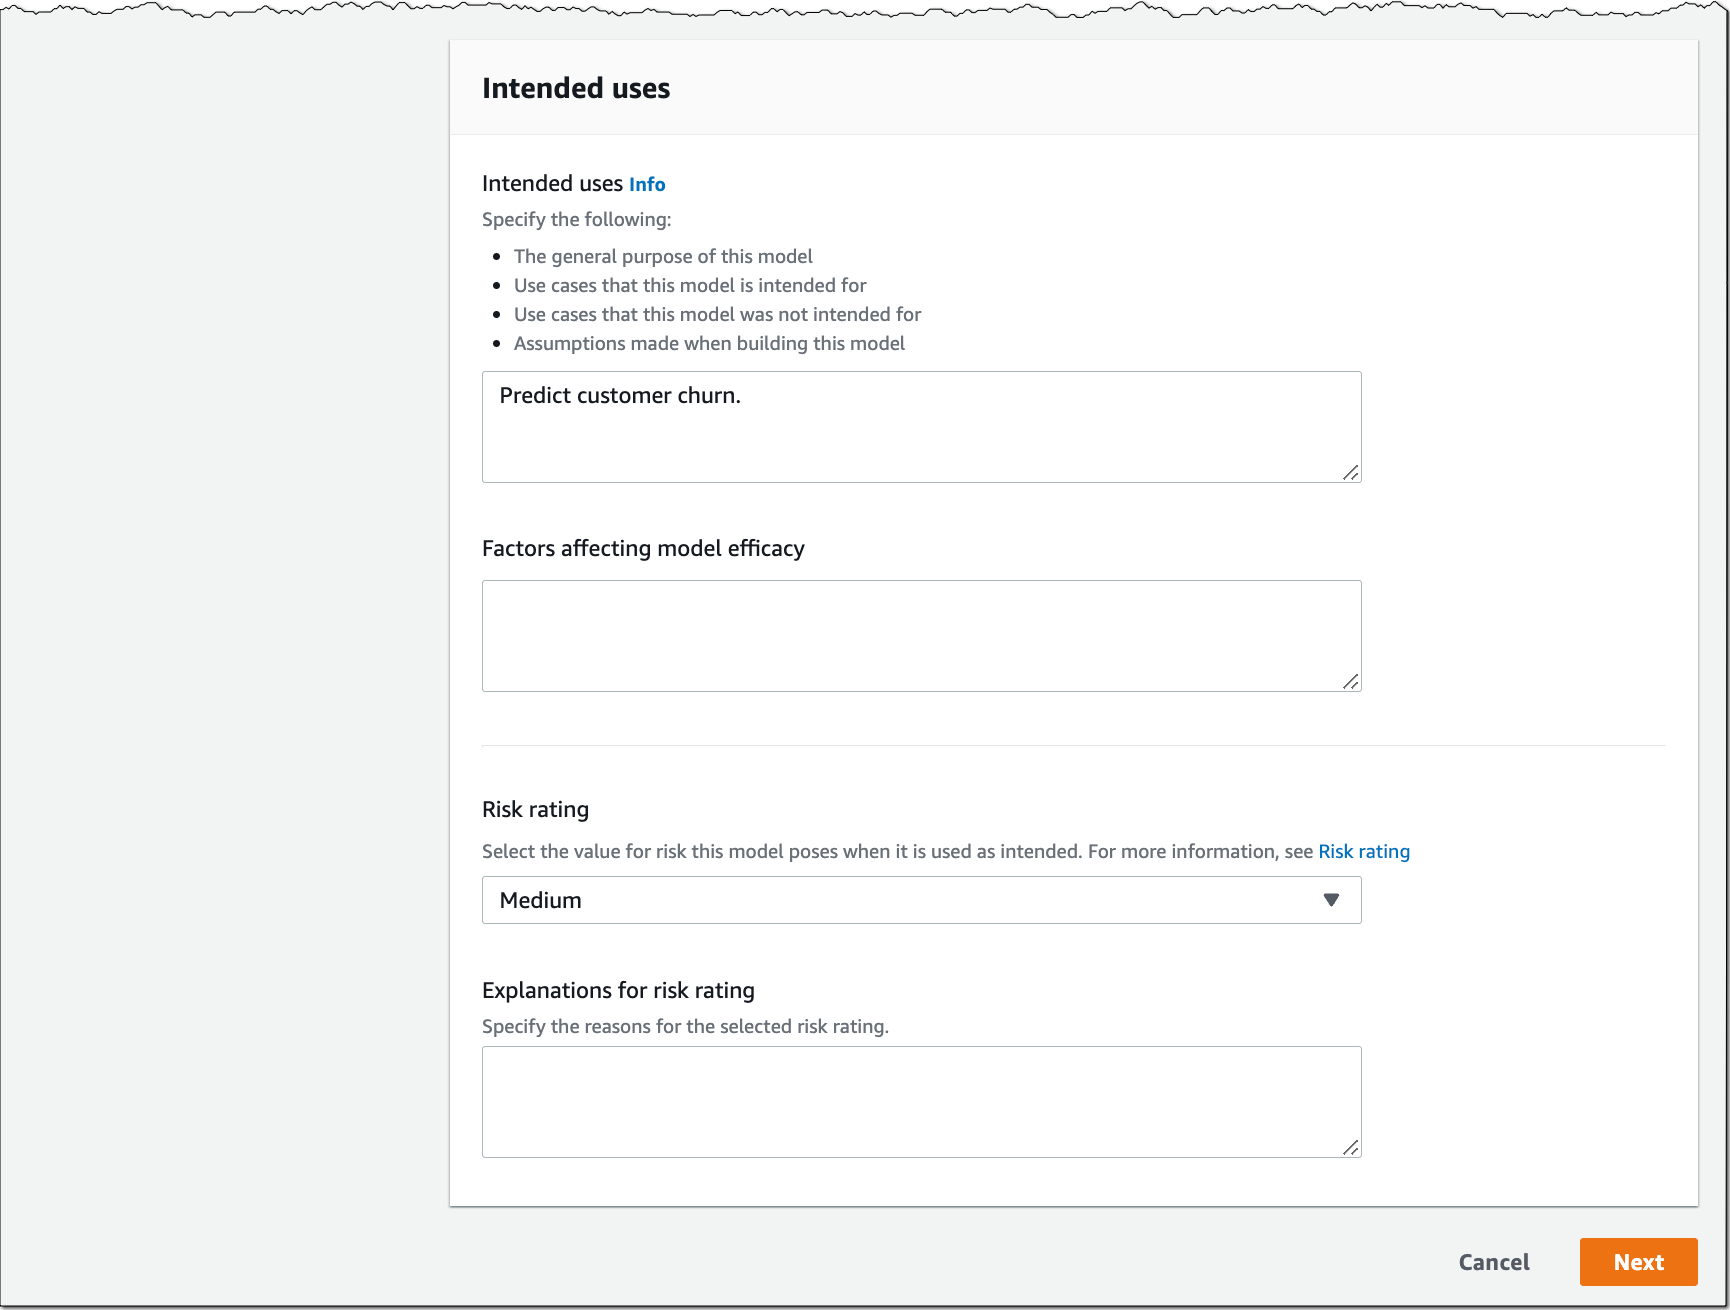
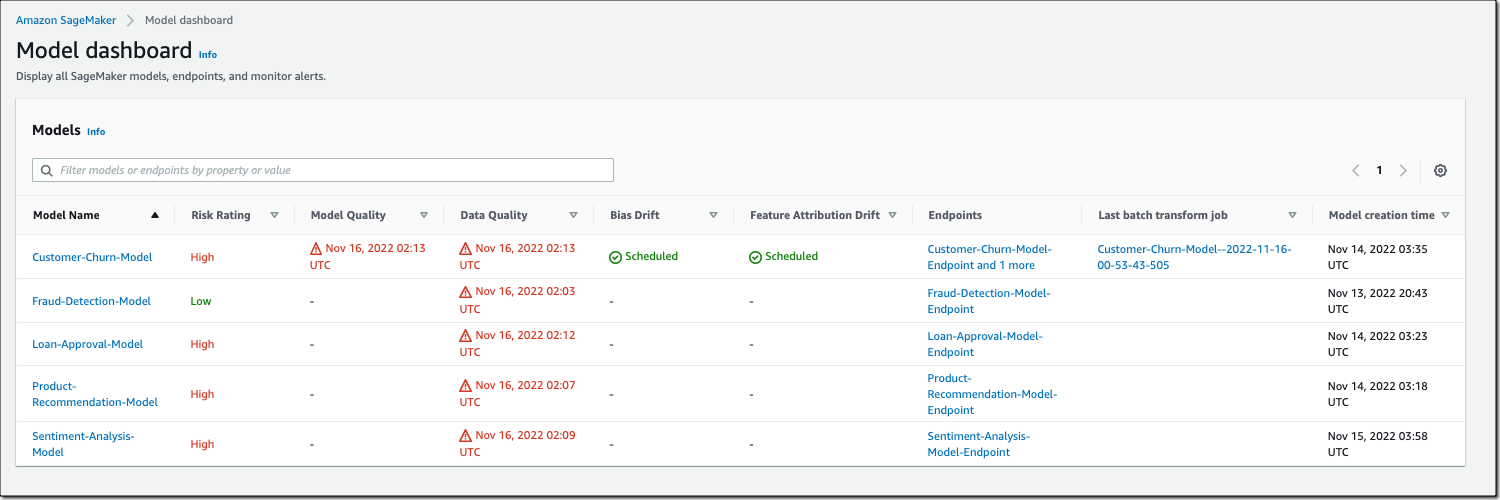
Amazon SageMaker turned 5 years old 🎉🎂. You can read the initial blog post we published at the time. To celebrate the event, the Amazon Science published this article where AWS’s Vice President Bratin Saha reflects on the past and future of AWS’s machine learning tools and AI services.

The security blog published a great post about the Cedar policy language. It explains how Amazon Verified Permissions provides a pre-built, flexible permissions system that you can use to build permissions based on both ABAC and RBAC in your applications. Cedar policy language is also at the heart of Amazon Verified Access I blogged about during re:Invent.

And just like every week, my most excellent colleague Ricardo published the open source newsletter.

Upcoming AWS Events
Check your calendars and sign up for these AWS events:

AWS re:Invent recaps in your area. During the re:Invent week, we had lots of new announcements, and in the next weeks, you can find in your area a recap of all these launches. All the events will be posted on this site, so check it regularly to find an event nearby.

AWS re:Invent keynotes, leadership sessions, and breakout sessions are available on demand. I recommend that you check the playlists and find the talks about your favorite topics in one collection.

AWS Summits season will restart in Q2 2023. The dates and locations will be announced here.

Stay Informed
That is my selection for this week! Heads up – the Week in Review will be taking a short break for the end of the year, but we’ll be back with regular updates starting on January 9, 2023. To better keep up with all of this news, do not forget to check out the following resources:

— seb
This post is part of our Week in Review series. Check back each week for a quick roundup of interesting news and announcements from AWS!

Progress on the Block Protocol

Post Syndicated from Joel Spolsky original https://www.joelonsoftware.com/2022/12/19/progress-on-the-block-protocol/

Since the 1990s, the web has been a publishing place for human-readable documents.

Documents published on the web are in HTML. HTML has a little bit of structure, for example, “here is a paragraph” or “emphasize this word.”

Then you stir in some CSS, which adds some pretty decorations to the structure, saying things like: make those paragraphs have tiny gray sans-serif text! And then people think you are hip. Unless they are older, and they can’t read your tiny gray words, so they give up on you.

That’s “structure,” as far as it goes, on the web.

Imagine, for example, that you mention a book on the web.

Goodnight Moon
by Margaret Wise Brown
Illustrated by Clement Hurd
Harper & Brothers, 1947
ISBN 0-06-443017-0

There’s not much structure there. A naive computer program reading this web page might not realize I was even mentioning a book. All I did was make the title bold.

So, also since the 1990s, people have realized that we can make the web a much more useful place to publish information if we applied a bit more structure. As early as 1999, Tim Berners-Lee was writing about the Semantic Web:

“I have a dream for the Web [in which computers] become capable of analyzing all the data on the Web – the content, links, and transactions between people and computers. A ‘Semantic Web’, which makes this possible, has yet to emerge, but when it does, the day-to-day mechanisms of trade, bureaucracy and our daily lives will be handled by machines talking to machines. The ‘intelligent agents’ people have touted for ages will finally materialize.”

Tim Berners-Lee, Weaving The Web, 1999 HarperSanFrancisco (Chapter 12)

Using the Semantic Web you might publish a book title with a lot more detail that makes it computer-readable. To do this, you would probably start by going to schema.org and looking up their idea of a book. Then you could use one of a number of formats, like RDF or JSON-LD, to add additional markup to your HTML saying “hey! here’s a book!”

Ok, well, doing that is kinda hard to figure out, and, to be honest, it’s homework. Once your beautiful blog post is published and human-readable, it’s hard to gather the mental energy to figure out how to add the additional fancy markups that will make your web page computer-readable, and, unless there is already a computer reading your web pages, at this point, you usually give up. So, yeah. That was 1999, and not much progress has been made and there is very little of this semantic markup in the wild.

Well.

We would like to fix this, because human progress depends on getting more and more information in formats that are readily accessible, both by regular humans, their dumb A.I. li’l sibs, and your more traditional computer programs.

Here is something I believe: people will only add semantic markup to their web pages if doing so is easier than not.

In other words, the cost of adding semantic markup has to be zero or negative, or this whole project is not going anywhere.

Now imagine this world for a second:

  • I want to insert a book into my blog post
  • I type /book
  • A search box appears where I start typing in the title of my book and choose from an autocomplete list.
  • Once I find the book, a block gets inserted in my blog post showing details of the book in a format I like, with nice semantic markup behind the scenes.

In this world I did less work to insert a book (because I was assisted by a UI that looked up the details for me).

You can imagine the same scenario applying to literally any other kind of structured data.

  • I want to insert an address into my blog post
  • I type /address
  • A search box appears where I start to type a location, which autocompletes in the way you have seen Instagram and Google Maps and a million other apps do it
  • Once I choose the address, a block gets inserted showing the details of the address complete with semantic markup behind the scenes.

My “address block” might have any visual appearance. Visitors to my web page might see the address, or a little map, or a little map in Japanese, etc. etc. The semantic content is there behind the scenes. So, for example, my web browser might know “gosh this is an address! Maybe you want to do address-y things with it, like go there,” and then my browser might offer me options to summon a self-driving car and even call an ambulance when the self-driving car self-drives into a snowbank.

My two simplistic examples of “book” and “address” are interesting right now because (a) you can probably think of 1,000,000 more data types like this, and (b) none of these things work right now, because even though almost every web editing environment has a concept of “blocks,” none of them are extensible. WordPress has (oh gosh) hundreds of block types, but they don’t have thousands or millions, they don’t have “book” or “address” or “Burning Man Theme Camp” yet, and there’s no ecosystem by which developers and users can contribute new block types.

So I guess I gotta wait around for someone at WordPress to develop all the blocks I want to use. And then someone at Notion, and then someone at Trello, and then someone at Mailchimp, and someone at every other vendor that provides a text editor.

I have a better plan.

The web was built with open protocols. Suppose we all agree on a protocol for blocks.

Any developer that wants to create a new block can conform to this protocol.

Any kind of web-text-editing application can also conform to this protocol.

Then if anyone goes to the trouble of creating a cool “book” or “address” block, we’ll all be able to use it, anywhere.

And we shall dub this protocol, oh I don’t know, the Block Protocol.

And it should be, I think, 100% free, open, and public, so that there is no impediment to anyone on earth using it. And in fact if you want to make blocks that are open source or public, good for you, but if for some reason you would like to make private or commercial blocks, that’s fine too.

Where we’re up to

It’s been about a year since we started talking about the Block Protocol, and we’ve made a lot of progress figuring out how it has to work to do all the things it will need to do, in a clean and straightforward way.

But this is all going nowhere if it requires 93,000,000 humans to cooperate with my crazy scheme just to get it off the ground.

So what we did is build a WordPress Plugin that allows you to embed Block Protocol blocks into posts on your WordPress sites just as easily as you insert any other block.

Since WordPress powers 43% of the web, that means if you build a block for the Block Protocol, it’ll be widely usable right away.

Here’s a video demo:

The WordPress Plugin will be free, and it will be widely available in February, when we’ll also publish version 0.3 of the Block Protocol specification. You can get early access now.

In fact, if you were thinking of writing a plugin for WordPress for your own kind of custom block, you’ll find that using our plugin as your starting point is a lot easier, because you don’t have to know anything about WordPress Plugins or write any PHP code. So even if you don’t care for any of my crazy theories and just want to add a block to WordPress, this is the way to go.

Ultimately, though, we just want to make it easier to add useful semantic, structured information to the web, and this is the first step.

PS We just set up a Discord server for the Block Protocol where you can participate, ask questions, and meet the team.

PPS You can follow me on Mastodon, where I am @[email protected]. I don’t post that much, but I’m enjoying hanging out there in a human-to-human environment where there isn’t an algorithm stirring up righteous indignation about the latest fake-outrage of the day.

New – Bring ML Models Built Anywhere into Amazon SageMaker Canvas and Generate Predictions

Post Syndicated from Antje Barth original https://aws.amazon.com/blogs/aws/new-bring-ml-models-built-anywhere-into-amazon-sagemaker-canvas-and-generate-predictions/

Amazon SageMaker Canvas provides business analysts with a visual interface to solve business problems using machine learning (ML) without writing a single line of code. Since we introduced SageMaker Canvas in 2021, many users have asked us for an enhanced, seamless collaboration experience that enables data scientists to share trained models with their business analysts with a few simple clicks.

Today, I’m excited to announce that you can now bring ML models built anywhere into SageMaker Canvas and generate predictions.

New – Bring Your Own Model into SageMaker Canvas
As a data scientist or ML practitioner, you can now seamlessly share models built anywhere, within or outside Amazon SageMaker, with your business teams. This removes the heavy lifting for your engineering teams to build a separate tool or user interface to share ML models and collaborate between the different parts of your organization. As a business analyst, you can now leverage ML models shared by your data scientists within minutes to generate predictions.

Let me show you how this works in practice!

In this example, I share an ML model that has been trained to identify customers that are potentially at risk of churning with my marketing analyst. First, I register the model in the SageMaker model registry. SageMaker model registry lets you catalog models and manage model versions. I create a model group called 2022-customer-churn-model-group and then select Create model version to register my model.

Amazon SageMaker Model Registry

To register your model, provide the location of the inference image in Amazon ECR, as well as the location of your model.tar.gz file in Amazon S3. You can also add model endpoint recommendations and additional model information. Once you’ve registered your model, select the model version and select Share.

Amazon SageMaker Studio - Share models from model registry with SageMaker Canvas users

You can now choose the SageMaker Canvas user profile(s) within the same SageMaker domain you want to share your model with. Then, provide additional model details, such as information about training and validation datasets, the ML problem type, and model output information. You can also add a note for the SageMaker Canvas users you share the model with.

Amazon SageMaker Studio - Share a model from Model Registry with SageMaker Canvas users

Similarly, you can now also share models trained in SageMaker Autopilot and models available in SageMaker JumpStart with SageMaker Canvas users.

The business analysts will receive an in-app notification in SageMaker Canvas that a model has been shared with them, along with any notes you added.

Amazon SageMaker Canvas - Received model from SageMaker Studio

My marketing analyst can now open, analyze, and start using the model to generate ML predictions in SageMaker Canvas.

Amazon SageMaker Canvas - Imported model from SageMaker Studio

Select Batch prediction to generate ML predictions for an entire dataset or Single prediction to create predictions for a single input. You can download the results in a .csv file.

Amazon SageMaker Canvas - Generate Predictions

New – Improved Model Sharing and Collaboration from SageMaker Canvas with SageMaker Studio Users
We also improved the sharing and collaboration capabilities from SageMaker Canvas with data science and ML teams. As a business analyst, you can now select which SageMaker Studio user profile(s) you want to share your standard-build models with.

Your data scientists or ML practitioners will receive a similar in-app notification in SageMaker Studio once a model has been shared with them, along with any notes from you. In addition to just reviewing the model, SageMaker Studio users can now also, if needed, update the data transformations in SageMaker Data Wrangler, retrain the model in SageMaker Autopilot, and share back the updated model. SageMaker Studio users can also recommend an alternate model from the list of models in SageMaker Autopilot.

Once SageMaker Studio users share back a model, you receive another notification in SageMaker Canvas that an updated model has been shared back with you. This collaboration between business analysts and data scientists will help democratize ML across organizations by bringing transparency to automated decisions, building trust, and accelerating ML deployments.

Now Available
The enhanced, seamless collaboration capabilities for Amazon SageMaker Canvas, including the ability to bring your ML models built anywhere, are available today in all AWS Regions where SageMaker Canvas is available with no changes to the existing SageMaker Canvas pricing.

Start collaborating and bring your ML model to Amazon SageMaker Canvas today!

— Antje

Heads-Up: Amazon S3 Security Changes Are Coming in April of 2023

Post Syndicated from Jeff Barr original https://aws.amazon.com/blogs/aws/heads-up-amazon-s3-security-changes-are-coming-in-april-of-2023/

Starting in April of 2023 we will be making two changes to Amazon Simple Storage Service (Amazon S3) to put our latest best practices for bucket security into effect automatically. The changes will begin to go into effect in April and will be rolled out to all AWS Regions within weeks.

Once the changes are in effect for a target Region, all newly created buckets in the Region will by default have S3 Block Public Access enabled and access control lists (ACLs) disabled. Both of these options are already console defaults and have long been recommended as best practices. The options will become the default for buckets that are created using the S3 API, S3 CLI, the AWS SDKs, or AWS CloudFormation templates.

As a bit of history, S3 buckets and objects have always been private by default. We added Block Public Access in 2018 and the ability to disable ACLs in 2021 in order to give you more control, and have long been recommending the use of AWS Identity and Access Management (IAM) policies as a modern and more flexible alternative.

In light of this change, we recommend a deliberate and thoughtful approach to the creation of new buckets that rely on public buckets or ACLs, and believe that most applications do not need either one. If your application turns out be one that does, then you will need to make the changes that I outline below (be sure to review your code, scripts, AWS CloudFormation templates, and any other automation).

What’s Changing
Let’s take a closer look at the changes that we are making:

S3 Block Public Access – All four of the bucket-level settings described in this post will be enabled for newly created buckets:

A subsequent attempt to set a bucket policy or an access point policy that grants public access will be rejected with a 403 Access Denied error. If you need public access for a new bucket you can create it as usual and then delete the public access block by calling DeletePublicAccessBlock (you will need s3:PutBucketPublicAccessBlock permission in order to call this function; read Block Public Access to learn more about the functions and the permissions).

ACLs Disabled – The Bucket owner enforced setting will be enabled for newly created buckets, making bucket ACLs and object ACLs ineffective, and ensuring that the bucket owner is the object owner no matter who uploads the object. If you want to enable ACLs for a bucket, you can set the ObjectOwnership parameter to ObjectWriter in your CreateBucket request or you can call DeleteBucketOwnershipControls after you create the bucket. You will need s3:PutBucketOwnershipControls permission in order to use the parameter or to call the function; read Controlling Ownership of Objects and Creating a Bucket to learn more.

Stay Tuned
We will publish an initial What’s New post when we start to deploy this change and another one when the deployment has reached all AWS Regions. You can also run your own tests to detect the change in behavior.

Jeff;

New – Process PDFs, Word Documents, and Images with Amazon Comprehend for IDP

Post Syndicated from Marcia Villalba original https://aws.amazon.com/blogs/aws/now-process-pdfs-word-documents-and-images-with-amazon-comprehend-for-idp/

Today we are announcing a new Amazon Comprehend feature for intelligent document processing (IDP). This feature allows you to classify and extract entities from PDF documents, Microsoft Word files, and images directly from Amazon Comprehend without you needing to extract the text first.

Many customers need to process documents that have a semi-structured format, like images of receipts that were scanned or tax statements in PDF format. Until today, those customers first needed to preprocess those documents using optical character recognition (OCR) tools to extract the text. Then they could use Amazon Comprehend to classify and extract entities from those preprocessed files.

Now with Amazon Comprehend for IDP, customers can process their semi-structured documents, such as PDFs, docx, PNG, JPG, or TIFF images, as well as plain-text documents, with a single API call. This new feature combines OCR and Amazon Comprehend’s existing natural language processing (NLP) capabilities to classify and extract entities from the documents. The custom document classification API allows you to organize documents into categories or classes, and the custom-named entity recognition API allows you to extract entities from documents like product codes or business-specific entities. For example, an insurance company can now process scanned customers’ claims with fewer API calls. Using the Amazon Comprehend entity recognition API, they can extract the customer number from the claims and use the custom classifier API to sort the claim into the different insurance categories—home, car, or personal.

Starting today, Amazon Comprehend for IDP APIs are available for real-time inferencing of files, as well as for asynchronous batch processing on large document sets. This feature simplifies the document processing pipeline and reduces development effort.

Getting Started
You can use Amazon Comprehend for IDP from the AWS Management Console, AWS SDKs, or AWS Command Line Interface (CLI).

In this demo, you will see how to asynchronously process a semi-structured file with a custom classifier. For extracting entities, the steps are different, and you can learn how to do it by checking the documentation.

In order to process a file with a classifier, you will first need to train a custom classifier. You can follow the steps in the Amazon Comprehend Developer Guide. You need to train this classifier with plain text data.

After you train your custom classifier, you can classify documents using either asynchronous or synchronous operations. For using the synchronous operation to analyze a single document, you need to create an endpoint to run real-time analysis using a custom model. You can find more information about real-time analysis in the documentation. For this demo, you are going to use the asynchronous operation, placing the documents to classify in an Amazon Simple Storage Service (Amazon S3) bucket and running an analysis batch job.

To get started classifying documents in batch from the console, on the Amazon Comprehend page, go to Analysis jobs and then Create job.

Create new job

Then you can configure the new analysis job. First, input a name and pick Custom classification and the custom classifier you created earlier.

Then you can configure the input data. First, select the S3 location for that data. In that location, you can place your PDFs, images, and Word Documents. Because you are processing semi-structured documents, you need to choose One document per file. If you want to override Amazon Comprehend settings for extracting and parsing the document, you can configure the Advanced document input options.

Input data for analysis job

After configuring the input data, you can select where the output of this analysis should be stored. Also, you need to give access permissions for this analysis job to read and write on the specified Amazon S3 locations, and then you are ready to create the job.

Configuring the classification job

The job takes a few minutes to run, depending on the size of the input. When the job is ready, you can check the output results. You can find the results in the Amazon S3 location you specified when you created the job.

In the results folder, you will find a .out file for each of the semi-structured files Amazon Comprehend classified. The .out file is a JSON, in which each line represents a page of the document. In the amazon-textract-output directory, you will find a folder for each classified file, and inside that folder, there is one file per page from the original file. Those page files contain the classification results. To learn more about the outputs of the classifications, check the documentation page.

Job output

Available Now
You can get started classifying and extracting entities from semi-structured files like PDFs, images, and Word Documents asynchronously and synchronously today from Amazon Comprehend in all the Regions where Amazon Comprehend is available. Learn more about this new launch in the Amazon Comprehend Developer Guide.

Marcia

Introducing Amazon GameLift Anywhere – Run Your Game Servers on Your Own Infrastructure

Post Syndicated from Channy Yun original https://aws.amazon.com/blogs/aws/introducing-amazon-gamelift-anywhere-run-your-game-servers-on-your-own-infrastructure/

In 2016, we launched Amazon GameLift, a dedicated hosting solution that securely deploys and automatically scales fleets of session-based multiplayer game servers to meet worldwide player demand.

With Amazon GameLift, you can create and upload a game server build once, replicate, and then deploy across multiple AWS Regions and AWS Local Zones to reach your players with low-latency experiences across the world. GameLift also includes standalone features for low-cost game fleets with GameLift FleetIQ and player matchmaking with GameLift FlexMatch.

Game developers asked us to reduce the wait time to deploy a candidate server build to the cloud each time they needed to test and iterate their game during the development phase. In addition, our customers told us that they often have ongoing bare-metal contracts or on-premises game servers and want the flexibility to use their existing infrastructure with cloud servers.

Today we are announcing the general availability of Amazon GameLift Anywhere, which decouples game session management from the underlying compute resources. With this new release, you can now register and deploy any hardware, including your own local workstations, under a logical construct called an Anywhere Fleet.

Because your local hardware can now be a GameLift-managed server, you can iterate on the server build in your familiar local desktop environment, and any server error can materialize in seconds. You can also set breakpoints in your environment’s debugger, thereby eliminating trial and error and further speeding up the iteration process.

Here are the major benefits for game developers to use GameLift Anywhere.

  • Faster game development – Instantly test and iterate on your local workstation while still leveraging GameLift FlexMatch and Queue services.
  • Hybrid server management – Deploy, operate, and scale dedicated game servers hosted in the cloud or on-premises, all from a single location.
  • Streamline server operations – Reduce cost and operational complexity by unifying server infrastructure under a single game server orchestration layer.

During the beta period of GameLift Anywhere, lots of customers gave feedback. For example, Nitro Games has been an Amazon GameLift customer since 2020 and have used the service for player matchmaking and managing dedicated game servers in the cloud. Daniel Liljeqvist, Senior DevOps Engineer at Nitro Games said “With GameLift Anywhere we can easily debug a game server on our local machine, saving us time and making the feedback loop much shorter when we are developing new games and features.”

GameLift Anywhere resources such as locations, fleets, and compute are managed through the same highly secure AWS API endpoints as all AWS services. This also applies to generating the authentication tokens for game server processes that are only valid for a limited amount of time for additional security. You can leverage AWS Identity and Access Management (AWS IAM) roles and policies to fully manage access to all the GameLift Anywhere endpoints.

Getting Started with GameLift Anywhere
Before creating your GameLift fleet in your local hardware, you can create custom locations to run your game builds or scripts. Choose Locations in the left navigation pane of the GameLift console and select Create location.

You can create a custom location of your hardware that you can use with your GameLift Anywhere fleet to test your games.

Choose Fleets from the left navigation pane, then choose Create fleet to add your GameLift Anywhere fleet in the desired location.

Choose Anywhere on the Choose compute type step.

Define your fleet details, such as a fleet name and optional items. For more information on settings, see Create a new GameLift fleet in the AWS documentation.

On the Select locations step, select the custom location that you created. The home AWS Region is automatically selected as the Region you are creating the fleet in. You can use the home Region to access and use your resources.

After completing the fleet creation steps to create your Anywhere fleet, you can see active fleets in both the managed EC2 instances and the Anywhere location. You also can integrate remote on-premises hardware by adding more GameLift Anywhere locations, so you can manage your game sessions from one place. To learn more, see Create a new GameLift fleet in the AWS documentation.

You can register your laptop as a compute resource in the fleet that you created. Use the fleet-id created in the previous step and add a compute-name and your laptop’s ip-address.

$ aws gamelift register-compute \
    --compute-name ChannyDevLaptop \
    --fleet-id fleet-12345678-abcdefghi \
    --ip-address 10.1.2.3

Now, you can start a debug session of your game server by retrieving the authorization token for your laptop in the fleet that you created.

$ aws gamelift get-compute-auth-token \
    --fleet-id fleet-12345678-abcdefghi \
    --compute-name ChannyDevLaptop

To run a debug instance of your game server executable, your game server must call InitSDK(). After the process is ready to host a game session, the game server calls ProcessReady(). To learn more, see Integrating games with custom game servers and Testing your integration in the AWS documentation.

Now Available
Amazon GameLift Anywhere is available in all Regions where Amazon GameLift is available.  GameLift offers a step-by-step developer guide, API reference guide, and GameLift SDKs. You can also see for yourself how easy it is to test Amazon GameLift using our sample game to get started.

Give it a try, and please send feedback to AWS re:Post for Amazon GameLift or through your usual AWS support contacts.

Channy

Announcing Amazon CodeCatalyst (preview), a Unified Software Development Service

Post Syndicated from Steve Roberts original https://aws.amazon.com/blogs/aws/announcing-amazon-codecatalyst-preview-a-unified-software-development-service/

Today, we announced the preview release of Amazon CodeCatalyst. A unified software development and delivery service, Amazon CodeCatalyst enables software development teams to quickly and easily plan, develop, collaborate on, build, and deliver applications on AWS, reducing friction throughout the development lifecycle.

In my time as a developer the biggest excitement—besides shipping software to users—was the start of a new project, or being invited to join a project. Both came with the anticipation of building something cool, cutting new code—seeing an idea come to life. However, starting out was sometimes a slow process. My team or I would need to update our local development environments—or entirely new machines—with tools, libraries, and programming frameworks. We had to create source code repositories and set up other shared tools such as Jira, Confluence, or Jenkins, configure build pipelines and other automation workflows, create test environments, and so on. Day-to-day maintenance of development and build environments consumed valuable team cycles and energy. Collaboration between the team took effort, too, because tools to share information and have a single source of truth were not available. Context switching between projects and dealing with conflicting dependencies in those projects, e.g., Python 3.6 for project X and Python 2.7 for project Y—especially when we had only a single machine to work on—further increased the burden.

It doesn’t seem to have gotten any better! These days, when talking to developers about their experiences, I often hear them express that they feel modern development has become even more complicated. This is due to having to select and configure a wider collection of modern frameworks and libraries, tools, cloud services, continuous integration and delivery pipelines, and many other choices that all need to work together to deliver the application experience. What was once manageable by one developer on one machine is now a sprawling, dynamic, complex net of decisions and tradeoffs, made even more challenging by the need to coordinate all this across dispersed teams.

Enter Amazon CodeCatalyst
I’ve spent some time talking with the team behind Amazon CodeCatalyst about their sources of inspiration and goals. Taking feedback from both new and experienced developers and service teams here at AWS, they examined the challenges typically experienced by teams and individual developers when building software for the cloud. Having gathered and reviewed this feedback, they set about creating a unified tool that smooths out the rough edges that needlessly slow down software delivery, and they added features to make it easier for teams to work together and collaborate. Features in Amazon CodeCatalyst to address these challenges include:

  • Blueprints that set up the project’s resources—not just scaffolding for new projects, but also the resources needed to support software delivery and deployment.
  • On-demand cloud-based Dev Environments, to make it easy to replicate consistent development environments for you or your teams.
  • Issue management, enabling tracing of changes across commits, pull requests, and deployments.
  • Automated build and release (CI/CD) pipelines using flexible, managed build infrastructure.
  • Dashboards to surface a feed of project activities such as commits, pull requests, and test reporting.
  • The ability to invite others to collaborate on a project with just an email.
  • Unified search, making it easy to find what you’re looking for across users, issues, code and other project resources.

There’s a lot in Amazon CodeCatalyst that I don’t have space to cover in this post, so I’m going to briefly cover some specific features, like blueprints, Dev Environments, and project collaboration. Other upcoming posts will cover additional features.

Project Blueprints
When I first heard about blueprints, they sounded like a feature to scaffold some initial code for a project. However, they’re much more! Parameterized application blueprints enable you to set up shared project resources to support the application development lifecycle and team collaboration in minutes—not just initial starter code for an application. The resources that a blueprint creates for a project include a source code repository, complete with initial sample code and AWS service configuration for popular application patterns, which follow AWS best practices by default. If you prefer, an external Git repository such as GitHub may be used instead. The blueprint can also add an issue tracker, but external trackers such as Jira can also be used. Then, the blueprint adds a build and release pipeline for CI/CD, which I’ll come to shortly, as well as other integrated tooling.

The project resources and integrated tools set up using blueprints, including the CI/CD pipeline and the AWS resources to host your application, make it so that you can press “deploy” and get sample code running in a few minutes, enabling you to jump right in and start working on your specific business logic.

Project blueprints when starting a new project

At launch, customers can choose from blueprints with Typescript, Python, Java, .NET, Javascript for languages and React, Angular, and Vue frameworks, with more to come. And you don’t need to start with a blueprint. You can build projects with workflows that run on anything that works with Linux and Windows operating systems.

Cloud-Based Dev Environments
Development teams can often run into a problem of “environment drift” where one team member has a slightly different version of a toolchain or library compared to everyone else or the test environments. This can introduce subtle bugs that might go unnoticed for some time. Dev Environment specifications, and the other shared resources, that blueprints create help ensure there’s no unnecessary variance, and everyone on the team gets the same setup to provide a consistent, repeatable experience between developers.

Amazon CodeCatalyst uses a devfile to define the configuration of an on-demand, cloud-based Dev Environment, which currently supports four resizable instance size options with 2, 4, 8, or 16 vCPUs. The devfile defines and configures all of the resources needed to code, test, and debug for a given project, minimizing the time the development team members need to spend on creating and maintaining their local development environments. Devfiles, which are added to the source code repository by the selected blueprint can also be modified if required. With Dev Environments, context switching between projects incurs less overhead—with one click, you can simply switch to a different environment, and you’re ready to start working. This means you’re easily able to work concurrently on multiple codebases without reconfiguring. Being on-demand, Dev Environments can also be paused, restarted, or deleted as needed.

Below is an example of a devfile that bootstraps a Dev Environment.

schemaVersion: 2.0.0
metadata:
  name: aws-universal
  version: 1.0.1
  displayName: AWS Universal
  description: Stack with AWS Universal Tooling
  tags:
    - aws
    - a12
  projectType: aws
commands:
  - id: npm_install
    exec:
      component: aws-runtime
      commandLine: "npm install"
      workingDir: /projects/spa-app
events:
  postStart:
    - npm_install
components:
  - name: aws-runtime
    container:
      image: public.ecr.aws/aws-mde/universal-image:latest
      mountSources: true
      volumeMounts:
        - name: docker-store
          path: /var/lib/docker
  - name: docker-store
    volume:
      size: 16Gi

Developers working in cloud-based Dev Environments provisioned by Amazon CodeCatalyst can use AWS Cloud9 as their IDE. However, they can just as easily work with Amazon CodeCatalyst from other IDEs on their local machines, such as JetBrains IntelliJ IDEA Ultimate, PyCharm Pro, GoLand, and Visual Studio Code. Developers can also create Dev Environments from within their IDE, such as Visual Studio Code or for JetBrains using the JetBrains Gateway app. Below, JetBrains IntelliJ is being used.

Editing an application source file in JetBrains IntelliJ

Build and Release Pipelines
The build and release pipeline created by the blueprint run on flexible, managed infrastructure. The pipelines can use on-demand compute or preprovisioned builds, including a choice of machine sizes, and you can bring your own container environments. You can incorporate build actions that are built in or provided by partners (e.g., Mend, which provides a software composition analysis build action), and you can also incorporate GitHub Actions to compose fully automated pipelines. Pipelines are configurable using either a visual editor or YAML files.

Build and release pipelines enable deployment to popular AWS services, including Amazon Elastic Container Service (Amazon ECS), AWS Lambda, and Amazon Elastic Compute Cloud (Amazon EC2). Amazon CodeCatalyst makes it trivial to set up test and production environments and deploy using pipelines to one or many Regions or even multiple accounts for security.

Running automated workflow

Project Collaboration
As a unified software development service, Amazon CodeCatalyst not only makes it easier to get started building and delivering applications on AWS, it helps developers of all levels collaborate on projects through a single shared project space and source of truth. Developers can be invited to collaborate using just an email. On accepting the invitation, the developer sees the full project context and can begin work at once using the project’s Dev Environments—no need to spend time updating or reconfiguring their local machine with required tools, libraries, or other pre-requisites.

Existing members of an Amazon CodeCatalyst space, or new members using their email, can be invited to collaborate on a project:

Inviting new members to collaborate on a project

Each will receive an invitation email containing a link titled Accept Invitation, which when clicked, opens a browser tab to sign in. Once signed in, they can view all the projects in the Amazon CodeCatalyst space they’ve been invited to and can also quickly switch to other spaces in which they are the owner or to which they’ve been invited.

Projects I'm invited to collaborate on

From there, they can select a project and get an immediate overview of where things stand, for example, the status of recent workflows, any open pull requests, and available Dev Environments.

CodeCatalyst project summary

On the Issues board, team members can see which issues need to be worked on, select one, and get started.

Viewing issues

Being able to immediately see the context for the project, and have access to on-demand cloud-based Dev Environments, all help with being able to start contributing more quickly, eliminating setup delays.

Get Started with Amazon CodeCatalyst in the Free Tier Today!
Blueprints to scaffold not just application code but also shared project resources supporting the development and deployment of applications, issue tracking, invite-by-email collaboration, automated workflows, and more are all available today in the newly released preview of Amazon CodeCatalyst to help accelerate your cloud development and delivery efforts. Learn more in the Amazon CodeCatalyst User Guide. And, as I mentioned earlier, additional blogs posts and other supporting content are planned by the team to dive into the range of features in more detail, so be sure to look out for them!

New — Create Point-to-Point Integrations Between Event Producers and Consumers with Amazon EventBridge Pipes

Post Syndicated from Donnie Prakoso original https://aws.amazon.com/blogs/aws/new-create-point-to-point-integrations-between-event-producers-and-consumers-with-amazon-eventbridge-pipes/

It is increasingly common to use multiple cloud services as building blocks to assemble a modern event-driven application. Using purpose-built services to accomplish a particular task ensures developers get the best capabilities for their use case. However, communication between services can be difficult if they use different technologies to communicate, meaning that you need to learn the nuances of each service and how to integrate them with each other. We usually need to create integration code (or “glue” code) to connect and bridge communication between services. Writing glue code slows our velocity, increases the risk of bugs, and means we spend our time writing undifferentiated code rather than building better experiences for our customers.

Introducing Amazon EventBridge Pipes
Today, I’m excited to announce Amazon EventBridge Pipes, a new feature of Amazon EventBridge that makes it easier for you to build event-driven applications by providing a simple, consistent, and cost-effective way to create point-to-point integrations between event producers and consumers, removing the need to write undifferentiated glue code.

The simplest pipe consists of a source and a target. An optional filtering step allows only specific source events to flow into the Pipe and an optional enrichment step using AWS Lambda, AWS Step Functions, Amazon EventBridge API Destinations, or Amazon API Gateway enriches or transforms events before they reach the target. With Amazon EventBridge Pipes, you can integrate supported AWS and self-managed services as event producers and event consumers into your application in a simple, reliable, consistent and cost-effective way.

Amazon EventBridge Pipes bring the most popular features of Amazon EventBridge Event Bus, such as event filtering, integration with more than 14 AWS services, and automatic delivery retries.

How Amazon EventBridge Pipes Works
Amazon EventBridge Pipes provides you a seamless means of integrating supported AWS and self-managed services, favouring configuration over code. To start integrating services with EventBridge Pipes, you need to take the following steps:

  1. Choose a source that is producing your events. Supported sources include: Amazon DynamoDB, Amazon Kinesis Data Streams, Amazon SQS, Amazon Managed Streaming for Apache Kafka, and Amazon MQ (both ActiveMQ and RabbitMQ).
  2. (Optional) Specify an event filter to only process events that match your filter (you’re not charged for events that are filtered out).
  3. (Optional) Transform and enrich your events using built-in free transformations, or AWS Lambda, AWS Step Functions, Amazon API Gateway, or EventBridge API Destinations to perform more advanced transformations and enrichments.
  4. Choose a target destination from more than 14 AWS services, including Amazon Step Functions, Kinesis Data Streams, AWS Lambda, and third-party APIs using EventBridge API destinations.

Amazon EventBridge Pipes provides simplicity to accelerate development velocity by reducing the time needed to learn the services and write integration code, to get reliable and consistent integration.

EventBridge Pipes also comes with additional features that can help in building event-driven applications. For example, with event filtering, Pipes helps event-driven applications become more cost-effective by only processing the events of interest.

Get Started with Amazon EventBridge Pipes
Let’s see how to get started with Amazon EventBridge Pipes. In this post, I will show how to integrate an Amazon SQS queue with AWS Step Functions using Amazon EventBridge Pipes.

The following screenshot is my existing Amazon SQS queue and AWS Step Functions state machine. In my case, I need to run the state machine for every event in the queue. To do so, I need to connect my SQS queue and Step Functions state machine with EventBridge Pipes.

Existing Amazon SQS queue and AWS Step Functions state machine

First, I open the Amazon EventBridge console. In the navigation section, I select Pipes. Then I select Create pipe.

On this page, I can start configuring a pipe and set the AWS Identity and Access Management (IAM) permission, and I can navigate to the Pipe settings tab.

Navigate to Pipe Settings

In the Permissions section, I can define a new IAM role for this pipe or use an existing role. To improve developer experience, the EventBridge Pipes console will figure out the IAM role for me, so I don’t need to manually configure required permissions and let EventBridge Pipes configures least-privilege permissions for IAM role. Since this is my first time creating a pipe, I select Create a new role for this specific resource.

Setting IAM Permission for pipe

Then, I go back to the Build pipe section. On this page, I can see the available event sources supported by EventBridge Pipes.

List of available services as the event source

I select SQS and select my existing SQS queue. If I need to do batch processing, I can select Additional settings to start defining Batch size and Batch window. Then, I select Next.

Select SQS Queue as event source

On the next page, things get even more interesting because I can define Event filtering from the event source that I just selected. This step is optional, but the event filtering feature makes it easy for me to process events that only need to be processed by my event-driven application. In addition, this event filtering feature also helps me to be more cost-effective, as this pipe won’t process unnecessary events. For example, if I use Step Functions as the target, the event filtering will only execute events that match the filter.

Event filtering in Amazon EventBridge Pipes

I can use sample events from AWS events or define custom events. For example, I want to process events for returned purchased items with a value of 100 or more. The following is the sample event in JSON format:

{
   "event-type":"RETURN_PURCHASE",
   "value":100
}

Then, in the event pattern section, I can define the pattern by referring to the Content filtering in Amazon EventBridge event patterns documentation. I define the event pattern as follows:

{
   "event-type": ["RETURN_PURCHASE"],
   "value": [{
      "numeric": [">=", 100]
   }]
}

I can also test by selecting test pattern to make sure this event pattern will match the custom event I’m going to use. Once I’m confident that this is the event pattern that I want, I select Next.

Defining and testing an event pattern for filtering

In the next optional step, I can use an Enrichment that will augment, transform, or expand the event before sending the event to the target destination. This enrichment is useful when I need to enrich the event using an existing AWS Lambda function, or external SaaS API using the Destination API. Additionally, I can shape the event using the Enrichment Input Transformer.

The final step is to define a target for processing the events delivered by this pipe.

Defining target destination service

Here, I can select various AWS services supported by EventBridge Pipes.

I select my existing AWS Step Functions state machine, named pipes-statemachine.

In addition, I can also use Target Input Transformer by referring to the Transforming Amazon EventBridge target input documentation. For my case, I need to define a high priority for events going into this target. To do that, I define a sample custom event in Sample events/Event Payload and add the priority: HIGH in the Transformer section. Then in the Output section, I can see the final event to be passed to the target destination service. Then, I select Create pipe.

In less than a minute, my pipe was successfully created.

Pipe successfully created

To test this pipe, I need to put an event into the Amaon SQS queue.

Sending a message into Amazon SQS Queue

To check if my event is successfully processed by Step Functions, I can look into my state machine in Step Functions. On this page, I see my event is successfully processed.

I can also go to Amazon CloudWatch Logs to get more detailed logs.

Things to Know
Event Sources
– At launch, Amazon EventBridge Pipes supports the following services as event sources: Amazon DynamoDB, Amazon Kinesis, Amazon Managed Streaming for Apache Kafka (Amazon MSK) alongside self-managed Apache Kafka, Amazon SQS (standard and FIFO), and Amazon MQ (both for ActiveMQ and RabbitMQ).

Event Targets – Amazon EventBridge Pipes supports 15 Amazon EventBridge targets, including AWS Lambda, Amazon API Gateway, Amazon SNS, Amazon SQS, and AWS Step Functions. To deliver events to any HTTPS endpoint, developers can use API destinations as the target.

Event Ordering – EventBridge Pipes maintains the ordering of events received from an event sources that support ordering when sending those events to a destination service.

Programmatic Access – You can also interact with Amazon EventBridge Pipes and create a pipe using AWS Command Line Interface (CLI), AWS CloudFormation, and AWS Cloud Development Kit (AWS CDK).

Independent Usage – EventBridge Pipes can be used separately from Amazon EventBridge bus and Amazon EventBridge Scheduler. This flexibility helps developers to define source events from supported AWS and self-managed services as event sources without Amazon EventBridge Event Bus.

Availability – Amazon EventBridge Pipes is now generally available in all AWS commercial Regions, with the exception of Asia Pacific (Hyderabad) and Europe (Zurich).

Visit the Amazon EventBridge Pipes page to learn more about this feature and understand the pricing. You can also visit the documentation page to learn more about how to get started.

Happy building!

— Donnie

Step Functions Distributed Map – A Serverless Solution for Large-Scale Parallel Data Processing

Post Syndicated from Sébastien Stormacq original https://aws.amazon.com/blogs/aws/step-functions-distributed-map-a-serverless-solution-for-large-scale-parallel-data-processing/

I am excited to announce the availability of a distributed map for AWS Step Functions. This flow extends support for orchestrating large-scale parallel workloads such as the on-demand processing of semi-structured data.

Step Function’s map state executes the same processing steps for multiple entries in a dataset. The existing map state is limited to 40 parallel iterations at a time. This limit makes it challenging to scale data processing workloads to process thousands of items (or even more) in parallel. In order to achieve higher parallel processing prior to today, you had to implement complex workarounds to the existing map state component.

The new distributed map state allows you to write Step Functions to coordinate large-scale parallel workloads within your serverless applications. You can now iterate over millions of objects such as logs, images, or .csv files stored in Amazon Simple Storage Service (Amazon S3). The new distributed map state can launch up to ten thousand parallel workflows to process data.

You can process data by composing any service API supported by Step Functions, but typically, you will invoke Lambda functions to process the data with code written in your favorite programming language.

Step Functions distributed map supports a maximum concurrency of up to 10,000 executions in parallel, which is well above the concurrency supported by many other AWS services. You can use the maximum concurrency feature of the distributed map to ensure that you do not exceed the concurrency of a downstream service. There are two factors to consider when working with other services. First, the maximum concurrency supported by the service for your account. Second, the burst and ramping rates, which determine how quickly you can achieve the maximum concurrency.

Let’s use Lambda as an example. Your functions’ concurrency is the number of instances that serve requests at a given time. The default maximum concurrency quota for Lambda is 1,000 per AWS Region. You can ask for an increase at any time. For an initial burst of traffic, your functions’ cumulative concurrency in a Region can reach an initial level of between 500 and 3000, which varies per Region. The burst concurrency quota applies to all your functions in the Region.

When using a distributed map, be sure to verify the quota on downstream services. Limit the distributed map maximum concurrency during your development, and plan for service quota increases accordingly.

To compare the new distributed map with the original map state flow, I created this table.

Original map state flow New distributed map flow
Sub workflows
  • Runs a sub-workflow for each item in an array. The array must be passed from the previous state.
  • Each iteration of the sub-workflow is called a map iteration, and its events are added to the state machine’s execution history.
  • Runs a sub-workflow for each item in an array or Amazon S3 dataset.
  • Each sub-workflow is run as a totally separate child execution, with its own event history.
Parallel branches Map iterations run in parallel, with an effective maximum concurrency of around 40 at a time. Can pass millions of items to multiple child executions, with concurrency of up to 10,000 executions at a time.
Input source Accepts only a JSON array as input. Accepts input as Amazon S3 object list, JSON arrays or files, csv files, or Amazon S3 inventory.
Payload 256 KB Each iteration receives a reference to a file (Amazon S3) or a single record from a file (state input). Actual file processing capability is limited by Lambda storage and memory.
Execution history 25,000 events Each iteration of the map state is a child execution, with up to 25,000 events each (express mode has no limit on execution history).

Sub-workflows within a distributed map work with both Standard workflows and the low-latency, short-duration Express Workflows.

This new capability is optimized to work with S3. I can configure the bucket and prefix where my data are stored directly from the distributed map configuration. The distributed map stops reading after 100 million items and supports JSON or csv files of up to 10GB.

When processing large files, think about downstream service capabilities. Let’s take Lambda again as an example. Each input—a file on S3, for example—must fit within the Lambda function execution environment in terms of temporary storage and memory. To make it easier to handle large files, Lambda Powertools for Python introduced a new streaming feature to fetch, transform, and process S3 objects with minimal memory footprint. This allows your Lambda functions to handle files larger than the size of their execution environment. To learn more about this new capability, check the Lambda Powertools documentation.

Let’s See It in Action
For this demo, I will create a workflow that processes one thousand dog images stored on S3. The images are already stored on S3.

➜  ~ aws s3 ls awsnewsblog-distributed-map/images/
2022-11-08 15:03:36      27034 n02085620_10074.jpg
2022-11-08 15:03:36      34458 n02085620_10131.jpg
2022-11-08 15:03:36      12883 n02085620_10621.jpg
2022-11-08 15:03:36      34910 n02085620_1073.jpg
...

➜  ~ aws s3 ls awsnewsblog-distributed-map/images/ | wc -l
    1000

The workflow and the S3 bucket must be in the same Region.

To get started, I navigate to the Step Functions page of the AWS Management Console and select Create state machine. On the next page, I choose to design my workflow using the visual editor. The distributed map works with Standard workflows, and I keep the default selection as-is. I select Next to enter the visual editor.

Distributed Map - create a workflowIn the visual editor, I search and select the Map component on the left-side pane, and I drag it to the workflow area. On the right side, I configure the component. I choose Distributed as Processing mode and Amazon S3 as Item Source.

Distributed maps are natively integrated with S3. I enter the name of the bucket (awsnewsblog-distributed-map) and the prefix (images) where my images are stored.

On the Runtime Settings section, I choose Express for Child workflow type. I also may decide to restrict the Concurrency limit. It helps to ensure we operate within the concurrency quotas of the downstream services (Lambda in this demo) for a particular account or Region.

By default, the output of my sub-workflows will be aggregated as state output, up to 256KB. To process larger outputs, I may choose to Export map state results to Amazon S3.

Distributed Map - add a Lambda invocation

Finally, I define what to do for each file. In this demo, I want to invoke a Lambda function for each file in the S3 bucket. The function exists already. I search for and select the Lambda invocation action on the left-side pane. I drag it to the distributed map component. Then, I use the right-side configuration panel to select the actual Lambda function to invoke: AWSNewsBlogDistributedMap in this example.

Distributed Map - add a Lambda invocation

When I am done, I select Next. I select Next again on the Review generated code page (not shown here).

On the Specify state machine settings page, I enter a Name for my state machine and the IAM Permissions to run. Then, I select Create state machine.

Create State Machine - Final ScreenNow I am ready to start the execution. On the State machine page, I select the new workflow and select Start execution. I can optionally enter a JSON document to pass to the workflow. In this demo, the workflow does not handle the input data. I leave it as-is, and I select Start execution.

Start workflow execution Start workflow execution - pass input data

During the execution of the workflow, I can monitor the progress. I observe the number of iterations, and the number of items successfully processed or in error.

I can drill down on one specific execution to see the details.

Distributed Map - monitor execution details

With just a few clicks, I created a large-scale and heavily parallel workflow able to handle a very large quantity of data.

Which AWS Service Should I Use
As often happens on AWS, you might observe an overlap between this new capability and existing services such as AWS Glue, Amazon EMR, or Amazon S3 Batch Operations. Let’s try to differentiate the use cases.

In my mental model, data scientists and data engineers use AWS Glue and EMR to process large amounts of data. On the other hand, application developers will use Step Functions to add serverless data processing into their applications. Step Functions is able to scale from zero quickly, which makes it a good fit for interactive workloads where customers may be waiting for the results. Finally, system administrators and IT operation teams are likely to use Amazon S3 Batch Operations for single-step IT automation operations such as copying, tagging, or changing permissions on billions of S3 objects.

Pricing and Availability
AWS Step Functions’ distributed map is generally available in the following ten AWS Regions: US East (Ohio, N. Virginia), US West (Oregon), Asia Pacific (Singapore, Sydney, Tokyo), Canada (Central), and Europe (Frankfurt, Ireland, Stockholm).

The pricing model for the existing inline map state does not change. For the new distributed map state, we charge one state transition per iteration. Pricing varies between Regions, and it starts at $0.025 per 1,000 state transitions. When you process your data using express workflows, you are also charged based on the number of requests for your workflow and its duration. Again, prices vary between Regions, but they start at $1.00 per 1 million requests and $0.06 per GB-hour (prorated to 100ms).

For the same amount of iterations, you will observe a cost reduction when using the combination of the distributed map and standard workflows compared to the existing inline map. When you use express workflows, expect the costs to stay the same for more value with the distributed map.

I am really excited to discover what you will build using this new capability and how it will unlock innovation. Go start to build highly parallel serverless data processing workflows today!

— seb

AWS Marketplace Vendor Insights – Simplify Third-Party Software Risk Assessments

Post Syndicated from Sébastien Stormacq original https://aws.amazon.com/blogs/aws/aws-marketplace-vendor-insights-simplify-third-party-software-risk-assessments/

AWS Marketplace Vendor Insights is a new capability of AWS Marketplace. It simplifies third-party software risk assessments when procuring solutions from the AWS Marketplace.

It helps you to ensure that the third-party software continuously meets your industry standards by compiling security and compliance information, such as data privacy and residency, application security, and access control, in one consolidated dashboard.

As a security engineer, you may now complete third-party software risk assessment in a few days instead of months. You can now:

  • Quickly discover products in AWS Marketplace that meet your security and certification standards by searching for and accessing Vendor Insights profiles.
  • Access and download current and validated information, with evidence gathered from the vendors’ security tools and audit reports. Reports are available for download on AWS Artifact third-party reports (now available in preview).
  • Monitor your software’s security posture post-procurement and receive notifications for security and compliance events.

As a software vendor, you can now reduce the operational burden of responding to buyer requests for risk assessment information. It gives your customers a self-service access experience. You can now:

  • Build your product’s security profile by uploading your ISO 27001 or SOC2 Type 2 report and completing a software risk assessment with AWS Audit Manager.
  • Store and share your compliance reports such as ISO 27001 and SOC2 Type 2, using AWS Artifact third-party reports (preview).
  • View and approve your buyer requests for viewing security controls and compliance artifacts stored in Vendor Insights.

Let’s See It in Action
I want to procure a solution on the AWS Marketplace. But before purchasing the product, as a security engineer, I want to review its compliance. I navigate to the AWS Marketplace page of the AWS Management Console. I use the faceted search on the left side to select vendors that are ISO 27001 compliant.

AWS MArketplace vendor insights - faceted searchI select a product. On the Product Overview page, I select View assessment data on the top right side (not shown on the screenshot). Then, I can see the overview page, which shows the Security certification received and the Expiration date.

AWS MArketplace vendor insights - certification receivedI select the Security and compliance tab and see that I need to request access to see the detailed security and compliance information. I select the Request access button on the top right side to ask the vendor for access to their compliance documents.

AWS MArketplace vendor insights - request access part 1

On the next page, I fill in the Your information form with my details, and I select Request access.

AWS MArketplace vendor insights - request access part 2The Next Steps section details what will happen next. The seller will contact me to sign a nondisclosure agreement (NDA). The seller will notify AWS Marketplace when the NDA is signed. Then, I will be granted access to Vendor Insights data.

The process can take a few days. For this demo, I switch to a fictional product—Everest—for which I have access to the compliance data. Here is the Security and compliance tab when my request for access is accepted.

The Summary section shows how many controls are available. It reports how many have been validated with evidence and how many have been self-reported by the seller. It also shows how many noncompliant controls are reported.

I can scroll down the page to see the details for multiple categories: Audit, compliance and security policy, Data security, Access management, Application security, Risk management and incident response, Business resiliency and continuity, End user device security, Infrastructure security, Human resources, and Security and configuration policy. The screenshot does not show all of them.

AWS Marketplace vendor insights - security and complianceI select the detail for Access control and see the list under Control name. For each of them, I can see the compliance for SOC2 Type 2, ISO 27001, and the Vendor self-assessment.

AWS Marketplace vendor insights - access controlI select the noncompliant one to get the details and the explanation the vendor provided.

AWS Marketplace vendor insights - non compliant details

If needed, I might also use AWS Artifact third-party reports (preview) to download the compliance reports.

For Software Vendors
As a software vendor, you can create a security profile for your SaaS products on AWS Marketplace and share this profile with your prospective and existing buyers. It helps you to reduce the manual work for engineering and security teams to respond to your customer questionnaires.

To create a security profile, you will need to complete a self-assessment using AWS Audit Manager on your marketplace management AWS account, share the current SOC2 Type II and ISO27001 compliance artifacts, if available, and turn on automated assessment using Audit Manager and AWS Config on your production AWS accounts.

Our team has created an AWS CloudFormation template to automate the onboarding steps. You can find the technical resources, such as the setup guide and the onboarding templates, on our GitHub repository. Once the profile is created, Vendor Insights will keep your security profile up to date by using automated evidence from Audit Manager and AWS Config. The updates to your profile are sent as notifications. Your security and compliance team can review the updates before they are shared with buyers.

With Vendor Insights, you manage access to your product’s security profile by approving the buyer’s subscription requests. When a buyer requests access, Vendor Insights shares their contact information over email to your compliance or deal-desk operations team. They can complete the NDA with the buyer and notify AWS Marketplace to grant the buyer access to your security profile. You can also request AWS Marketplace to revoke the buyer’s subscription on a later day if you don’t want to share your product’s security and compliance posture information with the buyer anymore.

The entire process is documented in the AWS Marketplace Vendor Insights seller guide.

Pricing and Availability
Vendor Insights is now available in all AWS Regions where AWS Marketplace is available.

The pricing model is very simple; there is no charge involved for using AWS Marketplace Vendor Insights.

For buyers, you can access and download assets during your procurement phase. You lose access to the Vendor Insights profile if you have not purchased the product after 60 days. When you purchase the product, you keep access to the product’s security profile for continuous monitoring of its compliance status.

For sellers, AWS Marketplace doesn’t charge to activate and use Vendor Insights. You will incur fees for using Audit Manager and AWS Config.

Go and start your risk assessments on the AWS Marketplace today.

— seb

New for Amazon SageMaker – Perform Shadow Tests to Compare Inference Performance Between ML Model Variants

Post Syndicated from Antje Barth original https://aws.amazon.com/blogs/aws/new-for-amazon-sagemaker-perform-shadow-tests-to-compare-inference-performance-between-ml-model-variants/

As you move your machine learning (ML) workloads into production, you need to continuously monitor your deployed models and iterate when you observe a deviation in your model performance. When you build a new model, you typically start validating the model offline using historical inference request data. But this data sometimes fails to account for current, real-world conditions. For example, new products might become trending that your product recommendation model hasn’t seen yet. Or, you experience a sudden spike in the volume of inference requests in production that you never exposed your model to before.

Today, I’m excited to announce Amazon SageMaker support for shadow testing!

Deploying a model in shadow mode lets you conduct a more holistic test by routing a copy of the live inference requests for a production model to the new (shadow) model. Yet, only the responses from the production model are returned to the calling application. Shadow testing helps you build further confidence in your model and catch potential configuration errors and performance issues before they impact end users. Once you complete a shadow test, you can use the deployment guardrails for SageMaker inference endpoints to safely update your model in production.

Get Started with Amazon SageMaker Shadow Testing
You can create shadow tests using the new SageMaker Inference Console and APIs. Shadow testing gives you a fully managed experience for setup, monitoring, viewing, and acting on the results of shadow tests. If you have existing workflows built around SageMaker endpoints, you can also deploy a model in shadow mode using the existing SageMaker Inference APIs.

On the SageMaker console, select Inference and Shadow tests to create, monitor, and deploy shadow tests.

Amazon SageMaker Shadow Tests

To create a shadow test, select an existing (or create a new) SageMaker endpoint and production variant you want to test against.

Amazon SageMaker - Create Shadow Test

Next, configure the proportion of traffic to send to the shadow variant, the comparison metrics you want to evaluate, and the duration of the test. You can also enable data capture for your production and shadow variant.

Amazon SagMaker - Create Shadow Test

That’s it. SageMaker now automatically deploys the new variant in shadow mode and routes a copy of the inference requests to it in real time, all within the same endpoint. The following diagram illustrates this workflow.

Amazon SageMaker - Shadow Testing

Note that only the responses of the production variant are returned to the calling application. You can choose to either discard or log the responses of the shadow variant for offline comparison.

You can also use shadow testing to validate changes you made to any component in your production variant, including the serving container or ML instance. This can be useful when you’re upgrading to a new framework version of your serving container, applying patches, or if you want to make sure that there is no impact to latency or error rate due to this change. Similarly, if you consider moving to another ML instance type, for example, Amazon EC2 C7g instances based on AWS Graviton processors, or EC2 G5 instances powered by NVIDIA A10G Tensor Core GPUs, you can use shadow testing to evaluate the performance on production traffic prior to rollout.

You can monitor the progress of the shadow test and performance metrics such as latency and error rate through a live dashboard. On the SageMaker console, select Inference and Shadow tests, then select the shadow test you want to monitor.

Amazon SageMaker - Monitor Shadow Test

Amazon SageMaker - Monitor Shadow Test

If you decide to promote the shadow model to production, select Deploy shadow variant and define the infrastructure configuration to deploy the shadow variant.

Amazon SageMaker - Deploy Shadow Variant

Amazon SageMaker - Deploy Shadow Variant

You can also use the SageMaker deployment guardrails if you want to add linear or canary traffic shifting modes and auto rollbacks to your update.

Availability and Pricing
SageMaker support for shadow testing is available today in all AWS Regions where SageMaker hosting is available except for the AWS GovCloud (US) Regions and AWS China Regions.

There is no additional charge for SageMaker shadow testing other than usage charges for the ML instances and ML storage provisioned to host the shadow variant. The pricing for ML instances and ML storage dimensions is the same as the real-time inference option. There is no additional charge for data processed in and out of shadow deployments. The SageMaker pricing page has all the details.

To learn more, visit Amazon SageMaker shadow testing.

Start validating your new ML models with SageMaker shadow tests today!

— Antje

AWS Machine Learning University New Educator Enablement Program to Build Diverse Talent for ML/AI Jobs

Post Syndicated from Marcia Villalba original https://aws.amazon.com/blogs/aws/aws-machine-learning-university-new-educator-enablement-program-to-build-diverse-talent-for-ml-ai-jobs/

AWS Machine Learning University is now providing a free educator enablement program. This program provides faculty at community colleges, minority-serving institutions (MSIs), and historically Black colleges and universities (HBCUs) with the skills and resources to teach data analytics, artificial intelligence (AI), and machine learning (ML) concepts to build a diverse pipeline for in-demand jobs of today and tomorrow.

According to the National Science Foundation, Black and Hispanic or Latino students earn bachelor’s degrees in Computer Science—the dominant pathway to AI/ML—at a much lower rate than their white peers, earning less than 11 percent of computer science degrees awarded. However, research shows that having diverse perspectives among skilled practitioners and across the AI/ML lifecycle contributes to the development of AI/ML systems that are safe, trustworthy, and have less bias. 

In 2018, we announced the Machine Learning University (MLU) to share with all developers the same courses that we used to train engineers at Amazon and AWS. This platform offers self-service, self-paced, AI/ML digital courses.

Machine Learning University home page

And today, we add this new program to our AI/ML training offering. Although anyone could access the MLU self-paced learning, it places the burden on the learner to source prerequisite work and solutions. This educator enablement program takes the concepts and lessons developed by MLU and makes them more accessible to educators. It offers a year-round educator enablement program with lesson planning, course playbooks, and access to free compute resources.

Program Details
Educators are onboarded in small-group cohorts into bootcamps where they will learn the material and deep dive into how to teach it via instructor-led lectures and hands-on projects. Educators who complete the bootcamp can take part in different year-round development opportunities, such as a dedicated Slack channel to share teaching best practices, education topic series and virtual study sessions moderated by MLU instructors, and regional events for continued professional development. Also, they will receive continuing education credits and AWS-provided stipends.

Faculty and students get access to instructional material through Amazon SageMaker Studio Lab. SageMaker Studio Lab was announced last year and is AWS’s free (no credit card required) ML development environment. It provides computing and storage for anybody that wants to learn and experiment with ML. Institutions can unlock additional resources to support their ML programs by registering for AWS Academy. AWS Academy unlocks all the AWS services for a complete AI/ML program.

Community colleges and universities can integrate this educator enablement program into their computer science, information technology, and business curricula to create an AI/ML course, certificate, or degree. We have worked with educators and education boards such as Houston Community College to create content that is vetted for credit-worthy and degree-earning curricula.

In August 2022, we launched our first educator bootcamp in partnership with The Coding School. The bootcamp was delivered over two weeks, offering lectures, case studies, and hands-on projects. 25 educators completed the Educator Machine Learning Bootcamp, representing 22 US community colleges and universities.

Learn More and Join The Program
During 2023, AWS Machine Learning University will run six educator-enablement cohorts starting in January. The program will give priority consideration to educators at community colleges, MSIs, and HBCUs, in alignment with this program mission to increase access to AI/ML technology to historically underserved and underrepresented students.

If you are a computer science educator or part of a board of educators interested in fostering more depth in your computer science coursework, you should sign up for the educator enablement program.

Marcia

New for Amazon Redshift – Simplify Data Ingestion and Make Your Data Warehouse More Secure and Reliable

Post Syndicated from Danilo Poccia original https://aws.amazon.com/blogs/aws/new-for-amazon-redshift-simplify-data-ingestion-and-make-your-data-warehouse-more-secure-and-reliable/

When we talk with customers, we hear that they want to be able to harness insights from data in order to make timely, impactful, and actionable business decisions. A common pattern with data-driven organizations is that they have many different data sources they need to ingest into their analytics systems. This requires them to build manual data pipelines spanning across their operational databases, data lakes, streaming data, and data within their warehouse. As a consequence of this complex setup, it can take data engineers weeks or even months to build data ingestion pipelines. These data pipelines are costly, and the delays can lead to missed business opportunities. Additionally, data warehouses are increasingly becoming mission critical systems that require high availability, reliability, and security.

Amazon Redshift is a fully managed petabyte-scale data warehouse used by tens of thousands of customers to easily, quickly, securely, and cost-effectively analyze all their data at any scale. This year at re:Invent, Amazon Redshift has announced a number of features to help you simplify data ingestion and get to insights easily and quickly, within a secure, reliable environment.

In this blog, I introduce some of these new features that fit into two main categories:

  • Simplify data ingestion
    • Amazon Redshift now supports auto-copy from Amazon S3 (available in preview). With this new capability, Amazon Redshift automatically loads the files that arrive in an Amazon Simple Storage Service (Amazon S3) location that you specify into your data warehouse. The files can use any of the formats supported by the Amazon Redshift copy command, such as CSV, JSON, Parquet, and Avro. In this way, you don’t need to manually or repeatedly run copy procedures. Amazon Redshift automates file ingestion and takes care of data-loading steps under the hood.
    • With Amazon Aurora zero-ETL integration with Amazon Redshift, you can use Amazon Redshift for near real-time analytics and machine learning on petabytes of transactional data stored on Amazon Aurora MySQL databases (available in limited preview). With this capability, you can choose the Amazon Aurora databases containing the data you want to analyze with Amazon Redshift. Data is then replicated into your data warehouse within seconds after transactional data is written into Amazon Aurora, eliminating the need to build and maintain complex data pipelines. You can replicate data from multiple Amazon Aurora databases into the same Amazon Redshift instance to run analytics across multiple applications. With near real-time access to transactional data, you can leverage Amazon Redshift’s analytics and capabilities, such as built-in machine learning (ML), materialized views, data sharing, and federated access to multiple data stores and data lakes, to derive insights from transactional and other data.
    • With the general availability of Amazon Redshift Streaming Ingestion, you can now natively ingest hundreds of megabytes of data per second from Amazon Kinesis Data Streams and Amazon MSK into an Amazon Redshift materialized view and query it in seconds. Learn more in this post.
  • Make your data warehouse more secure and reliable
    • You can now improve the availability of your data warehouse by choosing multiple Availability Zone (AZ) deployments. Multi-AZ deployments for your Amazon Redshift clusters are available in preview and reduce recovery times to seconds through automatic recovery. In this way, you can build solutions that are more compliant with the recommendations of the Reliability Pillar of the AWS Well-Architected Framework.
    • With dynamic data masking (available in preview), you can protect sensitive information stored in your data warehouse and ensure that only the relevant data is accessible by users based on their roles. You can limit how much identifiable data is visible to users using multiple levels of policies so different users and groups can have different levels of data access without having to create multiple copies of data. Dynamic data masking complements other granular access control capabilities in Amazon Redshift including row-level and column-level security and role-based access controls. In this way, Dynamic Data Masking helps you meet requirements for GDPR, CCPA, and other privacy regulations.
    • Amazon Redshift now supports central access controls for data sharing with AWS Lake Formation (available in public preview). You can now use Lake Formation to simplify governance of data shared from Amazon Redshift and centrally manage granular access across all data-sharing consumers.

There have been other interesting news for Amazon Redshift at re:Invent you might have already heard about:

  • The general availability of Amazon Redshift integration for Apache Spark makes it easy to build and run Spark applications on Amazon Redshift and Redshift Serverless, opening up the data warehouse for a broader set of AWS analytics and machine learning solutions.
  • AWS Backup now supports Amazon Redshift. AWS Backup allows you to define a central backup policy to manage data protection of your applications and can also protect your Amazon Redshift clusters. In this way, you have a consistent experience when managing data protection across all supported services.

Availability and Pricing
Multi-AZ deployments, central access control for data sharing with AWS Lake Formation, auto-copy from Amazon S3, and dynamic data masking are available in preview in US East (Ohio), US East (N. Virginia), US West (Oregon), Asia Pacific (Tokyo), Europe (Ireland), and Europe (Stockholm).

There is no additional cost for using auto-copy from Amazon S3 and near real-time analytics on transactional data. There is no extra charge for dynamic data masking and central access control for data sharing. For more information, see Amazon Redshift pricing.

These new capabilities take you one step further in analyzing all your data across data sources with simple data ingestion capabilities, while improving the security and reliability of your data warehouse.

Danilo

New — Introducing Support for Real-Time and Batch Inference in Amazon SageMaker Data Wrangler

Post Syndicated from Donnie Prakoso original https://aws.amazon.com/blogs/aws/new-introducing-support-for-real-time-and-batch-inference-in-amazon-sagemaker-data-wrangler/

To build machine learning models, machine learning engineers need to develop a data transformation pipeline to prepare the data. The process of designing this pipeline is time-consuming and requires a cross-team collaboration between machine learning engineers, data engineers, and data scientists to implement the data preparation pipeline into a production environment.

The main objective of Amazon SageMaker Data Wrangler is to make it easy to do data preparation and data processing workloads. With SageMaker Data Wrangler, customers can simplify the process of data preparation and all of the necessary steps of data preparation workflow on a single visual interface. SageMaker Data Wrangler reduces the time to rapidly prototype and deploy data processing workloads to production, so customers can easily integrate with MLOps production environments.

However, the transformations applied to the customer data for model training need to be applied to new data during real-time inference. Without support for SageMaker Data Wrangler in a real-time inference endpoint, customers need to write code to replicate the transformations from their flow in a preprocessing script.

Introducing Support for Real-Time and Batch Inference in Amazon SageMaker Data Wrangler
I’m pleased to share that you can now deploy data preparation flows from SageMaker Data Wrangler for real-time and batch inference. This feature allows you to reuse the data transformation flow which you created in SageMaker Data Wrangler as a step in Amazon SageMaker inference pipelines.

SageMaker Data Wrangler support for real-time and batch inference speeds up your production deployment because there is no need to repeat the implementation of the data transformation flow. You can now integrate SageMaker Data Wrangler with SageMaker inference. The same data transformation flows created with the easy-to-use, point-and-click interface of SageMaker Data Wrangler, containing operations such as Principal Component Analysis and one-hot encoding, will be used to process your data during inference. This means that you don’t have to rebuild the data pipeline for a real-time and batch inference application, and you can get to production faster.

Get Started with Real-Time and Batch Inference
Let’s see how to use the deployment supports of SageMaker Data Wrangler. In this scenario, I have a flow inside SageMaker Data Wrangler. What I need to do is to integrate this flow into real-time and batch inference using the SageMaker inference pipeline.

First, I will apply some transformations to the dataset to prepare it for training.

I add one-hot encoding on the categorical columns to create new features.

Then, I drop any remaining string columns that cannot be used during training.

My resulting flow now has these two transform steps in it.

After I’m satisfied with the steps I have added, I can expand the Export to menu, and I have the option to export to SageMaker Inference Pipeline (via Jupyter Notebook).

I select Export to SageMaker Inference Pipeline, and SageMaker Data Wrangler will prepare a fully customized Jupyter notebook to integrate the SageMaker Data Wrangler flow with inference. This generated Jupyter notebook performs a few important actions. First, define data processing and model training steps in a SageMaker pipeline. The next step is to run the pipeline to process my data with Data Wrangler and use the processed data to train a model that will be used to generate real-time predictions. Then, deploy my Data Wrangler flow and trained model to a real-time endpoint as an inference pipeline. Last, invoke my endpoint to make a prediction.

This feature uses Amazon SageMaker Autopilot, which makes it easy for me to build ML models. I just need to provide the transformed dataset which is the output of the SageMaker Data Wrangler step and select the target column to predict. The rest will be handled by Amazon SageMaker Autopilot to explore various solutions to find the best model.

Using AutoML as a training step from SageMaker Autopilot is enabled by default in the notebook with the use_automl_step variable. When using the AutoML step, I need to define the value of target_attribute_name, which is the column of my data I want to predict during inference. Alternatively, I can set use_automl_step to False if I want to use the XGBoost algorithm to train a model instead.

On the other hand, if I would like to instead use a model I trained outside of this notebook, then I can skip directly to the Create SageMaker Inference Pipeline section of the notebook. Here, I would need to set the value of the byo_model variable to True. I also need to provide the value of algo_model_uri, which is the Amazon Simple Storage Service (Amazon S3) URI where my model is located. When training a model with the notebook, these values will be auto-populated.

In addition, this feature also saves a tarball inside the data_wrangler_inference_flows folder on my SageMaker Studio instance. This file is a modified version of the SageMaker Data Wrangler flow, containing the data transformation steps to be applied at the time of inference. It will be uploaded to S3 from the notebook so that it can be used to create a SageMaker Data Wrangler preprocessing step in the inference pipeline.

The next step is that this notebook will create two SageMaker model objects. The first object model is the SageMaker Data Wrangler model object with the variable data_wrangler_model, and the second is the model object for the algorithm, with the variable algo_model. Object data_wrangler_model will be used to provide input in the form of data that has been processed into algo_model for prediction.

The final step inside this notebook is to create a SageMaker inference pipeline model, and deploy it to an endpoint.

Once the deployment is complete, I will get an inference endpoint that I can use for prediction. With this feature, the inference pipeline uses the SageMaker Data Wrangler flow to transform the data from your inference request into a format that the trained model can use.

In the next section, I can run individual notebook cells in Make a Sample Inference Request. This is helpful if I need to do a quick check to see if the endpoint is working by invoking the endpoint with a single data point from my unprocessed data. Data Wrangler automatically places this data point into the notebook, so I don’t have to provide one manually.

Things to Know
Enhanced Apache Spark configuration — In this release of SageMaker Data Wrangler, you can now easily configure how Apache Spark partitions the output of your SageMaker Data Wrangler jobs when saving data to Amazon S3. When adding a destination node, you can set the number of partitions, corresponding to the number of files that will be written to Amazon S3, and you can specify column names to partition by, to write records with different values of those columns to different subdirectories in Amazon S3. Moreover, you can also define the configuration in the provided notebook.

You can also define memory configurations for SageMaker Data Wrangler processing jobs as part of the Create job workflow. You will find similar configuration as part of your notebook.

Availability — SageMaker Data Wrangler supports for real-time and batch inference as well as enhanced Apache Spark configuration for data processing workloads are generally available in all AWS Regions that Data Wrangler currently supports.

To get started with Amazon SageMaker Data Wrangler supports for real-time and batch inference deployment, visit AWS documentation.

Happy building
— Donnie

Announcing Additional Data Connectors for Amazon AppFlow

Post Syndicated from Steve Roberts original https://aws.amazon.com/blogs/aws/announcing-additional-data-connectors-for-amazon-appflow/

Gathering insights from data is a more effective process if that data isn’t fragmented across multiple systems and data stores, whether on premises or in the cloud. Amazon AppFlow provides bidirectional data integration between on-premises systems and applications, SaaS applications, and AWS services. It helps customers break down data silos using a low- or no-code, cost-effective solution that’s easy to reconfigure in minutes as business needs change.

Today, we’re pleased to announce the addition of 22 new data connectors for Amazon AppFlow, including:

  • Marketing connectors (e.g., Facebook Ads, Google Ads, Instagram Ads, LinkedIn Ads).
  • Connectors for customer service and engagement (e.g., MailChimp, Sendgrid, Zendesk Sell or Chat, and more).
  • Business operations (Stripe, QuickBooks Online, and GitHub).

In total, Amazon AppFlow now supports over 50 integrations with various different SaaS applications and AWS services. This growing set of connectors can be combined to enable you to achieve 360 visibility across the data your organization generates. For instance, you could combine CRM (Salesforce), e-commerce (Stripe), and customer service (ServiceNow, Zendesk) data to build integrated analytics and predictive modeling that can guide your next best offer decisions and more. Using web (Google Analytics v4) and social surfaces (Facebook Ads, Instagram Ads) allows you to build comprehensive reporting for your marketing investments, helping you understand how customers are engaging with your brand. Or, sync ERP data (SAP S/4HANA) with custom order management applications running on AWS. For more information on the current range of connectors and integrations, visit the Amazon AppFlow integrations page.

Datasource connectors for Amazon AppFlow

Amazon AppFlow and AWS Glue Data Catalog
Amazon AppFlow has also recently announced integration with the AWS Glue Data Catalog to automate the preparation and registration of your SaaS data into the AWS Glue Data Catalog. Previously, customers using Amazon AppFlow to store data from supported SaaS applications into Amazon Simple Storage Service (Amazon S3) had to manually create and run AWS Glue Crawlers to make their data available to other AWS services such as Amazon Athena, Amazon SageMaker, or Amazon QuickSight. With this new integration, you can populate AWS Glue Data Catalog with a few clicks directly from the Amazon AppFlow configuration without the need to run any crawlers.

To simplify data preparation and improve query performance when using analytics engines such as Amazon Athena, Amazon AppFlow also now enables you to organize your data into partitioned folders in Amazon S3. Amazon AppFlow also automates the aggregation of records into files that are optimized to the size you specify. This increases performance by reducing processing overhead and improving parallelism.

You can find more information on the AWS Glue Data Catalog integration in the recent What’s New post.

Getting Started with Amazon AppFlow
Visit the Amazon AppFlow product page to learn more about the service and view all the available integrations. To help you get started, there’s also a variety of videos and demos available and some sample integrations available on GitHub. And finally, should you need a custom integration, try the Amazon AppFlow Connector SDK, detailed in the Amazon AppFlow documentation. The SDK enables you to build your own connectors to securely transfer data between your custom endpoint, application, or other cloud service to and from Amazon AppFlow‘s library of managed SaaS and AWS connectors.

— Steve

New ML Governance Tools for Amazon SageMaker – Simplify Access Control and Enhance Transparency Over Your ML Projects

Post Syndicated from Antje Barth original https://aws.amazon.com/blogs/aws/new-ml-governance-tools-for-amazon-sagemaker-simplify-access-control-and-enhance-transparency-over-your-ml-projects/

As companies increasingly adopt machine learning (ML) for their business applications, they are looking for ways to improve governance of their ML projects with simplified access control and enhanced visibility across the ML lifecycle. A common challenge in that effort is managing the right set of user permissions across different groups and ML activities. For example, a data scientist in your team that builds and trains models usually requires different permissions than an MLOps engineer that manages ML pipelines. Another challenge is improving visibility over ML projects. For example, model information, such as intended use, out-of-scope use cases, risk rating, and evaluation results, is often captured and shared via emails or documents. In addition, there is often no simple mechanism to monitor and report on your deployed model behavior.

That’s why I’m excited to announce a new set of ML governance tools for Amazon SageMaker.

As an ML system or platform administrator, you can now use Amazon SageMaker Role Manager to define custom permissions for SageMaker users in minutes, so you can onboard users faster. As an ML practitioner, business owner, or model risk and compliance officer, you can now use Amazon SageMaker Model Cards to document model information from conception to deployment and Amazon SageMaker Model Dashboard to monitor all your deployed models through a unified dashboard.

Let’s dive deeper into each tool, and I’ll show you how to get started.

Introducing Amazon SageMaker Role Manager
SageMaker Role Manager lets you define custom permissions for SageMaker users in minutes. It comes with a set of predefined policy templates for different personas and ML activities. Personas represent the different types of users that need permissions to perform ML activities in SageMaker, such as data scientists or MLOps engineers. ML activities are a set of permissions to accomplish a common ML task, such as running SageMaker Studio applications or managing experiments, models, or pipelines. You can also define additional personas, add ML activities, and your managed policies to match your specific needs. Once you have selected the persona type and the set of ML activities, SageMaker Role Manager automatically creates the required AWS Identity and Access Management (IAM) role and policies that you can assign to SageMaker users.

A Primer on SageMaker and IAM Roles
A role is an IAM identity that has permissions to perform actions with AWS services. Besides user roles that are assumed by a user via federation from an Identity Provider (IdP) or the AWS Console, Amazon SageMaker requires service roles (also known as execution roles) to perform actions on behalf of the user. SageMaker Role Manager helps you create these service roles:

  • SageMaker Compute Role – Gives SageMaker compute resources the ability to perform tasks such as training and inference, typically used via PassRole. You can select the SageMaker Compute Role persona in SageMaker Role Manager to create this role. Depending on the ML activities you select in your SageMaker service roles, you will need to create this compute role first.
  • SageMaker Service Role – Some AWS services, including SageMaker, require a service role to perform actions on your behalf. You can select the Data Scientist, MLOps, or Custom persona in SageMaker Role Manager to start creating service roles with custom permissions for your ML practitioners.

Now, let me show you how this works in practice.

There are two ways to get to SageMaker Role Manager, either through Getting started in the SageMaker console or when you select Add user in the SageMaker Studio Domain control panel.

I start in the SageMaker console. Under Configure role, select Create a role. This opens a workflow that guides you through all required steps.

Amazon SageMaker Admin Hub - Getting Started

Let’s assume I want to create a SageMaker service role with a specific set of permissions for my team of data scientists. In Step 1, I select the predefined policy template for the Data Scientist persona.

Amazon SageMaker Role Manager - Select persona

I can also define the network and encryption settings in this step by selecting Amazon Virtual Private Cloud (Amazon VPC) subnets, security groups, and encryption keys.

In Step 2, I select what ML activities data scientists in my team need to perform.

Amazon SageMaker Admin Hub - Configure ML activities

Some of the selected ML activities might require you to specify the Amazon Resource Name (ARN) of the SageMaker Compute Role so SageMaker compute resources have the ability to perform the tasks.

In Step 3, you can attach additional IAM policies and add tags to the role if needed. Tags help you identify and organize your AWS resources. You can use tags to add attributes such as project name, cost center, or location information to a role. After a final review of the settings in Step 4, select Submit, and the role is created.

In just a few minutes, I set up a SageMaker service role, and I’m now ready to onboard data scientists in SageMaker with custom permissions in place.

Introducing Amazon SageMaker Model Cards
SageMaker Model Cards helps you streamline model documentation throughout the ML lifecycle by creating a single source of truth for model information. For models trained on SageMaker, SageMaker Model Cards discovers and autopopulates details such as training jobs, training datasets, model artifacts, and inference environment. You can also record model details such as the model’s intended use, risk rating, and evaluation results. For compliance documentation and model evidence reporting, you can export your model cards to a PDF file and easily share them with your customers or regulators.

To start creating SageMaker Model Cards, go to the SageMaker console, select Governance in the left navigation menu, and select Model cards.

Amazon SageMaker Model Cards

Select Create model card to document your model information.

Amazon SageMaker Model Card

Amazon SageMaker Model Cards

Introducing Amazon SageMaker Model Dashboard
SageMaker Model Dashboard lets you monitor all your models in one place. With this bird’s-eye view, you can now see which models are used in production, view model cards, visualize model lineage, track resources, and monitor model behavior through an integration with SageMaker Model Monitor and SageMaker Clarify. The dashboard automatically alerts you when models are not being monitored or deviate from expected behavior. You can also drill deeper into individual models to troubleshoot issues.

To access SageMaker Model Dashboard, go to the SageMaker console, select Governance in the left navigation menu, and select Model dashboard.

Amazon SageMaker Model Dashboard

Note: The risk rating shown above is for illustrative purposes only and may vary based on input provided by you.

Now Available
Amazon SageMaker Role Manager, SageMaker Model Cards, and SageMaker Model Dashboard are available today at no additional charge in all the AWS Regions where Amazon SageMaker is available except for the AWS GovCloud and AWS China Regions.

To learn more, visit ML governance with Amazon SageMaker and check the developer guide.

Start building your ML projects with our new governance tools for Amazon SageMaker today

— Antje

Join the Preview – AWS Glue Data Quality

Post Syndicated from Jeff Barr original https://aws.amazon.com/blogs/aws/join-the-preview-aws-glue-data-quality/

Back in 1980, at my second professional programming job, I was working on a project that analyzed driver’s license data from a bunch of US states. At that time data of that type was generally stored in fixed-length records, with values carefully (or not) encoded into each field. Although we were given schemas for the data, we would invariably find that the developers had to resort to tricks in order to represent values that were not anticipated up front. For example, coding for someone with heterochromia, eyes of different colors. We ended up doing a full scan of the data ahead of our actual time-consuming and expensive analytics run in order to make sure that we were dealing with known data. This was my introduction to data quality, or the lack thereof.

AWS makes it easier for you to build data lakes and data warehouses at any scale. We want to make it easier than ever before for you to measure and maintain the desired quality level of the data that you ingest, process, and share.

Introducing AWS Glue Data Quality
Today I would like to tell you about AWS Glue Data Quality, a new set of features for AWS Glue that we are launching in preview form. It can analyze your tables and recommend a set of rules automatically based on what it finds. You can fine-tune those rules if necessary and you can also write your own rules. In this blog post I will show you a few highlights, and will save the details for a full post when these features progress from preview to generally available.

Each data quality rule references a Glue table or selected columns in a Glue table and checks for specific types of properties: timeliness, accuracy, integrity, and so forth. For example, a rule can indicate that a table must have the expected number of columns, that the column names match a desired pattern, and that a specific column is usable as a primary key.

Getting Started
I can open the new Data quality tab on one of my Glue tables to get started. From there I can create a ruleset manually, or I can click Recommend ruleset to get started:

Then I enter a name for my Ruleset (RS1), choose an IAM Role that has permission to access it, and click Recommend ruleset:

My click initiates a Glue Recommendation task (a specialized type of Glue job) that scans the data and makes recommendations. Once the task has run to completion I can examine the recommendations:

I click Evaluate ruleset to check on the quality of my data.

The data quality task runs and I can examine the results:

In addition to creating Rulesets that are attached to tables, I can use them as part of a Glue job. I create my job as usual and then add an Evaluate Data Quality node:

Then I use the Data Quality Definition Language (DDQL) builder to create my rules. I can choose between 20 different rule types:

For this blog post, I made these rules more strict than necessary so that I could show you what happens when the data quality evaluation fails.

I can set the job options, and choose the original data or the data quality results as the output of the transform. I can also write the data quality results to an S3 bucket:

After I have created my Ruleset, I set any other desired options for the job, save it, and then run it. After the job completes I can find the results in the Data quality tab. Because I made some overly strict rules, the evaluation correctly flagged my data with a 0% score:

There’s a lot more, but I will save that for the next blog post!

Things to Know
Preview Regions – This is an open preview and you can access it today the US East (Ohio, N. Virginia), US West (Oregon), Asia Pacific (Tokyo), and Europe (Ireland) AWS Regions.

Pricing – Evaluating data quality consumes Glue Data Processing Units (DPU) in the same manner and at the same per-DPU pricing as any other Glue job.

Jeff;

New – Trusted Language Extensions for PostgreSQL on Amazon Aurora and Amazon RDS

Post Syndicated from Channy Yun original https://aws.amazon.com/blogs/aws/new-trusted-language-extensions-for-postgresql-on-amazon-aurora-and-amazon-rds/

PostgreSQL has become the preferred open-source relational database for many enterprises and start-ups with its extensible design for developers. One of the reasons developers use PostgreSQL is it allows them to add database functionality by building extensions with their preferred programming languages.

You can already install and use PostgreSQL extensions in Amazon Aurora PostgreSQL-Compatible Edition and Amazon Relational Database Service for PostgreSQL. We support more than 85 PostgreSQL extensions in Amazon Aurora and Amazon RDS, such as the pgAudit extension for logging your database activity. While many workloads use these extensions, we heard our customers asking for flexibility to build and run the extensions of their choosing for their PostgreSQL database instances.

Today, we are announcing the general availability of Trusted Language Extensions for PostgreSQL (pg_tle), a new open-source development kit for building PostgreSQL extensions. With Trusted Language Extensions for PostgreSQL, developers can build high-performance extensions that run safely on PostgreSQL.

Trusted Language Extensions for PostgreSQL provides database administrators control over who can install extensions and a permissions model for running them, letting application developers deliver new functionality as soon as they determine an extension meets their needs.

To start building with Trusted Language Extensions, you can use trusted languages such as JavaScript, Perl, and PL/pgSQL. These trusted languages have safety attributes, including restricting direct access to the file system and preventing unwanted privilege escalations. You can easily install extensions written in a trusted language on Amazon Aurora PostgreSQL-Compatible Edition 14.5 and Amazon RDS for PostgreSQL 14.5 or a newer version.

Trusted Language Extensions for PostgreSQL is an open-source project licensed under Apache License 2.0 on GitHub. You can comment or suggest items on the Trusted Language Extensions for PostgreSQL roadmap and help us support this project across multiple programming languages, and more. Doing this as a community will help us make it easier for developers to use the best parts of PostgreSQL to build extensions.

Let’s explore how we can use Trusted Language Extensions for PostgreSQL to build a new PostgreSQL extension for Amazon Aurora and Amazon RDS.

Setting up Trusted Language Extensions for PostgreSQL
To use pg_tle with Amazon Aurora or Amazon RDS for PostgreSQL, you need to set up a parameter group that loads pg_tle in the PostgreSQL shared_preload_libraries setting. Choose Parameter groups in the left navigation pane in the Amazon RDS console and Create parameter group to make a new parameter group.

Choose Create after you select postgres14 with Amazon RDS for PostgreSQL in the Parameter group family and pg_tle in the Group Name. You can select aurora-postgresql14 for an Amazon Aurora PostgreSQL-Compatible cluster.

Choose a created pgtle parameter group and Edit in the Parameter group actions dropbox menu. You can search shared_preload_library in the search box and choose Edit parameter. You can add your preferred values, including pg_tle, and choose Save changes.

You can also do the same job in the AWS Command Line Interface (AWS CLI).

$ aws rds create-db-parameter-group \
  --region us-east-1 \
  --db-parameter-group-name pgtle \
  --db-parameter-group-family aurora-postgresql14 \
  --description "pgtle group"

$ aws rds modify-db-parameter-group \
  --region us-east-1 \
  --db-parameter-group-name pgtle \
  --parameters "ParameterName=shared_preload_libraries,ParameterValue=pg_tle,ApplyMethod=pending-reboot"

Now, you can add the pgtle parameter group to your Amazon Aurora or Amazon RDS for PostgreSQL database. If you have a database instance called testing-pgtle, you can add the pgtle parameter group to the database instance using the command below. Please note that this will cause an active instance to reboot.

$ aws rds modify-db-instance \
  --region us-east-1 \
  --db-instance-identifier testing-pgtle \
  --db-parameter-group-name pgtle-pg \
  --apply-immediately

Verify that the pg_tle library is available on your Amazon Aurora or Amazon RDS for PostgreSQL instance. Run the following command on your PostgreSQL instance:

SHOW shared_preload_libraries;

pg_tle should appear in the output.

Now, we need to create the pg_tle extension in your current database to run the command:

 CREATE EXTENSION pg_tle;

You can now create and install Trusted Language Extensions for PostgreSQL in your current database. If you create a new extension, you should grant the pgtle_admin role to your primary user (e.g., postgres) with the following command:

GRANT pgtle_admin TO postgres;

Let’s now see how to create our first pg_tle extension!

Building a Trusted Language Extension for PostgreSQL
For this example, we are going to build a pg_tle extension to validate that a user is not setting a password that’s found in a common password dictionary. Many teams have rules around the complexity of passwords, particularly for database users. PostgreSQL allows developers to help enforce password complexity using the check_password_hook.

In this example, you will build a password check hook using PL/pgSQL. In the hook, you can check to see if the user-supplied password is in a dictionary of 10 of the most common password values:

SELECT pgtle.install_extension (
  'my_password_check_rules',
  '1.0',
  'Do not let users use the 10 most commonly used passwords',
$_pgtle_$
  CREATE SCHEMA password_check;
  REVOKE ALL ON SCHEMA password_check FROM PUBLIC;
  GRANT USAGE ON SCHEMA password_check TO PUBLIC;

  CREATE TABLE password_check.bad_passwords (plaintext) AS
  VALUES
    ('123456'),
    ('password'),
    ('12345678'),
    ('qwerty'),
    ('123456789'),
    ('12345'),
    ('1234'),
    ('111111'),
    ('1234567'),
    ('dragon');
  CREATE UNIQUE INDEX ON password_check.bad_passwords (plaintext);

  CREATE FUNCTION password_check.passcheck_hook(username text, password text, password_type pgtle.password_types, valid_until timestamptz, valid_null boolean)
  RETURNS void AS $$
    DECLARE
      invalid bool := false;
    BEGIN
      IF password_type = 'PASSWORD_TYPE_MD5' THEN
        SELECT EXISTS(
          SELECT 1
          FROM password_check.bad_passwords bp
          WHERE ('md5' || md5(bp.plaintext || username)) = password
        ) INTO invalid;
        IF invalid THEN
          RAISE EXCEPTION 'password must not be found on a common password dictionary';
        END IF;
      ELSIF password_type = 'PASSWORD_TYPE_PLAINTEXT' THEN
        SELECT EXISTS(
          SELECT 1
          FROM password_check.bad_passwords bp
          WHERE bp.plaintext = password
        ) INTO invalid;
        IF invalid THEN
          RAISE EXCEPTION 'password must not be found on a common password dictionary';
        END IF;
      END IF;
    END
  $$ LANGUAGE plpgsql SECURITY DEFINER;

  GRANT EXECUTE ON FUNCTION password_check.passcheck_hook TO PUBLIC;

  SELECT pgtle.register_feature('password_check.passcheck_hook', 'passcheck');
$_pgtle_$
);

You need to enable the hook through the pgtle.enable_password_check configuration parameter. On Amazon Aurora and Amazon RDS for PostgreSQL, you can do so with the following command:

$ aws rds modify-db-parameter-group \
    --region us-east-1 \
    --db-parameter-group-name pgtle \
    --parameters "ParameterName=pgtle.enable_password_check,ParameterValue=on,ApplyMethod=immediate"

It may take several minutes for these changes to propagate. You can check that the value is set using the SHOW command:

SHOW pgtle.enable_password_check;

If the value is on, you will see the following output:

 pgtle.enable_password_check
-----------------------------
 on

Now you can create this extension in your current database and try setting your password to one of the dictionary passwords and observe how the hook rejects it:

CREATE EXTENSION my_password_check_rules;

CREATE ROLE test_role PASSWORD '123456';
ERROR:  password must not be found on a common password dictionary

CREATE ROLE test_role;
SET SESSION AUTHORIZATION test_role;
SET password_encryption TO 'md5';
\password
-- set to "password"
ERROR:  password must not be found on a common password dictionary

To disable the hook, set the value of pgtle.enable_password_check to off:

$ aws rds modify-db-parameter-group \
    --region us-east-1 \
    --db-parameter-group-name pgtle \
    --parameters "ParameterName=pgtle.enable_password_check,ParameterValue=off,ApplyMethod=immediate"

You can uninstall this pg_tle extension from your database and prevent anyone else from running CREATE EXTENSION on my_password_check_rules with the following command:

DROP EXTENSION my_password_check_rules;
SELECT pgtle.uninstall_extension('my_password_check_rules');

You can find more sample extensions and give them a try. To build and test your Trusted Language Extensions in your local PostgreSQL database, you can build from our source code after cloning the repository.

Join Our Community!
The Trusted Language Extensions for PostgreSQL community is open to everyone. Give it a try, and give us feedback on what you would like to see in future releases. We welcome any contributions, such as new features, example extensions, additional documentation, or any bug reports in GitHub.

To learn more about using Trusted Language Extensions for PostgreSQL in the AWS Cloud, see the Amazon Aurora PostgreSQL-Compatible Edition and Amazon RDS for PostgreSQL documentation.

Give it a try, and please send feedback to AWS re:Post for PostgreSQL or through your usual AWS support contacts.

Channy

Preview: Use Amazon SageMaker to Build, Train, and Deploy ML Models Using Geospatial Data

Post Syndicated from Channy Yun original https://aws.amazon.com/blogs/aws/preview-use-amazon-sagemaker-to-build-train-and-deploy-ml-models-using-geospatial-data/

You use map apps every day to find your favorite restaurant or travel the fastest route using geospatial data. There are two types of geospatial data: vector data that uses two-dimensional geometries such as a building location (points), roads (lines), or land boundary (polygons), and raster data such as satellite and aerial images.

Last year, we introduced Amazon Location Service, which makes it easy for developers to add location functionality to their applications. With Amazon Location Service, you can visualize a map, search points of interest, optimize delivery routes, track assets, and use geofencing to detect entry and exit events in your defined geographical boundary.

However, if you want to make predictions from geospatial data using machine learning (ML), there are lots of challenges. When I studied geographic information systems (GIS) in graduate school, I was limited to a small data set that covered only a narrow area and had to contend with limited storage and only the computing power of my laptop at the time.

These challenges include 1) acquiring and accessing high-quality geospatial datasets is complex as it requires working with multiple data sources and vendors, 2) preparing massive geospatial data for training and inference can be time-consuming and expensive, and 3) specialized tools are needed to visualize geospatial data and integrate with ML operation infrastructure

Today I’m excited to announce the preview release of Amazon SageMaker‘s new geospatial capabilities that make it easy to build, train, and deploy ML models using geospatial data. This collection of features offers pre-trained deep neural network (DNN) models and geospatial operators that make it easy to access and prepare large geospatial datasets. All generated predictions can be visualized and explored on the map.

Also, you can use the new geospatial image to transform and visualize data inside geospatial notebooks using open-source libraries such as NumPy, GDAL, GeoPandas, and Rasterio, as well as SageMaker-specific libraries.

With a few clicks in the SageMaker Studio console, a fully integrated development environment (IDE) for ML, you can run an Earth Observation job, such as a land cover segmentation or launch notebooks. You can bring various geospatial data, for example, your own Planet Labs satellite data from Amazon S3, or US Geological Survey LANDSAT and Sentinel-2 images from Open Data on AWS, Amazon Location Service, or bring your own data, such as location data generated from GPS devices, connected vehicles or internet of things (IoT) sensors, retail store foot traffic, geo-marketing and census data.

The Amazon SageMaker geospatial capabilities support use cases across any industry. For example, insurance companies can use satellite images to analyze the damage impact from natural disasters on local economies, and agriculture companies can track the health of crops, predict harvest yield, and forecast regional demand for agricultural produce. Retailers can combine location and map data with competitive intelligence to optimize new store locations worldwide. These are just a few of the example use cases. You can turn your own ideas into reality!

Introducing Amazon SageMaker Geospatial Capabilities
In the preview, you can use SageMaker Studio initialized in the US West (Oregon) Region. Make sure to set the default Jupyter Lab 3 as the version when you create a new user in the Studio. To learn more about setting up SageMaker Studio, see Onboard to Amazon SageMaker Domain Using Quick setup in the AWS documentation.

Now you can find the Geospatial section by navigating to the homepage and scrolling down in SageMaker Studio’s new Launcher tab.

Here is an overview of three key Amazon SageMaker geospatial capabilities:

  • Earth Observation jobs – Acquire, transform, and visualize satellite imagery data to make predictions and get useful insights.
  • Vector Enrichment jobs – Enrich your data with operations, such as converting geographical coordinates to readable addresses from CSV files.
  • Map Visualization – Visualize satellite images or map data uploaded from a CSV, JSON, or GeoJSON file.

Let’s dive deep into each component!

Get Started with an Earth Observation Job
To get started with Earth Observation jobs, select Create Earth Observation job on the front page.

You can select one of the geospatial operations or ML models based on your use case.

  • Spectral Index – Obtain a combination of spectral bands that indicate the abundance of features of interest.
  • Cloud Masking – Identify cloud and cloud-free pixels to get clear and accurate satellite imagery.
  • Land Cover Segmentation – Identify land cover types such as vegetation and water in satellite imagery.

The SageMaker provides a combination of geospatial functionalities that include built-in operations for data transformations along with pretrained ML models. You can use these models to understand the impact of environmental changes and human activities over time, identify cloud and cloud-free pixels, and perform semantic segmentation.

Define a Job name, choose a model to be used, and click the bottom-right Next button to move to the second configuration step.

Next, you can define an area of interest (AOI), the satellite image data set you want to use, and filters for your job. The left screen shows the Area of Interest map to visualize for your Earth Observation Job selection, and the right screen contains satellite images and filter options for your AOI.

You can choose the satellite image collection, either USGS LANDSAT or Sentinel-2 images, the date span for your Earth Observation job, and filters on properties of your images in the filter section.

I uploaded GeoJSON format to define my AOI as the Mountain Halla area in Jeju island, South Korea. I select all job properties and options and choose Create.

Once the Earth Observation job is successfully created, a flashbar will appear where I can view my job details by pressing the View job details button.

Once the job is finished, I can Visualize job output.

This image is a job output on rendering process to detect land usage from input satellite images. You can see either input images, output images, or the AOI from data layers in the left pane.

It shows automatic mapping results of land cover for natural resource management. For example, the yellow area is the sea, green is cloud, dark orange is forest, and orange is land.

You can also execute the same job with SageMaker notebook using the geospatial image with geospatial SDKs.

From the File and New, choose Notebook and select the Image dropdown menu in the Setup notebook environment and choose Geospatial 1.0. Let the other settings be set to the default values.

Let’s look at Python sample code! First, set up SageMaker geospatial libraries.

import boto3
import botocore
import sagemaker
import sagemaker_geospatial_map

region = boto3.Session().region_name
session = botocore.session.get_session()
execution_role = sagemaker.get_execution_role()

sg_client= session.create_client(
    service_name='sagemaker-geospatial',
    region_name=region
)

Start an Earth Observation Job to identify the land cover types in the area of Jeju island.

# Perform land cover segmentation on images returned from the sentinel dataset.
eoj_input_config = {
    "RasterDataCollectionQuery": {
        "RasterDataCollectionArn": <ArnDataCollection,
        "AreaOfInterest": {
            "AreaOfInterestGeometry": {
                "PolygonGeometry": {
                    "Coordinates": [
                        [[126.647226, 33.47014], [126.406116, 33.47014], [126.406116, 33.307529], [126.647226, 33.307529], [126.647226, 33.47014]]
                    ]
                }
            }
        },
        "TimeRangeFilter": {
            "StartTime": "2022-11-01T00:00:00Z",
            "EndTime": "2022-11-22T23:59:59Z"
        },
        "PropertyFilters": {
            "Properties": [
                {
                    "Property": {
                        "EoCloudCover": {
                            "LowerBound": 0,
                            "UpperBound": 20
                        }
                    }
                }
            ],
            "LogicalOperator": "AND"
        }
    }
}
eoj_config = {"LandCoverSegmentationConfig": {}}

response = sg_client.start_earth_observation_job(
    Name =  "jeju-island-landcover", 
    InputConfig = eoj_input_config,
    JobConfig = eoj_config, 
    ExecutionRoleArn = execution_role
)
# Monitor the EOJ status
sg_client.get_earth_observation_job(Arn = response['Arn'])

After your EOJ is created, the Arn is returned to you. You use the Arn to identify a job and perform further operations. After finishing the job, visualize Earth Observation inputs and outputs in the visualization tool.

# Creates an instance of the map to add EOJ input/ouput layer
map = sagemaker_geospatial_map.create_map({
    'is_raster': True
})
map.set_sagemaker_geospatial_client(sg_client)
# render the map
map.render()

# Visualize input, you can see EOJ is not be completed.
time_range_filter={
    "start_date": "2022-11-01T00:00:00Z",
    "end_date": "2022-11-22T23:59:59Z"
}
arn_to_visualize = response['Arn']
config = {
    'label': 'Jeju island'
}
input_layer=map.visualize_eoj_input(Arn=arn_to_visualize, config=config , time_range_filter=time_range_filter)

# Visualize output, EOJ needs to be in completed status
time_range_filter={
    "start_date": "2022-11-01T00:00:00Z",
    "snd_date": "2022-11-22T23:59:59Z"
}

config = {
   'preset': 'singleBand',
   'band_name': 'mask'
}
output_layer = map.visualize_eoj_output(Arn=arn_to_visualize, config=config, time_range_filter=time_range_filter)

You can also execute the StartEarthObservationJob API using the AWS Command Line Interface (AWS CLI).

When you create an Earth Observation Job in notebooks, you can use additional geospatial functionalities. Here is a list of some of the other geospatial operations that are supported by Amazon SageMaker:

  • Band Stacking – Combine multiple spectral properties to create a single image.
  • Cloud Removal – Remove pixels containing parts of a cloud from satellite imagery.
  • Geomosaic – Combine multiple images for greater fidelity.
  • Resampling – Scale images to different resolutions.
  • Temporal Statistics – Calculate statistics through time for multiple GeoTIFFs in the same area.
  • Zonal Statistics – Calculate statistics on user-defined regions.

To learn more, see Amazon SageMaker geospatial notebook SDK and Amazon SageMaker geospatial capability Service APIs in the AWS documentation and geospatial sample codes in the GitHub repository.

Perform a Vector Enrichment Job and Map Visualization
A Vector Enrichment Job (VEJ) performs operations on your vector data, such as reverse geocoding or map matching.

  • Reverse Geocoding – Convert map coordinates to human-readable addresses powered by Amazon Location Service.
  • Map Matching – Match GPS coordinates to road segments.

While you need to use an Amazon SageMaker Studio notebook to execute a VEJ, you can view all the jobs you create.

With the StartVectorEnrichmentJob API, you can create a VEJ for the supplied two job types.

{
  "Name":"vej-reverse", 
  "InputConfig":{
       "DocumentType":"csv", //
       "DataSourceConfig":{
       "S3Data":{
            "S3Uri":"s3://channy-geospatial/sample/vej.csv",
        } 
   }
  }, 
  "JobConfig": {
      "MapMatchingConfig": { 
          "YAttributeName":"string", // Latitude 
          "XAttributeName":"string", // Longitude 
          "TimestampAttributeName":"string", 
          "IdAttributeName":"string"
       }
   },
   "ExecutionRoleArn":"string" 
}

You can visualize the output of VEJ in the notebook or use the Map Visualization feature after you export VEJ jobs output to your S3 bucket. With the map visualization feature, you can easily show your geospatial data on the map.

This sample visualization includes Seattle City Council districts and public-school locations in GeoJSON format. Select Add data to upload data files or select S3 bucket.

{
  "type": "FeatureCollection",
  "crs": { "type": "name", "properties": { 
            "name":   "urn:ogc:def:crs:OGC:1.3:CRS84" } },
                                                                                
  "features": [
            { "type": "Feature", "id": 1, "properties": { "PROPERTY_L": "Jane Addams", "Status": "MS" }, "geometry": { "type": "Point", "coordinates": [ -122.293009024934037, 47.709944862769468 ] } },
            { "type": "Feature", "id": 2, "properties": { "PROPERTY_L": "Rainier View", "Status": "ELEM" }, "geometry": { "type": "Point", "coordinates": [ -122.263172064204767, 47.498863322205558 ] } },
            { "type": "Feature", "id": 3, "properties": { "PROPERTY_L": "Emerson", "Status": "ELEM" }, "geometry": { "type": "Point", "coordinates": [ -122.258636146463658, 47.514820466363943 ] } }
            ]
}

That’s all! For more information about each component, see Amazon SageMaker geospatial Developer Guide.

Join the Preview
The preview release of Amazon SageMaker geospatial capability is now available in the US West (Oregon) Region.

We want to hear more feedback during the preview. Give it a try, and please send feedback to AWS re:Post for Amazon SageMaker or through your usual AWS support contacts.

Channy

New – Redesigned UI for Amazon SageMaker Studio

Post Syndicated from Antje Barth original https://aws.amazon.com/blogs/aws/new-redesigned-ui-for-amazon-sagemaker-studio/

Today, I’m excited to announce a new, redesigned user interface (UI) for Amazon SageMaker Studio.

SageMaker Studio provides a single, web-based visual interface where you can perform all machine learning (ML) development steps with a comprehensive set of ML tools. For example, you can prepare data using SageMaker Data Wrangler, build ML models with fully managed Jupyter notebooks, and deploy models using SageMaker’s multi-model endpoints.

Introducing the Redesigned UI for Amazon SageMaker Studio
The redesigned UI makes it easier for you to discover and get started with the ML tools in SageMaker Studio. One highlight of the new UI includes a redesigned navigation menu with links to SageMaker capabilities that follow the typical ML development workflow from preparing data to building, training, and deploying ML models.

We also added new dynamic landing pages for each of the navigation menu items. These landing pages will refresh automatically to show the ML resources relevant for the tool, such as clusters, feature groups, experiments, and model endpoints, as you create or update them. On each of these pages, you can also find links to videos, tutorials, blogs, or additional documentation, to help you get started with the corresponding ML tool in SageMaker Studio.

The new SageMaker Studio Home page gives you one-click access to common tasks and workflows. From here, you can also open the redesigned Launcher with quick links to some of the most frequent tasks, such as creating a new notebook, opening a code console, or opening an image terminal.

Let me give you a whirlwind tour of the redesigned UI.

New Navigation Menu
The new left navigation menu in SageMaker Studio now helps you discover and navigate to the right tools for each step in your ML development workflow. The menu offers clear entry points to key ML tasks, such as data preparation, experimentation, model building, and deployments. The menu also provides shortcuts to quick start solutions and helpful content to accelerate your work in SageMaker Studio.

Amazon SageMaker Studio - New Navigation Menu

New Landing Pages for SageMaker Features and Capabilities
The new left navigation menu groups relevant tools together. For example, if you click on Data, you can now see the relevant SageMaker capabilities for your data preparation tasks. From here, you can prepare your data with SageMaker Data Wrangler, create and store ML features with SageMaker Feature Store, or manage Amazon EMR clusters for large-scale data processing.

If you click on Data Wrangler, the new landing page opens. These landing pages are designed to help you get started more easily. You can find a brief introduction to the tool and links to additional resources, such as videos, tutorials, or blogs.

Amazon SageMaker Studio - New Feature Landing Pages

Similar landing pages exist for the other navigation menu items. For example, with one click on AutoML, you can now see your existing SageMaker Autopilot experiments or get started by creating a new one.

Amazon SageMaker Studio - New AutoML Landing Page

New SageMaker Studio Home Page
We also added a new SageMaker Studio Home page with tooltips on key controls in the UI.

The Home page includes a list of Quick actions for common tasks, such as Open Launcher to create notebooks and other resources. Import & prepare data visually takes you to SageMaker Data Wrangler and helps you get started with your data preparation tasks. You can open the new Getting Started notebook or find additional resources, such as documentation and tutorials.

The Prebuilt and automated solutions help you get started quickly with prebuilt solutions, pretrained open-source models, and AutoML.

In Workflows and tasks, you find a list of relevant tasks for each step in your ML development workflow that take you to the right tool for the job. For example, Store, manage, and retrieve features takes you to SageMaker Feature Store and opens the feature catalog. Similarly, View all experiments takes you to SageMaker Experiments and opens the experiments list view.

In Quick start solutions, you can find pretrained vision, text, and tabular models, notebooks, and end-to-end solutions for common use cases.

Amazon SageMaker Studio - New Home Page

New Getting Started Notebook
SageMaker Studio now includes a new Getting Started notebook that walks you through the basics of how to use SageMaker Studio. If you are a first-time user of SageMaker Studio, this is the perfect starting place. The notebook covers everything from the fundamentals of JupyterLab to a practical walkthrough of training an ML model. The notebook also provides detailed insight into SageMaker-specific functionality, resources, and tools.

New SageMaker Studio Launcher
The Launcher is designed to help you invoke JupyterLab actions and has been optimized to give you quick access to the most frequent tasks, such as creating a notebook, opening a code console, or opening an image terminal. In the same step, you can also choose the image, kernel, instance type, or startup script as needed. 

Amazon SageMaker Studio - New Launcher

Now Available
The redesigned Amazon SageMaker Studio UI is now available in all AWS Regions where SageMaker Studio is available. The redesigned UI is supported by SageMaker Studio domains running on JupyterLab 3. For instructions on how to update the JupyterLab version, see View and update the JupyterLab version of an app from the console.

Give the new user experience a try, and let us know what you think through the purple Feedback widget in SageMaker Studio, or through your usual AWS support contacts.

Start building your ML projects with Amazon SageMaker Studio today!

— Antje