Post Syndicated from The Hook Up original https://www.youtube.com/watch?v=p7pcVKvtgCE
Yearly Archives: 2024
[$] The beginning of the 6.13 merge window
Post Syndicated from corbet original https://lwn.net/Articles/998623/
As of this writing, just over 1,800 non-merge changesets have been pulled
into the mainline kernel for the 6.13 release. That number may seem small,
given that a typical merge window brings in at least 12,000 commits, but
the early pulls this time around have focused on significant core changes,
and there are quite a few of them. The time has come to summarize the
changes pulled so far, including lazy preemption, multi-grained timestamps,
new extended-attribute system calls, and more.
Announcing a visual update to the AWS Management Console (preview)
Post Syndicated from Prasad Rao original https://aws.amazon.com/blogs/aws/announcing-a-visual-update-to-the-aws-management-console-preview/
Today, we are announcing a visual update to the AWS Management Console in preview. We are rolling out this update by using the latest version of Cloudscape, the Amazon Web Services (AWS) design system used to build intuitive, inclusive, and meaningful AWS experiences at scale.
In this post, I describe how the visual update makes it easier for you to scan content, focus on the key information, and find what you are looking for more effectively while preserving the familiar and consistent experience of the AWS Management Console.


Improved readability
A revised typography scale and improved treatment of headings result in a stronger visual hierarchy, which helps you to better locate and understand your data. A refined use of color and weight across text elements help you differentiate key pieces of information faster. For example, you’ll see that labels in form fields are now more prominent, which eases scanning. The same applies to keys in key-value pairs and sections across components, such as service navigation, expandable elements, and tabs.

We improved the color palette, made it more vibrant, and simplified the color treatment of interactive elements. For example, secondary buttons, links, tokens, and interactive states for numerous interface elements are now blue, making it easier for you to interact with the content on the screen and contributing to improving task efficiency.

Improved focus in light and dark mode
Reduced visual complexity supports user focus. We replaced drop shadows with a new thinner stroke on main content wrappers, such as cards, panels, and containers, and unified the use of border styles across components. This reduces visual noise and optimizes the space inside the layout. Shadows are now reserved to add emphasis on specific interactive and transient elements, which helps simplify visual depth and improves the overall content hierarchy.

We also released updates to dark mode to address the need for clearer differentiation between elements on the page. These changes include an update to the color ramp and improved contrast between interactive states across components.

Modernized interface
We modernized the interface while retaining familiarity to continue to offer predictable and recognizable experiences across AWS. The user experience is now easier on the eyes, thanks to the use of rounder shapes, brighter colors, and improved layout treatment. These updates create a smoother, more natural appearance, making the interface more visually pleasing.

To deliver a more delightful experience and support visual storytelling, we also introduced a whole new family of illustrations and motion while still offering the highest accessibility standards.

Improved information density
We optimized information density by reducing unused space, leading to more content visible on the screen. Related data is now displayed closer together, reinforcing visual grouping. Space within content wrappers such as cards and containers has been minimized, so you can consume more information at once. The new layout is centered and wider, optimizing the experience to serve larger screen sizes than before. The visual update makes it easier to consume information, which creates a better and friendlier experience within the AWS Management Console.


Additionally, we introduced Toolbar, a new way to navigate and access contextual tools and features. This helps you perform your tasks while maximizing the amount of content available on screen.

Improved consistency
The interface is now more distinctive and consistent. Refreshed colors, iconography, and shapes help deliver a more dynamic and expressive experience while reinforcing a unified and cohesive journey across all AWS experiences.
Available now
You can start experiencing the visual update now in selected consoles across all AWS Regions by visiting the AWS Management Console. We’ll be extending the update across all services. Thanks to the new visual treatment, you can now benefit from an experience that’s more readable and intuitive and that contributes to improved overall task efficiency.
PATREON UNCUT – Join us Behind The Scenes
Post Syndicated from Matt Granger original https://www.youtube.com/watch?v=-PExuy2Wrkw
Security updates for Thursday
Post Syndicated from jake original https://lwn.net/Articles/998949/
Security updates have been issued by AlmaLinux (kernel, NetworkManager-libreswan, and openssl), Fedora (chromium and llvm-test-suite), Mageia (thunderbird), and Ubuntu (linux-aws-6.8, linux-azure, linux-azure-6.8, linux-oracle-6.8,, linux-azure, and ruby2.7).
Secret Service Tracking People’s Locations without Warrant
Post Syndicated from Bruce Schneier original https://www.schneier.com/blog/archives/2024/11/secret-service-tracking-peoples-locations-without-warrant.html
This feels important:
The Secret Service has used a technology called Locate X which uses location data harvested from ordinary apps installed on phones. Because users agreed to an opaque terms of service page, the Secret Service believes it doesn’t need a warrant.
TikTok Ban: Last Week Tonight with John Oliver (HBO)
Post Syndicated from LastWeekTonight original https://www.youtube.com/watch?v=5CZNlaeZAtw
Trump’s Vision to Remake the Military
Post Syndicated from The Atlantic original https://www.youtube.com/watch?v=SiCjPqLWnu8
Има нещо гнило в (името на) пуйката
Post Syndicated from original https://www.toest.bg/ima-neshto-gnilo-v-imeto-na-puykata/

След президентските избори в САЩ близо половината американски граждани вероятно се чувстват всякак, но не и благодарни. И все пак това едва ли ще спре огромното мнозинство американци – без значение дали са гласували за Камала Харис, или за Доналд Тръмп – и тази година, както всяка, в четвъртия четвъртък на месец ноември да се съберат със своите семейства, близки, а често и с не толкова близки безпризорни чужденци, за да празнуват.
Точно като такъв безпризорен чужденец през осемте години, които прекарах в Щатите, съм присъствала поне на два пъти по толкова събирания по случай Деня на благодарността. За обкръжаващите ме американци, за които може да се каже всичко, но не и че са негостоприемни, беше немислимо да ме оставят сама на този така важен за тях, макар и незначещ нищо за мен празник. Ето защо аз ежегодно бях канена да присъствам на по две, нерядко на три, а понякога дори и на четири събирания за Деня на благодарността.
При първоначалната ми среща с американската Thanksgiving трапеза няколко месеца след пристигането ми в Америка в края на 90-те се почувствах, както вероятно са се чувствали пилигримите от Плимутската колония през 1621 г., споделяйки празника на реколтата с местното население от индианското племе Уампаноаг. Именно това събитие се смята за първообраза на Деня на благодарността. С други думи,
празничното меню ми се стори изключително екзотично.
Макар че повечето наименования на ястията ми бяха познати поне на теория, много от тях виждах на живо за пръв път, а начинът на приготвяне и комбинирането им надхвърляше и най-развинтеното кулинарно въображение: сос от боровинки и сос „грейви“; печени сладки картофи, покрити с пухкави бонбони маршмелоу; картофено пюре, но приготвено от небелени картофи; плънка от хляб с гъби, печени кестени, бекон и сушени сливи, която се сервира отделно; тиквен пай, пай от пекан или някаква умопомрачаваща комбинация от двете за десерт. Почетното място в центъра на трапезата, разбира се, неизменно беше заето от огромна печена пуйка.
Още тогава, макар и зашеметена от екзотичните гозби и безмерните количества погълната храна¹, усетих, че има нещо гнило – само че не в Дания, а в Турция, или по-точно във факта, че английското название на пуйката по някаква причина е идентично с името на държавата, с която България има граница на югоизток².
Едва сега се заемам да проуча тази мистерия по-внимателно. Оказва се, че макар и летенето изобщо да не ѝ се удава, тази едра, странно изглеждаща птица през изминалите няколко столетия е обиколила цялото земно кълбо – както буквално, така и чрез названията си на различни езици. Проследяването на тези наименования чудесно илюстрира сложните, често водещи до обърквания и недоразумения процеси на глобализация, и то векове преди самият термин да съществува.
Преди да се озове на американската трапеза за Деня на благодарността и да получи англоезичното си наименование, пуйката прекосява Атлантическия океан не веднъж, а цели два пъти, като междувременно се разпространява из цяла Европа, участва в пиеса на Шекспир, минава през Азия, среща се със свои африкански роднини и стига чак до Индия.
Прародителите на пуйката от американската трапеза първоначално се опитомяват и отглеждат от ацтеките, които я наричат huehxolotl, или „голямо чудовище”, на езика науатъл³.
Европейците в лицето на Кортес и неговите конкистадори за пръв път се срещат с въпросното чудовище през 1519 г., а впоследствие вождът на ацтеките Монтесума им подарява 1500 броя от птиците, които те отнасят в Европа. Но испанците тогава объркват пуйката с вид по-скромно украсен паун, като това се отразява и в наименованието pavo – от pavo real ‘паун’) – което те ѝ дават и под което е известна в Испания и досега.
Още през XV век обаче, тоест преди испанците да срещнат чудатата птица в Америка, английски търговци внасят в Европа друг вид птица, известна на български като „токачка“. Тя наподобява пуйката и принадлежи към същия разред (Кокошоподобни, или Galliformes) като нея, но всъщност произлиза от западния бряг на Африка. Тъй като търговията на много стоки през този период минава през Османската империя, въпросната птица (подобно на много други продукти, обозначени като „турски“, без значение какъв е реалният им произход) става известна на английски като turkey-cock.
Ето как в първите стотина години след пристигането на американската пуйка в Европа тя често била бъркана с африканската птица, а понятието turkey-cock се използвало без особена претенция за прецизност и за двете⁴.
През 1620 г. понятието turkey-cock прекосява Атлантическия океан в обратната посока заедно с английските пилигрими на кораба „Мейфлауър“,
които също толкова непридирчиво започват да го прилагат към всякакви едри птици, включително и към северноамериканските наследници на ацтекските пуйки. По този начин, макар да се смята, че пуйката всъщност не е присъствала на първото празнуване на Деня на благодарността през 1621 г., наименованието, впоследствие скъсено до turkey, се установява в Америка⁵.
Жертва на безразборната употреба става и иначе придирчивият Шекспир, който в пиесата си „Хенри V“ от 1599 г. подигравателно представя (в превод на Валери Петров) „оня подъл, низък, долен, въшлив самохвалко и нахалник Пистол“ с думите: Why, here he comes, swelling like a turkey-cock. (Или, отново в същия превод: „Ха, ето го, иде, наперен като пуяк!“). Но определението всъщност се оказва анахронично, тъй като действието в пиесата се развива непосредствено преди и след Битката при Аженкур, състояла се през 1415 г., когато европейците само са могли да мечтаят за Новия свят и неговите пуйки.
Самият Нов свят, както знаем, е резултат от колосално объркване, първоначално географско, а впоследствие и етимологично, вследствие на което в края на XV век карибските острови стават известни като Западни Индии, а коренното население на Америка – като „индианци“. Това объркване вероятно води и до свързаните с Индия наименования на пуйката на няколко езика. Освен в турския, на който англоезичната turkey се нарича hindi, те включват и френски (dinde, от poule d’Inde, или „пиле от Индия“), руски („индейка“ или „индюшка“), полски (indyk), даже и баски (indioilar arrunt), каталански (gall dindi), грузински (ინდაური/indauri) и иврит (הוֹדוּ/hodu).
Към тези имена можем да добавим и наименованията, заети от съвсем реално съществуващо място в самата Индия, а именно град Каликут, където експедицията на португалския мореплавател Вашку да Гама акостира през 1498 г. Точно Каликут служи като основа за наименованията на пуйката на няколко езика, например скандинавските (kalkon на шведски, kalkun на норвежки и датски), откъдето навлиза и във финския (kalkkuna), а също така и на литовски (kalakutas) и нидерландски (kalkoen), откъдето се озовава в африкаанс и даже в синхалски (කළුකුමා/kaḷukumā), макар че би се очаквало неговите ползватели, бидейки жители на близкия до Индия остров Шри Ланка, да са по-добре ориентирани относно индийската фауна.
Тези наименования също се дължат на объркването на пуйката с токачката, която португалските търговци активно внасят в Индия през целия XVI век, преди значително по-впечатляващата ѝ американска роднина тържествено да пристигне на Индийския субконтинент в началото на XVII век.
Когато през 1612 г. американската пуйка се появява заедно с други екзотични животни в двора на моголския император Джахангир в Агра, тя предизвиква истинска сензация. Джахангир е толкова впечатлен от странната птица, че поръчва на придворния художник Устад Мансур да я нарисува, „така че изумлението, което произтича от научаването за [нея], да се увеличи“ още повече. Рисунката, която днес се намира в колекцията на музея „Виктория и Алберт“ в Лондон, представя пуйката като някакво вълшебно създание от приказките и наистина предизвиква изумление.
Името, което пуйката впоследствие получава на хинди – पेरू /piroo, отвежда до място от другата страна на Земята, което е толкова далече от Индия, че на практика би могло да е приказно. На фона на сериозните обърквания на континенти и посоки обаче това наименование – взето назаем от португалската дума peru, появила се в резултат от схващането, че пуйката пристига в Португалия от Перу – се оказва най-близко до истината.
Ако говорим за фактологична точност, българският език поне на пръв поглед, изглежда, се представя доста добре. Етимологичният речник на БАН цитира предполагаемо родство на думата „пуйка“ с „птица“, сочейки съответствия с няколко различни езика, но също така „допуска и ономатопеичен произход“6.
И тъкмо да взема да си помисля, че като по чудо не сме попаднали в капана с обърканите наименования, откривам, че и българският не е застрахован срещу чужди влияния. С други думи, и ние, ако не сме дали, то поне сме взели нещо от света, било то и фактологично неточно. А именно диалектната дума за пуйка „мисирка“ (която през 2020 г. Бойко Борисов направи вайръл, използвайки я като определение на журналисти) всъщност произлиза от арабското наименование на Египет – مِصْر/miṣr, откъдето в миналото (погрешно) се е смятало, че птицата е дошла.
На основата на всички тези разкрития вече ми става трудно да мисля за пуйката като за ястиe, което е типично за Деня на благодарността, или в преносния смисъл на думатa – като синоним на глуповато перчене. Вместо това вече започвам да възприемам птицата като символ на завидна космополитност, както и като особено забавна илюстрация на непредвидимите последствия от човешкия порив да опитоми далечното и непознатото, давайки му отново далечно, макар и по-познато, а често и съвсем грешно име.
1 Един от изразите, които научих покрай празнуването на Деня на благодарността, е food coma, или „хранителна кома“, а сега разбирам, че медицинският термин за това състояние звучи много по-застрашително от обикновена сънливост след хранене – „постпрандиална сомнолентност“.
2 Всъщност пуйката споделя името си с Турция до 2022 г., когато държавата официално сменя изписването на англоезичното си наименование от Turkey на Türkiye – турското име на Турция. Като инициатор на промяната Ердоган твърди, че новото изписване най-добре изразява културата, цивилизацията и ценностите на турския народ, но според някои промяната на практика цели да сложи край на обидните асоциации с пуйката.
3 В Хондурас, Мексико и Ел Салвадор, както и в някои от южните американски щати, пуйката и досега е известна като guajolote – испанизираното наименование на думата от езика науатъл.
4 Езиковите недоразумения се простират и до таксономичното наименование на пуйката, което Карл Линей ѝ дава през 1758 г. Meleagris gallopavo произлиза от старогръцката дума μελεαγρίς (meleagrís, ‘токачка’) и латинската gallus (‘пиле’) + pāvō (‘паун’).
5 Днес менюто за Деня на благодарността чувствително се различава от храната, която според историческите източници е присъствала на първото празненство през 1621 г. Тогава на трапезата е имало еленско месо, разнообразни диви птици, няколко вида риба и местен сорт царевица, известен като „флинт“.
6 За съвременните наименования на пуйката на немски и италиански също може да се каже, че са „фактологично правилни“: немската дума Truthahn е комбинация от trut (смятана за имитация на звука, с която пуйката вика малките си) и Hahn (‘петел’), докато италианската tacchino е формирана чрез добавяне на умалителната наставка -ino към ономатопеичния корен. По-старите наименования и на тези езици обаче са следвали моделите, споменати по-горе в текста: на немски пуйката се е наричала Calecutischerhahn, а на италиански тя е била известна като gallo d’India.
В рубриката „От дума на дума“ Екатерина Петрова търси актуални, интересни или новопоявили се думи от нашето ежедневие и проследява често изненадващия им произход, развитието на значенията им във времето и взаимовръзките им с близки и далечни езици.
На север: Снежни лета в една исландска хижа (първа част)
Post Syndicated from Светла Стоянова original https://www.toest.bg/na-sever-snezhni-leta-v-edna-islandska-hizha-purva-chast/

Ето че плаването на север ни отвежда и до Исландия. Тя е все по-приканваща и загадъчна, но същевременно и все по-посещавана и разгадавана. С население от едва 395 000 души (2024 г.) и поток от туристи от над 2 млн. годишно, Исландия е своеобразен феномен. За територия, малко по-малка от тази на България, разнообразието от природни забележителности е впечатляващо. Този остров по средата на Северния Атлантически океан е създаден от хиляди вулканични изригвания между постоянно раздалечаващите се Евразийска и Северноамериканска тектонска плоча, така че
страната практически се уголемява с по 2 см годишно.
През последните години Исландия попада в новините у нас заради зачестилите вулканични изригвания. Но този остров не е само бълбукаща или изстинала лава, а много повече. В това се уверих през няколкото години, в които живях там, като учих, работих, къмпингувах и правих разнообразни преходи с близките ми хора. Тук ще ви разкажа за едно особено място далеч в исландските планини, което беше мой дом в продължение на две снежни лета. Но най-напред нека си го представим…
Живея и работя в зелена хижа с червен покрив, построена насред блещукаща лава отпреди няколко хилядолетия. Земята тук е съчетание от ситен пясък и едри парчета лъскаво черно стъкло – вълшебния многоъгълен обсидиан. Хижата се намира в средата на огромна калдера с диаметър около 12 км – преди милиони години на това място е имало планина, която след освобождаването на магмата изпод основите ѝ постепенно се вдлъбва в котловина.
Близо до хижата бушуват горещи извори, които я затоплят чрез специална система. Водата от чешмата се носи от ручей топящ се сняг, който препуска по многоцветните камъни. Потокът се слива със себеподобните си в пълноводна река, която все по-стремително си проправя път сред тесни отвесни каньони и вае страните им, докато не се разлее нашироко по заоблените скали в равнината.
В далечината се белеят няколко ледници столетници, отразяват слънчевите лъчи и ослепително искрят. От краищата им зеят ледени пещери и приканват в тъмните си коридори, проблясващи загадъчно от пукнатините. Ледът на входовете обаче непрестанно се топи и капе заплашително. В следващия миг се срутва на огромни късове и се предава пред горещите извори наблизо. Нажежена в земните недра, водата извира и клокочи в яркочервено и сивкавосиньо, оцветява в контрастни багри заобикалящите я камъни и чертае абстрактни окръжности. Земята кипи от живот, изпуска топлина, диша и издиша, докато водата и вятърът дълбаят формите ѝ с нестихваща сила.
Водопади се спускат шумно един подир друг, смесват ледените и жарките извори и вият меандри измежду оранжевите скали. Стръмни чукари се издигат в причудливи форми и отдалеч напомнят същества, застинали във времето. Яркозелени мъхове омекотяват като възглавнички нащърбения релеф на лавата, разстилат се навред и уютно приканват за почивка. Тук-там сред вулканичната пустиня зеленеят оскъдни поляни, на които си почиват овце. Необезпокоявани, те опоскват малкото жълти цветя наоколо, докато черно-бели снежни овесарки любопитстват, чуруликат и отлитат.
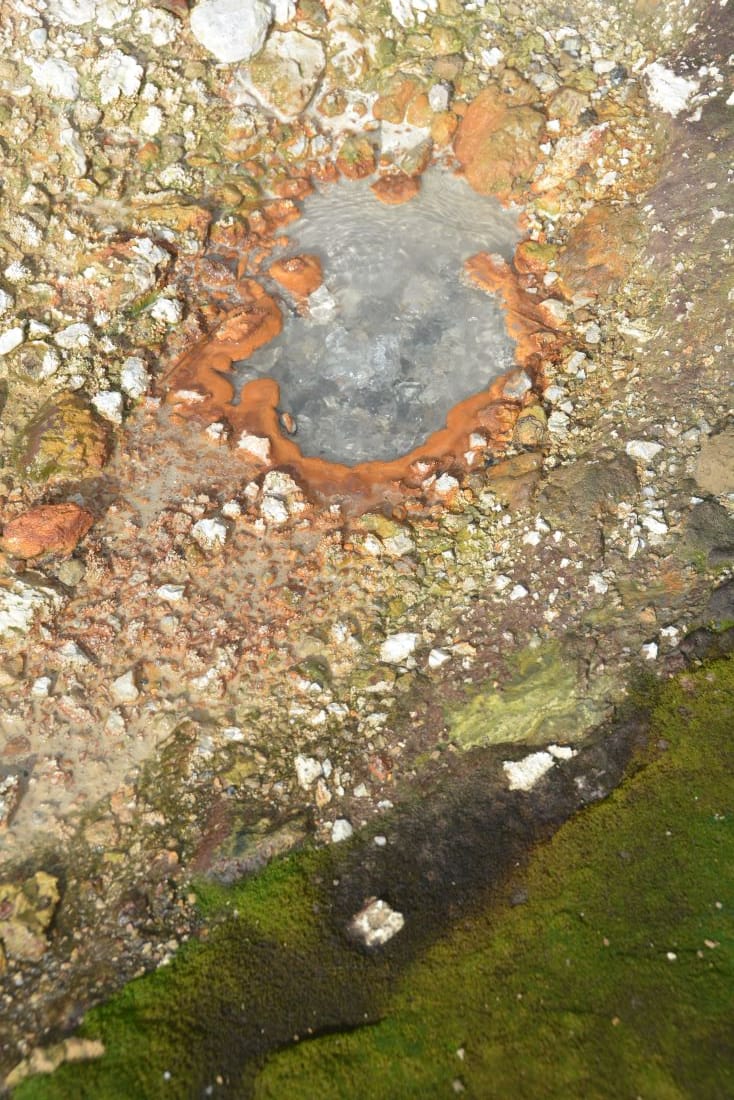


Горещ извор / Исландски мъх / Ледена пещера / Меандри / Слоеве лед и вулканичен прах / Релеф от риолитни скали © Светла Стоянова
Такъв спектакъл представяше природата, но често гъстата мъгла спускаше завесите и скриваше всичко от погледите ни. Подобно време е типично за исландските планински земи (исл. Hálendið, англ. Highlands): ненаселени и труднопроходими райони във вътрешната част на острова, с достъп чрез неравни планински пътища, отворени само през лятото. Населените райони на страната са основно по крайбрежието, защото океанът поддържа сравнително устойчива температура през годината. Затова и големите градове, като столицата Рейкявик и Акурейри, са разположени до морския бряг.
Всичко останало отвъд заселената част са яркозелени планини без гори, безкрайни черни пустини без камили и пълноводни ледникови реки без мостове. Неведнъж
тези почти извънземни места са използвани от НАСА за трениране на космонавти за стъпването на Луната през 60-те години, а само преди няколко години беше изпробван и прототип на марсоход за бъдещи мисии на Марс.
Именно там устояват на времето няколко скромни хижи на Исландския туристически съюз, достъпни само от юни до септември. В една от тях работих заедно с приятеля ми в продължение на два сезона. Нашата хижа е част от най-популярния няколкодневен планински преход в Исландия – Лойгавегюр (исл. Laugavegur – словосъчетание от laug ‘горещ извор’ и vegur ‘път’, или в превод „Пътят на горещите извори“).
Подобно на преходите Ел Камино де Сантяго в Испания или Ком – Емине у нас, се върви от хижа на хижа или се нощува в палатка на определените за целта места. Преходът от местността Ландманалойгар до Тоурсмьорк е 55 км, но може да бъде удължен с още 25 км, преминаващи между ледниците Мирдалсьокутъл и Ейяфятлайокутъл¹ до популярния водопад Скоугафос. Макар да не впечатлява с надморската си височина (400–1100 м), теренът се води планински. В по-голямата си част земната маса се състои от различни видове вулканични скали – риолит, обсидиан, базалт и др. Растителността е оскъдна, срещат се предимно мъхове, но и някои видове ниски растения.


Рядко срещани растения / Пейзажът във „Фятлабак“ – Реми Мартинаш © Светла Стоянова
Единствените диви животни са арктическите лисици, с черна козина през лятото и бяла през зимата, както и няколко вида птици, като снежните овесарки, тундровите яребици и гарваните. Други животни, на които човек може да попадне в изобилие, са овцете – те принадлежат на местните фермери, които лете ги пускат да пасат на воля по дивите места, докато не ги приберат отново наесен. Тази практика е типична за исландците, но и за други северни народи, като фарьорците, където по-големи хищници на практика няма.
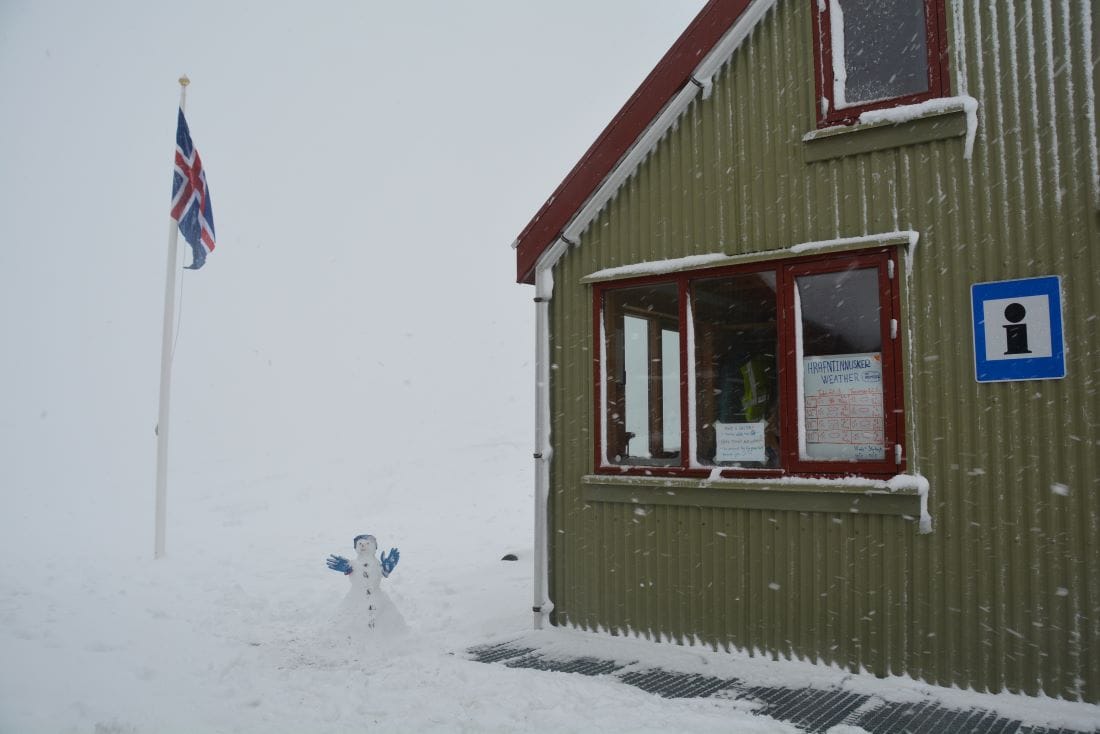
Околността е природен парк, наречен „Фятлабак“ (исл. Fjallabak, в превод „Зад гърба на планините“) – геотермално активен, богат на горещи извори и често разтърсван от безобидни земетресения. Едно нещо обаче няма – дървета – и така гледката се простира на десетки километри във всички посоки. Освен това през юни и юли дните са дълги и нощем не се стъмва напълно, тъй като Исландия е досами Полярния кръг. Същинските бели нощи, когато слънцето не се скрива зад хоризонта, започват от 66-тия паралел нататък. Нощите са бели не само заради светлината навън.
Макар да е краят на юни, вали сняг на парцали хоризонтално – типично за Исландия. Едрите снежинки се наслояват по прозореца, докато не затулят изцяло „зрелището“ към пристигащите в хижата. Малкото звънче на вратата зазвънява и туристите влизат грохнали и с жвакащи обувки. Въздъхват, съвземат се от топлината и изстискват подгизналите си ръкавици. Били планирали да палаткуват тази вечер, но на бърза ръка решават да платят четворната цена за място в хижата. Приемам ги и си мисля как предния ден семейство с деца на по 4 и 6 години спаха на палатка в снега и бяха дори въодушевени от това приключение. Същевременно обаче си спомням ясно как при първото ми идване тук преди няколко години и аз бях една от тях – брулена от вятъра, капнала от газенето в кишата, мокра до кости и в отчаяна нужда да се приютя някъде на сухо и топло.


На разходка / Снеговалеж през август / Табела на прехода Лойгавегюр / Еднокилометров риолитен ръб, по който вървят туристи, а понякога и овце © Светла Стоянова
Когато предприехме прехода Лойгавегюр през 2020 г., имаше метри сняг. В продължение на шест дни вървяхме по няколко часа и преминавахме от един пейзаж в друг, като от картичка. Бяхме избрали да палаткуваме, така че на гръб носехме раници с всичко нужно: палатка, постелки, спални чували за ниски температури, тенджерка, котлон и газова бутилка, суха храна и сухи дрехи. Това беше първият ми преход, през който пренасях къщичката си на гръб. От ден на ден срещите с всеки хижар ни вълнуваха все повече. Да посрещаш и изпращаш туристите и да оставаш в онези прекрасни места изглеждаше като мечта. И ето че няколко години по-късно тя се сбъдна.
(Следва продължение.)
1 Ейяфятлайокутъл е име на ледник в Южна Исландия, но и на вулкана под него, който изригна през 2010 г. и предизвика отмяната на хиляди полети в Европа.
The Titan II ICBM
Post Syndicated from The History Guy: History Deserves to Be Remembered original https://www.youtube.com/watch?v=iappfoeSXqc
[$] LWN.net Weekly Edition for November 21, 2024
Post Syndicated from corbet original https://lwn.net/Articles/998144/
The LWN.net Weekly Edition for November 21, 2024 is available.
Introducing Amazon CloudFront VPC origins: Enhanced security and streamlined operations for your applications
Post Syndicated from Matheus Guimaraes original https://aws.amazon.com/blogs/aws/introducing-amazon-cloudfront-vpc-origins-enhanced-security-and-streamlined-operations-for-your-applications/
I’m happy to introduce the release of Amazon CloudFront Virtual Private Cloud (VPC) origins, a new feature that enables content delivery from applications hosted in private subnets within their Amazon Virtual Private Cloud (Amazon VPC). This makes it easy to secure web applications, allowing you to focus on growing your businesses while improving security and maintaining high-performance and global scalability with CloudFront.
Customers serving content from Amazon Simple Storage Solution (Amazon S3), AWS Elemental Services and AWS Lambda Function URLs can use Origin Access Control as a managed solution to secure their origins, and make CloudFront the single front-door to your application. However, this was more difficult to achieve for applications that are hosted on Amazon Elastic Compute Cloud (Amazon EC2) or using load balancers, because you had to create your own solution to achieve the same result. You would have to use a combination of methods such as using access control lists (ACLs), managing firewall rules, or using logic such as header validation and a few other techniques to ensure that the endpoint remained exclusive to CloudFront.
CloudFront VPC origins removes the need for this kind of undifferentiated work by offering a managed solution that can be used to point CloudFront distributions directly to Application Load Balancers (ALBs), Network Load Balancers (NLBs), or EC2 instances inside your private subnets. This ensures that CloudFront becomes the sole ingress point for those resources with minimum configuration effort, providing you with improved performance and a cost-saving opportunity because it also eliminates the need for public IP addresses.
Configuring a CloudFront VPC origin
CloudFront VPC origins is available at no additional cost, making it an accessible option for all AWS customers. It can be integrated with new or existing CloudFront distributions using the Amazon CloudFront console or the AWS Command Line Interface (AWS CLI).
Imagine that you have an application hosted privately on an AWS Fargate for Amazon ECS fronted through an ALB. Let’s create a CloudFront distribution that uses the ALB directly inside the private subnet.
Start by navigating to the CloudFront console and select the new menu option: VPC origins.

Creating a new VPC origin is straightforward. You only need to select from a few options. In the Origin ARN, you can search for available resources that are hosted in private subnets or enter it directly. You select the resources that you want, choose a friendly name for your VPC origin alongside some security options, and then confirm. Please note that, at launch, the VPC origin resource must be in the same AWS Account as the CloudFront distribution, although support for resources across all accounts is coming soon.

After the creation process is complete, your VPC origin will be deployed and ready to go! You can check its status on the VPC origins page.

With this, we have created a CloudFront distribution that serves content directly from a resource hosted on a private subnet in a few clicks! After your VPC origin is created, you can navigate to your Distribution window, and add the VPC origin to your Distribution by either selecting the ARN from the dropdown or copy-pasting the ARN manually.
Remember, though, that it’s important to still continue to layer your application’s security by using services such as AWS Web Application Firewall (WAF) to protect from web exploits, or AWS Shield for managed DDos protection, and other services to achieve a full-spectrum protection.
Conclusion
CloudFront VPC Origins offers a new way for organizations to deliver secure, high-performance applications by enabling CloudFront distributions to serve content directly from resources hosted within private subnets. This reduces the complexity and cost of maintaining public-facing origins while ensuring that your application remains secure.
To learn more, see the getting started guide.
Amazon CloudFront now accepts your applications’ gRPC calls
Post Syndicated from Sébastien Stormacq original https://aws.amazon.com/blogs/aws/amazon-cloudfront-now-accepts-your-applications-grpc-calls/
Starting today, you can deploy Amazon CloudFront, our global content delivery network (CDN), in front of your gRPC API endpoints.
gRPC is a modern, efficient, and language-agnostic framework for building APIs. It uses Protocol Buffers (protobuf) as its interface definition language (IDL), which enable you to define services and message types in a platform-independent manner. With gRPC, communication between services is achieved through lightweight and high-performance remote procedure calls (RPCs) over HTTP/2. This promotes efficient and low-latency communication across services, making it ideal for microservices architectures.
gRPC offers features such as bidirectional streaming, flow control, and automatic code generation for a variety of programming languages. It’s well-suited for scenarios in which you require high performance, efficient communication, and real-time data streaming. If your application needs to handle a large amount of data or requires low-latency communication between client and server, gRPC can be a good choice. However, gRPC might be more challenging to learn compared to REST. For example, gRPC relies on the protobuf serialization format, which requires developers to define their data structures and service methods in .proto files.
I see two benefits of deploying CloudFront in front of your gRPC API endpoints.
First, it allows the reduction of latency between the client application and your API implementation. CloudFront offers a global network of over 600+ edge locations with intelligent routing to the closest edge. Edge locations provide TLS termination and optional caching for your static content. CloudFront transfers client application requests to your gRPC origin through the fully managed, low-latency, and high-bandwidth private AWS network.
Secondly, your applications benefit from additional security services deployed on edge locations, such as traffic encryption, the validation of the HTTP headers through AWS Web Application Firewall, and AWS Shield Standard protection against distributed denial of service (DDoS) attacks.
Let’s see it in action
To start this demo, I use the gRPC route-guide demo from the official gRPC code repository. I deploy this example application in a container for ease of deployment (but any other deployment option is supported too).
I use this Dockerfile
FROM python:3.7
RUN pip install protobuf grpcio
COPY ./grpc/examples/python/route_guide .
CMD python route_guide_server.py
EXPOSE 50051
I also use the AWS Copilot command line to deploy my container on Amazon Elastic Container Service (Amazon ECS). The Copilot command prompts me to collect the information it requires to build and deploy the container. Then, it creates the ECS cluster, the ECS service, and the ECS task automatically. It also creates a TLS certificate and the load balancer for me. I test the client application by modifying line 122 to use the DNS name of the load balancer listener endpoint. I also change the client application code to use grpc.secure_channel instead of grpc.insecure_channel because the load balancer provides the application with an HTTPS endpoint.

When I’m confident my API is correctly deployed and working, I proceed and configure CloudFront.
First, in the CloudFront section of the AWS Management Console, I select Create distribution.

Under Origin, I enter my gRPC endpoint DNS name as Origin domain. I enable HTTPS only as Protocol and leave the HTTPS port as is (443). Then I choose a Name for the distribution.

Under Viewer, I select HTTPS only as Viewer protocol policy. Then, I select GET, HEAD, OPTIONS, PUT, POST, PATCH, DELETE as Allowed HTTP methods. I select Enable for Allow gRPC requests over HTTP/2.

Under Cache key and origin requests, I select AllViewer as Origin request policy.
The default cache policy is CacheOptimized, but gRPC isn’t cacheable API traffic. Therefore, I select CachingDisabled as Cache policy.

AWS WAF helps protect you against common web exploits and bots that can affect availability, compromise security, or consume excessive resources. For gRPC traffic, AWS WAF can inspect the HTTP headers of the request and enforce access control. It doesn’t inspect the request body in protobuf format.
For this demo, I choose to not use AWS WAF. Under Web Application Firewall (WAF), I select Do not enable security protections.

I also keep all the other options with their default value. HTTP/2 support is selected by default. Do not disable it because it is required for gRPC.
Finally, I select Create distribution.

There is only one switch to enable gRPC on top of the usual setup. When turned on, with HTTP/2 and HTTP POST enabled, CloudFront detects gRPC client traffic and forwards it to your gRPC origin.
After a few minutes, the distribution is ready. I copy and paste the endpoint URL of the CloudFront distribution, and I change the client-side app to make it point to CloudFront instead of the previously created load balancer.

I test the application again, and it works.

Pricing and Availability
gRPC origins are available on all the more than 600 CloudFront edge locations at no additional cost. The usual requests and data transfer fees apply.
Go and point your CloudFront origin to a gRPC endpoint today.
Bigger and badder: how DDoS attack sizes have evolved over the last decade
Post Syndicated from José Salvador original https://blog.cloudflare.com/bigger-and-badder-how-ddos-attack-sizes-have-evolved-over-the-last-decade
Distributed Denial of Service (DDoS) attacks are cyberattacks that aim to overwhelm and disrupt online services, making them inaccessible to users. By leveraging a network of distributed devices, DDoS attacks flood the target system with excessive requests, consuming its bandwidth or exhausting compute resources to the point of failure. These attacks can be highly effective against unprotected sites and relatively inexpensive for attackers to launch. Despite being one of the oldest types of attacks, DDoS attacks remain a constant threat, often targeting well-known or high traffic websites, services, or critical infrastructure. Cloudflare has mitigated over 14.5 million DDoS attacks since the start of 2024 — an average of 2,200 DDoS attacks per hour. (Our DDoS Threat Report for Q3 2024 contains additional related statistics).
If we look at the metrics associated with large attacks mitigated in the last 10 years, does the graph show a steady increase in an exponential curve that keeps getting steeper, especially over the last few years, or is it closer to linear growth? We found that the growth is not linear, but rather is exponential, with the slope dependent on the metric we are looking at.
Why is this question interesting? Simple. The answer to it provides valuable insights into the evolving strategies of attackers, the sophistication of their tools, and the readiness of defense mechanisms.
As an example, an upward curve of the number of requests per second (rps) suggests that the attackers are changing something on their side that enables them to generate larger volumes of requests. This is an insight that prompts us to investigate more and look at other data to understand if anything new is happening.
For instance, at one of those moments, we looked at the source of the traffic and saw a shift from subscriber/enterprise IP address space (suggesting IoT) to cloud provider IP address space (suggesting VMs), and realized there was a shift in the type and capabilities of devices used by attackers.
As another example: when the HTTP/2 Rapid Reset attack happened, the record number of requests per second seen at that time suggested that a new technique was being employed by attackers, prompting us to swiftly investigate what was being executed and adapt our defenses.
Delimiting an individual attack in time is surprisingly blurry. First of all, an attack analysis can provide inconsistent observations at different layers of the OSI model. The footprint seen at all these different layers may tell different stories for the same attack. There are, however, some variables that together can allow us to create a fingerprint and enable us to group a set of events, establishing that they are part of the same individual attack. Examples include:
-
Do we see the same attack vector(s) being used across this set of events?
-
Are all the attack events focused on the same target(s)?
-
Do the payloads on events share the same signature? (Specific data payloads or request types unique to certain types of attacks or botnets, like Mirai, which may use distinctive HTTP request headers or packet structures).
Before we dive into a growth analysis of DDoS attacks over the last 10 years, let’s take a step back and have a look at the metrics typically used to measure them: requests per second (rps), packets per second (pps), and bits per second (bps). Each metric captures a different aspect of the attack’s scale and impact.
-
Requests per second (rps): Measures the number of HTTP or similar protocol requests made each second. This metric is particularly relevant for application-layer attacks (Layer 7), where the intent is to overwhelm a specific application or service by overloading its request handling, and is useful for measuring attacks targeting web servers, APIs, or applications because it reflects the volume of requests, not just raw data transfer.
-
Packets per second (pps): Represents the number of individual packets sent to the target per second, regardless of their size. This metric is critical for network-layer attacks (Layers 3 and 4), where the goal is to overwhelm network infrastructure by exceeding its packet-processing capacity. pps measurements are useful for volumetric attacks, identifying a quantity of packets that can impact routers, switches, or firewalls.
-
Bits per second (bps): This measures the total data transferred per second and is especially useful in evaluating network-layer attacks that aim to saturate the bandwidth of the target or its upstream provider. bps is widely used measuring Layer 3 and 4 attacks, such as UDP floods, where the attack intends to clog network bandwidth. This metric is often highlighted for DDoS attacks because high bps values (often measured in gigabits or terabits) signal bandwidth saturation, which is a common goal of large-scale DDoS campaigns.
So, how have DDoS attack sizes changed in the last decade? During this period, DDoS attacks have grown bigger and stronger, each year having the potential to be more disruptive.
If we look at the metrics associated with large attacks seen in the last 10 years, does it look like we have a steady increase in an exponential curve that keeps steepening, especially in the last few years, or is it closer to a linear growth? We found that it is exponential, so let’s have a look at the details around why we came to that conclusion.
In this analysis, we used attacks that Google has seen from 2010 until 2022 as a baseline (Figure 1) that we extended with attacks that Cloudflare has seen in 2023 and 2024 (Figure 2).
Going back in time, early in the 2010s, the largest attacks were measured in the Gigabits per second (Gbps) scale, but these days, it’s all about Terabits per second (Tbps). The number of requests per second (rps) and bits per second (bps) are also significantly higher these days, as we will see.
The historical data from Google shown below in Figure 1 reveals a rising trend in requests per second during DDoS attacks observed between 2010 and 2022, peaking at 6 Million requests per second (Mrps) in 2020. The increase highlights a significant escalation in attack volume across the decade.

Figure 1. Largest known DDoS attacks, 2010 – 2022. (Source: Google)
Figure 2 (below) provides a view of trends seen across the different metrics. The escalation seen in Google’s statistics is also visible in Cloudflare’s data regarding large mitigated DDoS attacks observed in 2023 and 2024, reaching 201 Mrps (green line) in September 2024. The rate of packets per second (pps) demonstrates (blue line) a slight exponential growth over time, rising from 230 Mpps in 2015 to 2,100 Mpps in 2024, suggesting that attackers are achieving higher throughput. For bits per second (bps), the trend is also exponential and with a steeper upwards curve (red line), building from a 309 Gbps attack in 2013 to a 5.6 Tbps (5,600 Gbps) attack in 2024.
Over roughly the last decade, attacks driving these metrics have seen significant growth rates:
-
Bits per second increased by 20x between 2013 and 2024
-
Packets per second increased by 10x between 2015 and 2024
-
Requests per second increased by 70x between 2014 and 2024

Figure 2. Data from Figure 1 extended with large attacks observed by Cloudflare in 2023 and 2024.
The blog posts listed in Table 1 highlight some of the attacks that we observed from 2021 to 2024.
|
Month |
Attack size |
Blog post |
|
August 2021 |
17.2 Mrps |
Cloudflare thwarts 17.2M rps DDoS attack — the largest ever reported |
|
April 2022 |
15 Mrps |
|
|
June 2022 |
26 Mrps |
Cloudflare mitigates 26 million request per second DDoS attack |
|
February 2023 |
71 Mrps |
Cloudflare mitigates record-breaking 71 million request-per-second DDoS attack |
|
September 2024 |
3.8 Tbps |
How Cloudflare auto-mitigated world record 3.8 Tbps DDoS attack |
|
October 2024 |
4.2 Tbps |
4.2 Tbps of bad packets and a whole lot more: Cloudflare’s Q3 DDoS report |
|
October 2024 |
5.6 Tbps |
Table 1. Notable DDoS attacks observed by Cloudflare between 2021 – 2024.
An overview of other selected significant high volume DDoS attacks that have occurred over the last decade, including 2018’s Memcached abuse and 2023’s HTTP/2 “Rapid Reset” attacks, can be found on the Cloudflare Learning Center.
Attack duration is not an effective metric to use to qualify attack aggressiveness because establishing a duration of a single attack or campaign is challenging, due to their possible intermittent nature, the potential for a multitude of attack vectors being used at the same time, or how the different defense layers triggered over time.
The attack patterns can differ considerably, with some consisting of a single large spike, while others featuring multiple tightly grouped spikes, or a continuous load maintained over a period of time, along with other changing characteristics.
DDoS attacks are increasingly shifting from IoT-based botnets to more powerful VM-based botnets. This change is primarily due to the higher computational and throughput capabilities of cloud-hosted virtual machines, which allow attackers to launch massive attacks with far fewer devices.
This shift is facilitated by several factors: VM botnets can be easier to establish than IoT botnets, as they don’t necessarily require widespread malware infections, since attackers can deploy them on cloud provider infrastructure anonymously using stolen payment details from data breaches or Magecart attacks.
This trend points to the evolution of DDoS tactics, as attackers exploit both the processing power of VMs and anonymized access to cloud resources, enabling smaller, more efficient botnets capable of launching large-scale attacks without the complexities involved in infecting and managing fleets of IoT devices.
Cloudflare’s Connectivity Cloud, built on our expansive anycast global network, plays a crucial role in defending against DDoS attacks by leveraging automated detection, traffic distribution, and rapid response capabilities. Here’s how it strengthens DDoS protection:
Automated attack detection and mitigation: Cloudflare’s DDoS protection relies heavily on automation, using machine learning algorithms to identify suspicious traffic patterns in real time. By automating the detection process, Cloudflare can quickly recognize and block DDoS attacks without requiring manual intervention, which is critical in high-volume attacks that would overwhelm human responders.
Global traffic distribution with IP anycast: Cloudflare’s network spans over 330 cities worldwide, and DDoS traffic gets distributed across our multiple data centers. IP anycast allows us to distribute traffic across this global network, and this wide distribution helps absorb and mitigate large-scale attacks, as attack traffic is not directed towards a single point, reducing strain on individual servers and networks.
Layered defense: Cloudflare’s Connectivity Cloud offers defense across multiple layers, including network (Layer 3), transport (Layer 4), and application (Layer 7). This layered approach allows for tailored defense strategies depending on the attack type, ensuring that even complex, multi-layered attacks can be mitigated effectively. Learn more about DDoS protection at layers 3, 4, and 7 in our DDoS protection documentation.
Unmetered DDoS mitigation: Pioneering this approach since 2017 to ensure Internet security, Cloudflare provides unmetered DDoS protection, meaning customers are protected without worrying about bandwidth or cost limitations during attacks. This approach helps ensure that businesses, regardless of size or budget, can benefit from robust DDoS protection.
Cloudflare’s distributed cloud infrastructure and advanced technology allows us to detect, absorb, and mitigate DDoS attacks in a way that is both scalable and responsive, avoiding downtime and maintaining service reliability, providing a robust solution to tackle the rising intensity and frequency of DDoS attacks compared to traditional options.
Protecting against DDoS attacks is essential for organizations of every size. Although humans initiate these attacks, they’re carried out by bots, so effective defense requires automated tools to counter bot-driven threats. Real-time detection and mitigation should be as automated as possible, since relying solely on human intervention puts defenders at a disadvantage as attackers adapt to new barriers and can change attack vectors, traffic behavior, payload signatures, among others, creating an unpredicted scenario and thus rendering some manual configurations useless. Cloudflare’s automated systems continuously identify and block DDoS attacks on behalf of our customers, enabling tailored protection that meets individual needs.
Our mission is to help build a better Internet, and providing resilience in the face of DDoS threats is a part of accomplishing that mission.
Read more about Cloudflare DDoS protection in our public technical documentation.
Resilient Internet connectivity in Europe mitigates impact from multiple cable cuts
Post Syndicated from David Belson original https://blog.cloudflare.com/resilient-internet-connectivity-baltic-cable-cuts
When cable cuts occur, whether submarine or terrestrial, they often result in observable disruptions to Internet connectivity, knocking a network, city, or country offline. This is especially true when there is insufficient resilience or alternative paths — that is, when a cable is effectively a single point of failure. Associated observations of traffic loss resulting from these disruptions are frequently covered by Cloudflare Radar in social media and blog posts. However, two recent cable cuts that occurred in the Baltic Sea resulted in little-to-no observable impact to the affected countries, as we discuss below, in large part because of the significant redundancy and resilience of Internet infrastructure in Europe.
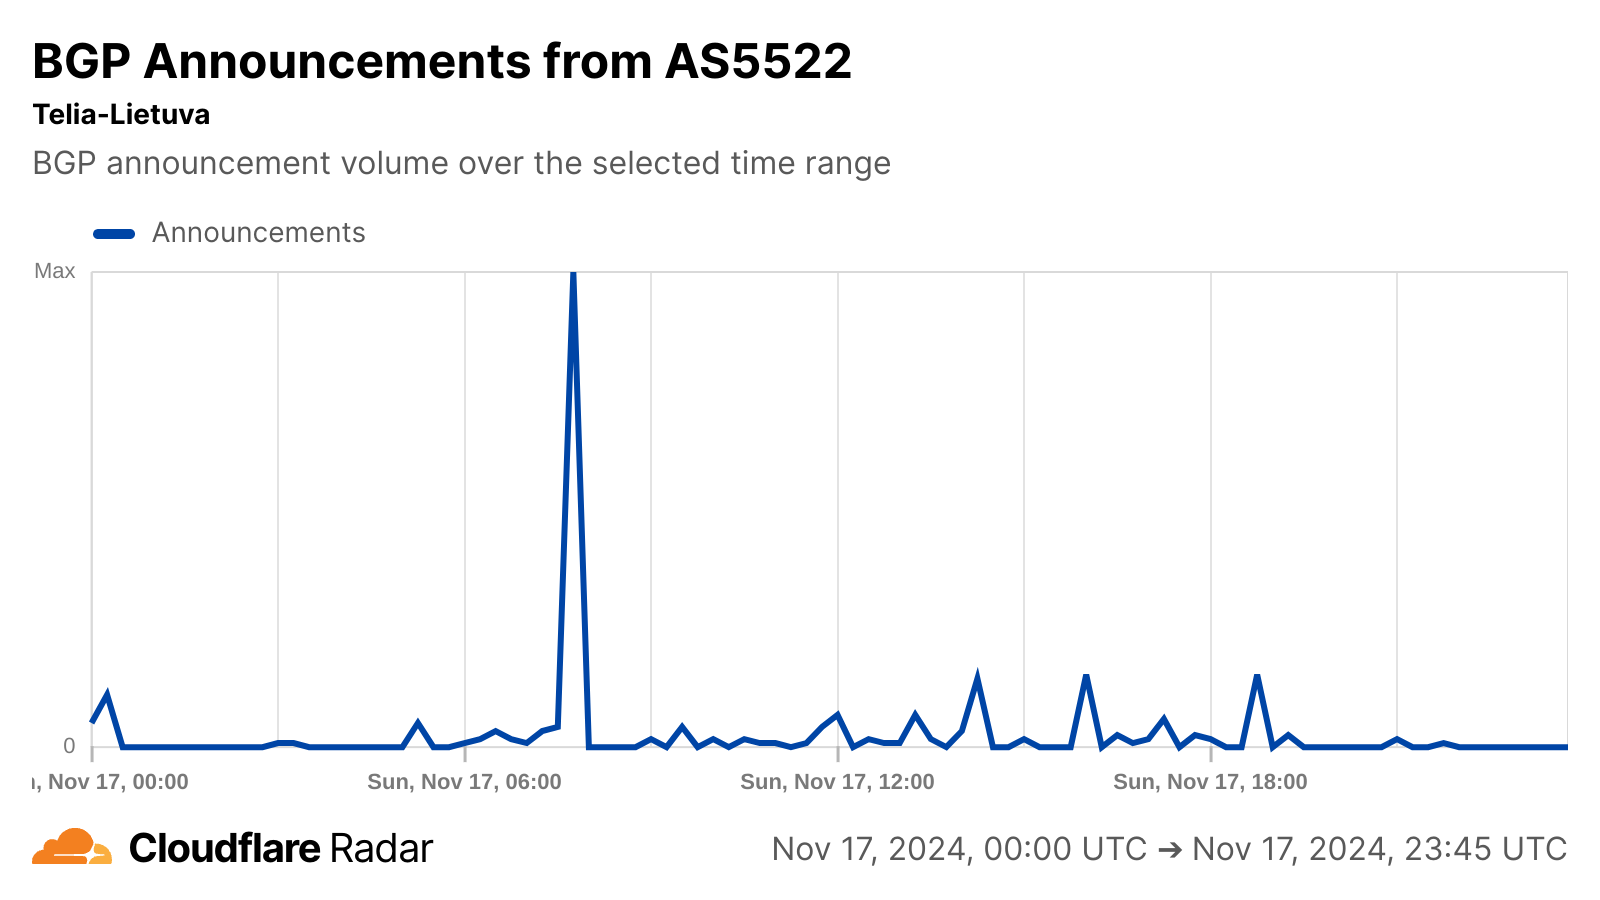
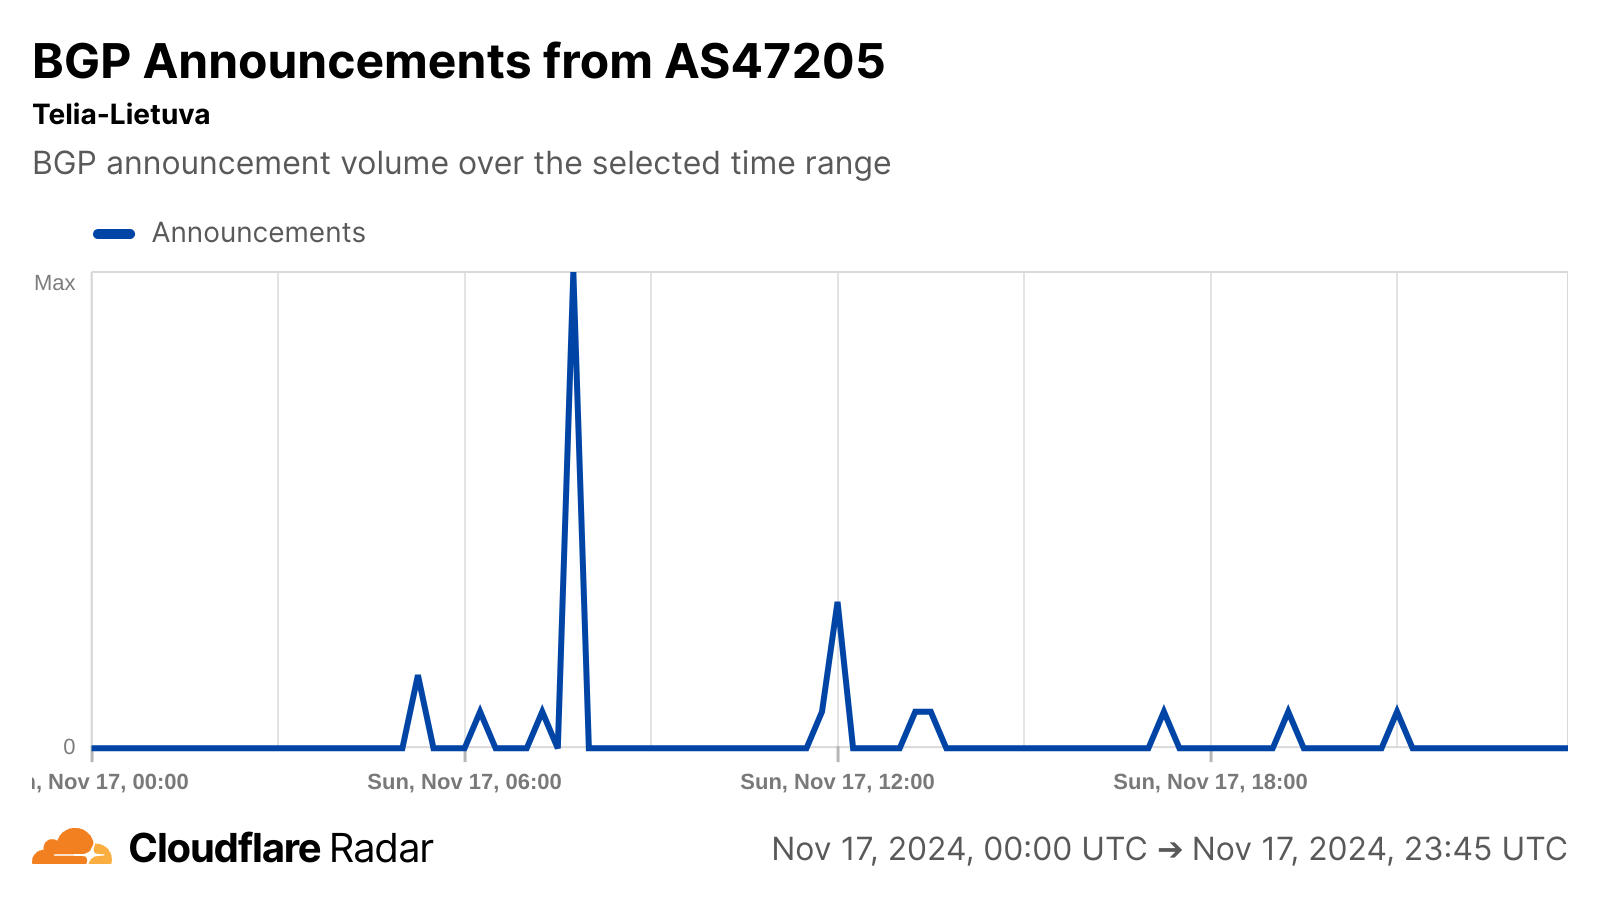
On Sunday, November 17 2024, the BCS East-West Interlink submarine cable connecting Sventoji, Lithuania and Katthammarsvik, Sweden was reportedly damaged around 10:00 local (Lithuania) time (08:00 UTC). A Data Center Dynamics article about the cable cut quotes the CTO of Telia Lietuva, the telecommunications provider that operates the cable, and notes “The Lithuanian cable carried about a third of the nation’s Internet capacity, but capacity was carried via other routes.”
As the Cloudflare Radar graphs below show, there was no apparent impact to traffic volumes in either country at the time that the cables were damaged. The NetFlows graphs represent the number of bytes that Cloudflare sends to users and clients in response to their requests.
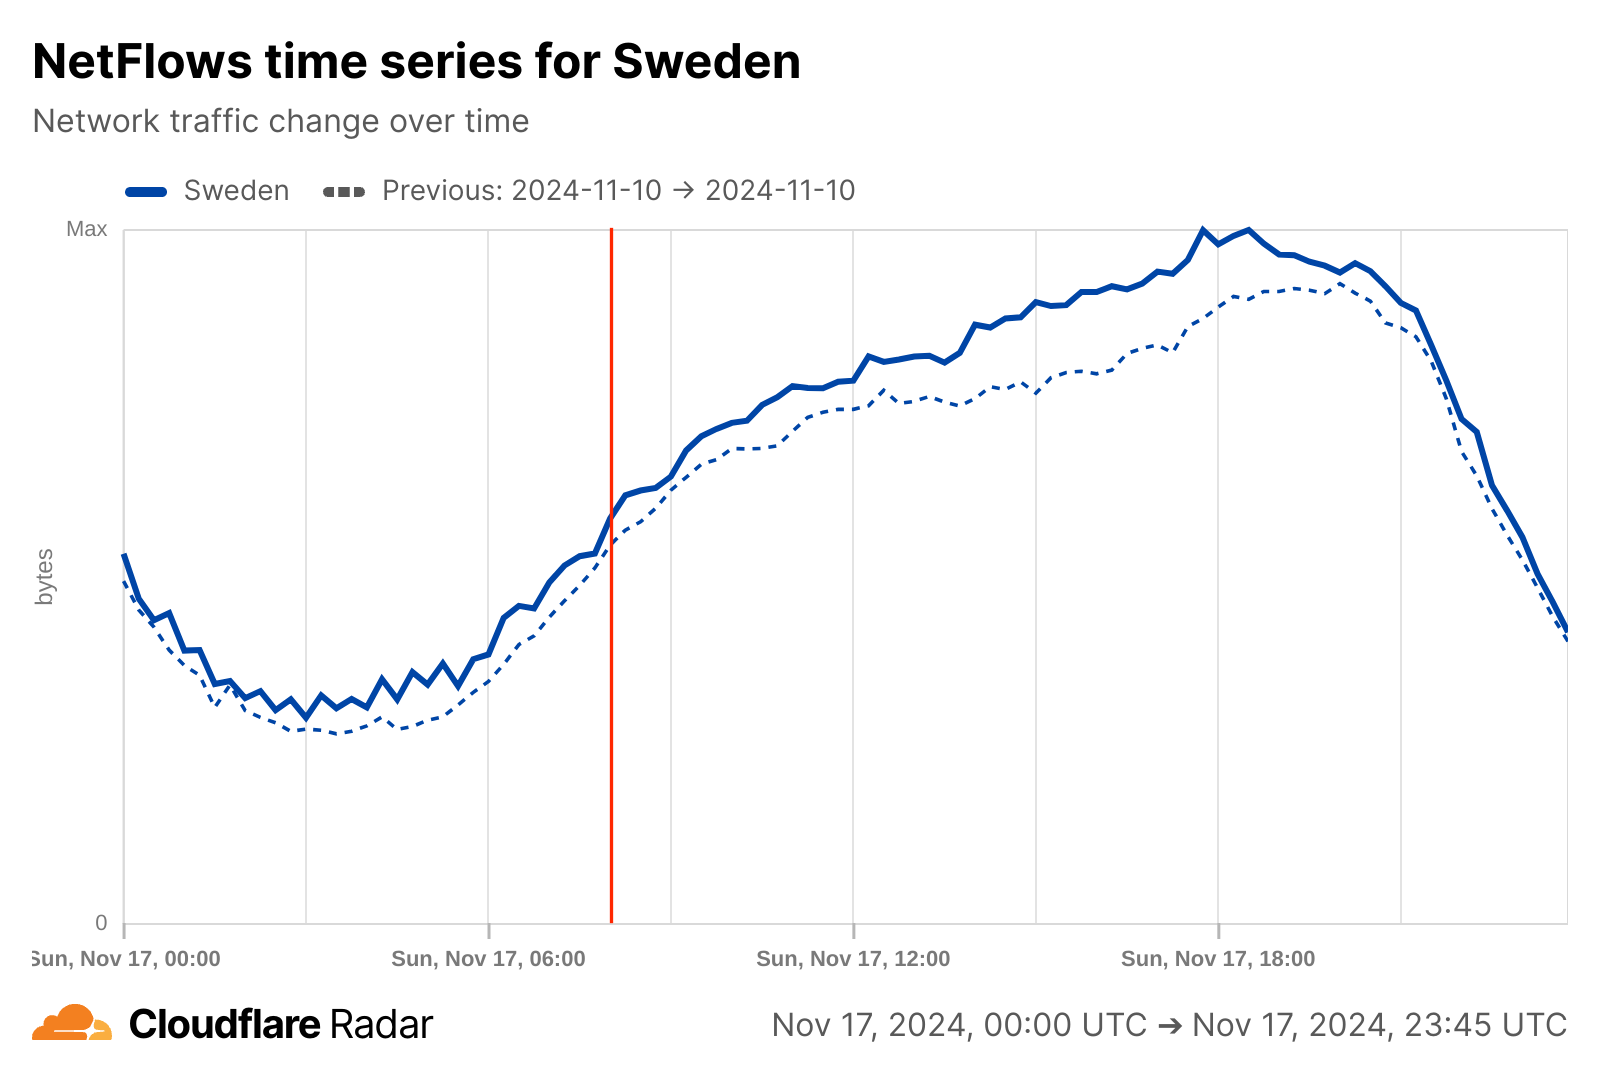


Internet quality metrics for both countries show changes in measured bandwidth and latency throughout the day on Sunday, but with no sudden anomalous shifts visible around the time of the cable cut. (The loss of connectivity associated with a cable cut potentially manifests itself as an increase in latency and concurrent decrease in bandwidth due to loss of capacity.) The latency graph for Sweden does show an increase in latency, but it began before the cable cut occurred, is similar to a pattern visible several hours earlier, and is matched by an increase in measured bandwidth, so it is unlikely to be related to the cable cut event.


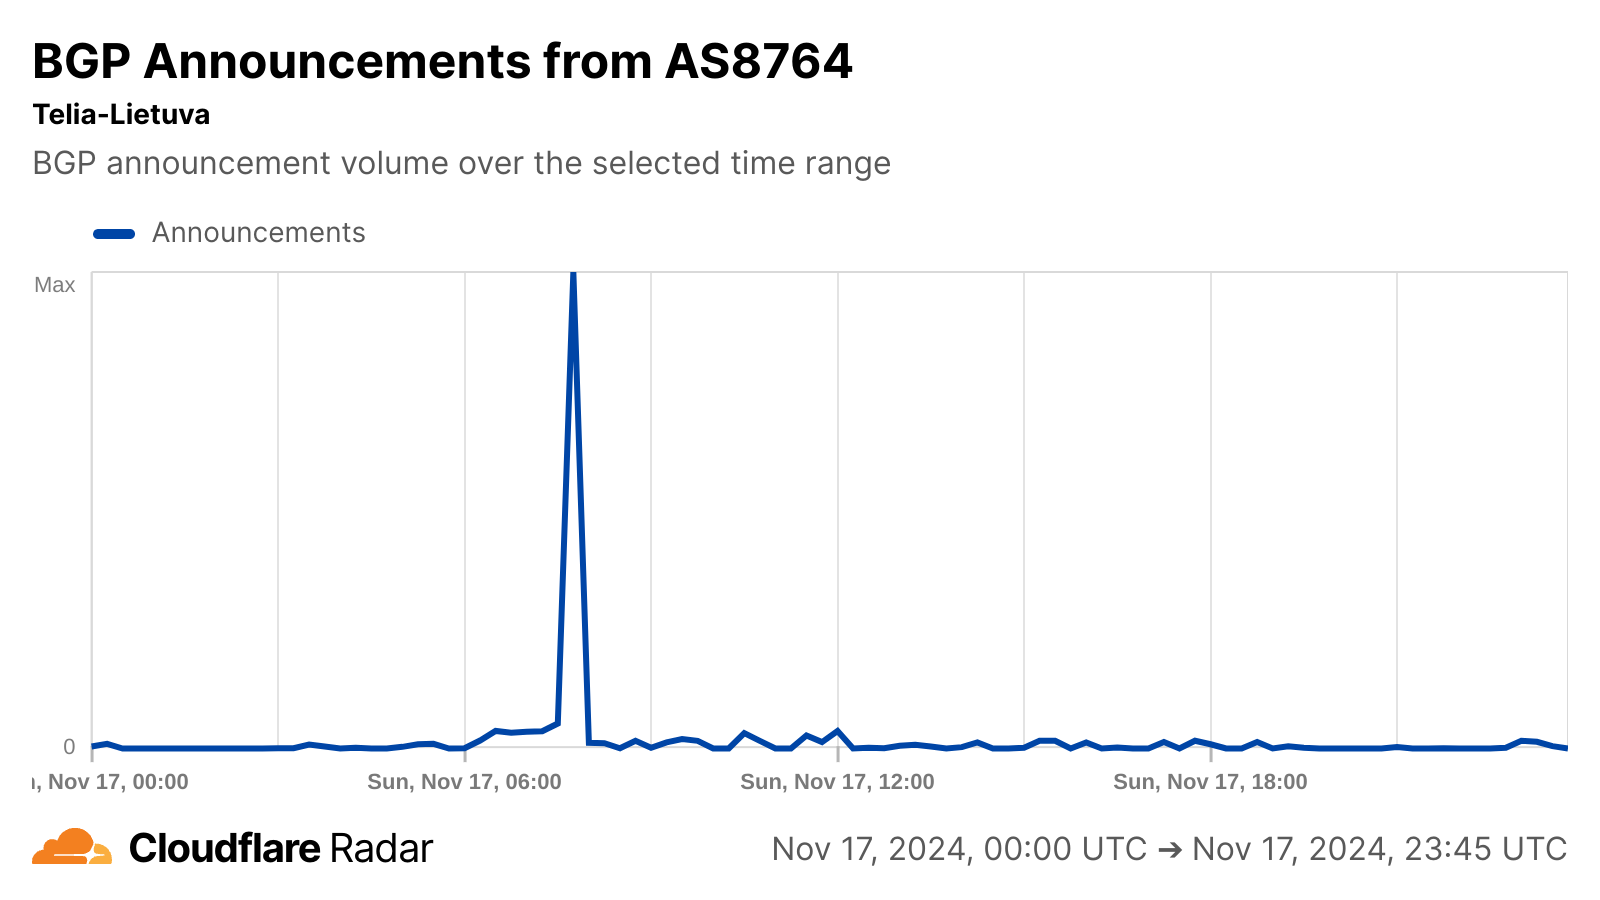
BGP announcements are a way for network providers to communicate routing information to other networks, and announcement activity observed on Telia Lietuva’s autonomous systems around the time of the cable cut may be related to the re-routing referenced in the article. No change in announced IP address space was visible for any of these autonomous systems, suggesting no loss of connectivity as the capacity was re-routed.

Telegeography’s submarinecablemap.com illustrates, at least in part, the resilience in connectivity enjoyed by these two countries. In addition to the damaged cable, it shows that Lithuania is connected to neighboring Latvia as well as to the Swedish mainland. Over 20 submarine cables land in Sweden, connecting it to multiple countries across Europe. In addition to the submarine resilience, network providers in both countries can take advantage of terrestrial fiber connections to neighboring countries, such as those illustrated in a European network map from Arelion (formerly Telia), which is only one of the large European backbone providers.
Less than a day later, the C-Lion1 submarine cable, which connects Helsinki, Finland and Rostock Germany was reportedly damaged during the early morning hours of Monday, November 18. Cinia, the telecommunications company that owns the cable, said that the cable stopped working at about 02:00 UTC.
In this situation as well, as the Cloudflare Radar graphs below show, there was no apparent impact to traffic volumes in either country at the time that the cables were damaged. The Finland graphs, week-on-week, show fewer bytes transferred and fewer HTTP requests, but that difference is present before the cable cut at 02:00 UTC. However, the trend of the current line does not change after the cable cut, so the two events would appear unrelated.


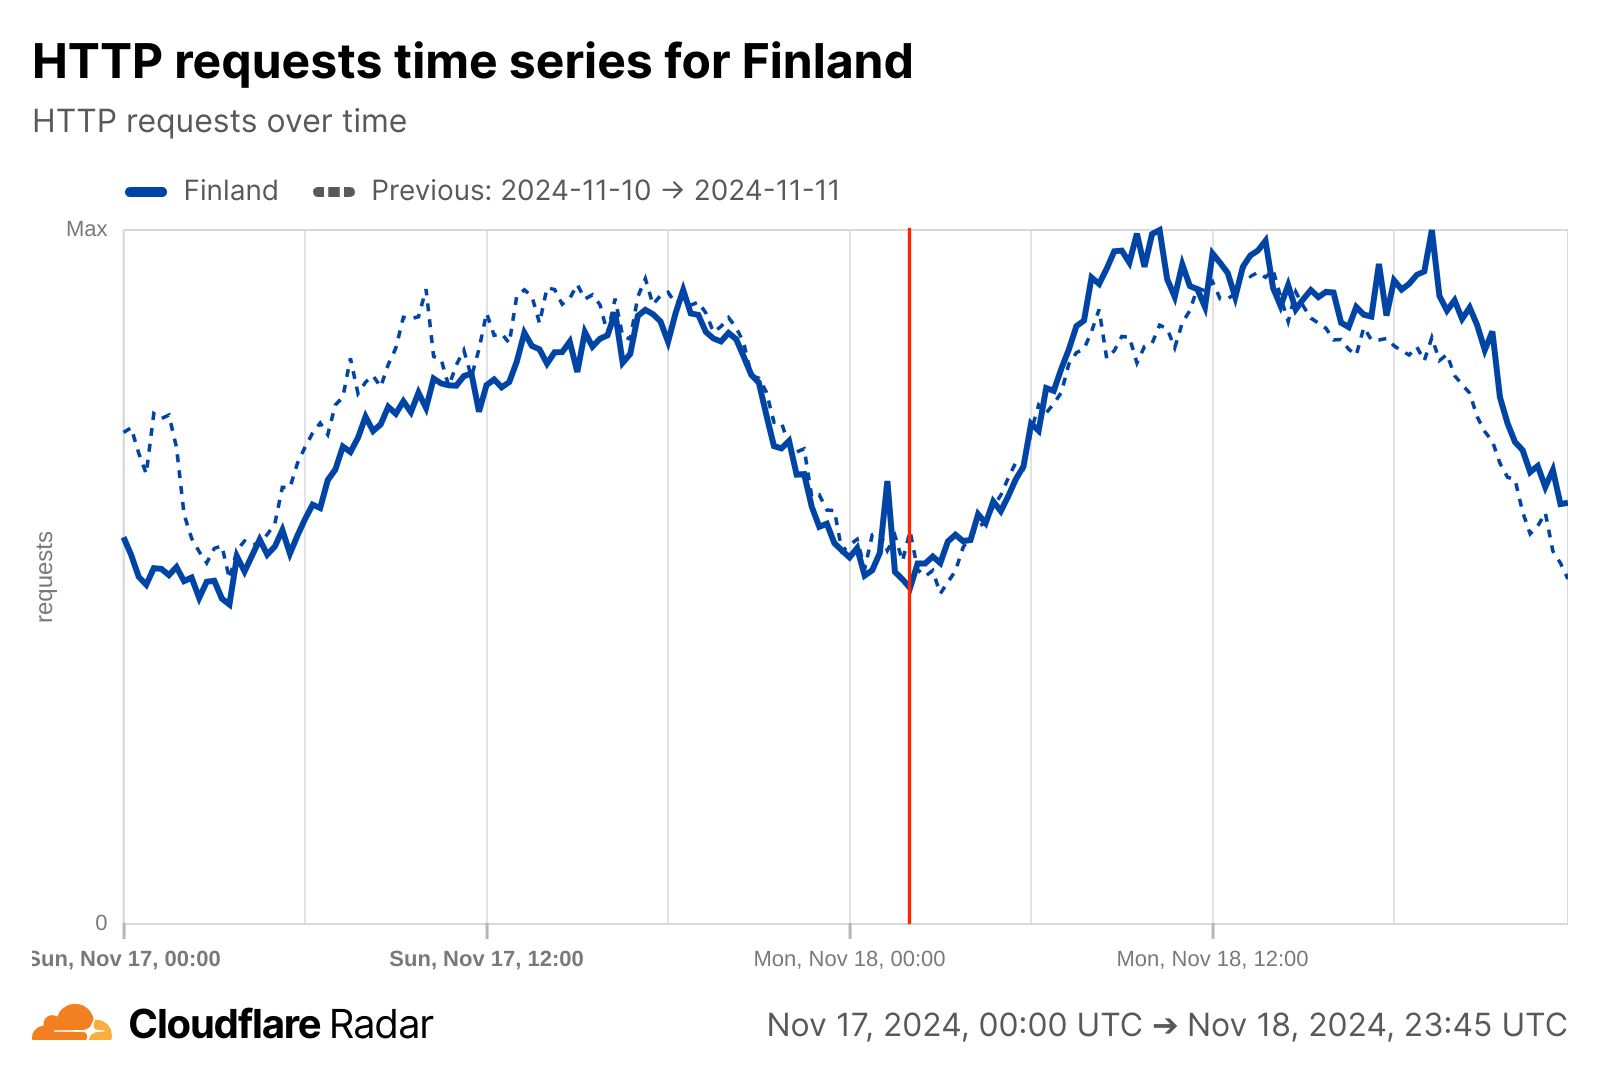
By looking at volume-related metrics, alone, Internet connectivity would appear to be unaffected by the cable cut.
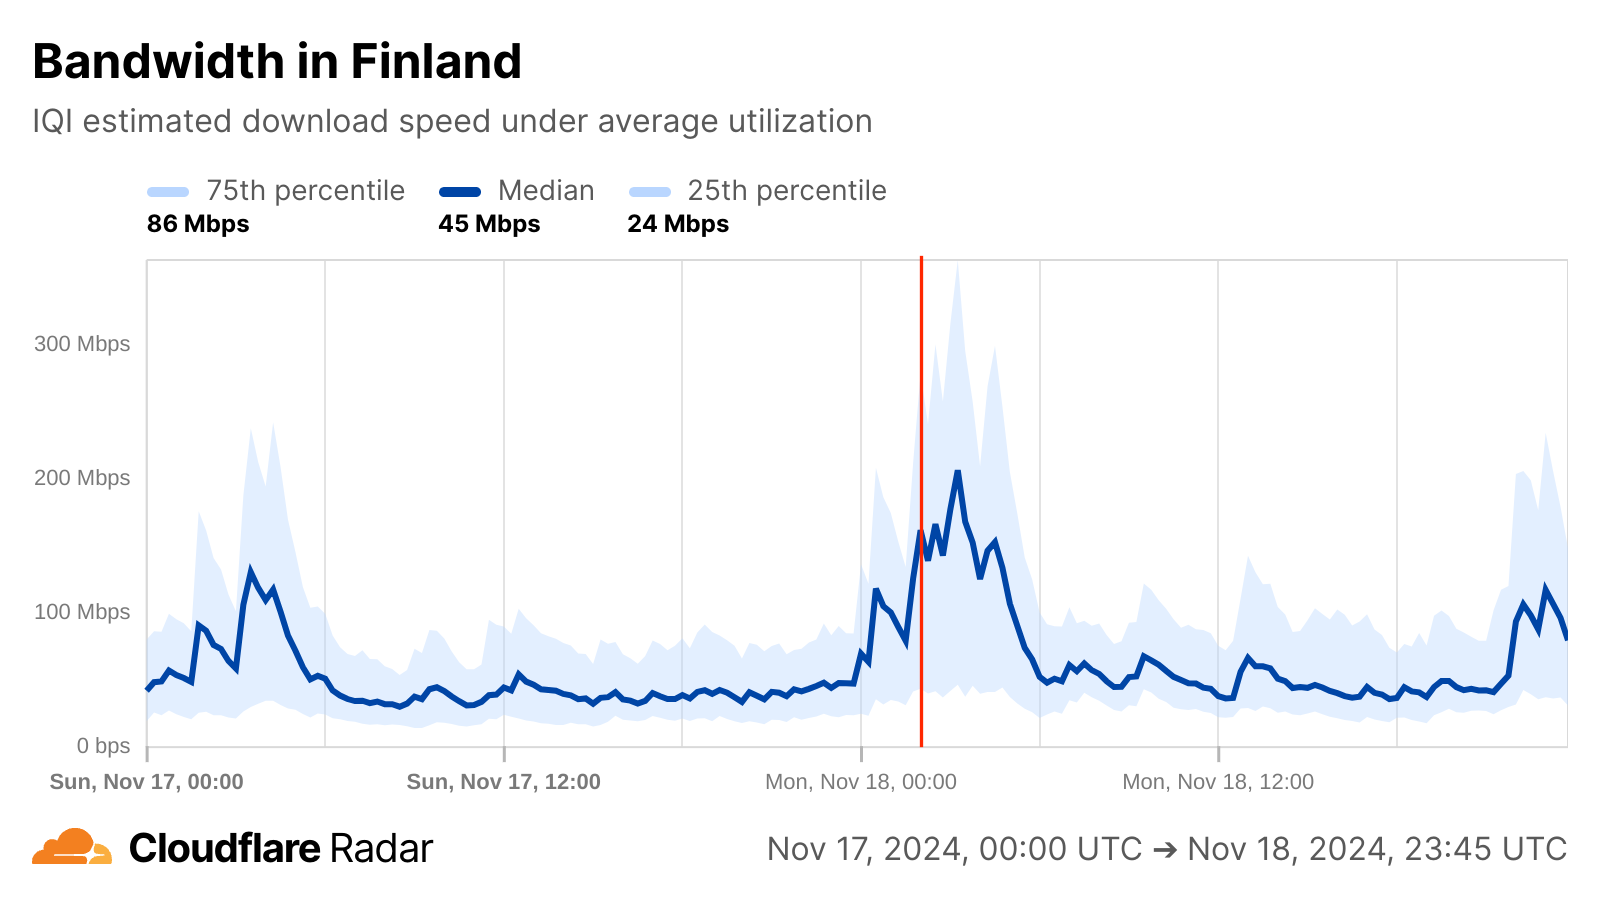
If, however, we change perspective and look at Internet quality, a brief yet interesting change is visible for Finland around the reported time of the cable damage, though it isn’t clear whether it is related in any way. Just after midnight, median measured bandwidth, previously consistent around 50 Mbps begins to grow, peaking just over 200 Mbps around 03:00 UTC. Around that same time, measured median latency also begins to drop, falling from around 30 ms to a low of 13 ms, also around 03:00 UTC. Median bandwidth returned to normal levels around 06:00 UTC, while latency took about two hours longer to return to normal levels. These observed improvements in bandwidth and latency could have been due to traffic being re-routed to along paths with better connectivity to measurement endpoints, but because the shifts began before the cable damage occurred, and recovered shortly thereafter, that is unlikely to be the root cause.
In Germany, a brief minor increase in median bandwidth peaked around 02:45 UTC, while no notable changes were observed in latency.
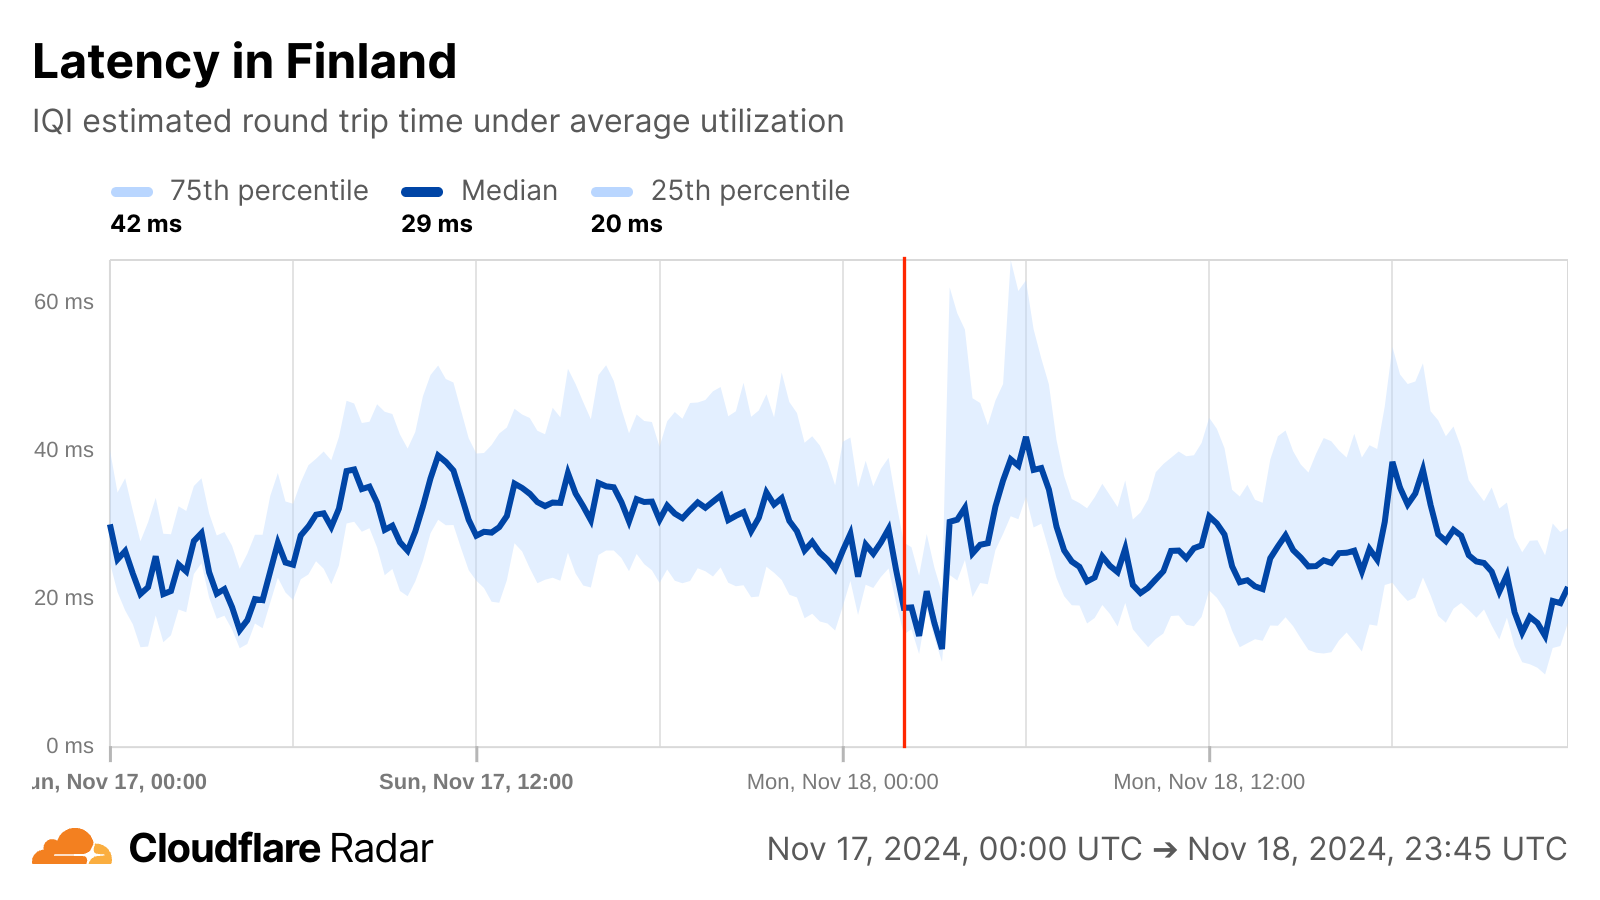

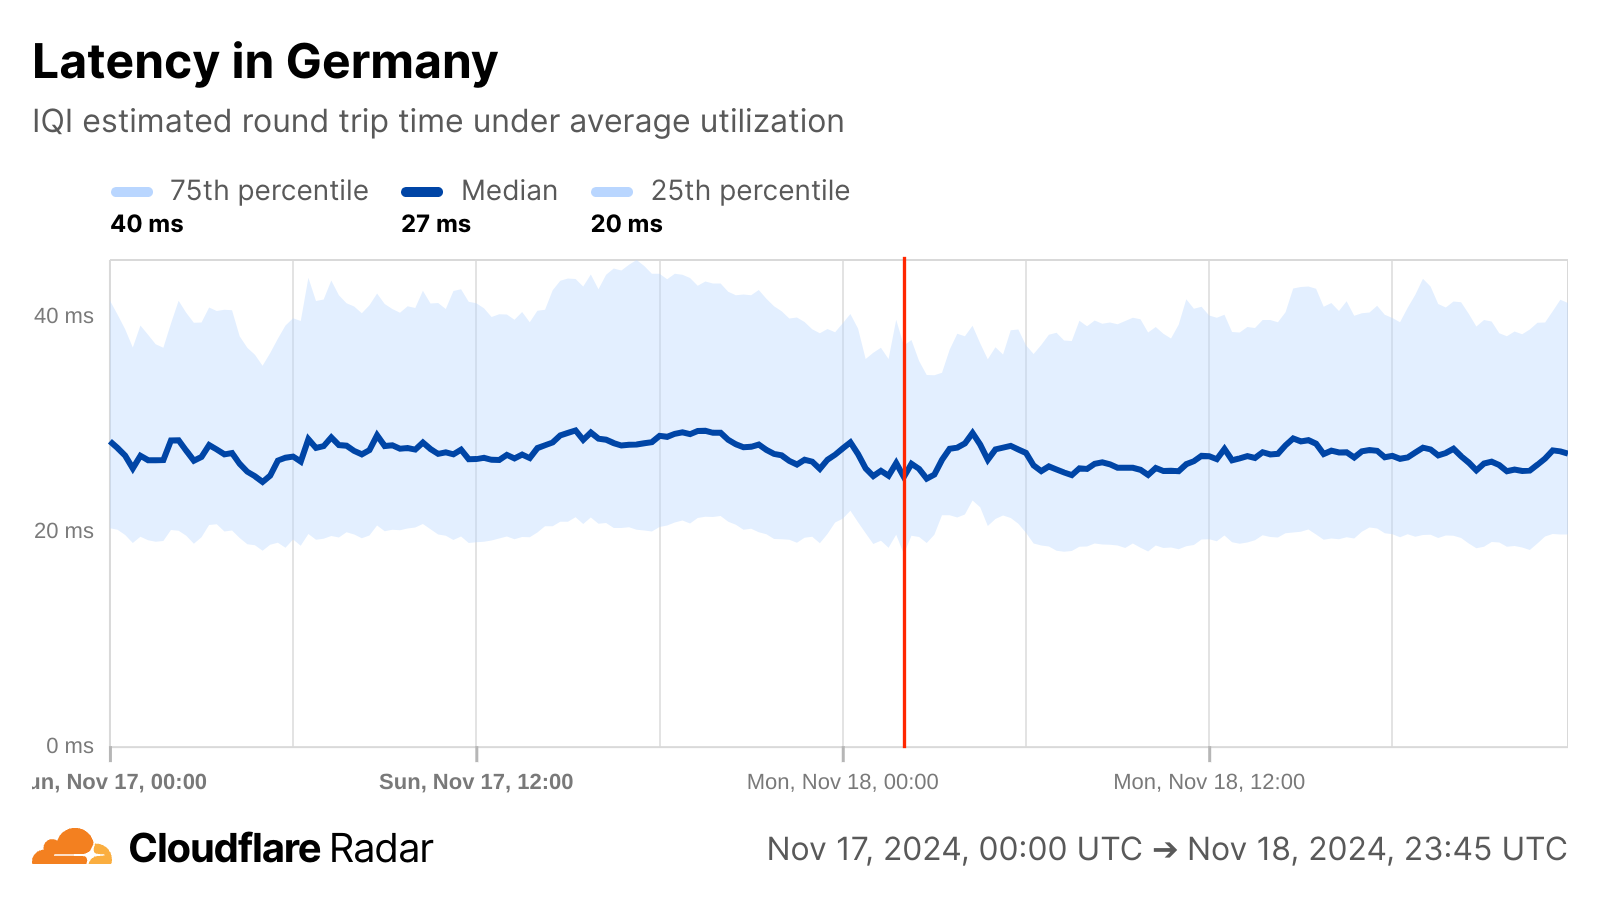
From a routing perspective, there was no notable BGP announcement activity observed for top autonomous systems in either Finland or Germany around 02:00 on November 18, and total announced IP address space aggregated at a country level also demonstrated no change.
Telegeography’s submarinecablemap.com shows that both Finland and Germany also have significant redundancy and resilience from a submarine cable perspective, with over 10 cables landing in Finland, and nearly 10 landing in Germany, including Atlantic Crossing-1 (AC-1), which connects to the United States over two distinct paths. Terrestrial fiber maps from Arelion and eunetworks (as just two examples) show multiple redundant fiber routes within both countries, as well as cross-border routes to other neighboring countries, enabling more resilient Internet connectivity.
As we have discussed in multiple prior blog posts (Jersey, 2016; AAE-1/SMW5, 2022; WACS/MainOne/SAT3/ACE, 2024; EASSy/Seacom, 2024), cable cuts often cause significant disruptions to Internet connectivity, in many cases because they represent a concentrated point of vulnerability, whether for an individual network provider, city/state, or country. These disruptions are often quite lengthy as well, due to the time needed to marshal repair resources, identify the location of the damage, etc. Although it is not always feasible due to financial or geographic constraints, building redundant and resilient network architecture, at multiple levels, is a best practice. This includes the sending traffic over multiple physical cables (both submarine and terrestrial), connecting to multiple peer and upstream network providers, and even avoiding single points of failure in core Internet resources like DNS servers.
The Cloudflare Radar team continually monitors the status of Internet connectivity in countries/regions around the world, and we share our observations on the Cloudflare Radar Outage Center, via social media, and in posts on blog.cloudflare.com. Follow us on social media at @CloudflareRadar (X), https://noc.social/@cloudflareradar (Mastodon), and radar.cloudflare.com (Bluesky), or contact us via email.
Unboxing a PlayStation 2 Console 24 Years Later!
Post Syndicated from LGR original https://www.youtube.com/watch?v=MMW05XnMNlM
Enhance data governance with enforced metadata rules in Amazon DataZone
Post Syndicated from Ramesh H Singh original https://aws.amazon.com/blogs/big-data/enhance-data-governance-with-enforced-metadata-rules-in-amazon-datazone/
We’re excited to announce a new feature in Amazon DataZone that offers enhanced metadata governance for your subscription approval process. With this update, domain owners can define and enforce metadata requirements for data consumers when they request access to data assets. By making it mandatory for data consumers to provide specific metadata, domain owners can achieve compliance, meet organizational standards, and support audit and reporting needs.
Many organizations require additional metadata from data consumers during the subscription request process to align with internal workflows and regulatory requirements. With enforced metadata rules, domain unit owners can establish consistent governance practices across all data subscriptions. For example, financial services organizations can mandate specific compliance-related metadata when data consumers request access to sensitive financial data. Similarly, healthcare providers can enforce metadata requirements to align with regulatory standards for patient data access. This feature simplifies the approval process by guiding data consumers through completing mandatory fields and enabling data owners to make informed decisions, ensuring data access requests meet organizational policies.
By streamlining metadata governance, Amazon DataZone empowers customers to meet compliance standards, maintain audit readiness, and simplify access workflows for enhanced efficiency and control. For example, one of our customers, Bristol Myers Squibb (BMS), leverages Amazon DataZone to address their specific data governance needs. Sitikantha Sarangi, Director of Data Engineering and ML Ops Platform at BMS, says:
“At BMS, our teams have been leveraging Amazon DataZone’s comprehensive data governance solution to catalog and enable secure data subscriptions across the organization within governed project environments. With the new custom metadata enforcement feature, we now can more easily navigate our data catalog. This capability allows us to set specific requirements for data consumers, such as providing a compliance certification link or detailing data usage intentions, ensuring that access requests for sensitive data are thoroughly reviewed and approved in alignment with our standards. This customization helps us more efficiently ensure we are appropriately utilizing data while facilitating efficient, secure data sharing across teams.”
Key benefits
The feature benefits multiple stakeholders. Domain unit owners can ensure compliance by enforcing metadata requirements, granting access only after thorough reviews. Data consumers benefit from a streamlined subscription request process, guided by metadata requirements that reduce complexity. Data producers gain clarity with detailed subscription requests, enabling informed decisions aligned with required standards. Overall, the key benefits are:
- Enhanced control for domain owners – Admins and domain unit owners can now enforce additional metadata requirements on subscription requests, making sure that data consumers supply essential information for thorough review and compliance checks
- Custom workflow support – Organizations can build custom workflows for assets by capturing critical metadata from data consumers, such as AWS account IDs or project-specific identifiers, to fulfill access requests
In this post, we walk you through setting up and using metadata enforcement to create seamless, compliant data access workflows.
Solution overview
The solution in this post is composed of two parts. In the first part, we walk through the steps necessary to enforce metadata for subscription requests for managed assets. In the second part, we walk through the steps necessary to request subscriptions for custom assets.
Prerequisites
To follow this post, user should already have Amazon DataZone setup with respective projects to publish and consume the assets. The publisher of the Retail project must have published a shipments data asset in Amazon DataZone. The domain owner or admin must have created a metadata form required for the subscription request.
This feature also supports metadata enforcement for subscription requests of a data product. For instructions on how to set this up, refer to Amazon DataZone data products.
Solution walkthrough: Enhance data governance with enforced metadata rules for Managed Assets
To perform the solution in this post, follow the steps in the next sections.
Metadata enforcement for subscription requests
To enforce metadata for subscription requests, use the following steps.
Step 1: Domain owner configures metadata requirements
Domain unit owners can configure metadata enforcement in Amazon DataZone as follows:
- On the Amazon DataZone console, choose Domain to open your domain or domain unit settings.
- Choose dataplatform, as shown in the following screenshot.

- To add metadata forms for subscription requests, on the RULES tab, choose ADD, as shown in the following screenshot.

- Provide the name to the metadata form rule.
- Choose ADD ANOTHER METADATA FORM.
- Choose from a list of available metadata forms within the domain or domain unit. Search options make navigation straightforward.


You can select multiple forms for enforcement on subscription requests.

- Choose Add, as shown in the following screenshot.


Create metadata form rule as below:

- In the next screen, you can specify additional settings. You can apply metadata forms across all asset types or limit them to specific asset types. Additionally, choose whether the rule applies to a specific project or all projects within the domain. After the scope is defined as shown in the screenshot, choose ADD RULE.

Note: Enable metadata enforcement across child domains, with optional permissions allowing child domains to override the parent domain’s enforced forms. This option is available while defining the scope, if the domain owner chooses All projects, as shown in the following screenshot.


Step 2: Data consumer submits subscription request
After metadata enforcement is configured, data consumers follow these steps to request access:
- To find and select an asset in the Amazon DataZone catalog, choose MARKETING and then sign in to the Amazon DataZone console as a data consumer. On the search bar, enter the
shipmentsdata asset, as shown in following screenshot.

- Choose SUBSCRIBE to open the subscription request modal, as shown in the following screenshot.

- Choose a project and provide a Reason for request, as shown in the following screenshot.

- Fill in the required metadata fields as specified by the domain unit. If mandatory fields are incomplete, they will be highlighted, and the submission will be disabled until resolved. After all the mandatory fields are entered, choose APPLY, as shown in the following screenshot.

- Choose Request to submit the subscription request, as shown in the following screenshot.


After submitting, an event is generated in Amazon EventBridge, which can be used in custom workflows outside of Amazon DataZone as needed.
Step 3: Data producer (owner) approves the subscription
After a data consumer submits a subscription request, they review the metadata. The data producer receives the subscription request with all metadata provided by the data consumer.
- Sign in to the Amazon DataZone console as a data producer. Choose RETAIL as the
- In the navigation pane, choose Incoming requests and find the subscription request. Choose View request, as shown in the following screenshot.

- Data producers can review the metadata, including document links and account IDs, to determine if the request meets compliance and workflow requirements before granting access, as shown in the following screenshot.

- Under Approval access, choose Full access to provide full access to data. For fine-grain access control, choose Approve with row or column filters. For this post, we choose Full access.
- Provide the Decision comment.
- Choose APPROVE, as shown in the following screenshot.


Step 4: Data consumer consumes the data
Now, data consumers follow these steps:
- After the subscription grants are approved and fulfilled, sign in to the Amazon DataZone console as data consumer from MARKETING project to query the subscribed data.
- Choose MARKETING On the Environments tab, choose Query data through Amazon Athena, as shown in the following screenshot.

- Query the subscribed data asset
shipmentsin Amazon Athena, with below query and as shown in the screenshot.


Solution walkthrough: Enhance data governance with enforced metadata rules for Custom Assets
Customers can manage access grants for unmanaged assets using Amazon DataZone. When a subscription to an asset in the business data catalog is approved by the data owner, Amazon DataZone publishes an event in Amazon EventBridge in the account along with all the necessary information in the payload that you can use to create the access grants between the source and the target. Using metadata enforcement for unmanaged assets, customers can provide all context in the single request.
STEP 1: Create a custom asset type
To create a custom asset type Metrics with an attached metadata form to describe the metric asset type, follow these steps:
Below is an example of a custom asset type – “Metrics” which has two fields 1/Dashboard Link and 2/Calculation

Step 2: Data producer creates a custom asset using the “Metrics” asset type
The data producer creates a Conversion Rate Metric with all metadata along with associated metadata forms by following these steps:
Below is “Conversion Rate Metric” asset created in DataZone. The highlighted boxes show that is an Unmanaged asset and of type “Metrics” that was created in the previous step.

Step 3: Domain owner configures metadata requirements
Domain unit owners can configure metadata enforcement in Amazon DataZone as follows:
- On the Amazon DataZone console, choose Domain to open your domain or domain unit settings.

- To add metadata forms for subscription requests, on the RULES tab, choose ADD, as shown in the following screenshot.

- To select metadata forms, provide the Name to the metadata form rule.
- Choose ADD METADATA FORM, as shown in the following screenshot.
- Remaining fields can be left as default. For this blog, please set it as shown in below

- In the Add metadata form pop-up, enter
MetricsRequestForm, as shown in the following screenshot.


- Choose ADD Rule as shown above to create the rule for all metrics assets. Below is the screenshot of the rule once created.


Step 4: Admins sets up an EventBridge rule
To set up an EventBridge rule, follow these steps:
- Create an EventBridge rule to capture all new subscription requests. Please see the documentation Amazon DataZone events and notifications for details to setup.
- Create an AWS Lambda function as a target to action on the event. Please see documentation – Event bus targets in Amazon EventBridge to setup targets.
For this blog, set the below event pattern that triggers the lambda only for new Subscription requests.

Step 5: Data consumer submits subscription request
After metadata enforcement is configured, data consumers follow these steps to request access:
- To locate the asset in the Amazon DataZone catalog, sign in to the Amazon DataZone console as a data consumer from the marketing Use the search bar to find the Conversion Rate Metric asset. Choose SUBSCRIBE, as shown in the following screenshot.

- Provide details, including the Metrics Request Form associated with the Metrics asset type.
- Choose REQUEST, as shown in the following screenshot.


You will receive notification confirming that your subscription request is submitted, as shown in the following screenshot.

For the request, EventBridge will capture the following request event and send it to the setup target:
The data steward and asset owner can get details for the request with the GetSubscriptionRequestDetails API and view the asset details and form associated with the request:
The data and asset owner can use these details to orchestrate an approval workflow using the Lambda function. After it has been validated, the asset owner or steward can then call the AcceptSubscriptionRequest API to grant access. The data consumer will be notified after access is approved. The following screenshot shows the notification that the subscription was approved.

Now that the subscription is approved, users can use the dashboard URL to access the metric.
Cleanup
To make sure no additional charges are incurred after testing, delete the Amazon DataZone domain. Refer to Delete Amazon DataZone domains for the process.
Conclusion
The new metadata enforcement rule for subscription requests in Amazon DataZone strengthens data governance by empowering domain unit owners to establish clear metadata requirements for data consumers, streamlining access requests and enhancing data governance. This feature enables organizations to align with the organization’s metadata standards, implement custom workflows, and provide a consistent, governed data access experience.
The feature is supported in all AWS Regions where Amazon DataZone is available at the time of this writing. To check which Regions are available, refer to AWS Services by Region. Check out the video below to learn more about how to set up metadata rules for subscription workflows. Get started with the technical documentation.
About the Authors
 Ramesh H Singh is a Senior Product Manager Technical (External Services) at AWS in Seattle, Washington, currently with the Amazon DataZone team. He is passionate about building high-performance ML/AI and analytics products that enable enterprise customers to achieve their critical goals using cutting-edge technology. Connect with him on LinkedIn.
 Pradeep Misra is a Principal Analytics Solutions Architect at AWS. He works across Amazon to architect and design modern distributed analytics and AI/ML platform solutions. He is passionate about solving customer challenges using data, analytics, and AI/ML. Outside of work, Pradeep likes exploring new places, trying new cuisines, and playing board games with his family. He also likes doing science experiments, building LEGOs and watching anime with his daughters.
 Lakshmi Nair is a Senior Analytics Specialist Solutions Architect at AWS. She specializes in designing advanced analytics systems across industries. She focuses on crafting cloud-based data platforms, enabling real-time streaming, big data processing, and robust data governance.
 Santhosh Padmanabhan is a Software Development Manager at AWS, leading the Amazon DataZone engineering team. His team designs, builds, and operates services specializing in data, machine learning, and AI governance. With deep expertise in building distributed data systems at scale, Santhosh plays a key role in advancing AWS’s data governance capabilities.
Proactively validate your AWS CloudFormation templates with AWS Lambda
Post Syndicated from Kirankumar Chandrashekar original https://aws.amazon.com/blogs/devops/proactively-validate-your-aws-cloudformation-templates-with-aws-lambda/
AWS CloudFormation is a service that allows you to define, manage, and provision your AWS cloud infrastructure using code. To enhance this process and ensure your infrastructure meets your organization’s standards, AWS offers CloudFormation Hooks. These Hooks are extension points that allow you to invoke custom logic at specific points during CloudFormation stack operations, enabling you to perform validations, make modifications, or trigger additional processes. Among these, the Lambda hook is a powerful option provided by AWS. This managed hook allows you to use Lambda functions to validate your CloudFormation templates before deployment. By using a Lambda hook, you can invoke custom logic to check infrastructure configurations on create or update or delete CloudFormation resources or stacks or change sets, as well as create or update operations for AWS Cloud Control API (CCAPI) resources. This enables you to enforce defined policies for your infrastructure-as-code (IaC), preventing the deployment of non-compliant resources or emitting warnings for potential issues. In this blog post, you will explore how to use a Lambda hook to validate your CloudFormation templates before deployment, ensuring your infrastructure is compliant and secure from the start.
Introducing Lambda Hook
The Lambda hook is an AWS-provided managed hook with the type AWS::Hooks::LambdaHook. It simplifies the integration of custom logic into CloudFormation stacks. This powerful feature allows you to focus on building and testing your custom logic as a Lambda function, without the complexity of creating a hook from scratch.
By using the Lambda hook, you can activate a pre-built hook and deploy your custom logic into a Lambda function using familiar tools like AWS CLI or AWS Serverless Application Model (SAM) or AWS Cloud Development Kit (CDK). This approach reduces the number of components you need to manage in your workflow, allowing for more streamlined operations. The Lambda hook also offers flexible evaluation capabilities, enabling you to respond to specific template properties or configurations as needed.
One of the key advantages of the Lambda hook is the enhanced control it provides. You can benefit from features such as VPC integration, local logging, and granular resource management, all while leveraging the power of AWS Lambda functions. To get started with the Lambda hook, you’ll need to activate it in your AWS account. This activation process eliminates the need for authoring, testing, packaging, and deploying a custom hook using the AWS CloudFormation Command Line Interface (CFN-CLI), significantly simplifying your workflow.
Example Use Case: S3 Bucket Versioning Validation
This blog post demonstrates using the Lambda hook to validate S3 Bucket versioning before deployment. While focused on S3 buckets, this approach can be applied to other resource types, properties, stack, and change set operations.
By leveraging the Lambda hook, you’ll streamline custom logic integration into your CloudFormation stacks. The process involves:
- Activating Lambda hook of type
AWS::Hooks::LambdaHookin your account - Writing a Lambda function for validation
- Providing the Lambda ARN as input to the hook
This example showcases how to enhance your infrastructure-as-code practices, ensuring compliant and secure deployments from the start.
Architecture
This section shows you how the Lambda hook and Lambda function work together to enhance your CloudFormation deployments.
Lambda hook and Lambda function
First, you need to create a Lambda function with the business logic to respond to the hook. Then, you need to create an IAM execution role with the necessary permissions to invoke the Lambda Function. Once you have the Lambda function and the IAM execution role, you can activate the AWS provided Lambda hook. Follow the steps in the documentation to activate a Lambda hook from the AWS console. Alternatively, you can activate it using the AWS Command Line Interface (AWS CLI) by using the activate-type and set-type-configuration commands. Lastly, you can also use AWS::CloudFormation::LambdaHook as a CloudFormation resource to activate and configure Lambda hook from a CloudFormation template. You can share this resource across your other accounts and regions using AWS CloudFormation StackSets by following this blog.
Lambda hook in action
The following diagram and explanation illustrate the step-by-step workflow of how Lambda hook integrates with your CloudFormation operations, providing a visual representation of the process from template creation to resource deployment or modification.

Diagram 1: Lambda hooks in action
The architecture diagram illustrates the step-by-step flow of how the Lambda hook is used during a CloudFormation stack operation.
- Author a template: Author a CloudFormation template, including the necessary resources to configure.
- Create the stack: The CloudFormation stack creation process has started, but the process of creating the defined resources in the template has not yet begun.
- Request is received by CloudFormation service: When a resource creation, update, or deletion is requested, the CloudFormation service receives the request.
- Invoke the Hook: The CloudFormation service then invokes the Lambda hook.
- The hook invokes your the Lambda Function: The Lambda hook, in turn, triggers the execution of the Lambda function that was defined in the hook activation.
- The Lambda function processes the request and responds back to the Hook: The Lambda function processes the request, performing validation, or additional tasks as required. The Lambda function then responds back to the Lambda hook.
- The stack workflow progresses further in either continuing the resource creation/update/deletion with/without a warning or fails: Based on the Lambda function’s output, the Lambda hook either allows the stack operation to proceed with the resource operation (for example, creation of the resource), or deny the resource operation causing a rollback of the stack.
This workflow demonstrates how Lambda hook seamlessly integrates into the CloudFormation stack deployment process, allowing you to implement custom validations, enforce policies, and extend the capabilities of your infrastructure-as-code deployments through the power of Lambda functions. By leveraging the Lambda hook and the custom Lambda function, customers can extend the capabilities of their CloudFormation deployments, enabling advanced use cases such as resource validation, or additional task execution.
Sample Deployment
This section shows you how to enable the Lambda hook, which is of type AWS::Hooks::LambdaHook, and add the business logic in the Lambda function to validate the versioning configuration of an S3 bucket. The sample solution shown in this blog post demonstrates the hook triggering for the resource type AWS::S3::Bucket, and if you want to trigger this for every resource type, then you can use the Resource filter within Hook filters configuration that can take wildcard "AWS::*::*" as a value or multiple targets of resource types for example "AWS::S3::Bucket", "AWS::DynamoDB::Table", and you’ll also want to make sure that the Lambda Function has the logic to handle the additional resource type. You can also add additional Hook targets , for example to validate your STACK or CHANGE_SET.
In the example used in this blog post, you will configure the hook and activate on create and update operations operations. For more information about TargetFilters, see Hook configuration schema and for more information about Lambda hook see here. With these modifications, you need to consider two important points: First, you will need to handle the business logic to deal with different resource types in your Lambda function code. Second, additional pricing may apply based on your resource usage, for more details see the Lambda pricing page.
Creating the Lambda Function
You can create a Lambda function in several ways – on the AWS Console, using CloudFormation, using AWS CLI, or by directly invoking the API via SDK. In this section, we will cover creating a Lambda function with a few clicks on the AWS console. See Using Lambda with infrastructure as code (IaC) for deploying Lambda Function using SAM CLI, CDK or CloudFormation.
Create the Lambda function on the AWS console by following create a Lambda function with the console instructions and use the following sample Python code.
"""Example Lambda function called by AWS::Hooks::LambdaHook."""


import logging


HOOK_INVOCATION_POINTS = [
    "CREATE_PRE_PROVISION",
    "UPDATE_PRE_PROVISION",
    "DELETE_PRE_PROVISION",
]

TARGET_NAMES = [
    "AWS::S3::Bucket",
]

LOGGER = logging.getLogger()

LOGGER.setLevel("INFO")


def lambda_handler(event, context):
  """Define the entry point of the function."""
  try:
    request = event

    LOGGER.info(f"Request: {request}")

    invocation_point = request["actionInvocationPoint"]
    LOGGER.info(f"Invocation point: {invocation_point}")

    target_name = request["requestData"]["targetName"]
    LOGGER.info(f"Target name: {target_name}")

    clientRequestToken = request["clientRequestToken"]

    if (
      invocation_point not in HOOK_INVOCATION_POINTS
      or target_name not in TARGET_NAMES
    ):
      message = (
        f"Skipping {target_name} evaluation for {invocation_point}."
      )
      LOGGER.info(message)
      payload = {
        "clientRequestToken": clientRequestToken,
        "hookStatus": "SUCCESS",
        "errorCode": None,
        "message": message,
        "callbackContext": None,
        "callbackDelaySeconds": 0,
      }
      LOGGER.debug(payload)
      return payload

    target_model = request["requestData"]["targetModel"]

    resource_properties = (
      target_model.get("resourceProperties")
      if target_model and target_model.get("resourceProperties")
      else None
    )
    LOGGER.debug(f"Resource properties: {resource_properties}")

    versioning_configuration = (
      resource_properties.get("VersioningConfiguration")
      if resource_properties
      and resource_properties.get("VersioningConfiguration")
      else None
    )
    versioning_configuration_status = (
      versioning_configuration.get("Status")
      if versioning_configuration
      and versioning_configuration.get("Status")
      else None
    )
    if (
      not resource_properties
      or not versioning_configuration
      or not versioning_configuration_status
      or not versioning_configuration_status == "Enabled"
    ):
      message = "Versioning not set or not enabled for the S3 bucket."
      LOGGER.error(message)
      payload = {
        "clientRequestToken": clientRequestToken,
        "hookStatus": "FAILED",
        "errorCode": "NonCompliant",
        "message": message,
      }
    else:
      message = "Versioning is enabled for the S3 bucket."
      LOGGER.info(message)
      payload = {
        "clientRequestToken": clientRequestToken,
        "hookStatus": "SUCCESS",
        "errorCode": None,
        "message": message,
      }

    LOGGER.debug(payload)
    return payload
  except Exception as exception:
    message = str(exception)
    payload = {
      "clientRequestToken":  event["clientRequestToken"],
      "hookStatus": "FAILED",
      "errorCode": "InternalFailure",
      "message": message,
      "callbackContext": None,
      "callbackDelaySeconds": 0,
    }
    LOGGER.error(message)
    return payload
Example event sent to Lambda by the hook
Explanation of the Lambda Function code
The Lambda Function code is designed to process the event received from the Lambda hook and validate the versioning configuration of the target S3 bucket resource. Here’s a detailed explanation of the code:
- The function first extracts the relevant information from the event, including the invocation point and the target resource type.
- It then checks if the current invocation point is in the configured
HOOK_INVOCATION_POINTSlist and if the target resource type isAWS::S3::Bucket. If not, the function returns a success response, skipping the validation for this particular invocation.
Note: this code that skips the validation is put here as a fallback logic in the event the user has not chosen to use TargetFilters. As this is a wildcard hook, without TargetFilters the hook will always be invoked for any AWS resource type described in the template, and since the hook targets preCreate, preUpdate, and preDelete by default, the hook will be invoked for these invocation points by default. To narrow the scope and reduce costs by avoiding to invoke the hook for all AWS resource type targets and invocation points, use TargetFilters.
- Next, the function retrieves the resource properties from the event, specifically looking for the
VersioningConfigurationproperty and itsStatus. - If the
VersioningConfigurationproperty is not present or itsStatusis not set toEnabled, the function returns a failure response, indicating that the versioning is not enabled for the S3 bucket. - If the versioning is enabled, the function returns a success response.
- The function also includes a fallback mechanism to return a failure response in case of any other exceptions. By evaluating this sample code, you can validate the versioning configuration of the S3 bucket during the CloudFormation stack creation and update processes, with your infrastructure-as-code policies.
Enabling Lambda Hook in your AWS Account/Region
- Navigate to the AWS CloudFormation service on the AWS Console, then choose “Create Hook” → “with Lambda” from the main Hooks page:

Diagram 2: Create a Hook with Lambda console page
You will see the page explaining how the Lambda function work as a hook.

Diagram 3: Provide a Lambda function to Hook Console page
- Provide the Hooks details: the name, the Lambda function it should take, the type, and the mode. You can also create your execution role directly from the console by choosing “New execution role”.
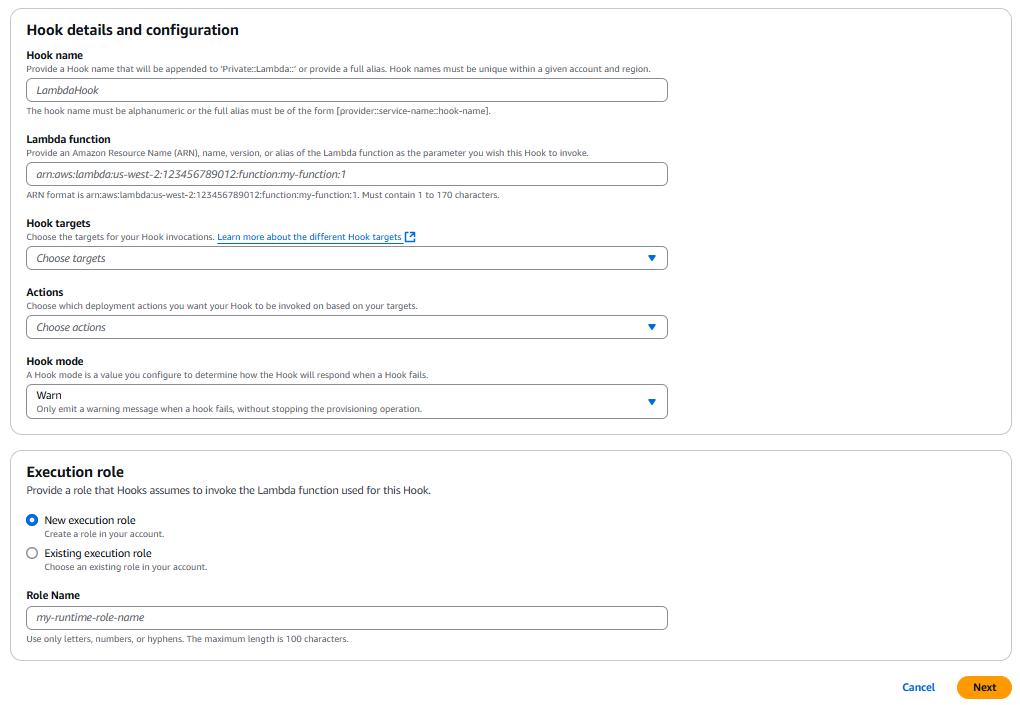
Diagram 3: Provide a Lambda function to Hook Console page
You can review the Lambda hook and activate it from the next page.

Diagram 4: Review Lambda hook Console page
Test a sample
In this section, you will test the hook and the Lambda Function that you activated for a S3 bucket resource.
Create an S3 Bucket without versioning
AWSTemplateFormatVersion: "2010-09-09"

Description: This CloudFormation template provisions an S3 Bucket without versioning enabled

Resources:
  S3Bucket:
    DeletionPolicy: Delete
    Type: AWS::S3::Bucket
    Properties:
      BucketName: !Sub test-bucket-versioning-1-${AWS::Region}-${AWS::AccountId}
You will see the hook invoking Lambda function and the Lambda Function responding back with a failure message since the Versioning is not enabled.
When you create or update a stack with the template above, the Lambda hook will be invoked, and the Lambda Function will respond with a failure message since bucket versioning is not enabled. The Lambda Function code will extract the resourceProperties from the event, check the VersioningConfiguration property, and find that the Status is not set to Enabled. As a result, if you use the example template above where you describe the S3 bucket without versioning enabled, the Lambda Function will send a failure response back to the hook, causing the CloudFormation stack operation to fail as shown in the following screenshot.

Diagram 5: Lambda Hook failure Stack
Create an S3 Bucket with versioning enabled You can try creating an S3 Bucket with versioning enabled to see how Hooks assessment succeeded.
AWSTemplateFormatVersion: "2010-09-09"

Description: This CloudFormation template provisions an S3 Bucket with Versioning enabled

Resources:
  S3Bucket:
    DeletionPolicy: Delete
    Type: AWS::S3::Bucket
    Properties:
      BucketName: !Sub test-bucket-versioning-2-${AWS::Region}-${AWS::AccountId}
      VersioningConfiguration:
        Status: Enabled
In this case, you will see the hook invoking the Lambda function and getting a success message since the Versioning is enabled
When you create a stack with this CloudFormation template, the Lambda hook will be invoked, and the Lambda Function will respond with a success message since the versioning is enabled. The Lambda Function code will extract the resourceProperties from the event, check the VersioningConfiguration property, and find that the Status is set to Enabled. As a result, the Lambda Function will send a success response back to the hook, allowing the CloudFormation stack operation to proceed as shown in the following screenshot.
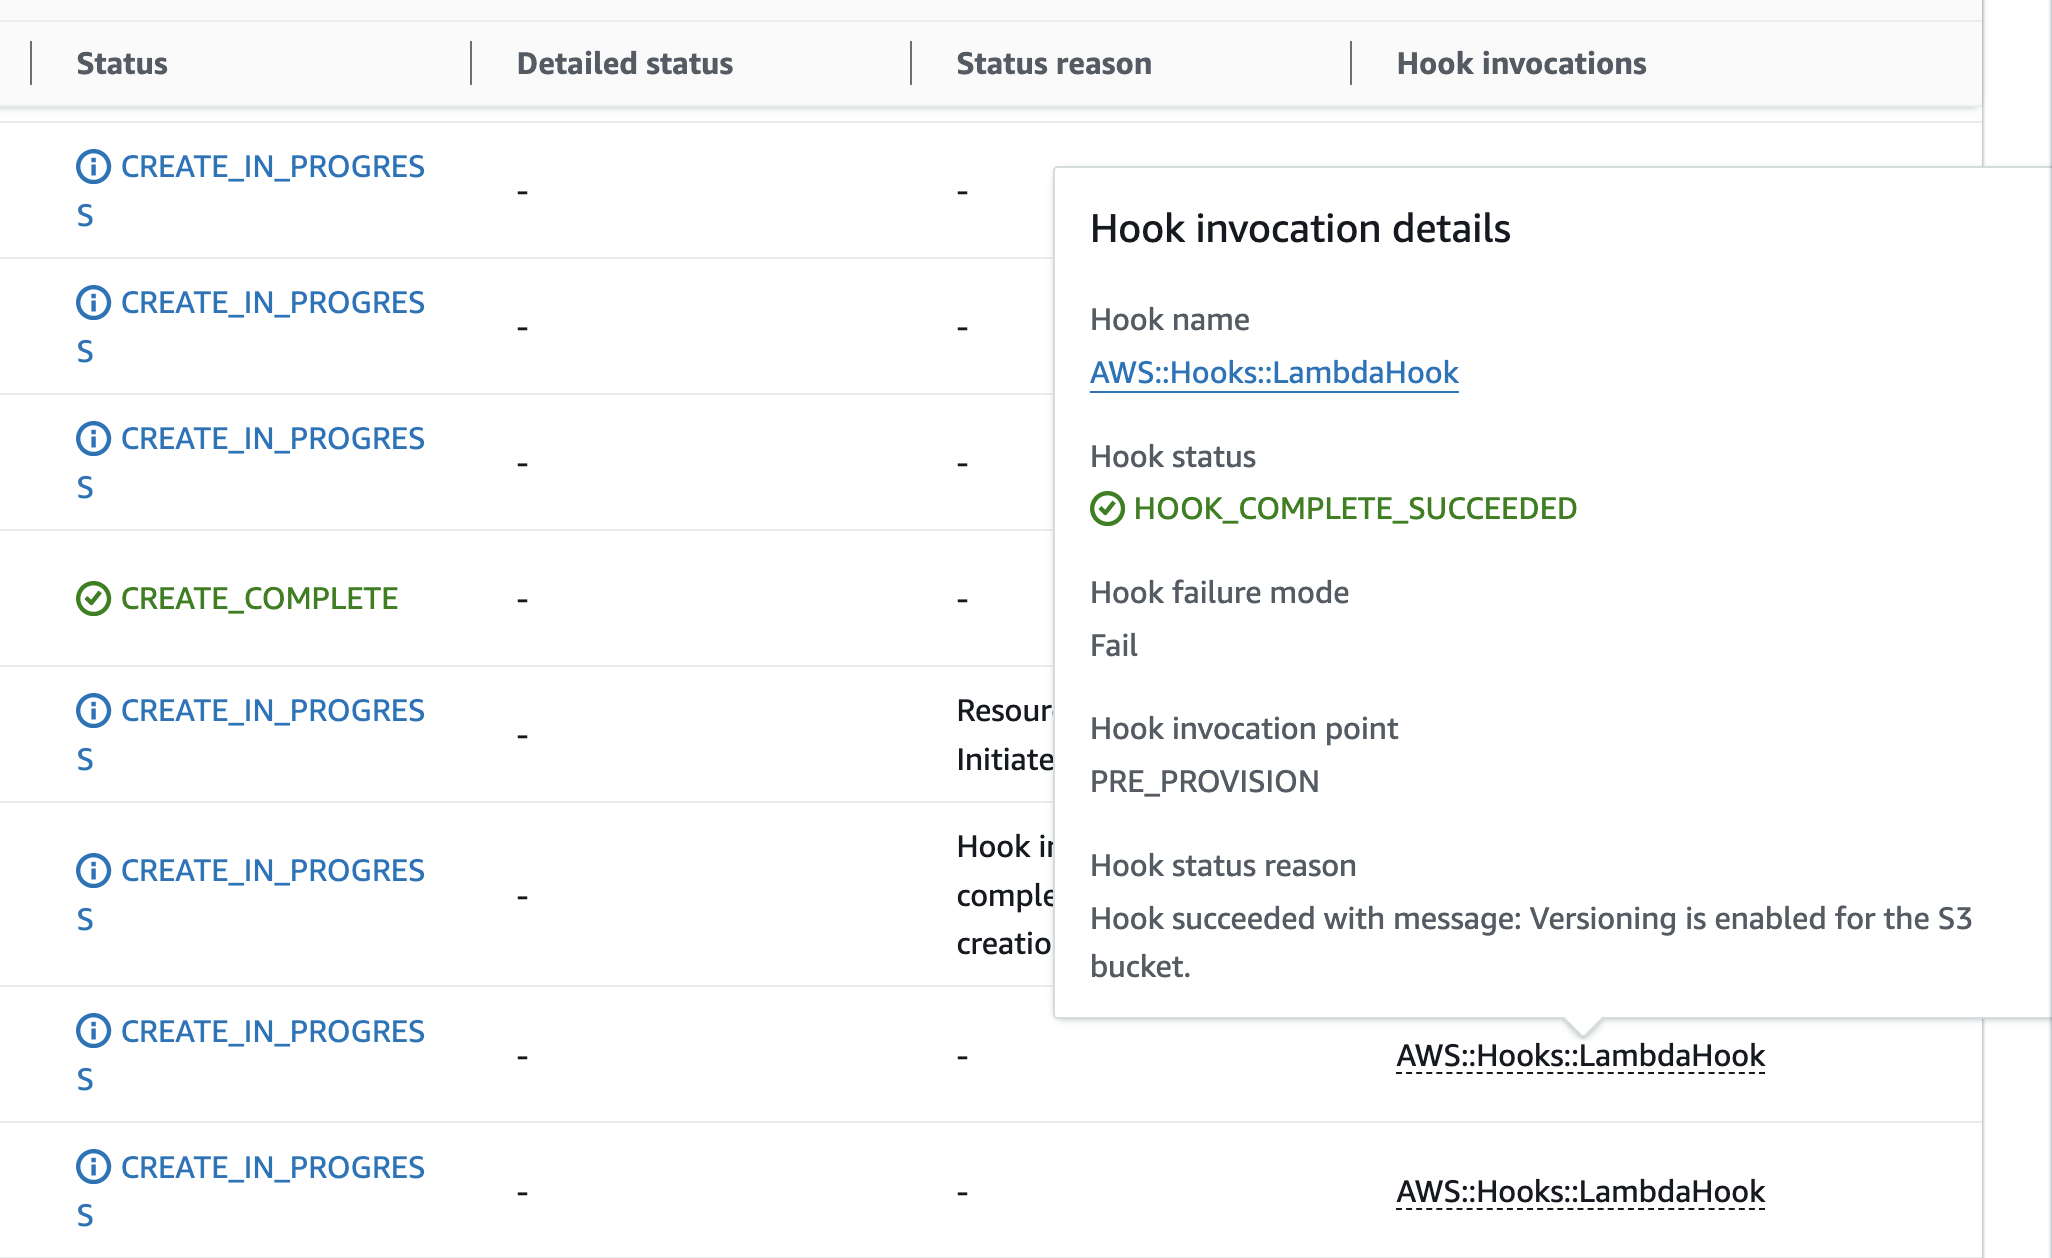
Diagram 6: Lambda Hook success Stack
By testing these two scenarios, you can verify that the Lambda hook and the associated Lambda Function are working as expected, enforcing the S3 bucket versioning policy during CloudFormation stack operations.
Clean up
To clean up, refer to the following documentation to delete CloudFormation Stacks: Deleting a stack on the AWS CloudFormation console or Deleting a stack using AWS CLI. Refer to documentation to deactivate the hook.
Conclusion
In this blog post, you explored the capabilities of CloudFormation Hooks and how they can be leveraged to extend the functionality of your infrastructure-as-code deployments. Specifically, you learned about the Lambda hook, a pre-built hook that simplifies the process of integrating custom logic into your CloudFormation stacks.
By activating the Lambda hook, and deploying a custom Lambda Function, you were able to validate the versioning configuration of an S3 bucket during the CloudFormation stack creation and update processes. This approach allows you to enforce infrastructure-as-code policies and ensure compliance at the point of deployment, rather than relying on post-deployment checks or indirect governance mechanisms. The ability to leverage familiar tools and workflows, such as the AWS CLI, AWS SAM, CI/CD pipelines, or the AWS CDK, makes it easier to incorporate custom logic into your CloudFormation deployments. This reduces the overhead and complexity associated with traditional hook orchestration and packaging, empowering you to streamline your infrastructure-as-code practices.
As you continue to build and deploy your cloud infrastructure, consider exploring the various CloudFormation Hooks available, for example, see aws-cloudformation/aws-cloudformation-samples and aws-cloudformation/community-registry-extensions GitHub repositories. The approach demonstrated in this blog post can be applied to other resource types supported by CloudFormation, allowing you to validate and enforce policies for a wide range of infrastructure components, from EC2 instances and VPCs to databases and application services.
About the Author

Kirankumar Chandrashekar is a Sr. Solutions Architect for Strategic Accounts at AWS. He focuses on leading customers in architecting DevOps, modernization using serverless, containers and container orchestration technologies like Docker, ECS, EKS to name a few. Kirankumar is passionate about DevOps, Infrastructure as Code, modernization and solving complex customer issues. He enjoys music, as well as cooking and traveling.
 Stella Hie is a Sr. Product Manager Technical for AWS Infrastructure as Code. She focuses on proactive control and governance space, working on delivering the best experience for customers to use AWS solutions safely. Outside of work, she enjoys hiking, playing piano, and watching live shows.
Introducing a managed hook for Guard
Post Syndicated from Brian Terry original https://aws.amazon.com/blogs/devops/introducing-a-managed-hook-for-guard/
In today’s cloud-driven world, maintaining compliance and enforcing organizational policies across your infrastructure is more critical than ever. AWS CloudFormation, a service that enables you to model, provision, and manage AWS and third-party resources through Infrastructure as Code (IaC), has been a cornerstone for automating cloud deployments. While CloudFormation simplifies resource management, ensuring compliance with internal and external standards requires robust tools and strategies to align with organizational and regulatory requirements.
Enter the new managed hook for Guard, a new hook designed to seamlessly integrate compliance into your AWS CloudFormation workflows. AWS CloudFormation Hooks are a powerful tool that allow you to validate and enforce policies during the provisioning and management of resources in your CloudFormation stacks. With a Guard hook, you can now bring your AWS CloudFormation Guard rules directly into your CloudFormation stacks, change sets, and individual resources. This feature eliminates the need to incorporate the Guard runtime into custom hooks, simplifying compliance enforcement and enhancing your security posture.
What is a Guard hook?
A Guard hook is a service-managed CloudFormation Hook that integrates AWS CloudFormation Guard—a policy-as-code tool—directly into your CloudFormation deployment process. AWS CloudFormation Guard uses a domain-specific language (DSL) to define compliance rules in an easily readable and reusable format, enabling you to codify and enforce organizational policies. This hook allows you to automatically validate your CloudFormation templates against these established compliance rules, enforcing policies seamlessly without the need to manage custom Lambda functions or Guard runtimes. By identifying non-compliant resources early, it helps streamline deployments and ensures that your infrastructure aligns with organizational standards right from the start.
Benefits of Using a Guard hook
Guard hooks provide unique advantages by combining the flexibility of CloudFormation Hooks with the expressiveness of the Guard Domain Specific Language (DSL), giving you a powerful tool for infrastructure compliance and security. As a fully managed CloudFormation hook, Guard hooks eliminate the need for a custom hook implementation and management, allowing you to leverage AWS’s service-driven infrastructure to streamline policy enforcement.With a Guard hook, you can express compliance rules and configurations directly in the Guard DSL.
Guard hooks specifically add value by enabling these Guard-based compliance policies to be applied automatically during stack operations. This helps validate that your infrastructure consistently aligns with security and compliance standards, reducing the risks of misconfiguration and non-compliance. Additionally, Guard hooks allow you to take advantage of CloudFormation’s native stack-level and resource-level hooks, adding depth to your compliance by enforcing policies across entire stacks and individual resources alike.
Use Cases
Guard hooks can be applied in various scenarios to enhance compliance and security. In security compliance, for instance, it can ensure that all databases and storage services have encryption enabled or prevent security groups from allowing unrestricted inbound traffic. Regarding resource configuration, it can enforce the use of approved EC2 instance types or require specific tags on all resources for cost tracking and management.
For operational governance, Guard hooks can validate that resources do not exceed predefined thresholds, such as storage size, ensuring that resources are provisioned within acceptable limits. It can also enforce network policies by ensuring the use of approved VPCs and subnets, maintaining network security and compliance with organizational standards.
A resource hook in CloudFormation targets individual resources within a template, such as EC2 instances, S3 buckets, or IAM roles. It is particularly useful for enforcing specific standards or compliance requirements on individual resources, thereby helping customers ensure each one meets defined criteria. For instance, you could use a resource-level hook to enforce that every S3 bucket created through CloudFormation has server-side encryption enabled. In contrast, a stack or change set hook targets the entire CloudFormation stack as a single entity, allowing for the application of guardrails or validation requirements across all resources within the stack collectively. This helps to ensure that the entire stack, not just individual resources, aligns with set policies before the stack is created or updated. For example, a stack-level hook could be used to prevent a stack from containing certain types of resources or to ensure that a specific number of resources are created in each stack. Together, these hooks provide different layers of validation to enforce compliance and configuration standards at both the resource and stack levels.
Getting Started
Getting started with a Guard hook involves configuring the hook, uploading your Guard rules to Amazon S3, activating the hook, and enabling it to run against your CloudFormation stacks. Below are the detailed steps to help you set up and start using Guard Hook effectively.
Pre-requisites Create an Amazon S3 Bucket
If you do not have one already, you will need to create an S3 bucket in your region. This bucket will hold your Guard policy files and optionally the full Guard evaluation output if so desired.
Configuring a Guard hook Create your rule
In this section, you will provide an example of AWS CloudFormation Guard rules that help enforce best practices for Amazon S3 buckets. Please create a file called safebucket.guard and include the following rules:
In this file, you can define rules to prevent public write access and require versioning on all S3 buckets. Here’s what the two rules in this example do:
- S3_BUCKET_PUBLIC_WRITE_PROHIBITED:
- This rule identifies S3 buckets within a CloudFormation template and checks if the public write access is restricted. It ensures that each S3 bucket has
PublicAccessBlockConfigurationproperties enabled to block public ACLs, block public policies, ignore public ACLs, and restrict public buckets. If a bucket does not meet these criteria, a violation message is triggered, instructing the user to set these properties totrue.
- This rule identifies S3 buckets within a CloudFormation template and checks if the public write access is restricted. It ensures that each S3 bucket has
- S3_BUCKET_VERSIONING_ENABLED:
- This rule targets S3 buckets and verifies that versioning is enabled. The rule checks if the
VersioningConfigurationproperty exists and has itsStatusset to'Enabled'. If this configuration is missing or set incorrectly, it alerts the user to enable versioning on the S3 bucket, providing an additional layer of data protection.
- This rule targets S3 buckets and verifies that versioning is enabled. The rule checks if the
These rules help you maintain strict security and operational best practices by ensuring that S3 buckets are configured according to compliance requirements. Place these rules in safebucket.guard, and you’re ready to start applying them to your CloudFormation templates using Guard Hook to enforce policies without any manual intervention.
Upload your rules to S3
The Guard hook expects your policy files to be uploaded to an S3 bucket to then be pulled down during hook execution time. The hook expects your rules to be either a single .guard file, or multiple .guard files uploaded as a .zip or .tar.gz
Once you have uploaded your Guard rule or Guard rules bundle to S3, take note of the S3 URI of the uploaded object, as you will need this later to configure the Guard hook. Example: s3://your-bucket-name/safebucket.guard
You can also get the S3 URI by copy-pasting it from the console

Authoring the Hook
You can author and activate a Guard hook from the console, CLI, and using the AWS::CloudFormation::GuardHook CloudFormation resource.
Console
You can use the new console flow to define and activate your hook. Click on Create a Hook and choose With Guard.
- You can type in your Guard rules S3 URI from the step before, or you can browse your S3 bucket using the console button.

- You can configure the hook by performing the following steps:
- In the Hook Name field, enter
My::Company::GuardHook. - Under Hook Targets, select both
StacksandResources. By selecting bothStacksandResourcesunder Hook Targets, you’re instructing CloudFormation to apply your hook validations at both levels. This ensures that individual resources and the overall stack comply with your defined policies, providing a comprehensive safeguard across deployments. - For Hook Mode, choose
Fail. - In Execution Role, select New execution role and enter
my-guard-hook-rolefor the name if you want CloudFormation to create the necessary role and permissions. Alternatively, an IAM role ARN you created manually (learn more here).
- In the Hook Name field, enter
- While we didn’t include a filter in this example, you can limit the executions of the hook to the intended resource types by using a filter. For more information about filters view our documentation page. You can skip to the next step if you do not have anything to filter.

- Review the hook details and then click the Activate Hook button.


CLI
export AWS_ACCOUNT_ID=<Your_Account_Id>

aws cloudformation activate-type --type HOOK \
--type-name AWS::Hooks::GuardHook \
--publisher-id aws-hooks \
--type-name-alias MyCompany::Hooks::GuardHook \
--execution-role arn:aws:iam::${AWS_ACCOUNT_ID}:role/<Your_ExecutionRole_Name> \
--region eu-central-1
Note: You can create your own type-name-alias → MyCompany::Hooks::GuardHook is just an example
Using the CloudFormation resource
Using the AWS::CloudFormation::GuardHook resource in a CloudFormation template allows you to enforce compliance checks and validations on your AWS resources before creating, modifying, or deleting them within a stack. By specifying Guard rules using the Guard domain-specific language (DSL), you can define policies to assess resource configurations and security standards. When integrated into a CloudFormation template, AWS::CloudFormation::GuardHook evaluates the resources during stack operations and can either block non-compliant actions or provide warnings, depending on the configuration. This tool benefits organizations by automating governance, enhancing security, and reducing manual intervention, which help ensure that deployments adhere to best practices and compliance requirements consistently across environments.
Here is an example of how to create a Guard hook with the AWS::CloudFormation::GuardHook resource in a YAML file.
AWSTemplateFormatVersion: '2010-09-09'
Resources:
  GuardHookRole:
    Type: AWS::IAM::Role
    Properties:
      RoleName: GuardHookExecutionRole
      AssumeRolePolicyDocument:
        Version: '2012-10-17'
        Statement:
          - Effect: Allow
            Principal:
              Service: hooks.cloudformation.amazonaws.com
            Action: sts:AssumeRole
      Policies:
        - PolicyName: S3AccessPolicy
          PolicyDocument:
            Version: '2012-10-17'
            Statement:
              - Effect: Allow
                Action:
                  - s3:GetObject
                  - s3:GetObjectVersion
                  - s3:PutObject
                  - s3:ListBucket
                Resource:
                  - arn:aws:s3:::<YourBucket>/*
                  - arn:aws:s3:::<YourBucket>

  MyGuardHook:
    Type: AWS::CloudFormation::GuardHook
    Properties:
      Alias: "my::guard::hook"
      ExecutionRole: !GetAtt GuardHookRole.Arn
      FailureMode: FAIL
      HookStatus: ENABLED
      LogBucket: "mysafebucket"
      RuleLocation:
        Uri: "s3://<YourBucket>/safebucket.guard"
      TargetOperations:
        - STACK
        - RESOURCE
For more about AWS::CloudFormation::GuardHook , see our docs.
Testing your hook (non-compliant stack)
Now at this point, the Guard Hook should be running against all S3 buckets deployed via CloudFormation stacks in your account. We can confirm this by creating a new stack, from the CLI.
To do so, create a file named s3-fail.yaml and add the following content:
AWSTemplateFormatVersion: "2010-09-09"
Description: This template creates a simple s3 bucket

Resources:
  DemoBucket:
   Type: AWS::S3::Bucket
Create a stack, and specify your template in the AWS Command Line Interface (AWS CLI). In the following example, specify the stack name as my-fail-stack and the template name as s3-fail.yaml.
aws cloudformation create-stack --stack-name my-fail-stack --template-body file://s3-fail.yamlView Hook Invocations
Console
- From Stack Events tab, enable Hook Invocations field

- You can see the completed assessment and the result in summarized view (how many rules compliant vs. not) and Stack status based on your hook mode:


CLI
- View stack events by running below command:
aws cloudformation describe-stack-events --stack-name my-fail-stack - You can see the completed assessment and the result (how many rules compliant vs. not compliant as part of
describe-stack-events. As theHook Failure Modeis set toFail, you can see the stack status:CREATE_FAILEDdue to Hook failure.... "EventId": "my-fail-stack-d7943992-9366-4d3a-8bad-9695a5f6b310", "StackName": "my-fail-stack", "LogicalResourceId": "my-fail-stack", "PhysicalResourceId": "", "ResourceType": "STACK", "Timestamp": "2024-11-12T15:54:29.582000+00:00", "ResourceStatus": "CREATE_IN_PROGRESS", "HookType": "My::Company::GuardHook", "HookStatus": "HOOK_COMPLETE_FAILED", "HookStatusReason": "Hook failed with message: Template failed validation, the following rule(s) failed: S3_BUCKET_PUBLIC_WRITE_PROHIBITED, S3_BUCKET_VERSIONING_ENABLED.", "HookInvocationPoint": "PRE_PROVISION", "HookFailureMode": "FAIL" }
Viewing Guard hooks output from Log Bucket
If you specified the logging bucket, now you can view the Guard hook invocation json and evaluate the output stored in your S3 bucket.
Console

CLI
You can download the log file by running the command below:
aws s3api get-object --bucket <Your log bucket> --key <insert_the-cfn-guard-validate-report-key.json> <Your_Outfile_DirectoryandName>
For more information about downloading S3 Object, see our docs.
Testing your hook (compliant stack)
To do so, create a file named s3-pass.yaml and add the following content:
AWSTemplateFormatVersion: "2010-09-09"
Description: This template creates a simple S3 bucket with versioning enabled and public write access disabled

Resources:
  DemoBucket:
   Type: AWS::S3::Bucket
   Properties:
      VersioningConfiguration:
        Status: Enabled
      PublicAccessBlockConfiguration:
        BlockPublicAcls: true
        IgnorePublicAcls: true
        BlockPublicPolicy: true
        RestrictPublicBuckets: true
Notice in the template, our bucket now does not allow public write access and enables versioning.
Create a stack, and specify your template in the AWS Command Line Interface (AWS CLI). In the following example, specify the stack name as my-pass-stack and the template name as s3-pass.yaml.
aws cloudformation create-stack --stack-name my-pass-stack --template-body file://s3-pass.yamlView Hook Invocations
Console
- You can see the completed assessment and the the bucket was created.


CLI
- View stack events by running below command:
aws cloudformation describe-stack-events --stack-name my-pass-stack - You can see the completed assessment and the result (how many rules compliant vs. not compliant as part of
describe-stack-event... "StackName": "my-pass-stack", "LogicalResourceId": "DemoBucket", "PhysicalResourceId": "my-pass-stack-demobucket-rmm9cngo70xq", "ResourceType": "AWS::S3::Bucket", "Timestamp": "2024-11-12T17:01:41.898000+00:00", "ResourceStatus": "CREATE_COMPLETE", "ResourceProperties": "{\"PublicAccessBlockConfiguration\":{\"RestrictPublicBuckets\":\"true\",\"BlockPublicPolicy\":\"true\",\"BlockPublicAcls\":\"true\",\"IgnorePublicAcls\":\"true\"},\"VersioningConfiguration\":{\"Status\":\"Enabled\"}}", "ClientRequestToken": "Console-CreateStack-46ec0d77-5d2b-3e2a-9c82-fcce5e60a2f5" },
Guard hooks revolutionize the way you enforce compliance and security policies within your AWS infrastructure. By leveraging a service-managed hook, you can seamlessly integrate policy validation into your CloudFormation deployments without additional operational overhead.
Take advantage of Guard hooks today to:
- Simplify compliance enforcement.
- Enhance your security posture.
- Streamline your deployment workflows.
- Focus on innovation rather than infrastructure management.
Ready to enhance your cloud compliance and security? Start integrating Guard hooks into your CloudFormation templates and experience a new level of simplicity and efficiency in policy enforcement.
Additional Resources
- AWS Guard Rules Registry
Github AWS AWS Guard Rules Registry - AWS CloudFormation Guard Documentation
AWS CloudFormation Guard User Guide - Guard hooks Reference
Using Guard Hook Documentation - GitHub Repository
AWS CloudFormation Guard on GitHub - Tutorials and Workshops
Implementing Compliance as Code with AWS CloudFormation Guard
AWS Workshops: CloudFormation Guard