All posts by Sébastien Stormacq

Week in Review – February 13, 2023

Post Syndicated from Sébastien Stormacq original https://aws.amazon.com/blogs/aws/week-in-review-february-13-2023/

AWS announced 32 capabilities since we published the last Week in Review blog post a week ago. I also read a couple of other news and blog posts.

Here is my summary.

The VPC section of the AWS Management Console now allows you to visualize your VPC resources, such as the relationships between a VPC and its subnets, routing tables, and gateways. This visualization was available at VPC creation time only, and now you can go back to it using the Resource Map tab in the console. You can read the details in Channy’s blog post.

CloudTrail Lake now gives you the ability to ingest activity events from non-AWS sources. This lets you immutably store and then process activity events without regard to their origin–AWS, on-premises servers, and so forth. All of this power is available to you with a single API call: PutAuditEvents. We launched AWS CloudTrail Lake about a year ago. It is a managed organization-scale data lake that aggregates, immutably stores, and allows querying of events recorded by CloudTrail. You can use it for auditing, security investigation, and troubleshooting. Again, my colleague Channy wrote a post with the details.

There are three new Amazon CloudWatch metrics for asynchronous AWS Lambda function invocations: AsyncEventsReceived, AsyncEventAge, and AsyncEventsDropped. These metrics provide visibility for asynchronous Lambda function invocations. They help you to identify the root cause of processing issues such as throttling, concurrency limit, function errors, processing latency because of retries, or missing events. You can learn more and have access to a sample application in this blog post.

Amazon Simple Notification Service (Amazon SNS) now supports AWS X-Ray to visualize, analyze, and debug applications. Developers can now trace messages going through Amazon SNS, making it easier to understand or debug microservices or serverless applications.

Amazon EC2 Mac instances now support replacing root volumes for quick instance restoration. Stopping and starting EC2 Mac instances trigger a scrubbing workflow that can take up to one hour to complete. Now you can swap the root volume of the instance with an EBS snapshot or an AMI. It helps to reset your instance to a previous known state in 10–15 minutes only. This significantly speeds up your CI and CD pipelines.

Amazon Polly launches two new Japanese NTTS voices. Neural Text To Speech (NTTS) produces the most natural and human-like text-to-speech voices possible. You can try these voices in the Polly section of the AWS Management Console. With this addition, according to my count, you can now choose among 52 NTTS voices in 28 languages or language variants (French from France or from Quebec, for example).

The AWS SDK for Java now includes the AWS CRT HTTP Client. The HTTP client is the center-piece powering our SDKs. Every single AWS API call triggers a network call to our API endpoints. It is therefore important to use a low-footprint and low-latency HTTP client library in our SDKs. AWS created a common HTTP client for all SDKs using the C programming language. We also offer 11 wrappers for 11 programming languages, from C++ to Swift. When you develop in Java, you now have the option to use this common HTTP client. It provides up to 76 percent cold start time reduction on AWS Lambda functions and up to 14 percent less memory usage compared to the Netty-based HTTP client provided by default. My colleague Zoe has more details in her blog post.

X in Y Jeff started this section a while ago to list the expansion of new services and capabilities to additional Regions. I noticed 10 Regional expansions this week:

Other AWS News
This week, I also noticed these AWS news items:

My colleague Mai-Lan shared some impressive customer stories and metrics related to the use and scale of Amazon S3 Glacier. Check it out to learn how to put your cold data to work.

Space is the final (edge) frontier. I read this blog post published on avionweek.com. It explains how AWS helps to deploy AIML models on observation satellites to analyze image quality before sending them to earth, saving up to 40 percent satellite bandwidth. Interestingly, the main cause for unusable satellite images is…clouds.

Upcoming AWS Events
Check your calendars and sign up for these AWS events:

AWS re:Invent recaps in your area. During the re:Invent week, we had lots of new announcements, and in the next weeks, you can find in your area a recap of all these launches. All the events are posted on this site, so check it regularly to find an event nearby.

AWS re:Invent keynotes, leadership sessions, and breakout sessions are available on demand. I recommend that you check the playlists and find the talks about your favorite topics in one collection.

AWS Summits season will restart in Q2 2023. The dates and locations will be announced here. Paris and Sidney are kicking off the season on April 4th. You can register today to attend these in-person, free events (Paris, Sidney).

Stay Informed
That was my selection for this week! To better keep up with all of this news, do not forget to check out the following resources:

— seb
This post is part of our Week in Review series. Check back each week for a quick roundup of interesting news and announcements from AWS!

New – Deployment Pipelines Reference Architecture and Reference Implementations

Post Syndicated from Sébastien Stormacq original https://aws.amazon.com/blogs/aws/new_deployment_pipelines_reference_architecture_and_-reference_implementations/

Today, we are launching a new reference architecture and a set of reference implementations for enterprise-grade deployment pipelines. A deployment pipeline automates the building, testing, and deploying of applications or infrastructures into your AWS environments. When you deploy your workloads to the cloud, having deployment pipelines is key to gaining agility and lowering time to market.

When I talk with you at conferences or on social media, I frequently hear that our documentation and tutorials are good resources to get started with a new service or a new concept. However, when you want to scale your usage or when you have complex or enterprise-grade use cases, you often lack resources to dive deeper.

This is why we have created over the years hundreds of reference architectures based on real-life use cases and also the security reference architecture. Today, we are adding a new reference architecture to this collection.

We used the best practices and lessons learned at Amazon and with hundreds of customer projects to create this deployment pipeline reference architecture and implementations. They go well beyond the typical “Hello World” example: They document how to architect and how to implement complex deployment pipelines with multiple environments, multiple AWS accounts, multiple Regions, manual approval, automated testing, automated code analysis, etc. When you want to increase the speed at which you deliver software to your customers through DevOps and continuous delivery, this new reference architecture shows you how to combine AWS services to work together. They document the mandatory and optional components of the architecture.

Having an architecture document and diagram is great, but having an implementation is even better. Each pipeline type in the reference architecture has at least one reference implementation. One of the reference implementations uses an AWS Cloud Development Kit (AWS CDK) application to deploy the reference architecture on your accounts. It is a good starting point to study or customize the reference architecture to fit your specific requirements.

You will find this reference architecture and its implementations at https://pipelines.devops.aws.dev.

Deployment pipeline reference architecture

Let’s Deploy a Reference Implementation
The new deployment pipeline reference architecture demonstrates how to build a pipeline to deploy a Java containerized application and a database. It comes with two reference implementations. We are working on additional pipeline types to deploy Amazon EC2 AMIs, manage a fleet of accounts, and manage dynamic configuration for your applications.

The sample application is developed with SpringBoot. It runs on top of Corretto, the Amazon-provided distribution of the OpenJDK. The application is packaged with the CDK and is deployed on AWS Fargate. But the application is not important here; you can substitute your own application. The important parts are the infrastructure components and the pipeline to deploy an application. For this pipeline type, we provide two reference implementations. One deploys the application using Amazon CodeCatalyst, the new service that we announced at re:Invent 2022, and one uses AWS CodePipeline. This is the one I choose to deploy for this blog post.

The pipeline starts building the applications with AWS CodeBuild. It runs the unit tests and also runs Amazon CodeGuru to review code quality and security. Finally, it runs Trivy to detect additional security concerns, such as known vulnerabilities in the application dependencies. When the build is successful, the pipeline deploys the application in three environments: beta, gamma, and production. It deploys the application in the beta environment in a single Region. The pipeline runs end-to-end tests in the beta environment. All the tests must succeed before the deployment continues to the gamma environment. The gamma environment uses two Regions to host the application. After deployment in the gamma environment, the deployment into production is subject to manual approval. Finally, the pipeline deploys the application in the production environment in six Regions, with three waves of deployments made of two Regions each.

Deployment Pipelines Reference Architecture

I need four AWS accounts to deploy this reference implementation: one to deploy the pipeline and tooling and one for each environment (beta, gamma, and production). At a high level, there are two deployment steps: first, I bootstrap the CDK for all four accounts, and then I create the pipeline itself in the toolchain account. You must plan for 2-3 hours of your time to prepare your accounts, create the pipeline, and go through a first deployment.

Once the pipeline is created, it builds, tests, and deploys the sample application from its source in AWS CodeCommit. You can commit and push changes to the application source code and see it going through the pipeline steps again.

My colleague Irshad Buch helped me try the pipeline on my account. He wrote a detailed README with step-by-step instructions to let you do the same on your side. The reference architecture that describes this implementation in detail is available on this new web page. The application source code, the AWS CDK scripts to deploy the application, and the AWS CDK scripts to create the pipeline itself are all available on AWS’s GitHub. Feel free to contribute, report issues or suggest improvements.

Available Now
The deployment pipeline reference architecture and its reference implementations are available today, free of charge. If you decide to deploy a reference implementation, we will charge you for the resources it creates on your accounts. You can use the provided AWS CDK code and the detailed instructions to deploy this pipeline on your AWS accounts. Try them today!

— seb

Amazon S3 Encrypts New Objects By Default

Post Syndicated from Sébastien Stormacq original https://aws.amazon.com/blogs/aws/amazon-s3-encrypts-new-objects-by-default/

At AWS, security is job zero. Starting today, Amazon Simple Storage Service (Amazon S3) encrypts all new objects by default. Now, S3 automatically applies server-side encryption (SSE-S3) for each new object, unless you specify a different encryption option. SSE-S3 was first launched in 2011. As Jeff wrote at the time: “Amazon S3 server-side encryption handles all encryption, decryption, and key management in a totally transparent fashion. When you PUT an object, we generate a unique key, encrypt your data with the key, and then encrypt the key with a [root] key.”

This change puts another security best practice into effect automatically—with no impact on performance and no action required on your side. S3 buckets that do not use default encryption will now automatically apply SSE-S3 as the default setting. Existing buckets currently using S3 default encryption will not change.

As always, you can choose to encrypt your objects using one of the three encryption options we provide: S3 default encryption (SSE-S3, the new default), customer-provided encryption keys (SSE-C), or AWS Key Management Service keys (SSE-KMS). To have an additional layer of encryption, you might also encrypt objects on the client side, using client libraries such as the Amazon S3 encryption client.

While it was simple to enable, the opt-in nature of SSE-S3 meant that you had to be certain that it was always configured on new buckets and verify that it remained configured properly over time. For organizations that require all their objects to remain encrypted at rest with SSE-S3, this update helps meet their encryption compliance requirements without any additional tools or client configuration changes.

With today’s announcement, we have now made it “zero click” for you to apply this base level of encryption on every S3 bucket.

Verify Your Objects Are Encrypted
The change is visible today in AWS CloudTrail data event logs. You will see the changes in the S3 section of the AWS Management Console, Amazon S3 Inventory, Amazon S3 Storage Lens, and as an additional header in the AWS CLI and in the AWS SDKs over the next few weeks. We will update this blog post and documentation when the encryption status is available in these tools in all AWS Regions.

To verify the change is effective on your buckets today, you can configure CloudTrail to log data events. By default, trails do not log data events, and there is an extra cost to enable it. Data events show the resource operations performed on or within a resource, such as when a user uploads a file to an S3 bucket. You can log data events for Amazon S3 buckets, AWS Lambda functions, Amazon DynamoDB tables, or a combination of those.

Once enabled, search for PutObject API for file uploads or InitiateMultipartUpload for multipart uploads. When Amazon S3 automatically encrypts an object using the default encryption settings, the log includes the following field as the name-value pair: "SSEApplied":"Default_SSE_S3". Here is an example of a CloudTrail log (with data event logging enabled) when I uploaded a file to one of my buckets using the AWS CLI command aws s3 cp backup.sh s3://private-sst.

Cloudtrail log for S3 with default encryption enabled

Amazon S3 Encryption Options
As I wrote earlier, SSE-S3 is now the new base level of encryption when no other encryption-type is specified. SSE-S3 uses Advanced Encryption Standard (AES) encryption with 256-bit keys managed by AWS.

You can choose to encrypt your objects using SSE-C or SSE-KMS rather than with SSE-S3, either as “one click” default encryption settings on the bucket, or for individual objects in PUT requests.

SSE-C lets Amazon S3 perform the encryption and decryption of your objects while you retain control of the keys used to encrypt objects. With SSE-C, you don’t need to implement or use a client-side library to perform the encryption and decryption of objects you store in Amazon S3, but you do need to manage the keys that you send to Amazon S3 to encrypt and decrypt objects.

With SSE-KMS, AWS Key Management Service (AWS KMS) manages your encryption keys. Using AWS KMS to manage your keys provides several additional benefits. With AWS KMS, there are separate permissions for the use of the KMS key, providing an additional layer of control as well as protection against unauthorized access to your objects stored in Amazon S3. AWS KMS provides an audit trail so you can see who used your key to access which object and when, as well as view failed attempts to access data from users without permission to decrypt the data.

When using an encryption client library, such as the Amazon S3 encryption client, you retain control of the keys and complete the encryption and decryption of objects client-side using an encryption library of your choice. You encrypt the objects before they are sent to Amazon S3 for storage. The Java, .Net, Ruby, PHP, Go, and C++ AWS SDKs support client-side encryption.

You can follow the instructions in this blog post if you want to retroactively encrypt existing objects in your buckets.

Available Now
This change is effective now, in all AWS Regions, including on AWS GovCloud (US) and AWS China Regions. There is no additional cost for default object-level encryption.

— seb

AWS Week in Review – December 19, 2022

Post Syndicated from Sébastien Stormacq original https://aws.amazon.com/blogs/aws/aws-week-in-review-december-19-2022/

We are half way between the re:Invent conference and the end-of-year holidays, and I did expect the cadence of releases and news to slow down a bit, but nothing is further away from reality. Our teams continue to listen to your feedback and release new capabilities and incremental improvements.

This week, many items caught my attention. Here is my summary.

The AWS Pricing Calculator for Amazon EC2 is getting a redesign to provide you with a simplified, consistent, and efficient calculator to estimate costs. It also added a way to bulk estimate costs for EC2 instances, EC2 Dedicated Hosts, and Amazon EBS services. Try it for yourself today.

AWS Pricing Calculator

Amazon CloudWatch Metrics Insights alarms now enables you to trigger alarms on entire fleets of dynamically changing resources (such as automatically scaling EC2 instances) with a single alarm using standard SQL queries. For example, you can now write a query like this to collect data about CPU utilization over your entire dynamic fleet of EC2 instances.

SELECT AVG(CPUUtilization) FROM SCHEMA("AWS/EC2", InstanceId)

AWS Amplify is a command line tool and a set of libraries to help you to build web and mobile applications connected to a cloud backend. We released Amplify Library for Android 2.0, with improvements and simplifications for user authentication. The team also released Amplify JavaScript library version 5, with improvements for React and React Native developers, such as a new notifications channel, also known as in-app messaging, that developers can use to display contextual messages to their users based on their behavior. The Amplify JavaScript library has also received improvements to reduce the overall bundle size and installation size.

Amazon Connect added granular access control based on resource tags for routing profiles, security profiles, users, and queues. It also adds bulk import for user hierarchy tags. This allows you to use attribute-based access control policies for Amazon Connect resources.

Amazon RDS Proxy now supports PostgreSQL major version 14. RDS Proxy is a fully managed, highly available database proxy for Amazon Relational Database Service (Amazon RDS) that makes applications more scalable, more resilient to database failures, and more secure. It is typically used by serverless applications that can have a large number of open connections to the database server and may open and close database connections at a high rate, exhausting database memory and compute resources.

AWS Gateway Load Balancer endpoints now support Ipv6 addresses. You can now send IPv6 traffic through Gateway Load Balancers and its endpoints to distribute traffic flows to dual stack appliance targets.

Amazon Location Service now provides Open Data Maps maps, in addition to ESRI and Here maps. I also noticed that Amazon is a core member of the new Overture Maps Foundation, officially hosted by the Linux Foundation. The mission of the Overture Maps Foundation is to power new map products through openly available datasets that can be used and reused across applications and businesses. The program is driven by Amazon Web Services (AWS), Facebook’s parent company Meta, Microsoft, and Dutch mapping company TomTom.

AWS Mainframe Modernization is a set of managed tools providing infrastructure and software for migrating, modernizing, and running mainframe applications. It is now available in three additional AWS Regions and supports AWS CloudFormation, AWS PrivateLink, AWS Key Management Service.

X in Y. Jeff started this section a while ago to list the expansion of new services and capabilities to additional Regions. I noticed 11 Regional expansions this week:

Other AWS News
This week, I also noticed these AWS news items:

Amazon SageMaker turned 5 years old 🎉🎂. You can read the initial blog post we published at the time. To celebrate the event, the Amazon Science published this article where AWS’s Vice President Bratin Saha reflects on the past and future of AWS’s machine learning tools and AI services.

The security blog published a great post about the Cedar policy language. It explains how Amazon Verified Permissions provides a pre-built, flexible permissions system that you can use to build permissions based on both ABAC and RBAC in your applications. Cedar policy language is also at the heart of Amazon Verified Access I blogged about during re:Invent.

And just like every week, my most excellent colleague Ricardo published the open source newsletter.

Upcoming AWS Events
Check your calendars and sign up for these AWS events:

AWS re:Invent recaps in your area. During the re:Invent week, we had lots of new announcements, and in the next weeks, you can find in your area a recap of all these launches. All the events will be posted on this site, so check it regularly to find an event nearby.

AWS re:Invent keynotes, leadership sessions, and breakout sessions are available on demand. I recommend that you check the playlists and find the talks about your favorite topics in one collection.

AWS Summits season will restart in Q2 2023. The dates and locations will be announced here.

Stay Informed
That is my selection for this week! Heads up – the Week in Review will be taking a short break for the end of the year, but we’ll be back with regular updates starting on January 9, 2023. To better keep up with all of this news, do not forget to check out the following resources:

— seb
This post is part of our Week in Review series. Check back each week for a quick roundup of interesting news and announcements from AWS!

Step Functions Distributed Map – A Serverless Solution for Large-Scale Parallel Data Processing

Post Syndicated from Sébastien Stormacq original https://aws.amazon.com/blogs/aws/step-functions-distributed-map-a-serverless-solution-for-large-scale-parallel-data-processing/

I am excited to announce the availability of a distributed map for AWS Step Functions. This flow extends support for orchestrating large-scale parallel workloads such as the on-demand processing of semi-structured data.

Step Function’s map state executes the same processing steps for multiple entries in a dataset. The existing map state is limited to 40 parallel iterations at a time. This limit makes it challenging to scale data processing workloads to process thousands of items (or even more) in parallel. In order to achieve higher parallel processing prior to today, you had to implement complex workarounds to the existing map state component.

The new distributed map state allows you to write Step Functions to coordinate large-scale parallel workloads within your serverless applications. You can now iterate over millions of objects such as logs, images, or .csv files stored in Amazon Simple Storage Service (Amazon S3). The new distributed map state can launch up to ten thousand parallel workflows to process data.

You can process data by composing any service API supported by Step Functions, but typically, you will invoke Lambda functions to process the data with code written in your favorite programming language.

Step Functions distributed map supports a maximum concurrency of up to 10,000 executions in parallel, which is well above the concurrency supported by many other AWS services. You can use the maximum concurrency feature of the distributed map to ensure that you do not exceed the concurrency of a downstream service. There are two factors to consider when working with other services. First, the maximum concurrency supported by the service for your account. Second, the burst and ramping rates, which determine how quickly you can achieve the maximum concurrency.

Let’s use Lambda as an example. Your functions’ concurrency is the number of instances that serve requests at a given time. The default maximum concurrency quota for Lambda is 1,000 per AWS Region. You can ask for an increase at any time. For an initial burst of traffic, your functions’ cumulative concurrency in a Region can reach an initial level of between 500 and 3000, which varies per Region. The burst concurrency quota applies to all your functions in the Region.

When using a distributed map, be sure to verify the quota on downstream services. Limit the distributed map maximum concurrency during your development, and plan for service quota increases accordingly.

To compare the new distributed map with the original map state flow, I created this table.

Original map state flow New distributed map flow
Sub workflows
  • Runs a sub-workflow for each item in an array. The array must be passed from the previous state.
  • Each iteration of the sub-workflow is called a map iteration, and its events are added to the state machine’s execution history.
  • Runs a sub-workflow for each item in an array or Amazon S3 dataset.
  • Each sub-workflow is run as a totally separate child execution, with its own event history.
Parallel branches Map iterations run in parallel, with an effective maximum concurrency of around 40 at a time. Can pass millions of items to multiple child executions, with concurrency of up to 10,000 executions at a time.
Input source Accepts only a JSON array as input. Accepts input as Amazon S3 object list, JSON arrays or files, csv files, or Amazon S3 inventory.
Payload 256 KB Each iteration receives a reference to a file (Amazon S3) or a single record from a file (state input). Actual file processing capability is limited by Lambda storage and memory.
Execution history 25,000 events Each iteration of the map state is a child execution, with up to 25,000 events each (express mode has no limit on execution history).

Sub-workflows within a distributed map work with both Standard workflows and the low-latency, short-duration Express Workflows.

This new capability is optimized to work with S3. I can configure the bucket and prefix where my data are stored directly from the distributed map configuration. The distributed map stops reading after 100 million items and supports JSON or csv files of up to 10GB.

When processing large files, think about downstream service capabilities. Let’s take Lambda again as an example. Each input—a file on S3, for example—must fit within the Lambda function execution environment in terms of temporary storage and memory. To make it easier to handle large files, Lambda Powertools for Python introduced a new streaming feature to fetch, transform, and process S3 objects with minimal memory footprint. This allows your Lambda functions to handle files larger than the size of their execution environment. To learn more about this new capability, check the Lambda Powertools documentation.

Let’s See It in Action
For this demo, I will create a workflow that processes one thousand dog images stored on S3. The images are already stored on S3.

➜  ~ aws s3 ls awsnewsblog-distributed-map/images/
2022-11-08 15:03:36      27034 n02085620_10074.jpg
2022-11-08 15:03:36      34458 n02085620_10131.jpg
2022-11-08 15:03:36      12883 n02085620_10621.jpg
2022-11-08 15:03:36      34910 n02085620_1073.jpg
...

➜  ~ aws s3 ls awsnewsblog-distributed-map/images/ | wc -l
    1000

The workflow and the S3 bucket must be in the same Region.

To get started, I navigate to the Step Functions page of the AWS Management Console and select Create state machine. On the next page, I choose to design my workflow using the visual editor. The distributed map works with Standard workflows, and I keep the default selection as-is. I select Next to enter the visual editor.

Distributed Map - create a workflowIn the visual editor, I search and select the Map component on the left-side pane, and I drag it to the workflow area. On the right side, I configure the component. I choose Distributed as Processing mode and Amazon S3 as Item Source.

Distributed maps are natively integrated with S3. I enter the name of the bucket (awsnewsblog-distributed-map) and the prefix (images) where my images are stored.

On the Runtime Settings section, I choose Express for Child workflow type. I also may decide to restrict the Concurrency limit. It helps to ensure we operate within the concurrency quotas of the downstream services (Lambda in this demo) for a particular account or Region.

By default, the output of my sub-workflows will be aggregated as state output, up to 256KB. To process larger outputs, I may choose to Export map state results to Amazon S3.

Distributed Map - add a Lambda invocation

Finally, I define what to do for each file. In this demo, I want to invoke a Lambda function for each file in the S3 bucket. The function exists already. I search for and select the Lambda invocation action on the left-side pane. I drag it to the distributed map component. Then, I use the right-side configuration panel to select the actual Lambda function to invoke: AWSNewsBlogDistributedMap in this example.

Distributed Map - add a Lambda invocation

When I am done, I select Next. I select Next again on the Review generated code page (not shown here).

On the Specify state machine settings page, I enter a Name for my state machine and the IAM Permissions to run. Then, I select Create state machine.

Create State Machine - Final ScreenNow I am ready to start the execution. On the State machine page, I select the new workflow and select Start execution. I can optionally enter a JSON document to pass to the workflow. In this demo, the workflow does not handle the input data. I leave it as-is, and I select Start execution.

Start workflow execution Start workflow execution - pass input data

During the execution of the workflow, I can monitor the progress. I observe the number of iterations, and the number of items successfully processed or in error.

I can drill down on one specific execution to see the details.

Distributed Map - monitor execution details

With just a few clicks, I created a large-scale and heavily parallel workflow able to handle a very large quantity of data.

Which AWS Service Should I Use
As often happens on AWS, you might observe an overlap between this new capability and existing services such as AWS Glue, Amazon EMR, or Amazon S3 Batch Operations. Let’s try to differentiate the use cases.

In my mental model, data scientists and data engineers use AWS Glue and EMR to process large amounts of data. On the other hand, application developers will use Step Functions to add serverless data processing into their applications. Step Functions is able to scale from zero quickly, which makes it a good fit for interactive workloads where customers may be waiting for the results. Finally, system administrators and IT operation teams are likely to use Amazon S3 Batch Operations for single-step IT automation operations such as copying, tagging, or changing permissions on billions of S3 objects.

Pricing and Availability
AWS Step Functions’ distributed map is generally available in the following ten AWS Regions: US East (Ohio, N. Virginia), US West (Oregon), Asia Pacific (Singapore, Sydney, Tokyo), Canada (Central), and Europe (Frankfurt, Ireland, Stockholm).

The pricing model for the existing inline map state does not change. For the new distributed map state, we charge one state transition per iteration. Pricing varies between Regions, and it starts at $0.025 per 1,000 state transitions. When you process your data using express workflows, you are also charged based on the number of requests for your workflow and its duration. Again, prices vary between Regions, but they start at $1.00 per 1 million requests and $0.06 per GB-hour (prorated to 100ms).

For the same amount of iterations, you will observe a cost reduction when using the combination of the distributed map and standard workflows compared to the existing inline map. When you use express workflows, expect the costs to stay the same for more value with the distributed map.

I am really excited to discover what you will build using this new capability and how it will unlock innovation. Go start to build highly parallel serverless data processing workflows today!

— seb

AWS Marketplace Vendor Insights – Simplify Third-Party Software Risk Assessments

Post Syndicated from Sébastien Stormacq original https://aws.amazon.com/blogs/aws/aws-marketplace-vendor-insights-simplify-third-party-software-risk-assessments/

AWS Marketplace Vendor Insights is a new capability of AWS Marketplace. It simplifies third-party software risk assessments when procuring solutions from the AWS Marketplace.

It helps you to ensure that the third-party software continuously meets your industry standards by compiling security and compliance information, such as data privacy and residency, application security, and access control, in one consolidated dashboard.

As a security engineer, you may now complete third-party software risk assessment in a few days instead of months. You can now:

  • Quickly discover products in AWS Marketplace that meet your security and certification standards by searching for and accessing Vendor Insights profiles.
  • Access and download current and validated information, with evidence gathered from the vendors’ security tools and audit reports. Reports are available for download on AWS Artifact third-party reports (now available in preview).
  • Monitor your software’s security posture post-procurement and receive notifications for security and compliance events.

As a software vendor, you can now reduce the operational burden of responding to buyer requests for risk assessment information. It gives your customers a self-service access experience. You can now:

  • Build your product’s security profile by uploading your ISO 27001 or SOC2 Type 2 report and completing a software risk assessment with AWS Audit Manager.
  • Store and share your compliance reports such as ISO 27001 and SOC2 Type 2, using AWS Artifact third-party reports (preview).
  • View and approve your buyer requests for viewing security controls and compliance artifacts stored in Vendor Insights.

Let’s See It in Action
I want to procure a solution on the AWS Marketplace. But before purchasing the product, as a security engineer, I want to review its compliance. I navigate to the AWS Marketplace page of the AWS Management Console. I use the faceted search on the left side to select vendors that are ISO 27001 compliant.

AWS MArketplace vendor insights - faceted searchI select a product. On the Product Overview page, I select View assessment data on the top right side (not shown on the screenshot). Then, I can see the overview page, which shows the Security certification received and the Expiration date.

AWS MArketplace vendor insights - certification receivedI select the Security and compliance tab and see that I need to request access to see the detailed security and compliance information. I select the Request access button on the top right side to ask the vendor for access to their compliance documents.

AWS MArketplace vendor insights - request access part 1

On the next page, I fill in the Your information form with my details, and I select Request access.

AWS MArketplace vendor insights - request access part 2The Next Steps section details what will happen next. The seller will contact me to sign a nondisclosure agreement (NDA). The seller will notify AWS Marketplace when the NDA is signed. Then, I will be granted access to Vendor Insights data.

The process can take a few days. For this demo, I switch to a fictional product—Everest—for which I have access to the compliance data. Here is the Security and compliance tab when my request for access is accepted.

The Summary section shows how many controls are available. It reports how many have been validated with evidence and how many have been self-reported by the seller. It also shows how many noncompliant controls are reported.

I can scroll down the page to see the details for multiple categories: Audit, compliance and security policy, Data security, Access management, Application security, Risk management and incident response, Business resiliency and continuity, End user device security, Infrastructure security, Human resources, and Security and configuration policy. The screenshot does not show all of them.

AWS Marketplace vendor insights - security and complianceI select the detail for Access control and see the list under Control name. For each of them, I can see the compliance for SOC2 Type 2, ISO 27001, and the Vendor self-assessment.

AWS Marketplace vendor insights - access controlI select the noncompliant one to get the details and the explanation the vendor provided.

AWS Marketplace vendor insights - non compliant details

If needed, I might also use AWS Artifact third-party reports (preview) to download the compliance reports.

For Software Vendors
As a software vendor, you can create a security profile for your SaaS products on AWS Marketplace and share this profile with your prospective and existing buyers. It helps you to reduce the manual work for engineering and security teams to respond to your customer questionnaires.

To create a security profile, you will need to complete a self-assessment using AWS Audit Manager on your marketplace management AWS account, share the current SOC2 Type II and ISO27001 compliance artifacts, if available, and turn on automated assessment using Audit Manager and AWS Config on your production AWS accounts.

Our team has created an AWS CloudFormation template to automate the onboarding steps. You can find the technical resources, such as the setup guide and the onboarding templates, on our GitHub repository. Once the profile is created, Vendor Insights will keep your security profile up to date by using automated evidence from Audit Manager and AWS Config. The updates to your profile are sent as notifications. Your security and compliance team can review the updates before they are shared with buyers.

With Vendor Insights, you manage access to your product’s security profile by approving the buyer’s subscription requests. When a buyer requests access, Vendor Insights shares their contact information over email to your compliance or deal-desk operations team. They can complete the NDA with the buyer and notify AWS Marketplace to grant the buyer access to your security profile. You can also request AWS Marketplace to revoke the buyer’s subscription on a later day if you don’t want to share your product’s security and compliance posture information with the buyer anymore.

The entire process is documented in the AWS Marketplace Vendor Insights seller guide.

Pricing and Availability
Vendor Insights is now available in all AWS Regions where AWS Marketplace is available.

The pricing model is very simple; there is no charge involved for using AWS Marketplace Vendor Insights.

For buyers, you can access and download assets during your procurement phase. You lose access to the Vendor Insights profile if you have not purchased the product after 60 days. When you purchase the product, you keep access to the product’s security profile for continuous monitoring of its compliance status.

For sellers, AWS Marketplace doesn’t charge to activate and use Vendor Insights. You will incur fees for using Audit Manager and AWS Config.

Go and start your risk assessments on the AWS Marketplace today.

— seb

AWS Verified Access Preview — VPN-less Secure Network Access to Corporate Applications

Post Syndicated from Sébastien Stormacq original https://aws.amazon.com/blogs/aws/aws-verified-access-preview-vpn-less-secure-network-access-to-corporate-applications/

Today, we announced the preview of AWS Verified Access, a new secure connectivity service that allows enterprises to enable local or remote secure access for their corporate applications without requiring a VPN.

Traditionally, remote access to applications when on the road or working from home is granted by a VPN. Once the remote workforce is authenticated on the VPN, they have access to a broad range of applications depending on multiple policies defined in siloed systems, such as the VPN gateway, the firewalls, the identity provider, the enterprise device management solution, etc. These policies are typically managed by different teams, potentially creating overlaps, making it difficult to diagnose application access issues. Internal applications often rely on older authentication protocols, like Kerberos, that were built with the LAN in mind, instead of modern protocols, like OIDC, that are better tuned to modern enterprise patterns. Customers told us that policy updates can take months to roll out.

Verified Access is built using the AWS Zero Trust security principles. Zero Trust is a conceptual model and an associated set of mechanisms that focus on providing security controls around digital assets that do not solely or fundamentally depend on traditional network controls or network perimeters.

Verified Access improves your organization’s security posture by leveraging multiple security inputs to grant access to applications. It grants access to applications only when users and their devices meet the specified security requirements. Examples of inputs are the user identity and role or the device security posture, among others. Verified Access validates each application request, regardless of user or network, before granting access. Having each application access request evaluated allows Verified Access to adapt the security posture based on changing conditions. For example, if the device security signals that your device posture is out of compliance, then Verified Access will not allow you to access the application anymore.

In my opinion, there are three main benefits when adopting Verified Access:

It is easy to use for IT administrators. As an IT Administrator, you can now easily set up applications for secure remote access. It provides a single configuration point to manage and enforce a multisystem security policy to allow or deny access to your corporate applications.

It provides an open ecosystem that allows you to retain your existing identity provider and device management system. I listed all our partners at the end of this post.

It is easy to use for end users. This is my preferred one. Your workforce is not required to use a VPN client anymore. A simple browser plugin is enough to securely grant access when the user and the device are identified and verified. As of today, we support Chrome and Firefox web browsers. This is something about which I can share my personal experience. Amazon adopted a VPN-less strategy a few years ago. It’s been a relief for my colleagues and me to be able to access most of our internal web applications without having to start a VPN client and keep it connected all day long.

Let’s See It in Action
I deployed a web server in a private VPC and exposed it to my end users through a private application load balancer (https://demo.seb.go-aws.com). I created a TLS certificate for the application external endpoint (secured.seb.go-aws.com). I also set up AWS Identity Center (successor of AWS SSO). In this demo, I will use it as a source for user identities. Now I am ready to expose this application to my remote workforce.

Verified Access - Demo application

Creating a Verified Access endpoint is a four-step process. To get started, I navigate to the VPC page of the AWS Management Console. I first create the trust provider. A trust provider maintains and manages identity information for users and devices. When an application request is made, the identity information sent by the trust provider will be evaluated by Verified Access before allowing or denying the application request. I select Verified Access trust provider on the left-side navigation pane.

Verified Access navigation menu

On the Create Verified Access trust provider page, I enter a Name and an optional Description. I enter the Policy reference name, an identifier that will be used when working with policy rules. I select the source of trust: User trust provider. For this demo, I select IAM Identity Center as the source of trust for user identities. Verified Access also works with other OpenID Connect-compliant providers. Finally, I select Create Verified Access trust provider.

Verified Access - Create trust provider

I may repeat the operation when I have multiple trust providers. For example, I might have an identity-based trust provider to verify the identity of my end users and a device-based trust provider to verify the security posture of their devices.

I then create the Verified Identity instance. A Verified Access instance is a Regional AWS entity that evaluates application requests and grants access only when your security requirements are met.

On the Create Verified Access instance page, I enter a Name and an optional Description. I select the trust provider I just created. I can add additional trust provider types once the Verified Access instance is created.

Verified Access - Create instance

Third, I create a Verified Access group.

A Verified Access group is a collection of applications that have similar security requirements. Each application within a Verified Access group shares a group-level policy. For example, you can group together all applications for “finance” users and use one common policy. This simplifies your policy management. You can use a single policy for a group of applications with similar access needs.

On the Create Verified Access group page, I enter a Name only. I will enter a policy at a later stage.

Verified Access - Create access groupThe fourth and last step before testing my setup is to create the endpoint.

A Verified Access endpoint is a regional resource that specifies the application that Verified Access will be providing access to. This is where your end users connect to. Each endpoint has its own DNS name and TLS certificate. After having evaluated incoming requests, the endpoint forwards authorized requests to your internal application, either an internal load balancer or a network interface. Verified Access supports network-level and application-level load balancers.

On the Create Verified Access endpoint page, I enter a Name and Description. I reference the Verified Access group that I just created.

In the Application details section, under Application domain, I enter the DNS name end users will use to access the application. For this demo, I use secured.seb.go-aws.com. Under Domain certificate ARN, I select a TLS certificate matching the DNS name. I created the certificate using AWS Certificate Manager.

Verified Access - Create endpoint - part 1

On the Endpoint details section, I select VPC as Attachment type. I select one or multiple Security groups to attach to this endpoint. I enter awsnewsblog as Endpoint domain prefix. I select load balancer as Endpoint type. I select the Protocol (HTTP), then I enter the Port (80). I select the Load balancer ARN and the private Subnets where my load balancer is deployed.

Verified Access - Create endpoint - part 2

Again, I leave the Policy details section empty. I will define a policy in the group instead. When I am done, I select Create Verified Access endpoint. It might take a few minutes to create.

Verified Access - Create endpoint - part 3

Now it is time to grab a coffee and stretch my legs. When I return, I see the Verified Access endpoint is ✅ Active. I copy the Endpoint domain and add it as a CNAME record to my application DNS name (secured.seb.go-aws.com). I use Amazon Route 53 for this, but you can use your existing DNS server as well.

Verified Access - endpoint detailsThen, I point my favorite browser to https://secured.seb.go-aws.com. The browser is redirected to IAM Identity Center (formerly AWS SSO). I enter the username and password of my test user. I am not adding a screenshot for this. After the redirection, I receive the error message : Unauthorized. This is expected because there is no policy defined on the Verified Access endpoint. It denies every request by default.

On the Verified Access groups page, I select the Policy tab. Then I select the Modify Verified Access endpoint policy button to create an access policy.

Verified Access - group policy tab

I enter a policy allowing anybody authenticated and having an email address ending with @amazon.com. This is the email address I used for the user defined in AWS Identity Center. Note that the name after context is the name I entered as Policy reference name when I created the Verified Access trust provider. The documentation page has the details of the policy syntax, the attributes, and the operators I can use.

permit(principal, action, resource)
when {
    context.awsnewsblog.user.email.address like "*@amazon.com"
};

Verified Access - group define policy

After a few minutes, Verified Access updates the policy and becomes Active again. I force my browser to refresh, and I see the internal application now available to my authenticated user.

Verified Access - access granted


Pricing and Availability

AWS Verified Access is now available in preview in 10 AWS Regions: US East (Ohio, N. Virginia), US West (N. California, Oregon), Asia Pacific (Sydney), Canada (Central), Europe (Ireland, London, Paris), and South America (São Paulo).

As usual, pricing is based on your usage. There is no upfront or fixed price. We charge per application (Verified Access endpoint) per hour, with tiers depending on the number of applications. Prices start in US East (N. Virginia) Region at $0.27 per verified Access endpoint and per hour. This price goes down to $0.20 per endpoint per hour when you have more than 200 applications.

On top of this, there is a charge of $0.02 per GB for data processed by Verified Access. You also incur standard AWS data transfer charges for all data transferred using Verified Access.

This billing model makes it easy to start small and then grow at your own pace.

Go and configure your first Verified Access access point today.

— seb

Announcing AWS KMS External Key Store (XKS)

Post Syndicated from Sébastien Stormacq original https://aws.amazon.com/blogs/aws/announcing-aws-kms-external-key-store-xks/

I am excited to announce the availability of AWS Key Management Service (AWS KMS) External Key Store. Customers who have a regulatory need to store and use their encryption keys on premises or outside of the AWS Cloud can now do so. This new capability allows you to store AWS KMS customer managed keys on a hardware security module (HSM) that you operate on premises or at any location of your choice.

At a high level, AWS KMS forwards API calls to securely communicate with your HSM. Your key material never leaves your HSM. This solution allows you to encrypt data with external keys for the vast majority of AWS services that support AWS KMS customer managed keys, such as Amazon EBS, AWS Lambda, Amazon S3, Amazon DynamoDB, and over 100 more services. There is no change required to your existing AWS services’ configuration parameters or code.

This helps you unblock use cases for a small portion of regulated workloads where encryption keys should be stored and used outside of an AWS data center. But this is a major change in the way you operate cloud-based infrastructure and a significant shift in the shared responsibility model. We expect only a small percentage of our customers to enable this capability. The additional operational burden and greater risks to availability, performance, and low latency operations on protected data will exceed—for most cases—the perceived security benefits from AWS KMS External Key Store.

Let me dive into the details.

A Brief Recap on Key Management and Encryption
When an AWS service is configured to encrypt data at rest, the service requests a unique encryption key from AWS KMS. We call this the data encryption key. To protect data encryption keys, the service also requests that AWS KMS encrypts that key with a specific KMS customer managed key, also known as a root key. Once encrypted, data keys can be safely stored alongside the data they protect. This pattern is called envelope encryption. Imagine an envelope that contains both the encrypted data and the encrypted key that was used to encrypt these data.

But how do we protect the root key? Protecting the root key is essential as it allows the decryption of all data keys it encrypted.

The root key material is securely generated and stored in a hardware security module, a piece of hardware designed to store secrets. It is tamper-resistant and designed so that the key material never leaves the secured hardware in plain text. AWS KMS uses HSMs that are certified under the NIST 140-2 Cryptographic Module certification program.

You can choose to create root keys tied to data classification, or create unique root keys to protect different AWS services, or by project tag, or associated to each data owner, and each root key is unique to each AWS Region.

AWS KMS calls the root keys customer managed keys when you create and manage the keys yourself. They are called AWS managed keys when they are created on behalf of an AWS service that encrypts data, such as Amazon Elastic Block Store (Amazon EBS), Amazon Simple Storage Service (Amazon S3), Amazon Relational Database Service (RDS), or Amazon DynamoDB. For simplicity, let’s call them KMS keys. These are the root keys, the ones that never leave the secured HSM environment. All KMS encryption and decryption operations happen in the secured environment of the HSM.

The XKS Proxy Solution
When configuring AWS KMS External Key Store (XKS), you are replacing the KMS key hierarchy with a new, external root of trust. The root keys are now all generated and stored inside an HSM you provide and operate. When AWS KMS needs to encrypt or decrypt a data key, it forwards the request to your vendor-specific HSM.

All AWS KMS interactions with the external HSM are mediated by an external key store proxy (XKS proxy), a proxy that you provide, and you manage. The proxy translates generic AWS KMS requests into a format that the vendor-specific HSMs can understand.

The HSMs that XKS communicates with are not located in AWS data centers.

XKS architecture

To provide customers with a broad range of external key manager options, AWS KMS developed the XKS specification with feedback from several HSM, key management, and integration service providers, including Atos, Entrust, Fortanix, HashiCorp, Salesforce, Thales, and T-Systems. For information about availability, pricing, and how to use XKS with solutions from these vendors, consult the vendor directly.

In addition, we will provide a reference implementation of an XKS proxy that can be used with SoftHSM or any HSM that supports a PKCS #11 interface. This reference implementation XKS proxy can be run as a container, is built in Rust, and will be available via GitHub in the coming weeks.

Once you have completed the setup of your XKS proxy and HSM, you can create a corresponding external key store resource in KMS. You create keys in your HSM and map these keys to the external key store resource in KMS. Then you can use these keys with AWS services that support customer keys or your own applications to encrypt your data.

Each request from AWS KMS to the XKS proxy includes meta-data such as the AWS principal that called the KMS API and the KMS key ARN. This allows you to create an additional layer of authorization controls at the XKS proxy level, beyond those already provided by IAM policies in your AWS accounts.

The XKS proxy is effectively a kill switch you control. When you turn off the XKS proxy, all new encrypt and decrypt operations using XKS keys will cease to function. AWS services that have already provisioned a data key into memory for one of your resources will continue to work until either you deactivate the resource or the service key cache expires. For example, Amazon S3 caches data keys for a few minutes when bucket keys are enabled.

The Shift in Shared Responsibility
Under standard cloud operating procedures, AWS is responsible for maintaining the cloud infrastructure in operational condition. This includes, but is not limited to, patching the systems, monitoring the network, designing systems for high availability, and more.

When you elect to use XKS, there is a fundamental shift in the shared responsibility model. Under this model, you are responsible for maintaining the XKS proxy and your HSM in operational condition. Not only do they have to be secured and highly available, but also sized to sustain the expected number of AWS KMS requests. This applies to all components involved: the physical facilities, the power supplies, the cooling system, the network, the server, the operating system, and more.

Depending on your workload, AWS KMS operations may be critical to operating services that require encryption for your data at rest in the cloud. Typical services relying on AWS KMS for normal operation include Amazon Elastic Block Store (Amazon EBS), Lambda, Amazon S3, Amazon RDS, DynamoDB, and more. In other words, it means that when the part of the infrastructure under your responsibility is not available or has high latencies (typically over 250 ms), AWS KMS will not be able to operate, cascading the failure to requests that you make to other AWS services. You will not be able to start an EC2 instance, invoke a Lambda function, store or retrieve objects from S3, connect to your RDS or DynamoDB databases, or any other service that relies on AWS KMS XKS keys stored in the infrastructure you manage.

As one of the product managers involved in XKS told me while preparing this blog post, “you are running your own tunnel to oxygen through a very fragile path.”

We recommend only using this capability if you have a regulatory or compliance need that requires you to maintain your encryption keys outside of an AWS data center. Only enable XKS for the root keys that support your most critical workloads. Not all your data classification categories will require external storage of root keys. Keep the data set protected by XKS to the minimum to meet your regulatory requirements, and continue to use AWS KMS customer managed keys—fully under your control—for the rest.

Some customers for which external key storage is not a compliance requirement have also asked for this feature in the past, but they all ended up accepting one of the existing AWS KMS options for cloud-based key storage and usage once they realized that the perceived security benefits of an XKS-like solution didn’t outweigh the operational cost.

What Changes and What Stays the Same?
I tried to summarize the changes for you.

What is identical
to standard AWS KMS keys
What is changing

The supported AWS KMS APIs and key identifiers (ARN) are identical. AWS services that support customer managed keys will work with XKS.

The way to protect access and monitor access from the AWS side is unchanged. XKS uses the same IAM policies and the same key policies. API calls are logged in AWS CloudTrail, and AWS CloudWatch has the usage metrics.

The pricing is the same as other AWS KMS keys and API operations.

XKS does not support asymmetric or HMAC keys managed in the HSM you provide.

You now own the concerns of availability, durability, performance, and latency boundaries of your encryption key operations.

You can implement another layer of authorization, auditing, and monitoring at XKS proxy level. XKS resides in your network.

While the KMS price stays the same, your expenses are likely to go up substantially to procure an HSM and maintain your side of the XKS-related infrastructure in operational condition.

An Open Specification
For those strictly regulated workloads, we are developing XKS as an open interoperability specification. Not only have we collaborated with the major vendors I mentioned already, but we also opened a GitHub repository with the following materials:

  • The XKS proxy API specification. This describes the format of the generic requests KMS sends to an XKS proxy and the responses it expects. Any HSM vendor can use the specification to create an XKS proxy for their HSM.
  • A reference implementation of an XKS proxy that implements the specification. This code can be adapted by HSM vendors to create a proxy for their HSM.
  • An XKS proxy test client that can be used to check if an XKS proxy complies with the requirements of the XKS proxy API specification.

Other vendors, such as SalesForce, announced their own XKS solution allowing their customers to choose their own key management solution and plug it into their solution of choice, including SalesForce.

Pricing and Availability
External Key Store is provided at no additional cost on top of AWS KMS. AWS KMS charges $1 per root key per month, no matter where the key material is stored, on KMS, on CloudHSM, or on your own on-premises HSM.

For a full list of Regions where AWS KMS XKS is currently available, visit our technical documentation.

If you think XKS will help you to meet your regulatory requirements, have a look at the technical documentation and the XKS FAQ.

— seb

New Amazon QuickSight API Capabilities to Accelerate Your BI Transformation

Post Syndicated from Sébastien Stormacq original https://aws.amazon.com/blogs/aws/new-amazon-quicksight-api-capabilities-to-accelerate-your-bi-transformation/

Regular readers of this blog, and AWS customers alike, know the benefits of infrastructure as code (IaC). It allows you to describe your infrastructure using a programming language to consistently deploy your infrastructure to multiple environments or AWS Regions. Other benefits are the possibility to version-control your infrastructure using the same development tools and workflow you use to manage your application source code. IaC also offers the ability to programmatically validate part of the infrastructure before it is deployed.

Today, we are expanding the capabilities of QuickSight APIs to allow programmatic creation and management of dashboards, analysis, and templates. These capabilities allow BI teams to manage their BI assets as code, similar to IaC. It brings greater agility to BI teams, and it allows them to accelerate BI migrations from legacy products through programmatic migration options.

Business intelligence and IT operations (BIOps) are inspired by best practices learned over decades from DevOps. BIOps enable faster innovation for your customers, bringing them data insights quickly. Dashboards are usually developed and deployed manually due to the UI-driven nature of BI authoring. This presents a challenge for BIOps, as changes to dashboards during deployments might not be fully validated, leading to errors and downtime when changes are inadvertently moved to production. The new QuickSight APIs enable you to programmatically create and modify your QuickSight analyses and dashboards, enable version control on these assets in your code repository, and help to accelerate your migration to the AWS Cloud.

Programmatic creation and management of analysis, templates, and dashboards also helps you to migrate assets from older BI solutions. Among all of the data and analytics workloads moving to the cloud, business intelligence tends to be among the last pieces to be migrated from the legacy, on-premises solutions. BI teams often have thousands of custom reports and dashboards, built over decades, that are tedious to migrate. Migrating these reports is time-consuming as BI teams need to spend months of work migrating each of these assets manually one by one.

Terminology
With this launch, QuickSight adds a new describe set of APIs. We are also updating existing create, update, and list API verbs. Altogether, these new and updated APIs allow you to work with the data model of analyses, templates, and dashboards for fine grain control via APIs.

  • A QuickSight analysis is the easy-to-use workspace for creating data visualizations, which are graphical representations of your data. Each analysis contains a collection of visualizations that you arrange and customize.
  • A QuickSight dashboard lets you share interactive visualizations or static reports from an analysis with other users.
  • A QuickSight template is an entity that encapsulates the metadata required to create an analysis or a dashboard. It abstracts the dataset associated with the analysis by replacing it with placeholders.

The new APIs (DescribeAnalysisDefinition, DescribeTemplateDefinition, DescribeDashboardDefinition) now allow developers to manage all supported charts and visual components.

Let’s See It in Action
Let’s imagine I want to programmatically create a QuickSight analysis.

Programmatically creating a new business intelligence analysis is a three-step process: create the data source that provides data for analyses, create a dataset based on the data source, and create the QuickSight analysis.

The first step when using QuickSight programmatically or through the user interface is to define your data sources. Data sources define the properties of the databases that have the data you want to analyze. Creating and managing data sources programmatically is not new. You can refer to the QuickSight API Operations to Control Data Sources page.

The second step is to create the dataset to link one or multiple data sources. Again, programmatically managing datasets is not new.

When using the new describe API, analysis, dashboards, and templates are defined as JSON objects fully modeled in the AWS SDK. In this demo, I am using the AWS Command Line Interface (CLI) that uses JSON objects. When you use Java or another AWS SDK, you can programmatically manipulate all elements.

The easiest way to get started to programmatically create a new analysis or dashboard is to start with the definition of an existing one that you created in the console.

The third step is to create the analysis. I first call the describe-analysis-definition API to describe an existing analysis. I receive a JSON file that is the full response of the API call. I can inspect and modify the Definition in the describe-analysis-definition response to create a new analysis.

aws quicksight describe-analysis-definition      \
        --aws-account-id 0123456789              \
        --analysis-id linechart-kpi-donut-pivot
> ./AWS\ Blog\ Sample\ Code/linechart-kpi-donut-pivot.json

Note: This JSON file cannot be used directly without several modifications as input to the create API.

When I am ready to create a new analysis, I generate a JSON file using the --generate-cli-skeleton argument. Then, I copy the original or modified Definition object from my earlier call to describe-analysis-definition into create-sales-analysis.json.

aws quicksight create-analysis \ 
      --generate-cli-skeleton > create-sales-analysis.json

aws quicksight create-analysis  \
      --cli-input-json file://./AWS\ Blog\ Sample\ Code/create-sales-analysis.json

The Definition field shares the same shape across dashboards, templates, and analyses, so the Definition used to create our analysis can also be re-used to create a new dashboard if desired with the create-dashboard API.

aws quicksight create-dashboard \
      --generate-cli-skeleton > create-dashboard.json

I can then modify create-dashboard.json to include the Definition from my create-sales-analysis.json file, as well as update other parameters, then make a call to create-dashboard.

aws quicksight create-dashboard \
       --cli-input-json file://./AWS\ Blog\ Sample\ Code/create-dashboard.json

Here is an extract of the JSON file I used.

QuickSight API - Create Dashboard

Obviously, developing a dashboard using the API is an iterative process. Here is the result after several iterations.

QuickSight API - new dashboard

I can apply the same technique to programmatically migrate assets from older BI solutions.

Pricing and Availability
The new API allows you to define your business intelligence dashboard as programmable objects. It will speed up migration from older BI tools. QuickSight’s API documentation page has all the details.

The API is available at no additional charge to all QuickSight Enterprise Edition customers in all AWS Regions where QuickSight is available. AWS CloudFormation support for the newly supported data models on these APIs is coming soon.

Go build your first dashboard programmatically today

— seb

Automated Data Discovery for Amazon Macie

Post Syndicated from Sébastien Stormacq original https://aws.amazon.com/blogs/aws/automated-data-discovery-for-amazon-macie/

Today, we announce automated data discovery for Amazon Macie. This new capability allows you to gain visibility into where your sensitive data resides on Amazon Simple Storage Service (Amazon S3) at a fraction of the cost of running a full data inspection across all your S3 buckets.

At AWS, security is our first priority. The security of the infrastructure itself, but also the security of your data. We give you access to services to manage identities and access, to protect the network and your applications, to detect suspicious activities, to protect your data, and to report on and monitor your compliance status.

Amazon Macie is a data security service that discovers sensitive data using machine learning and pattern matching and enables visibility and automated protection against data security risks. You use Amazon Macie to protect your data in S3 by scanning for the presence of sensitive data, such as names, addresses, and credit card numbers, and continually monitoring for properly configured preventative controls, such as encryption and access policies. Amazon Macie generates alerts when it detects publicly accessible buckets, unencrypted buckets, or buckets shared with an AWS account outside of your organization. You may also configure Amazon Macie to scan your S3 to run full sensitive data discovery scans on your S3 buckets to provide visibility into where sensitive data resides.

But customers operating at scale told us it is difficult to know where to start. When employees and applications add new buckets and generate petabytes of data on a daily basis, what should be scanned first?

Automated data discovery automates the continual discovery of sensitive data and potential data security risks across your entire set of buckets aggregated at AWS Organizations level.

When you enable automated discovery in the console, Macie starts to evaluate the level of sensitivity of each of your buckets and highlights any data security risks. Automated data discovery introduces intelligent and fully managed data sampling to provide an optimized sample rate that meaningfully reduces the amount of data that needs to be analyzed. This reduces the cost of discovering S3 buckets containing sensitive data compared to the cost of full data inspection.

You can tune automated data discovery to only identify the types of sensitive data that are relevant for your use case by choosing from over 100 managed sensitive data types, such as personally identifiable information (PII) and financial records with specific formats for multiple countries. For example, you can enable detection of Spanish or Swedish driving license numbers and choose to ignore US Social Security numbers, depending on your use cases. When the specific type of data you manage is not on our list, you can create custom data types that may be unique to your business, such as employee or patient identification numbers.

Let’s See It in Action
Automated data discovery is on by default for all new Amazon Macie customers, and existing Macie customers can enable it with one click in the AWS Management Console of the Amazon Macie administrator account. There is a 30-day free trial, and you can always opt out at the administrator level.

I can enable or disable the capability from the Automated discovery entry–under Settings–on the left side navigation menu. The Status section reveals the current status.

Automated data discovery for Amazon Macie - Enable

On the same page, I can configure the list of managed data identifiers. I can turn on or off individual types of data among more than one hundred managed data identifier types. I can also configure new ones. I select Edit on the Managed data identifiers section to include or exclude additional data identifiers.

Automated data discovery for Amazon Macie - include or exclude data identifiers

If I have some buckets with lots of objects and others with a few, Macie won’t spend all its time inspecting one really large bucket at the expense of other smaller ones. Macie also prioritizes buckets that it knows the least about. For example, if it looked at the majority of objects in a small bucket, that bucket will be deprioritized compared to larger buckets where it has seen proportionally fewer objects.

Automated data discovery can provide an interactive data map of sensitive data distribution in S3 buckets within days of the feature being enabled. This data map refreshes daily as it intelligently picks and scans S3 objects in buckets and spreads the scan effort across the entire S3 estate in a given month.

Here is the Summary section of the Amazon Macie page. It looks like my set of buckets is secured. I have no bucket with public access, and 31 of my buckets might contain sensitive data.

Automated data discovery for Amazon Macie - Summary section

When selecting the S3 buckets section of the navigation menu on the left side, I can see a data map of my buckets. The more red the squares are, the more sensitive data are detected in the buckets. The squares in blue represent buckets with no sensitive data detected so far. From there, I can drill down at bucket level to investigate the details.

Automated data discovery for Amazon Macie - Heat map

Pricing and Availability
When you are new to Amazon Macie, automated data discovery is enabled by default. When you already use Amazon Macie in your organization, you can enable automatic data discovery with one click in the Management Console of the Amazon Macie administrator account.

There is a 30-day free trial period when you enable automatic data discovery on your AWS account. After the evaluation period, we charge based on the total quantity of S3 objects in your account as well as the bytes scanned for sensitive content. Charges are prorated per day. You can disable this capability at any time. The pricing page has all the details.

This new capability is now available in all 21 commercial AWS Regions where Macie is available.

Go and enable Amazon Macie automated data discovery today!

— seb

AWS Wickr – A Secure, End-to-End Encrypted Communication Service For Enterprises With Auditing And Regulatory Requirements

Post Syndicated from Sébastien Stormacq original https://aws.amazon.com/blogs/aws/aws-wickr-a-secure-end-to-end-encrypted-communication-service-for-enterprises-with-auditing-and-regulatory-requirements/

I am excited to announce the availability of AWS Wickr, an enterprise communications service with end-to-end encryption, that allows businesses and public sector organizations to communicate more securely, enabling customers to meet auditing and regulatory requirements like e-discovery, legal hold, and FOIA requests. Unlike many enterprise communication tools, Wickr uses end-to-end encryption mechanisms to ensure your messages, files, voice, or video calls are solely accessible to their intended recipients.

The flexible administrative controls make it easy for your Wickr administrator to manage the communication channels and retain information to meet regulatory requirements when required. The information retained is stored on the servers you choose and stays entirely under your control.

End-to-End Encryption
Wickr provides secure communication between two or more correspondents. It means that the system provides authenticity and confidentiality: no unauthorized party can inject a message into the system, and no unintended party can access or understand the communications without being given them by one of the correspondents.

Each message gets a unique AES encryption key and a unique ECDH public key to negotiate the key exchange with other recipients. The message content (text, files, audio, or video) is encrypted on the sending device (your iPhone, for example) using the message-specific AES key. The message-specific AES key is exchanged with recipients via a Diffie-Hellman elliptic curve key exchange (EDCH521) mechanism. This ensures that only intended recipients have the message-specific AES key to decrypt the message.

Message-specific keys are passed through a key derivation function that binds the key exchange to a recipient device. When the recipient adds devices to their account later on (for example, I add a macOS client to my Wickr account, in addition to my iPhone), the new device will not see the message history by default. There is a way to migrate history from your old device to your new device if you have the two devices at hand and single sign-on (SSO) configured.

I drew the below diagram to show how the key exchange works at a high level.

wickr key exchange

The Wickr secure messaging protocol is open and documented, allowing the community to inspect it. The source code we use in Wickr clients to implement the secure messaging protocol is available to audit and review.

Wickr Client Application
The Wickr client application is very familiar to end users and easy to get started with. It is available for Windows, macOS, Linux, Android, and iOS devices. Once downloaded from a preferred app store and registered, users can create chat rooms or send messages to individual recipients. They may use emoticons to react to messages, exchange files, and make audio and video calls.

Here I am on macOS connected with me on iOS in my kitchen.

Wickr text message Wickr video calls

Wickr for the Administrator
Wickr administration is now integrated and available in the AWS Management Console. You can control access to Wickr administration using familiar AWS Identity and Access Management (IAM) access control and policies. It is integrated with AWS Cloud Development Kit (AWS CDK) and Amazon CloudWatch for monitoring.

A Wickr administrator manages networks. A network is a group of users and its related configuration, similar to Slack workspaces. Users might be added manually or imported. Most organizations will federate users through an existing identity system. Wickr will federate users with any OpenID Connect-compliant system.

A Wickr network is also the place where Wickr administrators configure security groups to manage messaging, calling, security, and federation settings. It also allows Wickr administrators to configure logging, data retention, and bots.

To get started, I select Wickr in the AWS Management Console. Then, I select Create a network. I enter a Network name, and I select Continue.

Wickr from AWS console Wickr - Create a network

The Wickr page of the Management Console lets you configure the Wickr network, the user federation with other Wickr networks, and more.

The Wickr consoleIn this demo, I don’t use single sign-on. I manually add two users by selecting Create new user. Once added, the user receives an invitation email with links to the client app. The client app asks the user to define a password at first use.

Customer-Controlled Data Retention and Bots
Wickr allows administrators to selectively retain information that must be maintained for regulatory needs into a secure, controlled data store that they manage. No one other than the recipient—including AWS—has access to keys to decrypt conversations or documents, giving organizations full control over their data. It helps organizations in the public sector to use Wickr for their secure collaboration needs.

Data retention is implemented as a process added to conversations, like a participant. The data retention process participates in the key exchange, just like any recipient, allowing it to decrypt the messages. The data retention process can run anywhere: on-premises, on an Amazon Elastic Compute Cloud (Amazon EC2) virtual machine, or at any location of your choice. Once data retention is configured in the console, Wickr administrators may start the data retention process and register it with their Wickr network.

Wickr Compliance Architecture schema

The data retention process is available as a Docker container for ease of deployment. The process stores clear text messages on the storage of your choice: a local or remote file system or Amazon Simple Storage Service (Amazon S3).

To try this process, I follow the documentation. I open the Wickr administration page and selected Data Retention under Network Settings.

Wickr Data retention

I copy the docker command, the Username, and the Password (not shown in the previous screenshot). Then, I connect to a Linux EC2 instance I created beforehand. I create a local directory for data retention, and I start the container.

docker run -v 
       /home/ec2-user/retention_34908291_bot:/tmp/retention_34908291_bot
       --restart on-failure:5 
       --name="retention_34908291_bot"
       -it 
       -e WICKRIO_BOT_NAME='retention_34908291_bot'
       wickr/bot-retention-cloud:5.109.08.03

The application prompts for the username and password collected in the console. When the process starts, I return to the console and activate the Data Retention switch at the bottom of the screen.

Note that for this demo, I choose to store data on the local file system. In reality, you might want to use S3 to securely store all your organization communications, encrypt the data at rest, and use the mechanisms you already have in place to control access to this data. The data retention process natively supports integration with AWS Secrets Manager and S3.

As a user, I exchange a few messages in a Wickr room. Then, as an administrator, I look at the data captured. I can observe that the data retention process captured the message and its metadata in JSON format.

Wickr Compliance data

When configuring the data retention capability, compliance and security officers can audit and review communications in a secure and controlled data store.

The retention bot is not the only bot available for Wickr. The Wickr Broadcast Bot allows you to broadcast messages to all of the members of your network or specific security groups. Developers can create workflows using Wickr Bots to automate chat-based workflows and integrate them with other systems. Similarly, a bot is a process integrated into conversation or chat rooms that can receive and act upon messages. Developers write bots with NodeJS. Bot processes securely integrate with a Wickr network, as defined by the network administrator. They are typically packaged as Docker containers for ease of deployment at the location of your choice. If you are a developer, have a look at the Wickr bot developer documentation to learn all the details.

Pricing and availability
Wickr is available in the US East (N. Virginia) AWS Region.

Wickr is free for individuals and teams of up to 30 users looking for a more secure workspace for the first 3 months. For organizations with more than 30 users, there is a standard plan available starting at $5 per user per month and a premium plan for $15 per user per month. The premium plan adds features and retention capabilities like granular administrative controls, client-side data expiration timer of up to 1 year, data retention, and e-discovery. As usual, there are no upfront fees or long-term engagement. You pay per user and per month (annual billing is available, contact us). Have a look at the pricing page for details.

Create your first Wickr network today!

— seb

Amazon CloudWatch Internet Monitor Preview – End-to-End Visibility into Internet Performance for your Applications

Post Syndicated from Sébastien Stormacq original https://aws.amazon.com/blogs/aws/cloudwatch-internet-monitor-end-to-end-visibility-into-internet-performance-for-your-applications/

How many times have you had monitoring dashboards show you a normal situation, and at the same time, you have received customer tickets reporting your app is “slow” or unavailable to them? How much time did it take to diagnose these customer reports?

You told us one of your challenges when monitoring internet-facing applications is to gather data outside of AWS to build a realistic picture of how your application behaves for your customers connected to multiple and geographically distant internet providers. Capturing and monitoring data about internet traffic before it reaches your infrastructure is either difficult or very expensive.

I am happy to announce the public preview of Amazon CloudWatch Internet Monitor, a new capability of CloudWatch that gives visibility into how an internet issue might impact the performance and availability of your applications. It allows you to reduce the time it takes to diagnose internet issues from days to minutes.

Internet Monitor uses the connectivity data that we capture from our global networking footprint to calculate a baseline of performance and availability for internet traffic. This is the same data that we use at AWS to monitor our own internet uptime and availability. With Internet Monitor, you can gain awareness of problems that arise on the internet experienced by your end users in different geographic locations and networks.

There is no need to instrument your application code. You can enable the service in the CloudWatch section of the AWS Management Console and start to use it immediately.

Let’s See It in Action
Getting started with Internet Monitor is easy. Let’s imagine I want to monitor the network paths between my customers and my AWS resources. I open the AWS Management Console and navigate to CloudWatch. I select Internet Monitor on the left-side navigation menu. Then, I select Create monitor.

Internet Monitor - Create

On the Create monitor page, I enter a Monitor name, and I select Add resources to choose the resources to monitor. For this demo, I select the VPC and the CloudFront distribution hosting my customer-facing application.

Internet Monitor - Select resources

I have the opportunity to review my choices. Then, I select Create monitor.

Internet Monitor - Final screen

From that moment on, Internet Monitor starts to collect data based on my application’s resource logs behind the scene. There is no need for you to activate (or pay for) VPC Flow Logs, CloudFront logs, or other log types.

After a while, I receive customer complaints about our application being slow. I open Internet Monitor again, I select the monitor I created earlier (Monitor_example), and I immediately see that the application suffers from internet performance issues.

The Health scores graph shows you performance and availability information for your global traffic. AWS has substantial historical data about internet performance and availability for network traffic between geographic locations for different network providers and services. By applying statistical analysis to the data, we can detect when the performance and availability towards your application have dropped, compared to an estimated baseline that we’ve calculated. To make it easier to see those drops, we report that information to you in the form of an estimated performance score and an availability score.

Internet Monitor - Health scoree

I scroll a bit down the page. The Internet traffic overview map shows the overall event status across all monitored locations. I look at the details in the Health events table. It also highlights other events that are happening globally, sorted by total traffic impact. I notice that a performance issue in Las Vegas, Nevada, US, is affecting my application traffic the most.

Internet Monitor - Internet Traffic OverviewNow that I have identified the issue, I am curious about the historical data. Has it happened before?

I select the Historical Explorer tab to understand trends and see earlier data related to this location and network provider. I can view aggregated metrics such as performance score, availability score, bytes transferred, and round-trip time at p50, p90, and p95 percentiles, for a customized timeframe, up to 18 months in the past.

Internet Monitor - Historical dataI can see today’s incident is not the first one. This specific client location and network provider has had multiple issues in the past few months.

Internet Monitor - Historical data detailsNow that I understand the context, I wonder what action I can take to mitigate the issue.

I switch to the Traffic insights tab. I see overall traffic data and top client locations that are being monitored based on total traffic (bytes). Apparently, Las Vegas, Nevada, US, is one of the top client locations.

Internet Monitor - Traffic insights 1

I select the graph to see traffic details for Las Vegas, Nevada, US. In the Lowest Time To First Byte (TTFB) column, I see AWS service and AWS Region setup recommendations for all of the top client location and network combinations. The Predicted Time To First Byte in the table shows the potential impact if I make the suggested architectural change.

In this example, Internet Monitor suggests having CloudFront distribute the traffic currently distributed by EC2 and to allow for some additional traffic to be served by EC2 instances in us-east-1 in addition to us-east-2.

Internet Monitor - Traffic insights 2

Available Today
Internet Monitor is available in public preview today in 20 AWS Regions:

  • In the Americas: US East (Ohio), US East (N. Virginia), US West (N. California), US West (Oregon), Canada (Central), South America (São Paulo).
  • In Asia and Pacific: Asia Pacific (Hong Kong), Asia Pacific (Mumbai), Asia Pacific (Seoul), Asia Pacific (Singapore), Asia Pacific (Sydney), Asia Pacific (Tokyo).
  • In Europe, Middle East, and Africa: Africa (Cape Town), Europe (Frankfurt), Europe (Ireland), Europe (London), Europe (Milan), Europe (Paris), Europe (Stockholm), Middle East (Bahrain)

Note that AWS CloudFormation support is missing at the moment; it will be added soon.

There is no costs associated with the service during the preview period. Just keep in mind that Internet Monitor vends metrics and logs to CloudWatch; you will be charged for these additional CloudWatch logs and CloudWatch metrics.

Whether you work for a startup or a large enterprise, CloudWatch Internet Monitor helps you be proactive about your application performance and availability. Give it a try today!

— seb

A New AWS Region Opens in Switzerland

Post Syndicated from Sébastien Stormacq original https://aws.amazon.com/blogs/aws/a-new-aws-region-opens-in-switzerland/

I am pleased to announce today the opening of our 28th AWS Region: Europe (Zurich), also known by its API name: eu-central-2.

An AWS Region allows you to deploy your most demanding workloads and replicate your applications and data across distinct groups of data centers called Availability Zones. This new Region has three fully redundant Availability Zones located in the vicinity of Zurich. It offers your customers low-latency access to your applications while meeting your data residency requirements.

Zurich

Regions and Availability Zones
AWS has the concept of a Region. Each Region is fully isolated from all other Regions. Within each Region, we have built Availability Zones. These Availability Zones are fully isolated partitions of our infrastructure that contain a cluster of data centers. Availability Zones are typically separated by multiple kilometers to mitigate the impact of disasters that could affect data centers. The distance between Availability Zones varies between Regions. The distance is large enough to avoid having data centers impacted by the same event at the same time but close enough to allow workloads with synchronous data replication. Availability Zones are linked by redundant, high-bandwidth, and low-latency network connections. Regions are linked by our custom-built, global, low-latency, private network with exabits per second of capacity in Europe.

Unlike other cloud providers, who often define a region as a single data center, the multiple Availability Zone design of every AWS Region offers advantages such as security, availability, performance, and scalability.

Instances and Services
The workloads deployed to this new Europe (Zurich) three-AZ Region can use C5, C5d, I3, I3en, M5, M5d, M6gd, R5, R5d, and T3 instances, and can use a long list of AWS services including Amazon API GatewayAWS AppConfigAWS Application Auto ScalingAmazon AuroraAmazon EC2 Auto ScalingAWS ConfigAWS Certificate ManagerAWS CloudFormationAWS CloudTrailAmazon CloudWatch, Amazon CloudWatch Events, Amazon CloudWatch LogsAWS CodeDeployAWS Database Migration Service (AWS DMS), AWS Direct ConnectAmazon DynamoDBAmazon Elastic Block Store (Amazon EBS),Amazon Elastic Compute Cloud (Amazon EC2)Amazon Elastic Container Registry (Amazon ECR)Amazon Elastic Container Service (Amazon ECS), AWS Fargate,  Amazon ElastiCacheAmazon EMRAmazon OpenSearch ServiceElastic Load Balancing, Elastic Load Balancing – Network (NLB), Amazon EventBridge, Amazon Simple Storage Service GlacierAWS Identity and Access Management (IAM)Amazon Kinesis Data StreamsAWS Key Management Service (AWS KMS)AWS Lambda, AWS MarketplaceAWS Health DashboardAmazon Relational Database Service (Amazon RDS)Aurora PostgreSQL, Amazon RedshiftAmazon Route 53Amazon Virtual Private Cloud (Amazon VPC)AWS Secrets ManagerAmazon Simple Storage Service (Amazon S3)Amazon Simple Notification Service (Amazon SNS)Amazon Simple Queue Service (Amazon SQS)AWS Step FunctionsAWS Support APIAmazon Simple Workflow Service (Amazon SWF), AWS Systems Manager, AWS Trusted AdvisorVM Import/ExportAWS VPN, and AWS X-Ray.

Continuous Investments in Switzerland
AWS has a long history of presence in Switzerland. We have worked with Swiss customers and partners since the launch of AWS 16 years ago. The first Swiss office was opened in Zurich in April 2016 to host the growing local team of technical and business professionals dedicated to supporting Swiss customers. In 2017, the AWS network was expanded into Switzerland with the launch of an Amazon CloudFront edge location and an AWS Direct Connect location. To support this growth, a second AWS office was opened in Geneva.

AWS plans to invest up to 5.9 billion Swiss francs (approximately $5.9 billion) in the Europe (Zurich) Region from 2022–2036 as we build, maintain, operate, and develop data centers to support the projected growth in demand for AWS technologies by our customers.

According to an AWS Economic Impact Study (EIS), this investment will contribute 16.3 billion Swiss francs (approximately $16.3 billion) to the GDP of Switzerland during the same period. This includes the value added by AWS services to the IT sector in Switzerland, as well as the direct, indirect, and induced effects of AWS purchases from the Swiss data center supply chain. The study estimates that this investment will support an average of 2,500 full-time jobs annually at external businesses in the Swiss data supply chain from 2022–2036.

Servicing our Swiss Customers
More than 10,000 Swiss customers use AWS services today. Organizations such as Fisch Asset Management, Helvetia, Eidgenössische Technische Hochschule Zürich (ETH Zürich), Richemont, Swiss Broadcasting Corporation (RSI), Swiss Post, Swisscom, and Swisstopo, just to name a few, use AWS. Private and public sector organizations in Switzerland use AWS to accelerate their time to market, reduce costs associated with IT operations, and scale their businesses globally.

Global luxury group Richemont, owners of prestigious brands like Cartier, Montblanc, IWC Schaffhausen, and Van Cleef & Arpels, moved its entire enterprise IT infrastructure, including 120 SAP instances, to AWS. AWS, with its depth and breadth of services, enables Richemont to provide their customers with new digital experiences faster, including personalized storefronts and styling services, video chat consultations featuring fashion shows customized to the shoppers’ tastes, and tailored offers for early access to new items before they hit stores.

Swisscom, Switzerland’s leading telecoms company and one of its leading IT companies, is using AWS’s proven and broad infrastructure and cloud capabilities to power its 5G network, increase operational efficiency, and fuel innovation. Swisscom is pursuing a cloud-first strategy and will use AWS to increase IT agility, drive operational efficiencies, and accelerate time to market for new information and communications technology (ICT) features and services.

With AWS infrastructure, Swiss startups have been able to quickly scale their businesses and compete globally. Ava, a digital women’s health startup (acquired by FemTec Health) with offices in Zurich, San Francisco, Makati, and Belgrade, is all in on AWS. They created the Ava Fertility Tracker as a daily companion for women, which provides women with real-time, personalized information about fertility, pregnancy, and general health. The Ava bracelet is now sold in 36 countries worldwide and has been running on AWS since the first sales day.

Extending Reach through AWS Partner Network
Switzerland-based AWS Partner Network (APN) Partners also welcomed the news of the launch of the Europe (Zurich) Region.

The APN includes tens of thousands of independent software vendors (ISVs) and systems integrators (SIs) around the world. AWS SIs, consulting partners, and ISVs help enterprise and public sector customers migrate to AWS, deploy mission-critical applications, and provide a full range of services for your cloud environments. We have more than 150 partners ready to help you in Switzerland, one third of them have their headquarters in the country.

Promoting a Diverse Community of Professionals
In December 2020, Amazon announced that it will help 29 million people around the world grow their technological skills with free cloud computing skills training by 2025. Switzerland is part of this global effort. Since 2019, AWS and our AWS training partner Digicomp have delivered training and certification programs to individual learners, customers, and AWS Partners to rapidly build cloud skills and close the skills gap.

Several universities in Switzerland have delivered AWS Academy courses as part of their curriculum, including FHNW (Fachhochschule Nordwestschweiz), Fachhochschule Luzern, and Technische Berufsschule Zürich. To date, 32 Swiss institutions participated in the AWS Academy program, and 16 of them offered classes in 2022.

In March 2022, AWS launched AWS re/Start in Switzerland in collaboration with Powerhouse Lausanne, a training provider that promotes digital equality and diversity in Switzerland. A second cohort of AWS re/Start began in October 2022 in collaboration with the non profit Powercoders, which is focused on teaching IT skills specifically to refugees and helping them transition into the Swiss labor market.

Available Today
With the launch of the Europe (Zurich) Region, AWS is further expanding its infrastructure offering, empowering you with the flexibility to run applications on the most secure and reliable cloud infrastructure while maintaining local data residency and providing the lowest possible latency for Swiss end-users. The new Region is available today on the AWS Management Console and for your API calls.
Europe (Zurich) Region

Go and deploy your workloads on eu-central-2 today!

— seb

AWS Named as a Leader in the 2022 Gartner Cloud Infrastructure & Platform Services (CIPS) Magic Quadrant for the 12th Consecutive Year

Post Syndicated from Sébastien Stormacq original https://aws.amazon.com/blogs/aws/aws-named-as-a-leader-in-the-2022-gartner-cloud-infrastructure-platform-services-cips-magic-quadrant-for-the-12th-consecutive-year/

This year, and for the twelfth consecutive year, AWS has been named as a Leader in the 2022 Magic Quadrant for Cloud Infrastructure and Platform Services (CIPS). Per Gartner, AWS is the longest-running CIPS Magic Quadrant Leader.

AWS was among the first cloud providers when we launched Amazon Elastic Compute Cloud (Amazon EC2) and Amazon Simple Storage Service (Amazon S3) 16 years ago. Our APIs have been adopted by the whole industry and often copied by others.

We believe this report validates AWS’s ability to innovate and deliver the broadest and deepest set of services for cloud computing. I encourage you to read the full report to appreciate the details.

As Jeff Bezos wrote in his first letter to shareholders in 1997 (reprinted at the end of each annual letter since then), Amazon makes decisions and weighs trade-offs differently than some companies. We focus on the long-term value rather than short-term profits, we make bold rather than timid investment decisions, and most importantly, we relentlessly focus on you: our customers. As a matter of fact, 90 percent of AWS’s roadmap for new services and capabilities is directly driven by your feedback and requests.

I work with AWS service teams every day. These teams work hard to innovate on your behalf. They make bold investments to invent, build, and operate services that help you innovate and build amazing experiences for your customers. The entire team is proud to see these efforts recognized by Gartner.

Our teams closely work with the vibrant AWS Partner Network. AWS has the largest and most dynamic community, with millions of active customers every month and more than 100,000 partners from over 150 countries—with almost 70% headquartered outside the United States. There is a real network effect when you use AWS.

The Magic Quadrant for CIPS, showing Amazon Web Services as a leader.

The full Gartner report has details about the features and factors they reviewed. It explains the methodology used and the results. This report can serve as a guide when choosing a cloud provider that helps you innovate on behalf of your customers.

— seb

Gartner, Magic Quadrant for Cloud Infrastructure and Platform Services, 19 October 2022, Raj Bala, et. al.


The Magic Quadrant graphic was published by Gartner, Inc. as part of a larger research document and should be evaluated in the context of the entire document. The Gartner document is available upon request from AWS.

Gartner does not endorse any vendor, product or service depicted in our research publications, and does not advise technology users to select only those vendors with the highest ratings or other designation. Gartner research publications consist of the opinions of Gartner research organization and should not be construed as statements of fact. Gartner disclaims all warranties, expressed or implied, with respect to this research, including any warranties of merchantability or fitness for a particular purpose.
Gartner and Magic Quadrant are registered trademarks of Gartner, Inc. and/or its affiliates in the U.S. and internationally and is used herein with permission. All rights reserved.


Amazon File Cache – A High Performance Cache On AWS For Your On-Premises File Systems

Post Syndicated from Sébastien Stormacq original https://aws.amazon.com/blogs/aws/amazon-file-cache-a-high-performance-cache-on-aws-for-your-on-premises-file-systems/

I am pleased to announce today the availability of Amazon File Cache, a new high-speed cache service on AWS designed for processing file data stored in disparate locations—including on premises. File Cache accelerates and simplifies your most demanding cloud bursting and hybrid workflows by giving your applications access to files using a fast and familiar POSIX interface, no matter if the original files live on premises on any file system that can be accessed through NFS v3 or on Amazon Simple Storage Service (Amazon S3).

Imagine you have a large data set on on-premises storage infrastructure, and your end-of-month reporting typically takes two to three days to run. You want to move that occasional workload to the cloud to run it on larger machines with more CPU and memory to reduce the processing time. But you’re not ready to move the data set to the cloud yet.

Imagine another scenario where you have access to a large data set on Amazon Simple Storage Service (Amazon S3), spread across multiple Regions. Your application that wants to exploit this data set is coded for traditional (POSIX) file system access and uses command line tools like awk, sed, pipes, and so on. Your application requires file access with sub-millisecond latencies. You cannot update the source code to use the S3 API.

File Cache helps to address these use cases and many others, think about management and transformation of video files, AI/ML data sets, and so on. File Cache creates a file system–based cache in front of either NFS v3 file systems or S3 buckets in one or more Regions. It transparently loads file content and metadata (such as the file name, size, and permissions) from the origin and presents it to your applications as a traditional file system. File Cache automatically releases the less recently used cached files to ensure the most active files are available in the cache for your applications.

You can link up to eight NFS file systems or eight S3 buckets to a cache, and they will be exposed as a unified set of files and directories. You can access the cache from a variety of AWS compute services, such as virtual machines or containers. The connection between File Cache and your on-premises infrastructure uses your existing network connection, based on AWS Direct Connect and/or Site-to-Site VPN.

When using File Cache, your applications benefit from consistent, sub-millisecond latencies, up to hundreds of GB/s of throughput, and up to millions of operations per second. Just like with other storage services, such as Amazon Elastic Block Store (Amazon EBS), the performance depends on the size of the cache. The cache size can be expanded to petabyte scale, with a minimum size of 1.2 TiB.

Let’s See How It Works
To show you how it works, I create a file cache on top of two existing Amazon FSx for OpenZFS file systems. In a real-world scenario, it is likely you will create caches on top of on-premises file systems. I choose FSx for OpenZFS for the demo because I don’t have an on-premises data center at hand (I should maybe invest in seb-west-1). Both demo OpenZFS file systems are accessible from a private subnet in my AWS account. Finally, I access the cache from an EC2 Linux instance.

I open my browser and navigate to the AWS Management Console. I search for “Amazon FSx” in the console search bar and click on Caches in the left navigation menu. Alternatively, I go directly to the File Cache section of the console. To get started, I select Create cache.

Amazon File Cache consoleI enter a Cache name for my cache (AWSNewsBlog for this demo) and a Cache storage capacity. The storage capacity is expressed in tebibytes. The minimum value is 1.2 TiB or increments of 2.4 TiB. Notice that the Throughput capacity increases as you choose large cache sizes.

Amazon File Cache create 1I check and accept the default values provided for Networking and Encryption. For networking, I might select a VPC, subnet, and security group to associate with my cache network interface. It is recommended to deploy the cache in the same subnet as your compute service to minimize the latency when accessing files. For encryption, I might use an AWS KMS-managed key (the default) or select my own.

Then, I create Data Repository Association. This is the link between the cache and a data source. A data source might be an NFS file system or an S3 bucket or prefix. I might create up to eight data repository associations for one cache. All Data Repository Associations for a cache have the same type: they are all NFS v3 or all S3. If you need both, you can create two caches.

In this demo, I choose to link two OpenZFS file systems on my AWS account. You can link to any NFS v3 servers, including the ones you already have on premises. Cache path allows you to choose where the source file system will be mounted in the cache. The Data repository path is the URL to your NFS v3 or S3 data repository. The format is nfs://hostname/path or s3://bucketname/path.

The DNS server IP addresses allows File Cache to resolve the DNS name of your NFS server. This is useful when DNS resolution is private, like in my example. When you are associating NFS v3 servers deployed in a VPC, and when using the AWS-provided DNS server, the DNS server IP address of your VPC is the VPC Range + two. In my example, my VPC CIDR range is 172.31.0.0, hence the DNS server IP address is 172.31.0.2.

Do not forget to click on the Add button! Otherwise, your input is ignored. You can repeat the operation to add more data repositories.

File Cache - Create new Data Repository Association- dataset one File Cache - Create new Data Repository Association- dataset two

Once I have entered my two data repositories, I select Next, and I review my choices. When I am ready, I select Create cache.

File Cache - review choices

After a few minutes, the cache status becomes ✅ Available.

Amazon File cache status is available

The last part is to mount the cache on the machine where my workload is deployed. File Cache uses Lustre behind the scene. I have to install the Lustre client for Linux first, as explained in our documentation. Once done, I select the Attach button on the console to receive the instructions to download and install the Lustre client and to mount the cache file system.File Cache Attach To do so, I connect to an EC2 instance running in the same VPC. Then I type:

sudo mount -t lustre -o relatime,flock file_cache_dns_name@tcp:/mountname /mnt

This command mounts my cache with two options:

  • relatime – Maintains atime (inode access times) data, but not for each time that a file is accessed. With this option enabled, atime data is written to disk only if the file has been modified since the atime data was last updated (mtime) or if the file was last accessed more than a certain amount of time ago (one day by default). relatime is required for automatic cache eviction to work properly.
  • flock – Enables file locking for your cache. If you don’t want file locking enabled, use the mount command without flock.

Once mounted, processes running on my EC2 instance can access files in the cache as usual. As I defined at cache creation time, the first ZFS file system is available inside the cache at /dataset1, and the second ZFS file system is available as /dataset2.

$ echo "Hello File Cache World" > /mnt/zsf1/greetings

$ sudo mount -t lustre -o relatime,flock fc-0280000000001.fsx.us-east-2.aws.internal@tcp:/r3xxxxxx /mnt/cache

$ ls -al /mnt/cache
total 98
drwxr-xr-x 5 root root 33280 Sep 21 14:37 .
drwxr-xr-x 2 root root 33280 Sep 21 14:33 dataset1
drwxr-xr-x 2 root root 33280 Sep 21 14:37 dataset2

$ cat /mnt/cache/dataset1/greetings
Hello File Cache World

I can observe and measure the activity and the health of my caches using Amazon CloudWatch metrics and AWS CloudTrail log monitoring.

CloudWatch metrics for a File Cache resource are organized into three categories:

  • Front-end I/O metrics
  • Backend I/O metrics
  • Cache front-end utilization metrics

As usual, I can create dashboards or define alarms to be informed when metrics reach thresholds that I defined.

Things To Keep In Mind
There are a couple of key points to keep in mind when using or planning to use File Cache.

First, File Cache encrypts data at rest and supports encryption of data in transit. Your data is always encrypted at rest using keys managed in AWS Key Management Service (AWS KMS). You can use either service-owned keys or your own keys (customer-managed CMKs).

Second, File Cache provides two options for importing data from your data repositories to the cache: lazy load and preload. Lazy load imports data on demand if it’s not already cached, and preload imports data at user request before you start your workload. Lazy loading is the default. It makes sense for most workloads since it allows your workload to start without waiting for metadata and data to be imported to the cache. Pre loading is helpful when your access pattern is sensitive to first-byte latencies.

Pricing and Availability
There are no upfront or fixed-price costs when using File Cache. You are billed for the provisioned cache storage capacity and metadata storage capacity. The pricing page has the details. In addition to File Cache itself, you pay for S3 request costs, AWS Direct Connect charges, and the usual data transfer charges for inter-AZ, inter-Region, and internet egress traffic between File Cache and the data sources.

File Cache is available in US East (Ohio), US East (N. Virginia), US West (Oregon), Asia Pacific (Singapore), Asia Pacific (Sydney), Asia Pacific (Tokyo), Canada (Central), Europe (Frankfurt), Europe (Ireland), and Europe (London).

Now go build and create your first file cache today!

— seb

Amazon WorkSpaces Introduces Ubuntu Desktops

Post Syndicated from Sébastien Stormacq original https://aws.amazon.com/blogs/aws/amazon-workspaces-introduces-ubuntu-desktops/

At AWS, we love to give our customers choices: the choice of infrastructure to deploy your workloads, to store your most important data, or the operating systems for your virtual desktops.

Many of you choose Amazon Workspaces to provision and distribute virtual desktops securely and at scale to your workforce. Our customers choose Workspaces when choosing a solution to enable secure remote workers or when they want to quickly provision desktop for contractors, just to name two use cases. When using Workspaces, you’ve had the choice between two operating systems: Microsoft Windows or Amazon Linux.

Starting today, you can also provision Ubuntu desktops for your developers, engineers, or data scientists. This allows virtual desktop users to have more choices and to embrace new categories of workloads. It also gives virtual desktop administrators a consistent experience whether you are managing Windows or Linux-based desktops for your workforce. You can now have one process and set of tools to manage the majority of your desktop operating systems.

According to the HackerEarth 2020 Developer Survey, Ubuntu is the most widely used operating system among professional developers (66 percent Ubuntu, 61 percent Windows, and 57 percent macOS). Many developers or DevOps engineers have a battery of scripts, tools, or libraries well tested on their Ubuntu desktops or laptops. Providing Ubuntu desktop on Workspaces gives developers and engineers a familiar and compatible environment allowing them to work from anywhere, with access to a wealth of open-source tools and libraries in cutting-edge fields like data science, AI/ML, cloud, and IoT. All Ubuntu WorkSpaces benefit from Ubuntu Pro, which includes support for expanded security patching for 10 years.

Having Ubuntu on Amazon Workspaces is important for you, but also for us, AWS, and for Canonical, the publisher of Ubuntu.


We’ve brought Ubuntu Desktop to WorkSpaces so developers can streamline the design, coding, pipelines, and deployment of Ubuntu-based workloads, whether instances or containers, all within the AWS environment,” said
Alex Gallagher, VP Cloud for
Canonical. “
Also, Ubuntu virtual desktops on WorkSpaces enable IT organizations to quickly and easily provision high-performance Ubuntu Desktop instances, delivered as a fully managed AWS service. In the face of constant and increasing pressure to support the security and productivity needs of hybrid workers, that’s a win for IT organizations and their end users.

Why a Virtual Desktop for Developers And Engineers?
There are several benefits to providing virtual cloud desktops to your technical workforce.

First, the security: all your files are securely stored on cloud-based volumes within the security perimeter of your AWS account. Application assets such as source code or design documents are not locally stored on end-user machines, and no data is at risk in case of a laptop being lost or stolen.

Second, the ease of provisioning at scale. Providing new desktops, including with the latest generation of hardware, is a matter of minutes. Onboarding new team members or contractors is accelerated, and can even be automated.

Third, the reduction in costs by paying on demand, either monthly or hourly, just for the time the resources are used.

Fourth, end-users may access their desktop from anywhere. They can work with the same desktop from on premises, from home, or when traveling.

And fifth, virtual desktop administrators now have a common administration experience across Windows and two distributions of Linux (Ubuntu and Amazon Linux).

How to Get Started
For IT administrators, provisioning Ubuntu desktops is no different than provisioning Windows or Amazon Linux desktops. You may choose the hardware bundle, with various sizes of CPUs and memory, depending on the end-user needs. Workspaces are bound to an Active Directory. You may use your on-premises AD or a fully managed directory service in the cloud.

For this blog post, I choose to show you the end-user experience instead. As a developer or engineer, once my desktop is provisioned, I receive an email like this one:

Workspaces provisioning emailI select the link and enter my password. Then, I download and install a client from https://clients.amazonworkspaces.com/.

Workspaces create password

For this demo, I am using the Windows Workspaces client. After downloading and installing it, I enter the registration code I received by email.

Workspaces enter code

A few seconds later, I have access to my Ubuntu desktop.

Ubuntu desktop from Windows

Imagine I later travel to a family member’s place, and I have to access my work desktop. I can borrow a web browser and reconnect from the web client. Not surprisingly, I find my desktop in the exact state I left it—even the mouse pointer is in the same place. When closing a session, I am confident that I did not leave any confidential files behind me. All my files, messages, and applications are securely stored within my company AWS account.

Workspaces web client

Things You Need To Know
The service team is actively listening to your feedback and building new capabilities into Workspaces.

For this launch, we chose to use version 22.04 LTS (Jammy Jellyfish). Canonical has optimized the base image for cloud development use cases. We have preinstalled AWS CLI and SDK.

You may select from a selection of Value, Standard, Performance, Power, or Power Pro bundles. These bundles provide you with computer sizes starting at 1 vCPU and 2 GB RAM, up to 8 vCPU and 32 GB RAM.

There are two features of Workspaces that are not present today for the launch of Ubuntu Workspaces. They will be added in the very near future. First, you may connect today using the Windows or web-based Workspaces clients. Linux and macOS clients will be supported as a quick follow-up to this launch. Second, the GPU-based Graphics.g4dn, and GraphicsPro.g4dn bundles will be available in the coming weeks.

Availability and Pricing
Ubuntu Workspaces are available in all AWS Regions where Workspaces is available, except a Region in China: China (Ningxia). Again, we’re working hard to add support for China (Ningxia) as a quick follow-up after launch.

Workspace pricing is either per month, for users that primarily use Workspaces as their main desktop, or per hour for those in your workforce making occasional use of the workspace. Ubuntu Workspace prices start at $23 per month and per desktop or $0.19 per hour. Our pricing page has the details.

Now go build and start your first Ubuntu Workspaces today.

— seb

AWS Week In Review — September 26, 2022

Post Syndicated from Sébastien Stormacq original https://aws.amazon.com/blogs/aws/aws-week-in-review-september-26-2022/

It looks like my travel schedule is coupled with this Week In Review series of blog posts. This week, I am traveling to Fort-de-France in the French Caribbean islands to meet our customers and partners. I enjoy the travel time when I am offline. It gives me the opportunity to reflect on the past or plan for the future.

Last Week’s Launches
Here are some of the launches that caught my eye last week:

Amazon SageMaker Autopilothas added a new Ensemble training mode powered by AutoGluon that is 8X faster than the current Hyper parameter Optimization Mode and supports a wide range of algorithms, including LightGBM, CatBoost, XGBoost, Random Forest, Extra Trees, linear models, and neural networks based on PyTorch and FastAI.

AWS Outposts and Amazon EKSYou can now deploy both the worker nodes and the Kubernetes control plane on an Outposts rack. This allows you to maximize your application availability in case of temporary network disconnection on premises. The Kubernetes control plane continues to manage the worker nodes, and no pod eviction happens when on-premises network connectivity is reestablished.

Amazon Corretto 19 – Corretto is a no-cost, multiplatform, production-ready distribution of OpenJDK. Corretto is distributed by Amazon under an open source license. This version supports the latest OpenJDK feature release and is available on Linux, Windows, and macOS. You can download Corretto 19 from our downloads page.

Amazon CloudWatch Evidently – Evidently is a fully-managed service that makes it easier to introduce experiments and launches in your application code. Evidently adds support for Client Side Evaluations (CSE) for AWS Lambda, powered by AWS AppConfig. Evidently CSE allows application developers to generate feature evaluations in single-digit milliseconds from within their own Lambda functions. Check the client-side evaluation documentation to learn more.

Amazon S3 on AWS OutpostsS3 on Outposts now supports object versioning. Versioning helps you to locally preserve, retrieve, and restore each version of every object stored in your buckets. Versioning objects makes it easier to recover from both unintended user actions and application failures.

Amazon PollyAmazon Polly is a service that turns text into lifelike speech. This week, we announced the general availability of Hiujin, Amazon Polly’s first Cantonese-speaking neural text-to-speech (NTTS) voice. With this launch, the Amazon Polly portfolio now includes 96 voices across 34 languages and language variants.

X in Y – We launched existing AWS services in additional Regions:

Other AWS News
Introducing the Smart City Competency program – The AWS Smart City Competency provides best-in-class partner recommendations to our customers and the broader market. With the AWS Smart City Competency, you can quickly and confidently identify AWS Partners to help you address Smart City focused challenges.

An update to IAM role trust policy behavior – This is potentially a breaking change. AWS Identity and Access Management (IAM) is changing an aspect of how role trust policy evaluation behaves when a role assumes itself. Previously, roles implicitly trusted themselves. AWS is changing role assumption behavior to always require self-referential role trust policy grants. This change improves consistency and visibility with regard to role behavior and privileges. This blog post shares the details and explains how to evaluate if your roles are impacted by this change and what to modify. According to our data, only 0.0001 percent of roles are impacted. We notified by email the account owners.

Amazon Music Unifies Music QueuingThe Amazon Music team published a blog post to explain how they created a unified music queue across devices. They used AWS AppSync and AWS Amplify to build a robust solution that scales to millions of music lovers.

Upcoming AWS Events
Check your calendar and sign up for an AWS event in your Region and language:

AWS re:Invent – Learn the latest from AWS and get energized by the community present in Las Vegas, Nevada. Registrations are open for re:Invent 2022 which will be held from Monday, November 28 to Friday, December 2.

AWS Summits – Come together to connect, collaborate, and learn about AWS. Registration is open for the following in-person AWS Summits: Bogotá (October 4), and Singapore (October 6).

Natural Language Processing (NLP) Summit – The AWS NLP Summit 2022 will host over 25 sessions focusing on the latest trends, hottest research, and innovative applications leveraging NLP capabilities on AWS. It is happening at our UK headquarters in London, October 5–6, and you can register now.

AWS Innovate for every app – This regional online conference is designed to inspire and educate executives and IT professionals about AWS. It offers dozens of technical sessions in eight languages (English, Spanish, French, German, Italian, Japanese, Korean, and Indonesian). Register today: Americas, September 28; Europe, Middle-East, and Africa, October 6; Asia Pacific & Japan, October 20.

AWS Innovate for every app

AWS Community DaysAWS Community Day events are community-led conferences to share and learn with one another. In September, the AWS community in the US will run events in Arlington, Virginia (September 30). In Europe, Community Day events will be held in October. Join us in Amersfoort, Netherlands (October 3), Warsaw, Poland (October 14), and Dresden, Germany (October 19).

AWS Tour du Cloud – The AWS Team in France has prepared a roadshow to meet customers and partners with a one-day free conference in seven cities across the country (Aix en Provence, Lille, Toulouse, Bordeaux, Strasbourg, Nantes, and Lyon), and in Fort-de-France, Martinique. Tour du Cloud France

AWS Fest – This third-party event will feature AWS influencers, community heroes, industry leaders, and AWS customers, all sharing AWS optimization secrets (this week on Wednesday, September). You can register for AWS Fest here.

Stay Informed
That is my selection for this week! To better keep up with all of this news, please check out the following resources:

— seb
This post is part of our Week in Review series. Check back each week for a quick roundup of interesting news and announcements from AWS!
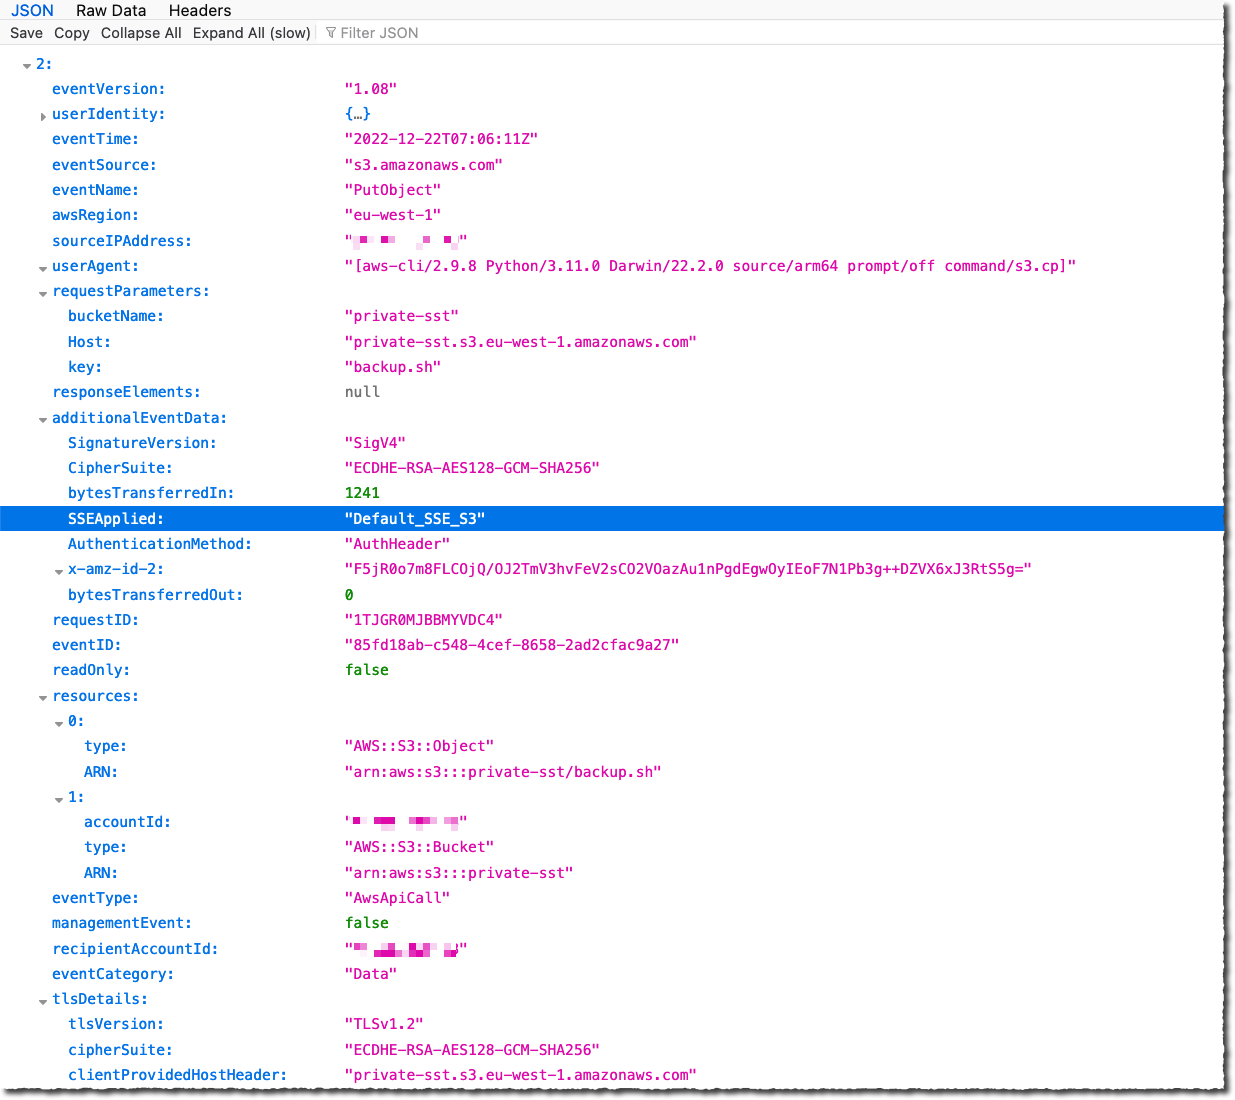
Deploy your Amazon EKS Clusters Locally on AWS Outposts

Post Syndicated from Sébastien Stormacq original https://aws.amazon.com/blogs/aws/deploy-your-amazon-eks-clusters-locally-on-aws-outposts/

I am pleased to announce the availability of local clusters for Amazon Elastic Kubernetes Service (Amazon EKS) on AWS Outposts. It means that starting today, you can deploy your Amazon EKS cluster entirely on Outposts: both the Kubernetes control plane and the nodes.

Amazon EKS is a managed Kubernetes service that makes it easy for you to run Kubernetes on AWS and on premises. AWS Outposts is a family of fully managed solutions delivering AWS infrastructure and services to virtually any on-premises or edge location for a truly consistent hybrid experience.

To fully understand the benefits of local clusters for Amazon EKS on Outposts, I need to first share a bit of background.

Some customers use Outposts to deploy Kubernetes cluster nodes and pods close to the rest of their on-premises infrastructure. This allows their applications to benefit from low latency access to on-premises services and data while managing the cluster and the lifecycle of the nodes using the same AWS API, CLI, or AWS console as they do for their cloud-based clusters.

Until today, when you deployed Kubernetes applications on Outposts, you typically started by creating an Amazon EKS cluster in the AWS cloud. Then you deployed the cluster nodes on your Outposts machines. In this hybrid cluster scenario, the Kubernetes control plane runs in the parent Region of your Outposts, and the nodes are running on your on-premises Outposts. The Amazon EKS service communicates through the network with the nodes running on the Outposts machine.

But, remember: everything fails all the time. Customers told us the main challenge they have in this scenario is to manage site disconnections. This is something we cannot control, especially when you deploy Outposts on rough edges: areas with poor or intermittent network connections. When the on-premises facility is temporarily disconnected from the internet, the Amazon EKS control plane running in the cloud is unable to communicate with the nodes and the pods. Although the nodes and pods work perfectly and continue to serve the application on the on-premises local network, Kubernetes may consider them unhealthy and schedule them for replacement when the connection is reestablished (see pod eviction in Kubernetes documentation). This may lead to application downtimes when connectivity is restored.

I talked with Chris, our Kubernetes Product Manager and expert, while preparing this blog post. He told me there are at least seven distinct options to configure how a control plane reconnects to its nodes. Unless you master all these options, the system status at re-connection is unpredictable.

To simplify this, we are giving you the ability to host your entire Amazon EKS cluster on Outposts. In this configuration, both the Kubernetes control plane and your worker nodes run locally on premises on your Outposts machine. That way, your cluster continues to operate even in the event of a temporary drop in your service link connection. You can perform cluster operations such as creating, updating, and scaling applications during network disconnects to the cloud.

EKS Local Cluster DiagramLocal clusters are identical to Amazon EKS in the cloud and automatically deploy the latest security patches to make it easy for you to maintain an up-to-date, secure cluster. You can use the same tooling you use with Amazon EKS in the cloud and the AWS Management Console for a single interface for your clusters running on Outposts and in AWS Cloud.

Let’s See It In Action
Let’s see how we can use this new capability. For this demo, I will deploy the Kubernetes control plane on Amazon Elastic Compute Cloud (Amazon EC2) instances running on premises on an Outposts rack.

I use an Outposts rack already configured. If you want to learn how to get started with Outposts, you can read the steps on the Get Started with AWS Outposts page.

AWS Outposts Configuration

This demo has two parts. First, I create the cluster. Second, I connect to the cluster and create nodes.

Creating Cluster
Before deploying the Amazon EKS local cluster on Outposts, I make sure I created an IAM cluster role and attached the AmazonEKSLocalOutpostClusterPolicy managed policy. This IAM cluster role will be used in cluster creation.

Then, I switch to the Amazon EKS dashboard, and I select Add Cluster, then Create.

Creating Cluster

On the following page, I chose the location of the Kubernetes control plane: the AWS Cloud or AWS Outposts. I select AWS Outposts and specify the Outposts ID.

Configure EKS Cluster to Use AWS Outposts

The Kubernetes control plane on Outposts is deployed on three EC2 instances for high availability. That’s why I see three Replicas. Then, I choose the instance type according to the number of worker nodes needed for workloads. For example, to handle 0–20 worker nodes, it is recommended to use m5d.large EC2 instances.

Setting Instance Type

On the same page, I specify configuration values for the Kubernetes cluster, such as its Name, Kubernetes version, and the Cluster service role that I created earlier.

Cluster Configuration

On the next page, I configure the networking options. Since Outposts is an extension of an AWS Region, I need to use the VPC and Subnets used by Outposts to enable communication between Kubernetes control plane and worker nodes. For Security Groups, Amazon EKS creates a security group for local clusters that enables communication between my cluster and my VPC. I can also define additional security groups according to my application requirements.

Specify Networking

As we run the Kubernetes control plane inside Outposts, the Cluster endpoint access can only be accessed privately. This means I can only access the Kubernetes cluster through machines that are deployed in the same VPC or over the local network via the Outposts local gateway with Direct VPC Routing.

Private Cluster Endoint Access
On the next page, I define logging. Logging is disabled by default, and I may enable it as needed. For more details about logging, you can read the Amazon EKS control plane logging documentation.

Configure Logging

The last screen allows me to review all configuration options. When I’m satisfied with the configuration, I select Create to create the cluster.

Networking

The cluster creation takes a few minutes. To check the cluster creation status, I can use the console or the terminal with the following command:

$ aws eks describe-cluster \ 
--region <REGION_CODE> \ 
--name <CLUSTER_NAME> \ 
--query "cluster.status"

The Status section tells me when the cluster is created and active.

Active Cluster

In addition to using the AWS Management Console, I can also create a local cluster using the AWS CLI. Here is the command snippet to create a local cluster with the AWS CLI:

$ aws eks create-cluster \ 
--region <REGION_CODE> \ 
--name <CLUSTER_NAME> \ 
--resources-vpc-config subnetIds=<SUBNET_ID>\ 
--role-arn <ARN_CLUSTER_ROLE> \ 
--outpost-config controlPlaneInstanceType=<INSTANCE_TYPE> \ 
--outpostArns=<ARN_OUTPOST>

Connecting to the Cluster
The endpoint access for a local cluster is private; therefore, I can access it from a local gateway with Direct VPC Routing or from machines that are in the same VPC. To find out how to use local gateways with Outposts, you can follow the information on the Working with local gateways page. For this demo, I use an EC2 instance as a bastion host, and I manage the Kubernetes cluster using kubectl command.

The first thing I do is edit Security Groups to open traffic access from the bastion host. I go to the detail page of the Kubernetes cluster and select the Networking tab. Then I select the link in Cluster security group.

Networking & Security Group

Then, I add inbound rules, and I provide access for the bastion host by specifying its IP address.

Adding Inbound Rule in Security Group

Once I’ve allowed the access, I create kubeconfig in the bastion host by running the command:

$ aws eks update-kubeconfig --region <REGION_CODE> --name <CLUSTER_NAME>

Finally, I use kubectl to interact with the Kubernetes API server, just like usual.

$ kubectl get nodes -o wide
NAME STATUS ROLES AGE VERSION INTERNAL-IP EXTERNAL-IP OS-IMAGE KERNEL-VERSION CONTAINER-RUNTIME
ip-10-X-Y-Z.us-west-2.compute.internal NotReady control-plane,master 10h v1.21.13 10.X.Y.Z <none> Bottlerocket OS 1.8.0 (aws-k8s-1.21) 5.10.118 containerd://1.6.6+bottlerocket
ip-10-X-Y-Z.us-west-2.compute.internal NotReady control-plane,master 9h v1.21.13 10.X.Y.Z <none> Bottlerocket OS 1.8.0 (aws-k8s-1.21) 5.10.118 containerd://1.6.6+bottlerocket

Kubernetes local clusters running on AWS Outposts run on three EC2 instances. We see on the output above that the status of three worker nodes is NotReady. This is because they are used by the control plane exclusively, and we cannot use them to schedule pods.

From this stage, you can deploy self-managed node groups using the Amazon EKS local cluster.

Pricing and Availability
Amazon EKS local clusters are charged at the same price as traditional EKS clusters. It starts at $0.10/hour. The EC2 instances required to deploy the Kubernetes control plane and nodes on Outposts are included in the price of the Outposts. As usual, the pricing page has the details.

Amazon EKS local clusters are available in all AWS Regions where Outposts is available.

Go build and create your first EKS local cluster today!

— seb and Donnie.

AWS Week In Review – September 12, 2022

Post Syndicated from Sébastien Stormacq original https://aws.amazon.com/blogs/aws/aws-week-in-review-september-12-2022/

I am working from London, UK, this week to record sessions for the upcoming Innovate EMEA online conference—more about this in a future Week In Review. While I was crossing the channel, I took the time to review what happened on AWS last week.

Last Week’s Launches
Here are some launches that got my attention:

Seekable OCI for lazy loading container images. Seekable OCI (SOCI) is a technology open sourced by AWS that enables containers to launch faster by lazily loading the container image. SOCI works by creating an index of the files within an existing container image. This index is a key enabler to launching containers faster, providing the capability to extract an individual file from a container image before downloading the entire archive. Check out the source code on GitHub.

Amazon Lookout for Metrics now lets you filter data by dimensions and increased the limits on the number of measures and dimensions. Lookout for Metrics uses machine learning (ML) to automatically detect and diagnose anomalies (i.e., outliers from the norm) in business and operational data, such as a sudden dip in sales revenue or customer acquisition rates.

Amazon SageMaker has three new capabilities. First, SageMaker Canvas added additional capabilities to explore and analyze data with advanced visualizations. Second, SageMaker Studio now sends API user identity data to AWS CloudTrail. And third, SageMaker added TensorFlow image classification to its list of builtin algorithms.

The AWS console launches a widget to display the most recent AWS blog posts on the console landing page. Being part of the AWS News Blog team, I couldn’t be more excited about a launch this week. 😀

AW Console Blog widget

Other AWS News
Some other updates and news that you may have missed:

The Amazon Science blog published an article on the design of a pinch grasping robot. It is one of the many areas where we try to improve the efficiency of our fulfillment centers. A must-read if you’re into robotics or logistics.

The Public Sector blog has an article on how Satellogic and AWS are harnessing the power of space and cloud. Satellogic is creating a live catalog of Earth and delivering daily updates to create a complete picture of changes to our planet for decision-makers. Satellogic is generating massive volumes of data, with each of its satellites collecting an average of 50GB of data daily. They are using compute, storage, analytics, and ground station infrastructure in support of their growth.

Event Ruler is now open-source. Talking about open-source, the source code of the core rule engine built first for Amazon CloudWatch Events, and now the core of Amazon Event Bridge, is newly available on GitHub. This is a Java library that allows applications to identify events that match a set of rules. Events and rules are expressed as JSON documents. Rules are compiled for fast evaluation by a finite state engine. Read the announcement blog post to understand how Event Bridge works under the hood.

HP Anyware (formerly Teradici CAS) is now available for Amazon EC2 Mac instances, from the AWS Marketplace. HP Anyware is a remote access solution that provides pixel-perfect rendering for your remote Mac Mini running in the AWS cloud. It uses PCoIP™ to securely and efficiently access the remote macOS machines. You can connect from anywhere, using a PCoIP client application or from thin terminals such as Thin Clients or Zero Clients workstations.

Upcoming AWS Events
Check your calendars and sign up for these AWS events that are happening all over the world:

AWS Summits – Come together to connect, collaborate, and learn about AWS. Registration is open for the following in-person AWS Summits: Mexico City (September 21–22), Bogotá (October 4), and Singapore (October 6).

AWS Community DaysAWS Community Day events are community-led conferences to share and learn with one another. In September, the AWS community in the US will run events in Arlington, Virginia (September 30). In Europe, Community Day events will be held in October. Join us in Amersfoort, Netherlands (October 3), Warsaw, Poland (October 14), and Dresden, Germany (October 19).

That’s all from me for this week. Come back next Monday for another Week in Review!

— seb


This post is part of our Week in Review series. Check back each week for a quick roundup of interesting news and announcements from AWS!
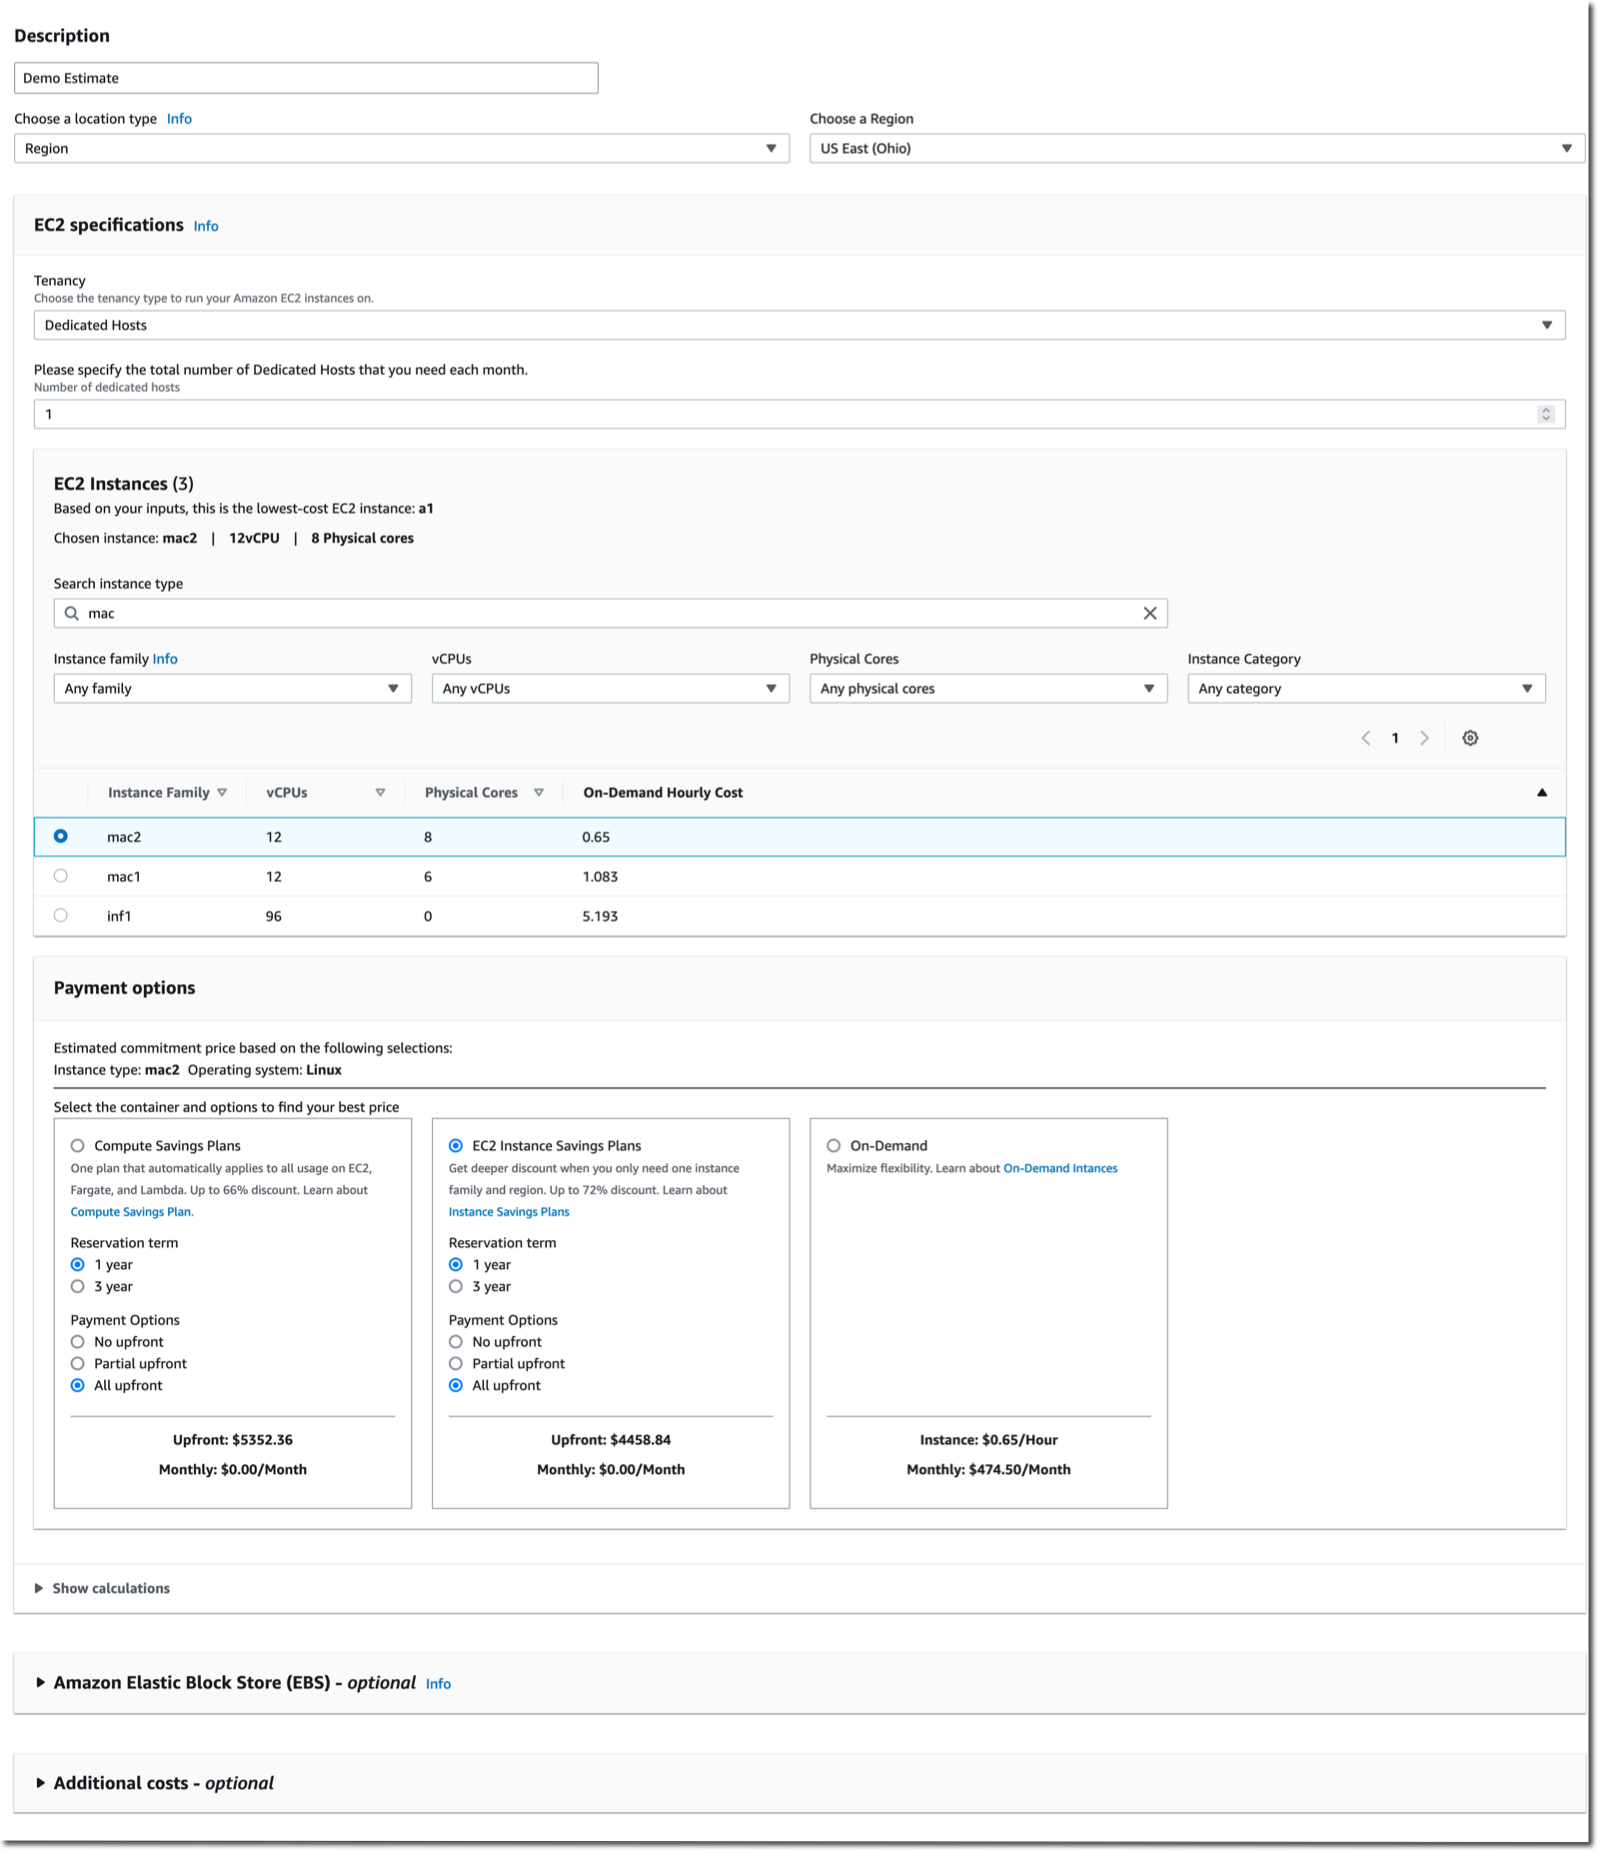
AWS Trusted Advisor – New Priority Capability

Post Syndicated from Sébastien Stormacq original https://aws.amazon.com/blogs/aws/aws-trusted-advisor-new-priority-capability/

AWS Trusted Advisor is a service that continuously analyzes your AWS accounts and provides recommendations to help you to follow AWS best practices and AWS Well-Architected guidelines. Trusted Advisor implements a series of checks. These checks identify ways to optimize your AWS infrastructure, improve security and performance, reduce costs, and monitor service quotas.

Today, we are making available to all Enterprise Support customers a new capability for AWS Trusted Advisor: Trusted Advisor Priority. It gives you prioritized and context-driven recommendations manually curated by your AWS account team, based on their knowledge of your environment and the machine-generated checks from AWS Services.

Trusted Advisor implements over 200 checks in five categories: cost optimization, performance, security, fault tolerance, and service limits. Here is a view of the current Trusted Advisor dashboard.

AWS Trusted Advisor Categories

The list of checks available on your account depends on your level of support. When you have AWS Basic Support, available to all customers, or AWS Developer Support, you have access to core security and service limits checks. When you have AWS Business Support or AWS Enterprise Support, you have access to all checks.

The new Priority capability gives you a prioritized view of critical risks. It shows prioritized, contextual recommendations and actionable insights based on your business outcomes and what’s important to you. It also surfaces risks proactively identified by your AWS account team to alert and address critical cloud risks stemming from deviations from AWS best practices. It is designed to help you: IT leaders, technical decisions makers, and members of a Cloud Center of Excellence.

The account team takes advantage of their understanding of your production accounts and business-critical workloads. By working with you, they identify what’s important to you, and the outcomes or goals you wish to achieve. For example, they know about your business viewpoint whether it is exiting a data center by the end of the year, launching a new product, expanding to a new geography, or migrating a workload to the cloud.

Trusted Advisor uses multiple sources to define the priorities. On one side, it uses signals from other AWS services, such as AWS Compute Optimizer, Amazon GuardDuty, or VPC Flow Logs. On the other side, it uses context manually curated by your AWS account team (Account Manager, Technical Account Manager, Solutions Architect, Customer Solutions Manager, and others) and the knowledge they have about your production accounts, business-critical applications and critical workloads. You will be guided to opportunities to take advantage of AWS Support engagements like a Cost Optimization workshop when the account team believes there are opportunities to reduce costs, a deep dive with a service team, or an Infrastructure Event Management for an upcoming workload migration.

You will be alerted to risks in your deployments on AWS, using sources such as the AWS Well-Architected framework. We will highlight and bring to attention any open high risk issues (HRIs) from recently conducted Well-Architected reviews. We also run campaigns to proactively identify, alert, and reduce single points of failures, such as single Availability Zone deployments. This verifies that you don’t have a single point of failures for production applications that are used for mission-critical processes, that drive significant revenue, or have regulated availability requirements. Trusted Advisor helps you to detect, raise awareness, and provide prescriptive guidance.

Here is a diagram to visualize my mental model for Trusted Advisor Priority:

Trusted Advisor Mental Model Diagram

Trusted Advisor Priority works with AWS Organizations: it aggregates all recommendations from member accounts in your management account or designed delegated administrator. You may delegate access to Trusted Advisor Priority to a maximum of five other AWS accounts. Trusted Advisor Priority comes with a new AWS Identity and Access Management (IAM) policy to help you manage access to the capability. Finally, you can also configure to receive daily and weekly email digests of all prioritized notifications to the alternate contacts you set up in the management account or each delegated admin account.

Let’s See Trusted Advisor Priority in Action
I open the AWS Management Console and navigate to Trusted Advisor. I notice a new navigation entry on the left menu. It is the default view for Enterprise Support customers.

The Trusted Advisor Priority main screen summarizes the number of Pending response and In progress recommendations. It shares some time-related statistics on the right side of the screen. I can start to look at the Active prioritized recommendations list on the bottom half of the screen.

Recommendations are divided into two panels: Active and Closed. The Active tab includes recommendations that have been surfaced to you and which you are actively working on. The Closed tab includes recommendations that have been resolved. All account team prioritized recommendations are presented with a series of searchable and sortable columns. I see the recommendation name, status, source, category, and age.

AWS Trusted Advisor Priority

The list gives me details about the category, the age, and the status of the recommendations. The Source column distinguishes between auto-detected and manually identified opportunities. The Category column shows the category from Trusted Advisor (cost optimization, performance, security, fault tolerance, and service limits). The Age column shows me how long it’s been since the recommendation was first shared. This helps with tracking the time to resolution for each of these items.

AWS Trusted Advisor Priority

I can select any recommendation to drill down into the details. In this example, I select the second one: Amazon RDS Public Snapshots. This is a recommendation in the Security category.

AWS Trusted Advisor Priority

Recommendations are actionable, and they give you a real course of action to respond to the issue. In this case, it suggests modifying the snapshot configuration and removing the public flag that makes the database snapshot available to all AWS customers.

Trusted Advisor Priority provides a closed-loop feedback mechanism where I have the ability to accept or reject a recommendation if I don’t think the issue is relevant to my account.

The information is aggregated at an Organizations level. When you are using Organizations to group accounts to reflect your business units, the recommendations are aggregated and present an overall risk posture across your business units.

As an infrastructure manager, I can either Accept the recommendation and take action or Reject it because it is not a risk or it is something I will not fix and want to remove the recommendation from my list.

AWS Trusted Advisor Priority - Accept AWS Trusted Advisor Priority - Reject

Pricing and Availability
AWS Trusted Advisor Priority is available in all commercial AWS Regions where Trusted Advisor is available now, except the two AWS Regions in China. It is available at no additional cost for Enterprise Support customers.

Trusted Advisor Priority will not replace your Technical Account Manager or Solution Architect. They are key in providing tailored guidance and working with you through all phases of managing your cloud applications. Trusted Advisor Priority provides anytime access to tailored, context-aware, risk-mitigating recommendations and insights from your account team and optimizes your engagement with AWS. It will not reduce your access to your account team in any way but rather will make it easier for you to collaborate with them on your most important priorities.

You can start to use Trusted Advisor Priority today.

And now, go build!

— seb