All posts by Sébastien Stormacq

Amazon WorkSpaces Introduces Ubuntu Desktops

Post Syndicated from Sébastien Stormacq original https://aws.amazon.com/blogs/aws/amazon-workspaces-introduces-ubuntu-desktops/

At AWS, we love to give our customers choices: the choice of infrastructure to deploy your workloads, to store your most important data, or the operating systems for your virtual desktops.

Many of you choose Amazon Workspaces to provision and distribute virtual desktops securely and at scale to your workforce. Our customers choose Workspaces when choosing a solution to enable secure remote workers or when they want to quickly provision desktop for contractors, just to name two use cases. When using Workspaces, you’ve had the choice between two operating systems: Microsoft Windows or Amazon Linux.

Starting today, you can also provision Ubuntu desktops for your developers, engineers, or data scientists. This allows virtual desktop users to have more choices and to embrace new categories of workloads. It also gives virtual desktop administrators a consistent experience whether you are managing Windows or Linux-based desktops for your workforce. You can now have one process and set of tools to manage the majority of your desktop operating systems.

According to the HackerEarth 2020 Developer Survey, Ubuntu is the most widely used operating system among professional developers (66 percent Ubuntu, 61 percent Windows, and 57 percent macOS). Many developers or DevOps engineers have a battery of scripts, tools, or libraries well tested on their Ubuntu desktops or laptops. Providing Ubuntu desktop on Workspaces gives developers and engineers a familiar and compatible environment allowing them to work from anywhere, with access to a wealth of open-source tools and libraries in cutting-edge fields like data science, AI/ML, cloud, and IoT. All Ubuntu WorkSpaces benefit from Ubuntu Pro, which includes support for expanded security patching for 10 years.

Having Ubuntu on Amazon Workspaces is important for you, but also for us, AWS, and for Canonical, the publisher of Ubuntu.


We’ve brought Ubuntu Desktop to WorkSpaces so developers can streamline the design, coding, pipelines, and deployment of Ubuntu-based workloads, whether instances or containers, all within the AWS environment,” said
Alex Gallagher, VP Cloud for
Canonical. “
Also, Ubuntu virtual desktops on WorkSpaces enable IT organizations to quickly and easily provision high-performance Ubuntu Desktop instances, delivered as a fully managed AWS service. In the face of constant and increasing pressure to support the security and productivity needs of hybrid workers, that’s a win for IT organizations and their end users.

Why a Virtual Desktop for Developers And Engineers?
There are several benefits to providing virtual cloud desktops to your technical workforce.

First, the security: all your files are securely stored on cloud-based volumes within the security perimeter of your AWS account. Application assets such as source code or design documents are not locally stored on end-user machines, and no data is at risk in case of a laptop being lost or stolen.

Second, the ease of provisioning at scale. Providing new desktops, including with the latest generation of hardware, is a matter of minutes. Onboarding new team members or contractors is accelerated, and can even be automated.

Third, the reduction in costs by paying on demand, either monthly or hourly, just for the time the resources are used.

Fourth, end-users may access their desktop from anywhere. They can work with the same desktop from on premises, from home, or when traveling.

And fifth, virtual desktop administrators now have a common administration experience across Windows and two distributions of Linux (Ubuntu and Amazon Linux).

How to Get Started
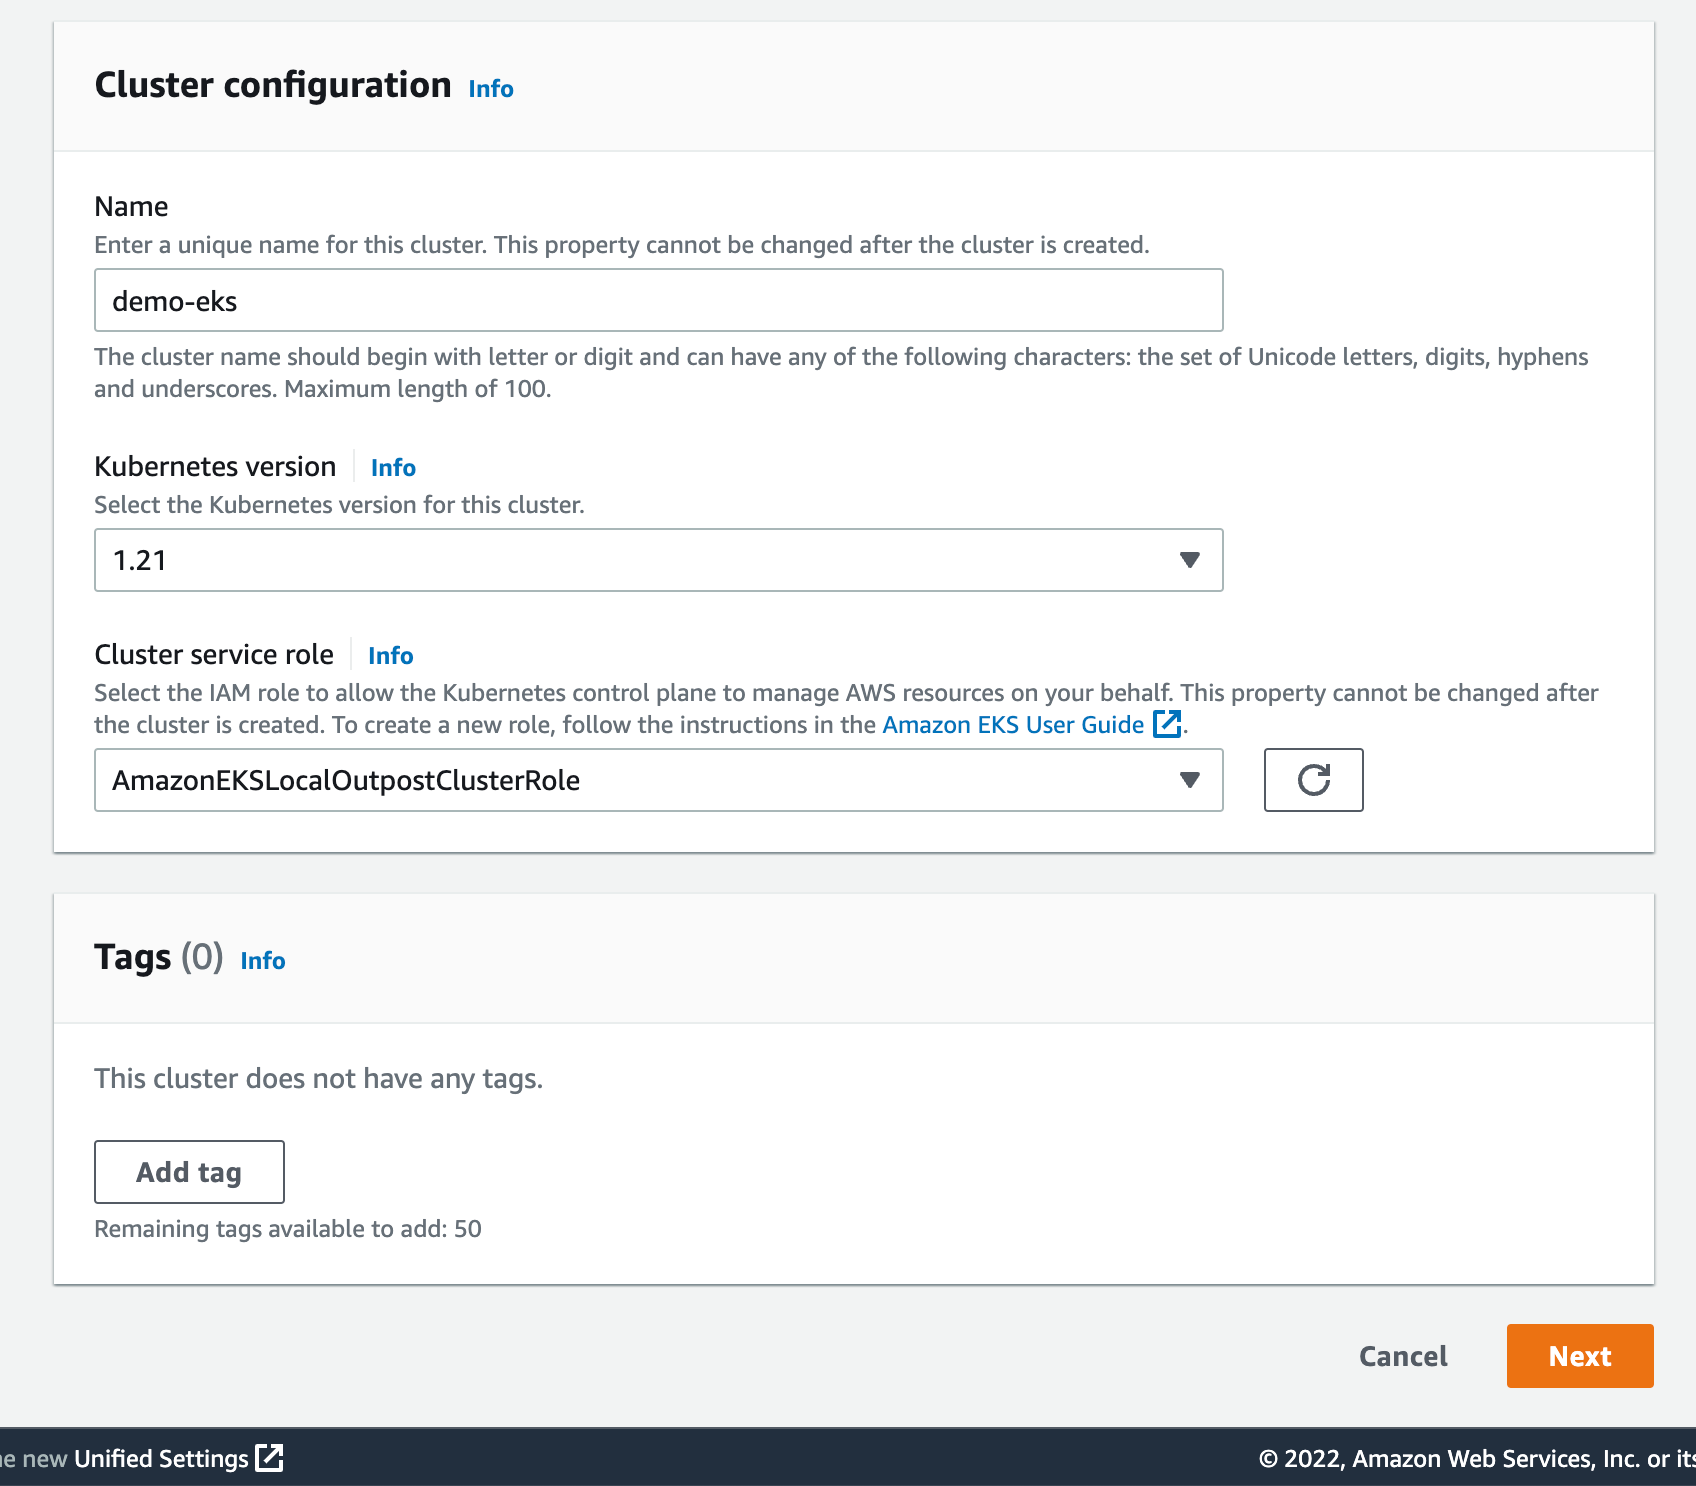
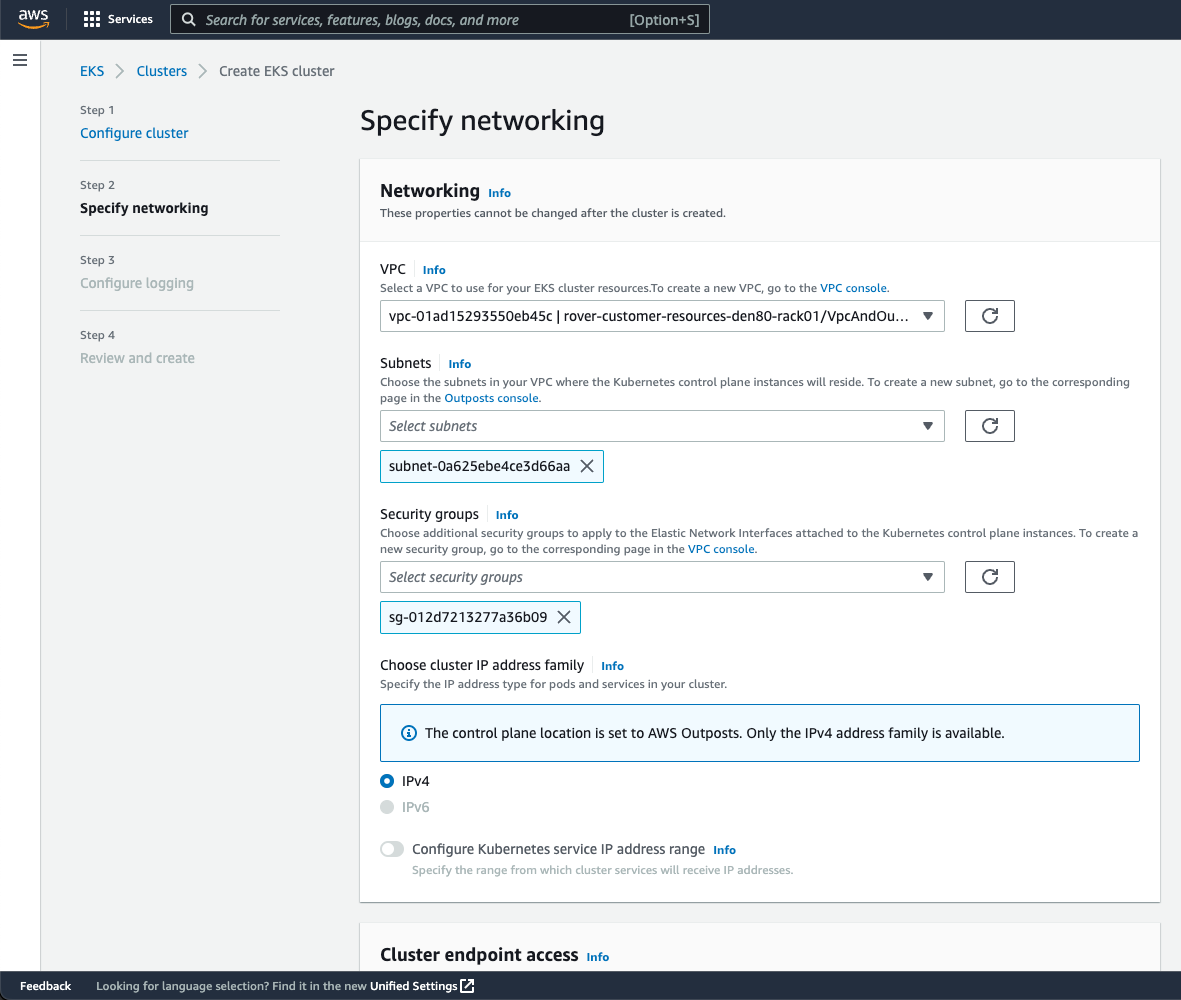
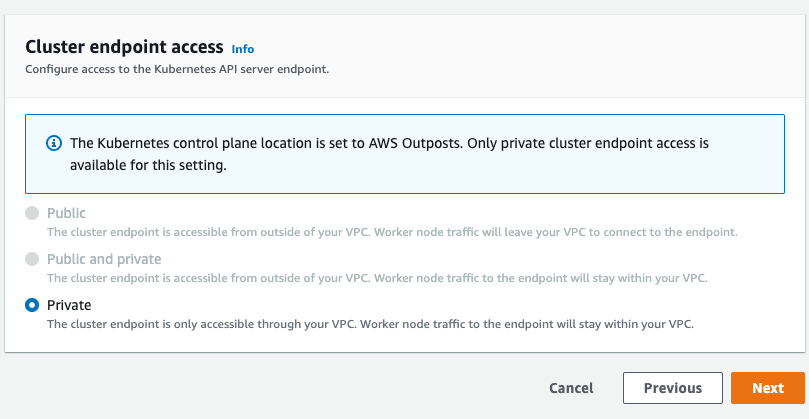
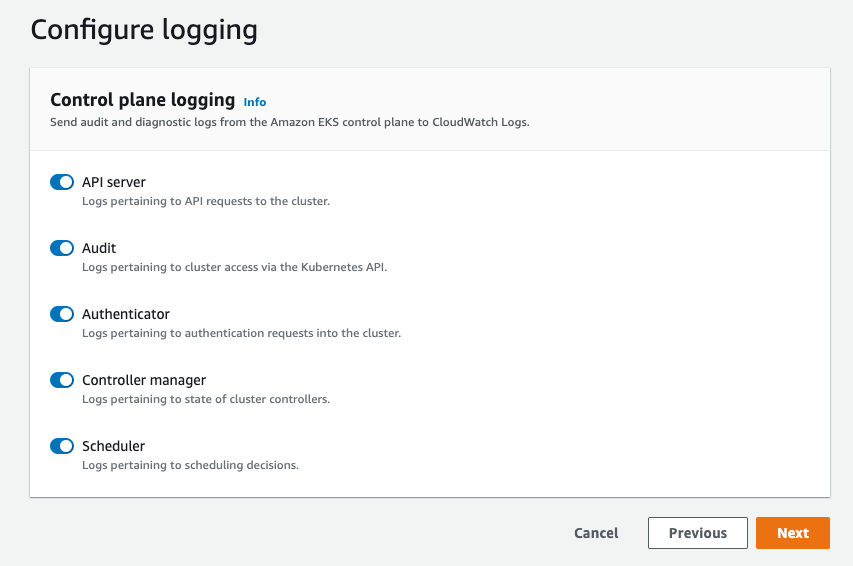
For IT administrators, provisioning Ubuntu desktops is no different than provisioning Windows or Amazon Linux desktops. You may choose the hardware bundle, with various sizes of CPUs and memory, depending on the end-user needs. Workspaces are bound to an Active Directory. You may use your on-premises AD or a fully managed directory service in the cloud.

For this blog post, I choose to show you the end-user experience instead. As a developer or engineer, once my desktop is provisioned, I receive an email like this one:

Workspaces provisioning email
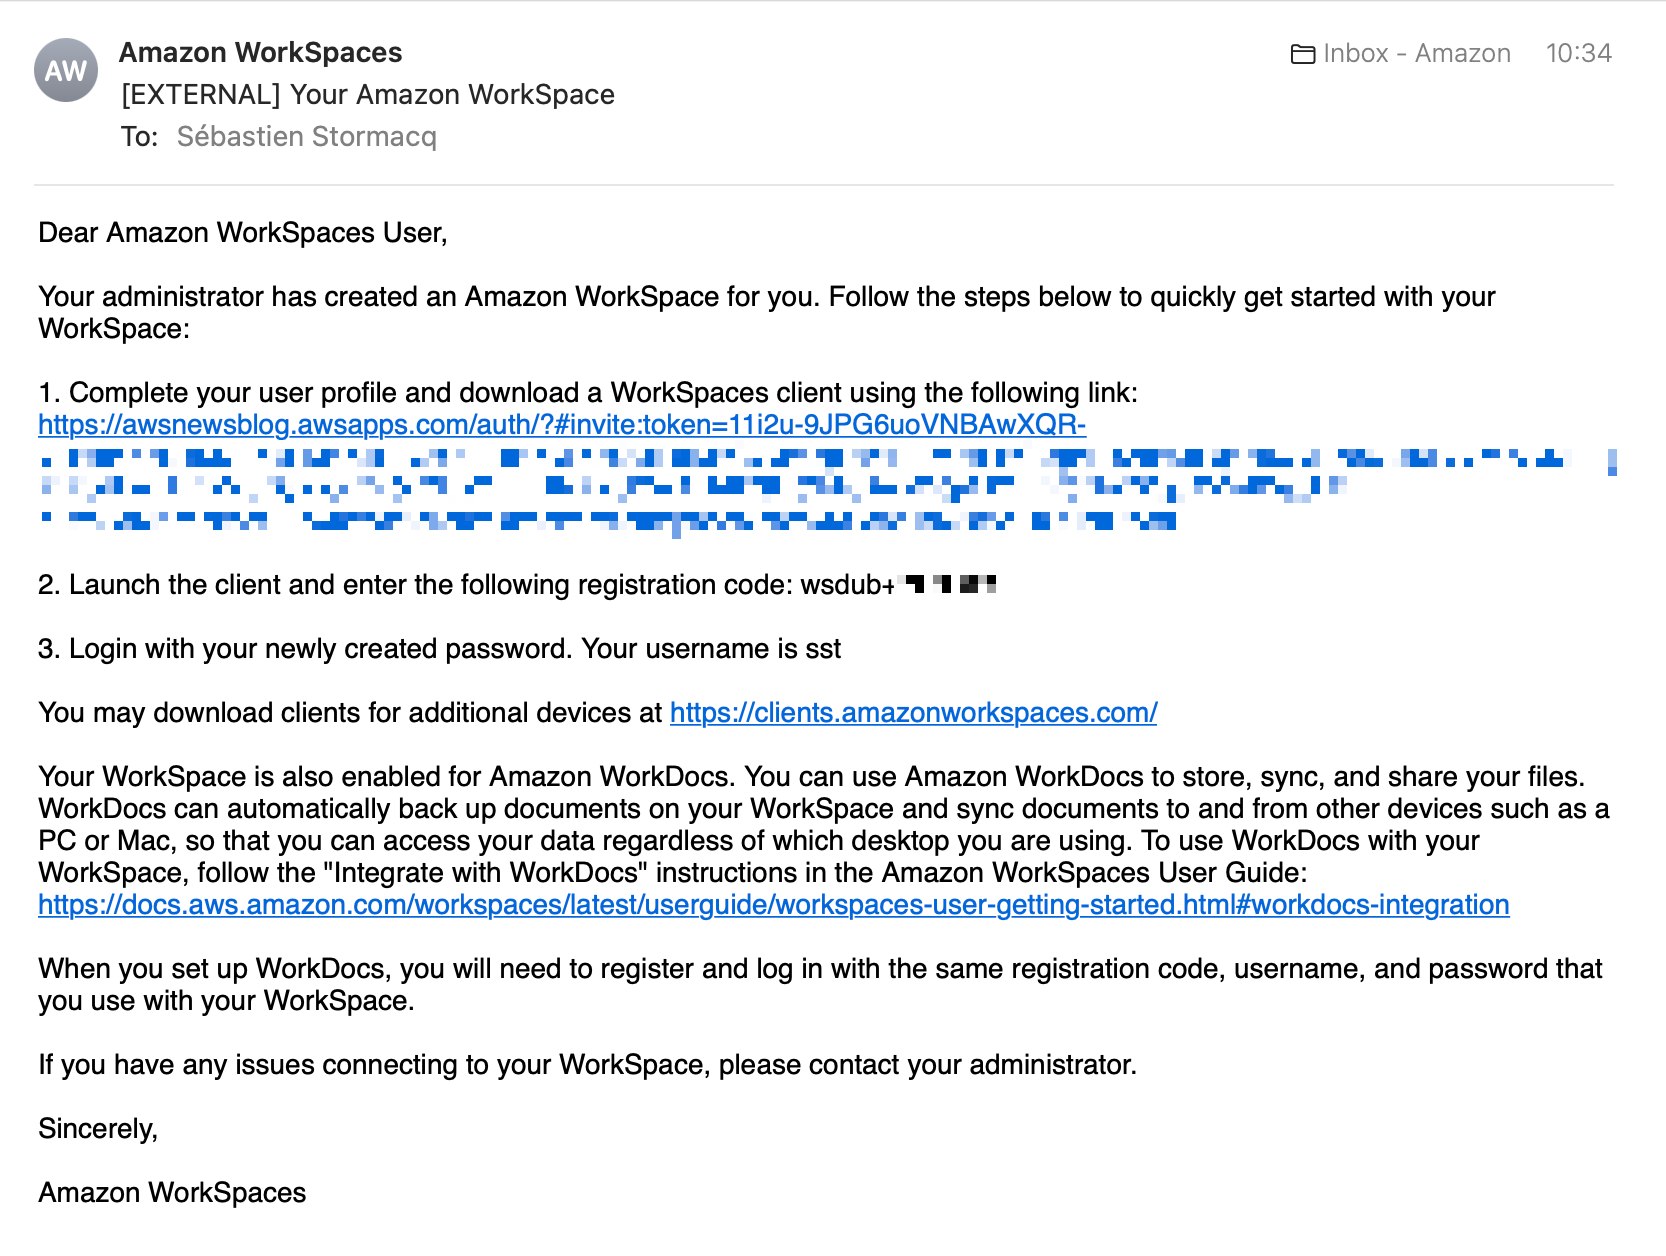
I select the link and enter my password. Then, I download and install a client from https://clients.amazonworkspaces.com/.

Workspaces create password

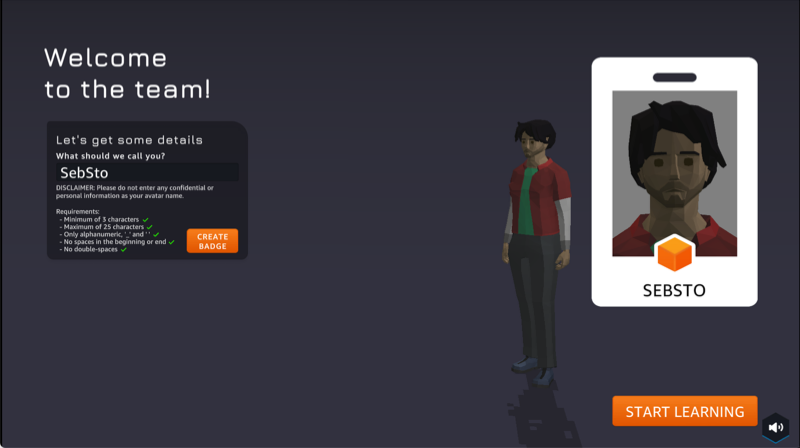
For this demo, I am using the Windows Workspaces client. After downloading and installing it, I enter the registration code I received by email.

Workspaces enter code

A few seconds later, I have access to my Ubuntu desktop.

Ubuntu desktop from Windows

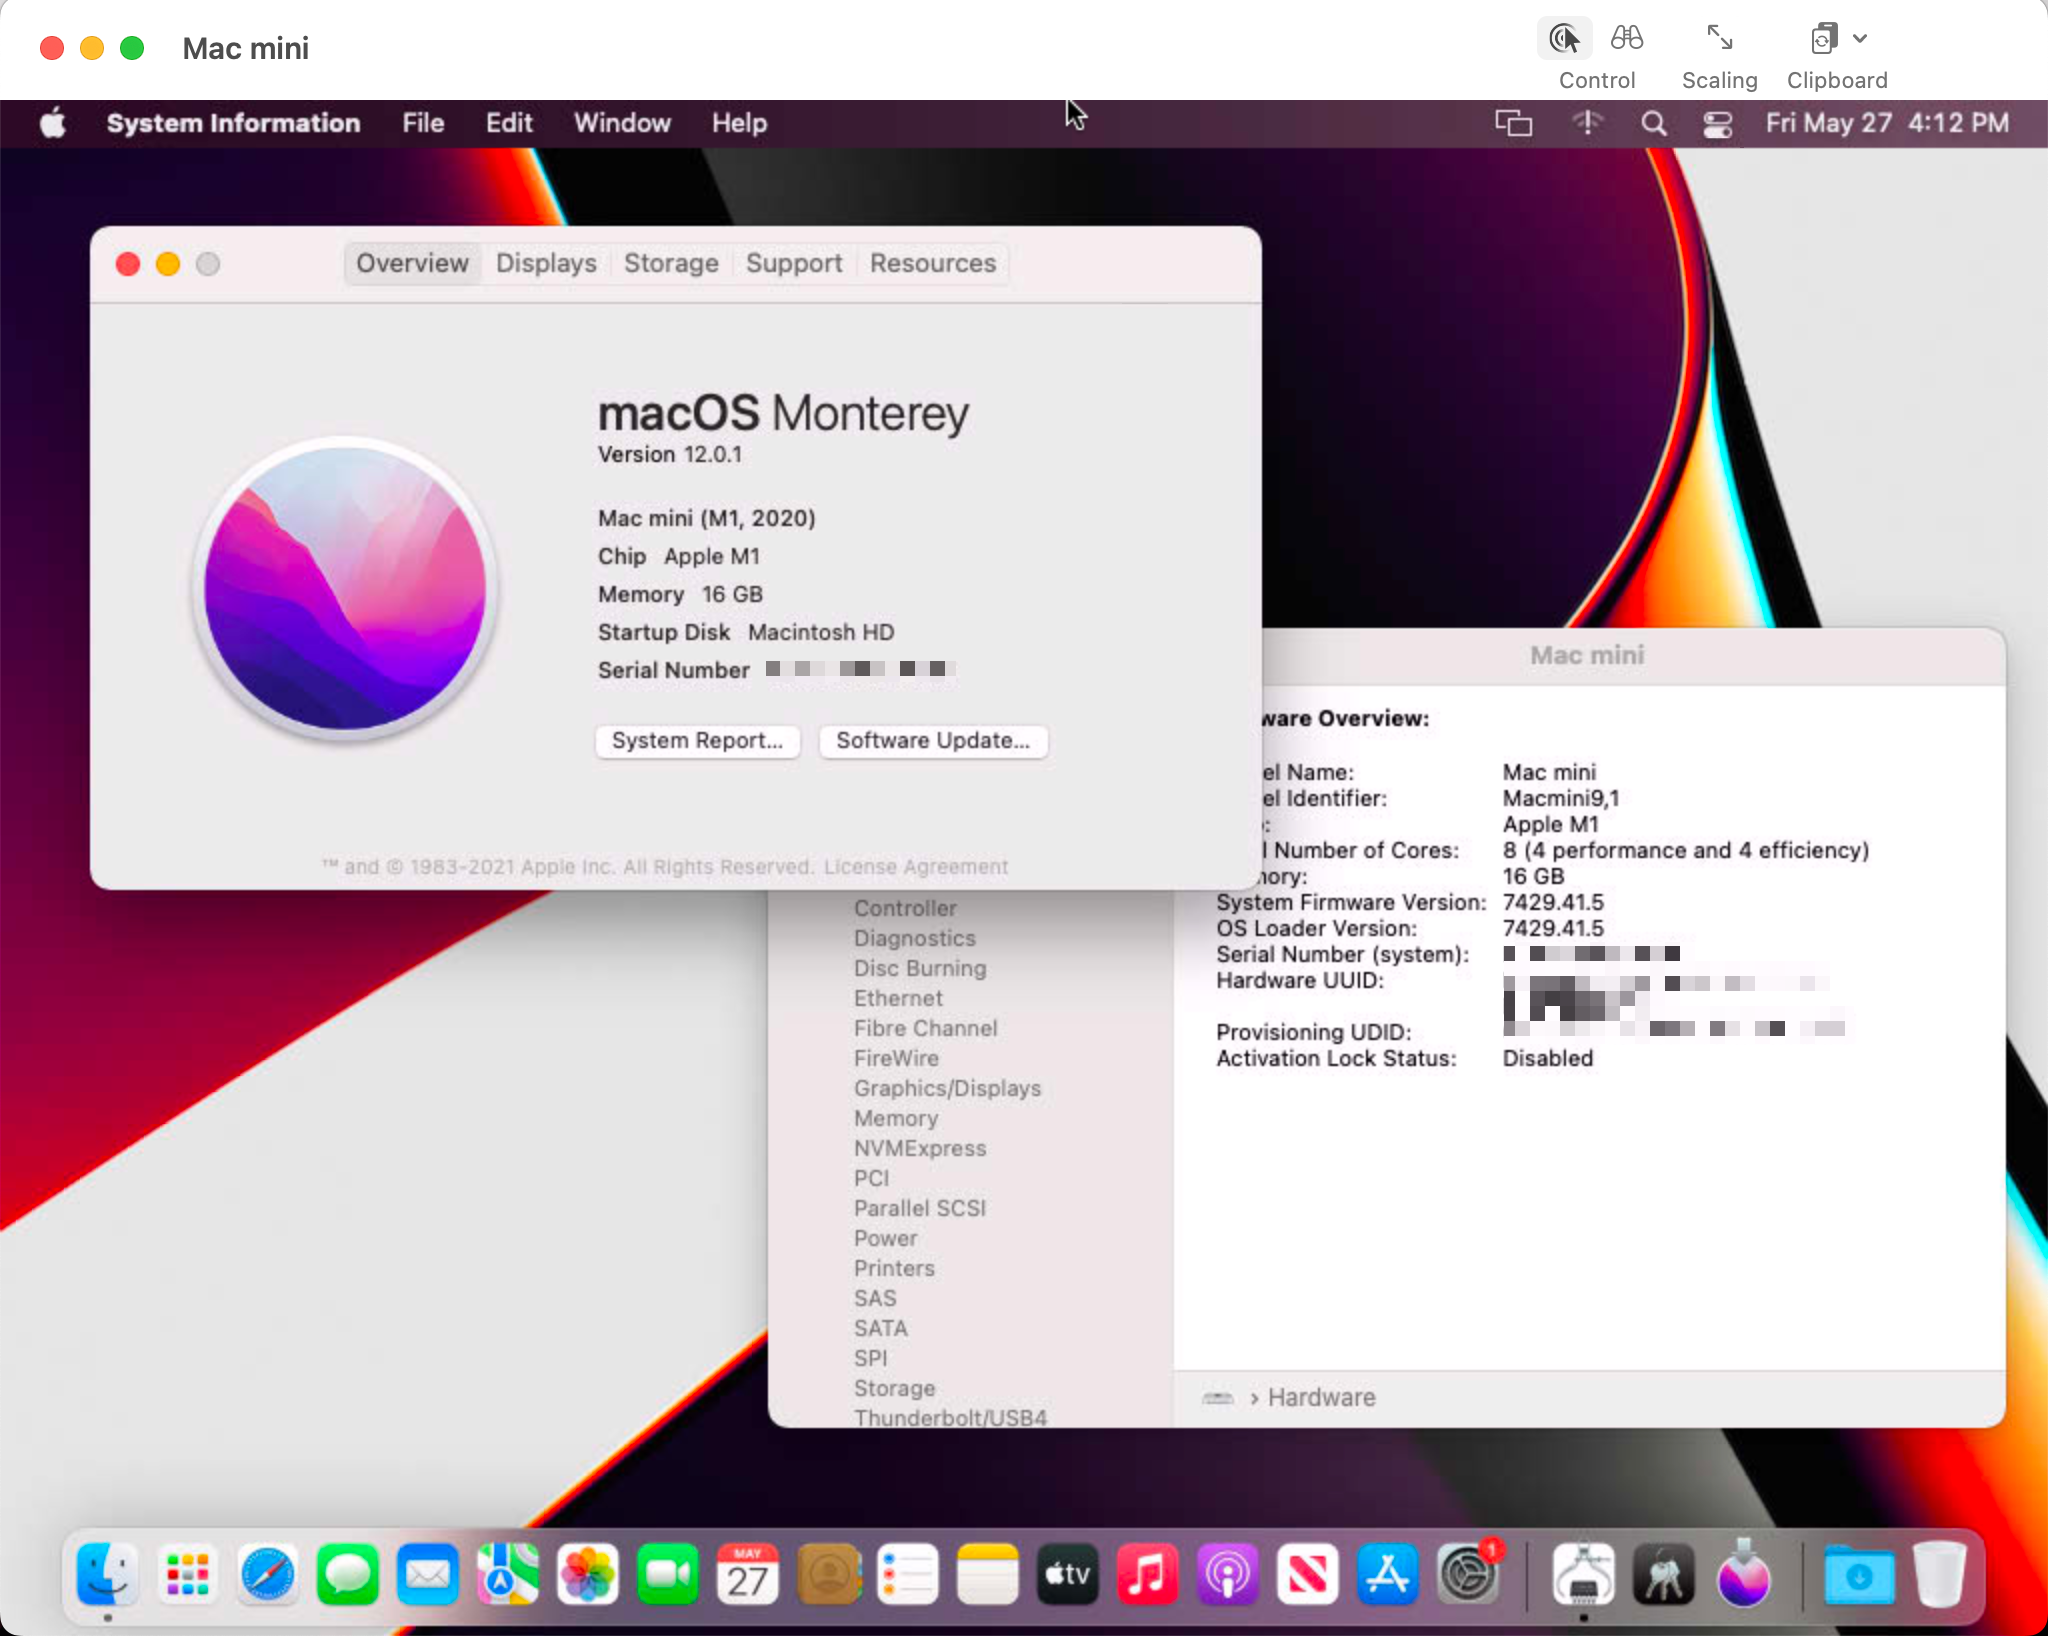
Imagine I later travel to a family member’s place, and I have to access my work desktop. I can borrow a web browser and reconnect from the web client. Not surprisingly, I find my desktop in the exact state I left it—even the mouse pointer is in the same place. When closing a session, I am confident that I did not leave any confidential files behind me. All my files, messages, and applications are securely stored within my company AWS account.

Workspaces web client

Things You Need To Know
The service team is actively listening to your feedback and building new capabilities into Workspaces.

For this launch, we chose to use version 22.04 LTS (Jammy Jellyfish). Canonical has optimized the base image for cloud development use cases. We have preinstalled AWS CLI and SDK.

You may select from a selection of Value, Standard, Performance, Power, or Power Pro bundles. These bundles provide you with computer sizes starting at 1 vCPU and 2 GB RAM, up to 8 vCPU and 32 GB RAM.

There are two features of Workspaces that are not present today for the launch of Ubuntu Workspaces. They will be added in the very near future. First, you may connect today using the Windows or web-based Workspaces clients. Linux and macOS clients will be supported as a quick follow-up to this launch. Second, the GPU-based Graphics.g4dn, and GraphicsPro.g4dn bundles will be available in the coming weeks.

Availability and Pricing
Ubuntu Workspaces are available in all AWS Regions where Workspaces is available, except a Region in China: China (Ningxia). Again, we’re working hard to add support for China (Ningxia) as a quick follow-up after launch.

Workspace pricing is either per month, for users that primarily use Workspaces as their main desktop, or per hour for those in your workforce making occasional use of the workspace. Ubuntu Workspace prices start at $23 per month and per desktop or $0.19 per hour. Our pricing page has the details.

Now go build and start your first Ubuntu Workspaces today.

— seb

AWS Week In Review — September 26, 2022

Post Syndicated from Sébastien Stormacq original https://aws.amazon.com/blogs/aws/aws-week-in-review-september-26-2022/

It looks like my travel schedule is coupled with this Week In Review series of blog posts. This week, I am traveling to Fort-de-France in the French Caribbean islands to meet our customers and partners. I enjoy the travel time when I am offline. It gives me the opportunity to reflect on the past or plan for the future.

Last Week’s Launches
Here are some of the launches that caught my eye last week:

Amazon SageMaker Autopilothas added a new Ensemble training mode powered by AutoGluon that is 8X faster than the current Hyper parameter Optimization Mode and supports a wide range of algorithms, including LightGBM, CatBoost, XGBoost, Random Forest, Extra Trees, linear models, and neural networks based on PyTorch and FastAI.

AWS Outposts and Amazon EKSYou can now deploy both the worker nodes and the Kubernetes control plane on an Outposts rack. This allows you to maximize your application availability in case of temporary network disconnection on premises. The Kubernetes control plane continues to manage the worker nodes, and no pod eviction happens when on-premises network connectivity is reestablished.

Amazon Corretto 19 – Corretto is a no-cost, multiplatform, production-ready distribution of OpenJDK. Corretto is distributed by Amazon under an open source license. This version supports the latest OpenJDK feature release and is available on Linux, Windows, and macOS. You can download Corretto 19 from our downloads page.

Amazon CloudWatch Evidently – Evidently is a fully-managed service that makes it easier to introduce experiments and launches in your application code. Evidently adds support for Client Side Evaluations (CSE) for AWS Lambda, powered by AWS AppConfig. Evidently CSE allows application developers to generate feature evaluations in single-digit milliseconds from within their own Lambda functions. Check the client-side evaluation documentation to learn more.

Amazon S3 on AWS OutpostsS3 on Outposts now supports object versioning. Versioning helps you to locally preserve, retrieve, and restore each version of every object stored in your buckets. Versioning objects makes it easier to recover from both unintended user actions and application failures.

Amazon PollyAmazon Polly is a service that turns text into lifelike speech. This week, we announced the general availability of Hiujin, Amazon Polly’s first Cantonese-speaking neural text-to-speech (NTTS) voice. With this launch, the Amazon Polly portfolio now includes 96 voices across 34 languages and language variants.

X in Y – We launched existing AWS services in additional Regions:

Other AWS News
Introducing the Smart City Competency program – The AWS Smart City Competency provides best-in-class partner recommendations to our customers and the broader market. With the AWS Smart City Competency, you can quickly and confidently identify AWS Partners to help you address Smart City focused challenges.

An update to IAM role trust policy behavior – This is potentially a breaking change. AWS Identity and Access Management (IAM) is changing an aspect of how role trust policy evaluation behaves when a role assumes itself. Previously, roles implicitly trusted themselves. AWS is changing role assumption behavior to always require self-referential role trust policy grants. This change improves consistency and visibility with regard to role behavior and privileges. This blog post shares the details and explains how to evaluate if your roles are impacted by this change and what to modify. According to our data, only 0.0001 percent of roles are impacted. We notified by email the account owners.

Amazon Music Unifies Music QueuingThe Amazon Music team published a blog post to explain how they created a unified music queue across devices. They used AWS AppSync and AWS Amplify to build a robust solution that scales to millions of music lovers.

Upcoming AWS Events
Check your calendar and sign up for an AWS event in your Region and language:

AWS re:Invent – Learn the latest from AWS and get energized by the community present in Las Vegas, Nevada. Registrations are open for re:Invent 2022 which will be held from Monday, November 28 to Friday, December 2.

AWS Summits – Come together to connect, collaborate, and learn about AWS. Registration is open for the following in-person AWS Summits: Bogotá (October 4), and Singapore (October 6).

Natural Language Processing (NLP) Summit – The AWS NLP Summit 2022 will host over 25 sessions focusing on the latest trends, hottest research, and innovative applications leveraging NLP capabilities on AWS. It is happening at our UK headquarters in London, October 5–6, and you can register now.

AWS Innovate for every app – This regional online conference is designed to inspire and educate executives and IT professionals about AWS. It offers dozens of technical sessions in eight languages (English, Spanish, French, German, Italian, Japanese, Korean, and Indonesian). Register today: Americas, September 28; Europe, Middle-East, and Africa, October 6; Asia Pacific & Japan, October 20.

AWS Innovate for every app

AWS Community DaysAWS Community Day events are community-led conferences to share and learn with one another. In September, the AWS community in the US will run events in Arlington, Virginia (September 30). In Europe, Community Day events will be held in October. Join us in Amersfoort, Netherlands (October 3), Warsaw, Poland (October 14), and Dresden, Germany (October 19).

AWS Tour du Cloud – The AWS Team in France has prepared a roadshow to meet customers and partners with a one-day free conference in seven cities across the country (Aix en Provence, Lille, Toulouse, Bordeaux, Strasbourg, Nantes, and Lyon), and in Fort-de-France, Martinique. Tour du Cloud France

AWS Fest – This third-party event will feature AWS influencers, community heroes, industry leaders, and AWS customers, all sharing AWS optimization secrets (this week on Wednesday, September). You can register for AWS Fest here.

Stay Informed
That is my selection for this week! To better keep up with all of this news, please check out the following resources:

— seb
This post is part of our Week in Review series. Check back each week for a quick roundup of interesting news and announcements from AWS!

Deploy your Amazon EKS Clusters Locally on AWS Outposts

Post Syndicated from Sébastien Stormacq original https://aws.amazon.com/blogs/aws/deploy-your-amazon-eks-clusters-locally-on-aws-outposts/

I am pleased to announce the availability of local clusters for Amazon Elastic Kubernetes Service (Amazon EKS) on AWS Outposts. It means that starting today, you can deploy your Amazon EKS cluster entirely on Outposts: both the Kubernetes control plane and the nodes.

Amazon EKS is a managed Kubernetes service that makes it easy for you to run Kubernetes on AWS and on premises. AWS Outposts is a family of fully managed solutions delivering AWS infrastructure and services to virtually any on-premises or edge location for a truly consistent hybrid experience.

To fully understand the benefits of local clusters for Amazon EKS on Outposts, I need to first share a bit of background.

Some customers use Outposts to deploy Kubernetes cluster nodes and pods close to the rest of their on-premises infrastructure. This allows their applications to benefit from low latency access to on-premises services and data while managing the cluster and the lifecycle of the nodes using the same AWS API, CLI, or AWS console as they do for their cloud-based clusters.

Until today, when you deployed Kubernetes applications on Outposts, you typically started by creating an Amazon EKS cluster in the AWS cloud. Then you deployed the cluster nodes on your Outposts machines. In this hybrid cluster scenario, the Kubernetes control plane runs in the parent Region of your Outposts, and the nodes are running on your on-premises Outposts. The Amazon EKS service communicates through the network with the nodes running on the Outposts machine.

But, remember: everything fails all the time. Customers told us the main challenge they have in this scenario is to manage site disconnections. This is something we cannot control, especially when you deploy Outposts on rough edges: areas with poor or intermittent network connections. When the on-premises facility is temporarily disconnected from the internet, the Amazon EKS control plane running in the cloud is unable to communicate with the nodes and the pods. Although the nodes and pods work perfectly and continue to serve the application on the on-premises local network, Kubernetes may consider them unhealthy and schedule them for replacement when the connection is reestablished (see pod eviction in Kubernetes documentation). This may lead to application downtimes when connectivity is restored.

I talked with Chris, our Kubernetes Product Manager and expert, while preparing this blog post. He told me there are at least seven distinct options to configure how a control plane reconnects to its nodes. Unless you master all these options, the system status at re-connection is unpredictable.

To simplify this, we are giving you the ability to host your entire Amazon EKS cluster on Outposts. In this configuration, both the Kubernetes control plane and your worker nodes run locally on premises on your Outposts machine. That way, your cluster continues to operate even in the event of a temporary drop in your service link connection. You can perform cluster operations such as creating, updating, and scaling applications during network disconnects to the cloud.

EKS Local Cluster DiagramLocal clusters are identical to Amazon EKS in the cloud and automatically deploy the latest security patches to make it easy for you to maintain an up-to-date, secure cluster. You can use the same tooling you use with Amazon EKS in the cloud and the AWS Management Console for a single interface for your clusters running on Outposts and in AWS Cloud.

Let’s See It In Action
Let’s see how we can use this new capability. For this demo, I will deploy the Kubernetes control plane on Amazon Elastic Compute Cloud (Amazon EC2) instances running on premises on an Outposts rack.

I use an Outposts rack already configured. If you want to learn how to get started with Outposts, you can read the steps on the Get Started with AWS Outposts page.

AWS Outposts Configuration

This demo has two parts. First, I create the cluster. Second, I connect to the cluster and create nodes.

Creating Cluster
Before deploying the Amazon EKS local cluster on Outposts, I make sure I created an IAM cluster role and attached the AmazonEKSLocalOutpostClusterPolicy managed policy. This IAM cluster role will be used in cluster creation.

Then, I switch to the Amazon EKS dashboard, and I select Add Cluster, then Create.

Creating Cluster

On the following page, I chose the location of the Kubernetes control plane: the AWS Cloud or AWS Outposts. I select AWS Outposts and specify the Outposts ID.

Configure EKS Cluster to Use AWS Outposts

The Kubernetes control plane on Outposts is deployed on three EC2 instances for high availability. That’s why I see three Replicas. Then, I choose the instance type according to the number of worker nodes needed for workloads. For example, to handle 0–20 worker nodes, it is recommended to use m5d.large EC2 instances.

Setting Instance Type

On the same page, I specify configuration values for the Kubernetes cluster, such as its Name, Kubernetes version, and the Cluster service role that I created earlier.

Cluster Configuration

On the next page, I configure the networking options. Since Outposts is an extension of an AWS Region, I need to use the VPC and Subnets used by Outposts to enable communication between Kubernetes control plane and worker nodes. For Security Groups, Amazon EKS creates a security group for local clusters that enables communication between my cluster and my VPC. I can also define additional security groups according to my application requirements.

Specify Networking

As we run the Kubernetes control plane inside Outposts, the Cluster endpoint access can only be accessed privately. This means I can only access the Kubernetes cluster through machines that are deployed in the same VPC or over the local network via the Outposts local gateway with Direct VPC Routing.

Private Cluster Endoint Access
On the next page, I define logging. Logging is disabled by default, and I may enable it as needed. For more details about logging, you can read the Amazon EKS control plane logging documentation.

Configure Logging

The last screen allows me to review all configuration options. When I’m satisfied with the configuration, I select Create to create the cluster.

Networking

The cluster creation takes a few minutes. To check the cluster creation status, I can use the console or the terminal with the following command:

$ aws eks describe-cluster \ 
--region <REGION_CODE> \ 
--name <CLUSTER_NAME> \ 
--query "cluster.status"

The Status section tells me when the cluster is created and active.

Active Cluster

In addition to using the AWS Management Console, I can also create a local cluster using the AWS CLI. Here is the command snippet to create a local cluster with the AWS CLI:

$ aws eks create-cluster \ 
--region <REGION_CODE> \ 
--name <CLUSTER_NAME> \ 
--resources-vpc-config subnetIds=<SUBNET_ID>\ 
--role-arn <ARN_CLUSTER_ROLE> \ 
--outpost-config controlPlaneInstanceType=<INSTANCE_TYPE> \ 
--outpostArns=<ARN_OUTPOST>

Connecting to the Cluster
The endpoint access for a local cluster is private; therefore, I can access it from a local gateway with Direct VPC Routing or from machines that are in the same VPC. To find out how to use local gateways with Outposts, you can follow the information on the Working with local gateways page. For this demo, I use an EC2 instance as a bastion host, and I manage the Kubernetes cluster using kubectl command.

The first thing I do is edit Security Groups to open traffic access from the bastion host. I go to the detail page of the Kubernetes cluster and select the Networking tab. Then I select the link in Cluster security group.

Networking & Security Group

Then, I add inbound rules, and I provide access for the bastion host by specifying its IP address.

Adding Inbound Rule in Security Group

Once I’ve allowed the access, I create kubeconfig in the bastion host by running the command:

$ aws eks update-kubeconfig --region <REGION_CODE> --name <CLUSTER_NAME>

Finally, I use kubectl to interact with the Kubernetes API server, just like usual.

$ kubectl get nodes -o wide
NAME STATUS ROLES AGE VERSION INTERNAL-IP EXTERNAL-IP OS-IMAGE KERNEL-VERSION CONTAINER-RUNTIME
ip-10-X-Y-Z.us-west-2.compute.internal NotReady control-plane,master 10h v1.21.13 10.X.Y.Z <none> Bottlerocket OS 1.8.0 (aws-k8s-1.21) 5.10.118 containerd://1.6.6+bottlerocket
ip-10-X-Y-Z.us-west-2.compute.internal NotReady control-plane,master 9h v1.21.13 10.X.Y.Z <none> Bottlerocket OS 1.8.0 (aws-k8s-1.21) 5.10.118 containerd://1.6.6+bottlerocket

Kubernetes local clusters running on AWS Outposts run on three EC2 instances. We see on the output above that the status of three worker nodes is NotReady. This is because they are used by the control plane exclusively, and we cannot use them to schedule pods.

From this stage, you can deploy self-managed node groups using the Amazon EKS local cluster.

Pricing and Availability
Amazon EKS local clusters are charged at the same price as traditional EKS clusters. It starts at $0.10/hour. The EC2 instances required to deploy the Kubernetes control plane and nodes on Outposts are included in the price of the Outposts. As usual, the pricing page has the details.

Amazon EKS local clusters are available in all AWS Regions where Outposts is available.

Go build and create your first EKS local cluster today!

— seb and Donnie.

AWS Week In Review – September 12, 2022

Post Syndicated from Sébastien Stormacq original https://aws.amazon.com/blogs/aws/aws-week-in-review-september-12-2022/

I am working from London, UK, this week to record sessions for the upcoming Innovate EMEA online conference—more about this in a future Week In Review. While I was crossing the channel, I took the time to review what happened on AWS last week.

Last Week’s Launches
Here are some launches that got my attention:

Seekable OCI for lazy loading container images. Seekable OCI (SOCI) is a technology open sourced by AWS that enables containers to launch faster by lazily loading the container image. SOCI works by creating an index of the files within an existing container image. This index is a key enabler to launching containers faster, providing the capability to extract an individual file from a container image before downloading the entire archive. Check out the source code on GitHub.

Amazon Lookout for Metrics now lets you filter data by dimensions and increased the limits on the number of measures and dimensions. Lookout for Metrics uses machine learning (ML) to automatically detect and diagnose anomalies (i.e., outliers from the norm) in business and operational data, such as a sudden dip in sales revenue or customer acquisition rates.

Amazon SageMaker has three new capabilities. First, SageMaker Canvas added additional capabilities to explore and analyze data with advanced visualizations. Second, SageMaker Studio now sends API user identity data to AWS CloudTrail. And third, SageMaker added TensorFlow image classification to its list of builtin algorithms.

The AWS console launches a widget to display the most recent AWS blog posts on the console landing page. Being part of the AWS News Blog team, I couldn’t be more excited about a launch this week. 😀

AW Console Blog widget

Other AWS News
Some other updates and news that you may have missed:

The Amazon Science blog published an article on the design of a pinch grasping robot. It is one of the many areas where we try to improve the efficiency of our fulfillment centers. A must-read if you’re into robotics or logistics.

The Public Sector blog has an article on how Satellogic and AWS are harnessing the power of space and cloud. Satellogic is creating a live catalog of Earth and delivering daily updates to create a complete picture of changes to our planet for decision-makers. Satellogic is generating massive volumes of data, with each of its satellites collecting an average of 50GB of data daily. They are using compute, storage, analytics, and ground station infrastructure in support of their growth.

Event Ruler is now open-source. Talking about open-source, the source code of the core rule engine built first for Amazon CloudWatch Events, and now the core of Amazon Event Bridge, is newly available on GitHub. This is a Java library that allows applications to identify events that match a set of rules. Events and rules are expressed as JSON documents. Rules are compiled for fast evaluation by a finite state engine. Read the announcement blog post to understand how Event Bridge works under the hood.

HP Anyware (formerly Teradici CAS) is now available for Amazon EC2 Mac instances, from the AWS Marketplace. HP Anyware is a remote access solution that provides pixel-perfect rendering for your remote Mac Mini running in the AWS cloud. It uses PCoIP™ to securely and efficiently access the remote macOS machines. You can connect from anywhere, using a PCoIP client application or from thin terminals such as Thin Clients or Zero Clients workstations.

Upcoming AWS Events
Check your calendars and sign up for these AWS events that are happening all over the world:

AWS Summits – Come together to connect, collaborate, and learn about AWS. Registration is open for the following in-person AWS Summits: Mexico City (September 21–22), Bogotá (October 4), and Singapore (October 6).

AWS Community DaysAWS Community Day events are community-led conferences to share and learn with one another. In September, the AWS community in the US will run events in Arlington, Virginia (September 30). In Europe, Community Day events will be held in October. Join us in Amersfoort, Netherlands (October 3), Warsaw, Poland (October 14), and Dresden, Germany (October 19).

That’s all from me for this week. Come back next Monday for another Week in Review!

— seb


This post is part of our Week in Review series. Check back each week for a quick roundup of interesting news and announcements from AWS!

AWS Trusted Advisor – New Priority Capability

Post Syndicated from Sébastien Stormacq original https://aws.amazon.com/blogs/aws/aws-trusted-advisor-new-priority-capability/

AWS Trusted Advisor is a service that continuously analyzes your AWS accounts and provides recommendations to help you to follow AWS best practices and AWS Well-Architected guidelines. Trusted Advisor implements a series of checks. These checks identify ways to optimize your AWS infrastructure, improve security and performance, reduce costs, and monitor service quotas.

Today, we are making available to all Enterprise Support customers a new capability for AWS Trusted Advisor: Trusted Advisor Priority. It gives you prioritized and context-driven recommendations manually curated by your AWS account team, based on their knowledge of your environment and the machine-generated checks from AWS Services.

Trusted Advisor implements over 200 checks in five categories: cost optimization, performance, security, fault tolerance, and service limits. Here is a view of the current Trusted Advisor dashboard.

AWS Trusted Advisor Categories

The list of checks available on your account depends on your level of support. When you have AWS Basic Support, available to all customers, or AWS Developer Support, you have access to core security and service limits checks. When you have AWS Business Support or AWS Enterprise Support, you have access to all checks.

The new Priority capability gives you a prioritized view of critical risks. It shows prioritized, contextual recommendations and actionable insights based on your business outcomes and what’s important to you. It also surfaces risks proactively identified by your AWS account team to alert and address critical cloud risks stemming from deviations from AWS best practices. It is designed to help you: IT leaders, technical decisions makers, and members of a Cloud Center of Excellence.

The account team takes advantage of their understanding of your production accounts and business-critical workloads. By working with you, they identify what’s important to you, and the outcomes or goals you wish to achieve. For example, they know about your business viewpoint whether it is exiting a data center by the end of the year, launching a new product, expanding to a new geography, or migrating a workload to the cloud.

Trusted Advisor uses multiple sources to define the priorities. On one side, it uses signals from other AWS services, such as AWS Compute Optimizer, Amazon GuardDuty, or VPC Flow Logs. On the other side, it uses context manually curated by your AWS account team (Account Manager, Technical Account Manager, Solutions Architect, Customer Solutions Manager, and others) and the knowledge they have about your production accounts, business-critical applications and critical workloads. You will be guided to opportunities to take advantage of AWS Support engagements like a Cost Optimization workshop when the account team believes there are opportunities to reduce costs, a deep dive with a service team, or an Infrastructure Event Management for an upcoming workload migration.

You will be alerted to risks in your deployments on AWS, using sources such as the AWS Well-Architected framework. We will highlight and bring to attention any open high risk issues (HRIs) from recently conducted Well-Architected reviews. We also run campaigns to proactively identify, alert, and reduce single points of failures, such as single Availability Zone deployments. This verifies that you don’t have a single point of failures for production applications that are used for mission-critical processes, that drive significant revenue, or have regulated availability requirements. Trusted Advisor helps you to detect, raise awareness, and provide prescriptive guidance.

Here is a diagram to visualize my mental model for Trusted Advisor Priority:

Trusted Advisor Mental Model Diagram

Trusted Advisor Priority works with AWS Organizations: it aggregates all recommendations from member accounts in your management account or designed delegated administrator. You may delegate access to Trusted Advisor Priority to a maximum of five other AWS accounts. Trusted Advisor Priority comes with a new AWS Identity and Access Management (IAM) policy to help you manage access to the capability. Finally, you can also configure to receive daily and weekly email digests of all prioritized notifications to the alternate contacts you set up in the management account or each delegated admin account.

Let’s See Trusted Advisor Priority in Action
I open the AWS Management Console and navigate to Trusted Advisor. I notice a new navigation entry on the left menu. It is the default view for Enterprise Support customers.

The Trusted Advisor Priority main screen summarizes the number of Pending response and In progress recommendations. It shares some time-related statistics on the right side of the screen. I can start to look at the Active prioritized recommendations list on the bottom half of the screen.

Recommendations are divided into two panels: Active and Closed. The Active tab includes recommendations that have been surfaced to you and which you are actively working on. The Closed tab includes recommendations that have been resolved. All account team prioritized recommendations are presented with a series of searchable and sortable columns. I see the recommendation name, status, source, category, and age.

AWS Trusted Advisor Priority

The list gives me details about the category, the age, and the status of the recommendations. The Source column distinguishes between auto-detected and manually identified opportunities. The Category column shows the category from Trusted Advisor (cost optimization, performance, security, fault tolerance, and service limits). The Age column shows me how long it’s been since the recommendation was first shared. This helps with tracking the time to resolution for each of these items.

AWS Trusted Advisor Priority

I can select any recommendation to drill down into the details. In this example, I select the second one: Amazon RDS Public Snapshots. This is a recommendation in the Security category.

AWS Trusted Advisor Priority

Recommendations are actionable, and they give you a real course of action to respond to the issue. In this case, it suggests modifying the snapshot configuration and removing the public flag that makes the database snapshot available to all AWS customers.

Trusted Advisor Priority provides a closed-loop feedback mechanism where I have the ability to accept or reject a recommendation if I don’t think the issue is relevant to my account.

The information is aggregated at an Organizations level. When you are using Organizations to group accounts to reflect your business units, the recommendations are aggregated and present an overall risk posture across your business units.

As an infrastructure manager, I can either Accept the recommendation and take action or Reject it because it is not a risk or it is something I will not fix and want to remove the recommendation from my list.

AWS Trusted Advisor Priority - Accept AWS Trusted Advisor Priority - Reject

Pricing and Availability
AWS Trusted Advisor Priority is available in all commercial AWS Regions where Trusted Advisor is available now, except the two AWS Regions in China. It is available at no additional cost for Enterprise Support customers.

Trusted Advisor Priority will not replace your Technical Account Manager or Solution Architect. They are key in providing tailored guidance and working with you through all phases of managing your cloud applications. Trusted Advisor Priority provides anytime access to tailored, context-aware, risk-mitigating recommendations and insights from your account team and optimizes your engagement with AWS. It will not reduce your access to your account team in any way but rather will make it easier for you to collaborate with them on your most important priorities.

You can start to use Trusted Advisor Priority today.

And now, go build!

— seb

New – AWS Skill Builder Subscriptions

Post Syndicated from Sébastien Stormacq original https://aws.amazon.com/blogs/aws/new-aws-skill-builder-subscriptions/

Today, I am excited to announce AWS Skill Builder Individual and Team subscriptions. This is a new way for you to learn about cloud technologies and get practical experience with hands-on training.

Between 2013 and 2016, I spent three years delivering AWS Training classes to customers in Europe, North America, and Asia. At the time, the only classes we offered were in-person, instructor-led classes. Now, you have the choice between a variety of digital courses or in-person classes, lecture-style or hands-on. The foundations are available online for free, and the new subscriptions we are announcing today give you access to a range of exclusive content to advance your cloud skills and prepare for AWS Certification exams with self-paced, digital training. The subscriptions allow you to learn AWS services with hands-on activities.

At Amazon, we often say that it is still Day 1. The cloud market is still nascent. Gartner predicts global public cloud spending will grow from $396 billion to $482 billion this year, a rate of 22 percent this year alone. But this is just 10 percent of total global IT spending in 2022. I talk with customers every day. When I ask them the main obstacles to adopting the cloud, they all mention the lack of trained IT professionals. In fact, 76 percent of IT decision-makers report an IT skills gap, which is up from 31 percent in 2016, according to the Global Knowledge IT Skills and Salary Report, one of the largest studies of industry salaries, certifications, skills, and more.

To close the skills gap, we want to give learners hands-on experience with cloud technologies.

What Content Is Available When I Subscribe?
Starting today, AWS Skill Builder subscriptions give registered individuals and organizations access to exclusive learning materials built by builders for builders. In addition to our 500+ free courses, there are four new learning experiences available.

AWS Builder Labs are hands-on guided exercises to develop practical skills for common cloud scenarios. You receive a sandbox AWS account for the duration of the lab. There is no need for you to use your own AWS account and risk accruing unwanted charges. Next, we provide you with step-by-step instructions to go through a typical cloud scenario. It goes from simple tasks, such as configuring Amazon Simple Storage Service (Amazon S3) to host a static website, to more advanced scenarios, such as developing a serverless web application using Amazon DynamoDB. These are just two examples, and we have 100+ labs available for you to learn by doing it yourself.

AWS Jam gives you clues to guide you in solving real-world, open-ended problems. There are no step-by-step instructions, just hints. There are two types of AWS Jam: AWS Jam Journey and AWS Jam events. Jam events are exclusive to Team subscription. Once started, the Jam Journey is available for several months to give you time to complete all the challenges at your own pace and schedule. With Jam events, team administrators can create events where teams can come together at a certain date and time to solve challenges and compete with each other. AWS Jam events provide 140+ challenges across different domains.

Let’s take a practical example. When you select the security Jam, you are tasked with resolving a series of security-related challenges curated by AWS experts. Tasks might be to perform a security posture evaluation, restore a previous version of a static website, or encrypt an existing Amazon Relational Database Service (Amazon RDS) database with a customer-managed AWS Key Management Service (AWS KMS) key.

Here is the dashboard for the security AWS Jam Journey.

AWS Jam - Security

AWS Cloud Quest is a role-based game where your mission is to help citizens of a virtual city by learning and building cloud solutions for their challenges. You move around in the city, and you’re assigned tasks to complete. Each time you complete a task, you get rewards, which you can use to transform the city. For each task, the Solution Center guides you through four steps: learn the cloud concept to complete the task, practice the execution of the task with instructions, practice by yourself, and evaluate the result. Once again, the practice is done inside an AWS sandbox environment where you can safely test your new skill. To evaluate the result, the Solution Center asks you to enter validation data, such as the name of an S3 bucket or a URL. The system automatically verifies your setup and grants you points when the test succeeds. As of today, there are four roles available: Cloud Practitioner, Solutions Architect, Serverless Developer, and Machine Learning Specialist. We have plans to add more roles to this list over time. AWS Cloud Quest is a fun way to learn cloud skills!

We’ll see Cloud Quest in action in a minute.

AWS Certification Official Practice Exams are, as the name implies, full-length practice exams to help you to evaluate your exam readiness. But wait! Aren’t there free Official Practice Question Sets already? Yes! But in addition to those free 20-question practice question sets, subscribed individuals or teams can now prepare for AWS Certification with new exam preparation courses that include practice materials and the full-length AWS Certification Official Practice Exams. We have designed the exam preparation courses to help you assess your exam preparedness. Each exam preparation course includes a review of technical content, practice questions, lab exercises, and access to the AWS Certification Official Practice Exams. And this is not just a pass/fail exercise. Official practice exams come with thorough feedback for each question and scaled scores simulating actual exam scores. The questions presented have the same style, depth, rigor, and scoring as our AWS Certification exams. Full-length practice exams and exam preparation courses are currently available for the AWS Certified Cloud Practitioner, AWS Certified Solutions Architect – Associate, and AWS Certified SysOps Administrator – Associate certifications, with more to come. Much of the other content available through the subscription, such as AWS Builder Labs and AWS Cloud Quest, can complement your exam preparation.

Here is a typical screen for an Official Practice Exam. I blurred the answers obviously.

SkilBuilder Practice Exam

Type of Subscriptions
Both Individual and Team subscriptions include these four new learning experiences. Team subscriptions are available to organizations that want to purchase seats for 50 or more people. Besides a tiered pricing model, depending on the number of seats, a Team subscription gives you administrator functionality and a single sign-on experience for employees. Team administrators may assign training to individuals to drive targeted skills in their team and track progress. Built-in reports show course enrollment, course progress, completion rates, and more.

This table compares the free digital training, the Individual subscription, and the Team subscription.

SkillBuilder Subscription Comparison

Let’s See It in Action
Regular readers of this blog know we like to show you what we are talking about. Let’s see what AWS Cloud Quest looks like. First, I open AWS Skill Builder and subscribe as an individual.

AWS Skil Builder Subscription Plans

Then, I search for Cloud Quest and launch the experience.

AWS Cloud Quest

I select the role playing game I want to start. I have the choice between Cloud Practitioner, Solutions Architect, Serverless Developer, and Machine Learning Specialist.

Select a quest

Just like in every role game, I may personalize my avatar before starting the game. Any resemblance with the actual me is pure coincidence 🤔.

Quest : personalize my avatar

And finally, I am ready to walk the city, help citizens, and complete my challenges.

quest : start my mission

How Much Does It Cost?
Inclusion is a core value at Amazon. We believe everybody must have a chance to learn and grow their professional career. We made the Individual subscription available in over 200 countries and territories and up to 12 languages: Chinese (Simplified), Chinese (Traditional), English, French (France), German, Indonesian, Italian, Japanese, Korean, Portuguese (Brazil), Spanish (Latin America), and Spanish (Spain). AWS Cloud Quest is in English.

The Individual subscription is offered monthly at the price of $29 per month or annually at the price of $299 per year (this is a 14 percent discount compared to the monthly price). The subscription fee is added to your monthly AWS bill, and there is no need to have a separate credit card or billing agreement. As usual with AWS, you can stop the subscription at any time.

The Team subscription is available for purchase in 17 countries (Australia, Brazil, Canada, Colombia, France, Germany, Ireland, India, Israel, Japan, Netherlands, New Zealand, Singapore, South Korea, Spain, United Kingdom, and the United States) and the same languages as the Individual subscription. These are available for teams over 50 persons. We offer an annual plan for $449 per year and per seat, with tiered pricing based on volume. Our pricing page has all the details.

I am excited to see a new generation of IT professionals acquiring AWS Cloud skills. I can’t wait to discover the new use cases, applications, or innovations you will bring to the world when armed with these new skills.

And now, get your AWS Skill Builder subscription and go learn.

— seb

New – Cloud WAN : A Managed WAN Service

Post Syndicated from Sébastien Stormacq original https://aws.amazon.com/blogs/aws/new-cloud-wan-a-managed-wan-service/

I am pleased to announce the availability of AWS Cloud WAN, a new network service that makes it easy to build and operate wide area networks (WAN) that connect your data centers and branch offices, as well as multiple VPCs in multiple AWS Regions.

Typically, large enterprises have resources running in different on-premises data centers, branch offices, and in the cloud. To connect these resources, network teams build and manage their own global networks using multiple networking, security, and internet services from multiple providers. They most probably use several technologies and providers to manage cloud-based networks, to connect their data centers to the AWS cloud, and for the connectivity between on-premises data centers and branch offices. All of these networks take different approaches to connectivity, security, and monitoring, resulting in an intricate patchwork of individual networks that are complicated to configure, secure, and manage.

For example, to prevent unauthorized access to resources running across locations that are connected with different network technologies, network operation teams must piece together different firewall solutions from different vendors and then manually configure and manage the policies between them. Every new location, network appliance, and security requirement exponentially increases complexity.

With Cloud WAN, networking teams connect to AWS through their choice of local network providers, then use a central dashboard and network policies to create a unified network that connects their locations and network types. This eliminates the need to configure and manage different networks individually, even when they are based on different technologies. Cloud WAN generates a complete view of your on-premises and AWS networks to help you visualize the health, security, and performance of your entire network.

Cloud WAN provides advanced security and network isolation, and I am excited by the possibilities offered by this network segmentation. You can use policies in Cloud WAN to easily segment your network traffic regardless of how many AWS Regions or on-premises locations you add to your network. For example, you can easily isolate network traffic from retail payment processing from other traffic on your corporate network while still giving both segments access to shared corporate resources. Another example would be the isolation of your development and production environment by creating logical network segments for each environment. This makes it easier to ensure consistent security policies when connecting large numbers of locations with your VPCs especially when your policies need to apply to large groups with unique security and routing requirements. Cloud WAN maintains a consistent configuration across Regions on your behalf. In a traditional network, a segment is like a globally consistent virtual routing and forwarding (VRF) table or a layer 3 IP VPN over an MPLS network. Segments are optional; smaller organizations may use Cloud WAN with one single network segment, encompassing all your traffic.

In addition to network segmentation and the simplicity it brings to your network management tasks, I see four principal benefits of using Cloud WAN:

Centralized management and network monitoring dashboard – Network Manager provides a central dashboard for connecting and managing your branch offices, data centers, VPN connections, and Software-Defined WAN (SD-WAN), as well as your Amazon VPC and AWS Transit Gateway. This dashboard helps you monitor and view the health of your network in one place, simplifying day-to-day operations.

Centralized policy management – You define access controls and traffic routing rules in a central network policy document, expressed in JSON. When you update a policy, Cloud WAN uses a two-step process to ensure accidental errors do not affect your global network. First, you review and validate that your changes will work as expected in production. Once you approve the changes, Cloud WAN handles the configuration details for the entire network. You can change your policy document using the AWS Management Console or Cloud WAN APIs.

Multi-Region VPC connectivity – Cloud WAN connects your VPCs across AWS Regions. Using a simple network policy document, you can create global networks that connect all of your EC2 resources, or you can choose to segment them across Regions.

Built-in automation. Cloud WAN can automatically attach new VPCs and network connections to your network, so you do not need to approve each change manually. It reduces the operational overhead involved in managing a growing network. You do this by tagging attachments and defining network policies that automatically map attachments with a certain tag to a specific network segment. With this tagging structure in place, you can choose which attachments can join a segment automatically, which segments require manual approval, and if attachments on the same segment can talk to each other, all based on the tags you choose.

Let’s get started
To get started with Cloud WAN, I open the AWS Management Console. In the VPC section, there is a new entry for AWS Cloud WAN on the menu on the left. Creating and configuring a global network is a four-step process.

First, I start by creating a global network and a core network.

Cloud WAN create global networkAfter entering the Name and an optional Description, I select Next.

Cloud WAN create core networkAfter giving the core network a Name and a Description, I enter my ASN range and the list of Edge locations, and I enter a Segment name and Segment description for my default segment. The default segment is automatically enabled in all selected edge locations.

Second, I define and attach my core networking policy. The core policy defines the rule to control network access across segments and AWS Regions. Third, I configure segments and segment actions. I can see all routes and filter by network Segment and Edge location.

Cloud Wan - RoutesAnd finally, I register the existing Transit Gateway to the new global network.

Cloud WAN - register transit gateways

Once configured, you have a single monitoring dashboard for your global network. You have access to the network inventory.

Cloud Wan - Monitoring inventoryOr you can have more granular and detailed views with Topology graph and Topology tree.

Cloud Wan - Monitoring topology

Other considerations
During the preview period we ran for Cloud WAN, we often received the question: “When should I build networks with Cloud WAN versus Transit Gateway?” This is a valid question because both Transit Gateway and Cloud WAN allow centralized connectivity between Amazon VPC and on-premises locations. Transit Gateway is a Regional network connectivity hub and is optimal when you operate in a few AWS Regions or when you want to manage your own peering and routing configuration or prefer to use your own automation.

On the other side, Cloud WAN is a managed wide area network (WAN) that unifies your data center, branches, and AWS networks. While you can create your own global network by interconnecting multiple Transit Gateways across Regions, Cloud WAN provides built-in automation, segmentation, and configuration management features designed specifically for building and operating global networks. Cloud WAN has added features such as automated VPC attachments, integrated performance monitoring, and centralized configuration.

But the world is better together, you can peer your Transit Gateways with Cloud WAN’s Core Network Edges (CNEs) and benefit from the central management and monitoring capabilities I described earlier. The peering between Cloud WAN and Transit Gateway keeps your options open – you can migrate from one to another, or use Cloud WAN to centrally connect all your existing Transit Gateways.

But then, AWS released SiteLink in December last year. When should you use SiteLink, and when should you use AWS Cloud WAN? Depending on your use case, you might choose one, the other, or both. Cloud WAN can create and manage networks of VPCs across multiple Regions. SiteLink, on the other hand, connects Direct Connect locations together, bypassing AWS Regions to improve performance. Direct Connect is one of the several connectivity options that you will be able to natively use with Cloud WAN in the future. As of today, you interconnect Direct Connect with Cloud WAN via Transit Gateway peering connections.

Availability and Pricing
Cloud WAN is available today in US East (N. Virginia), US East (Ohio), US West (N. California), US West (Oregon), Africa (Cape Town), Asia Pacific (Mumbai), Asia Pacific (Singapore), Asia Pacific (Sydney), Asia Pacific (Tokyo), Canada (Central), Europe (Frankfurt), Europe (Ireland), Europe (London), Europe (Milan), Europe (Paris), Europe (Stockholm), and Middle East (Bahrain) AWS Regions.

As usual, there are no setup or upfront fees, and billing is on-demand based on your actual usage. There are four factors that determine what you pay for using AWS Cloud WAN. First, the number of Core Network Edges (CNEs) deployed. Second, the number of attachments to each CNE. An attachment might be an Amazon VPC, a VPN, or an SD-WAN. Third, the number of Transit Gateways peered with your CNEs. And fourth, there is a data processing charge for traffic sent through each CNE.

On top of these factors that are specific to Cloud WAN, sending data between Regions triggers an EC2 inter-Region data transfer out charge. While EC2 inter-Region data transfer out is billed separately from Cloud WAN, it’s a factor in the total cost of the Cloud WAN service. The pricing page has the details.

Go build your global network!

— seb

AWS Week In Review – July 11, 2022

Post Syndicated from Sébastien Stormacq original https://aws.amazon.com/blogs/aws/aws-week-in-review-july-11/

This post is part of our Week in Review series. Check back each week for a quick roundup of interesting news and announcements from AWS!

In France, we know summer has started when you see the Tour de France bike race on TV or in a city nearby. This year, the tour stopped in the city where I live, and I was blocked on my way back home from a customer conference to let the race pass through.

It’s Monday today, so let’s make another tour—a tour of the AWS news, announcements, or blog posts that captured my attention last week. I selected these as being of interest to IT professionals and developers: the doers, the builders that spend their time on the AWS Management Console or in code.

Last Week’s Launches
Here are some launches that got my attention during the previous week:

Amazon EC2 Mac M1 instances are generally available – this new EC2 instance type allows you to deploy Mac mini computers with M1 Apple Silicon running macOS using the same console, API, SDK, or CLI you are used to for interacting with EC2 instances. You can start, stop them, assign a security group or an IAM role, snapshot their EBS volume, and recreate an AMI from it, just like with Linux-based or Windows-based instances. It lets iOS developers create full CI/CD pipelines in the cloud without requiring someone in your team to reinstall various combinations of macOS and Xcode versions on on-prem machines. Some of you had the chance the enter the preview program for EC2 Mac M1 instances when we announced it last December. EC2 Mac M1 instances are now generally available.

AWS IAM Roles Anywhere – this is one of those incremental changes that has the potential to unlock new use cases on the edge or on-prem. AWS IAM Roles Anywhere enables you to use IAM roles for your applications outside of AWS to access AWS APIs securely, the same way that you use IAM roles for workloads on AWS. With IAM Roles Anywhere, you can deliver short-term credentials to your on-premises servers, containers, or other compute platforms. It requires an on-prem Certificate Authority registered as a trusted source in IAM. IAM Roles Anywhere exchanges certificates issued by this CA for a set of short-term AWS credentials limited in scope by the IAM role associated to the session. To make it easy to use, we do provide a CLI-based signing helper tool that can be integrated in your CLI configuration.

A streamlined deployment experience for .NET applications – the new deployment experience focuses on the type of application you want to deploy instead of individual AWS services by providing intelligent compute recommendations. You can find it in the AWS Toolkit for Visual Studio using the new “Publish to AWS” wizard. It is also available via the .NET CLI by installing AWS Deploy Tool for .NET. Together, they help easily transition from a prototyping phase in Visual Studio to automated deployments. The new deployment experience supports ASP.NET Core, Blazor WebAssembly, console applications (such as long-lived message processing services), and tasks that need to run on a schedule.

For a full list of AWS announcements, be sure to keep an eye on the What’s New at AWS page.

Other AWS News
This week, I also learned from these blog posts:

TLS 1.2 to become the minimum TLS protocol level for all AWS API endpointsthis article was published at the end of June, and it deserves more exposure. Starting in June 2022, we will progressively transition all our API endpoints to TLS 1.2 only. The good news is that 95 percent of the API calls we observe are already using TLS 1.2, and only five percent of the applications are impacted. If you have applications developed before 2014 (using a Java JDK before version 8 or .NET before version 4.6.2), it is worth checking your app and updating them to use TLS 1.2. When we detect your application is still using TLS 1.0 or TLS 1.1, we inform you by email and in the AWS Health Dashboard. The blog article goes into detail about how to analyze AWS CloudTrail logs to detect any API call that would not use TLS 1.2.

How to implement automated appointment reminders using Amazon Connect and Amazon Pinpoint this blog post guides you through the steps to implement a system to automatically call your customers to remind them of their appointments. This automated outbound campaign for appointment reminders checked the campaign list against a “do not call” list before making an outbound call. Your customers are able to confirm automatically or reschedule by speaking to an agent. You monitor the results of the calls on a dashboard in near real time using Amazon QuickSight. It provides you with AWS CloudFormation templates for the parts that can be automated and detailed instructions for the manual steps.

Using Amazon CloudWatch metrics math to monitor and scale resources AWS Auto Scaling is one of those capabilities that may look like magic at first glance. It uses metrics to take scale-out or scale-in decisions. Most customers I talk with struggle a bit at first to define the correct combination of metrics that allow them to scale at the right moment. Scaling out too late impacts your customer experience while scaling out too early impacts your budget. This article explains how to use metric math, a way to query multiple Amazon CloudWatch metrics, and use math expressions to create new time series based on these metrics. These math metrics may, in turn, be used to trigger scaling decisions. The typical use case would be to mathematically combine CPU, memory, and network utilization metrics to decide when to scale in or to scale out.

How to use Amazon RDS and Amazon Aurora with a static IP address – in the cloud, it is better to access network resources by referencing their DNS name instead of IP addresses. IP addresses come and go as resources are stopped, restarted, scaled out, or scaled in. However, when integrating with older, more rigid environments, it might happen, for a limited period of time, to authorize access through a static IP address. You have probably heard that scary phrase: “I have to authorize your IP address in my firewall configuration.” This new blog post explains how to do so for Amazon Relational Database Service (Amazon RDS) database. It uses a Network Load Balancer and traffic forwarding at the Linux-kernel level to proxy your actual database server.

Amazon S3 Intelligent-Tiering significantly reduces storage costs – we estimate our customers saved up to $250 millions in storage costs since we launched S3 Intelligent-Tiering in 2018. A recent blog post describes how Amazon Photo, a service that provides unlimited photo storage and 5 GB of video storage to Amazon Prime members in eight marketplaces world-wide, uses S3 Intelligent-Tiering to significantly save on storage costs while storing hundreds of petabytes of content and billions of images and videos on S3.

Upcoming AWS Events
Check your calendars and sign up for these AWS events:

AWS re:Inforce is the premier cloud security conference, July 26-27. This year it is hosted at the Boston Convention and Exhibition Center, Massachusetts, USA. The conference agenda is available and there is still time to register.

AWS Summit Chicago, August 25, at McCormick Place, Chicago, Illinois, USA. You may register now.

AWS Summit Canberra, August 31, at the National Convention Center, Canberra, Australia. Registrations are already open.

That’s all for this week. Check back next Monday for another tour of AWS news and launches!

— seb

New – Amazon EC2 M1 Mac Instances

Post Syndicated from Sébastien Stormacq original https://aws.amazon.com/blogs/aws/new-amazon-ec2-m1-mac-instances/

Last year, during the re:Invent 2021 conference, I wrote a blog post to announce the preview of EC2 M1 Mac instances. I know many of you requested access to the preview, and we did our best but could not satisfy everybody. However, the wait is over. I have the pleasure of announcing the general availability of EC2 M1 Mac instances.

EC2 Mac instances are dedicated Mac mini computers attached through Thunderbolt to the AWS Nitro System, which lets the Mac mini appear and behave like another EC2 instance. It connects to your Amazon Virtual Private Cloud (Amazon VPC), boots from Amazon Elastic Block Store (EBS) volumes, and uses EBS snapshots, Amazon Machine Images (AMIs), security groups and other AWS services such as Amazon CloudWatch and AWS Systems Manager.

The availability of EC2 M1 Mac instances lets you access machines built around the Apple-designed M1 System on Chip (SoC). If you are a Mac developer and re-architecting your apps to natively support Macs with Apple silicon, you may now build and test your apps and take advantage of all the benefits of AWS. Developers building for iPhone, iPad, Apple Watch, and Apple TV will also benefit from faster builds. EC2 M1 Mac instances deliver up to 60 percent better price performance over the x86-based EC2 Mac instances for iPhone and Mac app build workloads.

For example, I tested the time it takes to clean, build, archive, and run the unit tests on a sample project I wrote. The new EC2 M1 Mac instances complete this set of tasks in 49 seconds on average. This is 47.8 percent faster than the same set of tasks running on the previous generation of EC2 Mac instances.

To see how to launch an EC2 M1 Mac instance from the AWS Management Console or the AWS Command Line Interface (CLI), I invite you to read my last blog post on the subject.

EC2 Mac M1 Instance

During the six months of the preview, we collected your feedback and fine-tuned the service to your needs.

We’ve added a new FAQ section to our documentation to get started with EC2 M1 Mac instances. Agents for management and observability, such as Systems Manager and CloudWatch, are pre-installed on all our macOS AMIs, along with tools such as the AWS Command Line Interface (CLI) and our AWS SDKs. EC2 M1 Mac instances integrate with other AWS services, such as Amazon Elastic File System (Amazon EFS) for file storage, AWS Auto Scaling, or AWS Secrets Manager.

For example, I am using Secrets Manager to securely store my build secrets, such as the signing keys and certificates used to sign my binaries before to distribute them on the App Store. From my laptop, I first make sure to export the certificate from the macOS keychain. I then upload my certificate to Secrets Manager with this command:

aws secretsmanager create-secret            \
       --name apple-signing-dev-certificate \
       --secret-binary fileb://./secrets/apple_dev_seb.p12 

On the EC2 M1 Mac instance, to prepare my instance before the build phase, I download the certificate, decode it (it is base64-encoded), and store it in the EC2 M1 Mac instance keychain, where the codesign tool will find it during the build.

# download the certificate from Secrets Manager
SIGNING_DEV_KEY=$($aws secretsmanager get-secret-value  \
      --secret-id apple-signing-dev-certificate         \
      --query SecretBinary --output text)
	  

# save the certificate as a file
echo $SIGNING_DEV_KEY | base64 -d > seb_dev_certificate.p12

# import the certificate in the keychain 
security import seb_dev_certificate.p12 \
                -P "my_cert_password"   \
                -k my.dev.keychain      \
                -T /usr/bin/security -T /usr/bin/codesign -T /usr/bin/xcodebuild

# delete the certificate from disk
rm seb_dev_certificate.p12

There are a few more configuration steps to get code signing work from the macOS command line. You can check out this presentation I made or my code repository for the details.

We are preparing a couple of events to help you learn more about EC2 M1 Mac instance use cases and configuration. First, we recently had an online webinar to learn how to take advantage of EC2 Mac instances for iOS development, content is available for you to consume on-demand after a free registration step. Second, we are preparing a one-day, in-person developer conference for later this year. The conference agenda will be packed with technical content and workshops. Stay tuned on social media to learn more about it.

Last and not least, but not related to EC2 Mac instances, the Apple WWDC 2022 conference took place last month, from June 6–8, 2022, and the content is available online. This is a great occasion to learn more about development for Apple systems in general.

And now, go build 😉

— seb

New – High Volume Outbound Communication with Amazon Connect Outbound Campaigns

Post Syndicated from Sébastien Stormacq original https://aws.amazon.com/blogs/aws/new-high-volume-outbound-communication-with-amazon-connect-outbound-campaigns/

The new high volume outbound communication capability in Amazon Connect which was announced at Enterprise Connect last year, is now generally available to all. It is named Amazon Connect outbound campaigns.

If you haven’t heard about Amazon Connect, it is an easy-to-use cloud contact center service that helps companies of any size deliver superior customer service at lower cost. You can read the original blog post Jeff wrote at launch in 2017, with amazing Lego art 🙂

Contact centers not only receive calls and communications, but they also send outbound communications to customers. There are a variety of reasons to send outbound communication: appointment reminders, telemarketing, subscription renewals, and billing reminders. The vast majority of these communications are phone calls, and in many contact centers, agents make the calls manually using customer contact lists in external systems. Since customers only answer about ten percent of calls, these agents can spend nearly half of their time dialing and waiting. This can result in millions of dollars in lost productivity each year for a contact center with as few as 200 agents.

To help you to address this challenge, today we are adding to Amazon Connect outbound campaigns a set of high-volume outbound communication capabilities that allows you to proactively reach more of your customers across voice, SMS, and email. When using this capability, you will have a scalable way for proactive outreach for hundreds to millions of your customers, and you will increase your agents’ productivity and lower your operational costs.

Amazon Connect outbound campaigns delivers a predictive phone dialer. The dialer includes an answering machine detection system powered by machine learning. It allows the automatic detection of answering machines for voice calls and passes calls to agents only when the call is answered by a human. The dialer also adjusts the call rate depending on factors such as percentage of human-answered the calls, call duration, and agent availability. There is no integration required to get the benefit of existing Amazon Connect features, such as automated workflows, routing, and machine learning capabilities like Contact Lens. You now have a single system for inbound and outbound communications.

To further refine the customer experience or use multiple channels in your campaigns, for example, to send an SMS or email message to your customers when they do not answer calls, you have the option to use Amazon Pinpoint. Amazon Pinpoint is a flexible and scalable outbound and inbound marketing communications service. It allows you to define customer segments, define the customer journey, define the contact strategy, and more. Amazon Pinpoint is the system handling high-volume SMS and email campaigns.

To better understand how Amazon Connect, Amazon Pinpoint, and other AWS services work together, you can refer to this very detailed blog post.

Let’s show you how it works
Imagine I am a contact center manager, and I want to create an outbound call campaign to target a selected list of customers.

I first import my customer contact list from a spreadsheet on Amazon S3. I may also import it from popular customer relationship management (CRM) and marketing automation applications, such as Marketo, Salesforce, Twilio’s Segment, ServiceNow, Shopify, Zendesk, and Amazon Pinpoint itself.

Amazon Connect outbound campaigns - import contact 2

Then I create a campaign and define some journey parameters: the communication channel, the start time, and the corresponding content, such as a call script, email template, or SMS message. At the scheduled start time, the journey is executed using Amazon Connect for calls or Amazon Pinpoint for SMS or emails, as specified.

Amazon Connect outbound campaigns - create campaign

When I configure the campaign to run in Predictive dial mode, as I mentioned before, the dialer automatically adjusts the dial rate based on the duration of calls and the real-time availability of agents. Once a call is answered, Amazon Connect distinguishes whether it is a live voice or a recorded message and routes the live customer to an available agent in the Amazon Connect agent application, where the agent can see the call script that I specified during setup, along with relevant customer information.

As explained earlier, I may use Amazon Pinpoint to define the customer journey. By doing so, I can combine voice, email, and SMS channels in the same outbound communication campaign to improve the efficiency of my agents and my customer’s experience. For example, a financial institution can use Amazon Connect to send an SMS notification to remind a customer of a missed payment and include a link to request a call back from an agent. When a call is requested, Amazon Connect automatically queues the call, dials the customer’s number, detects their voice, and connects an available agent to the customer.

Amazon Connect outbound campaigns - journey workflow

Amazon Pinpoint allows you to define the details of the customer journey.

Amazon Connect outbound campaigns - setup quiet times

As usual with AWS services, I can analyze contact events sent via Amazon EventBridge. EventBridge is a serverless event bus that makes it easier to build event-driven applications at scale using events generated from your applications, integrated software-as-a-service (SaaS) applications, and AWS service. When filtering or analyzing events posted to EventBridge, I can create metrics such as time to connect to an agent, duration of the contact, and call abandonment rate

These metrics help me understand the status of my campaign and ensure compliance with applicable regulations, such as maximum call abandonment rates. I also can use historical reports of these metrics to understand the effectiveness of all my communications campaigns over time.

Amazon Connect outbound campaigns - jounrey metrics

Speaking of compliance, we do not want anyone to abuse the system, intentionally or not, or to break any local compliance rules.

Access and Compliance
Using automated services to drive outbound communication campaigns is strictly regulated in several countries and territories. For example, the US adopted the Telephone Consumer Protection Act (TCPA) in 1991, and the United Kingdom’s Office of Communications has similar rules.

Amazon Connect outbound campaigns gives you the tools to stay compliant with these regulations and many others. However, just like with traditional IT security, it is a shared responsibility. It is your responsibility to use the service in a compliant manner. We are happy to assist you in addressing specific use cases.

Let’s share two examples to illustrate how Amazon Connect outbound campaigns can help you meet your compliance status: respect quiet time and monitor call abandonment rate.

The use of quiet times allows contact center managers to configure a schedule for channel communications based on the day of the week and the hours of the day. More precise delivery times means your customers are most likely to engage with the communication and increase metrics such as open rates for SMS and email, as well as pick-up rates for voice calls. It also allows contact center managers to follow country and state-level voice dialing legislation. The following screenshot shows how you can configure quiet times using Amazon Pinpoint.

Amazon Connect outbound campaigns - quiet times

According to TCPA, call abandonment rate is the percentage of calls picked up by a live customer but not connected to a live agent within two seconds after the customer greeting. I found it interesting that in the UK, the time is measured from the start of your customer greetings, while in the US, it is measured from the end of the greeting. Amazon Connect outbound campaigns provides you with metrics, such as customerGreetingStart, customerGreetingStop, andconnectedToAgent for each outbound communication. Contact center managers can use these to compute the abandonment rate and dial up or down the outgoing communication channel accordingly.

Other metrics, configuration parameters, and AWS Lambda API integration allow contact center managers to consult a Do-Not-Call (DNC) registry or list scrubbing and verify your customer’s local time zone or bank holiday calendars, just to name a few.

Pricing and Availability
Amazon Connect outbound campaigns is available in US East (N. Virginia), US West (Oregon), Asia Pacific (Sydney), and Europe (London) AWS Regions. This allows you to start your outbound campaigns for customers in the USA, UK, Australia, and New Zealand.

As usual, pricing is based on your usage; you only pay for what you use with no upfront or minimum engagement. The key metrics we are using for pricing are the minutes of outbound calls. The pricing page has all the details.

And now, go build your contact centers.

— seb

Modernize Your Mainframe Applications & Deploy Them In The Cloud

Post Syndicated from Sébastien Stormacq original https://aws.amazon.com/blogs/aws/modernize-your-mainframe-applications-deploy-them-in-the-cloud/

Today, we are launching AWS Mainframe Modernization service to help you modernize your mainframe applications and deploy them to AWS fully-managed runtime environments. This new service also provides tools and resources to help you plan and implement migration and modernization.

Since the introduction of System/360 on April 7 1964, mainframe computers have enabled many industries to transform themselves. The mainframe has revolutionized the way people buy things, how people book and purchase travel, and how governments manage taxes or deliver social services. Two thirds of the Fortune 100 companies have their core businesses located on a mainframe. And according to a 2018 estimate, $3 trillion ($3 x 10^12) in daily commerce flows through mainframes.

Mainframes are using their very own set of technologies: programming languages such as COBOL, PL/1, and Natural, to name a few, or databases and data files such as VSAM, DB2, IMS DB, or Adabas. They also run “application servers” (or transaction managers as we call them) such as CICS or IMS TM. Recent IBM mainframes also run applications developed in the Java programming language deployed on WebSphere Application Server.

Many of our customers running mainframes told us they want to modernize their mainframe-based applications to take advantage of the AWS cloud. They want to increase their agility and their capacity to innovate, gain access to a growing pool of talents with experience running workloads on AWS, and benefit from the continual AWS trend of improving cost/performance ratio.

Application modernization is a journey composed of four phases:

  • First, you assess the situation. Are you ready to migrate? You define the business case and educate the migration team.
  • Second, you mobilize. You kick off the project, identify applications for a proof of concept, and refine your migration plan and business cases.
  • Third, you migrate and modernize. For each application, you run in-depth discovery, decide on the right application architecture and migration journey, replatform or refactor the code base, and test and deploy to production.
  • Last, you operate and optimize. You monitor deployed applications, manage resources, and ensure that security and compliance are up to date.

AWS Mainframe Modernization helps you during each phase of your journey.

Assess and Mobilize
During the assessment and mobilization phase, you have access to analysis and development tools to discover the scope of your application portfolio and to transform source code as needed. Typically, the service helps you discover the assets of your mainframe applications and identify all the data and other dependencies. We provide you with integrated development environments where you can adapt or refactor your source code, depending on whether you are replatforming or refactoring your applications.

Application Automated Refactoring
You may choose to use the automated refactoring pattern, where mainframe application assets are automatically converted into a modern language and ecosystem. With automated refactoring, AWS Mainframe Modernization uses Blu Age tools to convert your COBOL, PL/1, or JCL code to Java services and scripts. It generates modern code, data access, and data format by implementing patterns and rules to transform screens, indexed files, and batch applications to a modern application stack.

AWS Mainfraime Modernization Refactoring

Application Replatforming
You may also choose to replatform your applications, meaning move them to AWS with minimal changes to the source code. When replatforming, the fully-managed runtime comes preinstalled with the Micro Focus mainframe-compatible components, such as transaction managers, data mapping tools, screen and maps readers, and batch execution environments, allowing you to run your application with minimum changes.

AWS Mainfraime Modernization Replatforming

This blog post can help you learn more about nuances between replatforming and refactoring.

DevOps For Your Mainframe Applications
AWS Mainframe Modernization service provides you with AWS CloudFormation templates to easily create continuous integration and continuous deployment pipelines. It also deploys and configures monitoring services to monitor the managed runtime. This allows you to maintain or continue to evolve your applications once migrated, using best practices from Agile and DevOps methodologies.

Managed Services
AWS Mainframe Modernization takes care of the undifferentiated heavy lifting and provides you with fully managed runtime environments based on 15 years of cloud architecture best practices in terms of security, high availability, scalability, system management, and using infrastructure as code. These are all important for the business-critical applications running on mainframes.

The analysis tools, development tools, and the replatforming or refactoring runtimes come preinstalled and ready to use. But there is much more than preinstalled environments. The service deploys and manages the whole infrastructure for you. It deploys the required network, load balancer, and configure log collection with Amazon CloudWatch, among others. It manages application versioning, deployments, and high availability dependencies. This saves you days of designing, testing, automating, and deploying your own infrastructure.

The fully managed runtime includes extensive automation and managed infrastructure resources that you can operate via the AWS console, the AWS Command Line Interface (CLI), and application programming interfaces (APIs). This removes the burden and undifferentiated heavy lifting of managing a complex infrastructure. It allows you to spend time and focus on innovating and building new capabilities.

Let’s Deploy an App
As usual, I like to show you how it works. I am using a demo banking application. The application has been replatformed and is available as two .zip files. The first one contains the application binaries, and the second one the data files. I uploaded the content of these zipped files to an Amazon Simple Storage Service (Amazon S3) bucket. As part of the prerequisites, I also created a PostgreSQL Aurora database, stored its username and password in AWS Secrets Manager, and I created an encryption key in AWS Key Management Service (KMS).

Sample Banking Application files

Create an Environment
Let’s deploy and run the BankDemo sample application in an AWS Mainframe Modernization managed runtime environment with the Micro Focus runtime engine. For brevity, I highlight only the main steps. The full tutorial is available as part of the service documentation.

I open the AWS Management Console and navigate to AWS Mainframe Modernization. I navigate to Environments and select Create environment.

AWS Mainframe Migration - Create EnvironmentI give the environment a name and select Micro Focus runtime since we are deploying a replatformed application. Then I select Next.

AWS Mainframe Modernization - Create Environment 2In the Specify Configurations section, I leave all the default values: a Standalone runtime environment, the M2.m5.large EC2 instance type, and the default VPC and subnets. Then I select Next.

AWS Mainframe Modernization - Create Environment 3

On the Attach Storage section, I mount an EFS endpoint as /m2/mount/demo. Then I select Next.

AWS Mainframe Modernization - Create Environment 4In the Review and create section, I review my configuration and select Create environment. After a while, the environment status switches to Available.

AWS Mainframe Modernization - environment available

Create an Application
Now that I have an environment, let’s deploy the sample banking application on it. I select the Applications section and select Create application.

AWS Mainframe Modernization - Create ApplicatioI give my application a name, and under Engine type, I select Micro Focus.

AWS Mainframe Modernization - Create Application 2In the Specify resources and configurations section, I enter a JSON definition of my application. The JSON tells the runtime environment where my application’s various files are located and how to access Secrets Manager. You can find a sample JSON file in the tutorial section of the documentation.

AWS Mainframe Modernization - Create Application 3In the last section, I Review and create the application. I select Create application. After a moment, the application becomes available.

AWS Mainframe Modernization - application is availableOnce available, I deploy the application to the environment. I select the AWSNewsBlog-SampleBanking app, then I select the Actions dropdown menu, and I select Deploy application.

AWS Mainframe Modernization - deploy the appAfter a while, the application status changes to Ready.

Import Data sets
The last step before starting the application is to import its data sets. In the navigation pane, I select Applications, then choose AWSNewsBlog-SampleBank. I then select the Data sets tab and select Import. I may either specify the data set configuration values individually using the console or provide the location of an S3 bucket that contains a data set configuration JSON file.

AWS Mainframe Modernization - import data setsI use the JSON file provided by the tutorial in the documentation. Before uploading the JSON file to S3, I replace the $S3_DATASET_PREFIX variable with the actual value of my S3 bucket and prefix. For this example, I use awsnewsblog-samplebank/catalog.

AWS Mainframe Modernization - import data sets 2After a while, the data set status changes to Completed.

My application and its data set are now deployed into the cloud.

Start the Application
The last step is to start the application. I navigate to the Applications section. I then select AWSNewsBlog-SampleBank. In the Actions dropdown menu, I select Start application. After a moment, the application status changes to Running.

AWS Mainframe Modernization - application running

Access the Application
To access the application, I need a 3270 terminal emulator. Depending on your platform, a couple of options are available. I choose to use a web-based TN3270 web-based client provided by Micro Focus and available on the AWS Marketplace. I configure the terminal emulator to point it to the AWS Mainframe Modernization environment endpoint, and I use port 6000.

TN3270 Configuration

Once the session starts, I receive the CICS welcome prompt. I type BANK and press ENTER to start the app. I authenticate with user BA0001 and password A. The main application menu is displayed. I select the first option of the menu and press ENTER.

TN3270 SampleBank demo

Congrats, your replatformed application has been deployed in the cloud and is available through a standard IBM 3270 terminal emulator.

Pricing and Availability
AWS Mainframe Modernization service is available in the following AWS Regions: US East (N. Virginia), US West (Oregon), Asia Pacific (Sydney), Canada (Central), Europe (Frankfurt), Europe (Ireland), and South America (São Paulo).

You only pay for what you use. There are no upfront costs. Third-party license costs are included in the hourly price. Runtime environments for refactored applications, based on Blu Age, start at $2.50/hour. Runtime environments for replatformed applications, based on Micro Focus, start at $5.55/hour. This includes the software licenses (Blu Age or Micro Focus). As usual, AWS Support plans are available. They also cover Blu Age and Micro Focus software.

Committed plans are available for pricing discounts. The pricing details are available on the service pricing page.

And now, go build 😉

— seb

New – Amazon EC2 C7g Instances, Powered by AWS Graviton3 Processors

Post Syndicated from Sébastien Stormacq original https://aws.amazon.com/blogs/aws/new-amazon-ec2-c7g-instances-powered-by-aws-graviton3-processors/

I am excited to announce that Amazon Elastic Compute Cloud (Amazon EC2) C7g instances powered by the latest AWS Graviton3 processors that have been available in preview since re:Invent last year are now available for all.

Let’s decompose the name C7g: the “C” instance family is designed for compute-intensive workloads. This is the 7th generation of this instance family. And the “g” means it is based on AWS Graviton, the silicon designed by AWS. These instances are the first instances to be powered by the latest generation of AWS Graviton, the Graviton3 processors.

As you bring more diverse workloads to the cloud, and as your compute, storage, and networking demands increase at a rapid pace, you are asking us to push the price performance boundary even further so that you can accelerate your migration to the cloud and optimize your costs. Additionally, you are looking for more energy-efficient compute options to help you reduce your carbon footprint and achieve your sustainability goals. We do this by working back from your requests, and innovating at a rapid pace across all levels of the AWS infrastructure. Our Graviton chips offer better performance at lower cost along with enhanced capabilities. For example, AWS Graviton3 processors offer you enhanced security with always-on memory encryption, dedicated caches for every vCPU, and support for pointer authentication.

Let’s illustrate this with numbers. When we launched Graviton2-based instances, they provided up to 40 percent better price/performance for a wide variety of workloads over comparable fifth-generation x86-based instances. We now have 12 instance families (M6g, M6gd, C6g, C6gd, C6gn, R6g, R6gd, T4g, X2gd, Im4gn, Is4gen, and G5g) that are powered by AWS Graviton2 processors that provide significant price performance benefits for a wide range of workloads. In 2021, we saw tens of thousands of AWS customers take advantage of this innovation by using Graviton2-based EC2 instances.

Our next generation, Graviton3 processors, deliver up to 25 percent higher performance, up to 2x higher floating-point performance, and 50 percent faster memory access based on leading-edge DDR5 memory technology compared with Graviton2 processors.

Graviton3 also uses up to 60 percent less energy for the same performance as comparable EC2 instances, which helps you reduce your carbon footprint.

Snap Inc, known for its popular social media services such as Snapchat and Bitmoji, adopted AWS Graviton2-based instances to optimize their price performance on Amazon EC2. Aaron Sheldon, software engineer at Snap, told us: “We trialed the new AWS Graviton3-based Amazon EC2 C7g instances and found that they provide significant performance improvements on real workloads compared to previous generation C6g instances. We are excited to migrate our Graviton2-based workloads to Graviton3, including messaging, storage, and friend graph workloads.”

The C7g instances are available in eight sizes with 1, 2, 4, 8, 16, 32, 48, and 64 vCPUs. C7g instances support configurations up to 128 GiB of memory, 30 Gbps of network performance, and 20 Gbps of Amazon Elastic Block Store (EBS) performance. These instances are powered by the AWS Nitro System, a combination of dedicated hardware and a lightweight hypervisor.

The following table summarizes the key characteristics of each instance type in this family.

Instance Name vCPUs
Memory
Network Bandwidth
EBS Bandwidth
c7g.medium 1 2 GiB up to 12.5 Gbps up to 10 Gbps
c7g.large 2 4 GiB up to 12.5 Gbps up to 10 Gbps
c7g.xlarge 4 8 GiB up to 12.5 Gbps up to 10 Gbps
c7g.2xlarge 8 16 GiB up to 15 Gbps up to 10 Gbps
c7g.4xlarge 16 32 GiB up to 15 Gbps up to 10 Gbps
c7g.8xlarge 32 64 GiB 15 Gbps 10 Gbps
c7g.12xlarge 48 96 GiB 22.5 Gbps 15 Gbps
c7g.16xlarge 64 128 GiB 30 Gbps 20 Gbps

C7g instances are initially available in US East (N. Virginia) and US West (Oregon) AWS Regions; other Regions will be added shortly after launch.

As usual, you can purchase C7g capacity on demand, as Reserved Instances, or as Spot instances, and use your Saving Plans. The pricing details are available on the EC2 pricing page.

I have the chance to talk with AWS customers on a daily basis, and many of my discussions are around price performance and the sustainability of their workloads. With more than 500 instance types to choose from, one question I often receive is: what are the workloads that would benefit from C7g?

You will find that C7g instances provide the best price performance within their instance families for a broad spectrum of compute-intensive workloads, including application servers, micro services, high-performance computing, electronic design automation, gaming, media encoding, or CPU-based ML inference. These instances are ideal for all Linux-based workloads, including containerized and micro service-based applications built using Amazon Elastic Kubernetes Service (EKS), Amazon Elastic Container Service (Amazon ECS), Amazon Elastic Container Registry, Kubernetes, and Docker, and written in popular programming languages such as C/C++, Rust, Go, Java, Python, .NET Core, Node.js, Ruby, and PHP.

The next question I receive is: given that Graviton instances are based on Arm architecture, how difficult is it to migrate from x86?

Graviton3 instances are supported by a broad choice of operating systems, independent software vendors, container services, agents, and developer tools, enabling you to migrate your workloads with minimal effort.

Applications and scripts written in high-level programming languages such as Python, Node.js, Ruby, Java, or PHP will typically just require a redeployment. Applications written in lower-level programming languages such as C/C++, Rust, or Go will require a re-compilation.

But you don’t always need to migrate your applications. Several managed services are based on Graviton already, such as Amazon ElastiCache, Amazon EKS, Amazon ECS, Amazon Relational Database Service (RDS), Amazon EMR, Amazon Aurora, and Amazon OpenSearch Service, and your application can benefit from Graviton with minimal efforts. A French customer told me recently they migrated a significant portion of their Amazon EMR clusters to Graviton by doing just one line change in their Terraform scripts; all the rest worked as-is.

For those of you building with serverless, we have also released Graviton support for AWS Fargate and AWS Lambda, extending the price, efficiency, and performance benefits of Graviton to serverless workloads. Lambda functions using Graviton2 can see up to 34 percent better price/performance.

Reducing the carbon footprint of your organization is also of paramount importance. Reducing the carbon footprint of cloud-based workloads is a shared responsibility between you and us. We do our part by innovating at all levels: from the materials used to build our facilities, the usage of water for cooling, and the production of renewable energy, down to inventing new silicons that are more energy efficient. To help you meet your own sustainability goals, we added a sustainability pillar to the AWS Well-Architected framework, and we released the Customer Carbon Footprint tool. Graviton3 fits into that context. It uses up to 60 percent less energy for the same performance as comparable EC2 instances.

We do our part in this shared responsibility model, and now, it is your turn. You can use our innovations and tools to help you optimize your workloads and only use the resources you need. Take the occasion to write clever code that uses fewer CPU cycles, less storage, or less network bandwidth. And be sure to select energy-efficient options, such as Graviton3-based instance types or managed services, when deploying your code.

To help you to get started migrating your applications to Graviton instance types today, we curated this list of technical resources. Have a look at it. To learn more about Graviton-based instances, visit the Graviton page or the C7g page and check out this video:

If you’d like to get started with Graviton-based instances for free, we also just reintroduced the free trial on T4g.small instances for up to 750 hours/month until the end of this year (December 31, 2022).

And now, go build 😉

— seb

AWS Week In Review – May 23, 2022

Post Syndicated from Sébastien Stormacq original https://aws.amazon.com/blogs/aws/aws-week-in-review-may-27-2022/

This post is part of our Week in Review series. Check back each week for a quick roundup of interesting news and announcements from AWS!

This is the right place to quickly learn about recent AWS news from last week, in just about five minutes or less. This week, I have collected a couple of news items that might be of interest to you, the IT professionals, developers, system administrators, or any type of builders that have their hands on the AWS console, the CLI, or that are writing code.

Last Week’s Launches
The launches that caught my attention last week are the following:

EC2 now supports NitroTPM and SecureBoot – A Trusted Platform Module is often a discrete chip in a computer where you can store secrets and release them to the operating system only when the system is in a known good state. You typically use TPM modules to store operating-system-level volume encryption keys, such as the ones used by BitLocker on Windows or LUKS. NitroTPM is a virtual TPM module available on selected instance families that allows you to deploy your workloads depending on TPM functionalities on EC2 instances.

Amazon EC2 Auto Scaling now backfills predictive scaling forecasts so you can quickly validate forecast accuracy. Auto Scaling Predictive Scaling is a capability of Auto Scaling that allows you to scale your fleet in and out based on observed usage patterns. It uses AI/ML to predict when your fleet needs more or less capacity. It allows you to scale a fleet in advance of the scaling event and have the fleet prepared at peak times. The new backfills shows you how predictive scaling would have scaled your fleet during the last 14 days. This allows you to quickly decide if the predictive scaling policy is accurate for your applications by comparing the demand and capacity forecasts against actual demand immediately after you create a predictive scaling policy.

AWS Backup adds support for two new managed file systems, Amazon FSx for OpenZFS and Amazon Fsx for NetApp ONTAP. These additions helps you meet your centralized data protection and regulatory compliance needs. You can now use AWS Backup’s policy-based capabilities to centrally protect Amazon FSx for NetApp ONTAP or Amazon Fsx for OpenZFS, along with the other AWS services for storage, database, and compute that AWS Backup supports.

AWS App Mesh now supports IPv6 AWS App Mesh is a service mesh that provides application-level networking to make it easy for your services to communicate with each other across multiple types of compute infrastructure. The new support for IPv6 allows you to support workloads running in IPv6 networks and to invoke App Mesh APIs over IPv6. This helps you meet IPv6 compliance requirements, and removes the need for complex networking configuration to handle address translation between IPv4 and IPv6.

Amazon Chime SDK now supports video background replacement and blur on iOS and Android. When you want to integrate audio and video call capabilities in your mobile applications, the Chime SDK is the easiest way to get started. It provides an easy-to-use API that uses the scalable and robust Amazon Chime backend to power your communications. For example, Slack is using Chime as backend for the communications in their apps. The Chime SDK client libraries for iOS and Android now include video background replacement and blur, which developers can use to reduce visual distractions and help increase visual privacy for mobile users on iOS and Android.

For a full list of AWS announcements, be sure to keep an eye on the What’s New at AWS page.

Other AWS News
Some other updates and news that you may have missed:

Amazon Redshift: Ten years of continuous reinvention. This is an Amazon Redshift research paper that will be presented at a leading international forum for database researchers. The authors reflect on how far the first petabyte-scale cloud data warehouse has advanced since it was announced ten years ago.

Improve Your Security at the Edge with AWS IoT Services is a new blog post on the IoT channel. We understand the risks associated with operating at the edge and that you need additional capabilities to ensure that your data is protected. AWS IoT services can help you with end-to-end data protection, device security, and device identification to create the foundation of an expanded information security model and confidently operate at the edge.

AWS Open Source News and Updates – Ricardo Sueiras, my colleague from the AWS Developer Relation team, runs this newsletter. It brings you all the latest open-source projects, posts, and more. Read edition #113 here.

Upcoming AWS Events
CDK Day, on May 26 is a one-day fully virtual event dedicated to the AWS Cloud Development Kit. With four versions of the CDK released (AWS, Terraform, CDK8s, and Projen), we tought the CDK deserves its own full-fledged conference. We will take one day and showcase the brightest and best of CDK from across the whole product family. Let’s talk serverless, Kubernetes and multi-cloud all on the same day! CDK Day will take place on May 26, 2022 and will be fully virtual, live-streamed to our YouTube channel. Book your ticket now, it’s free.

The AWS Summit season is mostly over in Europe, but there are upcoming Summits in North America and the Asia Pacific Regions. Here are some virtual and in-person Summits that might be close to you:

More to come in July, August, and September.

You can register for re:MARS to get fresh ideas on topics such as machine learning, automation, robotics, and space. The conference will be in person in Las Vegas, June 21–24.

That’s all for this week. Check back next Monday for another Week in Review!

— seb

Amazon EC2 Now Supports NitroTPM and UEFI Secure Boot

Post Syndicated from Sébastien Stormacq original https://aws.amazon.com/blogs/aws/amazon-ec2-now-supports-nitrotpm-and-uefi-secure-boot/

In computing, Trusted Platform Module (TPM) technology is designed to provide hardware-based, security-related functions. A TPM chip is a secure crypto-processor that is designed to carry out cryptographic operations. There are three key advantages of using TPM technology. First, you can generate, store, and control access to encryption keys outside of the operating system. Second, you can use a TPM module to perform platform device authentication by using the TPM’s unique RSA key, which is burned into it. And third, it may help to ensure platform integrity by taking and storing security measurements.

During re:Invent 2021, we announced the future availability of NitroTPM, a virtual TPM 2.0-compliant TPM module for your Amazon Elastic Compute Cloud (Amazon EC2) instances, based on AWS Nitro System. We also announced Unified Extensible Firmware Interface (UEFI) Secure Boot availability for EC2.

I am happy to announce you can start to use both NitroTPM and Secure Boot today in all AWS Regions outside of China, including the AWS GovCloud (US) Regions.

You can use NitroTPM to store secrets, such as disk encryption keys or SSH keys, outside of the EC2 instance memory, protecting them from applications running on the instance. NitroTPM leverages the isolation and security properties of the Nitro System to ensure only the instance can access these secrets. It provides the same functions as a physical or discrete TPM. NitroTPM follows the ISO TPM 2.0 specification, allowing you to migrate existing on-premises workloads that leverage TPMs to EC2.

The availability of NitroTPM unlocks a couple of use cases to strengthen the security posture of your EC2 instances, such as secured key storage and access for OS-level volume encryption or platform attestation for measured boot or identity access.

Secured Key Storage and Access
NitroTPM can create and store keys that are wrapped and tied to certain platform measurements (known as Platform Configuration Registers – PCR). NitroTPM unwraps the key only when those platform measurements have the same value as they had at the moment the key was created. This process is referred to as “sealing the key to the TPM.” Decrypting the key is called unsealing. NitroTPM only unseals keys when the instance and the OS are in a known good state. Operating systems compliant with TPM 2.0 specifications use this mechanism to securely unseal volume encryption keys. You can use NitroTPM to store encryption keys for BitLocker on Microsoft Windows. Linux Unified Key Setup (LUKS) or dm-verity on Linux are examples of OS-level applications that can leverage NitroTPM too.

Platform Attestation
Another key feature that NitroTPM provides is “measured boot” a process where the bootloader and operating system extend PCRs with measurements of the software or configuration that they load during the boot process. This improves security in the event that, for example, a malicious program overwrites part of your kernel with malware. With measured boot, you can also obtain signed PCR values from the TPM and use them to prove to remote servers that the boot state is valid, enabling remote attestation support.

How to Use NitroTPM
There are three prerequisites to start using NitroTPM:

  • You must use an operating system that has Command Response Buffer (CRB) drivers for TPM 2.0, such as recent versions of Windows or Linux. We tested the following OSes: Red Hat Enterprise Linux 8, SUSE Linux Enterprise Server 15, Ubuntu 18.04, Ubuntu 20.04, and Windows Server 2016, 2019, and 2022.
  • You must deploy it on a Nitro-based EC2 instance. At the moment, we support all Intel and AMD instance types that support UEFI boot mode. Graviton1, Graviton2, Xen-based, Mac, and bare-metal instances are not supported.
  • Note that NitroTPM does not work today with some additional instance types, but support for these instance types will come soon after the launch. The list is: C6a, C6i, G4ad, G4dn, G5, Hpc6a, I4i, M6a, M6i, P3dn, R6i, T3, T3a, U-12tb1, U-3tb1, U-6tb1, U-9tb1, X2idn, X2iedn, and X2iezn.
  • When you create your own AMI, it must be flagged to use UEFI as boot mode and NitroTPM. Windows AMIs provided by AWS are flagged by default. Linux-based AMI are not flagged by default; you must create your own.

How to Create an AMI with TPM Enabled
AWS provides AMIs for multiple versions of Windows with TPM enabled. I can verify if an AMI supports NitroTPM using the DescribeImagesAPI call. For example:

aws ec2 describe-images --image-ids ami-0123456789

When NitroTPM is enabled for the AMI, “TpmSupport”: “v2.0” appears in the output, such as in the following example.

{
   "Images": [
      {
         ...
         "BootMode": "uefi",
         "TpmSupport": "v2.0"
      }
   ]
}

I may also query for tpmSupport using the DescribeImageAttribute API call.

When creating my own AMI, I may enable TPM support using the RegisterImage API call, by setting boot-mode to uefi and tpm-support to v2.0.

aws ec2 register-image             \
       --region us-east-1           \
       --name my-image              \
       --boot-mode uefi             \
       --architecture x86_64        \
       --root-device-name /dev/xvda \
       --block-device-mappings DeviceName=/dev/xvda,Ebs={SnapshotId=snap-0123456789example} DeviceName=/dev/xvdf,Ebs={VolumeSize=10} \
       --tpm-support v2.0

Now that you know how to create an AMI with TPM enabled, let’s create a Windows instance and configure BitLocker to encrypt the root volume.

A Walk Through: Using NitroTPM with BitLocker
BitLocker automatically detects and uses NitroTPM when available. There is no extra configuration step beyond what you do today to install and configure BitLocker. Upon installation, BitLocker recognizes the TPM module and starts to use it automatically.

Let’s go through the installation steps. I start the instance as usual, using an AMI that has both uefi and TPM v2.0 enabled. I make sure I use a supported version of Windows. Here I am using Windows Server 2022 04.13.

Once connected to the instance, I verify that Windows recognizes the TPM module. To do so, I launch the tpm.msc application, and the Trusted Platform Module (TPM) Management window opens. When everything goes well, it shows Manufacturer Name: AMZN under TPM Manufacturer Information.

Trusted Platform Module ManagementNext, I install BitLocker.

I open the servermanager.exe application and select Manage at the top right of the screen. In the dropdown menu, I select Add Roles and Features.

Add roles and featuresI select Role-based or feature-based installation from the wizard.

Install BitLocker - Step 1I select Next multiple times until I reach the Features section. I select BitLocker Drive Encryption, and I select Install.

Install BitLocker - Step 2I wait a bit for the installation and then restart the server at the end of the installation.

After reboot, I reconnect to the server and open the control panel. I select BitLocker Drive Encryption under the System and Security section.

Turn on Bitlocker - part 1I select Turn on BitLocker, and then I select Next and wait for the verification of the system and the time it takes to encrypt my volume’s data.

Just for extra safety, I decide to reboot at the end of the encryption. It is not strictly necessary. But I encrypted the root volume of the machine (C:) so I am wondering if the machine can still boot.

After the reboot, I reconnect to the instance, and I verify the encryption status.

Turn on Bitlocker - part 2I also verify BitLocker’s status and key protection method enabled on the volume. To do so, I open PowerShell and type

manage-bde -protectors -get C:

Bitlocker statusI can see on the resulting screen that the C: volume encryption key is coming from the NitroTPM module and the instance used Secure Boot for integrity validation. I can also view the recovery key.

I left the recovery key in plain text in the previous screenshot because the instance and volume I used for this demo will not exist anymore by the time you will read this. Do not share your recovery keys publicly otherwise.

Important Considerations
Now that I have shown how to use NitroTPM to protect BitLocker’s volume encryption key, I’ll go through a couple of additional considerations:

  • You can only enable an AMI for NitroTPM support by using the RegisterImage API via the AWS CLI and not via the Amazon EC2 console.
  • NitroTPM support is enabled by setting a flag on an AMI. After you launch an instance with the AMI, you can’t modify the attributes on the instance. The ModifyInstanceAttribute API is not supported on running or stopped instances.
  • Importing or exporting EC2 instances with NitroTPM, such as with the ImportImage API, will omit NitroTPM data.
  • The NitroTPM state is not included in EBS snapshots. You can only restore an EBS snapshot to the same EC2 instance.
  • BitLocker volumes that are encrypted with TPM-based keys cannot be restored on a different instance. It is possible to change the instance type (stop, change instance type, and restart it).

At the moment, we support all Intel and AMD instance types that supports UEFI boot mode. Graviton1, Graviton2, Xen-based, Mac, and bare-metal instances are not supported. Some additional instance types are not supported at launch (I shared the exact list previously). We will add support for these soon after launch.

There is no additional cost for using NitroTPM. It is available today in all AWS Regions, including the AWS GovCloud (US) Regions, except in China.

And now, go build 😉

— seb

AWS Week in Review – April 4, 2022

Post Syndicated from Sébastien Stormacq original https://aws.amazon.com/blogs/aws/aws-week-in-review-april-4-2022/

This post is part of our Week in Review series. Check back each week for a quick round up of interesting news and announcements from AWS!

Welcome to the April 4 edition of the AWS Week in Review. This week, alongside the main launches, I also captured a couple of new capabilities, such as a new API to manage your AWS accounts within AWS Organizations, an easier process to update your AWS Lambda layers, and a new behavior of Amazon Elastic Compute Cloud (Amazon EC2).

Last Week’s Launches
Here are some launches that caught my attention last week:

Sustainability Pillar is now available in the Well Architect Tool – The Well Architected Tool is a central place for cloud architecture best practices and guidance. The Sustainability Pillar was announced at the re:Invent 2021 conference. It helps you to learn, measure, and improve your workloads using environmental best practices for cloud computing.

Close an AWS Member Account with an API Call – This feature was launched with little fanfare, but it is a big deal for those of you managing large numbers of AWS accounts through Organizations.  The Twitter community first spotted the change, noticing a commit in the AWS SDK for Go. See the official blog post announcement for more information!

The Lambda Console Now Allows Updates a Lambda Layer in All or a Subset of Functions – Lambda layers provide a convenient way to package libraries and other dependencies that you can use with your Lambda functions. Using layers reduces the size of uploaded deployment archives and makes it faster to deploy your code. Previously, it was challenging to identify and update all the functions that used a specific layer version. With this release, the Lambda console displays a list of all the functions using a given layer and allows you to select multiple functions to be updated with a newer layer version. It eliminates the need to update one function at a time or utilize an external script to perform the update on multiple functions.

Amazon EC2 Launched Automatic Recovery on Hardware Failure by Default – This new feature makes it easier to recover your instance when it becomes unreachable. Automatic recovery improves instance availability by recovering the instance if it becomes impaired due to an underlying hardware issue. Automatic recovery migrates the instance to another hardware during an instance reboot while retaining its instance ID, private IP addresses, Elastic IP addresses, and all instance metadata. You can choose to disable automatic recovery for your instance if you wish.

For a full list of AWS announcements, be sure to keep an eye on the What’s New at AWS page.

Other AWS News
Beside launches, here are other news worthy items and a blog that caught my attention:

New AWS podcast for Sub-Saharan AWS communities – There are AWS podcasts in many different languages: English, French, Italian, German, three in Spanish, and Russian just to name a few. This week, my colleague Veliswa launched an English podcast aimed at highlighting the Sub-Saharian AWS communities and customers. You can listen to it using any good podcast application (including but not only Spotify and Apple).

100th episode of Le Podcast AWS en Français – This week also marked the publication of the 100th episode of the AWS French Podcast. Since its start in 2019, the podcast has seen 250k downloads. Thank you for listening.

AWS Open Source News and Updates My colleague Ricardo writes this weekly open-source newsletter. In the 106th edition, I noticed two pieces of information important for the Java community:

First, we released Amazon Corretto 18. This version supports the latest Java feature release OpenJDK 18, and is available on Linux, Windows, and macOS. OpenJDK 18 offers a new internet-address resolution capability, a Simple Web Server, an updated Vector API, a new @snippet Tag for JavaDoc, a new implementation of Core Reflection, a change to UTF-8 as the default character set (charset) of the standard Java APIs, a second iteration of the foreign memory API, advancements in pattern matching for switch statements, and the deprecation of finalization.

Second, we published a blog post showing how to reduce Lambda cold start time by deploying your Java-based Lambda function on Quarkus. Quarkus was created by Java Champion Emmanuel Bernard. It is an open-source native Java stack tailored for GraalVM and OpenJDK HotSpot, crafted from the best of breed Java libraries and standards. It is designed to have an extremely low memory footprint and fast startup time. And yes, Quarkus runs on Corretto too.

A Cloud Guru Answers a Common Question – Nearly every week, people ask me what AWS certification they should take. A Cloud Guru walks through the decision in Which AWS certification is right for me?

Upcoming AWS Events
Check your calendars and sign up for these AWS events:

The AWS Summit season has started – The Brussels Summit was last week, and the next ones are Paris, San Francisco, and London, in that order. I will be delivering the closing keynote at the Paris Summit and will be around the Formula1 GameDay area in London. Be sure to stop by and say “Hi!” if you’re around. You can sign up to receive a notification when registration opens for a Summit in your area. If you can’t attend a Summit in person this year, we will have an online Summit for EMEA in June (at European time, but all sessions will stay available on-demand until September).

.NET Enterprise Developer Day EMEA registrations are open – .NET Enterprise Developer Day EMEA 2022 is a free, one-day virtual conference providing enterprise developers with the most relevant information to swiftly and efficiently migrate and modernize their .NET applications and workloads on AWS. It will happen online on April 26, 2022.

re:Mars conference registrations are open – Mars stands for Machine learning, Automation, Robotics, and Space. You will learn from recognized thought leaders and technical experts who are building the future of AI/ML. It will happen in Las Vegas, Nevada, between June 21 and 24, 2022.

re:Inforce conference registrations are open – Security is our first priority at AWS, and it deserves its own two-day conference to reinforce your AWS security posture. You’ll hear the latest from industry-leading speakers in security, compliance, identity, and privacy. It will happen in Boston, Massachusetts, on July 26 and 27, 2022.

That’s all for this week. Come back next Monday for another Week in Review!

— seb

New Amazon RDS for MySQL & PostgreSQL Multi-AZ Deployment Option: Improved Write Performance & Faster Failover

Post Syndicated from Sébastien Stormacq original https://aws.amazon.com/blogs/aws/amazon-rds-multi-az-db-cluster/

Today, we are announcing a new Amazon Relational Database Service (RDS) Multi-AZ deployment option with up to 2x faster transaction commit latency, automated failovers typically under 35 seconds, and readable standby instances.

Amazon RDS offers two replication options to enhance availability and performance:

  • Multi-AZ deployments gives high availability and automatic failover. Amazon RDS creates a storage-level replica of the database in a second Availability Zone. It then synchronously replicates data from the primary to the standby DB instance for high availability. The primary DB instance serves application requests, while the standby DB instance remains ready to take over in case of a failure. Amazon RDS manages all aspects of failure detection, failover, and repair actions so the applications using the database can be highly available.
  • Read replicas allow applications to scale their read operations across multiple database instances. The database engine replicates data asynchronously to the read replicas. The application sends the write requests (INSERT, UPDATE, and DELETE) to the primary database, and read requests (SELECT) can be load balanced across read replicas. In case of failure of the primary node, you can manually promote a read replica to become the new primary database.

Multi-AZ deployments and read replicas serve different purposes. Multi-AZ deployments give your application high availability, durability, and automatic failover. Read replicas give your applications read scalability.

But what about applications that require both high availability with automatic failover and read scalability?

Introducing the New Amazon RDS Multi-AZ Deployment Option With Two Readable Standby Instances.
Starting today, we’re adding a new option to deploy RDS databases. This option combines automatic failover and read replicas: Amazon RDS Multi-AZ with two readable standby instances. This deployment option is available for MySQL and PostgreSQL databases. This is a database cluster with one primary and two readable standby instances. It provides up to 2x faster transaction commit latency and automated failovers, typically under 35 seconds.

The following diagram illustrates such a deployment:

Three AZ RDS databases

When the new Multi-AZ DB cluster deployment option is enabled, RDS configures a primary database and two read replicas in three distinct Availability Zones. It then monitors and enables failover in case of failure of the primary node.

Just like with traditional read replicas, the database engine replicates data between the primary node and the read replicas. And just like with the Multi-AZ one standby deployment option, RDS automatically detects and manages failover for high availability.

You do not have to choose between high availability or scalability; Multi-AZ DB cluster with two readable standby enables both.

What Are the Benefits?
This new deployment option offers you four benefits over traditional multi-AZ deployments: improved commit latency, faster failover, readable standby instances, and optimized replications.

First, write operations are faster when using Multi-AZ DB cluster. The new Multi-AZ DB cluster instances leverage M6gd and R6gd instance types. These instances are powered by AWS Graviton2 processors. They are equipped with fast NVMe SSD for local storage, ideal for high speed and low-latency storage. They deliver up to 40 percent better price performance and 50 percent more local storage GB per vCPU over comparable x86-based instances.

Multi-AZ DB instances use Amazon Elastic Block Store (EBS) to store the data and the transaction log. The new Multi-AZ DB cluster instances use local storage provided by the instances to store the transaction log. Local storage is optimized to deliver low-latency, high I/O operations per second (IOPS) to applications. Write operations are first written to the local storage transaction log, then flushed to permanent storage on database storage volumes.

Second, failover operations are typically faster than in the Multi-AZ DB instance scenario. The read replicas created by the new Multi-AZ DB cluster are full-fledged database instances. The system is designed to fail over as quickly as 35 seconds, plus the time to apply any pending transaction log. In case of failover, the system is fully automated to promote a new primary and reconfigure the old primary as a new reader instance.

Third, the two standby instances are hot standbys. Your applications may use the cluster reader endpoint to send their read requests (SELECT) to these standby instances. It allows your application to spread the database read load equally between the instances of the database cluster.

And finally, leveraging local storage for transaction log optimizes replication. The existing Multi-AZ DB instance replicates all changes at storage-level. The new Multi-AZ DB cluster replicates only the transaction log and uses a quorum mechanism to confirm at least one standby acknowledged the change. Database transactions are committed synchronously when one of the secondary instances confirms the transaction log is written on its local disk.

Migrating Existing Databases
For those of you having existing RDS databases and willing to take advantage of this new Multi-AZ DB cluster deployment option, you may take a snapshot of your database to create a storage-level backup of your existing database instance. Once the snapshot is ready, you can create a new database cluster, with Multi-AZ DB cluster deployment option, based on this snapshot. Your new Multi-AZ DB cluster will be a perfect copy of your existing database.

Let’s See It in Action
To get started, I point my browser to the AWS Management Console and navigate to RDS. The Multi-AZ DB cluster deployment option is available for MySQL version 8.0.28 or later and PostgreSQL version 13.4 R1 and 13.5 R1. I select either database engine, and I ensure the version matches the minimum requirements. The rest of the procedure is the same as a standard Amazon RDS database launch.

Under Deployment options, I select PostgreSQL, version 13.4 R1, and under Availability and Durability, I select Multi-AZ DB cluster.

Three AZ RDS launch console

If required, I may choose the set of Availability Zones RDS uses for the cluster. To do so, I create a DB subnet group and assign the cluster to this subnet group.

Once launched, I verify that three DB instances have been created. I also take note of the two endpoints provided by Amazon RDS: the primary endpoint and one load-balanced endpoint for the two readable standby instances.

RDS Three AZ list of instances

To test the new cluster, I create an Amazon Linux 2 EC2 instance in the same VPC, within the same security group as the database, and I make sure I attach an IAM role containing the AmazonSSMManagedInstanceCore managed policy. This allows me to connect to the instance using SSM instead of SSH.

Once the instance is started, I use SSM to connect to the instance. I install PostgreSQL client tools.

sudo amazon-linux-extras enable postgresql13
sudo yum clean metadata
sudo yum install postgresql

I connect to the primary DB. I create a table and INSERT a record.

psql -h awsnewsblog.cluster-c1234567890r.us-east-1.rds.amazonaws.com -U postgres

postgres=> create table awsnewsblogdemo (id int primary key, name varchar);
CREATE TABLE

postgres=> insert into awsnewsblogdemo (id,name) values (1, 'seb');
INSERT 0 1

postgres=> exit

To verify the replication works as expected, I connect to the read-only replica. Notice the -ro- in the endpoint name. I check the table structure and enter a SELECT statement to confirm the data have been replicated.

psql -h awsnewsblog.cluster-ro-c1234567890r.us-east-1.rds.amazonaws.com -U postgres

postgres=> \dt

              List of relations
 Schema |      Name       | Type  |  Owner
--------+-----------------+-------+----------
 public | awsnewsblogdemo | table | postgres
(1 row)

postgres=> select * from awsnewsblogdemo;
 id | name
----+------
  1 | seb
(1 row)

postgres=> exit

In the scenario of a failover, the application will be disconnected from the primary database instance. In that case, it is important that your application-level code try to reestablish network connection. After a short period of time, the DNS name of the endpoint will point to the standby instance, and your application will be able to reconnect.

To learn more about Multi-AZ DB clusters, you can refer to our documentation.

Pricing and Availability
Amazon RDS Multi-AZ deployments with two readable standbys is generally available in the following Regions: US East (N. Virginia), US West (Oregon), and Europe (Ireland). We will add more regions to this list.

You can use it with MySQL version 8.0.28 or later, or PostgreSQL version 13.4 R1 or 13.5 R1.

Pricing depends on the instance type. In US regions, on-demand pricing starts at $0.522 per hour for M6gd instances and $0.722 per hour for R6gd instances. As usual, the Amazon RDS pricing page has the details for MySQL and PostgreSQL.

You can start to use it today.

Let Your IPv6-only Workloads Connect to IPv4 Services

Post Syndicated from Sébastien Stormacq original https://aws.amazon.com/blogs/aws/let-your-ipv6-only-workloads-connect-to-ipv4-services/

Today we are announcing two new capabilities for Amazon Virtual Private Cloud (VPC) NAT gateway and Amazon Route 53, allowing your IPv6-only workloads to transparently communicate with IPV4-only services. Curious? Read on; I have details for you.

Some of you are running very large workloads involving tens of thousands of virtual machines, containers, or micro-services. To do so, you configured these workloads to work in the IPv6 address space. This avoids the problem of running out of available IPv4 addresses (a single VPC has a maximum theoretical size of 65,536 IPv4 addresses, compared to /56 ranges for IPv6, allowing for a maximum theoretical size of 2^73 -1 IPv6 addresses), and it saves you from additional headaches caused by managing complex IPv4-based networks (think about non-overlapping subnets in between VPCs belonging to multiple AWS accounts, AWS Regions, or on-premises networks).

But can you really run an IPv6 workload in isolation from the rest of the IPv4 world? Most of you told us it is important to let such workloads continue to communicate with IPv4 services, either to make calls to older APIs or just as a transient design, while you are migrating multiple dependent workloads from IPv6 to IPv4. Not having the ability to call an IPv4 service from IPv6 hosts makes migrations slower and more difficult than it needs to be. It obliged some of you to build custom solutions that are hard to maintain.

This is why we are launching two new capabilities allowing your IPv6 workloads to transparently communicate with IPv4 services: NAT64 (read “six to four”) for the VPC NAT gateway and DNS64 (also “six to four”) for the Amazon Route 53 resolver.

How Does It Work?
As illustrated by the following diagram, let’s imagine I have an Amazon Elastic Compute Cloud (Amazon EC2) instance with an IPv6-only address that has to make an API call to an IPv4 service running on another EC2 instance. In the diagram, I chose to have the IPv4-only host in a separate VPC in the same AWS account, but these capabilities work to connect to any IPv4 service, whether in the same VPC or in another AWS account’s VPC, your on-premises network, or even on the public internet. My IPv6-only host only knows the DNS name of the service.

NAT64 DNS64 beforeHere is the sequence happening when the IPv6-only host initiates a connection to the IPv4 service:

1. The IPV6 host makes a DNS call to resolve the service name to an IP address. Without DNS64, Route 53 would have returned an IPv4 address. The IPv6-only hosts would not have been able to connect to that IPv4 address. But starting today, you can turn on DNS64 for your subnet. The DNS resolver first checks if the record contains an IPv6 address (AAAA record). If it does, the IPv6 address is returned. The IPv6 host can connect to the service using just IPv6. When the record only contains an IPv4 address, the Route 53 resolver synthesizes an IPv6 address by prepending the well-known 64:ff9b::/96 prefix to the IPv4 address.

For example, when the IPv4 service has the address 34.207.250.62, Route 53 returns 64:ff9b::ffff:22cf:fa3e.

IPv6 (hexadecimal) : 64:ff9b::ffff: 22 cf fa 3e
IPv4 (decimal) : 34 207 250 62

64:ff9b::/96is a well-known prefix defined in the RFC 6052 proposed standard to the IETF. Reading the text of the standard is a great way to fall asleep rapidly to learn all the details about IPv6 to IPv4 translation.

2. The IPv6 host initiates a connection to 64:ff9b::ffff:22cf:fa3e. You may configure subnet routing to send all packets starting with 64:ff9b::/96 to the NAT gateway. The NAT gateway recognizes the IPv6 address prefix, extracts the IPv4 address from it, and initiates an IPv4 connection to the destination. As usual, the source IPv4 address is the IPv4 address of the NAT gateway itself.

3. When the packet response arrives, the NAT gateway repopulates the destination host IPv6 address and prepends the well-known prefix 64:ff9b::/96 to the source IP address of the response packet.

Now that you understand how it works, how can you configure your VPC to take advantage of these two new capabilities?

How to Get Started
To enable these two capabilities, I have to adjust two configurations: first, I flag the subnets that require DNS64 translation, and second, I add a route to the IPv6 subnet routing table to send part of the IPv6 traffic to the NAT gateway.

To enable DNS64, I have to use the new --enable-dns64 option to modify my existing subnets. In this demo, I use the modify-subnet-attribute command. This is a one-time operation. I can do it using the VPC API, the AWS Command Line Interface (CLI), or the AWS Management Console. Notice this is a subnet-level configuration that must be turned on explicitly. By default, the existing behavior is maintained.

aws ec2 modify-subnet-attribute --subnet-id subnet-123 --enable-dns64

I have to add a route to the subnet’s routing table to allow VPC to forward IPv6 packets prefixed by DNS64 to the NAT gateway. It tells it to route all packets with destination 64:ff9b::/96 to the NAT gateway.

aws ec2 create-route --route-table-id rtb-123 –-destination-ipv6-cidr-block 64:ff9b::/96 –-nat-gateway-id nat-123

The following diagram illustrates these two simple configuration changes.

NAT64 DNS64 afterWith these two simple changes, my IPv6-only workloads in the subnet may now communicate with IPv4 services. The IPv4 service might live in the same VPC, in another VPC, or anywhere on the internet.

You can continue to use your existing NAT gateway, and no change is required on the gateway itself or on the routing table attached to the NAT gateway subnet.

Pricing and Availability
These two new capabilities to the VPC NAT gateway and Route 53 are available today in all AWS Regions at no additional costs. Regular NAT gateway charges may apply.

Go and build your IPv6-only networks!

— seb

Happy 10th Birthday, DynamoDB! 🎉🎂🎁

Post Syndicated from Sébastien Stormacq original https://aws.amazon.com/blogs/aws/happy-birthday-dynamodb/

On January 18th 2012, Jeff and Werner announced the general availability of Amazon DynamoDB, a fully managed flexible NoSQL database service for single-digit millisecond performance at any scale.

During the last 10 years, hundreds of thousands of customers have adopted DynamoDB. It regularly reaches new peaks of performance and scalability. For example, during the last Prime Day sales in June 2021, it handled trillions of requests over 66 hours while maintaining single-digit millisecond performance and peaked at 89.2 million requests per second. Disney+ uses DynamoDB to ingest content, metadata, and billions of viewers actions each day. Even during unprecedented demands caused by the pandemic, DynamoDB was able to help customers as many across the world had to change their way of working, needing to meet and conduct business virtually. For example, Zoom was able to scale from 10 million to 300 million daily meeting participants when we all started to make video calls in early 2020.

A decade of innovation with Amazon DynamoDB

On this special anniversary, join us for an unique online event on Twitch on March 1st. I’ll tell you more about this at the end of this post. But before talking about this event, let’s take this opportunity to reflect back on the genesis of this service and the main capabilities we added since the original launch 10 years ago.

The History Behind DynamoDB
The story of DynamoDB started long before the launch 10 years ago. It started with a series of outages on Amazon’s e-commerce platform during the holiday shopping season in 2004. At that time, Amazon was transitioning from a monolithic architecture to microservices. The design principle was (and still is) that each stateful microservice uses its own data store, and other services are required to access a microservice’s data through a publicly exposed API. Direct database access was not an option anymore. At that time, most microservices were using a relational database provided by a third-party vendor. Given the volume of traffic during the holiday season in 2004, the database system experienced some hard-to-debug and hard-to-reproduce deadlocks. The e-commerce platform was pushing the relational databases to their limits, despite the fact that we were using simple usage patterns, such as query by primary keys only. These usage patterns do not require the complexity of a relational database.

At Amazon and AWS, after an outage happens, we start a process called Correction of Error (COE) to document the root cause of the issue, to describe how we fixed it, and to detail the changes we’re making to avoid recurrence. During the COE for this database issue, a young, naïve, 20-year-old intern named Swaminathan (Swami) Sivasubramanian (now VP of the database, analytics, and ML organization at AWS) asked the question, “Why are we using a relational database for this? These workloads don’t need the SQL level of complexity and transactional guarantees.”

This led Amazon to rethink the architecture of its data stores and to build the original Dynamo database. The objective was to address the demanding scalability and reliability requirements of the Amazon e-commerce platform. This non-relational, key-value database was initially targeted at use cases that were the core of the Amazon e-commerce operations, such as the shopping basket and the session service.

AWS published the Dynamo paper in 2007, three years later, to describe our design principles and provide the lessons learned from running this database to support Amazon’s core e-commerce operations. Over the years, we saw several Dynamo clones appear, proving other companies were searching for scalable solutions, just like Amazon.

After a couple of years, Dynamo was adopted by several core service teams at Amazon. Their engineers were very satisfied with the performance and scalability. However, we started to interview engineers to understand why it was not more broadly adopted within Amazon. We learned Dynamo was giving teams the reliability, performance, and scalability they needed, but it did not simplify the operational complexity of running the system. Teams were still needed to install, configure, and operate the system in Amazon’s data centers.

At the time, AWS was proposing Amazon SimpleDB as a NoSQL service. Many teams preferred the operational simplicity of SimpleDB despite the difficulties to scale a domain beyond 10 GB, its non-predictable latency (it was affected by the size of the database and its indexes), and its eventual consistency model.

We concluded the ideal solution would combine the strengths of Dynamo—the scalability and the predictable low latency to retrieve data—with the operational simplicity of SimpleDB—just having a table to declare and let the system handle the low-level complexity transparently.

DynamoDB was born.

DynamoDB frees developers from the complexity of managing hardware and software. It handles all the complexity of scaling partitions and re-partitions your data to meet your throughput requirements. It scales seamlessly without the need to manually re-partition tables, and it provides predictable low latency access to your data (single-digit milliseconds).

At AWS, the moment we launch a new service is not the end of the project. It is actually the beginning. Over the last 10 years, we have continuously listened to your feedback, and we have brought new capabilities to DynamoDB. In addition to hundreds of incremental improvements, we added:

… and many more.

Lastly, during the last AWS re:Invent conference, we announced Amazon DynamoDB Standard-Infrequent Access (DynamoDB Standard-IA). This new DynamoDB table class allows you to lower the cost of data storage for infrequently accessed data by 60%. The ideal use case is for data that you need to keep for the long term and that your application needs to occasionally access, without compromising on access latency. In the past, to lower storage costs for such data, you were writing code to move infrequently accessed data to lower-cost storage alternatives, such as Amazon Simple Storage Service (Amazon S3). Now you can switch to the DynamoDB Standard-IA table class to store infrequently accessed data while preserving the high availability and performance of DynamoDB.

How To Get Started
To get started with DynamoDB, as a developer, you can refer to the Getting Started Guide in our documentation or read the excellent DynamoDB, Explained, written by Alex DeBrie, one of our AWS Heroes, and author of The DynamoDB Book. To dive deep into DynamoDB data modeling, AWS Hero Jeremy Daly is preparing a video course “DynamoDB Modeling for the rest of us“.

Customers now leverage DynamoDB across virtually any industry vertical, geographic area, and company size. You are continually surprising us with how you innovate on DynamoDB, and you are continually pushing us to continue to evolve DynamoDB to make it easier to build the next generation of applications. We are going to continue to work backwards from your feedback to meet your ever evolving needs and to enable you to innovate and scale for decades to come.

A Decade of Innovation with DynamoDB – A Virtual Event
As I mentioned at the beginning, we also would love to celebrate this anniversary with you. We prepared a live Twitch event for you to learn best practices, see technical demos, and attend a live Q&A. You will hear stories from two of our long-time customers : SmugMug CEO Don MacAskill, and engineering leaders from Dropbox. In addition, you’ll get a chance to ask your questions to and chat with AWS’ blog legend and Chief Evangelist Jeff Barr, and DynamoDB‘s product managers and engineers. Finally, AWS heroes Alex DeBrie and Jeremy Daly will host two deep dive technical sessions. Have a look at the full agenda here.

This will be live on Twitch on March 1st, you can register today. The first 1,000 registrants from US will receive a free digital copy of the DynamoDB book (this has a $79 retail value).

To DynamoDB’s next 10 years. Cheers 🥂.

— seb

Amazon GuardDuty Enhances Detection of EC2 Instance Credential Exfiltration

Post Syndicated from Sébastien Stormacq original https://aws.amazon.com/blogs/aws/amazon-guardduty-enhances-detection-of-ec2-instance-credential-exfiltration/

Amazon GuardDuty is a threat detection service that continuously monitors for malicious activity and unauthorized behavior to protect your AWS accounts, workloads, and data stored in Amazon Simple Storage Service (Amazon S3). Informed by a multitude of public and AWS-generated data feeds and powered by machine learning, GuardDuty analyzes billions of events in pursuit of trends, patterns, and anomalies that are recognizable signs that something is amiss. You can enable it with a click and see the first findings within minutes.

Today, we are adding to GuardDuty the ability to detect when your Amazon Elastic Compute Cloud (Amazon EC2) instance credentials are being used from another AWS Account. EC2 instance credentials are the temporary credentials made available through the EC2 metadata service to any applications running on an instance, when an AWS Identity and Access Management (IAM) role is attached to it.

What Are the Risks?
When your workloads deployed on EC2 instances access AWS services, they use an access key, a secret access key, and a session token. The secure mechanism to pass access key credentials to your workloads is to define the permissions required by your workload, create one or several IAM policies with the permissions, attach the policies to an IAM role and, finally, attach the role to the instance.

Any process running on an EC2 instance with a role attached can retrieve the security credentials by calling the EC2 metadata service:

curl 169.254.169.254/latest/meta-data/iam/security-credentials/role_name
{
  "Code" : "Success",
  "LastUpdated" : "2021-09-05T18:24:45Z",
  "Type" : "AWS-HMAC",
  "AccessKeyId" : "AS...J5",
  "SecretAccessKey" : "r1...9m",
  "Token" : "IQ...z5Q==",
  "Expiration" : "2021-09-06T00:44:06Z"
}

These credentials are limited in time and in scope. They are valid for a maximum of six hours. They are limited to the scope of the permissions attached to the IAM role associated with the EC2 instance.

All AWS SDK are able to retrieve and renew such credentials automatically. No additional code is necessary in your application.

Now imagine that your application running on the EC2 instance is compromised and a malicious actor managed to access the instance’s meta data service. The malicious actor would extract the credentials. These credentials have the permissions you defined in the IAM role attached to the instance. Depending on your application, attackers might have the possibility to exfiltrate data from S3 or DynamoDB, to start or terminate EC2 instances, or even to create new IAM users or roles.

Since the launch of GuardDuty, it has detected when such credentials are used from IP addresses outside of AWS. Smart attackers therefore might hide their activity from another AWS account to operate outside of the sight of GuardDuty. Starting today, GuardDuty also detects when the credentials are used from other AWS accounts, inside the AWS network.

What Alerts Are Generated?
There are legitimate reasons why the source IP address communicating with AWS Services APIs might be different than the EC2 instance IP address. Think about complex network topologies that route traffic to one or multiple VPCs; AWS Transit Gateway, or AWS Direct Connect for example. In addition, multi-Region configurations, or not using AWS Organizations, makes it non trivial to detect if the AWS account using the credentials belongs to you or not. Large companies have implemented their own solution to detect such security compromises, but these type of solutions are not easy to build and to maintain. Only a handful of organizations have the resources required to tackle this challenge. When they do so, they distract their engineering efforts from their core business. This is why we decided to address this.

Starting today, GuardDuty generates alerts when it detects a misuse of EC2 instance credentials. When the credentials are used from an affiliated account, the alert is labeled as medium-severity. Otherwise, a high-severity alert is generated. Affiliated accounts are accounts monitored by the same GuardDuty administrator account, also known as GuardDuty member accounts. They might be part of your organization or not.

In Practice
To learn how it’s working, let’s capture and exfiltrate a set of EC2 credentials from one of my EC2 instances. I use SSH to connect to one of my instances, and I use curl to retrieve the credentials, as shown earlier:

curl 169.254.169.254/latest/meta-data/iam/security-credentials/role_name
{
  "Code" : "Success",
  "LastUpdated" : "2021-09-05T18:24:45Z",
  "Type" : "AWS-HMAC",
  "AccessKeyId" : "AS...J5",
  "SecretAccessKey" : "r1...9m",
  "Token" : "IQ...z5Q==",
  "Expiration" : "2021-09-06T00:44:06Z"
}

The instance has an IAM role with permissions allowing to read S3 buckets in this AWS account. I copy and paste the credentials. Then I connect to another EC2 instance running in a different AWS account, not affiliated with the same GuardDuty administrator account. I use SSH to connect to that other instance, and then I configure the AWS CLI with the compromised credentials. I attempt to access a private S3 bucket.


# first verify I do not have access 
[ec2-user@ip-1-1-0-79 ~]$ aws s3 ls s3://my-private-bucket

An error occurred (AccessDenied) when calling the ListObjectsV2 operation: Access Denied

# then I configure the CLI using the compromised credentials
[ec2-user@ip-1-1-0-79 ~]$ aws configure
AWS Access Key ID [None]: AS...J5
AWS Secret Access Key [None]: r1...9m
Default region name [None]: us-east-1
Default output format [None]:

[ec2-user@ip-1-1-0-79 ~]$ aws configure set aws_session_token IQ...z5Q==

# Finally, I attempt to access S3 again
[ec2-user@ip-1-1-0-79 ~]$ aws s3 ls s3://my-private-bucket
                     PRE folder1/
                     PRE folder2/
                     PRE folder3/
2021-01-22 16:37:48 6148 .DS_Store

Shortly after, I use the AWS Management Console to access GuardDuty in the AWS account where I stole the credentials. I can verify a high-severity alert was generated.

GuardDuty EC2 credentials exfiltration alarm

And So What?
Attackers may extract credentials when they have remote code execution (RCE), local presence on the instance, or by exploiting application-level vulnerabilities like Server Side Request Forgery (SSRF) and XML External Entity (XXE) injection. There are multiple methods to mitigate RCE or local access, including rebuilding the instances from a secured and patched AMI to eliminate remote access, rotate access credentials, and so on. When the vulnerability is at the application level, you or the application vendor are required to patch the application code to eliminate the vulnerability.

When you receive an alert indicating a risk of compromised credentials, the first thing to do is to verify the account ID. Is it one of your company accounts or not? During the analysis, when the business case allows, you may terminate the compromised instances or shut down the application. This prevents the attacker from extracting renewed instance credentials upon expiration. When in doubt, contact the AWS Trust & Safety team using the Report Amazon AWS abuse form or by contacting [email protected]. Provide all the necessary information, including the suspicious AWS account ID, logs in plaintext, and so on, when you submit your request.

Availability
This new ability is available in all AWS Regions at no additional cost. It is enabled by default when GuardDuty is already enabled on your AWS account.

Otherwise, enable GuardDuty now, and start the 30-day trial period.

— seb

A New AWS Console Home Experience

Post Syndicated from Sébastien Stormacq original https://aws.amazon.com/blogs/aws/a-new-aws-console-home-experience/

If you are reading this blog, there is a high chance you frequently use the AWS Management Console. I taught AWS classes for years. During classes, students’ first hands-on experience with the AWS Cloud happened on the console, and I bet yours did too.

Until today, the home page of the console showed your most recently used services and a set of static links organized in sections, such as Getting Started with AWS, Build a Solution, or Explore AWS with links to training courses. However, we learned from our data that their usage is very different depending on your profile. You also told us it is cumbersome and time-consuming to navigate to different parts of the console to get an overview of important information for you.

We listened to your feedback, and I’m happy to announce a redesigned home page for the AWS Management Console. This new home page experience includes dynamic content, can be customized, and includes data from multiple AWS Regions.

The screenshot below shows the default view of this new console home page:

New console default layout

New console homepage action

The new Console Home is made of widgets. I may choose which widget to display on the page and where to include it. I may use the actions in the Actions drop down to customize my home page.

I may move and arrange widgets on the home page to organize the content as I want. When I click on the three little dots on the widget title bar, I may choose to remove the widget or resize it. I have the choice between Regular view and Extended view.

New console resize widget

At launch, the console provides eight widgets, and we will add more over time. Three widgets provide me with static links to learn how to build a solution or to explore AWS (Welcome to AWS, Build a Solution and Explore AWS). The other five are dynamic; their content depends on the usage of AWS by my applications and infrastructure:

  • AWS Health: this widget provides information on important events and changes
  • Cost and usage: this widget provides an overview of service costs, with a break down per AWS service.
  • Favorites: this widget shows a list of services that I have bookmarked
  • Recently visited: this widget provides the list of top recently visited services
  • Trusted Advisor: this widget provides recommendations to follow AWS best practices

AWS News Console List of widgets

As usual, we pay attention to the importance of not disturbing existing workflows and habits. You can use the new Console Home after opt-in. You can revert back to the old console home with a simple click.

This new Console Home is the first step to bring you more relevant content on this very first page you see every day. Stay tuned for more.

The new Console Home is available today in all AWS Regions at no additional cost. Go and customize your console homepage today.

— seb