All posts by Sébastien Stormacq

Amazon Bedrock now provides access to Cohere Command Light and Cohere Embed English and multilingual models

Post Syndicated from Sébastien Stormacq original https://aws.amazon.com/blogs/aws/amazon-bedrock-now-provides-access-to-cohere-command-light-and-cohere-embed-english-and-multilingual-models/

Cohere provides text generation and representation models powering business applications to generate text, summarize, search, cluster, classify, and utilize Retrieval Augmented Generation (RAG). Today, we’re announcing the availability of Cohere Command Light and Cohere Embed English and multilingual models on Amazon Bedrock. They’re joining the already available Cohere Command model.

Amazon Bedrock is a fully managed service that offers a choice of high-performing foundation models (FMs) from leading AI companies, including AI21 Labs, Anthropic, Cohere, Meta, Stability AI, and Amazon, along with a broad set of capabilities to build generative AI applications, simplifying the development while maintaining privacy and security. With this launch, Amazon Bedrock further expands the breadth of model choices to help you build and scale enterprise-ready generative AI. You can read more about Amazon Bedrock in Antje’s post here.

Command is Cohere’s flagship text generation model. It is trained to follow user commands and to be useful in business applications. Embed is a set of models trained to produce high-quality embeddings from text documents.

Embeddings are one of the most fascinating concepts in machine learning (ML). They are central to many applications that process natural language, recommendations, and search algorithms. Given any type of document, text, image, video, or sound, it is possible to transform it into a suite of numbers, known as a vector. Embeddings refer specifically to the technique of representing data as vectors in such a way that it captures meaningful information, semantic relationships, or contextual characteristics. In simple terms, embeddings are useful because the vectors representing similar documents are “close” to each other. In more formal terms, embeddings translate semantic similarity as perceived by humans to proximity in a vector space. Embeddings are typically generated through training algorithms or models.

Cohere Embed is a family of models trained to generate embeddings from text documents. Cohere Embed comes in two forms, an English language model and a multilingual model, both of which are now available in Amazon Bedrock.

There are three main use cases for text embeddings:

Semantic searches – Embeddings enable searching collections of documents by meaning, which leads to search systems that better incorporate context and user intent compared to existing keyword-matching systems.

Text Classification – Build systems that automatically categorize text and take action based on the type. For example, an email filtering system might decide to route one message to sales and escalate another message to tier-two support.

Retrieval Augmented Generation (RAG) – Improve the quality of a large language model (LLM) text generation by augmenting your prompts with data provided in context. The external data used to augment your prompts can come from multiple data sources, such as document repositories, databases, or APIs.

Imagine you have hundreds of documents describing your company policies. Due to the limited size of prompts accepted by LLMs, you have to select relevant parts of these documents to be included as context into prompts. The solution is to transform all your documents into embeddings and store them in a vector database, such as OpenSearch.

When a user wants to query this corpus of documents, you transform the user’s natural language query into a vector and perform a similarity search on the vector database to find the most relevant documents for this query. Then, you embed (pun intended) the original query from the user and the relevant documents surfaced by the vector database together in a prompt for the LLM. Including relevant documents in the context of the prompt helps the LLM generate more accurate and relevant answers.

You can now integrate Cohere Command Light and Embed models in your applications written in any programming language by calling the Bedrock API or using the AWS SDKs or the AWS Command Line Interface (AWS CLI).

Cohere Embed in action
Those of you who regularly read the AWS News Blog know we like to show you the technologies we write about.

We’re launching three distinct models today: Cohere Command Light, Cohere Embed English, and Cohere Embed multilingual. Writing code to invoke Cohere Command Light is no different than for Cohere Command, which is already part of Amazon Bedrock. So for this example, I decided to show you how to write code to interact with Cohere Embed and review how to use the embedding it generates.

To get started with a new model on Bedrock, I first navigate to the AWS Management Console and open the Bedrock page. Then, I select Model access on the bottom left pane. Then I select the Edit button on the top right side, and I enable access to the Cohere model.

Bedrock - model activation with Cohere models

Now that I know I can access the model, I open a code editor on my laptop. I assume you have the AWS Command Line Interface (AWS CLI) configured, which will allow the AWS SDK to locate your AWS credentials. I use Python for this demo, but I want to show that Bedrock can be called from any language. I also share a public gist with the same code sample written in the Swift programming language.

Back to Python, I first run the ListFoundationModels API call to discover the modelId for Cohere Embed.

import boto3
import json
import numpy

bedrock = boto3.client(service_name='bedrock', region_name='us-east-1')

listModels = bedrock.list_foundation_models(byProvider='cohere')
print("\n".join(list(map(lambda x: f"{x['modelName']} : { x['modelId'] }", listModels['modelSummaries']))))

Running this code produces the list:

Command : cohere.command-text-v14
Command Light : cohere.command-light-text-v14
Embed English : cohere.embed-english-v3
Embed Multilingual : cohere.embed-multilingual-v3

I select cohere.embed-english-v3 model ID and write the code to transform a text document into an embedding.

cohereModelId = 'cohere.embed-english-v3'

# For the list of parameters and their possible values, 
# check Cohere's API documentation at https://docs.cohere.com/reference/embed

coherePayload = json.dumps({
     'texts': ["This is a test document", "This is another document"],
     'input_type': 'search_document',
     'truncate': 'NONE'
})

bedrock_runtime = boto3.client(
    service_name='bedrock-runtime', 
    region_name='us-east-1'
)
print("\nInvoking Cohere Embed...")
response = bedrock_runtime.invoke_model(
    body=coherePayload, 
    modelId=cohereModelId, 
    accept='application/json', 
    contentType='application/json'
)

body = response.get('body').read().decode('utf-8')
response_body = json.loads(body)
print(np.array(response_body['embeddings']))

The response is printed

[ 1.234375 -0.63671875 -0.28515625 ... 0.38085938 -1.2265625 0.22363281]

Now that I have the embedding, the next step depends on my application. I can store this embedding in a vector store or use it to search similar documents in an existing store, and so on.

To learn more, I highly recommend following the hands-on instructions provided by this section of the Amazon Bedrock workshop. This is an end-to-end example of RAG. It demonstrates how to load documents, generate embeddings, store the embeddings in a vector store, perform a similarity search, and use relevant documents in a prompt sent to an LLM.

Availability
The Cohere Embed models are available today for all AWS customers in two of the AWS Regions where Amazon Bedrock is available: US East (N. Virginia) and US West (Oregon).

AWS charges for model inference. For Command Light, AWS charges per processed input or output token. For Embed models, AWS charges per input tokens. You can choose to be charged on a pay-as-you-go basis, with no upfront or recurring fees. You can also provision sufficient throughput to meet your application’s performance requirements in exchange for a time-based term commitment. The Amazon Bedrock pricing page has the details.

With this information, you’re ready to use text embeddings with Amazon Bedrock and the Cohere Embed models in your applications.

Go build!

— seb

AWS Weekly Roundup – CodeWhisperer, CodeCatalyst, RDS, Route53, and more – October 24, 2023

Post Syndicated from Sébastien Stormacq original https://aws.amazon.com/blogs/aws/aws-weekly-roundup-codewhisperer-codecatalyst-rds-route53-and-more-october-23-2023/

The entire AWS News Blog team is fully focused on writing posts to announce the new services and features during our annual customer conference in Las Vegas, AWS re:Invent! And while we prepare content for you to read, our services teams continue to innovate. Here is my summary of last week’s launches.

Last week’s launches
Here are some of the launches that captured my attention:

Amazon CodeCatalystYou can now add a cron expression to trigger a CI/CD workflow, providing a way to start workflows at set times. CodeCatalyst is a unified development service that integrates a project’s collaboration tools, CI/CD pipelines, and development and deployment environments.

Amazon Route53You can now route your customer’s traffic to their closest AWS Local Zones to improve application performance for latency-sensitive workloads. Learn more about geoproximity routing in the Route53 documentation.

Amazon RDS – The root certificates we use to sign your databases’ TLS certificates will expire in 2024. You must generate new certificates for your databases before the expiration date. This blog post details the procedure step by step. The new root certificates we generated are valid for the next 40 years for RSA2048 and 100 years for the RSA4098 and ECC384. It is likely this is the last time in your professional career that you are obliged to renew your database certificates for AWS.

Amazon MSK – Replicating Kafka clusters at scale is difficult and often involves managing the infrastructure and the replication solution by yourself. We launched Amazon MSK Replicator, a fully managed replication solution for your Kafka clusters, in the same or across multiple AWS Regions.

Amazon CodeWhisperer – We launched a preview for an upcoming capability of Amazon CodeWhisperer Professional. You can now train CodeWhisperer on your private code base. It allows you to give your organization’s developers more relevant suggestions to better assist them in their day-to-day coding against your organization’s private libraries and frameworks.

Amazon EC2The seventh generation of memory-optimized EC2 instances is available (R7i). These instances use the 4th Generation Intel Xeon Scalable Processors (Sapphire Rapids). This family of instances provides up to 192 vCPU and 1,536 GB of memory. They are well-suited for memory-intensive applications such as in-memory databases or caches.

X in Y – We launched existing services and instance types in additional Regions:

Other AWS news
Here are some other blog posts and news items that you might like:

The Community.AWS blog has new posts to teach you how to integrate Amazon Bedrock inside your Java and Go applications, and my colleague Brooke wrote a survival guide for re:Invent first-timers.

The Official AWS Podcast – Listen each week for updates on the latest AWS news and deep dives into exciting use cases. There are also official AWS podcasts in several languages. Check out the ones in FrenchGermanItalian, and Spanish.

Some other great sources of AWS news include:

Upcoming AWS events
Check your calendars and sign up for these AWS events:

AWS Community DayAWS Community Days – Join a community-led conference run by AWS user group leaders in your region: Jaipur (November 4), Vadodara (November 4), and Brasil (November 4).

AWS Innovate: Every Application Edition – Join our free online conference to explore cutting-edge ways to enhance security and reliability, optimize performance on a budget, speed up application development, and revolutionize your applications with generative AI. Register for AWS Innovate Online Asia Pacific & Japan on October 26.

AWS re:Invent 2023AWS re:Invent (November 27 – December 1) – Join us to hear the latest from AWS, learn from experts, and connect with the global cloud community. Browse the session catalog and attendee guides and check out the re:Invent highlights for generative AI.

You can browse all upcoming in-person and virtual events.

And that’s all for me today. I’ll go back writing my re:Invent blog posts.

Check back next Monday for another Weekly Roundup!

— seb

This post is part of our Weekly Roundup series. Check back each week for a quick roundup of interesting news and announcements from AWS!

Amazon MSK Introduces Managed Data Delivery from Apache Kafka to Your Data Lake

Post Syndicated from Sébastien Stormacq original https://aws.amazon.com/blogs/aws/amazon-msk-introduces-managed-data-delivery-from-apache-kafka-to-your-data-lake/

I’m excited to announce today a new capability of Amazon Managed Streaming for Apache Kafka (Amazon MSK) that allows you to continuously load data from an Apache Kafka cluster to Amazon Simple Storage Service (Amazon S3). We use Amazon Kinesis Data Firehose—an extract, transform, and load (ETL) service—to read data from a Kafka topic, transform the records, and write them to an Amazon S3 destination. Kinesis Data Firehose is entirely managed and you can configure it with just a few clicks in the console. No code or infrastructure is needed.

Kafka is commonly used for building real-time data pipelines that reliably move massive amounts of data between systems or applications. It provides a highly scalable and fault-tolerant publish-subscribe messaging system. Many AWS customers have adopted Kafka to capture streaming data such as click-stream events, transactions, IoT events, and application and machine logs, and have applications that perform real-time analytics, run continuous transformations, and distribute this data to data lakes and databases in real time.

However, deploying Kafka clusters is not without challenges.

The first challenge is to deploy, configure, and maintain the Kafka cluster itself. This is why we released Amazon MSK in May 2019. MSK reduces the work needed to set up, scale, and manage Apache Kafka in production. We take care of the infrastructure, freeing you to focus on your data and applications. The second challenge is to write, deploy, and manage application code that consumes data from Kafka. It typically requires coding connectors using the Kafka Connect framework and then deploying, managing, and maintaining a scalable infrastructure to run the connectors. In addition to the infrastructure, you also must code the data transformation and compression logic, manage the eventual errors, and code the retry logic to ensure no data is lost during the transfer out of Kafka.

Today, we announce the availability of a fully managed solution to deliver data from Amazon MSK to Amazon S3 using Amazon Kinesis Data Firehose. The solution is serverless–there is no server infrastructure to manage–and requires no code. The data transformation and error-handling logic can be configured with a few clicks in the console.

The architecture of the solution is illustrated by the following diagram.

Amazon MSK to Amazon S3 architecture diagram

Amazon MSK is the data source, and Amazon S3 is the data destination while Amazon Kinesis Data Firehose manages the data transfer logic.

When using this new capability, you no longer need to develop code to read your data from Amazon MSK, transform it, and write the resulting records to Amazon S3. Kinesis Data Firehose manages the reading, the transformation and compression, and the write operations to Amazon S3. It also handles the error and retry logic in case something goes wrong. The system delivers the records that can not be processed to the S3 bucket of your choice for manual inspection. The system also manages the infrastructure required to handle the data stream. It will scale out and scale in automatically to adjust to the volume of data to transfer. There are no provisioning or maintenance operations required on your side.

Kinesis Data Firehose delivery streams support both public and private Amazon MSK provisioned or serverless clusters. It also supports cross-account connections to read from an MSK cluster and to write to S3 buckets in different AWS accounts. The Data Firehose delivery stream reads data from your MSK cluster, buffers the data for a configurable threshold size and time, and then writes the buffered data to Amazon S3 as a single file. MSK and Data Firehose must be in the same AWS Region, but Data Firehose can deliver data to Amazon S3 buckets in other Regions.

Kinesis Data Firehose delivery streams can also convert data types. It has built-in transformations to support JSON to Apache Parquet and Apache ORC formats. These are columnar data formats that save space and enable faster queries on Amazon S3. For non-JSON data, you can use AWS Lambda to transform input formats such as CSV, XML, or structured text into JSON before converting the data to Apache Parquet/ORC. Additionally, you can specify data compression formats from Data Firehose, such as GZIP, ZIP, and SNAPPY, before delivering the data to Amazon S3, or you can deliver the data to Amazon S3 in its raw form.

Let’s See How It Works
To get started, I use an AWS account where there’s an Amazon MSK cluster already configured and some applications streaming data to it. To get started and to create your first Amazon MSK cluster, I encourage you to read the tutorial.

Amazon MSK - List of existing clusters

For this demo, I use the console to create and configure the data delivery stream. Alternatively, I can use the AWS Command Line Interface (AWS CLI), AWS SDKs, AWS CloudFormation, or Terraform.

I navigate to the Amazon Kinesis Data Firehose page of the AWS Management Console and then choose Create delivery stream.

Kinesis Data Firehose - Main console page

I select Amazon MSK as a data Source and Amazon S3 as a delivery Destination. For this demo, I want to connect to a private cluster, so I select Private bootstrap brokers under Amazon MSK cluster connectivity.

I need to enter the full ARN of my cluster. Like most people, I cannot remember the ARN, so I choose Browse and select my cluster from the list.

Finally, I enter the cluster Topic name I want this delivery stream to read from.

Configure the delivery stream

After the source is configured, I scroll down the page to configure the data transformation section.

On the Transform and convert records section, I can choose whether I want to provide my own Lambda function to transform records that aren’t in JSON or to transform my source JSON records to one of the two available pre-built destination data formats: Apache Parquet or Apache ORC.

Apache Parquet and ORC formats are more efficient than JSON format to query data from Amazon S3. You can select these destination data formats when your source records are in JSON format. You must also provide a data schema from a table in AWS Glue.

These built-in transformations optimize your Amazon S3 cost and reduce time-to-insights when downstream analytics queries are performed with Amazon Athena, Amazon Redshift Spectrum, or other systems.

Configure the data transformation in the delivery stream

Finally, I enter the name of the destination Amazon S3 bucket. Again, when I cannot remember it, I use the Browse button to let the console guide me through my list of buckets. Optionally, I enter an S3 bucket prefix for the file names. For this demo, I enter aws-news-blog. When I don’t enter a prefix name, Kinesis Data Firehose uses the date and time (in UTC) as the default value.

Under the Buffer hints, compression and encryption section, I can modify the default values for buffering, enable data compression, or select the KMS key to encrypt the data at rest on Amazon S3.

When ready, I choose Create delivery stream. After a few moments, the stream status changes to ✅  available.

Select the destination S3 bucket

Assuming there’s an application streaming data to the cluster I chose as a source, I can now navigate to my S3 bucket and see data appearing in the chosen destination format as Kinesis Data Firehose streams it.

S3 bucket browsers shows the files streamed from MSK

As you see, no code is required to read, transform, and write the records from my Kafka cluster. I also don’t have to manage the underlying infrastructure to run the streaming and transformation logic.

Pricing and Availability.
This new capability is available today in all AWS Regions where Amazon MSK and Kinesis Data Firehose are available.

You pay for the volume of data going out of Amazon MSK, measured in GB per month. The billing system takes into account the exact record size; there is no rounding. As usual, the pricing page has all the details.

I can’t wait to hear about the amount of infrastructure and code you’re going to retire after adopting this new capability. Now go and configure your first data stream between Amazon MSK and Amazon S3 today.

— seb

New – Add Your Swift Packages to AWS CodeArtifact

Post Syndicated from Sébastien Stormacq original https://aws.amazon.com/blogs/aws/new-add-your-swift-packages-to-aws-codeartifact/

Starting today, Swift developers who write code for Apple platforms (iOS, iPadOS, macOS, tvOS, watchOS, or visionOS) or for Swift applications running on the server side can use AWS CodeArtifact to securely store and retrieve their package dependencies. CodeArtifact integrates with standard developer tools such as Xcode, xcodebuild, and the Swift Package Manager (the swift package command).

Simple applications routinely include dozens of packages. Large enterprise applications might have hundreds of dependencies. These packages help developers speed up the development and testing process by providing code that solves common programming challenges such as network access, cryptographic functions, or data format manipulation. Developers also embed SDKs–such as the AWS SDKs–to access remote services. These packages might be produced by other teams in your organization or maintained by third-parties, such as open-source projects. Managing packages and their dependencies is an integral part of the software development process. Modern programming languages include tools to download and resolve dependencies: Maven in Java, NuGet in C#, npm or yarn in JavaScript, and pip in Python just to mention a few. Developers for Apple platforms use CocoaPods or the Swift Package Manager (SwiftPM).

Downloading and integrating packages is a routine operation for application developers. However, it presents at least two significant challenges for organizations.

The first challenge is legal. Organizations must ensure that licenses for third-party packages are compatible with the expected use of licenses for your specific project and that the package doesn’t violate someone else’s intellectual property (IP). The second challenge is security. Organizations must ensure that the included code is safe to use and doesn’t include back doors or intentional vulnerabilities designed to introduce security flaws in your app. Injecting vulnerabilities in popular open-source projects is known as a supply chain attack and has become increasingly popular in recent years.

To address these challenges, organizations typically install private package servers on premises or in the cloud. Developers can only use packages vetted by their organization’s security and legal teams and made available through private repositories.

AWS CodeArtifact is a managed service that allows you to safely distribute packages to your internal teams of developers. There is no need to install, manage, or scale the underlying infrastructure. We take care of that for you, giving you more time to work on your apps instead of the software development infrastructure.

I’m excited to announce that CodeArtifact now supports native Swift packages, in addition to npm, PyPI, Maven, NuGet, and generic package formats. Swift packages are a popular way to package and distribute reusable Swift code elements. To learn how to create your own Swift package, you can follow this tutorial. The community has also created more than 6,000 Swift packages that you can use in your Swift applications.

You can now publish and download your Swift package dependencies from your CodeArtifact repository in the AWS Cloud. CodeArtifact SwiftPM works with existing developer tools such as Xcode, VSCode, and the Swift Package Manager command line tool. After your packages are stored in CodeArtifact, you can reference them in your project’s Package.swift file or in your Xcode project, in a similar way you use Git endpoints to access public Swift packages.

After the configuration is complete, your network-jailed build system will download the packages from the CodeArtifact repository, ensuring that only approved and controlled packages are used during your application’s build process.

How To Get Started
As usual on this blog, I’ll show you how it works. Imagine I’m working on an iOS application that uses Amazon DynamoDB as a database. My application embeds the AWS SDK for Swift as a dependency. To comply with my organization policies, the application must use a specific version of the AWS SDK for Swift, compiled in-house and approved by my organization’s legal and security teams. In this demo, I show you how I prepare my environment, upload the package to the repository, and use this specific package build as a dependency for my project.

For this demo, I focus on the steps specific to Swift packages. You can read the tutorial written by my colleague Steven to get started with CodeArtifact.

I use an AWS account that has a package repository (MySwiftRepo) and domain (stormacq-test) already configured.

CodeArtifact repository

To let SwiftPM acess my CodeArtifact repository, I start by collecting an authentication token from CodeArtifact.

export CODEARTIFACT_AUTH_TOKEN=`aws codeartifact get-authorization-token \
                                     --domain stormacq-test              \
                                     --domain-owner 012345678912         \
                                     --query authorizationToken          \
                                     --output text`

Note that the authentication token expires after 12 hours. I must repeat this command after 12 hours to obtain a fresh token.

Then, I request the repository endpoint. I pass the domain name and domain owner (the AWS account ID). Notice the --format swift option.

export CODEARTIFACT_REPO=`aws codeartifact get-repository-endpoint  \
                               --domain stormacq-test               \
                               --domain-owner 012345678912          \
                               --format swift                       \
                               --repository MySwiftRepo             \
                               --query repositoryEndpoint           \
                               --output text`

Now that I have the repository endpoint and an authentication token, I use the AWS Command Line Interface (AWS CLI) to configure SwiftPM on my machine.

SwiftPM can store the repository configurations at user level (in the file ~/.swiftpm/configurations) or at project level (in the file <your project>/.swiftpm/configurations). By default, the CodeArtifact login command creates a project-level configuration to allow you to use different CodeArtifact repositories for different projects.

I use the AWS CLI to configure SwiftPM on my build machine.

aws codeartifact login          \
    --tool swift                \
    --domain stormacq-test      \
    --repository MySwiftRepo    \
    --namespace aws             \
    --domain-owner 012345678912

The command invokes swift package-registry login with the correct options, which in turn, creates the required SwiftPM configuration files with the given repository name (MySwiftRepo) and scope name (aws).

Now that my build machine is ready, I prepare my organization’s approved version of the AWS SDK for Swift package and then I upload it to the repository.

git clone https://github.com/awslabs/aws-sdk-swift.git
pushd aws-sdk-swift
swift package archive-source
mv aws-sdk-swift.zip ../aws-sdk-swift-0.24.0.zip
popd

Finally, I upload this package version to the repository.

When using Swift 5.9 or more recent, I can upload my package to my private repository using the SwiftPM command:

swift package-registry publish           \
                       aws.aws-sdk-swift \
                       0.24.0            \
                       --verbose

The versions of Swift before 5.9 don’t provide a swift package-registry publish command. So, I use the curl command instead.

curl  -X PUT 
      --user "aws:$CODEARTIFACT_AUTH_TOKEN"               \
      -H "Accept: application/vnd.swift.registry.v1+json" \
      -F source-archive="@aws-sdk-swift-0.24.0.zip"       \
      "${CODEARTIFACT_REPO}aws/aws-sdk-swift/0.24.0"

Notice the format of the package name after the URI of the repository: <scope>/<package name>/<package version>. The package version must follow the semantic versioning scheme.

I can use the CLI or the console to verify that the package is available in the repository.

CodeArtifact List Packages

aws codeartifact list-package-versions      \
                  --domain stormacq-test    \
                  --repository MySwiftRepo  \
                  --format swift            \
                  --namespace aws           \
                  --package aws-sdk-swift
{
    "versions": [
        {
            "version": "0.24.0",
            "revision": "6XB5O65J8J3jkTDZd8RMLyqz7XbxIg9IXpTudP7THbU=",
            "status": "Published",
            "origin": {
                "domainEntryPoint": {
                    "repositoryName": "MySwiftRepo"
                },
                "originType": "INTERNAL"
            }
        }
    ],
    "defaultDisplayVersion": "0.24.0",
    "format": "swift",
    "package": "aws-sdk-swift",
    "namespace": "aws"
}

Now that the package is available, I can use it in my projects as usual.

Xcode uses SwiftPM tools and configuration files I just created. To add a package to my Xcode project, I select the project name on the left pane, and then I select the Package Dependencies tab. I can see the packages that are already part of my project. To add a private package, I choose the + sign under Packages.

Xcode add a package as dependency to a project

On the top right search field, I enter aws.aws-sdk-swift (this is <scope name>.<package name>). After a second or two, the package name appears on the list. On the top right side, you can verify the source repository (next to the Registry label). Before selecting the Add Package button, select the version of the package, just like you do for publicly available packages.

Add a private package from Codeartifact on Xcode

Alternatively, for my server-side or command-line applications, I add the dependency in the Package.swift file. I also use the format (<scope>.<package name>) as the first parameter of .package(id:from:)function.

    dependencies: [
        .package(id: "aws.aws-sdk-swift", from: "0.24.0")
    ],

When I type swift package update, SwiftPM downloads the package from the CodeArtifact repository.

Things to Know
There are some things to keep in mind before uploading your first Swift packages.

  • Be sure to update to the latest version of the CLI before trying any command shown in the preceding instructions.
  • You have to use Swift version 5.8 or newer to use CodeArtifact with the swift package command. On macOS, the Swift toolchain comes with Xcode. Swift 5.8 is available on macOS 13 (Ventura) and Xcode 14. On Linux and Windows, you can download the Swift toolchain from swift.org.
  • You have to use Xcode 15 for your iOS, iPadOS, tvOS, or watchOS applications. I tested this with Xcode 15 beta8.
  • The swift package-registry publish command is available with Swift 5.9 or newer. When you use Swift 5.8, you can use curlto upload your package, as I showed in the demo (or use any HTTP client of your choice).
  • Swift packages have the concept of scope. A scope provides a namespace for related packages within a package repository. Scopes are mapped to CodeArtifact namespaces.
  • The authentication token expires after 12 hours. We suggest writing a script to automate its renewal or using a scheduled AWS Lambda function and securely storing the token in AWS Secrets Manager (for example).

Troubleshooting
If Xcode can not find your private package, double-check the registry configuration in ~/.swiftpm/configurations/registries.json. In particular, check if the scope name is present. Also verify that the authentication token is present in the keychain. The name of the entry is the URL of your repository. You can verify the entries in the keychain with the /Application/Utilities/Keychain Access.app application or using the security command line tool.

security find-internet-password                                                  \
          -s "stormacq-test-012345678912.d.codeartifact.us-west-2.amazonaws.com" \
          -g

Here is the SwiftPM configuration on my machine.

cat ~/.swiftpm/configuration/registries.json

{
  "authentication" : {
    "stormacq-test-012345678912.d.codeartifact.us-west-2.amazonaws.com" : {
      "loginAPIPath" : "/swift/MySwiftRepo/login",
      "type" : "token"
    }
  },
  "registries" : {
    "aws" : { // <-- this is the scope name!
      "url" : "https://stormacq-test-012345678912.d.codeartifact.us-west-2.amazonaws.com/swift/MySwiftRepo/"
    }
  },
  "version" : 1
}

Keychain item for codeartifact authentication token

Pricing and Availability
CodeArtifact costs for Swift packages are the same as for the other package formats already supported. CodeArtifact billing depends on three metrics: the storage (measured in GB per month), the number of requests, and the data transfer out to the internet or to other AWS Regions. Data transfer to AWS services in the same Region is not charged, meaning you can run your CICD jobs on Amazon EC2 Mac instances, for example, without incurring a charge for the CodeArtifact data transfer. As usual, the pricing page has the details.

CodeArtifact for Swift packages is available in all 13 Regions where CodeArtifact is available.

Now go build your Swift applications and upload your private packages to CodeArtifact!

— seb

PS : Do you know you can write Lambda functions in the Swift programming language? Check the quick start guide or follow this 35-minute tutorial.

AWS Weekly Roundup – AWS Dedicated Zones, Events and More – August 28, 2023

Post Syndicated from Sébastien Stormacq original https://aws.amazon.com/blogs/aws/aws-weekly-roundup-aws-dedicated-zones-events-and-more-august-28-2023/

This week, I will meet our customers and partners at the AWS Summit Mexico. If you are around, please come say hi at the community lounge and at the F1 Game Day where I will spend most of my time. I would love to discuss your developer experience on AWS and listen to your stories about building on AWS.

Last Week’s Launches
I am amazed at how quickly service teams are deploying services to the new il-central-1 Region, aka AWS Israel (Tel-Aviv) Region. I counted no fewer than 25 new service announcements since we opened the Region on August 1, including ten just for last week!

In addition to these developments in the new Region, here are some launches that got my attention during the previous week.

AWS Dedicated Local Zones – Just like Local Zones, Dedicated Local Zones are a type of AWS infrastructure that is fully managed by AWS. Unlike Local Zones, they are built for exclusive use by you or your community and placed in a location or data center specified by you to help comply with regulatory requirements. I think about them as a portion of AWS infrastructure dedicated to my exclusive usage.

Enhanced search on AWS re:Post – AWS re:Post is a cloud knowledge service. The enhanced search experience helps you locate answers and discover articles more quickly. Search results are now presenting a consolidated view of all AWS knowledge on re:Post. The view shows AWS Knowledge Center articles, question and answers, and community articles that are relevant to the user’s search query.

Amazon QuickSight supports scheduled programmatic export to Microsoft ExcelAmazon QuickSight now supports scheduled generation of Excel workbooks by selecting multiple tables and pivot table visuals from any sheet of a dashboard. Snapshot Export APIs will now also support programmatic export to Excel format, in addition to Paginated PDF and CSV.

Amazon WorkSpaces announced a new client to support Ubuntu 20.04 and 22.04 – The new client, powered by WorkSpaces Streaming Protocol (WSP), improves the remote desktop experience by offering enhanced web conferencing functionality, better multi-monitor support, and a more user-friendly interface. To get started, simply download the new Linux client versions from Amazon WorkSpaces client download website.

Amazon Sagemaker CPU/GPU profiler – We launched the preview of Amazon SageMaker Profiler, an advanced observability tool for large deep learning workloads. With this new capability, you are able to access granular compute hardware-related profiling insights for optimizing model training performance.

Amazon Sagemaker rolling deployments strategy – You can now update your Amazon SageMaker Endpoints using a rolling deployment strategy. Rolling deployment makes it easier for you to update fully-scaled endpoints that are deployed on hundreds of popular accelerated compute instances.

For a full list of AWS announcements, be sure to keep an eye on the What’s New at AWS page.

Other AWS News
Some other updates and news that you might have missed:

On-demand Container Loading in AWS Lambda – This one is not new from this week, but I spotted it while I was taking a few days of holidays. Marc Brooker and team were awarded Best Paper by USENIX Association for On-demand Container Loading in AWS Lambda (pdf). They explained in detail the challenges of loading (huge) container images in AWS Lambda. A must-read if you’re curious how Lambda functions work behind the scenes (pdf).

The Official AWS Podcast – Listen each week for updates on the latest AWS news and deep dives into exciting use cases. There are also official AWS podcasts in several languages. Check out the ones in FrenchGermanItalian, and Spanish.

AWS Open Source News and Updates – This is a newsletter curated by my colleague Ricardo to bring you the latest open source projects, posts, events, and more.

Upcoming AWS Events
Check your calendars and sign up for these AWS events:

AWS Hybrid Cloud & Edge Day (August 30) – Join a free-to-attend one-day virtual event to hear the latest hybrid cloud and edge computing trends, emerging technologies, and learn best practices from AWS leaders, customers, and industry analysts. To learn more, see the detail agenda and register now.

AWS Global SummitsAWS Summits – The 2023 AWS Summits season is almost ending with the last two in-person events in Mexico City (August 30) and Johannesburg (September 26).

AWS re:Invent – But don’t worry because re:Invent season (November 27–December 1) is coming closer. Join us to hear the latest from AWS, learn from experts, and connect with the global cloud community. Registration is now open.

AWS Community Days AWS Community Day– Join a community-led conference run by AWS user group leaders in your region: Aotearoa (September 6), Lebanon (September 9), Munich (September 14), Argentina (September 16), Spain (September 23), and Chile (September 30). Visit the landing page to check out all the upcoming AWS Community Days.

CDK Day (September 29) – A community-led fully virtual event with tracks in English and Spanish about CDK and related projects. Learn more at the website.

That’s all for this week. Check back next Monday for another Week in Review!

This post is part of our Week in Review series. Check back each week for a quick roundup of interesting news and announcements from AWS!

— seb

Amazon Route 53 Resolver Now Available on AWS Outposts Rack

Post Syndicated from Sébastien Stormacq original https://aws.amazon.com/blogs/aws/amazon-route-53-resolver-now-available-on-aws-outposts-rack/

Starting today, Amazon Route 53 Resolver is now available on AWS Outposts rack, providing your on-premises services and applications with local DNS resolution directly from Outposts. Local Route 53 Resolver endpoints also enable DNS resolution between Outposts and your on-premises DNS server. Route 53 Resolver on Outposts helps to improve your on-premises applications availability and performance.

AWS Outposts provides a hybrid cloud solution that allows you to extend your AWS infrastructure and services to your on-premises data centers. This enables you to build and operate hybrid applications that seamlessly integrate with your existing on-premises infrastructure. Your applications deployed on Outposts benefit from low-latency access to on-premises systems. You also get a consistent management experience across AWS Regions and your on-premises environments. This includes access to the same AWS management tools, APIs, and services that you use when managing AWS services in a Region. Outposts uses the same security controls and policies as AWS in the cloud, providing you with a consistent security posture across your hybrid cloud environment. This includes data encryption, identity and access management, and network security.

One of the typical use cases for Outposts is to deploy applications that require low-latency access to on-premises systems, such as factory equipment, high-frequency trading applications, or medical diagnosis systems.

DNS stands for Domain Name System, which is the system that translates human-readable domain names like “example.com” into IP addresses like “93.184.216.34” that computers use to communicate with each other on the internet. A Route 53 Resolver is a component that is responsible for resolving domain names to IP addresses.

Until today, applications and services running on an Outpost forwarded their DNS queries to the parent AWS Region the Outpost is connected to. But remember, as Amazon CTO Dr Werner Vogels says: everything fails all the time. There can be temporary site disconnections—think about fiber cuts or weather events. When the on-premises facility becomes temporarily disconnected from the internet, local DNS resolution fails, making it difficult for applications and services to discover other services, even when they are running on the same Outposts rack. For example, applications running locally on the Outpost won’t be able to discover the IP address of a local database running on the same Outpost, or a microservice won’t be able to locate other microservices running locally.

Starting today, when you opt in for local Route 53 Resolvers on Outposts, applications and services will continue to benefit from local DNS resolution to discover other services—even in a parent AWS Region connectivity loss event. Local Resolvers also help to reduce latency for DNS resolutions as query results are cached and served locally from the Outposts, eliminating unnecessary round-trips to the parent AWS Region. All the DNS resolutions for applications in Outposts VPCs using private DNS are served locally.

In addition to local Resolvers, this launch also enables local Resolver endpoints. Route 53 Resolver endpoints are not new; creating inbound or outbound Resolver endpoints in a VPC has been available since November 2018. Today, you can also create endpoints inside the VPC on Outposts. Route 53 Resolver outbound endpoints enable Route 53 Resolvers to forward DNS queries to DNS resolvers that you manage, for example, on your on-premises network. In contrast, Route 53 Resolver inbound endpoints forward the DNS queries they receive from outside the VPC to the Resolver running on Outposts. It allows sending DNS queries for services deployed on a private Outposts VPC from outside of that VPC.

Let’s See It in Action
To create and test a local Resolver on Outposts, I first connect to the Outpost section of the AWS Management Console. I navigate to the Route 53 Outposts section and select Create Resolver.

Create local resolver on outpost

I select the Outpost on which I want to create the Resolver and enter a Resolver name. Then, I select the size of the instances to deploy the Resolver and the number of instances. The selection of instance size impacts the performance of the Resolver (the number of resolutions it can process per second). The default is an m5.large instance able to handle up to 7,000 queries per second. The number of instances impacts the availability of the Resolver, the default is four instances. I select Create Resolver to create the Resolver instances.

Create local resolver - choose instance type and number

After a few minutes, I should see the Resolver status becoming ✅ Operational.

Local resolver is operationalThe next step is to create the Resolver endpoint. Inbound endpoints allow to forward external DNS queries to the local Resolver on the Outpost. Outbound endpoints allow to forward locally initiated DNS queries to external DNS resolvers you manage. For this demo, I choose to create an inbound endpoint.

Under the Inbound endpoints section, I select Create inbound endpoint.

Local resolver - create inbound endpoint

I enter an Endpoint name, I choose the VPC in the Region to attach this endpoint to, and I select the previously created Security group for this endpoint.

Create inbound endpoint details

I select the IP address the endpoint will consume in each subnet. I can select to Use an IP address that is selected automatically or Use an IP address that I specify.

Create inbound endpoint - select an IP addressFinally, I select the instance type to bind to the inbound endpoint. The larger the instance, the more queries per second it will handle. The service creates two endpoint instances for high availability.

When I am ready, I select the Create inbound endpoint to start the creation process.

Create inbound endpoint - select the instance type

After a few minutes, the endpoint Status becomes ✅ Operational.

Create inbound endpoint sttaus operational

The setup is now ready to test. I therefore SSH-connect to an EC2 instance running on the Outpost, and I test the time it takes to resolve an external DNS name. Local Resolvers cache queries on the Outpost itself. I therefore expect my first query to take a few milliseconds and the second one to be served immediately from the cache.

Indeed, the first query resolves in 13 ms (see the line ;; Query time: 13 msec).

➜  ~ dig amazon.com

; <<>> DiG 9.16.38-RH <<>> amazon.com
;; global options: +cmd
;; Got answer:
;; ->>HEADER<<- opcode: QUERY, status: NOERROR, id: 35859
;; flags: qr rd ra; QUERY: 1, ANSWER: 3, AUTHORITY: 0, ADDITIONAL: 1

;; OPT PSEUDOSECTION:
; EDNS: version: 0, flags:; udp: 1232
;; QUESTION SECTION:
;amazon.com.			IN	A

;; ANSWER SECTION:
amazon.com.		797	IN	A	52.94.236.248
amazon.com.		797	IN	A	205.251.242.103
amazon.com.		797	IN	A	54.239.28.85

;; Query time: 13 msec
;; SERVER: 10.0.0.2#53(10.0.0.2)
;; WHEN: Sun May 28 09:47:27 CEST 2023
;; MSG SIZE  rcvd: 87

And when I repeat the same query, it resolves in zero milliseconds, showing it is now served from a local cache.

➜  ~ dig amazon.com

; <<>> DiG 9.16.38-RH <<>> amazon.com
;; global options: +cmd
;; Got answer:
;; ->>HEADER<<- opcode: QUERY, status: NOERROR, id: 63500
;; flags: qr rd ra; QUERY: 1, ANSWER: 3, AUTHORITY: 0, ADDITIONAL: 1

;; OPT PSEUDOSECTION:
; EDNS: version: 0, flags:; udp: 1232
;; QUESTION SECTION:
;amazon.com.			IN	A

;; ANSWER SECTION:
amazon.com.		586	IN	A	54.239.28.85
amazon.com.		586	IN	A	205.251.242.103
amazon.com.		586	IN	A	52.94.236.248

;; Query time: 0 msec
;; SERVER: 10.0.0.2#53(10.0.0.2)
;; WHEN: Sun May 28 09:50:58 CEST 2023
;; MSG SIZE  rcvd: 87

Pricing and Availability
Remember that only the Resolver and the VPC endpoints are deployed on your Outposts. You continue to manage your Route 53 zones and records from the AWS Regions. The local Resolver and its endpoints will consume some capacity on the Outposts. You will need to provide four EC2 instances from your Outposts for the Route 53 Resolver and two other instances for each Resolver endpoint.

Your existing Outposts racks must have the latest Outposts software for you to use the local Route 53 Resolver and the Resolver endpoints. You can raise a ticket with us to have your Outpost updated (the console will also remind you to do so when needed).

The local Resolvers are provided without additional cost. The endpoints are charged per elastic network interface (ENI) per hour, as is already the case today.

You can configure local Resolvers and local endpoints in all AWS Regions where Outposts racks are available, except in AWS GovCloud (US) Regions. That’s a list of 22 AWS Regions as of today.

Go and configure local Route 53 Resolvers on Outposts now!

— seb


P.S. We’re focused on improving our content to provide a better customer experience, and we need your feedback to do so. Please take this quick survey to share insights on your experience with the AWS Blog. Note that this survey is hosted by an external company, so the link does not lead to our website. AWS handles your information as described in the AWS Privacy Notice.

New Solution – Clickstream Analytics on AWS for Mobile and Web Applications

Post Syndicated from Sébastien Stormacq original https://aws.amazon.com/blogs/aws/new-solution-clickstream-analytics-on-aws-for-mobile-and-web-applications/

Starting today, you can deploy on your AWS account an end-to-end solution to capture, ingest, store, analyze, and visualize your customers’ clickstreams inside your web and mobile applications (both for Android and iOS). The solution is built on top of standard AWS services.

This new solution Clickstream Analytics on AWS allows you to keep your data in the security and compliance perimeter of your AWS account and customize the processing and analytics as you require, giving you the full flexibility to extract value for your business. For example, many business line owners want to combine clickstream analytics data with business system data to gain more comprehensive insights. Storing clickstream analysis data in your AWS account allows you to cross reference the data with your existing business system, which is complex to implement when you use a third-party analytics solution that creates an artificial data silo.

Clickstream Analytics on AWS is available from the AWS Solutions Library at no cost, except for the services it deploys on your account.

Why Analyze Your Applications Clickstreams?
Organizations today are in search of vetted solutions and architectural guidance to rapidly solve business challenges. Whether you prefer off-the-shelf deployments or customizable architectures, the AWS Solutions Library carries solutions built by AWS and AWS Partners for a broad range of industry and technology use cases.

When I talk with mobile and web application developers or product owners, you often tell me that you want to use a clickstream analysis solution to understand your customers’ behavior inside your application. Click stream analysis solutions help you to identify popular and frequently visited screens, analyze navigation patterns, identify bottlenecks and drop-off points, or perform A/B testing of functionalities such as the pay wall, but you face two challenges to adopt or build a click stream analysis solution.

Either you use a third-party library and analytics solution that sends all your application and customer data to an external provider, which causes security and compliance risks and makes it more difficult to reference your existing business data to enrich the analysis, or you dedicate time and resources to build your own solution based on AWS services, such as Amazon Kinesis (for data ingestion), Amazon EMR (for processing), Amazon Redshift (for storage), and Amazon QuickSight (for visualization). Doing so ensures your application and customer data stay in the security perimeter of your AWS account, which is already approved and vetted by your information and security team. Often, building such a solution is an undifferentiated task that drives resources and budget away from developing the core business of your application.

Introducing Clickstream Analytics on AWS
The new solution Clickstream Analytics on AWS provides you with a backend for data ingestion, processing, and visualization of click stream data. It’s shipped as an AWS CloudFormation template that you can easily deploy into the AWS account of your choice.

In addition to the backend component, the solution provides you with purpose-built Java and Swift SDKs to integrate into your mobile applications (for both Android and iOS). The SDKs automatically collects data and provide developers with an easy-to-use API to collect application-specific data. They manage the low-level tasks of buffering the data locally, sending them to the backend, managing the retries in case of communication errors, and more.

The following diagram shows you the high-level architecture of the solution.

Clickstream analysis - architecture

The solution comes with an easy-to-use console to configure your solution. For example, it allows you to choose between three AWS services to ingest the application clickstream data: Amazon Managed Streaming for Apache Kafka, Amazon Kinesis Data Streams, or Amazon Simple Storage Service (Amazon S3). You can create multiple data pipelines for multiple applications or teams, each using a different configuration. This allows you to adjust the backend to the application user base and requirements.

You can use plugins to transform the data during the processing phase. The solution comes with two plugins preinstalled: User-Agent enrichment and IP address enrichment to add additional data that’s related to the User-Agent and the geolocation of the IP address used by the client applications.

By default, it provides a Amazon Redshift Serverless cluster to minimize the costs, but you can select a provisioned Amazon Redshift configuration to meet your performance and budget requirements.

Finally, the solution provides you with a set of pre-assembled visualization dashboards to report on user acquisition, user activity, and user engagement. The dashboard consumes the data available in Amazon Redshift. You’re free to develop other analytics and other dashboards using the tools and services of your choice.

Let’s See It in Action
The best way to learn how to deploy and to configure Clickstream Analytics on AWS is to follow the tutorial steps provided by the Clickstream Analytics on AWS workshop.

The workshop goes into great detail about each step. Here are the main steps I did to deploy the solution:

1. I create the control plane (the management console) of the solution using this CloudFormation template. The output of the template contains the URL to the management console. I later receive an email with a temporary password for the initial connection.

2. On the Clickstream Analytics console, I create my first project and define various network parameters such as the VPC, subnets, and security groups. I also select the service to use for data ingestion and my choice of configuration for Amazon Redshift.

Clickstream analysis - Create project

Clickstream analysis - data sink

3. When I enter all configuration data, the console creates the data plane for my application.

AWS services and solutions are usually built around a control plane and one or multiple data planes. In the context of Clickstream Analytics, the control plane is the console that I use to define my data acquisition and analysis project. The data plane is the infrastructure to receive, analyze, and visualize my application data. Now that I define my project, the console generates and launches another CloudFormation template to create and manage the data plane.

4. The Clickstream Analytics console generates a JSON configuration file to include into my application and it shares the Java or Swift code to include into my Android or iOS application. The console provides instructions to add the clickstream analysis as a dependency to my application. I also update my application code to insert the code suggested and start to deploy.

Clickstream analysis - code for your applications

5. After my customers start to use the mobile app, I access the Clickstream Analytics dashboard to visualize the data collected.

The Dashboards
Clickstream Analytics dashboards are designed to provide a holistic view of the user lifecycle: the acquisition, the engagement, the activity, and the retention. In addition, it adds visibility into user devices and geographies. The solution automatically generates visualizations in these six categories: Acquisition, Engagement, Activity, Retention, Devices, and Navigation path. Here are a couple of examples.

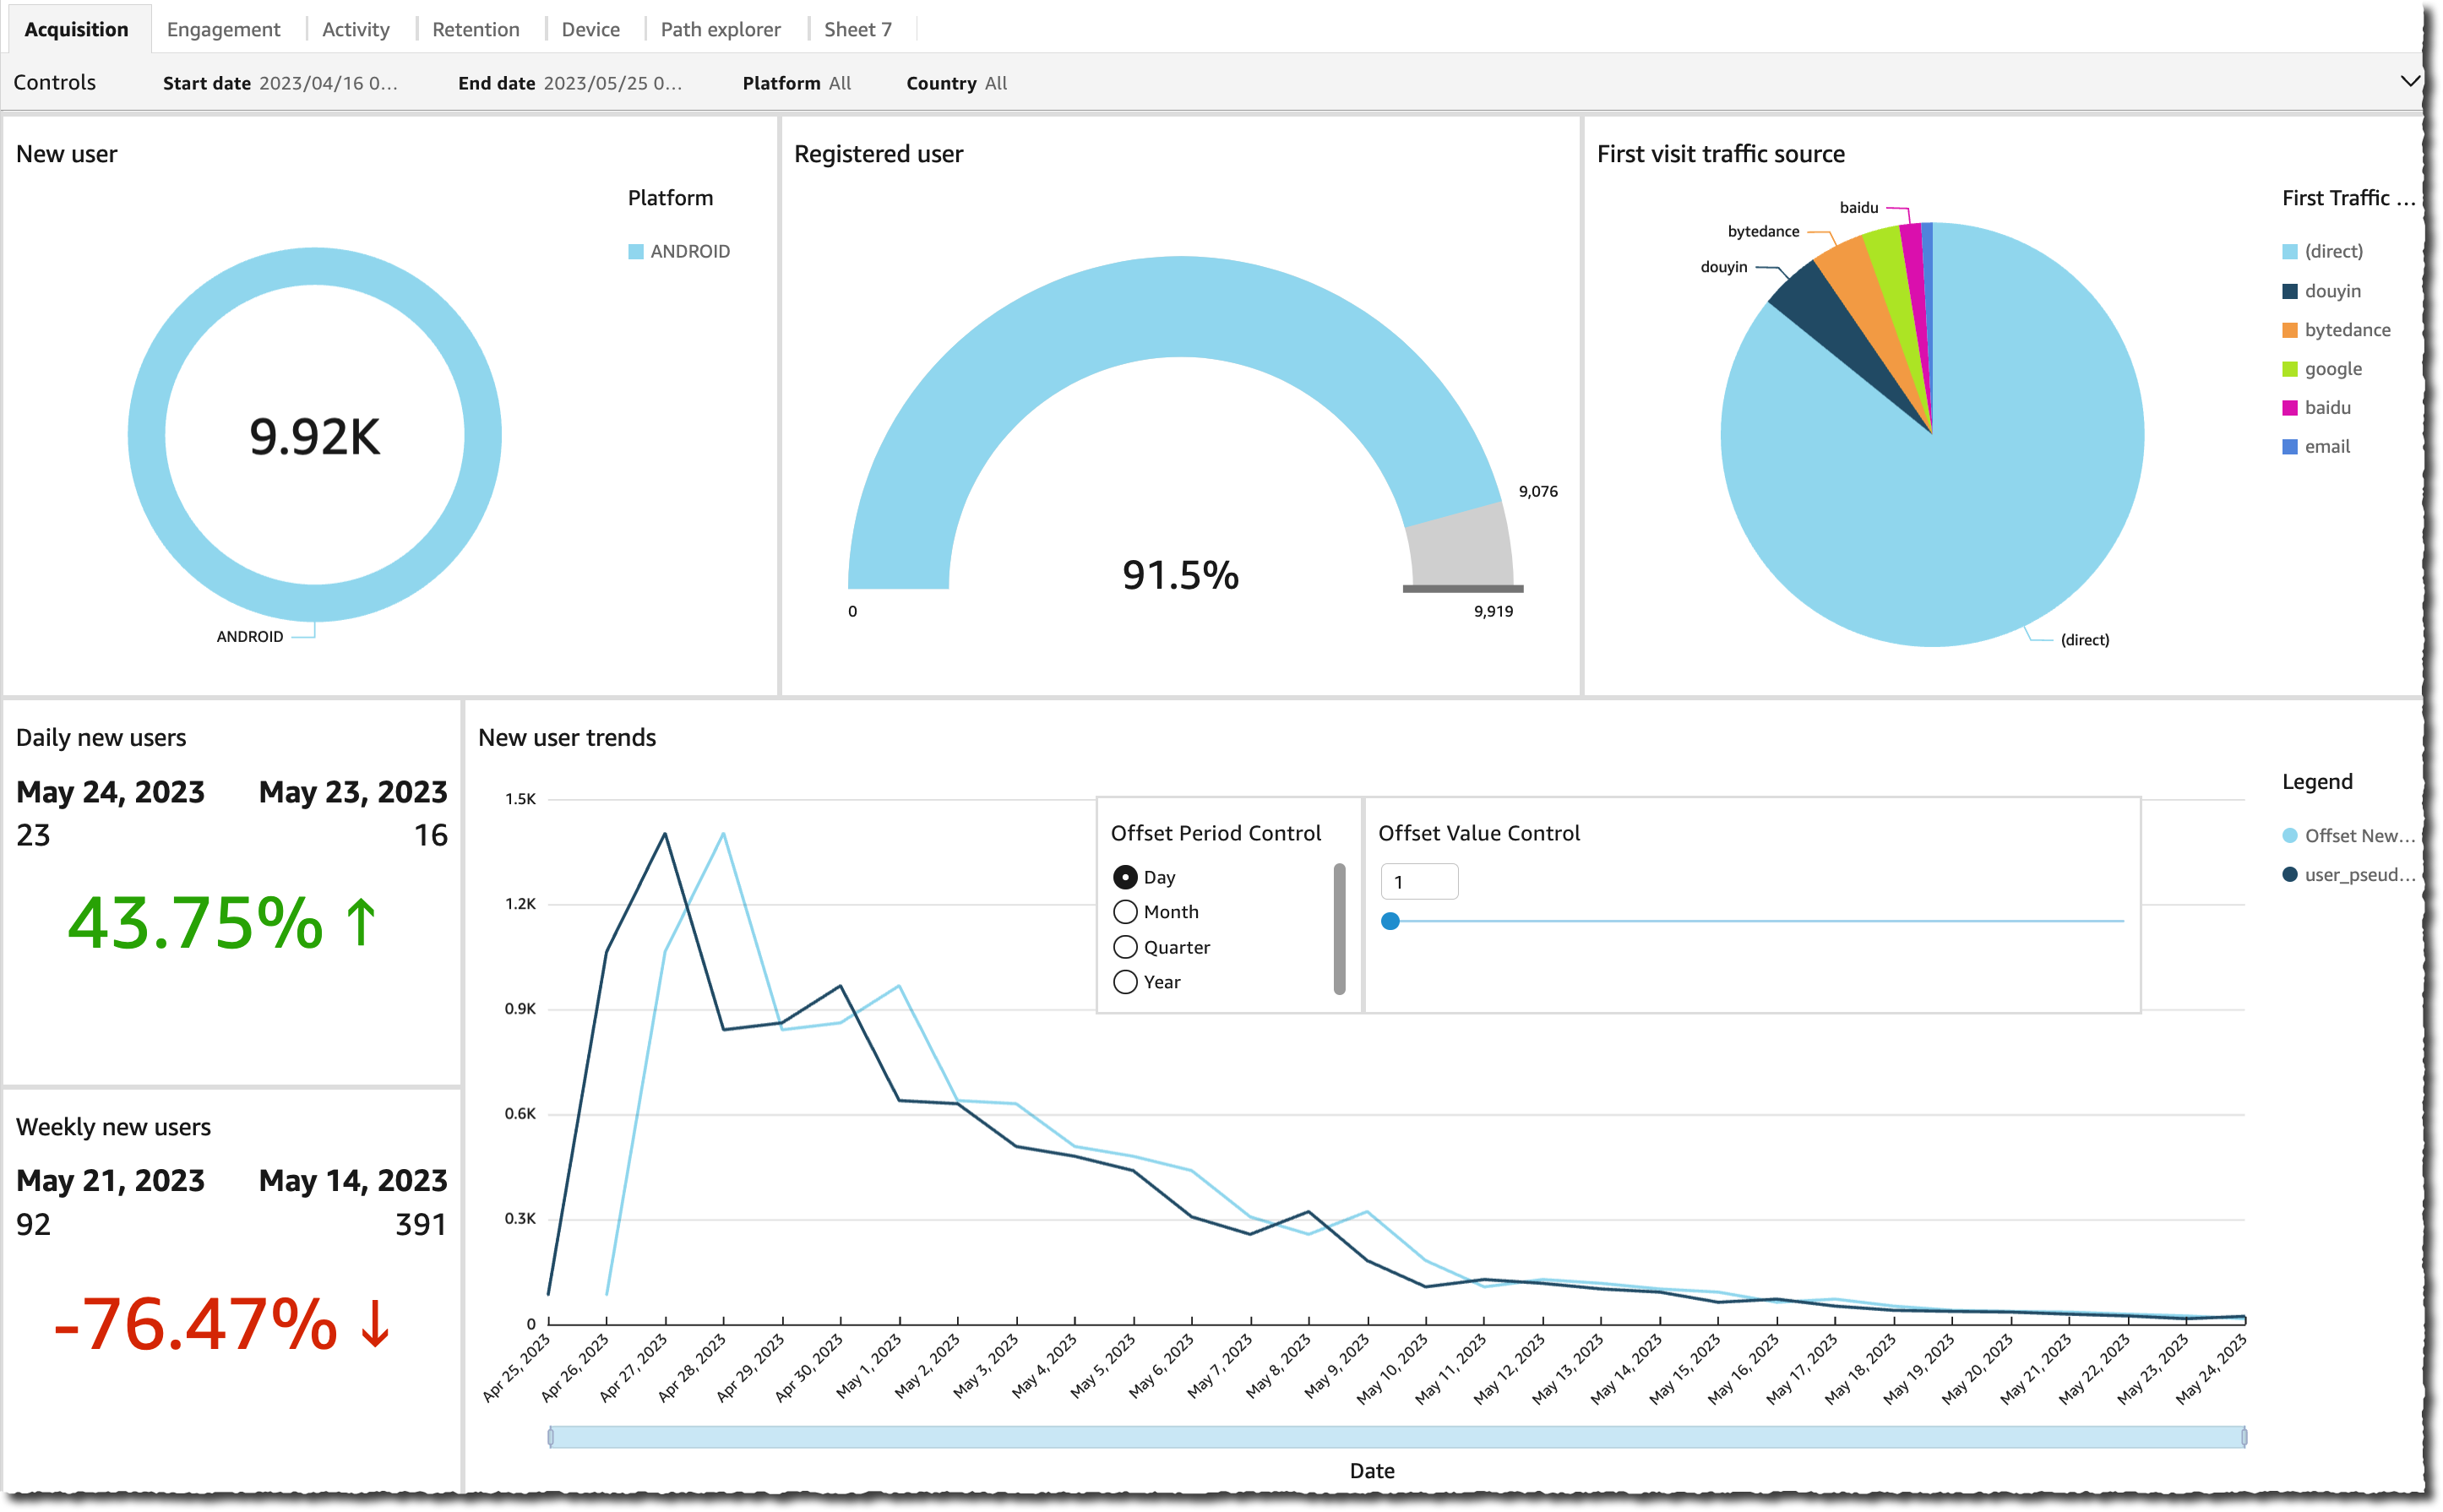
The Acquisition dashboard reports the total number of users, the registered number of users (the ones that signed in), and the number of users by traffic source. It also computes the new users and registered users’ trends.

Clickstream analysis - acquisition dashboard

The Engagement dashboard reports the user engagement level (the number of user sessions versus the time users spent on my application). Specifically, I have access to the number of engaged sessions (sessions that last more than 10 seconds or have at least two screen views), the engagement rate (the percentage of engaged sessions from the total number of sessions), and the average engagement time.

Clickstream analysis - engagement dashboard

The Activity dashboard shows the event and actions taken by my customers in my application. It reports data, such as the number of events and number of views (or screens) shown, with the top events and views shown for a given amount of time.

Clickstream analysis - activity dashboard

The Retention tab shows user retention over time: the user stickiness for your daily, weekly, and monthly active users. It also shows the rate of returning users versus new users.

Clickstream analysis - retention

The Device tab shows data about your customer’s devices: operating systems, versions, screen sizes, and language.

Clickstream analysis - devices dashboard

And finally, the Path explorer dashboard shows your customers’ navigation path into the screens of your applications.

Clickstream analysis - path explorer dashboard

As I mentioned earlier, all the data are available in Amazon Redshift, so you’re free to build other analytics and dashboards.

Pricing and Availability
The Clickstream Analytics solution is available free of charge. You pay for the AWS services provisioned for you, including Kinesis or Amazon Redshift. Cost estimates depend on the configuration that you select. For example, the size of the Kinesis and Amazon Redshift cluster you select for your data ingestion and analytics needs, or the volume of data your applications send to the pipeline both affect the monthly cost of the solution.

To learn how to get started with this solution, take the Clickstream Analytics workshop today and stop sharing your customer and application clickstream data with third-party solutions.

— seb

AWS Week in Review – Amazon EC2 Instance Connect Endpoint, Detective, Amazon S3 Dual Layer Encryption, Amazon Verified Permission – June 19, 2023

Post Syndicated from Sébastien Stormacq original https://aws.amazon.com/blogs/aws/aws-week-in-review-amazon-ec2-instance-connect-endpoint-detective-amazon-s3-dual-layer-encryption-amazon-verified-permission-june-19-2023/

This week, I’ll meet you at AWS partner’s Jamf Nation Live in Amsterdam where we’re showing how to use Amazon EC2 Mac to deploy your remote developer workstations or configure your iOS CI/CD pipelines in the cloud.Mac in an instant

Last Week’s Launches
While I was traveling last week, I kept an eye on the AWS News. Here are some launches that got my attention.

Amazon EC2 Instance Connect Endpoint. Endpoint for EC2 Instance Connect allows you to securely access Amazon EC2 instances using their private IP addresses, making the use of bastion hosts obsolete. Endpoint for EC2 Instance Connect is by far my favorite launch from last week. With EC2 Instance Connect, you use AWS Identity and Access Management (IAM) policies and principals to control SSH access to your instances. This removes the need to share and manage SSH keys. We also updated the AWS Command Line Interface (AWS CLI) to allow you to easily connect or open a secured tunnel to an instance using only its instance ID. I read and contributed to a couple of threads on social media where you pointed out that AWS Systems Manager Session Manager already offered similar capabilities. You’re right. But the extra advantage of EC2 Instance Connect Endpoint is that it allows you to use your existing SSH-based tools and libraries, such as the scp command.

Amazon Inspector now supports code scanning of AWS Lambda functions. This expands the existing capability to scan Lambda functions and associated layers for software vulnerabilities in application package dependencies. Amazon Detective also extends finding groups to Amazon Inspector. Detective automatically collects findings from Amazon Inspector, GuardDuty, and other AWS security services, such as AWS Security Hub, to help increase situational awareness of related security events.

Amazon Verified Permissions is generally available. If you’re designing or developing business applications that need to enforce user-based permissions, you have a new option to centrally manage application permissions. Verified Permissions is a fine-grained permissions management and authorization service for your applications that can be used at any scale. Verified Permissions centralizes permissions in a policy store and helps developers use those permissions to authorize user actions within their applications. Similarly to the way an identity provider simplifies authentication, a policy store lets you manage authorization in a consistent and scalable way. Read Danilo’s post to discover the details.

Amazon S3 Dual-Layer Server-Side Encryption with keys stored in AWS Key Management Service (DSSE-KMS). Some heavily regulated industries require double encryption to store some type of data at rest. Amazon Simple Storage Service (Amazon S3) offers DSSE-KMS, a new free encryption option that provides two layers of data encryption, using different keys and different implementation of the 256-bit Advanced Encryption Standard with Galois Counter Mode (AES-GCM) algorithm. My colleague Irshad’s post has all the details.

AWS CloudTrail Lake Dashboards provide out-of-the-box visibility and top insights from your audit and security data directly within the CloudTrail Lake console. CloudTrail Lake features a number of AWS curated dashboards so you can get started right away – with no required detailed dashboard setup or SQL experience.

AWS IAM Identity Center now supports automated user provisioning from Google Workspace. You can now connect your Google Workspace to AWS IAM Identity Center (successor to AWS Single Sign-On) once and manage access to AWS accounts and applications centrally in IAM Identity Center.

AWS CloudShell is now available in 12 additional regions. AWS CloudShell is a browser-based shell that makes it easier to securely manage, explore, and interact with your AWS resources. The list of the 12 new Regions is detailed in the launch announcement.

For a full list of AWS announcements, be sure to keep an eye on the What’s New at AWS page.

Other AWS News
Here are some other updates and news that you might have missed:

  • AWS Extension for Stable Diffusion WebUI. WebUI is a popular open-source web interface that allows you to easily interact with Stable Diffusion generative AI. We built this extension to help you to migrate existing workloads (such as inference, train, and ckpt merge) from your local or standalone servers to the AWS Cloud.
  • GoDaddy developed a multi-Region, event-driven system. Their system handles 400 millions events per day. They plan to scale it to process 2 billion messages per day in a near future. My colleague Marcia explains the detail of their architecture in her post.
  • The Official AWS Podcast – Listen each week for updates on the latest AWS news and deep dives into exciting use cases. There are also official AWS podcasts in several languages. Check out the podcasts in FrenchGermanItalian, and Spanish.
  • AWS Open Source News and Updates – This is a newsletter curated by my colleague Ricardo to bring you the latest open source projects, posts, events, and more.

Upcoming AWS Events
Check your calendars and sign up for these AWS events:

  • AWS Silicon Innovation Day (June 21) – A one-day virtual event that will allow you to better understand AWS Silicon and how you can use the Amazon EC2 chip offerings to your benefit. My colleague Irshad shared the details in this post. Register today.
  • AWS Global Summits – There are many AWS Summits going on right now around the world: Milano (June 22), Hong Kong (July 20), New York (July 26), Taiwan (Aug 2 & 3), and Sao Paulo (Aug 3).
  • AWS Community Day – Join a community-led conference run by AWS user group leaders in your region: Manila (June 29–30), Chile (July 1), and Munich (September 14).
  • AWS User Group Perú Conf 2023 (September 2023). Some of the AWS News blog writer team will be present: Marcia, Jeff, myself, and our colleague Startup Developer Advocate Mark. Save the date and register today.
  • CDK Day CDK Day is happening again this year on September 29. The call for papers for this event is open, and this year we’re also accepting talks in Spanish. Submit your talk here.

That’s all for this week. Check back next Monday for another Week in Review!

This post is part of our Week in Review series. Check back each week for a quick roundup of interesting news and announcements from AWS!
— seb

A New Set of APIs for Amazon SQS Dead-Letter Queue Redrive

Post Syndicated from Sébastien Stormacq original https://aws.amazon.com/blogs/aws/a-new-set-of-apis-for-amazon-sqs-dead-letter-queue-redrive/

Today, we launch a new set of APIs for Amazon Simple Queue Service (Amazon SQS). These new APIs allow you to manage dead-letter queue (DLQ) redrive programmatically. You can now use the AWS SDKs or the AWS Command Line Interface (AWS CLI) to programmatically move messages from the DLQ to their original queue, or to a custom queue destination, to attempt to process them again. A DLQ is a queue where Amazon SQS automatically moves messages that are not correctly processed by your consumer application.

To fully appreciate how this new API might help you, let’s have a quick look back at history.

Message queues are an integral part of modern application architectures. They allow developers to decouple services by allowing asynchronous and message-based communications between message producers and consumers. In most systems, messages are persisted in shared storage (the queue) until the consumer processes them. Message queues allow developers to build applications that are resilient to temporary service failure. They help prioritize message processing and scale their fleet of worker nodes that process the messages. Message queues are also popular in event-driven architectures.

Asynchronous message exchange is not new in application architectures. The concept of exchanging messages asynchronously between applications appeared in the 1960s and was first made popular when IBM launched TCAM for OS/360 in 1972. The general adoption came 20 years later with IBM MQ Series in 1993 (now IBM MQ) and when Sun Microsystems released Java Messaging Service (JMS) in 1998, a standard API for Java applications to interact with message queues.

AWS launched Amazon SQS on July 12, 2006. Amazon SQS is a highly scalable, reliable, and elastic queuing service that “just works.” As Werner wrote at the time: “We have chosen a concurrency model where the process working on a message automatically acquires a leased lock on that message; if the message is not deleted before the lease expires, it becomes available for processing again. Makes failure handling very simple.

On January 29, 2014, we introduced dead-letter queues (DLQ). DLQs help you avoid a message that failed to be processed from staying forever on top of the queue, possibly preventing other messages in the queue from processing. With DLQs, each queue has an associated property telling Amazon SQS how many times a message may be presented for processing (maxReceiveCount). Each message also has an associated receive counter (ReceiveCount). Each time a consumer application picks up a message for processing, the message receive count is incremented by 1. When ReceiveCount > maxReceiveCount, Amazon SQS moves the message to your designated DLQ for human analysis and debugging. You generally associate alarms with the DLQ to send notifications when such events happen. Typical reasons to move a message to the DLQ are because they are incorrectly formatted, there are bugs in the consumer application, or it takes too long to process the message.

At AWS re:Invent 2021, AWS announced dead-letter queue redrive on the Amazon SQS console. The redrive addresses the second part of the failed message lifecycle. It allows you to reinject the message in its original queue to attempt processing it again. After the consumer application is fixed and ready to consume the failed messages, you can redrive the messages from the DLQ back in the source queue or a customized queue destination. It just requires a couple of clicks on the console.

Today, we are adding APIs allowing you to write applications and scripts that handle the redrive programmatically. There is no longer a need to have a human clicking on the console. Using the API increases the scalability of your processes and reduces the risk of human error.

Let’s See It in Action
To try out this new API, I open a terminal for a command-line only demo. Before I get started, I make sure I have the latest version of the AWS CLI. On macOS I enter brew upgrade awscli.

I first create two queues. One is the dead-letter queue, and the other is my application queue:

# First, I create the dead-letter queue (notice the -dlq I choose to add at the end of the queue name)
➜ ~ aws sqs create-queue \
            --queue-name awsnewsblog-dlq                                            
{
    "QueueUrl": "https://sqs.us-east-2.amazonaws.com/012345678900/awsnewsblog-dlq"
}

# second, I retrieve the Arn of the queue I just created
➜  ~ aws sqs get-queue-attributes \
             --queue-url https://sqs.us-east-2.amazonaws.com/012345678900/awsnewsblog-dlq \
             --attribute-names QueueArn
{
    "Attributes": {
        "QueueArn": "arn:aws:sqs:us-east-2:012345678900:awsnewsblog-dlq"
    }
}

# Third, I create the application queue. I enter a redrive policy: post messages in the DLQ after three delivery attempts
➜  ~ aws sqs create-queue \
             --queue-name awsnewsblog \
             --attributes '{"RedrivePolicy": "{\"deadLetterTargetArn\":\"arn:aws:sqs:us-east-2:012345678900:awsnewsblog-dlq\",\"maxReceiveCount\":\"3\"}"}' 
{
    "QueueUrl": "https://sqs.us-east-2.amazonaws.com/012345678900/awsnewsblog"
}

Now that the two queues are ready, I post a message to the application queue:

➜ ~ aws sqs send-message \
            --queue-url https://sqs.us-east-2.amazonaws.com/012345678900/awsnewsblog \
            --message-body "Hello World"
{
"MD5OfMessageBody": "b10a8db164e0754105b7a99be72e3fe5",
"MessageId": "fdc26778-ce9a-4782-9e33-ae73877cfcb2"
}

Next, I consume the message, but I don’t delete it from the queue. This simulates a crash in the message consumer application. Message consumers are supposed to delete the message after successful processing. I set the maxReceivedCount property to 3 when I entered the redrivePolicy. I therefore repeat this operation three times to force Amazon SQS to move the message to the dead-letter queue after three delivery attempts. The default visibility timeout is 30 seconds, so I have to wait 30 seconds or more between the retries.

➜ ~ aws sqs receive-message \
            --queue-url https://sqs.us-east-2.amazonaws.com/012345678900/awsnewsblog
{
"Messages": [
{
"MessageId": "fdc26778-ce9a-4782-9e33-ae73877cfcb2",
"ReceiptHandle": "AQEBP8yOfgBlnjlkGXjyeLROiY7xg7cZ6Znq8Aoa0d3Ar4uvTLPrHZptNotNfKRK25xm+IU8ebD3kDwZ9lja6JYs/t1kBlwiNO6TBACN5srAb/WggQiAAkYl045Tx3CvsOypbJA3y8U+MyEOQRwIz6G85i7MnR8RgKTlhOzOZOVACXC4W8J9GADaQquFaS1wVeM9VDsOxds1hDZLL0j33PIAkIrG016LOQ4sAntH0DOlEKIWZjvZIQGdlRJS65PJu+I/Ka1UPHGiFt9f8m3SR+Y34/ttRWpQANlXQi5ByA47N8UfcpFXXB5L30cUmoDtKucPewsJNG2zRCteR0bQczMMAmOPujsKq70UGOT8X2gEv2LfhlY7+5n8z3yew8sdBjWhVSegrgj6Yzwoc4kXiMddMg==",
"MD5OfBody": "b10a8db164e0754105b7a99be72e3fe5",
"Body": "Hello World"
}
]
}

# wait 30 seconds,
# then repeat two times (for a total of three receive-message API calls)

After three processing attempts, the message is not in the queue anymore:

➜  ~ aws sqs receive-message \
             --queue-url  https://sqs.us-east-2.amazonaws.com/012345678900/awsnewsblog
{
    "Messages": []
}

The message has been moved to the dead-letter queue. I check the DLQ to confirm (notice the queue URL ending with -dlq):

➜  ~ aws sqs receive-message \
             --queue-url  https://sqs.us-east-2.amazonaws.com/012345678900/awsnewsblog-dlq
{
    "Messages": [
        {
            "MessageId": "fdc26778-ce9a-4782-9e33-ae73877cfcb2",
            "ReceiptHandle": "AQEBCLtBMoZYVMMq7fUGNHeCliqE3mFXnkuJ+nOXLK1++uoXWBG31nDejCpxElmiBZWfbcfGJrEdKj4P9HJdrQMYDbeSqB+u1ZlB7CYzQBiQps4SEG0biEoubwqjQbmDZlPrmkFsnYgLD98D1XYWk/Ik6Z2n/wxDo9ko9rbZ15izK5RFnbwveNy8dfc6ireqVB1EGbeGkHcweHGuoeKWXEab1ynZWhNqZsQgCR6pWRkgtn59lJcLv4cJ4UMewNzvt7tMHH69GvVjXdYDYvJJI2vj+6RHvcvSHWWhTNT+CuPEXguVNuNrSya8gho1fCnKpVwQre6HhMlLPjY4wvn/tXY7+5rmte9eXagCqLQXaENB2R7qWNVPiWRIJy8/cTf37NLYVzBom030DNJlH9EeceRhCQ==",
            "MD5OfBody": "b10a8db164e0754105b7a99be72e3fe5",
            "Body": "Hello World"
        }
    ]
}

Now that the setup is ready, let’s programmatically redrive the message to its original queue. Let’s assume I understand why the consumer didn’t correctly process the message and that I fixed the consumer application code. I use start-message-move-task on the DLQ to start the asynchronous redrive. There is an optional attribute (MaxNumberOfMessagesPerSecond) to control the velocity of the redrive:

➜ ~ aws sqs start-message-move-task \
            --source-arn arn:aws:sqs:us-east-2:012345678900:awsnewsblog-dlq
{
    "TaskHandle": "eyJ0YXNrSWQiOiI4ZGJmNjBiMy00MmUwLTQzYTYtYjg4Zi1iMTZjYWRjY2FkNmEiLCJzb3VyY2VBcm4iOiJhcm46YXdzOnNxczp1cy1lYXN0LTI6NDg2NjUyMDY2NjkzOmF3c25ld3NibG9nLWRscSJ9"
}

I can list and check status the of the move tasks I initiated with list-message-move-tasks or cancel a running task by calling the cancel-message-move-task API:

➜ ~ aws sqs list-message-move-tasks \
            --source-arn arn:aws:sqs:us-east-2:012345678900:awsnewsblog-dlq
{
    "Results": [
        {
            "Status": "COMPLETED",
            "SourceArn": "arn:aws:sqs:us-east-2:012345678900:awsnewsblog-dlq",
            "ApproximateNumberOfMessagesMoved": 1,
            "ApproximateNumberOfMessagesToMove": 1,
            "StartedTimestamp": 1684135792239
        }
    ]
}

Now my application can consume the message again from the application queue:

➜  ~ aws sqs receive-message \
             --queue-url  https://sqs.us-east-2.amazonaws.com/012345678900/awsnewsblog                                   
{
    "Messages": [
        {
            "MessageId": "a7ae83ca-cde4-48bf-b822-3d4bc1f4dcae",
            "ReceiptHandle": "AQEB9a+Dm2nvb3VUn9+46j9UsDidU/W6qFwJtXtNWTyfoSDOKT7h73e6ctT9RVZysEw3qqzJOx1cxblTTOSrYwwwoBA2qoJMGsqsrsRGGYojBvf9X8hqi8B8MHn9rTm8diJ2wT2b7WC+TDrx3zIvUeiSEkP+EhqyYOvOs7Q9aETR+Uz02kQxZ/cUJWsN4MMSXBejwW+c5ivv5uQtpfUrfZuCWa9B9O67Kj/q52clriPHpcqCCfJwFBSZkGTXYwTpnjxD4QM7DPS+xVeVfTyM7DsKCAOtpvFBmX5m4UNKT6TROgCnGxTRglUSMWQp8ufVxXiaUyM1dwqxYekM9uX/RCb01gEyCZHas4jeNRV5nUJlhBkkqPlw3i6w9Uuc2y9nH0Df8nH3g7KTXo4lv5Bl3ayh9w==",
            "MD5OfBody": "b10a8db164e0754105b7a99be72e3fe5",
            "Body": "Hello World"
        }
    ]
}

Availability
DLQ redrive APIs are available today in all commercial Regions where Amazon SQS is available.

Redriving the messages from the dead-letter queue to the source queue or a custom destination queue generates additional API calls billed based on existing pricing (starting at $0.40 per million API calls, after the first million, which is free every month). Amazon SQS batches the messages while redriving them from one queue to another. This makes moving messages from one queue to another a simple and low-cost option.

To learn more about DLQ and DLQ redrive, check our documentation.

Remember that we live in an asynchronous world—so should your applications. Get started today and write your first redrive application.

— seb

Week in Review – AWS Verified Access, Java 17, Amplify Flutter, Conferences, and More – May 1, 2023

Post Syndicated from Sébastien Stormacq original https://aws.amazon.com/blogs/aws/week-in-review-aws-verified-access-java-17-amplify-flutter-conferences-and-more-may-1-2023/

Conference season has started and I was happy to meet and talk with iOS and Swift developers at the New York Swifty conference last week. I will travel again to Turino (Italy), Amsterdam (Netherlands), Frankfurt (Germany), and London (UK) in the coming weeks. Feel free to stop by and say hi if you are around. But, while I was queuing for passport control at JFK airport, AWS teams continued to listen to your feedback and innovate on your behalf.

What happened on AWS last week ? I counted 26 new capabilities since last Monday (not counting last Friday, since I am writing these lines before the start of the day in the US). Here are the eight that caught my attention.

Last Week on AWS

Amplify Flutter now supports web and desktop apps. You can now write Flutter applications that target six platforms, including iOS, Android, Web, Linux, MacOS, and Windows with a single codebase. This update encompasses not only the Amplify libraries but also the Flutter Authenticator UI library, which has been entirely rewritten in Dart. As a result, you can now deliver a consistent experience across all targeted platforms.

AWS Lambda adds support for Java 17. AWS Lambda now supports Java 17 as both a managed runtime and a container base image. Developers creating serverless applications in Lambda with Java 17 can take advantage of new language features including Java records, sealed classes, and multi-line strings. The Lambda Java 17 runtime also has numerous performance improvements, including optimizations when running Lambda functions on Graviton 2 processors. It supports AWS Lambda Snap Start (in supported Regions) for fast cold starts, and the latest versions of the popular Spring Boot 3 and Micronaut 4 application frameworks

AWS Verified Access is now generally available. I first wrote about Verified Access when we announced the preview at the re:Invent conference last year. AWS Verified Access is now available. This new service helps you provide secure access to your corporate applications without using a VPN. Built based on AWS Zero Trust principles, you can use Verified Access to implement a work-from-anywhere model with added security and scalability.

AWS Support is now available in Korean. As the number of customers speaking Korean grows, AWS Support is invested in providing the best support experience possible. You can now communicate with AWS Support engineers and agents in Korean when you create a support case at the AWS Support Center.

AWS DataSync Discovery is now generally available. DataSync Discovery enables you to understand your on-premises storage performance and capacity through automated data collection and analysis. It helps you quickly identify data to be migrated and evaluate suggested AWS Storage services that align with your performance and capacity needs. Capabilities added since preview include support for NetApp ONTAP 9.7, recommendations at cluster and storage virtual machine (SVM) levels, and discovery job events in Amazon EventBridge.

Amazon Location Service adds support for long-distance matrix routing. This makes it easier for you to quickly calculate driving time and driving distance between multiple origins and destinations, no matter how far apart they are. Developers can now make a single API request to calculate up to 122,500 routes (350 origins and 350 destinations) within a 180 km region or up to 100 routes without any distance limitation.

AWS Firewall Manager adds support for multiple administrators. You can now create up to 10 AWS Firewall Manager administrator accounts from AWS Organizations to manage your firewall policies. You can delegate responsibility for firewall administration at a granular scope by restricting access based on OU, account, policy type, and Region, thereby enabling policy management tasks to be implemented faster and more effectively.

AWS AppSync supports TypeScript and source maps in JavaScript resolvers. With this update, you can take advantage of TypeScript features when you write JavaScript resolvers. With the updated libraries, you get improved support for types and generics in AppSync’s utility functions. The updated AppSync documentation provides guidance on how to get started and how to bundle your code when you want to use TypeScript.

Amazon Athena Provisioned Capacity. Athena is a query service that makes it simple to analyze data in S3 data lakes and 30 different data sources, including on-premises data sources or other cloud systems, using standard SQL queries. Athena is serverless, so there is no infrastructure to manage, and–until today–you pay only for the queries that you run. Starting last week, you can now get dedicated capacity for your queries and use new workload management features to prioritize, control, and scale your most important queries, paying only for the capacity you provision.

X in Y – We made existing services available in additional Regions and locations:

Upcoming AWS Events
And to finish this post, I recommend you check your calendars and sign up for these AWS events:

AWS Serverless Innovation DayJoin us on May 17, 2023, for a virtual event hosted on the Twitch AWS channel. We will showcase AWS serverless technology choices such as AWS Lambda, Amazon ECS with AWS Fargate, Amazon EventBridge, and AWS Step Functions. In addition, we will share serverless modernization success stories, use cases, and best practices.

AWS re:Inforce 2023 – Now register for AWS re:Inforce, in Anaheim, California, June 13–14. AWS Chief Information Security Officer CJ Moses will share the latest innovations in cloud security and what AWS Security is focused on. The breakout sessions will provide real-world examples of how security is embedded into the way businesses operate. To learn more and get the limited discount code to register, see CJ’s blog post Gain insights and knowledge at AWS re:Inforce 2023 in the AWS Security Blog.

AWS Global Summits – Check your calendars and sign up for the AWS Summit close to where you live or work: Seoul (May 3–4), Berlin and Singapore (May 4), Stockholm (May 11), Hong Kong (May 23), Amsterdam (June 1), London (June 7), Madrid (June 15), and Milano (June 22).

AWS Community Day – Join community-led conferences driven by AWS user group leaders close to your city: Chicago (June 15), Manila (June 29–30), and Munich (September 14). Recently, we have been bringing together AWS user groups from around the world into Meetup Pro accounts. Find your group and its meetups in your city!

AWS User Group Peru Conference – There is more than a new edge location opening in Lima. The local AWS User Group announced a one-day cloud event in Spanish and English in Lima on September 23. Three of us from the AWS News blog team will attend. I will be joined by my colleagues Marcia and Jeff. Save the date and register today!

You can browse all upcoming AWS-led in-person and virtual events and developer-focused events such as AWS DevDay.

Stay Informed
That was my selection for this week! To better keep up with all of this news, don’t forget to check out the following resources:

That’s all for this week. Check back next Monday for another Week in Review!

— seb

This post is part of our Week in Review series. Check back each week for a quick roundup of interesting news and announcements from AWS!

Introducing Athena Provisioned Capacity

Post Syndicated from Sébastien Stormacq original https://aws.amazon.com/blogs/aws/introducing-athena-provisioned-capacity/

Today we launch the ability to provision capacity to run your Amazon Athena queries.

Athena is a query service that makes it simple to analyze data in Amazon Simple Storage Service (Amazon S3) data lakes and 30 different data sources, including on-premises data sources or other cloud systems, using standard SQL queries. Athena is serverless, so there is no infrastructure to manage, and–until today–you pay only for the queries that you run. Starting today, you can get dedicated capacity for your queries and use new workload management features to prioritize, control, and scale your most important queries, paying only for the capacity you provision.

At AWS, 90 percent of the new services and features are driven by your direct feedback. Many of you Athena customers told us that, when running a large volume of queries, you sometimes experience queuing, which might slow down some applications or business processes. To work around this, you typically create a query prioritization mechanism to prioritize mission-critical queries over less critical, interactive, or exploratory queries. This prioritization mechanism helps to get the highest priority queries run first, at the price of building and maintaining code or business processes outside of Athena itself. You also told us it is difficult to forecast your Athena costs. Athena charges by the volume of data scanned, which is often difficult to predict as it depends on the size of your data set, the construction of the user queries, and the storage format for the data.

We heard this feedback, and today, we introduce the capability to provision dedicated query processing capacity at scale. With provisioned capacity, you provision a dedicated set of compute resources to run your queries. This always-on capacity can serve your business-critical queries with near-zero latency and no queuing. It gives you control over workload performance characteristics such as cost, concurrency, and query prioritization. Similar to provisioned capacity for other AWS services, you pay only for the capacity provisioned, not for the actual usage. With provisioned capacity, your Athena bills are predictable, and you do not have to limit user queries to stay within your monthly budget. I’ll share more about the billing model down below.

Behind the scenes, Athena maintains a large pool of compute in each AWS Region that it operates in. You can think of this as one large pool of compute, divided logically across customers. When you reserve capacity in Athena, the capacity is held for your exclusive use. You can choose which queries run on the capacity you provisioned and which run on Athena’s multi-tenant, on-demand capacity. Multiple queries can share the capacity you provisioned. You may add additional capacity units at any time, based on your evolving business requirements. You may also adjust the provisioned capacity down after a minimum period of time of 8 hours.

The unit of capacity is a Data Processing Unit (DPU). A single DPU is equivalent to four vCPU and 16 Gb RAM. The minimum capacity you may provision is 24 DPU for 8 hours. This new provisioned capacity for Athena is ideal for those of you running any volume of queries, but the sweet spot to start using provisioned capacity is when you spend $100 or more per month on Athena.

The number of DPUs you need depends on your goals and analysis patterns. For example, if you need queries to start immediately and without queuing, you should provision enough DPUs to meet your peak concurrent query demand. Provisioning fewer DPUs than your peak demand is allowed, but may result in queuing. When this occurs, queries are held in a queue and executed when capacity is available. If your goal is to run queries within a fixed budget, you can use the AWS Pricing Calculator to determine the number of DPUs that meets your budget. Lastly, remember that data size, storage format, and query construction influence the number of DPU a query requires. You can increase query performance by compressing, partitioning, and converting your data into columnar formats. Athena’s documentation provides you with guidelines to determine how much capacity you might require to run multiple queries at the same time.

How Does It Work?
Getting started is a three-step process. I navigate to the Athena page in the AWS Management Console and select Capacity Reservations on the left-side navigation menu.
(The console you see on this demo is based on the new Cloudscape open-source design system, yours might still see the traditional design on your AWS account.)

Athena Capacity Reservation landing page in the console

I select the Create capacity reservation button at the top right of the page.

On the Create capacity reservation page, I enter a Capacity reservation name and the number of DPUs I want to provision.

Athena Capacity Reservation - Create Reservation

I select Review to review my choices, and I select Create capacity reservation to create my reservation. After a brief period of time, the capacity reservation status becomes ✅ Active.

Athena Capacity Reservation - Status

The third and last step is to create a workgroup and assign the workgroup to the provisioned capacity. A workgroup is an Athena mechanism allowing you to separate users, teams, applications, or workloads to set limits on the amount of data each query or the entire workgroup can process and to track costs.

Queries belonging to the assigned workgroup will run on the capacity you provisioned. Capacity may be shared with multiple workgroups as long as they all use the same Athena engine version. This concept, depicted in the diagram below, is surfaced through a capacity allocation policy, which defines how capacity is assigned over workgroups. This gives you the flexibility to run queries with more or less capacity, depending on your business needs.

Athena Capacity Reservation - shared workgroups

To create a workgroup, I navigate to the Workgroups section of the Athena page. Then, I select Create workgroup.

Athena Capacity Reservation - Create Workgroup

I make sure the analytics engine selected in the reservation matches the one in the workgroup.

Athena Capacity Reservation - select analytic engineThen, I go back to the capacity reservation I just created, and I select Add workgroups to add the workgroup I just created.

Athena Capacity Reservation - Add workgroup

That’s it! Now that the configuration is ready, I can run my queries. Existing queries will run on the provisioned capacity unmodified. I make sure to select the workgroup I just created when I run queries. I choose a workgroup on the top right side of the query editor, or use the --work-group argument on the AWS command line, such as:

aws athena start-query-execution --work-group AWSNewsBlog

Athena Capacity Reservation - Select workgroup

Availability and Pricing
As I explained in the introduction, we charge for the number of DPUs you provisioned and the duration. The minimum duration is 8 hours, and after that, billing is per minute. You can release the provisioned capacity at any time. Cancellations within the minimum duration period are billed for the full term, and capacity is deallocated as soon as all currently running queries are terminated.

Queries run from a workgroup assigned to a provisioned capacity are not billed for the amount of data scanned. You effectively pay a flat rate depending on the provisioned capacity, not the usage. If you have excess capacity, you can reduce the number of DPUs you provisioned or add workgroups to consume the excess capacity.

As usual, the Athena pricing page has all the details.

Athena provisioned capacity is available today in US East (Ohio, N. Virginia), US West (Oregon), Asia Pacific (Singapore, Sydney, Tokyo), and Europe (Ireland, Stockholm) AWS Regions.

Go and provision your Athena capacity today!

— seb

Week in Review: Terraform in Service Catalog, AWS Supply Chain, Streaming Response in Lambda, and Amplify Library for Swift – April 10, 2023

Post Syndicated from Sébastien Stormacq original https://aws.amazon.com/blogs/aws/week-in-review-terraform-in-service-catalog-aws-supply-chain-streaming-response-in-lambda-and-amplify-library-for-swift-april-10-2023/

The AWS Summit season has started. AWS Summits are free technical and business conferences happening in large cities across the planet. This week, we were happy to welcome our customers and partners in Sydney and Paris. In France, 9,973 customers and partners joined us for the day to meet and exchange ideas but also to attend one of the more than 145 technical breakout sessions and the keynote. This is the largest cloud computing event in France, and I can’t resist sharing a picture from the main room during the opening keynote.

AWS Summit Paris keynote

There are AWS Summits on all continents ; you can find the list and the links for registration here https://aws.amazon.com/events/summits. The next on my agenda are listed at the end of this post.

These two Summits did not slow down our services teams. I counted 44 new capabilities since last Monday. Here are the few that caught my attention.

Last Week on AWS

AWS Lambda response streaming – Response streaming is a new invocation pattern that lets functions progressively stream response payloads back to clients. You can use Lambda response payload streaming to send response data to callers as it becomes available. Response streaming also allows you to build functions that return larger payloads and perform long-running operations while reporting incremental progress (within the 15 minutes execution period). My colleague Julian wrote an incredibly detailed blog post to help you to get started.

AWS Supply Chain Now Generally Available – AWS Supply Chain is a cloud application that mitigates risk and lowers costs with unified data and built-in contextual collaboration. It connects to your existing enterprise resource planning (ERP) and supply chain management systems to bring you ML-powered actionable insights into your supply chain.

AWS Service Catalog Supports Terraform Templates – With AWS Service Catalog, you can create, govern, and manage a catalog of infrastructure as code (IaC) templates that are approved for use on AWS. You can now define AWS Service Catalog products and their resources using either AWS CloudFormation or Hashicorp Terraform and choose the tool that better aligns with your processes and expertise.

Amazon S3 enforces two security best practices and brings new visibility into object replication status – As announced on December 13, 2022, Amazon S3 is now deploying two new default bucket security settings by automatically enabling S3 Block Public Access and disabling S3 access control lists (ACLs) for all new S3 buckets. Amazon S3 also adds a new Amazon CloudWatch metric that can be used to diagnose and correct S3 Replication configuration issues more quickly. The OperationFailedReplication metric, available in both the Amazon S3 console and in Amazon CloudWatch, gives you per-minute visibility into the number of objects that did not replicate to the destination bucket for each of your replication rules.

AWS Security Hub launches four security best practicesAWS Security Hub has released 4 new controls for its National Institute of Standards and Technology (NIST) SP 800-53 Rev. 5 standard. These controls conduct fully-automatic security checks against Elastic Load Balancing (ELB), Amazon Elastic Kubernetes Service (Amazon EKS), Amazon Redshift, and Amazon Simple Storage Service (Amazon S3). To use these controls, you should first turn on the NIST standard.

AWS Cloud Operation Competency Partners – AWS Cloud Operations covers five fundamental solution areas: Cloud Governance, Cloud Financial Management, Monitoring and Observability, Compliance and Auditing, and Operations Management. The new competency enables customers to select validated AWS Partners who offer comprehensive solutions with an integrated approach across multiple areas.

Amplify Library for Swift on macOS – Amplify is an open-source, client-side library making it easier to access a cloud backend from your front-end application code. It provides language-specific constructs to abstract low-level details of the cloud API. It helps you to integrate services such as analytics, object storage, REST or GraphQL APIs, user authentication, geolocation and mapping, and push notifications. You can now write beautiful macOS applications that connect to the same cloud backend as their iOS counterparts.

X in Y Jeff started this section a while ago to list the expansion of new services and capabilities to additional Regions. I noticed 11 Regional expansions this week:

Upcoming AWS Events
And to finish this post, I recommend you check your calendars and sign up for these AWS-led events:

Dot Net Developer Day.Net Developer Day.NET Enterprise Developer Day EMEA 2023 (April 25) is a free, one-day virtual conference providing enterprise developers with the most relevant information to swiftly and efficiently migrate and modernize their .NET applications and workloads on AWS.

AWS re:Inforce 2023 – Now register AWS re:Inforce, in Anaheim, California, June 13–14. AWS Chief Information Security Officer CJ Moses will share the latest innovations in cloud security and what AWS Security is focused on. The breakout sessions will provide real-world examples of how security is embedded into the way businesses operate. To learn more and get the limited discount code to register, see CJ’s blog post of Gain insights and knowledge at AWS re:Inforce 2023 in the AWS Security Blog.

AWS Global Summits – Check your calendars and sign up for the AWS Summit close to where you live or work: Seoul (May 3–4), Berlin and Singapore (May 4), Stockholm (May 11), Hong Kong (May 23), Amsterdam (June 1), London (June 7), Madrid (June 15), and Milano (June 22).

AWS Community Day – Join community-led conferences driven by AWS user group leaders close to your city: Lima (April 15), Helsinki (April 20), Chicago (June 15), Manila (June 29–30), and Munich (September 14). Recently, we have been bringing together AWS user groups from around the world into Meetup Pro accounts. Find your group and its meetups in your city!

You can browse all upcoming AWS-led in-person and virtual events, and developer-focused events such as AWS DevDay.

Stay Informed
That was my selection for this week! To better keep up with all of this news, don’t forget to check out the following resources:

That’s all for this week. Check back next Monday for another Week in Review!

— seb

This post is part of our Week in Review series. Check back each week for a quick roundup of interesting news and announcements from AWS!

How French Broadcaster TF1 Used AWS Cloud Technology and Expertise to Bring the FIFA World Cup to Millions

Post Syndicated from Sébastien Stormacq original https://aws.amazon.com/blogs/aws/how-french-broadcaster-tf1-used-aws-cloud-technology-and-expertise-to-bring-the-fifa-world-cup-to-millions/

Three years before millions of viewers saw, arguably, one of the most thrilling World Cup Finals ever broadcast, TF1, the leading private TV channel in France, started a project to redefine the foundations of its broadcasting platform, including adopting a new cloud-based architecture.

They, and all other broadcasters, have been observing diminishing audiences for traditional over-the-air broadcasting and increasing popularity of digital platforms, such as smart TVs, and boxes like FireTV, ChromeCast, and AppleTV, as well as laptops, tablets, and mobile phones. According to Thierry Bonhomme, CTO of eTF1 (the group within TF1 in charge of digital platforms) whom I recently interviewed for the AWS French Podcast, digital broadcasting now accounts for 20–25 percent of TF1’s total audience.

Image of a soccer ball in a large stadium This online and mobile usage drives very specific traffic patterns on IT systems: a huge peak of connections and authentications in the few minutes before the start of a game and millions of video streams that must be delivered reliably over a variety of changing network qualities. In addition to these technical challenges, there is also an economic challenge: to deliver advertisements at key moments, such as before a national anthem or during a 15-minute half-time. The digital platform sells its own set of commercials, which are different from the commercials broadcast over the air, and might also be different from region to region. All these video streams have to be delivered to millions of viewers on a wide range of devices and a variety of network conditions: from 1 Gbs fiber at home down to 3 G networks in remote areas.

TF1’s approach to readiness included redesigning its digital architecture, setting up metrics showing how the new system is performing, and defining processes, roles and responsibilities for people in the team. As part of this preparation, AWS helped TF1 prepare their system to meet their scalability, performance, and security requirements.

In my conversation with Thierry, he described the two main objectives the company had when designing its new technical architecture for the future of broadcasting: first, the scalability of the platform and second, meet the demand for performance. Scalability is key to absorbing the peaks of concurrent viewers. And performance is required to ensure that the video streams start quickly (in less than 3 seconds) and there is no interruption of the video player (known as re-buffering). After all, nobody wants to know their team just scored by hearing their neighbors yelling before seeing it happen on the screen they’re watching.

The Technology
Starting in 2019, TF1 started to redesign its digital broadcasting architecture and to rewrite significant parts of the code, such as the back-end API or the front-end applications running on set-top boxes, on Android, or on iOS devices. They adopted a micro service architecture, deployed on Amazon Elastic Kubernetes Service (EKS) and written in the Go programming language for maximum performance. They designed a set of REST and GraphQL APIs to define the contracts between front and back-end applications, and an event-driven architecture with Apache Kafka for maximum scalability. They adopted multiple content delivery networks, including Amazon CloudFront, to reliably distribute the video streams to client devices. In August 2020, TF1 got a chance to test the new platform on a large-scale sporting event when Bayern Munich beat Paris Saint Germain 1-0 at the UEFA European Champion League.

TF1 headquarters in paris

Here’s a peek at what happens from the moment the action is shot on the field to the moment you see it on your mobile device: The high-quality video stream first lands in the TF1 tower, located in Paris, where hardware encoders create the necessary videos streams adapted to your device. AWS Elemental Live hardware encoders are able to generate up to eight different encodings: 4K for TVs, high-definition (1080), standard definition (720), and a variety of other formats suited to a wide range of mobile devices and network bandwidth. (This extra video encoding step is one of the reasons why you might sometimes observe a extra latency between the video you receive on your traditional TV and the feed you receive on your mobile device.) The system sends the encoded videos to AWS Elemental Media Package for packaging and, finally, to the CDNs where the player applications fetch the video segments. The player applications select the best video encoding depending on your device size and current network bandwidth available.

At the end of 2021, one year before millions watched French player Kylian Mbappé score a hat trick (three goals) for the first time in a World Cup final since 1966, TF1 started preparing for the big event by identifying risks based on previous experiences and areas needing improvement. Thierry described how they built hypotheses of the likely audience size based on different game scenarios: the longer the French national team might stay in the competition, the higher the expected traffic. They classified risks for each phase of the tournament (selection pools, quarter-final, semi-final, and final). Based on these scenarios, they figured that the platform must be able to sustain 4.5 million viewers connecting to the platform 15 minutes before the start of a game (that’s 5,000 new viewers every second).

This level of scalability requires preparation from TF1’s team but also all external systems in use, such as the AWS cloud services, the authentication and authorization service, and the CDN services.

A viewer arrival triggers multiple flows and API calls. The viewer must authenticate, and some must create a new account or reset their passwords. Once authenticated, the viewer sees the homepage that, in turn, triggers multiple API calls, one of them to the catalog service. When the viewer selects a live stream, other API calls are made to receive the video stream URL. Then the video part kicks in. The client-side player connects to the chosen CDN and starts to download video segments. Once the video is playing, the platform must ensure the stream is delivered smoothly, with high quality and no drop that would cause a re-buffering. All these elements are key to ensuring the best possible viewer experience.

The Preparation
Six months before France made it to the final and squared off against Argentina, TF1 started to work closely with their vendors, including AWS, to define requirements, reserve capacity, and start to work on test and execution plans. At this point, TF1 engaged with AWS Infrastructure Event Management, a dedicated program of the AWS enterprise support plan. Our experts offer architecture and guidance and operational support during the preparation and execution of planned events, such as shopping holidays, product launches, migrations – and in this case, the largest football (soccer) event in the world. For these events, AWS helps customers assess operational readiness, identify and mitigate risks, and execute confidently with AWS experts by their side.

Special care was given to test the scalability of the API. The TF1 team developped a load-testing engine to simulate users connecting to the platform, authenticating, selecting a program, and starting a video stream. To closely simulate real traffic, TF1 used another hyperscale cloud provider to send requests to their AWS infrastructure. The testing allowed them to define the correct metrics to observe in their dashboards and the correct values to generate alarms. Thierry said the first time the load simulator ran full speed, simulating 5,000 new connections per second, it crashed the entire back end.

But like any world class team, TF1 used this to their advantage. They took 2–3 weeks to tune the system. They eliminated redundant API calls from client applications and applied aggressive caching strategies. They learned how to scale their back-end platform in response to such traffic. They also learned to identify the value of key metrics under load. After a couple of back-end deployments and new releases for their Android and iOS apps, the system successfully passed the load test. It was a month before the start of the event. At that moment, TF1 decided to freeze all new developments or deployments until the first kickoff in Qatar, unless critical bugs were found.

Monitoring and Planning
The technological platform was only one piece of the project, Thierry told me. They also designed metric dashboards using Datadog and Grafana to monitor key performance indicators and detect anomalies during the event. Thierry noted that when observing average values, they often miss parts of the picture. For example, he said, observing a P95 percentile value instead of an average shows the experience for five percent of your users. When you have three million of them, five percent represents 150K customers, so it is important to know what their experience is. (Incidentally, this percentile technique is used routinely at Amazon and AWS across all service teams, and Amazon CloudWatch has built-in support to measure percentile values.)

TF1 also prepared for the worst, he said, including the specter of having three million people staring at a black screen during a game. TF1 involved community managers and social media owners early on, and they prepared press releases and social media messages for multiple scenarios. The team also planned to gather all key team members together in a “war room” during each game to reduce communication and reaction time if something needed immediate action. This team included the AWS technical account manager, their counterpart from the authentication service, and other CDN vendors. AWS also had on-call engineers from service teams and premium support team monitoring the health of our services and ready to react in case something went wrong.

The Attacks Weren’t Just on the Field
Three key moments at the start of the tournament provided opportunities to test the platform for real: the opening ceremony, the first game, and particularly for TF1’s audience, the first game for the French team. As the tournament played out over the following weeks — with increased intensity, suspense, and load on IT systems as the French team progressed — the TF1 team would reevaluate its traffic estimates and conduct debriefs after each game. But while the intensity of the action was unfolding on the field, TF1’s team had some behind-the-scenes excitement of its own.

Starting in the quarter final, the team noticed unusual activity from a wide range of distributed IP addresses, and they determined that the system was under a large distributed denial of service (DDOS) attack from a network of compromised machines; someone was trying to take down the service and prevent millions of people from watching. TF1 is accustomed to these types of attacks, and their dashboard helped to identify the traffic patterns in real time. Services such as AWS Shield and AWS Web Application Firewall helped to mitigate the incident without impacting the viewer experience. The TF1 security team and AWS experts conducted further analysis to proactively block some patterns of traffic and IP addresses for the next game.

Still, the intensity of the attacks increased during the semi-finals and final game, when it peaked at 40 millions of requests for a ten-minute period. “These attacks are a cat-and-mouse game,” said Thierry: attackers try new strategies and apply new patterns, but the team in the war room detects them and dynamically updates the filtering rules to block them before viewers can even detect a change in the quality of the service. The long and detailed preparation served its purpose, and everybody knew what to do. Thierry reported that the attacks were successfully mitigated with no consequences.

The Thrilling Finale
France ArgentineBy the time France took to the pitch on Dec. 18, 2022, TF1 knew they would break records on the platform. Thierry said the traffic was higher than estimated, but the platform absorbed it. He also described that during the first part of the game, when Argentina was leading, the TF1 team observed a slow decline of connections… that is, until the first goal scored by MBappé 10 minutes before the end of the game. At that point, all dashboards showed a sudden return of viewers for the thrilling last moments of the game. At peak, more than 3.2 million digital players were connected at the same time, delivering 3.6 terabits per second of outgoing bandwidth through all four CDNs.

Across the globe, Amazon CloudFront also helped 18 broadcasters deliver video streams. In all, over 48 million unique client IPs connected to one of 450+ edge locations globally during the tournament, peaking at just under 23 terabits per second across these customer distributions during the final game of the tournament.

The Future
While Argentina ultimately triumphed and Lionel Messi achieved his long-sought World Cup win, the 2022 FIFA World Cup proved to the team at TF1 that their processes, their architecture, and their implementation are able to deliver a high-quality viewing experience to millions. The team is now confident the platform is ready to absorb the next planned large-scale events: the World Cup of Rugby in September 2023 and the next French presidential election in 2027. Thierry concluded our conversation predicting digital broadcasting will eventually attain a larger audience than over-the-air, and having 3+ millions simultaneous viewers will become the new normal.

If your company is also looking to transform its business using the power of cloud computing, consult with one of our AWS Enterprise support advisors today.

— seb

Amazon Chime SDK Call Analytics: Real-Time Voice Tone Analysis and Speaker Search

Post Syndicated from Sébastien Stormacq original https://aws.amazon.com/blogs/aws/amazon-chime-sdk-call-analytics-real-time-voice-tone-analysis-and-speaker-search/

Today, I am pleased to announce the availability of Amazon Chime SDK call analytics, a new set of capabilities that helps make it easier and cost effective to record and generate insights on real-time audio calls: transcription, voice tone analysis, and speaker search. We’ve also improved the Amazon Chime SDK section of the AWS Management Console to let you integrate machine learning (ML)-based services, such as these new call analytics capabilities or Amazon Transcribe into your audio applications in just a few steps.

Voice Analytics: Voice Tone Analysis and Speaker Search
Voice analytics delivers real-time insights into audio conversations. It helps detect and classify participants expressing a positive, neutral, or negative tone. Typically, enterprises working in regulated industries have obligations to record or want to analyze conversations between employees and their business partners, customers, or suppliers.

Voice tone analysis uses ML to extract sentiment from a speech signal based on a joint analysis of lexical and linguistic information as well as acoustic and tonal information. Voice tone analysis for live calls are delivered in the data lake of your choice, on top of which you can create your own dashboards to visualize the data.

Let’s take an example from the finance industry. Trading room supervisors are sometimes required to record all the trading conversations occurring on the floor. Voice tone analysis helps them meet their regulatory requirements. They can also deliver these insights to the traders to help to improve their productivity. But finance is not the only industry that needs to record and analyze calls. We have received similar requests from customers in Business Process Outsourcing (BPO), public sector, healthcare, telecom, and insurance industries.

Alongside with voice tone analysis, your applications can now benefit from speaker search to help match speakers to an existing database. It only requires a short sample to recognize a speaker based on their voice stored in a database of known voices. Speaker search helps your applications expedite caller lookup and enrich call records and transcripts with identity attribution. Speaker search delivers a suggested unique internal identifier for the speaker and a confidence score. The decision to match current the speaker with a known speaker from your organization is up to your application. Some of our customers plan to use speaker search for real-time speaker labeling on communication happening over trading turrets, which are shared devices.

Integration with AI Services in the AWS Management Console
We want to make it easier for developers to add these capabilities into existing telephony applications without requiring expertise in telephony, cloud infrastructure, or AI.

This is why we added a easier-to-use graphical configuration in the Amazon Chime SDK section of the console. On the console, you can choose the AWS AI service you want to use to analyze real-time audio data: voice analytics, Amazon Transcribe, or Amazon Transcribe Call Analytics. Whether you choose to use voice analytics or Amazon Transcribe to generate insights, you don’t have to write any integration code. We manage the integrations with AWS AI services and your voice-based or telephony applications. The console helps you define where you want to send the analytics data: an Amazon Kinesis stream or an Amazon Simple Storage Service (Amazon S3) bucket. Voice analytics can send real-time notifications to a function deployed on AWS Lambda, or an SQS queue or Amazon Simple Notification Service (Amazon SNS) topic.

To visualize insights, call analytics also delivers analyses to a data lake of your choice. You can then use Amazon QuickSight or Tableau to build dashboards and get insights from real-time media. These dashboards can be embedded in apps, wikis, and portals. Of course, we don’t leave you alone with your data. You can download prebuilt dashboards as AWS CloudFormation templates to deploy into your own AWS account. The link to download these templates is available on the console.

Finally, call analytics can generate real-time alerts by posting events to Amazon EventBridge. You can route these events to any destination of your choice, on your AWS account or supported third-party applications.

When using call analytics, you can reduce the initial project time to generate insights from real-time audio from months to days.

How It Works
I’d like to show you how it works.

On the Amazon Chime SDK section of the console, I open Configuration under Call Analytics on the left-side menu. Then, I select Create configuration.

Amazon Chime SDK - Create configuration

I give a name to my configuration. Optionally, I may also associate tags.

Amazon Chime SDK - Configuration first step

Under Configure analytics service, I can choose between Amazon Chime SDK voice analytics or Amazon Transcribe services to analyse calls. For this demo, I select Voice analytics.

Amazon Chime SDK - Configuration second step

I configure where to send the analysis. Voice analytics results are always sent to Kinesis. I specify a Kinesis data stream I created previously. When I want to use a business intelligence tool such as Quicksight to create a dashboard with analytics results, I also specify an S3 bucket to receive the analysis.

The console also gives me the link to the CloudFormation templates I can use to create the voice analytics dashboards.

Finally, I choose a Lambda function, SQS queue, or SNS topic that will receive notifications of events such as when the analytics are available, a new voice enrollment occurs, or the result of a voice verification. In the later case, the payload looks as follow:

{
    ...common to all events...
    "detail-type": "SpeakerSearchStatus",
    "detail": {
        "taskId": "uuid",
        "detailStatus": "IdentificationSuccessful",
        "speakerSearchDetails" : {
            "results": [
                {
                    "voiceProfileId": "guid",
                    "confidenceScore": "0.94",
                },
                {
                    "voiceProfileId": "guid",
                    "confidenceScore": "0.92",
                },
                {
                    "voiceProfileId": "guid",
                    "confidenceScore": "0.91",
                },
                ... (up to 10)
            ]
        },
        "isCaller": false,
        "voiceConnectorId": "guid",
        "transactionId": "guid"

        ...details from Voice connector
    }
}

For this demo, I choose an existing SQS queue.

Amazon Chime SDK - Configuration third step

Under Consent acknowledgment, I select all the boxes and select Next.

Amazon Chime SDK - Configuration second step consent

The next step is only available when I didn’t specify any analytics service in the previous step. It allows us to configure voice recordings. Recordings are available when no analytics are selected.

Under Configure access permissions, I choose a previously created AWS Identity and Access Management (IAM) role allowing the Amazon Chime SDK to access the other AWS services I configured: the Kinesis data stream, S3 bucket, and Lambda function, SQS queue, or SNS topic. The console may create an IAM role for me if I don’t have one already.

Amazon Chime SDK - Configuration four step

The next step is available if I selected Amazon Transcribe service under Configure analytics service. It allows me to configure real-time alerts through EventBridge. I may configure rules to send messages based on keyword match, sentiment detected, or issue detection.

The final step is Review and Create my configuration. I review the configuration details and then, I select Create configuration.

Finally, I link this configuration to a voice connector under the Voice Connector section, on the Streaming tab.

That’s it! As I mentioned earlier, no glue between AWS services or AI knowledge is required.

After the data arrives on Kinesis or your S3 bucket, you can point your preferred business reporting solution at it. When you use the QuickSight template we provide, you can get started in minutes with a high-level overview and a deep-dive view, as shown on the following screenshot.

Chime SDK Call Analytics - dashboard general

Chime SDK Call Analytics - dashboard deep dive

The deep-dive dashboard gives you graphical representations about the distribution of agent and customer sentiments and emotions. You also get a detailed analysis and transcript of the conversation.

Pricing and Availability
Adopting these capabilities in your audio applications requires no up-front infrastructure investment; you will be charged based only on your usage. Pricing is per minute of audio data analyzed. Visit Amazon Chime SDK pricing for details.

Call analytics is available in the following AWS Regions: US East (Ohio, N. Virginia), Asia Pacific (Singapore), and Europe (Frankfurt).

In this post, I discussed Amazon Chime SDK call analytics, a new set of capabilities that makes it easier and cost-effective to record and generate insights on real-time audio calls. With their focus on ease of use, these new capabilities are particularly well adapted to customers with minimal knowledge of cloud infrastructure, telephony, and ML.

Start today and configure your first dashboard!

— seb

AWS Chatbot Now Integrates With Microsoft Teams

Post Syndicated from Sébastien Stormacq original https://aws.amazon.com/blogs/aws/aws-chatbot-now-integrates-with-microsoft-teams/

I am pleased to announce that, starting today, you can use AWS Chatbot to troubleshoot and operate your AWS resources from Microsoft Teams.

Communicating and collaborating on IT operation tasks through chat channels is known as ChatOps. It allows you to centralize the management of infrastructure and applications, as well as to automate and streamline your workflows. It helps to provide a more interactive and collaborative experience, as you can communicate and work with your colleagues in real time through a familiar chat interface to get the job done.

We launched AWS Chatbot in 2020 with Amazon Chime and Slack integrations. Since then, the landscape of chat platforms has evolved rapidly, and many of you are now using Microsoft Teams.

AWS Chatbot Benefits
When using AWS Chatbot for Microsoft Teams or other chat platforms, you receive notifications from AWS services directly in your chat channels, and you can take action on your infrastructure by typing commands without having to switch to another tool.

Typically you want to receive alerts about your system health, your budget, any new security threat or risk, or the status of your CI/CD pipelines. Sending a message to the chat channel is as simple as sending a message on an Amazon Simple Notification Service (Amazon SNS) topic. Thanks to the native integration between Amazon CloudWatch alarms and SNS, alarms are automatically delivered to your chat channels with no additional configuration step required. Similarly, thanks to the integration between Amazon EventBridge and SNS, any system or service that emits events to EventBridge can send information to your chat channels.

But ChatOps is more than the ability to spot problems as they arise. AWS Chatbot allows you to receive predefined CloudWatch dashboards interactively and retrieve Logs Insights logs to troubleshoot issues directly from the chat thread. You can also directly type in the chat channel most AWS Command Line Interface (AWS CLI) commands to retrieve additional telemetry data or resource information or to run runbooks to remediate the issues.

Typing and remembering long commands is difficult. With AWS Chatbot, you can define your own aliases to reference frequently used commands and their parameters. It reduces the number of steps to complete a task. Aliases are flexible and can contain one or more custom parameters injected at the time of the query.

And because chat channels are designed for conversation, you can also ask questions in natural language and have AWS Chatbot answer you with relevant extracts from the AWS documentation or support articles. Natural language understanding also allows you to make queries such as “show me my ec2 instances in eu-west-3.”

Let’s Configure the Integration Between AWS Chatbot and Microsoft Teams
Getting started is a two-step process. First, I configure my team in Microsoft Teams. As a Teams administrator, I add the AWS Chatbot application to the team, and I take note of the URL of the channel I want to use for receiving notifications and operating AWS resources from Microsoft Teams channels.

Second, I register Microsoft Teams channels in AWS Chatbot. I also assign IAM permissions on what channel members can do in this channel and associate SNS topics to receive notifications. I may configure AWS Chatbot with the AWS Management Console, an AWS CloudFormation template, or the AWS Cloud Development Kit (AWS CDK). For this demo, I choose to use the console.

I open the Management Console and navigate to the AWS Chatbot section. On the top right side of the screen, in the Configure a chat client box, I select Microsoft Teams and then Configure client.

I enter the Microsoft Teams channel URL I noted in the Teams app.

Add the team channel URL to ChatbotAt this stage, Chatbot redirects my browser to Microsoft Teams for authentication. If I am already authenticated, I will be redirected back to the AWS console immediately. Otherwise, I enter my Microsoft Teams credentials and one-time password and wait to be redirected.

At this stage, my Microsoft Teams team is registered with AWS Chatbot and ready to add Microsoft Teams channels. I select Configure new channel.

Chabot is now linked to your Microsoft Teams There are four sections to enter the details of the configuration. In the first section, I enter a Configuration name for my channel. Optionally, I also define the Logging details. In the second section, I paste—again—the Microsoft Teams Channel URL.

Configure chatbot section one and two

In the third section, I configure the Permissions. I can choose between the same set of permissions for all Microsoft Teams users in my team, or I can set User-level roles permission to enable user-specific permissions in the channel. In this demo, I select Channel role, and I assign an IAM role to the channel. The role defines the permissions shared by all users in the channel. For example, I can assign a role that allows users to access configuration data from Amazon EC2 but not from Amazon S3. Under Channel role, I select Use an existing IAM role. Under Existing role, I select a role I created for my 2019 re:Invent talk about ChatOps: chatbot-demo. This role gives read-only access to all AWS services, but I could also assign other roles that would allow Chatbot users to take actions on their AWS resources.

To mitigate the risk that another person in your team accidentally grants more than the necessary privileges to the channel or user-level roles, you might also include Channel guardrail policies. These are the maximum permissions your users might have when using the channel. At runtime, the actual permissions are the intersection of the channel or user-level policies and the guardrail policies. Guardrail policies act like a boundary that channel users will never escape. The concept is similar to permission boundaries for IAM entities or service control policies (SCP) for AWS Organizations. In this example, I attach the ReadOnlyAccess managed policy.

Configure chatbot section three

The fourth and last section allows you to specify the SNS topic that will be the source for notifications sent to your team’s channel. Your applications or AWS services, such as CloudWatch alarms, can send messages to this topic, and AWS Chatbot will relay all messages to the configured Microsoft Teams channel. Thanks to the integration between Amazon EventBridge and SNS, any application able to send a message to EventBridge is able to send a message to Microsoft Teams.

For this demo, I select an existing SNS topic: alarmme in the us-east-1 Region. You can configure multiple SNS topics to receive alarms from various Regions. I then select Configure.

Configure chatbot section fourLet’s Test the Integration
That’s it. Now I am ready to test my setup.

On the AWS Chatbot configuration page, I first select the Send test message. I also have an alarm defined when my estimated billing goes over $500. On the CloudWatch section of the Management Console, I configure the alarm to post a message on the SNS topic shared with Microsoft Teams.

Within seconds, I receive the test message and the alarm message on the Microsoft Teams channel.

AWS Chatbot with Microsoft Teams, first messages received on the channel

Then I type a command to understand where the billing alarm comes from. I want to understand how many EC2 instances are running.

On the chat client channel, I type @aws to select Chatbot as the destination, then the rest of the CLI command, as I would do in a terminal: ec2 describe-instances --region us-east-1 --filters "Name=architecture,Values=arm64_mac" --query "Reservations[].Instances[].InstanceId"

Chatbot answers within seconds.

AWS chatbot describe instances

I can create aliases for commands I frequently use. Aliases may have placeholder parameters that I can give at runtime, such as the Region name for example.

I create an alias to get the list of my macOS instance IDs with the command: aws alias create mac ec2 describe-instances --region $region --filters "Name=architecture,Values=arm64_mac" --query "Reservations[].Instances[].InstanceId"

Now, I can type @aws alias run mac us-east-1 as a shortcut to get the same result as above. I can also manage my aliases with the @aws alias list, @aws alias get, and @aws alias delete commands.

I don’t know about you, but for me it is hard to remember commands. When I use the terminal, I rely on auto-complete to remind me of various commands and their options. AWS Chatbot offers similar command completion and guides me to collect missing parameters.

AWS Chatbot command completion

When using AWS Chatbot, I can also ask questions using natural English language. It can help to find answers from the AWS docs and from support articles by typing questions such as @aws how can I tag my EC2 instances? or @aws how do I configure Lambda concurrency setting?

It can also find resources in my account when AWS Resource Explorer is activated. For example, I asked the bot: @aws what are the tags for my ec2 resources? and @aws what Regions do I have Lambda service?

And I received these responses.

AWS Chatbot NLP Response 1AWS Chatbot NLP Response 2Thanks to AWS Chatbot, I realized that I had a rogue Lambda function left in ca-central-1. I used the AWS console to delete it.

Available Now
You can start to use AWS Chatbot with Microsoft Teams today. AWS Chatbot for Microsoft Teams is available to download from Microsoft Teams app at no additional cost. AWS Chatbot is available in all public AWS Regions, at no additional charge. You pay for the underlying resources that you use. You might incur charges from your chat client.

Get started today and configure your first integration with Microsoft Teams.

— seb

Amazon Linux 2023, a Cloud-Optimized Linux Distribution with Long-Term Support

Post Syndicated from Sébastien Stormacq original https://aws.amazon.com/blogs/aws/amazon-linux-2023-a-cloud-optimized-linux-distribution-with-long-term-support/

I am excited to announce the general availability of Amazon Linux 2023 (AL2023). AWS has provided you with a cloud-optimized Linux distribution since 2010. This is the third generation of our Amazon Linux distributions.

Every generation of Amazon Linux distribution is secured, optimized for the cloud, and receives long-term AWS support. We built Amazon Linux 2023 on these principles, and we go even further. Deploying your workloads on Amazon Linux 2023 gives you three major benefits: a high-security standard, a predictable lifecycle, and a consistent update experience.

Let’s look at security first. Amazon Linux 2023 includes preconfigured security policies that make it easy for you to implement common industry guidelines. You can configure these policies at launch time or run time.

For example, you can configure the system crypto policy to enforce system-wide usage of a specific set of cipher suites, TLS versions, or acceptable parameters in certificates and key exchanges. Also, the Linux kernel has many hardening features enabled by default.

Amazon Linux 2023 makes it easier to plan and manage the operating system lifecycle. New Amazon Linux major versions will be available every two years. Major releases include new features and improvements in security and performance across the stack. The improvements might include major changes to the kernel, toolchain, GLib C, OpenSSL, and any other system libraries and utilities.

During those two years, a major release will receive an update every three months. These updates include security updates, bug fixes, and new features and packages. Each minor version is a cumulative list of updates that includes security and bug fixes in addition to new features and packages. These releases might include the latest language runtimes such as Python or Java. They might also include other popular software packages such as Ansible and Docker. In addition to these quarterly updates, security updates will be provided as soon as they are available.

Each major version, including 2023, will come with five years of long-term support. After the initial two-year period, each major version enters a three-year maintenance period. During the maintenance period, it will continue to receive security bug fixes and patches as soon as they are available. This support commitment gives you the stability you need to manage long project lifecycles.

The following diagram illustrates the lifecycle of Amazon Linux distributions:

Last—and this policy is by far my favorite—Amazon Linux provides you with deterministic updates through versioned repositories, a flexible and consistent update mechanism. The distribution locks to a specific version of the Amazon Linux package repository, giving you control over how and when you absorb updates. By default, and in contrast with Amazon Linux 2, a dnf update command will not update your installed packages (dnf is the successor to yum). This helps to ensure that you are using the same package versions across your fleet. All Amazon Elastic Compute Cloud (Amazon EC2) instances launched from an Amazon Machine Image (AMI) will have the same version of packages. Deterministic updates also promote usage of immutable infrastructure, where no infrastructure is updated after deployment. When an update is required, you update your infrastructure as code scripts and redeploy a new infrastructure. Of course, if you really want to update your distribution in place, you can point dnf to an updated package repository and update your machine as you do today. But did I tell you this is not a good practice for production workloads? I’ll share more technical details later in this blog post.

How to Get Started
Getting started with Amazon Linux 2023 is no different than with other Linux distributions. You can use the EC2 run-instances API, the AWS Command Line Interface (AWS CLI), or the AWS Management Console, and one of the four Amazon Linux 2023 AMIs that we provide. We support two machine architectures (x86_64 and Arm) and two sizes (standard and minimal). Minimal AMIs contain the most basic tools and utilities to start the OS. The standard version comes with the most commonly used applications and tools installed.

To retrieve the latest AMI ID for a specific Region, you can use AWS Systems Manager get-parameter API and query the /aws/service/ami-amazon-linux-latest/<alias> parameter.

Be sure to replace <alias> with one of the four aliases available:

  • For arm64 architecture (standard AMI): al2023-ami-kernel-default-arm64
  • For arm64 architecture (minimal AMI): al2023-ami-minimal-kernel-default-arm64
  • For x86_64 architecture (standard AMI): al2023-ami-kernel-default-x86_64
  • For x86_64 architecture (minimal AMI): al2023-ami-minimal-kernel-default-x86_64

For example, to search for the latest Arm64 full distribution AMI ID, I open a terminal and enter:

~ aws ssm get-parameters --region us-east-2 --names /aws/service/ami-amazon-linux-latest/al2023-ami-kernel-default-arm64
{
    "Parameters": [
        {
            "Name": "/aws/service/ami-amazon-linux-latest/al2023-ami-kernel-default-arm64",
            "Type": "String",
            "Value": "ami-02f9b41a7af31dded",
            "Version": 1,
            "LastModifiedDate": "2023-02-24T22:54:56.940000+01:00",
            "ARN": "arn:aws:ssm:us-east-2::parameter/aws/service/ami-amazon-linux-latest/al2023-ami-kernel-default-arm64",
            "DataType": "text"
        }
    ],
    "InvalidParameters": []
}

To launch an instance, I use the run-instances API. Notice how I use Systems Manager resolution to dynamically lookup the AMI ID from the CLI.

➜ aws ec2 run-instances                                                                            \
       --image-id resolve:ssm:/aws/service/ami-amazon-linux-latest/al2023-ami-kernel-default-arm64  \
       --key-name my_ssh_key_name                                                                   \
       --instance-type c6g.medium                                                                   \
       --region us-east-2 
{
    "Groups": [],
    "Instances": [
        {
          "AmiLaunchIndex": 0,
          "ImageId": "ami-02f9b41a7af31dded",
          "InstanceId": "i-0740fe8e23f903bd2",
          "InstanceType": "c6g.medium",
          "KeyName": "my_ssh_key_name",
          "LaunchTime": "2023-02-28T14:12:34+00:00",

...(redacted for brevity)
}

When the instance is launched, and if the associated security group allows SSH (TCP 22) connections, I can connect to the machine:

~ ssh [email protected]
Warning: Permanently added '3.145.19.213' (ED25519) to the list of known hosts.
   ,     #_
   ~\_  ####_        Amazon Linux 2023
  ~~  \_#####\       Preview
  ~~     \###|
  ~~       \#/ ___   https://aws.amazon.com/linux/amazon-linux-2023
   ~~       V~' '->
    ~~~         /
      ~~._.   _/
         _/ _/
       _/m/'
Last login: Tue Feb 28 14:14:44 2023 from 81.49.148.9
[ec2-user@ip-172-31-9-76 ~]$ uname -a
Linux ip-172-31-9-76.us-east-2.compute.internal 6.1.12-19.43.amzn2023.aarch64 #1 SMP Thu Feb 23 23:37:18 UTC 2023 aarch64 aarch64 aarch64 GNU/Linux

We also distribute Amazon Linux 2023 as Docker images. The Amazon Linux 2023 container image is built from the same software components that are included in the Amazon Linux 2023 AMI. The container image is available for use in any environment as a base image for Docker workloads. If you’re using Amazon Linux for applications in EC2, you can containerize your applications with the Amazon Linux container image.

These images are available from Amazon Elastic Container Registry (Amazon ECR) and from Docker Hub. Here is a quick demo to start a Docker container using Amazon Linux 2023 from Elastic Container Registry.

$ aws ecr-public get-login-password --region us-east-1 | docker login --username AWS --password-stdin public.ecr.aws
Login Succeeded
~ docker run --rm -it public.ecr.aws/amazonlinux/amazonlinux:2023 /bin/bash
Unable to find image 'public.ecr.aws/amazonlinux/amazonlinux:2023' locally
2023: Pulling from amazonlinux/amazonlinux
b4265814d5cf: Pull complete 
Digest: sha256:bbd7a578cff9d2aeaaedf75eb66d99176311b8e3930c0430a22e0a2d6c47d823
Status: Downloaded newer image for public.ecr.aws/amazonlinux/amazonlinux:2023
bash-5.2# uname -a 
Linux 9d5b45e9f895 5.15.49-linuxkit #1 SMP PREEMPT Tue Sep 13 07:51:32 UTC 2022 aarch64 aarch64 aarch64 GNU/Linux
bash-5.2# exit 

When pulling from Docker Hub, you can use this command to pull the image: docker pull amazonlinux:2023.

What Are the Main Differences Compared to Amazon Linux 2?
Amazon Linux 2023 has some differences compared to Amazon Linux 2. The documentation explains these differences in detail. The two differences I would like to focus on are dnf and the package management policies.

AL2023 comes with Fedora’s dnf, the successor to yum. But don’t worry, dnf provides similar commands as yum to search, install, or remove packages. Where you used to run the commands yum list or yum install httpd, you may now run dnf list or dnf install httpd. For convenience, we create a symlink for /usr/bin/yum, so you can run your scripts unmodified.

$ which yum
/usr/bin/yum
$ ls -al /usr/bin/yum
lrwxrwxrwx. 1 root root 5 Jun 19 18:06 /usr/bin/yum -> dnf-3

The biggest difference, in my opinion, is the deterministic updates through versioned repositories. By default, the software repository is locked to the AMI version. This means that a dnf update command will not return any new packages to install. Versioned repositories give you the assurance that all machines started from the same AMI ID are identical. Your infrastructure will not deviate from the baseline.

$ sudo dnf update 
Last metadata expiration check: 0:14:10 ago on Tue Feb 28 14:12:50 2023.
Dependencies resolved.
Nothing to do.
Complete!

Yes, but what if you want to update a machine? You have two options to update an existing machine. The cleanest one for your production environment is to create duplicate infrastructure based on new AMIs. As I mentioned earlier, we publish updates for every security fix and a consolidated update every three months for two years after the initial release. Each update is provided as a set of AMIs and their corresponding software repository.

For smaller infrastructure, such as test or development machines, you might choose to update the operating system or individual packages in place as well. This is a three-step process:

  • first, list the available updated software repositories;
  • second, point dnf to a specific software repository;
  • and third, update your packages.

To show you how it works, I purposely launched an EC2 instance with an “old” version of Amazon Linux 2023 from February 2023. I first run dnf check-release-update to list the available updated software repositories.

$ dnf check-release-update
WARNING:
  A newer release of "Amazon Linux" is available.

  Available Versions:

  Version 2023.0.20230308:
    Run the following command to upgrade to 2023.0.20230308:

      dnf upgrade --releasever=2023.0.20230308

    Release notes:
     https://docs.aws.amazon.com/linux/al2023/release-notes/relnotes.html

Then, I might either update the full distribution using dnf upgrade --releasever=2023.0.20230308 or point dnf to the updated repository to select individual packages.

$ dnf check-update --releasever=2023.0.20230308

Amazon Linux 2023 repository                                                    28 MB/s |  11 MB     00:00
Amazon Linux 2023 Kernel Livepatch repository                                  1.2 kB/s | 243  B     00:00

amazon-linux-repo-s3.noarch                          2023.0.20230308-0.amzn2023                amazonlinux
binutils.aarch64                                     2.39-6.amzn2023.0.5                       amazonlinux
ca-certificates.noarch                               2023.2.60-1.0.amzn2023.0.1                amazonlinux
(redacted for brevity)
util-linux-core.aarch64 2.37.4-1.amzn2022.0.1 amazonlinux

Finally, I might run a dnf update <package_name> command to update a specific package.

This might look like overkill for a simple machine, but when managing enterprise infrastructure or large-scale fleets of instances, this facilitates the management of your fleet by ensuring that all instances run the same version of software packages. It also means that the AMI ID is now something that you can fully run through your CI/CD pipelines for deployment and that you have a way to roll AMI versions forward and backward according to your schedule.

Where is Fedora?
When looking for a base to serve as a starting point for Amazon Linux 2023, Fedora was the best choice. We found that Fedora’s core tenets (Freedom, Friends, Features, First) resonate well with our vision for Amazon Linux. However, Amazon Linux focuses on a long-term, stable OS for the cloud, which is a notable different release cycle and lifecycle than Fedora. Amazon Linux 2023 provides updated versions of open-source software, a larger variety of packages, and frequent releases.

Amazon Linux 2023 isn’t directly comparable to any specific Fedora release. The Amazon Linux 2023 GA version includes components from Fedora 34, 35, and 36. Some of the components are the same as the components in Fedora, and some are modified. Other components more closely resemble the components in CentOS Stream 9 or were developed independently. The Amazon Linux kernel, on its side, is sourced from the long-term support options that are on kernel.org, chosen independently from the kernel provided by Fedora.

Like every good citizen in the open-source community, we give back and contribute our changes to upstream distributions and sources for the benefit of the entire community. Amazon Linux 2023 itself is open source. The source code for all RPM packages that are used to build the binaries that we ship are available through the SRPM yum repository (sudo dnf install -y 'dnf-command(download)' && dnf download --source bash)

One More Thing: Amazon EBS Gp3 Volumes
Amazon Linux 2023 AMIs use gp3 volumes by default.

Gp3 is the latest generation general-purpose solid-state drive (SSD) volume for Amazon Elastic Block Store (Amazon EBS). Gp3 provides 20 percent lower storage costs compared to gp2. Gp3 volumes deliver a baseline performance of 3,000 IOPS and 125MB/s at any volume size. What I particularly like about gp3 volumes is that I can now provision performance independently of capacity. When using gp3 volumes, I can now increase IOPS and throughput without incurring charges for extra capacity that I don’t actually need.

With the availability of gp3-backed AL2023 AMIs, this is the first time a gp3-backed Amazon Linux AMI is available. Gp3-backed AMIs have been a common customer request since gp3 was launched in 2020. It is now available by default.

Price and Availability
Amazon Linux 2023 is provided at no additional charge. Standard Amazon EC2 and AWS charges apply for running EC2 instances and other services. This distribution includes full support for five years. When deploying on AWS, our support engineers will provide technical support according to the terms and conditions of your AWS Support plan. AMIs are available in all AWS Regions.

Amazon Linux is the most used Linux distribution on AWS, with hundreds of thousands of customers using Amazon Linux 2. Dozens of Independent Software Vendors (ISVs) and hardware partners are supporting Amazon Linux 2023 today. You can adopt this new version with the confidence that the partner tools you rely on are likely to be supported. We are excited about this release, which brings you an even higher level of security, a predictable release lifecycle, and a consistent update experience.

Now go build and deploy your workload on Amazon Linux 2023 today.

— seb

Celebrate Amazon S3’s 17th birthday at AWS Pi Day 2023

Post Syndicated from Sébastien Stormacq original https://aws.amazon.com/blogs/aws/celebrate-amazon-s3s-17th-birthday-at-aws-pi-day-2023/

AWS Pi Day 2023 is live today starting at 13:00 PDT; join us on the AWS on Air channel on Twitch.

On this day 17 years ago, we launched a very simple object storage service. It allowed developers to create, list, and delete private storage spaces (known as buckets), upload and download files, and manage their access permissions. The service was available only through a REST and SOAP API. It was designed to provide highly durable data storage with 99.999999999 percent data durability (that’s 11 nines!).

Fast forward to 2023, Amazon Simple Storage Service (Amazon S3) holds more than 280 trillion objects and averages over 100 million requests per second. To protect data integrity, Amazon S3 performs over four billion checksum computations per second. Over the years, we added many capabilities, such as a range of storage classes, to store your colder data cost effectively. Every day, you restore on average more than 1 petabyte from the S3 Glacier Flexible Retrieval and S3 Glacier Deep Archive storage classes. Since launch, you have saved $1 billion from using Amazon S3 Intelligent-Tiering. In 2015, we added the possibility of replicating your data across Regions. Every week, Amazon S3 Replication moves more than 100 petabytes of data. Amazon S3 is also at the core of hundreds of thousands of data lakes. It also has become a critical component of a growing ecosystem of serverless applications. Every day, Amazon S3 sends over 125 billion event notifications to serverless applications. Altogether, Amazon S3 is helping people around the world securely store and extract value from their data.

AWS Pi Day 2023 Small

To celebrate Amazon S3‘s birthday AWS is hosting the AWS Pi Day event for the third consecutive year. This live online event starts at 13:00 PDT today (March 14, 2023) on the AWS On Air channel on Twitch and will feature four hours of fresh educational content from AWS experts. We will discuss not only Amazon S3 best practices, we will also dive into the latest innovations across AWS data services, from storage to analytics and AI/ML. Tune in to learn how to get the most out of your data by making it more secure, available, accessible, and connected, and to help you respond to rapid growth and changing demand. You will also learn how to optimize your data costs, automate your cost savings, eliminate operational complexity, and get new insights from your data. Have a look at the full agenda on the registration page.

At AWS, we innovate on your behalf. During the last few weeks, we announced a 99.99 percent SLA for Amazon MemoryDB for Redis, enhanced I/O multiplexing for Amazon ElastiCache for Redis, and encryption by default for new objects on Amazon S3.

But we are not stopping there, and today we take the occasion of this celebration to announce seven new capabilities across our data services.

Mountpoint for Amazon S3 (alpha release): an open-source file client for Amazon S3
Mountpoint for Amazon S3 is an open-source file client for Amazon S3 that you can install on your compute instance. It translates local file storage API calls to REST API calls on objects in Amazon S3. When using Mountpoint for Amazon S3, data lake applications that access objects using file APIs can achieve high single-instance transfer rates, saving on compute costs.

You can get started with Mountpoint for Amazon S3 by mounting an Amazon S3 bucket at a local mount point on your compute instance. Once mounted, applications read objects as files available locally. Mountpoint for Amazon S3 supports sequential and random read operations on existing S3 objects. It is available to download for Linux operating systems as an alpha release and is not yet intended for production workloads. Instead, we want to collect your feedback early and incorporate your input into the design and implementation. To get started, visit the Mountpoint for Amazon S3 GitHub repo, read the technical launch blog, and share your feedback.

Now Generally Available: AWS Data Exchange for Amazon S3
AWS Data Exchange for Amazon S3 enables you to easily find, subscribe to, and use third-party data files for faster time to insight, storage cost optimization, simplified data licensing management, and more. Data Exchange subscribers can directly use files from data providers’ Amazon S3 buckets for their analysis with AWS services without needing to create or manage copies to their account. Data providers can license in-place access to data hosted in their Amazon S3 buckets.

To learn more about how data providers can simplify and scale access management to multiple data subscribers, you can read this blog.

AWS Data Exchange for S3

Amazon S3 Multi-Region Access Points now support replicated datasets that span multiple AWS accounts
We launched Amazon S3 Multi-Region Access Points in September 2021. We added failover control in November 2022. Amazon S3 Multi-Region Access Points now support datasets that are replicated across multiple AWS accounts. Cross-account Multi-Region Access Points simplify object storage access for applications that span both AWS Regions and accounts, avoiding the need for complex request routing logic in your application. They provide a single global endpoint for your multi-Region applications and dynamically route S3 requests based on policies that you define. This helps you to easily implement multi-Region resilience, latency-based routing, and active/passive failover, even when your data is stored in multiple AWS accounts.

You can learn more about S3 Multi-Region Access Points on the Amazon S3 FAQs.

Aliases for S3 Object Lambda Access Points as CloudFront origin
Amazon S3 Object Lambda, launched in March 2021, lets you add your own code to S3 GET, HEAD, and LIST API requests to modify data as it is returned to an application. With today’s launch of aliases for S3 Object Lambda Access Points any application that requires an S3 bucket name can easily present different views of data depending on the requester. You can now use an S3 Object Lambda Access Point alias as an origin for your Amazon CloudFront distribution to modify the data requested. For example, you can dynamically transform an image depending on the device that a user is visiting from, such as a desktop or a smartphone.

If you want to learn more, my colleague Danilo wrote a blog post with more details and code examples.

Simplify private connectivity from on-premises networks
Amazon Virtual Private Cloud (Amazon VPC) interface endpoints for Amazon S3 now offer private DNS options that can help you more easily route Amazon S3 requests to the lowest-cost endpoint in your VPC. With private DNS for Amazon S3, your on-premises applications can use AWS PrivateLink to access Amazon S3 over an interface endpoint, while requests from your in-VPC applications access Amazon S3 using gateway endpoints. Routing requests like this helps you take advantage of the lowest-cost private network path without having to make code or configuration changes to your clients.

S3 private connectivity

You can learn more on the AWS PrivateLink for Amazon S3 documentation.

Local Amazon S3 Replication on Outposts
Amazon S3 on Outposts now supports S3 replication on Outposts. This extends S3’s fully managed approach to replication to S3 on Outposts buckets. It helps you meet your data residency and data redundancy requirements. With local S3 Replication on Outposts, you can create and configure replication rules to automatically replicate your S3 objects to another Outpost or to another bucket on the same Outpost. During replication, your S3 on Outposts objects are always sent over your local gateway, and objects do not travel back to the AWS Region. S3 Replication on Outposts provides an easy and flexible way to automatically replicate data within a specific data perimeter to address your data redundancy and compliance requirements.

Amazon OpenSearch Security Analytics
The new Amazon OpenSearch Service’s security analytics capability enables your Security Operations (SecOps) teams to detect potential threats quickly while having the tools to help with security investigations on historical data—all with lower data storage costs. Like many other advanced capabilities of Amazon OpenSearch Service, there is no additional charge for security analytics.

You can learn more about Amazon OpenSearch security analytics by reading this blog post.

Join Us Online Today
You will learn more about these launches and about AWS data services in general. We have also prepared some live demos. We designed the AWS Pi Day event for system administrators, engineers, developers, and architects. Our sessions will bring you the latest and greatest information on storage, security, backup, archiving, training and certification, and more.

And to dive deeper, get Pi Day started early by attending AWS Innovate: Data and AI/ML Edition to learn about cutting-edge machine learning tools, strategies for building future-proof applications, and making data-driven decisions for your organization. Don’t miss Swami Sivasubramanian‘s keynote, starting at 9:00 PDT.

Join us today on the AWS Pi Day live stream. Kevin Miller, VP and GM of Amazon S3, will kick off the event with a keynote at 13:00 PDT.

See you there!

— seb

Week in Review – February 13, 2023

Post Syndicated from Sébastien Stormacq original https://aws.amazon.com/blogs/aws/week-in-review-february-13-2023/

AWS announced 32 capabilities since we published the last Week in Review blog post a week ago. I also read a couple of other news and blog posts.

Here is my summary.

The VPC section of the AWS Management Console now allows you to visualize your VPC resources, such as the relationships between a VPC and its subnets, routing tables, and gateways. This visualization was available at VPC creation time only, and now you can go back to it using the Resource Map tab in the console. You can read the details in Channy’s blog post.

CloudTrail Lake now gives you the ability to ingest activity events from non-AWS sources. This lets you immutably store and then process activity events without regard to their origin–AWS, on-premises servers, and so forth. All of this power is available to you with a single API call: PutAuditEvents. We launched AWS CloudTrail Lake about a year ago. It is a managed organization-scale data lake that aggregates, immutably stores, and allows querying of events recorded by CloudTrail. You can use it for auditing, security investigation, and troubleshooting. Again, my colleague Channy wrote a post with the details.

There are three new Amazon CloudWatch metrics for asynchronous AWS Lambda function invocations: AsyncEventsReceived, AsyncEventAge, and AsyncEventsDropped. These metrics provide visibility for asynchronous Lambda function invocations. They help you to identify the root cause of processing issues such as throttling, concurrency limit, function errors, processing latency because of retries, or missing events. You can learn more and have access to a sample application in this blog post.

Amazon Simple Notification Service (Amazon SNS) now supports AWS X-Ray to visualize, analyze, and debug applications. Developers can now trace messages going through Amazon SNS, making it easier to understand or debug microservices or serverless applications.

Amazon EC2 Mac instances now support replacing root volumes for quick instance restoration. Stopping and starting EC2 Mac instances trigger a scrubbing workflow that can take up to one hour to complete. Now you can swap the root volume of the instance with an EBS snapshot or an AMI. It helps to reset your instance to a previous known state in 10–15 minutes only. This significantly speeds up your CI and CD pipelines.

Amazon Polly launches two new Japanese NTTS voices. Neural Text To Speech (NTTS) produces the most natural and human-like text-to-speech voices possible. You can try these voices in the Polly section of the AWS Management Console. With this addition, according to my count, you can now choose among 52 NTTS voices in 28 languages or language variants (French from France or from Quebec, for example).

The AWS SDK for Java now includes the AWS CRT HTTP Client. The HTTP client is the center-piece powering our SDKs. Every single AWS API call triggers a network call to our API endpoints. It is therefore important to use a low-footprint and low-latency HTTP client library in our SDKs. AWS created a common HTTP client for all SDKs using the C programming language. We also offer 11 wrappers for 11 programming languages, from C++ to Swift. When you develop in Java, you now have the option to use this common HTTP client. It provides up to 76 percent cold start time reduction on AWS Lambda functions and up to 14 percent less memory usage compared to the Netty-based HTTP client provided by default. My colleague Zoe has more details in her blog post.

X in Y Jeff started this section a while ago to list the expansion of new services and capabilities to additional Regions. I noticed 10 Regional expansions this week:

Other AWS News
This week, I also noticed these AWS news items:

My colleague Mai-Lan shared some impressive customer stories and metrics related to the use and scale of Amazon S3 Glacier. Check it out to learn how to put your cold data to work.

Space is the final (edge) frontier. I read this blog post published on avionweek.com. It explains how AWS helps to deploy AIML models on observation satellites to analyze image quality before sending them to earth, saving up to 40 percent satellite bandwidth. Interestingly, the main cause for unusable satellite images is…clouds.

Upcoming AWS Events
Check your calendars and sign up for these AWS events:

AWS re:Invent recaps in your area. During the re:Invent week, we had lots of new announcements, and in the next weeks, you can find in your area a recap of all these launches. All the events are posted on this site, so check it regularly to find an event nearby.

AWS re:Invent keynotes, leadership sessions, and breakout sessions are available on demand. I recommend that you check the playlists and find the talks about your favorite topics in one collection.

AWS Summits season will restart in Q2 2023. The dates and locations will be announced here. Paris and Sidney are kicking off the season on April 4th. You can register today to attend these in-person, free events (Paris, Sidney).

Stay Informed
That was my selection for this week! To better keep up with all of this news, do not forget to check out the following resources:

— seb
This post is part of our Week in Review series. Check back each week for a quick roundup of interesting news and announcements from AWS!

New – Deployment Pipelines Reference Architecture and Reference Implementations

Post Syndicated from Sébastien Stormacq original https://aws.amazon.com/blogs/aws/new_deployment_pipelines_reference_architecture_and_-reference_implementations/

Today, we are launching a new reference architecture and a set of reference implementations for enterprise-grade deployment pipelines. A deployment pipeline automates the building, testing, and deploying of applications or infrastructures into your AWS environments. When you deploy your workloads to the cloud, having deployment pipelines is key to gaining agility and lowering time to market.

When I talk with you at conferences or on social media, I frequently hear that our documentation and tutorials are good resources to get started with a new service or a new concept. However, when you want to scale your usage or when you have complex or enterprise-grade use cases, you often lack resources to dive deeper.

This is why we have created over the years hundreds of reference architectures based on real-life use cases and also the security reference architecture. Today, we are adding a new reference architecture to this collection.

We used the best practices and lessons learned at Amazon and with hundreds of customer projects to create this deployment pipeline reference architecture and implementations. They go well beyond the typical “Hello World” example: They document how to architect and how to implement complex deployment pipelines with multiple environments, multiple AWS accounts, multiple Regions, manual approval, automated testing, automated code analysis, etc. When you want to increase the speed at which you deliver software to your customers through DevOps and continuous delivery, this new reference architecture shows you how to combine AWS services to work together. They document the mandatory and optional components of the architecture.

Having an architecture document and diagram is great, but having an implementation is even better. Each pipeline type in the reference architecture has at least one reference implementation. One of the reference implementations uses an AWS Cloud Development Kit (AWS CDK) application to deploy the reference architecture on your accounts. It is a good starting point to study or customize the reference architecture to fit your specific requirements.

You will find this reference architecture and its implementations at https://pipelines.devops.aws.dev.

Deployment pipeline reference architecture

Let’s Deploy a Reference Implementation
The new deployment pipeline reference architecture demonstrates how to build a pipeline to deploy a Java containerized application and a database. It comes with two reference implementations. We are working on additional pipeline types to deploy Amazon EC2 AMIs, manage a fleet of accounts, and manage dynamic configuration for your applications.

The sample application is developed with SpringBoot. It runs on top of Corretto, the Amazon-provided distribution of the OpenJDK. The application is packaged with the CDK and is deployed on AWS Fargate. But the application is not important here; you can substitute your own application. The important parts are the infrastructure components and the pipeline to deploy an application. For this pipeline type, we provide two reference implementations. One deploys the application using Amazon CodeCatalyst, the new service that we announced at re:Invent 2022, and one uses AWS CodePipeline. This is the one I choose to deploy for this blog post.

The pipeline starts building the applications with AWS CodeBuild. It runs the unit tests and also runs Amazon CodeGuru to review code quality and security. Finally, it runs Trivy to detect additional security concerns, such as known vulnerabilities in the application dependencies. When the build is successful, the pipeline deploys the application in three environments: beta, gamma, and production. It deploys the application in the beta environment in a single Region. The pipeline runs end-to-end tests in the beta environment. All the tests must succeed before the deployment continues to the gamma environment. The gamma environment uses two Regions to host the application. After deployment in the gamma environment, the deployment into production is subject to manual approval. Finally, the pipeline deploys the application in the production environment in six Regions, with three waves of deployments made of two Regions each.

Deployment Pipelines Reference Architecture

I need four AWS accounts to deploy this reference implementation: one to deploy the pipeline and tooling and one for each environment (beta, gamma, and production). At a high level, there are two deployment steps: first, I bootstrap the CDK for all four accounts, and then I create the pipeline itself in the toolchain account. You must plan for 2-3 hours of your time to prepare your accounts, create the pipeline, and go through a first deployment.

Once the pipeline is created, it builds, tests, and deploys the sample application from its source in AWS CodeCommit. You can commit and push changes to the application source code and see it going through the pipeline steps again.

My colleague Irshad Buch helped me try the pipeline on my account. He wrote a detailed README with step-by-step instructions to let you do the same on your side. The reference architecture that describes this implementation in detail is available on this new web page. The application source code, the AWS CDK scripts to deploy the application, and the AWS CDK scripts to create the pipeline itself are all available on AWS’s GitHub. Feel free to contribute, report issues or suggest improvements.

Available Now
The deployment pipeline reference architecture and its reference implementations are available today, free of charge. If you decide to deploy a reference implementation, we will charge you for the resources it creates on your accounts. You can use the provided AWS CDK code and the detailed instructions to deploy this pipeline on your AWS accounts. Try them today!

— seb

Amazon S3 Encrypts New Objects By Default

Post Syndicated from Sébastien Stormacq original https://aws.amazon.com/blogs/aws/amazon-s3-encrypts-new-objects-by-default/

At AWS, security is job zero. Starting today, Amazon Simple Storage Service (Amazon S3) encrypts all new objects by default. Now, S3 automatically applies server-side encryption (SSE-S3) for each new object, unless you specify a different encryption option. SSE-S3 was first launched in 2011. As Jeff wrote at the time: “Amazon S3 server-side encryption handles all encryption, decryption, and key management in a totally transparent fashion. When you PUT an object, we generate a unique key, encrypt your data with the key, and then encrypt the key with a [root] key.”

This change puts another security best practice into effect automatically—with no impact on performance and no action required on your side. S3 buckets that do not use default encryption will now automatically apply SSE-S3 as the default setting. Existing buckets currently using S3 default encryption will not change.

As always, you can choose to encrypt your objects using one of the three encryption options we provide: S3 default encryption (SSE-S3, the new default), customer-provided encryption keys (SSE-C), or AWS Key Management Service keys (SSE-KMS). To have an additional layer of encryption, you might also encrypt objects on the client side, using client libraries such as the Amazon S3 encryption client.

While it was simple to enable, the opt-in nature of SSE-S3 meant that you had to be certain that it was always configured on new buckets and verify that it remained configured properly over time. For organizations that require all their objects to remain encrypted at rest with SSE-S3, this update helps meet their encryption compliance requirements without any additional tools or client configuration changes.

With today’s announcement, we have now made it “zero click” for you to apply this base level of encryption on every S3 bucket.

Verify Your Objects Are Encrypted
The change is visible today in AWS CloudTrail data event logs. You will see the changes in the S3 section of the AWS Management Console, Amazon S3 Inventory, Amazon S3 Storage Lens, and as an additional header in the AWS CLI and in the AWS SDKs over the next few weeks. We will update this blog post and documentation when the encryption status is available in these tools in all AWS Regions.

To verify the change is effective on your buckets today, you can configure CloudTrail to log data events. By default, trails do not log data events, and there is an extra cost to enable it. Data events show the resource operations performed on or within a resource, such as when a user uploads a file to an S3 bucket. You can log data events for Amazon S3 buckets, AWS Lambda functions, Amazon DynamoDB tables, or a combination of those.

Once enabled, search for PutObject API for file uploads or InitiateMultipartUpload for multipart uploads. When Amazon S3 automatically encrypts an object using the default encryption settings, the log includes the following field as the name-value pair: "SSEApplied":"Default_SSE_S3". Here is an example of a CloudTrail log (with data event logging enabled) when I uploaded a file to one of my buckets using the AWS CLI command aws s3 cp backup.sh s3://private-sst.

Cloudtrail log for S3 with default encryption enabled

Amazon S3 Encryption Options
As I wrote earlier, SSE-S3 is now the new base level of encryption when no other encryption-type is specified. SSE-S3 uses Advanced Encryption Standard (AES) encryption with 256-bit keys managed by AWS.

You can choose to encrypt your objects using SSE-C or SSE-KMS rather than with SSE-S3, either as “one click” default encryption settings on the bucket, or for individual objects in PUT requests.

SSE-C lets Amazon S3 perform the encryption and decryption of your objects while you retain control of the keys used to encrypt objects. With SSE-C, you don’t need to implement or use a client-side library to perform the encryption and decryption of objects you store in Amazon S3, but you do need to manage the keys that you send to Amazon S3 to encrypt and decrypt objects.

With SSE-KMS, AWS Key Management Service (AWS KMS) manages your encryption keys. Using AWS KMS to manage your keys provides several additional benefits. With AWS KMS, there are separate permissions for the use of the KMS key, providing an additional layer of control as well as protection against unauthorized access to your objects stored in Amazon S3. AWS KMS provides an audit trail so you can see who used your key to access which object and when, as well as view failed attempts to access data from users without permission to decrypt the data.

When using an encryption client library, such as the Amazon S3 encryption client, you retain control of the keys and complete the encryption and decryption of objects client-side using an encryption library of your choice. You encrypt the objects before they are sent to Amazon S3 for storage. The Java, .Net, Ruby, PHP, Go, and C++ AWS SDKs support client-side encryption.

You can follow the instructions in this blog post if you want to retroactively encrypt existing objects in your buckets.

Available Now
This change is effective now, in all AWS Regions, including on AWS GovCloud (US) and AWS China Regions. There is no additional cost for default object-level encryption.

— seb