Introducing Workers Analytics Engine

Post Syndicated from Jon Levine original https://blog.cloudflare.com/workers-analytics-engine/

Introducing Workers Analytics Engine

Introducing Workers Analytics Engine

Today we’re excited to introduce Workers Analytics Engine, a new way to get telemetry about anything using Cloudflare Workers. Workers Analytics Engine provides time series analytics built for the serverless era.

Workers Analytics Engine uses the same technology that powers Cloudflare’s analytics for millions of customers, who generate 10s of millions of events per second. This unique architecture provides significant benefits over traditional metrics systems – and even enables our customers to build analytics for their customers.

Why use Workers Analytics Engine

Workers Analytics Engine can be used to get telemetry about just about anything.

Our initial motivation for building Workers Analytics Engine was to help internal teams at Cloudflare better understand what’s happening in their Workers. For example, one early internal customer is our R2 storage product. The R2 team is using the Analytics Engine to measure how many reads and writes happen in R2, how many users make these requests, how many bytes are transferred, how long the operations take, and so forth.

After seeing quick adoption from internal teams at Cloudflare, we realized that many customers could benefit from using this product.

For example, Workers Analytics Engine can also be used to build custom security rules. You could use it to implement something like fail2ban, a program that can ban malicious traffic. Every time someone logs in, you could record information like their location and IP. On subsequent logins, you could query the rate of login attempts from these attackers, and block them if they’ve attempted to sign in too many times in a given period.

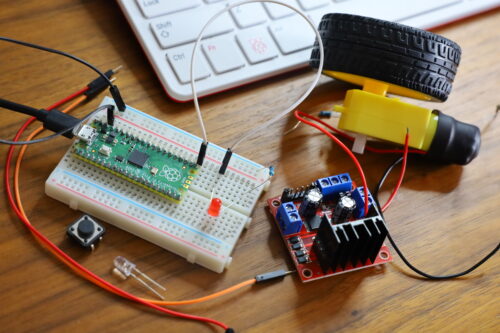
Workers Analytics Engine can even be used to track things in the world that have nothing (yet!) to do with Workers. For example, imagine you have a network of IoT sensors that connect to the Internet to report weather and air quality data, like temperature, air pressure, wind speed, and PM2.5 pollution. Using Workers Analytics Engine, you could deploy a Worker in just a few minutes that collects these reports, and then query and visualize the data using our analytics APIs.

How to use Workers Analytics Engine

There are three steps to get started with Workers Analytics Engine:

  1. Configure your analytics using Wrangler
  2. Write data using the Workers Runtime API
  3. Query your data using our SQL or GraphQL API.

Configuring Workers Analytics Engine in Wrangler

To start using Workers Analytics Engine, you first need to configure it in Wrangler. This is done by creating a binding in wrangler.toml.

[analytics_engine]
bindings = [
    { name = "WEATHER" }
]

Your analytics can be named after the event in the world that they represent. For example, readings from our weather sensor above might be named “WEATHER.”

For our current beta release, customers may only create one binding at a time. In the future, we plan to enable customers to define multiple bindings, or even define them on-the-fly from within the Workers runtime.

Writing data from the Workers runtime

Once a binding is declared in Wrangler, you get a new environment variable in the Workers runtime that represents your Analytics Engine. This variable has a method, writeDataPoint(). A “data point” is a structured event which consists of a vector of labels and a vector of metrics.

A metric is just a “number” type field that can be aggregated in some way – for example, it could be summed, averaged, or quantiled. A label is a “string” type field that can be used for grouping or filtering.

For example, suppose you are collecting air quality samples. Each data point would represent a reading from your weather sensor. Metrics might include numbers like the temperature or air pressure reading. The labels could include the location of the sensor and the hardware identifier of the sensor.

Here’s what this looks like in code:

  async fetch(request: Request, env) {
    env.WEATHER.writeDataPoint({
      labels: ["Seattle", "USA", "pro_sensor_9000”],
      metrics: [25, 0.5]
    });
    return new Response("OK!");
  }

In our initial version, developers are responsible for providing fields in a consistent order, so that they have the same semantics when querying. In a future iteration, we plan to let developers name their labels and metrics in the binding, and then use these names when writing data points in the runtime.

Querying and visualizing data

To query your data, Cloudflare provides a rich SQL API. For example:

SELECT label_1 as city, avg(metric_2) as avg_humidity
FROM WEATHER
WHERE metric_1 > 0
ORDER BY avg_humidity DESC
LIMIT 10

The results would show you the top 10 cities that had the highest average humidity readings when the temperature was above 0.

Note that, for our initial version, labels and metrics are accessed via names that have 1-based indexing. In the future, when we let developers name labels and metrics in their binding, these names will also be available via the SQL API.

Workers Analytics Engine is optimized for powering time series analytics that can be visualized using tools like Grafana. Every event written from the runtime is automatically populated with a timestamp field. This makes it incredibly easy to make time series charts in Grafana:

Introducing Workers Analytics Engine

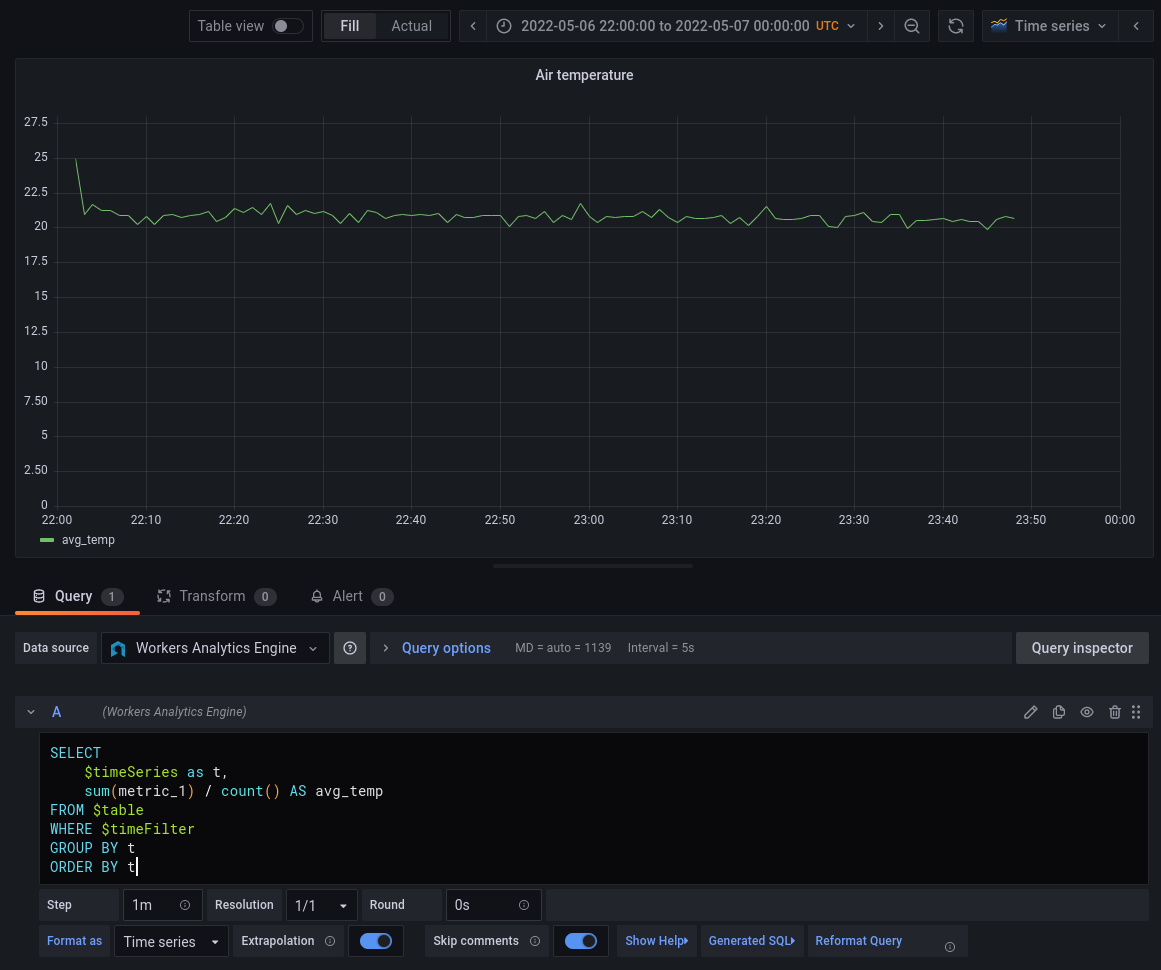
The macro $timeSeries simply expands to intDiv(toUInt32(timestamp), 60) * 60 * 1000 — i.e. the timestamp rounded to the nearest minute (as defined in our \$step parameter)  and converted into milliseconds. Grafana also provides \$timeFilter which can be changed at the grafana dashboard level. We could easily add another series here by just “grouping” on another field like “city”.

Data can also be queried using our GraphQL API. At this time, the GraphQL API only supports querying total counts for each named binding.

Finally, the Cloudflare dashboard also provides a high-level count of the total number of data points seen for each binding. In the future, we plan to offer rich analytical abilities through the dashboard.

How is this different from traditional metrics systems?

Many developers are familiar with metrics systems like Prometheus. We built Workers Analytics Engine based on our experience providing analytics for millions of Cloudflare customers. Writing structured event logs and querying them using a relational database model is very different from writing metrics – but it’s also much more powerful.

Here are some of the benefits of our model, compared with metrics systems:

  • Unlimited cardinality of label values: In a traditional metrics system, like Prometheus, every time you add a new label value, under the hood you are actually adding a new metric. If you have multiple labels for one data point, this can rapidly increase the number of metrics. Nearly everyone using a metrics system runs into challenges with cardinality. For example, you may start by including a “customer ID” in a label – but what happens when you have thousands or millions of customers? In contrast, when using Workers Analytics Engine, every label value is stored independently – so every data point can have unique label values with no problem.
  • Low latency reporting: Pull-based metrics systems must check for new metrics at some fixed interval, known as a scrape interval. Commonly this is set to one minute or longer – and this is the absolute fastest that your data can be collected. With Workers Analytics Engine, we can report on new data points within a few seconds.
  • Fast queries at any timescale: Everyone who uses Prometheus knows what happens when you expand that range selector in Grafana to change from looking back 30 minutes to seven days… you wait, and you’re lucky if you get any results at all. Whole new pieces of software exist just for the challenge of storing Prometheus metrics long-term. In contrast, Workers Analytics Engine is superfast at querying anything from the last five minutes of data to the last seven days. Look for yourself to see!

And of course, Workers Analytics Engine runs on Cloudflare’s global network. So rather than worrying about running your own Prometheus server, setting up Thanos, and closely tracking cardinality, you can just write data and query it using our SQL API.

What’s next

Today we’re introducing a closed beta for Workers Analytics Engine. You can join the waitlist by signing up here. We already have many teams at Cloudflare happily using this and would love to get your feedback at this early stage, as we are quickly adding new functionality.

We have an ambitious roadmap ahead of us. One critical use case we plan to support is building analytics and usage-based billing for your customers – so if you’re a platform who is looking to build analytics into your product, we’d love to talk to you!

And of course, if this sounds fun to work on, we’re hiring engineers on the Data team to work in San Francisco, London, or remote locations!

Handy Tips #29: Discovering hosts and services with network discovery

Post Syndicated from Arturs Lontons original https://blog.zabbix.com/handy-tips-29-discovering-hosts-and-services-with-network-discovery/20484/

Automate host creation and monitoring with Zabbix network discovery.

Creating hosts for a large number of monitoring endpoints can become a menial and time-consuming task. It is important to provide the end-users with the tools to automate such tasks to create and start monitoring hosts based on a user-defined set of rules and conditions.

Automate host onboarding and offboarding with Zabbix network discovery:

  • Discover monitoring endpoints and services in user defined IP ranges
  • Define a set of services that should be discovered

  • Provide custom workflows based on the received values
  • Onboard or offboard hosts based on the discovery status

Check out the video to learn how to discover your monitoring endpoints with Zabbix network discovery.

How to configure Zabbix network discovery:

  1. Navigate to ConfigurationDiscovery
  2. Press the Create discovery rule button service button
  3. Provide the discovery rule name, IP range and update interval
  4. Define discovery checks
  5. Press the Add button
  6. Navigate to ​​​​​​​ConfigurationActionsDiscovery actions
  7. Press the Create action button
  8. Provide the action name and action conditions
  9. Navigate to the Operations tab
  10. Define operations to assign templates and host groups
  11. Press the Add button
  12. Wait for the services to be discovered
  13. Navigate to MonitoringDiscovery and confirm the discovery status
  14. Confirm that the hosts have been created in Zabbix

Tips and best practices
  • A single discovery rule will always be processed by a single Discoverer process
  • Every check of a service and a host generates one of the following events: Host or service – Discovered/Up/Lost/Down
  • The hosts discovered by different proxies are always treated as different hosts
  • A host is also added, even if the Add host operation is missing, if you select operations resulting in actions on a host, such as enable/disable/add to host group/link template

The post Handy Tips #29: Discovering hosts and services with network discovery appeared first on Zabbix Blog.

Teaching with Raspberry Pi Pico in the computing classroom

Post Syndicated from Dan Elwick original https://www.raspberrypi.org/blog/raspberry-pi-pico-classroom-physical-computing/

Raspberry Pi Pico is a low-cost microcontroller that can be connected to another computer to be programmed using MicroPython. We think it’s a great tool for exploring physical computing in classrooms and coding clubs. Pico has been available since last year, amid school closures, reopenings, isolation periods, and restrictions for students and teachers. Recently, I spoke to some teachers in England about how their reception of Raspberry Pi Pico, and how they have found using it to teach physical computing to their learners.

A student uses a Raspberry Pi Pico in the computing classroom.

This blog post is adapted from issue 18 of Hello World, our free magazine written by computing educators for computing educators.

Extra-curricular engagement

At secondary schools, a key use of Raspberry Pi Pico was in teacher-led lunchtime or after-school clubs. One teacher from a girls’ secondary school in Liverpool described how he introduced it to his Women in Tech club, which he runs for 11- to 12-year-old students for half an hour per week at lunchtime. As this teacher has free reign over the club content and a personal passion for Raspberry Pi, his eventual aim for the club participants was to build a line-following car using Pico.

On a wooden desktop, electronic components, a Raspberry Pi Pico, and a motor next to a keyboard.

The group started by covering the basics of Pico, such as connecting it with a breadboard and making LEDs flash, using our ‘Getting started with Raspberry Pi Pico’ project guide. The teacher described how walking into a room with Picos and physical computing kits grabs students’ attention: “It’s massively more engaging than programming Python on a screen… They love the idea of building something physical, like a car.” He has to remind them that phones aren’t allowed at school, as they’re keen to take photos of the flashing lights to show their parents. His overall verdict? “Once the software had been installed, [Picos are] just plug and play. As a tool in school, it gives you something physical, enthuses interest in the subject. If it gets just one person choosing the subject, who wouldn’t have done otherwise, then job done.”

“If it gets just one person choosing the subject, who wouldn’t have done otherwise, then job done.”

Teacher at a Liverpool girls’ secondary school

Another teacher from a school in Hampshire used Picos at an after-school club with students aged 13 to 15. After about six sessions of less than 50 minutes last term, the students have almost finished building motorised buggies. The first two sessions were spent familiarising students with the Picos, making LEDs flash, and using sensors. In the next four sessions, the students made their way through the Pico-focused physical computing unit from our Teach Computing Curriculum. The students worked in pairs, and initially some learners had trouble getting the motors to turn the wheels on their buggies. Rather than giving them the correct code, the teacher gave them duplicate sets of the hardware and suggested that they test each piece in turn to ‘debug’ the hardware. Thus the students quickly worked out what they needed to do to make the wheels turn.

A soldered Raspberry Pi Pico on a breadboard.

For non-formal learning settings such as computing and coding clubs, we’ve just released a six-project learning path called ‘Introduction to Raspberry Pi Pico’ for beginner digital makers. You can check out the path directly, or learn more about how we’ve designed it to encourage learners’ independence.

Reinforcing existing computing skills

Another key theme that came through in my conversations with teachers was how Raspberry Pi Pico can be used to reinforce learners’ existing computing skills. One teacher I interviewed, from a school in Essex, has been using Picos to teach computing to 12- to 14-year-olds in class, and talked about the potential for physical computing as a pedagogical tool for recapping topics that have been covered before. “If [physical computing] is taught well, it enhances students’ understanding of programming. If they just copy code from the board, it becomes about the kit and not how you solve a problem, it’s not as effective at helping them develop their computational thinking. Teaching Python on Pico really can strengthen existing understanding of using Python libraries and subroutines, as well as passing subroutine arguments.”

“If [physical computing] is taught well, it enhances students’ understanding of programming.”

Teacher at an Essex secondary school

Another teacher I spoke to, working at a Waterlooville school and relatively new to teaching, talked about the benefits of using Pico to teach Python: “It takes some of the anxiety away from computing for some of the younger students and makes them more resilient. They can be wary of making mistakes, and see them as a hurdle, but working towards a tangible output can help some students to see the value of learning through their mistakes.”

Raspberry Pi Pico attached with jumper wires to a purple LED.

This teacher was keen for his students to get a sense of the variety of jobs that are available in the computing sector, and not just in software. He explained how physical computing can demonstrate to students how you can make inputs, outputs, and processing very real: “Give students a Pico and make them thirsty about what they could do with it — the device allows them to interact with it and work out how to bend it to what they want to do. You can be creative in computing without just writing code, you can capture information and output it again in a more useful way.”

“Working towards a tangible output can help some students to see the value of learning through their mistakes.”

Teacher at a Waterlooville school

One of the teachers we spoke to was initially a bit cynical about Pico, but had a much better experience of using it in the classroom than expected: “It’s not such a big progression from block-based microcontrollers to Pico — it could be a good stepping stone between, for example, a micro:bit and a Raspberry Pi computer.”

Why not try out Raspberry Pi Pico in your classroom or club? It might be the engagement booster you’ve been looking for!  

Top teacher tips for activities with Raspberry Pi Pico

  • Prepare to install Thonny (the software we recommend to program Pico) on your school’s or venue’s IT systems, and ask your IT technician for support.
  • It takes time to unpack devices, connect them, and pack them back up again. Build this time into your plan!

Free learning resources for using Raspberry Pi Pico in your classroom or club

Teachers at state schools in England can borrow physical computing kits with class sets of Raspberry Pi Picos from their local Computing Hub. We’ve made these kits available through our work as part of the National Centre for Computing Education. The Pico kit is perfect for teaching the Pico-focused physical computing unit from our Teach Computing Curriculum.

Qualified US-based educators can still get their hands on 1 of 1000 free Raspberry Pi Pico hardware kits if they sign up to our free course Design, build, and code a rover with Raspberry Pi Pico. This course shows you how to introduce Pico in your classroom. We’ve designed the course on the Pathfinders Online Institute platform, specifically for US-based educators, thanks to our partners at Infosys Foundation USA. These Raspberry Pi Pico kits are also available at PiShop.us.

For non-formal learning settings, such as Code Clubs and CoderDojos, we’ve created a six-project learning path: ‘Introduction to Raspberry Pi Pico’. This path is for beginner digital makers to follow and create Pico projects, all the while learning the skills to independently design, code, and build their own projects. All of the components for the path are available as a kit from Pimoroni.

The post Teaching with Raspberry Pi Pico in the computing classroom appeared first on Raspberry Pi.

Т. Сингер – анонимният самотник. Непубликувано интервю на Марин Бодаков с Даг Сулста

Post Syndicated from Марин Бодаков original https://toest.bg/dag-solstad-interview/

Това интервю можеше да има продължение…

С тези думи започва писмото на Даря Хараланова от издателство „Аквариус“ до нас. Към писмото тя беше прикачила едно интервю, което преди точно една година Марин Бодаков подготвяше за „Тоест“, но така и не пристигна в редакцията. Ето защо: 

В началото на 2021 г., веднага след като издадохме „Т. Сингер“ на Даг Сулста, Марин се свърза с мен и ме помоли да му оставя един екземпляр в обичайната ни „пощенска кутия“ – „Български книжици“ в София. Сулста (р. 1941) е многократно награждаван норвежки романист, есеист, драматург и автор на над 30 книги, но досега не беше излизал на български. Марин искаше да включи „Т. Сингер“ в колонката си „По буквите“.

Скоро след прочитането на романа обаче Марин ми поръча да попитам Даг Сулста дали ще се съгласи на интервю. Тъй като контактът с него беше възможен само през литературната агенция, се наложи да почакаме. Освен всичко 80-годишният Сулста не използва имейл, поради което от агенцията трябваше да разпечатат на хартия въпросите на Марин, да ги изпратят на писателя по обикновената поща и пак по нея да изчакат отговорите, да ги наберат на компютър и да ги изпратят обратно на нас.

Получих отговорите в началото на октомври, месец след като Марин внезапно ни напусна. Оттогава държа този файл в компютъра си…

И ето че сега задочният разговор между Марин Бодаков и Даг Сулста най-после стигна до нас благодарение на усилията на литературни агенти и издатели, на интернет и норвежките пощи. Насладете му се, а следващата събота, на 21 май, очаквайте ревю от Стефан Иванов на романа „Т. Сингер“ в книжната ни рубрика „На второ четене“.


На кои литературни персонажи от европейската литература е сродник Вашият герой Сингер?

Не съм мислил за това. А и не искам да мисля. Но многократно съм казвал, в интервюта и на други места, че от книгите ми трябва да мирише на литература, не на жив живот. С други думи, книгите ми представляват фикция, те са съчинени, съчинени от мен. Тоест всички романи, които съм изчел през живота си, може да се появят в творчеството ми под формата на придобит опит.

В началото на романа много внимателно осмисляте вината и срама като двигатели на житейските избори на Сингер. Какво щеше да изгуби литературата, ако бяхме описали историята на Вашия герой/антигерой в психиатрични термини – като паник атаки или натрапливи спомени?

Не виждам нищо лошо в избора на подобен прочит. На читателя е позволено всичко, дори и да се противопоставя на писателския замисъл. Но в този случай бих предпочел да не вземам отношение по въпроса. Избягвам да чета за това – не е трудно, предвид колко оглушах с времето и от колко много неща ме пощадява старостта ми, а в интернет изобщо не влизам.

Дали Сингер не спазва съвета на Епикур „Живей незабелязано“? Може ли днес човек да бъде щастлив, ако предпочете неизвестността?

Не бих определил Сингер като щастлив, но той сам е избрал да води живота, който води и който толкова цени, макар това да е един невъзможен и несъстоятелен живот. Допускам, че повечето разумни хора в наши дни биха оценили съществуването му точно така – или поне разумните хора от 2000 г., когато се развива краят на романа.

Къде изчезва радостта във всекидневието на Сингер? И защо?

Не знам кога точно изчезва щастието от живота на Сингер, защото той никога не се е чувствал щастлив, освен може би в зачатъка на брака си с Мерете Сетре, но после тя загива в катастрофа, а по това време бракът им вече е започнал да се разпада и двамата са решили да се разведат. Но ето че тя умира и Сингер остава сам с дъщеричката на Мерете Сетре – Исабела, в редовата къща в Нутоден. Решението му да поеме грижите за Исабела като за собствено дете е повратен момент в романа. Тогава щастието му вече го е напуснало, но в този момент настъпва решаващият обрат в живота му.

Помогнете на читателя: как да тълкуваме отказа на Сингер от писателството в полза на библиотекарството? Това въпрос на страх ли е, или въпрос на смелост?

Младият Сингер мечтае да стане писател, точно като мен. Но за разлика от мен, той не успява в начинанието си. Записва се в библиотекарското училище на около 28 години, завършва го на около 30–31 години и веднага след това бива назначен в библиотеката в Нутоден. С пълно основание можем да кажем, че се предава, претърпял е сериозно поражение, нещо недотам необичайно за един млад човек. Но както повечето от нас, и той се изправя и извлича максимума от поражението си – при това не без каква да е жизнерадост, въпреки меланхоличния си нрав, който никога не го напуска и по който той се родее с мен. Дали решението му е породено от страх, или от смелост, не се наемам да кажа.

Съдейки по опита на Сингер, има ли смисъл човек изобщо да опознава себе си?

Сингер се познава добре, той има задълбочен поглед върху собствените си действия и причините за тях. Дали има смисъл човек да се опознава? Строго погледнато, не знам, но за Сингер себепознанието е от значение, защото му позволява да живее порядъчно. Той поема отговорността за дъщеричката на загиналата си съпруга, заедно с нея напуска Нутоден и започва едно анонимно съществуване в столицата Осло. В крайна сметка нима за един меланхоличен човек, който не вижда фундаментален смисъл в битието, представата за порядъчен живот, изпълнен с отговорни действия, не се изчерпва тъкмо с това?

Какво от себе си вградихте в Сингер?

Сингер е неизличима част от моето ДНК и от гените ми. Той ме свързва с мнозина от предците ми, особено с един мой чичо, но също и с баща ми. Първоначално възнамерявах да озаглавя романа „Божие дете“, но през 1999–2000 г. това заглавие ми се стори твърде ударно. Може би все пак е трябвало да изпълня първоначалното си намерение, при всички положения това заглавие би било точно. „Т. Сингер“ е по-сполучливо. Макар „Божие дете“ да е различно и по-запомнящо се, се радвам, че избрах „Т. Сингер“. То съхранява комплексността на романа по един по-анонимен начин.

Превод от норвежки Стефка Кожухарова

Заглавна илюстрация: Фрагмент от корицата на българското издание на „Т. Сингер“, дело на Росица Ралева

Източник

Войната в Украйна извади България от хибернацията

Post Syndicated from Емилия Милчева original https://toest.bg/voynata-v-ukrayna-izvadi-bulgariya-ot-hibernatsiyata/

България ще стане член на Европейския съюз и НАТО през 2022 г. Точно така, няма грешка. Българската държава пребиваваше в състояние на хибернация през всичките тези 15 години след присъединяването ѝ към европейската общност и 18 години от приемането ѝ в Алианса. Поглъщаше евросредства на порции – чрез създадените за целта кръжила от фирми, имитираше превъоръжаване чрез прескъпи договори за военна техника, но така, че руската да остане на въоръжение. В общи линии успя да си създаде имидж на консуматор на преките ползи от двата договора, на пасивен и ненадежден партньор и съюзник.

Войната в Украйна извади принудително от хибернацията българските управляващи, заставяйки ги не просто да изберат отбор, но и да играят в него. Правителството на четворната коалиция не беше готово за суровата реалност – ударите отвън и отвътре. На дневен ред излязоха проблеми, чиито решения не бяха системно и целенасочено търсени досега, като енергийната диверсификация; боеспособността на българската армия; кампанията относно еврозоната (предвид присъединяването от 1 януари 2024 г.); руската хибридна война като национална и европейска заплаха. Тук е и темата за българското вето за Северна Македония, с начертаните от по-рано червени линии в Договора за добросъседство от 2017 г. и грешката тя да бъде оставена „на концесия“ на ВМРО.

Руската агресия в Украйна принуди управляващите да търсят решения за поне част от проблемите, а решенията следва да са два типа – спешни и дългосрочни. Тези процеси са усложнени от непрекъснатите протести на различни браншове – превозвачи, пътни строители, собственици на заведения, полицаи, медицински сестри, местни общности, както и от бързия спад на доверие към управляващите още в края на първите 100 дни и ръста на подкрепата за националконсерватори с пропутински уклон. Наред с това държавните институции са отслабени от години и с традиционно ниско доверие, а върховенството на правото – унизено, което улеснява проникването на руската пропаганда предвид слабия национален имунитет.

Решенията обаче не минават през реформи нито в енергийния сектор, нито в секторите по сигурност и отбрана, нито в здравеопазването. По всичко личи, че е стопирана знаковата реформа в правосъдието – едно от основанията за управление на четирите партии. Правителството действа като изправен до стената човек с опрян в главата пистолет – готово е да обещае всичко всекиму. А обещаващите щедро задължават държавния бюджет с обещанията си. Предстои актуализацията му през юни и вицепремиерът и министър на финансите Асен Василев съобщи, че се подготвя пакет от антикризисни мерки на стойност 1,5–2 млрд. лв. А при мерките, както се оказва, засега цари пълен хаос – както за отстъпките за горивата, така и за евентуалните данъчни облекчения, преизчисляване на пенсии и др.

Енергийна диверсификация

Европейският съюз, а значи и България, слага началото на раздялата си с руските енергийни суровини. Колко време ще трае дългото сбогуване, е невъзможно да се прогнозира, независимо от обявения финал до 2030 г. да бъдат приключени доставките на руски природен газ, от август т.г. да се спре вносът на руски въглища, както и намерението за ембарго на петрола от Русия (засега осуетено). За най-бедната държава в ЕС, зависима над 85% от руския газ, 70% от петрола и 100% от руското ядрено гориво, това е тежък удар. Със свежо ядрено гориво двата работещи блока на АЕЦ „Козлодуй“ са осигурени в близките две до четири години – диверсификацията там начева с постепенната замяна на касети с гориво на американската „Уестингхаус“ от средата на 2024 г. А нерешеният проблем е липсата на „гробище“ за геологическо погребване на остъкления отпадък, който Русия трябва да ни връща.

Спрените от „Газпром“ доставки на руско синьо гориво за Полша и България през април – заради отказа на страните да плащат в рубли – поставиха управляващите пред необходимостта, първо, спешно да осигурят доставки до края на годината и второ, да подготвят пакет от решения, гарантиращи снабдяването с газ в дългосрочен план. В краткосрочен план изходът е втечнен газ и азерски газ, който обаче ще влиза в пълен обем в края на годината, когато е реалният срок за пускане в търговска експлоатация на интерконектора в Гърция. Правителството съобщи, че по време на посещението си в САЩ премиерът Кирил Петков е договорил „реални доставки на втечнен природен газ към България на цени под тези на „Газпром“, които да започнат от месец юни“. За последно цените на руския газ за България надхвърлиха $1000 за 1000 куб.м.

Но каквито и да са цените на новите доставки, ще бъдат платени. Хранилището в Чирен, сега почти празно, трябва да бъде запълнено преди началото на отоплителния сезон, а топлофикациите, индустриите, хлебозаводите, 150-те хиляди битови абонати, както и газифицираните общини трябва да продължат да получават суровината. Положението ще бъде някак закърпено, въпросът е как ще се договорят количества в дългосрочен план. Договорът с Азербайджан за доставки на 1 млрд. куб.м е 25-годишен, до 2045 г., и покрива една трета от българската консумация. Откъде ще се вземат останалите 2 млрд. куб.м, е въпрос на преговори отсега, но и на политическа воля в коалиция, в която единият от партньорите – БСП, смята Русия за „приятелска държава“. (Какво от това, че България е в кремълския списък на неприятелите?!)

Раздялата с руския петрол ще стане доста по-трудно (и) поради обявеното вече от вицепремиера Василев намерение за вето върху европейското решение за ембарго. В основата му е господстващото положение на „Лукойл“ на пазара за горива и при данъчните складове, а също и като основен доставчик за държавния резерв, в комбинация със страха на управляващите горивата да не поскъпнат значително, което ще взриви нови протести – и инфлация.

Съюзник в НАТО

Прословутият български батальон, за който ратуваха и президентът Румен Радев, и отстраненият военен министър и бивш негов съветник Стефан Янев, се оказа мултинационален. Към него се присъединяват американски, британски и италиански военни – 150 от Великобритания, толкова и от САЩ. Испански изтребители пристигнаха, за да охраняват българското небе. Какво направи България като партньор? Нула, освен декларативни изявления срещу агресора и в подкрепа на Украйна. Чуха се дори предложения за „пълен неутралитет“ (отново най-гласовити бяха от БСП и „Възраждане“) по отношение не просто на война, която руският агресор води за територия, но война срещу международния правов ред и европейските ценности.

На българската върховна власт, каквато е Народното събрание в парламентарна демокрация, обаче дори не му стискаше да гласува изпращане на военна помощ в Украйна и така еднозначно да покаже позиция, изразена вече от останалите държави в ЕС (без Унгария). По този начин се стигна до военнотехническа помощ, при това конкретно упомената – ремонт на военна техника, ако и когато Украйна поиска.

Впрочем в годините назад като че ли българската армия проявяваше повече активност. Мисията в Афганистан например започна още преди НАТО, през 2002 г., когато българският военен контингент се включи в Международните сили за поддържане на сигурността, а след 2005 г. – вече като част от операцията на НАТО „Решителна подкрепа“. Що се отнася до американската операция в Ирак през 2003 г., правителството на НДСВ–ДПС обяви малко преди това, че ще действа като „фактически член на НАТО“. И досущ като британския премиер Тони Блеър – в името на „особените отношения“ със САЩ, се включи в инвазия, чието начало бе аргументирано с лъжа – че режимът на Саддам Хюсеин създава оръжия за масово поразяване.

Как настоящото управление ще разреши основния въпрос – партньор ли е България в ЕС и НАТО, или снишен наблюдател, ще определи по-нататъшното бъдеще. Ако ще позволи на страха и Корнелия Нинова да диктуват условия, по-добре да се разчетворят още отсега. Възможно е избирателите да оценят по достойнство тази смелост. Аргументът, че оставката би отворила път за „Български възход“ на Стефан Янев и „Възраждане“ на Костадин Костадинов, не са състоятелни, ако ще ни предложат съглашателство в името на същото като сега.

Излизането от хибернацията ще е мъчително. България, която е интегрирана със Запада, чиито деца избират да учат на Запад, чиито мозъци изтичат на Запад, чиито гастарбайтери отиват да работят на Запад, още чака чорбаджи Марко да събере фамилията на вечеря, а чорбаджи Мичо Бейзадето да тропне по масата, че Русия не може да се победи. Време е да се излиза от хибернацията – XXI век е.

Заглавна снимка: © Пресцентър на Министерския съвет

Източник

Getting started with AWS SSO delegated administration

Post Syndicated from Chris Mercer original https://aws.amazon.com/blogs/security/getting-started-with-aws-sso-delegated-administration/

Recently, AWS launched the ability to delegate administration of AWS Single Sign-On (AWS SSO) in your AWS Organizations organization to a member account (an account other than the management account). This post will show you a practical approach to using this new feature. For the documentation for this feature, see Delegated administration in the AWS Single Sign-On User Guide.

With AWS Organizations, your enterprise organization can manage your accounts more securely and at scale. One of the benefits of Organizations is that it integrates with many other AWS services, so you can centrally manage accounts and how the services in those accounts can be used.

AWS SSO is where you can create, or connect, your workforce identities in AWS just once, and then manage access centrally across your AWS organization. You can create user identities directly in AWS SSO, or you can bring them from your Microsoft Active Directory or a standards-based identity provider, such as Okta Universal Directory or Azure AD. With AWS SSO, you get a unified administration experience to define, customize, and assign fine-grained access.

By default, the management account in an AWS organization has the power and authority to manage member accounts in the organization. Because of these additional permissions, it is important to exercise least privilege and tightly control access to the management account. AWS recommends that enterprises create one or more accounts specifically designated for security of the organization, with proper controls and access management policies in place. AWS provides a method in which many services can be administered for the organization from a member account; this is usually referred to as a delegated administrator account. These accounts can reside in a security organizational unit (OU), where administrators can enforce organizational policies. Figure 1 is an example of a recommended set of OUs in Organizations.

Figure 1: Recommended AWS Organizations OUs

Figure 1: Recommended AWS Organizations OUs

Many AWS services support this delegated administrator model, including Amazon GuardDuty, AWS Security Hub, and Amazon Macie. For an up-to-date complete list, see AWS services that you can use with AWS Organizations. AWS SSO is now the most recent addition to the list of services in which you can delegate administration of your users, groups, and permissions, including third-party applications, to a member account of your organization.

How to configure a delegated administrator account

In this scenario, your enterprise AnyCompany has an organization consisting of a management account, an account for managing security, as well as a few member accounts. You have enabled AWS SSO in the organization, but you want to enable the security team to manage permissions for accounts and roles in the organization. AnyCompany doesn’t want you to give the security team access to the management account, and they also want to make sure the security team can’t delete the AWS SSO configuration or manage access to that account, so you decide to delegate the administration of AWS SSO to the security account.

Note: There are a few things to consider when making this change, which you should review before you enable delegated administration. These items are covered in the console during the process, and are described in the section Considerations when delegating AWS SSO administration in this post.

To delegate AWS SSO administration to a security account

  1. In the AWS Organizations console, log in to the management account with a user or role that has permission to use organizations:RegisterDelegatedAdministrator, as well as AWS SSO management permissions.
  2. In the AWS SSO console, navigate to the Region in which AWS SSO is enabled.
  3. Choose Settings on the left navigation pane, and then choose the Management tab on the right side.
  4. Under Delegated administrator, choose Register account, as shown in Figure 2.
    Figure 2: The registered account button in AWS SSO

    Figure 2: The Register account button in AWS SSO

  5. Consider the implications of designating a delegated administrator account (as described in the section Considerations when delegating AWS SSO administration). Select the account you want to be able to manage AWS SSO, and then choose Register account, as shown in Figure 3.
    Figure 3: Choosing a delegated administrator account in AWS SSO

    Figure 3: Choosing a delegated administrator account in AWS SSO

You should see a success message to indicate that the AWS SSO delegated administrator account is now setup.

To remove delegated AWS SSO administration from an account

  1. In the AWS Organizations console, log in to the management account with a user or role that has permission to use organizations:DeregisterDelegatedAdministrator.
  2. In the AWS SSO console, navigate to the Region in which AWS SSO is enabled.
  3. Choose Settings on the left navigation pane, and then choose the Management tab on the right side.
  4. Under Delegated administrator, select Deregister account, as shown in Figure 4.
    Figure 4: The Deregister account button in AWS SSO

    Figure 4: The Deregister account button in AWS SSO

  5. Consider the implications of removing a delegated administrator account (as described in the section Considerations when delegating AWS SSO administration), then enter the account name that is currently administering AWS SSO, and choose Deregister account, as shown in Figure 5.
    Figure 5: Considerations of deregistering a delegated administrator in AWS SSO

    Figure 5: Considerations of deregistering a delegated administrator in AWS SSO

Considerations when delegating AWS SSO administration

There are a few considerations you should keep in mind when you delegate AWS SSO administration. The first consideration is that the delegated administrator account will not be able to perform the following actions:

  • Delete the AWS SSO configuration.
  • Delegate (to other accounts) administration of AWS SSO.
  • Manage user or group access to the management account.
  • Manage permission sets that are provisioned (have a user or group assigned) in the organization management account.

For examples of those last two actions, consider the following scenarios:

In the first scenario, you are managing AWS SSO from the delegated administrator account. You would like to give your colleague Saanvi access to all the accounts in the organization, including the management account. This action would not be allowed, since the delegated administrator account cannot manage access to the management account. You would need to log in to the management account (with a user or role that has proper permissions) to provision that access.

In a second scenario, you would like to change the permissions Paulo has in the management account by modifying the policy attached to a ManagementAccountAdmin permission set, which Paulo currently has access to. In this scenario, you would also have to do this from inside the management account, since the delegated administrator account does not have permissions to modify the permission set, because it is provisioned to a user in the management account.

With those caveats in mind, users with proper access in the delegated administrator account will be able to control permissions and assignments for users and groups throughout the AWS organization. For more information about limiting that control, see Allow a user to administer AWS SSO for specific accounts in the AWS Single Sign-On User Guide.

Deregistering an AWS SSO delegated administrator account will not affect any permissions or assignments in AWS SSO, but it will remove the ability for users in the delegated account to manage AWS SSO from that account.

Additional considerations if you use Microsoft Active Directory

There are additional considerations for you to keep in mind if you use Microsoft Active Directory (AD) as an identity provider, specifically if you use AWS SSO configurable AD sync, and which AWS account the directory resides in. In order to use AWS SSO delegated administration when the identity source is set to Active Directory, AWS SSO configurable AD sync must be enabled for the directory. Your organization’s administrators must synchronize Active Directory users and groups you want to grant access to into an AWS SSO identity store. When you enable AWS SSO configurable AD sync, a new feature that launched in April, Active Directory administrators can choose which users and groups get synced into AWS SSO, similar to how other external identity providers work today when using the System for Cross-domain Identity Management (SCIM) v2.0 protocol. This way, AWS SSO knows about users and groups even before they are granted access to specific accounts or roles, and AWS SSO administrators don’t have to manually search for them.

Another thing to consider when delegating AWS SSO administration when using AD as an identity source is where your directory resides, that is which AWS account owns the directory. If you decide to change the AWS SSO identity source from any other source to Active Directory, or change it from Active Directory to any other source, then the directory must reside in (be owned by) the account that the change is being performed in. For example, if you are currently signed in to the management account, you can only change the identity source to or from directories that reside in (are owned by) the management account. For more information, see Manage your identity source in the AWS Single Sign-On User Guide.

Best practices for managing AWS SSO with delegated administration

AWS recommends the following best practices when using delegated administration for AWS SSO:

  • Maintain separate permission sets for use in the organization management account (versus the rest of the accounts). This way, permissions can be kept separate and managed from within the management account without causing confusion among the delegated administrators.
  • When granting access to the organization management account, grant the access to groups (and permission sets) specifically for access in that account. This helps enable the principal of least privilege for this important account, and helps ensure that AWS SSO delegated administrators are able to manage the rest of the organization as efficiently as possible (by reducing the number of users, groups, and permission sets that are off limits to them).
  • If you plan on using one of the AWS Directory Services for Microsoft Active Directory (AWS Managed Microsoft AD or AD Connector) as your AWS SSO identity source, locate the directory and the AWS SSO delegated administrator account in the same AWS account.

Conclusion

In this post, you learned about a helpful new feature of AWS SSO, the ability to delegate administration of your users and permissions to a member account of your organization. AWS recommends as a best practice that the management account of an AWS organization be secured by a least privilege access model, in which as few people as possible have access to the account. You can enable delegated administration for supported AWS services, including AWS SSO, as a useful tool to help your organization minimize access to the management account by moving that control into an AWS account designated specifically for security or identity services. We encourage you to consider AWS SSO delegated administration for administrating access in AWS. To learn more about the new feature, see Delegated administration in the AWS Single Sign-On User Guide.

If you have feedback about this post, submit comments in the Comments section below. If you have questions about this post, start a new thread on the AWS IAM forum or contact AWS Support.

Want more AWS Security how-to content, news, and feature announcements? Follow us on Twitter.

Author

Chris Mercer

Chris is a security specialist solutions architect. He helps AWS customers implement sophisticated, scalable, and secure solutions to business challenges. He has experience in penetration testing, security architecture, and running military IT systems and networks. Chris holds a Master’s Degree in Cybersecurity, several AWS certifications, OSCP, and CISSP. Outside of AWS, he is a professor, student pilot, and Cub Scout leader.

Red Hat Enterprise Linux 9 released

Post Syndicated from original https://lwn.net/Articles/894869/

On May 10, Red Hat announced the release of Red Hat Enterprise Linux 9 (RHEL 9). Not surprisingly, the announcement is rather buzzword-heavy and full of marketing, though there are some technical details scattered in it. The release notes for the RHEL 9 beta are available, which have a lot more information. “The platform will be generally available in the coming weeks.

Building on decades of relentless innovation, the latest version of the world’s leading enterprise Linux platform is the first production release built from CentOS Stream, the continuously delivered Linux distribution that tracks just ahead of Red Hat Enterprise Linux. This approach helps the broader Red Hat Enterprise Linux ecosystem, from partners to customers to independent users, provide feedback, code and feature updates to the world’s leading enterprise Linux platform.

NVIDIA Transitioning To Official, Open-Source Linux GPU Kernel Driver (Phoronix)

Post Syndicated from original https://lwn.net/Articles/894861/

Phoronix reports
that the days of proprietary NVIDIA graphics drivers are coming to a close.

NVIDIA’s open kernel modules is already considered “production
ready, opt-in” for data center GPUs. For GeForce and workstation
GPUs, the open kernel module code is considered “alpha quality” but
will be ramped up moving forward with future releases. NVIDIA has
already deprecated the monolithic kernel module approach for their
data center GPU support to focus on this open kernel driver
solution (and their existing proprietary kernel module using the
GSP). Only Turing and newer GPUs will be supported by this
open-source kernel driver. Pre-Turing GPUs are left to using the
existing proprietary kernel drivers or the Nouveau DRM driver for
that matter.

The user-space code remains proprietary, though, which could inhibit the
eventual merging of this code into the mainline kernel.

Update: here is NVIDIA’s
press release
on the new drivers.

[$] Changing filesystem resize patterns

Post Syndicated from original https://lwn.net/Articles/894629/

In a filesystem session at the
2022 Linux Storage,
Filesystem, Memory-management and BPF Summit
(LSFMM), Ted Ts’o brought
up the subject of filesystems that get resized frequently and whether the
default parameters for filesystem creation should change as a result. It
stems from a conversation that he had with XFS developer Darrick
Wong, who is experiencing some the same challenges as ext4 in this area.
He outlined the problem and how it comes about, then led the discussion on
ways to perhaps address it.

Running hybrid Active Directory service with AWS Managed Microsoft Active Directory

Post Syndicated from Lewis Tang original https://aws.amazon.com/blogs/architecture/running-hybrid-active-directory-service-with-aws-managed-microsoft-active-directory/

Enterprise customers often need to architect a hybrid Active Directory solution to support running applications in the existing on-premises corporate data centers and AWS cloud. There are many reasons for this, such as maintaining the integration with on-premises legacy applications, keeping the control of infrastructure resources, and meeting with specific industry compliance requirements.

To extend on-premises Active Directory environments to AWS, some customers choose to deploy Active Directory service on self-managed Amazon Elastic Compute Cloud (EC2) instances after setting up connectivity for both environments. This setup works fine, but it also presents management and operations challenges when it comes to EC2 instance operation management, Windows operating system, and Active Directory service patching and backup. This is where AWS Directory Service for Microsoft Active Directory (AWS Managed Microsoft AD) helps.

Benefits of using AWS Managed Microsoft AD

With AWS Managed Microsoft AD, you can launch an AWS-managed directory in the cloud, leveraging the scalability and high availability of an enterprise directory service while adding seamless integration into other AWS services.

In addition, you can still access AWS Managed Microsoft AD using existing administrative tools and techniques, such as delegating administrative permissions to select groups in your organization. The full list of permissions that can be delegated is described in the AWS Directory Service Administration Guide.

Active Directory service design consideration with a single AWS account

Single region

A single AWS account is where the journey begins: a simple use case might be when you need to deploy a new solution in the cloud from scratch (Figure 1).

A single AWS account and single-region model

Figure 1. A single AWS account and single-region model

In a single AWS account and single-region model, the on-premises Active Directory has “company.com” domain configured in the on-premises data center. AWS Managed Microsoft AD is set up across two availability zones in the AWS region for high availability. It has a single domain, “na.company.com”, configured. The on-premises Active Directory is configured to trust the AWS Managed Microsoft AD with network connectivity via AWS Direct Connect or VPN. Applications that are Active-Directory–aware and run on EC2 instances have joined na.company.com domain, as do the selected AWS managed services (for example, Amazon Relational Database Service for SQL server).

Multi-region

As your cloud footprint expands to more AWS regions, you have two options also to expand AWS Managed Microsoft AD, depending on which edition of AWS Managed Microsoft AD is used (Figure 2):

  1. With AWS Managed Microsoft AD Enterprise Edition, you can turn on the multi-region replication feature to configure automatically inter-regional networking connectivity, deploy domain controllers, and replicate all the Active Directory data across multiple regions. This ensures that Active-Directory–aware workloads residing in those regions can connect to and use AWS Managed Microsoft AD with low latency and high performance.
  2. With AWS Managed Microsoft AD Standard Edition, you will need to add a domain by creating independent AWS Managed Microsoft AD directories per-region. In Figure 2, “eu.company.com” domain is added, and AWS Transit Gateway routes traffic among Active-Directory–aware applications within two AWS regions. The on-premises Active Directory is configured to trust the AWS Managed Microsoft AD, either by Direct Connect or VPN.
A single AWS account and multi-region model

Figure 2. A single AWS account and multi-region model

Active Directory Service Design consideration with multiple AWS accounts

Large organizations use multiple AWS accounts for administrative delegation and billing purposes. This is commonly implemented through AWS Control Tower service or AWS Control Tower landing zone solution.

Single region

You can share a single AWS Managed Microsoft AD with multiple AWS accounts within one AWS region. This capability makes it simpler and more cost-effective to manage Active-Directory–aware workloads from a single directory across accounts and Amazon Virtual Private Cloud (VPC). This option also allows you seamlessly join your EC2 instances for Windows to AWS Managed Microsoft AD.

As a best practice, place AWS Managed Microsoft AD in a separate AWS account, with limited administrator access but sharing the service with other AWS accounts. After sharing the service and configuring routing, Active Directory aware applications, such as Microsoft SharePoint, can seamlessly join Active Directory Domain Services and maintain control of all administrative tasks. Find more details on sharing AWS Managed Microsoft AD in the Share your AWS Managed AD directory tutorial.

Multi-region

With multiple AWS Accounts and multiple–AWS-regions model, we recommend using AWS Managed Microsoft AD Enterprise Edition. In Figure 3, AWS Managed Microsoft AD Enterprise Edition supports automating multi-region replication in all AWS regions where AWS Managed Microsoft AD is available. In AWS Managed Microsoft AD multi-region replication, Active-Directory–aware applications use the local directory for high performance but remain multi-region for high resiliency.

Multiple AWS accounts and multi-region model

Figure 3. Multiple AWS accounts and multi-region model

Domain Name System resolution design

To enable Active-Directory–aware applications communicate between your on-premises data centers and the AWS cloud, a reliable solution for Domain Name System (DNS) resolution is needed. You can set the Amazon VPC Dynamic Host Configuration Protocol (DHCP) option sets to either AWS Managed Microsoft AD or on-premises Active Directory; then, assign it to each VPC in which the required Active-Directory–aware applications reside. The full list of options working with DHCP option sets is described in Amazon Virtual Private Cloud User Guide.

The benefit of configuring DHCP option sets is to allow any EC2 instances in that VPC to resolve their domain names by pointing to the specified domain and DNS servers. This prevents the need for manual configuration of DNS on EC2 instances. However, because DHCP option sets cannot be shared across AWS accounts, this requires a DHCP option sets also to be created in additional accounts.

DHCP option sets

Figure 4. DHCP option sets

An alternative option is creating an Amazon Route 53 Resolver. This allows customers to leverage Amazon-provided DNS and Route 53 Resolver endpoints to forward a DNS query to the on-premises Active Directory or AWS Managed Microsoft AD. This is ideal for multi-account setups and customers desiring hub/spoke DNS management.

This alternative solution replaces the need to create and manage EC2 instances running as DNS forwarders with a managed and scalable solution, as Route 53 Resolver forwarding rules can be shared with other AWS accounts. Figure 5 demonstrates a Route 53 resolver forwarding a DNS query to on-premises Active Directory.

Route 53 Resolver

Figure 5. Route 53 Resolver

Conclusion

In this post, we described the benefits of using AWS Managed Microsoft AD to integrate with on-premises Active Directory. We also discussed a range of design considerations to explore when architecting hybrid Active Directory service with AWS Managed Microsoft AD. Different design scenarios were reviewed, from a single AWS account and region, to multiple AWS accounts and multi-regions. We have also discussed choosing between the Amazon VPC DHCP option sets and Route 53 Resolver for DNS resolution.

Further reading

[$] Better tools for out-of-memory debugging

Post Syndicated from original https://lwn.net/Articles/894546/

Out-of-memory (OOM) situations are dreaded by users, system administrators,
and kernel developers alike. Usually, all that is known is that a lot of
memory is being used somewhere and the system has run out, but the kernel provides little help to
anybody trying to figure out where the memory has gone. In a memory-management
session at the 2022
Linux Storage, Filesystem, Memory-management and BPF Summit
(LSFMM),
Kent Overstreet asked what could be done to improve OOM reports and reduce
the pain for all involved.

Законът за колекторските фирми на Корнелия Нинова – полезен или буря в чаша вода?

Post Syndicated from VassilKendov original http://kendov.com/%D0%B7%D0%B0%D0%BA%D0%BE%D0%BD-%D0%B7%D0%B0-%D0%BA%D0%BE%D0%BB%D0%B5%D0%BA%D1%82%D0%BE%D1%80%D1%81%D0%BA%D0%B8%D1%82%D0%B5-%D1%84%D0%B8%D1%80%D0%BC%D0%B8/

В Обединеното кралство се води статистика и се следи строго, броят на новите закони да съвпада с броя на отпадналите такива.
У нас явно тенденцията е да се натрупват един върху друг и да създават противоречия.

Последният закон за колекторските фирми, лобиран от Корнелия Нинова, е точно такъв – излишен и отчитащ дейност. При наличие на ЧСИ и Публични изпълнители с много права по отношение на събирането на вземания, е напълно излишно да се регламентира дейността на нови структури, занимаващи се със същата дейност.

За срещи и консултации по банкови неволи, моля използвайте посочената форма.

[contact-form-7]

The post Законът за колекторските фирми на Корнелия Нинова – полезен или буря в чаша вода? appeared first on Kendov.com.

Orchestrate big data jobs on on-premises clusters with AWS Step Functions

Post Syndicated from Göksel SARIKAYA original https://aws.amazon.com/blogs/big-data/orchestrate-big-data-jobs-on-on-premises-clusters-with-aws-step-functions/

Customers with specific needs to run big data compute jobs on an on-premises infrastructure often require a scalable orchestration solution. For large-scale distributed compute clusters, the orchestration of jobs must be scalable to maximize their utilization, while at the same time remain resilient to any failures to prevent blocking the ever-growing influx of data and jobs. Moreover, on-premises compute resources can’t be extended on demand, therefore, the jobs may be competing for the same resources with different priorities.

This post showcases serverless building blocks for orchestrating big data jobs using AWS Step Functions, AWS Lambda, and Amazon DynamoDB with a focus on reliability, maintainability, and monitoring. In this solution, Step Functions enables thousands of workflows to run parallel. Additionally, Lambda provides flexibility implementing arbitrary interfaces to the on-premises infrastructure and its compute resources. With additional steps in the orchestration, the solution also allows operations to monitor thousands of parallel jobs in a visual interface for better debugging.

Architecture

The proposed serverless solution consists of the following main components:

  • Job trigger – Requests new compute jobs to run on the on-premises cluster. For simplicity, in this architecture we assume that the trigger is a client calling Step Functions directly. However, you could extend this to include Amazon API Gateway to create a job API to interface with the orchestration solution or a rule engine to trigger jobs when relevant data becomes available.
  • Job manager – This Step Functions workflow runs once per compute job, with multiple workflows running in parallel. It tracks the status of a job from queueing, scheduling, running, retrying, all the way to its completion. Ideally, a job can be scheduled immediately, but workflows can run for days if a job is very low priority and compute resources are sparse. The job manager delegates the decision when or where to run the job to the job queue manager. Communication to the on-premises cluster is abstracted through a Lambda adapter.
  • Job queue manager – Maintains a queue of all jobs. With the given job properties (for example based on priority), the job queue manager decides the running time of jobs, and the cluster on which they run. To illustrate the concept, the architecture considers real-time information on the resource utilization of the compute clusters (memory, CPU) for scheduling. However, you could apply different scheduling algorithms as required given the flexibility of Lambda.
  • On-premises compute cluster – Provides the computing resources, data nodes, and tools to run compute jobs.

The following diagram illustrates the solution architecture.

Solution Architecture

The main process of the solution consists of seven steps:

  1. The job trigger runs a new Step Functions workflow to run a compute job on premises and provides the necessary information (such as priority and required resources).
  2. The job manager creates a new record in DynamoDB to add the job to the queue of the job queue manager, and the workflow waits for the job queue manager to call back.
  3. Amazon EventBridge triggers a scheduled Lambda function in the job queue manager periodically (for example, every 5 minutes), decoupled from the job requests.
  4. The job scheduler Lambda function retrieves real-time information from cluster metrics to see whether jobs can be scheduled at this point in time.
  5. The job scheduler function fetches all queued jobs from DynamoDB and tries to schedule as many of those jobs as possible to available compute resources based on priority, as well as memory and CPU demands.
  6. For each job that can be scheduled to the compute cluster, the job scheduler function communicates back to the job manager to signal the workflow to continue and that the job can be run.
  7. The job manager communicates with the on-premises cluster through the compute cluster adapter Lambda function to run the job, track its status periodically, and retry in case of errors.

On-premises compute cluster

In this post, we assume the on-premises compute cluster offers interfaces to interact with the compute resources. For example, customers could run a Spark compute cluster on premises that allows the following basic interactions through an API:

  • Upload and trigger a compute job on a cluster (for example, upload a Spark JAR file and submit)
  • Get the status of a compute job (such as running, stopped, or error)
  • Get error output in case of failures in the compute job (for example, the job failed due to access denied)

In addition, we assume the cluster can provide metrics on its current utilization. For example, the cluster could provide Prometheus metrics as aggregates over all resources within a compute cluster:

  • Memory utilization (for example, 2 TB with 80% utilization)
  • CPU utilization (for example, 5,000 cores with 50% utilization)

We use the terminology introduced here for the example in this post. Depending on the capabilities of the on-premises cluster, you can adjust these concepts. For example, the compute cluster could use Kubernetes or SLURM instead of Spark.

Job manager

The job manager is responsible for communicating with on-premises clusters to trigger big data jobs and query their status. It’s a Step Functions state machine that consists of three steps, as illustrated in the following figure.

The first step is JobQueueRequest, which makes a request to the job queue manager component and waits for the callback. When the job queue manager sends OK to the waiting step with a callback pattern, the second step StartJobRun runs.

The StartJobRun step communicates with the on-premises environment (for example, via HTTP post to a REST API endpoint) to trigger an on-premises job.

The third step GetJobStatus queries the job status from the on-premises cluster. If the job status is InProgress, the state machine waits for a configured time. When the Wait state is over, it returns to the GetJobStatus step to query the job status again in a loop. When the job returns a successful state from the on-premises cluster, the state machine completes its cycle with a Success state. If the job fails with a timeout or with an error, the state machine completes its cycle with a Fail state.

The following screenshot shows the details of the state machine on the Step Functions console.

Jpob Manager Step Function Inputs

Job queue manager

The job queue manager is responsible for managing job queues based on job priorities and cluster utilization. It consists of DynamoDB, Lambda, and EventBridge.

The JobQueue table keeps data of waiting jobs, including jobId as the primary key, priority as the sort key, needed memory and CPU consumptions, callbackId, and timestamp information. You can add further information to the table dynamically if required by the scheduling algorithm.

The following screenshot shows the attribute details of the JobQueue table.

EventBridge triggers the job scheduler Lambda function on a regular bases in a configured interval. First, the job scheduler function gets waiting jobs data from the JobQueue table in DynamoDB. Then it establishes a connection with the on-premises cluster to fetch cluster metrics such as memory and CPU utilization. Based on this information, the function decides which jobs are ready to be triggered on the on-premises cluster.

The scheduling algorithm proposed here follows a simple concept to maximize resource utilization, while respecting the job priority. Essentially, for an on-premises cluster (we could potentially have multiple in different geographies), the job scheduler Lambda function builds a queue of jobs according to their priority, while allocating the first job in the queue to compute resources on the cluster. If enough resources are available, the scheduler moves to the next job in the queue and repeats.

Due to the flexibility of Lambda functions, you can tailor the scheduling algorithm for a specific use case. Cluster scheduling algorithms are still an open research topic with different optimization goals, such as throughput, data location, fairness, deadlines, and more.

Get started

In this section, we provide a starting point for the solution described in this post. The steps walk you through creating a Step Functions state machine with the appropriate template, and the necessary Lambda and DynamoDB interactions to create the job manager and job queue manager building blocks. Example code for the Lambda functions is excluded from this post, because the communication with the on-premises cluster to trigger jobs can vary depending on your on-premises interface.

  1. On the Step Functions console, choose State machines.
  2. Choose Create state machine.
  3. Select Run a sample project.
  4. Select Job Poller.
    Job Poller State Machine Template
  5. Scroll down to see the sample projects, which are defined using Amazon States Language (ASL).
  6. Review the example definition, then choose Next.Job Manager Step Functions Template
  7. Choose Deploy resources.
    Deployment can take up to 10 minutes.Step Functions Deploy Resources
    The deployment creates the state machine that is responsible for job management. After you deploy the resources, you need to edit the sample ASL code to add the extra JobQueueRequest step in the state machine.
  8. Select the created state machine.
  9. Choose Edit to add ARNs of the three Lambda functions to make a request in the job queue manager (Job Queue Request), to submit a job to the on-premises cluster (Submit Job), and to poll the status of the jobs (Get Job Status).Job Manager Step Functions Definition
    Now you’re ready to create the job queue manager.
  10. On the DynamoDB console, create a table for storing job metadata.
  11. On the EventBridge console, create a scheduled rule that triggers the Lambda function at a configured interval.
  12. On the Lambda console, create the function that communicates with the on-premises cluster to fetch cluster metrics. It also gets jobs from the DynamoDB table to retrieve information including job priorities, required memory, and CPU to run the job on the on-premises cluster.

Limitations

This solution uses Step Functions to track all jobs until completion, and therefore the Step Functions quotas must be considered for potential use cases. Mainly, a workflow can run for a maximum of 1 year (cannot be increased) and by default 1 million parallel runs can run in a single account (can be increased to millions). See Quotas for further details.

Conclusion

This post described how to orchestrate big data jobs running in parallel on on-premises clusters with a Step Functions workflow. To learn more about how to use Step Functions workflows for serverless orchestration, visit Serverless Land.


About the Authors

Göksel Sarikaya is a Senior Cloud Application Architect at AWS Professional Services. He enables customers to design scalable, high-performance, and cost effective applications using the AWS Cloud. He helps them to be more flexible and competitive during their digital transformation journey.

Nicolas Jacob Baer is a Senior Cloud Application Architect with a strong focus on data engineering and machine learning, based in Switzerland. He works closely with enterprise customers to design data platforms and build advanced analytics/ml use-cases.

Shukhrat Khodjaev is a Senior Engagement Manager at AWS ProServe, based out of Berlin. He focuses on delivering engagements in the field of Big Data and AI/ML that enable AWS customers to uncover and to maximize their value through efficient use of data.

Announcing Developer Quick Starts: Open-source Code You Can Build On

Post Syndicated from Greg Hamer original https://www.backblaze.com/blog/announcing-developer-quick-starts-access-open-source-code-you-can-build-on/

Developing finished applications always requires coding custom functionality, but, as a developer, isn’t it great when you have pre-built, working code you can use as scaffolding for your applications? That way, you can get right to the custom components.

To help you finish building applications faster, we are launching our Developer Quick Start series. This series provides developers with free, open-source code available for download from GitHub. We also built pre-staged buckets with a browsable media application and sample data. For read-only API calls against those buckets, we are sharing API key pairs for programmatic access to these pre-staged buckets. That means you can download the code, run it, and see the results, all without even having to create a Backblaze account!

Today, we’re debuting the first Quick Start in the series—using Python with the Backblaze S3 Compatible API. Read on to get access to all of the resources, including the code on GitHub, sample data to run it against, a video walkthrough, and guided instructions.

Announcing Our Developer Quick Start for Using Python With the Backblaze S3 Compatible API

All of the resources you need to use Python with the Backblaze S3 Compatible API are linked below:

  1. Sample Application: Get our open-source code on GitHub here.
  2. Hosted Sample Data: Experiment with a media application with Application Keys shared for read-only access here.
  3. Video Code Walk-throughs of Sample Application: Share and rewatch walk-throughs on demand here.
  4. Guided Instructions: Get instructions that guide you through downloading the sample code, running it yourself, and then using the code as you see fit, including incorporating it into your own applications here.

Depending on your skill level, the open-source code may be all that you need. If you’re new to the cloud, or just want a deeper, guided walk-through on the source code, check out the written code walk-throughs and video-guided code walk-throughs, too. Whatever works best for you, please feel free to mix and match as you see fit.

Click to enlarge.

The Quick Start walks you through how to perform create and delete API operations inside your own account, all of which can be completed using Backblaze B2 Cloud Storage—and the first 10GB of storage per month are on us.

With the Quick Start code we are sharing, you can get basic functionality working and interacting with B2 Cloud Storage in minutes.

Share the Love

Know someone who might be interested in leveraging the power and ease of cloud storage? Feel free to share these resources at will. Also, we welcome your participation in the projects on GitHub via pull requests. If you are satisfied, feel free to star the project on GitHub or like the videos on YouTube.

Finally, please explore our other Backblaze B2 Sample Code Repositories up on GitHub.

Stay Tuned for More

The initial launch of the Developer Quick Start series logic is available in Python. We will be rolling out Developer Quick Starts for other languages in the months ahead.

Which programming languages (or scripting environments) are of most interest for you? Please let us know in the comments down below. We are continually adding more working examples in GitHub projects, both in Python and in additional languages. Your feedback in the comments below can help guide what gets priority.

We look forward to hearing from you about how these Developer Quick Starts work for you!

The post Announcing Developer Quick Starts: Open-source Code You Can Build On appeared first on Backblaze Blog | Cloud Storage & Cloud Backup.

Amazon EC2 Now Supports NitroTPM and UEFI Secure Boot

Post Syndicated from Sébastien Stormacq original https://aws.amazon.com/blogs/aws/amazon-ec2-now-supports-nitrotpm-and-uefi-secure-boot/

In computing, Trusted Platform Module (TPM) technology is designed to provide hardware-based, security-related functions. A TPM chip is a secure crypto-processor that is designed to carry out cryptographic operations. There are three key advantages of using TPM technology. First, you can generate, store, and control access to encryption keys outside of the operating system. Second, you can use a TPM module to perform platform device authentication by using the TPM’s unique RSA key, which is burned into it. And third, it may help to ensure platform integrity by taking and storing security measurements.

During re:Invent 2021, we announced the future availability of NitroTPM, a virtual TPM 2.0-compliant TPM module for your Amazon Elastic Compute Cloud (Amazon EC2) instances, based on AWS Nitro System. We also announced Unified Extensible Firmware Interface (UEFI) Secure Boot availability for EC2.

I am happy to announce you can start to use both NitroTPM and Secure Boot today in all AWS Regions outside of China, including the AWS GovCloud (US) Regions.

You can use NitroTPM to store secrets, such as disk encryption keys or SSH keys, outside of the EC2 instance memory, protecting them from applications running on the instance. NitroTPM leverages the isolation and security properties of the Nitro System to ensure only the instance can access these secrets. It provides the same functions as a physical or discrete TPM. NitroTPM follows the ISO TPM 2.0 specification, allowing you to migrate existing on-premises workloads that leverage TPMs to EC2.

The availability of NitroTPM unlocks a couple of use cases to strengthen the security posture of your EC2 instances, such as secured key storage and access for OS-level volume encryption or platform attestation for measured boot or identity access.

Secured Key Storage and Access
NitroTPM can create and store keys that are wrapped and tied to certain platform measurements (known as Platform Configuration Registers – PCR). NitroTPM unwraps the key only when those platform measurements have the same value as they had at the moment the key was created. This process is referred to as “sealing the key to the TPM.” Decrypting the key is called unsealing. NitroTPM only unseals keys when the instance and the OS are in a known good state. Operating systems compliant with TPM 2.0 specifications use this mechanism to securely unseal volume encryption keys. You can use NitroTPM to store encryption keys for BitLocker on Microsoft Windows. Linux Unified Key Setup (LUKS) or dm-verity on Linux are examples of OS-level applications that can leverage NitroTPM too.

Platform Attestation
Another key feature that NitroTPM provides is “measured boot” a process where the bootloader and operating system extend PCRs with measurements of the software or configuration that they load during the boot process. This improves security in the event that, for example, a malicious program overwrites part of your kernel with malware. With measured boot, you can also obtain signed PCR values from the TPM and use them to prove to remote servers that the boot state is valid, enabling remote attestation support.

How to Use NitroTPM
There are three prerequisites to start using NitroTPM:

  • You must use an operating system that has Command Response Buffer (CRB) drivers for TPM 2.0, such as recent versions of Windows or Linux. We tested the following OSes: Red Hat Enterprise Linux 8, SUSE Linux Enterprise Server 15, Ubuntu 18.04, Ubuntu 20.04, and Windows Server 2016, 2019, and 2022.
  • You must deploy it on a Nitro-based EC2 instance. At the moment, we support all Intel and AMD instance types that support UEFI boot mode. Graviton1, Graviton2, Xen-based, Mac, and bare-metal instances are not supported.
  • Note that NitroTPM does not work today with some additional instance types, but support for these instance types will come soon after the launch. The list is: C6a, C6i, G4ad, G4dn, G5, Hpc6a, I4i, M6a, M6i, P3dn, R6i, T3, T3a, U-12tb1, U-3tb1, U-6tb1, U-9tb1, X2idn, X2iedn, and X2iezn.
  • When you create your own AMI, it must be flagged to use UEFI as boot mode and NitroTPM. Windows AMIs provided by AWS are flagged by default. Linux-based AMI are not flagged by default; you must create your own.

How to Create an AMI with TPM Enabled
AWS provides AMIs for multiple versions of Windows with TPM enabled. I can verify if an AMI supports NitroTPM using the DescribeImagesAPI call. For example:

aws ec2 describe-images --image-ids ami-0123456789

When NitroTPM is enabled for the AMI, “TpmSupport”: “v2.0” appears in the output, such as in the following example.

{
   "Images": [
      {
         ...
         "BootMode": "uefi",
         "TpmSupport": "v2.0"
      }
   ]
}

I may also query for tpmSupport using the DescribeImageAttribute API call.

When creating my own AMI, I may enable TPM support using the RegisterImage API call, by setting boot-mode to uefi and tpm-support to v2.0.

aws ec2 register-image             \
       --region us-east-1           \
       --name my-image              \
       --boot-mode uefi             \
       --architecture x86_64        \
       --root-device-name /dev/xvda \
       --block-device-mappings DeviceName=/dev/xvda,Ebs={SnapshotId=snap-0123456789example} DeviceName=/dev/xvdf,Ebs={VolumeSize=10} \
       --tpm-support v2.0

Now that you know how to create an AMI with TPM enabled, let’s create a Windows instance and configure BitLocker to encrypt the root volume.

A Walk Through: Using NitroTPM with BitLocker
BitLocker automatically detects and uses NitroTPM when available. There is no extra configuration step beyond what you do today to install and configure BitLocker. Upon installation, BitLocker recognizes the TPM module and starts to use it automatically.

Let’s go through the installation steps. I start the instance as usual, using an AMI that has both uefi and TPM v2.0 enabled. I make sure I use a supported version of Windows. Here I am using Windows Server 2022 04.13.

Once connected to the instance, I verify that Windows recognizes the TPM module. To do so, I launch the tpm.msc application, and the Trusted Platform Module (TPM) Management window opens. When everything goes well, it shows Manufacturer Name: AMZN under TPM Manufacturer Information.

Trusted Platform Module ManagementNext, I install BitLocker.

I open the servermanager.exe application and select Manage at the top right of the screen. In the dropdown menu, I select Add Roles and Features.

Add roles and featuresI select Role-based or feature-based installation from the wizard.

Install BitLocker - Step 1I select Next multiple times until I reach the Features section. I select BitLocker Drive Encryption, and I select Install.

Install BitLocker - Step 2I wait a bit for the installation and then restart the server at the end of the installation.

After reboot, I reconnect to the server and open the control panel. I select BitLocker Drive Encryption under the System and Security section.

Turn on Bitlocker - part 1I select Turn on BitLocker, and then I select Next and wait for the verification of the system and the time it takes to encrypt my volume’s data.

Just for extra safety, I decide to reboot at the end of the encryption. It is not strictly necessary. But I encrypted the root volume of the machine (C:) so I am wondering if the machine can still boot.

After the reboot, I reconnect to the instance, and I verify the encryption status.

Turn on Bitlocker - part 2I also verify BitLocker’s status and key protection method enabled on the volume. To do so, I open PowerShell and type

manage-bde -protectors -get C:

Bitlocker statusI can see on the resulting screen that the C: volume encryption key is coming from the NitroTPM module and the instance used Secure Boot for integrity validation. I can also view the recovery key.

I left the recovery key in plain text in the previous screenshot because the instance and volume I used for this demo will not exist anymore by the time you will read this. Do not share your recovery keys publicly otherwise.

Important Considerations
Now that I have shown how to use NitroTPM to protect BitLocker’s volume encryption key, I’ll go through a couple of additional considerations:

  • You can only enable an AMI for NitroTPM support by using the RegisterImage API via the AWS CLI and not via the Amazon EC2 console.
  • NitroTPM support is enabled by setting a flag on an AMI. After you launch an instance with the AMI, you can’t modify the attributes on the instance. The ModifyInstanceAttribute API is not supported on running or stopped instances.
  • Importing or exporting EC2 instances with NitroTPM, such as with the ImportImage API, will omit NitroTPM data.
  • The NitroTPM state is not included in EBS snapshots. You can only restore an EBS snapshot to the same EC2 instance.
  • BitLocker volumes that are encrypted with TPM-based keys cannot be restored on a different instance. It is possible to change the instance type (stop, change instance type, and restart it).

At the moment, we support all Intel and AMD instance types that supports UEFI boot mode. Graviton1, Graviton2, Xen-based, Mac, and bare-metal instances are not supported. Some additional instance types are not supported at launch (I shared the exact list previously). We will add support for these soon after launch.

There is no additional cost for using NitroTPM. It is available today in all AWS Regions, including the AWS GovCloud (US) Regions, except in China.

And now, go build 😉

— seb

[Security Nation] Jim O’Gorman and g0tmi1k on Kali Linux

Post Syndicated from Rapid7 original https://blog.rapid7.com/2022/05/11/security-nation-jim-ogorman-and-g0tmi1k-on-kali-linux/

[Security Nation] Jim O’Gorman and g0tmi1k on Kali Linux

In this episode of Security Nation, Jen and Tod sit down with Jim O’Gorman and Ben “g0tmi1k” Wilson of Offensive Security to chat about Kali Linux. They walk our hosts through the vision behind Kali and how they understand the uses, advantages, and challenges of open-source security tools.

Stick around for our Rapid Rundown, where producer Jesse joins Tod to talk about an upcoming change in security protocols across the internet that might make passwords obsolete (eventually).

Jim O’Gorman

[Security Nation] Jim O’Gorman and g0tmi1k on Kali Linux

Jim O’Gorman (Elwood) began his tech career as a network administrator with a particular talent for network intrusion simulation, digital investigations, and malware analysis. Jim started teaching for OffSec in 2009 as an instructor for the Penetration Testing with Kali (PWK) course — a role he still enjoys. He went on to co-author Metasploit: The Penetration Tester’s Guide and Kali Linux: Revealed, and has developed and curated a number of OffSec courses. As the Chief Content and Strategy officer, he currently oversees the open source Kali Linux development project and participates with OffSec’s Penetration Testing Team.

Ben “g0tmi1k” Wilson

[Security Nation] Jim O’Gorman and g0tmi1k on Kali Linux

Ben “g0tmi1k” Wilson has been in the information security world for nearly two decades. Since joining Offensive Security nine years ago, he has applied his experience in a number of roles including live instructor, content developer, and security administrator. He is currently managing the day-to-day activity as well as developing Kali Linux, pushing it forward. He has worked on various vulnerabilities, which are published on Exploit-DB that he also works on. Furthermore he created and still runs VulnHub, allowing for hands-on experience.

Show notes

Interview links

Rapid Rundown links

Like the show? Want to keep Jen and Tod in the podcasting business? Feel free to rate and review with your favorite podcast purveyor, like Apple Podcasts.

Want More Inspiring Stories From the Security Community?

Subscribe to Security Nation Today

More episodes:

The collective thoughts of the interwebz