Post Syndicated from The Atlantic original https://www.youtube.com/shorts/674xQ_hmkCs
Isolate email reputation in Amazon SES Mail Manager with tenant management
Post Syndicated from Abilashkumar P C original https://aws.amazon.com/blogs/messaging-and-targeting/isolate-email-reputation-in-amazon-ses-mail-manager-with-tenant-management/
When AnyCompany’s new IT outsource team misconfigured the email settings on 200 of the company’s multifunction printer/scanners, it had two bad outcomes. First, nobody received their scanned documents in their inboxes. Somewhat predictably, many users rescanned the same documents multiple times before creating support tickets. Second, the misconfiguration along with the multiple failed attempts resulted in a “bounce storm” that was quickly reported by a major email service provider, but unfortunately ignored by the IT team.
Within 48 hours, the bounce rate crossed the provider’s threshold. The company’s entire Amazon Simple Email Service (Amazon SES) account lost its sending reputation. Password resets, order confirmations, and service notifications from every business unit on the account started landing in spam or failing to deliver. The damage spread because every sender on the account, from the mission-critical billing system to the misconfigured printers, shared the same reputation score.
This is a preventable problem. With Amazon SES tenant management you can isolate email reputation per tenant inside a single account so one misbehaving sender cannot affect the rest. If you use Amazon SES Mail Manager for Simple Mail Transfer Protocol (SMTP) filtering, routing, archiving, or relay, you can activate tenant isolation. To do so, tag each message with the X-SES-TENANT header in your Mail Manager rule set. In this post, you will compare five architectural patterns for applying the X-SES-TENANT header, from static per-tenant endpoints to AWS Lambda driven runtime resolution.
This post complements Isolate email suppression per tenant with Amazon SES. That post explains how tenant-level suppression lists prevent cross-tenant bounce and complaint contamination, which is the “what happens after the message is tagged” story. This post focuses on the upstream problem: how to get the X-SES-TENANT tag onto messages when your senders are legacy appliances, printers, or applications that can’t set custom MIME headers. Together, the two posts cover the full tenant isolation pipeline, from tagging through delivery and suppression.
This post provides architectural guidance. For step-by-step implementation, refer to the Amazon SES documentation.
How SES tenant isolation works
Amazon SES tenant management isolates reputation per tenant inside a single Amazon SES account. Each tenant acts as a container organized around sending identities, configuration sets, and the resulting reputation metrics. Amazon SES attributes bounces, complaints, and Trust and Safety signals to the tenant, not the account, so a deliverability issue in one tenant doesn’t affect the others.
A critical benefit of tenant isolation: when one tenant’s reputation degrades beyond a threshold, Amazon SES can pause sending for that tenant only. Other tenants continue delivering normally. Without tenant isolation, a reputation issue affects the entire account. This pause-and-contain mechanism is one of the strongest reasons to adopt tenant management, especially for accounts with diverse sender types.
You associate a message with a tenant by passing the TenantName parameter on the Amazon SES API v2 SendEmail operation, or by adding an X-SES-TENANT Multipurpose Internet Mail Extensions (MIME) header to an SMTP message. For a detailed walkthrough of tenant management concepts, including identity ownership, the ses:TenantName AWS Identity and Access Management (IAM) condition key, and tenant-level suppression lists, see Improve email deliverability with tenant management in Amazon SES.
How Mail Manager works
Mail Manager processes inbound and outbound SMTP traffic through a pipeline of three components:
- Ingress endpoint: an authenticated SMTP endpoint that accepts connections from your senders. Mail Manager ingress endpoints handle SMTP only, not the Amazon SES API.
- Traffic policy: filters connections based on sender attributes (IP, TLS version, authentication) before messages reach rule processing.
- Rule set: an ordered list of rules. Each rule has conditions (match on envelope sender, recipient, source IP, or header values) and actions (Add header, Write to S3, Invoke Lambda, Send to internet, SMTP relay, Drop).
The “Add header” rule action is what makes tenant isolation possible for legacy senders: it injects the X-SES-TENANT SMTP header before the “Send to internet” action hands the message to Amazon SES for delivery.
With the “Add header” rule action inserted before the “Send to internet” action in the same rule, Mail Manager effectively tags the message with the SMTP header that defines the tenant. When Amazon SES processes the send, it reads the X-SES-TENANT header and attributes the message to the corresponding tenant.
Amazon SES performs tenant attribution only during send processing. A Send to internet action, or a Lambda function that calls SendEmail with the TenantName parameter or X-SES-TENANT header, activates tenant management. An SMTP relay action forwards to a third-party SMTP server (Google Workspace, Microsoft 365, or on-premises mail), so Amazon SES doesn’t process the send and tenant attribution doesn’t apply. Write to S3 and Drop don’t hand messages to Amazon SES, so they don’t activate tenant management either. This post describes flows that include a Send to internet action or a Lambda function calling SendEmail.
Understanding the outbound email flow
An outbound message flows from the SMTP client to the Mail Manager ingress endpoint, passes through the traffic policy and rule set, then routes through Amazon SES to the internet.

Figure 1: Outbound email flow from an SMTP client through Mail Manager to Amazon SES
Compare the patterns
Before diving into each pattern, use this table to identify which one fits your workload. You can then read only the pattern section that applies, or read all five for the full picture.
| Consideration | Pattern 1 | Pattern 2 | Pattern 3 | Pattern 4 | Pattern 5 |
| Works for legacy and appliance senders | — | Yes | Yes | Yes | Yes |
| Retrieve tenant from static value | Yes | Yes | Yes | Yes | Yes |
| Retrieve tenant from source IP or sender condition | — | Yes | Yes | Yes | Yes |
| Retrieve tenant from runtime lookup or body inspection | — | — | — | Yes | Yes |
| Records Send in Mail Manager log | Yes | Yes | Yes | — | — |
| Tenants per Region | Up to 10,000 | ~50 | 400 (per-tenant Send) or 1,560 (chained) | Up to 10,000 | Up to 10,000 |
One difference cuts across the patterns: where the tenant mapping lives determines what it takes to change it. Patterns 2 and 3 hold the mapping in rule-set configuration, so adding or removing a tenant is a rule-set edit and deployment (a control-plane change, not a data change). Patterns 4 and 5 resolve the tenant from a runtime source such as a database, so onboarding or offboarding a tenant is a data update that takes effect without a deployment. In Pattern 1, the sender supplies the tenant, so there’s no mapping to maintain in Mail Manager at all.
Pattern 1: The SMTP sender sets the header before Mail Manager

Figure 2: Pattern 1, where the SMTP sender sets the tenant header before Mail Manager
If the SMTP sender (a backend service, internal tool, or any application that can add a custom MIME header) sets X-SES-TENANT on the message before connecting to the Mail Manager ingress endpoint, the message arrives pre-tagged. The rule set only needs a Send to internet action.
Pattern 1 fits customers who already use Mail Manager for filtering, archiving, or compliance and whose sending applications can add one header at send time. You keep Mail Manager gateway capabilities without adding Add header or conditional logic to the rule set.
Pattern 2: Mail Manager adds a static header with Add header

Figure 3: Pattern 2, where a Mail Manager rule adds a static tenant header
A rule with Add header followed by Send to internet attaches a fixed tenant value to each message. This pattern fits a one-tenant-per-endpoint model: provision one authenticated ingress endpoint per tenant, give each tenant its own SMTP credentials, and attach a rule set that injects the tenant value.
For example, an enterprise provisions one endpoint for facilities-printer notifications and a second for corporate alerts. The Send to internet action’s IAM role grants permission only to that tenant’s Amazon SES identities, preventing a misrouted client from sending as another tenant.
You can group tenants behind one endpoint when they share a sending configuration. The header value and IAM scope live in the rule-set configuration, and no code runs at send time.
Pattern 3: Mail Manager derives the header from rule conditions
If multiple tenants share an endpoint but have stable distinguishing attributes (like source IP), one rule set handles each of them. Rule conditions match on envelope properties, and matching rules run an Add header action that sets X-SES-TENANT to the correct value.

Figure 4: Pattern 3, where Mail Manager derives the tenant header from rule conditions
Mail Manager rule sets allow 40 rules with up to 10 conditions and 10 actions per rule, but caps Send to internet and SMTP relay actions at 10 per rule set (counting every occurrence). One Send to internet per tenant rule tops out at 10 tenants.
To support more tenants, separate header-setting from delivery:
- Rules 1 to 39: Each matches a distinguishing condition and runs a single Add header action.
- Rule 40: A catch-all with no conditions and a single Send to internet action.
Each message matches at most one header-setting rule, picks up its tenant header, and passes through the catch-all. The effective ceiling is now 39 tenants per rule set with one Send to internet action and one IAM role.
Scale limits of Pattern 3
Pattern 3’s ceiling depends on how you structure the rule set. Two cases:
Case A: Chained structure (39 Add header rules + 1 Send to internet rule): Each rule set uses one Send to internet action, so the 10-action cap isn’t binding. Capacity is 39 tenants per rule set × 40 rule sets per Region = 1,560 tenants per Region.
Case B: Per-tenant Send to internet (each tenant rule has its own Send action): The 10-action cap binds at 10 tenants per rule set. Capacity is 10 tenants per rule set × 40 rule sets per Region = 400 tenants per Region.
The two cases trade off scale against IAM scoping. Case A shares one IAM role across all tenants in the rule set. Case B gives each tenant its own IAM role at the cost of 4× fewer tenants.
Amazon SES supports up to 10,000 tenants per account (adjustable). Workloads that exceed a few hundred tenants, or need runtime tenant changes, can use Pattern 4 or Pattern 5.
Pattern 4: Mail Manager calls Lambda for runtime tenant resolution
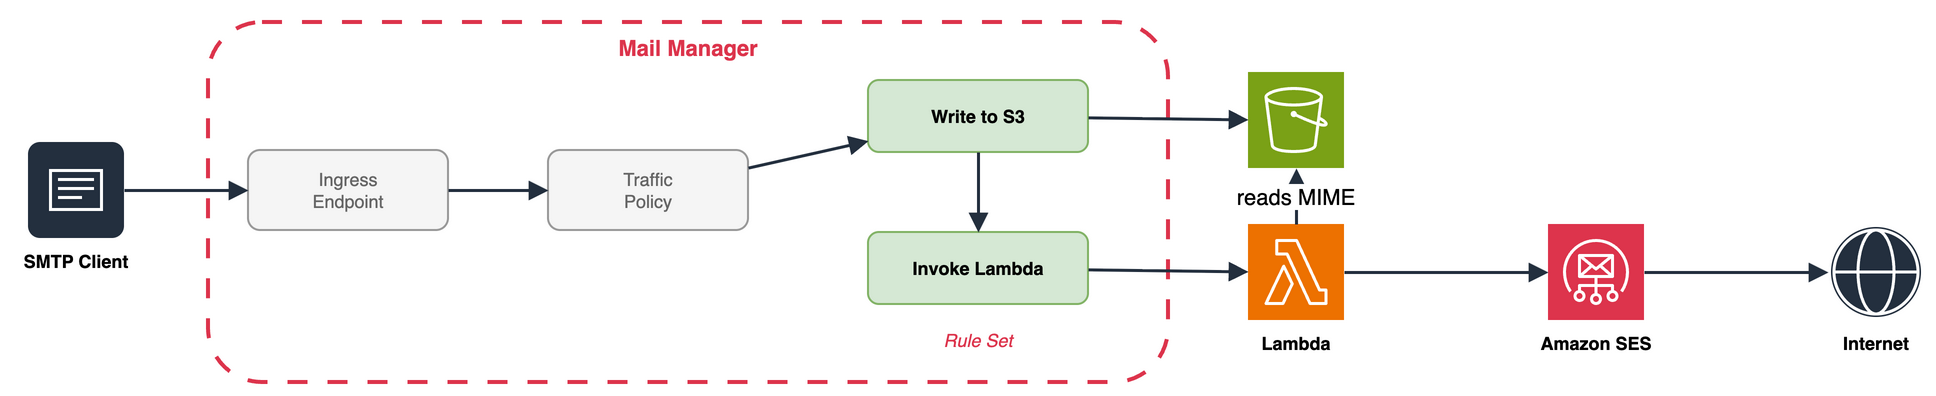
Figure 5: Pattern 4, where Mail Manager invokes a Lambda function for runtime tenant resolution
Some tenant values require runtime logic, such as a database lookup on the sender IP, an external policy service, or content inspection. For these cases, the Mail Manager Invoke Lambda action runs a Lambda function inside the rule chain.
The Lambda event carries only metadata (headers, envelope sender, recipients, verdicts), not the MIME body. The function also can’t modify the message for downstream actions. Lambda must therefore handle delivery.
The rule writes the raw MIME to Amazon S3 with Write to S3, then invokes the Lambda function with the message ID. The function fetches the object and determines the tenant through the runtime logic your workload requires. That logic might be a database lookup (for example, an Amazon DynamoDB query), a call to an external policy service, or inspection of the message body. It then calls the Amazon SES API v2 SendEmail operation, passing the resolved tenant in the TenantName parameter. Delivery permissions live on the function’s execution role, which carries the ses:TenantName condition key.
The Lambda function is yours to build and maintain. This gives you full control over the tenant resolution logic and everything downstream (retries, dead-letter queues, observability), but it also means you own the operational overhead: code updates, monitoring, and cost management.
Mail Manager can invoke the function synchronously or asynchronously. Synchronous invocation (REQUEST_RESPONSE) keeps Lambda in Mail Manager’s critical path: Mail Manager waits up to 30 seconds for the function to return, and retries on failure. Asynchronous invocation (EVENT) hands control to Lambda instead, so Mail Manager invokes the function and moves on. There are no additional Mail Manager charges for the Lambda invocation beyond standard Lambda pricing.
Pattern 5: Mail Manager stages to Amazon S3, Lambda delivers asynchronously

Figure 6: Pattern 5, where an Amazon S3 event triggers a Lambda function that delivers the message
In Pattern 4, Mail Manager invokes the function directly through the Invoke Lambda rule action. Pattern 5 removes that direct invocation: the Mail Manager rule ends at Write to S3, and an Amazon S3 event notification triggers the Lambda function instead. Mail Manager’s work finishes at the write, and delivery becomes fully event-driven.
The rule set has two actions: write the raw MIME to Amazon S3, followed by an explicit Drop action. The Drop action prevents accidental duplicate delivery if a Send to internet action is inadvertently added to the rule later. The Lambda function handles delivery through the Amazon SES API, so Mail Manager’s job ends at writing the MIME to Amazon S3. The Amazon S3 event routes to the function directly or through Amazon Simple Queue Service (Amazon SQS) or Amazon EventBridge for fan-out and back-pressure.
The function reads the object, performs the tenant lookup, and calls SendEmail with the TenantName parameter. The Mail Manager critical path is minimal, and Lambda retries use the Lambda retry model with dead-letter queue support. The same Amazon S3 object fans out to multiple consumers (delivery, analytics) without changing the Mail Manager rule.
The Lambda function is yours to build and maintain. The upside is full control over the function and everything after it: tenant resolution logic, retries, dead-letter queues, and observability. The tradeoff is cost and upkeep, since you own code updates, monitoring, and operational overhead.
The other tradeoff is less visibility. After Write to S3, the Mail Manager log no longer records the delivery outcome.
Secure tenant attribution with IAM
Regardless of which pattern sets the X-SES-TENANT header, the Send to internet action’s IAM role should enforce tenant boundaries. Scope the IAM role with a Condition element that includes the ses:TenantName condition key.
Example IAM policy:
This policy allows the role to send email only when the message is attributed to the facilities-printers tenant. Messages tagged with any other tenant value, or messages with no tenant header, are denied.
In Pattern 1, the sender sets the header, the IAM role on the Send to internet action validates that the claimed tenant matches the role’s permissions. In Pattern 2, the Add header action sets a fixed value, and the IAM role confirms the header matches the expected tenant for that endpoint. In Pattern 3 with a chained structure, a single Send to internet action services all tenants. Scope its role to the set of valid tenant names so untagged messages (those matching no Add header rule) fail authorization. For Patterns 4 and 5, the Lambda function’s execution role carries the ses:TenantName condition key, providing the same enforcement at the API call level.
Paused tenants
Each of the five patterns handles paused tenants the same way. When Amazon SES pauses a tenant (through a reputation policy or manually), sends for that tenant fail with a rejection error. Other tenants keep delivering. The failure surfaces depending on the pattern:
- Patterns 1 to 3: Mail Manager records the rejection in the rule set log.
- Patterns 4 and 5: The rejection surfaces in the Lambda function’s Amazon CloudWatch Logs.
- Patterns 1 to 5: Amazon SES publishes tenant status changes to Amazon EventBridge (such as Sending Status Disabled).
Mail Manager won’t re-route or retry a paused tenant send. Graceful handling (queueing, failover, notification) belongs in the Lambda function in Patterns 4 and 5.
Observability
Observability for these patterns draws on three sources, each answering a different question:
Mail Manager vended log: which rule actions ran, and whether Amazon SES accepted the message from a Send to internet action. Mail Manager delivers this log to a destination you configure: Amazon CloudWatch Logs, Amazon S3, or Amazon Data Firehose. Query CloudWatch Logs with CloudWatch Logs Insights, or query Amazon S3 with Amazon Athena to surface IAM denials, configuration errors, and throttling.
Amazon SES event publishing: the final delivery outcome (delivered, bounced, or complaint), routed through a configuration set. This applies to every pattern.
Lambda Amazon CloudWatch Logs: for Patterns 4 and 5, where delivery runs inside the Lambda function, the acceptance result and any application errors.
To trace a message end to end, correlate these sources. For Patterns 1 to 3, the Mail Manager log and Amazon SES event publishing cover the flow. For Patterns 4 and 5, add the Lambda function’s CloudWatch Logs, since the Mail Manager log ends at Invoke Lambda (Pattern 4) or Write to S3 (Pattern 5).
Limits that shape the architecture
Review the Amazon SES Mail Manager service quotas before committing to a pattern. These quotas most often drive your pattern choice:
| Resource | Default | Where it matters |
| Maximum message size (SMTP ingress) | 40 MB | Patterns 1 to 5 |
| Authenticated ingress endpoints per Region | 50 | Pattern 2 per-tenant endpoints |
| Rule sets per Region | 40 | Pattern 2, Pattern 3 partitioning |
| Rules per rule set | 40 | Pattern 3 |
| Send to internet action per rule set | 10 | Pattern 3 tightest constraint |
| Actions per rule | 10 | |
| Conditions per rule | 10 | |
| Addresses per address list | 100,000 | Pattern 3 consolidation |
| Tenants per account (Amazon SES) | 10,000 (adjustable) | Patterns 4 and 5 ceiling |
| Lambda concurrent executions per Region | 1,000 (adjustable) | Patterns 4 and 5 throughput ceiling |
| Lambda timeout (Mail Manager InvokeLambda) | 30 seconds | Pattern 4 synchronous path |
| S3 event notification destinations per prefix | 1 (use Amazon EventBridge for fan-out) | Pattern 5 fan-out design |
| Lambda invocation payload (synchronous) | 6 MB | Pattern 4 metadata-only (body in S3) |
| Sending quota per 24 hours (Amazon SES) | 200 in sandbox (adjustable in production) | Patterns 1 to 5 |
| Maximum send rate (Amazon SES) | 1 message/second in sandbox (adjustable in production) | Patterns 1 to 5 |
Conclusion
The five patterns in this post show how to architect tenant tagging, whether through static endpoints, rule-set headers, or runtime resolution, so you can choose the approach that fits your workload.
Next steps
- Create your first ingress endpoint and rule set in the Mail Manager console.
- Create your first tenant.
- Review the tenant management page.
- Review the Amazon SES product detail page for pricing and Regional availability.
- Read the Amazon SES Mail Manager documentation.
- Learn how tenant-level suppression lists prevent cross-tenant contamination in Isolate email suppression per tenant with Amazon SES.
About the authors
Getting started with Apache Iceberg write support in Amazon Redshift – Part 3
Post Syndicated from Raghu Kuppala original https://aws.amazon.com/blogs/big-data/getting-started-with-apache-iceberg-write-support-in-amazon-redshift-part-3/
Production data is always evolving. Tables gain and lose columns, outgrow their data types, and get re-partitioned as query patterns shift. Multiple engines often need to read the same data. These changes used to mean expensive data rewrites or rebuilt pipelines. Apache Iceberg makes them metadata-only operations, and Amazon Redshift now supports evolving schemas and partitioning layouts through ALTER statements, with no data rewrites and no pipeline rebuilds. You can also create AWS Lake Formation resource links in the catalog of Amazon S3 Tables, a capability of Amazon Simple Storage Service (Amazon S3), for centralized cross-engine governance.
In Part 1, you created Apache Iceberg tables and wrote data directly from Amazon Redshift to your data lake, setting up external schemas, creating tables in both Amazon Simple Storage Service (Amazon S3) and Amazon S3 Tables, and performing INSERT operations with full ACID (Atomicity, Consistency, Isolation, Durability) compliance. In Part 2, you performed DELETE, UPDATE, and MERGE operations to modify data at the row level and synchronize staging and production tables.
In this post, you use the customer and orders datasets from the previous posts to evolve Iceberg table schemas and partitioning with ALTER operations. You also create an AWS Lake Formation resource link in the S3 Tables catalog to share tables with other analytics engines under a single, centralized permission model.
Solution overview
This solution demonstrates ALTER operations for Apache Iceberg tables in Amazon Redshift and Lake Formation resource link creation for the S3 Tables catalog. The walkthrough includes the following key operations:
- ALTER TABLE RENAME COLUMN – Rename existing columns without changing data types or partition specs.
- ALTER TABLE ADD/DROP COLUMN – Add new columns or remove existing columns as metadata-only operations.
- ALTER TABLE ALTER COLUMN – Widen column data types (for example, INT to BIGINT) without rewriting data.
- ALTER TABLE SET TABLE PROPERTIES – Change compression type for future writes.
- ALTER TABLE ADD/DROP/REPLACE PARTITION FIELD – Evolve partition specs without re-partitioning existing data.
- Lake Formation resource link – Create a resource link in the S3 Tables catalog for centralized access governance.
The following diagram shows the end-to-end architecture:
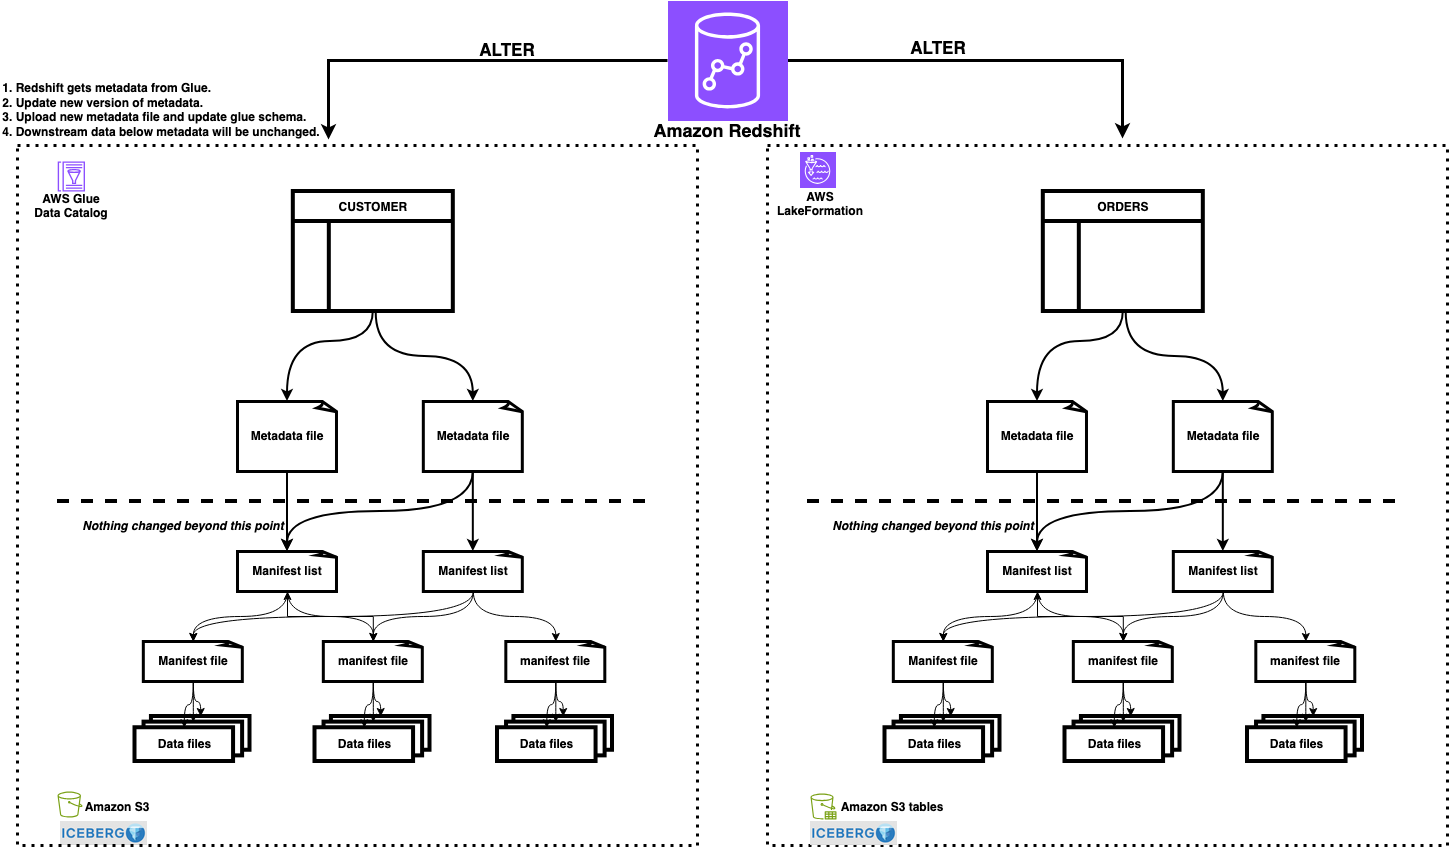
Figure 1: Architecture showing Amazon Redshift performing ALTER operations on Iceberg tables in S3 Tables, with Lake Formation resource links providing access from Amazon Athena and other engines
Prerequisites
Complete the setup from Part 1 and Part 2, including:
- An Amazon Redshift data warehouse (provisioned or Serverless) on patch 201 or higher.
- The AWS Identity and Access Management (IAM) role (
RedshifticebergRole) with permissions for Amazon S3, AWS Glue Data Catalog, and Lake Formation. - The
customertable in a standard Amazon S3 bucket (AWS Glue catalog:customer_db). - The
orderstable in an Amazon S3 table bucket (iceberg-write-blog@s3tablescatalog). - Access to an IAM role that is a Lake Formation data lake administrator.
- AWS Glue Data Catalog integrated with S3 Tables (
s3tablescatalogexists).
Schema evolution with ALTER TABLE
With ALTER TABLE, you can change Iceberg table definitions, including schema, partition specs, and properties, without rewriting stored data. Each operation updates only metadata. The table structure changes instantly while existing data files remain untouched. This helps make schema evolution, partition adjustments, and property updates safe to run on production tables.
Add a column
You can add a new column to an Iceberg table using ALTER TABLE. Each new column is added with a unique field ID that Iceberg uses for column tracking across schema evolution. Existing rows return NULL for the newly added column.
Verify the current schema:
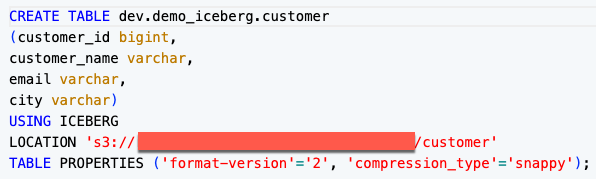
Figure 2: SHOW TABLE output showing the current customer table schema
Add the column:
Verify the schema change:
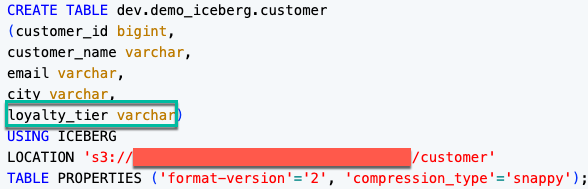
Figure 3: SHOW TABLE output showing the loyalty_tier column added to the schema
The following output shows the new loyalty_tier column as NULL for existing rows:
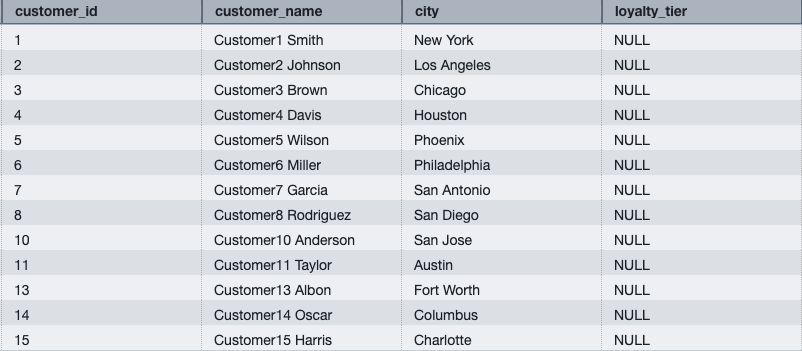
Figure 4: Query results showing loyalty_tier as NULL for existing rows
Populate the new column by aggregating order totals from the orders table in S3 Tables:
The following output shows customer loyalty tiers after the update:
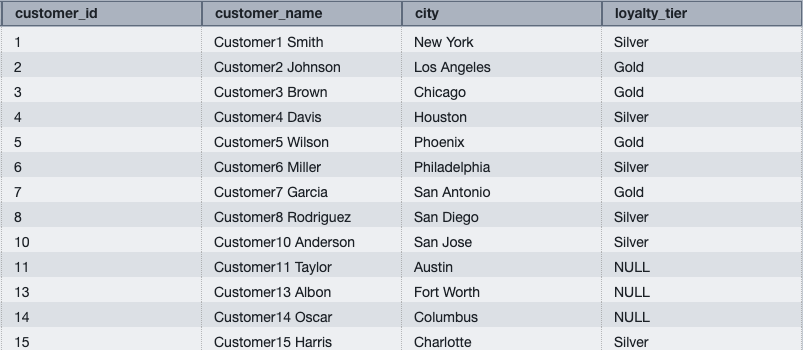
Figure 5: Customer table showing Gold and Silver loyalty tiers
Note: Customer IDs 11, 13, and 15 show NULL for loyalty_tier because they have no matching orders in the orders table.
Drop a column
Remove columns that are no longer needed. The column is removed from the current schema, but data in existing files remains untouched and simply becomes invisible to queries.
Verify the current schema:
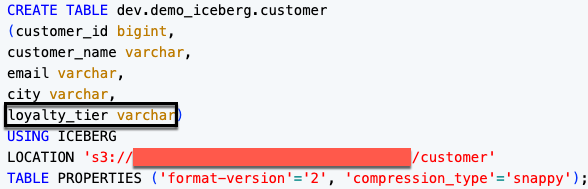
Figure 6: SHOW TABLE output showing the current customer table schema before dropping loyalty_tier
Drop the column:
Verify the schema change:
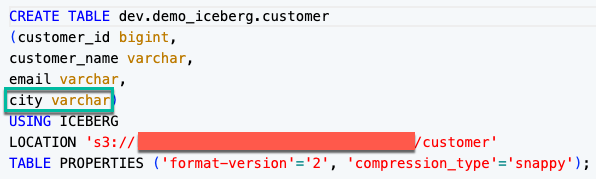
Figure 7: SHOW TABLE output showing the customer table schema after loyalty_tier is dropped
Verify the column is dropped:
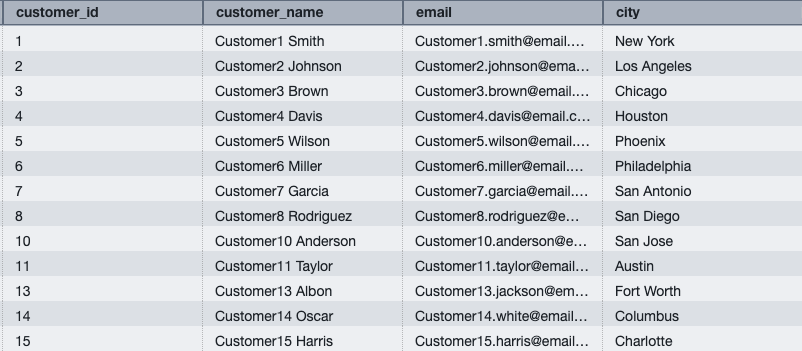
Figure 8: Query results confirming the loyalty_tier column has been dropped
Note: To drop a column used in the current partition spec, first drop or replace the partition field, then drop the column.
Rename a column
Rename a column without affecting data types or partition specs:
The following output confirms the column has been renamed to location:
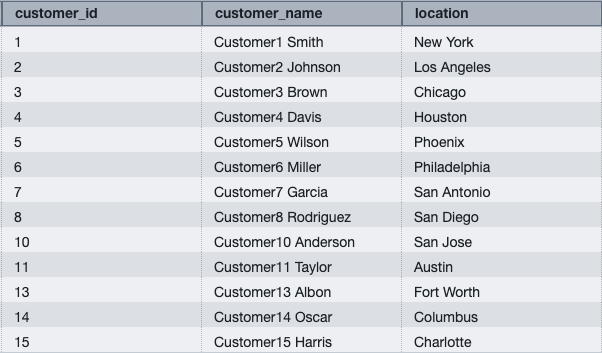
Figure 9: Query results showing the renamed column location
Widen a column type
Widen a column’s data type without rewriting data. This is useful when your data outgrows the original precision, for example when order amounts exceed the original decimal range.
Verify the current column type:
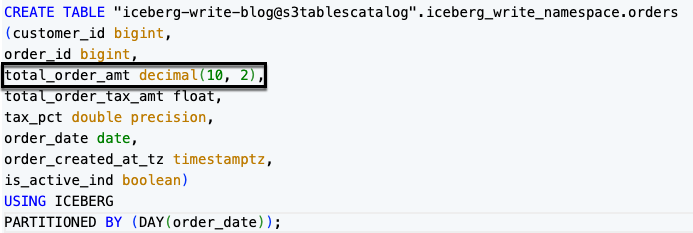
Figure 10: SHOW TABLE output showing total_order_amt as DECIMAL(10,2)
Now run the ALTER to widen the column:
Verify the updated column type:
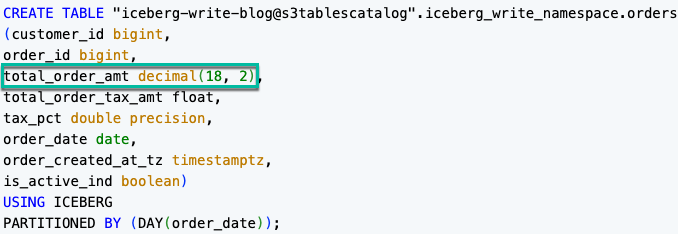
Figure 11: SHOW TABLE output confirming total_order_amt widened to DECIMAL(18,2)
Note: Amazon Redshift supports safe type promotions (for example, INT to BIGINT, FLOAT to DOUBLE, DECIMAL(10,2) to DECIMAL(18,2)). Plan column types accordingly for future growth.
Set table properties
Change the compression type for future writes:
Verify the current compression type:
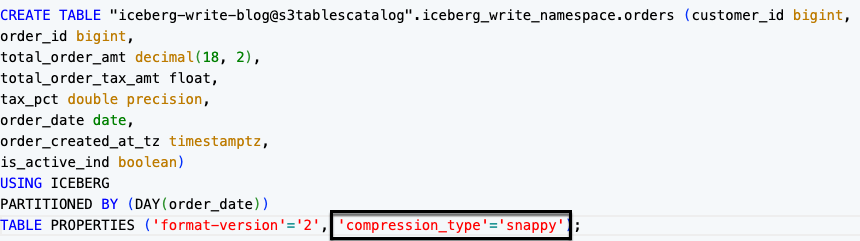
Figure 12: SHOW TABLE output showing the current compression type before the update
Now run the ALTER to change the compression type:
The following SHOW TABLE output confirms the updated compression setting:
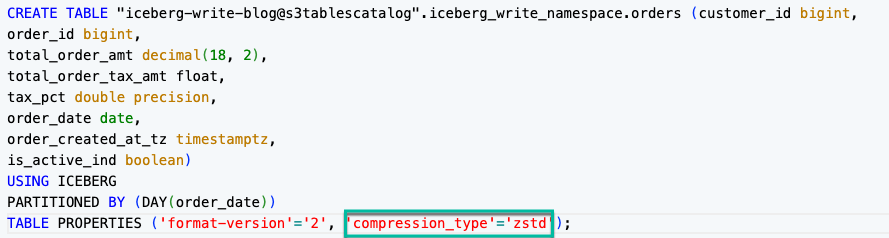
Figure 13: SHOW TABLE output showing compression_type set to zstd
Note: This affects only future writes. Existing data files retain their original compression.
Partition evolution
A powerful feature of Iceberg is partition evolution, the ability to change how a table is partitioned without rewriting existing data. Amazon Redshift writes new data with the updated partition scheme, while existing data remains in the old layout. Query engines handle both layouts transparently.
Adding a partition field
The orders table from Part 1 is partitioned by DAY(order_date). Add an additional bucket partition to distribute data across hash buckets:
Verify the current partition spec:
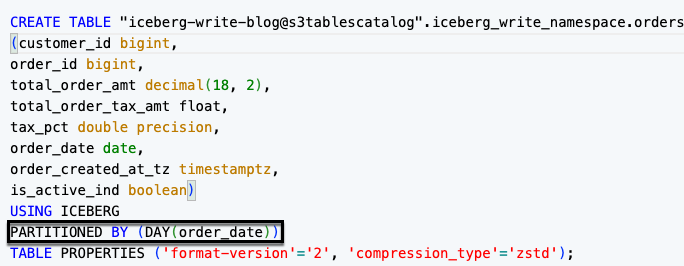
Figure 14: SHOW TABLE output showing the current partition spec before adding a partition field
Add the partition field:
After this change, new data is partitioned by both DAY(order_date) and bucket(16, customer_id), while existing data remains in the original day-only layout.
Verify the updated spec:
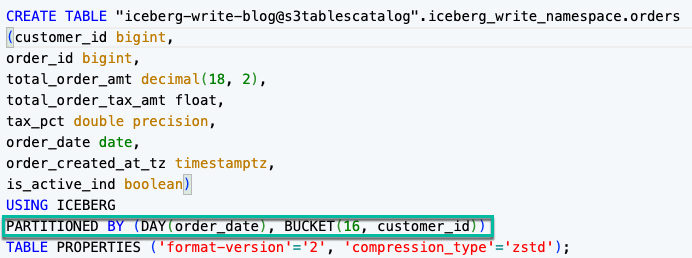
Figure 15: SHOW TABLE output showing the updated partition spec with DAY(order_date) and bucket(16, customer_id)
Replacing a partition field
Instead of separately dropping and adding, use REPLACE PARTITION FIELD as a single atomic operation. This is the recommended approach when swapping one transform for another on the same source column, because it makes the intent explicit and avoids a transient state where the table is unpartitioned between operations.
Verify the current partition spec:
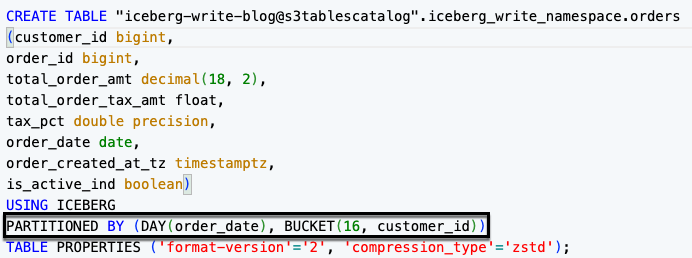
Figure 16: SHOW TABLE output showing the current partition spec with DAY(order_date) and bucket(16, customer_id)
Replace the partition field:
After this change:
- Existing data remains in day-based partition folders.
- Amazon Redshift writes new data into month-based partition folders.
- The query engine reads both layouts transparently.
Confirm the new partition spec:
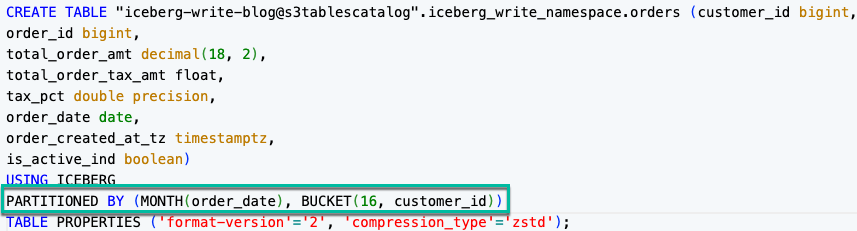
Figure 17: SHOW TABLE output confirming the partition field replaced with MONTH(order_date)
Insert new data and verify that both partition layouts are queryable:
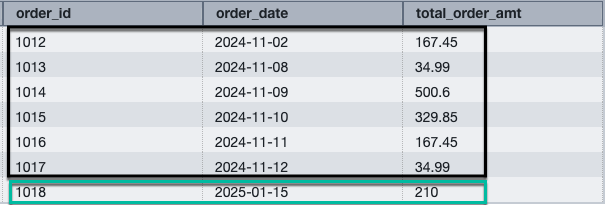
Figure 18: Query results spanning both partition layouts
Converting to a multi-level partition
Iceberg supports multi-level (composite) partition specs, where data is organized by more than one partition field. You can evolve an existing single-level spec into a multi-level spec by adding partition fields one at a time. Each ADD PARTITION FIELD is a lightweight metadata operation, and no data is rewritten.
The orders table is currently partitioned by MONTH(order_date) and bucket(16, customer_id). Add one more partition field to create a three-level spec:
Verify the current partition spec:
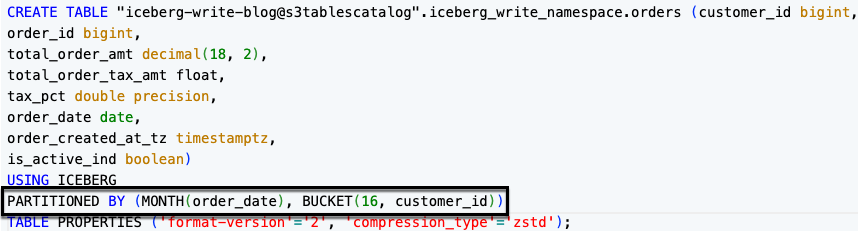
Figure 19: SHOW TABLE output showing the current two-level partition spec of MONTH(order_date) and bucket(16, customer_id)
Add partition field to build the three-level spec:
Verify the new multi-level partition spec:
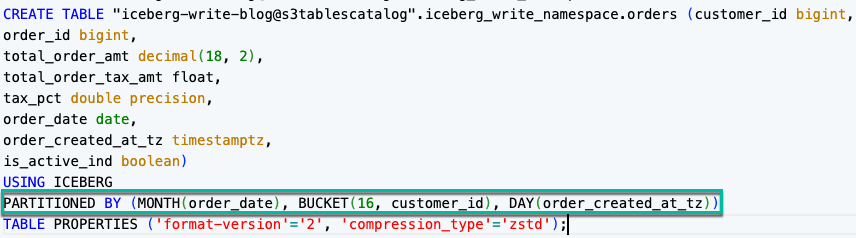
Figure 20: SHOW TABLE output showing the three-level partition spec of MONTH(order_date), bucket(16, customer_id), and day(order_created_at_tz)
After these changes:
- Existing data remains in the original single-level layout (month-based folders).
- Amazon Redshift writes new data into the multi-level layout (month, then bucket, then day folders).
- The query engine reads both layouts transparently.
Dropping partition fields from a multi-level partition
You can also evolve in the other direction by removing partition fields from a multi-level spec to simplify the partition layout. Like adding fields, dropping a partition field is a metadata-only operation and removes one field per statement.
Verify the current multi-level partition spec:
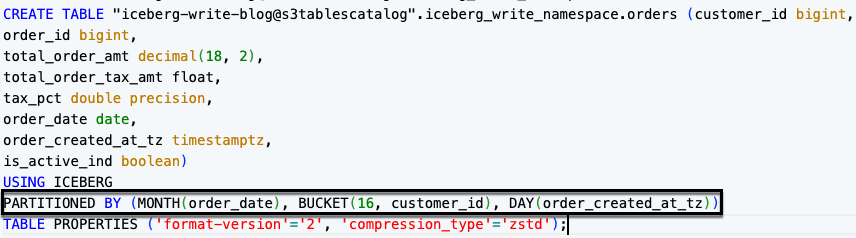
Figure 21: SHOW TABLE output showing the three-level partition spec before dropping fields
Drop the partition fields one at a time:
Verify the table is back to its original single-level spec:
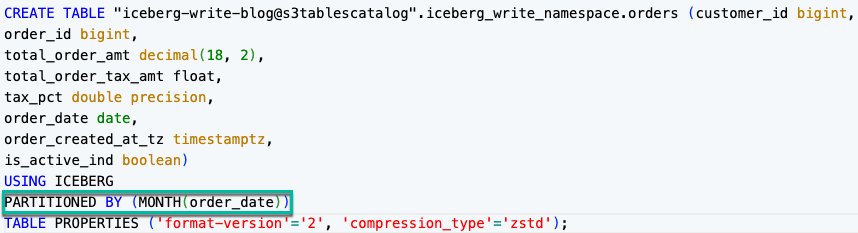
Figure 22: SHOW TABLE output confirming the table is back to a single-level MONTH(order_date) partition spec
After dropping a partition field:
- Data written under the dropped field’s layout stays in place and remains queryable.
- Amazon Redshift writes new data using only the remaining partition fields.
- Queries that filtered on the dropped field still work, but they no longer benefit from partition pruning on that field for newly written data.
Supported partition transforms
The following table lists the partition transforms available for Iceberg tables in Amazon Redshift:
| Partition transform | Syntax example | What it does |
| Year | year(order_date) |
Groups data into yearly partitions based on a date or timestamp column. |
| Month | month(order_date) |
Groups data into monthly partitions based on a date or timestamp column. |
| Day | day(order_date) |
Groups data into daily partitions based on a date or timestamp column. |
| Hour | hour(event_ts) |
Groups data into hourly partitions based on a timestamp column. |
| Bucket | bucket(16, customer_id) |
Distributes data across N hash buckets for even distribution on high-cardinality columns. |
| Truncate | truncate(3, zip_code) |
Truncates column values to a fixed width W for grouping similar values together. |
| Identity | identity(region) |
Partitions by the exact column value with no transformation applied. |
Note: A column that is already part of an existing partition field can’t be used in a new partition field. Drop or replace the existing field first.
Accessing S3 Tables with external schemas
Lake Formation resource links provide cross-engine access to your S3 Tables through centralized governance. You create a resource link in the default AWS Glue Data Catalog that points to your S3 Tables database. Amazon Redshift, Amazon Athena, Amazon EMR, and other engines can then discover and query the tables using a single permission model.
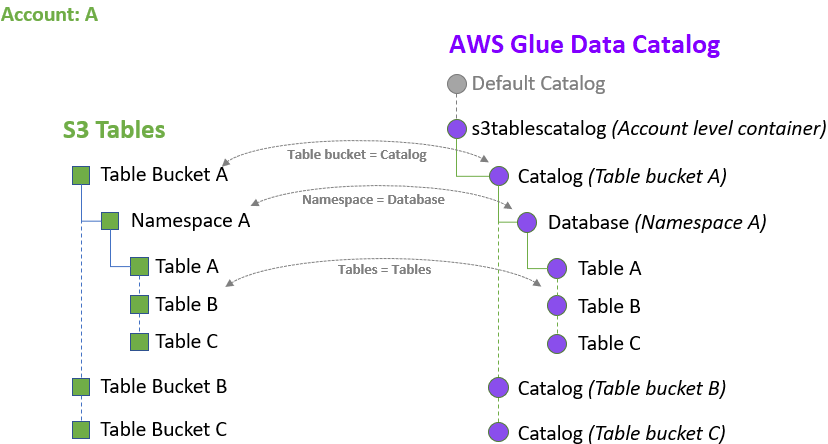
Figure 23: S3 Tables integration with AWS Glue Data Catalog and Lake Formation
For the complete setup walkthrough, including Lake Formation prerequisites, resource link creation, and permission grants, see Optimize Amazon S3 Tables queries with Amazon Redshift. For conceptual details on resource links and S3 Tables catalog integration, see About resource links and Creating an S3 Tables catalog.
The following steps show how to query S3 Tables through a resource link after completing the setup from the referenced blog.
Grant access to the resource link
In the Lake Formation console, the resource link appears as a database named iceberg_write_blog_rl (type: Resource link). To grant access to the resource link:
- In the Lake Formation console, choose Databases.
- Locate
iceberg_write_blog_rl(type: Resource link). - Choose Actions, then Grant.
- Grant DESCRIBE permission to RedshiftIcebergRole.
Create an external schema
With the resource link in place, create an external schema in Amazon Redshift for two-part notation access.
For IAM federated users:
For database users and business intelligence (BI) tools:
Grant access to specific users or roles:
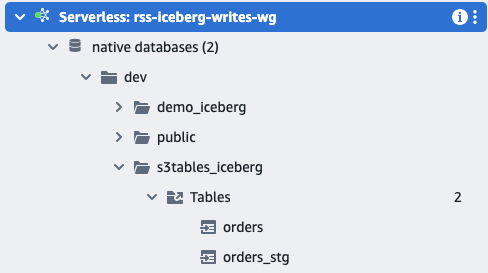
Figure 24: S3 Tables available through an external schema
Query with two-part notation
With the external schema created, query S3 Tables using two-part notation:
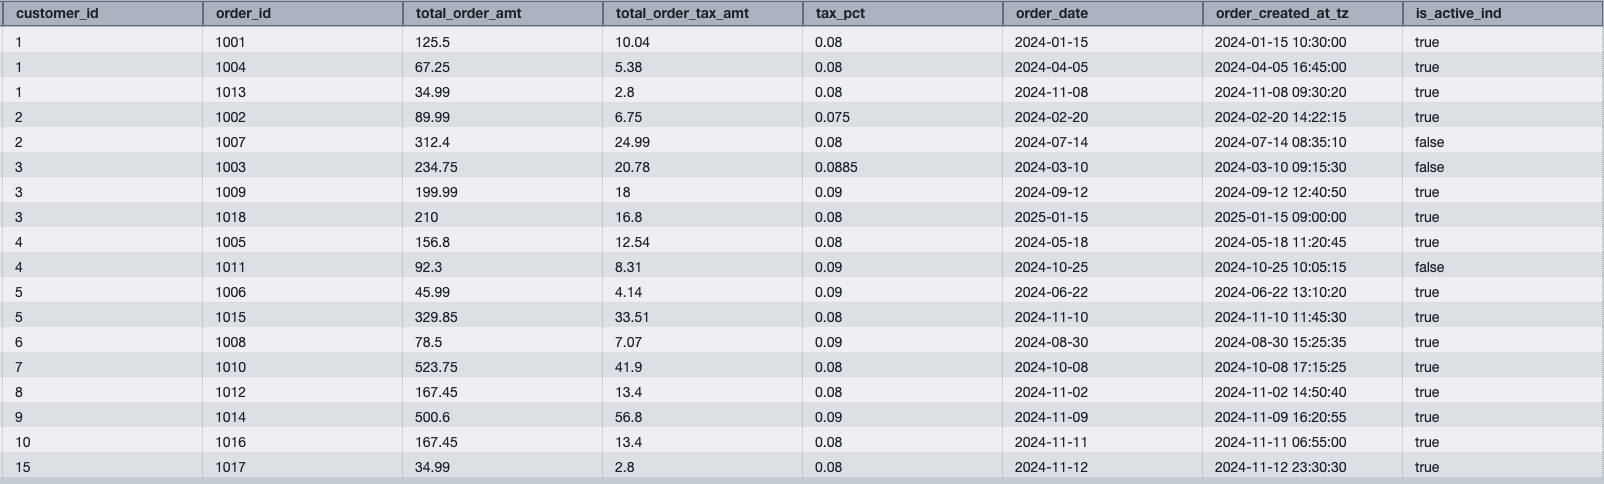
Figure 25: Query results from S3 Tables through an external schema using two-part notation
Access methods comparison
The following table compares the available methods for accessing Iceberg tables in Amazon Redshift:
| Access method | Query syntax | Authentication | Best for |
| S3 Tables three-part notation | "bucket@s3tablescatalog".namespace.table |
IAM federated identity only | Interactive queries in Query Editor v2 with direct catalog access. |
| External schema through resource link | schema_name.table |
Any (IAM role defined in schema) | BI tools, Data API, JDBC/ODBC applications, and shared team access. |
| awsdatacatalog | awsdatacatalog.database.table |
IAM federated identity only | Multi-database access in a single session without creating external schemas. |
Bringing it together
Combine schema evolution with cross-engine access in a single workflow. The following example adds a column to the orders table and immediately queries it through the external schema:
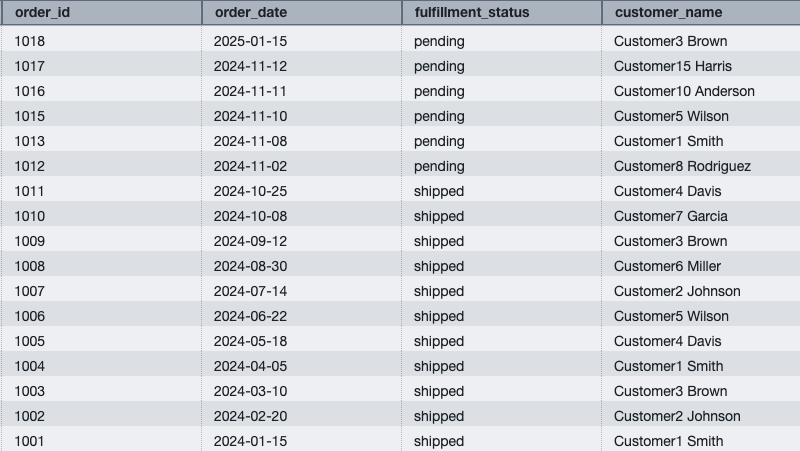
Figure 26: Cross-catalog join showing the evolved schema immediately visible through the external schema
The new column is visible through both the three-part notation and the external schema without any additional configuration, because the schema evolution in Iceberg propagates automatically.
Best practices
- Test ALTER operations in non-production first. While metadata-only, schema changes affect all readers immediately.
- Use REPLACE PARTITION FIELD instead of DROP + ADD. The atomic operation avoids a transient unpartitioned state.
- Monitor partition spec changes with SHOW TABLE. Verify the current spec after any partition evolution.
- Choose partition transforms based on query patterns. Use
month()orday()for time-range filters. Usebucket()for high-cardinality join keys. - Set table properties before bulk loads. Change compression type (
zstdfor better ratios,snappyfor speed) before large INSERT operations. - Run table maintenance after mutations. After performing multiple UPDATE, DELETE, or MERGE operations, run AWS Glue table optimizers to compact deletion files and improve read performance.
- Use Lake Formation for fine-grained access. Column-level and row-level security can be applied through Lake Formation on tables accessed through resource links.
- Grant schema access to specific users or roles. Avoid granting to PUBLIC. Use named IAM roles or database users for least-privilege access.
- Monitor query performance. Use Amazon Redshift query monitoring features to track performance of write operations and optimize partitioning strategies as needed.
Considerations
Keep the following in mind when working with ALTER TABLE and partition evolution on Iceberg tables:
- Plan for metadata-only behavior. ALTER TABLE operations update metadata instantly, and existing data files remain unchanged. All readers see the new schema immediately after the operation completes.
- Drop partition fields before dropping partitioned columns. To remove a column used in the current partition spec, first drop or replace the partition field, then drop the column.
- Use safe type promotions for ALTER COLUMN TYPE. Amazon Redshift supports widening within compatible families (INT to BIGINT, FLOAT to DOUBLE, DECIMAL(10,2) to DECIMAL(18,2)). Plan column types with future growth in mind.
- Account for mixed partition layouts after evolution. Partition evolution doesn’t re-partition existing data. Old files remain in their original layout, and the query engine reads both layouts transparently.
- Use external schemas for database user access. The auto-mounted three-part notation (
"bucket@s3tablescatalog") requires IAM federated authentication. For database users and BI tools, create an external schema with an explicit IAM role. - Use full three-part notation with awsdatacatalog. The USE statement isn’t supported with awsdatacatalog, so always specify the full path.
- Clean up S3 data separately after dropping tables. Dropping an Iceberg table removes only the catalog entry from AWS Glue Data Catalog. Delete the underlying S3 data files separately, or use AWS Glue table optimizers to remove orphaned files.
Clean up
To avoid ongoing charges, run the following:
Conclusion
In this post, you evolved Apache Iceberg table schemas using ALTER TABLE operations. You added, dropped, and renamed columns, widened data types, changed compression, and evolved partition specs, all as metadata-only operations without rewriting data. You also created Lake Formation resource links to provide governed cross-engine access to S3 Tables, and simplified query syntax with external schemas.
This concludes the three-part series on getting started with Apache Iceberg write support in Amazon Redshift:
- Part 1: Create Iceberg tables and perform INSERT operations.
- Part 2: Run DELETE, UPDATE, and MERGE for row-level modifications.
- Part 3: Evolve schemas with ALTER TABLE and add cross-engine access with Lake Formation resource links.
If you have questions or feedback about this series, leave a comment on this post.
Additional resources
- Amazon Redshift Iceberg integration – Complete syntax reference.
- Writing to Apache Iceberg tables – Detailed examples.
- ALTER TABLE for Iceberg – Full ALTER reference.
- Amazon S3 Tables – Managed Iceberg storage.
- AWS Lake Formation – Centralized data governance.
- Optimize S3 Tables queries with Amazon Redshift – Resource links and performance tuning.
About the authors
Enforce IAM permissions boundaries for Amazon SageMaker Unified Studio Tooling blueprints
Post Syndicated from Sanjana Sekar original https://aws.amazon.com/blogs/big-data/enforce-iam-permissions-boundaries-for-amazon-sagemaker-unified-studio-tooling-blueprints/
Amazon SageMaker Unified Studio now supports custom permissions boundaries for IAM roles created by the Tooling blueprint. Organizations that enforce Service Control Policies (SCPs) requiring permissions boundaries on all AWS Identity and Access Management (IAM) roles can now adopt Amazon SageMaker Unified Studio without modifying their security posture.
Amazon SageMaker Unified Studio is a unified development environment that brings together data engineering, machine learning, and analytics tools into a single workspace. In Amazon SageMaker Unified Studio, a project is a collaborative workspace that bundles people, tools, and access permissions together. It builds every project from a project profile, which defines a list of blueprints. Blueprints are pre-configured infrastructure templates that provision AWS resources at project creation time or on demand, along with their default parameters. The Tooling blueprint is the only mandatory one. Amazon SageMaker Unified Studio deploys it with every project, creating foundational resources such as the project IAM role and security groups.
In this post, you learn how to create a permissions boundary that restricts AI agent capabilities. You then configure it on the Tooling blueprint using the AWS Command Line Interface (AWS CLI). Finally, you validate that the boundary is enforced on all provisioned roles.
The problem
Enterprises in regulated industries use SCPs to require that every IAM role in an account carries a permissions boundary. A well-scoped boundary prevents privilege escalation and verifies no role exceeds the maximum permissions defined by the organization’s security team. Before this feature, Amazon SageMaker Unified Studio Tooling blueprints created IAM roles without permissions boundaries. When an SCP enforced permissions boundaries, project creation failed with an explicit deny:
Amazon SageMaker Unified Studio surfaces the blocked role creation as a Tooling environment provisioning failure, as shown in Figure 1.
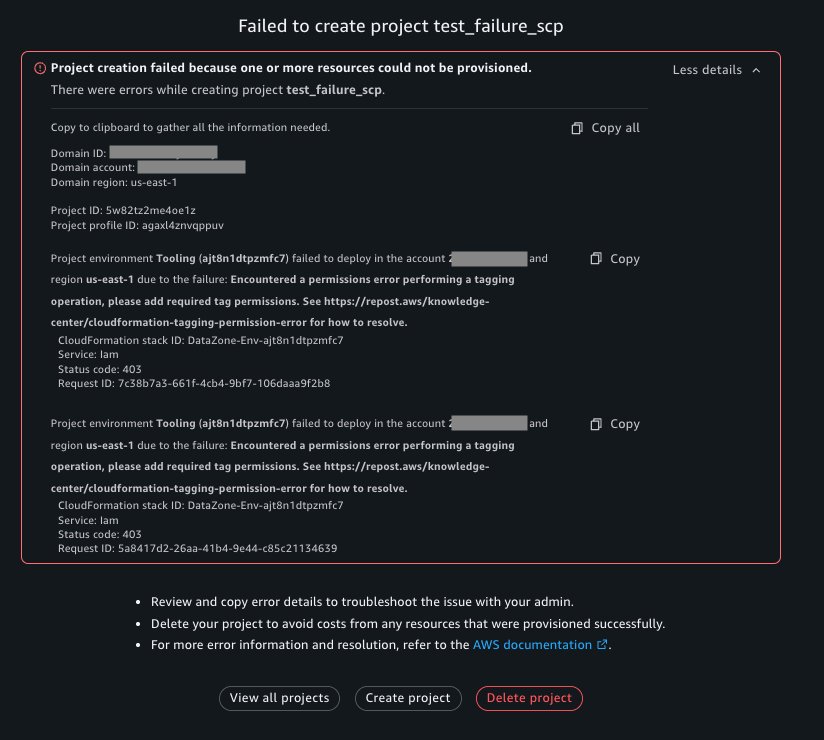
Figure 1: Project creation fails when the SCP requires a permissions boundary that is not attached
The project is marked as failed because its Tooling environment couldn’t deploy in the US East (N. Virginia) AWS Region (us-east-1). The details show a 403 permissions error, while the preceding IAM message identifies the underlying iam:CreateRole SCP denial. This blocked adoption for any organization with SCP-enforced permissions boundaries. The AWS CloudFormation event for the Tooling stack exposes the IAM failure behind the project-level error, as shown in Figure 2.
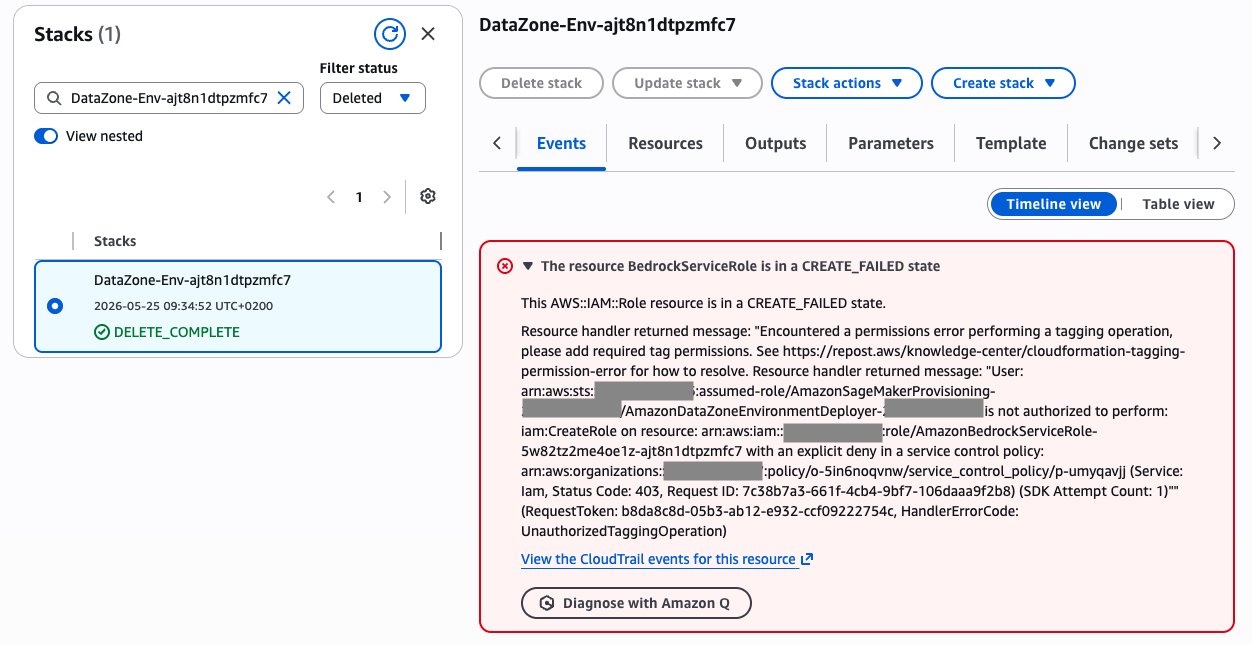
Figure 2: Detailed error showing the SCP denial in the Tooling blueprint AWS CloudFormation stack
The AmazonBedrockServiceRole resource entered CREATE_FAILED because iam:CreateRole was explicitly denied by the SCP, even though AWS CloudFormation surfaced the wrapper error as UnauthorizedTaggingOperation.
Granular control using a permissions boundary: Example use case
Beyond satisfying SCP requirements, permissions boundaries give administrators granular control over what the Tooling blueprint roles can do. For instance, some organizations have SecOps policies that require disabling Data Agent and Data Notebook capabilities across their accounts. These organizations want project members to access data connections and run SQL queries directly, but must block conversational AI, code generation, and notebook cell execution through the agent.
When PermissionsBoundaryArn is configured on the Tooling blueprint, SageMaker Unified Studio attaches the specified customer-managed permissions boundary to all IAM roles provisioned by that blueprint. If your governance requires a boundary, configure it explicitly and verify the resulting roles.
The following permissions boundary policy scopes the roles to the AWS services that Amazon SageMaker Unified Studio uses and then explicitly denies the Amazon DataZone actions that power the AI agent. This permissions boundary is provided for illustrative purposes only and isn’t a recommendation or reference for environment configuration. You should tailor your permissions boundaries to your specific workloads in accordance with the principle of least privilege.
Warning: validate before using in production. This example scopes the roles to the service namespaces Amazon SageMaker Unified Studio uses, but it is still coarse (it allows each listed service in full) and is provided only for illustration. Because a permissions boundary is a ceiling, it must remain a superset of everything the three Tooling roles (datazone_usr_role, AmazonBedrockServiceRole, and AmazonBedrockLambdaExecutionRole) actually need. If Amazon SageMaker Unified Studio adds a dependency that isn’t listed, provisioning or in-console actions will fail with an access denied error. Validate in a non-production domain first.
With this boundary attached, the Tooling blueprint provisions normally, project members can access data connections and run SQL queries. However, any attempt to invoke the AI assistant or execute notebook cells through the agent returns an access denied error. The boundary acts as a ceiling that no policy attached to the role can override.
How it works
The custom permissions boundary feature operates at the blueprint configuration level. An administrator sets a PermissionsBoundaryArn in the Tooling blueprint’s regional parameters. When a user creates a new project that includes the Tooling blueprint, Amazon SageMaker Unified Studio provisions an AWS CloudFormation stack that creates three IAM roles and attaches the specified boundary to each:
datazone_usr_role– the role that all project members assume to access data and resources in that project.AmazonBedrockServiceRole– for Amazon Bedrock operations.AmazonBedrockLambdaExecutionRole– for Amazon Bedrock-related AWS Lambda functions.
Because the boundary is set at the blueprint level, it applies to every project created under that blueprint. No per-project configuration is needed.
Prerequisites
Before you begin, make sure that you have:
- An AWS account with a Amazon SageMaker Unified Studio Identity Center-based domain created.
- The Tooling blueprint enabled in the domain.
- AWS CLI v2 configured with administrator access.
If your organization uses AWS Organizations with SCPs that require permissions boundaries, you will also need an organization with the target account as a member and permissions to create and attach SCPs in the management account.
Setting up the SCP (optional)
This section provides instructions to create an SCP and attach it to your AWS Organizations organizational unit or accounts. If your organization already enforces permissions boundaries through SCPs, skip this section. Otherwise, create an SCP in your AWS Organizations management account that denies IAM role creation unless an approved permissions boundary is attached. This also prevents the boundary from being removed, swapped, or weakened afterward:
This policy does three things:
DenyRoleWithoutApprovedBoundaryblocks creating a role, or attaching a boundary to an existing role, with anything other than the approved boundary ARN. Denyingiam:PutRolePermissionsBoundaryin addition toiam:CreateRolestops a privileged principal from swapping in a weaker boundary after the role exists.DenyRemovingBoundaryblocksiam:DeleteRolePermissionsBoundaryoutright, so the boundary cannot be stripped off. (This action doesn’t support theiam:PermissionsBoundarycondition key, so it must be denied unconditionally.)ProtectBoundaryPolicyprevents tampering with the boundary policy itself. Deleting it, or publishing and defaulting a new version that quietly widens what it allows.
Note: Scope these denies so you don’t lock yourself out. A broad deny on iam:PutRolePermissionsBoundary and iam:DeleteRolePermissionsBoundary also applies to your own administrators. Add an exception for a break-glass or IAM-admin role (for example, an aws:PrincipalArn StringNotLike condition) so a trusted principal can still manage boundaries.
To create the SCP, sign in to the AWS Organizations console with your management account and go to AWS Organizations → Policies → Service control policies. If SCPs aren’t enabled for your organization yet, choose Enable service control policies first. Choose Create policy, give it a name (for example, test_scp), and replace the default content in the policy editor with the JSON above substituting <account-id> with your account ID. Choose Create policy to save it.
After creating the SCP in the management account, verify its content before attaching it. Figure 3 shows the core create-role control. The full example above adds controls that prevent replacing or removing the boundary and modifying the protected policy.
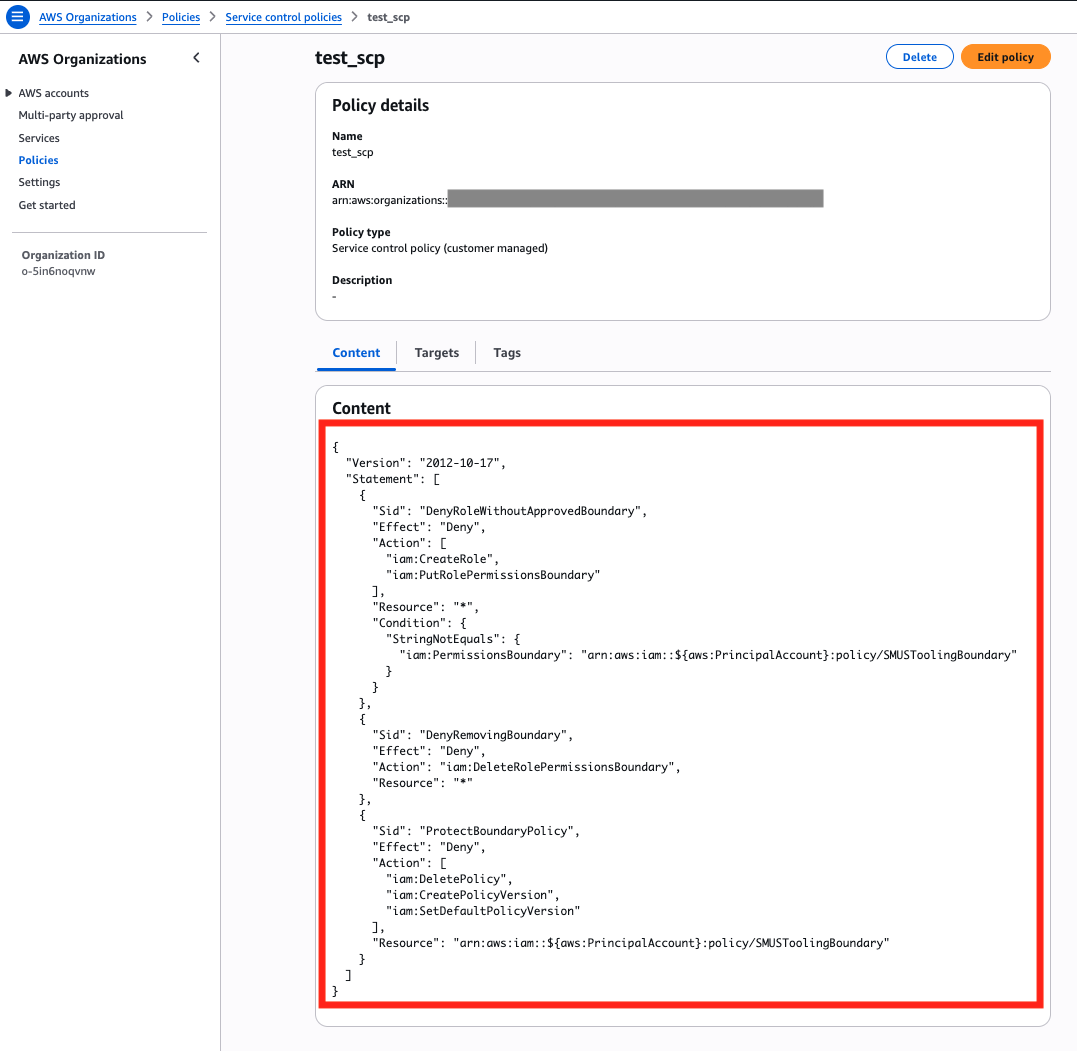
Figure 3: Service Control Policy defined in the AWS Organizations management account
The AWS Organizations Content tab displays the customer-managed test_scp policy. Its visible statement denies iam:CreateRole unless the request uses the SMUSToolingBoundary policy.
Attach this SCP to the organizational unit or account where your Amazon SageMaker Unified Studio domain and domain-associated accounts reside. To do so, open the test_scp service control policy, choose the Targets tab, and choose Attach. The AWS organization structure appears; select the OU or account where the SCP should apply, then choose Attach policy.
Figure 4 identifies the member account that must inherit the SCP in this example organization. The target member account, datazone-account2, resides under OU2, while datazone-account1 is the organization’s management account. Attaching the SCP to the target account or a parent organizational unit enforces it there.
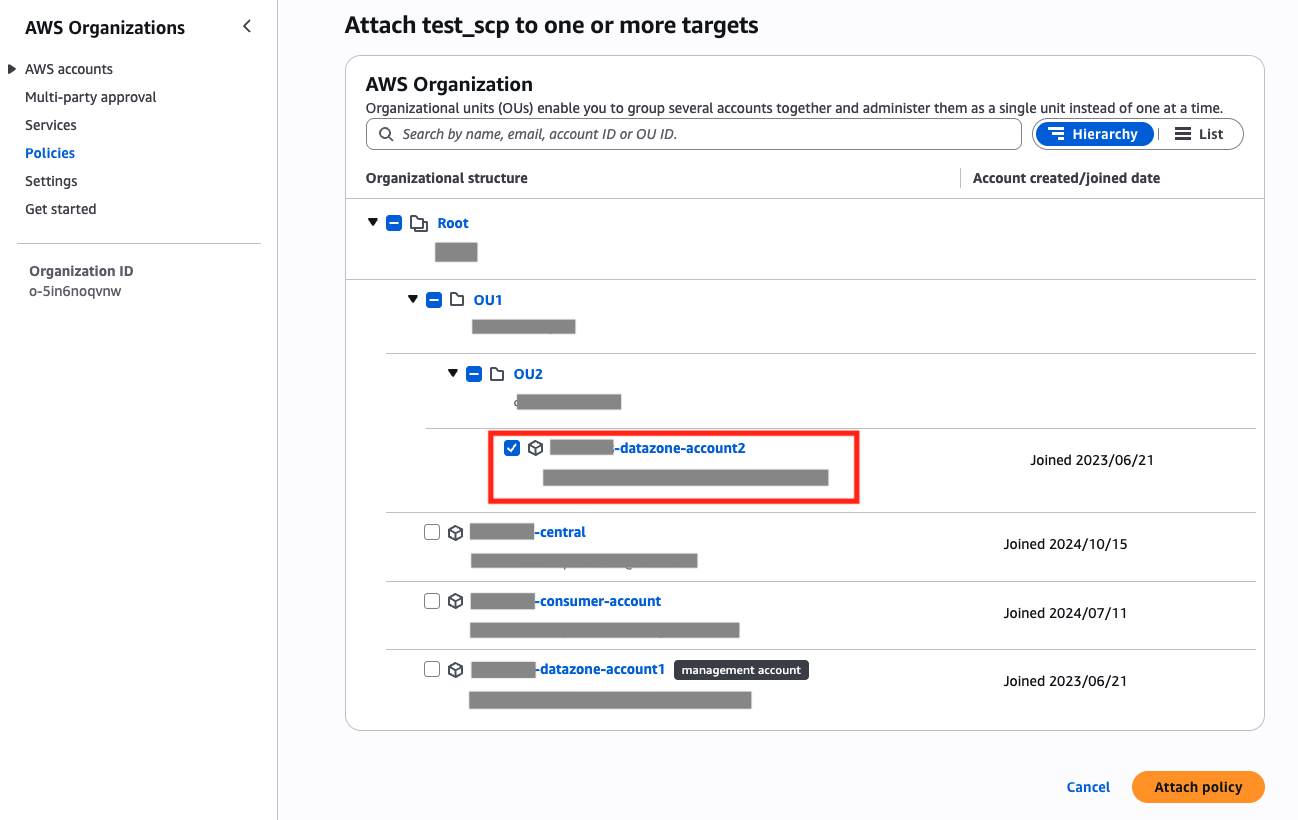
Figure 4: AWS Organizations account structure showing the management account and the target member account
After attaching the policy, verify the association on the SCP’s Targets tab, as shown in Figure 5.
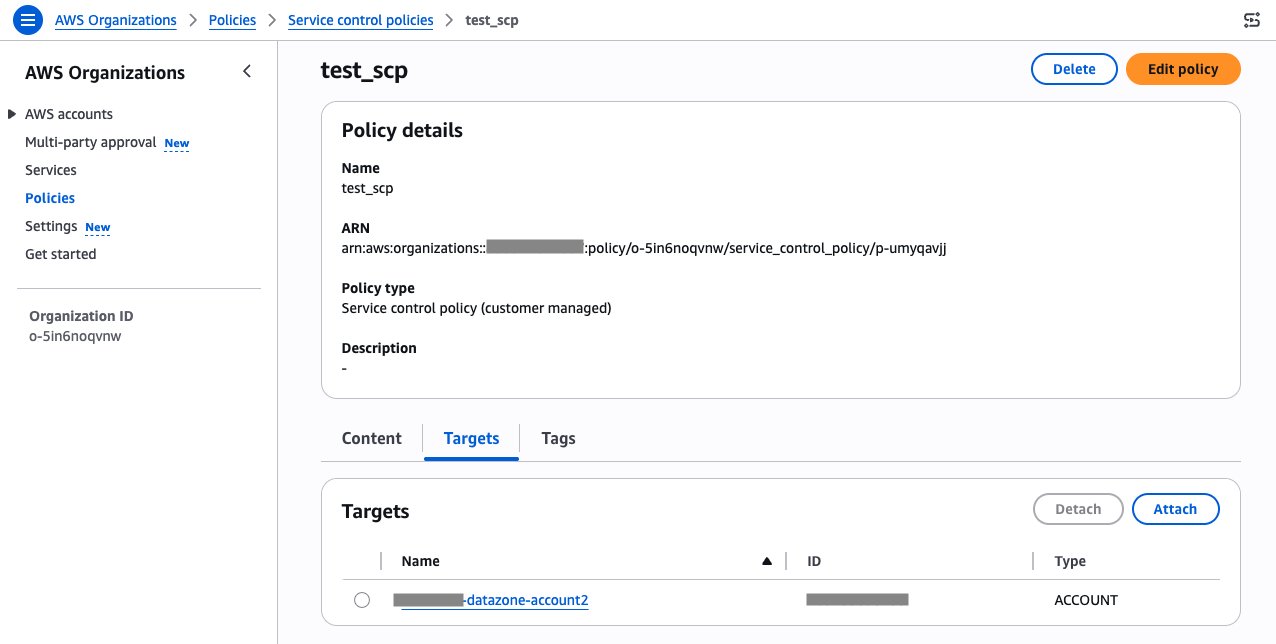
Figure 5: Service Control Policy attached to the target account where it should be enforced
The Targets tab lists datazone-account2 as an ACCOUNT target, confirming that test_scp is enforced directly on the intended member account.
Configuring the permissions boundary
In this section you will execute the required steps to create the permissions boundary and enable it in the Tooling blueprint. The example in this walkthrough uses us-east-1. Change it to the Region where your Amazon SageMaker Unified Studio domain is deployed. You must execute the configuration in the account where you plan to create your project. This can be your Amazon SageMaker Unified Studio domain account or accounts associated to your Amazon SageMaker Unified Studio domain.
Step 1: Create the permissions boundary policy
If you haven’t already created the boundary policy, save the following JSON document as a boundary-policy.json file on your workstation:
As noted previously, this illustrative policy is scoped to the services Amazon SageMaker Unified Studio uses but is still coarse, and its allow list must stay a superset of what all three Tooling roles need.
Then create the policy using the following command:
Note the policy ARN from the output, because it will be used later in the procedure.
Step 2: Retrieve the ID of your domain
Retrieve the ID of your domain by running the following command. Replace <YOUR_DOMAIN_NAME> with the name of your SageMaker Unified Studio domain.
Note the returned ID, because it will be used later in the procedure.
Step 3: Identify the Tooling blueprint
Retrieve the Tooling blueprint ID by running the following command. Replace <domain-id> with the ID you noted in Step 2.
Note the returned ID, because it will be used later in the procedure.
Step 4: Read the current configuration
Retrieve the current Tooling blueprint configuration by executing the following command. Replace <domain-id> with the ID from Step 2 and <tooling-bp-id> with the ID from Step 3.
Important: Back up the output of get-environment-blueprint-configuration before making any changes. The command above pipes the response to tooling-bp-config-backup.json so you have a restore point if you need to revert.
Note the values of provisioningRoleArn, manageAccessRoleArn, enabledRegions, and all fields inside regionalParameters (AZs, S3Location, Subnets, VpcId). You will need all of these in the next step.
Step 5: Set the permissions boundary
Update the blueprint configuration to include PermissionsBoundaryArn in the regional parameters using the following command.
Important: The put-environment-blueprint-configuration API operates in overwrite mode, it replaces the entire configuration with what you provide. You must include all existing values from the previous step’s output. The only new addition is PermissionsBoundaryArn inside the regional parameters. Omitting any existing parameter removes it.
Make sure to replace <domain-id> with the ID you noted in Step 2, <tooling-bp-id> with the ID you noted in Step 3, and all other <placeholder> values with the corresponding values from Step 4’s output.
The following anonymized example is based on an existing Tooling blueprint configuration. Its S3Location reflects the bucket naming pattern used in that environment. Copy the exact S3Location returned in Step 4. Don’t use the following illustrative value. Here’s an example:
Step 6: Verify the configuration was applied
Confirm the permissions boundary ARN is now set in the blueprint configuration using the following command. Make sure to replace <domain-id> with the ID you noted in Step 2 and <tooling-bp-id> with the ID you noted in Step 3.
The output should return your boundary policy ARN:
Validating the configuration
After configuring the permissions boundary, in this section you will get instructions to create a new project to verify it works end to end and that the IAM roles created with the project actually include the permissions boundary.
Step 1: Select a project profile in enabled state
Use the following command to list project profiles configured in your domain. Make sure to replace <domain-id> with the ID you noted in Step 2 of the “Configuring the permissions boundary” section.
Choose a project profile that has "status": "ENABLED". Note the id of any project profile returned in the previous command.
Step 2: Create a test project
Create a new project using the following command. Make sure to replace <domain-id> with the ID you noted in Step 2 of the “Configuring the permissions boundary” section and to replace <profile-id> with the project profile ID noted in Step 1 of this section.
Note the id (project ID) returned in the response. Wait for the Tooling blueprint to provision. This typically takes a minute or two. After provisioning completes, confirm that the validation project reaches the Active state, as shown in Figure 6.

Figure 6: Project created successfully with the permissions boundary configured
The Projects list shows the timestamped PB-Validation-* project with an Active status, confirming that project creation succeeded with the custom boundary configured.
Step 3: Verify the roles have the boundary attached
In this section you check that the IAM roles created with the project have the permissions boundary attached. Use the following commands to get the configuration for the IAM roles created with the project you just created. Replace <domain-id> and <project-id> with the values from the previous steps.
All three roles should return a response showing the permissions boundary ARN:
You can also verify each role in the IAM console. Figure 7 shows the permissions boundary for the project user role.
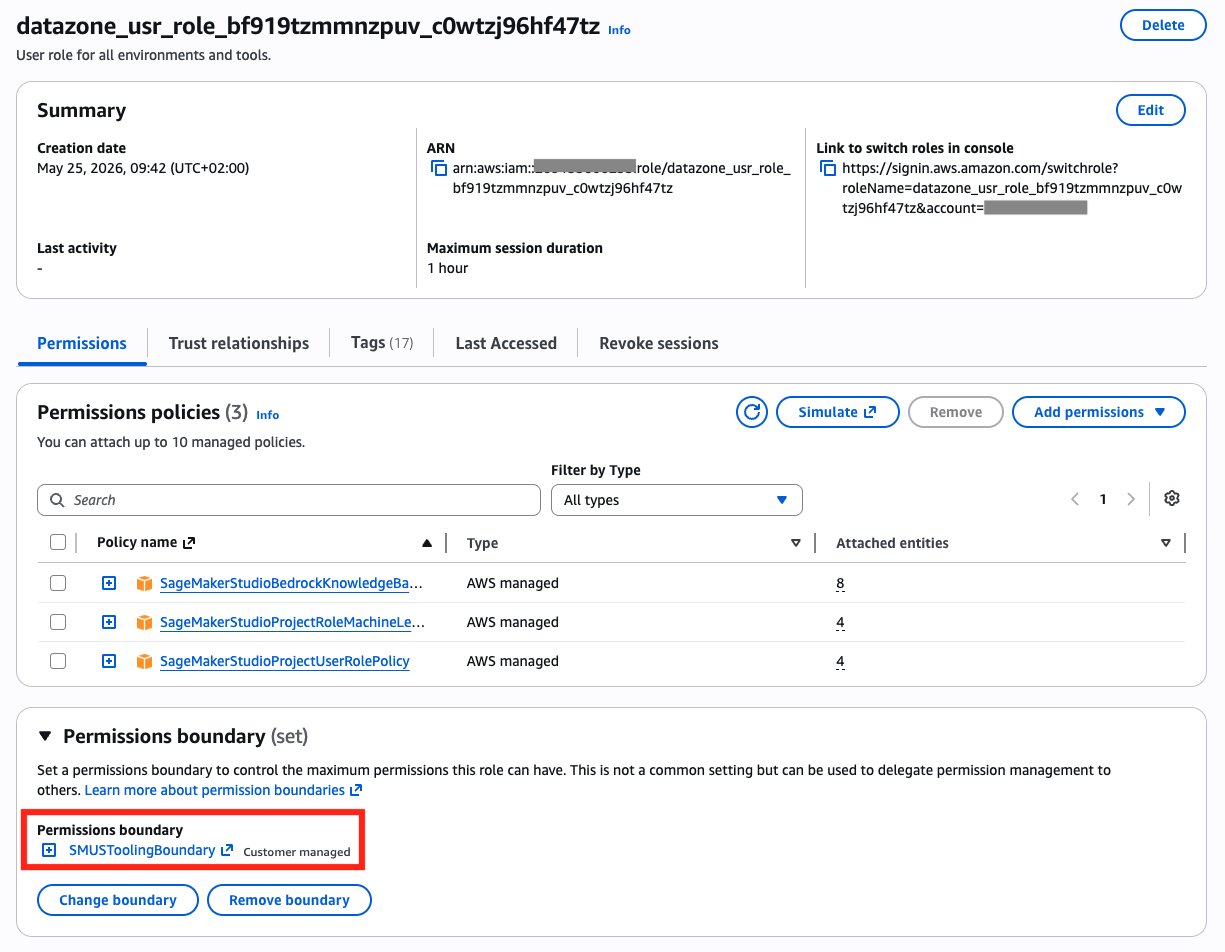
Figure 7: IAM console showing the permissions boundary attached to the datazone_usr_role
The datazone_usr_role Permissions tab displays SMUSToolingBoundary as its customer-managed permissions boundary.
Figure 8 confirms that the same boundary is attached to the Amazon Bedrock service role.
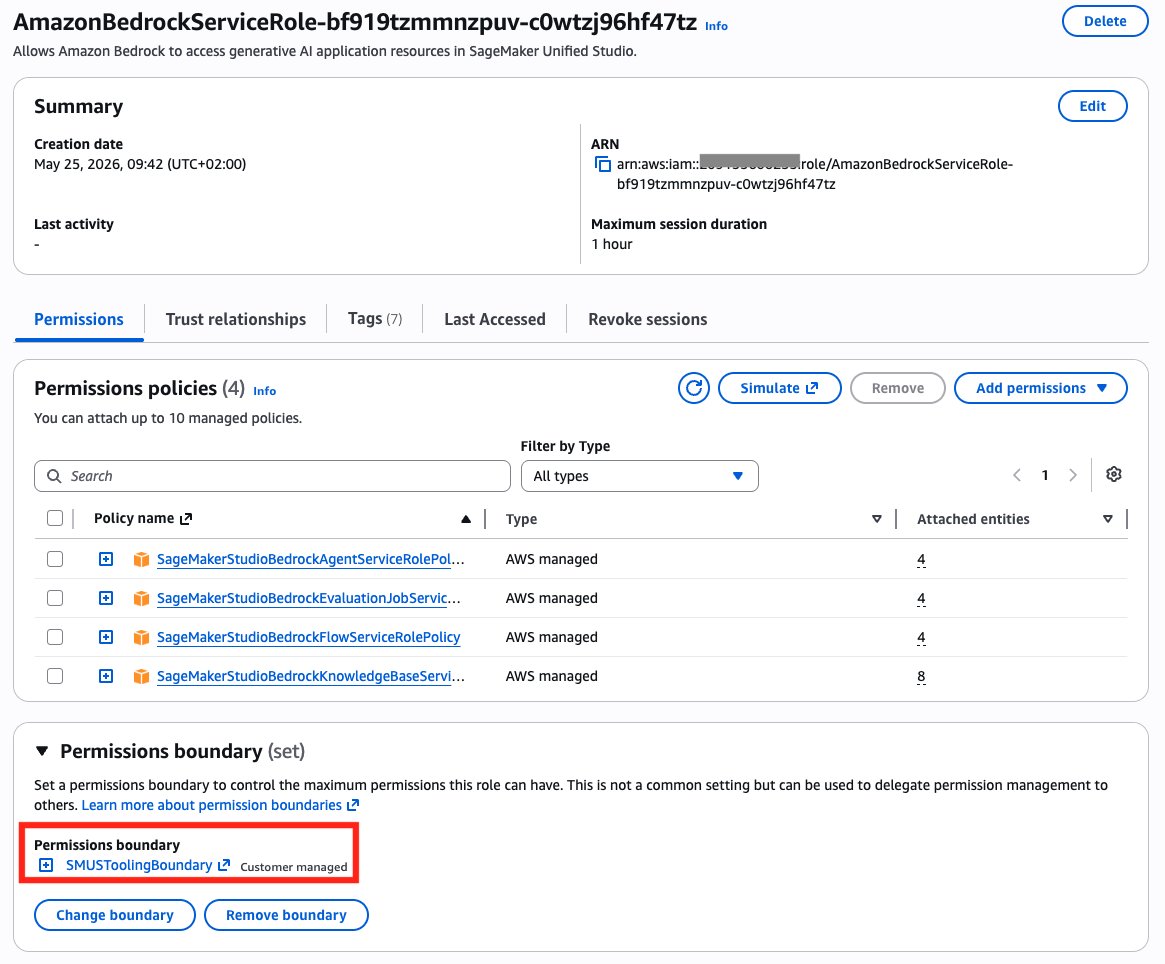
Figure 8: IAM console showing the permissions boundary attached to the AmazonBedrockServiceRole
The AmazonBedrockServiceRole also displays SMUSToolingBoundary as its customer-managed permissions boundary.
Figure 9 verifies the boundary on the third Tooling role, the Bedrock Lambda execution role.
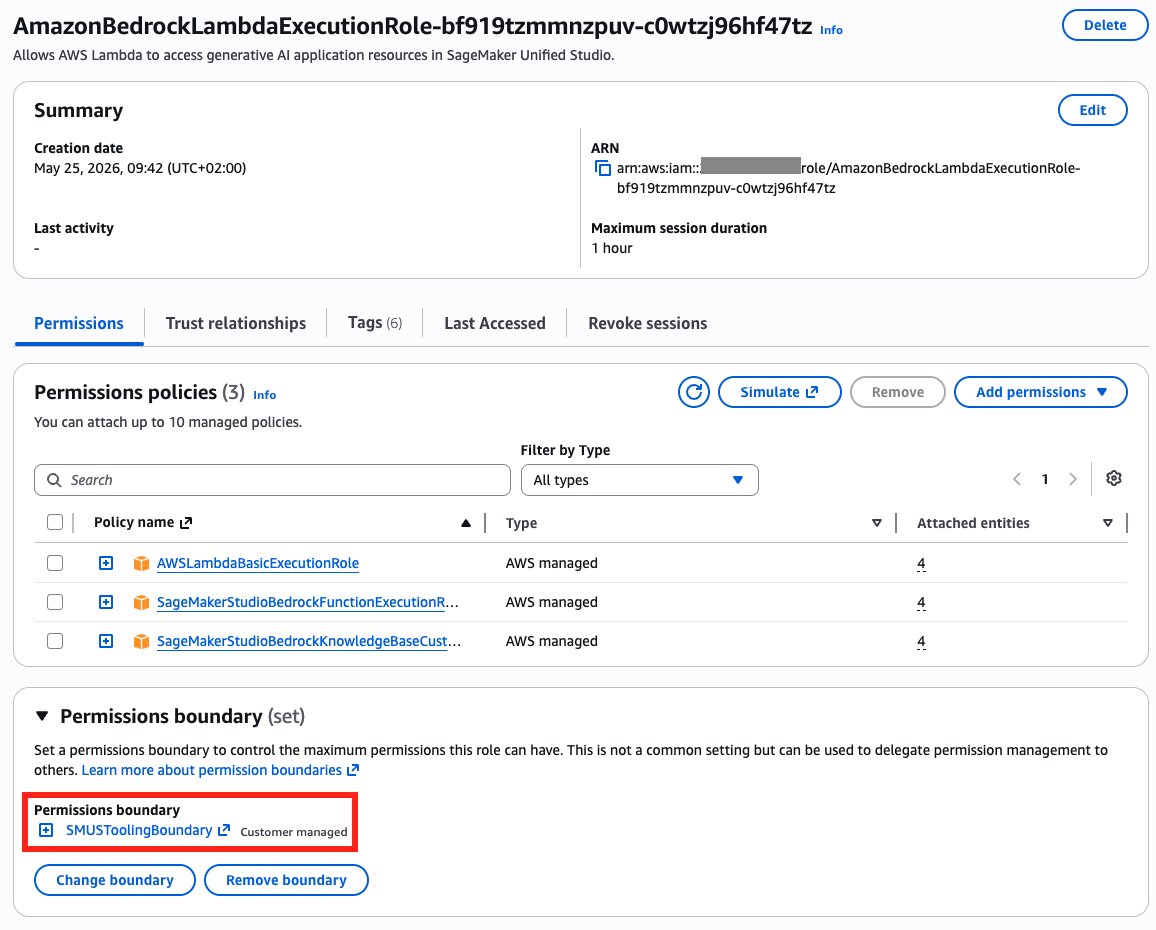
Figure 9: IAM console showing the permissions boundary attached to the AmazonBedrockLambdaExecutionRole
The AmazonBedrockLambdaExecutionRole likewise displays SMUSToolingBoundary, confirming that all three provisioned roles carry the boundary.
Step 4: Verify the boundary denies AI agent actions
In this section you verify the boundary actually denies AI agent actions. If you configured the boundary from the use case section earlier, the boundary blocks Data Notebooks and messages to the Data Agent, such as the Query Editor assistant. Any such attempt returns an access denied error. The project user role has the boundary attached, so even if the role’s identity policies grant the relevant APIs, the boundary’s explicit deny takes precedence.
To confirm, navigate to your project in SageMaker Unified Studio and test the following actions:
- Attempt to create a notebook – In the left sidebar, select Notebooks. Select Create notebook. The operation will fail because the permissions boundary prevents the
datazone:CreateNotebookaction (Figure 10).
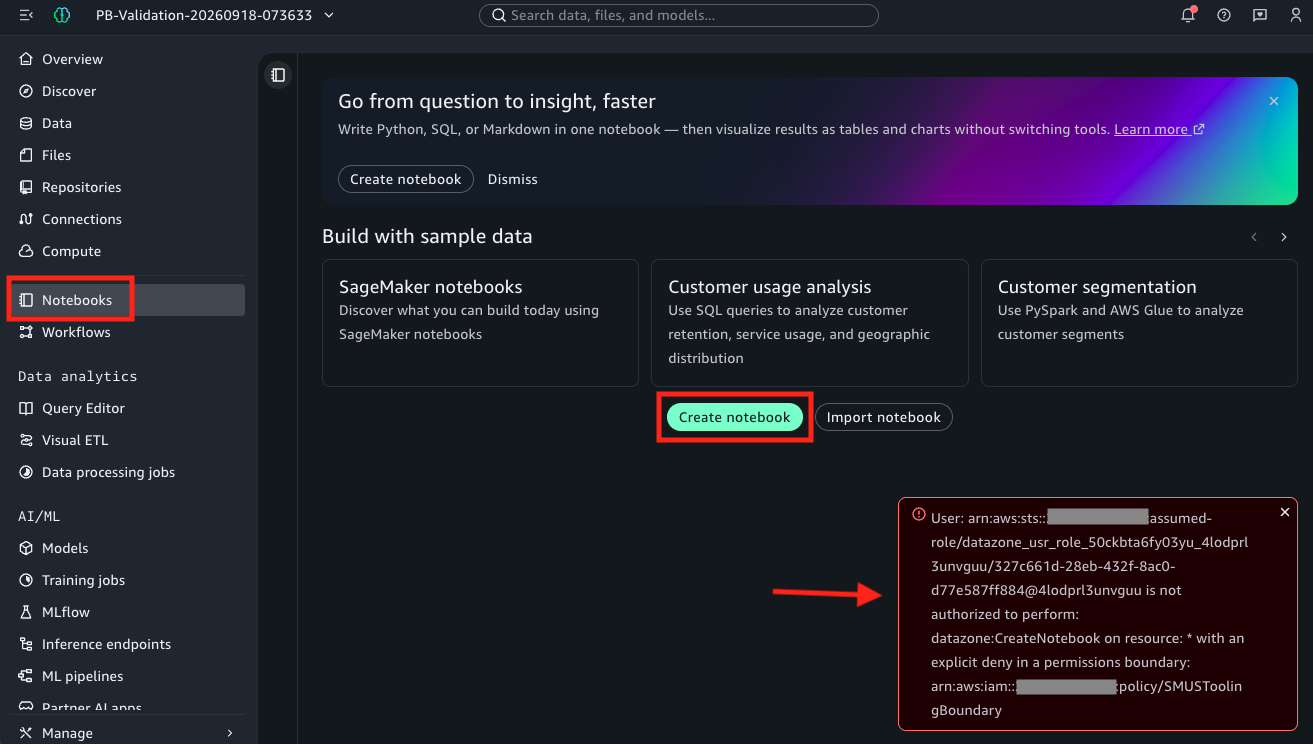
Figure 10: Permissions boundary preventing creation of Data Notebooks
After the create action, Amazon SageMaker Unified Studio reports Failed to create notebook and identifies datazone:CreateNotebook as explicitly denied by SMUSToolingBoundary.
- Attempt to use Data Agent in the Query Editor – In the left sidebar, select Query Editor, then select the Chat with AI icon. The agent chat will fail to load because the permissions boundary blocks the APIs required by Data Agent (Figure 11).
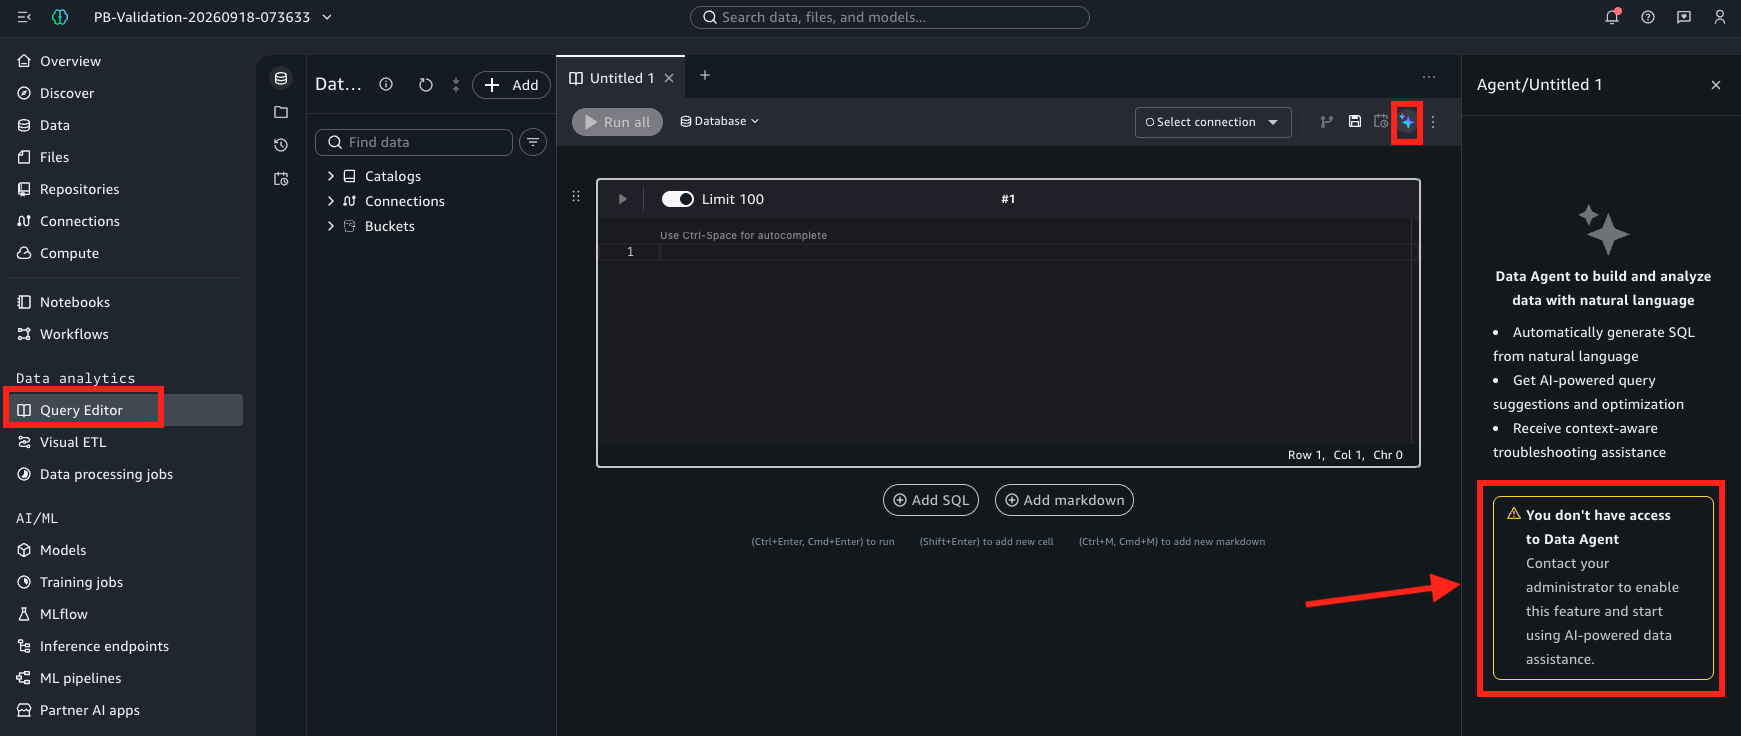
Figure 11: Permissions boundary preventing using Data Agent on Query Editor
The Query Editor remains available, but the Agent panel reports “You don’t have access to Data Agent“. In this configured test, that message is the user-visible result of denying the Data Agent APIs. The screenshot itself doesn’t display the denied API or boundary ARN.
Important considerations
- Immutable after project creation – The permissions boundary is set at provisioning time. Changing the boundary ARN on the blueprint configuration only affects new projects. Existing projects retain their original boundary.
- Applies to all Tooling-provisioned roles – When
PermissionsBoundaryArnis configured on the Tooling blueprint, SageMaker Unified Studio attaches the specified customer-managed permissions boundary to all three IAM roles created by that blueprint. It’s applied uniformly — you can’t selectively apply it to individual roles. No boundary is attached unless you configure one, so if your governance requires a boundary, set it explicitly and verify the resulting roles rather than assuming one is present by default. - Policy must exist – The IAM policy referenced by
PermissionsBoundaryArnmust exist in the account before project creation. If the policy is deleted or the ARN is invalid, provisioning will fail. - Tooling blueprint only – Among Amazon SageMaker Unified Studio provided blueprints, only the Tooling blueprint supports custom permissions boundaries. Other provided blueprints that create IAM roles (for example, the EmrOnEc2 blueprint) don’t currently support this feature. If your organization requires permissions boundaries on roles created by additional blueprints, you can build custom blueprints that include a permissions boundary configuration so you can extend this security control across your entire project infrastructure.
Clean up
To remove test resources, delete the test project from the SageMaker Unified Studio UI. On the project’s Overview page, choose the ⋮ (more actions) menu in the top-right and choose Delete project.

Figure 12: Deleting the test project from the project Overview page.
In the Delete project dialog, type confirm in the text box to acknowledge that the action is final, then choose Delete project. This permanently deletes the project and its underlying resources, and triggers an asynchronous AWS CloudFormation stack deletion.
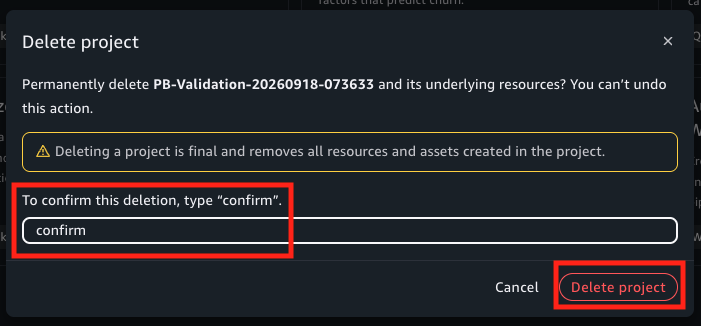
Figure 13: Confirming project deletion.
To remove the boundary from future projects, re-run the put-environment-blueprint-configuration command from Step 5: Set the permissions boundary, but omit the PermissionsBoundaryArn field from the regional parameters. Because you backed up the original configuration in Step 4: Read the current configuration (tooling-bp-config-backup.json), you can reuse the exact same provisioningRoleArn, manageAccessRoleArn, enabledRegions, and regionalParameters values (AZs, S3Location, Subnets, VpcId) — just without PermissionsBoundaryArn — so the blueprint returns to provisioning roles with no permissions boundary.
Conclusion
With the custom permissions boundary feature for Amazon SageMaker Unified Studio, organizations can adopt Amazon SageMaker Unified Studio Tooling blueprints without compromising their IAM governance posture. By configuring a single parameter on the Tooling blueprint, all IAM roles provisioned by future projects automatically carry the specified permissions boundary. This satisfies SCPs that mandate a boundary on every role and gives administrators granular control over what the Tooling roles can do, for example disabling AI agent and notebook capabilities. Remember that the example boundary in this post is illustrative, because it scopes to the services SageMaker Unified Studio uses but is still coarse.
“I just updated the EnvironmentBlueprintConfiguration for the Tooling blueprint to include the new PermissionsBoundaryArn param. After that the blueprint provisioned successfully with the required permissions boundary attached to all the IAM roles, in line with our security policies. In the end it was a one-line change.”
— Nat Noordanus, Data Tech Lead at Nexthink
To get started, create your permissions boundary policy, configure it on the Tooling blueprint using the CLI, and create a project to verify the boundary is attached.
For more information, see the documentation for Amazon SageMaker Unified Studio, IAM permissions boundaries, and Service Control Policies.
About the authors
[$] Reducing undefined behavior in the C language
Post Syndicated from corbet original https://lwn.net/Articles/1095811/
As a professor of biomedical engineering, Martin Uecker perhaps does not
fit the profile of a typical presenter at Kernel Recipes. He is,
however, a longtime Linux user, and works on free software for controlling
magnetic resonance imaging (MRI) scanners. He was at the conference to
talk about the C programming language, the specific problem of undefined
behavior in C, and whether it can eventually be made into a memory-safe
language.
Comic for 2026.09.28 – Abled
Post Syndicated from Explosm.net original https://explosm.net/comics/abled
New Cyanide and Happiness Comic
Security updates for Monday
Post Syndicated from jake original https://lwn.net/Articles/1097191/
Security updates have been issued by AlmaLinux (firefox, ipa, kernel, libxml2, perl-DBI, python-cryptography, thunderbird, and unbound), Debian (chromium, evolution-data-server, exim4, ghostscript, incus, lemonldap-ng, libheif, nodejs, php8.4, ruby-oj, swift, and vlc), Fedora (chromium, cinnamon, cinnamon-desktop, cinnamon-session, cinnamon-settings-daemon, ckermit, dnf5, forgejo, goose, gssntlmssp, libheif, libpcap, librsvg2, mingw-gstreamer1, mingw-gstreamer1-plugins-bad-free, mingw-gstreamer1-plugins-base, mingw-gstreamer1-plugins-good, mingw-python3, mongo-c-driver, muffin, nemo, nemo-extensions, nextcloud, pgadmin4, postgresql16-postgis, postgresql17-postgis, postgresql18-postgis, rust-librsvg, rust-xml5ever, sipp, suricata, tesseract, and xreader), Mageia (erlang, gpsd, libreswan, python3 & python-pip, and udisks2), Oracle (abrt, buildah, cockpit-image-builder, corosync, ipa, kernel, libxml2, openexr, perl-DBI, perl-DBI:1.641, postgresql, thunderbird, unbound, and yelp), SUSE (389-ds, ansible-lint, cups, firefox, flatpak-builder, forgejo-longterm, gdb, gimp, gitoxide, glib2, gnome-shell, google-guest-agent, google-osconfig-agent, haveged, helm, ImageMagick, kbd, libsoup, libtpms, obs-service-cargo, openai-codex, opensuse-signkey-cert, osmo-iuh, perl-mojolicious, poppler, python-WebOb, python-WebOb-doc, python313-vllm, python314, sdbootutil, suseconnect-ng, and swtpm), and Ubuntu (exim4, freerdp3, libvirt, libvirt-hwe, libwebsockets, lxc, pyjwt, and requests).
Next.js applications, powered by Vite: introducing Vinext 1.0
Post Syndicated from James Anderson original https://blog.cloudflare.com/vinext-nextjs-on-vite/
When we launched Vinext in February, it was the result of an audacious week-long AI-driven experiment to see how far one engineer, and a stack of tokens, could get to replicating the NextJS framework backed by Vite.
In the seven months since that experiment, Vinext has grown into a framework that our customers trust and run in production for high-traffic, dynamic applications.
Today we are announcing the release of Vinext 1.0, the latest step on our journey to make it possible to deploy Next.js apps anywhere. Vinext lets you take any Next.js application, whether it was built for the Pages or App Router, and make it portable to be deployed to any web platform, including the Cloudflare Workers free plan, Netlify, or AWS Lambda.
Vinext 1.0 brings with it sweeping improvements to compatibility, stability, and caching behaviors, and sets the project up for the long term. There’s never been a better time to take your Next.js project and convert it to Vinext; just run npx vinext check and npx vinext init.
Graduation to 1.0
On release Vinext was promising, but it was incomplete. Since then, we’ve spent a lot of time both improving App Router compatibility and expanding that to Pages Router apps — which we’ve learned many customers are longtime fans of, with large applications that are complex to migrate. We didn’t want Vinext to be a tool that only worked for people using the latest App Router features.
Our focus has been on adopting both these routers, and watching our test compatibility closely, which for most important customer-requested features now surpasses 99%.
This improvement has been fueled through the community around our GitHub project. As soon as Vinext launched, that community threw it at a wide variety of applications to find the gaps. With their scrutiny, we found challenges not immediately obvious in the test coverage. Vinext needs to act exactly as Next.js behaves. It is not good enough to imitate functions with the same name. Building an alternative import { revalidatePath } is simple enough; the difficulty is in making sure it correctly affects the rendered pages, cache entry, and future requests.
Tracing requests through the application to make sure Vinext responds in the way expected — and replicating not just the API, but the behavior of this machine — was by far the more challenging aspect.
Once we’ve patched problems and brought new features forward, it’s important that we don’t regress, especially if Next.js makes a change. That’s why we’ve also built out our test suite: thousands of focused tests covering core framework behavior across both routers, the development and production server, and the deployment targets of Nodejs and Cloudflare Workers. We also run the Next.js end-to-end test suite against Vinext nightly, giving us a continually moving window on our compatibility, and making sure we immediately become aware of regressions coming from merged changes. Alongside the automated testing, we’ve been working directly with large customers that have Vinext in production to make sure they are not facing issues.
What’s in 1.0
The clearest messages we got from customers using Vinext is that certain Next.js features carry the framework and Vinext didn’t actually need to do everything that Next.js has launched in recent versions to be incredibly useful to them. So we focused on better support where you need it:
- App Router, Pages Router, and Hybrid applications: We heard from customers that Pages Router was still important, and migrations are not a one-step process. Vinext therefore has support for both routing paths, including React Server Components, Server Actions, API routes, route handlers, middleware, and client-side navigation.
- The complete page lifecycle: Pages can be rendered in many different ways: on the server, pre-rendered in the build, exported as static assets, or cached with page-level Incremental Static Regeneration (ISR). We’ve made sure that Background and on-demand revalidation work with any output.
- Caching: Vinext has a shared set of caching functions across the App and Pages Router and the supported runtimes. We have further support for using Cloudflare’s Workers Cache.
- Observability: Vinext provides Next.js-compatible tracing across both routers, so existing OpenTelemetry and Sentry setups continue to work. On Cloudflare Workers, traces also integrate with native Workers Observability.
- Next.js ecosystem compatibility: Vinext implements the public
next/*surface and supports common Next patterns for use of authentication, MDX, image optimization, fonts, metadata, environment variables, and more. - First-class runtime support for Workers: While Vinext can run anywhere, server code can run in the Cloudflare workerd runtime during development and production, with direct access to bindings such as image optimization and hyperdrive.
We’ve also made migration part of the framework: it takes two commands to verify that your Next.js install and any modification you have made is compatible, and set up the Vite and deployment configuration while keeping all your previous Next.js project structure.
When we talked to teams about what features were important for them, something stood out. Next.js 16 took a stance that Cache Components were an important part of the future of the framework, and yet most teams that we talked to were not using them and did not consider support a prerequisite to move. Therefore, Vinext today has limited support for the “use cache” directive that drives Cache Components, and though we will continue to improve compatibility there, we’re much more focused on the core priorities above.
Pre-rendering and cache warming
When we first announced Vinext, it supported Incremental Static Regeneration (ISR) after the first request, but it did not yet render pages during the build. Applications use generateStaticParams() and getStaticPaths() to identify pages that should be rendered when building, and they expect page-level ISR to connect those initial responses to background and on-demand revalidation.
Vinext 1.0 supports that lifecycle for both routers. It can prerender App Router and Pages Router routes during the build, serve those responses through page-level ISR, and invalidate them by path or tag. It also supports output: "export" when the result you want is a fully static site.
But this led us to question something: Why should this rendering happen during the build at all?
A site with tens or hundreds of thousands of possible URLs can spend a seriously long time rendering pages that receive little traffic. The build process cannot evaluate the long tail of traffic that most sites experience and therefore cannot focus compute time on the smaller number of more critical pages. Instead you waste hours of time waiting for sequential builds working their way through thousands of pages, long after the most important routes are done.
Cache warming is our solution to this, moving page prerendering from the build machine to Cloudflare’s network. Developers can continue to use Next.js primitives to identify the pages for prerendering, and Vinext can additionally identify high-traffic pages to add to this list. This happens in the background before your site is deployed to production, so that the moment it is, it is ready to serve rapid responses from the Cloudflare cache.
Inside the deployment process, this works by uploading a new Worker version and deploying it to 0% of production traffic, before then requesting pages specifically from that version. This allows the rendering pipeline to work before any real users hit the new deployment. Once the caches have been populated, the deployment can be promoted safely.
What we’re doing next
If the original experiment invented the one-off slopfork, the more consequential part has been how we can keep that process of self-improvement running indefinitely.
The project is now focused on keeping the framework up to date with everything happening upstream. Next.js canary receives new commits every day. Each morning, an agent reviews the changes, fetches diffs, and opens tracking issues for anything that could affect Vinext. Every night, the compatibility matrix is regenerated as we run the Next.js test suite against Vinext.
When one of these tests or issues reveals a gap, agents are now in the position where they can identify the change across both codebases, build a reproduction, port any relevant tests, and propose a fix.
This review has been catching missing cases, unsafe caching behaviors, and differences in the development vs. production servers.
Automation has helped us narrow the stream of activity into a focused set of changes that deserve attention, allowing the maintainers of the project to focus on only the issues that need context of how a process should map onto Vite from the Next.js implementation.
We’re building a software factory for open source at Cloudflare, and you can see what we’re up to on GitHub.
Try it out
Vinext is available for new applications, and existing Next.js projects.
Start a new application today:
Or migrate an existing application:
And then deploy it to Cloudflare Workers, with our cache warming:
Visit vinext.dev for documentation, examples, and the current compatibility matrix. Vinext is open source at github.com/cloudflare/vinext. Issues, pull requests, application reproductions, and feedback are welcome.
Introducing cf: the agentic CLI for the entire Cloudflare API
Post Syndicated from Matt “TK” Taylor original https://blog.cloudflare.com/cloudflare-cf-cli-launch/
Over the last year, agent use of Wrangler has skyrocketed.
In March 2026, agents were responsible for a quarter of Wrangler use, up from single-digit percentages the year prior. Last week, agent usage reached 48%.
Agents are more prolific users, using almost twice as many distinct commands per day, and are almost four times as likely to use six or more commands.
Agents love CLIs. But Wrangler only provides commands for around 280 operations, and Cloudflare offers thousands.
Earlier in the year we teased how we were planning to solve this and today, we’re enabling agents to use every Cloudflare product by introducing a new CLI: cf.
cf is a CLI that is built for the next generation of software development:
- Agents can find the command they need to do anything they want to do with bespoke search and steering.
- JSON is the default interface, pretty printed for humans and condensed for agents for maximum context savings.
- cloudflare.config.ts is the new configuration format for the whole of Cloudflare, starting with Workers, and bringing the safety and accuracy of TypeScript to you and your agent’s language server protocol (LSP)
- Vite becomes default, bringing with it the best local development server, and a plugin suite for developers and framework authors.
Install the open beta today globally and run it from anywhere:
cf gives your agent access to the entire Cloudflare API
What if your agent could do everything Cloudflare can do? That’s the question that sparked our interest earlier this year: agents were getting ever more powerful, but what they were able to do with Cloudflare’s CLI was still limited.
Wrangler was hand-built with each product team contributing and taking their own approach to their command developer experience. Enforcing patterns across teams was virtually impossible, even across our ~280 command paths. We had inconsistent terminology across d1 info, hyperdrive get, workflows describe as each team came up with their own practices at different times. Some teams built entirely custom experiences across thousands of lines of code that turned out to be used extremely rarely, and teams came up with different approaches to solve the same problems.
We wanted to both standardize what we had and make a massive expansion, all at once. Forge — Cloudflare’s new unified API generation pipeline — enabled us to do this, building on the idea of generating our CLI commands directly from the API schema that powers our API documentation and SDK generation. Everything we provide has an OpenAPI schema, and if we annotate this with just a little more information, we can use it as the source for Forge to make a CLI.
This enables us to expand cf from the ~280 functions that Wrangler had built up over time, to cover the entirety of the Cloudflare API surface of over 3,000 operations.
Now it’s simple to give your agent cf and ask it to go set up a worker, deploy it, monitor and observe it, protect it with Cloudflare Access, buy a domain, and front it with Cloudflare WAF, all from a single tool.
Building for an agent that has never used cf
cf is built for the trajectory of software engineering, where agentic development is drastically changing how software is built and deployed. This year we’ve been focused on providing tools to support this shift, culminating in cf. cf has been built from the ground up with agents in mind, and includes novel tools for agentic command discovery that we think will become standard in more CLIs in the near future.
Wrangler came with the advantage that years of documentation, blogs, and third-party guides have been absorbed into the training process of LLMs. It also came with the same disadvantage: changing how Wrangler works now goes against learned behavior, and significant change would be inevitable given the scale of improvement we want to make.
Introducing a new CLI that agents have never seen sounds like a big disruptive change — but actually it’s the cleanest thing we can do. Because of the design decisions we have made, the context injections we can make, and the AGENTS.md files we can append, making a switch in this way is actually less confusing than having an agent contextualize the major differences between two versions of a tool it is familiar with. We’re launching with a couple of these agent-focused features built in, with more to come.
Agents need to filter JSON, not look at tables
When agents use Wrangler, they append --json to every command they run, and then often filter the output with jq to extract a subset of fields. But only some commands in Wrangler supported --json ; many commands returned unicode tables, designed for humans looking at output in their terminal. Agents can figure these out, but it costs them more time and tokens than a jq filter.
In cf we’re taking the opposite stance: agents just need JSON, and if agents are the future primary user of this tool, it should be the default. For the vast majority of commands that will rarely be accessed by humans, this is obviously the right call.
You as the human customer of this CLI are, in reality, one step removed from using it. Agents being able to easily filter their results and then return that filtered list in whatever format you request is preferable to supplying tables you will never likely read directly.
But what if you’re looking to do something that might require real personal input, like searching for a domain to buy?
For commands that your agent can access through chaining named parameters in a long and unwieldy sequence, you can simply fill in a form. Cf deconstructs the requirements of the API into a series of validated inputs, so buying a domain, even one with complex requirements, is simple to follow.
Or, if you insist, just ask your agent to do it.
Your agent can find the right command itself
With 3,000 possible routes through a CLI, how can your agent find the right operation it needs quickly without bloating your context? For this reason we have also added cf cli search.
This command allows your agent to ask in natural language what it needs to do, and a small search index will provide a list of appropriate commands, based on their API description and parameters. We automatically tell your agent about this command when it runs --help for the first time.
Configuration that type-checks your agent
Our new configuration format is based on TypeScript, which is easy for humans and agents to parse, and allows you to write your configuration programmatically.
Typed configuration is enormously helpful for agents. We’ve found that even with no prior context of the programmatic configuration format, agents are able to easily identify and edit the configuration on demand, even across elements like env which have dramatically changed from the same named feature in Wrangler. All agents that use LSP plugins, such as Claude Code and Codex, benefit from being able to interpret more about the configuration file format in context, and make much more accurate suggestions as a result.
Compare this to TOML, which had no accessible schema, or JSONC, which had a linked schema that agents rarely used.
Some Wrangler configuration files inside Cloudflare have been condensed by 40% from over 5,000 lines, with many custom environments per developer, to factory files that build each developer’s configuration more efficiently.
This is achieved through programmatically defining each environment from the same universal base, instead of copying env blocks as was typical in Wrangler. A simple Worker with multiple environments simply switches on the Vite-native mode argument to swap between one set of configuration and another.
A simple configuration that does this now looks like:
You can migrate your Cloudflare Worker to this new format through cf migrate.
We’re also providing a few helper functions to make building your Worker a breeze.
bindings gives you a simple place for your agent to discover all the developer platform has to offer. Everything — from environment variables to storage, database, and queues — can be auto-completed and explained by your editor.
Similarly, we have included a helper for triggers, which is the new way to define routes, queues, schedules, and email triggers for your Worker. Rather than having these scattered through your configuration file, it’s now simple to find, in a single block, the actions that could trigger your Worker to run.
defineConfig.worker is just the start here. Our intention with cloudflare.config.ts is that this is how you manage Cloudflare as a whole. Every product you need — along with its API being available to your agent through cf — will be able to be expressed through typesafe configuration. Soon you will be able to configure entire policies, set up zones, configure DNS and more, all through this configuration file.
A best in class development experience
When Wrangler first started building JavaScript Workers, Vite didn’t exist. Instead, we used esbuild in Wrangler to bundle your Workers. The dev server that Wrangler made available on :8787 was something that the Wrangler team built, and modifying any of this meant reaching into the internals of Cloudflare-specific local tooling like Miniflare.
Vite is a huge improvement on this, and comes with a large ecosystem of plugins you can use, as well as providing a best in class dev server with HMR (hot module replacement), and builds that use the Rust-based library Rolldown for tree-shaking. Anything you can do with Vite, you can do with the Cloudflare Vite Plugin.
The Cloudflare Vite Plugin is the recommended way we suggest you build Workers, whatever you are building: whether that’s a frontend-focused project or a backend API. Together with our Vitest plugin it provides a cohesive development and testing environment that matches the Workers runtime and gives you direct access to bindings and platform APIs.
cf is built on Vite as default. Most of your Workers will migrate simply with agents. Others may take more time, which is why cf will continue to delegate to Wrangler for dev and deployment for JavaScript Workers that need to continue to use esbuild and Rust and Python Workers.
Migrating from Wrangler
Migrating a Worker from Wrangler is as simple as running
Workers that already build with Vite will be converted to cloudflare.config.ts for you. If your Worker relies on Wrangler for esbuild, then cf will continue to delegate builds to Wrangler.
When the open beta ends we will release a final major version of Wrangler that directs you and your agent to use cf. We’ll continue to provide maintenance support for Wrangler for 18 months after the beta ends, to give you time to migrate.
You can also take new projects and automatically configure them for Cloudflare by running cf init/deploy, which will install the Cloudflare Vite Plugin for you and create a configuration file.
Static sites still don’t require a configuration file to start, and deploying them is as simple as running cf deploy in your project.
To start a new Hello World project with cf, use cf init.
cf is open source and issues can be reported to our GitHub repository.
How fast is the web? Explore billions of real-user measurements with BEACON
Post Syndicated from Ryan Townsend original https://blog.cloudflare.com/how-fast-is-the-web/
If you work in technology, you’re probably reading this on a powerful laptop or flagship mobile on robust, lightning-fast Wi-Fi. This is fantastic for building software, but often is far removed from the reality facing many who are using that software.
End users might be nursing a four-year-old budget phone, running low on battery, on a data plan that throttles after 2 GB, living with under-invested public infrastructure, or even just walking into that corner of the gym where the Wi-Fi never seems to work. Multiply this by billions of people around the world and the gap between “works on my machine” and “works for everyone” starts to widen, distorting critical decisions regarding our technology choices and priorities.
Closing the perception gap with objective data is central to our mission of helping build a better Internet, one that's fast and accessible to everyone, not just those of us using the best hardware.
That’s why today, we’re sharing a view that offers insight on how real people experience the web, by publishing the Cloudflare BEACON dataset — Browser Experience Across Cloudflare's Observed Network. Cloudflare has collected this kind of telemetry for years on behalf of our customers, giving them a customer-specific, detailed understanding of how real users experience their sites. Today, we're opening that view up to everyone.
BEACON is an anonymized dataset built from billions of real-world performance measurements across 10,000 of the largest websites on our network. It covers every major browser engine, is updated daily in Google BigQuery, and uses standards defined by the community-led RUM Archive, a publicly available Real User Monitoring (RUM) database. By expanding the footprint of that project 100-fold, BEACON gives researchers an unprecedented view of how the web performs across browsers, devices, and countries.
What BEACON reveals
The Core Web Vitals have long been the de facto standard for measuring perceived performance on the web, and BEACON reports all three:
- Largest Contentful Paint (LCP): load time
- Cumulative Layout Shift (CLS): visual stability
- Interaction to Next Paint (INP): interaction responsiveness
Because we’re publishing these as full histograms rather than single averages, you can derive any percentile you like. Instead of stopping at P75 (the 75th percentile), you can examine the long tail and see where the industry still struggles to deliver fast experiences for everyone.
Who experiences a slower web?
WebKit, currently the only browser engine on iOS, performs best on these metrics overall, but that advantage is not universal. In 46 countries where WebKit represents more than 10% of traffic, its LCP, INP, or both are at least 10% worse than those of Blink-based browsers such as Chrome, Edge, and Opera. In Cambodia, for example, WebKit accounts for 17.5% of page views, but its LCP is 50% worse than Blink’s.
BEACON also includes domain industry classifications from our Intel API. Government and Politics, Health, and Safe for Kids stand out as high-performing categories, while Ads, Religion, and Weather typically perform worst:
The additional percentiles expose differences hidden by a single P75 result. In several industries, the slowest experiences fall sharply in the long tail, particularly for visual stability as measured by Cumulative Layout Shift.
What makes pages feel slow?
BEACON extends the RUM Archive standard with LCP and INP sub-parts that separate the stages of loading and responding to an interaction. We’ll also add these metrics to our Real User Monitoring (RUM) dashboard in the coming weeks. Aggregating them into the suggested ‘Good’, ‘Needs Improvement’, and ‘Poor’ thresholds helps narrow down what needs to be optimized:
|
LCP Sub-part |
Document TTFB Nothing can be rendered until we have our HTML document. |
Load Delay Is JavaScript dependence slowing discovery of our LCP candidates? |
Load Duration Is bandwidth an issue, with the LCP image/video/webfont taking a long time to download? |
Render Delay When all is ready, is there something blocking the LCP from rendering? |
|
Good |
|
|
|
|
|
Needs Improvement |
|
|
|
|
|
Poor |
|
|
|
|
The query for the table above and others for every data is stored in BigQuery alongside the dataset as ‘Global LCP Sub-parts’ so you can customize it as you see fit.
The results challenge a common assumption: downloading the resource itself, such as an image, font, or video, typically contributes the least to perceived loading time. For most page views that breach the ‘Good’ threshold, the larger opportunities are discovering the LCP (load time) candidate and unblocking its render. Cloudflare customers can address some resource-discovery delays with Smart Hints.
The same workflow breaks down Interaction to Next Paint (INP), our measure of responsiveness, into input delay, processing time, and presentation delay:
|
INP Sub-part |
Input Delay Are our interactions waiting on the main thread becoming available? |
Processing Time Does processing the interactions themselves block the main thread? |
Presentation Delay How long does it take to paint any update to the screen? |
|
Good |
|
|
|
|
Needs Improvement |
|
|
|
|
Poor |
|
|
|
Query for above table stored as ‘Global INP Sub-parts’ in BigQuery
For the slowest interactions, JavaScript execution time covers the longest period but we also see a significant rise in presentation time, which is typically dominated by complex CSS layout recalculations. Cloudflare customers can use tools such as Zaraz to reduce the performance impact of third-party JavaScript.
How application architecture changes the picture
Speaking of JavaScript, we recently added support for Google Chrome’s new Soft Navigations API, which provides accurate LCP reporting for client-side navigations commonly used in single-page applications built with frameworks such as React, Vue, Angular, and Svelte.
|
LCP Percentile |
P50 |
P75 |
P90 |
P95 |
|
Hard Navigations |
|
|
|
|
|
Soft Navigations |
|
|
|
|
Query for above table stored as ‘Blink – Hard vs Soft Navigations’ in BigQuery
Soft navigations render two to three times faster than hard navigations at every percentile. But they do not eliminate the cost of the initial landing page, which is often considerably heavier:
|
LCP Percentile |
P50 |
P75 |
P90 |
P95 |
|
Landing Page |
|
|
|
|
Query for above table stored as ‘Blink – Landing Pages’ in BigQuery
For teams choosing this architecture, it’s important to be mindful of tradeoffs: faster subsequent navigations must offset a slower first experience. If users rarely progress beyond the landing page, a heavier initial load may never pay for itself.
What can researchers discover by combining data?
Because BEACON is an open dataset, its value is not limited to the fields it contains. Researchers can join it with other sources to explore new questions. For example, combining BEACON with the World Bank Group’s measure of GDP per capita reveals how economic conditions correlate with web performance by country:
Cloudflare Radar, our public data insights and visualizations platform, will start using this approach in a new Web Performance section on Radar, featuring correlations of their Internet Quality Index (IQI) data with BEACON data. IQI is an aggregation of the performance benchmarking data that powers our bi-annual network performance updates.
Pairing BEACON and IQI is particularly compelling because it splits the user experience into its two most influential components: the performance of the website a user is visiting, and the performance of the eyeball network getting them there. Both affect how quickly the page will load, and together they determine whether a visit to a website feels painful or seamless.
Early analysis shows the two tend to move together: good web performance usually coincides with good network quality, and vice versa. In the above graphs we see that the higher the bandwidth, the faster the perceived load time (LCP). For example in Europe, the bandwidth is higher relative to other continents, while the LCP is higher overall with the lower end.
The relationship between bandwidth and LCP was expected, but when comparing IQI to Transfer Size we saw something surprising. We would expect that transfer size would be uniform across continents — after all, the content of the sites are typically the same. However, see that Africa has a noticeably smaller transfer size, suggesting less content being downloaded by these users. Although we can’t be sure of the cause, we can observe that in the IQI data Africa has lower bandwidth, which suggests that businesses on the continent are adapting their websites to optimize towards the constraints of network conditions. High-quality eyeball networks are also potentially more forgiving to poorly-optimized websites, while a slow one exacerbates bottlenecks. Each of these hypotheses are potential directions for future analysis.
The new Web Performance section will explore how common these patterns are, and in particular how often one half of the experience cancels out the gains made by the other. Follow our progress on Radar.
We’ll continue to introduce more metrics and more dimensions over time, and we welcome requests for data you’d like to see next.
How we process all this data and make it useful
Anonymization
Publicizing a real-world dataset at this scale brings with it responsibility for privacy. Our Real User Monitoring (RUM) product is already built to be privacy-first, and for BEACON, we also strip out any potential customer website identifiers such as the domain name and URL paths. Ultimately, the community gains valuable insight without compromising the trust of the people and businesses behind it.
Normalization
For the primary table, including all websites from our data would lead to one of two problems:
- The largest sites would dominate the data by traffic volume, skewing performance metrics towards their architecture, visitor profiles etc., or:
- If we instead normalize every site down to the traffic volume smallest website, that would drastically reduce the overall number of records in the data.
These two extremes made it necessary to scope the dataset to the greatest number of the largest websites on our network to provide maximum diversity across architectures, technologies, geography, and more, all while retaining the total beacon count after normalizing. We found 10,000 to be a good balance: a globally representative sample with enough volume in the 10,000th that when we normalize the data down to their level, the overall dataset still represents billions of daily records collectively.
Aggregation
Finally, we aggregate records together where they share dimensions such as country, operating system, browser, and connection protocol, and discard any records with fewer than five data points to further guarantee no individual or specific site can be identified.
How to get access and contribute
BEACON is publicly available on Google BigQuery. We’ve included queries for all the data included in this post as examples you can adapt for your own analysis, and the RUM Archive website includes further documentation too.
We’d love to hear what you discover. Share your findings in our community forum or on Discord.
BEACON makes it possible to study web performance at a scale and level of geographic and browser diversity that has not previously been publicly available. We hope researchers, browser vendors, developers, and standards groups use it to identify where the web falls short and help make fast experiences available to everyone.
A special shout out to Cloudflare’s 1,111 intern project. This couldn’t have happened without the hard work of two of our wonderful summer interns, taking the initial idea through to what you see today. Their contributions were instrumental in launching this project. Thanks Chisara Duru and Tong Zhou!
Texas Midterm Elections #lastweektonight
Post Syndicated from LastWeekTonight original https://www.youtube.com/shorts/9vflU7z90Yk
Four months of VoidZero at Cloudflare: making the open-source JavaScript toolchain faster for all humans and agents
Post Syndicated from Evan You original https://blog.cloudflare.com/voidzero-update/
When VoidZero joined Cloudflare four months ago, we made a commitment to open source, promising that Vite, Vitest, Rolldown, Oxc, and Vite+ will stay open source, vendor-agnostic, and community-driven. As part of Cloudflare’s Birthday Week, where Cloudflare gives back to the Internet, we thought it’d be a good time to check in on how we’ve been doing against this commitment.
In the four months since VoidZero joined Cloudflare, we’ve shipped more than 80 releases, closed over 1,200 issues, and landed some big performance improvements, including:
- Oxc React Compiler, released in August, compiles React.js apps 10x faster
- Vitest 5, released in September, is up to 50% faster than Vitest 4
- tsgolint is now stable, and is up to 18x faster than ESLint in large codebases
- Oxfmt’s JSON, CSS, SCSS, Less, GraphQL, and YAML formatters are now written in Rust, making it 7x faster than Prettier
On top of this, Vite+, which unifies the entire toolchain with a set of great defaults, is now 1.0. And we’re making progress towards shipping “Bundled Dev” (f.k.a. Full Bundle Mode) — a new development mode that has been shaped by working with customers with massive web applications, including Cloudflare’s own dashboard. By being part of Cloudflare, our engineering team gets a much better view into scenarios that only occur in massive codebases.
VoidZero’s mission is to make the next generation of JavaScript developers more productive than ever before. And in 2026, that means making developers’ agents faster.
A faster developer experience for humans and agents
Developer experience and performance were always about improving the feedback loop while creating software. But now when we optimize for developer experience, we no longer just optimize for humans — we optimize for agents. And as inference gets faster, the speed of type-checking, linting, or building the code becomes the bottleneck again. The longer those processes take, the longer an agent has to wait before making progress and completing its goals.
VoidZero has always been focused on performance, but this new era of software has given us even more reason and motivation to make the entire toolchain faster for both agents and humans. And since the tools in the VoidZero toolchain are built on each other, from the compiler (Oxc) to the bundler (Rolldown) to the build tool (Vite), the linter (Oxlint) and the test runner (Vitest), any optimization at one layer automatically benefits everything built on top.
Oxc React Compiler — 10x faster compile times for React.js apps
We’ve recently shipped the Oxc React Compiler, a rewrite of the React Compiler, based on the React team’s rewrite in Rust. It is 10x faster than the original Babel implementation, uses less memory, and has a more complete implementation with better error handling. If you use Vite, you can enable the Oxc React Compiler by installing the oxc-transform-react package and enabling the compiler flag:
Vitest 5 — up to 50% faster than Vitest 4
Vitest 5, released in September, cuts test times by double-digit percentages across many common scenarios.
- Faster test runs. Vitest shares transformed files across projects, caches modules on disk, and sends less data between its main process and workers.
- vitest doctor. It breaks down setup, import, transform, and test time, then tests other configurations and recommends faster settings.
- Trace View. It records browser interactions, assertions, and DOM snapshots, so you can replay failures or inspect them in an HTML report.
- Conditional mocks with vi.when. Map arguments to responses without writing a manual
mockImplementation. - Better benchmarks. Benchmarks now work like regular tests, with fixtures, hooks, retries, filters, and assertions.
- Fewer false passes. Vitest fails unawaited async assertions, clears mock calls before each test, and adds the
--repeatsflag to help find intermittent failures.
tsgolint — now stable, up to 18x faster than ESLint in large codebases
tsgolint, the type-aware linting engine behind Oxlint, is now stable. It catches bugs that require TypeScript type data while running 12 to 18 times faster than ESLint with typescript-eslint.
- 59 type-aware rules. tsgolint now supports 59 of typescript-eslint's 61 type-aware rules.
- One pass for linting and type-checking. Oxlint can share one TypeScript program across both tasks instead of analyzing the project twice.
Enable type-aware linting and TypeScript diagnostics in your Oxlint config:
Oxfmt — 7x faster than Prettier with formatters now written in Rust
Oxfmt brings the speed of the Oxc toolchain to formatting. We rewrote its JSON, CSS, SCSS, Less, GraphQL, and YAML formatters in Rust, making Oxfmt many times faster than Prettier, while keeping Prettier-compatible output and ergonomics.
Bundled Dev — faster dev server for larger apps
We’ve made progress towards shipping “Bundled Dev” (f.k.a. Full Bundle Mode), which uses Vite’s production bundler during development. This should lead to significant dev server speed-ups in larger applications and reduce network overhead when working with remote sandboxes.
We’re looking forward to bringing Bundled Dev out of experimental status soon. Cloudflare’s Dashboard already uses Bundled Dev for all internal developers.
Vite+ is now 1.0 — a unified toolchain
Speeding up tools is one way of making humans and agents ship software faster. Another way is by reducing decision fatigue (“Which linter shall I use?”) and providing great defaults. We are excited to announce that Vite+ is now 1.0. Vite+ bundles all of VoidZero’s tools together into a single unified and fast toolchain.
Vite+ ships with Vite 8, Vitest 5, Rolldown, Oxlint, Oxfmt and task caching built in, and comes with great defaults. Check out the Getting Started guide to try it out today.
Cloudflare’s Open Source Investment
VoidZero was born in open source, and we believe a more sustainable open-source ecosystem benefits everyone. VoidZero is a proud member of the Open Source Pledge and as part of Cloudflare, we have the opportunity to expand that impact.
Cloudflare committed $1M to a Vite ecosystem fund to support maintainers and contributors in the original announcement. Since then, Cloudflare has committed an additional $1M to open source. Together, we’re doubling down on open source.
The open-source toolchain for the entire JavaScript community
There is more to come! Features we plan to ship in the next few months include major improvements to Oxc’s parser with up to 3x potential speedup, a re-designed chunking algorithm in Rolldown, and an open-source, self-hostable version of Void, the Vite-native deployment platform built on top of Cloudflare. Cloudflare and VoidZero both recognize our responsibility that we have to developers, and we do not take the community’s trust in us for granted. We’re in this for the long haul.
We are excited to keep shipping faster tools, and will continue to make every decision with the community in mind, just like we did when raising venture capital, or when we open sourced Vite+, or when we joined Cloudflare. Thank you for continuing to trust us with your projects and apps, supporting us, and building with us.
Introducing Forge: the open source pipeline for generating SDKs, CLIs, docs, and more
Post Syndicated from Dimitri Mitropoulos original https://blog.cloudflare.com/forge-open-source-generation-pipeline/
Today we’re introducing Forge, a fresh approach to generating SDKs, CLIs, docs, and libraries. Forge is an open source, pluggable generation pipeline that anyone can deploy and run for free.
Forge is early in its life, but already generates the output required for the cf CLI, and over the next few months will power Cloudflare’s API documentation, SDKs, and much more.
We built Forge because we needed it ourselves in order to treat agents as our customers. Now, we’re open sourcing it because we think everyone should be able to generate all the surfaces that agents need. It used to be that only developer products needed CLIs, API SDKs, MCP servers, all with great corresponding docs. Now these are table stakes for every product.
Our API outgrew our generators
Cloudflare’s API has over 3,500 operations, and the hundreds of services that power these APIs are written in many languages, including Rust, Go, TypeScript, and Python. As we embarked on building a CLI for the entire Cloudflare API, including our SDKs and API docs, we needed a code generation pipeline that could handle this scale. That pipeline needs to be flexible enough to work across languages and the ways each of our engineering teams operate.
We needed a way to reduce coordination overhead between teams. When a Cloudflare product team makes an API change, they need to be able to use a preview build of the Cloudflare-wide CLI, SDK, and docs site that will be generated, before merging that change and shipping to customers. We needed a way to ensure they didn’t inadvertently break the generation pipeline. And we needed a system that we could extend to generate more than just an SDK, from Cap‘n Web to MCP and beyond.
We’ve tried several hosted products that attempt to solve this, and relied on some in production. None of them solved this problem for us, and some have shut down entirely. One team would merge a change that inadvertently would break the generation pipeline, another team would discover this at release time, and we spent too much time swimming upstream through hosted tools we couldn’t control, coordinating changes between teams and vendors.
That’s how we started building Forge.
Forge seeks to fix all these problems: it runs in CI, on each team’s API repos, just like our AI code reviewer and test pipelines. It lints every change, and then generates preview builds of the CLI, docs, and SDKs with just your changes highlighted that you can install to test. It’s the same premise as Workers Previews: a full preview build for every change, but applied to SDK generation at scale, including when the API surface is distributed across hundreds of services and repositories. That’s what Forge seeks to deliver.
Forge transformers can generate anything, including Cap’n Web
Cloudflare has more reasons than most to want a generator that can go well beyond the normal language targets. Cap’n Web is Cloudflare’s RPC system that lets TypeScript call a remote API as if it were calling a local method:
Forge makes it possible to take an OpenAPI spec and generate Cap’n Web directly. This opens the door to generating bindings from Workers to other APIs. After all, bindings in the Workers runtime are implemented as Workers that expose RPC methods.
This isn’t specific to Cap’n Web: other popular tools you may already rely on need the same thing. If you use TanStack Query, you’d ideally want to be able to generate TanStack Query bindings for your application, built directly from your API itself. Always up to date, always validated against your real API. The same is true of generating Zod or Valibot schemas, MCP servers, or anything else that makes it easier to consume your API.
This is possible because Forge code generators are flexible. They’re built for flowing information from one output to another.
Forge transformers can be chained: generate outputs from other outputs
We’ve designed Forge to be pluggable, and support many input and output types. Forge provides CLI, SDK and docs generators, but there’s nothing stopping you from adding a transformer that generates a library-specific package or even a full dashboard or application. Forge supports OpenAPI as an input type today, but we’ve designed it to allow AsyncAPI, GraphQL, Cap’n Proto, Protobuf, or other input formats in the future.
This is about more than just compatibility: it lets you chain targets, using one target output to produce others. This is common in other generators where the CLI and Terraform targets are produced from the Go SDK. But what’s missing, and what Forge provides, is a way for the user to control this chaining system themselves.
We needed a solution for this ourselves, because our own cf CLI is written in TypeScript, which other SDK generators don't generally chain from for CLIs. But our own situation made us recognize the deeper problem: why should any SDK generator tool make this decision for you? Maybe you’re a Python shop, and you want the CLI to be in Python.
If you’re thinking “Well, but who cares if it’s in Python or not? The code is automatically generated,” it’s because CLIs are different. CLIs often introduce local-only behaviors that wouldn’t make sense in an SDK. Behaviors that you write by hand since they’re inherently not something backed by any API call. For example, the cf CLI has commands like cf dev and cf build that are added on top of the rest of the generated output. These commands need to call TypeScript APIs from other packages like Vite.
Now let’s add docs to the mix. If you’re generating your CLI and your docs purely from your OpenAPI spec, how do you feed those handwritten commands back into your docs, so they can be documented alongside the rest?
We couldn’t find an existing tool that does this today, and yet this is exactly what we need for cf. So we’re building it into Forge.
Change your API without breaking users
Forge is also setting us up for better API versioning. Cloudflare’s v4 API has been the one major version of our API for 10 years. Since then, it appears like we haven’t launched any new major versions, but by SemVer definitions we’ve made quite a few changes worthy of a new major version. At the same time, several operations across our API feature internal ‘v2’ tags or ‘beta’ identifiers that have long outlived that part of the product’s lifecycle.
After so many years of our v4 API, we’re keenly aware that a big new v5 would leave a lot of our customers behind. That’s why, with Forge releasing artifacts along the way, we’re working on an API versioning approach that allows us to release new major API versions without breaking old clients or SDKs.
We’ll have more on our SDKs very soon, including TypeScript, Rust, Python, Go, PHP, and Terraform. Especially Terraform. We know that upgrading any Terraform provider comes with its own set of rigor, and we’re going to put extra special care into the Terraform transition.
Critical tools should be open to all
We believe that building tools for APIs is a core part of the Internet, and you should be able to do that without needing a SaaS product. You should own your SDKs, CLIs, and docs. And if you generate them, then you should be able to do whatever you want, wherever you want, for free.
That’s why we’re making Forge available open source under the permissive Apache 2.0 license. We want people to join in on this journey with us, and contribute.
Or not? Maybe you want to keep everything to yourself. Go for it! You can run Forge on your own for any purpose, with custom modifications, for free, in private.
Acknowledgements: This project was also made possible by the design and implementation efforts of Dan Carter, Steven Chong, Krishna Paritala, and Shelley Jones.
The road to the agentic browser: A Kitesurf update
Post Syndicated from Celso Martinho original https://blog.cloudflare.com/kitesurf-update/
In August, we introduced Kitesurf, a browser for the agentic age that runs entirely on Cloudflare Workers. We built it around what agents need from the web, rather than carrying all the features and bloat of a browser designed for humans. If this is the first you’re hearing about it, we highly recommend you read the blog post where we introduced Kitesurf, for all the juicy technical details of how we did it.
Since then, we’ve put Kitesurf through increasingly realistic tasks and used internal and external feedback from customers to make it more capable and more efficient. Here’s what has changed, how you can try it today, and where we’re going next.
WebMCP support
Websites were not built for agents to use. Browsing today is a messy process of clicking pixels and hoping the right element loads. In a programmatic world this is slow and fragile. WebMCP helps by allowing developers to expose site functionality directly to agents, where they can call functions like searchFlights() instead of simulating clicks.
Cloudflare has been supporting WebMCP since its early days; just a few weeks ago we announced that site owners can now turn on WebMCP with one switch, so browser agents can discover and use tools on their sites without changing the site’s code, and Browser Run has been supporting WebMCP when using Chrome beta for some time now.
Today we are announcing that Kitesurf now supports WebMCP.
You can test this by going to our public Kitesurf playground, opening Cloudflare Radar, and navigating to WebMCP on the Application tab in the DevTools panel. As you can see, Radar exposes a list of WebMCP tools like navigate-to or set-location which allow clients to interact with the page and explore Radar programmatically.
If you target Kitesurf with your AI Agent:
You can see that the AI model can interact with the exposed WebMCP tools which you can use to complete tasks more reliably.
You can read more about how to use WebMCP with Kitesurf and Browser Run here.
New APIs, better WPT coverage
Since the initial announcement, we’ve been adding more browser standards so that agents can render more sophisticated pages. The list of the APIs that Kitesurf supports has grown, and now includes:
We added URL-based module resolution, JSON modules, and import map handling—important for sites that load JavaScript in chunks. Additionally we are using the new Cloudflare Workers’ module registry to support imports from URLs.
Iframe behavior has improved as well; now they load at the right time, stay better isolated, and display text correctly across more languages and encodings.
As we said at launch, running tests is how we keep the quality of both code and results under control without losing velocity while improving Kitesurf. Web Platform Tests (WPT) is a shared, open-source test suite that checks whether browsers implement web standards consistently.
We now pass 730,000+ WPT subtests and are growing. That’s 500,000 more subtests than when we launched. Here you can see the evolution over time, up to the latest version since we started the project:
Efficiency optimized for agents
For an AI agent, efficiency isn’t so much about loading pages fast, but about the latency of the agentic loop. To make Kitesurf truly agentic, we’ve aggressively optimized the browser engine’s internals so that every DOM traversal, timer, and font fetch is as lightweight as possible, ensuring the agent spends its compute cycles on reasoning, not waiting for the browser to catch up.
These optimizations include:
- Improved JavaScript execution with less work crossing between Boa and the DOM, making the boundary more compatible with real Web frameworks. Common reads such as getAttribute, id, and parentNode can now be answered inside the Wasm DOM instead of making repeated Boa → JavaScript shim → Wasm trips.
- Kitesurf does less repeated work when running timers and loading scripts, and releases memory from objects it no longer needs. It also handles objects and classes more consistently when code moves between its two JavaScript engines, resulting in running busy pages more efficiently.
- Kitesurf now loads fonts when they’re needed, fetches fewer fonts a page won’t use, checks which characters appear on the page before fetching language-specific font files and renders synthetic italics more faithfully.
Together, these optimizations help keep Kitesurf efficient for agents. Despite adding support for more web standards—and bringing Kitesurf closer to the capabilities of full-featured browsers like Chrome—its wall-clock time and CPU usage remain roughly in line with our launch benchmarks, and in some cases they have improved.
Plays better with Browser Run
Browser Run is our developer platform product that lets you programmatically control and run headless browser instances. When you use this API, you can select from a list of browser flavors we support, including Kitesurf.
This means that we have to make sure that all of our browsers are supported across the API surface. Starting today, Kitesurf has full Browser Run API coverage. You can use Kitesurf with CDP, Playwright, Puppeteer, or MCP.
One of the most popular Browser Run features, Quick Actions, provide simple interfaces for common browser tasks like capturing screenshots, extracting HTML content, generating PDFs, and more. When we launched Kitesurf, you could use Quick Actions from our REST API. Now you can also use them from inside a Worker script using the env.BROWSER.quickAction() binding:
Kitesurf runs in the terminal now
As we detailed in the How we built it section of our announcement blog post, Kitesurf separates PageScript, the isolate that handles the page session and runs the page code, from PageRenderer, which is responsible for generating the actual pixels from the computed page objects.
This not only gives great isolation and flexibility, but it also allows us to decouple and move the rendering logic to outside Kitesurf (to the client, for example, or to another Worker), while keeping the security-critical parts server-side, running in our network.
If this model sounds familiar, it may be because Cloudflare has another SASE product called Cloudflare Browser Isolation, which runs all untrusted web code at the edge of our global network while it “streams” the rendering data back to the clients.
We can do something similar with Kitesurf. To prove it, we moved PageRenderer to our Playground Worker and patched this version so that instead of converting scene data into an image, it outputs to Kitty—a terminal graphics protocol supported by modern terminals like Kitty itself, Ghostty, WezTerm, and others. We even went a step further and added a pure ANSI text mode for environments where Kitty isn't available.
The result is that you can now quickly open and render a page using Kitesurf without leaving the comfort of your terminal application. This is super useful not only because you can now browse the modern Web at a glance without context-switching, but you can also use this tool to see how an agent using Kitesurf “sees” a page.
To install the terminal version of Kitesurf, do this:
From now on just type this in terminal:
Here’s a demo of it working.
The terminal also sends back scrolling and click events, so you use the keyboard, arrows, or the mouse normally, as if you were in a dedicated browser application window.
And here is our Silent Space Marine Doom demo running in Kitesurf inside the terminal:
Where we go from here
We continue to iterate rapidly on the road to the best agentic browser for our customers and developers. Expect ever-better performance benchmarks and for the list of supported Web standards and WPT test coverage to continue to rise quickly. In fact, we’ve decided to publish the results here and here, in the open, so that you track them as we move forward, in real time.
We are going to continue exploring scenarios where decoupling Kitesurf and moving PageRenderer away from PageScript is an advantage for agents, or where higher frame rates are important. We may or may not have a 30fps Doom version running in Kitesurf as we write this.
We also want to address the elephant in the room: While we are currently prioritizing rapid development, we remain committed to open-sourcing Kitesurf. This is coming soon, but we want to do this right, so we are set up to support it for the long term.
Kitesurf stays true to its initial design goal: It runs entirely on top of Workers just like any other customer application does; that means we only use our publicly available features and APIs and have no access to any special privileges. This is not only a great way to dogfood and prove our own platform, but also the only way to make Kitesurf very cheap and scale automatically across the Cloudflare global network.
Give Kitesurf a try in the refreshed kitesurf.dev playground, and use it in your projects via Browser Run. It’s available for free while in beta, behind per-account limits. Keep an eye on our changelog and come chat with the team on Discord. Share your experience and send us feedback—we’ll be listening.
Introducing The Cold Start: pitch your startup live at Cloudflare Connect
Post Syndicated from Fatima Yusuf original https://blog.cloudflare.com/introducing-the-cold-start/
Sixteen years ago, Cloudflare was one of more than 1,000 startups hoping for a spot on stage at TechCrunch Disrupt.
We were not, on the face of it, an obvious choice. Cloudflare was infrastructure: we made websites faster and protected them from attack, which was not well understood by the general market at the time. Infrastructure is often invisible right up until the moment it becomes important.
But on September 27, 2010, Matthew Prince and Michelle Zatlyn got on the Startup Battlefield stage and launched Cloudflare to the public. During the presentation, people started signing up. Then more people started signing up. By the time the judges had finished asking questions, hundreds of websites had joined Cloudflare, putting our initial five data centers to the test in real time. In the seven days following, traffic through our network increased almost 10x and Cloudflare jumped from the 1,000th largest site online to one of the top 50.
Cloudflare didn’t win the main trophy that day. At the awards ceremony, TechCrunch founder Mike Arrington described what we did as something akin to "muffler repair for the Internet" and honestly, he had a point. But then he named us the Most Innovative Company. As Matthew wrote later: "You may not win the trophy, but you'll receive something else far more important."
There are moments in the life of a company when somebody gives you a room, a microphone, and a small amount of time to explain the thing you have spent months or years obsessing over. Most of the time nothing magical happens. Sometimes, though, the right people hear it at the right moment and suddenly an idea that has mostly existed between a handful of people starts moving through the world.
This October, as Cloudflare turns 16, we want to give five early-stage startups a stage of their own.
Introducing The Cold Start
The Cold Start is a live startup competition taking place next month at Cloudflare Connect in San Francisco. We’ll select five early-stage companies and give each of them five minutes on stage to explain what they’re building, why it needs to exist, and why they are the people who should build it.
We are less interested in perfect pitch decks than in interesting ideas clearly explained. You do not need thirty slides, a suspiciously precise TAM calculation, or a rehearsed story about how your childhood prepared you to disrupt accounts receivable. What we want is to understand the vision: what changed in the world that makes it possible, what you see that other people have missed, and why you cannot stop thinking about it.
The five finalists will make their case in front of the Cloudflare Connect audience and three people who've spent a fair amount of their lives thinking about companies, infrastructure, and the Internet:
- Matthew Prince, co-founder and CEO of Cloudflare
- Michelle Zatlyn, co-founder and President of Cloudflare
- Dane Knecht, CTO of Cloudflare
The judges will select one startup to win $500,000 in Cloudflare credits, take over a billboard in San Francisco, and receive an invitation to our VIP speakers dinner that evening.
Five companies, five minutes each, and a room full of people paying attention.
What are we looking for?
The Cold Start is open to ambitious early-stage startups that have raised less than $10 million. Beyond that, we are deliberately keeping the definition broad because the most interesting companies rarely arrive neatly categorized.
We want to see ideas that seem obvious once somebody finally builds them, and ideas that initially sound slightly unreasonable. We want infrastructure that appears boring until you realize everyone is going to need it; products that could not have existed a few years ago; strange new interfaces; new ways of building software; things aimed at enormous existing markets and things aimed at markets nobody has bothered to name yet.
Most of all, we want to meet people who have noticed something about the world and decided to do something about it.
As part of the application, we’ll ask you to tell us who you are, give us your one-line pitch, explain what you’re building and why, tell us about your funding and revenue stage, show us how Cloudflare fits into your stack, and point us toward anything else that helps us understand you and your work.
The goal is simple: make us understand why the thing you’re building should exist.
Applications are open now and close Friday, October 2, 2026.
Five minutes in San Francisco
The Cold Start will take place Monday, October 19, from 4:00-5:00 p.m. PDT at Moscone West in San Francisco, as part of Cloudflare Connect. Cloudflare will pay for the five finalists to fly to San Francisco for the competition.
Connect brings together people building and thinking about what comes next for the Internet. This year’s lineup includes AI pioneer Dr. Fei-Fei Li; Idealab founder Bill Gross; organizational psychologist and author Adam Grant; AMD CTO Mark Papermaster; Vue.js and Vite creator Evan You; Lovable co-founder and CTO Fabian Hedin; and OpenAI member of technical staff and creator of OpenClaw, Peter Steinberger.
For five young companies, we are reserving part of that stage. Each startup will have 5 minutes to pitch, followed by 3–5 minutes of questions by the judges.
There is something we like about that symmetry. Sixteen years ago, Cloudflare needed someone to take a chance on an infrastructure company with a difficult story to tell and give us a few minutes in front of the right room. Today, we are fortunate enough to have a stage of our own, and we want to pass that same opportunity on to companies that are just getting started.
Start small. Build something enormous.
There is a practical reason Cloudflare spends so much time working with startups: very small groups of people have an uncanny ability to attempt very large things.
The problem is that ambitious software increasingly depends on infrastructure that, not very long ago, only the largest technology companies in the world could afford to build for themselves. Global compute, storage, networking, security, real-time systems, AI inference, and the ability to survive the possibility that the thing you made suddenly becomes popular should not require a company to first become enormous.
We think you should be able to reach for those capabilities on day one.
That is part of the idea behind Cloudflare for Startups, through which eligible early-stage companies can receive up to $350,000 in Cloudflare credits for one year. It is also part of the reason we continue expanding Cloudflare’s developer platform: a tiny team should be able to build something on Tuesday and if the Internet decides it likes it on Wednesday, spend Thursday focused on the product rather than hastily becoming experts in global infrastructure.
Cloudflare began with its own slightly unreasonable premise: that the performance, security, and global compute available to the largest companies on the Internet should be available to everyone on day one. In 2010, we got a chance on a stage to explain why that matters.
Sixteen years later, we have a much larger network, a somewhat larger team, and significantly better circuit breakers.
Now we want to hear what you’re building.
EmDash 1.0: the stable CMS with a secure plugin registry
Post Syndicated from Scott Buscemi original https://blog.cloudflare.com/emdash-cms-plugin-registry/
When we introduced EmDash on April 1 as the “spiritual successor to WordPress”, the buzz was hard to ignore. Walking around a WordPress conference that month, we couldn’t walk far without hearing murmurs about EmDash from fellow attendees.
But alongside the excitement and curiosity has been a seed of doubt among some in the industry. Was this just an April Fools’ joke?
It was not. Today, we are releasing EmDash 1.0: a stable, free, and open source CMS built on Astro, ready to power a production website, your agency’s vibe-coding platform, or your hosting company’s site-building experience.
Developers build with Astro, editors manage content through the EmDash admin, and agents can work through the API, CLI, or built-in MCP server. EmDash 1.0 brings those pieces together with production-tested editorial, media, localization, migration, and deployment workflows.
We are also launching a decentralized plugin registry that lets developers publish without handing ownership of their identity or releases to a central marketplace, while site owners can discover and install their plugins directly from inside EmDash.
The road to 1.0
Since EmDash's first beta, developers have launched real websites with it. Even so, we kept hearing a reasonable response: “This looks interesting. Let me know when it is 1.0.” Before relying on EmDash for their sites, they wanted confidence that it was stable, secure, that upgrades would protect their content, and that we are fully committed to maintaining it.
EmDash 1.0 is our answer to that. For the past five months, we have worked with contributors and production users on the parts of the CMS that every site depends upon: data safety, database migrations, editorial workflows, localization, plugin security, performance, and the reliability of the admin, API, MCP, and media experiences.
Real deployments shaped much of that work, uncovering edge cases and identifying needs that only show up when a site is serving real traffic and being used by real teams of editors.
As one example of this, Avulux converted a custom microsite to EmDash after dealing with the maintenance burden of WordPress for too long. Since EmDash is an agent’s best friend, using the EmDash Agent Skills helped that transition take less than a day to complete.
“The site had to be fast to use and simple for our team to update,” says Greg Barbosa, Director of Innovation and Systems at Avulux. “WordPress had become the opposite of that. With EmDash, we now have a shared platform that developers can extend and marketers can edit content."
In August, we migrated the Cloudflare Blog to EmDash as part of our “Customer Zero” approach. Working alongside our content engineering team provided actionable insights around localization, media management, the admin editor experience, and scaling. Comfortably handling the traffic load for the Cloudflare Blog meant being ready for millions of pageviews per week, spikes up to 5,000 requests per second (RPS) of legitimate traffic, or sporadic DDoS attacks. The optional KV object caching, Hyperdrive database adapter, and Workers Cache compatibility were all features spawned from our migration project that are widely available to all customers now.
Built in public, open to everyone
A CMS sits at the heart of an organization’s web presence. It is trusted with its most important data, and is often used by dozens of editors every day. They need to be able to know they can rely on it, without fear of vendor lock-in or changing business priorities. For that reason, EmDash is completely free and open source, using the flexible and permissive MIT license.
EmDash 1.0 could not exist without its open-source development community. At the time of writing, more than 175 people have contributed to the project, across more than 1,800 commits. The rise of agentic coding tools has presented both challenges and opportunities to open-source projects, and we have deliberately built a project where the agents can help the human developers, rather than being overwhelmed by them.
We are particularly grateful to the core group of the most dedicated contributors, who between them have shipped hundreds of improvements to all areas of the project. They include @swissky, @danielmlr, @MA2153, @marcusbellamyshaw-cell, and dozens of others. Contributors have translated EmDash into 25 languages, from Arabic to Ukrainian.
Particular recognition is due to Noah Pham, who joined Cloudflare as an intern and became EmDash’s second maintainer alongside Matt. Noah contributed more than 80 changes, taking ownership of major parts of the media library, content editor, and admin interface. We have said that interns ship meaningful work at Cloudflare; Noah’s work is now at the heart of EmDash 1.0.
There is plenty more to build, and contributing does not have to mean writing code. If you want to help with code, translations, documentation, testing, design, issue triage, answering questions, or just welcoming new users, join over 800 others in the EmDash community on Discord.
A growing ecosystem
A content management system thrives when the ecosystem around it is healthy and supported. We’ve been excited by the theme companies, plugin shops, agencies, and platforms who are creating new services and products using EmDash.
- Lexington Themes offers 44 Astro themes with EmDash variants, giving teams a beautiful and functional starting point for their site, complete with reusable components and built-in content collections.
- Urumi is using their WooCommerce expertise to release EmDash’s first eCommerce plugin.
- Empress is launching a platform for multi-brand entities, offering the flexibility of managing a fleet of sites with natural language or a conventional CMS admin panel.
“Empress's delightful multisite experience would not be possible without the foundations EmDash has laid: sites that are fast, safe to extend, and easy for people and agents to read and act on,” says Raj Makker, Empress’s founder. “EmDash unlocks powerful control over a website, and Empress builds on it to give you complete control over as many sites as you want. We're excited to be part of this journey.”
A plugin registry that does not own the ecosystem
With EmDash 1.0, developers can publish sandboxed plugins and site owners can discover, inspect, and install them from the EmDash plugin registry.
Traditional plugin registries usually combine three roles: they provide the publisher’s account, hold the authoritative package record, and operate the catalog where users discover it. That is convenient, but it also makes one company the gatekeeper for both identity and distribution. If an account is suspended, a listing is removed, the rules change, or the service shuts down, publishers cannot take the same identity and release history somewhere else.
EmDash separates the plugin from the catalog. Publishers retain control of their packages and release history, while EmDash provides a convenient place for people to find and install them. Other services can index the same publications, build their own catalogs, and apply their own policies without requiring developers to start again.
The EmDash catalog applies default content moderation to the names, descriptions, links, and images it displays. Moderation can hide harmful or inappropriate material from this catalog, but it does not rewrite a release, take ownership of the plugin, or erase the underlying publication.
The registry is built on AT Protocol (atproto), a decentralized network protocol that powers Bluesky and a growing ecosystem of applications. Plugin authors publish with an Atmosphere account, the portable identity also used across these applications. The package and release records are signed by the publisher and stored in the publisher's own account.
EmDash hosts the default registry services so publishers and site owners can use them without running infrastructure themselves. We hope others will build new catalogs, moderation systems, publishing tools, and other services we have not imagined yet. To help this, we have released all of our services as open-source software, including the aggregator that powers the plugin registry, the labeler service that uses Workers AI to moderate package descriptions, and an Astro live content loader to make it easy to include plugin listings in any Astro site. We are excited to see what the community will build with them!
There’s no centralized controller that can take over plugins or remove them on a whim. We believe the security of plugins and the registry should be baked into code, rather than trusting any central authority or code of conduct.
Decentralized publishing does not mean accepting unverified code. Atproto repositories use signed Merkle Search Trees, so an inclusion proof connects the exact release record to a signed commit from the publisher’s account. EmDash can therefore verify the record independently instead of trusting the catalog’s copy. It then checks the plugin’s checksum, package name, version, requested access, and any required build provenance, and confirms that the downloaded bundle matches the signed record.
The registry supports free plugins today, and we aim to add support for paid plugins in future, with the same decentralized model as now. We are watching the Atproto Spaces Alpha with interest. Anybody should be able to run a secure, paid plugin marketplace. We want publishers to be able to make money from their software.
For now, plugin authors can publish useful software without asking permission from EmDash — and site owners can understand exactly what that software is allowed to do before they run it.
Plugins with clear boundaries
Plugins are the core of a CMS ecosystem. They save site developers from rebuilding the same integrations and workflows, while giving experts a way to share their best practices — and potentially build a software business.
Agents make that reuse even more valuable. An agent can build a one-off integration, but it still has to understand the problem, generate and test the code, and maintain it afterward. A plugin captures that work. Another agent can install and configure a proven solution instead of starting again from scratch.
That convenience creates a serious security concern: plugins are code you did not write, operating alongside valuable content and customer data. With WordPress, plugins run inside the same PHP process as the rest of the application, with direct access to its database, filesystem, and network. A contact-form plugin can technically read unpublished posts, modify another plugin, or send data anywhere. Site owners must trust that it will not — and that a future update will not change its behavior.
Sandboxed EmDash plugins use a different model. Each plugin runs in an isolated runtime with access to its own private storage, but not to the site’s content, media, users, secrets, environment, filesystem, or network. It gains additional abilities only when they are declared by the plugin and approved by the site administrator.
Installing a sandboxed plugin therefore feels more like installing a mobile app than a traditional CMS plugin. EmDash shows what the plugin wants to do before it runs, and the runtime limits it to those approved abilities.
That lets plugins perform useful work without receiving unrelated access:
|
A plugin could… |
It might need to… |
It still cannot… |
|
Index published articles for search |
Read content and contact the search service |
Edit articles or contact other hosts |
|
Optimize uploaded images |
Read and manage media |
Read user content |
|
Send publishing notifications |
Observe publishing and send email |
Change the content being published |
|
Provide configurable webhooks |
Read selected events and contact public destinations |
Reach private networks or other plugins’ storage |
The important part is that these abilities are independent. Giving a plugin access to media does not also expose users or unpublished content. Allowing it to contact one service does not open the rest of the network. These boundaries are enforced by the runtime, not left to the plugin author’s good intentions.
This isolation is not limited to Cloudflare deployments. On Cloudflare, EmDash runs each plugin as a Dynamic Worker through the Worker Loader. On Node.js, EmDash starts workerd — the open-source Workers runtime — as a separate process and runs each plugin as an isolated service inside it. Plugins use the same manifests and capability-gated APIs on either platform. See the plugin sandbox documentation for setup and runtime differences.
From a single site to a website platform
EmDash can power an individual Astro site, but it is also designed for companies building website creation and hosting products.
Workers for Platforms lets those companies run each customer’s site as a Worker on Cloudflare’s global network. They do not need to provision a server for every site or build the surrounding networking and deployment infrastructure themselves. That leaves them free to focus on the experience their customers use to create and manage a website.
EmDash provides the content layer for that experience. A platform can use the admin interface directly, build its own interface on the API and CLI, or put an agent in front of the built-in MCP server. A bakery owner could update opening hours by asking for the change in plain language; the platform’s agent would handle reading, updating, and saving the content.
The sandboxed plugin model also gives platforms a safer way to offer extensions across many customer sites. Plugins receive only approved access to content, media, users, email, or external services, rather than running with unrestricted access to the whole application. Platforms can run their own plugin marketplaces with access to the full registry — or curate a selection of pre-approved plugins.
We are always looking for additional hosting partners that want to join us in developing new agent-oriented CMS experiences. Reach out to us if you’d like to learn more about reinventing with EmDash.
EmDash Build: an open source AI site builder
We are also releasing and open-sourcing an alpha of EmDash Build, an AI site builder that hosting providers, website builders, and platforms can run themselves and integrate with their own systems. Try the demo today at build.emdashcms.com, or explore the code.
If you’re building a site today, for yourself or for a client, you won’t start in an IDE. You’re more likely going to start with a chat box, and describe to an agent what you want. But once you have something, you could find that changing simple things requires you to go back to that prompt box, and either roll the dice on the result, or burn credits for a one-line change.
EmDash Build creates an EmDash site instead, which brings the full stack: server-rendered Astro pages, a database, media storage, and an admin interface. The agent designs a content model from the brief, fills it in through EmDash's MCP server, and writes the pages that display it. After that, you or your customer can edit text right on the page, schedule posts, or let an agent do it for you.
In EmDash Build, each project gets its own Cloudflare Sandbox container, where the agent, built on the Agents SDK, verifies its own work. Artifacts tracks every change as a git commit. When the site is published, the content moves into a production EmDash site, and deploys to the host's Workers for Platforms namespace.
Get started and get involved
With the release of EmDash 1.0, now is a great time to migrate your company’s marketing site or have an agent spin up that side project you’ve been talking about. Try out the EmDash playground site here.
To create a new EmDash site locally, via the CLI, run:
Or you can do the same via the Cloudflare dashboard below:
If you’re ready to develop an EmDash plugin, our documentation has a step-by-step guide for creating and publishing a plugin to the registry.
We also welcome you to join our growing community of contributors on Discord. You don’t have to be an engineer to get involved — we welcome translators, issue triage managers, user experience designers, marketers, and all others who are excited about the future of content management systems.
Supporting native Rust in Workers with the new Emscripten target for wasm-bindgen
Post Syndicated from Guy Bedford original https://blog.cloudflare.com/rust-workers-emscripten-target/
Today we’re announcing the first public experimental preview of a feature to better support native Rust code and even Tokio-based applications just running natively on Workers: first-class support for the Emscripten wasm32-unknown-emscripten Rust compiler target on the wasm-bindgen open source toolchain and Cloudflare’s Rust Workers.
wasm-bindgen is the open source toolchain powering Rust-based WebAssembly applications on our V8-based Workers Runtime. Enabling the Emscripten target for wasm-bindgen has been a long-term effort, first initiated by Google over a year ago, and then further reviewed and supported by the Cloudflare engineers maintaining wasm-bindgen.
While still in pre-release, we’re excited to share the new workflow possibilities this work enables in running native wasm-bindgen Rust applications with Emscripten on the web, Node.js, and on Cloudflare’s global Workers platform.
In testing we’ve been able to see significantly improved library compatibility for Rust Workers. To illustrate the sort of capabilities supported, we were able to get a Rust-native Minecraft server (Pumpkin) running inside of a Durable Object with TCP ingress, using real TCP sockets via Tokio. See the end of this post for a full description of this port.
Emscripten is an open-source WebAssembly compiler toolchain initially created by Mozilla and currently maintained by Google engineers, which makes it possible to run and bridge native code with the web platform, including supporting and virtualizing platform features such as timers, file system operations, sockets, and other native functionality.
Since Cloudflare Workers supports Web Platform APIs and Node.js compatibility, we are able to support Emscripten on Workers using its Node.js compilation flags, fully virtualizing native platform features such as timers, file system operations, and sockets on top of our existing Node.js APIs. And with our work on Tokio support, Rust code building on top of Tokio’s async runtime ecosystem can now also be fully integrated into JavaScript-based host environments with this Emscripten target.
We’ve made these current experimental patchsets available with example applications to try out today, including:
- Building Emscripten Rust Workers
- Running the Tokio async runtime in a Worker
- TCP Sockets on Workers with Emscripten and Tokio
Supporting the wasm32-unknown-emscripten target in wasm-bindgen
Mitch Foley on Google’s Portable Toolchains team first encountered the need for Rust WebAssembly toolchains to interoperate with C++ when another internal team at Google was interested in using wasm-bindgen to interface with their JavaScript. The goal was for wasm-bindgen to drive the build and produce the companion JavaScript, while Emscripten’s linker (wasm-ld) would be able to link in any C++ dependencies needed.
Internally, Google uses Emscripten in C++ codebases to generate JavaScript along with the rest of their applications, allowing the C++ and JS to interact with one another. While Emscripten was capable of linking in Rust code as a dependency, the thing it couldn’t do was provide a robust binding system between Rust and JavaScript like wasm-bindgen does.
The problem was both tools assume they are in charge of loading and interacting with JavaScript and generating the final JS and Wasm output. Because of this conflict, Google internal users would have to commit to using one or the other toolchain and never both, and adding a second set of tooling would have doubled the support surface for Google’s Portable Toolchains team.
Mitch and his colleague Yifan Yang crafted a plan to have them work cooperatively: Emscripten would continue to drive the build, load the Wasm module, and provide the companion JS, while wasm-bindgen would produce a smaller portable version of its JavaScript bindings in a format that could be directly included in Emscripten’s library system.
This wasn’t just a technical problem — both Emscripten and the wasm-bindgen maintainers had to support this plan and be willing to maintain integration tests that depended on the other. With feedback from Google’s Portable Toolchains team, Google’s Wasm Tools team, and Cloudflare engineers, this finally resulted in the required changes landing in both projects.
As a result of these efforts, the wasm-bindgen and Emscripten toolchains now have seamless interoperability under the new -sWASM_BINDGEN configuration:
- C++ Emscripten code driven by Emscripten’s compiler can be built against static wasm-bindgen Rust code, fully supporting the wasm-bindgen bindings layer alongside the Emscripten bindings layer.
- Rust applications using wasm-bindgen and driven by Rust’s compiler can now be built for the Emscripten target, fully supporting Emscripten’s bindings layer alongside wasm-bindgen’s bindings layer.
See the wasm-bindgen Emscripten documentation page for more information about using this target.
Rust library support for Emscripten
After landing the wasm32-unknown-emscripten target support in wasm-bindgen, early prototypes by Cloudflare engineers demonstrated clear success for supporting this target on Cloudflare Workers. Many libraries worked out of the box, even including low-level systems libraries, since Emscripten already supports the target_family = unix in Rust.
Some low-level systems libraries that were unaware of Emscripten required patching, for example libc, socket2, and Mio. Even for these low-level libraries, patches primarily involved adding the Emscripten target to the existing platform gates, for example to explicitly allow target_os = “emscripten”, in place of Wasm platform gates.
Overall we posted these target support patches fairly infrequently, and they were mostly trivial when needed, with the Rust library maintainers very receptive to reviewing the support.
That said, one of the critical foundational libraries that needed significant support was Tokio.
Tokio support
Cloudflare Workers are single-threaded and hosted within a JS event loop, while Tokio async is designed around blocking operations being supported through threaded parking semantics. The two models are clearly not compatible with each other — a blocking operation such as a pending socket read or epoll wait cannot block the shared JS event loop.
To get around this, we had two options: WebAssembly JavaScript Promise Integration or to modify Tokio to support event loop runtime integration.
To support Tokio building for Emscripten, we have contributed full Tokio support patchsets that are being reviewed upstream, with the first target support patch for wasm32-unknown-emscripten already landed upstream in Tokio. With these patchsets, we’ve been able to fully support both approaches in Cloudflare Workers. In our Rust Workers Tokio examples, these patches are required directly pending further integration upstream.
Supporting JSPI
WebAssembly JavaScript Promise Integration (JSPI) maps directly onto Tokio’s existing parking semantics. This is because JSPI allows a blocking Wasm call to suspend the WebAssembly stack on a synchronous operation and return control to the JS event loop, exactly as one would expect of a park.
But when a new Wasm call is made while an earlier one is suspended, JSPI doesn’t break: it instead supports having a new WebAssembly stack being entered while arbitrary existing stacks are suspended at the same time.
The problem here, though, is that Rust itself isn’t aware that its stack is being switched out from under it. Tokio’s runtime context is tracked via a thread local, but a JSPI stack switch is not a thread switch, so the suspended and new stack still share the same thread-local runtime context. As a result, the Tokio runtime context still thinks it is in the parked context when a new Wasm call enters, and then panics because the runtime is already entered.
Supporting fully reentrant JSPI therefore requires careful thread local handling to split context between JSPI context switches. To support this, the thread-local context itself must be swapped on each JSPI enter, exit, suspend, and resume. In effect this is cooperative time-multiplexed threading, with each suspended stack carrying its own runtime context.
With our pre-release Tokio patchset, we were able to implement and verify this model. Finalizing the design and upstreaming it is ongoing in collaboration with the Tokio and Emscripten teams.
Adding an event loop runtime to Tokio
The other runtime approach is full event loop integration. Event loops are of course a common paradigm in native UI applications, so the idea of supporting an event loop runtime for Tokio was certainly not something completely unfamiliar to the maintainers in discussions we had around the Emscripten target support.
The question was rather how to design an event loop for Tokio in such a way that it could work across native applications (including Windows and macOS), as well as for WebAssembly embeddings in JavaScript hosts.
If we could design a general LocalEventLoop runtime for Tokio, we could solve this problem more generally.
A Tokio runtime does two things in a loop: (1) it polls tasks until nothing is ready, and then (2) it waits. The wait is what makes it a runtime rather than a library: the thread parks inside the I/O driver until a socket becomes readable, a timer expires, or another thread wakes it.
But when the host already has its own event loop, Tokio's loop cannot run inside it without blocking the host's. The way around this is to split Tokio's loop in two with both parts able to integrate with the host: (1) becomes an explicit drive() operation that runs one batch of ready tasks and returns, and (2) is replaced by a wake, so that instead of parking, the runtime tells the host it has work and the host calls drive() when it is ready to.
Our proposed LocalEventLoop design for Tokio is a LocalRuntime whose wait has been replaced by a wake. It is built with a standard std::task::Waker that the host owns, which instead of being used to signal that a future should be polled soon, is used by the Tokio runtime to signal that the runtime itself should be driven soon.
Consider the example of a socket read under a regular Tokio runtime:
This would correspond to the following call diagram:
Instead, with LocalEventLoop we can write:
Here, spawn_local returns immediately, with the host event loop taking responsibility for driving the spawned task to completion via el.drive() calls from the host. When stream data is unavailable, the runtime simply returns, handing back control to the host. Once the socket becomes readable, Tokio uses the host_waker to signal that the runtime needs driving.
This LocalEventLoop flow corresponds to the following call diagram:
Everything that would have unparked a native runtime's thread wakes the host instead: a spawn, a task woken from another thread, a socket becoming readable, a timer expiring. Because a Waker is Send + Sync and carries no execution semantics, its implementation is just a notification to the host's event loop. This makes the contract safe by construction: a wake arriving from another thread, from a host callback, or even during a drive, queues work rather than re-entering the runtime. The drive that follows runs on the owning thread with nothing else on the stack.
The one thing you cannot do is wait. block_on still exists and runs a future as far as ready work carries it, but where a normal runtime would park, LocalEventLoop::block_on panics instead. This is because nothing could wake that future from inside the call since its wait belongs to the host.
With this design, the host event loop is never blocked, and interleaves its own work with Tokio's, one batch at a time. The same architecture embeds into a GTK main loop, a Win32 message pump, or a Cocoa run loop. In addition, any number of these runtimes can co-exist due to their cooperative execution semantics.
Supporting sockets and epoll on Emscripten
With both Tokio runtime integration approaches fleshed out for the Rust Emscripten target, we were then able to support most of the Tokio test suite, with one major subsystem still unsupported — the net feature. This includes its sockets APIs: TCP, UDP, and Unix sockets. The reason for this was that Emscripten only supported poll() and a WebSocket emulation layer, but not epoll_wait(), on which Tokio’s I/O driver is built (via mio).
For Cloudflare Workers, we wanted to be able to fully integrate with our TCP sockets APIs, including upcoming inbound TCP. To do this, we would need to build a bridge between Emscripten’s virtualization layer and our own sockets API layer.
Instead of having to build this bridge ourselves, we realized we already have one: the node:net API we support in our Node.js compatibility layer. Emscripten had an -sNODERAWFS mode to bridge natively into Node.js FS APIs, so the same approach could give us a sockets bridge without Emscripten or Cloudflare Workers needing to implement any custom APIs on either side.
We contributed this work in over 40 pull requests to Emscripten, which is now the –sNODERAWSOCKETS layer compilation option, enabling support for epoll, TCP, UDP, and Unix sockets for Emscripten applications in Node.js — and, because Workers implements the same node:net API, on Workers itself as well.
Under JSPI, Emscripten's epoll_wait() simply suspends the stack until readiness, so Tokio's I/O driver works as on native. For LocalEventLoop, readiness instead had to reach the Waker from a JS callback. To support this, we drafted an Emscripten proposal for a new emscripten_epoll_add_listener API to associate a callback on an epoll’s ready events. The next drive() then collects these events with a zero-timeout epoll_wait(), so Tokio's existing I/O driver can be used unchanged.
Running a Minecraft server on Workers
To test out this new target, the challenge was raised to see if a Minecraft server could be deployed to Workers. Dan Lapid then implemented a Pumpkin Minecraft server running on a Durable Object over a single weekend.
Pumpkin is a Rust Minecraft server built on Tokio and designed for multi-core machines. World generation runs on a dedicated thread pool, while the game tick loop and chunk scheduler each run on their own OS threads.
Inside a Durable Object there is exactly one thread, so getting Pumpkin to run there meant turning those threads into cooperative tasks on the event loop. Leaning on the Tokio integration, the tick loop and chunk scheduler became async tasks and each Rayon job became a Tokio task. World generation then runs on the event loop itself, taking one turn per chunk and interleaving with network I/O and game ticks rather than blocking them.
For persistence, Pumpkin writes its world through ordinary std::fs. Under Emscripten’s -sNODERAWFS option file system calls get forwarded to the node:fs Node.js compatibility layer for Workers. Since this bridge is just JavaScript, it is easy to swap out. Dan’s worker-fs-mount library enables mounting a node:fs-compatible file system with its durable-object-fs backend, which stores files as rows in the Durable Object's SQLite storage. With this integrated, every file Pumpkin saves becomes a row in the object's database, written synchronously and committed with the Durable Object's transaction. Pumpkin itself has no idea it isn't on disk, and a restarted object boots straight from the same world.
Networking needed no changes in Pumpkin either. Each player's connection arrives through Workers TCP ingress at the Worker's connect() handler, which forwards it into the Durable Object. There, handleAsNodeConnection() from cloudflare:node dispatches the socket to a net.Server listening on that port inside the object – a new TCP counterpart of handleAsNodeRequest(). Emscripten’s -sNODERAWSOCKETS backend implements TcpListener on top of net.Server, so the server accepts players exactly as it would on Linux, and the returned promise tells the object when the last player has left, so it can save and shut down.
Running a fully persistent Minecraft server inside a Durable Object with multiplayer support demonstrates the level of native compatibility that is possible with this new Emscripten target. We’re excited to see what native Rust applications you can bring to the platform.
Try it out
We’re making these full patchsets and workflows available today for experimental use. Improving wasm-bindgen’s support for modern WebAssembly standards for all users is part of our ongoing commitment to the Rust and Wasm ecosystem.
We welcome all contributions and feedback — find us on GitHub and in the #rust-on-workers channel on Cloudflare’s Discord.
Best of The History Guy: Television
Post Syndicated from The History Guy: History Deserves to Be Remembered original https://www.youtube.com/watch?v=9fRHWqVnUaQ
New Attack Against RSA
Post Syndicated from Bruce Schneier original https://www.schneier.com/blog/archives/2026/09/new-attack-against-rsa.html
ArsTechnica is reporting on a “new” attack against RSA, one that bypasses factoring.
First, this attack isn’t new. The original research is from 2007. What is new is the implementation.
Second, it is a forgery attack. It allows an attacker to forge digital signatures. It does not recover the private key from the public key.
Third, the attack only works against pure signatures. That is, signatures without any formatting or padding. This is not generally how we use RSA in practice.
Fourth, speed is all relative. This is not a polynomial-time algorithm; it’s a subexponential-time algorithm. But it is somewhat faster than factoring. The authors were able to forge messages for 1024-bit RSA with 1380 CPU core-years (over five real-world months).
The authors have a webpage that explains the context much better than the article. And here’s the paper.
EDITED TO ADD: Slashdot thread.
Zero-Day Exploitation of Citrix NetScaler ADC and Gateway: CVE-2026-88771 and CVE-2026-88772
Post Syndicated from Rapid7 original https://www.rapid7.com/blog/post/etr-zero-day-exploitation-of-citrix-netscaler-adc-and-gateway-cve-2026-88771-and-cve-2026-88772
Overview
On September 27, 2026, Citrix disclosed eight new vulnerabilities affecting NetScaler ADC and NetScaler Gateway, including two critical remote code execution (RCE) vulnerabilities: CVE-2026-88771 and CVE-2026-88772. Both of these RCE vulnerabilities carry a critical CVSSv4 score of 9.5, and both have been confirmed as being actively exploited in the wild as zero-days prior to the vendor disclosure.
CVE-2026-88771 affects vulnerable NetScaler deployments in their default configuration, with no additional product features required. The vendor has also indicated that the attack complexity for exploiting CVE-2026-88771 is low, meaning reliable RCE is likely against all vulnerable NetScaler appliances regardless of their configuration. This is especially concerning due to the prevalence of NetScaler appliances.
CVE-2026-88772 is a memory corruption vulnerability and requires the DTLS feature to be enabled on the appliance. The vendor has indicated that the attack complexity is high, meaning achieving reliable exploitation may be more difficult for an attacker than that of CVE-2026-88771.
The U.S. Cybersecurity and Infrastructure Security Agency (CISA) reports active exploitation is occurring globally, and added both CVE-2026-88771 and CVE-2026-88772 to its Known Exploited Vulnerabilities (KEV) catalog on September 27, 2026. Multiple CERTs worldwide have begun issuing alerts due to the critical nature of this situation.
The following table summarizes all eight vulnerabilities:
|
CVE |
CVSSv4 |
Vulnerability |
Exploitation confirmed |
|---|---|---|---|
|
Improper input validation leading to RCE in a default configuration (CWE-20) |
Yes (CISA) |
||
|
Memory overflow leading to RCE in a DTLS configuration (CWE-119) |
Yes (CISA) |
||
|
HTTP request smuggling (CWE-444) |
No |
||
|
Policy bypass involving URL expressions (CWE-16) |
No |
||
|
Memory overflow in Gateway or AAA configuration (CWE-119) |
No |
||
|
Memory overflow in load balancer of type Oracle configuration (CWE-119) |
No |
||
|
Memory overflow in a LB/CS or CGNAT-LSN/NAT64 configuration (CWE-119) |
No |
||
|
Predictable TCP initial sequence numbers (CWE-342) |
No |
Mitigation guidance
The following vendor-supplied updates are available to remediate all eight vulnerabilities. Rapid7 strongly recommends updating affected NetScaler appliances on an emergency basis, outside of normal patching cycles, and investigating vulnerable appliances for signs of compromise.
-
Citrix NetScaler ADC and Citrix NetScaler Gateway 14.1-73.37 and later releases.
-
Citrix NetScaler ADC and Citrix NetScaler Gateway 13.1-64.23 and later releases of 13.1.
-
Citrix NetScaler ADC 14.1-FIPS 14.1-73.37 FIPS and later releases of 14.1-FIPS.
-
Citrix NetScaler ADC 13.1-FIPS and 13.1-NDcPP 13.1.37.279 and later releases of 13.1-FIPS and 13.1-NDcPP.
For the latest mitigation guidance, please refer to the vendor advisory.
Rapid7 customers
Exposure Command, InsightVM, and Nexpose
Exposure Command, InsightVM, and Nexpose customers can assess exposure to all the CVEs listed in this blog with authenticated vulnerability checks expected to be available in today’s (September 28) content release.
Intelligence Hub
Customers leveraging Rapid7’s Intelligence Hub can track the latest developments surrounding CVE-2026-88771 and CVE-2026-88772, including indicators of compromise (IOCs).
Updates
-
September 28, 2026: Initial publication.