Ladybird is an open-source
project aimed at building an independent web browser, rather than
yet another browser based on Chrome. It is written in C++ and licensed under a
two-clause BSD license. The effort
began as part of the SerenityOS project, but
developer Andreas Kling announced
on June 3 that he was “forking” Ladybird as a separate project and stepping away from
SerenityOS to focus his attention on the browser completely. Ladybird
is not ready to replace Firefox or Chrome for regular use, but it is showing
great promise.
As noted by the exploit developer, leveraging this POC is dependent on the
kernel’s unprivileged user namespaces feature accessing nf_tables. This access
is enabled by default on Debian, Ubuntu and kernel capture-the-flag (CTF)
distributions. An attacker can then trigger the double-free vulnerability, scan
the physical memory for the kernel base address, bypass kernel address-space
layout randomization (KASLR) and access the modprobe_path kernel variable with
read/write privileges. After overwriting the modprobe_path, the exploit drops a
root shell.
In addition to an RCE leveraging CVE-2024-5084 to gain RCE through a WordPress Hash form, this release features the addition of several new binary OSX stageless payloads with aarch64 support: Execute Command, Shell Bind TCP, and Shell Reverse TCP.
The new osx/aarch64/shell_bind_tcp payload opens a listening port on the target machine, which allows the attacker to connect to this open port to spawn a command shell using the user provided command using the execve system call on Apple silicon laptops.
The new osx/aarch64/shell_reverse_tcp payload that can connect back to the configured attacker’s RHOST and RPORT to spawn a command shell using the execve system call on Apple silicon laptops.
The new osx/aarch64/exec payload can execute arbitrary user provided commands using the execve system call on Apple silicon laptops, for example:
Authors: Francesco Carlucci and Valentin Lobstein
Type: Exploit
Pull request: #19208 contributed by Chocapikk
Path: multi/http/wp_hash_form_rce
AttackerKB reference: CVE-2024-5084
Description: This adds an exploit module that leverages a vulnerability in the WordPress Hash Form – Drag & Drop Form Builder plugin (CVE-2024-5084) to achieve remote code execution. Versions up to and including 1.1.0 are vulnerable. This allows unauthenticated attackers to upload arbitrary files, including PHP scripts, due to missing file type validation in the file_upload_action function.
#19209 from zgoldman-r7 – Updates multiple file format exploits to show the default settings to users when running show options.
#19211 from sjanusz-r7 – Fixes an issue were the database management logic would default a model’s updated_at value to incorrectly be set to the created_at value.
#19217 from zgoldman-r7 – Fixes path tab completion for modules when using Ruby 3.2+.
#19227 from bcoles – Fixed an issue in Moodle::Login.moodle_login that reported a false negative when logging in with user’s credentials.
Documentation
You can find the latest Metasploit documentation on our docsite at docs.metasploit.com.
Get it
As always, you can update to the latest Metasploit Framework with msfupdate
and you can get more details on the changes since the last blog post from
GitHub:
Устойчивостта, или т.нар. резилиънс (чуждицата често се използва в научни текстове в областта на психологията), е едно качествата, които са най-важни за оцеляването. Така се нарича способността ни да устояваме на травми, да оцеляваме в трудности и да се адаптираме към изключително неблагоприятни условия. Устойчивостта не е константа – тя се променя спрямо развитието ни и взаимодействието ни с околната среда. Благодарение на устойчивостта хората се учат да живеят със и въпреки тежки заболявания, инвалидност, загуба на деца и близки, в рамките на жестоки репресивни диктатури, в условия на крайна бедност и недостиг, в ужаса на войната.
Погледнато от друга страна обаче, устойчивостта може да представлява и това, което наричаме „синдром на сварената жаба“ – ако жива жаба се постави в съд с гореща вода, тя мигновено ще изскочи и ще се спаси. Но ако я поставим в съд със студена вода и постепенно повишаваме температурата, тя ще се адаптира, или ще прояви устойчивост – докато не бъде сварена до смърт.
В статия за литературното списание n+1 журналистката Розина Али изброява всички думи, изречени от световни организации, политици, журналисти и свидетели на израелската офанзива в Газа от атаката на „Хамас“ през октомври насам. С натрупването на суперлативите, с натрупването на думите и ужасяващите кадри – както се случва и с руската инвазия в Украйна, както се случва и в политическия живот през последното десетилетие, в който немислимото за изричане се превърна в ежедневно заглавие и анонимен коментар – съзнанието претръпва и ужасът се нормализира. Свикваме. За това помага и относителната изолация на Запада, САЩ и Европа от горещите точки на конфликт. Засега.
Въпрос на перспектива е дали проявяваме устойчивост спрямо ужаса на времената, или се варим бавно като жаби. Едно от проявленията на този въпрос е способна ли е (не)позицията на САЩ спрямо случващото се в Палестина да обърне хода на изборите в страната през ноември. И какво изобщо би означавало това.
Tel Aviv tonight: over calling for a hostage deal and for the government to resign. Polls show most Israelis are in favor of stopping the war. The government won't let that happen. pic.twitter.com/RhO8vVkbQF
Публикация на журналиста и писател Итън Нечин, кореспондент за израелския „Хаарец“, „Гардиън“ и др.: „Тел Авив тази вечер [25 май 2024 г.]: протести с призив за връщане на заложниците и оставка на правителството. Според анкетите по-голяма част от израелците подкрепят прекратяване на войната. Правителството на Израел не би позволило това.“
Позиция, противоречие, парадокс
Хронологията на Розина Али се състои от изказвания на представители на организации като „Оксфам“, „Лекари без граници“, Би Би Си, „Ню Йорк Таймс“, ООН, УНИЦЕФ, „Уошингтън Поуст“, Си Ен Ен, „Ню Йоркър“, „Амнести Интернешънъл“ и др.
Техните цитати са придружени от данни на контролираните от терористичната организация „Хамас“ палестински официални власти за броя на цивилните жертви, загинали под израелски удари. Заради източника си тези данни следва да се интерпретират критично, но не и да бъдат игнорирани. Организации като ООН се стараят да проверяват и обновяват данните с обективна информация с помощта на хора на терен, доколкото е възможно по време на сериозен военен конфликт. Но дори консервативните цифри представят ужасяващ брой загинали цивилни, много от които жени и деца. Освен данните и цитатите Розина Али добавя и изказвания на американски и израелски политици, както и данни за предоставените оръжия на Израел от САЩ.
Колажът е красноречив: „безпрецедентна хуманитарна криза от невиждан мащаб“; „броят на убитите деца в Газа в рамките на три седмици е по-висок от броя на убитите във въоръжени конфликти в световен план в над 20 държави в рамките на цяла година за последните три години“; „лавина от човешко страдание“; „свидетели сме на изтребване на цивилни без еквивалент и прецедент в рамките на който и да е конфликт от началото на поста ми“ (цитат от генералния секретар на ООН Антонио Гутериш); „израелската военна кампания в Газа според експерти е сред най-смъртоносните и унищожителни кампании в близката история“; „според експерти в рамките на малко повече от два месеца израелската офанзива е причинила повече щети от сриването на Алепо между 2012 и 2016 г. и унищожението на Мариупол или пропорционално на бомбардировките на съюзниците над Германия по време на Втората световна война“ (и двата цитата от „Асошиейтед Прес“).
Плакати в Тел Авив, които призовават за връщането на израелските заложници от Газа, 14 октомври 2023 г., снимка: Oren Rozen
Освен данните на Али – например „В началото на декември Белият дом заобикаля Конгреса и изпраща 14 000 единици танкови муниции на Израел“ – данни на Council for Foreign Relations (CFR) показват огромното количество помощ, което САЩ осигурява на Израел. Част от причините за това са изброени в текста на Искрен Иванов, публикуван в „Тоест“ на 29 май 2024 г. Авторите на доклада в CFR – политолозите Джонатан Мастърс и Уил Мероу, също говорят за безпрецедентност: от атаката на Хамас на 7 октомври насам САЩ са предоставили огромно количество военна помощ на Израел, възлизаща по предварителни изчисления на 12,5 млрд. долара. Администрацията на президента Джо Байдън мотивира политиката си с подкрепа на правото на Израел на защита, но тази позиция губи тежест с нарастването на цивилните жертви и информацията за блокиране на хуманитарна помощ, насочена към Газа.
Хуманитарната помощ за Палестина идва от… САЩ. Мащабите обаче са различни. Още през 2021 г. държавата предоставя 5,5 млн. долара, част от които за здравеопазване, в допълнение към 90 млн. долара, насочени към специфични организации, част от ООН. Седмица след началото на конфликта ООН изчислява, че на Палестина са нужни над 1,2 млрд. долара за спешна хуманитарна помощ. На 5 юни т.г. американската агенция USAIDобещава още 90 млн. долара, а армията работи за построяването на инфраструктура, която да спомогне за доставките на хуманитарни помощи за Палестина. Проектът се оценява на стойност 320 млн. долара.
Какъв е смисълът от „все по-противоречивата политика на Байдън в Израел“, както я определя „Ню Йоркър“?
Цената на realpolitik и скъсването с реалността
Политиката на Джо Байдън има две основни цели: да овладее конфликта в настоящите рамки и да предотврати прерастването му в регионален конфликт, както и да подсигури унищожението на „Хамас“ до степен, в която повторение на кръвожадната атака от 7 октомври е невъзможно, казва регионалният експерт Арън Дейвид Милър в интервю пред американското списание. Обясненията за тези цели са както лични – траекторията на Джо Байдън като политик, десетилетията му опит в Сената, отношението му към Израел, – така и политически, например вече споменатата дългогодишна политика на САЩ като съюзник на Израел.
„Бих нарекъл политиката на кабинета на Байдън пасивно-агресивна. Те са бесни на Нетаняху, и то от много време насам. Нетаняху управлява едно от най-екстремистките правителства от началото на историята на Държавата Израел. Настоящото правителство и предшестващото го управление на Нетаняху уронват фундаментални устои на връзката между САЩ и Израел, споделените ценности и общите интереси. Така че когато казвам „пасивно-агресивна“, имам предвид, че шест месеца след началото на тази война американската администрация не желае – и е неспособна – да наложи каквито и да е последствия, които аз и вие като нормални човешки същества бихме приели за реален натиск“, казва Милър.
Той описва три възможни лоста за прилагане на този натиск: прекратяване на военната помощ (почти невъзможен сценарий), промяна на позицията на САЩ в ООН (все още неизпълнено) и радикално оттегляне от преговорите за освобождаване на израелските заложници и присъединяване към гласовете на международната общност, които призовават за прекратяване на огъня от страна на Израел. Всеки един от тези сценарии обаче би предизвикал цунами от последствия и във вътрешнополитическата ситуация в САЩ. „Ако Джо Байдън иска да промени ситуацията в Газа, той трябва да открие начин да деескалира военната офанзива на Израел, да увеличи хуманитарната помощ и да предложи план за възстановяване на Газа, както и да освободи заложниците, което няма да стане със заклеймяване, открита критика или публично скъсване с израелския премиер.“
Israel's Diaspora Affairs Ministry commissioned an influence campaign primarily aimed at Black lawmakers and young progressives in the U.S. and Canada that used fake sites and accounts to promote posts that served the Israeli narrative, Haaretz reports: https://t.co/YKzPeui7EG
Публикация на разследващия журналист Евън Хил, „Уошингтън Поуст“: „Израелското Министерство на диаспората е поръчало кампания за влияние, насочена основно към чернокожи законодатели и млади протестиращи в САЩ и Канада, в която се използват фалшиви сайтове и профили, за да се разпространяват публикации, благоприятни за Израел, според разследване на „Хаарец“.
Проблемът е, че Америка е държава, построена върху митове и ценности, в които повечето граждани вярват искрено. Тези ценности – човешки права, свобода на изразяване, демокрация и т.н., представляват и експортен продукт, културна политика, захранват шовинизъм и усещане за превъзходство, а загубата на този ореол води до национална криза на идентичността и все по-дълбоки разделения. САЩ искат образа на спасител от Втората световна война, а не онзи на жестокостта от Виетнам или Ирак. В очите на обществото случващото се в Газа напомня по-скоро за последните и е възможно благодарение на оръжията на САЩ. Това поражда все по-голямо недоволство сред определени сегменти на обществото, както и протести, разриви в академичните среди и все по-силни политически движения, които са критични към действията на администрацията на Байдън.
Липса на алтернатива
И докато много прогресивни и демократично настроени американци се канят да бойкотират изборите и са все по-открито критични към Демократическата партия, която ще излъчи Джо Байдън като кандидат за президент за втори мандат, по-добра алтернатива всъщност няма. Още през 2021 г. Доналд Тръмп признава, че Бенямин Нетаняху не се интересува от припознаването на палестинска държава и т.нар. двустранно решение на кризата, което се състои в обособяването на две държави – Израел и Палестина. През 2017 г. Тръмп саботира собствените си усилия за мир в региона, като припозна Йерусалим за столица на Израел и премести Посолството на САЩ, допълнително нагнетявайки напрежението. Към края на мандата на Тръмп връзките с Израел са в застой.
Плюшени мечета, покрити с червени петна, на площад в Тел Авив. Всяко мече е символ на едно от трийсетте деца, отвлечени от Хамас. 27 октомври 2023 г., Yossipik
На 4 април кандидат-президентът на Републиканската партия заяви, че Израел „губи медийната война“ и трябва да „приключи“ с Палестина. В характерния си стил, в който изказванията му могат да се тълкуват двояко според това към кое идеологическо племе принадлежи тълкуващият и как избере да ги интерпретира, Доналд Тръмп заяви, че „това трябва да приключи и да се върнем към мира и стига сме убивали хора. Трябва да приключат нещата. Свършвайте работата и приключвайте бързо, защото трябва да… се върнем към някаква нормалност и мир“.
Тръмп критикува опонента си за недостатъчната му подкрепа за Израел, а след това казва, отново в същия стил, че „трябва да има победа“, без да е ясно за кого, на каква цена и при какви условия. Много по-категоричен пример за позицията на републиканците са действията на бившата кандидат-президентка и представителка на САЩ в ООН Ники Хейли, която написа „Довършете ги“ върху израелска ракета, добавяйки сърчице и подписа си. Републиканската медия „Фокс Нюз“ публикува новината със заглавие, в което уточни, че ракетата била предназначена за „Хамас“. „Кандидатът на Републиканската партия се представя като най-произраелския президент в историята. Републиканската партия затвърждава имиджа си на партия, която вярва, че Израел не е способен на грешни ходове“, казва Милър пред „Ню Йоркър“.
At least 70 dead people and over 300 wounded, the majority of whom are women and children, have been brought to Al-Aqsa hospital since yesterday following heavy Israeli strikes in the Middle Area of the #Gaza strip.
Публикация на „Лекари без граници“: „Най-малко 70 убити и над 300 ранени, основно деца и жени, са постъпили в болницата „Ал-Акса“ от вчера [4 юни 2024 г.], след тежки удари от страна на Израел в централните части на ивицата Газа.“
Реакцията на американците
Към необичайната за поляризираната политика на САЩ консолидация на двете партии по отношение на политиката спрямо Израел се прибавя и сложната картина на реакциите на американците спрямо конфликта. Повечето американци определят отношението си към войната в Газа като силно емоционално. Парадоксално обаче, голяма част от тях не следят конфликта в детайли. Едва половината от запитаните дават верни отговори на въпроси, свързани с конкретни факти.
Израело- и мюсюлмано-американците съвсем естествено, са много по-информирани по темата. Все пак 83% от запитаните отговарят, че конфликтът предизвиква у тях тъга, а 65% – гняв. 51% казват, че са изморени от новинарския обмен, свързан с Израел и Палестина. Едва 22% заявяват, че следят новините по темата в детайли. Стойностите са сходни сред симпатизантите на двете партии. Важен нюанс е, че следящите конфликта принадлежат към двата изявени края на политическия спектър, докато политически по-умерените респонденти отделят по-малко внимание.
Семейството на 19-годишната Даниела Гилбоа на демонстрация за връщане на заложниците, 14 октомври 2023 г., Lizzy Shaanan Pikiwiki, Israel
Едва 5% смятат, че атаките на „Хамас“ от 7 октомври са приемливи. По-голям дял счита обаче, че цялостните причини на „Хамас“ да се бори срещу Израел са валидни. 58% от американците подкрепят офанзивата на Израел срещу „Хамас“, но едва 38% определят методите на офанзивата като приемливи. 57% от респондентите симпатизират еднакво на израелците и палестинците, а като цяло тенденцията е симпатията да е по-скоро към израелците като народ, отколкото към израелското правителство и Бенямин Нетаняху. Същото важи и за палестинците.
Демографското разделение е важно, ако искаме да дадем поне донякъде верен отговор на въпроса в заглавието: респондентите под 30 години са много по-категорични в мнението, че „Хамас“ има валидни причини да атакува Израел, а младите американци като цяло са по-склонни да гледат положително на палестинците, отколкото на израелците. И все пак мнозинството (58%) от отговорилите в тази възрастова група заклеймява действията на палестинската терористична организация.
Младите, образовани и по-заможни избиратели, които живеят в градовете, традиционно гласуват за демократите. Те са и тези, които изразяват най-силна симпатия към палестинската кауза и народ. Протестиращите студенти не са добра представителна извадка, но със сигурност са културен феномен, сравним с антивоенните протести в ерата на войната във Виетнам. Освен тази демографска група може да има отлив на гласове и от страна на мюсюлманите и други малцинства, които също подкрепят Демократическата партия, но и палестинската държава и прекратяването на огъня в Газа.
В допълнение, парадоксалната политика на администрацията на президента Байдън е в полза на републиканците, независимо от взетите решения: консерваторите заклеймяват протестите в университетите като хаос и провал на образователната система, която самите те определят като проядена от „марксизъм“ и „либерализъм“; вкарват в калъпа на антисемитизма всеки, изразяващ опозиция срещу избиването на цивилни палестинци (не помага това, че проявите на антисемитизъм зачестяват, макар и сред малцина); и накрая, вътрешно- и външнополитическият хаос така или иначе традиционно подкопават позицията на настоящия президент.
Няма полезен ход
Конфликтът между Израел и Палестина осветява и вътрешните проблеми в САЩ. От въпроси за цензурата и свободата на словото до печалбата от войни и разходването на ресурси за военни конфликти (позицията на САЩ спрямо Украйна също е компрометирана и разклатена, тъжно последствие), докато вътрешните кризи в страната се разрастват и пораждат все по-голямо недоволство. Поради консолидацията на корпоративни интереси и безконтролен капитализъм, ежедневните политически кризи и растящите като последствие рекордни неравенства за „обикновения човек“ и гласоподавател, живеещ далеч от метрополисите Ню Йорк, Чикаго и Лос Анджелис, ежедневието е все по-трудно и несигурно. Газа и Украйна са все по-големи абстракции; изолационизмът, радикализмът и недоверието в системата – все по-сериозни. Към това се добавят и идеологическите различия – ако гласуващите за демократите са по-склонни да проявяват емпатия и загриженост за хора отвъд пределите на своята държава, то консервативно настроените определят като приоритет просперитета на най-близките си и на малката общност.
BREAKING: Biden told @TIME that "there is every reason for people" to draw the conclusion that Israeli Prime Minister Benjamin Netanyahu is prolonging the war for his own political self-preservation
Публикация на репортера на „Аксиос“ Барак Равид: „Байдън заявява пред „Тайм“, че „има предостатъчно основания“ хората да стигнат до заключението, че израелският премиер Бенямин Нетаняху продължава войната в името на собственото си политическо оцеляване.“
Всички тези фактори накланят везните в полза на републиканците, въпреки че съвсем прясната присъда на Доналд Тръмп според първоначални данни е успяла да промени мнението на част от независимите гласоподаватели, тоест тези, които не се идентифицират с нито една партия. Но независимо от това на кой котлон е поставена тенджерата – вляво или вдясно, – температурата се покачва.
Освен ако Израел и „Хамас“ не се съгласят с настоящото предложение за прекратяване на огъня и с последващите стъпки за двустранно решение за света, няма полезен ход. Независимо дали Америка ще реши да оттегли подкрепата от Украйна и да продължи да подкрепя Израел (вероятен сценарий при победа на Тръмп), или да направи рязък завой в политиката спрямо Израел (който ще дойде на друга геополитическа цена с оглед на интересите на Русия и Китай в региона), или пък да продължи досегашния курс (с цената на хиляди избити цивилни и вероятно напълно разрушена репутация в дългосрочен план).
Когато сме принудени да претегляме чий живот е по-важен – на жертвите на зверствата на „Хамас“ от 7 октомври или на убитите цивилни палестинци например; когато се налага да се връщаме все по-назад в историята, за да подкрепим правото на една или друга страна да убива, за да съществува; когато човешкият живот се превърне в кръчмарска геополитическа сметка; когато политиката се сведе до жертване на едни, за да не бъдат жертвани други; когато хората се редуцират до едноизмерно свое качество – политическа принадлежност, религия или националност, до страна в някакъв конфликт, за да получим право да одерем човешката им кожа и да ги третираме като безлики единици с извратено удоволствие от собственото си въображаемо морално превъзходство; когато се превръщаме в онлайн запалянковци на това непрестанно дране; когато призоваваме за отнемане на правото на една или друга страна да говори, защото сме толкова освирепели, че вече не можем да понесем различна реалност от своята; когато сме толкова уморени от жестокостта и покварата на света, че изберем жестокостта и покварата на свой ред, или изберем да изключим телевизора, да игнорираме неудобните истини, да отречем тежката сложност на света, да се преструваме, че реалността не съществува… Тогава няма полезен ход, защото, независимо дали в Украйна, в Европа, в Газа, в Судан, в Китай, или другаде, точката на кипене е опасно близо. И отдавна сме привикнали с немислимото.
Заглавно изображение: Израелските отбранителни сили се подготвят за действия в Газа, 29 октомври 2023 г., IDF Spokesperson's Unit
BPF was first
generalized beyond packet filtering more than a decade ago. In that time, it
has changed a lot, becoming much more capable.
Alexei Starovoitov kicked off the second day of the BPF track at the 2024 Linux Storage,
Filesystem, Memory Management, and BPF Summit by leading a session
discussing which changes to BPF are going to come in the next ten years as it
continues evolving. He proposed several ideas, including expanding the number of
registers available to BPF programs, dynamic deadlock detection, and relaxing
some existing limits of the verifier.
Security updates have been issued by Mageia (libtiff), Oracle (cockpit, glibc, kernel, less, libxml2, linux-kernel, and tomcat), Red Hat (java-1.8.0-ibm, nghttp2, and ruby:3.3), Slackware (php), SUSE (go1.21, go1.22, and python-docker), and Ubuntu (aom and libvpx).
Четиринайсетото издание на „София Прайд Филм Фест“ (4–15 юни 2024 г.) започна в Дома на киното с превъзходна селекция от 10 пълнометражни филма и 15 късометражки. Хубавото е, че програматорите Симеон Цончев и Яна Алексиева и организаторите от „Действие“ дават шанс в България да се види работата на изключително актуални творци – онова, което се гледа по големите фестивали и се отличава със заслужените награди. Лошото е, че всеки филм има само по една прожекция.
По-долу ще хвърлим поглед върху няколко от предложенията на СПФФ. Първо обаче е важно да уточним: макар те да са събрани тематично (ЛГБТИ+) и да се показват в месеца, в който ще се състои „София прайд“, съвкупността им не е наръч от памфлети или образователни материали, а адекватна извадка от най-интересното в съвременното кино. Обстоятелството, че ще научим нещо за хора, които не познаваме, или ще проумеем по-ясно онези, с които живеем (включително себе си), открай време е бонус към доброто кино, не негов фокус. Както и в случая.
Кадър от „Домакинство за начинаещи“
4 юни: македонецът от Австралия
Детството на Горан Столевски (р. 1985) минава в Тетово до 12-годишна възраст, когато родителите му емигрират в Мелбърн. Ето защо той понастоящем е една от големите надежди на австралийското кино, а третият му филм – „Домакинство за начинаещи“, стана най-новото предложение на Северна Македония за Оскарите. Него именно гледахме в София на откриването на СПФФ, но преди да се спрем на хубавините му, сме длъжни да споменем двата филма на Столевски от 2022-ра.
„Няма да си сама“, пълнометражният му дебют (Сънданс), е мрачна приказка от Балканите през ХIХ в., в която вещица се намъква от тяло в тяло и от съдба в съдба от любов към живота, но в заговор със смъртта – дори под твърдите жанрови конвенции (фентъзи, хорър) си личи талантът на Столевски да борави с емоциите на персонажите и на публиката. Вторият – „На тази възраст“, е една от най-правдоподобните, вълнуващи и красиво заснети любовни истории, попадали на широк екран. Действието се развива в Австралия между двама млади мъже, които дълбоко преживяват случайното пресичане на твърде различните си пътища…
Обаятелният „Домакинство за начинаещи“ (премиера във Венеция 2023) е нагледното доказателство, че Столевски израства като разказвач от филм на филм. В голяма къща съжителстват като странно дисфункционално семейство няколко души, които отначало е трудно да бъдат изброени и разтълкувани: Дита, собственичката; приятелката ѝ, яростната Суада, която ѝ „завещава“ двете си деца (деветокласничката Ванеса и малката Мия); три устати тийнейджърки с неясна връзка помежду си и с останалите; Тони, сърдит на живота мъж; приказният Али, новодошъл младеж от „Шутка“.
Това, което отначало прилича на брауново движение, в един момент се избистря: тези ругаещи, пушещи, сумтящи, дърпащи във всички посоки хора са клан, в който обичта е дошла през болката и е станала единственото непоклатимо нещо. Кастът от актьори и натуршчици (изпълнители без професионална подготовка за сцената или екрана и най-често без намерения за кариера в актьорството) е отличен; говорят се няколко езика; казват се насъщни като дишането истини: от другия винаги ще имаме нужда. Цялото човечество е едно странно дисфункционално семейство.
Кадър от „Обвиняеми“
7 юни: аржентинката без граници
Това, което пропагандистите на омразата се опитват да направят най-напред, е да лишат човека от човещината му. От лице, биография, глас и сърце. Лола Ариас (р. 1976) върви в точно обратната посока. Тя взема типично отхвърлените, които сме приучени да не поглеждаме, да не изслушваме и да не отчитаме – и им връща сърцето, гласа, биографията, лицето. Ариас – която досега се е изявявала успешно като литератор, куратор, драматург (тя е тазгодишната носителка на „Ибсен“, най-щедрата международна театрална награда) и кинорежисьор (премиерите и на двата ѝ филма бяха в Берлин) – твърди, че се смята за артист, който си служи с инструментите на всички изкуства, за да разказва.
Така беше в „Театърът на войната“ (буквален превод на нещо, което иначе бихме дали като „арена на бойни действия“): трима аржентински и трима английски ветерани от войната за Малвините се събират 30 години по-късно и споделят наблюдения, кратки пътешествия, песен и тъги в една история, която е колкото документална, толкова и „поставена“. Така е и в „Обвиняеми“, който предстои на СПФФ: дузина жени с излежани присъди в Буенос Айрес са събрани в общ декор и разсъждават, учат, спомнят си, разрешават спорове с танц, изразяват чувства в песен.
В „Обвиняеми“ авторката е синтезирала материала още по-добре, отколкото в „Театърът на войната“: мястото и действието са по-прибрани, изведен е сюжет – току-що осъдената Йосели пристига в затвора и става причина другите жени да отворят дума за живота си (началото е посрещането ѝ, финалът – изпращането). Документален мюзикъл, така го нарича Ариас: „Исках да направя филм за женски затвор, без да възпроизвеждам стигматизацията. Чрез песни, в основата на които е опитът на героините, и хореография, разработена заедно с тях, реалният живот се превърна във фикция.“ Неизбежните ограничения на този подход са използвани за опора и рамка; резултатът е пробуждащ.
„Единственият начин да се помогне на тия хора в затворите – и на хората извън затворите също – е да им бъде припомнено, че те са и нещо друго, нещо повече от това, което са извършили, нещо различно от наплашено стадо виновни жертви“, както казваше в първата си книга танцьорката Ана Лий Евънс. (Ана е българка, затворът е Сливенският, където по едно време тя поставя танцов спектакъл, а книгата ѝ „Фламенко в затвора“ е животворно събитие.)
Божидар Асенов в кадър от „Любен“
14 юни: българинът от Испания
Една от големите трагедии на човечеството като цяло и по-конкретно на България е как част от хората допускат, че знаят какво представляват, искат и могат друга част от хората, особено най-непознатите. Така се сеят ветрове и се жънат бури, вместо през разговор да се стигне до разбиране, а през разбиране – до сътрудничество; вместо, казано още по-просто, да се види как различието да се превърне в богатство.
Голяма част от родната ни „култура на общуване“ понастоящем стъпва на опозиции добро–лошо, в чиято основа е точно принципът на подценяване поради непознаване: столица срещу провинция, град срещу село, заможен срещу незаможен, як срещу слаботелесен, бял срещу мургав, мъж срещу жена, овластен срещу редови, интелектуалец срещу работяга, пътувал срещу уседнал и пр., и пр. И те всички действат в двете посоки (макар че зъбенето на по-привилегированите обикновено е по-опасно от зъбенето на другите).
„Любен“, пълнометражният игрален дебют на Венци Д. Костов (р. 1987) – отрасъл в Малага и работил главно в телевизията и в театъра, – се захваща директно с една от най-обичаните омрази по нашите ширини: малцинствата. Филмът е, както коментираха във „Фотограмас“, най-престижното списание за кино в Испания (където той отдавна мина по кината, за разлика от България), „малка социална мелодрама… за емиграция, расизъм и хомосексуалност“. Млад мъж се връща от чужбина за лятото – на село, при баща си, с когото отдавна не са се виждали. Запознава се с очарователен ромски съсед и се оказва във въртележка от случки, които нито е търсил, нито може да овладее…
Натуршчикът Божидар Асенов има великолепни попадения като Любен (вж. чудната завръзка, магнетична и смешна, когато той рецитира азбуката, за да впечатли събеседника си); Димитър Баненкин като бащата прави най-хубавата и многоизмерна роля в целия филм (историята за къщата за децата, в която е вложил устрема на целия си живот, но която в залеза на живота му пустее, защото децата са в странство, е историята на цяла България); Димитър Николов в образа на гостуващия Виктор е на моменти силен, на моменти просто присъстващ, което може би е и нужно за колебливия му герой.
Това е първият български филм, който разказва недвусмислено за влюбването на двама мъже, и ако трябва да го поместя някъде по ска̀лата между други два сюжета от региона за подобна връзка, за които се сещам – разпиления, безвкусен „Българските любовници“ на Елой де ла Иглесия (Испания, 2003), и смелия, трудно окачествим „Войници. Разказ от Ферентар“ на Ивана Младенович (Румъния, 2017), – бих го разположила някъде откъм страната на втория, защото е повествователно неукрепнал, но пълен с потенциал. „За да разчупим клишетата, трябва да минем през тях, не да ги прескачаме“, каза Венци Д. Костов за избора си да постави своите герои в ситуации, които до голяма степен биха се очаквали. И вероятно е прав.
Любопитен факт: преди година „Любен“ спечели наградата на публиката на 8-мия кинофестивал в Бургас, малко след като в София група недоразбрали разиграха сценка и осуетиха прожекцията на прекрасния „Близо“ – разказ за вредата именно от разиграването на сценки от недоразбрали. Явно истинските почитатели на киното не просто не бягат с писъци от възможността за замисляне, а и я търсят съзнателно.
И другите
Сред останалите заглавия от СПФФ е добре да отбележим поне „Сребриста мъгла“ на 8 юни (игрална драма с високо документално съдържание на холандката Саша Полак, от селекцията на Берлинале 2023), „Мелез“ на 12 юни (дебюта на нюйоркчанина Вук Лунгулов–Клоц с награда от Сънданс 2023) и грузинско-турското „Пресичане“ на 15 юни (Берлинале 2024, реж. Леван Акин, когото познаваме от сърдечния „И след това танцувахме“).
Другите са като теб и могат да бъдат обичани. Другите не са като теб и могат да бъдат обичани. Ето за какво говори изкуството с душа; ето за какво говори подборката на тазгодишния „София Прайд Филм Фест“.
Generative artificial intelligence (AI) tools are becoming more easily accessible to learners and educators, and increasingly better at generating code solutions to programming tasks, code explanations, computing lesson plans, and other learning resources. This raises many questions for educators in terms of what and how we teach students about computing and AI, and AI’s impact on assessment, plagiarism, and learning objectives.
We were honoured to have Professor Brett Becker (University College Dublin) join us as part of our ‘Teaching programming (with or without AI)’ seminar series. He is uniquely placed to comment on teaching computing using AI tools, having been involved in many initiatives relevant to computing education at different levels, in Ireland and beyond.
Brett’s talk focused on what educators and education systems need to do to prepare all students — not just those studying Computing — so that they are equipped with sufficient knowledge about AI to make their way from primary school to secondary and beyond, whether it be university, technical qualifications, or work.
How do AI tools currently perform?
Brett began his talk by illustrating the increase in performance of large language models (LLMs) in solving first-year undergraduate programming exercises: he compared the findings from two recent studies he was involved in as part of an ITiCSE Working Group. In the first study — from 2021 — the results generated by GPT-3 were similar to those of students in the top quartile. By the second study in 2023, GPT-4’s performance matched that of a top student (Figure 1).
Figure 1: Student scores on Exam 1 and Exam 2, represented by circles. GPT-3’s 2021 score is represented by the blue ‘x’, and GPT-4’s 2023 score on the same questions is represented by the red ‘x’.
Brett also explained that the study found some models were capable of solving current undergraduate programming assessments almost error-free, and could solve the Irish Leaving Certificate and UK A level Computer Science exams.
What are challenges and opportunities for education?
This level of performance raises many questions for computing educators about what is taught and how to assess students’ learning. To address this, Brett referred to his 2023 paper, which included findings from a literature review and a survey on students’ and instructors’ attitudes towards using LLMs in computing education. This analysis has helped him identify several opportunities as well as the ethical challenges education systems face regarding generative AI.
The opportunities include:
The generation of unique content, lesson plans, programming tasks, or feedback to help educators with workload and productivity
More accessible content and tools generated by AI apps to make Computing more broadly accessible to more students
More engaging and meaningful student learning experiences, including using generative AI to enable creativity and using conversational agents to augment students’ learning
The impact on assessment practices, both in terms of automating the marking of current assessments as well as reconsidering what is assessed and how
Some of the challenges include:
The lack of reliability and accuracy of outputs from generative AI tools
The need to educate everyone about AI to create a baseline level of understanding
The legal and ethical implications of using AI in computing education and beyond
How to deal with questionable or even intentionally harmful uses of AI and mitigating the consequences of such uses
Programming as a basic skill for all subjects
Next, Brett talked about concrete actions that he thinks we need to take in response to these opportunities and challenges.
He also discussed the increased relevance of programming to all subjects, not only Computing, in a similar way to how reading and mathematics transcend the boundaries of their subjects, and the need he sees to adapt subjects and curricula to that effect.
As an example of how rapidly curricula may need to change with increasing AI use by students, Brett looked at the Irish Computer science specification for “senior cycle” (final two years of second-level, ages 16–18). This curriculum was developed in 2018 and remains a strong computing curriculum in Brett’s opinion. However, he pointed out that it only contains a single learning outcome on AI.
To help educators bridge this gap, in the book Brett wrote alongside Keith Quille to accompany the curriculum, they included two chapters dedicated to AI, machine learning, and ethics and computing. Brett believes these types of additional resources may be instrumental for teaching and learning about AI as resources are more adaptable and easier to update than curricula.
Generative AI in computing education
Taking the opportunity to use generative AI to reimagine new types of programming problems, Brett and colleagues have developed Promptly, a tool that allows students to practise prompting AI code generators. This tool provides a combined approach to learning about generative AI while learning programming with an AI tool.
Promptly is intended to help students learn how to write effective prompts. It encourages students to specify and decompose the programming problem they want to solve, read the code generated, compare it with test cases to discern why it is failing (if it is), and then update their prompt accordingly (Figure 2).
Figure 2: Example of a student’s use of Promptly.
Early undergraduate student feedback points to Promptly being a useful way to teach programming concepts and encourage metacognitive programming skills. The tool is further described in a paper, and whilst the initial evaluation was aimed at undergraduate students, Brett positioned it as a secondary school–level tool as well.
Brett hopes that by using generative AI tools like this, it will be possible to better equip a larger and more diverse pool of students to engage with computing.
Re-examining the concept of programming
Brett concluded his seminar by broadening the relevance of programming to all learners, while challenging us to expand our perspectives of what programming is. If we define programming as a way of prompting a machine to get an output, LLMs allow all of us to do so without the need for learning the syntax of traditional programming languages. Taking that view, Brett left us with a question to consider: “How do we prepare for this from an educational perspective?”
You can watch Brett’s presentation here:
Join our next seminar
The focus of our ongoing seminar series is on teaching programming with or without AI.
For our next seminar on Tuesday 11 June at 17:00 to 18:30 GMT, we’re joined by Veronica Cucuiat (Raspberry Pi Foundation), who will talk about whether LLMs could be employed to help understand programming error messages, which can present a significant obstacle to anyone new to coding, especially young people.
To take part in the seminar, click the button below to sign up, and we will send you information about how to join. We hope to see you there.
Operators, administrators, developers, and many other personas leveraging AWS come across multiple common issues when it comes to troubleshooting in the AWS Console. To help alleviate this burden, AWS released Amazon Q. Amazon Q is AWS’s generative AI-powered assistant that helps make your organizational data more accessible, write code, answer questions, generate content, solve problems, manage AWS resources, and take action. A component of Amazon Q is Amazon Q Developer. Amazon Q Developer reimagines your experience across the entire development lifecycle, including having the ability to help you understand errors and remediate them in the AWS Management Console. Additionally, Amazon Q also provides access to opening new AWS support cases to address your AWS questions if further troubleshooting help is needed.
In this blog post, we will highlight the five troubleshooting examples with Amazon Q. Specific use cases that will be covered include: EC2 SSH connection issues, VPC Network troubleshooting, IAM Permission troubleshooting, AWS Lambda troubleshooting, and troubleshooting S3 errors.
Prerequisites
To follow along with these examples, the following prerequisites are required:
In this section, we will show an example of troubleshooting an EC2 SSH connection issue. If you haven’t already, please be sure to create an Amazon EC2 instance for the purpose of this walkthrough.
First, sign into the AWS console and navigate to the us-west-2 region then click on the Amazon Q icon in the right sidebar on the AWS Management Console as shown below in figure 1.
Figure 1 – Opening Amazon Q chat in the console
With the Amazon Q chat open, we enter the following prompt below:
Prompt:
"Why cant I SSH into my EC2 instance <insert Instance ID here>?"
Note: you can obtain the instance ID from within EC2 service in the console.
We now get a response up stating: “It looks like you need help with network connectivity issues. Amazon Q works with VPC Reachability Analyzer to provide an interactive generative AI experience for troubleshooting network connectivity issues. You can try the preview experience here (available in US East N. Virginia Region).”
Now, Amazon Q will run an analysis for connectivity between the internet and your EC2 instance. Find a sample response from Amazon Q below:
Figure 3 – Response from Amazon Q network troubleshooting
Toward the end of the explanation from Amazon Q, it states that it checked the security groups for allowing inbound traffic from port 22 and was blocked from accessing.
Figure 4 – Response from Amazon Q network troubleshooting cont.
In this section, we will show how to troubleshoot a VPC network connection issue.
In this example, I have two EC2 instances, Server-1-demo and Server-2-demo in two separate VPCs shown below in figure 5. I want to leverage amazon Q troubleshooting to understand why these two instances cannot communicate with each other.
Figure 5 – two EC2 instances
First, we navigate to the AWS console and click on the Amazon Q icon in the right sidebar on the AWS Management Console as shown below in figure 1.
Figure 6 – Opening Amazon Q chat in the console
Now, with the Q console chat open, I enter the following prompt for Amazon Q below to help understand the connectivity issue between the servers:
Prompt:
"Why cant my Server-1-demo communicate with Server-2-demo?"
Figure 7 – prompt for Amazon Q connectivity troubleshooting
Now, click the preview experience here hyperlink to be redirected to the Amazon Q network troubleshooting – preview. Amazon Q troubleshooting will now generate a response as shown below in Figure 8.
Figure 8 – connectivity troubleshooting response generated by Amazon Q
In the response, Amazon Q states, “It sounds like you are troubleshooting connectivity between Server-1-demo and Server-2-demo. Based on the previous context, these instances are in different VPCs which could explain why TCP testing previously did not resolve the issue, if a peering connection is not established between the VPCs.“
So, we need to establish a VPC peering connection between the two instances since they are in different VPCs.
IAM Permission troubleshooting
Now, let’s take a look at how Amazon Q can help resolve IAM Permission issues.
In this example, I’m creating a cluster with Amazon Elastic Container Service (ECS). I chose to deploy my containers on Amazon EC2 instances, which prompted some configuration options, including whether I wanted an SSH Key pair. I chose to “Create a new key pair”.
Figure 9 – Configuring ECS key pair
That opens up a new tab in the EC2 console.
Figure 10 – Creating ECS key pair
But when I tried to create the SSH. I got the error below:
Figure 11 – ECS console error
So, I clicked the link to “Troubleshoot with Amazon Q” which revealed an explanation as to why my user was not able to create the SSH key pair and the specific permissions that were missing.
Figure 12 – Amazon Q troubleshooting analysis
So, I clicked the “Help me resolve” link ad I got the following steps.
Figure 13 – Amazon Q troubleshooting resolution
Even though my user had permissions to use Amazon ECS, the user also needs certain permission permissions in the Amazon EC2 services as well, specifically ec2:CreateKeyPair. By only enabling the specific action required for this IAM user, your organization can follow the best practice of least privilege.
Lambda troubleshooting
Another area Amazon Q can help is with AWS Lambda errors when doing development work in the AWS Console. Users may find issues with things like missing configurations, environment variables, and code typos. With Amazon Q, it can help you fix and troubleshoot these issues with step by step guidance on how to fix it.
In this example, in the us-west-2 region, we have created a new lambda function called demo_function_blog in the console with the Python 3.12 runtime. The following code below is included with a missing lambda layer for AWS pandas.
Lambda Code:
import json
import pandas as pd

def lambda_handler(event, context):
    data = {'Name': ['John', 'Jane', 'Jim'],'Age': [25, 30, 35]}
    df = pd.DataFrame(data)
    print(df.head()) # print first five rows

    return {
        'statusCode': 200,
        'body': json.dumps("execution successful!")
    }
Now, we configure a test event to test the following code within the lambda console called test-event as shown below in figure 14.
Figure 14 – configuring test event
Now that the test event is created, we can move over to the Test tab in the lambda console and click the Test button. We will then see an error (intended) and we will click on the Troubleshoot with Amazon Q button as shown below in figure 15.
Figure 15 – Lambda Error
Now we will be able to see Amazon Qs analysis of the issue. It states “It appears that the Lambda function is missing a dependency. The error message indicates that the function code requires the ‘pandas’ module, ….”. Click Help me resolve to get step by step instructions on the fix as shown below in figure 16.
Figure 16 – Amazon Q Analysis
Amazon Q will then generate a step-by-step resolution on how to the fix the error as shown below in figure 17.
Figure 17 – Amazon Q Resolution
Following with Amazon Q’s recommendations, we need to add a new lambda layer for the pandas dependency as shown below in figure 18:
Figure 18 – Updating lambda layer
Once updated, go to the Test tab once again and click Test. The function code should now run successfully as shown below in figure 19:
While working with Amazon S3, users might encounter errors that can disrupt the smooth functioning of their operations. Identifying and resolving these issues promptly is crucial for ensuring uninterrupted access to S3 resources. Amazon Q, a powerful tool, offers a seamless way to troubleshoot errors across various AWS services, including Amazon S3.
In this example we use Q to troubleshoot S3 Replication rule configuration error. Imagine you’re attempting to configure a replication rule for an Amazon S3 bucket, and configuration fails. You can turn to Amazon Q for assistance. If you receive an error that Amazon Q can help with, a Troubleshoot with Amazon Q button appears in the error message. Navigate to the Amazon S3 service in the console to follow along with this example if it applies to your use case.
Figure 20 – S3 console error
To use Amazon Q to troubleshoot, choose Troubleshoot with Amazon Q to proceed. A window appears where Amazon Q provides information about the error titled “Analysis“.
Amazon Q diagnosed that the error occurred because versioning is not enabled for the source bucket specified. Versioning must be enabled on the source bucket in order to replicate objects from that bucket.
Amazon Q also provides an overview on how to resolve this error. To see detailed steps for how to resolve the error, choose Help me resolve.
Figure 21 – Amazon Q analysis
It can take several seconds for Amazon Q to generate instructions. After they appear, follow the instructions to resolve the error.
Figure 22 – Amazon Q Resolution
Here, Amazon Q recommends the following steps to resolve the error:
Navigate to the S3 console
Select the S3 bucket
Go to the Properties tab
Under Versioning, click Edit
Enable versioning on the bucket
Return to replication rule creation page
Retry creating replication rule
Conclusion
Amazon Q is a powerful AI-powered assistant that can greatly simplify troubleshooting of common issues across various AWS services, especially for Developers. Amazon Q provides detailed analysis and step-by-step guidance to resolve errors efficiently. By leveraging Amazon Q, AWS users can save significant time and effort in diagnosing and fixing problems, allowing them to focus more on building and innovating with AWS. Amazon Q represents a valuable addition to the AWS ecosystem, empowering users with enhanced support and streamlined troubleshooting capabilities.
The US Justice Department has dismantled an enormous botnet:
According to an indictment unsealed on May 24, from 2014 through July 2022, Wang and others are alleged to have created and disseminated malware to compromise and amass a network of millions of residential Windows computers worldwide. These devices were associated with more than 19 million unique IP addresses, including 613,841 IP addresses located in the United States. Wang then generated millions of dollars by offering cybercriminals access to these infected IP addresses for a fee.
[…]
This operation was a coordinated multiagency effort led by law enforcement in the United States, Singapore, Thailand, and Germany. Agents and officers searched residences, seized assets valued at approximately $30 million, and identified additional forfeitable property valued at approximately $30 million. The operation also seized 23 domains and over 70 servers constituting the backbone of Wang’s prior residential proxy service and the recent incarnation of the service. By seizing multiple domains tied to the historical 911 S5, as well as several new domains and services directly linked to an effort to reconstitute the service, the government has successfully terminated Wang’s efforts to further victimize individuals through his newly formed service Clourouter.io and closed the existing malicious backdoors.
The creator and operator of the botnet, YunHe Wang, was arrested in Singapore.
AWS CodeBuild now supports managed self-hosted GitHub Action runners, allowing you to build powerful CI/CD capabilities right beside your code and quickly implement a build, test and deploy pipeline. Last year AWS announced that customers can define their GitHub Actions steps within any phase of a CodeBuild buildspec file but with a self-hosted runner, jobs execute from GitHub Actions on GitHub.com to a system you deploy and manage.
For customers managing their self-hosted runners on their own infrastructure, CodeBuild can now provide a secure, scalable and lower latency solution. In addition, CodeBuild managed self-hosted GitHub Action runners bring features, such as:
Available compute platforms including AWS Lambda, Windows, Linux, Linux GPU-enhanced and AWS Graviton Processors (Arm-based instances).
With the compute options available, customers can now run tests on hardware and operating system combinations that closely match production and reduce manual operational tasks by shifting the management of the runners to AWS.
In this blog, I will explore how AWS managed GitHub Action self-hosted runners work by building and deploying an application to AWS using GitHub Actions.
Architecture overview
The architecture of what I’ll be building can be seen below:
The architecture above shows how a developer pushes code changes to GitHub. This triggers CodeBuild to detect the update. CodeBuild then runs the defined GitHub Action Workflow, which builds and deploys it to AWS Lambda.
Step 1. Build a AWS Lambda Function
I’ll start with a simple application to demonstrate how to build and deploy an application on AWS via a Managed Self-Hosted GitHub Actions runner. We’ve written before about why AWS is the best place to run Rust, Amazon CTO Werner Vogels has been an outspoken advocate for exploring energy-efficient programming languages like Rust and AWS have great guides on using Rust to build on AWS such as:
From the above cloned repository, install Cargo Lambda:For macOS & Linux:
brew tap cargo-lambda/cargo-lambda
brew install cargo-lambda
Windows users can follow the guide to see all the ways that you can install Cargo Lambda in your system.
Use Cargo lambda to create a new project
cargo lambda new new-lambda-project && cd new-lambda-project
It’s now possible to explore the project, in this case I am using JetBrains RustRover with Amazon Q Developer installed to increase my productivity while working on the application:
Figure 3. JetBrains RustRover with Amazon Q Developer
I will create a new CodeBuild project as per the documentation to connect CodeBuild to our GitHub repository and correctly configure a webhook to trigger the GitHub Actions.
For Repository, choose Repository in my GitHub account.
For Repository URL, enter https://github.com/user-name/repository-name.
In Primary source webhook events:
For Webhook – optional, select Rebuild every time a code change is pushed to this repository.
For Event type, select WORKFLOW_JOB_QUEUED. Once this is enabled, builds will only be triggered by GitHub Actions workflow jobs events.
Figure 4. WORKFLOW_JOB_QUEUED Event Type
In Environment:
Choose a supported Environment image and Compute. Note that you have the option to override the image and instance settings by using a label in your GitHub Actions workflow YAML.
In Buildspec:
Note that your Buildspec will be ignored. Instead, CodeBuild will override it to use commands that will setup the self-hosted runner. This project’s primary responsibility is to set up a self-hosted runner in CodeBuild to run GitHub Actions workflow jobs.
Continue with the remaining default options and select Create build project.
CodeBuild Service Role Permissions
In order for the CodeBuild service role to be able to successfully create and deploy a Lambda function, the service role will require the necessary permissions. The Service role can be seen when editing the CodeBuild project:
Note that I do not need to manage IAM permissions outside of our AWS Account, for example GitHub does not need to know about our AWS permissions.
Step 3. Create a GitHub Action Workflow
GitHub Actions is a continuous integration and continuous deliver (CI/CD) platform that provides automation through building, testing and deploying applications. In this section we will create a GitHub Action Workflow to build and deploy our Lambda.
Navigate back to our GitHub project create a workflow within the .github/workflows directory, the Simple Workflow is a good starting point:
Figure 6. Create a Simple Workflow
Update the Job to include the tooling required to build our Rust Lambda function, the details can be found in the GitHub Actions section. Our workflow file should now look like this:
The above GitHub Actions Workflow currently runs on GitHub; However, I now want to make two further changes:
Define an AWS CodeBuild runner
Define Build and Deploy Lambda steps
Define an AWS CodeBuild runner
A GitHub Actions workflow is made up of one or more jobs, each job runs in a runner environment specified by runs-on. The value for runs-on to specify CodeBuild as a runner takes the format:
I will update the <CodeBuildProjectName> to the CodeBuild project name that was entered in Step2, e.g. “GitHubActionsDemo”.
When configuring CodeBuild as a runner environment, BuildSpecs are ignored. In order to define the specification of our build environments it is possible to pass in variables including:
When I commit changes to the workflow to the main branch it will trigger the GitHub Action.
Step 4. Testing our GitHub Action Workflow.
The GitHub Action is currently triggered on all push and pull requests to main branch:
Figure 7. Trigger a build
Note that GitHub is where the CI/CD process is being driven, the build logs are available in GitHub as the job is running:
Figure 8. GitHub Action Logs
As the build progresses through the deployment step, the details of the Lambda function deployed are shown:
Figure 9. Deployment ARN
Navigating back to the AWS Console, the deployed Lambda Function can be seen:
Figure 10. Lambda Deployed
And finally, opening the CodeBuild console, it’s possible to observe the status of the Managed GitHub Actions Runner, the build number and also the duration:
Figure 11. Lambda Deployed via Managed Self-Hosted GitHub Action runner
Clean Up
To avoid incurring future charges:
Delete the Lambda created via the deployment in Step 4.
Delete the CodeBuild Project created in Step 2.
Conclusion
As I’ve shown in this blog, setting up GitHub Actions Workflows that run on AWS is now even easier to allow CodeBuild projects to receive GitHub Actions workflow job events and run them on CodeBuild ephemeral hosts. AWS customers can take advantage of natively integrating with AWS and providing security and convenience through features such as defining service role permissions with AWS IAM or passing credentials as environment variables to build jobs with AWS Secrets Manager.
Being able to use CodeBuild’s reserved capacity allows you to provision a fleet of CodeBuild hosts that persist your build environment. These hosts remain available to receive subsequent build requests, which reduces build start-up latencies but also make it possible to compile your software within your VPC and access resources such as Amazon Relational Database Service, Amazon ElastiCache, or any service endpoints that are only reachable from within a specific VPC.
CodeBuild-hosted GitHub Actions runners are supported in all CodeBuild regions and customers managing their CI/CD processes via GitHub Actions can use the compute platforms CodeBuild offers, including Lambda, Windows, Linux, Linux GPU-enhanced and Arm-based instances powered by AWS Graviton Processors.
Политиката, също и животът извън политиката се определят от намирането или отхвърлянето на компромисите. Бъдещето на 50-тия парламент ще се определи от това доколко страните в даден процес разрешават конфликти чрез споразумения, които частично реализират интересите им, или отхвърлят всякакви взаимни отстъпки.
В България стремежът към компромис в името на жизнеспособно управление не се разбира като съвещателната демокрация на Юрген Хабермас – повече публичност и широка обществена дискусия, – а по-скоро като консолидация на властта в ръцете на няколко лидери, договарящи се при закрити врати. Каквито и решения да се вземат обаче за формиране на мнозинства след изборите на 9 юни, те не могат да бъдат основани на негласни споразумения като 9-месечната „сглобка“ – съюз между ПП–ДБ и ГЕРБ и съучастие на ДПС. В противен случай отвращението от политическото и политиците може да достигне разрушителни размери за бездруго нездравата българска демокрация.
Политическите сили са предпазливи в заявките за обвързване или необвързване преди този вот. А гражданите са свикнали с фалша на нападките, които отправят помежду си – наясно са, че в следизборните седмици започва договарянето и нищо друго няма значение.
Последните социологически проучвания в навечерието на предстоящите след ден избори за национален и европейски парламент не изненадват. Единственото сигурно в тях е, че ГЕРБ ще е първа политическа сила предвид дистанцията от над 9%, което всички измерват между партията на Бойко Борисов и втората формация. Но втората, третата и четвъртата са неизвестни заради незначителните разлики помежду им. Така че за ПП–ДБ, „Възраждане“ и ДПС окончателното подреждане ще е ясно след 20:00 часа на 9 юни. Никой не оспорва петата и шестата позиция съответно на БСП и „Има такъв народ“. Втората въпросителна обаче е коя от по-малките формации ще успее да прескочи 4-процентовата бариера – дясната „Синя България“ или лявата „Солидарна България“.
Какво е известно за (не)възможните компромиси 48 часа преди изборния ден?
ГЕРБ изключва БСП и „Възраждане“
„След изборите няма да преговаряме с БСП и „Възраждане“, обяви по Нова телевизия кандидат-депутатката от ГЕРБ Рая Назарян. Това означава, че ДПС, ПП–ДБ и ИТН остават потенциални партньори – заедно или част от тях.
След като цяла кампания нахъсваше избирателите, че може да оглави четвърто правителство, лидерът на ГЕРБ Бойко Борисов заяви, че изобщо не се гласи за такъв.
Христо [Христо Иванов, б.а.] вика: „Борисов се гласи за премиер.“ Христо, приятелю мой, изобщо не се глася, изобщо не се глася. Не си позволих веднъж да ви обидя.
През цялата кампания Борисов редуваше критики към ПП–ДБ с намеци за бъдещо управление на принципа „премиерът е от нас, но може и някой министър от вас“.
ПП–ДБ изключва коалиция с ГЕРБ и ДПС
След изборите „Продължаваме Промяната – Демократична България“ няма да участва в процес, който се води от ГЕРБ и ДПС. Това пък заяви пак по Нова телевизия бившият премиер и кандидат за депутат от ПП–ДБ Николай Денков, убеден, че коалицията ще е „твърдо“ на второ място. По bTV съпредседателят на ПП и бивш министър на финансите Асен Василев беше още по-категоричен – че коалиция с ГЕРБ и ДПС няма да има в 50-тото НС. „Няма да сме в коалиция с Пеевски и Борисов“, написа във Facebookслед предизборна среща в Хасково и другият съпредседател на ПП Кирил Петков.
От ДБ обаче не посочват ГЕРБ като недопустим партньор, а единствено ДПС. През май съпредседателят на „Демократична България“ Христо Иванов заяви пред журналисти, че каузата им е да не допуснат Пеевски на власт.
Категорично казвам, че следващо управление с Пеевски няма да има. Всички лъжи ще излязат наяве. Тази кална кампания, която виждате, е смъртният писък на Пеевски.
Готова ли е ПП–ДБ да остане в опозиция предвид зачестилите прокоби, че наесен може да има нови парламентарни избори? Дори и да е така, двете коалиции трябва да изяснят помежду си границите на допустимите партньорства, защото сега проличават известни несходства.
ДПС не изключва коалиция с никого
Макар публично и по всеки удобен повод да напада Христо Иванов, Кирил Петков или Асен Василев, лидерът на ДПС Делян Пеевски не прокарва нито една червена линия за бъдещо управление. В тази предизборна кампания той наприказва различни работи за всеки от тях – как Иванов и Кирил Петков искали да пенсионират Борисов, как Христо Иванов му доверил, че иска да става президент, и поискал подкрепата на ДПС, а също така и да е единствен лидер на дясното.
Въпреки всички тези персонални атаки Пеевски не прави стратегически изявления за допустими или недопустими съюзници. Известно е, че ДПС не прокарва червени линии – а как ще се пласира след 9 юни, зависи от непосилната лекота на компромисите.
„Възраждане“ изключва само ДПС
Председателят на „Възраждане“ Костадин Костадинов вече на няколко пъти заявява, че са готови да разговарят с други партии за участие във властта, но само при техните пет условия. Те, разбира се, са неизпълними за която и да е от останалите парламентарно представени сили с изключение на БСП. От „Възраждане“ настояват за референдуми за еврото и членството в НАТО, прекратяване на военната помощ за Украйна и на санкциите срещу Русия, предоговаряне на условията за членството на България в ЕС.
От кръга на формациите, с които биха преговаряли, една все пак (формално) е изключена.
Но има една партия, с която мога да кажа със сигурност, че разговори няма да водим, и това е ДПС.
През ноември миналата година Костадинов прогнозира, че сглобката няма да издържи дълго и че очаква парламентарни избори през април или най-късно през юни, заедно с вота за Европейски парламент.
Позна, но не заради интуицията си.
БСП изключва ГЕРБ
Както неизменно уверява от години председателката на БСП Корнелия Нинова, ГЕРБ са червената линия за социалистите.
Неслучайно сме посветили последните 10 години на борба с модела ГЕРБ – и сме неговата единствена алтернатива.
Макар за кратко, Нинова вече управлява заедно с ПП, ДБ и ИТН – и едва ли би се съпротивлявала на втори кабинет, стига да я поканят. Малко вероятно е да се случи, а наесен недоволните във и извън БСП, които стават все повече, се готвят да я свалят от лидерския пост. През октомври партията ще избира нов лидер и тогава ще се реши и дали ще промени устава си, който сега предвижда ограничение от два мандата за председател на партията.
ИТН изключва „Продължаваме промяната“
Партията на Слави Трифонов е готова на експертно правителство с ГЕРБ, ДПС, но и с ДБ, „когато не страдат от левичарството на ПП“, също и с БСП и „Възраждане“. Тази готовност обяви заместник-председателят Ивайло Вълчев.
Няма как да не разделяме ПП–ДБ, при положение че ДБ са влезли в политическия живот, декларирайки десни принципи, а ПП показват абсолютно обратното… Много неща са ни доближавали до различни партии, имали сме допирни точки и с БСП, и с „Възраждане“. Не ни интересува от кого идва една идея, ако е добра.
Политиците от ИТН обаче повтарят най-често имената на ГЕРБ и ДПС като евентуални партньори въпреки декларациите им за широкия кръг формации, с които са готови да водят преговори.
Следизборното напасване на политическите сили ще е трудно. Новият модел на власт засега изглежда невъзможен. Но следизборните компромиси често нямат нищо общо с предизборните.
As a developer, marketing professional, or someone in the communications space, you’re likely familiar with the importance of SMS messaging in engaging customers and driving valuable interactions. However, you may have also encountered the growing challenge of artificially inflated traffic (AIT), also known as SMS pumping. A new report co-authored by Enea revealed that AIT is so widespread within the SMS ecosystem that 19.8B-35.7B fraudulent messages were sent by bad actors in 2023, incurring substantial costs of over $1 billion. In this blog post, we’ll explore how you can use Protect configurations, a powerful set of capabilities within Amazon Pinpoint SMS, that provides granular control over which destination countries your SMS, MMS, and voice messages can be sent to.
” width=”1252″ height=”889″>
What is SMS Pumping, aka Artificially Inflated Traffic (AIT)?
AIT, or SMS pumping, is a type of fraud where bad actors use bots to generate large volumes of fake SMS traffic. These bots target businesses’ whose websites, apps, and other assets have forms or other mechanisms that trigger SMS being sent out. Common use cases for SMS such as one-time passwords (OTPs), app download links, promotion signups, etc. are all targets for these bad actors to “pump” SMS and send out fraudulent messages. The goal is to artificially inflate the number of SMS messages a business sends, resulting in increased costs and a negative impact on the sender’s reputation. In the realm of SMS-based artificially inflated traffic (AIT), the prevalent method for bad actors to profit involves colluding with parties in the SMS delivery chain to receive a portion of the revenue generated from each fraudulent message sent.
” width=”1280″ height=”720″>
AIT poses several challenges for businesses:
Overspending: The fake SMS traffic generated by AIT bots results in businesses paying for messages that yield no actual results.
Interrupted service: Large volumes of AIT can force businesses to temporarily halt SMS services, disrupting legitimate customer communications.
Diverted focus: Dealing with AIT can shift businesses’ attention away from core operations and priorities.
Reduced deliverability rates due to the messages never being interacted with and/or large volumes of SMS being sent quickly.
How does Protect mitigate AIT?
Amazon Pinpoint’s Protect feature allows you to control which countries you can send messages to. This is beneficial if your customers are located in specific countries.
With Protect, you can create a list of country rules that either allow or block messages to each destination country. These country rules can be applied to SMS, MMS, and voice messages sent from your AWS account. The Protect configurations you create enable precise control over which destination countries your messages can be sent to. This helps mitigate the impact of AIT by allowing you to tailor where you do or do not send.
Protect offers flexibility in how the country rules are applied. You can apply them at the account level, the configuration set level, or the individual message level. This enables you to customize your AIT mitigation strategy to best fit your business needs and messaging patterns.
By leveraging Protect within Amazon Pinpoint, you can help ensure the integrity and cost-effectiveness of your SMS, MMS, and voice communications.
Account-level Protect Configuration
The simplest approach is to create a Protect configuration and associate it as the account default. This means the allow/block rules defined in that configuration will be applied across all messages sent from your account, unless overridden. This is an effective option if you only need one set of country rules applied universally.
Configuration set-specific Protect configuration
You can associate a Protect configuration with one or more of your Pinpoint SMS configuration sets. This allows you to apply different country rules to distinct messaging flows or use cases within your application without changing your existing code if you are already using Config Sets. It also enables more detailed logging and monitoring of the Protect configuration’s impact, such as:
Error Logs: Logging of any errors or issues encountered when messages are sent, providing insights into how the Protect configuration is affecting message delivery.
Audit Logs: Records of all configuration changes, access attempts, and other relevant activities related to the Protect configuration, allowing for comprehensive auditing and monitoring.
Usage Metrics: Tracking of usage statistics, such as the number of messages sent to different countries, the impact of the Protect configuration on message volumes, and other usage-related data.
Compliance and Policy Enforcement Logs: Documentation of how the Protect configuration is enforcing compliance with messaging policies and regulations, including any instances where messages are blocked or allowed based on the configuration rules.
Dynamic Protect configuration per message
If your needs are even more specific, you can create a Protect configuration without any association, and then specify its ID when sending messages via the Pinpoint APIs (e.g. SendMediaMessage, SendTextMessage, SendVoiceMessage). This gives you the ability to dynamically choose the Protect configuration to apply for each individual message, providing the ultimate flexibility.
Regardless of the approach, the core benefit of Protect configurations is the ability to precisely control which destination countries your messages may be sent to. Blocking countries where you don’t have a presence or where SMS pricing is high eliminates your exposure to fraudulent AIT traffic originating from those regions. This helps protect your messaging budget, maintain service continuity, and focus your efforts on legitimate customer interactions.
Who should use Protect configurations?
Protect configurations are designed to benefit a wide range of AWS customers, particularly those who:
Send SMS messages to a limited number of countries: If your business primarily operates in a few specific countries, Protect configurations can help you easily block SMS messages to countries where you don’t have a presence, reducing the risk of AIT.
Have experienced AIT issues in the past: If your business has been a target of SMS pumping, Protect configurations can help you regain control over your SMS communications and prevent future AIT attacks.
Want to proactively protect their SMS messaging: Even if you haven’t encountered AIT issues yet, Protect configurations can help you stay ahead of the curve and maintain the integrity of your SMS communications.
How to create a country rules list with Protect configuration
To begin building a list of country rules that allow or block messages to specific destination countries, you start by creating a new Protect configuration. There are two ways to accomplish this, either by using the console, or the API.
Option 1 – Using the AWS Console
Console Scenario:My account is out of the sandbox and I only want to send to 1 country – United Kingdom (iso:GB) using the SenderID “DEMOTP”.
At a high level, we will follow the three steps outlined below for each method. In our examples, we used a SenderID as our Originator. However, it should be noted that the same process can be achieved using any originator you’d like. i.e. SenderID, Phone pool, Phone number, 10DLC, short code, etc.
Create SenderID (Optional if you already have one)
Select all countries by toggling checkbox in search bar
” width=”863″ height=”521″>
Search for Country=United Kingdom then deselect United Kingdom
” width=”865″ height=”582″>
Set as Account Default and select Create protect configuration
” width=”1497″ height=”1173″>
3) Send a test message with SMS simulator
Note: The Pinpoint SMS Simulator provides special phone numbers you can use to send test text messages and receive realistic event records, all within the confines of the Amazon Pinpoint service. These simulator phone numbers are designed to stay entirely within the Pinpoint SMS ecosystem, ensuring your test messages don’t get sent over the carrier network.
You can use these simulator phone numbers to send both SMS and MMS messages, allowing you to thoroughly validate your message content, workflow, and event handling. The responses you receive back will mimic either success or fail depending on which destination simulator number you send to.
For Originator, Choose Sender ID, and select your Sender ID created from earlier.
Under Destination number, select Simulator numbers and choose United Kingdom (GB). Enter a test message in the Message body.
Finally, choose send test message. This should prompt a green “Success” banner at the top of your page.
” width=”1336″ height=”1313″>
Conversely, follow the previous test message steps, and instead attempt to send to anywhere other than the United Kingdom (GB). In this example, Australia (AU)
As shown below in the screenshot this one is blocked since you have configured to only send to GB.
” width=”1333″ height=”1364″>
Option 2 – Using the V2 API and CLI
V2 API Scenario: My account is out of the sandbox and I want to BLOCK only 1 country – Australia (AU) while using the SenderID “DEMOTP”.
1) Create SenderID for GB
Note: before using the CLI remember to configure your access and secret key using
aws configure
Windows users should use PowerShell over cmd to test
Use RequestSenderId to create the same Sender Id as previously made via the console.
{
An error occurred (ConflictException) when calling the
SendTextMessage operation: Conflict Occurred -
Reason="DESTINATION_COUNTRY_BLOCKED_BY_PROTECT_CONFIGURATION" ResourceType="protect-configuration" ResourceId="string"
}
Conclusion
As SMS messaging continues to play a crucial role in customer engagement and authentication, protecting your communications from AIT is more important than ever. Amazon Pinpoint Protect provides a powerful and user-friendly solution to help you mitigate the impact of SMS pumping, ensuring the integrity of your SMS channels and preserving your business’ reputation and resources. Whether you’re a small business or a large enterprise, Pinpoint Protect is a valuable tool to have in your arsenal as you navigate the evolving landscape of SMS messaging.
To get started with Pinpoint SMS Protect, visit the Amazon Pinpoint SMS documentation or reach out to your AWS account team. And don’t forget to let us know in the comments how Protect configurations has helped you combat AIT and strengthen your SMS communications.
A few resources to help you plan for your SMS program:
The V2 API for SMS and Voice has many more useful actions not possible with the V1 API so we encourage you to explore how it can further help you simplify and automate your applications.
Brett Ezell is your friendly neighborhood Solutions Architect at AWS, where he specializes in helping customers optimize their SMS and email campaigns using Amazon Pinpoint and Amazon Simple Email Service. As a former US Navy veteran, Brett brings a unique perspective to his work, ensuring customers receive tailored solutions to meet their needs. In his free time, Brett enjoys live music, collecting vinyl, and the challenges of a good workout. And, as a self-proclaimed comic book aficionado, he can often be found combing through his local shop for new books to add to his collection.
The collective thoughts of the interwebz
Manage Consent
To provide the best experiences, we use technologies like cookies to store and/or access device information. Consenting to these technologies will allow us to process data such as browsing behavior or unique IDs on this site. Not consenting or withdrawing consent, may adversely affect certain features and functions.
Functional
Always active
The technical storage or access is strictly necessary for the legitimate purpose of enabling the use of a specific service explicitly requested by the subscriber or user, or for the sole purpose of carrying out the transmission of a communication over an electronic communications network.
Preferences
The technical storage or access is necessary for the legitimate purpose of storing preferences that are not requested by the subscriber or user.
Statistics
The technical storage or access that is used exclusively for statistical purposes.The technical storage or access that is used exclusively for anonymous statistical purposes. Without a subpoena, voluntary compliance on the part of your Internet Service Provider, or additional records from a third party, information stored or retrieved for this purpose alone cannot usually be used to identify you.
Marketing
The technical storage or access is required to create user profiles to send advertising, or to track the user on a website or across several websites for similar marketing purposes.


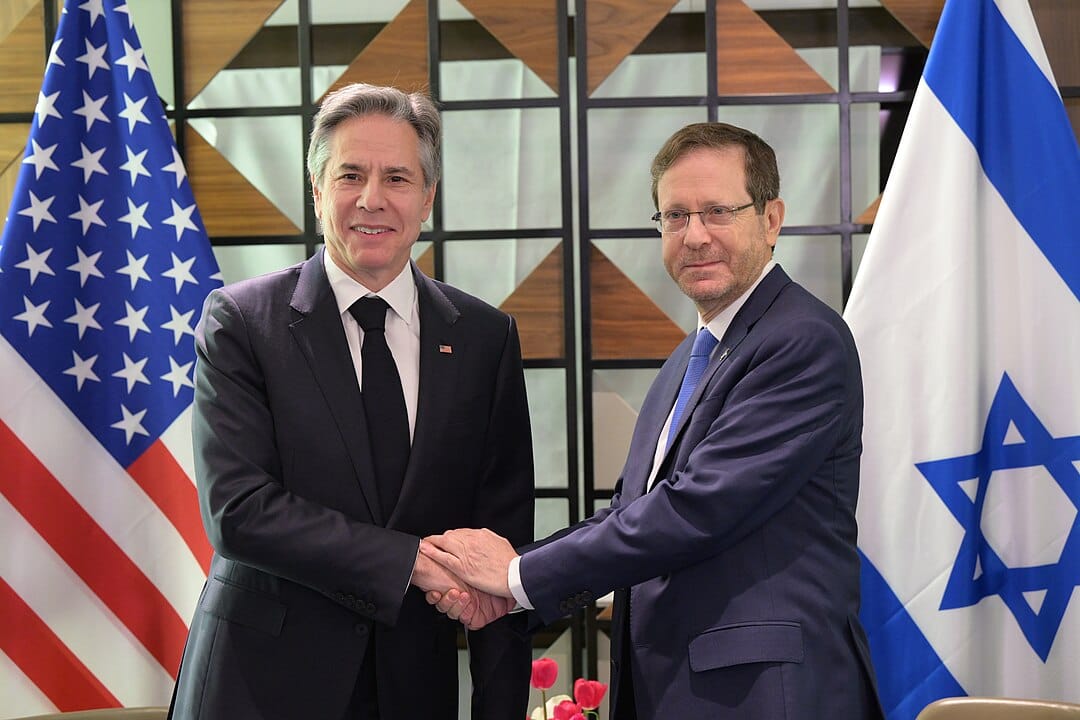

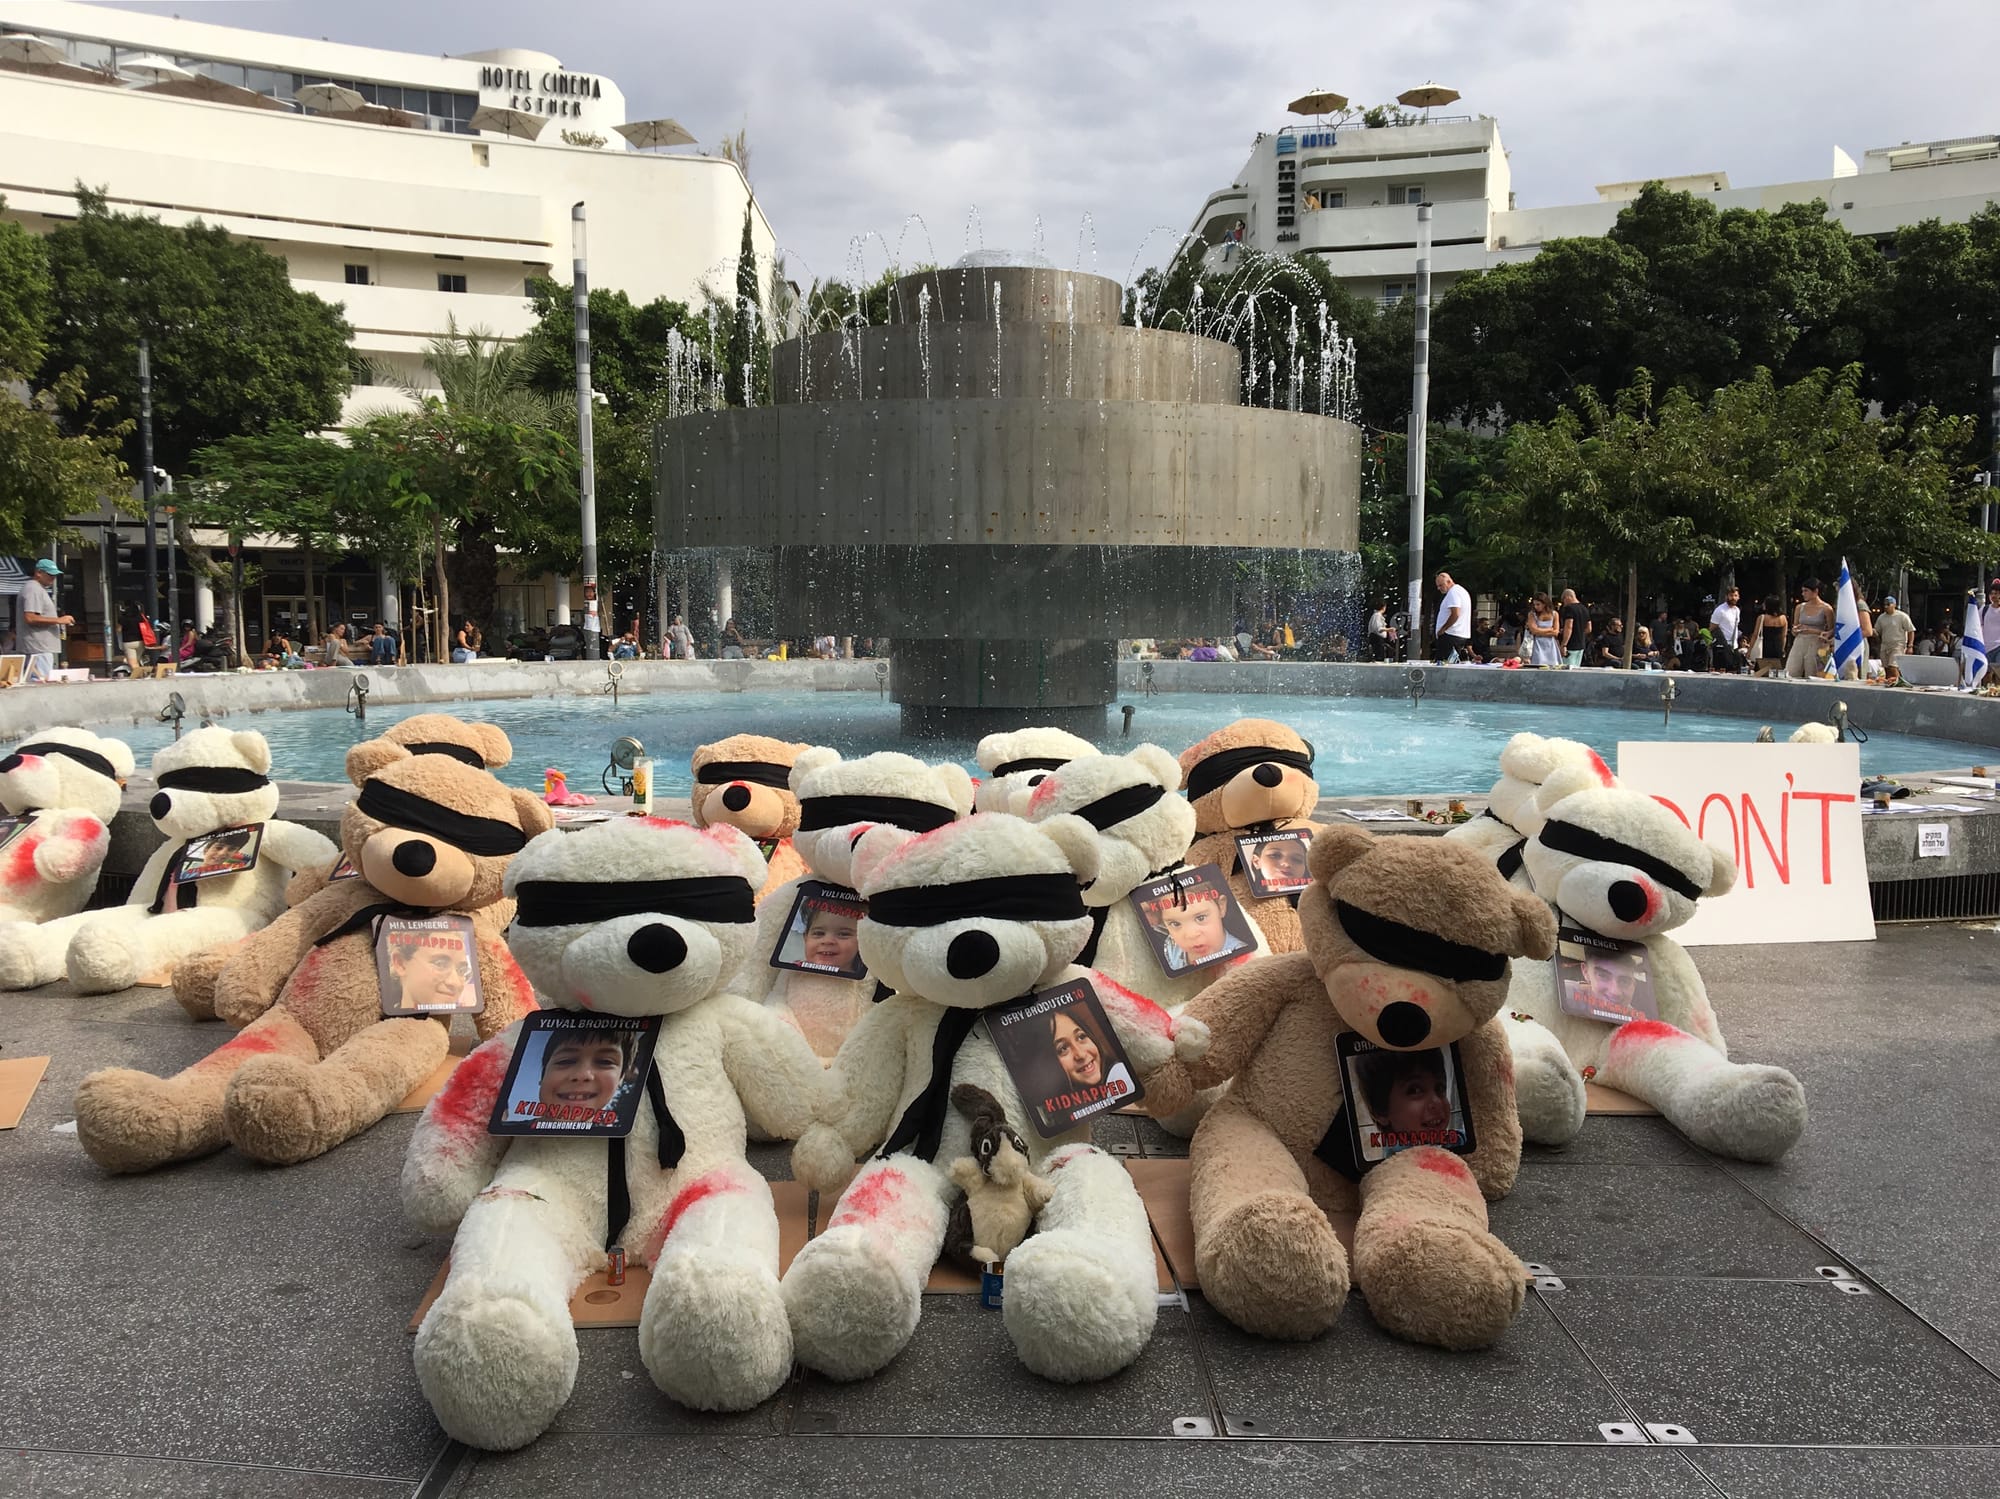


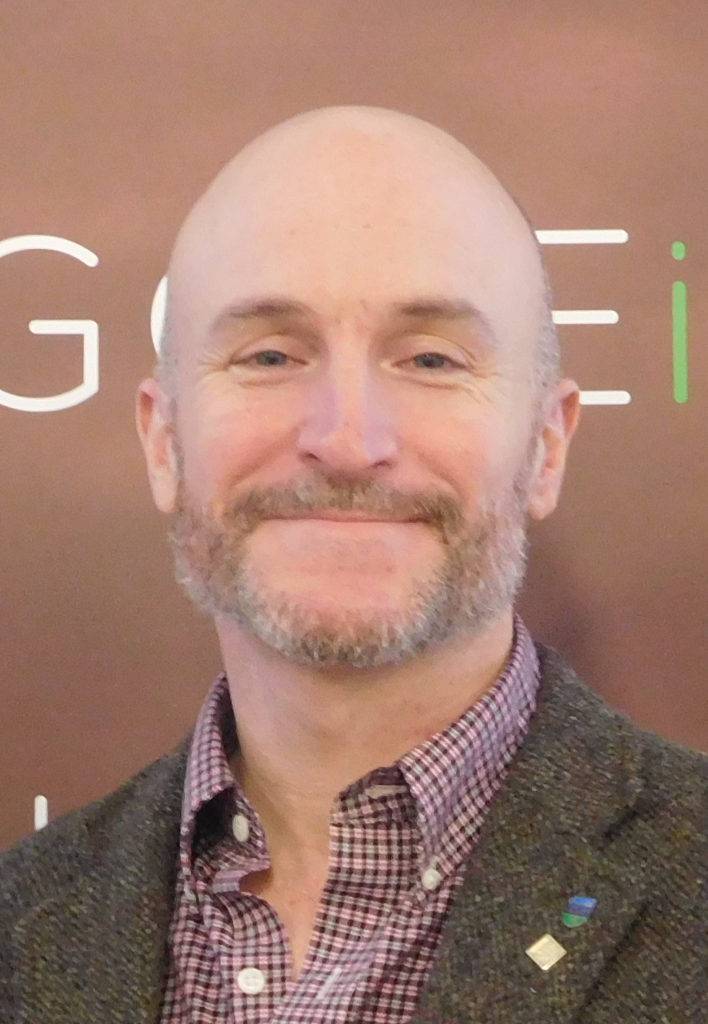

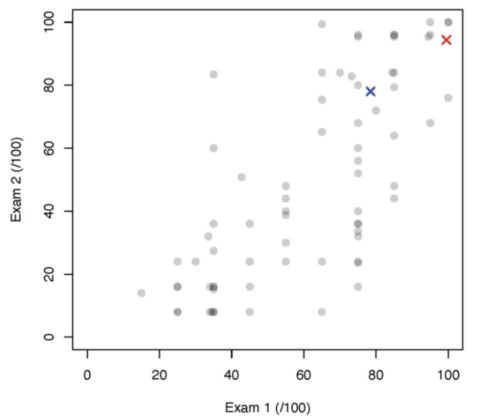

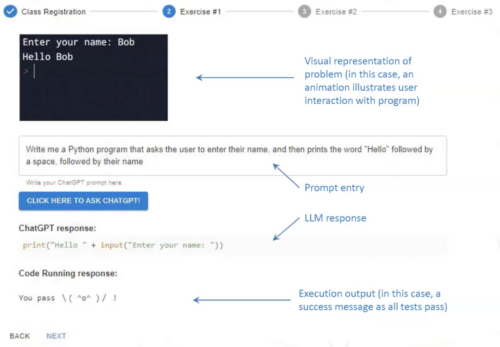


 Figure 8 – connectivity troubleshooting response generated by Amazon Q


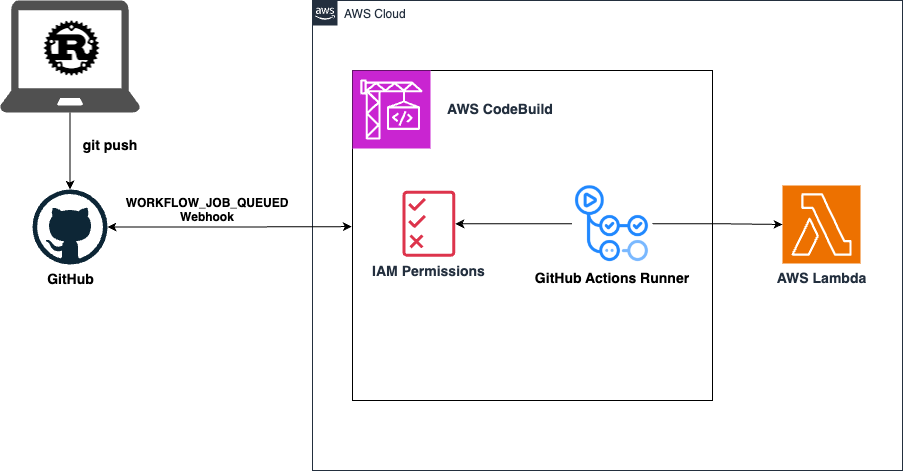

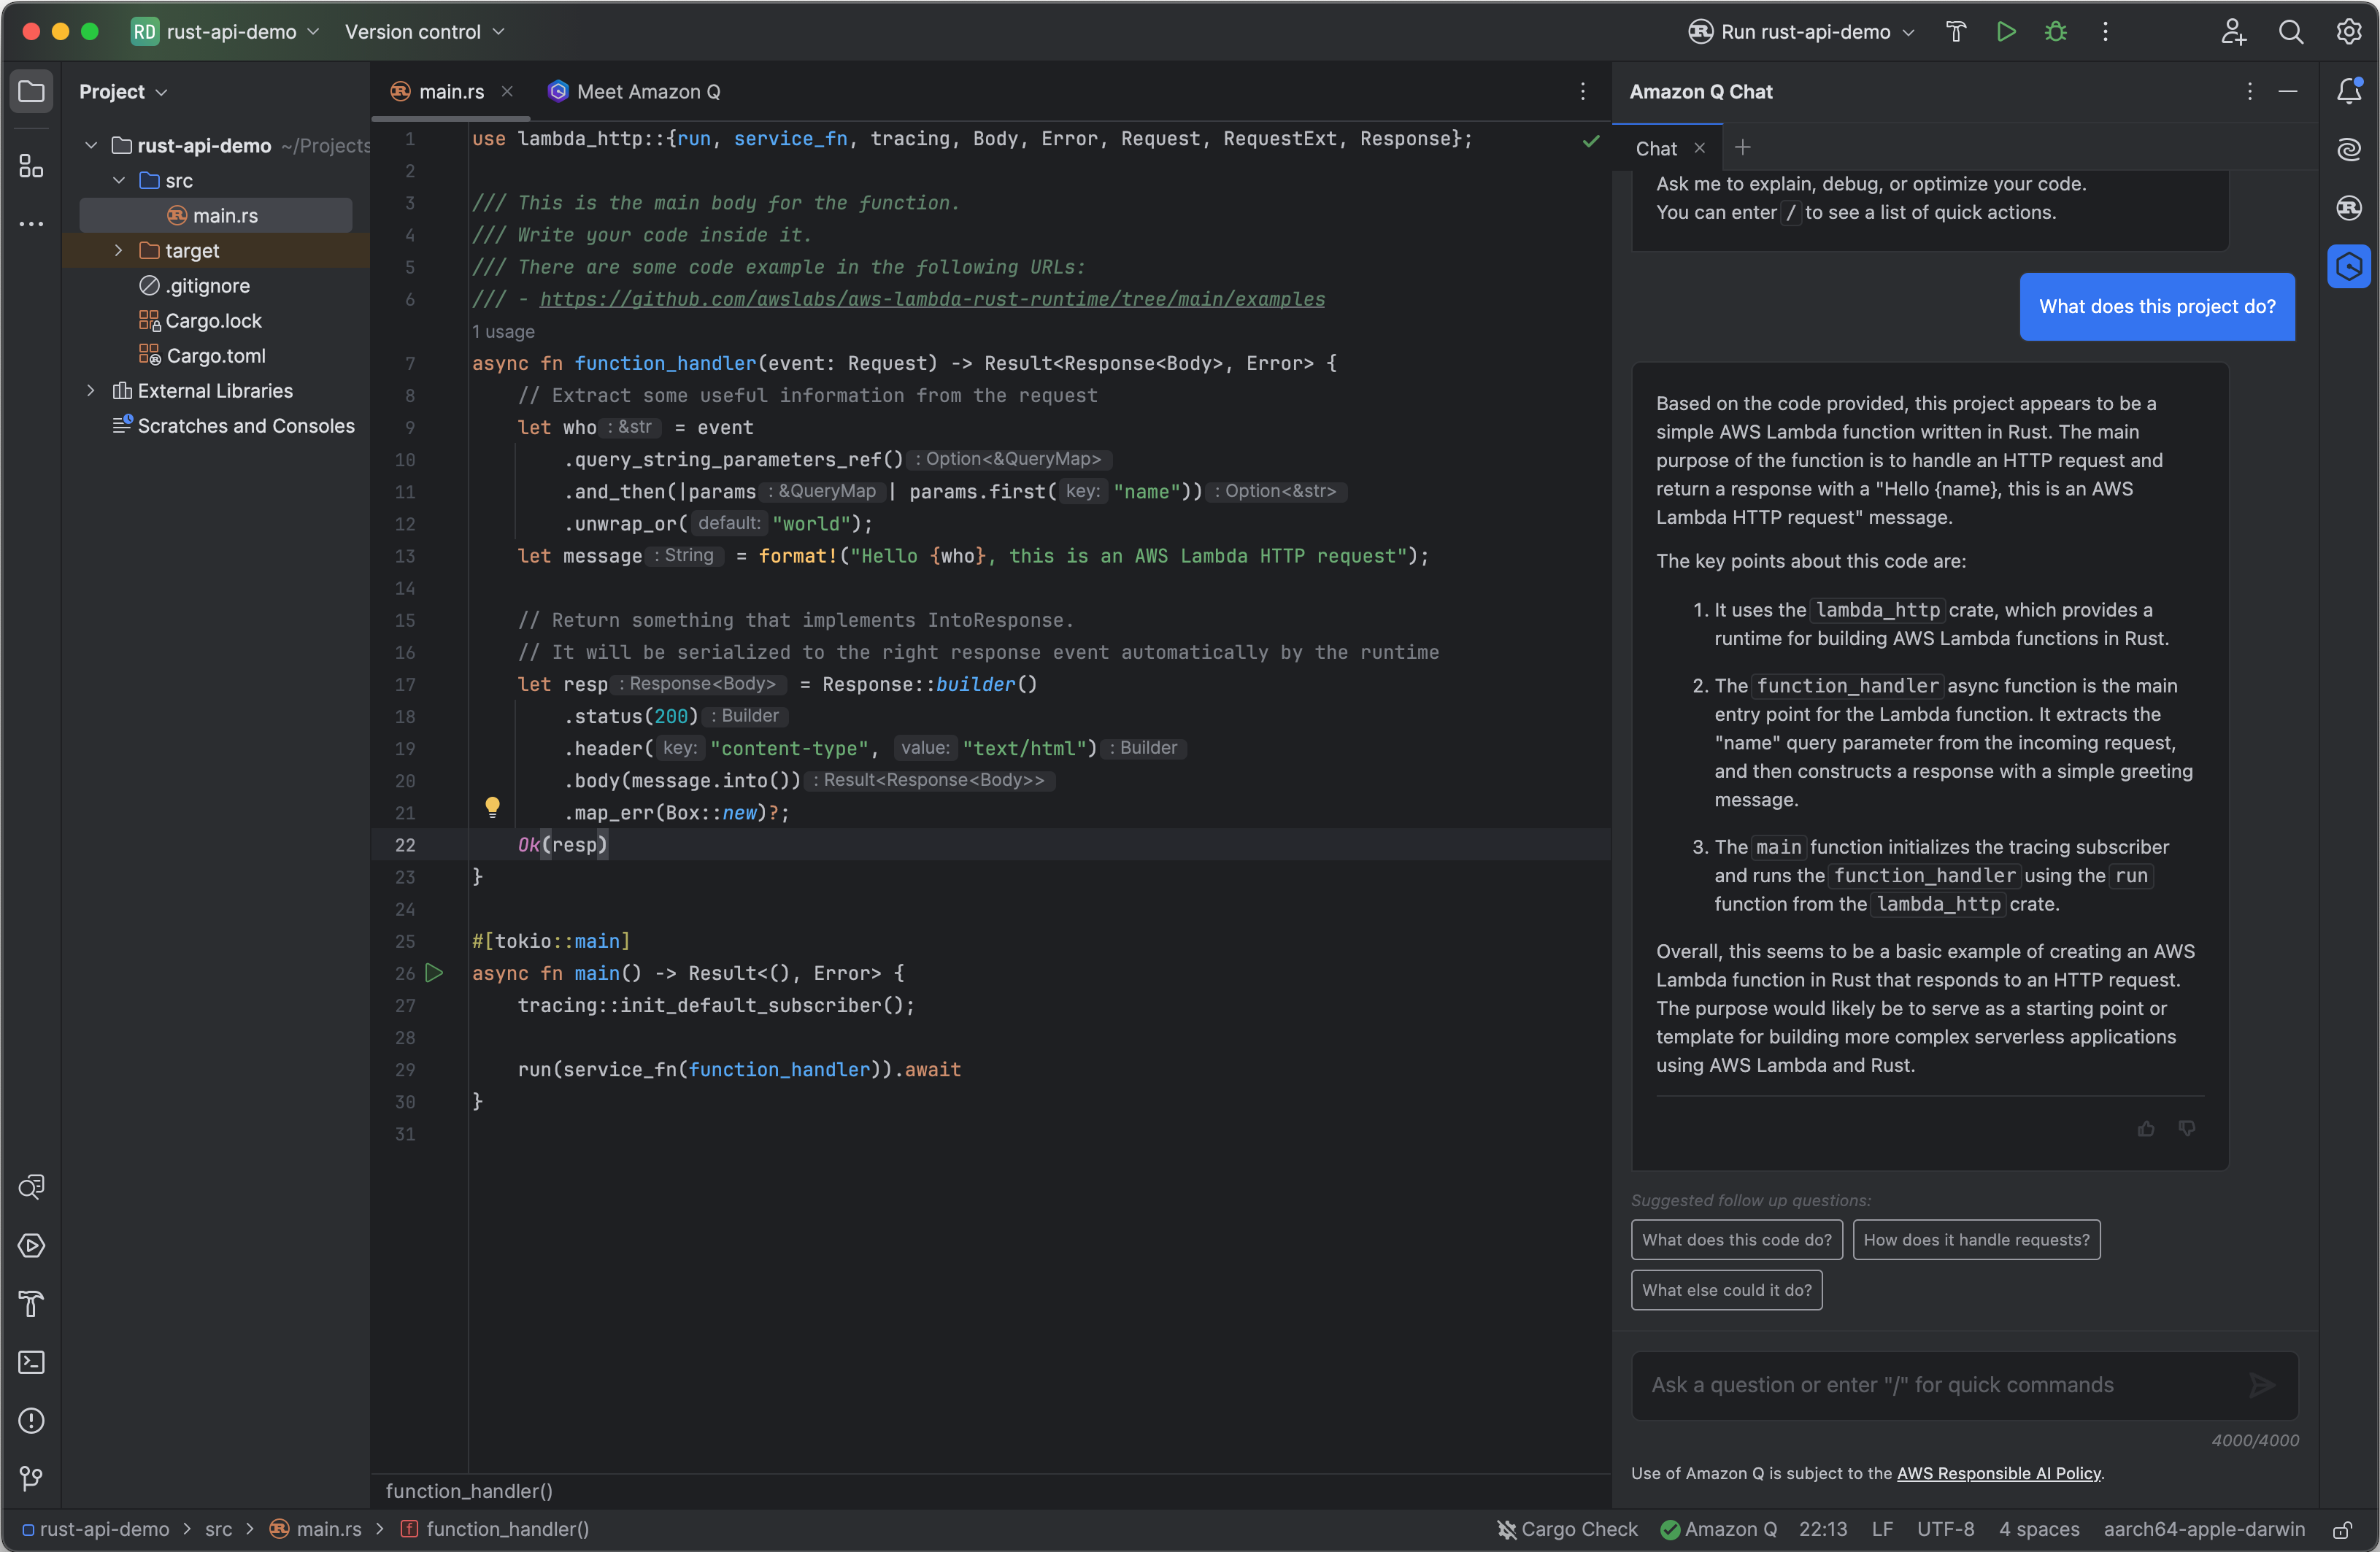


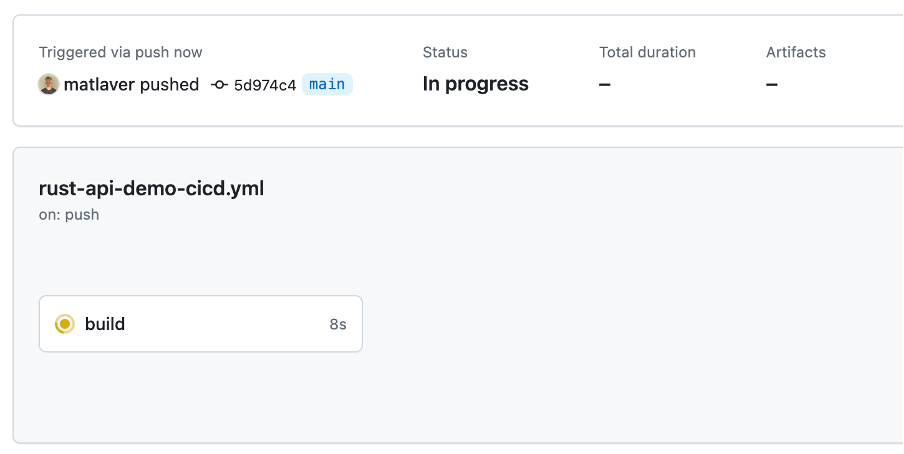
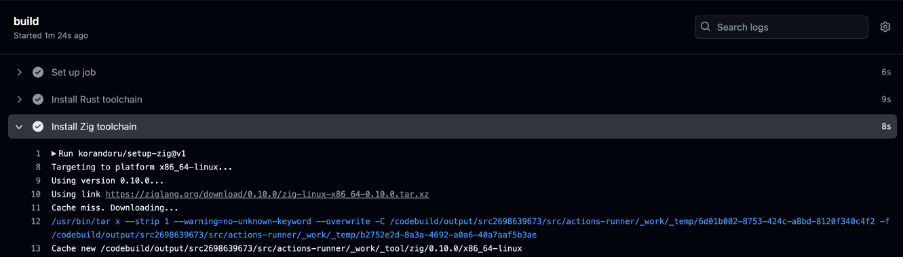
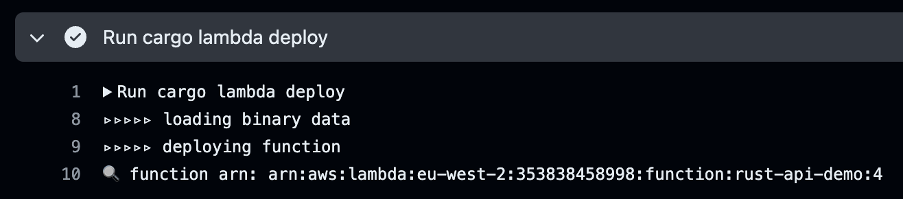
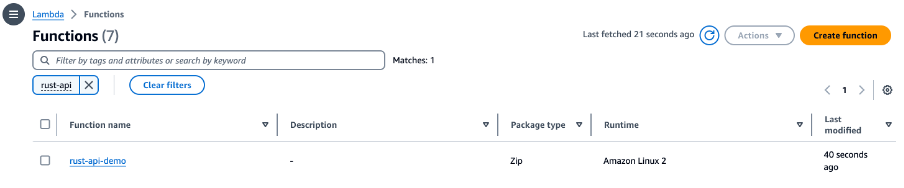
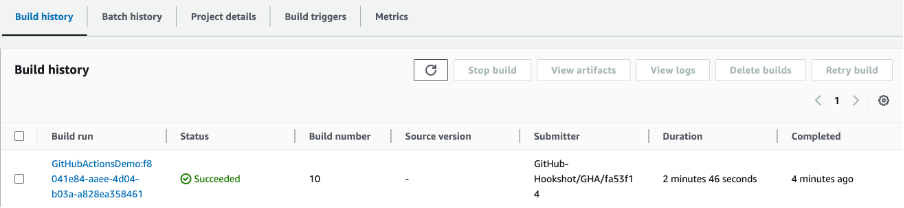


 ” width=”1252″ height=”889″>
 ” width=”1280″ height=”720″>
 ” width=”863″ height=”521″>
 ” width=”865″ height=”582″>
 ” width=”1497″ height=”1173″>
 ” width=”1336″ height=”1313″>
 ” width=”1333″ height=”1364″>
.jpg)
Response:
3) Send test message
Response:
Response – (ConflictException):
Conclusion
As SMS messaging continues to play a crucial role in customer engagement and authentication, protecting your communications from AIT is more important than ever. Amazon Pinpoint Protect provides a powerful and user-friendly solution to help you mitigate the impact of SMS pumping, ensuring the integrity of your SMS channels and preserving your business’ reputation and resources. Whether you’re a small business or a large enterprise, Pinpoint Protect is a valuable tool to have in your arsenal as you navigate the evolving landscape of SMS messaging.
To get started with Pinpoint SMS Protect, visit the Amazon Pinpoint SMS documentation or reach out to your AWS account team. And don’t forget to let us know in the comments how Protect configurations has helped you combat AIT and strengthen your SMS communications.
A few resources to help you plan for your SMS program:
About the Author
Brett Ezell is your friendly neighborhood Solutions Architect at AWS, where he specializes in helping customers optimize their SMS and email campaigns using Amazon Pinpoint and Amazon Simple Email Service. As a former US Navy veteran, Brett brings a unique perspective to his work, ensuring customers receive tailored solutions to meet their needs. In his free time, Brett enjoys live music, collecting vinyl, and the challenges of a good workout. And, as a self-proclaimed comic book aficionado, he can often be found combing through his local shop for new books to add to his collection.