Tag Archives: Amazon S3

Security is the top priority for Amazon S3

Post Syndicated from Maddie Bacon original https://aws.amazon.com/blogs/security/security-is-the-top-priority-for-amazon-s3/

Amazon Simple Storage Service (Amazon S3) launched 15 years ago in March 2006, and became the first generally available service from Amazon Web Services (AWS). AWS marked the fifteenth anniversary with AWS Pi Week—a week of in-depth streams and live events. During AWS Pi Week, AWS leaders and experts reviewed the history of AWS and Amazon S3, and some of the key decisions involved in building and evolving S3.

As part of this celebration, Werner Vogels, VP and CTO for Amazon.com, and Eric Brandwine, VP and Distinguished Engineer with AWS Security, had a conversation about the role of security in Amazon S3 and all AWS services. They touched on why customers come to AWS, and how AWS services grow with customers by providing built-in security that can progress to protections that are more complex, based on each customer’s specific needs. They also touched on how, starting with Amazon S3 over 15 years ago and continuing to this day, security is the top priority at AWS, and how nothing can proceed at AWS without security that customers can rely on.

“In security, there are constantly challenging tradeoffs,” Eric says. “The path that we’ve taken at AWS is that our services are usable, but secure by default.”

To learn more about how AWS helps secure its customers’ systems and information through a culture of security first, watch the video, and be sure to check out AWS Pi Week 2021: The Birth of the AWS Cloud.

If you have feedback about this post, submit comments in the Comments section below.

Want more AWS Security how-to content, news, and feature announcements? Follow us on Twitter.

Author

Maddie Bacon

Maddie (she/her) is a technical writer for AWS Security with a passion for creating meaningful, inclusive content. She previously worked as a security reporter and editor at TechTarget and has a BA in Mathematics. In her spare time, she enjoys reading, traveling, and all things Harry Potter.

How to visualize multi-account Amazon Inspector findings with Amazon Elasticsearch Service

Post Syndicated from Moumita Saha original https://aws.amazon.com/blogs/security/how-to-visualize-multi-account-amazon-inspector-findings-with-amazon-elasticsearch-service/

Amazon Inspector helps to improve the security and compliance of your applications that are deployed on Amazon Web Services (AWS). It automatically assesses Amazon Elastic Compute Cloud (Amazon EC2) instances and applications on those instances. From that assessment, it generates findings related to exposure, potential vulnerabilities, and deviations from best practices.

You can use the findings from Amazon Inspector as part of a vulnerability management program for your Amazon EC2 fleet across multiple AWS Regions in multiple accounts. The ability to rank and efficiently respond to potential security issues reduces the time that potential vulnerabilities remain unresolved. This can be accelerated within a single pane of glass for all the accounts in your AWS environment.

Following AWS best practices, in a secure multi-account AWS environment, you can provision (using AWS Control Tower) a group of accounts—known as core accounts, for governing other accounts within the environment. One of the core accounts may be used as a central security account, which you can designate for governing the security and compliance posture across all accounts in your environment. Another core account is a centralized logging account, which you can provision and designate for central storage of log data.

In this blog post, I show you how to:

  1. Use Amazon Inspector, a fully managed security assessment service, to generate security findings.
  2. Gather findings from multiple Regions across multiple accounts using Amazon Simple Notification Service (Amazon SNS) and Amazon Simple Queue Service (Amazon SQS).
  3. Use AWS Lambda to send the findings to a central security account for deeper analysis and reporting.

In this solution, we send the findings to two services inside the central security account:

Solution overview

Overall architecture

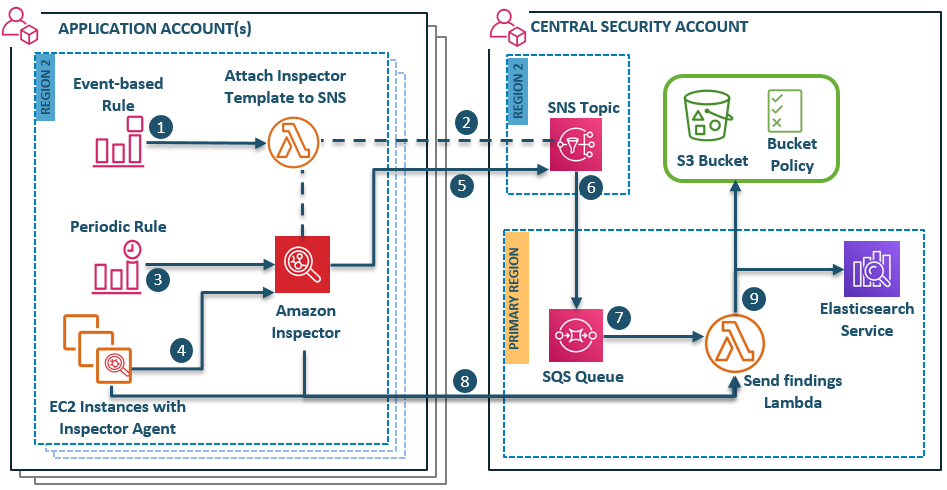
The flow of events to implement the solution is shown in Figure 1 and described in the following process flow.

Figure 1: Solution overview architecture

Figure 1: Solution overview architecture

Process flow

The flow of this architecture is divided into two types of processes—a one-time process and a scheduled process. The AWS resources that are part of the one-time process are triggered the first time an Amazon Inspector assessment template is created in each Region of each application account. The AWS resources of the scheduled process are triggered at a designated interval of Amazon Inspector scan in each Region of each application account.

One-time process

  1. An event-based Amazon CloudWatch rule in each Region of every application account triggers a regional AWS Lambda function when an Amazon Inspector assessment template is created for the first time in that Region.

    Note: In order to restrict this event to trigger the Lambda function only the first time an assessment template is created, you must use a specific user-defined tag to trigger the Attach Inspector template to SNS Lambda function for only one Amazon Inspector template per Region. For more information on tags, see the Tagging AWS resources documentation.

  2. The Lambda function attaches the Amazon Inspector assessment template (created in application accounts) to the cross-account Amazon SNS topic (created in the security account). The function, the template, and the topic are all in the same AWS Region.

    Note: This step is needed because Amazon Inspector templates can only be attached to SNS topics in the same account via the AWS Management Console or AWS Command Line Interface (AWS CLI).

Scheduled process

  1. A scheduled Amazon CloudWatch Event in every Region of the application accounts starts the Amazon Inspector scan at a scheduled time interval, which you can configure.
  2. An Amazon Inspector agent conducts the scan on the EC2 instances of the Region where the assessment template is created and sends any findings to Amazon Inspector.
  3. Once the findings are generated, Amazon Inspector notifies the Amazon SNS topic of the security account in the same Region.
  4. The Amazon SNS topics from each Region of the central security account receive notifications of Amazon Inspector findings from all application accounts. The SNS topics then send the notifications to a central Amazon SQS queue in the primary Region of the security account.
  5. The Amazon SQS queue triggers the Send findings Lambda function (as shown in Figure 1) of the security account.

    Note: Each Amazon SQS message represents one Amazon Inspector finding.

  6. The Send findings Lambda function assumes a cross-account role to fetch the following information from all application accounts:
    1. Finding details from the Amazon Inspector API.
    2. Additional Amazon EC2 attributes—VPC, subnet, security group, and IP address—from EC2 instances with potential vulnerabilities.
  7. The Lambda function then sends all the gathered data to a central S3 bucket and a domain in Amazon ES—both in the central security account.

These Amazon Inspector findings, along with additional attributes on the scanned instances, can be used for further analysis and visualization via Kibana—a data visualization dashboard for Amazon ES. Storing a copy of these findings in an S3 bucket gives you the opportunity to forward the findings data to outside monitoring tools that don’t support direct data ingestion from AWS Lambda.

Prerequisites

The following resources must be set up before you can implement this solution:

  1. A multi-account structure. To learn how to set up a multi-account structure, see Setting up AWS Control Tower and AWS Landing zone.
  2. Amazon Inspector agents must be installed on all EC2 instances. See Installing Amazon Inspector agents to learn how to set up Amazon Inspector agents on EC2 instances. Additionally, keep note of all the Regions where you install the Amazon Inspector agent.
  3. An Amazon ES domain with Kibana authentication. See Getting started with Amazon Elasticsearch Service and Use Amazon Cognito for Kibana access control.
  4. An S3 bucket for centralized storage of Amazon Inspector findings.
  5. An S3 bucket for storage of the Lambda source code for the solution.

Set up Amazon Inspector with Amazon ES and S3

Follow these steps to set up centralized Amazon Inspector findings with Amazon ES and Amazon S3:

  1. Upload the solution ZIP file to the S3 bucket used for Lambda code storage.
  2. Collect the input parameters for AWS CloudFormation deployment.
  3. Deploy the base template into the central security account.
  4. Deploy the second template in the primary Region of all application accounts to create global resources.
  5. Deploy the third template in all Regions of all application accounts.

Step 1: Upload the solution ZIP file to the S3 bucket used for Lambda code storage

  1. From GitHub, download the file Inspector-to-S3ES-crossAcnt.zip.
  2. Upload the ZIP file to the S3 bucket you created in the central security account for Lambda code storage. This code is used to create the Lambda function in the first CloudFormation stack set of the solution.

Step 2: Collect input parameters for AWS CloudFormation deployment

In this solution, you deploy three AWS CloudFormation stack sets in succession. Each stack set should be created in the primary Region of the central security account. Underlying stacks are deployed across the central security account and in all the application accounts where the Amazon Inspector scan is performed. You can learn more in Working with AWS CloudFormation StackSets.

Before you proceed to the stack set deployment, you must collect the input parameters for the first stack set: Central-SecurityAcnt-BaseTemplate.yaml.

To collect input parameters for AWS CloudFormation deployment

  1. Fetch the account ID (CentralSecurityAccountID) of the AWS account where the stack set will be created and deployed. You can use the steps in Finding your AWS account ID to help you find the account ID.
  2. Values for the ES domain parameters can be fetched from the Amazon ES console.
    1. Open the Amazon ES Management Console and select the Region where the Amazon ES domain exists.
    2. Select the domain name to view the domain details.
    3. The value for ElasticsearchDomainName is displayed on the top left corner of the domain details.
    4. On the Overview tab in the domain details window, select and copy the URL value of the Endpoint to use as the ElasticsearchEndpoint parameter of the template. Make sure to exclude the https:// at the beginning of the URL.

      Figure 2: Details of the Amazon ES domain for fetching parameter values

      Figure 2: Details of the Amazon ES domain for fetching parameter values

  3. Get the values for the S3 bucket parameters from the Amazon S3 console.
    1. Open the Amazon S3 Management Console.
    2. Copy the name of the S3 bucket that you created for centralized storage of Amazon Inspector findings. Save this bucket name for the LoggingS3Bucket parameter value of the Central-SecurityAcnt-BaseTemplate.yaml template.
    3. Select the S3 bucket used for source code storage. Select the bucket name and copy the name of this bucket for the LambdaSourceCodeS3Bucket parameter of the template.

      Figure 3: The S3 bucket where Lambda code is uploaded

      Figure 3: The S3 bucket where Lambda code is uploaded

  4. On the bucket details page, select the source code ZIP file name that you previously uploaded to the bucket. In the detail page of the ZIP file, choose the Overview tab, and then copy the value in the Key field to use as the value for the LambdaCodeS3Key parameter of the template.

    Figure 4: Details of the Lambda code ZIP file uploaded in Amazon S3 showing the key prefix value

    Figure 4: Details of the Lambda code ZIP file uploaded in Amazon S3 showing the key prefix value

Note: All of the other input parameter values of the template are entered automatically, but you can change them during stack set creation if necessary.

Step 3: Deploy the base template into the central security account

Now that you’ve collected the input parameters, you’re ready to deploy the base template that will create the necessary resources for this solution implementation in the central security account.

Prerequisites for CloudFormation stack set deployment

There are two permission modes that you can choose from for deploying a stack set in AWS CloudFormation. If you’re using AWS Organizations and have all features enabled, you can use the service-managed permissions; otherwise, self-managed permissions mode is recommended. To deploy this solution, you’ll use self-managed permissions mode. To run stack sets in self-managed permissions mode, your administrator account and the target accounts must have two IAM roles—AWSCloudFormationStackSetAdministrationRole and AWSCloudFormationStackSetExecutionRole—as prerequisites. In this solution, the administrator account is the central security account and the target accounts are application accounts. You can use the following CloudFormation templates to create the necessary IAM roles:

To deploy the base template

  1. Download the base template (Central-SecurityAcnt-BaseTemplate.yaml) from GitHub.
  2. Open the AWS CloudFormation Management Console and select the Region where all the stack sets will be created for deployment. This should be the primary Region of your environment.
  3. Select Create StackSet.
    1. In the Create StackSet window, select Template is ready and then select Upload a template file.
    2. Under Upload a template file, select Choose file and select the Central-SecurityAcnt-BaseTemplate.yaml template that you downloaded earlier.
    3. Choose Next.
  4. Add stack set details.
    1. Enter a name for the stack set in StackSet name.
    2. Under Parameters, most of the values are pre-populated except the values you collected in the previous procedure for CentralSecurityAccountID, ElasticsearchDomainName, ElasticsearchEndpoint, LoggingS3Bucket, LambdaSourceCodeS3Bucket, and LambdaCodeS3Key.
    3. After all the values are populated, choose Next.
  5. Configure StackSet options.
    1. (Optional) Add tags as described in the prerequisites to apply to the resources in the stack set that these rules will be deployed to. Tagging is a recommended best practice, because it enables you to add metadata information to resources during their creation.
    2. Under Permissions, choose the Self service permissions mode to be used for deploying the stack set, and then select the AWSCloudFormationStackSetAdministrationRole from the dropdown list.

      Figure 5: Permission mode to be selected for stack set deployment

      Figure 5: Permission mode to be selected for stack set deployment

    3. Choose Next.
  6. Add the account and Region details where the template will be deployed.
    1. Under Deployment locations, select Deploy stacks in accounts. Under Account numbers, enter the account ID of the security account that you collected earlier.

      Figure 6: Values to be provided during the deployment of the first stack set

      Figure 6: Values to be provided during the deployment of the first stack set

    2. Under Specify regions, select all the Regions where the stacks will be created. This should be the list of Regions where you installed the Amazon Inspector agent. Keep note of this list of Regions to use in the deployment of the third template in an upcoming step.
      • Though an Amazon Inspector scan is performed in all the application accounts, the regional Amazon SNS topics that send scan finding notifications are created in the central security account. Therefore, this template is created in all the Regions where Amazon Inspector will notify SNS. The template has the logic needed to handle the creation of specific AWS resources only in the primary Region, even though the template executes in many Regions.
      • The order in which Regions are selected under Specify regions defines the order in which the stack is deployed in the Regions. So you must make sure that the primary Region of your deployment is the first one specified under Specify regions, followed by the other Regions of stack set deployment. This is required because global resources are created using one Region—ideally the primary Region—and so stack deployment in that Region should be done before deployment to other Regions in order to avoid any build dependencies.

        Figure 7: Showing the order of specifying the Regions of stack set deployment

        Figure 7: Showing the order of specifying the Regions of stack set deployment

  7. Review the template settings and select the check box to acknowledge the Capabilities section. This is required if your deployment template creates IAM resources. You can learn more at Controlling access with AWS Identity and Access Management.

    Figure 8: Acknowledge IAM resources creation by AWS CloudFormation

    Figure 8: Acknowledge IAM resources creation by AWS CloudFormation

  8. Choose Submit to deploy the stack set.

Step 4: Deploy the second template in the primary Region of all application accounts to create global resources

This template creates the global resources required for sending Amazon Inspector findings to Amazon ES and Amazon S3.

To deploy the second template

  1. Download the template (ApplicationAcnts-RolesTemplate.yaml) from GitHub and use it to create the second CloudFormation stack set in the primary Region of the central security account.
  2. To deploy the template, follow the steps used to deploy the base template (described in the previous section) through Configure StackSet options.
  3. In Set deployment options, do the following:
    1. Under Account numbers, enter the account IDs of your application accounts as comma-separated values. You can use the steps in Finding your AWS account ID to help you gather the account IDs.
    2. Under Specify regions, select only your primary Region.

      Figure 9: Select account numbers and specify Regions

      Figure 9: Select account numbers and specify Regions

  4. The remaining steps are the same as for the base template deployment.

Step 5: Deploy the third template in all Regions of all application accounts

This template creates the resources in each Region of all application accounts needed for scheduled scanning of EC2 instances using Amazon Inspector. Notifications are sent to the SNS topics of each Region of the central security account.

To deploy the third template

  1. Download the template InspectorRun-SetupTemplate.yaml from GitHub and create the final AWS CloudFormation stack set. Similar to the previous stack sets, this one should also be created in the central security account.
  2. For deployment, follow the same steps you used to deploy the base template through Configure StackSet options.
  3. In Set deployment options:
    1. Under Account numbers, enter the same account IDs of your application accounts (comma-separated values) as you did for the second template deployment.
    2. Under Specify regions, select all the Regions where you installed the Amazon Inspector agent.

      Note: This list of Regions should be the same as the Regions where you deployed the base template.

  4. The remaining steps are the same as for the second template deployment.

Test the solution and delivery of the findings

After successful deployment of the architecture, to test the solution you can wait until the next scheduled Amazon Inspector scan or you can use the following steps to run the Amazon Inspector scan manually.

To run the Amazon Inspector scan manually for testing the solution

  1. In any one of the application accounts, go to any Region where the Amazon Inspector scan was performed.
  2. Open the Amazon Inspector console.
  3. In the left navigation menu, select Assessment templates to see the available assessments.
  4. Choose the assessment template that was created by the third template.
  5. Choose Run to start the assessment immediately.
  6. When the run is complete, Last run status changes from Collecting data to Analysis Complete.

    Figure 10: Amazon Inspector assessment run

    Figure 10: Amazon Inspector assessment run

  7. You can see the recent scan findings in the Amazon Inspector console by selecting Assessment runs from the left navigation menu.

    Figure 11: The assessment run indicates total findings from the last Amazon Inspector run in this Region

    Figure 11: The assessment run indicates total findings from the last Amazon Inspector run in this Region

  8. In the left navigation menu, select Findings to see details of each finding, or use the steps in the following section to verify the delivery of findings to the central security account.

Test the delivery of the Amazon Inspector findings

This solution delivers the Amazon Inspector findings to two AWS services—Amazon ES and Amazon S3—in the primary Region of the central security account. You can either use Kibana to view the findings sent to Amazon ES or you can use the findings sent to Amazon S3 and forward them to the security monitoring software of your preference for further analysis.

To check whether the findings are delivered to Amazon ES

  1. Open the Amazon ES Management Console and select the Region where the Amazon ES domain is located.
  2. Select the domain name to view the domain details.
  3. On the domain details page, select the Kibana URL.

    Figure 12: Amazon ES domain details page

    Figure 12: Amazon ES domain details page

  4. Log in to Kibana using your preferred authentication method as set up in the prerequisites.
    1. In the left panel, select Discover.
    2. In the Discover window, select a Region to view the total number of findings in that Region.

      Figure 13: The total findings in Kibana for the chosen Region of an application account

      Figure 13: The total findings in Kibana for the chosen Region of an application account

To check whether the findings are delivered to Amazon S3

  1. Open the Amazon S3 Management Console.
  2. Select the S3 bucket that you created for storing Amazon Inspector findings.
  3. Select the bucket name to view the bucket details. The total number of findings for the chosen Region is at the top right corner of the Overview tab.

    Figure 14: The total security findings as stored in an S3 bucket for us-east-1 Region

    Figure 14: The total security findings as stored in an S3 bucket for us-east-1 Region

Visualization in Kibana

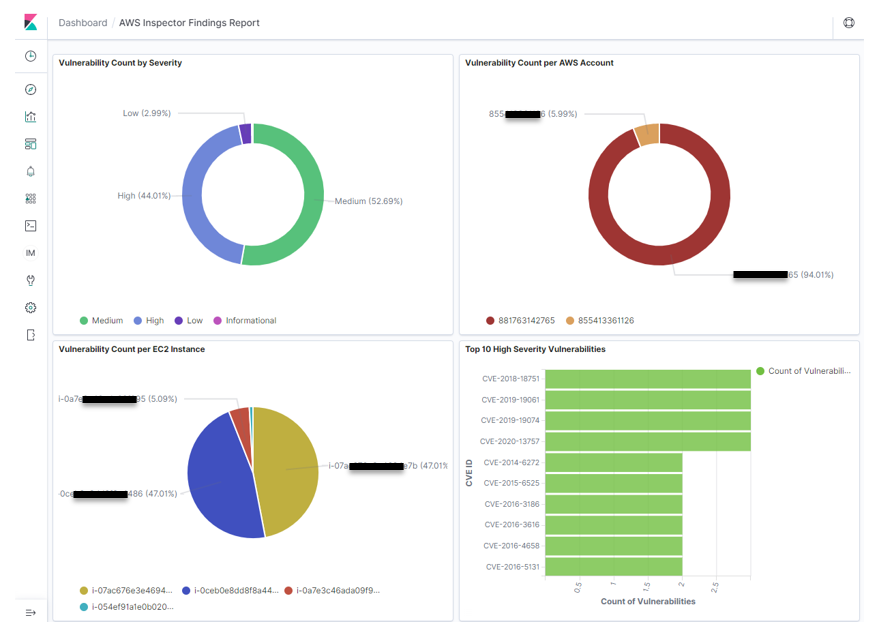
The data sent to the Amazon ES index can be used to create visualizations in Kibana that make it easier to identify potential security gaps and plan the remediation accordingly.

You can use Kibana to create a dashboard that gives an overview of the potential vulnerabilities identified in different instances of different AWS accounts. Figure 15 shows an example of such a dashboard. The dashboard can help you rank the need for remediation based on criteria such as:

  • The category of vulnerability
  • The most impacted AWS accounts
  • EC2 instances that need immediate attention
Figure 15: A sample Kibana dashboard showing findings from Amazon Inspector

Figure 15: A sample Kibana dashboard showing findings from Amazon Inspector

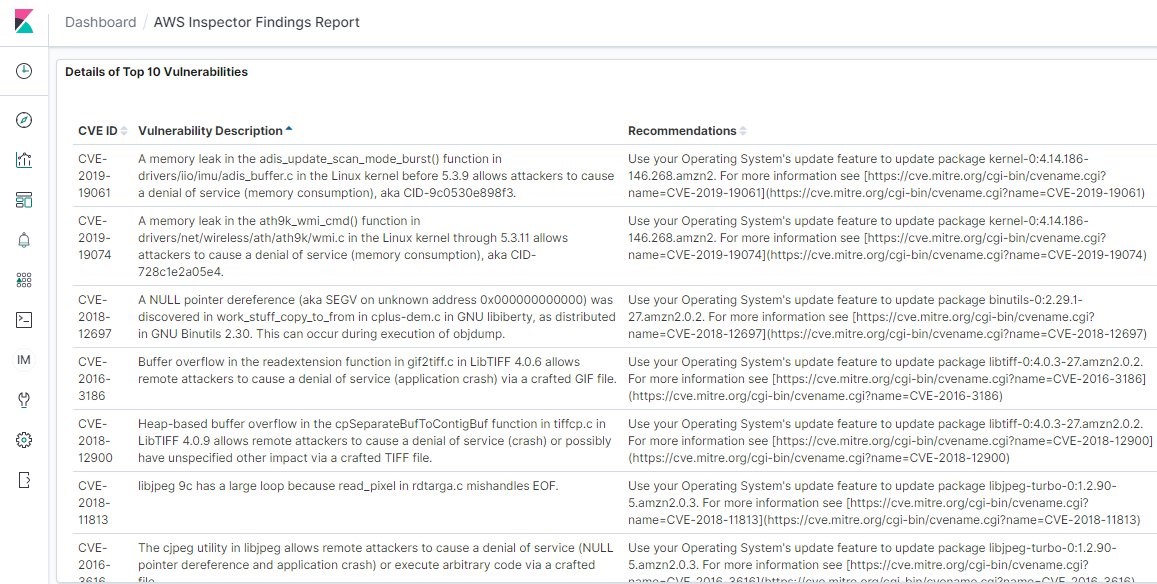
You can build additional panels to visualize details of the vulnerability findings identified by Amazon Inspector, such as the CVE ID of the security vulnerability, its description, and recommendations on how to remove the vulnerabilities.

Figure 16: A sample Kibana dashboard panel listing the top identified vulnerabilities and their details

Figure 16: A sample Kibana dashboard panel listing the top identified vulnerabilities and their details

Conclusion

By using this solution to combine Amazon Inspector, Amazon SNS topics, Amazon SQS queues, Lambda functions, an Amazon ES domain, and S3 buckets, you can centrally analyze and monitor the vulnerability posture of EC2 instances across your AWS environment, including multiple Regions across multiple AWS accounts. This solution is built following least privilege access through AWS IAM roles and policies to help secure the cross-account architecture.

In this blog post, you learned how to send the findings directly to Amazon ES for visualization in Kibana. These visualizations can be used to build dashboards that security analysts can use for centralized monitoring. Better monitoring capability helps analysts to identify potentially vulnerable assets and perform remediation activities to improve security of your applications in AWS and their underlying assets. This solution also demonstrates how to store the findings from Amazon Inspector in an S3 bucket, which makes it easier for you to use those findings to create visualizations in your preferred security monitoring software.

If you have feedback about this post, submit comments in the Comments section below. If you have questions about this post, contact AWS Support.

Want more AWS Security how-to content, news, and feature announcements? Follow us on Twitter.

Author

Moumita Saha

Moumita is a Security Consultant with AWS Professional Services working to help enterprise customers secure their workloads in the cloud. She assists customers in secure cloud migration, designing automated solutions to protect against cyber threats in the cloud. She is passionate about cyber security, data privacy, and new, emerging cloud-security technologies.

Use Macie to discover sensitive data as part of automated data pipelines

Post Syndicated from Brandon Wu original https://aws.amazon.com/blogs/security/use-macie-to-discover-sensitive-data-as-part-of-automated-data-pipelines/

Data is a crucial part of every business and is used for strategic decision making at all levels of an organization. To extract value from their data more quickly, Amazon Web Services (AWS) customers are building automated data pipelines—from data ingestion to transformation and analytics. As part of this process, my customers often ask how to prevent sensitive data, such as personally identifiable information, from being ingested into data lakes when it’s not needed. They highlight that this challenge is compounded when ingesting unstructured data—such as files from process reporting, text files from chat transcripts, and emails. They also mention that identifying sensitive data inadvertently stored in structured data fields—such as in a comment field stored in a database—is also a challenge.

In this post, I show you how to integrate Amazon Macie as part of the data ingestion step in your data pipeline. This solution provides an additional checkpoint that sensitive data has been appropriately redacted or tokenized prior to ingestion. Macie is a fully managed data security and privacy service that uses machine learning and pattern matching to discover sensitive data in AWS.

When Macie discovers sensitive data, the solution notifies an administrator to review the data and decide whether to allow the data pipeline to continue ingesting the objects. If allowed, the objects will be tagged with an Amazon Simple Storage Service (Amazon S3) object tag to identify that sensitive data was found in the object before progressing to the next stage of the pipeline.

This combination of automation and manual review helps reduce the risk that sensitive data—such as personally identifiable information—will be ingested into a data lake. This solution can be extended to fit your use case and workflows. For example, you can define custom data identifiers as part of your scans, add additional validation steps, create Macie suppression rules to archive findings automatically, or only request manual approvals for findings that meet certain criteria (such as high severity findings).

Solution overview

Many of my customers are building serverless data lakes with Amazon S3 as the primary data store. Their data pipelines commonly use different S3 buckets at each stage of the pipeline. I refer to the S3 bucket for the first stage of ingestion as the raw data bucket. A typical pipeline might have separate buckets for raw, curated, and processed data representing different stages as part of their data analytics pipeline.

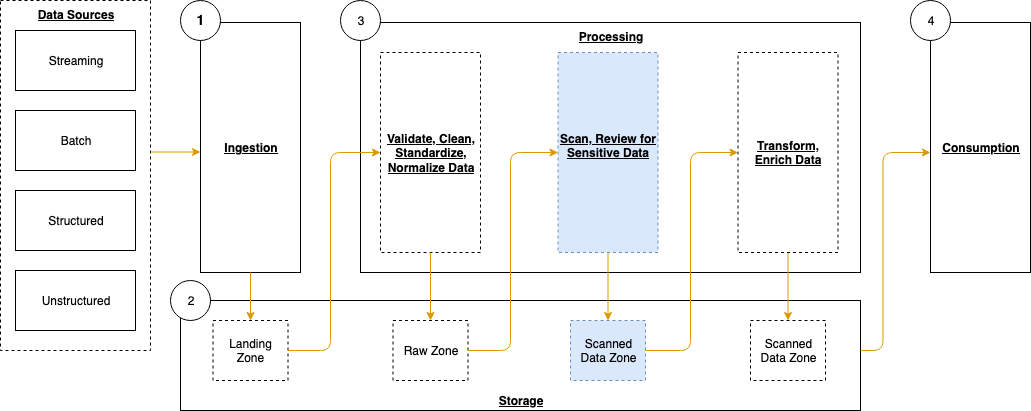
Typically, customers will perform validation and clean their data before moving it to a raw data zone. This solution adds validation steps to that pipeline after preliminary quality checks and data cleaning is performed, noted in blue (in layer 3) of Figure 1. The layers outlined in the pipeline are:

  1. Ingestion – Brings data into the data lake.
  2. Storage – Provides durable, scalable, and secure components to store the data—typically using S3 buckets.
  3. Processing – Transforms data into a consumable state through data validation, cleanup, normalization, transformation, and enrichment. This processing layer is where the additional validation steps are added to identify instances of sensitive data that haven’t been appropriately redacted or tokenized prior to consumption.
  4. Consumption – Provides tools to gain insights from the data in the data lake.


Figure 1: Data pipeline with sensitive data scan

Figure 1: Data pipeline with sensitive data scan

The application runs on a scheduled basis (four times a day, every 6 hours by default) to process data that is added to the raw data S3 bucket. You can customize the application to perform a sensitive data discovery scan during any stage of the pipeline. Because most customers do their extract, transform, and load (ETL) daily, the application scans for sensitive data on a scheduled basis before any crawler jobs run to catalog the data and after typical validation and data redaction or tokenization processes complete.

You can expect that this additional validation will add 5–10 minutes to your pipeline execution at a minimum. The validation processing time will scale linearly based on object size, but there is a start-up time per job that is constant.

If sensitive data is found in the objects, an email is sent to the designated administrator requesting an approval decision, which they indicate by selecting the link corresponding to their decision to approve or deny the next step. In most cases, the reviewer will choose to adjust the sensitive data cleanup processes to remove the sensitive data, deny the progression of the files, and re-ingest the files in the pipeline.

Additional considerations for deploying this application for regular use are discussed at the end of the blog post.

Application components

The following resources are created as part of the application:

Note: the application uses various AWS services, and there are costs associated with these resources after the Free Tier usage. See AWS Pricing for details. The primary drivers of the solution cost will be the amount of data ingested through the pipeline, both for Amazon S3 storage and data processed for sensitive data discovery with Macie.

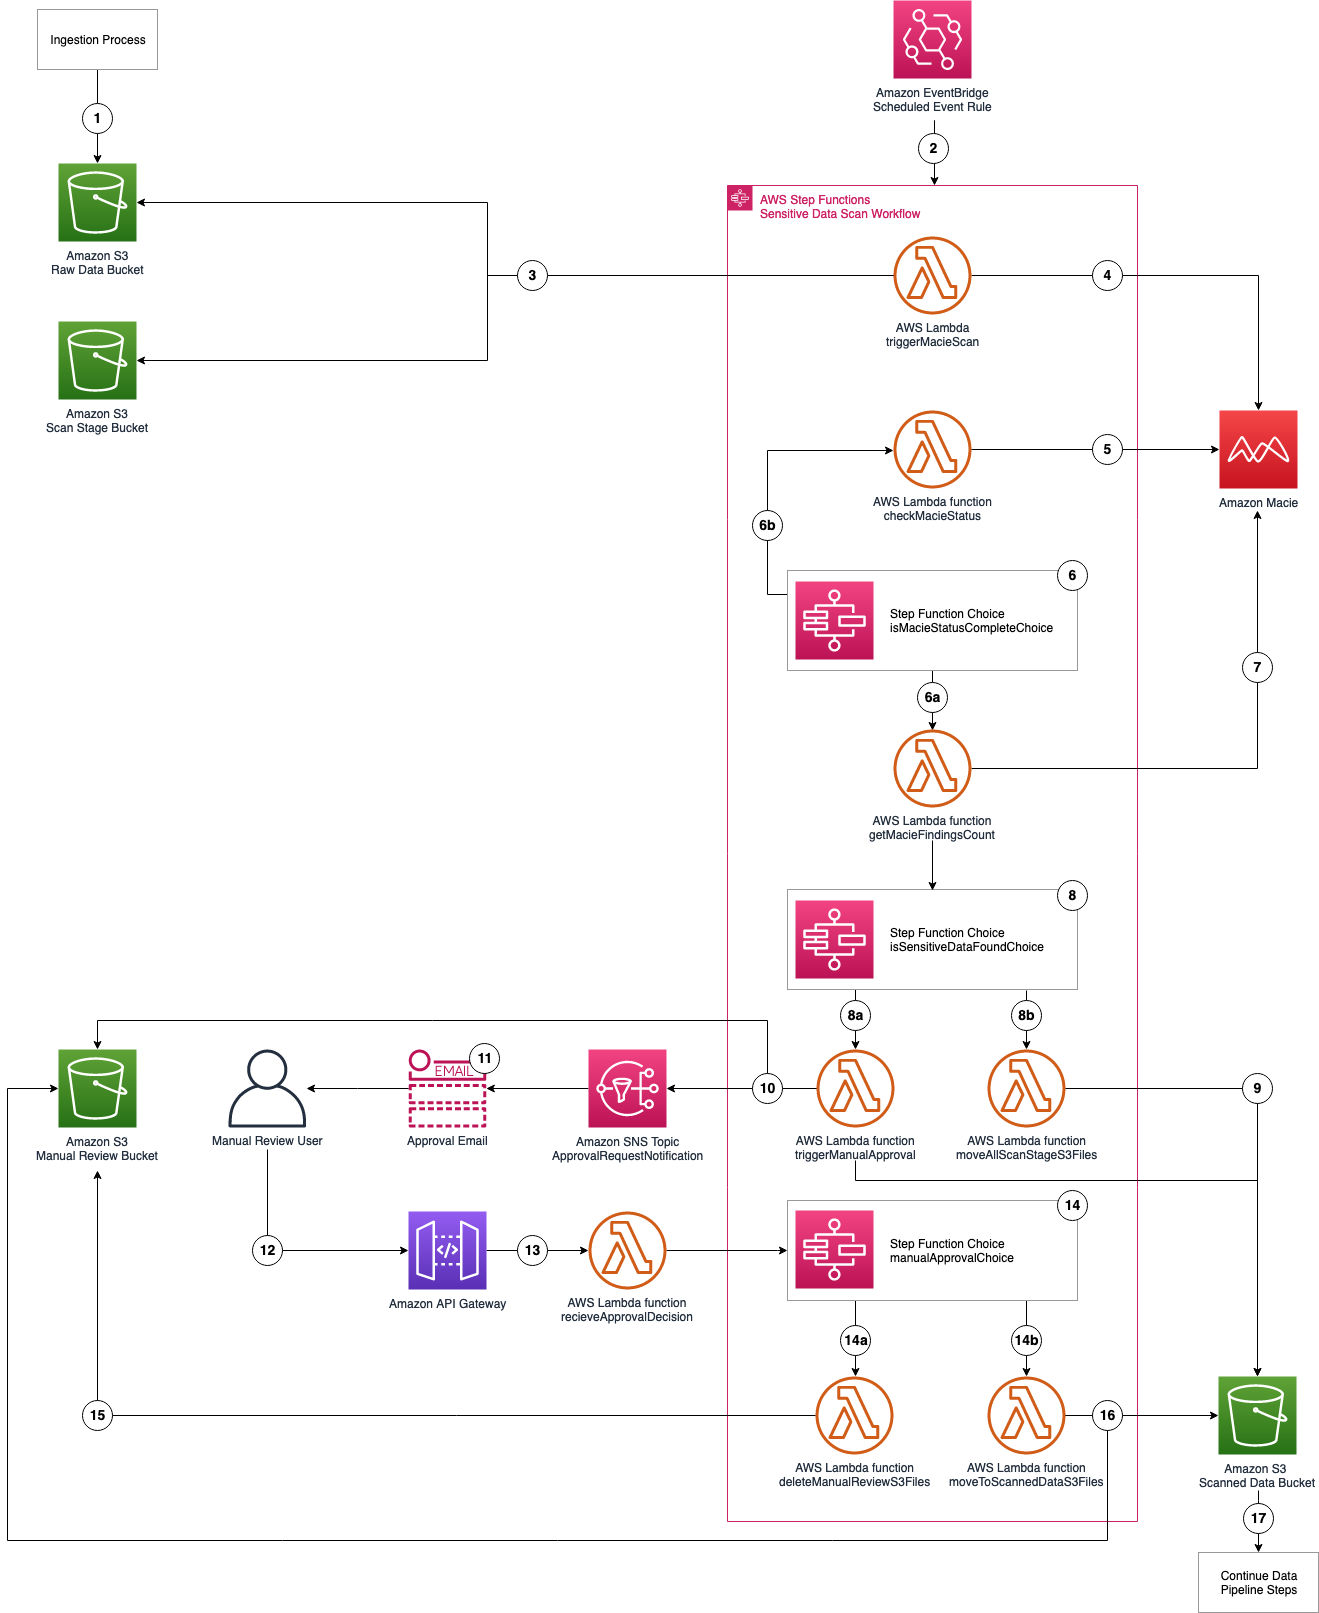
The architecture of the application is shown in Figure 2 and described in the text that follows.
 

Figure 2: Application architecture and logic

Figure 2: Application architecture and logic

Application logic

  1. Objects are uploaded to the raw data S3 bucket as part of the data ingestion process.
  2. A scheduled EventBridge rule runs the sensitive data scan Step Functions workflow.
  3. triggerMacieScan Lambda function moves objects from the raw data S3 bucket to the scan stage S3 bucket.
  4. triggerMacieScan Lambda function creates a Macie sensitive data discovery job on the scan stage S3 bucket.
  5. checkMacieStatus Lambda function checks the status of the Macie sensitive data discovery job.
  6. isMacieStatusCompleteChoice Step Functions Choice state checks whether the Macie sensitive data discovery job is complete.
    1. If yes, the getMacieFindingsCount Lambda function runs.
    2. If no, the Step Functions Wait state waits 60 seconds and then restarts Step 5.
  7. getMacieFindingsCount Lambda function counts all of the findings from the Macie sensitive data discovery job.
  8. isSensitiveDataFound Step Functions Choice state checks whether sensitive data was found in the Macie sensitive data discovery job.
    1. If there was sensitive data discovered, run the triggerManualApproval Lambda function.
    2. If there was no sensitive data discovered, run the moveAllScanStageS3Files Lambda function.
  9. moveAllScanStageS3Files Lambda function moves all of the objects from the scan stage S3 bucket to the scanned data S3 bucket.
  10. triggerManualApproval Lambda function tags and moves objects with sensitive data discovered to the manual review S3 bucket, and moves objects with no sensitive data discovered to the scanned data S3 bucket. The function then sends a notification to the ApprovalRequestNotification Amazon SNS topic as a notification that manual review is required.
  11. Email is sent to the email address that’s subscribed to the ApprovalRequestNotification Amazon SNS topic (from the application deployment template) for the manual review user with the option to Approve or Deny pipeline ingestion for these objects.
  12. Manual review user assesses the objects with sensitive data in the manual review S3 bucket and selects the Approve or Deny links in the email.
  13. The decision request is sent from the Amazon API Gateway to the receiveApprovalDecision Lambda function.
  14. manualApprovalChoice Step Functions Choice state checks the decision from the manual review user.
    1. If denied, run the deleteManualReviewS3Files Lambda function.
    2. If approved, run the moveToScannedDataS3Files Lambda function.
  15. deleteManualReviewS3Files Lambda function deletes the objects from the manual review S3 bucket.
  16. moveToScannedDataS3Files Lambda function moves the objects from the manual review S3 bucket to the scanned data S3 bucket.
  17. The next step of the automated data pipeline will begin with the objects in the scanned data S3 bucket.

Prerequisites

For this application, you need the following prerequisites:

You can use AWS Cloud9 to deploy the application. AWS Cloud9 includes the AWS CLI and AWS SAM CLI to simplify setting up your development environment.

Deploy the application with AWS SAM CLI

You can deploy this application using the AWS SAM CLI. AWS SAM uses AWS CloudFormation as the underlying deployment mechanism. AWS SAM is an open-source framework that you can use to build serverless applications on AWS.

To deploy the application

  1. Initialize the serverless application using the AWS SAM CLI from the GitHub project in the aws-samples repository. This will clone the project locally which includes the source code for the Lambda functions, Step Functions state machine definition file, and the AWS SAM template. On the command line, run the following:
    sam init --location gh: aws-samples/amazonmacie-datapipeline-scan
    

    Alternatively, you can clone the Github project directly.

  2. Deploy your application to your AWS account. On the command line, run the following:
    sam deploy --guided
    

    Complete the prompts during the guided interactive deployment. The first deployment prompt is shown in the following example.

    Configuring SAM deploy
    ======================
    
            Looking for config file [samconfig.toml] :  Found
            Reading default arguments  :  Success
    
            Setting default arguments for 'sam deploy'
            =========================================
            Stack Name [maciepipelinescan]:
    

  3. Settings:
    • Stack Name – Name of the CloudFormation stack to be created.
    • AWS RegionRegion—for example, us-west-2, eu-west-1, ap-southeast-1—to deploy the application to. This application was tested in the us-west-2 and ap-southeast-1 Regions. Before selecting a Region, verify that the services you need are available in those Regions (for example, Macie and Step Functions).
    • Parameter StepFunctionName – Name of the Step Functions state machine to be created—for example, maciepipelinescanstatemachine).
    • Parameter BucketNamePrefix – Prefix to apply to the S3 buckets to be created (S3 bucket names are globally unique, so choosing a random prefix helps ensure uniqueness).
    • Parameter ApprovalEmailDestination – Email address to receive the manual review notification.
    • Parameter EnableMacie – Whether you need Macie enabled in your account or Region. You can select yes or no; select yes if you need Macie to be enabled for you as part of this template, select no, if you already have Macie enabled.
  4. Confirm changes and provide approval for AWS SAM CLI to deploy the resources to your AWS account by responding y to prompts, as shown in the following example. You can accept the defaults for the SAM configuration file and SAM configuration environment prompts.
    #Shows you resources changes to be deployed and require a 'Y' to initiate deploy
    Confirm changes before deploy [y/N]: y
    #SAM needs permission to be able to create roles to connect to the resources in your template
    Allow SAM CLI IAM role creation [Y/n]: y
    ReceiveApprovalDecisionAPI may not have authorization defined, Is this okay? [y/N]: y
    ReceiveApprovalDecisionAPI may not have authorization defined, Is this okay? [y/N]: y
    Save arguments to configuration file [Y/n]: y
    SAM configuration file [samconfig.toml]: 
    SAM configuration environment [default]:
    

    Note: This application deploys an Amazon API Gateway with two REST API resources without authorization defined to receive the decision from the manual review step. You will be prompted to accept each resource without authorization. A token (Step Functions taskToken) is used to authenticate the requests.

  5. This creates an AWS CloudFormation changeset. Once the changeset creation is complete, you must provide a final confirmation of y to Deploy the changeset? [y/N] when prompted as shown in the following example.
    Changeset created successfully. arn:aws:cloudformation:ap-southeast-1:XXXXXXXXXXXX:changeSet/samcli-deploy1605213119/db681961-3635-4305-b1c7-dcc754c7XXXX
    
    
    Previewing CloudFormation changeset before deployment
    ======================================================
    Deploy this changeset? [y/N]:
    

Your application is deployed to your account using AWS CloudFormation. You can track the deployment events in the command prompt or via the AWS CloudFormation console.

After the application deployment is complete, you must confirm the subscription to the Amazon SNS topic. An email will be sent to the email address entered in Step 3 with a link that you need to select to confirm the subscription. This confirmation provides opt-in consent for AWS to send emails to you via the specified Amazon SNS topic. The emails will be notifications of potentially sensitive data that need to be approved. If you don’t see the verification email, be sure to check your spam folder.

Test the application

The application uses an EventBridge scheduled rule to start the sensitive data scan workflow, which runs every 6 hours. You can manually start an execution of the workflow to verify that it’s working. To test the function, you will need a file that contains data that matches your rules for sensitive data. For example, it is easy to create a spreadsheet, document, or text file that contains names, addresses, and numbers formatted like credit card numbers. You can also use this generated sample data to test Macie.

We will test by uploading a file to our S3 bucket via the AWS web console. If you know how to copy objects from the command line, that also works.

Upload test objects to the S3 bucket

  1. Navigate to the Amazon S3 console and upload one or more test objects to the <BucketNamePrefix>-data-pipeline-raw bucket. <BucketNamePrefix> is the prefix you entered when deploying the application in the AWS SAM CLI prompts. You can use any objects as long as they’re a supported file type for Amazon Macie. I suggest uploading multiple objects, some with and some without sensitive data, in order to see how the workflow processes each.

Start the Scan State Machine

  1. Navigate to the Step Functions state machines console. If you don’t see your state machine, make sure you’re connected to the same region that you deployed your application to.
  2. Choose the state machine you created using the AWS SAM CLI as seen in Figure 3. The example state machine is maciepipelinescanstatemachine, but you might have used a different name in your deployment.
     
    Figure 3: AWS Step Functions state machines console

    Figure 3: AWS Step Functions state machines console

  3. Select the Start execution button and copy the value from the Enter an execution name – optional box. Change the Input – optional value replacing <execution id> with the value just copied as follows:
    {
        “id”: “<execution id>”
    }
    

    In my example, the <execution id> is fa985a4f-866b-b58b-d91b-8a47d068aa0c from the Enter an execution name – optional box as shown in Figure 4. You can choose a different ID value if you prefer. This ID is used by the workflow to tag the objects being processed to ensure that only objects that are scanned continue through the pipeline. When the EventBridge scheduled event starts the workflow as scheduled, an ID is included in the input to the Step Functions workflow. Then select Start execution again.
     

    Figure 4: New execution dialog box

    Figure 4: New execution dialog box

  4. You can see the status of your workflow execution in the Graph inspector as shown in Figure 5. In the figure, the workflow is at the pollForCompletionWait step.
     
    Figure 5: AWS Step Functions graph inspector

    Figure 5: AWS Step Functions graph inspector

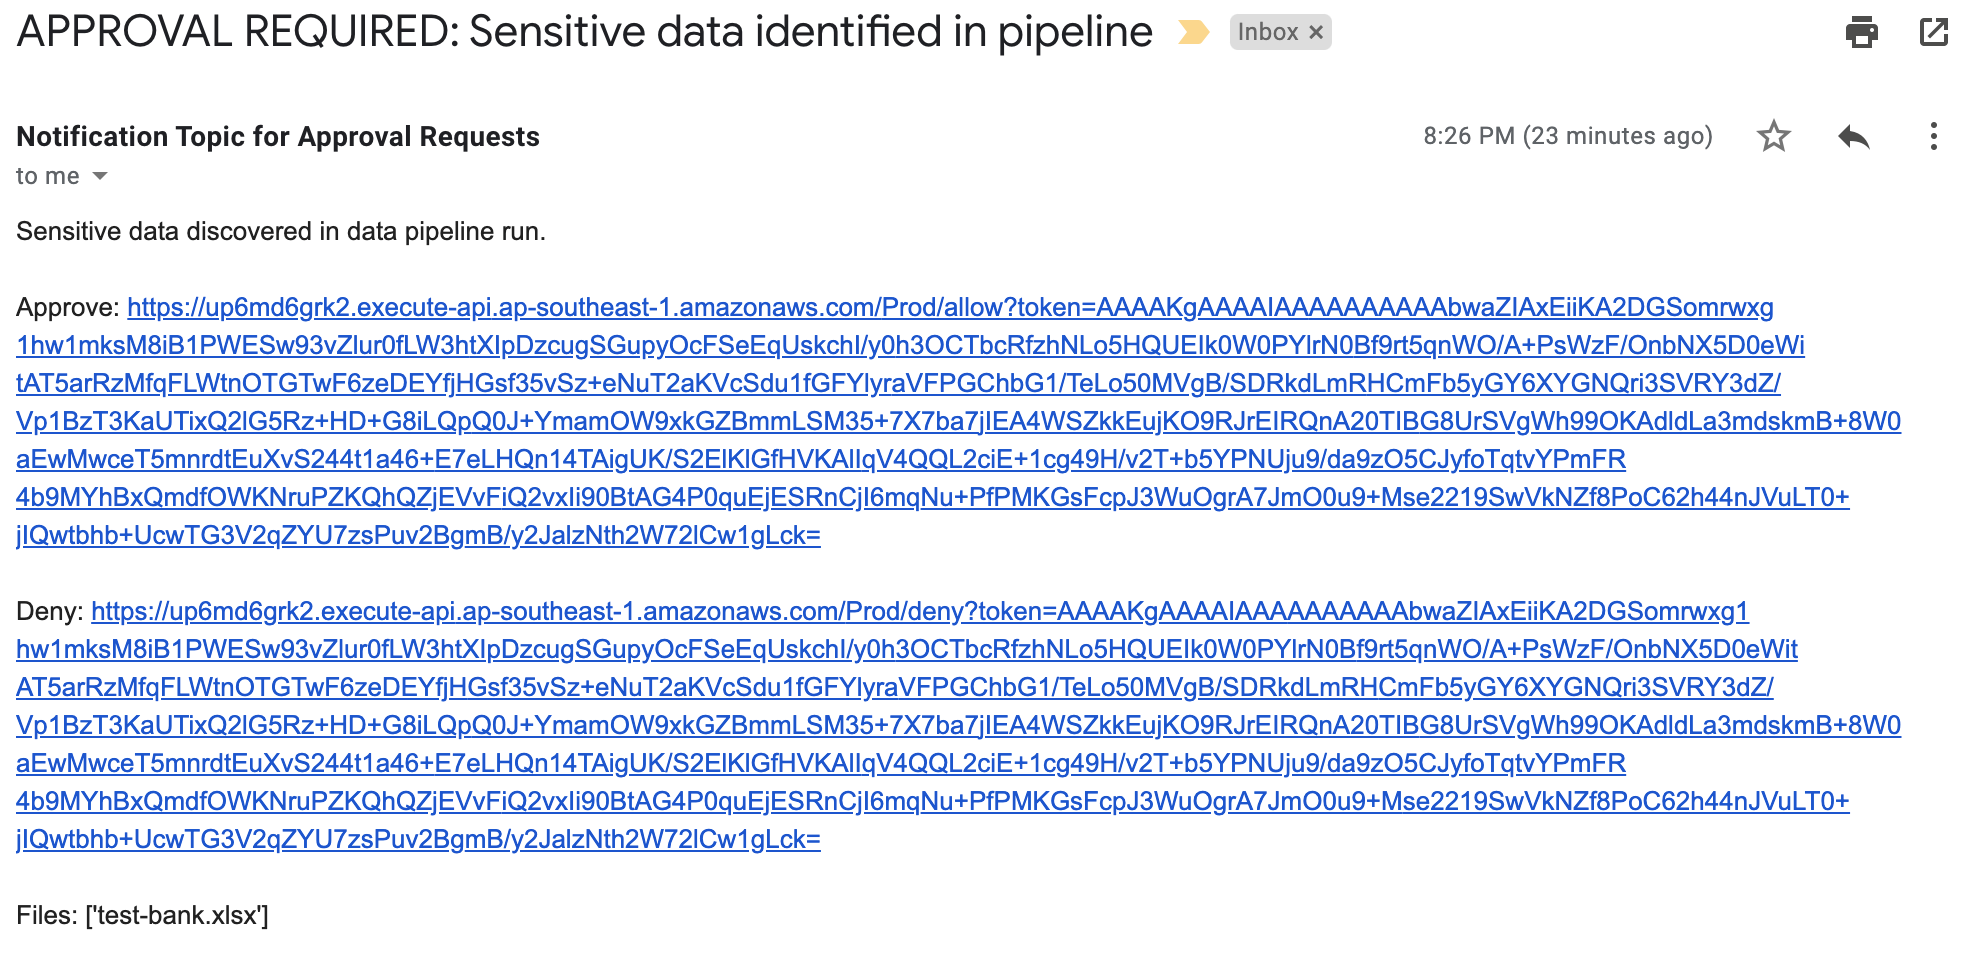
The sensitive discovery job should run for about five to ten minutes. The jobs scale linearly based on object size, but there is a start-up time per job that is constant. If sensitive data is found in the objects uploaded to the <BucketNamePrefix>-data-pipeline-upload S3 bucket, an email is sent to the address provided during the AWS SAM deployment step, notifying the recipient requesting of the need for an approval decision, which they indicate by selecting the link corresponding to their decision to approve or deny the next step as shown in Figure 6.
 

Figure 6: Sensitive data identified email

Figure 6: Sensitive data identified email

When you receive this notification, you can investigate the findings by reviewing the objects in the <BucketNamePrefix>-data-pipeline-manual-review S3 bucket. Based on your review, you can either apply remediation steps to remove any sensitive data or allow the data to proceed to the next step of the data ingestion pipeline. You should define a standard response process to address discovery of sensitive data in the data pipeline. Common remediation steps include review of the files for sensitive data, deleting the files that you do not want to progress, and updating the ETL process to redact or tokenize sensitive data when re-ingesting into the pipeline. When you re-ingest the files into the pipeline without sensitive data, the files will not be flagged by Macie.

The workflow performs the following:

  • If you select Approve, the files are moved to the <BucketNamePrefix>-data-pipeline-scanned-data S3 bucket with an Amazon S3 SensitiveDataFound object tag with a value of true.
  • If you select Deny, the files are deleted from the <BucketNamePrefix>-data-pipeline-manual-review S3 bucket.
  • If no action is taken, the Step Functions workflow execution times out after five days and the file will automatically be deleted from the <BucketNamePrefix>-data-pipeline-manual-review S3 bucket after 10 days.

Clean up the application

You’ve successfully deployed and tested the sensitive data pipeline scan workflow. To avoid ongoing charges for resources you created, you should delete all associated resources by deleting the CloudFormation stack. In order to delete the CloudFormation stack, you must first delete all objects that are stored in the S3 buckets that you created for the application.

To delete the application

  1. Empty the S3 buckets created in this application (<BucketNamePrefix>-data-pipeline-raw S3 bucket, <BucketNamePrefix>-data-pipeline-scan-stage, <BucketNamePrefix>-data-pipeline-manual-review, and <BucketNamePrefix>-data-pipeline-scanned-data).
  2. Delete the CloudFormation stack used to deploy the application.

Considerations for regular use

Before using this application in a production data pipeline, you will need to stop and consider some practical matters. First, the notification mechanism used when sensitive data is identified in the objects is email. Email doesn’t scale: you should expand this solution to integrate with your ticketing or workflow management system. If you choose to use email, subscribe a mailing list so that the work of reviewing and responding to alerts is shared across a team.

Second, the application is run on a scheduled basis (every 6 hours by default). You should consider starting the application when your preliminary validations have completed and are ready to perform a sensitive data scan on the data as part of your pipeline. You can modify the EventBridge Event Rule to run in response to an Amazon EventBridge event instead of a scheduled basis.

Third, the application currently uses a 60 second Step Functions Wait state when polling for the Macie discovery job completion. In real world scenarios, the discovery scan will take 10 minutes at a minimum, likely several orders of magnitude longer. You should evaluate the typical execution times for your application execution and tune the polling period accordingly. This will help reduce costs related to running Lambda functions and log storage within CloudWatch Logs. The polling period is defined in the Step Functions state machine definition file (macie_pipeline_scan.asl.json) under the pollForCompletionWait state.

Fourth, the application currently doesn’t account for false positives in the sensitive data discovery job results. Also, the application will progress or delete all objects identified based on the decision by the reviewer. You should consider expanding the application to handle false positives through automation rather than manual review / intervention (such as deleting the files from the manual review bucket or removing the sensitive data tags applied).

Last, the solution will stop the ingestion of a subset of objects into your pipeline. This behavior is similar to other validation and data quality checks that most customers perform as part of the data pipeline. However, you should test to ensure that this will not cause unexpected outcomes and address them in your downstream application logic accordingly.

Conclusion

In this post, I showed you how to integrate sensitive data discovery using Macie as an additional validation step in an automated data pipeline. You’ve reviewed the components of the application, deployed it using the AWS SAM CLI, tested to validate that the application functions as expected, and cleaned up by removing deployed resources.

You now know how to integrate sensitive data scanning into your ETL pipeline. You can use automation and—where required—manual review to help reduce the risk of sensitive data, such as personally identifiable information, being inadvertently ingested into a data lake. You can take this application and customize it to fit your use case and workflows, such as using custom data identifiers as part of your scans, adding additional validation steps, creating Macie suppression rules to define cases to archive findings automatically, or only request manual approvals for findings that meet certain criteria (such as high severity findings).

If you have feedback about this post, submit comments in the Comments section below. If you have questions about this post, start a new thread on the Amazon Macie forum.

Want more AWS Security how-to content, news, and feature announcements? Follow us on Twitter.

Author

Brandon Wu

Brandon is a security solutions architect helping financial services organizations secure their critical workloads on AWS. In his spare time, he enjoys exploring outdoors and experimenting in the kitchen.

How to delete user data in an AWS data lake

Post Syndicated from George Komninos original https://aws.amazon.com/blogs/big-data/how-to-delete-user-data-in-an-aws-data-lake/

General Data Protection Regulation (GDPR) is an important aspect of today’s technology world, and processing data in compliance with GDPR is a necessity for those who implement solutions within the AWS public cloud. One article of GDPR is the “right to erasure” or “right to be forgotten” which may require you to implement a solution to delete specific users’ personal data.

In the context of the AWS big data and analytics ecosystem, every architecture, regardless of the problem it targets, uses Amazon Simple Storage Service (Amazon S3) as the core storage service. Despite its versatility and feature completeness, Amazon S3 doesn’t come with an out-of-the-box way to map a user identifier to S3 keys of objects that contain user’s data.

This post walks you through a framework that helps you purge individual user data within your organization’s AWS hosted data lake, and an analytics solution that uses different AWS storage layers, along with sample code targeting Amazon S3.

Reference architecture

To address the challenge of implementing a data purge framework, we reduced the problem to the straightforward use case of deleting a user’s data from a platform that uses AWS for its data pipeline. The following diagram illustrates this use case.

We’re introducing the idea of building and maintaining an index metastore that keeps track of the location of each user’s records and allows us locate to them efficiently, reducing the search space.

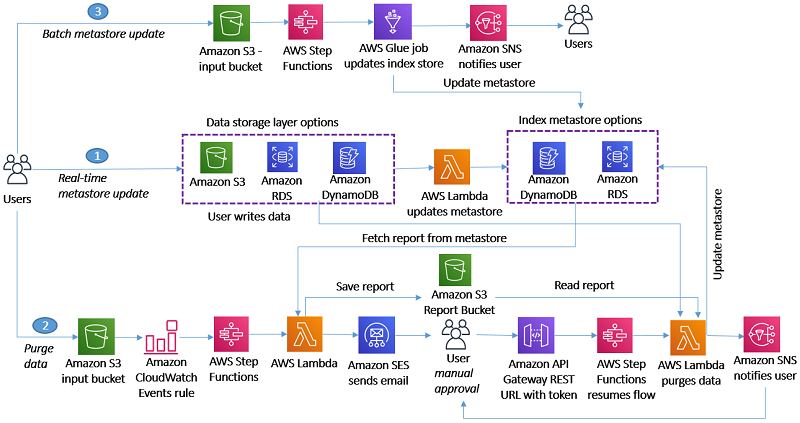
You can use the following architecture diagram to delete a specific user’s data within your organization’s AWS data lake.

For this initial version, we created three user flows that map each task to a fitting AWS service:

Flow 1: Real-time metastore update

The S3 ObjectCreated or ObjectDelete events trigger an AWS Lambda function that parses the object and performs an add/update/delete operation to keep the metadata index up to date. You can implement a simple workflow for any other storage layer, such as Amazon Relational Database Service (RDS), Amazon Aurora, or Amazon Elasticsearch Service (ES). We use Amazon DynamoDB and Amazon RDS for PostgreSQL as the index metadata storage options, but our approach is flexible to any other technology.

Flow 2: Purge data

When a user asks for their data to be deleted, we trigger an AWS Step Functions state machine through Amazon CloudWatch to orchestrate the workflow. Its first step triggers a Lambda function that queries the metadata index to identify the storage layers that contain user records and generates a report that’s saved to an S3 report bucket. A Step Functions activity is created and picked up by a Lambda Node JS based worker that sends an email to the approver through Amazon Simple Email Service (SES) with approve and reject links.

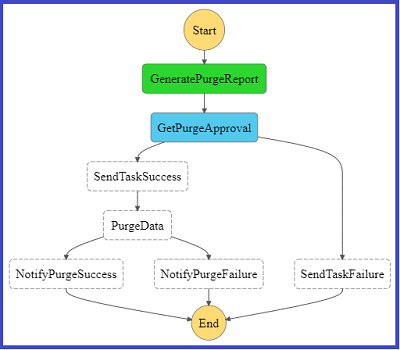
The following diagram shows a graphical representation of the Step Function state machine as seen on the AWS Management Console.

The approver selects one of the two links, which then calls an Amazon API Gateway endpoint that invokes Step Functions to resume the workflow. If you choose the approve link, Step Functions triggers a Lambda function that takes the report stored in the bucket as input, deletes the objects or records from the storage layer, and updates the index metastore. When the purging job is complete, Amazon Simple Notification Service (SNS) sends a success or fail email to the user.

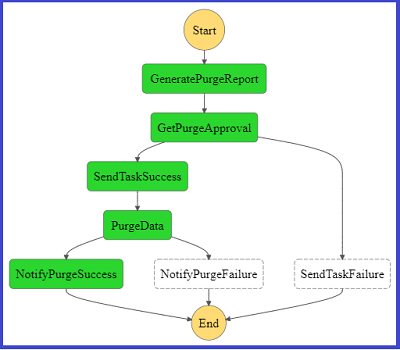
The following diagram represents the Step Functions flow on the console if the purge flow completed successfully.

For the complete code base, see step-function-definition.json in the GitHub repo.

Flow 3: Batch metastore update

This flow refers to the use case of an existing data lake for which index metastore needs to be created. You can orchestrate the flow through AWS Step Functions, which takes historical data as input and updates metastore through a batch job. Our current implementation doesn’t include a sample script for this user flow.

Our framework

We now walk you through the two use cases we followed for our implementation:

  • You have multiple user records stored in each Amazon S3 file
  • A user has records stored in homogenous AWS storage layers

Within these two approaches, we demonstrate alternatives that you can use to store your index metastore.

Indexing by S3 URI and row number

For this use case, we use a free tier RDS Postgres instance to store our index. We created a simple table with the following code:

CREATE UNLOGGED TABLE IF NOT EXISTS user_objects (
				userid TEXT,
				s3path TEXT,
				recordline INTEGER
			);

You can index on user_id to optimize query performance. On object upload, for each row, you need to insert into the user_objects table a row that indicates the user ID, the URI of the target Amazon S3 object, and the row that corresponds to the record. For instance, when uploading the following JSON input, enter the following code:

{"user_id":"V34qejxNsCbcgD8C0HVk-Q","body":"…"}
{"user_id":"ofKDkJKXSKZXu5xJNGiiBQ","body":"…"}
{"user_id":"UgMW8bLE0QMJDCkQ1Ax5Mg","body ":"…"}

We insert the tuples into user_objects in the Amazon S3 location s3://gdpr-demo/year=2018/month=2/day=26/input.json. See the following code:

(“V34qejxNsCbcgD8C0HVk-Q”, “s3://gdpr-demo/year=2018/month=2/day=26/input.json”, 0)
(“ofKDkJKXSKZXu5xJNGiiBQ”, “s3://gdpr-demo/year=2018/month=2/day=26/input.json”, 1)
(“UgMW8bLE0QMJDCkQ1Ax5Mg”, “s3://gdpr-demo/year=2018/month=2/day=26/input.json”, 2)

You can implement the index update operation by using a Lambda function triggered on any Amazon S3 ObjectCreated event.

When we get a delete request from a user, we need to query our index to get some information about where we have stored the data to delete. See the following code:

SELECT s3path,
                ARRAY_AGG(recordline)
                FROM user_objects
                WHERE userid = ‘V34qejxNsCbcgD8C0HVk-Q’
                GROUP BY;

The preceding example SQL query returns rows like the following:

(“s3://gdpr-review/year=2015/month=12/day=21/review-part-0.json“, {2102,529})

The output indicates that lines 529 and 2102 of S3 object s3://gdpr-review/year=2015/month=12/day=21/review-part-0.json contain the requested user’s data and need to be purged. We then need to download the object, remove those rows, and overwrite the object. For a Python implementation of the Lambda function that implements this functionality, see deleteUserRecords.py in the GitHub repo.

Having the record line available allows you to perform the deletion efficiently in byte format. For implementation simplicity, we purge the rows by replacing the deleted rows with an empty JSON object. You pay a slight storage overhead, but you don’t need to update subsequent row metadata in your index, which would be costly. To eliminate empty JSON objects, we can implement an offline vacuum and index update process.

Indexing by file name and grouping by index key

For this use case, we created a DynamoDB table to store our index. We chose DynamoDB because of its ease of use and scalability; you can use its on-demand pricing model so you don’t need to guess how many capacity units you might need. When files are uploaded to the data lake, a Lambda function parses the file name (for example, 1001-.csv) to identify the user identifier and populates the DynamoDB metadata table. Userid is the partition key, and each different storage layer has its own attribute. For example, if user 1001 had data in Amazon S3 and Amazon RDS, their records look like the following code:

{"userid:": 1001, "s3":{"s3://path1", "s3://path2"}, "RDS":{"db1.table1.column1"}}

For a sample Python implementation of this functionality, see update-dynamo-metadata.py in the GitHub repo.

On delete request, we query the metastore table, which is DynamoDB, and generate a purge report that contains details on what storage layers contain user records, and storage layer specifics that can speed up locating the records. We store the purge report to Amazon S3. For a sample Lambda function that implements this logic, see generate-purge-report.py in the GitHub repo.

After the purging is approved, we use the report as input to delete the required resources. For a sample Lambda function implementation, see gdpr-purge-data.py in the GitHub repo.

Implementation and technology alternatives

We explored and evaluated multiple implementation options, all of which present tradeoffs, such as implementation simplicity, efficiency, critical data compliance, and feature completeness:

  • Scan every record of the data file to create an index – Whenever a file is uploaded, we iterate through its records and generate tuples (userid, s3Uri, row_number) that are then inserted to our metadata storing layer. On delete request, we fetch the metadata records for requested user IDs, download the corresponding S3 objects, perform the delete in place, and re-upload the updated objects, overwriting the existing object. This is the most flexible approach because it supports a single object to store multiple users’ data, which is a very common practice. The flexibility comes at a cost because it requires downloading and re-uploading the object, which introduces a network bottleneck in delete operations. User activity datasets such as customer product reviews are a good fit for this approach, because it’s unexpected to have multiple records for the same user within each partition (such as a date partition), and it’s preferable to combine multiple users’ activity in a single file. It’s similar to what was described in the section “Indexing by S3 URI and row number” and sample code is available in the GitHub repo.
  • Store metadata as file name prefix – Adding the user ID as the prefix of the uploaded object under the different partitions that are defined based on query pattern enables you to reduce the required search operations on delete request. The metadata handling utility finds the user ID from the file name and maintains the index accordingly. This approach is efficient in locating the resources to purge but assumes a single user per object, and requires you to store user IDs within the filename, which might require InfoSec considerations. Clickstream data, where you would expect to have multiple click events for a single customer on a single date partition during a session, is a good fit. We covered this approach in the section “Indexing by file name and grouping by index key” and you can download the codebase from the GitHub repo.
  • Use a metadata file – Along with uploading a new object, we also upload a metadata file that’s picked up by an indexing utility to create and maintain the index up to date. On delete request, we query the index, which points us to the records to purge. A good fit for this approach is a use case that already involves uploading a metadata file whenever a new object is uploaded, such as uploading multimedia data, along with their metadata. Otherwise, uploading a metadata file on every object upload might introduce too much of an overhead.
  • Use the tagging feature of AWS services – Whenever a new file is uploaded to Amazon S3, we use the Put Object Tagging Amazon S3 operation to add a key-value pair for the user identifier. Whenever there is a user data delete request, it fetches objects with that tag and deletes them. This option is straightforward to implement using the existing Amazon S3 API and can therefore be a very initial version of your implementation. However, it involves significant limitations. It assumes a 1:1 cardinality between Amazon S3 objects and users (each object only contains data for a single user), searching objects based on a tag is limited and inefficient, and storing user identifiers as tags might not be compliant with your organization’s InfoSec policy.
  • Use Apache Hudi – Apache Hudi is becoming a very popular option to perform record-level data deletion on Amazon S3. Its current version is restricted to Amazon EMR, and you can use it if you start to build your data lake from scratch, because you need to store your as Hudi datasets. Hudi is a very active project and additional features and integrations with more AWS services are expected.

The key implementation decision of our approach is separating the storage layer we use for our data and the one we use for our metadata. As a result, our design is versatile and can be plugged in any existing data pipeline. Similar to deciding what storage layer to use for your data, there are many factors to consider when deciding how to store your index:

  • Concurrency of requests – If you don’t expect too many simultaneous inserts, even something as simple as Amazon S3 could be a starting point for your index. However, if you get multiple concurrent writes for multiple users, you need to look into a service that copes better with transactions.
  • Existing team knowledge and infrastructure – In this post, we demonstrated using DynamoDB and RDS Postgres for storing and querying the metadata index. If your team has no experience with either of those but are comfortable with Amazon ES, Amazon DocumentDB (with MongoDB compatibility), or any other storage layer, use those. Furthermore, if you’re already running (and paying for) a MySQL database that’s not used to capacity, you could use that for your index for no additional cost.
  • Size of index – The volume of your metadata is orders of magnitude lower than your actual data. However, if your dataset grows significantly, you might need to consider going for a scalable, distributed storage solution rather than, for instance, a relational database management system.

Conclusion

GDPR has transformed best practices and introduced several extra technical challenges in designing and implementing a data lake. The reference architecture and scripts in this post may help you delete data in a manner that’s compliant with GDPR.

Let us know your feedback in the comments and how you implemented this solution in your organization, so that others can learn from it.


About the Authors

George Komninos is a Data Lab Solutions Architect at AWS. He helps customers convert their ideas to a production-ready data product. Before AWS, he spent 3 years at Alexa Information domain as a data engineer. Outside of work, George is a football fan and supports the greatest team in the world, Olympiacos Piraeus.


Sakti Mishra is a Data Lab Solutions Architect at AWS. He helps customers architect data analytics solutions, which gives them an accelerated path towards modernization initiatives. Outside of work, Sakti enjoys learning new technologies, watching movies, and travel.
Discover sensitive data by using custom data identifiers with Amazon Macie

Post Syndicated from Kayla Jing original https://aws.amazon.com/blogs/security/discover-sensitive-data-by-using-custom-data-identifiers-with-amazon-macie/

As you put more and more data in the cloud, you need to rely on security automation to keep it secure at scale. AWS recently launched Amazon Macie, a fully managed service that uses machine learning and pattern matching to help you detect, classify, and better protect your sensitive data stored in the AWS Cloud.

Many data breaches are not the result of malicious activity from unauthorized users, but rather from mistakes made by authorized users. To monitor and manage the security of sensitive data, you must first be able to identify it. In this post, we show you how to use custom data identifiers with Macie to identify sensitive data. Once you know what’s sensitive, you can start designing security controls that operate at scale to monitor and remediate risk automatically.

Macie comes with a set of managed data identifiers that you can use to discover many types of sensitive data. These are somewhat generic and broadly applicable to many organizations. What makes Macie unique is its ability to help you address specific data needs. Macie enables you to expand your sensitive data detection through the new custom data identifiers. Custom data identifiers can be used to highlight organizational proprietary data, intellectual property, and specific scenarios.

Custom Data Identifiers in Macie help you find and identify sensitive data based on your own organization’s specific needs. In this post, we show you a step-by-step walkthrough of how to define and run custom data identifiers to automatically discover specific, sensitive data. Before you begin using Custom Data Identifiers, you need to enable Macie and configure detailed logging. Follow these instructions to enable Macie and follow these instructions to configure detailed logging, if you haven’t done that already.

When to use the Custom Data Identifier resource

To begin, imagine you’re an IT administrator for a manufacturing company that’s headquartered in France. Your company has acquired a few additional local subsidiaries, including an R&D facility in São Paulo, Brazil. The company is migrating to AWS, and in the process is classifying registration information, employee information, and product data into encrypted and non-encrypted storage.

You want to identify sensitive data for the following three scenarios:

  • SIRET-NIC: SIRET-NIC is a unique number assigned to businesses in France. This number is issued by their National Institute of Statistics (INSEE) when a business is registered. A sample file that contains SIRET-NIC information is shown in the following figure. Each record in the file includes the GUID, employee name, employee email, the company name, the date it was issued, and the SIRET-NIC number.

    Figure 1: SIRET-NIC dataset

    Figure 1: SIRET-NIC dataset

  • Brazil CPF (Cadastro de Pessoas Físicas – Natural Persons Register): CPF is a unique number assigned by the Brazilian revenue agency to people subject to taxes in the country. Each of your employees residing in the Brazilian office has a CPF.
  • Prototyping naming convention: Your company has products that are publicly available, but also products that are still in the prototyping stage and should be kept confidential. A sample file that contains Brazil CPF numbers and the prototype names is shown in the following figure.

    Figure 2: Brazil CPF and prototype number dataset

    Figure 2: Brazil CPF and prototype number dataset

Configure the Custom Data Identifier resource in the Macie console

To use custom data identifiers to identify your organization’s sensitive information, you must:

  1. Create custom data identifiers.
  2. Create a job to scan your Amazon Simple Storage Service (Amazon S3) bucket to locate the data patterns that match your custom data identifiers.
  3. Respond to the returned results.

The following steps introduce you to the Custom Data Identifier resource in Macie.

Designing Custom Data Identifiers for use with Amazon Macie

In the previous section you discovered 3 scenarios that your company will like to protect SIRET-NIC, Brazil CPF, and your prototyping naming convention. You now need to first create a specific REGEX pattern for each of these scenarios. There are different syntaxes and dialects of regular expression languages. Amazon Macie supports a subset of the Perl Compatible Regular Expressions (PCRE) library, and you can learn more about it in Regex support in custom data identifiers section. Once the patterns are ready, follow the instructions below to create the custom data identifiers.

Creating Custom Data Identifiers in Amazon Macie

  1. Sign in to the AWS Management Console.
  2. Enter Amazon Macie in the AWS services search box.
  3. Choose Amazon Macie.
  4. In the navigation pane on the left-hand side, under Settings, choose Custom data identifiers as shown in the following figure.

    Figure 3: Custom data identifiers console

    Figure 3: Custom data identifiers console

Create a custom data identifier

  1. Choose Create on the custom data identifier console.
  2. Name: Enter a name for your custom data identifier. Make it descriptive so you know what it does. For example, enter SIRET-NIC for the SIRET-NIC number you use.
  3. Description: Enter a description of the custom data identifier.
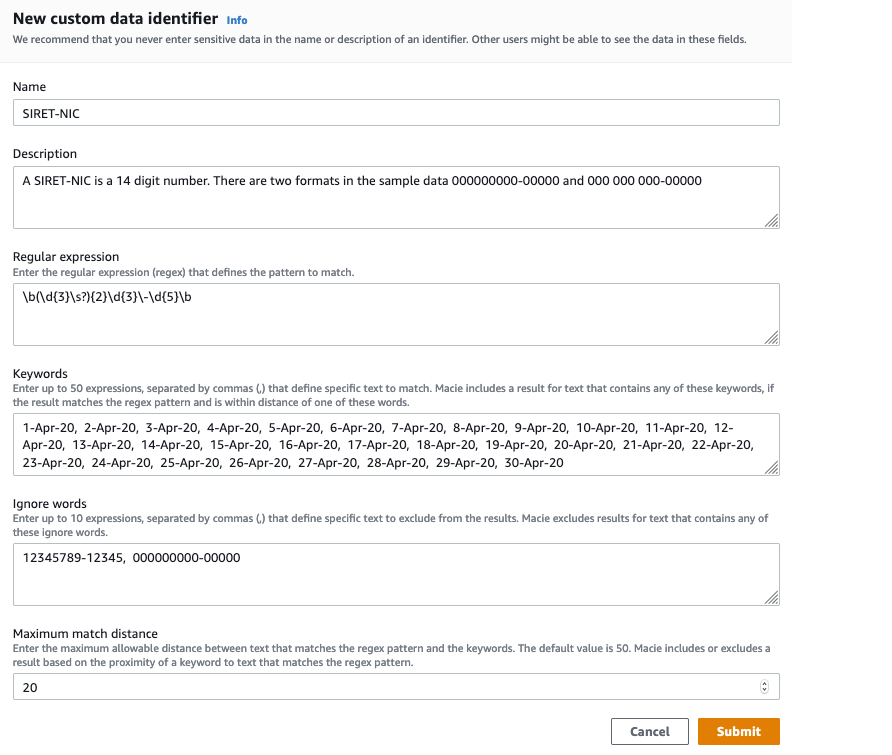
  4. Regular expression (regex): Define the pattern you want to identify. Use a Regular Expression (“regex”) to create the desired pattern. For example, a SIRET-NIC number contains 14 digits—9 numbers followed by a hyphen and then 5 more numbers. The first part, 9 numbers, can stay together or separated by spaces into 3 groups of 3. The specific regex pattern for this is \b(\d{3}\s?){2}\d{3}\-\d{5}\b
  5. Keywords: Define expressions that identify the text to match. The SIRET-NIC number itself is publicly accessible information. But in your case, you want to encrypt the information about the company that was registered during the month the acquisition happened (April 2020), thus the information will not leak to your competitors. So, the keywords here will be all the days in April.
  6. (Optional) Ignore words: Use this box to enter text that you want to be ignored. In this example scenario, you know your security training materials always use an example SIRET-NICs of 12345789-12345 and 000000000-00000. You can enter these values here, so that your security training materials are not flagged as sensitive data containing SIRET-NICs.
  7. Maximum match distance: Use this box to define the proximity between the result and the keywords. If you enter 20, Macie will provide results that include the specified keyword and 20 characters on either side of it.

Note: Do not select Submit yet. After entering the settings and before selecting Submit, you should test your custom data identifier with sample data to confirm that it works.

With all the attributes set, your console will look like what is shown in Figure 4.

Figure 4: SIRET-NIC custom data identifier creation

Figure 4: SIRET-NIC custom data identifier creation

Test your SIRET-NIC custom data identifier

Use the Evaluate section on the right-hand panel of the Macie console to confirm that the regex pattern and other configurations for your custom data identifier are correct.

Follow the steps below to use the Evaluate section.

  1. Enter test data in the sample data box.
  2. Select Submit. There will be one match per record in the file if the configurations are correct and your custom data identifier is ready.The following figure is an example of the Evaluate section using test data. The test data has 3 records, each record has 5 fields which are GUID, employee name, employee email, company name, date SIRET-NIC was issued, and the SIRET-NIC number.

    Figure 5: Evaluate, showing sample data

    Figure 5: Evaluate, showing sample data

  3. After verifying your SIRET-NIC custom data identifier works in the Evaluate section, now select Submit on the New custom data identifier window to create the custom data identifier.

Create a Brazil CPF Custom Data Identifier

Congrats on creating your first custom data identifier! Now use the same steps to create and test custom data identifiers for the Brazil CPF and prototyping naming convention scenarios. The Brazil CPF number usually shows up in the format of 000.000.000-00.

Use the following values for the Brazil CPF scenario, as shown in the following figure:

  • Name: Brazil CPF
  • Description: The format for Brazil CPF in our sample data is 000.000.000-00
  • Regular expression: \b(\d{3}\.){2}\d{3}\-\d{2}\b

    Figure 6: Brazil CPF custom data identifier

    Figure 6: Brazil CPF custom data identifier

Create a Prototype Name Custom Data Identifier

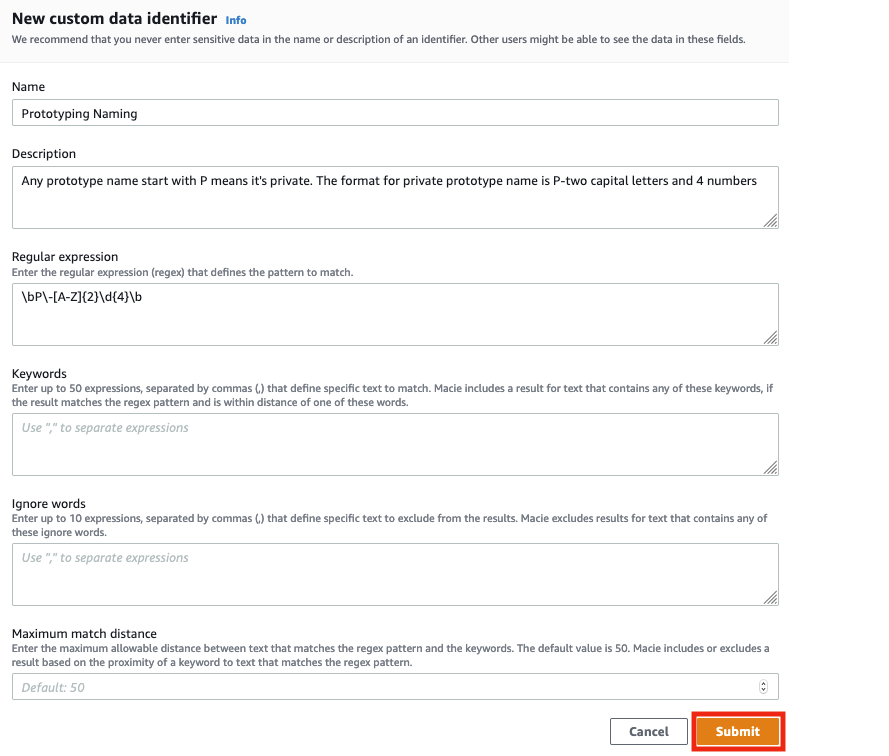
Assume that your company has a very strict and regular naming scheme for prototype part numbers. It is P, followed by a hyphen, and then 2 letters and 4 digits. E.g., P-AB1234. You want to identify objects in S3 that contain references to private prototype parts. This is a small pattern, and so if we’re not careful it will cause Macie to flag objects that do not actually contain one of our prototype numbers. We suggest adding \b at the beginning and the end of the regular expression. The \b symbol means a “word boundary” and word boundaries are basically whitespace, punctuation, or other things that are not letters and numbers. With \b, you limit the pattern so that you only match if the entire word matches the pattern. For example, P-AB1234 will match the pattern, but STEP-AB123456 and P-XY123 will not match the pattern. This gives you finer grained control and reduces false positives.

Use the following values for the prototyping name scenario, as shown in the following figure:

  • Name: Prototyping Naming
  • Description: Any prototype name start with P means it’s private. The format for private prototype name is P-2 capital letters and 4 numbers
  • Regular expression: \bP\-[A-Z]{2}\d{4}\b
Figure 7: Prototyping naming custom data identifier

Figure 7: Prototyping naming custom data identifier

You should now see a page like the following figure, indicating that the SIRET-NIC, Brazil CPF, and Prototyping Naming custom data identifiers are successfully configured.

Figure 8: Successfully configured custom data identifier

Figure 8: Successfully configured custom data identifier

Set up a Test Bucket to Demonstrate Macie

Before we can see Macie do its work, we have to create a bucket with some test data that we can scan. We’ve provided some sample data files that you can download. Follow these instructions to create a test bucket and load our test data into the test bucket.

  1. Download the sample data and unzip it.
  2. Sign in to the AWS Management Console and open the Amazon S3 console at https://console.aws.amazon.com/s3/.
  3. Choose Create bucket. The Create bucket wizard opens.
  4. In Bucket name, enter a DNS-compliant name for your bucket. The bucket name must:
    • Be unique across all of Amazon S3.
    • Be between 3 and 63 characters long.
    • Not contain uppercase characters.
    • Start with a lowercase letter or number.

    We created a bucket called bucketformacieuse; you have to choose another name because this one is already taken by us.

  5. In Region, choose the AWS Region where you want the bucket to reside.
  6. Select Create, to finish the bucket creation.
  7. Open the bucket you just created and upload the two Excel files you downloaded in step 1.

Use Macie to create a job to scan your data

Now you can create a job to scan your Amazon S3 bucket to detect and locate the data patterns defined in the SIRET-NIC, Brazil CPF, and Prototyping Naming custom data identifiers.

To create a job

  1. In the navigation pane, choose Jobs, and then select Create Job on the upper right.
  2. Select Amazon S3 buckets: Select the S3 bucket you want to analyze. In this case, we are using the bucket previously created, bucketformacieuse.
  3. Review Amazon S3 buckets: Verify that you selected the S3 bucket you want the job to scan and analyze.
  4. Scope: Select your scope. For this example, choose the One-time job option as your scope. The scope specifies how often you want the job to run. This can be either a one-time job or a scheduled job. If you choose a scheduled job, you can define how often you want your job to scan your Amazon S3 bucket.
  5. Custom data identifiers: Select the 3 custom data identifiers you created to be associated with this job, and then select Next. This is shown in the following figure.

    Figure 9: Select your custom data identifiers

    Figure 9: Select your custom data identifiers

  6. Name and description: Enter a name and description for the job.
  7. Review and create: Review and verify all your settings, and then select Create.

You now have a job in Macie to scan the Amazon S3 buckets you’ve chosen using the 3 custom data identifiers you created. More information about creating jobs is available in Running sensitive data discovery jobs in Amazon Macie.

Respond to results

Macie will help you be secure when you’re effectively responding to the findings that it produces. For our example, we’ll show you how to review your findings manually. You can look at your findings by bucket, type, or job, or see a collective summary of all findings. In this example, let’s look at all findings.

To review your results

  1. In the navigation pane on the left-hand side, choose Findings. Findings include the severity, the type, the resources affected, and when the findings were last updated.
  2. The following figure shows an example of the results you might see on the findings page. There are two findings for the selected job. The compagnie_français.csv and the empresa_brasileira.csv files contain the custom data identifiers that you created earlier and added to the job.

    Figure 10: Findings

    Figure 10: Findings

  3. Let’s look at the details of one of the findings so you can review the results. From the page showing the 4r findings, select the file that contains your custom data identifier for the Brazil CPF: empresa_brasileira.csv. The number of custom data identifiers found in the document is shown in the Result section on the right, as shown in the following figure.

    Figure 11: Findings detail page for the Brazil CPF custom data identifiers

    Figure 11: Findings detail page for the Brazil CPF custom data identifiers

  4. Now look at the findings details for the compagnie_français.csv file. It shows the number of custom data identifiers found in the file. In this case Macie found 13 SIRET-NIC numbers as shown in the following figure.

    Figure 12: Findings page for the French company file

    Figure 12: Findings page for the French company file

  5. If you configured detailed logging, the results will be saved in the Amazon S3 bucket you specified. The S3 bucket location can be found in the Details section after Detailed result location as shown in the preceding figure.

Now that you’ve used Macie and the Custom Data Identifiers resource to obtain these findings, you can identify what data to place in encrypted storage, and what can be placed in non-encrypted storage when migrating to AWS. Macie and custom data identifiers provide an automated tool to help you enhance protection of your sensitive data by providing you the information to help detect and classify your data in the AWS Cloud.

Using Macie at Scale

Custom Data Identifiers help you tell Macie what to look for. As you move more and more data to the cloud, you’ll need to make new identifiers and new rules. As your rules and identifiers grow you will need to create automation that responds to things that are found. For example, perhaps a lambda function turns on encryption in a bucket when it finds sensitive data in that bucket. Or perhaps a function automatically applies tags to buckets where sensitive data is found, and those buckets and their owners start to appear on reports for audit and compliance. Once you’ve done this at small scale, think about how you will automate responses at larger scale.

Conclusion

The new Custom Data Identifier resource in the newly enhanced Macie can help you detect, classify, and protect sensitive data types unique to your organization. This post focused on the functionality and use of custom data identifiers to automatically discover sensitive data stored in Amazon S3. You can also review the managed data identifiers to see a list of personally identifiable information (PII) that Macie can detect by default. Visit What is Amazon Macie? to learn more.

If you have feedback about this post, submit comments in the Comments section below. If you have questions about this post, start a new thread on the Amazon Macie forum or contact AWS Support.

Want more AWS Security how-to content, news, and feature announcements? Follow us on Twitter.

Author

Kayla Jing

Kayla is a Solutions Architect at Amazon Web Services based out of Seattle. She has experience in data science with a focus on Data Analytics and Machine Learning.

Author

Joshua Choung

Joshua is a Solutions Architect based out of Seattle. He works with customers to provide architectural and technical guidance and training on their AWS cloud journey.

Author

Laura Reith

Laura is a Solutions Architect at Amazon Web Services. Before AWS, she worked as a Solutions Architect in Taiwan focusing on physical security and retail analytics.