With the rise of the cloud and increased security awareness, the use of private Amazon VPCs with no public internet access also expanded rapidly. This setup is recommended to make sure of proper security through isolation. The isolation requirement also applies to code pipelines, in which developers deploy their application modules, software packages, and other dependencies and bundles throughout the development lifecycle. This is done without having to push larger bundles from the developer space to the staging space or the target environment. Furthermore, AWS CodeArtifact is used as an artifact management service that will help organizations of any size to securely store, publish, and share software packages used in their software development process.
We’ll walk through the steps required to build a secure, private continuous integration/continuous development (CI/CD) pipeline with no public internet access while maintaining log retention in Amazon CloudWatch. We’ll utilize AWS CodeCommit for source, CodeArtifact for the Modules and software packages, and Amazon Simple Storage Service (Amazon S3) as artifact storage.
Prerequisites
The prerequisites for following along with this post include:
A CI/CD pipeline – This can be CodePipeline, Jenkins or any CI/CD tool you want to integrate CodeArtifact with, we will use CodePipeline in our walkthrough here.
Solution walkthrough
The main service we’ll focus on is CodeArtifact, a fully managed artifact repository service that makes it easy for organizations of any size to securely store, publish, and share software packages used in their software development process. CodeArtifact works with commonly used package managers and build tools, such as Maven and Gradle (Java), npm and yarn (JavaScript), pip and twine (Python), or NuGet (.NET).
Users push code to CodeCommit, CodePipeline will detect the change and start the pipeline, in CodeBuild the build stage will utilize the private endpoints and download the software packages needed without the need to go over the internet.
The preceding diagram shows how the requests remain private within the VPC and won’t go through the Internet gateway, by going from CodeBuild over the private endpoint to CodeArtifact service, all within the private subnet.
The requests will use the following VPC endpoints to connect to these AWS services:
CloudWatch Logs endpoint (for CodeBuild to put logs in CloudWatch)
Expand Additional configurations and scroll down to the VPC section, select the desired VPC, your Subnets (we recommend selecting multiple AZs, to ensure high availability), and Security Group (the security group rules must allow resources that will use the VPC endpoint to communicate with the AWS service to communicate with the endpoint network interface, default VPC security group will be used here as an example)
Select the CloudWatch logs option you can leave the group name and stream empty this will let the service use the default values and click Continue to CodePipeline
After you get the popup click skip again you’ll see the review page, scroll all the way down and click Create Pipeline
Create a VPC endpoint for Amazon CloudWatch Logs. This will enable CodeBuild to send execution logs to CloudWatch:
Navigate to your VPC console, and from the navigation menu on the left select “Endpoints”.
Figure 21. Screenshot: VPC endpoint.
click Create endpoint Button.
Figure 22. Screenshot: Create endpoint.
For service Category, select “AWS Services”. You can set a name for the new endpoint, and make sure to use something descriptive.
Figure 23. Screenshot: Create endpoint page.
From the list of services, search for the endpoint by typing logs in the search bar and selecting the one with com.amazonaws.us-west-2.logs. This walkthrough can be done in any region that supports the services. I am going to be using us-west-2, please select the appropriate region for your workload.
Figure 24. Screenshot: create endpoint select services with com.amazonaws.us-west-2.logs selected.
Select the VPC that you want the endpoint to be associated with, and make sure that the Enable DNS name option is checked under additional settings.
Select the Subnets where you want the endpoint to be associated, and you can leave the security group as default and the policy as empty.
Figure 26. Screenshot: create endpoint subnet setting shows 2 subnet selected and default security group selected.
Select Create Endpoint.
Figure 27. Screenshot: create endpoint button.
Create a VPC endpoint for CodeArtifact. At the time of writing this article, CodeArifact has two endpoints: one is for API operations like service level operations and authentication, and the other is for using the service such as getting modules for our code. We’ll need both endpoints to automate working with CodeArtifact. Therefore, we’ll create both endpoints with DNS enabled.
Follow steps a-c from the steps that were used from the creating the Logs endpoint above.
a. From the list of services, you can search for the endpoint by typing codeartifact in the search bar and selecting the one with com.amazonaws.us-west-2.codeartifact.api.
Figure 28. Screenshot: create endpoint select services with com.amazonaws.us-west-2.codeartifact.api selected.
Follow steps e-g from Part 4.
Then, repeat the same for com.amazon.aws.us-west-2.codeartifact.repositories service.
Figure 29. Screenshot: create endpoint select services with com.amazonaws.us-west-2.codeartifact.api selected.
Enable a VPC endpoint for AWS STS:
Follow steps a-c from Part 4
a. From the list of services you can search for the endpoint by typing sts in the search bar and selecting the one with com.amazonaws.us-west-2.sts.
Figure 30.Screenshot: create endpoint select services with com.amazon.aws.us-west-2.codeartifact.repositories selected.
Then follow steps e-g from Part 4.
Create a VPC endpoint for S3:
Follow steps a-c from Part 4
a. From the list of services you can search for the endpoint by typing sts in the search bar and selecting the one with com.amazonaws.us-west-2.s3, select the one with type of Gateway
Then select your VPC, and select the route tables for your subnets, this will auto update the route table with the new S3 endpoint.
Figure 31. Screenshot: create endpoint select services with com.amazonaws.us-west-2.s3 selected.
Now we have all of the endpoints set. The last step is to update your pipeline to point at the CodeArtifact repository when pulling your code dependencies. I’ll use CodeBuild buildspec.yml as an example here.
Navigate to IAM console and click Roles from the left navigation menu, then search for your IAM role name, in our case since we selected “New service role” option in step 2.k was created with the name “codebuild-Private-service-role” (codebuild-<BUILD PROJECT NAME>-service-role)
Figure 32. Screenshot: IAM roles with codebuild-Private-service-role role shown in search.
From the Add permissions menu, click on Create inline policy
Search for STS in the services then select STS
Figure 34. Screenshot: IAM visual editor with sts shown in search.
Search for “GetCallerIdentity” and select the action
Figure 35. Screenshot: IAM visual editor with GetCallerIdentity in search and action selected.
Repeat the same with “GetServiceBearerToken”
Figure 36. Screenshot: IAM visual editor with GetServiceBearerToken in search and action selected.
Click on Review, add a name then click on Create policy
Figure 37. Screenshot: Review page and Create policy button.
You should see the new inline policy added to the list
Figure 38. Screenshot: shows the new in-line policy in the list.
For CodeArtifact actions we will do the same on that role, click on Create inline policy
Figure 39. Screenshot: attach policies.
Search for CodeArtifact in the services then select CodeArtifact
Figure 40. Screenshot: select service with CodeArtifact in search.
Search for “GetAuthorizationToken” in actions and select that action in the check box
Figure 41. CodeArtifact: with GetAuthorizationToken in search.
Repeat for “GetRepositoryEndpoint” and “ReadFromRepository”
Click on Resources to fix the 2 warnings, then click on Add ARN on the first one “Specify domain resource ARN for the GetAuthorizationToken action.”
Figure 42. Screenshot: with all selected filed and 2 warnings.
You’ll get a pop up with fields for Region, Account and Domain name, enter your region, your account number, and the domain name, we used “private” when we created our domain earlier.
Figure 43. Screenshot: Add ARN page.
Then click Add
Repeat the same process for “Specify repository resource ARN for the ReadFromRepository and 1 more”, and this time we will provide Region, Account ID, Domain name and Repository name, we used “Private” for the repository we created earlier and “private” for domain
Figure 44. Screenshot: add ARN page.
Note it is best practice to specify the resource we are targeting, we can use the checkbox for “Any” but we want to narrow the scope of our IAM role best we can.
Navigate to CodeCommit then click on the repo you created earlier in step1
Figure 45. Screenshot: CodeCommit repo.
Click on Add file dropdown, then Create file button
Paste the following in the editor space:
{
  "dependencies": {
    "mathjs": "^11.2.0"
  }
}
Name the file “package.json”
Add your name and email, and optional commit message
Repeat this process for “index.js” and paste the following in the editor space:
This will force the pipeline to kick off and start building the application
Figure 47. Screenshot: CodePipeline.
This is a very simple application that gets the square root of 49 and log it to the screen, if you click on the Details link from the pipeline build stage, you’ll see the output of running the NodeJS application, the logs are stored in CloudWatch and you can navigate there by clicking on the link the View entire log “Showing the last xx lines of the build log. View entire log”
Figure 48. Screenshot: Showing the last 54 lines of the build log. View entire log.
We used npm example in the buildspec.yml above, Similar setup will be used for pip and twine,
For Maven, Gradle, and NuGet, you must set Environment variables and change your settings.xml and build.gradle, as well as install the plugin for your IDE. For more information, see here.
Cleanup
Navigate to VPC endpoint from the AWS console and delete the endpoints that you created.
Navigate to CodePipeline and delete the Pipeline you created.
Navigate to CodeBuild and delete the Build Project created.
Navigate to CodeCommit and delete the Repository you created.
Navigate to CodeArtifact and delete the Repository and the domain you created.
Navigate to IAM and delete the Roles created:
For CodeBuild: codebuild-<Build Project Name>-service-role
For CodePipeline: AWSCodePipelineServiceRole-<Region>-<Project Name>
Conclusion
In this post, we deployed a full CI/CD pipeline with CodePipeline orchestrating CodeBuild to build and test a small NodeJS application, using CodeArtifact to download the application code dependencies. All without going to the public internet and maintaining the logs in CloudWatch.
Amazon Macie is a fully managed data security service that uses machine learning and pattern matching to help you discover and protect sensitive data in Amazon Simple Storage Service (Amazon S3). With Macie, you can analyze objects in your S3 buckets to detect occurrences of sensitive data, such as personally identifiable information (PII), financial information, personal health information, and access credentials.
In this post, we walk you through a solution to gain comprehensive and organization-wide visibility into which types of sensitive data are present in your S3 storage, where the data is located, and how much is present. Once enabled, Macie automatically starts discovering sensitive data in your S3 storage and builds a sensitive data profile for each bucket. The profiles are organized in a visual, interactive data map, and you can use the data map to run targeted sensitive data discovery jobs. Both automated data discovery and targeted jobs produce rich, detailed sensitive data discovery results. This solution uses Amazon Athena and Amazon QuickSight to deep-dive on the Macie results, and to help you analyze, visualize, and report on sensitive data discovered by Macie, even when the data is distributed across millions of objects, thousands of S3 buckets, and thousands of AWS accounts. Athena is an interactive query service that makes it simpler to analyze data directly in Amazon S3 using standard SQL. QuickSight is a cloud-scale business intelligence tool that connects to multiple data sources, including Athena databases and tables.
This solution is relevant to data security, data governance, and security operations engineering teams.
The challenge: how to summarize sensitive data discovered in your growing S3 storage
Macie issues findings when an object is found to contain sensitive data. In addition to findings, Macie keeps a record of each S3 object analyzed in a bucket of your choice for long-term storage. These records are known as sensitive data discovery results, and they include additional context about your data in Amazon S3. Due to the large size of the results file, Macie exports the sensitive data discovery results to an S3 bucket, so you need to take additional steps to query and visualize the results. We discuss the differences between findings and results in more detail later in this post.
With the increasing number of data privacy guidelines and compliance mandates, customers need to scale their monitoring to encompass thousands of S3 buckets across their organization. The growing volume of data to assess, and the growing list of findings from discovery jobs, can make it difficult to review and remediate issues in a timely manner. In addition to viewing individual findings for specific objects, customers need a way to comprehensively view, summarize, and monitor sensitive data discovered across their S3 buckets.
To illustrate this point, we ran a Macie sensitive data discovery job on a dataset created by AWS. The dataset contains about 7,500 files that have sensitive information, and Macie generated a finding for each sensitive file analyzed, as shown in Figure 1.
Figure 1: Macie findings from the dataset
Your security team could spend days, if not months, analyzing these individual findings manually. Instead, we outline how you can use Athena and QuickSight to query and visualize the Macie sensitive data discovery results to understand your data security posture.
The additional information in the sensitive data discovery results will help you gain comprehensive visibility into your data security posture. With this visibility, you can answer questions such as the following:
What are the top 5 most commonly occurring sensitive data types?
Which AWS accounts have the most findings?
How many S3 buckets are affected by each of the sensitive data types?
Your security team can write their own customized queries to answer questions such as the following:
Is there sensitive data in AWS accounts that are used for development purposes?
Is sensitive data present in S3 buckets that previously did not contain sensitive information?
Was there a change in configuration for S3 buckets containing the greatest amount of sensitive data?
Findings provide a report of potential policy violations with an S3 bucket, or the presence of sensitive data in a specific S3 object. Each finding provides a severity rating, information about the affected resource, and additional details, such as when Macie found the issue. Findings are published to the Macie console, AWS Security Hub, and Amazon EventBridge.
In contrast, results are a collection of records for each S3 object that a Macie job analyzed. These records contain information about objects that do and do not contain sensitive data, including up to 1,000 occurrences of each sensitive data type that Macie found in a given object, and whether Macie was unable to analyze an object because of issues such as permissions settings or use of an unsupported format. If an object contains sensitive data, the results record includes detailed information that isn’t available in the finding for the object.
One of the key benefits of querying results is to uncover gaps in your data protection initiatives—these gaps can occur when data in certain buckets can’t be analyzed because Macie was denied access to those buckets, or was unable to decrypt specific objects. The following table maps some of the key differences between findings and results.
Findings
Results
Enabled by default
Yes
No
Location of published results
Macie console, Security Hub, and EventBridge
S3 bucket
Details of S3 objects that couldn’t be scanned
No
Yes
Details of S3 objects in which no sensitive data was found
No
Yes
Identification of files inside compressed archives that contain sensitive data
No
Yes
Number of occurrences reported per object
Up to 15
Up to 1,000
Retention period
90 days in Macie console
Defined by customer
Architecture
As shown in Figure 2, you can build out the solution in three steps:
Enable the results and publish them to an S3 bucket
Build out the Athena table to query the results by using SQL
Visualize the results with QuickSight
Figure 2: Architecture diagram showing the flow of the solution
Prerequisites
To implement the solution in this blog post, you must first complete the following prerequisites:
To follow along with the examples in this post, download the sample dataset. The dataset is a single .ZIP file that contains three directories (fk, rt, and mkro). For this post, we used three accounts in our organization, created an S3 bucket in each of them, and then copied each directory to an individual bucket, as shown in Figure 3.
Figure 3: Sample data loaded into three different AWS accounts
Note: All data in this blog post has been artificially created by AWS for demonstration purposes and has not been collected from any individual person. Similarly, such data does not, nor is it intended, to relate back to any individual person.
Step 1: Enable the results and publish them to an S3 bucket
Publication of the discovery results to Amazon S3 is not enabled by default. The setup requires that you specify an S3 bucket to store the results (we also refer to this as the discovery results bucket), and use an AWS Key Management Service (AWS KMS) key to encrypt the bucket.
If you are analyzing data across multiple accounts in your organization, then you need to enable the results in your delegated Macie administrator account. You do not need to enable results in individual member accounts. However, if you’re running Macie jobs in a standalone account, then you should enable the Macie results directly in that account.
Select the AWS Region from the upper right of the page.
From the left navigation pane, select Discovery results.
Select Configure now.
Select Create Bucket, and enter a unique bucket name. This will be the discovery results bucket name. Make note of this name because you will use it when you configure the Athena tables later in this post.
Under Encryption settings, select Create new key. This takes you to the AWS KMS console in a new browser tab.
In the AWS KMS console, do the following:
For Key type, choose symmetric, and for Key usage, choose Encrypt and Decrypt.
Enter a meaningful key alias (for example, macie-results-key) and description.
(Optional) For simplicity, set your current user or role as the Key Administrator.
Set your current user/role as a user of this key in the key usage permissions step. This will give you the right permissions to run the Athena queries later.
From the AWS KMS Key dropdown, select the new key.
To view KMS key policy statements that were automatically generated for your specific key, account, and Region, select View Policy. Copy these statements in their entirety to your clipboard.
Navigate back to the browser tab with the AWS KMS console and then do the following:
Select Customer managed keys.
Choose the KMS key that you created, choose Switch to policy view, and under Key policy, select Edit.
In the key policy, paste the statements that you copied. When you add the statements, do not delete any existing statements and make sure that the syntax is valid. Policies are in JSON format.
Review the inputs in the Settings page for Discovery results and then choose Save. Macie will perform a check to make sure that it has the right access to the KMS key, and then it will create a new S3 bucket with the required permissions.
If you haven’t run a Macie discovery job in the last 90 days, you will need to run a new discovery job to publish the results to the bucket.
In this step, you created a new S3 bucket and KMS key that you are using only for Macie. For instructions on how to enable and configure the results using existing resources, see Storing and retaining sensitive data discovery results with Amazon Macie. Make sure to review Macie pricing details before creating and running a sensitive data discovery job.
Step 2: Build out the Athena table to query the results using SQL
Now that you have enabled the discovery results, Macie will begin publishing them into your discovery results bucket in the form of jsonl.gz files. Depending on the amount of data, there could be thousands of individual files, with each file containing multiple records. To identify the top five most commonly occurring sensitive data types in your organization, you would need to query all of these files together.
In this step, you will configure Athena so that it can query the results using SQL syntax. Before you can run an Athena query, you must specify a query result bucket location in Amazon S3. This is different from the Macie discovery results bucket that you created in the previous step.
If you haven’t set up Athena previously, we recommend that you create a separate S3 bucket, and specify a query result location using the Athena console. After you’ve set up the query result location, you can configure Athena.
To create a new Athena database and table for the Macie results
Open the Athena console, and in the query editor, enter the following data definition language (DDL) statement. In the context of SQL, a DDL statement is a syntax for creating and modifying database objects, such as tables. For this example, we named our database macie_results.
CREATE DATABASE macie_results;
After running this step, you’ll see a new database in the Database dropdown. Make sure that the new macie_results database is selected for the next queries.
Figure 4: Create database in the Athena console
Create a table in the database by using the following DDL statement. Make sure to replace <RESULTS-BUCKET-NAME> with the name of the discovery results bucket that you created previously.
CREATE EXTERNAL TABLE maciedetail_all_jobs(
	accountid string,
	category string,
	classificationdetails struct<jobArn:string,result:struct<status:struct<code:string,reason:string>,sizeClassified:string,mimeType:string,sensitiveData:array<struct<category:string,totalCount:string,detections:array<struct<type:string,count:string,occurrences:struct<lineRanges:array<struct<start:string,`end`:string,`startColumn`:string>>,pages:array<struct<pageNumber:string>>,records:array<struct<recordIndex:string,jsonPath:string>>,cells:array<struct<row:string,`column`:string,`columnName`:string,cellReference:string>>>>>>>,customDataIdentifiers:struct<totalCount:string,detections:array<struct<arn:string,name:string,count:string,occurrences:struct<lineRanges:array<struct<start:string,`end`:string,`startColumn`:string>>,pages:array<string>,records:array<string>,cells:array<string>>>>>>,detailedResultsLocation:string,jobId:string>,
	createdat string,
	description string,
	id string,
	partition string,
	region string,
	resourcesaffected struct<s3Bucket:struct<arn:string,name:string,createdAt:string,owner:struct<displayName:string,id:string>,tags:array<string>,defaultServerSideEncryption:struct<encryptionType:string,kmsMasterKeyId:string>,publicAccess:struct<permissionConfiguration:struct<bucketLevelPermissions:struct<accessControlList:struct<allowsPublicReadAccess:boolean,allowsPublicWriteAccess:boolean>,bucketPolicy:struct<allowsPublicReadAccess:boolean,allowsPublicWriteAccess:boolean>,blockPublicAccess:struct<ignorePublicAcls:boolean,restrictPublicBuckets:boolean,blockPublicAcls:boolean,blockPublicPolicy:boolean>>,accountLevelPermissions:struct<blockPublicAccess:struct<ignorePublicAcls:boolean,restrictPublicBuckets:boolean,blockPublicAcls:boolean,blockPublicPolicy:boolean>>>,effectivePermission:string>>,s3Object:struct<bucketArn:string,key:string,path:string,extension:string,lastModified:string,eTag:string,serverSideEncryption:struct<encryptionType:string,kmsMasterKeyId:string>,size:string,storageClass:string,tags:array<string>,embeddedFileDetails:struct<filePath:string,fileExtension:string,fileSize:string,fileLastModified:string>,publicAccess:boolean>>,
	schemaversion string,
	severity struct<description:string,score:int>,
	title string,
	type string,
	updatedat string)
ROW FORMAT SERDE
	'org.openx.data.jsonserde.JsonSerDe'
WITH SERDEPROPERTIES (
	'paths'='accountId,category,classificationDetails,createdAt,description,id,partition,region,resourcesAffected,schemaVersion,severity,title,type,updatedAt')
STORED AS INPUTFORMAT
	'org.apache.hadoop.mapred.TextInputFormat'
OUTPUTFORMAT
	'org.apache.hadoop.hive.ql.io.HiveIgnoreKeyTextOutputFormat'
LOCATION
	's3://<RESULTS-BUCKET-NAME>/AWSLogs/'
After you complete this step, you will see a new table named maciedetail_all_jobs in the Tables section of the query editor.
Query the results to start gaining insights. For example, to identify the top five most common sensitive data types, run the following query:
select sensitive_data.category,
	detections_data.type,
	sum(cast(detections_data.count as INT)) total_detections
from maciedetail_all_jobs,
	unnest(classificationdetails.result.sensitiveData) as t(sensitive_data),
	unnest(sensitive_data.detections) as t(detections_data)
where classificationdetails.result.sensitiveData is not null
and resourcesaffected.s3object.embeddedfiledetails is null
group by sensitive_data.category, detections_data.type
order by total_detections desc
LIMIT 5
Running this query on the sample dataset gives the following output.
Figure 5: Results of a query showing the five most common sensitive data types in the dataset
(Optional) The previous query ran on all of the results available for Macie. You can further query which accounts have the greatest amount of sensitive data detected.
select accountid,
	sum(cast(detections_data.count as INT)) total_detections
from maciedetail_all_jobs,
	unnest(classificationdetails.result.sensitiveData) as t(sensitive_data),
	unnest(sensitive_data.detections) as t(detections_data)
where classificationdetails.result.sensitiveData is not null
and resourcesaffected.s3object.embeddedfiledetails is null
group by accountid
order by total_detections desc
To test this query, we distributed the synthetic dataset across three member accounts in our organization, ran the query, and received the following output. If you enable Macie in just a single account, then you will only receive results for that one account.
Figure 6: Query results for total number of sensitive data detections across all accounts in an organization
In the previous step, you used Athena to query your Macie discovery results. Although the queries were powerful, they only produced tabular data as their output. In this step, you will use QuickSight to visualize the results of your Macie jobs.
Before creating the visualizations, you first need to grant QuickSight the right permissions to access Athena, the results bucket, and the KMS key that you used to encrypt the results.
Paste the following statement in the key policy. When you add the statement, do not delete any existing statements, and make sure that the syntax is valid. Replace <QUICKSIGHT_SERVICE_ROLE_ARN> and <KMS_KEY_ARN> with your own information. Policies are in JSON format.
	{ "Sid": "Allow Quicksight Service Role to use the key",
		"Effect": "Allow",
		"Principal": {
			"AWS": <QUICKSIGHT_SERVICE_ROLE_ARN>
		},
		"Action": "kms:Decrypt",
		"Resource": <KMS_KEY_ARN>
	}
To allow QuickSight access to Athena and the discovery results S3 bucket
In QuickSight, in the upper right, choose your user icon to open the profile menu, and choose US East (N.Virginia). You can only modify permissions in this Region.
In the upper right, open the profile menu again, and select Manage QuickSight.
Select Security & permissions.
Under QuickSight access to AWS services, choose Manage.
Make sure that the S3 checkbox is selected, click on Select S3 buckets, and then do the following:
Choose the discovery results bucket.
You do not need to check the box under Write permissions for Athena workgroup. The write permissions are not required for this post.
Select Finish.
Make sure that the Amazon Athena checkbox is selected.
Review the selections and be careful that you don’t inadvertently disable AWS services and resources that other users might be using.
Select Save.
In QuickSight, in the upper right, open the profile menu, and choose the Region where your results bucket is located.
Now that you’ve granted QuickSight the right permissions, you can begin creating visualizations.
To create a new dataset referencing the Athena table
On the QuickSight start page, choose Datasets.
On the Datasets page, choose New dataset.
From the list of data sources, select Athena.
Enter a meaningful name for the data source (for example, macie_datasource) and choose Create data source.
Select the database that you created in Athena (for example, macie_results).
Select the table that you created in Athena (for example, maciedetail_all_jobs), and choose Select.
You can either import the data into SPICE or query the data directly. We recommend that you use SPICE for improved performance, but the visualizations will still work if you query the data directly.
To create an analysis using the data as-is, choose Visualize.
You can then visualize the Macie results in the QuickSight console. The following example shows a delegated Macie administrator account that is running a visualization, with account IDs on the y axis and the count of affected resources on the x axis.
Figure 7: Visualize query results to identify total number of sensitive data detections across accounts in an organization
You can also visualize the aggregated data in QuickSight. For example, you can view the number of findings for each sensitive data category in each S3 bucket. The Athena table doesn’t provide aggregated data necessary for visualization. Instead, you need to query the table and then visualize the output of the query.
To query the table and visualize the output in QuickSight
On the Amazon QuickSight start page, choose Datasets.
On the Datasets page, choose New dataset.
Select the data source that you created in Athena (for example, macie_datasource) and then choose Create Dataset.
Select the database that you created in Athena (for example, macie_results).
Choose Use Custom SQL, enter the following query below, and choose Confirm Query.
	select resourcesaffected.s3bucket.name as bucket_name,
		sensitive_data.category,
		detections_data.type,
		sum(cast(detections_data.count as INT)) total_detections
	from macie_results.maciedetail_all_jobs,
		unnest(classificationdetails.result.sensitiveData) as t(sensitive_data),unnest(sensitive_data.detections) as t(detections_data)
where classificationdetails.result.sensitiveData is not null
and resourcesaffected.s3object.embeddedfiledetails is null
group by resourcesaffected.s3bucket.name, sensitive_data.category, detections_data.type
order by total_detections desc
You can either import the data into SPICE or query the data directly.
To create an analysis using the data as-is, choose Visualize.
Now you can visualize the output of the query that aggregates data across your S3 buckets. For example, we used the name of the S3 bucket to group the results, and then we created a donut chart of the output, as shown in Figure 6.
Figure 8: Visualize query results for total number of sensitive data detections across each S3 bucket in an organization
From the visualizations, we can identify which buckets or accounts in our organizations contain the most sensitive data, for further action. Visualizations can also act as a dashboard to track remediation.
You can replicate the preceding steps by using the sample queries from the amazon-macie-results-analytics GitHub repo to view data that is aggregated across S3 buckets, AWS accounts, or individual Macie jobs. Using these queries with the results of your Macie results will help you get started with tracking the security posture of your data in Amazon S3.
Conclusion
In this post, you learned how to enable sensitive data discovery results for Macie, query those results with Athena, and visualize the results in QuickSight.
Because Macie sensitive data discovery results provide more granular data than the findings, you can pursue a more comprehensive incident response when sensitive data is discovered. The sample queries in this post provide answers to some generic questions that you might have. After you become familiar with the structure, you can run other interesting queries on the data.
We hope that you can use this solution to write your own queries to gain further insights into sensitive data discovered in S3 buckets, according to the business needs and regulatory requirements of your organization. You can consider using this solution to better understand and identify data security risks that need immediate attention. For example, you can use this solution to answer questions such as the following:
Is financial information present in an AWS account where it shouldn’t be?
Are S3 buckets that contain PII properly hardened with access controls and encryption?
You can also use this solution to understand gaps in your data security initiatives by tracking files that Macie couldn’t analyze due to encryption or permission issues. To further expand your knowledge of Macie capabilities and features, see the following resources:
If you have feedback about this post, submit comments in the Comments section below. If you have questions about this post, start a new thread on Amazon Macie re:Post.
Want more AWS Security news? Follow us on Twitter.
Over the past year, AWS CIRT has responded to hundreds of such security events, including the unauthorized use of AWS Identity and Access Management (IAM) credentials, ransomware and data deletion in an AWS account, and billing increases due to the creation of unauthorized resources to mine cryptocurrency.
We are excited to release five workshops that simulate these security events to help you learn the tools and procedures that AWS CIRT uses on a daily basis to detect, investigate, and respond to such security events. The workshops cover AWS services and tools, such as Amazon GuardDuty, Amazon CloudTrail, Amazon CloudWatch, Amazon Athena, and AWS WAF, as well as some open source tools written and published by AWS CIRT.
To access the workshops, you just need an AWS account, an internet connection, and the desire to learn more about incident response in the AWS Cloud! Choose the following links to access the workshops.
During this workshop, you will simulate the unauthorized use of IAM credentials by using a script invoked within AWS CloudShell. The script will perform reconnaissance and privilege escalation activities that have been commonly seen by AWS CIRT and that are typically performed during similar events of this nature. You will also learn some tools and processes that AWS CIRT uses, and how to use these tools to find evidence of unauthorized activity by using IAM credentials.
During this workshop, you will use an AWS CloudFormation template to replicate an environment with multiple IAM users and five Amazon Simple Storage Service (Amazon S3) buckets. AWS CloudShell will then run a bash script that simulates data exfiltration and data deletion events that replicate a ransomware-based security event. You will also learn the tools and processes that AWS CIRT uses to respond to similar events, and how to use these tools to find evidence of unauthorized S3 bucket and object deletions.
During this workshop, you will simulate a cryptomining security event by using a CloudFormation template to initialize three Amazon Elastic Compute Cloud (Amazon EC2) instances. These EC2 instances will mimic cryptomining activity by performing DNS requests to known cryptomining domains. You will also learn the tools and processes that AWS CIRT uses to respond to similar events, and how to use these tools to find evidence of unauthorized creation of EC2 instances and communication with known cryptomining domains.
During this workshop, you will simulate the unauthorized use of a web application that is hosted on an EC2 instance configured to use Instance Metadata Service Version 1 (IMDSv1) and vulnerable to server side request forgery (SSRF). You will learn how web application vulnerabilities, such as SSRF, can be used to obtain credentials from an EC2 instance. You will also learn the tools and processes that AWS CIRT uses to respond to this type of access, and how to use these tools to find evidence of the unauthorized use of EC2 instance credentials through web application vulnerabilities such as SSRF.
During this workshop, you will install and experiment with some common tools and utilities that AWS CIRT uses on a daily basis to detect security misconfigurations, respond to active events, and assist customers with protecting their infrastructure.
If you have feedback about this post, submit comments in the Comments section below. If you have questions about this post, contact AWS Support.
Want more AWS Security news? Follow us on Twitter.
There are several infrastructure as code (IaC) frameworks available today, to help you define your infrastructure, such as the AWS Cloud Development Kit (AWS CDK) or Terraform by HashiCorp. Terraform, an AWS Partner Network (APN) Advanced Technology Partner and member of the AWS DevOps Competency, is an IaC tool similar to AWS CloudFormation that allows you to create, update, and version your AWS infrastructure. Terraform provides friendly syntax (similar to AWS CloudFormation) along with other features like planning (visibility to see the changes before they actually happen), graphing, and the ability to create templates to break infrastructure configurations into smaller chunks, which allows better maintenance and reusability. We use the capabilities and features of Terraform to build an API-based ingestion process into AWS. Let’s get started!
In this post, we showcase how to build and orchestrate a Scala Spark application using Amazon EMR Serverless, AWS Step Functions, and Terraform. In this end-to-end solution, we run a Spark job on EMR Serverless that processes sample clickstream data in an Amazon Simple Storage Service (Amazon S3) bucket and stores the aggregation results in Amazon S3.
With EMR Serverless, you don’t have to configure, optimize, secure, or operate clusters to run applications. You will continue to get the benefits of Amazon EMR, such as open source compatibility, concurrency, and optimized runtime performance for popular data frameworks. EMR Serverless is suitable for customers who want ease in operating applications using open-source frameworks. It offers quick job startup, automatic capacity management, and straightforward cost controls.
Solution overview
We provide the Terraform infrastructure definition and the source code for an AWS Lambda function using sample customer user clicks for online website inputs, which are ingested into an Amazon Kinesis Data Firehose delivery stream. The solution uses Kinesis Data Firehose to convert the incoming data into a Parquet file (an open-source file format for Hadoop) before pushing it to Amazon S3 using the AWS Glue Data Catalog. The generated output S3 Parquet file logs are then processed by an EMR Serverless process, which outputs a report detailing aggregate clickstream statistics in an S3 bucket. The EMR Serverless operation is triggered using Step Functions. The sample architecture and code are spun up as shown in the following diagram.
The following are the high-level steps and AWS services used in this solution:
The provided application code is packaged and built using Apache Maven.
Terraform commands are used to deploy the infrastructure in AWS.
The EMR Serverless application provides the option to submit a Spark job.
The solution uses two Lambda functions:
Ingestion – This function processes the incoming request and pushes the data into the Kinesis Data Firehose delivery stream.
EMR Start Job – This function starts the EMR Serverless application. The EMR job process converts the ingested user click logs into output in another S3 bucket.
Step Functions triggers the EMR Start Job Lambda function, which submits the application to EMR Serverless for processing of the ingested log files.
The solution uses four S3 buckets:
Kinesis Data Firehose delivery bucket – Stores the ingested application logs in Parquet file format.
Loggregator source bucket – Stores the Scala code and JAR for running the EMR job.
Loggregator output bucket – Stores the EMR processed output.
EMR Serverless logs bucket – Stores the EMR process application logs.
Sample invoke commands (run as part of the initial setup process) insert the data using the ingestion Lambda function. The Kinesis Data Firehose delivery stream converts the incoming stream into a Parquet file and stores it in an S3 bucket.
For this solution, we made the following design decisions:
We use Step Functions and Lambda in this use case to trigger the EMR Serverless application. In a real-world use case, the data processing application could be long running and may exceed Lambda’s timeout limits. In this case, you can use tools like Amazon Managed Workflows for Apache Airflow (Amazon MWAA). Amazon MWAA is a managed orchestration service makes it easier to set up and operate end-to-end data pipelines in the cloud at scale.
The Lambda code and EMR Serverless log aggregation code are developed using Java and Scala, respectively. You can use any supported languages in these use cases.
The AWS Command Line Interface (AWS CLI) V2 is required for querying EMR Serverless applications from the command line. You can also view these from the AWS Management Console. We provide a sample AWS CLI command to test the solution later in this post.
Prerequisites
To use this solution, you must complete the following prerequisites:
Install the AWS CLI. For this post, we used version 2.7.18. This is required in order to query the aws emr-serverless AWS CLI commands from your local machine. Optionally, all the AWS services used in this post can be viewed and operated via the console.
Make sure to have Java installed, and JDK/JRE 8 is set in the environment path of your machine. For instructions, see the Java Development Kit.
Install Apache Maven. The Java Lambda functions are built using mvn packages and are deployed using Terraform into AWS.
Install the Scala Build Tool. For this post, we used version 1.4.7. Make sure to download and install based on your operating system needs.
To spin up the infrastructure and the application, complete the following steps:
Clone the following GitHub repository. The provided exec.sh shell script builds the Java application JAR (for the Lambda ingestion function) and the Scala application JAR (for the EMR processing) and deploys the AWS infrastructure that is needed for this use case.
Run the following commands:
$ chmod +x exec.sh
$ ./exec.sh
To run the commands individually, set the application deployment Region and account number, as shown in the following example:
$ terraform init
$ terraform plan
$ terraform apply --auto-approve
Test the solution
After you build and deploy the application, you can insert sample data for Amazon EMR processing. We use the following code as an example. The exec.sh script has multiple sample insertions for Lambda. The ingested logs are used by the EMR Serverless application job.
The sample AWS CLI invoke command inserts sample data for the application logs:
aws lambda invoke --function-name clicklogger-dev-ingestion-lambda —cli-binary-format raw-in-base64-out —payload '{"requestid":"OAP-guid-001","contextid":"OAP-ctxt-001","callerid":"OrderingApplication","component":"login","action":"load","type":"webpage"}' out
To validate the deployments, complete the following steps:
On the Amazon S3 console, navigate to the bucket created as part of the infrastructure setup.
Choose the bucket to view the files. You should see that data from the ingested stream was converted into a Parquet file.
Choose the file to view the data. The following screenshot shows an example of our bucket contents. Now you can run Step Functions to validate the EMR Serverless application.
On the Step Functions console, open clicklogger-dev-state-machine. The state machine shows the steps to run that trigger the Lambda function and EMR Serverless application, as shown in the following diagram.
Run the state machine.
After the state machine runs successfully, navigate to the clicklogger-dev-output-bucket on the Amazon S3 console to see the output files.
Use the AWS CLI to check the deployed EMR Serverless application:
On the Amazon EMR console, choose Serverless in the navigation pane.
Select clicklogger-dev-studio and choose Manage applications.
The Application created by the stack will be as shown below clicklogger-dev-loggregator-emr-<Your-Account-Number> Now you can review the EMR Serverless application output.
On the Amazon S3 console, open the output bucket (us-east-1-clicklogger-dev-loggregator-output-). The EMR Serverless application writes the output based on the date partition, such as 2022/07/28/response.md.The following code shows an example of the file output:
The provided ./cleanup.sh script has the required steps to delete all the files from the S3 buckets that were created as part of this post. The terraform destroy command cleans up the AWS infrastructure that you created earlier. See the following code:
$ chmod +x cleanup.sh
$ ./cleanup.sh
To do the steps manually, you can also delete the resources via the AWS CLI:
In this post, we built, deployed, and ran a data processing Spark job in EMR Serverless that interacts with various AWS services. We walked through deploying a Lambda function packaged with Java using Maven, and a Scala application code for the EMR Serverless application triggered with Step Functions with infrastructure as code. You can use any combination of applicable programming languages to build your Lambda functions and EMR job application. EMR Serverless can be triggered manually, automated, or orchestrated using AWS services like Step Functions and Amazon MWAA.
We encourage you to test this example and see for yourself how this overall application design works within AWS. Then, it’s just the matter of replacing your individual code base, packaging it, and letting EMR Serverless handle the process efficiently.
If you implement this example and run into any issues, or have any questions or feedback about this post, please leave a comment!
Sivasubramanian Ramani (Siva Ramani) is a Sr Cloud Application Architect at Amazon Web Services. His expertise is in application optimization & modernization, serverless solutions and using Microsoft application workloads with AWS.
Naveen Balaraman is a Sr Cloud Application Architect at Amazon Web Services. He is passionate about Containers, serverless Applications, Architecting Microservices and helping customers leverage the power of AWS cloud.
AWS Security Hub is a central dashboard for security, risk management, and compliance findings from AWS Audit Manager, AWS Firewall Manager, Amazon GuardDuty, IAM Access Analyzer, Amazon Inspector, and many other AWS and third-party services. You can use the insights from Security Hub to get an understanding of your compliance posture across multiple AWS accounts. It is not unusual for a single AWS account to have more than a thousand Security Hub findings. Multi-account and multi-Region environments may have tens or hundreds of thousands of findings. With so many findings, it is important for you to get a summary of the most important ones. Navigating through duplicate findings, false positives, and benign positives can take time.
In this post, we demonstrate how to export those findings to comma separated values (CSV) formatted files in an Amazon Simple Storage Service (Amazon S3) bucket. You can analyze those files by using a spreadsheet, database applications, or other tools. You can use the CSV formatted files to change a set of status and workflow values to align with your organizational requirements, and update many or all findings at once in Security Hub.
The solution described in this post, called CSV Manager for Security Hub, uses an AWS Lambda function to export findings to a CSV object in an S3 bucket, and another Lambda function to update Security Hub findings by modifying selected values in the downloaded CSV file from an S3 bucket. You use an Amazon EventBridge scheduled rule to perform periodic exports (for example, once a week). CSV Manager for Security Hub also has an update function that allows you to update the workflow, customer-specific notation, and other customer-updatable values for many or all findings at once. If you’ve set up a Region aggregator in Security Hub, you should configure the primary CSV Manager for Security Hub stack to export findings only from the aggregator Region. However, you may configure other CSV Manager for Security Hub stacks that export findings from specific Regions or from all applicable Regions in specific accounts. This allows application and account owners to view their own Security Hub findings without having access to other findings for the organization.
How it works
CSV Manager for Security Hub has two main features:
Export Security Hub findings to a CSV object in an S3 bucket
Update Security Hub findings from a CSV object in an S3 bucket
Overview of the export function
The overview of the export function CsvExporter is shown in Figure 1.
Figure 1: Architecture diagram of the export function
Figure 1 shows the following numbered steps:
In the AWS Management Console, you invoke the CsvExporter Lambda function with a test event.
The export function calls the Security Hub GetFindings API action and gets a list of findings to export from Security Hub.
The export function converts the most important fields to identify and sort findings to a 37-column CSV format (which includes 12 updatable columns) and writes to an S3 bucket.
Overview of the update function
To update existing Security Hub findings that you previously exported, you can use the update function CsvUpdater to modify the respective rows and columns of the CSV file you exported, as shown in Figure 2. There are 12 modifiable columns out of 37 (any changes to other columns are ignored), which are described in more detail in Step 3: View or update findings in the CSV file later in this post.
Figure 2: Architecture diagram of the update function
Figure 2 shows the following numbered steps:
You download the CSV file that the CsvExporter function generated from the S3 bucket and update as needed.
You upload the CSV file that contains your updates to the S3 bucket.
In the AWS Management Console, you invoke the CsvUpdater Lambda function with a test event containing the URI of the CSV file.
CsvUpdater reads the updated CSV file from the S3 bucket.
CsvUpdater identifies the minimum set of updates and invokes the Security Hub BatchUpdateFindings API action.
Step 1: Use the CloudFormation template to deploy the solution
You can find the latest code in the aws-security-hub-csv-manager GitHub repository, where you can also contribute to the sample code. The following commands show how to deploy the solution by using the AWS CDK. First, the AWS CDK initializes your environment and uploads the AWS Lambda assets to an S3 bucket. Then, you deploy the solution to your account by using the following commands. Replace <INSERT_AWS_ACCOUNT> with your account number, and replace <INSERT_REGION> with the AWS Region that you want the solution deployed to, for example us-east-1.
Choose the following Launch Stack button to open the AWS CloudFormation console pre-loaded with the template for this solution:
In the Parameters section, as shown in Figure 3, enter your values.
Figure 3: CloudFormation template variables
For What folder for CSV Manager for Security Hub Lambda code, leave the default Code. For What folder for CSV Manager for Security Hub exports, leave the default Findings.
These are the folders within the S3 bucket that the CSV Manager for Security Hub CloudFormation template creates to store the Lambda code, as well as where the findings are exported by the Lambda function.
For Frequency, for this solution you can leave the default value cron(0 8 ? * SUN *). This default causes automatic exports to occur every Sunday at 8:00 AM local time using an EventBridge scheduled rule. For more information about how to update this value to meet your needs, see Schedule Expressions for Rules in the Amazon CloudWatch Events User Guide.
The values you enter for the Regions field depend on whether you have configured an aggregation Region in Security Hub.
If you have configured an aggregation Region, enter only that Region code, for example eu-north-1, as shown in Figure 3.
If you haven’t configured an aggregation Region, enter a comma-separated list of Regions in which you have enabled Security Hub, for example us-east-1, eu-west-1, eu-west-2.
If you would like to export findings from all Regions where Security Hub is enabled, leave the Regions field blank. Regions where Security Hub is not enabled will generate a message and will be skipped.
Choose Next.
The CloudFormation stack deploys the necessary resources, including an EventBridge scheduling rule, AWS System Managers Automation documents, an S3 bucket, and Lambda functions for exporting and updating Security Hub findings.
After you deploy the CloudFormation stack
After you create the CSV Manager for Security Hub stack, you can do the following:
Perform a bulk update of Security Hub findings by following the instructions in Step 3: View or update findings in the CSV file later in this post. You can make changes to one or more of the 12 updatable columns of the CSV file, and perform the update function to update some or all Security Hub findings.
Step 2: Export Security Hub findings to a CSV file
You can export Security Hub findings from the AWS Lambda console. To do this, you create a test event and invoke the CsvExporter Lambda function. CsvExporter exports all Security Hub findings from all applicable Regions to a single CSV file in the S3 bucket for CSV Manager for Security Hub.
To export Security Hub findings to a CSV file
In the AWS Lambda console, find the CsvExporter Lambda function and select it.
On the Code tab, choose the down arrow at the right of the Test button, as shown in Figure 4, and select Configure test event.
Figure 4: The down arrow at the right of the Test button
To create an empty test event, on the Configure test event page, do the following:
Choose Create a new event.
Enter an event name; in this example we used testEvent.
For Template, leave the default hello-world.
For Event JSON, enter the JSON object {} as shown in Figure 5.
Figure 5: Creating an empty test event
Choose Save to save the empty test event.
To invoke the Lambda function, choose the Test button, as shown in Figure 6.
Figure 6: Test button to invoke the Lambda function
On the Execution Results tab, note the following details, which you will need for the next step.
Locate the CSV object that matches the value of “exportKey” (in this example, DOC-EXAMPLE-OBJECT) in the S3 bucket that matches the value of “bucket” (in this example, DOC-EXAMPLE-BUCKET).
Now you can view or update the findings in the CSV file, as described in the next section.
Step 3: (Optional) Using filters to limit CSV results
In your test event, you can specify any filter that is accepted by the GetFindings API action. You do this by adding a filter key to your test event. The filter key can either contain the word HighActive (which is a predefined filter configured as a default for selecting active high-severity and critical findings, as shown in Figure 8), or a JSON filter object.
Figure 8 depicts an example JSON filter that performs the same filtering as the HighActive predefined filter.
To use filters to limit CSV results
In the AWS Lambda console, find the CsvExporter Lambda function and select it.
On the Code tab, choose the down arrow at the right of the Test button, as shown in Figure 7, and select Configure test event.
Figure 7: The down arrow at the right of the Test button
To create a test event containing a filter, on the Configure test event page, do the following:
Choose Create a new event.
Enter an event name; in this example we used filterEvent.
For Template, select testEvent,
For Event JSON, enter the following JSON object, as shown in Figure 8.
Locate the CSV object that matches the value of “exportKey” (in this example, DOC-EXAMPLE-OBJECT) in the S3 bucket that matches the value of “bucket” (in this example, DOC-EXAMPLE-BUCKET).
The results in this CSV file should be a filtered set of Security Hub findings according to the filter you specified above. You can now proceed to step 4 if you want to view or update findings.
Step 4: View or update findings in the CSV file
You can use any program that allows you to view or edit CSV files, such as Microsoft Excel. The first row in the CSV file are the column names. These column names correspond to fields in the JSON objects that are returned by the GetFindings API action.
Warning: Do not modify the first two columns, Id (column A) or ProductArn (column B). If you modify these columns, Security Hub will not be able to locate the finding to update, and any other changes to that finding will be discarded.
You can locally modify any of the columns in the CSV file, but only 12 columns out of 37 columns will actually be updated if you use CsvUpdater to update Security Hub findings. The following are the 12 columns you can update. These correspond to columns C through N in the CSV file.
Column name
Spreadsheet column
Description
Criticality
C
An integer value between 0 and 100.
Confidence
D
An integer value between 0 and 100.
NoteText
E
Any text you wish
NoteUpdatedBy
F
Automatically updated with your AWS principal user ID.
CustomerOwner*
G
Information identifying the owner of this finding (for example, email address).
CustomerIssue*
H
A Jira issue or another identifier tracking a specific issue.
CustomerTicket*
I
A ticket number or other trouble/problem tracking identification.
ProductSeverity**
J
A floating-point number from 0.0 to 99.9.
NormalizedSeverity**
K
An integer between 0 and 100.
SeverityLabel
L
One of the following:
INFORMATIONAL
LOW
MEDIUM
HIGH
HIGH
CRITICAL
VerificationState
M
One of the following:
UNKNOWN — Finding has not been verified yet.
TRUE_POSITIVE — This is a valid finding and should be treated as a risk.
FALSE_POSITIVE — This an incorrect finding and should be ignored or suppressed.
BENIGN_POSITIVE — This is a valid finding, but the risk is not applicable or has been accepted, transferred, or mitigated.
Workflow
N
One of the following:
NEW — This is a new finding that has not been reviewed.
NOTIFIED — The responsible party or parties have been notified of this finding.
RESOLVED — The finding has been resolved.
SUPPRESSED — A false or benign finding has been suppressed so that it does not appear as a current finding in Security Hub.
* These columns are stored inside the UserDefinedFields field of the updated findings. The column names imply a certain kind of information, but you can put any information you wish.
** These columns are stored inside the Severity field of the updated findings. These values have a fixed format and will be rejected if they do not meet that format.
Columns with fixed text values (L, M, N) in the previous table can be specified in mixed case and without underscores—they will be converted to all uppercase and underscores added in the CsvUpdater Lambda function. For example, “false positive” will be converted to “FALSE_POSITIVE”.
Step 5: Create a test event and update Security Hub by using the CSV file
If you want to update Security Hub findings, make your changes to columns C through N as described in the previous table. After you make your changes in the CSV file, you can update the findings in Security Hub by using the CSV file and the CsvUpdater Lambda function.
Use the following procedure to create a test event and run the CsvUpdater Lambda function.
To create a test event and run the CsvUpdaterLambda function
In the AWS Lambda console, find the CsvUpdater Lambda function and select it.
On the Code tab, choose the down arrow to the right of the Test button, as shown in Figure 10, and select Configure test event.
Figure 10: The down arrow to the right of the Test button
To create a test event as shown in Figure 11, on the Configure test event page, do the following:
Choose Create a new event.
Enter an event name; in this example we used testEvent.
Replace <s3ObjectUri> with the full URI of the S3 object where the updated CSV file is located.
Replace <aggregationRegionName> with your Security Hub aggregation Region, or the primary Region in which you initially enabled Security Hub.
Figure 11: Create and save a test event for the CsvUpdater Lambda function
Choose Save.
Choose the Test button, as shown in Figure 12, to invoke the Lambda function.
Figure 12: Test button to invoke the Lambda function
To verify that the Lambda function ran successfully, on the Execution Results tab, review the results for “message”: “Success”, as shown in the following example. Note that the results may be thousands of lines long.
The processed array lists every successfully updated finding by Id and ProductArn.
If any of the findings were not successfully updated, their Id and ProductArn appear in the unprocessed array. In the previous example, no findings were unprocessed.
The value s3://DOC-EXAMPLE-BUCKET/DOC-EXAMPLE-OBJECT is the URI of the S3 object from which your updates were read.
Cleaning up
To avoid incurring future charges, first delete the CloudFormation stack that you deployed in Step 1: Use the CloudFormation template to deploy the solution. Next, you need to manually delete the S3 bucket deployed with the stack. For instructions, see Deleting a bucket in the Amazon Simple Storage Service User Guide.
Conclusion
In this post, we showed you how you can export Security Hub findings to a CSV file in an S3 bucket and update the exported findings by using CSV Manager for Security Hub. We showed you how you can automate this process by using AWS Lambda, Amazon S3, and AWS Systems Manager. Full documentation for CSV Manager for Security Hub is available in the aws-security-hub-csv-manager GitHub repository. You can also investigate other ways to manage Security Hub findings by checking out our blog posts about Security Hub integration with Amazon OpenSearch Service, Amazon QuickSight, Slack, PagerDuty, Jira, or ServiceNow.
If you have feedback about this post, submit comments in the Comments section below. If you have questions about this post, start a new thread on the Security Hub re:Post. To learn more or get started, visit AWS Security Hub.
Want more AWS Security news? Follow us on Twitter.
In Part 1 of this two-part series, we shared an overview of some of the most important 2021 Amazon Web Services (AWS) Security service and feature launches. In this follow-up, we’ll dive deep into additional launches that are important for security professionals to be aware of and understand across all AWS services. There have already been plenty in the first half of 2022, so we’ll highlight those soon, as well.
AWS Identity
You can use AWS Identity Services to build Zero Trust architectures, help secure your environments with a robust data perimeter, and work toward the security best practice of granting least privilege. In 2021, AWS expanded the identity source options, AWS Region availability, and support for AWS services. There is also added visibility and power in the permission management system. New features offer new integrations, additional policy checks, and secure resource sharing across AWS accounts.
AWS Single Sign-On
For identity management, AWS Single Sign-On (AWS SSO) is where you create, or connect, your workforce identities in AWS once and manage access centrally across your AWS accounts in AWS Organizations. In 2021, AWS SSO announced new integrations for JumpCloud and CyberArk users. This adds to the list of providers that you can use to connect your users and groups, which also includes Microsoft Active Directory Domain Services, Okta Universal Directory, Azure AD, OneLogin, and Ping Identity.
For access management, there have been a range of feature launches with AWS Identity and Access Management (IAM) that have added up to more power and visibility in the permissions management system. Here are some key examples.
IAM made it simpler to relate a user’s IAM role activity to their corporate identity. By setting the new source identity attribute, which persists through role assumption chains and gets logged in AWS CloudTrail, you can find out who is responsible for actions that IAM roles performed.
IAM added support for policy conditions, to help manage permissions for AWS services that access your resources. This important feature launch of service principal conditions helps you to distinguish between API calls being made on your behalf by a service principal, and those being made by a principal inside your account. You can choose to allow or deny the calls depending on your needs. As a security professional, you might find this especially useful in conjunction with the aws:CalledVia condition key, which allows you to scope permissions down to specify that this account principal can only call this API if they are calling it using a particular AWS service that’s acting on their behalf. For example, your account principal can’t generally access a particular Amazon Simple Storage Service (Amazon S3) bucket, but if they are accessing it by using Amazon Athena, they can do so. These conditions can also be used in service control policies (SCPs) to give account principals broader scope across an account, organizational unit, or organization; they need not be added to individual principal policies or resource policies.
Another very handy new IAM feature launch is additional information about the reason for an access denied error message. With this additional information, you can now see which of the relevant access control policies (for example, IAM, resource, SCP, or VPC endpoint) was the cause of the denial. As of now, this new IAM feature is supported by more than 50% of all AWS services in the AWS SDK and AWS Command Line Interface, and a fast-growing number in the AWS Management Console. We will continue to add support for this capability across services, as well as add more features that are designed to make the journey to least privilege simpler.
IAM Access Analyzer also launched the ability to generate fine-grained policies based on analyzing past AWS CloudTrail activity. This feature provides a great new capability for DevOps teams or central security teams to scope down policies to just the permissions needed, making it simpler to implement least privilege permissions. IAM Access Analyzer launched further enhancements to expand policy checks, and the ability to generate a sample least-privilege policy from past activity was expanded beyond the account level to include an analysis of principal behavior within the entire organization by analyzing log activity stored in AWS CloudTrail.
AWS Resource Access Manager
AWS Resource Access Manager (AWS RAM) helps you securely share your resources across unrelated AWS accounts within your organization or organizational units (OUs) in AWS Organizations. Now you can also share your resources with IAM roles and IAM users for supported resource types. This update enables more granular access using managed permissions that you can use to define access to shared resources. In addition to the default managed permission defined for each shareable resource type, you now have more flexibility to choose which permissions to grant to whom for resource types that support additional managed permissions. Additionally, AWS RAM added support for global resource types, enabling you to provision a global resource once, and share that resource across your accounts. A global resource is one that can be used in multiple AWS Regions; the first example of a global resource is found in AWS Cloud WAN, currently in preview as of this publication. AWS RAM helps you more securely share an AWS Cloud WAN core network, which is a managed network containing AWS and on-premises networks. With AWS RAM global resource sharing, you can use the Cloud WAN core network to centrally operate a unified global network across Regions and accounts.
AWS Directory Service
AWS Directory Service for Microsoft Active Directory, also known as AWS Managed Microsoft Active Directory (AD), was updated to automatically provide domain controller and directory utilization metrics in Amazon CloudWatch for new and existing directories. Analyzing these utilization metrics helps you quantify your average and peak load times to identify the need for additional domain controllers. With this, you can define the number of domain controllers to meet your performance, resilience, and cost requirements.
Amazon Cognito
Amazon Cognitoidentity pools (federated identities) was updated to enable you to use attributes from social and corporate identity providers to make access control decisions and simplify permissions management in AWS resources. In Amazon Cognito, you can choose predefined attribute-tag mappings, or you can create custom mappings using the attributes from social and corporate providers’ access and ID tokens, or SAML assertions. You can then reference the tags in an IAM permissions policy to implement attribute-based access control (ABAC) and manage access to your AWS resources. Amazon Cognito also launched a new console experience for user pools and now supports targeted sign out through refresh token revocation.
Governance, control, and logging services
There were a number of important releases in 2021 in the areas of governance, control, and logging services.
This approach provides a powerful new middle ground between the older security models of prevention (which provide developers only an access denied message, and often can’t distinguish between an acceptable and an unacceptable use of the same API) and a detect and react model (when undesired states have already gone live). The Cfn-Guard 2.0 model gives builders the freedom to build with IaC, while allowing central teams to have the ability to reject infrastructure configurations or changes that don’t conform to central policies—and to do so with completely custom error messages that invite dialog between the builder team and the central team, in case the rule is unnuanced and needs to be refined, or if a specific exception needs to be created.
For example, a builder team might be allowed to provision and attach an internet gateway to a VPC, but the team can do this only if the routes to the internet gateway are limited to a certain pre-defined set of CIDR ranges, such as the public addresses of the organization’s branch offices. It’s not possible to write an IAM policy that takes into account the CIDR values of a VPC route table update, but you can write a Cfn-Guard 2.0 rule that allows the creation and use of an internet gateway, but only with a defined and limited set of IP addresses.
AWS Systems Manager Incident Manager
An important launch that security professionals should know about is AWS Systems Manager Incident Manager. Incident Manager provides a number of powerful capabilities for managing incidents of any kind, including operational and availability issues but also security issues. With Incident Manager, you can automatically take action when a critical issue is detected by an Amazon CloudWatch alarm or Amazon EventBridge event. Incident Manager runs pre-configured response plans to engage responders by using SMS and phone calls, can enable chat commands and notifications using AWS Chatbot, and runs automation workflows with AWS Systems Manager Automation runbooks. The Incident Manager console integrates with AWS Systems Manager OpsCenter to help you track incidents and post-incident action items from a central place that also synchronizes with third-party management tools such as Jira Service Desk and ServiceNow. Incident Manager enables cross-account sharing of incidents using AWS RAM, and provides cross-Region replication of incidents to achieve higher availability.
Amazon Simple Storage Service (Amazon S3) is one of the most important services at AWS, and its steady addition of security-related enhancements is always big news. Here are the 2021 highlights.
Access Points aliases
Amazon S3 introduced a new feature, Amazon S3 Access Points aliases. With Amazon S3 Access Points aliases, you can make the access points backwards-compatible with a large amount of existing code that is programmed to interact with S3 buckets rather than access points.
To understand the importance of this launch, we have to go back to 2019 to the launch of Amazon S3 Access Points. Access points are a powerful mechanism for managing S3 bucket access. They provide a great simplification for managing and controlling access to shared datasets in S3 buckets. You can create up to 1,000 access points per Region within each of your AWS accounts. Although bucket access policies remain fully enforced, you can delegate access control from the bucket to its access points, allowing for distributed and granular control. Each access point enforces a customizable policy that can be managed by a particular workgroup, while also avoiding the problem of bucket policies needing to grow beyond their maximum size. Finally, you can also bind an access point to a particular VPC for its lifetime, to prevent access directly from the internet.
With the 2021 launch of Access Points aliases, Amazon S3 now generates a unique DNS name, or alias, for each access point. The Access Points aliases look and acts just like an S3 bucket to existing code. This means that you don’t need to make changes to older code to use Amazon S3 Access Points; just substitute an Access Points aliases wherever you previously used a bucket name. As a security team, it’s important to know that this flexible and powerful administrative feature is backwards-compatible and can be treated as a drop-in replacement in your various code bases that use Amazon S3 but haven’t been updated to use access point APIs. In addition, using Access Points aliases adds a number of powerful security-related controls, such as permanent binding of S3 access to a particular VPC.
S3 Bucket Keys were launched at the end of 2020, another great launch that security professionals should know about, so here is an overview in case you missed it. S3 Bucket Keys are data keys generated by AWS KMS to provide another layer of envelope encryption in which the outer layer (the S3 Bucket Key) is cached by S3 for a short period of time. This extra key layer increases performance and reduces the cost of requests to AWS KMS. It achieves this by decreasing the request traffic from Amazon S3 to AWS KMS from a one-to-one model—one request to AWS KMS for each object written to or read from Amazon S3—to a one-to-many model using the cached S3 Bucket Key. The S3 Bucket Key is never stored persistently in an unencrypted state outside AWS KMS, and so Amazon S3 ultimately must always return to AWS KMS to encrypt and decrypt the S3 Bucket Key, and thus, the data. As a result, you still retain control of the key hierarchy and resulting encrypted data through AWS KMS, and are still able to audit Amazon S3 returning periodically to AWS KMS to refresh the S3 Bucket Keys, as logged in CloudTrail.
Returning to our review of 2021, S3 Bucket Keys gained the ability to use Amazon S3 Inventory and Amazon S3 Batch Operations automatically to migrate objects from the higher cost, slightly lower-performance SSE-KMS model to the lower-cost, higher-performance S3 Bucket Keys model.
To understand this launch, we need to go in time to the origins of Amazon S3, which is one of the oldest services in AWS, created even before IAM was launched in 2011. In those pre-IAM days, a storage system like Amazon S3 needed to have some kind of access control model, so Amazon S3 invented its own: Amazon S3 access control lists (ACLs). Using ACLs, you could add access permissions down to the object level, but only with regard to access by other AWS account principals (the only kind of identity that was available at the time), or public access (read-only or read-write) to an object. And in this model, objects were always owned by the creator of the object, not the bucket owner.
After IAM was introduced, Amazon S3 added the bucket policy feature, a type of resource policy that provides the rich features of IAM, including full support for all IAM principals (users and roles), time-of-day conditions, source IP conditions, ability to require encryption, and more. For many years, Amazon S3 access decisions have been made by combining IAM policy permissions and ACL permissions, which has served customers well. But the object-writer-is-owner issue has often caused friction. The good news for security professionals has been that a deny by either type of access control type overrides an allow by the other, so there were no security issues with this bi-modal approach. The challenge was that it could be administratively difficult to manage both resource policies—which exist at the bucket and access point level—and ownership and ACLs—which exist at the object level. Ownership and ACLs might potentially impact the behavior of only a handful of objects, in a bucket full of millions or billions of objects.
With the features released in 2021, Amazon S3 has removed these points of friction, and now provides the features needed to reduce ownership issues and to make IAM-based policies the only access control system for a specified bucket. The first step came in 2020 with the ability to make object ownership track bucket ownership, regardless of writer. But that feature applied only to newly-written objects. The final step is the 2021 launch we’re highlighting here: the ability to disable at the bucket level the evaluation of all existing ACLs—including ownership and permissions—effectively nullifying all object ACLs. From this point forward, you have the mechanisms you need to govern Amazon S3 access with a combination of S3 bucket policies, S3 access point policies, and (within the same account) IAM principal policies, without worrying about legacy models of ACLs and per-object ownership.
Additional database and storage service features
AWS Backup Vault Lock
AWS Backup added an important new additional layer for backup protection with the availability of AWS Backup Vault Lock. A vault lock feature in AWS is the ability to configure a storage policy such that even the most powerful AWS principals (such as an account or Org root principal) can only delete data if the deletion conforms to the preset data retention policy. Even if the credentials of a powerful administrator are compromised, the data stored in the vault remains safe. Vault lock features are extremely valuable in guarding against a wide range of security and resiliency risks (including accidental deletion), notably in an era when ransomware represents a rising threat to data.
ACM Private CA achieved FedRAMP authorization for six additional AWS Regions in the US.
Additional certificate customization now allows administrators to tailor the contents of certificates for new use cases, such as identity and smart card certificates; or to securely add information to certificates instead of relying only on the information present in the certificate request.
Additional capabilities were added for sharing CAs across accounts by using AWS RAM to help administrators issue fully-customized certificates, or revoke them, from a shared CA.
Integration with Kubernetes provides a more secure certificate authority solution for Kubernetes containers.
Online Certificate Status Protocol (OCSP) provides a fully-managed solution for notifying endpoints that certificates have been revoked, without the need for you to manage or operate infrastructure yourself.
Network and application protection
We saw a lot of enhancements in network and application protection in 2021 that will help you to enforce fine-grained security policies at important network control points across your organization. The services and new capabilities offer flexible solutions for inspecting and filtering traffic to help prevent unauthorized resource access.
AWS WAF
AWS WAF launched AWS WAF Bot Control, which gives you visibility and control over common and pervasive bots that consume excess resources, skew metrics, cause downtime, or perform other undesired activities. The Bot Control managed rule group helps you monitor, block, or rate-limit pervasive bots, such as scrapers, scanners, and crawlers. You can also allow common bots that you consider acceptable, such as status monitors and search engines. AWS WAF also added support for custom responses, managed rule group versioning, in-line regular expressions, and Captcha. The Captcha feature has been popular with customers, removing another small example of “undifferentiated work” for customers.
AWS Shield Advanced
AWS Shield Advanced now automatically protects web applications by blocking application layer (L7) DDoS events with no manual intervention needed by you or the AWS Shield Response Team (SRT). When you protect your resources with AWS Shield Advanced and enable automatic application layer DDoS mitigation, Shield Advanced identifies patterns associated with L7 DDoS events and isolates this anomalous traffic by automatically creating AWS WAF rules in your web access control lists (ACLs).
Amazon CloudFront
In other edge networking news, Amazon CloudFront added support for response headers policies. This means that you can now add cross-origin resource sharing (CORS), security, and custom headers to HTTP responses returned by your CloudFront distributions. You no longer need to configure your origins or use custom Lambda@Edge or CloudFront Functions to insert these headers.
Following Route 53 Resolver’s much-anticipated launch of DNS logging in 2020, the big news for 2021 was the launch of its DNS Firewall capability. Route 53 Resolver DNS Firewall lets you create “blocklists” for domains you don’t want your VPC resources to communicate with, or you can take a stricter, “walled-garden” approach by creating “allowlists” that permit outbound DNS queries only to domains that you specify. You can also create alerts for when outbound DNS queries match certain firewall rules, allowing you to test your rules before deploying for production traffic. Route 53 Resolver DNS Firewall launched with two managed domain lists—malware domains and botnet command and control domains—enabling you to get started quickly with managed protections against common threats. It also integrated with Firewall Manager (see the following section) for easier centralized administration.
AWS Network Firewall and Firewall Manager
Speaking of AWS Network Firewall and Firewall Manager, 2021 was a big year for both. Network Firewall added support for AWS Managed Rules, which are groups of rules based on threat intelligence data, to enable you to stay up to date on the latest security threats without writing and maintaining your own rules. AWS Network Firewall features a flexible rules engine enabling you to define firewall rules that give you fine-grained control over network traffic. As of the launch in late 2021, you can enable managed domain list rules to block HTTP and HTTPS traffic to domains identified as low-reputation, or that are known or suspected to be associated with malware or botnets. Prior to that, another important launch was new configuration options for rule ordering and default drop, making it simpler to write and process rules to monitor your VPC traffic. Also in 2021, Network Firewall announced a major regional expansion following its initial launch in 2020, and a range of compliance achievements and eligibility including HIPAA, PCI DSS, SOC, and ISO.
Elastic Load Balancing now supports forwarding traffic directly from Network Load Balancer (NLB) to Application Load Balancer (ALB). With this important new integration, you can take advantage of many critical NLB features such as support for AWS PrivateLink and exposing static IP addresses for applications that still require ALB.
The AWS Networking team also made Amazon VPC private NAT gateways available in both AWS GovCloud (US) Regions. The expansion into the AWS GovCloud (US) Regions enables US government agencies and contractors to move more sensitive workloads into the cloud by helping them to address certain regulatory and compliance requirements.
Compute
Security professionals should also be aware of some interesting enhancements in AWS compute services that can help improve their organization’s experience in building and operating a secure environment.
Amazon Elastic Compute Cloud (Amazon EC2) launched the Global View on the console to provide visibility to all your resources across Regions. Global View helps you monitor resource counts, notice abnormalities sooner, and find stray resources. A few days into 2022, another simple but extremely useful EC2 launch was the new ability to obtain instance tags from the Instance Metadata Service (IMDS). Many customers run code on Amazon EC2 that needs to introspect about the EC2 tags associated with the instance and then change its behavior depending on the content of the tags. Prior to this launch, you had to associate an EC2 role and call the EC2 API to get this information. That required access to API endpoints, either through a NAT gateway or a VPC endpoint for Amazon EC2. Now, that information can be obtained directly from the IMDS, greatly simplifying a common use case.
Amazon EC2 launched sharing of Amazon Machine Images (AMIs) with AWS Organizations and Organizational Units (OUs). Previously, you could share AMIs only with specific AWS account IDs. To share AMIs within AWS Organizations, you had to explicitly manage sharing of AMIs on an account-by-account basis, as they were added to or removed from AWS Organizations. With this new feature, you no longer have to update your AMI permissions because of organizational changes. AMI sharing is automatically synchronized when organizational changes occur. This feature greatly helps both security professionals and governance teams to centrally manage and govern AMIs as you grow and scale your AWS accounts. As previously noted, this feature was also added to EC2 Image Builder. Finally, Amazon Data Lifecycle Manager, the tool that manages all your EBS volumes and AMIs in a policy-driven way, now supports automatic deprecation of AMIs. As a security professional, you will find this helpful as you can set a timeline on your AMIs so that, if the AMIs haven’t been updated for a specified period of time, they will no longer be considered valid or usable by development teams.
Looking ahead
In 2022, AWS continues to deliver experiences that meet administrators where they govern, developers where they code, and applications where they run. We will continue to summarize important launches in future blog posts. If you’re interested in learning more about AWS services, join us for AWS re:Inforce, the AWS conference focused on cloud security, identity, privacy, and compliance. AWS re:Inforce 2022 will take place July 26–27 in Boston, MA. Registration is now open. Register now with discount code SALxUsxEFCw to get $150 off your full conference pass to AWS re:Inforce. For a limited time only and while supplies last. We look forward to seeing you there!
To stay up to date on the latest product and feature launches and security use cases, be sure to read the What’s New with AWS announcements (or subscribe to the RSS feed) and the AWS Security Blog.
If you have feedback about this post, submit comments in the Comments section below. If you have questions about this post, contact AWS Support.
Want more AWS Security news? Follow us on Twitter.
Amazon Athena is an interactive query service that makes it easy to analyze data in Amazon Simple Storage Service (Amazon S3) using standard SQL. Athena is serverless, so there is no infrastructure to manage, and you pay only for the queries that you run. In 2019, Athena added support for federated queries to run SQL queries across data stored in relational, non-relational, object, and custom data sources.
In 2021, Athena added support for the EXPLAIN statement, which can help you understand and improve the efficiency of your queries. The EXPLAIN statement provides a detailed breakdown of a query’s run plan. You can analyze the plan to identify and reduce query complexity and improve its runtime. You can also use EXPLAIN to validate SQL syntax prior to running the query. Doing so helps prevent errors that would have occurred while running the query.
Athena also added EXPLAIN ANALYZE, which displays the computational cost of your queries alongside their run plans. Administrators can benefit from using EXPLAIN ANALYZE because it provides a scanned data count, which helps you reduce financial impact due to user queries and apply optimizations for better cost control.
In this post, we demonstrate how to use and interpret EXPLAIN and EXPLAIN ANALYZE statements to improve Athena query performance when querying multiple data sources.
Solution overview
To demonstrate using EXPLAIN and EXPLAIN ANALYZE statements, we use the following services and resources:
Athena uses the AWS Glue Data Catalog to store and retrieve table metadata for the Amazon S3 data in your AWS account. The table metadata lets the Athena query engine know how to find, read, and process the data that you want to query. We use Athena data source connectors to connect to data sources external to Amazon S3.
Prerequisites
To deploy the CloudFormation template, you must have the following:
To deploy the CloudFormation template, complete the following steps:
Choose Launch Stack:
Follow the prompts on the AWS CloudFormation console to create the stack.
Note the key-value pairs on the stack’s Outputs tab.
You use these values when configuring the Athena data source connectors.
The CloudFormation template creates the following resources:
S3 buckets to store data and act as temporary spill buckets for Lambda
AWS Glue Data Catalog tables for the data in the S3 buckets
A DynamoDB table and Amazon RDS for MySQL tables, which are used to join multiple tables from different sources
A VPC, subnets, and endpoints, which are needed for Amazon RDS for MySQL and DynamoDB
The following figure shows the high-level data model for the data load.
Create the DynamoDB data source connector
To create the DynamoDB connector for Athena, complete the following steps:
On the Athena console, choose Data sources in the navigation pane.
Choose Create data source.
For Data sources, select Amazon DynamoDB.
Choose Next.
For Data source name, enter DDB.
For Lambda function, choose Create Lambda function.
This opens a new tab in your browser.
For Application name, enter AthenaDynamoDBConnector.
For SpillBucket, enter the value from the CloudFormation stack for AthenaSpillBucket.
For AthenaCatalogName, enter dynamodb-lambda-func.
Leave the remaining values at their defaults.
Select I acknowledge that this app creates custom IAM roles and resource policies.
Choose Deploy.
You’re returned to the Connect data sources section on the Athena console.
Choose the refresh icon next to Lambda function.
Choose the Lambda function you just created (dynamodb-lambda-func).
Choose Next.
Review the settings and choose Create data source.
If you haven’t already set up the Athena query results location, choose View settings on the Athena query editor page.
Choose Manage.
For Location of query result, browse to the S3 bucket specified for the Athena spill bucket in the CloudFormation template.
Add Athena-query to the S3 path.
Choose Save.
In the Athena query editor, for Data source, choose DDB.
For Database, choose default.
You can now explore the schema for the sportseventinfo table; the data is the same in DynamoDB.
Choose the options icon for the sportseventinfo table and choose Preview Table.
Create the Amazon RDS for MySQL data source connector
Now let’s create the connector for Amazon RDS for MySQL.
On the Athena console, choose Data sources in the navigation pane.
Choose Create data source.
For Data sources, select MySQL.
Choose Next.
For Data source name, enter MySQL.
For Lambda function, choose Create Lambda function.
For Application name, enter AthenaMySQLConnector.
For SecretNamePrefix, enter AthenaMySQLFederation.
For SpillBucket, enter the value from the CloudFormation stack for AthenaSpillBucket.
For DefaultConnectionString, enter the value from the CloudFormation stack for MySQLConnection.
For LambdaFunctionName, enter mysql-lambda-func.
For SecurityGroupIds, enter the value from the CloudFormation stack for RDSSecurityGroup.
For SubnetIds, enter the value from the CloudFormation stack for RDSSubnets.
Select I acknowledge that this app creates custom IAM roles and resource policies.
Choose Deploy.
On the Lambda console, open the function you created (mysql-lambda-func).
On the Configuration tab, under Environment variables, choose Edit.
Choose Add environment variable.
Enter a new key-value pair:
For Key, enter MYSQL_connection_string.
For Value, enter the value from the CloudFormation stack for MySQLConnection.
Choose Save.
Return to the Connect data sources section on the Athena console.
Choose the refresh icon next to Lambda function.
Choose the Lambda function you created (mysql-lamdba-function).
Choose Next.
Review the settings and choose Create data source.
In the Athena query editor, for Data Source, choose MYSQL.
For Database, choose sportsdata.
Choose the options icon by the tables and choose Preview Table to examine the data and schema.
In the following sections, we demonstrate different ways to optimize our queries.
Optimal join order using EXPLAIN plan
A join is a basic SQL operation to query data on multiple tables using relations on matching columns. Join operations affect how much data is read from a table, how much data is transferred to the intermediate stages through networks, and how much memory is needed to build up a hash table to facilitate a join.
If you have multiple join operations and these join tables aren’t in the correct order, you may experience performance issues. To demonstrate this, we use the following tables from difference sources and join them in a certain order. Then we observe the query runtime and improve performance by using the EXPLAIN feature from Athena, which provides some suggestions for optimizing the query.
The CloudFormation template you ran earlier loaded data into the following services:
AWS Storage
Table Name
Number of Rows
Amazon DynamoDB
sportseventinfo
657
Amazon S3
person
7,025,585
Amazon S3
ticketinfo
2,488
Let’s construct a query to find all those who participated in the event by type of tickets. The query runtime with the following join took approximately 7 mins to complete:
SELECT t.id AS ticket_id,
e.eventid,
p.first_name
FROM
"DDB"."default"."sportseventinfo" e,
"AwsDataCatalog"."athenablog"."person" p,
"AwsDataCatalog"."athenablog"."ticketinfo" t
WHERE
t.sporting_event_id = cast(e.eventid as double)
AND t.ticketholder_id = p.id
Now let’s use EXPLAIN on the query to see its run plan. We use the same query as before, but add explain (TYPE DISTRIBUTED):
EXPLAIN (TYPE DISTRIBUTED)
SELECT t.id AS ticket_id,
e.eventid,
p.first_name
FROM
"DDB"."default"."sportseventinfo" e,
"AwsDataCatalog"."athenablog"."person" p,
"AwsDataCatalog"."athenablog"."ticketinfo" t
WHERE
t.sporting_event_id = cast(e.eventid as double)
AND t.ticketholder_id = p.id
The following screenshot shows our output
Notice the cross-join in Fragment 1. The joins are converted to a Cartesian product for each table, where every record in a table is compared to every record in another table. Therefore, this query takes a significant amount of time to complete.
To optimize our query, we can rewrite it by reordering the joining tables as sportseventinfo first, ticketinfo second, and person last. The reason for this is because the WHERE clause, which is being converted to a JOIN ON clause during the query plan stage, doesn’t have the join relationship between the person table and sportseventinfo table. Therefore, the query plan generator converted the join type to cross-joins (a Cartesian product), which less efficient. Reordering the tables aligns the WHERE clause to the INNER JOIN type, which satisfies the JOIN ON clause and runtime is reduced from 7 minutes to 10 seconds.
The code for our optimized query is as follows:
SELECT t.id AS ticket_id,
e.eventid,
p.first_name
FROM
"DDB"."default"."sportseventinfo" e,
"AwsDataCatalog"."athenablog"."ticketinfo" t,
"AwsDataCatalog"."athenablog"."person" p
WHERE
t.sporting_event_id = cast(e.eventid as double)
AND t.ticketholder_id = p.id
The following is the EXPLAIN output of our query after reordering the join clause:
EXPLAIN (TYPE DISTRIBUTED)
SELECT t.id AS ticket_id,
e.eventid,
p.first_name
FROM
"DDB"."default"."sportseventinfo" e,
"AwsDataCatalog"."athenablog"."ticketinfo" t,
"AwsDataCatalog"."athenablog"."person" p
WHERE t.sporting_event_id = cast(e.eventid as double)
AND t.ticketholder_id = p.id
The following screenshot shows our output.
The cross-join changed to INNER JOIN with join on columns (eventid, id, ticketholder_id), which results in the query running faster. Joins between the ticketinfo and person tables converted to the PARTITION distribution type, where both left and right tables are hash-partitioned across all worker nodes due to the size of the person table. The join between the sportseventinfo table and ticketinfo are converted to the REPLICATED distribution type, where one table is hash-partitioned across all worker nodes and the other table is replicated to all worker nodes to perform the join operation.
As a best practice, we recommend having a JOIN statement along with an ON clause, as shown in the following code:
SELECT t.id AS ticket_id,
e.eventid,
p.first_name
FROM
"AwsDataCatalog"."athenablog"."person" p
JOIN "AwsDataCatalog"."athenablog"."ticketinfo" t ON t.ticketholder_id = p.id
JOIN "ddb"."default"."sportseventinfo" e ON t.sporting_event_id = cast(e.eventid as double)
Also as a best practice when you join two tables, specify the larger table on the left side of join and the smaller table on the right side of the join. Athena distributes the table on the right to worker nodes, and then streams the table on the left to do the join. If the table on the right is smaller, then less memory is used and the query runs faster.
In the following sections, we present examples of how to optimize pushdowns for filter predicates and projection filter operations for the Athena data source using EXPLAIN ANALYZE.
Pushdown optimization for the Athena connector for Amazon RDS for MySQL
A pushdown is an optimization to improve the performance of a SQL query by moving its processing as close to the data as possible. Pushdowns can drastically reduce SQL statement processing time by filtering data before transferring it over the network and filtering data before loading it into memory. The Athena connector for Amazon RDS for MySQL supports pushdowns for filter predicates and projection pushdowns.
The following table summarizes the services and tables we use to demonstrate a pushdown using Aurora MySQL.
Table Name
Number of Rows
Size in KB
player_partitioned
5,157
318.86
sport_team_partitioned
62
5.32
We use the following query as an example of a filtering predicate and projection filter:
SELECT full_name,
name
FROM "sportsdata"."player_partitioned" a
JOIN "sportsdata"."sport_team_partitioned" b ON a.sport_team_id=b.id
WHERE a.id='1.0'
This query selects the players and their team based on their ID. It serves as an example of both filter operations in the WHERE clause and projection because it selects only two columns.
We use EXPLAIN ANALYZE to get the cost for the running this query:
EXPLAIN ANALYZE
SELECT full_name,
name
FROM "MYSQL"."sportsdata"."player_partitioned" a
JOIN "MYSQL"."sportsdata"."sport_team_partitioned" b ON a.sport_team_id=b.id
WHERE a.id='1.0'
The following screenshot shows the output in Fragment 2 for the table player_partitioned, in which we observe that the connector has a successful pushdown filter on the source side, so it tries to scan only one record out of the 5,157 records in the table. The output also shows that the query scan has only two columns (full_name as the projection column and sport_team_id and the join column), and uses SELECT and JOIN, which indicates the projection pushdown is successful. This helps reduce the data scan when using Athena data source connectors.
Now let’s look at the conditions in which a filter predicate pushdown doesn’t work with Athena connectors.
LIKE statement in filter predicates
We start with the following example query to demonstrate using the LIKE statement in filter predicates:
SELECT *
FROM "MYSQL"."sportsdata"."player_partitioned"
WHERE first_name LIKE '%Aar%'
We then add EXPLAIN ANALYZE:
EXPLAIN ANALYZE
SELECT *
FROM "MYSQL"."sportsdata"."player_partitioned"
WHERE first_name LIKE '%Aar%'
The EXPLAIN ANALYZE output shows that the query performs the table scan (scanning the table player_partitioned, which contains 5,157 records) for all the records even though the WHERE clause only has 30 records matching the condition %Aar%. Therefore, the data scan shows the complete table size even with the WHERE clause.
We can optimize the same query by selecting only the required columns:
EXPLAIN ANALYZE
SELECT sport_team_id,
full_name
FROM "MYSQL"."sportsdata"."player_partitioned"
WHERE first_name LIKE '%Aar%'
From the EXPLAIN ANALYZE output, we can observe that the connector supports the projection filter pushdown, because we select only two columns. This brought the data scan size down to half of the table size.
OR statement in filter predicates
We start with the following query to demonstrate using the OR statement in filter predicates:
SELECT id,
first_name
FROM "MYSQL"."sportsdata"."player_partitioned"
WHERE first_name = 'Aaron' OR id ='1.0'
We use EXPLAIN ANALYZE with the preceding query as follows:
EXPLAIN ANALYZE
SELECT *
FROM
"MYSQL"."sportsdata"."player_partitioned"
WHERE first_name = 'Aaron' OR id ='1.0'
Similar to the LIKE statement, the following output shows that query scanned the table instead of pushing down to only the records that matched the WHERE clause. This query outputs only 16 records, but the data scan indicates a complete scan.
Pushdown optimization for the Athena connector for DynamoDB
For our example using the DynamoDB connector, we use the following data:
Table
Number of Rows
Size in KB
sportseventinfo
657
85.75
Let’s test the filter predicate and project filter operation for our DynamoDB table using the following query. This query tries to get all the events and sports for a given location. We use EXPLAIN ANALYZE for the query as follows:
EXPLAIN ANALYZE
SELECT EventId,
Sport
FROM "DDB"."default"."sportseventinfo"
WHERE Location = 'Chase Field'
The output of EXPLAIN ANALYZE shows that the filter predicate retrieved only 21 records, and the project filter selected only two columns to push down to the source. Therefore, the data scan for this query is less than the table size.
Now let’s see where filter predicate pushdown doesn’t work. In the WHERE clause, if you apply the TRIM() function to the Location column and then filter, predicate pushdown optimization doesn’t apply, but we still see the projection filter optimization, which does apply. See the following code:
EXPLAIN ANALYZE
SELECT EventId,
Sport
FROM "DDB"."default"."sportseventinfo"
WHERE trim(Location) = 'Chase Field'
The output of EXPLAIN ANALYZE for this query shows that the query scans all the rows but is still limited to only two columns, which shows that the filter predicate doesn’t work when the TRIM function is applied.
We’ve seen from the preceding examples that the Athena data source connector for Amazon RDS for MySQL and DynamoDB do support filter predicates and projection predicates for pushdown optimization, but we also saw that operations such as LIKE, OR, and TRIM when used in the filter predicate don’t support pushdowns to the source. Therefore, if you encounter unexplained charges in your federated Athena query, we recommend using EXPLAIN ANALYZE with the query and determine whether your Athena connector supports the pushdown operation or not.
Please note that running EXPLAIN ANALYZE incurs cost because it scans the data.
Conclusion
In this post, we showcased how to use EXPLAIN and EXPLAIN ANALYZE to analyze Athena SQL queries for data sources on AWS S3 and Athena federated SQL query for data source like DynamoDB and Amazon RDS for MySQL. You can use this as an example to optimize queries which would also result in cost savings.
About the Authors
Nishchai JM is an Analytics Specialist Solutions Architect at Amazon Web services. He specializes in building Big-data applications and help customer to modernize their applications on Cloud. He thinks Data is new oil and spends most of his time in deriving insights out of the Data.
Varad Ram is Senior Solutions Architect in Amazon Web Services. He likes to help customers adopt to cloud technologies and is particularly interested in artificial intelligence. He believes deep learning will power future technology growth. In his spare time, he like to be outdoor with his daughter and son.
This blog post shows you how to share encrypted Amazon Simple Storage Service (Amazon S3) buckets across accounts on a multi-tenant data lake. Our objective is to show scalability over a larger volume of accounts that can access the data lake, in a scenario where there is one central account to share from. Most use cases involve multiple groups or customers that need to access data across multiple accounts, which makes data lake solutions inherently multi-tenant. Therefore, it becomes very important to associate data assets and set policies to manage these assets in a consistent way. The use of AWS Key Management Service (AWS KMS) simplifies seamless integration with AWS services and offers improved data protection to ultimately enable data lake services (for example, Amazon EMR, AWS Glue, or Amazon Redshift).
To further enable access at scale, you can use AWS Identity and Access Management (IAM) to restrict access to all IAM principals in your organization in AWS Organizations through the aws:PrincipalOrgID condition key. When used in a role trust policy, this key enables you to restrict access to IAM principals in your organization when assuming the role to gain access to resources in your account. This is more scalable than adding every role or account that needs access in the trust policy’s Principal element, and automatically includes future accounts that you may add to your organization.
A data lake that is built on AWS uses Amazon S3 as its primary storage location; Amazon S3 provides an optimal foundation for a data lake because of its virtually unlimited scalability and high durability. AWS Lake Formation can be used as your authorization engine to manage or enforce permissions to your data lake with integrated services such as Amazon Athena, Amazon EMR, and Amazon Redshift Spectrum. For AWS services that integrate with Lake Formation and honor Lake Formation permissions, see the Lake Formation Developer Guide.
This post focuses on services that are not integrated with Lake Formation or where Lake Formation is not enabled on the account; in these cases, direct access for S3 buckets is required for defining and enforcing access control policies. You will learn how to use attribute-based access control (ABAC) as an authorization strategy that defines fine-grained permissions based on attributes, where fewer IAM roles are required to be provisioned, which helps scale your authorization needs. By using ABAC in conjunction with S3 bucket policies, you can authorize users to read objects based on one or more tags that are applied to S3 objects and to the IAM role session of your users based on key-value pair attributes, named session tags. ABAC reduces the number of policies, because session tags are easier to manage and establish a differentiation in job policies. The session tags will be passed when you assume an IAM role or federate a user (through your identity provider) in AWS Security Token Service (AWS STS). This enables administrators to configure a SAML-based identity provider (IdP) to send specific employee attributes as tags in AWS. As a result, you can simplify the creation of fine-grained permissions for employees to get access only to the AWS resources with matching tags.
For simplicity, in this solution you will be using an AWS Command Line Interface (AWS CLI) request for temporary security credentials when generating a session. You will apply the global aws:PrincipalOrgID condition key in your resource-based policies to restrict access to accounts in your AWS organization. This key will restrict access even though the Principal element uses the wildcard character * which applies to all AWS principals in the Principal element. We will suggest additional controls where feasible.
Cross-account access
From a high-level overview perspective, the following items are a starting point when enabling cross-account access. In order to grant cross-account access to AWS KMS-encrypted S3 objects in Account A to a user in Account B, you must have the following permissions in place (objective #1):
The bucket policy in Account A must grant access to Account B.
The AWS KMS key policy in Account A must grant access to the user in Account B.
By establishing these permissions, you will learn how to maintain entitlements (objective #2) at the bucket or object level, explore cross-account bucket sharing at scale, and overcome limitations such as inline policy size or bucket policy file size (you can learn more details in the Policies overview section). As an extension, you:
Enable granular permissions.
Grant access to groups of resources by tags.
Configuration options can be challenging for cross-account access, especially when the objective is to scale across a large number of accounts to a multi-tenant data lake. This post offers to orchestrate the various configurations options in such a way that both objectives #1 and #2 are met and challenges are addressed. Note that although not all AWS services support tag-based authorization today, we are seeing an increase in support for ABAC.
Solution overview
Our objective is to overcome challenges and design backwards with scalability in mind. The following table depicts the challenges, and outlines recommendations for a better design.
Challenge
Recommendation detail
Use employee attributes from your corporate directory
You can configure your SAML-based or web identity provider to pass session tags to AWS. When your employees federate into AWS, their attributes are applied to their resulting principal in AWS. You can then use ABAC to allow or deny permissions based on those attributes.
Enable granular permissions
ABAC requires fewer policies, because differentiation in job policies is given through session tags, which are easier to manage. Permissions are granted automatically based on attributes.
Grant access to resources by tags
When you use ABAC, you can allow actions on all resources, but only if the resource tag matches the principal’s tag and/or the organization’s tag. It’s best practice to grant least privilege.
Not all services support tag-based authorization
Check for service updates and design around the limitations.
Scale with innovation
ABAC permissions scale with innovation, because it’s not necessary for the administrator to update existing policies to allow access to new resources.
Architecture overview
Figure 1: High-level architecture
The high-level architecture in Figure 1 is designed to show you the advantages of scaling ABAC across accounts and to reflect on a common model that applies to most large organizations.
Solution walkthrough
Here is a brief introduction to the basic components that make up the solution:
Identity provider (IdP) – Can be either on-premises or in the cloud. Your administrators configure your SAML-based IdP to allow workforce users federated access to AWS resources using credentials from your corporate directory (backed by Active Directory). Now you can configure your IdP to pass in user attributes as session tags in federated AWS sessions. These tags can also be transitive, persisting even across subsequent role assumptions.
Central governance account – Helps to establish the access control policies. It takes in the user’s attributes from the IdP and grants permission to access resources. The X-Acct Control Manager is a collection of IAM roles with trust boundaries that grants access to the SAML role by role re-assumption, also known as role chaining. The governance account manages access to the SAML role and trust relationship by using OpenID Connect (OIDC) to allow users to assume roles and pass session tags. This account’s primary purpose is to manage permissions for secure data access. This account can also consume data from the lake if necessary.
Multiple accounts to connect to a multi-tenant data lake – Mirrors a large organization with a multitude of accounts that would like cross-account read access. Each account uses a pre-pave data manager role (one that has been previously established) that can tag or untag any IAM roles in the account, with the cross-account trust allowing users to assume a role to a specific central account. Any role besides the data manager should be prevented from tagging or untagging IAM principals to help prevent unauthorized changes.
Member Analytics organizational unit (OU) – Is where the EMR analytics clusters are connecting to the data in the consumptions layer to visualize by using business intelligence (BI) tools such as Tableau. Access to the shared buckets is granted through bucket and identity policies. Multiple accounts may also have access to buckets within their own accounts. Since this is a consumer account, this account is only joining the lake to consume data from the lake and will not be contributing any data to the data lake.
Central Data Lake OU – Is the account that owns the data stored on Amazon S3. The objects are encrypted, which will require the IAM role to have permissions to the specified AWS KMS key in the key policy. AWS KMS supports the use of the aws:ResourceTag/tag-key global condition context key within identity policies, which lets you control access to AWS KMS keys based on the tags on the key.
Prerequisites
For using SAML session tags for ABAC, you need to have the following:
Access to a SAML-based IdP where you can create test users with specific attributes.
For simplicity, you will be using an AWS CLI request for temporary security credentials when generating a session.
You’ll be passing session tags using AssumeRoleWithSAML.
AWS accounts where users can sign in. There are five accounts for interaction defined with accommodating policies and permission, as outlined in Figure 1. The numerals listed here refer to the labels on the figure:
IdP account – IAM user with administrative permission (1)
Central governance account – Admin/Writer ABAC policy (2)
Sample accounts to connect to multi-tenant data lake – Reader ABAC policy (3)
Member Analytics OU account – Assume roles in shared bucket (4)
Central Data Lake OU account – Pave (that is create) or update virtual private cloud (VPC) condition and principals/PrincipalOrgId in a shared bucket (5)
AWS resources, such as Amazon S3, AWS KMS, or Amazon EMR.
Any third-party software or hardware, such as BI tools.
Our objective is to design an AWS perimeter where access is allowed only if necessary and sufficient conditions are met for getting inside the AWS perimeter. See the following table, and the blog post Establishing a data perimeter on AWS for more information.
Boundary
Perimeter objective
AWS services used
Identity
Only My Resources Only My Networks
Identity-based policies and SCPs
Resource
Only My IAM Principals Only My Networks
Resource-based policies
Network
Only My IAM Principals Only My Resources
VPC endpoint (VPCE) policies
There are multiple design options, as described in the whitepaper Building A Data Perimeter on AWS, but this post will focus on option A, which is a logical AND (∧) conjunction of principal organization, resource, and network:
(Only My aws:PrincipalOrgID) ∧ (Only My Resource) ∧ (Only My Network)
(Only My IAM Principals) ∧ (Only My Resource) ∧ (Only My Network)
(Only My aws:PrincipalOrgID) ∧ (Only My IAM Principals) ∧ (Only My Resource) ∧ (Only My Network)
Policies overview
In order to properly design and consider control points as well as scalability limitations, the following table shows an overview of the policies applied in this post. It outlines the design limitations and briefly discusses the proposed solutions, which are described in more detail in the Establish an ABAC policy section.
Policy type
Sample policies
Limitations to overcome
Solutions outlined in this blog
IAM user policy
AllowIamUserAssumeRole
AllowPassSessionTagsAndTransitive
IAMPolicyWithResourceTagForKMS
Inline JSON policy document is limited to (2048 bytes).
For using KMS keys, accounts are limited to specific AWS Regions.
Enable session tags, which expire and require credentials.
It is a best practice to grant least privilege permissions with AWS Identity and Access Management (IAM) policies.
S3 bucket policy
Principals-only-from-given-Org
Access-to-specific-VPCE-only
KMS-Decrypt-with-specific-key
DenyUntaggedData
The bucket policy has a 20 KB maximum file size.
Data exfiltration or non-trusted writing to buckets can be restricted by a combination of policies and conditions.
Use aws:PrincipalOrgID to simplify specifying the Principal element in a resource-based policy.
No manual updating of account IDs required, if they belong to the intended organization.
~ VPCE policy
DenyNonApprovedIPAddresses VPCEndpointsNonAdmin
DenyNonSSLConnections
DenyIncorrectEncryptionKey
DenyUnEncryptedObjectUploads
aws:PrincipalOrgID opens up broadly to accounts with single control—requiring additional controls.
Make sure that principals aren’t inadvertently allowed or denied access.
Restrict access to VPC with endpoint policies and deny statements.
KMS key policy
Allow-use-of-the-KMS-key-for-organization
Listing all AWS account IDs in an organization.
Maximum key policy document size is 32 KB, which applies to KMS key.
Changing a tag or alias might allow or deny permission to a KMS key.
Specify the organization ID in the condition element, instead of listing all the AWS account IDs.
AWS owned keys do not count against these quotas, so use these where possible.
Assure visibility of API operations
By using a combination of these policies and conditions, you can work to mitigate accidental or intentional exfiltration of data, IAM credentials, and VPC endpoints. You can also alleviate writing to a bucket that is owned by a non-trusted account by using even more restrictive policies for write operations. For example, use the s3:ResourceAccount condition key to filter access to trusted S3 buckets that belong only to specific AWS accounts.
Today, the scalability of cross-account bucket sharing is limited by the current allowed S3 bucket policy size (20 KB) and KMS key policy size (32 KB). Cross-account sharing also may increase risk, unless the appropriate guardrails are in place. The aws:PrincipalOrgID condition helps by allowing sharing of resources such as buckets only to accounts and principals within your organization. If ABAC is also used for enforcement, tags used for authorization also need to be governed across all participating accounts; this includes protecting them from modification and also helps ensure only authorized principals can use ABAC when gaining access.
Figure 2 demonstrates a sample scenario for the roles from a specific organization in AWS Organizations, including multiple application accounts (Consumer Account 1, Consumer Account 2) with defined tags accessing an S3 bucket that is owned by Central Data Lake Account.
Figure 2: Sample scenario
Establish an ABAC policy
AWS has published additional blog posts and documentation for various services and features that are helpful supplements to this post. For more information, see the following resources:
Federate the user with permissions to assume roles with the same tags. By way of tagging the users, they automatically get access to assume the correct role, if they work only on one project and team.
Create the customer managed policy to attach to the federated user that uses ABAC to allow role assumption.
The federated user can assume a role only when the user and role tags are matching. More detailed instructions for defining permissions to access AWS resources based on tags are available in Create the ABAC policy in the IAM tutorial: Define permissions to access AWS resources based on tags.
Policy sample to allow the user to assume the role
The AllowUserAssumeRole statement in the following sample policy allows the federated user to assume the role test-session-tags with the attached policy. When that federated user assumes the role, they must pass the required session tags. For more information about federation, see Identity providers and federation in the AWS Identity and Access Management User Guide.
Allow cross-account access to an AWS KMS key. This is a key policy to allow principals to call specific operations on KMS keys.
Using ABAC with AWS KMS provides a flexible way to authorize access without editing policies or managing grants. Additionally, the aws:PrincipalOrgID global condition key can be used to restrict access to all accounts in your organization. This is more scalable than having to list all the account IDs in an organization within a policy. You accomplish this by specifying the organization ID in the condition element with the condition key aws:PrincipalOrgID. For detailed instructions about changing the key policy by using the AWS Management Console, see Changing a key policy in the AWS KMS Developer Guide.
You should use these features with care so that principals aren’t inadvertently allowed or denied access.
Policy sample to allow a role in another account to use a KMS key
To grant another account access to a KMS key, update its key policy to grant access to the external account or role. For instructions, see Allowing users in other accounts to use a KMS key in the AWS KMS Developer Guide.
The accounts are limited to roles that have an access-project=CDO5951 tag. You might attach this policy to roles in the example Alpha project.
Note: when using ABAC to grant access to an external account, you need to ensure that the tags used for ABAC are protected from modification across your organization.
Configure the S3 bucket policy.
For cross-account permissions to other AWS accounts or users in another account, you must use a bucket policy. Bucket policy is limited to a size of 20KB. For more information, see Access policy guidelines.
The idea of the S3 bucket policy is based on data classification, where the S3 bucket policy is used with deny statements that apply if the user doesn’t have the appropriate tags applied. You don’t need to explicitly deny all actions in the bucket policy, because a user must be authorized in both their identity policy and the S3 bucket policy in a cross-account scenario.
Policy sample for the S3 bucket
You can use the Amazon S3 console to add a new bucket policy or edit an existing bucket policy. For detailed instructions to create or edit a bucket policy, see Adding a bucket policy using the Amazon S3 console in the Amazon S3 User Guide. The following sample policy restricts access only to principals from organizations as listed in the policy and a specific VPC endpoint. It is important to test that all the AWS services involved in a solution can access this S3 bucket. For more information, see Resource-based policy examples in the whitepaper Building A Data Perimeter on AWS.
To create an interface endpoint, you must specify the VPC in which to create the interface endpoint, and the service to which to establish the connection.
Configure the SAML IdP (if you have one) or post in commands manually.
Typically, you configure your SAML IdP to pass in the project, cost-center, and department attributes as session tags. For more information, see Passing session tags using AssumeRoleWithSAML.
The following assume-role AWS CLI command helps you perform and test this request.
This example request assumes the test-session-tags role for the specified duration with the included session policy, session tags, external ID, and source identity. The resulting session is named my-session.
Cleanup
To avoid unwanted charges to your AWS account, follow the instructions to delete the AWS resources that you created during this walkthrough.
Conclusion
This post explains how to share encrypted S3 buckets across accounts at scale by granting access across a large number of accounts to a multi-tenant data lake. The approach does not use Lake Formation, which may have advantages for use-cases requiring fine-grained access control. Instead, this solution uses a central governance account combining role-chaining with session tags to produce data for the lake. Permissions are granted through these tags. For read-only consumption of data by multiple accounts, cross-account read-only access is granted through Amazon EMR analytics clusters that access the data, visualizing them though BI tools. Access to the shared buckets is restricted through bucket and identity policies. Through the use of multiple AWS services and IAM features such as KMS key policies, IAM policies, S3 bucket policies, and VPCE policies, this solution enables controls that help secure access to the data, while enabling the users to use ABAC for access.
This approach is focused on scalability; you can generalize and repurpose the steps for different requirements and projects. As a result, this scalable solution for services not integrated with AWS Lake Formation can be customized with AWS KMS by way of combining with ABAC to authorize access without editing policies or managing grants. For services that honor Lake Formation permissions, you can use the Lake Formation Developer Guide to more easily set up integrated services to encrypt and decrypt data.
In summary, the design provided here is feasible for large projects, with appropriate controls to allow scalability potentially across more than 1,000 accounts.
If you have feedback about this post, submit comments in the Comments section below. If you have questions about this post, contact AWS Support.
Want more AWS Security news? Follow us on Twitter.
With more than 100 trillion objects in Amazon Simple Storage Service (Amazon S3) and an almost unimaginably broad set of use cases, securing data stored in Amazon S3 is important for every organization. So, we’ve curated the top 10 controls for securing your data in S3. By default, all S3 buckets are private and can be accessed only by users who are explicitly granted access through ACLs, S3 bucket policies, and identity-based policies. In this post, we review the latest S3 features and Amazon Web Services (AWS) services that you can use to help secure your data in S3, including organization-wide preventative controls such as AWS Organizations service control policies (SCPs). We also provide recommendations for S3 detective controls, such as Amazon GuardDuty for S3, AWS CloudTrail object-level logging, AWS Security Hub S3 controls, and CloudTrail configuration specific to S3 data events. In addition, we provide data protection options and considerations for encrypting data in S3. Finally, we review backup and recovery recommendations for data stored in S3. Given the broad set of use cases that S3 supports, you should determine the priority of controls applied in accordance with your specific use case and associated details.
Block public S3 buckets at the organization level
Designate AWS accounts for public S3 use and prevent all other S3 buckets from inadvertently becoming public by enabling S3 Block Public Access. Use Organizations SCPs to confirm that the S3 Block Public Access setting cannot be changed. S3 Block Public Access provides a level of protection that works at the account level and also on individual buckets, including those that you create in the future. You have the ability to block existing public access—whether it was specified by an ACL or a policy—and to establish that public access isn’t granted to newly created items. This allows only designated AWS accounts to have public S3 buckets while blocking all other AWS accounts. To learn more about Organizations SCPs, see Service control policies.
Use bucket policies to verify all access granted is restricted and specific
Check that the access granted in the Amazon S3 bucket policy is restricted to specific AWS principals, federated users, service principals, IP addresses, or VPCs that you provide. A bucket policy that allows a wildcard identity such as Principal “*” can potentially be accessed by anyone. A bucket policy that allows a wildcard action “*” can potentially allow a user to perform any action in the bucket. For more information, see Using bucket policies.
Ensure that any identity-based policies don’t use wildcard actions
Identity policies are policies assigned to AWS Identity and Access Management (IAM) users and roles and should follow the principle of least privilege to help prevent inadvertent access or changes to resources. Establishing least privilege identity policies includes defining specific actions such as S3:GetObject or S3:PutObject instead of S3:*. In addition, you can use predefined AWS-wide condition keys and S3‐specific condition keys to specify additional controls on specific actions. An example of an AWS-wide condition key commonly used for S3 is IpAddress: { aws:SourceIP: “10.10.10.10”}, where you can specify your organization’s internal IP space for specific actions in S3. See IAM.1 in Monitor S3 using Security Hub and CloudWatch Logs for detecting policies with wildcard actions and wildcard resources are present in your accounts with Security Hub.
Consider splitting read, write, and delete access. Allow only write access to users or services that generate and write data to S3 but don’t need to read or delete objects. Define an S3 lifecycle policy to remove objects on a schedule instead of through manual intervention— see Managing your storage lifecycle. This allows you to remove delete actions from your identity-based policies. Verify your policies with the IAM policy simulator. Use IAM Access Analyzer to help you identify, review, and design S3 bucket policies or IAM policies that grant access to your S3 resources from outside of your AWS account.
Enable S3 protection in GuardDuty to detect suspicious activities
In 2020, GuardDuty announced coverage for S3. Turning this on enables GuardDuty to continuously monitor and profile S3 data access events (data plane operations) and S3 configuration (control plane APIs) to detect suspicious activities. Activities such as requests coming from unusual geolocations, disabling of preventative controls, and API call patterns consistent with an attempt to discover misconfigured bucket permissions. To achieve this, GuardDuty uses a combination of anomaly detection, machine learning, and continuously updated threat intelligence. To learn more, including how to enable GuardDuty for S3, see Amazon S3 protection in Amazon GuardDuty.
Use Macie to scan for sensitive data outside of designated areas
In May of 2020, AWS re-launched Amazon Macie. Macie is a fully managed service that helps you discover and protect your sensitive data by using machine learning to automatically review and classify your data in S3. Enabling Macie organization wide is a straightforward and cost-efficient method for you to get a central, continuously updated view of your entire organization’s S3 environment and monitor your adherence to security best practices through a central console. Macie continually evaluates all buckets for encryption and access control, alerting you of buckets that are public, unencrypted, or shared or replicated outside of your organization. Macie evaluates sensitive data using a fully-managed list of common sensitive data types and custom data types you create, and then issues findings for any object where sensitive data is found.
Encrypt your data in S3
There are four options for encrypting data in S3, including client-side and server-side options. With server-side encryption, S3 encrypts your data at the object level as it writes it to disks in AWS data centers and decrypts it when you access it. As long as you authenticate your request and you have access permissions, there is no difference in the way you access encrypted or unencrypted objects.
The first two options use AWS Key Management Service (AWS KMS). AWS KMS lets you create and manage cryptographic keys and control their use across a wide range of AWS services and their applications. There are options for managing which encryption key AWS uses to encrypt your S3 data.
Server-side encryption with Amazon S3-managed encryption keys (SSE-S3). When you use SSE-S3, each object is encrypted with a unique key that’s managed by AWS. This option enables you to encrypt your data by checking a box with no additional steps. The encryption and decryption are handled for you transparently. SSE-S3 is a convenient and cost-effective option.
Server-side encryption with customer master keys (CMKs) stored in AWS KMS (SSE-KMS), is similar to SSE-S3, but with some additional benefits and costs compared to SSE-S3. There are separate permissions for the use of a CMK that provide added protection against unauthorized access of your objects in S3. SSE-KMS also provides you with an audit trail that shows when your CMK was used and by whom. SSE-KMS gives you control of the key access policy, which might provide you with more granular control depending on your use case.
In server-side encryption with customer-provided keys (SSE-C), you manage the encryption keys and S3 manages the encryption as it writes to disks and decryption when you access your objects. This option is useful if you need to provide and manage your own encryption keys. Keep in mind that you are responsible for the creation, storage, and tracking of the keys used to encrypt each object and AWS has no ability to recover customer-provided keys if they’re lost. The major thing to account for with SSE-C is that you must provide the customer-managed key every-time you PUT or GET an object.
Client-side encryption is another option to encrypt your data in S3. You can use a CMK stored in AWS KMS or use a master key that you store within your application. Client-side encryption means that you encrypt the data before you send it to AWS and that you decrypt it after you retrieve it from AWS. AWS doesn’t manage your keys and isn’t responsible for encryption or decryption. Usually, client-side encryption needs to be deeply embedded into your application to work.
Protect data in S3 from accidental deletion using S3 Versioning and S3 Object Lock
Amazon S3 is designed for durability of 99.999999999 percent of objects across multiple Availability Zones, is resilient against events that impact an entire zone, and designed for 99.99 percent availability over a given year. In many cases, when it comes to strategies to back up your data in S3, it’s about protecting buckets and objects from accidental deletion, in which case S3 Versioning can be used to preserve, retrieve, and restore every version of every object stored in your buckets. S3 Versioning lets you keep multiple versions of an object in the same bucket and can help you recover objects from accidental deletion or overwrite. Keep in mind this feature has costs associated. You may consider S3 Versioning in selective scenarios such as S3 buckets that store critical backup data or sensitive data.
With S3 Versioning enabled on your S3 buckets, you can optionally add another layer of security by configuring a bucket to enable multi-factor authentication (MFA) delete. With this configuration, the bucket owner must include two forms of authentication in any request to delete a version or to change the versioning state of the bucket.
S3 Object Lock is a feature that helps you mitigate data loss by storing objects using a write-once-read-many (WORM) model. By using Object Lock, you can prevent an object from being overwritten or deleted for a fixed time or indefinitely. Keep in mind that there are specific use cases for Object Lock, including scenarios where it is imperative that data is not changed or deleted after it has been written.
Enable logging for S3 using CloudTrail and S3 server access logging
Amazon S3 is integrated with CloudTrail. CloudTrail captures a subset of API calls, including calls from the S3 console and code calls to the S3 APIs. In addition, you can enable CloudTrail data events for all your buckets or for a list of specific buckets. Keep in mind that a very active S3 bucket can generate a large amount of log data and increase CloudTrail costs. If this is concern around cost then consider enabling this additional logging only for S3 buckets with critical data.
Server access logging provides detailed records of the requests that are made to a bucket. Server access logs can assist you in security and access audits.
Backup your data in S3
Although S3 stores your data across multiple geographically diverse Availability Zones by default, your compliance requirements might dictate that you store data at even greater distances. Cross-region replication (CRR) allows you to replicate data between distant AWS Regions to help satisfy these requirements. CRR enables automatic, asynchronous copying of objects across buckets in different AWS Regions. For more information on object replication, see Replicating objects. Keep in mind that this feature has costs associated, you might consider CCR in selective scenarios such as S3 buckets that store critical backup data or sensitive data.
Monitor S3 using Security Hub and CloudWatch Logs
Security Hub provides you with a comprehensive view of your security state in AWS and helps you check your environment against security industry standards and best practices. Security Hub collects security data from across AWS accounts, services, and supported third-party partner products and helps you analyze your security trends and identify the highest priority security issues.
The AWS Foundational Security Best Practices standard is a set of controls that detect when your deployed accounts and resources deviate from security best practices, and provides clear remediation steps. The controls contain best practices from across multiple AWS services, including S3. We recommend you enable the AWS Foundational Security Best Practices as it includes the following detective controls for S3 and IAM:
IAM.1: IAM policies should not allow full “*” administrative privileges. S3.1: Block Public Access setting should be enabled S3.2: S3 buckets should prohibit public read access S3.3: S3 buckets should prohibit public write access S3.4: S3 buckets should have server-side encryption enabled S3.5: S3 buckets should require requests to use Secure Socket layer S3.6: Amazon S3 permissions granted to other AWS accounts in bucket policies should be restricted S3.8: S3 Block Public Access setting should be enabled at the bucket level
If there is a specific S3 API activity not covered above that you’d like to be alerted on, you can use CloudTrail Logs together with Amazon CloudWatch for S3 to do so. CloudTrail integration with CloudWatch Logs delivers S3 bucket-level API activity captured by CloudTrail to a CloudWatch log stream in the CloudWatch log group that you specify. You create CloudWatch alarms for monitoring specific API activity and receive email notifications when the specific API activity occurs.
Conclusion
By using the ten practices described in this blog post, you can build strong protection mechanisms for your data in Amazon S3, including least privilege access, encryption of data at rest, blocking public access, logging, monitoring, and configuration checks.
Depending on your use case, you should consider additional protection mechanisms. For example, there are security-related controls available for large shared datasets in S3 such as Access Points, which you can use to decompose one large bucket policy into separate, discrete access point policies for each application that needs to access the shared data set. To learn more about S3 security, see Amazon S3 Security documentation.
Now that you’ve reviewed the top 10 security best practices to make your data in S3 more secure, make sure you have these controls set up in your AWS accounts—and go build securely!
If you have feedback about this post, submit comments in the Comments section below. If you have questions about this post, start a new thread on the Amazon S3 forum or contact AWS Support.
Want more AWS Security how-to content, news, and feature announcements? Follow us on Twitter.
A CRL is a list of certificates that have been revoked by the CA. Certificates can be revoked because they might have inadvertently been shared, or to discontinue their use, such as when someone leaves the company or an IoT device is decommissioned. In this solution, you use a combination of separate AWS accounts, Amazon S3 Block Public Access (BPA) settings, and a new parameter created by ACM Private CA called S3ObjectAcl to mark the CRL as private. This new parameter allows you to set the privacy of your CRL as PUBLIC_READ or BUCKET_OWNER_FULL_CONTROL. If you choose PUBLIC_READ, the CRL will be accessible over the internet. If you choose BUCKET_OWNER_FULL_CONTROL, then only the CRL S3 bucket owner can access it, and you will need to use Amazon CloudFront to serve the CRL stored in Amazon S3 using origin access identity (OAI). This is because most TLS implementations expect a public endpoint for access.
A best practice for Amazon S3 is to apply the principle of least privilege. To support least privilege, you want to ensure you have the BPA settings for Amazon S3 enabled. These settings deny public access to your S3 objects by using ACLs, bucket policies, or access point policies. I’m going to walk you through setting up your CRL as a private object in an isolated secondary account with BPA settings for access, and a CloudFront distribution with OAI settings enabled. This will confirm that access can only be made through the CloudFront distribution and not directly to your S3 bucket. This enables you to maintain your private CA in your primary account, accessible only by your public key infrastructure (PKI) security team.
As part of the private infrastructure setup, you will create a CloudFront distribution to provide access to your CRL. While not required, it allows access to private CRLs, and is helpful in the event you want to move the CRL to a different location later. However, this does come with an extra cost, so that’s something to consider when choosing to make your CRL private instead of public.
Prerequisites
For this walkthrough, you should have the following resources ready to use:
Two AWS accounts, with an AWS IAM role created that has Amazon S3, ACM Private CA, Amazon Route 53, and Amazon CloudFront permissions. One account will be for your private CA setup, the other will be for your CRL hosting.
The solution consists of creating an S3 bucket in an isolated secondary account, enabling all BPA settings, creating a CloudFront OAI, and a CloudFront distribution.
Figure 1: Solution flow diagram
As shown in Figure 1, the steps in the solution are as follows:
Set up the S3 bucket in the secondary account with BPA settings enabled.
Create the CloudFront distribution and point it to the S3 bucket.
Create your private CA in AWS Certificate Manager (ACM).
In this post, I walk you through each of these steps.
Deploying the CRL solution
In this section, you walk through each item in the solution overview above. This will allow access to your CRL stored in an isolated secondary account, away from your private CA.
To create your S3 bucket
Sign in to the AWS Management Console of your secondary account. For Services, select S3.
In the S3 console, choose Create bucket.
Give the bucket a unique name. For this walkthrough, I named my bucket example-test-crl-bucket-us-east-1, as shown in Figure 2. Because S3 buckets are unique across all of AWS and not just within your account, you must create your own unique bucket name when completing this tutorial. Remember to follow the S3 naming conventions when choosing your bucket name.
Figure 2: Creating an S3 bucket
Choose Next, and then choose Next again.
For Block Public Access settings for this bucket, make sure the Block all public access check box is selected, as shown in Figure 3.
Figure 3: S3 block public access bucket settings
Choose Create bucket.
Select the bucket you just created, and then choose the Permissions tab.
For Bucket Policy, choose Edit, and in the text field, paste the following policy (remember to replace each <user input placeholder> with your own value).
Select Bucket owner preferred, and then choose Save changes.
To create your CloudFront distribution
Still in the console of your secondary account, from the Services menu, switch to the CloudFront console.
Choose Create Distribution.
For Select a delivery method for your content, under Web, choose Get Started.
On the Origin Settings page, do the following, as shown in Figure 4:
For Origin Domain Name, select the bucket you created earlier. In this example, my bucket name is example-test-crl-bucket-us-east-1.s3.amazonaws.com.
For Restrict Bucket Access, select Yes.
For Origin Access Identity, select Create a New Identity.
For Comment enter a name. In this example, I entered access-identity-crl.
For Grant Read Permissions on Bucket, select Yes, Update Bucket Policy.
Leave all other defaults.
Figure 4: CloudFront Origin Settings page
Choose Create Distribution.
To create your private CA
(Optional) If you have already created a private CA, you can update your CRL pointer by using the update-certificate-authority API. You must do this step from the CLI because you can’t select an S3 bucket in a secondary account for the CRL home when you create the CRL through the console. If you haven’t already created a private CA, follow the remaining steps in this procedure.
Use a text editor to create a file named ca_config.txt that holds your CA configuration information. In the following example ca_config.txt file, replace each <user input placeholder> with your own value.
From the CLI configured with a credential profile for your primary account, use the create-certificate-authority command to create your CA. In the following example, replace each <user input placeholder> with your own value.
With the CA created, use the describe-certificate-authority command to verify success. In the following example, replace each <user input placeholder> with your own value.
You should see the CA in the PENDING_CERTIFICATE state. Use the get-certificate-authority-csr command to retrieve the certificate signing request (CSR), and sign it with your ACM private CA. In the following example, replace each <user input placeholder> with your own value.
Now that you have your CSR, use it to issue a certificate. Because this example sets up a ROOT CA, you will issue a self-signed RootCACertificate. You do this by using the issue-certificate command. In the following example, replace each <user input placeholder> with your own value. You can find all allowable values in the ACM PCA documentation.
Now that the certificate is issued, you can retrieve it. You do this by using the get-certificate command. In the following example, replace each <user input placeholder> with your own value.
Import the certificate ca_cert.pem into your CA to move it into the ACTIVE state for further use. You do this by using the import-certificate-authority-certificate command. In the following example, replace each <user input placeholder> with your own value.
Use a text editor to create a file named revoke_config.txt that holds your CRL information pointing to your CloudFront distribution ID. In the following example revoke_config.txt, replace each <user input placeholder> with your own value.
Update your CA CRL CNAME to point to the CloudFront distribution you created. You do this by using the update-certificate-authority command. In the following example, replace each <user input placeholder> with your own value.
You can use the describe-certificate-authority command to verify that your CA is in the ACTIVE state. After the CA is active, ACM generates your CRL periodically for you, and places it into your specified S3 bucket. It also generates a new CRL list shortly after you revoke any certificate, so you have the most updated copy.
Now that the PCA, CRL, and CloudFront distribution are all set up, you can test to verify the CRL is served appropriately.
To test that the CRL is served appropriately
Create a CSR to issue a new certificate from your PCA. In the following example, replace each <user input placeholder> with your own value. Enter a secure PEM password when prompted and provide the appropriate field data.
Note: Do not enter any values for the unused attributes, just press Enter with no value.
Issue a new certificate using the issue-certificate command. In the following example, replace each <user input placeholder> with your own value. You can find all allowable values in the ACM PCA documentation.
After issuing the certificate, you can use the get-certificate command retrieve it, parse it, then get the CRL URL from the certificate just like a PKI client would. In the following example, replace each <user input placeholder> with your own value. This command uses the JQ package.
The following are some of the security best practices for setting up and maintaining your private CA in ACM Private CA.
Place your root CA in its own account. You want your root CA to be the ultimate authority for your private certificates, limiting access to it is key to keeping it secure.
Minimize access to the root CA. This is one of the best ways of reducing the risk of intentional or unintentional inappropriate access or configuration. If the root CA was to be inappropriately accessed, all subordinate CAs and certificates would need to be revoked and recreated.
Keep your CRL in a separate account from the root CA. The reason for placing the CRL in a separate account is because some external entities—such as customers or users who aren’t part of your AWS organization, or external applications—might need to access the CRL to check for revocation. To provide access to these external entities, the CRL object and the S3 bucket need to be accessible, so you don’t want to place your CRL in the same account as your private CA.
You’ve now successfully set up your private CA and have stored your CRL in an isolated secondary account. You configured your S3 bucket with Block Public Access settings, created a custom URL through CloudFront, enabled OAI settings, and pointed your DNS to it by using Route 53. This restricts access to your S3 bucket through CloudFront and your OAI only. You walked through the setup of each step, from bucket configurations, hosted zone setup, distribution setup, and finally, private CA configuration and setup. You can now store your private CA in an account with limited access, while your CRL is hosted in a separate account that allows external entity access.
If you have feedback about this post, submit comments in the Comments section below. If you have questions about this post, start a new thread on the AWS Certificate Manager forum or contact AWS Support.
Want more AWS Security how-to content, news, and feature announcements? Follow us on Twitter.
In April 2021, AWS Identity and Access Management (IAM)Access Analyzer added policy generation to help you create fine-grained policies based on AWS CloudTrail activity stored within your account. Now, we’re extending policy generation to enable you to generate policies based on access activity stored in a designated account. For example, you can use AWS Organizations to define a uniform event logging strategy for your organization and store all CloudTrail logs in your management account to streamline governance activities. You can use Access Analyzer to review access activity stored in your designated account and generate a fine-grained IAM policy in your member accounts. This helps you to create policies that provide only the required permissions for your workloads.
Customers that use a multi-account strategy consolidate all access activity information in a designated account to simplify monitoring activities. By using AWS Organizations, you can create a trail that will log events for all Amazon Web Services (AWS) accounts into a single management account to help streamline governance activities. This is sometimes referred to as an organization trail. You can learn more from Creating a trail for an organization. With this launch, you can use Access Analyzer to generate fine-grained policies in your member account and grant just the required permissions to your IAM roles and users based on access activity stored in your organization trail.
When you request a policy, Access Analyzer analyzes your activity in CloudTrail logs and generates a policy based on that activity. The generated policy grants only the required permissions for your workloads and makes it easier for you to implement least privilege permissions. In this blog post, I’ll explain how to set up the permissions for Access Analyzer to access your organization trail and analyze activity to generate a policy. To generate a policy in your member account, you need to grant Access Analyzer limited cross-account access to access the Amazon Simple Storage Service (Amazon S3) bucket where logs are stored and review access activity.
Generate a policy for a role based on its access activity in the organization trail
In this example, you will set fine-grained permissions for a role used in a development account. The example assumes that your company uses Organizations and maintains an organization trail that logs all events for all AWS accounts in the organization. The logs are stored in an S3 bucket in the management account. You can use Access Analyzer to generate a policy based on the actions required by the role. To use Access Analyzer, you must first update the permissions on the S3 bucket where the CloudTrail logs are stored, to grant access to Access Analyzer.
To grant permissions for Access Analyzer to access and review centrally stored logs and generate policies
Select the bucket where the logs from the organization trail are stored.
Change object ownership to bucket owner preferred. To generate a policy, all of the objects in the bucket must be owned by the bucket owner.
Update the bucket policy to grant cross-account access to Access Analyzer by adding the following statement to the bucket policy. This grants Access Analyzer limited access to the CloudTrail data. Replace the <organization-bucket-name>, and <organization-id> with your values and then save the policy.
By using the preceding statement, you’re allowing listbucket and getobject for the bucket my-organization-bucket-name if the role accessing it belongs to an account in your Organizations and has a name that starts with AccessAnalyzerMonitorServiceRole. Using aws:PrincipalAccount in the resource section of the statement allows the role to retrieve only the CloudTrail logs belonging to its own account. If you are encrypting your logs, update your AWS Key Management Service (AWS KMS) key policy to grant Access Analyzer access to use your key.
Now that you’ve set the required permissions, you can use the development account and the following steps to generate a policy.
To generate a policy in the AWS Management Console
Use your development account to open the IAM Console, and then in the navigation pane choose Roles.
Select a role to analyze. This example uses AWS_Test_Role.
Under Generate policy based on CloudTrail events, choose Generate policy, as shown in Figure 1.
Figure 1: Generate policy from the role detail page
In the Generate policy page, select the time window for which IAM Access Analyzer will review the CloudTrail logs to create the policy. In this example, specific dates are chosen, as shown in Figure 2.
Figure 2: Specify the time period
Under CloudTrail access, select the organization trail you want to use as shown in Figure 3.
Note: If you’re using this feature for the first time: select create a new service role, and then choose Generate policy.
This example uses an existing service role “AccessAnalyzerMonitorServiceRole_MBYF6V8AIK.”
Figure 3: CloudTrail access
After the policy is ready, you’ll see a notification on the role page. To review the permissions, choose View generated policy, as shown in Figure 4.
Figure 4: Policy generation progress
After the policy is generated, you can see a summary of the services and associated actions in the generated policy. You can customize it by reviewing the services used and selecting additional required actions from the drop down. To refine permissions further, you can replace the resource-level placeholders in the policies to restrict permissions to just the required access. You can learn more about granting fine-grained permissions and creating the policy as described in this blog post.
Conclusion
Access Analyzer makes it easier to grant fine-grained permissions to your IAM roles and users by generating IAM policies based on the CloudTrail activity centrally stored in a designated account such as your AWS Organizations management accounts. To learn more about how to generate a policy, see Generate policies based on access activity in the IAM User Guide.
If you have feedback about this blog post, submit comments in the Comments section below. If you have questions about this blog post, start a new thread on the IAM forum or contact AWS Support.
Want more AWS Security how-to content, news, and feature announcements? Follow us on Twitter.
In this post, we describe the AWS services that you can use to both detect and protect your data stored in Amazon Simple Storage Service (Amazon S3). When you analyze security in depth for your Amazon S3 storage, consider doing the following:
Monitor and remediate configuration changes with AWS Config
Using these additional AWS services along with Amazon S3 can improve your security posture across your accounts.
Audit and restrict Amazon S3 access with IAM Access Analyzer
IAM Access Analyzer allows you to identify unintended access to your resources and data. Users and developers need access to Amazon S3, but it’s important for you to keep users and privileges accurate and up to date.
Amazon S3 can often house sensitive and confidential information. To help secure your data within Amazon S3, you should be using AWS Key Management Service (AWS KMS) with server-side encryption at rest for Amazon S3. It is also important that you secure the S3 buckets so that you only allow access to the developers and users who require that access. Bucket policies and access control lists (ACLs) are the foundation of Amazon S3 security. Your configuration of these policies and lists determines the accessibility of objects within Amazon S3, and it is important to audit them regularly to properly secure and maintain the security of your Amazon S3 bucket.
IAM Access Analyzer can scan all the supported resources within a zone of trust. Access Analyzer then provides you with insight when a bucket policy or ACL allows access to any external entities that are not within your organization or your AWS account’s zone of trust.
The example in Figure 1 shows creating an analyzer with the zone of trust as the current account, but you can also create an analyzer with the organization as the zone of trust.
Figure 1: Creating IAM Access Analyzer and zone of trust
After you create your analyzer, IAM Access Analyzer automatically scans the resources in your zone of trust and returns the findings from your Amazon S3 storage environment. The initial scan shown in Figure 2 shows the findings of an unsecured S3 bucket.
Figure 2: Example of unsecured S3 bucket findings
For each finding, you can decide which action you would like to take. As shown in figure 3, you are given the option to archive (if the finding indicates intended access) or take action to modify bucket permissions (if the finding indicates unintended access).
Figure 3: Displays choice of actions to take
After you address the initial findings, Access Analyzer monitors your bucket policies for changes, and notifies you of access issues it finds. Access Analyzer is regional and must be enabled in each AWS Region independently.
Classify and secure sensitive data with Macie
Organizational compliance standards often require the identification and securing of sensitive data. Your organization’s sensitive data might contain personally identifiable information (PII), which includes things such as credit card numbers, birthdates, and addresses.
Macie is a data security and privacy service offered by AWS that uses machine learning and pattern matching to discover the sensitive data stored within Amazon S3. You can define your own custom type of sensitive data category that might be unique to your business or use case. Macie will automatically provide an inventory of S3 buckets and alert you of unprotected sensitive data.
Figure 4 shows a sample result from a Macie scan in which you can see important information regarding Amazon S3 public access, encryption settings, and sharing.
Figure 4: Sample results from a Macie scan
In addition to finding potential sensitive data, Macie also gives you a severity score based on the privacy risk, as shown in the example data in Figure 5.
Figure 5: Example Macie severity scores
When you use Macie in conjunction with AWS Step Functions, you can also automatically remediate any issues found. You can use this combination to help meet regulations such as General Data Protection Regulation (GDPR) and Health Insurance Portability and Accountability Act (HIPAA). Macie allows you to have constant visibility of sensitive data within your Amazon S3 storage environment.
When you deploy Macie in a multi-account configuration, your usage is rolled up to the master account to provide the total usage for all accounts and a breakdown across the entire organization.
Detect malicious access patterns with GuardDuty
Your customers and users can commit thousands of actions each day on S3 buckets. Discerning access patterns manually can be extremely time consuming as the volume of data increases. GuardDuty uses machine learning, anomaly detection, and integrated threat intelligence to analyze billions of events across multiple accounts and uses data collected in AWS CloudTrail logs for S3 data events as well as S3 access logs, VPC Flow Logs, and DNS logs. GuardDuty can be configured to analyze these logs and notify you of suspicious activity, such as unusual data access patterns, unusual discovery API calls, and more. After you receive a list of findings on these activities, you will be able to make informed decisions to secure your S3 buckets.
Figure 6 shows a sample list of findings returned by GuardDuty which shows the finding type, resource affected, and count of occurrences.
Figure 6: Example GuardDuty list of findings
You can select one of the results in Figure 6 to see the IP address and details associated from this potential malicious IP caller, as shown in Figure 7.
Figure 7: GuardDuty Malicious IP Caller detailed findings
Monitor and remediate configuration changes with AWS Config
Configuration management is important when securing Amazon S3, to prevent unauthorized users from gaining access. It is important that you monitor the configuration changes of your S3 buckets, whether the changes are intentional or unintentional. AWS Config can track all configuration changes that are made to an S3 bucket. For example, if an S3 bucket had its permissions and configurations unexpectedly changed, using AWS Config allows you to see the changes made, as well as who made them.
AWS Config can be used in conjunction with a service called AWS Lambda. If an S3 bucket is noncompliant, AWS Config can trigger a preprogrammed Lambda function and then the Lambda function can resolve those issues. This combination can be used to reduce your operational overhead in maintaining compliance within your S3 buckets.
Figure 8 shows a sample of AWS Config managed rules selected for configuration monitoring and gives a brief description of what the rule does.
Figure 8: Sample selections of AWS Managed Rules
Figure 9 shows a sample result of a non-compliant configuration and resource inventory listing the type of resource affected and the number of occurrences.
Figure 9: Example of AWS Config non-compliant resources
Conclusion
AWS has many offerings to help you audit and secure your storage environment. In this post, we discussed the particular combination of AWS services that together will help reduce the amount of time and focus your business devotes to security practices. This combination of services will also enable you to automate your responses to any unwanted permission and configuration changes, saving you valuable time and resources to dedicate elsewhere in your organization.
In software as a service (SaaS) systems, which are designed to be used by multiple customers, isolating tenant data is a fundamental responsibility for SaaS providers. The practice of isolation of data in a multi-tenant application platform is called tenant isolation. In this post, we describe an approach you can use to achieve tenant isolation in Amazon Simple Storage Service (Amazon S3) and Amazon Aurora PostgreSQL-Compatible Edition databases by implementing attribute-based access control (ABAC). You can also adapt the same approach to achieve tenant isolation in other AWS services.
ABAC in Amazon Web Services (AWS), which uses tags to store attributes, offers advantages over the traditional role-based access control (RBAC) model. You can use fewer permissions policies, update your access control more efficiently as you grow, and last but not least, apply granular permissions for various AWS services. These granular permissions help you to implement an effective and coherent tenant isolation strategy for your customers and clients. Using the ABAC model helps you scale your permissions and simplify the management of granular policies. The ABAC model reduces the time and effort it takes to maintain policies that allow access to only the required resources.
The solution we present here uses the pool model of data partitioning. The pool model helps you avoid the higher costs of duplicated resources for each tenant and the specialized infrastructure code required to set up and maintain those copies.
Solution overview
In a typical customer environment where this solution is implemented, the tenant request for access might land at Amazon API Gateway, together with the tenant identifier, which in turn calls an AWS Lambda function. The Lambda function is envisaged to be operating with a basic Lambda execution role. This Lambda role should also have permissions to assume the tenant roles. As the request progresses, the Lambda function assumes the tenant role and makes the necessary calls to Amazon S3 or to an Aurora PostgreSQL-Compatible database. This solution helps you to achieve tenant isolation for objects stored in Amazon S3 and data elements stored in an Aurora PostgreSQL-Compatible database cluster.
Figure 1 shows the tenant isolation architecture for both Amazon S3 and Amazon Aurora PostgreSQL-Compatible databases.
Figure 1: Tenant isolation architecture diagram
As shown in the numbered diagram steps, the workflow for Amazon S3 tenant isolation is as follows:
An Aurora PostgreSQL-Compatible cluster with a database created.
Note: Make sure to note down the default master database user and password, and make sure that you can connect to the database from your desktop or from another server (for example, from Amazon Elastic Compute Cloud (Amazon EC2) instances).
A security group and inbound rules that are set up to allow an inbound PostgreSQL TCP connection (Port 5432) from Lambda functions. This solution uses regular non-VPC Lambda functions, and therefore the security group of the Aurora PostgreSQL-Compatible database cluster should allow an inbound PostgreSQL TCP connection (Port 5432) from anywhere (0.0.0.0/0).
Make sure that you’ve completed the prerequisites before proceeding with the next steps.
Deploy the solution
The following sections describe how to create the IAM roles, IAM policies, and Lambda functions that are required for the solution. These steps also include guidelines on the changes that you’ll need to make to the prerequisite components Amazon S3 and the Aurora PostgreSQL-Compatible database cluster.
Step 1: Create the IAM policies
In this step, you create two IAM policies with the required permissions for Amazon S3 and the Aurora PostgreSQL database.
Choose IAM, choose Policies, and then choose Create policy.
Use the following JSON policy document to create a second policy. This policy grants an IAM role permission to connect to an Aurora PostgreSQL-Compatible database through a database user that is IAM authenticated. Replace the placeholders with the appropriate Region, account number, and cluster resource ID of the Aurora PostgreSQL-Compatible database cluster, respectively.
Save the policy with the name sts-ti-demo-dbuser-policy.
Figure 3: Create the IAM policy for Aurora PostgreSQL database (sts-ti-demo-dbuser-policy)
Note: Make sure that you use the cluster resource ID for the clustered database. However, if you intend to adapt this solution for your Aurora PostgreSQL-Compatible non-clustered database, you should use the instance resource ID instead.
Step 2: Create the IAM roles
In this step, you create two IAM roles for the two different tenants, and also apply the necessary permissions and tags.
To create the IAM roles
In the IAM console, choose Roles, and then choose Create role.
On the Trusted entities page, choose the EC2 service as the trusted entity.
On the Permissions policies page, select sts-ti-demo-s3-access-policy and sts-ti-demo-dbuser-policy.
On the Tags page, add two tags with the following keys and values.
Tag key
Tag value
s3_home
tenant1_home
dbuser
tenant1_dbuser
On the Review screen, name the role assumeRole-tenant1, and then choose Save.
In the IAM console, choose Roles, and then choose Create role.
On the Trusted entities page, choose the EC2 service as the trusted entity.
On the Permissions policies page, select sts-ti-demo-s3-access-policy and sts-ti-demo-dbuser-policy.
On the Tags page, add two tags with the following keys and values.
Tag key
Tag value
s3_home
tenant2_home
dbuser
tenant2_dbuser
On the Review screen, name the role assumeRole-tenant2, and then choose Save.
Step 3: Create and apply the IAM policies for the tenants
In this step, you create a policy and a role for the Lambda functions. You also create two separate tenant roles, and establish a trust relationship with the role that you created for the Lambda functions.
To create and apply the IAM policies for tenant1
In the IAM console, choose Policies, and then choose Create policy.
Use the following JSON policy document to create the policy. Replace the placeholder <111122223333> with your AWS account number.
Save the policy with the name sts-ti-demo-assumerole-policy.
In the IAM console, choose Roles, and then choose Create role.
On the Trusted entities page, select the Lambda service as the trusted entity.
On the Permissions policies page, select sts-ti-demo-assumerole-policy and AWSLambdaBasicExecutionRole.
On the review screen, name the role sts-ti-demo-lambda-role, and then choose Save.
In the IAM console, go to Roles, and enter assumeRole-tenant1 in the search box.
Select the assumeRole-tenant1 role and go to the Trust relationship tab.
Choose Edit the trust relationship, and replace the existing value with the following JSON document. Replace the placeholder <111122223333> with your AWS account number, and choose Update trust policy to save the policy.
To verify that the policies are applied correctly for tenant1
In the IAM console, go to Roles, and enter assumeRole-tenant1 in the search box. Select the assumeRole-tenant1 role and on the Permissions tab, verify that sts-ti-demo-dbuser-policy and sts-ti-demo-s3-access-policy appear in the list of policies, as shown in Figure 4.
Figure 4: The assumeRole-tenant1 Permissions tab
On the Trust relationships tab, verify that sts-ti-demo-lambda-role appears under Trusted entities, as shown in Figure 5.
Figure 5: The assumeRole-tenant1 Trust relationships tab
On the Tags tab, verify that the following tags appear, as shown in Figure 6.
Tag key
Tag value
dbuser
tenant1_dbuser
s3_home
tenant1_home
Figure 6: The assumeRole-tenant1 Tags tab
To create and apply the IAM policies for tenant2
In the IAM console, go to Roles, and enter assumeRole-tenant2 in the search box.
Select the assumeRole-tenant2 role and go to the Trust relationship tab.
Edit the trust relationship, replacing the existing value with the following JSON document. Replace the placeholder <111122223333> with your AWS account number.
To verify that the policies are applied correctly for tenant2
In the IAM console, go to Roles, and enter assumeRole-tenant2 in the search box. Select the assumeRole-tenant2 role and on the Permissions tab, verify that sts-ti-demo-dbuser-policy and sts-ti-demo-s3-access-policy appear in the list of policies, you did for tenant1. On the Trust relationships tab, verify that sts-ti-demo-lambda-role appears under Trusted entities.
On the Tags tab, verify that the following tags appear, as shown in Figure 7.
Tag key
Tag value
dbuser
tenant2_dbuser
s3_home
tenant2_home
Figure 7: The assumeRole-tenant2 Tags tab
Step 4: Set up an Amazon S3 bucket
Next, you’ll set up an S3 bucket that you’ll use as part of this solution. You can either create a new S3 bucket or re-purpose an existing one. The following steps show you how to create two user homes (that is, S3 prefixes, which are also known as folders) in the S3 bucket.
In the AWS Management Console, go to Amazon S3 and select the S3 bucket you want to use.
Create two prefixes (folders) with the names tenant1_home and tenant2_home.
Place two test objects with the names tenant.info-tenant1_home and tenant.info-tenant2_home in the prefixes that you just created, respectively.
Step 5: Set up test objects in Aurora PostgreSQL-Compatible database
In this step, you create a table in Aurora PostgreSQL-Compatible Edition, insert tenant metadata, create a row level security (RLS) policy, create tenant users, and grant permission for testing purposes.
To set up Aurora PostgreSQL-Compatible
Connect to Aurora PostgreSQL-Compatible through a client of your choice, using the master database user and password that you obtained at the time of cluster creation.
Run the following commands to create a table for testing purposes and to insert a couple of testing records.
CREATE TABLE tenant_metadata (
    tenant_id VARCHAR(30) PRIMARY KEY,
    email     VARCHAR(50) UNIQUE,
    status    VARCHAR(10) CHECK (status IN ('active', 'suspended', 'disabled')),
    tier      VARCHAR(10) CHECK (tier IN ('gold', 'silver', 'bronze')));

INSERT INTO tenant_metadata (tenant_id, email, status, tier)
VALUES ('tenant1_dbuser','[email protected]','active','gold');
INSERT INTO tenant_metadata (tenant_id, email, status, tier)
VALUES ('tenant2_dbuser','[email protected]','suspended','silver');
ALTER TABLE tenant_metadata ENABLE ROW LEVEL SECURITY;
Run the following command to query the newly created database table.
SELECT * FROM tenant_metadata;
Figure 8: The tenant_metadata table content
Run the following command to create the row level security policy.
CREATE POLICY tenant_isolation_policy ON tenant_metadata
USING (tenant_id = current_user);
Run the following commands to establish two tenant users and grant them the necessary permissions.
CREATE USER tenant1_dbuser WITH LOGIN;
CREATE USER tenant2_dbuser WITH LOGIN;
GRANT rds_iam TO tenant1_dbuser;
GRANT rds_iam TO tenant2_dbuser;

GRANT select, insert, update, delete ON tenant_metadata to tenant1_dbuser, tenant2_dbuser;
Run the following commands to verify the newly created tenant users.
SELECT usename AS role_name,
  CASE
     WHEN usesuper AND usecreatedb THEN
       CAST('superuser, create database' AS pg_catalog.text)
     WHEN usesuper THEN
        CAST('superuser' AS pg_catalog.text)
     WHEN usecreatedb THEN
        CAST('create database' AS pg_catalog.text)
     ELSE
        CAST('' AS pg_catalog.text)
  END role_attributes
FROM pg_catalog.pg_user
WHERE usename LIKE (‘tenant%’)
ORDER BY role_name desc;
Figure 9: Verify the newly created tenant users output
Step 6: Set up the AWS Lambda functions
Next, you’ll create two Lambda functions for Amazon S3 and Aurora PostgreSQL-Compatible. You also need to create a Lambda layer for the Python package PG8000.
To set up the Lambda function for Amazon S3
Navigate to the Lambda console, and choose Create function.
Choose Author from scratch. For Function name, enter sts-ti-demo-s3-lambda.
For Runtime, choose Python 3.7.
Change the default execution role to Use an existing role, and then select sts-ti-demo-lambda-role from the drop-down list.
Keep Advanced settings as the default value, and then choose Create function.
Copy the following Python code into the lambda_function.py file that is created in your Lambda function.
import json
import os
import time

def lambda_handler(event, context):
    import boto3
    bucket_name     =   os.environ['s3_bucket_name']

    try:
        login_tenant_id =   event['login_tenant_id']
        data_tenant_id  =   event['s3_tenant_home']
    except:
        return {
            'statusCode': 400,
            'body': 'Error in reading parameters'
        }

    prefix_of_role  =   'assumeRole'
    file_name       =   'tenant.info' + '-' + data_tenant_id

    # create an STS client object that represents a live connection to the STS service
    sts_client = boto3.client('sts')
    account_of_role = sts_client.get_caller_identity()['Account']
    role_to_assume  =   'arn:aws:iam::' + account_of_role + ':role/' + prefix_of_role + '-' + login_tenant_id

    # Call the assume_role method of the STSConnection object and pass the role
    # ARN and a role session name.
    RoleSessionName = 'AssumeRoleSession' + str(time.time()).split(".")[0] + str(time.time()).split(".")[1]
    try:
        assumed_role_object = sts_client.assume_role(
            RoleArn         = role_to_assume,
            RoleSessionName = RoleSessionName,
            DurationSeconds = 900) #15 minutes

    except:
        return {
            'statusCode': 400,
            'body': 'Error in assuming the role ' + role_to_assume + ' in account ' + account_of_role
        }

    # From the response that contains the assumed role, get the temporary
    # credentials that can be used to make subsequent API calls
    credentials=assumed_role_object['Credentials']

    # Use the temporary credentials that AssumeRole returns to make a connection to Amazon S3
    s3_resource=boto3.resource(
        's3',
        aws_access_key_id=credentials['AccessKeyId'],
        aws_secret_access_key=credentials['SecretAccessKey'],
        aws_session_token=credentials['SessionToken']
    )

    try:
        obj = s3_resource.Object(bucket_name, data_tenant_id + "/" + file_name)
        return {
            'statusCode': 200,
            'body': obj.get()['Body'].read()
        }
    except:
        return {
            'statusCode': 400,
            'body': 'error in reading s3://' + bucket_name + '/' + data_tenant_id + '/' + file_name
        }
Under Basic settings, edit Timeout to increase the timeout to 29 seconds.
Edit Environment variables to add a key called s3_bucket_name, with the value set to the name of your S3 bucket.
Configure a new test event with the following JSON document, and save it as testEvent.
Choose Test to test the Lambda function with the newly created test event testEvent. You should see status code 200, and the body of the results should contain the data for tenant1.
Figure 10: The result of running the sts-ti-demo-s3-lambda function
Next, create another Lambda function for Aurora PostgreSQL-Compatible. To do this, you first need to create a new Lambda layer.
To set up the Lambda layer
Use the following commands to create a .zip file for Python package pg8000.
Note: This example is created by using an Amazon EC2 instance running the Amazon Linux 2 Amazon Machine Image (AMI). If you’re using another version of Linux or don’t have the Python 3 or pip3 packages installed, install them by using the following commands.
Choose Test to test the Lambda function with the newly created test event testEvent. You should see status code 200, and the body of the results should contain the data for tenant1.
Figure 12: The result of running the sts-ti-demo-pgdb-lambda function
Step 7: Perform negative testing of tenant isolation
You already performed positive tests of tenant isolation during the Lambda function creation steps. However, it’s also important to perform some negative tests to verify the robustness of the tenant isolation controls.
To perform negative tests of tenant isolation
In the Lambda console, navigate to the sts-ti-demo-s3-lambda function. Update the test event to the following, to mimic a scenario where tenant1 attempts to access other tenants’ objects.
Choose Test to test the Lambda function with the updated test event. You should see status code 400, and the body of the results should contain an error message.
Figure 13: The results of running the sts-ti-demo-s3-lambda function (negative test)
Navigate to the sts-ti-demo-pgdb-lambda function and update the test event to the following, to mimic a scenario where tenant1 attempts to access other tenants’ data elements.
Choose Test to test the Lambda function with the updated test event. You should see status code 400, and the body of the results should contain an error message.
Figure 14: The results of running the sts-ti-demo-pgdb-lambda function (negative test)
Cleaning up
To de-clutter your environment, remove the roles, policies, Lambda functions, Lambda layers, Amazon S3 prefixes, database users, and the database table that you created as part of this exercise. You can choose to delete the S3 bucket, as well as the Aurora PostgreSQL-Compatible database cluster that we mentioned in the Prerequisites section, to avoid incurring future charges.
Update the security group of the Aurora PostgreSQL-Compatible database cluster to remove the inbound rule that you added to allow a PostgreSQL TCP connection (Port 5432) from anywhere (0.0.0.0/0).
Conclusion
By taking advantage of attribute-based access control (ABAC) in IAM, you can more efficiently implement tenant isolation in SaaS applications. The solution we presented here helps to achieve tenant isolation in Amazon S3 and Aurora PostgreSQL-Compatible databases by using ABAC with the pool model of data partitioning.
If you run into any issues, you can use Amazon CloudWatch and AWS CloudTrail to troubleshoot. If you have feedback about this post, submit comments in the Comments section below.
To learn more, see these AWS Blog and AWS Support articles:
Amazon Simple Storage Service (Amazon S3) launched 15 years ago in March 2006, and became the first generally available service from Amazon Web Services (AWS). AWS marked the fifteenth anniversary with AWS Pi Week—a week of in-depth streams and live events. During AWS Pi Week, AWS leaders and experts reviewed the history of AWS and Amazon S3, and some of the key decisions involved in building and evolving S3.
As part of this celebration, Werner Vogels, VP and CTO for Amazon.com, and Eric Brandwine, VP and Distinguished Engineer with AWS Security, had a conversation about the role of security in Amazon S3 and all AWS services. They touched on why customers come to AWS, and how AWS services grow with customers by providing built-in security that can progress to protections that are more complex, based on each customer’s specific needs. They also touched on how, starting with Amazon S3 over 15 years ago and continuing to this day, security is the top priority at AWS, and how nothing can proceed at AWS without security that customers can rely on.
“In security, there are constantly challenging tradeoffs,” Eric says. “The path that we’ve taken at AWS is that our services are usable, but secure by default.”
To learn more about how AWS helps secure its customers’ systems and information through a culture of security first, watch the video, and be sure to check out AWS Pi Week 2021: The Birth of the AWS Cloud.
If you have feedback about this post, submit comments in the Comments section below.
Want more AWS Security how-to content, news, and feature announcements? Follow us on Twitter.
Amazon Inspector helps to improve the security and compliance of your applications that are deployed on Amazon Web Services (AWS). It automatically assesses Amazon Elastic Compute Cloud (Amazon EC2) instances and applications on those instances. From that assessment, it generates findings related to exposure, potential vulnerabilities, and deviations from best practices.
You can use the findings from Amazon Inspector as part of a vulnerability management program for your Amazon EC2fleet across multiple AWS Regions in multiple accounts. The ability to rank and efficiently respond to potential security issues reduces the time that potential vulnerabilities remain unresolved. This can be accelerated within a single pane of glass for all the accounts in your AWS environment.
Following AWS best practices, in a secure multi-account AWS environment, you can provision (using AWS Control Tower) a group of accounts—known as core accounts, for governing other accounts within the environment. One of the core accounts may be used as a central security account, which you can designate for governing the security and compliance posture across all accounts in your environment. Another core account is a centralized logging account, which you can provision and designate for central storage of log data.
In this blog post, I show you how to:
Use Amazon Inspector, a fully managed security assessment service, to generate security findings.
The flow of events to implement the solution is shown in Figure 1 and described in the following process flow.
Figure 1: Solution overview architecture
Process flow
The flow of this architecture is divided into two types of processes—a one-time process and a scheduled process. The AWS resources that are part of the one-time process are triggered the first time an Amazon Inspector assessment template is created in each Region of each application account. The AWS resources of the scheduled process are triggered at a designated interval of Amazon Inspector scan in each Region of each application account.
One-time process
An event-based Amazon CloudWatch rule in each Region of every application account triggers a regional AWS Lambda function when an Amazon Inspector assessment template is created for the first time in that Region.
Note: In order to restrict this event to trigger the Lambda function only the first time an assessment template is created, you must use a specific user-defined tag to trigger the Attach Inspector template to SNS Lambda function for only one Amazon Inspector template per Region. For more information on tags, see the Tagging AWS resources documentation.
The Lambda function attaches the Amazon Inspector assessment template (created in application accounts) to the cross-account Amazon SNS topic (created in the security account). The function, the template, and the topic are all in the same AWS Region.
A scheduled Amazon CloudWatch Event in every Region of the application accounts starts the Amazon Inspector scan at a scheduled time interval, which you can configure.
An Amazon Inspector agent conducts the scan on the EC2 instances of the Region where the assessment template is created and sends any findings to Amazon Inspector.
Once the findings are generated, Amazon Inspector notifies the Amazon SNS topic of the security account in the same Region.
The Amazon SNS topics from each Region of the central security account receive notifications of Amazon Inspector findings from all application accounts. The SNS topics then send the notifications to a central Amazon SQS queue in the primary Region of the security account.
The Amazon SQS queue triggers the Send findings Lambda function (as shown in Figure 1) of the security account.
Note: Each Amazon SQS message represents one Amazon Inspector finding.
The Send findings Lambda function assumes a cross-account role to fetch the following information from all application accounts:
Finding details from the Amazon Inspector API.
Additional Amazon EC2 attributes—VPC, subnet, security group, and IP address—from EC2 instances with potential vulnerabilities.
The Lambda function then sends all the gathered data to a central S3 bucket and a domain in Amazon ES—both in the central security account.
These Amazon Inspector findings, along with additional attributes on the scanned instances, can be used for further analysis and visualization via Kibana—a data visualization dashboard for Amazon ES. Storing a copy of these findings in an S3 bucket gives you the opportunity to forward the findings data to outside monitoring tools that don’t support direct data ingestion from AWS Lambda.
Prerequisites
The following resources must be set up before you can implement this solution:
Amazon Inspector agents must be installed on all EC2 instances. See Installing Amazon Inspector agents to learn how to set up Amazon Inspector agents on EC2 instances. Additionally, keep note of all the Regions where you install the Amazon Inspector agent.
Upload the ZIP file to the S3 bucket you created in the central security account for Lambda code storage. This code is used to create the Lambda function in the first CloudFormation stack set of the solution.
Step 2: Collect input parameters for AWS CloudFormation deployment
In this solution, you deploy three AWS CloudFormation stack sets in succession. Each stack set should be created in the primary Region of the central security account. Underlying stacks are deployed across the central security account and in all the application accounts where the Amazon Inspector scan is performed. You can learn more in Working with AWS CloudFormation StackSets.
Before you proceed to the stack set deployment, you must collect the input parameters for the first stack set: Central-SecurityAcnt-BaseTemplate.yaml.
To collect input parameters for AWS CloudFormation deployment
Fetch the account ID (CentralSecurityAccountID) of the AWS account where the stack set will be created and deployed. You can use the steps in Finding your AWS account ID to help you find the account ID.
Values for the ES domain parameters can be fetched from the Amazon ES console.
Select the domain name to view the domain details.
The value for ElasticsearchDomainName is displayed on the top left corner of the domain details.
On the Overview tab in the domain details window, select and copy the URL value of the Endpoint to use as the ElasticsearchEndpoint parameter of the template. Make sure to exclude the https:// at the beginning of the URL.
Figure 2: Details of the Amazon ES domain for fetching parameter values
Get the values for the S3 bucket parameters from the Amazon S3 console.
Copy the name of the S3 bucket that you created for centralized storage of Amazon Inspector findings. Save this bucket name for the LoggingS3Bucket parameter value of the Central-SecurityAcnt-BaseTemplate.yaml template.
Select the S3 bucket used for source code storage. Select the bucket name and copy the name of this bucket for the LambdaSourceCodeS3Bucket parameter of the template.
Figure 3: The S3 bucket where Lambda code is uploaded
On the bucket details page, select the source code ZIP file name that you previously uploaded to the bucket. In the detail page of the ZIP file, choose the Overview tab, and then copy the value in the Key field to use as the value for the LambdaCodeS3Key parameter of the template.
Figure 4: Details of the Lambda code ZIP file uploaded in Amazon S3 showing the key prefix value
Note: All of the other input parameter values of the template are entered automatically, but you can change them during stack set creation if necessary.
Step 3: Deploy the base template into the central security account
Now that you’ve collected the input parameters, you’re ready to deploy the base template that will create the necessary resources for this solution implementation in the central security account.
Prerequisites for CloudFormation stack set deployment
There are two permission modes that you can choose from for deploying a stack set in AWS CloudFormation. If you’re using AWS Organizations and have all features enabled, you can use the service-managed permissions; otherwise, self-managed permissions mode is recommended. To deploy this solution, you’ll use self-managed permissions mode. To run stack sets in self-managed permissions mode, your administrator account and the target accounts must have two IAM roles—AWSCloudFormationStackSetAdministrationRole and AWSCloudFormationStackSetExecutionRole—as prerequisites. In this solution, the administrator account is the central security account and the target accounts are application accounts. You can use the following CloudFormation templates to create the necessary IAM roles:
Open the AWS CloudFormation Management Console and select the Region where all the stack sets will be created for deployment. This should be the primary Region of your environment.
Select Create StackSet.
In the Create StackSet window, select Template is ready and then select Upload a template file.
Under Upload a template file, select Choose file and select the Central-SecurityAcnt-BaseTemplate.yaml template that you downloaded earlier.
Choose Next.
Add stack set details.
Enter a name for the stack set in StackSet name.
Under Parameters, most of the values are pre-populated except the values you collected in the previous procedure for CentralSecurityAccountID, ElasticsearchDomainName, ElasticsearchEndpoint, LoggingS3Bucket, LambdaSourceCodeS3Bucket, and LambdaCodeS3Key.
After all the values are populated, choose Next.
Configure StackSet options.
(Optional) Add tags as described in the prerequisites to apply to the resources in the stack set that these rules will be deployed to. Tagging is a recommended best practice, because it enables you to add metadata information to resources during their creation.
Under Permissions, choose the Self service permissions mode to be used for deploying the stack set, and then select the AWSCloudFormationStackSetAdministrationRole from the dropdown list.
Figure 5: Permission mode to be selected for stack set deployment
Choose Next.
Add the account and Region details where the template will be deployed.
Under Deployment locations, select Deploy stacks in accounts. Under Account numbers, enter the account ID of the security account that you collected earlier.
Figure 6: Values to be provided during the deployment of the first stack set
Under Specify regions, select all the Regions where the stacks will be created. This should be the list of Regions where you installed the Amazon Inspector agent. Keep note of this list of Regions to use in the deployment of the third template in an upcoming step.
Though an Amazon Inspector scan is performed in all the application accounts, the regional Amazon SNS topics that send scan finding notifications are created in the central security account. Therefore, this template is created in all the Regions where Amazon Inspector will notify SNS. The template has the logic needed to handle the creation of specific AWS resources only in the primary Region, even though the template executes in many Regions.
The order in which Regions are selected under Specify regions defines the order in which the stack is deployed in the Regions. So you must make sure that the primary Region of your deployment is the first one specified under Specify regions, followed by the other Regions of stack set deployment. This is required because global resources are created using one Region—ideally the primary Region—and so stack deployment in that Region should be done before deployment to other Regions in order to avoid any build dependencies.
Figure 7: Showing the order of specifying the Regions of stack set deployment
Review the template settings and select the check box to acknowledge the Capabilities section. This is required if your deployment template creates IAM resources. You can learn more at Controlling access with AWS Identity and Access Management.
Figure 8: Acknowledge IAM resources creation by AWS CloudFormation
Choose Submit to deploy the stack set.
Step 4: Deploy the second template in the primary Region of all application accounts to create global resources
This template creates the global resources required for sending Amazon Inspector findings to Amazon ES and Amazon S3.
To deploy the second template
Download the template (ApplicationAcnts-RolesTemplate.yaml) from GitHub and use it to create the second CloudFormation stack set in the primary Region of the central security account.
To deploy the template, follow the steps used to deploy the base template (described in the previous section) through Configure StackSet options.
In Set deployment options, do the following:
Under Account numbers, enter the account IDs of your application accounts as comma-separated values. You can use the steps in Finding your AWS account ID to help you gather the account IDs.
Under Specify regions, select only your primary Region.
Figure 9: Select account numbers and specify Regions
The remaining steps are the same as for the base template deployment.
Step 5: Deploy the third template in all Regions of all application accounts
This template creates the resources in each Region of all application accounts needed for scheduled scanning of EC2 instances using Amazon Inspector. Notifications are sent to the SNS topics of each Region of the central security account.
To deploy the third template
Download the template InspectorRun-SetupTemplate.yaml from GitHub and create the final AWS CloudFormation stack set. Similar to the previous stack sets, this one should also be created in the central security account.
For deployment, follow the same steps you used to deploy the base template through Configure StackSet options.
In Set deployment options:
Under Account numbers, enter the same account IDs of your application accounts (comma-separated values) as you did for the second template deployment.
Under Specify regions, select all the Regions where you installed the Amazon Inspector agent.
Note: This list of Regions should be the same as the Regions where you deployed the base template.
The remaining steps are the same as for the second template deployment.
Test the solution and delivery of the findings
After successful deployment of the architecture, to test the solution you can wait until the next scheduled Amazon Inspector scan or you can use the following steps to run the Amazon Inspector scan manually.
To run the Amazon Inspector scan manually for testing the solution
In any one of the application accounts, go to any Region where the Amazon Inspector scan was performed.
In the left navigation menu, select Assessment templates to see the available assessments.
Choose the assessment template that was created by the third template.
Choose Run to start the assessment immediately.
When the run is complete, Last run status changes from Collecting data to Analysis Complete.
Figure 10: Amazon Inspector assessment run
You can see the recent scan findings in the Amazon Inspector console by selecting Assessment runs from the left navigation menu.
Figure 11: The assessment run indicates total findings from the last Amazon Inspector run in this Region
In the left navigation menu, select Findings to see details of each finding, or use the steps in the following section to verify the delivery of findings to the central security account.
Test the delivery of the Amazon Inspector findings
This solution delivers the Amazon Inspector findings to two AWS services—Amazon ES and Amazon S3—in the primary Region of the central security account. You can either use Kibana to view the findings sent to Amazon ES or you can use the findings sent to Amazon S3 and forward them to the security monitoring software of your preference for further analysis.
To check whether the findings are delivered to Amazon ES
Select the S3 bucket that you created for storing Amazon Inspector findings.
Select the bucket name to view the bucket details. The total number of findings for the chosen Region is at the top right corner of the Overview tab.
Figure 14: The total security findings as stored in an S3 bucket for us-east-1 Region
Visualization in Kibana
The data sent to the Amazon ES index can be used to create visualizations in Kibana that make it easier to identify potential security gaps and plan the remediation accordingly.
You can use Kibana to create a dashboard that gives an overview of the potential vulnerabilities identified in different instances of different AWS accounts. Figure 15 shows an example of such a dashboard. The dashboard can help you rank the need for remediation based on criteria such as:
The category of vulnerability
The most impacted AWS accounts
EC2 instances that need immediate attention
Figure 15: A sample Kibana dashboard showing findings from Amazon Inspector
You can build additional panels to visualize details of the vulnerability findings identified by Amazon Inspector, such as the CVE ID of the security vulnerability, its description, and recommendations on how to remove the vulnerabilities.
Figure 16: A sample Kibana dashboard panel listing the top identified vulnerabilities and their details
Conclusion
By using this solution to combine Amazon Inspector, Amazon SNS topics, Amazon SQS queues, Lambda functions, an Amazon ES domain, and S3 buckets, you can centrally analyze and monitor the vulnerability posture of EC2 instances across your AWS environment, including multiple Regions across multiple AWS accounts. This solution is built following least privilege access through AWS IAM roles and policies to help secure the cross-account architecture.
In this blog post, you learned how to send the findings directly to Amazon ES for visualization in Kibana. These visualizations can be used to build dashboards that security analysts can use for centralized monitoring. Better monitoring capability helps analysts to identify potentially vulnerable assets and perform remediation activities to improve security of your applications in AWS and their underlying assets. This solution also demonstrates how to store the findings from Amazon Inspector in an S3 bucket, which makes it easier for you to use those findings to create visualizations in your preferred security monitoring software.
If you have feedback about this post, submit comments in the Comments section below. If you have questions about this post, contact AWS Support.
Want more AWS Security how-to content, news, and feature announcements? Follow us on Twitter.
Data is a crucial part of every business and is used for strategic decision making at all levels of an organization. To extract value from their data more quickly, Amazon Web Services (AWS) customers are building automated data pipelines—from data ingestion to transformation and analytics. As part of this process, my customers often ask how to prevent sensitive data, such as personally identifiable information, from being ingested into data lakes when it’s not needed. They highlight that this challenge is compounded when ingesting unstructured data—such as files from process reporting, text files from chat transcripts, and emails. They also mention that identifying sensitive data inadvertently stored in structured data fields—such as in a comment field stored in a database—is also a challenge.
In this post, I show you how to integrate Amazon Macie as part of the data ingestion step in your data pipeline. This solution provides an additional checkpoint that sensitive data has been appropriately redacted or tokenized prior to ingestion. Macie is a fully managed data security and privacy service that uses machine learning and pattern matching to discover sensitive data in AWS.
When Macie discovers sensitive data, the solution notifies an administrator to review the data and decide whether to allow the data pipeline to continue ingesting the objects. If allowed, the objects will be tagged with an Amazon Simple Storage Service (Amazon S3) object tag to identify that sensitive data was found in the object before progressing to the next stage of the pipeline.
This combination of automation and manual review helps reduce the risk that sensitive data—such as personally identifiable information—will be ingested into a data lake. This solution can be extended to fit your use case and workflows. For example, you can define custom data identifiers as part of your scans, add additional validation steps, create Macie suppression rules to archive findings automatically, or only request manual approvals for findings that meet certain criteria (such as high severity findings).
Solution overview
Many of my customers are building serverless data lakes with Amazon S3 as the primary data store. Their data pipelines commonly use different S3 buckets at each stage of the pipeline. I refer to the S3 bucket for the first stage of ingestion as the raw data bucket. A typical pipeline might have separate buckets for raw, curated, and processed data representing different stages as part of their data analytics pipeline.
Typically, customers will perform validation and clean their data before moving it to a raw data zone. This solution adds validation steps to that pipeline after preliminary quality checks and data cleaning is performed, noted in blue (in layer 3) of Figure 1. The layers outlined in the pipeline are:
Ingestion – Brings data into the data lake.
Storage – Provides durable, scalable, and secure components to store the data—typically using S3 buckets.
Processing – Transforms data into a consumable state through data validation, cleanup, normalization, transformation, and enrichment. This processing layer is where the additional validation steps are added to identify instances of sensitive data that haven’t been appropriately redacted or tokenized prior to consumption.
Consumption – Provides tools to gain insights from the data in the data lake.
Figure 1: Data pipeline with sensitive data scan
The application runs on a scheduled basis (four times a day, every 6 hours by default) to process data that is added to the raw data S3 bucket. You can customize the application to perform a sensitive data discovery scan during any stage of the pipeline. Because most customers do their extract, transform, and load (ETL) daily, the application scans for sensitive data on a scheduled basis before any crawler jobs run to catalog the data and after typical validation and data redaction or tokenization processes complete.
You can expect that this additional validation will add 5–10 minutes to your pipeline execution at a minimum. The validation processing time will scale linearly based on object size, but there is a start-up time per job that is constant.
If sensitive data is found in the objects, an email is sent to the designated administrator requesting an approval decision, which they indicate by selecting the link corresponding to their decision to approve or deny the next step. In most cases, the reviewer will choose to adjust the sensitive data cleanup processes to remove the sensitive data, deny the progression of the files, and re-ingest the files in the pipeline.
Additional considerations for deploying this application for regular use are discussed at the end of the blog post.
Application components
The following resources are created as part of the application:
S3 buckets store data in various stages of processing: A raw data bucket for uploading objects for the data pipeline, a scanning bucket where objects are scanned for sensitive data, a manual review bucket holding objects where sensitive data was discovered, and a scanned data bucket for starting the next ingestion step of the data pipeline.
Lambda functions execute the logic to run the sensitive data scans and workflow.
Note: the application uses various AWS services, and there are costs associated with these resources after the Free Tier usage. See AWS Pricing for details. The primary drivers of the solution cost will be the amount of data ingested through the pipeline, both for Amazon S3 storage and data processed for sensitive data discovery with Macie.
The architecture of the application is shown in Figure 2 and described in the text that follows.
Figure 2: Application architecture and logic
Application logic
Objects are uploaded to the raw data S3 bucket as part of the data ingestion process.
A scheduled EventBridge rule runs the sensitive data scan Step Functions workflow.
triggerMacieScan Lambda function moves objects from the raw data S3 bucket to the scan stage S3 bucket.
triggerMacieScan Lambda function creates a Macie sensitive data discovery job on the scan stage S3 bucket.
checkMacieStatus Lambda function checks the status of the Macie sensitive data discovery job.
isMacieStatusCompleteChoiceStep Functions Choice state checks whether the Macie sensitive data discovery job is complete.
If yes, the getMacieFindingsCount Lambda function runs.
getMacieFindingsCount Lambda function counts all of the findings from the Macie sensitive data discovery job.
isSensitiveDataFound Step Functions Choice state checks whether sensitive data was found in the Macie sensitive data discovery job.
If there was sensitive data discovered, run the triggerManualApproval Lambda function.
If there was no sensitive data discovered, run the moveAllScanStageS3Files Lambda function.
moveAllScanStageS3Files Lambda function moves all of the objects from the scan stage S3 bucket to the scanned data S3 bucket.
triggerManualApproval Lambda function tags and moves objects with sensitive data discovered to the manual review S3 bucket, and moves objects with no sensitive data discovered to the scanned data S3 bucket. The function then sends a notification to the ApprovalRequestNotification Amazon SNS topic as a notification that manual review is required.
Email is sent to the email address that’s subscribed to the ApprovalRequestNotification Amazon SNS topic (from the application deployment template) for the manual review user with the option to Approve or Deny pipeline ingestion for these objects.
Manual review user assesses the objects with sensitive data in the manual review S3 bucket and selects the Approve or Deny links in the email.
The decision request is sent from the Amazon API Gateway to the receiveApprovalDecision Lambda function.
manualApprovalChoice Step Functions Choice state checks the decision from the manual review user.
If denied, run the deleteManualReviewS3Files Lambda function.
If approved, run the moveToScannedDataS3Files Lambda function.
deleteManualReviewS3Files Lambda function deletes the objects from the manual review S3 bucket.
moveToScannedDataS3Files Lambda function moves the objects from the manual review S3 bucket to the scanned data S3 bucket.
The next step of the automated data pipeline will begin with the objects in the scanned data S3 bucket.
Prerequisites
For this application, you need the following prerequisites:
You can use AWS Cloud9 to deploy the application. AWS Cloud9 includes the AWS CLI and AWS SAM CLI to simplify setting up your development environment.
Deploy the application with AWS SAM CLI
You can deploy this application using the AWS SAM CLI. AWS SAM uses AWS CloudFormation as the underlying deployment mechanism. AWS SAM is an open-source framework that you can use to build serverless applications on AWS.
To deploy the application
Initialize the serverless application using the AWS SAM CLI from the GitHub project in the aws-samples repository. This will clone the project locally which includes the source code for the Lambda functions, Step Functions state machine definition file, and the AWS SAM template. On the command line, run the following:
sam init --location gh: aws-samples/amazonmacie-datapipeline-scan
Alternatively, you can clone the Github project directly.
Deploy your application to your AWS account. On the command line, run the following:
sam deploy --guided
Complete the prompts during the guided interactive deployment. The first deployment prompt is shown in the following example.
Configuring SAM deploy
======================

        Looking for config file [samconfig.toml] :  Found
        Reading default arguments  :  Success

        Setting default arguments for 'sam deploy'
        =========================================
        Stack Name [maciepipelinescan]:
Settings:
Stack Name – Name of the CloudFormation stack to be created.
AWS Region – Region—for example, us-west-2, eu-west-1, ap-southeast-1—to deploy the application to. This application was tested in the us-west-2 and ap-southeast-1 Regions. Before selecting a Region, verify that the services you need are available in those Regions (for example, Macie and Step Functions).
Parameter StepFunctionName – Name of the Step Functions state machine to be created—for example, maciepipelinescanstatemachine).
Parameter BucketNamePrefix – Prefix to apply to the S3 buckets to be created (S3 bucket names are globally unique, so choosing a random prefix helps ensure uniqueness).
Parameter ApprovalEmailDestination – Email address to receive the manual review notification.
Parameter EnableMacie – Whether you need Macie enabled in your account or Region. You can select yes or no; select yes if you need Macie to be enabled for you as part of this template, select no, if you already have Macie enabled.
Confirm changes and provide approval for AWS SAM CLI to deploy the resources to your AWS account by responding y to prompts, as shown in the following example. You can accept the defaults for the SAM configuration file and SAM configuration environment prompts.
#Shows you resources changes to be deployed and require a 'Y' to initiate deploy
Confirm changes before deploy [y/N]: y
#SAM needs permission to be able to create roles to connect to the resources in your template
Allow SAM CLI IAM role creation [Y/n]: y
ReceiveApprovalDecisionAPI may not have authorization defined, Is this okay? [y/N]: y
ReceiveApprovalDecisionAPI may not have authorization defined, Is this okay? [y/N]: y
Save arguments to configuration file [Y/n]: y
SAM configuration file [samconfig.toml]:
SAM configuration environment [default]:
Note: This application deploys an Amazon API Gateway with two REST API resources without authorization defined to receive the decision from the manual review step. You will be prompted to accept each resource without authorization. A token (Step Functions taskToken) is used to authenticate the requests.
This creates an AWS CloudFormation changeset. Once the changeset creation is complete, you must provide a final confirmation of y to Deploy the changeset? [y/N] when prompted as shown in the following example.
Changeset created successfully. arn:aws:cloudformation:ap-southeast-1:XXXXXXXXXXXX:changeSet/samcli-deploy1605213119/db681961-3635-4305-b1c7-dcc754c7XXXX


Previewing CloudFormation changeset before deployment
======================================================
Deploy this changeset? [y/N]:
Your application is deployed to your account using AWS CloudFormation. You can track the deployment events in the command prompt or via the AWS CloudFormation console.
After the application deployment is complete, you must confirm the subscription to the Amazon SNS topic. An email will be sent to the email address entered in Step 3 with a link that you need to select to confirm the subscription. This confirmation provides opt-in consent for AWS to send emails to you via the specified Amazon SNS topic. The emails will be notifications of potentially sensitive data that need to be approved. If you don’t see the verification email, be sure to check your spam folder.
Test the application
The application uses an EventBridge scheduled rule to start the sensitive data scan workflow, which runs every 6 hours. You can manually start an execution of the workflow to verify that it’s working. To test the function, you will need a file that contains data that matches your rules for sensitive data. For example, it is easy to create a spreadsheet, document, or text file that contains names, addresses, and numbers formatted like credit card numbers. You can also use this generated sample data to test Macie.
We will test by uploading a file to our S3 bucket via the AWS web console. If you know how to copy objects from the command line, that also works.
Upload test objects to the S3 bucket
Navigate to the Amazon S3 console and upload one or more test objects to the <BucketNamePrefix>-data-pipeline-raw bucket. <BucketNamePrefix> is the prefix you entered when deploying the application in the AWS SAM CLI prompts. You can use any objects as long as they’re a supported file type for Amazon Macie. I suggest uploading multiple objects, some with and some without sensitive data, in order to see how the workflow processes each.
Start the Scan State Machine
Navigate to the Step Functions state machines console. If you don’t see your state machine, make sure you’re connected to the same region that you deployed your application to.
Choose the state machine you created using the AWS SAM CLI as seen in Figure 3. The example state machine is maciepipelinescanstatemachine, but you might have used a different name in your deployment.
Figure 3: AWS Step Functions state machines console
Select the Start execution button and copy the value from the Enter an execution name – optional box. Change the Input – optional value replacing <execution id> with the value just copied as follows:
{
    “id”: “<execution id>”
}
In my example, the <execution id> is fa985a4f-866b-b58b-d91b-8a47d068aa0c from the Enter an execution name – optional box as shown in Figure 4. You can choose a different ID value if you prefer. This ID is used by the workflow to tag the objects being processed to ensure that only objects that are scanned continue through the pipeline. When the EventBridge scheduled event starts the workflow as scheduled, an ID is included in the input to the Step Functions workflow. Then select Start execution again.
Figure 4: New execution dialog box
You can see the status of your workflow execution in the Graph inspector as shown in Figure 5. In the figure, the workflow is at the pollForCompletionWait step.
Figure 5: AWS Step Functions graph inspector
The sensitive discovery job should run for about five to ten minutes. The jobs scale linearly based on object size, but there is a start-up time per job that is constant. If sensitive data is found in the objects uploaded to the <BucketNamePrefix>-data-pipeline-upload S3 bucket, an email is sent to the address provided during the AWS SAM deployment step, notifying the recipient requesting of the need for an approval decision, which they indicate by selecting the link corresponding to their decision to approve or deny the next step as shown in Figure 6.
Figure 6: Sensitive data identified email
When you receive this notification, you can investigate the findings by reviewing the objects in the <BucketNamePrefix>-data-pipeline-manual-review S3 bucket. Based on your review, you can either apply remediation steps to remove any sensitive data or allow the data to proceed to the next step of the data ingestion pipeline. You should define a standard response process to address discovery of sensitive data in the data pipeline. Common remediation steps include review of the files for sensitive data, deleting the files that you do not want to progress, and updating the ETL process to redact or tokenize sensitive data when re-ingesting into the pipeline. When you re-ingest the files into the pipeline without sensitive data, the files will not be flagged by Macie.
The workflow performs the following:
If you select Approve, the files are moved to the <BucketNamePrefix>-data-pipeline-scanned-data S3 bucket with an Amazon S3 SensitiveDataFound object tag with a value of true.
If you select Deny, the files are deleted from the <BucketNamePrefix>-data-pipeline-manual-review S3 bucket.
If no action is taken, the Step Functions workflow execution times out after five days and the file will automatically be deleted from the <BucketNamePrefix>-data-pipeline-manual-review S3 bucket after 10 days.
Clean up the application
You’ve successfully deployed and tested the sensitive data pipeline scan workflow. To avoid ongoing charges for resources you created, you should delete all associated resources by deleting the CloudFormation stack. In order to delete the CloudFormation stack, you must first delete all objects that are stored in the S3 buckets that you created for the application.
To delete the application
Empty the S3 buckets created in this application (<BucketNamePrefix>-data-pipeline-raw S3 bucket, <BucketNamePrefix>-data-pipeline-scan-stage, <BucketNamePrefix>-data-pipeline-manual-review, and <BucketNamePrefix>-data-pipeline-scanned-data).
Before using this application in a production data pipeline, you will need to stop and consider some practical matters. First, the notification mechanism used when sensitive data is identified in the objects is email. Email doesn’t scale: you should expand this solution to integrate with your ticketing or workflow management system. If you choose to use email, subscribe a mailing list so that the work of reviewing and responding to alerts is shared across a team.
Second, the application is run on a scheduled basis (every 6 hours by default). You should consider starting the application when your preliminary validations have completed and are ready to perform a sensitive data scan on the data as part of your pipeline. You can modify the EventBridge Event Rule to run in response to an Amazon EventBridge event instead of a scheduled basis.
Third, the application currently uses a 60 second Step Functions Wait state when polling for the Macie discovery job completion. In real world scenarios, the discovery scan will take 10 minutes at a minimum, likely several orders of magnitude longer. You should evaluate the typical execution times for your application execution and tune the polling period accordingly. This will help reduce costs related to running Lambda functions and log storage within CloudWatch Logs. The polling period is defined in the Step Functions state machine definition file (macie_pipeline_scan.asl.json) under the pollForCompletionWait state.
Fourth, the application currently doesn’t account for false positives in the sensitive data discovery job results. Also, the application will progress or delete all objects identified based on the decision by the reviewer. You should consider expanding the application to handle false positives through automation rather than manual review / intervention (such as deleting the files from the manual review bucket or removing the sensitive data tags applied).
Last, the solution will stop the ingestion of a subset of objects into your pipeline. This behavior is similar to other validation and data quality checks that most customers perform as part of the data pipeline. However, you should test to ensure that this will not cause unexpected outcomes and address them in your downstream application logic accordingly.
Conclusion
In this post, I showed you how to integrate sensitive data discovery using Macie as an additional validation step in an automated data pipeline. You’ve reviewed the components of the application, deployed it using the AWS SAM CLI, tested to validate that the application functions as expected, and cleaned up by removing deployed resources.
You now know how to integrate sensitive data scanning into your ETL pipeline. You can use automation and—where required—manual review to help reduce the risk of sensitive data, such as personally identifiable information, being inadvertently ingested into a data lake. You can take this application and customize it to fit your use case and workflows, such as using custom data identifiers as part of your scans, adding additional validation steps, creating Macie suppression rules to define cases to archive findings automatically, or only request manual approvals for findings that meet certain criteria (such as high severity findings).
If you have feedback about this post, submit comments in the Comments section below. If you have questions about this post, start a new thread on the Amazon Macie forum.
Want more AWS Security how-to content, news, and feature announcements? Follow us on Twitter.
General Data Protection Regulation (GDPR) is an important aspect of today’s technology world, and processing data in compliance with GDPR is a necessity for those who implement solutions within the AWS public cloud. One article of GDPR is the “right to erasure” or “right to be forgotten” which may require you to implement a solution to delete specific users’ personal data.
In the context of the AWS big data and analytics ecosystem, every architecture, regardless of the problem it targets, uses Amazon Simple Storage Service (Amazon S3) as the core storage service. Despite its versatility and feature completeness, Amazon S3 doesn’t come with an out-of-the-box way to map a user identifier to S3 keys of objects that contain user’s data.
This post walks you through a framework that helps you purge individual user data within your organization’s AWS hosted data lake, and an analytics solution that uses different AWS storage layers, along with sample code targeting Amazon S3.
Reference architecture
To address the challenge of implementing a data purge framework, we reduced the problem to the straightforward use case of deleting a user’s data from a platform that uses AWS for its data pipeline. The following diagram illustrates this use case.
We’re introducing the idea of building and maintaining an index metastore that keeps track of the location of each user’s records and allows us locate to them efficiently, reducing the search space.
You can use the following architecture diagram to delete a specific user’s data within your organization’s AWS data lake.
For this initial version, we created three user flows that map each task to a fitting AWS service:
When a user asks for their data to be deleted, we trigger an AWS Step Functions state machine through Amazon CloudWatch to orchestrate the workflow. Its first step triggers a Lambda function that queries the metadata index to identify the storage layers that contain user records and generates a report that’s saved to an S3 report bucket. A Step Functions activity is created and picked up by a Lambda Node JS based worker that sends an email to the approver through Amazon Simple Email Service (SES) with approve and reject links.
The following diagram shows a graphical representation of the Step Function state machine as seen on the AWS Management Console.
The approver selects one of the two links, which then calls an Amazon API Gateway endpoint that invokes Step Functions to resume the workflow. If you choose the approve link, Step Functions triggers a Lambda function that takes the report stored in the bucket as input, deletes the objects or records from the storage layer, and updates the index metastore. When the purging job is complete, Amazon Simple Notification Service (SNS) sends a success or fail email to the user.
The following diagram represents the Step Functions flow on the console if the purge flow completed successfully.
This flow refers to the use case of an existing data lake for which index metastore needs to be created. You can orchestrate the flow through AWS Step Functions, which takes historical data as input and updates metastore through a batch job. Our current implementation doesn’t include a sample script for this user flow.
Our framework
We now walk you through the two use cases we followed for our implementation:
You have multiple user records stored in each Amazon S3 file
A user has records stored in homogenous AWS storage layers
Within these two approaches, we demonstrate alternatives that you can use to store your index metastore.
Indexing by S3 URI and row number
For this use case, we use a free tier RDS Postgres instance to store our index. We created a simple table with the following code:
CREATE UNLOGGED TABLE IF NOT EXISTS user_objects (
				userid TEXT,
				s3path TEXT,
				recordline INTEGER
			);
You can index on user_id to optimize query performance. On object upload, for each row, you need to insert into the user_objects table a row that indicates the user ID, the URI of the target Amazon S3 object, and the row that corresponds to the record. For instance, when uploading the following JSON input, enter the following code:
You can implement the index update operation by using a Lambda function triggered on any Amazon S3 ObjectCreated event.
When we get a delete request from a user, we need to query our index to get some information about where we have stored the data to delete. See the following code:
SELECT s3path,
                ARRAY_AGG(recordline)
                FROM user_objects
                WHERE userid = ‘V34qejxNsCbcgD8C0HVk-Q’
                GROUP BY;
The preceding example SQL query returns rows like the following:
The output indicates that lines 529 and 2102 of S3 object s3://gdpr-review/year=2015/month=12/day=21/review-part-0.json contain the requested user’s data and need to be purged. We then need to download the object, remove those rows, and overwrite the object. For a Python implementation of the Lambda function that implements this functionality, see deleteUserRecords.py in the GitHub repo.
Having the record line available allows you to perform the deletion efficiently in byte format. For implementation simplicity, we purge the rows by replacing the deleted rows with an empty JSON object. You pay a slight storage overhead, but you don’t need to update subsequent row metadata in your index, which would be costly. To eliminate empty JSON objects, we can implement an offline vacuum and index update process.
Indexing by file name and grouping by index key
For this use case, we created a DynamoDB table to store our index. We chose DynamoDB because of its ease of use and scalability; you can use its on-demand pricing model so you don’t need to guess how many capacity units you might need. When files are uploaded to the data lake, a Lambda function parses the file name (for example, 1001-.csv) to identify the user identifier and populates the DynamoDB metadata table. Userid is the partition key, and each different storage layer has its own attribute. For example, if user 1001 had data in Amazon S3 and Amazon RDS, their records look like the following code:
For a sample Python implementation of this functionality, see update-dynamo-metadata.py in the GitHub repo.
On delete request, we query the metastore table, which is DynamoDB, and generate a purge report that contains details on what storage layers contain user records, and storage layer specifics that can speed up locating the records. We store the purge report to Amazon S3. For a sample Lambda function that implements this logic, see generate-purge-report.py in the GitHub repo.
After the purging is approved, we use the report as input to delete the required resources. For a sample Lambda function implementation, see gdpr-purge-data.py in the GitHub repo.
Implementation and technology alternatives
We explored and evaluated multiple implementation options, all of which present tradeoffs, such as implementation simplicity, efficiency, critical data compliance, and feature completeness:
Scan every record of the data file to create an index – Whenever a file is uploaded, we iterate through its records and generate tuples (userid, s3Uri, row_number) that are then inserted to our metadata storing layer. On delete request, we fetch the metadata records for requested user IDs, download the corresponding S3 objects, perform the delete in place, and re-upload the updated objects, overwriting the existing object. This is the most flexible approach because it supports a single object to store multiple users’ data, which is a very common practice. The flexibility comes at a cost because it requires downloading and re-uploading the object, which introduces a network bottleneck in delete operations. User activity datasets such as customer product reviews are a good fit for this approach, because it’s unexpected to have multiple records for the same user within each partition (such as a date partition), and it’s preferable to combine multiple users’ activity in a single file. It’s similar to what was described in the section “Indexing by S3 URI and row number” and sample code is available in the GitHub repo.
Store metadata as file name prefix – Adding the user ID as the prefix of the uploaded object under the different partitions that are defined based on query pattern enables you to reduce the required search operations on delete request. The metadata handling utility finds the user ID from the file name and maintains the index accordingly. This approach is efficient in locating the resources to purge but assumes a single user per object, and requires you to store user IDs within the filename, which might require InfoSec considerations. Clickstream data, where you would expect to have multiple click events for a single customer on a single date partition during a session, is a good fit. We covered this approach in the section “Indexing by file name and grouping by index key” and you can download the codebase from the GitHub repo.
Use a metadata file – Along with uploading a new object, we also upload a metadata file that’s picked up by an indexing utility to create and maintain the index up to date. On delete request, we query the index, which points us to the records to purge. A good fit for this approach is a use case that already involves uploading a metadata file whenever a new object is uploaded, such as uploading multimedia data, along with their metadata. Otherwise, uploading a metadata file on every object upload might introduce too much of an overhead.
Use the tagging feature of AWS services – Whenever a new file is uploaded to Amazon S3, we use the Put Object Tagging Amazon S3 operation to add a key-value pair for the user identifier. Whenever there is a user data delete request, it fetches objects with that tag and deletes them. This option is straightforward to implement using the existing Amazon S3 API and can therefore be a very initial version of your implementation. However, it involves significant limitations. It assumes a 1:1 cardinality between Amazon S3 objects and users (each object only contains data for a single user), searching objects based on a tag is limited and inefficient, and storing user identifiers as tags might not be compliant with your organization’s InfoSec policy.
Use Apache Hudi – Apache Hudi is becoming a very popular option to perform record-level data deletion on Amazon S3. Its current version is restricted to Amazon EMR, and you can use it if you start to build your data lake from scratch, because you need to store your as Hudi datasets. Hudi is a very active project and additional features and integrations with more AWS services are expected.
The key implementation decision of our approach is separating the storage layer we use for our data and the one we use for our metadata. As a result, our design is versatile and can be plugged in any existing data pipeline. Similar to deciding what storage layer to use for your data, there are many factors to consider when deciding how to store your index:
Concurrency of requests – If you don’t expect too many simultaneous inserts, even something as simple as Amazon S3 could be a starting point for your index. However, if you get multiple concurrent writes for multiple users, you need to look into a service that copes better with transactions.
Existing team knowledge and infrastructure – In this post, we demonstrated using DynamoDB and RDS Postgres for storing and querying the metadata index. If your team has no experience with either of those but are comfortable with Amazon ES, Amazon DocumentDB (with MongoDB compatibility), or any other storage layer, use those. Furthermore, if you’re already running (and paying for) a MySQL database that’s not used to capacity, you could use that for your index for no additional cost.
Size of index – The volume of your metadata is orders of magnitude lower than your actual data. However, if your dataset grows significantly, you might need to consider going for a scalable, distributed storage solution rather than, for instance, a relational database management system.
Conclusion
GDPR has transformed best practices and introduced several extra technical challenges in designing and implementing a data lake. The reference architecture and scripts in this post may help you delete data in a manner that’s compliant with GDPR.
Let us know your feedback in the comments and how you implemented this solution in your organization, so that others can learn from it.
About the Authors
George Komninos is a Data Lab Solutions Architect at AWS. He helps customers convert their ideas to a production-ready data product. Before AWS, he spent 3 years at Alexa Information domain as a data engineer. Outside of work, George is a football fan and supports the greatest team in the world, Olympiacos Piraeus.
Sakti Mishra is a Data Lab Solutions Architect at AWS. He helps customers architect data analytics solutions, which gives them an accelerated path towards modernization initiatives. Outside of work, Sakti enjoys learning new technologies, watching movies, and travel.
As you put more and more data in the cloud, you need to rely on security automation to keep it secure at scale. AWS recently launched Amazon Macie, a fully managed service that uses machine learning and pattern matching to help you detect, classify, and better protect your sensitive data stored in the AWS Cloud.
Many data breaches are not the result of malicious activity from unauthorized users, but rather from mistakes made by authorized users. To monitor and manage the security of sensitive data, you must first be able to identify it. In this post, we show you how to use custom data identifiers with Macie to identify sensitive data. Once you know what’s sensitive, you can start designing security controls that operate at scale to monitor and remediate risk automatically.
Macie comes with a set of managed data identifiers that you can use to discover many types of sensitive data. These are somewhat generic and broadly applicable to many organizations. What makes Macie unique is its ability to help you address specific data needs. Macie enables you to expand your sensitive data detection through the new custom data identifiers. Custom data identifiers can be used to highlight organizational proprietary data, intellectual property, and specific scenarios.
Custom Data Identifiers in Macie help you find and identify sensitive data based on your own organization’s specific needs. In this post, we show you a step-by-step walkthrough of how to define and run custom data identifiers to automatically discover specific, sensitive data. Before you begin using Custom Data Identifiers, you need to enable Macie and configure detailed logging. Follow these instructions to enable Macie and follow these instructions to configure detailed logging, if you haven’t done that already.
When to use the Custom Data Identifier resource
To begin, imagine you’re an IT administrator for a manufacturing company that’s headquartered in France. Your company has acquired a few additional local subsidiaries, including an R&D facility in São Paulo, Brazil. The company is migrating to AWS, and in the process is classifying registration information, employee information, and product data into encrypted and non-encrypted storage.
You want to identify sensitive data for the following three scenarios:
SIRET-NIC: SIRET-NIC is a unique number assigned to businesses in France. This number is issued by their National Institute of Statistics (INSEE) when a business is registered. A sample file that contains SIRET-NIC information is shown in the following figure. Each record in the file includes the GUID, employee name, employee email, the company name, the date it was issued, and the SIRET-NIC number.
Figure 1: SIRET-NIC dataset
Brazil CPF (Cadastro de Pessoas Físicas – Natural Persons Register): CPF is a unique number assigned by the Brazilian revenue agency to people subject to taxes in the country. Each of your employees residing in the Brazilian office has a CPF.
Prototyping naming convention: Your company has products that are publicly available, but also products that are still in the prototyping stage and should be kept confidential. A sample file that contains Brazil CPF numbers and the prototype names is shown in the following figure.
Figure 2: Brazil CPF and prototype number dataset
Configure the Custom Data Identifier resource in the Macie console
To use custom data identifiers to identify your organization’s sensitive information, you must:
The following steps introduce you to the Custom Data Identifier resource in Macie.
Designing Custom Data Identifiers for use with Amazon Macie
In the previous section you discovered 3 scenarios that your company will like to protect SIRET-NIC, Brazil CPF, and your prototyping naming convention. You now need to first create a specific REGEX pattern for each of these scenarios. There are different syntaxes and dialects of regular expression languages. Amazon Macie supports a subset of the Perl Compatible Regular Expressions (PCRE) library, and you can learn more about it in Regex support in custom data identifiers section. Once the patterns are ready, follow the instructions below to create the custom data identifiers.
Enter Amazon Macie in the AWS services search box.
Choose Amazon Macie.
In the navigation pane on the left-hand side, under Settings, choose Custom data identifiers as shown in the following figure.
Figure 3: Custom data identifiers console
Create a custom data identifier
Choose Create on the custom data identifier console.
Name: Enter a name for your custom data identifier. Make it descriptive so you know what it does. For example, enter SIRET-NIC for the SIRET-NIC number you use.
Description: Enter a description of the custom data identifier.
Regular expression (regex): Define the pattern you want to identify. Use a Regular Expression (“regex”) to create the desired pattern. For example, a SIRET-NIC number contains 14 digits—9 numbers followed by a hyphen and then 5 more numbers. The first part, 9 numbers, can stay together or separated by spaces into 3 groups of 3. The specific regex pattern for this is \b(\d{3}\s?){2}\d{3}\-\d{5}\b
Keywords: Define expressions that identify the text to match. The SIRET-NIC number itself is publicly accessible information. But in your case, you want to encrypt the information about the company that was registered during the month the acquisition happened (April 2020), thus the information will not leak to your competitors. So, the keywords here will be all the days in April.
(Optional) Ignore words: Use this box to enter text that you want to be ignored. In this example scenario, you know your security training materials always use an example SIRET-NICs of 12345789-12345 and 000000000-00000. You can enter these values here, so that your security training materials are not flagged as sensitive data containing SIRET-NICs.
Maximum match distance: Use this box to define the proximity between the result and the keywords. If you enter 20, Macie will provide results that include the specified keyword and 20 characters on either side of it.
Note: Do not select Submit yet. After entering the settings and before selecting Submit, you should test your custom data identifier with sample data to confirm that it works.
With all the attributes set, your console will look like what is shown in Figure 4.
Figure 4: SIRET-NIC custom data identifier creation
Test your SIRET-NIC custom data identifier
Use the Evaluate section on the right-hand panel of the Macie console to confirm that the regex pattern and other configurations for your custom data identifier are correct.
Follow the steps below to use the Evaluate section.
Enter test data in the sample data box.
Select Submit. There will be one match per record in the file if the configurations are correct and your custom data identifier is ready.The following figure is an example of the Evaluate section using test data. The test data has 3 records, each record has 5 fields which are GUID, employee name, employee email, company name, date SIRET-NIC was issued, and the SIRET-NIC number.
Figure 5: Evaluate, showing sample data
After verifying your SIRET-NIC custom data identifier works in the Evaluate section, now select Submit on the New custom data identifier window to create the custom data identifier.
Create a Brazil CPF Custom Data Identifier
Congrats on creating your first custom data identifier! Now use the same steps to create and test custom data identifiers for the Brazil CPF and prototyping naming convention scenarios. The Brazil CPF number usually shows up in the format of 000.000.000-00.
Use the following values for the Brazil CPF scenario, as shown in the following figure:
Name: Brazil CPF
Description: The format for Brazil CPF in our sample data is 000.000.000-00
Regular expression: \b(\d{3}\.){2}\d{3}\-\d{2}\b
Figure 6: Brazil CPF custom data identifier
Create a Prototype Name Custom Data Identifier
Assume that your company has a very strict and regular naming scheme for prototype part numbers. It is P, followed by a hyphen, and then 2 letters and 4 digits. E.g., P-AB1234. You want to identify objects in S3 that contain references to private prototype parts. This is a small pattern, and so if we’re not careful it will cause Macie to flag objects that do not actually contain one of our prototype numbers. We suggest adding \b at the beginning and the end of the regular expression. The \b symbol means a “word boundary” and word boundaries are basically whitespace, punctuation, or other things that are not letters and numbers. With \b, you limit the pattern so that you only match if the entire word matches the pattern. For example, P-AB1234 will match the pattern, but STEP-AB123456 and P-XY123 will not match the pattern. This gives you finer grained control and reduces false positives.
Use the following values for the prototyping name scenario, as shown in the following figure:
Name: Prototyping Naming
Description: Any prototype name start with P means it’s private. The format for private prototype name is P-2 capital letters and 4 numbers
Regular expression: \bP\-[A-Z]{2}\d{4}\b
Figure 7: Prototyping naming custom data identifier
You should now see a page like the following figure, indicating that the SIRET-NIC, Brazil CPF, and Prototyping Naming custom data identifiers are successfully configured.
Figure 8: Successfully configured custom data identifier
Set up a Test Bucket to Demonstrate Macie
Before we can see Macie do its work, we have to create a bucket with some test data that we can scan. We’ve provided some sample data files that you can download. Follow these instructions to create a test bucket and load our test data into the test bucket.
Choose Create bucket. The Create bucket wizard opens.
In Bucket name, enter a DNS-compliant name for your bucket. The bucket name must:
Be unique across all of Amazon S3.
Be between 3 and 63 characters long.
Not contain uppercase characters.
Start with a lowercase letter or number.
We created a bucket called bucketformacieuse; you have to choose another name because this one is already taken by us.
In Region, choose the AWS Region where you want the bucket to reside.
Select Create, to finish the bucket creation.
Open the bucket you just created and upload the two Excel files you downloaded in step 1.
Use Macie to create a job to scan your data
Now you can create a job to scan your Amazon S3 bucket to detect and locate the data patterns defined in the SIRET-NIC, Brazil CPF, and Prototyping Naming custom data identifiers.
To create a job
In the navigation pane, choose Jobs, and then select Create Job on the upper right.
Select Amazon S3 buckets: Select the S3 bucket you want to analyze. In this case, we are using the bucket previously created, bucketformacieuse.
Review Amazon S3 buckets: Verify that you selected the S3 bucket you want the job to scan and analyze.
Scope: Select your scope. For this example, choose the One-time job option as your scope. The scope specifies how often you want the job to run. This can be either a one-time job or a scheduled job. If you choose a scheduled job, you can define how often you want your job to scan your Amazon S3 bucket.
Custom data identifiers: Select the 3 custom data identifiers you created to be associated with this job, and then select Next. This is shown in the following figure.
Figure 9: Select your custom data identifiers
Name and description: Enter a name and description for the job.
Review and create: Review and verify all your settings, and then select Create.
You now have a job in Macie to scan the Amazon S3 buckets you’ve chosen using the 3 custom data identifiers you created. More information about creating jobs is available in Running sensitive data discovery jobs in Amazon Macie.
Respond to results
Macie will help you be secure when you’re effectively responding to the findings that it produces. For our example, we’ll show you how to review your findings manually. You can look at your findings by bucket, type, or job, or see a collective summary of all findings. In this example, let’s look at all findings.
To review your results
In the navigation pane on the left-hand side, choose Findings. Findings include the severity, the type, the resources affected, and when the findings were last updated.
The following figure shows an example of the results you might see on the findings page. There are two findings for the selected job. The compagnie_français.csv and the empresa_brasileira.csv files contain the custom data identifiers that you created earlier and added to the job.
Figure 10: Findings
Let’s look at the details of one of the findings so you can review the results. From the page showing the 4r findings, select the file that contains your custom data identifier for the Brazil CPF: empresa_brasileira.csv. The number of custom data identifiers found in the document is shown in the Result section on the right, as shown in the following figure.
Figure 11: Findings detail page for the Brazil CPF custom data identifiers
Now look at the findings details for the compagnie_français.csv file. It shows the number of custom data identifiers found in the file. In this case Macie found 13 SIRET-NIC numbers as shown in the following figure.
Figure 12: Findings page for the French company file
If you configured detailed logging, the results will be saved in the Amazon S3 bucket you specified. The S3 bucket location can be found in the Details section after Detailed result location as shown in the preceding figure.
Now that you’ve used Macie and the Custom Data Identifiers resource to obtain these findings, you can identify what data to place in encrypted storage, and what can be placed in non-encrypted storage when migrating to AWS. Macie and custom data identifiers provide an automated tool to help you enhance protection of your sensitive data by providing you the information to help detect and classify your data in the AWS Cloud.
Using Macie at Scale
Custom Data Identifiers help you tell Macie what to look for. As you move more and more data to the cloud, you’ll need to make new identifiers and new rules. As your rules and identifiers grow you will need to create automation that responds to things that are found. For example, perhaps a lambda function turns on encryption in a bucket when it finds sensitive data in that bucket. Or perhaps a function automatically applies tags to buckets where sensitive data is found, and those buckets and their owners start to appear on reports for audit and compliance. Once you’ve done this at small scale, think about how you will automate responses at larger scale.
Conclusion
The new Custom Data Identifier resource in the newly enhanced Macie can help you detect, classify, and protect sensitive data types unique to your organization. This post focused on the functionality and use of custom data identifiers to automatically discover sensitive data stored in Amazon S3. You can also review the managed data identifiers to see a list of personally identifiable information (PII) that Macie can detect by default. Visit What is Amazon Macie? to learn more.
If you have feedback about this post, submit comments in the Comments section below. If you have questions about this post, start a new thread on the Amazon Macie forum or contact AWS Support.
Want more AWS Security how-to content, news, and feature announcements? Follow us on Twitter.
The collective thoughts of the interwebz
Manage Consent
To provide the best experiences, we use technologies like cookies to store and/or access device information. Consenting to these technologies will allow us to process data such as browsing behavior or unique IDs on this site. Not consenting or withdrawing consent, may adversely affect certain features and functions.
Functional
Always active
The technical storage or access is strictly necessary for the legitimate purpose of enabling the use of a specific service explicitly requested by the subscriber or user, or for the sole purpose of carrying out the transmission of a communication over an electronic communications network.
Preferences
The technical storage or access is necessary for the legitimate purpose of storing preferences that are not requested by the subscriber or user.
Statistics
The technical storage or access that is used exclusively for statistical purposes.The technical storage or access that is used exclusively for anonymous statistical purposes. Without a subpoena, voluntary compliance on the part of your Internet Service Provider, or additional records from a third party, information stored or retrieved for this purpose alone cannot usually be used to identify you.
Marketing
The technical storage or access is required to create user profiles to send advertising, or to track the user on a website or across several websites for similar marketing purposes.
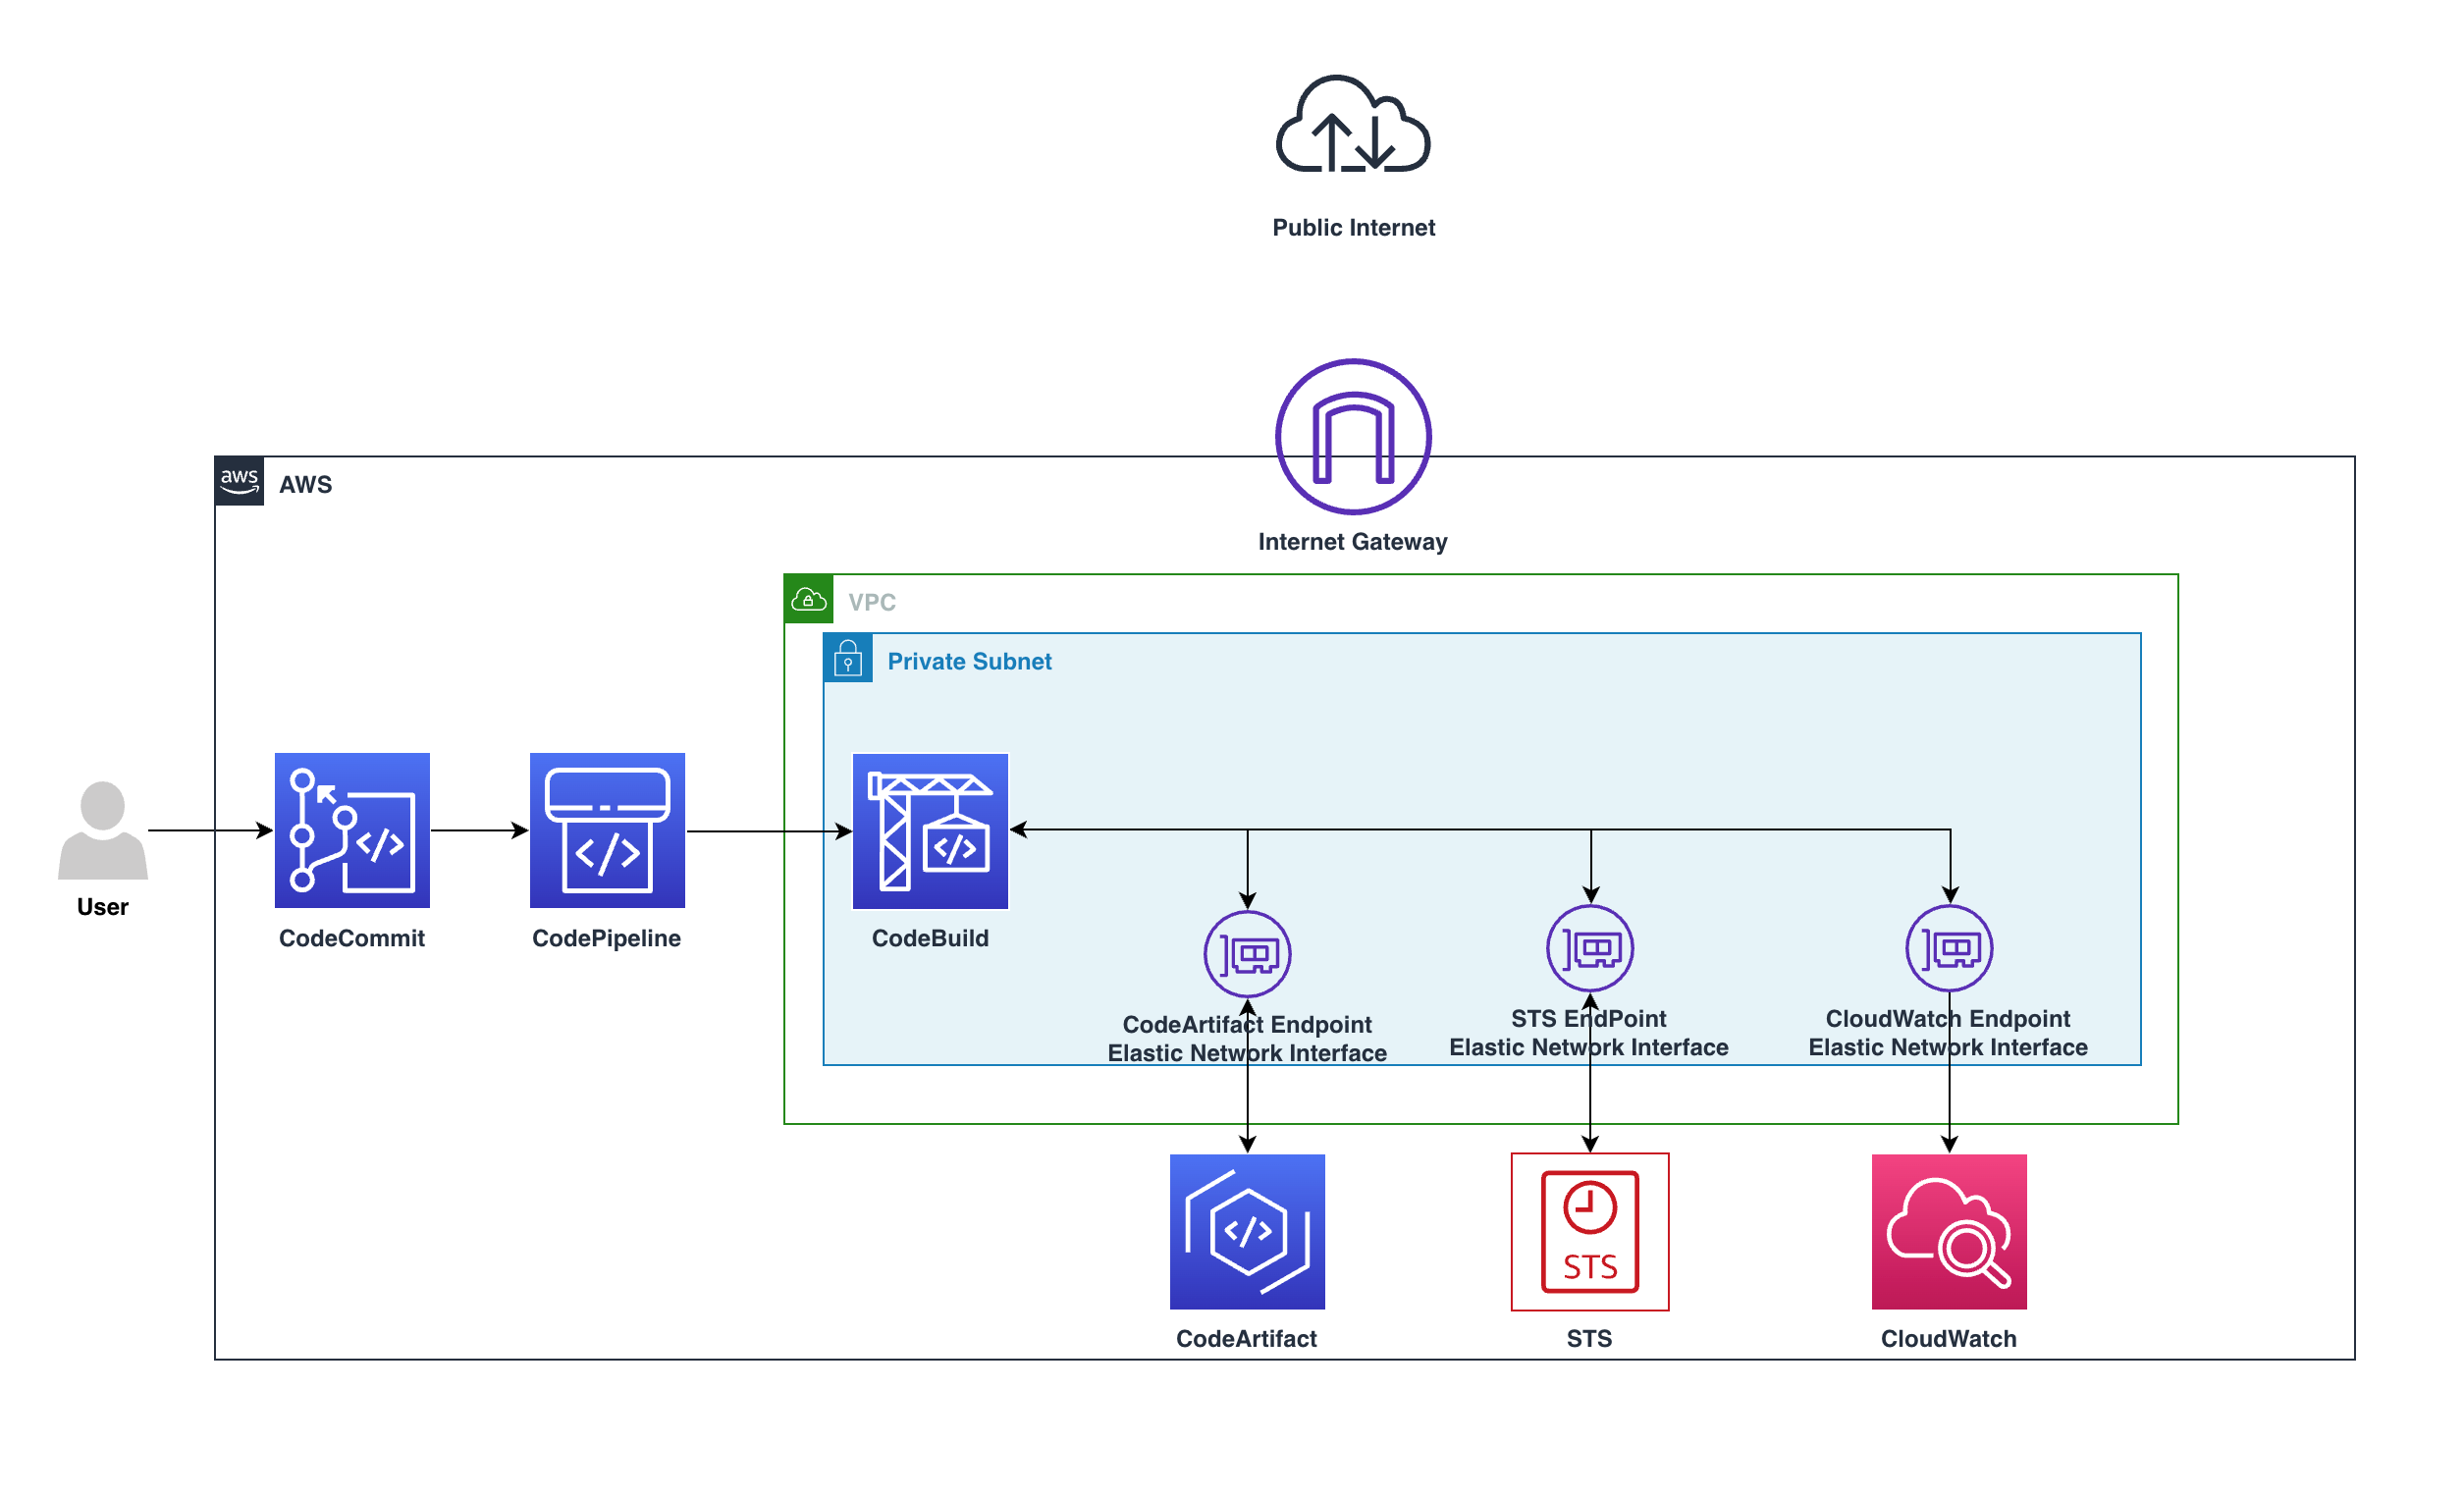
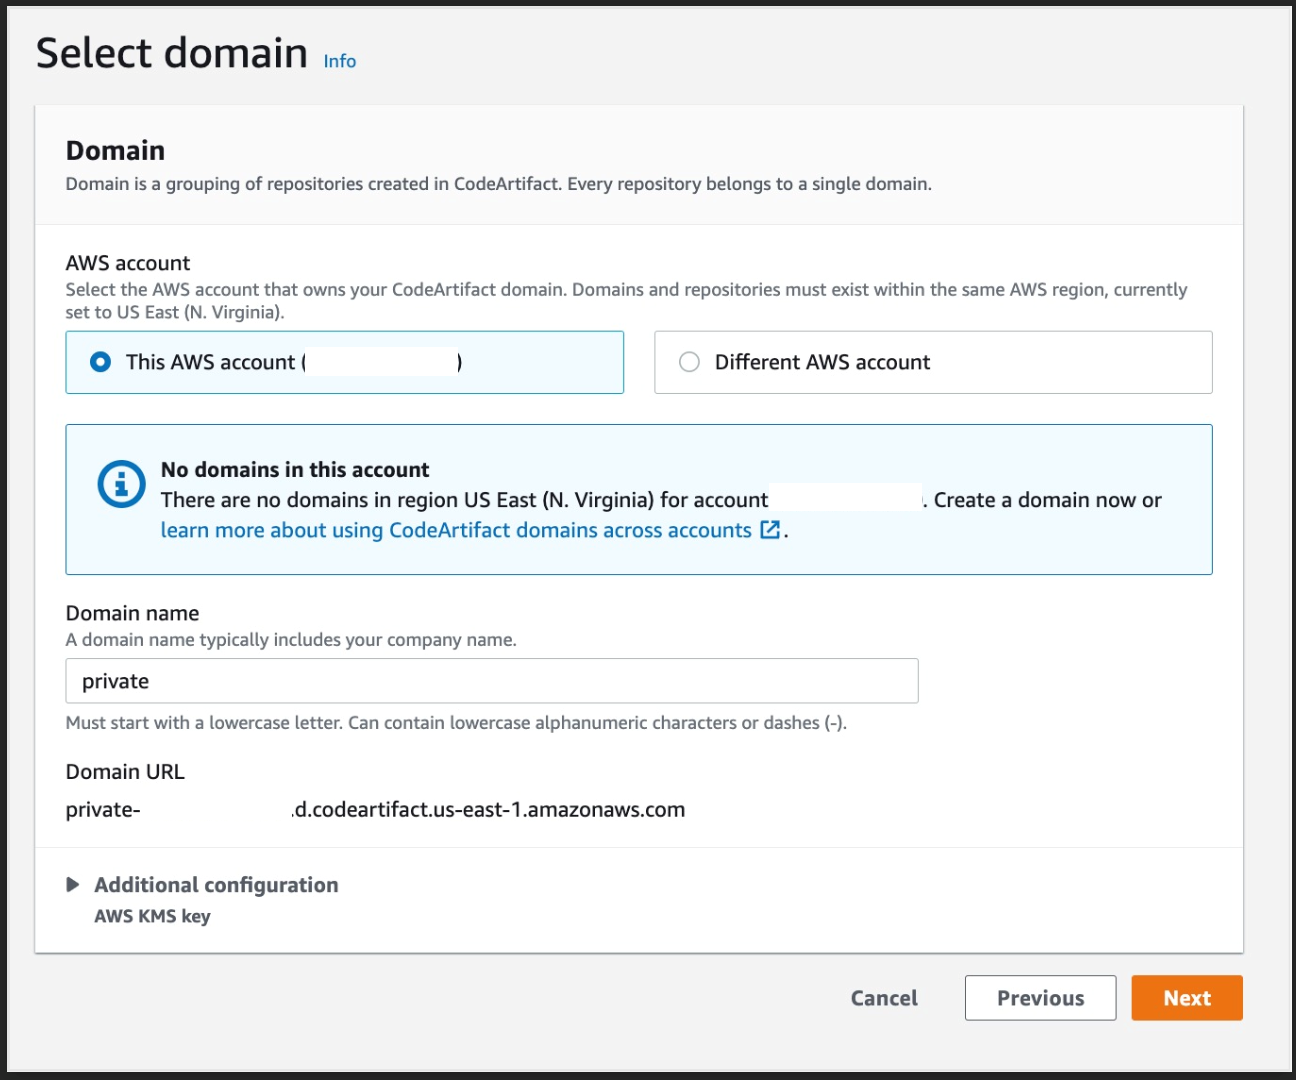

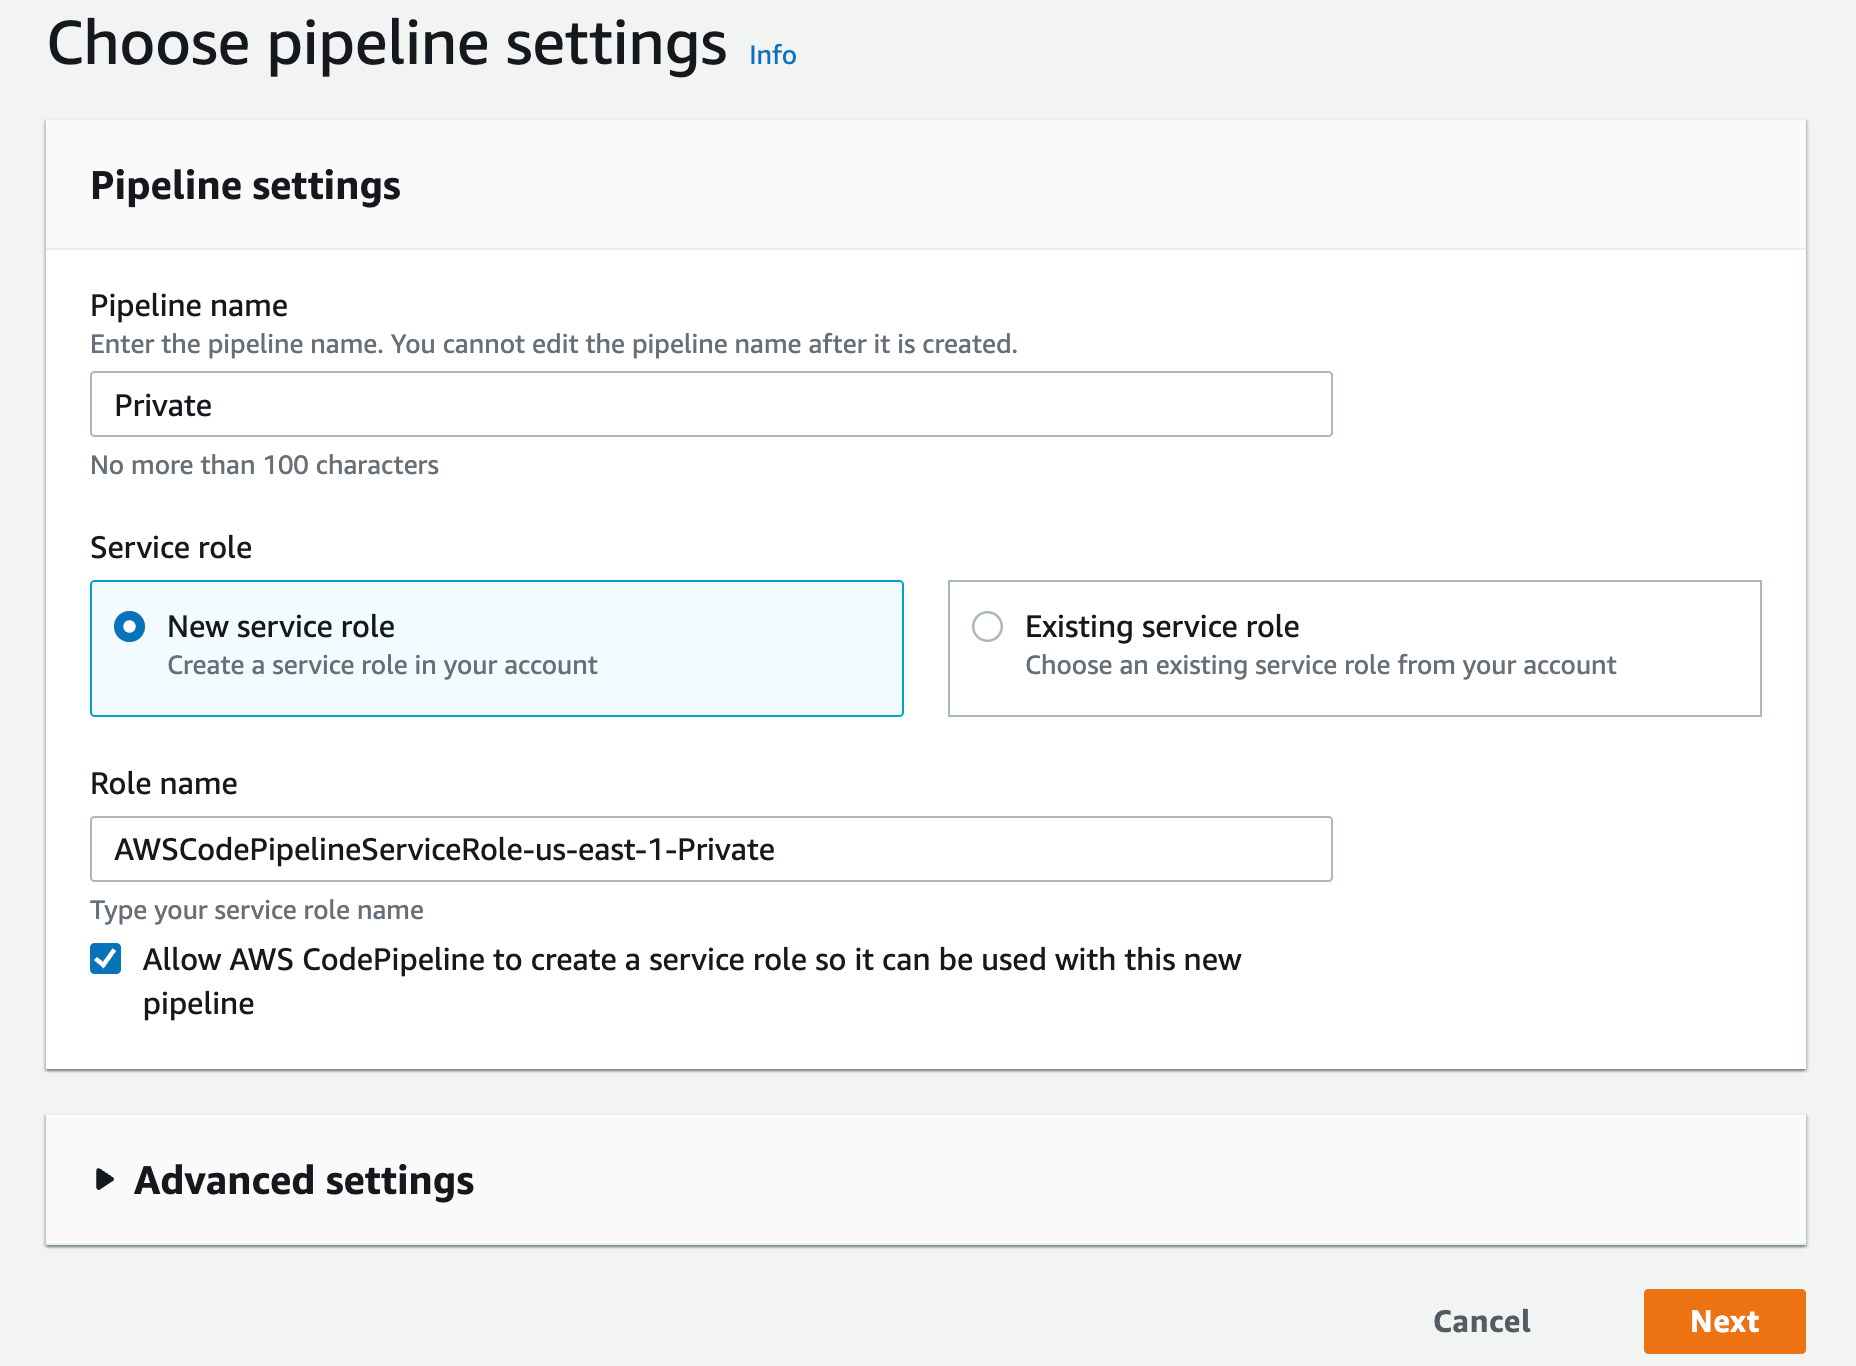
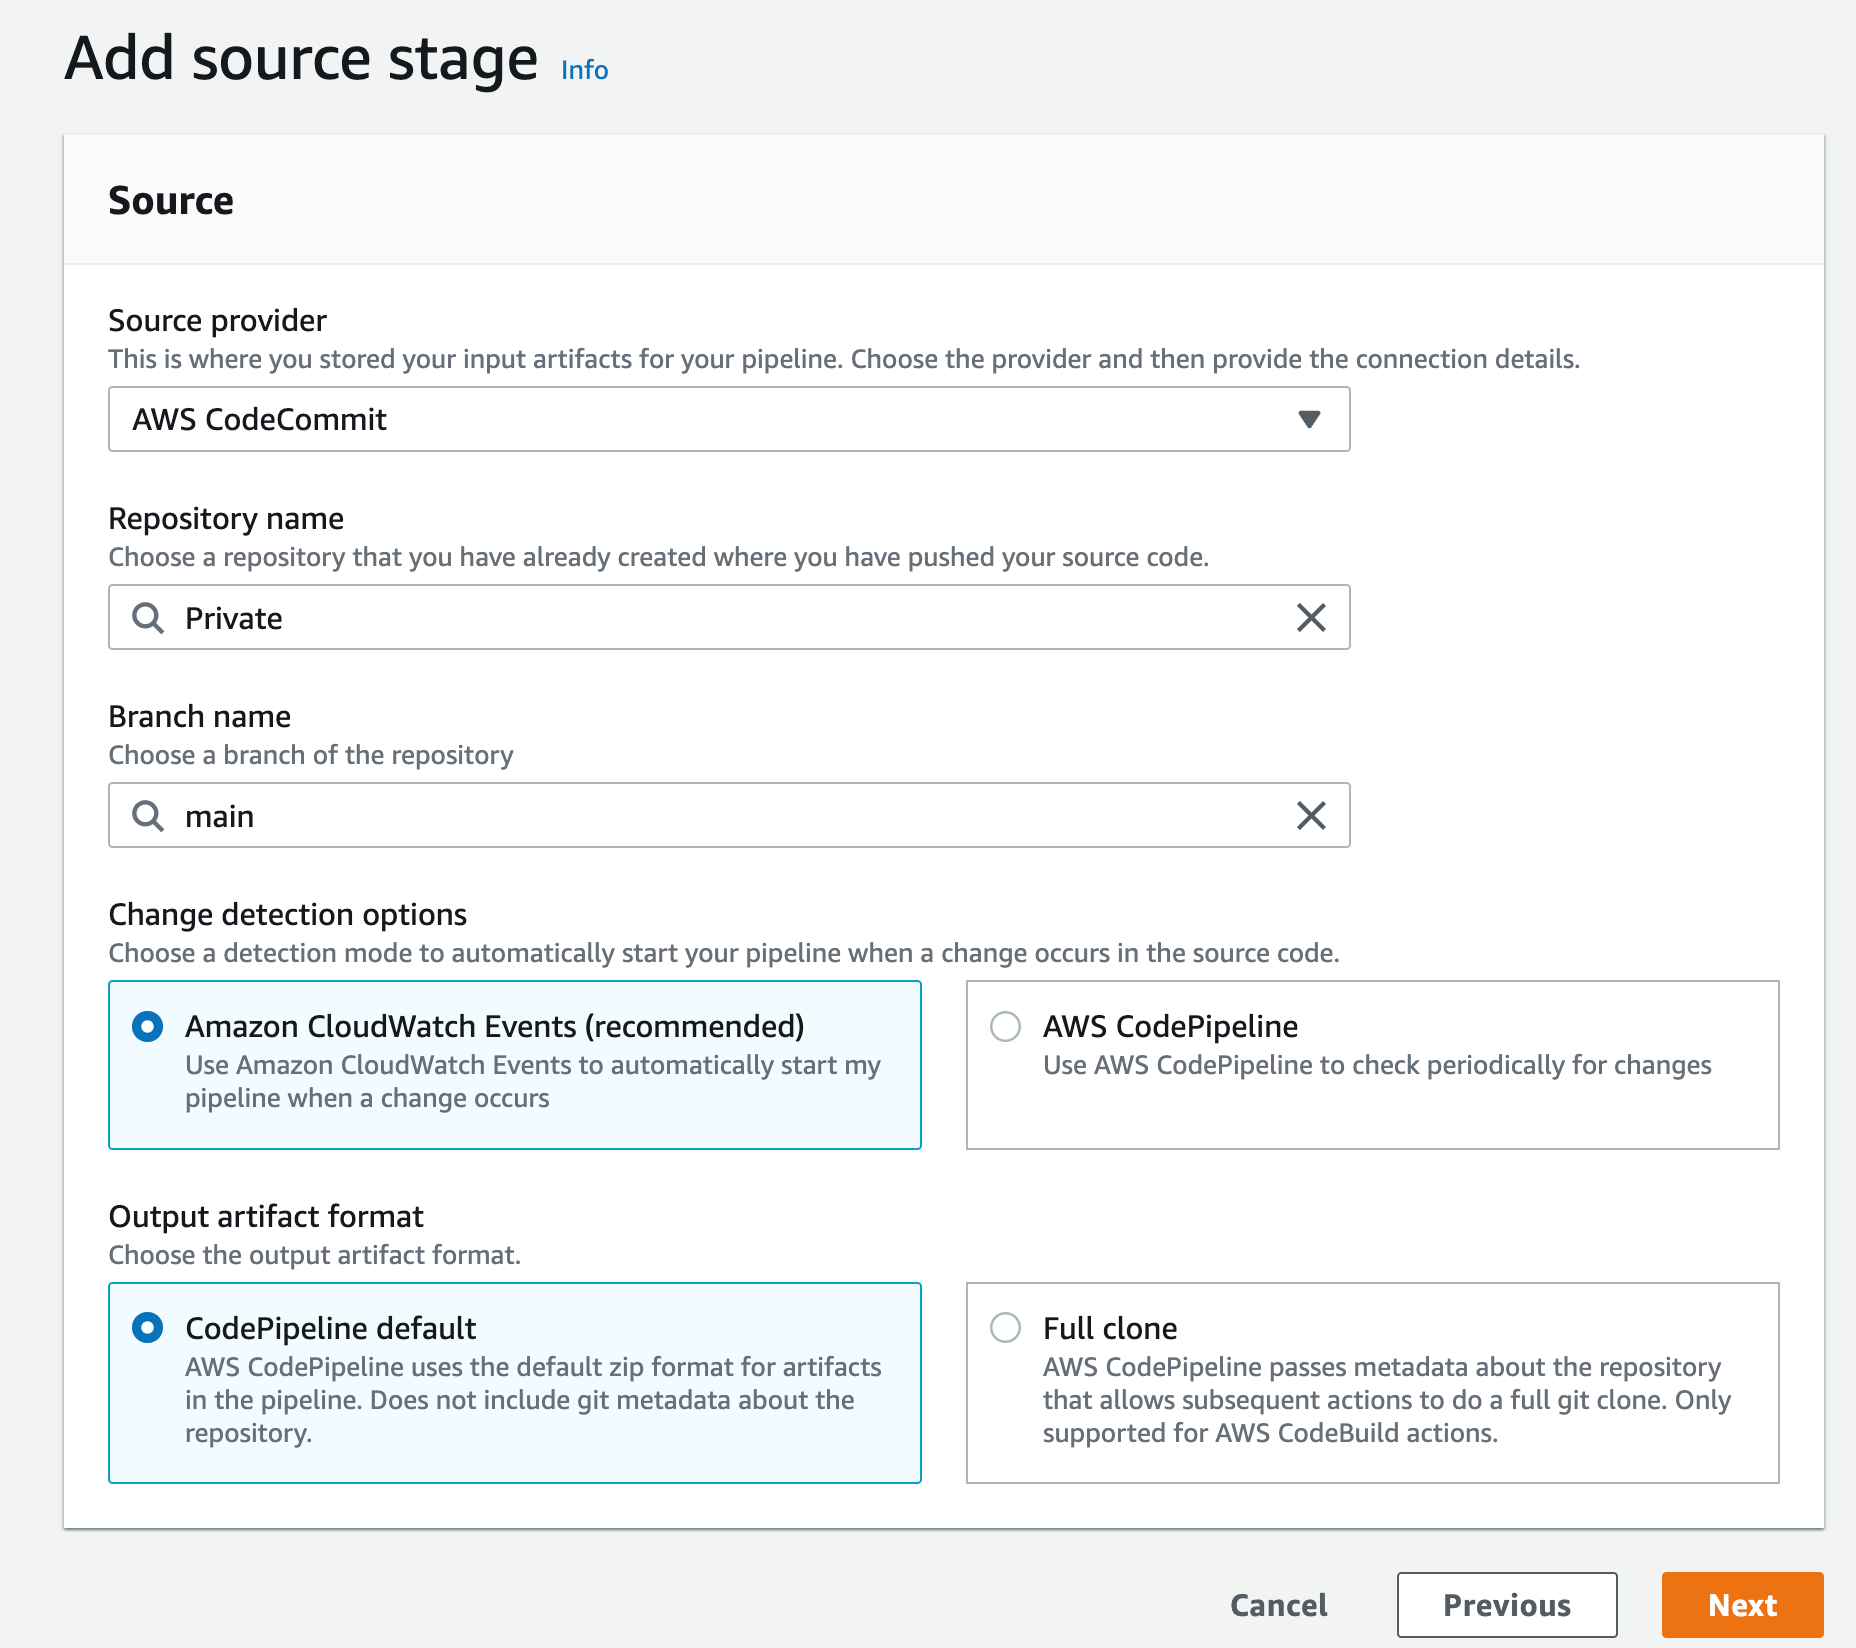
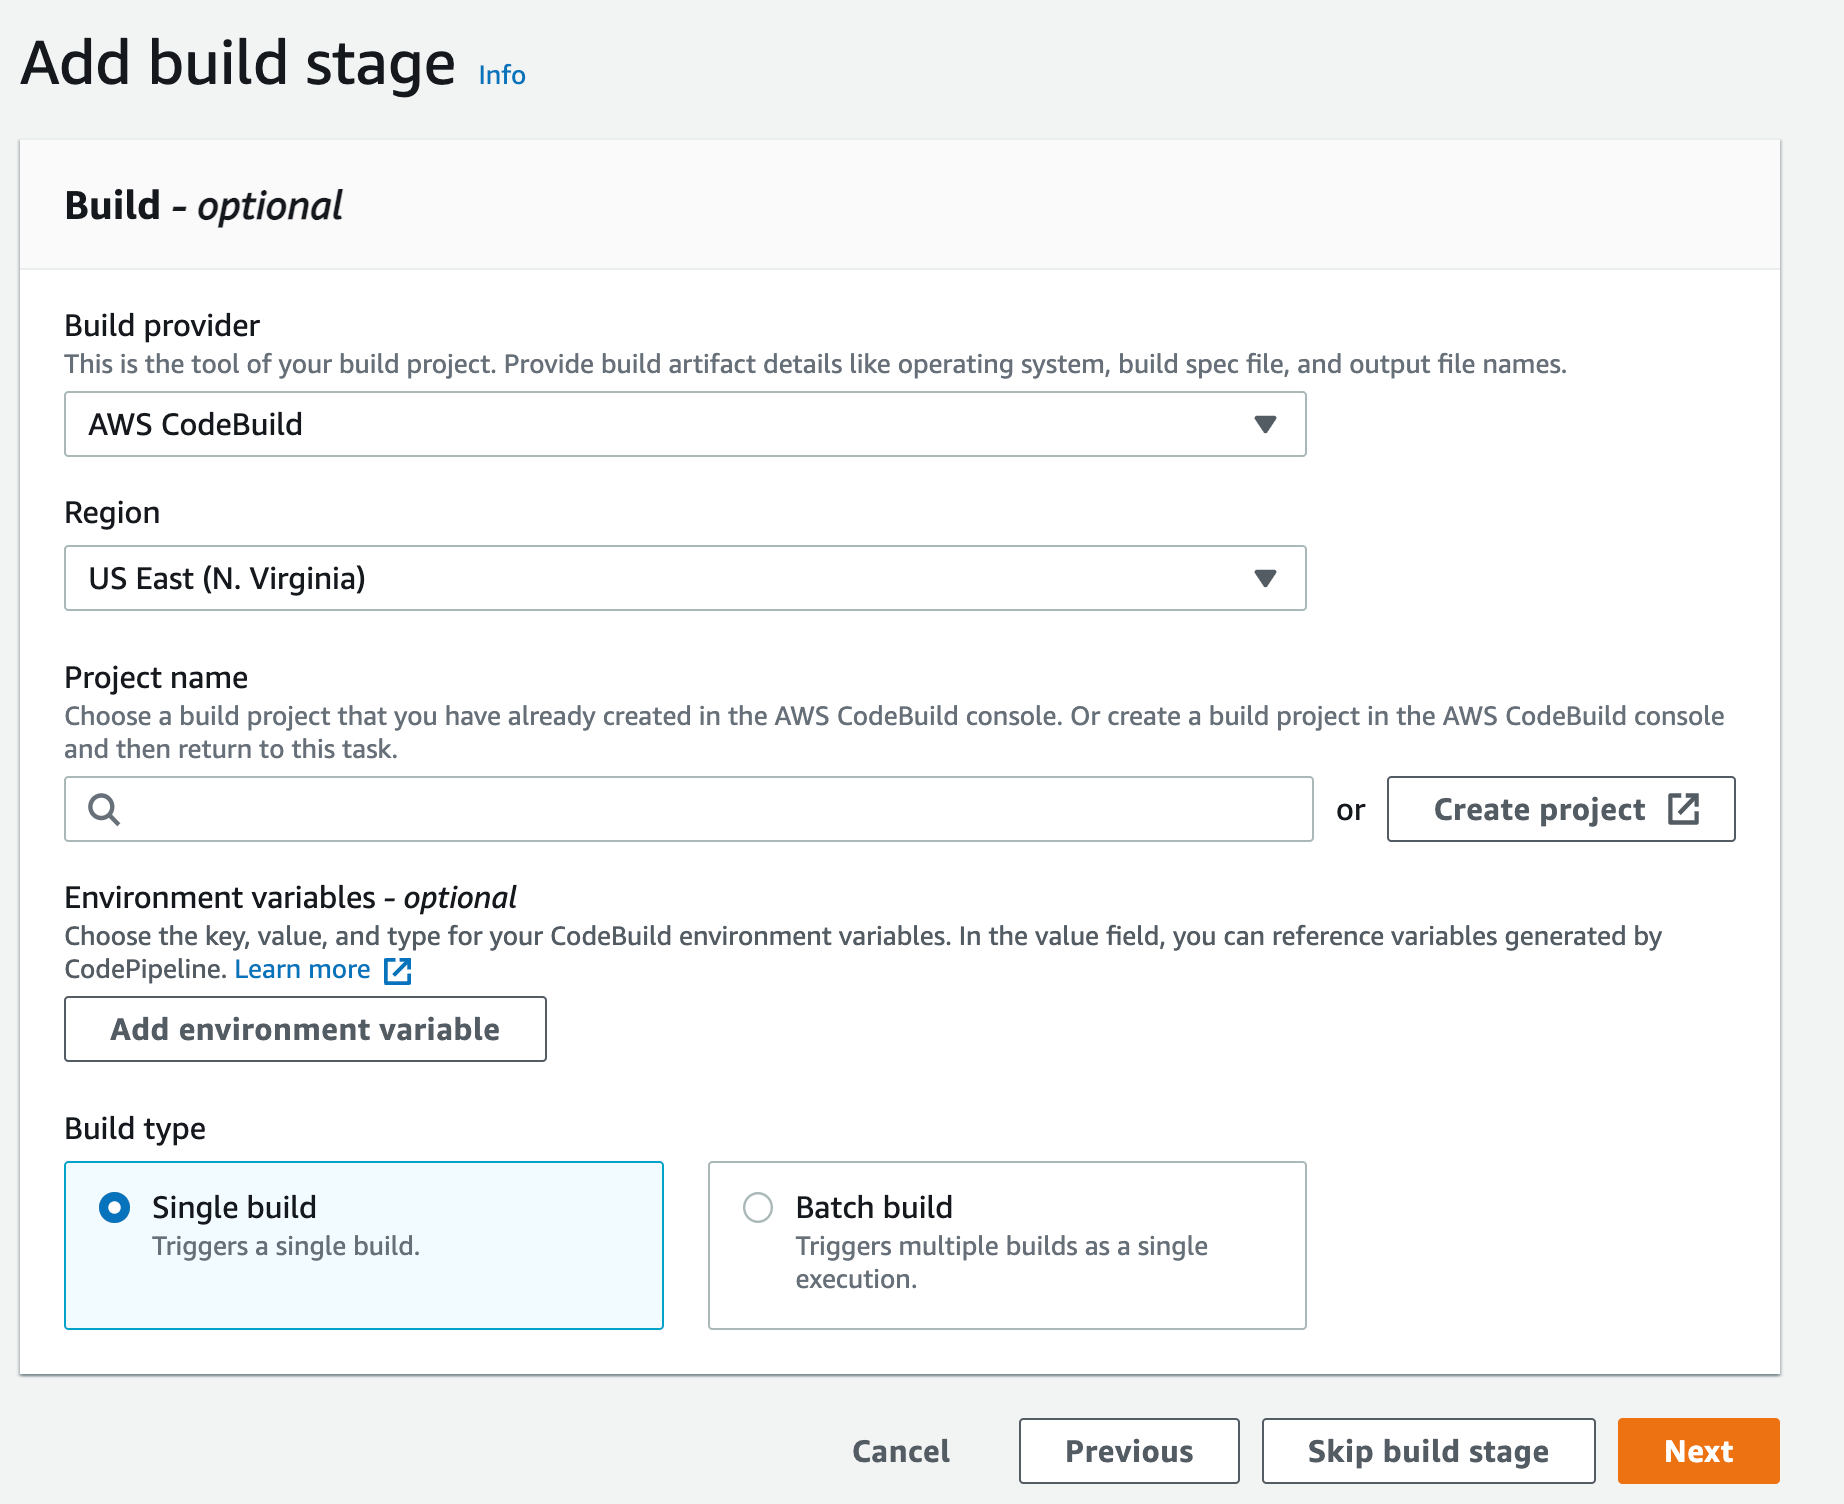
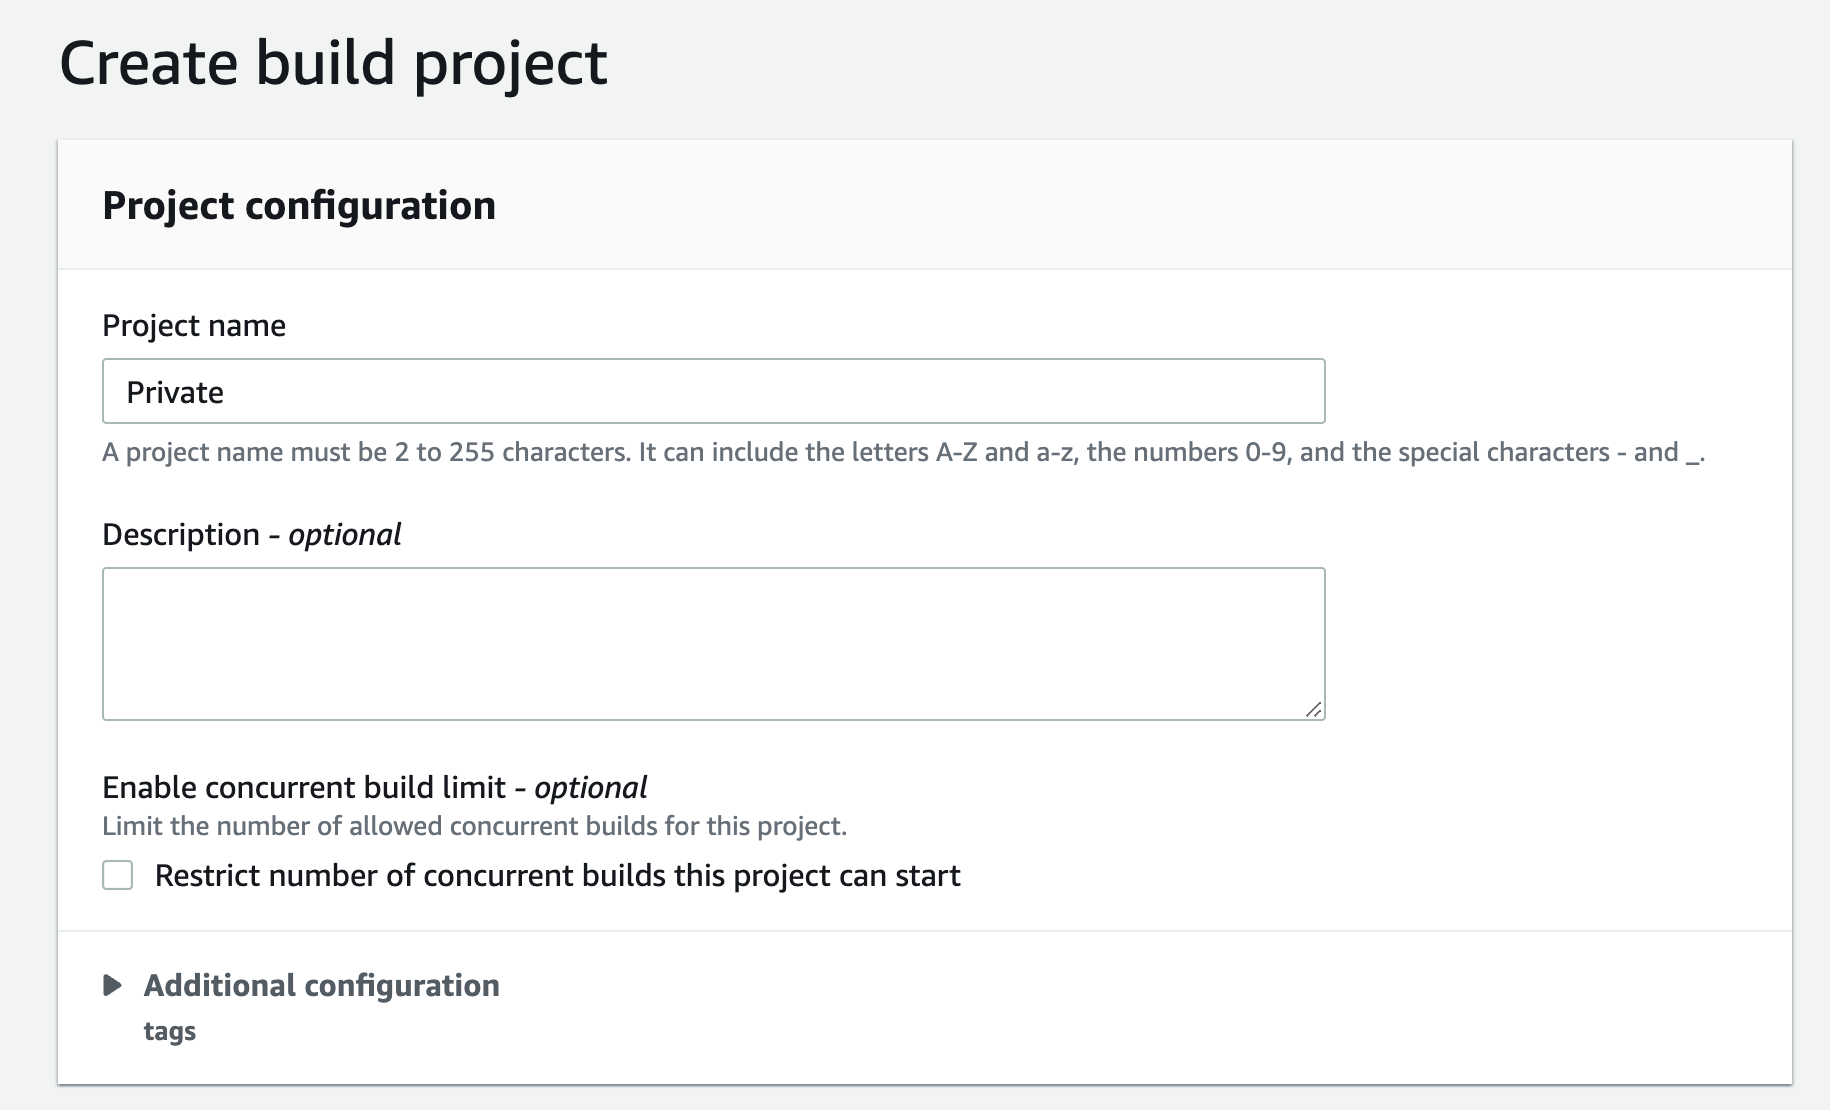

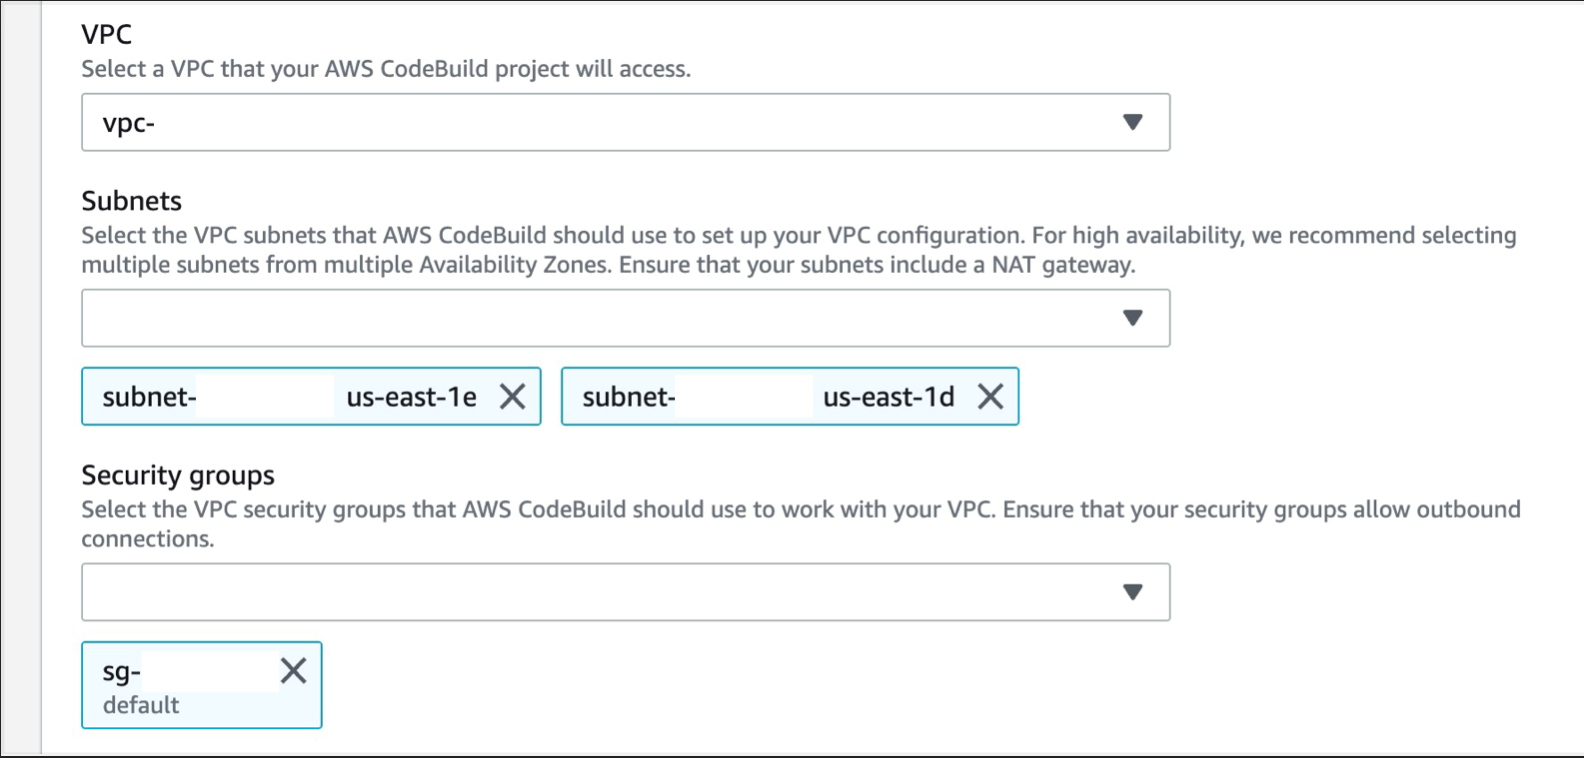
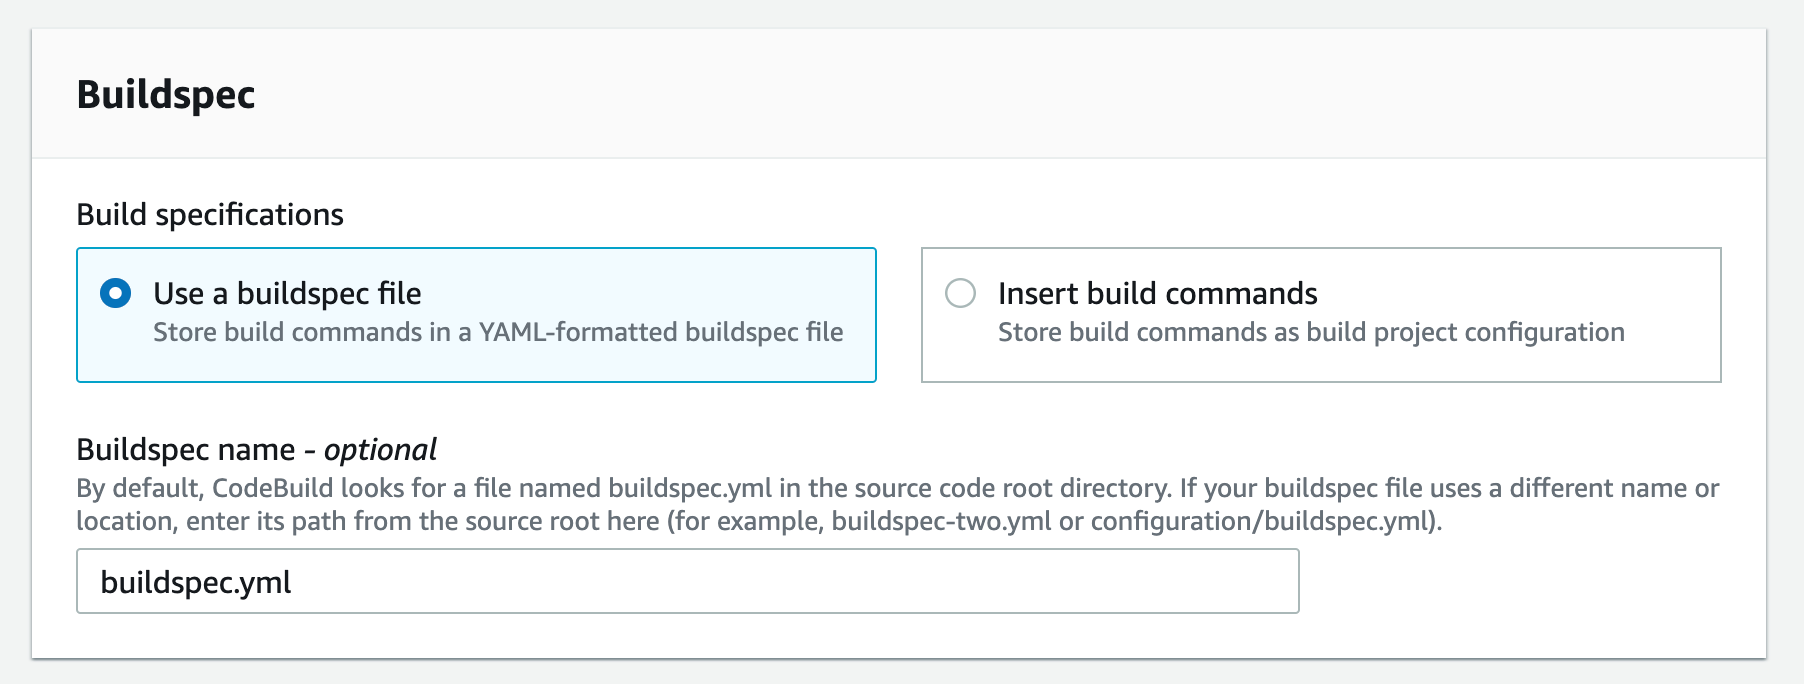
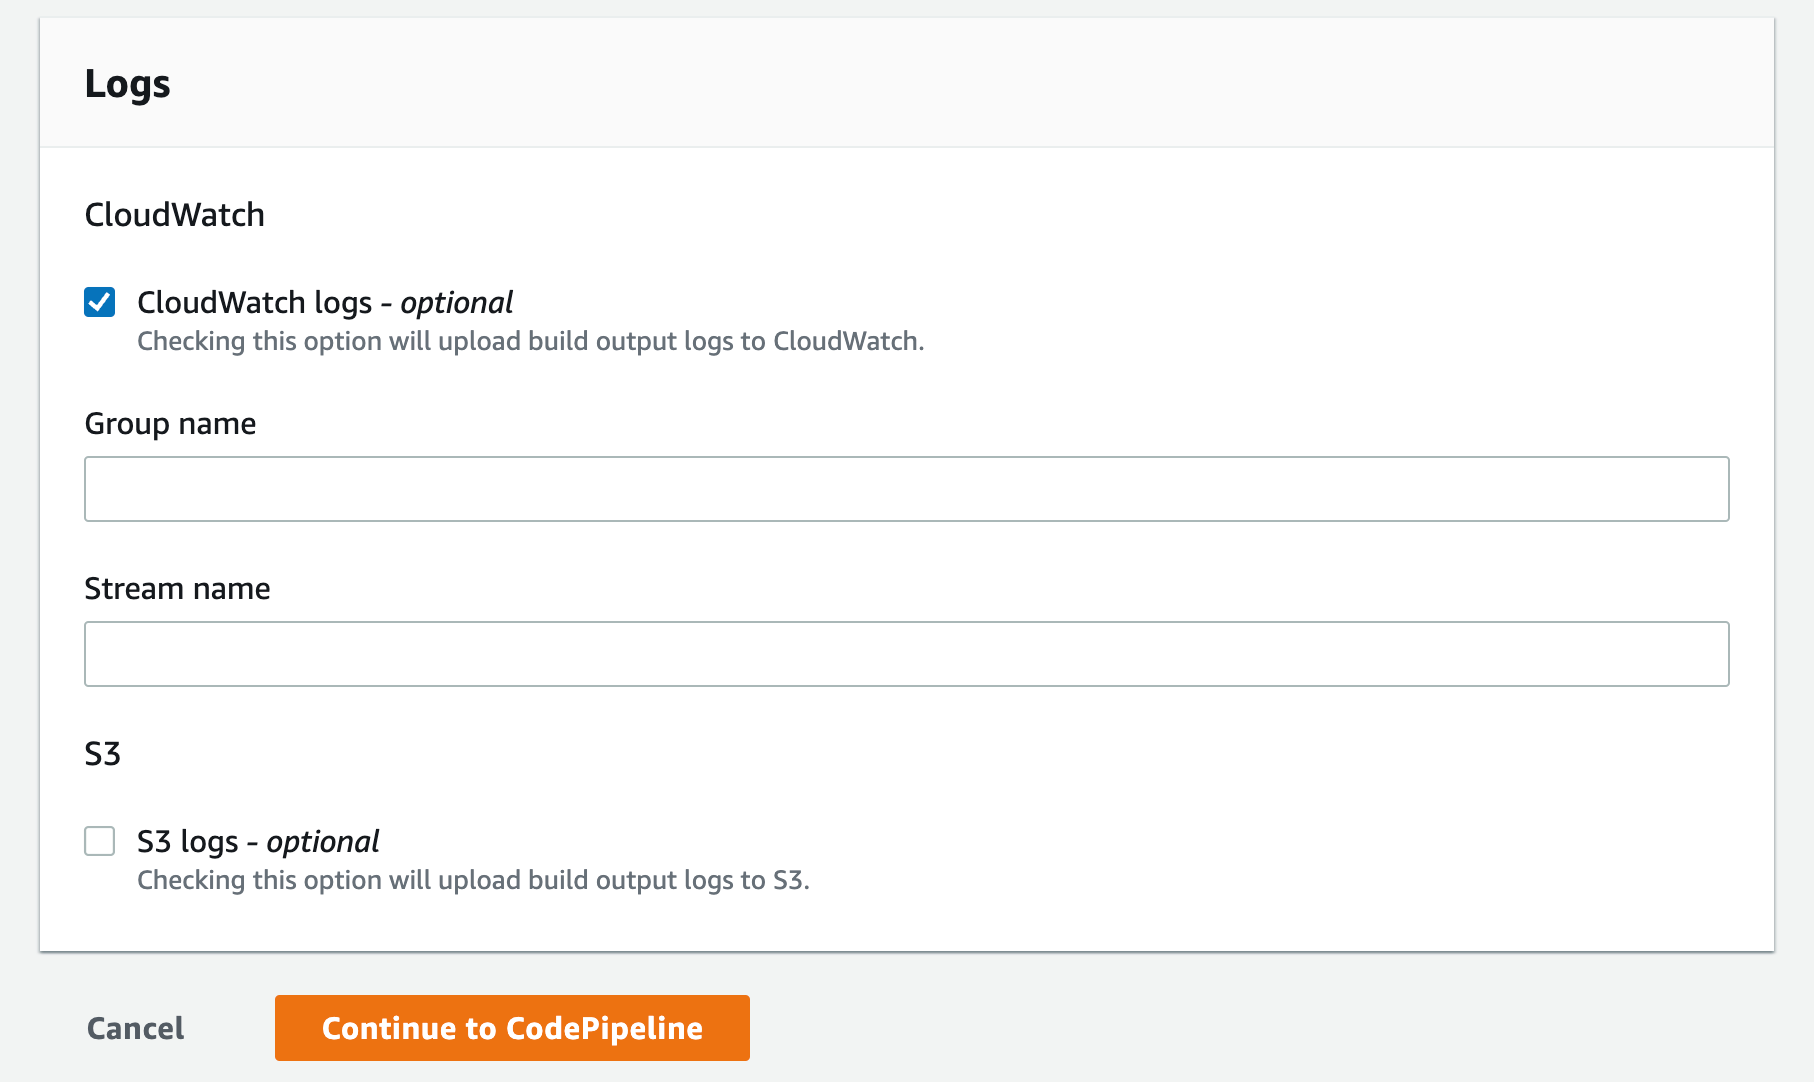
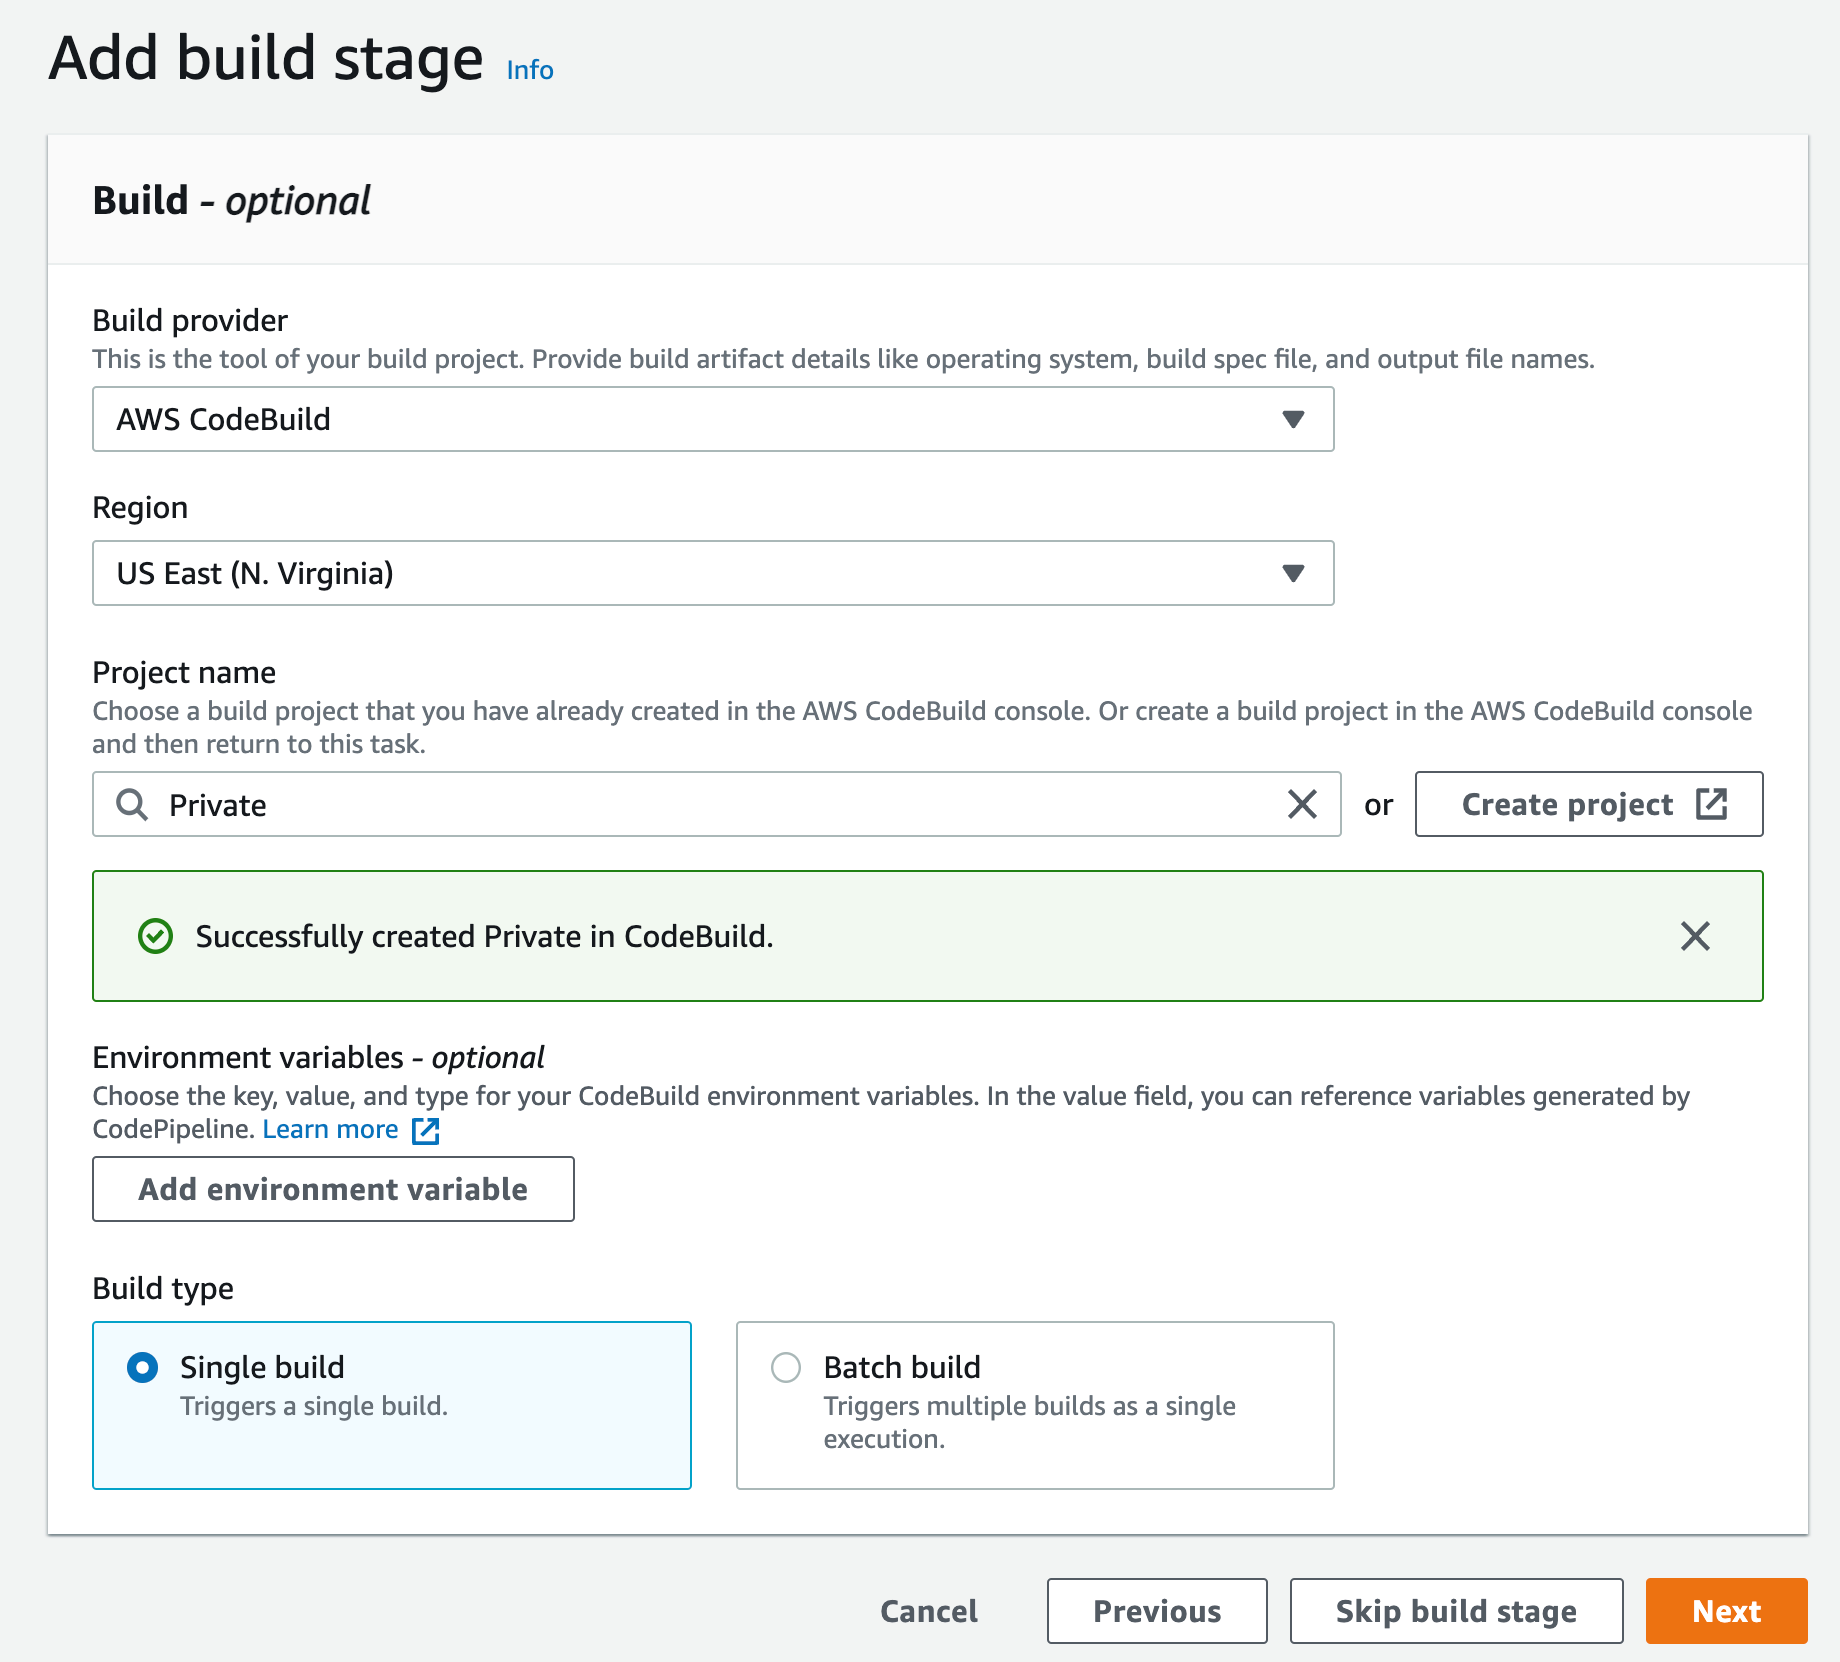
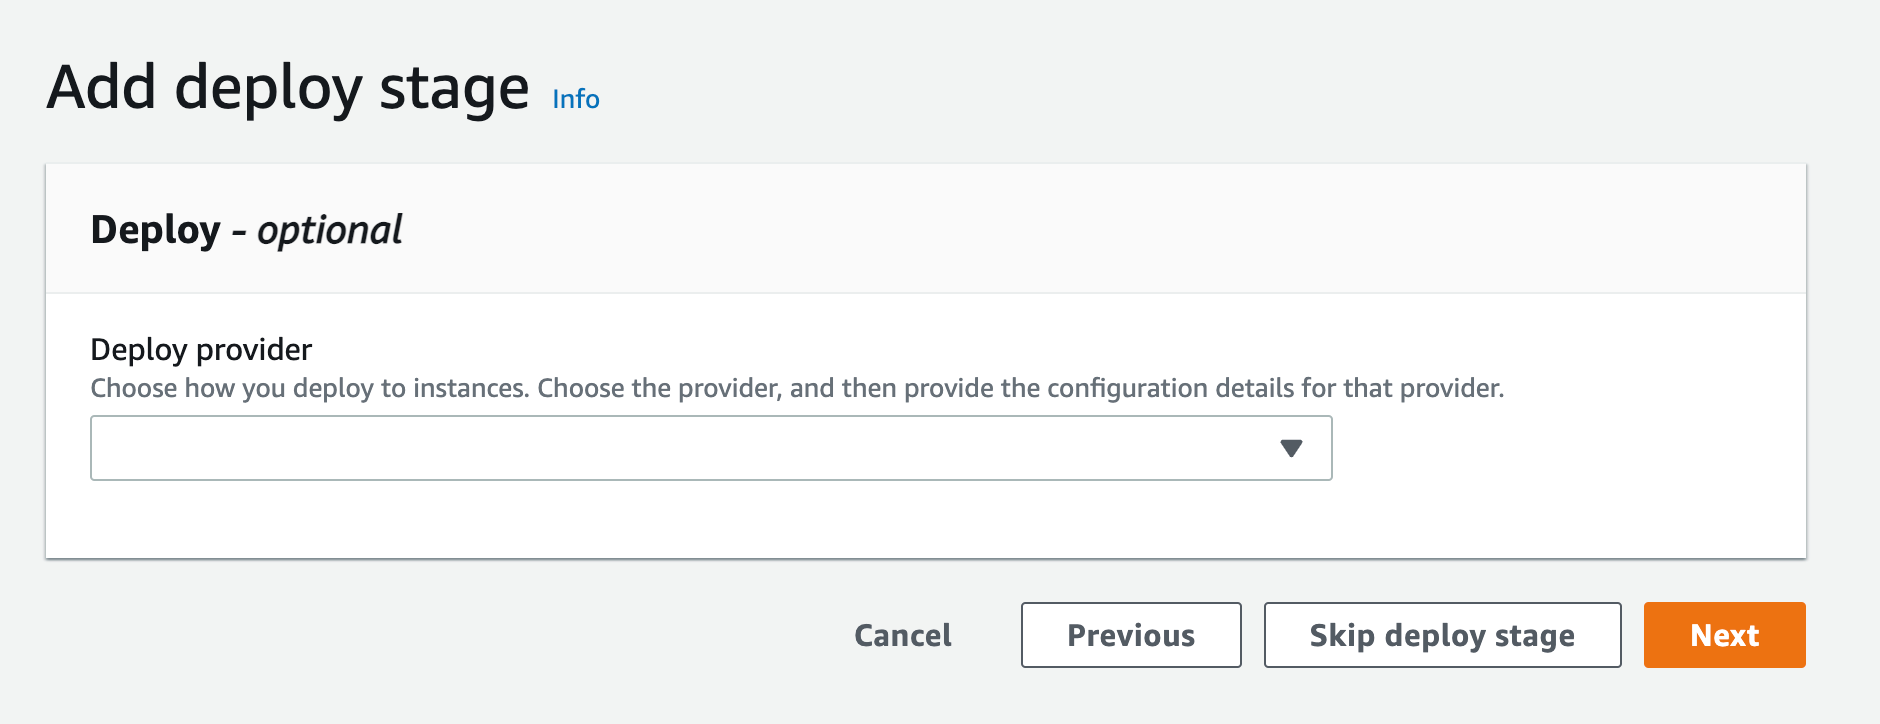
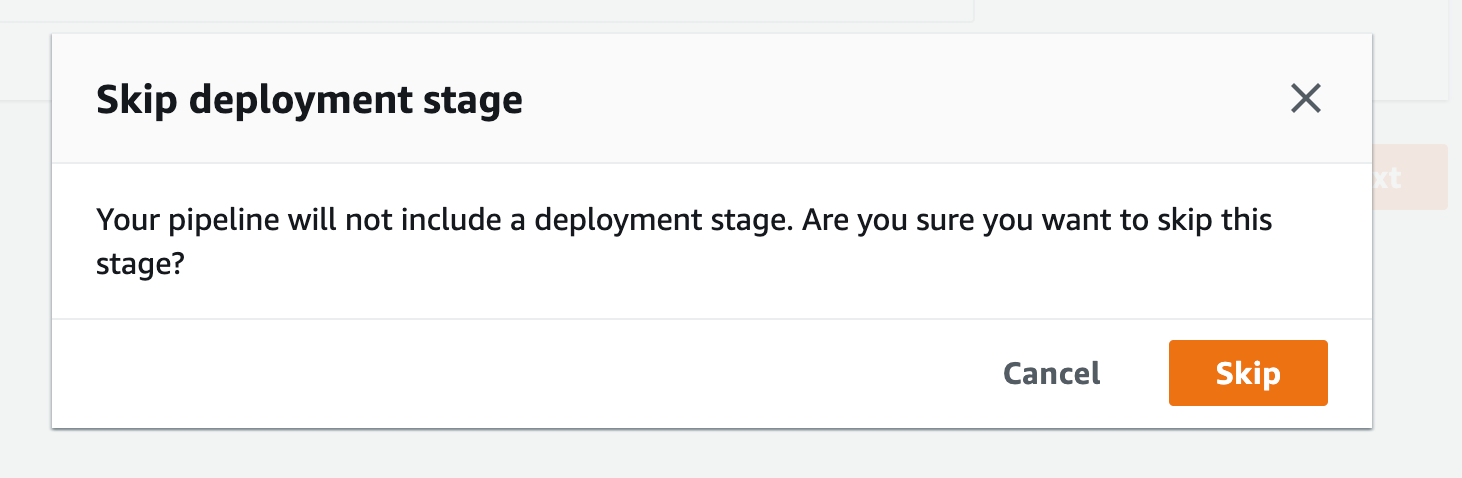
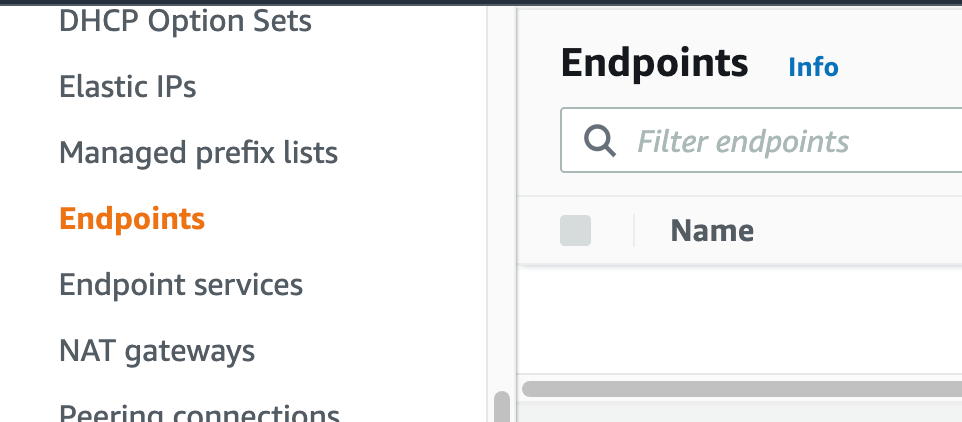
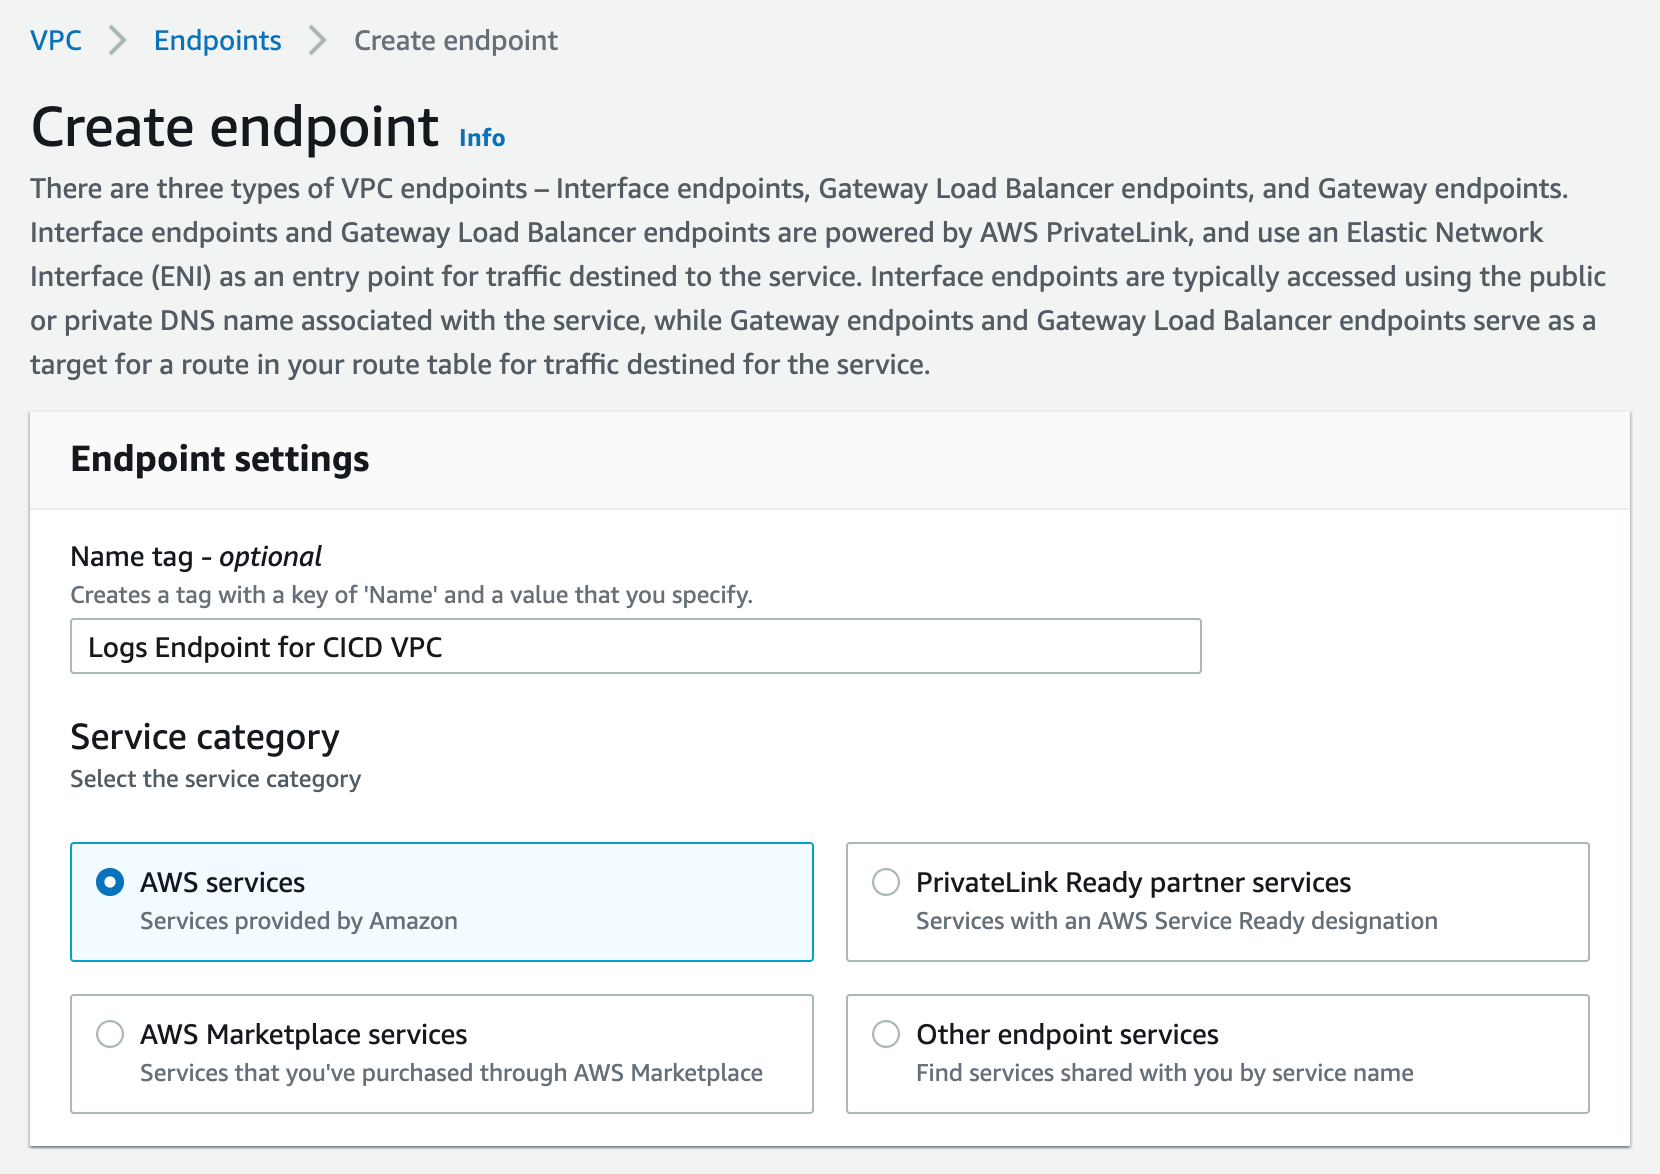
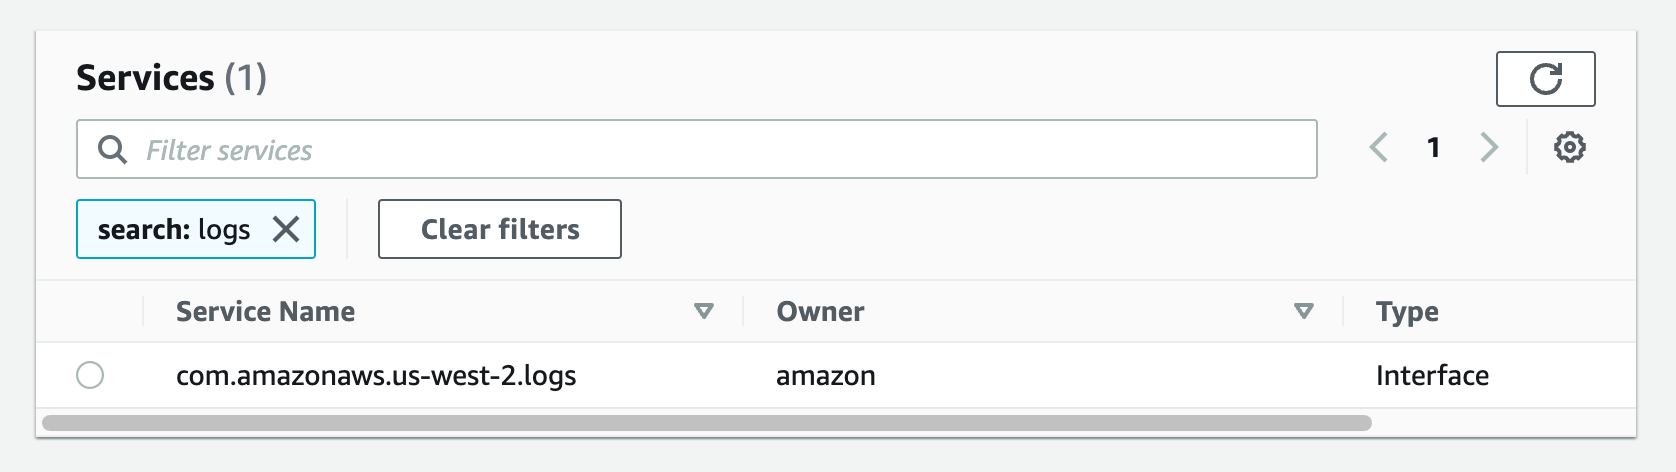
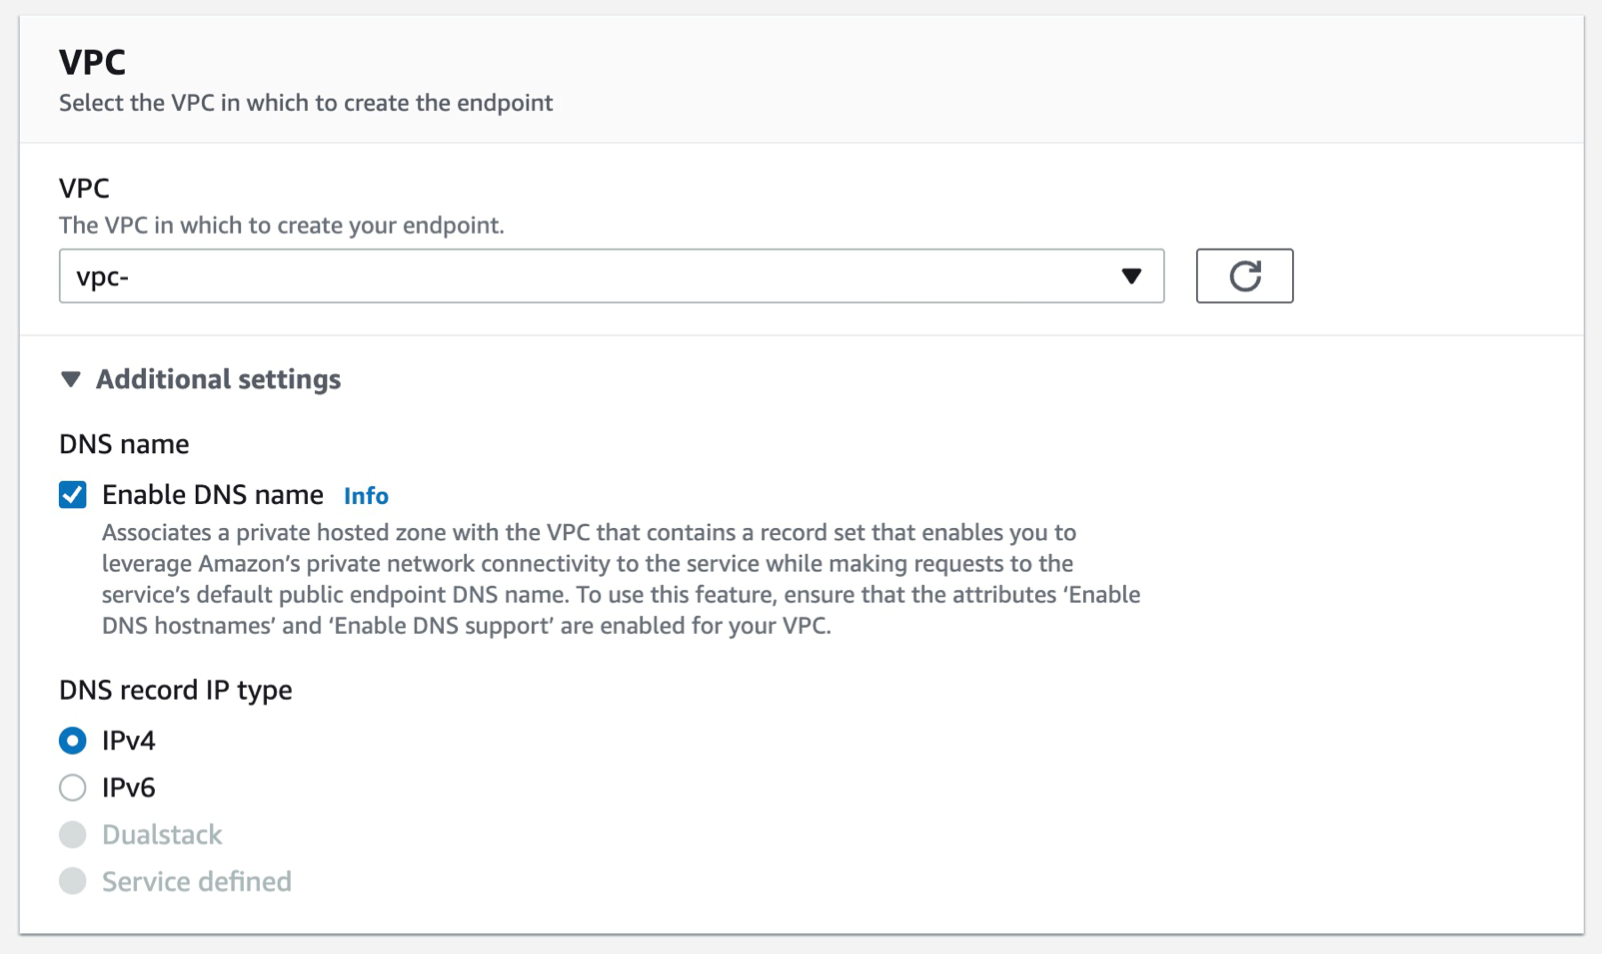
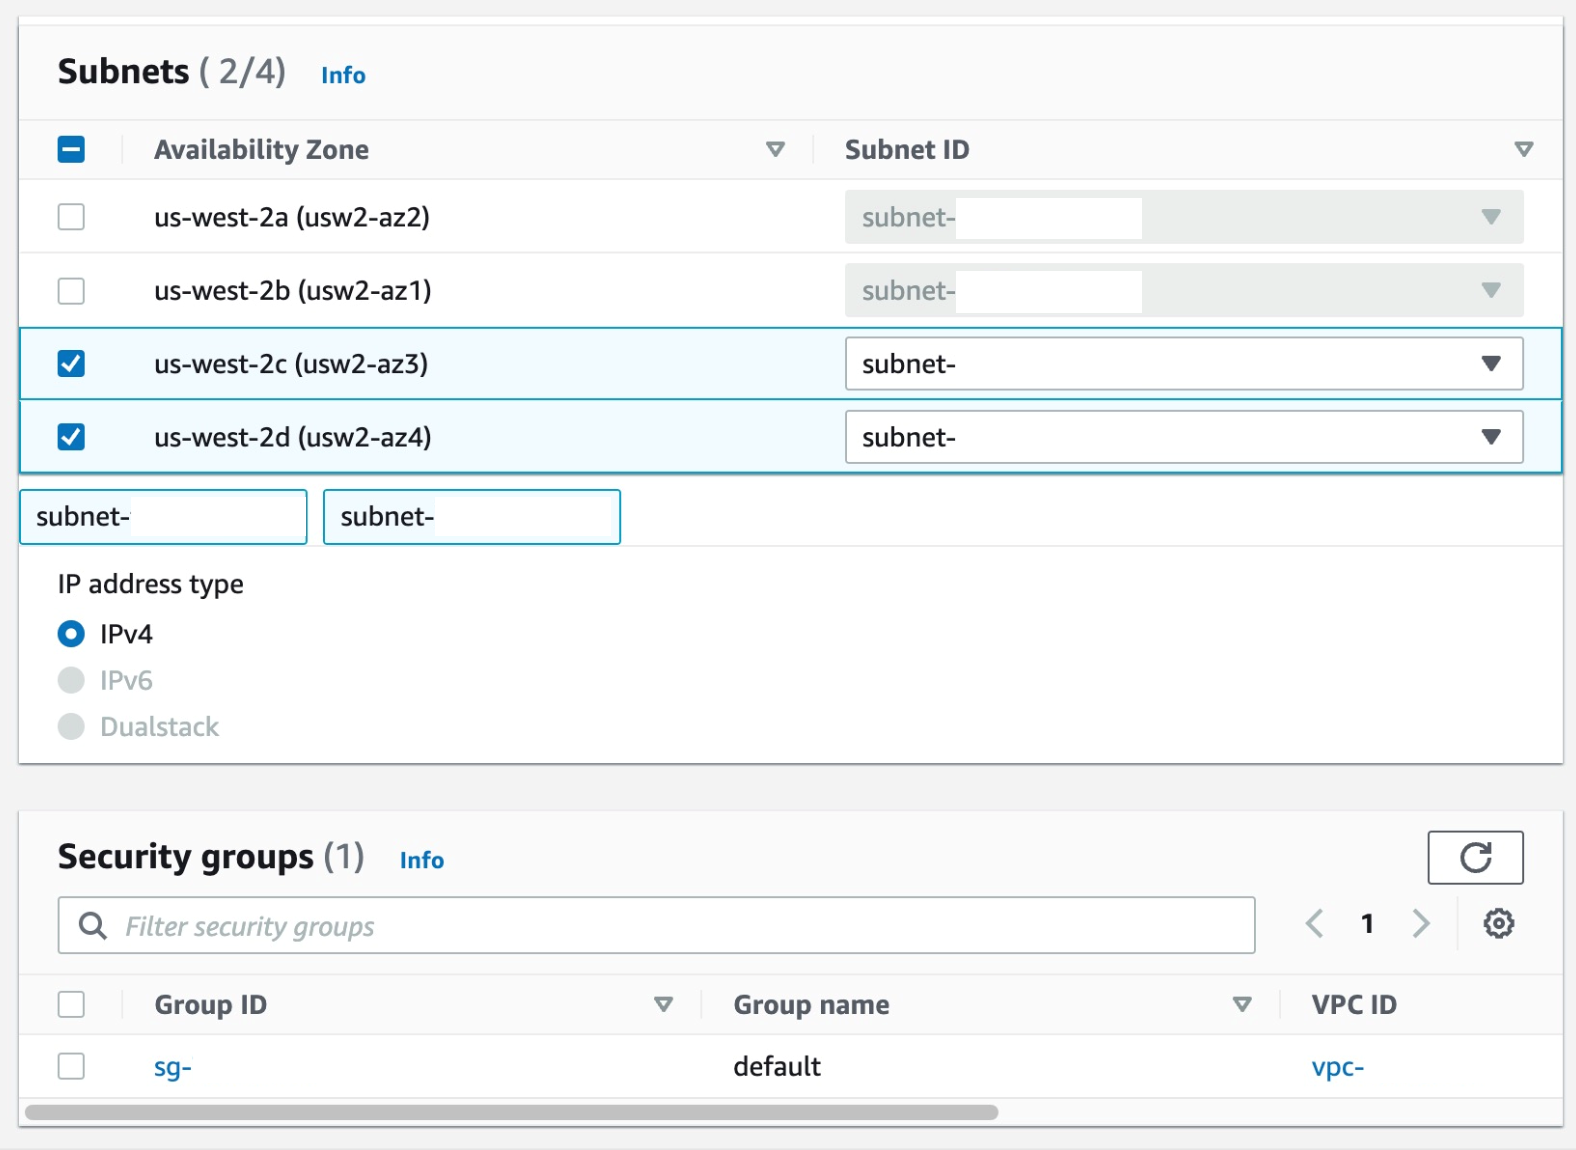
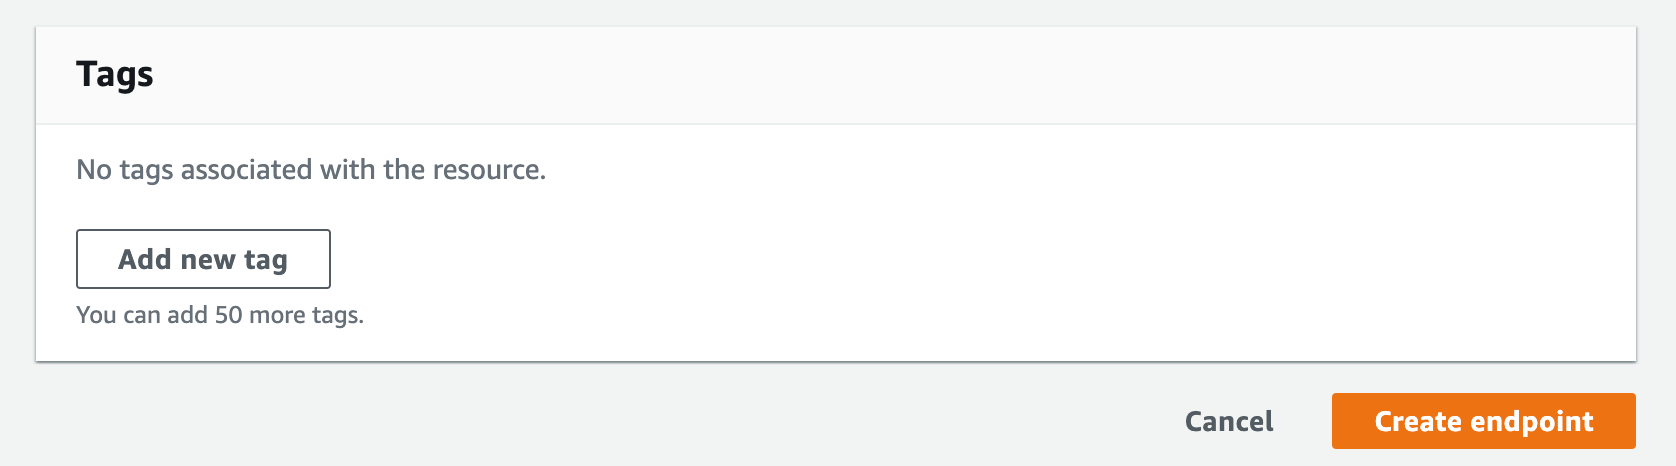
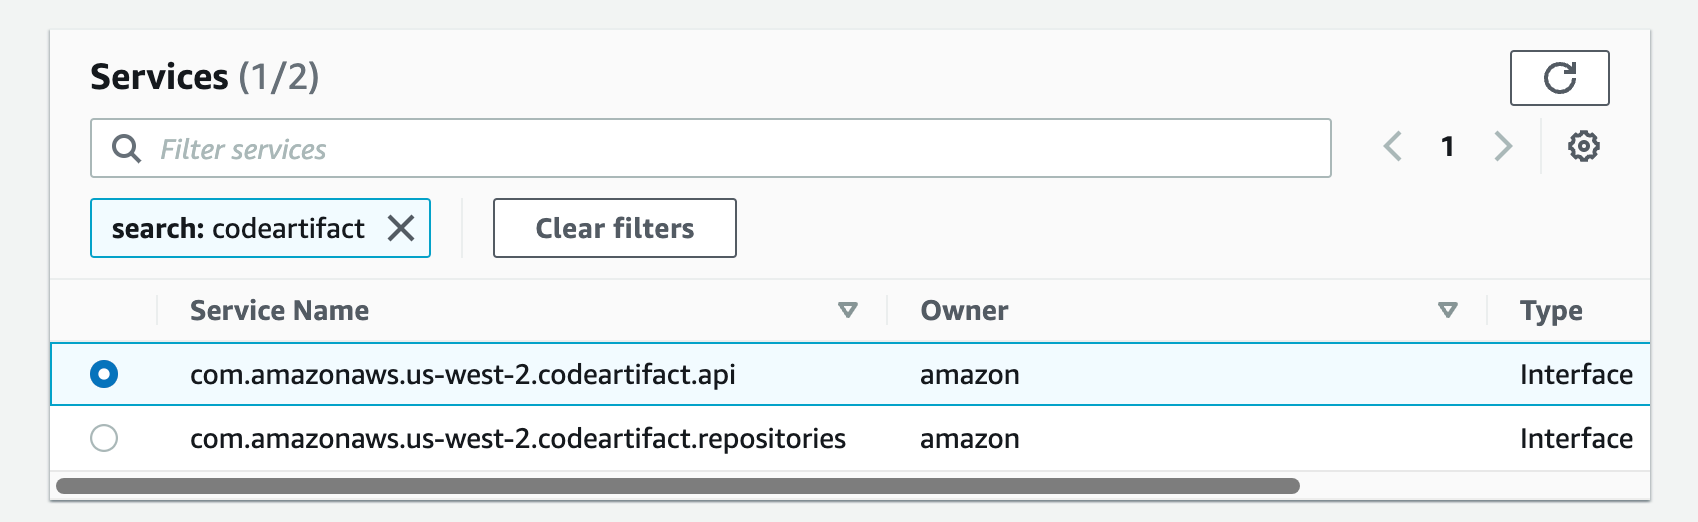
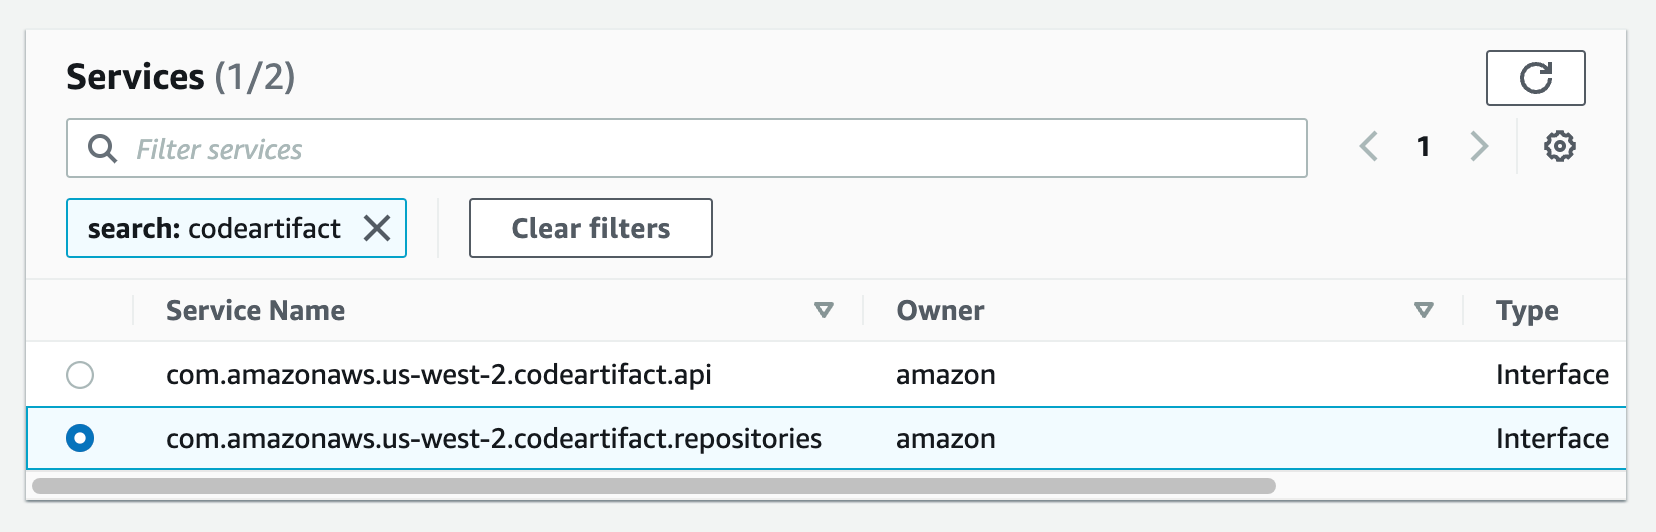
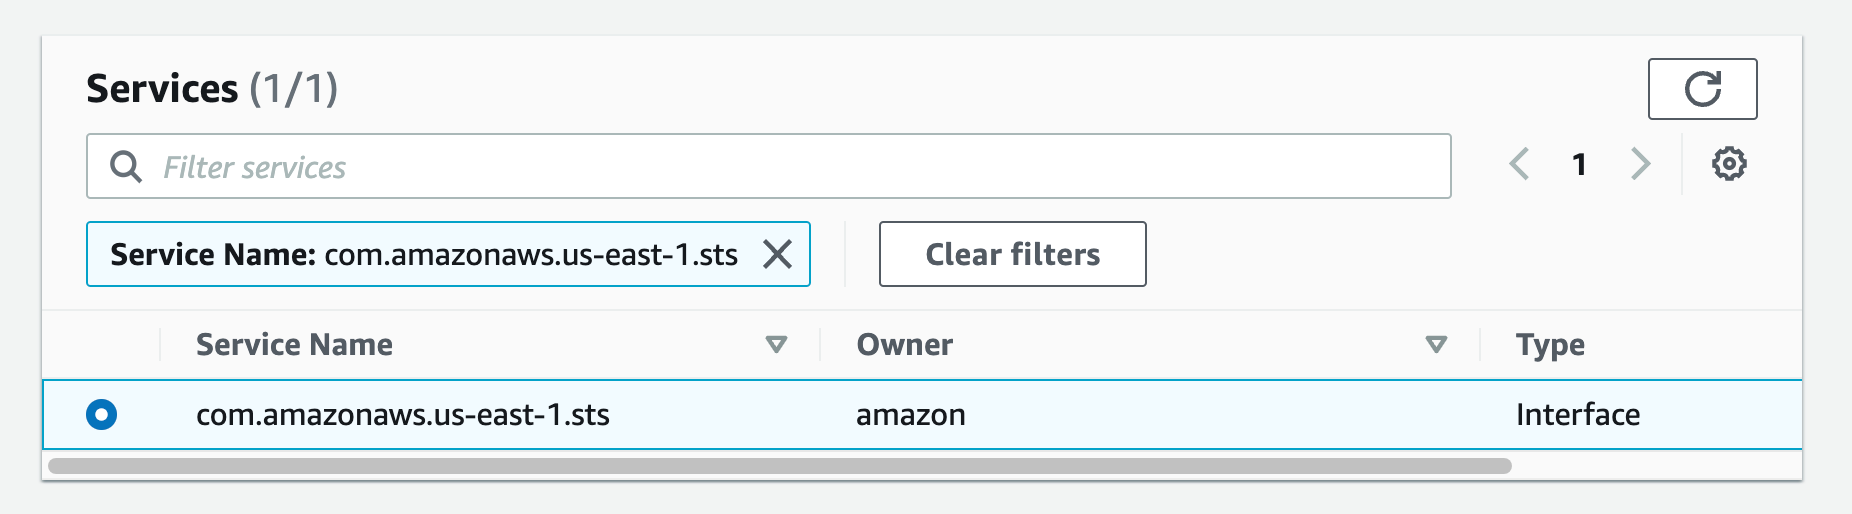
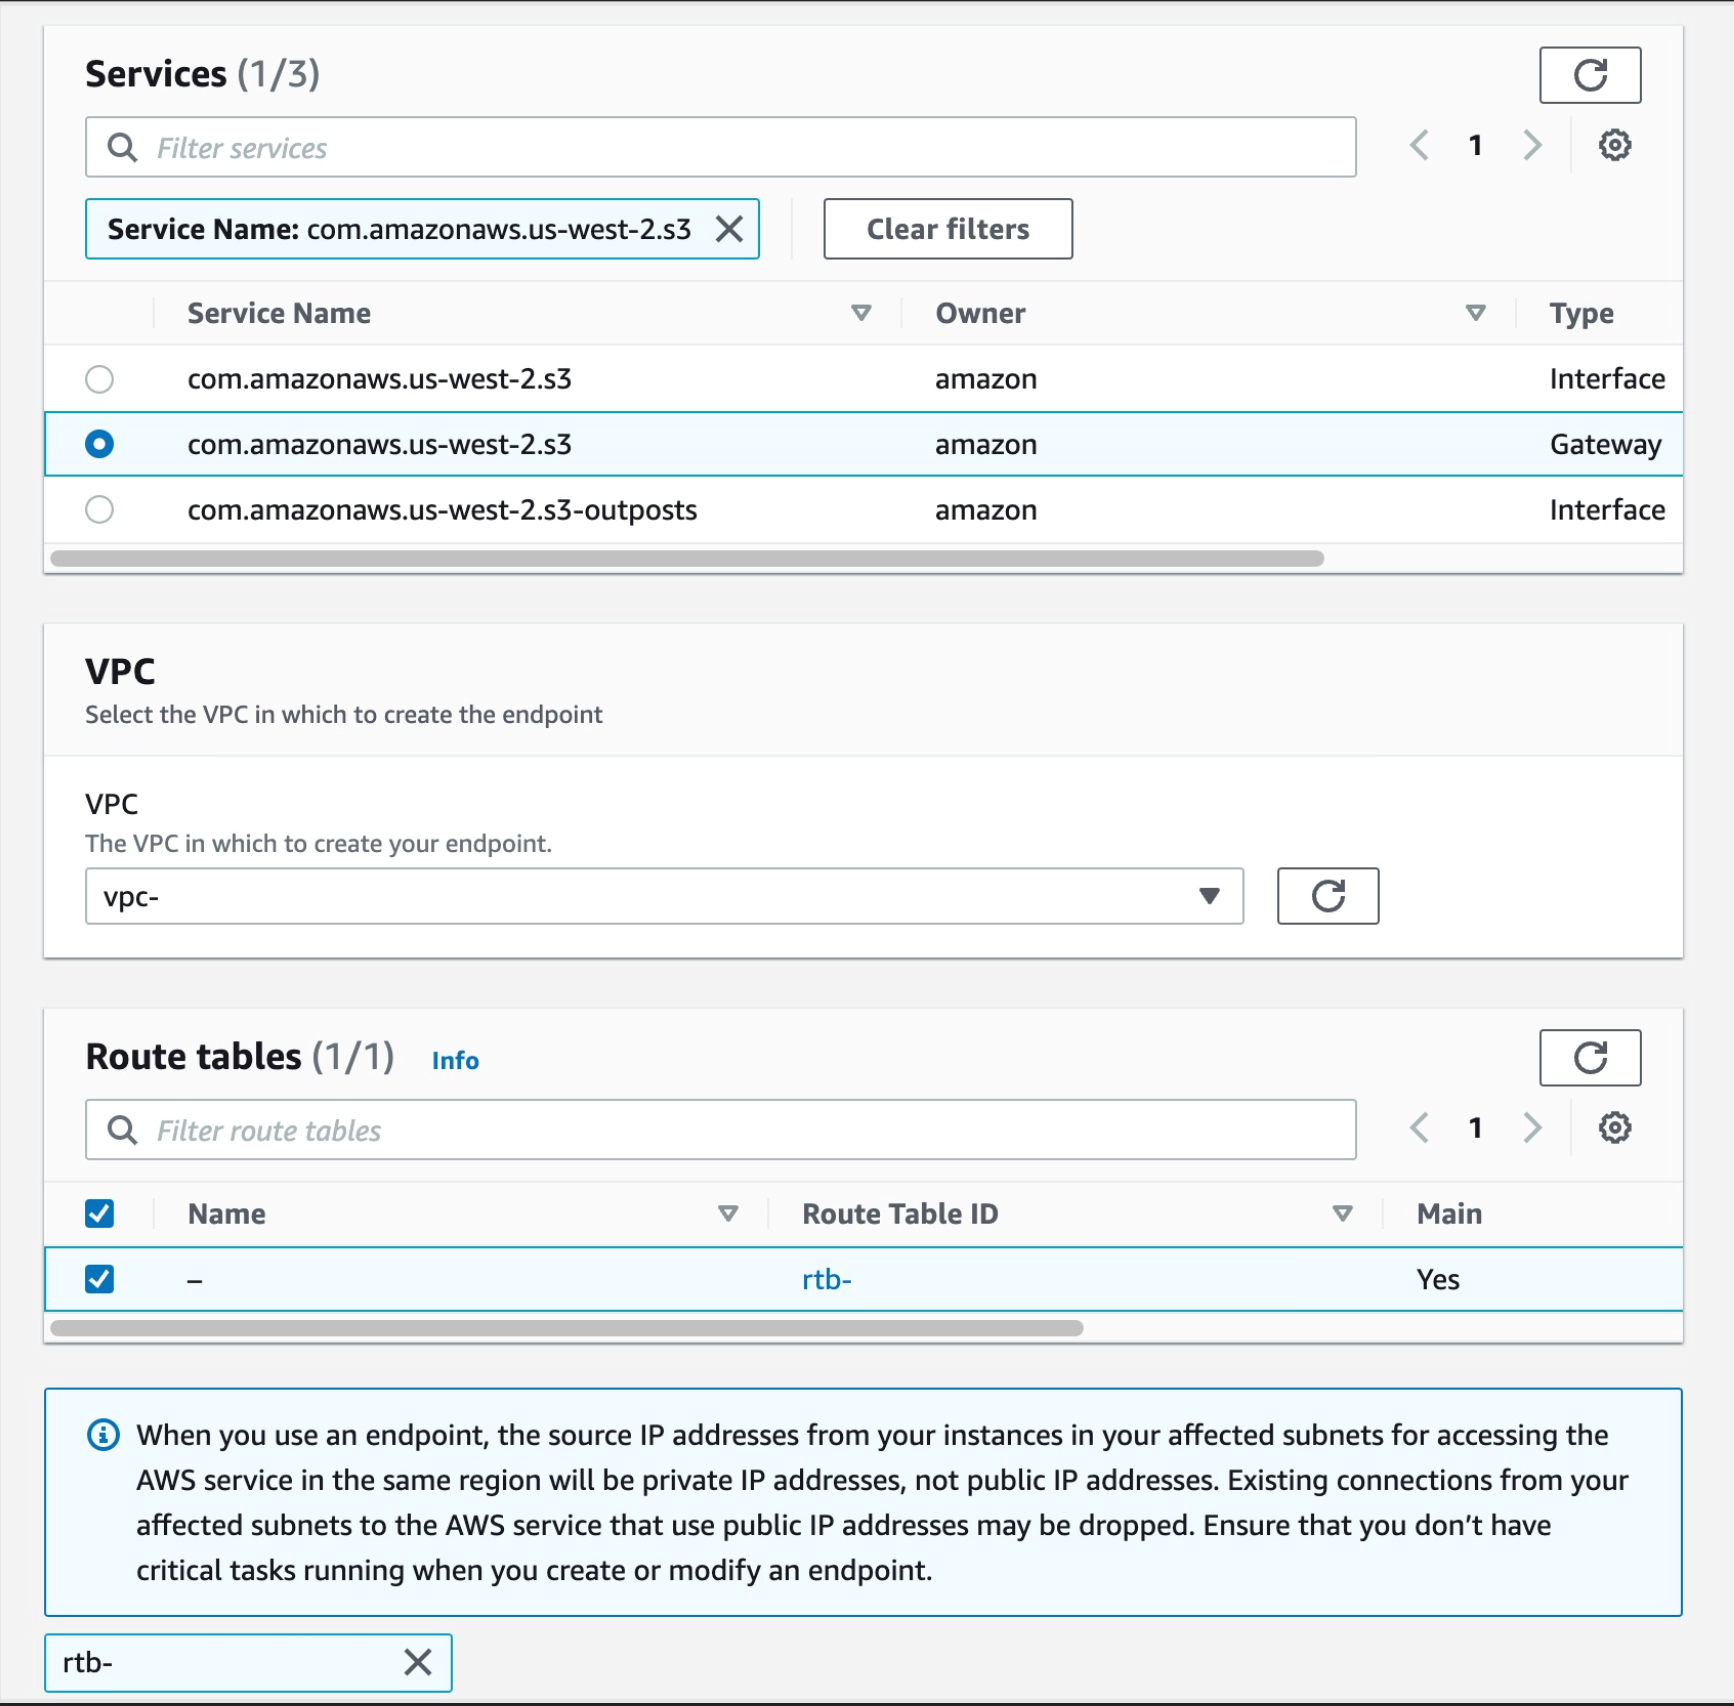
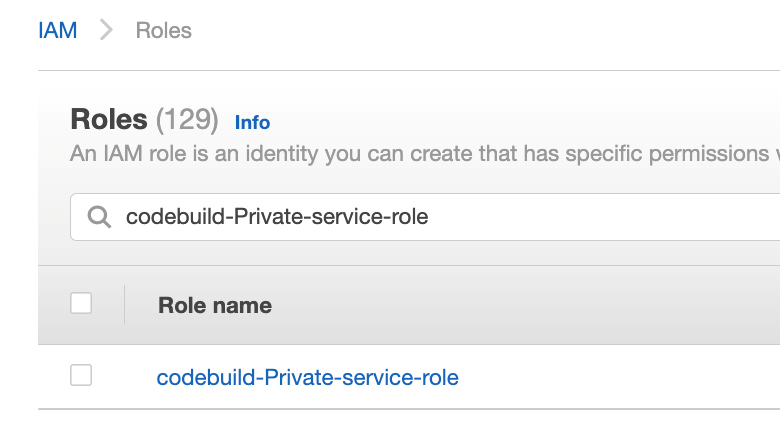

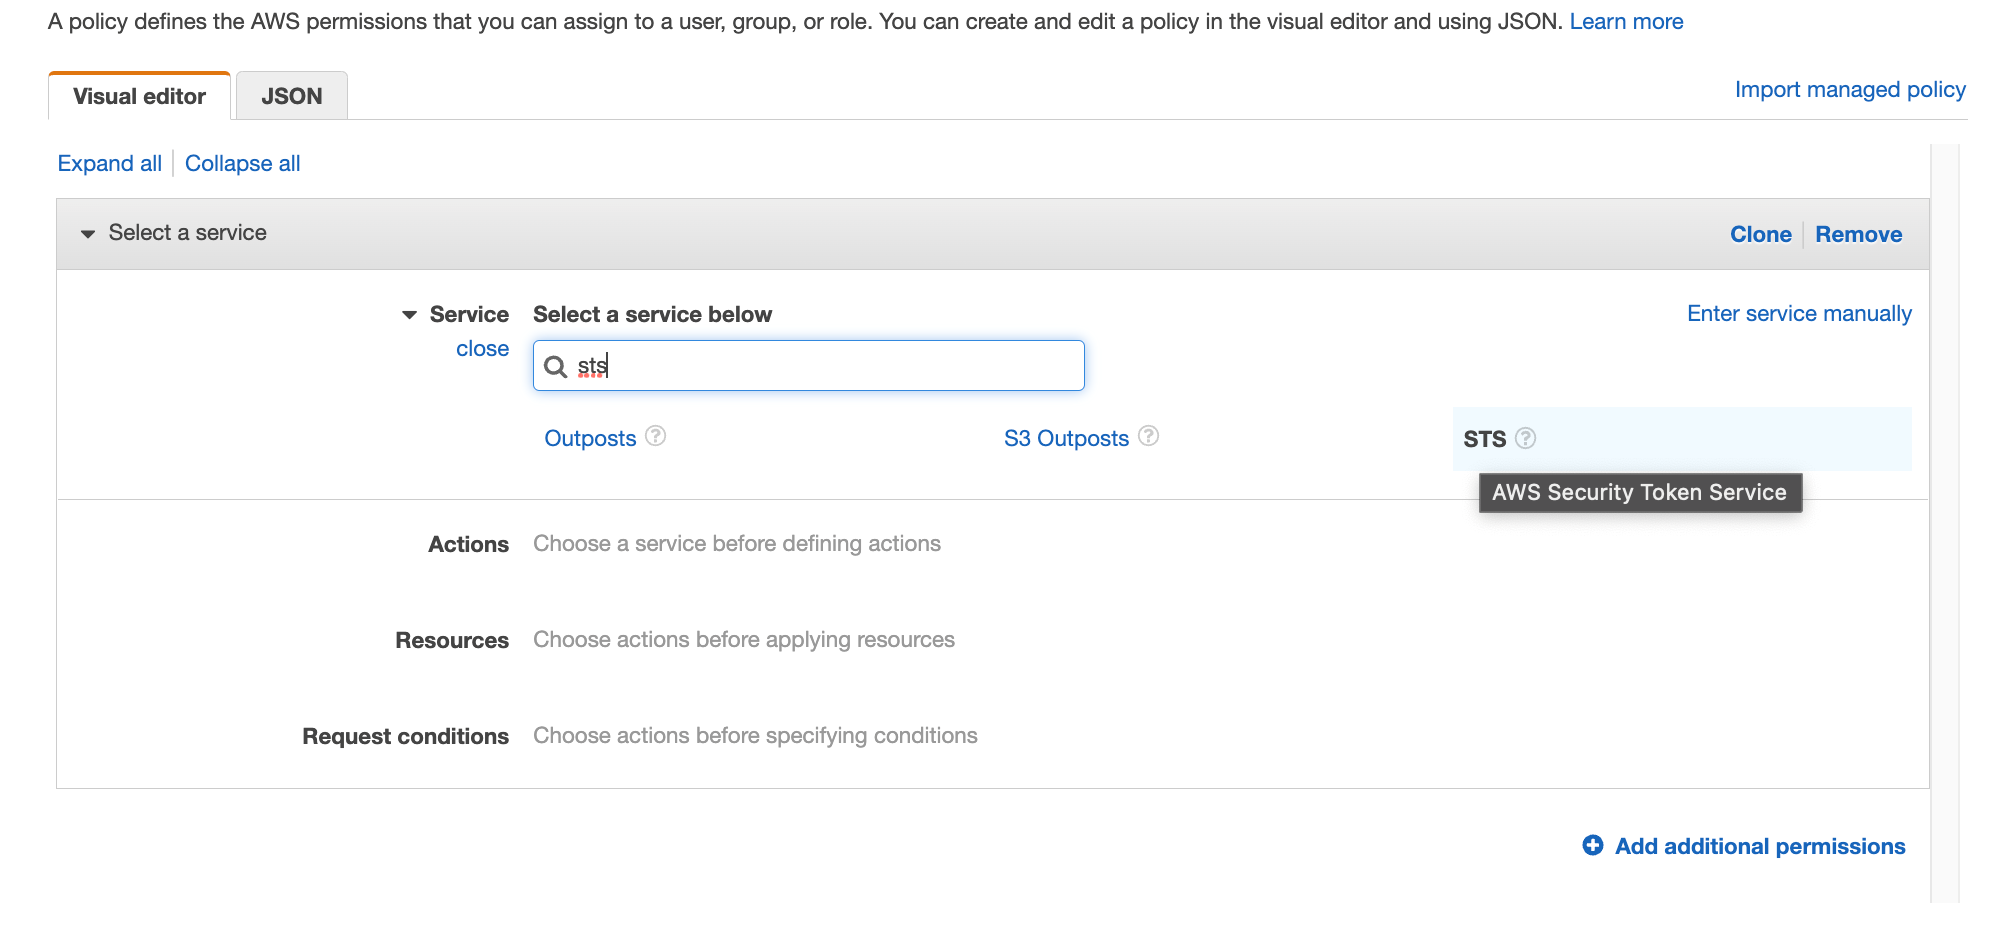
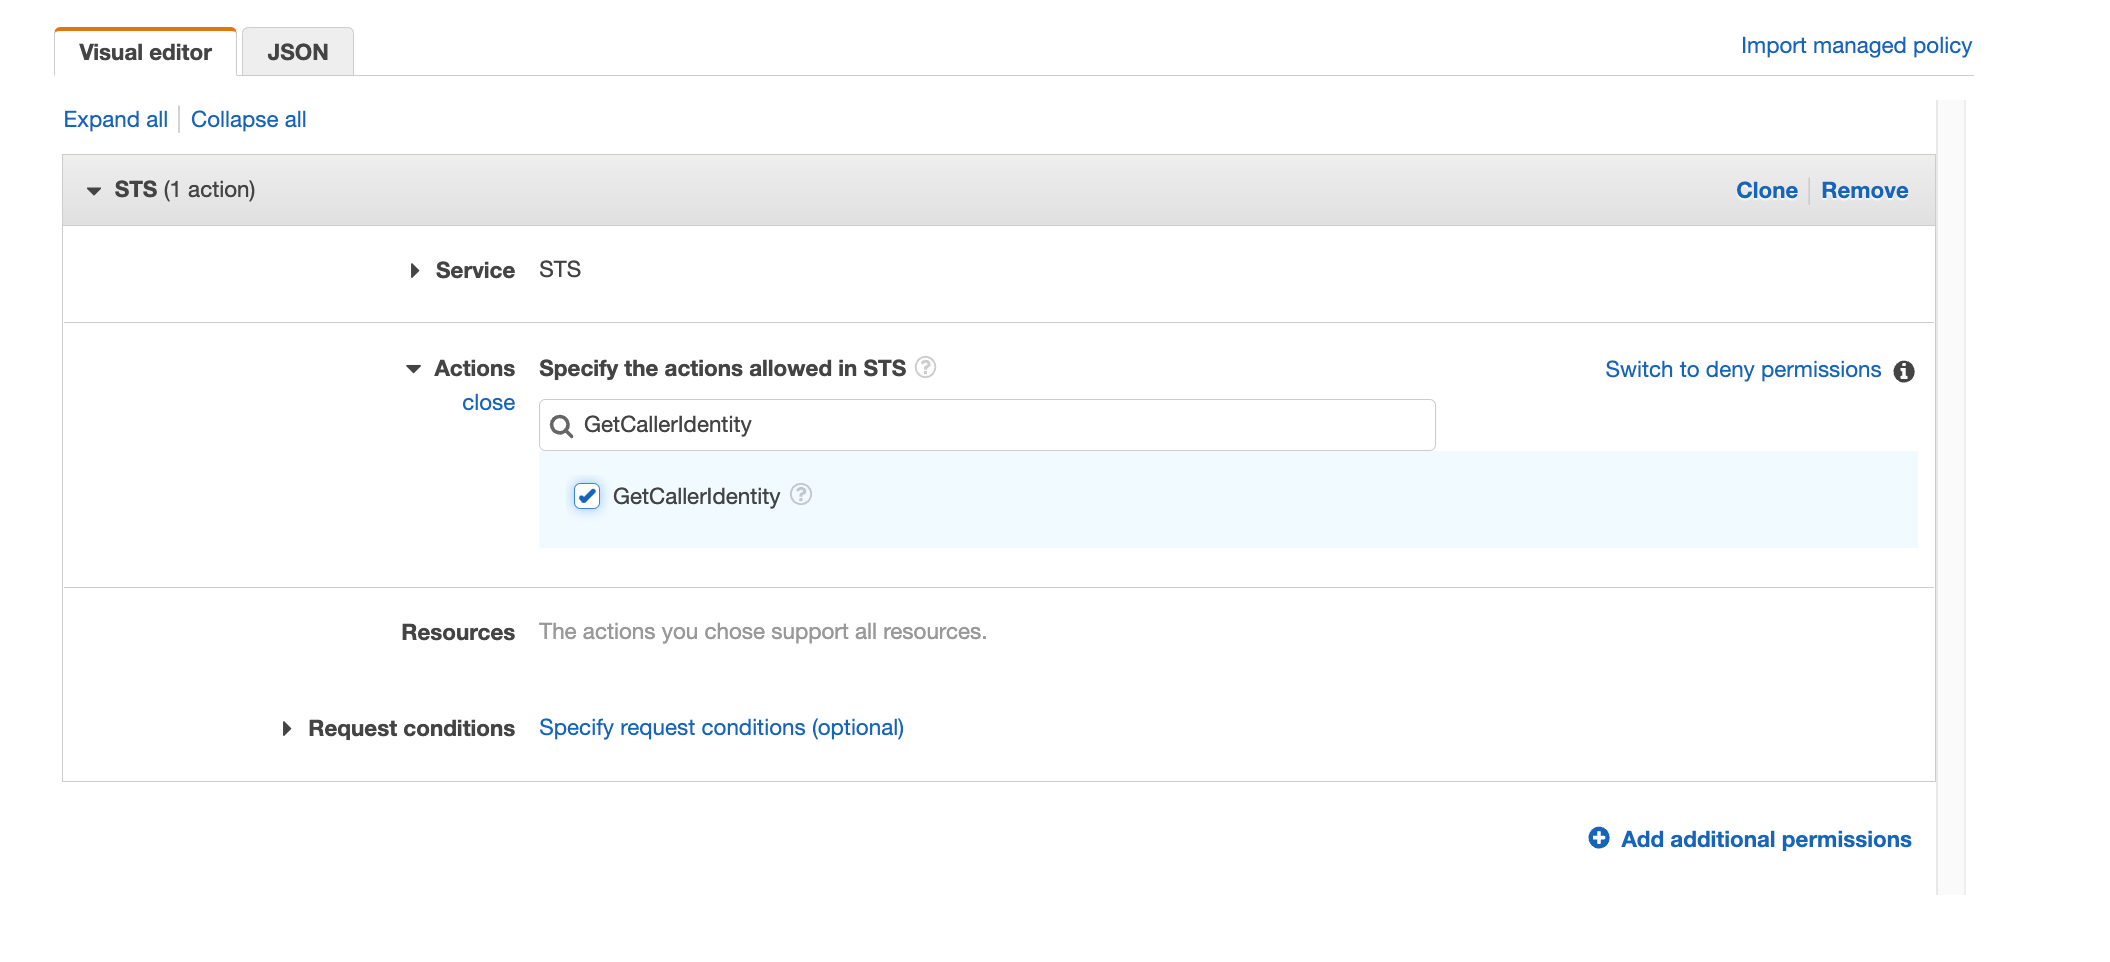
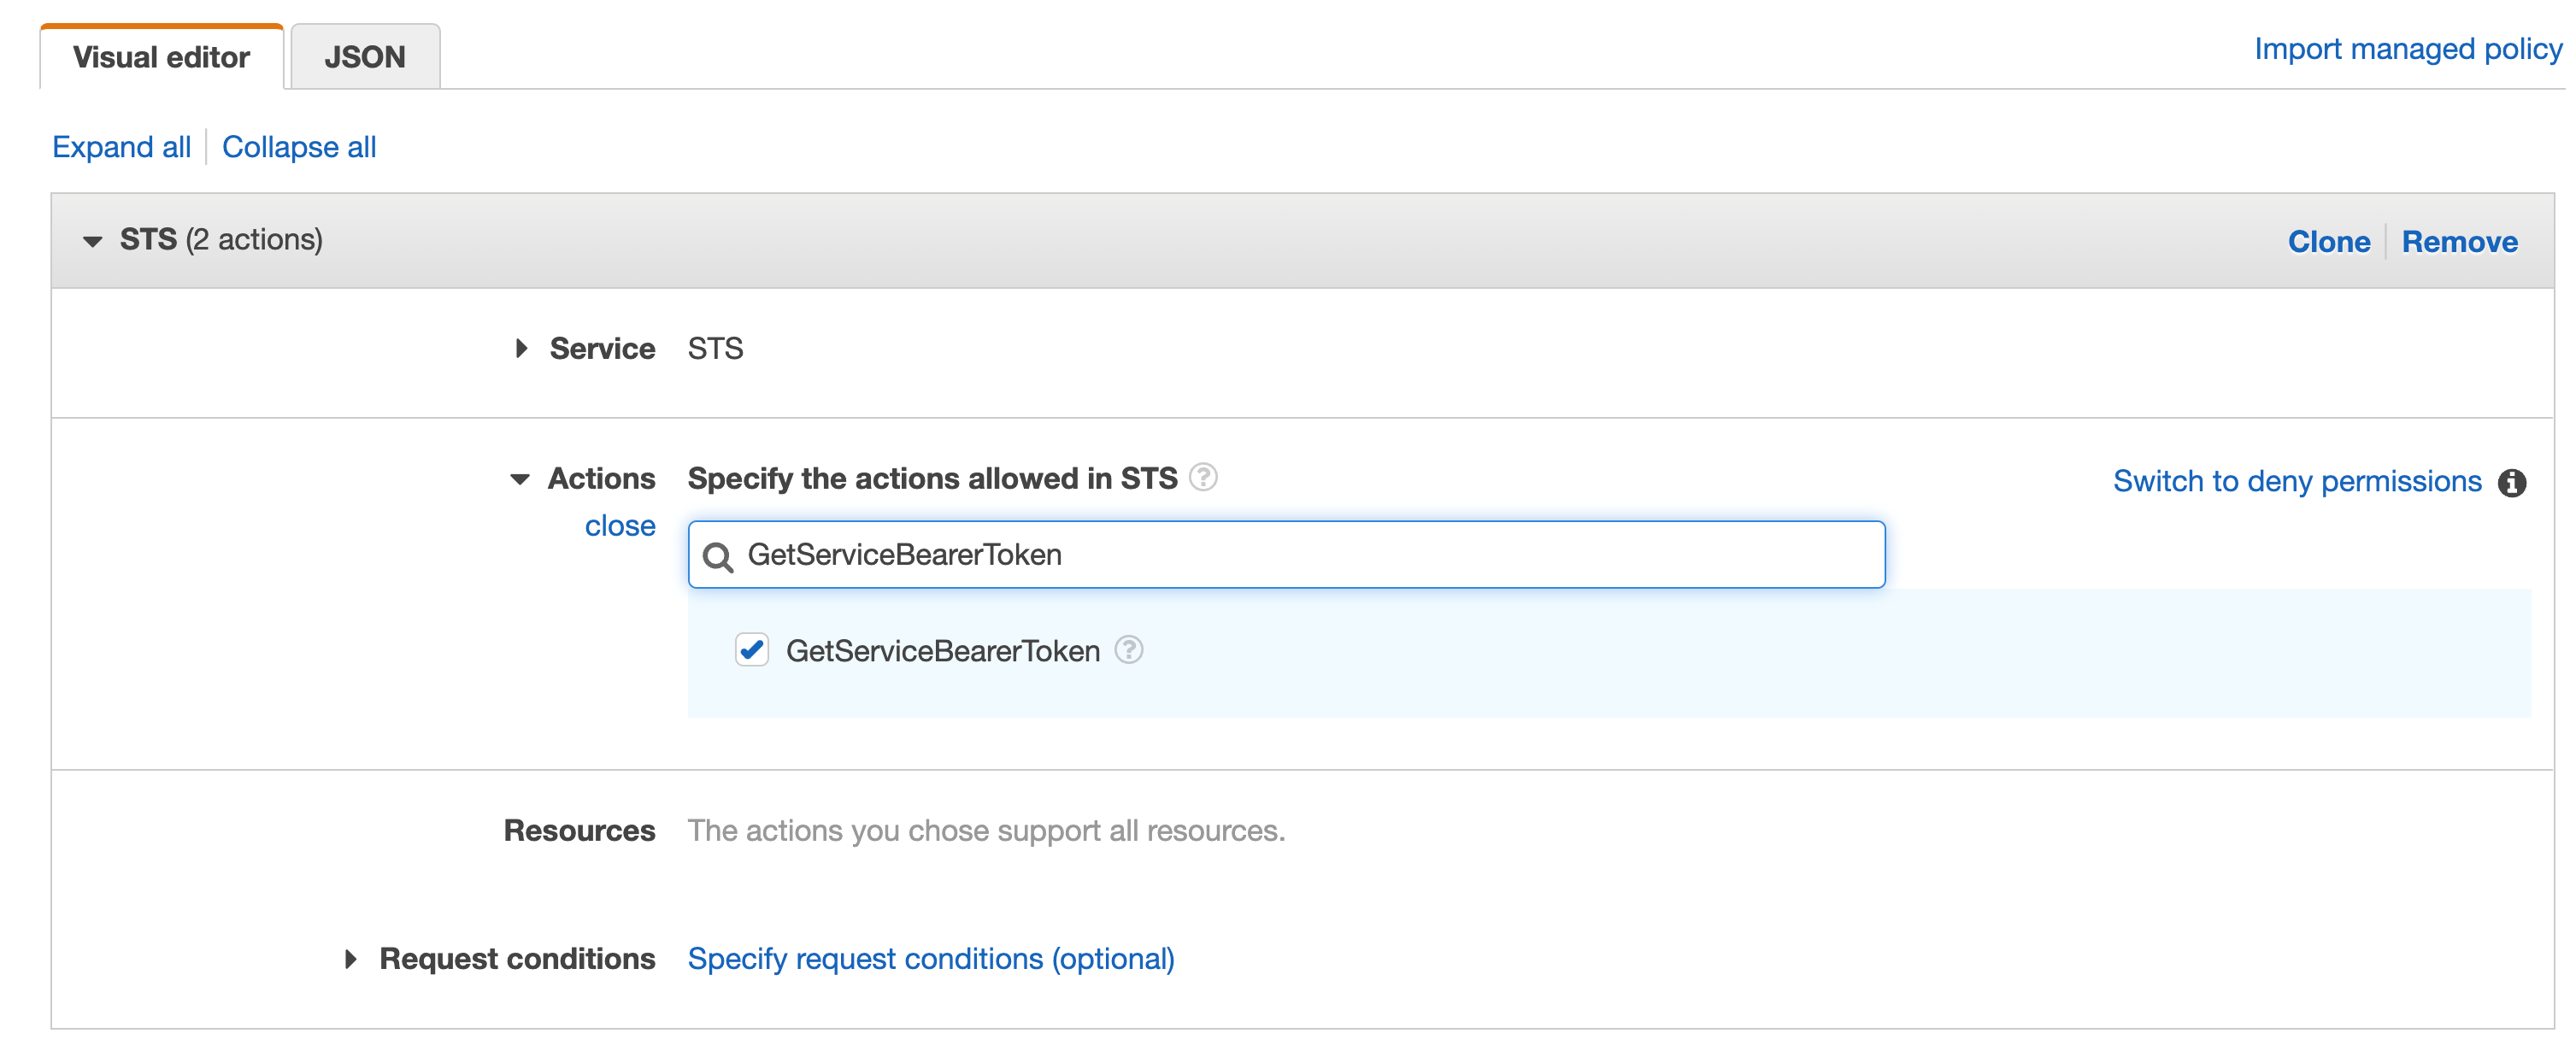
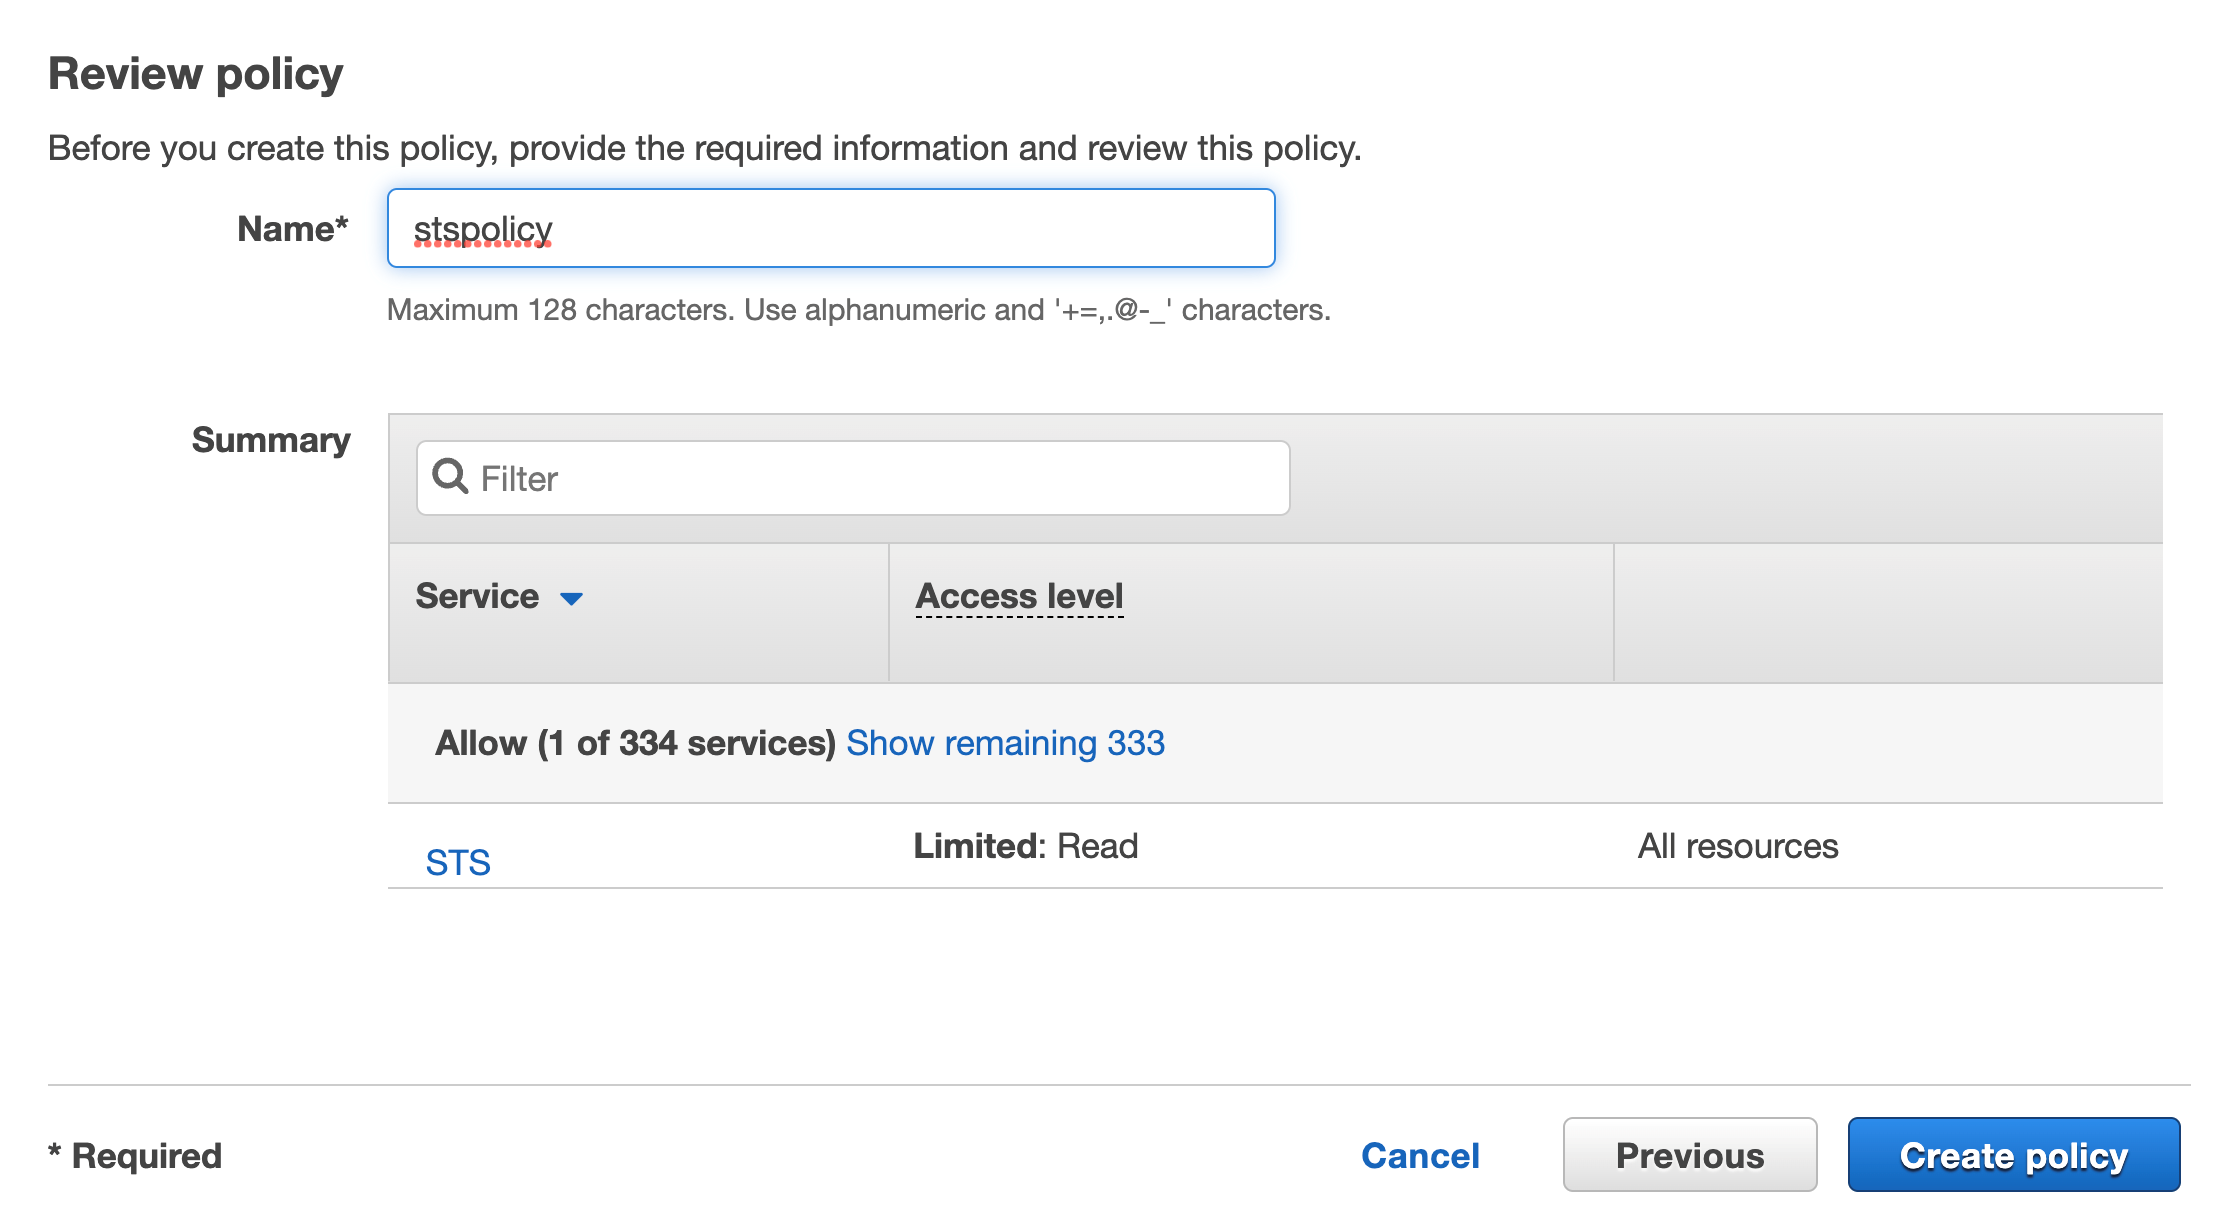
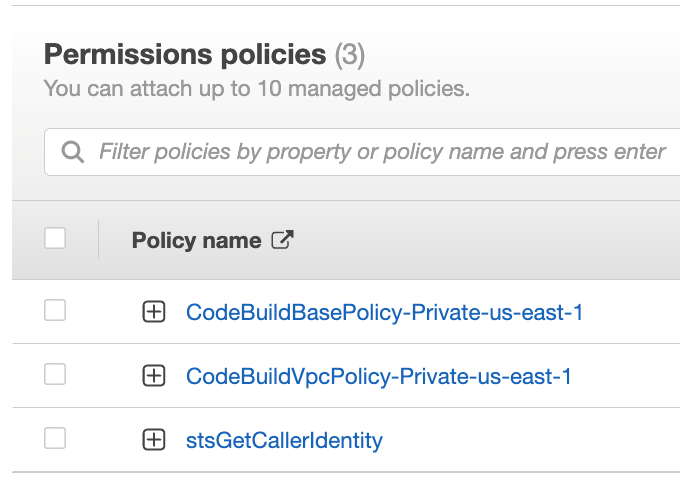
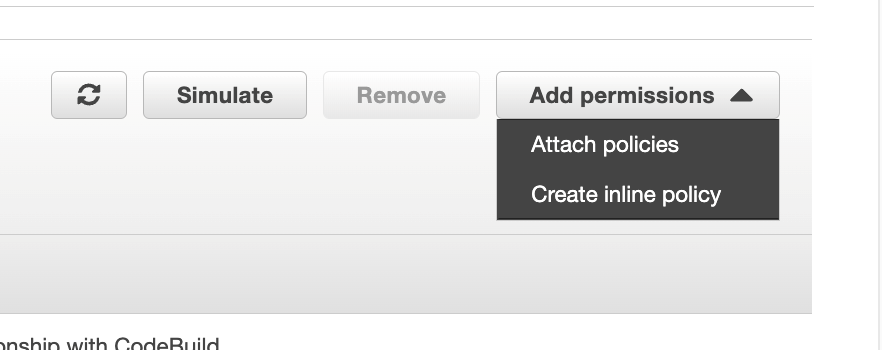
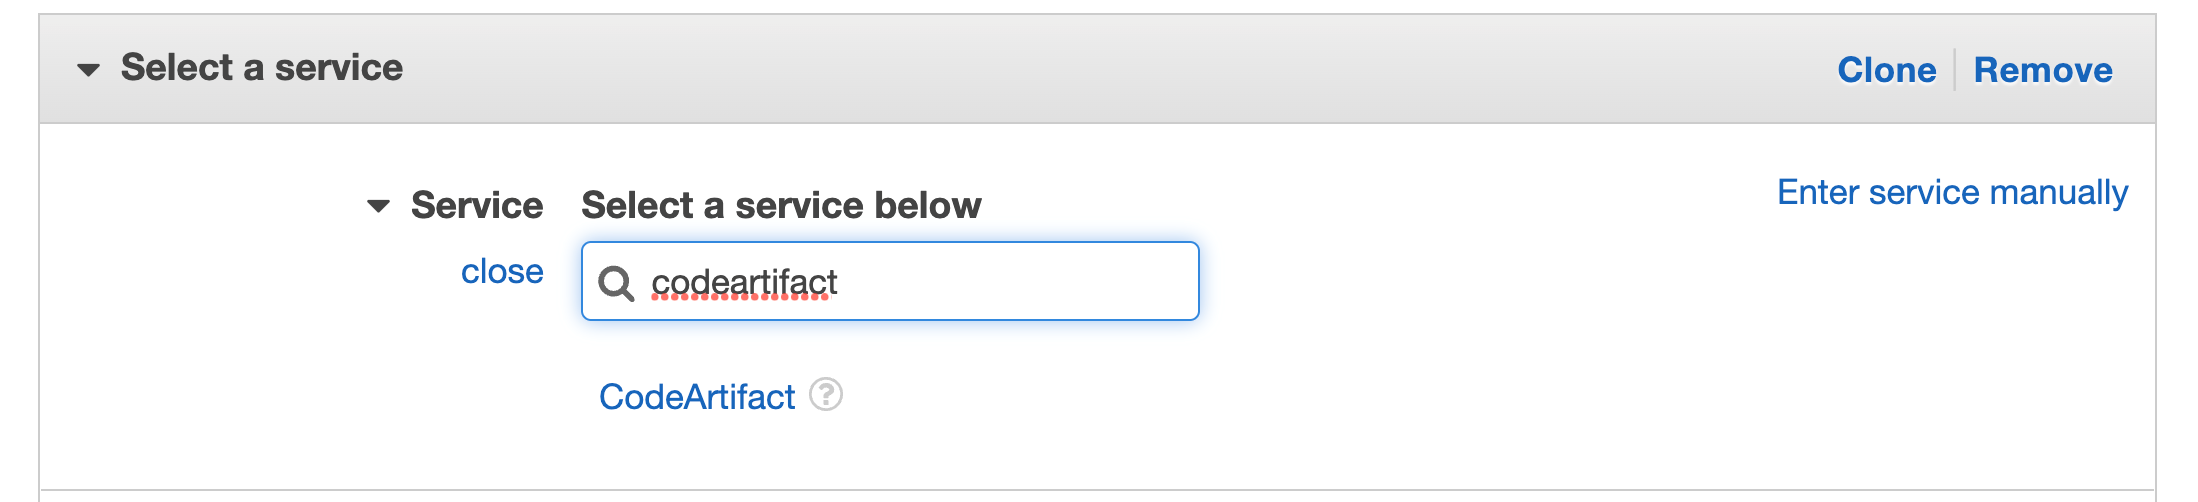
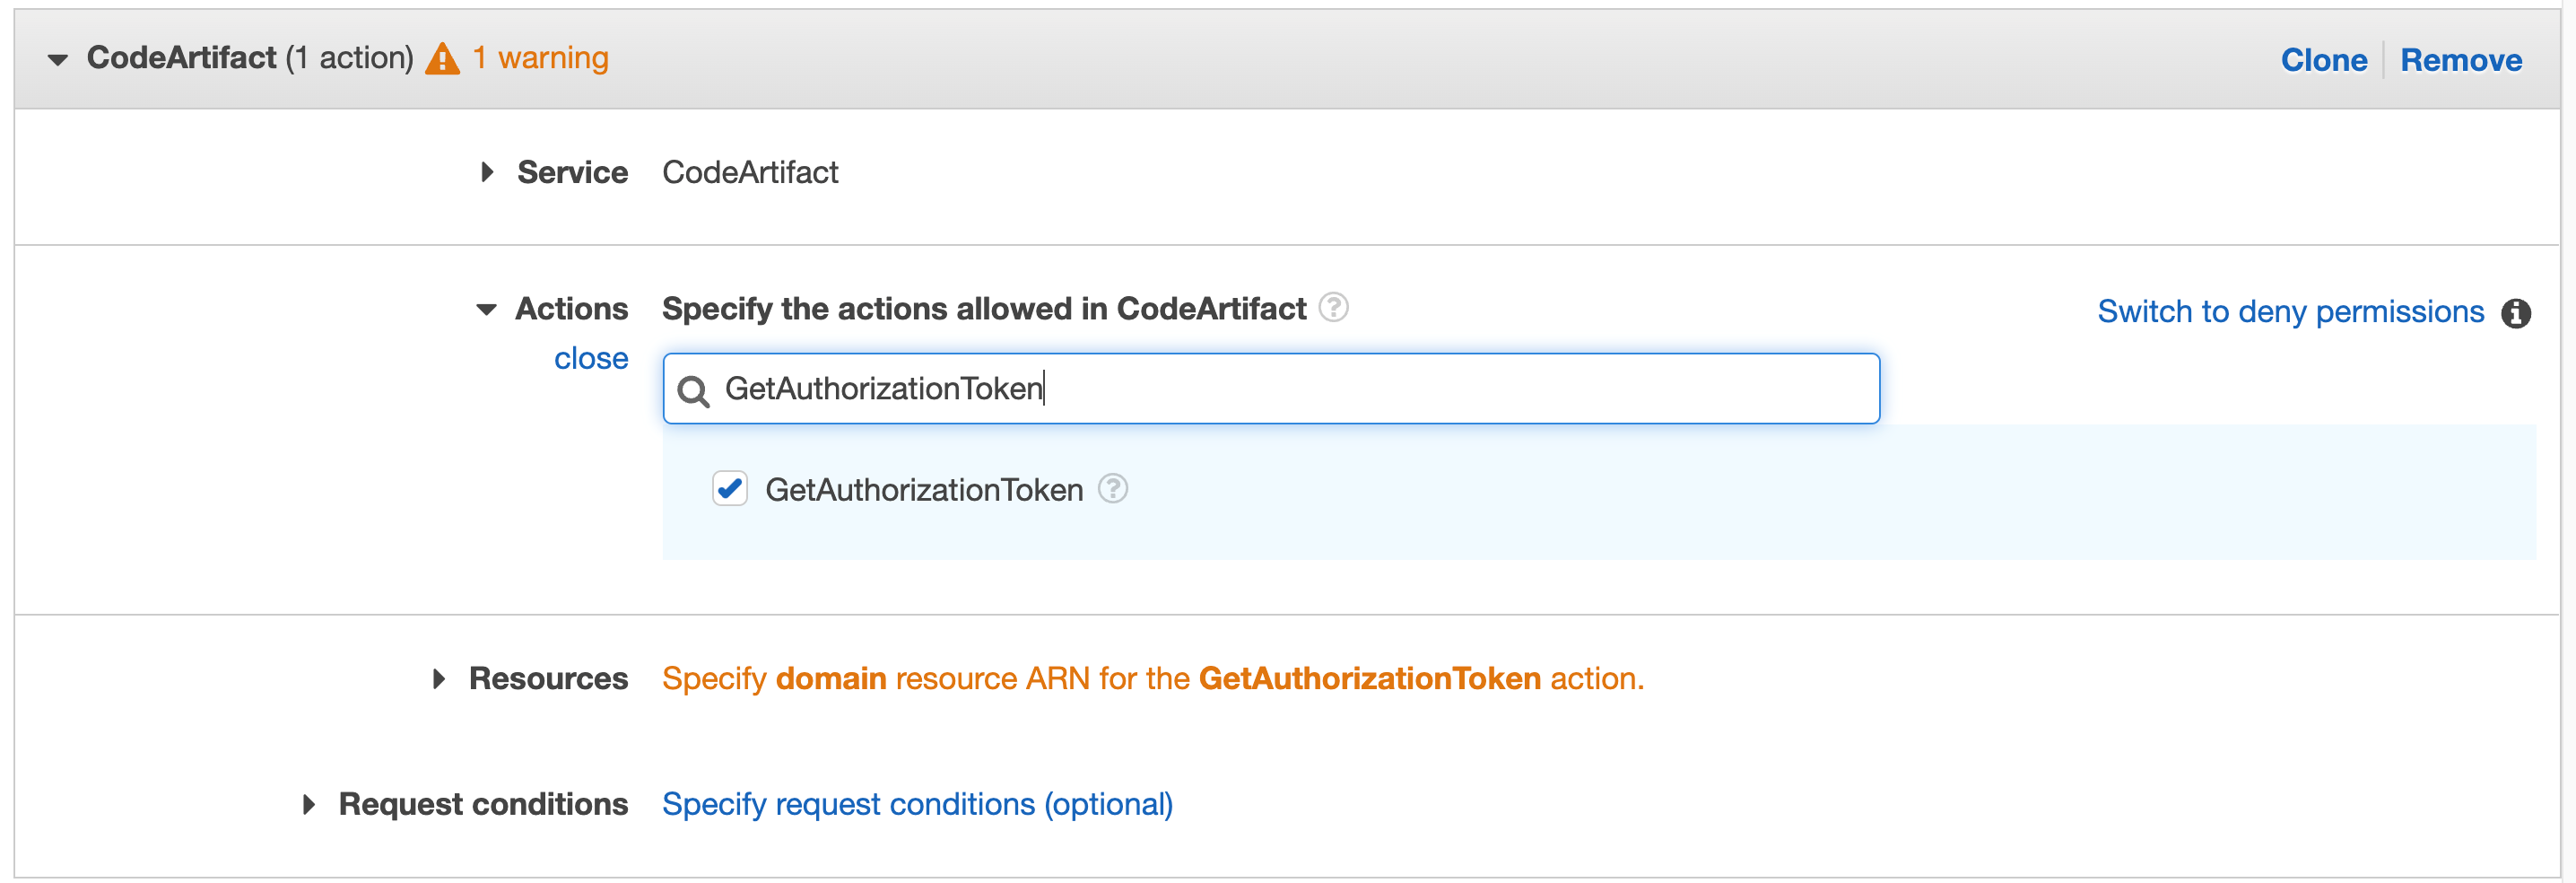
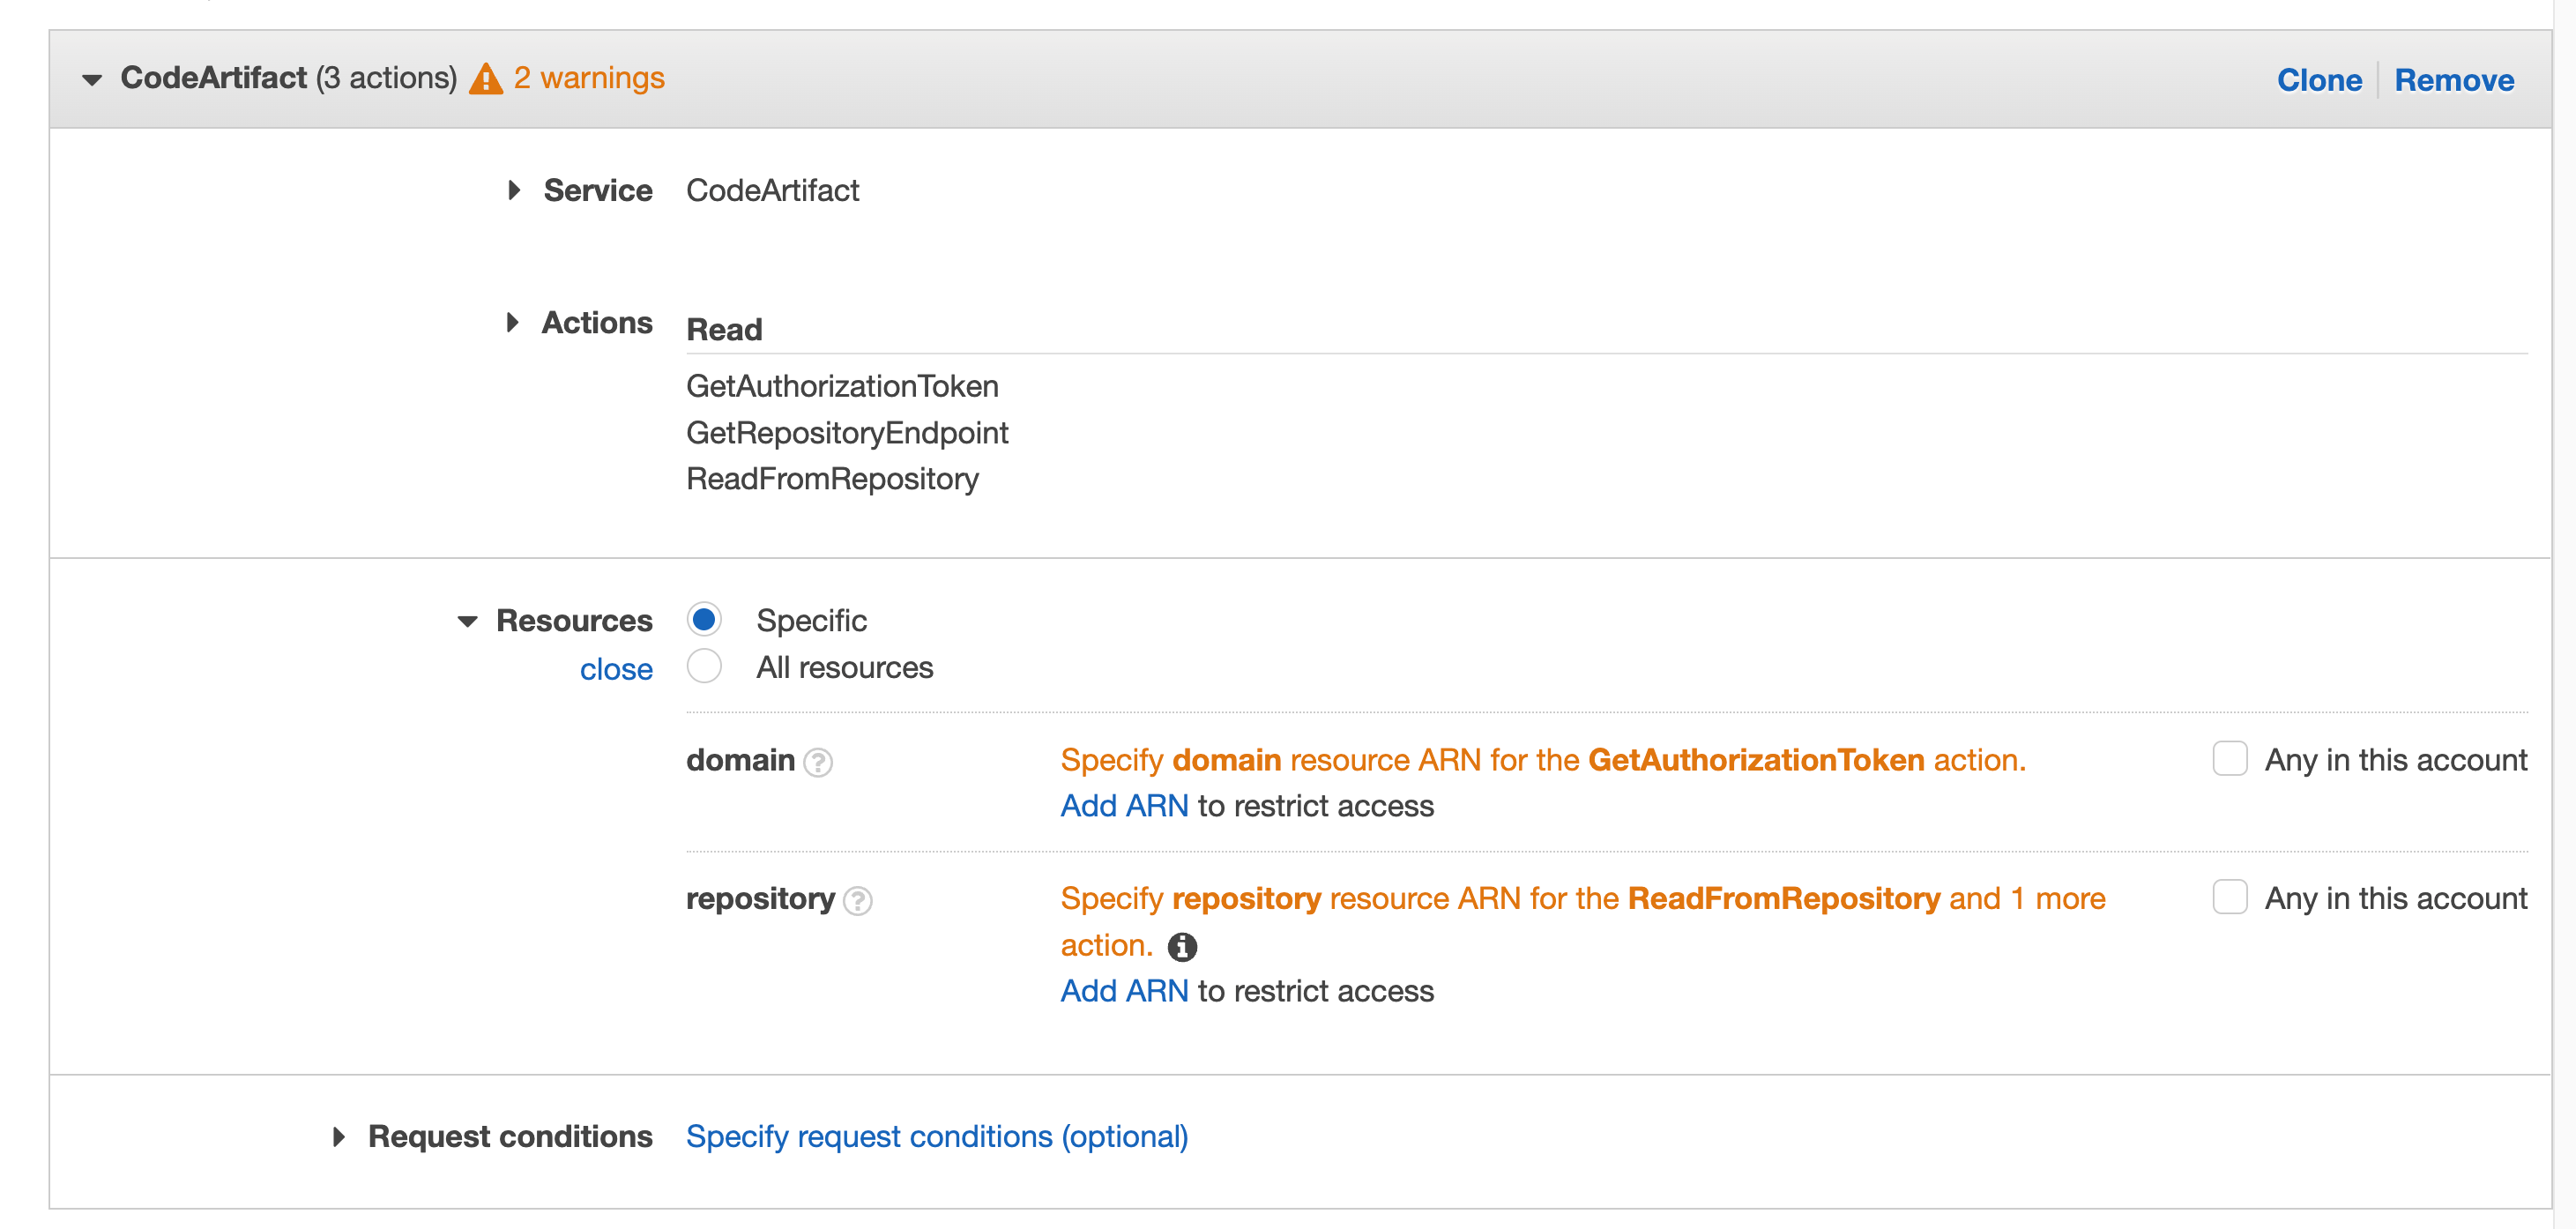
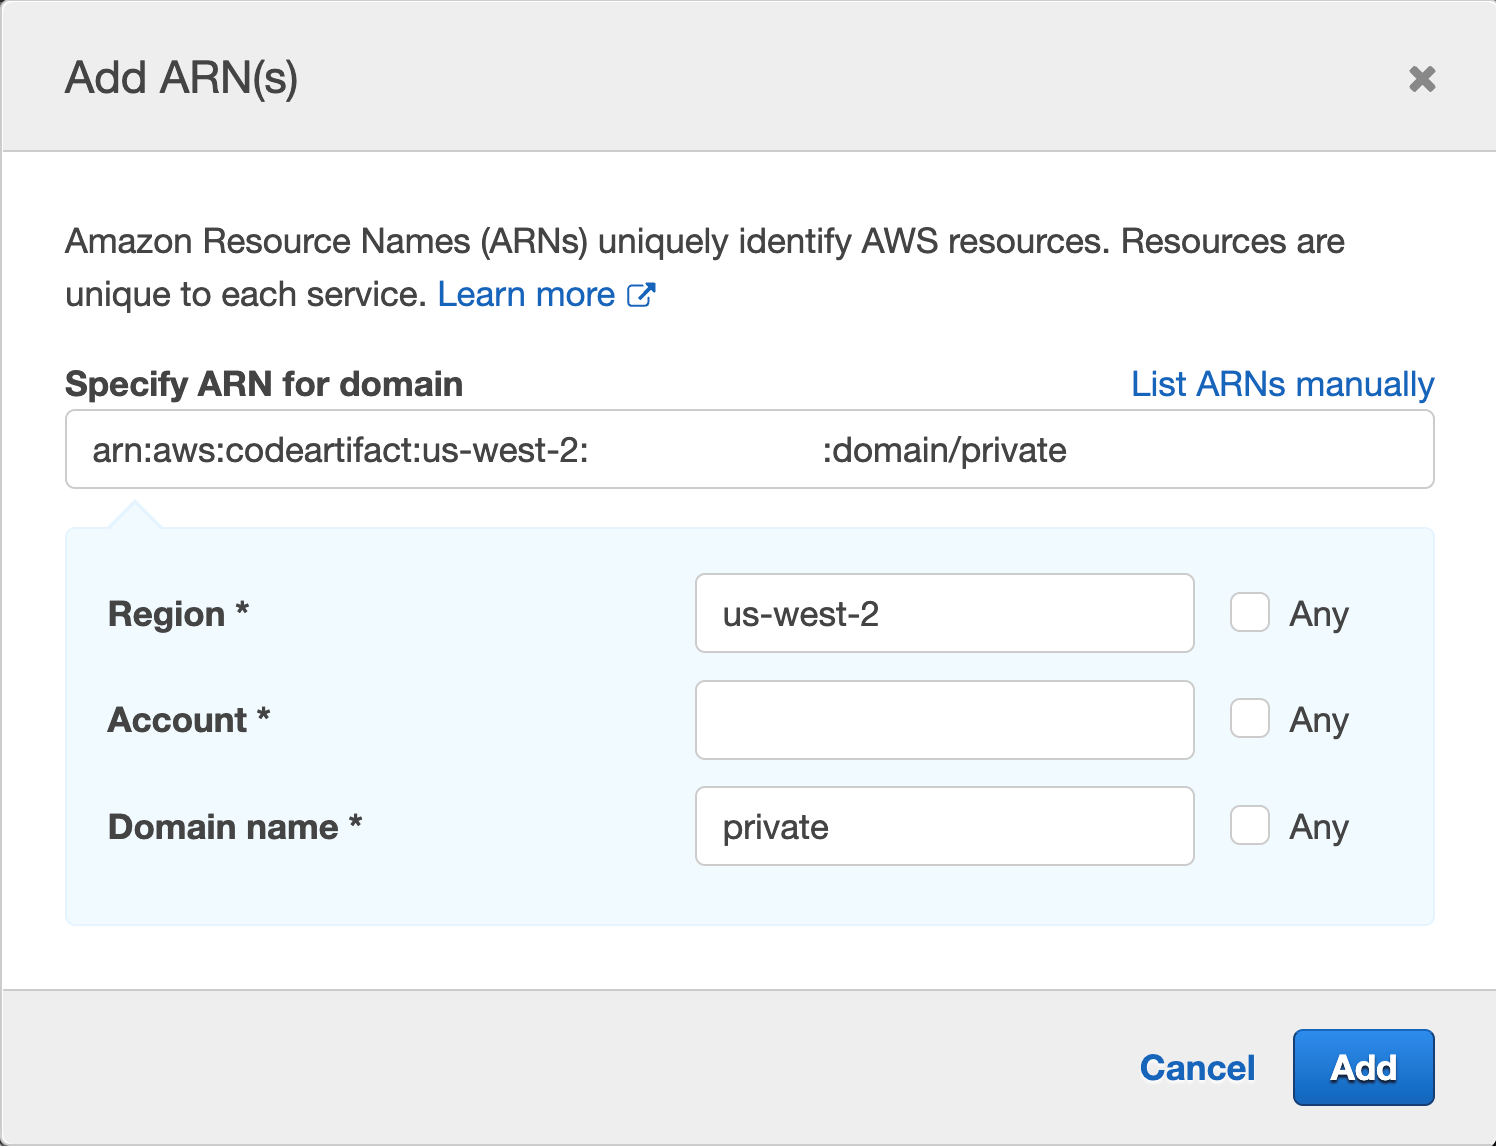
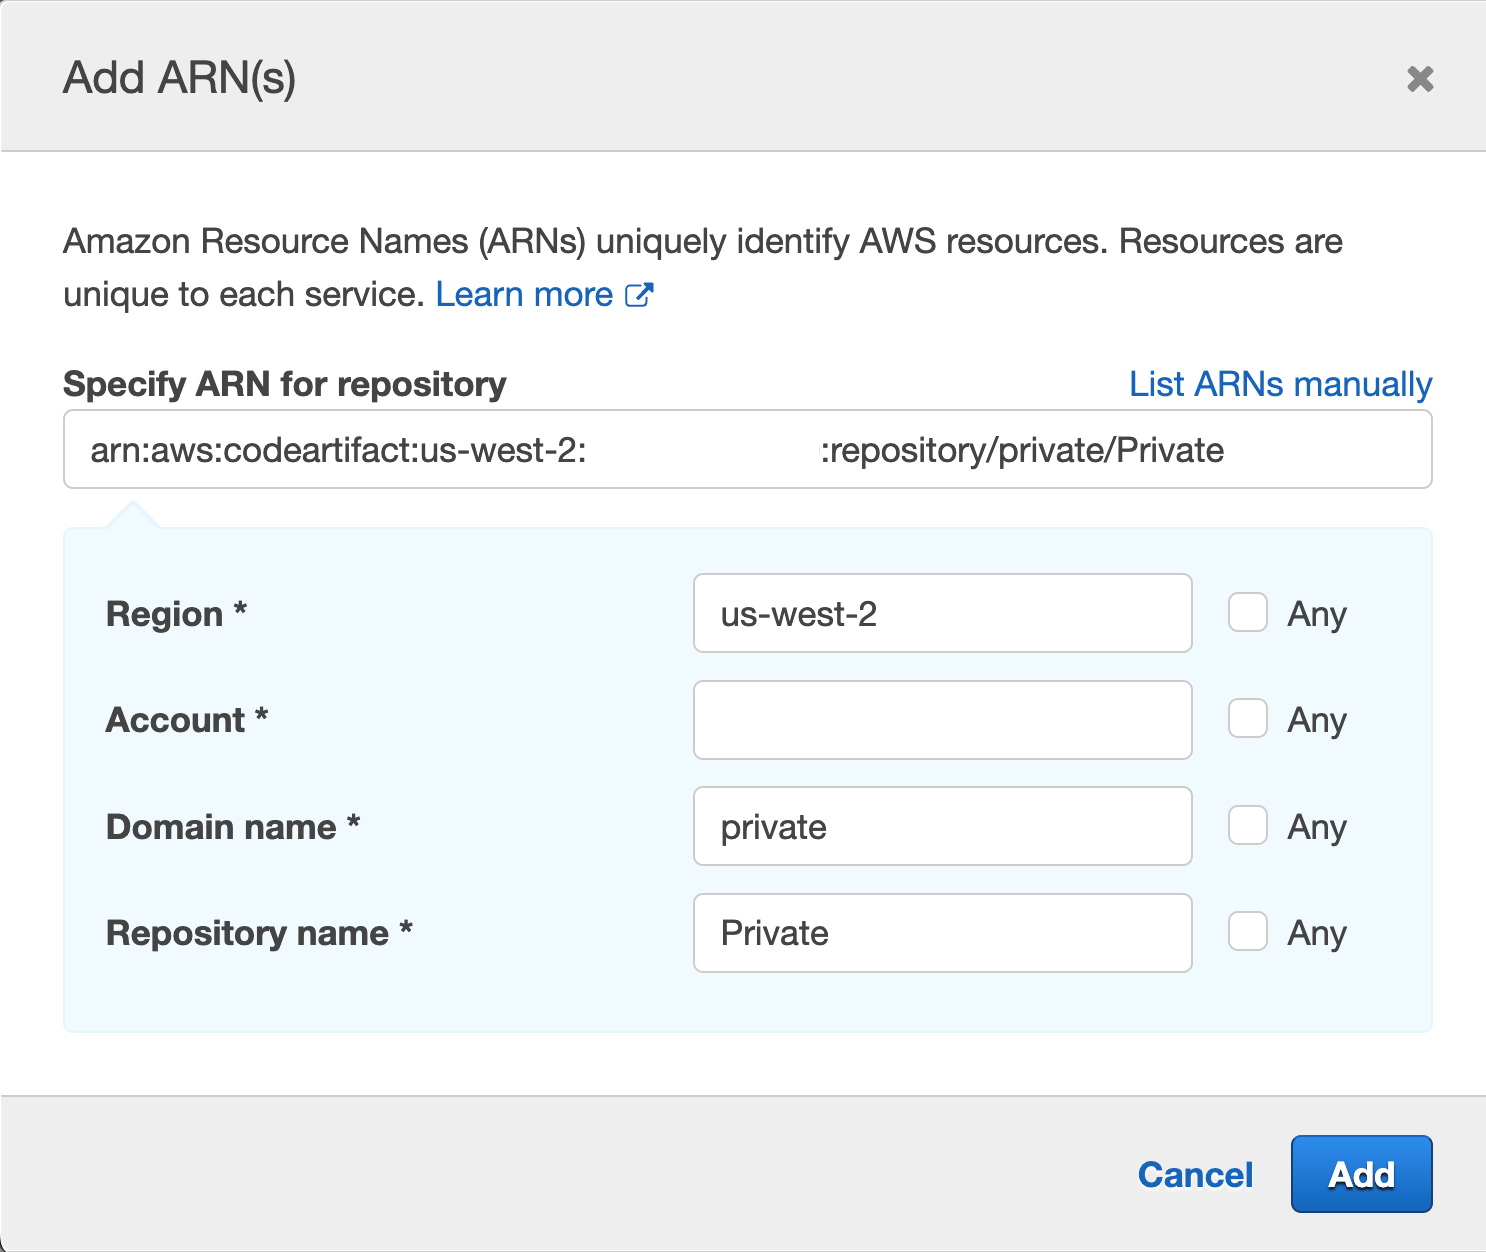

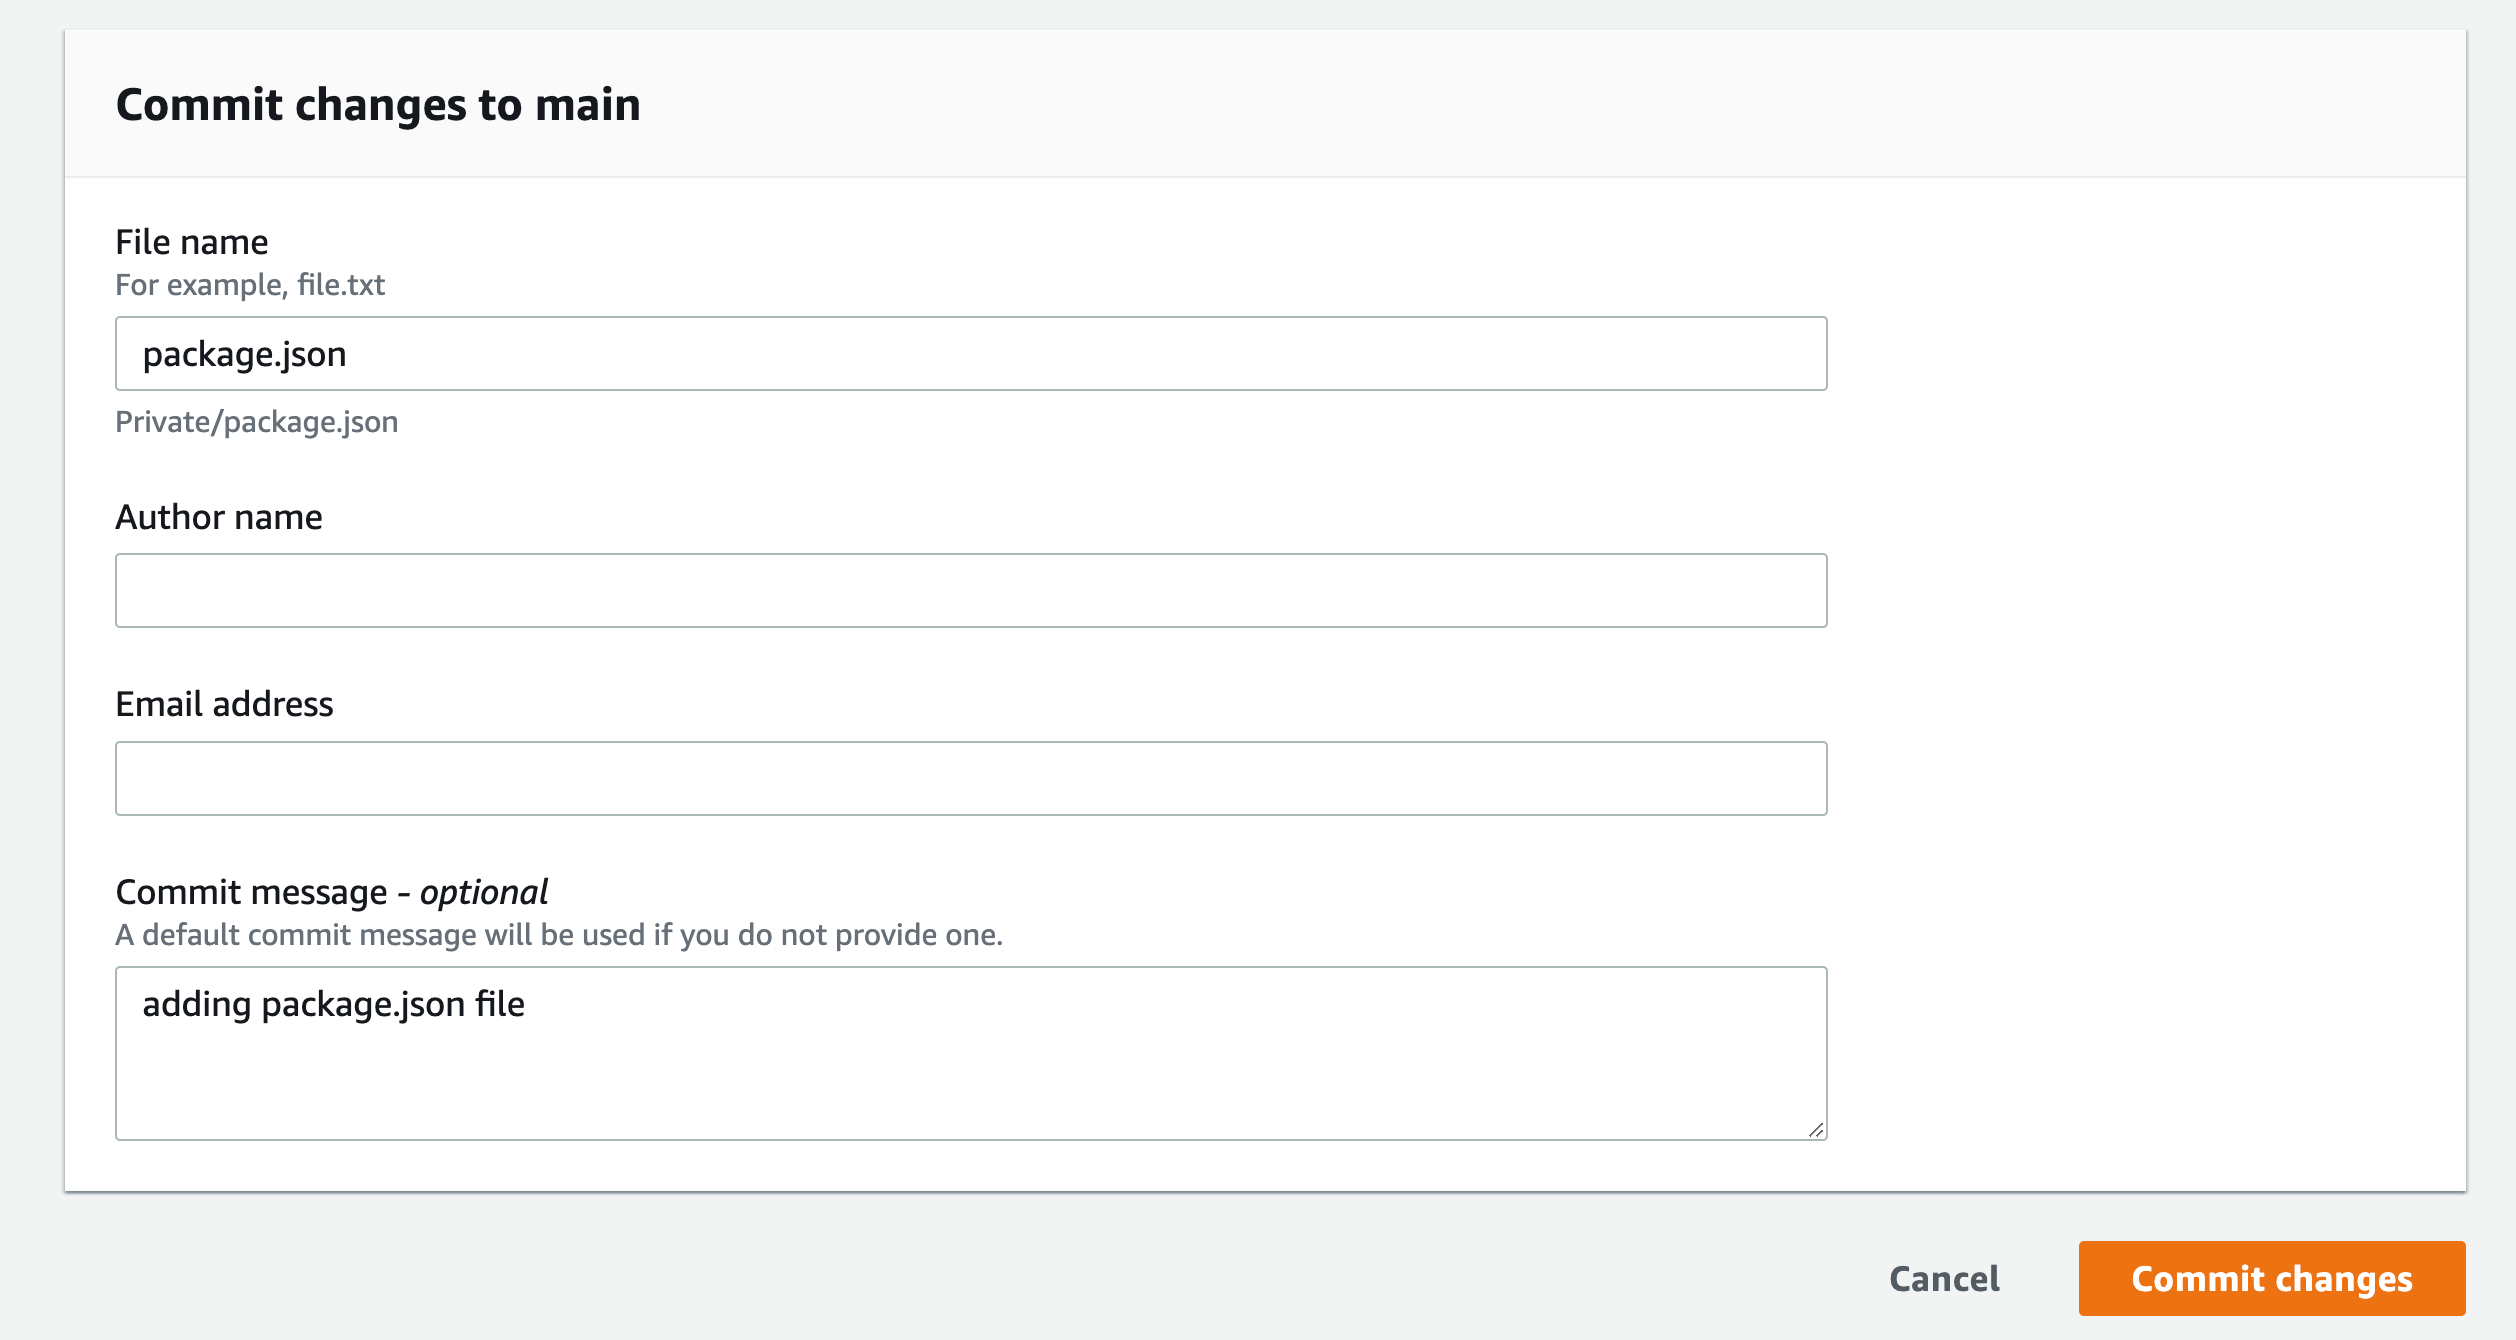
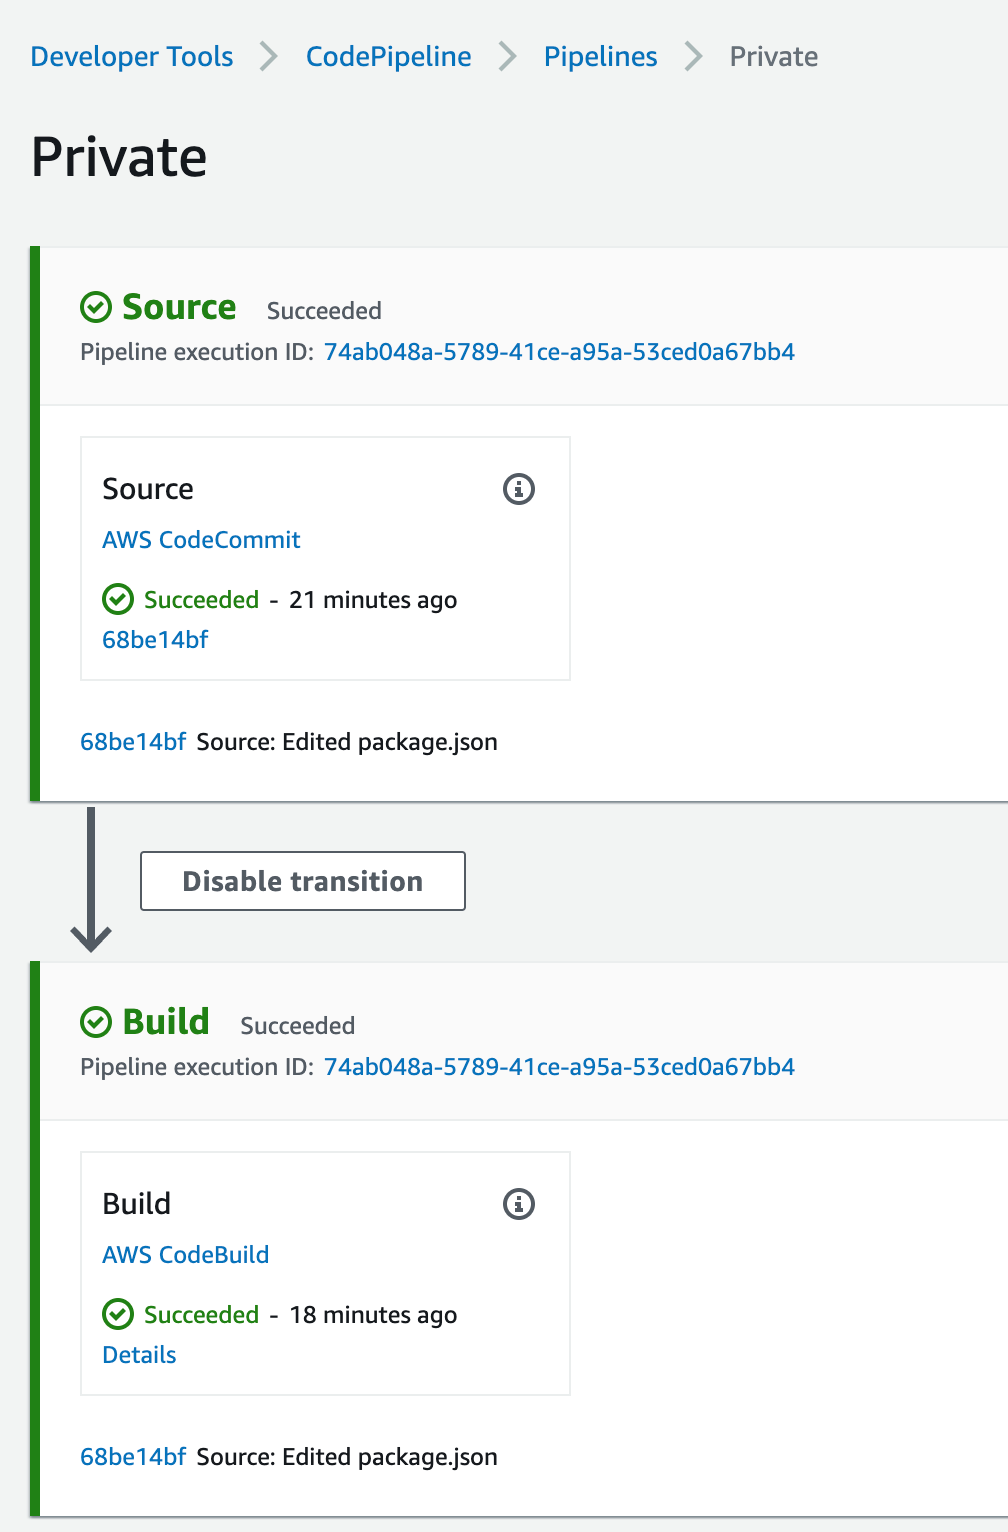

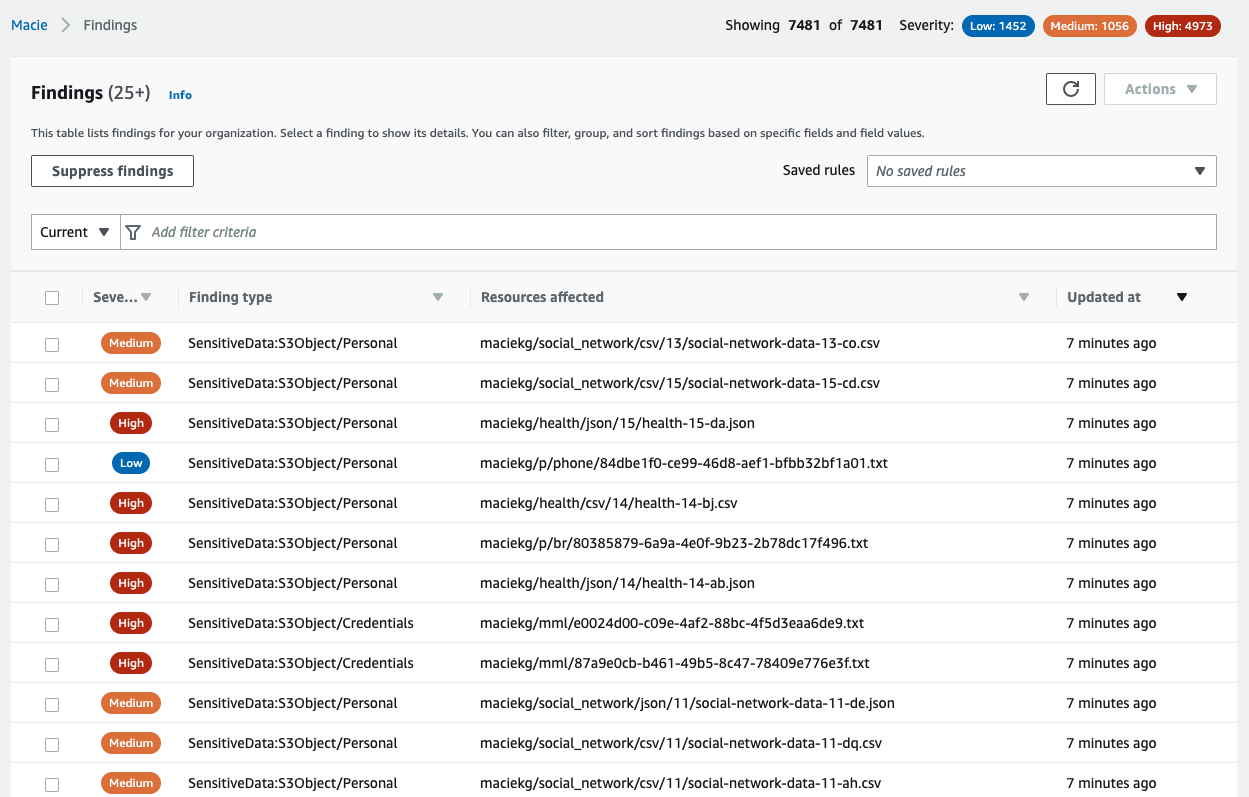
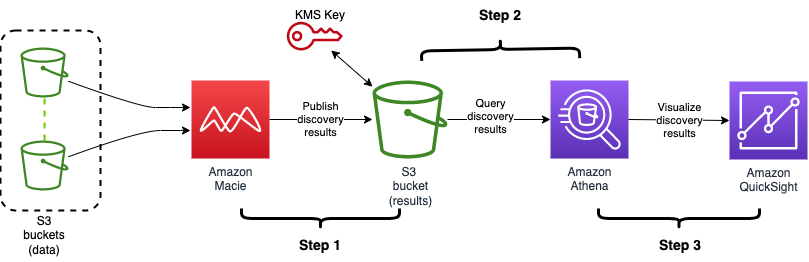
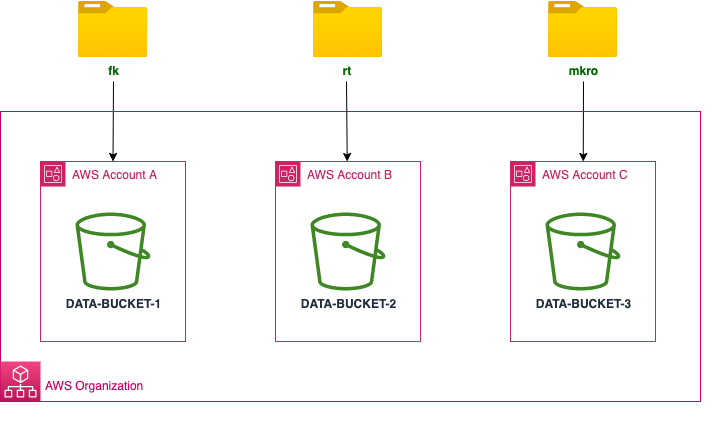


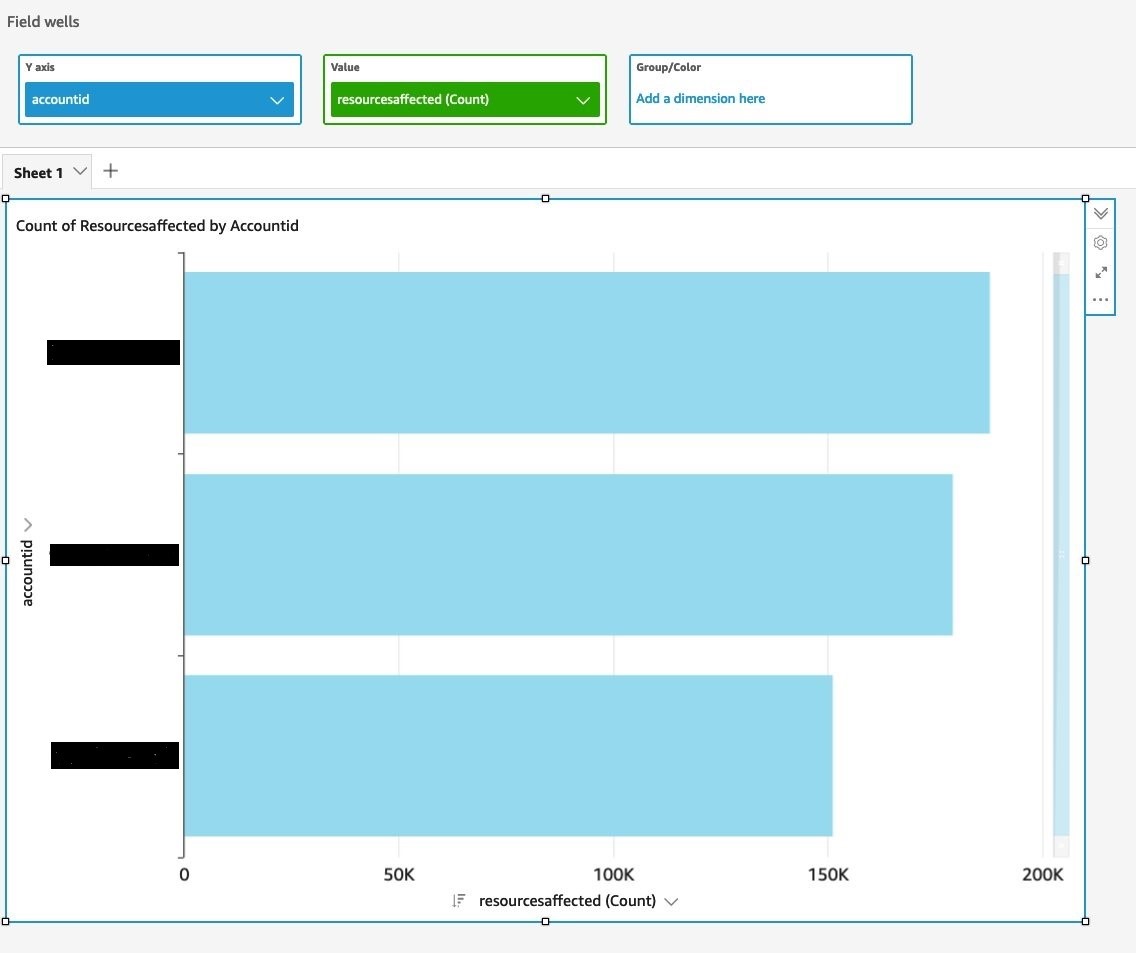
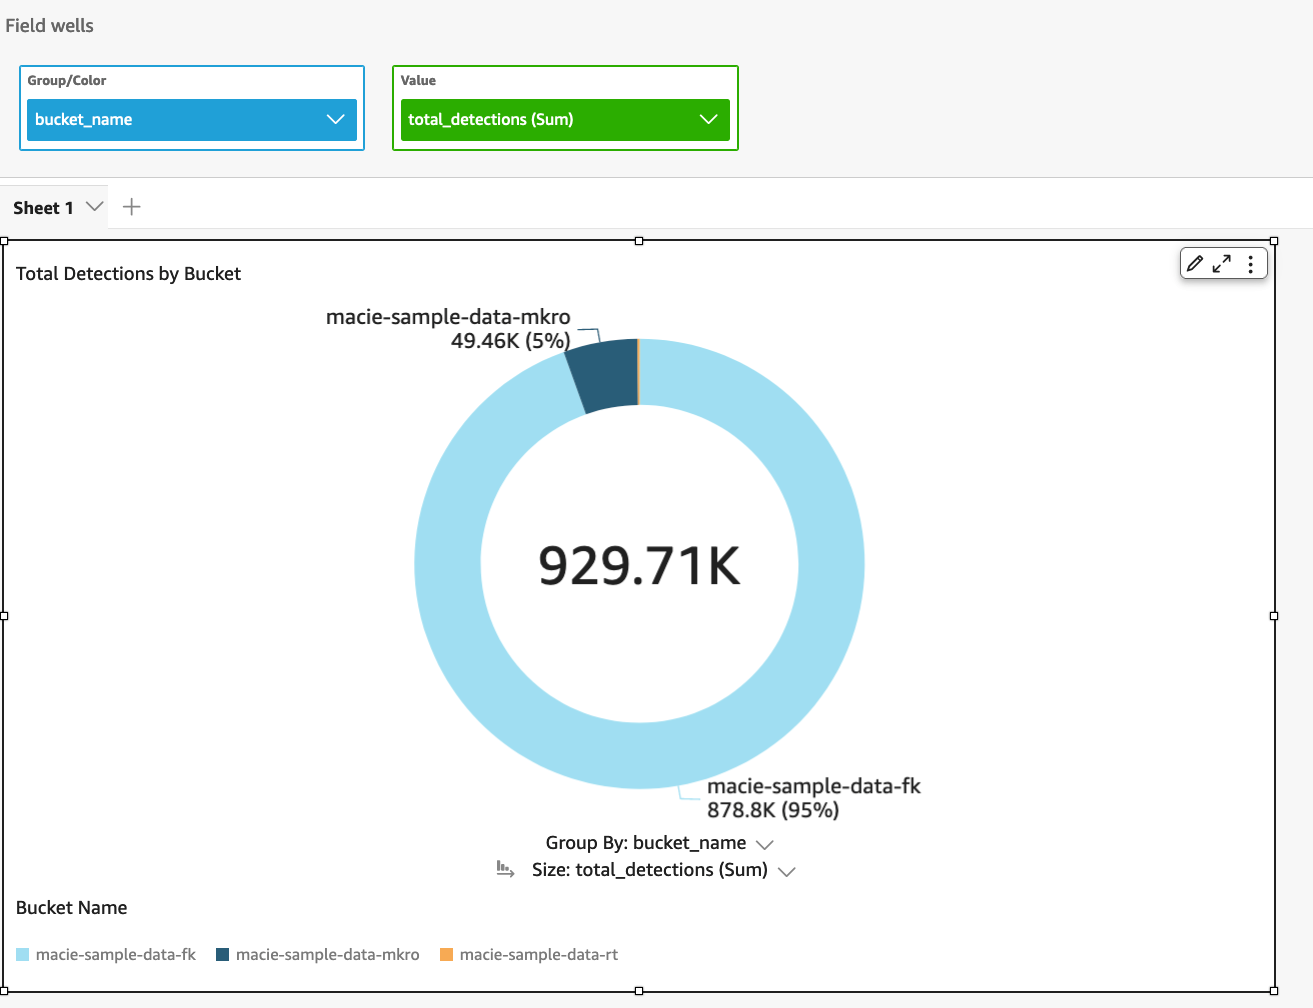

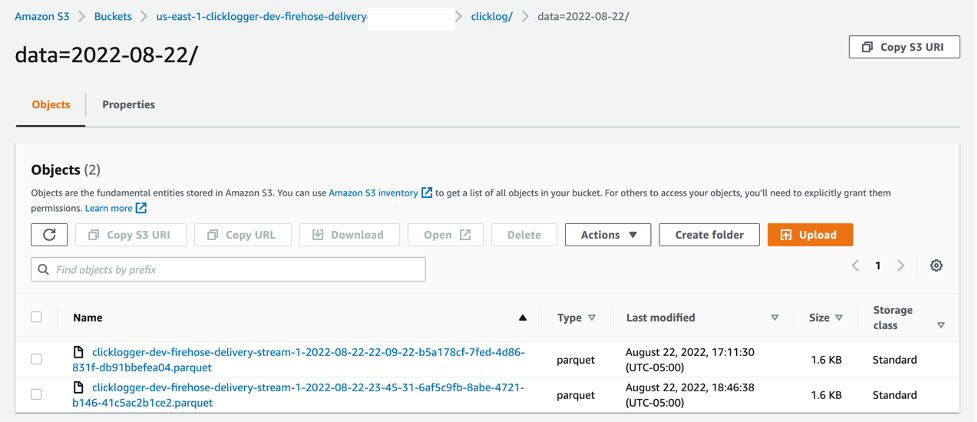


 Varad Ram is Senior Solutions Architect in Amazon Web Services. He likes to help customers adopt to cloud technologies and is particularly interested in artificial intelligence. He believes deep learning will power future technology growth. In his spare time, he like to be outdoor with his daughter and son.

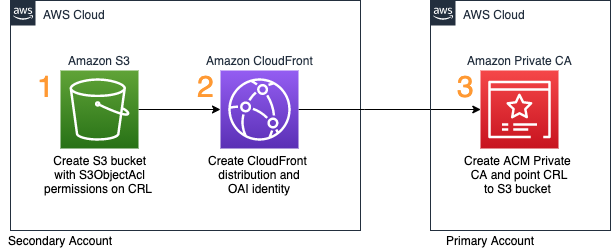


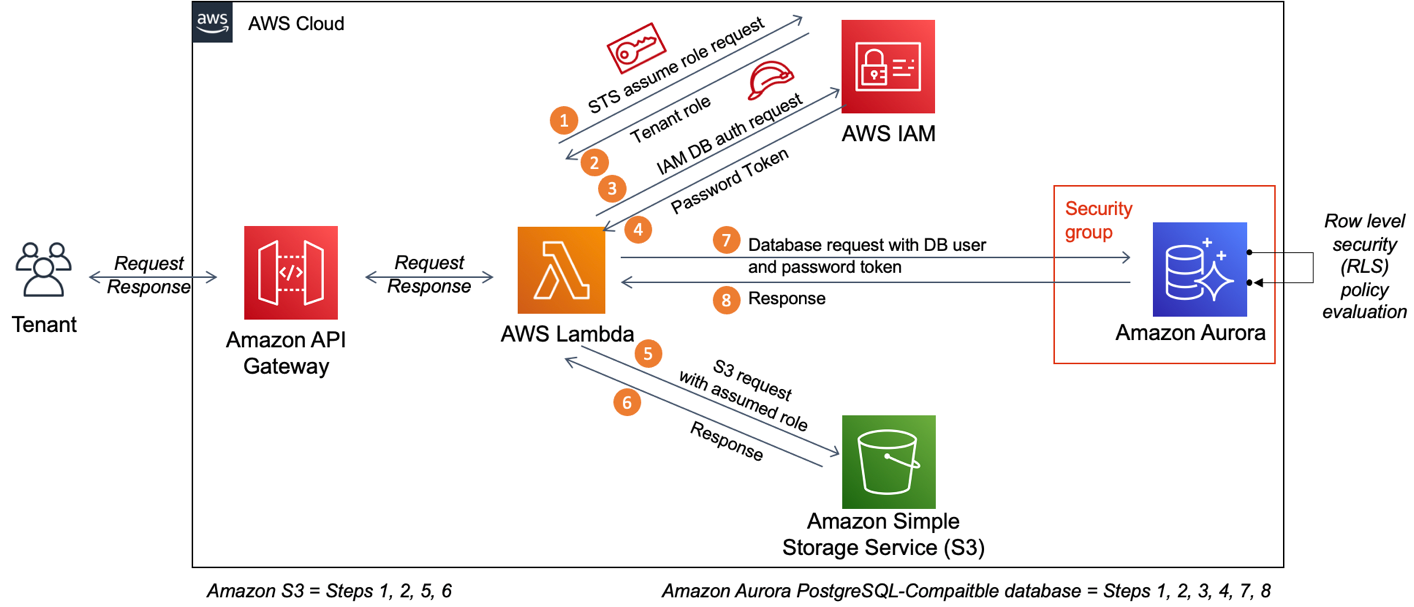


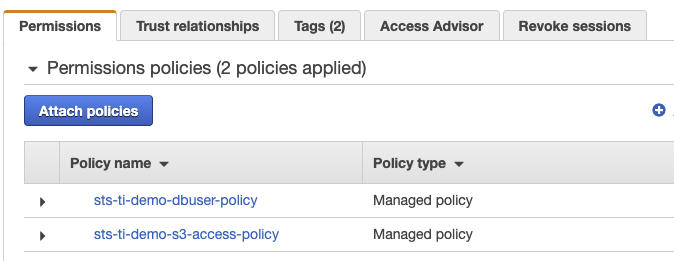
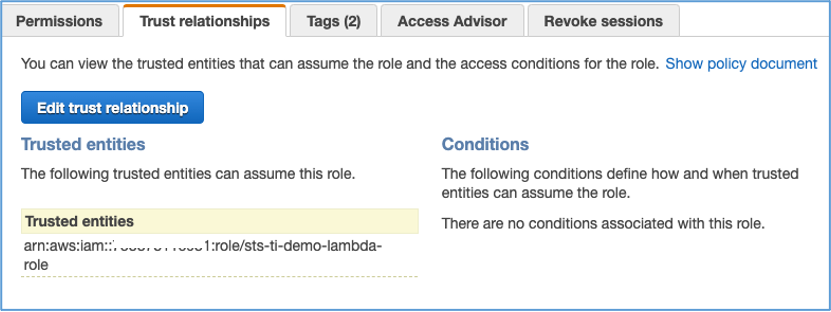
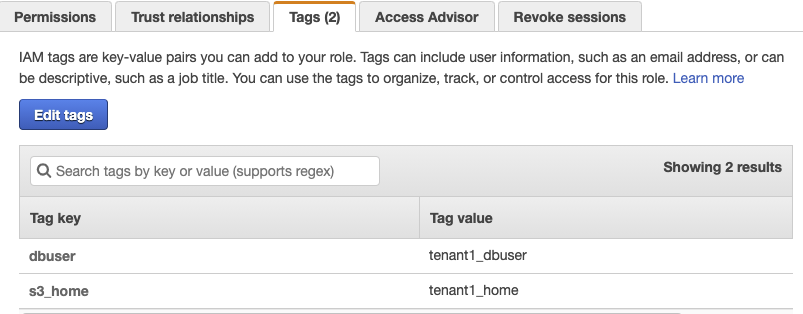
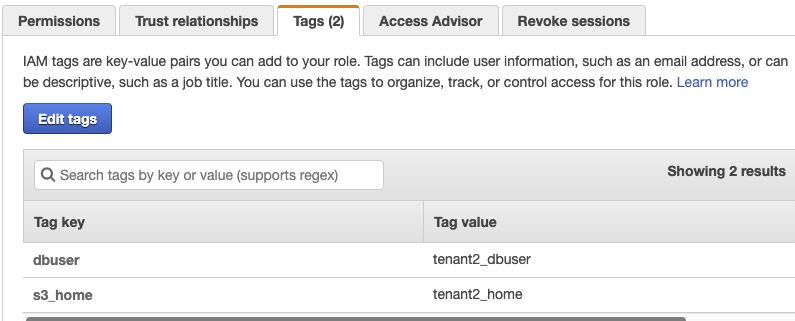


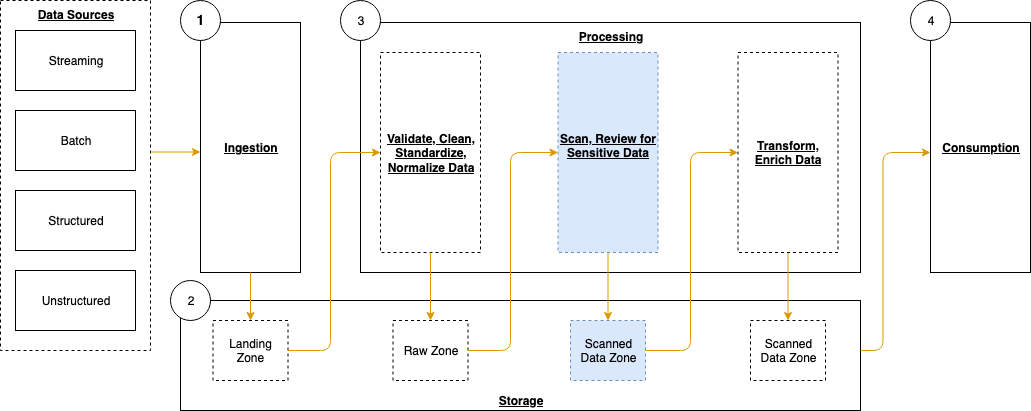
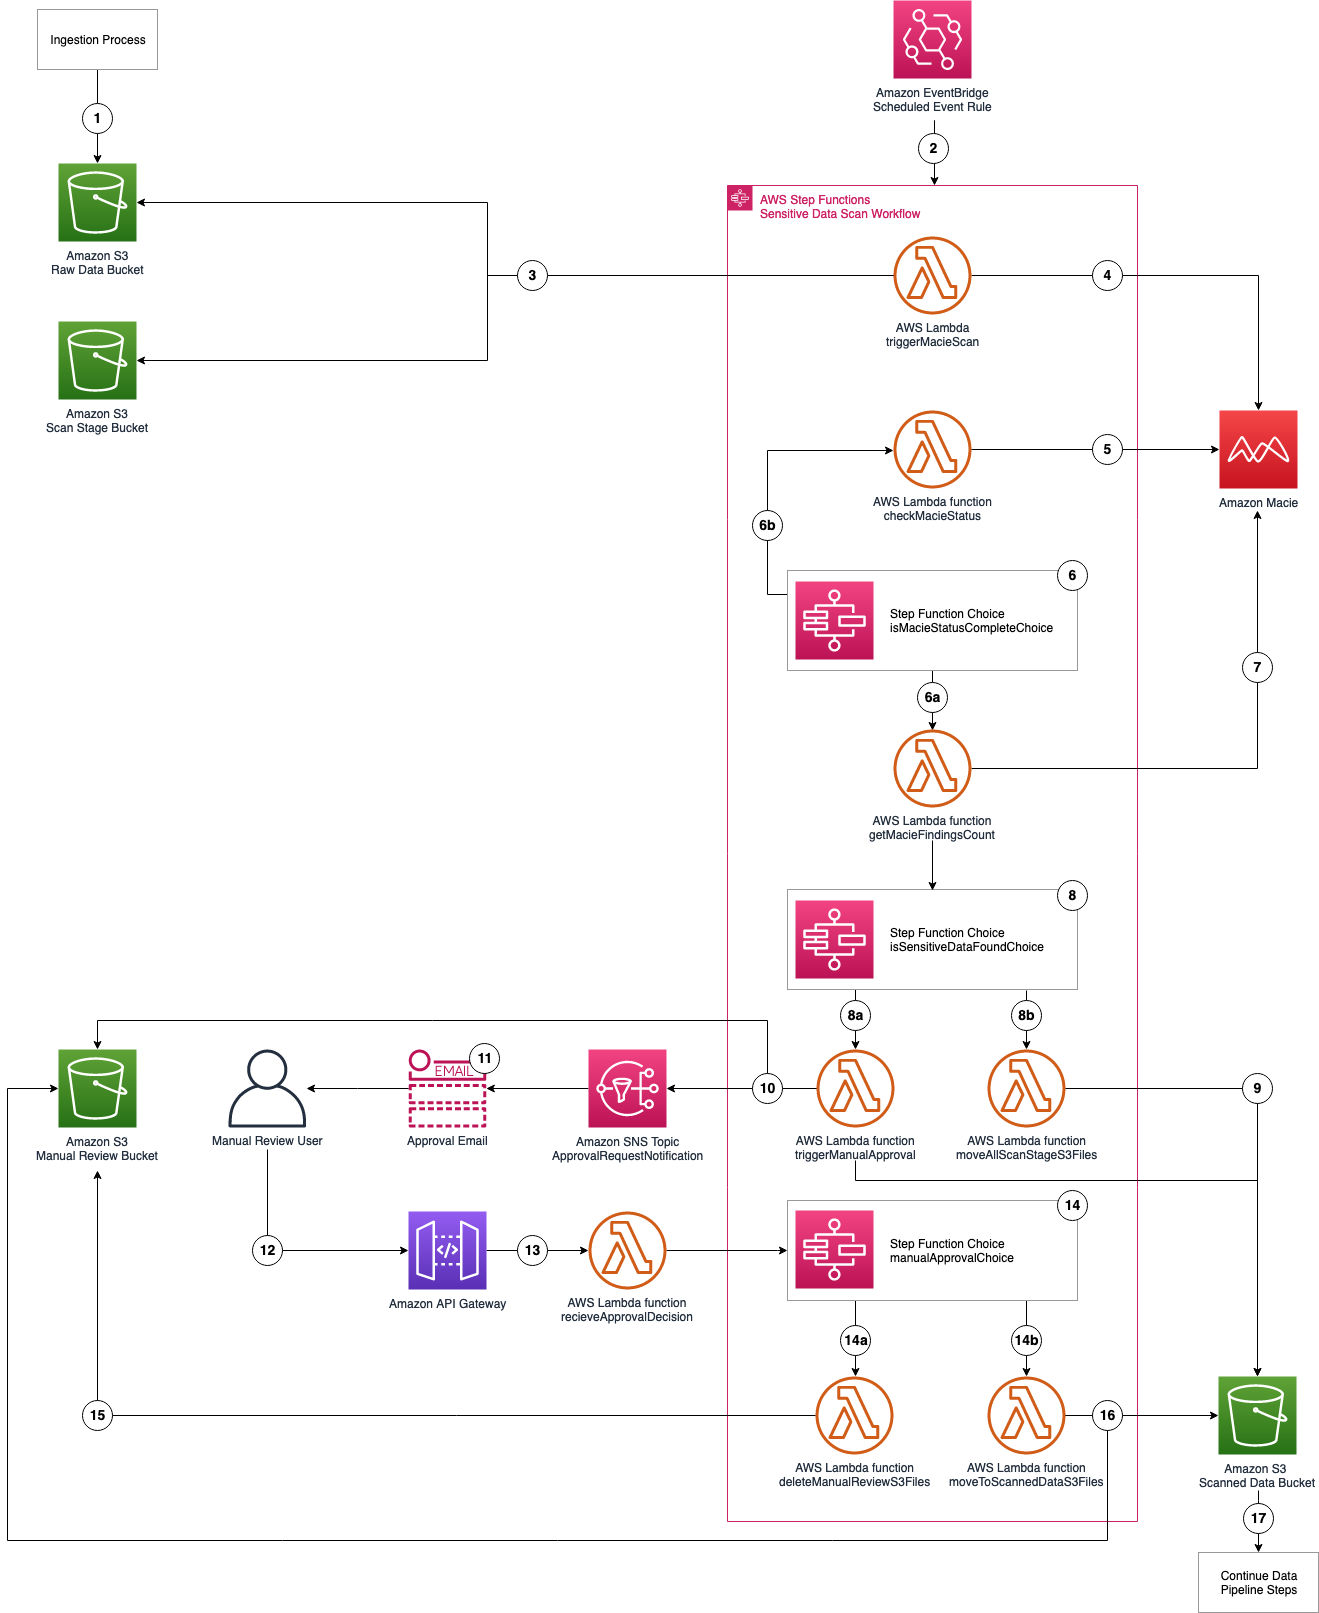


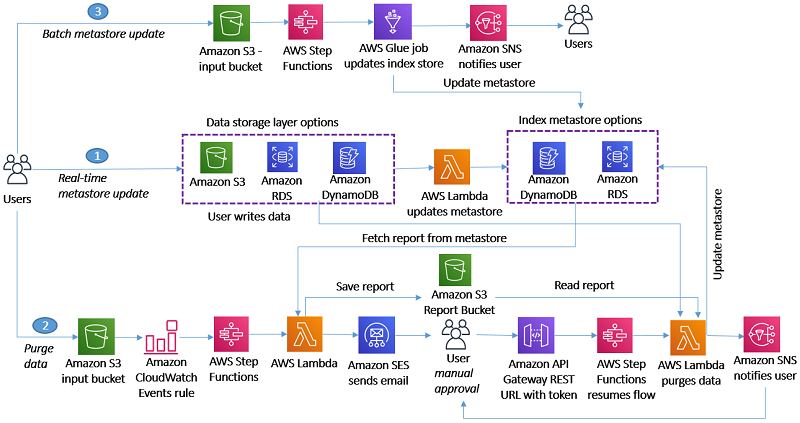
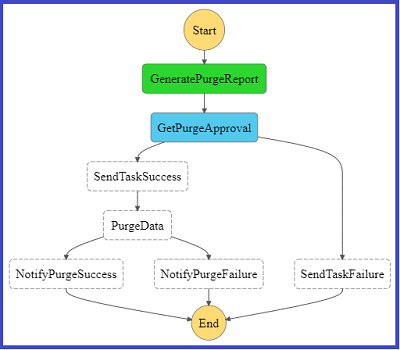
 George Komninos is a Data Lab Solutions Architect at AWS. He helps customers convert their ideas to a production-ready data product. Before AWS, he spent 3 years at Alexa Information domain as a data engineer. Outside of work, George is a football fan and supports the greatest team in the world, Olympiacos Piraeus.
 Sakti Mishra is a Data Lab Solutions Architect at AWS. He helps customers architect data analytics solutions, which gives them an accelerated path towards modernization initiatives. Outside of work, Sakti enjoys learning new technologies, watching movies, and travel.