Tag Archives: AWS CDK

CDK Corner – May 2021

Post Syndicated from Christian Weber original https://aws.amazon.com/blogs/devops/cdk-corner-may-2021/

Social – community engagement

According to Matt Coulter’s tweet, nearly 4000 people signed up for CDK Day to celebrate all things CDK on April 30. As a single-day, two-track event, there was a significant amount of content to learn from while having fun, and interacting with the CDK community.

Eric Johnson as the emcee, keynoted the first session of the morning, presenting “Better together: AWS CDK and AWS SAM.” This keynote was the announcement for the public preview of the AWS Serverless Application Model CLI (AWS SAM CLI). The AWS Serverless Application Model CLI includes support for local development and testing of AWS CDK projects.

To learn more, the blog post announcing the AWS SAM CLI public preview has more detail about the capabilities of the AWS SAM CLI.

If you missed CDK Day, fear not! CDK Day Track 1 and Track2 are available to watch online.

Great job and round of applause to the sign-language translators, the speakers, the organizers, and the hosts for making the second CDK Day a success! We can’t wait for CDK Day number 3!

Updates to the CDK

AWS CDK v2 developer preview

It’s here! The much-anticipated release of CDK v2’s developer preview is now available!

When using CDK previously, developers in JavaScript and TypeScript have faced challenges with the way that npm handles transitive dependencies; the dependencies that your dependencies rely on. For example, the aws-ec2 package.json file lists dependencies for other CDK construct libraries. If one of these transitive dependencies were updated, all of them would be need to be updated. Or you would run into dependency tree resolution errors, as seen in this StackOverflow thread.

With v2, all construct modules are now provided in a single package: aws-cdk-lib. All of the dependencies are now pinned to a single version of aws-cdk-lib, making it easier to manage. This also gives you the flexibility of having all CDK construct library modules available without having to run npm install each time you want to use a new construct library.

Another change to AWS CDK v2 is the removal of experimental modules. To help promote API stability and comply with semantic versioning, CDK v2 ships only with modules marked as stable.

Experimental modules aren’t going away completely, though. In v1, experimental modules and constructs will be provided together with no change. In v2, experimental modules are distributed and versioned separately from the aws-cdk-lib package, in their own dedicated package and namespace. Once a v2 construct is deemed stable, it is then merged into the aws-cdk-lib package.

The CDK team is still determining the best method of distributing experimental modules and constructs, so stay tuned for more information. Read more about the AWS CDK v2 developer preview in the What’s new blog post.

AWS CDK for Go developer preview

On April 7, the AWS CDK team announced support for golang. From the Go tracking issue on GitHub, nearly 900 members of the CDK community have requested for CDK to support golang, and we’re happy to see it become available! We are looking forward to helping out all the golang gophers out there build amazing CDK applications!

To learn more about Go and AWS CDK, read the AWS CDK for Go module API documentation on pkg.go.dev. You can also read the Go bindings for JSII RFC document on GitHub. Want to contribute to the success of Go and CDK? The project tracking board for Go’s General Availability has tasks and items which could use your help.

Construct modules promoted to General Availability

Many new construct modules were promoted to General Availability recently. General Availability indicates a module’s stability, giving confidence to run these modules in production workloads. In April, a total of 15 modules were promoted stable:

Notable new L2 constructs

In the @aws-cdk/route-53 module, name server (NS) records were previously defined with the route53.RecordType enum. In PR#13895, user stijnbrouwers introduces the NS record as its own L2 construct: route53.NSRecord. bringing it into company with other record type L2s, such as route53.ARecord. This makes managing NS records consistent with the other record types represented as L2 constructs.

Improving the @aws-cdk/aws-events-targets module, CDK community user hedrall submitted PR#13823. This change brings support for Amazon API Gateway as a target for an Amazon EventBridge event.

@aws-cdk/aws-codepipeline-actions now includes an L2 construct for AWS CodeStar Connections supporting BitBucket and GitHub. This construct lets you create a CDK application that uses AWS CodeStar with a source connection from either provider, thanks to PR#13781 from the CDK Team.

Level ups to existing CDK constructs

Amazon Elastic Inference makes available low-cost GPU-acceleration for deep-learning workloads. PR#13950 now lets you use the service via @aws-cdk/aws-ecs in Amazon Elastic Container Service tasks, from CDK community user upparekh.

In PR#13473, from pgarbe, the @aws-cdk/aws-lambda-nodejs module will now bundle AWS Lambda functions with Docker images sourced from the Amazon Elastic Container Registry (Amazon ECR) Public Registry, instead of DockerHub. Prior to this change, CDK used your DockerHub credentials to pull a Docker image for the Lambda function. If your account was in DockerHub’s free-tier account level, your account is throttled whenever it exceeds the API limit within a short time frame set by DockerHub. This can cause your AWS CDK deployment to be delayed until you are under DockerHub’s API limit. By moving to the Amazon ECR Public Registry, this removes the risk of being affected by DockerHub’s API rate limiting . You can read more in this blog post giving customers advice about DockerHub rate limits from last year.

With @aws-cdk/aws-codebuild, you can use concurrent build support to speed up your build process. Sometimes you’ll want to limit the number of builds that run concurrently, whether for cost reduction or reducing the complexity of your build process. PR#14185, authored by gmokki, adds the ability to define a concurrent build limit for an AWS CodeBuild project Stage.

It is common for customers to have applications or resources spanning multiple AWS Regions. If you’re using @aws-cdk/aws-secretsmanager, you can now replicate secrets to multiple Regions, with PR#14266 from the CDK team. Make sure you’re not setting your secret as “test123” for your production databases in multiple Regions!

For users of @aws-cdk/aws-eks, PR#12659 from anguslees lets you pass arguments from bootstrap.sh to avoid the DescribeCluster API call. This will speed up the time it takes nodes to join an EKS cluster.

PR#14250 from the CDK team gives developers using @aws-cdk/aws-ec2 the ability to set fixed IPs when defining NAT gateways. This change will now pre-create Elastic IP address allocations and assign them to the NAT gateway. This can be useful when managing links from an Amazon Virtual Private Cloud (VPC) to an on-premises data center that relies on fixed/static IP addresses.

@aws-cdk/aws-iam now lets you add AWS Identity and Access Management (AWS IAM) users to new or existing groups. For example, you might want to have a user in a specific group for the life of a deployed CDK application. And on stack deletion, revoke that membership. Thanks to PR#13698 from jogold, this is now possible.

Learning – Finds from across the internet

If you work with CDK parameters, you might be curious how parameters derive their names and values. Borislav Hadzhiev released a blog post about setting and using CDK parameters.

Ibrahim Cesar’s wrote an awesome blog post detailing the experience of discovering and working with CDK. It’s an enjoyable read of inspiration and animated gifs.

Twitter user edwin4_ released a tool for CDK automation called RocketCDK. From the project’s GitHub repository, this tool will initialize your CDK app, install your packages, and auto-import them into your stack. Neat! Anything that helps save time is a plus-one.

Community acknowledgments

And finally, congratulations and rounds of applause for these folks who had their first Pull Request merged to the CDK repository!

*These users’ Pull Requests were merged in April.

Thank you for joining us on this update of the CDK corner. See you next time!
CDK Corner – April 2021

Post Syndicated from Christian Weber original https://aws.amazon.com/blogs/devops/cdk-corner-april-2021/

Social – Community Engagement

We’re getting closer and closer to CDK Day, with the event receiving 75 CFP submissions. The cdkday schedule is now available to plan out your conference day.

Updates to the CDK

Constructs promoted to General Availability

Promoting a module to stable/General Availability is always a cause for celebration. Great job to all the folks involved who helped move aws-acmpca from Experimental to Stable. PR#13778 gives a peak into the work involved. If you’re interested in helping promote a module to G.A., or would like to learn more about the process, read the AWS Construct Library Module Lifecycle document. A big thanks to the CDK Community and team for their work!

Dead Letter Queues

Dead Letter Queues (“DLQs”) are a service implementation pattern that can queue messages when a service cannot process them. For example, if an email message can’t be delivered to a client, an email server could implement a DLQ holding onto that undeliverable message until the client can process the message. DLQs are supported by many AWS services, the community and CDK team have been working to support DLQs with CDK in various modules: aws-codebuild in PR#11228, aws-stepfunctions in PR#13450, and aws-lambda-targets in PR#11617.

Amazon API Gateway

Amazon API Gateway is a fully managed service to deploy APIs at scale. Here are the modules that have received updates to their support for API Gateway:

  • stepfunctions-tasks now supports API Gateway with PR#13033.

  • You can now specify regions when integrating Amazon API Gateway with other AWS services in PR#13251.

  • Support for websockets api in PR#13031 is now available in aws-apigatewayv2 as a Level 2 construct. To differentiate configuration between HTTP and websockets APIs, several of the HTTP API properties were renamed. More information about these changes can be found in the conversation section of PR#13031.

  • You can now set default authorizers in PR#13172. This lets you use an API Gateway HTTP, REST, or Websocket APIs with an authorizer and authorization scopes that cover all routes for a given API resource.

Notable new L2 constructs

AWS Global Accelerator is a networking service that lets users of your infrastructure hosted on AWS use the AWS global network infrastructure for traffic routing, improving speed and performance. Amazon Route 53 supports Global Accelerator and, thanks to PR#13407, you can now take advantage of this functionality in the aws-route-53-targets module as an L2 construct.

Amazon CloudWatch is an important part of monitoring AWS workloads. With PR#13281, the aws-cloudwatch-actions module now includes an Ec2Action construct, letting you programmatically set up observability of EC2-based workloads with CDK.

The aws-cognito module now supports Apple ID User Pools in PR#13160 allowing Developers to define workloads that use Apple IDs for identity management.

aws-iam received a new L2 construct with PR#13393, bringing SAML implementation support to CDK. SAML has become a preferred framework when implementing Single Sign On, and has been supported with IAM for sometime. Now, set it up with even more efficiency with the SamlProvider construct.

Amazon Neptune is a managed graph database service available as a construct in the aws-neptune module. PR#12763 adds L2 constructs to support Database Clusters and Database Instances.

Level ups to existing CDK constructs

Service discovery in AWS is provided by AWS CloudMap. With PR#13192, users of aws-ecs can now register an ECS Service with CloudMap.

aws-lambda has received two notable additions related to Docker: PR#13318, and PR#12258 add functionality to package Lambda function code with the output of a Docker build, or from a Docker build asset, respectively.

The aws-ecr module now supports Tag Mutability. Tags can denote a specific release for a piece of software. Setting the enum in the construct to IMMUTABLE will prevent tags from being overwritten by a later image, if that image uses a tag already present in the container repository.

Last year, AWS announced support for deployment circuit breakers in Amazon Elastic Container Service, enabling customers to perform auto-rollbacks on unhealthy service deployments without manual intervention. PR#12719 includes this functionality as part of the aws-ecs-patterns module, via the DeploymentCircuitBreaker interface. This interface is now available and can be used in constructs such as ApplicationLoadBalancedFargateService.

The aws-ec2 module received some nice quality of life upgrades to it: Support for multi-part user-data in PR#11843, client vpn endpoints in PR#12234, and non-numeric security protocols for security groups in PR#13593 all help improve the experience of using EC2 with CDK.

Learning – Finds from across the internet

On the AWS DevOps Blog, Eric Beard and Rico Huijbers penned a post detailing Best Practices for Developing Cloud Applications with AWS CDK.

Users of AWS Elastic Beanstalk wanting to deploy with AWS CDK can read about deploying Elastic Beanstalk applications with the AWS CDK and the aws-elasticbeanstalk module.

Deploying Infrastructure that is HIPAA and HiTrust compliant with AWS CDK can help customers move faster. This best practices guide for Hipaa and HiTrust environments goes into detail on deploying compliant architecture with the AWS CDK.

Community Acknowledgements

And finally, congratulations and rounds of applause for these folks who had their first Pull Request merged to the CDK Repository!*

*These users’ Pull Requests were merged between 2021-03-01 and 2021-03-31.

Thanks for reading this update of the CDK Corner. See you next time!

Mitigate data leakage through the use of AppStream 2.0 and end-to-end auditing

Post Syndicated from Chaim Landau original https://aws.amazon.com/blogs/security/mitigate-data-leakage-through-the-use-of-appstream-2-0-and-end-to-end-auditing/

Customers want to use AWS services to operate on their most sensitive data, but they want to make sure that only the right people have access to that data. Even when the right people are accessing data, customers want to account for what actions those users took while accessing the data.

In this post, we show you how you can use Amazon AppStream 2.0 to grant isolated access to sensitive data and decrease your attack surface. In addition, we show you how to achieve end-to-end auditing, which is designed to provide full traceability of all activities around your data.

To demonstrate this idea, we built a sample solution that provides a data scientist with access to an Amazon SageMaker Studio notebook using AppStream 2.0. The solution deploys a new Amazon Virtual Private Cloud (Amazon VPC) with isolated subnets, where the SageMaker notebook and AppStream 2.0 instances are set up.

Why AppStream 2.0?

AppStream 2.0 is a fully-managed, non-persistent application and desktop streaming service that provides access to desktop applications from anywhere by using an HTML5-compatible desktop browser.

Each time you launch an AppStream 2.0 session, a freshly-built, pre-provisioned instance is provided, using a prebuilt image. As soon as you close your session and the disconnect timeout period is reached, the instance is terminated. This allows you to carefully control the user experience and helps to ensure a consistent, secure environment each time. AppStream 2.0 also lets you enforce restrictions on user sessions, such as disabling the clipboard, file transfers, or printing.

Furthermore, AppStream 2.0 uses AWS Identity and Access Management (IAM) roles to grant fine-grained access to other AWS services such as Amazon Simple Storage Service (Amazon S3), Amazon Redshift, Amazon SageMaker, and other AWS services. This gives you both control over the access as well as an accounting, via Amazon CloudTrail, of what actions were taken and when.

These features make AppStream 2.0 uniquely suitable for environments that require high security and isolation.

Why SageMaker?

Developers and data scientists use SageMaker to build, train, and deploy machine learning models quickly. SageMaker does most of the work of each step of the machine learning process to help users develop high-quality models. SageMaker access from within AppStream 2.0 provides your data scientists and analysts with a suite of common and familiar data-science packages to use against isolated data.

Solution architecture overview

This solution allows a data scientist to work with a data set while connected to an isolated environment that doesn’t have an outbound path to the internet.

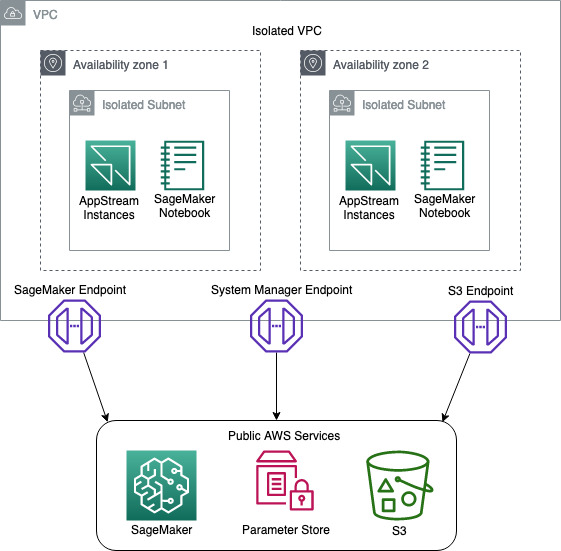
First, you build an Amazon VPC with isolated subnets and with no internet gateways attached. This ensures that any instances stood up in the environment don’t have access to the internet. To provide the resources inside the isolated subnets with a path to commercial AWS services such as Amazon S3, SageMaker, AWS System Manager you build VPC endpoints and attach them to the VPC, as shown in Figure 1.

Figure 1: Network Diagram

Figure 1: Network Diagram

You then build an AppStream 2.0 stack and fleet, and attach a security group and IAM role to the fleet. The purpose of the IAM role is to provide the AppStream 2.0 instances with access to downstream AWS services such as Amazon S3 and SageMaker. The IAM role design follows the least privilege model, to ensure that only the access required for each task is granted.

During the building of the stack, you will enable AppStream 2.0 Home Folders. This feature builds an S3 bucket where users can store files from inside their AppStream 2.0 session. The bucket is designed with a dedicated prefix for each user, where only they have access. We use this prefix to store the user’s pre-signed SagaMaker URLs, ensuring that no one user can access another users SageMaker Notebook.

You then deploy a SageMaker notebook for the data scientist to use to access and analyze the isolated data.

To confirm that the user ID on the AppStream 2.0 session hasn’t been spoofed, you create an AWS Lambda function that compares the user ID of the data scientist against the AppStream 2.0 session ID. If the user ID and session ID match, this indicates that the user ID hasn’t been impersonated.

Once the session has been validated, the Lambda function generates a pre-signed SageMaker URL that gives the data scientist access to the notebook.

Finally, you enable AppStream 2.0 usage reports to ensure that you have end-to-end auditing of your environment.

To help you easily deploy this solution into your environment, we’ve built an AWS Cloud Development Kit (AWS CDK) application and stacks, using Python. To deploy this solution, you can go to the Solution deployment section in this blog post.

Note: this solution was built with all resources being in a single AWS Region. The support of multi Region is possible but isn’t part of this blog post.

Solution requirements

Before you build a solution, you must know your security requirements. The solution in this post assumes a set of standard security requirements that you typically find in an enterprise environment:

  • User authentication is provided by a Security Assertion Markup Language (SAML) identity provider (IdP).
  • IAM roles are used to access AWS services such as Amazon S3 and SageMaker.
  • AWS IAM access keys and secret keys are prohibited.
  • IAM policies follow the least privilege model so that only the required access is granted.
  • Windows clipboard, file transfer, and printing to local devices is prohibited.
  • Auditing and traceability of all activities is required.

Note: before you will be able to integrate SAML with AppStream 2.0, you will need to follow the AppStream 2.0 Integration with SAML 2.0 guide. There are quite a few steps and it will take some time to set up. SAML authentication is optional, however. If you just want to prototype the solution and see how it works, you can do that without enabling SAML integration.

Solution components

This solution uses the following technologies:

  • Amazon VPC – provides an isolated network where the solution will be deployed.
  • VPC endpoints – provide access from the isolated network to commercial AWS services such as Amazon S3 and SageMaker.
  • AWS Systems Manager – stores parameters such as S3 bucket names.
  • AppStream 2.0 – provides hardened instances to run the solution on.
  • AppStream 2.0 home folders – store users’ session information.
  • Amazon S3 – stores application scripts and pre-signed SageMaker URLs.
  • SageMaker notebook – provides data scientists with tools to access the data.
  • AWS Lambda – runs scripts to validate the data scientist’s session, and generates pre-signed URLs for the SageMaker notebook.
  • AWS CDK – deploys the solution.
  • PowerShell – processes scripts on AppStream 2.0 Microsoft Windows instances.

Solution high-level design and process flow

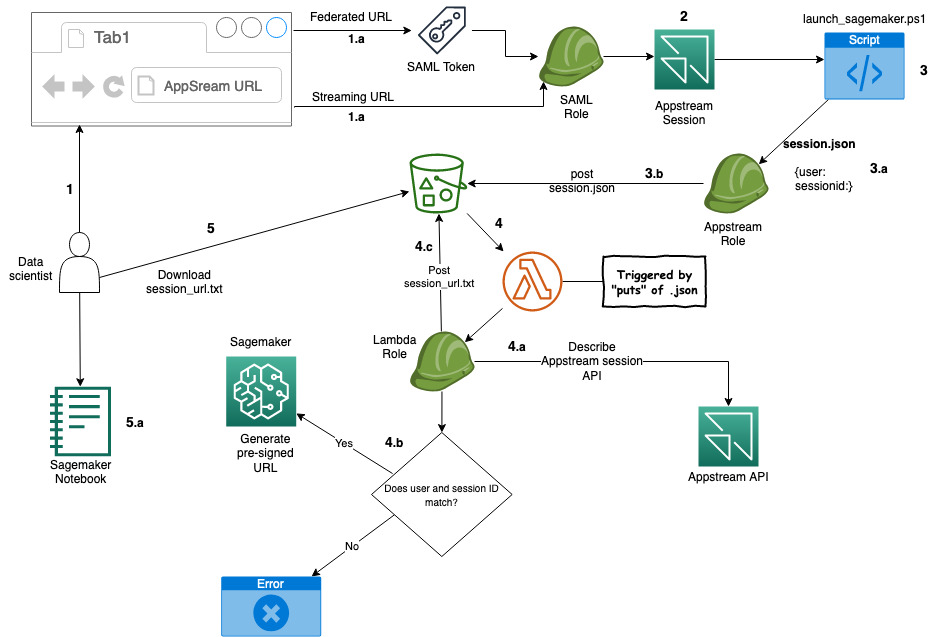
The following figure is a high-level depiction of the solution and its process flow.

Figure 2: Solution process flow

Figure 2: Solution process flow

The process flow—illustrated in Figure 2—is:

  1. A data scientist clicks on an AppStream 2.0 federated or a streaming URL.
    1. If it’s a federated URL, the data scientist authenticates using their corporate credentials, as well as MFA if required.
    1. If it’s a streaming URL, no further authentication is required.
  2. The data scientist is presented with a PowerShell application that’s been made available to them.
  3. After starting the application, it starts the PowerShell script on an AppStream 2.0 instance.
  4. The script then:
    1. Downloads a second PowerShell script from an S3 bucket.
    2. Collects local AppStream 2.0 environment variables:
      1. AppStream_UserName
      2. AppStream_Session_ID
      3. AppStream_Resource_Name
    3. Stores the variables in the session.json file and copies the file to the home folder of the session on Amazon S3.
  5. The PUT event of the JSON file into the Amazon S3 bucket triggers an AWS Lambda function that performs the following:
    1. Reads the session.json file from the user’s home folder on Amazon S3.
    2. Performs a describe action against the AppStream 2.0 API to ensure that the session ID and the user ID match. This helps to prevent the user from manipulating the local environment variable to pretend to be someone else (spoofing), and potentially gain access to unauthorized data.
    3. If the session ID and user ID match, a pre-signed SageMaker URL is generated and stored in session_url.txt, and copied to the user’s home folder on Amazon S3.
    4. If the session ID and user ID do not match, the Lambda function ends without generating a pre-signed URL.
  6. When the PowerShell script detects the session_url.txt file, it opens the URL, giving the user access to their SageMaker notebook.

Code structure

To help you deploy this solution in your environment, we’ve built a set of code that you can use. The code is mostly written in Python and for the AWS CDK framework, and with an AWS CDK application and some PowerShell scripts.

Note: We have chosen the default settings on many of the AWS resources our code deploys. Before deploying the code, you should conduct a thorough code review to ensure the resources you are deploying meet your organization’s requirements.

AWS CDK application – ./app.py

To make this application modular and portable, we’ve structured it in separate AWS CDK nested stacks:

  • vpc-stack – deploys a VPC with two isolated subnets, along with three VPC endpoints.
  • s3-stack – deploys an S3 bucket, copies the AppStream 2.0 PowerShell scripts, and stores the bucket name in an SSM parameter.
  • appstream-service-roles-stack – deploys AppStream 2.0 service roles.
  • appstream-stack – deploys the AppStream 2.0 stack and fleet, along with the required IAM roles and security groups.
  • appstream-start-fleet-stack – builds a custom resource that starts the AppStream 2.0 fleet.
  • notebook-stack – deploys a SageMaker notebook, along with IAM roles, security groups, and an AWS Key Management Service (AWS KMS) encryption key.
  • saml-stack – deploys a SAML role as a placeholder for SAML authentication.

PowerShell scripts

The solution uses the following PowerShell scripts inside the AppStream 2.0 instances:

  • sagemaker-notebook-launcher.ps1 – This script is part of the AppStream 2.0 image and downloads the sagemaker-notebook.ps1 script.
  • sagemaker-notebook.ps1 – starts the process of validating the session and generating the SageMaker pre-signed URL.

Note: Having the second script reside on Amazon S3 provides flexibility. You can modify this script without having to create a new AppStream 2.0 image.

Deployment Prerequisites

To deploy this solution, your deployment environment must meet the following prerequisites:

Note: We used AWS Cloud9 with Amazon Linux 2 to test this solution, as it comes preinstalled with most of the prerequisites for deploying this solution.

Deploy the solution

Now that you know the design and components, you’re ready to deploy the solution.

Note: In our demo solution, we deploy two stream.standard.small AppStream 2.0 instances, using Windows Server 2019. This gives you a reasonable example to work from. In your own environment you might need more instances, a different instance type, or a different version of Windows. Likewise, we deploy a single SageMaker notebook instance of type ml.t3.medium. To change the AppStream 2.0 and SageMaker instance types, you will need to modify the stacks/data_sandbox_appstream.py and stacks/data_sandbox_notebook.py respectively.

Step 1: AppStream 2.0 image

An AppStream 2.0 image contains applications that you can stream to your users. It’s what allows you to curate the user experience by preconfiguring the settings of the applications you stream to your users.

To build an AppStream 2.0 image:

  1. Build an image following the Create a Custom AppStream 2.0 Image by Using the AppStream 2.0 Console tutorial.

    Note: In Step 1: Install Applications on the Image Builder in this tutorial, you will be asked to choose an Instance family. For this example, we chose General Purpose. If you choose a different Instance family, you will need to make sure the appstream_instance_type specified under Step 2: Code modification is of the same family.

    In Step 6: Finish Creating Your Image in this tutorial, you will be asked to provide a unique image name. Note down the image name as you will need it in Step 2 of this blog post.

  2. Copy notebook-launcher.ps1 to a location on the image. We recommend that you copy it to C:\AppStream.
  3. In Step 2—Create an AppStream 2.0 Application Catalog—of the tutorial, use C:\Windows\System32\Windowspowershell\v1.0\powershell.exe as the application, and the path to notebook-launcher.ps1 as the launch parameter.

Note: While testing your application during the image building process, the PowerShell script will fail because the underlying infrastructure is not present. You can ignore that failure during the image building process.

Step 2: Code modification

Next, you must modify some of the code to fit your environment.

Make the following changes in the cdk.json file:

  • vpc_cidr – Supply your preferred CIDR range to be used for the VPC.

    Note: VPC CIDR ranges are your private IP space and thus can consist of any valid RFC 1918 range. However, if the VPC you are planning on using for AppStream 2.0 needs to connect to other parts of your private network (on premise or other VPCs), you need to choose a range that does not conflict or overlap with the rest of your infrastructure.

  • appstream_Image_name – Enter the image name you chose when you built the Appstream 2.0 image in Step 1.a.
  • appstream_environment_name – The environment name is strictly cosmetic and drives the naming of your AppStream 2.0 stack and fleet.
  • appstream_instance_type – Enter the AppStream 2.0 instance type. The instance type must be part of the same instance family you used in Step 1 of the To build an AppStream 2.0 image section. For a list of AppStream 2.0 instances, visit https://aws.amazon.com/appstream2/pricing/.
  • appstream_fleet_type – Enter the fleet type. Allowed values are ALWAYS_ON or ON_DEMAND.
  • Idp_name – If you have integrated SAML with this solution, you will need to enter the IdP name you chose when creating the SAML provider in the IAM Console.

Step 3: Deploy the AWS CDK application

The CDK application deploys the CDK stacks.

The stacks include:

  • VPC with isolated subnets
  • VPC Endpoints for S3, SageMaker, and Systems Manager
  • S3 bucket
  • AppStream 2.0 stack and fleet
  • Two AppStream 2.0 stream.standard.small instances
  • A single SageMaker ml.t2.medium notebook

Run the following commands to deploy the AWS CDK application:

  1. Install the AWS CDK Toolkit.
    npm install -g aws-cdk
    

  2. Create and activate a virtual environment.
    python -m venv .datasandbox-env
    
    source .datasandbox-env/bin/activate
    

  3. Change directory to the root folder of the code repository.
  4. Install the required packages.
    pip install -r requirements.txt
    

  5. If you haven’t used AWS CDK in your account yet, run:
    cdk bootstrap
    

  6. Deploy the AWS CDK stack.
    cdk deploy DataSandbox
    

Step 4: Test the solution

After the stack has successfully deployed, allow approximately 25 minutes for the AppStream 2.0 fleet to reach a running state. Testing will fail if the fleet isn’t running.

Without SAML

If you haven’t added SAML authentication, use the following steps to test the solution.

  1. In the AWS Management Console, go to AppStream 2.0 and then to Stacks.
  2. Select the stack, and then select Action.
  3. Select Create streaming URL.
  4. Enter any user name and select Get URL.
  5. Enter the URL in another tab of your browser and test your application.

With SAML

If you are using SAML authentication, you will have a federated login URL that you need to visit.

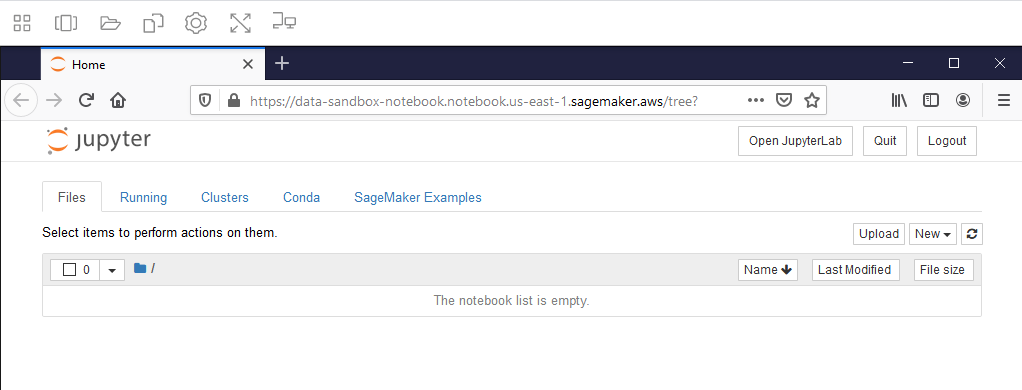
If everything is working, your SageMaker notebook will be launched as shown in Figure 3.

Figure 3: SageMaker Notebook

Figure 3: SageMaker Notebook

Note: if you receive a web browser timeout, verify that the SageMaker notebook instance “Data-Sandbox-Notebook” is currently in InService status.

Auditing

Auditing for this solution is provided through AWS CloudTrail and AppStream 2.0 Usage Reports. Though CloudTrail is enabled by default, to collect and store the CloudTrail logs, you must create a trail for your AWS account.

The following logs will be available for you to use, to provide auditing.

Connecting the dots

To get an accurate idea of your users’ activity, you have to correlate some logs from different services. First, you collect the login information from CloudTrail. This gives you the user ID of the user who logged in. You then collect the Amazon S3 put from CloudTrail, which gives you the IP address of the AppStream 2.0 instance. And finally, you collect the AppStream 2.0 usage report which gives you the IP address of the AppStream 2.0 instance, plus the user ID. This allows you to connect the user ID to the activity on Amazon S3. For auditing & controlling exploration activities with SageMaker, please visit this GitHub repository.

Though the logs are automatically being collected, what we have shown you here is a manual way of sifting through those logs. For a more robust solution on querying and analyzing CloudTrail logs, visit Querying AWS CloudTrail Logs.

Costs of this Solution

The cost for running this solution will depend on a number of factors like the instance size, the amount of data you store, and how many hours you use the solution. AppStream 2.0 is charged per instance hour and there is one instance in this example solution. You can see details on the AppStream 2.0 pricing page. VPC endpoints are charged by the hour and by how much data passes through them. There are three VPC endpoints in this solution (S3, System Manager, and SageMaker). VPC endpoint pricing is described on the Privatelink pricing page. SageMaker Notebooks are charged based on the number of instance hours and the instance type. There is one SageMaker instance in this solution, which may be eligible for free tier pricing. See the SageMaker pricing page for more details. Amazon S3 storage pricing depends on how much data you store, what kind of storage you use, and how much data transfers in and out of S3. The use in this solution may be eligible for free tier pricing. You can see details on the S3 pricing page.

Before deploying this solution, make sure to calculate your cost using the AWS Pricing Calculator, and the AppStream 2.0 pricing calculator.

Conclusion

Congratulations! You have deployed a solution that provides your users with access to sensitive and isolated data in a secure manner using AppStream 2.0. You have also implemented a mechanism that is designed to prevent user impersonation, and enabled end-to-end auditing of all user activities.

To learn about how Amazon is using AppStream 2.0, visit the blog post How Amazon uses AppStream 2.0 to provide data scientists and analysts with access to sensitive data.

If you have feedback about this post, submit comments in the Comments section below.

Want more AWS Security how-to content, news, and feature announcements? Follow us on Twitter.

Author

Chaim Landau

As a Senior Cloud Architect at AWS, Chaim works with large enterprise customers, helping them create innovative solutions to address their cloud challenges. Chaim is passionate about his work, enjoys the creativity that goes into building solutions in the cloud, and derives pleasure from passing on his knowledge. In his spare time, he enjoys outdoor activities, spending time in nature, and immersing himself in his books.

Author

JD Braun

As a Data and Machine Learning Engineer, JD helps organizations design and implement modern data architectures to deliver value to their internal and external customers. In his free time, he enjoys exploring Minneapolis with his fiancée and black lab.

Developing enterprise application patterns with the AWS CDK

Post Syndicated from Krishnakumar Rengarajan original https://aws.amazon.com/blogs/devops/developing-application-patterns-cdk/

Enterprises often need to standardize their infrastructure as code (IaC) for governance, compliance, and quality control reasons. You also need to manage and centrally publish updates to your IaC libraries. In this post, we demonstrate how to use the AWS Cloud Development Kit (AWS CDK) to define patterns for IaC and publish them for consumption in controlled releases using AWS CodeArtifact.

AWS CDK is an open-source software development framework to model and provision cloud application resources in programming languages such as TypeScript, JavaScript, Python, Java, and C#/.Net. The basic building blocks of AWS CDK are called constructs, which map to one or more AWS resources, and can be composed of other constructs. Constructs allow high-level abstractions to be defined as patterns. You can synthesize constructs into AWS CloudFormation templates and deploy them into an AWS account.

AWS CodeArtifact is a fully managed service for managing the lifecycle of software artifacts. You can use CodeArtifact to securely store, publish, and share software artifacts. Software artifacts are stored in repositories, which are aggregated into a domain. A CodeArtifact domain allows organizational policies to be applied across multiple repositories. You can use CodeArtifact with common build tools and package managers such as NuGet, Maven, Gradle, npm, yarn, pip, and twine.

Solution overview

In this solution, we complete the following steps:

  1. Create two AWS CDK pattern constructs in Typescript: one for traditional three-tier web applications and a second for serverless web applications.
  2. Publish the pattern constructs to CodeArtifact as npm packages. npm is the package manager for Node.js.
  3. Consume the pattern construct npm packages from CodeArtifact and use them to provision the AWS infrastructure.

We provide more information about the pattern constructs in the following sections. The source code mentioned in this blog is available in GitHub.

Note: The code provided in this blog post is for demonstration purposes only. You must ensure that it meets your security and production readiness requirements.

Traditional three-tier web application construct

The first pattern construct is for a traditional three-tier web application running on Amazon Elastic Compute Cloud (Amazon EC2), with AWS resources consisting of Application Load Balancer, an Autoscaling group and EC2 launch configuration, an Amazon Relational Database Service (Amazon RDS) or Amazon Aurora database, and AWS Secrets Manager. The following diagram illustrates this architecture.


Traditional stack architecture

Serverless web application construct

The second pattern construct is for a serverless application with AWS resources in AWS Lambda, Amazon API Gateway, and Amazon DynamoDB.

Serverless application architecture

Publishing and consuming pattern constructs

Both constructs are written in Typescript and published to CodeArtifact as npm packages. A semantic versioning scheme is used to version the construct packages. After a package gets published to CodeArtifact, teams can consume them for deploying AWS resources. The following diagram illustrates this architecture.

Pattern constructs

Prerequisites

Before getting started, complete the following steps:

  1. Clone the code from the GitHub repository for the traditional and serverless web application constructs:
    git clone https://github.com/aws-samples/aws-cdk-developing-application-patterns-blog.git
    cd aws-cdk-developing-application-patterns-blog
  2. Configure AWS Identity and Access Management (IAM) permissions by attaching IAM policies to the user, group, or role implementing this solution. The following policy files are in the iam folder in the root of the cloned repo:
    • BlogPublishArtifacts.json – The IAM policy to configure CodeArtifact and publish packages to it.
    • BlogConsumeTraditional.json – The IAM policy to consume the traditional three-tier web application construct from CodeArtifact and deploy it to an AWS account.
    • PublishArtifacts.json – The IAM policy to consume the serverless construct from CodeArtifact and deploy it to an AWS account.

Configuring CodeArtifact

In this step, we configure CodeArtifact for publishing the pattern constructs as npm packages. The following AWS resources are created:

  • A CodeArtifact domain named blog-domain
  • Two CodeArtifact repositories:
    • blog-npm-store – For configuring the upstream NPM repository.
    • blog-repository – For publishing custom packages.

Deploy the CodeArtifact resources with the following code:

cd prerequisites/
rm -rf package-lock.json node_modules
npm install
cdk deploy --require-approval never
cd ..

Log in to the blog-repository. This step is needed for publishing and consuming the npm packages. See the following code:

aws codeartifact login \
     --tool npm \
     --domain blog-domain \
     --domain-owner $(aws sts get-caller-identity --output text --query 'Account') \
     --repository blog-repository

Publishing the pattern constructs

  1. Change the directory to the serverless construct:
    cd serverless
  2. Install the required npm packages:
    rm package-lock.json && rm -rf node_modules
    npm install
    
  3. Build the npm project:
    npm run build
  4. Publish the construct npm package to the CodeArtifact repository:
    npm publish

    Follow the previously mentioned steps for building and publishing a traditional (classic Load Balancer plus Amazon EC2) web app by running these commands in the traditional directory.

    If the publishing is successful, you see messages like the following screenshots. The following screenshot shows the traditional infrastructure.

    Successful publishing of Traditional construct package to CodeArtifact

    The following screenshot shows the message for the serverless infrastructure.

    Successful publishing of Serverless construct package to CodeArtifact

    We just published version 1.0.1 of both the traditional and serverless web app constructs. To release a new version, we can simply update the version attribute in the package.json file in the traditional or serverless folder and repeat the last two steps.

    The following code snippet is for the traditional construct:

    {
        "name": "traditional-infrastructure",
        "main": "lib/index.js",
        "files": [
            "lib/*.js",
            "src"
        ],
        "types": "lib/index.d.ts",
        "version": "1.0.1",
    ...
    }

    The following code snippet is for the serverless construct:

    {
        "name": "serverless-infrastructure",
        "main": "lib/index.js",
        "files": [
            "lib/*.js",
            "src"
        ],
        "types": "lib/index.d.ts",
        "version": "1.0.1",
    ...
    }

Consuming the pattern constructs from CodeArtifact

In this step, we demonstrate how the pattern constructs published in the previous steps can be consumed and used to provision AWS infrastructure.

  1. From the root of the GitHub package, change the directory to the examples directory containing code for consuming traditional or serverless constructs.To consume the traditional construct, use the following code:
    cd examples/traditional

    To consume the serverless construct, use the following code:

    cd examples/serverless
  2. Open the package.json file in either directory and note that the packages and versions we consume are listed in the dependencies section, along with their version.
    The following code shows the traditional web app construct dependencies:

    "dependencies": {
        "@aws-cdk/core": "1.30.0",
        "traditional-infrastructure": "1.0.1",
        "aws-cdk": "1.47.0"
    }

    The following code shows the serverless web app construct dependencies:

    "dependencies": {
        "@aws-cdk/core": "1.30.0",
        "serverless-infrastructure": "1.0.1",
        "aws-cdk": "1.47.0"
    }
  3. Install the pattern artifact npm package along with the dependencies:
    rm package-lock.json && rm -rf node_modules
    npm install
    
  4. As an optional step, if you need to override the default Lambda function code, build the npm project. The following commands build the Lambda function source code:
    cd ../override-serverless
    npm run build
    cd -
  5. Bootstrap the project with the following code:
    cdk bootstrap

    This step is applicable for serverless applications only. It creates the Amazon Simple Storage Service (Amazon S3) staging bucket where the Lambda function code and artifacts are stored.

  6. Deploy the construct:
    cdk deploy --require-approval never

    If the deployment is successful, you see messages similar to the following screenshots. The following screenshot shows the traditional stack output, with the URL of the Load Balancer endpoint.

    Traditional CloudFormation stack outputs

    The following screenshot shows the serverless stack output, with the URL of the API Gateway endpoint.

    Serverless CloudFormation stack outputs

    You can test the endpoint for both constructs using a web browser or the following curl command:

    curl <endpoint output>

    The traditional web app endpoint returns a response similar to the following:

    [{"app": "traditional", "id": 1605186496, "purpose": "blog"}]

    The serverless stack returns two outputs. Use the output named ServerlessStack-v1.Api. See the following code:

    [{"purpose":"blog","app":"serverless","itemId":"1605190688947"}]

  7. Optionally, upgrade to a new version of pattern construct.
    Let’s assume that a new version of the serverless construct, version 1.0.2, has been published, and we want to upgrade our AWS infrastructure to this version. To do this, edit the package.json file and change the traditional-infrastructure or serverless-infrastructure package version in the dependencies section to 1.0.2. See the following code example:

    "dependencies": {
        "@aws-cdk/core": "1.30.0",
        "serverless-infrastructure": "1.0.2",
        "aws-cdk": "1.47.0"
    }

    To update the serverless-infrastructure package to 1.0.2, run the following command:

    npm update

    Then redeploy the CloudFormation stack:

    cdk deploy --require-approval never

Cleaning up

To avoid incurring future charges, clean up the resources you created.

  1. Delete all AWS resources that were created using the pattern constructs. We can use the AWS CDK toolkit to clean up all the resources:
    cdk destroy --force

    For more information about the AWS CDK toolkit, see Toolkit reference. Alternatively, delete the stack on the AWS CloudFormation console.

  2. Delete the CodeArtifact resources by deleting the CloudFormation stack that was deployed via AWS CDK:
    cd prerequisites
    cdk destroy –force
    

Conclusion

In this post, we demonstrated how to publish AWS CDK pattern constructs to CodeArtifact as npm packages. We also showed how teams can consume the published pattern constructs and use them to provision their AWS infrastructure.

This mechanism allows your infrastructure for AWS services to be provisioned from the configuration that has been vetted for quality control and security and governance checks. It also provides control over when new versions of the pattern constructs are released, and when the teams consuming the constructs can upgrade to the newly released versions.

About the Authors

Usman Umar


Usman Umar is a Sr. Applications Architect at AWS Professional Services. He is passionate about developing innovative ways to solve hard technical problems for the customers. In his free time, he likes going on biking trails, doing car modifications, and spending time with his family.


Krishnakumar Rengarajan


Krishnakumar Rengarajan is a DevOps Consultant with AWS Professional Services. He enjoys working with customers and focuses on building and delivering automated solutions that enables customers on their AWS cloud journeys.

Rapid and flexible Infrastructure as Code using the AWS CDK with AWS Solutions Constructs

Post Syndicated from Biff Gaut original https://aws.amazon.com/blogs/devops/rapid-flexible-infrastructure-with-solutions-constructs-cdk/

Introduction

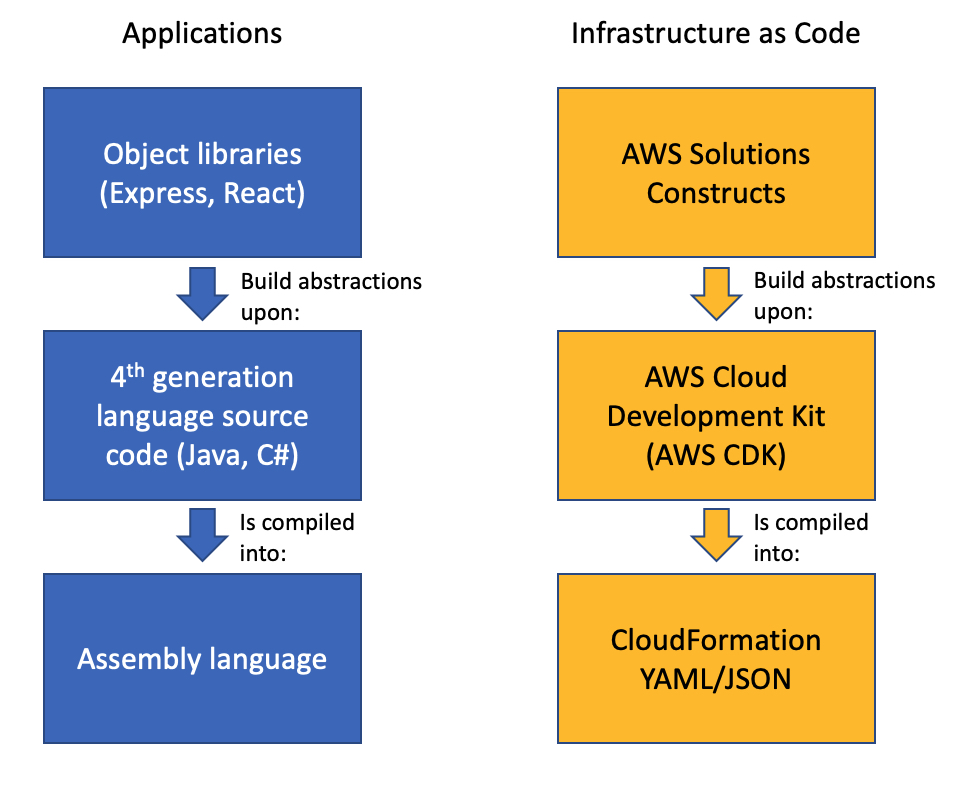
As workloads move to the cloud and all infrastructure becomes virtual, infrastructure as code (IaC) becomes essential to leverage the agility of this new world. JSON and YAML are the powerful, declarative modeling languages of AWS CloudFormation, allowing you to define complex architectures using IaC. Just as higher level languages like BASIC and C abstracted away the details of assembly language and made developers more productive, the AWS Cloud Development Kit (AWS CDK) provides a programming model above the native template languages, a model that makes developers more productive when creating IaC. When you instantiate CDK objects in your Typescript (or Python, Java, etc.) application, those objects “compile” into a YAML template that the CDK deploys as an AWS CloudFormation stack.

AWS Solutions Constructs take this simplification a step further by providing a library of common service patterns built on top of the CDK. These multi-service patterns allow you to deploy multiple resources with a single object, resources that follow best practices by default – both independently and throughout their interaction.

Comparison of an Application stack with Assembly Language, 4th generation language and Object libraries such as Hibernate with an IaC stack of CloudFormation, AWS CDK and AWS Solutions Constructs

Application Development Stack vs. IaC Development Stack

Solution overview

To demonstrate how using Solutions Constructs can accelerate the development of IaC, in this post you will create an architecture that ingests and stores sensor readings using Amazon Kinesis Data Streams, AWS Lambda, and Amazon DynamoDB.

An architecture diagram showing sensor readings being sent to a Kinesis data stream. A Lambda function will receive the Kinesis records and store them in a DynamoDB table.

Prerequisite – Setting up the CDK environment

Tip – If you want to try this example but are concerned about the impact of changing the tools or versions on your workstation, try running it on AWS Cloud9. An AWS Cloud9 environment is launched with an AWS Identity and Access Management (AWS IAM) role and doesn’t require configuring with an access key. It uses the current region as the default for all CDK infrastructure.

To prepare your workstation for CDK development, confirm the following:

  • Node.js 10.3.0 or later is installed on your workstation (regardless of the language used to write CDK apps).
  • You have configured credentials for your environment. If you’re running locally you can do this by configuring the AWS Command Line Interface (AWS CLI).
  • TypeScript 2.7 or later is installed globally (npm -g install typescript)

Before creating your CDK project, install the CDK toolkit using the following command:

npm install -g aws-cdk

Create the CDK project

  1. First create a project folder called stream-ingestion with these two commands:

mkdir stream-ingestion
cd stream-ingestion

  1. Now create your CDK application using this command:

npx [email protected] init app --language=typescript

Tip – This example will be written in TypeScript – you can also specify other languages for your projects.

At this time, you must use the same version of the CDK and Solutions Constructs. We’re using version 1.68.0 of both based upon what’s available at publication time, but you can update this with a later version for your projects in the future.

Let’s explore the files in the application this command created:

  • bin/stream-ingestion.ts – This is the module that launches the application. The key line of code is:

new StreamIngestionStack(app, 'StreamIngestionStack');

This creates the actual stack, and it’s in StreamIngestionStack that you will write the CDK code that defines the resources in your architecture.

  • lib/stream-ingestion-stack.ts – This is the important class. In the constructor of StreamIngestionStack you will add the constructs that will create your architecture.

During the deployment process, the CDK uploads your Lambda function to an Amazon S3 bucket so it can be incorporated into your stack.

  1. To create that S3 bucket and any other infrastructure the CDK requires, run this command:

cdk bootstrap

The CDK uses the same supporting infrastructure for all projects within a region, so you only need to run the bootstrap command once in any region in which you create CDK stacks.

  1. To install the required Solutions Constructs packages for our architecture, run the these two commands from the command line:

npm install @aws-solutions-constructs/[email protected]

Write the code

First you will write the Lambda function that processes the Kinesis data stream messages.

  1. Create a folder named lambda under stream-ingestion
  2. Within the lambda folder save a file called lambdaFunction.js with the following contents:
var AWS = require("aws-sdk");

// Create the DynamoDB service object
var ddb = new AWS.DynamoDB({ apiVersion: "2012-08-10" });

AWS.config.update({ region: process.env.AWS_REGION });

// We will configure our construct to 
// look for the .handler function
exports.handler = async function (event) {
  try {
    // Kinesis will deliver records 
    // in batches, so we need to iterate through
    // each record in the batch
    for (let record of event.Records) {
      const reading = parsePayload(record.kinesis.data);
      await writeRecord(record.kinesis.partitionKey, reading);
    };
  } catch (err) {
    console.log(`Write failed, err:\n${JSON.stringify(err, null, 2)}`);
    throw err;
  }
  return;
};

// Write the provided sensor reading data to the DynamoDB table
async function writeRecord(partitionKey, reading) {

  var params = {
    // Notice that Constructs automatically sets up 
    // an environment variable with the table name.
    TableName: process.env.DDB_TABLE_NAME,
    Item: {
      partitionKey: { S: partitionKey },  // sensor Id
      timestamp: { S: reading.timestamp },
      value: { N: reading.value}
    },
  };

  // Call DynamoDB to add the item to the table
  await ddb.putItem(params).promise();
}

// Decode the payload and extract the sensor data from it
function parsePayload(payload) {

  const decodedPayload = Buffer.from(payload, "base64").toString(
    "ascii"
  );

  // Our CLI command will send the records to Kinesis
  // with the values delimited by '|'
  const payloadValues = decodedPayload.split("|", 2)
  return {
    value: payloadValues[0],
    timestamp: payloadValues[1]
  }
}

We won’t spend a lot of time explaining this function – it’s pretty straightforward and heavily commented. It receives an event with one or more sensor readings, and for each reading it extracts the pertinent data and saves it to the DynamoDB table.

You will use two Solutions Constructs to create your infrastructure:

The aws-kinesisstreams-lambda construct deploys an Amazon Kinesis data stream and a Lambda function.

  • aws-kinesisstreams-lambda creates the Kinesis data stream and Lambda function that subscribes to that stream. To support this, it also creates other resources, such as IAM roles and encryption keys.

The aws-lambda-dynamodb construct deploys a Lambda function and a DynamoDB table.

  • aws-lambda-dynamodb creates an Amazon DynamoDB table and a Lambda function with permission to access the table.
  1. To deploy the first of these two constructs, replace the code in lib/stream-ingestion-stack.ts with the following code:
import * as cdk from "@aws-cdk/core";
import * as lambda from "@aws-cdk/aws-lambda";
import { KinesisStreamsToLambda } from "@aws-solutions-constructs/aws-kinesisstreams-lambda";

import * as ddb from "@aws-cdk/aws-dynamodb";
import { LambdaToDynamoDB } from "@aws-solutions-constructs/aws-lambda-dynamodb";

export class StreamIngestionStack extends cdk.Stack {
  constructor(scope: cdk.Construct, id: string, props?: cdk.StackProps) {
    super(scope, id, props);

    const kinesisLambda = new KinesisStreamsToLambda(
      this,
      "KinesisLambdaConstruct",
      {
        lambdaFunctionProps: {
          // Where the CDK can find the lambda function code
          runtime: lambda.Runtime.NODEJS_10_X,
          handler: "lambdaFunction.handler",
          code: lambda.Code.fromAsset("lambda"),
        },
      }
    );

    // Next Solutions Construct goes here
  }
}

Let’s explore this code:

  • It instantiates a new KinesisStreamsToLambda object. This Solutions Construct will launch a new Kinesis data stream and a new Lambda function, setting up the Lambda function to receive all the messages in the Kinesis data stream. It will also deploy all the additional resources and policies required for the architecture to follow best practices.
  • The third argument to the constructor is the properties object, where you specify overrides of default values or any other information the construct needs. In this case you provide properties for the encapsulated Lambda function that informs the CDK where to find the code for the Lambda function that you stored as lambda/lambdaFunction.js earlier.
  1. Now you’ll add the second construct that connects the Lambda function to a new DynamoDB table. In the same lib/stream-ingestion-stack.ts file, replace the line // Next Solutions Construct goes here with the following code:
    // Define the primary key for the new DynamoDB table
    const primaryKeyAttribute: ddb.Attribute = {
      name: "partitionKey",
      type: ddb.AttributeType.STRING,
    };

    // Define the sort key for the new DynamoDB table
    const sortKeyAttribute: ddb.Attribute = {
      name: "timestamp",
      type: ddb.AttributeType.STRING,
    };

    const lambdaDynamoDB = new LambdaToDynamoDB(
      this,
      "LambdaDynamodbConstruct",
      {
        // Tell construct to use the Lambda function in
        // the first construct rather than deploy a new one
        existingLambdaObj: kinesisLambda.lambdaFunction,
        tablePermissions: "Write",
        dynamoTableProps: {
          partitionKey: primaryKeyAttribute,
          sortKey: sortKeyAttribute,
          billingMode: ddb.BillingMode.PROVISIONED,
          removalPolicy: cdk.RemovalPolicy.DESTROY
        },
      }
    );

    // Add autoscaling
    const readScaling = lambdaDynamoDB.dynamoTable.autoScaleReadCapacity({
      minCapacity: 1,
      maxCapacity: 50,
    });

    readScaling.scaleOnUtilization({
      targetUtilizationPercent: 50,
    });

Let’s explore this code:

  • The first two const objects define the names and types for the partition key and sort key of the DynamoDB table.
  • The LambdaToDynamoDB construct instantiated creates a new DynamoDB table and grants access to your Lambda function. The key to this call is the properties object you pass in the third argument.
    • The first property sent to LambdaToDynamoDB is existingLambdaObj – by setting this value to the Lambda function created by KinesisStreamsToLambda, you’re telling the construct to not create a new Lambda function, but to grant the Lambda function in the other Solutions Construct access to the DynamoDB table. This illustrates how you can chain many Solutions Constructs together to create complex architectures.
    • The second property sent to LambdaToDynamoDB tells the construct to limit the Lambda function’s access to the table to write only.
    • The third property sent to LambdaToDynamoDB is actually a full properties object defining the DynamoDB table. It provides the two attribute definitions you created earlier as well as the billing mode. It also sets the RemovalPolicy to DESTROY. This policy setting ensures that the table is deleted when you delete this stack – in most cases you should accept the default setting to protect your data.
  • The last two lines of code show how you can use statements to modify a construct outside the constructor. In this case we set up auto scaling on the new DynamoDB table, which we can access with the dynamoTable property on the construct we just instantiated.

That’s all it takes to create the all resources to deploy your architecture.

  1. Save all the files, then compile the Typescript into a CDK program using this command:

npm run build

  1. Finally, launch the stack using this command:

cdk deploy

(Enter “y” in response to Do you wish to deploy all these changes (y/n)?)

You will see some warnings where you override CDK default values. Because you are doing this intentionally you may disregard these, but it’s always a good idea to review these warnings when they occur.

Tip – Many mysterious CDK project errors stem from mismatched versions. If you get stuck on an inexplicable error, check package.json and confirm that all CDK and Solutions Constructs libraries have the same version number (with no leading caret ^). If necessary, correct the version numbers, delete the package-lock.json file and node_modules tree and run npm install. Think of this as the “turn it off and on again” first response to CDK errors.

You have now deployed the entire architecture for the demo – open the CloudFormation stack in the AWS Management Console and take a few minutes to explore all 12 resources that the program deployed (and the 380 line template generated to created them).

Feed the Stream

Now use the CLI to send some data through the stack.

Go to the Kinesis Data Streams console and copy the name of the data stream. Replace the stream name in the following command and run it from the command line.

aws kinesis put-records \
--stream-name StreamIngestionStack-KinesisLambdaConstructKinesisStreamXXXXXXXX-XXXXXXXXXXXX \
--records \
PartitionKey=1301,'Data=15.4|2020-08-22T01:16:36+00:00' \
PartitionKey=1503,'Data=39.1|2020-08-22T01:08:15+00:00'

Tip – If you are using the AWS CLI v2, the previous command will result in an “Invalid base64…” error because v2 expects the inputs to be Base64 encoded by default. Adding the argument --cli-binary-format raw-in-base64-out will fix the issue.

To confirm that the messages made it through the service, open the DynamoDB console – you should see the two records in the table.

Now that you’ve got it working, pause to think about what you just did. You deployed a system that can ingest and store sensor readings and scale to handle heavy loads. You did that by instantiating two objects – well under 60 lines of code. Experiment with changing some property values and deploying the changes by running npm run build and cdk deploy again.

Cleanup

To clean up the resources in the stack, run this command:

cdk destroy

Conclusion

Just as languages like BASIC and C allowed developers to write programs at a higher level of abstraction than assembly language, the AWS CDK and AWS Solutions Constructs allow us to create CloudFormation stacks in Typescript, Java, or Python instead JSON or YAML. Just as there will always be a place for assembly language, there will always be situations where we want to write CloudFormation templates manually – but for most situations, we can now use the AWS CDK and AWS Solutions Constructs to create complex and complete architectures in a fraction of the time with very little code.

AWS Solutions Constructs can currently be used in CDK applications written in Typescript, Javascript, Java and Python and will be available in C# applications soon.

About the Author

Biff Gaut has been shipping software since 1983, from small startups to large IT shops. Along the way he has contributed to 2 books, spoken at several conferences and written many blog posts. He is now a Principal Solutions Architect at AWS working on the AWS Solutions Constructs team, helping customers deploy better architectures more quickly.
Building, bundling, and deploying applications with the AWS CDK

Post Syndicated from Cory Hall original https://aws.amazon.com/blogs/devops/building-apps-with-aws-cdk/

The AWS Cloud Development Kit (AWS CDK) is an open-source software development framework to model and provision your cloud application resources using familiar programming languages.

The post CDK Pipelines: Continuous delivery for AWS CDK applications showed how you can use CDK Pipelines to deploy a TypeScript-based AWS Lambda function. In that post, you learned how to add additional build commands to the pipeline to compile the TypeScript code to JavaScript, which is needed to create the Lambda deployment package.

In this post, we dive deeper into how you can perform these build commands as part of your AWS CDK build process by using the native AWS CDK bundling functionality.

If you’re working with Python, TypeScript, or JavaScript-based Lambda functions, you may already be familiar with the PythonFunction and NodejsFunction constructs, which use the bundling functionality. This post describes how to write your own bundling logic for instances where a higher-level construct either doesn’t already exist or doesn’t meet your needs. To illustrate this, I walk through two different examples: a Lambda function written in Golang and a static site created with Nuxt.js.

Concepts

A typical CI/CD pipeline contains steps to build and compile your source code, bundle it into a deployable artifact, push it to artifact stores, and deploy to an environment. In this post, we focus on the building, compiling, and bundling stages of the pipeline.

The AWS CDK has the concept of bundling source code into a deployable artifact. As of this writing, this works for two main types of assets: Docker images published to Amazon Elastic Container Registry (Amazon ECR) and files published to Amazon Simple Storage Service (Amazon S3). For files published to Amazon S3, this can be as simple as pointing to a local file or directory, which the AWS CDK uploads to Amazon S3 for you.

When you build an AWS CDK application (by running cdk synth), a cloud assembly is produced. The cloud assembly consists of a set of files and directories that define your deployable AWS CDK application. In the context of the AWS CDK, it might include the following:

  • AWS CloudFormation templates and instructions on where to deploy them
  • Dockerfiles, corresponding application source code, and information about where to build and push the images to
  • File assets and information about which S3 buckets to upload the files to

Use case

For this use case, our application consists of front-end and backend components. The example code is available in the GitHub repo. In the repository, I have split the example into two separate AWS CDK applications. The repo also contains the Golang Lambda example app and the Nuxt.js static site.

Golang Lambda function

To create a Golang-based Lambda function, you must first create a Lambda function deployment package. For Go, this consists of a .zip file containing a Go executable. Because we don’t commit the Go executable to our source repository, our CI/CD pipeline must perform the necessary steps to create it.

In the context of the AWS CDK, when we create a Lambda function, we have to tell the AWS CDK where to find the deployment package. See the following code:

new lambda.Function(this, 'MyGoFunction', {
  runtime: lambda.Runtime.GO_1_X,
  handler: 'main',
  code: lambda.Code.fromAsset(path.join(__dirname, 'folder-containing-go-executable')),
});

In the preceding code, the lambda.Code.fromAsset() method tells the AWS CDK where to find the Golang executable. When we run cdk synth, it stages this Go executable in the cloud assembly, which it zips and publishes to Amazon S3 as part of the PublishAssets stage.

If we’re running the AWS CDK as part of a CI/CD pipeline, this executable doesn’t exist yet, so how do we create it? One method is CDK bundling. The lambda.Code.fromAsset() method takes a second optional argument, AssetOptions, which contains the bundling parameter. With this bundling parameter, we can tell the AWS CDK to perform steps prior to staging the files in the cloud assembly.

Breaking down the BundlingOptions parameter further, we can perform the build inside a Docker container or locally.

Building inside a Docker container

For this to work, we need to make sure that we have Docker running on our build machine. In AWS CodeBuild, this means setting privileged: true. See the following code:

new lambda.Function(this, 'MyGoFunction', {
  code: lambda.Code.fromAsset(path.join(__dirname, 'folder-containing-source-code'), {
    bundling: {
      image: lambda.Runtime.GO_1_X.bundlingDockerImage,
      command: [
        'bash', '-c', [
          'go test -v',
          'GOOS=linux go build -o /asset-output/main',
      ].join(' && '),
    },
  })
  ...
});

We specify two parameters:

  • image (required) – The Docker image to perform the build commands in
  • command (optional) – The command to run within the container

The AWS CDK mounts the folder specified as the first argument to fromAsset at /asset-input inside the container, and mounts the asset output directory (where the cloud assembly is staged) at /asset-output inside the container.

After we perform the build commands, we need to make sure we copy the Golang executable to the /asset-output location (or specify it as the build output location like in the preceding example).

This is the equivalent of running something like the following code:

docker run \
  --rm \
  -v folder-containing-source-code:/asset-input \
  -v cdk.out/asset.1234a4b5/:/asset-output \
  lambci/lambda:build-go1.x \
  bash -c 'GOOS=linux go build -o /asset-output/main'

Building locally

To build locally (not in a Docker container), we have to provide the local parameter. See the following code:

new lambda.Function(this, 'MyGoFunction', {
  code: lambda.Code.fromAsset(path.join(__dirname, 'folder-containing-source-code'), {
    bundling: {
      image: lambda.Runtime.GO_1_X.bundlingDockerImage,
      command: [],
      local: {
        tryBundle(outputDir: string) {
          try {
            spawnSync('go version')
          } catch {
            return false
          }

          spawnSync(`GOOS=linux go build -o ${path.join(outputDir, 'main')}`);
          return true
        },
      },
    },
  })
  ...
});

The local parameter must implement the ILocalBundling interface. The tryBundle method is passed the asset output directory, and expects you to return a boolean (true or false). If you return true, the AWS CDK doesn’t try to perform Docker bundling. If you return false, it falls back to Docker bundling. Just like with Docker bundling, you must make sure that you place the Go executable in the outputDir.

Typically, you should perform some validation steps to ensure that you have the required dependencies installed locally to perform the build. This could be checking to see if you have go installed, or checking a specific version of go. This can be useful if you don’t have control over what type of build environment this might run in (for example, if you’re building a construct to be consumed by others).

If we run cdk synth on this, we see a new message telling us that the AWS CDK is bundling the asset. If we include additional commands like go test, we also see the output of those commands. This is especially useful if you wanted to fail a build if tests failed. See the following code:

$ cdk synth
Bundling asset GolangLambdaStack/MyGoFunction/Code/Stage...
✓  . (9ms)
✓  clients (5ms)

DONE 8 tests in 11.476s
✓  clients (5ms) (coverage: 84.6% of statements)
✓  . (6ms) (coverage: 78.4% of statements)

DONE 8 tests in 2.464s

Cloud Assembly

If we look at the cloud assembly that was generated (located at cdk.out), we see something like the following code:

$ cdk synth
Bundling asset GolangLambdaStack/MyGoFunction/Code/Stage...
✓  . (9ms)
✓  clients (5ms)

DONE 8 tests in 11.476s
✓  clients (5ms) (coverage: 84.6% of statements)
✓  . (6ms) (coverage: 78.4% of statements)

DONE 8 tests in 2.464s

It contains our GolangLambdaStack CloudFormation template that defines our Lambda function, as well as our Golang executable, bundled at asset.01cf34ff646d380829dc4f2f6fc93995b13277bde7db81c24ac8500a83a06952/main.

Let’s look at how the AWS CDK uses this information. The GolangLambdaStack.assets.json file contains all the information necessary for the AWS CDK to know where and how to publish our assets (in this use case, our Golang Lambda executable). See the following code:

{
  "version": "5.0.0",
  "files": {
    "01cf34ff646d380829dc4f2f6fc93995b13277bde7db81c24ac8500a83a06952": {
      "source": {
        "path": "asset.01cf34ff646d380829dc4f2f6fc93995b13277bde7db81c24ac8500a83a06952",
        "packaging": "zip"
      },
      "destinations": {
        "current_account-current_region": {
          "bucketName": "cdk-hnb659fds-assets-${AWS::AccountId}-${AWS::Region}",
          "objectKey": "01cf34ff646d380829dc4f2f6fc93995b13277bde7db81c24ac8500a83a06952.zip",
          "assumeRoleArn": "arn:${AWS::Partition}:iam::${AWS::AccountId}:role/cdk-hnb659fds-file-publishing-role-${AWS::AccountId}-${AWS::Region}"
        }
      }
    }
  }
}

The file contains information about where to find the source files (source.path) and what type of packaging (source.packaging). It also tells the AWS CDK where to publish this .zip file (bucketName and objectKey) and what AWS Identity and Access Management (IAM) role to use (assumeRoleArn). In this use case, we only deploy to a single account and Region, but if you have multiple accounts or Regions, you see multiple destinations in this file.

The GolangLambdaStack.template.json file that defines our Lambda resource looks something like the following code:

{
  "Resources": {
    "MyGoFunction0AB33E85": {
      "Type": "AWS::Lambda::Function",
      "Properties": {
        "Code": {
          "S3Bucket": {
            "Fn::Sub": "cdk-hnb659fds-assets-${AWS::AccountId}-${AWS::Region}"
          },
          "S3Key": "01cf34ff646d380829dc4f2f6fc93995b13277bde7db81c24ac8500a83a06952.zip"
        },
        "Handler": "main",
        ...
      }
    },
    ...
  }
}

The S3Bucket and S3Key match the bucketName and objectKey from the assets.json file. By default, the S3Key is generated by calculating a hash of the folder location that you pass to lambda.Code.fromAsset(), (for this post, folder-containing-source-code). This means that any time we update our source code, this calculated hash changes and a new Lambda function deployment is triggered.

Nuxt.js static site

In this section, I walk through building a static site using the Nuxt.js framework. You can apply the same logic to any static site framework that requires you to run a build step prior to deploying.

To deploy this static site, we use the BucketDeployment construct. This is a construct that allows you to populate an S3 bucket with the contents of .zip files from other S3 buckets or from a local disk.

Typically, we simply tell the BucketDeployment construct where to find the files that it needs to deploy to the S3 bucket. See the following code:

new s3_deployment.BucketDeployment(this, 'DeployMySite', {
  sources: [
    s3_deployment.Source.asset(path.join(__dirname, 'path-to-directory')),
  ],
  destinationBucket: myBucket
});

To deploy a static site built with a framework like Nuxt.js, we need to first run a build step to compile the site into something that can be deployed. For Nuxt.js, we run the following two commands:

  • yarn install – Installs all our dependencies
  • yarn generate – Builds the application and generates every route as an HTML file (used for static hosting)

This creates a dist directory, which you can deploy to Amazon S3.

Just like with the Golang Lambda example, we can perform these steps as part of the AWS CDK through either local or Docker bundling.

Building inside a Docker container

To build inside a Docker container, use the following code:

new s3_deployment.BucketDeployment(this, 'DeployMySite', {
  sources: [
    s3_deployment.Source.asset(path.join(__dirname, 'path-to-nuxtjs-project'), {
      bundling: {
        image: cdk.BundlingDockerImage.fromRegistry('node:lts'),
        command: [
          'bash', '-c', [
            'yarn install',
            'yarn generate',
            'cp -r /asset-input/dist/* /asset-output/',
          ].join(' && '),
        ],
      },
    }),
  ],
  ...
});

For this post, we build inside the publicly available node:lts image hosted on DockerHub. Inside the container, we run our build commands yarn install && yarn generate, and copy the generated dist directory to our output directory (the cloud assembly).

The parameters are the same as described in the Golang example we walked through earlier.

Building locally

To build locally, use the following code:

new s3_deployment.BucketDeployment(this, 'DeployMySite', {
  sources: [
    s3_deployment.Source.asset(path.join(__dirname, 'path-to-nuxtjs-project'), {
      bundling: {
        local: {
          tryBundle(outputDir: string) {
            try {
              spawnSync('yarn --version');
            } catch {
              return false
            }

            spawnSync('yarn install && yarn generate');

       fs.copySync(path.join(__dirname, ‘path-to-nuxtjs-project’, ‘dist’), outputDir);
            return true
          },
        },
        image: cdk.BundlingDockerImage.fromRegistry('node:lts'),
        command: [],
      },
    }),
  ],
  ...
});

Building locally works the same as the Golang example we walked through earlier, with one exception. We have one additional command to run that copies the generated dist folder to our output directory (cloud assembly).

Conclusion

This post showed how you can easily compile your backend and front-end applications using the AWS CDK. You can find the example code for this post in this GitHub repo. If you have any questions or comments, please comment on the GitHub repo. If you have any additional examples you want to add, we encourage you to create a Pull Request with your example!

Our code also contains examples of deploying the applications using CDK Pipelines, so if you’re interested in deploying the example yourself, check out the example repo.


About the author

Cory Hall

Cory is a Solutions Architect at Amazon Web Services with a passion for DevOps and is based in Charlotte, NC. Cory works with enterprise AWS customers to help them design, deploy, and scale applications to achieve their business goals.

Cross-account and cross-region deployment using GitHub actions and AWS CDK

Post Syndicated from DAMODAR SHENVI WAGLE original https://aws.amazon.com/blogs/devops/cross-account-and-cross-region-deployment-using-github-actions-and-aws-cdk/

GitHub Actions is a feature on GitHub’s popular development platform that helps you automate your software development workflows in the same place you store code and collaborate on pull requests and issues. You can write individual tasks called actions, and combine them to create a custom workflow. Workflows are custom automated processes that you can set up in your repository to build, test, package, release, or deploy any code project on GitHub.

A cross-account deployment strategy is a CI/CD pattern or model in AWS. In this pattern, you have a designated AWS account called tools, where all CI/CD pipelines reside. Deployment is carried out by these pipelines across other AWS accounts, which may correspond to dev, staging, or prod. For more information about a cross-account strategy in reference to CI/CD pipelines on AWS, see Building a Secure Cross-Account Continuous Delivery Pipeline.

In this post, we show you how to use GitHub Actions to deploy an AWS Lambda-based API to an AWS account and Region using the cross-account deployment strategy.

Using GitHub Actions may have associated costs in addition to the cost associated with the AWS resources you create. For more information, see About billing for GitHub Actions.

Prerequisites

Before proceeding any further, you need to identify and designate two AWS accounts required for the solution to work:

  • Tools – Where you create an AWS Identity and Access Management (IAM) user for GitHub Actions to use to carry out deployment.
  • Target – Where deployment occurs. You can call this as your dev/stage/prod environment.

You also need to create two AWS account profiles in ~/.aws/credentials for the tools and target accounts, if you don’t already have them. These profiles need to have sufficient permissions to run an AWS Cloud Development Kit (AWS CDK) stack. They should be your private profiles and only be used during the course of this use case. So, it should be fine if you want to use admin privileges. Don’t share the profile details, especially if it has admin privileges. I recommend removing the profile when you’re finished with this walkthrough. For more information about creating an AWS account profile, see Configuring the AWS CLI.

Solution overview

You start by building the necessary resources in the tools account (an IAM user with permissions to assume a specific IAM role from the target account to carry out deployment). For simplicity, we refer to this IAM role as the cross-account role, as specified in the architecture diagram.

You also create the cross-account role in the target account that trusts the IAM user in the tools account and provides the required permissions for AWS CDK to bootstrap and initiate creating an AWS CloudFormation deployment stack in the target account. GitHub Actions uses the tools account IAM user credentials to the assume the cross-account role to carry out deployment.

In addition, you create an AWS CloudFormation execution role in the target account, which AWS CloudFormation service assumes in the target account. This role has permissions to create your API resources, such as a Lambda function and Amazon API Gateway, in the target account. This role is passed to AWS CloudFormation service via AWS CDK.

You then configure your tools account IAM user credentials in your Git secrets and define the GitHub Actions workflow, which triggers upon pushing code to a specific branch of the repo. The workflow then assumes the cross-account role and initiates deployment.

The following diagram illustrates the solution architecture and shows AWS resources across the tools and target accounts.

Architecture diagram

Creating an IAM user

You start by creating an IAM user called git-action-deployment-user in the tools account. The user needs to have only programmatic access.

  1. Clone the GitHub repo aws-cross-account-cicd-git-actions-prereq and navigate to folder tools-account. Here you find the JSON parameter file src/cdk-stack-param.json, which contains the parameter CROSS_ACCOUNT_ROLE_ARN, which represents the ARN for the cross-account role we create in the next step in the target account. In the ARN, replace <target-account-id> with the actual account ID for your designated AWS target account.                                             Replace <target-account-id> with designated AWS account id
  2. Run deploy.sh by passing the name of the tools AWS account profile you created earlier. The script compiles the code, builds a package, and uses the AWS CDK CLI to bootstrap and deploy the stack. See the following code:
cd aws-cross-account-cicd-git-actions-prereq/tools-account/
./deploy.sh "<AWS-TOOLS-ACCOUNT-PROFILE-NAME>"

You should now see two stacks in the tools account: CDKToolkit and cf-GitActionDeploymentUserStack. AWS CDK creates the CDKToolkit stack when we bootstrap the AWS CDK app. This creates an Amazon Simple Storage Service (Amazon S3) bucket needed to hold deployment assets such as a CloudFormation template and Lambda code package. cf-GitActionDeploymentUserStack creates the IAM user with permission to assume git-action-cross-account-role (which you create in the next step). On the Outputs tab of the stack, you can find the user access key and the AWS Secrets Manager ARN that holds the user secret. To retrieve the secret, you need to go to Secrets Manager. Record the secret to use later.

Stack that creates IAM user with its secret stored in secrets manager

Creating a cross-account IAM role

In this step, you create two IAM roles in the target account: git-action-cross-account-role and git-action-cf-execution-role.

git-action-cross-account-role provides required deployment-specific permissions to the IAM user you created in the last step. The IAM user in the tools account can assume this role and perform the following tasks:

  • Upload deployment assets such as the CloudFormation template and Lambda code package to a designated S3 bucket via AWS CDK
  • Create a CloudFormation stack that deploys API Gateway and Lambda using AWS CDK

AWS CDK passes git-action-cf-execution-role to AWS CloudFormation to create, update, and delete the CloudFormation stack. It has permissions to create API Gateway and Lambda resources in the target account.

To deploy these two roles using AWS CDK, complete the following steps:

  1. In the already cloned repo from the previous step, navigate to the folder target-account. This folder contains the JSON parameter file cdk-stack-param.json, which contains the parameter TOOLS_ACCOUNT_USER_ARN, which represents the ARN for the IAM user you previously created in the tools account. In the ARN, replace <tools-account-id> with the actual account ID for your designated AWS tools account.                                             Replace <tools-account-id> with designated AWS account id
  2. Run deploy.sh by passing the name of the target AWS account profile you created earlier. The script compiles the code, builds the package, and uses the AWS CDK CLI to bootstrap and deploy the stack. See the following code:
cd ../target-account/
./deploy.sh "<AWS-TARGET-ACCOUNT-PROFILE-NAME>"

You should now see two stacks in your target account: CDKToolkit and cf-CrossAccountRolesStack. AWS CDK creates the CDKToolkit stack when we bootstrap the AWS CDK app. This creates an S3 bucket to hold deployment assets such as the CloudFormation template and Lambda code package. The cf-CrossAccountRolesStack creates the two IAM roles we discussed at the beginning of this step. The IAM role git-action-cross-account-role now has the IAM user added to its trust policy. On the Outputs tab of the stack, you can find these roles’ ARNs. Record these ARNs as you conclude this step.

Stack that creates IAM roles to carry out cross account deployment

Configuring secrets

One of the GitHub actions we use is aws-actions/configure-aws-credentials@v1. This action configures AWS credentials and Region environment variables for use in the GitHub Actions workflow. The AWS CDK CLI detects the environment variables to determine the credentials and Region to use for deployment.

For our cross-account deployment use case, aws-actions/configure-aws-credentials@v1 takes three pieces of sensitive information besides the Region: AWS_ACCESS_KEY_ID, AWS_ACCESS_KEY_SECRET, and CROSS_ACCOUNT_ROLE_TO_ASSUME. Secrets are recommended for storing sensitive pieces of information in the GitHub repo. It keeps the information in an encrypted format. For more information about referencing secrets in the workflow, see Creating and storing encrypted secrets.

Before we continue, you need your own empty GitHub repo to complete this step. Use an existing repo if you have one, or create a new repo. You configure secrets in this repo. In the next section, you check in the code provided by the post to deploy a Lambda-based API CDK stack into this repo.

  1. On the GitHub console, navigate to your repo settings and choose the Secrets tab.
  2. Add a new secret with name as TOOLS_ACCOUNT_ACCESS_KEY_ID.
  3. Copy the access key ID from the output OutGitActionDeploymentUserAccessKey of the stack GitActionDeploymentUserStack in tools account.
  4. Enter the ID in the Value field.                                                                                                                                                                Create secret
  5. Repeat this step to add two more secrets:
    • TOOLS_ACCOUNT_SECRET_ACCESS_KEY (value retrieved from the AWS Secrets Manager in tools account)
    • CROSS_ACCOUNT_ROLE (value copied from the output OutCrossAccountRoleArn of the stack cf-CrossAccountRolesStack in target account)

You should now have three secrets as shown below.

All required git secrets

Deploying with GitHub Actions

As the final step, first clone your empty repo where you set up your secrets. Download and copy the code from the GitHub repo into your empty repo. The folder structure of your repo should mimic the folder structure of source repo. See the following screenshot.

Folder structure of the Lambda API code

We can take a detailed look at the code base. First and foremost, we use Typescript to deploy our Lambda API, so we need an AWS CDK app and AWS CDK stack. The app is defined in app.ts under the repo root folder location. The stack definition is located under the stack-specific folder src/git-action-demo-api-stack. The Lambda code is located under the Lambda-specific folder src/git-action-demo-api-stack/lambda/ git-action-demo-lambda.

We also have a deployment script deploy.sh, which compiles the app and Lambda code, packages the Lambda code into a .zip file, bootstraps the app by copying the assets to an S3 bucket, and deploys the stack. To deploy the stack, AWS CDK has to pass CFN_EXECUTION_ROLE to AWS CloudFormation; this role is configured in src/params/cdk-stack-param.json. Replace <target-account-id> with your own designated AWS target account ID.

Update cdk-stack-param.json in git-actions-cross-account-cicd repo with TARGET account id

Finally, we define the Git Actions workflow under the .github/workflows/ folder per the specifications defined by GitHub Actions. GitHub Actions automatically identifies the workflow in this location and triggers it if conditions match. Our workflow .yml file is named in the format cicd-workflow-<region>.yml, where <region> in the file name identifies the deployment Region in the target account. In our use case, we use us-east-1 and us-west-2, which is also defined as an environment variable in the workflow.

The GitHub Actions workflow has a standard hierarchy. The workflow is a collection of jobs, which are collections of one or more steps. Each job runs on a virtual machine called a runner, which can either be GitHub-hosted or self-hosted. We use the GitHub-hosted runner ubuntu-latest because it works well for our use case. For more information about GitHub-hosted runners, see Virtual environments for GitHub-hosted runners. For more information about the software preinstalled on GitHub-hosted runners, see Software installed on GitHub-hosted runners.

The workflow also has a trigger condition specified at the top. You can schedule the trigger based on the cron settings or trigger it upon code pushed to a specific branch in the repo. See the following code:

name: Lambda API CICD Workflow
# This workflow is triggered on pushes to the repository branch master.
on:
  push:
    branches:
      - master

# Initializes environment variables for the workflow
env:
  REGION: us-east-1 # Deployment Region

jobs:
  deploy:
    name: Build And Deploy
    # This job runs on Linux
    runs-on: ubuntu-latest
    steps:
      # Checkout code from git repo branch configured above, under folder $GITHUB_WORKSPACE.
      - name: Checkout
        uses: actions/checkout@v2
      # Sets up AWS profile.
      - name: Configure AWS credentials
        uses: aws-actions/configure-aws-credentials@v1
        with:
          aws-access-key-id: ${{ secrets.TOOLS_ACCOUNT_ACCESS_KEY_ID }}
          aws-secret-access-key: ${{ secrets.TOOLS_ACCOUNT_SECRET_ACCESS_KEY }}
          aws-region: ${{ env.REGION }}
          role-to-assume: ${{ secrets.CROSS_ACCOUNT_ROLE }}
          role-duration-seconds: 1200
          role-session-name: GitActionDeploymentSession
      # Installs CDK and other prerequisites
      - name: Prerequisite Installation
        run: |
          sudo npm install -g [email protected]
          cdk --version
          aws s3 ls
      # Build and Deploy CDK application
      - name: Build & Deploy
        run: |
          cd $GITHUB_WORKSPACE
          ls -a
          chmod 700 deploy.sh
          ./deploy.sh

For more information about triggering workflows, see Triggering a workflow with events.

We have configured a single job workflow for our use case that runs on ubuntu-latest and is triggered upon a code push to the master branch. When you create an empty repo, master branch becomes the default branch. The workflow has four steps:

  1. Check out the code from the repo, for which we use a standard Git action actions/checkout@v2. The code is checked out into a folder defined by the variable $GITHUB_WORKSPACE, so it becomes the root location of our code.
  2. Configure AWS credentials using aws-actions/configure-aws-credentials@v1. This action is configured as explained in the previous section.
  3. Install your prerequisites. In our use case, the only prerequisite we need is AWS CDK. Upon installing AWS CDK, we can do a quick test using the AWS Command Line Interface (AWS CLI) command aws s3 ls. If cross-account access was successfully established in the previous step of the workflow, this command should return a list of buckets in the target account.
  4. Navigate to root location of the code $GITHUB_WORKSPACE and run the deploy.sh script.

You can check in the code into the master branch of your repo. This should trigger the workflow, which you can monitor on the Actions tab of your repo. The commit message you provide is displayed for the respective run of the workflow.

Workflow for region us-east-1 Workflow for region us-west-2

You can choose the workflow link and monitor the log for each individual step of the workflow.

Git action workflow steps

In the target account, you should now see the CloudFormation stack cf-GitActionDemoApiStack in us-east-1 and us-west-2.

Lambda API stack in us-east-1 Lambda API stack in us-west-2

The API resource URL DocUploadRestApiResourceUrl is located on the Outputs tab of the stack. You can invoke your API by choosing this URL on the browser.

API Invocation Output

Clean up

To remove all the resources from the target and tools accounts, complete the following steps in their given order:

  1. Delete the CloudFormation stack cf-GitActionDemoApiStack from the target account. This step removes the Lambda and API Gateway resources and their associated IAM roles.
  2. Delete the CloudFormation stack cf-CrossAccountRolesStack from the target account. This removes the cross-account role and CloudFormation execution role you created.
  3. Go to the CDKToolkit stack in the target account and note the BucketName on the Output tab. Empty that bucket and then delete the stack.
  4. Delete the CloudFormation stack cf-GitActionDeploymentUserStack from tools account. This removes cross-account-deploy-user IAM user.
  5. Go to the CDKToolkit stack in the tools account and note the BucketName on the Output tab. Empty that bucket and then delete the stack.

Security considerations

Cross-account IAM roles are very powerful and need to be handled carefully. For this post, we strictly limited the cross-account IAM role to specific Amazon S3 and CloudFormation permissions. This makes sure that the cross-account role can only do those things. The actual creation of Lambda, API Gateway, and Amazon DynamoDB resources happens via the AWS CloudFormation IAM role, which AWS  CloudFormation assumes in the target AWS account.

Make sure that you use secrets to store your sensitive workflow configurations, as specified in the section Configuring secrets.

Conclusion

In this post we showed how you can leverage GitHub’s popular software development platform to securely deploy to AWS accounts and Regions using GitHub actions and AWS CDK.

Build your own GitHub Actions CI/CD workflow as shown in this post.

About the author


Damodar Shenvi Wagle is a Cloud Application Architect at AWS Professional Services. His areas of expertise include architecting serverless solutions, ci/cd and automation.