Today we’re excited to announce the general availability of CDK Migrate, a component of the AWS Cloud Development Kit (CDK). This feature enables users to migrate AWS CloudFormation templates, previously deployed CloudFormation stacks, or resources created outside of Infrastructure as Code (IaC) into a CDK application. This feature is being launched in tandem with the CloudFormation IaC Generator, which helps customers import resources created outside of CloudFormation into a template, and into a newly generated, fully managed CloudFormation stack. To read more on this feature, check out the launch post.
There are various ways to create and manage resources in AWS, whether that be via “ClickOps” (creating and updating via the AWS Console), via AWS API’s, or using Infrastructure as Code (IaC). While it’s a good and recommended practice to manage the lifecycle of resources using IaC, there can be an on-ramp to getting started. For those that aren’t ready to use IaC, it is likely that they use the console to create the resources and update them accordingly. While this can be acceptable for smaller use cases or for testing out a new service, it becomes more challenging as the complexity of the environment grows. This is further exacerbated when there is a need to re-deploy the exact configuration to other accounts, environments, or regions, as the process becomes very error prone when trying to replicate it. IaC is built to help solve this problem by allowing users to define once and deploy everywhere. For those who have been putting off the move to IaC, now is the time to take the plunge with the IaC generator functionality and CDK migrate, which can accelerate and simplify the move.
Getting Started
The first step when migrating resources into the AWS CDK is to understand the best mechanism for how the users would prefer to interact with their IaC.
For users that are looking to define their IaC declaratively (manage resources via a configuration language like YAML), it is recommended that they look at IaC generator, which can generate a CloudFormation template as well as manage the existing resources in a CloudFormation stack.
For users that are looking to manage their IaC via a higher level programming language as well as build on top of those templates with higher level abstractions and automation, the AWS Cloud Development Kit and CDK migrate serve as an excellent option,
There is also functionality in the CDK CLI to import resources into an existing CDK application. Let’s review the use cases for when to use CDK migrate vs when to use CDK import.
CDK Migrate
Users are looking to migrate one or many resources into a new CDK application.
Examples of existing resources in the AWS region to be migrated:
Resources created outside of IaC
A deployed CloudFormation Stack
Users want to migrate from CloudFormation templates into a new CDK application
Users are looking for a managed experience to generate CDK code from existing resources and/or CloudFormation templates.
While the CDK migrate feature is designed to help accelerate those users looking to use the AWS CDK, it’s important to understand that there are limitations. For more information on the limitations, please review the documentation.
CDK Import
Users have an existing CDK application and want to import one or many resources that were created outside of the CDK.
Examples of existing resources in the AWS region to be migrated:
Resources created outside of IaC (via ClickOps)
A deployed CloudFormation Stack
The user must define the resources in their CDK app on their own, and ensure that the resources defined in the CDK code map directly to the resource as it exists in the account. There is a multi-step process to follow when using this feature, for more information see here.
This post will walk through an example of how to take a local CloudFormation template and convert it into a new CDK application.
Walkthrough
To start, take the CloudFormation template below that will be converted to a CDK application. The template creates an AWS Lambda Function, AWS Identity and Access Management (IAM) role, and an Amazon S3 Bucket along with some parameters to help make some of the inputs dynamic. Below is the template in full:
AWSTemplateFormatVersion: "2010-09-09"
Description: AWS CDK Migrate Demo Template
Parameters:
  FunctionResponse:
    Description: Response message from the Lambda function
    Type: String
    Default: Hello World
  BucketTag:
    Description: The tag value of the S3 bucket
    Type: String
    Default: ChangeMe
Resources:
  LambdaExecutionRole:
    Type: AWS::IAM::Role
    Properties:
      AssumeRolePolicyDocument:
        Version: "2012-10-17"
        Statement:
          - Effect: Allow
            Principal:
              Service: lambda.amazonaws.com
            Action: sts:AssumeRole
      ManagedPolicyArns:
        - arn:aws:iam::aws:policy/service-role/AWSLambdaBasicExecutionRole
  HelloWorldFunction:
    Type: AWS::Lambda::Function
    Properties:
      Role: !GetAtt LambdaExecutionRole.Arn
      Code:
        ZipFile: |
          import os
          def lambda_handler(event, context):
            function_response = os.getenv('FUNCTION_RESPONSE')
            return {
              "statusCode": 200,
              "body": function_response
            }
      Handler: index.lambda_handler
      Runtime: python3.11
      Environment:
        Variables:
          FUNCTION_RESPONSE: !Ref FunctionResponse
  S3Bucket:
    Type: AWS::S3::Bucket
    Properties:
      PublicAccessBlockConfiguration:
        BlockPublicAcls: true
        BlockPublicPolicy: true
        IgnorePublicAcls: true
        RestrictPublicBuckets: true
      BucketEncryption:
        ServerSideEncryptionConfiguration:
          - ServerSideEncryptionByDefault:
              SSEAlgorithm: AES256
      Tags:
        - Key: Application
          Value: Git-Sync-Demo
        - Key: DynamicTag
          Value: !Ref BucketTag
Outputs:
  S3BucketName:
    Description: The name of the S3 bucket
    Value: !Ref S3Bucket
    Export:
      Name: !Sub ${AWS::StackName}-S3BucketName
This is the template that you will use when running the migration command. As a reminder, this demo migrates a CloudFormation template to a CDK application, but you can also migrate a previously deployed stack or non IaC created resources.
Migrate
The migration from the CloudFormation template to the CDK is done with a single command: cdk migrate. Simply point to the local CloudFormation template file (let’s call it demo-template.yaml), and watch as the CLI converts the template into a CDK application. The output and result from running the command will be a directory comprised of the CDK code and dependencies, but will not deploy the stack.
In the above command, you’re instructing the CDK CLI to consume the CloudFormation template file using the --from-path parameter, and choose the language as the output for the CDK application. The CDK CLI will convert the template as well as create a project folder along with the required dependencies for the CDK application.
When the migration is complete, the CDK application along with the project structure and files are available and ready to use, but have not yet been deployed. Below is the file structure of what was generated:
The above output represents the scaffold for your CDK Typescript application, ready for deployment. The two directories that house the CDK code are bin and lib. Within the bin directory you’ll find the code that creates our CDK app and calls the CDK Stack class. The name of the files will match the input that was passed into the –stack-name parameter when running the migrate command, so in this case the file is named: bin/cdk-local-template-migrate-demo.ts. Below is the generated code:
The CdkLocalTemplateMigrateDemoStack is imported and then instantiated. This is where the code that was converted from the existing CloudFormation template (or stack, or resources) resides. Again, similar to how the file was named above, the filename and location for the CDK stack code is lib/cdk-local-template-migrate-demo-stack.ts. Let’s look at the code that was converted.
Comparing the above auto generated code to the original CloudFormation template, the definitions of the resources look similar. This is because the migrate command is generating the CDK code using L1 constructs, which represent all resources available in CloudFormation. For more information on CDK constructs and the various levels of abstraction they offer, check out this video.
The CloudFormation parameters were converted to properties inside of an interface, which are passed in to the Stack class. Inside of the Stack class code, it honors the defaults set in the properties based on the defaults were set in the original CloudFormation parameters. If you wanted to override those defaults, you could pass those properties into the CDK stack as follows:
With your newly created CDK application, you’re ready to deploy it to your AWS account.
Deploy
If this is the first time that you are using the CDK in the account and region, you will need to run the cdk bootstrap command, which creates assets required for the CDK to properly deploy resources to the region and account. For more information see here. Assuming the bootstrap process has happened, you can proceed to deployment.
The Infrastructure as Code is ready to deploy, but prior to deploying you should run a cdk diff to see what will be deployed. Running the diff command creates a change set and surfaces the changes being proposed (in this case it is a brand new stack with new resources).
From the output you can see that all new resources are being created. If the cdk diff command was run against existing resources or stacks, assuming nothing changed (like above where I updated the properties), the diff would show no changes to the existing resources.
Next, deploy the stack (by running the cdk deploy command) and once the deployment is complete, head over to the AWS console and find your Lambda function. Run a test on your lambda function, and the response should match the functionResponse property that was updated as “CDK Migrate Demo Blog”.
Wrapping up
In this post, we discussed how the CDK migrate command can help you move your resources to the CDK to manage your infrastructure as code, whether it’s from a CloudFormation template, previously deployed CloudFormation stack, or from importing resources via the CloudFormation IaC generator feature. As always, we encourage you to test this feature and provide feedback and/or feature requests in our GitHub repo. In addition, if you’re new to the CDK there are some resources that can help you get started.
Recently, we launched a new AWS Cloud Development Kit (CDK) construct for Amazon DynamoDB tables, known as TableV2. This construct provides a number of new features in addition to what the original construct offered, enabling CDK authors to create global tables, simplifying the configuration of global secondary indexes and auto scaling, as well as supporting AWS CloudFormation drift detection and import operations. We believe that this new construct will make it easier for organizations to build and manage their DynamoDB tables at scale, in addition to providing more flexibility and control over the configuration of tables.
AWS CDK is a framework for defining cloud infrastructure in code and provisioning it through AWS CloudFormation. Developers can use any of the supported programming languages to define reusable cloud components known as Constructs. A construct is a reusable and programmable component that represents AWS resources. CDK translates the high-level constructs defined by you into equivalent AWS CloudFormation templates. CloudFormation provisions the resources specified in the template, streamlining the usage of Infrastructure as a Code (IaC) on AWS.
In this post we’ll explore:
The reasoning behind the creation of a new L2 construct for DynamoDB tables.
Features of new L2 constructs along with examples.
The benefits of leveraging this new construct in terms of scalability, flexibility, and simplicity.
By understanding the reasons behind its development and exploring its capabilities through practical examples, you will gain a comprehensive understanding of how this new L2 construct can enhance their DynamoDB experience. Let’s dive in.
Background
The original DynamoDB L2 Table construct is a powerful and versatile tool for creating and managing DynamoDB tables. It allows you to easily define the schema of your table, as well as the provisioned throughput and replicas. It also supports features like global tables, secondary indexes, and streams.
However, the Table construct uses a custom resource to add replicas to the primary table. This means that a separate Lambda function is created as the resource provider in addition to the Table resources (primary table and any replicas). This can be cumbersome to manage and can lead to drift detection issues.
The new TableV2 construct is an abstraction built on top of the GlobalTable L1 construct. It uses the CloudFormation resource AWS::DynamoDB::GlobalTable to create and manage DynamoDB tables. This has two important benefits:
CloudFormation is in control and aware of all replicas that make up the Global Table, which means you will experience drift detection across all the replicas. With the original table construct, CloudFormation was not aware of any replicas since this was being handled through the Lambda function being used as a resource provider.
No extra resource (Lambda function) is created when replicas are configured with TableV2. This eliminates the need to manage an extra resource and the risk of troubleshooting issues that may arise with the custom resource. TableV2 simplifies the setup and maintenance of DynamoDB tables by using native CloudFormation constructs to directly manage replicas, without the need for a Lambda function. This results in a more efficient and streamlined experience for users.
The new TableV2 construct provides more fine-grained control to customers over the replicas created as part of the Global Table. Specifically, customers can specify properties like contributor insights, deletion protection, point-in-time recovery, table class, read capacity, and global secondary index options on a per-replica basis.
This means that customers can tailor their table setup to meet their specific needs and optimize their overall experience with the Global Table feature. For example, a customer might want to enable contributor insights for all replicas, but only enable deletion protection for the primary replica. Or, a customer might want to use a different table class for each replica, depending on the expected workload.
The new TableV2 construct also offers greater flexibility and customization options by allowing customers to specify these properties on a per-replica basis. This can be helpful for customers who need to have different configurations for their replicas, or who want to fine-tune the performance and availability of their tables.
In the next section, we will explore each of these properties in more detail and how they can be specified in the new construct.
Features Walk-through
The new TableV2 construct is the recommended CDK DynamoDB construct for creating both single tables and global tables. In this section, we will review some specific aspects of the TableV2 construct and how they can be implemented. The walkthrough will cover features like Replicas, Billing, and Encryption, providing a comprehensive understanding of its capabilities.
Replicas
One of the most important benefits of the new L2 construct is the ability to configure properties on a per-replica basis. For example, the following code creates a global DynamoDB table with contributor insights and point-in-time recovery enabled for the table:
import * as cdk from 'aws-cdk-lib';
import * as dynamodb from 'aws-cdk-lib/aws-dynamodb';

const app = new cdk.App();
const stack = new cdk.Stack(app, 'Stack', { env: { region: 'us-west-2' } });

const globalTable = new dynamodb.TableV2(stack, 'GlobalTable', {
  partitionKey: { name: 'pk', type: dynamodb.AttributeType.STRING },
  contributorInsights: true,
  pointInTimeRecovery: true,
  replicas: [
    {
      region: 'us-east-1',
      tableClass: dynamodb.TableClass.STANDARD_INFREQUENT_ACCESS,
      pointInTimeRecovery: false,
    },
    {
      region: 'us-east-2',
      contributorInsights: false,
    },
  ],
});

// This is an ITableV2 instance for the replica table in us-east-1
const replica = globalTable.replica('us-east-1');
This code creates two replicas, one in the us-east-1 region and one in the us-east-2 region. For the replica in the us-east-1 region, we disable point-in-time recovery and set the table class to STANDARD_INFREQUENT_ACCESS. For the replica in the us-east-2 region, we disable contributor insights. The TableV2 construct also enables users to work with individual instances of the replicas in a global table via the replica() method. We see how this can be utilized from the above code where an ITableV2 instance representing the replica in us-east-1 is returned.
This is particularly useful for the grant() and metric() methods. For example, the following code gives a user write access to a replica in us-east-1 region:
import { Construct } from 'constructs';
import { App, Stack, StackProps } from 'aws-cdk-lib';
import { ITableV2, TableV2 } from 'aws-cdk-lib/aws-dynamodb';
import { AttributeType } from 'aws-cdk-lib/aws-dynamodb';
import * as iam from 'aws-cdk-lib/aws-iam';


class FooStack extends Stack {
  public readonly globalTable: TableV2;

  public constructor(scope: Construct, id: string, props: StackProps) {
    super(scope, id, props);

    this.globalTable = new TableV2(this, 'GlobalTable', {
      partitionKey: { name: 'pk', type: AttributeType.STRING },
      replicas: [
        { region: 'us-east-1' },
        { region: 'us-east-2' },
      ],
    });
  }
}

interface BarStackProps extends StackProps {
  readonly replicaTable: ITableV2;
}

class BarStack extends Stack {
  public constructor(scope: Construct, id: string, props: BarStackProps) {
    super(scope, id, props);
    const user = new iam.User(this, 'User')

    // user is given grantWriteData permissions to replica in us-east-1
    props.replicaTable.grantWriteData(user);
  }
}

const app = new App();

const fooStack = new FooStack(app, 'FooStack', { env: { region: 'us-west-2', account: process.env.CDK_DEFAULT_ACCOUNT } });
const barStack = new BarStack(app, 'BarStack', {
  replicaTable: fooStack.globalTable.replica('us-east-1'),
  env: { region: 'us-east-1', account: process.env.CDK_DEFAULT_ACCOUNT },
});
Before the replica() method was introduced, grant methods on the original Table construct applied to the primary table and all replicas. This was because there was no way to pull out a specific replica. This limited a user’s ability to grant a specific principal read, write, or read/write permission to a specific replica. The replica() method enables granting specific permissions to individual replicas in a global table. It maintains consistent behavior across all methods in the ITableV2 interface, including grants and metrics.
Billing
Table billing is easily configured using the onDemand() or provisioned() static methods of the Billing class. If provisioned billing is configured, the user must provide read and write capacity, which can be easily configured using the fixed() or autoscaled() static methods of the Capacity class.
Note that with the previous Table construct, users had to set a billingMode property and configure readCapacity and writeCapacity as separate properties. Additionally, configuring autoscaled capacity required calling the autoScaleReadCapacity() or autoScaleWriteCapacity() method on an instance of the Table construct. Lastly, since readCapacity, writeCapacity, and billingMode were all individual properties, a user had to know not to provision read and write capacity for a table with PAY_PER_REQUEST billing mode. With the new Billing class, the user is guided into providing necessary properties via the onDemand() and provisioned() static methods.
Encryption
The TableEncryptionV2 class allows you to provide your own KMS keys for each replica instead of using the default AWS owned keys, thus encrypting every replica with a custom KMS key. This provides more granular control over the encryption of your DynamoDB tables.
Here is an example of how to use the TableEncryptionV2 class to encrypt each replica of a global table with a custom KMS key:
The ability to provide custom KMS keys for each replica can help to improve the security of your DynamoDB tables. It also gives you more control over the encryption of your data. This can help you to meet specific compliance requirements.
Conclusion
In this post, I introduced the new AWS CDK TableV2 construct, highlighting its advantages over the original construct. Notably, TableV2 enables drift detection for replica tables and eliminates the need for an extra Lambda function custom resource. I delved into practical implementations, focusing on three key aspects: Replicas, Billing, and Encryption.
To summarize, TableV2 marks a substantial improvement over the original construct. Its user experience provides significant improvement over the original construct in several ways, such as:
Direct support for global tables: TableV2 makes it easy to create and manage global DynamoDB tables.
Easier configuration of global secondary indexes and Autoscaling: TableV2 provides a simplified and streamlined process for configuring global secondary indexes and Autoscaling.
More granular control over replicas: TableV2 allows you to configure properties on a per-replica basis, giving you more control over the performance and availability of your tables.
Improved API design and user experience: TableV2 improves the API design and user experience by implementing new classes for billing, capacity, and encryption.
Overall, TableV2 is a powerful and flexible construct that makes it easier to build and manage DynamoDB tables at scale. It is the preferred CDK DynamoDB construct for creating both single tables and global tables. If you are looking for a powerful and flexible way to build and manage DynamoDB tables, TableV2 is the perfect choice for you.
If you’re new to CDK and eager to get started, we highly recommend checking out the CDK documentation and the CDK workshop.
Enterprises are constantly seeking ways to accelerate their journey to the cloud. Infrastructure as code (IaC) is crucial for automating and managing cloud resources efficiently. The AWS Cloud Development Kit (AWS CDK) lets you define your cloud infrastructure as code in your favorite programming language and deploy it using AWS CloudFormation. In this post, we will discuss strategies and best practices for accelerating CDK adoption within your organization. Our discussion begins after your organization has successfully completed a pilot. In this post, you will learn how to scale the lessons learned from the pilot project across your organization through platform engineering. You will learn how to reduce complexity through building reusable components, deploy with speed and safety via builder tooling, and accelerate project startup with an internal developer portal (IDP). We will conclude by discussing ways to participate in and benefit from the broader CDK community.
Before we dive in, let’s briefly discuss a new trend in technology: Platform Engineering. DevOps practices have helped IT organizations deliver software to customers more frequently and with higher quality. A recent evolution in DevOps is the introduction of platform engineering teams to build services, toolchains, and documentation to support workload teams. An important responsibility of the platform engineering team is governance of the software delivery process.
At Amazon, we have a long and storied history of leveraging platform engineering to accelerate deployments. This is why we are able to maintain 143 different compliance certifications and attestations while deploying 150 million times per year. Platform engineering increases productivity, reduces friction between ideas and implementation, and improves agility by accelerating the delivery of workloads via a secure, scalable, and reusable set of resources and components through self-service portals and developer tools. Platform Engineering is comprised of seven capabilities: Platform Architecture, Data Architecture, Platform Product Engineering, Data Engineering, Provisioning & Orchestration, Modern App Development and CI/CD. For more information on platform engineering visit the AWS Cloud Adoption Framework.
Establishing these capabilities takes several platform and workload teams working together. From an operating model standpoint, a workload team interacts with Platform Engineering in one of the three following ways (for more information, see Building a Cloud Operating Model):
Reduce Builder Complexity and Cognitive load with Reusable Components
So, how can the platform team incorporate CDK to accomplish their goals? One of the common objectives of the Platform Engineering team is to publish and curate reusable patterns called Constructs. Constructs provide a mechanism to create reusable, extensible, and common components that can be shared across multiple teams and projects.
Many customers write their own implementations for constructs to enforce security best practices such as encryption and specific AWS Identity and Access Management policies. For example, you might create a MyCompanyBucket that implements your organizations security requirements in place of the default Amazon S3 Bucket construct. This bucket configuration can be implemented and extended by multiple teams to ensure they are using components that are validated by your security and compliance teams.
For customers focused on data governance, CDK constructs can automatically add in best practices for recovery time objectives and recovery point objectives by ensuring backups and architecture meet an organization’s resilience policies. For advance customers looking to enforce data lifecycle policies, create uniform access controls, or emit required KPIs, CDK constructs can provide avenues to create safe and secure configuration by default. Applying CDK constructs to DataOps, customers can benefit from templated ETL pipelines that ensure data lineage metadata is maintained and data cleansing occurs.
Customers also build constructs for non-AWS resources. Teams can build Constructs for third-party builder tooling, observability systems, testing apparatuses and more. In this way, workload teams can codify AWS and non-AWS resources in one code base. There is a balance required when writing your own constructs between ensuring standardization and providing the freedom and flexibility of taking advantage of the growing ecosystems of CDK packages. Examples of this balance include AWS Solutions Constructs, as these are typically built upon standard constructs. Without extending standard constructs, the constructs you build will be harder for consumer to integrate with the larger CDK ecosystem since it uses standardize interfaces.
Construct Hub is a central destination for discovering and sharing cloud application design patterns and reference architectures defined for CDK, that are built and published by the AWS community. While AWS provides a public Construct Hub, enterprises can maintain their private Construct Hub inside their own AWS accounts (see construct-hub, the GitHub repository, or the CDK Workshop for more details). The primary objective in either case remains consistent: to provide shared libraries that can be readily utilized by different workload teams. This approach ensures enhanced consistency, reusability, and ultimately leads to cost reduction and faster development timelines.
One of the pitfalls customers often have with leveraging this approach is that Platform Engineering cannot keep up building reusable components to leverage the latest technology enhancements. This is where leveraging the lessons learned from a pilot really can help. A pilot team works with platform engineering to research and implement security best practices. Some customers have the platform engineering team act as approvers for new constructs in addition to authors of new constructs. In this model, a pilot team works to build construct(s) for a new technology. The platform engineers approve the new construct(s). Platform engineers ensure the pilot team meets required standards such as enforcing encryption at rest, encryption in transit, and least privilege. When approval occurs, the pilot team can publish the new construct(s) to Construct Hub. In this way, platform engineering can enable experimentation and innovation, rather than become a gatekeeper. Additionally, platform engineering teams can encourage and curate an inner-sourcing model for construct creation rather than being the sole creator of constructs.
Deploy Applications Using DevSecOps Best Practices
Application builders are most productive when their expertise is channeled towards writing code that directly addresses business challenges. While creating applications is a skill well within the grasp of many software developers, the complex task of deploying and operating these applications in line with organizational standards can be overwhelming, especially for those new to a team. This complexity often acts as a bottleneck, slowing down the experimentation process and delaying the realization of value from new application initiatives.
A solution to this challenge lies in automating the deployment pipeline and operational model. By employing thoroughly tested CDK (Cloud Development Kit) components that are shared across teams and validated through a robust CI/CD (Continuous Integration/Continuous Deployment) process, the burden on developers is significantly reduced. They no longer need to delve into the complexities of the organization’s deployment strategies, allowing them to concentrate on writing unique, innovative code. This approach not only streamlines the development process but also bridges the gap between development and operations, leading to more cohesive teams and faster, more efficient releases.
One key to high-quality software delivery is to have a proper Continuous Integration and Continuous Delivery (CI/CD) process in place. You can see CDK Pipelines: Continuous delivery for AWS CDK applications for practical examples. This high-level construct, powered by AWS CodePipeline, comes in handy when you need to go beyond test deployments with the cdk deploy command and build automated pipelines for production deployments to multiple environments in different regions and/or accounts.
Whenever you commit your AWS CDK app’s source code into AWS CodeCommit, GitHub, GitLab, BitBucket, or Amazon CodeCatalyst source repository, AWS CDK Pipelines automatically builds, tests, and deploys a new version of the application. This pipeline automatically reconfigures itself to deploy as the resources in stacks changes or the environments being deployed to change. For GitHub Actions users, see CDK Pipelines for GitHub Workflows.
A number of teams are extending these pipelines and adding their own stages to ensure deployed code meets the organization’s quality, security, risk, compliance and cloud financial management criteria. For best practices of what automation to put inside the pipeline, see the AWS Deployment Pipeline Reference Architecture. By creating fully functional pipelines, platform engineering teams can reduce the cognitive load place on development teams and increase the developer experience. This strategy has two implementations: QuickStart pipelines and golden pipelines.
In QuickStart pipelines, these pipelines are created as a construct in your Construct Hub and treated similar to the above discussion on reusable components. While these pipelines offer simplified interfaces and a reduction in cognitive load, workload teams remain in control of the pipeline and are free to modify it. As a result, quality gates such as security or compliance tooling can be disabled by workload teams and controls inside the pipeline aren’t provable. This is suboptimal for organizations looking to reduce costs of compliance and audit. As the number of versions of the construct grows, teams can have difficulty governing which versions are used to ensure teams consume.
In golden pipelines, the pipelines are created as constructs, but deployed via a centralized team. Workload teams cannot control or modify these pipelines, so quality gates such as security and compliance tooling cannot be disabled. These controls become provable to stakeholders in security, risk and compliance such as auditors. Removing permissions from workload teams comes with costs. With golden pipelines, platform engineering teams often spend a majority of their time troubleshooting workload teams’ deployments. With so much time spent on troubleshooting, teams have little time to introduce new tooling to raise the security and quality standard, improve environment setup and organizational consistency, or improve audit evidence and enforcement.
Two mechanisms can augment these strategies. Traditional change control boards (CCB) can provide provability in situations where gathering evidence and enforcement are difficult. CCBs can benefit from CDK constructs that integrate IT Service Management (ITSM) approvals and fleet management processes into the pipeline and account creation processes. Alternatively, there is an emerging story with Software Supply Chain Level Artifacts (SLSA). These artifacts can be used as digital proof. In the Kubernetes space, we see this pattern with tools like Tekton chains where attestations associated with OCI images and Kyverno is used for to enforcement the presence of attestations (see Protect the pipe! Secure CI/CD pipelines with a policy-based approach using Tekton and Kyverno for details).
Multi-account and cross-region deployment with CDK
DevOps best practices suggest multiple stages of deployment and testing before deploying to production. On top of that, AWS recommends a dedicated account for each stage to simplify resource isolation and access control. This multi-account strategy helps organizations make best use of AWS resources and provides fine-grain controls (see Recommended OUs and accounts).
Often, you will have a designated AWS account, where all CI/CD pipelines reside. A deployment is executed by these pipelines to publish to other AWS accounts, which may correspond to development, staging, or production stages. For more information about a cross-account strategy in reference to CI/CD pipelines on AWS, see Building a Secure Cross-Account Continuous Delivery Pipeline.
Automated Governance
Many enterprise customers leverage CDK to enforce security controls and policies and can prevent security issues before deployment with tooling to analyze code as part of the deployment pipeline. Using the industry standard tooling of cdk-nag, many teams check applications for best practices using a combination of available rule packs. We are also seeing enterprises build their own Aspects to enforce additional requirements such as tagging requirements to manage and organize their deployed resources.
Customers can create CDK synthesized CloudFormation and add additional checkpoints with CloudFormation Guard to verify the output using policy-as-code domain-specific language (DSL) rules. Platform Engineering teams can build the rules and workload team can consume rules and run CloudFormation Guard inside the pipeline. There is an official construct that supports makes it easy to add CloudFormation Guard checks to your application.
With AWS CDK, infrastructure is code. So, the standard tooling you already use to ensure quality and improve the builder experience should be used with CDK. If your organization has a code quality program, treat CDK applications no differently than web applications or microservices. Similarly, with Amazon CodeGuru Security and Amazon CodeWhisperer, builders can get actionable recommendations on how to improve both the security and quality on their CDK code as they would with any other type of application.
With Aspects, cdk-nag, and code quality tools, organizations can prevent security issues before they are deployed. However, it is also important to create controls that work after a deployment occurs. AWS CloudFormation Hooks allow customers to inspect resources prior to create, update, or delete CloudFormation Stacks or CDK Applications. With CloudFormation Hooks, Platform Engineering teams can provide warnings or prevent provisioning resources for non-compliant resources. These hooks can be created via CDK (see Build and Deploy CloudFormation Hooks using A CI/CD Pipeline for details).
Finally, you can deploy AWS Config’s conformance packs via CDK. These collections of rules you’re your organization insist on security standards at scale. If your organization wishes to build custom rules, teams can build reactive controls using higher level constructs for AWS Config Rules. While many of these patterns existed prior to CDK, CDK helps accelerate building and deploying cloud applications and controls by leveraging reusable components that are shared within the enterprise or by the community at large.
Operate the Application using Observability
The open-source community provides high-level construct libraries that expand basic monitoring capabilities for CDK applications. The cdk-monitoring-constructs project makes it easy to monitor CDK apps. Similarly, Cdk-wakeful takes that a step further, adding many additional services and provides easily configurable interfaces to automatically be notified by AWS System Manager Incident Manager, AWS Chatbot, or Amazon Simple Notification Service. By leveraging prebuilt solutions from the open-source community, you can focus on creating custom metrics and thresholds around your business logic. Platform Engineering teams can modify and extends 1open-source projects to help workload teams simplify their operations and emit health and status to centralized systems.
Accelerate New Project Startup with an Internal Developer Platform
An Internal Developer Platform (IDP) is built by platform engineering teams to build golden paths and enable developer self-service. These golden paths are expressed as a series of templates that the structure of a source control repository and files stored inside the repository. When the IDP uses these templates to create source code repositories, the resultant repository contains the following:
A getting-started tutorial (usually in a README.md)
Reference documentation
Skeleton source code
Dependency Management
CI/CD pipeline template
IaC template
Observability configuration
With CDK, the CI/CD pipeline, IaC template, and observability configuration can all be a part of a single CDK application.
Platform engineering teams build golden paths and expose them using tools like Backstage, Humanitec, or Port. When building golden paths, there are two common approaches to the underlying project structure. Some organizations choose the approach where their IaC code repository is separate from the application code. Others choose to include everything in one repository. There is a healthy tension between how much to place inside a golden path vs a reusable component. In both strategies, platform engineering teams can avoid code duplication by leveraging CDK. The approach your organization chooses will dictate how you organize your reusable components. Below, we will walk through both options and the implications on reusable constructs.
Option 1: Everything in one repository
In this approach, all the code is contained in one repository: infrastructure, application, configuration, and deployment. This approach enables builders to collaborate, build features, and innovate together quickly, which is why it is the recommended approach. For more details, refer to the Best practices documentation. For examples, see AWS Deployment Reference Architecture for Applications.
This approach works best in teams that are “value-stream aligned.” Value-stream aligned teams have development and operations capabilities within the same team. These teams are organized around solving problems for customers rather than technical capabilities. Within the project, teams can organize around logical units such as application tier (API, database, etc.) or business capabilities (order management, product catalog, delivery services, etc.). In organizations that are value stream aligned, larger, highly conventionalized reusable components are better. An extreme example of this type of constructs is a single construct that contains all the code for an entire microservice. In these teams, the cognitive load focuses on the customer problem, so reducing the complexity of developing applications is critical to success.
Option 2: Separated application code pipeline
In this alternative approach, you can decouple your application code from your infrastructure by storing them in separate repositories and having separate pipelines. Separating the pipelines often leads to siloes and less collaboration between workload builders, who shift focus to developing features, and infrastructure engineers, who limit their efforts to building the infrastructure on which those applications run.
This approach works best in teams that are “matrixed.” A matrix organization is structured around technical capabilities (development, operations, security, business, etc.). In these cases, more modular constructs work better than constructs that are highly conventionalized. Experts from each organization can use CDK constructs as mechanisms to share their expertise across the entire organization. Examples of these types of constructs are monitoring, alerting, or security constructs prebuilt with hooks to plug in to centralized monitoring.
Building a Community of Practice with Platform Engineering
Scaling any new technology within a large organization requires the creation and enablement of a community that fosters collaboration, establishes best practices, and stays up to date with the changes in the ecosystem. In order to enable the creation of these communities of practice within your organization, AWS supports multiple public communities centered around the creation of content to educate and enable CDK users. Members of your organization’s community of practice can connect with other CDK development teams around the world through these public AWS supported communities.
Communities of Practice
A Community of Practice (CoP) is a group of people with shared interest who come together to learn, collaborate and develop expertise in a specific domain through informal interactions and knowledge sharing. Within your organization, establishing communities of practice around CDK has been proven to enable mentorship, problem solving, and reusable assets. To get started, your platform engineering team – the creators of reusable constructs and builder tooling with CDK – become early content creators for the community of practice. This establishes a feedback loop where CDK creators publicize their achievements via the CoP and consumers can ask questions and provide direct guidance to creators. Once the CoP has sustainably expanded by the initial group that established it, the CoP can start to add hack-a-thons or game days within your organization, which can bring innovation and solve organization-wide challenges. Fully mature communities of practices own curated wikis or databases of knowledge. They use mechanisms such as townhalls, office hours, newsletters, and chat channels to keep the community up to date. In this way, CDK expertise is diffused across the organization. At AWS, this diffusion of expertise has led to teams other than platform engineering becoming creators of reusable constructs. By expanding who can create reusable constructs, we are able to accelerate our own innovation.
Communities
There is a growing community that supports CDK, with many different platforms available providing content, code, examples and meetups. CDK is currently maintained by AWS with support from the community on AWS CDK GitHub page where you can contribute to the platform, raise issues, see the backlog and join discussions with active community members.
CDK.dev is the community driven hub around the CDK ecosystem. This site brings together all the latest blogs, videos, and educational content. It also provides links to join the community Slack platform.
Finally, AWS re:Post provides a question-and-answer portal for the community to resolve.
The AWS Community Builders program offers technical resources, education, and networking opportunities to AWS technical enthusiasts and emerging thought leaders who are passionate about sharing knowledge and connecting with the technical community.
Communities of practice can leverage AWS public communities like cdk.dev to fill gaps in knowledge. Townhalls can benefit from speakers from AWS Heroes or community builders, frequent contributors to GitHub or re:Post, or speakers from CDK Day. Newsletters can aggregate and summarize the latest news from across all AWS channels. Once your community of practice establishes CDK competencies, this collaboration can also be bidirectional. For example, experts in your organization’s community can become AWS Heroes. Success stories can be shared via CDK Day, guest blog posts, and you might even speak at one of our major events such as AWS Summits, AWS re:Invent, AWS re:Inforce, or AWS re:Mars.
Final Thoughts
As we’ve said throughout this blog, with CDK, Infrastructure is code. This has enabled a paradigm shift in the infrastructure management space. Today, we see many customers such as Liberty Mutual,Scenario,Checkmarx, and Registers of Scotland establishing mature ecosystems using CDK. With an active open-source community, an AWS dev team for long term support, and multiple platforms for knowledge sharing, your builders can quickly learn, build, and innovate. Due to successful pilots, many organizations adopt CDK, become more agile, and innovate faster. This is exactly what happened at Amazon, where CDK is the first choice for building new services.
Organizations often scale and reduce complexity through platform engineering. These teams build higher level constructs by applying best practices, and provide CI/CD pipelines to accelerate deployments. Your deployment is safer using unit testing on your infrastructure as code and through robust security controls to provide guidance to builders at every stage: from author to operate.
Finally, establishing a community enables your organization to build its own mature ecosystem. Through both internal and open-source communities your builders can connect, discover, and grow.
In the modern world of cloud computing, Infrastructure as Code (IaC) has become a vital practice for deploying and managing cloud resources. AWS Cloud Development Kit (AWS CDK) is a popular open-source framework that allows developers to define cloud resources using familiar programming languages. A related open source tool called Projen is a powerful project generator that simplifies the management of complex software configurations. In this post, we’ll explore how to get started with Projen and AWS CDK, and discuss the pros and cons of using Projen.
What is Projen?
Building modern and high quality software requires a large number of tools and configuration files to handle tasks like linting, testing, and automating releases. Each tool has its own configuration interface, such as JSON or YAML, and a unique syntax, increasing maintenance complexity.
When starting a new project, you rarely start from scratch, but more often use a scaffolding tool (for instance, create-react-app) to generate a new project structure. A large amount of configuration is created on your behalf, and you get the ownership of those files. Moreover, there is a high number of project generation tools, with new ones created almost everyday.
Projen is a project generator that helps developers to efficiently manage project configuration files and build high quality software. It allows you to define your project structure and configuration in code, making it easier to maintain and share across different environments and projects.
Out of the box, Projen supports multiple project types like AWS CDK construct libraries, react applications, Java projects, and Python projects. New project types can be added by contributors, and projects can be developed in multiple languages. Projen uses the jsii library, which allows us to write APIs once and generate libraries in several languages. Moreover, Projen provides a single interface, the projenrc file, to manage the configuration of your entire project!
The diagram below provides an overview of the deployment process of AWS cloud resources using Projen:
In this example, Projen can be used to generate a new project, for instance, a new CDK Typescript application.
Developers define their infrastructure and application code using AWS CDK resources. To modify the project configuration, developers use the projenrc file instead of directly editing files like package.json.
The project is synthesized to produce an AWS CloudFormation template.
The CloudFormation template is deployed in a AWS account, and provisions AWS cloud resources.
Diagram 1 – Projen packaged features: Projen helps gets your project started and allows you to focus on coding instead of worrying about the other project variables. It comes out of the box with linting, unit test and code coverage, and a number of Github actions for release and versioning and dependency management.
Pros and Cons of using Projen
Pros
Consistency: Projen ensures consistency across different projects by allowing you to define standard project templates. You don’t need to use different project generators, only Projen.
Version Control: Since project configuration is defined in code, it can be version-controlled, making it easier to track changes and collaborate with others.
Extensibility: Projen supports various plugins and extensions, allowing you to customize the project configuration to fit your specific needs.
Integration with AWS CDK: Projen provides seamless integration with AWS CDK, simplifying the process of defining and deploying cloud resources.
Polyglot CDK constructs library: Build once, run in multiple runtimes. Projen can convert and publish a CDK Construct developed in TypeScript to Java (Maven) and Python (PYPI) with JSII support.
API Documentation : Generate API documentation from the comments, if you are building a CDK construct
Deploying stacks with the AWS CDK requires dedicated Amazon S3 buckets and other containers to be available to AWS CloudFormation during deployment (More information).
Note: Projen doesn’t need to be installed globally. You will be using npx to run Projen which takes care of all required setup steps. npx is a tool for running npm packages that:
You can create a new Projen project using the following command:
mkdir test_project && cd test_project npx projen new awscdk-app-ts
This command creates a new TypeScript project with AWS CDK support. The exhaustive list of supported project types is available through the official documentation: Projen.io, or by running the npx projen new command without a project type. It also supports npx projen new awscdk-construct to create a reusable construct which can then be published to other package managers.
The created project structure should be as follows:
Initialization of an empty git repository, with the associated GitHub workflow files to build and upgrade the project. The release workflow can be customized with projen tasks.
.projenrc.js is the main configuration file for project
tasks.json file for integration with Visual Studio Code
src folder containing an empty CDK stack
License and README files
A projen configuration file: projenrc.js
package.json contains functional metadata about the project like name, versions and dependencies.
.gitignore, .gitattributes file to manage your files with git.
.eslintrc identifying and reporting patterns on javascript.
.npmignore to keep files out of package manager.
.mergify.yml for managing the pull requests.
tsconfig.json configure the compiler options
Most of the generated files include a disclaimer:
# ~~ Generated by projen. To modify, edit .projenrc.js and run "npx projen".
Projen’s power lies in its single configuration file, .projenrc.js. By editing this file, you can manage your project’s lint rules, dependencies, .gitignore, and more. Projen will propagate your changes across all generated files, simplifying and unifying dependency management across your projects.
Projen generated files are considered implementation details and are not meant to be edited manually. If you do make manual changes, they will be overwritten the next time you run npx projen.
To edit your project configuration, simply edit .projenrc.js and then run npx projen to synthesize again. For more information on the Projen API, please see the documentation: http://projen.io/api/API.html.
Projen uses the projenrc.js file’s configuration to instantiate a new AwsCdkTypeScriptApp with some basic metadata: the project name, CDK version and the default release branch. Additional APIs are available for this project type to customize it (for instance, add runtime dependencies).
Let’s try to modify a property and see how Projen reacts. As an example, let’s update the project name in projenrc.js :
name: 'test_project_2',
and then run the npx projen command:
npx projen
Once done, you can see that the project name was updated in the package.json file.
Step 3: Define AWS CDK Resources
Inside your Projen project, you can define AWS CDK resources using familiar programming languages like TypeScript. Here’s an example of defining an Amazon Simple Storage Service (Amazon S3) bucket:
1. Navigate to your main.ts file in the src/ directory 2. Modify the imports at the top of the file as follow:
import { App, CfnOutput, Stack, StackProps } from 'aws-cdk-lib'; import * as s3 from 'aws-cdk-lib/aws-s3'; import { Construct } from 'constructs';
1. Replace line 9 “// define resources here…” with the code below:
const bucket = new s3.Bucket(this, 'MyBucket', {
  versioned: true,
});

new CfnOutput(this, 'TestBucket', { value: bucket.bucketArn });
Once you’ve defined your resources, you can synthesize a cloud assembly, which includes a CloudFormation template (or many depending on the application) using:
$ npx projen build
npx projen build will perform several actions:
Build the application
Synthesize the CloudFormation template
Run tests and linter
The synth() method of Projen performs the actual synthesizing (and updating) of all configuration files managed by Projen. This is achieved by deleting all Projen-managed files (if there are any), and then re-synthesizing them based on the latest configuration specified by the user.
You can find an exhaustive list of the available npx projen commands in .projen/tasks.json. You can also use the projen API project.addTask to add a new task to perform any custom action you need ! Tasks are a project-level feature to define a project command system backed by shell scripts.
Deploy the CDK application:
$ npx projen deploy
Projen will use the cdk deploy command to deploy the CloudFormation stack in the configured AWS account by creating and executing a change set based on the template generated by CDK synthesis. The output of the step above should look as follow:
deploy | cdk deploy
✨ Synthesis time: 3.28s
toto-dev: start: Building 387a3a724050aec67aa083b74c69485b08a876f038078ec7ea1018c7131f4605:263905523351-us-east-1 toto-dev: success: Built 387a3a724050aec67aa083b74c69485b08a876f038078ec7ea1018c7131f4605:263905523351-us-east-1 toto-dev: start: Publishing 387a3a724050aec67aa083b74c69485b08a876f038078ec7ea1018c7131f4605:263905523351-us-east-1 toto-dev: success: Published 387a3a724050aec67aa083b74c69485b08a876f038078ec7ea1018c7131f4605:263905523351-us-east-1 toto-dev: deploying... [1/1] toto-dev: creating CloudFormation changeset...
The application was successfully deployed in the configured AWS account! Also, the Amazon Resource Name (ARN) of the S3 bucket created is available through the CloudFormation stack Outputs tab, and displayed in your terminal under the ‘Outputs’ section.
Clean up
Delete CloudFormation Stack
To clean up the resources created in this section of the workshop, navigate to the CloudFormation console and delete the stack created. You can also perform the same task programmatically:
$ npx projen destroy
Which should produce the following output:
destroy | cdk destroy Are you sure you want to delete: testproject-dev (y/n)? y testproject-dev: destroying... [1/1]
testproject-dev: destroyed
Delete S3 Buckets
The S3 bucket will not be deleted since its retention policy was set to RETAIN. Navigate to the S3 console and delete the created bucket. If you added files to that bucket, you will need to empty it before deletion. See the Deleting a bucket documentation for more information.
Conclusion
Projen and AWS CDK together provide a powerful combination for managing cloud resources and project configuration. By leveraging Projen, you can ensure consistency, version control, and extensibility across your projects. The integration with AWS CDK allows you to define and deploy cloud resources using familiar programming languages, making the entire process more developer-friendly.
Whether you’re a seasoned cloud developer or just getting started, Projen and AWS CDK offer a streamlined approach to cloud resource management. Give it a try and experience the benefits of Infrastructure as Code with the flexibility and power of modern development tools.
Your DevOps and Developer Productivity guide to re:Invent 2023
ICYMI – AWS re:Invent is less than a week away! We can’t wait to join thousands of builders in person and virtually for another exciting event. Still need to save your spot? You can register here.
With so much planned for the DevOps and Developer Productivity (DOP) track at re:Invent, we’re highlighting the most exciting sessions for technology leaders and developers in this post. Sessions span intermediate (200) through expert (400) levels of content in a mix of interactive chalk talks, hands-on workshops, and lecture-style breakout sessions.
You will experience the future of efficient development at the DevOps and Developer Productivity track and get a chance to talk to AWS experts about exciting services, tools, and new AI capabilities that optimize and automate your software development lifecycle. Attendees will leave re:Invent with the latest strategies to accelerate development, use generative AI to improve developer productivity, and focus on high-value work and innovation.
How to reserve a seat in the sessions
Reserved seating is available for registered attendees to secure seats in the sessions of their choice. Reserve a seat by signing in to the attendee portal and navigating to Event, then Sessions.
Do not miss the Innovation Talk led by Vice President of AWS Generative Builders, Adam Seligman. In DOP225-INT Build without limits: The next-generation developer experience at AWS, Adam will provide updates on the latest developer tools and services, including generative AI-powered capabilities, low-code abstractions, cloud development, and operations. He’ll also welcome special guests to lead demos of key developer services and showcase how they integrate to increase productivity and innovation.
DevOps and Developer Productivity breakout sessions
What are breakout sessions?
AWS re:Invent breakout sessions are lecture-style and 60 minutes long. These sessions are delivered by AWS experts and typically reserve 10–15 minutes for Q&A at the end. Breakout sessions are recorded and made available on-demand after the event.
Level 200 — Intermediate
DOP201 | Best practices for Amazon CodeWhisperer Generative AI can create new content and ideas, including conversations, stories, images, videos, and music. Learning how to interact with generative AI effectively and proficiently is a skill worth developing. Join this session to learn about best practices for engaging with Amazon CodeWhisperer, which uses an underlying foundation model to radically improve developer productivity by generating code suggestions in real time.
DOP202 |Realizing the developer productivity benefits of Amazon CodeWhisperer Developers spend a significant amount of their time writing undifferentiated code. Amazon CodeWhisperer radically improves productivity by generating code suggestions in real time to alleviate this burden. In this session, learn how CodeWhisperer can “write” much of this undifferentiated code, allowing developers to focus on business logic and accelerate the pace of their innovation.
DOP205 |Accelerate development with Amazon CodeCatalyst In this session, explore the newest features in Amazon CodeCatalyst. Learn firsthand how these practical additions to CodeCatalyst can simplify application delivery, improve team collaboration, and speed up the software development lifecycle from concept to deployment.
DOP206 |AWS infrastructure as code: A year in review AWS provides services that help with the creation, deployment, and maintenance of application infrastructure in a programmatic, descriptive, and declarative way. These services help provide rigor, clarity, and reliability to application development. Join this session to learn about the new features and improvements for AWS infrastructure as code with AWS CloudFormation and AWS Cloud Development Kit (AWS CDK) and how they can benefit your team.
DOP207 |Build and run it: Streamline DevOps with machine learning on AWS While organizations have improved how they deliver and operate software, development teams still run into issues when performing manual code reviews, looking for hard-to-find defects, and uncovering security-related problems. Developers have to keep up with multiple programming languages and frameworks, and their productivity can be impaired when they have to search online for code snippets. Additionally, they require expertise in observability to successfully operate the applications they build. In this session, learn how companies like Fidelity Investments use machine learning–powered tools like Amazon CodeWhisperer and Amazon DevOps Guru to boost application availability and write software faster and more reliably.
DOP208 |Continuous integration and delivery for AWS AWS provides one place where you can plan work, collaborate on code, build, test, and deploy applications with continuous integration/continuous delivery (CI/CD) tools. In this session, learn about how to create end-to-end CI/CD pipelines using infrastructure as code on AWS.
DOP209 |Governance and security with infrastructure as code In this session, learn how to use AWS CloudFormation and the AWS CDK to deploy cloud applications in regulated environments while enforcing security controls. Find out how to catch issues early with cdk-nag, validate your pipelines with cfn-guard, and protect your accounts from unintended changes with CloudFormation hooks.
DOP210 | Scale your application development with Amazon CodeCatalyst Amazon CodeCatalyst brings together everything you need to build, deploy, and collaborate on software into one integrated software development service. In this session, discover the ways that CodeCatalyst helps developers and teams build and ship code faster while spending more time doing the work they love.
DOP211 |Boost developer productivity with Amazon CodeWhisperer Generative AI is transforming the way that developers work. Writing code is already getting disrupted by tools like Amazon CodeWhisperer, which enhances developer productivity by providing real-time code completions based on natural language prompts. In this session, get insights into how to evaluate and measure productivity with the adoption of generative AI–powered tools. Learn from the AWS Disaster Recovery team who uses CodeWhisperer to solve complex engineering problems by gaining efficiency through longer productivity cycles and increasing velocity to market for ongoing fixes. Hear how integrating tools like CodeWhisperer into your workflows can boost productivity.
DOP212 |New AWS generative AI features and tools for developers Explore how generative AI coding tools are changing the way developers and companies build software. Generative AI–powered tools are boosting developer and business productivity by automating tasks, improving communication and collaboration, and providing insights that can inform better decision-making. In this session, see the newest AWS tools and features that make it easier for builders to solve problems with minimal technical expertise and that help technical teams boost productivity. Walk through how organizations like FINRA are exploring generative AI and beginning their journey using these tools to accelerate their pace of innovation.
DOP220 | Simplify building applications with AWS SDKs AWS SDKs play a vital role in using AWS services in your organization’s applications and services. In this session, learn about the current state and the future of AWS SDKs. Explore how they can simplify your developer experience and unlock new capabilities. Discover how SDKs are evolving, providing a consistent experience in multiple languages and empowering you to do more with high-level abstractions to make it easier to build on AWS. Learn how AWS SDKs are built using open source tools like Smithy, and how you can use these tools to build your own SDKs to serve your customers’ needs.
DevOps and Developer Productivity chalk talks
What are chalk talks?
Chalk Talks are highly interactive sessions with a small audience. Experts lead you through problems and solutions on a digital whiteboard as the discussion unfolds. Each begins with a short lecture (10–15 minutes) delivered by an AWS expert, followed by a 45- or 50-minute Q&A session with the audience.
Level 300 — Advanced
DOP306 | Streamline DevSecOps with a complete software development service Security is not just for application code—the automated software supply chains that build modern software can also be exploited by attackers. In this chalk talk, learn how you can use Amazon CodeCatalyst to incorporate security tests into every aspect of your software development lifecycle while maintaining a great developer experience. Discover how CodeCatalyst’s flexible actions-based CI/CD workflows streamline the process of adapting to security threats.
DOP309-R | AI for DevOps: Modernizing your DevOps operations with AWS As more organizations move to microservices architectures to scale their businesses, applications increasingly have become distributed, requiring the need for even greater visibility. IT operations professionals and developers need more automated practices to maintain application availability and reduce the time and effort required to detect, debug, and resolve operational issues. In this chalk talk, discover how you can use AWS services, including Amazon CodeWhisperer, Amazon CodeGuru and Amazon DevOps Guru, to start using AI for DevOps solutions to detect, diagnose, and remedy anomalous application behavior.
DOP310-R | Better together: GitHub Actions, Amazon CodeCatalyst, or AWS CodeBuild Learn how combining GitHub Actions with Amazon CodeCatalyst or AWS CodeBuild can maximize development efficiency. In this chalk talk, learn about the tradeoffs of using GitHub Actions runners hosted on Amazon EC2 or Amazon ECS with GitHub Actions hosted on CodeCatalyst or CodeBuild. Explore integration with other AWS services to enhance workflow automation. Join this talk to learn how GitHub Actions on AWS can take your development processes to the next level.
DOP311 | Building infrastructure as code with AWS CloudFormation AWS CloudFormation helps you manage your AWS infrastructure as code, increasing automation and supporting infrastructure-as-code best practices. In this chalk talk, learn the fundamentals of CloudFormation, including templates, stacks, change sets, and stack dependencies. See a demo of how to describe your AWS infrastructure in a template format and provision resources in an automated, repeatable way.
DOP312 | Creating custom constructs with AWS CDK Join this chalk talk to get answers to your questions about creating, publishing, and sharing your AWS CDK constructs publicly and privately. Learn about construct levels, how to test your constructs, how to discover and use constructs in your AWS CDK projects, and explore Construct Hub.
DOP313-R | Multi-account and multi-Region deployments at scale Many AWS customers are implementing multi-account strategies to more easily manage their cloud infrastructure and improve their security and compliance postures. In this chalk talk, learn about various options for deploying resources into multiple accounts and AWS Regions using AWS developer tools, including AWS CodePipeline, AWS CodeDeploy, and Amazon CodeCatalyst.
DOP314 | Simplifying cloud infrastructure creation with the AWS CDK The AWS Cloud Development Kit (AWS CDK) is an open source software development framework for defining cloud infrastructure in code and provisioning it through AWS CloudFormation. In this chalk talk, get an introduction to the AWS CDK and see a demo of how it can simplify infrastructure creation. Through code examples and diagrams, see how the AWS CDK lets you use familiar programming languages for declarative infrastructure definition. Also learn how it provides higher-level abstractions and constructs over native CloudFormation.
DOP317 | Applying Amazon’s DevOps culture to your team In this chalk talk, learn how Amazon helps its developers rapidly release and iterate software while maintaining industry-leading standards on security, reliability, and performance. Learn about the culture of two-pizza teams and how to maintain a culture of DevOps in a large enterprise. Also, discover how you can help build such a culture at your own organization.
DOP318 | Testing for resilience with AWS Fault Injection Simulator As cloud-based systems grow in scale and complexity, there is increased need to test distributed systems for resiliency. AWS Fault Injection Simulator (FIS) allows you to stress test your applications to understand failure modes and build more resilient services. Through code examples and diagrams, see how to set up and run fault injection experiments on AWS. By the end of this session, understand how FIS helps identify weaknesses and validate improvements to build more resilient cloud-based systems.
DOP319-R | Zero-downtime deployment strategies AWS services support a wealth of deployment options to meet your needs, ranging from in-place updates to blue/green deployment to continuous configuration with feature flags. In this chalk talk, hear about multiple options for deploying changes to Amazon EC2, Amazon ECS, and AWS Lambda compute platforms using AWS CodeDeploy, AWS AppConfig, AWS CloudFormation, AWS Cloud Development Kit (AWS CDK), and Amazon CodeCatalyst.
DOP320 | Build a path to production with Amazon CodeCatalyst blueprints Amazon CodeCatalyst uses blueprints to configure your software projects in the service. Blueprints instruct CodeCatalyst on how to set up a code repository with working sample code, define cloud infrastructure, and run pre-configured CI/CD workflows for your project. In this session, learn how blueprints in CodeCatalyst can give developers a compliant software service they’ll want to use on AWS.
DOP321-R | Code faster with Amazon CodeWhisperer Traditionally, building applications requires developers to spend a lot of time manually writing code and trying to learn and keep up with new frameworks, SDKs, and libraries. In the last three years, AI models have grown exponentially in complexity and sophistication, enabling the creation of tools like Amazon CodeWhisperer that can generate code suggestions in real time based on a natural language description of the task. In this session, learn how CodeWhisperer can accelerate and enhance your software development with code generation, reference tracking, security scans, and more.
DOP324 | Accelerating application development with AWS client-side tools Did you know AWS has more than just services? There are dozens of AWS client-side tools and libraries designed to make developing quality applications easier. In this chalk talk, explore some of the tools available in your development workspace. Learn more about command line tooling (AWS CLI), libraries (AWS SDK), IDE integrations, and application frameworks that can accelerate your AWS application development. The audience helps set the agenda so there’s sure to be something for every builder.
DevOps and Developer Productivity workshops
What are workshops?
Workshops are two-hour interactive learning sessions where you work in small group teams to solve problems using AWS services. Each workshop starts with a short lecture (10–15 minutes) by the main speaker, and the rest of the time is spent working as a group.
Level 300 — Advanced
DOP301 | Boost your application availability with AIOps on AWS As applications become increasingly distributed and complex, developers and IT operations teams can benefit from more automated practices to maintain application availability and reduce the time and effort spent detecting, debugging, and resolving operational issues manually. In this workshop, learn how AWS AIOps solutions can help you make the shift toward more automation and proactive mechanisms so your IT team can innovate faster. The workshop includes use cases spanning multiple AWS services such as AWS Lambda, Amazon DynamoDB, Amazon API Gateway, Amazon RDS, and Amazon EKS. Learn how you can reduce MTTR and quickly identify issues within your AWS infrastructure. You must bring your laptop to participate.
DOP302 | Build software faster with Amazon CodeCatalyst In this workshop, learn about creating continuous integration and continuous delivery (CI/CD) pipelines using Amazon CodeCatalyst. CodeCatalyst is a unified software development service on AWS that brings together everything teams need to plan, code, build, test, and deploy applications with continuous CI/CD tools. You can utilize AWS services and integrate AWS resources into your projects by connecting your AWS accounts. With all of the stages of an application’s lifecycle in one tool, you can deliver quality software quickly and confidently. You must bring your laptop to participate.
DOP303-R | Continuous integration and delivery on AWS In this workshop, learn to create end-to-end continuous integration and continuous delivery (CI/CD) pipelines using AWS Cloud Development Kit (AWS CDK). Review the fundamental concepts of continuous integration, continuous deployment, and continuous delivery. Then, using TypeScript/Python, define an AWS CodePipeline, AWS CodeBuild, and AWS CodeCommit workflow. You must bring your laptop to participate.
DOP304 | Develop AWS CDK resources to deploy your applications on AWS In this workshop, learn how to build and deploy applications using infrastructure as code with AWS Cloud Development Kit (AWS CDK). Create resources using AWS CDK and learn maintenance and operations tips. In addition, get an introduction to building your own constructs. You must bring your laptop to participate.
DOP305 | Develop AWS CloudFormation templates to manage your infrastructure In this workshop, learn how to develop and test AWS CloudFormation templates. Create CloudFormation templates to deploy and manage resources and learn about CloudFormation language features that allow you to reuse and extend templates for many scenarios. Explore testing tools that can help you validate your CloudFormation templates, including cfn-lint and CloudFormation Guard. You must bring your laptop to participate.
DOP307-R | Hands-on with Amazon CodeWhisperer In this workshop, learn how to build applications faster and more securely with Amazon CodeWhisperer. The workshop begins with several examples highlighting how CodeWhisperer incorporates your comments and existing code to produce results. Then dive into a series of challenges designed to improve your productivity using multiple languages and frameworks. You must bring your laptop to participate.
DOP308 | Enforcing development standards with Amazon CodeCatalyst In this workshop, learn how Amazon CodeCatalyst can accelerate the application development lifecycle within your organization. Discover how your cloud center of excellence (CCoE) can provide standardized code and workflows to help teams get started quickly and securely. In addition, learn how to update projects as organization standards evolve. You must bring your laptop to participate.
Level 400 — Expert
DOP401 | Get better at building AWS CDK constructs In this workshop, dive deep into how to design AWS CDK constructs, which are reusable and shareable cloud components that help you meet your organization’s security, compliance, and governance requirements. Learn how to build, test, and share constructs representing a single AWS resource, as well as how to create higher-level abstractions that include built-in defaults and allow you to provision multiple AWS resources. You must bring your laptop to participate.
DevOps and Developer Productivity builders’ sessions
What are builders’ sessions?
These 60-minute group sessions are led by an AWS expert and provide an interactive learning experience for building on AWS. Builders’ sessions are designed to create a hands-on experience where questions are encouraged.
Level 300 — Advanced
DOP322-R | Accelerate data science coding with Amazon CodeWhisperer Generative AI removes the heavy lifting that developers experience today by writing much of the undifferentiated code, allowing them to build faster. Helping developers code faster could be one of the most powerful uses of generative AI that we will see in the coming years—and this framework can also be applied to data science projects. In this builders’ session, explore how Amazon CodeWhisperer accelerates the completion of data science coding tasks with extensions for JupyterLab and Amazon SageMaker. Learn how to build data processing pipeline and machine learning models with the help of CodeWhisperer and accelerate data science experiments in Python. You must bring your laptop to participate.
Level 400 — Expert
DOP402-R | Manage dev environments at scale with Amazon CodeCatalyst Amazon CodeCatalyst Dev Environments are cloud-based environments that you can use to quickly work on the code stored in the source repositories of your project. They are automatically created with pre-installed dependencies and language-specific packages so you can work on a new or existing project right away. In this session, learn how to create secure, reproducible, and consistent environments for VS Code, AWS Cloud9, and JetBrains IDEs. You must bring your laptop to participate.
DOP403-R | Hands-on with Amazon CodeCatalyst: Automating security in CI/CD pipelines In this session, learn how to build a CI/CD pipeline with Amazon CodeCatalyst and add the necessary steps to secure your pipeline. Learn how to perform tasks such as secret scanning, software composition analysis (SCA), static application security testing (SAST), and generating a software bill of materials (SBOM). You must bring your laptop to participate.
DevOps and Developer Productivity lightning talks
What are lightning talks?
Lightning talks are short, 20-minute demos led from a stage.
DOP221 | Amazon CodeCatalyst in real time: Deploying to production in minutes In this follow-up demonstration to DOP210, see how you can use an Amazon CodeCatalyst blueprint to build a production-ready application that is set up for long-term success. See in real time how to create a project using a CodeCatalyst Dev Environment and deploy it to production using a CodeCatalyst workflow.
DevOps and Developer Productivity code talks
What are code talks?
Code talks are 60-minute, highly-interactive discussions featuring live coding. Attendees are encouraged to dig in and ask questions about the speaker’s approach.
DOP203 | The future of development on AWS This code talk includes a live demo and an open discussion about how builders can use the latest AWS developer tools and generative AI to build production-ready applications in minutes. Starting at an Amazon CodeCatalyst blueprint and using integrated AWS productivity and security capabilities, see a glimpse of what the future holds for developing on AWS.
DOP204 | Tips and tricks for coding with Amazon CodeWhisperer Generative AI tools that can generate code suggestions, such as Amazon CodeWhisperer, are growing rapidly in popularity. Join this code talk to learn how CodeWhisperer can accelerate and enhance your software development with code generation, reference tracking, security scans, and more. Learn best practices for prompt engineering, and get tips and tricks that can help you be more productive when building applications.
Want to stay connected?
Get the latest updates for DevOps and Developer Productivity by following us on Twitter and visiting the AWS devops blog.
Customers often ask for help with implementing Blue/Green deployments to Amazon Elastic Container Service (Amazon ECS) using AWS CodeDeploy. Their use cases usually involve cross-Region and cross-account deployment scenarios. These requirements are challenging enough on their own, but in addition to those, there are specific design decisions that need to be considered when using CodeDeploy. These include how to configure CodeDeploy, when and how to create CodeDeploy resources (such as Application and Deployment Group), and how to write code that can be used to deploy to any combination of account and Region.
Today, I will discuss those design decisions in detail and how to use CDK Pipelines to implement a self-mutating pipeline that deploys services to Amazon ECS in cross-account and cross-Region scenarios. At the end of this blog post, I also introduce a demo application, available in Java, that follows best practices for developing and deploying cloud infrastructure using AWS Cloud Development Kit (AWS CDK).
The Pipeline
CDK Pipelines is an opinionated construct library used for building pipelines with different deployment engines. It abstracts implementation details that developers or infrastructure engineers need to solve when implementing a cross-Region or cross-account pipeline. For example, in cross-Region scenarios, AWS CloudFormation needs artifacts to be replicated to the target Region. For that reason, AWS Key Management Service (AWS KMS) keys, an Amazon Simple Storage Service (Amazon S3) bucket, and policies need to be created for the secondary Region. This enables artifacts to be moved from one Region to another. In cross-account scenarios, CodeDeploy requires a cross-account role with access to the KMS key used to encrypt configuration files. This is the sort of detail that our customers want to avoid dealing with manually.
AWS CodeDeploy is a deployment service that automates application deployment across different scenarios. It deploys to Amazon EC2 instances, On-Premises instances, serverless Lambda functions, or Amazon ECS services. It integrates with AWS Identity and Access Management (AWS IAM), to implement access control to deploy or re-deploy old versions of an application. In the Blue/Green deployment type, it is possible to automate the rollback of a deployment using Amazon CloudWatch Alarms.
CDK Pipelines was designed to automate AWS CloudFormation deployments. Using AWS CDK, these CloudFormation deployments may include deploying application software to instances or containers. However, some customers prefer using CodeDeploy to deploy application software. In this blog post, CDK Pipelines will deploy using CodeDeploy instead of CloudFormation.
Design Considerations
In this post, I’m considering the use of CDK Pipelines to implement different use cases for deploying a service to any combination of accounts (single-account & cross-account) and regions (single-Region & cross-Region) using CodeDeploy. More specifically, there are four problems that need to be solved:
CodeDeploy Configuration
The most popular options for implementing a Blue/Green deployment type using CodeDeploy are using CloudFormation Hooks or using a CodeDeploy construct. I decided to operate CodeDeploy using its configuration files. This is a flexible design that doesn’t rely on using custom resources, which is another technique customers have used to solve this problem. On each run, a pipeline pushes a container to a repository on Amazon Elastic Container Registry (ECR) and creates a tag. CodeDeploy needs that information to deploy the container.
I recommend creating a pipeline action to scan the AWS CDK cloud assembly and retrieve the repository and tag information. The same action can create the CodeDeploy configuration files. Three configuration files are required to configure CodeDeploy: appspec.yaml, taskdef.json and imageDetail.json. This pipeline action should be executed before the CodeDeploy deployment action. I recommend creating template files for appspec.yaml and taskdef.json. The following script can be used to implement the pipeline action:
##
#!/bin/sh
#
# Action Configure AWS CodeDeploy
# It customizes the files template-appspec.yaml and template-taskdef.json to the environment
#
# Account = The target Account Id
# AppName = Name of the application
# StageName = Name of the stage
# Region = Name of the region (us-east-1, us-east-2)
# PipelineId = Id of the pipeline
# ServiceName = Name of the service. It will be used to define the role and the task definition name
#
# Primary output directory is codedeploy/. All the 3 files created (appspec.json, imageDetail.json and
# taskDef.json) will be located inside the codedeploy/ directory
#
##
Account=$1
Region=$2
AppName=$3
StageName=$4
PipelineId=$5
ServiceName=$6
repo_name=$(cat assembly*$PipelineId-$StageName/*.assets.json | jq -r '.dockerImages[] | .destinations[] | .repositoryName' | head -1)
tag_name=$(cat assembly*$PipelineId-$StageName/*.assets.json | jq -r '.dockerImages | to_entries[0].key')
echo ${repo_name}
echo ${tag_name}
printf '{"ImageURI":"%s"}' "$Account.dkr.ecr.$Region.amazonaws.com/${repo_name}:${tag_name}" > codedeploy/imageDetail.json
sed 's#APPLICATION#'$AppName'#g' codedeploy/template-appspec.yaml > codedeploy/appspec.yaml
sed 's#APPLICATION#'$AppName'#g' codedeploy/template-taskdef.json | sed 's#TASK_EXEC_ROLE#arn:aws:iam::'$Account':role/'$ServiceName'#g' | sed 's#fargate-task-definition#'$ServiceName'#g' > codedeploy/taskdef.json
cat codedeploy/appspec.yaml
cat codedeploy/taskdef.json
cat codedeploy/imageDetail.json
Using a Toolchain
A good strategy is to encapsulate the pipeline inside a Toolchain to abstract how to deploy to different accounts and regions. This helps decoupling clients from the details such as how the pipeline is created, how CodeDeploy is configured, and how cross-account and cross-Region deployments are implemented. To create the pipeline, deploy a Toolchain stack. Out-of-the-box, it allows different environments to be added as needed. Depending on the requirements, the pipeline may be customized to reflect the different stages or waves that different components might require. For more information, please refer to our best practices on how to automate safe, hands-off deployments and its reference implementation.
In detail, the Toolchain stack follows the builder pattern used throughout the CDK for Java. This is a convenience that allows complex objects to be created using a single statement:
In the statement above, the continuous deployment pipeline is created in the TOOLCHAIN_ACCOUNT and TOOLCHAIN_REGION. It implements a stage that builds the source code and creates the Java archive (JAR) using Apache Maven. The pipeline then creates a Docker image containing the JAR file.
The UAT stage will deploy the service to the SERVICE_ACCOUNT and SERVICE_REGION using the deployment configuration CANARY_10_PERCENT_5_MINUTES. This means 10 percent of the traffic is shifted in the first increment and the remaining 90 percent is deployed 5 minutes later.
To create additional deployment stages, you need a stage name, a CodeDeploy deployment configuration and an environment where it should deploy the service. As mentioned, the pipeline is, by default, a self-mutating pipeline. For example, to add a Prod stage, update the code that creates the Toolchain object and submit this change to the code repository. The pipeline will run and update itself adding a Prod stage after the UAT stage. Next, I show in detail the statement used to add a new Prod stage. The new stage deploys to the same account and Region as in the UAT environment:
In the statement above, the Prod stage will deploy new versions of the service using a CodeDeploy deployment configurationCANARY_10_PERCENT_5_MINUTES. It means that 10 percent of traffic is shifted in the first increment of 5 minutes. Then, it shifts the rest of the traffic to the new version of the application. Please refer to Organizing Your AWS Environment Using Multiple Accounts whitepaper for best-practices on how to isolate and manage your business applications.
Some customers might find this approach interesting and decide to provide this as an abstraction to their application development teams. In this case, I advise creating a construct that builds such a pipeline. Using a construct would allow for further customization. Examples are stages that promote quality assurance or deploy the service in a disaster recovery scenario.
The implementation creates a stack for the toolchain and another stack for each deployment stage. As an example, consider a toolchain created with a single deployment stage named UAT. After running successfully, the DemoToolchain and DemoService-UAT stacks should be created as in the next image:
CodeDeploy Application and Deployment Group
CodeDeploy configuration requires an application and a deployment group. Depending on the use case, you need to create these in the same or in a different account from the toolchain (pipeline). The pipeline includes the CodeDeploy deployment action that performs the blue/green deployment. My recommendation is to create the CodeDeploy application and deployment group as part of the Service stack. This approach allows to align the lifecycle of CodeDeploy application and deployment group with the related Service stack instance.
CodePipeline allows to create a CodeDeploy deployment action that references a non-existing CodeDeploy application and deployment group. This allows us to implement the following approach:
Toolchain stack deploys the pipeline with CodeDeploy deployment action referencing a non-existing CodeDeploy application and deployment group
When the pipeline executes, it first deploys the Service stack that creates the related CodeDeploy application and deployment group
The next pipeline action executes the CodeDeploy deployment action. When the pipeline executes the CodeDeploy deployment action, the related CodeDeploy application and deployment will already exist.
Below is the pipeline code that references the (initially non-existing) CodeDeploy application and deployment group.
To make this work, you should use the same application name and deployment group name values when creating the CodeDeploy deployment action in the pipeline and when creating the CodeDeploy application and deployment group in the Service stack (where the Amazon ECS infrastructure is deployed). This approach is necessary to avoid a circular dependency error when trying to create the CodeDeploy application and deployment group inside the Service stack and reference these objects to configure the CodeDeploy deployment action inside the pipeline. Below is the code that uses Service stack construct ID to name the CodeDeploy application and deployment group. I set the Service stack construct ID to the same name I used when creating the CodeDeploy deployment action in the pipeline.
CDK Pipelines creates roles and permissions the pipeline uses to execute deployments in different scenarios of regions and accounts. When using CodeDeploy in cross-account scenarios, CDK Pipelines deploys a cross-account support stack that creates a pipeline action role for the CodeDeploy action. This cross-account support stack is defined in a JSON file that needs to be published to the AWS CDK assets bucket in the target account. If the pipeline has the self-mutation feature on (default), the UpdatePipeline stage will do a cdk deploy to deploy changes to the pipeline. In cross-account scenarios, this deployment also involves deploying/updating the cross-account support stack. For this, the SelfMutate action in UpdatePipeline stage needs to assume CDK file-publishing and a deploy roles in the remote account.
The IAM role associated with the AWS CodeBuild project that runs the UpdatePipeline stage does not have these permissions by default. CDK Pipelines cannot grant these permissions automatically, because the information about the permissions that the cross-account stack needs is only available after the AWS CDK app finishes synthesizing. At that point, the permissions that the pipeline has are already locked-in. Hence, for cross-account scenarios, the toolchain should extend the permissions of the pipeline’s UpdatePipeline stage to include the file-publishing and deploy roles.
In cross-account environments it is possible to manually add these permissions to the UpdatePipeline stage. To accomplish that, the Toolchain stack may be used to hide this sort of implementation detail. In the end, a method like the one below can be used to add these missing permissions. For each different mapping of stage and environment in the pipeline it validates if the target account is different than the account where the pipeline is deployed. When the criteria is met, it should grant permission to the UpdatePipeline stage to assume CDK bootstrap roles (tagged using key aws-cdk:bootstrap-role) in the target account (with the tag value as file-publishing or deploy). The example below shows how to add permissions to the UpdatePipeline stage:
Let’s consider a pipeline that has a single deployment stage, UAT. The UAT stage deploys a DemoService. For that, it requires four actions: DemoService-UAT (Prepare and Deploy), ConfigureBlueGreenDeploy and Deploy.
The DemoService-UAT.Deploy action will create the ECS resources and the CodeDeploy application and deployment group. The ConfigureBlueGreenDeploy action will read the AWS CDK cloud assembly. It uses the configuration files to identify the Amazon Elastic Container Registry (Amazon ECR) repository and the container image tag pushed. The pipeline will send this information to the Deploy action. The Deploy action starts the deployment using CodeDeploy.
Solution Overview
As a convenience, I created an application, written in Java, that solves all these challenges and can be used as an example. The application deployment follows the same 5 steps for all deployment scenarios of account and Region, and this includes the scenarios represented in the following design:
Conclusion
In this post, I identified, explained and solved challenges associated with the creation of a pipeline that deploys a service to Amazon ECS using CodeDeploy in different combinations of accounts and regions. I also introduced a demo application that implements these recommendations. The sample code can be extended to implement more elaborate scenarios. These scenarios might include automated testing, automated deployment rollbacks, or disaster recovery. I wish you success in your transformative journey.
AWS Cloud Development Kit (CDK) has become a powerful tool for defining and provisioning AWS cloud resources. While CDK simplifies the process of infrastructure as code, managing resources across different projects and environments can still present challenges. In this blog post, we’ll explore a new experimental library, the App Staging Synthesizer, that enhances resource isolation and provides finer control over staging resources in CDK applications.
Background: The CDK Bootstrapping Model
Let’s consider a scenario where a company has two projects in the same account, Project A and Project B. Both projects are developed using the AWS CDK and deploy various AWS resources. However, the company wants to ensure that resources used in Project A are not discoverable or accessible to Project B. Prior to the introduction of the App Staging Synthesizer library in CDK, the default bootstrapping process created shared staging resources, such as a single Amazon S3 bucket and Amazon ECR repository, which are used by all CDK applications deployed in the CDK environment. In AWS CDK, a combination of region and an account is considered to be an environment. The traditional CDK bootstrapping method offers simplicity and consistency by providing a standardized set of shared staging resources for all CDK applications in an environment, which can be cost-effective for multiple applications. This shared model makes it challenging to control access and visibility between the projects in the same account, particularly in scenarios where resource isolation is crucial between different projects. In such scenarios, AWS recommends a best practice of separating projects that need critical isolation into different AWS accounts. However, it is recognized that there might be organizational or practical reasons preventing the immediate adoption of this recommendation. In such cases, mechanisms like the App Staging Synthesizer can provide a valuable workaround.
Introducing the App Staging Synthesizer:
Today, a growing trend among customers is the consolidation of their cloud accounts driven by the desire to optimize costs, bolster security and enhance compliance control. However, while consolidation offers several advantages, it can sometimes limit the flexibility to align ownership and decision making with individual accounts. This can lead to dependencies and conflicts in how workloads across accounts are secured and managed. The App Staging Synthesizer which is an experimental library designed to provide a more flexible approach to resource management and staging in CDK applications was designed to address these challenges. The AppStagingSynthesizer enhances resource isolation and cleanup control by creating separate staging resources for each application, reducing the risk of conflicts between resources and providing more granular management. It also enables better asset lifecycle management and customization of roles and resource handling, offering CDK developers a flexible and organized approach to resource deployment. Let’s delve into some of the advantages and key features of this library.
Advantages and Outcomes:
Isolation and Access Control: The resources created for Project A are now completely isolated from Project B. Project B doesn’t have visibility or access to the staging resources of Project A, and vice versa. This ensures a higher level of data and resource security.
Easier Resource Cleanup: When cleaning up or deleting resources, the Staging Stack specific to each project can be removed independently. This allows for a more streamlined and controlled cleanup process, mitigating the risk of inadvertently affecting other projects.
Lifecycle Management: With separate ECR repositories for each CDK application, the company can apply lifecycle rules independently for retention and cost management. For example, they can configure each ECR repository to retain only the most recent 5 images, effectively cutting down on storage costs.
Reduced Bootstrapping Complexity: As the only shared resources required are global Roles, the company now only needs to bootstrap every account in one Region instead of bootstrapping every Region. This simplifies the bootstrapping process, making it easier to manage with CloudFormation StackSets.
Key Features of the App Staging Synthesizer:
IStagingResources Interface: The App Staging Synthesizer introduces the IStagingResources interface, offering a framework to manage app-level bootstrap stacks. These stacks handle file assets and Docker assets for CDK applications.
DefaultStagingStack: Included in the library, the DefaultStagingStack is a pre-built implementation of the IStagingResources It comes with default configurations for staging resources, making it easier to get started.
AppStagingSynthesizer: This is a new CDK synthesizer that orchestrates the creation of staging resources for each CDK application. It seamlessly integrates with the application deployment process.
Deployment Roles: In addition to creating staging resources, the CDK App Staging Synthesizer also manages deployment roles. These roles are crucial for secure and controlled resource deployment, ensuring that only authorized processes can modify or access the resources.
Implementation:
Let’s explore practical examples of using the App Staging Synthesizer within a CDK application.
Prerequisite:
For this walkthrough, you should have the following prerequisites:
A basic understanding of CDK. Please go through cdkworkshop.com to get hands-on learning about CDK and related concepts.
NOTE: To utilize the AppStagingSynthesizer, you should have an existing CDK application or should be working on a CDK application.
Using Default Staging Resources:
When configuring your CDK application to use deployment identities with the old bootstrap stack, it’s important to note that the existing staging resources, including the global S3 bucket and ECR repository, will still be created as part of the bootstrapping process. However, they will remain unused by this specific application, thanks to the App Staging Synthesizer. While we won’t delve into the removal of these unused resources in this blogpost, it’s worth mentioning that for a more streamlined resource setup, you have the option to customize the bootstrap template to remove these resources if desired. This can help reduce clutter and ensure that only the necessary resources are retained within your CDK environment.
To get started, update your CDK App with the following code snippet:
const app = new App({
defaultStackSynthesizer: AppStagingSynthesizer.defaultResources({
appId: 'my-app-id',
// The following line is optional. By default, it is assumed you have bootstrapped in the same region(s) as the stack(s) you are deploying.
deploymentIdentities: DeploymentIdentities.defaultBootstrapRoles({ bootstrapRegion: 'us-east-1' }),
}),
});
This code snippet creates a DefaultStagingStack for a CDK App, allowing you to manage staging resources more effectively.
Customizing Roles:
You can customize roles for the synthesizer, which can be useful for several reasons such as:
Reuse of existing roles: In many AWS environments, organizations have existing IAM roles with specific permissions and policies that are aligned with their security and compliance requirements. Rather than creating new roles from scratch, you might want to leverage these existing roles to maintain consistency and adhere to established security practices.
Compatibility: In scenarios where you have pre-existing IAM roles that are being used across various AWS services or applications, customizing roles within the CDK App Staging Synthesizer allows you to seamlessly integrate CDK deployments into your existing IAM role management strategy.
Overall, customizing roles provides flexibility and control over resources used during CDK application deployments, enabling you to align CDK-based infrastructure with the organization’s policies. An example is:
This code snippet illustrates how you can specify custom roles for different stages of the deployment process.
Deploy Time S3 Assets:
Deploy-time S3 assets can be classified into two categories, each serving a distinct purpose:
Assets Used Only During Deployment: These assets are instrumental in handing off substantial data to other services for private copying during deployment. They play a vital role during initial deployment, and afterwards are retained solely for potential future rollbacks
Assets Accessed Throughout Application Lifespan: In contrast, some assets are accessed continuously throughout the runtime of your application. These could include script files utilized in CodeBuild projects, startup scripts for EC2 instances, or, in the case of CDK applications, ECR images that persist throughout the application’s life.
Marking Lambda Assets as Deploy-Time:
By default, Lambda assets are marked as deploy-time assets in the CDK App Staging Synthesizer. This means they fall into the first category mentioned above, serving as essential components during deployment. For instance, consider the following code snippet:
In this example, the Lambda code bundle is automatically identified as a deploy-time asset. This distinction ensures that it’s cleaned up after the configurable rollback window.
Creating Custom Deploy-Time Assets:
CDK offers the flexibility needed to create custom deploy-time assets. This can be achieved by utilizing the Asset construct from the AWS CDK library:
import { Asset } from 'aws-cdk-lib/aws-s3-assets';
declare const stack: Stack;
const asset = new Asset(stack, 'deploy-time-asset', {
deployTime: true, // Marking the asset as deploy-time
path: path.join(__dirname, './deploy-time-asset'),
});
By setting deployTime to true, the asset is explicitly marked as deploy-time. This allows you to maintain control over the lifecycle of these assets, ensuring they are retained for as long as needed. However, it is important to note that deploy-time assets eventually become eligible for cleanup.
Configuring Asset Lifecycles: By default, the CDK retains deploy-time assets for a period of 30 days. However, there is flexibility to adjust this duration according to custom requirements. This can be achieved by specifying deployTimeFileAssetLifetime. The value set here determines how long you can roll back to a previous application version without the need for rebuilding and republishing assets:
const app = new App({
defaultStackSynthesizer: AppStagingSynthesizer.defaultResources({
appId: 'my-app-id',
deployTimeFileAssetLifetime: Duration.days(100), // Adjusting the asset retention period to 100 days
}),
});
By fine-tuning the lifecycle of deploy-time S3 assets, you gain more control over CDK deployments and ensure that CDK applications are equipped to handle rollbacks and updates with ease.
Optimizing ECR Repository Management with Lifecycle Rules:
The AWS CDK App Staging Synthesizer provides you with the capability to control the lifecycle of container images by leveraging lifecycle rules within ECR repositories. Let’s explore how this feature can help streamline your CDK workflows.
ECR repositories can accumulate numerous versions of Docker images over time. While retaining some historical versions is essential for rollback scenarios and reference, an unregulated growth of image versions can lead to increased storage costs and management complexity.
The AWS CDK App Staging Synthesizer offers a default configuration that stores a maximum of 3 revisions for a given Docker image asset. This ensures that you maintain access to previous image versions, facilitating seamless rollback operations. When more than 3 revisions of an asset exist in the ECR repository, the oldest one is purged.
Although by default, it’s set to 3, you can also adjust this value using the imageAssetVersionCount property:
const app = new App({
defaultStackSynthesizer: AppStagingSynthesizer.defaultResources({
appId: 'my-app-id',
imageAssetVersionCount: 10, // Customizing the image version count to retain up to 10 revisions
}),
});
By increasing or decreasing the imageAssetVersionCount, you can strike a balance between storage efficiency and the need to access historical image versions. This ensures that ECR repositories are optimized to the CDK application’s requirements.
Streamlining Cleanup: Auto Delete Staging Assets on Stack Deletion
Efficiently managing resources throughout the lifecycle of your CDK applications is essential, and this includes handling the cleanup of staging assets when stacks are deleted. The AWS CDK App Staging Synthesizer simplifies this process by providing an auto-delete feature for staging resources. In this section, we’ll explore how this feature works and how you can customize it according to your needs.
The Default Cleanup Behavior: By default, the AWS CDK App Staging Synthesizer is designed to facilitate the cleanup of staging resources automatically when a stack is deleted. This means that associated resources, such as S3 buckets and ECR repositories, are configured with a RemovalPolicy.DESTROY and have autoDeleteObjects (for S3 buckets) or autoDeleteImages (for ECR repositories) turned on. Under the hood, custom resources are created to ensure a seamless cleanup process.
Customizing Cleanup Behavior: While automatic cleanup is convenient for many scenarios, there may be situations where you want to retain staging resources even after stack deletion. This can be useful when you intend to reuse these resources or when you have specific cleanup processes outside of the default behavior. To retain staging assets and disable the auto-delete feature, you can specify autoDeleteStagingAssets: as false when configuring the AWS CDK App Staging Synthesizer:
const app = new App({
defaultStackSynthesizer: AppStagingSynthesizer.defaultResources({
appId: 'my-app-id',
autoDeleteStagingAssets: false, // Disabling auto-delete of staging assets
}),
});
By setting autoDeleteStagingAssets to false, you have full control over the cleanup of staging resources. This allows you to retain and manage these resources independently, giving you the flexibility to align CDK workflows with the organization’s specific practices.
Using an Existing Staging Stack:
While the AWS CDK App Staging Synthesizer offers powerful tools for managing staging resources, there may be scenarios where you already have a meticulously crafted staging stack in place. In such cases, you can seamlessly integrate the existing stack with the AppStagingSynthesizer using the customResources() method. Let’s explore how you can make the most of your pre-existing staging infrastructure.
The process is straightforward—supply your existing staging stack as a resource to the AppStagingSynthesizer using the customResources() method. It’s crucial to ensure that the custom stack adheres to the requirements of the IStagingResources interface for smooth integration.
Here’s an example:
// Create a new CDK App
const resourceApp = new App();

//Instantiate your custom staging stack (make sure it implements IstagingResources)
const resources = new CustomStagingStack(resourceApp, 'CustomStagingStack', {});

//Configure your CDK App to use the App Staging Synthesizer with your custom staging stack
const app = new App({
defaultStackSynthesizer: AppStagingSynthesizer.customResources({
resources,
}),
});
In this example, CustomStagingStack represents the pre-existing staging infrastructure. By providing it as a resource to the App Staging Synthesizer, you seamlessly integrate it into the CDK application’s deployment workflow.
Crafting Custom Staging Stacks for Environment Control:
For those seeking precise control over resource management in different environments, the AWS CDK App Staging Synthesizer offers a robust solution – custom staging stacks. This feature allows you to tailor resource configurations, permissions, and behaviors to meet the unique demands of each environment within the CDK application.
Subclassing DefaultStagingStack for a Quick Start:
If your customization requirements align with the available properties, you can start by subclassing DefaultStagingStack. This streamlined approach lets you inherit existing functionalities while tweaking specific behaviors as needed. Here’s how you can dive right in:
//Define custom staging stack
interface CustomStagingStackOptions extends DefaultStagingStackOptions {}

//Subclass DefaultStagingStack to create the custom stgaing stack
class CustomStagingStack extends DefaultStagingStack {
// Implement customizations here
}
Building Staging Resources from Scratch:
For more granular control, consider building the staging resources entirely from scratch. This approach allows you to define every aspect of the staging stack, from the ground up, by implementing the “IStagingResources” interface. Here’s an example:
Implementing custom staging resources also involves crafting a CustomFactory class to facilitate the creation of these resources in every environment where your CDK App is deployed. This approach offers a high level of customization while ensuring consistency across deployments. Here’s how it works:
// Define a custom factory for your staging resources
class CustomFactory implements IStagingResourcesFactory {
public obtainStagingResources(stack: Stack, context: ObtainStagingResourcesContext) {
const myApp = App.of(stack);

// Create a custom staging stack instance for the current environment
return new CustomStagingStack(myApp!, `CustomStagingStack-${context.environmentString}`, {});
}
}

//Incorporate your custom staging resources into the Application using the customer factory
const app = new App({
defaultStackSynthesizer: AppStagingSynthesizer.customFactory({
factory: new CustomFactory(),
oncePerEnv: true, // by default
}),
});
With this setup, you can create custom staging stacks for each environment, ensuring resource management tailored to your specific needs. Whether you choose to subclass DefaultStagingStack for a quick start or build resources from scratch, custom staging stacks empower you to achieve fine-grained control and consistency across CDK deployments.
Conclusion:
The App Staging Synthesizer introduces a powerful approach to managing staging resources in AWS CDK applications. With enhanced resource isolation and lifecycle control, it addresses the limitations of the default bootstrapping model. By integrating the App Staging Synthesizer into CDK applications, you can achieve better resource management, cleaner cleanup processes, and more control over cloud infrastructure. Explore this experimental library and unleash the potential of fine-tuned resource management in CDK projects.
For more information and code examples, refer to the official documentation provided by AWS.
Many customers have provisioned resources through the AWS Management Console or different Infrastructure as Code (IaC) tools, and then started using AWS Cloud Development Kit (AWS CDK) in a later stage. After introducing AWS CDK into the architecture, you might want to import some of the existing resources to avoid losing data or impacting availability.
In this post, I will show you how to import existing AWS Resources into an AWS CDK Stack.
The AWS CDK is a framework for defining cloud infrastructure through code and provisioning it with AWS CloudFormation stacks. With the AWS CDK, developers can easily provision and manage cloud resources, define complex architectures, and automate infrastructure deployments, all while leveraging the full power of modern software development practices like version control, code reuse, and automated testing. AWS CDK accelerates cloud development using common programming languages such as TypeScript, JavaScript, Python, Java, C#/.Net, and Go.
AWS CDK stacks are a collection of AWS resources that can be programmatically created, updated, or deleted. CDK constructs are the building blocks of CDK applications, representing a blueprint to define cloud architectures.
Solution Overview
The AWS CDK Toolkit (the CLI command cdk), is the primary tool for interacting with your AWS CDK app. I will show you the commands that you will encounter when implementing this solution. When you create a CDK stack, you can deploy it using the cdk deploy command, which also synthesizes the application. The cdk synthesize (synth) command synthesizes and prints the CloudFormation template for one or more specified stacks.
To import existing AWS resources into a CDK stack, you need to create the CDK stack and add the resource you want to import, then generate a CloudFormation template representing this stack. Next, you need to import this resource into the CloudFormation stack using the AWS CloudFormation Console, by uploading the newly generated CloudFormation template. Finally, you need to deploy the CDK stack that includes your resource.
Walkthrough
The walkthrough consists of three main steps:
Step 1: Update the CDK stack with the resource you want to import
Step 2: Import the existing resource into the CloudFormation stack
Step 3: Import the existing resource into the CDK stack
Prerequisites
aws-cdk v2 is installed on your system, in order to be able to use the AWS CDK CLI.
A CDK stack deployed in your AWS Account.
You can skip the following and move to the Step 1 section if you already have an existing CDK stack that you want to import your resources into.
Let’s create a CDK stack into which you will import your existing resources. We need to specify at least 1 resource in order to create it. For this example, you will create a CDK stack with an Amazon Simple Storage Service (Amazon S3) bucket.
After you’ve successfully installed and configured AWS CDK:
Open your IDE and a new terminal window. Create a new folder hello-cdk by running these two commands:
mkdir hello-cdk && cd hello-cdk
cdk init app --language typescript
The cdk init command creates a number of files and folders inside the hello-cdk directory to help you organize the source code for your AWS CDK app. Take a moment to explore. The structure of a basic app is all there; you’ll fill in the details when implementing this solution.
At this point, your app doesn’t do anything because the stack it contains doesn’t define any resources. Let’s add an Amazon S3 bucket.
In lib/hello-cdk-stack.ts replace the code with the following code snippet:
import * as cdk from 'aws-cdk-lib';
import { aws_s3 as s3 } from 'aws-cdk-lib';

export class HelloCdkStack extends cdk.Stack {
  constructor(scope: cdk.App, id: string, props?: cdk.StackProps) {
    super(scope, id, props);

    new s3.Bucket(this, 'MyExampleBucket');
  }
}
NOTE: Amazon S3 provides a number of security features to consider as you develop and implement your own security policies. I recommend you go through the security best practices for Amazon S3 for more details on how to enhance the security of your S3 Bucket.
Now, you can deploy the stack using the cdk deploy command. This command will first create a CloudFormation template in cdk.out/HelloCDKStack.template.json, and then deploy it in your AWS account.
Navigate to the AWS CloudFormation Console and see the stack being created. It might take some time depending on the number and type of resources.
After the stack gets created, you can explore the Resources tab for created resources
Step 1: Update the CDK stack with the resource you want to import
After you’ve created the stack, you need to update the CDK stack with the resources you would like to import. For this example, we will be importing an existing S3 bucket.
Go to your IDE and open the terminal. Open lib/hello-cdk-stack.ts file and add the following code snippet:
new s3.Bucket(this, 'ImportBucket', {
	removalPolicy: cdk.RemovalPolicy.RETAIN
});
Resources to import must have a DeletionPolicy attribute specified in the template. We will set the removalPolicy attribute to RETAIN to avoid resource deletion if you delete the CDK stack.
In the terminal, run cdk synth command to obtain our CloudFormation template. This command will synthesize the CloudFormation template, but it will not deploy it to your AWS account. The template will be saved in cdk.out/HelloCdkStack.template.json.
Step 2: Import the existing resource into CloudFormation stack
Open the CloudFormation Console, and choose your stack.
In the right-upper corner, choose Stack actions -> Import resources into stack.
On the Identify Resources page, choose Next.
On Specify template page, you will be asked to specify a new template that includes the resource you want to import. Choose Upload a template file and specify the template that was created by cdk synth command in cdk.out/HelloCdkStack.template.json. CloudFormation will now use that template which includes the resource you want to import.
Choose Next.
On the Identify resources page, you will be asked to identify the resources to import. For BucketName, choose the name of the S3 bucket you want to import.
Choose Next.
On the Specify stack details page, you will be asked to specify the stack parameters. For BootstrapVersion parameter, leave the default as it is.
Choose Next.
On the Review page, you will be able to see what changes have been made to the CloudFormation template, and which resources have been imported.
Review the changes and choose Import resources.
You can see in the Events tab that the bucket is being imported. Go to the Resources tab, and see the imported bucket.
Step 3: Import the existing resource into CDK stack
The last step is to import the existing resource into your CDK stack. Go back to the terminal and run cdk deploy. You will get the message that no changes have been found in the stack, this is because the CloudFormation template has been updated in the previous step.
Congratulations! You’ve just imported your resources into CDK stack and now you can continue deploying and managing your infrastructure with more flexibility and control.
Cleanup
Destroy the AWS CDK stack and Buckets
When you’re done with the resources you created, you can destroy your CDK stack by running the following commands in your terminal:
cd ~/hello-cdk
cdk destroy HelloCdkStack
When asked to confirm the deletion of the stack, enter yes. NOTE: The S3 buckets you’ve imported won’t get deleted because of the removal policy. If no longer needed, delete the S3 bucket/s.
Conclusion
In this post, I showed you a solution to import existing AWS resources into CDK stacks. As the demand for IaC and DevOps solutions continues to grow, an increasing number of customers are turning to AWS CDK as their preferred IaC solution due to its powerful capabilities and ease of use as you can write infrastructure code using familiar programming languages.
AWS is continuously improving CDK by adding new features and capabilities, in collaboration with the open source community. Here you can find an RFC on adding a new CDK CLI sub-command cdk import that works just like cdk deploy but for newly added constructs in the stack. Instead of creating new AWS resources, it will import corresponding existing resources, which will effectively automate the manual actions demonstrated in this post. Keep an eye on that RFC and provide any feedback you have to the team.
Customers often need to architect solutions to support components across multiple cloud service providers, a need which may arise if they have acquired a company running on another cloud, or for functional purposes where specific services provide a differentiated capability. In this post, we will show you how to use the AWS Cloud Development Kit (AWS CDK) to create a single pane of glass for managing your multicloud resources.
AWS CDK is an open source framework that builds on the underlying functionality provided by AWS CloudFormation. It allows developers to define cloud resources using common programming languages and an abstraction model based on reusable components called constructs. There is a misconception that CloudFormation and CDK can only be used to provision resources on AWS, but this is not the case. The CloudFormation registry, with support for third party resource types, along with custom resource providers, allow for any resource that can be configured via an API to be created and managed, regardless of where it is located.
Multicloud solution design paradigm
Multicloud solutions are often designed with services grouped and separated by cloud, creating a segregation of resource and functions within the design. This approach leads to a duplication of layers of the solution, most commonly a duplication of resources and the deployment processes for each environment. This duplication increases cost, and leads to a complexity of management increasing the potential break points within the solution or practice.
Along with simplifying resource deployments, and the ever-increasing complexity of customer needs, so too has the need increased for the capability of IaC solutions to deploy resources across hybrid or multicloud environments. Through meeting this need, a proliferation of supported tools, frameworks, languages, and practices has created “choice overload”. At worst, this scares the non-cloud-savvy away from adopting an IaC solution benefiting their cloud journey, and at best confuses the very reason for adopting an IaC practice.
A single pane of glass
Systems Thinking is a holistic approach that focuses on the way a system’s constituent parts interrelate and how systems work as a whole especially over time and within the context of larger systems. Systems thinking is commonly accepted as the backbone of a successful systems engineering approach. Designing solutions taking a full systems view, based on the component’s function and interrelation within the system across environments, more closely aligns with the ability to handle the deployment of each cloud-specific resource, from a single control plane.
While AWS provides a list of services that can be used to help design, manage and operate hybrid and multicloud solutions, with AWS as the primary cloud you can go beyond just using services to support multicloud. CloudFormation registry resource types model and provision resources using custom logic, as a component of stacks in CloudFormation. Public extensions are not only provided by AWS, but third-party extensions are made available for general use by publishers other than AWS, meaning customers can create their own extensions and publish them for anyone to use.
The AWS CDK, which has a 1:1 mapping of all AWS CloudFormation resources, as well as a library of abstracted constructs, supports the ability to import custom AWS CloudFormation extensions, enabling customers and partners to create custom AWS CDK constructs for their extensions. The chosen programming language can be used to inherit and abstract the custom resource into reusable AWS CDK constructs, allowing developers to create solutions that contain native AWS extensions along with secondary hybrid or alternate cloud resources.
Providing the ability to integrate mixed resources in the same stack more closely aligns with the functional design and often diagrammatic depiction of the solution. In essence, we are creating a single IaC pane of glass over the entire solution, deployed through a single control plane. This lowers the complexity and the cost of maintaining separate modules and deployment pipelines across multiple cloud providers.
A common use case for a multicloud: disaster recovery
One of the most common use cases of the requirement for using components across different cloud providers is the need to maintain data sovereignty while designing disaster recovery (DR) into a solution.
Data sovereignty is the idea that data is subject to the laws of where it is physically located, and in some countries extends to regulations that if data is collected from citizens of a geographical area, then the data must reside in servers located in jurisdictions of that geographical area or in countries with a similar scope and rigor in their protection laws.
This requires organizations to remain in compliance with their host country, and in cases such as state government agencies, a stricter scope of within state boundaries, data sovereignty regulations. Unfortunately, not all countries, and especially not all states, have multiple AWS regions to select from when designing where their primary and recovery data backups will reside. Therefore, the DR solution needs to take advantage of multiple cloud providers in the same geography, and as such a solution must be designed to backup or replicate data across providers.
The multicloud solution
A multicloud solution to the proposed use case would be the backup of data from an AWS resource such as an Amazon S3 bucket to another cloud provider within the same geography, such as an Azure Blob Storage container, using AWS event driven behaviour to trigger the copying of data from the primary AWS resource to the secondary Azure backup resource.
Following the IaC single pane of glass approach, the Azure Blob Storage container is created as a resource type in the CloudFormation Registry, and imported into the AWS CDK to be used as a construct in the solution. However, before the extension resource type can be used effectively in the CDK as a reusable construct and added to your private library, you will first need to go through the import into CDK process for creating Constructs.
There are three different levels of constructs, beginning with low-level constructs, which are called CFN Resources (or L1, short for “layer 1”). These constructs directly represent all resources available in AWS CloudFormation. They are named CfnXyz, where Xyz is name of the resource.
Layer 1 Construct
In this example, an L1 construct named CfnAzureBlobStorage represents an Azure::BlobStorage AWS CloudFormation extension. Here you also explicitly configure the ref property, in order for higher level constructs to access the Output value which will be the Azure blob container url being provisioned.
As with every CDK Construct, the constructor arguments are scope, id and props. scope and id are propagated to the cdk.Construct base class. The props argument is of type CfnAzureBlobStorageProps which includes four properties all of type string. This is how the Azure credentials are propagated down from upstream constructs.
Layer 2 Construct
The next level of constructs, L2, also represent AWS resources, but with a higher-level, intent-based API. They provide similar functionality, but incorporate the defaults, boilerplate, and glue logic you’d be writing yourself with a CFN Resource construct. They also provide convenience methods that make it simpler to work with the resource.
In this example, an L2 construct is created to abstract the CfnAzureBlobStorage L1 construct and provides additional properties and methods.
The custom L2 construct class is declared as AzureBlobStorage, this time without the Cfn prefix to represent an L2 construct. This time the constructor arguments include the Azure credentials and client secret, and the ref from the L1 construct us output to the public variable AzureBlobContainerUrl.
As an L2 construct, the AzureBlobStorage construct could be used in CDK Apps along with AWS Resource Constructs in the same Stack, to be provisioned through AWS CloudFormation creating the IaC single pane of glass for a multicloud solution.
Layer 3 Construct
The true value of the CDK construct programming model is in the ability to extend L2 constructs, which represent a single resource, into a composition of multiple constructs that provide a solution for a common task. These are Layer 3, L3, Constructs also known as patterns.
In this example, the L3 construct represents the solution architecture to backup objects uploaded to an Amazon S3 bucket into an Azure Blob Storage container in real-time, using AWS Lambda to process event notifications from Amazon S3.
import { RemovalPolicy, Duration, CfnOutput } from "aws-cdk-lib";
import { Bucket, BlockPublicAccess, EventType } from "aws-cdk-lib/aws-s3";
import { DockerImageFunction, DockerImageCode } from "aws-cdk-lib/aws-lambda";
import { PolicyStatement, Effect } from "aws-cdk-lib/aws-iam";
import { LambdaDestination } from "aws-cdk-lib/aws-s3-notifications";
import { IStringParameter, StringParameter } from "aws-cdk-lib/aws-ssm";
import { Secret, ISecret } from "aws-cdk-lib/aws-secretsmanager";
import { Construct } from "constructs";
import { AzureBlobStorage } from "./azure-blob-storage";

// L3 Construct
export class S3ToAzureBackupService extends Construct {
  constructor(
    scope: Construct,
    id: string,
    azureSubscriptionIdParamName: string,
    azureClientIdParamName: string,
    azureTenantIdParamName: string,
    azureClientSecretName: string
  ) {
    super(scope, id);

    // Retrieve existing SSM Parameters
    const azureSubscriptionIdParameter = this.getSSMParameter("AzureSubscriptionIdParam", azureSubscriptionIdParamName);
    const azureClientIdParameter = this.getSSMParameter("AzureClientIdParam", azureClientIdParamName);
    const azureTenantIdParameter = this.getSSMParameter("AzureTenantIdParam", azureTenantIdParamName);

    // Retrieve existing Azure Client Secret
    const azureClientSecret = this.getSecret("AzureClientSecret", azureClientSecretName);

    // Create an S3 bucket
    const sourceBucket = new Bucket(this, "SourceBucketForAzureBlob", {
      removalPolicy: RemovalPolicy.RETAIN,
      blockPublicAccess: BlockPublicAccess.BLOCK_ALL,
    });

    // Create a corresponding Azure Blob Storage account and a Blob Container
    const azurebBlobStorage = new AzureBlobStorage(
      this,
      "MyCustomAzureBlobStorage",
      azureSubscriptionIdParameter.stringValue,
      azureClientIdParameter.stringValue,
      azureTenantIdParameter.stringValue,
      azureClientSecretName
    );

    // Create a lambda function that will receive notifications from S3 bucket
    // and copy the new uploaded object to Azure Blob Storage
    const copyObjectToAzureLambda = new DockerImageFunction(
      this,
      "CopyObjectsToAzureLambda",
      {
        timeout: Duration.seconds(60),
        code: DockerImageCode.fromImageAsset("copy_s3_fn_code", {
          buildArgs: {
            "--platform": "linux/amd64"
          }
        }),
      },
    );

    // Add an IAM policy statement to allow the Lambda function to access the
    // S3 bucket
    sourceBucket.grantRead(copyObjectToAzureLambda);

    // Add an IAM policy statement to allow the Lambda function to get the contents
    // of an S3 object
    copyObjectToAzureLambda.addToRolePolicy(
      new PolicyStatement({
        effect: Effect.ALLOW,
        actions: ["s3:GetObject"],
        resources: [`arn:aws:s3:::${sourceBucket.bucketName}/*`],
      })
    );

    // Set up an S3 bucket notification to trigger the Lambda function
    // when an object is uploaded
    sourceBucket.addEventNotification(
      EventType.OBJECT_CREATED,
      new LambdaDestination(copyObjectToAzureLambda)
    );

    // Grant the Lambda function read access to existing SSM Parameters
    azureSubscriptionIdParameter.grantRead(copyObjectToAzureLambda);
    azureClientIdParameter.grantRead(copyObjectToAzureLambda);
    azureTenantIdParameter.grantRead(copyObjectToAzureLambda);

    // Put the Azure Blob Container Url into SSM Parameter Store
    this.createStringSSMParameter(
      "AzureBlobContainerUrl",
      "Azure blob container URL",
      "/s3toazurebackupservice/azureblobcontainerurl",
      azurebBlobStorage.blobContainerUrl,
      copyObjectToAzureLambda
    );

    // Grant the Lambda function read access to the secret
    azureClientSecret.grantRead(copyObjectToAzureLambda);

    // Output S3 bucket arn
    new CfnOutput(this, "sourceBucketArn", {
      value: sourceBucket.bucketArn,
      exportName: "sourceBucketArn",
    });

    // Output the Blob Conatiner Url
    new CfnOutput(this, "azureBlobContainerUrl", {
      value: azurebBlobStorage.blobContainerUrl,
      exportName: "azureBlobContainerUrl",
    });
  }

}
The custom L3 construct can be used in larger IaC solutions by calling the class called S3ToAzureBackupService and providing the Azure credentials and client secret as properties to the constructor.
import * as cdk from "aws-cdk-lib";
import { Construct } from "constructs";
import { S3ToAzureBackupService } from "./s3-to-azure-backup-service";

export class MultiCloudBackupCdkStack extends cdk.Stack {
  constructor(scope: Construct, id: string, props?: cdk.StackProps) {
    super(scope, id, props);

    const s3ToAzureBackupService = new S3ToAzureBackupService(
      this,
      "MyMultiCloudBackupService",
      "/s3toazurebackupservice/azuresubscriptionid",
      "/s3toazurebackupservice/azureclientid",
      "/s3toazurebackupservice/azuretenantid",
      "s3toazurebackupservice/azureclientsecret"
    );
  }
}
Solution Diagram
Diagram 1: IaC Single Control Plane, demonstrates the concept of the Azure Blob Storage extension being imported from the AWS CloudFormation Registry into AWS CDK as an L1 CfnResource, wrapped into an L2 Construct and used in an L3 pattern alongside AWS resources to perform the specific task of backing up from and Amazon s3 Bucket into an Azure Blob Storage Container.
Diagram 1: IaC Single Control Plan
The CDK application is then synthesized into one or more AWS CloudFormation Templates, which result in the CloudFormation service deploying AWS resource configurations to AWS and Azure resource configurations to Azure.
This solution demonstrates not only how to consolidate the management of secondary cloud resources into a unified infrastructure stack in AWS, but also the improved productivity by eliminating the complexity and cost of operating multiple deployment mechanisms into multiple public cloud environments.
The following video demonstrates an example in real-time of the end-state solution:
Next Steps
While this was just a straightforward example, with the same approach you can use your imagination to come up with even more and complex scenarios where AWS CDK can be used as a single pane of glass for IaC to manage multicloud and hybrid solutions.
To get started with the solution discussed in this post, this workshop will provide you with the instructions you need to understand the steps required to create the S3ToAzureBackupService.
Once you have learned how to create AWS CloudFormation extensions and develop them into AWS CDK Constructs, you will learn how, with just a few lines of code, you can develop reusable multicloud unified IaC solutions that deploy through a single AWS control plane.
Conclusion
By adopting AWS CloudFormation extensions and AWS CDK, deployed through a single AWS control plane, the cost and complexity of maintaining deployment pipelines across multiple cloud providers is reduced to a single holistic solution-focused pipeline. The techniques demonstrated in this post and the related workshop provide a capability to simplify the design of complex systems, improve the management of integration, and more closely align the IaC and deployment management practices with the design.
A deployment pipeline typically comprises several stages such as dev, test, and prod, which ensure that changes undergo testing before reaching the production environment. To improve the reliability and stability of release processes, DevOps teams must review Infrastructure as Code (IaC) changes before applying them in production. As a result, implementing a mechanism for notification and manual approval that grants stakeholders improved access to changes in their release pipelines has become a popular practice for DevOps teams.
Notifications keep development teams and stakeholders informed in real-time about updates and changes to deployment status within release pipelines. Manual approvals establish thresholds for transitioning a change from one stage to the next in the pipeline. They also act as a guardrail to mitigate risks arising from errors and rework because of faulty deployments.
Please note that manual approvals, as described in this post, are not a replacement for the use of automation. Instead, they complement automated checks within the release pipeline.
In this blog post, we describe how to set up notifications and add a manual approval stage to AWS Cloud Development Kit (AWS CDK) Pipeline.
Concepts
CDK Pipeline
CDK Pipelines is a construct library for painless continuous delivery of CDK applications. CDK Pipelines can automatically build, test, and deploy changes to CDK resources. CDK Pipelines are self-mutating which means as application stages or stacks are added, the pipeline automatically reconfigures itself to deploy those new stages or stacks. Pipelines need only be manually deployed once, afterwards, the pipeline keeps itself up to date from the source code repository by pulling the changes pushed to the repository.
Notifications
Adding notifications to a pipeline provides visibility to changes made to the environment by utilizing the NotificationRule construct. You can also use this rule to notify pipeline users of important changes, such as when a pipeline starts execution. Notification rules specify both the events and the targets, such as Amazon Simple Notification Service (Amazon SNS) topic or AWS Chatbot clients configured for Slack which represents the nominated recipients of the notifications. An SNS topic is a logical access point that acts as a communication channel while Chatbot is an AWS service that enables DevOps and software development teams to use messaging program chat rooms to monitor and respond to operational events.
Manual Approval
In a CDK pipeline, you can incorporate an approval action at a specific stage, where the pipeline should pause, allowing a team member or designated reviewer to manually approve or reject the action. When an approval action is ready for review, a notification is sent out to alert the relevant parties. This combination of notifications and approvals ensures timely and efficient decision-making regarding crucial actions within the pipeline.
Solution Overview
The solution explains a simple web service that is comprised of an AWS Lambda function that returns a static web page served by Amazon API Gateway. Since Continuous Deployment and Continuous Integration (CI/CD) are important components to most web projects, the team implements a CDK Pipeline for their web project.
There are two important stages in this CDK pipeline; the Pre-production stage for testing and the Production stage, which contains the end product for users.
The flow of the CI/CD process to update the website starts when a developer pushes a change to the repository using their Integrated Development Environment (IDE). An Amazon CloudWatch event triggers the CDK Pipeline. Once the changes reach the pre-production stage for testing, the CI/CD process halts. This is because a manual approval gate is between the pre-production and production stages. So, it becomes a stakeholder’s responsibility to review the changes in the pre-production stage before approving them for production. The pipeline includes an SNS notification that notifies the stakeholder whenever the pipeline requires manual approval.
After approving the changes, the CI/CD process proceeds to the production stage and the updated version of the website becomes available to the end user. If the approver rejects the changes, the process ends at the pre-production stage with no impact to the end user.
The following diagram illustrates the solution architecture.
Figure 1. This image shows the CDK pipeline process in our solution and how applications or updates are deployed using AWS Lambda Function to end users.
Prerequisites
For this walkthrough, you should have the following prerequisites:
A basic understanding of CDK and CDK Pipelines. Please go through the Python Workshop on cdkworkshop.com to follow along with the code examples and get hands-on learning about CDK and related concepts.
Since the pipeline stack is being modified, there may be a need to run cdk deploy locally again.
NOTE: The CDK Pipeline code structure used in the CDK workshop can be found here: Pipeline stack Code.
Add notification to the pipeline
In this tutorial, perform the following steps:
Add the import statements for AWS CodeStar notifications and SNS to the import section of the pipeline stack py
import aws_cdk.aws_codestarnotifications as notifications
import aws_cdk.pipelines as pipelines
import aws_cdk.aws_sns as sns
import aws_cdk.aws_sns_subscriptions as subs
Ensure the pipeline is built by calling the ‘build pipeline’ function.
pipeline.build_pipeline()
Create an SNS topic.
topic = sns.Topic(self, "MyTopic1")
Add a subscription to the topic. This specifies where the notifications are sent (Add the stakeholders’ email here).
Assign the source the value pipeline.pipeline The first pipeline is the name of the CDK pipeline(variable) and the .pipeline is to show it is a pipeline(function).
source=pipeline.pipeline,
Define the events to be monitored. Specify notifications for when the pipeline starts, when it fails, when the execution succeeds, and finally when manual approval is needed.
Add the ManualApprovalStep import to the aws_cdk.pipelines import statement.
from aws_cdk.pipelines import (
CodePipeline,
CodePipelineSource,
ShellStep,
ManualApprovalStep
)
Add the ManualApprovalStep to the production stage. The code must be added to the add_stage() function.
 prod = WorkshopPipelineStage(self, "Prod")
        prod_stage = pipeline.add_stage(prod,
            pre = [ManualApprovalStep('PromoteToProduction')])
When a stage is added to a pipeline, you can specify the pre and post steps, which are arbitrary steps that run before or after the contents of the stage. You can use them to add validations like manual or automated gates to the pipeline. It is recommended to put manual approval gates in the set of pre steps, and automated approval gates in the set of post steps. So, the manual approval action is added as a pre step that runs after the pre-production stage and before the production stage .
The final version of the pipeline_stack.py becomes:
from constructs import Construct
import aws_cdk as cdk
import aws_cdk.aws_codestarnotifications as notifications
import aws_cdk.aws_sns as sns
import aws_cdk.aws_sns_subscriptions as subs
from aws_cdk import (
    Stack,
    aws_codecommit as codecommit,
    aws_codepipeline as codepipeline,
    pipelines as pipelines,
    aws_codepipeline_actions as cpactions,

)
from aws_cdk.pipelines import (
    CodePipeline,
    CodePipelineSource,
    ShellStep,
    ManualApprovalStep
)


class WorkshopPipelineStack(cdk.Stack):
    def __init__(self, scope: Construct, id: str, **kwargs) -> None:
        super().__init__(scope, id, **kwargs)

        # Creates a CodeCommit repository called 'WorkshopRepo'
        repo = codecommit.Repository(
            self, "WorkshopRepo", repository_name="WorkshopRepo",

        )

        #Create the Cdk pipeline
        pipeline = pipelines.CodePipeline(
            self,
            "Pipeline",

            synth=pipelines.ShellStep(
                "Synth",
                input=pipelines.CodePipelineSource.code_commit(repo, "main"),
                commands=[
                    "npm install -g aws-cdk",  # Installs the cdk cli on Codebuild
                    "pip install -r requirements.txt",  # Instructs Codebuild to install required packages
                    "npx cdk synth",
                ]

            ),
        )


         # Create the Pre-Prod Stage and its API endpoint
        deploy = WorkshopPipelineStage(self, "Pre-Prod")
        deploy_stage = pipeline.add_stage(deploy)

        deploy_stage.add_post(

            pipelines.ShellStep(
                "TestViewerEndpoint",
                env_from_cfn_outputs={
                    "ENDPOINT_URL": deploy.hc_viewer_url
                },
                commands=["curl -Ssf $ENDPOINT_URL"],
            )


        )
        deploy_stage.add_post(
            pipelines.ShellStep(
                "TestAPIGatewayEndpoint",
                env_from_cfn_outputs={
                    "ENDPOINT_URL": deploy.hc_endpoint
                },
                commands=[
                    "curl -Ssf $ENDPOINT_URL",
                    "curl -Ssf $ENDPOINT_URL/hello",
                    "curl -Ssf $ENDPOINT_URL/test",
                ],
            )

        )

        # Create the Prod Stage with the Manual Approval Step
        prod = WorkshopPipelineStage(self, "Prod")
        prod_stage = pipeline.add_stage(prod,
            pre = [ManualApprovalStep('PromoteToProduction')])

        prod_stage.add_post(

            pipelines.ShellStep(
                "ViewerEndpoint",
                env_from_cfn_outputs={
                    "ENDPOINT_URL": prod.hc_viewer_url
                },
                commands=["curl -Ssf $ENDPOINT_URL"],

            )

        )
        prod_stage.add_post(
            pipelines.ShellStep(
                "APIGatewayEndpoint",
                env_from_cfn_outputs={
                    "ENDPOINT_URL": prod.hc_endpoint
                },
                commands=[
                    "curl -Ssf $ENDPOINT_URL",
                    "curl -Ssf $ENDPOINT_URL/hello",
                    "curl -Ssf $ENDPOINT_URL/test",
                ],
            )

        )

        # Create The SNS Notification for the Pipeline

        pipeline.build_pipeline()

        topic = sns.Topic(self, "MyTopic")
        topic.add_subscription(subs.EmailSubscription("[email protected]"))
        rule = notifications.NotificationRule(self, "NotificationRule",
            source = pipeline.pipeline,
            events = ["codepipeline-pipeline-pipeline-execution-started", "codepipeline-pipeline-pipeline-execution-failed", "codepipeline-pipeline-manual-approval-needed", "codepipeline-pipeline-manual-approval-succeeded"],
            targets=[topic]
            )
When a commit is made with git commit -am "Add manual Approval" and changes are pushed with git push, the pipeline automatically self-mutates to add the new approval stage.
Now when the developer pushes changes to update the build environment or the end user application, the pipeline execution stops at the point where the approval action was added. The pipeline won’t resume unless a manual approval action is taken.
Figure 2. This image shows the pipeline with the added Manual Approval action.
Since there is a notification rule that includes the approval action, an email notification is sent with the pipeline information and approval status to the stakeholder(s) subscribed to the SNS topic.
Figure 3. This image shows the SNS email notification sent when the pipeline starts.
After pushing the updates to the pipeline, the reviewer or stakeholder can use the AWS Management Console to access the pipeline to approve or deny changes based on their assessment of these changes. This process helps eliminate any potential issues or errors and ensures only changes deemed relevant are made.
Figure 4. This image shows the review action that gives the stakeholder the ability to approve or reject any changes.
If a reviewer rejects the action, or if no approval response is received within seven days of the pipeline stopping for the review action, the pipeline status is “Failed.”
Figure 5. This image depicts when a stakeholder rejects the action.
If a reviewer approves the changes, the pipeline continues its execution.
Figure 6. This image depicts when a stakeholder approves the action.
Considerations
It is important to consider any potential drawbacks before integrating a manual approval process into a CDK pipeline. one such consideration is its implementation may delay the delivery of updates to end users. An example of this is business hours limitation. The pipeline process might be constrained by the availability of stakeholders during business hours. This can result in delays if changes are made outside regular working hours and require approval when stakeholders are not immediately accessible.
Clean up
To avoid incurring future charges, delete the resources. Use cdk destroy via the command line to delete the created stack.
Conclusion
Adding notifications and manual approval to CDK Pipelines provides better visibility and control over the changes made to the pipeline environment. These features ideally complement the existing automated checks to ensure that all updates are reviewed before deployment. This reduces the risk of potential issues arising from bugs or errors. The ability to approve or deny changes through the AWS Management Console makes the review process simple and straightforward. Additionally, SNS notifications keep stakeholders updated on the status of the pipeline, ensuring a smooth and seamless deployment process.
The AWS Cloud Development Kit (AWS CDK) is a popular open source toolkit that allows developers to create their cloud infrastructure using high level programming languages. AWS CDK comes bundled with a construct called CDK Pipelines that makes it easy to set up continuous integration, delivery, and deployment with AWS CodePipeline. The CDK Pipelines construct does all the heavy lifting, such as setting up appropriate AWS IAM roles for deployment across regions and accounts, Amazon Simple Storage Service (Amazon S3) buckets to store build artifacts, and an AWS CodeBuild project to build, test, and deploy the app. The pipeline deploys a given CDK application as one or more AWS CloudFormation stacks.
With CloudFormation stacks, there is the possibility that someone can manually change the configuration of stack resources outside the purview of CloudFormation and the pipeline that deploys the stack. This causes the deployed resources to be inconsistent with the intent in the application, which is referred to as “drift”, a situation that can make the application’s behavior unpredictable. For example, when troubleshooting an application, if the application has drifted in production, it is difficult to reproduce the same behavior in a development environment. In other cases, it may introduce security vulnerabilities in the application. For example, an AWS EC2 SecurityGroup that was originally deployed to allow ingress traffic from a specific IP address might potentially be opened up to allow traffic from all IP addresses.
CloudFormation offers a drift detection feature for stacks and stack resources to detect configuration changes that are made outside of CloudFormation. The stack/resource is considered as drifted if its configuration does not match the expected configuration defined in the CloudFormation template and by extension the CDK code that synthesized it.
In this blog post you will see how CloudFormation drift detection can be integrated as a pre-deployment validation step in CDK Pipelines using an event driven approach.
Amazon EventBridge is a serverless AWS service that offers an agile mechanism for the developers to spin up loosely coupled, event driven applications at scale. EventBridge supports routing of events between services via an event bus. EventBridge out of the box supports a default event bus for each account which receives events from AWS services. Last year, CloudFormation added a new feature that enables event notifications for changes made to CloudFormation-based stacks and resources. These notifications are accessible through Amazon EventBridge, allowing users to monitor and react to changes in their CloudFormation infrastructure using event-driven workflows. Our solution leverages the drift detection events that are now supported by EventBridge. The following architecture diagram depicts the flow of events involved in successfully performing drift detection in CDK Pipelines.
Architecture diagram
The user starts the pipeline by checking code into an AWS CodeCommit repo, which acts as the pipeline source. We have configured drift detection in the pipeline as a custom step backed by a lambda function. When the drift detection step invokes the provider lambda function, it first starts the drift detection on the CloudFormation stack Demo Stack and then saves the drift_detection_id along with pipeline_job_id in a DynamoDB table. In the meantime, the pipeline waits for a response on the status of drift detection.
The EventBridge rules are set up to capture the drift detection state change events for Demo Stack that are received by the default event bus. The callback lambda is registered as the intended target for the rules. When drift detection completes, it triggers the EventBridge rule which in turn invokes the callback lambda function with stack status as either DRIFTED or IN SYNC. The callback lambda function pulls the pipeline_job_id from DynamoDB and sends the appropriate status back to the pipeline, thus propelling the pipeline out of the wait state. If the stack is in the IN SYNC status, the callback lambda sends a success status and the pipeline continues with the deployment. If the stack is in the DRIFTED status, callback lambda sends failure status back to the pipeline and the pipeline run ends up in failure.
Solution Deep Dive
The solution deploys two stacks as shown in the above architecture diagram
CDK Pipelines stack
Pre-requisite stack
The CDK Pipelines stack defines a pipeline with a CodeCommit source and drift detection step integrated into it. The pre-requisite stack deploys following resources that are required by the CDK Pipelines stack.
A Lambda function that implements drift detection step
A DynamoDB table that holds drift_detection_id and pipeline_job_id
An Event bridge rule to capture “CloudFormation Drift Detection Status Change” event
A callback lambda function that evaluates status of drift detection and sends status back to the pipeline by looking up the data captured in DynamoDB.
The pre-requisites stack is deployed first, followed by the CDK Pipelines stack.
Defining drift detection step
CDK Pipelines offers a mechanism to define your own step that requires custom implementation. A step corresponds to a custom action in CodePipeline such as invoke lambda function. It can exist as a pre or post deployment action in a given stage of the pipeline. For example, your organization’s policies may require its CI/CD pipelines to run a security vulnerability scan as a prerequisite before deployment. You can build this as a custom step in your CDK Pipelines. In this post, you will use the same mechanism for adding the drift detection step in the pipeline.
You start by defining a class called DriftDetectionStep that extends Step and implements ICodePipelineActionFactory as shown in the following code snippet. The constructor accepts 3 parameters stackName, account, region as inputs. When the pipeline runs the step, it invokes the drift detection lambda function with these parameters wrapped inside userParameters variable. The function produceAction() adds the action to invoke drift detection lambda function to the pipeline stage.
Please note that the solution uses an SSM parameter to inject the lambda function ARN into the pipeline stack. So, we deploy the provider lambda function as part of pre-requisites stack before the pipeline stack and publish its ARN to the SSM parameter. The CDK code to deploy pre-requisites stack can be found here.
export class DriftDetectionStep
    extends Step
    implements pipelines.ICodePipelineActionFactory
{
    constructor(
        private readonly stackName: string,
        private readonly account: string,
        private readonly region: string
    ) {
        super(`DriftDetectionStep-${stackName}`);
    }

    public produceAction(
        stage: codepipeline.IStage,
        options: ProduceActionOptions
    ): CodePipelineActionFactoryResult {
        // Define the configuraton for the action that is added to the pipeline.
        stage.addAction(
            new cpactions.LambdaInvokeAction({
                actionName: options.actionName,
                runOrder: options.runOrder,
                lambda: lambda.Function.fromFunctionArn(
                    options.scope,
                    `InitiateDriftDetectLambda-${this.stackName}`,
                    ssm.StringParameter.valueForStringParameter(
                        options.scope,
                        SSM_PARAM_DRIFT_DETECT_LAMBDA_ARN
                    )
                ),
                // These are the parameters passed to the drift detection step implementaton provider lambda
                userParameters: {
                    stackName: this.stackName,
                    account: this.account,
                    region: this.region,
                },
            })
        );
        return {
            runOrdersConsumed: 1,
        };
    }
}
Configuring drift detection step in CDK Pipelines
Here you will see how to integrate the previously defined drift detection step into CDK Pipelines. The pipeline has a stage called DemoStage as shown in the following code snippet. During the construction of DemoStage, we declare drift detection as the pre-deployment step. This makes sure that the pipeline always does the drift detection check prior to deployment.
Please note that for every stack defined in the stage; we add a dedicated step to perform drift detection by instantiating the class DriftDetectionStep detailed in the prior section. Thus, this solution scales with the number of stacks defined per stage.
Here you will go through the deployment steps for the solution and see drift detection in action.
Deploy the pre-requisites stack
Clone the repo from the GitHub location here. Navigate to the cloned folder and run script script-deploy.sh You can find detailed instructions in README.md
Deploy the CDK Pipelines stack
Clone the repo from the GitHub location here. Navigate to the cloned folder and run script script-deploy.sh. This deploys a pipeline with an empty CodeCommit repo as the source. The pipeline run ends up in failure, as shown below, because of the empty CodeCommit repo.
Next, check in the code from the cloned repo into the CodeCommit source repo. You can find detailed instructions on that in README.md This triggers the pipeline and pipeline finishes successfully, as shown below.
The pipeline deploys two stacks DemoStackA and DemoStackB. Each of these stacks creates an S3 bucket.
Demonstrate drift detection
Locate the S3 bucket created by DemoStackA under resources, navigate to the S3 bucket and modify the tag aws-cdk:auto-delete-objects from true to false as shown below
Now, go to the pipeline and trigger a new execution by clicking on Release Change
The pipeline run will now end in failure at the pre-deployment drift detection step.
Cleanup
Please follow the steps below to clean up all the stacks.
Navigate to S3 console and empty the buckets created by stacks DemoStackA and DemoStackB.
Navigate to the CloudFormation console and delete stacks DemoStackA and DemoStackB, since deleting CDK Pipelines stack does not delete the application stacks that the pipeline deploys.
Delete the CDK Pipelines stack cdk-drift-detect-demo-pipeline
Delete the pre-requisites stack cdk-drift-detect-demo-drift-detection-prereq
Conclusion
In this post, I showed how to add a custom implementation step in CDK Pipelines. I also used that mechanism to integrate a drift detection check as a pre-deployment step. This allows us to validate the integrity of a CloudFormation Stack before its deployment. Since the validation is integrated into the pipeline, it is easier to manage the solution in one place as part of the overarching pipeline. Give the solution a try, and then see if you can incorporate it into your organization’s delivery pipelines.
About the author:
Damodar Shenvi Wagle is a Senior Cloud Application Architect at AWS Professional Services. His areas of expertise include architecting serverless solutions, CI/CD, and automation.
Load testing is a foundational pillar of building resilient applications. Today, load testing practices across many organizations are often based on desktop tools, where someone must manually run the performance tests and validate the results before a software release can be promoted to production. This leads to increased time to market for new features and products. Load testing applications in automated CI/CD pipelines provides the following benefits:
Early and automated feedback on performance thresholds based on clearly defined benchmarks.
Consistent and reliable load testing process for every feature release.
Reduced overall time to market due to eliminated manual load testing effort.
Improved overall resiliency of the production environment.
The ability to rapidly identify and document bottlenecks and scaling limits of the production environment.
The AWS Cloud Development Kit (AWS CDK) is an open-source software development framework to define cloud infrastructure in code and provision it through AWS CloudFormation. AWS CDK Pipelines is a construct library module for continuous delivery of AWS CDK applications, powered by AWS CodePipeline. AWS CDK Pipelines can automatically build, test, and deploy the new version of your CDK app whenever the new source code is checked in.
Distributed Load Testing is an AWS Solution that automates software applications testing at scale to help you identify potential performance issues before their release. It creates and simulates thousands of users generating transactional records at a constant pace without the need to provision servers or instances.
Prerequisites
To deploy and test this solution, you will need:
AWS Command Line Interface (AWS CLI): This tutorial assumes that you have configured the AWS CLI on your workstation. Alternatively, you can use also use AWS CloudShell.
AWS CDK V2: This tutorial assumes that you have installed AWS CDK V2 on your workstation or in the CloudShell environment.
Solution Overview
In this solution, we create a CI/CD pipeline using AWS CDK Pipelines and use it to deploy a sample RESTful CDK application in two environments; development and production. We load test the application using AWS Distributed Load Testing Solution in the development environment. Based on the load test result, we either fail the pipeline or proceed to production deployment. You may consider running the load test in a dedicated testing environment that mimics the production environment.
For demonstration purposes, we use the following metrics to validate the load test results.
Average Response Time – the average response time, in seconds, for all the requests generated by the test. In this blog post we define the threshold for average response time to 1 second.
Error Count – the total number of errors. In this blog post, we define the threshold for for total number of errors to 1.
For your application, you may consider using additional metrics from the Distributed Load Testing solution documentation to validate your load test.
The AWS Lambda (Lambda) function in the architecture contains a 500 millisecond sleep statement to add latency to the API response.
Typescript code for starting the load test and validating the test results. This code is executed in the ‘Load Test’ step of the ‘Development Deployment’ stage. It starts a load test against the sample restful application endpoint and waits for the test to finish. For demonstration purposes, the load test is started with the following parameters:
Concurrency: 1
Task Count: 1
Ramp up time: 0 secs
Hold for: 30 sec
End point to test: endpoint for the sample RESTful application.
For the purposes of this blog, we deploy the CI/CD pipeline, the RESTful application and the AWS Distributed Load Testing solution into the same AWS account. In your environment, you may consider deploying these stacks into separate AWS accounts based on your security and governance requirements.
To deploy the solution components
Follow the instructions in the the AWS Distributed Load Testing solution Automated Deployment guide to deploy the solution. Note down the value of the CloudFormation output parameter ‘DLTApiEndpoint’. We will need this in the next steps. Proceed to the next step once you are able to login to the User Interface of the solution.
Deploy the CloudFormation stack for the CI/CD pipeline. This step will also commit the AWS CDK code for the sample RESTful application stack and start the application deployment.
cd pipeline && cdk bootstrap && cdk deploy --require-approval never
Follow the below steps to view the load test results:
Open the AWS CodePipeline console.
Click on the pipeline named “blog-pipeline”.
Observe that one of the stages (named ‘LoadTest’) in the CI/CD pipeline (that was provisioned by the CloudFormation stack in the previous step) executes a load test against the application Development environment.
Click on the details of the ‘LoadTest’ step to view the test results. Notice that the load test succeeded.
Change the response time threshold
In this step, we will modify the response time threshold from 1 second to 200 milliseconds in order to introduce a load test failure. Remember from the steps earlier that the Lambda function code has a 500 millisecond sleep statement to add latency to the API response time.
From the AWS Console and then go to CodeCommit. The source for the pipeline is a CodeCommit repository named “blog-repo”.
Click on the “blog-repo” repository, and then browse to the “pipeline” folder. Click on file ‘loadTestEnvVariables.json’ and then ‘Edit’.
Set the response time threshold to 200 milliseconds by changing attribute ‘AVG_RT_THRESHOLD’ value to ‘.2’. Click on the commit button. This will start will start the CI/CD pipeline.
Go to CodePipeline from the AWS console and click on the ‘blog-pipeline’.
Observe the ‘LoadTest’ step in ‘Development-Deploy’ stage will fail in about five minutes, and the pipeline will not proceed to the ‘Production-Deploy’ stage.
Click on the details of the ‘LoadTest’ step to view the test results. Notice that the load test failed.
Log into the Distributed Load Testing Service console. You will see two tests named ‘sampleScenario’. Click on each of them to see the test result details.
Cleanup
Delete the CloudFormation stack that deployed the sample application.
From the AWS Console, go to CloudFormation and delete the stacks ‘Production-Deploy-Application’ and ‘Development-Deploy-Application’.
Delete the CI/CD pipeline.
cd pipeline && cdk destroy
Delete the Distributed Load Testing Service CloudFormation stack.
From CloudFormation console, delete the stack for Distributed Load Testing service that you created earlier.
Conclusion
In the post above, we demonstrated how to automatically load test your applications in a CI/CD pipeline using AWS CDK Pipelines and AWS Distributed Load Testing solution. We defined the performance bench marks for our application as configuration. We then used these benchmarks to automatically validate the application performance prior to production deployment. Based on the load test results, we either proceeded to production deployment or failed the pipeline.
AWS CloudFormation is an Infrastructure as Code (IaC) service that allows you to model your cloud resources in template files that can be authored or generated in a variety of languages. You can manage stacks that deploy those resources via the AWS Management Console, the AWS Command Line Interface (AWS CLI), or the API. CloudFormation helps customers to quickly and consistently deploy and manage cloud resources, but like all IaC tools, it faced challenges keeping up with the rapid pace of innovation of AWS services. In this post, we will review the history of the CloudFormation registry, which is the result of a strategy we developed to address scaling and standardization, as well as integration with other leading IaC tools and partner products. We will also give an update on the current state of CloudFormation resource coverage and review the future state, which has a goal of keeping CloudFormation and other IaC tools up to date with the latest AWS services and features.
History
The CloudFormation service was first announced in February of 2011, with sample templates that showed how to deploy common applications like blogs and wikis. At launch, CloudFormation supported 13 out of 15 available AWS services with 48 total resource types. At first, resource coverage was tightly coupled to the core CloudFormation engine, and all development on those resources was done by the CloudFormation team itself. Over the past decade, AWS has grown at a rapid pace, and there are currently 200+ services in total. A challenge over the years has been the coverage gap between what was possible for a customer to achieve using AWS services, and what was possible to define in a CloudFormation template.
It became obvious that we needed a change in strategy to scale resource development in a way that could keep up with the rapid pace of innovation set by hundreds of service teams delivering new features on a daily basis. Over the last decade, our pace of innovation has increased nearly 40-fold, with 80 significant new features launched in 2011 versus more than 3,000 in 2021. Since CloudFormation was a key adoption driver (or blocker) for new AWS services, those teams needed a way to create and manage their own resources. The goal was to enable day one support of new services at the time of launch with complete CloudFormation resource coverage.
In 2016, we launched an internal self-service platform that allowed service teams to control their own resources. This began to solve the scaling problems inherent in the prior model where the core CloudFormation team had to do all the work themselves. The benefits went beyond simply distributing developer effort, as the service teams have deep domain knowledge on their products, which allowed them to create more effective IaC components. However, as we developed resources on this model, we realized that additional design features were needed, such as standardization that could enable automatic support for features like drift detection and resource imports.
We embarked on a new project to address these concerns, with the goal of improving the internal developer experience as well as providing a public registry where customers could use the same programming model to define their own resource types. We realized that it wasn’t enough to simply make the new model available—we had to evangelize it with a training campaign, conduct engineering boot-camps, build better tooling like dashboards and deployment pipeline templates, and produce comprehensive on-boarding documentation. Most importantly, we made CloudFormation support a required item on the feature launch checklist for new services, a requirement that goes beyond documentation and is built into internal release tooling (exceptions to this requirement are rare as training and awareness around the registry have improved over time). This was a prime example of one of the maxims we repeat often at Amazon: good mechanisms are better than good intentions.
In 2019, we made this new functionality available to customers when we announced the CloudFormation registry, a capability that allowed developers to create and manage private resource types. We followed up in 2021 with the public registry where third parties, such as partners in the AWS Partner Network (APN), can publish extensions. The open source resource model that customers and partners use to publish third-party registry extensions is the same model used by AWS service teams to provide CloudFormation support for their features.
Once a service team on-boards their resources to the new resource model and builds the expected Create, Read, Update, Delete, and List (CRUDL) handlers, managed experiences like drift detection and resource import are all supported with no additional development effort. One recent example of day-1 CloudFormation support for a popular new feature was Lambda Function URLs, which offered a built-in HTTPS endpoint for single-function micro-services. We also migrated the Amazon Relational Database Service (Amazon RDS) Database Instance resource (AWS::RDS::DBInstance) to the new resource model in September 2022, and within a month, Amazon RDS delivered support for Amazon Aurora Serverless v2 in CloudFormation. This accelerated delivery is possible because teams can now publish independently by taking advantage of the de-centralized Registry ownership model.
Current State
We are building out future innovations for the CloudFormation service on top of this new standardized resource model so that customers can benefit from a consistent implementation of event handlers. We built AWS Cloud Control API on top of this new resource model. Cloud Control API takes the Create-Read-Update-Delete-List (CRUDL) handlers written for the new resource model and makes them available as a consistent API for provisioning resources. APN partner products such as HashiCorp Terraform, Pulumi, and Red Hat Ansible use Cloud Control API to stay in sync with AWS service launches without recurring development effort.
Figure 1. Cloud Control API Resource Handler Diagram
Besides 3rd party application support, the public registry can also be used by the developer community to create useful extensions on top of AWS services. A common solution to extending the capabilities of CloudFormation resources is to write a custom resource, which generally involves inline AWS Lambda function code that runs in response to CREATE, UPDATE, and DELETE signals during stack operations. Some of those use cases can now be solved by writing a registry extension resource type instead. For more information on custom resources and resource types, and the differences between the two, see Managing resources using AWS CloudFormation Resource Types.
CloudFormation Registry modules, which are building blocks authored in JSON or YAML, give customers a way to replace fragile copy-paste template reuse with template snippets that are published in the registry and consumed as if they were resource types. Best practices can be encapsulated and shared across an organization, which allows infrastructure developers to easily adhere to those best practices using modular components that abstract away the intricate details of resource configuration.
CloudFormation Registry hooks give security and compliance teams a vital tool to validate stack deployments before any resources are created, modified, or deleted. An infrastructure team can activate hooks in an account to ensure that stack deployments cannot avoid or suppress preventative controls implemented in hook handlers. Provisioning tools that are strictly client-side do not have this level of enforcement.
A useful by-product of publishing a resource type to the public registry is that you get automatic support for the AWS Cloud Development Kit (CDK) via an experimental open source repository on GitHub called cdk-cloudformation. In large organizations it is typical to see a mix of CloudFormation deployments using declarative templates and deployments that make use of the CDK in languages like TypeScript and Python. By publishing re-usable resource types to the registry, all of your developers can benefit from higher level abstractions, regardless of the tool they choose to create and deploy their applications. (Note that this project is still considered a developer preview and is subject to change)
If you want to see if a given CloudFormation resource is on the new registry model or not, check if the provisioning type is either Fully Mutable or Immutable by invoking the DescribeType API and inspecting the ProvisioningType response element.
Here is a sample CLI command that gets a description for the AWS::Lambda::Function resource, which is on the new registry model.
The difference between FULLY_MUTABLE and IMMUTABLE is the presence of the Update handler. FULLY_MUTABLE types includes an update handler to process updates to the type during stack update operations. Whereas, IMMUTABLE types do not include an update handler, so the type can’t be updated and must instead be replaced during stack update operations. Legacy resource types will be NON_PROVISIONABLE.
Opportunities for improvement
As we continue to strive towards our ultimate goal of achieving full feature coverage and a complete migration away from the legacy resource model, we are constantly identifying opportunities for improvement. We are currently addressing feature gaps in supported resources, such as tagging support for EC2 VPC Endpoints and boosting coverage for resource types to support drift detection, resource import, and Cloud Control API. We have fully migrated more than 130 resources, and acknowledge that there are many left to go, and the migration has taken longer than we initially anticipated. Our top priority is to maintain the stability of existing stacks—we simply cannot break backwards compatibility in the interest of meeting a deadline, so we are being careful and deliberate. One of the big benefits of a server-side provisioning engine like CloudFormation is operational stability—no matter how long ago you deployed a stack, any future modifications to it will work without needing to worry about upgrading client libraries. We remain committed to streamlining the migration process for service teams and making it as easy and efficient as possible.
The developer experience for creating registry extensions has some rough edges, particularly for languages other than Java, which is the language of choice on AWS service teams for their resource types. It needs to be easier to author schemas, write handler functions, and test the code to make sure it performs as expected. We are devoting more resources to the maintenance of the CLI and plugins for Python, Typescript, and Go. Our response times to issues and pull requests in these and other repositories in the aws-cloudformation GitHub organization have not been as fast as they should be, and we are making improvements. One example is the cloudformation-cli repository, where we have merged more than 30 pull requests since October of 2022.
To keep up with progress on resource coverage, check out the CloudFormation Coverage Roadmap, a GitHub project where we catalog all of the open issues to be resolved. You can submit bug reports and feature requests related to resource coverage in this repository and keep tabs on the status of open requests. One of the steps we took recently to improve responses to feature requests and bugs reported on GitHub is to create a system that converts GitHub issues into tickets in our internal issue tracker. These tickets go directly to the responsible service teams—an example is the Amazon RDS resource provider, which has hundreds of merged pull requests.
We have recently announced a new GitHub repository called community-registry-extensions where we are managing a namespace for public registry extensions. You can submit and discuss new ideas for extensions and contribute to any of the related projects. We handle the testing, validation, and deployment of all resources under the AwsCommunity:: namespace, which can be activated in any AWS account for use in your own templates.
To get started with the CloudFormation registry, visit the user guide, and then dive in to the detailed developer guide for information on how to use the CloudFormation Command Line Interface (CFN-CLI) to write your own resource types, modules, and hooks.
We recently created a new Discord server dedicated to CloudFormation. Please join us to ask questions, discuss best practices, provide feedback, or just hang out! We look forward to seeing you there.
Conclusion
In this post, we hope you gained some insights into the history of the CloudFormation registry, and the design decisions that were made during our evolution towards a standardized, scalable model for resource development that can be shared by AWS service teams, customers, and APN partners. Some of the lessons that we learned along the way might be applicable to complex design initiatives at your own company. We hope to see you on Discord and GitHub as we build out a rich set of registry resources together!
In this blog post, we will explore the process of creating a Continuous Integration/Continuous Deployment (CI/CD) pipeline for a .NET AWS Lambda function using the CDK Pipelines. We will cover all the necessary steps to automate the deployment of the .NET Lambda function, including setting up the development environment, creating the pipeline with AWS CDK, configuring the pipeline stages, and publishing the test reports. Additionally, we will show how to promote the deployment from a lower environment to a higher environment with manual approval.
Background
AWS CDK makes it easy to deploy a stack that provisions your infrastructure to AWS from your workstation by simply running cdk deploy. This is useful when you are doing initial development and testing. However, in most real-world scenarios, there are multiple environments, such as development, testing, staging, and production. It may not be the best approach to deploy your CDK application in all these environments using cdk deploy. Deployment to these environments should happen through more reliable, automated pipelines. CDK Pipelines makes it easy to set up a continuous deployment pipeline for your CDK applications, powered by AWS CodePipeline.
The AWS CDK Developer Guide’s Continuous integration and delivery (CI/CD) using CDK Pipelines page shows you how you can use CDK Pipelines to deploy a Node.js based Lambda function. However, .NET based Lambda functions are different from Node.js or Python based Lambda functions in that .NET code first needs to be compiled to create a deployment package. As a result, we decided to write this blog as a step-by-step guide to assist our .NET customers with deploying their Lambda functions utilizing CDK Pipelines.
In this post, we dive deeper into creating a real-world pipeline that runs build and unit tests, and deploys a .NET Lambda function to one or multiple environments.
Architecture
CDK Pipelines is a construct library that allows you to provision a CodePipeline pipeline. The pipeline created by CDK pipelines is self-mutating. This means, you need to run cdk deploy one time to get the pipeline started. After that, the pipeline automatically updates itself if you add new application stages or stacks in the source code.
The following diagram captures the architecture of the CI/CD pipeline created with CDK Pipelines. Let’s explore this architecture at a high level before diving deeper into the details.
Figure 1: Reference architecture diagram
The solution creates a CodePipeline with a AWS CodeCommit repo as the source (CodePipeline Source Stage). When code is checked into CodeCommit, the pipeline is automatically triggered and retrieves the code from the CodeCommit repository branch to proceed to the Build stage.
Build stage compiles the CDK application code and generates the cloud assembly.
Update Pipeline stage updates the pipeline (if necessary).
Publish Assets stage uploads the CDK assets to Amazon S3.
After Publish Assets is complete, the pipeline deploys the Lambda function to both the development and production environments. For added control, the architecture includes a manual approval step for releases that target the production environment.
Before you use AWS CDK to deploy CDK Pipelines, you must bootstrap the AWS environments where you want to deploy the Lambda function. An environment is the target AWS account and Region into which the stack is intended to be deployed.
In this post, you deploy the Lambda function into a development environment and, optionally, a production environment. This requires bootstrapping both environments. However, deployment to a production environment is optional; you can skip bootstrapping that environment for the time being, as we will cover that later.
This is one-time activity per environment for each environment to which you want to deploy CDK applications. To bootstrap the development environment, run the below command, substituting in the AWS account ID for your dev account, the region you will use for your dev environment, and the locally-configured AWS CLI profile you wish to use for that account. See the documentation for additional details.
‐‐profile specifies the AWS CLI credential profile that will be used to bootstrap the environment. If not specified, default profile will be used. The profile should have sufficient permissions to provision the resources for the AWS CDK during bootstrap process.
‐‐cloudformation-execution-policies specifies the ARNs of managed policies that should be attached to the deployment role assumed by AWS CloudFormation during deployment of your stacks.
For this post, you will use CodeCommit to store your source code. First, create a git repository named dotnet-lambda-cdk-pipeline in CodeCommit by following these steps in the CodeCommit documentation.
After you have created the repository, generate git credentials to access the repository from your local machine if you don’t already have them. Follow the steps below to generate git credentials.
Sign in to the AWS Management Console and open the IAM console.
Next. open the user details page, choose the Security Credentials tab, and in HTTPS Git credentials for AWS CodeCommit, choose Generate.
Download credentials to download this information as a .CSV file.
Clone the recently created repository to your workstation, then cd into dotnet-lambda-cdk-pipeline directory.
git clone <CODECOMMIT-CLONE-URL>
cd dotnet-lambda-cdk-pipeline
Alternatively, you can use git-remote-codecommit to clone the repository with git clone codecommit::<REGION>://<PROFILE>@<REPOSITORY-NAME> command, replacing the placeholders with their original values. Using git-remote-codecommit does not require you to create additional IAM users to manage git credentials. To learn more, refer AWS CodeCommit with git-remote-codecommit documentation page.
Initialize the CDK project
From the command prompt, inside the dotnet-lambda-cdk-pipeline directory, initialize a AWS CDK project by running the following command.
cdk init app --language csharp
Open the generated C# solution in Visual Studio, right-click the DotnetLambdaCdkPipeline project and select Properties. Set the Target framework to .NET 6.
Create a CDK stack to provision the CodePipeline
Your CDK Pipelines application includes at least two stacks: one that represents the pipeline itself, and one or more stacks that represent the application(s) deployed via the pipeline. In this step, you create the first stack that deploys a CodePipeline pipeline in your AWS account.
From Visual Studio, open the solution by opening the .sln solution file (in the src/ folder). Once the solution has loaded, open the DotnetLambdaCdkPipelineStack.cs file, and replace its contents with the following code. Note that the filename, namespace and class name all assume you named your Git repository as shown earlier.
Note: be sure to replace “<CODECOMMIT-REPOSITORY-NAME>” in the code below with the name of your CodeCommit repository (in this blog post, we have used dotnet-lambda-cdk-pipeline).
using Amazon.CDK;
using Amazon.CDK.AWS.CodeBuild;
using Amazon.CDK.AWS.CodeCommit;
using Amazon.CDK.AWS.IAM;
using Amazon.CDK.Pipelines;
using Constructs;
using System.Collections.Generic;

namespace DotnetLambdaCdkPipeline
{
    public class DotnetLambdaCdkPipelineStack : Stack
    {
        internal DotnetLambdaCdkPipelineStack(Construct scope, string id, IStackProps props = null) : base(scope, id, props)
        {

            var repository = Repository.FromRepositoryName(this, "repository", "<CODECOMMIT-REPOSITORY-NAME>");

            // This construct creates a pipeline with 3 stages: Source, Build, and UpdatePipeline
            var pipeline = new CodePipeline(this, "pipeline", new CodePipelineProps
            {
                PipelineName = "LambdaPipeline",
                SelfMutation = true,

                // Synth represents a build step that produces the CDK Cloud Assembly.
                // The primary output of this step needs to be the cdk.out directory generated by the cdk synth command.
                Synth = new CodeBuildStep("Synth", new CodeBuildStepProps
                {
                    // The files downloaded from the repository will be placed in the working directory when the script is executed
                    Input = CodePipelineSource.CodeCommit(repository, "master"),

                    // Commands to run to generate CDK Cloud Assembly
                    Commands = new string[] { "npm install -g aws-cdk", "cdk synth" },

                    // Build environment configuration
                    BuildEnvironment = new BuildEnvironment
                    {
                        BuildImage = LinuxBuildImage.AMAZON_LINUX_2_4,
                        ComputeType = ComputeType.MEDIUM,

                        // Specify true to get a privileged container inside the build environment image
                        Privileged = true
                    }
                })
            });
        }
    }
}
In the preceding code, you use CodeBuildStep instead of ShellStep, since ShellStep doesn’t provide a property to specify BuildEnvironment. We need to specify the build environment in order to set privileged mode, which allows access to the Docker daemon in order to build container images in the build environment. This is necessary to use the CDK’s bundling feature, which is explained in later in this blog post.
Open the file src/DotnetLambdaCdkPipeline/Program.cs, and edit its contents to reflect the below. Be sure to replace the placeholders with your AWS account ID and region for your dev environment.
using Amazon.CDK;

namespace DotnetLambdaCdkPipeline
{
    sealed class Program
    {
        public static void Main(string[] args)
        {
            var app = new App();
            new DotnetLambdaCdkPipelineStack(app, "DotnetLambdaCdkPipelineStack", new StackProps
            {
                Env = new Amazon.CDK.Environment
                {
                    Account = "<DEV-ACCOUNT-ID>",
                    Region = "<DEV-REGION>"
                }
            });
            app.Synth();
        }
    }
}
Note: Instead of committing the account ID and region to source control, you can set environment variables on the CodeBuild agent and use them; see Environments in the AWS CDK documentation for more information. Because the CodeBuild agent is also configured in your CDK code, you can use the BuildEnvironmentVariableType property to store environment variables in AWS Systems Manager Parameter Store or AWS Secrets Manager.
After you make the code changes, build the solution to ensure there are no build issues. Next, commit and push all the changes you just made. Run the following commands (or alternatively use Visual Studio’s built-in Git functionality to commit and push your changes):
Then navigate to the root directory of repository where your cdk.json file is present, and run the cdk deploy command to deploy the initial version of CodePipeline. Note that the deployment can take several minutes.
The pipeline created by CDK Pipelines is self-mutating. This means you only need to run cdk deploy one time to get the pipeline started. After that, the pipeline automatically updates itself if you add new CDK applications or stages in the source code.
After the deployment has finished, a CodePipeline is created and automatically runs. The pipeline includes three stages as shown below.
Source – It fetches the source of your AWS CDK app from your CodeCommit repository and triggers the pipeline every time you push new commits to it.
Build – This stage compiles your code (if necessary) and performs a cdk synth. The output of that step is a cloud assembly.
UpdatePipeline – This stage runs cdk deploy command on the cloud assembly generated in previous stage. It modifies the pipeline if necessary. For example, if you update your code to add a new deployment stage to the pipeline to your application, the pipeline is automatically updated to reflect the changes you made.
Figure 2: Initial CDK pipeline stages
Define a CodePipeline stage to deploy .NET Lambda function
In this step, you create a stack containing a simple Lambda function and place that stack in a stage. Then you add the stage to the pipeline so it can be deployed.
To create a Lambda project, do the following:
In Visual Studio, right-click on the solution, choose Add, then choose New Project.
In the New Project dialog box, choose the AWS Lambda Project (.NET Core – C#) template, and then choose OK or Next.
For Project Name, enter SampleLambda, and then choose Create.
From the Select Blueprint dialog, choose Empty Function, then choose Finish.
Next, create a new file in the CDK project at src/DotnetLambdaCdkPipeline/SampleLambdaStack.cs to define your application stack containing a Lambda function. Update the file with the following contents (adjust the namespace as necessary):
using Amazon.CDK;
using Amazon.CDK.AWS.Lambda;
using Constructs;
using AssetOptions = Amazon.CDK.AWS.S3.Assets.AssetOptions;

namespace DotnetLambdaCdkPipeline
{
    class SampleLambdaStack: Stack
    {
        public SampleLambdaStack(Construct scope, string id, StackProps props = null) : base(scope, id, props)
        {
            // Commands executed in a AWS CDK pipeline to build, package, and extract a .NET function.
            var buildCommands = new[]
            {
                "cd /asset-input",
                "export DOTNET_CLI_HOME=\"/tmp/DOTNET_CLI_HOME\"",
                "export PATH=\"$PATH:/tmp/DOTNET_CLI_HOME/.dotnet/tools\"",
                "dotnet build",
                "dotnet tool install -g Amazon.Lambda.Tools",
                "dotnet lambda package -o output.zip",
                "unzip -o -d /asset-output output.zip"
            };

            new Function(this, "LambdaFunction", new FunctionProps
            {
                Runtime = Runtime.DOTNET_6,
                Handler = "SampleLambda::SampleLambda.Function::FunctionHandler",

                // Asset path should point to the folder where .csproj file is present.
                // Also, this path should be relative to cdk.json file.
                Code = Code.FromAsset("./src/SampleLambda", new AssetOptions
                {
                    Bundling = new BundlingOptions
                    {
                        Image = Runtime.DOTNET_6.BundlingImage,
                        Command = new[]
                        {
                            "bash", "-c", string.Join(" && ", buildCommands)
                        }
                    }
                })
            });
        }
    }
}
Building inside a Docker container
The preceding code uses bundling feature to build the Lambda function inside a docker container. Bundling starts a new docker container, copies the Lambda source code inside /asset-input directory of the container, runs the specified commands that write the package files under /asset-output directory. The files in /asset-output are copied as assets to the stack’s cloud assembly directory. In a later stage, these files are zipped and uploaded to S3 as the CDK asset.
Building Lambda functions inside Docker containers is preferable than building them locally because it reduces the host machine’s dependencies, resulting in greater consistency and reliability in your build process.
Bundling requires the creation of a docker container on your build machine. For this purpose, the privileged: true setting on the build machine has already been configured.
Adding development stage
Create a new file in the CDK project at src/DotnetLambdaCdkPipeline/DotnetLambdaCdkPipelineStage.cs to hold your stage. This class will create the development stage for your pipeline.
using Amazon.CDK;
using Constructs;

namespace DotnetLambdaCdkPipeline
{
    public class DotnetLambdaCdkPipelineStage : Stage
    {
        internal DotnetLambdaCdkPipelineStage(Construct scope, string id, IStageProps props = null) : base(scope, id, props)
        {
            Stack lambdaStack = new SampleLambdaStack(this, "LambdaStack");
        }
    }
}
Edit src/DotnetLambdaCdkPipeline/DotnetLambdaCdkPipelineStack.cs to add the stage to your pipeline. Add the bolded line from the code below to your file.
using Amazon.CDK;
using Amazon.CDK.Pipelines;

namespace DotnetLambdaCdkPipeline
{
    public class DotnetLambdaCdkPipelineStack : Stack
    {
        internal DotnetLambdaCdkPipelineStack(Construct scope, string id, IStackProps props = null) : base(scope, id, props)
        {

            var repository = Repository.FromRepositoryName(this, "repository", "dotnet-lambda-cdk-application");

            // This construct creates a pipeline with 3 stages: Source, Build, and UpdatePipeline
            var pipeline = new CodePipeline(this, "pipeline", new CodePipelineProps
            {
                PipelineName = "LambdaPipeline",
                .
                .
                .
            });

            var devStage = pipeline.AddStage(new DotnetLambdaCdkPipelineStage(this, "Development"));
        }
    }
}
Next, build the solution, then commit and push the changes to the CodeCommit repo. This will trigger the CodePipeline to start.
When the pipeline runs, UpdatePipeline stage detects the changes and updates the pipeline based on the code it finds there. After the UpdatePipeline stage completes, pipeline is updated with additional stages.
Let’s observe the changes:
An Assets stage has been added. This stage uploads all the assets you are using in your app to Amazon S3 (the S3 bucket created during bootstrapping) so that they could be used by other deployment stages later in the pipeline. For example, the CloudFormation template used by the development stage, includes reference to these assets, which is why assets are first moved to S3 and then referenced in later stages.
A Development stage with two actions has been added. The first action is to create the change set, and the second is to execute it.
Figure 3: CDK pipeline with development stage to deploy .NET Lambda function
After the Deploy stage has completed, you can find the newly-deployed Lambda function by visiting the Lambda console, selecting “Functions” from the left menu, and filtering the functions list with “LambdaStack”. Note the runtime is .NET.
Right click on the solution, choose Add, then choose New Project.
In the New Project dialog box, choose the xUnit Test Project template, and then choose OK or Next.
For Project Name, enter SampleLambda.Tests, and then choose Create or Next. Depending on your version of Visual Studio, you may be prompted to select the version of .NET to use. Choose .NET 6.0 (Long Term Support), then choose Create.
Right click on SampleLambda.Tests project, choose Add, then choose Project Reference. Select SampleLambda project, and then choose OK.
Next, edit the src/SampleLambda.Tests/UnitTest1.cs file to add a unit test. You can use the code below, which verifies that the Lambda function returns the input string as upper case.
using Xunit;

namespace SampleLambda.Tests
{
    public class UnitTest1
    {
        [Fact]
        public void TestSuccess()
        {
            var lambda = new SampleLambda.Function();

            var result = lambda.FunctionHandler("test string", context: null);

            Assert.Equal("TEST STRING", result);
        }
    }
}
You can add pre-deployment or post-deployment actions to the stage by calling its AddPre() or AddPost() method. To execute above test cases, we will use a pre-deployment action.
To add a pre-deployment action, we will edit the src/DotnetLambdaCdkPipeline/DotnetLambdaCdkPipelineStack.cs file in the CDK project, after we add code to generate test reports.
To run the unit test(s) and publish the test report in CodeBuild, we will construct a BuildSpec for our CodeBuild project. We also provide IAM policy statements to be attached to the CodeBuild service role granting it permissions to run the tests and create reports. Update the file by adding the new code (starting with “// Add this code for test reports”) below the devStage declaration you added earlier:
using Amazon.CDK;
using Amazon.CDK.Pipelines;
...

namespace DotnetLambdaCdkPipeline
{
    public class DotnetLambdaCdkPipelineStack : Stack
    {
        internal DotnetLambdaCdkPipelineStack(Construct scope, string id, IStackProps props = null) : base(scope, id, props)
        {
            // ...
            // ...
            // ...
            var devStage = pipeline.AddStage(new DotnetLambdaCdkPipelineStage(this, "Development"));


            // Add this code for test reports
            var reportGroup = new ReportGroup(this, "TestReports", new ReportGroupProps
            {
                ReportGroupName = "TestReports"
            });

            // Policy statements for CodeBuild Project Role
            var policyProps = new PolicyStatementProps()
            {
                Actions = new string[] {
                    "codebuild:CreateReportGroup",
                    "codebuild:CreateReport",
                    "codebuild:UpdateReport",
                    "codebuild:BatchPutTestCases"
                },
                Effect = Effect.ALLOW,
                Resources = new string[] { reportGroup.ReportGroupArn }
            };

            // PartialBuildSpec in AWS CDK for C# can be created using Dictionary
            var reports = new Dictionary<string, object>()
            {
                {
                    "reports", new Dictionary<string, object>()
                    {
                        {
                            reportGroup.ReportGroupArn, new Dictionary<string,object>()
                            {
                                { "file-format", "VisualStudioTrx" },
                                { "files", "**/*" },
                                { "base-directory", "./testresults" }
                            }
                        }
                    }
                }
            };
            // End of new code block
        }
    }
}
Finally, add the CodeBuildStep as a pre-deployment action to the development stage with necessary CodeBuildStepProps to set up reports. Add this after the new code you added above.
devStage.AddPre(new Step[]
{
    new CodeBuildStep("Unit Test", new CodeBuildStepProps
    {
        Commands= new string[]
        {
            "dotnet test -c Release ./src/SampleLambda.Tests/SampleLambda.Tests.csproj --logger trx --results-directory ./testresults",
        },
        PrimaryOutputDirectory = "./testresults",
        PartialBuildSpec= BuildSpec.FromObject(reports),
        RolePolicyStatements = new PolicyStatement[] { new PolicyStatement(policyProps) },
        BuildEnvironment = new BuildEnvironment
        {
            BuildImage = LinuxBuildImage.AMAZON_LINUX_2_4,
            ComputeType = ComputeType.MEDIUM
        }
    })
});
Build the solution, then commit and push the changes to the repository. Pushing the changes triggers the pipeline, runs the test cases, and publishes the report to the CodeBuild console. To view the report, after the pipeline has completed, navigate to TestReports in CodeBuild’s Report Groups as shown below.
Figure 4: Test report in CodeBuild report group
Deploying to production environment with manual approval
CDK Pipelines makes it very easy to deploy additional stages with different accounts. You have to bootstrap the accounts and Regions you want to deploy to, and they must have a trust relationship added to the pipeline account.
To bootstrap an additional production environment into which AWS CDK applications will be deployed by the pipeline, run the below command, substituting in the AWS account ID for your production account, the region you will use for your production environment, the AWS CLI profile to use with the prod account, and the AWS account ID where the pipeline is already deployed (the account you bootstrapped at the start of this blog).
The --trust option indicates which other account should have permissions to deploy AWS CDK applications into this environment. For this option, specify the pipeline’s AWS account ID.
Use below code to add a new stage for production deployment with manual approval. Add this code below the “devStage.AddPre(...)” code block you added in the previous section, and remember to replace the placeholders with your AWS account ID and region for your prod environment.
var prodStage = pipeline.AddStage(new DotnetLambdaCdkPipelineStage(this, "Production", new StageProps
{
    Env = new Environment
    {
        Account = "<PROD-ACCOUNT-ID>",
        Region = "<PROD-REGION>"
    }
}), new AddStageOpts
{
    Pre = new[] { new ManualApprovalStep("PromoteToProd") }
});
To support deploying CDK applications to another account, the artifact buckets must be encrypted, so add a CrossAccountKeys property to the CodePipeline near the top of the pipeline stack file, and set the value to true (see the line in bold in the code snippet below). This creates a KMS key for the artifact bucket, allowing cross-account deployments.
var pipeline = new CodePipeline(this, "pipeline", new CodePipelineProps
{
PipelineName = "LambdaPipeline",
SelfMutation = true,
CrossAccountKeys = true,EnableKeyRotation = true, //Enable KMS key rotation for the generated KMS keys
// ...
}
After you commit and push the changes to the repository, a new manual approval step called PromoteToProd is added to the Production stage of the pipeline. The pipeline pauses at this step and awaits manual approval as shown in the screenshot below.
Figure 5: Pipeline waiting for manual review
When you click the Review button, you are presented with the following dialog. From here, you can choose to approve or reject and add comments if needed.
Figure 6: Manual review approval dialog
Once you approve, the pipeline resumes, executes the remaining steps and completes the deployment to production environment.
Figure 7: Successful deployment to production environment
Clean up
To avoid incurring future charges, log into the AWS console of the different accounts you used, go to the AWS CloudFormation console of the Region(s) where you chose to deploy, select and click Delete on the stacks created for this activity. Alternatively, you can delete the CloudFormation Stack(s) using cdk destroy command. It will not delete the CDKToolkit stack that the bootstrap command created. If you want to delete that as well, you can do it from the AWS Console.
Conclusion
In this post, you learned how to use CDK Pipelines for automating the deployment process of .NET Lambda functions. An intuitive and flexible architecture makes it easy to set up a CI/CD pipeline that covers the entire application lifecycle, from build and test to deployment. With CDK Pipelines, you can streamline your development workflow, reduce errors, and ensure consistent and reliable deployments. For more information on CDK Pipelines and all the ways it can be used, see the CDK Pipelines reference documentation.
Did you know you can use CloudFormation to manage third-party resources? The AWS CloudFormation Public Registry provides a searchable collection of CloudFormation extensions and makes it easy to discover and provision them in CloudFormation templates and AWS Cloud Development Kit (CDK) applications. In the past three months, we’ve added a number of new, exciting partners to the Public Registry, including GitLab, Okta, and PagerDuty.
The extensions available on the registry are wide-ranging and include third-party resources from partners such as MongoDB; hooks, which are preventative controls that add safeguards to provisioning; and modules, which are re-usable components that take into account best practices and opinionated definitions of resources. AWS Partner Network (APN), third parties, and the developer community contribute these extensions to the Public Registry. Using extensions, customers no longer need to create and maintain custom provisioning logic for resource types from third-party vendors.
Over last few months, AWS collaborated with partners to develop and publish over 80 new resources across 14 providers to Public Registry for CloudFormation. Below is a summary of the new resource type additions.
Manage components in MongoDB Atlas. Add, edit, or delete administrative objects within Atlas, including projects, users, and database deployments
Note: You cannot read or write data to Atlas Clusters with Atlas Admin APIs and AWS CloudFormation resources. To read and write data in Atlas, you must use the Atlas Data API
Manage the users and groups in an organization, set up a new project with the right users, groups, and access token, tag a project automatically for every active CI/CD deployment
Create a new Dashboard with custom Pages, Widgets and Layout, add tags to your data to help improve data organization and findability, workloads-related tasks
Here are some of the benefits for extension builders and consumers when publishing extensions to the public registry:
Discoverability – Publishing your extensions in the public registry will make them discoverable by 1M+ active CloudFormation and CDK customers.
CDK Support – We’re seeing rapid growth in the adoption of the CDK amongst the developer population. Upon publishing to the registry, L1 CDK Constructs will automatically be created for your third party resources making them compatible with the CDK with no added work required. These constructs will also be listed on Construct Hub and aids discoverability discoverable by customers. Note: Automated L1 CDK construct generation is currently an experimental feature.
Drift detection – Third-party resource types in the public registry also integrate with drift detection. After creating a resource from a third-party resource type, CloudFormation will detect changes to the third-party resource from its template configuration, known as configuration drift, just as it would with AWS resources.
AWS Config – You can also use AWS Config to manage compliance for third-party resources consumed from the registry. The resource types are automatically tracked as Configuration Items when you have configured AWS Config to record them, and used CloudFormation to create, update, and delete them. Whether the resource types you use are third-party or AWS resources, you can view configuration history for them, in addition to being able to write AWS Config rules to verify configuration best practices.
Abstraction of Best Practices with Modules – Browse and use modules from the registry when creating your CloudFormation templates to ensure you’re provisioning resources while adhering to best practices.
AWS Cloud Control API – The AWS Cloud Control API allows AWS partners and customers to interface with your resource type through API calls using Create, Read, Update, Delete, and List (CRUD-L) operations. Resources in the registry will be automatically integrated with our AWS Cloud Control API and expands your third party resource compatibility to even more AWS services and IaC tools.
We’ve seen great momentum from our partners and developer community over the past year. We are looking forward to continued investment and innovation in the Public Registry.
How to Get Started
For Resource Type Users: Explore and Activate Third Party Resource Types
Third party resource types must first be activated before they can be used. You do this by logging into your AWS Console > Navigate to CloudFormation > Registry > Public extensions > Set the Publisher to Third Party. This will show you a list of available third-party resources in your region (note that different regions may have a different set of third-party resource types). Select the radio box next to the resource types you want to activate and click the activate button at the top of the list.
Figure 1:
Don’t see the extension you need in the registry?
You can submit requests for new third-party extensions through our Community Registry Extensions Github repo issue tracker! Click the New Issue button and describe the third-party extension along with information about your use case.
For Developers and Publishers: Join the CloudFormation Developer Community and Start Building
You can see several of the community-built registry extensions in the AWS CloudFormation Community Registry Extensions repository and even contribute yourself. You can also read about the experiences and lessons learned from publishing to the Registry through this blog written by Cloudsoft.
For developers looking to create new resource types to add to the public Registry, follow this creating resource types walkthrough help you get started. If you need assistance creating, publishing resources, or just want to join the discussion, you can join the conversation today in our CloudFormation Discord Channel. We’d love to hear about your experiences and use cases in developing innovations with registry extensions.
Customers who require private keys for their TLS certificates to be stored in FIPS 140-2 Level 3 certified hardware security modules (HSMs) can use AWS CloudHSM to store their keys for websites hosted in the cloud. In this blog post, we will show you how to automate the deployment of a web application using NGINX in AWS Fargate, with full integration with CloudHSM. You will also use AWS CodeDeploy to manage the deployment of changes to your Amazon Elastic Container Service (Amazon ECS) service.
CloudHSM offers FIPS 140-2 Level 3 HSMs that you can integrate with NGINX or Apache HTTP Server through the OpenSSL Dynamic Engine. The CloudHSM Client SDK 5 includes the OpenSSL Dynamic Engine to allow your web server to use a private key stored in the HSM with TLS versions 1.2 and 1.3 to support applications that are required to use FIPS 140-2 Level 3 validated HSMs.
CloudHSM uses the private key in the HSM as part of the server verification step of the TLS handshake that occurs every time that a new HTTPS connection is established between the client and server. Using the exchanged symmetric key, OpenSSL software performs the key exchange and bulk encryption. For more information about this process and how CloudHSM fits in, see How SSL/TLS offload with AWS CloudHSM works.
Solution overview
This blog post uses the AWS Cloud Development Kit (AWS CDK) to deploy the solution infrastructure. The AWS CDK allows you to define your cloud application resources using familiar programming languages.
Figure 1 shows an overview of the overall architecture deployed in this blog. This solution contains three CDK stacks: The TlsOffloadContainerBuildStack CDK stack deploys the CodeCommit, CodeBuild, and AmazonECR resources. The TlsOffloadEcsServiceStack CDK stack deploys the ECS Fargate service along with the required VPC resources. The TlsOffloadPipelineStack CDK stack deploys the CodePipeline resources to automate deployments of changes to the service configuration.
Figure 1: Overall architecture
At a high level, here’s how the solution in Figure 1 works:
Clients make an HTTPS request to the public IP address exposed by Network Load Balancer to connect to the web server and establish a secure connection that uses TLS.
Network Load Balancer routes the request to one of the ECS hosts running in private virtual private cloud (VPC) subnets, which are connected to the CloudHSM cluster.
The NGINX web server that is running on ECS containers performs a TLS handshake by using the private key stored in the HSM to establish a secure connection with the requestor.
Note: Although we don’t focus on perimeter protection in this post, AWS has a number of services that help provide layered perimeter protection for your internet-facing applications, such as AWS Shield and AWS WAF.
Figure 2 shows an overview of the automation infrastructure that is deployed by the TlsOffloadContainerBuildStack and TlsOffloadPipelineStack CDK stacks.
Figure 2: Deployment pipeline
At a high level, here’s how the solution in Figure 2 works:
A developer makes changes to the service configuration and commits the changes to the AWS CodeCommit repository.
An RSA private key in the HSM with a corresponding fake PEM file and certificate signed by a trusted Certificate Authority for the web server. Fake PEM files are PEM-encoded key files that store a reference to the key on the HSM instead of storing the private key information. For instructions on how to generate this file, see Generate or import a private key and SSL/TLS certificate.
An environment configured with AWS CDK to deploy the CDK stacks with the relevant resources. For instructions on how to set up this environment, see Getting started with the AWS CDK.
Step 1: Store secrets in Secrets Manager
As with other container projects, you need to decide what to build statically into the container (for example, libraries, code, or packages) and what to set as runtime parameters, to be pulled from a parameter store. In this walkthrough, we use Secrets Manager to store sensitive parameters and use the integration of Amazon ECS with Secrets Manager to securely retrieve them when the container is launched.
Important: You need to store the following information in Secrets Manager as plaintext, not as key/value pairs.
The web server certificate – In this example, the name of the secret for the web server certificate is tls/servercert. It will look similar to the following:
Figure 4: Store the web server certificate
The fake PEM file for the private key stored in the HSM that you generated in the Prerequisites section. In this example, the name of the secret for the fake PEM file is tls/fakepem.
Figure 5: Store the fake PEM
The HSM pin used to authenticate with the HSMs in your cluster. In this example, the name of the secret for the HSM pin is tls/pin.
Figure 6: Store the HSM pin
After you’ve stored your secrets, you should see output similar to the following:
Figure 7: List of required secrets
Step 2: Download and configure the CDK app
This post uses the AWS CDK to deploy the solution infrastructure. In this section, you will download the CDK app and configure it.
Run the following command to build the CDK stacks from the root of the project directory.
npm run build
To view the stacks that are available to deploy, run the following command from the root of the project directory.
cdk ls
You should see the following stacks available to deploy:
TlsOffloadContainerBuildStack — Deploys the CodeCommit, CodeBuild, and ECR repository that builds the ECS container image.
TlsOffloadEcsServiceStack — Deploys the ECS Fargate service along with the required VPC resources.
TlsOffloadPipelineStack — Deploys the CodePipeline that automates the deployment of updates to the service.
Step 3: Deploy the container build stack
In this step, you will deploy the container build stack, and then create a build and verify that the image was built successfully.
To deploy the container build stack
Deploy the TlsOffloadContainerBuildStack stack that we described in Figure 2 to your AWS account. In your CDK environment, run the following command:
cdk deploy TlsOffloadContainerBuildStack
The command line interface (CLI) will prompt you to approve the changes. After you approve them, you will see the following resources deployed to your newly created CodeCommit repository.
Dockerfile — This file provides a containerized environment for each of the Fargate containers to run. It downloads and installs necessary dependencies to run the NGINX web server with CloudHSM.
nginx.conf — This file provides NGINX with the configuration settings to run an HTTPS web server with CloudHSM configured as the SSL engine that performs the TLS handshake. The following nginx.conf values have already been configured in the file; if you want to make changes, update the file before deployment:
ssl_engine is set to cloudhsm
the environment variable is env CLOUDHSM_PIN
error_log is set to stderr so that the Fargate container can capture the logs in CloudWatch
the server section is set up to listen on port 443
ssl_ciphers are configured for a server with an RSA private key
run.sh — This script configures the CloudHSM OpenSSL Dynamic Engine on the Fargate task before the NGINX server is started.
nginx.service — This file specifies the configuration settings that systemd uses to run the NGINX service. Included in this file is a reference to the file that contains the environment variables for the NGINX service. This provides the HSM pin to the OpenSSL Engine.
index.html — This file is a sample HTML file that is displayed when you navigate to the HTTPS endpoint of the load balancer in your browser.
dhparam.pem — This file provides sample Diffie-Hellman parameters for demonstration purposes, but AWS recommends that you generate your own. You can generate your own Diffie-Hellman parameters by running the following command with the OpenSSL CLI. These parameters are not required for TLS but are recommended to provide perfect forward secrecy in your encrypted messages.
openssl dhparam -out ./dhparam.pem 2048
Your repository should look like the following:
Figure 8: CodeCommit repository
Before you deploy the Amazon ECS service, you need to build your first Docker image to populate the ECR repository. To successfully deploy the service, you need to have at least one image already present in the repository.
To create a build and verify the image was built successfully
Find the CodeBuild project that was created by the CDK deployment and select it.
Choose Start Build to initiate a new build.
Wait for the build to complete successfully, and then open the Amazon ECR console.
Select the repository that the CDK deployment created.
You should now see an image in your repository, similar to the following:
Figure 9: ECR repository
Step 4: Deploy the Amazon ECS service
Now that you have successfully built an ECR image, you can deploy the Amazon ECS service. This step deploys the following resources to your account:
VPC endpoints for the required AWS services that your ECS task needs to communicate with, including the following:
Amazon ECR
Secrets Manager
CloudWatch
CloudHSM
Network Load Balancer, which load balances HTTPS traffic to your ECS tasks.
A CloudWatch Logs log group to host the logs for the ECS tasks.
An ECS cluster with ECS tasks using your previously built Docker image that hosts the NGINX service.
To deploy the Amazon ECS service with the CDK
In your CDK environment, run the following command:
cdk deploy TlsOffloadEcsServiceStack
The CLI will prompt you to approve the changes. After you approve them, you will see these resources deploy to your account.
Checkpoint
At this point, you should have a working service. To confirm that you do, in your browser, navigate using HTTPS to the public address associated with the Network Load Balancer. While not covered in this blog, you can additionally configure DNS routing using Amazon Route53 to setup a custom domain name for your web service. You should see a screen similar to the following.
Figure 10: The sample website
Step 5: Use CodePipeline to automate the deployment of changes to the web server
Now that you have deployed a preliminary version of the application, you can take a few steps to automate further releases of the web server. As you maintain this application in production, you might need to update one or more of the following items:
Your website HTML source and other required libraries (for example, CSS or JavaScript)
Your Docker environment, such as the OpenSSL libraries, operating system and CloudHSM packages, and NGINX version.
Re-deploy the service after rotating your web server private key and certificate in Secrets Manager
Next, you will set up a CodePipeline project that orchestrates the end-to-end deployment of a change to the application—from an update to the code in our CodeCommit repo to the deployment of updated container images and the redirection of user traffic by the load balancer to the updated application.
This step deploys to your account a deployment pipeline that connects your CodeCommit, CodeBuild, and Amazon ECS services.
Deploy the CodePipeline stack with CDK
In your CDK environment, run the following command:
cdk deploy TlsOffloadPipelineStack
The CLI will prompt you to approve the changes. After you approve them, you will see the resources deploy to your account.
Start a deployment
To verify that your automation is working correctly, start a new deployment in your CodePipeline by making a change to your source repository. If everything works, the CodeBuild project will build the latest version of the Dockerfile located in your CodeCommit repository and push it to Amazon ECR. Then, the CodeDeploy application will create a new version of the ECS task definition and deploy new tasks while spinning down the existing tasks.
View your website
Now that the deployment is complete, you should again be able to view your website in your browser by navigating to the website for your application. If you made changes to the source code, such as changes to your index.html file, you should see these changes now.
Verify that the web server is properly configured by checking that the website’s certificate matches the one that you created in the Prerequisites section. Figure 11 shows an example of a certificate.
Figure 11: Certificate for the application
To verify that your NGINX service is using your CloudHSM cluster to offload the TLS handshake, you can view the CloudHSM client logs for this application in CloudWatch in the log group that you specified when you configured the ECS task definition.
Select the log group corresponding to your CloudHSM cluster. The log group has the following format: /aws/cloudhsm/<cluster-id>.
You can see entries similar to the following, which indicates that the NGINX application is connecting and logging in to the HSM to perform cryptographic operations.
Time: 02/04/23 17:45:40.333033, usecs:1675532740333033
Version No : 1.0
Sequence No : 0x2
Reboot counter : 0x8
Opcode : CN_LOGIN (0xd)
Command Type(hex) : CN_MGMT_CMD (0x0)
User id : 3
Session Handle : 0x15010002
Response : 0x0:HSM Return: SUCCESS
Log type : USER_AUTH_LOG (2)
User Name : crypto_user
User Type : CN_CRYPTO_USER (1)
Conclusion
In this post, you learned how to set up a NGINX web server on Fargate in a secure, private subnet that offloads the TLS termination to a FIPS 140-2 Level 3 HSM environment that uses the CloudHSM OpenSSL Dynamic Engine. You also learned how to set up a deployment pipeline to automate the Fargate deployments when updates are made.
You can expand this solution to fit your individual use case. For example, you can use the NGINX web server as a reverse proxy for additional servers in your internal network, and set up mutual TLS between these internal servers.
If you have feedback about this post, submit comments in the Comments section below. If you have questions about this post, start a new thread on the AWS CloudHSM re:Post or contact AWS Support.
Want more AWS Security news? Follow us on Twitter.
There are different ways to organize teams to deliver great software products. There are companies that give the end-to-end responsibility for a product to a single team, like Amazon’s Two-Pizza teams, and there are companies where multiple teams split the responsibility between infrastructure (or platform) teams and application development teams. This post provides guidance on how collaboration efficiency can be improved in the case of a split-team approach with the help of the AWS Cloud Development Kit (CDK).
The AWS CDK is an open-source software development framework to define your cloud application resources. You do this by using familiar programming languages like TypeScript, Python, Java, C# or Go. It allows you to mix code to define your application’s infrastructure, traditionally expressed through infrastructure as code tools like AWS CloudFormation or HashiCorp Terraform, with code to bundle, compile, and package your application.
This is great for autonomous teams with end-to-end responsibility, as it helps them to keep all code related to that product in a single place and single programming language. There is no need to separate application code into a different repository than infrastructure code with a single team, but what about the split-team model?
Larger enterprises commonly split the responsibility between infrastructure (or platform) teams and application development teams. We’ll see how to use the AWS CDK to ensure team independence and agility even with multiple teams involved. We’ll have a look at the different responsibilities of the participating teams and their produced artifacts, and we’ll also discuss how to make the teams work together in a frictionless way.
This blog post assumes a basic level of knowledge on the AWS CDK and its concepts. Additionally, a very high level understanding of event driven architectures is required.
Team Topologies
Let’s first have a quick look at the different team topologies and each team’s responsibilities.
One-Team Approach
In this blog post we will focus on the split-team approach described below. However, it’s still helpful to understand what we mean by “One-Team” Approach: A single team owns an application from end-to-end. This cross-functional team decides on its own on the features to implement next, which technologies to use and how to build and deploy the resulting infrastructure and application code. The team’s responsibility is infrastructure, application code, its deployment and operations of the developed service.
In reality we see many customers who have separate teams for application development and infrastructure development and deployment.
Infrastructure Team
What I call the infrastructure team is also known as the platform or operations team. It configures, deploys, and operates the shared infrastructure which other teams consume to run their applications on. This can be things like an Amazon SQS queue, an Amazon Elastic Container Service (Amazon ECS) cluster as well as the CI/CD pipelines used to bring new versions of the applications into production. It is the infrastructure team’s responsibility to get the application package developed by the Application Team deployed and running on AWS, as well as provide operational support for the application.
Application Team
Traditionally the application team just provides the application’s package (for example, a JAR file or an npm package) and it’s the infrastructure team’s responsibility to figure out how to deploy, configure, and run it on AWS. However, this traditional setup often leads to bottlenecks, as the infrastructure team will have to support many different applications developed by multiple teams. Additionally, the infrastructure team often has little knowledge of the internals of those applications. This often leads to solutions which are not optimized for the problem at hand: If the infrastructure team only offers a handful of options to run services on, the application team can’t use options optimized for their workload.
This is why we extend the traditional responsibilities of the application team in this blog post. The team provides the application and additionally the description of the infrastructure required to run the application. With “infrastructure required” we mean the AWS services used to run the application. This infrastructure description needs to be written in a format which can be consumed by the infrastructure team.
While we understand that this shift of responsibility adds additional tasks to the application team, we think that in the long term it is worth the effort. This can be the starting point to introduce DevOps concepts into the organization. However, the concepts described in this blog post are still valid even if you decide that you don’t want to add this responsibility to your application teams. The boundary of who is delivering what would then just move more into the direction of the infrastructure team.
To be successful with the given approach, the two teams need to agree on a common format on how to hand over the application, its infrastructure definition, and how to bring it to production. The AWS CDK with its concept of Constructs provides a perfect means for that.
Primer: AWS CDK Constructs
In this section we take a look at the concepts the AWS CDK provides for structuring our code base and how these concepts can be used to fit a CDK project into your team topology.
Constructs
Constructs are the basic building block of an AWS CDK application. An AWS CDK application is composed of multiple constructs which in the end define how and what is deployed by AWS CloudFormation.
The AWS CDK ships with constructs created to deploy AWS services. However, it is important to understand that you are not limited to the out-of-the-box constructs provided by the AWS CDK. The true power of AWS CDK is the possibility to create your own abstractions on top of the default constructs to create solutions for your specific requirement. To achieve this you write, publish, and consume your own, custom constructs. They codify your specific requirements, create an additional level of abstraction and allow other teams to consume and use your construct.
We will use a custom construct to separate the responsibilities between the the application and the infrastructure team. The application team will release a construct which describes the infrastructure along with its configuration required to run the application code. The infrastructure team will consume this construct to deploy and operate the workload on AWS.
How to use the AWS CDK in a Split-Team Setup
Let’s now have a look at how we can use the AWS CDK to split the responsibilities between the application and infrastructure team. I’ll introduce a sample scenario and then illustrate what each team’s responsibility is within this scenario.
Scenario
Our fictitious application development team writes an AWS Lambda function which gets deployed to AWS. Messages in an Amazon SQS queue will invoke the function. Let’s say the function will process orders (whatever this means in detail is irrelevant for the example) and each order is represented by a message in the queue.
The application development team has full flexibility when it comes to creating the AWS Lambda function. They can decide which runtime to use or how much memory to configure. The SQS queue which the function will act upon is created by the infrastructure team. The application team does not have to know how the messages end up in the queue.
With that we can have a look at a sample implementation split between the teams.
Application Team
The application team is responsible for two distinct artifacts: the application code (for example, a Java jar file or an npm module) and the AWS CDK construct used to deploy the required infrastructure on AWS to run the application (an AWS Lambda Function along with its configuration).
The lifecycles of these artifacts differ: the application code changes more frequently than the infrastructure it runs in. That’s why we want to keep the artifacts separate. With that each of the artifacts can be released at its own pace and only if it was changed.
In order to achieve these separate lifecycles, it is important to notice that a release of the application artifact needs to be completely independent from the release of the CDK construct. This fits our approach of separate teams compared to the standard CDK way of building and packaging application code within the CDK construct.
But how will this be done in our example solution? The team will build and publish an application artifact which does not contain anything related to CDK. When a CDK Stack with this construct is synthesized it will download the pre-built artifact with a given version number from AWS CodeArtifact and use it to create the input zip file for a Lambda function. There is no build of the application package happening during the CDK synth.
With the separation of construct and application code, we need to find a way to tell the CDK construct which specific version of the application code it should fetch from CodeArtifact. We will pass this information to the construct via a property of its constructor.
For dependencies on infrastructure outside of the responsibility of the application team, I follow the pattern of dependency injection. Those dependencies, for example a shared VPC or an Amazon SQS queue, are passed into the construct from the infrastructure team.
Let’s have a look at an example. We pass in the external dependency on an SQS Queue, along with details on the desired appPackageVersion and its CodeArtifact details:
Note the code lambda.Code.fromDockerBuild(...): We use AWS CDK’s functionality to bundle the code of our Lambda function via a Docker build. The only things which happen inside of the provided Dockerfile are:
the login into the AWS CodeArtifact repository which holds the pre-built application code’s package
the download and installation of the application code’s artifact from AWS CodeArtifact (in this case via npm)
If you are interested in more details on how you can build, bundle and deploy your AWS CDK assets I highly recommend a blog post by my colleague Cory Hall: Building, bundling, and deploying applications with the AWS CDK. It goes into much more detail than what we are covering here.
Looking at the example Dockerfile we can see the two steps described above:
FROM public.ecr.aws/sam/build-nodejs16.x:latest

ARG PACKAGE_VERSION
ARG CODE_ARTIFACT_AWS_REGION
ARG CODE_ARTIFACT_ACCOUNT
ARG CODE_ARTIFACT_REPOSITORY

RUN aws codeartifact login --tool npm --repository $CODE_ARTIFACT_REPOSITORY --domain $CODE_ARTIFACT_DOMAIN --domain-owner $CODE_ARTIFACT_ACCOUNT --region $CODE_ARTIFACT_AWS_REGION
RUN npm install order-processing-app@$PACKAGE_VERSION --prefix /asset
Please note the following:
we use --prefix /asset with our npm install command. This tells npm to install the dependencies into the folder which CDK will mount into the container. All files which should go into the output of the docker build need to be placed here.
the aws codeartifact login command requires credentials with the appropriate permissions to proceed. In case you run this on for example AWS CodeBuild or inside of a CDK Pipeline you need to make sure that the used role has the appropriate policies attached.
Infrastructure Team
The infrastructure team consumes the AWS CDK construct published by the application team. They own the AWS CDK Stack which composes the whole application. Possibly this will only be one of several Stacks owned by the Infrastructure team. Other Stacks might create shared infrastructure (like VPCs, networking) and other applications.
Within the stack for our application the infrastructure team consumes and instantiates the application team’s construct, passes any dependencies into it and then deploys the stack by whatever means they see fit (e.g. through AWS CodePipeline, GitHub Actions or any other form of continuous delivery/deployment).
The dependency on the application team’s construct is manifested in the package.json of the infrastructure team’s CDK app:
Within the created CDK Stack we see the dependency version for the application package as well as how the infrastructure team passes in additional information (like e.g. the queue to use):
We now have the responsibilities of each team sorted out along with the artifacts owned by each team. But how do we propagate a change done by the application team all the way to production? Or asked differently: how can we invoke the infrastructure team’s CI/CD pipeline with the updated artifact versions of the application team?
We will need to update the infrastructure team’s dependencies on the application teams artifacts whenever a new version of either the application package or the AWS CDK construct is published. With the dependencies updated we can then start the release pipeline.
One approach is to listen and react to events published by AWS CodeArtifact via Amazon EventBridge. On each release AWS CodeArtifact will publish an event to Amazon EventBridge. We can listen to that event, extract the version number of the new release from its payload and start a workflow to update either our dependency on the CDK construct (e.g. in the package.json of our CDK application) or a update the appPackageVersion which the infrastructure team passes into the consumed construct.
Here’s how a release of a new app version flows through the system:
Figure 1 – A release of the application package triggers a change and deployment of the infrastructure team’s CDK Stack
The application team publishes a new app version into AWS CodeArtifact
CodeArtifact triggers an event on Amazon EventBridge
The infrastructure team listens to this event
The infrastructure team updates its CDK stack to include the latest appPackageVersion
The infrastructure team’s CDK Stack gets deployed
And very similar the release of a new version of the CDK Construct:
Figure 2 – A release of the application team’s CDK construct triggers a change and deployment of the infrastructure team’s CDK Stack
The application team publishes a new CDK construct version into AWS CodeArtifact
CodeArtifact triggers an event on Amazon EventBridge
The infrastructure team listens to this event
The infrastructure team updates its dependency to the latest CDK construct
The infrastructure team’s CDK Stack gets deployed
We will not go into the details on how such a workflow could look like, because it’s most likely highly custom for each team (think of different tools used for code repositories, CI/CD). However, here are some ideas on how it can be accomplished:
Updating the CDK Construct dependency
To update the dependency version of the CDK construct the infrastructure team’s package.json (or other files used for dependency tracking like pom.xml) needs to be updated. You can build automation to checkout the source code and issue a command like npm install sample-app-construct@NEW_VERSION (where NEW_VERSION is the value read from the EventBridge event payload). You then automatically create a pull request to incorporate this change into your main branch. For a sample on what this looks like see the blog post Keeping up with your dependencies: building a feedback loop for shared librares.
Updating the appPackageVersion
To update the appPackageVersion used inside of the infrastructure team’s CDK Stack you can either follow the same approach outlined above, or you can use CDK’s capability to read from an AWS Systems Manager (SSM) Parameter Store parameter. With that you wouldn’t put the value for appPackageVersion into source control, but rather read it from SSM Parameter Store. There is a how-to for this in the AWS CDK documentation: Get a value from the Systems Manager Parameter Store. You then start the infrastructure team’s pipeline based on the event of a change in the parameter.
To have a clear understanding of what is deployed at any given time and in order to see the used parameter value in CloudFormation I’d recommend using the option described at Reading Systems Manager values at synthesis time.
Conclusion
You’ve seen how the AWS Cloud Development Kit and its Construct concept can help to ensure team independence and agility even though multiple teams (in our case an application development team and an infrastructure team) work together to bring a new version of an application into production. To do so you have put the application team in charge of not only their application code, but also of the parts of the infrastructure they use to run their application on. This is still in line with the discussed split-team approach as all shared infrastructure as well as the final deployment is in control of the infrastructure team and is only consumed by the application team’s construct.
About the Authors
As a Solutions Architect Jörg works with manufacturing customers in Germany. Before he joined AWS in 2019 he held various roles like Developer, DevOps Engineer and SRE. With that Jörg enjoys building and automating things and fell in love with the AWS Cloud Development Kit.
Mo joined AWS in 2020 as a Technical Account Manager, bringing with him 7 years of hands-on AWS DevOps experience and 6 year as System operation admin. He is a member of two Technical Field Communities in AWS (Cloud Operation and Builder Experience), focusing on supporting customers with CI/CD pipelines and AI for DevOps to ensure they have the right solutions that fit their business needs.
This blog post is written by Enrico Liguori, SA – Solutions Builder , WWPS Solution Architecture.
AWS Local Zones are a type of infrastructure deployment that places compute, storage,and other select AWS services close to large population and industry centers.
We now have a total of 32 Local Zones; 15 outside of the US (Bangkok, Buenos Aires, Copenhagen, Delhi, Hamburg, Helsinki, Kolkata, Lagos, Lima, Muscat, Perth, Querétaro, Santiago, Taipei, and Warsaw) and 17 in the US. We will continue to launch Local Zones in 21 metro areas in 18 countries, including Australia, Austria, Belgium, Brazil, Canada, Colombia, Czech Republic, Germany, Greece, India, Kenya, Netherlands, New Zealand, Norway, Philippines, Portugal, South Africa, and Vietnam.
Customers using AWS Local Zones can provision the infrastructure and services needed to host their workloads with the same APIs and tools for automation that they use in the AWS Region, included the AWS Cloud Development Kit (AWS CDK).
The AWS CDK is an open source software development framework to model and provision your cloud application resources using familiar programming languages, including TypeScript, JavaScript, Python, C#, and Java. For the solution in this post, we use Python.
Overview
In this post we demonstrate how to:
Programmatically enable the Local Zone of your interest.
Explore the supported APIs to check the types of Amazon Elastic Compute Cloud (Amazon EC2) instances available in a specific Local Zone and get their associated price per hour;
Deploy a simple WordPress application in the Local Zone through AWS CDK.
Prerequisites
To be able to try the examples provided in this post, you must configure:
To get started with Local Zones, you must first enable the Local Zone that you plan to use in your AWS account. In this tutorial, you can learn how to select the Local Zone that provides the lowest latency to your site and understand how to opt into the Local Zone from the AWS Management Console.
If you prefer to interact with AWS APIs programmatically, then you can enable the Local Zone of your interest by calling the ModifyAvailabilityZoneGroup API through the AWS CLI or one of the supported AWS SDKs.
The following examples show how to opt into the Atlanta Local Zone through the AWS CLI and through the Python SDK:
The opt in process takes approximately five minutes to complete. After this time, you can confirm the opt in status using the DescribeAvailabilityZones API.
From the AWS CLI, you can check the enabled Local Zones with:
The OptInStatus confirms that we successful enabled the Atlanta Local Zone and that we can now deploy resources in it.
How to check available EC2 instances in Local Zones
The set of instance types available in a Local Zone might change from one Local Zone to another. This means that before starting deploying resources, it’s a good practice to check which instance types are supported in the Local Zone.
After enabling the Local Zone, we can programmatically check the instance types that are available by using DescribeInstanceTypeOfferings. To use the API with Local Zones, we must pass availability-zone as the value of the LocationType parameter and use a Filter object to select the correct Local Zone that we want to check. The resulting AWS CLI command will look like the following example:
How to check prices of EC2 instances in Local Zones
EC2 instances and other AWS resources in Local Zones will have different prices than in the parent Region. Check the pricing page for the complete list of pricing options and associated price-per-hour.
To access the pricing list programmatically, we can use the GetProducts API. The API returns the list of pricing options available for the AWS service specified in the ServiceCode parameter. We also recommend defining Filters to restrict the number of results returned. For example, to retrieve the On-Demand pricing list of a T3 Medium instance in Atlanta from the AWS CLI, we can use the following:
Note that the Region specified in the CLI command and in Boto3, is the location of the AWS Price List service API endpoint. This API is available only in us-east-1 and ap-south-1 Regions.
Deploying WordPress in Local Zones using AWS CDK
In this section, we see how to use the AWS CDK and Python to deploy a simple non-production WordPress installation in a Local Zone.
Architecture overview
The AWS CDK stack will deploy a new standard Amazon Virtual Private Cloud (Amazon VPC) in the parent Region (us-east-1) that will be extended to the Local Zone. This creates two subnets associated with the Atlanta Local Zone: a public subnet to expose resources on the Internet, and a private subnet to host the application and database layers. Review the AWS public documentation for a definition of public and private subnets in a VPC.
The application architecture is made of the following:
A front-end in the private subnet where a WordPress application is installed, through a User Data script, in a type T3 medium EC2 instance.
A back-end in the private subnet where MySQL database is installed, through a User Data script, in a type T3 medium EC2 instance.
Together with the VPC CIDR (i.e. 172.31.100.0/24), we define also the subnets configuration through the subnet_configuration parameter.
Note that in the subnet definitions above there is no specification of the Availability Zone or Local Zone that we want to associate them with. We can define this setting at the VPC level, overwriting the availability_zones method as shown here:
As an alternative, you can use a Local Zone Name as the value of the availability_zones parameter in each Subnet definition. For a complete list of Local Zone Names, check out the Zone Names on the Local Zones Locations page.
Specifying ec2.SubnetType.PUBLIC in the subnet_type parameter, AWS CDK automatically creates an Internet Gateway (IGW) associated with our VPC and a default route in its routing table pointing to the IGW. With this setup, the Internet traffic will go directly to the IGW in the Local Zone without going through the parent AWS Region. For other connectivity options, check the AWS Local Zone User Guide.
The last piece of our networking infrastructure is a self-managed NAT instance. This will allow instances in the private subnet to communicate with services outside of the VPC and simultaneously prevent them from receiving unsolicited connection requests.
We can implement the best practices for NAT instances included in the AWS public documentation using a combination of parameters of the Instance construct, as shown here:
In the previous code example, we specify the following as parameters:
vpc – the VPC object created before.
security group – the Security Group containing the rules to allow HTTP and HTTPS traffic. The Security Group is created in create_nat_SG function provided in the code that we copied from the repository.
instance_type – the instance type, in our case a T3 Medium.
The other resources, including the front-end instance managed by AutoScaling, the back-end instance, and ALB are deployed using the standard AWS CDK constructs. Note that the ALB service is only available in some Local Zones. If you plan to use a Local Zone where ALB isn’t supported, then you must deploy a load balancer on a self-managed EC2 instance, or use a load balancer available in AWS Marketplace.
Stack deployment
Next, let’s go through the AWS CDK bootstrapping process. This is required only for the first time that we use AWS CDK in a specific AWS environment (an AWS environment is a combination of an AWS account and Region).
$ cdk bootstrap
Now we can deploy the stack with the following:
$ cdk deploy
After the deployment is completed, we can connect to the application with a browser using the URL returned in the output of the cdk deploy command:
The WordPress install wizard will be displayed in the browser, thereby confirming that the deployment worked as expected:
Note that in this post we use the Local Zone in Atlanta. Therefore, we must deploy the stack in its parent Region, US East (N. Virginia). To select the Region used by the stack, configure the AWS CLI default profile.
Cleanup
To terminate the resources that we created in this post, you can simply run the following:
$ cdk destroy
Conclusion
In this post, we demonstrated how to interact programmatically with the different AWS APIs available for Local Zones. Furthermore, we deployed a simple WordPress application in the Atlanta Local Zone after analyzing the AWS CDK code used for the deployment.
We encourage you to try the examples provided in this post and get familiar with the programmatic configuration and deployment of resources in a Local Zone.
In this post I will show you how to add a manual approval to AWS Cloud Development Kit (CDK) Pipelines to confirm security changes before deployment. With this solution, when a developer commits a change, CDK pipeline identifies an IAM permissions change, pauses execution, and sends a notification to a security engineer to manually approve or reject the change before it is deployed.
Introduction
In my role I talk to a lot of customers that are excited about the AWS Cloud Development Kit (CDK). One of the things they like is that L2 constructs often generate IAM and other security policies. This can save a lot of time and effort over hand coding those policies. Most customers also tell me that the policies generated by CDK are more secure than the policies they generate by hand.
However, these same customers are concerned that their security engineering team does not know what is in the policies CDK generates. In the past, these customers spent a lot of time crafting a handful of IAM policies that developers can use in their apps. These policies were well understood, but overly permissive because they were often reused across many applications.
Customers want more visibility into the policies CDK generates. Luckily CDK provides a mechanism to approve security changes. If you are using CDK, you have probably been prompted to approve security changes when you run cdk deploy at the command line. That works great on a developer’s machine, but customers want to build the same confirmation into their continuous delivery pipeline. CDK provides a mechanism for this with the ConfirmPermissionsBroadening action. Note that ConfirmPermissionsBroadening is only supported by the AWS CodePipline deployment engine.
Background
Before I talk about ConfirmPermissionsBroadening, let me review how CDK creates IAM policies. Consider the “Hello, CDK” application created in AWS CDK Workshop. At the end of this module, I have an AWS Lambda function and an Amazon API Gateway defined by the following CDK code.
// defines an AWS Lambda resource
const hello = new lambda.Function(this, 'HelloHandler', {
  runtime: lambda.Runtime.NODEJS_14_X,    // execution environment
  code: lambda.Code.fromAsset('lambda'),  // code loaded from "lambda" directory
  handler: 'hello.handler'                // file is "hello", function is "handler"
});

// defines an API Gateway REST API resource backed by our "hello" function.
new apigw.LambdaRestApi(this, 'Endpoint', {
  handler: hello
});
Note that I did not need to define the IAM Role or Lambda Permissions. I simply passed a refence to the Lambda function to the API Gateway (line 10 above). CDK understood what I was doing and generated the permissions for me. For example, CDK generated the following Lambda Permission, among others.
Notice that CDK generated a narrowly scoped policy, that allows a specific API (line 10 above) to call a specific Lambda function (line 7 above). This policy cannot be reused elsewhere. Later in the same workshop, I created a Hit Counter Construct using a Lambda function and an Amazon DynamoDB table. Again, I associated them using a single line of CDK code.
table.grantReadWriteData(this.handler);
As in the prior example, CDK generated a narrowly scoped IAM policy. This policy allows the Lambda function to perform certain actions (lines 4-11) on a specific table (line 14 below).
As you can see, CDK is doing a lot of work for me. In addition, CDK is creating narrowly scoped policies for each resource, rather than sharing a broadly scoped policy in multiple places.
CDK Pipelines Permissions Checks
Now that I have reviewed how CDK generates policies, let’s discuss how I can use this in a Continuous Deployment pipeline. Specifically, I want to allow CDK to generate policies, but I want a security engineer to review any changes using a manual approval step in the pipeline. Of course, I don’t want security to be a bottleneck, so I will only require approval when security statements or traffic rules are added. The pipeline should skip the manual approval if there are no new security rules added.
Let’s continue to use CDK Workshop as an example. In the CDK Pipelines module, I used CDK to configure AWS CodePipeline to deploy the “Hello, CDK” application I discussed above. One of the last things I do in the workshop is add a validation test using a post-deployment step. Adding a permission check is similar, but I will use a pre-deployment step to ensure the permission check happens before deployment.
First, I will import ConfirmPermissionsBroadening from the pipelines package
import {ConfirmPermissionsBroadening} from "aws-cdk-lib/pipelines";
Then, I can simply add ConfirmPermissionsBroadening to the deploySatage using the addPre method as follows.
const deploy = new WorkshopPipelineStage(this, 'Deploy');
const deployStage = pipeline.addStage(deploy);

deployStage.addPre(
  new ConfirmPermissionsBroadening("PermissionCheck", {
    stage: deploy
})

deployStage.addPost(
    // Post Deployment Test Code Omitted
)
Once I commit and push this change, a new manual approval step called PermissionCheck.Confirm is added to the Deploy stage of the pipeline. In the future, if I push a change that adds additional rules, the pipeline will pause here and await manual approval as shown in the screenshot below.
Figure 1. Pipeline waiting for manual review
When the security engineer clicks the review button, she is presented with the following dialog. From here, she can click the URL to see a summary of the change I am requesting which was captured in the build logs. She can also choose to approve or reject the change and add comments if needed.
Figure 2. Manual review dialog with a link to the build logs
When the security engineer clicks the review URL, she is presented with the following sumamry of security changes.
Figure 3. Summary of security changes in the build logs
The final feature I want to add is an email notification so the security engineer knows when there is something to approve. To accomplish this, I create a new Amazon Simple Notification Service (SNS) topic and subscription and associate it with the ConfirmPermissionsBroadening Check.
// Create an SNS topic and subscription for security approvals
const topic = new sns.Topic(this, 'SecurityApproval’);
topic.addSubscription(new subscriptions.EmailSubscription('[email protected]'));

deployStage.addPre(
  new ConfirmPermissionsBroadening("PermissionCheck", {
    stage: deploy,
    notificationTopic: topic
})
With the notification configured, the security engineer will receive an email when an approval is needed. She will have an opportunity to review the security change I made and assess the impact. This gives the security engineering team the visibility they want into the policies CDK is generating. In addition, the approval step is skipped if a change does not add security rules so the security engineer does not become a bottle neck in the deployment process.
Conclusion
AWS Cloud Development Kit (CDK) automates the generation of IAM and other security policies. This can save a lot of time and effort but security engineering teams want visibility into the policies CDK generates. To address this, CDK Pipelines provides the ConfirmPermissionsBroadening action. When you add ConfirmPermissionsBroadening to your CI/CD pipeline, CDK will wait for manual approval before deploying a change that includes new security rules.
The AWS Cloud Development Kit (CDK) accelerates cloud development by allowing developers to use common programming languages when modelling their applications. To take advantage of this speed, developers need to operate in an environment where permissions and security controls don’t slow things down, and in a tightly controlled environment this is not always the case. Of particular concern is the scenario where a developer has permission to create AWS Identity and Access Management (IAM) entities (such as users or roles), as these could have permissions beyond that of the developer who created them, allowing for an escalation of privileges. This approach is typically controlled through the use of permission boundaries for IAM entities, and in this post you will learn how these boundaries can now be applied more effectively to CDK development – allowing developers to stay secure and move fast.
Applying custom permission boundaries to CDK deployments
When the CDK deploys a solution, it assumes a AWS CloudFormation execution role to perform operations on the user’s behalf. This role is created during the bootstrapping phase by the AWS CDK Command Line Interface (CLI). This role should be configured to represent the maximum set of actions that CloudFormation can perform on the developers behalf, while not compromising any compliance or security goals of the organisation. This can become complicated when developers need to create IAM entities (such as IAM users or roles) and assign permissions to them, as those permissions could be escalated beyond their existing access levels. Taking away the ability to create these entities is one way to solve the problem. However, doing this would be a significant impediment to developers, as they would have to ask an administrator to create them every time. This is made more challenging when you consider that security conscious practices will create individual IAM roles for every individual use case, such as each AWS Lambda Function in a stack. Rather than taking this approach, IAM permission boundaries can help in two ways – first, by ensuring that all actions are within the overlap of the users permissions and the boundary, and second by ensuring that any IAM entities that are created also have the same boundary applied. This blocks the path to privilege escalation without restricting the developer’s ability to create IAM identities. With the latest version of the AWS CLI these boundaries can be applied to the execution role automatically when running the bootstrap command, as well as being added to IAM entities that are created in a CDK stack.
To use a permission boundary in the CDK, first create an IAM policy that will act as the boundary. This should define the maximum set of actions that the CDK application will be able to perform on the developer’s behalf, both during deployment and operation. This step would usually be performed by an administrator who is responsible for the security of the account, ensuring that the appropriate boundaries and controls are enforced. Once created, the name of this policy is provided to the bootstrap command. In the example below, an IAM policy called “developer-policy” is used to demonstrate the command. cdk bootstrap –custom-permissions-boundary developer-policy Once this command runs, a new bootstrap stack will be created (or an existing stack will be updated) so that the execution role has this boundary applied to it. Next, you can ensure that any IAM entities that are created will have the same boundaries applied to them. This is done by either using a CDK context variable, or the permissionBoundary attribute on those resources. To explain this in some detail, let’s use a real world scenario and step through an example that shows how this feature can be used to restrict developers from using the AWS Config service.
Installing or upgrading the AWS CDK CLI
Before beginning, ensure that you have the latest version of the AWS CDK CLI tool installed. Follow the instructions in the documentation to complete this. You will need version 2.54.0 or higher to make use of this new feature. To check the version you have installed, run the following command.
cdk --version
Creating the policy
First, let’s begin by creating a new IAM policy. Below is a CloudFormation template that creates a permission policy for use in this example. In this case the AWS CLI can deploy it directly, but this could also be done at scale through a mechanism such as CloudFormation Stack Sets. This template has the following policy statements:
Allow all actions by default – this allows you to deny the specific actions that you choose. You should carefully consider your approach to allow/deny actions when creating your own policies though.
Deny the creation of users or roles unless the “developer-policy” permission boundary is used. Additionally limit the attachment of permissions boundaries on existing entities to only allow “developer-policy” to be used. This prevents the creation or change of an entity that can escalate outside of the policy.
Deny the ability to change the policy itself so that a developer can’t modify the boundary they will operate within.
Deny the ability to remove the boundary from any user or role
Deny any actions against the AWS Config service
Here items 2, 3 and 4 all ensure that the permission boundary works correctly – they are controls that prevent the boundary being removed, tampered with, or bypassed. The real focus of this policy in terms of the example are items 1 and 5 – where you allow everything, except the specific actions that are denied (creating a deny list of actions, rather than an allow list approach).
Resources:
  PermissionsBoundary:
    Type: AWS::IAM::ManagedPolicy
    Properties:
      PolicyDocument:
        Statement:
          # ----- Begin base policy ---------------
          # If permission boundaries do not have an explicit allow
          # then the effect is deny
          - Sid: ExplicitAllowAll
            Action: "*"
            Effect: Allow
            Resource: "*"
          # Default permissions to prevent privilege escalation
          - Sid: DenyAccessIfRequiredPermBoundaryIsNotBeingApplied
            Action:
              - iam:CreateUser
              - iam:CreateRole
              - iam:PutRolePermissionsBoundary
              - iam:PutUserPermissionsBoundary
            Condition:
              StringNotEquals:
                iam:PermissionsBoundary:
                  Fn::Sub: arn:${AWS::Partition}:iam::${AWS::AccountId}:policy/developer-policy
            Effect: Deny
            Resource: "*"
          - Sid: DenyPermBoundaryIAMPolicyAlteration
            Action:
              - iam:CreatePolicyVersion
              - iam:DeletePolicy
              - iam:DeletePolicyVersion
              - iam:SetDefaultPolicyVersion
            Effect: Deny
            Resource:
              Fn::Sub: arn:${AWS::Partition}:iam::${AWS::AccountId}:policy/developer-policy
          - Sid: DenyRemovalOfPermBoundaryFromAnyUserOrRole
            Action:
              - iam:DeleteUserPermissionsBoundary
              - iam:DeleteRolePermissionsBoundary
            Effect: Deny
            Resource: "*"
          # ----- End base policy ---------------
          # -- Begin Custom Organization Policy --
          - Sid: DenyModifyingOrgCloudTrails
            Effect: Deny
            Action: config:*
            Resource: "*"
          # -- End Custom Organization Policy --
        Version: "2012-10-17"
      Description: "Bootstrap Permission Boundary"
      ManagedPolicyName: developer-policy
      Path: /
Save the above locally as developer-policy.yaml and then you can deploy it with a CloudFormation command in the AWS CLI:
To begin, create a new CDK application that you will use to test and observe the behaviour of the permission boundary. Create a new directory with a TypeScript CDK application in it by executing these commands.
mkdir DevUsers && cd DevUsers
cdk init --language typescript
Once this is done, you should also make sure that your account has a CDK bootstrap stack deployed with the cdk bootstrap command – to start with, do not apply a permission boundary to it, you can add that later an observe how it changes the behaviour of your deployment. Because the bootstrap command is not using the --cloudformation-execution-policies argument, it will default to arn:aws:iam::aws:policy/AdministratorAccess which means that CloudFormation will have full access to the account until the boundary is applied.
cdk bootstrap
Once the command has run, create an AWS Config Rule in your application to be sure that this works without issue before the permission boundary is applied. Open the file lib/dev_users-stack.ts and edit its contents to reflect the sample below.
import * as cdk from 'aws-cdk-lib';
import { ManagedRule, ManagedRuleIdentifiers } from 'aws-cdk-lib/aws-config';
import { Construct } from "constructs";

export class DevUsersStack extends cdk.Stack {
  constructor(scope: Construct, id: string, props?: cdk.StackProps) {
    super(scope, id, props);

    new ManagedRule(this, 'AccessKeysRotated', {
      configRuleName: 'access-keys-policy',
      identifier: ManagedRuleIdentifiers.ACCESS_KEYS_ROTATED,
      inputParameters: {
        maxAccessKeyAge: 60, // default is 90 days
      },
    });
  }
}
Next you can deploy with the CDK CLI using the cdk deploy command, which will succeed (the output below has been truncated to show a summary of the important elements).
Before you deploy the permission boundary, remove this stack again with the cdk destroy command.
❯ cdk destroy
Are you sure you want to delete: DevUsersStack (y/n)? y
DevUsersStack: destroying... [1/1]
 DevUsersStack: destroyed
Using a permission boundary with the CDK test application
Now apply the permission boundary that you created above and observe the impact it has on the same deployment. To update your booststrap with the permission boundary, re-run the cdk bootstrap command with the new custom-permissions-boundary parameter.
After this command executes, the CloudFormation execution role will be updated to use that policy as a permission boundary, which based on the deny rule for config:* will cause this same application deployment to fail. Run cdk deploy again to confirm this and observe the error message.
 Deployment failed: Error: Stack Deployments Failed: Error: The stack
named DevUsersStack failed creation, it may need to be manually deleted
from the AWS console:
  ROLLBACK_COMPLETE:
    User: arn:aws:sts::123456789012:assumed-role/cdk-hnb659fds-cfn-exec-role-123456789012-ap-southeast-2/AWSCloudFormation
    is not authorized to perform: config:PutConfigRule on resource: access-keys-policy with an explicit deny in a
    permissions boundary
This shows you that the action was denied specifically due to the use of a permissions boundary, which is what was expected.
Applying permission boundaries to IAM entities automatically
Next let’s explore how the permission boundary can be extended to IAM entities that are created by a CDK application. The concern here is that a developer who is creating a new IAM entity could assign it more permissions than they have themselves – the permission boundary manages this by ensuring that entities can only be created that also have the boundary attached. You can validate this by modifying the stack to deploy a Lambda function that uses a role that doesn’t include the boundary. Open the file lib/dev_users-stack.ts again and edit its contents to reflect the sample below.
Here the AwsCustomResource is used to provision a Lambda function that will attempt to create a new config rule. This is the same result as the previous stack but in this case the creation of the rule is done by a new IAM role that is created by the CDK construct for you. Attempting to deploy this will result in a failure – run cdk deploy to observe this.
 Deployment failed: Error: Stack Deployments Failed: Error: The stack named
DevUsersStack failed creation, it may need to be manually deleted from the AWS
console:
  ROLLBACK_COMPLETE:
    API: iam:CreateRole User: arn:aws:sts::123456789012:assumed-
role/cdk-hnb659fds-cfn-exec-role-123456789012-ap-southeast-2/AWSCloudFormation
    is not authorized to perform: iam:CreateRole on resource:
arn:aws:iam::123456789012:role/DevUsersStack-
AWS679f53fac002430cb0da5b7982bd2287S-1EAD7M62914OZ
    with an explicit deny in a permissions boundary
The error message here details that the stack was unable to deploy because the call to iam:CreateRole failed because the boundary wasn’t applied. The CDK now offers a straightforward way to set a default permission boundary on all IAM entities that are created, via the CDK context variable core:permissionsBoundary in the cdk.json file.
This approach is useful because now you can import constructs that create IAM entities (such as those found on Construct Hub or out of the box constructs that create default IAM roles) and have the boundary apply to them as well. There are alternative ways to achieve this, such as setting a boundary on specific roles, which can be used in scenarios where this approach does not fit. Make the change to your cdk.json file and run the CDK deploy again. This time the custom resource will attempt to create the config rule using its IAM role instead of the CloudFormation execution role. It is expected that the boundary will also protect this Lambda function in the same way – run cdk deploy again to confirm this. Note that the deployment updates from CloudFormation show that this time the role creation succeeds this time, and a new error message is generated.
 Deployment failed: Error: Stack Deployments Failed: Error: The stack named
DevUsersStack failed creation, it may need to be manually deleted from the AWS
console:
  ROLLBACK_COMPLETE:
    Received response status [FAILED] from custom resource. Message returned: User:
    arn:aws:sts::123456789012:assumed-role/DevUsersStack-
AWS679f53fac002430cb0da5b7982bd2287S-84VFVA7OGC9N/DevUsersStack-
AWS679f53fac002430cb0da5b7982bd22872-MBnArBmaaLJp
    is not authorized to perform: config:PutConfigRule on resource: SampleRule with an explicit deny in a permissions boundary
In this error message you can see that the user it refers to is DevUsersStack-AWS679f53fac002430cb0da5b7982bd2287S-84VFVA7OGC9N rather than the CloudFormation execution role. This is the role being used by the custom Lambda function resource, and when it attempts to create the Config rule it is rejected because of the permissions boundary in the same way. Here you can see how the boundary is being applied consistently to all IAM entities that are created in your CDK app, which ensures the administrative controls can be applied consistently to everything a developer does with a minimal amount of overhead.
Cleanup
At this point you can either choose to remove the CDK bootstrap stack if you no longer require it, or remove the permission boundary from the stack. To remove it, delete the CDKToolkit stack from CloudFormation with this AWS CLI command.
If you want to keep the bootstrap stack, you can remove the boundary by following these steps:
Browse to the CloudFormation page in the AWS console, and select the CDKToolit stack.
Select the ‘Update’ button. Choose “Use Current Template” and then press ‘Next’
On the parameters page, find the value InputPermissionsBoundary which will have developer-policy as the value, and delete the text in this input to leave it blank. Press ‘Next’ and the on the following page, press ‘Next’ again
On the final page, scroll to the bottom and check the box acknowledging that CloudFormation might create IAM resources with custom names, and choose ‘Submit’
With the permission boundary no longer being used, you can now remove the stack that created it as the final step.
Now you can see how IAM permission boundaries can easily be integrated in to CDK development, helping ensure developers have the control they need while administrators can ensure that security is managed in a way that meets the needs of the organisation as well.
With this being understood, there are next steps you can take to further expand on the use of permission boundaries. The CDK Security and Safety Developer Guide document on GitHub outlines these approaches, as well as ways to think about your approach to permissions on deployment. It’s recommended that developers and administrators review this, and work to develop and appropriate approach to permission policies that suit your security goals.
Additionally, the permission boundary concept can be applied in a multi-account model where each Stage has a unique boundary name applied. This can allow for scenarios where a lower-level environment (such as a development or beta environment) has more relaxed permission boundaries that suit troubleshooting and other developer specific actions, but then the higher level environments (such as gamma or production) could have the more restricted permission boundaries to ensure that security risks are more appropriately managed. The mechanism for implement this is defined in the security and safety developer guide also.
About the authors:
The collective thoughts of the interwebz
Manage Consent
To provide the best experiences, we use technologies like cookies to store and/or access device information. Consenting to these technologies will allow us to process data such as browsing behavior or unique IDs on this site. Not consenting or withdrawing consent, may adversely affect certain features and functions.
Functional
Always active
The technical storage or access is strictly necessary for the legitimate purpose of enabling the use of a specific service explicitly requested by the subscriber or user, or for the sole purpose of carrying out the transmission of a communication over an electronic communications network.
Preferences
The technical storage or access is necessary for the legitimate purpose of storing preferences that are not requested by the subscriber or user.
Statistics
The technical storage or access that is used exclusively for statistical purposes.The technical storage or access that is used exclusively for anonymous statistical purposes. Without a subpoena, voluntary compliance on the part of your Internet Service Provider, or additional records from a third party, information stored or retrieved for this purpose alone cannot usually be used to identify you.
Marketing
The technical storage or access is required to create user profiles to send advertising, or to track the user on a website or across several websites for similar marketing purposes.


 testproject-dev: destroyed


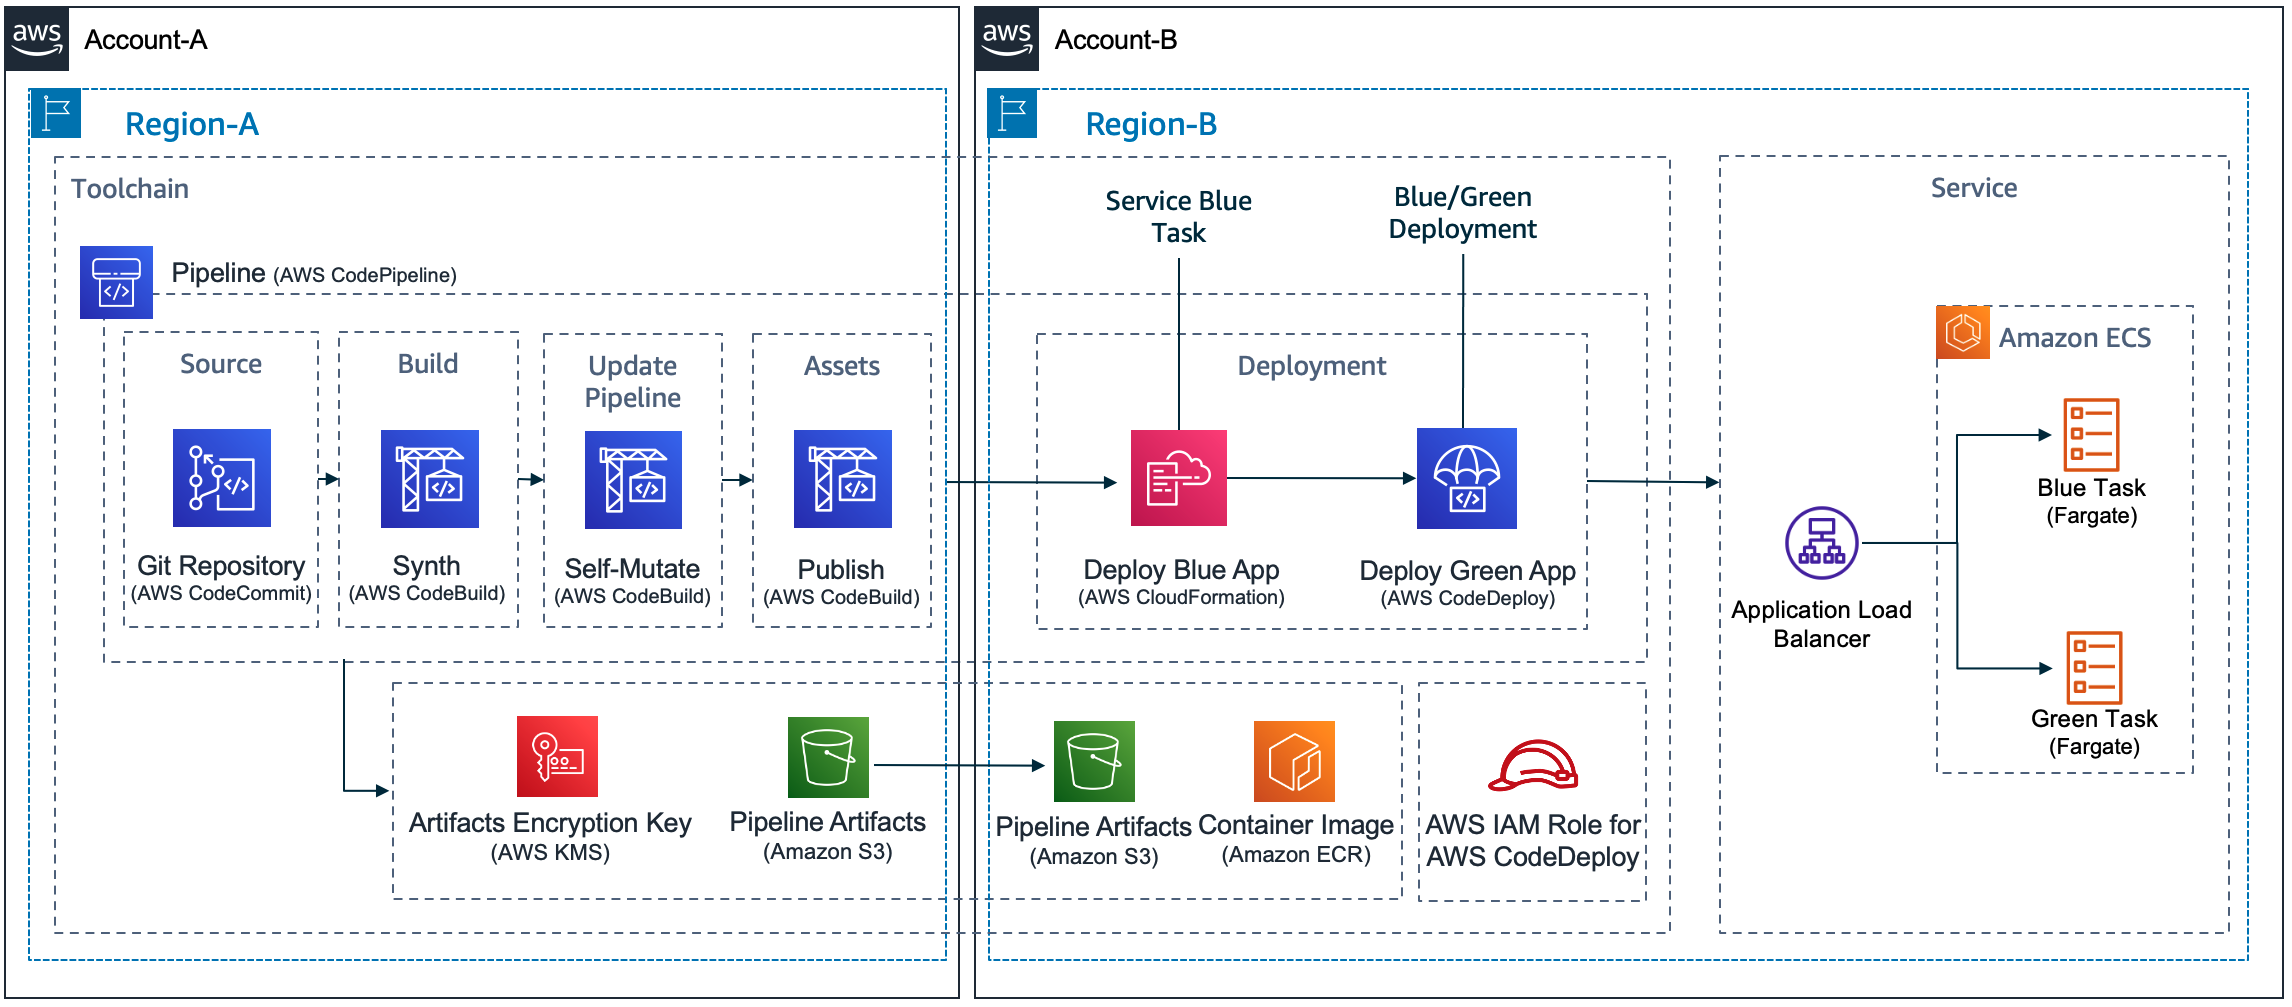


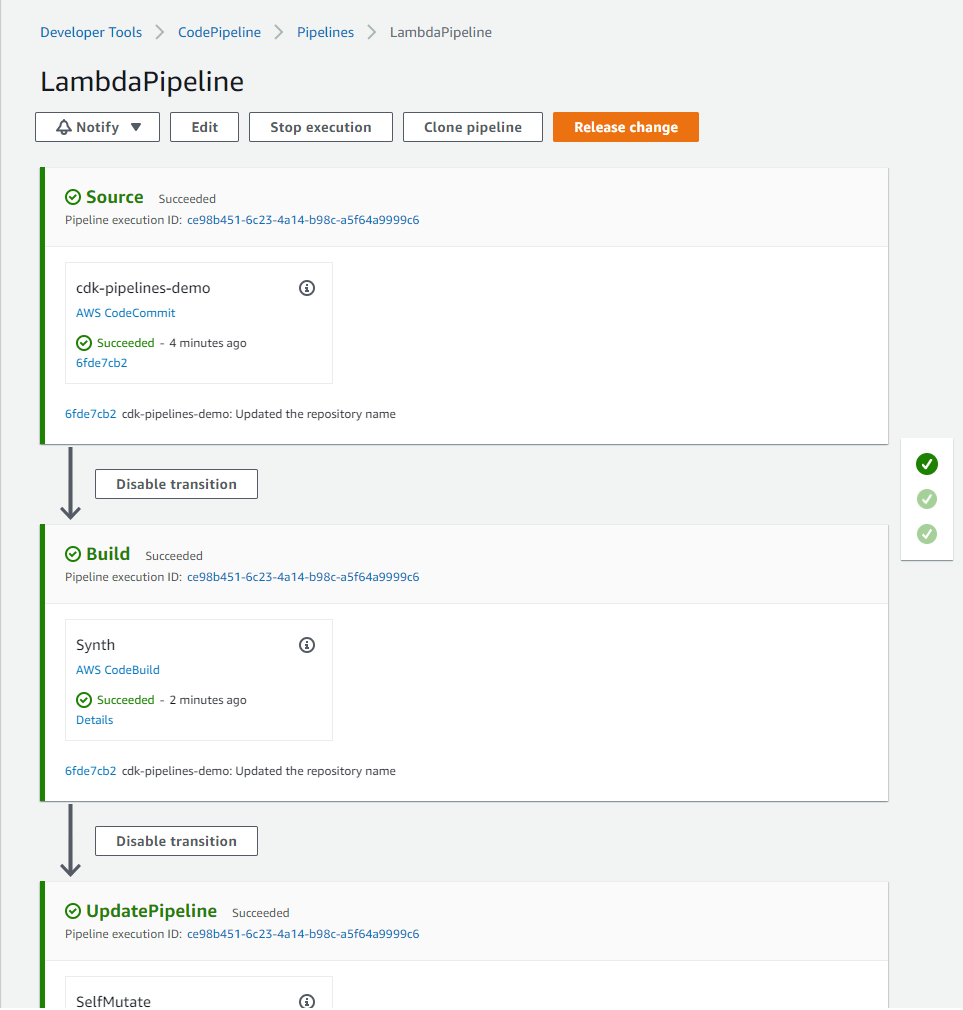
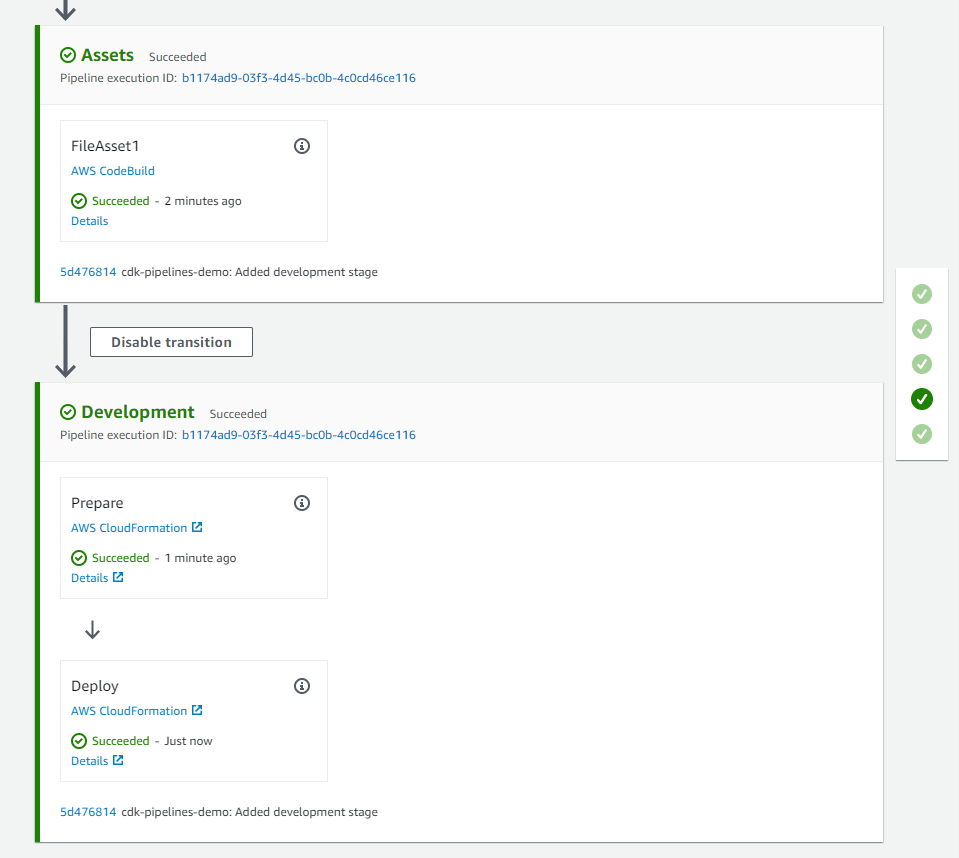
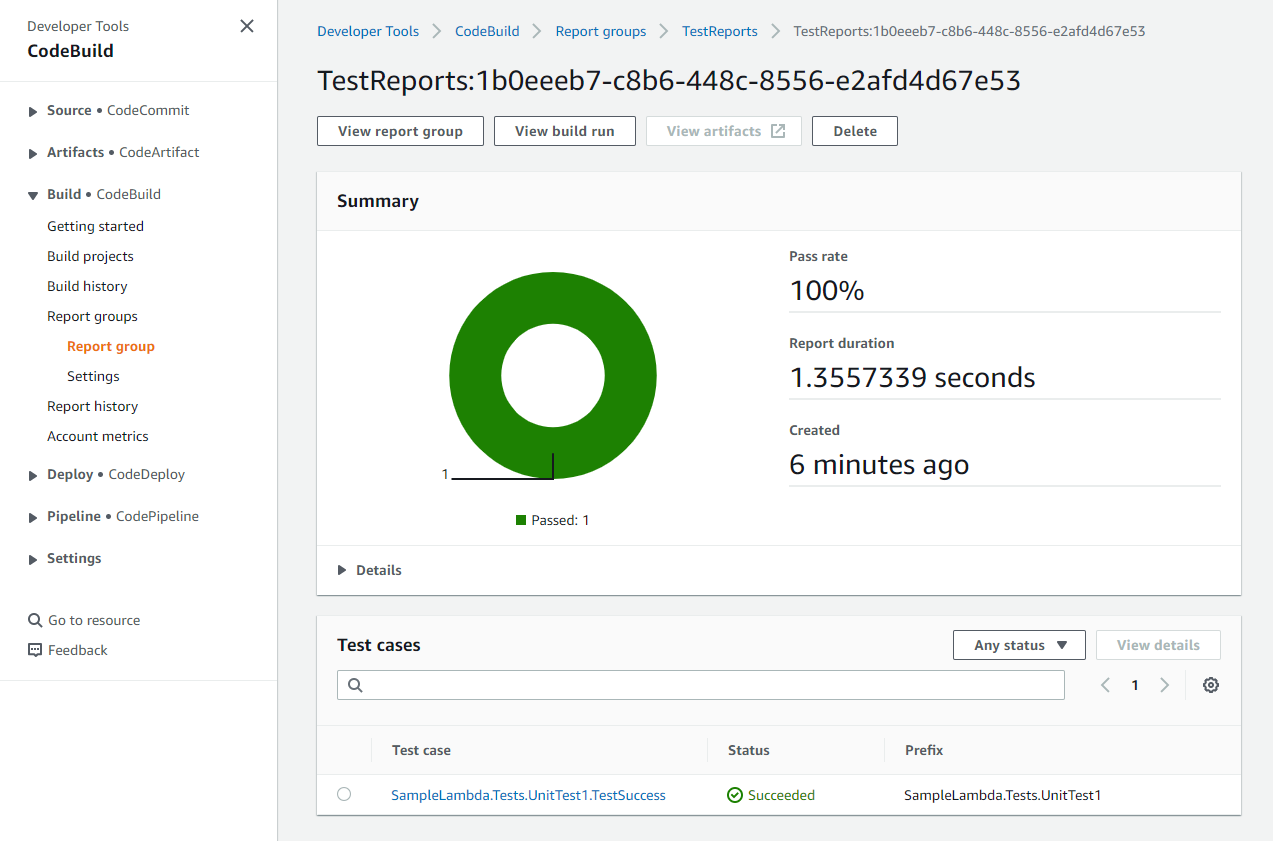
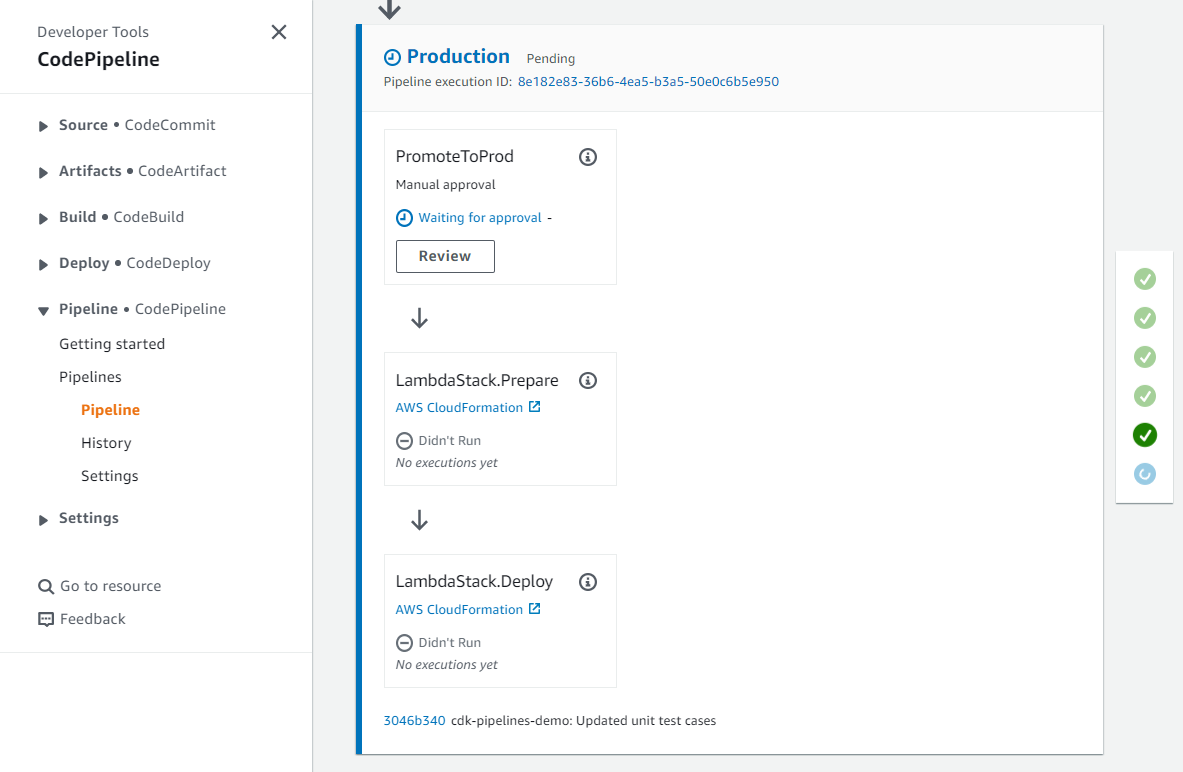
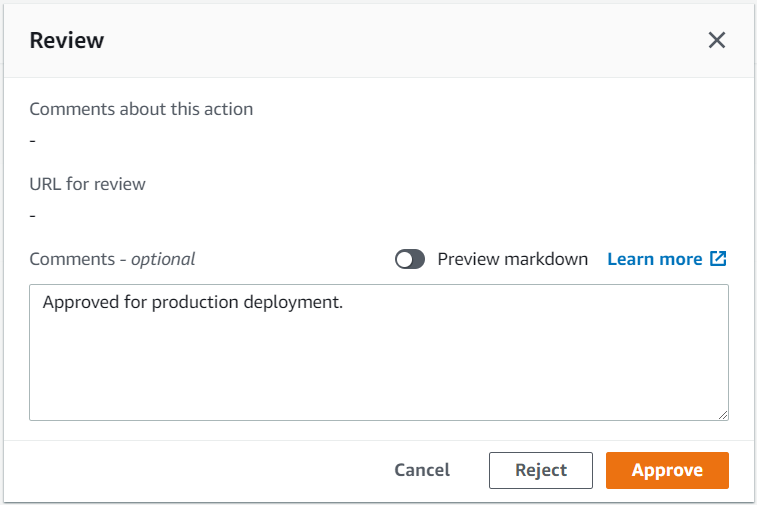
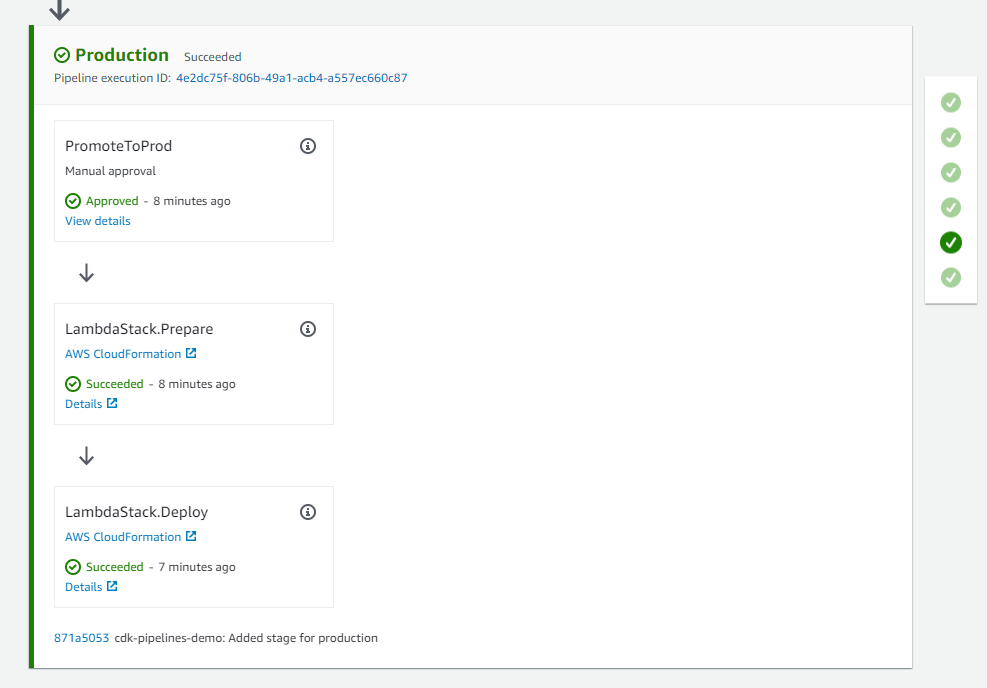

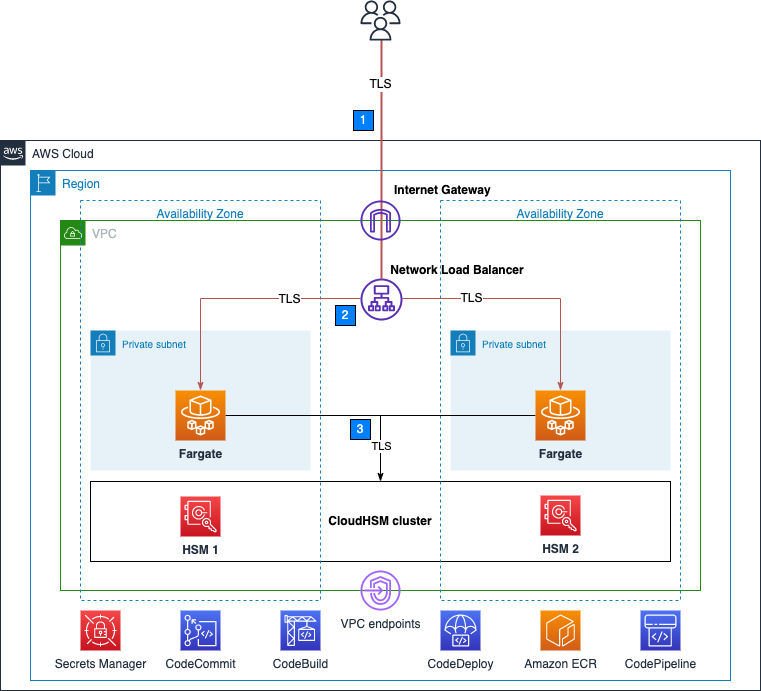


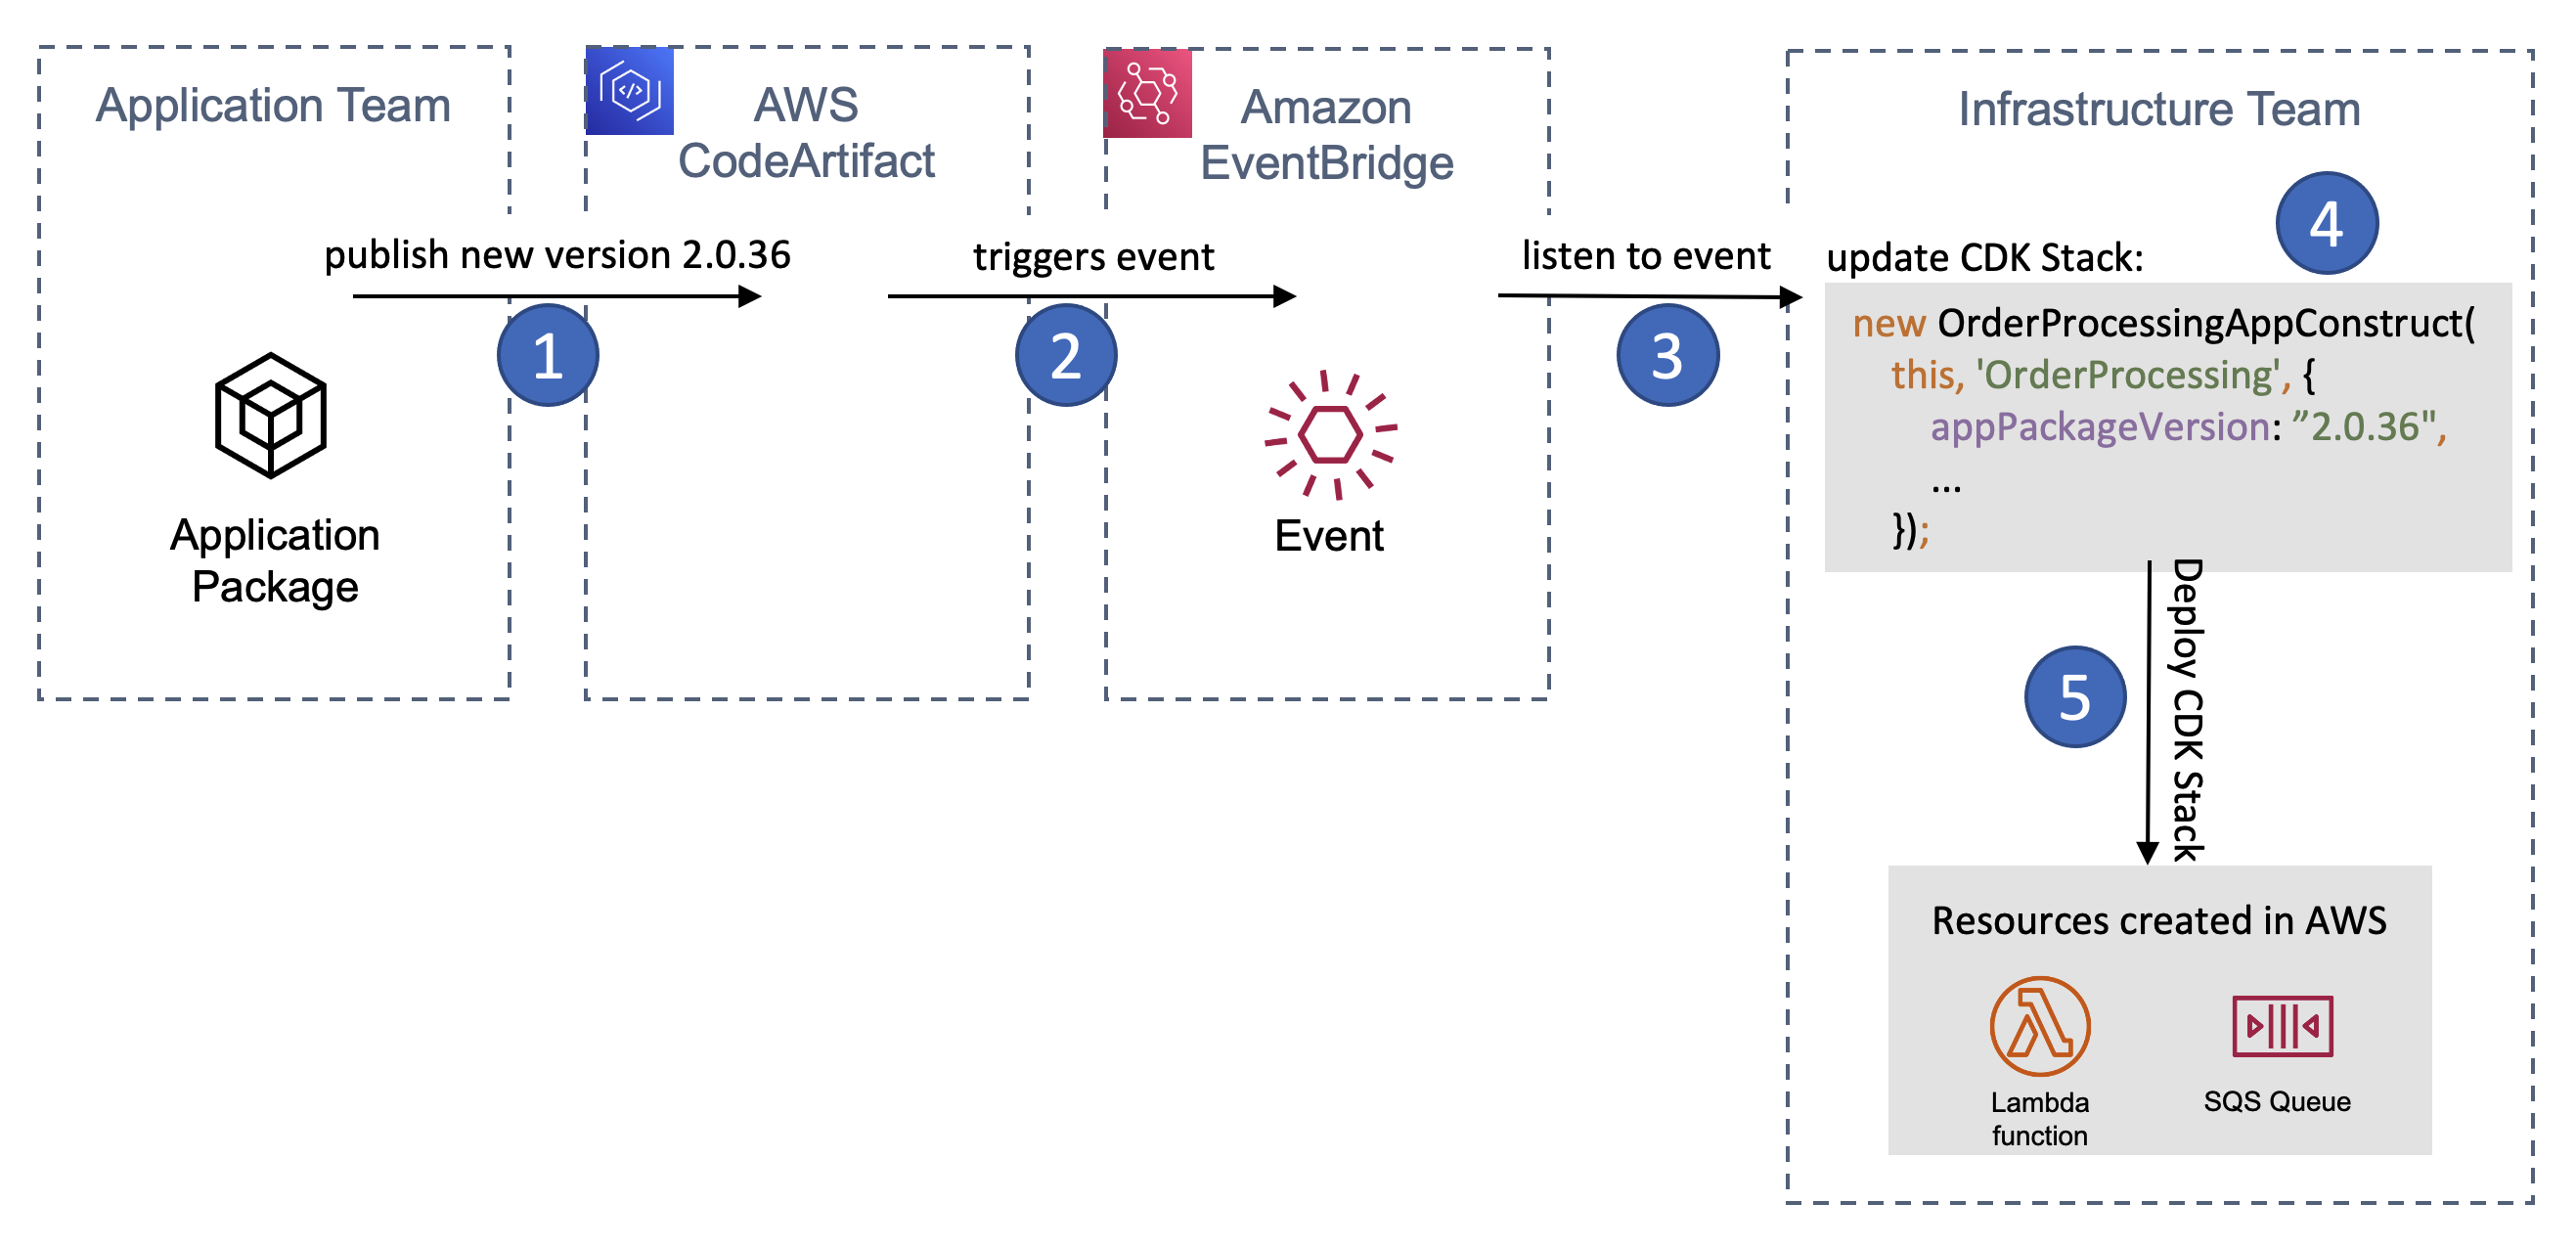


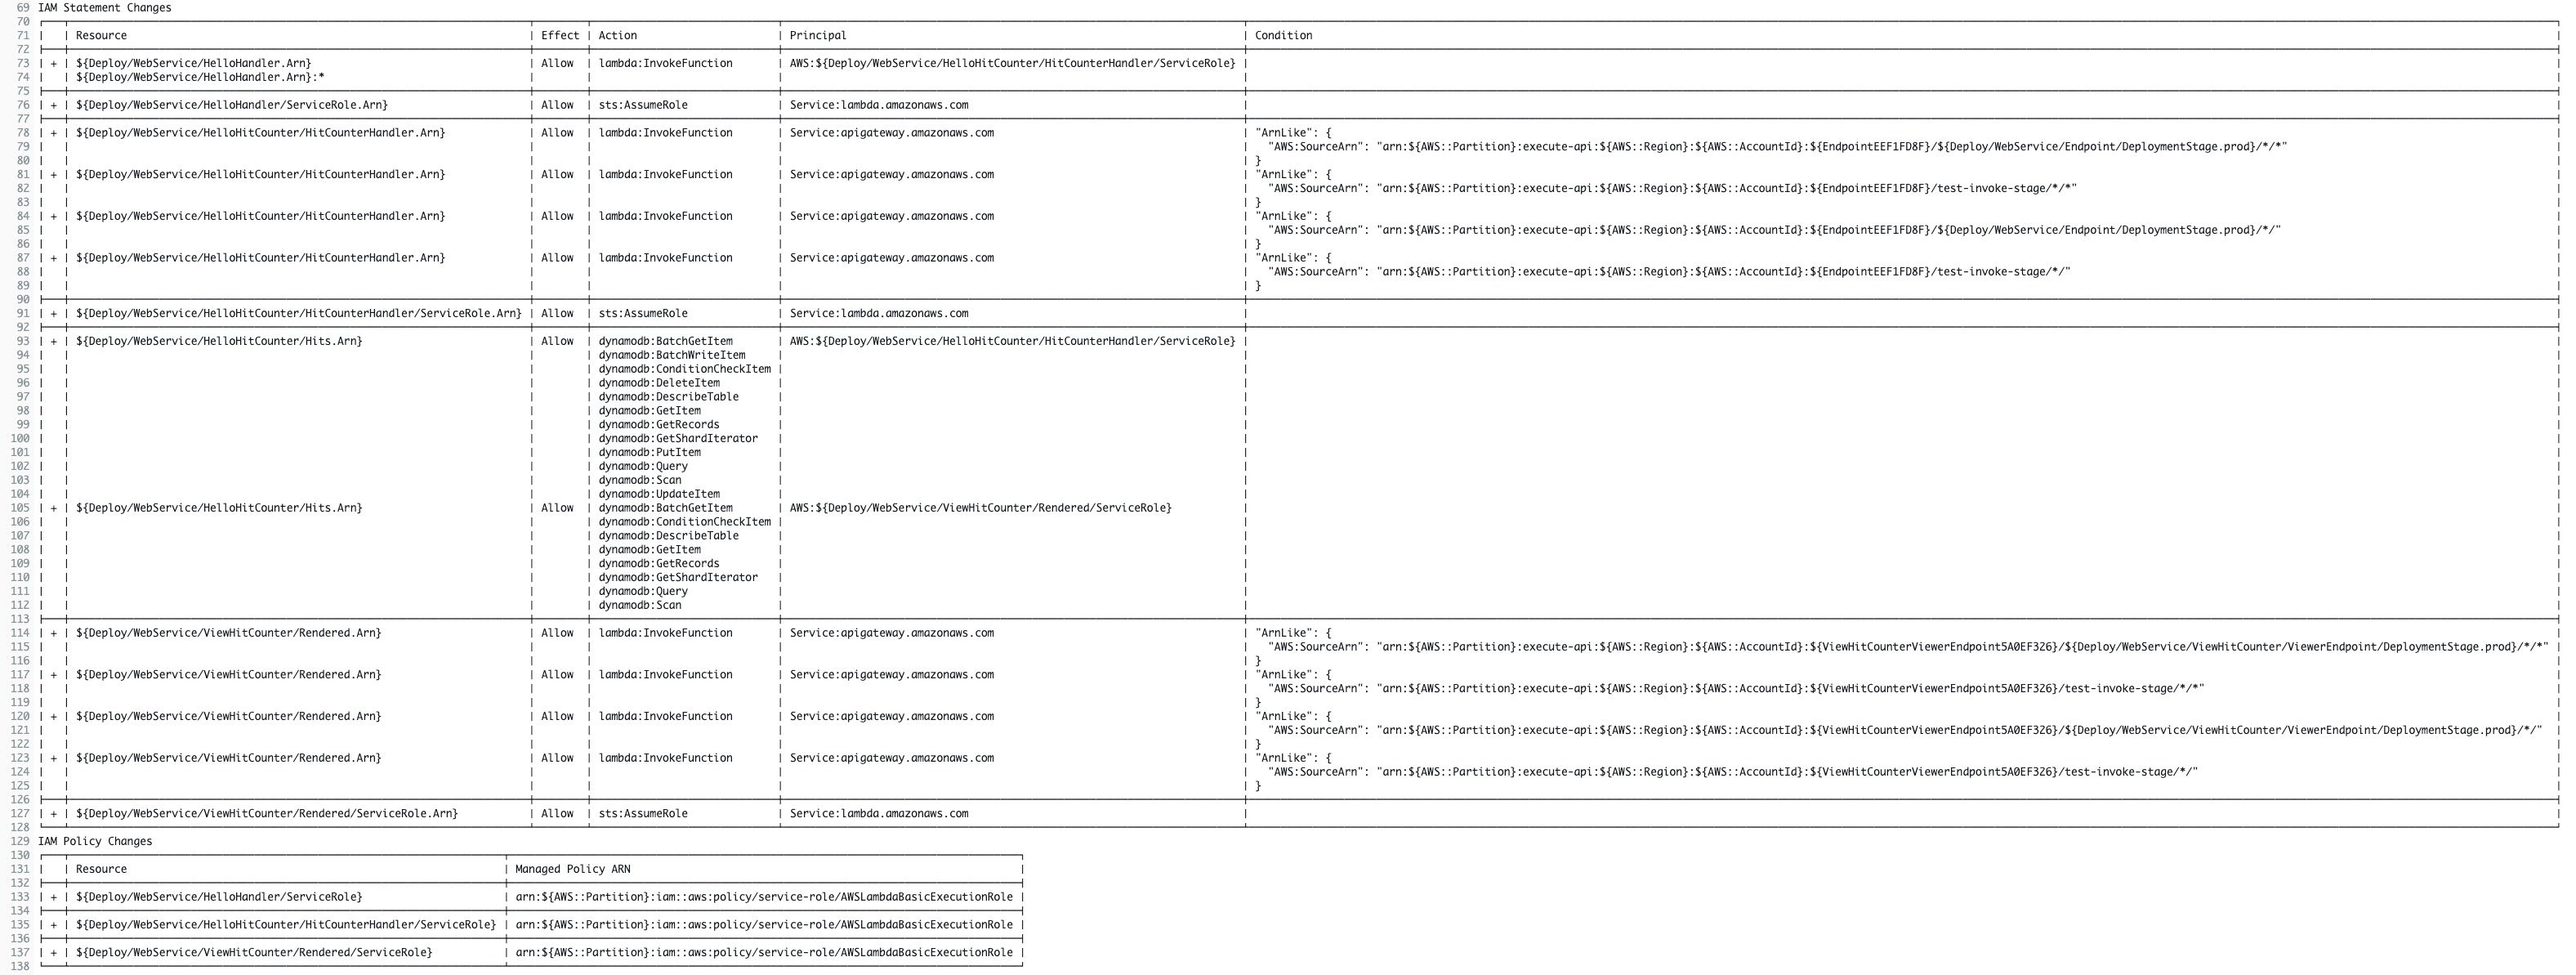
 Synthesis time: 3.05s
 Deployment failed: Error: Stack Deployments Failed: Error: The stack
named DevUsersStack failed creation, it may need to be manually deleted
from the AWS console:
ROLLBACK_COMPLETE:
User: arn:aws:sts::123456789012:assumed-role/cdk-hnb659fds-cfn-exec-role-123456789012-ap-southeast-2/AWSCloudFormation
is not authorized to perform: config:PutConfigRule on resource: access-keys-policy with an explicit deny in a
permissions boundary
Deployment failed: Error: Stack Deployments Failed: Error: The stack
named DevUsersStack failed creation, it may need to be manually deleted
from the AWS console:
ROLLBACK_COMPLETE:
User: arn:aws:sts::123456789012:assumed-role/cdk-hnb659fds-cfn-exec-role-123456789012-ap-southeast-2/AWSCloudFormation
is not authorized to perform: config:PutConfigRule on resource: access-keys-policy with an explicit deny in a
permissions boundary