Tag Archives: AWS KMS

How to protect sensitive data for its entire lifecycle in AWS

Post Syndicated from Raj Jain original https://aws.amazon.com/blogs/security/how-to-protect-sensitive-data-for-its-entire-lifecycle-in-aws/

Many Amazon Web Services (AWS) customer workflows require ingesting sensitive and regulated data such as Payments Card Industry (PCI) data, personally identifiable information (PII), and protected health information (PHI). In this post, I’ll show you a method designed to protect sensitive data for its entire lifecycle in AWS. This method can help enhance your data security posture and be useful for fulfilling the data privacy regulatory requirements applicable to your organization for data protection at-rest, in-transit, and in-use.

An existing method for sensitive data protection in AWS is to use the field-level encryption feature offered by Amazon CloudFront. This CloudFront feature protects sensitive data fields in requests at the AWS network edge. The chosen fields are protected upon ingestion and remain protected throughout the entire application stack. The notion of protecting sensitive data early in its lifecycle in AWS is a highly desirable security architecture. However, CloudFront can protect a maximum of 10 fields and only within HTTP(S) POST requests that carry HTML form encoded payloads.

If your requirements exceed CloudFront’s native field-level encryption feature, such as a need to handle diverse application payload formats, different HTTP methods, and more than 10 sensitive fields, you can implement field-level encryption yourself using the Lambda@Edge feature in CloudFront. In terms of choosing an appropriate encryption scheme, this problem calls for an asymmetric cryptographic system that will allow public keys to be openly distributed to the CloudFront network edges while keeping the corresponding private keys stored securely within the network core. One such popular asymmetric cryptographic system is RSA. Accordingly, we’ll implement a Lambda@Edge function that uses asymmetric encryption using the RSA cryptosystem to protect an arbitrary number of fields in any HTTP(S) request. We will discuss the solution using an example JSON payload, although this approach can be applied to any payload format.

A complex part of any encryption solution is key management. To address that, I use AWS Key Management Service (AWS KMS). AWS KMS simplifies the solution and offers improved security posture and operational benefits, detailed later.

Solution overview

You can protect data in-transit over individual communications channels using transport layer security (TLS), and at-rest in individual storage silos using volume encryption, object encryption or database table encryption. However, if you have sensitive workloads, you might need additional protection that can follow the data as it moves through the application stack. Fine-grained data protection techniques such as field-level encryption allow for the protection of sensitive data fields in larger application payloads while leaving non-sensitive fields in plaintext. This approach lets an application perform business functions on non-sensitive fields without the overhead of encryption, and allows fine-grained control over what fields can be accessed by what parts of the application.

A best practice for protecting sensitive data is to reduce its exposure in the clear throughout its lifecycle. This means protecting data as early as possible on ingestion and ensuring that only authorized users and applications can access the data only when and as needed. CloudFront, when combined with the flexibility provided by Lambda@Edge, provides an appropriate environment at the edge of the AWS network to protect sensitive data upon ingestion in AWS.

Since the downstream systems don’t have access to sensitive data, data exposure is reduced, which helps to minimize your compliance footprint for auditing purposes.

The number of sensitive data elements that may need field-level encryption depends on your requirements. For example:

  • For healthcare applications, HIPAA regulates 18 personal data elements.
  • In California, the California Consumer Privacy Act (CCPA) regulates at least 11 categories of personal information—each with its own set of data elements.

The idea behind field-level encryption is to protect sensitive data fields individually, while retaining the structure of the application payload. The alternative is full payload encryption, where the entire application payload is encrypted as a binary blob, which makes it unusable until the entirety of it is decrypted. With field-level encryption, the non-sensitive data left in plaintext remains usable for ordinary business functions. When retrofitting data protection in existing applications, this approach can reduce the risk of application malfunction since the data format is maintained.

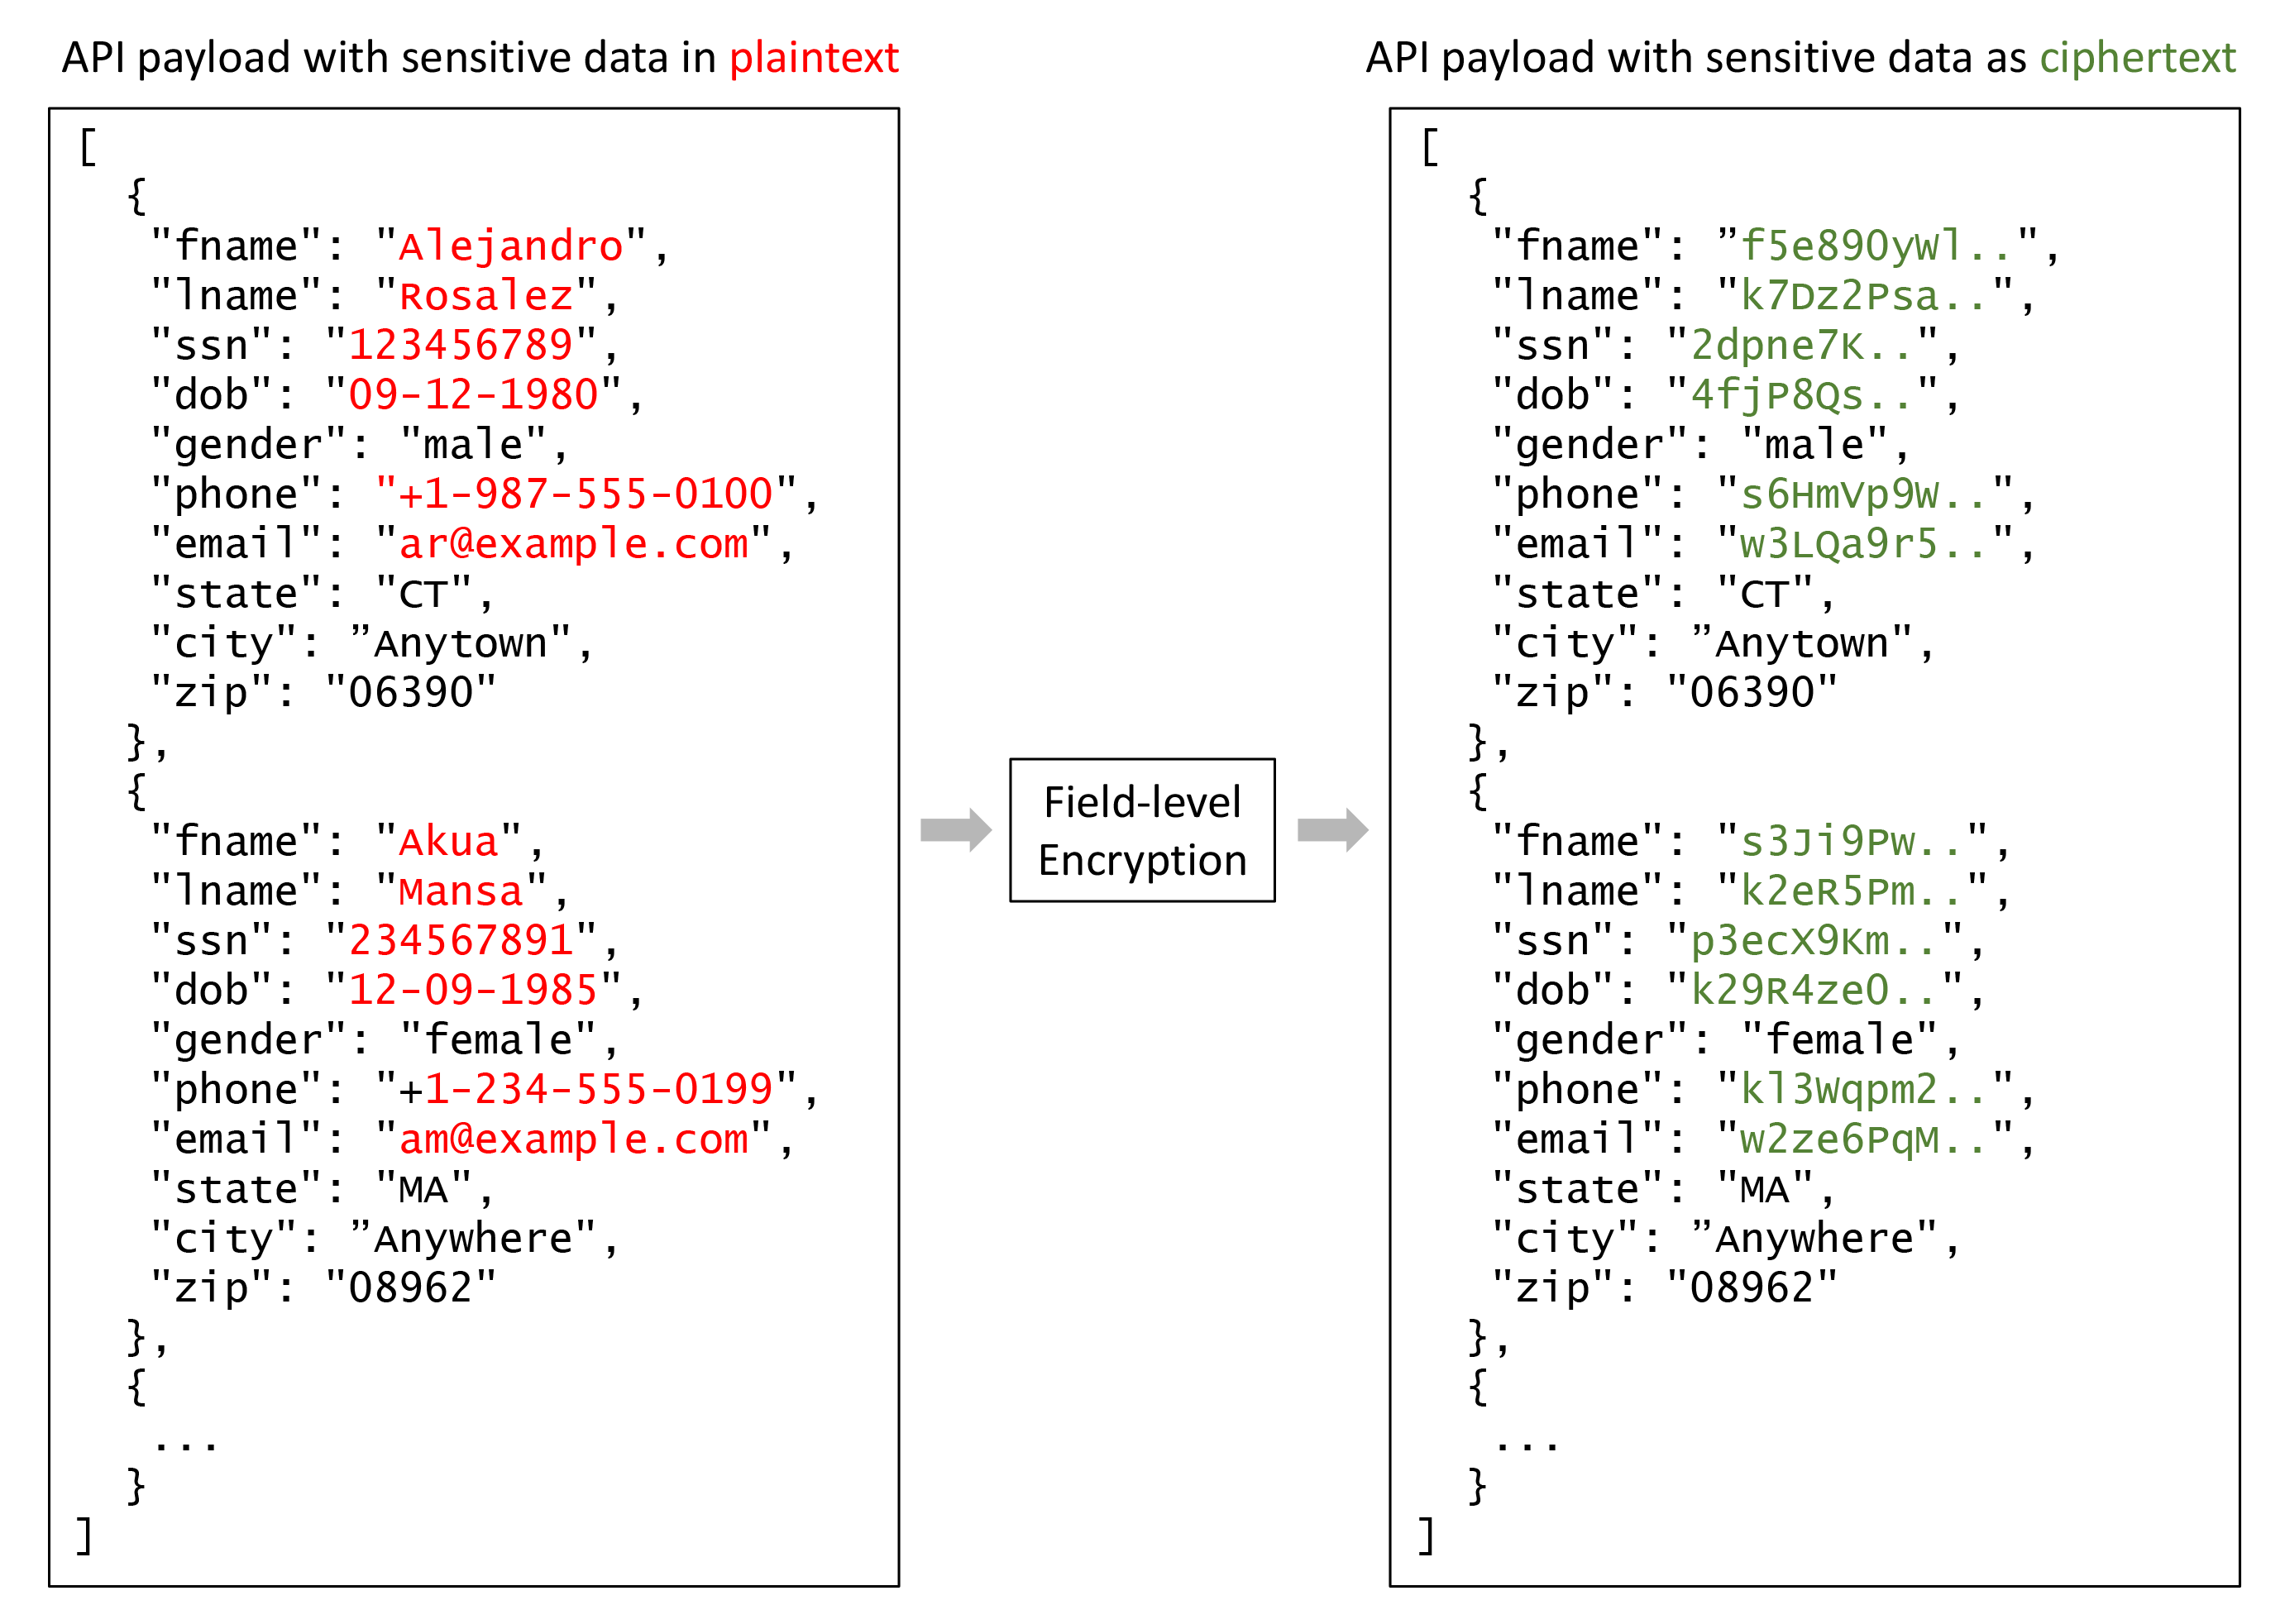
The following figure shows how PII data fields in a JSON construction that are deemed sensitive by an application can be transformed from plaintext to ciphertext with a field-level encryption mechanism.

Figure 1: Example of field-level encryption

Figure 1: Example of field-level encryption

You can change plaintext to ciphertext as depicted in Figure 1 by using a Lambda@Edge function to perform field-level encryption. I discuss the encryption and decryption processes separately in the following sections.

Field-level encryption process

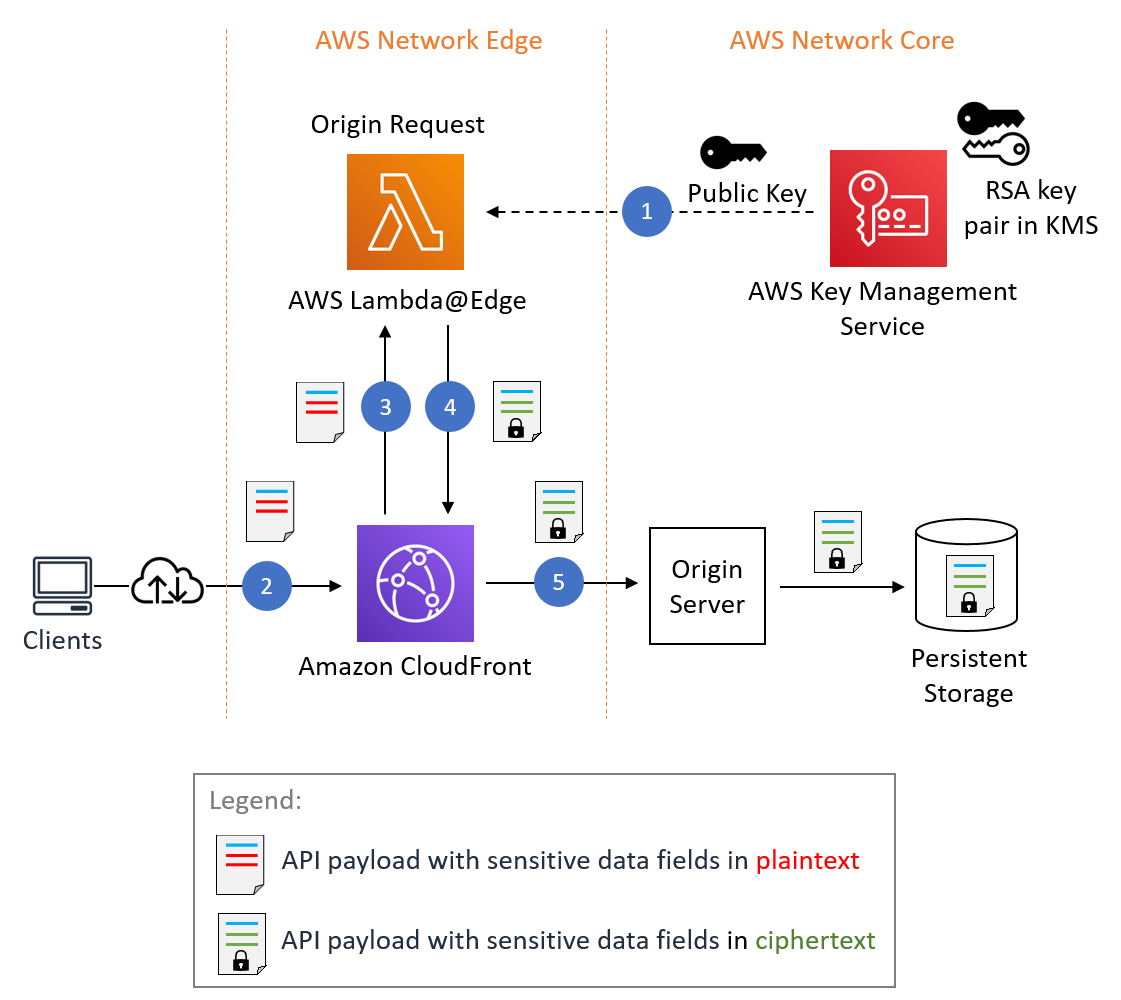
Let’s discuss the individual steps involved in the encryption process as shown in Figure 2.

Figure 2: Field-level encryption process

Figure 2: Field-level encryption process

Figure 2 shows CloudFront invoking a Lambda@Edge function while processing a client request. CloudFront offers multiple integration points for invoking Lambda@Edge functions. Since you are processing a client request and your encryption behavior is related to requests being forwarded to an origin server, you want your function to run upon the origin request event in CloudFront. The origin request event represents an internal state transition in CloudFront that happens immediately before CloudFront forwards a request to the downstream origin server.

You can associate your Lambda@Edge with CloudFront as described in Adding Triggers by Using the CloudFront Console. A screenshot of the CloudFront console is shown in Figure 3. The selected event type is Origin Request and the Include Body check box is selected so that the request body is conveyed to Lambda@Edge.

Figure 3: Configuration of Lambda@Edge in CloudFront

Figure 3: Configuration of Lambda@Edge in CloudFront

The Lambda@Edge function acts as a programmable hook in the CloudFront request processing flow. You can use the function to replace the incoming request body with a request body with the sensitive data fields encrypted.

The process includes the following steps:

Step 1 – RSA key generation and inclusion in Lambda@Edge

You can generate an RSA customer managed key (CMK) in AWS KMS as described in Creating asymmetric CMKs. This is done at system configuration time.

Note: You can use your existing RSA key pairs or generate new ones externally by using OpenSSL commands, especially if you need to perform RSA decryption and key management independently of AWS KMS. Your choice won’t affect the fundamental encryption design pattern presented here.

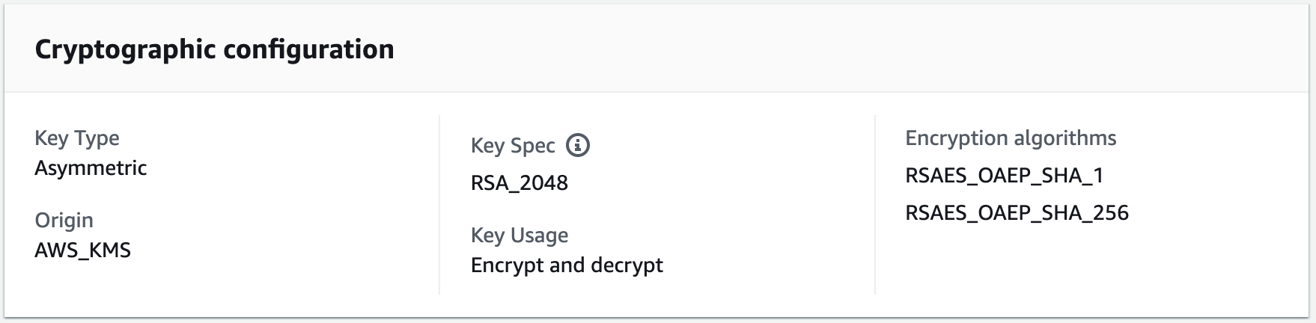
The RSA key creation in AWS KMS requires two inputs: key length and type of usage. In this example, I created a 2048-bit key and assigned its use for encryption and decryption. The cryptographic configuration of an RSA CMK created in AWS KMS is shown in Figure 4.

Figure 4: Cryptographic properties of an RSA key managed by AWS KMS

Figure 4: Cryptographic properties of an RSA key managed by AWS KMS

Of the two encryption algorithms shown in Figure 4— RSAES_OAEP_SHA_256 and RSAES_OAEP_SHA_1, this example uses RSAES_OAEP_SHA_256. The combination of a 2048-bit key and the RSAES_OAEP_SHA_256 algorithm lets you encrypt a maximum of 190 bytes of data, which is enough for most PII fields. You can choose a different key length and encryption algorithm depending on your security and performance requirements. How to choose your CMK configuration includes information about RSA key specs for encryption and decryption.

Using AWS KMS for RSA key management versus managing the keys yourself eliminates that complexity and can help you:

  • Enforce IAM and key policies that describe administrative and usage permissions for keys.
  • Manage cross-account access for keys.
  • Monitor and alarm on key operations through Amazon CloudWatch.
  • Audit AWS KMS API invocations through AWS CloudTrail.
  • Record configuration changes to keys and enforce key specification compliance through AWS Config.
  • Generate high-entropy keys in an AWS KMS hardware security module (HSM) as required by NIST.
  • Store RSA private keys securely, without the ability to export.
  • Perform RSA decryption within AWS KMS without exposing private keys to application code.
  • Categorize and report on keys with key tags for cost allocation.
  • Disable keys and schedule their deletion.

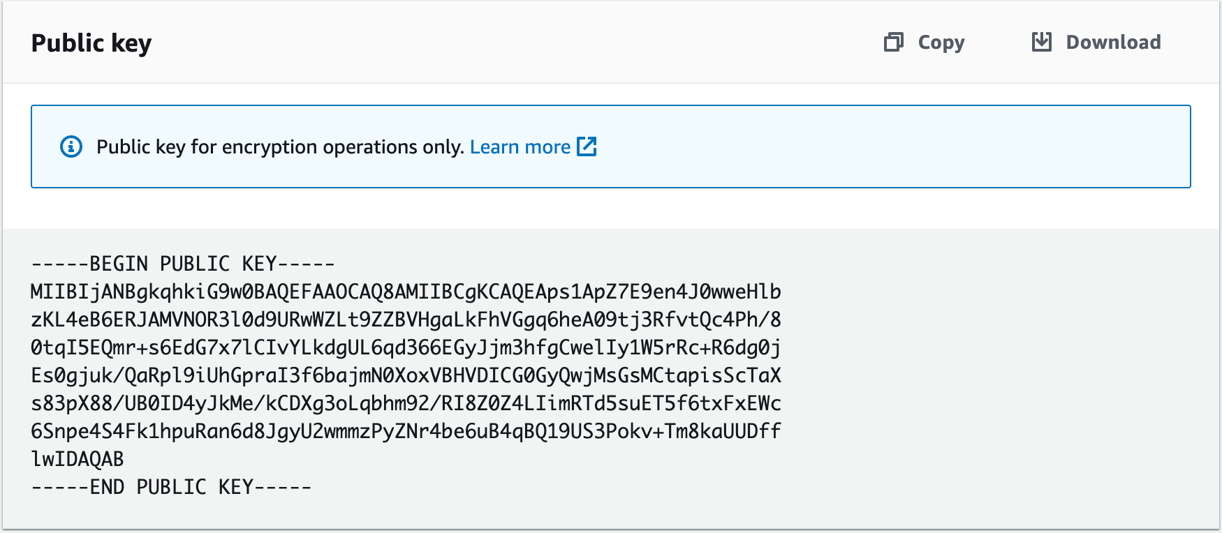
You need to extract the RSA public key from AWS KMS so you can include it in the AWS Lambda deployment package. You can do this from the AWS Management Console, through the AWS KMS SDK, or by using the get-public-key command in the AWS Command Line Interface (AWS CLI). Figure 5 shows Copy and Download options for a public key in the Public key tab of the AWS KMS console.

Figure 5: RSA public key available for copy or download in the console

Figure 5: RSA public key available for copy or download in the console

Note: As we will see in the sample code in step 3, we embed the public key in the Lambda@Edge deployment package. This is a permissible practice because public keys in asymmetric cryptography systems aren’t a secret and can be freely distributed to entities that need to perform encryption. Alternatively, you can use Lambda@Edge to query AWS KMS for the public key at runtime. However, this introduces latency, increases the load against your KMS account quota, and increases your AWS costs. General patterns for using external data in Lambda@Edge are described in Leveraging external data in Lambda@Edge.

Step 2 – HTTP API request handling by CloudFront

CloudFront receives an HTTP(S) request from a client. CloudFront then invokes Lambda@Edge during origin-request processing and includes the HTTP request body in the invocation.

Step 3 – Lambda@Edge processing

The Lambda@Edge function processes the HTTP request body. The function extracts sensitive data fields and performs RSA encryption over their values.

The following code is sample source code for the Lambda@Edge function implemented in Python 3.7:

import Crypto
import base64
import json
from Crypto.Cipher import PKCS1_OAEP
from Crypto.PublicKey import RSA

# PEM-formatted RSA public key copied over from AWS KMS or your own public key.
RSA_PUBLIC_KEY = "-----BEGIN PUBLIC KEY-----<your key>-----END PUBLIC KEY-----"
RSA_PUBLIC_KEY_OBJ = RSA.importKey(RSA_PUBLIC_KEY)
RSA_CIPHER_OBJ = PKCS1_OAEP.new(RSA_PUBLIC_KEY_OBJ, Crypto.Hash.SHA256)

# Example sensitive data field names in a JSON object. 
PII_SENSITIVE_FIELD_NAMES = ["fname", "lname", "email", "ssn", "dob", "phone"]

CIPHERTEXT_PREFIX = "#01#"
CIPHERTEXT_SUFFIX = "#10#"

def lambda_handler(event, context):
    # Extract HTTP request and its body as per documentation:
    # https://docs.aws.amazon.com/AmazonCloudFront/latest/DeveloperGuide/lambda-event-structure.html
    http_request = event['Records'][0]['cf']['request']
    body = http_request['body']
    org_body = base64.b64decode(body['data'])
    mod_body = protect_sensitive_fields_json(org_body)
    body['action'] = 'replace'
    body['encoding'] = 'text'
    body['data'] = mod_body
    return http_request


def protect_sensitive_fields_json(body):
    # Encrypts sensitive fields in sample JSON payload shown earlier in this post.
    # [{"fname": "Alejandro", "lname": "Rosalez", … }]
    person_list = json.loads(body.decode("utf-8"))
    for person_data in person_list:
        for field_name in PII_SENSITIVE_FIELD_NAMES:
            if field_name not in person_data:
                continue
            plaintext = person_data[field_name]
            ciphertext = RSA_CIPHER_OBJ.encrypt(bytes(plaintext, 'utf-8'))
            ciphertext_b64 = base64.b64encode(ciphertext).decode()
            # Optionally, add unique prefix/suffix patterns to ciphertext
            person_data[field_name] = CIPHERTEXT_PREFIX + ciphertext_b64 + CIPHERTEXT_SUFFIX 
    return json.dumps(person_list)

The event structure passed into the Lambda@Edge function is described in Lambda@Edge Event Structure. Following the event structure, you can extract the HTTP request body. In this example, the assumption is that the HTTP payload carries a JSON document based on a particular schema defined as part of the API contract. The input JSON document is parsed by the function, converting it into a Python dictionary. The Python native dictionary operators are then used to extract the sensitive field values.

Note: If you don’t know your API payload structure ahead of time or you’re dealing with unstructured payloads, you can use techniques such as regular expression pattern searches and checksums to look for patterns of sensitive data and target them accordingly. For example, credit card primary account numbers include a Luhn checksum that can be programmatically detected. Additionally, services such as Amazon Comprehend and Amazon Macie can be leveraged for detecting sensitive data such as PII in application payloads.

While iterating over the sensitive fields, individual field values are encrypted using the standard RSA encryption implementation available in the Python Cryptography Toolkit (PyCrypto). The PyCrypto module is included within the Lambda@Edge zip archive as described in Lambda@Edge deployment package.

The example uses the standard optimal asymmetric encryption padding (OAEP) and SHA-256 encryption algorithm properties. These properties are supported by AWS KMS and will allow RSA ciphertext produced here to be decrypted by AWS KMS later.

Note: You may have noticed in the code above that we’re bracketing the ciphertexts with predefined prefix and suffix strings:

person_data[field_name] = CIPHERTEXT_PREFIX + ciphertext_b64 + CIPHERTEXT_SUFFIX

This is an optional measure and is being implemented to simplify the decryption process.

The prefix and suffix strings help demarcate ciphertext embedded in unstructured data in downstream processing and also act as embedded metadata. Unique prefix and suffix strings allow you to extract ciphertext through string or regular expression (regex) searches during the decryption process without having to know the data body format or schema, or the field names that were encrypted.

Distinct strings can also serve as indirect identifiers of RSA key pair identifiers. This can enable key rotation and allow separate keys to be used for separate fields depending on the data security requirements for individual fields.

You can ensure that the prefix and suffix strings can’t collide with the ciphertext by bracketing them with characters that don’t appear in cyphertext. For example, a hash (#) character cannot be part of a base64 encoded ciphertext string.

Deploying a Lambda function as a Lambda@Edge function requires specific IAM permissions and an IAM execution role. Follow the Lambda@Edge deployment instructions in Setting IAM Permissions and Roles for Lambda@Edge.

Step 4 – Lambda@Edge response

The Lambda@Edge function returns the modified HTTP body back to CloudFront and instructs it to replace the original HTTP body with the modified one by setting the following flag:

http_request['body']['action'] = 'replace'

Step 5 – Forward the request to the origin server

CloudFront forwards the modified request body provided by Lambda@Edge to the origin server. In this example, the origin server writes the data body to persistent storage for later processing.

Field-level decryption process

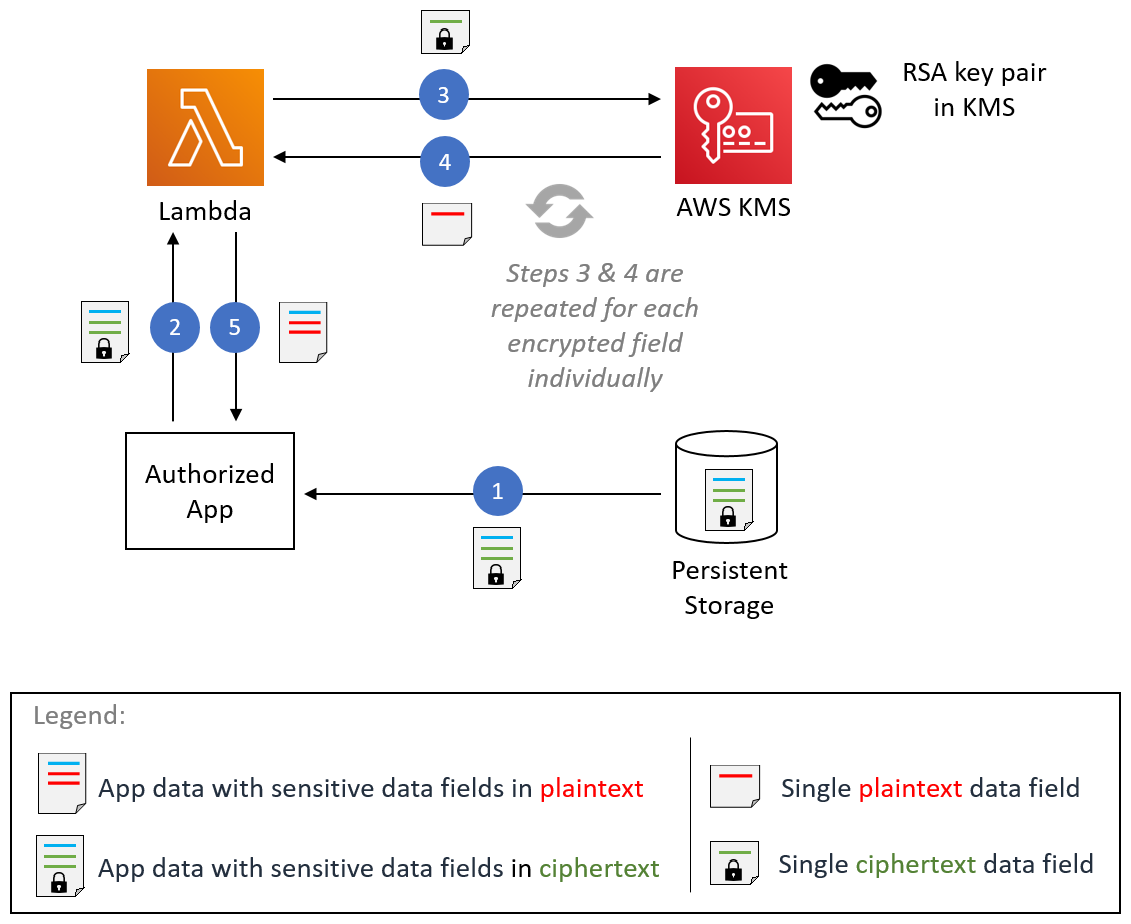
An application that’s authorized to access sensitive data for a business function can decrypt that data. An example decryption process is shown in Figure 6. The figure shows a Lambda function as an example compute environment for invoking AWS KMS for decryption. This functionality isn’t dependent on Lambda and can be performed in any compute environment that has access to AWS KMS.

Figure 6: Field-level decryption process

Figure 6: Field-level decryption process

The steps of the process shown in Figure 6 are described below.

Step 1 – Application retrieves the field-level encrypted data

The example application retrieves the field-level encrypted data from persistent storage that had been previously written during the data ingestion process.

Step 2 – Application invokes the decryption Lambda function

The application invokes a Lambda function responsible for performing field-level decryption, sending the retrieved data to Lambda.

Step 3 – Lambda calls the AWS KMS decryption API

The Lambda function uses AWS KMS for RSA decryption. The example calls the KMS decryption API that inputs ciphertext and returns plaintext. The actual decryption happens in KMS; the RSA private key is never exposed to the application, which is a highly desirable characteristic for building secure applications.

Note: If you choose to use an external key pair, then you can securely store the RSA private key in AWS services like AWS Systems Manager Parameter Store or AWS Secrets Manager and control access to the key through IAM and resource policies. You can fetch the key from relevant vault using the vault’s API, then decrypt using the standard RSA implementation available in your programming language. For example, the cryptography toolkit in Python or javax.crypto in Java.

The Lambda function Python code for decryption is shown below.

import base64
import boto3
import re

kms_client = boto3.client('kms')
CIPHERTEXT_PREFIX = "#01#"
CIPHERTEXT_SUFFIX = "#10#"

# This lambda function extracts event body, searches for and decrypts ciphertext 
# fields surrounded by provided prefix and suffix strings in arbitrary text bodies 
# and substitutes plaintext fields in-place.  
def lambda_handler(event, context):    
    org_data = event["body"]
    mod_data = unprotect_fields(org_data, CIPHERTEXT_PREFIX, CIPHERTEXT_SUFFIX)
    return mod_data

# Helper function that performs non-greedy regex search for ciphertext strings on
# input data and performs RSA decryption of them using AWS KMS 
def unprotect_fields(org_data, prefix, suffix):
    regex_pattern = prefix + "(.*?)" + suffix
    mod_data_parts = []
    cursor = 0

    # Search ciphertexts iteratively using python regular expression module
    for match in re.finditer(regex_pattern, org_data):
        mod_data_parts.append(org_data[cursor: match.start()])
        try:
            # Ciphertext was stored as Base64 encoded in our example. Decode it.
            ciphertext = base64.b64decode(match.group(1))

            # Decrypt ciphertext using AWS KMS  
            decrypt_rsp = kms_client.decrypt(
                EncryptionAlgorithm="RSAES_OAEP_SHA_256",
                KeyId="<Your-Key-ID>",
                CiphertextBlob=ciphertext)
            decrypted_val = decrypt_rsp["Plaintext"].decode("utf-8")
            mod_data_parts.append(decrypted_val)
        except Exception as e:
            print ("Exception: " + str(e))
            return None
        cursor = match.end()

    mod_data_parts.append(org_data[cursor:])
    return "".join(mod_data_parts)

The function performs a regular expression search in the input data body looking for ciphertext strings bracketed in predefined prefix and suffix strings that were added during encryption.

While iterating over ciphertext strings one-by-one, the function calls the AWS KMS decrypt() API. The example function uses the same RSA encryption algorithm properties—OAEP and SHA-256—and the Key ID of the public key that was used during encryption in Lambda@Edge.

Note that the Key ID itself is not a secret. Any application can be configured with it, but that doesn’t mean any application will be able to perform decryption. The security control here is that the AWS KMS key policy must allow the caller to use the Key ID to perform the decryption. An additional security control is provided by Lambda execution role that should allow calling the KMS decrypt() API.

Step 4 – AWS KMS decrypts ciphertext and returns plaintext

To ensure that only authorized users can perform decrypt operation, the KMS is configured as described in Using key policies in AWS KMS. In addition, the Lambda IAM execution role is configured as described in AWS Lambda execution role to allow it to access KMS. If both the key policy and IAM policy conditions are met, KMS returns the decrypted plaintext. Lambda substitutes the plaintext in place of ciphertext in the encapsulating data body.

Steps three and four are repeated for each ciphertext string.

Step 5 – Lambda returns decrypted data body

Once all the ciphertext has been converted to plaintext and substituted in the larger data body, the Lambda function returns the modified data body to the client application.

Conclusion

In this post, I demonstrated how you can implement field-level encryption integrated with AWS KMS to help protect sensitive data workloads for their entire lifecycle in AWS. Since your Lambda@Edge is designed to protect data at the network edge, data remains protected throughout the application execution stack. In addition to improving your data security posture, this protection can help you comply with data privacy regulations applicable to your organization.

Since you author your own Lambda@Edge function to perform standard RSA encryption, you have flexibility in terms of payload formats and the number of fields that you consider to be sensitive. The integration with AWS KMS for RSA key management and decryption provides significant simplicity, higher key security, and rich integration with other AWS security services enabling an overall strong security solution.

By using encrypted fields with identifiers as described in this post, you can create fine-grained controls for data accessibility to meet the security principle of least privilege. Instead of granting either complete access or no access to data fields, you can ensure least privileges where a given part of an application can only access the fields that it needs, when it needs to, all the way down to controlling access field by field. Field by field access can be enabled by using different keys for different fields and controlling their respective policies.

In addition to protecting sensitive data workloads to meet regulatory and security best practices, this solution can be used to build de-identified data lakes in AWS. Sensitive data fields remain protected throughout their lifecycle, while non-sensitive data fields remain in the clear. This approach can allow analytics or other business functions to operate on data without exposing sensitive data.

If you have feedback about this post, submit comments in the Comments section below.

Want more AWS Security how-to content, news, and feature announcements? Follow us on Twitter.

Author

Raj Jain

Raj is a Senior Cloud Architect at AWS. He is passionate about helping customers build well-architected applications in AWS. Raj is a published author in Bell Labs Technical Journal, has authored 3 IETF standards, and holds 12 patents in internet telephony and applied cryptography. In his spare time, Raj enjoys outdoors, cooking, reading, and travel.

Use AWS Secrets Manager to simplify the management of private certificates

Post Syndicated from Maitreya Ranganath original https://aws.amazon.com/blogs/security/use-aws-secrets-manager-to-simplify-the-management-of-private-certificates/

AWS Certificate Manager (ACM) lets you easily provision, manage, and deploy public and private Secure Sockets Layer/Transport Layer Security (SSL/TLS) certificates for use with Amazon Web Services (AWS) services and your internal connected resources. For private certificates, AWS Certificate Manager Private Certificate Authority (ACM PCA) can be used to create private CA hierarchies, including root and subordinate CAs, without the investment and maintenance costs of operating an on-premises CA. With these CAs, you can issue custom end-entity certificates or use the ACM defaults.

When you manage the lifecycle of certificates, it’s important to follow best practices. You can think of a certificate as an identity of a service you’re connecting to. You have to ensure that these identities are secure and up to date, ideally with the least amount of manual intervention. AWS Secrets Manager provides a mechanism for managing certificates, and other secrets, at scale. Specifically, you can configure secrets to automatically rotate on a scheduled basis by using pre-built or custom AWS Lambda functions, encrypt them by using AWS Key Management Service (AWS KMS) keys, and automatically retrieve or distribute them for use in applications and services across an AWS environment. This reduces the overhead of manually managing the deployment, creation, and secure storage of these certificates.

In this post, you’ll learn how to use Secrets Manager to manage and distribute certificates created by ACM PCA across AWS Regions and accounts.

We present two use cases in this blog post to demonstrate the difference between issuing private certificates with ACM and with ACM PCA. For the first use case, you will create a certificate by using the ACM defaults for private certificates. You will then deploy the ACM default certificate to an Amazon Elastic Compute Cloud (Amazon EC2) instance that is launched in the same account as the secret and private CA. In the second scenario, you will create a custom certificate by using ACM PCA templates and parameters. This custom certificate will be deployed to an EC2 instance in a different account to demonstrate cross-account sharing of secrets.

Solution overview

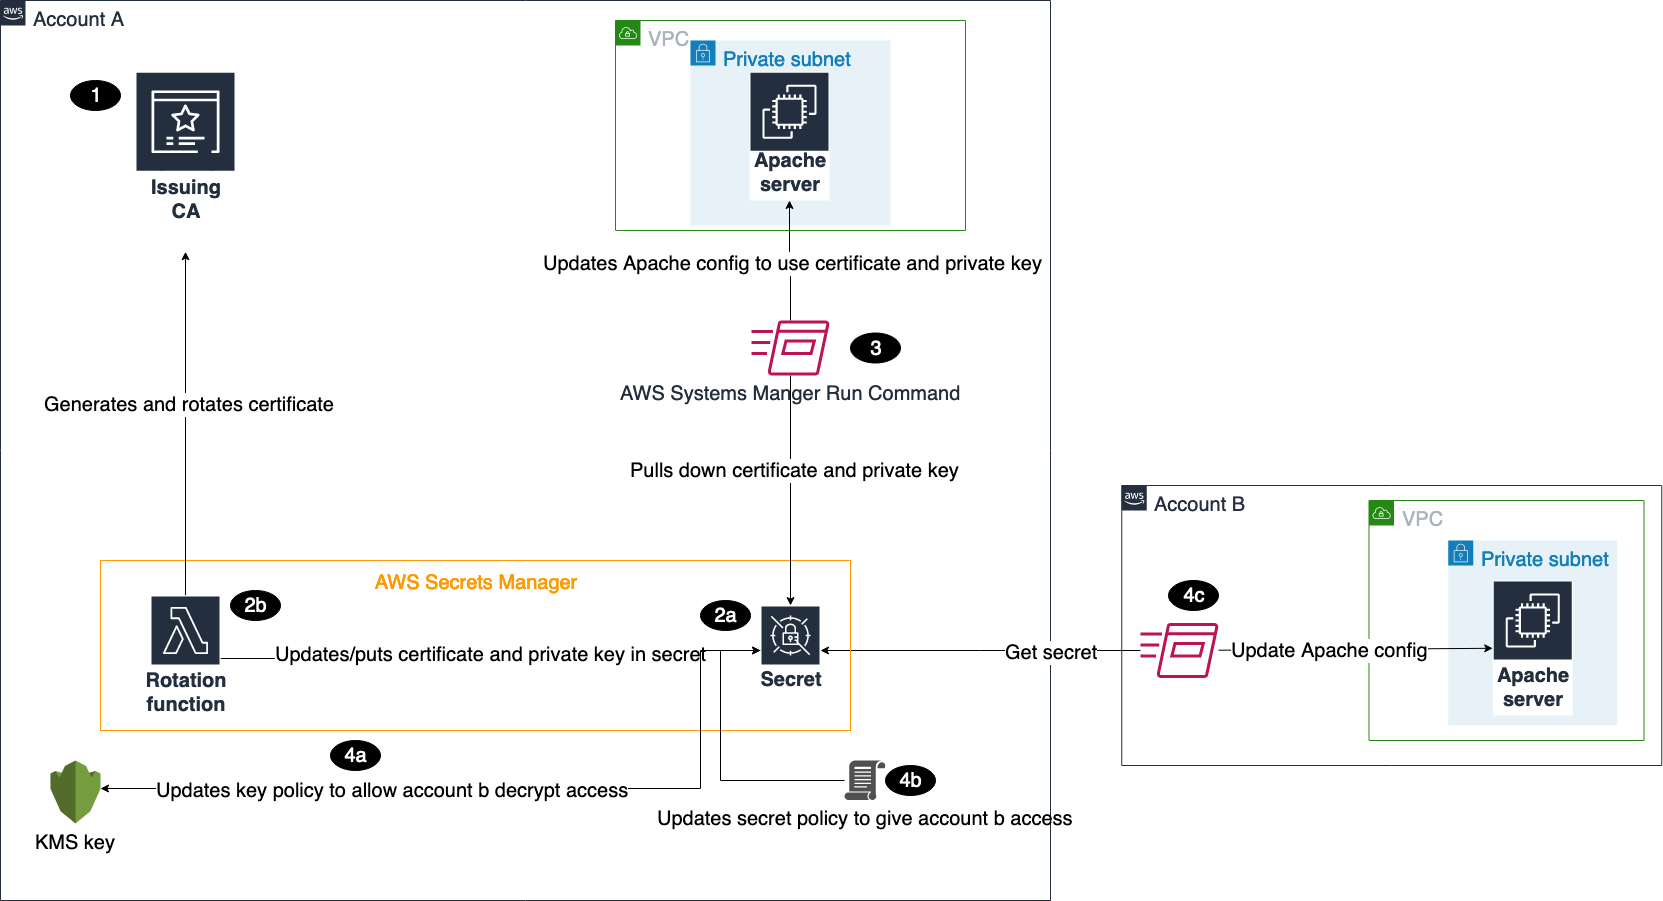
Figure 1 shows the architecture of our solution.

Figure 1: Solution architecture

Figure 1: Solution architecture

This architecture includes resources that you will create during the blog walkthrough and by using AWS CloudFormation templates. This architecture outlines how these services can be used in a multi-account environment. As shown in the diagram:

  1. You create a certificate authority (CA) in ACM PCA to generate end-entity certificates.
  2. In the account where the issuing CA was created, you create secrets in Secrets Manager.
    1. There are several required parameters that you must provide when creating secrets, based on whether you want to create an ACM or ACM PCA issued certificate. These parameters will be passed to our Lambda function to make sure that the certificate is generated and stored properly.
    2. The Lambda rotation function created by the CloudFormation template is attached when configuring secrets rotation. Initially, the function generates two Privacy-Enhanced Mail (PEM) encoded files containing the certificate and private key, based on the provided parameters, and stores those in the secret. Subsequent calls to the function are made when the secret needs to be rotated, and then the function stores the resulting Certificate PEM and Private Key PEM in the desired secret. The function is written using Python, the AWS SDK for Python (Boto3), and OpenSSL. The flow of the function follows the requirements for rotating secrets in Secrets Manager.
  3. The first CloudFormation template creates a Systems Manager Run Command document that can be invoked to install the certificate and private key from the secret on an Apache Server running on EC2 in Account A.
  4. The second CloudFormation template deploys the same Run Command document and EC2 environment in Account B.
    1. To make sure that the account has the ability to pull down the certificate and private key from Secrets Manager, you need to update the key policy in Account A to give Account B access to decrypt the secret.
    2. You also need to add a resource-based policy to the secret that gives Account B access to retrieve the secret from Account A.
    3. Once the proper access is set up in Account A, you can use the Run Command document to install the certificate and private key on the Apache Server.

In a multi-account scenario, it’s common to have a central or shared AWS account that owns the ACM PCA resource, while workloads that are deployed in other AWS accounts use certificates issued by the ACM PCA. This can be achieved in two ways:

  1. Secrets in Secrets Manager can be shared with other AWS accounts by using resource-based policies. Once shared, the secrets can be deployed to resources, such as EC2 instances.
  2. You can share the central ACM PCA with other AWS accounts by using AWS Resource Access Manager or ACM PCA resource-based policies. These two options allow the receiving AWS account or accounts to issue private certificates by using the shared ACM PCA. These issued certificates can then use Secrets Manager to manage the secret in the child account and leverage features like rotation.

We will focus on first case for sharing secrets.

Solution cost

The cost for running this solution comes from the following services:

  • AWS Certificate Manager Private Certificate Authority (ACM PCA)
    Referring to the pricing page for ACM PCA, this solution incurs a prorated monthly charge of $400 for each CA that is created. A CA can be deleted the same day it’s created, leading to a charge of around $13/day (400 * 12 / 365.25). In addition, there is a cost for issuing certificates using ACM PCA. For the first 1000 certificates, this cost is $0.75. For this demonstration, you only need two certificates, resulting in a total charge of $1.50 for issuing certificates using ACM PCA. In all, the use of ACM PCA in this solution results in a charge of $14.50.
  • Amazon EC2
    The CloudFormation templates create t2.micro instances that cost $0.0116/hour, if they’re not eligible for Free Tier.
  • Secrets Manager
    There is a 30-day free trial for Secrets Manager, which is initiated when the first secret is created. After the free trial has completed, it costs $0.40 per secret stored per month. You will use two secrets for this solution and can schedule these for deletion after seven days, resulting in a prorated charge of $0.20.
  • Lambda
    Lambda has a free usage tier that allows for 1 million free requests per month and 400,000 GB-seconds of compute time per month. This fits within the usage for this blog, making the cost $0.
  • AWS KMS
    A single key created by one of the CloudFormation templates costs $1/month. The first 20,000 requests to AWS KMS are free, which fits within the usage of the test environment. In a production scenario, AWS KMS would charge $0.03 per 10,000 requests involving this key.

There are no charges for Systems Manager Run Command.

See the “Clean up resources” section of this blog post to get information on how to delete the resources that you create for this environment.

Deploy the solution

Now we’ll walk through the steps to deploy the solution. The CloudFormation templates and Lambda function code can be found in the AWS GitHub repository.

Create a CA to issue certificates

First, you’ll create an ACM PCA to issue private certificates. A common practice we see with customers is using a subordinate CA in AWS that is used to issue end-entity certificates for applications and workloads in the cloud. This subordinate can either point to a root CA in ACM PCA that is maintained by a central team, or to an existing on-premises public key infrastructure (PKI). There are some considerations when creating a CA hierarchy in ACM.

For demonstration purposes, you need to create a CA that can issue end-entity certificates. If you have an existing PKI that you want to use, you can create a subordinate CA that is signed by an external CA that can issue certificates. Otherwise, you can create a root CA and begin building a PKI on AWS. During creation of the CA, make sure that ACM has permissions to automatically renew certificates, because this feature will be used in later steps.

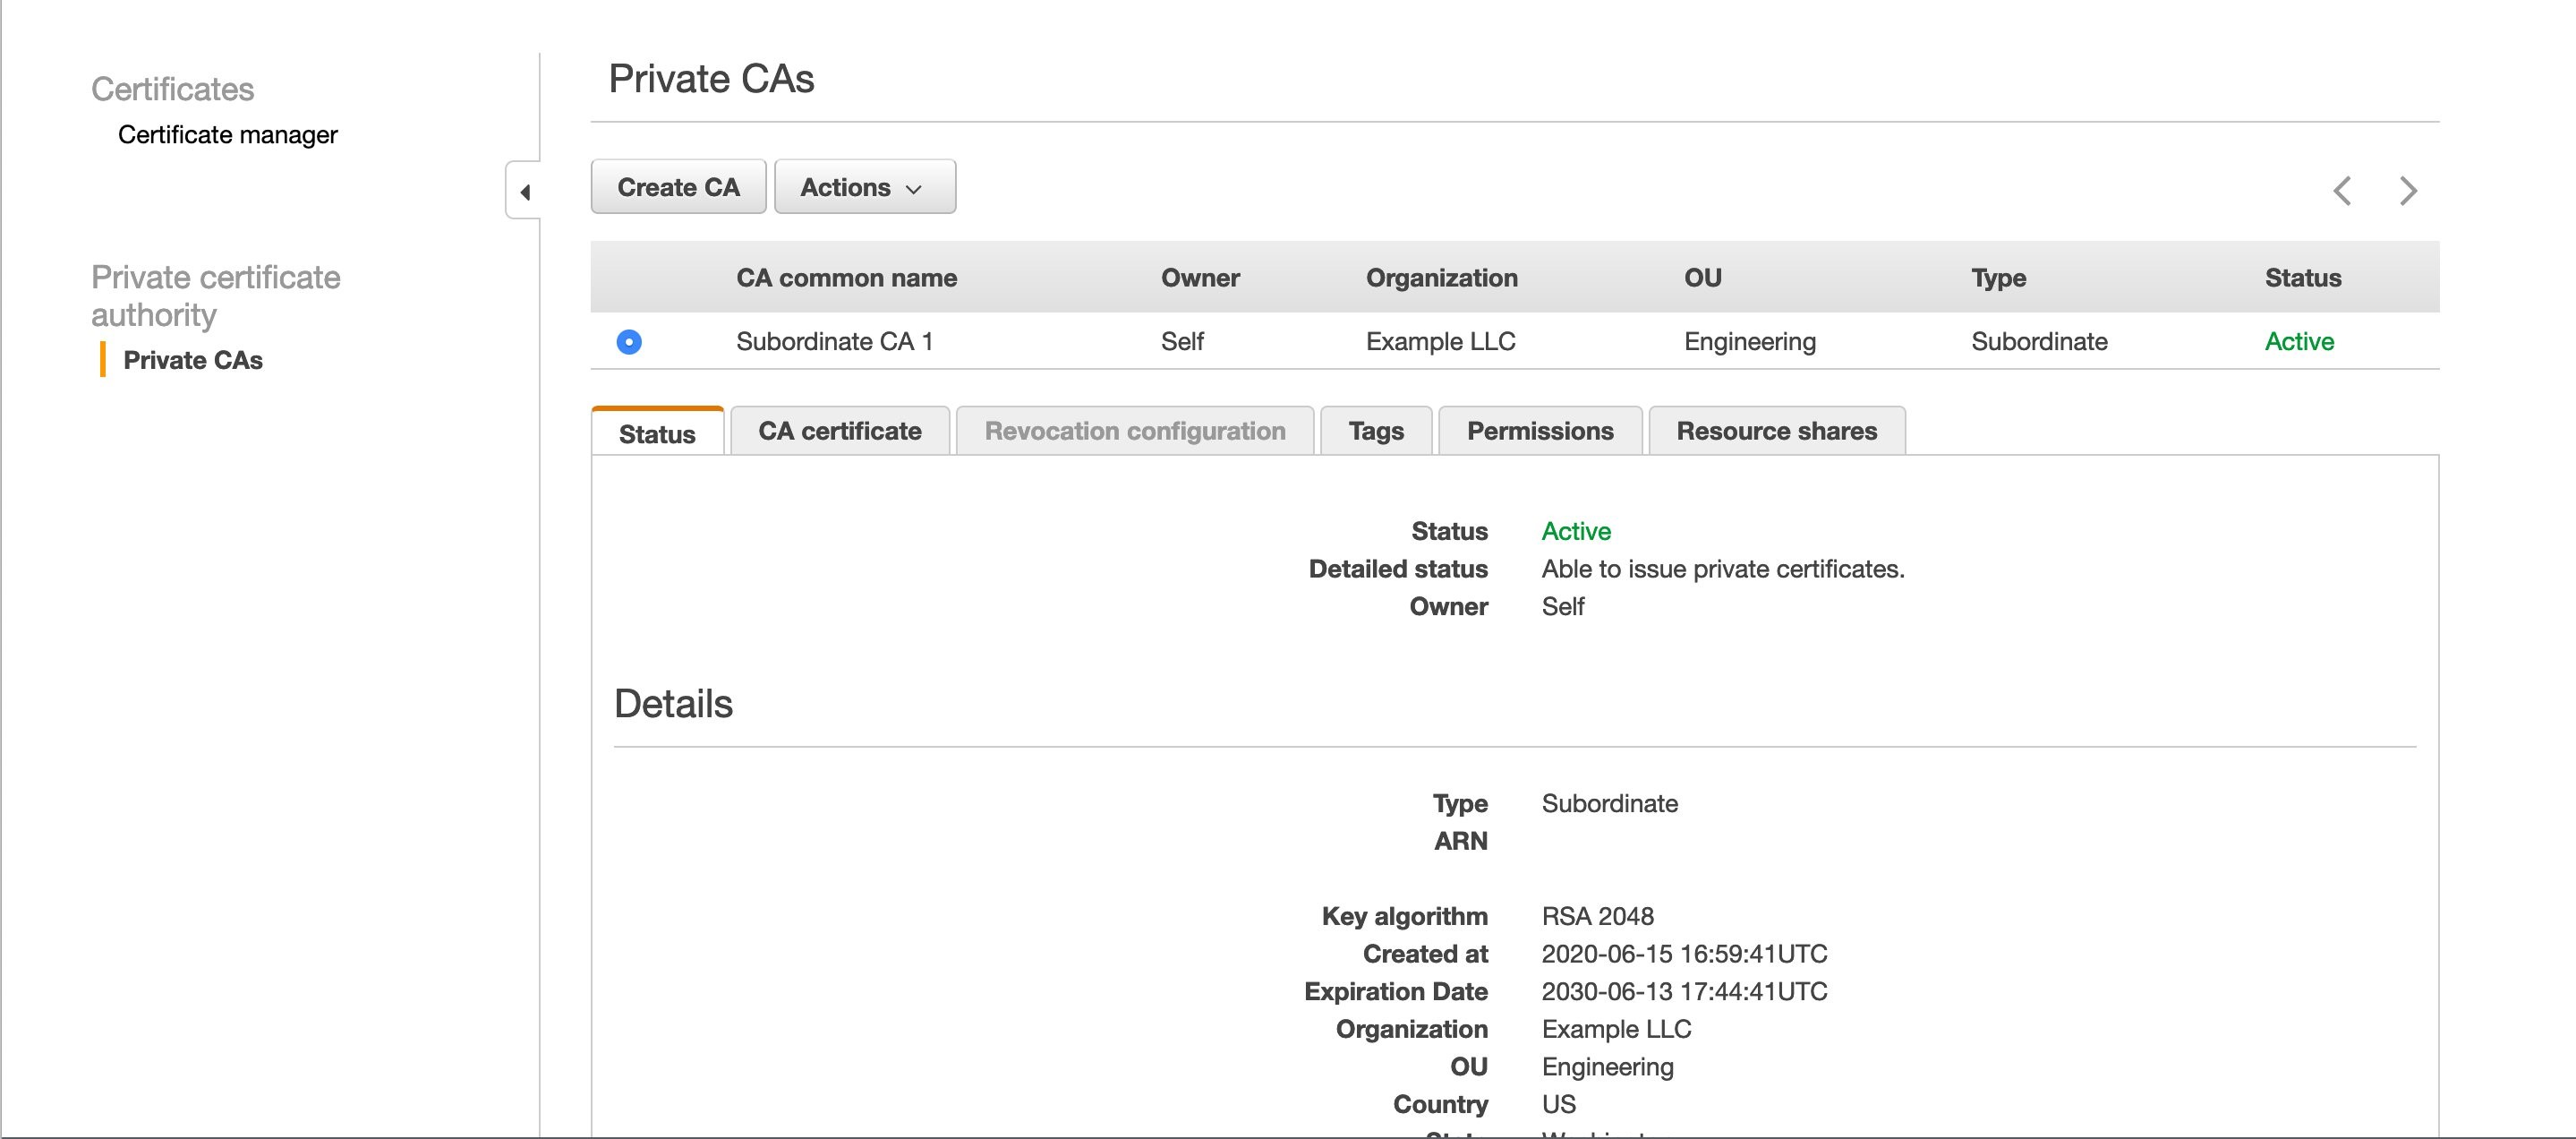
You should have one or more private CAs in the ACM console, as shown in Figure 2.

Figure 2: A private CA in the ACM PCA console

Figure 2: A private CA in the ACM PCA console

You will use two CloudFormation templates for this architecture. The first is launched in the same account where your private CA lives, and the second is launched in a different account. The first template generates the following: a Lambda function used for Secrets Manager rotation, an AWS KMS key to encrypt secrets, and a Systems Manager Run Command document to install the certificate on an Apache Server running on EC2 in Amazon Virtual Private Cloud (Amazon VPC). The second template launches the same Systems Manager Run Command document and EC2 environment.

To deploy the resources for the first template, select the following Launch Stack button. Make sure you’re in the N. Virginia (us-east-1) Region.

Select the Launch Stack button to launch the template

The template takes a few minutes to launch.

Use case #1: Create and deploy an ACM certificate

For the first use case, you’ll create a certificate by using the ACM defaults for private certificates, and then deploy it.

Create a Secrets Manager secret

To begin, create your first secret in Secrets Manager. You will create these secrets in the console to see how the service can be set up and used, but all these actions can be done through the AWS Command Line Interface (AWS CLI) or AWS SDKs.

To create a secret

  1. Navigate to the Secrets Manager console.
  2. Choose Store a new secret.
  3. For the secret type, select Other type of secrets.
  4. The Lambda rotation function has a set of required parameters in the secret type depending on what kind of certificate needs to be generated.For this first secret, you’re going to create an ACM_ISSUED certificate. Provide the following parameters.

    Key Value
    CERTIFICATE_TYPE ACM_ISSUED
    CA_ARN The Amazon Resource Name (ARN) of your certificate-issuing CA in ACM PCA
    COMMON_NAME The end-entity name for your certificate (for example, server1.example)
    ENVIRONMENT TEST (You need this later on to test the renewal of certificates. If using this outside of the blog walkthrough, set it to something like DEV or PROD.)
  5. For Encryption key, select CAKey, and then choose Next.
  6. Give the secret a name and optionally add tags or a description. Choose Next.
  7. Select Enable automatic rotation and choose the Lambda function that starts with <CloudFormation Stack Name>-SecretsRotateFunction. Because you’re creating an ACM-issued certificate, the rotation will be handled 60 days before the certificate expires. The validity is set to 365 days, so any value higher than 305 would work. Choose Next.
  8. Review the configuration, and then choose Store.
  9. This will take you back to a list of your secrets, and you will see your new secret, as shown in Figure 3. Select the new secret.

    Figure 3: The new secret in the Secrets Manager console

    Figure 3: The new secret in the Secrets Manager console

  10. Choose Retrieve secret value to confirm that CERTIFICATE_PEM, PRIVATE_KEY_PEM, CERTIFICATE_CHAIN_PEM, and CERTIFICATE_ARN are set in the secret value.

You now have an ACM-issued certificate that can be deployed to an end entity.

Deploy to an end entity

For testing purposes, you will now deploy the certificate that you just created to an Apache Server.

To deploy the certificate to the Apache Server

  1. In a new tab, navigate to the Systems Manager console.
  2. Choose Documents at the bottom left, and then choose the Owned by me tab.
  3. Choose RunUpdateTLS.
  4. Choose Run command at the top right.
  5. Copy and paste the secret ARN from Secrets Manager and make sure there are no leading or trailing spaces.
  6. Select Choose instances manually, and then choose ApacheServer.
  7. Select CloudWatch output to track progress.
  8. Choose Run.

The certificate and private key are now installed on the server, and it has been restarted.

To verify that the certificate was installed

  1. Navigate to the EC2 console.
  2. In the dashboard, choose Running Instances.
  3. Select ApacheServer, and choose Connect.
  4. Select Session Manager, and choose Connect.
  5. When you’re logged in to the instance, enter the following command.
    openssl s_client -connect localhost:443 | openssl x509 -text -noout
    

    This will display the certificate that the server is using, along with other metadata like the certificate chain and validity period. For the validity period, note the Not Before and Not After dates and times, as shown in figure 4.

    Figure 4: Server certificate

    Figure 4: Server certificate

Now, test the rotation of the certificate manually. In a production scenario, this process would be automated by using maintenance windows. Maintenance windows allow for the least amount of disruption to the applications that are using certificates, because you can determine when the server will update its certificate.

To test the rotation of the certificate

  1. Navigate back to your secret in Secrets Manager.
  2. Choose Rotate secret immediately. Because you set the ENVIRONMENT key to TEST in the secret, this rotation will renew the certificate. When the key isn’t set to TEST, the rotation function pulls down the renewed certificate based on its rotation schedule, because ACM is managing the renewal for you. In a couple of minutes, you’ll receive an email from ACM stating that your certificate was rotated.
  3. Pull the renewed certificate down to the server, following the same steps that you used to deploy the certificate to the Apache Server.
  4. Follow the steps that you used to verify that the certificate was installed to make sure that the validity date and time has changed.

Use case #2: Create and deploy an ACM PCA certificate by using custom templates

Next, use the second CloudFormation template to create a certificate, issued by ACM PCA, which will be deployed to an Apache Server in a different account. Sign in to your other account and select the following Launch Stack button to launch the CloudFormation template.

Select the Launch Stack button to launch the template

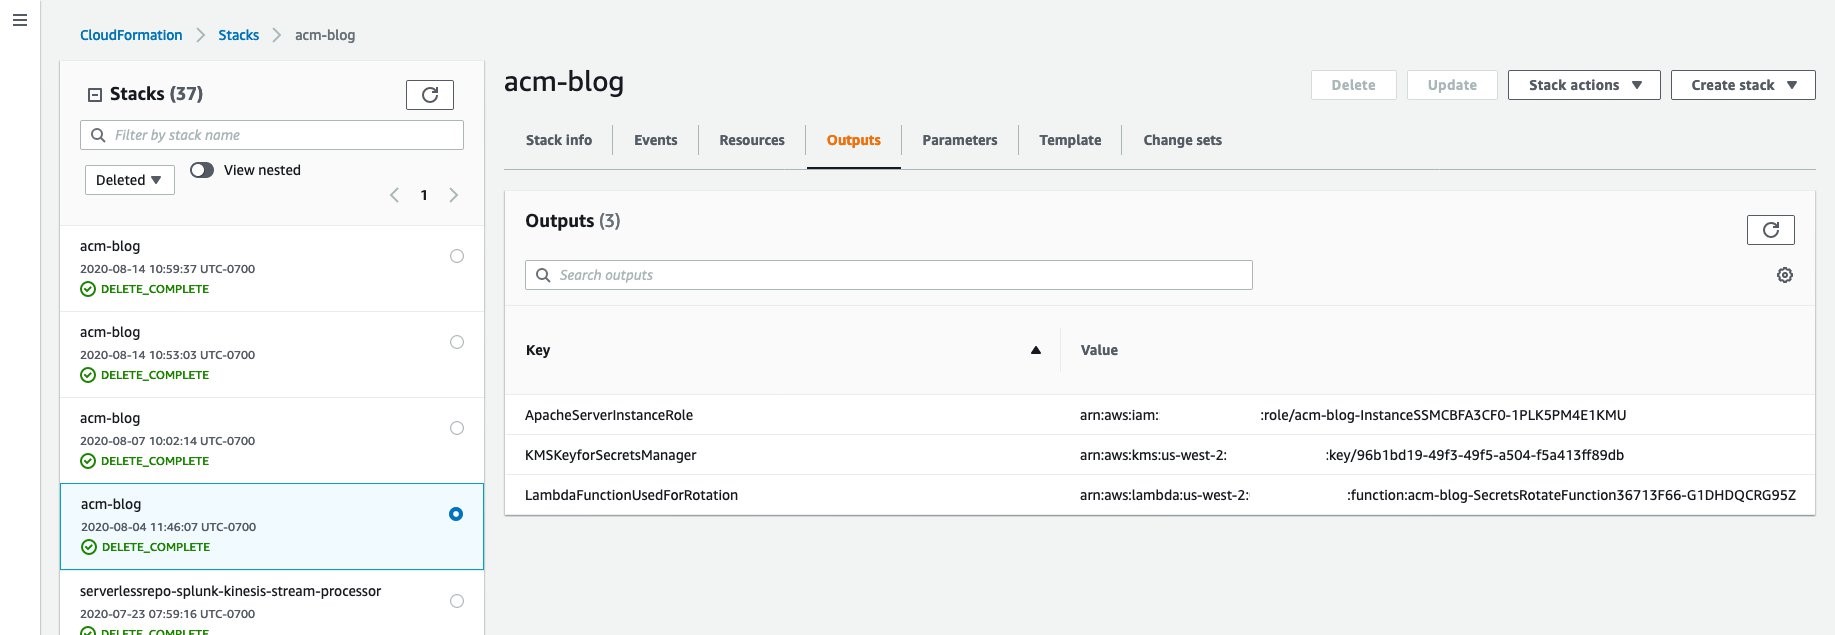
This creates the same Run Command document you used previously, as well as the EC2 and Amazon VPC environment running an Apache Server. This template takes in a parameter for the KMS key ARN; this can be found in the first template’s output section, shown in figure 5.

Figure 5: CloudFormation outputs

Figure 5: CloudFormation outputs

While that’s completing, sign in to your original account so that you can create the new secret.

To create the new secret

  1. Follow the same steps you used to create a secret, but change the secret values passed in to the following.

    Key Value
    CA_ARN The ARN of your certificate-issuing CA in ACM PCA
    COMMON_NAME You can use any name you want, such as server2.example
    TEMPLATE_ARN

    For testing purposes, use arn:aws:acm-pca:::template/EndEntityCertificate/V1

    This template ARN determines what type of certificate is being created and your desired path length. For more information, see Understanding Certificate Templates.

    KEY_ALGORITHM TYPE_RSA
    (You can also use TYPE_DSA)
    KEY_SIZE 2048
    (You can also use 1024 or 4096)
    SIGNING_HASH sha256
    (You can also use sha384 or sha512)
    SIGNING_ALGORITHM RSA
    (You can also use ECDSA if the key type for your issuing CA is set to ECDSA P256 or ECDSA P384)
    CERTIFICATE_TYPE ACM_PCA_ISSUED
  2. Add the following resource policy during the name and description step. This gives your other account access to pull this secret down to install the certificate on its Apache Server.
    {
      "Version" : "2012-10-17",
      "Statement" : [ {
        "Effect" : "Allow",
        "Principal" : {
          "AWS" : "<ARN in output of second CloudFormation Template>"
        },
        "Action" : "secretsmanager:GetSecretValue",
        "Resource" : "*"
      } ]
    }
    

  3. Finish creating the secret.

After the secret has been created, the last thing you need to do is add permissions to the KMS key policy so that your other account can decrypt the secret when installing the certificate on your server.

To add AWS KMS permissions

  1. Navigate to the AWS KMS console, and choose CAKey.
  2. Next to the key policy name, choose Edit.
  3. For the Statement ID (SID) Allow use of the key, add the ARN of the EC2 instance role in the other account. This can be found in the CloudFormation templates as an output called ApacheServerInstanceRole, as shown in Figure 5. The Statement should look something like this:
    {
                "Sid": "Allow use of the key",
                "Effect": "Allow",
                "Principal": {
                    "AWS": [
                        "arn:aws:iam::<AccountID with CA>:role/<Apache Server Instance Role>",
                        "arn:aws:iam:<Second AccountID>:role/<Apache Server Instance Role>"
                    ]
                },
                "Action": [
                    "kms:Encrypt",
                    "kms:Decrypt",
                    "kms:ReEncrypt*",
                    "kms:GenerateDataKey*",
                    "kms:DescribeKey"
                ],
                "Resource": "*"
    }
    

Your second account now has permissions to pull down the secret and certificate to the Apache Server. Follow the same steps described in the earlier section, “Deploy to an end entity.” Test rotating the secret the same way, and make sure the validity period has changed. You may notice that you didn’t get an email notifying you of renewal. This is because the certificate isn’t issued by ACM.

In this demonstration, you may have noticed you didn’t create resources that pull down the secret in different Regions, just in different accounts. If you want to deploy certificates in different Regions from the one where you create the secret, the process is exactly the same as what we described here. You don’t need to do anything else to accomplish provisioning and deploying in different Regions.

Clean up resources

Finally, delete the resources you created in the earlier steps, in order to avoid additional charges described in the section, “Solution cost.”

To delete all the resources created:

  1. Navigate to the CloudFormation console in both accounts, and select the stack that you created.
  2. Choose Actions, and then choose Delete Stack. This will take a few minutes to complete.
  3. Navigate to the Secrets Manager console in the CA account, and select the secrets you created.
  4. Choose Actions, and then choose Delete secret. This won’t automatically delete the secret, because you need to set a waiting period that allows for the secret to be restored, if needed. The minimum time is 7 days.
  5. Navigate to the Certificate Manager console in the CA account.
  6. Select the certificates that were created as part of this blog walkthrough, choose Actions, and then choose Delete.
  7. Choose Private CAs.
  8. Select the subordinate CA you created at the beginning of this process, choose Actions, and then choose Disable.
  9. After the CA is disabled, choose Actions, and then Delete. Similar to the secrets, this doesn’t automatically delete the CA but marks it for deletion, and the CA can be recovered during the specified period. The minimum waiting period is also 7 days.

Conclusion

In this blog post, we demonstrated how you could use Secrets Manager to rotate, store, and distribute private certificates issued by ACM and ACM PCA to end entities. Secrets Manager uses AWS KMS to secure these secrets during storage and delivery. You can introduce additional automation for deploying the certificates by using Systems Manager Maintenance Windows. This allows you to define a schedule for when to deploy potentially disruptive changes to EC2 instances.

If you have feedback about this post, submit comments in the Comments section below. If you have questions about this post, start a new thread on the AWS Secrets Manager forum or contact AWS Support.

Want more AWS Security how-to content, news, and feature announcements? Follow us on Twitter.

Author

Maitreya Ranganath

Maitreya is an AWS Security Solutions Architect. He enjoys helping customers solve security and compliance challenges and architect scalable and cost-effective solutions on AWS.

Author

Blake Franzen

Blake is a Security Solutions Architect with AWS in Seattle. His passion is driving customers to a more secure AWS environment while ensuring they can innovate and move fast. Outside of work, he is an avid movie buff and enjoys recreational sports.

Round 2 post-quantum TLS is now supported in AWS KMS

Post Syndicated from Alex Weibel original https://aws.amazon.com/blogs/security/round-2-post-quantum-tls-is-now-supported-in-aws-kms/

AWS Key Management Service (AWS KMS) now supports three new hybrid post-quantum key exchange algorithms for the Transport Layer Security (TLS) 1.2 encryption protocol that’s used when connecting to AWS KMS API endpoints. These new hybrid post-quantum algorithms combine the proven security of a classical key exchange with the potential quantum-safe properties of new post-quantum key exchanges undergoing evaluation for standardization. The fastest of these algorithms adds approximately 0.3 milliseconds of overheard compared to a classical TLS handshake. The new post-quantum key exchange algorithms added are Round 2 versions of Kyber, Bit Flipping Key Encapsulation (BIKE), and Supersingular Isogeny Key Encapsulation (SIKE). Each organization has submitted their algorithms to the National Institute of Standards and Technology (NIST) as part of NIST’s post-quantum cryptography standardization process. This process spans several rounds of evaluation over multiple years, and is likely to continue beyond 2021.

In our previous hybrid post-quantum TLS blog post, we announced that AWS KMS had launched hybrid post-quantum TLS 1.2 with Round 1 versions of BIKE and SIKE. The Round 1 post-quantum algorithms are still supported by AWS KMS, but at a lower priority than the Round 2 algorithms. You can choose to upgrade your client to enable negotiation of Round 2 algorithms.

Why post-quantum TLS is important

A large-scale quantum computer would be able to break the current public-key cryptography that’s used for key exchange in classical TLS connections. While a large-scale quantum computer isn’t available today, it’s still important to think about and plan for your long-term security needs. TLS traffic using classical algorithms recorded today could be decrypted by a large-scale quantum computer in the future. If you’re developing applications that rely on the long-term confidentiality of data passed over a TLS connection, you should consider a plan to migrate to post-quantum cryptography before the lifespan of the sensitivity of your data would be susceptible to an unauthorized user with a large-scale quantum computer. As an example, this means that if you believe that a large-scale quantum computer is 25 years away, and your data must be secure for 20 years, you should migrate to post-quantum schemes within the next 5 years. AWS is working to prepare for this future, and we want you to be prepared too.

We’re offering this feature now instead of waiting for standardization efforts to be complete so you have a way to measure the potential performance impact to your applications. Offering this feature now also gives you the protection afforded by the proposed post-quantum schemes today. While we believe that the use of this feature raises the already high security bar for connecting to AWS KMS endpoints, these new cipher suites will impact bandwidth utilization and latency. However, using these new algorithms could also create connection failures for intermediate systems that proxy TLS connections. We’d like to get feedback from you on the effectiveness of our implementation or any issues found so we can improve it over time.

Hybrid post-quantum TLS 1.2

Hybrid post-quantum TLS is a feature that provides the security protections of both the classical and post-quantum key exchange algorithms in a single TLS handshake. Figure 1 shows the differences in the connection secret derivation process between classical and hybrid post-quantum TLS 1.2. Hybrid post-quantum TLS 1.2 has three major differences from classical TLS 1.2:

  • The negotiated post-quantum key is appended to the ECDHE key before being used as the hash-based message authentication code (HMAC) key.
  • The text hybrid in its ASCII representation is prepended to the beginning of the HMAC message.
  • The entire client key exchange message from the TLS handshake is appended to the end of the HMAC message.
Figure 1: Differences in the connection secret derivation process between classical and hybrid post-quantum TLS 1.2

Figure 1: Differences in the connection secret derivation process between classical and hybrid post-quantum TLS 1.2

Some background on post-quantum TLS

Today, all requests to AWS KMS use TLS with key exchange algorithms that provide perfect forward secrecy and use one of the following classical schemes:

While existing FFDHE and ECDHE schemes use perfect forward secrecy to protect against the compromise of the server’s long-term secret key, these schemes don’t protect against large-scale quantum computers. In the future, a sufficiently capable large-scale quantum computer could run Shor’s Algorithm to recover the TLS session key of a recorded classical session, and thereby gain access to the data inside. Using a post-quantum key exchange algorithm during the TLS handshake protects against attacks from a large-scale quantum computer.

The possibility of large-scale quantum computing has spurred the development of new quantum-resistant cryptographic algorithms. NIST has started the process of standardizing post-quantum key encapsulation mechanisms (KEMs). A KEM is a type of key exchange that’s used to establish a shared symmetric key. AWS has chosen three NIST KEM submissions to adopt in our post-quantum efforts:

Hybrid mode ensures that the negotiated key is as strong as the weakest key agreement scheme. If one of the schemes is broken, the communications remain confidential. The Internet Engineering Task Force (IETF) Hybrid Post-Quantum Key Encapsulation Methods for Transport Layer Security 1.2 draft describes how to combine post-quantum KEMs with ECDHE to create new cipher suites for TLS 1.2.

These cipher suites use a hybrid key exchange that performs two independent key exchanges during the TLS handshake. The key exchange then cryptographically combines the keys from each into a single TLS session key. This strategy combines the proven security of a classical key exchange with the potential quantum-safe properties of new post-quantum key exchanges being analyzed by NIST.

The effect of hybrid post-quantum TLS on performance

Post-quantum cipher suites have a different performance profile and bandwidth usage from traditional cipher suites. AWS has measured bandwidth and latency across 2,000 TLS handshakes between an Amazon Elastic Compute Cloud (Amazon EC2) C5n.4xlarge client and the public AWS KMS endpoint, which were both in the us-west-2 Region. Your own performance characteristics might differ, and will depend on your environment, including your:

  • Hardware–CPU speed and number of cores.
  • Existing workloads–how often you call AWS KMS and what other work your application performs.
  • Network–location and capacity.

The following graphs and table show latency measurements performed by AWS for all newly supported Round 2 post-quantum algorithms, in addition to the classical ECDHE key exchange algorithm currently used by most customers.

Figure 2 shows the latency differences of all hybrid post-quantum algorithms compared with classical ECDHE alone, and shows that compared to ECDHE alone, SIKE adds approximately 101 milliseconds of overhead, BIKE adds approximately 9.5 milliseconds of overhead, and Kyber adds approximately 0.3 milliseconds of overhead.
 

Figure 2: TLS handshake latency at varying percentiles for four key exchange algorithms

Figure 2: TLS handshake latency at varying percentiles for four key exchange algorithms

Figure 3 shows the latency differences between ECDHE with Kyber, and ECDHE alone. The addition of Kyber adds approximately 0.3 milliseconds of overhead.
 

Figure 3: TLS handshake latency at varying percentiles, with only top two performing key exchange algorithms

Figure 3: TLS handshake latency at varying percentiles, with only top two performing key exchange algorithms

The following table shows the total amount of data (in bytes) needed to complete the TLS handshake for each cipher suite, the average latency, and latency at varying percentiles. All measurements were gathered from 2,000 TLS handshakes. The time was measured on the client from the start of the handshake until the handshake was completed, and includes all network transfer time. All connections used RSA authentication with a 2048-bit key, and ECDHE used the secp256r1 curve. All hybrid post-quantum tests used the NIST Round 2 versions. The Kyber test used the Kyber-512 parameter, the BIKE test used the BIKE-1 Level 1 parameter, and the SIKE test used the SIKEp434 parameter.

Item Bandwidth
(bytes)
Total
handshakes
Average
(ms)
p0
(ms)
p50
(ms)
p90
(ms)
p99
(ms)
ECDHE (classic) 3,574 2,000 3.08 2.07 3.02 3.95 4.71
ECDHE + Kyber R2 5,898 2,000 3.36 2.38 3.17 4.28 5.35
ECDHE + BIKE R2 12,456 2,000 14.91 11.59 14.16 18.27 23.58
ECDHE + SIKE R2 4,628 2,000 112.40 103.22 108.87 126.80 146.56

By default, the AWS SDK client performs a TLS handshake once to set up a new TLS connection, and then reuses that TLS connection for multiple requests. This means that the increased cost of a hybrid post-quantum TLS handshake is amortized over multiple requests sent over the TLS connection. You should take the amortization into account when evaluating the overall additional cost of using post-quantum algorithms; otherwise performance data could be skewed.

AWS KMS has chosen Kyber Round 2 to be KMS’s highest prioritized post-quantum algorithm, with BIKE Round 2, and SIKE Round 2 next in priority order for post-quantum algorithms. This is because Kyber’s performance is closest to the classical ECDHE performance that most AWS KMS customers are using today and are accustomed to.

How to use hybrid post-quantum cipher suites

To use the post-quantum cipher suites with AWS KMS, you need the preview release of the AWS Common Runtime (CRT) HTTP client for the AWS SDK for Java 2.x. Also, you will need to configure the AWS CRT HTTP client to use the s2n post-quantum hybrid cipher suites. Post-quantum TLS for AWS KMS is available in all AWS Regions except for AWS GovCloud (US-East), AWS GovCloud (US-West), AWS China (Beijing) Region operated by Beijing Sinnet Technology Co. Ltd (“Sinnet”), and AWS China (Ningxia) Region operated by Ningxia Western Cloud Data Technology Co. Ltd. (“NWCD”). Since NIST has not yet standardized post-quantum cryptography, connections that require Federal Information Processing Standards (FIPS) compliance cannot use the hybrid key exchange. For example, kms.<region>.amazonaws.com supports the use of post-quantum cipher suites, while kms-fips.<region>.amazonaws.com does not.

  1. If you’re using the AWS SDK for Java 2.x, you must add the preview release of the AWS Common Runtime client to your Maven dependencies.
    <dependency>
        <groupId>software.amazon.awssdk</groupId>
        <artifactId>aws-crt-client</artifactId>
        <version>2.14.13-PREVIEW</version>
    </dependency>
    

  2. You then must configure the new SDK and cipher suite in the existing initialization code of your application:
    if(!TLS_CIPHER_PREF_KMS_PQ_TLSv1_0_2020_07.isSupported()){
        throw new RuntimeException("Post Quantum Ciphers not supported on this Platform");
    }
    
    SdkAsyncHttpClient awsCrtHttpClient = AwsCrtAsyncHttpClient.builder()
              .tlsCipherPreference(TLS_CIPHER_PREF_KMS_PQ_TLSv1_0_2020_07)
              .build();
              
    KmsAsyncClient kms = KmsAsyncClient.builder()
             .httpClient(awsCrtHttpClient)
             .build();
             
    ListKeysResponse response = kms.listKeys().get();
    

Now, all connections made to AWS KMS in supported Regions will use the new hybrid post-quantum cipher suites! To see a complete example of everything set up, check out the example application here.

Things to try

Here are some ideas about how to use this post-quantum-enabled client:

  • Run load tests and benchmarks. These new cipher suites perform differently than traditional key exchange algorithms. You might need to adjust your connection timeouts to allow for the longer handshake times or, if you’re running inside an AWS Lambda function, extend the execution timeout setting.
  • Try connecting from different locations. Depending on the network path your request takes, you might discover that intermediate hosts, proxies, or firewalls with deep packet inspection (DPI) block the request. This could be due to the new cipher suites in the ClientHello or the larger key exchange messages. If this is the case, you might need to work with your security team or IT administrators to update the relevant configuration to unblock the new TLS cipher suites. We’d like to hear from you about how your infrastructure interacts with this new variant of TLS traffic. If you have questions or feedback, please start a new thread on the AWS KMS discussion forum.

Conclusion

In this blog post, I announced support for Round 2 hybrid post-quantum algorithms in AWS KMS, and showed you how to begin experimenting with hybrid post-quantum key exchange algorithms for TLS when connecting to AWS KMS endpoints.

More info

If you’d like to learn more about post-quantum cryptography check out:

If you have feedback about this post, submit comments in the Comments section below.

Want more AWS Security how-to content, news, and feature announcements? Follow us on Twitter.

Author

Alex Weibel

Alex is a Senior Software Engineer on the AWS Crypto Algorithms team. He’s one of the maintainers for Amazon’s TLS Library s2n. Previously, Alex worked on TLS termination and request proxying for S3 and the Elastic Load Balancing Service developing new features for customers. Alex holds a Bachelor of Science degree in Computer Science from the University of Texas at Austin.

Combining encryption and signing with AWS asymmetric keys

Post Syndicated from J.D. Bean original https://aws.amazon.com/blogs/security/combining-encryption-and-signing-with-aws-asymmetric-keys/

In this post, I discuss how to use AWS Key Management Service (KMS) to combine asymmetric digital signature and asymmetric encryption of the same data.

The addition of support for asymmetric keys in AWS KMS has exciting use cases for customers. The ability to create, manage, and use public and private key pairs with KMS enables you to perform digital signing operations using RSA and Elliptic Curve Cryptography (ECC) keys. AWS KMS asymmetric keys can also be used to perform digital encryption operations using RSA keys. You can use these features together to digitally sign and encrypt the same data.

Another notable property of AWS KMS asymmetric keys is that they enable disconnected use cases. For example AWS KMS asymmetric keys can be used to cryptographically verify a digital signature client-side without the need for a network connection. AWS KMS asymmetric keys also enable scenarios where customers can use KMS to securely manage decryption of data that has been encrypted by a partner’s system that does not integrate with AWS APIs or have access to AWS account credentials. For the sake of simplicity, however, the example that I discuss in this post describes a connected use case where all cryptographic actions are performed server-side in AWS KMS using AWS credentials. The use of AWS KMS asymmetric keys throughout this post allows the overall approach to be adapted to disconnected and/or non-AWS-integrated use cases.

Overview

This post contains three basic steps.

  1. Create and configure AWS asymmetric customer master keys (CMK), AWS Identity and Access Management (IAM) roles, and key policies.
  2. Use your asymmetric CMKs to encrypt and sign a sample message in the role of a sender.
  3. Use AWS KMS to decrypt and verify the message signature of the sample message archive you generated in the previous procedure using your asymmetric CMKs in the role of a receiver.

Prerequisites

The commands I use in this tutorial were tested using AWS Command Line Interface (AWS CLI) version 2.50 on Amazon Linux 2. In order to run these commands in your in your own local environment ensure that you have first installed and updated the AWS CLI.

I assume you have at least one administrator identity available to you that has broad rights for creating roles, assuming roles, as well as creating, managing and using KMS keys. This can be a federated identity (for example, from your corporate identity provider or from a social identity), or it can be an AWS IAM user. Where no AWS identity is mentioned, I assume that you will be accessing the AWS Management Console or the AWS CLI using this administrator identity.

For simplicity, I create the KMS keys in the same region as each other. You must specify an AWS Region when using the AWS CLI, either explicitly or by setting a default Region. Before beginning, you should select an AWS Region to work in such as US East (N. Virginia). If you have not configured the AWS CLI in your environment please review the Configuration basics section of the AWS Command Line Interface User Guide for instructions. You may revert this configuration once you have finished if you do not wish to continue using a default Region with your AWS CLI. Take note of your selected region. When working in the AWS Console, if you do not see resources, such as AWS KMS keys, that you expect you may want to confirm that you are viewing resources in your chosen Region. For more information on selecting your Region in the AWS Console see Choosing a Region in AWS Management Console Getting Started Guide.

Create and configure resources

In the first phase of this tutorial you create and configure two asymmetric AWS KMS CMKs, two AWS IAM roles, and configure the key policies for both of your KMS CMKs to grant permissions to the roles. Shown in the following figure.
 

Figure 1: Create keys, roles, and key policies

Figure 1: Create keys, roles, and key policies

Create asymmetric signing and encryption key pairs

In the first step, you create two asymmetric master keys (CMK). One is configured for signing and verifying digital signatures while the other is configured for encrypting and decrypting data.

Note: The CMKs configured for this post are examples. RSA and Elliptic curve CMKs key specs can differ in a variety of dimensions. The RSA or elliptic curve key spec that you choose might be determined by your security standards or the requirements of your task. Different CMK key specs are priced differently and are subject to different request quotas because they each have different performance profiles. In general, use RSA or ECC keys with the highest security level that is practical and affordable for your task. For more information on CMK configuration options, please review the How to choose your CMK configuration section of the KMS Developer Guide.

To create a CMK for encryption and decryption

  1. Use the KMS CreateKey API. Pass RSA_4096 for the CustomerMasterKeySpec parameter and ENCRYPT_DECRYPT for the KeyUsage parameter in the AWS CLI example command below in order to generate a RSA 4096 key pair for signature creation and verification using AWS KMS.
    aws kms create-key --customer-master-key-spec RSA_4096 \
        --key-usage ENCRYPT_DECRYPT \
        --description "Sample Digital Encryption Key Pair"
    

    Note: If successful, this command returns a KeyMetadata object. Take note of the KeyID value in this object.

  2. As a best practice, assign an alias for your key. Use the following command to assign an alias of sample-encrypt-decrypt-key to your newly created CMK (replace the target-key-id value of 1234abcd-12ab-34cd-56ef-1234567890ab with your KeyID). Mapping a human-readable alias to the KeyID will make it easier to identify, use, and manage.
    aws kms create-alias \
        --alias-name alias/sample-encrypt-decrypt-key \
        --target-key-id 1234abcd-12ab-34cd-56ef-1234567890ab
    

To create a CMK for signature and verification

  1. Use the KMS CreateKey API. Pass ECC_NIST_P521 for the CustomerMasterKeySpec parameter and SIGN_VERIFY for the KeyUsage parameter in the AWS CLI example command below in order to generate an elliptic curve (ECC) key pair for signature creation and verification using AWS KMS.
    aws kms create-key --customer-master-key-spec \
        ECC_NIST_P521  \
        --key-usage SIGN_VERIFY \
        --description "Sample Digital Signature Key Pair"
    

    Note: If successful, this command returns a KeyMetadata object. Take note of the KeyID value.

  2. Use the following command to assign an alias of sample-sign-verify-key to your newly created CMK (replace the target-key-id value of 1234abcd-12ab-34cd-56ef-1234567890ab with your KeyID).
    aws kms create-alias \
        --alias-name alias/sample-sign-verify-key \
        --target-key-id 1234abcd-12ab-34cd-56ef-1234567890ab
    

Create sender and receiver roles

For the next step of this tutorial, you create two AWS principals. Use the steps that follow to create two roles—a sender principal and a receiver principal. Later, you will grant permissions to perform private key operations (sign and decrypt) and public key operations (verify and encrypt) to these roles.

To create and configure the roles

  1. Navigate to the AWS Identity and Access Management (IAM) Create role console dialogue that allows entities in a specified account to assume the role. Enter your Account ID and choose Next, as shown in the following figure.

    Note: If you don’t know you AWS account ID, please read Finding you AWS account ID in the AWS IAM User Guide for guidance on how to obtain this information.

    Figure 2: Enter your account ID to begin creating a role in AWS IAM

    Figure 2: Enter your account ID to begin creating a role in AWS IAM

  2. Select Next through the next two screens.

    Note: By clicking next through these dialogues you do not attach an IAM permissions policy or a tag to this new role.

  3. On the final screen, enter a Role name of SenderRole and a Role description of your choice, as shown in the following figure.
     
    Figure 3: Create the sender role

    Figure 3: Create the sender role

  4. Choose Create role to finish creating the sender role.
  5. To create the receiver role, repeat the preceding role creation process. However, in step 3, substitute the name ReceiverRole for SenderRole.

Configure key policy permissions

Best practice is to adhere to the principle of least privilege and provide each AWS principal with the minimal permissions necessary to perform its tasks. The sender and receiver roles that you created in the previous step currently have no permissions in your account. For this scenario, the receiver principal must be granted permission to verify digital signatures and decrypt data in AWS KMS using your asymmetric CMKs and the sender principal must be granted permission to create digital signatures and encrypt data in KMS using your asymmetric CMKs.

To provide access control permissions for AWS KMS actions to your AWS principals, attach a key policy to each of your CMKs.

Modify the CMK key policy

For the sample-encrypt-decrypt-key CMK, grant the IAM role for the sender principal (SenderRole) kms:Encrypt permissions and the IAM role for the receiver principal (ReceiverRole) kms:Decrypt permissions in the CMK key policy.

To modify the CMK key policy (console)

  1. Navigate to the AWS KMS page in the AWS Console and select customer-managed keys.
  2. Select your sample-encrypt-decrypt-key CMK.
  3. In the key policy section, choose edit.
  4. To allow your receiver principal to use the CMK to decrypt data encrypted under that CMK, append the following statement to the key policy (replace the account ID value of 111122223333 with your own).
    {
        "Sid": "Allow use of the CMK for decryption",
        "Effect": "Allow",
        "Principal": {"AWS":"arn:aws:iam::111122223333:role/ReceiverRole"},
        "Action": "kms:Decrypt",
        "Resource": "*"
    }
    

  5. To allow your sender principal to use the CMK to encrypt data, append the following statement to the key policy (replace the account ID value of 111122223333 with your own):
    {
        "Sid": "Allow use of the CMK for encryption",
        "Effect": "Allow",
        "Principal": {"AWS":"arn:aws:iam::111122223333:role/SenderRole"},
        "Action": "kms:Encrypt",
        "Resource": "*"
    }
    

  6. Choose Save changes.

Note: The kms:Encrypt permission is sufficient to permit the sender principal to encrypt small amounts of arbitrary data using your CMK directly.

Grant sign and verify permissions to the CMK key policy

For the sample-sign-verify-key CMK, grant the IAM role for the sender principal (SenderRole) kms:Sign permissions in the CMK key policy and the IAM role for the receiver principal (ReceiverRole) kms:Verify permissions in the CMK key policy.

To grant sign and verify permissions

  1. Using the same process as above, navigate to the key policy edit dialog for the sample-sign-verify-key CMK in the AWS console.
  2. To allow your sender principal to use the CMK to create digital signatures, append the following statement to the key policy (replace the account ID value of 111122223333 with your own).
    {
        "Sid": "Allow use of the CMK for digital signing",
        "Effect": "Allow",
        "Principal": {"AWS":"arn:aws:iam::111122223333:role/SenderRole"},
        "Action": "kms:Sign",
        "Resource": "*"
    }
    

  3. To allow your receiver principal to use the CMK to verify signatures created by that CMK, append the following statement to the key policy (replace the account ID value of 111122223333 with your own):
    {
        "Sid": "Allow use of the CMK for digital signature verification",
        "Effect": "Allow",
        "Principal": {"AWS":"arn:aws:iam::111122223333:role/ReceiverRole"},
        "Action": "kms:Verify",
        "Resource": "*"
    }
    

  4. Choose Save changes.

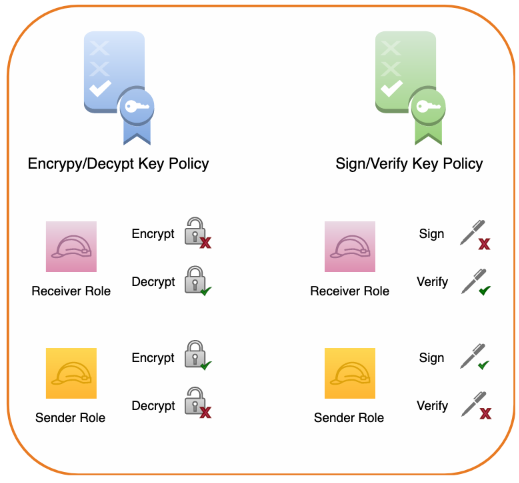
Key permissions summary

When these key policy edits have been completed the sender principal:

  • Will have permissions to encrypt data using the sample-encrypt-decrypt-key CMK and generate digital signatures using the sample-sign-verify-key CMK.
  • Will not have permissions to decrypt or to verify signatures using the CMKs.

The receiver principal:

  • Will have permissions to decrypt data which has been encrypted using the sample-encrypt-decrypt-key CMK and to verify signatures created using the sample-sign-verify-key CMK.
  • Will not have permissions to encrypt or to generate signatures using the CMKs.
Figure 4: Summary of key policy permissions

Figure 4: Summary of key policy permissions

Signing and encrypting a sample message

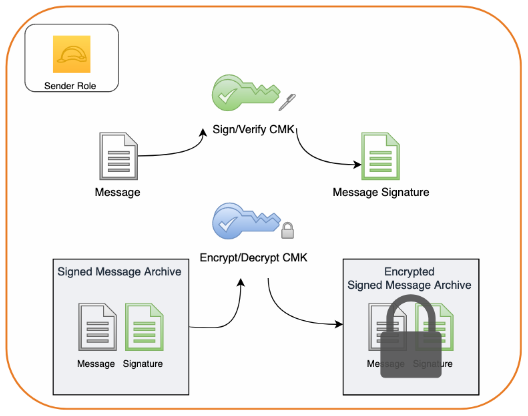
So far, you’ve created two asymmetric CMKs, created a set of sender and receiver roles, and configured permissions for those roles in each of your CMK key policies. In the second phase of this tutorial, you assume the role of sender and use your asymmetric signature and verification CMK to sign a sample message. You then bundle the sample message and its corresponding digital signature together into an archive and use your encryption and decryption asymmetric CMK to encrypt the archive.
 

Figure 5: Creating a message signature and encrypting the message along with its signature

Figure 5: Creating a message signature and encrypting the message along with its signature

Note: The order of operations in this process is that the message is first signed and then the signature and the message are encrypted together. This order is intentional. When a message is signed and then encrypted, neither the contents nor the identity of the sender will be available to unauthorized 3rd parties. If the order of operations were reversed, however, and a message was first encrypted and then signed it could leak information about the sender’s identity to unauthorized 3rd parties. Moreover, when a message is encrypted and then signed, an unauthorized 3rd party with access to the files could discard the authentic signature created by the sender and replace it with a valid signature created by their own key. This creates the potential for a 3rd party to deceptively create the appearance that they are the legitimate sender of the message and exploit that misperception further.

Assume the sender role

Start by assuming the sender role. In order to successfully assume a role you must authenticate as an IAM principal which has permission to perform sts:AssumeRole. If the principal you are authenticated as lacks this permission you will not able to assume the sender role.

To assume the sender role

  1. Run the following command, but be sure to replace the account ID value of 111122223333 with your account ID:
    aws sts assume-role \
        --role-arn arn:aws:iam::111122223333::role/SenderRole \
        --role-session-name AWSCLI-Session
    

  2. The return value for this command provides an access key ID, secret key, and session token. Substitute them into their respective places in the following commands and execute:
    export AWS_ACCESS_KEY_ID=ExampleAccessKeyID1
    export AWS_SECRET_ACCESS_KEY=ExampleSecretKey1
    export AWS_SESSION_TOKEN=ExampleSessionToken1
    

  3. Confirm that you’ve successfully assumed the sender role by issuing:
    aws sts get-caller-identity
    

    Note: If the output of this command contains the text assumed-role/SenderRole, then you’ve successfully assumed the sender role.

Create a message

Now, create a sample message file called message.json.

To create a message

Run the following command to create a message with the following content:

echo "
{ 
    "message": "The Magic Words are Squeamish Ossifrage", 
    "sender": "Sender Principal" 
}
" > ./message.json 

Create a digital signature

Creating and verifying a digital signature for the message provides confidence that the message contents haven’t been altered after being sent. This characteristic is known as integrity. Furthermore, when access to a signing key is scoped to a particular principal, creating and verifying a digital signature for the message provides confidence in the sender’s identity. This characteristic is known as authenticity. Finally, a high degree of confidence in both the integrity and authenticity of a message limits the plausible ability of a sender to fraudulently deny having signed a message. This characteristic is known a non-repudiation.

To create a digital signature

Run the following command to create a digital signature for message.json:

aws kms sign \
    --key-id alias/sample-sign-verify-key \
    --message-type RAW \
    --signing-algorithm ECDSA_SHA_512 \
    --message fileb://message.json \
    --output text \
    --query Signature | base64 --decode > message.sig

This generates an independent digital signature file, message.sig, for message.json. Any modification to the contents of message.json, such as changing the sender or message fields, will now cause signature validation of message.sig to fail for message.json.

Encrypt the message and signature

Even with the benefits of a digital signature, the message could still be viewed by any party with access to the file. In order to provide confidence that the message contents aren’t exposed to unauthorized parties, you can encrypt the message. This characteristic is known as confidentiality. In order to retain the benefits of your digital signature you can encrypt the message and corresponding signature together in a single package.

To encrypt the message and signature

  1. Combine your message and signature into an archive. For example, with the GNU Tar utility you can issue the following:
    tar -czvf message.tar.gz message.sig message.json
    

    This will create a new archive file named message.tar.gz containing both your message and message signature.

  2. Encrypt the archive using AWS KMS. To do so, issue the following command:
    aws kms encrypt \
        --key-id alias/sample-encrypt-decrypt-key \
        --encryption-algorithm RSAES_OAEP_SHA_256 \
        --plaintext fileb://message.tar.gz \
        --output text \
        --query CiphertextBlob | base64 --decode > message.enc
    

    This will output a message.enc file containing an encrypted copy of the message.tar.gz archive.

Decrypting and verifying a sample message

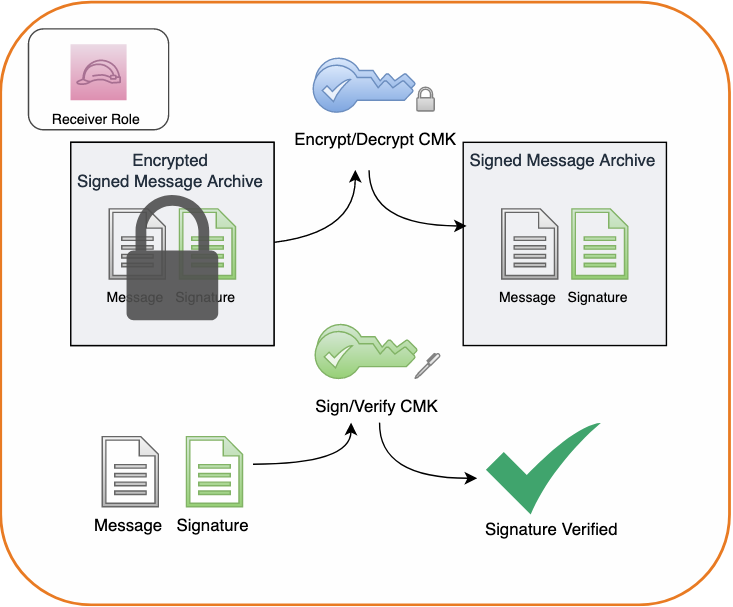
Now that you’ve created, signed, and encrypted a message, let’s change gears and see what working with this message.enc file is like from the perspective of a receiving party. In the final phase of this tutorial you assume the role of receiver and use your asymmetric CMKs to decrypt the encrypted message archive and verify the digital signature that you created. Finally, you will view your message. The process is shown in the following figure.
 

Figure 6: Decrypting a message archive and verifying the message signature

Figure 6: Decrypting a message archive and verifying the message signature

Assume the receiver role

Assume the receiver role so that you can simulate receiving a signed and encrypted message. As before, in order to assume the receiver role you must authenticate as an IAM principal which has permission to perform sts:AssumeRole. If the principal you are authenticated as lacks this permission you will not able to assume the receiver role.

To assume the receiver role

  1. Copy the message.enc file to a new directory to create a clean working space and navigate there in a terminal session.
  2. Assume your receiver role. To do so, execute the following command, replacing the account ID value of 111122223333 with your own:
    aws sts assume-role \
    	--role-arn arn:aws:iam::111122223333::role/ReceiverRole \
    	--role-session-name AWSCLI-Session
    

  3. The return value for this command provides an access key ID, secret key, and session token. Substitute them into their respective places in the following commands and execute:
    export AWS_ACCESS_KEY_ID=ExampleAccessKeyID1
    export AWS_SECRET_ACCESS_KEY=ExampleSecretKey1
    export AWS_SESSION_TOKEN=ExampleSessionToken1
    

  4. Confirm that you have successfully assumed the receiver role by issuing:
    aws sts get-caller-identity
    

If the output of this command contains the text assumed-role/ReceiverRole then you have successfully assumed the receiver role.

Decrypt the encrypted message archive in AWS KMS

Decrypt the encrypted message archive to access the plaintext of the message and message signature files.

To decrypt the encrypted message archive

  1. Issue the following command:
    aws kms decrypt \
        --key-id alias/sample-encrypt-decrypt-key \
        --ciphertext-blob fileb://EncryptedMessage \
        --encryption-algorithm RSAES_OAEP_SHA_256 \
        --output text \
        --query Plaintext | base64 --decode > message.tar.gz
    

  2. This will create an unencrypted message.tar.gz file that you can unpack with:
    tar -xvfz message.tar.gz
    

This, in turn, will expand the archive contents message.sig and message.json in your working directory.

Verify the message signature

To verify the signature on the message issue the following command:

aws kms verify \
    --key-id alias/sample-sign-verify-key \
    --message-type RAW \
    --message fileb://message.json \
    --signing-algorithm ECDSA_SHA_512 \
    --signature fileb://message.sig

In the response you should see that SignatureValid is marked true indicating that the signature has been verified using the specified sample-sign-verify-key that you granted the sender principal permission to generate signatures with.

View the message

Finally, open message.json and view the file’s contents by issuing the following command:

less message.json

You will see that the contents of the file have not been modified and still read:

{ 
    "message": "The Magic Words are Squeamish Ossifrage", 
    "sender": "Sender Principal" 
}

Note: Be careful to avoid making any changes to the contents of this file. Even a minor modification of the message contents will compromise the integrity of the message and cause future attempts at signature validation using your message.sig file to fail.

Summary

In this tutorial, you signed and encrypted data using two AWS KMS asymmetric CMKs and later decrypted and verified your signature using those CMKs.

You first created two asymmetric CMKs in AWS KMS, one for creating and verifying digital signatures and the other for encrypting and decrypting data. You then configured key policy permissions for your sender and receiver principals. Acting as your sender principal, you digitally signed a message in AWS KMS, added the message and signature to an archive and then encrypted that archive in AWS KMS. Next you assumed your receiver role and decrypted the archive in AWS KMS, viewed your message, and verified its signature in AWS KMS.

To learn more about the asymmetric keys feature of AWS KMS, please read the AWS KMS Developer Guide. If you have questions about the asymmetric keys feature, please start a new thread on the AWS KMS forum. If you have feedback about this post, submit comments in the Comments section below.

Want more AWS Security how-to content, news, and feature announcements? Follow us on Twitter.
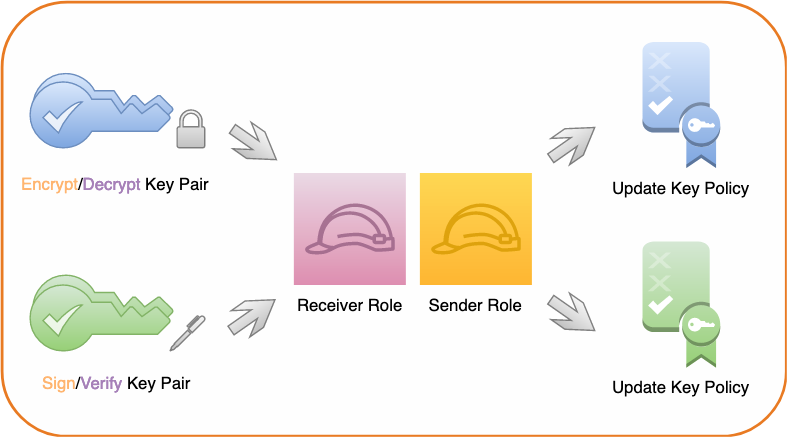
Author

J.D. Bean

J.D. is a Senior Solutions Architect at AWS working with public sector organizations and financial institutions based out of New York City. His interests include security, privacy, and compliance. He is passionate about his work enabling AWS customers’ successful cloud journeys. J.D. holds a Bachelor of Arts from The George Washington University and a Juris Doctor from New York University School of Law.

Architecting for database encryption on AWS

Post Syndicated from Jonathan Jenkyn original https://aws.amazon.com/blogs/security/architecting-for-database-encryption-on-aws/

In this post, I review the options you have to protect your customer data when migrating or building new databases in Amazon Web Services (AWS). I focus on how you can support sensitive workloads in ways that help you maintain compliance and regulatory obligations, and meet security objectives.

Understanding transparent data encryption

I commonly see enterprise customers migrating existing databases straight from on-premises to AWS without reviewing their design. This might seem simpler and faster, but they miss the opportunity to review the scalability, cost-savings, and feature capability of native cloud services. A straight lift and shift migration can also create unnecessary operational overheads, carry-over unneeded complexity, and result in more time spent troubleshooting and responding to events over time.

One example is when enterprise customers who are using Transparent Data Encryption (TDE) or Extensible Key Management (EKM) technologies want to reuse the same technologies in their migration to AWS. TDE and EKM are database technologies that encrypt and decrypt database records as the records are written and read to the underlying storage medium. Customers use TDE features in Microsoft SQL Server, Oracle 10g and 11g, and Oracle Enterprise Edition to meet requirements for data-at-rest encryption. This shouldn’t mean that TDE is the requirement. It’s infrequent that an organizational policy or compliance framework specifies a technology such as TDE in the actual requirement. For example, the Payment Card Industry Data Security Standard (PCI-DSS) standard requires that sensitive data must be protected using “Strong cryptography with associated key-management processes and procedures.” Nowhere does PCI-DSS endorse or require the use of a specific technology.

Understanding risks

It’s important that you understand the risks that encryption-at-rest mitigates before selecting a technology to use. Encryption-at-rest, in the context of databases, generally manages the risk that one of the disks used to store database data is physically stolen and thus compromised. In on-premises scenarios, TDE is an effective technology used to manage this risk. All data from the database—up to and including the disk—is encrypted. The database manages all key management and cryptographic operations. You can also use TDE with a hardware security module (HSM) so that the keys and cryptography for the database are managed outside of the database itself. In TDE implementations, the HSM is used only to manage the key encryption keys (KEK), and not the data encryption keys (DEK) themselves. The DEKs are in volatile memory in the database at runtime, and so the cryptographic operations occur on the database itself.

You can also use native operating system encryption technologies such as dm-crypt or LUKS (Linux Unified Key Setup). Dm-crypt is a full disk encryption (FDE) subsystem in Linux kernel version 2.6 and beyond. Dm-crypt can be used on its own or with LUKS as an extension to add more features. When using dm-crypt, the operating system kernel is responsible for encrypting and decrypting data as it’s written and read from the attached volumes. This would achieve the same outcome as TDE—data written and read to the disk volume is encrypted, and the risk related to physical disk compromise is managed. DEKs are in runtime memory of the machine running the database.

With some TDE implementations, you can encrypt tables, rows, columns, and cells with different DEKs to achieve granular separation of duties between operators. Customers can then configure TDE to authorize access to each DEK based on database login credentials and job function, helping to manage risks associated with unauthorized access. However, the most common configuration I’ve seen is to rely on whole database encryption when using TDE. This configuration gives similar protection against the identified risks as dm-crypt with LUKS used without an HSM, since the DEKs and KEKs are stored within the instance in both cases and the result is that the database data on disk is encrypted.

Using encryption to manage data at rest risks in AWS

When you move to AWS, you gain additional security capabilities that can simplify your security implementations. Since the announcement of the AWS Key Management Service (AWS KMS) in 2014, it has been tightly integrated with Amazon Elastic Block Store (Amazon EBS), Amazon Simple Storage Service (Amazon S3), and dozens of other services on AWS. This means that data is encrypted on disk by checking a single check box. Furthermore, you get the benefits of AWS KMS for key management and cryptographic operations, while being transparent to the Amazon Elastic Compute Cloud (Amazon EC2) instance where the data is being encrypted and decrypted. For simplicity, the authorization for access to the data is managed entirely by AWS Identity and Access Management (IAM) and AWS KMS key resource policies.

If you need more granular access control to the data, you can use the AWS Encryption SDK to encrypt data at the application layer. That provides the same effect as TDE cell-level protection, with a FIPS140-2 Level 2 validated HSM, as might be required by a recognizing standard.

If you must use a FIPS140-2 Level 3 validated HSM to meet more stringent compliance standards or regulations, then you can use the Custom Key Store capability of AWS KMS to achieve that—again in a transparent way. This option has a trade-off, as there is additional operational overhead in terms of managing an AWS CloudHSM cluster.

Many customers choose to migrate their database into the managed Amazon Relational Database Service (Amazon RDS), rather than managing the database instance themselves. Like the Amazon EC2 service, RDS uses Amazon EBS volumes for its data storage, and so can seamlessly use AWS KMS for encryption at rest functionality. When you do so, your management overhead for the protection of data-at-rest reduces to almost zero. This lets you focus on business value while AWS is responsible for the management of your database and the protection of the underlying data. The next section reviews this option and others in more detail.

You can review the available Amazon RDS database engines and versions via the Amazon RDS User Guide documentation, or by running the following AWS Command Line Interface (AWS CLI) command:

aws rds describe-db-engine-versions --query "DBEngineVersions[].DBEngineVersionDescription" --region <regionIdentifier>

Recommended Solutions

If you’re moving an existing database to AWS, you have the following solutions for data at rest encryption. I go into more detail for each option below.

Table 1 – Encryption options

Option Database management Host Encryption Key management
1 Amazon managed Amazon RDS Amazon EBS AWS KMS
2 Amazon managed Amazon RDS Amazon EBS AWS KMS Custom Key Store
3 Customer managed Amazon EC2 Amazon EBS AWS KMS
4 Customer managed Amazon EC2 Amazon EBS AWS KMS Custom Key Store
5 Customer managed Amazon EC2 Amazon EBS LUKS
6 Customer managed Amazon EC2 Database Database TDE
7 Customer managed Amazon EC2 Database CloudHSM

Option 1 – Using Amazon RDS with Amazon EBS encryption and key management provided by AWS KMS

This approach uses the Amazon RDS service where AWS manages the operating system and database engine. You can configure this service to be a highly scalable resource spanning multiple Availability Zones within an AWS Region to provide resiliency. AWS KMS manages the keys that are used to encrypt the attached Amazon EBS volumes at rest.

Note: This configuration is recommended as your default database encryption approach.

Benefits

  • No key management requirement on host; key management is automated and performed by AWS KMS
  • Meets FIPS140-2 Level 2 validation requirements
  • Simple vertical and horizontal scalability
  • Snapshots for recovery are encrypted automatically
  • AWS manages the patching, maintenance, and configuration of the operating system and database engine
  • Well-recognized configuration, with support offered through AWS Support
  • AWS KMS costs are comparatively low

Challenges

  • Dependent on Amazon RDS supported engines and versions
  • Might require additional controls to manage unauthorized access at table, row, column, or cell level

Option 2 – Using Amazon RDS with Amazon EBS encryption and key management provided by AWS KMS custom key store

This approach uses the Amazon RDS service where AWS manages the operating system and database engine. You can configure this service to be a highly scalable resource spanning multiple Availability Zones within a Region to provide resiliency. CloudHSM keys are used via AWS KMS service integration to encrypt the Amazon EBS volumes at rest.

Note: This configuration is recommended where FIPS140-2 Level 3 validation is a specified compliance requirement.

Benefits

  • No key management requirement on host; key management is performed by AWS KMS
  • Meets FIPS140-2 Level 3 validation requirements
  • Simple vertical and horizontal scalability
  • Snapshots for recovery are encrypted automatically
  • AWS manages the patching, maintenance, and configuration of the database engine
  • Well-recognized configuration with support offered through AWS Support

Challenges

  • Dependent on Amazon RDS supported engines and versions
  • You are responsible for provisioning, configuration, scaling, maintenance, and costs of running CloudHSM cluster
  • Might require additional controls to manage unauthorized access at table, row, column or cell level

Option 3 – Customer-managed database platform hosted on Amazon EC2 with Amazon EBS encryption and key management provided by KMS

In this approach, the key difference is that you’re responsible for managing the EC2 instances, operating systems, and database engines. You can still configure your databases to be highly scalable resources spanning multiple Availability Zones within a Region to provide resiliency, but it takes more effort. AWS KMS manages the keys that are used to encrypt the attached Amazon EBS volumes at rest.

Note: This configuration is recommended when Amazon RDS doesn’t support the desired database engine type or version.

Benefits

  • A 1:1 relationship for migration of database engine configuration
  • Key rotation and management is handled transparently by AWS
  • Data encryption keys are managed by the hypervisor, not by your EC2 instance
  • AWS KMS costs are comparatively low

Challenges

  • You’re responsible for patching and updates of the database engine and OS
  • Might require additional controls to manage unauthorized access at table, row, column, or cell level

Option 4 – Customer-managed database platform hosted on Amazon EC2 with Amazon EBS encryption and key management provided by KMS custom key store

In this approach, you are again responsible for managing the EC2 instances, operating systems, and database engines. You can still configure your databases to be highly scalable resources spanning multiple Availability Zones within a Region to provide resiliency, but it takes more effort. And similar to Option 2, CloudHSM keys are used via AWS KMS service integration to encrypt the Amazon EBS volumes at rest.

Note: This configuration is recommended when Amazon RDS doesn’t support the desired database engine type or version and when FIPS140-2 Level 3 compliance is required.

Benefits

  • A 1:1 relationship for migration of database engine configuration
  • Data encryption keys managed by the hypervisor, not by your EC2 instance
  • Keys managed by FIPS140-2 Level 3 validated HSM

Challenges

  • You’re responsible for provisioning, configuration, scaling, maintenance, and costs of running CloudHSM cluster
  • You’re responsible for patching and updates of the database engine and OS
  • Might require additional controls to manage unauthorized access at table, row, column, or cell level

Option 5 – Customer-managed database platform hosted on Amazon EC2 with Amazon EBS encryption and key management provided by LUKS

In this approach, you’re still responsible for managing the EC2 instances, operating systems, and database engines. You also need to install LUKS onto the Linux instance to manage the encryption of data on Amazon EBS.

Benefits

  • A 1:1 relationship for migration of database engine configuration
  • Transparent encryption is managed by OS with LUKS

Challenges

  • You’re responsible for patching and updates of the database engine and OS
  • Data encryption keys are managed directly on the EC2 instance, and not a dedicated key management system
  • Scaling must be vertical, which is slow and costly
  • LUKS is supported through open-source licensing
  • Support for backup and recovery is LUKS specific, and require additional consideration
  • Might require additional controls to manage unauthorized access at table, row, column or cell level

Note: This approach limits you to only Linux instances and requires the most technical knowledge and effort on your part. Options, such as BitLocker and SQL Server Always Encrypted, exist for Windows hosts, and the complexity and challenges are similar to those of LUKS.

Option 6 – Customer-managed database platform hosted on Amazon EC2 with database encryption and key management provided by TDE

In this approach, you’re still responsible for managing the EC2 instances, operating systems, and database engines. However, instead of encrypting the Amazon EBS volume where the database is stored, you use TDE wallet keys managed by the database engine to encrypt and decrypt records as they are stored and retrieved.

Benefits

  • A 1:1 relationship for migration of database engine configuration
  • Table, row, column, and cell level encryption are managed by TDE, reducing end point risks relating to unauthorized access

Challenges

  • You’re responsible for patching and updates of the database engine and OS
  • Costly license for TDE feature
  • Data encryption keys are managed directly on the EC2 instance
  • Scaling is dependent on TDE functionality and Amazon EC2 scaling
  • Support is split between AWS and a third-party database vendor
  • Cannot share snapshots

Note: This approach is not available with Amazon RDS.

Option 7 – Customer-managed database platform hosted on Amazon EC2 with database encryption performed by TDE and key management provided by CloudHSM

In this approach, you’re still responsible for managing the EC2 instances, operating systems, and database engines. However, instead of encrypting the Amazon EBS volume where the database is stored, you use TDE wallet keys managed by a CloudHSM cluster to encrypt and decrypt records as they are stored and retrieved.

Benefits

  • A 1:1 relationship for migration of database engine configuration
  • Wallet keys (KEK) are managed by a FIPS140-2 Level 3 validated HSM
  • Table, row, column, and cell level encryption are managed by TDE, reducing end point risks relating to unauthorized access

Challenges

  • You’re responsible for patching and updates of the database engine and OS
  • Costly license for TDE feature
  • You are responsible for provisioning, configuration, scaling, maintenance, and costs of running CloudHSM cluster
  • Integration and support of CloudHSM with TDE might vary
  • Scaling is dependent on TDE functionality, Amazon EC2 scaling, and CloudHSM cluster.
  • Data encryption keys are managed on EC2 instance
  • Support is split between AWS and a third-party database vendor
  • Cannot share snapshots

Note: This approach is not available with Amazon RDS.

Summary

While you can operate in AWS similar to how you operate in your on-premises environment, the preceding configurations and recommendations show how you can significantly reduce your challenges and increase your benefits by using cloud-native security services like AWS KMS, Amazon RDS, and CloudHSM. Specifically, using Amazon RDS with Amazon EBS volumes encrypted by AWS KMS provides a highly scalable, resilient, and secure way to manage your keys in AWS.

While there might be some architectural redesign and configuration work needed to move an on-premises database into Amazon RDS, you can leverage AWS services to help you meet your compliance requirements with less effort. By offloading the OS and database maintenance responsibility to AWS, you simultaneously reduce operational friction and increase security. By migrating this way, you can benefit from the scalability and resilience of the AWS global infrastructure and expertise. Lastly, to get started with migrating your database to AWS, I encourage you to use the AWS Database Migration Service.

If you have feedback about this post, submit comments in the Comments section below.

Want more AWS Security how-to content, news, and feature announcements? Follow us on Twitter.

Author

Jonathan Jenkyn

Jonathan is a Senior Security Growth Strategies Consultant with AWS Professional Services. He’s an active member of the People with Disabilities affinity group, and has built several Amazon initiatives supporting charities and social responsibility causes. Since 1998, he has been involved in IT Security at many levels, from implementation of cryptographic primitives to managing enterprise security governance. Outside of work, he enjoys running, cycling, fund-raising for the BHF and Ipswich Hospital Charity, and spending time with his wife and 5 children.

Author

Scott Conklin

Scott is a Senior Security Consultant with AWS Professional Services (Global Specialty Practice). Based out of Chicago with 4 years tenure, he is an avid distance runner, crypto nerd, lover of unicorns, and enjoys camping, nature, playing Minecraft with his 3 kids, and binge watching Amazon Prime with his wife.