Tag Archives: AWS Lake Formation

Insights for CTOs: Part 3 – Growing your business with modern data capabilities

Post Syndicated from Syed Jaffry original https://aws.amazon.com/blogs/architecture/insights-for-ctos-part-3-growing-your-business-with-modern-data-capabilities/

This post was co-wrtiten with Jonathan Hwang, head of Foundation Data Analytics at Zendesk.


In my role as a Senior Solutions Architect, I have spoken to chief technology officers (CTOs) and executive leadership of large enterprises like big banks, software as a service (SaaS) businesses, mid-sized enterprises, and startups.

In this 6-part series, I share insights gained from various CTOs and engineering leaders during their cloud adoption journeys at their respective organizations. I have taken these lessons and summarized architecture best practices to help you build and operate applications successfully in the cloud. This series also covers building and operating cloud applications, security, cloud financial management, modern data and artificial intelligence (AI), cloud operating models, and strategies for cloud migration.

In Part 3, I’ve collaborated with the head of Foundation Analytics at Zendesk, Jonathan Hwang, to show how Zendesk incrementally scaled their data and analytics capabilities to effectively use the insights they collect from customer interactions. Read how Zendesk built a modern data architecture using Amazon Simple Storage Service (Amazon S3) for storage, Apache Hudi for row-level data processing, and AWS Lake Formation for fine-grained access control.

Why Zendesk needed to build and scale their data platform

Zendesk is a customer service platform that connects over 100,000 brands with hundreds of millions of customers via telephone, chat, email, messaging, social channels, communities, review sites, and help centers. They use data from these channels to make informed business decisions and create new and updated products.

In 2014, Zendesk’s data team built the first version of their big data platform in their own data center using Apache Hadoop for incubating their machine learning (ML) initiative. With that, they launched Answer Bot and Zendesk Benchmark report. These products were so successful they soon overwhelmed the limited compute resources available in the data center. By the end of 2017, it was clear Zendesk needed to move to the cloud to modernize and scale their data capabilities.

Incrementally modernizing data capabilities

Zendesk built and scaled their workload to use data lakes on AWS, but soon encountered new architecture challenges:

  • The General Data Protection Regulation (GDPR) “right to be forgotten” rule made it difficult and costly to maintain data lakes, because deleting a small piece of data required reprocessing large datasets.
  • Security and governance was harder to manage when data lake scaled to a larger number of users.

The following sections show you how Zendesk is addressing GDPR rules by evolving from plain Apache Parquet files on Amazon S3 to Hudi datasets on Amazon S3 to enable row level inserts/updates/deletes. To address security and governance, Zendesk is migrating to AWS Lake Formation centralized security for fine-grained access control at scale.

Zendesk’s data platform

Figure 1 shows Zendesk’s current data platform. It consists of three data pipelines: “Data Hub,” “Data Lake,” and “Self Service.”

Zendesk data pipelines

Figure 1. Zendesk data pipelines

Data Lake pipelines

The Data Lake and Data Hub pipelines cover the entire lifecycle of the data from ingestion to consumption.

The Data Lake pipelines consolidate the data from Zendesk’s highly distributed databases into a data lake for analysis.

Zendesk uses Amazon Database Migration Service (AWS DMS) for change data capture (CDC) from over 1,800 Amazon Aurora MySQL databases in eight AWS Regions. It detects transaction changes and applies them to the data lake using Amazon EMR and Hudi.

Zendesk ticket data consists of over 10 billion events and petabytes of data. The data lake files in Amazon S3 are transformed and stored in Apache Hudi format and registered on the AWS Glue catalog to be available as data lake tables for analytics querying and consumption via Amazon Athena.

Data Hub pipelines

The Data Hub pipelines focus on real-time events and streaming analytics use cases with Apache Kafka. Any application at Zendesk can publish events to a global Kafka message bus. Apache Flink ingests these events into Amazon S3.

The Data Hub provides high-quality business data that is highly available and scalable.

Self-managed pipeline

The self-managed pipelines empower product engineering teams to use the data lake for those use cases that don’t fit into our standard integration patterns. All internal Zendesk product engineering teams can use standard tools such as Amazon EMR, Amazon S3, Athena, and AWS Glue to publish their own analytics dataset and share them with other teams.

A notable example of this is Zendesk’s fraud detection engineering team. They publish their fraud detection data and findings through our self-manage data lake platform and use Amazon QuickSight for visualization.

You need fine-grained security and compliance

Data lakes can accelerate growth through faster decision making and product innovation. However, they can also bring new security and compliance challenges:

  • Visibility and auditability. Who has access to what data? What level of access do people have and how/when and who is accessing it?
  • Fine-grained access control. How do you define and enforce least privilege access to subsets of data at scale without creating bottlenecks or key person/team dependencies?

Lake Formation helps address these concerns by auditing data access and offering row- and column-level security and a delegated access control model to create data stewards for self-managed security and governance.

Zendesk used Lake Formation to build a fine-grained access control model that uses row-level security. It detects personally identifiable information (PII) while scaling the data lake for self-managed consumption.

Some Zendesk customers opt out of having their data included in ML or market research. Zendesk uses Lake Formation to apply row-level security to filter out records associated with a list of customer accounts who have opted out of queries. They also help data lake users understand which data lake tables contain PII by automatically detecting and tagging columns in the data catalog using AWS Glue’s PII detection algorithm.

The value of real-time data processing

When you process and consume data closer to the time of its creation, you can make faster decisions. Streaming analytics design patterns, implemented using services like Amazon Managed Streaming for Apache Kafka (Amazon MSK) or Amazon Kinesis, create an enterprise event bus to exchange data between heterogeneous applications in near real time.

For example, it is common to use streaming to augment the traditional database CDC ingestion into the data lake with additional streaming ingestion of application events. CDC is a common data ingestion pattern, but the information can be too low level. This requires application context to be reconstructed in the data lake and business logic to be duplicated in two places, inside the application and in the data lake processing layer. This creates a risk of semantic misrepresentation of the application context.

Zendesk faced this challenge with their CDC data lake ingestion from their Aurora clusters. They created an enterprise event bus built with Apache Kafka to augment their CDC with higher-level application domain events to be exchanged directly between heterogeneous applications.

Zendesk’s streaming architecture

A CDC database ticket table schema can sometimes contain unnecessary and complex attributes that are application specific and do not capture the domain model of the ticket. This makes it hard for downstream consumers to understand and use the data. A ticket domain object may span several database tables when modeled in third normal form, which makes querying for analysts difficult downstream. This is also a brittle integration method because downstream data consumers can easily be impacted when the application logic changes, which makes it hard to derive a common data view.

To move towards event-based communication between microservices, Zendesk created the Platform Data Architecture (PDA) project, which uses a standard object model to represent a higher level, semantic view of their application data. Standard objects are domain objects designed for cross-domain communication and do not suffer from the lower level fragmented scope of database CDC. Ultimately, Zendesk aims to transition their data architecture from a collection of isolated products and data silos into a cohesive unified data platform.

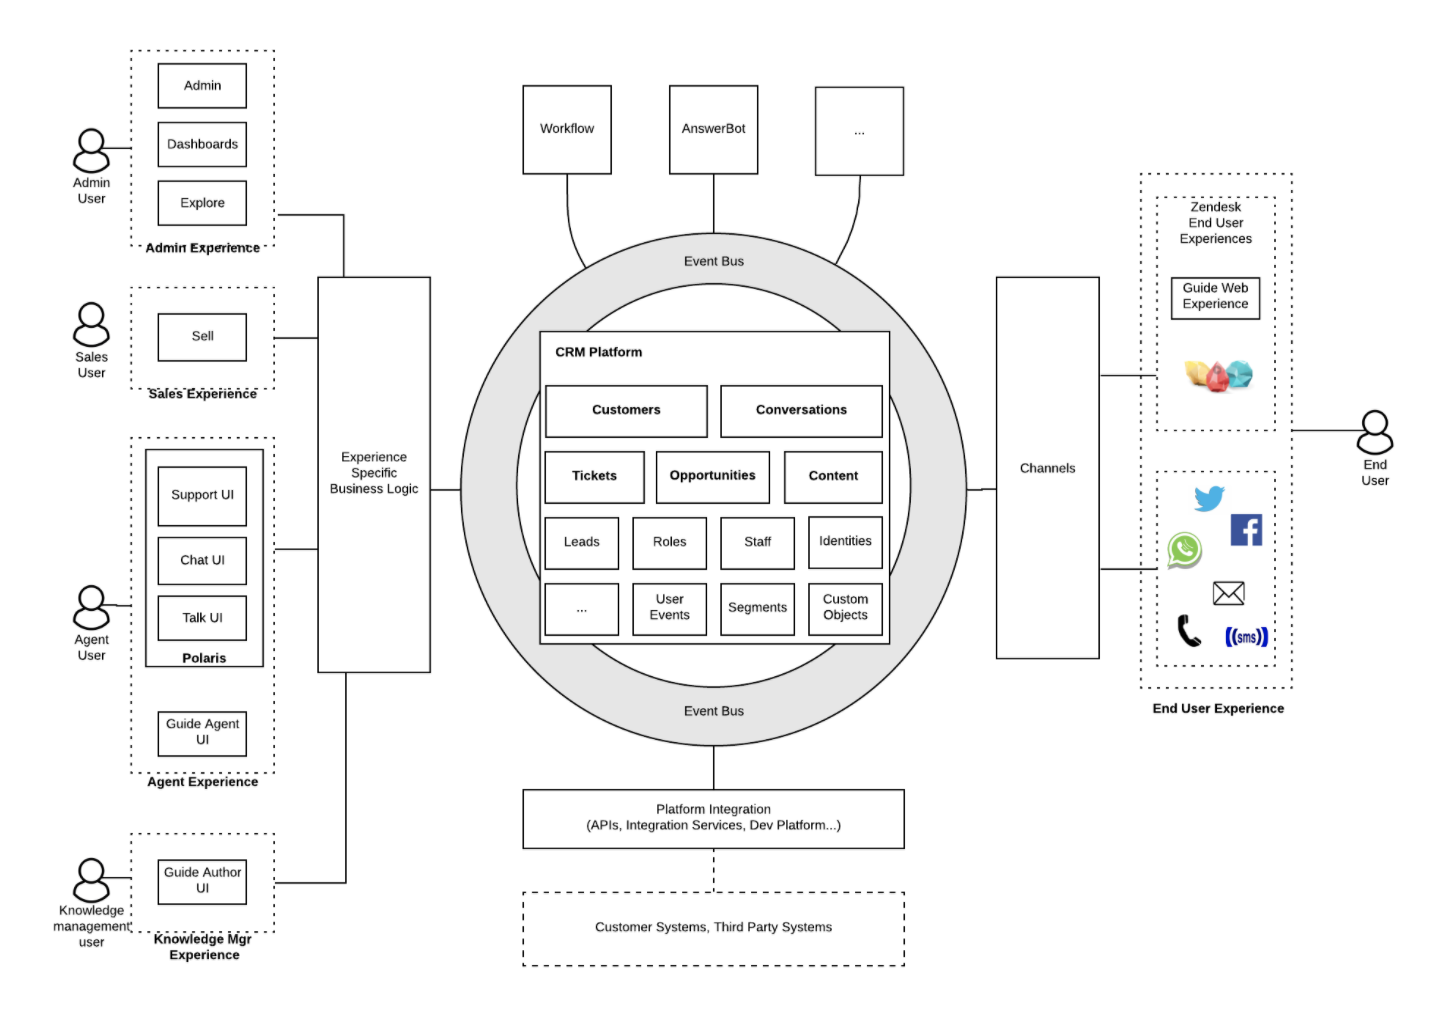
An application view of Zendesk’s streaming architecture

Figure 2. An application view of Zendesk’s streaming architecture

Figure 3 shows how all Zendesk products and users integrate through common standard objects and standard events within the Data Hub. Applications publish and consume standard objects and events to/from the event bus.

For example, a complete ticket standard object will be published to the message bus whenever it is created, updated, or changed. On the consumption side, these events get used by product teams to enable platform capabilities such as search, data export, analytics, and reporting dashboards.

Summary

As Zendesk’s business grew, their data lake evolved from simple Parquet files on Amazon S3 to a modern Hudi-based incrementally updateable data lake. Now, their original coarse-grained IAM security policies use fine-grained access control with Lake Formation.

We have repeatedly seen this incremental architecture evolution achieve success because it reduces the business risk associated with the change and provides sufficient time for your team to learn and evaluate cloud operations and managed services.

Looking for more architecture content? AWS Architecture Center provides reference architecture diagrams, vetted architecture solutions, Well-Architected best practices, patterns, icons, and more!

Other posts in this series

How the Georgia Data Analytics Center built a cloud analytics solution from scratch with the AWS Data Lab

Post Syndicated from Kanti Chalasani original https://aws.amazon.com/blogs/big-data/how-the-georgia-data-analytics-center-built-a-cloud-analytics-solution-from-scratch-with-the-aws-data-lab/

This is a guest post by Kanti Chalasani, Division Director at Georgia Data Analytics Center (GDAC). GDAC is housed within the Georgia Office of Planning and Budget to facilitate governed data sharing between various state agencies and departments.

The Office of Planning and Budget (OPB) established the Georgia Data Analytics Center (GDAC) with the intent to provide data accountability and transparency in Georgia. GDAC strives to support the state’s government agencies, academic institutions, researchers, and taxpayers with their data needs. Georgia’s modern data analytics center will help to securely harvest, integrate, anonymize, and aggregate data.

In this post, we share how GDAC created an analytics platform from scratch using AWS services and how GDAC collaborated with the AWS Data Lab to accelerate this project from design to build in record time. The pre-planning sessions, technical immersions, pre-build sessions, and post-build sessions helped us focus on our objectives and tangible deliverables. We built a prototype with a modern data architecture and quickly ingested additional data into the data lake and the data warehouse. The purpose-built data and analytics services allowed us to quickly ingest additional data and deliver data analytics dashboards. It was extremely rewarding to officially release the GDAC public website within only 4 months.

A combination of clear direction from OPB executive stakeholders, input from the knowledgeable and driven AWS team, and the GDAC team’s drive and commitment to learning played a huge role in this success story. GDAC’s partner agencies helped tremendously through timely data delivery, data validation, and review.

We had a two-tiered engagement with the AWS Data Lab. In the first tier, we participated in a Design Lab to discuss our near-to-long-term requirements and create a best-fit architecture. We discussed the pros and cons of various services that can help us meet those requirements. We also had meaningful engagement with AWS subject matter experts from various AWS services to dive deeper into the best practices.

The Design Lab was followed by a Build Lab, where we took a smaller cross section of the bigger architecture and implemented a prototype in 4 days. During the Build Lab, we worked in GDAC AWS accounts, using GDAC data and GDAC resources. This not only helped us build the prototype, but also helped us gain hands-on experience in building it. This experience also helped us better maintain the product after we went live. We were able to continually build on this hands-on experience and share the knowledge with other agencies in Georgia.

Our Design and Build Lab experiences are detailed below.

Step 1: Design Lab

We wanted to stand up a platform that can meet the data and analytics needs for the Georgia Data Analytics Center (GDAC) and potentially serve as a gold standard for other government agencies in Georgia. Our objective with the AWS Data Design Lab was to come up with an architecture that meets initial data needs and provides ample scope for future expansion, as our user base and data volume increased. We wanted each component of the architecture to scale independently, with tighter controls on data access. Our objective was to enable easy exploration of data with faster response times using Tableau data analytics as well as build data capital for Georgia. This would allow us to empower our policymakers to make data-driven decisions in a timely manner and allow State agencies to share data and definitions within and across agencies through data governance. We also stressed on data security, classification, obfuscation, auditing, monitoring, logging, and compliance needs. We wanted to use purpose-built tools meant for specialized objectives.

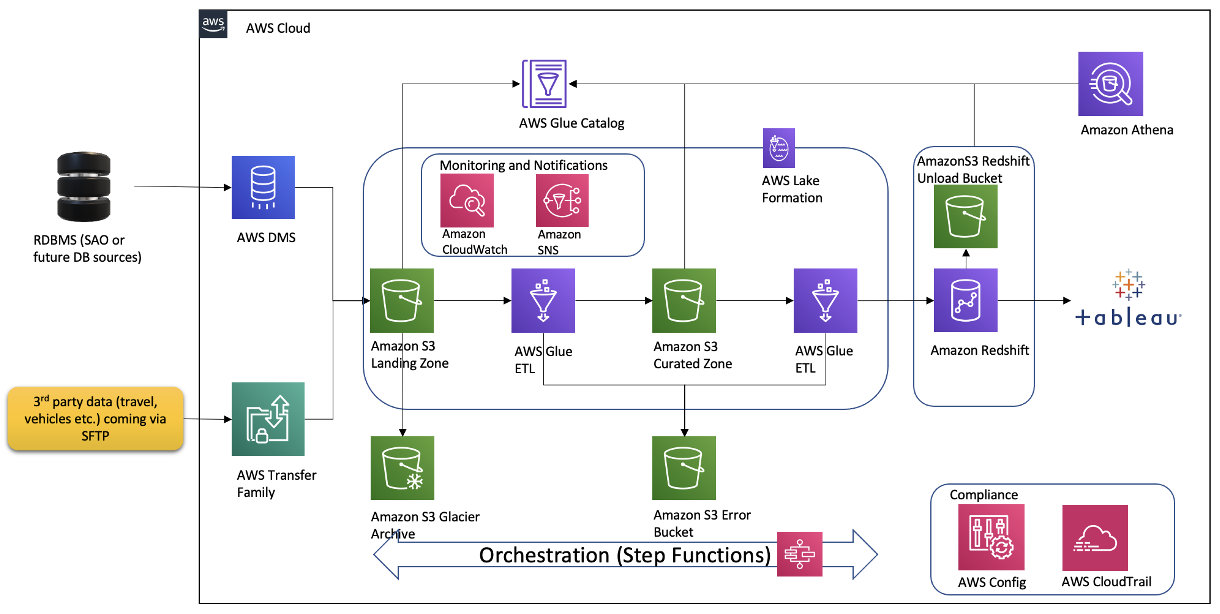
Over the course of the 2-day Design Lab, we defined our overall architecture and picked a scaled-down version to explore. The following diagram illustrates the architecture of our prototype.

The architecture contains the following key components:

  • Amazon Simple Storage Service (Amazon S3) for raw data landing and curated data staging.
  • AWS Glue for extract, transform, and load (ETL) jobs to move data from the Amazon S3 landing zone to Amazon S3 curated zone in optimal format and layout. We used an AWS Glue crawler to update the AWS Glue Data Catalog.
  • AWS Step Functions for AWS Glue job orchestration.
  • Amazon Athena as a powerful tool for a quick and extensive SQL data analysis and to build a logical layer on the landing zone.
  • Amazon Redshift to create a federated data warehouse with conformed dimensions and star schemas for consumption by Tableau data analytics.

Step 2: Pre-Build Lab

We started with planning sessions to build foundational components of our infrastructure: AWS accounts, Amazon Elastic Compute Cloud (Amazon EC2) instances, an Amazon Redshift cluster, a virtual private cloud (VPC), route tables, security groups, encryption keys, access rules, internet gateways, a bastion host, and more. Additionally, we set up AWS Identity and Access Management (IAM) roles and policies, AWS Glue connections, dev endpoints, and notebooks. Files were ingested via secure FTP, or from a database to Amazon S3 using AWS Command Line Interface (AWS CLI). We crawled Amazon S3 via AWS Glue crawlers to build Data Catalog schemas and tables for quick SQL access in Athena.

The GDAC team participated in Immersion Days for training in AWS Glue, AWS Lake Formation, and Amazon Redshift in preparation for the Build Lab.

We defined the following as the success criteria for the Build Lab:

  • Create ETL pipelines from source (Amazon S3 raw) to target (Amazon Redshift). These ETL pipelines should create and load dimensions and facts in Amazon Redshift.
  • Have a mechanism to test the accuracy of the data loaded through our pipelines.
  • Set up Amazon Redshift in a private subnet of a VPC, with appropriate users and roles identified.
  • Connect from AWS Glue to Amazon S3 to Amazon Redshift without going over the internet.
  • Set up row-level filtering in Amazon Redshift based on user login.
  • Data pipelines orchestration using Step Functions.
  • Build and publish Tableau analytics with connections to our star schema in Amazon Redshift.
  • Automate the deployment using AWS CloudFormation.
  • Set up column-level security for the data in Amazon S3 using Lake Formation. This allows for differential access to data based on user roles to users using both Athena and Amazon Redshift Spectrum.

Step 3: Four-day Build Lab

Following a series of implementation sessions with our architect, we formed the GDAC data lake and organized downstream data pulls for the data warehouse with governed data access. Data was ingested in the raw data landing lake and then curated into a staging lake, where data was compressed and partitioned in Parquet format.

It was empowering for us to build PySpark Extract Transform Loads (ETL) AWS Glue jobs with our meticulous AWS Data Lab architect. We built reusable glue jobs for the data ingestion and curation using the code snippets provided. The days were rigorous and long, but we were thrilled to see our centralized data repository come into fruition so rapidly. Cataloging data and using Athena queries proved to be a fast and cost-effective way for data exploration and data wrangling.

The serverless orchestration with Step Functions allowed us to put AWS Glue jobs into a simple readable data workflow. We spent time designing for performance and partitioning data to minimize cost and increase efficiency.

Database access from Tableau and SQL Workbench/J were set up for my team. Our excitement only grew as we began building data analytics and dashboards using our dimensional data models.

Step 4: Post-Build Lab

During our post-Build Lab session, we closed several loose ends and built additional AWS Glue jobs for initial and historic loads and append vs. overwrite strategies. These strategies were picked based on the nature of the data in various tables. We returned for a second Build Lab to work on building data migration tasks from Oracle Database via VPC peering, file processing using AWS Glue DataBrew, and AWS CloudFormation for automated AWS Glue job generation. If you have a team of 4–8 builders looking for a fast and easy foundation for a complete data analytics system, I would highly recommend the AWS Data Lab.

Conclusion

All in all, with a very small team we were able to set up a sustainable framework on AWS infrastructure with elastic scaling to handle future capacity without compromising quality. With this framework in place, we are moving rapidly with new data feeds. This would not have been possible without the assistance of the AWS Data Lab team throughout the project lifecycle. With this quick win, we decided to move forward and build AWS Control Tower with multiple accounts in our landing zone. We brought in professionals to help set up infrastructure and data compliance guardrails and security policies. We are thrilled to continually improve our cloud infrastructure, services and data engineering processes. This strong initial foundation has paved the pathway to endless data projects in Georgia.


About the Author

Kanti Chalasani serves as the Division Director for the Georgia Data Analytics Center (GDAC) at the Office of Planning and Budget (OPB). Kanti is responsible for GDAC’s data management, analytics, security, compliance, and governance activities. She strives to work with state agencies to improve data sharing, data literacy, and data quality through this modern data engineering platform. With over 26 years of experience in IT management, hands-on data warehousing, and analytics experience, she thrives for excellence.

Vishal Pathak is an AWS Data Lab Solutions Architect. Vishal works with customers on their use cases, architects solutions to solve their business problems, and helps them build scalable prototypes. Prior to his journey with AWS, Vishal helped customers implement BI, data warehousing, and data lake projects in the US and Australia.

Build a data sharing workflow with AWS Lake Formation for your data mesh

Post Syndicated from Jan Michael Go Tan original https://aws.amazon.com/blogs/big-data/build-a-data-sharing-workflow-with-aws-lake-formation-for-your-data-mesh/

A key benefit of a data mesh architecture is allowing different lines of business (LOBs) and organizational units to operate independently and offer their data as a product. This model not only allows organizations to scale, but also gives the end-to-end ownership of maintaining the product to data producers that are the domain experts of the data. This ownership entails maintaining the data pipelines, debugging ETL scripts, fixing data quality issues, and keeping the catalog entries up to date as the dataset evolves over time.

On the consumer side, teams can search the central catalog for relevant data products and request access. Access to the data is done via the data sharing feature in AWS Lake Formation. As the amount of data products grow and potentially more sensitive information is stored in an organization’s data lake, it’s important that the process and mechanism to request and grant access to specific data products are done in a scalable and secure manner.

This post describes how to build a workflow engine that automates the data sharing process while including a separate approval mechanism for data products that are tagged as sensitive (for example, containing PII data). Both the workflow and approval mechanism are customizable and should be adapted to adhere to your company’s internal processes. In addition, we include an optional workflow UI to demonstrate how to integrate with the workflow engine. The UI is just one example of how the interaction works. In a typical large enterprise, you can also use ticketing systems to automatically trigger both the workflow and the approval process.

Solution overview

A typical data mesh architecture for analytics in AWS contains one central account that collates all the different data products from multiple producer accounts. Consumers can search the available data products in a single location. Sharing data products to consumers doesn’t actually make a separate copy, but instead just creates a pointer to the catalog item. This means any updates that producers make to their products are automatically reflected in the central account as well as in all the consumer accounts.

Building on top of this foundation, the solution contains several components, as depicted in the following diagram:

The central account includes the following components:

  • AWS Glue – Used for Data Catalog purposes.
  • AWS Lake Formation – Used to secure access to the data as well as provide the data sharing capabilities that enable the data mesh architecture.
  • AWS Step Functions – The actual workflow is defined as a state machine. You can customize this to adhere to your organization’s approval requirements.
  • AWS Amplify – The workflow UI uses the Amplify framework to secure access. It also uses Amplify to host the React-based application. On the backend, the Amplify framework creates two Amazon Cognito components to support the security requirements:
    • User pools – Provide a user directory functionality.
    • Identity pools – Provide federated sign-in capabilities using Amazon Cognito user pools as the location of the user details. The identity pools vend temporary credentials so the workflow UI can access AWS Glue and Step Functions APIs.
  • AWS Lambda – Contains the application logic orchestrated by the Step Functions state machine. It also provides the necessary application logic when a producer approves or denies a request for access.
  • Amazon API Gateway – Provides the API for producers to accept and deny requests.

The producer account contains the following components:

The consumer account contains the following components:

  • AWS Glue – Used for Data Catalog purposes.
  • AWS Lake Formation – After the data has been made available, consumers can grant access to its own users via Lake Formation.
  • AWS Resource Access Manager (AWS RAM) – If the grantee account is in the same organization as the grantor account, the shared resource is available immediately to the grantee. If the grantee account is not in the same organization, AWS RAM sends an invitation to the grantee account to accept or reject the resource grant. For more details about Lake Formation cross-account access, see Cross-Account Access: How It Works.

The solution is split into multiple steps:

  1. Deploy the central account backend, including the workflow engine and its associated components.
  2. Deploy the backend for the producer accounts. You can repeat this step multiple times depending on the number of producer accounts that you’re onboarding into the workflow engine.
  3. Deploy the optional workflow UI in the central account to interact with the central account backend.

Workflow overview

The following diagram illustrates the workflow. In this particular example, the state machine checks if the table or database (depending on what is being shared) has the pii_flag parameter and if it’s set to TRUE. If both conditions are valid, it sends an approval request to the producer’s SNS topic. Otherwise, it automatically shares the product to the requesting consumer.

This workflow is the core of the solution, and can be customized to fit your organization’s approval process. In addition, you can add custom parameters to databases, tables, or even columns to attach extra metadata to support the workflow logic.

Prerequisites

The following are the deployment requirements:

You can clone the workflow UI and AWS CDK scripts from the GitHub repository.

Deploy the central account backend

To deploy the backend for the central account, go to the root of the project after cloning the GitHub repository and enter the following code:

yarn deploy-central --profile <PROFILE_OF_CENTRAL_ACCOUNT>

This deploys the following:

  • IAM roles used by the Lambda functions and Step Functions state machine
  • Lambda functions
  • The Step Functions state machine (the workflow itself)
  • An API Gateway

When the deployment is complete, it generates a JSON file in the src/cfn-output.json location. This file is used by the UI deployment script to generate a scoped-down IAM policy and workflow UI application to locate the state machine that was created by the AWS CDK script.

The actual AWS CDK scripts for the central account deployment are in infra/central/. This also includes the Lambda functions (in the infra/central/functions/ folder) that are used by both the state machine and the API Gateway.

Lake Formation permissions

The following table contains the minimum required permissions that the central account data lake administrator needs to grant to the respective IAM roles for the backend to have access to the AWS Glue Data Catalog.

Role Permission Grantable
WorkflowLambdaTableDetails
  • Database: DESCRIBE
  • Tables: DESCRIBE
N/A
WorkflowLambdaShareCatalog
  • Tables: SELECT, DESCRIBE
  • Tables: SELECT, DESCRIBE

Workflow catalog parameters

The workflow uses the following catalog parameters to provide its functionality.

Catalog Type Parameter Name Description
Database data_owner (Required) The account ID of the producer account that owns the data products.
Database data_owner_name A readable friendly name that identifies the producer in the UI.
Database pii_flag A flag (true/false) that determines whether the data product requires approval (based on the example workflow).
Column pii_flag A flag (true/false) that determines whether the data product requires approval (based on the example workflow). This is only applicable if requesting table-level access.

You can use UpdateDatabase and UpdateTable to add parameters to database and column-level granularity, respectively. Alternatively, you can use the CLI for AWS Glue to add the relevant parameters.

Use the AWS CLI to run the following command to check the current parameters in your database:

aws glue get-database --name <DATABASE_NAME> --profile <PROFILE_OF_CENTRAL_ACCOUNT>

You get the following response:

{
  "Database": {
    "Name": "<DATABASE_NAME>",
    "CreateTime": "<CREATION_TIME>",
    "CreateTableDefaultPermissions": [],
    "CatalogId": "<CATALOG_ID>"
  }
}

To update the database with the parameters indicated in the preceding table, we first create the input JSON file, which contains the parameters that we want to update the database with. For example, see the following code:

{
  "Name": "<DATABASE_NAME>",
  "Parameters": {
    "data_owner": "<AWS_ACCOUNT_ID_OF_OWNER>",
    "data_owner_name": "<AWS_ACCOUNT_NAME_OF_OWNER>",
    "pii_flag": "true"
  }
}

Run the following command to update the Data Catalog:

aws glue update-database --name <DATABASE_NAME> --database-input file://<FILE_NAME>.json --profile <PROFILE_OF_CENTRAL_ACCOUNT>

Deploy the producer account backend

To deploy the backend for your producer accounts, go to the root of the project and run the following command:

yarn deploy-producer --profile <PROFILE_OF_PRODUCER_ACCOUNT> --parameters centralMeshAccountId=<central_account_account_id>

This deploys the following:

  • An SNS topic where approval requests get published.
  • The ProducerWorkflowRole IAM role with a trust relationship to the central account. This role allows Amazon SNS publish to the previously created SNS topic.

You can run this deployment script multiple times, each time pointing to a different producer account that you want to participate in the workflow.

To receive notification emails, subscribe your email in the SNS topic that the deployment script created. For example, our topic is called DataLakeSharingApproval. To get the full ARN, you can either go to the Amazon Simple Notification Service console or run the following command to list all the topics and get the ARN for DataLakeSharingApproval:

aws sns list-topics --profile <PROFILE_OF_PRODUCER_ACCOUNT>

After you have the ARN, you can subscribe your email by running the following command:

aws sns subscribe --topic-arn <TOPIC_ARN> --protocol email --notification-endpoint <EMAIL_ADDRESS> --profile <PROFILE_OF_PRODUCER_ACCOUNT>

You then receive a confirmation email via the email address that you subscribed. Choose Confirm subscription to receive notifications from this SNS topic.

Deploy the workflow UI

The workflow UI is designed to be deployed in the central account where the central data catalog is located.

To start the deployment, enter the following command:

yarn deploy-ui

This deploys the following:

  • Amazon Cognito user pool and identity pool
  • React-based application to interact with the catalog and request data access

The deployment command prompts you for the following information:

  • Project information – Use the default values.
  • AWS authentication – Use your profile for the central account. Amplify uses this profile to deploy the backend resources.

UI authentication – Use the default configuration and your username. Choose No, I am done when asked to configure advanced settings.

  • UI hosting – Use hosting with the Amplify console and choose manual deployment.

The script gives a summary of what is deployed. Entering Y triggers the resources to be deployed in the backend. The prompt looks similar to the following screenshot:

When the deployment is complete, the remaining prompt is for the initial user information such as user name and email. A temporary password is automatically generated and sent to the email provided. The user is required to change the password after the first login.

The deployment script grants IAM permissions to the user via an inline policy attached to the Amazon Cognito authenticated IAM role:

{
   "Version":"2012-10-17",
   "Statement":[
      {
         "Effect":"Allow",
         "Action":[
            "glue:GetDatabase",
            "glue:GetTables",
            "glue:GetDatabases",
            "glue:GetTable"
         ],
         "Resource":"*"
      },
      {
         "Effect":"Allow",
         "Action":[
            "states:ListExecutions",
            "states:StartExecution"
         ],
         "Resource":[
"arn:aws:states:<REGION>:<AWS_ACCOUNT_ID>:stateMachine:<STATE_MACHINE_NAME>"
]
      },
      {
         "Effect":"Allow",
         "Action":[
             "states:DescribeExecution"
         ],
         "Resource":[
"arn:aws:states:<REGION>:<AWS_ACCOUNT_ID>:execution:<STATE_MACHINE_NAME>:*"
]
      }


   ]
}

The last remaining step is to grant Lake Formation permissions (DESCRIBE for both databases and tables) to the authenticated IAM role associated with the Amazon Cognito identity pool. You can find the IAM role by running the following command:

cat amplify/team-provider-info.json

The IAM role name is in the AuthRoleName property under the awscloudformation key. After you grant the required permissions, you can use the URL provided in your browser to open the workflow UI.

Your temporary password is emailed to you so you can complete the initial login, after which you’re asked to change your password.

The first page after logging in is the list of databases that consumers can access.

Choose Request Access to see the database details and the list of tables.

Choose Request Per Table Access and see more details at the table level.

Going back in the previous page, we request database-level access by entering the consumer account ID that receives the share request.

Because this database has been tagged with a pii_flag, the workflow needs to send an approval request to the product owner. To receive this approval request email, the product owner’s email needs to be subscribed to the DataLakeSharingApproval SNS topic in the product account. The details should look similar to the following screenshot:

The email looks similar to the following screenshot:

The product owner chooses the Approve link to trigger the Step Functions state machine to continue running and share the catalog item to the consumer account.

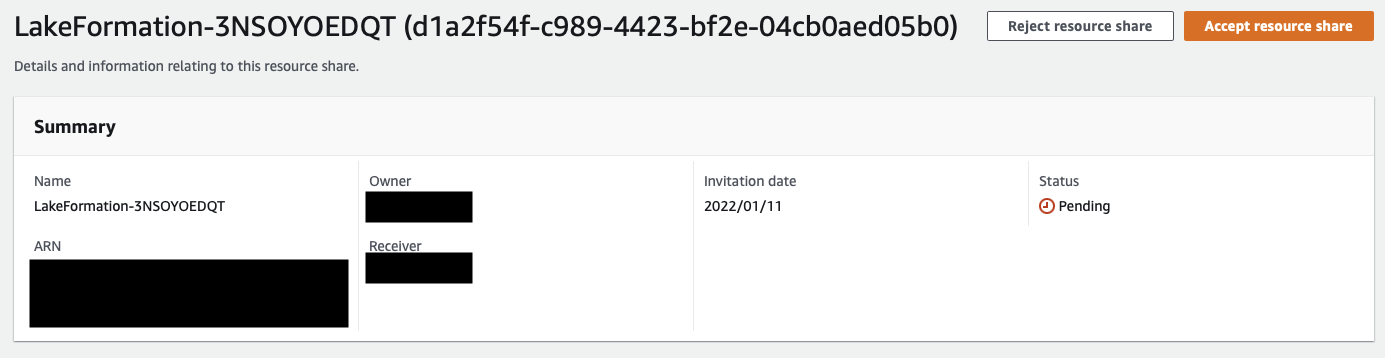
For this example, the consumer account is not part of an organization, so the admin of the consumer account has to go to AWS RAM and accept the invitation.

After the resource share is accepted, the shared database appears in the consumer account’s catalog.

Clean up

If you no longer need to use this solution, use the provided cleanup scripts to remove the deployed resources.

Producer account

To remove the deployed resources in producer accounts, run the following command for each producer account that you deployed in:

yarn clean-producer --profile <PROFILE_OF_PRODUCER_ACCOUNT>

Central account

Run the following command to remove the workflow backend in the central account:

yarn clean-central --profile <PROFILE_OF_CENTRAL_ACCOUNT>

Workflow UI

The cleanup script for the workflow UI relies on an Amplify CLI command to initiate the teardown of the deployed resources. Additionally, you can use a custom script to remove the inline policy in the authenticated IAM role used by Amazon Cognito so that Amplify can fully clean up all the deployed resources. Run the following command to trigger the cleanup:

yarn clean-ui

This command doesn’t require the profile parameter because it uses the existing Amplify configuration to infer where the resources are deployed and which profile was used.

Conclusion

This post demonstrated how to build a workflow engine to automate an organization’s approval process to gain access to data products with varying degrees of sensitivity. Using a workflow engine enables data sharing in a self-service manner while codifying your organization’s internal processes to be able to safely scale as more data products and teams get onboarded.

The provided workflow UI demonstrated one possible integration scenario. Other possible integration scenarios include integration with your organization’s ticketing system to trigger the workflow as well as receive and respond to approval requests, or integration with business chat applications to further shorten the approval cycle.

Lastly, a high degree of customization is possible with the demonstrated approach. Organizations have complete control over the workflow, how data product sensitivity levels are defined, what gets auto-approved and what needs further approvals, the hierarchy of approvals (such as a single approver or multiple approvers), and how the approvals get delivered and acted upon. You can take advantage of this flexibility to automate your company’s processes to help them safely accelerate towards being a data-driven organization.


About the Author

Jan Michael Go Tan is a Principal Solutions Architect for Amazon Web Services. He helps customers design scalable and innovative solutions with the AWS Cloud.

How to Run Massively Scalable ADAS Simulation Workloads on CAEdge

Post Syndicated from Hendrik Schoeneberg original https://aws.amazon.com/blogs/architecture/how-to-run-massively-scalable-adas-simulation-workloads-on-caedge/

This post was co-written by Hendrik Schoeneberg, Sr. Global Big Data Architect, The An Binh Nguyen, Product Owner for Cloud Simulation at Continental, Autonomous Mobility – Engineering Platform, Rumeshkrishnan Mohan, Global Big Data Architect, and Junjie Tang, Principal Consultant at AWS Professional Services.

AV/ADAS simulations processing large-scale field sensor data such as radar, lidar, and high-resolution video come with many challenges. Typically, the simulation workloads are spiky with occasional, but high compute demands, so the platform must scale up or down elastically to match the compute requirements. The platform must be flexible enough to integrate specialized ADAS simulation software, use distributed computing or HPC frameworks, and leverage GPU accelerated compute resources where needed.

Continental created the Continental Automotive Edge (CAEdge) Framework to address these challenges. It is a modular multi-tenant hardware and software framework that connects the vehicle to the cloud. You can learn more about this in Developing a Platform for Software-defined Vehicles with Continental Automotive Edge (CAEdge) and Developing a platform for software-defined vehicles (re:Invent session-AUT304).

In this blog post, we’ll illustrate how the CAEdge Framework orchestrates ADAS simulation workloads with Amazon Managed Workflows for Apache Airflow (MWAA). We’ll show how it delegates the high-performance workloads to AWS Batch for elastic, highly scalable, and customizable compute needs. We’ll showcase the “bring your own software-in-the-loop” (BYO-SIL) pattern, detailing how to leverage specialized and proprietary simulation software in your workflow. We’ll also demonstrate how to integrate the simulation platform with tenant data in the CAEdge framework. This orchestrate and delegate pattern has previously been introduced in Field Notes: Deploying Autonomous Driving and ADAS Workloads at Scale with Amazon Managed Workflows for Apache Airflow and the Reference Architecture for Autonomous Driving Data Lake.

Solution overview for autonomous driving simulation

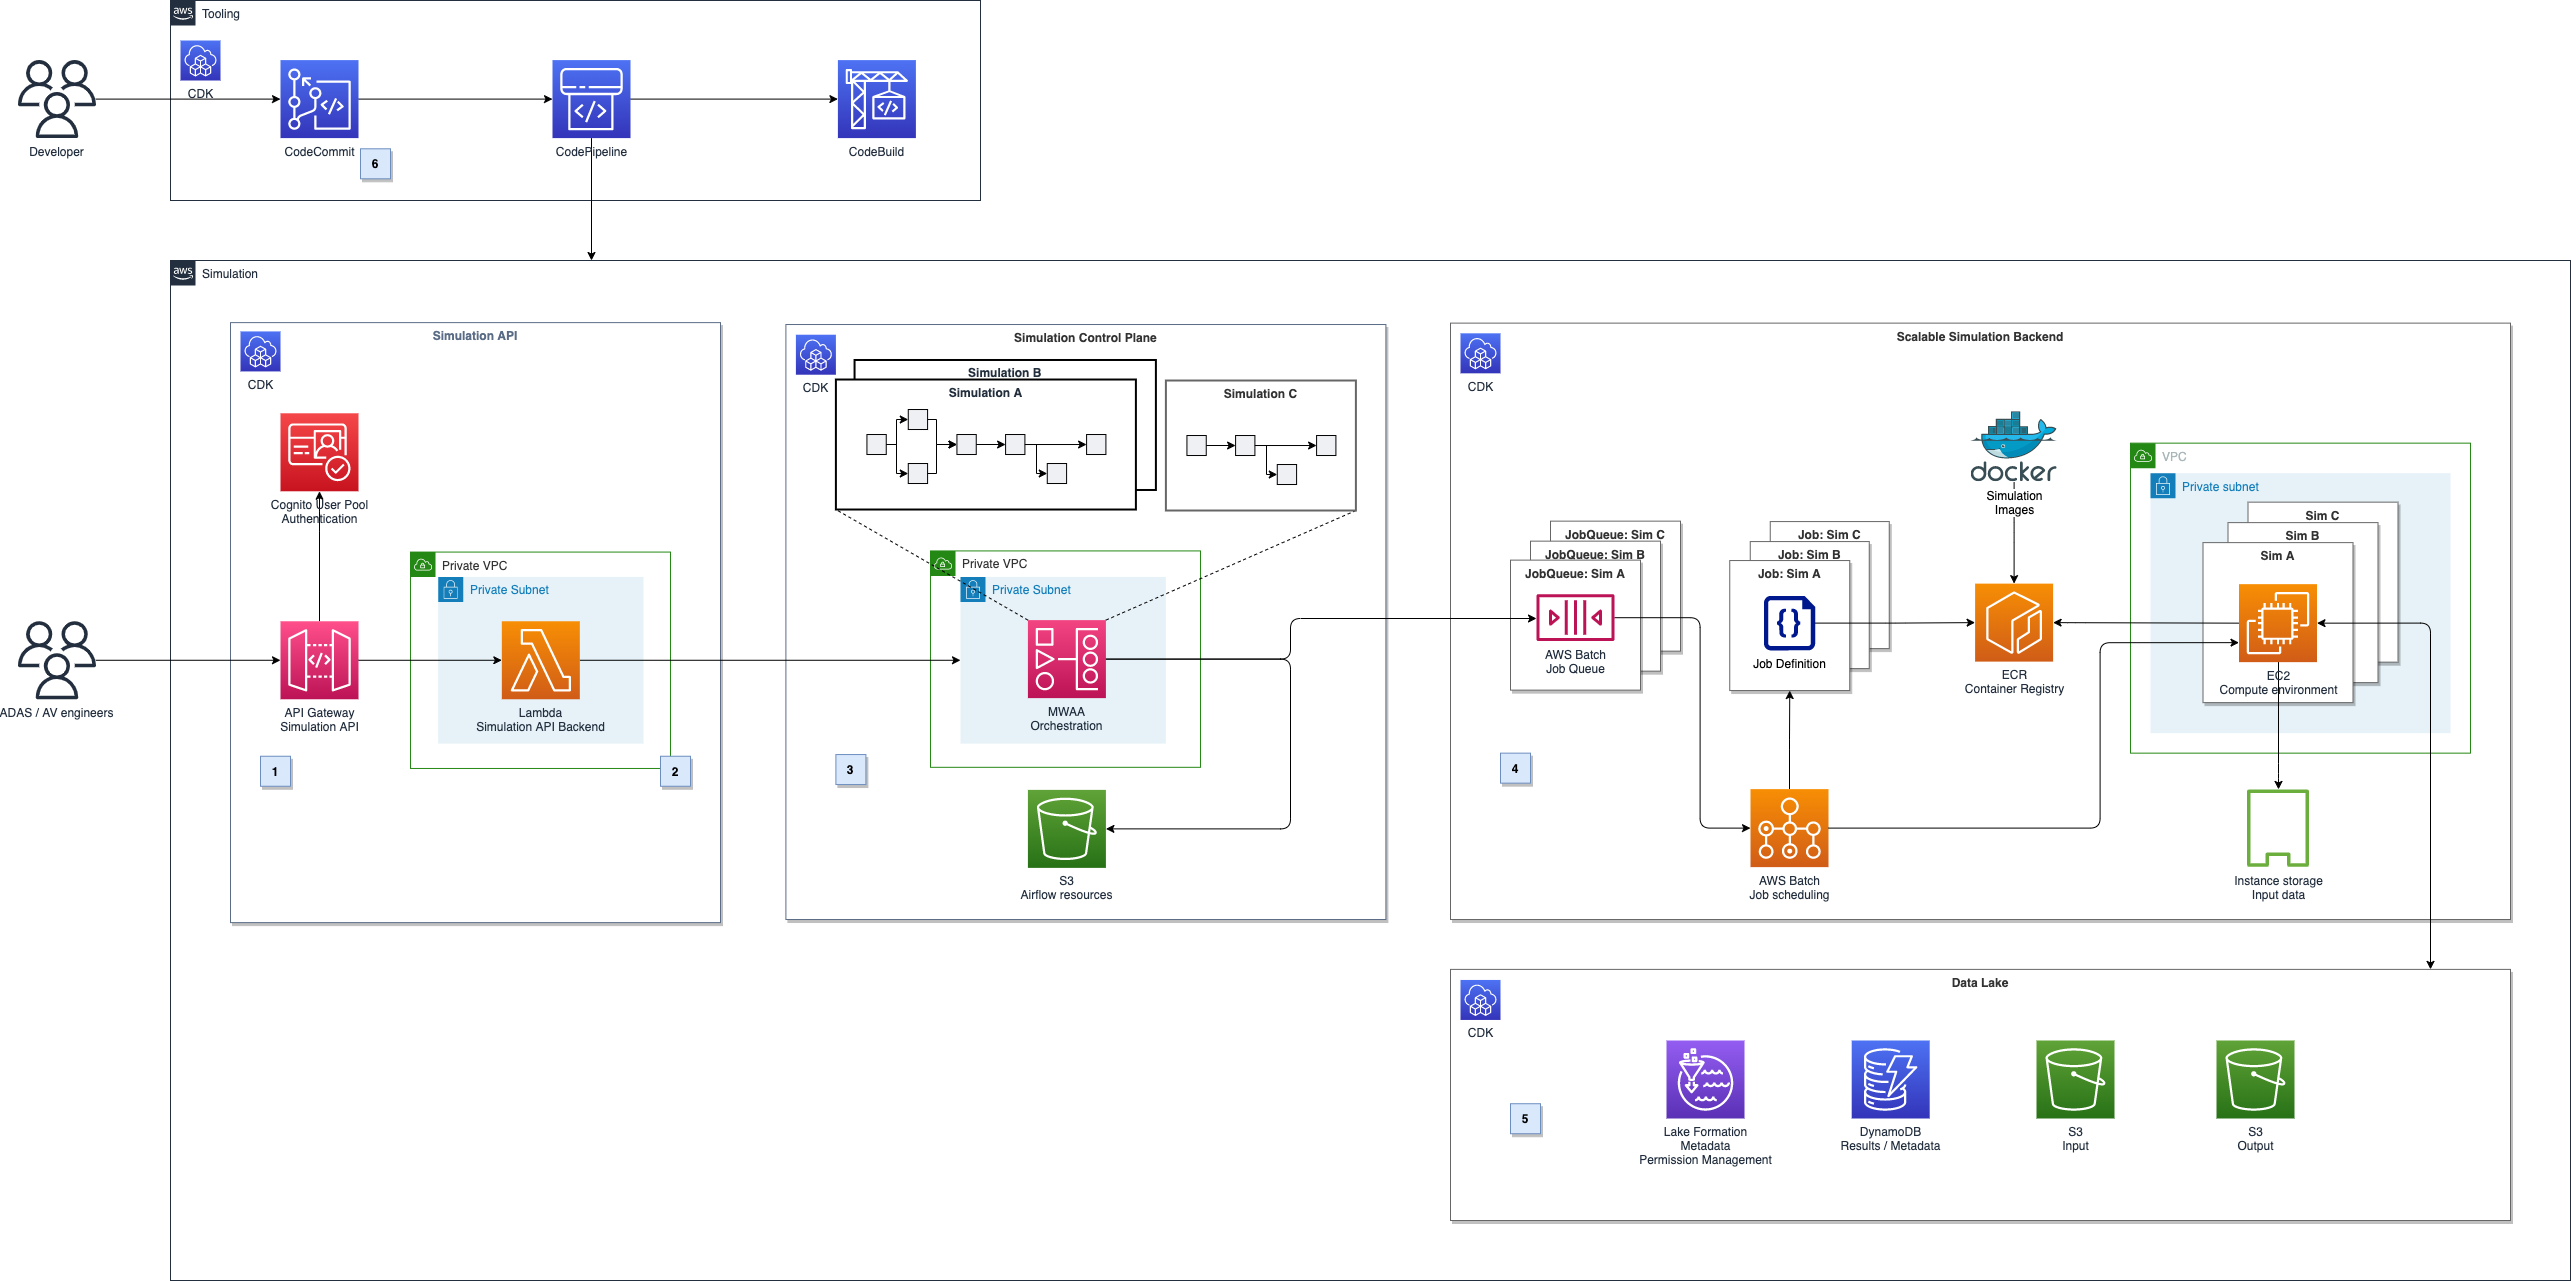
The following diagram shows a high-level overview of this solution.

Figure 1. Architecture diagram for autonomous driving simulation

Figure 1. Architecture diagram for autonomous driving simulation

It can be broken down into five major parts, illustrated in Figure 1.

  1. Simulation API: Amazon API Gateway (label 1) provides a REST API for authenticated users to schedule or monitor simulation. It runs on Amazon Managed Workflows for Apache Airflow (MWAA) using AWS Lambda (label 2).
  2. Simulation control plane: The simulation control plane (label 3) built on MWAA enables users to design and initiate workflows and integrate with AWS services.
  3. Scalable compute backend: We leverage the parallelization and elastic scalability capabilities of AWS Batch to distribute the workload (label 4). Additionally, we want to be able to run proprietary software components as part of the simulation workflows and use highly customizable Amazon EC2 compute environments. For example, we can use GPU acceleration or Graviton-based instances for workloads that must run on ARM, instead of x86 architectures.
  4. Autonomous Driving Data Lake (ADDL) integration: The simulations’ input and output data will be stored in a data lake (label 5) on Amazon S3. To provide efficient read and write access, data gets copied before each simulation run using RAID0 bundled ephemeral instance storage drives. After the simulation, results are written back to the data lake and are ready for reporting and analytics. We use AWS Lake Formation for metadata storage, data cataloging, and permission handling.
  5. Automated deployment: The solution architecture’s deployment is fully automated using a CI/CD pipeline in AWS CodePipeline and AWS CodeBuild (label 6). We can then perform automated testing and deployment to multiple target environments.

In this blog we will focus on the simulation control plane, scalable compute backend, and ADDL integration.

Simulation control plane

In a typical simulation, there are tasks like data movement (copying input data and persisting the results). These steps can require high levels of parallelization or GPU support. In addition, they can involve third-party or proprietary software, specialized runtime environments, or architectures like ARM. To facilitate all task requirements, we will delegate task initiation to the AWS services that best match the requirements. Correct sequence of tasks is achieved by an orchestration layer. Decoupling the simulation orchestration from task initiation follows the key design pattern to separate concerns. This enables the architecture to be adapted to specific requirements.

For the high-level task orchestration, we’ll introduce a simulation control plane built on MWAA. Modeling all simulation tasks in a directed acyclic graph (DAG), MWAA performs scheduling and task initiation in the correct sequence. It also handles the integration with AWS’ services. You can intuitively monitor and debug the progress of a simulation run across different services and networks. For the workflow within CAEdge, we’ll use AWS Batch to run simulations that are packaged as Docker containers.

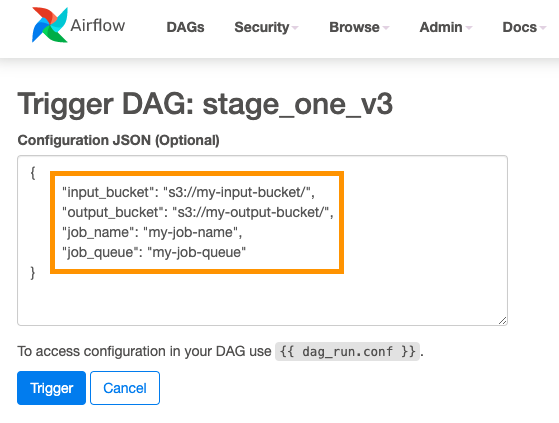
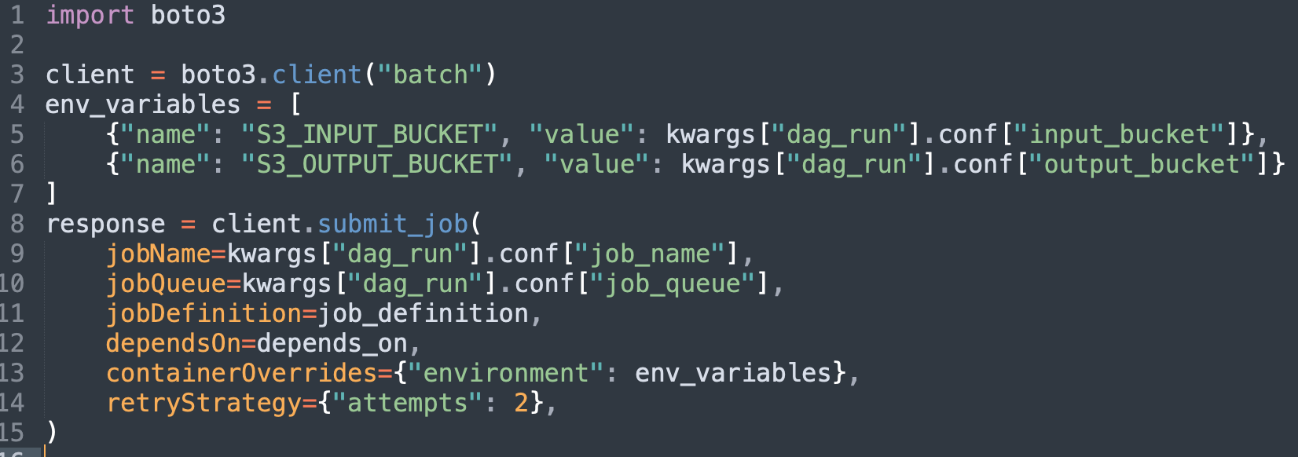
Parameterizable workflows: Airflow supports parameterization of DAGs by providing a JSON object when triggering a DAG run that can be accessed at runtime. This enables us to create a simulation execution framework in which we model the simulation steps. It lets you specify the simulations’ parameters such as which Docker container to execute, runtime configuration, or input and output data locations, see Figures 2 and 3.

Figure 2. Specify simulations’ parameters in JSON

Figure 2. Specify simulations’ parameters in JSON

Figure 3. Read simulations’ parameters from JSON

Figure 3. Read simulations’ parameters from JSON

Scalable compute backend

Publishing the Docker image: To run a simulation, you must provide a Docker container in Amazon Elastic Container Registry (ECR). Manually push Docker images to ECR using the command line interface (CLI) or using CI/CD pipeline automation.

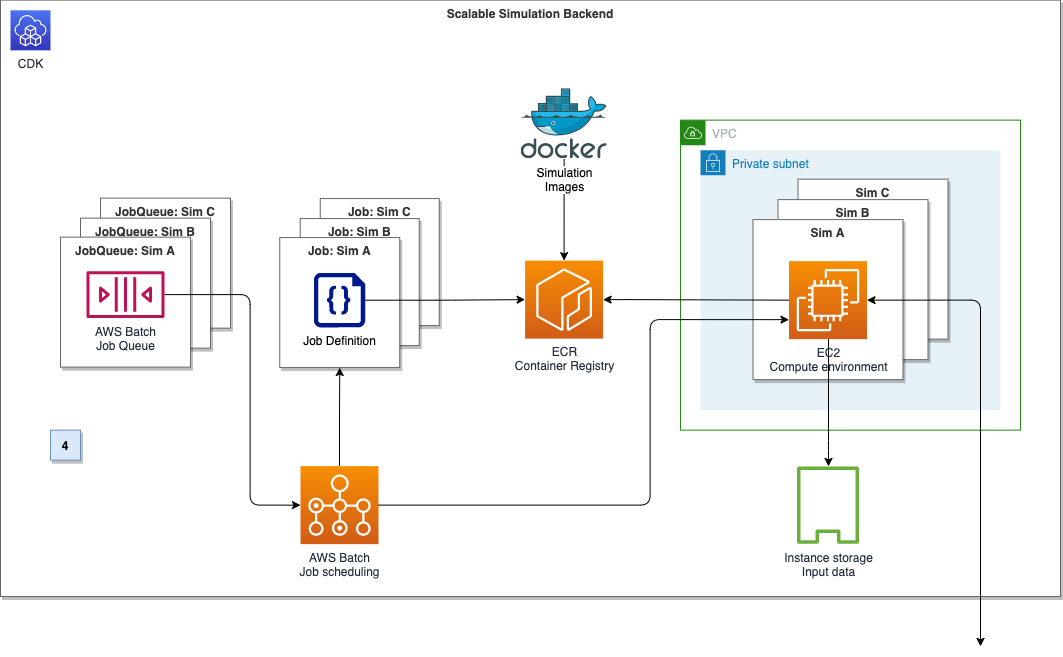
Choosing the compute option: Containers at AWS describes the services options for developers. Various factors can contribute to your decision-making. For the CAEdge platform, we want to run thousands of containers with fine-grained control over the underlying compute instance’s configuration. We also want to run containers in privileged mode, so AWS Batch on EC2 is a great match. Figure 4 outlines the compute backend’s architecture.

Figure 4. Compute backend architecture diagram

Figure 4. Compute backend architecture diagram

To run a Docker container on AWS Batch, we need three components: A job definition, a compute environment, and a job queue. The AWS Batch job definition specifies which job to run and how to run it. For example, we can define the Docker image to use, and specify the vCPU and memory configuration. The job definition will be submitted to a job queue, which in turn is linked to one or more compute environments. The compute environment specifies the compute configuration used to run a containerized workload, in addition to instance types and storage configurations. Creating a compute environment describes this more in detail. In the section ‘ADDL integration,’ we’ll describe how to select and configure the EC2 container instances to maximize network and disk I/O.

The AWS Batch array job feature can spin up thousands of independent, but similarly configured jobs. Instead of submitting a single job for each input file from the simulation control plane, we can instead submit a single array job. This provides the collection of input files as input. AWS Batch can spin up child jobs to process each entry of the collection in parallel, reducing operational overhead drastically.

With these components, we can now submit a job definition to a job queue from the simulation control plane, which will initiate on the corresponding compute environment.

ADDL integration

In the CAEdge platform, all simulation recordings and their metadata are stored and cataloged in the data lake. On average, single recordings are around 100 GB in size with simulation requests containing 100–300 recordings. A simulation request can therefore require 10–30 TB of data movement from S3 to the containers before the simulation starts. The containers’ performance will directly depend on I/O performance, as the input data is read and processed during execution. To provide the highest performance of data transfer and simulation workload, we need data storage options that maximize network and disk I/O throughput.

Choosing the storage option: For CAEdge’s simulation workloads, the storage solution acts as a temporary scratch space for the simulation containers’ input data. It should maximize I/O throughput. These requirements are met in the most cost-efficient way by choosing EC2 instances of the M5d family and their attached instance storage.

The M5d are general-purpose instances with NVMe-based SSDs, which are physically connected to the host server and provide block-level storage coupled to the lifetime of the instance. As described in the previous section, we configured AWS Batch to create compute environments using EC2’s M5d instances. While other storage options like Amazon Elastic File System (EFS) and Amazon Elastic Block Storage (EBS) can scale to match even demanding throughput scenarios, the simulation benefits from a high-performance, temporary storage location that is directly attached to the host.

Bundling the volumes: M5d instances can have multiple NVMe drives attached, depending on their size and storage configuration. To provide a single stable storage location for the simulation containers, bundle all attached NVMe SSDs into a single RAID0 volume during the instance’s launch, using a modified user data script. With this, we can provide a fixed storage location that can be accessed from the simulation containers. Additionally, we are distributing I/O operations evenly across all disks in the RAID0 configuration, which improves the read and write performance.

KPIs used for measurement

The SIL factor tells you how long the simulation takes compared to the duration of the recorded data.

SIL factor example:

  • For a recording with 60 minutes of data and a simulation duration of 120 minutes, the resulting SIL factor is 120 / 60 = 2. The simulation runs twice as long as real time.
  • For a recording with 60 minutes of data and a simulation duration of 60 minutes, the resulting SIL factor is 60 / 60 = 1. The simulation runs in real time.

Similarly, the aggregated SIL factor tells you how long the simulation for multiple recordings takes compared to the duration of the recorded data. It also factors in the horizontal scaling capabilities.

Aggregated SIL factor example:

  • For 3 recordings with 60 minutes of data and an overall simulation duration of 120 minutes, the resulting SIL factor is 120 / 3 * 60 = 0.67. The overall simulation is a third faster than real time.

Performance results

The storage optimizations described in the ADDL integration KPI section preceding, led to an improvement of the overall simulation duration of 50%. To benchmark the overall simulation platform’s performance, we created a simulation run with 15 recordings. The simulation run completed successfully with an aggregated SIL factor of 0.363, or, alternatively put, the simulation was roughly three times faster than real time. During production use, the platform will handle simulation runs with an average of 100-300 recordings. For these runs, the aggregated SIL factor is expected to be even smaller, as more simulations can be processed in parallel.

Conclusion

In this post, we showed how to design a platform for ADAS simulation workloads using the Bring Your Own Software-In-the-Loop (BYO-SIL) concept. We covered the key components including simulation control plane, scalable compute backend, and ADDL integration based on Continental Automotive Edge (CAEdge). We discussed the key performance benefits due to horizontal scalability and how to choose an optimized storage integration pattern. This led to an improvement of the overall simulation duration of 50%.

Centralize governance for your data lake using AWS Lake Formation while enabling a modern data architecture with Amazon Redshift Spectrum

Post Syndicated from Rajesh Francis original https://aws.amazon.com/blogs/big-data/centralize-governance-for-your-data-lake-using-aws-lake-formation-while-enabling-a-modern-data-architecture-with-amazon-redshift-spectrum/

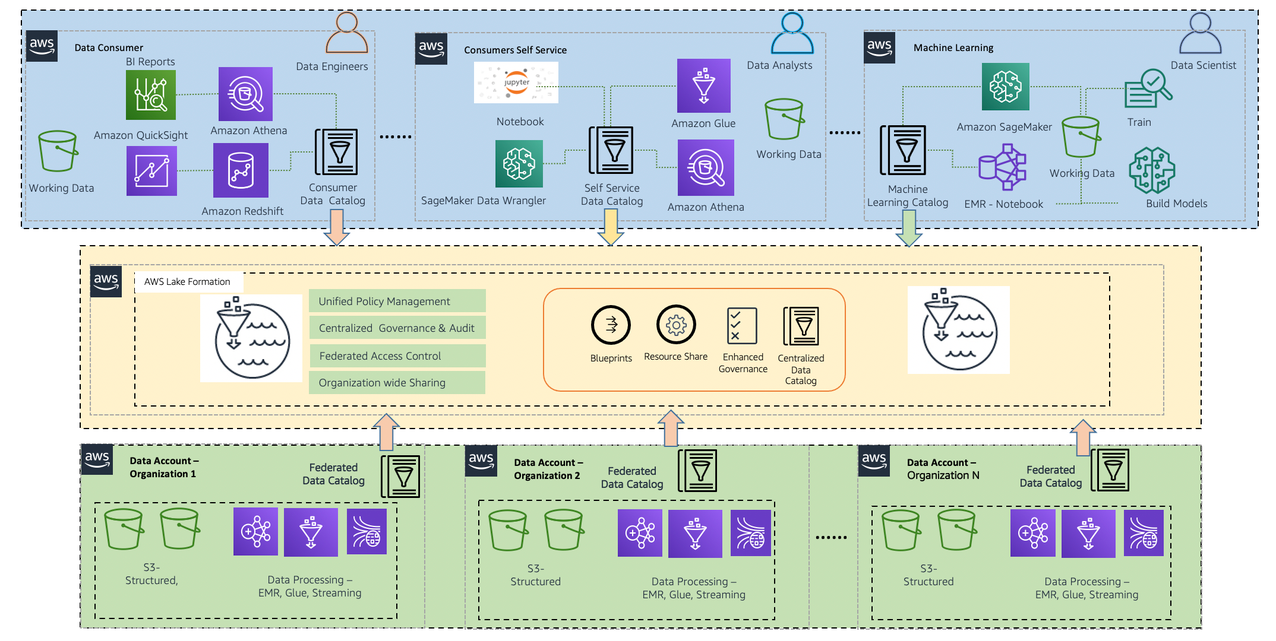
Many customers are modernizing their data architecture using Amazon Redshift to enable access to all their data from a central data location. They are looking for a simpler, scalable, and centralized way to define and enforce access policies on their data lakes on Amazon Simple Storage Service (Amazon S3). They want access policies to allow their data lake consumers to use the analytics service of their choice, to best suit the operations they want to perform on the data. Although the existing method of using Amazon S3 bucket policies to manage access control is an option, when the number of combinations of access levels and users increase, managing bucket level policies may not scale.

AWS Lake Formation allows you to simplify and centralize access management. It allows organizations to manage access control for Amazon S3-based data lakes using familiar concepts of databases, tables, and columns (with more advanced options like row and cell-level security). Lake Formation uses the AWS Glue Data Catalog to provide access control for Amazon S3 data lake with most commonly used AWS analytics services, like Amazon Redshift (via Amazon Redshift Spectrum), Amazon Athena, AWS Glue ETL, and Amazon EMR (for Spark-based notebooks). These services honor the Lake Formation permissions model out of the box, which makes it easy for customers to simplify, standardize, and scale data security management for data lakes.

With Amazon Redshift, you can build a modern data architecture, to seamlessly extend your data warehouse to your data lake and read all data – data in your data warehouse, and data in your data lake – without creating multiple copies of data. Amazon Redshift Spectrum feature enable direct query of your S3 data lake, and many customers are leveraging this to modernize their data platform. You can use Amazon Redshift managed storage for frequently accessed data and move less frequently accessed data to Amazon S3 data lake and securely access it using Redshift Spectrum.

In this post, we discuss how you can use AWS Lake Formation to centralize data governance and data access management while using Amazon Redshift Spectrum to query your data lake. Lake Formation allows you to grant and revoke permissions on databases, tables, and column catalog objects created on top of Amazon S3 data lake. This is easier for customers, as it is similar to managing permissions on relational databases.

In the first post of this two-part series, we focus on resources within the same AWS account. In the second post, we extend the solution across AWS accounts using the Lake Formation data sharing feature.

Solution overview

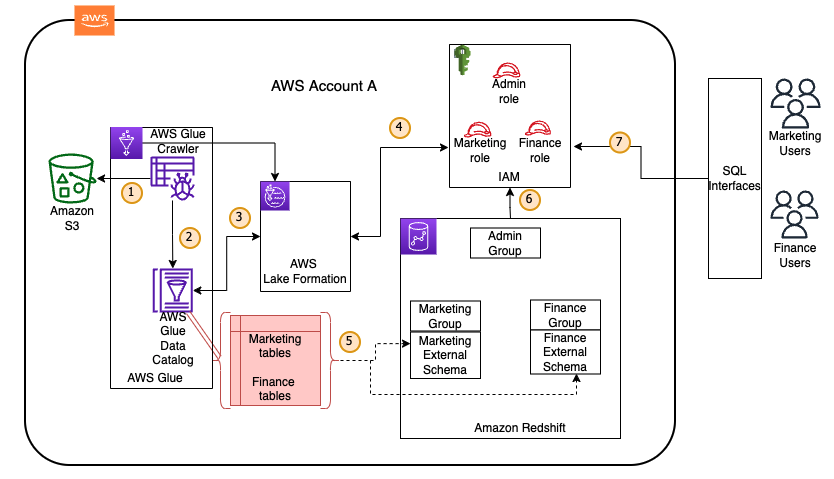
The following diagram illustrates our solution architecture.

The solution workflow consists of the following steps:

  1. Data stored in an Amazon S3 data lake is crawled using an AWS Glue crawler.
  2. The crawler infers the metadata of data on Amazon S3 and stores it in the form of a database and tables in the AWS Glue Data Catalog.
  3. You register the Amazon S3 bucket as the data lake location with Lake Formation. It’s natively integrated with the Data Catalog.
  4. You use Lake Formation to grant permissions at the database, table, and column level to defined AWS Identity and Access Management (IAM) roles.
  5. You create external schemas within Amazon Redshift to manage access for marketing and finance teams.
  6. You provide access to the marketing and finance groups to their respective external schemas and associate the appropriate IAM roles to be assumed. The admin role and admin group is limited for administration work.
  7. Marketing and finance users now can assume their respective IAM roles and query data using the SQL query editor to their external schemas inside Amazon Redshift.

Lake Formation default security settings

To maintain backward compatibility with AWS Glue, Lake Formation has the following initial security settings:

  • The super permission is granted to the group IAMAllowedPrincipals on all existing Data Catalog resources.
  • Settings to use only IAM access control are enabled for new Data Catalog resources.

To change security settings, see Changing the Default Security Settings for Your Data Lake.

Note: Leave the default settings as is until you’re ready to move completely to the Lake Formation permission model. You can update settings at a database level if you want permissions set by Lake Formation to take effect. For more details about upgrades, refer to Upgrading AWS Glue Data Permissions to the AWS Lake Formation Model.

We don’t recommend reverting back from the Lake Formation permission model to an IAM-only permission model. You may also want to first deploy the solution in a new test account.

Prerequisites

To set up this solution, you need basic familiarity with the AWS Management Console, an AWS account, and access to the following AWS services:

Create the data lake administrator

Data lake administrators are initially the only IAM users or roles that can grant Lake Formation permissions on data locations and Data Catalog resources to any principal.

To set up an IAM user as a data lake administrator, add the provided inline policy to the IAM user or IAM role you use to provision the resources for this blog solution. For more details, refer to Create a Data Lake Administrator.

  1. On the IAM console, choose Users, and choose the IAM user who you want to designate as the data lake administrator.
  2. Choose Add an inline policy on the Permissions tab and add the following policy:
    {
        "Version": "2012-10-17",
        "Statement": [
            {
                "Sid": "VisualEditor0",
                "Effect": "Allow",
                "Action": [
                    "lakeformation:GetDataLakeSettings",
                    "lakeformation:PutDataLakeSettings"
                ],
                "Resource": "*"
            }
        ]
    }

  3. Provide a policy name.
  4. Review and save your settings.

Note: If you’re using an existing administrator user/role, you may have this already provisioned.

  1. Sign in to the AWS management console as the designated data lake administrator IAM user or role for this solution.

Note: The CloudFormation template doesn’t work if you skip the below step.

  1. If this is your first time on the Lake Formation console, select Add myself and choose Get started.

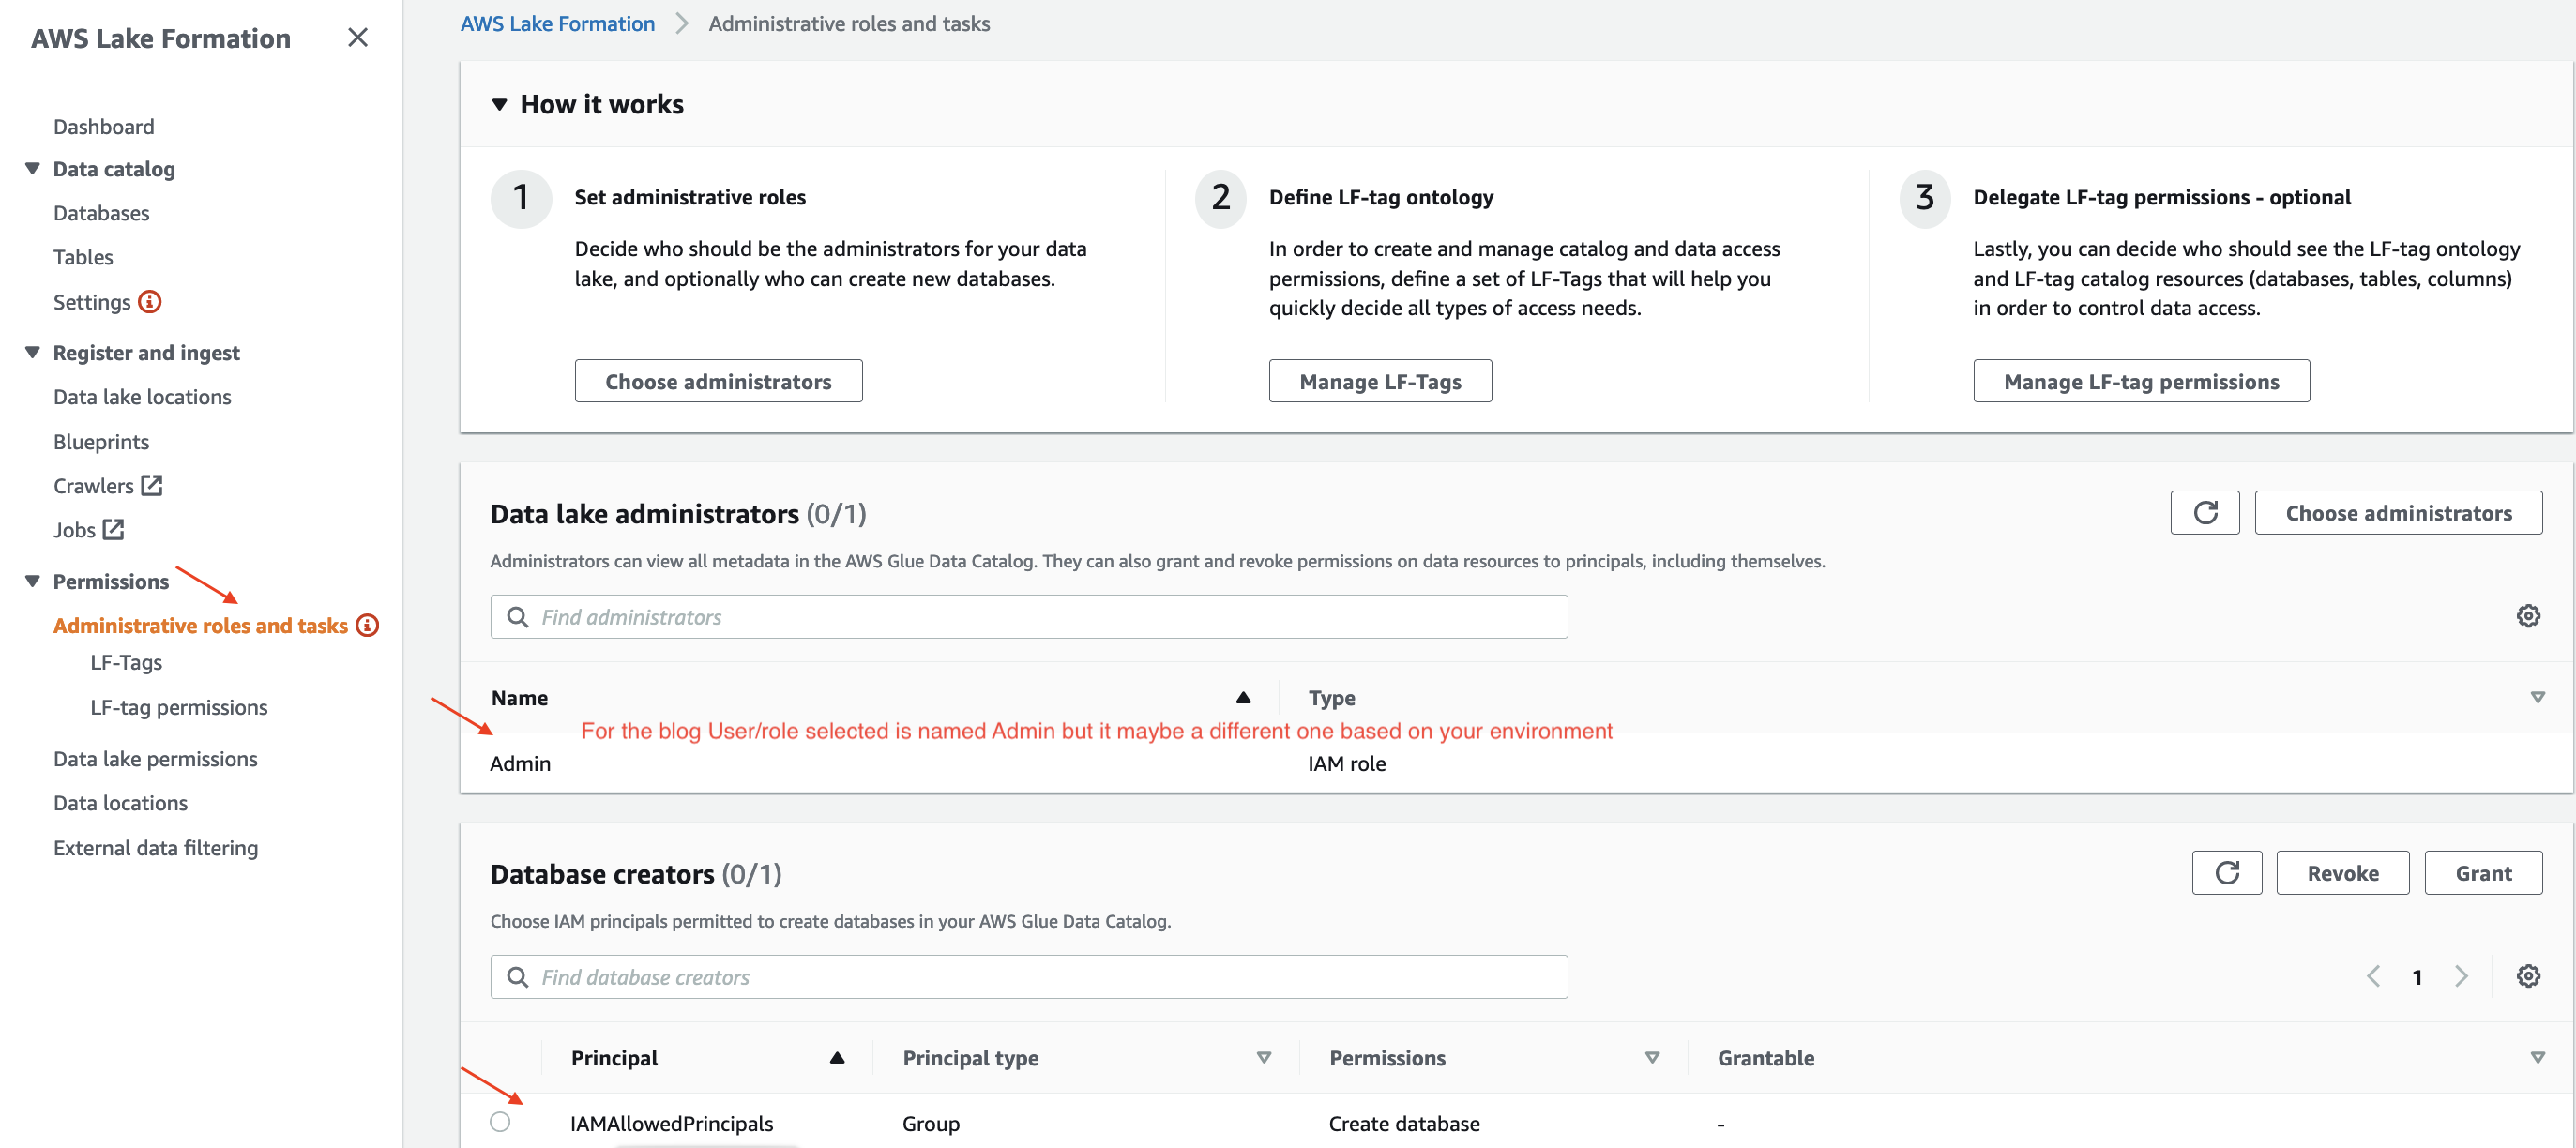
You can also add yourself as data lake administrator by going to Administrative roles and tasks under Permissions, select Choose administrators, and adding yourself as an administrator if you missed this in the initial welcome screen.

Provision resources with CloudFormation

In this step, we create the solution resources using a CloudFormation template. The template performs the following actions:

  • Creates an S3 bucket to copy sample data files and SQL scripts
  • Registers the S3 data lake location with Lake Formation
  • Creates IAM roles and policies as needed for the environment
  • Assigns principals (IAM roles) to handle data lake settings
  • Creates Lambda and Step Functions resources to load necessary data
  • Runs AWS Glue crawler jobs to create Data Catalog tables
  • Configures Lake Formation permissions
  • Creates an Amazon Redshift cluster
  • Runs a SQL script to create the database group, database user, and external schemas for the admin, marketing, and finance groups

To create your resources, complete the following steps:

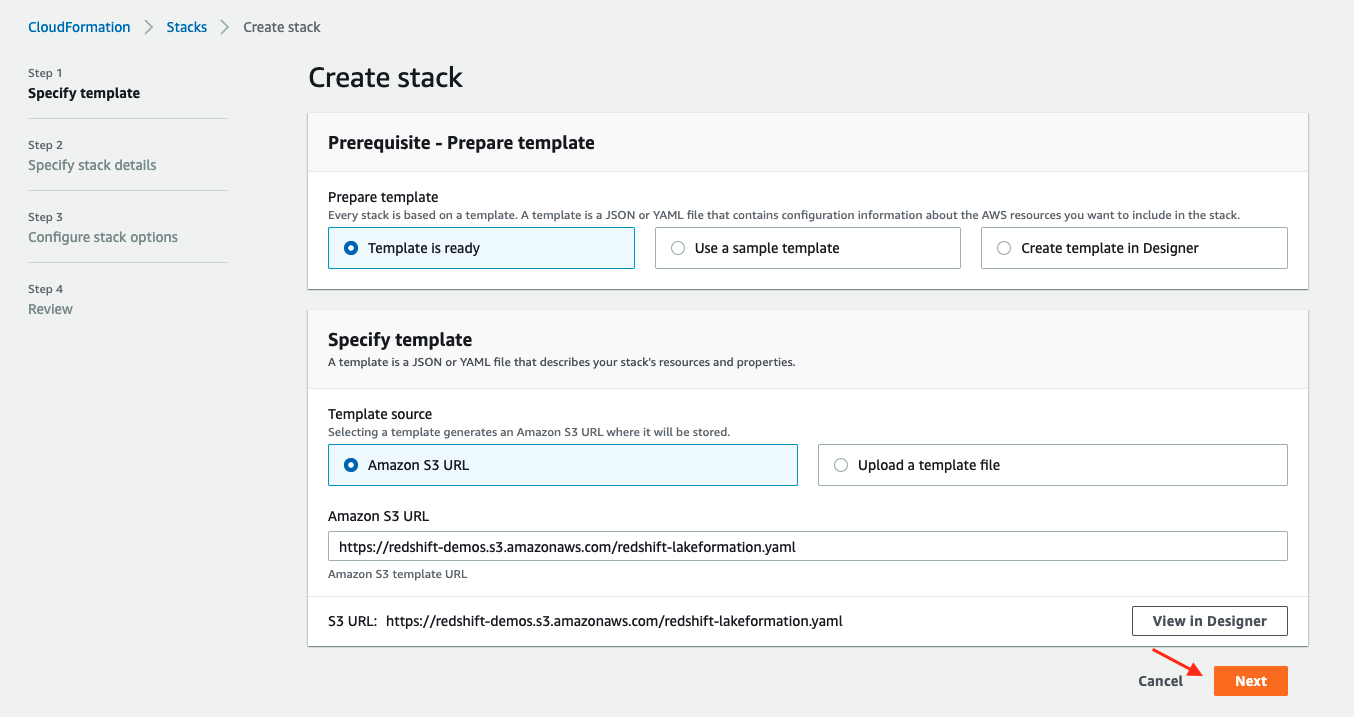
  1. Launch the provided template in AWS Region us-east-1.
  2. Choose Next.
  3. For Stack name, you can keep the default stack name or change it.
  4. For DbPassword, provide a secure password instead of using the default provided.
  5. For InboundTraffic, change the IP address range to your local machine’s IP address in CIDR format instead of using the default.
  6. Choose Next.
  7. Choose Next again until you get to the review page.
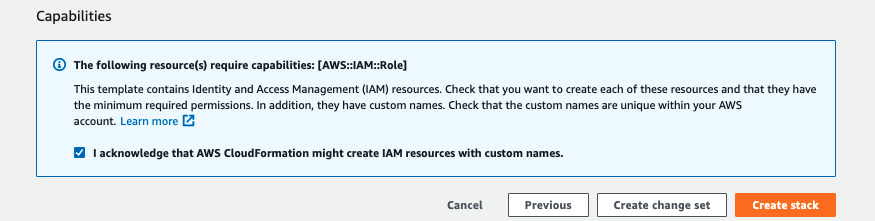
  8. Select I acknowledge that AWS CloudFormation might create IAM resources with custom names.
  9. Choose Create stack.

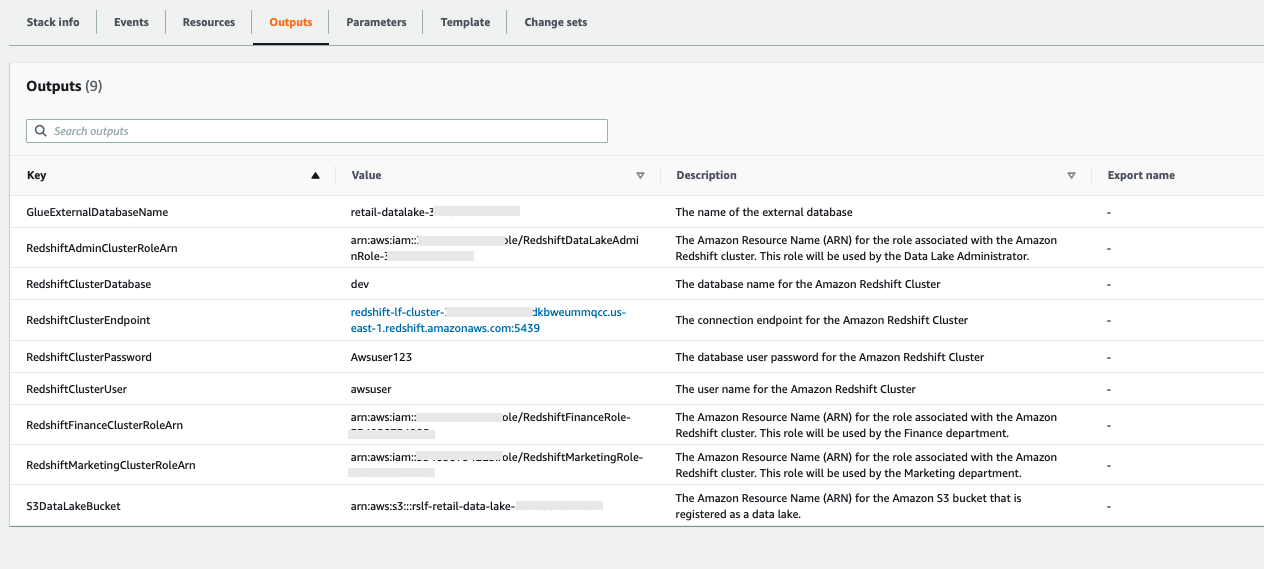
The stack takes approximately 10 minutes to deploy successfully. When it’s complete, you can view the outputs on the AWS CloudFormation console.

Update Lake Formation default settings

You also need to update the default settings at the Lake Formation database level. This makes sure that the Lake Formation permissions the CloudFormation template sets up during provisioning can take effect over the default settings.

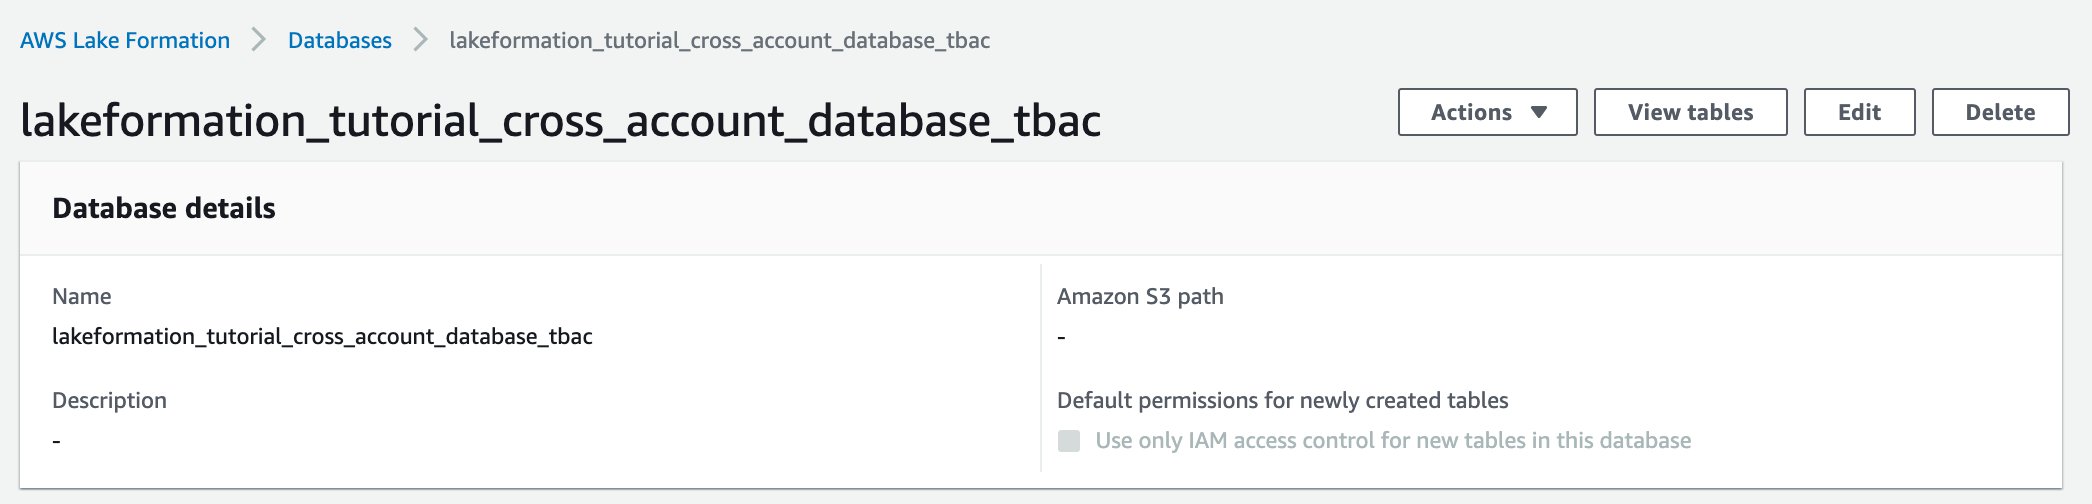
  1. On the Lake Formation console, under Data catalog in the navigation pane, choose Databases.
  2. Choose the database you created with the CloudFormation template.
  3. Choose Edit.
  4. Deselect Use only IAM access control for new tables in the database.
  5. Choose Save.

This action is important because it removes the IAM control model from this database and allows only Lake Formation to take security grant/revoke access to it. This step makes sure other steps in this solution are successful.

  1. Choose Databases in the navigation pane.
  2. Select the same database.
  3. On the Actions menu, choose View permissions.

You can review the permissions enabled for this database.

  1. Select the IAMAllowedPrincipals group and choose Revoke to remove default permission settings for this individual database.

The IAMAllowedPrincipal row no longer appears in the list on the Permissions page.

Similarly, we need to remove the IAMAllowedPrincipal group at the table level. The CloudFormation template created six tables for this database. Let’s see how to use data lake permissions to remove access at the table level.

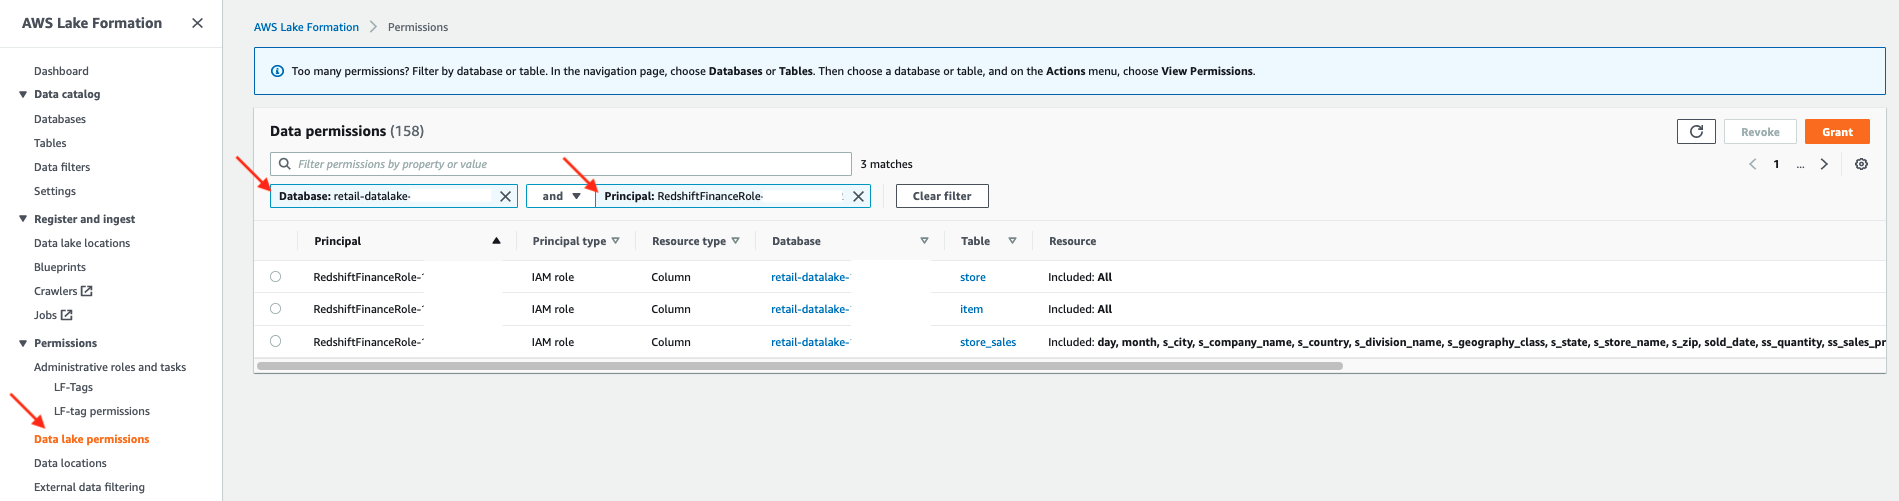
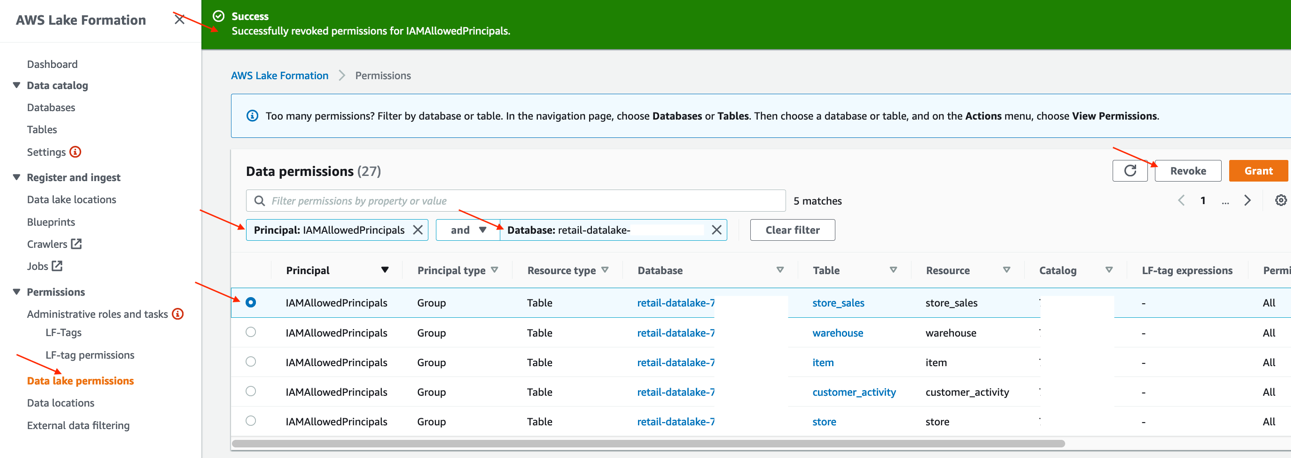
  1. On the Lake Formation console, choose Data lake permissions in the navigation pane.
  2. Filter by Principal:IAMAllowedPrincipals and Database:<<database name>>.

You can review all the tables we need to update permissions for.

  1. Select each table one by one and choose Revoke.

With these steps, we’ve made sure that the default settings at the Lake Formation account level are still in place, and only manually updated for the database and tables we’re going to work with in this post. When you’re ready to move completely to a Lake Formation permission model, you can update the settings at the account level instead of individually updating them. For more details, see Change the default permission model.

Validate the provisioned resources

The CloudFormation template provisions many resources automatically to create your environment. In this section, we check some of the key resources to understand them better.

Lake Formation resources

On the Lake Formation console, check that a new data lake location is registered with an IAM role on the Data lake locations page.

This is the IAM role any integrated service like Amazon Redshift assumes to access data on the registered Amazon S3 location. This integration happens out of the box when the right roles and policies are applied. For more details, see Requirements for Roles Used to Register Locations.

Check the Administrative roles and tasks page confirm that the logged-in user is added as the data lake administrator and IAMAllowedPrincipals is added as database creator.

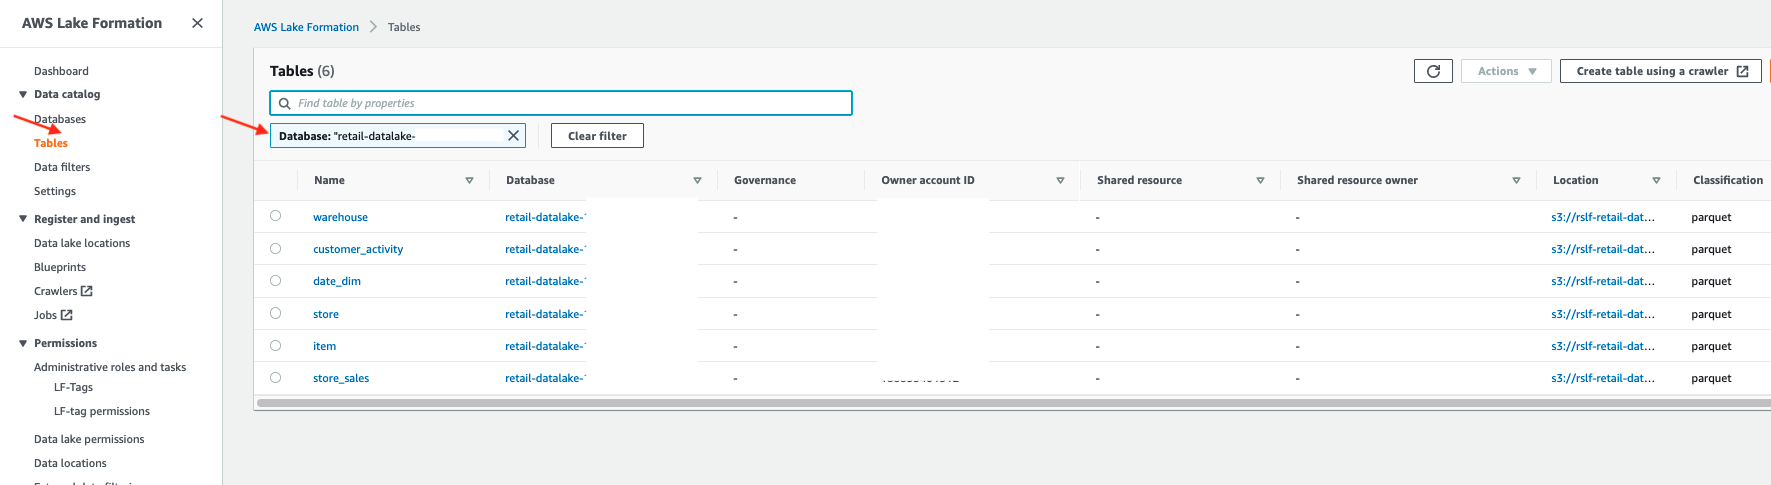
Then check the tables that the AWS Glue crawlers created in the Data Catalog database. These tables are logical entities, because the data is in an Amazon S3 location. After you create these objects, you can access them via different services.

Lastly, check permissions set by the template using the Lake Formation permission model on the tables to be accessed by finance and marketing users from Amazon Redshift.

The following screenshot shows that the finance role has access to all columns for the store and item tables, but only the listed columns for the store_sales table.

Similarly, you can review access for the marketing role, which has access to all columns in the customer_activity and store_sales tables.

Amazon S3 resources

The CloudFormation template creates two S3 buckets:

  • data-lake – Contains the data used for this post
  • script – Contains the SQL which we use to create Amazon Redshift database objects

Open the script bucket to see the scripts. You can download and open them to view the SQL code used.

The setup_lakeformation_demo.sql script gives you the SQL code to create the external database schema and assign different roles for data governance purposes. The external schema is for AWS Glue Data Catalog-based objects that point to data in the data lake. We then grant access to different database groups and users to manage security for finance and marketing users.

The scripts run in the following order:

  1. sp_create_db_group.sql
  2. sp_create_db_user.sql
  3. setup_lakeformation_demo.sql

Amazon Redshift resources

On the Amazon Redshift console, choose Clusters in the navigation pane and choose the cluster you created with the CloudFormation template. Then choose the Properties tab.

The Cluster permissions section lists three attached roles. The template used the admin role to provision Amazon Redshift database-level objects. The finance role is attached to the finance schema in Amazon Redshift, and the marketing role is attached to the marketing schema.

Each of these roles are given permissions in such a way that they can use the Amazon Redshift query editor to query Data Catalog tables using Redshift Spectrum. For more details, see Using Redshift Spectrum with AWS Lake Formation and Query the Data in the Data Lake Using Amazon Redshift Spectrum.

Query the data

We use Amazon Redshift query editor v2 to query the external schema and Data Catalog tables (external tables). The external schema is already created as part of the CloudFormation template. When the external schema is created using the Data Catalog, the tables in the database are automatically created and are available through Amazon Redshift as external tables.

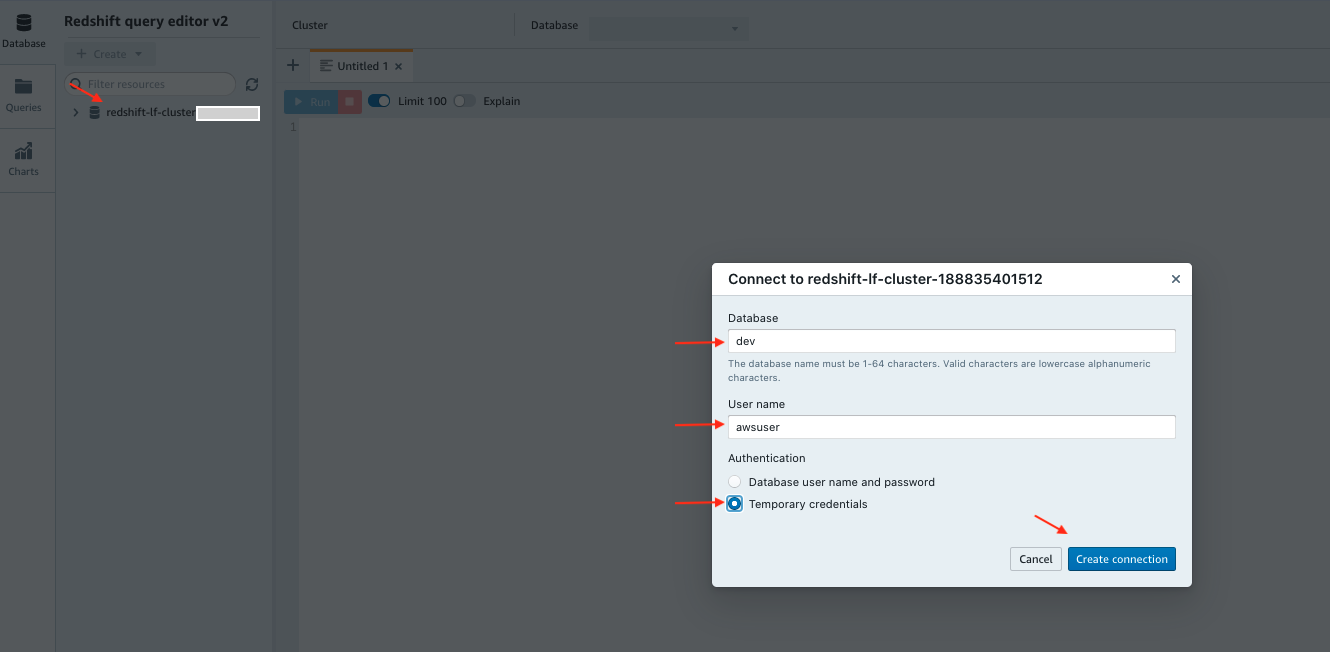
  1. On the Amazon Redshift console, choose Query editor v2.
  2. Choose Configure account.
  3. Choose the database cluster.
  4. For Database, enter dev.
  5. For User name, enter awsuser.
  6. For Authentication, select Temporary credentials.
  7. Choose Create connection.

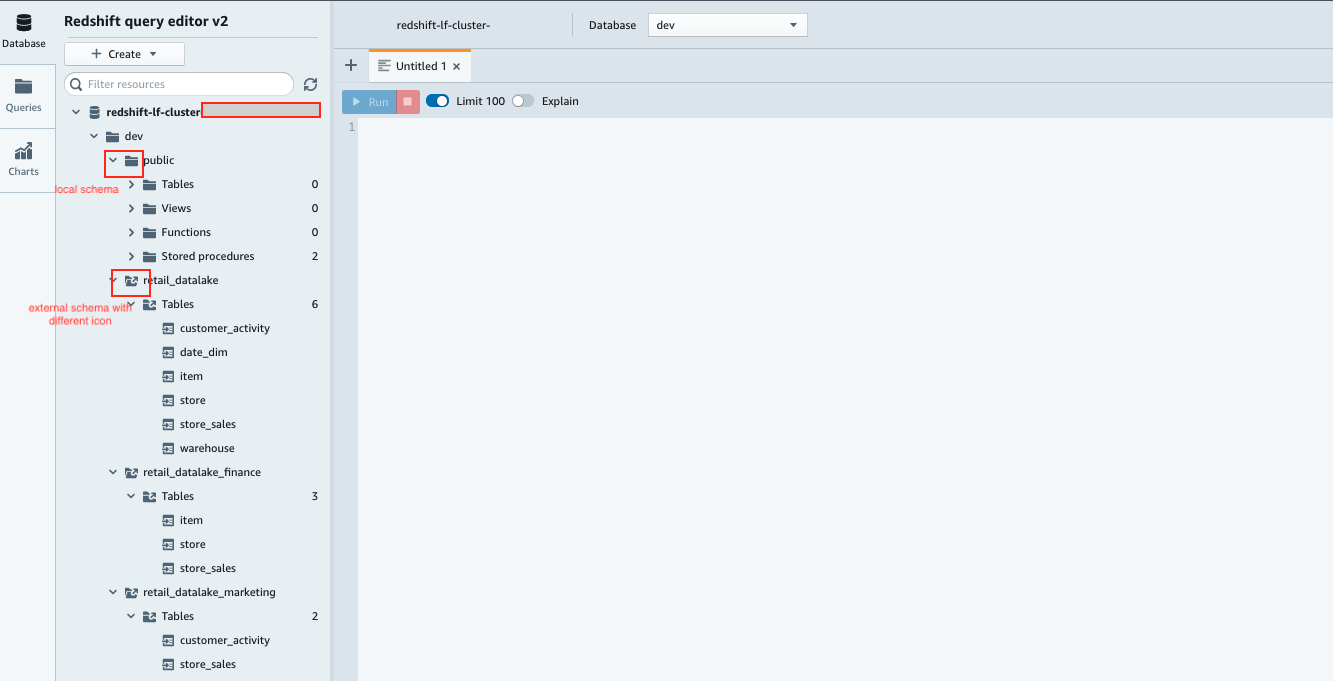
When you’re connected and logged in as administrator user, you can see both local and external schemas and tables, as shown in the following screenshot.

Validate role-based Lake formation permissions in Amazon Redshift

Next, we validate how the Lake Formation security settings work for the marketing and finance users.

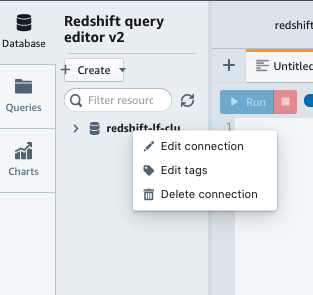
  1. In the query editor, choose (right-click) the database connection.
  2. Choose Edit connection.
  3. For User name, enter marketing_ro.
  4. Choose Edit connection.
  5. After connected as maketing_ro, choose the dev database under the cluster and navigate to the customer_activity table.
  6. Choose the refresh icon.
  7. Repeat these steps to edit the connection and update the user to finance_ro.
  8. Try again to refresh the dev database.

As expected, this user only has access to the allowed schema and tables.

With this solution, you can segregate different users at the schema level and use Lake Formation to make sure they can only see the tables and columns their role allows.

Column-level security with Lake Formation permissions

Lake Formation also allows you to set which columns a principal can or can’t see within a table. For example, when you select store_sales as the marketing_ro user, you see many columns, like customer_purchase_estimate. However, as the finance_ro user, you don’t see these columns.

Manual access control via the Lake Formation console

In this post, we’ve been working with a CloudFormation template-based environment, which is an automated way to create environment templates and simplify operations.

In this section, we show how you can set up all the configurations through the console, and we use another table as an example to walk you through the steps.

As demonstrated in previous steps, the marketing user in this environment has all column access to the tables customer_activity and store_sales in the external schema retail_datalake_marketing. We change some of that manually to see how it works using the console.

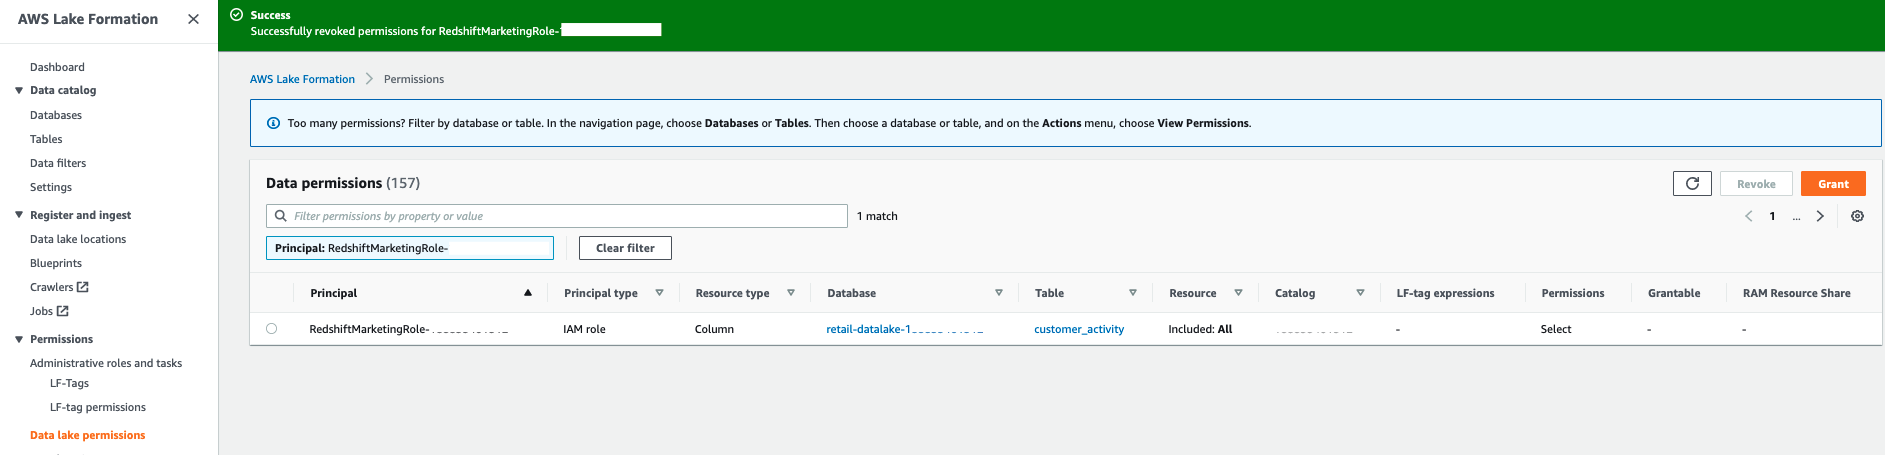
  1. On the Lake Formation console, choose Data lake permissions.
  2. Filter by the principal RedshiftMarketingRole.
  3. Select the principal for the store_sales table and choose Revoke.
  4. Confirm by choosing Revoke again.

A success message appears, and the permission row is no longer listed.

  1. Choose Grant to configure a new permission level for the marketing user on the store_sales table at the column level.
  2. Select IAM users and roles and choose your role.
  3. In the LF-Tags or catalog resources section, select Named data catalog resources.
  4. For Databases, choose your database.
  5. For Tables, choose the store_sales table.
  6. For Table permissions¸ check Select.
  7. In the Data permissions section, select Simple column-based access.
  8. Select Exclude columns.
  9. Choose the columns as shown in the following screenshot.
  10. Choose Grant.

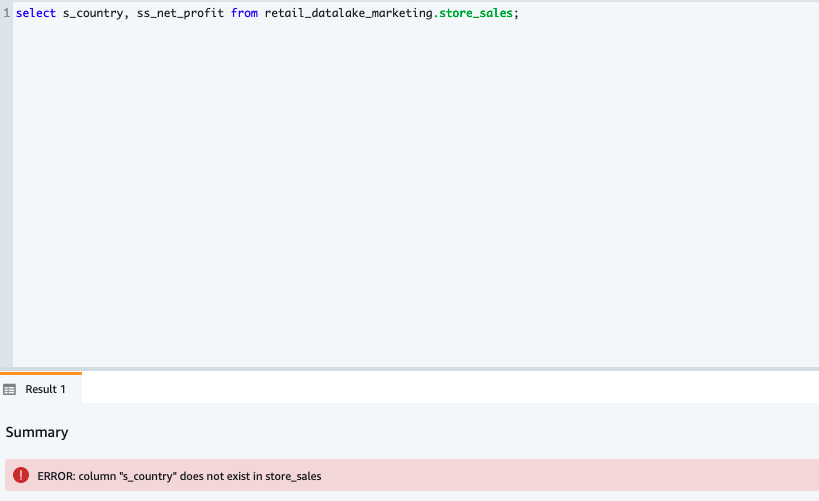
We now query the table from Amazon Redshift again to confirm that the effective changes match the controls placed by Lake Formation. In the following query, we select a column that isn’t authorized:

/* Selecting columns not authorized will result in error. */
select s_country, ss_net_profit from retail_datalake_marketing.store_sales;

As expected, we get an error.

Clean up

Clean up resources created by the CloudFormation template to avoid unnecessary cost to your AWS account. You can delete the CloudFormation stack by selecting the stack on the AWS CloudFormation console and choosing Delete. This action deletes all the resources it provisioned. If you manually updated a template-provisioned resource, you may see some issues during clean-up, and you need to clean these up manually.

Summary

In this post, we showed how you can integrate Lake Formation with Amazon Redshift to seamlessly control access to Amazon S3 data lake. We also demonstrated how to query your data lake using Redshift Spectrum and external tables. This is a powerful mechanism that helps you build a modern data architecture to easily query data on your data lake and data warehouses together. We also saw how you can use CloudFormation templates to automate the resource creation with infrastructure as code. You can use this to simplify your operations, especially when you want replicate the resource setup from development to production landscape during your project cycles.

Finally, we covered how data lake administrators can manually control search on data catalog objects and grant or revoke access at the database, table, and column level. We encourage you to try the steps we outlined in this post and use the CloudFormation template to set up security in Lake Formation to control data lake access from Redshift Spectrum.

In the second post of this series, we focus on how you can take this concept and apply it across accounts using a Lake Formation data-sharing feature in a hub-and-spoke topography.


About the Authors

Vaibhav Agrawal is an Analytics Specialist Solutions Architect at AWS. Throughout his career, he has focused on helping customers design and build well-architected analytics and decision support platforms.

Jason Pedreza is an Analytics Specialist Solutions Architect at AWS with over 13 years of data warehousing experience. Prior to AWS, he built data warehouse solutions at Amazon.com. He specializes in Amazon Redshift and helps customers build scalable analytic solutions.

Rajesh Francis is a Senior Analytics Customer Experience Specialist at AWS. He specializes in Amazon Redshift and focuses on helping to drive AWS market and technical strategy for data warehousing and analytics services. Rajesh works closely with large strategic customers to help them adopt our new services and features, develop long-term partnerships, and feed customer requirements back to our product development teams to guide our product roadmap.

Securely share your data across AWS accounts using AWS Lake Formation

Post Syndicated from Yumiko Kanasugi original https://aws.amazon.com/blogs/big-data/securely-share-your-data-across-aws-accounts-using-aws-lake-formation/

Data lakes have become very popular with organizations that want a centralized repository that allows you to store all your structured data and unstructured data at any scale. Because data is stored as is, there is no need to convert it to a predefined schema in advance. When you have new business use cases, you can easily build new types of analyses on top of the data lake, at any time.

In real-world use cases, it’s common to have requirements to share data stored within the data lake with multiple companies, organizations, or business units. For example, you may want to provide your data to stakeholders in another company for a co-marketing campaign between the two companies. For any of these use cases, the producer party wants to share data in a secure and effective manner, without having to copy the entire database.

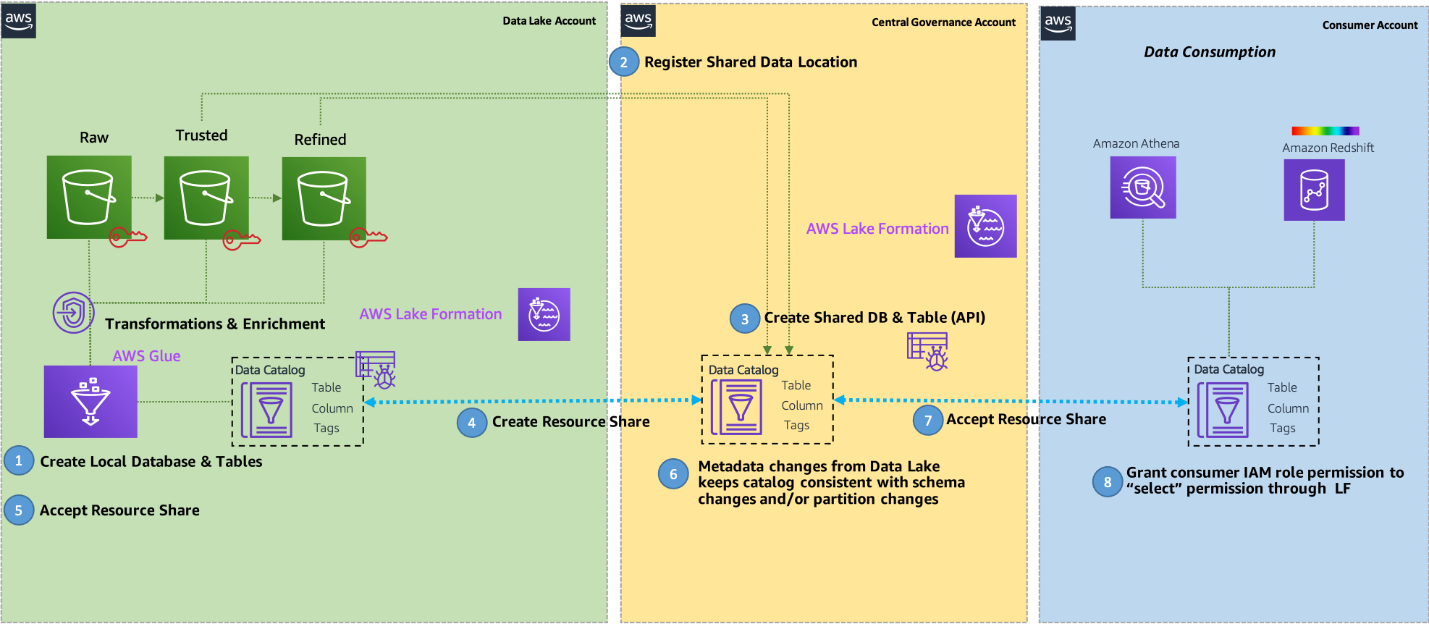
In August 2019, we announced the general availability of AWS Lake Formation, a fully managed service that makes it easy to set up a secure data lake in days. AWS Lake Formation permission management capabilities simplify securing and managing distributed data lakes across multiple AWS accounts through a centralized approach, providing fine-grained access control to the AWS Glue Data Catalog and Amazon Simple Storage Service (Amazon S3) locations.

There are two options to share your databases and tables with another account by using Lake Formation cross-account access control:

  • Lake Formation tag-based access control (recommended)
  • Lake Formation named resources

In this post, I explain the differences between these two options, and walk you through the steps to configure cross-account sharing.

Overview of tag-based access control

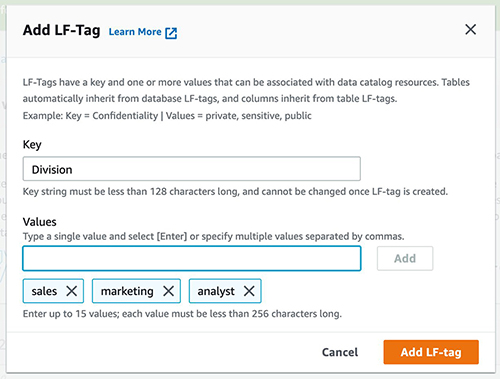
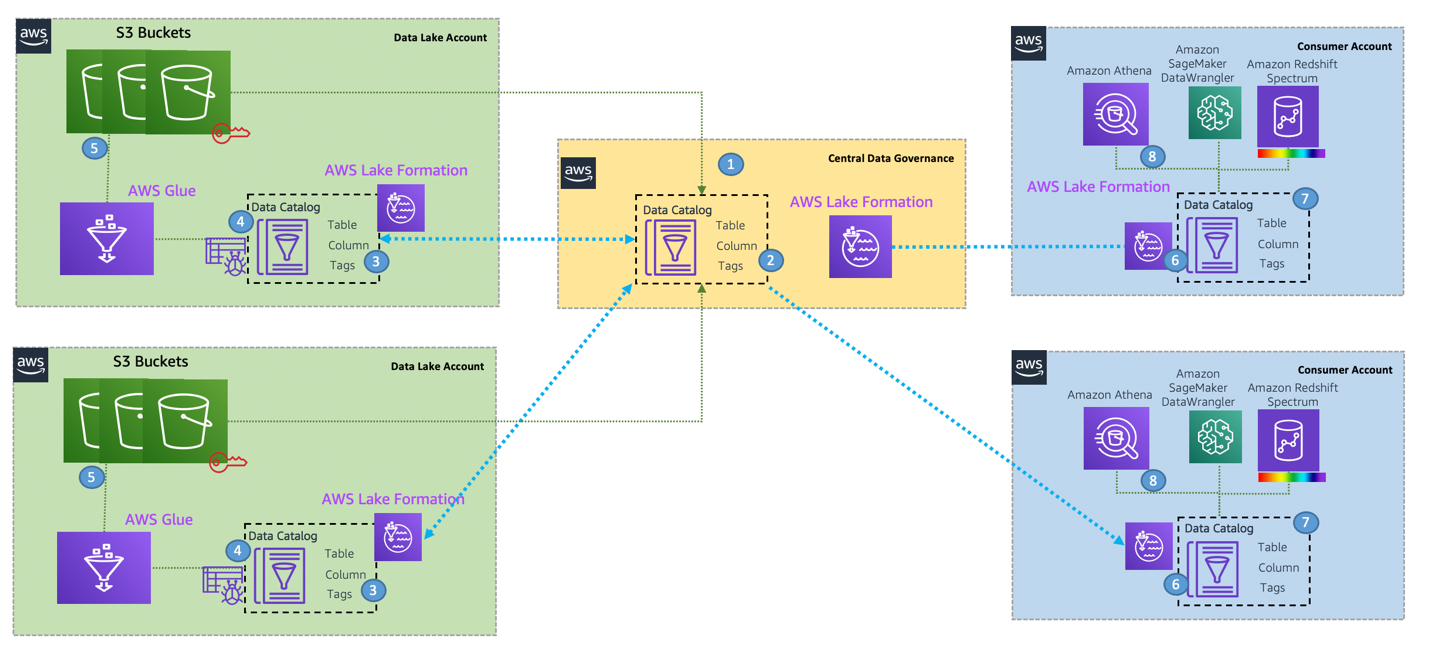
Lake Formation tag-based access control is an authorization strategy that defines permissions based on attributes. In Lake Formation, these attributes are called LF-tags. You can attach LF-tags to Data Catalog resources and Lake Formation principals. Data lake administrators can assign and revoke permissions on Lake Formation resources using these LF-tags. For more details about tag-based access control, refer to Easily manage your data lake at scale using AWS Lake Formation Tag-based access control.

The following diagram illustrates the architecture of this method.

We recommend tag-based access control for the following use cases:

  • You have a large number of tables and principals that the data lake administrator has to grant access to
  • You want to classify your data based on an ontology and grant permissions based on classification
  • The data lake administrator wants to assign permissions dynamically, in a loosely coupled way

You can also use tag-based access control to share Data Catalog resources (databases, tables, and columns) with external AWS accounts.

Overview of named resources

The Lake Formation named resource method is an authorization strategy that defines permissions for resources. Resources include databases, tables, and columns. Data lake administrators can assign and revoke permissions on Lake Formation resources. See Cross-Account Access: How It Works for details.

The following diagram illustrates the architecture for this method.

We recommend using named resources if the data lake administrator prefers granting permissions explicitly to individual resources.

When you use the named resource method to grant Lake Formation permissions on a Data Catalog resource to an external account, Lake Formation uses AWS Resource Access Manager (AWS RAM) to share the resource.

Now, let’s take a closer look at how to configure cross-account access with these two options. We refer to the account that has the source table as the producer account, and refer to the account that needs access to the source table as consumer account.

Configure Lake Formation Data Catalog settings in the producer account

Lake Formation provides its own permission management model. To maintain backward compatibility with the AWS Identity and Access Management (IAM) permission model, the Super permission is granted to the group IAMAllowedPrincipals on all existing AWS Glue Data Catalog resources by default. Also, Use only IAM access control settings are enabled for new data catalog resources.

In this post, we do fine grained access control using Lake Formation permissions and use IAM policies for coarse grained access control. See Methods for Fine-Grained Access Control for details. Therefore, before you use an AWS CloudFormation template for a quick setup, you need to change Lake Formation Data Catalog settings in the producer account.

This setting affects all newly created databases and tables, so we strongly recommend completing this tutorial in a non-production or new account. Also, if you’re using a shared account (such as your company’s dev account), make sure it doesn’t affect others resources. If you prefer to keep the default security settings, you must complete an extra step when sharing resources to other accounts, in which you revoke the default Super permission from IAMAllowedPrincipals on the database or table. We discuss the details later in this post.

To configure Lake Formation Data Catalog settings in the producer account, complete the following steps:

  1. Sign in to the producer account as an admin user, or a user with Lake Formation PutDataLakeSettings API permission.
  2. On the Lake Formation console, in the navigation pane, under Data catalog, choose Settings.
  3. Deselect Use only IAM access control for new databases and Use only IAM access control for new tables in new databases
  4. Choose Save.

Additionally, you can remove CREATE_DATABASE permissions for IAMAllowedPrincipals under Administrative roles and tasks > Database creators. Only then, who can create a new database is governed through Lake Formation permissions.

Set up resources with AWS CloudFormation

We provide two CloudFormation templates in this post: one for the producer account, and one for the consumer account.

The CloudFormation template for the producer account generates the following resources:

  • An S3 bucket to serve as our data lake.
  • A Lambda function (for Lambda-backed AWS CloudFormation custom resources). We use the function to copy sample data files from the public S3 bucket to your S3 bucket.
  • IAM users and policies:
    • DataLakeAdminProducer
  • An AWS Glue Data Catalog database, table, and partition. Because we introduce two options for sharing resources across AWS accounts, this template creates two separate sets of database and table.
  • Lake Formation data lake settings and permissions. This includes:

The CloudFormation template for the consumer account generates the following resources:

  • IAM users and policies:
    • DataLakeAdminConsumer
    • DataAnalyst
  • An AWS Glue Data Catalog database. We use this database for creating resource links to shared resources.

Launch the CloudFormation stack in the producer account

To launch the CloudFormation stack in the producer account, complete the following steps:

  1. Sign in to the producer account’s AWS CloudFormation console in the target Region.
  2. Choose Launch Stack:
  3. Choose Next.
  4. For Stack name, enter a stack name, such as stack-producer.
  5. For ProducerDatalakeAdminUserName and ProducerDatalakeAdminUserPassword, enter the user name and password you want for the data lake admin IAM user.
  6. For DataLakeBucketName, enter the name of your data lake bucket. This name needs to be globally unique.
  7. For DatabaseName and TableName, leave the default values.
  8. Choose Next.
  9. On the next page, choose Next.
  10. Review the details on the final page and select I acknowledge that AWS CloudFormation might create IAM resources.
  11. Choose Create stack.

Launch the CloudFormation stack in the consumer account

To launch the CloudFormation stack in the consumer account, complete the following steps:

  1. Sign in to the consumer account’s AWS CloudFormation console in the target Region.
  2. Choose Launch Stack:
  3. Choose Next.
  4. For Stack name, enter a stack name, such as stack-consumer.
  5. For ConsumerDatalakeAdminUserName and ConsumerDatalakeAdminUserPassword, enter the user name and password you want for the data lake admin IAM user.
  6. For DataAnalystUserName and DataAnalystUserPassword, enter the user name and password you want for the data analyst IAM user.
  7. For DatabaseName, leave the default values.
  8. For AthenaQueryResultS3BucketName, enter the name of the S3 bucket that stores Amazon Athena query results. If you don’t have one, create an S3 bucket.
  9. Choose Next.
  10. On the next page, choose Next.
  11. Review the details on the final page and select I acknowledge that AWS CloudFormation might create IAM resources.
  12. Choose Create stack.

Stack creation can take about 1 minute.

(Optional) AWS KMS server-side encryption

If the source S3 bucket is encrypted using server-side encryption with an AWS Key Management Service (AWS KMS) customer master key (CMK), make sure the IAM role that Lake Formation uses to access S3 data is registered as the key user for the KMS CMK. By default, the IAM role AWSServiceRoleForLakeFormationDataAccess is used, but you can choose other IAM roles when registering an S3 data lake location. To register the Lake Formation role as the KMS key user, you can use the AWS KMS console, or directly add the permission to the key policy using the KMS PutKeyPolicy API and the AWS Command Line Interface (AWS CLI).

You don’t have to add individual consumer accounts to the key policy. Only the role that Lake Formation uses is required. Also, this step isn’t necessary if the source S3 bucket is encrypted with server-side encryption with Amazon S3, or an AWS managed key.

To add a Lake Formation role as the KMS key user via the console, complete the following steps:

  1. Sign in to the AWS KMS console as the key administrator.
  2. In the navigation pane, under Customer managed keys, choose the key that is used to encrypt the source S3 bucket.
  3. Under Key users, choose Add.
  4. Select AWSServiceRoleForLakeFormationDataAccess and choose Add.

To use the AWS CLI, enter the following command (replace <key-id>, <name-of-key-policy>, and <key-policy> with valid values):

aws kms put-key-policy --key-id <key-id> --policy-name <name-of-key-policy> --policy <key-policy>

For more information, see put-key-policy.

Lake Formation cross-account sharing prerequisites

Before sharing resources with Lake Formation, there are prerequisites for both the tag-based access control method and named resource method.

Tag-based access control cross-account sharing prerequisites

As described in Lake Formation Tag-Based Access Control Cross-Account Prerequisites, before you can use the tag-based access control method to grant cross-account access to resources, you must add the following JSON permissions object to the AWS Glue Data Catalog resource policy in the producer account. This gives the consumer account permission to access the Data Catalog when glue:EvaluatedByLakeFormationTags is true. Also, this condition becomes true for resources on which you granted permission using Lake Formation permission Tags to the consumer’s account. This policy is required for every AWS account that you’re granting permissions to.

The following policy must be within a Statement element. We discuss the full IAM policy later in this post.

{
    "Effect": "Allow",
    "Action": [
        "glue:*"
    ],
    "Principal": {
        "AWS": [
            "<consumer-account-id>"
        ]
    },
    "Resource": [
        "arn:aws:glue:<region>:<account-id>:table/*",
        "arn:aws:glue:<region>:<account-id>:database/*",
        "arn:aws:glue:<region>:<account-id>:catalog"
    ],
    "Condition": {
        "Bool": {
            "glue:EvaluatedByLakeFormationTags": true
        }
    }
}

Named resource method cross-account sharing prerequisites

As described in Managing Cross-Account Permissions Using Both AWS Glue and Lake Formation, if there is no Data Catalog resource policy in your account, the Lake Formation cross-account grants that you make proceed as usual. However, if a Data Catalog resource policy exists, you must add the following statement to it to permit your cross-account grants to succeed if they’re made with the named resource method. If you plan to use only the named resource method, or only the tag-based access control method, you can skip this step. In this post, we evaluate both methods, so we need to add the following policy.

The following policy must be within a Statement element. We discuss the full IAM policy in the next section.

{
    "Effect": "Allow",
    "Action": [
        "glue:ShareResource"
    ],
    "Principal": {
        "Service": [
            "ram.amazonaws.com"
        ]
    },
    "Resource": [
        "arn:aws:glue:<region>:<account-id>:table/*/*",
        "arn:aws:glue:<region>:<account-id>:database/*",
        "arn:aws:glue:<region>:<account-id>:catalog"
    ]
}

Add the AWS Glue Data Catalog resource policy using the AWS CLI

If we grant cross-account permissions by using both the tag-based access control method and named resource method, we must set the EnableHybrid argument to ‘true’ when adding the preceding policies. Because this option isn’t currently supported on the console, we must use the glue:PutResourcePolicy API and AWS CLI.

First, create a policy document (such as policy.json) and add the preceding two policies. Replace <consumer-account-id> with the account ID of the AWS account receiving the grant, <region> with the Region of the Data Catalog containing the databases and tables that you are granting permissions on, and <account-id> with the producer AWS account ID.

{
    "Version": "2012-10-17",
    "Statement": [
        {
            "Effect": "Allow",
            "Principal": {
                "Service": "ram.amazonaws.com"
            },
            "Action": "glue:ShareResource",
            "Resource": [
                "arn:aws:glue:<region>:<account-id>:table/*/*",
                "arn:aws:glue:<region>:<account-id>:database/*",
                "arn:aws:glue:<region>:<account-id>:catalog"
            ]
        },
        {
            "Effect": "Allow",
            "Principal": {
                "AWS": "<consumer-account-id>"
            },
            "Action": "glue:*",
            "Resource": [
                "arn:aws:glue:<region>:<account-id>:table/*/*",
                "arn:aws:glue:<region>:<account-id>:database/*",
                "arn:aws:glue:<region>:<account-id>:catalog"
            ],
            "Condition": {
                "Bool": {
                    "glue:EvaluatedByLakeFormationTags": "true"
                }
            }
        }
    ]
}

Enter the following AWS CLI command. Replace <glue-resource-policy> with the correct values (such as file://policy.json).

aws glue put-resource-policy --policy-in-json <glue-resource-policy> --enable-hybrid TRUE

For more information, see put-resource-policy.

Implement the Lake Formation tag-based access control method

In this section, we walk through the following high-level steps:

  1. Define an LF-tag.
  2. Assign the LF-tag to the target resource.
  3. Grant LF-tag permissions to the consumer account.
  4. Grant data permissions to the consumer account.
  5. Optionally, revoke permissions for IAMAllowedPrincipals on the database, tables, and columns.
  6. Create a resource link to the shared table.
  7. Create an LF-tag and assign it to the target database.
  8. Grant LF-tag data permissions to the consumer account.

Define an LF-tag

If you’re signed in to your producer account, sign out before completing the following steps.

  1. Sign in as the producer account data lake administrator. Use the producer account ID, IAM user name (the default is DatalakeAdminProducer), and password that you specified during CloudFormation stack creation.
  2. On the Lake Formation console, in the navigation pane, under Permissions, and under Administrative roles and tasks, choose LF-tags.
  3. Choose Add LF-tag.
  4. Specify the key and values. In this post, we create an LF-tag where the key is Confidentiality and the values are private, sensitive, and public.
  5. Choose Add LF-tag.

Assign the LF-tag to the target resource

As a data lake administrator, you can attach tags to resources. If you plan to use a separate role, you may have to grant describe and attach permissions to the separate role.

  1. In the navigation pane, under Data catalog, select Databases.
  2. Select the target database (lakeformation_tutorial_cross_account_database_tbac) and on the Actions menu, choose Edit LF-tags.

For this post, we assign an LF-tag to a database, but you can also assign LF-tags to tables and columns.

  1. Choose Assign new LF-Tag.
  2. Add the key Confidentiality and value public.
  3. Choose Save.

Grant LF-tag permission to the consumer account

Still in the producer account, we grant permissions to the consumer account to access the LF-tag.

  1. In the navigation pane, under Permissions, Administrative roles and tasks, LF-tag permissions, choose Grant.
  2. For Principals, choose External accounts.
  3. Enter the target AWS account ID.

AWS accounts within the same organization appear automatically. Otherwise, you have to manually enter the AWS account ID. As of this writing, Lake Formation tag-based access control doesn’t support granting permission to organizations or organization units.

  1. For LF-Tags, choose the key and values of the LF-tag that is being shared with the consumer account (key Confidentiality and value public).
  2. For Permissions, select Describe for LF-tag permissions.

LF-tag permissions are permissions given to the consumer account. Grantable permissions are permissions that the consumer account can grant to other principals.

  1. Choose Grant.

At this point, the consumer data lake administrator should be able to find the policy tag being shared via the consumer account Lake Formation console, under Permissions, Administrative roles and tasks, LF-tags.

Grant data permission to the consumer account

We will now provide data access to the consumer account by specifying an LF-Tag expression and granting the consumer account access to any table or database that matches the expression.

  1. In the navigation pane, under Permissions, Data lake permissions, choose Grant.
  2. For Principals, choose External accounts, and enter the consumer AWS account ID.
  3. For LF-tags or catalog resources, under Resources matched by LF-Tags (recommended), choose Add LF-Tag.
  4. Select the key and values of the tag that is being shared with the consumer account (key Confidentiality and value public).
  5. For Database permissions, select Describe under Database permissions to grant access permissions at the database level.
  6. Select Describe under Grantable permissions so the consumer account can grant database-level permissions to its users.
  7. For Table and column permissions, select Select and Describe under Table permissions.
  8. Select Select and Describe under Grantable permissions.
  9. Choose Grant.

Revoke permission for IAMAllowedPrincipals on the database, tables, and columns (Optional)

At the very beginning of this tutorial, we changed the Lake Formation Data Catalog settings. If you skipped that part, this step is required. If you changed your Lake Formation Data Catalog settings, you can skip this step.

In this step, we have to revoke the default Super permission from IAMAllowedPrincipals on the database or table. See Secure Existing Data Catalog Resources for details.

Before revoking permission for IAMAllowedPrincipals, make sure that you granted existing IAM principals with necessary permission through Lake Formation. This includes two steps:

  1. Add IAM permission to the target IAM user or role with the Lake Formation GetDataAccess action (with IAM policy).
  2. Grant the target IAM user or role with Lake Formation data permissions (alter, select, and so on)

Then, revoke permissions for IAMAllowedPrincipals. Otherwise, after revoking permissions for IAMAllowedPrincipals, existing IAM principals may no longer be able to access the target database or catalog.

Revoking Super permission for IAMAllowedPrincipals is required when you want to apply the Lake Formation permission model (instead of the IAM policy model) to manage user access within a single account or among multiple accounts using the Lake Formation permission model. You don’t have to revoke permission of IAMAllowedPrincipals for other tables where you want to keep the traditional IAM policy model.

At this point, the consumer account data lake administrator should be able to find the database and table being shared via the consumer account Lake Formation console, under Data catalog, Databases. If not, confirm if the following are properly configured:

  • Make sure the correct policy tag and values are assigned to the target databases and tables
  • Make sure the correct tag permission and data permission are assigned to the consumer account
  • Revoke the default super permission from IAMAllowedPrincipals on the database or table

Create a resource link to the shared table

When a resource is shared between accounts, the shared resources are not put in the consumer accounts’ catalog. To make them available, and query the underlying data of a shared table using services like Athena, we need to create a resource link to the shared table. A resource link is a Data Catalog object that is a link to a local or shared database or table. By creating a resource link, you can:

  • Assign a different name to a database or table that aligns with your Data Catalog resource naming policies
  • Use services such as Athena and Amazon Redshift Spectrum to query shared databases or tables

To create a resource link, complete the following steps:

  1. If you’re signed in to your consumer account, sign out.
  2. Sign in as the consumer account data lake administrator. Use the consumer account ID, IAM user name (default DatalakeAdminConsumer) and password that you specified during CloudFormation stack creation.
  3. On the Lake Formation console, in the navigation pane, under Data catalog, Databases, choose the shared database lakeformation_tutorial_cross_account_database_tbac.

If you don’t see the database, revisit the previous steps to see if everything is properly configured.

  1. Choose View tables.
  2. Choose the shared table amazon_reviews_table_tbac.
  3. On the Actions menu, choose Create resource link.
  4. For Resource link name, enter a name (for this post, amazon_reviews_table_tbac_resource_link).
  5. Under Database, select the database that the resource link is created in (for this post, the CloudFormation stack created the database lakeformation_tutorial_cross_account_database_consumer).
  6. Choose Create.

The resource link appears under Data catalog, Tables.

Create an LF-tag and assign it to the target database

Lake Formation tags reside in the same catalog as the resources. This means that tags created in the producer account aren’t available to use when granting access to the resource links in the consumer account. You need to create a separate set of LF-tags in the consumer account to use LF tag-based access control when sharing the resource links in the consumer account. Let’s first create the LF-tag. Refer to the previous sections for full instructions.

  1. Define the LF-tag in the consumer account. For this post, we use key Division and values sales, marketing, and analyst.
  2. Assign the LF-tag key Division and value analyst to the database lakeformation_tutorial_cross_account_database_consumer, where the resource link is created in.

Grant LF-tag data permission to the consumer

As a final step, we grant LF-tag data permission to the consumer.

  1. In the navigation pane, under Permissions, Data lake permissions, choose Grant.
  2. For Principals, choose IAM users and roles, and choose the user DataAnalyst.
  3. For LF-tags or catalog resources, choose Resources matched by LF-tags (recommended).
  4. Choose key Division and value analyst.
  5. For Database permissions, select Describe under Database permissions.
  6. For Table and column permissions, select Select and Describe under Table permissions.
  7. Choose Grant.
  8. Repeat these steps for user DataAnalyst, where the LF-tag key is Confidentiality and value is public.

At this point, the data analyst user in the consumer account should be able to find the database and resource link, and query the shared table via the Athena console.

If not, confirm if the following are properly configured:

  • Make sure the resource link is created for the shared table
  • Make sure you granted the user access to the LF-tag shared by the producer account
  • Make sure you granted the user access to the LF-tag associated to the resource link and database that the resource link is created in
  • Check if you assigned the correct LF-tag to the resource link, and to the database that the resource link is created in

Implement the Lake Formation named resource method

To use the named resource method, we walk through the following high-level steps:

  1. Optionally, revoke permission for IAMAllowedPrincipals on the database, tables, and columns.
  2. Grant data permission to the consumer account.
  3. Accept a resource share from AWS RAM.
  4. Create a resource link for the shared table.
  5. Grant data permission for the shared table to the consumer.
  6. Grant data permission for the resource link to the consumer.

Revoke permission for IAMAllowedPrincipals on the database, tables, and columns (Optional)

At the very beginning of this tutorial, we changed Lake Formation Data Catalog settings. If you skipped that part, this step is required. For instructions, see the optional step in the previous section.

Grant data permission to the consumer account

If you’re signed in to producer account as another user, sign out first.

  1. Sign in as the producer account data lake administrator using the AWS account ID, IAM user name (default is DatalakeAdminProducer), and password specified during CloudFormation stack creation.
  2. In the navigation pane, under Permissions, Data lake permissions, choose Grant.
  3. For Principals, choose External accounts, and enter one or more AWS account IDs or AWS Organizations IDs.

Organizations that the producer account belongs to and AWS accounts within the same organization appear automatically. Otherwise, manually enter the account ID or organization ID.

  1. For LF-tags or catalog resources, choose Named data catalog resources.
  2. Under Databases, choose the database lakeformation_tutorial_cross_account_database_named_resource.
  3. Under Tables, choose All tables.
  4. For Table and column permissions, select Select and Describe under Table permissions.
  5. Select Select and Describe under Grantable permissions.
  6. Optionally, for Data permissions, select Simple column-based access if column-level permission management is required.
  7. Choose Grant.

If you haven’t revoked permission for IAMAllowedPrincipals, you get a Grant permissions failed error.

At this point, you should see the target table being shared via AWS RAM with the consumer account under Permissions, Data permissions.

Accept a resource share from AWS RAM

This step is required only for account ID-based sharing, not for organization-based sharing.

  1. Sign in as the consumer account data lake administrator using the IAM user name (default is DatalakeAdminConsumer) and password specified during CloudFormation stack creation.
  2. On the AWS RAM console, in the navigation pane, under Shared with me, Resource shares, choose the shared Lake Formation resource.

The Status should be Pending.

  1. Confirm the resource details, and choose Accept resource share.

At this point, the consumer account data lake administrator should be able to find the shared resource on the Lake Formation console under Data catalog, Databases.

Create a resource link for the shared table

Follow the instructions detailed earlier to create a resource link for a shared table. Name the resource link amazon_reviews_table_named_resource_resource_link. Create the resource link in the database lakeformation_tutorial_cross_account_database_consumer.

Grant data permission for the shared table to the consumer

To grant data permission for the shared table to the consumer, complete the following steps:

  1. In the navigation pane, under Permissions, Data lake permissions, choose Grant.
  2. For Principals, choose IAM users and roles, and choose the user DataAnalyst.
  3. For LF-tags or catalog resources, choose Named data catalog resources.
  4. Under Databases, choose the database lakeformation_tutorial_cross_account_database_named_resource.

If you don’t see the database on the drop-down list, choose Load more.

  1. Under Tables, choose the table amazon_reviews_table_named_resource.
  2. For Table and column permissions, select Select and Describe under Table permissions.
  3. Choose Grant.

Grant data permission for the resource link to the consumer

In addition to granting the data lake user permission to access the shared table, you also need to grant the data lake user permission to access the resource link.

  1. In the navigation pane, under Permissions, Data lake permissions, choose Grant.
  2. For Principals, choose IAM users and roles, and choose the user DataAnalyst.
  3. For LF-tags or catalog resources, choose Named data catalog resources.
  4. Under Databases, choose the database lakeformation_tutorial_cross_account_database_consumer.
  5. Under Tables, choose the table amazon_reviews_table_named_resource_resource_link.
  6. For Resource link permissions, select Describe under Resource link permissions.
  7. Choose Grant.

At this point, the data analyst user in the consumer account should be able to find the database and resource link, and query the shared table via the Athena console.

If not, confirm if the following are properly configured:

  • Make sure the resource link is created for the shared table
  • Make sure you granted the user access to the table shared by the producer account
  • Make sure you granted the user access to the resource link and database that the resource link is created in

Clean up

To clean up the resources created within this tutorial, delete or change the following resources:

  • Producer account:
    • AWS RAM resource share
    • Lake Formation tags
    • CloudFormation stack
    • Lake Formation settings
    • AWS Glue Data Catalog settings
  • Consumer account:
    • Lake Formation tags
    • CloudFormation stack

Summary

Lake Formation cross-account sharing enables you to share data across AWS accounts without copying the actual data. Also, it provides both the producer and consumer with control over data permissions in a flexible way. In this post, we introduced two different options to reference catalog data from another account by using the cross-account access features provided by Lake Formation:

  • Tag-based access control
  • Named resource

The tag-based access control method is recommended when many resources and entities are involved. Although it seems like this option requires more steps, tag-based access control helps data lake administrators control relationships between each user and table via tags dynamically. The named resource method provides the data lake administrator with a more straightforward way to manage catalog permissions. You can choose the method that best fits your requirement.


About the author

Yumiko Kanasugi is a Solutions Architect with Amazon Web Services Japan, supporting digital native business customers to utilize AWS.
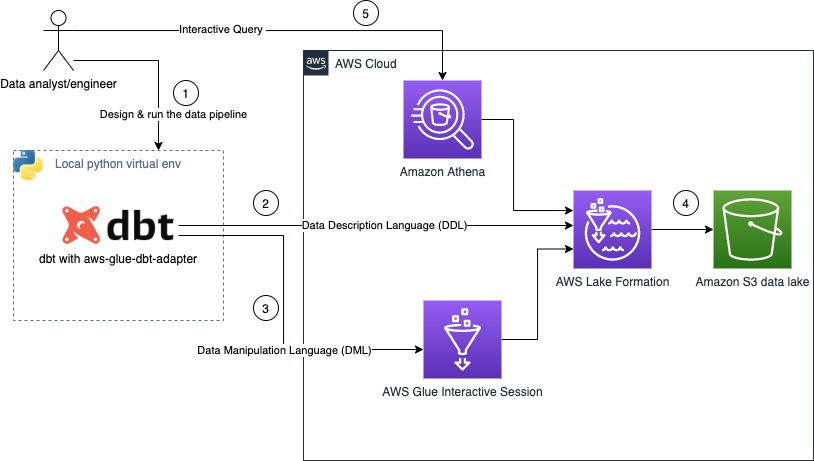

Build a modern data architecture on AWS with Amazon AppFlow, AWS Lake Formation, and Amazon Redshift.

Post Syndicated from Dr. Yannick Misteli original https://aws.amazon.com/blogs/big-data/build-a-modern-data-architecture-on-aws-with-amazon-appflow-aws-lake-formation-and-amazon-redshift/

This is a guest post written by Dr. Yannick Misteli, lead cloud platform and ML engineering in global product strategy (GPS) at Roche.

Recently the Roche Data Insights (RDI) initiative was launched to achieve our vision using new ways of working and collaboration in order to build shared, interoperable data & insights with federated governance. Furthermore, a simplified & integrated data landscape shall be established in order to empower insights communities. One of the first domains to engage in this program is the Go-to-Market (GTM) area which comprises sales, marketing, medical access and market affairs in Roche. GTM domain enables Roche to understand customers and to ultimately create and deliver valuable services that meet their needs. GTM as a domain extends beyond health care professionals (HCPs) to a larger healthcare ecosystem consisting of patients, communities, health authorities, payers, providers, academia, competitors, so on and so forth. Therefore, Data & Analytics are key in supporting the internal and external stakeholders in their decision-making processes through actionable insights.
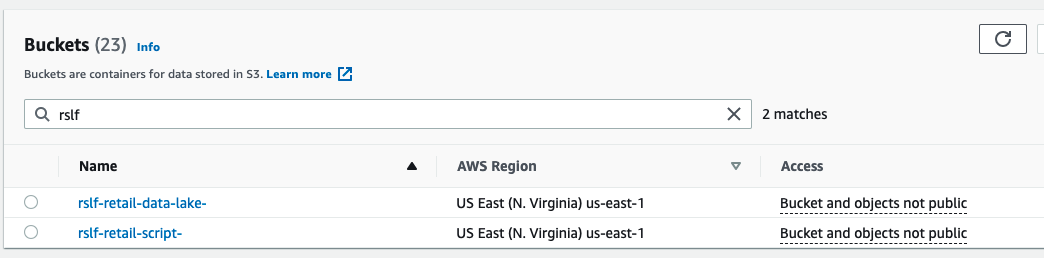
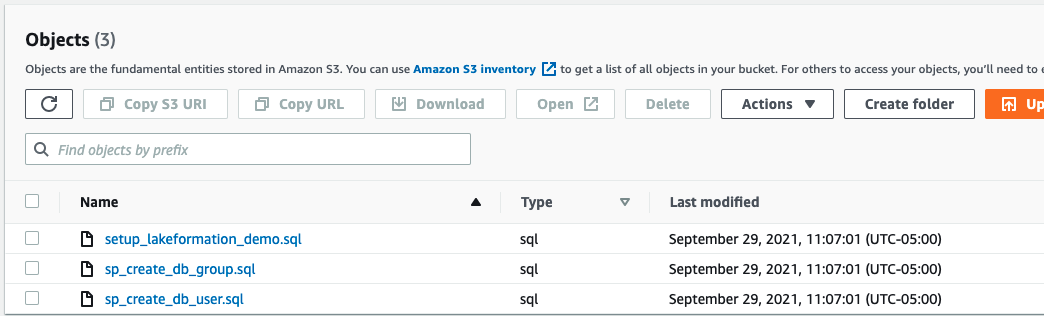
Roche GTM built a modern data and machine learning (ML) platform on AWS while utilizing DevOps best practices. The mantra of everything as code (EaC) was key in building a fully automated, scalable data lake and data warehouse on AWS.

In this this post, you learn about how Roche used AWS products and services such as Amazon AppFlow, AWS Lake Formation, and Amazon Redshift to provision and populate their data lake; how they sourced, transformed, and loaded data into the data warehouse; and how they realized best practices in security and access control.

In the following sections, you dive deep into the scalable, secure, and automated modern data platform that Roche has built. We demonstrate how to automate data ingestion, security standards, and utilize DevOps best practices to ease management of your modern data platform on AWS.

Data platform architecture

The following diagram illustrates the data platform architecture.

The architecture contains the following components:

Lake Formation security

We use Lake Formation to secure all data as it lands in the data lake. Separating each data lake layer into distinct S3 buckets and prefixes enables fine-grained access control policies that Lake Formation implements. This concept also extends to locking down access to specific rows and columns and applying policies to specific IAM roles and users. Governance and access to data lake resources is difficult to manage, but Lake Formation simplifies this process for administrators.

To secure access to the data lake using Lake Formation, the following steps are automated using the AWS CDK with customized constructs:

  1. Register the S3 data buckets and prefixes, and corresponding AWS Glue databases with Lake Formation.
  2. Add data lake administrators (GitLab runner IAM deployment role and administrator IAM role).
  3. Grant the AWS Glue job IAM roles access to the specific AWS Glue databases.
  4. Grant the AWS Lambda IAM role access to the Amazon AppFlow databases.
  5. Grant the listed IAM roles access to the corresponding tables in the AWS Glue databases.

AWS Glue Data Catalog

The AWS Glue Data Catalog is the centralized registration and access point for all databases and tables that are created in both the data lake and in Amazon Redshift. This provides centralized transparency to all resources along with their schemas and the location of all data that is referenced. This is a critical aspect for any data operations performed within the lake house platform.

Data sourcing and ingestion

Data is sourced and loaded into the data lake through the use of AWS Glue jobs and Amazon AppFlow. The ingested data is made available in the Amazon Redshift data warehouse through Amazon Redshift Spectrum using external schemas and tables. The process of creating the external schemas and linking it to the Data Catalog is outlined later in this post.

Amazon AppFlow Salesforce ingestion

Amazon AppFlow is a fully-managed integration service that allows you to pull data from sources such as Salesforce, SAP, and Zendesk. Roche integrates with Salesforce to load Salesforce objects securely into their data lake without needing to write any custom code. Roche also pushes ML results back to Salesforce using Amazon AppFlow to facilitate the process.

Salesforce objects are first fully loaded into Amazon S3 and then are flipped to a daily incremental load to capture deltas. The data lands in the raw zone bucket in Parquet format using the date as a partition. The Amazon AppFlow flows are created through the use of a YAML configuration file (see the following code). This configuration is consumed by the AWS CDK deployment to create the corresponding flows.

appflow:
  flow_classes:
    salesforce:
      source: salesforce
      destination: s3
      incremental_load: 1
      schedule_expression: "rate(1 day)"
      s3_prefix: na
      connector_profile: roche-salesforce-connector-profile1,roche-salesforce-connector-profile2
      description: appflow flow flow from Salesforce
      environment: all
  - name: Account
    incremental_load: 1
    bookmark_col: appflow_date_str
  - name: CustomSalesforceObject
    pii: 0
    bookmark_col: appflow_date_str
    upsert_field_list: upsertField
    s3_prefix: prefix
    source: s3
    destination: salesforce
    schedule_expression: na
    connector_profile: roche-salesforce-connector-profile

The YAML configuration makes it easy to select whether data should be loaded from an S3 bucket back to Salesforce or from Salesforce to an S3 bucket. This configuration is subsequently read by the AWS CDK app and corresponding stacks to translate into Amazon AppFlow flows.

The following options are specified in the preceding YAML configuration file:

  • source – The location to pull data from (Amazon S3, Salesforce)
  • destination – The destination to put data to (Amazon S3, Salesforce)
  • object_name – The name of the Salesforce object to interact with
  • incremental_load – A Boolean specifying if the load should be incremental or full (0 means full, 1 means incremental)
  • schedule_expression – The cron or rate expression to run the flow (na makes it on demand)
  • s3_prefix – The prefix to push or pull the data from in the S3 bucket
  • connector_profile – The Amazon AppFlow connector profile name to use when connecting to Salesforce (can be a CSV list)
  • environment – The environment to deploy this Amazon AppFlow flow to (all means deploy to dev and prod, dev means development environment, prod means production environment)
  • upsert_field_list – The set of Salesforce object fields (can be a CSV list) to use when performing an upsert operation back to Salesforce (only applicable when loaded data back from an S3 bucket back to Salesforce)
  • bookmark_col – The name of the column to use in the Data Catalog for registering the daily load date string partition

Register Salesforce objects to the Data Catalog

Complete the following steps to register data loaded into the data lake with the Data Catalog and link it to Amazon Redshift:

  1. Gather Salesforce object fields and corresponding data types.
  2. Create a corresponding AWS Glue database in the Data Catalog.
  3. Run a query against Amazon Redshift to create an external schema that links to the AWS Glue database.
  4. Create tables and partitions in the AWS Glue database and tables.

Data is accessible via the Data Catalog and the Amazon Redshift cluster.

Amazon AppFlow dynamic field gathering

To construct the schema of the loaded Salesforce object in the data lake, you invoke the following Python function. The code utilizes an Amazon AppFlow client from Boto3 to dynamically gather the Salesforce object fields to construct the Salesforce object’s schema.

import boto3

client = boto3.client('appflow')

def get_salesforce_object_fields(object_name: str, connector_profile: str):
    """
    Gathers the Salesforce object and its corresponding fields.

    Parameters:
        salesforce_object_name (str) = the name of the Salesforce object to consume.
        appflow_connector_profile (str) = the name of AppFlow Connector Profile.

    Returns:
        object_schema_list (list) =  a list of the object's fields and datatype (a list of dictionaries).
    """
    print("Gathering Object Fields")

    object_fields = []

    response = client.describe_connector_entity(
        connectorProfileName=connector_profile,
        connectorEntityName=object_name,
        connectorType='Salesforce'
    )

    for obj in response['connectorEntityFields']:
        object_fields.append(
            {'field': obj['identifier'], 'data_type': obj['supportedFieldTypeDetails']['v1']['fieldType']})

    return object_fields

We use the function for both the creation of the Amazon AppFlow flow via the AWS CDK deployment and for creating the corresponding table in the Data Catalog in the appropriate AWS Glue database.

Create an Amazon CloudWatch Events rule, AWS Glue table, and partition

To add new tables (one per Salesforce object loaded into Amazon S3) and partitions into the Data Catalog automatically, you create an Amazon CloudWatch Events rule. This function enables you to query the data in both AWS Glue and Amazon Redshift.

After the Amazon AppFlow flow is complete, it invokes a CloudWatch Events rule and a corresponding Lambda function to either create a new table in AWS Glue or add a new partition with the corresponding date string for the current day. The CloudWatch Events rule looks like the following screenshot.

The invoked Lambda function uses the Amazon SageMaker Data Wrangler Python package to interact with the Data Catalog. Using the preceding function definition, the object fields and their data types are accessible to pass to the following function call:

import awswrangler as wr

def create_external_parquet_table(
    database_name: str, 
    table_name: str, 
    s3_path: str, 
    columns_map: dict, 
    partition_map: dict
):
    """
    Creates a new external table in Parquet format.

    Parameters:
        database_name (str) = the name of the database to create the table in.
        table_name (str) = the name of the table to create.
        s3_path (str) = the S3 path to the data set.
        columns_map (dict) = a dictionary object containing the details of the columns and their data types from appflow_utility.get_salesforce_object_fields
        partition_map (dict) = a map of the paritions for the parquet table as {'column_name': 'column_type'}
    
    Returns:
        table_metadata (dict) = metadata about the table that was created.
    """

    column_type_map = {}

    for field in columns_map:
        column_type_map[field['name']] = field['type']

    return wr.catalog.create_parquet_table(
        database=database_name,
        table=table_name,
        path=s3_path,
        columns_types=column_type_map,
        partitions_types=partition_map,
        description=f"AppFlow ingestion table for {table_name} object"
    )

If the table already exists, the Lambda function creates a new partition to account for the date in which the flow completed (if it doesn’t already exist):

import awswrangler as wr

def create_parquet_table_date_partition(
    database_name: str, 
    table_name: str, 
    s3_path: str, 
    year: str, 
    month: str, 
    day: str
):
    """
    Creates a new partition by the date (YYYY-MM-DD) on an existing parquet table.

    Parameters:
        database_name (str) = the name of the database to create the table in.
        table_name (str) = the name of the table to create.
        s3_path (str) = the S3 path to the data set.
        year(str) = the current year for the partition (YYYY format).
        month (str) = the current month for the partition (MM format).
        day (str) = the current day for the partition (DD format).
    
    Returns:
        table_metadata (dict) = metadata about the table that has a new partition
    """

    date_str = f"{year}{month}{day}"
    
    return wr.catalog.add_parquet_partitions(
        database=database_name,
        table=table_name,
        partitions_values={
            f"{s3_path}/{year}/{month}/{day}": [date_str]
        }
    )
    
def table_exists(
    database_name: str, 
    table_name: str
):
    """
    Checks if a table exists in the Glue catalog.

    Parameters:
        database_name (str) = the name of the Glue Database where the table should be.
        table_name (str) = the name of the table.
    
    Returns:
        exists (bool) = returns True if the table exists and False if it does not exist.
    """

    try:
        wr.catalog.table(database=database_name, table=table_name)
        return True
    except ClientError as e:
        return False

Amazon Redshift external schema query

An AWS Glue database is created for each Amazon AppFlow connector profile that is present in the preceding configuration. The objects that are loaded from Salesforce into Amazon S3 are registered as tables in the Data Catalog under the corresponding database. To link the database in the Data Catalog with an external Amazon Redshift schema, run the following query:

CREATE EXTERNAL SCHEMA ${connector_profile_name}_ext from data catalog
database '${appflow_connector_profile_name}'
iam_role 'arn:aws:iam::${AWS_ACCOUNT_ID}:role/RedshiftSpectrumRole'
region 'eu-west-1';

The specified iam_role value must be an IAM role created ahead of time and must have the appropriate access policies specified to query the Amazon S3 location.

Now, all the tables available in the Data Catalog can be queried using SQL locally in Amazon Redshift Spectrum.

Amazon AppFlow Salesforce destination

Roche trains and invokes ML models using data found in the Amazon Redshift data warehouse. After the ML models are complete, the results are pushed back into Salesforce. Through the use of Amazon AppFlow, we can achieve the data transfer without writing any custom code. The schema of the results must match the schema of the corresponding Salesforce object, and the format of the results must be written in either JSON lines or CSV format in order to be written back into Salesforce.

AWS Glue Jobs

To source on-premises data feeds into the data lake, Roche has built a set of AWS Glue jobs in Python. There are various external sources including databases and APIs that are directly loaded into the raw zone S3 bucket. The AWS Glue jobs are run on a daily basis to load new data. The data that is loaded follows the partitioning scheme of YYYYMMDD format in order to more efficiently store and query datasets. The loaded data is then converted into Parquet format for more efficient querying and storage purposes.

Amazon EKS and KubeFlow

To deploy ML models on Amazon EKS, Roche uses Kubeflow on Amazon EKS. The use of Amazon EKS as the backbone infrastructure makes it easy to build, train, test, and deploy ML models and interact with Amazon Redshift as a data source.

Firewall Manager

As an added layer of security, Roche takes extra precautions through the use of Firewall Manager. This allows Roche to explicitly deny or allow inbound and outbound traffic through the use of stateful and stateless rule sets. This also enables Roche to allow certain outbound access to external websites and deny websites that they don’t want resources inside of their Amazon VPC to have access to. This is critical especially when dealing with any sensitive datasets to ensure that data is secured and has no chance of being moved externally.

CI/CD

All the infrastructure outlined in the architecture diagram was automated and deployed to multiple AWS Regions using a continuous integration and continuous delivery (CI/CD) pipeline with GitLab Runners as the orchestrator. The GitFlow model was used for branching and invoking automated deployments to the Roche AWS accounts.

Infrastructure as code and AWS CDK

Infrastructure as code (IaC) best practices were used to facilitate the creation of all infrastructure. The Roche team uses the Python AWS CDK to deploy, version, and maintain any changes that occur to the infrastructure in their AWS account.

AWS CDK project structure

The top level of the project structure in GitLab includes the following folders (while not limited to just these folders) in order to keep infrastructure and code all in one location.

To facilitate the various resources that are created in the Roche account, the deployment was broken into the following AWS CDK apps, which encompass multiple stacks:

  • core
  • data_lake
  • data_warehouse

The core app contains all the stacks related to account setup and account bootstrapping, such as:

  • VPC creation
  • Initial IAM roles and policies
  • Security guardrails

The data_lake app contains all the stacks related to creating the AWS data lake, such as:

  • Lake Formation setup and registration
  • AWS Glue database creation
  • S3 bucket creation
  • Amazon AppFlow flow creation
  • AWS Glue job setup

The data_warehouse app contains all the stacks related to setting up the data warehouse infrastructure, such as:

  • Amazon Redshift cluster
  • Load balancer to Amazon Redshift cluster
  • Logging

The AWS CDK project structure described was chosen to keep the deployment flexible and to logically group together stacks that relied on each other. This flexibility allows for deployments to be broken out by function and deployed only when truly required and needed. This decoupling of different parts of the provisioning maintains flexibility when deploying.

AWS CDK project configuration

Project configurations are flexible and extrapolated away as YAML configuration files. For example, Roche has simplified the process of creating a new Amazon AppFlow flow and can add or remove flows as needed simply by adding a new entry into their YAML configuration. The next time the GitLab runner deployment occurs, it picks up the changes on AWS CDK synthesis to generate a new change set with the new set of resources. This configuration and setup keeps things dynamic and flexible while decoupling configuration from code.

Network architecture

The following diagram illustrates the network architecture.

We can break down the architecture into the following:

  • All AWS services are deployed in two Availability Zones (except Amazon Redshift)
  • Only private subnets have access to the on-premises Roche environment
  • Services are deployed in backend subnets
  • Perimeter protection using AWS Network Firewall
  • A network load balancer publishes services to the on premises environment

Network security configurations

Infrastructure, configuration, and security are defined as code in AWS CDK, and Roche uses a CI/CD pipeline to manage and deploy them. Roche has an AWS CDK application to deploy the core services of the project: VPC, VPN connectivity, and AWS security services (AWS Config, Amazon GuardDuty, and AWS Security Hub). The VPC contains four network layers deployed in two Availability Zones, and they have VPC endpoints to access AWS services like Amazon S3, Amazon DynamoDB, and Amazon Simple Queue Service (Amazon SQS). They limit internet access using AWS Network Firewall.

The infrastructure is defined as code and the configuration is segregated. Roche performed the VPC setup by running the CI/CD pipeline to deploy their infrastructure. The configuration is in a specific external file; if Roche wants to change any value of the VPC, they need to simply modify this file and run the pipeline again (without typing any new lines of code). If Roche wants to change any configurations, they don’t want to have to change any code. It makes it simple for Roche to make changes and simply roll them out to their environment, making the changes more transparent and easier to configure. Traceability of the configuration is more transparent and it makes it simpler for approving the changes.

The following code is an example of the VPC configuration:

"test": {
        "vpc": {
            "name": "",
            "cidr_range": "192.168.40.0/21",
            "internet_gateway": True,
            "flow_log_bucket": shared_resources.BUCKET_LOGGING,
            "flow_log_prefix": "vpc-flow-logs/",
        },
        "subnets": {
            "private_subnets": {
                "private": ["192.168.41.0/25", "192.168.41.128/25"],
                "backend": ["192.168.42.0/23", "192.168.44.0/23"],
            },
            "public_subnets": {
                "public": {
                    "nat_gateway": True,
                    "publics_ip": True,
                    "cidr_range": ["192.168.47.64/26", "192.168.47.128/26"],
                }
            },
            "firewall_subnets": {"firewall": ["192.168.47.0/28", "192.168.47.17/28"]},
        },
        ...
         "vpc_endpoints": {
            "subnet_group": "backend",
            "services": [
                "ec2",
                "ssm",
                "ssmmessages",
                "sns",
                "ec2messages",
                "glue",
                "athena",
                "secretsmanager",
                "ecr.dkr",
                "redshift-data",
                "logs",
                "sts",
            ],
            "gateways": ["dynamodb", "s3"],
            "subnet_groups_allowed": ["backend", "private"],
        },
        "route_53_resolvers": {
            "subnet": "private",
        ...

The advantages of this approach are as follows:

  • No need to modify the AWS CDK constructor and build new code to change VPC configuration
  • Central point to manage VPC configuration
  • Traceability of changes and history of the configuration through Git
  • Redeploy all the infrastructure in a matter of minutes in other Regions or accounts

Operations and alerting

Roche has developed an automated alerting system if any part of the end-to-end architecture encounters any issues, focusing on any issues when loading data from AWS Glue or Amazon AppFlow. All logging is published to CloudWatch by default for debugging purposes.

The operational alerts have been built for the following workflow:

  1. AWS Glue jobs and Amazon AppFlow flows ingest data.
  2. If a job fails, it emits an event to a CloudWatch Events rule.
  3. The rule is triggered and invokes an Lambda function to send failure details to an Amazon Simple Notification Service (Amazon SNS) topic.
  4. The SNS topic has a Lambda subscriber that gets invoked:
    1. The Lambda function reads out specific webhook URLs from AWS Secrets Manager.
    2. The function fires off an alert to the specific external systems.
  5. The external systems receive the message and the appropriate parties are notified of the issue with details.

The following architecture outlines the alerting mechanisms built for the lake house platform.

Conclusion

The GTM (Go-To-Market) domain has been successful in enabling their business stakeholders, data engineers and data scientists providing a platform that is extendable to many use-cases that Roche faces. It is a key enabler and an accelerator for the GTM organization in Roche. Through a modern data platform, Roche is now able to better understand customers and ultimately create and deliver valuable services that meet their needs. It extends beyond health care professionals (HCPs) to a larger healthcare ecosystem. The platform and infrastructure in this blog help to support and accelerate both internal and external stakeholders in their decision-making processes through actionable insights.

The steps in this post can help you plan to build a similar modern data strategy using AWS managed services to ingest data from sources like Salesforce, automatically create metadata catalogs and share data seamlessly between the data lake and data warehouse, and create alerts in the event of an orchestrated data workflow failure. In part 2 of this post, you learn about how the data warehouse was built using an agile data modeling pattern and how ELT jobs were quickly developed, orchestrated, and configured to perform automated data quality testing.

Special thanks go to the Roche team: Joao Antunes, Krzysztof Slowinski, Krzysztof Romanowski, Bartlomiej Zalewski, Wojciech Kostka, Patryk Szczesnowicz, Igor Tkaczyk, Kamil Piotrowski, Michalina Mastalerz, Jakub Lanski, Chun Wei Chan, Andrzej Dziabowski for their project delivery and support with this post.


About The Authors

Dr. Yannick Misteli, Roche – Dr. Yannick Misteli is leading cloud platform and ML engineering teams in global product strategy (GPS) at Roche. He is passionate about infrastructure and operationalizing data-driven solutions, and he has broad experience in driving business value creation through data analytics.

Simon Dimaline, AWS – Simon Dimaline has specialised in data warehousing and data modelling for more than 20 years. He currently works for the Data & Analytics team within AWS Professional Services, accelerating customers’ adoption of AWS analytics services.

Matt Noyce, AWS – Matt Noyce is a Senior Cloud Application Architect in Professional Services at Amazon Web Services. He works with customers to architect, design, automate, and build solutions on AWS for their business needs.

Chema Artal Banon, AWS – Chema Artal Banon is a Security Consultant at AWS Professional Services and he works with AWS’s customers to design, build, and optimize their security to drive business. He specializes in helping companies accelerate their journey to the AWS Cloud in the most secure manner possible by helping customers build the confidence and technical capability.

A special Thank You goes out to the following people whose expertise made this post possible from AWS:

  • Thiyagarajan Arumugam – Principal Analytics Specialist Solutions Architect
  • Taz Sayed – Analytics Tech Leader
  • Glenith Paletta – Enterprise Service Manager
  • Mike Murphy – Global Account Manager
  • Natacha Maheshe – Senior Product Marketing Manager
  • Derek Young – Senior Product Manager
  • Jamie Campbell – Amazon AppFlow Product Manager
  • Kamen Sharlandjiev – Senior Solutions Architect – Amazon AppFlow
  • Sunil Jethwani Principal Customer Delivery Architect
  • Vinay Shukla – Amazon Redshift Principal Product Manager
  • Nausheen Sayed – Program Manager

AWS Lake Formation – General Availability of Cell-Level Security and Governed Tables with Automatic Compaction

Post Syndicated from Danilo Poccia original https://aws.amazon.com/blogs/aws/aws-lake-formation-general-availability-of-cell-level-security-and-governed-tables-with-automatic-compaction/

A data lake can help you break down data silos and combine different types of analytics into a centralized repository. You can store all of your structured and unstructured data in this repository. However, setting up and managing data lakes involve a lot of manual, complicated, and time-consuming tasks. AWS Lake Formation makes it easy to set up a secure data lake in days instead of weeks or months.

Today, I am excited to share the general availability of some new features that simplify even further loading data, optimizing storage, and managing access to a data lake:

  • Governed Tables – A new type of Amazon Simple Storage Service (Amazon S3) tables that makes it simple and reliable to ingest and manage data at any scale. Governed tables support ACID transactions that let multiple users concurrently and reliably insert and delete data across multiple governed tables. ACID transactions also let you run queries that return consistent and up-to-date data. In case of errors in your extract, transform, and load (ETL) processes, or during an update, changes are not committed and will not be visible.
  • Storage Optimization with Automatic Compaction for governed tables – When this option is enabled, Lake Formation automatically compacts small S3 objects in your governed tables into larger objects to optimize access via analytics engines, such as Amazon Athena and Amazon Redshift Spectrum. By using automatic compaction, you don’t have to implement custom ETL jobs that read, merge, and compress data into new files, and then replace the original files.
  • Granular Access Control with Row and Cell-Level Security – You can control access to specific rows and columns in query results and within AWS Glue ETL jobs based on the identity of who is performing the action. In this way, you don’t have to create (and keep updated) subsets of your data for different roles and legislations. This works for both governed and traditional S3 tables.

Using Governed Tables, ACID Transactions, and Automatic Compaction
In the Lake Formation console, I can enable governed data access and management at table creation. Automatic compaction is enabled by default, and it can be disabled using the AWS Command Line Interface (CLI) or AWS SDKs.

Console screenshot.

Governed tables have a manifest that tracks the S3 objects that are part of the table’s data. I can use the UpdateTableObjects API to keep the manifest updated when adding new objects to the table, and I can call it using the AWS CLI and SDKs. This API is implicitly used by the AWS Glue ETL library.

Moreover, I have access to new Lake Formation APIs to start, commit, or cancel a transaction. I can use these APIs to wrap data loading, data transformation, and output consistent and up-to-date data.

Using Row and Cell-Level Security
There are many use cases where, for a table, you want to restrict access to specific columns, rows, or a combination that depends on the role of the user accessing the data. For example, a company with offices in the US, Germany, and France can create a filter for analysts based in the European Union (EU) to limit access to EU-based customers.

Console screenshot.

The filter can enforce that some columns, such as date of birth (dob) and phone, are not accessible to those analysts. Moreover, access to individual rows can be filtered by using filter expressions. You can configure row filter expressions with a SQL-compatible syntax based on the open-source PartiQL language. In this case, only rows with country equal to Germany or France (country='DE' OR country='FR') are visible.

Console screenshot.

Availability and Pricing
These new features are available today in the following AWS Regions: US East (N. Virginia), US West (Oregon), Europe (Ireland), US East (Ohio), and Asia Pacific (Tokyo).

When querying governed tables, or tables secured with row and cell-level security, you pay by the amount of data scanned (with a 10MB minimum). When using governed tables, transaction metadata is charged by the number of S3 objects tracked, and you pay for the number of transaction requests. Automatic compaction is charged based on the data processed. For more information, see the AWS Lake Formation pricing page.

While implementing these features, we introduced a new Lake Formation Storage API that is integrated with tools such as AWS Glue, Amazon Athena, Amazon Redshift Spectrum, and Amazon QuickSight. You can use this storage API directly in your applications to query tables with a SQL-like syntax (joins are not supported) and get the benefits of governed tables and cell-level security.

See the detailed blog series published during the preview to learn more:

Effective data lakes using AWS Lake Formation

Take advantage of these new features to simplify the creation and management of your data lake.

Danilo

How Parametric Built Audit Surveillance using AWS Data Lake Architecture

Post Syndicated from Raghavarao Sodabathina original https://aws.amazon.com/blogs/architecture/how-parametric-built-audit-surveillance-using-aws-data-lake-architecture/

Parametric Portfolio Associates (Parametric), a wholly owned subsidiary of Morgan Stanley, is a registered investment adviser. Parametric provides investment advisory services to individual and institutional investors around the world. Parametric manages over 100,000 client portfolios with assets under management exceeding $400B (as of 9/30/21).

As a registered investment adviser, Parametric is subject to numerous regulatory requirements. The Parametric Compliance team conducts regular reviews on the firm’s portfolio management activities. To accomplish this, the organization needs both active and archived audit data to be readily available.

Parametric’s on-premises data lake solution was based on an MS-SQL server. They used an Apache Hadoop platform for their data storage, data management, and analytics. Significant gaps existed with the on-premises solution, which complicated audit processes. They were spending a large amount of effort on system maintenance, operational management, and software version upgrades. This required expensive consulting services and challenges with keeping the maintenance windows updated. This limited their agility, and also impacted their ability to derive more insights and value from their data. In an environment of rapid growth, adoption of more sophisticated analytics tools and processes has been slower to evolve.

In this blog post, we will show how Parametric implemented their Audit Surveillance Data Lake on AWS with purpose-built fully managed analytics services. With this solution, Parametric was able to respond to various audit requests within hours rather than days or weeks. This resulted in a system with a cost savings of 5x, with no data growth. Additionally, this new system can seamlessly support a 10x data growth.

Audit surveillance platform

The Parametric data management office (DMO) was previously running their data workloads using an on-premises data lake, which ran on the Hortonworks data platform of Apache Hadoop. This platform wasn’t up to date, and Parametric’s hardware was reaching end-of-life. Parametric was faced with a decision to either reinvest in their on-premises infrastructure or modernize their infrastructure using a modern data analytics platform on AWS. After doing a detailed cost/benefit analysis, the DMO calculated a 5x cost savings by using AWS. They decided to move forward and modernize with AWS due to these cost benefits, in addition to elasticity and security features.

The PPA compliance team asked the DMO to provide an enterprise data service to consume data from a data lake. This data was destined for downstream applications and ad-hoc data querying capabilities. It was accessed via standard JDBC tools and user-friendly business intelligence dashboards. The goal was to ensure that seven years of audit data would be readily available.

The DMO team worked with AWS to conceptualize an audit surveillance data platform architecture and help accelerate the implementation. They attended a series of AWS Immersion Days focusing on AWS fundamentals, Data Lakes, Devops, Amazon EMR, and serverless architectures. They later were involved in a four-day AWS Data Lab with AWS SMEs to create a data lake. The first use case in this Lab was creating the Audit Surveillance system on AWS.

Audit surveillance architecture on AWS

The following diagram shows the Audit Surveillance data lake architecture on AWS by using AWS purpose-built analytics services.

Figure 1. Audit Surveillance data lake architecture diagram

Figure 1. Audit Surveillance data lake architecture diagram

Architecture flow

  1. User personas: As first step, the DMO team identified three user personas for the Audit Surveillance system on AWS.
    • Data service compliance users who would like to consume audit surveillance data from the data lake into their respective applications through an enterprise data service.
    • Business users who would like to create business intelligence dashboards using a BI tool to audit data for compliance needs.
    • Complaince IT users who would like to perform ad-hoc queries on the data lake to perform analytics using an interactive query tool.
  2. Data ingestion: Data is ingested into Amazon Simple Storage Service (S3) from different on-premises data sources by using AWS Lake Formation blueprints. AWS Lake Formation provides workflows that define the data source and schedule to import data into the data lake. It is a container for AWS Glue crawlers, jobs, and triggers that are used to orchestrate the process to load and update the data lake.
  3. Data storage: Parametric used Amazon S3 as a data storage to build an Audit Surveillance data lake, as it has unmatched 11 nines of durability and 99.99% availability. The existing Hadoop storage was replaced with Amazon S3. The DMO team created a drop zone (raw), an analytics zone (transformed), and curated (enriched) storage layers for their data lake on AWS.
  4. Data cataloging: AWS Glue Data Catalog was the central catalog used to store and manage metadata for all datasets hosted in the Audit Surveillance data lake. The existing Hadoop metadata store was replaced with AWS Glue Data Catalog. AWS services such as AWS Glue, Amazon EMR, and Amazon Athena, natively integrate with AWS Glue Data Catalog.
  5. Data processing: Amazon EMR and AWS Glue process the raw data and places it into analytics zones (transformed) and curated zones (enriched) S3 buckets. Amazon EMR was used for big data processing and AWS Glue for standard ETL processes. AWS Lambda and AWS Step Functions were used to initiate monitoring and ETL processes.
  6. Data consumption: After Audit Surveillance data was transformed and enriched, the data was consumed by various personas within the firm as follows:
    • AWS Lambda and Amazon API Gateway were used to support consumption for data service compliance users.
    • Amazon QuickSight was used to create business intelligence dashboards for compliance business users.
    • Amazon Athena was used to query transformed and enriched data for compliance IT users.
  7. Security: AWS Key Management Service (KMS) customer managed keys were used for encryption at rest, and TLS for encryption at transition. Access to the encryption keys is controlled using AWS Identity and Access Management (IAM) and is monitored through detailed audit trails in AWS CloudTrail. Amazon CloudWatch was used for monitoring, and thresholds were created to determine when to send alerts.
  8. Governance: AWS IAM roles were attached to compliance users that permitted the administrator to grant access. This was only given to approved users or programs that went through authentication and authorization through AWS SSO. Access is logged and permissions can be granted or denied by the administrator. AWS Lake Formation is used for fine-grained access controls to grant/revoke permissions at the database, table, or column-level access.

Conclusion

The Parametric DMO team successfully replaced their on-premises Audit Surveillance Data Lake. They now have a modern, flexible, highly available, and scalable data platform on AWS, with purpose-built analytics services.

This change resulted in a 5x cost savings, and provides for a 10x data growth. There are now fast responses to internal and external audit requests (hours rather than days or weeks). This migration has given the company access to a wider breadth of AWS analytics services, which offers greater flexibility and options.

Maintaining the on-premises data lake would have required significant investment in both hardware upgrade costs and annual licensing and upgrade vendor consulting fees. Parametric’s decision to migrate their on-premises data lake has yielded proven cost benefits. And it has introduced new functions, service, and capabilities that were previously unavailable to Parametric DMO.

You may also achieve similar efficiencies and increase scalability by migrating on-premises data platforms into AWS. Read more and get started on building Data Lakes on AWS.

Integral Ad Science secures self-service data lake using AWS Lake Formation

Post Syndicated from Mat Sharpe original https://aws.amazon.com/blogs/big-data/integral-ad-science-secures-self-service-data-lake-using-aws-lake-formation/

This post is co-written with Mat Sharpe, Technical Lead, AWS & Systems Engineering from Integral Ad Science.

Integral Ad Science (IAS) is a global leader in digital media quality. The company’s mission is to be the global benchmark for trust and transparency in digital media quality for the world’s leading brands, publishers, and platforms. IAS does this through data-driven technologies with actionable real-time signals and insight.

In this post, we discuss how IAS uses AWS Lake Formation and Amazon Athena to efficiently manage governance and security of data.

The challenge

IAS processes over 100 billion web transactions per day. With strong growth and changing seasonality, IAS needed a solution to reduce cost, eliminate idle capacity during low utilization periods, and maximize data processing speeds during peaks to ensure timely insights for customers.

In 2020, IAS deployed a data lake in AWS, storing data in Amazon Simple Storage Service (Amazon S3), cataloging its metadata in the AWS Glue Data Catalog, ingesting and processing using Amazon EMR, and using Athena to query and analyze the data. IAS wanted to create a unified data platform to meet its business requirements. Additionally, IAS wanted to enable self-service analytics for customers and users across multiple business units, while maintaining critical controls over data privacy and compliance with regulations such as GDPR and CCPA. To accomplish this, IAS needed to securely ingest and organize real-time and batch datasets, as well as secure and govern sensitive customer data.

To meet the dynamic nature of IAS’s data and use cases, the team needed a solution that could define access controls by attribute, such as classification of data and job function. IAS processes significant volumes of data and this continues to grow. To support the volume of data, IAS needed the governance solution to scale in order to create and secure many new daily datasets. This meant IAS could enable self-service access to data from different tools, such as development notebooks, the AWS Management Console, and business intelligence and query tools.

To address these needs, IAS evaluated several approaches, including a manual ticket-based onboarding process to define permissions on new datasets, many different AWS Identity and Access Management (IAM) policies, and an AWS Lambda based approach to automate defining Lake Formation table and column permissions triggered by changes in security requirements and the arrival of new datasets.

Although these approaches worked, they were complex and didn’t support the self-service experience that IAS data analysts required.

Solution overview

IAS selected Lake Formation, Athena, and Okta to solve this challenge. The following architectural diagram shows how the company chose to secure its data lake.

The solution needed to support data producers and consumers in multiple AWS accounts. For brevity, this diagram shows a central data lake producer that includes a set of S3 buckets for raw and processed data. Amazon EMR is used to ingest and process the data, and all metadata is cataloged in the data catalog. The data lake consumer account uses Lake Formation to define fine-grained permissions on datasets shared by the producer account; users logging in through Okta can run queries using Athena and be authorized by Lake Formation.

Lake Formation enables column-level control, and all Amazon S3 access is provisioned via a Lake Formation data access role in the query account, ensuring only that service can access the data. Each business unit with access to the data lake is provisioned with an IAM role that only allows limited access to:

  • That business unit’s Athena workgroup
  • That workgroup’s query output bucket
  • The lakeformation:GetDataAccess API

Because Lake Formation manages all the data access and permissions, the configuration of the user’s role policy in IAM becomes very straightforward. By defining an Athena workgroup per business unit, IAS also takes advantage of assigning per-department billing tags and query limits to help with cost management.

Define a tag strategy

IAS commonly deals with two types of data: data generated by the company and data from third parties. The latter usually includes contractual stipulations on privacy and use.

Some data sets require even tighter controls, and defining a tag strategy is one key way that IAS ensures compliance with data privacy standards. With the tag-based access controls in Lake Formation IAS can define a set of tags within an ontology that is assigned to tables and columns. This ensures users understand available data and whether or not they have access. It also helps IAS manage privacy permissions across numerous tables with new ones added every day.

At a simplistic level, we can define policy tags for class with private and non-private, and for owner with internal and partner.

As we progressed, our tagging ontology evolved to include individual data owners and data sources within our product portfolio.

Apply tags to data assets

After IAS defined the tag ontology, the team applied tags at the database, table, and column level to manage permissions. Tags are inherited, so they only need to be applied at the highest level. For example, IAS applied the owner and class tags at the database level and relied on inheritance to propagate the tags to all the underlying tables and columns. The following diagram shows how IAS activated a tagging strategy to distinguish between internal and partner datasets , while classifying sensitive information within these datasets.

Only a small number of columns contain sensitive information; IAS relied on inheritance to apply a non-private tag to the majority of the database objects and then overrode it with a private tag on a per-column basis.

The following screenshot shows the tags applied to a database on the Lake Formation console.

With its global scale, IAS needed a way to automate how tags are applied to datasets. The team experimented with various options including string matching on column names, but the results were unpredictable in situations where unexpected column names are used (ipaddress vs. ip_address, for example). Ultimately, IAS incorporated metadata tagging into its existing infrastructure as code (IaC) process, which gets applied as part of infrastructure updates.

Define fine-grained permissions

The final piece of the puzzle was to define permission rules to associate with tagged resources. The initial data lake deployment involved creating permission rules for every database and table, with column exclusions as necessary. Although these were generated programmatically, it added significant complexity when the team needed to troubleshoot access issues. With Lake Formation tag-based access controls, IAS reduced hundreds of permission rules down to precisely two rules, as shown in the following screenshot.

When using multiple tags, the expressions are logically ANDed together. The preceding statements permit access only to data tagged non-private and owned by internal.

Tags allowed IAS to simplify permission rules, making it easy to understand, troubleshoot, and audit access. The ability to easily audit which datasets include sensitive information and who within the organization has access to them made it easy to comply with data privacy regulations.

Benefits

This solution provides self-service analytics to IAS data engineers, analysts, and data scientists. Internal users can query the data lake with their choice of tools, such as Athena, while maintaining strong governance and auditing. The new approach using Lake Formation tag-based access controls reduces the integration code and manual controls required. The solution provides the following additional benefits:

  • Meets security requirements by providing column-level controls for data
  • Significantly reduces permission complexity
  • Reduces time to audit data security and troubleshoot permissions
  • Deploys data classification using existing IaC processes
  • Reduces the time it takes to onboard data users including engineers, analysts, and scientists

Conclusion

When IAS started this journey, the company was looking for a fully managed solution that would enable self-service analytics while meeting stringent data access policies. Lake Formation provided IAS with the capabilities needed to deliver on this promise for its employees. With tag-based access controls, IAS optimized the solution by reducing the number of permission rules from hundreds down to a few, making it even easier to manage and audit. IAS continues to analyze data using more tools governed by Lake Formation.


About the Authors

Mat Sharpe is the Technical Lead, AWS & Systems Engineering at IAS where he is responsible for the company’s AWS infrastructure and guiding the technical teams in their cloud journey. He is based in New York.

Brian Maguire is a Solution Architect at Amazon Web Services, where he is focused on helping customers build their ideas in the cloud. He is a technologist, writer, teacher, and student who loves learning. Brian is the co-author of the book Scalable Data Streaming with Amazon Kinesis.

Danny Gagne is a Solutions Architect at Amazon Web Services. He has extensive experience in the design and implementation of large-scale high-performance analysis systems, and is the co-author of the book Scalable Data Streaming with Amazon Kinesis. He lives in New York City.

Implement anti-money laundering solutions on AWS

Post Syndicated from Yomi Abatan original https://aws.amazon.com/blogs/big-data/implement-anti-money-laundering-solutions-on-aws/

The detection and prevention of financial crime continues to be an important priority for banks. Over the past 10 years, the level of activity in financial crimes compliance in financial services has expanded significantly, with regulators around the globe taking scores of enforcement actions and levying $36 billion in fines. Apart from the fines, the overall cost of compliance for global financial services companies is suspected to have reached $181 billion in 2020. For most banks, know your customer (KYC) and anti-money laundering (AML) constitute the largest area of concern within the broader financial crime compliance. In light of this, there is an urgent need to have effective AML systems that are scalable and fit for purpose in order to manage the risk of money laundering as well as the risk of non-compliance by the banks. Addressing money laundering at a high-level covers the following areas:

  • Client screening and identity
  • Transaction monitoring
  • Extended customer risk profile
  • Reporting of suspicious transactions

In this post we focus on transaction monitoring by looking at the general challenges with implementing transaction monitoring (TM) solutions and how AWS services can be leveraged to build a solution in the cloud from the perspectives of data analytics; risk management and ad hoc analysis. The following diagram is a conceptual architecture for a transaction monitoring solution on the AWS Cloud.

Current challenges

Due to growing digital channels for facilitating financial transactions, the increasing access to financial services for more people, and the growth in global payments; capturing and processing data related to TM is now considered a big data challenge. The big data challenges and observations include:

  • The volume of data continues to prove to be too expansive for effective processing in a traditional on-premises data center solution.
  • The velocity of banking transactions continues to rise despite the economic challenges of COVID-19.
  • The variety of the data that needs to be processed for TM platforms continues to increase as more data sources with unstructured data become available. These data sources require techniques such as optical character recognition (OCR) and natural language processing (NLP) to automate the process of getting value out of such data without excessive manual effort.
  • Finally, due to the layered nature of complex transactions involved in TM solutions, having data aggregated from multiple financial institutions provides a more comprehensive insight into the flow of financial transactions. Such an aggregation is usually less viable in a traditional on-premises solution.

Data Analytics

The first challenge with implementing TM solutions is having the tools and services to ingest data into a central store (often called a data lake) that is secure and scalable. Not only does this data lake need to capture terabytes or even petabytes of data, but it also needs to facilitate the process of moving data in and out of purpose-built data stores for time series, graph, data marts, and machine learning (ML) processing. In AWS, we refer to a data architecture which covers data lakes, purpose-built data stores and the data movement across data stores as a lake house architecture.

The following diagram illustrates a TM architecture on the AWS Cloud. This is a more detailed sample architecture of the lake house approach.

Ingestion of data into the lake house typically comes from a client’s data center (if the client is not already on the cloud), or from different client AWS accounts that host transaction systems or from external sources. For clients with transaction systems still on premises, we notice although several AWS services can be used to transfer data from on premises to the AWS Cloud, a number of our clients with a batch requirement utilize AWS Transfer Family, which provides fully managed support for secure file transfers directly into and out of Amazon Simple Storage Service (Amazon S3) or Amazon Elastic File System (Amazon EFS). With real-time requirements, we see the use of Amazon Managed Streaming for Apache Kafka (Amazon MSK), which is a fully managed service that makes it easy for you to build and run applications that use Apache Kafka to process streaming data. One other way to bring in reference data or external data like politically exposed persons (PEP) lists, watch lists, or stop lists for the AML process is via AWS Data Exchange, which makes it easy to find, subscribe to, and use third-party data in the cloud.

In this architecture, the ingestion process always stores the raw data in Amazon S3, which offers industry-leading scalability, data availability, security, and performance. For those clients already on the AWS Cloud, it’s very likely your data is already stored in Amazon S3.

For TM, the ingestion of the data comes from KYC systems, customer account stores, as well as transaction repositories. Data from KYC systems need to have the entity information, which can relate to a company or individual. For the corporate entities, information on the underlying beneficiary owners (UBOs)—the natural persons who directly or indirectly own or control a certain percentage of company—is also required. Before we discuss the data pipeline (the flow of data from the landing zone to the curated data layer) in detail, it’s important to address some of the security and audit requirements of the sensitive data classes typically used in AML processing.

According to Gartner, “Data governance is the specification of decision rights and an accountability framework to ensure the appropriate behavior in the valuation, creation, consumption, and control of data and analytics.” From an AML perspective, the specification and the accountable framework mentioned in this definition requires several enabling components.

The first is a data catalog, which is sometimes grouped into technical, process, and business catalogs. On the AWS platform, this catalog is provided either directly through AWS Glue or indirectly through AWS Lake Formation. Although the catalog implemented by AWS Glue is fundamentally a technical catalog, you can still extend it to add process and business relevant attributes.

The second enabling component is data lineage. This service should be flexible enough to support the different types of data lineage, namely vertical, horizontal, and physical. From an AML perspective, vertical lineage can provide a trace from AML regulation, which requires the collection of certain data classes, all the way to the data models captured in the technical catalog. Horizontal and physical lineage provide a trace of the data from source to eventual suspicious activity reporting for suspected transactions. Horizonal lineage provides lineage at the metadata level, whereas physical lineage captures trace at the physical level.

The third enabling component of data governance is data security. This covers several aspects of dealing with requirements of encryption of data at rest and in transit, but also de-identification of data during processing. This area requires a range of de-identification techniques depending on the context of use. Some of the techniques include tokenization, encryption, generalization, masking, perturbation, redaction, and even substitution of personally identifiable information (PII) or sensitive data usually at the attribute level. It’s important to use the right de-identification technique to enforce the right level of privacy while still ensuring the data still has sufficient inference signals for use in ML. You can use Amazon Macie, a fully managed data security and data privacy service that uses ML and pattern matching to discover and protect sensitive data, to automate PII discovery prior to applying the right de-identification technique.

Moving data from landing zone (raw data) all the way to curated data involves several steps of processing, including data quality validation, compression, transformation, enrichment, de-duplication, entity resolution, and entity aggregation. Such processing is usually referred to as extract, transform, and load (ETL). In this architecture, we have a choice of using a serverless architecture based on AWS Glue (using Scala or Python programming languages) or implementing Amazon EMR (a cloud big-data platform for processing large datasets using open-source tools such as Apache Spark and Hadoop). Amazon EMR provides the flexibility to run these ETL workloads on Amazon Elastic Compute Cloud (Amazon EC2) instances, Amazon Elastic Kubernetes Service (Amazon EKS) clusters and also on AWS Outposts.

Risk management framework

The risk management framework part of the architecture contains the rules, thresholds, algorithms, models, and control policies that govern the process of detecting and reporting suspicious transactions. Traditionally, most TM solutions have relied solely on rule-based controls to implement AML requirements. However, these rule-based implementations quickly become complex and difficult to maintain, as criminals find new and sophisticated ways to circumvent existing AML controls. Apart from the complexity and maintenance, rule-based approaches usually result in large number of false positives. False positives in this context are when transactions are flagged as suspicious but turn out not to be. Some of the numbers here are quite remarkable, with some studies revealing less than 2% of cases actually turning to be suspicious. The implication of this is the operational costs and the teams of operational resources required to investigate these false positives. Another implication that sometimes get overlooked is the customer experience, in which a customer service like payment or clearing of transactions is delayed or declined due to false positives. This usually leads to a less than satisfactory customer experience. Despite the number of false positives, AML failings and subsequent fines are hardly out of the news; in one case the Financial Conduct Authority (FCA) in the United Kingdom deciding to take the unprecedented step of bringing criminal proceedings against a bank over failed AML processes.

In light of some of the shortcomings of a rule-based AML approach, a lot of research and focus has been performed by financial services customers, including RegTechs, on applying ML to detect suspicious transactions. One comprehensive study on the use of ML techniques in suspicious transaction detection is a paper published by Z. Chen et al. This paper was published in 2018 (which in ML terms is a lifetime ago), but the concepts and findings are still relevant. The paper highlights some of the common algorithms and challenges with using ML for AML. AML data is a high-dimensional space that usually requires dimensionality reduction through the use of algorithms like Principal Component Analysis (PCA) or autoencoders (neural networks used to learn efficient data encodings in an unsupervised manner). As part of feature engineering, most algorithms require the value of transactions (debits and credits) aggregated by time intervals—daily, weekly, and monthly. Clustering algorithms like k-means or some variants of k-means are used to create clusters for customer or transaction profiles. There is also the need to deal with class imbalance usually found in AML datasets.

All of these algorithms referenced in the Z. Chen et al paper are supported by Amazon SageMaker. SageMaker is a fully managed ML service that allows data scientists and developers to easily build, train, and deploy ML models for AML. You can also implement some of the other categories of algorithms that support AML such as behavioral modelling, risk scoring, and anomaly detection with SageMaker. You can use a wide range of algorithms to address AML challenges, including supervised, semi-supervised, and unsupervised models. Some additional factors that determine the suitability of algorithms include high recall and precision rate of the models, and the ability to utilize approaches such as SHapley Additive exPlanation (SHAP) and Local Interpretable Model-Agnostic Explanations (LIME) values to explain the model output. Amazon SageMaker Clarify can detect bias and increases transparency of ML models.

Algorithms that focus on risk scoring enable a risk profile that can span across various data classes such as core customer attributes including industry, geography, bank product, business size, complex ownership structure for entities, as well as transactions (debits and credits) and frequency of such transactions. In addition, external data such as PEP lists, various stop lists and watch lists, and in some cases media coverage related to suspected fraud or corruption can also be weighted into a customer’s risk profile.

Rule-based and ML approaches aren’t mutually exclusive, but it’s likely that rules will continue to play a peripheral role as better algorithms are researched and implemented. One of the reasons why the development of algorithms for AML has been sluggish is the availability of reliable datasets, which include result data indicating when a correct suspicious activity report (SAR) was filed for a given scenario. Unlike other areas of ML in which findings have been openly shared for further research, with AML, a lot of the progress first appears in commercial products belonging to vendors who are protective of their intellectual property.

Ad hoc analysis and reporting

The final part of the architecture includes support for case or event management tooling and a reporting service for the eventual SAR. These services can be AWS Marketplace solutions or developed from scratch using AWS services such as Amazon EKS or Amazon ECS. This part of the architecture also provides support for a very important aspect of AML: network analytics. Network or link analysis has three main components:

  • Clustering – The construction of graphs and representation of money flow. Amazon Neptune is a fast, reliable, fully managed graph database service that makes it easy to build and run applications that work with highly connected datasets.
  • Statistical analysis – Used to assist with finding metrics around centrality, normality, clustering, and eigenvector centrality.
  • Data visualization – An interactive and extensible data visualization platform to support exploratory data analysis. Findings from the network analytics can also feed into customer risk profiles and supervised ML algorithms.

Conclusion

None of the services or architecture layers described in this architecture are tightly coupled; different layers and services can be swapped with AWS Marketplace solutions or other FinTech or RegTech solutions that support cloud-based deployment. This means the AWS Cloud has a powerful ecosystem of native services and third-party solutions that can be deployed on the foundation of a Lake House Architecture on AWS to build a modern TM solution in the cloud. To find out more information about key of parts of the architecture described in this post, refer to the following resources:

For seeding data into a data lake (including taking advantage of ACID compliance):

For using Amazon EMR for data pipeline processing and some of recent updates to the Amazon EMR:

For taking advantage of SageMaker to support financial crime use cases:

Please contact AWS if you need help developing a full-scale AML solution (covering client screening and identity, transaction monitoring, extended customer risk profile and reporting of suspicious transactions) on AWS.


About the Author

Yomi Abatan is a Sr. Solution Architect based in London, United Kingdom. He works with financial services organisations, architecting, designing and implementing various large-scale IT solutions. He, currently helps established financial services AWS customers embark on Digital transformations using AWS cloud as an accelerator. Before joining AWS he worked in various architecture roles with several tier-one investment banks.
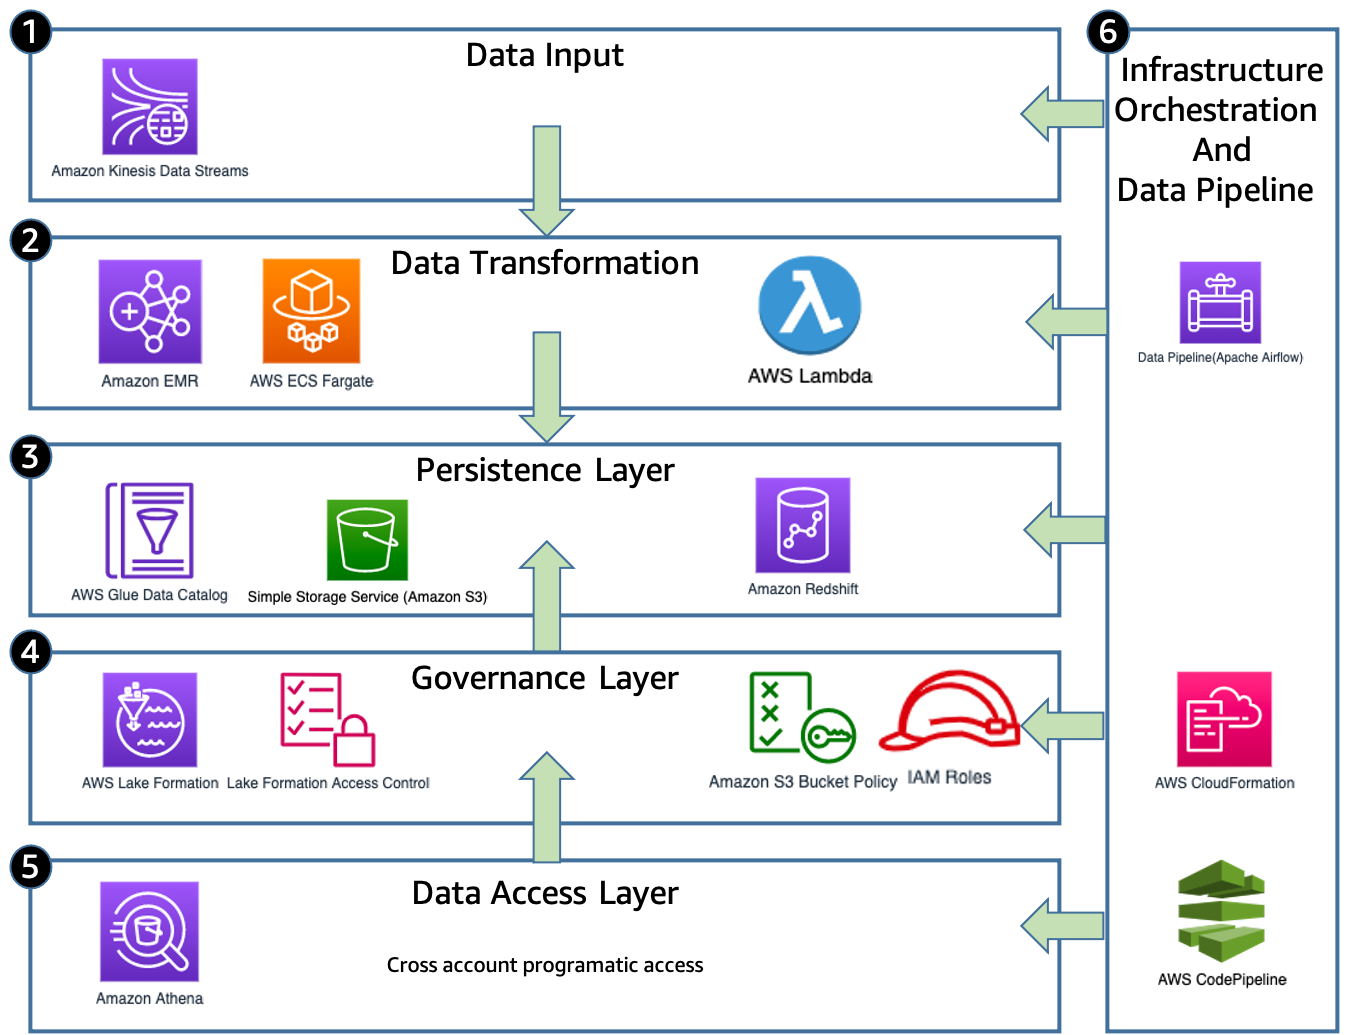
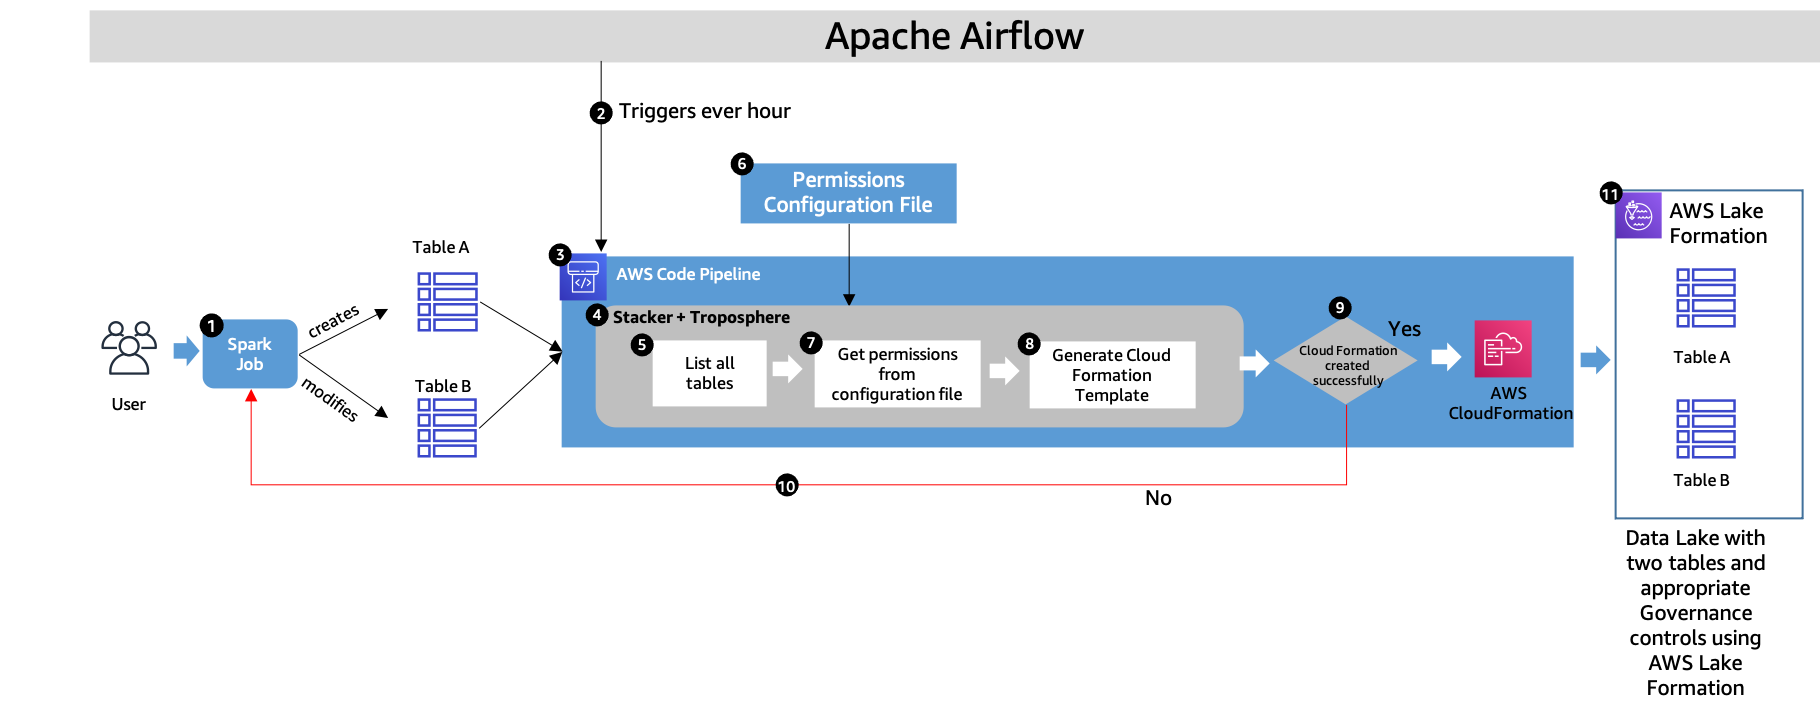
How MOIA built a fully automated GDPR compliant data lake using AWS Lake Formation, AWS Glue, and AWS CodePipeline

Post Syndicated from Leonardo Pêpe original https://aws.amazon.com/blogs/big-data/how-moia-built-a-fully-automated-gdpr-compliant-data-lake-using-aws-lake-formation-aws-glue-and-aws-codepipeline/

This is a guest blog post co-written by Leonardo Pêpe, a Data Engineer at MOIA.

MOIA is an independent company of the Volkswagen Group with locations in Berlin and Hamburg, and operates its own ride pooling services in Hamburg and Hanover. The company was founded in 2016 and develops mobility services independently or in partnership with cities and existing transport systems. MOIA’s focus is on ride pooling and the holistic development of the software and hardware for it. In October 2017, MOIA started a pilot project in Hanover to test a ride pooling service, which was brought into public operation in July 2018. MOIA covers the entire value chain in the area of ​​ride pooling. MOIA has developed a ridesharing system to avoid individual car traffic and use the road infrastructure more efficiently.

In this post, we discuss how MOIA uses AWS Lake Formation, AWS Glue, and AWS CodePipeline to store and process gigabytes of data on a daily basis to serve 20 different teams with individual user data access and implement fine-grained control of the data lake to comply with General Data Protection Regulation (GDPR) guidelines. This involves controlling access to data at a granular level. The solution enables MOIA’s fast pace of innovation to automatically adapt user permissions to new tables and datasets as they become available.

Background

Each MOIA vehicle can carry six passengers. Customers interact with the MOIA app to book a trip, cancel a trip, and give feedback. The highly distributed system prepares multiple offers to reach their destination with different pickup points and prices. Customers select an option and are picked up from their chosen location. All interactions between the customers and the app, as well as all the interactions between internal components and systems (the backend’s and vehicle’s IoT components), are sent to MOIA’s data lake.

Data from the vehicle, app, and backend must be centralized to have the synchronization between trips planned and implemented, and then to collect passenger feedback. To provide different pricing and routing options, MOIA needed centralized data. MOIA decided to build and secure its Amazon Simple Storage Service (Amazon S3) based Data Lake using AWS Lake Formation.

Different MOIA teams that includes Data Analysts, Data Scientists and Data Engineers need to access centralized data from different sources for the development and operations of the application workloads. It’s a legal requirement to control the access and format of the data to these different teams. The app development team needs to understand customer feedback in an anonymized way, pricing-related data must be accessed only by the business analytics team, vehicle data is meant to be used only by the vehicle maintenance team, and the routing team needs access to customer location and destination.

Architecture overview

The following diagram illustrates MOIA solution architecture.

The solution has the following components:

  1. Data input – The apps, backend, and IoT devices are continuously streaming event messages via Amazon Kinesis Data Streams in a nested information in a JSON format.
  2. Data transformation – When the raw data is received, the data pipeline orchestrator (Apache Airflow) starts the data transformation jobs to meet requirements for respective data formats. Amazon EMR, AWS Lambda, or AWS Fargate cleans, transforms, and loads the events in the S3 data lake.
  3. Persistence layer – After the data is transformed and normalized, AWS Glue crawlers classify the data to determine the format, schema, and associated properties. They group data into tables or partitions and write metadata to the AWS Glue Data Catalog based on the structured partitions created in Amazon S3. The data is written on Amazon S3 partitioned by its event type and timestamp so it can be easily accessed via Amazon Athena and the correct permissions can be applied using Lake Formation. The crawlers are run at a fixed interval in accordance with the batch jobs, so no manual runs are required.
  4. Governance layer – Access on the data lake is managed using the Lake Formation governance layer. MOIA uses Lake Formation to centrally define security, governance, and auditing policies in one place. These policies are consistently implemented, which eliminates the need to manually configure them across security services like AWS Identity and Access Management (IAM), AWS Key Management Service (AWS KMS), storage services like Amazon S3, or analytics and machine learning (ML) services like Amazon Redshift, Athena, Amazon EMR for Apache Spark. Lake Formation reduces the effort in configuring policies across services and provides consistent assistance for GDPR requirements and compliance. When a user makes a request to access Data Catalog resources or underlying data from the data lake, for the request to succeed, it must pass permission checks by both IAM and Lake Formation. Lake Formation permissions control access to Data Catalog resources, Amazon S3 locations, and the underlying data at those locations. User permissions to the data on the table, row, or column level are defined in Lake Formation, so that users only access the data if they’re authorized.
  5. Data access layer – After the flattened and structured data is available to be accessed by the data analysts, scientists, and engineers they can use Amazon Redshift or Athena to perform SQL analysis, or AWS Data Wrangler and Apache Spark to perform programmatic analysis and build ML use cases.
  6. Infrastructure orchestration and data pipeline – After the data is ingested and transformed, the infrastructure orchestration layer (CodePipeline and Lake Formation) creates or updates the governance layer with the proper and predefined permissions periodically every hour (see more about the automation in the governance layer later in this post).

Governance challenge

MOIA wants to evolve their ML models for routing, demand prediction, and business models continuously. This requires MOIA to constantly review models and update them, therefore power users such as data administrators and engineers frequently redesign the table schemas in the AWS Glue Data Catalog as part of the data engineering workflow. This highly dynamic metadata transformation requires an equally dynamic governance layer pipeline that can assign the right user permissions to all tables and adapt to these changes transparently without disruptions to end-users. Due to GDPR requirements, there is no room for error, and manual work is required to assign the right permissions according to GDPR compliance on the tables in the data lake with many terabytes of data. Without automation, many developers are needed for administration; this adds human error into the workflows, which is not acceptable. Manual administration and access management isn’t a scalable solution. MOIA needed to innovate faster with GDPR compliance with a small team of developers.

Data schema and data structure often changes at MOIA, resulting in new tables being created in the data lake. To guarantee that new tables inherit the permissions granted to the same group of users who already have access to the entire database, MOIA uses an automated process that grants Lake Formation permission to newly created tables, columns, and databases, as described in the next section.

Solution overview

The following diagram illustrates the continuous deployment loop using AWS CloudFormation.

The workflow contains the following steps:

  1. MOIA data scientists and engineers create or modify new tables to evolve the business and ML models. This results in new tables or changes in the existing schema of the table.
  2. The data pipeline is orchestrated via Apache Airflow, which controls the whole cycle of ingestion, cleansing, and data transformation using Spark jobs (as shown in Step 1). When the data is in its desired format and state, Apache Airflow triggers the AWS Glue crawler job to discover the data schema in the S3 bucket and add the new partitions to the Data Catalog. Apache Airflow also triggers CodePipeline to assign the right permissions on all the tables.
  3. Apache Airflow triggers CodePipeline every hour, which uses MOIA’s libraries to discover the new tables, columns, and databases, and grants Lake Formation permissions in the AWS CloudFormation template for all tables, including new and modified. This orchestration layer ensures Lake Formation permissions are granted. Without this step, nobody can access new tables, and new data isn’t visible to data scientists, business analysts, and others who need it.
  4. MOIA uses Stacker and Troposphere to identify all the tables, assign the tables the right permissions, and deploy the CloudFormation stack. Troposphere is the infrastructure as code (IaC) framework that renders the CloudFormation templates, and stacker helps with the parameterization and deployment of the templates on AWS. Stacker also helps produce reusable templates in the form of blueprints as pure Python code, which can be easily parameterized using YAML files. The Python code uses Boto3 clients to lookup the Data Catalog and search for databases and tables.
  5. The stacker blueprint libraries developed by MOIA (which internally use Boto3 and troposphere) are used to discover newly created databases or tables in the Data Catalog.
  6. A Permissions configuration file allows MOIA to predefine data lake tables (Can be a wildcard indicating all tables available in one database) and specific personas who have access to these tables. These roles are split into different categories called lake personas, and have specific access levels. Example lake personas include data domain engineers, data domain technical users, data administrators, and data analysts. Users and their permissions are defined in the file. In case access to personally identifiable information (PII) data is granted, the GDPR officer ensures that a record of processing activities is in place and the usage of personal data is documented according to the law.
  7. MOIA uses stacker to read the predefined permissions file, and uses the customized stacker blueprints library containing the logic to assign permissions to lake personas for each of the tables discovered in Step 5.
  8. The discovered and modified tables are matched with predefined permissions in Step 6 and Step 7. Stacker uses YAML format as the input for the CloudFormation template parameters to define users and data access permissions. These parameters are related to the user’s roles and define access to the tables. Based on this, MOIA creates a customized stacker that creates AWS CloudFormation resources dynamically. The following are the example stacks in AWS CloudFormation:
    1. data-lake-domain-database – Holds all resources that are relevant during the creation of the database, which includes lake permissions at the database level that allow the domain database admin personas to perform operations in the database.
    2. data-lake-domain-crawler – Scans Amazon S3 constantly to discover and create new tables and updates.
    3. data-lake-lake-table-permissions – Uses Boto3 combined with troposphere to list the available tables and grant lake permissions to the domain roles that access it.

This way, new CloudFormation templates are created, containing permissions for new or modified tables. This process guarantees a fully automated governance layer for the data lake. The generated CloudFormation template contains Lake Formation permission resources for each table, database, or column. The process of managing Lake Formation permissions on Data Catalog databases, tables, and columns is simplified by granting Data Catalog permissions using the Lake Formation tag-based access control method. The advantage of generating a CloudFormation template is audibility. When the new version of the CloudFormation stack is prepared with an access control set on new or modified tables, administrators can compare that stack with the older version to discover newly prepared and modified tables. MOIA can view the differences via the AWS CloudFormation console before new stack deployment.

  1. Either the CloudFormation stack is deployed in the account with the right permissions for all users, or a stack deployment failure notice is sent to the developers via a Slack channel (Step 10). This ensures the visibility in the deployment process and failed pipelines in permission assignment.
  2. Whenever the pipeline fails, MOIA receives the notification via Slack so the engineers can promptly fix the errors. This loop is very important to guarantee that whenever the schema changes, those changes are reflected in the data lake without manual intervention.
  3. Following this automated pipeline, all the tables are assigned right permissions.

Benefits

This solution delivers the following benefits:

  • Automated enforcement of data access permissions allows people to access the data without manual interventions in a scalable way. With automation, 1,000 hours of manual work are saved every year.
  • The GDPR team does the assessment internally every month. The GDPR team constantly provides guidance and approves each change in permissions. This audit trail for records of processing activities is automated with the help of Lake Formation (otherwise it needs a dedicated human resource).
  • The automated workflow of permission assignment is integrated into existing CI/CD processes, resulting in faster onboarding of new teams, features, and dataset releases. An average of 48 releases are done each month (including major and minor version releases and new event types). Onboarding new teams and forming internal new teams is very easy now.
  • This solution enables you to create a data lake using IaC processes that are easy and GDPR-compliant.

Conclusion

MOIA has created scalable, automated, and versioned permissions with a GDPR-supported, governed data lake using Lake Formation. This solution helps them bring new features and models to market faster, and reduces administrative and repetitive tasks. MOIA can focus on 48 average releases every month, contributing to a great customer experience and new data insights.


About the Authors

Leonardo Pêpe is a Data Engineer at MOIA. With a strong background in infrastructure and application support and operations, he is immersed in the DevOps philosophy. He’s helping MOIA build automated solutions for its data platform and enabling the teams to be more data-driven and agile. Outside of MOIA, Leonardo enjoys nature, Jiu-Jitsu and martial arts, and explores the good of life with his family.


Sushant Dhamnekar is a Solutions Architect at AWS. As a trusted advisor, Sushant helps automotive customers to build highly scalable, flexible, and resilient cloud architectures, and helps them follow the best practices around advanced cloud-based solutions. Outside of work, Sushant enjoys hiking, food, travel, and CrossFit workouts.


Shiv Narayanan is Global Business Development Manager for Data Lakes and Analytics solutions at AWS. He works with AWS customers across the globe to strategize, build, develop and deploy modern data platforms. Shiv loves music, travel, food and trying out new tech.

Address Modernization Tradeoffs with Lake House Architecture

Post Syndicated from Sukhomoy Basak original https://aws.amazon.com/blogs/architecture/address-modernization-tradeoffs-with-lake-house-architecture/

Many organizations are modernizing their applications to reduce costs and become more efficient. They must adapt to modern application requirements that provide 24×7 global access. The ability to scale up or down quickly to meet demand and process a large volume of data is critical. This is challenging while maintaining strict performance and availability. For many companies, modernization includes decomposing a monolith application into a set of independently developed, deployed, and managed microservices. The decoupled nature of a microservices environment allows each service to evolve agilely and independently. While there are many benefits for moving to a microservices-based architecture, there can be some tradeoffs. As your application monolith evolves into independent microservices, you must consider the implications to your data architecture.

In this blog post we will provide example use cases, and show how Lake House Architecture on AWS can streamline your microservices architecture. A Lake house architecture embraces the decentralized nature of microservices by facilitating data movement. These transfers can be between data stores, from data stores to data lake, and from data lake to data stores (Figure 1).

Figure 1. Integrating data lake, data warehouse, and all purpose-built stores into a coherent whole

Figure 1. Integrating data lake, data warehouse, and all purpose-built stores into a coherent whole

Health and wellness application challenges

Our fictitious health and wellness customer has an application architecture comprised of several microservices backed by purpose-built data stores. User profiles, assessments, surveys, fitness plans, health preferences, and insurance claims are maintained in an Amazon Aurora MySQL-Compatible relational database. The event service monitors the number of steps walked, sleep pattern, pulse rate, and other behavioral data in Amazon DynamoDB, a NoSQL database (Figure 2).

Figure 2. Microservices architecture for health and wellness company

Figure 2. Microservices architecture for health and wellness company

With this microservices architecture, it’s common to have data spread across various data stores. This is because each microservice uses a purpose-built data store suited to its usage patterns and performance requirements. While this provides agility, it also presents challenges to deriving needed insights.

Here are four challenges that different users might face:

  1. As a health practitioner, how do I efficiently combine the data from multiple data stores to give personalized recommendations that improve patient outcomes?
  2. As a sales and marketing professional, how do I get a 360 view of my customer, when data lives in multiple data stores? Profile and fitness data are in a relational data store, but important behavioral and clickstream data are in NoSQL data stores. It’s hard for me to run targeted marketing campaigns, which can lead to revenue loss.
  3. As a product owner, how do I optimize healthcare costs when designing wellbeing programs for patients?
  4. As a health coach, how do I find patients and help them with their wellness goals?

Our remaining subsections highlight AWS Lake House Architecture capabilities and features that allow data movement and the integration of purpose-built data stores.

1. Patient care use case

In this scenario, a health practitioner is interested in historical patient data to estimate the likelihood of a future outcome. To get the necessary insights and identify patterns, the health practitioner needs event data from Amazon DynamoDB and patient profile data from Aurora MySQL-Compatible. Our health practitioner will use Amazon Athena to run an ad-hoc analysis across these data stores.

Amazon Athena provides an interactive query service for both structured and unstructured data. The federated query functionality in Amazon Athena helps with running SQL queries across data stored in relational, NoSQL, and custom data sources. Amazon Athena uses Lambda-based data source connectors to run federated queries. Figure 3 illustrates the federated query architecture.

Figure 3. Amazon Athena federated query

Figure 3. Amazon Athena federated query

The patient care team could use an Amazon Athena federated query to find out if a patient needs urgent care. It is able to detect anomalies in the combined datasets from claims processing, device data, and electronic health record (HER) as show in Figure 4.

Figure 4. Federated query result by combining data from claim, device, and EHR stores

Figure 4. Federated query result by combining data from claim, device, and EHR stores

Healthcare data from various sources, including EHRs and genetic data, helps improve personalized care. Machine learning (ML) is able to harness big data and perform predictive analytics. This creates opportunities for researchers to develop personalized treatments for various diseases, including cancer and depression.

To achieve this, you must move all the related data into a centralized repository such as an Amazon S3 data lake. For specific use cases, you also must move the data between the purpose-built data stores. Finally, you must build an ML solution that can predict the outcome. Amazon Redshift ML, combined with its federated query processing capabilities enables data analysts and database developers to create a platform to detect patterns (Figure 5). With this platform, health practitioners are able to make more accurate, data-driven decisions.

Figure 5. Amazon Redshift federated query with Amazon Redshift ML

Figure 5. Amazon Redshift federated query with Amazon Redshift ML

2. Sales and marketing use case

To run marketing campaigns, the sales and marketing team must search customer data from a relational database, with event data in a non-relational data store. We will move the data from Aurora MySQL-Compatible and Amazon DynamoDB to Amazon Elasticsearch Service (ES) to meet this requirement.

AWS Database Migration Service (DMS) helps move the change data from Aurora MySQL-Compatible to Amazon ES using Change Data Capture (CDC). AWS Lambda could be used to move the change data from DynamoDB streams to Amazon ES, as shown in Figure 6.

Figure 6. Moving and combining data from Aurora MySQL-Compatible and Amazon DynamoDB to Amazon Elasticsearch Service

Figure 6. Moving and combining data from Aurora MySQL-Compatible and Amazon DynamoDB to Amazon Elasticsearch Service

The sales and marketing team can now run targeted marketing campaigns by querying data from Amazon Elasticsearch Service, see Figure 7. They can improve sales operations by visualizing data with Amazon QuickSight.

Figure 7. Personalized search experience for ad-tech marketing team

Figure 7. Personalized search experience for ad-tech marketing team

3. Healthcare product owner use case

In this scenario, the product owner must define the care delivery value chain. They must develop process maps for patient activity and estimate the cost of patient care. They must analyze these datasets by building business intelligence (BI) reporting and dashboards with a tool like Amazon QuickSight. Amazon Redshift, a cloud scale data warehousing platform, is a good choice for this. Figure 8 illustrates this pattern.

Figure 8. Moving data from Amazon Aurora and Amazon DynamoDB to Amazon Redshift

Figure 8. Moving data from Amazon Aurora and Amazon DynamoDB to Amazon Redshift

The product owners can use integrated business intelligence reports with Amazon Redshift to analyze their data. This way they can make more accurate and appropriate decisions, see Figure 9.

Figure 9. Business intelligence for patient care processes

Figure 9. Business intelligence for patient care processes

4. Health coach use case

In this scenario, the health coach must find a patient based on certain criteria. They would then send personalized communication to connect with the patient to ensure they are following the proposed health plan. This proactive approach contributes to a positive patient outcome. It can also reduce healthcare costs incurred by insurance companies.

To be able to search patient records with multiple data points, it is important to move data from Amazon DynamoDB to Amazon ES. This also will provide a fast and personalized search experience. The health coaches can be notified and will have the information they need to provide guidance to their patients. Figure 10 illustrates this pattern.

Figure 10. Moving Data from Amazon DynamoDB to Amazon ES

Figure 10. Moving Data from Amazon DynamoDB to Amazon ES

The health coaches can use Elasticsearch to search users based on specific criteria. This helps them with counseling and other health plans, as shown in Figure 11.

Figure 11. Simplified personalized search using patient device data

Figure 11. Simplified personalized search using patient device data

Summary

In this post, we highlight how Lake House Architecture on AWS helps with the challenges and tradeoffs of modernization. A Lake House architecture on AWS can help streamline the movement of data between the microservices data stores. This offers new capabilities for various analytics use cases.

For further reading on architectural patterns, and walkthroughs for building Lake House Architecture, see the following resources:

Easily manage your data lake at scale using AWS Lake Formation Tag-based access control

Post Syndicated from Nivas Shankar original https://aws.amazon.com/blogs/big-data/easily-manage-your-data-lake-at-scale-using-tag-based-access-control-in-aws-lake-formation/

Thousands of customers are building petabyte-scale data lakes on AWS. Many of these customers use AWS Lake Formation to easily build and share their data lakes across the organization. As the number of tables and users increase, data stewards and administrators are looking for ways to manage permissions on data lakes easily at scale. Customers are struggling with “role explosion” and need to manage hundreds or even thousands of user permissions to control data access. For example, for an account with 1,000 resources and 100 principals, the data steward would have to create and manage up to 100,000 policy statements. Furthermore, as new principals and resources get added or deleted, these policies have to be updated to keep the permissions current.

Lake Formation Tag-based access control solves this problem by allowing data stewards to create LF-tags (based on their data classification and ontology) that can then be attached to resources. You can create policies on a smaller number of logical tags instead of specifying policies on named resources. LF-tags enable you to categorize and explore data based on taxonomies, which reduces policy complexity and scales permissions management. You can create and manage policies with tens of logical tags instead of the thousands of resources. LF-tags access control decouples policy creation from resource creation, which helps data stewards manage permissions on a large number of databases, tables, and columns by removing the need to update policies every time a new resource is added to the data lake. Finally, LF-tags access allows you to create policies even before the resources come into existence. All you have to do is tag the resource with the right LF-tags to ensure it is managed by existing policies.

This post focuses on managing permissions on data lakes at scale using LF-tags in Lake Formation. When it comes to managing data lake catalog tables from AWS Glue and administering permission to Lake Formation, data stewards within the producing accounts have functional ownership based on the functions they support, and can grant access to various consumers, external organizations, and accounts. You can now define LF-tags; associate at the database, table, or column level; and then share controlled access across analytic, machine learning (ML), and extract, transform, and load (ETL) services for consumption. LF-tags ensures that governance can be scaled easily by replacing the policy definitions of thousands of resources with a small number of logical tags.

LF-tags access has three main components:

  • Tag ontology and classification – Data stewards can define a LF-tag ontology based on data classification and grant access based on LF-tags to AWS Identity and Access Management (IAM) principals and SAML principals or groups
  • Tagging resources – Data engineers can easily create, automate, implement, and track all LF-tags and permissions against AWS Glue catalogs through the Lake Formation API
  • Policy evaluation – Lake Formation evaluates the effective permissions based on LF-tags at query time and allows access to data through consuming services such as Amazon Athena, Amazon Redshift Spectrum, Amazon SageMaker Data Wrangler, and Amazon EMR Studio, based on the effective permissions granted across multiple accounts or organization-level data shares

Solution overview

The following diagram illustrates the architecture of the solution described in this post.

In this post, we demonstrate how you can set up a Lake Formation table and create Lake Formation tag-based policies using a single account with multiple databases. We walk you through the following high-level steps:

  1. The data steward defines the tag ontology with two LF-tags: Confidential and Sensitive. Data with “Confidential = True” has tighter access controls. Data with “Sensitive = True” requires specific analysis from the analyst.
  2. The data steward assigns different permission levels to the data engineer to build tables with different LF-tags.
  3. The data engineer builds two databases: tag_database and col_tag_database. All tables in tag_database are configured with “Confidential = True”. All tables in the col_tag_database are configured with “Confidential = False”. Some columns of the table in col_tag_database are tagged with “Sensitive = True” for specific analysis needs.
  4. The data engineer grants read permission to the analyst for tables with specific expression condition “Confidential = True” and  “Confidential = FalseSensitive = True”.
  5. With this configuration, the data analyst can focus on performing analysis with the right data.

Provision your resources

This post includes an AWS CloudFormation template for a quick setup. You can review and customize it to suit your needs. The template creates three different personas to perform this exercise and copies the nyc-taxi-data dataset to your local Amazon Simple Storage Service (Amazon S3) bucket.

To create these resources, complete the following steps:

  1. Sign in to the AWS CloudFormation console in the us-east-1 Region.
  2. Choose Launch Stack:
  3. Choose Next.
  4. In the User Configuration section, enter password for three personas: DataStewardUserPassword, DataEngineerUserPassword and DataAnalystUserPassword.
  5. Review the details on the final page and select I acknowledge that AWS CloudFormation might create IAM resources.
  6. Choose Create.

The stack takes up to 5 minutes and creates all the required resources, including:

  • An S3 bucket
  • The appropriate Lake Formation settings
  • The appropriate Amazon Elastic Compute Cloud (Amazon EC2) resources
  • Three user personas with user ID credentials:
    • Data steward (administrator) – The lf-data-steward user has the following access:
      • Read access to all resources in the Data Catalog
      • Can create LF-tags and associate to the data engineer role for grantable permission to other principals
    • Data engineer – The lf-data-engineer user has the following access:
      • Full read, write, and update access to all resources in the Data Catalog
      • Data location permissions in the data lake
      • Can associate LF-tags and associate to the Data Catalog
      • Can attach LF-tags to resources, which provides access to principals based on any policies created by data stewards
    • Data analyst – The lf-data-analyst user has the following access:
      • Fine-grained access to resources shared by Lake Formation Tag-based access policies

Register your data location and create an LF-tag ontology

We perform this first step as the data steward user (lf-data-steward) to verify the data in Amazon S3 and the Data Catalog in Lake Formation.

  1. Sign in to the Lake Formation console as lf-data-steward with the password used while deploying the CloudFormation stack.
  2. In the navigation pane, under Permissions¸ choose Administrative roles and tasks.
  3. For IAM users and roles, choose the user lf-data-steward.
  4. Choose Save to add lf-data-steward as a Lake Formation admin.

    Next, we will update the Data catalog settings to use Lake Formation permission to control catalog resources instead of IAM based access control.
  5. In the navigation pane, under Data catalog¸ choose Settings.
  6. Uncheck Use only IAM access control for new databases.
  7. Uncheck Use only IAM access control for new tables in new databases.
  8. Click Save.

    Next, we need to register the data location for the data lake.
  9. In the navigation pane, under Register and ingest, choose Data lake locations.
  10. For Amazon S3 path, enter s3://lf-tagbased-demo-<<Account-ID>>.
  11. For IAM role¸ leave it as the default value AWSServiceRoleForLakeFormationDataAccess.
  12. Choose Register location.
    Next, we create the ontology by defining a LF-tag.
  13. Under Permissions in the navigation pane, under Administrative roles, choose LF-Tags.
  14. Choose Add LF-tags.
  15. For Key, enter Confidential.
  16. For Values, add True and False.
  17. Choose Add LF-tag.
  18. Repeat the steps to create the LF-tag Sensitive with the value True.
    You have created all the necessary LF-tags for this exercise.Next, we give specific IAM principals the ability to attach newly created LF-tags to resources.
  19. Under Permissions in the navigation pane, under Administrative roles, choose LF-tag permissions.
  20. Choose Grant.
  21. Select IAM users and roles.
  22. For IAM users and roles, search for and choose the lf-data-engineer role.
  23. In the LF-tag permission scope section, add the key Confidential with values True and False, and the key Sensitive with value True.
  24. Under Permissions¸ select Describe and Associate for LF-tag permissions and Grantable permissions.
  25. Choose Grant.

    Next, we grant permissions to lf-data-engineer to create databases in our catalog and on the underlying S3 bucket created by AWS CloudFormation.
  26. Under Permissions in the navigation pane, choose Administrative roles.
  27. In the Database creators section, choose Grant.
  28. For IAM users and roles, choose the lf-data-engineer role.
  29. For Catalog permissions, select Create database.
  30. Choose Grant.

    Next, we grant permissions on the S3 bucket (s3://lf-tagbased-demo-<<Account-ID>>) to the lf-data-engineer user.
  31. In the navigation pane, choose Data locations.
  32. Choose Grant.
  33. Select My account.
  34. For IAM users and roles, choose the lf-data-engineer role.
  35. For Storage locations, enter the S3 bucket created by the CloudFormation template (s3://lf-tagbased-demo-<<Account-ID>>).
  36. Choose Grant.
    Next, we grant lf-data-engineer grantable permissions on resources associated with the LF-tag expression Confidential=True.
  37. In the navigation pane, choose Data permissions.
  38. Choose Grant.
  39. Select IAM users and roles.
  40. Choose the role lf-data-engineer.
  41. In the LF-tag or catalog resources section, Select Resources matched by LF-Tags.
  42. Choose Add LF-Tag.
  43. Add the key Confidential with the values True.
  44. In the Database permissions section, select Describe for Database permissions and Grantable permissions.
  45. In the Table and column permissions section, select Describe, Select, and Alter for both Table permissions and Grantable permissions.
  46. Choose Grant.
    Next, we grant lf-data-engineer grantable permissions on resources associated with the LF-tag expression Confidential=False.
  47. In the navigation pane, choose Data permissions.
  48. Choose Grant.
  49. Select IAM users and roles.
  50. Choose the role lf-data-engineer.
  51. Select Resources matched by LF-tags.
  52. Choose Add LF-tag.
  53. Add the key Confidential with the values False.
  54. In the Database permissions section, select Describe for Database permissions and Grantable permissions.
  55. In the Table and column permissions section, do not select anything.
  56. Choose Grant.
    Next, we grant lf-data-engineer grantable permissions on resources associated with the LF-tag expression Confidential=False and Sensitive=True.
  57. In the navigation pane, choose Data permissions.
  58. Choose Grant.
  59. Select IAM users and roles.
  60. Choose the role lf-data-engineer.
  61. Select Resources matched by LF-tags.
  62. Choose Add LF-tag.
  63. Add the key Confidential with the values False.
  64. Choose Add LF-tag.
  65. Add the key Sensitive with the values True.
  66. In the Database permissions section, select Describe for Database permissions and Grantable permissions.
  67. In the Table and column permissions section, select Describe, Select, and Alter for both Table permissions and Grantable permissions.
  68. Choose Grant.

Create the Lake Formation databases

Now, sign in as lf-data-engineer with the password used while deploying the CloudFormation stack. We create two databases and attach LF-tags to the databases and specific columns for testing purposes.

Create your database and table for database-level access

We first create the database tag_database, the table source_data, and attach appropriate LF-tags.

  1. On the Lake Formation console, choose Databases.
  2. Choose Create database.
  3. For Name, enter tag_database.
  4. For Location, enter the S3 location created by the CloudFormation template (s3://lf-tagbased-demo-<<Account-ID>>/tag_database/).
  5. Deselect Use only IAM access control for new tables in this database.
  6. Choose Create database.

Next, we create a new table within tag_database.

  1. On the Databases page, select the database tag_database.
  2. Choose View Tables and click Create table.
  3. For Name, enter source_data.
  4. For Database, choose the database tag_database.
  5. For Data is located in, select Specified path in my account.
  6. For Include path, enter the path to tag_database created by the CloudFormation template (s3://lf-tagbased-demo-<<Account-ID>>/tag_database/).
  7. For Data format, select CSV.
  8. Under Upload schema, enter the following schema JSON:
    [
                   {
                        "Name": "vendorid",
                        "Type": "string"
                        
                        
                   },
                   {
                        "Name": "lpep_pickup_datetime",
                        "Type": "string"
                        
                        
                   },
                   {
                        "Name": "lpep_dropoff_datetime",
                        "Type": "string"
                        
                        
                   },
                      {
                        "Name": "store_and_fwd_flag",
                        "Type": "string"
                        
                        
                   },
                      {
                        "Name": "ratecodeid",
                        "Type": "string"
                        
                        
                   },
                      {
                        "Name": "pulocationid",
                        "Type": "string"
                        
                        
                   },
                   {
                        "Name": "dolocationid",
                        "Type": "string"
                        
                        
                   },
                      {
                        "Name": "passenger_count",
                        "Type": "string"
                        
                        
                   },
                   {
                        "Name": "trip_distance",
                        "Type": "string"
                        
                        
                   }, 
                      {
                        "Name": "fare_amount",
                        "Type": "string"
                        
                        
                   },
                   {
                        "Name": "extra",
                        "Type": "string"
                        
                        
                   },
                      {
                        "Name": "mta_tax",
                        "Type": "string"
                        
                        
                   },
                   {
                        "Name": "tip_amount",
                        "Type": "string"
                        
                        
                   },
                      {
                        "Name": "tolls_amount",
                        "Type": "string"
                        
                        
                   },
                   {
                        "Name": "ehail_fee",
                        "Type": "string"
                        
                        
                   }, 
                   {
                        "Name": "improvement_surcharge",
                        "Type": "string"
                        
                        
                   },
                   {
                        "Name": "total_amount",
                        "Type": "string"
                        
                        
                   },
                   {
                        "Name": "payment_type",
                        "Type": "string"
                        
                        
                   }
     
    ]
    

  9. Choose Upload.

After uploading the schema, the table schema should look like the following screenshot.

  1. Choose Submit.

Now we’re ready to attach LF-tags at the database level.

  1. On the Databases page, find and select tag_database.
  2. On the Actions menu, choose Edit LF-tags.
  3. Choose Assign new LF-tag.
  4. For Assigned keys¸ choose the Confidential LF-tag you created earlier.
  5. For Values, choose True.
  6. Choose Save.

This completes the LF-tag assignment to the tag_database database.

Create your database and table for column-level access

Now we repeat these steps to create the database col_tag_database and table source_data_col_lvl, and attach LF-tags at the column level.

  1. On the Databases page, choose Create database.
  2. For Name, enter col_tag_database.
  3. For Location, enter the S3 location created by the CloudFormation template (s3://lf-tagbased-demo-<<Account-ID>>/col_tag_database/).
  4. Deselect Use only IAM access control for new tables in this database.
  5. Choose Create database.
  6. On the Databases page, select your new database (col_tag_database).
  7. Choose View tables and Click Create table.
  8. For Name, enter source_data_col_lvl.
  9. For Database, choose your new database (col_tag_database).
  10. For Data is located in, select Specified path in my account.
  11. Enter the S3 path for col_tag_database (s3://lf-tagbased-demo-<<Account-ID>>/col_tag_database/).
  12. For Data format, select CSV.
  13. Under Upload schema, enter the following schema JSON:
    [
                   {
                        "Name": "vendorid",
                        "Type": "string"
                        
                        
                   },
                   {
                        "Name": "lpep_pickup_datetime",
                        "Type": "string"
                        
                        
                   },
                   {
                        "Name": "lpep_dropoff_datetime",
                        "Type": "string"
                        
                        
                   },
                      {
                        "Name": "store_and_fwd_flag",
                        "Type": "string"
                        
                        
                   },
                      {
                        "Name": "ratecodeid",
                        "Type": "string"
                        
                        
                   },
                      {
                        "Name": "pulocationid",
                        "Type": "string"
                        
                        
                   },
                   {
                        "Name": "dolocationid",
                        "Type": "string"
                        
                        
                   },
                      {
                        "Name": "passenger_count",
                        "Type": "string"
                        
                        
                   },
                   {
                        "Name": "trip_distance",
                        "Type": "string"
                        
                        
                   }, 
                      {
                        "Name": "fare_amount",
                        "Type": "string"
                        
                        
                   },
                   {
                        "Name": "extra",
                        "Type": "string"
                        
                        
                   },
                      {
                        "Name": "mta_tax",
                        "Type": "string"
                        
                        
                   },
                   {
                        "Name": "tip_amount",
                        "Type": "string"
                        
                        
                   },
                      {
                        "Name": "tolls_amount",
                        "Type": "string"
                        
                        
                   },
                   {
                        "Name": "ehail_fee",
                        "Type": "string"
                        
                        
                   }, 
                   {
                        "Name": "improvement_surcharge",
                        "Type": "string"
                        
                        
                   },
                   {
                        "Name": "total_amount",
                        "Type": "string"
                        
                        
                   },
                   {
                        "Name": "payment_type",
                        "Type": "string"
                        
                        
                   }
     
    ]
    

  14. Choose Upload.

After uploading the schema, the table schema should look like the following screenshot.

  1. Choose Submit to complete the creation of the table

Now you associate the  Sensitive=True LF-tag to the columns vendorid and fare_amount.

  1. On the Tables page, select the table you created (source_data_col_lvl).
  2. On the Actions menu, choose Edit Schema.
  3. Select the column vendorid and choose Edit LF-tags.
  4. For Assigned keys, choose Sensitive.
  5. For Values, choose True.
  6. Choose Save.

Repeat the steps for the Sensitive LF-tag update for fare_amount column.

  1. Select the column fare_amount and choose Edit LF-tags.
  2. Add the Sensitive key with value True.
  3. Choose Save.
  4. Choose Save as new version to save the new schema version with tagged columns.The following screenshot shows column properties with the LF-tags updated.
    Next we associate the Confidential=False LF-tag to col_tag_database. This is required for lf-data-analyst to be able to describe the database col_tag_database when logged in from Athena.
  5. On the Databases page, find and select col_tag_database.
  6. On the Actions menu, choose Edit LF-tags.
  7. Choose Assign new LF-tag.
  8. For Assigned keys¸ choose the Confidential LF-tag you created earlier.
  9. For Values, choose False.
  10. Choose Save.

Grant table permissions

Now we grant permissions to data analysts for consumption of the database tag_database and the table col_tag_database.

  1. Sign in to the Lake Formation console as lf-data-engineer.
  2. On the Permissions page, select Data Permissions
  3. Choose Grant.
  4. Under Principals, select IAM users and roles.
  5. For IAM users and roles, choose lf-data-analyst.
  6. Select Resources matched by LF-tags.
  7. Choose Add LF-tag.
  8. For Key, choose Confidential.
  9. For Values¸ choose True.
  10. For Database permissions, select Describe
  11. For Table permissions, choose Select and Describe.
  12. Choose Grant.

    This grants permissions to the lf-data-analyst user on the objects associated with the LF-tag Confidential=True (Database : tag_database)  to describe the database and the select permission on tables.Next, we repeat the steps to grant permissions to data analysts for LF-tag expression for Confidential=False . This LF-tag is used for describing the col_tag_database and the table source_data_col_lvl when logged in as lf-data-analyst from Athena. And so, we only grant describe access to the resources through this LF-tag expression.
  13. Sign in to the Lake Formation console as lf-data-engineer.
  14. On the Databases page, select the database col_tag_database.
  15. Choose Action and Grant.
  16. Under Principals, select IAM users and roles.
  17. For IAM users and roles, choose lf-data-analyst.
  18. Select Resources matched by LF-tags.
  19. Choose Add LF-tag.
  20. For Key, choose Confidential.
  21. For Values¸ choose False.
  22. For Database permissions, select Describe.
  23. For Table permissions, do not select anything.
  24. Choose Grant.

    Next, we repeat the steps to grant permissions to data analysts for LF-tag expression for Confidential=False and Sensitive=True. This LF-tag is used for describing the col_tag_database and the table source_data_col_lvl (Column level) when logged in as lf-data-analyst from Athena.
  25. Sign in to the Lake Formation console as lf-data-engineer.
  26. On the Databases page, select the database col_tag_database.
  27. Choose Action and Grant.
  28. Under Principals, select IAM users and roles.
  29. For IAM users and roles, choose lf-data-analyst.
  30. Select Resources matched by LF-tags.
  31. Choose Add LF-tag.
  32. For Key, choose Confidential.
  33. For Values¸ choose False.
  34. Choose Add LF-tag.
  35. For Key, choose Sensitive.
  36. For Values¸ choose True.
  37. For Database permissions, select Describe.
  38. For Database permissions, select Describe.
  39. For Table permissions, select Select and Describe.
  40. Choose Grant.

Run a query in Athena to verify the permissions

For this step, we sign in to the Athena console as lf-data-analyst and run SELECT queries against the two tables (source_data and source_data_col_lvl). We use our S3 path as the query result location (s3://lf-tagbased-demo-<<Account-ID>>/athena-results/).

  1. In the Athena query editor, choose tag_database in the left panel.
  2. Choose the additional menu options icon (three vertical dots) next to source_data and choose Preview table.
  3. Choose Run query.

The query should take a few minutes to run. The following screenshot shows our query results.

The first query displays all the columns in the output because the LF-tag is associated at the database level and the source_data table automatically inherited the LF-tag from the database tag_database.

  1. Run another query using col_tag_database and source_data_col_lvl.

The second query returns just the two columns that were tagged (Non-Confidential and Sensitive).

As a thought experiment, you can also check to see the Lake Formation Tag-based access policy behavior on columns to which the user doesn’t have policy grants.

When an untagged column is selected from the table source_data_col_lvl, Athena returns an error. For example, you can run the following query to choose untagged columns geolocationid:

SELECT geolocationid FROM "col_tag_database"."source_data_col_lvl" limit 10;

Extend the solution to cross-account scenarios

You can extend this solution to share catalog resources across accounts. The following diagram illustrates a cross-account architecture.

We describe this in more detail in a subsequent post.

Clean up

To help prevent unwanted charges to your AWS account, you can delete the AWS resources that you used for this walkthrough.

  1. Sign in as lf-data-engineer Delete the databases tag_database and col_tag_database
  2. Now, Sign in as lf-data-steward and clean up all the LF-tag Permissions, Data Permissions and Data Location Permissions that were granted above that were granted lf-data-engineer and lf-data-analyst.
  3. Sign in to the Amazon S3 console as the account owner (the IAM credentials you used to deploy the CloudFormation stack).
  4. Delete the following buckets:
    1. lf-tagbased-demo-accesslogs-<acct-id>
    2. lf-tagbased-demo-<acct-id>
  5. On the AWS CloudFormation console, delete the stack you created.
  6. Wait for the stack status to change to DELETE_COMPLETE.

Conclusion

In this post, we explained how to create a LakeFormation Tag-based access control policy in Lake Formation using an AWS public dataset. In addition, we explained how to query tables, databases, and columns that have LakeFormation Tag-based access policies associated with them.

You can generalize these steps to share resources across accounts. You can also use these steps to grant permissions to SAML identities. In subsequent posts, we highlight these use cases in more detail.


About the Authors

Sanjay Srivastava is a principal product manager for AWS Lake Formation. He is passionate about building products, in particular products that help customers get more out of their data. During his spare time, he loves to spend time with his family and engage in outdoor activities including hiking, running, and gardening.



Nivas Shankar is a Principal Data Architect at Amazon Web Services. He helps and works closely with enterprise customers building data lakes and analytical applications on the AWS platform. He holds a master’s degree in physics and is highly passionate about theoretical physics concepts.


Pavan Emani is a Data Lake Architect at AWS, specialized in big data and analytics solutions. He helps customers modernize their data platforms on the cloud. Outside of work, he likes reading about space and watching sports.


Effective data lakes using AWS Lake Formation, Part 5: Securing data lakes with row-level access control

Post Syndicated from Noritaka Sekiyama original https://aws.amazon.com/blogs/big-data/effective-data-lakes-using-aws-lake-formation-part-5-secure-data-lakes-with-row-level-access-control/

Increasingly, customers are looking at data lakes as a core part of their strategy to democratize data access across the organization. Data lakes enable you to handle petabytes and exabytes of data coming from a multitude of sources in varying formats, and gives users the ability to access it from their choice of analytics and machine learning tools. Fine-grained access controls are needed to ensure data is protected and access is granted to only those who require it.

AWS Lake Formation is a fully managed service that helps you build, secure, and manage data lakes, and provide access control for data in the data lake. Lake Formation row-level permissions allow you to restrict access to specific rows based on data compliance and governance policies. Lake Formation also provides centralized auditing and compliance reporting by identifying which principals accessed what data, when, and through which services.

Effective data lakes using AWS Lake Formation

This post demonstrates how row-level access controls work in Lake Formation, and how to set them up.

If you have large fact tables storing billions of records, you need a way to enable different users and teams to access only the data they’re allowed to see. Row-level access control is a simple and performant way to protect data, while giving users access to the data they need to perform their job. In the retail industry for instance, you may want individual departments to only see their own transactions, but allow regional managers access to transactions from every department.

Traditionally you can achieve row-level access control in a data lake through two common approaches:

  • Duplicate the data, redact sensitive information, and grant coarse-grained permissions on the redacted dataset
  • Load data into a database or a data warehouse, create a view with a WHERE clause to select only specific records, and grant permission on the resulting view

These solutions work well when dealing with a small number of tables, principals, and permissions. However, they make it difficult to audit and maintain because access controls are spread across multiple systems and methods. To make it easier to manage and enforce fine-grained access controls in a data lake, we announced a preview of Lake Formation row-level access controls. With this preview feature, you can create row-level filters and attach them to tables to restrict access to data for AWS Identity and Access Management (IAM) and SAMLv2 federated identities.

How data filters work for row-level security

Granting permissions on a table with row-level security (row filtering) restricts access to only specific rows in the table. The filtering is based on the values of one or more columns. For example, a salesperson analyzing sales opportunities should only be allowed to see those opportunities in their assigned territory and not others. We can define row-level filters to restrict access where the value of the territory column matches the assigned territory of the user.

With row-level security, we introduced the concept of data filters. Data filters make it simpler to manage and assign a large number of fine-grained permissions. You can specify the row filter expression using the WHERE clause syntax described in the PartiQL dialect.

Example use case

In this post, a fictional ecommerce company sells many different products, like books, videos, and toys. Customers can leave reviews and star ratings for each product, so other customers can make informed decisions about what they should buy. We use the Amazon Customer Reviews Dataset, which includes different products and customer reviews.

To illustrate the different roles and responsibilities of a data owner and a data consumer, we assume two personas: a data lake administrator and a data analyst. The administrator is responsible for setting up the data lake, creating data filters, and granting permissions to data analysts. Data analysts residing in different countries (for our use case, the US and Japan) can only analyze product reviews for customers located in their own country and for compliance reasons, shouldn’t be able to see data for customers located in other countries. We have two data analysts: one responsible for the US marketplace and another for the Japanese marketplace. Each analyst uses Amazon Athena to analyze customer reviews for their specific marketplace only.

Set up resources with AWS CloudFormation

This post includes an AWS CloudFormation template for a quick setup. You can review and customize it to suit your needs.

The CloudFormation template generates the following resources:

  • An AWS Lambda function (for Lambda-backed AWS CloudFormation custom resources). We use the function to copy sample data files from the public S3 bucket to your Amazon Simple Storage Service (Amazon S3) bucket.
  • An S3 bucket to serve as our data lake.
  • IAM users and policies:
    • DataLakeAdmin
    • DataAnalystUS
    • DataAnalystJP
  • An AWS Glue Data Catalog database, table, and partition.
  • Lake Formation data lake settings and permissions.

When following the steps in this section, use either us-east-1 or us-west-2 Regions (where the preview functionality is currently available).

Before launching the CloudFormation template, you need to ensure that you disabled Use only IAM access control for new databases/tables by following steps:

  1. Sign in to the Lake Formation console in the us-east-1 or us-west-2 Region.
  2. Under Data catalog, choose Settings.
  3. Deselect Use only IAM access control for new databases and Use only IAM access control for new tables in new databases.
  4. Choose Save.

To launch the CloudFormation stack, complete the following steps:

  1. Sign in to the CloudFormation console in the same Region.
  2. Choose Launch Stack:
  3. Choose Next.
  4. For DatalakeAdminUserName and DatalakeAdminUserPassword, enter the user name and password you want for the data lake admin IAM user.
  5. For DataAnalystUsUserName and DataAnalystUsUserPassword, enter the user name and password you want for the data analyst user who is responsible for the US marketplace.
  6. For DataAnalystJpUserName and DataAnalystJpUserPassword, enter the user name and password you want for the data analyst user who is responsible for the Japanese marketplace.
  7. For DataLakeBucketName, enter the name of your data lake bucket.
  8. For DatabaseName and TableName, leave as the default.
  9. Choose Next.
  10. On the next page, choose Next.
  11. Review the details on the final page and select I acknowledge that AWS CloudFormation might create IAM resources.
  12. Choose Create.

Stack creation can take about 1 minute.

Query without data filters

After you set up the environment, you can query the product reviews table. Let’s first query the table without row-level access controls to make sure we can see the data. If you’re running queries in Athena for the first time, you need to configure the query result location.

Sign in to the Athena console using the DatalakeAdmin user, and run the following query:

SELECT * 
FROM lakeformation_tutorial_row_security.amazon_reviews
LIMIT 10

The following screenshot shows the query result. This table has only one partition, product_category=Video, so each record is a review comment for a video product.

Let’s run an aggregation query to retrieve the total number of records per marketplace:

SELECT marketplace, count(*) as total_count
FROM lakeformation_tutorial_row_security.amazon_reviews
GROUP BY marketplace

The following screenshot shows the query result. The marketplace column has five different values. In the subsequent steps, we set up row-based filters using the marketplace column.

Set up data filters

Let’s start by creating two different data filters, one for the analyst responsible for the US marketplace, and another for the one responsible for the Japanese marketplace. The we grant the users their respective permissions.

Create a filter for the US marketplace data

Let’s first set up a filter for the US marketplace data.

  1. As the DatalakeAdmin user, open the Lake Formation console.
  2. Choose Data filters.
  3. Choose Create new filter.
  4. For Data filter name, enter amazon_reviews_US.
  5. For Target database, choose the database lakeformation_tutorial_row_security.
  6. For Target table, choose the table amazon_reviews.
  7. For Column-level access, leave as the default.
  8. For Row filter expression, enter marketplace='US'.
  9. Choose Create filter.

Create a filter for the Japanese marketplace data

Let’s create another data filter to restrict access to the Japanese marketplace data.

  1. On the Data filters page, choose Create new filter.
  2. For Data filter name, enter amazon_reviews_JP.
  3. For Target database, choose the database lakeformation_tutorial_row_security.
  4. For Target table, choose the table amazon_reviews.
  5. For Column-level access, leave as the default.
  6. For Row filter expression, enter marketplace='JP'.
  7. Choose Create filter.

Grant permissions to the US data analyst

Now we have two data filters. Next, we need to grant permissions using these data filters to our analysts. We start by granting permissions to the DataAnalystUS user.

  1. On the Data permissions page, choose Grant.
  2. For Principals, choose IAM users and roles, and choose the user DataAnalystUS.
  3. For Policy tags or catalog resources, choose Named data catalog resources.
  4. For Database, choose the database lakeformation_tutorial_row_security.
  5. For Table, choose the table amazon_reviews.
  6. For Table permissions, select Select.
  7. For Data permissions, select Advanced cell-level filters.
  8. Select the filter amazon_reviews_US.
  9. Choose Grant.

The following screenshot show the available data filters you can attach to a table when configuring permissions.

Grant permissions to the Japanese data analyst

Next, complete the following steps to configure permissions for the user DataAnalystJP:

  1. On the Data permissions page, choose Grant.
  2. For Principals, choose IAM users and roles, and choose the user DataAnalystJP.
  3. For Policy tags or catalog resources, choose Named data catalog resources.
  4. For Database, choose the database lakeformation_tutorial_row_security.
  5. For Table, choose the table amazon_reviews.
  6. For Table permissions, select Select.
  7. For Data permissions, select Advanced cell-level filters.
  8. Select the filter amazon_reviews_JP.
  9. Choose Grant.

Query with data filters

With the data filters attached to the product reviews table, we’re ready to run some queries and see how permissions are enforced by Lake Formation. Because row-level security is in preview as of this writing, we need to create a special Athena workgroup named AmazonAthenaLakeFormationPreview, and switch to using it. For more information, see Managing Workgroups.

Sign in to the Athena console using the DataAnalystUS user and switch to the AmazonAthenaLakeFormationPreview workgroup. Run the following query to retrieve a few records, which are filtered based on the row-level permissions we defined:

SELECT * 
FROM lakeformation.lakeformation_tutorial_row_security.amazon_reviews
LIMIT 10

Note the prefix of lakeformation. before the database name; this is required for the preview only.

The following screenshot shows the query result.

Similarly, run a query to count the total number of records per marketplace:

SELECT marketplace, count(*) as total_count
FROM lakeformation.lakeformation_tutorial_row_security.amazon_reviews
GROUP BY marketplace 

The following screenshot shows the query result. Only the marketplace US shows in the results. This is because our user is only allowed to see rows where the marketplace column value is equal to US.

Switch to the DataAnalystJP user and run the same query:

SELECT * 
FROM lakeformation.lakeformation_tutorial_row_security.amazon_reviews
LIMIT 10

The following screenshot shows the query result. All of the records belong to the JP marketplace.

Run the query to count the total number of records per marketplace:

SELECT marketplace, count(*) as total_count
FROM lakeformation.lakeformation_tutorial_row_security.amazon_reviews
GROUP BY marketplace

The following screenshot shows the query result. Again, only the row belonging to the JP marketplace is returned.

Clean up

Now to the final step, cleaning up the resources.

  1. Delete the CloudFormation stack.
  2. Delete the Athena workgroup AmazonAthenaLakeFormationPreview.

Conclusion

In this post, we covered how row-level security in Lake Formation enables you to control data access without needing to duplicate it or manage complicated alternatives such as views. We demonstrated how Lake Formation data filters can make creating, managing, and enforcing row-level permissions simple and easy.

When you want to grant permission on specific cell, you can include or exclude columns in the data filters in addition to the row filter expression. You can learn more about the cell filters in Part 4: Implementing cell-level and row-level security.

You can get started with Lake Formation today by visiting the AWS Lake Formation product page. If you want to try out row-level security, as well as the other exciting new features like ACID transactions and acceleration currently available for preview in the US East (N. Virginia) and the US West (Oregon) Regions, sign up for the preview.


About the Authors

Noritaka Sekiyama is a Senior Big Data Architect on the AWS Glue and AWS Lake Formation team. He has 11 years of experience working in the software industry. Based in Tokyo, Japan, he is responsible for implementing software artifacts, building libraries, troubleshooting complex issues and helping guide customer architectures.


Sanjay Srivastava is a Principal Product Manager for AWS Lake Formation. He is passionate about building products, in particular products that help customers get more out of their data. During his spare time, he loves to spend time with his family and engage in outdoor activities including hiking, running, and gardening.


Incremental data matching using AWS Lake Formation and AWS Glue

Post Syndicated from Shehzad Qureshi original https://aws.amazon.com/blogs/big-data/incremental-data-matching-using-aws-lake-formation/

AWS Lake Formation provides a machine learning (ML) capability (FindMatches transform) to identify duplicate or matching records in your dataset, even when the records don’t have a common unique identifier and no fields match exactly. Customers across many industries have come to rely on this feature for linking datasets like patient records, customer databases, and TV shows. The initial release of the FindMatches transform identified matching records within a single dataset. When you had a new dataset, you had to merge it with the existing clean dataset and rerun matching against the complete merged dataset.

We’re excited to announce the Lake Formation FindMatches incremental matching feature (Find Incremental Matches), which enables you to effortlessly match to incremental records against existing matched datasets.

In this post, you learn how to use the Find Incremental Matches capability to match prospects data with existing customer datasets for the marketing department of a fictional company. The dataset used for this post is synthetically generated.

Overview of solution

The marketing department of our fictional company is responsible for organizing promotion campaigns every month and developing communications content to promote services and product to prospects (potential new customers). A list of prospects is generated by multiple internal business processes and also from multiple third-party services.

At end of each month, the marketing team ends up with hundreds of thousands of prospects. Now the team has the herculean task of identifying unique prospects by removing duplicates and existing customers from the list.

The prospect list purchased from the third-party service doesn’t have any common unique identifiers like Social Security number (SSN) or driver’s license, which makes these tasks arduous to do manually.

You can use the ML capabilities of Lake Formation to address this challenge. The Find Incremental Matches transform enables you to identify duplicate or matching records in your dataset, even when the records don’t have a common unique identifier and no fields match exactly.

Specifically, the new incremental match capability provides the flexibility to match hundreds of thousands of new prospects with the existing database of prospects and customers without merging the two databases. Moreover, by conducting matches only between the new and existing datasets, the Find Incremental Matches optimization reduces computation time, which also reduces cost.

The following screenshot shows a sample of the existing customers dataset.

The following screenshot shows a sample of the incremental prospect dataset.

In this post, you perform the following steps for incremental matching:

  1. Run an AWS Glue extract, transform, and load (ETL) job for initial matching.
  2. Run an AWS Glue ETL job for incremental matching.
  3. Verify output data from Amazon Simple Storage Service (Amazon S3) with Amazon Athena.

The first step of initial matching is mandatory in order to perform incremental matching.

Prerequisites

To create resources for incremental matching in AWS Glue, launch the following AWS CloudFormation stack in the us-east-1 Region:

This stack creates the following resources:

  • A S3 bucket that stores the input and outputs of matching
  • The AWS Glue database marketing-demo
  • AWS Glue tables for existing and incremental customers:
    • existing_customers – Raw customer data
    • cleaned_existing_customers – Matched and cleaned customer data. This is the output generated by InitialMatching job.
    • incremental_prospects – New incremental prospects data for matching
    • unique_prospects – Final output of unique prospects as required by this post’s use case
  • The AWS Glue ML transform incremental-match-blog-transform
  • AWS Glue Jobs for initial matching and incremental matching:
    • InitialMatching – For matching and transforming existing_customers to cleaned_existing_customers
    • IncrementalMatching – For incrementally matching new prospects data with cleaned_existing_customers and identifying unique prospects
  • IAM roles

Run an AWS Glue ETL job for initial matching

Before we perform the incremental matching, we need to clean the existing customer datasets by running an AWS Glue ETL job:

  1. On the AWS Glue console, choose Jobs in the navigation pane.
  2. Select the job InitialMatching.
  3. On the Action menu, choose Run job.

This job uses the FindMatches transformation to identify unique and matched customers from the existing_customers table and writes it to the cleaned_existing_customers table. The transform adds another column named match_id to identify matching records in the output. Rows with the same match_id are considered matching records.

The cleaned_existing_customers table becomes the primary customer data table and incremental customer data is matched against this table.

Run an AWS Glue ETL job for incremental matching

To perform the incremental matching, complete the following steps:

  1. On the AWS Glue console, choose Jobs in the navigation pane.
  2. Select the job IncrementalMatching.
  3. On the Action menu, choose Run job.

In comparison to the initial FindMatches scripts, the following changes are added to read data from the incremental customers table (lines 24 and 27) and call the incremental matching API (line 30):

L6
import com.amazonaws.services.glue.ml.FindIncrementalMatches

L22
val existingCustomersSource = glueContext.getCatalogSource(database = "marketing-demo", 
							   tableName = "cleaned_existing_customers", 
							   redshiftTmpDir = "", 
							   transformationContext = "existingCustomersSource").getDynamicFrame()

L24
val incrementalProspectsSource = glueContext.getCatalogSource(database = "marketing-demo", 
							      tableName = "incremental_prospects", 
							      redshiftTmpDir = "", 
							      transformationContext = "incrementalProspectsSource").getDynamicFrame()

L26
val existingCustomers = existingCustomersSource.resolveChoice(choiceOption = Some(ChoiceOption("MATCH_CATALOG")), 
							      database = Some("marketing-demo"), 
							      tableName = Some("cleaned_existing_customers"), 
							      transformationContext = "existingCustomers")

L27
val incrementalProspects = incrementalProspectsSource.resolveChoice(choiceOption = Some(ChoiceOption("MATCH_CATALOG")), 
								    database = Some("marketing-demo"), 
								    tableName = Some("incremental_prospects"), 
								    transformationContext = "incrementalProspects")

L30
val incrementalMatchesResult = FindIncrementalMatches.apply(existingFrame = existingCustomers, 
					   		    incrementalFrame = incrementalProspects, 
					   		    transformId = args("tansform_id"), 
					   		    transformationContext = "findIncrementalMatches")

The DynamicFrame incrementalMatchesResult contains both matched and unmatched records from the incremental prospects dataset. Matching is done both within the prospects dataset and against the existing customer dataset. In the script, the DynamicFrame incrementalMatchesResult is further processed to filter and store the unique prospects from the incremental dataset (lines 37–53).

The job takes a few minutes to complete with 10 worker nodes. When the job is complete, you can find the matched records in the target S3 path specified in the script.

Create an AWS Glue job bookmark

Because the incremental matching targets the datasets that are received at certain intervals and joins with the existing dataset to generate output, we highly recommend you enable AWS Glue job bookmarks when you create the job. This way, when the new incremental dataset is available, you can schedule the job to run and don’t need to make any change in the ETL script.

  1. On the AWS Glue console, choose Jobs in the navigation pane.
  2. Select the job IncrementalMatching.
  3. On the Action menu, choose Edit job.
  4. Under Advanced properties, for Job bookmark, choose Enable.
  5. Choose Save.

When a new prospect dataset arrives, you only need to upload it to the bucket of incremental dataset and run the incremental matching job you have created. AWS Glue job bookmarks track both the existing and incremental data that has already been processed during your previous job run, so the job automatically reads the cleaned customer dataset generated by the previous job and the newly added incremental prospect dataset. The incremental matching job writes the output to the same target S3 path.

Verify the output

To review the unique prospects identified by the IncrementalMatching job, complete the following steps:

  1. On the Athena console, make sure you’re in the correct Region.
  2. Choose AwsGlueDataCatalog as your data source and marketing_demo as the database.
  3. Create the following query:
    SELECT * FROM "marketing_demo"."unique_prospects";

  4. Choose Run query.

The Results window shows all the unique customers from the incremental customer dataset.

Pricing

In Region us-east-1, the total runtime is approximately 7 minutes for both the jobs. We configured these jobs to run with 10 workers with the standard worker type, resulting in a total cost of $1.47. Pricing can vary by region. For more information, see AWS Glue pricing.

Conclusion

This post showed how you can incrementally match a new prospect dataset against an existing customer dataset using the Lake Formation FindMatches transform in order to identify unique prospects. You can use a similar process to identify duplicates and matched records from the incremental dataset, and it’s especially useful in the use case of product matching and fraud detection.

To learn more, see the AWS Glue PySpark or Scala documentation. Please send any feedback to the AWS Glue Discussion Forums or through your usual AWS Support contacts.


About the Authors

Shehzad Qureshi is a Senior Software Engineer at Amazon Web Services.


Bin Pang is a software development engineer at Amazon Web Services.


Deenbandhu Prasad is a Senior Analytics Specialist at AWS, specializing in big data services. He is passionate about helping customers build modern data platforms on the AWS Cloud. He has helped customers of all sizes implement data management, data warehouse, and data lake solutions.

Create a secure data lake by masking, encrypting data, and enabling fine-grained access with AWS Lake Formation

Post Syndicated from Shekar Tippur original https://aws.amazon.com/blogs/big-data/create-a-secure-data-lake-by-masking-encrypting-data-and-enabling-fine-grained-access-with-aws-lake-formation/

You can build data lakes with millions of objects on Amazon Simple Storage Service (Amazon S3) and use AWS native analytics and machine learning (ML) services to process, analyze, and extract business insights. You can use a combination of our purpose-built databases and analytics services like Amazon EMR, Amazon Elasticsearch Service (Amazon ES), and Amazon Redshift as the right tool for your specific job and benefit from optimal performance, scale, and cost.

In this post, you learn how to create a secure data lake using AWS Lake Formation for processing sensitive data. The data (simulated patient metrics) is ingested through a serverless pipeline to identify, mask, and encrypt sensitive data before storing it securely in Amazon S3. After the data has been processed and stored, you use Lake Formation to define and enforce fine-grained access permissions to provide secure access for data analysts and data scientists.

Target personas

The proposed solution focuses on the following personas, with each one having different level of access:

  • Cloud engineer – As the cloud infrastructure engineer, you implement the architecture but may not have access to the data itself or to define access permissions
  • secure-lf-admin – As a data lake administrator, you configure the data lake setting and assign data stewards
  • secure-lf-business-analyst – As a business analyst, you shouldn’t be able to access sensitive information
  • secure-lf-data-scientist – As a data scientist, you shouldn’t be able to access sensitive information

Solution overview

We use the following AWS services for ingesting, processing, and analyzing the data:

  • Amazon Athena is an interactive query service that can query data in Amazon S3 using standard SQL queries using tables in an AWS Glue Data Catalog. The data can be accessed via JDBC for further processing such as displaying in business intelligence (BI) dashboards.
  • Amazon CloudWatch is a monitoring and observability service that provides you with data and actionable insights to monitor your applications, respond to system-wide performance changes, and more. The logs from AWS Glue jobs and AWS Lambda functions are saved in CloudWatch logs.
  • Amazon Comprehend is a natural language processing (NLP) service that uses ML to uncover information in unstructured data.
  • Amazon DynamoDB is a NoSQL database that delivers single-digit millisecond performance at any scale and is used to avoid processing duplicates files.
  • AWS Glue is a serverless data preparation service that makes it easy to extract, transform, and load (ETL) data. An AWS Glue job encapsulates a script that reads, processes, and writes data to a new schema. This solution uses Python3.6 AWS Glue jobs for ETL processing.
  • AWS IoT provides the cloud services that connect your internet of things (IoT) devices to other devices and AWS Cloud services.
  • Amazon Kinesis Data Firehose is the easiest way to reliably load streaming data into data lakes, data stores, and analytics services.
  • AWS Lake Formation makes it easy to set up, secure, and manage your data lake. With Lake Formation, you can discover, cleanse, transform, and ingest data into your data lake from various sources; define fine-grained permissions at the database, table, or column level; and share controlled access across analytic, ML, and ETL services.
  • Amazon S3 is a scalable object storage service that hosts the raw data files and processed files in the data lake for millisecond access.

You can enhance the security of your sensitive data with the following methods:

  • Implement encryption at rest using AWS Key Management Service (AWS KMS) and customer managed encryption keys
  • Instrument AWS CloudTrail and audit logging
  • Restrict access to AWS resources based on the least privilege principle

Architecture overview

The solution emulates diagnostic devices sending Message Queuing Telemetry Transport (MQTT) messages onto an AWS IoT Core topic. We use Kinesis Data Firehose to preprocess and stage the raw data in Amazon S3. We then use AWS Glue for ETL to further process the data by calling Amazon Comprehend to identify any sensitive information. Finally, we use Lake Formation to define fine-grained permissions that restrict access to business analysts and data scientists who use Athena to query the data.

The following diagram illustrates the architecture for our solution.

Prerequisites

To follow the deployment walkthrough, you need an AWS account. Use us-east-1 or us-west-2 as your Region.

For this post, make sure you don’t have Lake Formation enabled in your AWS account.

Stage the data

Download the zipped archive file to use for this solution and unzip the files locally. patient.csv file is dummy data created to help demonstrate masking, encryption, and granting fine-grained access. The send-messages.sh script randomly generates simulated diagnostic data to represent body vitals. AWS Glue job uses glue-script.py script to perform ETL that detects sensitive information, masks/encrypt data, and populates curated table in AWS Glue catalog.

Create an S3 bucket called secure-datalake-scripts-<ACCOUNT_ID> via the Amazon S3 console. Upload the scripts and CSV files to this location.

Deploy your resources

For this post, we use AWS CloudFormation to create our data lake infrastructure.

  1. Choose Launch Stack:
  2. Select I acknowledge that AWS CloudFormation might create IAM resources with custom names before deploying.

The stack takes approximately 5 minutes to complete.

The following screenshot shows the key-values the stack created. We use the TestUserPassword parameter for the Lake Formation personas to sign in to the AWS Management Console.

Load the simulation data

Sign in to the AWS CloudShell console and wait for the terminal to start.

Stage the send-messages.sh script by running the Amazon S3 copy command:

aws s3 cp s3://secure-datalake-scripts-<ACCOUNT_ID>/send-messages.sh

Run your script by using the following command:

sh send-messages.sh.

The script runs for a few minutes and emits 300 messages. This sends MQTT messages to the secure_iot_device_analytics topic, filtered using IoT rules, processed using Kinesis Data Firehose, and converted to Parquet format. After a minute, data starts showing up in the raw bucket.

Run the AWS Glue ETL pipeline

Run AWS Glue workflow (secureGlueWorkflow) from the AWS Glue console; you can also schedule to run this using CloudWatch. It takes approximately 10 minutes to complete.

The AWS Glue job that is triggered as part of the workflow (ProcessSecureData) joins the patient metadata and patient metrics data. See the following code:

# Join Patient metadata and patient metrics dataframe
combined_df=Join.apply(patient_metadata, patient_metrics, 'PatientId', 'pid', transformation_ctx = "combined_df")

The ensuing dataframe contains sensitive information like FirstName, LastName, DOB, Address1, Address2, and AboutYourself. AboutYourself is freeform text entered by the patient during registration. In the following code snippet, the detect_sensitive_info function calls the Amazon Comprehend API to identify personally identifiable information (PII):

# Apply groupBy to get unique  AboutYourself records
group=combined_df.toDF().groupBy("pid","DOB", "FirstName", "LastName", "Address1", "Address2", "AboutYourself").count()
# Apply detect_sensitive_info to get the redacted string after masking  PII data
df_with_about_yourself = Map.apply(frame = group_df, f = detect_sensitive_info)
# Apply encryption to the identified fields
df_with_about_yourself_encrypted = Map.apply(frame = group_df, f = encrypt_rows)

Amazon Comprehend returns an object that has information about the entity name and entity type. Based on your needs, you can filter the entity types that need to be masked.

These fields are masked, encrypted, and written to their respective S3 buckets where fine-grained access controls are applied via Lake Formation:

  • Masked datas3://secure-data-lake-masked-<ACCOUNT_ID>
    secure-dl-masked-data/
  • Encrypted datas3://secure-data-lake-masked-<ACCOUNT_ID>
    secure-dl-encrypted-data/
  • Curated datas3://secure-data-lake-<ACCOUNT_ID>
    secure-dl-curated-data/

Now that the tables have been defined, we review permissions using Lake Formation.

Enable Lake Formation fine-grained access

To enable fine-grained access, we first add a Lake Formation admin user.

  1. On the Lake Formation console, select Add other AWS users or roles.
  2. On the drop-down menu, choose secure-lf-admin.
  3. Choose Get started.
  4. In the navigation pane, choose Settings.
  5. On the Data Catalog Settings page, deselect Use only IAM access control for new databases and Use only IAM access control for new tables in new databases.
  6. Choose Save.

Grant access to different personas

Before we grant permissions to different user personas, let’s register the S3 locations in Lake Formation so these personas can access S3 data without granting access through AWS Identity and Access Management (IAM).

  1. On the Lake Formation console, choose Register and ingest in the navigation pane.
  2. Choose Data lake locations.
  3. Choose Register location.
  4. Find and select each of the following S3 buckets and choose Register location:
    1. s3://secure-raw-bucket-<ACCOUNT_ID>/temp-raw-table
    2. s3://secure-data-lake-masked-<ACCOUNT_ID>/secure-dl-encrypted-data
    3. s3://secure-data-lake-<ACCOUNT_ID>/secure-dl-curated-data
    4. s3://secure-data-lake-masked-<ACCOUNT_ID>/secure-dl-masked-data

We’re now ready to grant access to our different users.

Grant read-only access to all the tables to secure-lf-admin

First, we grant read-only access to all the tables for the user secure-lf-admin.

  1. Sign in to the console with secure-lf-admin (use the password value for TestUserPassword from the CloudFormation stack) and make sure you’re in the same Region.
  2. Navigate to AWS Lake Formation console
  3. Under Data Catalog, choose Databases.
  4. Select the database secure-db.
  5. On the Actions drop-down menu, choose Grant.
  6. Select IAM users and roles.
  7. Choose the role secure-lf-admin.
  8. Under Policy tags or catalog resources, select Named data catalog resources.
  9. For Database, choose the database secure-db.
  10. For Tables, choose All tables.
  11. Under Permissions, select Table permissions.
  12. For Table permissions, select Super.
  13. Choose Grant.
  14. Choosesecure_dl_curated_data table.
  15. On the Actions drop-down menu, chose View permissions.
  16. Check IAMAllowedPrincipals and select Revoke and click on Revoke button.

You can confirm your user permissions on the Data Permissions page.

Grant read-only access to secure-lf-business-analyst

Now we grant read-only access to certain encrypted columns to the user secure-lf-business-analyst.

  1. On the Lake Formation console, under Data Catalog, choose Databases.
  2. Select the database secure-db and choose View tables.
  3. Select the table secure_dl_encrypted_data.
  4. On the Actions drop-down menu, choose Grant.
  5. Select IAM users and roles.
  6. Choose the role secure-lf-business-analyst.
  7. Under Permissions, select Column-based permissions.
  8. Choose the following columns:
    1. count
    2. address1_encrypted
    3. firstname_encrypted
    4. address2_encrypted
    5. dob_encrypted
    6. lastname_encrypted
  9. For Grantable permissions, select Select.
  10. Choose Grant.
  11. Chose secure_dl_encrypted_data table.
  12. On the Actions drop-down menu, chose View permissions.
  13. Check IAMAllowedPrincipals and select Revoke and click on Revoke button.

You can confirm your user permissions on the Data Permissions page.

Grant read-only access to secure-lf-data-scientist

Lastly, we grant read-only access to masked data to the user secure-lf-data-scientist.

  1. On the Lake Formation console, under Data Catalog, choose Databases.
  2. Select the database secure-db and choose View tables.
  3. Select the table secure_dl_masked_data.
  4. On the Actions drop-down menu, choose Grant.
  5. Select IAM users and roles.
  6. Choose the role secure-lf-data-scientist.
  7. Under Permissions, select Table permissions.
  8. For Table permissions, select Select.
  9. Choose Grant.
  10. Under Data Catalog, chose Tables.
  11. Chose secure_dl_masked_data table.
  12. On the Actions drop-down menu, chose View permissions.
  13. Check IAMAllowedPrincipals and select Revoke and click on Revoke button.

You can confirm your user permissions on the Data Permissions page.

Query the data lake using Athena from different personas

To validate the permissions of different personas, we use Athena to query against the S3 data lake.

Make sure you set the query result location to the location created as part of the CloudFormation stack (secure-athena-query-<ACCOUNT_ID>). The following screenshot shows the location information in the Settings section on the Athena console.

You can see all the tables listed under secure-db.

  1. Sign in to the console with secure-lf-admin (use the password value for TestUserPassword from the CloudFormation stack) and make sure you’re in the same Region.
  2. Navigate to Athena Console.
  3. Run a SELECT query against the secure_dl_curated_data

The user secure-lf-admin should see all the columns with encryption or masking.

Now let’s validate the permissions of secure-lf-business-analyst user.

  1. Sign in to the console with secure-lf-business-analyst.
  2. Navigate to Athena console.
  3. Run a SELECT query against the secure_dl_encrypted_data table.

The secure-lf-business-analyst user can only view the selected encrypted columns.

Lastly, let’s validate the permissions of secure-lf-data-scientist.

  1. Sign in to the console with secure-lf-data-scientist.
  2. Run a SELECT query against the secure_dl_masked_data table.

The secure-lf-data-scientist user can only view the selected masked columns.

If you try to run a query on different tables, such as secure_dl_curated_data, you get an error message for insufficient permissions.

Clean up

To avoid unexpected future charges, delete the CloudFormation stack.

Conclusion

In this post, we presented a potential solution for processing and storing sensitive data workloads in an S3 data lake. We demonstrated how to build a data lake on AWS to ingest, transform, aggregate, and analyze data from IoT devices in near-real time. This solution also demonstrates how you can mask and encrypt sensitive data, and use fine-grained column-level security controls with Lake Formation, which benefits those with a higher level of security needs.

Lake Formation recently announced the preview for row-level access; and you can sign up for the preview now!


About the Authors

Shekar Tippur is an AWS Partner Solutions Architect. He specializes in machine learning and analytics workloads. He has been helping partners and customers adopt best practices and discover insights from data.


Ramakant Joshi is an AWS Solution Architect, specializing in the analytics and serverless domain. He has over 20 years of software development and architecture experience, and is passionate about helping customers in their cloud journey.


Navnit Shukla is AWS Specialist Solution Architect, Analytics, and is passionate about helping customers uncover insights from their data. He has been building solutions to help organizations make data-driven decisions.

Design a data mesh architecture using AWS Lake Formation and AWS Glue

Post Syndicated from Nivas Shankar original https://aws.amazon.com/blogs/big-data/design-a-data-mesh-architecture-using-aws-lake-formation-and-aws-glue/

Organizations of all sizes have recognized that data is one of the key enablers to increase and sustain innovation, and drive value for their customers and business units. They are eagerly modernizing traditional data platforms with cloud-native technologies that are highly scalable, feature-rich, and cost-effective. As you look to make business decisions driven by data, you can be agile and productive by adopting a mindset that delivers data products from specialized teams, rather than through a centralized data management platform that provides generalized analytics.

In this post, we describe an approach to implement a data mesh using AWS native services, including AWS Lake Formation and AWS Glue. This approach enables lines of business (LOBs) and organizational units to operate autonomously by owning their data products end to end, while providing central data discovery, governance, and auditing for the organization at large, to ensure data privacy and compliance.

Benefits of a data mesh model

A centralized model is intended to simplify staffing and training by centralizing data and technical expertise in a single place, to reduce technical debt by managing a single data platform, and to reduce operational costs. Data platform groups, often part of central IT, are divided into teams based on the technical functions of the platform they support. For instance, one team may own the ingestion technologies used to collect data from numerous data sources managed by other teams and LOBs. A different team might own data pipelines, writing and debugging extract, transform, and load (ETL) code and orchestrating job runs, while validating and fixing data quality issues and ensuring data processing meets business SLAs. However, managing data through a central data platform can create scaling, ownership, and accountability challenges, because central teams may not understand the specific needs of a data domain, whether due to data types and storage, security, data catalog requirements, or specific technologies needed for data processing.

You can often reduce these challenges by giving ownership and autonomy to the team who owns the data, best allowing them to build data products, rather than only being able to use a common central data platform. For instance, product teams are responsible for ensuring the product inventory is updated regularly with new products and changes to existing ones. They’re the domain experts of the product inventory datasets. If a discrepancy occurs, they’re the only group who knows how to fix it. Therefore, they’re best able to implement and operate a technical solution to ingest, process, and produce the product inventory dataset. They own everything leading up to the data being consumed: they choose the technology stack, operate in the mindset of data as a product, enforce security and auditing, and provide a mechanism to expose the data to the organization in an easy-to-consume way. This reduces overall friction for information flow in the organization, where the producer is responsible for the datasets they produce and is accountable to the consumer based on the advertised SLAs.

This data-as-a-product paradigm is similar to Amazon’s operating model of building services. Service teams build their services, expose APIs with advertised SLAs, operate their services, and own the end-to-end customer experience. This is distinct from the world where someone builds the software, and a different team operates it. The end-to-end ownership model has enabled us to implement faster, with better efficiency, and to quickly scale to meet customers’ use cases. We aren’t limited by centralized teams and their ability to scale to meet the demands of the business. Each service we build stands on the shoulders of other services that provide the building blocks. The analogy in the data world would be the data producers owning the end-to-end implementation and serving of data products, using the technologies they selected based on their unique needs. At AWS, we have been talking about the data-driven organization model for years, which consists of data producers and consumers. This model is similar to those used by some of our customers, and has been eloquently described recently by Zhamak Dehghani of Thoughtworks, who coined the term data mesh in 2019.

Solution overview

In this post, we demonstrate how the Lake House Architecture is ideally suited to help teams build data domains, and how you can use the data mesh approach to bring domains together to enable data sharing and federation across business units. This approach can enable better autonomy and a faster pace of innovation, while building on top of a proven and well-understood architecture and technology stack, and ensuring high standards for data security and governance.

The following are key points when considering a data mesh design:

  • Data mesh is a pattern for defining how organizations can organize around data domains with a focus on delivering data as a product. However, it may not be the right pattern for every customer.
  • A Lake House approach and the data lake architecture provide technical guidance and solutions for building a modern data platform on AWS.
  • The Lake House approach with a foundational data lake serves as a repeatable blueprint for implementing data domains and products in a scalable way.
  • The manner in which you utilize AWS analytics services in a data mesh pattern may change over time, but still remains consistent with the technological recommendations and best practices for each service.

The following are data mesh design goals:

  • Data as a product – Each organizational domain owns their data end to end. They’re responsible for building, operating, serving, and resolving any issues arising from the use of their data. Data accuracy and accountability lies with the data owner within the domain.
  • Federated data governance – Data governance ensures data is secure, accurate, and not misused. The technical implementation of data governance such as collecting lineage, validating data quality, encrypting data at rest and in transit, and enforcing appropriate access controls can be managed by each of the data domains. However, central data discovery, reporting, and auditing is needed to make it simple for users to find data and for auditors to verify compliance.
  • Common Access – Data must be easily consumable by subject matter personas like data analysts and data scientists, as well as purpose-built analytics and machine learning (ML) services like Amazon Athena, Amazon Redshift, and Amazon SageMaker. To do that, data domains must expose a set of interfaces that make data consumable while enforcing appropriate access controls and audit tracking.

The following are user experience considerations:

  • Data teams own their information lifecycle, from the application that creates the original data, through to the analytics systems that extract and create business reports and predictions. Through this lifecycle, they own the data model, and determine which datasets are suitable for publication to consumers.
  • Data domain producers expose datasets to the rest of the organization by registering them with a central catalog. They can choose what to share, for how long, and how consumers can interact with it. They’re also responsible for maintaining the data and making sure it’s accurate and current.
  • Data domain consumers or individual users should be given access to data through a supported interface, like a data API, that can ensure consistent performance, tracking, and access controls.
  • All data assets are easily discoverable from a single central data catalog. The data catalog contains the datasets registered by data domain producers, including supporting metadata such as lineage, data quality metrics, ownership information, and business context.
  • All actions taken with data, usage patterns, data transformation, and data classifications should be accessible through a single, central place. Data owners, administrators, and auditors should able to inspect a company’s data compliance posture in a single place.

Let’s start with a high-level design that builds on top of the data mesh pattern. As seen in the following diagram, it separates consumers, producers, and central governance to highlight the key aspects discussed previously. However, a data domain may represent a data consumer, a data producer, or both.

The objective for this design is to create a foundation for building data platforms at scale, supporting the objectives of data producers and consumers with strong and consistent governance. The AWS approach to designing a data mesh identifies a set of general design principles and services to facilitate best practices for building scalable data platforms, ubiquitous data sharing, and enable self-service analytics on AWS.

Expanding on the preceding diagram, we provide additional details to show how AWS native services support producers, consumers, and governance. Each data domain, whether a producer, consumer, or both, is responsible for its own technology stack. However, using AWS native analytics services with the Lake House Architecture offers a repeatable blueprint that your organization can use as you scale your data mesh design. Having a consistent technical foundation ensures services are well integrated, core features are supported, scale and performance are baked in, and costs remain low.

A data domain: producer and consumer

A data mesh design organizes around data domains. Each data domain owns and operates multiple data products with its own data and technology stack, which is independent from others. Data domains can be purely producers, such as a finance domain that only produces sales and revenue data for domains to consumers, or a consumer domain, such as a product recommendation service that consumes data from other domains to create the product recommendations displayed on an ecommerce website. In addition to sharing, a centralized data catalog can provide users with the ability to more quickly find available datasets, and allows data owners to assign access permissions and audit usage across business units.

A producer domain resides in an AWS account and uses Amazon Simple Storage Service (Amazon S3) buckets to store raw and transformed data. It maintains its own ETL stack using AWS Glue to process and prepare the data before being cataloged into a Lake Formation Data Catalog in their own account. Similarly, the consumer domain includes its own set of tools to perform analytics and ML in a separate AWS account. The central data governance account is used to share datasets securely between producers and consumers. It’s important to note that sharing is done through metadata linking alone. Data isn’t copied to the central account, and ownership remains with the producer. The central catalog makes it easy for any user to find data and to ask the data owner for access in a single place. They can then use their tool of choice inside of their own environment to perform analytics and ML on the data.

The following diagram illustrates the end-to-end workflow.

The workflow from producer to consumer includes the following steps:

  1. Data source locations hosted by the producer are created within the producer’s AWS Glue Data Catalog and registered with Lake Formation.
  2. When a dataset is presented as a product, producers create Lake Formation Data Catalog entities (database, table, columns, attributes) within the central governance account. This makes it easy to find and discover catalogs across consumers. However, this doesn’t grant any permission rights to catalogs or data to all accounts or consumers, and all grants are be authorized by the producer.
  3. The central Lake Formation Data Catalog shares the Data Catalog resources back to the producer account with required permissions via Lake Formation resource links to metadata databases and tables.
  4. Lake Formation permissions are granted in the central account to producer role personas (such as the data engineer role) to manage schema changes and perform data transformations (alter, delete, update) on the central Data Catalog.
  5. Producers accept the resource share from the central governance account so they can make changes to the schema at a later time.
  6. Data changes made within the producer account are automatically propagated into the central governance copy of the catalog.
  7. Based on a consumer access request, and the need to make data visible in the consumer’s AWS Glue Data Catalog, the central account owner grants Lake Formation permissions to a consumer account based on direct entity sharing, or based on tag based access controls, which can be used to administer access via controls like data classification, cost center, or environment.
  8. Lake Formation in the consumer account can define access permissions on these datasets for local users to consume. Users in the consumer account, like data analysts and data scientists, can query data using their chosen tool such as Athena and Amazon Redshift.

Build data products

Data domain producers ingest data into their respective S3 buckets through a set of pipelines that they manage, own, and operate. Producers are responsible for the full lifecycle of the data under their control, and for moving data from raw data captured from applications to a form that is suitable for consumption by external parties. AWS Glue is a serverless data integration and preparation service that offers all the components needed to develop, automate, and manage data pipelines at scale, and in a cost-effective way. It provides a simple-to-use interface that organizations can use to quickly onboard data domains without needing to test, approve, and juggle vendor roadmaps to ensure all required features and integrations are available.

Central data governance

The central data governance account stores a data catalog of all enterprise data across accounts, and provides features allowing producers to register and create catalog entries with AWS Glue from all their S3 buckets. No data (except logs) exists in this account. Lake Formation centrally defines security, governance, and auditing policies in one place, enforces those policies for consumers across analytics applications, and only provides authorization and session token access for data sources to the role that is requesting access. Lake Formation also provides uniform access control for enterprise-wide data sharing through resource shares with centralized governance and auditing.

Common access

Each consumer obtains access to shared resources from the central governance account in the form of resource links. These are available in the consumer’s local Lake Formation and AWS Glue Data Catalog, allowing database and table access that can be managed by consumer admins. After access is granted, consumers can access the account and perform different actions with the following services:

  • Athena acts as a consumer and runs queries on data registered using Lake Formation. Lake Formation verifies that the workgroup AWS Identity and Access Management (IAM) role principal has the appropriate Lake Formation permissions to the database, table, and Amazon S3 location as appropriate for the query. If the principal has access, Lake Formation vends temporary credentials to Athena, and the query runs. Authentication is granted through IAM roles or users, or web federated identities using SAML or OIDC. For more information, see How Athena Accesses Data Registered With Lake Formation.
  • Amazon SageMaker Data Wrangler allows you to quickly select data from multiple data sources, such as Amazon S3, Athena, Amazon Redshift, Lake Formation, and Amazon SageMaker Feature Store. You can also write queries for data sources and import data directly into SageMaker from various file formats, such as CSV files, Parquet files, and database tables. Authentication is granted through IAM roles in the consumer account. For more information, see Prepare ML Data with Amazon SageMaker Data Wrangler.
  • Amazon Redshift Spectrum allows you to register external schemas from Lake Formation, and provides a hierarchy of permissions to control access to Amazon Redshift databases and tables in a Data Catalog. If the consumer principal has access, Lake Formation vends temporary credentials to Redshift Spectrum tables, and the query runs. Authentication is granted through IAM roles or users, or web federated identities using SAML or OIDC. For more information, see Using Redshift Spectrum with AWS Lake Formation.
  • Amazon QuickSight via Athena integrates with Lake Formation permissions. If you’re querying data with Athena, you can use Lake Formation to simplify how you secure and connect to your data from QuickSight. Lake Formation adds to the IAM permissions model by providing its own permissions model that is applied to AWS analytics and ML services. Authentication is granted through IAM roles that are mapped to QuickSight user permissions. For more information, see Authorizing Connections Through AWS Lake Formation.
  • Amazon EMR Studio and EMR notebooks allow running Spark SQL against Lake Formation’s tables backed by a SAML authority. Beginning with Amazon EMR31.0, you can launch a cluster that integrates with Lake Formation. Authentication is granted through IAM roles or users, or web federated identities using SAML or OIDC. For more information, see Integrate Amazon EMR with AWS Lake Formation.

With this design, you can connect multiple data lake houses to a centralized governance account that stores all the metadata from each environment. The strength of this approach is that it integrates all the metadata and stores it in one meta model schema that can be easily accessed through AWS services for various consumers. You can extend this architecture to register new data lake catalogs and share resources across consumer accounts. The following diagram illustrates a cross-account data mesh architecture.

Conclusion

A data mesh approach provides a method by which organizations can share data across business units. Each domain is responsible for the ingestion, processing, and serving of their data. They are data owners and domain experts, and are responsible for data quality and accuracy. This is similar to how microservices turn a set of technical capabilities into a product that can be consumed by other microservices. Implementing a data mesh on AWS is made simple by using managed and serverless services such as AWS Glue, Lake Formation, Athena, and Redshift Spectrum to provide a wellunderstood, performant, scalable, and cost-effective solution to integrate, prepare, and serve data.

One customer who used this data mesh pattern is JPMorgan Chase. For more information, see How JPMorgan Chase built a data mesh architecture to drive significant value to enhance their enterprise data platform.

Lake Formation offers the ability to enforce data governance within each data domain and across domains to ensure data is easily discoverable and secure, and lineage is tracked and access can be audited. The Lake House Architecture provides an ideal foundation to support a data mesh, and provides a design pattern to ramp up delivery of producer domains within an organization. Each domain has autonomy to choose their own tech stack, but is governed by a federated security model that can be administered centrally, providing best practices for security and compliance, while allowing high agility within the domain.


About the Authors

Nivas Shankar is a Principal Data Architect at Amazon Web Services. He helps and works closely with enterprise customers building data lakes and analytical applications on the AWS platform. He holds a master’s degree in physics and is highly passionate about theoretical physics concepts.


Roy Hasson is the Global Business Development Lead of Analytics and Data Lakes at AWS. He works with customers around the globe to design solutions to meet their data processing, analytics, and business intelligence needs. Roy is big Manchester United fan, cheering his team on and hanging out with his family.


Zach Mitchell is a Sr. Big Data Architect. He works within the product team to enhance understanding between product engineers and their customers while guiding customers through their journey to develop data lakes and other data solutions on AWS analytics services.


Ian Meyers is a Sr. Principal Product Manager for AWS Database Services. He works with many of AWS largest customers on emerging technology needs, and leads several data and analytics initiatives within AWS including support for Data Mesh.


The AWS Data Lake Team members are Chanu Damarla, Sanjay Srivastava, Natacha Maheshe, Roy Ben-Alta, Amandeep Khurana, Jason Berkowitz, David Tucker, and Taz Sayed.

Effective data lakes using AWS Lake Formation, Part 4: Implementing cell-level and row-level security

Post Syndicated from Deenbandhu Prasad original https://aws.amazon.com/blogs/big-data/part-4-effective-data-lakes-using-aws-lake-formation-part-4-implementing-cell-level-and-row-level-security/

We announced the preview of AWS Lake Formation transactions, cell-level and row-level security, and acceleration at AWS re: Invent 2020. In Parts 1 , 2, and 3 of this series, we explained how to set up governed tables, add streaming and batch data to them, and use ACID transactions. In this post, we focus on cell-level and row-level security and show you how to enforce business needs by restricting access to specific rows.

Effective data lakes using AWS Lake Formation

The goal of modern data lakes is to democratize access to broad datasets to empower data analysts and business users. In these scenarios, data lake security becomes more important than ever. Enterprises want to share their data across groups, departments, and organizations, while balancing their compliance and security needs. A common paradigm used by many enterprises is to restrict data access to limit scope based on the user profile or the organizations to which they belong. Previously, you had to enforce this by duplicating the original data or creating materialized and non-materialized views of the data based on filtered datasets. However, these solutions often break the concept of a single source of truth and result in write amplification, which doubles or triples storage. The large number of copies required also increases the management effort required due to their complexity.

Lake Formation supports simple row-level security and cell-level security:

  • Basic row-level security allows you to specify filter expressions that limit access to specific rows of a table to a user.
  • Cell-level security builds on row-level security by allowing you to hide or show specific columns along with providing access to specific rows.

In this post, we consider an example use case in which Company A does business across the United States and Canada. They have built an enterprise customer data hub on Amazon Simple Storage Service (Amazon S3), which sources customers from both countries into this central location for company-wide analytics and marketing.

The marketing department of Company A is responsible for organizing promotion campaigns and developing communications content to promote services and product to prospects. The team consumes the data from this enterprise customer data hub to create the targeted campaign.

The marketing team data analysts are divided by country, and the requirement is to restrict analyst access to customer data from their country—analysts from the United States can see only customers from the United States, and analysts from Canada can only access customers from Canada. Additionally, analysts from Canada aren’t allowed to see the date of birth (DoB column) due to local company policy (this restriction is an example of cell-level security).

The dataset used for this post is synthetically generated; the following screenshot shows an example of the data.

Solution overview

Let’s see how you can use the Lake Formation row-level security feature to enforce Company A’s requirements on the data in the S3 data lake. You can apply row-level security to a governed table or to a standard table in Lake Formation. In this post, you apply row-level security on a standard Lake Formation table; you can follow a similar process for a governed table.

We walk through the following high-level steps:

  1. Create a database (lf_rls_blog) and table (customer).
  2. Grant select (row and column) permissions to the users lf-rls-blog-analyst-us and lf-rls-blog-analyst-ca.
  3. Run queries in Amazon Athena as the US and Canada analysts to verify that you only see rows from the user’s respective country (and the appropriate columns).

Set up resources with AWS CloudFormation

This post includes an AWS CloudFormation template for a quick setup. You can review and customize it to suit your needs.

The CloudFormation template generates the following resources:

  • AWS Identity and Access Management (IAM) users, roles, and policies:
    • The three users include lf-rls-blog-manager (data lake administrator), lf-rls-blog-analyst-us (US data analyst), and lf-rls-blog-analyst-ca (Canada data analyst)
  • Lake Formation data lake settings and resources:
    • This includes an S3 bucket with the prefix lf-rowlevel-security-blog-* and the customer data files used in this post

As of this writing, these Lake Formation preview features are available only in us-east-1 and us-west-2. When following the steps in this post, use Region us-east-1. Check the availability of the features in other Regions in the future.

To create your resources, complete the following steps:

  1. Sign in to the AWS CloudFormation console in the us-east-1 Region.
  2. Choose Launch Stack:
  3. Create passwords for the three users.
  4. Review the details on the page and select I acknowledge that AWS CloudFormation might create IAM resources.
  5. Choose Create stack.

Create a database and table

To create your database and table, complete the following steps:

  1. Sign in to the AWS Management Console as the data lake administrator (lf-rls-blog-manager).
  2. On the Lake Formation console, choose Databases in the navigation pane.
  3. Choose Create database.
  4. For Name, enter lf_rls_blog.
  5. If Use only IAM access control for new tables in this database is selected, uncheck it.
  6. Choose Create database.

Next, you create a new data lake table.

  1. In the navigation pane, choose Tables.
  2. Choose Create table.
  3. For Name, enter customer.
  4. For Database, choose the database you just created (lf_rls_blog).
  5. Browse to the customers folder under datafiles in the S3 bucket (starting with lf-rowlevel-security-blog-*) created by the CloudFormation template.
  6. For Classification, select CSV.
  7. For Delimiter, choose Comma:
  8. Choose Upload Schema.
  9. Enter the following JSON code:
    [
    {
    "Name": "customer_id",
    "Type": "bigint"
    },
    {
    "Name": "prefix",
    "Type": "string"
    },
    {
    "Name": "first_Name",
    "Type": "string"
    },
    {
    "Name": "middle_Name",
    "Type": "string"
    },
    {
    "Name": "last_Name",
    "Type": "string"
    },
    {
    "Name": "suffix",
    "Type": "string"
    },
    {
    "Name": "gender",
    "Type": "string"
    },
    {
    "Name": "dob",
    "Type": "string"
    },
    {
    "Name": "phone",
    "Type": "string"
    },
    {
    "Name": "building_number",
    "Type": "bigint"
    },
    {
    "Name": "street_Name",
    "Type": "string"
    },
    {
    "Name": "city",
    "Type": "string"
    },
    {
    "Name": "cust_zip",
    "Type": "bigint"
    },
    {
    "Name": "country",
    "Type": "string"
    }
    ]
    

  10. Choose Upload.
  11. Choose Submit.

Create data filters and grant permissions

To implement column-level, row-level, and cell-level security, first you create data filters. Then you choose that data filter while granting the select Lake Formation permission on tables. For this use case, you create two data filters: one for the US data analyst and one for the Canada data analyst.

Permitted filter expressions are predicates that obey a subset of the WHERE clause grammar in PartiQL. You can use comparison operators to compare columns with constants. The following are the supported operators:

  • Comparison operators – =, >, <, >=, <=, <>, BETWEEN, IN, LIKE
  • Logical operators – AND, OR

Let’s first create the data filter for the US analyst.

  1. On the Lake Formation console, choose Data filters in the navigation pane.
  2. Choose Create new filter.
  3. For Data filter name, enter US Filter.
  4. For Target database, choose the lf_rls_blog database.
  5. For Target table, choose the customer table.
  6. For Column-level access, select Access to all columns.
  7. For Row filter expression, enter country='US'.
  8. Choose Create filter.

The US analyst has access to all the columns of US customers only.

Now let’s create a data filter for the Canada analyst.

  1. On the Data filters page, choose Create new filter.
  2. For Data filter name, enter Canada Filter.
  3. For Target database, choose the lf_rls_blog database.
  4. For Target table, choose the customer table.
  5. For Column-level access, select Exclude columns.
  6. For Select columns, choose the dob column.
  7. For Row filter expression, enter country='Canada'.
  8. Choose Create filter.

The Canada analyst now has access to all the columns except dob (date of birth) of Canadian customers only.

Verify both data filters are created by checking the Data filters page.

Now we can grant table and column permissions.

  1. On the Tables page, select the customer table.
  2. On the Actions menu, choose Grant.
  1. For IAM users and roles, choose lf-rls-blog-analyst-us.
  2. Choose Named data catalog resources
  3. For Databases, choose lf_rls_blog.
  4. For Tables, choose customer.
  5. For Table and column permissions, choose Select.
  6. Under Data permissions¸ select Advanced cell-level filters.
  7. Select US Filter.
  8. Choose Grant.
  9. Repeat these steps for the lf-rls-blog-analyst-ca user, choosing the lf_rls_blog database and customer table and granting Select permissions.
  10. Select Advanced cell-level filters.
  11. In the Data permissions section, select Canada Filter.
  12. Choose Grant.

Run queries to test permission levels

To utilize Lake Formation preview features in Athena, you need to create a new workgroup named AmazonAthenaLakeFormationPreview and switch to that workgroup before running queries. For more information, see Managing Workgroups. Additionally, for preview you use the lakeformation qualifier for the database and table name, as shown in the following example:

select * from lakeformation.<databasename>.<tablename>

Lake Formation implicitly grants all permissions to the table creator. In this use case, lf-rls-blog-manager has SELECT permissions on all rows and columns of the customer table. Let’s first verify permissions for lf-rls-blog-manager by querying the customer table using Athena.

  1. On the Athena console (in Region us-east-1), open the query editor.
  2. Choose set up a query result location in Amazon S3.
  3. Navigate to the S3 bucket starting with lf-rowlevel-security-blog-* and select the folder anthenaqueryresults.
  4. Choose Save.
  5. In the query editor, for Data source, choose AWSDataCatalog.
  6. For Database, choose lf_rls_blog.
  7. Create and switch to the AmazonAthenaLakeFormationPreview workgroup.

You can see the customer table under Tables.

  1. Enter the following query:
    SELECT * FROM lakeformation."lf_rls_blog"."customer"

  2. Choose Run query.

Rows from both countries are displayed to the lf-rls-blog-manager users.

Next, lets verify permission of the lf-rls-blog-analyst-us and lf-rls-blog-analyst-ca users on this table.

  1. Sign in to the console as lf-rls-blog-analyst-us.
  2. Repeat the previous steps on the Athena console (in us-east-1) to set up the query result location.
  3. Switch to the AmazonAthenaLakeFormationPreview workgroup.
  4. Run the following query:
    SELECT * FROM lakeformation."lf_rls_blog"."customer"

Only US customers are shown in the result for the US data analyst.

Now you verify the same for the Canada data analyst.

  1. Sign in to the console as lf-rls-blog-analyst-ca.
  2. Repeat the previous steps on the Athena console (in us-east-1) to set up the query result location.
  3. Switch to AmazonAthenaLakeFormationPreview workgroup.
  4. Run the following query:
    SELECT * FROM lakeformation."lf_rls_blog"."customer"

Only customers from Canada are visible to the Canada data analyst. Furthermore, the lf-rls-blog-analyst-ca user doesn’t have access to the dob column.

Clean up

For the final step, clean up the resources you created:

  1. Sign in to the console as lf-rls-blog-manager.
  2. On the Lake Formation console, choose Databases in the navigation pane.
  3. Select the database lf_rls_blog.
  4. On the Action menu, choose Delete.
  5. Delete anthenaqueryresults folder from the Amazon S3 bucket with prefix lf-rowlevel-security-blog-*.
  6. Login as the user that launched the CloudFormation stack in this post.
  7. On the AWS CloudFormation console, delete the stack lf-rowlevel-security-blog.

When you delete the stack, the resources it created are automatically deleted.

Conclusion

In this post, you learned how to implement fine-grained access control on a data lake table using the new row-level security feature of Lake Formation. This feature allows you to easily enforce privacy regulations or corporate governance data access rules on your data lake.

Learn more about Lake Formation and start using these features to build and secure your data lake on Amazon S3 using Lake Formation today, and leave your thoughts and questions in the comments.


About the Authors

Deenbandhu Prasad is a Senior Analytics Specialist at AWS, specializing in big data services. He is passionate about helping customers build modern data platforms on the AWS Cloud. Deenbandhu has helped customers of all sizes implement master data management, data warehouse, and data lake solutions.


Noritaka Sekiyama is a Senior Big Data Architect at AWS Glue and AWS Lake Formation. His passion is for implementing software artifacts for building data lakes more effectively and easily. During his spare time, he loves to spend time with his family, especially hunting bugs—not software bugs, but bugs like butterflies, pill bugs, snails, and grasshoppers.