Tag Archives: AWS Lake Formation

How Morningstar used tag-based access controls in AWS Lake Formation to manage permissions for an Amazon Redshift data warehouse

Post Syndicated from Don Drake original https://aws.amazon.com/blogs/big-data/how-morningstar-used-tag-based-access-controls-in-aws-lake-formation-to-manage-permissions-for-an-amazon-redshift-data-warehouse/

This post was co-written by Ashish Prabhu, Stephen Johnston, and Colin Ingarfield at Morningstar and Don Drake, at AWS.

With “Empowering Investor Success” as the core motto, Morningstar aims at providing our investors and advisors with the tools and information they need to make informed investment decisions.

In this post, Morningstar’s Data Lake Team Leads discuss how they utilized tag-based access control in their data lake with AWS Lake Formation and enabled similar controls in Amazon Redshift.

The business challenge

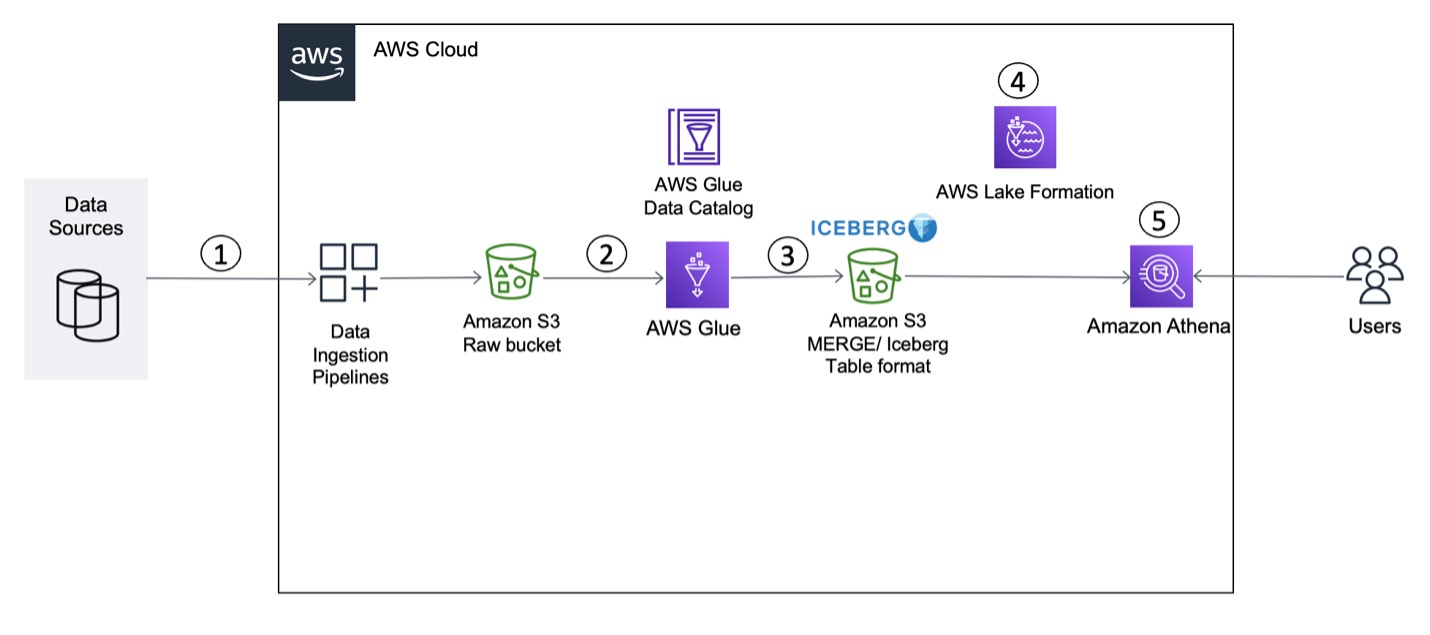
At Morningstar, we built a data lake solution that allows our consumers to easily ingest data, make it accessible via the AWS Glue Data Catalog, and grant access to consumers to query the data via Amazon Athena. In this solution, we were required to ensure that the consumers could only query the data to which they had explicit access. To enforce our access permissions, we chose Lake Formation tag-based access control (TBAC). TBAC helps us categorize the data into a simple, broad level or a complex, more granular level using tags and then grant consumers access to those tags based on what group of data they need. Tag-based entitlements allow us to have a flexible and manageable entitlements system that solves our complex entitlements scenarios.

However, our consumers pushed us for better query performance and enhanced analytical capabilities. We realized we needed a data warehouse to cater to all of these consumer requirements, so we evaluated Amazon Redshift. Amazon Redshift provides us with features that we could use to work with our consumers and enable their analytical requirements:

  • Better performance for consumers’ analytical requirements
  • Ability to tune query performance with user-specified sort keys and distribution keys
  • Ability to have different representations of the same data via views and materialized views
  • Consistent query performance regardless of concurrency

Many new Amazon Redshift features helped solve and scale our analytical query requirements, specifically Amazon Redshift Serverless and Amazon Redshift data sharing.

Because our Lake Formation-enforced data lake is a central data repository for all our data, it makes sense for us to flow the data permissions from the data lake into Amazon Redshift. We utilize AWS Identity and Access Management (IAM) authentication and want to centralize the governance of permissions based on IAM roles and groups. For each AWS Glue database and table, we have a corresponding Amazon Redshift schema and table. Our goal was to ensure customers who have access to AWS Glue tables via Lake Formation also have access to the corresponding tables in Amazon Redshift.

However, we faced a problem with user-based entitlements as we moved to Amazon Redshift.

The entitlements problem

Even though we added Amazon Redshift as part of our overall solution, the entitlement requirements and challenges that came with it remained the same for our users consuming via Lake Formation. At the same time, we had to find a way to implement entitlements in our Amazon Redshift data warehouse with the same set of tags that we had already defined in Lake Formation. Amazon Redshift supports resource-based entitlements but doesn’t support tag-based entitlements. The challenge we had to overcome was how to map our existing tag-based entitlements in Lake Formation to the resource-based entitlements in Amazon Redshift.

The data in the AWS Glue Data Catalog needed to be also loaded in the Amazon Redshift data warehouse native tables. This was necessary so that the users get a familiar list of schema and tables that they are accustomed to seeing in the Data Catalog when accessing via Athena. This way, our existing data lake consumers could easily transition to Amazon Redshift.

The following diagram illustrates the structure of the AWS Glue Data Catalog mapped 1:1 with the structure of our Amazon Redshift data warehouse.

Shows mapping of Glue databases and tables to Redshift schemas and tables.

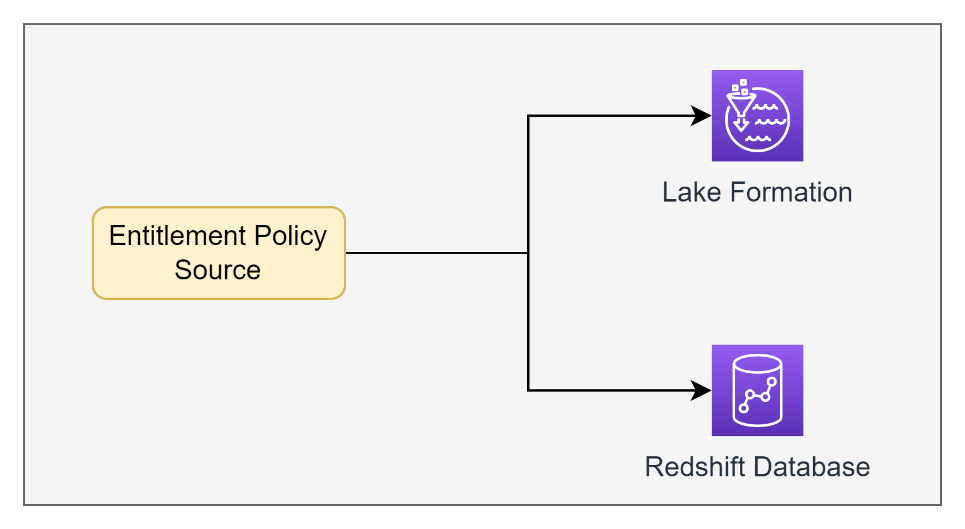
We wanted to utilize the ontology of tags in Lake Formation to also be used on the datasets in Amazon Redshift so that consumers could be granted access to the same datasets in both places. This enabled us to have a single entitlement policy source API that would grant appropriate access to both our Amazon Redshift tables as well as the corresponding Lake Formation tables based on the Lake Formation tag-based policies.

Entitlement Policy Source is used by Lake Formation and Redshift

To solve this problem, we needed to build our own solution to convert the tag-based policies in Lake Formation into grants and revokes in the resource-based entitlements in Amazon Redshift.

Solution overview

To solve this mismatch, we wanted to synchronize our Lake Formation tag ontology and classifications to the Amazon Redshift permission model. To do this, we map Lake Formation tags and grants to Amazon Redshift grants with the following steps:

  1. Map all the resources (databases, schemas, tables, and more) in Lake Formation that are tagged to their equivalent Amazon Redshift tables.
  2. Translate each policy in Lake Formation on a tag expression to a set of Amazon Redshift table grants and revokes.

The net result is that when there is a tag or policy change in Lake Formation, a corresponding set of grants or revokes are made to the equivalent Amazon Redshift tables to keep our entitlements in sync.

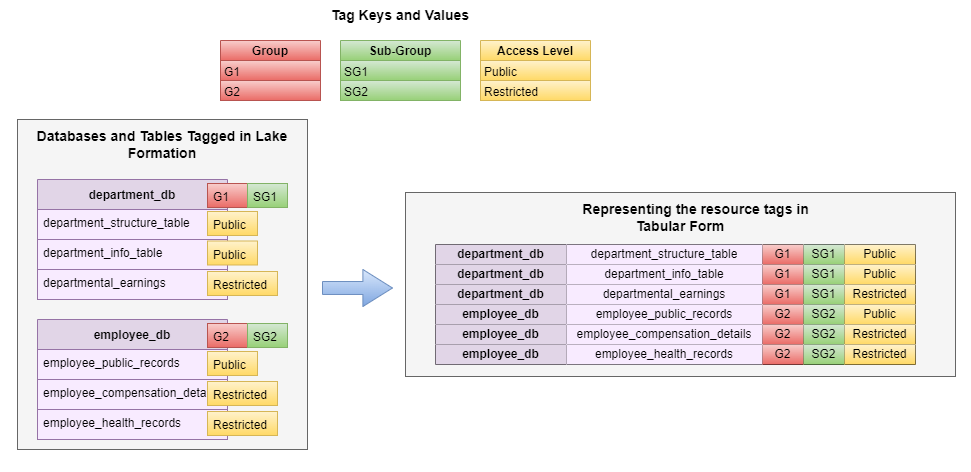
Map all tagged resources in Lake Formation to Amazon Redshift equivalents

The tag-based access control of Lake Formation allowed us to apply multiple tags on a single resource (database and table) in the AWS Glue Data Catalog. If visualized in a mapping form, the resource tagging can be displayed as how multiple tags on a single table would be flattened into individual entitlements on Amazon Redshift tables.

Mapping of tags in Lake Formation to Redshift tables

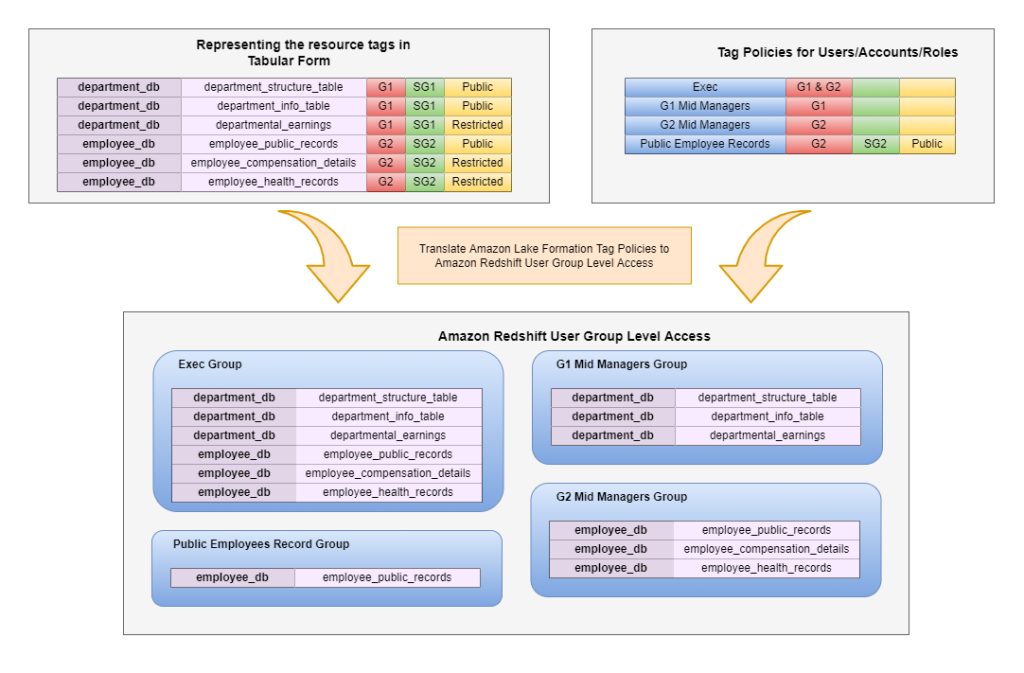
Translate tags to Amazon Redshift grants and revokes

To enable the migration of the tag-based policy enforced in Lake Formation, the permissions can be converted into simple grants and revokes that can be done on a per-group level.

There are two fundamental parts to a tag policy: the principal_id and the tag expression (for example, “Acess Level” = “Public”). Assuming that we have an Amazon Redshift database group for each principal_id, then the resources that represent the tag expression can be permissioned accordingly. We plan on migrating from database groups to database roles in a future implementation.

mapping of tags to Redshift user group

The solution implementation

The implementation of this solution led us to develop two components:

  • The mapper service
  • The Amazon Redshift data configuration

The mapper service can be thought of as a translation service. As the name suggests, it has the core business logic to map the tag and policy information into resource-based grants and revokes in Amazon Redshift. It needs to mimic the behavior of Lake Formation when handling the tag policy translation.

To do this translation, the mapper needs to understand and store the metadata at two levels:

  • Understanding what resource in Amazon Redshift is to be tagged with what value
  • Tracking the grants and revokes already performed so they can be updated with changes in the policy

To do this, we created a config schema in our Amazon Redshift cluster, which currently stores all the configurations.

As part of our implementation, we store the mapped (translated) information in Amazon Redshift. This allows us to incrementally update table grants as Lake Formation tags or policies changed. The following diagram illustrates this schema.

schema of configuration stored in Redshift

Business impact and value

The solution we put together has created key business impacts and values out of the current implementation and allows us greater flexibility in the future.

It allows us to get the data to our users faster with the tag policies applied in Lake Formation and translated directly to permissions in Amazon Redshift with immediate effect. It also allows us to have consistency in permissions applied in both Lake Formation and Amazon Redshift, based on the effective permissions derived from tag policies. And all this happens via a single source that grants and revokes permissions across the board, instead of managing them separately.

If we translate this into the business impact and business value that we generate, the solution improves the time to market of our data, but at the same time provides consistent entitlements across the business-driven categories that we define as tags.

The solution also opens up solutions to add more impact as our product scales both horizontally and vertically. There are potential solutions we could implement in terms of automation, users self-servicing their permissions, auditing, dashboards, and more. As our business scales, we expect to take advantage of these capabilities.

Conclusion

In this post, we shared how Morningstar utilized tag-based access control in our data lake with Lake Formation and enabled similar controls in Amazon Redshift. We developed two components that handle mapping of the tag-based access controls to Amazon Redshift permissions. This solution has improved the time to market for our data and provides consistent entitlements across different business-driven categories.

If you have any questions or comments, please leave them in the comments section.


About the Authors

Ashish Prabhu is a Senior Manager of Software Engineering in Morningstar, Inc. He focuses on the solutioning and delivering the different aspects of Data Lake and Data Warehouse for Morningstar’s Enterprise Data and Platform Team. In his spare time he enjoys playing basketball, painting and spending time with his family.

Stephen Johnston is a Distinguished Software Architect at Morningstar, Inc. His focus is on data lake and data warehousing technologies for Morningstar’s Enterprise Data Platform team.

Colin Ingarfield is a Lead Software Engineer at Morningstar, Inc. Based in Austin, Colin focuses on access control and data entitlements on Morningstar’s growing Data Lake platform.

Don Drake is a Senior Analytics Specialist Solutions Architect at AWS. Based in Chicago, Don helps Financial Services customers migrate workloads to AWS.

Interact with Apache Iceberg tables using Amazon Athena and cross account fine-grained permissions using AWS Lake Formation

Post Syndicated from Kishore Dhamodaran original https://aws.amazon.com/blogs/big-data/interact-with-apache-iceberg-tables-using-amazon-athena-and-cross-account-fine-grained-permissions-using-aws-lake-formation/

We recently announced support for AWS Lake Formation fine-grained access control policies in Amazon Athena queries for data stored in any supported file format using table formats such as Apache Iceberg, Apache Hudi and Apache Hive. AWS Lake Formation allows you to define and enforce database, table, and column-level access policies to query Iceberg tables stored in Amazon S3. Lake Formation provides an authorization and governance layer on data stored in Amazon S3. This capability requires that you upgrade to Athena engine version 3.

Large organizations often have lines of businesses (LoBs) that operate with autonomy in managing their business data. It makes sharing data across LoBs non-trivial. These organizations have adopted a federated model, with each LoB having the autonomy to make decisions on their data. They use the publisher/consumer model with a centralized governance layer that is used to enforce access controls. If you are interested in learning more about data mesh architecture, visit Design a data mesh architecture using AWS Lake Formation and AWS Glue. With Athena engine version 3, customers can use the same fine-grained controls for open data frameworks such as Apache Iceberg, Apache Hudi, and Apache Hive.

In this post, we deep dive into a use-case where you have a producer/consumer model with data sharing enabled to give restricted access to an Apache Iceberg table that the consumer can query. We’ll discuss column filtering to restrict certain rows, filtering to restrict column level access, schema evolution, and time travel.

Solution overview

To illustrate the functionality of fine-grained permissions for Apache Iceberg tables with Athena and Lake Formation, we set up the following components:

  • In the producer account:
    • An AWS Glue Data Catalog to register the schema of a table in Apache Iceberg format
    • Lake Formation to provide fine-grained access to the consumer account
    • Athena to verify data from the producer account
  • In the consumer account:
    • AWS Resource Access Manager (AWS RAM) to create a handshake between the producer Data Catalog and consumer
    • Lake Formation to provide fine-grained access to the consumer account
    • Athena to verify data from producer account

The following diagram illustrates the architecture.

Cross-account fine-grained permissions architecture

Prerequisites

Before you get started, make sure you have the following:

Data producer setup

In this section, we present the steps to set up the data producer.

Create an S3 bucket to store the table data

We create a new S3 bucket to save the data for the table:

  1. On the Amazon S3 console, create an S3 bucket with unique name (for this post, we use iceberg-athena-lakeformation-blog).
  2. Create the producer folder inside the bucket to use for the table.

Amazon S3 bucket and folder creation

Register the S3 path storing the table using Lake Formation

We register the S3 full path in Lake Formation:

  1. Navigate to the Lake Formation console.
  2. If you’re logging in for the first time, you’re prompted to create an admin user.
  3. In the navigation pane, under Register and ingest, choose Data lake locations.
  4. Choose Register location, and provide the S3 bucket path that you created earlier.
  5. Choose AWSServiceRoleForLakeFormationDataAccess for IAM role.

For additional information about roles, refer to Requirements for roles used to register locations.

If you enabled encryption of your S3 bucket, you have to provide permissions for Lake Formation to perform encryption and decryption operations. Refer to Registering an encrypted Amazon S3 location for guidance.

  1. Choose Register location.

Register Lake Formation location

Create an Iceberg table using Athena

Now let’s create the table using Athena backed by Apache Iceberg format:

  1. On the Athena console, choose Query editor in the navigation pane.
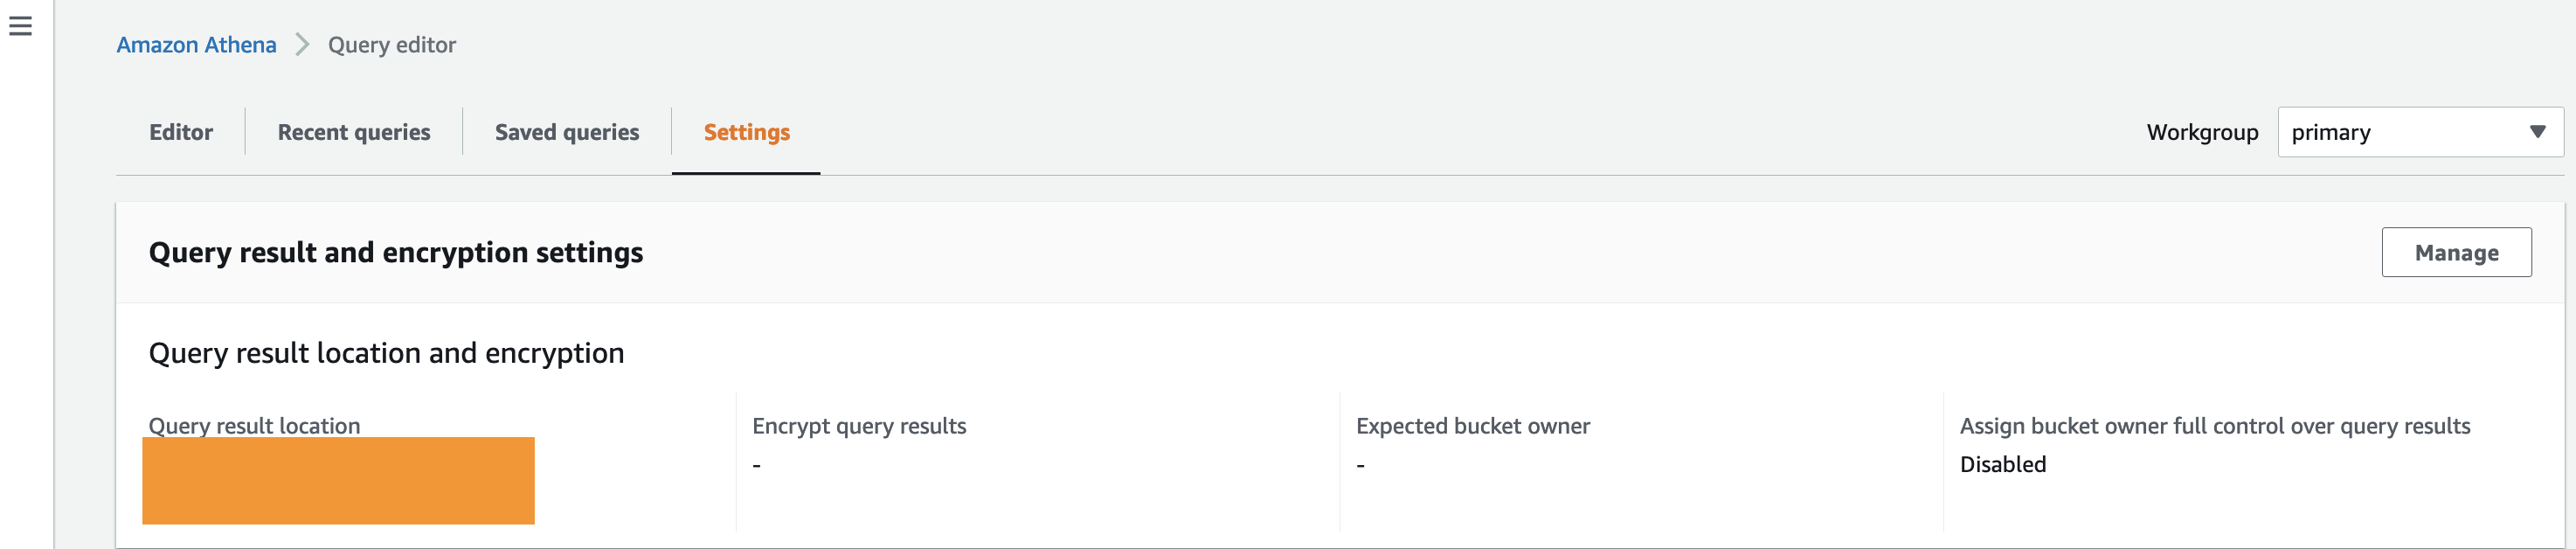
  2. If you’re using Athena for the first time, under Settings, choose Manage and enter the S3 bucket location that you created earlier (iceberg-athena-lakeformation-blog/producer).
  3. Choose Save.
  4. In the query editor, enter the following query (replace the location with the S3 bucket that you registered with Lake Formation). Note that we use the default database, but you can use any other database.
CREATE TABLE consumer_iceberg (
customerid bigint,
customername string,
email string,
city string,
country string,
territory string,
contactfirstname string,
contactlastname string)
LOCATION 's3://YOUR-BUCKET/producer/' -- *** Change bucket name to your bucket***
TBLPROPERTIES ('table_type'='ICEBERG')
  1. Choose Run.

Athena query editor to create Iceberg table

Share the table with the consumer account

To illustrate functionality, we implement the following scenarios:

  • Provide access to selected columns
  • Provide access to selected rows based on a filter

Complete the following steps:

  1. On the Lake Formation console, in the navigation pane under Data catalog, choose Data filters.
  2. Choose Create new filter.
  3. For Data filter name, enter blog_data_filter.
  4. For Target database, enter lf-demo-db.
  5. For Target table, enter consumer_iceberg.
  6. For Column-level access, select Include columns.
  7. Choose the columns to share with the consumer: country, address, contactfirstname, city, customerid, and customername.
  8. For Row filter expression, enter the filter country='France'.
  9. Choose Create filter.

create data filter

Now let’s grant access to the consumer account on the consumer_iceberg table.

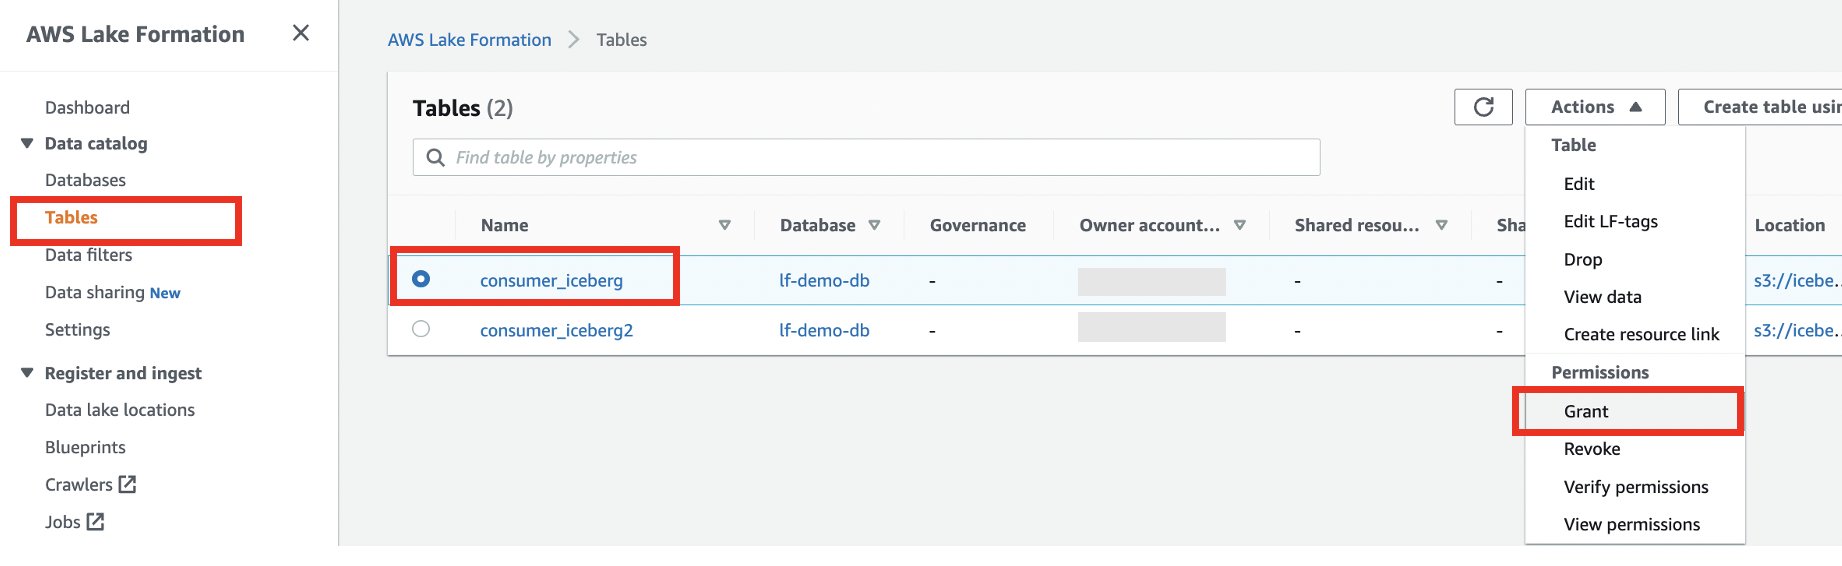
  1. In the navigation pane, choose Tables.
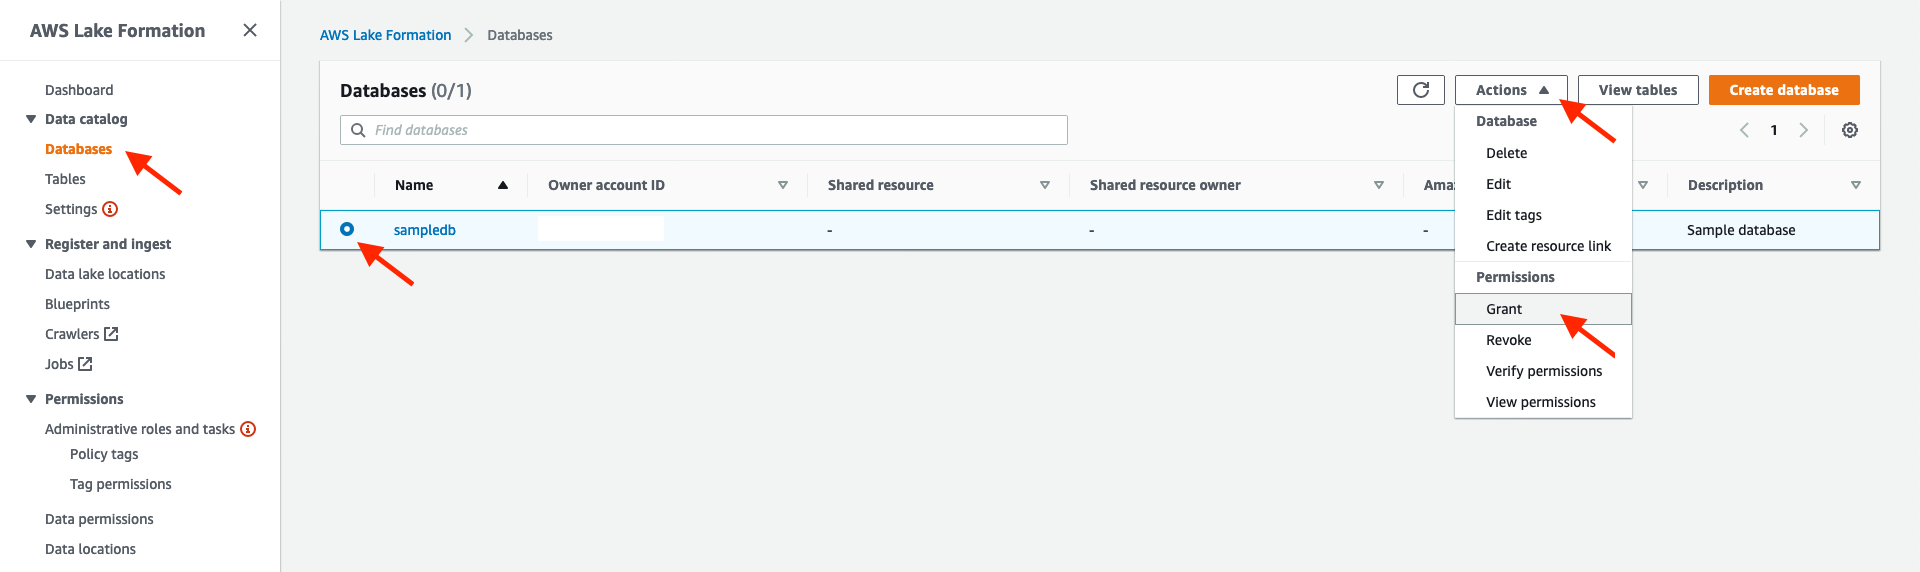
  2. Select the consumer_iceberg table, and choose Grant on the Actions menu.
    Grant access to consumer account on consumer_iceberg table
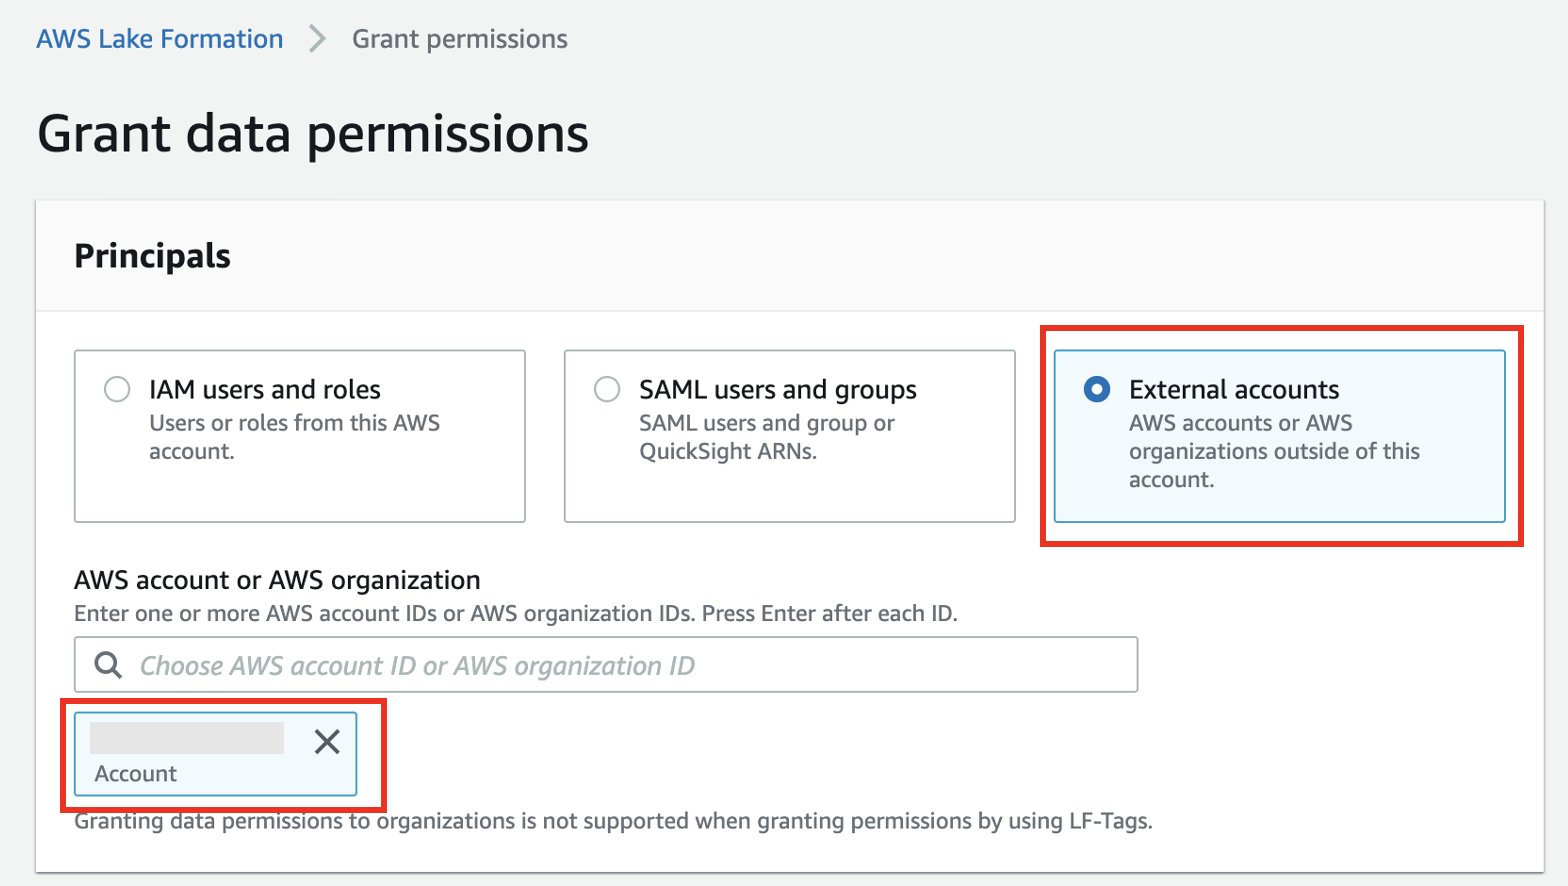
  3. Select External accounts.
  4. Enter the external account ID.
    Grant data permissions
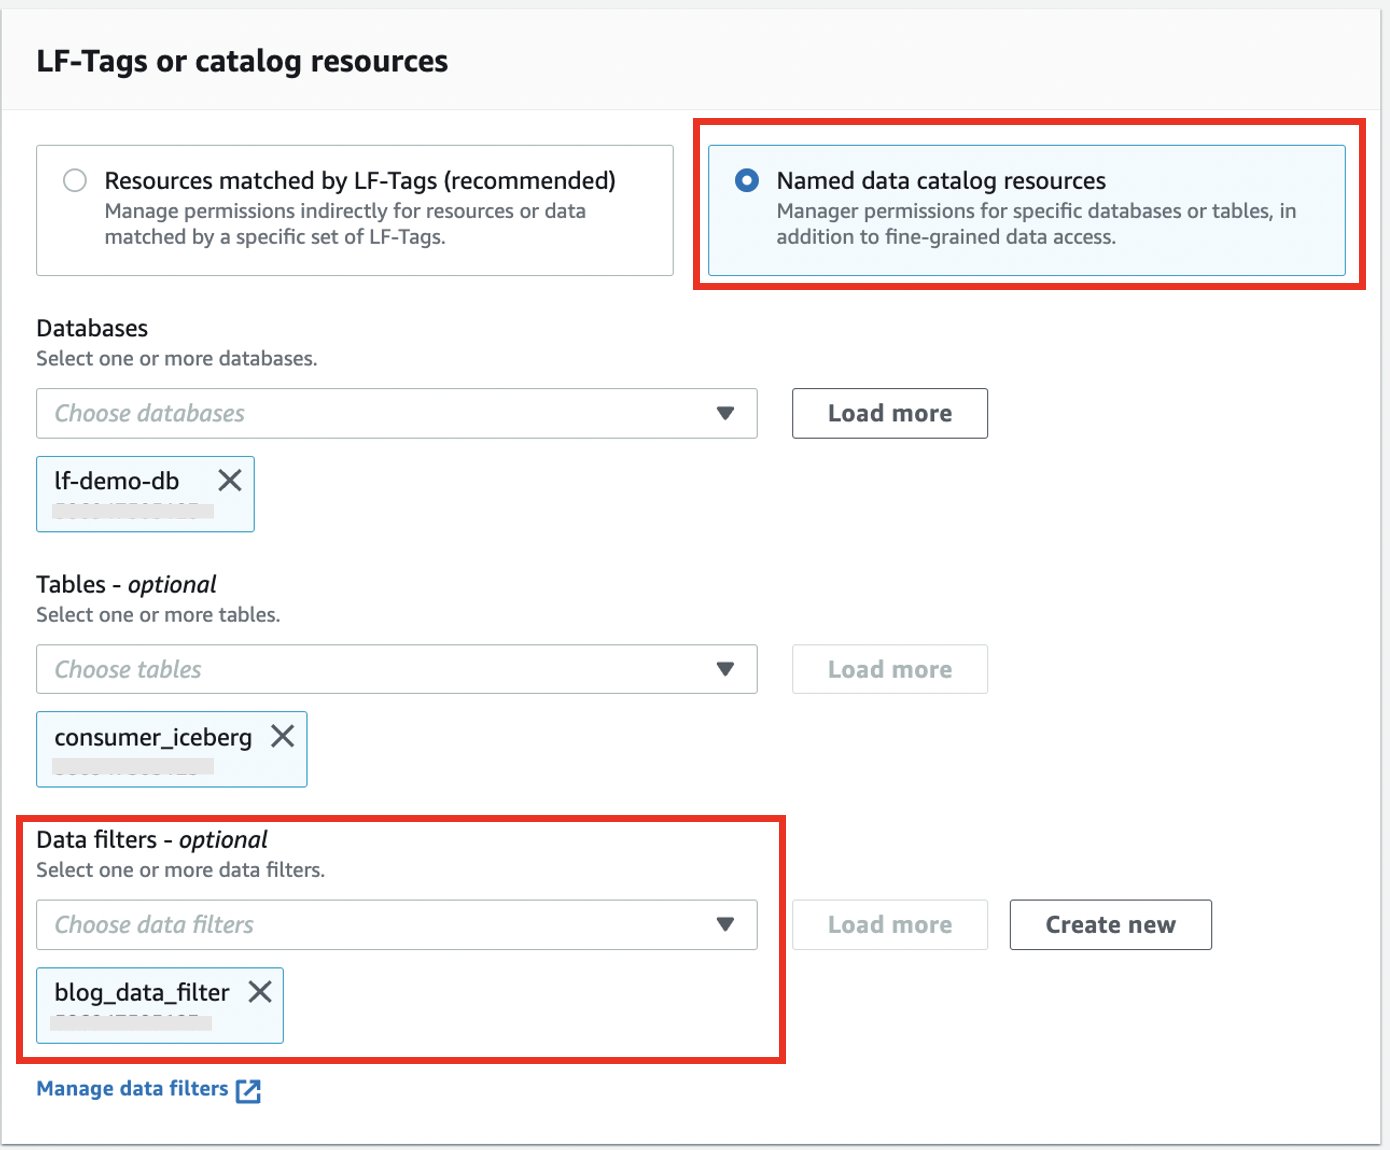
  5. Select Named data catalog resources.
  6. Choose your database and table.
  7. For Data filters, choose the data filter you created.
    Add data filter
  8. For Data filter permissions and Grantable permissions, select Select.
  9. Choose Grant.

Permissions for creating grant

Data consumer setup

To set up the data consumer, we accept the resource share and create a table using AWS RAM and Lake Formation. Complete the following steps:

  1. Log in to the consumer account and navigate to the AWS RAM console.
  2. Under Shared with me in the navigation pane, choose Resource shares.
  3. Choose your resource share.
    Resource share in consumer account
  4. Choose Accept resource share.
  5. Note the name of the resource share to use in the next steps.
    Accept resource share
  6. Navigate to the Lake Formation console.
  7. If you’re logging in for the first time, you’re prompted to create an admin user.
  8. Choose Databases in the navigation pane, then choose your database.
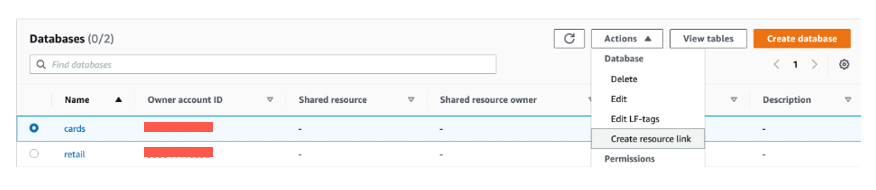
  9. On the Actions menu, choose Create resource link.
    Create a resource link
  10. For Resource link name, enter the name of your resource link (for example, consumer_iceberg).
  11. Choose your database and shared table.
  12. Choose Create.
    Create table with resource link

Validate the solution

Now we can run different operations on the tables to validate the fine-grained access controls.

Insert operation

Let’s insert data into the consumer_iceberg table in the producer account, and validate the data filtering works as expected in the consumer account.

  1. Log in to the producer account.
  2. On the Athena console, choose Query editor in the navigation pane.
  3. Use the following SQL to write and insert data into the Iceberg table. Use the Query editor to run one query at a time. You can highlight/select one query at a time and click “Run”/“Run again:
INSERT INTO consumer_iceberg VALUES (1, 'Land of Toys Inc.', '[email protected]',
'NYC','USA', 'NA', 'James', 'xxxx 118th NE');

INSERT INTO consumer_iceberg VALUES (2, 'Reims Collectables', '[email protected]',
'Reims','France', 'EMEA', 'Josephine', 'Darakjy');

INSERT INTO consumer_iceberg VALUES (3, 'Lyon Souveniers', '[email protected]',
'Paris', 'France', 'EMEA','Art', 'Venere');

Insert data into consumer_iceberg table in the producer account

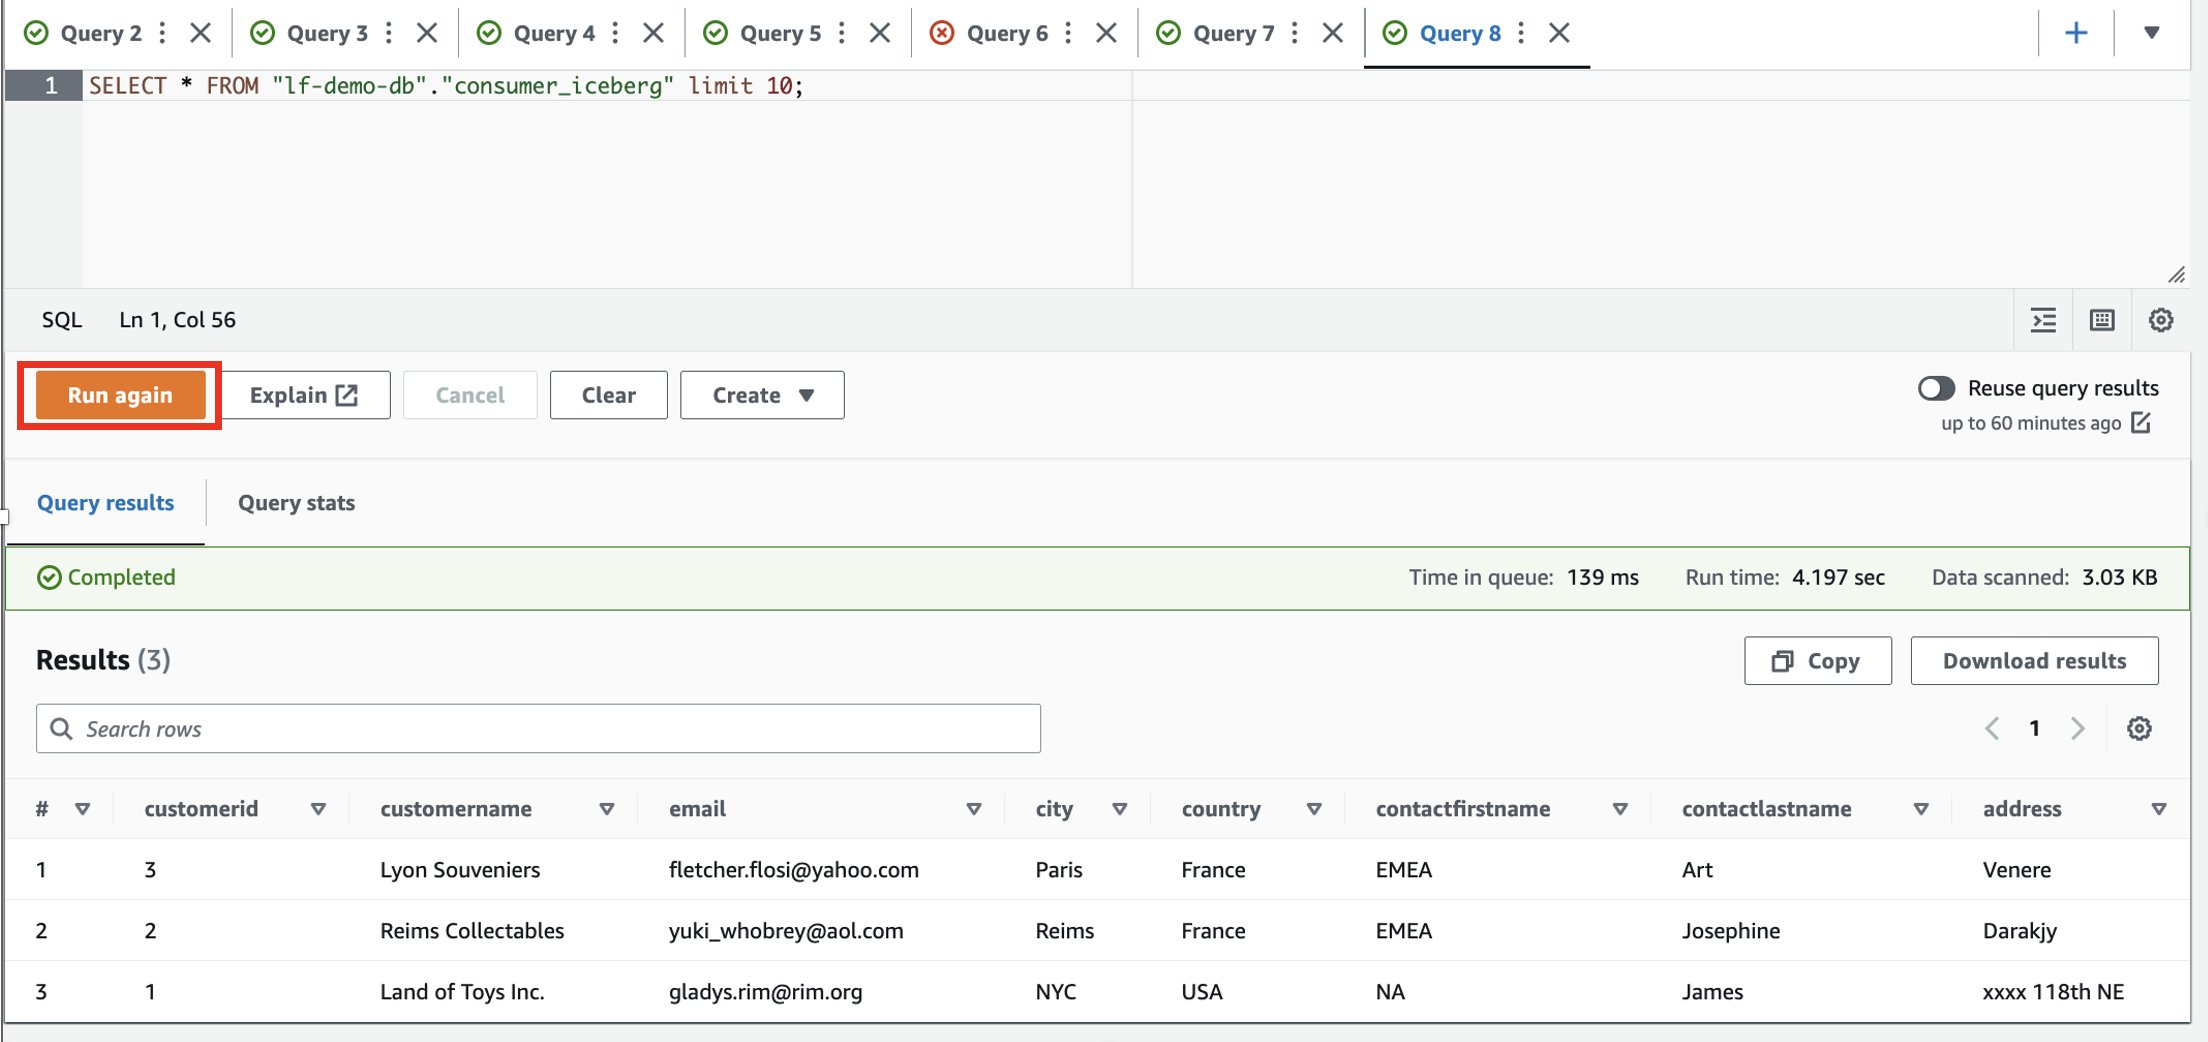
  1. Use the following SQL to read and select data in the Iceberg table:
SELECT * FROM "lf-demo-db"."consumer_iceberg" limit 10;

Run select query to validate rows were inserted

  1. Log in to the consumer account.
  2. In the Athena query editor, run the following SELECT query on the shared table:
SELECT * FROM "lf-demo-db"."consumer_iceberg" limit 10;

Run same query in consumer account

Based on the filters, the consumer has visibility to a subset of columns, and rows where the country is France.

Update/Delete operations

Now let’s update one of the rows and delete one from the dataset shared with the consumer.

  1. Log in to the producer account.
  2. Update city='Paris' WHERE city='Reims' and delete the row customerid = 3;
    UPDATE consumer_iceberg SET city= 'Paris' WHERE city= 'Reims' ;

    Run update query in producer account

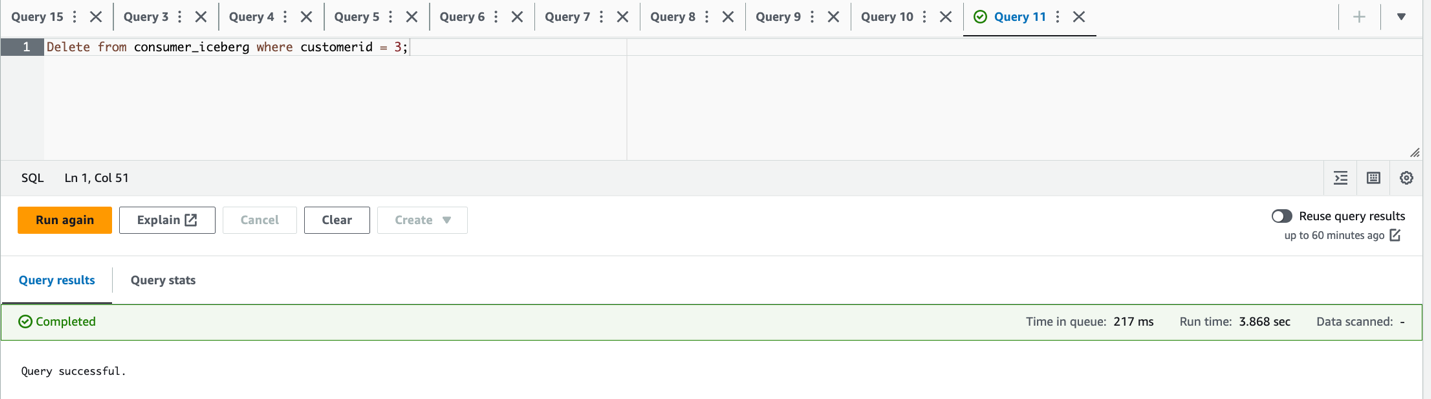
DELETE FROM consumer_iceberg WHERE customerid =3;

Run delete query in producer account

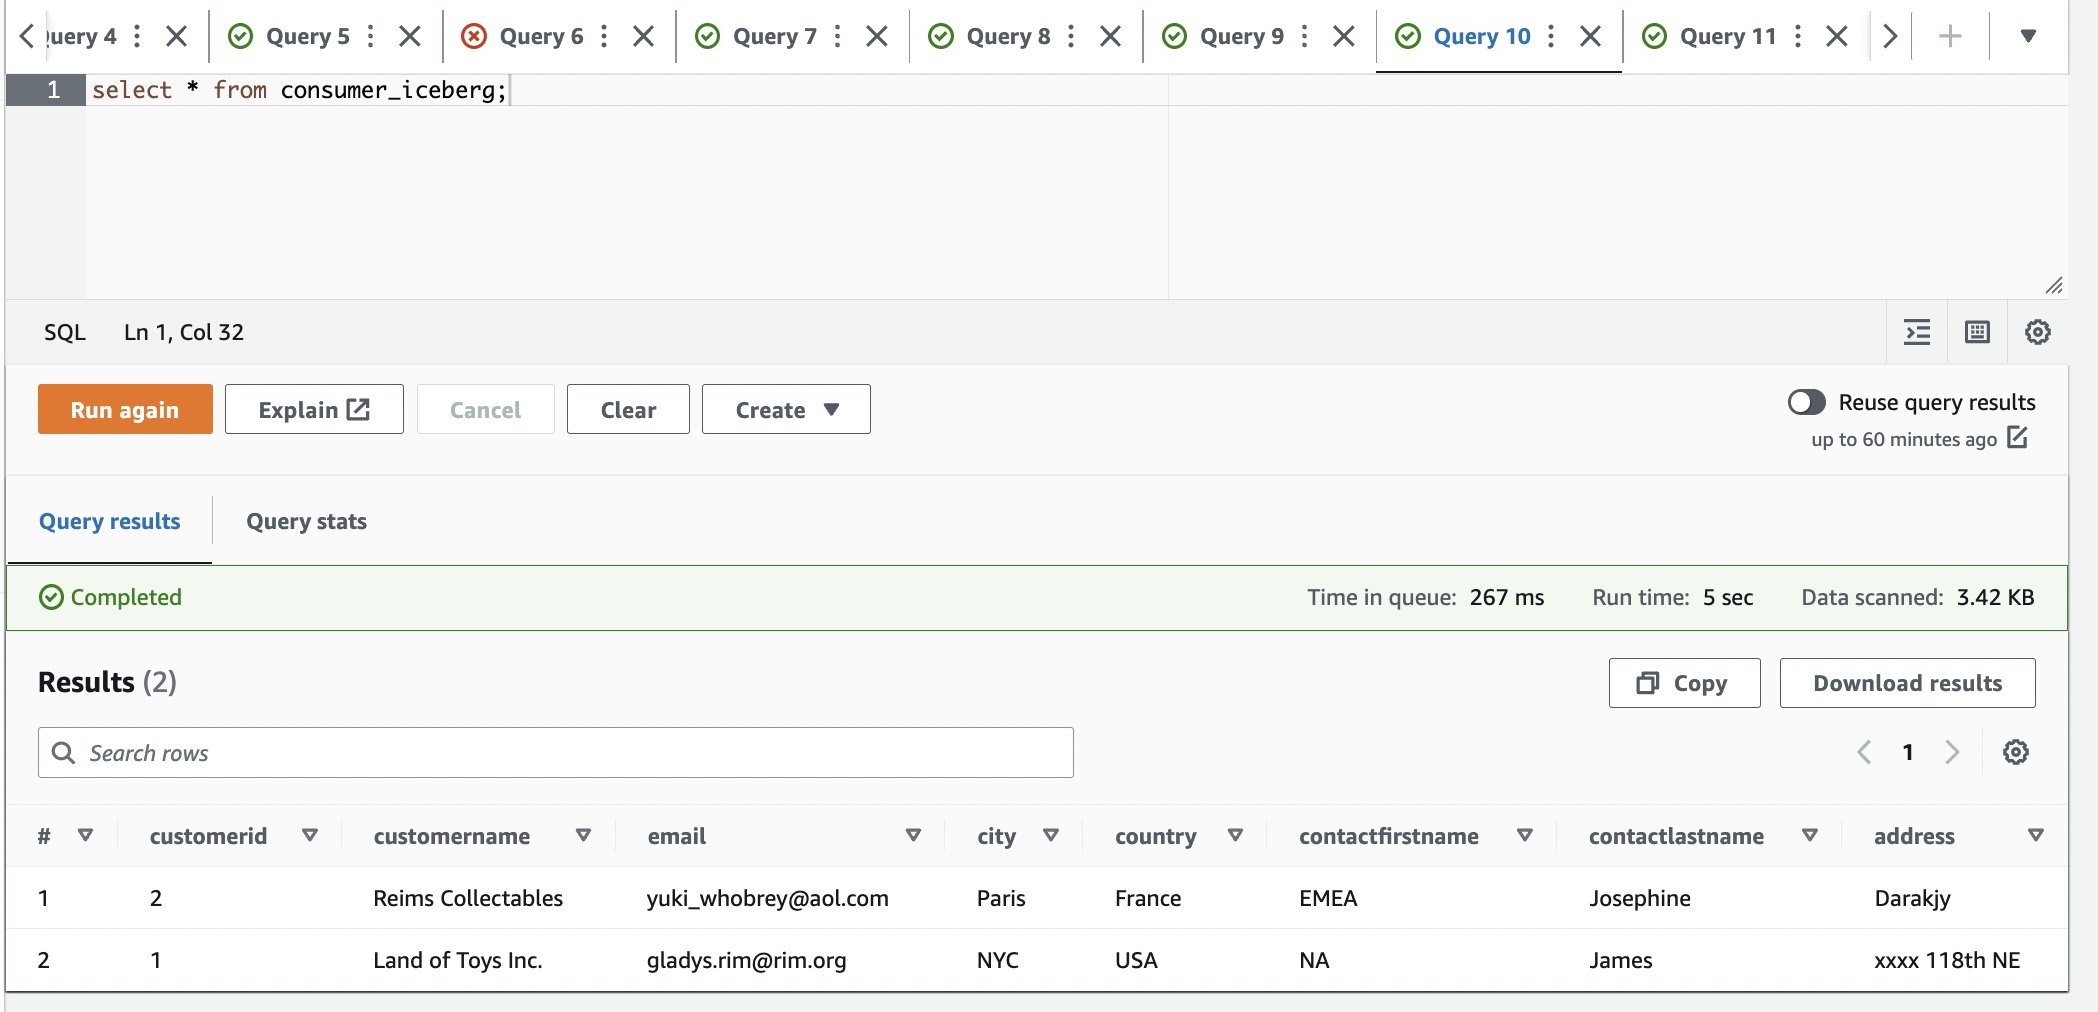
  1. Verify the updated and deleted dataset:
SELECT * FROM consumer_iceberg;

Verify update and delete reflected in producer account

  1. Log in to the consumer account.
  2. In the Athena query editor, run the following SELECT query on the shared table:
SELECT * FROM "lf-demo-db"."consumer_iceberg" limit 10;

Verify update and delete in consumer account

We can observe that only one row is available and the city is updated to Paris.

Schema evolution: Add a new column

Let’s update one of the rows and delete one from the dataset shared with the consumer.

  1. Log in to the producer account.
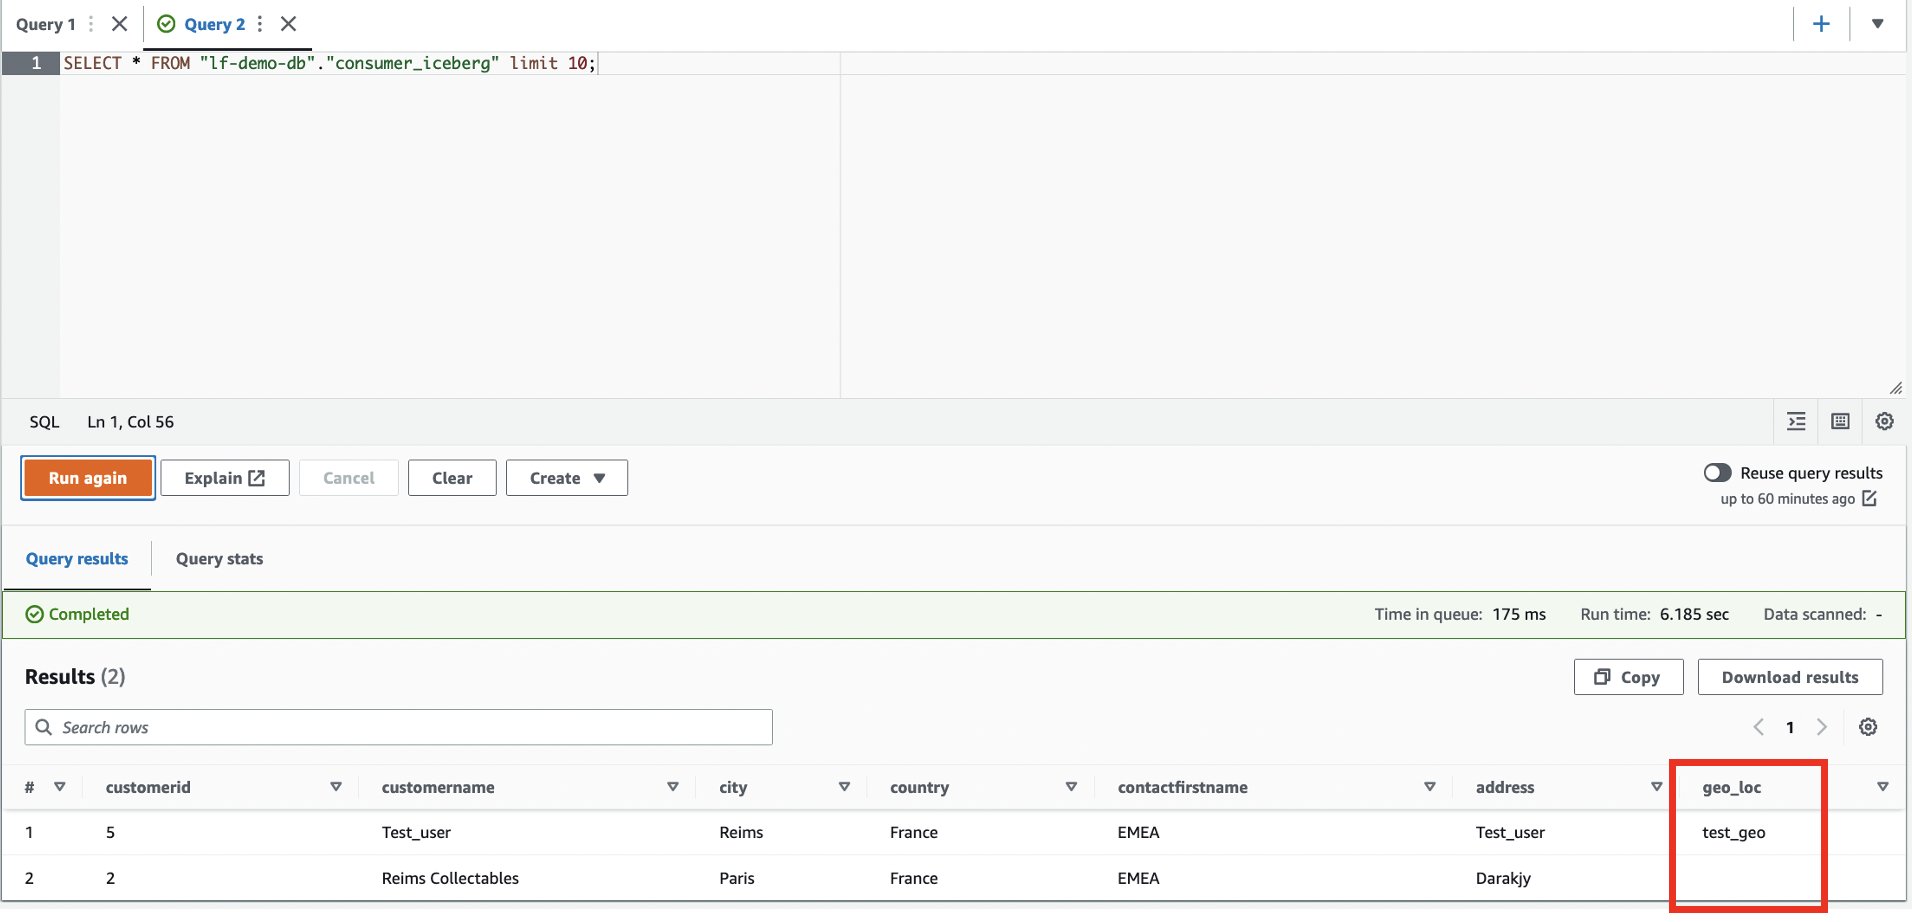
  2. Add a new column called geo_loc in the Iceberg table. Use the Query editor to run one query at a time. You can highlight/select one query at a time and click “Run”/“Run again:
ALTER TABLE consumer_iceberg ADD COLUMNS (geo_loc string);

INSERT INTO consumer_iceberg VALUES (5, 'Test_user', '[email protected]',
'Reims','France', 'EMEA', 'Test_user', 'Test_user', 'test_geo');

SELECT * FROM consumer_iceberg;

Add a new column in producer aacccount

To provide visibility to the newly added geo_loc column, we need to update the Lake Formation data filter.

  1. On the Lake Formation console, choose Data filters in the navigation pane.
  2. Select your data filter and choose Edit.
    Update data filter
  3. Under Column-level access, add the new column (geo_loc).
  4. Choose Save.
    Add new column to data filter
  5. Log in to the consumer account.
  6. In the Athena query editor, run the following SELECT query on the shared table:
SELECT * FROM "lf-demo-db"."consumer_iceberg" limit 10;

Validate new column appears in consumer account

The new column geo_loc is visible and an additional row.

Schema evolution: Delete column

Let’s update one of the rows and delete one from the dataset shared with the consumer.

  1. Log in to the producer account.
  2. Alter the table to drop the address column from the Iceberg table. Use the Query editor to run one query at a time. You can highlight/select one query at a time and click “Run”/“Run again:
ALTER TABLE consumer_iceberg DROP COLUMN address;

SELECT * FROM consumer_iceberg;

Delete a column in producer account

We can observe that the column address is not present in the table.

  1. Log in to the consumer account.
  2. In the Athena query editor, run the following SELECT query on the shared table:
SELECT * FROM "lf-demo-db"."consumer_iceberg" limit 10;

Validate column deletion in consumer account

The column address is not present in the table.

Time travel

We have now changed the Iceberg table multiple times. The Iceberg table keeps track of the snapshots. Complete the following steps to explore the time travel functionality:

  1. Log in to the producer account.
  2. Query the system table:
SELECT * FROM "lf-demo-db"."consumer_iceberg$snapshots" limit 10;

We can observe that we have generated multiple snapshots.

  1. Note down one of the committed_at values to use in the next steps (for this example, 2023-01-29 21:35:02.176 UTC).
    Time travel query in consumer account
  2. Use time travel to find the table snapshot. Use the Query editor to run one query at a time. You can highlight/select one query at a time and click “Run”/“Run again:
SELECT * FROM consumer_iceberg FOR TIMESTAMP
AS OF TIMESTAMP '2023-01-29 21:35:02.176 UTC';

Find table snapshot using time travel

Clean up

Complete the following steps to avoid incurring future charges:

  1. On the Amazon S3 console, delete the table storage bucket (for this post, iceberg-athena-lakeformation-blog).
  2. In the producer account on the Athena console, run the following commands to delete the tables you created:
DROP TABLE "lf-demo-db"."consumer_iceberg";
DROP DATABASE lf-demo-db;
  1. In the producer account on the Lake Formation console, revoke permissions to the consumer account.
    Clean up - Revoke permissions to consumer account
  2. Delete the S3 bucket used for the Athena query result location from the consumer account.

Conclusion

With the support for cross account, fine-grained access control policies for formats such as Iceberg, you have the flexibility to work with any format supported by Athena. The ability to perform CRUD operations against the data in your S3 data lake combined with Lake Formation fine-grained access controls for all tables and formats supported by Athena provides opportunities to innovate and simplify your data strategy. We’d love to hear your feedback!


About the authors

Kishore Dhamodaran is a Senior Solutions Architect at AWS. Kishore helps strategic customers with their cloud enterprise strategy and migration journey, leveraging his years of industry and cloud experience.

Jack Ye is a software engineer of the Athena Data Lake and Storage team at AWS. He is an Apache Iceberg Committer and PMC member.

Chris Olson is a Software Development Engineer at AWS.

Xiaoxuan Li is a Software Development Engineer at AWS.

Rahul Sonawane is a Principal Analytics Solutions Architect at AWS with AI/ML and Analytics as his area of specialty.

AWS Week in Review – March 20, 2023

Post Syndicated from Danilo Poccia original https://aws.amazon.com/blogs/aws/aws-week-in-review-march-20-2023/

This post is part of our Week in Review series. Check back each week for a quick roundup of interesting news and announcements from AWS!

A new week starts, and Spring is almost here! If you’re curious about AWS news from the previous seven days, I got you covered.

Last Week’s Launches
Here are the launches that got my attention last week:

Picture of an S3 bucket and AWS CEO Adam Selipsky.Amazon S3 – Last week there was AWS Pi Day 2023 celebrating 17 years of innovation since Amazon S3 was introduced on March 14, 2006. For the occasion, the team released many new capabilities:

Amazon Linux 2023 – Our new Linux-based operating system is now generally available. Sébastien’s post is full of tips and info.

Application Auto Scaling – Now can use arithmetic operations and mathematical functions to customize the metrics used with Target Tracking policies. You can use it to scale based on your own application-specific metrics. Read how it works with Amazon ECS services.

AWS Data Exchange for Amazon S3 is now generally available – You can now share and find data files directly from S3 buckets, without the need to create or manage copies of the data.

Amazon Neptune – Now offers a graph summary API to help understand important metadata about property graphs (PG) and resource description framework (RDF) graphs. Neptune added support for Slow Query Logs to help identify queries that need performance tuning.

Amazon OpenSearch Service – The team introduced security analytics that provides new threat monitoring, detection, and alerting features. The service now supports OpenSearch version 2.5 that adds several new features such as support for Point in Time Search and improvements to observability and geospatial functionality.

AWS Lake Formation and Apache Hive on Amazon EMR – Introduced fine-grained access controls that allow data administrators to define and enforce fine-grained table and column level security for customers accessing data via Apache Hive running on Amazon EMR.

Amazon EC2 M1 Mac Instances – You can now update guest environments to a specific or the latest macOS version without having to tear down and recreate the existing macOS environments.

AWS Chatbot – Now Integrates With Microsoft Teams to simplify the way you troubleshoot and operate your AWS resources.

Amazon GuardDuty RDS Protection for Amazon Aurora – Now generally available to help profile and monitor access activity to Aurora databases in your AWS account without impacting database performance

AWS Database Migration Service – Now supports validation to ensure that data is migrated accurately to S3 and can now generate an AWS Glue Data Catalog when migrating to S3.

AWS Backup – You can now back up and restore virtual machines running on VMware vSphere 8 and with multiple vNICs.

Amazon Kendra – There are new connectors to index documents and search for information across these new content: Confluence Server, Confluence Cloud, Microsoft SharePoint OnPrem, Microsoft SharePoint Cloud. This post shows how to use the Amazon Kendra connector for Microsoft Teams.

For a full list of AWS announcements, be sure to keep an eye on the What’s New at AWS page.

Other AWS News
A few more blog posts you might have missed:

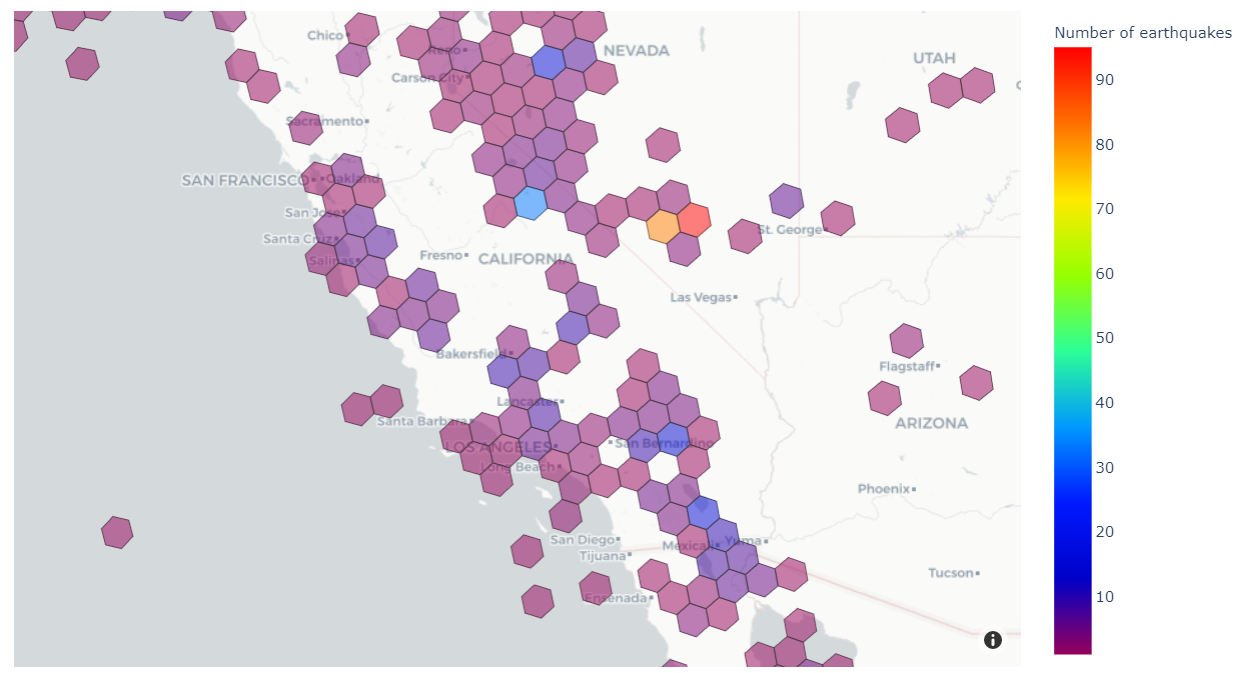
Example of a geospatial query.Women founders Q&A – We’re talking to six women founders and leaders about how they’re making impacts in their communities, industries, and beyond.

What you missed at that 2023 IMAGINE: Nonprofit conference – Where hundreds of nonprofit leaders, technologists, and innovators gathered to learn and share how AWS can drive a positive impact for people and the planet.

Monitoring load balancers using Amazon CloudWatch anomaly detection alarms – The metrics emitted by load balancers provide crucial and unique insight into service health, service performance, and end-to-end network performance.

Extend geospatial queries in Amazon Athena with user-defined functions (UDFs) and AWS Lambda – Using a solution based on Uber’s Hexagonal Hierarchical Spatial Index (H3) to divide the globe into equally-sized hexagons.

How cities can use transport data to reduce pollution and increase safety – A guest post by Rikesh Shah, outgoing head of open innovation at Transport for London.

For AWS open-source news and updates, here’s the latest newsletter curated by Ricardo to bring you the most recent updates on open-source projects, posts, events, and more.

Upcoming AWS Events
Here are some opportunities to meet:

AWS Public Sector Day 2023 (March 21, London, UK) – An event dedicated to helping public sector organizations use technology to achieve more with less through the current challenging conditions.

Women in Tech at Skills Center Arlington (March 23, VA, USA) – Let’s celebrate the history and legacy of women in tech.

The AWS Summits season is warming up! You can sign up here to know when registration opens in your area.

That’s all from me for this week. Come back next Monday for another Week in Review!

Danilo

Patterns for enterprise data sharing at scale

Post Syndicated from Venkata Sistla original https://aws.amazon.com/blogs/big-data/patterns-for-enterprise-data-sharing-at-scale/

Data sharing is becoming an important element of an enterprise data strategy. AWS services like AWS Data Exchange provide an avenue for companies to share or monetize their value-added data with other companies. Some organizations would like to have a data sharing platform where they can establish a collaborative and strategic approach to exchange data with a restricted group of companies in a closed, secure, and exclusive environment. For example, financial services companies and their auditors, or manufacturing companies and their supply chain partners. This fosters development of new products and services and helps improve their operational efficiency.

Data sharing is a team effort, it’s important to note that in addition to establishing the right infrastructure, successful data sharing also requires organizations to ensure that business owners sponsor data sharing initiatives. They also need to ensure that data is of high quality. Data platform owners and security teams should encourage proper data use and fix any privacy and confidentiality issues.

This blog discusses various data sharing options and common architecture patterns that organizations can adopt to set up their data sharing infrastructure based on AWS service availability and data compliance.

Data sharing options and data classification types

Organizations operate across a spectrum of security compliance constraints. For some organizations, it’s possible to use AWS services like AWS Data Exchange. However, organizations working in heavily regulated industries like federal agencies or financial services might be limited by the allow listed AWS service options. For example, if an organization is required to operate in a Fedramp Medium or Fedramp High environment, their options to share data may be limited by the AWS services that are available and have been allow listed. Service availability is based on platform certification by AWS, and allow listing is based on the organizations defining their security compliance architecture and guidelines.

The kind of data that the organization wants to share with its partners may also have an impact on the method used for data sharing. Complying with data classification rules may further limit their choice of data sharing options they may choose.

The following are some general data classification types:

  • Public data – Important information, though often freely available for people to read, research, review and store. It typically has the lowest level of data classification and security.
  • Private data – Information you might want to keep private like email inboxes, cell phone content, employee identification numbers, or employee addresses. If private data were shared, destroyed, or altered, it might pose a slight risk to an individual or the organization.
  • Confidential or restricted data – A limited group of individuals or parties can access sensitive information often requiring special clearance or special authorization. Confidential or restricted data access might involve aspects of identity and authorization management. Examples of confidential data include Social Security numbers and vehicle identification numbers.

The following is a sample decision tree that you can refer to when choosing your data sharing option based on service availability, classification type, and data format (structured or unstructured). Other factors like usability, multi-partner accessibility, data size, consumption patterns like bulk load/API access, and more may also affect the choice of data sharing pattern.

decisiontree

In the following sections, we discuss each pattern in more detail.

Pattern 1: Using AWS Data Exchange

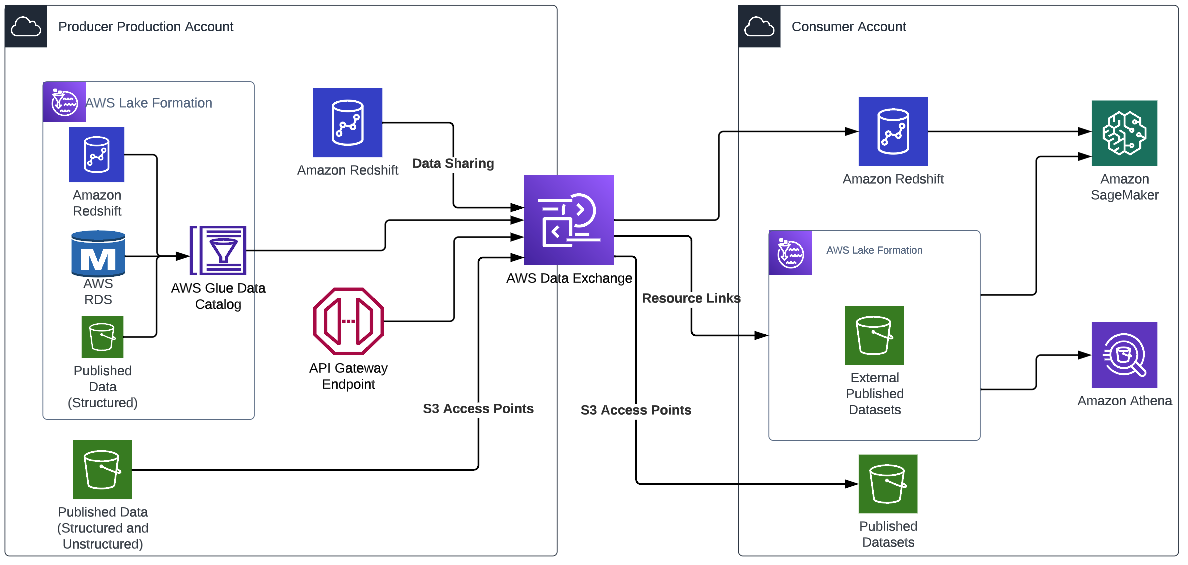
AWS Data Exchange makes exchanging data easier, helping organizations lower costs, become more agile, and innovate faster. Organizations can choose to share data privately using AWS Data Exchange with their external partners. AWS Data Exchange offers perimeter controls that are applied at identity and resource levels. These controls decide which external identities have access to specific data resources. AWS Data Exchange provides multiple different patterns for external parties to access data, such as the following:

The following diagram illustrates an example architecture.

pattern1

With AWS Data Exchange, once the dataset to share (or sell) is configured, AWS Data Exchange automatically manages entitlements (and billing) between the producer and the consumer. The producer doesn’t have to manage policies, set up new access points, or create new Amazon Redshift data shares for each consumer, and access is automatically revoked if the subscription ends. This can significantly reduce the operational overhead in sharing data.

Pattern 2: Using AWS Lake Formation for centralized access management

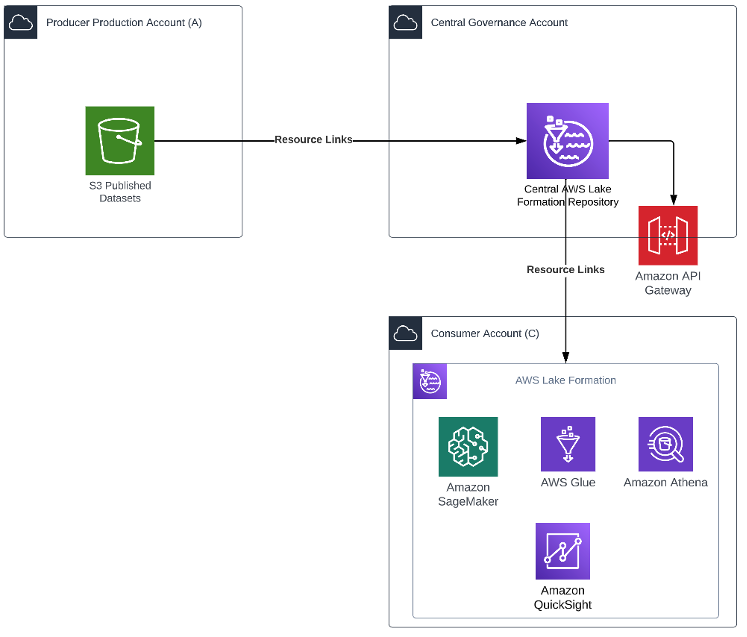
You can use this pattern in cases where both the producer and consumer are on the AWS platform with an AWS account that is enabled to use AWS Lake Formation. This pattern provides a no-code approach to data sharing. The following diagram illustrates an example architecture.

pattern2

In this pattern, the central governance account has Lake Formation configured for managing access across the producer’s org accounts. Resource links from the production account Amazon Simple Storage Service (Amazon S3) bucket are created in Lake Formation. The producer grants Lake Formation permissions on an AWS Glue Data Catalog resource to an external account, or directly to an AWS Identity and Access Management (IAM) principal in another account. Lake Formation uses AWS Resource Access Manager (AWS RAM) to share the resource. If the grantee account is in the same organization as the grantor account, the shared resource is available immediately to the grantee. If the grantee account is not in the same organization, AWS RAM sends an invitation to the grantee account to accept or reject the resource grant. To make the shared resource available, the consumer administrator in the grantee account must use the AWS RAM console or AWS Command Line Interface (AWS CLI) to accept the invitation.

Authorized principals can share resources explicitly with an IAM principal in an external account. This feature is useful when the producer wants to have control over who in the external account can access the resources. The permissions the IAM principal receives are a union of direct grants and the account-level grants that are cascaded down to the principals. The data lake administrator of the recipient account can view the direct cross-account grants, but can’t revoke permissions.

Pattern 3: Using AWS Lake Formation from the producer external sharing account

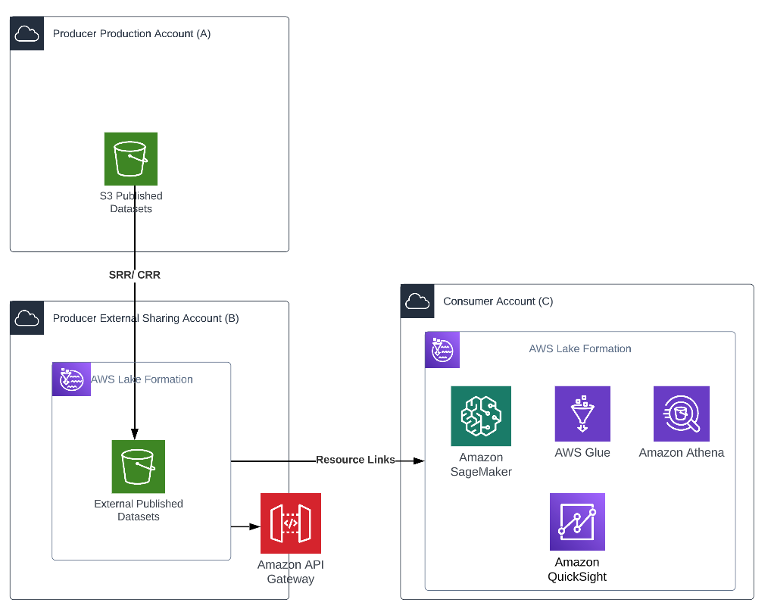
The producer may have stringent security requirements where no external consumer should access their production account or their centralized governance account. They may also not have Lake Formation enabled on their production platform. In such cases, as shown in the following diagram, the producer production account (Account A) is dedicated to its internal organization users. The producer creates another account, the producer external sharing account (Account B), which is dedicated for external sharing. This gives the producer more latitude to create specific policies for specific organizations.

The following architecture diagram shows an overview of the pattern.

pattern3

The producer implements a process to create an asynchronous copy of data in Account B. The bucket can be configured for Same Region Replication (SRR) or Cross Region Replication (CRR) for objects that need to be shared. This facilitates automated refresh of data to the external account to the “External Published Datasets” S3 bucket without having to write any code.

Creating a copy of the data allows the producer to add another degree of separation between the external consumer and its production data. It also helps meet any compliance or data sovereignty requirements.

Lake Formation is set up on Account B, and the administrator creates resources links for the “External Published Datasets” S3 bucket in its account to grant access. The administrator follows the same process to grant access as described earlier.

Pattern 4: Using Amazon Redshift data sharing

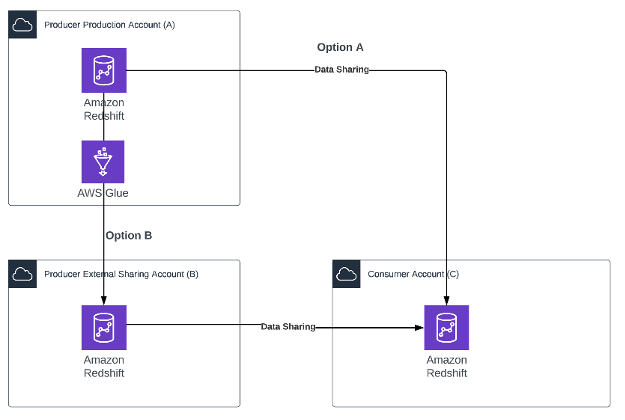
This pattern is ideally suited for a producer who has most of their published data products on Amazon Redshift. This pattern also requires the producer’s external sharing account (Account B) and the consumer account (Account C) to have an encrypted Amazon Redshift cluster or Amazon Redshift Serverless endpoint that meets the prerequisites for Amazon Redshift data sharing.

The following architecture diagram shows an overview of the pattern.

pattern4

Two options are possible depending on the producer’s compliance constraints:

  • Option A – The producer enables data sharing directly on the production Amazon Redshift cluster.
  • Option B – The producer may have constraints with respect to sharing the production cluster. The producer creates a simple AWS Glue job that copies data from the Amazon Redshift cluster in the production Account A to the Amazon Redshift cluster in the external Account B. This AWS Glue job can be scheduled to refresh data as needed by the consumer. When the data is available in Account B, the producer can create multiple views and multiple data shares as needed.

In both options, the producer maintains complete control over what data is being shared, and the consumer admin maintains full control over who can access the data within their organization.

After both the producer and consumer admins approve the data sharing request, the consumer user can access this data as if it were part of their own account without have to write any additional code.

Pattern 5: Sharing data securely and privately using APIs

You can adopt this pattern when the external partner doesn’t have a presence on AWS. You can also use this pattern when published data products are spread across various services like Amazon S3, Amazon Redshift, Amazon DynamoDB, and Amazon OpenSearch Service but the producer would like to maintain a single data sharing interface.

Here’s an example use case: Company A would like to share some of its log data in near-real time with its partner Company B, who uses this data to generate predictive insights for Company A. Company A stores this data in Amazon Redshift. The company wants to share this transactional information with its partner after masking the personally identifiable information (PII) in a cost-effective and secure way to generate insights. Company B doesn’t use the AWS platform.

Company A establishes a microbatch process using an AWS Lambda function or AWS Glue that queries Amazon Redshift to get incremental log data, applies the rules to redact the PII, and loads this data to the “Published Datasets” S3 bucket. This instantiates an SRR/CRR process that refreshes this data in the “External Sharing” S3 bucket.

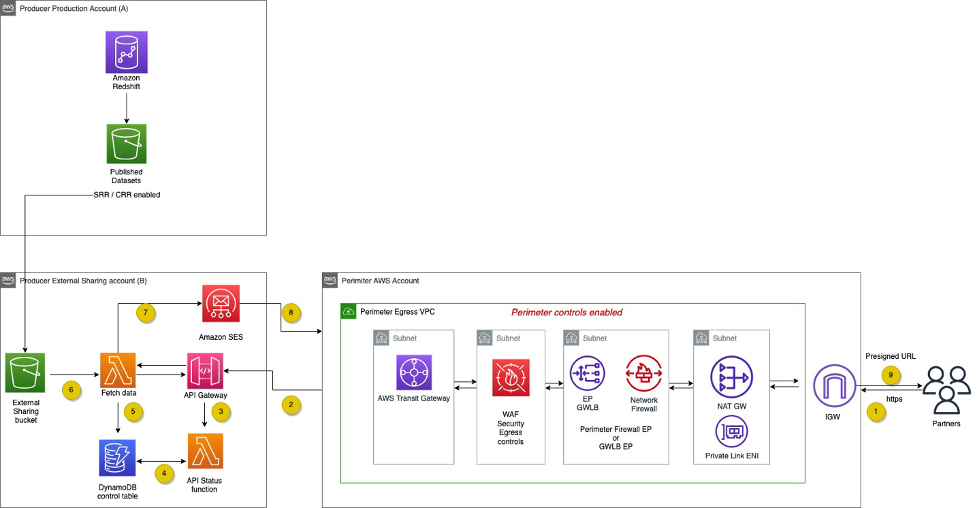
The following diagram shows how the consumer can then use an API-based approach to access this data.

pattern5

The workflow contains the following steps:

  1. An HTTPS API request is sent from the API consumer to the API proxy layer.
  2. The HTTPS API request is forwarded from the API proxy to Amazon API Gateway in the external sharing AWS account.
  3. Amazon API Gateway calls the request receiver Lambda function.
  4. The request receiver function writes the status to a DynamoDB control table.
  5. A second Lambda function, the poller, checks the status of the results in the DynamoDB table.
  6. The poller function fetches results from Amazon S3.
  7. The poller function sends a presigned URL to download the file from the S3 bucket to the requestor via Amazon Simple Email Service (Amazon SES).
  8. The requestor downloads the file using the URL.
  9. The network perimeter AWS account only allows egress internet connection.
  10. The API proxy layer enforces both the egress security controls and perimeter firewall before the traffic leaves the producer’s network perimeter.
  11. The AWS Transit Gateway security egress VPC routing table only allows connectivity from the required producer’s subnet, while preventing internet access.

Pattern 6: Using Amazon S3 access points

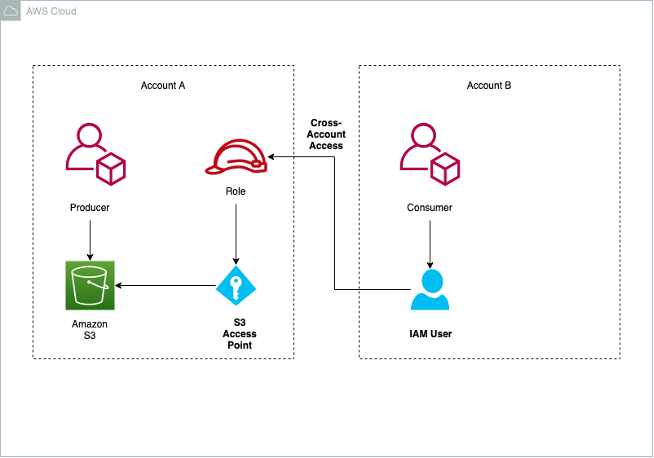
Data scientists may need to work collaboratively on image, videos, and text documents. Legal and audit groups may want to share reports and statements with the auditing agencies. This pattern discusses an approach to sharing such documents. The pattern assumes that the external partners are also on AWS. Amazon S3 access points allow the producer to share access with their consumer by setting up cross-account access without having to edit bucket policies.

Access points are named network endpoints that are attached to buckets that you can use to perform S3 object operations, such as GetObject and PutObject. Each access point has distinct permissions and network controls that Amazon S3 applies for any request that is made through that access point. Each access point enforces a customized access point policy that works in conjunction with the bucket policy attached to the underlying bucket.

The following architecture diagram shows an overview of the pattern.

pattern6

The producer creates an S3 bucket and enables the use of access points. As part of the configuration, the producer specifies the consumer account, IAM role, and privileges for the consumer IAM role.

The consumer users with the IAM role in the consumer account can access the S3 bucket via the internet or restricted to an Amazon VPC via VPC endpoints and AWS PrivateLink.

Conclusion

Each organization has its unique set of constraints and requirements that it needs to fulfill to set up an efficient data sharing solution. In this post, we demonstrated various options and best practices available to organizations. The data platform owner and security team should work together to assess what works best for your specific situation. Your AWS account team is also available to help.

Related resources

For more information on related topics, refer to the following:


About the Authors


Venkata Sistla
is a Cloud Architect – Data & Analytics at AWS. He specializes in building data processing capabilities and helping customers remove constraints that prevent them from leveraging their data to develop business insights.

Santosh Chiplunkar is a Principal Resident Architect at AWS. He has over 20 years of experience helping customers solve their data challenges. He helps customers develop their data and analytics strategy and provides them with guidance on how to make it a reality.

Introducing AWS Glue crawlers using AWS Lake Formation permission management

Post Syndicated from Sandeep Adwankar original https://aws.amazon.com/blogs/big-data/introducing-aws-glue-crawlers-using-aws-lake-formation-permission-management/

Data lakes provide a centralized repository that consolidates your data at scale and makes it available for different kinds of analytics. AWS Glue crawlers are a popular way to scan data in a data lake, classify it, extract schema information from it, and store the metadata automatically in the AWS Glue Data Catalog. AWS Lake Formation enables you to centrally govern, secure, and share your data, and lets you scale permissions easily.

We are pleased to announce AWS Glue crawler and Lake Formation integration. You can now use Lake Formation permissions for the crawler’s access to your Lake Formation managed data lakes, whether those are in your account or in other accounts. Before this release, you had to set up AWS Glue crawler IAM role with Amazon Simple Storage Service (Amazon S3) permissions to crawl data source on Amazon S3. And also establish Amazon S3 bucket policies on the source bucket for the crawler role to access S3 data source. Now you can use AWS Lake Formation permission defined on data lake for crawling the data and you no longer need to configure dedicated Amazon S3 permissions for crawlers. AWS Lake Formation manages crawler IAM role access to various Amazon S3 buckets and/or its prefix using data locations permissions to simplify security management. Further you can apply the same security model for crawlers in addition to AWS Glue jobs, Amazon Athena for centralized governance.

When you configure an AWS Glue crawler to use Lake Formation, by default, the crawler uses Lake Formation in the same account to obtain data access credentials. However, you can also configure the crawler to use Lake Formation of a different account by providing an account ID during creation. The cross-account capability allows you to perform permissions management from a central governance account. Customers prefer the central governance experience over writing bucket policies separately in each bucket-owning account. To build a data mesh architecture, you can author permissions in a single Lake Formation governance to manage access to data locations and crawlers spanning multiple accounts in your data lake. You can refer to How to configure a crawler to use Lake Formation credentials for more information.

In this post, we walk through a single in-account architecture that shows how to enable Lake Formation permissions on the data lake, configure an AWS Glue crawler with Lake Formation permission to scan and populate schema from an S3 data lake into the AWS Glue Data Catalog, and then use an analytical engine like Amazon Athena to query the data.

Solution overview

The AWS Glue crawler and Lake Formation integration supports in-account crawling as well as cross-account crawling. You can configure a crawler to use Lake Formation permissions to access an S3 data store or a Data Catalog table with an underlying S3 location within the same AWS account or another AWS account. You can configure an existing Data Catalog table as a crawler’s target if the crawler and the Data Catalog table reside in the same account. The following figure shows the in-account crawling architecture.

Prerequisites

Complete the following prerequisite steps:

  1. Sign in to the Lake Formation console as admin.
  2. If this is the first time accessing the Lake Formation console, add yourself as the data lake administrator.
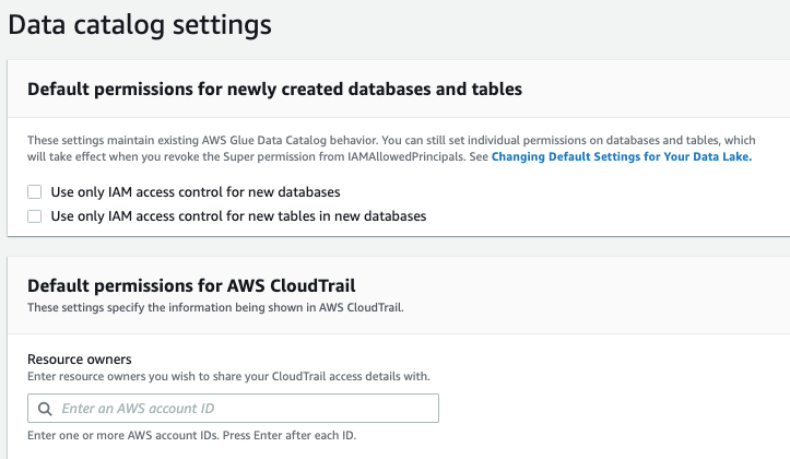
  3. In the navigation pane, under Data catalog, choose Settings.
  4. Deselect Use only IAM access control for new databases.
  5. Deselect Use only IAM access control for new tables in new databases.
  6. Keep Version 3 as the current cross-account version.
  7. Choose Save.

Set up your solution resources

We set up the solution resources using AWS CloudFormation. Complete the following steps:

  1. Log in to the AWS Management Console as IAM administrator.
  2. Choose Launch Stack to deploy a CloudFormation template:
  3. For LFBusinessAnalystUserName, keep as the default LFBusinessAnalyst.
  4. Create your stack.
  5. When the stack is complete, on the AWS CloudFormation console, navigate to the Resources tab of the stack.
  6. Note down value of Databasename, DataLakeBucket, and GlueCrawlerName.
  7. Choose the LFBusinessAnalystUserCredentials value to navigate to the AWS Secrets Manager console.
  8. In the Secret value section, choose Retrieve secret value.
  9. Note down the secret value for the password for IAM user LFBusinessAnalyst.

Validate resources

In your account, validate the following resources created by template:

  • AWS Glue database – The Databasename value noted from the CloudFormation template.
  • S3 bucket for the data lake with sample data – The DataLakeBucketvalue value noted from the CloudFormation template.
  • AWS Glue crawler and IAM role with required permission – The GlueCrawlerName value noted from the CloudFormation template.

The template registers the S3 bucket with Lake Formation as the data location. On Lake Formation console left navigation choose Data lake locations under Register and ingest.

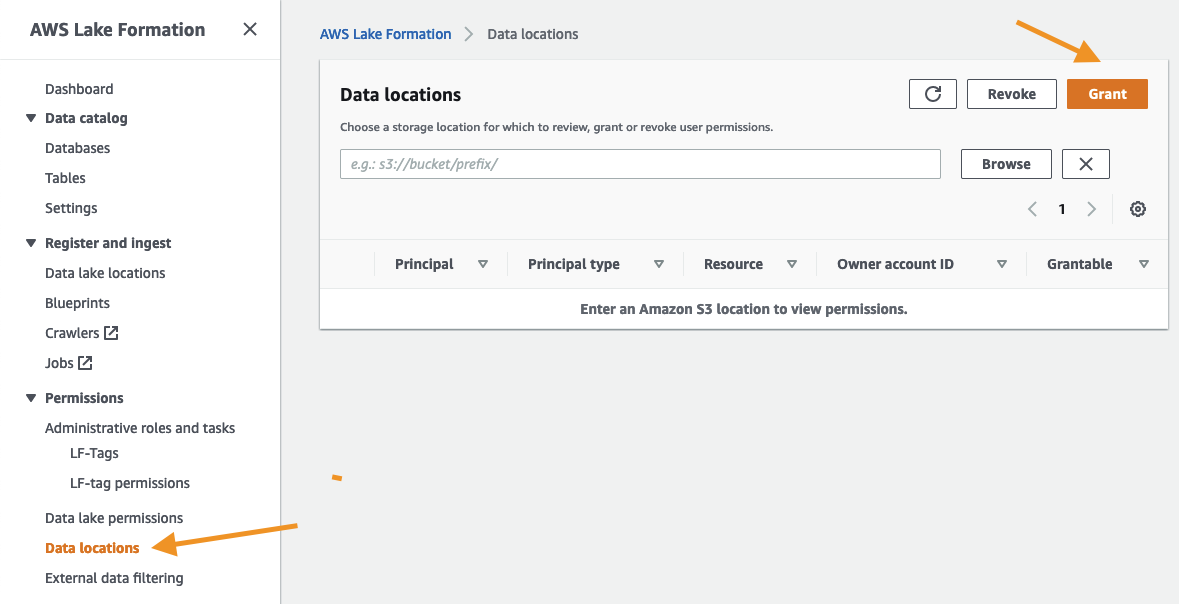
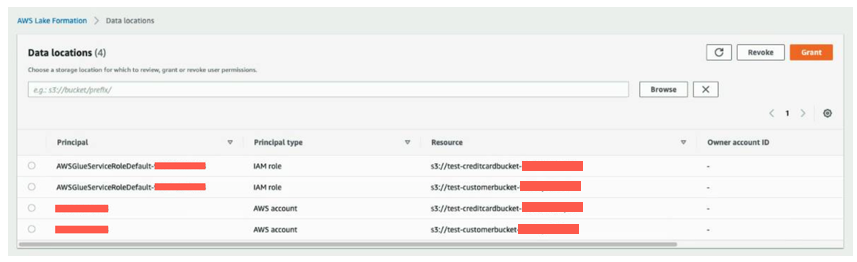
The template also grants data location permission on the S3 bucket to the crawler role. On Lake Formation console left navigation choose Data locations under Permissions.

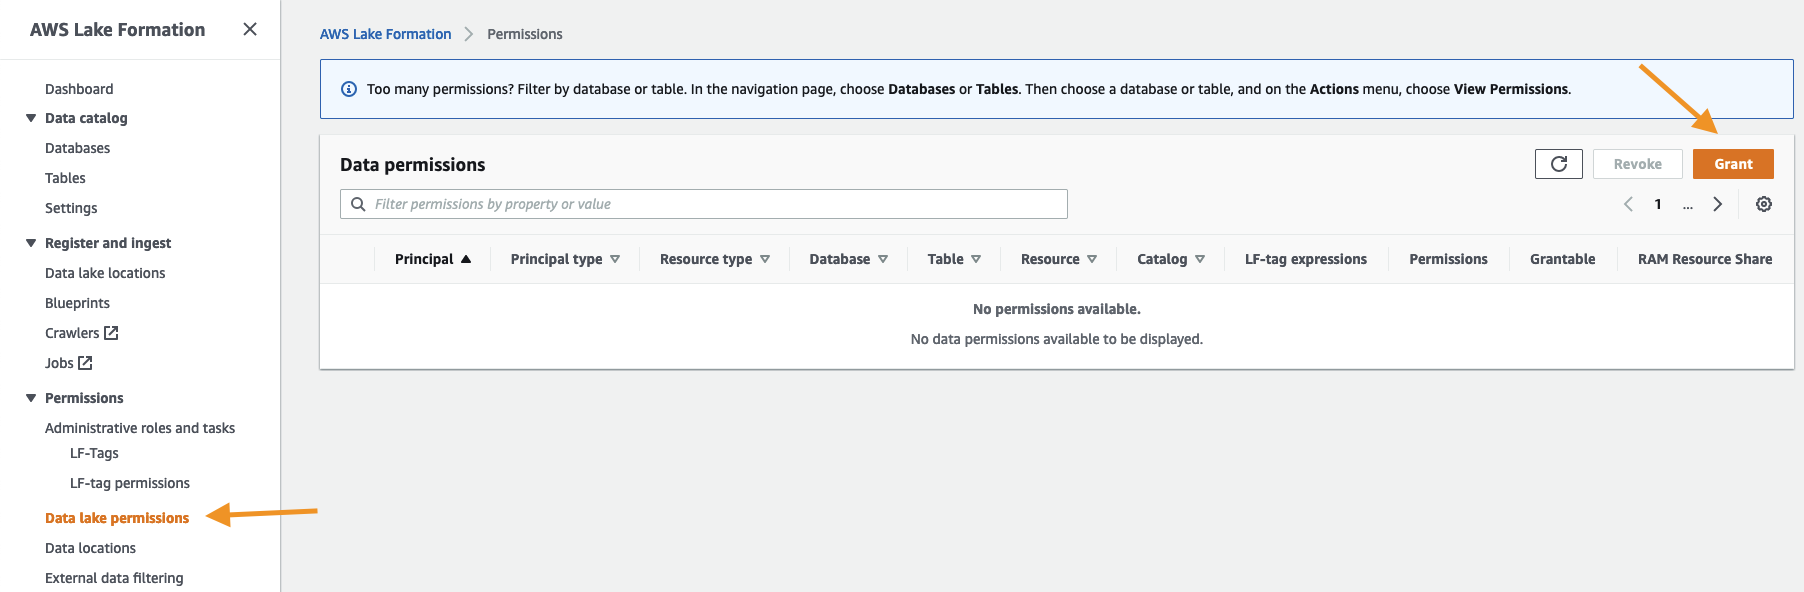
Lastly, the template grants database permission to the crawler role. On Lake Formation console left navigation choose Data lake permissions under Permissions.

Edit and run the AWS Glue crawler

To configure and run the AWS Glue crawler, complete the following steps:

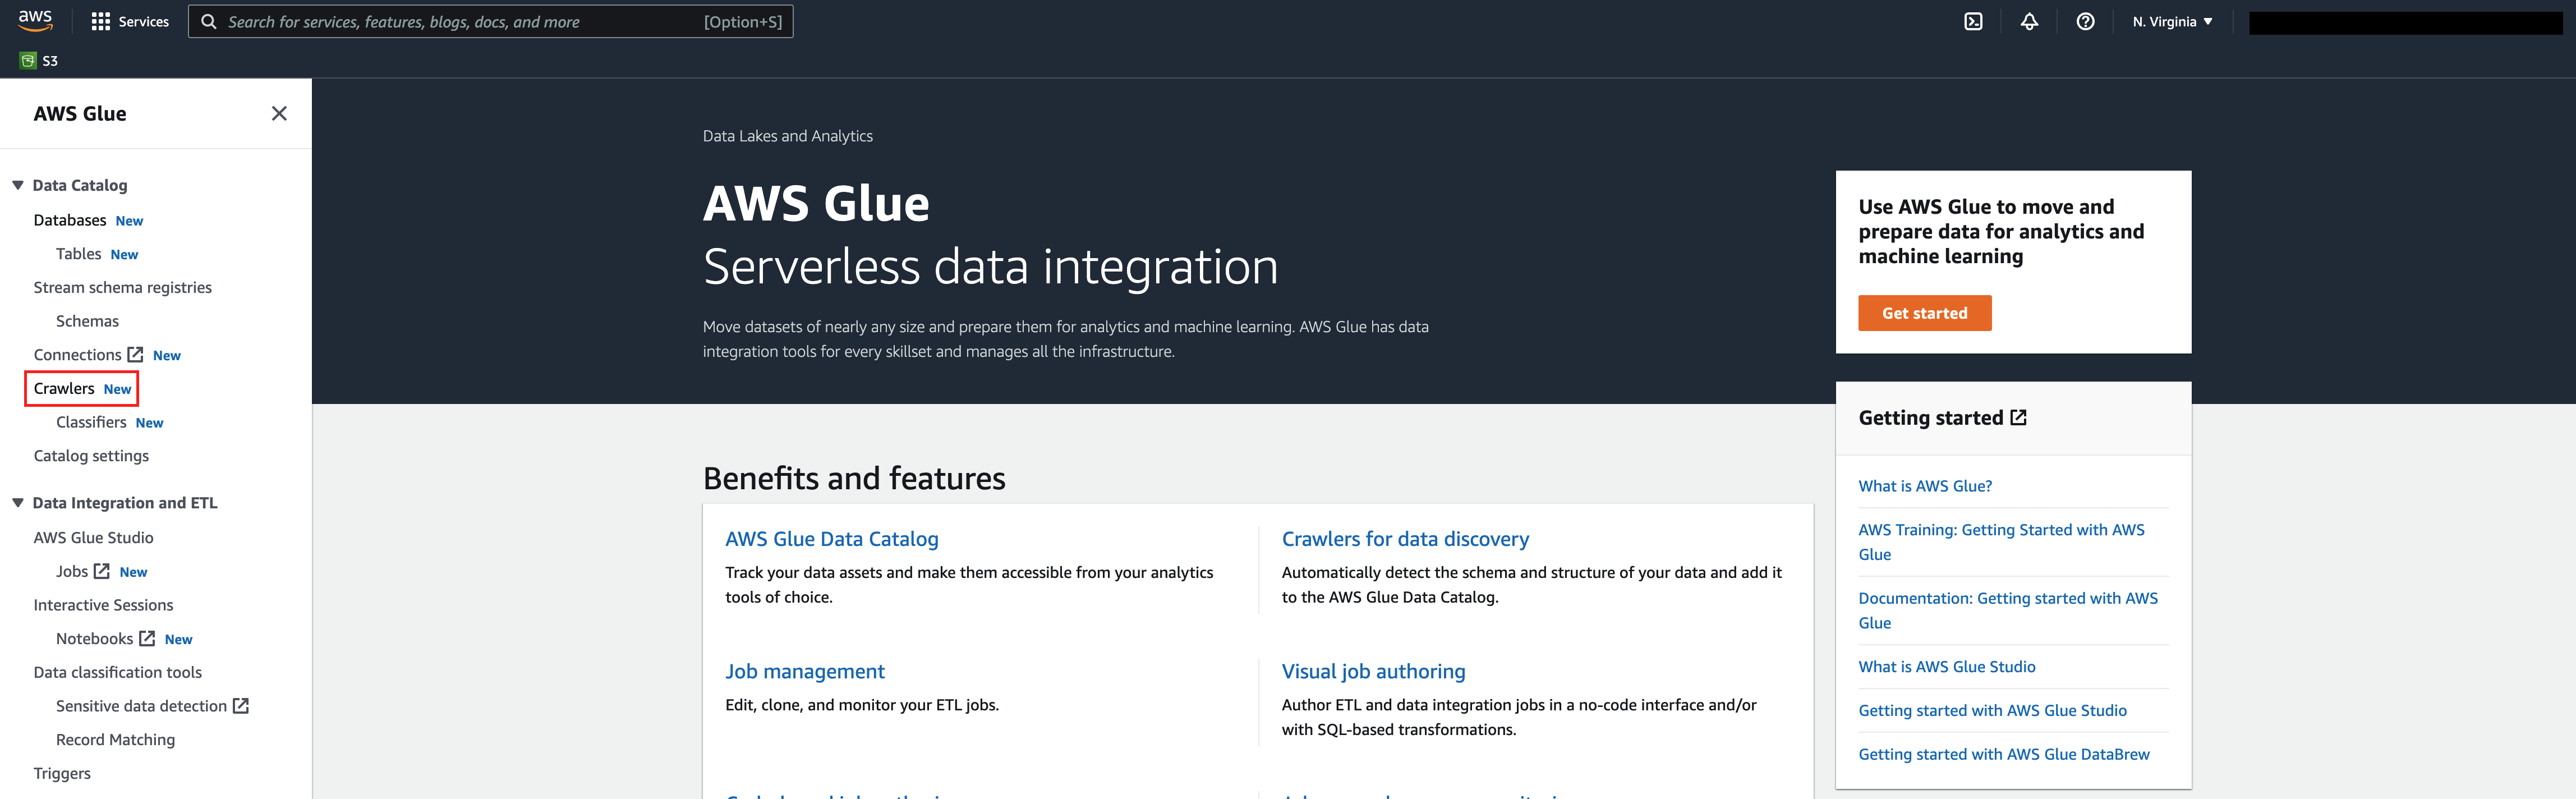
  1. On the AWS Glue console, choose Crawlers in the navigation pane.
  2. Locate the crawler lfcrawler-<your-account-id> and edit it.
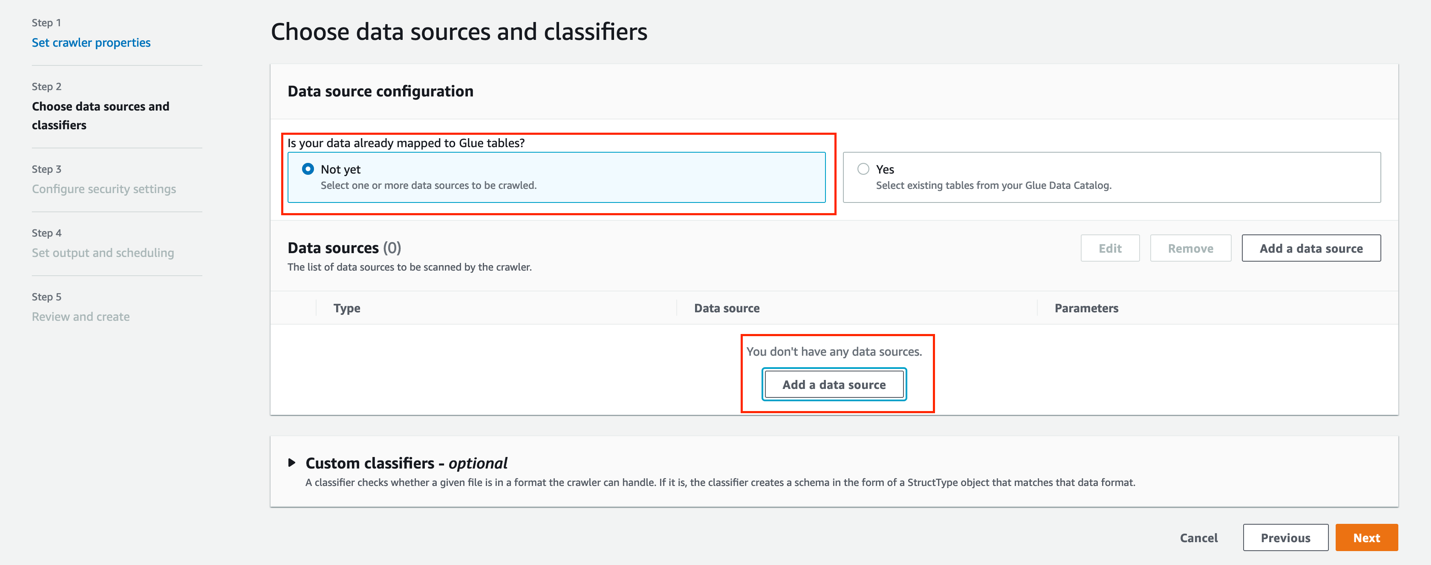
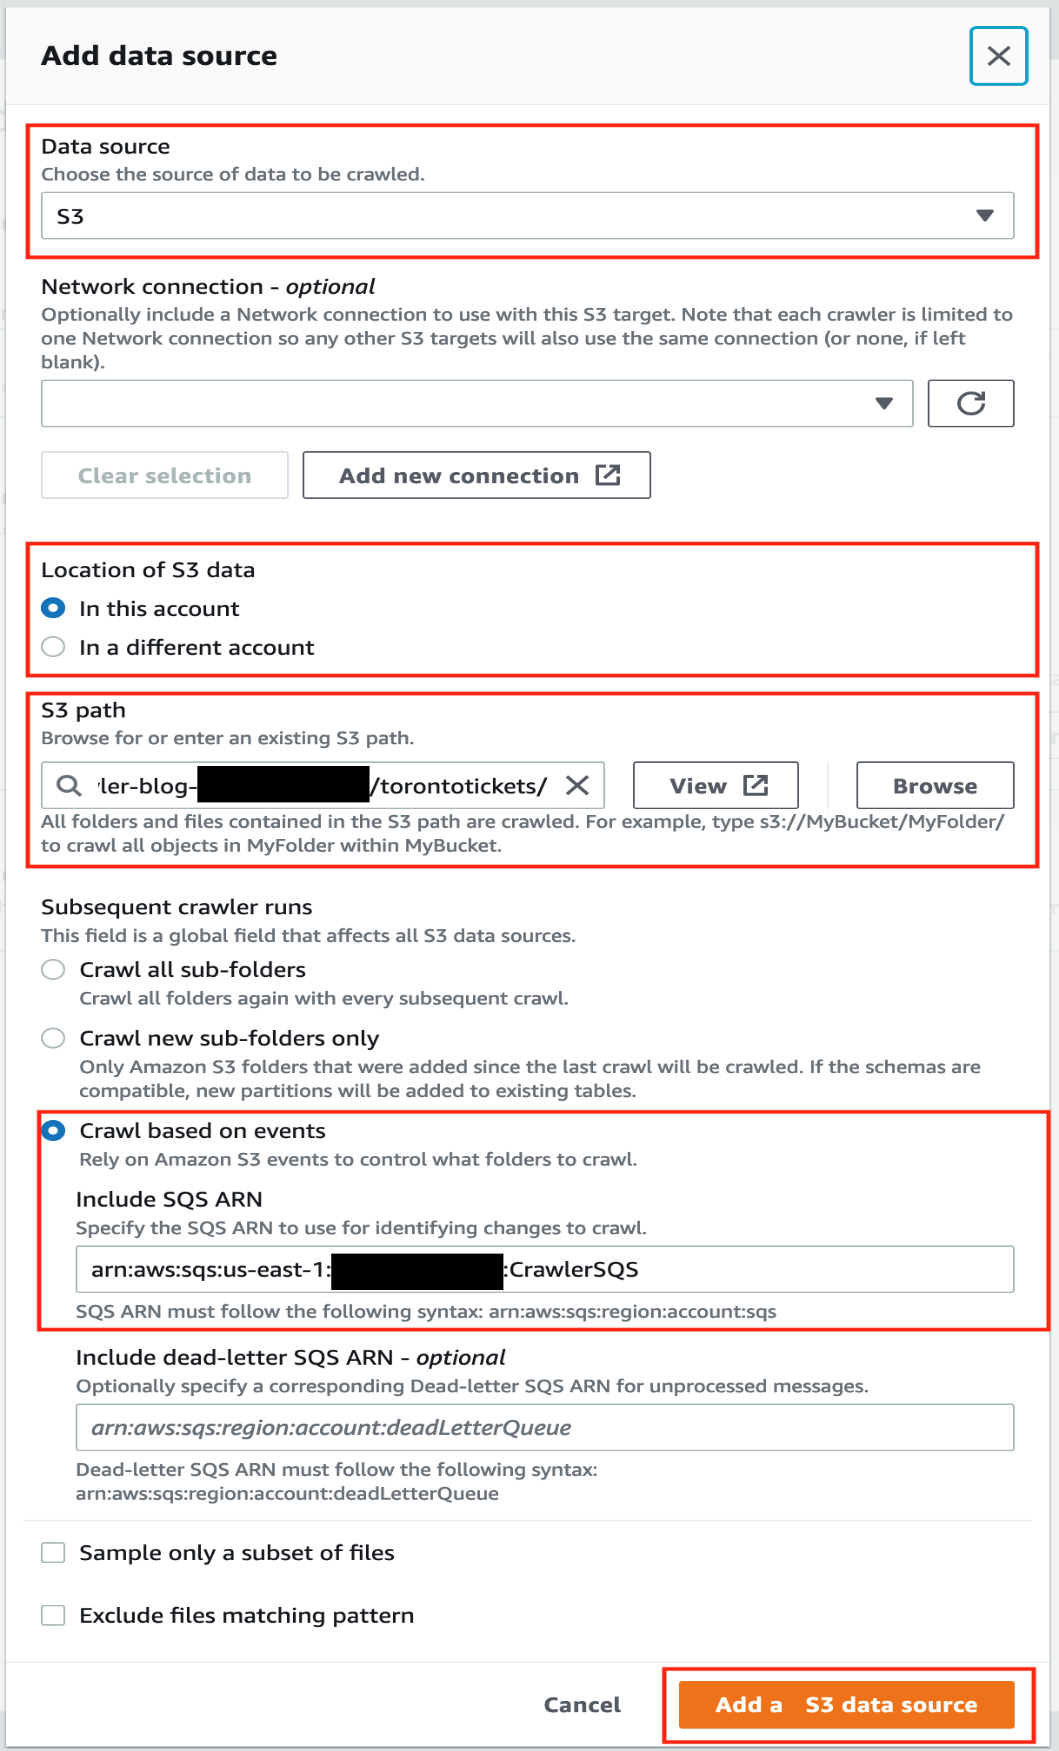
  3. Under Lake Formation configuration, select Use Lake Formation credentials for crawling S3 data source.
  4. Choose Next.
  5. Review and update the crawler settings.

Note that the crawler IAM role uses Lake Formation permission to access the data and doesn’t have any S3 policies.

  1. Run the crawler and verify that the crawler run is complete.
  2. In the AWS Glue database lfcrawlerdb<your-account-id>, verify that the table is created and the schema matches with what you have in the S3 bucket.

The crawler was able to crawl the S3 data source and successfully populate the schema using Lake Formation permissions.

Grant access to the data analyst using Lake Formation

Now the data lake admin can delegate permissions on the database and table to the LFBusinessAnalyst user via the Lake Formation console.

Grant the LFBusinessAnalyst IAM user access to the database with Describe permissions.

  1. On the Lake Formation console, under Permissions in the navigation pane, choose Data lake permission .
  2. Choose Grant
  3. Under Principals, select IAM users and roles.
  4. Choose the IAM users LFBusinessAnalyst
  5. Under LF-Tags or catalog resources, choose lfcrawlerdb<your-accountid> for Databases.
  6. Select Describe for Database permissions.
  7. Choose Grant to apply the permissions.

Grant the LFBusinessAnalyst IAM user Select and Describe access to the table.

  1. On the Lake Formation console, under Permissions in the navigation pane, choose Data lake permission.
  2. Choose Grant.
  3. Under Principals, select IAM users and roles.
  4. Choose the IAM users LFBusinessAnalyst.
  5. Under LF-Tags or catalog resources, choose lfcrawlerdb<your-accountid> for Databases and lf_datalake_<your-accountid>_<region> for Tables
  6. Choose Select, Describe for Table permissions.
  7. Choose Grant to apply the permissions.

Verify the tables using Athena

To verify the tables using Athena, complete the following steps:

  1. Log in as LFBusinessAnalyst using the password noted earlier through the CloudFormation stack.
  2. On the Athena console, choose lfconsumer-primary-workgroup as the Athena workgroup.
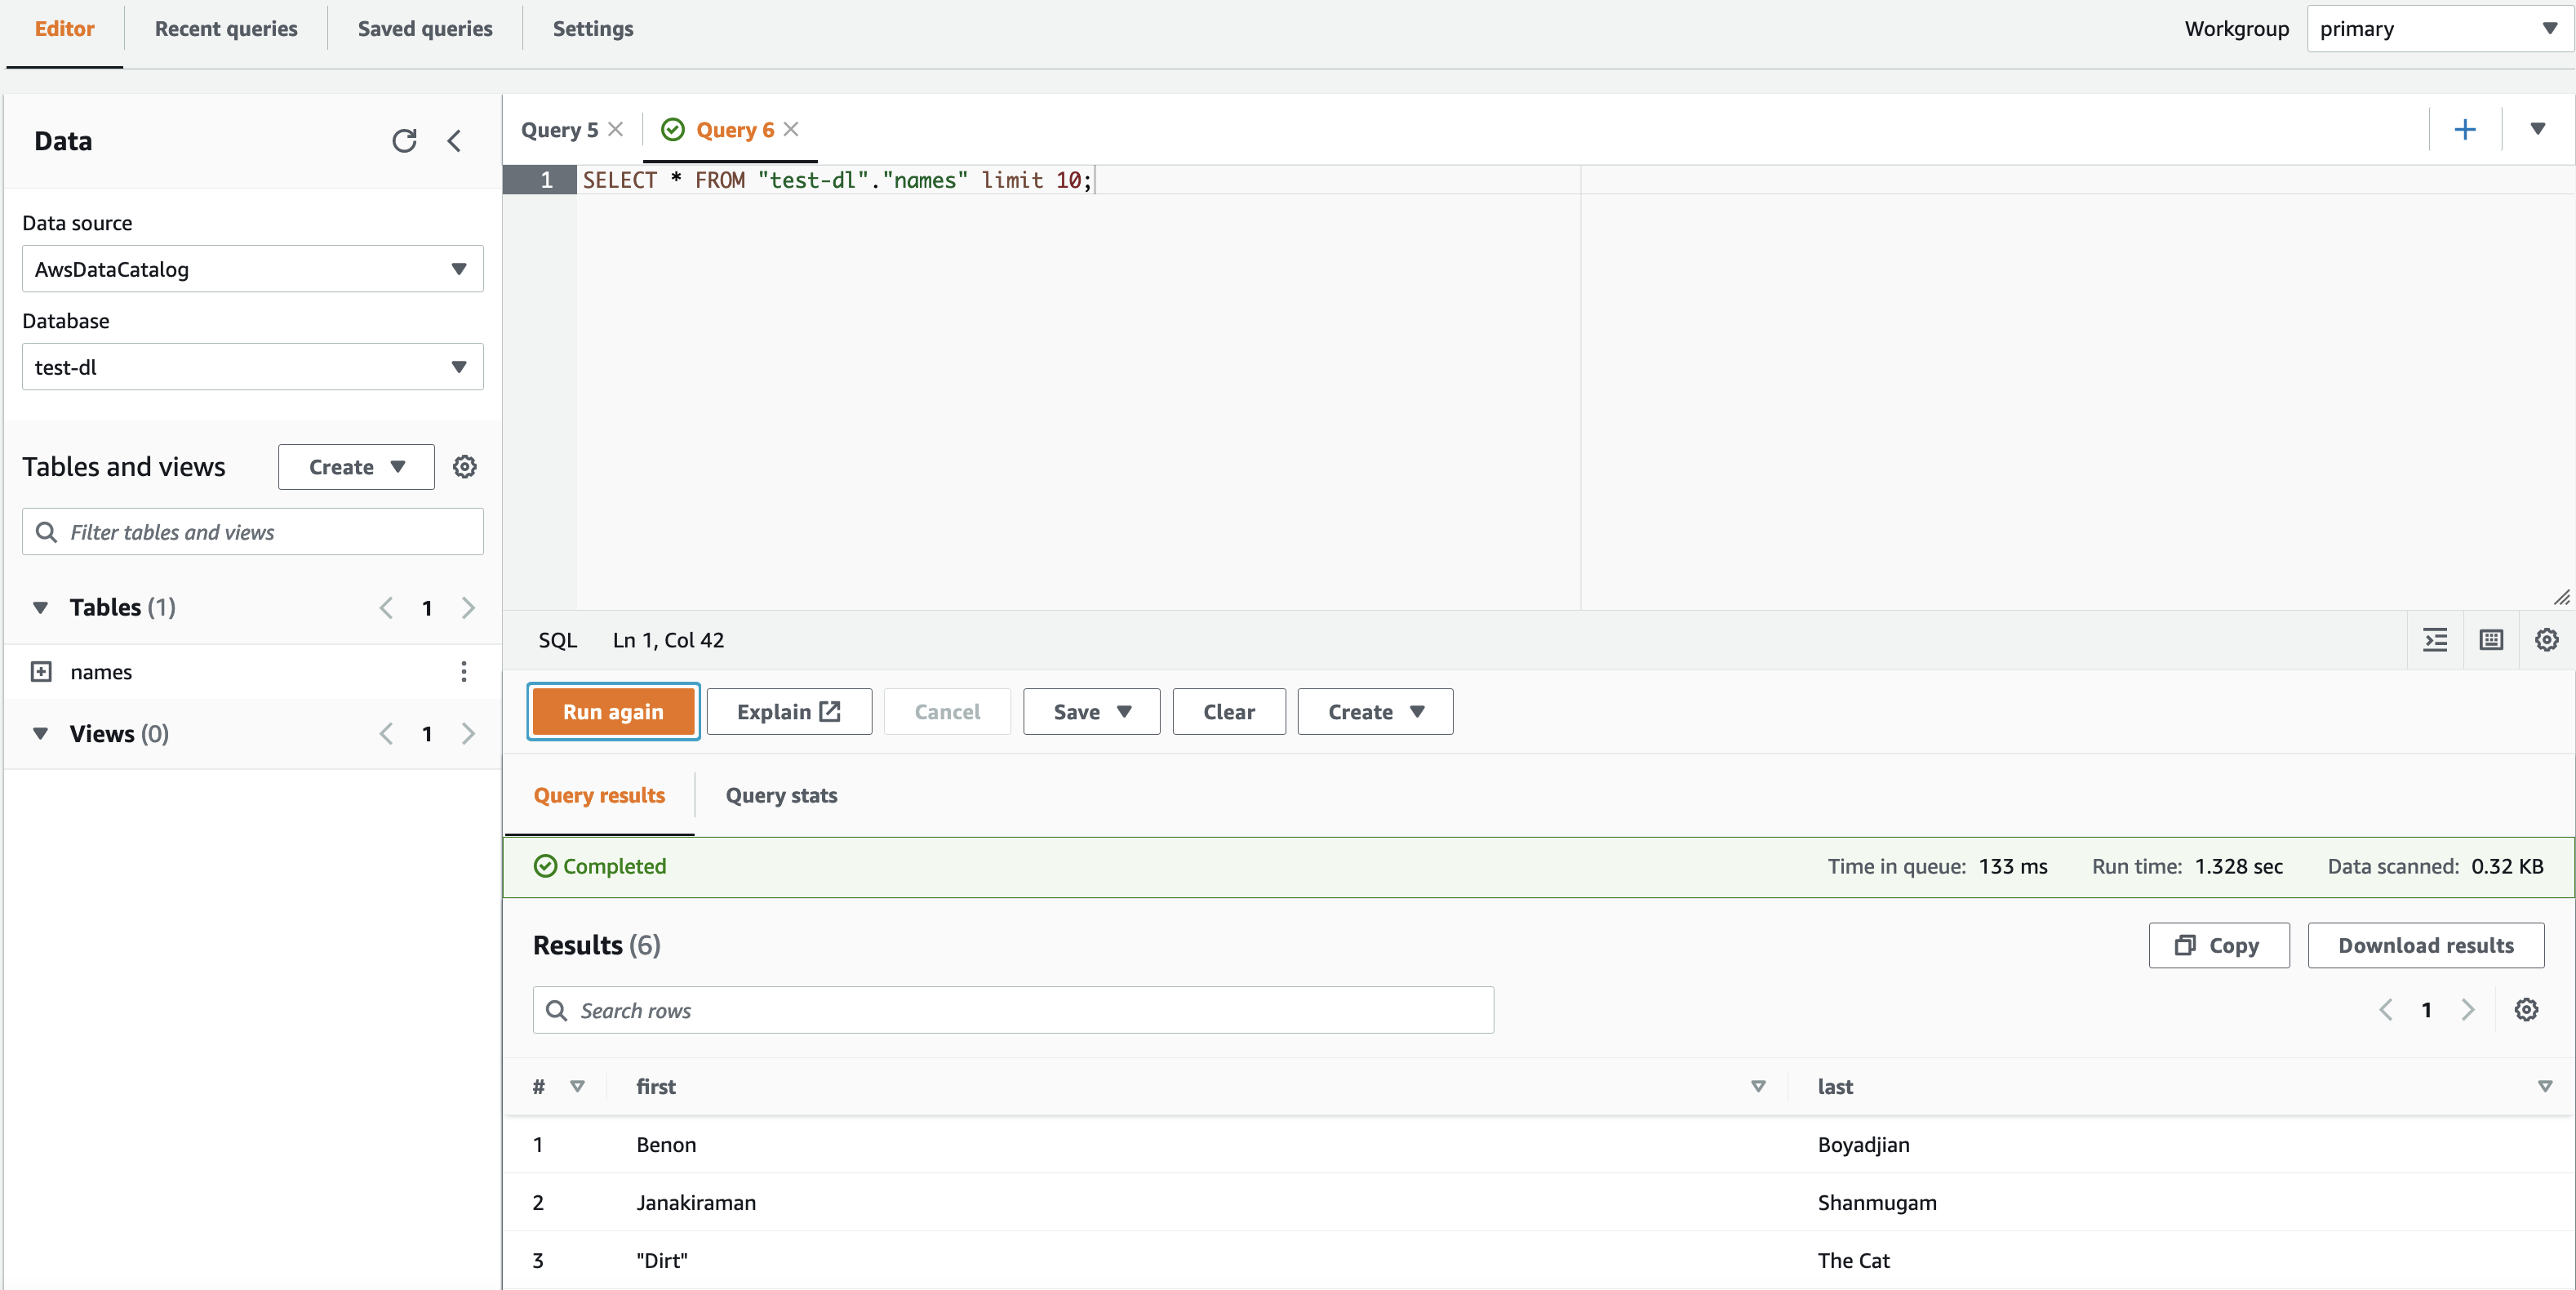
  3. Run the query to validate access as shown in the following screenshot.

We have successfully crawled Amazon S3 data store using the crawler with Lake Formation permission and populated the metadata in AWS Glue Data Catalog. We have granted Lake Formation permission on database and table to consumer user and validated user access to the data using Athena.

Clean up

To avoid unwanted charges to your AWS account, you can delete the AWS resources:

  1. Sign in to the CloudFormation console as the IAM admin used for creating the CloudFormation stack.
  2. Delete the stack you created.

Summary

In this post, we showed how to use the new AWS Glue crawler integration with Lake Formation. Data lake admins can now share crawled tables with data analysts using Lake Formation, allowing analysts to use analytical services such as Athena. You can centrally manage all permissions in Lake Formation, making it easier to administer and protect data lakes.

Special thanks to everyone who contributed to this crawler feature launch: Anshuman Sharma, Jessica Cheng, Aditya K, Sandya Krishnanand

If you have questions or suggestions, submit them in the comments section.


About the authors

Sandeep Adwankar is a Senior Technical Product Manager at AWS. Based in the California Bay Area, he works with customers around the globe to translate business and technical requirements into products that enable customers to improve how they manage, secure, and access data.

Srividya Parthasarathy is a Senior Big Data Architect on the AWS Lake Formation team. She enjoys building data mesh solutions and sharing them with the community.

AWS Lake Formation 2022 year in review

Post Syndicated from Jason Berkowitz original https://aws.amazon.com/blogs/big-data/aws-lake-formation-2022-year-in-review/

Data governance is the collection of policies, processes, and systems that organizations use to ensure the quality and appropriate handling of their data throughout its lifecycle for the purpose of generating business value. Data governance is increasingly top-of-mind for customers as they recognize data as one of their most important assets. Effective data governance enables better decision-making by improving data quality, reducing data management costs, and ensuring secure access to data for stakeholders. In addition, data governance is required to comply with an increasingly complex regulatory environment with data privacy (such as GDPR and CCPA) and data residency regulations (such as in the EU, Russia, and China).

For AWS customers, effective data governance improves decision-making, increases business agility, provides a competitive advantage, and reduces the risk of fines due to non-compliance with regulatory obligations. We understand the unique opportunity to provide our customers a comprehensive end-to-end data governance solution that is seamlessly integrated into our portfolio of services, and AWS Lake Formation and the AWS Glue Data Catalog are key to solving these challenges.

In this post, we are excited to summarize the features that the AWS Glue Data Catalog, AWS Glue crawler, and Lake Formation teams delivered in 2022. We have collected some of the key talks and solutions on data governance, data mesh, and modern data architecture published and presented in AWS re:Invent 2022, and a few data lake solutions built by customers and AWS Partners for easy reference. Whether you are a data platform builder, data engineer, data scientist, or any technology leader interested in data lake solutions, this post is for you.

To learn more about how customers are securing and sharing data with Lake Formation, we recommend going deeper into GoDaddy’s decentralized data mesh, Novo Nordisk’s modern data architecture, and JPMorgan’s improvements to their Federated Data Lake, a governed data mesh implementation using Lake Formation. Also, you can learn how AWS Partners integrated with Lake Formation to help customers build unique data lakes, in Starburst’s data mesh solution, Informatica’s automated data sharing solution, Ahana’s Presto integration with Lake Formation, Ascending’s custom data governance system, how PBS used machine learning on their data lakes, and how hc1 provides personalized health insights for customers.

You can review how Lake Formation is used by customers to build modern data architectures in the following re:Invent 2022 talks:

The Lake Formation team listened to customer feedback and made improvements in the areas of cross-account data governance, expanding the source of data lakes, enabling unified data governance of a business data catalog, making secure business-to-business data sharing possible, and expanding the coverage area for fine-grained access controls to Amazon Redshift. In the rest of this post, we are happy to share the progress we made in 2022.

Enhancing cross-account governance

Lake Formation provides the foundation for customers to share data across accounts within their organization. You can share AWS Glue Data Catalog resources to AWS Identity and Access Management (IAM) principals within an account as well as other AWS accounts using two methods. The first one is called the named-resource method, where users can select the names of databases and tables and choose the type of permissions to share. The second method uses LF-Tags, where users can create and associate LF-Tags to databases and tables and grant permission to IAM principals using LF-Tag policies and expressions.

In November 2022, Lake Formation introduced version 3 of its cross-account sharing feature. With this new version, Lake Formation users can share catalog resources using LF-Tags at the AWS Organizations level. Sharing data using LF-tags helps scale permissions and reduces the admin work for data lake builders. The cross-account sharing version 3 also allows you to share resources to specific IAM principals in other accounts, providing data owners control over who can access their data in other accounts. Lastly, we have removed the overhead of writing and maintaining Data Catalog resource policies by introducing AWS Resource Access Manager (AWS RAM) invites with LF-Tags-based policies in the cross-account sharing version 3. We encourage you to further explore cross-account sharing in Lake Formation.

Extending Lake Formation permissions to new data

Until re:Invent 2022, Lake Formation provided permissions management for IAM principals on Data Catalog resources with underlying data primarily on Amazon Simple Storage Service (Amazon S3). At re:Invent 2022, we introduced Lake Formation permissions management for Amazon Redshift data shares in preview mode. Amazon Redshift is a fully-managed, petabyte-scale data warehouse service in the AWS Cloud. The data sharing feature allows data owners to group databases, tables, and views in an Amazon Redshift cluster and share it with other Amazon Redshift clusters within or across AWS accounts. Data sharing reduces the need to keep multiple copies of the same data in different data warehouses to accelerate business decision-making across an organization. Lake Formation further enhances sharing data within Amazon Redshift data shares by providing fine-grained access control on tables and views.

For additional details on this feature, refer to AWS Lake Formation-managed Redshift datashares (preview) and How Redshift data share can be managed by Lake Formation.

Amazon EMR is a managed cluster platform to run big data applications using Apache Spark, Apache Hive, Apache HBase, Apache Flink, Apache Hudi, and Presto at scale. You can use Amazon EMR to run batch and stream processing analytics jobs on your S3 data lakes. Starting with Amazon EMR release 6.7.0, we introduced Lake Formation permissions management on a runtime IAM role used with the EMR Steps API. This feature enables you to submit Apache Spark and Apache Hive applications to an EMR cluster through the EMR Steps API that enforces table-level and column-level permissions using Lake Formation to that IAM role submitting the application. This Lake Formation integration with Amazon EMR allows you to share an EMR cluster across multiple users in an organization with different permissions by isolating your applications through a runtime IAM role. We encourage you to check this feature in the Lake Formation workshop Integration with Amazon EMR using Runtime Roles. To explore a use case, see Introducing runtime roles for Amazon EMR steps: Use IAM roles and AWS Lake Formation for access control with Amazon EMR.

Amazon SageMaker Studio is a fully integrated development environment (IDE) for machine learning (ML) that enables data scientists and developers to prepare data for building, training, tuning, and deploying models. Studio offers a native integration with Amazon EMR so that data scientists and data engineers can interactively prepare data at petabyte scale using open-source frameworks such as Apache Spark, Presto, and Hive using Studio notebooks. With the release of Lake Formation permissions management on a runtime IAM role, Studio now supports table-level and column-level access with Lake Formation. When users connect to EMR clusters from Studio notebooks, they can choose the IAM role (called the runtime IAM role) that they want to connect with. If data access is managed by Lake Formation, users can enforce table-level and column-level permissions using policies attached to the runtime role. For more details, refer to Apply fine-grained data access controls with AWS Lake Formation and Amazon EMR from Amazon SageMaker Studio.

Ingest and catalog varied data

A robust data governance model includes data from an organization’s many data sources and methods to discover and catalog those varied data assets. AWS Glue crawlers provide the ability to discover data from sources including Amazon S3, Amazon Redshift, and NoSQL databases, and populate the AWS Glue Data Catalog.

In 2022, we launched AWS Glue crawler support for Snowflake and AWS Glue crawler support for Delta Lake tables. These integrations allow AWS Glue crawlers to create and update Data Catalog tables based on these popular data sources. This makes it even easier to create extract, transform, and load (ETL) jobs with AWS Glue based on these Data Catalog tables as sources and targets.

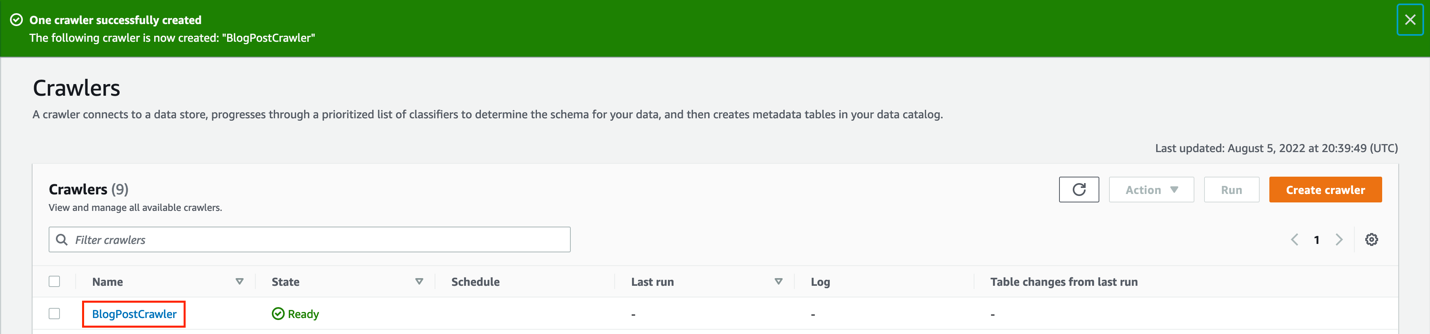
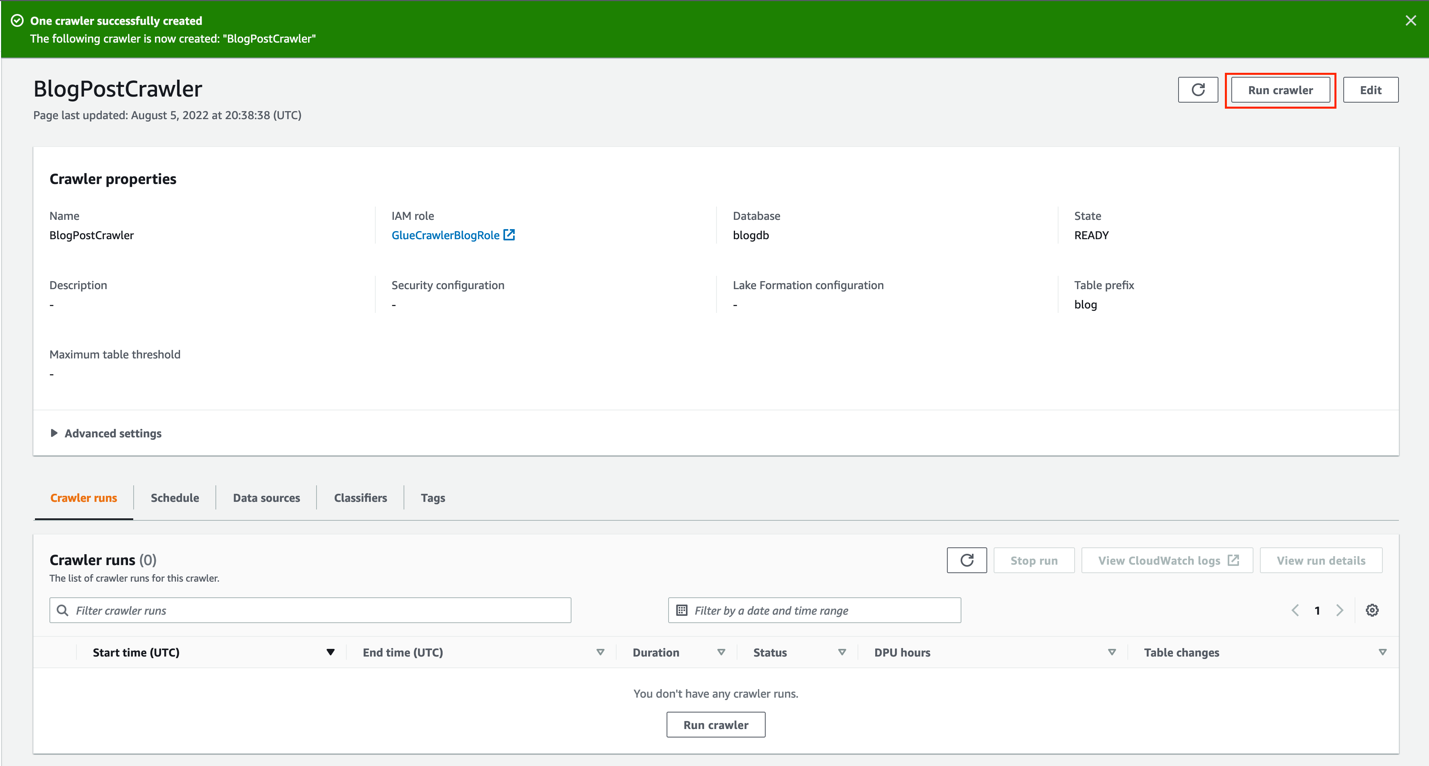
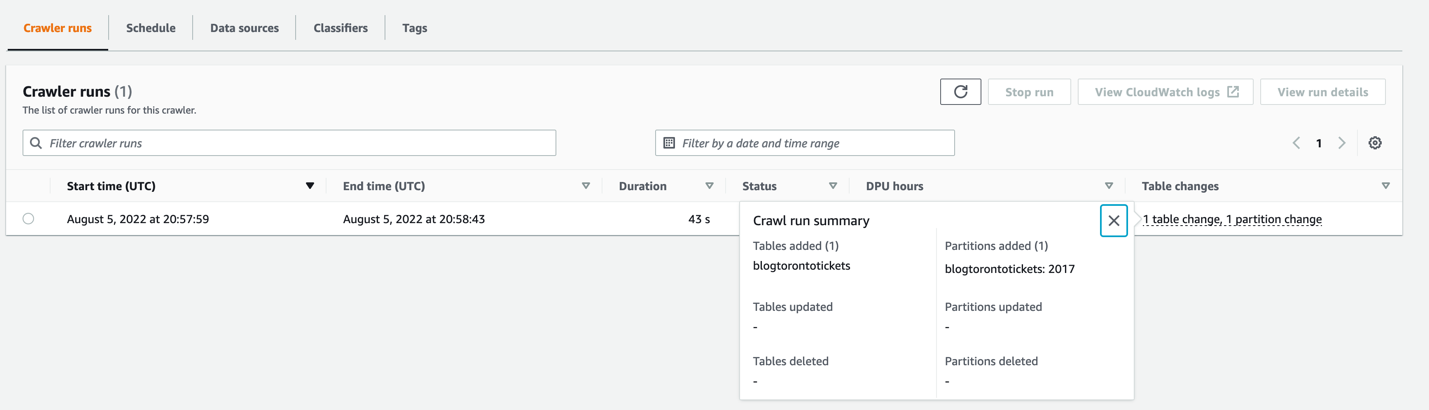
In 2022, the AWS Glue crawlers UI was redesigned to offer a better user experience. One of the main enhancements delivered as part of this revision is the greater insights into AWS Glue crawler history. The crawler history UI provides an easy view of crawler runs, schedules, data sources, and tags. For each crawl, the crawler history offers a summary of changes in the database schema or Amazon S3 partition changes. Crawler history also provides detailed info about DPU hours and reduces the time spent analyzing and debugging crawler operations and costs. To explore the new functionalities added to the crawlers UI, refer to Set up and monitor AWS Glue crawlers using the enhanced AWS Glue UI and crawler history.

In 2022, we also extended support for crawlers based on Amazon S3 event notifications to support catalog tables. With this feature, incremental crawling can be offloaded from data pipelines to the scheduled AWS Glue crawler, reducing crawls to incremental S3 events. For more information, refer to Build incremental crawls of data lakes with existing Glue catalog tables.

More ways to share data beyond the data lake

During re:Invent 2022, we announced a preview of AWS Data Exchange for AWS Lake Formation, a new feature that enables data subscribers to find and subscribe to third-party datasets that are managed directly through Lake Formation. Until now, AWS Data Exchange subscribers could access third-party datasets by exporting providers’ files to their own S3 buckets, calling providers’ APIs through Amazon API Gateway, or querying producers’ Amazon Redshift data shares from their Amazon Redshift cluster. With the new Lake Formation integration, data providers curate AWS Data Exchange datasets using Lake Formation tags. Data subscribers are able to query and explore the databases and tables associated with those tags, just like any other AWS Glue Data Catalog resource. Organizations can apply resource-based Lake Formation permissions to share the licensed datasets within the same account or across accounts using AWS License Manager. AWS Data Exchange for Lake Formation streamlines data licensing and sharing operations by accelerating data onboarding, reducing the amount of ETL required for end-users to access third-party data, and centralizing governance and access controls for third-party data.

At re:Invent 2022, we also announced Amazon DataZone, a new data management service that makes it faster and easier for you to catalog, discover, share, and govern data stored across AWS, on-premises, and third-party sources. Amazon DataZone is a business data catalog service that supplements the technical metadata in the AWS Glue Data Catalog. Amazon DataZone is integrated with Lake Formation permissions management so that you can effectively manage and govern access to your data, and audit who is accessing what data and for what purpose. With the publisher-subscriber model of Amazon DataZone, data assets can be shared and accessed across Regions. For additional details about the service and its capabilities, refer to the Amazon DataZone FAQs and re:Invent launch.

Conclusion

Data is transforming every field and every business. However, with data growing faster than most companies can keep track of, collecting, securing, and getting value out of that data is a challenging thing to do. A modern data strategy can help you create better business outcomes with data. AWS provides the most complete set of services for the end-to-end data journey to help you unlock value from your data and turn it into insight.

At AWS, we work backward from customer requirements. From the Lake Formation team, we worked hard to deliver the features described in this post, and we invite you to check them out. With our continued focus to invent, we hope to play a key role in empowering organizations to build new data governance models that help you derive more business value at lightning speed.

You can get started with Lake Formation by exploring our hands-on workshop modules and Getting started tutorials. We look forward to hearing from you, our customers, on your data lake and data governance use cases. Please get in touch through your AWS account team and share your comments.


About the Authors

Jason Berkowitz is a Senior Product Manager with AWS Lake Formation. He comes from a background in machine learning and data lake architectures. He helps customers become data-driven.

Aarthi Srinivasan is a Senior Big Data Architect with AWS Lake Formation. She enjoys building data lake solutions for AWS customers and partners. When not on the keyboard, she explores the latest science and technology trends and spends time with her family.

Leonardo Gómez is a Senior Analytics Specialist Solutions Architect at AWS. Based in Toronto, Canada, he has over a decade of experience in data management, helping customers around the globe address their business and technical needs.

Build a multi-Region and highly resilient modern data architecture using AWS Glue and AWS Lake Formation

Post Syndicated from Vivek Shrivastava original https://aws.amazon.com/blogs/big-data/build-a-multi-region-and-highly-resilient-modern-data-architecture-using-aws-glue-and-aws-lake-formation/

AWS Lake Formation helps with enterprise data governance and is important for a data mesh architecture. It works with the AWS Glue Data Catalog to enforce data access and governance. Both services provide reliable data storage, but some customers want replicated storage, catalog, and permissions for compliance purposes.

This post explains how to create a design that automatically backs up Amazon Simple Storage Service (Amazon S3), the AWS Glue Data Catalog, and Lake Formation permissions in different Regions and provides backup and restore options for disaster recovery. These mechanisms can be customized for your organization’s processes. The utility for cloning and experimentation is available in the open-sourced GitHub repository.

This solution only replicates metadata in the Data Catalog, not the actual underlying data. To have a redundant data lake using Lake Formation and AWS Glue in an additional Region, we recommend replicating the Amazon S3-based storage using S3 replication, S3 sync, aws-s3-copy-sync-using-batch or S3 Batch replication process. This ensures that the data lake will still be functional in another Region if Lake Formation has an availability issue. The Data Catalog setup (tables, databases, resource links) and Lake Formation setup (permissions, settings) must also be replicated in the backup Region.

Solution overview

This post shows how to create a backup of the Lake Formation permissions and AWS Glue Data Catalog from one Region to another in the same account. The solution doesn’t create or modify AWS Identity and Access Management (IAM) roles, which are available in all Regions. There are three steps to creating a multi-Region data lake:

  1. Migrate Lake Formation data permissions.
  2. Migrate AWS Glue databases and tables.
  3. Migrate Amazon S3 data.

In the following sections, we look at each migration step in more detail.

Lake Formation permissions

In Lake Formation, there are two types of permissions: metadata access and data access.

Metadata access permissions allow users to create, read, update, and delete metadata databases and tables in the Data Catalog.

Data access permissions allow users to read and write data to specific locations in Amazon S3. Data access permissions are managed using data location permissions, which allow users to create and alter metadata databases and tables that point to specific Amazon S3 locations.

When data is migrated from one Region to another, only the metadata access permissions are replicated. This means that if data is moved from a bucket in the source Region to another bucket in the target Region, the data access permissions need to be reapplied in the target Region.

AWS Glue Data Catalog

The AWS Glue Data Catalog is a central repository of metadata about data stored in your data lake. It contains references to data that is used as sources and targets in AWS Glue ETL (extract, transform, and load) jobs, and stores information about the location, schema, and runtime metrics of your data. The Data Catalog organizes this information in the form of metadata tables and databases. A table in the Data Catalog is a metadata definition that represents the data in a data lake, and databases are used to organize these metadata tables.

Lake Formation permissions can only be applied to objects that already exist in the Data Catalog in the target Region. Therefore, in order to apply these permissions, the underlying Data Catalog databases and tables must already exist in the target Region. To meet this requirement, this utility migrates both the AWS Glue databases and tables from the source Region to the target Region.

Amazon S3 data

The data that underlies an AWS Glue table can be stored in an S3 bucket in any Region, so replication of the data itself isn’t necessary. However, if the data has already been replicated to the target Region, this utility has the option to update the table’s location to point to the replicated data in the target Region. If the location of the data is changed, the utility updates the S3 bucket name and keeps the rest of the prefix hierarchy unchanged.

This utility doesn’t include the migration of data from the source Region to the target Region. Data migration must be performed separately using methods such as S3 replication, S3 sync, aws-s3-copy-sync-using-batch or S3 Batch replication.

This utility has two modes for replicating Lake Formation and Data Catalog metadata: on-demand and real-time. The on-demand mode is a batch replication that takes a snapshot of the metadata at a specific point in time and uses it to synchronize the metadata. The real-time mode replicates changes made to the Lake Formation permissions or Data Catalog in near-real time.

The on-demand mode of this utility is recommended for creating existing Lake Formation permissions and Data Catalogs because it replicates a snapshot of the metadata. After the Lake Formation and Data Catalogs are synchronized, you can use real-time mode to replicate any ongoing changes. This creates a mirror image of the source Region in the target Region and keeps it up to date as changes are made in the source Region. These two modes can be used independently of each other, and the operations are idempotent.

The code for the on-demand and real-time modes is available in the GitHub repository. Let’s look at each mode in more detail.

On-demand mode

On-demand mode is used to copy the Lake Formation permissions and Data Catalog at a specific point in time. The code is deployed using the AWS Cloud Development Kit (AWS CDK). The following diagram shows the solution architecture for this mode.

The AWS CDK deploys an AWS Glue job to perform the replication. The job retrieves configuration information from a file stored in an S3 bucket. This file includes details such as the source and target Regions, an optional list of databases to replicate, and options for moving data to a different S3 bucket. More information about these options and deployment instructions is available in the GitHub repository.

The AWS Glue job retrieves the Lake Formation permissions and Data Catalog object metadata from the source Region and stores it in a JSON file in an S3 bucket. The same job then uses this file to create the Lake Formation permissions and Data Catalog databases and tables in the target Region.

This tool can be run on demand by running the AWS Glue job. It copies the Lake Formation permissions and Data Catalog object metadata from the source Region to the target Region. If you run the tool again after making changes to the target Region, the changes are replaced with the latest Lake Formation permissions and Data Catalog from the source Region.

This utility can detect any changes made to the Data Catalog metadata, databases, tables, and columns while replicating the Data Catalog from the source to the target Region. If a change is detected in the source Region, the latest version of the AWS Glue object is applied to the target Region. The utility reports the number of objects modified during its run.

The Lake Formation permissions are copied from the source to the target Region, so any new permissions are replicated in the target Region. If a permission is removed from the source Region, it is not removed from the target Region.

Real-time mode

Real-time mode replicates the Lake Formation permissions and Data Catalog at a regular interval. The default interval is 1 minute, but it can be modified during deployment. The code is deployed using the AWS CDK. The following diagram shows the solution architecture for this mode.

The AWS CDK deploys two AWS Lambda jobs and creates an Amazon DynamoDB table to store AWS CloudTrail events and an Amazon EventBridge rule to run the replication at a regular interval. The Lambda jobs retrieve the configuration information from a file stored in an S3 bucket. This file includes details such as the source and target Regions, options for moving data to a different S3 bucket, and the lookback period for CloudTrail in hours. More information about these options and deployment instructions is available in the GitHub repository.

The EventBridge rule triggers a Lambda job at a fixed interval. This job retrieves the configuration information and queries CloudTrail events related to the Data Catalog and Lake Formation that occurred in the past hour (the duration is configurable). All relevant events are then stored in a DynamoDB table.

After the event information is inserted into the DynamoDB table, another Lambda job is triggered. This job retrieves the configuration information and queries the DynamoDB table. It then applies all the changes to the target Region. If the tool is run again after making changes to the target Region, the changes are replaced with the latest Lake Formation permissions and Data Catalog from the source Region. Unlike on-demand mode, this utility also removes any Lake Formation permissions that were removed from the source Region from the target Region.

Limitations

This utility is designed to replicate permissions within a single account only. The on-demand mode replicates a snapshot and doesn’t remove existing permissions, so it doesn’t perform delete operations. The API currently doesn’t support replicating changes to row and column permissions.

Conclusion

In this post, we showed how you can use this utility to migrate the AWS Glue Data Catalog and Lake Formation permissions from one Region to another. It can also keep the source and target Regions synchronized if any changes are made to the Data Catalog or the Lake Formation permissions. Implementing it across Regions (multi-Region) is a good option if you are looking for the most separation and complete independence of your globally diverse data workloads. Also consider the trade-offs. Implementing and operating this strategy, particularly using multi-Region, can be more complicated and more expensive, than other DR strategies.

To get started, checkout the github repo. For more resources, refer to the following:


About the authors

Vivek Shrivastava is a Principal Data Architect, Data Lake in AWS Professional Services. He is a Bigdata enthusiast and holds 13 AWS Certifications. He is passionate about helping customers build scalable and high-performance data analytics solutions in the cloud. In his spare time, he loves reading and finds areas for home automation

Raza Hafeez is a Senior Data Architect within the Shared Delivery Practice of AWS Professional Services. He has over 12 years of professional experience building and optimizing enterprise data warehouses and is passionate about enabling customers to realize the power of their data. He specializes in migrating enterprise data warehouses to AWS Modern Data Architecture.

Nivas Shankar  is a Principal Product Manager for AWS Lake Formation. He works with customers around the globe to translate business and technical requirements into products that enable customers to improve how they manage, secure and access data lake. Also leads several data and analytics initiatives within AWS including support for Data Mesh.

Enable cross-account sharing with direct IAM principals using AWS Lake Formation Tags

Post Syndicated from Aarthi Srinivasan original https://aws.amazon.com/blogs/big-data/enable-cross-account-sharing-with-direct-iam-principals-using-aws-lake-formation-tags/

With AWS Lake Formation, you can build data lakes with multiple AWS accounts in a variety of ways. For example, you could build a data mesh, implementing a centralized data governance model and decoupling data producers from the central governance. Such data lakes enable the data as an asset paradigm and unleash new possibilities with data discovery and exploration across organization-wide consumers. While enabling the power of data in decision-making across your organization, it’s also crucial to secure the data. With Lake Formation, sharing datasets across accounts only requires a few simple steps, and you can control what you share.

Lake Formation has launched Version 3 capabilities for sharing AWS Glue Data Catalog resources across accounts. When moving to Lake Formation cross-account sharing V3, you get several benefits. When moving from V1, you get more optimized usage of AWS Resource Access Manager (AWS RAM) to scale sharing of resources. When moving from V2, you get a few enhancements. First, you don’t have to maintain AWS Glue resource policies to share using LF-tags because Version 3 uses AWS RAM. Second, you can share with AWS Organizations using LF-tags. Third, you can share to individual AWS Identity and Access Management (IAM) users and roles in other accounts, thereby providing data owners control over which individuals can access their data.

Lake Formation tag-based access control (LF-TBAC) is an authorization strategy that defines permissions based on attributes called LF-tags. LF-tags are different from IAM resource tags and are associated only with Lake Formation databases, tables, and columns. LF-TBAC allows you to define the grant and revoke permissions policy by grouping Data Catalog resources, and therefore helps in scaling permissions across a large number of databases and tables. LF-tags are inherited from a database to all its tables and all the columns of each table.

Version 3 offers the following benefits:

  • True central governance with cross-account sharing to specific IAM principals in the target account
  • Ease of use in not having to maintain an AWS Glue resource policy for LF-TBAC
  • Efficient reuse of AWS RAM shares
  • Ease of use in scaling to hundreds of accounts with LF-TBAC

In this post, we illustrate the new features of cross-account sharing Version 3 in a producer-consumer scenario using TPC datasets. We walk through the setup of using LF-TBAC to share data catalog resources from the data producer account to direct IAM users in the consumer account. We also go through the steps in the receiving account to accept the shares and query the data.

Solution overview

To demonstrate the Lake Formation cross-account Version 3 features, we use the TPC datasets available at s3://aws-data-analytics-workshops/shared_datasets/tpcparquet/. The solution consists of steps in both accounts.

In account A, complete the following steps:

  1. As a data producer, register the dataset with Lake Formation and create AWS Glue Data Catalog tables.
  2. Create LF-tags and associate them with the database and tables.
  3. Grant LF-tag based permissions on resources directly to personas in consumer account B.

The following steps take place in account B:

  1. The consumer account data lake admin reviews and accepts the AWS RAM invitations.
  2. The data lake admin gives CREATE DATABASE access to the IAM user lf_business_analysts.
  3. The data lake admin creates a database for the marketing team and grants CREATE TABLE access to lf_campaign_manager.
  4. The IAM users create resource links on the shared database and tables and query them in Amazon Athena.

The producer account A has the following personas:

  • Data lake admin – Manages the data lake in the producer account
  • lf-producersteward – Manages the data and user access

The consumer account B has the following personas:

  • Data lake admin – Manages the data lake in the consumer account
  • lf-business-analysts – The business analysts in the sales team needs access to non-PII data
  • lf-campaign-manager – The manager in the marketing team needs access to data related to products and promotions

Prerequisites

You need the following prerequisites:

  • Two AWS accounts. For this demonstration of how AWS RAM invites are created and accepted, you should use two accounts that are not part of the same organization.
  • An admin IAM user in both accounts to launch the AWS CloudFormation stacks.
  • Lake Formation mode enabled in both the producer and consumer account with cross-account Version 3. For instructions, refer to Change the default permission model.

Lake Formation and AWS CloudFormation setup in account A

To keep the setup simple, we have an IAM admin registered as the data lake admin.

  1. Sign into the AWS Management Console in the us-east-1 Region.
  2. On the Lake Formation console, under Permissions in the navigation pane, choose Administrative roles and tasks.
  3. Select Choose Administrators under Datalake administrators.
  4. In the pop-up window Manage data lake administrators, under IAM users and roles, choose IAM admin user and choose Save.
  5. Choose Launch Stack to deploy the CloudFormation template:
    BDB-2063-launch-cloudformation-stack
  6. Choose Next.
  7. Provide a name for the stack and choose Next.
  8. On the next page, choose Next.
  9. Review the details on the final page and select I acknowledge that AWS CloudFormation might create IAM resources.
  10. Choose Create.

Stack creation should take about 2–3 minutes. The stack establishes the producer setup as follows:

  • Creates an Amazon Simple Storage Service (Amazon S3) data lake bucket
  • Registers the data lake bucket with Lake Formation
  • Creates an AWS Glue database and tables
  • Creates an IAM user (lf-producersteward) who will act as producer steward
  • Creates LF-tags and assigns them to the created catalog resources as specified in the following table
Database Table LF-Tag Key LF-Tag Value Resource Tagged
lftpcdb . Sensitivity Public DATABASE
lftpcdb items HasCampaign true TABLE
lftpcdb promotions HasCampaign true TABLE
lftpcdb customers table columns = "c_last_name","c_first_name","c_email_address" Sensitivity Confidential TABLECOLUMNS

Verify permissions in account A

After the CloudFormation stack launches, complete the following steps in account A:

  1. On the AWS CloudFormation console, navigate to the Outputs tab of the stack.

  1. Choose the LFProducerStewardCredentials value to navigate to the AWS Secrets Manager console.
  2. In the Secret value section, choose Retrieve secret value.
  3. Note down the secret value for the password for IAM user lf-producersteward.

You need this to log in to the console later as the user lf-producersteward.

  1. On the LakeFormation console, choose Databases on the navigation pane.
  2. Open the database lftpcdb.
  3. Verify the LF-tags on the database are created.

  1. Choose View tables and choose the items table to verify the LF-tags.

  1. Repeat the steps for the promotions and customers tables to verify the LF-tags assigned.

  1. On the Lake Formation console, under Data catalog in the navigation pane, choose Databases.
  2. Select the database lftpcdb and on the Actions menu, choose View Permissions.
  3. Verify that there are no default permissions granted on the database lftpcdb for IAMAllowedPrincipals.
  4. If you find any, select the permission and choose Revoke to revoke the permission.
  5. On the AWS Management Console, choose the AWS CloudShell icon on the top menu.

This opens AWS CloudShell in another tab of the browser. Allow a few minutes for the CloudShell environment to set up.

  1. Run the following AWS Command Line Interface (AWS CLI) command after replacing {BUCKET_NAME} with DataLakeBucket from the stack output.
aws s3 cp s3://aws-data-analytics-workshops/shared_datasets/tpcparquet/ s3://${BUCKET_NAME}/tpcparquet/  --recursive

If CloudShell isn’t available in your chosen Region, run the following AWS CLI command to copy the required dataset from your preferred AWS CLI environment as the IAM admin user.

  1. Verify that your S3 bucket has the dataset copied in it.
  2. Log out as the IAM admin user.

Grant permissions in account A

Next, we continue granting Lake Formation permissions to the dataset as a data steward within the producer account. The data steward grants the following LF-tag-based permissions to the consumer personas.

Consumer Persona LF-tag Policy
lf-business-analysts Sensitivity=Public
lf-campaign-manager HasCampaign=true
  1. Log in to account A as user lf-producersteward, using the password you noted from Secrets Manager earlier.
  2. On the Lake Formation console, under Permissions in the navigation pane, choose Data Lake permissions.
  3. Choose Grant.
  4. Under Principals, select External accounts.
  5. Provide the ARN of the IAM user in the consumer account (arn:aws:iam::<accountB_id>:user/lf-business-analysts) and press Enter.

  1. Under LF_Tags or catalog resources, select Resources matched by LF-Tags.
  2. Choose Add LF-Tag to add a new key-value pair.
  3. For the key, choose Sensitivity and for the value, choose Public.
  4. Under Database permissions, select Describe, and under Table permissions, select Select and Describe.

  1. Choose Grant to apply the permissions.
  2. On the Lake Formation console, under Permissions in the navigation pane, choose Data Lake permissions.
  3. Choose Grant.
  4. Under Principals, select External accounts.
  5. Provide the ARN of the IAM user in the consumer account (arn:aws:iam::<accountB_id>:user/lf-campaign-manager) and press Enter.
  6. Under LF_Tags or catalog resources, select Resources matched by LF-Tags.
  7. Choose Add LF-Tag to add a new key-value pair.
  8. For the key, choose HasCampaign and for the value, choose true.

  1. Under Database permissions, select Describe, and under Table permissions, select Select and Describe.
  2. Choose Grant to apply the permissions.
  3.  Verify on the Data lake permissions tab that the permissions you have granted show up correctly.

AWS CloudFormation setup in account B

Complete the following steps in the consumer account:

  1. Log in as an IAM admin user in account B and launch the CloudFormation stack:
    BDB-2063-launch-cloudformation-stack
  2. Choose Next.
  3. Provide a name for the stack, then choose Next.
  4. On the next page, choose Next.
  5. Review the details on the final page and select I acknowledge that AWS CloudFormation might create IAM resources.
  6. Choose Create.

Stack creation should take about 2–3 minutes. The stack sets up the following resources in account B:

  • IAM users datalakeadmin1, lf-business-analysts, and lf-campaign-manager, with relevant IAM and Lake Formation permissions
  • A database called db_for_shared_tables with Create_Table permissions to the lf-campaign-manager user
  • An S3 bucket named lfblog-athenaresults-<your-accountB-id>-us-east-1 with ListBucket and write permissions to lf-business-analysts and lf-campaign-manager

Note down the stack output details.

Accept resource shares in account B

After you launch the CloudFormation stack, complete the following steps in account B:

  1. On the CloudFormation stack Outputs tab, choose the link for DataLakeAdminCredentials.

This takes you to the Secrets Manager console.

  1. On the Secrets Manager console, choose Retrieve secret value and copy the password for DataLakeAdmin user.
  2. Use the ConsoleIAMLoginURL value from the CloudFormation template output to log in to account B with the data lake admin user name datalakeadmin1 and the password you copied from Secrets Manager.
  3. Open the AWS RAM console in another browser tab.
  4. In the navigation pane, under Shared with me, choose Resource shares to view the pending invitations.

You should see two resource share invitations from the producer account A: one for database-level share and one for table-level share.

  1. Choose each resource share link, review the details, and choose Accept.

After you accept the invitations, the status of the resource shares changes from Active from Pending.

Grant permissions in account B

To grant permissions in account B, complete the following steps:

  1. On the Lake Formation console, under Permissions on the navigation pane, choose Administrative roles and tasks.

  1. Under Database creators, choose Grant.

  1. Under IAM users and roles, choose lf-business-analysts.
  2. For Catalog permissions, select Create database.
  3. Choose Grant.
  4. Log out of the console as the data lake admin user.

Query the shared datasets as consumer users

To validate the lf-business-analysts user’s data access, perform the following steps:

  1. Log in to the console as lf-business-analysts, using the credentials noted from the CloudFormation stack output.
  2. On the Lake Formation console, under Data catalog in the navigation pane, choose Databases.

  1. Select the database lftpcdb and on the Actions menu, choose Create resource link.

  1. Under Resource link name, enter rl_lftpcdb.
  2. Choose Create.
  3. After the resource link is created, select the resource link and choose View tables.

You can now see the four tables in the shared database.

  1. Open the Athena console in another browser tab and choose the lfblog-athenaresults-<your-accountB-id>-us-east-1 bucket as the query results location.
  2. Verify data access using the following query (for more information, refer to Running SQL queries using Amazon Athena):
Select * from rl_lftpcdb.customers limit 10;

The following screenshot shows the query output.

Notice that account A shared the database lftpcdb to account B using the LF-tag expression Sensitivity=Public. Columns c_first_name, c_last_name, and c_email_address in table customers were overwritten with Sensitivity=Confidential. Therefore, these three columns are not visible to user lf-business-analysts.

You can preview the other tables from the database similarly to see the available columns and data.

  1. Log out of the console as lf-business-analysts.

Now we can validate the lf-campaign-manager user’s data access.

  1. Log in to the console as lf-campaign-manager using the credentials noted from the CloudFormation stack output.
  2. On the Lake Formation console, under Data catalog in the navigation pane, choose Databases.
  3. Verify that you can see the database db_for_shared_tables shared by the data lake admin.

  1. Under Data catalog in the navigation pane, choose Tables.

You should be able to see the two tables shared from account A using the LF-tag expression HasCampaign=true. The two tables show the Owner account ID as account A.

Because lf-campaign-manager received table level shares, this user will create table-level resource links for querying in Athena.

  1. Select the promotions table, and on the Actions menu, choose Create resource link.

  1. For Resource link name, enter rl_promotions.

  1. Under Database, choose db_for_shared_tables for the database to contain the resource link.
  2. Choose Create.
  3. Repeat the table resource link creation for the other table items.

Notice that the resource links show account B as owner, whereas the actual tables show account A as the owner.

  1. Open the Athena console in another browser tab and choose the lfblog-athenaresults-<your-accountB-id>-us-east-1 bucket as the query results location.
  2. 11. Query the tables using the resource links.

As shown in the following screenshot, all columns of both tables are accessible to lf-campaign-manager.

In summary, you have seen how LF-tags are used to share a database and select tables from one account to another account’s IAM users.

Clean up

To avoid incurring charges on the AWS resources created in this post, you can perform the following steps.

First, clean up resources in account A:

  1. Empty the S3 bucket created for this post by deleting the downloaded objects from your S3 bucket.
  2. Delete the CloudFormation stack.

This deletes the S3 bucket, custom IAM roles, policies, and the LF database, tables, and permissions.

  1. You may choose to undo the Lake Formation settings also and add IAM access back from the Lake Formation console Settings page.

Now complete the following steps in account B:

  1. Empty the S3 bucket lfblog-athenaresults-<your-accountB-id>-us-east-1 used as the Athena query results location.
  2. Revoke permission to lf-business-analysts as database creator.
  3. Delete the CloudFormation stack.

This deletes the IAM users, S3 bucket, Lake Formation database db_for_shared_tables, resource links, and all the permissions from Lake Formation.

If there are any resource links and permissions left, delete them manually in Lake Formation from both accounts.

Conclusion

In this post, we illustrated the benefits of using Lake Formation cross-account sharing Version 3 using LF-tags to direct IAM principals and how to receive the shared tables in the consumer account. We used a two-account scenario in which a data producer account shares a database and specific tables to individual IAM users in another account using LF-tags. In the receiving account, we showed the role played by a data lake admin vs. the receiving IAM users. We also illustrated how to overwrite column tags to mask and share PII data.

With Version 3 of cross-account sharing features, Lake Formation makes possible more modern data mesh models, where a producer can directly share to an IAM principal in another account, instead of the entire account. Data mesh implementation becomes easier for data administrators and data platform owners because they can easily scale to hundreds of consumer accounts using the LF-tags based sharing to organizational units or IDs.

We encourage you to upgrade your Lake Formation cross-account sharing to Version 3 and benefit from the enhancements. For more details, see Updating cross-account data sharing version settings.


About the authors

Aarthi Srinivasan is a Senior Big Data Architect with AWS Lake Formation. She likes building data lake solutions for AWS customers and partners. When not on the keyboard, she explores the latest science and technology trends and spends time with her family.

Srividya Parthasarathy is a Senior Big Data Architect on the AWS Lake Formation team. She enjoys building analytics and data mesh solutions on AWS and sharing them with the community.

How Novo Nordisk built a modern data architecture on AWS

Post Syndicated from Jonatan Selsing original https://aws.amazon.com/blogs/big-data/how-novo-nordisk-built-a-modern-data-architecture-on-aws/

Novo Nordisk is a leading global pharmaceutical company, responsible for producing life-saving medicines that reach more than 34 million patients each day. They do this following their triple bottom line—that they must strive to be environmentally sustainable, socially sustainable, and financially sustainable. The combination of using AWS and data supports all these targets.

Data is pervasive throughout the entire value chain of Novo Nordisk. From foundational research, manufacturing lines, sales and marketing, clinical trials, pharmacovigilance, through patient-facing data-driven applications. Therefore, getting the foundation around how data is stored, safeguarded, and used in a way that provides the most value is one of the central drivers of improved business outcomes.

Together with AWS Professional Services, we’re building a data and analytics solution using a modern data architecture. The collaboration between Novo Nordisk and AWS Professional Services is a strategic and long-term close engagement, where developers from both organizations have worked together closely for years. The data and analytics environments are built around of the core tenets of the data mesh—decentralized domain ownership of data, data as a product, self-service data infrastructure, and federated computational governance. This enables the users of the environment to work with data in the way that drives the best business outcomes. We have combined this with elements from evolutionary architectures that will allow us to adapt different functionalities as AWS continuously develops new services and capabilities.

In this series of posts, you will learn how Novo Nordisk and AWS Professional Services built a data and analytics ecosystem to speed up innovation at petabyte scale:

  • In this first post, you will learn how the overall design has enabled the individual components to come together in a modular way. We dive deep into how we built a data management solution based on the data mesh architecture.
  • The second post discusses how we built a trust network between the systems that comprise the entire solution. We show how we use event-driven architectures, coupled with the use of attribute-based access controls, to ensure permission boundaries are respected at scale.
  • In the third post, we show how end-users can consume data from their tool of choice, without compromising data governance. This includes how to configure Okta, AWS Lake Formation, and Microsoft Power BI to enable SAML-based federated use of Amazon Athena for an enterprise business intelligence (BI) activity.

Pharma-compliant environment

As a pharmaceutical industry, GxP compliance is a mandate for Novo Nordisk. GxP is a general abbreviation for the “Good x Practice” quality guidelines and regulations defined by regulators such as European Medicines Agency, U.S. Food and Drug Administration, and others. These guidelines are designed to ensure that medicinal products are safe and effective for their intended use. In the context of a data environment, GxP compliance involves implementing integrity controls for data used to in decision making and processes and is used to guide how change management processes are implemented to continuously ensure compliance over time.

Because this data environment supports teams across the whole organization, each individual data owner must retain accountability on their data. Features were designed to provide data owners autonomy and transparency when managing their data, enabling them to take this responsibility. This includes the capability to handle personally identifiable information (PII) data and other sensitive workloads. To provide traceability on the environment, audit capabilities were added, which we describe more in this post.

Solution overview

The full solution is a sprawling landscape of independent services that work together to enable data and analytics with a decentralized data governance model at petabyte scale. Schematically, it can be represented as in the following figure.

Novo Nordisk Modern Data Architecture on AWS

The architecture is split into three independent layers: data management, virtualization, and consumption. The end-user sits in the consumption layer and works with their tool of choice. It’s meant to abstract as much of the AWS-native resources to application primitives. The consumption layer is integrated into the virtualization layer, which abstracts the access to data. The purpose of the virtualization layer is to translate between data consumption and data management solutions. The access to data is managed by what we refer to as data management solutions. We discuss one of our versatile data management solutions later in this post. Each layer in this architecture is independent of each other and instead only relies on well-defined interfaces.

Central to this architecture is that access is encapsulated in an AWS Identity and Access Management (IAM) role session. The data management layer focuses on providing the IAM role with the right permissions and governance, the virtualization layer provides access to the role, and the consumption layer abstracts the use of the roles in the tools of choice.

Technical architecture

Each of the three layers in the overall architecture has a distinct responsibility, but no singular implementation. Think of them as abstract classes. They can be implemented in concrete classes, and in our case they rely on foundational AWS services and capabilities. Let’s go through each of the three layers.

Data management layer

The data management layer is responsible for providing access to and governance of data. As illustrated in the following diagram, a minimal construct in the data management layer is the combination of an Amazon Simple Storage Service (Amazon S3) bucket and an IAM role that gives access to the S3 bucket. This construct can be expanded to include granular permission with Lake Formation, auditing with AWS CloudTrail, and security response capabilities from AWS Security Hub. The following diagram also shows that a single data management solution has no singular span. It can cross many AWS accounts and be comprised of any number of IAM role combinations.Data Mamangement Architecture

We have purposely not illustrated the trust policy of these roles in this figure, because those are a collaborative responsibility between the virtualization layer and the data management layer. We go into detail of how that works in the next post in this series. Data engineering professionals often interface directly with the data management layer, where they curate and prepare data for consumption.

Virtualization layer

The purpose of the virtualization layer is to keep track of who can do what. It doesn’t have any capabilities in itself, but translates the requirements from the data management ecosystems to the consumption layers and vice versa. It enables end-users on the consumption layer to access and manipulate data on one or more data management ecosystems, according to their permissions. This layer abstracts from end-users the technical details on data access, such as permission model, role assumptions, and storage location. It owns the interfaces to the other layers and enforces the logic of the abstraction. In the context of hexagonal architectures (see Developing evolutionary architecture with AWS Lambda), the interface layer plays the role of the domain logic, ports, and adapters. The other two layers are actors. The data management layer communicates the state of the layer to the virtualization layer and conversely receives information about the service landscape to trust. The virtualization layer architecture is shown in the following diagram.

Virtualization Layer Architecture

Consumption layer

The consumption layer is where the end-users of the data products are sitting. This can be data scientists, business intelligence analysts, or any third party that generates value from consuming the data. It’s important for this type of architecture that the consumption layer has a hook-based sign-in flow, where the authorization into the application can be modified at sign-in time. This is to translate the AWS-specific requirement into the target applications. After the session in the client-side application has successfully been started, it’s up to the application itself to instrument for data layer abstraction, because this will be application specific. And this is an additional important decoupling, where some responsibility is pushed to the decentralized units. Many modern software as a service (SaaS) applications support these built-in mechanisms, such as Databricks or Domino Data Lab, whereas more traditional client-side applications like RStudio Server have more limited native support for this. In the case where native support is missing, a translation down to the OS user session can be done to enable the abstraction. The consumption layer is shown schematically in the following diagram.

Consumption Layer Architecture

When using the consumption layer as intended, the users don’t know that the virtualization layer exists. The following diagram illustrates the data access patterns.

Data Access Patterns

Modularity

One of the main advantages of adopting the hexagonal architecture pattern, and delegating both the consuming layer and the data management layer to primary and secondary actors, means that they can be changed or replaced as new functionalities are released that require new solutions. This gives a hub-and-spoke type pattern, where many different types of producer/consumer type systems can be connected and work simultaneously in union. An example of this is that the current solution running in Novo Nordisk supports multiple, simultaneous data management solutions and are exposed in a homogenous way in the consuming layer. This includes both a data lake, the data mesh solution presented in this post, and several independent data management solutions. And these are exposed to multiple types of consuming applications, from custom managed, self-hosted applications, to SaaS offerings.

Data management ecosystem

To scale the usage of the data and increase the freedom, Novo Nordisk, jointly with AWS Professional Services, built a data management and governance environment, named Novo Nordisk Enterprise DataHub (NNEDH). NNEDH implements a decentralized distributed data architecture, and data management capabilities such as an enterprise business data catalog and data sharing workflow. NNEDH is an example of a data management ecosystem in the conceptual framework introduced earlier.

Decentralized architecture: From a centralized data lake to a distributed architecture

Novo Nordisk’s centralized data lake consists of 2.3 PB of data from more than 30 business data domains worldwide serving over 2000+ internal users throughout the value chain. It has been running successfully for several years. It is one of the data management ecosystems currently supported.

Within the centralized data architecture, data from each data domain is copied, stored, and processed in one central location: a central data lake hosted in one data storage. This pattern has challenges at scale because it retains the data ownership with the central team. At scale, this model slows down the journey toward a data-driven organization, because ownership of the data isn’t sufficiently anchored with the professionals closest to the domain.

The monolithic data lake architecture is shown in the following diagram.Monolithic Data Lake Architecture

Within the decentralized distributed data architecture, the data from each domain is kept within the domain on its own data storage and compute account. In this case, the data is kept close to domain experts, because they’re the ones who know their own data best and are ultimately the owner of any data products built around their data. They often work closely with business analysts to build the data product and therefore know what good data means to consumers of their data products. In this case, the data responsibility is also decentralized, where each domain has its own data owner, putting the accountability onto the true owners of the data. Nevertheless, this model might not work at small scale, for example an organization with only one business unit and tens of users, because it would introduce more overhead on the IT team to manage the organization data. It better suits large organizations, or small and medium ones that would like to grow and scale.

The Novo Nordisk data mesh architecture is shown in the following diagram.

Novo Nordisk Data Mesh Architecture

Data domains and data assets

To enable the scalability of data domains across the organization, it’s mandatory to have a standard permission model and data access pattern. This standard must not be too restrictive in such a way that it may be a blocker for specific use cases, but it should be standardized in such a way to use the same interface between the data management and virtualization layers.

The data domains on NNEDH are implemented by a construct called an environment. An environment is composed of at least one AWS account and one AWS Region. It’s a workplace where data domain teams can work and collaborate to build data products. It links the NNEDH control plane to the AWS accounts where the data and compute of the domain reside. The data access permissions are also defined at the environment level, managed by the owner of the data domain. The environments have three main components: a data management and governance layer, data assets, and optional blueprints for data processing.

For data management and governance, the data domains rely on Lake Formation, AWS Glue, and CloudTrail. The deployment method and setup of these components is standardized across data domains. This way, the NNEDH control plane can provide connectivity and management to data domains in a standardized way.

The data assets of each domain residing in an environment are organized in a dataset, which is a collection of related data used for building a data product. It includes technical metadata such as data format, size, and creation time, and business metadata such as the producer, data classification, and business definition. A data product can use one or several datasets. It is implemented through managed S3 buckets and the AWS Glue Data Catalog.

Data processing can be implemented in different ways. NNEDH provides blueprints for data pipelines with predefined connectivity to data assets to speed up the delivery of data products. Data domain users have the freedom to use any other compute capability on their domain, for example using AWS services not predefined on the blueprints or accessing the datasets from other analytics tools implemented in the consumption layer, as mentioned earlier in this post.

Data domain personas and roles

On NNEDH, the permission levels on data domains are managed through predefined personas, for example data owner, data stewards, developers, and readers. Each persona is associated with an IAM role that has a predefined permission level. These permissions are based on the typical needs of users on these roles. Nevertheless, to give more flexibility to data domains, these permissions can be customized and extended as needed.

The permissions associated with each persona are related only to actions allowed on the AWS account of the data domain. For the accountability on data assets, the data access to the assets is managed by specific resource policies instead of IAM roles. Only the owner of each dataset, or data stewards delegated by the owner, can grant or revoke data access.

On the dataset level, a required persona is the data owner. Typically, they work closely with one or many data stewards as data products managers. The data steward is the data subject matter expert of the data product domain, responsible for interpreting collected data and metadata to derive deep business insights and build the product. The data steward bridges between business users and technical teams on each data domain.

Enterprise business data catalog

To enable freedom and make the organization data assets discoverable, a web-based portal data catalog is implemented. It indexes in a single repository metadata from datasets built on data domains, breaking data silos across the organization. The data catalog enables data search and discovery across different domains, as well as automation and governance on data sharing.

The business data catalog implements data governance processes within the organization. It ensures the data ownership—someone in the organization is responsible for the data origin, definition, business attributes, relationships, and dependencies.

The central construct of a business data catalog is a dataset. It’s the search unit within the business catalog, having both technical and business metadata. To collect technical metadata from structured data, it relies on AWS Glue crawlers to recognize and extract data structures from the most popular data formats, including CSV, JSON, Avro, and Apache Parquet. It provides information such as data type, creation date, and format. The metadata can be enriched by business users by adding a description of the business context, tags, and data classification.

The dataset definition and related metadata are stored in an Amazon Aurora Serverless database and Amazon OpenSearch Service, enabling you to run textual queries on the data catalog.

Data sharing

NNEDH implements a data sharing workflow, enabling peer-to-peer data sharing across AWS accounts using Lake Formation. The workflow is as follows:

  1. A data consumer requests access to the dataset.
  2. The data owner grants access by approving the access request. They can delegate the approval of access requests to the data steward.
  3. Upon the approval of an access request, a new permission is added to the specific dataset in Lake Formation of the producer account.

The data sharing workflow is shown schematically in the following figure.

Data Sharing Workflow

Security and audit

The data in the Novo Nordisk data mesh lies in AWS accounts owned by Novo Nordisk business accounts. The configuration and the states of the data mesh are stored in Amazon Relational Database Service (Amazon RDS). The Novo Nordisk security architecture is shown in the following figure.

Novo Nordisk Distributed Security and Audit Architecture

Access and edits to the data in NNEDH needs to be logged for audit purposes. We need to be able to tell who modified data, when the modification happened, and what modifications were applied. In addition, we need to be able to answer why the modification was allowed by that person at that time.

To meet these requirements, we use the following components:

  • CloudTrail to log API calls. We specifically enable CloudTrail data event logging for S3 buckets and objects. By activating the logging, we can trace back any modification to any files in the data lake to the person who made the modification. We enforce usage of source identity for IAM role sessions to ensure user traceability.
  • We use Amazon RDS to store the configuration of the data mesh. We log queries against the RDS database. Together with CloudTrail, this log allows us to answer the question of why a modification to a file in Amazon S3 at a specific time by a specific person is possible.
  • Amazon CloudWatch to log activities across the mesh.

In addition to those logging mechanisms, the S3 buckets are created using the following properties:

  • The bucket is encrypted using server-side encryption with AWS Key Management Service (AWS KMS) and customer managed keys
  • Amazon S3 versioning is activated by default

Access to the data in NNEDH is controlled at the group level instead of individual users. The group corresponds to the group defined in the Novo Nordisk directory group. To keep track of the person who modified the data in the data lakes, we use the source identity mechanism explained in the post How to relate IAM role activity to corporate identity.

Conclusion

In this post, we showed how Novo Nordisk built a modern data architecture to speed up the delivery of data-driven use cases. It includes a distributed data architecture, to scale the usage to petabyte scale for over 2,000 internal users throughout the value chain, as well as a distributed security and audit architecture handling data accountability and traceability on the environment to meet their compliance requirements.

The next post in this series describes the implementation of distributed data governance and control at scale of Novo Nordisk’s modern data architecture.


About the Authors

Jonatan Selsing is former research scientist with a PhD in astrophysics that has turned to the cloud. He is currently the Lead Cloud Engineer at Novo Nordisk, where he enables data and analytics workloads at scale. With an emphasis on reducing the total cost of ownership of cloud-based workloads, while giving full benefit of the advantages of cloud, he designs, builds, and maintains solutions that enable research for future medicines.

Hassen Riahi is a Sr. Data Architect at AWS Professional Services. He holds a PhD in Mathematics & Computer Science on large-scale data management. He works with AWS customers on building data-driven solutions.

Anwar Rizal is a Senior Machine Learning consultant based in Paris. He works with AWS customers to develop data and AI solutions to sustainably grow their business.

Moses Arthur comes from a mathematics and computational research background and holds a PhD in Computational Intelligence specialized in Graph Mining. He is currently a Cloud Product Engineer at Novo Nordisk building GxP-compliant enterprise data lakes and analytics platforms for Novo Nordisk global factories producing digitalized medical products.

Alessandro FiorAlessandro Fior is a Sr. Data Architect at AWS Professional Services. With over 10 years of experience delivering data and analytics solutions, he is passionate about designing and building modern and scalable data platforms that accelerate companies to get value from their data.

Kumari RamarKumari Ramar is an Agile certified and PMP certified Senior Engagement Manager at AWS Professional Services. She delivers data and AI/ML solutions that speed up cross-system analytics and machine learning models, which enable enterprises to make data-driven decisions and drive new innovations.

Build an AWS Lake Formation permissions inventory dashboard using AWS Glue and Amazon QuickSight

Post Syndicated from Srividya Parthasarathy original https://aws.amazon.com/blogs/big-data/build-an-aws-lake-formation-permissions-inventory-dashboard-using-aws-glue-and-amazon-quicksight/

AWS Lake Formation is an integrated data lake service that makes it easy for you to ingest, clean, catalog, transform, and secure your data and make it available for analysis and machine learning (ML). Lake Formation provides a single place to define fine-grained access control on catalog resources. These permissions are granted to the principals by a data lake admin, and integrated engines like Amazon Athena, AWS Glue, Amazon EMR, and Amazon Redshift Spectrum enforce the access controls defined in Lake Formation. It also allows principals to securely share data catalog resources across multiple AWS accounts and AWS organizations through a centralized approach.

As organizations are adopting Lake Formation for scaling their permissions, there is steady increase in the access policies established and managed within the enterprise. However, it becomes more difficult to analyze and understand the permissions for auditing. Therefore, customers are looking for a simple way to collect, analyze, and visualize permissions data so that they can inspect and validate the policies. It also enables organizations to take actions that help them with compliance requirements.

This solution offers the ability to consolidate and create a central inventory of Lake Formation permissions that are registered in the given AWS account and Region. It provides a high-level view of various permissions that Lake Formation manages and aims at answering questions like:

  • Who has select access on given table
  • Which tables have delete permission granted
  • Which databases or tables does the given principal have select access to

In this post, we walk through how to set up and collect the permissions granted on resources in a given account using the Lake Formation API. AWS Glue makes it straightforward to set up and run jobs for collecting the permission data and creating an external table on the collected data. We use Amazon QuickSight to create a permissions dashboard using an Athena data source and dataset.

Overview of solution

The following diagram illustrates the architecture of this solution.

In this solution, we walk through the following tasks:

  1. Create an AWS Glue job to collect and store permissions data, and create external tables using Boto3.
  2. Verify the external tables created using Athena.
  3. Sign up for a QuickSight Enterprise account and enable Athena access.
  4. Create a dataset using an Athena data source.
  5. Use the datasets for analysis.
  6. Publish the analyses as a QuickSight dashboard.

The collected JSON data is flattened and written into an Amazon Simple Storage Service (Amazon S3) bucket as Parquet files partitioned by account ID, date, and resource type. After the data is stored in Amazon S3, external tables are created on them and filters are added for different types of resource permissions. These datasets can be imported into SPICE, an in-memory query engine that is part of QuickSight, or queried directly from QuickSight to create analyses. Later, you can publish these analyses as a dashboard and share it with other users.

Dashboards are created for the following use cases:

  • Database permissions
  • Table permissions
  • Principal permissions

Prerequisites

You should have the following prerequisites:

  • An S3 bucket to store the permissions inventory data
  • An AWS Glue database for permissions inventory metadata
  • An AWS Identity and Access Management (IAM) role for the AWS Glue job with access to the inventory AWS Glue database and S3 bucket and added as a data lake admin
  • A QuickSight account with access to Athena
  • An IAM role for QuickSight with access to the inventory AWS Glue database and S3 bucket

Set up and run the AWS Glue job

We create an AWS Glue job to collect Lake Formation permissions data for the given account and Region that is provided as job parameters, and the collected data is flattened before storage. Data is partitioned by account ID, date, and permissions type, and is stored as Parquet in an S3 bucket using Boto3. We create external tables on the data and add filters for different types of resource permissions.

To create the AWS Glue job, complete the following steps:

  1. Download the Python script file to local.
  2. On the AWS Glue console, under Data Integration and ETL in the navigation pane, choose Jobs.
  3. Under Create job, select Python Shell script editor.
  4. For Options, select Upload and edit an existing script.
  5. For File upload, choose Choose file.
  6. Choose the downloaded file (lf-permissions-inventory.py).
  7. Choose Create.

GlueJob

  1. After the job is created, enter a name for the job (for this post, lf-inventory-builder) and choose Save.

Glue Job save

  1. Choose the Job details tab.
  2. For Name, enter a name for the job.
  3. For IAM Role¸ choose an IAM role that has access to the inventory S3 bucket and inventory schema and registered as data lake admin.
  4. For Type, choose Python Shell.
  5. For Python version, choose Python 3.9.

Glue Job Details

  1. You can leave other property values at their default.
  2. Under Advanced properties¸ configure the following job parameters and values:
    1. catalog-id: with the value as the current AWS account ID whose permissions data are collected.
    2. databasename: with the value as the AWS Glue database where the inventory-related schema objects are created.
    3. region: with the value as the current Region where the job is configured and whose permissions data is collected.
    4. s3bucket: with the value as the S3 bucket where the collected permissions data is written.
    5. createtable: with the value yes, which enables external table creation on the data.

Job Parameters

  1. Choose Save to save the job settings.

Glue Job Save

  1. Choose Run to start the job.

When the job is complete, the run status changes to Succeeded. You can view the log messages in Amazon CloudWatch Logs.

Job Run

Permissions data is collected and stored in the S3 bucket (under lfpermissions-data) that you provided in the job parameters.

S3 Structure

The following external tables are created on the permissions data and can be queried using Athena:

  • lfpermissions – A summary of resource permissions
  • lfpermissionswithgrant – A summary of grantable resource permissions

For both tables, the schema structure is the same and the lftype column indicates what type of permissions the row applies to.

Athena Table Schema

Verify the tables using Athena

You can use Athena to verify the data using the following queries.

For more information, refer to Running SQL queries using Amazon Athena

  • List the database permissions:
Select * from lfpermissions where lftype=’DATABASE’
  • List the table permissions:
Select * from lfpermissions where lftype= ‘TABLE’
  • List the data lake permissions:
Select * from lfpermissions where lftype= ‘DATA_LOCATION’
  • List the grantable database permissions:
Select * from lfpermissionswithgrant where lftype=’DATABASE’
  • List the grantable table permissions:
Select * from lfpermissionswithgrant where lftype= ‘TABLE’
  • List grantable data lake permissions:
Select * from lfpermissionswithgrant where lftype= ‘DATA_LOCATION’

As the next step, we create a QuickSight dashboard with three sheets, each focused on different sets of permissions (database, table, principal) to slice and dice the data.

Sign up for a QuickSight account

If you haven’t signed up for QuickSight, complete the following steps:

  1. Sign in to the AWS Management Console as Admin, search for QuickSight and choose Sign up for QuickSight.

QuickSight signup

  1. For Edition, select Enterprise.
  2. Choose Continue.
  3. For Authentication method, select Use IAM federated identities & QuickSight-managed users.
  4. Under QuickSight Region, choose the same Region as your inventory S3 bucket.
  5. Under Account info, enter a QuickSight account name and email address for notification.

QuickSight Form

  1. In the Quick access to AWS services section, for IAM Role, select Use QuickSight-managed role (default).
  2. Allow access to IAM, Athena, and Amazon S3.
  3. Specify the S3 bucket that contains the permissions data.
  4. Choose Finish to complete the signup process.

QuickSight configuration

Note: If the inventory bucket and database is managed by Lake Formation, grant database and table access to the created QuickSight IAM role. For instructions, refer to Granting and revoking permissions on Data Catalog resources.

Configure your dataset in QuickSight

QuickSight is configured with an Athena data source the same Region as the S3 bucket. To set up your dataset, complete the following steps:

  1. On the QuickSight console, choose Datasets in the navigation pane.
  2. Choose New dataset.

Quicksight DataSet

  1. Choose Athena as your data source.

QuickSight Datasource

  1. Enter LF_DASHBOARD_DS as the name of your data source.
  2. Choose Create data source.
  3. For Catalog, leave it as AwsDataCatalog.
  4. For Database, choose database name provided as parameter to the Job.
  5. For Tables, select lfpermissions.
  6. Choose Select.

QuickSight Catalog Info

  1. Select Directly query your data and choose Visualize to take you to the analysis.

Quicksight data mode

Create analyses

We create three sheets for our dashboard to view different levels of permissions.

Sheet 1: Database permission view

To view database permissions, complete the following steps:

  1. On the QuickSight console, choose the plus sign to create a new sheet.
  2. Choose Add, then choose Add title.

QuickSight Title

  1. Name the sheet Database Permissions.
  2. Repeat steps (5-7) to add the following parameters:
    • catalogid
    • databasename
    • permission
    • tablename
  3. On the Add menu, choose Add parameter.
  4. Enter a name for the parameter.
  5. Leave the other values as default and choose Create.
  6. Choose Insights in the navigation pane, then choose Add control.

QuickSight Control

  1. Add a control for each parameter:
    1. For each parameter, for Style¸ choose List, and for Values, select Link to a dataset field.
      QuickSight Dependency
    2. Provide additional information for each parameter according to the following table.
Parameter Display Name Dataset Field
catalogid AccountID lfpermissions catalog_id
databasename DatabaseName lfpermissions databasename
permission Permission lfpermissions permission
  1. Add a control dependency and for Database, choose the options menu and choose Edit.

QuickSight Dependency

  1. Under Format control, choose Control options.
  2. Change the relevant values, choose AccountID, and choose Update.
  3. Similarly, under Permission control, choose Control options.
  4. Change the relevant values, choose AccountID, and choose Update.

We create two visuals for this view.

  1. For the first visual, choose Visualize and choose pivot table as the visual type.
  2. Drag and drop catalog_id and databasename into Rows.
  3. Drag and drop permission into Column.
  4. Drag and drop principal into Values and change the aggregation to Count distinct.

QuickSight Database View1

  1. Add a filter on the lftype field with the following options:
    1. Custom filter as the filter type.
    2. Equals as the filter condition.
    3. DATABASE as the value.
  2. Add a filter on catalog_id the following options:
    1. Custom filter as the filter type.
    2. Equals as the filter condition.
    3. Select Use parameters and choose catalogid.
  3. Add a filter on databasename with the following options:
    1. Custom filter as the filter type.
    2. Equals as the filter condition.
    3. Select Use parameters and choose databasename.
  4. Add a filter on permission with the following options:
    1. Custom filter as the filter type.
    2. Equals as the filter condition.
    3. Select Use parameters and choose permission.
  5. Choose Actions in the navigation pane.
  6. Define a new action with the following parameters:
    1. For Activation, select Select.
    2. For Filter action, select All fields.
    3. For Target visuals, select Select visuals and Check principal.

Now we add our second visual.

  1. Add a second visual and choose the table visual type.
  2. Drag and drop principal to Group by.
  3. Add a filter on the lftype field with the following options:
    1. Custom filter as the filter type.
    2. Equals as the filter condition.
    3. DATABASE as the value.
  4. Add a filter on catalog_id the following options:
    1. Custom filter as the filter type.
    2. Equals as the filter condition.
    3. Select Use parameters and choose catalogid.
  5. Add a filter on databasename the following options:
    1. Custom filter as the filter type.
    2. Equals as the filter condition.
    3. Select Use parameters and choose databasename.
  6. Add a filter on permission with the following options:
    1. Custom filter as the filter type.
    2. Equals as the filter condition.
    3. Select Use parameters and choose permission.

Now the Database and Permission drop-down menus are populated based on the relevant attributes and changes dynamically.

QuickSight Database View2

Sheet 2: Table permission view

Now that we have created the database permissions sheet, we can add a table permissions sheet.

  1. Choose the plus sign to add a new sheet.
  2. On the QuickSight console, choose Add, then choose Add title.
  3. Name the sheet Table Permissions.
  4. Choose Insights in the navigation pane, then choose Add control.
  5. Add a control for each parameter:
    1. For each parameter, for Style¸ choose List, and for Values, select Link to a dataset field.
    2. Provide the additional information for each parameter according to the following table.
Parameter Display Name Dataset Field
catalogid AccountID lfpermissions catalog_id
databasename DatabaseName lfpermissions databasename
permission Permission lfpermissions permission
tablename TableName lfpermissions tablename

We create two visuals for this view.

  1. For the first visual, choose Visualize and choose pivot table as the visual type.
  2. Drag and drop catalog_id, databasename, and tablename into Rows.
  3. Drag and drop permission into Column.
  4. Drag and drop principal into Values and change the aggregation to Count distinct.
  5. Add a filter on the lftype field with the following options:
    1. Custom filter as the filter type.
    2. Equals as the filter condition.
    3. TABLE as the value.
  6. Add a filter on catalog_id the following options:
    1. Custom filter as the filter type.
    2. Equals as the filter condition.
    3. Select Use parameters and choose catalogid.
  7. Add a filter on the databasename with the following options:
    1. Custom filter as the filter type.
    2. Equals as the filter condition.
    3. Select Use parameters and choose databasename.
  8. Add a filter on tablename with the following options:
    1. Custom filter as the filter type.
    2. Equals as the filter condition.
    3. Select Use parameters and choose tablename.
  9. Add a filter on permission with the following options:
    1. Custom filter as the filter type.
    2. Equals as the filter condition.
    3. Select Use parameters and choose permission.
  10. Choose Actions in the navigation pane.
  11. Define a new action with the following parameters:
    1. For Activation, select Select.
    2. For Filter action, select All fields.
    3. For Target visuals, select Select visuals and Check principal.

Now we add our second visual.

  1. Add a second visual and choose the table visual type.
  2. Drag and drop principal to Group by.
  3. Add a filter on the lftype field with the following options:
    1. Custom filter as the filter type.
    2. Equals as the filter condition.
    3. TABLE as the value.
  4. Add a filter on catalog_id the following options:
    1. Custom filter as the filter type.
    2. Equals as the filter condition.
    3. Select Use parameters and choose catalogid.
  5. Add a filter on the databasename with the following options:
    1. Custom filter as the filter type.
    2. Equals as the filter condition.
    3. Select Use parameters and choose databasename.
  6. Add a filter on tablename with the following options:
    1. Custom filter as the filter type.
    2. Equals as the filter condition.
    3. Select Use parameters and choose tablename.
  7. Add a filter on permission with the following options:
    1. Custom filter as the filter type.
    2. Equals as the filter condition.
    3. Select Use parameters and choose permission.

Now the Databasename, Tablename, and Permission drop-down menus are populated based on the relevant attributes.

QuickSight Table Permissions

Sheet 3: Principal permission view

Now we add a third sheet for principal permissions.

  1. Choose the plus sign to add a new sheet.
  2. On the QuickSight console, choose Add, then choose Add title.
  3. Name the sheet Principal Permissions.
  4. Choose Insights in the navigation pane, then choose Add control.
  5. Add a control for the catalogid parameter:
    1. For Style¸ choose List, and for Values, select Link to a dataset field.
    2. Provide the additional information for the parameter according to the following table.
Parameter Display Name Dataset Field
catalogid AccountID lfpermissions catalog_id

We create four visuals for this view.

  1. For the first visual, choose Visualize and choose pivot table as the visual type.
  2. Drag and drop catalog_id and principal into Rows.
  3. Drag and drop permission into Column.
  4. Drag and drop databasename into Values and change the aggregation to Count distinct.
  5. Add a filter on the lftype field with the following options:
    1. Custom filter as the filter type.
    2. Equals as the filter condition.
    3. DATABASE as the value.
  6. Add a filter on the catalog_id field with the following options:
    1. Custom filter as the filter type.
    2. Equals as the filter condition.
    3. Select Use parameters and choose catalogid.
  7. Choose Actions in the navigation pane.
  8. Define a new action with the following parameters:
    1. For Activation, select Select.
    2. For Filter action, select All fields.
    3. For Target visuals, select Select visuals and Check Databasename.
  9. For the second visual, choose Visualize and choose table as the visual type.
  10. Drag and drop databasename into Group by.
  11. Add a filter on the lftype field with the following options:
    1. Custom filter as the filter type.
    2. Equals as the filter condition.
    3. DATABASE as the value.
  12. Add a filter on the catalog_id field with the following options:
    1. Custom filter as the filter type.
    2. Equals as the filter condition.
    3. Select Use parameters and choose catalogid.
  13. For the third visual, choose Visualize and choose pivot table as the visual type.
  14. Drag and drop catalog_id and principal into Rows.
  15. Drag and drop permission into Column.
  16. Drag and drop tablename into Values and change the aggregation to Count distinct.
  17. Add a filter on the lftype field with the following options:
    1. Custom filter as the filter type.
    2. Equals as the filter condition.
    3. TABLE as the value.
  18. Add a filter on the catalog_id field with the following options:
    1. Custom filter as the filter type.
    2. Equals as the filter condition.
    3. Select Use parameters and choose catalogid.
  19. Choose Actions in the navigation pane.
  20. Define a new action with the following parameters:
    1. For Activation, select Select.
    2. For Filter action, select All fields.
    3. For Target visuals, select Select visuals and Check Tablename.
  21. For the final visual, choose Visualize and choose table as the visual type.
  22. Drag and drop tablename into Group by.
  23. Add a filter on the lftype field with the following options:
    1. Custom filter as the filter type.
    2. Equals as the filter condition.
    3. TABLE as the value.
  24. Add a filter on the catalog_id field with the following options:
    1. Custom filter as the filter type.
    2. Equals as the filter condition.
    3. Select Use parameters and choose catalogid.

The following screenshot shows our sheet.

QuickSight Prinicipal View

Create a dashboard

Now that the analysis is ready, you can publish it as a dashboard and share it with other users. For instructions, refer to the tutorial Create an Amazon QuickSight dashboard.

Clean up

To clean up the resources created in this post, complete the following steps:

  1. Delete the AWS Glue job lf-inventory-builder.
  2. Delete the data stored under the bucket provided as the value of the s3bucket job parameter.
  3. Drop the external tables created under the schema provided as the value of the databasename job parameter.
  4. If you signed up for QuickSight to follow along with this post, you can delete the account.
  5. For an existing QuickSight account, delete the following resources:
    1. lfpermissions dataset
    2. lfpermissions analysis
    3. lfpermissions dashboard

Conclusion

In this post, we provided a design and implementation steps for a solution to collect Lake Formation permissions in a given Region of an account and consolidate them for analysis. We also walked through the steps to create a dashboard using Amazon QuickSight. You can utilize other QuickSight visuals to create more sophisticated dashboards based on your requirements.

You can also expand this solution to consolidate permissions for a multi-account setup. You can use a shared bucket across organizations and accounts and configure an AWS Glue job in each account or organization to write their permission data. With this solution, you can maintain a unified dashboard view of all the Lake Formation permissions within your organization, thereby providing a central audit mechanism to comply with business requirements.

Thanks for reading this post! If you have any comments or questions, please don’t hesitate to leave them in the comments section.


About the Author

Srividya Parthasarathy is a Senior Big Data Architect on the AWS Lake Formation team. She enjoys building analytics and data mesh solutions on AWS and sharing them with the community.

Centrally manage access and permissions for Amazon Redshift data sharing with AWS Lake Formation

Post Syndicated from Srividya Parthasarathy original https://aws.amazon.com/blogs/big-data/centrally-manage-access-and-permissions-for-amazon-redshift-data-sharing-with-aws-lake-formation/

Today’s global, data-driven organizations treat data as an asset and use it across different lines of business (LOBs) to drive timely insights and better business decisions. Amazon Redshift data sharing allows you to securely share live, transactionally consistent data in one Amazon Redshift data warehouse with another Amazon Redshift data warehouse within the same AWS account, across accounts, and across Regions, without needing to copy or move data from one cluster to another.

Some customers share their data with 50–100 data warehouses in different accounts and do a lot of cross-sharing, making it difficult to track who is accessing what data. They have to navigate to an individual account’s Amazon Redshift console to retrieve the access information. Also, many customers have their data lake on Amazon Simple Storage Service (Amazon S3), which is shared within and across various business units. As the organization grows and democratizes the data, administrators want the ability to manage the datashare centrally for governance and auditing, and to enforce fine-grained access control.

Working backward from customer ask, we are announcing the preview of the following new feature: Amazon Redshift data sharing integration with AWS Lake Formation, which enables Amazon Redshift customers to centrally manage access to their Amazon Redshift datashares using Lake Formation.

Lake Formation has been a popular choice for centrally governing data lakes backed by Amazon S3. Now, with Lake Formation support for Amazon Redshift data sharing, it opens up new design patterns, and broadens governance and security posture across data warehouses. With this integration, you can use Lake Formation to define fine-grained access control on tables and views being shared with Amazon Redshift data sharing for federated AWS Identity and Access Management (IAM) users and IAM roles.

Customers are using the data mesh approach, which provides a mechanism to share data across business units. Customers are also using a modern data architecture to share data from data lake stores and Amazon Redshift purpose-built data stores across business units. Lake Formation provides the ability to enforce data governance within and across business units, which enables secure data access and sharing, easy data discovery, and centralized audit for data access.

United Airlines is in the business of connecting people and uniting the world.

“As a data-driven enterprise, United is trying to create a unified data and analytics experience for our analytics community that will innovate and build modern data-driven applications. We believe we can achieve this by building a purpose-built data mesh architecture using a variety of AWS services like Athena, Aurora, Amazon Redshift, and Lake Formation to simplify management and governance around granular data access and collaboration.”

-Ashok Srinivas, Director of ML Engineering and Sarang Bapat, Director of Data Engineering.

In this post, we show how to centrally manage access and permissions for Amazon Redshift data sharing with Lake Formation.

Solution overview

In this solution, we demonstrate how integration of Amazon Redshift data sharing with Lake Formation for data governance can help you build data domains, and how you can use the data mesh approach to bring data domains together to enable data sharing and federation across business units. The following diagram illustrates our solution architecture.

solution architecture

The data mesh is a decentralized, domain-oriented architecture that emphasizes separating data producers from data consumers via a centralized, federated Data Catalog. Typically, the producers and consumers run within their own account. The details of these data mesh characteristics are as follows:

  • Data producers – Data producers own their data products and are responsible for building their data, maintaining its accuracy, and keeping their data product up to date. They determine what datasets can be published for consumption and share their datasets by registering them with the centralized data catalog in a central governance account. You might have a producer steward or administrator persona for managing the data products with the central governance steward or administrators team.
  • Central governance account – Lake Formation enables fine-grained access management on the shared dataset. The centralized Data Catalog offers consumers the ability to quickly find shared datasets, allows administrators to centrally manage access permissions on shared datasets, and provides security teams the ability to audit and track data product usage across business units.
  • Data consumers – The data consumer obtains access to shared resources from the central governance account. These resources are available inside the consumer’s AWS Glue Data Catalog, allowing fine-grained access on the database and table that can be managed by the consumer’s data stewards and administrators.

The following steps provide an overview of how Amazon Redshift data sharing can be governed and managed by Lake Formation in the central governance pattern of a data mesh architecture:

  1. In the producer account, data objects are created and maintained in the Amazon Redshift producer cluster. A data warehouse admin creates the Amazon Redshift datashare and adds datasets (tables, views) to the share.
  2. The data warehouse admin grants and authorizes access on the datashare to the central governance account’s Data Catalog.
  3. In the central governance account, the data lake admin accepts the datashare and creates the AWS Glue database that points to the Amazon Redshift datashare so that Lake Formation can manage it.
  4. The data lake admin shares the AWS Glue database and tables to the consumer account using Lake Formation cross-account sharing.
  5. In the consumer account, the data lake admin accepts the resource share invitation via AWS Resource Access Manager (AWS RAM) and can view the database listed in the account.
  6. The data lake admin defines the fine-grained access control and grants permissions on databases and tables to IAM users (for this post, consumer1 and consumer2) in the account.
  7. In the Amazon Redshift cluster, the data warehouse admin creates an Amazon Redshift database that points to the Glue database and authorizes usage on the created Amazon Redshift database to the IAM users.
  8. The data analyst as an IAM user can now use their preferred tools like the Amazon Redshift query editor to access the dataset based on the Lake Formation fine-grained permissions.

We use the following account setup for our example in this post:

  • Producer account – 123456789012
  • Central account – 112233445566
  • Consumer account – 665544332211

Prerequisites

Create the Amazon Redshift data share and add datasets

In the data producer account, create an Amazon Redshift cluster using the RA3 node type with encryption enabled. Complete the following steps:

  1. On the Amazon Redshift console, create a cluster subnet group.

For more information, refer to Managing cluster subnet groups using the console.

  1. Choose Create cluster.
  2. For Cluster identifier, provide the cluster name of your choice.
  3. For Preview track, choose preview_2022.

  1. For Node type, choose one of the RA3 node types.

This feature is only supported on the RA3 node type.

  1. For Number of nodes, enter the number of nodes that you need for your cluster.
  2. Under Database configurations, choose the admin user name and admin user password.
  3. Under Cluster permissions, you can select the IAM role and set it as the default.

For more information about the default IAM role, refer to Creating an IAM role as default for Amazon Redshift.

cluster permissions

  1. Turn on the Use defaults option next to Additional configurations to modify the default settings.
  2. Under Network and security, specify the following:
    1. For Virtual private cloud (VPC), choose the VPC you would like to deploy the cluster in.
    2. For VPC security groups, either leave as default or add the security groups of your choice.
    3. For Cluster subnet group, choose the cluster subnet group you created.

additional configurations

  1. Under Database configuration, in the Encryption section, select Use AWS Key Management Service (AWS KMS) or Use a hardware security module (HSM).

Encryption is disabled by default.

  1. For Choose an AWS KMS key, you can either choose an existing AWS Key Management Service (AWS KMS) key, or choose Create an AWS KMS key to create a new key.

For more information, refer to Creating keys.

database configurations

  1. Choose Create cluster.
  2. For this post, create tables and load data into the producer Amazon Redshift cluster using the following script.

Authorize the datashare

Install or update the latest AWS Command Line Interface (AWS CLI) version to run the AWS CLI to authorize the datashare. For instructions, refer to Installing or updating the latest version of the AWS CLI.

Set up Lake Formation permissions

To use the AWS Glue Data Catalog in Lake Formation, complete the following steps in the central governance account to update the Data Catalog settings to use Lake Formation permissions to control catalog resources instead of IAM-based access control:

  1. Sign in to the Lake Formation console as admin.
  2. In the navigation pane, under Data catalog, choose Settings.
  3. Deselect Use only IAM access control for new databases.
  4. Deselect Use only IAM access control for new tables in new databases.
  5. Choose Version 2 for Cross account version settings.
  6. Choose Save.

data catalog settings

Set up an IAM user as a data lake administrator

If you’re using an existing data lake administrator user or role add the following managed policies, if not attached and skip the below setup steps:

AWSGlueServiceRole
AmazonRedshiftFullAccess

Otherwise, to set up an IAM user as a data lake administrator, complete the following steps:

  1. On the IAM console, choose Users in the navigation pane.
  2. Select the IAM user who you want to designate as the data lake administrator.
  3. Choose Add an inline policy on the Permissions tab.
  4. Replace <AccountID> with your own account ID and add the following policy:
{
    "Version": "2012-10-17",
    "Statement": [ {
        "Condition": {"StringEquals": {
            "iam:AWSServiceName":"lakeformation.amazonaws.com"}},
            "Action":"iam:CreateServiceLinkedRole",
            "Resource": "*",
            "Effect": "Allow"},
            {"Action": ["iam:PutRolePolicy"],
            "Resource": "arn:aws:iam::<AccountID>:role/aws-service role/lakeformation.amazonaws.com/AWSServiceRoleForLakeFormationDataAccess",
            "Effect": "Allow"
     },{
                  "Effect": "Allow",
                  "Action": [
                    "ram:AcceptResourceShareInvitation",
                    "ram:RejectResourceShareInvitation",
                    "ec2:DescribeAvailabilityZones",
                    "ram:EnableSharingWithAwsOrganization"
                  ],
                  "Resource": "*"
                }]
}
  1. Provide a policy name.
  2. Review and save your settings.
  3. Choose Add permissions, and choose Attach existing policies directly.
  4. Add the following policies:
    1. AWSLakeFormationCrossAccountManager
    2. AWSGlueConsoleFullAccess
    3. AWSGlueServiceRole
    4. AWSLakeFormationDataAdmin
    5. AWSCloudShellFullAccess
    6. AmazonRedshiftFullAccess
  5. Choose Next: Review and add permissions.

Data consumer account setup

In the consumer account, follow the steps mentioned previously in the central governance account to set up Lake Formation and a data lake administrator.

  1. In the data consumer account, create an Amazon Redshift cluster using the RA3 node type with encryption (refer to the steps demonstrated to create an Amazon Redshift cluster in the producer account).
  2. Choose Launch stack to deploy an AWS CloudFormation template to create two IAM users with policies.

launch stack

The stack creates the following users under the data analyst persona:

  • consumer1
  • consumer2
  1. After the CloudFormation stack is created, navigate to the Outputs tab of the stack.
  2. Capture the ConsoleIAMLoginURL and LFUsersCredentials values.

createiamusers

  1. Choose the LFUsersCredentials value to navigate to the AWS Secrets Manager console.
  2. In the Secret value section, choose Retrieve secret value.

secret value

  1. Capture the secret value for the password.

Both consumer1 and consumer2 need to use this same password to log in to the AWS Management Console.

secret value

Configure an Amazon Redshift datashare using Lake Formation

Producer account

Create a datashare using the console

Complete the following steps to create an Amazon Redshift datashare in the data producer account and share it with Lake Formation in the central account:

  1. On the Amazon Redshift console, choose the cluster to create the datashare.
  2. On the cluster details page, navigate to the Datashares tab.
  3. Under Datashares created in my namespace, choose Connect to database.

connect to database

  1. Choose Create datashare.

create datashare

  1. For Datashare type, choose Datashare.
  2. For Datashare name, enter the name (for this post, demotahoeds).
  3. For Database name, choose the database from where to add datashare objects (for this post, dev).
  4. For Publicly accessible, choose Turn off (or choose Turn on to share the datashare with clusters that are publicly accessible).

datashare information

  1. Under DataShare objects, choose Add to add the schema to the datashare (in this post, the public schema).
  2. Under Tables and views, choose Add to add the tables and views to the datashare (for this post, we add the table customer and view customer_view).

datashare objects

  1. Under Data consumers, choose Publish to AWS Data Catalog.
  2. For Publish to the following accounts, choose Other AWS accounts.
  3. Provide the AWS account ID of the consumer account. For this post, we provide the AWS account ID of the Lake Formation central governance account.
  4. To share within the same account, choose Local account.
  5. Choose Create datashare.

data consumers

  1. After the datashare is created, you can verify by going back to the Datashares tab and entering the datashare name in the search bar under Datashares created in my namespace.
  2. Choose the datashare name to view its details.
  3. Under Data consumers, you will see the consumer status of the consumer data catalog account as Pending Authorization.

data consumers

  1. Choose the checkbox against the consumer data catalog which will enable the Authorize option.

authorize

  1. Click Authorize to authorize the datashare access to the consumer account data catalog, consumer status will change to Authorized.

authorized

Create a datashare using a SQL command

Complete the following steps to create a datashare in data producer account 1 and share it with Lake Formation in the central account:

  1. On the Amazon Redshift console, in the navigation pane, choose Editor, then Query editor V2.
  2. Choose (right-click) the cluster name and choose Edit connection or Create Connection.
  3. For Authentication, choose Temporary credentials.

Refer to Connecting to an Amazon Redshift database to learn more about the various authentication methods.

  1. For Database, enter a database name (for this post, dev).
  2. For Database user, enter the user authorized to access the database (for this post, awsuser).
  3. Choose Save to connect to the database.

Connecting to an Amazon Redshift database

  1. Run the following SQL commands to create the datashare and add the data objects to be shared:
create datashare demotahoeds;
ALTER DATASHARE demotahoeds ADD SCHEMA PUBLIC;
ALTER DATASHARE demotahoeds ADD TABLE customer;
ALTER DATASHARE demotahoeds ADD TABLE customer_view;
  1. Run the following SQL command to share the producer datashare to the central governance account:
GRANT USAGE ON DATASHARE demotahoeds TO ACCOUNT '<central-aws-account-id>' via DATA CATALOG

Run the following SQL command

  1. You can verify the datashare created and objects shared by running the following SQL command:
DESC DATASHARE demotahoeds

DESC DATASHARE demotahoeds

  1. Run the following command using the AWS CLI to authorize the datashare to the central data catalog so that Lake Formation can manage them:
aws redshift authorize-data-share \
--data-share-arn 'arn:aws:redshift:<producer-region>:<producer-aws-account-id>:datashare:<producer-cluster-namespace>/demotahoeds' \
--consumer-identifier DataCatalog/<central-aws-account-id>

The following is an example output:

 {
    "DataShareArn": "arn:aws:redshift:us-east-1:XXXXXXXXXX:datashare:cd8d91b5-0c17-4567-a52a-59f1bdda71cd/demotahoeds",
    "ProducerArn": "arn:aws:redshift:us-east-1:XXXXXXXXXX:namespace:cd8d91b5-0c17-4567-a52a-59f1bdda71cd",
    "AllowPubliclyAccessibleConsumers": false,
    "DataShareAssociations": [{
        "ConsumerIdentifier": "DataCatalog/XXXXXXXXXXXX",
        "Status": "AUTHORIZED",
        "CreatedDate": "2022-11-09T21:10:30.507000+00:00",
        "StatusChangeDate": "2022-11-09T21:10:50.932000+00:00"
    }]
}

You can verify the datashare status on the console by following the steps outlined in the previous section.

Central catalog account

The data lake admin accepts and registers the datashare with Lake Formation in the central governance account and creates a database for the same. Complete the following steps:

  1. Sign in to the console as the data lake administrator IAM user or role.
  2. If this is your first time logging in to the Lake Formation console, select Add myself and choose Get started.
  3. Under Data catalog in the navigation pane, choose Data sharing and view the Amazon Redshift datashare invitations on the Configuration tab.
  4. Select the datashare and choose Review Invitation.

AWS Lake Formation data sharing

A window pops up with the details of the invitation.

  1. Choose Accept to register the Amazon Redshift datashare to the AWS Glue Data Catalog.

accept reject invitation

  1. Provide a name for the AWS Glue database and choose Skip to Review and create.

Skip to Review and create

  1. Review the content and choose Create database.

create database

After the AWS Glue database is created on the Amazon Redshift datashare, you can view them under Shared Databases.

Shared Databases.

You can also use the AWS CLI to register the datashare and create the database. Use the following commands:

  1. Describe the Amazon Redshift datashare that is shared with the central account:
aws redshift describe-data-shares
  1. Accept and associate the Amazon Redshift datashare to Data Catalog:
aws redshift associate-data-share-consumer \
--data-share-arn 'arn:aws:redshift:<producer-region>:<producer-aws-account-id>:datashare:<producer-cluster-namespace>/demotahoeds' \
--consumer-arn arn:aws:glue:us-east-1:<central-aws-account-id>:catalog

The following is an example output:

 {
    "DataShareArn": "arn:aws:redshift:us-east-1:123456789012:datashare:cd8d91b5-0c17-4567-a52a-59f1bdda71cd/demotahoeds",
    "ProducerArn": "arn:aws:redshift:us-east-1:123456789012:namespace:cd8d91b5-0c17-4567-a52a-59f1bdda71cd",
    "AllowPubliclyAccessibleConsumers": false,
    "DataShareAssociations": [
        {
            "ConsumerIdentifier": "arn:aws:glue:us-east-1:112233445566:catalog",
            "Status": "ACTIVE",
            "ConsumerRegion": "us-east-1",
            "CreatedDate": "2022-11-09T23:25:22.378000+00:00",
            "StatusChangeDate": "2022-11-09T23:25:22.378000+00:00"
        }
    ]
}
  1. Register the Amazon Redshift datashare in Lake Formation:
aws lakeformation register-resource \
--resource-arn arn:aws:redshift:<producer-region>:<producer-aws-account-id>:datashare:<producer-cluster-namespace>/demotahoeds
  1. Create the AWS Glue database that points to the accepted Amazon Redshift datashare:
aws glue create-database --region <central-catalog-region> --cli-input-json '{
    "CatalogId": "<central-aws-account-id>",
    "DatabaseInput": {
        "Name": "demotahoedb",
        "FederatedDatabase": {
            "Identifier": "arn:aws:redshift:<producer-region>:<producer-aws-account-id>:datashare:<producer-cluster-namespace>/demotahoeds",
            "ConnectionName": "aws:redshift"
        }
    }
}'

Now the data lake administrator of the central governance account can view and share access on both the database and tables to the data consumer account using the Lake Formation cross-account sharing feature.

Grant datashare access to the data consumer

To grant the data consumer account permissions on the shared AWS Glue database, complete the following steps:

  1. On the Lake Formation console, under Permissions in the navigation pane, choose Data Lake permissions.
  2. Choose Grant.
  3. Under Principals, select External accounts.
  4. Provide the data consumer account ID (for this post, 665544332211).
  5. Under LF_Tags or catalog resources, select Named data catalog resources.
  6. For Databases, choose the database demotahoedb.
  7. Select Describe for both Database permissions and Grantable permissions.
  8. Choose Grant to apply the permissions.

grant data permissions

To grant the data consumer account permissions on tables, complete the following steps:

  1. On the Lake Formation console, under Permissions in the navigation pane, choose Data Lake permissions.
  2. Choose Grant.
  3. Under Principals, select External accounts.
  4. Provide the consumer account (for this post, we use 665544332211).
  5. Under LF-Tags or catalog resources, select Named data catalog resources.
  6. For Databases, choose the database demotahoedb.
  7. For Tables, choose All tables.
  8. Select Describe and Select for both Table permissions and Grantable permissions.
  9. Choose Grant to apply the changes.

grant the data consumer account permissions on tables

Consumer account

The consumer admin will receive the shared resources from the central governance account and delegate access to other users in the consumer account as shown in the following table.

IAM User Object Access Object Type Access Level
consumer1 public.customer Table All
consumer2 public.customer_view View specific columns: c_customer_id, c_birth_country, cd_gender, cd_marital_status, cd_education_status

In the data consumer account, follow these steps to accept the resources shared with the account:

  1. Sign in to the console as the data lake administrator IAM user or role.
  2. If this is your first time logging in to the Lake Formation console, select Add myself and choose Get started.
  3. Sign in to the AWS RAM console.
  4. In the navigation pane, under Shared with me, choose Resource shares to view the pending invitations. You will receive 2 invitations.

Resource shares to view the pending invitations

  1. Choose the pending invitations and accept the resource share.

Choose the pending invitation and accept the resource share

  1. On the Lake formation console, under Data catalog in the navigation pane, choose Databases to view the cross-account shared database.

choose Databases to view the cross-account shared database

Grant access to the data analyst and IAM users using Lake Formation

Now the data lake admin in the data consumer account can delegate permissions on the shared database and tables to users in the consumer account.

Grant database permissions to consumer1 and consumer2

To grant the IAM users consumer1 and consumer2 database permissions, follow these steps:

  1. On the Lake Formation console, under Data catalog in the navigation pane, choose Databases.
  2. Select the database demotahoedb and on the Actions menu, choose Grant.

choose Grant database

  1. Under Principals, select IAM users and roles.
  2. Choose the IAM users consumer1 and consumer2.
  3. Under LF-Tags or catalog resources, demotahoedb is already selected for Databases.
  4. Select Describe for Database permissions.
  5. Choose Grant to apply the permissions.

Choose Grant to apply the permissions

Grant table permissions to consumer1

To grant the IAM user consumer1 permissions on table public.customer, follow these steps:

  1. Under Data catalog in the navigation pane, choose Databases.
  2. Select the database demotahoedb and on the Actions menu, choose Grant.
  3. Under Principals, select IAM users and roles.
  4. Choose IAM user consumer1.
  5. Under LF-Tags or catalog resources, demotahoedb is already selected for Databases.
  6. For Tables, choose public.customer.
  7. Select Describe and Select for Table permissions.
  8. Choose Grant to apply the permissions.

Grant table permissions to consumer1

Grant column permissions to consumer2

To grant the IAM user consumer2 permissions on non-sensitive columns in public.customer_view, follow these steps:

  1. Under Data catalog in the navigation pane, choose Databases.
  2. Select the database demotahoedb and on the Actions menu, choose Grant.
  3. Under Principals, select IAM users and roles.
  4. Choose the IAM user consumer2.
  5. Under LF-Tags or catalog resources, demotahoedb is already selected for Databases.
  6. For Tables, choose public.customer_view.

Grant column permissions to consumer2

  1. Select Select for Table permissions.
  2. Under Data Permissions, select Column-based access.
  3. Select Include columns and choose the non-sensitive columns (c_customer_id, c_birth_country, cd_gender, cd_marital_status, and cd_education_status).
  4. Choose Grant to apply the permissions.

table permissions

Consume the datashare from the data consumer account in the Amazon Redshift cluster

In the Amazon Redshift consumer data warehouse, log in as the admin user using Query Editor V2 and complete the following steps:

  1. Create the Amazon Redshift database from the shared catalog database using the following SQL command:
CREATE DATABASE demotahoedb FROM ARN 'arn:aws:glue:<producer-region>:<producer-aws-account-id>:database/demotahoedb' WITH DATA CATALOG SCHEMA demotahoedb ;
  1. Run the following SQL commands to create and grant usage on the Amazon Redshift database to the IAM users consumer1 and consumer2:
CREATE USER IAM:consumer1 password disable;
CREATE USER IAM:consumer2  password disable;
GRANT USAGE ON DATABASE demotahoedb TO IAM:consumer1;
GRANT USAGE ON DATABASE demotahoedb TO IAM:consumer2;

In order to use a federated identity to enforce Lake Formation permissions, follow the next steps to configure Query Editor v2.

  1. Choose the settings icon in the bottom left corner of the Query Editor v2, then choose Account settings.

identity to enforce Lake Formation permissions

  1. Under Connection settings, select Authenticate with IAM credentials.
  2. Choose Save.

Authenticate with IAM credentials

Query the shared datasets as a consumer user

To validate that the IAM user consumer1 has datashare access from Amazon Redshift, perform the following steps:

  1. Sign in to the console as IAM user consumer1.
  2. On the Amazon Redshift console, choose Query Editor V2 in the navigation pane.
  3. To connect to the consumer cluster, choose the consumer cluster in the tree-view pane.
  4. When prompted, for Authentication, select Temporary credentials using your IAM identity.
  5. For Database, enter the database name (for this post, dev).
  6. The user name will be mapped to your current IAM identity (for this post, consumer1).
  7. Choose Save.

edit connection for redshift

  1. Once you’re connected to the database, you can validate the current logged-in user with the following SQL command:
select current_user;

  1. To find the federated databases created on the consumer account, run the following SQL command:
SHOW DATABASES FROM DATA CATALOG [ACCOUNT '<id1>', '<id2>'] [LIKE 'expression'];

federated databases created on the consumer account

  1. To validate permissions for consumer1, run the following SQL command:
select * from demotahoedb.public.customer limit 10;

As shown in the following screenshot, consumer1 is able to successfully access the datashare customer object.

Now let’s validate that consumer2 doesn’t have access to the datashare tables “public.customer” on the same consumer cluster.

  1. Log out of the console and sign in as IAM user consumer2.
  2. Follow the same steps to connect to the database using the query editor.
  3. Once connected, run the same query:
select * from demotahoedb.public.customer limit 10;

The user consumer2 should get a permission denied error, as in the following screenshot.

should get a permission denied error

Let’s validate the column-level access permissions of consumer2 on public.customer_view view.

  1. Connect to Query Editor v2 as consumer2 and run the following SQL command:
select c_customer_id,c_birth_country,cd_gender,cd_marital_status from demotahoedb.public.customer_view limit 10;

In the following screenshot, you can see consumer2 is only able to access columns as granted by Lake Formation.

access columns as granted by Lake Formation

Conclusion

A data mesh approach provides a method by which organizations can share data across business units. Each domain is responsible for the ingestion, processing, and serving of their data. They are data owners and domain experts, and are responsible for data quality and accuracy. Using Amazon Redshift data sharing with Lake Formation for data governance helps build the data mesh architecture, enabling data sharing and federation across business units with fine-grained access control.

Special thanks to everyone who contributed to launch Amazon Redshift data sharing with AWS Lake Formation:

Debu Panda, Michael Chess, Vlad Ponomarenko, Ting Yan, Erol Murtezaoglu, Sharda Khubchandani, Rui Bi

References


About the Authors

Srividya Parthasarathy is a Senior Big Data Architect on the AWS Lake Formation team. She enjoys building data mesh solutions and sharing them with the community.

Harshida Patel is a Analytics Specialist Principal Solutions Architect, with AWS.

Ranjan Burman is a Analytics Specialist Solutions Architect, with AWS.

Vikram Sahadevan is a Senior Resident Architect on the AWS Data Lab team. He enjoys efforts that focus around providing prescriptive architectural guidance, sharing best practices, and removing technical roadblocks with joint engineering engagements between customers and AWS technical resources that accelerate data, analytics, artificial intelligence, and machine learning initiatives.

Steve Mitchell is a Senior Solution Architect with a passion for analytics and data mesh. He enjoys working closely with customers as they transition to a modern data architecture.

How GoDaddy built a data mesh to decentralize data ownership using AWS Lake Formation

Post Syndicated from Ankit Jhalaria original https://aws.amazon.com/blogs/big-data/how-godaddy-built-a-data-mesh-to-decentralize-data-ownership-using-aws-lake-formation/

This is a guest post co-written with Ankit Jhalaria from GoDaddy.

GoDaddy is empowering everyday entrepreneurs by providing all the help and tools to succeed online. With more than 20 million customers worldwide, GoDaddy is the place people come to name their idea, build a professional website, attract customers, and manage their work.

GoDaddy is a data-driven company, and getting meaningful insights from data helps them drive business decisions to delight their customers. In 2018, GoDaddy began a large infrastructure revamp and partnered with AWS to innovate faster than ever before to meet the needs of its customer growth around the world. As part of this revamp, the GoDaddy Data Platform team wanted to set the company up for long-term success by creating a well-defined data strategy and setting goals to decentralize the ownership and processing of data.

In this post, we discuss how GoDaddy uses AWS Lake Formation to simplify security management and data governance at scale, and enable data as a service (DaaS) supporting organization-wide data accessibility with cross-account data sharing using a data mesh architecture.

The challenge

In the vast ocean of data, deriving useful insights is an art. Prior to the AWS partnership, GoDaddy had a shared Hadoop cluster on premises that various teams used to create and share datasets with other analysts for collaboration. As the teams grew, copies of data started to grow in the Hadoop Distributed File System (HDFS). Several teams started to build tooling to manage this challenge independently, duplicating efforts. Managing permissions on these data assets became harder. Making data discoverable across a growing number of data catalogs and systems is something that had started to become a big challenge. Although the cost of storage these days is relatively inexpensive, when there are several copies of the same data asset available, it makes it harder for analysts to efficiently and reliably use the data available to them. Business analysts need robust pipelines on key datasets that they rely upon to make business decisions.

Solution overview

In GoDaddy’s data mesh hub and spoke model, a central data catalog contains information about all the data products that exist in the company. In AWS terminology, this is the AWS Glue Data Catalog. The data platform team provides APIs, SDKs, and Airflow Operators as components that different teams use to interact with the catalog. Activities such as updating the metastore to reflect a new partition for a given data product, and occasionally running MSCK repair operations, are all handled in the central governance account, and Lake Formation is used to secure access to the Data Catalog.

The data platform team introduced a layer of data governance that ensures best practices for building data products are followed throughout the company. We provide the tooling to support data engineers and business analysts while leaving the domain experts to run their data pipelines. With this approach, we have well-curated data products that are intuitive and easy to understand for our business analysts.

A data product refers to an entity that powers insights for analytical purposes. In simple terms, this could refer to an actual dataset pointing to a location in Amazon Simple Storage Service (Amazon S3). Data producers are responsible for the processing of data and creating new snapshots or partitions depending on the business needs. In some cases, data is refreshed every 24 hours, and other cases, every hour. Data consumers come to the data mesh to consume data, and permissions are managed in the central governance account through Lake Formation. Lake Formation uses AWS Resource Access Manager (AWS RAM) to send resource shares to different consumer accounts to be able to access the data from the central governance account. We go into details about this functionality later in the post.

The following diagram illustrates the solution architecture.

Solution architecture illustrated

Defining metadata with the central schema repository

Data is only useful if end-users can derive meaningful insights from it—otherwise, it’s just noise. As part of onboarding with the data platform, a data producer registers their schema with the data platform along with relevant metadata. This is reviewed by the data governance team that ensures best practices for creating datasets are followed. We have automated some of the most common data governance review items. This is also the place where producers define a contract about reliable data deliveries, often referred to as Service Level Objective (SLO). After a contract is in place, the data platform team’s background processes monitor and send out alerts when data producers fail to meet their contract or SLO.

When managing permissions with Lake Formation, you register the Amazon S3 location of different S3 buckets. Lake Formation uses AWS RAM to share the named resource.

When managing resources with AWS RAM, the central governance account creates AWS RAM shares. The data platform provides a custom AWS Service Catalog product to accept AWS RAM shares in consumer accounts.

Having consistent schemas with meaningful names and descriptions makes the discovery of datasets easy. Every data producer who is a domain expert is responsible for creating well-defined schemas that business users use to generate insights to make key business decisions. Data producers register their schemas along with additional metadata with the data lake repository. Metadata includes information about the team responsible for the dataset, such as their SLO contract, description, and contact information. This information gets checked into a Git repository where automation kicks in and validates the request to make sure it conforms to standards and best practices. We use AWS CloudFormation templates to provision resources. The following code is a sample of what the registration metadata looks like.

Sample code of what the registration metadata looks like

As part of the registration process, automation steps run in the background to take care of the following on behalf of the data producer:

  • Register the producer’s Amazon S3 location of the data with Lake Formation – This allows us to use Lake Formation for fine-grained access to control the table in the AWS Glue Data Catalog that refers to this location as well as to the underlying data.
  • Create the underlying AWS Glue database and table – Based on the schema specified by the data producer along with the metadata, we create the underlying AWS Glue database and table in the central governance account. As part of this, we also use table properties of AWS Glue to store additional metadata to use later for analysis.
  • Define the SLO contract – Any business-critical dataset needs to have a well-defined SLO contract. As part of dataset registration, the data producer defines a contract with a cron expression that gets used by the data platform to create an event rule in Amazon EventBridge. This rule triggers an AWS Lambda function to watch for deliveries of the data and triggers an alert to the data producer’s Slack channel if they breach the contract.

Consuming data from the data mesh catalog

When a data consumer belonging to a given line of business (LOB) identifies the data product that they’re interested in, they submit a request to the central governance team containing their AWS account ID that they use to query the data. The data platform provides a portal to discover datasets across the company. After the request is approved, automation runs to create an AWS RAM share with the consumer account covering the AWS Glue database and tables mapped to the data product registered in the AWS Glue Data Catalog of the central governance account.

The following screenshot shows an example of a resource share.

Example of a resource share

The consumer data lake admin needs to accept the AWS RAM share and create a resource link in Lake Formation to start querying the shared dataset within their account. We automated this process by building an AWS Service Catalog product that runs in the consumer’s account as a Lambda function that accepts shares on behalf of consumers.

When the resource linked datasets are available in the consumer account, the consumer data lake admin provides grants to IAM users and roles mapping to data consumers within the account. These consumers (application or user persona) can now query the datasets using AWS analytics services of their choice like Amazon Athena and Amazon EMR based on the access privileges granted by the consumer data lake admin.

Day-to-day operations and metrics

Managing permissions using Lake Formation is one part of the overall ecosystem. After permissions have been granted, data producers create new snapshots of the data at a certain cadence that can vary from every 15 minutes to a day. Data producers are integrated with the data platform APIs that informs the platform about any new refreshes of the data. The data platform automatically writes a 0-byte _SUCCESS file for every dataset that gets refreshed, and notifies the subscribed consumer account via an Amazon Simple Notification Service (Amazon SNS) topic in the central governance account. Consumers use this as a signal to trigger their data pipelines and processes to start processing newer version of the data utilizing an event-driven approach.

There are over 2,000 data products built on the GoDaddy data mesh on AWS. Every day, there are thousands of updates to the AWS Glue metastore in the central data governance account. There are hundreds of data producers generating data every hour in a wide array of S3 buckets, and thousands of data consumers consuming data across a wide array of tools, including Athena, Amazon EMR, and Tableau from different AWS accounts.

Business outcomes

With the move to AWS, GoDaddy’s Data Platform team laid the foundations to build a modern data platform that has increased our velocity of building data products and delighting our customers. The data platform has successfully transitioned from a monolithic platform to a model where ownership of data has been decentralized. We accelerated the data platform adoption to over 10 lines of business and over 300 teams globally, and are successfully managing multiple petabytes of data spread across hundreds of accounts to help our business derive insights faster.

Conclusion

GoDaddy’s hub and spoke data mesh architecture built using Lake Formation simplifies security management and data governance at scale, to deliver data as a service supporting company-wide data accessibility. Our data mesh manages multiple petabytes of data across hundreds of accounts, enabling decentralized ownership of well-defined datasets with automation in place, which helps the business discover data assets quicker and derive business insights faster.

This post illustrates the use of Lake Formation to build a data mesh architecture that enables a DaaS model for a modernized enterprise data platform. For more information, see Design a data mesh architecture using AWS Lake Formation and AWS Glue.


About the Authors

Ankit Jhalaria is the Director Of Engineering on the Data Platform at GoDaddy. He has over 10 years of experience working in big data technologies. Outside of work, Ankit loves hiking, playing board games, building IoT projects, and contributing to open-source projects.

Harsh Vardhan is an AWS Solutions Architect, specializing in Analytics. He has over 6 years of experience working in the field of big data and data science. He is passionate about helping customers adopt best practices and discover insights from their data.

Kyle Tedeschi is a Principal Solutions Architect at AWS. He enjoys helping customers innovate, transform, and become leaders in their respective domains. Outside of work, Kyle is an avid snowboarder, car enthusiast, and traveler.

Use an event-driven architecture to build a data mesh on AWS

Post Syndicated from Jan Michael Go Tan original https://aws.amazon.com/blogs/big-data/use-an-event-driven-architecture-to-build-a-data-mesh-on-aws/

In this post, we take the data mesh design discussed in Design a data mesh architecture using AWS Lake Formation and AWS Glue, and demonstrate how to initialize data domain accounts to enable managed sharing; we also go through how we can use an event-driven approach to automate processes between the central governance account and data domain accounts (producers and consumers). We build a data mesh pattern from scratch as Infrastructure as Code (IaC) using AWS CDK and use an open-source self-service data platform UI to share and discover data between business units.

The key advantage of this approach is being able to add actions in response to data mesh events such as permission management, tag propagation, search index management, and to automate different processes.

Before we dive into it, let’s look at AWS Analytics Reference Architecture, an open-source library that we use to build our solution.

AWS Analytics Reference Architecture

AWS Analytics Reference Architecture (ARA) is a set of analytics solutions put together as end-to-end examples. It regroups AWS best practices for designing, implementing, and operating analytics platforms through different purpose-built patterns, handling common requirements, and solving customers’ challenges.

ARA exposes reusable core components in an AWS CDK library, currently available in Typescript and Python. This library contains AWS CDK constructs (L3) that can be used to quickly provision analytics solutions in demos, prototypes, proofs of concept, and end-to-end reference architectures.

The following table lists data mesh specific constructs in the AWS Analytics Reference Architecture library.

Construct Name Purpose
CentralGovernance Creates an Amazon EventBridge event bus for central governance account that is used to communicate with data domain accounts (producer/consumer). Creates workflows to automate data product registration and sharing.
DataDomain Creates an Amazon EventBridge event bus for data domain account (producer/consumer) to communicate with central governance account. It creates data lake storage (Amazon S3), and workflow to automate data product registration. It also creates a workflow to populate AWS Glue Catalog metadata for newly registered data product.

You can find AWS CDK constructs for the AWS Analytics Reference Architecture on Construct Hub.

In addition to ARA constructs, we also use an open-source Self-service data platform (User Interface). It is built using AWS Amplify, Amazon DynamoDB, AWS Step Functions, AWS Lambda, Amazon API Gateway, Amazon EventBridge, Amazon Cognito, and Amazon OpenSearch. The frontend is built with React. Through the self-service data platform you can: 1) manage data domains and data products, and 2) discover and request access to data products.

Central Governance and data sharing

For the governance of our data mesh, we will use AWS Lake Formation. AWS Lake Formation is a fully managed service that simplifies data lake setup, supports centralized security management, and provides transactional access on top of your data lake. Moreover, it enables data sharing across accounts and organizations. This centralized approach has a number of key benefits, such as: centralized audit; centralized permission management; and centralized data discovery. More importantly, this allows organizations to gain the benefits of centralized governance while taking advantage of the inherent scaling characteristics of decentralized data product management.

There are two ways to share data resources in Lake Formation: 1) Named Based Access Control (NRAC), and 2) Tag-Based Access Control (LF-TBAC). NRAC uses AWS Resource Access Manager (AWS RAM) to share data resources across accounts. Those are consumed via resource links that are based on created resource shares. Tag-Based Access Control (LF-TBAC) is another approach to share data resources in AWS Lake Formation, that defines permissions based on attributes. These attributes are called LF-tags. You can read this blog to learn about LF-TBAC in the context of data mesh.

The following diagram shows how NRAC and LF-TBAC data sharing works. In this example, data domain is registered as a node on mesh and therefore we create two databases in the central governance account. NRAC database is shared with data domain via AWS RAM. Access to data products that we register in this database will be handled through NRAC. LF-TBAC database is tagged with data domain N line of business (LOB) LF-tag: <LOB:N>. LOB tag is automatically shared with data domain N account and therefore database is available in that account. Access to Data Products in this database will be handled through LF-TBAC.

BDB-2279-ram-tag-share

In our solution we will demonstrate both NRAC and LF-TBAC approaches. With the NRAC approach, we will build up an event-based workflow that would automatically accept RAM share in the data domain accounts and automate the creation of the necessary metadata objects (eg. local database, resource links, etc). While with the LF-TBAC approach, we rely on permissions associated with the shared LF-Tags to allow producer data domains to manage their data products, and consumer data domains read access to the relevant data products associated with the LF-Tags that they requested access to.

We use CentralGovernance construct from ARA library to build a central governance account. It creates an EventBridge event bus to enable communication with data domain accounts that register as nodes on mesh. For each registered data domain, specific event bus rules are created that route events towards that account. Central governance account has a central metadata catalog that allows for data to be stored in different data domains, as opposed to a single central lake. For each registered data domain, we create two separate databases in central governance catalog to demonstrate both NRAC and LF-TBAC data sharing. CentralGovernance construct creates workflows for data product registration and data product sharing. We also deploy a self-service data platform UI  to enable good user experience to manage data domains, data products, and to simplify data discovery and sharing.

BDB-2279-central-gov

A data domain: producer and consumer

We use DataDomain construct from ARA library to build a data domain account that can be either producer, consumer, or both. Producers manage the lifecycle of their respective data products in their own AWS accounts. Typically, this data is stored in Amazon Simple Storage Service (Amazon S3). DataDomain construct creates a data lake storage with cross-account bucket policy that enables central governance account to access the data. Data is encrypted using AWS KMS, and central governance account has a permission to use the key. Config secret in AWS Secrets Manager contains all the necessary information to register data domain as a node on mesh in central governance. It includes: 1) data domain name, 2) S3 location that holds data products, and 3) encryption key ARN. DataDomain construct also creates data domain and crawler workflows to automate data product registration.

BDB-2279-data-domain

Creating an event-driven data mesh

Data mesh architectures typically require some level of communication and trust policy management to maintain least privileges of the relevant principals between the different accounts (for example, central governance to producer, central governance to consumer). We use event-driven approach via EventBridge to securely forward events from one event bus to event bus in another account while maintaining the least privilege access. When we register data domain to central governance account through the self-service data platform UI, we establish bi-directional communication between the accounts via EventBridge. Domain registration process also creates database in the central governance catalog to hold data products for that particular domain. Registered data domain is now a node on mesh and we can register new data products.

The following diagram shows data product registration process:

BDB-2279-register-dd-small

  1. Starts Register Data Product workflow that creates an empty table (the schema is managed by the producers in their respective producer account). This workflow also grants a cross-account permission to the producer account that allows producer to manage the schema of the table.
  2. When complete, this emits an event into the central event bus.
  3. The central event bus contains a rule that forwards the event to the producer’s event bus. This rule was created during the data domain registration process.
  4. When the producer’s event bus receives the event, it triggers the Data Domain workflow, which creates resource-links and grants permissions.
  5. Still in the producer account, Crawler workflow gets triggered when the Data Domain workflow state changes to Successful. This creates the crawler, runs it, waits and checks if the crawler is done, and deletes the crawler when it’s complete. This workflow is responsible for populating tables’ schemas.

Now other data domains can find newly registered data products using the self-service data platform UI and request access. The sharing process works in the same way as product registration by sending events from the central governance account to consumer data domain, and triggering specific workflows.

Solution Overview

The following high-level solution diagram shows how everything fits together and how event-driven architecture enables multiple accounts to form a data mesh. You can follow the workshop that we released to deploy the solution that we covered in this blog post. You can deploy multiple data domains and test both data registration and data sharing. You can also use self-service data platform UI to search through data products and request access using both LF-TBAC and NRAC approaches.

BDB-2279-arch-diagram

Conclusion

Implementing a data mesh on top of an event-driven architecture provides both flexibility and extensibility. A data mesh by itself has several moving parts to support various functionalities, such as onboarding, search, access management and sharing, and more. With an event-driven architecture, we can implement these functionalities in smaller components to make them easier to test, operate, and maintain. Future requirements and applications can use the event stream to provide their own functionality, making the entire mesh much more valuable to your organization.

To learn more how to design and build applications based on event-driven architecture, see the AWS Event-Driven Architecture page. To dive deeper into data mesh concepts, see the Design a Data Mesh Architecture using AWS Lake Formation and AWS Glue blog.

If you’d like our team to run data mesh workshop with you, please reach out to your AWS team.


About the authors


Jan Michael Go Tan is a Principal Solutions Architect for Amazon Web Services. He helps customers design scalable and innovative solutions with the AWS Cloud.

Dzenan Softic is a Senior Solutions Architect at AWS. He works with startups to help them define and execute their ideas. His main focus is in data engineering and infrastructure.

David Greenshtein is a Specialist Solutions Architect for Analytics at AWS with a passion for ETL and automation. He works with AWS customers to design and build analytics solutions enabling business to make data-driven decisions. In his free time, he likes jogging and riding bikes with his son.
Vincent Gromakowski is an Analytics Specialist Solutions Architect at AWS where he enjoys solving customers’ analytics, NoSQL, and streaming challenges. He has a strong expertise on distributed data processing engines and resource orchestration platform.

Integrate AWS IAM Identity Center (successor to AWS Single Sign-On) with AWS Lake Formation fine-grained access controls

Post Syndicated from Benon Boyadjian original https://aws.amazon.com/blogs/big-data/integrate-aws-iam-identity-center-successor-to-aws-single-sign-on-with-aws-lake-formation-fine-grained-access-controls/

Data lakes are a centralized repository for storing structured and unstructured data at scale. Data lakes enable you to create dashboards, perform big data processing and real-time analytics, and create machine learning (ML) models on your data to drive business decisions.

Many customers are choosing AWS Lake Formation as their data lake management solution. Lake Formation is an integrated data lake service that makes it simple for you to ingest, clean, catalog, transform, and secure your data and make it available for analysis and ML.

However, some companies require account authentication and authorization to be managed through AWS IAM Identity Center (successor to AWS Single Sign-On), which doesn’t have a built-in integration with Lake Formation.

Integrating Lake Formation with IAM Identity Center can help you manage data access at the organization level, consolidating AWS account and data lake authentication and authorization.

In this post, we walk through the steps to integrate IAM Identity Center with Lake Formation.

Solution overview

In this post, we configure IAM Identity Center with permission sets for your data lake personas. These are the permissions that allow your data lake users to access Lake Formation. When the permission sets are assigned to your data lake account, IAM Identity Center creates Identity and Access Management (IAM) roles in that account. The IAM roles are prefixed with AWSReservedSSO_<Permission Set Name>.

In Lake Formation, you can grant data resource permissions to IAM users and roles. To integrate with IAM Identity Center, you will grant data resource access to the IAM roles created by IAM Identity Center.

Now, when users access the data lake account through the IAM Identity Center portal, they assume an IAM role that has access to Lake Formation resources.

The following diagram illustrates this solution architecture.

To implement the solution, complete the following high-level steps:

  1. Create a permission set within IAM Identity Center
  2. Grant Users or Groups access to the data lake account in IAM Identity Center
  3. Assign an IAM Identity Center role as a Data Lake Administrator
  4. Grant IAM Identity Center generated IAM role data lake permissions in Lake Formation
  5. Grant IAM Identity Center generated IAM role data location permissions in Lake Formation

Prerequisites

For this walkthrough, you should have the following prerequisites: 

Create a permission set with IAM Identity Center

To create your permission set, complete the following steps:

  1. Sign into the AWS Management Console with your management account and go to the Region where IAM Identity Center is configured.
  2. On the IAM Identity Center Console, choose Permissions sets in the navigation pane.
  3. Choose Create permission set.

  4. Select Custom permission set, then choose Next.

  5. Next, you must specify policies. The first permission set you create should have data lake admin privileges.
    AWS recommends granting data lake admins the following AWS managed policies: AWSGlueConsoleFullAccess, AWSLakeFormationCrossAccountManager, AWSLakeFormationDataAdmin, AmazonAthenaFullAccess, and CloudWatchLogsReadOnlyAccess. However, if these permissions are too permissive or not permissive enough, you may prefer using customer managed policies.
  6. Choose Next
  7. Specify permission set details, then choose Next.

  8. Review your settings, then choose Create.

Repeat the steps to create a data analyst role to grant Lake Formation access. For this post, we created the role LakeFormationDataAnalyst with the policy AmazonAthenaFullAccess.

Grant users or groups access to the data lake account in IAM Identity Center

To grant access to users and groups, complete the following steps:

  1. On the IAM Identity Center console, chose AWS accounts in the navigation pane.
  2. Choose Assign users or groups.

  3. Select the user or group you want to assign the data lake account permissions to (DataLakeAdmin).
  4. Choose Next.

  5. Select the permission you created earlier.
  6. Choose Next.

  7. Review your settings, then choose Submit.

Verify your IAM Identity Center permissions have been successfully granted by visiting your IAM Identity Center Portal, choosing the data lake admin, and signing in to the console.

Assign an IAM Identity Center role as a data lake administrator

The following steps set up a data lake administrator with the IAM role created by IAM Identity Center. Administrators have full access to the Lake Formation console, and control the initial data configuration and access permissions. For all users and groups that don’t need to be data lake administrators, skip to the next series of steps.

  1. Sign in to the console as the data lake account with admin access.
  2. Open the Lake Formation console.A pop-up window appears, prompting you to define your administrators.
  3. Select Add other AWS users or roles.
  4. Choose the permission set you created earlier (starting with AWSReservedSSO_DataLakeAdmin).
  5. Choose Get started.
  6. On the Administrative roles and tasks page, under Database creators, choose Grant.
  7. Choose your data lake admin role.
  8. Select Create database under Catalog permissions and Grantable permissions.
  9. Choose Grant.

You now have an IAM Identity Center-generated IAM principal that is assigned as the data lake administrator and database creator.

Grant the IAM Identity Center role data lake permissions in Lake Formation

You now manage data lake permissions. For more information, refer to Managing Lake Formation permissions. 

Whether you’re managing permissions with LF-tags or named resources, the steps for granting access remain the same

  1. On the Lake Formation console, under Permissions in the navigation pane, choose Data lake permissions.
  2. Choose Grant.
  3. Select IAM users and roles.
  4. Choose the AWSReservedSSO_LakeFormationDataAnalyst role.
  5. Grant access to database and table permissions as applicable, then choose Grant.

You now have an IAM Identity Center-generated IAM principal data permissions.

Grant the IAM Identity Center role data location permissions in Lake Formation

When granting access to data locations, the process remains the same.

  1. On the Lake Formation console, under Permissions in the navigation pane, choose Data locations.
  2. Choose Grant.
  3. Choose the AWSReservedSSO_LakeFormationDataAnalyst role.
  4. Complete the remaining fields and choose Grant.

You now have an IAM Identity Center-generated IAM principal with Data location access.

Validate data access

We now validate data access for the IAM Identity Center principal.

  1. Sign in to the console through IAM Identity Center as the principal you granted access to. For this post, we’re logging in as the LakeFormationDataAnalyst role.

    To test data access, we run some queries in Amazon Athena.
  2. On the Athena console, choose Query editor.
  3. On the Settings tab, confirm that a query result location is set up.
  4. If you don’t have a query result location, choose Manage and configure your query result location and encryption.
  5. In the Athena query editor, on the Editor tab, choose the database that you granted access to.If the principal doesn’t have access to the Lake Formation table and data location, you won’t be able to view data in Athena.
  6. Choose the menu icon next to your table and choose Generate table DDL.

Confirm that the data appears on the Query results tab.

Conclusion

In this post, we demonstrated how to integrate IAM Identity Center with Lake Formation permissions. You can now grant IAM Identity Center identities administrator, database creation, database and table, and data location access in Lake Formation. Managing data lake permissions through IAM Identity Center allows you to control data access from your management account, helping to improve your scalability and security.

If you’re wondering how to adapt this solution to Tag-based access control, read Easily manage your data lake at scale using AWS Lake Formation Tag-based access control and apply the techniques you learned from this blog.


About the authors

Benon Boyadjian is a Private Equity Solutions Architect at AWS. He is passionate about helping customers understand the impact AWS can have on their businesses and guiding their AWS implementations. In his free time, he enjoys swimming, snowboarding, and playing with his cat Dirt.

Janakiraman Shanmugam is a Senior Data Architect at Amazon Web Services . He has a focus in Data & Analytics and enjoys helping customers to solve Big data & machine learning problems. Outside of the office, he loves to be with his friends and family and spend time outdoors.

Let’s Architect! Modern data architectures

Post Syndicated from Luca Mezzalira original https://aws.amazon.com/blogs/architecture/lets-architect-modern-data-architectures/

With the rapid growth in data coming from data platforms and applications, and the continuous improvements in state-of-the-art machine learning algorithms, data are becoming key assets for companies.

Modern data architectures include data mesh—a recent style that represents a paradigm shift, in which data is treated as a product and data architectures are designed around business domains. This type of approach supports the idea of distributed data, where each business domain focuses on the quality of the data it produces and exposes to the consumers.

In this edition of Let’s Architect!, we focus on data mesh and how it is designed on AWS, plus other approaches to adopt modern architectural patterns.

Design a data mesh architecture using AWS Lake Formation and AWS Glue

Domain Driven Design (DDD) is a software design approach where a solution is divided into domains aligned with business capabilities, software, and organizational boundaries. Unlike software architectures, most data architectures are often designed around technologies rather than business domains.

In this blog, you can learn about data mesh, an architectural pattern that applies the principles of DDD to data architectures. Data are organized into domains and considered the product that each team owns and offers for consumption.

A data mesh design organizes around data domains. Each domain owns multiple data products with their own data and technology stacks

A data mesh design organizes around data domains. Each domain owns multiple data products with their own data and technology stacks

Building Data Mesh Architectures on AWS

In this video, discover how to use the data mesh approach in AWS. Specifically, how to implement certain design patterns for building a data mesh architecture with AWS services in the cloud.

This is a pragmatic presentation to get a quick understanding of data mesh fundamentals, the benefits/challenges, and the AWS services that you can use to build it. This video provides additional context to the aforementioned blog post and includes several examples on the benefits of modern data architectures.

This diagram demonstrates the pattern for sharing data catalogs between producer domains and consumer domains

This diagram demonstrates the pattern for sharing data catalogs between producer domains and consumer domains

Build a modern data architecture on AWS with Amazon AppFlow, AWS Lake Formation, and Amazon Redshift

In this blog, you can learn how to build a modern data strategy using AWS managed services to ingest data from sources like Salesforce. Also discussed is how to automatically create metadata catalogs and share data seamlessly between the data lake and data warehouse, plus creating alerts in the event of an orchestrated data workflow failure.

The second part of the post explains how a data warehouse can be built by using an agile data modeling pattern, as well as how ELT jobs were quickly developed, orchestrated, and configured to perform automated data quality testing.

A data platform architecture and the subcomponents used to build it

A data platform architecture and the subcomponents used to build it

AWS Lake Formation Workshop

With a modern data architecture on AWS, architects and engineers can rapidly build scalable data lakes; use a broad and deep collection of purpose-built data services; and ensure compliance via unified data access, security, and governance. As data mesh is a modern architectural pattern, you can build it using a service like AWS Lake Formation.

Familiarize yourself with new technologies and services by not only learning how they work, but also to building prototypes and projects to gain hands-on experience. This workshop allows builders to become familiar with the features of AWS Lake Formation and its integrations with other AWS services.

A data catalog is a key component in a data mesh architecture. AWS Glue crawlers interact with data stores and other elements to populate the data catalog

A data catalog is a key component in a data mesh architecture. AWS Glue crawlers interact with data stores and other elements to populate the data catalog

See you next time!

Thanks for joining our discussion on data mesh! See you in a couple of weeks when we talk more about architectures and the challenges that we face every day while working with distributed systems.

Other posts in this series

Looking for more architecture content?

AWS Architecture Center provides reference architecture diagrams, vetted architecture solutions, Well-Architected best practices, patterns, icons, and more!

Use Amazon Redshift Spectrum with row-level and cell-level security policies defined in AWS Lake Formation

Post Syndicated from Anusha Challa original https://aws.amazon.com/blogs/big-data/use-amazon-redshift-spectrum-with-row-level-and-cell-level-security-policies-defined-in-aws-lake-formation/

Data warehouses and data lakes are key to an enterprise data management strategy. A data lake is a centralized repository that consolidates your data in any format at any scale and makes it available for different kinds of analytics. A data warehouse, on the other hand, has cleansed, enriched, and transformed data that is optimized for faster queries. Amazon Redshift is a cloud-based data warehouse that powers a lake house architecture, which enables you to query the data in a data warehouse and an Amazon Simple Storage Service (Amazon S3) data lake using familiar SQL statements and gain deeper insights.

Data lakes often contain data for multiple business units, users, locations, vendors, and tenants. Enterprises want to share their data while balancing compliance and security needs. To satisfy compliance requirements and to achieve data isolation, enterprises often need to control access at the row level and cell level. For example:

  • If you have a multi-tenant data lake, you may want each tenant to be able to view only those rows that are associated to their tenant ID
  • You may have data for multiple portfolios in the data lake and you need to control access for various portfolio managers
  • You may have sensitive information or personally identifiable information (PII) that can be viewed by users with elevated privileges only

AWS Lake Formation makes it easy to set up a secure data lake and access controls for these kinds of use cases. You can use Lake Formation to centrally define security, governance, and auditing policies, thereby achieving unified governance for your data lake. Lake Formation supports row-level security and cell-level security:

  • Row-level security allows you to specify filter expressions that limit access to specific rows of a table to a user
  • Cell-level security builds on row-level security by allowing you to apply filter expressions on each row to hide or show specific columns

Amazon Redshift is the fastest and most widely used cloud data warehouse. Amazon Redshift Spectrum is a feature of Amazon Redshift that enables you to query data from and write data back to Amazon S3 in open formats. You can query open file formats such as Parquet, ORC, JSON, Avro, CSV, and more directly in Amazon S3 using familiar ANSI SQL. This gives you the flexibility to store highly structured, frequently accessed data in an Amazon Redshift data warehouse, while also keeping up to exabytes of structured, semi-structured, and unstructured data in Amazon S3. Redshift Spectrum integrates with Lake Formation natively. This integration enables you to define data filters in Lake Formation that specify row-level and cell-level access control for users on your data and then query it using Redshift Spectrum.

In this post, we present a sample multi-tenant scenario and describe how to define row-level and cell-level security policies in Lake Formation. We also show how these policies are applied when querying the data using Redshift Spectrum.

Solution overview

In our use case, Example Corp has built an enterprise data lake on Amazon S3. They store data for multiple tenants in the data lake and query it using Redshift Spectrum. Example Corp maintains separate AWS Identity and Access Management (IAM) roles for each of their tenants and wants to control access to the multi-tenant dataset based on their IAM role.

Example Corp needs to ensure that the tenants can view only those rows that are associated to them. For example, Tenant1 should see only those rows where tenantid = 'Tenant1' and Tenant2 should see only those rows where tenantid = 'Tenant2'. Also, tenants can only view sensitive columns such as phone, email, and date of birth associated to specific countries.

The following is a screenshot of the multi-tenant dataset we use to demonstrate our solution. It has data for two tenants: Tenant1 and Tenant2. tenantid is the column that distinguishes data associated to each tenant.

To solve this use case, we implement row-level and cell-level security in Lake Formation by defining data filters. When Example Corp’s tenants query the data using Redshift Spectrum, the service checks filters defined in Lake Formation and returns only the data that the tenant has access to.

Lake Formation metadata tables contain information about data in the data lake, including schema information, partition information, and data location. You can use them to access underlying data in the data lake and manage that data with Lake Formation permissions. You can apply row-level and cell-level security to Lake Formation tables. In this post, we provide a walkthrough using a standard Lake Formation table.

The following diagram illustrates our solution architecture.

The solution workflow consists of the following steps:

  1. Create IAM roles for the tenants.
  2. Register an Amazon S3 location in Lake Formation.
  3. Create a database and use AWS Glue crawlers to create a table in Lake Formation.
  4. Create data filters in Lake Formation.
  5. Grant access to the IAM roles in Lake Formation.
  6. Attach the IAM roles to the Amazon Redshift cluster.
  7. Create an external schema in Amazon Redshift.
  8. Create Amazon Redshift users for each tenant and grant access to the external schema.
  9. Users Tenant1 and Tenant2 assume their respective IAM roles and query data using the SQL query editor or any SQL client to their external schemas inside Amazon Redshift.

Prerequisites

This walkthrough assumes that you have the following prerequisites:

Create IAM roles for the tenants

Create IAM roles Tenant1ReadRole and Tenant2ReadRole for users with elevated privileges for the two tenants, with Amazon Redshift as the trusted entity, and attach the following policy to both roles:

{
	"Version": "2012-10-17",
	"Statement": [{
		"Effect": "Allow",
		"Action": [
			"lakeformation:GetDataAccess",
			"glue:GetTable",
			"glue:GetTables",
			"glue:SearchTables",
			"glue:GetDatabase",
			"glue:GetDatabases",
			"glue:GetPartition",
			"glue:GetPartitions"
		],
		"Resource": "*"
	}]
}

Register an Amazon S3 location in Lake Formation

We use the sample multi-tenant dataset SpectrumRowLevelFiltering.csv. Complete the following steps to register the location of this dataset in Lake Formation:

  1. Download the dataset and upload it to the Amazon S3 path s3://<your_bucket>/order_details/SpectrumRowLevelFiltering.csv.
  2. On the Lake Formation console, choose Data lake locations in the navigation pane.
  3. Choose Register location.
  4. For Amazon S3 path, enter the S3 path of your dataset.
  5. For IAM role, choose either the AWSServiceRoleForLakeFormationDataAccess service-linked role (the default) or the Lake Formation administrator role mentioned in the prerequisites.
  6. Choose Register location.

Create a database and a table in Lake Formation

To create your database and table, complete the following steps:

  1. Sign in to the AWS Management Console as the data lake administrator.
  2. On the Lake Formation console, choose Databases in the navigation pane.
  3. Choose Create database.
  4. For Name, enter rs_spectrum_rls_blog.
  5. If Use only IAM access control for new tables in this database is selected, uncheck it.
  6. Choose Create database.Next, you create a new data lake table.
  7. On the AWS Glue console, choose Crawlers in navigation pane.
  8. Choose Add crawler.
  9. For Crawler name, enter order_details.
  10. For Specify crawler source type, keep the default selections.
  11. For Add data store, choose Include path, and choose the S3 path to the dataset (s3://<your_bucket>/order_details/).
  12. For Choose IAM Role, choose Create an IAM role, with the suffix rs_spectrum_rls_blog.
  13. For Frequency, choose Run on demand.
  14. For Database, choose database you just created (rs_spectrum_rls_blog).
  15. Choose Finish to create the crawler.
  16. Grant CREATE TABLE permissions and DESCRIBE/ALTER/DELETE database permissions to the IAM role you created in Step 12.
  17. To run the crawler, in the navigation pane, choose Crawlers.
  18. Select the crawler order_details and choose Run crawler.When the crawler is complete, you can find the table order_details created under the database rs_spectrum_rls_blog in the AWS Glue Data Catalog.
  19. On the AWS Glue console, in the navigation pane, choose Databases.
  20. Select the database rs_spectrum_rls_blog and choose View tables.
  21. Choose the table order_details.

The following screenshot is the schema of the order_details table.

Create data filters in Lake Formation

To implement row-level and cell-level security, first you create data filters. Then you choose that data filter while granting SELECT permission on the tables. For this use case, you create two data filters: one for Tenant1 and one for Tenant2.

  1. On the Lake Formation console, choose Data catalog in the navigation pane, then choose Data filters.
  2. Choose Create new filter.
    Let’s create the first data filter filter-tenant1-order-details restricting the rows Tenant1 is able to see in table order_details.
  3. For Data filter name, enter filter-tenant1-order-details.
  4. For Target database, choose rs_spectrum_rls_blog.
  5. For Target table, choose order_details.
  6. For Column-level access, select Include columns and then choose the following columns: c_emailaddress, c_phone, c_dob, c_firstname, c_address, c_country, c_lastname, and tenanted.
  7. For Row filter expression, enter tenantid = 'Tenant1' and c_country in  (‘USA’,‘Spain’).
  8. Choose Create filter.
  9. Repeat these steps to create another data filter filter-tenant2-order-details, with row filter expression tenantid = 'Tenant2' and c_country in (‘USA’,‘Canada’).

Grant access to IAM roles in Lake Formation

After you create the data filters, you need to attach them to the table to grant access to a principal. First let’s grant access to order_details to the IAM role Tenant1ReadRole using the data filter we created for Tenant1.

  1. On the Lake Formation console, in the navigation pane, under Permissions, choose Data Permissions.
  2. Choose Grant.
  3. In the Principals section, select IAM users and roles.
  4. For IAM users and roles, choose the role Tenant1ReadRole.
  5. In the LF-Tags or catalog resources section, choose Named data catalog resources.
  6. For Databases, choose rs_spectrum_rls_blog.
  7. For Tables, choose order_details.
  8. For Data filters, choose filter-tenant1-order-details.
  9. For Data filter permissions, choose Select.
  10. Choose Grant.
  11. Repeat these steps with the IAM role Tenant2ReadRole and data filter filter-tenant2-order-details.

Attach the IAM roles to the Amazon Redshift cluster

To attach your roles to the cluster, complete the following steps:

  1. On the Amazon Redshift console, in the navigation menu, choose CLUSTERS, then select the name of the cluster that you want to update.
  2. On the Actions menu, choose Manage IAM roles.The IAM roles page appears.
  3. Either choose Enter ARN and enter an ARN of the Tenant1ReadRole IAM role, or choose the Tenant1ReadRole IAM role from the list.
  4. Choose Add IAM role.
  5. Choose Done to associate the IAM role with the cluster.The cluster is modified to complete the change.
  6. Repeat these steps to add the Tenant2ReadRole IAM role to the Amazon Redshift cluster.

Amazon Redshift allows up to 50 IAM roles to attach to the cluster to access other AWS services.

Create an external schema in Amazon Redshift

Create an external schema on the Amazon Redshift cluster, one for each IAM role, using the following code:

CREATE EXTERNAL SCHEMA IF NOT EXISTS spectrum_tenant1
FROM DATA CATALOG DATABASE 'rs_spectrum_rls_blog'
IAM_ROLE '<<Tenant1ReadRole ARN>>'
REGION 'us-east-1';

CREATE EXTERNAL SCHEMA IF NOT EXISTS  spectrum_tenant2
FROM DATA CATALOG DATABASE  'rs_spectrum_rls_blog'
IAM_ROLE '<<Tenant2ReadRole ARN>>'
REGION 'us-east-1';

Create Amazon Redshift users for each tenant and grant access to the external schema

Complete the following steps:

  1. Create Amazon Redshift users to restrict access to the external schemas (connect to the cluster with a user that has permission to create users or superusers) using the following code:
    CREATE USER tenant1_user WITH PASSWORD '<password>';
    CREATE USER tenant2_user WITH PASSWORD '<password>';

  2. Let’s create the read-only role (tenant1_ro) to provide read-only access to the spectrum_tenant1 schema:
    create role tenant1_ro;

  3. Grant usage on spectrum_tenant1 schema to the read-only tenant1_ro role:
    grant usage on schema spectrum_tenant1 to role tenant1_ro;

  4. Now assign the user to the read-only tenant1_ro role:
    grant role tenant1_ro to tenant1_user;

  5. Repeat the same steps to grant permission to the user tenant2_user:
    create role tenant2_ro;
    grant usage on schema spectrum_tenant2 to role tenant2_ro;
    grant role tenant2_ro to tenant2_user;

Tenant1 and Tenant2 users run queries using the SQL editor or a SQL client

To test the permission levels for different users, connect to the database using the query editor with that user.

In the Query Editor in the Amazon Redshift console, connect to the cluster with tenant1_user and run the following query:

-- Query table 'order_details' in schema spectrum_tenant1 with role Tenant1ReadRole

SELECT * FROM spectrum_tenant1.order_details;

In the following screenshot, tenant1_user is only able to see records where the tenantid value is Tenant1 and only the customer PII fields specific to the US and Spain.

To validate the Lake Formation data filters, the following screenshot shows that Tenant1 can’t see any records for Tenant2.

Reconnect to the cluster using tenant2_user and run the following query:

-- Query table 'order_details' in schema spectrum_tenant2 with role Tenant2ReadRole

SELECT * FROM spectrum_tenant2.order_details;

In the following screenshot, tenant2_user is only able to see records where the tenantid value is Tenant2 and only the customer PII fields specific to the US and Canada.

To validate the Lake Formation data filters, the following screenshot shows that Tenant2 can’t see any records for Tenant1.

Conclusion

In this post, you learned how to implement row-level and cell-level security on an Amazon S3-based data lake using data filters and access control features in Lake Formation. You also learned how to use Redshift Spectrum to access the data from Amazon S3 while adhering to the row-level and cell-level security policies defined in Lake Formation.

You can further enhance your understanding of Lake Formation row-level and cell-level security by referring to Effective data lakes using AWS Lake Formation, Part 4: Implementing cell-level and row-level security.

To learn more about Redshift Spectrum, refer Amazon Redshift Spectrum Extends Data Warehousing Out to Exabytes—No Loading Required.

For more information about configuring row-level access control natively in Amazon Redshift, refer to Achieve fine-grained data security with row-level access control in Amazon Redshift.


About the authors

Anusha Challa is a Senior Analytics Specialist Solutions Architect at AWS. Her expertise is in building large-scale data warehouses, both on premises and in the cloud. She provides architectural guidance to our customers on end-to-end data warehousing implementations and migrations.

Ranjan Burman is an Analytics Specialist Solutions Architect at AWS.

Set up and monitor AWS Glue crawlers using the enhanced AWS Glue UI and crawler history

Post Syndicated from Leonardo Gomez original https://aws.amazon.com/blogs/big-data/set-up-and-monitor-aws-glue-crawlers-using-the-enhanced-aws-glue-ui-and-crawler-history/

A data lake is a centralized, curated, and secured repository that stores all your data, both in its original form and prepared for analysis. Setting up and managing data lakes today involves a lot of manual, complicated, and time-consuming tasks. AWS Glue and AWS Lake Formation make it easy to build, secure, and manage data lakes. As data from existing data stores is moved in the data lake, there is a need to catalog the data to prepare it for analytics from services such as Amazon Athena.

AWS Glue crawlers are a popular way to populate the AWS Glue Catalog. AWS Glue crawlers are a key component that allow you to connect to data sources or targets, use different classifiers to determine the logical schema for the data, and create metadata in the Data Catalog. You can run crawlers on a schedule, on demand, or triggered based on an Amazon Simple Storage Service (Amazon S3) event to ensure that the Data Catalog is up to date. Using S3 event notifications can reduce the cost and time a crawler needs to update large and frequently changing tables.

The AWS Glue crawlers UI has been redesigned to offer a better user experience, and new functionalities have been added. This new UI provides easier setup of crawlers across multiple sources, including Amazon S3, Amazon DynamoDB, Amazon Redshift, Amazon Aurora, Amazon DocumentDB (with MongoDB compatibility), Delta Lake, MariaDB, Microsoft SQL Server, MySQL, Oracle, PostgreSQL, and MongoDB. A new AWS Glue crawler history feature has also been launched, which provides a convenient way to view crawler runs, their schedules, data sources, and tags. For each crawl, the crawler history offers a summary of data modifications such as changes in the database schema or Amazon S3 partition changes. Crawler history also provides DPU hours that can reduce the time to analyze and debug crawler operations and costs.

This post shows how to create an AWS Glue crawler that supports S3 event notification using the new UI. We also show how to navigate through the new crawler history section and get valuable insights.

Overview of solution

To demonstrate how to create an AWS Glue crawler using the new UI, we use the Toronto parking tickets dataset, specifically the data about parking tickets issued in the city of Toronto between 2017–2018. The goal is to create a crawler based on S3 events, run it, and explore the information showed in the UI about the run of this crawler.

As mentioned before, instead of crawling all the subfolders on Amazon S3, we use an S3 event-based approach. This helps improve the crawl time by using S3 events to identify the changes between two crawls by listing all the files from the subfolder that triggered the event instead of listing the full Amazon S3 target. For this post, we create an S3 event, Amazon Simple Storage Service (Amazon SNS) topic, and Amazon Simple Queue Service (Amazon SQS ) queue.

The following diagram illustrates our solution architecture.

Prerequisites

For this walkthrough, you should have the following prerequisites:

If the AWS account you use to follow this post uses Lake Formation to manage permissions on the AWS Glue Data Catalog, make sure that you log in as a user with access to create databases and tables. For more information, refer to Implicit Lake Formation permissions.

Launch your CloudFormation stack

To create your resources for this use case, complete the following steps:

  1. Launch your CloudFormation stack in us-east-1:
    BDB-2063-launch-cloudformation-stack
  2. Under Parameters, enter a name for your S3 bucket (include your account number).
  3. Select I acknowledge that AWS CloudFormation might create IAM resources with custom names.
  4. Choose Create stack.
  5. Wait until the creation of the stack is complete, as shown on the AWS CloudFormation console.
  6. On the stack’s Outputs tab, take note of the SQS queue ARN—we use it during the crawler creation process.

Launching this stack creates AWS resources. You need the following resources from the Outputs tab for the next steps:

  • GlueCrawlerRole – The IAM role to run AWS Glue jobs
  • BucketName – The name of the S3 bucket to store solution-related files
  • GlueSNSTopic – The SNS topic, which we use as the target for the S3 event
  • SQSArn – The SQS queue ARN; this queue is going to be consumed by the AWS Glue crawler

Create an AWS Glue crawler

Let’s first create the dataset that is going to be used as the source of the AWS Glue crawler:

  1. Open AWS CloudShell.
  2. Run the following command:
    aws s3 cp s3://aws-bigdata-blog/artifacts/gluenewcrawlerui/sourcedata/year=2017/Parking_Tags_Data_2017_2.csv s3://glue-crawler-blog-<YOUR ACCOUNT NUMBER>/torontotickets/year=2017/Parking_Tags_Data_2017_2.csv


    This action triggers an S3 event that sends a message to the SNS topic that you created using the CloudFormation template. This message is consumed by an SQS queue that will be input for the AWS Glue crawler.

    Now, let’s create the AWS Glue crawler.

  3. On the AWS Glue console, choose Crawlers in the navigation pane.
  4. Choose Create crawler.
  5. For Name, enter a name (for example, BlogPostCrawler).
  6. Choose Next.
  7. For Is your data already mapped to Glue tables, select Not yet.
  8. In the Data sources section, choose Add data source.

    For this post, you use an S3 dataset as a source.
  9. For Data source, choose S3.
  10. For Location of S3 data, select In this account.
  11. For S3 path, enter the path to the S3 bucket you created with the CloudFormation template (s3://glue-crawler-blog-YOUR ACCOUNT NUMBER/torontotickets/).
  12. For Subsequent crawler runs, select Crawl based on events.
  13. Enter the SQS queue ARN you created earlier.
  14. Choose Add a S3 data source.
  15. Choose Next.
  16. For Existing IAM role¸ choose the role you created (GlueCrawlerBlogRole).
  17. Choose Next.

    Now let’s create an AWS Glue database.
  18. Under Target database, choose Add database.
  19. For Name, enter blogdb.
  20. For Location, choose the S3 bucket created by the CloudFormation template.
  21. Choose Create database.
  22. On the Set output and scheduling page, for Target database, choose the database you just created (blogdb).
  23. For Table name prefix, enter blog.
  24. For Maximum table threshold, you can optionally set a limit for the number of tables that this crawler can scan. For this post, we leave this option blank.
  25. For Frequency, choose On demand.
  26. Choose Next.
  27. Review the configuration and choose Create crawler.

Run the AWS Glue crawler

To run the crawler, navigate to the crawler on the AWS Glue console.

Choose Run crawler.

On the Crawler runs tab, you can see the current run of the crawler.

Explore the crawler run history data

When the crawler is complete, you can see the following details:

  • Duration – The exact duration time of the crawler run
  • DPU hours – The number of DPU hours spent during the crawler run; this is very useful to calculate costs
  • Table changes – The changes applied to the table, like new columns or partitions

Choose Table changes to see the crawler run summary.

You can see the table blogtorontotickets was created, and also a 2017 partition.

Let’s add more data to the S3 bucket to see how the crawler processes this change.

  1. Open CloudShell.
  2. Run the following command:
    aws s3 cp s3://aws-bigdata-blog/artifacts/gluenewcrawlerui/sourcedata/year=2018/Parking_Tags_Data_2018_1.csv s3://glue-crawler-blog-<YOUR ACCOUNT NUMBER>/torontotickets/year=2018/Parking_Tags_Data_2018_1.csv

  3. Choose Run crawler to run the crawler one more time.

You can see the second run of the crawler listed.

Note that the DPU hours were reduced by more than half; this is because only one partition was scanned and added. Having an event-based crawler helps reduce runtime and cost.

You can choose the Table changes information of the second run to see more details.

Note under Partitions added, the 2018 partition was created.

Additional notes

Keep in mind the following considerations:

  • Crawler history is supported for crawls that have occurred since the launch date of the crawler history feature, and only retains up to 12 months of crawls. Older crawls will not be returned.
  • To set up a crawler using AWS CloudFormation, you can use following template.
  • You can get all the crawls of a specified crawler by using list-crawls APIs.
  • You can update existing crawlers with a single Amazon S3 target to use this new feature. You can do this either via the AWS Glue console or by calling the update_crawler API.

Clean up

To avoid incurring future charges, and to clean up unused roles and policies, delete the resources you created: the CloudFormation stack, S3 bucket, AWS Glue crawler, AWS Glue database, and AWS Glue table.

Conclusion

You can use AWS Glue crawlers to discover datasets, extract schema information, and populate the AWS Glue Data Catalog. AWS Glue crawlers now provide an easier-to-use UI workflow to set up crawlers and also provide metrics associated with past crawlers run to simplify monitoring and auditing. In this post, we provided a CloudFormation template to set up AWS Glue crawlers to use S3 event notifications, which reduces the time and cost needed to incrementally process table data updates in the AWS Glue Data Catalog. We also showed you how to monitor and understand the cost of crawlers.

Special thanks to everyone who contributed to the crawler history launch: Theo Xu, Jessica Cheng and Joseph Barlan.

Happy crawling!


About the authors

Leonardo Gómez is a Senior Analytics Specialist Solutions Architect at AWS. Based in Toronto, Canada, He has over a decade of experience in data management, helping customers around the globe address their business and technical needs. Connect with him on LinkedIn.

Sandeep Adwankar is a Senior Technical Product Manager at AWS. Based in the California Bay Area, he works with customers around the globe to translate business and technical requirements into products that enable customers to improve how they manage, secure, and access data.

Use an AD FS user and Tableau to securely query data in AWS Lake Formation

Post Syndicated from Jason Nicholls original https://aws.amazon.com/blogs/big-data/use-an-ad-fs-user-and-tableau-to-securely-query-data-in-aws-lake-formation/

Security-conscious customers often adopt a Zero Trust security architecture. Zero Trust is a security model centered on the idea that access to data shouldn’t be solely based on network location, but rather require users and systems to prove their identities and trustworthiness and enforce fine-grained identity-based authorization rules before granting access to applications, data, and other systems.

Some customers rely on third-party identity providers (IdPs) like Active Directory Federated Services (AD FS) as a system to manage credentials and prove identities and trustworthiness. Users can use their AD FS credentials to authenticate to various related yet independent systems, including the AWS Management Console (for more information, see Enabling SAML 2.0 federated users to access the AWS Management Console).

In the context of analytics, some customers extend Zero Trust to data stored in data lakes, which includes the various business intelligence (BI) tools used to access that data. A common data lake pattern is to store data in Amazon Simple Storage Service (Amazon S3) and query the data using Amazon Athena.

AWS Lake Formation allows you to define and enforce access policies at the database, table, and column level when using Athena queries to read data stored in Amazon S3. Lake Formation supports Active Directory and Security Assertion Markup Language (SAML) identity providers such as OKTA and Auth0. Furthermore, Lake Formation securely integrates with the AWS BI service Amazon QuickSight. QuickSight allows you to effortlessly create and publish interactive BI dashboards, and supports authentication via Active Directory. However, if you use alternative BI tools like Tableau, you may want to use your Active Directory credentials to access data stored in Lake Formation.

In this post, we show you how you can use AD FS credentials with Tableau to implement a Zero Trust architecture and securely query data in Amazon S3 and Lake Formation.

Solution overview

In this architecture, user credentials are managed by Active Directory, and not Amazon Identity and Access Management (IAM). Although Tableau provides a connector to connect Tableau to Athena, the connector requires an AWS access key ID and an AWS secret access key normally used for programmatic access. Creating an IAM user with programmatic access for use by Tableau is a potential solution, however some customers have made an architectural decision that access to AWS accounts is done via a federated process using Active Directory, and not an IAM user.

In this post, we show you how you can use the Athena ODBC driver in conjunction with AD FS credentials to query sample data in a newly created data lake. We simulate the environment by enabling federation to AWS using AD FS 3.0 and SAML 2.0. Then we guide you through setting up a data lake using Lake Formation. Finally, we show you how you can configure an ODBC driver for Tableau to securely query your data in the lake data using your AD FS credentials.

Prerequisites

The following prerequisites are required to complete this walkthrough:

Create your environment

To simulate the production environment, we created a standard VPC in Amazon Virtual Private Cloud (Amazon VPC) with one private subnet and one public subnet. You can do the same using the VPC wizard. Our Amazon Elastic Compute Cloud (Amazon EC2) instance running the Tableau client is located in a private subnet and accessible via an EC2 bastion host. For simplicity, connecting out to Amazon S3, AWS Glue, and Athena is done via the NAT gateway and internet gateway set up by the VPC wizard. Optionally, you can replace the NAT gateway with AWS PrivateLink endpoints (AWS Security Token Service (AWS STS), Amazon S3, Athena, and AWS Glue endpoints are required) to make sure traffic remains within the AWS network.

The following diagram illustrates our environment architecture.

After you create your VPC with its private and public subnets, you can continue to build out the other requirements, such as Active Directory and Lake Formation. Let’s begin with Active Directory.

Enable federation to AWS using AD FS 3.0 and SAML 2.0

AD FS 3.0, a component of Windows Server, supports SAML 2.0 and is integrated with IAM. This integration allows Active Directory users to federate to AWS using corporate directory credentials, such as a user name and password from Active Directory. Before you can complete this section, AD FS must be configured and running.

To set up AD FS, follow the instructions in Setting up trust between AD FS and AWS and using Active Directory credentials to connect to Amazon Athena with ODBC driver. The first section of the post explains in detail how to set up AD FS and establish the trust between AD FS and Active Directory. The post ends with setting up an ODBC driver for Athena, which you can skip. The post creates a group name called ArunADFSTest. This group relates to a role in your AWS account, which you use later.

When you have successfully verified that you can log in using your IdP, you’re ready to configure your Windows environment ODBC driver to connect to Athena.

Set up a data lake using Lake Formation

Lake Formation is a fully managed service that makes it easy for you to build, secure, and manage data lakes. Lake Formation provides its own permissions model that augments the IAM permissions model. This centrally defined permissions model enables fine-grained access to data stored in data lakes through a simple grant/revoke mechanism. We use this permissions model to grant access to the AD FS role we created earlier.

  1. On the Lake Formation console, you’re prompted with a welcome box the first time you access Lake formation.
    The box asks you to select the initial administrative user and roles.
  2. Choose Add myself and choose Get Started.
    We use the sample database provided by Lake Formation, but you’re welcome to use your own dataset. For instructions on loading your own dataset, see Getting Started with Lake Formation.With Lake Formation configured, we must grant read access to the AD FS role (ArunADFSTest) we created in the previous step.
  3. In the navigation pane, choose Databases.
  4. Select the database sampledb.
  5. On the Actions menu, choose Grant.

    We grant the SamlOdbcAccess role access to sampledb.
  6. For Principals, select IAM users and roles.
  7. For IAM users and roles, choose the role ArunADFSTest.
  8. Select Named data catalog resources.
  9. For Databases, choose the database sampledb.
  10. For Tables¸ choose All tables.
  11. Set the table permissions to Select and Describe.
  12. For Data permissions, select All data access.
  13. Choose Grant.
    Our AD FS user assumes the role ArunADFSTest, which has been granted access to sampledb by Lake Formation. However, the ArunADFSTest role requires access to Lake Formation, Athena, AWS Glue, and Amazon S3. Following the practice of least privilege, AWS defines policies for specific Lake Formation personas. Our user fits the Data Analyst persona, which requires enough permissions to run queries.
  14. Add the AmazonAthenaFullAccess managed policy (for instructions, see Adding and removing IAM identity permissions) and the following inline policy to the ArunADFSTest role:
    {
        "Version": "2012-10-17",
        "Statement": [
            {
                "Effect": "Allow",
                "Action": [
                    "lakeformation:GetDataAccess",
                    "glue:GetTable",
                    "glue:GetTables",
                    "glue:SearchTables",
                    "glue:GetDatabase",
                    "glue:GetDatabases",
                    "glue:GetPartitions",
                    "lakeformation:GetResourceLFTags",
                    "lakeformation:ListLFTags",
                    "lakeformation:GetLFTag",
                    "lakeformation:SearchTablesByLFTags",
                    "lakeformation:SearchDatabasesByLFTags"
                ],
                "Resource": "*"
            }
        ]
    }

    Each time Athena runs a query, it stores the results in an S3 bucket, which is configured as the query result location in Athena.

  15. Create an S3 bucket, and in this new bucket create a new folder called athena_results.
  16. Update the settings on the Athena console to use your newly created folder.
    Tableau uses Athena to run the query and read the results from Amazon S3, which means that the ArunADFSTest role requires access to your newly created S3 folder.
  17. Attach the following inline policy to the ArunADFSTest role:
    {
        "Version": "2012-10-17",
        "Statement": [
            {
                "Effect": "Allow",
                "Action": [
                    "s3:GetObject",
                    "s3:PutObject",
                    "s3:PutObjectAcl"
                ],
                "Resource": "arn:aws:s3:::[BUCKET_NAME]/athena_results/*"
            }
        ]
    }

Our AD FS user can now assume a role that has enough privileges to query the sample database. The next step is to configure the ODBC driver on the client.

Configure an Athena ODBC driver

Athena is a managed serverless and interactive query service that allows you to analyze your data in Amazon S3 using standard Structured Query Language (SQL). You can use Athena to directly query data that is located in Amazon S3 or data that is registered with Lake Formation. Athena provides you with ODBC and JDBC drivers to effortlessly integrate with your data analytics tools (such as Microsoft Power BI, Tableau, or SQL Workbench) to seamlessly gain insights about your data in minutes.

To connect to our Lake Formation environment, we first need to install and configure the Athena ODBC driver on our Windows environment.

  1. Download the Athena ODBC driver relevant to your Windows environment.
  2. Install the driver by choosing the driver file you downloaded (in our case, Simba+Athena+1.1+64-bit.msi).
  3. Choose Next on the welcome page.
  4. Read the End-User License Agreement, and if you agree to it, select I Accept the terms in the License Agreement and choose Next.
  5. Leave the default installation location for the ODBC driver and choose Next.
  6. Choose Install to begin the installation.
  7. If the User Access Control pop-up appears, choose Yes to allow the driver installation to continue.
  8. When the driver installation is complete, choose Finish to close the installer.
  9. Open the Windows ODBC configuration application by selecting the Start bar and searching for ODBC.
  10. Open the version corresponding to the Athena ODBC version you installed, in our case 64 bit.
  11. On the User DSN tab, choose Add.
  12. Choose the Simba Athena ODBC driver and choose Finish.

Configure the ODBC driver to AD FS authentication

We now need to configure the driver.

  1. Choose the driver on the Driver configuration page.
  2. For Data Source Name, enter sampledb.
  3. For Description, enter Lake Formation Sample Database.
  4. For AWS Region, enter eu-west-1 or the Region you used when configuring Lake Formation.
  5. For Metadata Retrieval Method, choose Auto.
  6. For S3 Output Location, enter s3://[BUCKET_NAME]/athena_results/.
  7. For Encryption Options, choose NOT_SET.
  8. Clear the rest of the options.
  9. Choose Authentication Options.
  10. For Authentication Type, choose ADFS.
  11. For User, enter [DOMAIN]\[USERNAME].
  12. For Password, enter your domain user password.
  13. For Preferred Role, enter aws:iam::[ACCOUNT NUMBER]:role/ArunADFSTest.
    The preferred role is the same role configured in the previous section (ArunADFSTest).
  14. For IdP Host, enter the AD federation URL you configured during AD FS setup.
  15. For IdP Port, enter 443.
  16. Select SSL Insecure.
  17. Choose OK.
  18. Choose Test on the initial configuration page to test the connection.
  19. When you see a success confirmation, choose OK.

We can now connect to our Lake Formation sample database from our desktop environment using the Athena ODBC driver. The next step is to use Tableau to query our data using the ODBC connection.

Connect to your data using Tableau

To connect to your data, complete the following steps:

  1. Open your Tableau Desktop edition.
  2. Under To a Server, choose More.
  3. On the list of available Tableau installed connectors, choose Other Databases (ODBC).
  4. Choose the ODBC database you created earlier.
  5. Choose Connect.
  6. Choose Sign In.

    When the Tableau workbook opens, select the database, schema, and table that you want to query.
  7. For Database, choose the database as listed in the ODBC setup (for this post, AwsDataCatalog).
  8. For Schema, choose your schema (sampledb).
  9. For Table, search for and choose your table (elb_logs).
  10. Drag the table to the work area to start your query and further report development.

Clean up

AWS Lake Formation provides database-, table-, column-, and tag-based access controls, and cross-account sharing at no charge. Lake Formation charges a fee for transaction requests and for metadata storage. In addition to providing a consistent view of data and enforcing row-level and cell-level security, the Lake Formation Storage API scans data in Amazon S3 and applies row and cell filters before returning results to applications. There is a fee for this filtering. To make sure that you’re not charged for any of the services that you no longer need, stop any EC2 instances that you created. Remove any objects in Amazon S3 you no longer require, because you pay for objects stored in S3 buckets.

Lastly, delete any Active Directory instances you may have created.

Conclusion

Lake Formation makes it simple to set up a secure data lake and then use the data lake with your choice of analytics and machine learning services, including Tableau. In this post, we showed you how you can connect to your data lake using AD FS credentials in a simple and secure way by using the Athena ODBC driver. Your AD FS user is configured within the ODBC driver, which then assumes a role in AWS. This role is granted access to only the data you require via Lake Formation.

To learn more about Lake Formation, see the Lake Formation Developer Guide or follow the Lake Formation workshop.


About the Authors

Jason Nicholls is an Enterprise Solutions Architect at AWS. He’s passionate about building scalable web and mobile applications on AWS. He started coding on a Commodore VIC 20, which lead to a career in software development. Jason holds a MSc in Computer Science with specialization in coevolved genetic programming. He is based in Johannesburg, South Africa.

Francois van Rensburg is a Partner Management Solutions Architect at AWS. He has spent the last decade helping enterprise organizations successfully migrate to the cloud. He is passionate about networking and all things cloud. He started as a Cobol programmer and has built everything from software to data centers. He is based in Denver, Colorado.

Build a modern data architecture and data mesh pattern at scale using AWS Lake Formation tag-based access control

Post Syndicated from Nivas Shankar original https://aws.amazon.com/blogs/big-data/build-a-modern-data-architecture-and-data-mesh-pattern-at-scale-using-aws-lake-formation-tag-based-access-control/

Customers are exploring building a data mesh on their AWS platform using AWS Lake Formation and sharing their data lakes across the organization. A data mesh architecture empowers business units (organized into domains) to have high ownership and autonomy for the technologies they use, while providing technology that enforces data security policies both within and between domains through data sharing. Data consumers request access to these data products, which are approved by producer owners within a framework that provides decentralized governance, but centralized monitoring and auditing of the data sharing process. As the number of tables and users increase, data stewards and administrators are looking for ways to manage permissions on data lakes easily at scale. Customers are struggling with “role explosion” and need to manage hundreds or even thousands of user permissions to control data access. For example, for an account with 1,000 resources and 100 principals, the data steward would have to create and manage up to 100,000 policy statements. As new principals and resources get added or deleted, these policies have to be updated to keep the permissions current.

Lake Formation tag-based access control (TBAC) solves this problem by allowing data stewards to create LF-tags (based on their business needs) that are attached to resources. You can create policies on a smaller number of logical tags instead of specifying policies on named resources. LF-tags enable you to categorize and explore data based on taxonomies, which reduces policy complexity and scales permissions management. You can create and manage policies with tens of logical tags instead of the thousands of resources. Lake Formation TBAC decouples policy creation from resource creation, which helps data stewards manage permissions on many databases, tables, and columns by removing the need to update policies every time a new resource is added to the data lake. Finally, TBAC allows you to create policies even before the resources come into existence. All you have to do is tag the resource with the right LF-tag to make sure existing policies manage it.

This post focuses on managing permissions on data lakes at scale using LF-tags in Lake Formation for cross accounts. For managing data lake catalog tables from AWS Glue and administering permission to Lake Formation, data stewards within the producing accounts have functional ownership based on the functions they support, and can grant access to various consumers, external organizations, and accounts. You can now define LF-tags; associate at the database, table, or column level; and then share controlled access across analytic, machine learning (ML), and extract, transform, and load (ETL) services for consumption. LF-tags make sure that governance can be scaled easily by replacing the policy definitions of thousands of resources with a few logical tags.

Solution overview

LF-tag access has three key components:

  • Tag ontology and classification – Data stewards can define an LF-tag ontology based on their business needs and grant access based on LF-tags to AWS Identity and Access Management (IAM) principals and SAML principals or groups
  • Tagging resources – Data engineers can easily create, automate, implement, and track all LF-tags and permissions against AWS Glue catalogs through the Lake Formation API
  • Policy evaluation – Lake Formation evaluates the effective permissions based on LF-tags at query time and allows access to data through consuming services such as Amazon Athena, AWS Glue, Amazon Redshift Spectrum, Amazon SageMaker Data Wrangler, and Amazon EMR Studio, based on the effective permissions granted across multiple accounts or organization-level data shares

The following diagram illustrates the relationship between the data producer, data consumer, and central governance accounts.

In the above diagram, the central governance account box shows the tagging ontology that will be used with the associated tag colors. These will be shared with both the producers and consumers, to be used to tag resources.

In this post, we considered two databases, as shown in the following figure, and show how you can set up a Lake Formation table and create Lake Formation tag-based policies.

The solution includes the following high-level steps:

  1. The data mesh owner defines the central tag ontology with LF-tags:
    1. LOB – Classified at the line of business (LOB) level (database)
    2. LOB:Function – Classified at the business function level (table)
    3. Classification – Classification of the functional data level (columns)
  2. The data mesh owner assigns respective permission levels to the product data steward to use centrally defined tags and associates permission to their database and tables with different LF-tags.
  3. The producer steward in the central account owns two databases: lob = card and lob = retail.
  4. The producer steward switches to the data producer account to add table metadata using an AWS Glue crawler.
  5. The producer steward associates column-level classifications Classification = Sensitive or Classification = Non-Sensitive to tables under the Card database in the central account.
  6. The producer steward associates table-level tags lob:retail = Customer and lob:retail = Reviews to tables under the Retail database in the central account.
  7. The consumer admin grants fine-grained access control to different data analysts.

With this configuration, the consumer analyst can focus on performing analysis with the right data.

Set up resources with AWS CloudFormation

We provide three AWS CloudFormation templates in this post: for the producer account, central account, and consumer account. Deploy the CloudFormation templates in the order of producer, central, and consumer, because there are dependencies between the templates.

The CloudFormation template for the central account generates the following resources:

  • Two IAM users:
    • DataMeshOwner
    • ProducerSteward
  • Grant DataMeshOwner as the LakeFormation Admin
  • One IAM role:
    • LFRegisterLocationServiceRole
  • Two IAM policies:
    • ProducerStewardPolicy
    • S3DataLakePolicy
  • Create databases “retail” and “cards” for ProducerSteward to manage Data Catalog
  • Share the data location permission for producer account to manage Data Catalog

The CloudFormation template for the producer account generates the following resources:

  • Two Amazon Simple Storage Service (Amazon S3) buckets:
    • RetailBucket, which holds two tables:
      • Customer_Info
      • Customer_Review
    • CardsBucket, which holds one table:
      • Credit_Card
  • Allow Amazon S3 bucket access for the central account Lake Formation service role.
  • Two AWS Glue crawlers
  • One AWS Glue crawler service role
  • Grant permissions on the S3 bucket locations tbac-cards-<ProducerAccountID>-<aws-region> and tbac-retail-<ProducerAccountID>-<aws-region> to the AWS Glue crawler role
  • One producer steward IAM user

The CloudFormation template for the consumer account generates the following resources:

  • One S3 bucket:
    • <AWS Account ID>-<aws-region>-athena-logs
  • One Athena workgroup:
    • consumer-workgroup
  • Three IAM users:
    • ConsumerAdmin
    • ConsumerAnalyst1
    • ConsumerAnalyst2

Launch the CloudFormation stack in the central account

To create resources in the central account, complete the following steps:

  1. Sign in to the central account’s AWS CloudFormation console in the target Region.
  2. Choose Launch Stack:   
    Launch Stack
  3. Choose Next.
  4. For Stack name, enter stack-central.
  5. For DataMeshOwnerUserPassword, enter the password you want for the data lake admin IAM user in the central account.
  6. For ProducerStewardUserPassword, enter the password you want for the producer steward IAM user in the producer account.
  7. For ProducerAWSAccount, enter the AWS <ProducerAccountID>.
  8. Choose Next.
  9. On the next page, choose Next.
  10. Review the details on the final page and select I acknowledge that AWS CloudFormation might create IAM resources.
  11. Choose Create stack.
  12. Collect the value for LFRegisterLocationServiceRole on the stack’s Outputs tab.

Launch the CloudFormation stack in the producer account

To set up resources in the producer account, complete the following steps:

  1. Sign in to the producer account’s AWS CloudFormation console in the target Region.
  2. Choose Launch Stack:
  3. Choose Next.
  4. For Stack name, enter stack-producer.
  5. For CentralAccountID, copy and paste the value of the <CentralAccountID> .
  6. For CentralAccountLFServiceRole, copy and paste the value of the LFRegisterLocationServiceRole collected from the stack-central.
  7. For LFDatabaseName, keep the default value of the tbac database name.
  8. For ProducerStewardUserPassword, enter the password you want for the data lake admin IAM user on the producer account.
  9. Choose Next.
  10. On the next page, choose Next.
  11. Review the details on the final page and select I acknowledge that AWS CloudFormation might create IAM resources.
  12. Choose Create stack.

Launch the CloudFormation stack in the consumer account

To create resources in the consumer account, complete the following steps:

  1. Sign in to the consumer account’s AWS CloudFormation console in the target Region.
  2. Choose Launch Stack:
  3. Choose Next.
  4. For Stack name, enter stack-consumer.
  5. For ConsumerAdminUserName and ConsumerAdminUserPassword, enter the user name and password you want for the data lake admin IAM user.
  6. For ConsumerAnalyst1UserName and ConsumerAnalyst1UserPassword, enter the user name and password you want for the consumeranalyst1 IAM user.
  7. For ConsumerAnalyst2UserName and ConsumerAnalyst2UserPassword, enter the user name and password you want for the consumeranalyst2 IAM user.
  8. Choose Next.
  9. On the next page, choose Next.
  10. Review the details on the final page and select I acknowledge that AWS CloudFormation might create IAM resources.
  11. Choose Create stack.

Configure Lake Formation cross-account sharing

After you create your resources with AWS CloudFormation, you perform the following steps in the producer and central account to set up Lake Formation cross-account sharing.

Central governance account

In the central account, complete the following steps:

  1. Sign in to the Lake Formation console as admin.
  2. In the navigation pane, choose Permissions, then choose Administrative roles and tasks.

The CloudFormation template added the data mesh owner as the data lake administrator.

Next, we update the Data Catalog settings to use Lake Formation permissions to control catalog resources instead of IAM-based access control.

  1. In the navigation pane, under Data catalog¸ choose Settings.
  2. Uncheck Use only IAM access control for new databases.
  3. Uncheck Use only IAM access control for new tables in new databases.
  4. Choose Save.

Next, we need to set up the AWS Glue Data Catalog resource policy to grant cross-account access to Data Catalog resources.

  1. Use the following policy, and replace the account number and Region with your own values:
  2. As described in Lake Formation Tag-Based Access Control Cross-Account Prerequisites, before you can use the tag-based access control method to grant cross-account access to resources, you must add the following JSON permissions object to the AWS Glue Data Catalog resource policy in the producer account. This gives the consumer account permission to access the Data Catalog when glue:EvaluatedByLakeFormationTagsis true. Also, this condition becomes true for resources on which you granted permission using Lake Formation permission Tags to the consumer’s account. This policy is required for every AWS account that you’re granting permissions to. We discuss the full IAM policy later in this post.
    {
       "PolicyInJson": "{\"Version\" : \"2012-10-17\",\"Statement\" : [ {\"Effect\" : \"Allow\",\"Principal\" : {\"AWS\" : [\"arn:aws:iam::<ProducerAccountID>:root\",\"arn:aws:iam::<ConsumerAccountID>:root\"]},\"Action\" : \"glue:*\",\"Resource\" : [ \"arn:aws:glue:<aws-region>:<CentralAccountID>:table/*\", \"arn:aws:glue:<aws-region>:<CentralAccountID>:database/*\", \"arn:aws:glue:<aws-region>:<CentralAccountID>:catalog\" ],\"Condition\" : {\"Bool\" : {\"glue:EvaluatedByLakeFormationTags\" : \"true\"}}}, {\"Effect\" : \"Allow\",\"Principal\" : {\"Service\" : \"ram.amazonaws.com\"},\"Action\" : \"glue:ShareResource\",\"Resource\" : [ \"arn:aws:glue:<aws-region>:<CentralAccountID>:table/*\", \"arn:aws:glue:<aws-region>:<CentralAccountID>:database/*\", \"arn:aws:glue:<aws-region>:<CentralAccountID>:catalog\" ]} ]}",
       "EnableHybrid": "TRUE"
    }

Replace the <aws-region>, <ProducerAccountID>, <ConsumerAccountID> and <CentralAccountID> values in the above policy as appropriate and save it in a file called policy.json.

  1. Next, run the following AWS Command Line Interface (AWS CLI) command on AWS CloudShell.
aws glue put-resource-policy --region <aws-region> --cli-input-json file://policy.json

For more information about this policy, see put-resource-policy.

  1. Next, we verify the two source data S3 buckets are registered as data lake locations in the central account. This is completed by the CloudFormation template.
  2. Under Register and ingest in the navigation pane, choose Data lake locations.

You should see the two S3 buckets registered under the data lake locations.

Configure Lake Formation Data Catalog settings in the central account

After we complete all the prerequisites, we start the data mesh configuration. We log in as DataMeshOwner in the central account.

Define LF-tags

DataMeshOwner creates the tag ontology by defining LF-tags. Complete the following steps:

  1. On the Lake Formation console, under Permissions in the navigation pane, under Administrative roles and tasks, choose LF-Tags.
  2. Choose Add LF-tags.
  3. For Key, enter LOB and for Values, choose Retail and Cards.
  4. Choose Add LF-tag.
  5. Repeat these steps to add the key LOB:Retail and values Customer and Reviews, and the key Classification with values Sensitive and Non-Sensitive.

Now we complete the configuration of the tag ontology.

Grant permissions

We grant ProducerSteward in the central accounts describe and associate permissions on the preceding tag ontology. This enables ProducerSteward to view the LF-tags and assign them to Data Catalog resources (databases, tables, and columns). ProducerSteward in the central account can further grant the permission to ProducerSteward in the producer account. For more information, see Granting, Revoking, and Listing LF-Tag Permissions. When you have multiple producers, grant the relevant tags to each steward.

  1. Under Permissions in the navigation pane, under Administrative roles and tasks, choose LF-tag permissions.
  2. Choose Grant.
  3. For IAM users and roles, choose the ProducerSteward user.
  4. In the LF-Tags section, add all three key-values:
    1. Key LOB with values Retail and Cards.
    2. Key LOB:Retail with values Customer and Reviews.
    3. Key Classification with values Sensitive and Non-Sensitive.
  5. For Permissions, select Describe and Associate for both LF-tag permissions and Grantable permissions.
  6. Choose Grant.

Next, we grant ProducerSteward tag-based data lake permissions. This enables ProducerSteward to create, alter, and drop tables in the databases with corresponding tags. ProducerSteward in the producer account can further grant the permission across accounts.

  1. In the navigation pane, under Permissions, Data lake permissions, choose Grant.
  2. For Principals, choose IAM users and roles, and choose ProducerSteward.
  3. For LF-tags or catalog resources, select Resources matched by LF-Tags (recommended).
  4. Choose Add LF-Tag.
  5. For Key, choose LOB and for Values, choose Cards.
  6. For Database permissions, select the Super permission because ProducerSteward owns the producer databases.

This permission allows a principal to perform every supported Lake Formation operation on the database. Use this admin permission when a principal is trusted with all operations.

  1. Select Super under Grantable permissions so the ProducerSteward user can grant database-level permissions to the producer and consumer accounts.
  2. For Table permissions, select Super.
  3. Select Super permission under Grantable permissions.
  4. Choose Grant.
  5. Repeat these steps for key LOB and value Retail.
  6. In the navigation pane, under Permissions, Data lake permissions, choose Grant.
  7. For Principals, choose IAM users and roles, and choose ProducerSteward.
  8. For LF-tags or catalog resources, select Resources matched by LF-Tags (recommended).
  9. Add the key LOB with value Cards, and the key Classification with values Sensitive and Non-Sensitive.
  10. For Database permissions, select Super.
  11. Select Super permission under Grantable permissions.
  12. For Table permissions, select Super.
  13. Select Super under Grantable permissions.
  14. Choose Grant.

This gives ProducerSteward fine-grained permission expression on columns with either Sensitive or Non-sensitive tags.

  1. Repeat these steps for key LOB and value Retails, and key LOB:Retails and value Reviews or Customer.

This gives ProducerSteward fine-grained permission expression on tables with either Reviews or Customers tags.

Producer data steward actions in the central account

Next, we log in as the ProducerSteward user in the central account and create skeleton databases.

  1. Sign in to the Lake Formation console as ProducerSteward.
  2. In the navigation pane, under Data catalog, select Databases.
  3. Choose the cards database.
  4. On the Actions menu, choose Edit LF-tags.
  5. Choose Assign new LF-tag.
  6. For Assigned Keys, enter LOB and for Values, choose Cards.
  7. Choose Save.

This assigns the LOB=Cards tag to the Cards database.

  1. Repeat these steps for Retail database and assign the LOB=Retail tag to the Retail database.

Next, we share the LF-tags and data lake permissions with the producer account so that ProducerSteward in the producer account can run AWS Glue crawlers and generate tables in the preceding skeleton databases.

  1. Under Permissions in the navigation pane, under Administrative roles and tasks, choose LF-tag permissions.
  2. Choose Grant.
  3. For Principals, select External accounts.
  4. For AWS account or AWS organization, enter the account ID for the producer account.
  5. In the LF-Tags section, we only need to add database-level tags.
  6. For Key, enter LOB and for Values, choose Retail and Cards.
  7. For Permissions, choose Describe and Associate for both LF-tag permissions and Grantable permissions.
  8. Choose Grant.
  9. In the navigation pane, under Permissions, Data lake permissions, choose Grant.
  10. For Principals, select External accounts.
  11. For AWS account or AWS organization, enter the account ID for the producer account.
  12. For LF-tags or catalog resources, select Resources matched by LF-Tags (recommended).
  13. Choose Add LF-Tag.
  14. Choose the key LOB and value Cards.
  15. For Database permissions, select Create table and Describe because the ProducerSteward user in the producer account will add tables in the database.
  16. Select Create table and Describe under Grantable permissions so the ProducerSteward user can further grant the permission to the AWS Glue crawler.
  17. For Table permissions, select all the permissions.
  18. Select all the permissions under Grantable permissions.
  19. Choose Grant.
  20. Repeat these steps for LOB=Retail.

Now the Lake Formation administrators on the producer account side has the right permissions to add tables.

Crawl source tables in the producer account

Next, we log in as the ProducerSteward user in the producer account to crawl the source tables for the Cards and Retail databases.

  1. Sign in to the Lake Formation console as ProducerSteward.
  2. In the navigation pane, under Administrative Roles and Tasks, verify that ProducerSteward is configured as the data lake administrator.
  3. In the navigation pane, under Permissions, then choose Administrative roles and tasks, choose LF-Tags.

You can verify the root-level LOB tags that were shared with the producer account.

  1. In the navigation pane, under Data catalog, select Databases.

You can verify the two databases cards and retail that were shared with the producer account from the previous step.

Now, we create resource links in the producer account for these two databases. These links point at the shared databases and are used by AWS Glue crawler to create the tables. First, we create a resource link for the cards database.

  1. Select the cards database and on the Actions menu, choose Create resource link.
  2. For Resource link name, enter rl_cards.
  3. Choose Create.
  4. Repeat these steps to create a resource link for the retail database.

After the resource link creation, you should see both the resource link databases as shown in the following screenshot.

Next, we need to grant permissions to the AWS Glue crawler role so that the crawler can crawl the source bucket and create the tables.

  1. Select the rl_cards database and on the Actions menu, choose Grant.
  2. In the Grant data permissions section, select IAM users and roles, and choose the AWS Glue crawler role that was created by the CloudFormation template (for example, stack-producer-AWSGlueServiceRoleDefault-xxxxxx).
  3. For Databases, choose rl_cards.
  4. For Resource link permissions, select Describe.
  5. Choose Grant.
  6. Repeat these steps for rl_retail.
  7. Next, in the navigation pane, choose Data lake Permissions and choose Grant.
  8. For IAM users and roles, choose the role stack-producer-AWSGlueServiceRoleDefault-XXXX.
  9. For LF-Tags or catalog resources, select Resources matched by LF-Tags.
  10. Enter the key LOB and values Retail and Cards.
  11. For Database permissions, select Create table and Describe.
  12. For Table permissions, choose Select, Describe, and Alter.
  13. Choose Grant.

Next, we will verify grant permissions on the S3 bucket locations corresponding to cards and retail producers to the AWS Glue crawler role. This is completed by the CloudFormation template.

In the navigation pane, under Permissions, on the Data Locations, you should see the locations.

Now we’re ready to run the crawlers. We configure the crawlers that the CloudFormation template created, to point to these resource link databases.

  1. On the AWS Glue console, under Data catalog in the navigation pane, choose Crawlers.

The two crawlers you created should be listed.

  1. Select the crawler for the cards database CardsCrawler-xxxxxxxxxxxx and on the Action menu, choose Edit crawler.
  2. For the input data store, choose the S3 bucket for the cards producer.
  3. For IAM role, choose the AWS Glue service role created by the CloudFormation template.
  4. For Schedule, choose Run on demand.
  5. For the output database, choose the resource link database rl_cards corresponding to the cards database.
  6. Verify all the information and choose Save.
  7. Repeat these steps for the crawler corresponding to the retail producer.
  8. Select both crawlers and choose Run crawler.

When the crawlers finish, they create tables corresponding to each producer in their respective resource link databases. The table schemas are present in the shared database in the central account.

Configure Lake Formation tags in the central account

Next, we perform fine-grained access control for the tables that the crawlers created to support different consumption use cases using Lake Formation tags.

Tag columns

First, we tag sensitive columns in the cards table corresponding to the cards database, first using the Classification tag that we created earlier.

  1. Log in to central account as IAM user ProducerSteward.
  2. On the Lake Formation console, in the navigation pane, choose Data catalog and then choose Tables.

You should see three tables: the cards table corresponding to cards database, and the reviews and customers tables corresponding to the retail database.

  1. Choose the cards table.
  2. Navigate to the Schema section and choose Edit schema.
  3. Select all the columns and choose Edit tags.
  4. Choose Assign new LF-Tag.
  5. For Assigned keys, enter Classification and for Values, choose Non-Sensitive.
  6. Choose Save.

Next, we selectively tag the sensitive columns.

  1. In the Edit schema section, select columns card number, card holder’s name, cvv/cvv2, and card pin.
  2. Choose Edit tags.
  3. For Assigned keys, enter Classification and for Values, choose Sensitive.
  4. Choose Save.
  5. Choose Save as new version to save the schema.

Tag tables

Next, we tag the reviews and customer tables under the retail database using the LOB:retail tag that we created earlier.

  1. On the Tables page, select the reviews table and on the Actions menu, choose Edit LF-tags.
  2. Choose Assign new LF-Tag.
  3. For Assigned keys, choose LOB:Retail and for Values, choose Reviews.
  4. Choose Save.
  5. Repeat the steps for the customer table. Choose LOB:Retail for the key and Customer for the value.

Grant tag permissions

Next, grant LF-tag permissions to the external consumer account.

  1. On the Lake Formation console, in the navigation pane, choose Permissions, then choose Administrative roles and tasks and choose LF-tag permissions.
  2. Choose Grant.
  3. For Principals, select External accounts.
  4. For AWS account or AWS organization, enter the AWS account number corresponding to the consumer account.
  5. For LF-Tags, choose Add LF-Tag.
  6. For Key, choose LOB and for Values, choose Retail and Cards.
  7. Repeat these steps for key Classification with values Non-Sensitive and Sensitive, and key LOB:Retail with values Reviews and Customer.
  8. For Permissions, choose Describe.
  9. For Grantable permissions, choose Describe.
  10. Choose Grant.

Next, we grant Lake Formation policy tag expression permissions to the external consumer account.

  1. In the navigation pane, choose Data lake permissions and choose Grant.
  2. In the Principals section, select External accounts.
  3. For AWS account or AWS organization, enter the AWS account number corresponding to the consumer account.
  4. For LF-Tags or catalog resources, select Resources matched by LF-Tags.
  5. Choose Add LF-Tag.
  6. For Key, choose LOB and for Values¸ choose Retail.
  7. For Database permissions, select Describe.
  8. For Grantable permissions, select Describe.
  9. Choose Grant.
  10. Repeat these steps to grant permissions on the policy tag expression LOB=Cards.

Next, we grant table permissions.

  1. In the navigation pane, choose Data lake permissions and choose Grant.
  2. For Principals, select External accounts.
  3. For AWS account or AWS organization, enter the AWS account number corresponding to the consumer account.
  4. For LF-Tags or catalog resources, select Resources matched by LF-Tags.
  5. Add key LOB with value Retail, and key LOB:Retail with values Reviews and Customer.
  6. For Table Permissions, select Select and Describe.
  7. For Grantable permissions, select Select and Describe.
  8. Choose Grant.
  9. Repeat these steps to grant permissions on the policy tag expressions LOB=Cards and Classification = (Non-Sensitive or Sensitive).

Share and consume tables in the consumer account

When you sign in to the Lake Formation console in the consumer account as ConsumerAdmin, you can see all the tags and the corresponding values that were shared by the producer.

In these next steps, we share and consume tables in the consumer account.

Create a resource link to the shared database

On the Databases page on the Lake Formation console, you can see all the databases that were shared to the consumer account. To create a resource link, complete the following steps:

  1. On the Databases page, select the cards database and on the Actions menu, choose Create resource link.
  2. Enter the resource link name as rl_cards.
  3. Leave the shared database and shared database’s owner ID as default.
  4. Choose Create.
  5. Follow the same process to create the rl_retail resource link.

Grant Describe permission to ConsumerAnalyst1

To grant Describe permissions on resource link databases to ConsumerAnalyst1, complete the following steps:

  1. On the Databases page, select the resource database rl_retail and on the Actions menu, choose Grant.
  2. In the Grant data permissions section, select IAM users and roles.
  3. Choose the role ConsumerAnalyst1.
  4. In the Resource link permissions section, select Describe.
  5. Choose Grant.
  6. Follow the same steps to grant rl_cards access to ConsumerAnalyst2.

Grant Tag permissions to ConsumerAnalyst1

To grant Tag permissions on the LOB:Retail Customer tag to ConsumerAnalyst1 to access the sales table, complete the following steps:

  1. On the Lake Formation console, on the Data permission page, choose Grant.
  2. In the Grant data permissions section, select IAM users and roles.
  3. Choose the role ConsumerAnalyst1.
  4. For LF-Tags or catalog resources, select Resources matched by LF-Tags.
  5. Add the key LOB with value Retail, and the key LOB:Retail with value Customer.
  6. For Table permissions, select Select and Describe.
  7. Choose Grant.

Access to the customers table inside the rl_retail database is granted to ConsumerAnalyst1.

Grant Tag permissions to ConsumerAnalyst2

To grant Tag permissions on the Classification:Sensitive tag to l to access attributes tagged as Sensitive in the cards table, complete the following steps:

  1. On the Lake Formation console, on the Data permission page, choose Grant.
  2. In the Grant data permissions section, select IAM users and roles.
  3. Choose the role ConsumerAnalyst2.
  4. For LF-Tags or catalog resources, select Resources matched by LF-Tags.
  5. Add the key LOB with value Cards, and the key Classification with value Sensitive.
  6. For Table permissions, select Select and Describe.
  7. Choose Grant.

Access to attributes tagged as sensitive in the cards table inside the rl_cards database is granted to ConsumerAnalyst2.

Validate the access to ConsumerAnalyst1

To confirm ConsumerAnalyst1 access, complete the following steps:

  1. On the Athena console, for Workgroup, choose consumer-workgroup.
  2. Choose Acknowledge.
  3. Choose the database rl_retail.

You should be able to see the customers table and be able to query.

Validate the access to ConsumerAnalyst2

To confirm ConsumerAnalyst2 access, complete the following steps:

  1. On the Athena console, for Workgroup, choose consumer-workgroup.
  2. Choose Acknowledge.
  3. Choose the database rl_cards.

You should be able to see only the sensitive attributes from the cards table.

As a thought experiment, you can also check to see the Lake Formation Tag-based access policy behavior on columns to which the user doesn’t have policy grants.

When an untagged column is selected from the table rl_cards.cards, Athena returns an error. For example, you can run the following query to choose the untagged column “issuing_bank” which is non-sensitive.

SELECT issuing_bank FROM "rl_cards"."cards" limit 10;

Conclusion

In this post, we explained how to create a Lake Formation tag-based access control policy in Lake Formation using an AWS public dataset. In addition, we explained how to query tables, databases, and columns that have Lake Formation tag-based access policies associated with them.

You can generalize these steps to share resources across accounts. You can also use these steps to grant permissions to SAML identities.

A data mesh approach provides a method by which organizations can share data across business units. Each domain is responsible for the ingestion, processing, and serving of their data. They are data owners and domain experts, and are responsible for data quality and accuracy. This is similar to how microservices turn a set of technical capabilities into a product that can be consumed by other microservices. Implementing a data mesh on AWS is made simple by using managed and serverless services such as AWS Glue, Lake Formation, Athena, and Redshift Spectrum to provide a well-understood, performant, scalable, and cost-effective solution to integrate, prepare, and serve data.


About the Authors

Nivas Shankar is a Principal Data Architect at Amazon Web Services. He helps and works closely with enterprise customers building data lakes and analytical applications on the AWS platform. He holds a master’s degree in physics and is highly passionate about theoretical physics concepts.

Dylan Qu is an AWS solutions architect responsible for providing architectural guidance across the full AWS stack with a focus on Data Analytics, AI/ML and DevOps.

Pavan Emani is a Data Lake Architect at AWS, specialized in big data and analytics solutions. He helps customers modernize their data platforms on the cloud. Outside of work, he likes reading about space and watching sports.

Prasanna Sridharan is a Senior Data & Analytics Architect with AWS. He is passionate about building the right big data solution for the AWS customers. He is specialized in the design and implementation of Analytics, Data Management and Big Data systems, mainly for Enterprise and FSI customers.

Build your data pipeline in your AWS modern data platform using AWS Lake Formation, AWS Glue, and dbt Core

Post Syndicated from Benjamin Menuet original https://aws.amazon.com/blogs/big-data/build-your-data-pipeline-in-your-aws-modern-data-platform-using-aws-lake-formation-aws-glue-and-dbt-core/

dbt has established itself as one of the most popular tools in the modern data stack, and is aiming to bring analytics engineering to everyone. The dbt tool makes it easy to develop and implement complex data processing pipelines, with mostly SQL, and it provides developers with a simple interface to create, test, document, evolve, and deploy their workflows. For more information, see docs.getdbt.com.

dbt primarily targets cloud data warehouses such as Amazon Redshift or Snowflake. Now, you can use dbt against AWS data lakes, thanks to the following two services:

In this post, you’ll learn how to deploy a data pipeline in your modern data platform using the dbt-glue adapter built by the AWS Professional Services team in collaboration with dbtlabs.

With this new open-source, battle-tested dbt AWS Glue adapter, developers can now use dbt for their data lakes, paying for just the compute they need, with no need to shuffle data around. They still have access to everything that makes dbt great, including the local developer experience, documentation, tests, incremental data processing, Git integration, CI/CD, and more.

Solution overview

The following diagram shows the architecture of the solution.

The steps in this workflow are as follows:

  1. The data team configures a local Python virtual environment and creates a data pipeline with dbt.
  2. The dbt-glue adapter uses Lake Formation to perform all structure manipulation, like creation of database, tables. or views.
  3. The dbt-glue adapter uses AWS Glue interactive sessions as the backend for processing your data.
  4. All data is stored in Amazon Simple Storage Service (Amazon S3) as Parquet open file format.
  5. The data team can now query all data stored in the data lake using Amazon Athena.

Walkthrough overview

For this post, you run a data pipeline that creates indicators based on NYC taxi data by following these steps:

  1. Deploy the provided AWS CloudFormation stack in Region us-east-1.
  2. Configure your Amazon CloudShell environment.
  3. Install dbt, the dbt CLI, and the dbt adaptor.
  4. Use CloudShell to clone the project and configure it to use your account’s configuration.
  5. Run dbt to implement the data pipeline.
  6. Query the data with Athena.

For our use case, we use the data from the New York City Taxi Records dataset. This dataset is available in the Registry of Open Data on AWS (RODA), which is a repository containing public datasets from AWS resources.

The CloudFormation template creates the nyctaxi database in your AWS Glue Data Catalog and a table (records) that points to the public dataset. You don’t need to host the data in your account.

Prerequisites

The CloudFormation template used by this project configures the AWS Identity and Access Management (IAM) role GlueInteractiveSessionRole with all the mandatory permissions.

For more details on permissions for AWS Glue interactive sessions, refer to Securing AWS Glue interactive sessions with IAM.

Deploy resources with AWS CloudFormation

The CloudFormation stack deploys all the required infrastructure:

  • An IAM role with all the mandatory permissions to run an AWS Glue interactive session and the dbt-glue adapter.
  • An AWS Glue database and table to store the metadata related to the NYC taxi records dataset
  • An S3 bucket to use as output and store the processed data
  • An Athena configuration (a workgroup and S3 bucket to store the output) to explore the dataset
  • An AWS Lambda function as an AWS CloudFormation custom resource that updates all the partitions in the AWS Glue table

To create these resources, choose Launch Stack and follow the instructions:

Configure the CloudShell environment

To start working with the shell, complete the following steps:

  1. Sign in to the AWS Management Console and launch CloudShell using either one of the following two methods:
    1. Choose the CloudShell icon on the console navigation bar.
    2. Enter cloudshell in the Find Services box and then choose the CloudShell option.
  2. Because dbt and the dbt-glue adapter are compatible with Python versions 3.7, 3.8, and 3.9, check the version of Python:
    $ python3 --version

  3. Configure a Python virtual environment to isolate the package version and code dependencies:
    $ sudo yum install git -y
    $ python3 -m venv dbt_venv
    $ source dbt_venv/bin/activate
    $ python3 -m pip install --upgrade pip

  4. Configure the aws-glue-session package:
    $ sudo yum install gcc krb5-devel.x86_64 python3-devel.x86_64 -y
    $ pip3 install --no-cache-dir --upgrade boto3
    $ pip3 install --no-cache-dir --upgrade aws-glue-sessions

Install dbt, the dbt CLI, and the dbt adaptor

The dbt CLI is a command-line interface for running dbt projects. It’s is free to use and available as an open source project. Install dbt and the dbt CLI with the following code:

$ pip3 install --no-cache-dir dbt-core

For more information, refer to How to install dbt, What is dbt?, and Viewpoint.

Install the dbt adapter with the following code:

$ pip3 install --no-cache-dir dbt-glue

Clone the project

The dbt AWS Glue interactive session demo project contains an example of a data pipeline that produces metrics based on NYC taxi dataset. Clone the project with the following code:

$ git clone https://github.com/aws-samples/dbtgluenyctaxidemo

This project comes with the following configuration example:

$ dbtgluenyctaxidemo/profile/profiles.yml

The following table summarizes the parameter options for the adaptor.

Option Description Mandatory
project_name The dbt project name. This must be the same as the one configured in the dbt project. yes
type The driver to use. yes
query-comment A string to inject as a comment in each query that dbt runs. no
role_arn The ARN of the interactive session role created as part of the CloudFormation template. yes
region The AWS Region were you run the data pipeline. yes
workers The number of workers of a defined workerType that are allocated when a job runs. yes
worker_type The type of predefined worker that is allocated when a job runs. Accepts a value of Standard, G.1X, or G.2X. yes
schema The schema used to organize data stored in Amazon S3. yes
database The database in Lake Formation. The database stores metadata tables in the Data Catalog. yes
session_provisioning_timeout_in_seconds The timeout in seconds for AWS Glue interactive session provisioning. yes
location The Amazon S3 location of your target data. yes
idle_timeout The AWS Glue session idle timeout in minutes. (The session stops after being idle for the specified amount of time.) no
glue_version The version of AWS Glue for this session to use. Currently, the only valid options are 2.0 and 3.0. The default value is 2.0. no
security_configuration The security configuration to use with this session. no
connections A comma-separated list of connections to use in the session. no

Run the dbt project

The objective of this sample project is to create the following four tables, which contain metrics based on the NYC taxi dataset:

  • silver_nyctaxi_avg_metrics – Basic metrics based on NYC Taxi Open Data for the year 2016
  • gold_nyctaxi_passengers_metrics – Metrics per passenger based on the silver metrics table
  • gold_nyctaxi_distance_metrics – Metrics per distance based on the silver metrics table
  • gold_nyctaxi_cost_metrics – Metrics per cost based on the silver metrics table
  1. To run the project dbt, you should be in the project folder:
    $ cd dbtgluenyctaxidemo

  2. The project requires you to set environment variables in order to run on the AWS account:
    $ export DBT_ROLE_ARN="arn:aws:iam::$(aws sts get-caller-identity --query "Account" --output text):role/GlueInteractiveSessionRole"
    $ export DBT_S3_LOCATION="s3://aws-dbt-glue-datalake-$(aws sts get-caller-identity --query "Account" --output text)-us-east-1/"

  3. Make sure the profile is set up correctly from the command line:
    $ dbt debug --profiles-dir profile

  4. Run the models with the following code:
    $ dbt run --profiles-dir profile

  5. Generate documentation for the project:
    $ dbt docs generate --profiles-dir profile

  6. View the documentation for the project:
    $ dbt docs serve --profiles-dir profile

Query data via Athena

This section demonstrates how to query the target table using Athena. To query the data, complete the following steps:

  1. On the Athena console, switch the workgroup to athena-dbt-glue-aws-blog.
  2. If the Workgroup athena-dbt-glue-aws-blog settings dialog box appears, choose Acknowledge.
  3. Use the following query to explore the metrics created by the dbt project:
    SELECT cm.avg_cost_per_minute
    , cm.avg_cost_per_distance
    , dm.avg_distance_per_duration
    , dm.year
    , dm.month
    , dm.type
    FROM "dbt_nyc_metrics"."gold_nyctaxi_distance_metrics" dm
    LEFT JOIN "dbt_nyc_metrics"."gold_nyctaxi_cost_metrics" cm
    ON dm.type = cm.type
    AND dm.year = cm.year
    AND dm.month = cm.month
    WHERE dm.type = 'yellow'
    AND dm.year = '2016'
    AND dm.month = '6'

The following screenshot shows the results of this query.

Clean Up

To clean up your environment, complete the following steps in CloudShell:

  1. Delete the database created by dbt:
    $ aws glue delete-database --name dbt_nyc_metrics

  2. Delete all generated data:
    $ aws s3 rm s3://aws-dbt-glue-datalake-$(aws sts get-caller-identity --query "Account" --output text)-us-east-1/ --recursive
    $ aws s3 rm 3://aws-athena-dbt-glue-query-results-$(aws sts get-caller-identity --query "Account" --output text)-us-east-1/ --recursive

  3. Delete the CloudFormation stack:
    $ aws cloudformation delete-stack --stack-name dbt-demo

Summary

This post demonstrates how AWS managed services are key enablers and accelerators to build a modern data platform at scale or take advantage of an existing one.

With the introduction of dbt and aws-glue-dbt-adapter, data teams can access data stored in your modern data platform using SQL statements to extract value from data.

To report a bug or request a feature, please open an issue on GitHub. If you have any questions or suggestions, leave your feedback in the comment section. If you need further assistance to optimize your modern data platform, contact your AWS account team or a trusted AWS Partner.


About the Authors

Benjamin Menuet is a Data Architect with AWS Professional Services. He helps customers develop big data and analytics solutions to accelerate their business outcomes. Outside of work, Benjamin is a trail runner and has finished some mythic races like the UTMB.

Armando Segnini is a Data Architect with AWS Professional Services. He spends his time building scalable big data and analytics solutions for AWS Enterprise and Strategic customers. Armando also loves to travel with his family all around the world and take pictures of the places he visits.

Moshir Mikael is a Senior Practice Manager with AWS Professional Services.  He led development of large enterprise data platforms in EMEA and currently leading the Professional Services teams in EMEA for analytics.

Anouar Zaaber is a Senior Engagement Manager in AWS Professional Services. He leads internal AWS teams, external partners, and customer teams to deliver AWS cloud services that enable customers to realize their business outcomes.