Tag Archives: AWS Secrets Manager

Journey to Adopt Cloud-Native Architecture Series: #4 – Governing Security at Scale and IAM Baselining

Post Syndicated from Anuj Gupta original https://aws.amazon.com/blogs/architecture/journey-to-adopt-cloud-native-architecture-series-4-governing-security-at-scale-and-iam-baselining/

In Part 3 of this series, Improved Resiliency and Standardized Observability, we talked about design patterns that you can adopt to improve resiliency, achieve minimum business continuity, and scale applications with lengthy transactions (more than 3 minutes).

As a refresher from previous blogs in this series, our example ecommerce company’s “Shoppers” application runs in the cloud. The company experienced hypergrowth, which posed a number of platform and technology challenges, namely, they needed to scale on the backend without impacting users.

Because of this hypergrowth, distributed denial of service (DDoS) attacks on the ecommerce company’s services increased 10 times in 6 months. Some of these attacks led to downtime and loss of revenue. This blog post shows you how we addressed these threats by implementing a multi-account strategy and applying AWS Identity and Access Management (IAM) best practices.

A multi-account strategy ensures security at scale

Originally, the company’s production and non-production services were running in a single account. This meant non-production vulnerabilities like frequently changing code or privileged access could impact the production environment. Additionally, the application experienced issues due to unexpectedly reaching service quotas. These include (but are not limited to) number of read replicas per master in Amazon Relational Database Service (Amazon RDS) and total storage for all DB instances in Auto Scaling Service Quotas for Amazon Elastic Compute Cloud (Amazon EC2).

To address these issues, we followed multi-account strategy best practices. We established the multi-account hierarchy shown in Figure 1 that includes the following eight organizational units (OUs) to meet business requirements:

  1. Security PROD OU
  2. Security SDLC OU
  3. Infrastructure PROD OU
  4. Infrastructure SDLC OU
  5. Workload PROD OU
  6. Workload SDLC OU
  7. Sandbox OU
  8. Transitional OU

To identify the right fit for our needs, we evaluated AWS Landing Zone and AWS Control Tower. To reduce operation overhead of maintaining a solution, we used AWS Control Tower to deploy guardrails as service control policies (SCPs). These guardrails were then separated into production and non-production environments, creating the hierarchy shown in Figure 1.

We created a new Payer (or Management) Account with Sandbox OU and Transitional OU under Root OU. We then moved existing AWS accounts under the Transitional OU and Sandbox OU. We provisioned new accounts with Account Factory and gradually migrated services from existing AWS accounts into the newly formed Log Archive Account, Security Account, Network Account, and Shared Services Account and applied appropriate guardrails. We then registered Sandbox OU with Control Tower. Additionally, we migrated the centralized logging solution from Part 3 of this blog series to the Security Account. We moved non-production applications into the Dev and Test Accounts, respectively, to isolate workloads. We then moved existing accounts that had production services from the Transitional OU to Workload PROD OU.

Multi-account hierarchy

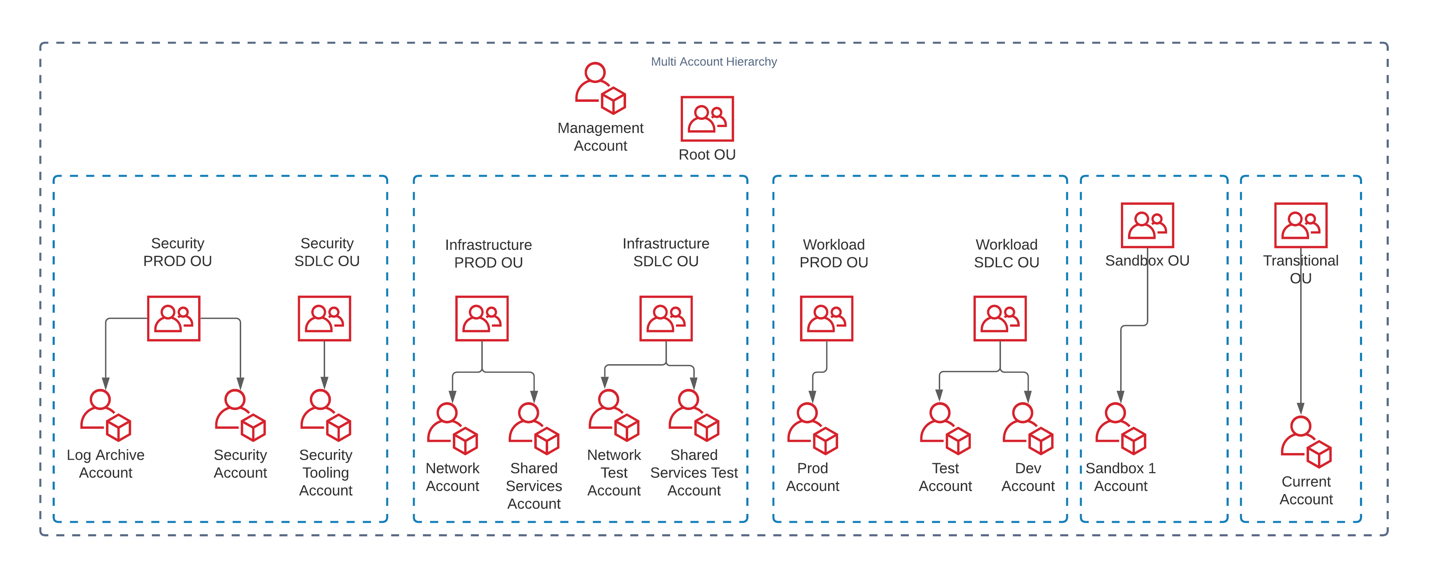
Figure 1. Multi-account hierarchy

Implementing a multi-account strategy alleviated service quota challenges. It isolated variable demand non-production environments from more consistent production environments, which reduced the downtime caused by unplanned scaling events. The multi-account strategy enforces governance at scale, but also promotes innovation by allocating separate accounts with distinct security requirements for proof of concepts and experimentation. This reduces impact risks to production accounts and allows the required guardrails to be automatically applied.

Improving access management and least privilege access

When the company experienced hypergrowth, they not only had to scale their application’s infrastructure, but they also had to increase how often they release their code. They also hired and onboarded new internal teams.

To strengthen new/existing employees’ credentials, we used AWS Trusted Advisor for IAM Access Key Rotation. This identifies IAM users whose access keys have not been rotated for more than 90 days and created an automated way to rotate them. We then generated an IAM credential report to identify IAM users that don’t need console access or that don’t need access keys. We gradually assigned these users role-based access versus IAM access keys.

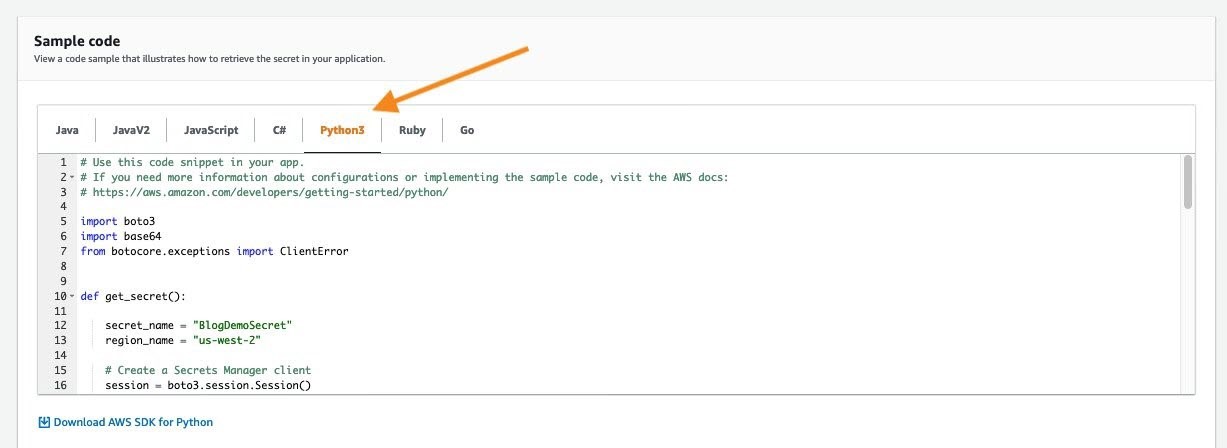
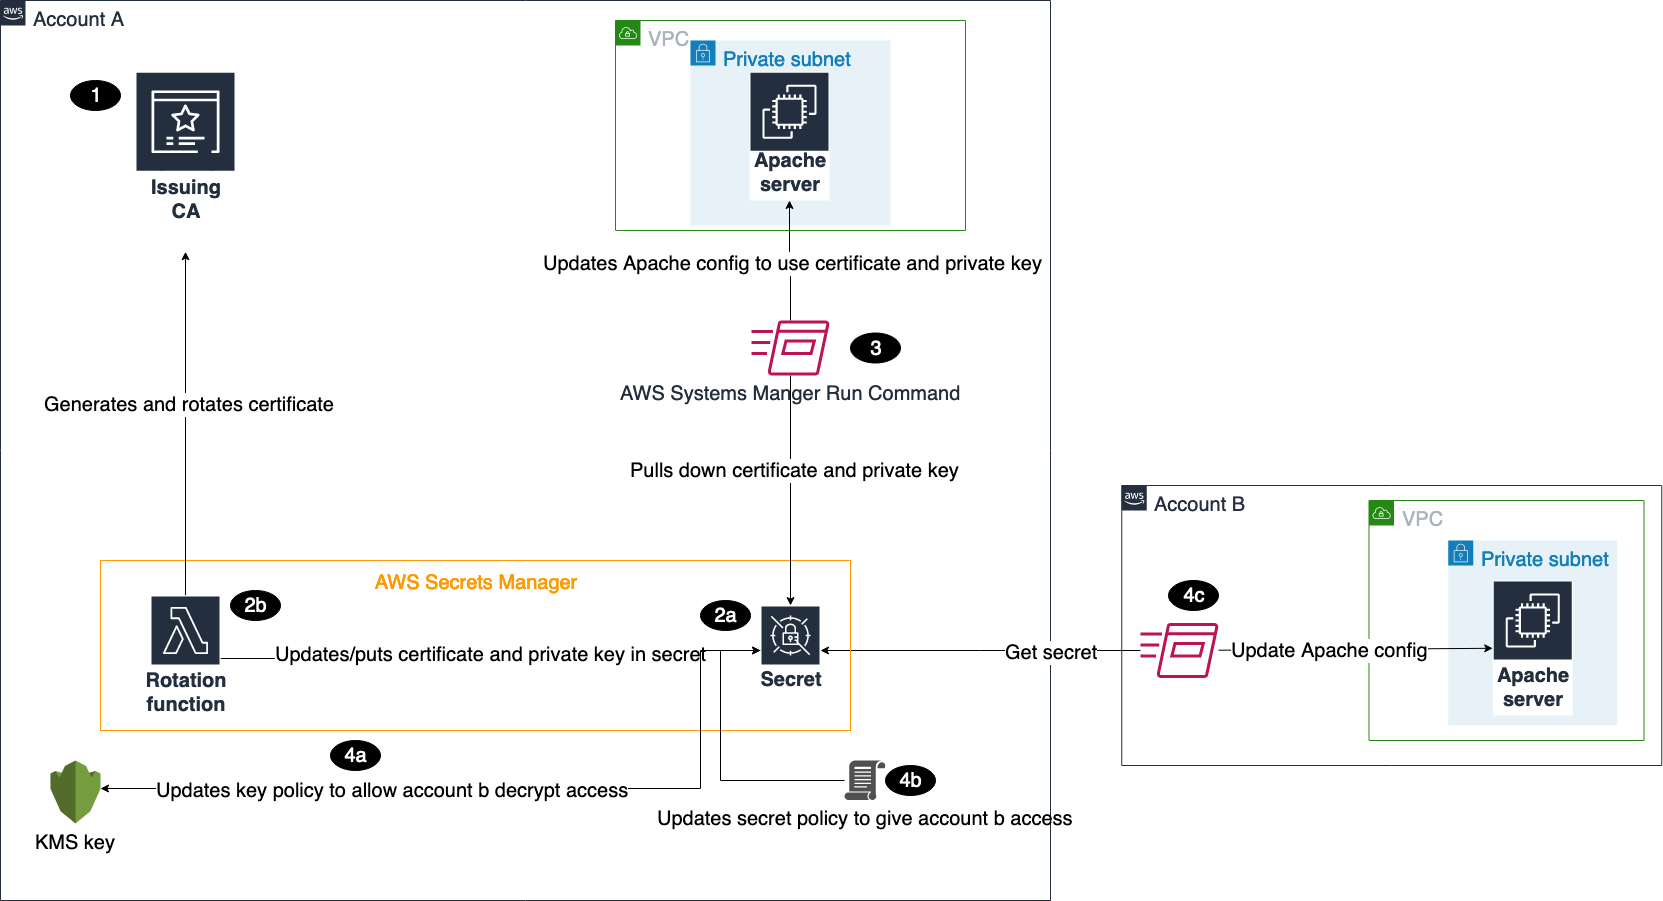
During a Well-Architected Security Pillar review, we identified some applications that used hardcoded passwords that hadn’t been updated for more than 90 days. We re-factored these applications to get passwords from AWS Secrets Manager and followed best practices for performance.

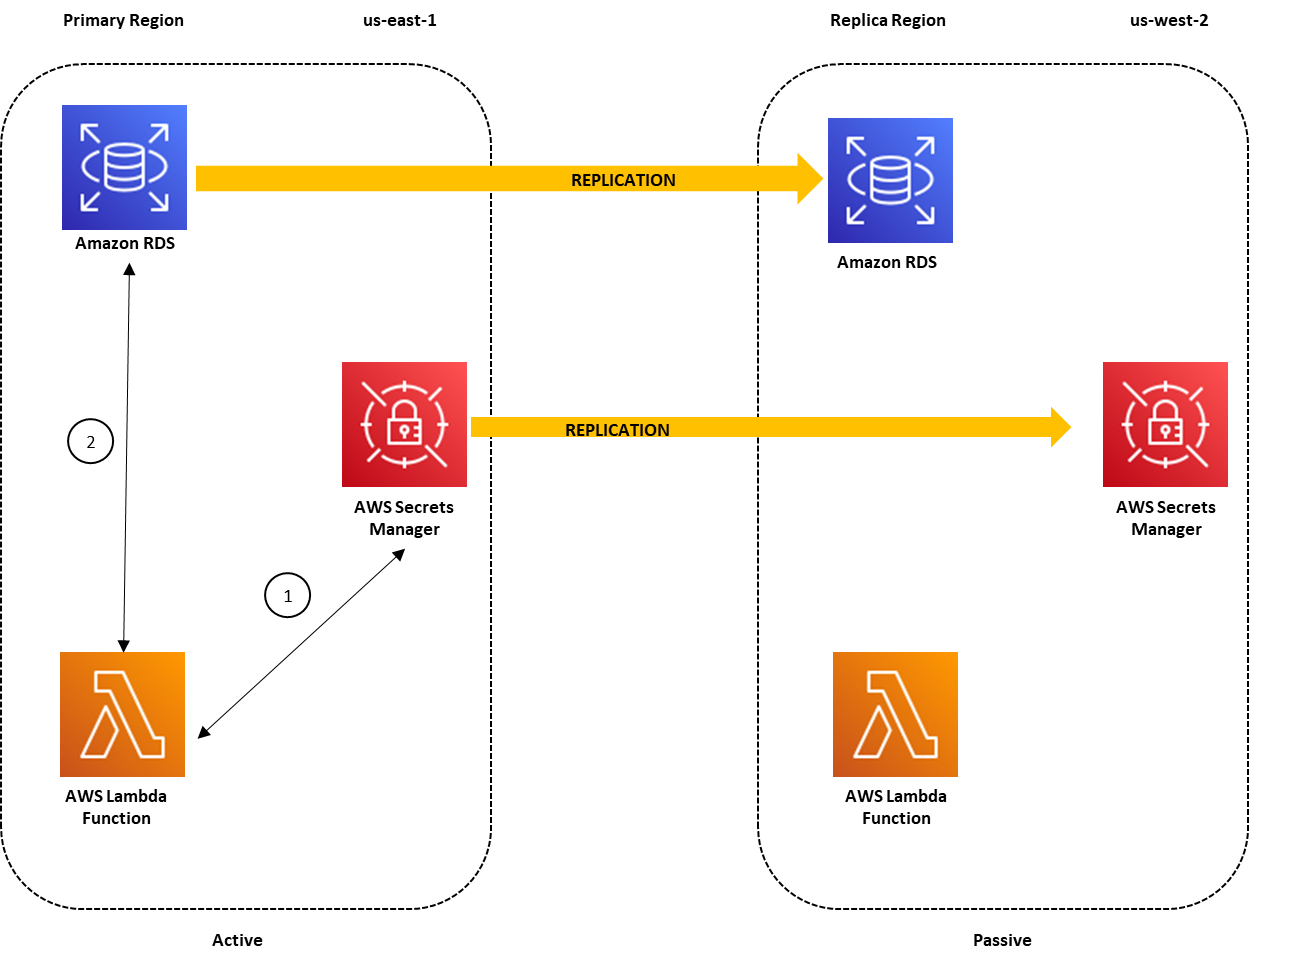
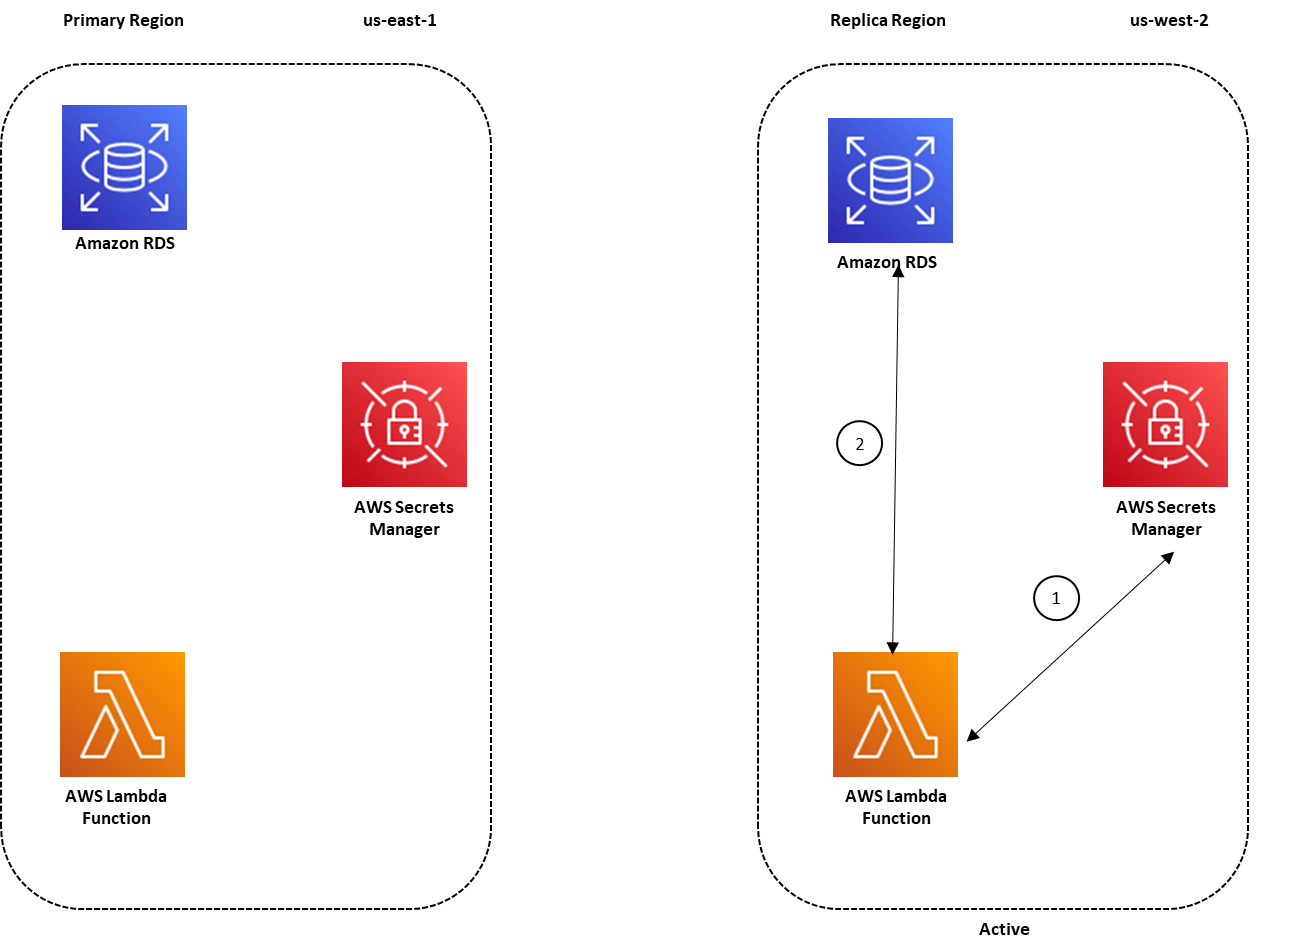
Additionally, we set up a system to automatically change passwords for RDS databases and wrote an AWS Lambda function to update passwords for third-party integration. Some applications on Amazon EC2 were using IAM access keys to access AWS services. We re-factored them to get permissions from the EC2 instance role attached to the EC2 instances, which reduced operational burden of rotating access keys.

Using IAM Access Analyzer, we analyzed AWS CloudTrail logs and generated policies for IAM roles. This helped us determine the least privilege permissions required for the roles as mentioned in the IAM Access Analyzer makes it easier to implement least privilege permissions by generating IAM policies based on access activity blog.

To streamline access for internal users, we migrated users to AWS Single Sign-On (AWS SSO) federated access. We enabled all features in AWS Organizations to use AWS SSO and created permission sets to define access boundaries for different functions. We assigned permission sets to different user groups and assigned users to user groups based on their job function. This allowed us to reduce the number of IAM policies and use tag-based control when defining AWS SSO permissions policies.

We followed the guidance in the Attribute-based Access Control with AWS SSO blog post to map user attributes and use tags to define permissions boundaries for user groups. This allowed us to provide access to users based on specific teams, projects, and departments. We enforced multi-factor authentication (MFA) for all AWS SSO users by configuring MFA settings to allow sign in only when an MFA device has been registered.

These improvements ensure that only the right people have access to the required resources for the right time. They reduce the risk of compromised security credentials by using AWS Security Token Service (AWS STS) to generate temporary credentials when needed. System passwords are better protected from unwanted access and automatically rotated for improved security. AWS SSO also allows us to enforce permissions at scale when people’s job functions change within or across teams.

Conclusion

In this blog post, we described design patterns we used to implement security governance at scale using multi-account strategy and AWS SSO integrations. We also talked about patterns you can adopt for IAM baselining that allow least privilege access, checking for IAM best practices, and proactively detecting unwanted access.

This blog post also covers why you need to refresh your threat model during hyperscale growth and how different services can make it easier to enforce security controls. In the next blog, we will talk about more security design patterns to improve infrastructure security and incident response during hyperscale.

Find out more

Other blogs in this series

Related information

Manage your AWS Directory Service credentials using AWS Secrets Manager

Post Syndicated from Ashwin Bhargava original https://aws.amazon.com/blogs/security/manage-your-aws-directory-service-credentials-using-aws-secrets-manager/

AWS Secrets Manager helps you protect the secrets that are needed to access your applications, services, and IT resources. With this service, you can rotate, manage, and retrieve database credentials, API keys, OAuth tokens, and other secrets throughout their lifecycle. The secret value rotation feature has built-in integration for services like Amazon Relational Database Service (Amazon RDS) , whose credentials can be rotated. The same integration functionality can also be extended to other types of secrets, including API keys and OAuth tokens, with the help of AWS Lambda functions.

This blog post provides details on how Secrets Manager can be used to store and rotate the admin password of AWS Directory Service at a specified frequency. Customers who use the directory services in AWS can deploy the solution in this blog post to minimize the effort spent by their operations team to manually rotate the password (which is one of the best practices of password management). These customers can also benefit by using the secure API access of Secrets Manager to allow access by applications that are using Active Directory–specific accounts. A good example is having an application to reset passwords for AD users and can be done using the API access.

Solution overview

When you configure AWS Directory Service, one of the inputs the service expects is the password for the admin user (administrator). By using an AWS Lambda function and Secrets Manager, you can store the password and rotate it periodically.

Figure 1 shows the architecture diagram for this solution.
 

Figure 1: Architecture diagram

Figure 1: Architecture diagram

The workflow is as follows:

  1. During initial setup (which can be performed either manually or through a CloudFormation template), the password of the admin user is stored as a secret in Secrets Manager. The secret is in the JSON format and contains three fields: Directory ID, UserName, and Password. The secret is encrypted using KMS Key to provide an added layer of security.
  2. This secret is attached to a Lambda function that controls rotation.
  3. This rotation Lambda function generates a new password, updates Active Directory, and then updates the secret. The function can be invoked on as-needed basis or at a desired interval. The CFN template we provide in this post schedules the rotation at a 30-day interval.
  4. Applications can securely fetch the new secret value from Secrets Manager.

Prerequisites and assumptions

To implement this solution, you need an AWS account to test the solution and access AWS services.

Also be aware of the following:

  1. In this solution, you will configure all the (supported) services in the same virtual private cloud (VPC) to simplify networking considerations.
  2. The predefined admin user name for Simple Active Directory is Administrator.
  3. The predefined password is a random 12-character string.

Important: The AWS CloudFormation template that we provide deploys a Simple Active Directory. This is for testing and demonstration purposes; you can modify or reuse the solution for other types of Active Directory solutions.

Deploy the solution

To deploy the solution, you first provision the baseline networking and other resources by using a CloudFormation stack.

The resource provisioning in this step creates these resources:

  • An Amazon Virtual Private Cloud (Amazon VPC) with two private subnets
  • AWS Directory Service installed and configured in the VPC
  • A Secrets Manager secret with rotation enabled
  • A Lambda function inside the VPC
  • These AWS Identity and Access Management (IAM) roles and permissions:
    • Secrets Manager has permission to invoke Lambda functions
    • The Lambda function has permission to update the secret in Secrets Manager
    • The Lambda function has permission to update the password for Directory Service

To deploy the solution by using the CloudFormation template

  1. You can use this downloadable template to set up the resources. To launch directly through the console, choose the following Launch Stack button, which creates the stack in the us-east-1 AWS Region.
    Select the Launch Stack button to launch the template
  2. Choose Next to go to the Specify stack details page.
  3. The bucket hosting the Lambda function code is predefined for ease of implementation, but you can edit the bucket name if necessary. Specify any other template details as needed, and then choose Next.
  4. (Optional) On the Configure Stack Options page, enter any tags, and then choose Next.
  5. On the Review page, select the check box for I acknowledge that AWS CloudFormation might create IAM resources with custom names, and choose Create stack.

It takes approximately 20–25 minutes for the provisioning to complete. When the stack status shows Create Complete, review the outputs that were created by navigating to the Outputs tab, as shown in Figure 2.
 

Figure 2: Outputs created by the CloudFormation template

Figure 2: Outputs created by the CloudFormation template

Now that the stack creation has completed successfully, you should validate the resources that were created.

To validate the resources

  1. Navigate to the AWS Directory Service console. You should see a new directory service that has the corp.com directory set up.
  2. Navigate to the AWS Secrets Manager console and review the secret that was created called DSAdminPswd. Choose the secret value, and then choose Retrieve secret value to reveal the secret values.
     
    Figure 3: Checking the secret value in the Secrets Manager console

    Figure 3: Checking the secret value in the Secrets Manager console

  3. As you might have noticed, the secret value changed from what was initially generated in the template. The Lambda function was invoked when it was attached to the secret, which caused the secret to rotate. To verify that the secret value changed, navigate to the Amazon CloudWatch console, and then navigate to Log groups.
  4. In the search bar, type the Lambda function name dj-rotate-lambda to filter on the log group name.
     
    Figure 4: CloudWatch log groups

    Figure 4: CloudWatch log groups

  5. Choose the log group /aws/lambda/dj-rotate-lambda to open the detailed log streams.
  6. Look at the Log streams and open the recent log stream to view the series of rotation events.
     
    Figure 5: The log data for a complete rotation

    Figure 5: The log data for a complete rotation

    You should see that each of the four stages of rotation (create, set, test, and finish) are called in the right sequence. A Success message in the finishSecret stage confirms the successful rotation of the secret value.

The next step is to rotate the secret manually or set a policy for rotation.

To rotate the secret

The CloudFormation automation has set the rotation configuration to rotate the secret every 30 days. You can alternatively initiate another rotation by choosing Rotate secret immediately, as shown in Figure 6. You will observe the log stream (in CloudWatch Logs) changing, followed by the new secret value.
 

Figure 6: Manual rotation of the secret

Figure 6: Manual rotation of the secret

You can also edit the rotation configuration by choosing Edit rotation and configuring the rotation policy that suits your organizational standards, as shown in Figure 7.
 

Figure 7: Editing the rotation configuration

Figure 7: Editing the rotation configuration

Code walkthrough

The rotation Lambda function works in four stages:

  1. CreateSecret – In this stage, the Lambda function creates a new password for the administrator user and sets up the staging label AWSPENDING for the secret’s new value.
  2. SetSecret – In this stage, the Lambda function fetches the newly generated password by using the label AWSPENDING and sets it as the password to the Active Directory administrator user.
  3. TestSecret – In this stage, the Lambda function verifies that the password is working by using the kinit command and the necessary dependent libraries of the Linux OS (the base OS for Lambda functions). If successful, the function continues to the next stage. In the case of failure, the catch block reverts the password of the Active Directory administrator user to the value in the AWSCURRENT label.
  4. FinishSecret – This is the final stage, where the Lambda function moves the labels AWSCURRENT from the current version of secret to the new version. And the same time, the old version of the secret is given AWSPREVIOUS label.

The Lambda function is written in Python 3.7 runtime and uses AWS SDK for Python (Boto3) API calls for interacting with Secrets Manager and Directory Services.

The directory ID and Secrets Manager endpoint are supplied as environment variables to the Lambda function, as shown in Figure 8. The secret ID is fetched from the event context.
 

Figure 8: Environment variables setup

Figure 8: Environment variables setup

You can download the Lambda code that is used for the rotation logic and modify it to suit your organizational needs. For instance, the random password is configured to have a length of 12 characters, excluding special characters and punctuations, as shown in the following code snippet. You can modify this configuration as needed.

newpasswd = service_client.get_random_password(PasswordLength=12,ExcludeCharacters='/@"\'\\',ExcludePunctuation=True)

As mentioned in the Prerequisites section, make sure that you do proper testing in development or test environments before proceeding to deploy the solution in production environments.

Cleanup

After you complete and test this solution, clean up the resources by deleting the AWS CloudFormation stack called aws-ds-creds-manager. For more information on deleting the stacks, see Deleting a stack on the AWS CloudFormation console.

Conclusion

In this post, we demonstrated how to use the AWS Secrets Manager service to store and rotate the AWS Directory Service Simple Active Directory admin password. You can also use this solution to rotate the AWS Managed Microsoft AD directory.

There are many other code samples listed in the AWS Code Sample Catalog that show how to rotate the passwords for other database services that are supported by this service.

You can find additional rotation Lambda function examples in the open source AWS library for Secrets Manager.

If you have feedback about this post, submit comments in the Comments section below. If you have questions about this post, start a new thread on the AWS Secrets Manager forum or contact AWS Support.

Want more AWS Security how-to content, news, and feature announcements? Follow us on Twitter.

Author

Ashwin Bhargava

Ashwin is a DevOps Consultant at AWS working in Professional Services Canada. He is a DevOps expert and a security enthusiast with more than 13 years of development and consulting experience.

Author

Satya Vajrapu

Satya is a Senior DevOps Consultant with AWS. He works with customers to help design, architect, and develop various practices and tools in the DevOps and cloud toolchain.

Building well-architected serverless applications: Implementing application workload security – part 2

Post Syndicated from Julian Wood original https://aws.amazon.com/blogs/compute/building-well-architected-serverless-applications-implementing-application-workload-security-part-2/

This series of blog posts uses the AWS Well-Architected Tool with the Serverless Lens to help customers build and operate applications using best practices. In each post, I address the serverless-specific questions identified by the Serverless Lens along with the recommended best practices. See the introduction post for a table of contents and explanation of the example application.

Security question SEC3: How do you implement application security in your workload?

This post continues part 1 of this security question. Previously, I cover reviewing security awareness documentation such as the Common Vulnerabilities and Exposures (CVE) database. I show how to use GitHub security features to inspect and manage code dependencies. I then show how to validate inbound events using Amazon API Gateway request validation.

Required practice: Store secrets that are used in your code securely

Store secrets such as database passwords or API keys in a secrets manager. Using a secrets manager allows for auditing access, easier rotation, and prevents exposing secrets in application source code. There are a number of AWS and third-party solutions to store and manage secrets.

AWS Partner Network (APN) member Hashicorp provides Vault to keep secrets and application data secure. Vault has a centralized workflow for tightly controlling access to secrets across applications, systems, and infrastructure. You can store secrets in Vault and access them from an AWS Lambda function to, for example, access a database. You can use the Vault Agent for AWS to authenticate with Vault, receive the database credentials, and then perform the necessary queries. You can also use the Vault AWS Lambda extension to manage the connectivity to Vault.

AWS Systems Manager Parameter Store allows you to store configuration data securely, including secrets, as parameter values.

AWS Secrets Manager enables you to replace hardcoded credentials in your code with an API call to Secrets Manager to retrieve the secret programmatically. You can protect, rotate, manage, and retrieve database credentials, API keys, and other secrets throughout their lifecycle. You can also generate secure secrets. By default, Secrets Manager does not write or cache the secret to persistent storage.

Parameter Store integrates with Secrets Manager. For more information, see “Referencing AWS Secrets Manager secrets from Parameter Store parameters.”

To show how Secrets Manager works, deploy the solution detailed in “How to securely provide database credentials to Lambda functions by using AWS Secrets Manager”.

The AWS Cloud​Formation stack deploys an Amazon RDS MySQL database with a randomly generated password. This is stored in Secrets Manager using a secret resource. A Lambda function behind an API Gateway endpoint returns the record count in a table from the database, using the required credentials. Lambda function environment variables store the database connection details and which secret to return for the database password. The password is not stored as an environment variable, nor in the Lambda function application code.

Lambda environment variables for Secrets Manager

Lambda environment variables for Secrets Manager

The application flow is as follows:

  1. Clients call the API Gateway endpoint
  2. API Gateway invokes the Lambda function
  3. The Lambda function retrieves the database secrets using the Secrets Manager API
  4. The Lambda function connects to the RDS database using the credentials from Secrets Manager and returns the query results

View the password secret value in the Secrets Manager console, which is randomly generated as part of the stack deployment.

Example password stored in Secrets Manager

Example password stored in Secrets Manager

The Lambda function includes the following code to retrieve the secret from Secrets Manager. The function then uses it to connect to the database securely.

secret_name = os.environ['SECRET_NAME']
rds_host = os.environ['RDS_HOST']
name = os.environ['RDS_USERNAME']
db_name = os.environ['RDS_DB_NAME']

session = boto3.session.Session()
client = session.client(
	service_name='secretsmanager',
	region_name=region_name
)
get_secret_value_response = client.get_secret_value(
	SecretId=secret_name
)
...
secret = get_secret_value_response['SecretString']
j = json.loads(secret)
password = j['password']
...
conn = pymysql.connect(
	rds_host, user=name, passwd=password, db=db_name, connect_timeout=5)

Browsing to the endpoint URL specified in the Cloud​Formation output displays the number of records. This confirms that the Lambda function has successfully retrieved the secure database credentials and queried the table for the record count.

Lambda function retrieving database credentials

Lambda function retrieving database credentials

Audit secrets access through a secrets manager

Monitor how your secrets are used to confirm that the usage is expected, and log any changes to them. This helps to ensure that any unexpected usage or change can be investigated, and unwanted changes can be rolled back.

Hashicorp Vault uses Audit devices that keep a detailed log of all requests and responses to Vault. Audit devices can append logs to a file, write to syslog, or write to a socket.

Secrets Manager supports logging API calls with AWS CloudTrail. CloudTrail captures all API calls for Secrets Manager as events. This includes calls from the Secrets Manager console and from code calling the Secrets Manager APIs.

Viewing the CloudTrail event history shows the requests to secretsmanager.amazonaws.com. This shows the requests from the console in addition to the Lambda function.

CloudTrail showing access to Secrets Manager

CloudTrail showing access to Secrets Manager

Secrets Manager also works with Amazon EventBridge so you can trigger alerts when administrator-specified operations occur. You can configure EventBridge rules to alert on deleted secrets or secret rotation. You can also create an alert if anyone tries to use a secret version while it is pending deletion. This can identify and alert when there is an attempt to use an out-of-date secret.

Enforce least privilege access to secrets

Access to secrets must be tightly controlled because the secrets contain sensitive information. Create AWS Identity and Access Management (IAM) policies that enable minimal access to secrets to prevent credentials being accidentally used or compromised. Secrets that have policies that are too permissive could be misused by other environments or developers. This can lead to accidental data loss or compromised systems. For more information, see “Authentication and access control for AWS Secrets Manager”.

Rotate secrets frequently.

Rotating your workload secrets is important. This prevents misuse of your secrets since they become invalid within a configured time period.

Secrets Manager allows you to rotate secrets on a schedule or on demand. This enables you to replace long-term secrets with short-term ones, significantly reducing the risk of compromise. Secrets Manager creates a CloudFormation stack with a Lambda function to manage the rotation process for you. Secrets Manager has native integrations with Amazon RDS, Amazon Redshift, and Amazon DocumentDB. It populates the function with the Amazon Resource Name (ARN) of the secret. You specify the permissions to rotate the credentials, and how often you want to rotate the secret.

The CloudFormation stack creates a MySecretRotationSchedule resource with a MyRotationLambda function to rotate the secret every 30 days.

MySecretRotationSchedule:
    Type: AWS::SecretsManager::RotationSchedule
    DependsOn: SecretRDSInstanceAttachment
    Properties:
    SecretId: !Ref MyRDSInstanceRotationSecret
    RotationLambdaARN: !GetAtt MyRotationLambda.Arn
    RotationRules:
        AutomaticallyAfterDays: 30
MyRotationLambda:
    Type: AWS::Serverless::Function
    Properties:
    Runtime: python3.7
    Role: !GetAtt MyLambdaExecutionRole.Arn
    Handler: mysql_secret_rotation.lambda_handler
    Description: 'This is a lambda to rotate MySql user passwd'
    FunctionName: 'cfn-rotation-lambda'
    CodeUri: 's3://devsecopsblog/code.zip'      
    Environment:
        Variables:
        SECRETS_MANAGER_ENDPOINT: !Sub 'https://secretsmanager.${AWS::Region}.amazonaws.com'

View and edit the rotation settings in the Secrets Manager console.

Secrets Manager rotation settings

Secrets Manager rotation settings

Manually rotate the secret by selecting Rotate secret immediately. This invokes the Lambda function, which updates the database password and updates the secret in Secrets Manager.

View the updated secret in Secrets Manager, where the password has changed.

Secrets Manager password change

Secrets Manager password change

Browse to the endpoint URL to confirm you can still access the database with the updated credentials.

Access endpoint with updated Secret Manager password

Access endpoint with updated Secret Manager password

You can provide your own code to customize a Lambda rotation function for other databases or services. The code includes the commands required to interact with your secured service to update or add credentials.

Conclusion

Implementing application security in your workload involves reviewing and automating security practices at the application code level. By implementing code security, you can protect against emerging security threats. You can improve the security posture by checking for malicious code, including third-party dependencies.

In this post, I continue from part 1, looking at securely storing, auditing, and rotating secrets that are used in your application code.

In the next post in the series, I start to cover the reliability pillar from the Well-Architected Serverless Lens with regulating inbound request rates.

For more serverless learning resources, visit Serverless Land.

How to replicate secrets in AWS Secrets Manager to multiple Regions

Post Syndicated from Fatima Ahmed original https://aws.amazon.com/blogs/security/how-to-replicate-secrets-aws-secrets-manager-multiple-regions/

On March 3, 2021, we launched a new feature for AWS Secrets Manager that makes it possible for you to replicate secrets across multiple AWS Regions. You can give your multi-Region applications access to replicated secrets in the required Regions and rely on Secrets Manager to keep the replicas in sync with the primary secret. In scenarios such as disaster recovery, you can read replicated secrets from your recovery Regions, even if your primary Region is unavailable. In this blog post, I show you how to automatically replicate a secret and access it from the recovery Region to support a disaster recovery plan.

With Secrets Manager, you can store, retrieve, manage, and rotate your secrets, including database credentials, API keys, and other secrets. When you create a secret using Secrets Manager, it’s created and managed in a Region of your choosing. Although scoping secrets to a Region is a security best practice, there are scenarios such as disaster recovery and cross-Regional redundancy that require replication of secrets across Regions. Secrets Manager now makes it possible for you to easily replicate your secrets to one or more Regions to support these scenarios.

With this new feature, you can create Regional read replicas for your secrets. When you create a new secret or edit an existing secret, you can specify the Regions where your secrets need to be replicated. Secrets Manager will securely create the read replicas for each secret and its associated metadata, eliminating the need to maintain a complex solution for this functionality. Any update made to the primary secret, such as a secret value updated through automatic rotation, will be automatically propagated by Secrets Manager to the replica secrets, making it easier to manage the life cycle of multi-Region secrets.

Note: Each replica secret is billed as a separate secret. For more details on pricing, see the AWS Secrets Manager pricing page.

Architecture overview

Suppose that your organization has a requirement to set up a disaster recovery plan. In this example, us-east-1 is the designated primary Region, where you have an application running on a simple AWS Lambda function (for the example in this blog post, I’m using Python 3). You also have an Amazon Relational Database Service (Amazon RDS) – MySQL DB instance running in the us-east-1 Region, and you’re using Secrets Manager to store the database credentials as a secret. Your application retrieves the secret from Secrets Manager to access the database. As part of the disaster recovery strategy, you set up us-west-2 as the designated recovery Region, where you’ve replicated your application, the DB instance, and the database secret.

To elaborate, the solution architecture consists of:

  • A primary Region for creating the secret, in this case us-east-1 (N. Virginia).
  • A replica Region for replicating the secret, in this case us-west-2 (Oregon).
  • An Amazon RDS – MySQL DB instance that is running in the primary Region and configured for replication to the replica Region. To set up read replicas or cross-Region replicas for Amazon RDS, see Working with read replicas.
  • A secret created in Secrets Manager and configured for replication for the replica Region.
  • AWS Lambda functions (running on Python 3) deployed in the primary and replica Regions acting as clients to the MySQL DBs.

This architecture is illustrated in Figure 1.

Figure 1: Architecture overview for a multi-Region secret replication with the primary Region active

Figure 1: Architecture overview for a multi-Region secret replication with the primary Region active

In the primary region us-east-1, the Lambda function uses the credentials stored in the secret to access the database, as indicated by the following steps in Figure 1:

  1. The Lambda function sends a request to Secrets Manager to retrieve the secret value by using the GetSecretValue API call. Secrets Manager retrieves the secret value for the Lambda function.
  2. The Lambda function uses the secret value to connect to the database in order to read/write data.

The replicated secret in us-west-2 points to the primary DB instance in us-east-1. This is because when Secrets Manager replicates the secret, it replicates the secret value and all the associated metadata, such as the database endpoint. The database endpoint details are stored within the secret because Secrets Manager uses this information to connect to the database and rotate the secret if it is configured for automatic rotation. The Lambda function can also use the database endpoint details in the secret to connect to the database.

To simplify database failover during disaster recovery, as I’ll cover later in the post, you can configure an Amazon Route 53 CNAME record for the database endpoint in the primary Region. The database host associated with the secret is configured with the database CNAME record. When the primary Region is operating normally, the CNAME record points to the database endpoint in the primary Region. The requests to the database CNAME are routed to the DB instance in the primary Region, as shown in Figure 1.

During disaster recovery, you can failover to the replica Region, us-west-2, to make it possible for your application running in this Region to access the Amazon RDS read replica in us-west-2 by using the secret stored in the same Region. As part of your failover script, the database CNAME record should also be updated to point to the database endpoint in us-west-2. Because the database CNAME is used to point to the database endpoint within the secret, your application in us-west-2 can now use the replicated secret to access the database read replica in this Region. Figure 2 illustrates this disaster recovery scenario.

Figure 2: Architecture overview for a multi-Region secret replication with the replica Region active

Figure 2: Architecture overview for a multi-Region secret replication with the replica Region active

Prerequisites

The procedure described in this blog post requires that you complete the following steps before starting the procedure:

  1. Configure an Amazon RDS DB instance in the primary Region, with replication configured in the replica Region.
  2. Configure a Route 53 CNAME record for the database endpoint in the primary Region.
  3. Configure the Lambda function to connect with the Amazon RDS database and Secrets Manager by following the procedure in this blog post.
  4. Sign in to the AWS Management Console using a role that has SecretsManagerReadWrite permissions in the primary and replica Regions.

Enable replication for secrets stored in Secrets Manager

In this section, I walk you through the process of enabling replication in Secrets Manager for:

  1. A new secret that is created for your Amazon RDS database credentials
  2. An existing secret that is not configured for replication

For the first scenario, I show you the steps to create a secret in Secrets Manager in the primary Region (us-east-1) and enable replication for the replica Region (us-west-2).

To create a secret with replication enabled

  1. In the AWS Management Console, navigate to the Secrets Manager console in the primary Region (N. Virginia).
  2. Choose Store a new secret.
  3. On the Store a new secret screen, enter the Amazon RDS database credentials that will be used to connect with the Amazon RDS DB instance. Select the encryption key and the Amazon RDS DB instance, and then choose Next.
  4. Enter the secret name of your choice, and then enter a description. You can also optionally add tags and resource permissions to the secret.
  5. Under Replicate Secret – optional, choose Replicate secret to other regions.

    Figure 3: Replicate a secret to other Regions

    Figure 3: Replicate a secret to other Regions

  6. For AWS Region, choose the replica Region, US West (Oregon) us-west-2. For Encryption Key, choose Default to store your secret in the replica Region. Then choose Next.

    Figure 4: Configure secret replication

    Figure 4: Configure secret replication

  7. In the Configure Rotation section, you can choose whether to enable rotation. For this example, I chose not to enable rotation, so I selected Disable automatic rotation. However, if you want to enable rotation, you can do so by following the steps in Enabling rotation for an Amazon RDS database secret in the Secrets Manager User Guide. When you enable rotation in the primary Region, any changes to the secret from the rotation process are also replicated to the replica Region. After you’ve configured the rotation settings, choose Next.
  8. On the Review screen, you can see the summary of the secret configuration, including the secret replication configuration.

    Figure 5: Review the secret before storing

    Figure 5: Review the secret before storing

  9. At the bottom of the screen, choose Store.
  10. At the top of the next screen, you’ll see two banners that provide status on:
    • The creation of the secret in the primary Region
    • The replication of the secret in the Secondary Region

    After the creation and replication of the secret is successful, the banners will provide you with confirmation details.

At this point, you’ve created a secret in the primary Region (us-east-1) and enabled replication in a replica Region (us-west-2). You can now use this secret in the replica Region as well as the primary Region.

Now suppose that you have a secret created in the primary Region (us-east-1) that hasn’t been configured for replication. You can also configure replication for this existing secret by using the following procedure.

To enable multi-Region replication for existing secrets

  1. In the Secrets Manager console, choose the secret name. At the top of the screen, choose Replicate secret to other regions.
    Figure 6: Enable replication for existing secrets

    Figure 6: Enable replication for existing secrets

    This opens a pop-up screen where you can configure the replica Region and the encryption key for encrypting the secret in the replica Region.

  2. Choose the AWS Region and encryption key for the replica Region, and then choose Complete adding region(s).
    Figure 7: Configure replication for existing secrets

    Figure 7: Configure replication for existing secrets

    This starts the process of replicating the secret from the primary Region to the replica Region.

  3. Scroll down to the Replicate Secret section. You can see that the replication to the us-west-2 Region is in progress.
    Figure 8: Review progress for secret replication

    Figure 8: Review progress for secret replication

    After the replication is successful, you can look under Replication status to review the replication details that you’ve configured for your secret. You can also choose to replicate your secret to more Regions by choosing Add more regions.

    Figure 9: Successful secret replication to a replica Region

    Figure 9: Successful secret replication to a replica Region

Update the secret with the CNAME record

Next, you can update the host value in your secret to the CNAME record of the DB instance endpoint. This will make it possible for you to use the secret in the replica Region without making changes to the replica secret. In the event of a failover to the replica Region, you can simply update the CNAME record to the DB instance endpoint in the replica Region as a part of your failover script

To update the secret with the CNAME record

  1. Navigate to the Secrets Manager console, and choose the secret that you have set up for replication
  2. In the Secret value section, choose Retrieve secret value, and then choose Edit.
  3. Update the secret value for the host with the CNAME record, and then choose Save.

    Figure 10: Edit the secret value

    Figure 10: Edit the secret value

  4. After you choose Save, you’ll see a banner at the top of the screen with a message that indicates that the secret was successfully edited.Because the secret is set up for replication, you can also review the status of the synchronization of your secret to the replica Region after you updated the secret. To do so, scroll down to the Replicate Secret section and look under Region Replication Status.


    Figure 11: Successful secret replication for a modified secret

    Figure 11: Successful secret replication for a modified secret

Access replicated secrets from the replica Region

Now that you’ve configured the secret for replication in the primary Region, you can access the secret from the replica Region. Here I demonstrate how to access a replicated secret from a simple Lambda function that is deployed in the replica Region (us-west-2).

To access the secret from the replica Region

  1. From the AWS Management Console, navigate to the Secrets Manager console in the replica Region (Oregon) and view the secret that you configured for replication in the primary Region (N. Virginia).

    Figure 12: View secrets that are configured for replication in the replica Region

    Figure 12: View secrets that are configured for replication in the replica Region

  2. Choose the secret name and review the details that were replicated from the primary Region. A secret that is configured for replication will display a banner at the top of the screen stating the replication details.

    Figure 13: The replication status banner

    Figure 13: The replication status banner

  3. Under Secret Details, you can see the secret’s ARN. You can use the secret’s ARN to retrieve the secret value from the Lambda function or application that is deployed in your replica Region (Oregon). Make a note of the ARN.

    Figure 14: View secret details

    Figure 14: View secret details

During a disaster recovery scenario when the primary Region isn’t available, you can update the CNAME record to point to the DB instance endpoint in us-west-2 as part of your failover script. For this example, my application that is deployed in the replica Region is configured to use the replicated secret’s ARN.

Let’s suppose your sample Lambda function defines the secret name and the Region in the environment variables. The REGION_NAME environment variable contains the name of the replica Region; in this example, us-west-2. The SECRET_NAME environment variable is the ARN of your replicated secret in the replica Region, which you noted earlier.

Figure 15: Environment variables for the Lambda function

Figure 15: Environment variables for the Lambda function

In the replica Region, you can now refer to the secret’s ARN and Region in your Lambda function code to retrieve the secret value for connecting to the database. The following sample Lambda function code snippet uses the secret_name and region_name variables to retrieve the secret’s ARN and the replica Region values stored in the environment variables.

secret_name = os.environ['SECRET_NAME']
region_name = os.environ['REGION_NAME']

def openConnection():
    # Create a Secrets Manager client
    session = boto3.session.Session()
    client = session.client(
        service_name='secretsmanager',
        region_name=region_name
    )
    try:
        get_secret_value_response = 
client.get_secret_value(
            SecretId=secret_name
        )
    except ClientError as e:
        if e.response['Error']['Code'] == 
'DecryptionFailureException':

Alternately, you can simply use the Python 3 sample code for the replicated secret to retrieve the secret value from the Lambda function in the replica Region. You can review the provided sample codes by navigating to the secret details in the console, as shown in Figure 16.

Figure 16: Python 3 sample code for the replicated secret

Figure 16: Python 3 sample code for the replicated secret

Summary

When you plan for disaster recovery, you can configure replication of your secrets in Secrets Manager to provide redundancy for your secrets. This feature reduces the overhead of deploying and maintaining additional configuration for secret replication and retrieval across AWS Regions. In this post, I showed you how to create a secret and configure it for multi-Region replication. I also demonstrated how you can configure replication for existing secrets across multiple Regions.

I showed you how to use secrets from the replica Region and configure a sample Lambda function to retrieve a secret value. When replication is configured for secrets, you can use this technique to retrieve the secrets in the replica Region in a similar way as you would in the primary Region.

You can start using this feature through the AWS Secrets Manager console, AWS Command Line Interface (AWS CLI), AWS SDK, or AWS CloudFormation. To learn more about this feature, see the AWS Secrets Manager documentation. If you have feedback about this blog post, submit comments in the Comments section below. If you have questions about this blog post, start a new thread on the AWS Secrets Manager forum.

Want more AWS Security how-to content, news, and feature announcements? Follow us on Twitter.

Author

Fatima Ahmed

Fatima is a Security Global Practice Lead at AWS. She is passionate about cybersecurity and helping customers build secure solutions in the AWS Cloud. When she is not working, she enjoys time with her cat or solving cryptic puzzles.

Use AWS Secrets Manager to simplify the management of private certificates

Post Syndicated from Maitreya Ranganath original https://aws.amazon.com/blogs/security/use-aws-secrets-manager-to-simplify-the-management-of-private-certificates/

AWS Certificate Manager (ACM) lets you easily provision, manage, and deploy public and private Secure Sockets Layer/Transport Layer Security (SSL/TLS) certificates for use with Amazon Web Services (AWS) services and your internal connected resources. For private certificates, AWS Certificate Manager Private Certificate Authority (ACM PCA) can be used to create private CA hierarchies, including root and subordinate CAs, without the investment and maintenance costs of operating an on-premises CA. With these CAs, you can issue custom end-entity certificates or use the ACM defaults.

When you manage the lifecycle of certificates, it’s important to follow best practices. You can think of a certificate as an identity of a service you’re connecting to. You have to ensure that these identities are secure and up to date, ideally with the least amount of manual intervention. AWS Secrets Manager provides a mechanism for managing certificates, and other secrets, at scale. Specifically, you can configure secrets to automatically rotate on a scheduled basis by using pre-built or custom AWS Lambda functions, encrypt them by using AWS Key Management Service (AWS KMS) keys, and automatically retrieve or distribute them for use in applications and services across an AWS environment. This reduces the overhead of manually managing the deployment, creation, and secure storage of these certificates.

In this post, you’ll learn how to use Secrets Manager to manage and distribute certificates created by ACM PCA across AWS Regions and accounts.

We present two use cases in this blog post to demonstrate the difference between issuing private certificates with ACM and with ACM PCA. For the first use case, you will create a certificate by using the ACM defaults for private certificates. You will then deploy the ACM default certificate to an Amazon Elastic Compute Cloud (Amazon EC2) instance that is launched in the same account as the secret and private CA. In the second scenario, you will create a custom certificate by using ACM PCA templates and parameters. This custom certificate will be deployed to an EC2 instance in a different account to demonstrate cross-account sharing of secrets.

Solution overview

Figure 1 shows the architecture of our solution.

Figure 1: Solution architecture

Figure 1: Solution architecture

This architecture includes resources that you will create during the blog walkthrough and by using AWS CloudFormation templates. This architecture outlines how these services can be used in a multi-account environment. As shown in the diagram:

  1. You create a certificate authority (CA) in ACM PCA to generate end-entity certificates.
  2. In the account where the issuing CA was created, you create secrets in Secrets Manager.
    1. There are several required parameters that you must provide when creating secrets, based on whether you want to create an ACM or ACM PCA issued certificate. These parameters will be passed to our Lambda function to make sure that the certificate is generated and stored properly.
    2. The Lambda rotation function created by the CloudFormation template is attached when configuring secrets rotation. Initially, the function generates two Privacy-Enhanced Mail (PEM) encoded files containing the certificate and private key, based on the provided parameters, and stores those in the secret. Subsequent calls to the function are made when the secret needs to be rotated, and then the function stores the resulting Certificate PEM and Private Key PEM in the desired secret. The function is written using Python, the AWS SDK for Python (Boto3), and OpenSSL. The flow of the function follows the requirements for rotating secrets in Secrets Manager.
  3. The first CloudFormation template creates a Systems Manager Run Command document that can be invoked to install the certificate and private key from the secret on an Apache Server running on EC2 in Account A.
  4. The second CloudFormation template deploys the same Run Command document and EC2 environment in Account B.
    1. To make sure that the account has the ability to pull down the certificate and private key from Secrets Manager, you need to update the key policy in Account A to give Account B access to decrypt the secret.
    2. You also need to add a resource-based policy to the secret that gives Account B access to retrieve the secret from Account A.
    3. Once the proper access is set up in Account A, you can use the Run Command document to install the certificate and private key on the Apache Server.

In a multi-account scenario, it’s common to have a central or shared AWS account that owns the ACM PCA resource, while workloads that are deployed in other AWS accounts use certificates issued by the ACM PCA. This can be achieved in two ways:

  1. Secrets in Secrets Manager can be shared with other AWS accounts by using resource-based policies. Once shared, the secrets can be deployed to resources, such as EC2 instances.
  2. You can share the central ACM PCA with other AWS accounts by using AWS Resource Access Manager or ACM PCA resource-based policies. These two options allow the receiving AWS account or accounts to issue private certificates by using the shared ACM PCA. These issued certificates can then use Secrets Manager to manage the secret in the child account and leverage features like rotation.

We will focus on first case for sharing secrets.

Solution cost

The cost for running this solution comes from the following services:

  • AWS Certificate Manager Private Certificate Authority (ACM PCA)
    Referring to the pricing page for ACM PCA, this solution incurs a prorated monthly charge of $400 for each CA that is created. A CA can be deleted the same day it’s created, leading to a charge of around $13/day (400 * 12 / 365.25). In addition, there is a cost for issuing certificates using ACM PCA. For the first 1000 certificates, this cost is $0.75. For this demonstration, you only need two certificates, resulting in a total charge of $1.50 for issuing certificates using ACM PCA. In all, the use of ACM PCA in this solution results in a charge of $14.50.
  • Amazon EC2
    The CloudFormation templates create t2.micro instances that cost $0.0116/hour, if they’re not eligible for Free Tier.
  • Secrets Manager
    There is a 30-day free trial for Secrets Manager, which is initiated when the first secret is created. After the free trial has completed, it costs $0.40 per secret stored per month. You will use two secrets for this solution and can schedule these for deletion after seven days, resulting in a prorated charge of $0.20.
  • Lambda
    Lambda has a free usage tier that allows for 1 million free requests per month and 400,000 GB-seconds of compute time per month. This fits within the usage for this blog, making the cost $0.
  • AWS KMS
    A single key created by one of the CloudFormation templates costs $1/month. The first 20,000 requests to AWS KMS are free, which fits within the usage of the test environment. In a production scenario, AWS KMS would charge $0.03 per 10,000 requests involving this key.

There are no charges for Systems Manager Run Command.

See the “Clean up resources” section of this blog post to get information on how to delete the resources that you create for this environment.

Deploy the solution

Now we’ll walk through the steps to deploy the solution. The CloudFormation templates and Lambda function code can be found in the AWS GitHub repository.

Create a CA to issue certificates

First, you’ll create an ACM PCA to issue private certificates. A common practice we see with customers is using a subordinate CA in AWS that is used to issue end-entity certificates for applications and workloads in the cloud. This subordinate can either point to a root CA in ACM PCA that is maintained by a central team, or to an existing on-premises public key infrastructure (PKI). There are some considerations when creating a CA hierarchy in ACM.

For demonstration purposes, you need to create a CA that can issue end-entity certificates. If you have an existing PKI that you want to use, you can create a subordinate CA that is signed by an external CA that can issue certificates. Otherwise, you can create a root CA and begin building a PKI on AWS. During creation of the CA, make sure that ACM has permissions to automatically renew certificates, because this feature will be used in later steps.

You should have one or more private CAs in the ACM console, as shown in Figure 2.

Figure 2: A private CA in the ACM PCA console

Figure 2: A private CA in the ACM PCA console

You will use two CloudFormation templates for this architecture. The first is launched in the same account where your private CA lives, and the second is launched in a different account. The first template generates the following: a Lambda function used for Secrets Manager rotation, an AWS KMS key to encrypt secrets, and a Systems Manager Run Command document to install the certificate on an Apache Server running on EC2 in Amazon Virtual Private Cloud (Amazon VPC). The second template launches the same Systems Manager Run Command document and EC2 environment.

To deploy the resources for the first template, select the following Launch Stack button. Make sure you’re in the N. Virginia (us-east-1) Region.

Select the Launch Stack button to launch the template

The template takes a few minutes to launch.

Use case #1: Create and deploy an ACM certificate

For the first use case, you’ll create a certificate by using the ACM defaults for private certificates, and then deploy it.

Create a Secrets Manager secret

To begin, create your first secret in Secrets Manager. You will create these secrets in the console to see how the service can be set up and used, but all these actions can be done through the AWS Command Line Interface (AWS CLI) or AWS SDKs.

To create a secret

  1. Navigate to the Secrets Manager console.
  2. Choose Store a new secret.
  3. For the secret type, select Other type of secrets.
  4. The Lambda rotation function has a set of required parameters in the secret type depending on what kind of certificate needs to be generated.For this first secret, you’re going to create an ACM_ISSUED certificate. Provide the following parameters.

    Key Value
    CERTIFICATE_TYPE ACM_ISSUED
    CA_ARN The Amazon Resource Name (ARN) of your certificate-issuing CA in ACM PCA
    COMMON_NAME The end-entity name for your certificate (for example, server1.example)
    ENVIRONMENT TEST (You need this later on to test the renewal of certificates. If using this outside of the blog walkthrough, set it to something like DEV or PROD.)
  5. For Encryption key, select CAKey, and then choose Next.
  6. Give the secret a name and optionally add tags or a description. Choose Next.
  7. Select Enable automatic rotation and choose the Lambda function that starts with <CloudFormation Stack Name>-SecretsRotateFunction. Because you’re creating an ACM-issued certificate, the rotation will be handled 60 days before the certificate expires. The validity is set to 365 days, so any value higher than 305 would work. Choose Next.
  8. Review the configuration, and then choose Store.
  9. This will take you back to a list of your secrets, and you will see your new secret, as shown in Figure 3. Select the new secret.

    Figure 3: The new secret in the Secrets Manager console

    Figure 3: The new secret in the Secrets Manager console

  10. Choose Retrieve secret value to confirm that CERTIFICATE_PEM, PRIVATE_KEY_PEM, CERTIFICATE_CHAIN_PEM, and CERTIFICATE_ARN are set in the secret value.

You now have an ACM-issued certificate that can be deployed to an end entity.

Deploy to an end entity

For testing purposes, you will now deploy the certificate that you just created to an Apache Server.

To deploy the certificate to the Apache Server

  1. In a new tab, navigate to the Systems Manager console.
  2. Choose Documents at the bottom left, and then choose the Owned by me tab.
  3. Choose RunUpdateTLS.
  4. Choose Run command at the top right.
  5. Copy and paste the secret ARN from Secrets Manager and make sure there are no leading or trailing spaces.
  6. Select Choose instances manually, and then choose ApacheServer.
  7. Select CloudWatch output to track progress.
  8. Choose Run.

The certificate and private key are now installed on the server, and it has been restarted.

To verify that the certificate was installed

  1. Navigate to the EC2 console.
  2. In the dashboard, choose Running Instances.
  3. Select ApacheServer, and choose Connect.
  4. Select Session Manager, and choose Connect.
  5. When you’re logged in to the instance, enter the following command.
    openssl s_client -connect localhost:443 | openssl x509 -text -noout
    

    This will display the certificate that the server is using, along with other metadata like the certificate chain and validity period. For the validity period, note the Not Before and Not After dates and times, as shown in figure 4.

    Figure 4: Server certificate

    Figure 4: Server certificate

Now, test the rotation of the certificate manually. In a production scenario, this process would be automated by using maintenance windows. Maintenance windows allow for the least amount of disruption to the applications that are using certificates, because you can determine when the server will update its certificate.

To test the rotation of the certificate

  1. Navigate back to your secret in Secrets Manager.
  2. Choose Rotate secret immediately. Because you set the ENVIRONMENT key to TEST in the secret, this rotation will renew the certificate. When the key isn’t set to TEST, the rotation function pulls down the renewed certificate based on its rotation schedule, because ACM is managing the renewal for you. In a couple of minutes, you’ll receive an email from ACM stating that your certificate was rotated.
  3. Pull the renewed certificate down to the server, following the same steps that you used to deploy the certificate to the Apache Server.
  4. Follow the steps that you used to verify that the certificate was installed to make sure that the validity date and time has changed.

Use case #2: Create and deploy an ACM PCA certificate by using custom templates

Next, use the second CloudFormation template to create a certificate, issued by ACM PCA, which will be deployed to an Apache Server in a different account. Sign in to your other account and select the following Launch Stack button to launch the CloudFormation template.

Select the Launch Stack button to launch the template

This creates the same Run Command document you used previously, as well as the EC2 and Amazon VPC environment running an Apache Server. This template takes in a parameter for the KMS key ARN; this can be found in the first template’s output section, shown in figure 5.

Figure 5: CloudFormation outputs

Figure 5: CloudFormation outputs

While that’s completing, sign in to your original account so that you can create the new secret.

To create the new secret

  1. Follow the same steps you used to create a secret, but change the secret values passed in to the following.

    Key Value
    CA_ARN The ARN of your certificate-issuing CA in ACM PCA
    COMMON_NAME You can use any name you want, such as server2.example
    TEMPLATE_ARN

    For testing purposes, use arn:aws:acm-pca:::template/EndEntityCertificate/V1

    This template ARN determines what type of certificate is being created and your desired path length. For more information, see Understanding Certificate Templates.

    KEY_ALGORITHM TYPE_RSA
    (You can also use TYPE_DSA)
    KEY_SIZE 2048
    (You can also use 1024 or 4096)
    SIGNING_HASH sha256
    (You can also use sha384 or sha512)
    SIGNING_ALGORITHM RSA
    (You can also use ECDSA if the key type for your issuing CA is set to ECDSA P256 or ECDSA P384)
    CERTIFICATE_TYPE ACM_PCA_ISSUED
  2. Add the following resource policy during the name and description step. This gives your other account access to pull this secret down to install the certificate on its Apache Server.
    {
      "Version" : "2012-10-17",
      "Statement" : [ {
        "Effect" : "Allow",
        "Principal" : {
          "AWS" : "<ARN in output of second CloudFormation Template>"
        },
        "Action" : "secretsmanager:GetSecretValue",
        "Resource" : "*"
      } ]
    }
    

  3. Finish creating the secret.

After the secret has been created, the last thing you need to do is add permissions to the KMS key policy so that your other account can decrypt the secret when installing the certificate on your server.

To add AWS KMS permissions

  1. Navigate to the AWS KMS console, and choose CAKey.
  2. Next to the key policy name, choose Edit.
  3. For the Statement ID (SID) Allow use of the key, add the ARN of the EC2 instance role in the other account. This can be found in the CloudFormation templates as an output called ApacheServerInstanceRole, as shown in Figure 5. The Statement should look something like this:
    {
                "Sid": "Allow use of the key",
                "Effect": "Allow",
                "Principal": {
                    "AWS": [
                        "arn:aws:iam::<AccountID with CA>:role/<Apache Server Instance Role>",
                        "arn:aws:iam:<Second AccountID>:role/<Apache Server Instance Role>"
                    ]
                },
                "Action": [
                    "kms:Encrypt",
                    "kms:Decrypt",
                    "kms:ReEncrypt*",
                    "kms:GenerateDataKey*",
                    "kms:DescribeKey"
                ],
                "Resource": "*"
    }
    

Your second account now has permissions to pull down the secret and certificate to the Apache Server. Follow the same steps described in the earlier section, “Deploy to an end entity.” Test rotating the secret the same way, and make sure the validity period has changed. You may notice that you didn’t get an email notifying you of renewal. This is because the certificate isn’t issued by ACM.

In this demonstration, you may have noticed you didn’t create resources that pull down the secret in different Regions, just in different accounts. If you want to deploy certificates in different Regions from the one where you create the secret, the process is exactly the same as what we described here. You don’t need to do anything else to accomplish provisioning and deploying in different Regions.

Clean up resources

Finally, delete the resources you created in the earlier steps, in order to avoid additional charges described in the section, “Solution cost.”

To delete all the resources created:

  1. Navigate to the CloudFormation console in both accounts, and select the stack that you created.
  2. Choose Actions, and then choose Delete Stack. This will take a few minutes to complete.
  3. Navigate to the Secrets Manager console in the CA account, and select the secrets you created.
  4. Choose Actions, and then choose Delete secret. This won’t automatically delete the secret, because you need to set a waiting period that allows for the secret to be restored, if needed. The minimum time is 7 days.
  5. Navigate to the Certificate Manager console in the CA account.
  6. Select the certificates that were created as part of this blog walkthrough, choose Actions, and then choose Delete.
  7. Choose Private CAs.
  8. Select the subordinate CA you created at the beginning of this process, choose Actions, and then choose Disable.
  9. After the CA is disabled, choose Actions, and then Delete. Similar to the secrets, this doesn’t automatically delete the CA but marks it for deletion, and the CA can be recovered during the specified period. The minimum waiting period is also 7 days.

Conclusion

In this blog post, we demonstrated how you could use Secrets Manager to rotate, store, and distribute private certificates issued by ACM and ACM PCA to end entities. Secrets Manager uses AWS KMS to secure these secrets during storage and delivery. You can introduce additional automation for deploying the certificates by using Systems Manager Maintenance Windows. This allows you to define a schedule for when to deploy potentially disruptive changes to EC2 instances.

If you have feedback about this post, submit comments in the Comments section below. If you have questions about this post, start a new thread on the AWS Secrets Manager forum or contact AWS Support.

Want more AWS Security how-to content, news, and feature announcements? Follow us on Twitter.

Author

Maitreya Ranganath

Maitreya is an AWS Security Solutions Architect. He enjoys helping customers solve security and compliance challenges and architect scalable and cost-effective solutions on AWS.

Author

Blake Franzen

Blake is a Security Solutions Architect with AWS in Seattle. His passion is driving customers to a more secure AWS environment while ensuring they can innovate and move fast. Outside of work, he is an avid movie buff and enjoys recreational sports.

Creating a cross-region Active Directory domain with AWS Launch Wizard for Microsoft Active Directory

Post Syndicated from AWS Admin original https://aws.amazon.com/blogs/compute/creating-a-cross-region-active-directory-domain-with-aws-launch-wizard-for-microsoft-active-directory/

AWS Launch Wizard is a console-based service to quickly and easily size, configure, and deploy third party applications, such as Microsoft SQL Server Always On and HANA based SAP systems, on AWS without the need to identify and provision individual AWS resources. AWS Launch Wizard offers an easy way to deploy enterprise applications and optimize costs. Instead of selecting and configuring separate infrastructure services, you go through a few steps in the AWS Launch Wizard and it deploys a ready-to-use application on your behalf. It reduces the time you need to spend on investigating how to provision, cost and configure your application on AWS.

You can now use AWS Launch Wizard to deploy and configure self-managed Microsoft Windows Server Active Directory Domain Services running on Amazon Elastic Compute Cloud (EC2) instances. With Launch Wizard, you can have fully-functioning, production-ready domain controllers within a few hours—all without having to manually deploy and configure your resources.

You can use AWS Directory Service to run Microsoft Active Directory (AD) as a managed service, without the hassle of managing your own infrastructure. If you need to run your own AD infrastructure, you can use AWS Launch Wizard to simplify the deployment and configuration process.

In this post, I walk through creation of a cross-region Active Directory domain using Launch Wizard. First, I deploy a single Active Directory domain spanning two regions. Then, I configure Active Directory Sites and Services to match the network topology. Finally, I create a user account to verify replication of the Active Directory domain.

Diagram of Resources deployed in this post

Figure 1: Diagram of resources deployed in this post

Prerequisites

  1. You must have a VPC in your home. Additionally, you must have remote regions that have CIDRs that do not overlap with each other. If you need to create VPCs and subnets that do not overlap, please refer here.
  2. Each subnet used must have outbound internet connectivity. Feel free to either use a NAT Gateway or Internet Gateway.
  3. The VPCs must be peered in order to complete the steps in this post. For information on creating a VPC Peering connection between regions, please refer here.
  4. If you choose to deploy your Domain Controllers to a private subnet, you must have an RDP jump / bastion instance setup to allow you to RDP to your instance.

Deploy Your Domain Controllers in the Home Region using Launch Wizard

In this section, I deploy the first set of domain controllers into the us-east-1 the home region using Launch Wizard. I refer to US-East-1 as the home region, and US-West-2 as the remote region.

  1. In the AWS Launch Wizard Console, select Active Directory in the navigation pane on the left.
  2. Select Create deployment.
  3. In the Review Permissions page, select Next.
  4. In the Configure application settings page set the following:
    • General:
      • Deployment name: UsEast1AD
    • Active Directory (AD) installation
      • Installation type: Active Directory on EC2
    • Domain Settings:
      • Number of domain controllers: 2
      • AMI installation type: License-included AMI
    • License-included AMI: ami-################# | Windows_Server-2019-English-Full-Base-202#-##-##
    • Connection type: Create new Active Directory
    • Domain DNS name: corp.example.com
    • Domain NetBIOS Name: CORP
    • Connectivity:
      • Key Pair Name: Choose and exiting Key pair or select and existing one.
      • Virtual Private Cloud (VPC): Select Virtual Private Cloud (VPC)
    • VPC: Select your home region VPC
    • Availability Zone (AZ) and private subnets:
      • Select 2 Availability Zones
      • Choose the proper subnet in each subnet
      • Assign a Controller IP address for each domain controller
    • Remote Desktop Gateway preferences: Disregard for now, this is set up later.
    • Check the I confirm that a public subnet has been set up. Each of the selected private subnets have outbound connectivity enabled check box.
  1. Select Next.
  2. In the Define infrastructure requirements page, set the following inputs.
    • Storage and compute: Based on infrastructure requirements
    • Number of AD users: Up to 5000 users
  3. Select Next.
  4. In the Review and deploy page, review your selections. Then, select Deploy.

Note that it may take up to 2 hours for your domain to be deployed. Once the status has changed to Completed, you can proceed to the next section. In the next section, I prepare Active Directory Sites and Services for the second set of domain controller in my other region.

Configure Active Directory Sites and Services

In this section, I configure the Active Directory Sites and Services topology to match my network topology. This step ensures proper Active Directory replication routing so that domain clients can find the closest domain controller. For more information on Active Directory Sites and Services, please refer here.

Retrieve your Administrator Credentials from Secrets Manager

  1. From the AWS Secrets Manager Console in us-east-1, select the Secret that begins with LaunchWizard-UsEast1AD.
  2. In the middle of the Secret page, select Retrieve secret value.
    1. This will display the username and password key with their values.
    2. You need these credentials when you RDP into one of the domain controllers in the next steps.

Rename the Default First Site

  1. Log in to the one of the domain controllers in us-east-1.
  2. Select Start, type dssite and hit Enter on your keyboard.
  3. The Active Directory Sites and Services MMC should appear.
    1. Expand Sites. There is a site named Default-First-Site-Name.
    2. Right click on Default-First-Site-Name select Rename.
    3. Enter us-east-1 as the name.
  4. Leave the Active Directory Sites and Services MMC open for the next set of steps.

Create a New Site and Subnet Definition for US-West-2

  1. Using the Active Directory Sites and Services MMC from the previous steps, right click on Sites.
  2. Select New Site… and enter the following inputs:
    • Name: us-west-2
    • Select DEFAULTIPSITELINK.
  3.  Select OK.
  4. A pop up will appear telling you there will need to be some additional configuration. Select OK.
  5. Expand Sites and right click on Subnets and select New Subnet.
  6. Enter the following information:
    • Prefix: the CIDR of your us-west-2 VPC. An example would be 1.0.0/24
    • Site: select us-west-2
  7. Select OK.
  8. Leave the Active Directory Sites and Services MMC open for the following set of steps.

Configure Site Replication Settings

Using the Active Directory Sites and Services MMC from the previous steps, expand Sites, Inter-Site Transports, and select IP. You should see an object named DEFAULTIPSITELINK,

  1. Right click on DEFAULTIPSITELINK.
  2. Select Properties. Set or verify the following inputs on the General tab:
  3. Select Apply.
  4. In the DEFAULTIPSITELINK Properties, select the Attribute Editor tab and modify the following:
    • Scroll down and double click on Enter 1 for the Value, then select OK twice.
      • For more information on these settings, please refer here.
  5. Close the Active Directory Sites and Services MMC, as it is no longer needed.

Prepare Your Home Region Domain Controllers Security Group

In this section, I modify the Domain Controllers Security Group in us-east-1. This allows the domain controllers deployed in us-west-2 to communicate with each other.

  1. From the Amazon Elastic Compute Cloud (Amazon EC2) console, select Security Groups under the Network & Security navigation section.
  2. Select the Domain Controllers Security Group that was created with Launch Wizard Active Directory.
  3. Select Edit inbound rules. The Security Group should start with LaunchWizard-UsEast1AD-.
  4. Choose Add rule and enter the following:
    • Type: Select All traffic
    • Protocol: All
    • Port range: All
    • Source: Select Custom
    • Enter the CIDR of your remote VPC. An example would be 1.0.0/24
  5. Select Save rules.

Create a Copy of Your Administrator Secret in Your Remote Region

In this section, I create a Secret in Secrets Manager that contains the Administrator credentials when I created a home region.

  1. Find the Secret that being with LaunchWizard-UsEast1AD from the AWS Secrets Manager Console in us-east-1.
  2. In the middle of the Secret page, select Retrieve secret value.
    • This displays the username and password key with their values. Make note of these keys and values, as we need them for the next steps.
  3. From the AWS Secrets Manager Console, change the region to us-west-2.
  4. Select Store a new secret. Then, enter the following inputs:
    • Select secret type: Other type of secrets
    • Add your first keypair
    • Select Add row to add the second keypair
  5. Select Next, then enter the following inputs.
    • Secret name: UsWest2AD
    • Select Next twice
    • Select Store

Deploy Your Domain Controllers in the Remote Region using Launch Wizard

In this section, I deploy the second set of domain controllers into the us-west-1 region using Launch Wizard.

  1. In the AWS Launch Wizard Console, select Active Directory in the navigation pane on the left.
  2. Select Create deployment.
  3. In the Review Permissions page, select Next.
  4. In the Configure application settings page, set the following inputs.
    • General
      • Deployment name: UsWest2AD
    • Active Directory (AD) installation
      • Installation type: Active Directory on EC2
    • Domain Settings:
      • Number of domain controllers: 2
      • AMI installation type: License-included AMI
      • License-included AMI: ami-################# | Windows_Server-2019-English-Full-Base-202#-##-##
    • Connection type: Add domain controllers to existing Active Directory
    • Domain DNS name: corp.example.com
    • Domain NetBIOS Name: CORP
    • Domain Administrator secret name: Select you secret you created above.
    • Add permission to secret
      • After you verified the Secret you created above has the policy listed. Check the checkbox confirming the secret has the required policy.
    • Domain DNS IP address for resolution: The private IP of either domain controller in your home region
    • Connectivity:
      • Key Pair Name: Choose an existing Key pair
      • Virtual Private Cloud (VPC): Select Virtual Private Cloud (VPC)
    • VPC: Select your home region VPC
    • Availability Zone (AZ) and private subnets:
      • Select 2 Availability Zones
      • Choose the proper subnet in each subnet
      • Assign a Controller IP address for each domain controller
    • Remote Desktop Gateway preferences: disregard for now, as I set this later.
    • Check the I confirm that a public subnet has been set up. Each of the selected private subnets have outbound connectivity enabled check box
  1. In the Define infrastructure requirements page set the following:
    • Storage and compute: Based on infrastructure requirements
    • Number of AD users: Up to 5000 users
  2. In the Review and deploy page, review your selections. Then, select Deploy.

Note that it may take up to 2 hours to deploy domain controllers. Once the status has changed to Completed, proceed to the next section. In this next section, I prepare Active Directory Sites and Services for the second set of domain controller in another region.

Prepare Your Remote Region Domain Controllers Security Group

In this section, I modify the Domain Controllers Security Group in us-west-2. This allows the domain controllers deployed in us-west-2 to communicate with each other.

  1. From the Amazon Elastic Compute Cloud (Amazon EC2) console, select Security Groups under the Network & Security navigation section.
  2. Select the Domain Controllers Security Group that was created by your Launch Wizard Active Directory.
  3. Select Edit inbound rules. The Security Group should start with LaunchWizard-UsWest2AD-EC2ADStackExistingVPC-
  4. Choose Add rule and enter the following:
    • Type: Select All traffic
    • Protocol: All
    • Port range: All
    • Source: Select Custom
    • Enter the CIDR of your remote VPC. An example would be 0.0.0/24
  5. Choose Save rules.

Create an AD User and Verify Replication

In this section, I create a user in one region and verify that it replicated to the other region. I also use AD replication diagnostics tools to verify that replication is working properly.

Create a Test User Account

  1. Log in to one of the domain controllers in us-east-1.
  2. Select Start, type dsa and press Enter on your keyboard. The Active Directory Users and Computers MMC should appear.
  3. Right click on the Users container and select New > User.
  4. Enter the following inputs:
    • First name: John
    • Last name: Doe
    • User logon name: jdoe and select Next
    • Password and Confirm password: Your choice of complex password
    • Uncheck User must change password at next logon
  5. Select Next.
  6. Select Finish.

Verify Test User Account Has Replicated

  1. Log in to the one of the domain controllers in us-west-2.
  2. Select Start and type dsa.
  3. Then, press Enter on your keyboard. The Active Directory Users and Computers MMC should appear.
  4. Select Users. You should see a user object named John Doe.

Note that if the user is not present, it may not have been replicated yet. Replication should not take longer than 60 seconds from when the item was created.

Summary

Congratulations, you have created a cross-region Active Directory! In this post you:

  1. Launched a new Active Directory forest in us-east-1 using AWS Launch Wizard.
  2. Configured Active Directory Sites and Service for a multi-region configuration.
  3. Launched a set of new domain controllers in the us-west-2 region using AWS Launch Wizard.
  4. Created a test user and verified replication.

This post only touches on a couple of features that are available in the AWS Launch Wizard Active Directory deployment. AWS Launch Wizard also automates the creation of a Single Tier PKI infrastructure or trust creation. One of the prime benefits of this solution is the simplicity in deploying a fully functional Active Directory environment in just a few clicks. You no longer need to do the undifferentiated heavy lifting required to deploy Active Directory.  For more information, please refer to AWS Launch Wizard documentation.

Fast and Cost-Effective Image Manipulation with Serverless Image Handler

Post Syndicated from Ajay Swamy original https://aws.amazon.com/blogs/architecture/fast-and-cost-effective-image-manipulation-with-serverless-image-handler/

As a modern company, you most likely have both a web-based and mobile app platform to provide content to customers who view it on a range of devices. This means you need to store multiple versions of images, depending on the device. The resulting image management can be a headache as it can be expensive and cumbersome to manage.

Serverless Image Handler (SIH) is an AWS Solution Implementation you use to store a single version of every image featured in your content, while dynamically delivering different versions at runtime based on your end user’s device. The solution simplifies code, saves on storage costs, and is ideal for use with web applications and mobile apps. SIH features include the ability to resize images, change background colors, apply formatting, and add watermarks.

Architecture overview

The SIH solution utilizes an AWS CloudFormation template to deploy the solution within minutes, and it’s for those of you who have multiple image assets needing an option to dynamically change or manipulate customer-facing images. SIH deploys best-in-class AWS services such as Amazon CloudFront, Amazon API Gateway, and AWS Lambda functions, and it connects to your Amazon Simple Storage Service (Amazon S3) bucket for storage.

Deploying this solution with the default parameters builds the following environment in AWS Cloud:

SIH: Emvironment in AWS Cloud-2

SIH uses the following AWS services:

  • Amazon CloudFront to quickly and securely  deliver images to your end users at scale
  • AWS Lambda to run code for image manipulation without the need for provisioning or managing servers (thereby reducing costs and overhead)
  • Your Amazon S3 bucket for storage of your image assets
  • AWS Secrets Manager to support the signing of image URLs so that image access is protected

How does Serverless Image Handler work?

When an HTTP request is received from a customer device, it is passed from CloudFront to API Gateway, and then forwarded to the Lambda function for processing. If the image is cached by CloudFront because of an earlier request, CloudFront will return the cached image instead of forwarding the request to the API Gateway. This reduces latency and eliminates the cost of reprocessing the image.

Requests that are not cached are passed to the API Gateway, and the entire request is forwarded to the Lambda function. The Lambda function retrieves the original image from your Amazon S3 bucket and uses Sharp (the open source image processing software) to return a modified version of the image to the API Gateway. SIH also utilizes Thumbor to apply dynamic filters on the fly. Additionally, the solution generates a CloudFront domain name that supports caching in CloudFront. The newly manipulated image is now cached at CloudFront for easy access and retrieval. The end-to-end request and response can be secured by using the solution’s signed URL feature via AWS Secrets Manager, which allows you to prevent unauthorized use of your proprietary images.

Lastly, SIH uses Amazon Rekognition for face detection in images submitted for smart cropping, allowing for easy cropping for specific content and image needs.

Code example of image manipulation

Please refer to the SIH implementation guide to quickly set up and use SIH. Using Node.js, you can create an image request as illustrated below. The code block specifies the image location as myImageBucket and specifies edits of grayscale :true to change the image to grayscale.

const imageRequest = JSON.stringify({
    bucket: “myImageBucket”,
    key: “myImage.jpg”,
    edits: {
        grayscale: true
    }
});

const url = `${CloudFrontUrl}/${Buffer.from(imageRequest).toString(‘base64’)}`;

With the generated URL, SIH can serve the grayscale image.

Conclusion

If you’re looking for a fast and cost-effective solution for image management, Serverless Image Handler provides a great way to manipulate and serve images on the fly with speed and security. Learn more about SIH and watch the accompanying Solving with AWS Solutions video below.

Field Notes: Integrating IoT and ITSM using AWS IoT Greengrass and AWS Secrets Manager – Part 2

Post Syndicated from Gary Emmerton original https://aws.amazon.com/blogs/architecture/field-notes-integrating-iot-and-itsm-using-aws-iot-greengrass-and-aws-secrets-manager-part-2/

In part 1 of this blog I introduced the need for organizations to securely connect thousands of IoT devices with many different systems in the hyperconnected world that exists today, and how that can be addressed using AWS IoT Greengrass and AWS Secrets Manager.  We walked through the creation of ServiceNow credentials in AWS Secrets Manager, the creation of IAM roles and the Lambda functions that will run on our edge device (a Raspberry Pi).

In this second part of the blog, we will setup AWS IoT Greengrass, on our Raspberry Pi, and AWS IoT Core so that we can run the AWS Lambda functions and access our ServiceNow credentials, retrieved securely from AWS Secrets Manager.

Setting up AWS IoT Core and AWS IoT Greengrass

The overall sequence for configuring AWS IoT Core and AWS IoT Greengrass is:

  • Create a certificate, and IoT Thing and link them
  • Create AWS IoT Greengrass group
  • Associate IAM role to the AWS IoT Greengrass group
  • Create and attach a policy to the certificate
  • Create an AWS IoT Greengrass Resource Definition for our ‘Secret’
  • Create an AWS IoT Greengrass Function Definition for our Lambda functions
  • Create an AWS IoT Greengrass Subscription Definition for IoT Topics to be used
  • Finally associate our Resource, Function and Subscription Definitions with our AWS IoT Greengrass Core

Steps

For this walkthrough, I have selected the AWS region “eu-west-1”, however, feel free to use other Regions where AWS IoT Core and AWS IoT Greengrass are available.

First, let’s install Greengrass on the Raspberry Pi:

  • Follow the instructions to configure the pre-requisites on the Raspberry Pi
  • Then we download the AWS IoT Greengrass software
  • And then we unzip the AWS IoT Greengrass software using the following command (note, this command is for version 1.10.0 of Greengrass and will change as later versions are released):

sudo tar -xzvf greengrass-linux-armv6l-1.10.0.tar.gz -C /

Note that AWS IoT Greengrass must be compatible with the version of the AWS Greengrass SDK installed to identify what versions are compatible and use sudo pip3 install greengrasssdk==<version_number> to install the SDK compatible with the version of AWS IoT Greengrass that we installed.

Our AWS IoT Greengrass core will authenticate with AWS IoT Core in AWS using certificates, so we need to generate these first using the following command:

aws iot create-keys-and-certificate --set-as-active --certificate-pem-outfile "iot-ge.cert.pem" --public-key-outfile "iot-ge.public.key" --private-key-outfile "iot-ge.private.key"

This command will generate three files containing the private key, public key and certificate.  All of these files need to be copied to the /greengrass/certs folder on the Raspberry Pi.  Also, the output of the preceding command will give the ARN of the certificate – we need to make a note of this ARN as we will use it in the next steps.

We also need to download a copy of the Amazon Root CA into the /greegrass/certs folder using the command below:

sudo wget -O root.ca.pem https://www.amazontrust.com/repository/AmazonRootCA1.pem

For the next step we need our AWS account number and IoT Host address unique to our account – we get the IoT Host address using the command:

aws iot describe-endpoint --endpoint-type iot:Data-ATS

Now we need to create a config.json file on the Raspberry Pi in the /greengrass/config folder, with the account number and IoT Host address obtained in the previous step;

{
  "coreThing" : {
    "caPath" : "root.ca.pem",
    "certPath" : "iot-ge.cert.pem",
    "keyPath" : "iot-ge.private.key",
    "thingArn" : "arn:aws:iot:eu-west-1:<aws_account_number>:thing/IoT-blog_Core",
    "iotHost" : "<endpoint_address>",
    "ggHost" : "greengrass-ats.iot.eu-west-1.amazonaws.com",
    "keepAlive" : 600
  },
  "runtime" : {
    "cgroup" : {
      "useSystemd" : "yes"
    },
    "allowFunctionsToRunAsRoot" : "yes"
  },
  "managedRespawn" : false,
  "crypto" : {
    "principals" : {
      "SecretsManager" : {
        "privateKeyPath" : "file:///greengrass/certs/iot-ge.private.key"
      },
      "IoTCertificate" : {
        "privateKeyPath" : "file:///greengrass/certs/iot-ge.private.key",
        "certificatePath" : "file:///greengrass/certs/iot-ge.cert.pem"
      }
    },
    "caPath" : "file:///greengrass/certs/root.ca.pem"
  }
}

Note that the line "allowFunctionsToRunAsRoot" : "yes" allows the Lambda functions to easily access the SenseHat on the Raspberry Pi. This configuration should normally be avoided in Production environments for security reasons but has been used here for simplicity.

Next we create the IoT Thing to represent our Raspberry Pi to match the entry we added into the config.json file previously:

aws iot create-thing --thing-name IoT-blog_Core

Now that our config.json file is in place and our IoT ‘thing’ created we can start the AWS IoT Greengrass software using the following commands:

cd /greengrass/ggc/core/
sudo ./greengrassd start

Then we attach the certificate to our new Thing – we need the ARN of the certificate that was noted in the earlier steps when we created the certificates:

aws iot attach-thing-principal --thing-name "IoT-blog_Core" --principal "<certificate_arn>"

Now we create the AWS IoT Greengrass group – make a note of the Group ID in the output of this command as we use it later:

aws greengrass create-group --name IoT-blog-group

Next we create the AWS IoT Greengrass Core definition file – create this using a text editor and save as core-def.json

{
  "Cores": [
    {
      "CertificateArn": "<certificate_arn>",
      "Id": "<IoT Thing Name>",
      "SyncShadow": true,
      "ThingArn": "<thing_arn>"
    }
  ]
}

Then, using the preceding file we just created, we create the core definition using the following command:

aws greengrass create-core-definition --name "IoT-blog_Core" --initial-version file://core-def.json

Now we associate the AWS IoT Greengrass core with the AWS IoT Greengrass group – we need the LatestVersionARN from the output of the command above and the group ID of your existing AWS IoT Greengrass group (in the output from the command for creation of the group in previous steps):

aws greengrass create-group-version --group-id "<greengrass_group_id>" --core-definition-version-arn "<core_definition_version_arn>"

Then we associate the IAM role (created earlier) to the AWS IoT Greengrass group;

aws greengrass associate-role-to-group --group-id "<greengrass_group_id>" --role-arn "arn:aws:iam::<aws_account_number>:role/IoTGGRole"

We need to create a policy to associate with the certificate so that our AWS IoT Greengrass Core (authenticated/authorized by our certificates) has rights to interact with AWS IoT Core.  To do this we create the policy.json file:

{
  "Version": "2012-10-17",
  "Statement": [
    {
      "Effect": "Allow",
      "Action": [
        "iot:Publish",
        "iot:Subscribe",
        "iot:Connect",
        "iot:Receive"
      ],
      "Resource": [
        "*"
      ]
    },
    {
      "Effect": "Allow",
      "Action": [
        "iot:GetThingShadow",
        "iot:UpdateThingShadow",
        "iot:DeleteThingShadow"
      ],
      "Resource": [
        "*"
      ]
    },
    {
      "Effect": "Allow",
      "Action": [
        "greengrass:*"
      ],
      "Resource": [
        "*"
      ]
    }
  ]
}

Then create the policy using the policy file using the command below:

aws iot create-policy --policy-name myGGPolicy --policy-document file://policy.json

And finally attach our new policy to the certificate – as the certificate is attached to our AWS IoT Greengrass Core, this gives the rights defined in the policy to our AWS IoT Greengrass Core;

aws iot attach-policy --target "<certificate_arn>" --policy-name "myGGPolicy"

Now we have the AWS IoT Greengrass Core and permissions in place, it’s time to add our Secret as a resource for AWS IoT Greengrass.

First, we need to create a resource definition that refers to the ARN of the secret we created earlier.  Get the ARN of the secret using the following command:

aws secretsmanager describe-secret --secret-id "greengrass-snow-creds"

And then we create a text file containing the following and save it as resource.json:

{
"Resources": [
    {
      "Id": "SNOW-Credentials",
      "Name": "SNOW-Credentials",
      "ResourceDataContainer": {
        "SecretsManagerSecretResourceData": {
          "ARN": "<secret_arn>"
        }
      }
    }
  ]
}

Now we command to create the resource reference in IoT to the Secret:

aws greengrass create-resource-definition --name "MySNOWSecret" --initial-version file://resource.json

Note the Resource ID from the output as it is needed as it has to be added to the Lambda definition json file in the next steps.  The function definition file contains the details of the Lambda function(s) that we will attach to our AWS IoT Greengrass group.  We create a text file with the content below and save as lambda-def.json.

We also specify a couple of variables in the definition file; these are the same as the environment variables that can be specified for Lambda, but they make the variables available in AWS IoT Greengrass.

Note, if we specify environment variables for the functions in the Lambda console then these will NOT be available when the function is running under AWS IoT Greengrass.  We will need our ServiceNow API URL to add to the configuration below, and this will be in the form of https://devXXXXX.service-now.com/api/now/table/incident, where XXXXX is the developer instance number assigned by ServiceNow when our instance is created.

We need the ARNs of the Lambda functions that we created in part 1 of the blog – these appear in the output after successfully creating the functions from the command line, or can be obtained using the aws lambda list-functions command – we need to have the ‘:1’ at the end of the ARN as AWS IoT Greengrass needs to reference published function versions.

{
  "DefaultConfig": {
    "Execution": {
      "IsolationMode": "NoContainer",
      "RunAs": {
        "Gid": 0,
        "Uid": 0
      }
    }
  },
  "Functions": [
    {
      "FunctionArn": "<lambda_function1_arn>:1",
      "FunctionConfiguration": {
        "EncodingType": "json",
        "Environment": {
          "Execution": {
            "IsolationMode": "NoContainer"
          },
          "Variables": { 
            "tempLimit": "30",
            "humidLimit": "50"
          }
        },
        "ExecArgs": "string",
        "Executable": "lambda_function.lambda_handler",
        "Pinned": true,
        "Timeout": 10
      },
    "Id": "sensorLambda"
    },
    {
      "FunctionArn": "<lambda_function2_arn>:1",
      "FunctionConfiguration": {
        "EncodingType": "json",
        "Environment": {
          "Execution": {
            "IsolationMode": "NoContainer"
          },
          "ResourceAccessPolicies": [
            {
              "Permission": "ro",
              "ResourceId": "SNOW-Credentials"
            }
          ],
          "Variables": { 
            "snowUrl": "<service_now_api_url>"
          }
        },
        "ExecArgs": "string",
        "Executable": "lambda_function.lambda_handler",
        "Pinned": false,
        "Timeout": 10
      },
    "Id": "anomalyLambda"
    }
  ]
}

The Lambda function now needs to be registered within our AWS IoT Greengrass core using the definition file just created, using the following command:

aws greengrass create-function-definition --name "IoT-blog-lambda" --initial-version file://lambda-def.json

Create Subscriptions

We now need to create some IoT Topics to pass data between the two Lambda functions and also to submit all sensor data to AWS IoT Core, which gives us visibility of the successful collection of sensor data.cd.

First, let’s create a subscription configuration file (subscriptions.json) for sensor data and anomaly data:

{
  "Subscriptions": [
    {
      "Id": "SensorData",
      "Source": "<lambda_function1_arn>:1",
      "Subject": "IoTBlog/sensorData",
      "Target": "cloud"
    },
    {
      "Id": "AnomalyData",
      "Source": "<lambda_function1_arn>:1",
      "Subject": "IoTBlog/anomaly",
      "Target": "<lambda_function2_arn>:1"
    },
    {
      "Id": "AnomalyDataB",
      "Source": "<lambda_function1_arn>:1",
      "Subject": "IoTBlog/anomaly",
      "Target": "cloud"
    }
  ]
}

And next, we run the command to create the subscription from this configuration:

aws greengrass create-subscription-definition --name "IoT-sensor-subs" --initial-version file://subscriptions.json

Update AWS IoT Greengrass Group Associations and Deploy

Now that the functions, subscriptions and resources have been defined, we run the following command to update our AWS IoT Greengrass group to the new version with those components included:

aws greengrass create-group-version --group-id <gg_group_id> --core-definition-version-arn "<core_def_version_arn>" --function-definition-version-arn "<function_def_version_arn>" --resource-definition-version-arn "<resource_def_version_arn>" --subscription-definition-version-arn "<subscription_def_version_arn>"

And finally, we can deploy our configuration.  Use the following command to deploy the Greengrass group to our device, using the group-version-id from the output of the previous command and also the group-id:

aws greengrass create-deployment --deployment-type NewDeployment --group-id <gg_group_id> --group-version-id <gg_group_version_id>

Summarized below is the integration between the different functions and components that we have now deployed to get from our sensor data through to an incident being raised in ServiceNow:

Raspberry PI

Create an Incident

Everything is setup now from an IoT perspective, so we can attempt to trigger a threshold breach on the sensors to trigger the creation of an incident in ServiceNow.  In order to trigger the incident creation, let’s raise the humidity around the sensor so that it breaches the threshold defined in the environment variables of the Lambda function.

Under normal conditions we will just see the data published by the first Lambda function in the IoTBlog/sensorData topic:

IoTblog sensordata

However, when a threshold is breached (in our example, humidity above 50%), the data is published to the IoTBlog/anomaly topic as shown below:

ioTblog Anomaly

Via the AWS IoT Greengrass subscriptions created earlier, this message arriving in the anomaly topic also triggers the second Lambda function to create the ticket in ServiceNow.

The log for the second Lambda function on AWS IoT Greengrass (stored in /greengrass/ggc/var/log/user/<region>/<aws_account_number>/ on the Raspberry Pi) will show a ‘201’ return code if the incident is successfully created in ServiceNow.

201 response

Now let’s log on to ServiceNow and check out our new incident.  Good news, our new incident appears correctly:

And when we click on our incident we can see the detail, including the full data from the IoT topic in the Activities section;

This is only a basic use of the ServiceNow API and there are many other parameters that you can use to increase the richness of the incident, refer to the ServiceNow API documentation for more details.

Cleaning up

To avoid incurring future charges, delete the resources that you created in the walkthrough.

Conclusion

We have built an IoT device (Raspberry Pi), running AWS IoT Greengrass, AWS Lambda, and using ServiceNow credentials managed in AWS Secrets Manager.  Using this we have triggered an anomaly event that has created an incident automatically in ServiceNow, directly from the Lambda function running on our Pi.  You can use this architecture as the foundation to integrate your edge devices and ITSM solution to automate ticket generation in your organization.

Look out for follow-up blogs that will extend this solution to provide a real-time dashboard for the sensor data and store the sensor data in a Data Lake for historical visualization.

Find out more about deploying Secrets to AWS IoT Greengrass Core.

Check out the AWS IoT Blog for more examples of how to use AWS to integrate your edge devices with the AWS Cloud.

Field Notes provides hands-on technical guidance from AWS Solutions Architects, consultants, and technical account managers, based on their experiences in the field solving real-world business problems for customers.


Field Notes: Integrating IoT and ITSM using AWS IoT Greengrass and AWS Secrets Manager – Part 1

Post Syndicated from Gary Emmerton original https://aws.amazon.com/blogs/architecture/field-notes-integrating-iot-and-itsm-using-aws-iot-greengrass-and-aws-secrets-manager-part-1/

IT Security is a hot topic in every organization, and in a hyper connected world the need to integrate thousands of IoT devices securely with many different systems at scale is critical.

AWS Secrets Manager helps customers manage their system credentials securely in the AWS Cloud, and with its integration with AWS IoT Greengrass, that capability now extends out to your edge-connected IoT devices.

In this two part blog post, I will walk through the steps to use this integration to give edge devices the capability to connect to and log incidents directly into ServiceNow. The credentials for connecting to ServiceNow are created in AWS Secrets Manager, and deployed locally (encrypted) to the edge device via AWS IoT Greengrass.

Part 1 (this post) gives an overview of the whole solution and the steps for setting up AWS Secrets Manager, creating the required IAM roles and AWS Lambda functions.  In part 2 of the blog we will then set up AWS IoT Greengrass and AWS IoT Core so that we can run the functions and access the secret on our edge device (Raspberry Pi).

Enabling edge devices to automatically raise incidents in your organization’s ITSM toolset ensures that you can use existing workflows and incident escalation paths for your edge devices.  Previously this would have been challenging to integrate. Additionally, by running this capability at the edge, it enables quicker responses and reduces the need to make calls back to the AWS Cloud.

Overview of solution

The solution makes use of a Raspberry Pi, running AWS IoT Greengrass. AWS Lambda functions on AWS IoT Greengrass capture temperature and humidity sensor data and make calls directly to ServiceNow when thresholds are breached.  The integration of AWS Secrets Manager with AWS IoT Core enables the credentials required for the ServiceNow API calls to be available locally. These calls are encrypted and available on the Pi for the Lambda function to use.

The sensors for temperature and humidity in this example are on a Raspberry Pi Sense Hat, which illustrates sensors that could be used in an industrial or manufacturing use case.  You can use any type of sensor such as vibration, strain gauges, or other electro-mechanical sensors.

One of the Lambda functions running on AWS IoT Greengrass on the RPi captures the sensor readings, and should a threshold on either be exceeded then it triggers a second Lambda function (again running on AWS IoT Greengrass). This then makes a ‘create incident’ API call to ServiceNow, using the credentials stored in AWS Secrets Manager.

In order to have visibility of the sensor data, and to manage communications between the first and second Lambda functions, all data from the sensors is published to one IoT Topic Data related to any threshold breaches is published to another IoT Topic.

Following is a high-level diagram for the architecture used in this blog.

ServiceNow RA

Prerequisites

To complete the steps in this blog, you need:

  • An AWS Account
  • A ServiceNow developer instance or other test ServiceNow instance that you can access – You can sign-up for a free ServiceNow developer account 
  • A Raspberry Pi (I used a Pi 3B with Raspbian Buster)
  • A Raspberry Pi SenseHat
  • A workstation with the latest AWS Command Line Interface (CLI) installed

Additionally, ensure that you have Python 3.7.x installed with the following Python modules on the Raspberry Pi (Raspian Buster includes Python 3.7 by default). Install the following packages as the root user (sudo pip):

  • greengrasssdk
  • boto3
  • requests
  • sense_hat
  • datetime

I have taken the approach of having these modules installed on the Pi in order to simplify the creation of the Lambda function.  This ensures the function will run locally on the Pi rather than having to build all of the Python modules on the Pi and then zip them to run the Lambda in an AWS IoT Greengrass container.

Walkthrough

The steps in the walkthrough can be achieved from the AWS console. I have focused on the command line approach, using the AWS CLI, as this will give a more detailed view of what is happening and the dependencies between the different components.  The overall sequence for the steps is:

  • Create secret in AWS Secrets Manager – this will contain the credentials required to access ServiceNow for Lambda running on AWS IoT Greengrass
  • Create IAM role – provides permissions for AWS IoT Greengrass to other AWS services, including AWS Secrets Manager
  • Create Lambda functions – the functions that will capture sensor data and create the Service Now ticket
  • Configure and Deploy IoT Core – deploy our configuration to the Raspberry Pi, covered in Part 2 of this blog

I’ve structured the order of the steps in a logical sequence so that any dependencies of later steps are created first.  There are a number of places where a value in the output of one command (such as an ARN) needs to be noted as required for subsequent commands. At times the steps may seem counter-intuitive, but whilst developing this blog, I found this sequence has proven to be the most effective.

Create Secret

First, we create our ‘Secret’ in AWS Secrets Manager.  This consists of a secret string containing a JSON object for the username and password required for authentication to the API of my ServiceNow developer instance.  For the purposes of this example, we will use the default encryption key for the AWS Secrets Manager service.

The following command, from the AWS CLI, is used to create the new secret, entering the relevant username and password for the ServiceNow instance.

IMPORTANT: the name of the secret must start with “greengrass-“(specified in the command after the “–name” parameter) because the IAM Greengrass managed service role (which we will use later) has permission by default to access secrets that start with this text.

aws secretsmanager create-secret --name "greengrass-snow-creds" --description "Credentials for ServiceNow API access" --secret-string '{"username":"&lt;username&gt;","password":"&lt;password&gt;"}'

The successful completion of the *preceding command results in an output on your terminal screen, containing the ARN (Amazon Resource Name) for the new secret.

Create IAM roles

In order for AWS IoT Greengrass to access our new secret and download it securely to AWS IoT Greengrass running on the Pi, we need to give it an IAM role. If we do not set this up correctly then there will be an error when trying to deploy the AWS IoT Greengrass group later in the walkthrough.

Our new IAM role needs a policy document that describes the permissions that we will give the role.  The first step is to create the IAM policy document, containing only the permissions for the Greengrass service this new role – to do this we create a text file called assume-role.json containing the following:

{
  "Version": "2012-10-17",
  "Statement": [
    {
      "Effect": "Allow",
      "Principal": {
        "Service": "greengrass.amazonaws.com"
      },
      "Action": "sts:AssumeRole"
    }
  ]
}

Then we run the following command, referencing the file just created:

aws iam create-role --role-name "IoTGGRole" --assume-role-policy-document file://assume-role.json

And finally we need to attach the IAM managed AWS IoT Greengrass service role to our new custom role:

aws iam attach-role-policy --role-name "IoTGGRole" --policy-arn arn:aws:iam::aws:policy/service-role/AWSGreengrassResourceAccessRolePolicy

We also need a role for our Lambda functions with basic execution permissions; create a text file called lambda-role.json containing the following:

{
  "Version": "2012-10-17",
  "Statement": [
    {
      "Effect": "Allow",
      "Principal": {
        "Service": "lambda.amazonaws.com"
      },
      "Action": "sts:AssumeRole"
    }
  ]
}

Then we run the following command, referencing the file just created:

aws iam create-role --role-name "IoTLambdaRole" --assume-role-policy-document file://lambda-role.json

And finally we need to attach the IAM managed Lambda basic execution role to our new custom role:

aws iam attach-role-policy --role-name "IoTLambdaRole" --policy-arn arn:aws:iam::aws:policy/service-role/AWSLambdaBasicExecutionRole

Create Lambda Functions

We now create the Lambda functions that will be deployed to Greengrass – these functions manage the interactions between the sensors and ServiceNow.

Lambda Function 1 – Get/Publish Sensor Data

The first Lambda function reads the sensor data and publishes the data to an IoT Topic (IoTBlog/sensorData), every 5 seconds, which can then be used by downstream services for analytics.  This function also determines whether a threshold has been breached and if so, it publishes the data to a separate IoT Topic (IotBlog/anomaly) to which our second Lambda function is subscribed.

import os
import json
from datetime import datetime
import time
import sys
from sense_hat import SenseHat
import greengrasssdk
import boto3

client = greengrasssdk.client('iot-data')
secClient = greengrasssdk.client('secretsmanager')
sense = SenseHat()
sense.clear()

t_threshold = int(os.environ['tempLimit'])
h_threshold = int(os.environ['humidLimit'])

def lambda_handler(event, context):
    return
 
# Get sensor data and check against thresholds
def getSensorData():
    while True:
        eventTitle = "no event"
        anomaly = False
        ts = time.time()
        dt = datetime.fromtimestamp(ts).strftime('%Y-%m-%d %H:%M:%S')
        
        temp     = round(sense.get_temperature(),2)
        humidity = round(sense.get_humidity(),2)
        
        time.sleep(5)

        if (temp > int(t_threshold)):
            anomaly = True
            eventTitle = "Temperature breach"
            
        if (humidity > int(h_threshold)):
            anomaly = True
            eventTitle = "Humidity breach"

        sensorData = { 'title': eventTitle,'dt':dt,'ts':ts,'t':temp,'h':humidity }
        publishData(anomaly,sensorData)

# Publish sensor data to IoT topic(s)
def publishData(anomaly,myData):
    response = client.publish(
        topic = 'IoTBlog/sensorData',
        payload = json.dumps(myData) )
    

We create a text file lambda_function.py containing the code above and then compress into a zip file named lambda_function_1.zip.  Once this is done we can then create the function in AWS using the following command:

aws lambda create-function --function-name "1-IoT-GetSensorData" --runtime python3.7 --zip-file fileb://lambda_function_1.zip --handler lambda_function.lambda_handler –role arn:aws:iam::&lt;aws_account_number&gt;:role/IoTLambdaRole
In order to make use of Lambda functions in AWS IoT Greengrass we then need to publish a version of the function using the following command:
aws lambda publish-version --function-name "1-IoT-GetSensorData"

Lambda Function 2 – Create Anomaly Ticket

The second Lambda function is triggered through its subscription to the anomaly data published to the anomaly IoT Topic by the first Lambda function. This then makes a call to the ServiceNow API to create an incident.  Prior to making the API call, the function obtains the ServiceNow credentials from the secret that has been made available to AWS IoT Greengrass.

As this is a Resource within the AWS IoT Greengrass Core, it is automatically downloaded to the Raspberry Pi as part of the deployment of the AWS IoT Greengrass Core.

import os
import json
import sys
import greengrasssdk
import requests

client = greengrasssdk.client('iot-data')
secClient = greengrasssdk.client('secretsmanager')
secret_name = "greengrass-snow-creds"
snow_instance = os.environ['snowUrl']
msg = ""

def publishAnomaly(msg,title):
    auth = getLocalSecret()
    createTicket(auth,msg,title)

# Get secret from GG
def getLocalSecret():
    secret = secClient.get_secret_value(SecretId=secret_name)
    rawSecret = secret.get('SecretString')
    return json.loads(str(rawSecret))

# Create ticket in ServiceNow            
def createTicket(auth,eventData,title):
    API_ENDPOINT = snow_instance
    HEADERS = {"Content-Type":"application/json","Accept":"application/json"}
    PARAMS = { 
        "short_description":title,
        "assignment_group":"sensor_team",
        "urgency":"2",
        "impact":"2",
        "comments":eventData
    } 

    request = requests.post(url = API_ENDPOINT, auth=(str(auth["username"]),str(auth["password"])), headers=HEADERS, data = json.dumps(PARAMS))
    print("Response:",request)

def lambda_handler(event, context):
    msg = json.dumps(event)
    msg = json.loads(msg)
    title = "Sensor Threshold - " + msg["title"]
    
    publishAnomaly(msg,title)
    return

We create another text file, lambda_function.py containing the code above and then compress into a zip file named lambda_function_2.zip.  Once this is done we can then create the function in AWS using the following command:

aws lambda create-function --function-name "2-IoT-ServiceNow" --runtime python3.7 --zip-file fileb://lambda_function_2.zip --handler lambda_function.lambda_handler –role arn:aws:iam::&lt;account_number&gt;:role/IoTLambdaRole

In order to make use of Lambda functions in Greengrass we then need to publish a version of the function using the following command:

aws lambda publish-version --function-name "2-IoT-ServiceNow"

Conclusion

In this post, I showed you the steps for integrating IoT and ITSM by setting up AWS Secrets Manager, creating the required IAM roles and AWS Lambda functions.  Now you can proceed to part 2 of the blog to set up AWS IoT-Core and AWS IoT Greengrass to make use of the secret and functions that you created in this post.

Field Notes provides hands-on technical guidance from AWS Solutions Architects, consultants, and technical account managers, based on their experiences in the field solving real-world business problems for customers.

How to enhance Amazon CloudFront origin security with AWS WAF and AWS Secrets Manager

Post Syndicated from Cameron Worrell original https://aws.amazon.com/blogs/security/how-to-enhance-amazon-cloudfront-origin-security-with-aws-waf-and-aws-secrets-manager/

Whether your web applications provide static or dynamic content, you can improve their performance, availability, and security by using Amazon CloudFront as your content delivery network (CDN). CloudFront is a web service that speeds up distribution of your web content through a worldwide network of data centers called edge locations. CloudFront ensures that end-user requests are served by the closest edge location. As a result, viewer requests travel a short distance, improving performance for your viewers. When you deliver web content through a CDN such as CloudFront, a best practice is to prevent viewer requests from bypassing the CDN and accessing your origin content directly. In this blog post, you’ll see how to use CloudFront custom headers, AWS WAF, and AWS Secrets Manager to restrict viewer requests from accessing your CloudFront origin resources directly.

You can configure CloudFront to add custom HTTP headers to the requests that it sends to your origin. HTTP header fields are components of the header section of request and response messages in the Hypertext Transfer Protocol (HTTP). These custom headers enable you to send and gather information from your origin that isn’t included in typical viewer requests. You can use custom headers to control access to content. By configuring your origin to respond to requests only when they include a custom header that was added by CloudFront, you prevent users from bypassing CloudFront and accessing your origin content directly. In addition to offloading traffic from your origin servers, this also helps enforce web traffic being processed at CloudFront edge locations according to your AWS WAF rules prior to being forwarded to your origin.

AWS WAF is a web application firewall that helps protect your web applications from common web exploits that could affect application availability, compromise security, or consume excessive resources. It supports managed rules as well as a powerful rule language for custom rules. AWS WAF is tightly integrated with CloudFront and the Application Load Balancer (ALB). AWS Secrets Manager helps you protect the secrets needed to access your applications, services, and IT resources. This service enables you to easily rotate, manage, and retrieve database credentials, API keys, and other secrets throughout their lifecycle.

Solution overview

This blog post includes a sample solution you can deploy to see how its components integrate to implement the origin access restriction. The sample solution includes a web server deployed on Amazon Elastic Compute Cloud (Amazon EC2) Linux instances running in an AWS Auto Scaling group. Elastic Load Balancing distributes the incoming application traffic across the EC2 instances by using an ALB. The ALB is associated with an AWS WAF web access control list (web ACL), which is used to validate the incoming origin requests. Finally, a CloudFront distribution is deployed with an AWS WAF web ACL and configured to point to the origin ALB.

Although the sample solution is designed for deployment with CloudFront with an AWS WAF–associated ALB as its origin, the same approach could be used for origins that use Amazon API Gateway. A custom origin is any origin that is not an Amazon Simple Storage Service (Amazon S3) bucket, with one exception. An S3 bucket that is configured with static website hosting is a custom origin. You can refer to the CloudFront Developer Guide for more information on securing content that CloudFront delivers from S3 origins.

This solution is intended to enhance security for CloudFront custom origins that support AWS WAF, such as ALB, and is not a substitute for authentication and authorization mechanisms within your web applications. In this solution, Secrets Manager is used to control, audit, monitor, and rotate a random string used within your CloudFront and AWS WAF configurations. Although most of these lifecycle attributes could be set manually, Secrets Manager makes it easier.

Figure 1 shows how the provided AWS CloudFormation template creates the sample solution.
 

Figure 1: How the CloudFormation template works

Figure 1: How the CloudFormation template works

Here’s how the solution works, as shown in the diagram:

  1. A viewer accesses your website or application and requests one or more files, such as an image file and an HTML file.
  2. DNS routes the request to the CloudFront edge location that can best serve the request—typically the nearest CloudFront edge location in terms of latency.
  3. At the edge location, AWS WAF inspects the incoming request according to configured web ACL rules.
  4. At the edge location, CloudFront checks its cache for the requested content. If the content is in the cache, CloudFront returns it to the user. If the content isn’t in the cache, CloudFront adds the custom header, X-Origin-Verify, with the value of the secret from Secrets Manager, and forwards the request to the origin.
  5. At the origin Application Load Balancer (ALB), AWS WAF inspects the incoming request header, X-Origin-Verify, and allows the request if the string value is valid. If the header isn’t valid, AWS WAF blocks the request.
  6. At the configured interval, Secrets Manager automatically rotates the custom header value and updates the origin AWS WAF and CloudFront configurations.

Solution deployment

This sample solution includes seven main steps:

  1. Deploy the CloudFormation template.
  2. Confirm successful viewer access to the CloudFront URL.
  3. Confirm that direct viewer access to the origin URL is blocked by AWS WAF.
  4. Review the CloudFront origin custom header configuration.
  5. Review the AWS WAF web ACL header validation rule.
  6. Review the Secrets Manager configuration.
  7. Review the Secrets Manager AWS Lambda rotation function.

Step 1: Deploy the CloudFormation template

The stack will launch in the N. Virginia (us-east-1) Region. It takes approximately 10 minutes for the CloudFormation stack to complete.

Note: The sample solution requires deployment in the N. Virginia (us-east-1) Region. Although out of scope for this blog post, an additional sample template is available in this solution’s GitHub repository for testing this solution with an existing CloudFront distribution and regional AWS WAF web ACL. Refer to the AWS regional service support information for more details on regional service availability.

To launch the CloudFormation stack

  1. Choose the following Launch Stack icon to launch a CloudFormation stack in your account in the N. Virginia Region.
     
    Select the Launch Stack button to launch the template
  2. In the CloudFormation console, leave the configured values, and then choose Next.
  3. On the Specify Details page, provide the following input parameters. You can modify the default values to customize the solution for your environment.

    Input parameter Input parameter description
    EC2InstanceSize The instance size for EC2 web servers.
    HeaderName The HTTP header name for the secret string.
    WAFRulePriority The rule number to use for the regional AWS WAF web ACL. 0 is recommended, because rules are evaluated in order based on the value of priority.
    RotateInterval The rotation interval, in days, for the origin secret value. Full rotation requires two intervals.
    ArtifactsBucket The S3 bucket with artifact files (Lambda functions, templates, HTML files, and so on). Keep the default value.
    ArtifactsPrefix The path for the S3 bucket that contains artifact files. Keep the default value.

    Figure 2 shows an example of values entered under Parameters.
     

    Figure 2: Input parameters for the CloudFormation stack

    Figure 2: Input parameters for the CloudFormation stack

  4. Enter values for all of the input parameters, and then choose Next.
  5. On the Options page, keep the defaults, and then choose Next.
  6. On the Review page, confirm the details, acknowledge the statements under Capabilities and transforms as shown in Figure 3, and then choose Create stack.
     
    Figure 3: CloudFormation Capabilities and Transforms acknowledgments

    Figure 3: CloudFormation Capabilities and Transforms acknowledgments

Step 2: Confirm access to the website through CloudFront

Next, confirm that website access through CloudFront is functioning as intended. After the CloudFormation stack completes deployment, you can access the test website using the domain name that was automatically assigned to the distribution.

To confirm viewer access to the website through CloudFront

  1. In the CloudFormation console, choose Services > CloudFormation > CFOriginVerify stack. On the stack Outputs tab, look for the cfEndpoint entry, similar to that shown in Figure 4.
     
    Figure 4: CloudFormation cfEndpoint stack output

    Figure 4: CloudFormation cfEndpoint stack output

  2. The cfEndpoint is the URL for the site, and it is automatically assigned by CloudFront. Choose the cfEndpoint link to open the test page, as shown in Figure 5.
     
    Figure 5: CloudFormation cfEndpoint test page

    Figure 5: CloudFormation cfEndpoint test page

In this step, you’ve confirmed that website accessibility through CloudFront is functioning as intended.

Step 3: Confirm that direct viewer access to the origin URL is blocked by AWS WAF

In this step, you confirm that direct access to the test website is blocked by the regional AWS WAF web ACL.

To test direct access to the origin URL

  1. In the CloudFormation console, choose Services > CloudFormation > CFOriginVerify stack. On the stack Outputs tab, look for the albEndpoint entry.
  2. Choose the albEndpoint link to go to the test site URL that was automatically assigned to the ALB. Choosing this link will result in a 403 Forbidden response. When AWS WAF blocks a web request based on the conditions that you specify, it returns HTTP status code 403 (Forbidden).

In this step, you’ve confirmed that website accessibility directly to the origin ALB is blocked by the regional AWS WAF web ACL.

Step 4: Review the CloudFront origin custom header configuration

Now that you’ve confirmed that the test website can only be accessed through CloudFront, you can review the detailed CloudFront, WAF, and Secrets Manager configurations that enable this restriction.

To review the custom header configuration

  1. In the CloudFormation console, choose Services > CloudFormation > CFOriginVerify stack. On the stack Outputs tab, look for the cfDistro entry.
  2. Choose the cfDistro link to go to this distribution’s configuration in the CloudFront console. On the Origin Groups tab, under Origins, select the origin as shown in Figure 6.
     
    Figure 6: CloudFront Origins and Origin Groups settings

    Figure 6: CloudFront Origins and Origin Groups settings

  3. Choose Edit to go to the Origin Settings section, scroll to the bottom and review the Origin Custom Headers as shown in Figure 7.
     
    Figure 7: CloudFront Origin Custom Headers settings

    Figure 7: CloudFront Origin Custom Headers settings

    You can see that the custom header, X-Origin-Verify, has been configured using Secrets Manager with a random 32-character alpha-numeric value. This custom header will be added to web requests that are forwarded from CloudFront to your origin. As you learned in steps 2 and 3, requests without this header are blocked by AWS WAF at the origin ALB. In the next two steps, you will dive deeper into how this works.

Step 5: Review the AWS WAF web ACL header validation rule

In this step, you review the AWS WAF rule configuration that validates the CloudFront custom header X-Origin-Verify.

To review the header validation rule

  1. In the CloudFormation console, select Services > CloudFormation > CFOriginVerify stack. On the stack Outputs tab, look for the wafWebACLR entry.
  2. Choose the wafWebACLR link to go to the origin ALB web ACL configuration in the WAF and Shield console. On the Overview tab, you can view the Requests per 5 minute period chart and the Sampled requests list, which shows requests from the last three hours that the ALB has forwarded to AWS WAF for inspection. The sample of requests includes detailed data about each request, such as the originating IP address and Uniform Resource Identifier (URI). You also can view which rule the request matched, and whether the rule Action is configured to ALLOW, BLOCK, or COUNT requests. You can enable AWS WAF logging to get detailed information about traffic that’s analyzed by your web ACL. You send logs from your web ACL to an Amazon Kinesis Data Firehose with a configured storage destination such as Amazon S3. Information that’s contained in the logs includes the time that AWS WAF received the request from your AWS resource, detailed information about the request, and the action for the rule that each request matched.
  3. Choose the Rules tab to review the rules for this web ACL, as shown in Figure 8.
     
    Figure 8: AWS WAF web ACL rules

    Figure 8: AWS WAF web ACL rules

    On the Rules tab, you can see that the CFOriginVerifyXOriginVerify rule has been configured with the Allow action, while the Default web ACL action is Block. This means that any incoming requests that don’t match the conditions in this rule will be blocked.

    In every AWS WAF rule group and every web ACL, rules define how to inspect web requests and what to do when a web request matches the inspection criteria. Each rule requires one top-level statement, which might contain nested statements at any depth, depending on the rule and statement type. You can learn more about AWS WAF rule statements in the AWS WAF Developer Guide, AWS Online Tech Talks, and samples on GitHub.

  4. Choose the CFOriginVerifyXOriginVerify rule, and then choose Edit to bring up the Rule Builder tool. In the Rule Builder, you can see that a rule has been created with two Rule Statements similar to those in Figure 9.
     
    Figure 9: AWS WAF web ACL rule statement

    Figure 9: AWS WAF web ACL rule statement

    In the Rule Builder configuration for Statement 1, you can see that the request Header is being inspected for the x-origin-verify Header field name (HTTP header field names are case insensitive), and the String to match value is set to the value you reviewed in step 4. In the Rule Builder, you can also see a logical OR with an additional rule statement, Statement 2. You will notice that the configuration for Statement 2 is the same as Statement 1, except that the String to match value is different. You will learn about this in detail in step 7, but Statement 2 helps to ensure that valid web requests are processed by your origin servers when Secrets Manager automatically rotates the value of the X-Origin-Verify header. The effect of this rule configuration is that inspected web requests will be allowed if they match either of the two statements.

    In addition to the visual web ACL representation you just reviewed in the WAF Rule visual editor, every web ACL also has a JSON format representation you can edit by using the WAF Rule JSON editor. You can retrieve the complete configuration for a web ACL in JSON format, modify it as you need, and then provide it to AWS WAF through the console, API, or command line interface (CLI).

    This step demonstrated how your request was allowed to access the test website in step 2 and why your request was blocked in step 3.

Step 6: Review Secrets Manager configuration

Now that you’re familiar with the CloudFront and AWS WAF configurations, you will learn how Secrets Manager creates and rotates the secret used for the X-Origin-Verify header field value. Secrets Manager uses an AWS Lambda function to perform the actual rotation of the secret used for the value and update the associated AWS WAF web ACL and CloudFront distribution.

To review the Secrets Manager configuration

  1. In the CloudFormation console, choose Services > CloudFormation > CFOriginVerify stack. On the stack Outputs tab, look for the OriginVerifySecret entry.
  2. Choose the OriginVerifySecret link to go to the configuration for the secret in the Secrets Manager console. Scroll down to the section titled Secret value, and then choose Retrieve secret value to display the Secret key/value as shown in Figure 10.
     
    Figure 10: Secrets Manager retrieve value

    Figure 10: Secrets Manager retrieve value

    When you retrieve the secret, Secrets Manager programmatically decrypts the secret and displays it in the console. You can see that the secret is stored as a key-value pair, where the secret key is HEADERVALUE, and the secret value is the string used in the CloudFront and WAF configurations you reviewed in steps 3 and 4.

  3. While you’re in the Secrets Manager console, review the Rotation configuration section, as shown in Figure 11.
     
    Figure 11: Secrets Manager rotation configuration

    Figure 11: Secrets Manager rotation configuration

    You can see that rotation was enabled for this secret at an interval of one day. This configuration also includes a Lambda rotation function. Secrets Manager uses a Lambda function to perform the actual rotation of a secret. If you use your secret for one of the supported Amazon Relational Database Service (Amazon RDS) databases, then Secrets Manager provides the Lambda function for you. If you use your secret for another service, then you must provide the code for the Lambda function, as we’ve done in this solution.

Step 7: Review the Secrets Manager Lambda rotation function

In this step, you review the Secrets Manager Lambda rotation function.

To review the Secrets Manager Lambda rotation function

  1. In the CloudFormation console, choose Services > CloudFormation > CFOriginVerify stack. In the stack Outputs tab, look for the OriginSecretRotateFunction entry.
  2. Choose the OriginSecretRotateFunction link to go to the Lambda function that is configured for this secret. The code used for this secrets rotation function is based on the AWS Secrets Manager Rotation Template. Choose the Monitoring tab and review the Invocations graph as shown in Figure 12.
     
    Figure 12: Monitoring tab for the Lambda rotation function

    Figure 12: Monitoring tab for the Lambda rotation function

    Shortly after the CloudFormation stack creation completes, you should see several invocations in the Invocations graph. When a configured rotation schedule or a manual process triggers rotation, Secrets Manager calls the Lambda function several times, each time with different parameters. The Lambda function performs several tasks throughout the process of rotating a secret. This includes the following steps: createSecret, setSecret, testSecret, and finishSecret. Secrets Manager uses staging labels, a simple text string, to enable you to identify different versions of a secret during rotation. This includes the following staging labels: AWSPENDING, AWSCURRENT, and AWSPREVIOUS, which are covered in the following step.

  3. To learn more about the rotation steps configured for this solution, choose View logs in CloudWatch on the Monitoring tab.
    1. On the Log streams tab, select the top entry in the list.
    2. Enter Event in the Filter events field, and then choose the arrows to expand the details for each event as shown in Figure 13.
       
      Figure 13: CloudWatch event logs for the Lambda rotation function

      Figure 13: CloudWatch event logs for the Lambda rotation function

The four rotation steps annotated in Figure 13 work as follows:

Note: This section provides an overview of the rotation process for this solution. For more detailed information about the Lambda rotation function, see the Secrets Manager User Guide.

  1. The createSecret step: In this step, the Lambda function generates a new version of the secret. The rotation Lambda function calls the GetRandomPassword method to generate a new random string, and then labels the new version of the secret with the staging label AWSPENDING to mark it as the in-process version of the secret.
  2. The SetSecret step: In this step, the rotation function retrieves the version of the secret labeled AWSPENDING from Secrets Manager and updates the web ACL rule for the AWS WAF associated with the origin ALB. The two rule statements you reviewed in step 5 of this blog post are updated with the AWSPENDING and AWSCURRENT values. The rotation function also updates the value for the Origin Custom Header X-Origin-Verify. When the rotation function updates your distribution configuration, CloudFront starts to propagate the changes to all edge locations. Maintaining both the AWSPENDING and AWSCURRENT secret values helps to ensure that web requests forwarded to your origin by CloudFront are not blocked. Therefore, once a secret value is created, two rotation intervals are required for it to be removed from the configuration.
  3. The testSecret step: This step of the Lambda function verifies the AWSPENDING version of the secret by using it to access the origin ALB endpoint with the X-Origin-Verify header. Both AWSPENDING and AWSCURRENT X-Origin-Verify header values are tested to confirm a “200 OK” response from the origin ALB endpoint.
  4. The finishSecret step: In the last step, the Lambda function moves the label AWSCURRENT from the current version to this new version of the secret. The old version receives the AWSPREVIOUS staging label, and is available for recovery as the last known good version of the secret, if needed. The old version with the AWSPREVIOUS staging label no longer has any staging labels attached, so Secrets Manager considers the old version deprecated and subject to deletion.

When the finishSecret step has successfully completed, Secrets Manager schedules the next rotation by adding the rotation interval (number of days) to the completion date. This automated process causes the values used for the validation headers to be updated at the configured interval. Although out of scope for this blog post, you should monitor your secrets to ensure usage of your secrets and log any changes to them. This helps you to make sure that any unexpected usage or change can be investigated, and unwanted changes can be rolled back.

Summary

You’ve learned how to use Amazon CloudFront, AWS WAF and AWS Secrets Manager to prevent web requests from directly accessing your CloudFront origin resources. You can use this solution to improve security for CloudFront custom origins that support AWS WAF, such as ALB, Amazon API Gateway, and AWS AppSync.

When using this solution, you will incur AWS WAF usage charges for both the ALB and CloudFront associated AWS WAF web ACLs. You might wish to consider subscribing to AWS Shield Advanced, which provides higher levels of protection against distributed denial of service (DDoS) attacks and includes AWS WAF and AWS Firewall Manager at no additional cost for usage on resources protected by AWS Shield Advanced. You can also learn more about pricing for CloudFront, AWS WAF, Secrets Manager, and AWS Shield Advanced.

You can review more options for restricting access to content with CloudFront, additional AWS WAF security automations, or managed rules for AWS WAF. You can explore solutions for using AWS IP address ranges to enhance CloudFront origin security. You might also wish to learn more about Secrets Manager best practices. This code for this solution is available on GitHub.

If you have feedback about this post, submit comments in the Comments section below. If you have questions about using this solution, you can start a thread in the CloudFront, WAF, or Secrets Manager forums, review or open an issue in this solution’s GitHub repository, or contact AWS Support.

Want more AWS Security how-to content, news, and feature announcements? Follow us on Twitter.

Cameron Worrell

Cameron Worrell

Cameron is a Solutions Architect with a passion for security and enterprise transformation. He joined AWS in 2015.