Thomson Reuters Corporation is a leading provider of business information services. The company’s products include highly specialized information-enabled software and tools for legal, tax, accounting and compliance professionals combined with the world’s most trusted global news service: Reuters.
Thomson Reuters is committed to a cloud first strategy on AWS, with thousands of applications hosted on AWS that are critical to its customers, with a growing number of AWS accounts that are used by different business units to deploy the applications. Service Management in Thomson Reuters is a centralized team, who needs an efficient way to measure, monitor and track the health of AWS services across the AWS environment. AWS Health provides the required visibility to monitor the performance and availability of AWS services and scheduled changes or maintenance that may impact their applications.
With approximately 16,000 AWS Health events received in 2022 alone due to the scale at which Thomson Reuters is operating on AWS, manually tracking AWS Health events is challenging. This necessitates a solution to provide centralized visibility of Health alerts across the organization, and an efficient way to track and monitor the Health events across the AWS accounts. Thomson Reuters requires retaining AWS Health event history for a minimum of 2 years to derive indicators affecting performance and availability of applications in the AWS environment and thereby ensuring high service levels to customers. Thomson Reuters utilizes ServiceNow for tracking IT operations and Datadog for infrastructure monitoring which is integrated with AWS Health to measure and track all the events and estimate the health performance with key indicators. Before this solution, Thomson Reuters didn’t have an efficient way to track scheduled events, and no metrics to identify the applications impacted by these Health events.
In this post, we will discuss how Thomson Reuters has implemented a solution to track and monitor AWS Health events at scale, automate notifications, and efficiently track AWS scheduled changes. This gives Thomson Reuters visibility into the health of AWS resources using Health events, and allows them to take proactive measures to minimize impact to their applications hosted on AWS.
Solution overview
Thomson Reuters leverages AWS Organizations to centrally govern their AWS environment. AWS Organization helps to centrally manage accounts and resources, optimize the cost, and simplify billing. The AWS environment in Thomson Reuters has a dedicated organizational management account to create Organizational Units (OUs), and policies to manage the organization’s member accounts. Thomson Reuters enabled organizational view within AWS Health, which once activated provides an aggregated view of AWS Health events across all their accounts (Figure 1).
Figure 1. Architecture to track and monitor AWS Health events
Let us walk through the architecture of this solution:
Lambda leverages execution role permissions to connect to the AWS Health API and send events to Amazon EventBridge. The loosely coupled architecture of Amazon EventBridge allows for storing and routing of the events to various targets based upon the AWS Health Event Type category.
AWS Health Event is matched against the EventBridge rules to identify the event category and route to the target AWS Lambda functions that process specific AWS Health Event types.
The AWS Health events are routed to ServiceNow and Datadog based on the AWS Health Event Type category.
If the Health Event Type category is “Scheduled change“ or ” Issues“ then it is routed to ServiceNow.
The event is stored in a DynamoDB table to track the AWS Health events beyond the 90 days history available in AWS Health.
If the entity value of the affected AWS resource exists inside the Health Event, then tags associated with that entity value are used to identify the application and resource owner to notify. One of the internal policies mandates the owners to include AWS resource tags for every AWS resource provisioned. The DynamoDB table is updated with additional details captured based on entity value.
Events that are not of interest are excluded from tracking.
A ServiceNow ticket is created containing the details of the AWS Health event and includes additional details regarding the application and resource owner that are captured in the DynamoDB table. The ServiceNow credentials to connect are stored securely in AWS Secrets Manager. The ServiceNow ticket details are also updated back in DynamoDB table to correlate AWS Health event with a ServiceNow tickets.
If the Health Event Type category is “Account Notification”, then it is routed to Datadog.
All account notifications including public notifications are routed to Datadog for tracking.
Datadog monitors are created to help derive more meaningful information from the account notifications received from the AWS Health events.
AWS Health Event Type “Account Notification” provides information about the administration or security of AWS accounts and services. These events are mostly informative, but some of them need urgent action, and tracking each of these events within Thomson Reuters incident management is substantial. Thomson Reuters has decided to route these events to Datadog, which is monitored by the Global Command Center from the centralized Service Management team. All other AWS Health Event types are tracked using ServiceNow.
ServiceNow to track scheduled changes and issues
Thomson Reuters leverages ServiceNow for incident management and change management across the organization, including both AWS cloud and on-premises applications. This allows Thomson Reuters to continue using the existing proven process to track scheduled changes in AWS through the ServiceNow change management process and AWS Health issues and investigations by using ServiceNow incident management, notify relevant teams, and monitor until resolution. Any AWS service maintenance or issues reported through AWS Health are tracked in ServiceNow.
One of the challenges while processing thousands of AWS Health events every month is also to identify and track events that has the potential to cause significant impact to the applications. Thomson Reuters decided to exclude events that are not relevant for Thomson Reuters hosted Regions, or specific AWS services. The process of identifying events to include is a continuous iterative effort, relying on the data captured in DynamoDB tables and from experiences of different teams. AWS EventBridge simplifies the process of filtering out events by eliminating the need to develop a custom application.
ServiceNow is used to create various dashboards which are important to Thomson Reuters leadership to view the health of the AWS environment in a glance, and detailed dashboards for individual application, business units and AWS Regions are also curated for specific requirements. This solution allows Thomson Reuters to capture metrics which helps to understand the scheduled changes that AWS performs and identify the underlying resources that are impacted in different AWS accounts. The ServiceNow incidents created from Health events are used to take real-time actions to mitigate any potential issues.
Thomson Reuters has a business requirement to persist AWS Health event history for a minimum of 2 years, and a need for customized dashboards for leadership to view performance and availability metrics across applications. This necessitated the creation of dashboards in ServiceNow. Figures 2, 3, and 4 are examples of dashboards that are created to provide a comprehensive view of AWS Health events across the organization.
Figure 2. ServiceNow dashboard with a consolidated view of AWS Health events
Figure 3. ServiceNow dashboard with a consolidated view of AWS Health events
Figure 4. ServiceNow dashboard showing AWS Health events
Datadog for account notifications
Thomson Reuters leverages Datadog as its strategic platform to observe, monitor, and track the infrastructure, applications and more. Health events with the category type Account Notification are forwarded to Datadog and are monitored by Thomson Reuters Global Command Center part of the Service Management. Account notifications are important to track as they contain information about administration or security of AWS accounts. Like ServiceNow, Datadog is also used to curate separate dashboards with unique Datadog monitors for monitoring and tracking these events (Figure 5). Currently, the Thomson Reuters Service Management team are the main consumers of these Datadog alerts, but in the future the strategy would be to route relevant and important notifications only to the concerned application team by ensuring a mandatory and robust tagging standards on the existing AWS accounts for all AWS resource types.
Figure 5. Datadog dashboard for AWS Health event type account notification
What’s next?
Thomson Reuters will continue to enhance the logic for identifying important Health events that require attention, reducing noise by filtering out unimportant ones. Thomson Reuters plan to develop a self-service subscription model, allowing application teams to opt into the Health events related to their applications.
The next key focus will also be to look at automating actions for specific AWS Health scheduled events wherever possible, such as responding to maintenance with AWS System Manager Automation documents.
Conclusion
By using this solution, Thomson Reuters can effectively monitor and track AWS Health events at scale using the preferred internal tools ServiceNow and Datadog. Integration with ServiceNow allowed Thomson Reuters to measure and track all the events and estimate the health performance with key indicators that can be generated from ServiceNow. This architecture provided an efficient way to track the AWS scheduled changes, capture metrics to understand the various schedule changes that AWS is doing and resources that are getting impacted in different AWS accounts. This solution provides actionable insights from the AWS Health events, allowing Thomson Reuters to take real-time actions to mitigate impacts to the applications and thus offer high Service levels to Thomson Reuters customers.
In Part 1 of this series, we provided guidance on how to discover and classify secrets and design a migration solution for customers who plan to migrate secrets to AWS Secrets Manager. We also mentioned steps that you can take to enable preventative and detective controls for Secrets Manager. In this post, we discuss how teams should approach the next phase, which is implementing the migration of secrets to Secrets Manager. We also provide a sample solution to demonstrate migration.
Implement secrets migration
Application teams lead the effort to design the migration strategy for their application secrets. Once you’ve made the decision to migrate your secrets to Secrets Manager, there are two potential options for migration implementation. One option is to move the application to AWS in its current state and then modify the application source code to retrieve secrets from Secrets Manager. Another option is to update the on-premises application to use Secrets Manager for retrieving secrets. You can use features such as AWS Identity and Access Management (IAM) Roles Anywhere to make the application communicate with Secrets Manager even before the migration, which can simplify the migration phase.
If the application code contains hardcoded secrets, the code should be updated so that it references Secrets Manager. A good interim state would be to pass these secrets as environment variables to your application. Using environment variables helps in decoupling the secrets retrieval logic from the application code and allows for a smooth cutover and rollback (if required).
Cutover to Secrets Manager should be done in a maintenance window. This minimizes downtime and impacts to production.
Before you perform the cutover procedure, verify the following:
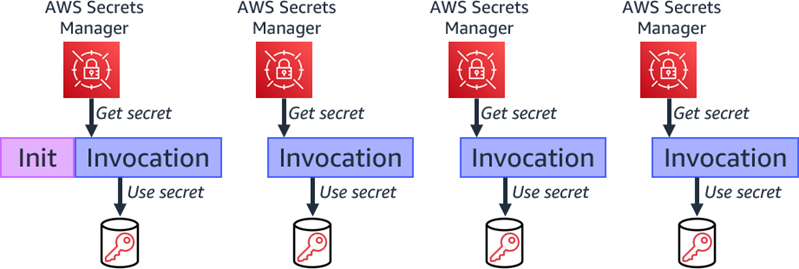
Application components can access Secrets Manager APIs. Based on your environment, this connectivity might be provisioned through interface virtual private cloud (VPC) endpoints or over the internet.
Secrets exist in Secrets Manager and have the correct tags. This is important if you are using attribute-based access control (ABAC).
Applications that integrate with Secrets Manager have the required IAM permissions.
Have a well-documented cutover and rollback plan that contains the changes that will be made to the application during cutover. These would include steps like updating the code to use environment variables and updating the application to use IAM roles or instance profiles (for apps that are being migrated to Amazon Elastic Compute Cloud (Amazon EC2)).
After the cutover, verify that Secrets Manager integration was successful. You can use AWS CloudTrail to confirm that application components are using Secrets Manager.
We recommend that you further optimize your integration by enabling automatic secrets rotation. If your secrets were previously widely accessible (for example, they were stored in your Git repositories), we recommend rotating as soon as possible when migrating .
Sample application to demo integration with Secrets Manager
In the next sections, we present a sample AWS Cloud Development Kit (AWS CDK) solution that demonstrates the implementation of the previously discussed guardrails, design, and migration strategy. You can use the sample solution as a starting point and expand upon it. It includes components that environment teams may deploy to help provide potentially secure access for application teams to migrate their secrets to Secrets Manager. The solution uses ABAC, a tagging scheme, and IAM Roles Anywhere to demonstrate regulated access to secrets for application teams. Additionally, the solution contains client-side utilities to assist application and migration teams in updating secrets. Teams with on-premises applications that are seeking integration with Secrets Manager before migration can use the client-side utility for access through IAM Roles Anywhere.
VPC endpoints for the AWS Key Management Service (AWS KMS) and Secrets Manager services to the sample VPC. The use of VPC endpoints means that calls to AWS KMS and Secrets Manager are not made over the internet and remain internal to the AWS backbone network.
An empty shell secret, tagged with the supplied attributes and an IAM managed policy that uses attribute-based access control conditions. This means that the secret is managed in code, but the actual secret value is not visible in version control systems like GitHub or in AWS CloudFormation parameter inputs.
An IAM Roles Anywhere infrastructure stack (created and owned by environment teams). This stack provisions the following resources:
An IAM Roles Anywhere public key infrastructure (PKI) trust anchor that uses AWS Private CA.
An IAM role for the on-premises application that uses the common environment infrastructure stack.
An IAM Roles Anywhere profile.
Note: You can choose to use your existing CAs as trust anchors. If you do not have a CA, the stack described here provisions a PKI for you. IAM Roles Anywhere allows migration teams to use Secrets Manager before the application is moved to the cloud. Post migration, you could consider updating the applications to use native IAM integration (like instance profiles for EC2 instances) and revoking IAM Roles Anywhere credentials.
A client-side utility (primarily used by application or migration teams). This is a shell script that does the following:
Assists in provisioning a certificate by using OpenSSL.
Assists application teams to access and update their application secrets after assuming an IAM role by using IAM Roles Anywhere.
A sample application stack (created and owned by the application/migration team). This is a sample serverless application that demonstrates the use of the solution. It deploys the following components, which indicate that your ABAC-based IAM strategy is working as expected and is effectively restricting access to secrets:
The sample application stack uses a VPC-deployed common environment infrastructure stack.
It deploys an Amazon Aurora MySQL serverless cluster in the PRIVATE_ISOLATED subnet and uses the secret that is created through a common environment infrastructure stack.
It deploys a sample Lambda function in the PRIVATE_WITH_NAT subnet.
It deploys two IAM roles for testing:
allowedRole (default role): When the application uses this role, it is able to use the GET action to get the secret and open a connection to the Aurora MySQL database.
Not allowedRole: When the application uses this role, it is unable to use the GET action to get the secret and open a connection to the Aurora MySQL database.
Prerequisites to deploy the sample solution
The following software packages need to be installed in your development environment before you deploy this solution:
Note: In this section, we provide examples of AWS CLI commands and configuration for Linux or macOS operating systems. For instructions on using AWS CLI on Windows, refer to the AWS CLI documentation.
Before deployment, make sure that the correct AWS credentials are configured in your terminal session. The credentials can be either in the environment variables or in ~/.aws. For more details, see Configuring the AWS CLI.
Next, use the following commands to set your AWS credentials to deploy the stack:
You can view the IAM credentials that are being used by your session by running the command aws sts get-caller-identity. If you are running the cdk command for the first time in your AWS account, you will need to run the following cdk bootstrap command to provision a CDK Toolkit stack that will manage the resources necessary to enable deployment of cloud applications with the AWS CDK.
cdk bootstrap aws://<AWS account number>/<Region> # Bootstrap CDK in the specified account and AWS Region
Select the applicable archetype and deploy the solution
This section outlines the design and deployment steps for two archetypes:
For customers with applications already migrated to AWS, we demonstrate a sample integration of Secrets Manager with AWS Lambda. (See the section Archetype 2: Application has migrated to AWS.)
Archetype 1: Application is currently on premises
Archetype 1 has the following requirements:
The application is currently hosted on premises.
The application would consume API keys, stored credentials, and other secrets in Secrets Manager.
The application, environment and security teams work together to define a tagging strategy that will be used to restrict access to secrets. After this, the proposed workflow for each persona is as follows:
The environment engineer deploys a common environment infrastructure stack (as described earlier in this post) to bootstrap the AWS account with secrets and IAM policy by using the supplied tagging requirement.
Additionally, the environment engineer deploys the IAM Roles Anywhere infrastructure stack.
The application developer updates the secrets required by the application by using the client-side utility (helper.sh).
The application developer uses the client-side utility to update the AWS CLI profile to consume the IAM Roles Anywhere role from the on-premises servers.
Figure 1 shows the workflow for Archetype 1.
Figure 1: Application on premises connecting to Secrets Manager
To deploy Archetype 1
(Actions by the application team persona) Clone the repository and update the tagging details at configs/tagconfig.json.
Note: Do not modify the tag/attributes name/key, only modify value.
(Actions by the environment team persona) Run the following command to deploy the common environment infrastructure stack. ./helper.sh prepare Then, run the following command to deploy the IAM Roles Anywhere infrastructure stack../helper.sh on-prem
(Actions by the application team persona) Update the secret value of the dummy secrets provided by the environment team, by using the following command. ./helper.sh update-secret
Note: This command will only update the secret if it’s still using the dummy value.
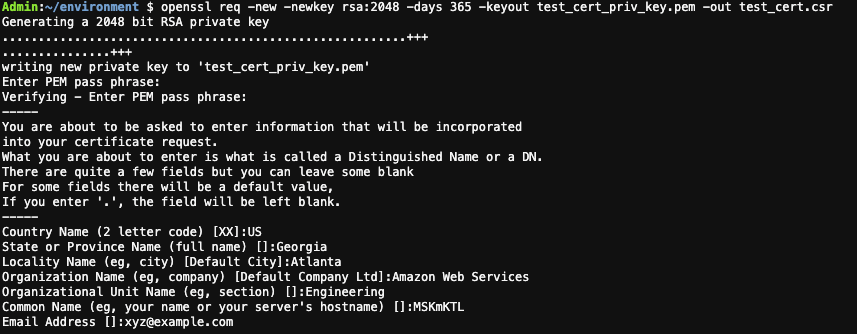
Then, run the following command to set up the client and server on premises../helper.sh client-profile-setup
Follow the command prompt. It will help you request a client certificate and update the AWS CLI profile.
Important: When you request a client certificate, make sure to supply at least one distinguished name, like CommonName.
The sample output should look like the following.
‐‐> This role can be used by the application by using the AWS CLI profile 'developer'.
‐‐> For instance, the following output illustrates how to access secret values by using the AWS CLI profile 'developer'.
‐‐> Sample AWS CLI: aws secretsmanager get-secret-value ‐‐secret-id $SECRET_ARN ‐‐profile developer
At this point, the client-side utility (helper.sh client-profile-setup) should have updated the AWS CLI configuration file with the following profile.
The application team can verify that the AWS CLI profile has been properly set up and is capable of retrieving secrets from Secrets Manager by running the following client-side utility command. ./helper.sh on-prem-test
This client-side utility (helper.sh) command verifies that the AWS CLI profile (for example, developer) has been set up for IAM Roles Anywhere and can run the GetSecretValue API action to retrieve the value of the secret stored in Secrets Manager.
The sample output should look like the following.
‐‐> Checking credentials ...
{
    "UserId": "AKIAIOSFODNN7EXAMPLE:EXAMPLE11111EXAMPLEEXAMPLE111111",
    "Account": "444455556666",
    "Arn": "arn:aws:sts::444455556666:assumed-role/RolesanywhereabacStack-onPremAppRole-1234567890ABC"
}
‐‐> Assume role worked for:
arn:aws:sts::444455556666:assumed-role/RolesanywhereabacStack-onPremAppRole-1234567890ABC
‐‐> This role can be used by the application by using the AWS CLI profile 'developer'.
‐‐> For instance, the following output illustrates how to access secret values by using the AWS CLI profile 'developer'.
‐‐> Sample AWS CLI: aws secretsmanager get-secret-value --secret-id $SECRET_ARN ‐‐profile $PROFILE_NAME
-------Output-------
{
  "password": "randomuniquepassword",
  "servertype": "testserver1",
  "username": "testuser1"
}
-------Output-------
Archetype 2: Application has migrated to AWS
Archetype 2 has the following requirement:
Deploy a sample application to demonstrate how ABAC authorization works for Secrets Manager APIs.
The application, environment, and security teams work together to define a tagging strategy that will be used to restrict access to secrets. After this, the proposed workflow for each persona is as follows:
The environment engineer deploys a common environment infrastructure stack to bootstrap the AWS account with secrets and an IAM policy by using the supplied tagging requirement.
The application developer updates the secrets required by the application by using the client-side utility (helper.sh).
The application developer tests the sample application to confirm operability of ABAC.
Figure 2 shows the workflow for Archetype 2.
Figure 2: Sample migrated application connecting to Secrets Manager
To deploy Archetype 2
(Actions by the application team persona) Clone the repository and update the tagging details at configs/tagconfig.json.
Note: Don’t modify the tag/attributes name/key, only modify value.
(Actions by the environment team persona) Run the following command to deploy the common platform infrastructure stack. ./helper.sh prepare
(Actions by the application team persona) Update the secret value of the dummy secrets provided by the environment team, using the following command. ./helper.sh update-secret
Note: This command will only update the secret if it is still using the dummy value.
Then, run the following command to deploy a sample app stack. ./helper.sh on-aws
Note: If your secrets were migrated from a system that did not have the correct access controls, as a best security practice, you should rotate them at least once manually.
At this point, the client-side utility should have deployed a sample application Lambda function. This function connects to a MySQL database by using credentials stored in Secrets Manager. It retrieves the secret values, validates them, and establishes a connection to the database. The function returns a message that indicates whether the connection to the database is working or not.
To test Archetype 2 deployment
The application team can use the following client-side utility (helper.sh) to invoke the Lambda function and verify whether the connection is functional or not. ./helper.sh on-aws-test
The sample output should look like the following.
‐‐> Check if AWS CLI is installed
‐‐> AWS CLI found
‐‐> Using tags to create Lambda function name and invoking a test
‐‐> Checking the Lambda invoke response.....
‐‐> The status code is 200
‐‐> Reading response from test function:
"Connection to the DB is working."
‐‐> Response shows database connection is working from Lambda function using secret.
Conclusion
Building an effective secrets management solution requires careful planning and implementation. AWS Secrets Manager can help you effectively manage the lifecycle of your secrets at scale. We encourage you to take an iterative approach to building your secrets management solution, starting by focusing on core functional requirements like managing access, defining audit requirements, and building preventative and detective controls for secrets management. In future iterations, you can improve your solution by implementing more advanced functionalities like automatic rotation or resource policies for secrets.
If you have feedback about this post, submit comments in the Comments section below. If you have questions about this post, start a new thread on the AWS Secrets Manager re:Post or contact AWS Support.
Want more AWS Security news? Follow us on Twitter.
“An ounce of prevention is worth a pound of cure.” – Benjamin Franklin
A secret can be defined as sensitive information that is not intended to be known or disclosed to unauthorized individuals, entities, or processes. Secrets like API keys, passwords, and SSH keys provide access to confidential systems and resources, but it can be a challenge for organizations to maintain secure and consistent management of these secrets. Commonly observed anti-patterns in organizational secrets management systems include sharing plaintext secrets in emails or messaging apps, allowing application developers to view secrets in plaintext, hard-coding secrets into applications and storing them in version control systems, failing to rotate secrets regularly, and not logging and monitoring access to secrets.
We have created a two-part Amazon Web Services (AWS) blog post that provides prescriptive guidance on how you can use AWS Secrets Manager to help you achieve a cloud-based and modern secrets management system. In this first blog post, we discuss approaches to discover and classify secrets. In Part 2 of this series, we elaborate on the implementation phase and discuss migration techniques that will help you migrate your secrets to AWS Secrets Manager.
Managing secrets: Best practices and personas
A secret’s lifecycle comprises four phases: create, store, use, and destroy. An effective secrets management solution protects the secret in each of these phases from unauthorized access. Besides being secure, robust, scalable, and highly available, the secrets management system should integrate closely with other tools, solutions, and services that are being used within the organization. Legacy secret stores may lack integration with privileged access management (PAM), logging and monitoring, DevOps, configuration management, and encryption and auditing, which leads to teams not having uniform practices for consuming secrets and creates discrepancies from organizational policies.
Secrets Manager is a secrets management service that helps you protect access to your applications, services, and IT resources. This is a non-exhaustive list of features that AWS Secrets Manager offers:
Access control through AWS Identity and Access Management (IAM) — Secrets Manager offers built-in integration with the AWS Identity and Access Management (IAM) service. You can attach access control policies to IAM principals or to secrets themselves (by using resource-based policies).
Logging and monitoring — Secrets Manager integrates with AWS logging and monitoring services such as AWS CloudTrail and Amazon CloudWatch. This means that you can use your existing AWS logging and monitoring stack to log access to secrets and audit their usage.
Secrets encryption at rest — Secrets Manager integrates with AWS Key Management Service (AWS KMS). Secrets are encrypted at rest by using an AWS-managed key or customer-managed key.
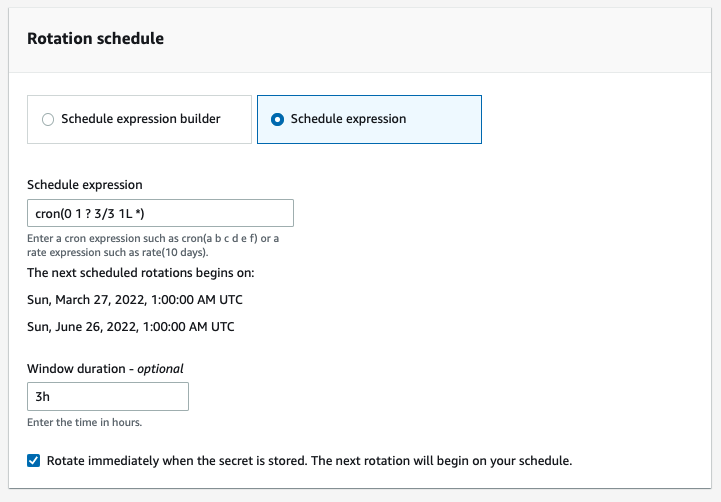
Framework to support the rotation of secrets securely — Rotation helps limit the scope of a compromise and should be an integral part of a modern approach to secrets management. You can use Secrets Manager to schedule automatic database credentials rotation for Amazon RDS, Amazon Redshift, and Amazon DocumentDB. You can use customized AWS Lambda functions to extend the Secrets Manager rotation feature to other secret types, such as API keys and OAuth tokens for on-premises and cloud resources.
Security, cloud, and application teams within an organization need to work together cohesively to build an effective secrets management solution. Each of these teams has unique perspectives and responsibilities when it comes to building an effective secrets management solution, as shown in the following table.
Persona
Responsibilities
What they want
What they don’t want
Security teams/security architect
Define control objectives and requirements from the secrets management system
Least privileged short-lived access, logging and monitoring, and rotation of secrets
Secrets sprawl
Cloud team/environment team
Implement controls, create guardrails, detect events of interest
Scalable, robust, and highly available secrets management infrastructure
Application teams reaching out to them to provision or manage app secrets
Developer/migration engineer
Migrate applications and their secrets to the cloud
Independent control and management of their app secrets
Dependency on external teams
To sum up the requirements from all the personas mentioned here: The approach to provision and consume secrets should be secure, governed, easily scalable, and self-service.
We’ll now discuss how to discover and classify secrets and design the migration in a way that helps you to meet these varied requirements.
Discovery — Assess and categorize existing secrets
The initial discovery phase involves running sessions aimed at discovering, assessing, and categorizing secrets. Migrating applications and associated infrastructure to the cloud requires a strategic and methodical approach to progressively discover and analyze IT assets. This analysis can be used to create high-confidence migration wave plans. You should treat secrets as IT assets and include them in the migration assessment planning.
For application-related secrets, arguably the most appropriate time to migrate a secret is when the application that uses the secret is being migrated itself. This lets you track and report the use of secrets as soon as the application begins to operate in the cloud. If secrets are left on-premises during an application migration, this often creates a risk to the availability of the application. The migrated application ends up having a dependency on the connectivity and availability of the on-premises secrets management system.
The activities performed in this phase are often handled by multiple teams. Depending on the purpose of the secret, this can be a mix of application developers, migration teams, and environment teams.
Following are some common secret types you might come across while migrating applications.
Type
Description
Application secrets
Secrets specific to an application
Client credentials
Cloud to on-premises credentials or OAuth tokens (such as Okta, Google APIs, and so on)
Database credentials
Credentials for cloud-hosted databases, for example, Amazon Redshift, Amazon RDS or Amazon Aurora, Amazon DocumentDB
Third-party credentials
Vendor application credentials or API keys
Certificate private keys
Custom applications or infrastructure that might require programmatic access to the private key
Cryptographic keys
Cryptographic keys used for data encryption or digital signatures
SSH keys
Centralized management of SSH keys can potentially make it easier to rotate, update, and track keys
AWS access keys
On-premises to cloud credentials (IAM)
Creating an inventory for secrets becomes simpler when organizations have an IT asset management (ITAM) or Identity and Access Management (IAM) tool to manage their IT assets (such as secrets) effectively. For organizations that don’t have an on-premises secrets management system, creating an inventory of secrets is a combination of manual and automated efforts. Application subject matter experts (SMEs) should be engaged to find the location of secrets that the application uses. In addition, you can use commercial tools to scan endpoints and source code and detect secrets that might be hardcoded in the application. Amazon CodeGuru is a service that can detect secrets in code. It also provides an option to migrate these secrets to Secrets Manager.
AWS has previously described seven common migration strategies for moving applications to the cloud. These strategies are refactor, replatform, repurchase, rehost, relocate, retain, and retire. For the purposes of migrating secrets, we recommend condensing these seven strategies into three: retire, retain, and relocate. You should evaluate every secret that is being considered for migration against a decision tree to determine which of these three strategies to use. The decision tree evaluates each secret against key business drivers like cost reduction, risk appetite, and the need to innovate. This allows teams to assess if a secret can be replaced by native AWS services, needs to be retained on-premises, migrated to Secrets Manager, or retired. Figure 1 shows this decision process.
Figure 1: Decision tree for assessing a secret for migration
Capture the associated details for secrets that are marked as RELOCATE. This information is essential and must remain confidential. Some secret metadata is transitive and can be derived from related assets, including details such as itsm-tier, sensitivity-rating, cost-center, deployment pipeline, and repository name. With Secrets Manager, you will use resource tags to bind this metadata with the secret.
You should gather at least the following information for the secrets that you plan to relocate and migrate to AWS Secrets Manager.
Metadata about secrets
Rationale for gathering data
Secrets team name or owner
Gathering the name or email address of the individual or team responsible for managing secrets can aid in verifying that they are maintained and updated correctly.
Secrets application name or ID
To keep track of which applications use which secrets, it is helpful to collect application details that are associated with these secrets.
Secrets environment name or ID
Gathering information about the environment to which secrets belong, such as “prod,” “dev,” or “test,” can assist in the efficient management and organization of your secrets.
Secrets data classification
Understanding your organization’s data classification policy can help you identify secrets that contain sensitive or confidential information. It is recommended to handle these secrets with extra care. This information, which may be labeled “confidential,” “proprietary,” or “personally identifiable information (PII),” can indicate the level of sensitivity associated with a particular secret according to your organization’s data classification policy or standard.
Secrets function or usage
If you want to quickly find the secrets you need for a specific task or project, consider documenting their usage. For example, you can document secrets related to “backup,” “database,” “authentication,” or “third-party integration.” This approach can allow you to identify and retrieve the necessary secrets within your infrastructure without spending a lot of time searching for them.
This is also a good time to decide on the rotation strategy for each secret. When you rotate a secret, you update the credentials in both Secrets Manager and the service to which that secret provides access (in other words, the resource). Secrets Manager supports automatic rotation of secrets based on a schedule.
Design the migration solution
In this phase, security and environment teams work together to onboard the Secrets Manager service to their organization’s cloud environment. This involves defining access controls, guardrails, and logging capabilities so that the service can be consumed in a regulated and governed manner.
As a starting point, use the following design principles mentioned in the Security Pillar of the AWS Well Architected Framework to design a migration solution:
Implement a strong identity foundation
Enable traceability
Apply security at all layers
Automate security best practices
Protect data at rest and in transit
Keep people away from data
Prepare for security events
The design considerations covered in the rest of this section will help you prepare your AWS environment to host production-grade secrets. This phase can be run in parallel with the discovery phase.
Design your access control system to establish a strong identity foundation
In this phase, you define and implement the strategy to restrict access to secrets stored in Secrets Manager. You can use the AWS Identity and Access Management (IAM) service to specify that identities (human and non-human IAM principals) are only able to access and manage secrets that they own. Organizations that organize their workloads and environments by using separate AWS accounts should consider using a combination of role-based access control (RBAC) and attribute-based access control (ABAC) to restrict access to secrets depending on the granularity of access that’s required.
You can use a scalable automation to deploy and update key IAM roles and policies, including the following:
Pipeline deployment policies and roles — This refers to IAM roles for CICD pipelines. These pipelines should be the primary mechanism for creating, updating, and deleting secrets in the organization.
IAM Identity Center permission sets — These allow human identities access to the Secrets Manager API. We recommend that you provision secrets by using infrastructure as code (IaC). However, there are instances where users need to interact directly with the service. This can be for initial testing, troubleshooting purposes, or updating a secret value when automatic rotation fails or is not enabled.
IAM permissions boundary — Boundary policies allow application teams to create IAM roles in a self-serviced, governed, and regulated manner.
Most organizations have Infrastructure, DevOps, or Security teams that deploy baseline configurations into AWS accounts. These solutions help these teams govern the AWS account and often have their own secrets. IAM policies should be created such that the IAM principals created by the application teams are unable to access secrets that are owned by the environment team, and vice versa. To enforce this logical boundary, you can use tagging and naming conventions on your secrets by using IAM.
A sample scheme for tagging your secrets can look like the following.
Tag key
Tag value
Notes
Policy elements
Secret tags
appname
Lowercase
Alphanumeric only
User friendly
Quickly identifiable
A user-friendly name for the application
PrincipalTag/ appname =<value> (applies to role) RequestTag/ appname =<value> (applies to caller) SecretManager:ResourceTag/ appname=<value> (applies to the secret)
appname:<value>
appid
Lowercase
Alphanumeric only
Unique across the organization
Fixed length (5–7 characters)
Uniquely identifies the application among other cloud-hosted apps
If you maintain a registry that documents details of your cloud-hosted applications, most of these tags can be derived from the registry.
It’s common to apply different security and operational policies for the non-production and production environments of a given workload. Although production environments are generally deployed in a dedicated account, it’s common to have less critical non-production apps and environments coexisting in the same AWS account. For operation and governance at scale in these multi-tenanted accounts, you can use attribute-based access control (ABAC) to manage secure access to secrets. ABAC enables you to grant permissions based on tags. The main benefits of using tag-based access control are its scalability and operational efficiency.
Figure 2 shows an example of ABAC in action, where an IAM policy allows access to a secret only if the appfunc, appenv, and appid tags on the secret match the tags on the IAM principal that is trying to access the secrets.
Figure 2: ABAC access control
ABAC works as follows:
Tags on a resource define who can access the resource. It is therefore important that resources are tagged upon creation.
For a create secret operation, IAM verifies whether the Principal tags on the IAM identity that is making the API call match the request tags in the request.
For an update, delete, or read operation, IAM verifies that the Principal tags on the IAM identity that is making the API call match the resource tags on the secret.
Regardless of the number of workloads or environments that coexist in the same account, you only need to create one ABAC-based IAM policy. This policy is the same for different kinds of accounts and can be deployed by using a capability like AWS CloudFormation StackSets. This is the reason that ABAC scales well for scenarios where multiple applications and environments are deployed in the same AWS account.
IAM roles can use a common IAM policy, such as the one described in the previous bullet point. You need to verify that the roles have the correct tags set on them, according to your tagging convention. This will automatically grant the roles access to the secrets that have the same resource tags.
Note that with this approach, tagging secrets and IAM roles becomes the most critical component for controlling access. For this reason, all tags on IAM roles and secrets on Secrets Manager must follow a standard naming convention at all times.
The following is an ABAC-based IAM policy that allows creation, updates, and deletion of secrets based on the tagging scheme described in the preceding table.
In addition to controlling access, this policy also enforces a naming convention. IAM principals will only be able to create a secret that matches the following naming scheme.
Secret name = value of tag-key (appid + appfunc + appenv + name)
For example, /ordersapp/api/prod/logisticsapi
You can choose to implement ABAC so that the resource name matches the principal tags or the resource tags match the principal tags, or both. These are just different types of ABAC. The sample policy provided here implements both types. It’s important to note that because ABAC-based IAM policies are shared across multiple workloads, potential misconfigurations in the policies will have a wider scope of impact.
You can also add checks in your pipeline to provide early feedback for developers. These checks may potentially assist in verifying whether appropriate tags have been set up in IaC resources prior to their creation. Your pipeline-based controls provide an additional layer of defense and complement or extend restrictions enforced by IAM policies.
Resource-based policies
Resource-based policies are a flexible and powerful mechanism to control access to secrets. They are directly associated with a secret and allow specific principals mentioned in the policy to have access to the secret. You can use these policies to grant identities (internal or external to the account) access to a secret.
If your organization uses resource policies, security teams should come up with control objectives for these policies. Controls should be set so that only resource-based policies meeting your organizations requirements are created. Control objectives for resource policies may be set as follows:
Allow statements in the policy to have allow access to the secret from the same application.
Allow statements in the policy to have allow access from organization-owned cross-account identities only if they belong to the same environment. Controls that meet these objectives can be preventative (checks in pipeline) or responsive (config rules and Amazon EventBridge invoked Lambda functions).
Environment teams can also choose to provision resource-based policies for application teams. The provision process can be manual, but is preferably automated. An example would be that these teams can allow application teams to tag secrets with specific values, like a cross-account IAM role Amazon Resource Number (ARN) that needs access. An automation invoked by EventBridge rules then asserts that the cross-account principal in the tag belongs to the organization and is in the same environment, and then provisions a resource-based policy for the application team. Using such mechanisms creates a self-service way for teams to create safe resource policies that meet common use cases.
Resource-based policies for Secrets Manager can be a helpful tool for controlling access to secrets, but it is important to consider specific situations where alternative access control mechanisms might be more appropriate. For example, if your access control requirements for secrets involve complex conditions or dependencies that cannot be easily expressed using the resource-based policy syntax, it may be challenging to manage and maintain the policies effectively. In such cases, you may want to consider using a different access control mechanism that better aligns with your requirements. For help determining which type of policy to use, see Identity-based policies and resource-based policies.
Design detective controls to achieve traceability, monitoring, and alerting
Prepare your environment to record and flag events of interest when Secrets Manager is used to store and update secrets. We recommend that you start by identifying risks and then formulate objectives and devise control measures for each identified risk, as follows:
Control objectives — What does the control evaluate, and how is it configured? Controls can be configured by using CloudTrail events invoked by Lambda functions, AWS config rules, or CloudWatch alarms. Controls can evaluate a misconfigured property in a secrets resource or report on an event of interest.
Target audience — Identify teams that should be notified if the event occurs. This can be a combination of the environment, security, and application teams.
Notification type — SNS, email, Slack channel notifications, or an ITIL ticket.
Criticality — Low, medium, or high, based on the criticality of the event.
The following is a sample matrix that can serve as a starting point for documenting detective controls for Secrets Manager. The column titled AWS services in the table offers some suggestions for implementation to help you meet your control objetves.
Risk
Control objective
Criticality
AWS services
A secret is created without tags that match naming and tagging schemes
Enforce least privilege
Establish logging and monitoring
Manage secrets
HIGH (if using ABAC)
CloudTrail invoked Lambda function or custom AWS config rule
IAM related tags on a secret are updated, removed
Manage secrets
Enforce least privilege
HIGH (if using ABAC)
CloudTrail invoked Lambda function or custom config rule
A resource policy is created when resource policies have not been onboarded to the environment
Manage secrets
Enforce least privilege
HIGH
Pipeline or CloudTrail invoked ¬Lambda function or custom config rule
A secret is marked for deletion from an unusual source — root user or admin break glass role
Improve availability
Protect configurations
Prepare for incident response
Manage secrets
HIGH
CloudTrail invoked Lambda function
A non-compliant resource policy was created — for example, to provide secret access to a foreign account
Enforce least privilege
Manage secrets
HIGH
CloudTrail invoked Lambda function or custom config rule
An AWS KMS key for secrets encryption is marked for deletion
Manage secrets
Protect configurations
HIGH
CloudTrail invoked Lambda function
A secret rotation failed
Manage secrets
Improve availability
MEDIUM
Managed config rule
A secret is inactive and is not being accessed for x number of days
Optimize costs
LOW
Managed config rule
Secrets are created that do not use KMS key
Encrypt data at rest
LOW
Managed config rule
Automatic rotation is not enabled
Manage secrets
LOW
Managed config rule
Successful create, update, and read events for secrets
Establish logging and monitoring
LOW
CloudTrail logs
We suggest that you deploy these controls in your AWS accounts by using a scalable mechanism, such as CloudFormation StackSets.
Design for additional protection at the network layer
You can use the guiding principles for Zero Trust networking to add additional mechanisms to control access to secrets. The best security doesn’t come from making a binary choice between identity-centric and network-centric controls, but by using both effectively in combination with each other.
VPC endpoints allow you to provide a private connection between your VPC and Secrets Manager API endpoints. They also provide the ability to attach a policy that allows you to enforce identity-centric rules at a logical network boundary. You can use global context keys like aws:PrincipalOrgID in VPC endpoint policies to allow requests to Secrets Manager service only from identities that belong to the same AWS organization. You can also use aws:sourceVpce and aws:sourceVpc IAM conditions to allow access to the secret only if the request originates from a specific VPC endpoint or VPC, respectively.
Design for least privileged access to encryption keys
To reduce unauthorized access, secrets should be encrypted at rest. Secrets Manager integrates with AWS KMS and uses envelope encryption. Every secret in Secrets Manager is encrypted with a unique data key. Each data key is protected by a KMS key. Whenever the secret value inside a secret changes, Secrets Manager generates a new data key to protect it. The data key is encrypted under a KMS key and stored in the metadata of the secret. To decrypt the secret, Secrets Manager first decrypts the encrypted data key by using the KMS key in AWS KMS.
The following is a sample AWS KMS policy that permits cryptographic operations to a KMS key only from the Secrets Manager service within an AWS account, and allows the AWS KMS decrypt action from a specific IAM principal throughout the organization.
{
    "Version": "2012-10-17",
    "Id": "secrets_manager_encrypt_org",
    "Statement": [
        {
            "Sid": "Root Access",
            "Effect": "Allow",
            "Principal": {
                "AWS": "arn:aws:iam::444455556666:root"
            },
            "Action": "kms:*",
            "Resource": "*"
        },
        {
            "Sid": "Allow access for Key Administrators",
            "Effect": "Allow",
            "Principal": {
                "AWS": [
             "arn:aws:iam::444455556666:role/platformRoles/KMS-key-admin-role",                    "arn:aws:iam::444455556666:role/platformRoles/KMS-key-automation-role"
                ]
            },
            "Action": [
                "kms:CancelKeyDeletion",
                "kms:Create*",
                "kms:Delete*",
                "kms:Describe*",
                "kms:Disable*",
                "kms:Enable*",
                "kms:Get*",
                "kms:List*",
                "kms:Put*",
                "kms:Revoke*",
                "kms:ScheduleKeyDeletion",
                "kms:TagResource",
                "kms:UntagResource",
                "kms:Update*"
            ],
            "Resource": "*"
        },
        {
            "Sid": "Allow Secrets Manager use of the KMS key for a specific account",
            "Effect": "Allow",
            "Principal": {
                "AWS": "*"
            },
            "Action": [
                "kms:Encrypt",
                "kms:Decrypt",
                "kms:ReEncrypt*",
                "kms:GenerateDataKey*",
                "kms:CreateGrant",
                "kms:ListGrants",
                "kms:DescribeKey"
            ],
            "Resource": "*",
            "Condition": {
                "StringEquals": {
                    "kms:CallerAccount": "444455556666",
                    "kms:ViaService": "secretsmanager.us-east-1.amazonaws.com"
                }
            }
        },
        {
            "Sid": "Allow use of Secrets Manager secrets from a specific IAM role (service account) throughout your org",
            "Effect": "Allow",
            "Principal": {
                "AWS": "*"
            },
            "Action": "kms:Decrypt",
            "Resource": "*",
            "Condition": {
                "StringEquals": {
                    "aws:PrincipalOrgID": "o-exampleorgid"
                },
                "StringLike": {
                    "aws:PrincipalArn": "arn:aws:iam::*:role/platformRoles/secretsAccessRole"
                }
            }
        }
    ]
}
Additionally, you can use the secretsmanager:KmsKeyId IAM condition key to allow secrets creation only when AWS KMS encryption is enabled for the secret. You can also add checks in your pipeline that allow the creation of a secret only when a KMS key is associated with the secret.
Design or update applications for efficient retrieval of secrets
In applications, you can retrieve your secrets by calling the GetSecretValue function in the available AWS SDKs. However, we recommend that you cache your secret values by using client-side caching. Caching secrets can improve speed, help to prevent throttling by limiting calls to the service, and potentially reduce your costs.
Secrets Manager integrates with the following AWS services to provide efficient retrieval of secrets:
For Amazon RDS, you can integrate with Secrets Manager to simplify managing master user passwords for Amazon RDS database instances. Amazon RDS can manage the master user password and stores it securely in Secrets Manager, which may eliminate the need for custom AWS Lambda functions to manage password rotations. The integration can help you secure your database by encrypting the secrets, using your own managed key or an AWS KMS key provided by Secrets Manager. As a result, the master user password is not visible in plaintext during the database creation workflow. This feature is available for the Amazon RDS and Aurora engines, and more information can be found in the Amazon RDS and Aurora User Guides.
For Amazon Elastic Kubernetes Service (Amazon EKS), you can use the AWS Secrets and Configuration Provider (ASCP) for the Kubernetes Secrets Store CSI Driver. This open-source project enables you to mount Secrets Manager secrets as Kubernetes secrets. The driver translates Kubernetes secret objects into Secrets Manager API calls, allowing you to access and manage secrets from within Kubernetes. After you configure the Kubernetes Secrets Store CSI Driver, you can create Kubernetes secrets backed by Secrets Manager secrets. These secrets are securely stored in Secrets Manager and can be accessed by your applications that are running in Amazon EKS.
For Amazon Elastic Container Service (Amazon ECS), sensitive data can be securely stored in Secrets Manager secrets and then accessed by your containers through environment variables or as part of the log configuration. This allows for a simple and potentially safe injection of sensitive data into your containers, making it a possible solution for your needs.
For AWS Lambda, you can use the AWS Parameters and Secrets Lambda Extension to retrieve and cache Secrets Manager secrets in Lambda functions without the need for an AWS SDK. It is noteworthy that retrieving a cached secret is faster compared to the standard method of retrieving secrets from Secrets Manager. Moreover, using a cache can be cost-efficient, because there is a charge for calling Secrets Manager APIs. For more details, see the Secrets Manager User Guide.
For additional information on how to use Secrets Manager secrets with AWS services, refer to the following resources:
Develop an incident response plan for security events
It is recommended that you prepare for unforeseeable incidents such as unauthorized access to your secrets. Developing an incident response plan can help minimize the impact of the security event, facilitate a prompt and effective response, and may help to protect your organization’s assets and reputation. The traceability and monitoring controls we discussed in the previous section can be used both during and after the incident.
The Computer Security Incident Handling Guide SP 800-61 Rev. 2, which was created by the National Institute of Standards and Technology (NIST), can help you create an incident response plan for specific incident types. It provides a thorough and organized approach to incident response, covering everything from initial preparation and planning to detection and analysis, containment, eradication, recovery, and follow-up. The framework emphasizes the importance of continual improvement and learning from past incidents to enhance the overall security posture of the organization.
Refer to the following documentation for further details and sample playbooks:
In this post, we discussed how organizations can take a phased approach to migrate their secrets to AWS Secrets Manager. Your teams can use the thought exercises mentioned in this post to decide if they would like to rehost, replatform, or retire secrets. We discussed what guardrails should be enabled for application teams to consume secrets in a safe and regulated manner. We also touched upon ways organizations can discover and classify their secrets.
In Part 2 of this series, we go into the details of the migration implementation phase and walk you through a sample solution that you can use to integrate on-premises applications with Secrets Manager.
If you have feedback about this post, submit comments in the Comments section below. If you have questions about this post, start a new thread on the AWS Secrets Manager re:Post or contact AWS Support.
Want more AWS Security news? Follow us on Twitter.
With AWS Secrets Manager, you can securely store, manage, retrieve, and rotate the secrets required for your applications and services running on AWS. A secret can be a password, API key, OAuth token, or other type of credential used for authentication purposes. You can control access to secrets in Secrets Manager by using AWS Identity and Access Management (IAM) permission policies. In this blog post, I will show you how to use principles of attribute-based access control (ABAC) to define dynamic IAM permission policies in AWS IAM Identity Center (successor to AWS Single Sign-On) by using user attributes from an external identity provider (IdP) and resource tags in Secrets Manager.
What is ABAC and why use it?
Attribute-based access control (ABAC) is an authorization strategy that defines permissions based on attributes or characteristics of the user, the data, or the environment, such as the department, business unit, or other factors that could affect the authorization outcome. In the AWS Cloud, these attributes are called tags. By assigning user attributes as principal tags, you can simplify the process of creating fine-grained permissions on AWS.
With ABAC, you can use attributes to build more dynamic policies that provide access based on matching attribute conditions. ABAC rules are evaluated dynamically at runtime, which means that the users’ access to applications and data and the type of allowed operations automatically change based on the contextual factors in the policy. For example, if a user changes department, access is automatically adjusted without the need to update permissions or request new roles. You can use ABAC in conjunction with role-based access control (RBAC) to combine the ease of policy administration with flexible policy specification and dynamic decision-making capability to enforce least privilege.
AWS IAM Identity Center (successor to AWS Single Sign-On) expands the capabilities of IAM to provide a central place that brings together the administration of users and their access to AWS accounts and cloud applications. With IAM Identity Center, you can define user permissions and manage access to accounts and applications in your AWS Organizations organization centrally. You can also create ABAC permission policies in a central place. ABAC will work with attributes from a supported identity source in IAM Identity Center. For a list of supported external IdPs for identity synchronization through the System for Cross-domain Identity Management (SCIM) and Security Assertion Markup Language (SAML) 2.0, see Supported identity providers.
The following are key benefits of using ABAC with IAM Identity Center and Secrets Manager:
Fewer permission sets — With ABAC, multiple users who use the same IAM Identity Center permission set and the same IAM role can still get unique permissions, because permissions are now based on user attributes. Administrators can author IAM policies that grant users access only to secrets that have matching attributes. This helps reduce the number of distinct permissions that you need to create and manage in IAM Identity Center and, in turn, reduces your permission management complexity.
Teams can change and grow quickly — When you create new secrets, you can apply the appropriate tags, which will automatically grant access without requiring you to update the permission policies.
Use employee attributes from your corporate directory to define access — You can use existing employee attributes from a supported identity source configured in IAM Identity Center to make access control decisions on AWS.
Figure 1 shows a framework to control access to Secrets Manager secrets using IAM Identity Center and ABAC principles.
Figure 1: ABAC framework to control access to secrets using IAM Identity Center
The following is a brief introduction to the basic components of the framework:
User attribute source or identity source — This is where your users and groups are administered. You can configure a supported identity source with IAM Identity Center. You can then define and manage supported user attributes in the identity source.
Policy management — You can create and maintain policy definitions (permission sets) centrally in IAM Identity Center. You can assign access to a user or group to one or more accounts in IAM Identity Center with these permission sets. You can then use attributes defined in your identity source to build ABAC policies for managing access to secrets.
Policy evaluation — When you assign a permission set, IAM Identity Center creates corresponding IAM Identity Center-controlled IAM roles in each account, and attaches the policies specified in the permission set to those roles. IAM Identity Center manages the role, and allows the authorized users that you’ve defined to assume the role. When users try to access a secret, IAM dynamically evaluates ABAC policies on the target account to determine access based on the attributes assigned to the user and resource tags assigned to that secret.
How to configure ABAC with IAM Identity Center
To configure ABAC with IAM Identity Center, you need to complete the following high-level steps. I will walk you through these steps in detail later in this post.
Identify and set up identities that are created and managed in the identity source with user attributes, such as project, team, AppID or department.
In IAM Identity Center, enable Attributes for access control and configure select attributes (such as department) to use for access control. For a list of supported attributes, see Supported external identity provider attributes.
If you are using an external IdP and choose to use custom attributes from your IdP for access controls, configure your IdP to send the attributes through SAML assertions to IAM Identity Center.
Assign appropriate tags to secrets in Secrets Manager.
Create permission sets based on attributes added to identities and resource tags.
Define guardrails to enforce access using ABAC.
ABAC enforcement and governance
Because an ABAC authorization model is based on tags, you must have a tagging strategy for your resources. To help prevent unintended access, you need to make sure that tagging is enforced and that a governance model is in place to protect the tags from unauthorized updates. By using service control policies (SCPs) and AWS Organizations tag policies, you can enforce tagging and tag governance on resources.
When you implement ABAC for your secrets, consider the following guidance for establishing a tagging strategy:
During secret creation, secrets must have an ABAC tag applied (tag-on-create).
During secret creation, the provided ABAC tag key must be the same case as the principal’s ABAC tag key.
After secret creation, the ABAC tag cannot be modified or deleted.
Only authorized principals can do tagging operations on secrets.
You enforce the permissions that give access to secrets through tags.
For more information on tag strategy, enforcement, and governance, see the following resources:
In this post, I will walk you through the steps to enable the IdP that is supported by IAM Identity Center.
Figure 2: Sample solution implementation
In the sample architecture shown in Figure 2, Arnav and Ana are users who each have the attributes department and AppID. These attributes are created and updated in the external directory—Okta in this case. The attribute department is automatically synchronized between IAM Identity Center and Okta using SCIM. The attribute AppID is a custom attribute configured on Okta, and is passed to AWS as a SAML assertion. Both users are configured to use the same IAM Identity Center permission set that allows them to retrieve the value of secrets stored in Secrets Manager. However, access is granted based on the tags associated with the secret and the attributes assigned to the user.
For example, user Arnav can only retrieve the value of the RDS_Master_Secret_AppAlpha secret. Although both users work in the same department, Arnav can’t retrieve the value of the RDS_Master_Secret_AppBeta secret in this sample architecture.
Prerequisites
Before you implement the solution in this blog post, make sure that you have the following prerequisites in place:
You have IAM Identity Center enabled for your organization and connected to an external IdP using SAML 2.0 identity federation.
You have IAM Identity Center configured for automatic provisioning with an external IdP using the SCIM v2.0 standard. SCIM keeps your IAM Identity Center identities in sync with identities from the external IdP.
Solution implementation
In this section, you will learn how to enable access to Secrets Manager using ABAC by completing the following steps:
Configure ABAC in IAM Identity Center
Define custom attributes in Okta
Update configuration for the IAM Identity Center application on Okta
Make sure that required tags are assigned to secrets in Secrets Manager
Create and assign a permission set with an ABAC policy in IAM Identity Center
Define guardrails to enforce access using ABAC
Step 1: Configure ABAC in IAM Identity Center
The first step is to set up attributes for your ABAC configuration in IAM Identity Center. This is where you will be mapping the attribute coming from your identity source to an attribute that IAM Identity Center passes as a session tag. The Key represents the name that you are giving to the attribute for use in the permission set policies. You need to specify the exact name in the policies that you author for access control. For the example in this post, you will create a new attribute with Key of department and Value of ${path:enterprise.department}. For supported external IdP attributes, see Attribute mappings.
To configure ABAC in IAM Identity Center (console)
Open the IAM Identity Center console.
In the Settings menu, enable Attributes for access control.
Choose the Attributes for access control tab, select Add attribute, and then enter the Key and Value details as follows.
The sample architecture in this post uses a custom attribute (AppID) on an external IdP for access control. In this step, you will create a custom attribute in Okta.
To define custom attributes in Okta (console)
Open the Okta console.
Navigate to Directory and then select Profile Editor.
On the Profile Editor page, choose Okta User (default).
Select Add Attribute and create a new custom attribute with the following parameters.
For Data type, enter string
For Display name, enter AppID
For Variable name, enter user.AppID
For Attribute length, select Less Than from the dropdown and enter a value.
For User permission, enter Read Only
Navigate to Directory, select People, choose in-scope users, and enter a value for Department and AppID attributes. The following shows these values for the users in our example.
Step 3: Update SAML configuration for IAM Identity Center application on Okta
Automatic provisioning (through the SCIM v2.0 standard) of user and group information from Okta into IAM Identity Center supports a set of defined attributes. A custom attribute that you create on Okta won’t be automatically synchronized to IAM Identity Center through SCIM. You can, however, define the attribute in the SAML configuration so that it is inserted into the SAML assertions.
To update the SAML configuration in Okta (console)
Open the Okta console and navigate to Applications.
On the Applications page, select the app that you defined for IAM Identity Center.
Under the Sign On tab, choose Edit.
Under SAML 2.0, expand the Attributes (Optional) section, and add an attribute statement with the following values, as shown in Figure 3:
Figure 3: Sample SAML configuration with custom attributes
To check that the newly added attribute is reflected in the SAML assertion, choose Preview SAML, review the information, and then choose Save.
Step 4: Make sure that required tags are assigned to secrets in Secrets Manager
The next step is to make sure that the required tags are assigned to secrets in Secrets Manager. You will review the required tags from the Secrets Manager console.
To verify required tags on secrets (console)
Open the Secrets Manager console in the target AWS account and then choose Secrets.
Verify that the required tags are assigned to the secrets in scope for this solution, as shown in Figure 4. In our example, the tags are as follows:
Key: department
Value: Digital
Key: AppID
Value: Alpha or Beta
Figure 4: Sample secret configuration with required tags
Step 5a: Create a permission set in IAM Identity Center using ABAC policy
In this step, you will create a new permission set that allows access to secrets based on the principal attributes and resource tags.
When you enable ABAC and specify attributes, IAM Identity Center passes the attribute value of the authenticated user to AWS Security Token Service (AWS STS) as session tags when an IAM role is assumed. You can use access control attributes in your permission sets by using the aws:PrincipalTag condition key to create access control rules.
To create a permission set (console)
Open the IAM Identity Center console and navigate to Multi-account permissions.
Choose Permission sets, and then select Create permission set.
On the Specify policies and permissions boundary page, choose Inline policy.
For Inline policy, paste the following sample policy document and then choose Next. This policy allows users to retrieve the value of only those secrets that have resource tags that match the required user attributes (department and AppID in our example).
Configure the session duration, and optionally provide a description and tags for the permission set.
Review and create the permission set.
Step 5b: Assign permission set to users in IAM Identity Center
Now that you have created a permission set with ABAC policy, complete the configuration by assigning the permission set to users to grant them access to secrets in one or more accounts in your organization.
To assign a permission set (console)
Open the IAM Identity Center console and navigate to Multi-account permissions.
Choose AWS accounts and select one or more accounts to which you want to assign access.
Choose Assign users or groups.
On the Assign users and groups page, select the users, groups, or both to which you want to assign access. For this example, I select both Arnav and Ana.
On the Assign permission sets page, select the permission set that you created in the previous section.
Review your changes, as shown in Figure 5, and then select Submit.
Figure 5: Sample permission set assignment
Step 6: Define guardrails to enforce access using ABAC
To govern access to secrets to your workforce users only through ABAC and to help prevent unauthorized access, you can define guardrails. In this section, I will show you some sample service control policies (SCPs) that you can use in your organization.
Note: Before you use these sample SCPs, you should carefully review, customize, and test them for your unique requirements. For additional instructions on how to attach an SCP, see Attaching and detaching service control policies.
Guardrail 1 – Enforce ABAC to access secrets
The following sample SCP requires the use of ABAC to access secrets in Secrets Manager. In this example, users and secrets must have matching values for the attributes department and AppID. Access is denied if those attributes don’t exist or if they don’t have matching values. Also, this example SCP allows only the admin role to access secrets without matching tags. Replace <arn:aws:iam::*:role/secrets-manager-admin-role> with your own information.
The following sample SCP denies the creation of new secrets that don’t have the required tag key-value pairs. In this example, the SCP denies creation of a new secret if it doesn’t include department and AppID tag keys. It also denies access if the tag department doesn’t have the value Digital and the tag AppID doesn’t have either Alpha or Beta assigned to it. Also, this example SCP allows only the admin role to create secrets without matching tags. Replace <arn:aws:iam::*:role/secrets-manager-admin-role> with your own information.
The following sample SCP denies the ability to delete the tags used for ABAC. In this example, only the admin role can delete the tags department and AppID after they are attached to a secret. Replace <arn:aws:iam::*:role/secrets-manager-admin-role> with your own information.
Guardrail 4 – Restrict modification of ABAC tags
The following sample SCP denies the ability to modify required tags for ABAC after they are attached to a secret. In this example, only the admin role can modify the tags department and AppID after they are attached to a secret. Replace <arn:aws:iam::*:role/secrets-manager-admin-role> with your own information.
In this section, you will test the solution by retrieving a secret using the Secrets Manager console. Your attempt to retrieve the secret value will be successful only when the required resource and principal tags exist, and have matching values (AppID and department in our example).
Test scenario 1: Retrieve and view the value of an authorized secret
In this test, you will verify whether you can successfully retrieve the value of a secret that belongs to your application.
To test the scenario
Sign in to IAM Identity Center and log in with your external IdP user. For this example, I log in as Arnav.
On the IAM Identity Center dashboard, select the target account.
From the list of available roles that the user has access to, choose the role that you created in Step 5a and select Management console, as shown in Figure 6. For this example, I select the SecretsManagerABACTest permission set.
Figure 6: Sample IAM Identity Center dashboard
Open the Secrets Manager console and select a secret that belongs to your application. For this example, I select RDS_Master_Secret_AppAlpha.
Because the AppID and department tags exist on both the secret and the user, the ABAC policy allowed the user to describe the secret, as shown in Figure 7.
Figure 7: Sample secret that was described successfully
In the Secret value section, select Retrieve secret value.
Because the value of the resource tags, AppID and department, matches the value of the corresponding user attributes (in other words, the principal tags), the ABAC policy allows the user to retrieve the secret value, as shown in Figure 8.
Figure 8: Sample secret value that was retrieved successfully
Test scenario 2: Retrieve and view the value of an unauthorized secret
In this test, you will verify whether you can retrieve the value of a secret that belongs to a different application.
Open the Secrets Manager console and select a secret that belongs to a different application. For this example, I select RDS_Master_Secret_AppBeta.
Because the value of the resource tag AppID doesn’t match the value of the corresponding user attribute (principal tag), the ABAC policy denies access to describe the secret, as shown in Figure 9.
Figure 9: Sample error when describing an unauthorized secret
Conclusion
In this post, you learned how to implement an ABAC strategy using attributes and to build dynamic policies that can simplify access management to Secrets Manager using IAM Identity Center configured with an external IdP. You also learned how to govern resource tags used for ABAC and establish guardrails to enforce access to secrets using ABAC. To learn more about ABAC and Secrets Manager, see Attribute-Based Access Control (ABAC) for AWS and the Secrets Manager documentation.
If you have feedback about this blog post, submit comments in the Comments section below. If you have questions about this blog post, start a new thread on AWS Secrets Manager re:Post.
Want more AWS Security news? Follow us on Twitter.
Welcome to the 21st edition of the AWS Serverless ICYMI (in case you missed it) quarterly recap. Every quarter, we share all the most recent product launches, feature enhancements, blog posts, webinars, live streams, and other interesting things that you might have missed!
In case you missed our last ICYMI, check out what happened last quarter here.
Example notification of a story hosted with Next.js and App Runner
Serverless Land is a website maintained by the Serverless Developer Advocate team to help you build serverless applications and includes workshops, code examples, blogs, and videos. There is now enhanced search functionality so you can search across resources, patterns, and video content.
ServerlessLand search
AWS Lambda
AWS Lambda has improved how concurrency works with Amazon SQS. You can now control the maximum number of concurrent Lambda functions invoked.
The launch blog post explains the scaling behavior of Lambda using this architectural pattern, challenges this feature helps address, and a demo of maximum concurrency in action.
Maximum concurrency is set to 10 for the SQS queue.
AWS Lambda Powertools is an open-source library to help you discover and incorporate serverless best practices more easily. Lambda Powertools for .NET is now generally available and currently focused on three observability features: distributed tracing (Tracer), structured logging (Logger), and asynchronous business and application metrics (Metrics). Powertools is also available for Python, Java, and Typescript/Node.js programming languages.
Lambda announced a new feature, runtime management controls, which provide more visibility and control over when Lambda applies runtime updates to your functions. The runtime controls are optional capabilities for advanced customers that require more control over their runtime changes. You can now specify a runtime management configuration for each function with three settings, Automatic (default), Function update, or manual.
There are three new Amazon CloudWatch metrics for asynchronous Lambda function invocations: AsyncEventsReceived, AsyncEventAge, and AsyncEventsDropped. You can track the asynchronous invocation requests sent to Lambda functions to monitor any delays in processing and take corrective actions if required. The launch blog post explains the new metrics and how to use them to troubleshoot issues.
Lambda now supports Amazon DocumentDB change streams as an event source. You can use Lambda functions to process new documents, track updates to existing documents, or log deleted documents. You can use any programming language that is supported by Lambda to write your functions.
There is a helpful blog post suggesting best practices for developing portable Lambda functions that allow you to port your code to containers if you later choose to.
AWS Step Functions
AWS Step Functions has expanded its AWS SDK integrations with support for 35 additional AWS services including Amazon EMR Serverless, AWS Clean Rooms, AWS IoT FleetWise, AWS IoT RoboRunner and 31 other AWS services. In addition, Step Functions also added support for 1000+ new API actions from new and existing AWS services such as Amazon DynamoDB and Amazon Athena. For the full list of added services, visit AWS SDK service integrations.
EventBridge event buses now also support enhanced integration with Service Quotas. Your quota increase requests for limits such as PutEvents transactions-per-second, number of rules, and invocations per second among others will be processed within one business day or faster, enabling you to respond quickly to changes in usage.
AWS SAM
The AWS Serverless Application Model (SAM) Command Line Interface (CLI) has added the sam list command. You can now show resources defined in your application, including the endpoints, methods, and stack outputs required to test your deployed application.
AWS SAM has a preview of sam build support for building and packaging serverless applications developed in Rust. You can use cargo-lambda in the AWS SAM CLI build workflow and AWS SAM Accelerate to iterate on your code changes rapidly in the cloud.
You can now use AWS SAM connectors as a source resource parameter. Previously, you could only define AWS SAM connectors as a AWS::Serverless::Connector resource. Now you can add the resource attribute on a connector’s source resource, which makes templates more readable and easier to update over time.
AWS SAM connectors now also support multiple destinations to simplify your permissions. You can now use a single connector between a single source resource and multiple destination resources.
In October 2022, AWS released OpenID Connect (OIDC) support for AWS SAM Pipelines. This improves your security posture by creating integrations that use short-lived credentials from your CI/CD provider. There is a new blog post on how to implement it.
Amazon S3 now automatically applies default encryption to all new objects added to S3, at no additional cost and with no impact on performance.
You can now use an S3 Object Lambda Access Point alias as an origin for your Amazon CloudFront distribution to tailor or customize data to end users. For example, you can resize an image depending on the device that an end user is visiting from.
S3 has introduced Mountpoint for S3, a high performance open source file client that translates local file system API calls to S3 object API calls like GET and LIST.
S3 Multi-Region Access Points now support datasets that are replicated across multiple AWS accounts. They provide a single global endpoint for your multi-region applications, and dynamically route S3 requests based on policies that you define. This helps you to more easily implement multi-Region resilience, latency-based routing, and active-passive failover, even when data is stored in multiple accounts.
Amazon Kinesis
Amazon Kinesis Data Firehose now supports streaming data delivery to Elastic. This is an easier way to ingest streaming data to Elastic and consume the Elastic Stack (ELK Stack) solutions for enterprise search, observability, and security without having to manage applications or write code.
Amazon DynamoDB
Amazon DynamoDB now supports table deletion protection to protect your tables from accidental deletion when performing regular table management operations. You can set the deletion protection property for each table, which is set to disabled by default.
Amazon SNS
Amazon SNS now supports AWS X-Ray active tracing to visualize, analyze, and debug application performance. You can now view traces that flow through Amazon SNS topics to destination services, such as Amazon Simple Queue Service, Lambda, and Kinesis Data Firehose, in addition to traversing the application topology in Amazon CloudWatch ServiceLens.
SNS also now supports setting content-type request headers for HTTPS notifications so applications can receive their notifications in a more predictable format. Topic subscribers can create a DeliveryPolicy that specifies the content-type value that SNS assigns to their HTTPS notifications, such as application/json, application/xml, or text/plain.
EDA Visuals collection added to Serverless Land
The Serverless Developer Advocate team has extended Serverless Land and introduced EDA visuals. These are small bite sized visuals to help you understand concept and patterns about event-driven architectures. Find out about batch processing vs. event streaming, commands vs. events, message queues vs. event brokers, and point-to-point messaging. Discover bounded contexts, migrations, idempotency, claims, enrichment and more!
There is also a new section on Serverless Land containing helpful code repositories. You can search for code repos to use for examples, learning or building serverless applications. You can also filter by use-case, runtime, and level.
Weekly office hours live stream. In each session we talk about a specific topic or technology related to serverless and open it up to helping you with your real serverless challenges and issues. Ask us anything you want about serverless technologies and applications.
Marcia Villalba frequently publishes new videos on her popular serverless YouTube channel. You can view all of Marcia’s videos at https://www.youtube.com/c/FooBar_codes.
Eric Johnson is exploring how developers are building serverless applications. We spend time talking about AWS SAM as well as others like AWS CDK, Terraform, Wing, and AMPT.
The Serverless landing page has more information. The Lambda resources page contains case studies, webinars, whitepapers, customer stories, reference architectures, and even more Getting Started tutorials.
Given the pace of Amazon Web Services (AWS) innovation, it can be challenging to stay up to date on the latest AWS service and feature launches. AWS provides services and tools to help you protect your data, accounts, and workloads from unauthorized access. AWS data protection services provide encryption capabilities, key management, and sensitive data discovery. Last year, we saw growth and evolution in AWS data protection services as we continue to give customers features and controls to help meet their needs. Protecting data in the AWS Cloud is a top priority because we know you trust us to help protect your most critical and sensitive asset: your data. This post will highlight some of the key AWS data protection launches in the last year that security professionals should be aware of.
AWS Key Management Service Create and control keys to encrypt or digitally sign your data
In April, AWS Key Management Service (AWS KMS) launched hash-based message authentication code (HMAC) APIs. This feature introduced the ability to create AWS KMS keys that can be used to generate and verify HMACs. HMACs are a powerful cryptographic building block that incorporate symmetric key material within a hash function to create a unique keyed message authentication code. HMACs provide a fast way to tokenize or sign data such as web API requests, credit card numbers, bank routing information, or personally identifiable information (PII). This technology is used to verify the integrity and authenticity of data and communications. HMACs are often a higher performing alternative to asymmetric cryptographic methods like RSA or elliptic curve cryptography (ECC) and should be used when both message senders and recipients can use AWS KMS.
At AWS re:Invent in November, AWS KMS introduced the External Key Store (XKS), a new feature for customers who want to protect their data with encryption keys that are stored in an external key management system under their control. This capability brings new flexibility for customers to encrypt or decrypt data with cryptographic keys, independent authorization, and audit in an external key management system outside of AWS. XKS can help you address your compliance needs where encryption keys for regulated workloads must be outside AWS and solely under your control. To provide customers with a broad range of external key manager options, AWS KMS developed the XKS specification with feedback from leading key management and hardware security module (HSM) manufacturers as well as service providers that can help customers deploy and integrate XKS into their AWS projects.
AWS Nitro System A combination of dedicated hardware and a lightweight hypervisor enabling faster innovation and enhanced security
In November, we published The Security Design of the AWS Nitro System whitepaper. The AWS Nitro System is a combination of purpose-built server designs, data processors, system management components, and specialized firmware that serves as the underlying virtualization technology that powers all Amazon Elastic Compute Cloud (Amazon EC2) instances launched since early 2018. This new whitepaper provides you with a detailed design document that covers the inner workings of the AWS Nitro System and how it is used to help secure your most critical workloads. The whitepaper discusses the security properties of the Nitro System, provides a deeper look into how it is designed to eliminate the possibility of AWS operator access to a customer’s EC2 instances, and describes its passive communications design and its change management process. Finally, the paper surveys important aspects of the overall system design of Amazon EC2 that provide mitigations against potential side-channel vulnerabilities that can exist in generic compute environments.
AWS Secrets Manager Centrally manage the lifecycle of secrets
In February, AWS Secrets Manager added the ability to schedule secret rotations within specific time windows. Previously, Secrets Manager supported automated rotation of secrets within the last 24 hours of a specified rotation interval. This new feature added the ability to limit a given secret rotation to specific hours on specific days of a rotation interval. This helps you avoid having to choose between the convenience of managed rotations and the operational safety of application maintenance windows. In November, Secrets Manager also added the capability to rotate secrets as often as every four hours, while providing the same managed rotation experience.
In May, Secrets Manager started publishing secrets usage metrics to Amazon CloudWatch. With this feature, you have a streamlined way to view how many secrets you are using in Secrets Manager over time. You can also set alarms for an unexpected increase or decrease in number of secrets.
At the end of December, Secrets Manager added support for managed credential rotation for service-linked secrets. This feature helps eliminate the need for you to manage rotation Lambda functions and enables you to set up rotation without additional configuration. Amazon Relational Database Service (Amazon RDS) has integrated with this feature to streamline how you manage your master user password for your RDS database instances. Using this feature can improve your database’s security by preventing the RDS master user password from being visible during the database creation workflow. Amazon RDS fully manages the master user password’s lifecycle and stores it in Secrets Manager whenever your RDS database instances are created, modified, or restored. To learn more about how to use this feature, see Improve security of Amazon RDS master database credentials using AWS Secrets Manager.
AWS Private Certificate Authority Create private certificates to identify resources and protect data
In September, AWS Private Certificate Authority (AWS Private CA) launched as a standalone service. AWS Private CA was previously a feature of AWS Certificate Manager (ACM). One goal of this launch was to help customers differentiate between ACM and AWS Private CA. ACM and AWS Private CA have distinct roles in the process of creating and managing the digital certificates used to identify resources and secure network communications over the internet, in the cloud, and on private networks. This launch coincided with the launch of an updated console for AWS Private CA, which includes accessibility improvements to enhance screen reader support and additional tab key navigation for people with motor impairment.
In October, AWS Private CA introduced a short-lived certificate mode, a lower-cost mode of AWS Private CA that is designed for issuing short-lived certificates. With this new mode, public key infrastructure (PKI) administrators, builders, and developers can save money when issuing certificates where a validity period of 7 days or fewer is desired. To learn more about how to use this feature, see How to use AWS Private Certificate Authority short-lived certificate mode.
Additionally, AWS Private CA supported the launches of certificate-based authentication with Amazon AppStream 2.0 and Amazon WorkSpaces to remove the logon prompt for the Active Directory domain password. AppStream 2.0 and WorkSpaces certificate-based authentication integrates with AWS Private CA to automatically issue short-lived certificates when users sign in to their sessions. When you configure your private CA as a third-party root CA in Active Directory or as a subordinate to your Active Directory Certificate Services enterprise CA, AppStream 2.0 or WorkSpaces with AWS Private CA can enable rapid deployment of end-user certificates to seamlessly authenticate users. To learn more about how to use this feature, see How to use AWS Private Certificate Authority short-lived certificate mode.
AWS Certificate Manager Provision and manage SSL/TLS certificates with AWS services and connected resources
In early November, ACM launched the ability to request and use Elliptic Curve Digital Signature Algorithm (ECDSA) P-256 and P-384 TLS certificates to help secure your network traffic. You can use ACM to request ECDSA certificates and associate the certificates with AWS services like Application Load Balancer or Amazon CloudFront. Previously, you could only request certificates with an RSA 2048 key algorithm from ACM. Now, AWS customers who need to use TLS certificates with at least 120-bit security strength can use these ECDSA certificates to help meet their compliance needs. The ECDSA certificates have a higher security strength—128 bits for P-256 certificates and 192 bits for P-384 certificates—when compared to 112-bit RSA 2048 certificates that you can also issue from ACM. The smaller file footprint of ECDSA certificates makes them ideal for use cases with limited processing capacity, such as small Internet of Things (IoT) devices.
Amazon Macie Discover and protect your sensitive data at scale
Amazon Macie introduced two major features at AWS re:Invent. The first is a new capability that allows for one-click, temporary retrieval of up to 10 samples of sensitive data found in Amazon Simple Storage Service (Amazon S3). With this new capability, you can more readily view and understand which contents of an S3 object were identified as sensitive, so you can review, validate, and quickly take action as needed without having to review every object that a Macie job returned. Sensitive data samples captured with this new capability are encrypted by using customer-managed AWS KMS keys and are temporarily viewable within the Amazon Macie console after retrieval.
Additionally, Amazon Macie introduced automated sensitive data discovery, a new feature that provides continual, cost-efficient, organization-wide visibility into where sensitive data resides across your Amazon S3 estate. With this capability, Macie automatically samples and analyzes objects across your S3 buckets, inspecting them for sensitive data such as personally identifiable information (PII) and financial data; builds an interactive data map of where your sensitive data in S3 resides across accounts; and provides a sensitivity score for each bucket. Macie uses multiple automated techniques, including resource clustering by attributes such as bucket name, file types, and prefixes, to minimize the data scanning needed to uncover sensitive data in your S3 buckets. This helps you continuously identify and remediate data security risks without manual configuration and lowers the cost to monitor for and respond to data security risks.
Support for new open source encryption libraries
In February, we announced the availability of s2n-quic, an open source Rust implementation of the QUIC protocol, in our AWS encryption open source libraries. QUIC is a transport layer network protocol used by many web services to provide lower latencies than classic TCP. AWS has long supported open source encryption libraries for network protocols; in 2015 we introduced s2n-tls as a library for implementing TLS over HTTP. The name s2n is short for signal to noise and is a nod to the act of encryption—disguising meaningful signals, like your critical data, as seemingly random noise. Similar to s2n-tls, s2n-quic is designed to be small and fast, with simplicity as a priority. It is written in Rust, so it has some of the benefits of that programming language, such as performance, threads, and memory safety.
Cryptographic computing for AWS Clean Rooms (preview)
At re:Invent, we also announced AWS Clean Rooms, currently in preview, which includes a cryptographic computing feature that allows you to run a subset of queries on encrypted data. Clean rooms help customers and their partners to match, analyze, and collaborate on their combined datasets—without sharing or revealing underlying data. If you have data handling policies that require encryption of sensitive data, you can pre-encrypt your data by using a common collaboration-specific encryption key so that data is encrypted even when queries are run. With cryptographic computing, data that is used in collaborative computations remains encrypted at rest, in transit, and in use (while being processed).
With AWS, you control your data by using powerful AWS services and tools to determine where your data is stored, how it is secured, and who has access to it. In 2023, we will further the AWS Digital Sovereignty Pledge, our commitment to offering AWS customers the most advanced set of sovereignty controls and features available in the cloud.
You can join us at our security learning conference, AWS re:Inforce 2023, in Anaheim, CA, June 13–14, for the latest advancements in AWS security, compliance, identity, and privacy solutions.
Amazon RDS now offers integration with Secrets Manager to manage master database credentials. You no longer have to manage master database credentials, such as creating a secret in Secrets Manager or setting up rotation, because Amazon RDS does it for you.
In this blog post, you will learn how to set up an Amazon RDS database instance and use the Secrets Manager integration to manage master database credentials. You will also learn how to set up alternating users rotation for application credentials.
Benefits of the integration
Managing Amazon RDS master database credentials with Secrets Manager provides the following benefits:
Amazon RDS automatically generates and helps secure master database credentials, so that you don’t have to do the heavy lifting of securely managing credentials.
Amazon RDS automatically stores and manages database credentials in Secrets Manager.
Amazon RDS rotates database credentials regularly without requiring application changes.
Secrets Manager helps to secure database credentials from human access and plaintext view.
Secrets Manager allows retrieval of database credentials using its API or the console.
In this blog post, we’ll show you how to use the console to do the following:
Manage master database credentials for new Amazon RDS instances in Secrets Manager. We will use the MySQL engine, but you can also use this process for other Amazon RDS database engines.
Use the managed master database secret to set up alternating users rotation for a new database user.
Manage Amazon RDS master database credentials in Secrets Manager
In this section, you will create a database instance with Secrets Manager integration.
To manage Amazon RDS master database credentials in Secrets Manager:
For Choose a database creation method, choose Standard create.
In Engine options, for Engine type, choose MySQL.
In Settings, under Credentials Settings, select Manage master credentials in AWS Secrets Manager.
Figure 1: Select Secrets Manager integration
You will have the option to encrypt the managed master database credentials. In this example, we will use the default KMS key.
Figure 2: Choose KMS key
(Optional) Choose other settings to meet your requirements. For more information, see Settings for DB instances.
Choose Create Database, and wait a few minutes for the database to be created.
After the database is created, from the Instances dashboard in the Amazon RDS console, navigate to your new Amazon RDS instance.
Choose the Configuration tab, and under Master Credentials ARN, you will find the secret that contains your master database credentials.
Create a new database user by using the master database credentials
In this section you will learn how to create and secure a credential that could be used in your application to connect to the database. You will learn how to access the master database credentials and use the master database credentials to create and set up rotation on child (application) credentials.
To create a new database user by using the master database credentials
Retrieve the master database credentials from Secrets Manager as follows:
Choose the Configuration tab of your RDS instance dashboard, and under Master Credentials ARN, choose Manage in Secrets Manager to open your managed master database secret in Secrets Manager.
Figure 3: View DB configuration
You can see that Amazon RDS has added some system tags to the secret and that rotation is turned on by default.
Figure 4: View secret details
To see the password, in the Secret value section, choose Retrieve secret value.
For the master database, create a new database user with the permissions that you want by running the following SQL command. Make sure to replace <password> with your own information, and make sure to use a strong password.
For Secret type, select Credentials for Amazon RDS database.
In the Credentials section, enter the username and password of the new database user.
In the Database section, select your Amazon RDS instance, and then choose Next, as shown in Figure 5.
Figure 5: Select the RDS instance
On the Configure secret page, give the secret a name and description. No other configuration is needed.
On the Configure rotation – optional page, turn on Automatic rotation.
Figure 6: Select automatic rotation
In the Rotation schedule section, configure the rotation schedule according to your needs.
In the Rotation function section, do the following:
Enter a descriptive name for the Lambda function that will be created.
For Use separate credentials to rotate this secret, select Yes.
For Secrets, choose the master database secret that was created by Amazon RDS.
Note: To find the name of your master database secret, in the Amazon RDS console, on your Amazon RDS instance details page, choose the Configuration tab and then see the Master Credentials ARN.
Figure 7: Select separate credentials for rotation
Choose Next, and then on the Review page, choose Store.
It will take a few minutes for the Secrets Manager workflow to set up the rotation Lambda function before the new database user secret is ready to be rotated.
To check that rotation is enabled
In the Secrets Manager console, navigate to the new database user secret.
Figure 8: View the child secret
In the Rotation configuration section, verify that Rotation status is Enabled.
In the Rotation configuration section, choose the Lambda rotation function.
Figure 12: View the rotation function
In the Lambda console, under Application, select the application.
Figure 13: Open application
On the Deployments tab, choose CloudFormation stack.
Choose Delete and then follow the Delete menu steps. You might need to navigate to the root stack and choose Delete again. You might also need to disable termination protection for the stack. The console will guide you through that.
Figure 14: Choose delete
Now that you have cleaned up rotation for the new database user secret, you need to delete the child secret. Navigate to the Secrets Manager console and select the secret that you want to delete.
In the Actions dropdown, select Delete secret to delete the secret.
Figure 15: Delete child secret
Summary
Amazon RDS integration with Secrets Manager helps you better secure and manage master DB credentials. This integration helps you store the credentials when the DB instances are created and eliminates the effort for you to set up credential rotation.
In this blog post, you learned how to do the following:
Set up an Amazon RDS instance that uses Secrets Manager to store the master database credentials
View the credentials in Secrets Manager and confirm that rotation is set up
Use the master database credentials to create database user credentials
Set up alternating users rotation on database user credentials
Additional resources
For instructions on how to create database users for other Amazon RDS engine types, see the following resources:
Leading modern application platform space OutSystems is a low-code platform that provides tools for companies to develop, deploy, and manage omnichannel enterprise applications.
Security is a top priority at OutSystems. Their Security Operations Center (SOC) deals with thousands of incidents a year, each with a set of response actions that need to be executed as quickly as possible. Providing security at such large scale is a challenge, even for the most well-prepared organizations. Manual and repetitive tasks account for the majority of the response time involved in this process, and decreasing this key metric requires orchestration and automation.
Security orchestration, automation, and response (SOAR) systems are designed to translate security analysts’ manual procedures into automated actions, making them faster and more scalable.
In this blog post, we’ll explore how OutSystems lowered their incident response time by 99 percent by designing and deploying a custom SOAR using Serverless services on AWS.
Solution architecture
Security incidents happen with unknown frequency, making serverless services a natural fit to boost security at OutSystems because of their increased agility and capability to scale to zero.
There are two ways to trigger SOAR actions in this architecture:
Automatically through Security Information and Event Management (SIEM) security incident findings
On-demand through chat application
Using the first method, when a security incident is detected by the SIEM, an event is published to Amazon Simple Notification Service (Amazon SNS). This triggers an AWS Lambda function that creates a ticket in an internal ticketing system. Then the Lambda Playbooks function triggers to decide which playbook to run depending on the incident details.
Each playbook is a set of actions that are executed in response to a trigger. Playbooks are the key component behind automated tasks. OutSystems uses AWS Step Functions to orchestrate the actions and Lambda functions to execute them.
But this solution does not exist in isolation. Depending on the playbook, Step Functions interacts with other components such as AWS Secrets Manager or external APIs.
Using the second method, the on-demand trigger for OutSystems SOAR relies on a chat application. This application calls a Lambda function URL that interacts with the playbooks we just discussed.
Figure 1 represents the high-level architecture of OutSystems’ custom SOAR.
This same IaC architecture is used when new playbooks or updates to existing ones are made. Code changes that are committed to a source control repository trigger the CodePipeline which uses AWS CodeBuild and CloudFormation change sets to deploy the updates to the affected resources.
Use cases
The use cases that OutSystems has deployed playbooks for to date include:
SQL injection
Unauthorized access to credentials
Issuance of new certificates
Login brute forces
Impossible travel
Let’s explore the Impossible travel use case. Impossible travel happens when a user logs in from one location, and then later logs in from a different location that would be impossible to travel between within the elapsed time.
When the SIEM identifies this behavior, it triggers an alert and the following actions are performed:
A ticket is created
An IP address check is performed in reputation databases, such as AbuseIPDB or VirusTotal
An IP address check is performed in the internal database, and the IP address is added if it is not found
A search is performed for past events with the same IP address
Recent logins of the user are identified in the SIEM, along with all related information
All of this information is automatically added to the ticket. Every step listed here was previously performed manually; a task that took an average of 15 minutes. Now, the process takes just 8 seconds—a 99.1% incident response time improvement.
The following remediation actions can also be automated, along with many others:
Some of these remediation actions are already in place, while others are in development.
Conclusion
At OutSystems, much like at AWS, security is considered “job zero.” It is not only important to be proactive in preventing security incidents, but when they happen, the response must be quick, effective, and as immune to human error as possible.
With the implementation of this custom SOAR, OutSystems reduced the average response time to security incidents by 99%. Tasks that previously took 76 hours of analysts’ time are now accomplished automatically within 31 minutes.
During the evaluation period, SOAR addressed hundreds of real-world incidents with some threat intel use cases being executed thousands of times.
An architecture composed of serverless services ensures OutSystems does not pay for systems that are standing by waiting for work, and at the same time, not compromising on performance.
Secrets managers are a great tool to securely store your secrets and provide access to secret material to a set of individuals, applications, or systems that you trust. Across your environments, you might have multiple secrets managers hosted on different providers, which can increase the complexity of maintaining a consistent operating model for your secrets. In these situations, centralizing your secrets in a single source of truth, and replicating subsets of secrets across your other secrets managers, can simplify your operating model.
This blog post explains how you can use your third-party secrets manager as the source of truth for your secrets, while replicating a subset of these secrets to AWS Secrets Manager. By doing this, you will be able to use secrets that originate and are managed from your third-party secrets manager in Amazon Web Services (AWS) applications or in AWS services that use Secrets Manager secrets.
I’ll demonstrate this approach in this post by setting up a sample open-source HashiCorp Vault to create and maintain secrets and create a replication mechanism that enables you to use these secrets in AWS by using AWS Secrets Manager. Although this post uses HashiCorp Vault as an example, you can also modify the replication mechanism to use secrets managers from other providers.
Important: This blog post is intended to provide guidance that you can use when planning and implementing a secrets replication mechanism. The examples in this post are not intended to be run directly in production, and you will need to take security hardening requirements into consideration before deploying this solution. As an example, HashiCorp provides tutorials on hardening production vaults.
You can use these links to navigate through this post:
The primary use case for this post is for customers who are running applications on AWS and are currently using a third-party secrets manager to manage their secrets, hosted on-premises, in the AWS Cloud, or with a third-party provider. These customers typically have existing secrets vending processes, deployment pipelines, and procedures and processes around the management of these secrets. Customers with such a setup might want to keep their existing third-party secrets manager and have a set of secrets that are accessible to workloads running outside of AWS, as well as workloads running within AWS, by using AWS Secrets Manager.
Another use case is for customers who are in the process of migrating workloads to the AWS Cloud and want to maintain a (temporary) hybrid form of secrets management. By replicating secrets from an existing third-party secrets manager, customers can migrate their secrets to the AWS Cloud one-by-one, test that they work, integrate the secrets with the intended applications and systems, and once the migration is complete, remove the third-party secrets manager.
Additionally, some AWS services, such as Amazon Relational Database Service (Amazon RDS) Proxy, AWS Direct Connect MACsec, and AD Connector seamless join (Linux), only support secrets from AWS Secrets Manager. Customers can use secret replication if they have a third-party secrets manager and want to be able to use third-party secrets in services that require integration with AWS Secrets Manager. That way, customers don’t have to manage secrets in two places.
Two approaches to secrets replication
In this post, I’ll discuss two main models to replicate secrets from an external third-party secrets manager to AWS Secrets Manager: a pull model and a push model.
Pull model In a pull model, you can use AWS services such as Amazon EventBridge and AWS Lambda to periodically call your external secrets manager to fetch secrets and updates to those secrets. The main benefit of this model is that it doesn’t require any major configuration to your third-party secrets manager. The AWS resources and mechanism used for pulling secrets must have appropriate permissions and network access to those secrets. However, there could be a delay between the time a secret is created and updated and when it’s picked up for replication, depending on the time interval configured between pulls from AWS to the external secrets manager.
Push model In this model, rather than periodically polling for updates, the external secrets manager pushes updates to AWS Secrets Manager as soon as a secret is added or changed. The main benefit of this is that there is minimal delay between secret creation, or secret updating, and when that data is available in AWS Secrets Manager. The push model also minimizes the network traffic required for replication since it’s a unidirectional flow. However, this model adds a layer of complexity to the replication, because it requires additional configuration in the third-party secrets manager. More specifically, the push model is dependent on the third-party secrets manager’s ability to run event-based push integrations with AWS resources. This will require a custom integration to be developed and managed on the third-party secrets manager’s side.
This blog post focuses on the pull model to provide an example integration that requires no additional configuration on the third-party secrets manager.
Replicate secrets to AWS Secrets Manager with the pull model
In this section, I’ll walk through an example of how to use the pull model to replicate your secrets from an external secrets manager to AWS Secrets Manager.
Solution overview
Figure 1: Secret replication architecture diagram
The architecture shown in Figure 1 consists of the following main steps, numbered in the diagram:
A Cron expression in Amazon EventBridge invokes an AWS Lambda function every 30 minutes.
To connect to the third-party secrets manager, the Lambda function, written in NodeJS, fetches a set of user-defined API keys belonging to the secrets manager from AWS Secrets Manager. These API keys have been scoped down to give read-only access to secrets that should be replicated, to adhere to the principle of least privilege. There is more information on this in Step 3: Update the Vault connection secret.
The third step has two variants depending on where your third-party secrets manager is hosted:
The Lambda function is configured to fetch secrets from a third-party secrets manager that is hosted outside AWS. This requires sufficient networking and routing to allow communication from the Lambda function.
Note: Depending on the location of your third-party secrets manager, you might have to consider different networking topologies. For example, you might need to set up hybrid connectivity between your external environment and the AWS Cloud by using AWS Site-to-Site VPN or AWS Direct Connect, or both.
Important: To simplify the deployment of this example integration, I’ll use a secrets manager hosted on a publicly available Amazon EC2 instance within the same VPC as the Lambda function (3b). This minimizes the additional networking components required to interact with the secrets manager. More specifically, the EC2 instance runs an open-source HashiCorp Vault. In the rest of this post, I’ll refer to the HashiCorp Vault’s API keys as Vault tokens.
The Lambda function compares the version of the secret that it just fetched from the third-party secrets manager against the version of the secret that it has in AWS Secrets Manager (by tag). The function will create a new secret in AWS Secrets Manager if the secret does not exist yet, and will update it if there is a new version. The Lambda function will only consider secrets from the third-party secrets manager for replication if they match a specified prefix. For example, hybrid-aws-secrets/.
In case there is an error synchronizing the secret, an email notification is sent to the email addresses which are subscribed to the Amazon Simple Notification Service (Amazon SNS) Topic deployed. This sample application uses email notifications with Amazon SNS as an example, but you could also integrate with services like ServiceNow, Jira, Slack, or PagerDuty. Learn more about how to use webhooks to publish Amazon SNS messages to external services.
Step 1: Deploy the solution by using the AWS CDK toolkit
For this blog post, I’ve created an AWS Cloud Development Kit (AWS CDK) script, which can be found in this AWS GitHub repository. Using the AWS CDK, I’ve defined the infrastructure depicted in Figure 1 as Infrastructure as Code (IaC), written in TypeScript, ready for you to deploy and try out. The AWS CDK is an open-source software development framework that allows you to write your cloud application infrastructure as code using common programming languages such as TypeScript, Python, Java, Go, and so on.
Prerequisites:
To deploy the solution, the following should be in place on your system:
AWS CDK Toolkit. Install using npm (included in Node setup) by running npm install -g aws-cdk in a local terminal.
An AWS access key ID and secret access key configured as this setup will interact with your AWS account. See Configuration basics in the AWS Command Line Interface User Guide for more details.
Clone the CDK script for secret replication. git clone https://github.com/aws-samples/aws-secrets-manager-hybrid-secret-replication-from-hashicorp-vault.git SecretReplication
Use the cloned project as the working directory. cd SecretReplication
Install the required dependencies to deploy the application. npm install
Adjust any configuration values for your setup in the cdk.json file. For example, you can adjust the secretsPrefix value to change which prefix is used by the Lambda function to determine the subset of secrets that should be replicated from the third-party secrets manager.
Bootstrap your AWS environments with some resources that are required to deploy the solution. With correctly configured AWS credentials, run the following command. cdk bootstrap
This command deploys the infrastructure shown in Figure 1 for you by using AWS CloudFormation. For a full list of resources, you can view the SecretsManagerReplicationStack in AWS CloudFormation after the deployment has completed.
Note: If your local environment does not have a terminal that allows you to run these commands, consider using AWS Cloud9 or AWS CloudShell.
After the deployment has finished, you should see an output in your terminal that looks like the one shown in Figure 2. If successful, the output provides the IP address of the sample HashiCorp Vault and its web interface.
Figure 2: AWS CDK deployment output
Step 2: Initialize the HashiCorp Vault
As part of the output of the deployment script, you will be given a URL to access the user interface of the open-source HashiCorp Vault. To simplify accessibility, the URL points to a publicly available Amazon EC2 instance running the HashiCorp Vault user interface as shown in step 3b in Figure 1.
Let’s look at the HashiCorp Vault that was just created. Go to the URL in your browser, and you should see the Raft Storage initialize page, as shown in Figure 3.
The vault requires an initial configuration to set up storage and get the initial set of root keys. You can go through the steps manually in the HashiCorp Vault’s user interface, but I recommend that you use the initialise_vault.sh script that is included as part of the SecretsManagerReplication project instead.
Using the HashiCorp Vault API, the initialization script will automatically do the following:
Initialize the Raft storage to allow the Vault to store secrets locally on the instance.
Create an initial set of unseal keys for the Vault. Importantly, for demo purposes, the script uses a single key share. For production environments, it’s recommended to use multiple key shares so that multiple shares are needed to reconstruct the root key, in case of an emergency.
Store the unseal keys in init/vault_init_output.json in your project.
Unseals the HashiCorp Vault by using the unseal keys generated earlier.
Enables two key-value secrets engines:
An engine named after the prefix that you’re using for replication, defined in the cdk.json file. In this example, this is hybrid-aws-secrets. We’re going to use the secrets in this engine for replication to AWS Secrets Manager.
An engine called super-secret-engine, which you’re going to use to show that your replication mechanism does not have access to secrets outside the engine used for replication.
Creates three example secrets, two in hybrid-aws-secrets, and one in super-secret-engine.
Creates a read-only policy, which you can see in the init/replication-policy-payload.json file after the script has finished running, that allows read-only access to only the secrets that should be replicated.
Creates a new vault token that has the read-only policy attached so that it can be used by the AWS Lambda function later on to fetch secrets for replication.
To run the initialization script, go back to your terminal, and run the following command. ./initialise_vault.sh
The script will then ask you for the IP address of your HashiCorp Vault. Provide the IP address (excluding the port) and choose Enter. Input y so that the script creates a couple of sample secrets.
If everything is successful, you should see an output that includes tokens to access your HashiCorp Vault, similar to that shown in Figure 4.
The setup script has outputted two tokens: one root token that you will use for administrator tasks, and a read-only token that will be used to read secret information for replication. Make sure that you can access these tokens while you’re following the rest of the steps in this post.
Note: The root token is only used for demonstration purposes in this post. In your production environments, you should not use root tokens for regular administrator actions. Instead, you should use scoped down roles depending on your organizational needs. In this case, the root token is used to highlight that there are secrets under super-secret-engine/ which are not meant for replication. These secrets cannot be seen, or accessed, by the read-only token.
Go back to your browser and refresh your HashiCorp Vault UI. You should now see the Sign in to Vault page. Sign in using the Token method, and use the root token. If you don’t have the root token in your terminal anymore, you can find it in the init/vault_init_output.json file.
After you sign in, you should see the overview page with three secrets engines enabled for you, as shown in Figure 5.
If you explore hybrid-aws-secrets and super-secret-engine, you can see the secrets that were automatically created by the initialization script. For example, first-secret-for-replication, which contains a sample key-value secret with the key secrets and value manager.
If you navigate to Policies in the top navigation bar, you can also see the aws-replication-read-only policy, as shown in Figure 6. This policy provides read-only access to only the hybrid-aws-secrets path.
Figure 6: Read-only HashiCorp Vault token policy
The read-only policy is attached to the read-only token that we’re going to use in the secret replication Lambda function. This policy is important because it scopes down the access that the Lambda function obtains by using the token to a specific prefix meant for replication. For secret replication we only need to perform read operations. This policy ensures that we can read, but cannot add, alter, or delete any secrets in HashiCorp Vault using the token.
You can verify the read-only token permissions by signing into the HashiCorp Vault user interface using the read-only token rather than the root token. Now, you should only see hybrid-aws-secrets. You no longer have access to super-secret-engine, which you saw in Figure 5. If you try to create or update a secret, you will get a permission denied error.
Great! Your HashiCorp Vault is now ready to have its secrets replicated from hybrid-aws-secrets to AWS Secrets Manager. The next section describes a final configuration that you need to do to allow access to the secrets in HashiCorp Vault by the replication mechanism in AWS.
Step 3: Update the Vault connection secret
To allow secret replication, you must give the AWS Lambda function access to the HashiCorp Vault read-only token that was created by the initialization script. To do that, you need to update the vault-connection-secret that was initialized in AWS Secrets Manager as part of your AWS CDK deployment.
For demonstration purposes, I’ll show you how to do that by using the AWS Management Console, but you can also do it programmatically by using the AWS Command Line Interface (AWS CLI) or AWS SDK with the update-secret command.
To update the Vault connection secret (console)
In the AWS Management Console, go to AWS Secrets Manager > Secrets > hybrid-aws-secrets/vault-connection-secret.
Under Secret Value, choose Retrieve Secret Value, and then choose Edit.
Update the vaultToken value to contain the read-only token that was generated by the initialization script.
Step 4: (Optional) Set up email notifications for replication failures
As highlighted in Figure 1, the Lambda function will send an email by using Amazon SNS to a designated email address whenever one or more secrets fails to be replicated. You will need to configure the solution to use the correct email address. To do this, go to the cdk.json file at the root of the SecretReplication folder and adjust the notificationEmail parameter to an email address that you own. Once done, deploy the changes using the cdk deploy command. Within a few minutes, you’ll get an email requesting you to confirm the subscription. Going forward, you will receive an email notification if one or more secrets fails to replicate.
Test your secret replication
You can either wait up to 30 minutes for the Lambda function to be invoked automatically to replicate the secrets, or you can manually invoke the function.
To test your secret replication
Open the AWS Lambda console and find the Secret Replication function (the name starts with SecretsManagerReplication-SecretReplication).
Navigate to the Test tab.
For the text event action, select Create new event, create an event using the default parameters, and then choose the Test button on the right-hand side, as shown in Figure 8.
Figure 8: AWS Lambda – Test page to manually invoke the function
This will run the function. You should see a success message, as shown in Figure 9. If this is the first time the Lambda function has been invoked, you will see in the results that two secrets have been created.
Figure 9: AWS Lambda function output
You can find the corresponding logs for the Lambda function invocation in a Log group in AWS CloudWatch matching the name /aws/lambda/SecretsManagerReplication-SecretReplicationLambdaF-XXXX.
To verify that the secrets were added, navigate to AWS Secrets Manager in the console, and in addition to the vault-connection-secret that you edited before, you should now also see the two new secrets with the same hybrid-aws-secrets prefix, as shown in Figure 10.
Figure 10: AWS Secrets Manager overview – New replicated secrets
For example, if you look at first-secret-for-replication, you can see the first version of the secret, with the secret key secrets and secret value manager, as shown in Figure 11.
Figure 11: AWS Secrets Manager – New secret overview showing values and version number
Success! You now have access to the secret values that originate from HashiCorp Vault in AWS Secrets Manager. Also, notice how there is a version tag attached to the secret. This is something that is necessary to update the secret, which you will learn more about in the next two sections.
Update a secret
It’s a recommended security practice to rotate secrets frequently. The Lambda function in this solution not only replicates secrets when they are created — it also periodically checks if existing secrets in AWS Secrets Manager should be updated when the third-party secrets manager (HashiCorp Vault in this case) has a new version of the secret. To validate that this works, you can manually update a secret in your HashiCorp Vault and observe its replication in AWS Secrets Manager in the same way as described in the previous section. You will notice that the version tag of your secret gets updated automatically when there is a new secret replication from the third-party secrets manager to AWS Secrets Manager.
Secret replication logic
This section will explain in more detail the logic behind the secret replication. Consider the following sequence diagram, which explains the overall logic implemented in the Lambda function.
Figure 12: State diagram for secret replication logic
This diagram highlights that the Lambda function will first fetch a list of secret names from the HashiCorp Vault. Then, the function will get a list of secrets from AWS Secrets Manager, matching the prefix that was configured for replication. AWS Secrets Manager will return a list of the secrets that match this prefix and will also return their metadata and tags. Note that the function has not fetched any secret material yet.
Next, the function will loop through each secret name that HashiCorp Vault gave and will check if the secret exists in AWS Secrets Manager:
If there is no secret that matches that name, the function will fetch the secret material from HashiCorp Vault, including the version number, and create a new secret in AWS Secrets Manager. It will also add a version tag to the secret to match the version.
If there is a secret matching that name in AWS Secrets Manager already, the Lambda function will first fetch the metadata from that secret in HashiCorp Vault. This is required to get the version number of the secret, because the version number was not exposed when the function got the list of secrets from HashiCorp Vault initially. If the secret version from HashiCorp Vault does not match the version value of the secret in AWS Secrets Manager (for example, the version in HashiCorp vault is 2, and the version in AWS Secrets manager is 1), an update is required to get the values synchronized again. Only now will the Lambda function fetch the actual secret material from HashiCorp Vault and update the secret in AWS Secrets Manager, including the version number in the tag.
The Lambda function fetches metadata about the secrets, rather than just fetching the secret material from HashiCorp Vault straight away. Typically, secrets don’t update very often. If this Lambda function is called every 30 minutes, then it should not have to add or update any secrets in the majority of invocations. By using metadata to determine whether you need the secret material to create or update secrets, you minimize the number of times secret material is fetched both from HashiCorp Vault and AWS Secrets Manager.
Note: The AWS Lambda function has permissions to pull certain secrets from HashiCorp Vault. It is important to thoroughly review the Lambda code and any subsequent changes to it to prevent leakage of secrets. For example, you should ensure that the Lambda function does not get updated with code that unintentionally logs secret material outside the Lambda function.
Use your secret
Now that you have created and replicated your secrets, you can use them in your AWS applications or AWS services that are integrated with Secrets Manager. For example, you can use the secrets when you set up connectivity for a proxy in Amazon RDS, as follows.
To use a secret when creating a proxy in Amazon RDS
Go to the Amazon RDS service in the console.
In the left navigation pane, choose Proxies, and then choose Create Proxy.
On the Connectivity tab, you can now select first-secret-for-replicationorsecond-secret-for-replication, which were created by the Lambda function after replicating them from the HashiCorp Vault.
Figure 13: Amazon RDS Proxy – Example of using replicated AWS Secrets Manager secrets
Due to the sensitive nature of the secrets, it is important that you scope down the permissions to the least amount required to prevent inadvertent access to your secrets. The setup adopts a least-privilege permission strategy, where only the necessary actions are explicitly allowed on the resources that are required for replication. However, the permissions should be reviewed in accordance to your security standards.
In the architecture of this solution, there are two main places where you control access to the management of your secrets in Secrets Manager.
Lambda execution IAM role: The IAM role assumed by the Lambda function during execution contains the appropriate permissions for secret replication. There is an additional safety measure, which explicitly denies any action to a resource that is not required for the replication. For example, the Lambda function only has permission to publish to the Amazon SNS topic that is created for the failed replications, and will explicitly deny a publish action to any other topic. Even if someone accidentally adds an allow to the policy for a different topic, the explicit deny will still block this action.
AWS KMS key policy: When other services need to access the replicated secret in AWS Secrets Manager, they need permission to use the hybrid-aws-secrets-encryption-key AWS KMS key. You need to allow the principal these permissions through the AWS KMS key policy. Additionally, you can manage permissions to the AWS KMS key for the principal through an identity policy. For example, this is required when accessing AWS KMS keys across AWS accounts. See Permissions for AWS services in key policies and Specifying KMS keys in IAM policy statements in the AWS KMS Developer Guide.
Options for customizing the sample solution
The solution that was covered in this post provides an example for replication of secrets from HashiCorp Vault to AWS Secrets Manager using the pull model. This section contains additional customization options that you can consider when setting up the solution, or your own variation of it.
Depending on the solution that you’re using, you might have access to different metadata attached to the secrets, which you can use to determine if a secret should be updated. For example, if you have access to data that represents a last_updated_datetime property, you could use this to infer whether or not a secret ought to be updated.
It is a recommended practice to not use long-lived tokens wherever possible. In this sample, I used a static vault token to give the Lambda function access to the HashiCorp Vault. Depending on the solution that you’re using, you might be able to implement better authentication and authorization mechanisms. For example, HashiCorp Vault allows you to use IAM auth by using AWS IAM, rather than a static token.
This post addressed the creation of secrets and updating of secrets, but for your production setup, you should also consider deletion of secrets. Depending on your requirements, you can choose to implement a strategy that works best for you to handle secrets in AWS Secrets Manager once the original secret in HashiCorp Vault has been deleted. In the pull model, you could consider removing a secret in AWS Secrets Manager if the corresponding secret in your external secrets manager is no longer present.
In the sample setup, the same AWS KMS key is used to encrypt both the environment variables of the Lambda function, and the secrets in AWS Secrets Manager. You could choose to add an additional AWS KMS key (which would incur additional cost), to have two separate keys for these tasks. This would allow you to apply more granular permissions for the two keys in the corresponding KMS key policies or IAM identity policies that use the keys.
Conclusion
In this blog post, you’ve seen how you can approach replicating your secrets from an external secrets manager to AWS Secrets Manager. This post focused on a pull model, where the solution periodically fetched secrets from an external HashiCorp Vault and automatically created or updated the corresponding secret in AWS Secrets Manager. By using this model, you can now use your external secrets in your AWS Cloud applications or services that have an integration with AWS Secrets Manager.
If you have feedback about this post, submit comments in the Comments section below. If you have questions about this post, start a new thread on the AWS Secrets Manager re:Post or contact AWS Support.
Want more AWS Security news? Follow us on Twitter.
Application migrations, especially from legacy/mainframe to the cloud, are done in phases that sometimes span multiple years. Each phase migrates a set of applications, data, and other resources to the cloud. During the transition phases, applications might require access to both on-premises and cloud-based resources to perform their function. While working with our customers, we observed that the most common resources that applications require access to are databases, file storage, and shared services.
This blog post includes architecture guidelines for setting up access to commonly used resources by building a security model in Amazon Web Services (AWS). As you move your legacy applications to the cloud, you can apply Zero Trust concepts and security best practices according to your security needs. With AWS, you can build strong identity and access management with centralized control and set up and manage guardrails and fine-grained access controls for your workforce and applications.
In large organizations, on-premises applications rely on mainframe-based security services, an Identity Provider (IdP) platform, or a combination of both.
A mainframe-based control facility enables on-premises applications to:
Identify and verify users.
Establish an authority (authorize users and backend programs to access protected resources) through privileges defined in the control facility.
The backend programs use a unique identifier (or surrogate key) and run under the authority defined by the privileges assigned to the unique identifier.This security mechanism needs to be transformed into a role-based security model in AWS as applications are moved to the cloud. You assign permissions to a role, which is assumed by an application to get access to resources in AWS, similar to an authority defined in the legacy environment.
An IdP platform (such as Octa or Ping Identify) provides capabilities such as centralized access management and identity federation using SAML 2.0 or OpenID Connect (OIDC), that builds a system of trust between on-premises IdP and AWS. Once the federation is set up, on-premises applications can access AWS resources using AWS Identity and Access Management (IAM) roles, as explained in the next section.
Setting up a scalable security model in AWS
Figure 1 shows an on-premises environment where enterprise identity management is integrated with the mainframe and provides authentication and authorization to applications running off the mainframe. Generally, mainframe-based security controls (users, resources, and profiles) are replicated to the enterprise identity platform and are kept in sync through a change data capture process.
Figure 1. Access to AWS resources from on-premises
To enable your on-premises applications to access AWS resources, the applications need valid AWS credentials for making AWS API requests. Avoid using long-term access keys (such as those associated with IAM users) because they remain valid until you remove them. The following two methods can be used to assume an IAM role and get temporary security credentials to gain access to the AWS resources:
SAML based Identity federation – AWS supports identity federation with SAML. It allows federated access to users and applications in your organization by assuming an IAM role created for SAML federation to get temporary credentials. This method is helpful:
If your application uses a service account to manage AWS resource access, regardless of who is logged in.
IAM Roles Anywhere – Your on-premises applications will exchange X.509 certificates so that they can assume a role and get temporary credentials. This method is helpful if your application needs access to an AWS resource based on a service account.
In both of these cases, authenticated requests assume an IAM role, get temporary security credentials, and perform certain actions using AWS command line interface (CLI) and AWS SDKs. The IAM role has attached permissions for AWS resources such as Amazon Simple Storage Service (Amazon S3), Amazon DynamoDB, and Amazon Relational Database Service (Amazon RDS).
The temporary credentials expire when the session expires. By default, the session duration is one hour; you can request longer duration and session refresh.
To understand better, let’s consider the use case in Figure 2, where on-premises applications need access to AWS resources.
Figure 2. Access to resources that are created or already migrated to AWS from on-premises
Applications can get temporary security credentials through SAML or IAM Roles Anywhere as explained earlier. The next sections explain setting up access to the resources in Figure 2 using temporary credentials.
1. Amazon S3
On-premises applications can access Amazon S3 using the REST API or the AWS SDK to perform certain actions (such as GetObjects or ListObjects):
You can also simplify by creating Amazon S3 access points for your application to perform object-level operations in your S3 bucket. Each access point has distinct permissions and network controls that S3 applies for any request made through it.
2. Amazon RDS and Amazon Aurora
AWS Secrets Manager helps you store credentials for Amazon RDS and Amazon Aurora. You can also set up automatic rotation of your database secrets to meet your security and compliance needs. Applications can retrieve secrets using AWS SDKs and AWS CLI.
Additional configuration values can be stored in AWS Systems Manager Parameter Store, which provides secure, hierarchical storage for configuration data management such as passwords, database strings and license codes as parameter values rather than hard coding them in the code.
To access Amazon RDS and Amazon Aurora:
You can launch Amazon RDS DB instances into a virtual private cloud (VPC). A client application can access DB instance through the internet or through the private network only using an established connection from on-premises to the AWS environment.
On-premises applications can connect to a relational database using a database driver such as Java Database Connectivity (JDBC). The application can retrieve database connection details (such as database URL, port, or credentials) from AWS Secrets Manager and AWS Systems Manager Parameter Store through API calls and can use them for the database connection.
Database admins can access AWS Management Console through an assumed role and can have access to database credentials from AWS Secrets Manager in order to connect directly with the database. For certain administration tasks (such as cluster setup, backup, recovery, maintenance, and management), they will need access to the Amazon RDS management console.
Amazon RDS also provides IAM database authentication option for MariaDB, MySQL, and PostgreSQL. You can authenticate without a password when you connect to a DB instance. Instead, you use an authentication token. For more information, go to IAM database authentication.
This blog helps you architect an application security model in AWS to provide on-premises access to commonly used resources in AWS.
You can apply security best practices and Zero Trust concepts as you move your legacy applications to the cloud. With AWS, you can build identity and access management with centralized and fine-grained access controls for your workforce and applications.
Amazon QuickSight is a fully managed, cloud-native business intelligence (BI) service that makes it easy to connect to your data, create interactive dashboards, and share them with tens of thousands of users, either directly within a QuickSight application, or embedded in web apps and portals.
Let’s consider AnyCompany, which owns healthcare facilities across the country. The central IT team of AnyCompany is responsible for setting up and maintaining IT infrastructure and services for all the facilities in each state. Because AnyCompany is in the healthcare industry and holds sensitive data, they want to store their database credentials safely and don’t want to share them with individuals in the reporting or BI teams. Additionally, they need to encrypt their data at rest using their own encryption key instead of service-managed keys to satisfy their regulatory requirements. AnyCompany is able to audit access of their SPICE (the QuickSight robust in-memory calculation engine) datasets. In an unlikely case of a security incident, AnyCompany is in full control to immediately lock down access to their data by universally revoking access to their AWS Key Management Service (AWS KMS) keys. QuickSight is one of the services used by AnyCompany, and central IT needs to be able to set up these security measures.
QuickSight Enterprise Edition now supports storing database credentials in AWS Secrets Manager, a feature that allows you to put these credentials in Secrets Manager and not share with every BI user for data source creation. Secrets Manager is a secret storage service that you can use to protect database credentials, API keys, and other secret information. Using a key helps you ensure that the secret can’t be compromised by someone examining your code, because the secret isn’t stored in the code.
Additionally, QuickSight supports account administrators to use their own customer managed key (CMK) to encrypt and manage datasets in SPICE, through integration with AWS KMS. AWS KMS lets you create, manage, and control cryptographic keys across your applications and more than 100 AWS services. With AWS KMS, you can encrypt data across your AWS workloads, digitally sign data, encrypt within your applications using the AWS Encryption SDK, and generate and verify message authentication codes (MACs). Using a QuickSight SPICE CMK enables QuickSight users to revoke access to SPICE datasets with one click, and maintain an auditable log that tracks how SPICE datasets are accessed.
Both features help increase the level of security and transparency, give you more control over QuickSight, and help satisfy security requirements by company and government agency policies.
In this post, we walk you through the steps to use these features.
Solution overview
To enable both features (storing of database credentials in Secrets Manager and using KMS keys for encryption), we require an administrator of the QuickSight account. In the following sections, we walk you through the high-level steps to implement this solution:
Enable Secrets Manager integration from the QuickSight management console.
Create or update a data source with secret credentials using the QuickSight API.
Create a dataset using the data source you created.
Enable KMS keys from the QuickSight management console.
A secret in Secrets Manager with your database credentials
KMS keys to encrypt data in SPICE
Enable Secrets Manager integration
With this integration, you no longer need to manually enter data source credentials; you can store them in Secrets Manager and manage access via Secrets Manager. You can also rotate the keys and credentials in one place instead of updating all the data sources. Complete the following steps to enable the integration:
Sign in to your QuickSight account.
On the user name drop-down menu, choose Manage QuickSight.
Choose Security & permissions in the navigation pane.
Under QuickSight access to AWS services, choose Manage.
From the list of services, choose Select secrets under AWS Secrets Manager.
Select the appropriate secret from the list of secrets and choose Finish.
QuickSight creates an AWS Identity and Access Management (IAM) role called aws-quicksight-secretsmanager-role-v0 in your account. It grants users in the account read-only access to the specified secrets and looks similar to the following code:
Create a data source with secret credentials using the QuickSight API
At the time of this writing, creation of data sources using the stored secret in Secrets Manager is only available through the CreateDatasource public API.
The following code is an example API call to create a data source in QuickSight. This example uses the create-data-source API operation. You can also use the update-data-source operation to update an existing data source. For more information, see CreateDataSource and UpdateDataSource.
In the preceding call, QuickSight authorizes secretsmanager:GetSecretValue access to the secret based on the API caller’s IAM policy, not the IAM service role’s policy. The IAM service role acts on the account level and is used when an analysis or dashboard is viewed by a user. It can’t be used to authorize secret access when a user creates or updates the data source.
In the initial response, the creation status is CREATION_IN_PROGRESS. To check if the data source was successfully created, use the DescribeDatasource API to receive a description of the data source:
On the QuickSight start page, choose Manage QuickSight.
Choose KMS keys in the navigation pane.
Choose Manage.
On the KMS Keys page, choose Select key.
In the Select key pop-up box, on the Key menu, choose the key that you want to add.
If your key isn’t on the list, you can manually enter the key’s ARN.
Choose Use as default encryption key for all new SPICE datasets in this QuickSight account to set the selected key as your default key.
A blue badge appears next to the default key to indicate its status.
When you choose a default key, all new SPICE datasets that are created in the Region that hosts your QuickSight account are encrypted with the default key.
Optionally, add more keys by repeating the previous steps.
Although you can add as many keys as you want, you can only have one default key at one time.
Optionally, change or remove CMKs by changing or deleting the default key for all new SPICE datasets.
For existing datasets, you need to perform a full refresh after changing or deleting the default key to take effect.
Audit CMK usage and dataset access in CloudTrail
When a key is used (for example, when a CMK-encrypted SPICE dataset is accessed), an audit log is created in CloudTrail. You can use the log to track the key’s usage. For more information, see Logging operations with AWS CloudTrail. If you need to know which key a SPICE dataset is encrypted by, you can find this information in CloudTrail. Complete the following steps:
On the CloudTrail console, navigate to your CloudTrail log.
Locate the CMK usage (CMK-encrypted SPICE dataset access), using the following search arguments:
The event name (eventName) is GenerateDataKey or Decrypt.
The eventTime denotes when the CMK is used (a CMK-encrypted SPICE dataset is accessed).
The request parameters (requestParameters) contain the QuickSight ARN for the dataset.
The request parameters (requestParameters) contain the KMS ARN (keyId) of the CMK.
Depending on the event type, one of the following applies:
CreateGrant – You can find the most recently used CMK in the key ID (keyID) for the last CreateGrant event for the SPICE dataset
RetireGrant – If latest CloudTrail event of the SPICE dataset is RetireGrant, there is no key ID and the SPICE dataset is no longer CMK encrypted
Revoke access to CMK-encrypted datasets
You can revoke access to your CMK-encrypted SPICE datasets. When you revoke access to a key that is used to encrypt a dataset, access to the dataset is denied until you undo the revoke. The following method is one example of how you can revoke access:
On the AWS KMS console, choose Customer managed keys in the navigation pane.
Select the key that you want to turn off.
On the Key actions menu, choose Disable.
After you revoke access by using any method, it can take up to 15 minutes for the SPICE dataset to become inaccessible.
Sample implementation
The following code shows a sample CreateDatasource API call for creating a QuickSight data source:
To validate the KMS keys used, navigate to CloudTrail logs, as shown in the following code:
Finally, audit the CMK usage (dataset access) via CloudTrail logs. And in the unlikely case of a security incident, access to data can be locked down universally by revoking access to the KMS keys.
Clean up
Clean up the resources created as part of this post with the following steps:
To remove the Secrets Manager integration, update the data source with regular service-level credentials.
Remove the secret from the QuickSight admin console.
On the QuickSight start page, choose Manage QuickSight.
Choose KMS keys in the navigation pane.
Choose Manage.
Choose the Actions menu (three dots) on the row of the default key, then choose Delete.
In the pop-up box that appears, choose Remove.
Conclusion
This post showcased the new features released in QuickSight to secure database credentials through integration with Secrets Manager and AWS KMS. We also demonstrated how to set up customer managed keys to enable encryption of data at rest in QuickSight SPICE, track key usage history using CloudTrail, and lock down access to data by revoking access to KMS keys.
Srikanth Baheti is a Specialized World Wide Sr. Solution Architect for Amazon QuickSight. He started his career as a consultant and worked for multiple private and government organizations. Later he worked for PerkinElmer Health and Sciences & eResearch Technology Inc, where he was responsible for designing and developing high traffic web applications, highly scalable and maintainable data pipelines for reporting platforms using AWS services and Serverless computing.
Raji Sivasubramaniam is a Sr. Solutions Architect at AWS, focusing on Analytics. Raji is specialized in architecting end-to-end Enterprise Data Management, Business Intelligence and Analytics solutions for Fortune 500 and Fortune 100 companies across the globe. She has in-depth experience in integrated healthcare data and analytics with wide variety of healthcare datasets including managed market, physician targeting and patient analytics.
With Amazon EMR, you can use a security configuration to specify settings for encrypting data in transit. When in-transit encryption is configured, you can enable application-specific encryption features, for example:
Hadoop HDFS NameNode or DataNode user interfaces use HTTPS
Hadoop MapReduce encrypted shuffle uses Transport Layer Security (TLS)
Presto nodes internal communication uses SSL/TLS (Amazon EMR version 5.6.0 and later only)
Spark component internal RPC communication, such as the block transfer service and the external shuffle service, is encrypted using the AES-256 cipher in Amazon EMR versions 5.9.0 and later
HTTP protocol communication with user interfaces such as Spark History Server and HTTPS-enabled file servers is encrypted using Spark’s SSL configuration
The security configuration of Amazon EMR allows you to set up TLS certificates to encrypt data in transit. A security configuration provides the following options to specify TLS certificates:
Through a custom certificate provider as a Java class
In many cases, company security policies prohibit storing any type of sensitive information in an S3 bucket, including certificate private keys. For that reason, the only remaining option to secure data in transit on Amazon EMR is to configure the custom certificate provider.
In this post, I guide you through the configuration process and provide Java code samples to secure data in transit on Amazon EMR by storing TLS custom certificates using AWS Secrets Manager.
Secrets Manager helps you protect secrets needed to access your applications, services, and IT resources. The service enables you to easily rotate, manage, and retrieve database credentials, API keys, and other secrets throughout their lifecycle. Users and applications retrieve secrets with a call to Secrets Manager APIs, eliminating the need to hardcode sensitive information in plain text.
Solution overview
The following diagram illustrates the solution architecture.
During an EMR cluster start, if a custom certificate provider is configured for in-transit encryption, the provider is called to get the certificates. A custom certificate provider is a Java class that implements the TLSArtifactsProvider interface.
To make this solution work, you need a secure place to store certificates that can also be accessed by Java code. This post uses Secrets Manager, which provides a mechanism for managing certificates, and encrypts them using AWS Key Management Service (AWS KMS) keys.
To implement this solution, you complete the following high-level steps:
Create a certificate.
Store your certificate to Secrets Manager.
Create a secret for a private key.
Create a secret for a public key.
Implement TLSArtifactsProvider.
Create the Amazon EMR security configuration.
Modify the Amazon Elastic Compute Cloud (Amazon EC2) instance profile role to get the certificate from Secrets Manager.
Start the Amazon EMR cluster.
Create a certificate
For demonstration purposes, this post uses OpenSSL to create a self-signed certificate. See the following code:
This command creates a self-signed, 4096-bit certificate. For production systems, we recommend using a trusted certificate authority (CA) to issue certificates.
The command above has the following parameters:
keyout – The output file in which to store the private key.
out – The output file in which to store the certificate.
days – The number of days for which to certify the certificate.
subj – The subject name for a new request. The common name (CN) must match the domain name specified in DHCP that is assigned to the virtual private cloud (VPC). The default is ec2.internal. The * prefix is the wildcard certificate.
nodes – Allows you to create a private key without a password, which is without encryption.
The output of OpenSSL includes a pair of keys—one private and one public:
privateKey.pem – SSL private key certificate
certificateChain.pem – SSL public key certificate
Store your certificate to Secrets Manager
In this section, we walk through the steps to create secrets for a private key and a public key.
Create a secret for a private key
To create a secret for a private key, complete the following steps:
On the Secrets Manager console, choose Store a new secret.
For the secret type, select Other type of secrets.
On the Plaintext tab in the Key/value pairs section, copy the content from privateKey.pem.
For Encryption key, choose DefaultEncryptionKey.
Choose Next.
For Secret name, enter emrprivate.
For Resource permissions, optionally add or edit a resource policy to access secrets across AWS accounts. For more information, refer to Permissions policy examples.
Choose Next.
Choose Store.
Create a secret for a public key
To create a secret for a public key, complete the following steps:
On the Secrets Manager console, choose Store a new secret.
For the secret type, select Other type of secrets.
On the Plaintext tab in the Key/value pairs section, copy the content from certificateChain.pem.
For Encryption key, choose DefaultEncryptionKey.
Choose Next.
For Secret name, enter emrcert.
For Resource permissions, optionally add or edit a resource policy to access secrets across AWS accounts.
Choose Next.
Choose Store.
Implement TLSArtifactsProvider
This section describes the flow in the Java code only. You can download the full code from GitHub.
The interface uses the getTlsArtifacts method, which expects certificates in return:
Java class EmrTlsFromSecretsManager implements following TLSArtifactsProvider interface

public abstract class TLSArtifactsProvider {

  public abstract TLSArtifacts getTlsArtifacts();
}
In the provided code example, we implement the following logic:
@Override
public TLSArtifacts getTlsArtifacts() {

   init();

   //Get private key from string
   PrivateKey privateKey = getPrivateKey(this.tlsPrivateKey);

   //Get certificate from string
   List<Certificate> certChain = getX509FromString(this.tlsCertificateChain);
   List<Certificate> certs = getX509FromString(this.tlsCertificate);

   return new TLSArtifacts(privateKey,certChain,certs);
}
The parameters are as follows:
init() – Includes the following:
readTags() – Reads the secret ARNs from the Amazon EMR tags
getCertificates() – Gets the certificates from Secrets Manager
getX509FromString() – Converts certificates to an X509 format
getPrivateKey() – Converts the private key to the correct format
Compile the Java project, and you will get the file emr-tls-provider-samples-0.1-jar-with-dependencies.jar. Alternatively you can download the JAR file from GitHub.
Create the Amazon EMR security configuration
To create the Amazon EMR security configuration, complete the following steps:
Upload the emr-tls-provider-samples-0.1-jar-with-dependencies.jar file to an S3 bucket.
On the Amazon EMR console, choose Security configurations, then choose Create.
Enter a name for your new security configuration; for example, emr-tls-ssm.
Select Enable in-transit encryption.
For Certificate provider type, choose Custom.
For Custom key provider location, enter the Amazon S3 path to the Java JAR file.
For Certificate provider class, enter the name of the Java class. In the example code, the name is com.amazonaws.awssamples.EmrTlsFromSecretsManager.
Configure the at-rest encryption as required.
Choose Create.
Modify the EC2 instance profile role
Applications running on Amazon EMR assume and use the Amazon EMR role for Amazon EC2 to interact with other AWS services. To grant permissions to get certificates from Secrets Manager, add the following policy to your EC2 instance profile role:
Make sure you limit the scope of the Secrets Manager policy to only the certificates that are required for provisioning.
Start the cluster
To reuse the same Java JAR file with different certificates and configurations, you can provide secret ARNs to EmrTlsFromSecretsManager through Amazon EMR tags, rather than embedding them in Java code.
In this example, we use the following tags:
sm:ssl:emrcert – The ARN of the Secrets Manager parameter key storing the CA-signed certificate
sm:ssl:emrprivate – The ARN of the Secrets Manager parameter key storing the CA-signed certificate private key
If you don’t need the resources you created in the earlier steps, you can delete the Secrets Manager secrets and EMR cluster in order to avoid additional charges.
On the Secrets Manager console, select the secrets you created.
On the Actions menu, choose Delete secret.This doesn’t automatically delete the secrets, because you need to set a waiting period that allows for the secrets to be restored, if needed. The minimum time is 7 days.
On the Amazon EMR console, select the cluster you created.
Choose Terminate.
The process of deleting the EMR cluster takes a few minutes to complete.
Conclusion
In this post, we demonstrated how to create your custom Amazon EMR TLSArtifactsProvider interface and use Secrets Manager to store certificates. This allows you to define a more secure way to store and use certificates for Amazon EMR in-transit data encryption.
About the author
Hao Wang is a Senior Big Data Architect at AWS. Hao actively works with customers building large scale data platforms on AWS. He has a background as a software architect on implementing distributed software systems. In his spare time, he enjoys reading and outdoor activities with his family.
AWS Lambda functions often need to access secrets, such as certificates, API keys, or database passwords. Storing secrets outside the function code in an external secrets manager helps to avoid exposing secrets in application source code. Using a secrets manager also allows you to audit and control access, and can help with secret rotation. Do not store secrets in Lambda environment variables, as these are visible to anyone who has access to view function configuration.
This post highlights some solutions to store secrets securely and retrieve them from within your Lambda functions.
AWS Partner Network (APN) member Hashicorp provides Vault to secure secrets and application data. Vault allows you to control access to your secrets centrally, across applications, systems, and infrastructure. You can store secrets in Vault and access them from a Lambda function to access a database, for example. The Vault Agent for AWS helps you authenticate with Vault, retrieve the database credentials, and then perform the queries. You can also use the Vault AWS Lambda extension to manage connectivity to Vault.
AWS Systems Manager Parameter Store enables you to store configuration data securely, including secrets, as parameter values. For information on Parameter Store pricing, see the documentation.
AWS Secrets Manager allows you to replace hardcoded credentials in your code with an API call to Secrets Manager to retrieve the secret programmatically. You can generate, protect, rotate, manage, and retrieve secrets throughout their lifecycle. By default, Secrets Manager does not write or cache the secret to persistent storage. Secrets Manager supports cross-account access to secrets. For information on Secrets Manager pricing, see the documentation.
Parameter Store integrates directly with Secrets Manager as a pass-through service for references to Secrets Manager secrets. Use this integration if you prefer using Parameter Store as a consistent solution for calling and referencing secrets across your applications. For more information, see “Referencing AWS Secrets Manager secrets from Parameter Store parameters.”
When Lambda first invokes your function, it creates a runtime environment. It runs the function’s initialization (init) code, which is the code outside the main handler. Lambda then runs the function handler code as the invocation. This receives the event payload and processes your business logic. Subsequent invocations can use the same runtime environment.
You can retrieve secrets during each function invocation from within your handler code. This ensures that the secret value is always up to date but can lead to increased function duration and cost, as the function calls the secret manager during each invocation. There may also be additional retrieval costs from Secret Manager.
Retrieving secret during each invocation
You can reduce costs and improve performance by retrieving the secret during the function init process. During subsequent invocations using the same runtime environment, your handler code can use the same secret.
Retrieving secret during function initialization.
The Serverless Land pattern example shows how to retrieve a secret during the init phase using Node.js and top-level await.
If a secret may change between subsequent invocations, ensure that your handler can check for the secret validity and, if necessary, retrieve the secret again.
Retrieve changed secret during subsequent invocation.
You can also use Lambda extensions to retrieve secrets from Secrets Manager, cache them, and automatically refresh the cache based on a time value. The extension retrieves the secret from Secrets Manager before the init process and makes it available via a local HTTP endpoint. The function then retrieves the secret from the local HTTP endpoint, rather than directly from Secrets Manager, increasing performance. You can also share the extension with multiple functions, which can reduce function code. The extension handles refreshing the cache based on a configurable timeout value. This ensures that the function has the updated value, without handling the refresh in your function code, which increases reliability.
Using Lambda extensions to cache and refresh secret.
Lambda Powertools provides a suite of utilities for Lambda functions to simplify the adoption of serverless best practices. AWS Lambda Powertools for Python and AWS Lambda Powertools for Java both provide a parameters utility that integrates with Secrets Manager.
from aws_lambda_powertools.utilities import parameters
def handler(event, context):
    # Retrieve a single secret
    value = parameters.get_secret("my-secret")
import software.amazon.lambda.powertools.parameters.SecretsProvider;
import software.amazon.lambda.powertools.parameters.ParamManager;

public class AppWithSecrets implements RequestHandler<APIGatewayProxyRequestEvent, APIGatewayProxyResponseEvent> {
    // Get an instance of the Secrets Provider
    SecretsProvider secretsProvider = ParamManager.getSecretsProvider();

    // Retrieve a single secret
    String value = secretsProvider.get("/my/secret");
Rotating secrets
You should rotate secrets to prevent the misuse of your secrets. This helps you to replace long-term secrets with short-term ones, which reduces the risk of compromise.
Secrets Manager has built-in functionality to rotate secrets on demand or according to a schedule. Secrets Manager has native integrations with Amazon RDS, Amazon DocumentDB, and Amazon Redshift, using a Lambda function to manage the rotation process for you. It deploys an AWS CloudFormation stack and populates the function with the Amazon Resource Name (ARN) of the secret. You specify the permissions to rotate the credentials, and how often you want to rotate the secret. You can view and edit Secrets Manager rotation settings in the Secrets Manager console.
Secrets Manager rotation settings
You can also create your own rotation Lambda function for other services.
Auditing secrets access
You should continually review how applications are using your secrets to ensure that the usage is as you expect. You should also log any changes to them so you can investigate any potential issues, and roll back changes if necessary.
When using Hashicorp Vault, use Audit devices to log all requests and responses to Vault. Audit devices can append logs to a file, write to syslog, or write to a socket.
Secrets Manager supports logging API calls using AWS CloudTrail. CloudTrail monitors and records all API calls for Secrets Manager as events. This includes calls from code calling the Secrets Manager APIs and access via the Secrets Manager console. CloudTrail data is considered sensitive, so you should use AWS KMS encryption to protect it.
The CloudTrail event history shows the requests to secretsmanager.amazonaws.com.
Viewing CloudTrail access to Secrets Manager
You can use Amazon EventBridge to respond to alerts based on specific operations recorded in CloudTrail. These include secret rotation or deleted secrets. You can also generate an alert if someone tries to use a version of a secret version while it is pending deletion. This may help identify and alert you when an outdated certificate is used.
Securing secrets
You must tightly control access to secrets because of their sensitive nature. Create AWS Identity and Access Management (IAM) policies and resource policies to enable minimal access to secrets. You can use role-based, as well as attribute-based, access control. This can prevent credentials from being accidentally used or compromised. For more information, see “Authentication and access control for AWS Secrets Manager”.
Secrets Manager supports encryption at rest using AWS Key Management Service (AWS KMS) using keys that you manage. Secrets are encrypted in transit using TLS by default, which requires request signing.
Do not store plaintext secrets in Lambda environment variables. Ensure that you do not embed secrets directly in function code, commit these secrets to code repositories, or log the secret to CloudWatch.
Conclusion
Using a secrets manager to store secrets such as certificates, API keys or database passwords helps to avoid exposing secrets in application source code. This post highlights some AWS and third-party solutions, such as Hashicorp Vault, to store secrets securely and retrieve them from within your Lambda functions.
Secrets Manager is the preferred AWS solution for storing and managing secrets. I explain when to retrieve secrets, including using Lambda extensions to cache secrets, which can reduce cost and improve performance.
You can use the Lambda Powertools parameters utility, which integrates with Secrets Manager. Rotating secrets reduces the risk of compromise and you can audit secrets using CloudTrail and respond to alerts using EventBridge. I also cover security considerations for controlling access to your secrets.
For more serverless learning resources, visit Serverless Land.
The web application client-server pattern is widely adopted. The access control allows only authorized clients to access the backend server resources by authenticating the client and providing granular-level access based on who the client is.
This post focuses on three solution architecture patterns that prevent unauthorized clients from gaining access to web application backend servers. There are multiple AWS services applied in these architecture patterns that meet the requirements of different use cases.
OAuth 2.0 authentication code flow
Figure 1 demonstrates the fundamentals to all the architectural patterns discussed in this post. The blog Understanding Amazon Cognito user pool OAuth 2.0 grants describes the details of different OAuth 2.0 grants, which can vary the flow to some extent.
Figure 1. A typical OAuth 2.0 authentication code flow
The architecture patterns detailed in this post use Amazon Cognito as the authorization server, and Amazon Elastic Compute Cloud instance(s) as resource server. The client can be any front-end application, such as a mobile application, that sends a request to the resource server to access the protected resources.
Figure 2. Application Load Balancer integration with Amazon Cognito
ALB can be used to authenticate clients through the user pool of Amazon Cognito:
The client sends HTTP request to ALB endpoint without authentication-session cookies.
ALB redirects the request to Amazon Cognito authentication endpoint. The client is authenticated by Amazon Cognito.
The client is directed back to the ALB with the authentication code.
The ALB uses the authentication code to obtain the access token from the Amazon Cognito token endpoint and also uses the access token to get client’s user claims from Amazon Cognito UserInfo endpoint.
The ALB prepares the authentication session cookie containing encrypted data and redirects client’s request with the session cookie. The client uses the session cookie for all further requests. The ALB validates the session cookie and decides if the request can be passed through to its targets.
The validated request is forwarded to the backend instances with the ALB adding HTTP headers that contain the data from the access token and user-claims information.
The backend server can use the information in the ALB added headers for granular-level permission control.
The key takeaway of this pattern is that the ALB maintains the whole authentication context by triggering client authentication with Amazon Cognito and prepares the authentication-session cookie for the client. The Amazon Cognito sign-in callback URL points to the ALB, which allows the ALB access to the authentication code.
The pattern demonstrated in Figure 3 offloads the work of authenticating clients to Amazon API Gateway.
Figure 3. Amazon API Gateway integration with Amazon Cognito
API Gateway can support both REST and HTTP API. API Gateway has integration with Amazon Cognito, whereas it can also have control access to HTTP APIs with a JSON Web Token (JWT) authorizer, which interacts with Amazon Cognito. The ALB can be integrated with API Gateway. The client is responsible for authenticating with Amazon Cognito to obtain the access token.
The client starts authentication with Amazon Cognito to obtain the access token.
The client sends REST API or HTTP API request with a header that contains the access token.
The API Gateway is configured to have:
Amazon Cognito user pool as the authorizer to validate the access token in REST API request, or
A JWT authorizer, which interacts with the Amazon Cognito user pool to validate the access token in HTTP API request.
After the access token is validated, the REST or HTTP API request is forwarded to the ALB, and:
The API Gateway can route HTTP API to private ALB via a VPC endpoint.
If a public ALB is used, the API Gateway can route both REST API and HTTP API to the ALB.
API Gateway cannot directly route REST API to a private ALB. It can route to a private Network Load Balancer (NLB) via a VPC endpoint. The private ALB can be configured as the NLB’s target.
The key takeaways of this pattern are:
API Gateway has built-in features to integrate Amazon Cognito user pool to authorize REST and/or HTTP API request.
An ALB can be configured to only accept the HTTP API requests from the VPC endpoint set by API Gateway.
Pattern 3
Amazon CloudFront is able to trigger AWS Lambda functions deployed at AWS edge locations. This pattern (Figure 4) utilizes a feature of Lambda@Edge, where it can act as an authorizer to validate the client requests that use an access token, which is usually included in HTTP Authorization header.
Figure 4. Using Amazon CloudFront and AWS Lambda@Edge with Amazon Cognito
The client can have an individual authentication flow with Amazon Cognito to obtain the access token before sending the HTTP request.
The client starts authentication with Amazon Cognito to obtain the access token.
The client sends a HTTP request with Authorization header, which contains the access token, to the CloudFront distribution URL.
The Lambda function extracts the access token from the Authorization header, and validates the access token with Amazon Cognito. If the access token is not valid, the request is denied.
If the access token is validated, the request is authorized and forwarded by CloudFront to the ALB. CloudFront is configured to add a custom header with a value that can only be shared with the ALB.
The ALB sets a listener rule to check if the incoming request has the custom header with the shared value. This makes sure the internet-facing ALB only accepts requests that are forwarded by CloudFront.
The Lambda function also updates CloudFront for the added custom header and ALB for the shared value in the listener rule.
The key takeaways of this pattern are:
By default, CloudFront will remove the authorization header before forwarding the HTTP request to its origin. CloudFront needs to be configured to forward the Authorization header to the origin of the ALB. The backend server uses the access token to apply granular levels of resource access permission.
The use of Lambda@Edge requires the function to sit in us-east-1 region.
The CloudFront-added custom header’s value is kept as a secret that can only be shared with the ALB.
Conclusion
The architectural patterns discussed in this post are token-based web access control methods that are fully supported by AWS services. The approach offloads the OAuth 2.0 authentication flow from the backend server to AWS services. The services managed by AWS can provide the resilience, scalability, and automated operability for applying access control to a web application.
Given the speed of Amazon Web Services (AWS) innovation, it can sometimes be challenging to keep up with AWS Security service and feature launches. To help you stay current, here’s an overview of some of the most important 2021 AWS Security launches that security professionals should be aware of. This is the first of two related posts; Part 2 will highlight some of the important 2021 launches that security professionals should be aware of across all AWS services.
Amazon GuardDuty
In 2021, the threat detection service Amazon GuardDuty expanded the internal AWS security intelligence it consumes to use more of the intel that AWS internal threat detection teams collect, including additional nation-state threat intelligence. Sharing more of the important intel that internal AWS teams collect lets you quickly improve your protection. GuardDuty also launched domain reputation modeling. These machine learning models take all the domain requests from across all of AWS, and feed them into a model that allows AWS to categorize previously unseen domains as highly likely to be malicious or benign based on their behavioral characteristics. In practice, AWS is seeing that these models often deliver high-fidelity threat detections, identifying malicious domains 7–14 days before they are identified and available on commercial threat feeds.
AWS also launched second generation anomaly detection for GuardDuty. Shortly after the original GuardDuty launch in 2017, AWS added additional anomaly detection for user behavior analytics and monitoring for unusual activity of AWS Identity and Access Management (IAM) users. After receiving customer feedback that the original feature was a little too noisy, and that it was difficult to understand why some findings were generated, the GuardDuty analytics team rebuilt this functionality on an entirely new machine learning model, considerably reducing the number of detections and generating a more accurate positive-detection rate. The new model also added additional context that security professionals (such as analysts) can use to understand why the model shows findings as suspicious or unusual.
Since its introduction, GuardDuty has detected when AWS EC2 Role credentials are used to call AWS APIs from IP addresses outside of AWS. Beginning in early 2022, GuardDuty now supports detection when credentials are used from other AWS accounts, inside the AWS network. This is a complex problem for customers to solve on their own, which is why the GuardDuty team added this enhancement. The solution considers that there are legitimate reasons why a source IP address that is communicating with AWS services APIs might be different than the Amazon Elastic Compute Cloud (Amazon EC2) instance IP address, or a NAT gateway associated with the instance’s VPC. The enhancement also considers complex network topologies that route traffic to one or multiple VPCs—for example, AWS Transit Gateway or AWS Direct Connect.
Our customers are increasingly running container workloads in production; helping to raise the security posture of these workloads became an AWS development priority in 2021. GuardDuty for EKS Protection is one recent feature that has resulted from this investment. This new GuardDuty feature monitors Amazon Elastic Kubernetes Service (Amazon EKS) cluster control plane activity by analyzing Kubernetes audit logs. GuardDuty is integrated with Amazon EKS, giving it direct access to the Kubernetes audit logs without requiring you to turn on or store these logs. Once a threat is detected, GuardDuty generates a security finding that includes container details such as pod ID, container image ID, and associated tags. See below for details on how the new Amazon Inspector is also helping to protect containers.
Amazon Inspector
At AWS re:Invent 2021, we launched the new Amazon Inspector, a vulnerability management service that continually scans AWS workloads for software vulnerabilities and unintended network exposure. The original Amazon Inspector was completely re-architected in this release to automate vulnerability management and to deliver near real-time findings to minimize the time needed to discover new vulnerabilities. This new Amazon Inspector has simple one-click enablement and multi-account support using AWS Organizations, similar to our other AWS Security services. This launch also introduces a more accurate vulnerability risk score, called the Inspector score. The Inspector score is a highly contextualized risk score that is generated for each finding by correlating Common Vulnerability and Exposures (CVE) metadata with environmental factors for resources such as network accessibility. This makes it easier for you to identify and prioritize your most critical vulnerabilities for immediate remediation. One of the most important new capabilities is that Amazon Inspector automatically discovers running EC2 instances and container images residing in Amazon Elastic Container Registry (Amazon ECR), at any scale, and immediately starts assessing them for known vulnerabilities. Now you can consolidate your vulnerability management solutions for both Amazon EC2 and Amazon ECR into one fully managed service.
AWS Security Hub
In addition to a significant number of smaller enhancements throughout 2021, in October AWS Security Hub, an AWS cloud security posture management service, addressed a top customer enhancement request by adding support for cross-Region finding aggregation. You can now view all your findings from all accounts and all selected Regions in a single console view, and act on them from an Amazon EventBridge feed in a single account and Region. Looking back at 2021, Security Hub added 72 additional best practice checks, four new AWS service integrations, and 13 new external partner integrations. A few of these integrations are Atlassian Jira Service Management, Forcepoint Cloud Security Gateway (CSG), and Amazon Macie. Security Hub also achieved FedRAMP High authorization to enable security posture management for high-impact workloads.
Amazon Macie
Based on customer feedback, data discovery tool Amazon Macie launched a number of enhancements in 2021. One new feature, which made it easier to manage Amazon Simple Storage Service (Amazon S3) buckets for sensitive data, was criteria-based bucket selection. This Macie feature allows you to define runtime criteria to determine which S3 buckets should be included in a sensitive data-discovery job. When a job runs, Macie identifies the S3 buckets that match your criteria, and automatically adds or removes them from the job’s scope. Before this feature, once a job was configured, it was immutable. Now, for example, you can create a policy where if a bucket becomes public in the future, it’s automatically added to the scan, and similarly, if a bucket is no longer public, it will no longer be included in the daily scan.
Originally Macie included all managed data identifiers available for all scans. However, customers wanted more surgical search criteria. For example, they didn’t want to be informed if there were exposed data types in a particular environment. In September 2021, Macie launched the ability to enable/disable managed data identifiers. This allows you to customize the data types you deem sensitive and would like Macie to alert on, in accordance with your organization’s data governance and privacy needs.
Amazon Detective
Amazon Detective is a service to analyze and visualize security findings and related data to rapidly get to the root cause of potential security issues. In January 2021, Amazon Detective added a convenient, time-saving integration that allows you to start security incident investigation workflows directly from the GuardDuty console. This new hyperlink pivot in the GuardDuty console takes findings directly from the GuardDuty console into the Detective console. Another time-saving capability added was the IP address drill down functionality. This new capability can be useful to security forensic teams performing incident investigations, because it helps quickly determine the communications that took place from an EC2 instance under investigation before, during, and after an event.
In December 2021, Detective added support for AWS Organizations to simplify management for security operations and investigations across all existing and future accounts in an organization. This launch allows new and existing Detective customers to onboard and centrally manage the Detective graph database for up to 1,200 AWS accounts.
AWS Key Management Service
In June 2021, AWS Key Management Service (AWS KMS) introduced multi-Region keys, a capability that lets you replicate keys from one AWS Region into another. With multi-Region keys, you can more easily move encrypted data between Regions without having to decrypt and re-encrypt with different keys for each Region. Multi-Region keys are supported for client-side encryption using direct AWS KMS API calls, or in a simplified manner with the AWS Encryption SDK and Amazon DynamoDB Encryption Client.
AWS Secrets Manager
Last year was a busy year for AWS Secrets Manager, with four feature launches to make it easier to manage secrets at scale, not just for client applications, but also for platforms. In March 2021, Secrets Manager launched multi-Region secrets to automatically replicate secrets for multi-Region workloads. Also in March, Secrets Manager added three new rules to AWS Config, to help administrators verify that secrets in Secrets Manager are configured according to organizational requirements. Then in April 2021, Secrets Manager added a CSI driver plug-in, to make it easy to consume secrets from Amazon EKS by using Kubernetes’s standard Secrets Store interface. In November, Secrets Manager introduced a higher secret limit of 500,000 per account to simplify secrets management for independent software vendors (ISVs) that rely on unique secrets for a large number of end customers. Although launched in January 2022, it’s also worth mentioning Secrets Manager’s release of rotation windows to align automatic rotation of secrets with application maintenance windows.
Amazon CodeGuru and Secrets Manager
In November 2021, AWS announced a new secrets detector feature in Amazon CodeGuru that searches your codebase for hardcoded secrets. Amazon CodeGuru is a developer tool powered by machine learning that provides intelligent recommendations to detect security vulnerabilities, improve code quality, and identify an application’s most expensive lines of code.
This new feature can pinpoint locations in your code with usernames and passwords; database connection strings, tokens, and API keys from AWS; and other service providers. When a secret is found in your code, CodeGuru Reviewer provides an actionable recommendation that links to AWS Secrets Manager, where developers can secure the secret with a point-and-click experience.
Looking ahead for 2022
AWS will continue to deliver experiences in 2022 that meet administrators where they govern, developers where they code, and applications where they run. A lot of customers are moving to container and serverless workloads; you can expect to see more work on this in 2022. You can also expect to see more work around integrations, like CodeGuru Secrets Detector identifying plaintext secrets in code (as noted previously).
To stay up-to-date in the year ahead on the latest product and feature launches and security use cases, be sure to read the Security service launch announcements. Additionally, stay tuned to the AWS Security Blog for Part 2 of this blog series, which will provide an overview of some of the important 2021 launches that security professionals should be aware of across all AWS services.
If you’re looking for more opportunities to learn about AWS security services, check out AWS re:Inforce, the AWS conference focused on cloud security, identity, privacy, and compliance, which will take place June 28-29 in Houston, Texas.
If you have feedback about this post, submit comments in the Comments section below. If you have questions about this post, contact AWS Support.
Want more AWS Security news? Follow us on Twitter.
November 21, 2022: We updated this post to reflect the fact that AWS Secrets Manager now supports rotating secrets as often as every four hours.
AWS Secrets Manager helps you manage, retrieve, and rotate database credentials, API keys, and other secrets throughout their lifecycles. You can specify a rotation window for your secrets, allowing you to rotate secrets during non-critical business hours or scheduled maintenance windows for your application. Secrets Manager now supports rotation of secrets as often as every four hours, on a predefined schedule you can configure to conform to your existing maintenance windows. Previously, you could only specify the rotation interval in days. AWS Secrets Manager would then rotate the secret within the last 24 hours of the scheduled rotation interval. You can rotate your secrets using an AWS Lambda rotation function provided by AWS, or create a custom Lambda rotation function.
With this release, you can now use Secrets Manager to automate the rotation of credentials and access tokens that must be refreshed more than once per day. This enables greater flexibility for common developer workflows through a single managed service. Additionally, you can continue to use integrations with AWS Config and AWS CloudTrail to manage and monitor your secret rotation configurations in accordance with your organization’s security and compliance requirements. Support for secrets rotation as often as every four hours is provided at no additional cost.
Why might you want to rotate secrets more than once a day? Rotating secrets more frequently can provide a number of benefits, including: discouraging the use of hard-coded credentials in your applications, reducing the scope of impact of a stolen credential, or helping you meet organizational requirements around secret rotation.
Hard-coding application secrets is not recommended, because it can increase the risk of credentials being written in logs, or accidentally exposed in code repositories. Using short-lived secrets limits your ability to hard-code credentials in your application. Short-lived secrets are rotated on a frequent basis: for example, every four hours – meaning even a hard-coded credential can only be used for a short period of time before it needs to be refreshed. This also means that if a credential is compromised, the impact is much smaller — the secret is only valid for a short period of time before the secret is rotated.
Secrets Manager supports familiar cron and rate expressions to specify rotation frequency and rotation windows. In this blog post, we will demonstrate how you can configure a secret to be rotated every four hours, how to specify a custom rotation window for your secret using a cron expression, and how you can set up a custom rotation window for existing secrets. This post describes the following processes:
Create a new secret and configure it to rotate every four hours using the schedule expression builder
Set up rotation window by directly specifying a cron expression
Enabling a custom rotation window for an existing secret
Use case 1: Create a new secret and configure it to rotate every four hours using the schedule expression builder
Let’s assume that your organization has a requirement to rotate GitHub credentials every four hours. To meet this requirement, we will create a new secret in Secrets Manager to store the GitHub credentials, and use the schedule expression builder to configure rotation of the secret at a four-hour interval.
The schedule expression builder enables you to configure your rotation window to help you meet your organization’s specific requirements, without requiring knowledge of cron expressions. AWS Secrets Manager also supports directly entering a cron expression to configure the rotation window, which we will demonstrate later in this post.
To create a new secret and configure a four-hour secret rotation schedule
Sign in to the AWS Management Console, and navigate to the Secrets Manager service.
Choose Store a new secret.
Figure 1: Store a secret in AWS Secrets Manager
In the Secret type section, choose Other type of secret.
Figure 2: Choose a secret type in Secrets Manager
In the Key/value pairs section, enter the GitHub credentials that you wish to store.
Select your preferred encryption key to protect the secret, and then choose Next. In this example, we are using an AWS managed key.
Enter a secret name of your choice in the Secret name field. You can optionally provide a Description of the secret, create tags, and add resource permissions to the secret. If desired, you can also replicate the secret to another region to help you meet your organization’s disaster recovery requirements by following the procedure in this blog post.
Choose Next.
Figure 3:Create a secret to store your Git credentials
Turn on Automatic rotation to enable rotation for the secret.
Under Rotation schedule, choose Schedule expression builder.
For Time unit, choose Hours, then enter a value of 4.
Leave the Window duration field blank as the secret is to be rotated every 4 hours.
For this example, keep the Rotate immediately when the secret is stored check box selected to rotate the secret immediately after creation
Figure 4: Enable automatic rotation using the schedule expression builder
Under Rotation function, choose your Lambda rotation function from the drop down menu.
Choose Next.
On the Secret review page, you are provided with an overview of the secret. Review the secret and scroll down to the Rotation schedule section.
Confirm the Rotation schedule and Next rotation date meet your requirements.
Figure 5: Rotation schedule with a summary of the configured custom rotation window
Choose Store secret.
To view the Rotation configuration for the secret, select the secret you created.
On the Secrets details page, scroll down to the Rotation configuration section. The Rotation status is Enabled and the Rotation schedule is rate(4 hours). The name of your Lambdafunctionbeing used for rotation is displayed.
Figure 6: Rotation configuration of your secret
You have now successfully stored a secret using the interactive schedule expression builder. This option provides a simple mechanism to configure rotation windows, and does not require expertise with cron expressions.
In the next example, we will be using the schedule expression option to directly enter a cron expression, to achieve a more complex rotation interval.
Use case 2: Set up a custom rotation window using a cron expression
The procedures described in the next two sections of this blog post require that you complete the following prerequisites:
Configure the Lambda function to connect with the Amazon RDS database and Secrets Manager by following the procedure in this blog post.
Configuring complicated rotation windows for secrets may be more effective using the schedule expression option, rather than the schedule expression builder. The schedule expression option allows you to directly enter a cron expression using a string of six inputs. Directly entering cron expressions provides more flexibility when defining a rotation schedule that is more complex.
Let’s suppose you have another secret in your organization which does not need to be rotated as frequently as others. Consequently, you’ve been asked to set up rotation for every last Sunday of the quarter and during the off-peak hours of 1:00 AM to 4:00 AM UTC to avoid application downtime. Due to the complex nature of the requirements, you will need to use the schedule expression option to write a cron job to achieve your use case.
Cron expressions consist of the following 6 required fields which are separated by a white space; Minutes, Hours, Day of month, Month, Day of week, and Year. Each required field has the following values using the syntax cron(fields).
The , (comma) wildcard includes additional values. In the Month field, JAN,FEB,MAR would include January, February, and March.
–
The – (dash) wildcard specifies ranges. In the Day field, 1-15 would include days 1 through 15 of the specified month.
*
The * (asterisk) wildcard includes all values in the field. In the Month field, * would include every month.
/
The / (forward slash) wildcard specifies increments In the Month field, you could enter 1/3 to specify every 3rd month, starting from January. So 1/3 specifies the January, April, July, Oct.
?
The ? (question mark) wildcard specifies one or another. In the day-of-month field you could enter 7 and then enter ? in the day-of-week field since the 7th of a month could be any day of a given week.
L
The L wildcard in the Day-of-month or Day-of-week fields specifies the last day of the month or week. For example, in the week Sun-Sat, you can state 5L to specify the last Thursday in the month.
#
The # wildcard in the Day-of-week field specifies a certain instance of the specified day of the week within a month. For example, 3#2 would be the second Tuesday of the month: the 3 refers to Tuesday because it is the third day of each week, and the 2 refers to the second day of that type within the month.
Table 2: Description of supported wilds cards for cron expression
As the use case is to setup a custom rotation window for the last Sunday of the quarter from 1:00 AM to 4:00 AM UTC, you’ll need to carry out the following steps:
To deploy the solution
To store a new secret in Secrets Manager repeat steps 1-6 above.
Once you’re on the Secret Rotation section of the Store a new secret screen, click on Automatic rotation to enable rotation for the secret.
Under Rotation schedule, choose Schedule expression.
In the Schedule expression field box, enter cron(0 1 ? 3/3 1L *).
Fields
Values
Explanation
Minutes
0
The use case does not have a specific minute requirement
Hours
1
Ensures the rotation window starts from 1am UTC
Day-of-month
?
The use case does not require rotation to occur on a specific date in the month
Month
3/3
Sets rotation to occur on the last month in a quarter
Day-of-week
1L
Ensures rotation occurs on the last Sunday of the month
Year
*
Allows the rotation window pattern to be repeated yearly
Table 3: Using cron expressions to achieve your rotation requirements
Figure 7: Enable automatic rotation using the schedule expression
On the Rotation function section choose your Lambda rotation function from the drop down menu.
Choose Next.
On the Secret review page, review the secret and scroll down to the Rotation schedule section. Confirm the Rotation schedule and Next rotation date meets your requirements.
Figure 8: Rotation schedule with a summary of your custom rotation window
Choose Store.
To view the Rotation configuration for this secret, select it from the Secrets page.
On the Secrets details page, scroll down to the Rotation configuration section. The Rotation status is Enabled, the Rotation schedule is cron(0 1 ? 3/3 1L *) and the name of your Lambda function being used for your custom rotation is displayed.
Figure 9: Rotation configuration section with a rotation status of Enabled
Use case 3: Enabling a custom rotation window for an existing secret
If you already use AWS Secrets Manager as a way to store and rotate secrets for your Organization, you might want to take advantage of custom scheduled rotation on existing secrets. For this use case, to meet your business needs the secret must be rotated bi-weekly, every Saturday from 12am to 5am.
To deploy the solution
On the Secrets page of the Secrets Manager console, chose the existing secret you want to configure rotation for.
Scroll down to the Rotation configuration section of the Secret details page, choose Edit rotation.
Figure 10: Rotation configuration section with a rotation status of Disabled
On the Edit rotation configuration pop-up window, turn on Automatic rotation to enable rotation for the secret.
Under Rotation Schedule choose Schedule expression builder, optionally you can use the Schedule expression to create the custom rotation window.
For the Time Unit choose Weeks, then enter a value of 2.
For the Day of week choose Saturday from the drop-down menu.
In the Start time field type 00. This ensures rotation does not start until 00:00 AM UTC.
In the Window duration field type 5h. This provides Secrets Manager with a 5hr period to rotate the secret.
For this example, keep the check box marked to rotate the secret immediately.
Under Rotation function, choose the Lambda function which will be used to rotate the secret.
Choose Save.
On the Secrets details page, scroll down to the Rotation configuration section. The Rotation status is Enabled, the Rotation schedule is cron(0 00 ? * 7#2,7#4 *) and the name of the custom rotation Lambda function is visible.
Figure 12:Rotation configuration section with a rotation status of Enabled
Summary
Regular rotation of secrets is a Secrets Manager best practice that helps you to meet compliance requirements, for example for PCI DSS, which mandates the rotation of application secrets every 90 days, and to improve your security posture for databases and credentials. The ability to rotate secrets as often as every four hours helps you rotate secrets more frequently, and the rotation window feature helps you adhere to rotation best practices while still having the flexibility to choose a rotation window that suits your organizational needs. This allows you to use AWS Secrets Manager as a centralized location to store, retrieve, and rotate your secrets regardless of their lifespan, providing a uniform approach for secrets management. At the same time, the custom rotation window feature alleviates the need for applications to continuously refresh secret caches and manage retries for secrets that were rotated, as rotation will occur during your specified window when the application usage is low.
In this blog post, we showed you how to create a secret and configure the secret to be rotated every four hours using the schedule expression builder. The use case examples show how each feature can be used to achieve different rotation requirements within an organization, including using the schedule expression builder option to create your cron expression, as well as using the schedule expression feature to help meet more specific rotation requirements.
Building a multi-Region application requires lots of preparation and work. Many AWS services have features to help you build and manage a multi-Region architecture, but identifying those capabilities across 200+ services can be overwhelming.
In this 3-part blog series, we’ll explore AWS services with features to assist you in building multi-Region applications. In Part 1, we’ll build a foundation with AWS security, networking, and compute services. In Part 2, we’ll add in data and replication strategies. Finally, in Part 3, we’ll look at the application and management layers.
Considerations before getting started
AWS Regions are built with multiple isolated and physically separate Availability Zones (AZs). This approach allows you to create highly available Well-Architected workloads that span AZs to achieve greater fault tolerance. There are three general reasons that you may need to expand beyond a single Region:
Expansion to a global audience as an application grows and its user base becomes more geographically dispersed, there can be a need to reduce latencies for different parts of the world.
Local laws and regulations may have strict data residency and privacy requirements that must be followed.
Ensuring security, identity, and compliance
Creating a security foundation starts with proper authentication, authorization, and accounting to implement the principle of least privilege. AWS Identity and Access Management (IAM) operates in a global context by default. With IAM, you specify who can access which AWS resources and under what conditions. For workloads that use directory services, the AWS Directory Service for Microsoft Active Directory Enterprise Edition can be set up to automatically replicate directory data across Regions. This allows applications to reduce lookup latencies by using the closest directory and creates durability by spanning multiple Regions.
AWS KMS can be used to encrypt data at rest, and is used extensively for encryption across AWS services. By default, keys are confined to a single Region. AWS KMS multi-Region keys can be created to replicate keys to a second Region, which eliminates the need to decrypt and re-encrypt data with a different key in each Region.
As your application expands to new Regions, AWS Security Hub can aggregate and link findings to a single Region to create a centralized view across accounts and Regions. These findings are continuously synced between Regions to keep you updated on global findings.
We put these features together in Figure 1.
Figure 1. Multi-Region security, identity, and compliance services
Building a global network
For resources launched into virtual networks in different Regions, Amazon Virtual Private Cloud (Amazon VPC) allows private routing between Regions and accounts with VPC peering. These resources can communicate using private IP addresses and do not require an internet gateway, VPN, or separate network appliances. This works well for smaller networks that only require a few peering connections. However, as the number of peered connections increases, the mesh of peered connections can become difficult to manage and troubleshoot.
AWS Transit Gateway can help reduce these difficulties by creating a central transitive hub to act as a cloud router. A Transit Gateway’s routing capabilities can expand to additional Regions with Transit Gateway inter-Region peering to create a globally distributed private network.
Building a reliable, cost-effective way to route users to distributed Internet applications requires highly available and scalable Domain Name System (DNS) records. Amazon Route 53 does exactly that.
Route 53 routing policies can route traffic to a record with the lowest latency, or automatically fail over a record. If a larger failure occurs, the Route 53 Application Recovery Controller can simplify the monitoring and failover process for application failures across Regions, AZs, and on-premises.
Amazon CloudFront’s content delivery network is truly global, built across 300+ points of presence (PoP) spread throughout the world. Applications that have multiple possible origins, such as across Regions, can use CloudFront origin failover to automatically fail over the origin. CloudFront’s capabilities expand beyond serving content, with the ability to run compute at the edge. CloudFront functions make it easy to run lightweight JavaScript functions, and AWS Lambda@Edge makes it easy to run Node.js and Python functions across these 300+ PoPs.
Although EC2 instances and their associated Amazon Elastic Block Store (Amazon EBS) volumes live in a single AZ, Amazon Data Lifecycle Manager can automate the process of taking and copying EBS snapshots across Regions. This can enhance DR strategies by providing a relatively easy cold backup-and-restore option for EBS volumes.
As an architecture expands into multiple Regions, it can become difficult to track where instances are provisioned. Amazon EC2 Global View helps solve this by providing a centralized dashboard to see Amazon EC2 resources such as instances, VPCs, subnets, security groups, and volumes in all active Regions.
Microservice-based applications that use containers benefit from quicker start-up times. Amazon Elastic Container Registry (Amazon ECR) can help ensure this happens consistently across Regions with private image replication at the registry level. An ECR private registry can be configured for either cross-Region or cross-account replication to ensure your images are ready in secondary Regions when needed.
We bring these compute layer features together in Figure 3.
Figure 3. AMI and EBS snapshot copy across Regions
Summary
It’s important to create a solid foundation when architecting a multi-Region application. These foundations pave the way for you to move fast in a secure, reliable, and elastic way as you build out your application. In this post, we covered options across AWS security, networking, and compute services that have built-in functionality to take away some of the undifferentiated heavy lifting. We’ll cover data, application, and management services in future posts.
Looking for more architecture content?AWS Architecture Center provides reference architecture diagrams, vetted architecture solutions, Well-Architected best practices, patterns, icons, and more!
Many customers use Amazon MSK for streaming data from multiple producers. Multiple subscribers can then consume the streaming data and build data pipelines, analytics, and data integration. To learn more, read Using Amazon MSK as an event source for AWS Lambda.
You can activate any combination of authentication modes (mutual TLS, SASL SCRAM, or IAM access control) on new or existing clusters. This is useful if you are migrating to a new authentication mode or must run multiple authentication modes simultaneously. Lambda natively supports consuming messages from both self-managed Kafka and Amazon MSK through event source mapping.
By default, the TLS protocol only requires a server to authenticate itself to the client. The authentication of the client to the server is managed by the application layer. The TLS protocol also offers the ability for the server to request that the client send an X.509 certificate to prove its identity. This is called mutual TLS as both parties are authenticated via certificates with TLS.
Mutual TLS is a commonly used authentication mechanism for business-to-business (B2B) applications. It’s used in standards such as Open Banking, which enables secure open API integrations for financial institutions. It is one of the popular authentication mechanisms for customers using Kafka.
To use mutual TLS authentication for your Kafka-triggered Lambda functions, you provide a signed client certificate, the private key for the certificate, and an optional password if the private key is encrypted. This establishes a trust relationship between Lambda and Amazon MSK or self-managed Kafka. Lambda supports self-signed server certificates or server certificates signed by a private certificate authority (CA) for self-managed Kafka. Lambda trusts the Amazon MSK certificate by default as the certificates are signed by Amazon Trust Services CAs.
This blog post explains how to set up a Lambda function to process messages from an Amazon MSK cluster using mutual TLS authentication.
Overview
Using Amazon MSK as an event source operates in a similar way to using Amazon SQS or Amazon Kinesis. You create an event source mapping by attaching Amazon MSK as event source to your Lambda function.
The Lambda service internally polls for new records from the event source, reading the messages from one or more partitions in batches. It then synchronously invokes your Lambda function, sending each batch as an event payload. Lambda continues to process batches until there are no more messages in the topic.
The Lambda function’s event payload contains an array of records. Each array item contains details of the topic and Kafka partition identifier, together with a timestamp and base64 encoded message.
Kafka event payload
You store the signed client certificate, the private key for the certificate, and an optional password if the private key is encrypted in the AWS Secrets Manager as a secret. You provide the secret in the Lambda event source mapping.
The steps for using mutual TLS authentication for Amazon MSK as event source for Lambda are:
To use mutual TLS client authentication with Amazon MSK, create a root CA using AWS ACM Private Certificate Authority (PCA). We recommend using independent ACM PCAs for each MSK cluster when you use mutual TLS to control access. This ensures that TLS certificates signed by PCAs only authenticate with a single MSK cluster.
In the Select CA type panel, select Root CA and choose Next.
Select Root CA
In the Configure CA subject name panel, provide your certificate details, and choose Next.
Provide your certificate details
From the Configure CA key algorithm panel, choose the key algorithm for your CA and choose Next.
Configure CA key algorithm
From the Configure revocation panel, choose any optional certificate revocation options you require and choose Next.
Configure revocation
Continue through the screens to add any tags required, allow ACM to renew certificates, review your options, and confirm pricing. Choose Confirm and create.
Once the CA is created, choose Install CA certificate to activate your CA. Configure the validity of the certificate and the signature algorithm and choose Next.
Configure certificate
Review the certificate details and choose Confirmand install. Note down the Amazon Resource Name (ARN) of the private CA for the next section.
Review certificate details
2. Creating a client certificate.
You generate a client certificate using the root certificate you previously created, which is used to authenticate the client with the Amazon MSK cluster using mutual TLS. You provide this client certificate and the private key as AWS Secrets Manager secrets to the AWS Lambda event source mapping.
On your local machine, run the following command to create a private key and certificate signing request using OpenSSL. Enter your certificate details. This creates a private key file and a certificate signing request file in the current directory.
OpenSSL create a private key and certificate signing request
Use the AWS CLI to sign your certificate request with the private CA previously created. Replace Private-CA-ARN with the ARN of your private CA. The certificate validity value is set to 300, change this if necessary. Save the certificate ARN provided in the response.
Retrieve the certificate that ACM signed for you. Replace the Private-CA-ARN and Certificate-ARN with the ARN you obtained from the previous commands. This creates a signed certificate file called client_cert.pem.
Create a new file called secret.json with the following structure
{
"certificate":"",
"privateKey":""
}
Copy the contents of the client_cert.pem in certificate and the content of key.pem in privatekey. Ensure that there are no extra spaces added.The file structure looks like this:
Certificate file structure
Create the secret and save the ARN for the next section.
3. Setting up an Amazon MSK cluster with AWS Lambda as a consumer.
Amazon MSK is a highly available service, so it must be configured to run in a minimum of two Availability Zones in your preferred Region. To comply with security best practice, the brokers are usually configured in private subnets in each Region.
You can use AWS CLI, AWS Management Console, AWS SDK and AWS CloudFormation to create the cluster and the Lambda functions. This blog uses AWS SAM to create the infrastructure and the associated code is available in the GitHub repository.
The AWS SAM template creates the following resources:
Amazon MSK cluster with mutual TLS authentication.
Lambda function for consuming the records from the Amazon MSK cluster.
IAM roles.
Lambda function for testing the Amazon MSK integration by publishing messages to the topic.
The VPC has public and private subnets in two Availability Zones with the private subnets configured to use a NAT Gateway. You can also set up VPC endpoints with PrivateLink to allow the Amazon MSK cluster to communicate with Lambda. To learn more about different configurations, see this blog post.
The Lambda function requires permission to describe VPCs and security groups, and manage elastic network interfaces to access the Amazon MSK data stream. The Lambda function also needs two Kafka permissions: kafka:DescribeCluster and kafka:GetBootstrapBrokers. The policy template AWSLambdaMSKExecutionRole includes these permissions. The Lambda function also requires permission to get the secret value from AWS Secrets Manager for the secret you configure in the event source mapping.
1. CLIENT_CERTIFICATE_TLS_AUTH – (Amazon MSK, Self-managed Apache Kafka) The Secrets Manager ARN of your secret key containing the certificate chain (PEM), private key (PKCS#8 PEM), and private key password (optional) used for mutual TLS authentication of your Amazon MSK/Apache Kafka brokers. A private key password is required if the private key is encrypted.
2. SERVER_ROOT_CA_CERTIFICATE – This is only for self-managed Apache Kafka. This contains the Secrets Manager ARN of your secret containing the root CA certificate used by your Apache Kafka brokers in PEM format. This is not applicable for Amazon MSK as Amazon MSK brokers use public AWS Certificate Manager certificates which are trusted by AWS Lambda by default.
Navigate to the aws-lambda-msk-mtls-integration directory. Copy the client certificate file and the private key file to the producer lambda function code.
cd aws-lambda-msk-mtls-integration
cp ../client_cert.pem code/producer/client_cert.pem
cp ../key.pem code/producer/client_key.pem
Navigate to the code directory and build the application artifacts using the AWS SAM build command.
cd code
sam build
Run sam deploy to deploy the infrastructure. Provide the Stack Name, AWS Region, ARN of the private CA created in section 1. Provide additional information as required in the sam deploy and deploy the stack.
sam deploy -g
Running sam deploy -g
The stack deployment takes about 30 minutes to complete. Once complete, note the output values.
Create the event source mapping for the Lambda function. Replace the CONSUMER_FUNCTION_NAME and MSK_CLUSTER_ARN from the output of the stack created by the AWS SAM template. Replace SECRET_ARN with the ARN of the AWS Secrets Manager secret created previously.
Navigate one directory level up and configure the producer function with the Amazon MSK broker details. Replace the PRODUCER_FUNCTION_NAME and MSK_CLUSTER_ARN from the output of the stack created by the AWS SAM template.
cd ../
./setup_producer.sh MSK_CLUSTER_ARN PRODUCER_FUNCTION_NAME
Verify that the event source mapping state is enabled before moving on to the next step. Replace UUID from the output of step 5.
aws lambda get-event-source-mapping --uuid UUID
Publish messages using the producer. Replace PRODUCER_FUNCTION_NAME from the output of the stack created by the AWS SAM template. The following command creates a Kafka topic called exampleTopic and publish 100 messages to the topic.
Verify that the consumer Lambda function receives and processes the messages by checking in Amazon CloudWatch log groups. Navigate to the log group by searching for aws/lambda/{stackname}-MSKConsumerLambda in the search bar.
Consumer function log stream
Conclusion
Lambda now supports mutual TLS authentication for Amazon MSK and self-managed Kafka as an event source. You now have the option to provide a client certificate to establish a trust relationship between Lambda and MSK or self-managed Kafka brokers. It supports configuration via the AWS Management Console, AWS CLI, AWS SDK, and AWS CloudFormation.
CI/CD in the context of application development is a well-understood topic, and developers can choose from numerous patterns and tools to build their pipelines to handle the build, test, and deploy cycle when a new commit gets into version control. For stored procedures or even schema changes that are directly related to the application, this is typically part of the code base and is included in the code repository of the application. These changes are then applied when the application gets deployed to the test or prod environment.
This post demonstrates how you can apply the same set of approaches to stored procedures, and even schema changes to data warehouses like Amazon Redshift.
Stored procedures are considered code and as such should undergo the same rigor as application code. This means that the pipeline should involve running tests against changes to make sure that no regressions are introduced to the production environment. Because we automate the deployment of both stored procedures and schema changes, this significantly reduces inconsistencies in between environments.
Solution overview
The following diagram illustrates our solution architecture. We use AWS CodeCommit to store our code, AWS CodeBuild to run the build process and test environment, and AWS CodePipeline to orchestrate the overall deployment, from source, to test, to production.
Database migrations and tests also require connection information to the relevant Amazon Redshift cluster; we demonstrate how to integrate this securely using AWS Secrets Manager.
We discuss each service component in more detail later in the post.
You can see how all these components work together by completing the following steps:
The CloudFormation template and the source code for the example application are available in the GitHub repo. Before you get started, you need to clone the repository using the following command:
This creates a new folder, amazon-redshift-devops-blog, with the files inside.
Deploy the CloudFormation template
The CloudFormation stack creates the VPC, Amazon Redshift clusters, CodeCommit repository, CodeBuild projects for both test and prod, and the pipeline using CodePipeline to orchestrate the change release process.
On the AWS CloudFormation console, choose Create stack.
Choose With new resources (standard).
Select Upload a template file.
Choose Choose file and locate the template file (<cloned_directory>/cloudformation_template.yml).
Choose Next.
For Stack name, enter a name.
In the Parameters section, provide the primary user name and password for both the test and prod Amazon Redshift clusters.
The username must be 1–128 alphanumeric characters, and it can’t be a reserved word.
The password has the following criteria:
Must be 8-64 characters
Must contain at least one uppercase letter
Must contain at least one lowercase letter
Must contain at least one number
Can only contain ASCII characters (ASCII codes 33–126), except ‘ (single quotation mark), ” (double quotation mark), /, \, or @
Please note that production credentials could be created separately by privileged admins, and you could pass in the ARN of a pre-existing secret instead of the actual password if you so choose.
Choose Next.
Leave the remaining settings at their default and choose Next.
Select I acknowledge that AWS CloudFormation might create IAM resources.
Choose Create stack.
You can choose the refresh icon on the stack’s Events page to track the progress of the stack creation.
Push code to the CodeCommit repository
When stack creation is complete, go to the CodeCommit console. Locate the redshift-devops-repo repository that the stack created. Choose the repository to view its details.
Before you can push any code into this repo, you have to set up your Git credentials using instructions here Setup for HTTPS users using Git credentials. At Step 4 of the Setup for HTTPS users using Git credentials, copy the HTTPS URL, and instead of cloning, add the CodeCommit repo URL into the code that we cloned earlier:
git remote add codecommit <repo_https_url>
git push codecommit main
The last step populates the repository; you can check it by refreshing the CodeCommit console. If you get prompted for a user name and password, enter the Git credentials that you generated and downloaded from Step 3 of the Setup for HTTPS users using Git credentials
Run the CI/CD pipeline
After you push the code to the CodeCommit repository, this triggers the pipeline to deploy the code into both the test and prod Amazon Redshift clusters. You can monitor the progress on the CodePipeline console.
To dive deeper into the progress of the build, choose Details.
You’re redirected to the CodeBuild console, where you can see the run logs as well as the result of the test.
Components and dependencies
Although from a high-level perspective the test and prod environment look the same, there are some nuances with regards to how these environments are configured. Before diving deeper into the code, let’s look at the components first:
CodeCommit – This is the version control system where you store your code.
CodeBuild – This service runs the build process and test using Maven.
Build – During the build process, Maven uses FlyWay to connect to Amazon Redshift to determine the current version of the schema and what needs to be run to bring it up to the latest version.
Test – In the test environment, Maven runs JUnit tests against the test Amazon Redshift cluster. These tests may involve loading data and testing the behavior of the stored procedures. The results of the unit tests are published into the CodeBuild test reports.
Secrets Manager – We use Secrets Manager to securely store connection information to the various Amazon Redshift clusters. This includes host name, port, user name, password, and database name. CodeBuild refers to Secrets Manager for the relevant connection information when a build gets triggered. The underlying CodeBuild service role needs to have the corresponding permission to access the relevant secrets.
CodePipeline – CodePipeline is responsible for the overall orchestration from source to test to production.
As referenced in the components, we also use some additional dependencies at the code level:
Flyway – This framework is responsible for keeping different Amazon Redshift clusters in different environments in sync as far as schema and stored procedures are concerned.
Apache Maven – A dependency management and build tool. Maven is where we integrate Flyway and JUnit.
In the following sections, we dive deeper into how these dependencies are integrated.
Apache Maven
For Maven, the configuration file is pom.xml. For an example, you can check out the pom file from our demo app. The pertinent part of the xml is the build section:
By default, the Surefire plugin triggers during the test phase of Maven. The plugin runs the unit tests and generates reports based on the results of those tests. These reports are stored in the target/surefire-reports folder. We reference this folder in the CodeBuild section.
Flyway is triggered during the process-resources phase of Maven, and it triggers the migrate goal of Flyway. Looking at Maven’s lifecycle, this phase is always triggered first and deploys the latest version of stored procedures and schemas to the test environment before running test cases.
Flyway
Changes to the database are called migrations, and these can be either versioned or repeatable. Developers can define which type of migration by the naming convention used by Flyway to determine which one is which. The following diagram illustrates the naming convention.
A versioned migration consists of the regular SQL script that is run and an optional undo SQL script to reverse the specific version. You have to create this undo script in order to enable the undo functionality for a specific version. For example, a regular SQL script consists of creating a new table, and the corresponding undo script consists of dropping that table. Flyway is responsible for keeping track of which version a database is currently at, and runs N number of migrations depending on how far back the target database is compared to the latest version. Versioned migrations are the most common use of Flyway and are primarily used to maintain table schema and keep reference or lookup tables up to date by running data loads or updates via SQL statements. Versioned migrations are applied in order exactly one time.
Repeatable migrations don’t have a version; instead they’re rerun every time their checksum changes. They’re useful for maintaining user-defined functions and stored procedures. Instead of having multiple files to track changes over time, we can just use a single file and Flyway keeps track of when to rerun the statement to keep the target database up to date.
By default, these migration files are located in the classpath under db/migration, the full path being src/main/resources/db/migration. For our example application, you can find the source code on GitHub.
JUnit
When Flyway finishes running the migrations, the test cases are run. These test cases are under the folder src/test/java. You can find examples on GitHub that run a stored procedure via JDBC and validate the output or the impact.
Another aspect of unit testing to consider is how the test data is loaded and maintained in the test Amazon Redshift cluster. There are a couple of approaches to consider:
As per our example, we’re packaging the test data as part of our version control and loading the data when the first unit test is run. The advantage of this approach is that you get flexibility of when and where you run the test cases. You can start with either a completely empty or partially populated test cluster and you get with the right environment for the test case to run. Other advantages are that you can test data loading queries and have more granular control over the datasets that are being loaded for each test. The downside of this approach is that, depending on how big your test data is, it may add additional time for your test cases to complete.
Using an Amazon Redshift snapshot dedicated to the test environment is another way to manage the test data. With this approach, you have a couple more options:
Transient cluster – You can provision a transient Amazon Redshift cluster based on the snapshot when the CI/CD pipeline gets triggered. This cluster stops after the pipeline completes to save cost. The downside of this approach is that you have to factor in Amazon Redshift provisioning time in your end-to-end runtime.
Long-running cluster – Your test cases can connect to an existing cluster that is dedicated to running test cases. The test cases are responsible for making sure that data-related setup and teardown are done accordingly depending on the nature of the test that’s running. You can use @BeforeAll and @AfterAll JUnit annotations to trigger the setup and teardown, respectively.
CodeBuild
CodeBuild provides an environment where all of these dependencies run. As shown in our architecture diagram, we use CodeBuild for both test and prod. The differences are in the actual commands that run in each of those environments. These commands are stored in the buildspec.yml file. In our example, we provide a separate buildspec file for test and a different one for prod. During the creation of a CodeBuild project, we can specify which buildspec file to use.
There are a few differences between the test and prod CodeBuild project, which we discuss in the following sections.
Buildspec commands
In the test environment, we use mvn clean test and package the Surefire reports so the test results can be displayed via the CodeBuild console. While in the prod environment, we just run mvn clean process-resources. The reason for this is because in the prod environment, we only need to run the Flyway migrations, which are hooked up to the process-resources Maven lifecycle, whereas in the test environment, we not only run the Flyway migrations, but also make sure that it didn’t introduce any regressions by running test cases. These test cases might have an impact on the underlying data, which is why we don’t run it against the production Amazon Redshift cluster. If you want to run the test cases against production data, you can use an Amazon Redshift production cluster snapshot and run the test cases against that.
Secrets via Secrets Manager
Both Flyway and JUnit need information to identify and connect to Amazon Redshift. We store this information in Secrets Manager. Using Secrets Manager has several benefits:
TEST_REDSHIFT_IAM_ROLE: <ARN of IAM role> (This can be in plaintext and should be attached to the Amazon Redshift cluster)
TEST_DATA_S3_BUCKET: <bucket name> (This is where the test data is staged)
CodeBuild automatically retrieves the parameters from Secrets Manager and they’re available in the application as environment variables. If you look at the buildspec_prod.yml example, we use the preceding variables to populate the Flyway environment variables and JDBC connection URL.
VPC configuration
For CodeBuild to be able to connect to Amazon Redshift, you need to configure which VPC it runs in. This includes the subnets and security group that it uses. The Amazon Redshift cluster’s security group also needs to allow access from the CodeBuild security group.
CodePipeline
To bring all these components together, we use CodePipeline to orchestrate the flow from the source code through prod deployment. CodePipeline also has additional capabilities. For example, you can add an approval step between test and prod so a release manager can review the results of the tests before releasing the changes to production.
Example scenario
You can use tests as a form of documentation of what is the expected behavior of a function. To further illustrate this point, let’s look at a simple stored procedure:
create or replace procedure merge_staged_products()
as $$
BEGIN
    update products set status='CLOSED' where product_name in (select product_name from products_staging) and status='ACTIVE';
    insert into products(product_name,price) select product_name, price from products_staging;
END;
$$ LANGUAGE plpgsql;
If you deployed the example app from the previous section, you can follow along by copying the stored procedure code and pasting it in src/main/resources/db/migration/R__MergeStagedProducts.sql. Save it and push the change to the CodeCommit repository by issuing the following commands (assuming that you’re at the top of the project folder):
After you push the changes to the CodeCommit repository, you can follow the progress of the build and test stages on the CodePipeline console.
We implement a basic Slowly Changing Dimension Type 2 approach in which we mark old data as CLOSED and append newer versions of the data. Although the stored procedure works as is, our test has the following expectations:
The number of closed status in the products table needs to correspond to the number of duplicate entries in the staging table.
The products table has a close_date column that needs to be populated so we know when it was deprecated
At the end of the merge, the staging table needs to be cleared for subsequent ETL runs
The stored procedure will pass the first test, but fail later tests. When we push this change to CodeCommit and the CI/CD process runs, we can see results like in the following screenshot.
The tests show that the second and third tests failed. Failed tests result in the pipeline stopping, which means these bad changes don’t end up in production.
We can update the stored procedure and push the change to CodeCommit to trigger the pipeline again. The updated stored procedure is as follows:
create or replace procedure merge_staged_products()
as $$
BEGIN
    update products set status='CLOSED', close_date=CURRENT_DATE where product_name in (select product_name from products_staging) and status='ACTIVE';
    insert into products(product_name,price) select product_name, price from products_staging;
    truncate products_staging;
END;
$$ LANGUAGE plpgsql;
All the tests passed this time, which allows CodePipeline to proceed with deployment to production.
We used Flyway’s repeatable migrations to make the changes to the stored procedure. Code is stored in a single file and Flyway verifies the checksum of the file to detect any changes and reapplies the migration if the checksum is different from the one that’s already deployed.
Clean up
After you’re done, it’s crucial to tear down the environment to avoid incurring additional charges beyond your testing. Before you delete the CloudFormation stack, go to the Resources tab of your stack and make sure the two buckets that were provisioned are empty. If they’re not empty, delete all the contents of the buckets.
Now that the buckets are empty, you can go back to the AWS CloudFormation console and delete the stack to complete the cleanup of all the provisioned resources.
Conclusion
Using CI/CD principles in the context of Amazon Redshift stored procedures and schema changes greatly improves confidence when updates are getting deployed to production environments. Similar to CI/CD in application development, proper test coverage of stored procedures is paramount to capturing potential regressions when changes are made. This includes testing both success paths as well as all possible failure modes.
In addition, versioning migrations enables consistency across multiple environments and prevents issues arising from schema changes that aren’t applied properly. This increases confidence when changes are being made and improves development velocity as teams spend more time developing functionality rather than hunting for issues due to environment inconsistencies.
We encourage you to try building a CI/CD pipeline for Amazon Redshift using these steps described in this blog.
About the Authors
Ashok Srirama is a Senior Solutions Architect at Amazon Web Services, based in Washington Crossing, PA. He specializes in serverless applications, containers, devops, and architecting distributed systems. When he’s not spending time with his family, he enjoys watching cricket, and driving his bimmer.
Indira Balakrishnan is a Senior Solutions Architect in the AWS Analytics Specialist SA Team. She is passionate about helping customers build cloud-based analytics solutions to solve their business problems using data-driven decisions. Outside of work, she volunteers at her kids’ activities and spends time with her family.
Vaibhav Agrawal is an Analytics Specialist Solutions Architect at AWS.Throughout his career, he has focused on helping customers design and build well-architected analytics and decision support platforms.
Rajesh Francis is a Sr. Analytics Customer Experience Specialist at AWS. He specializes in Amazon Redshift and works with customers to build scalable Analytic solutions.
Jeetesh Srivastva is a Sr. Manager, Specialist Solutions Architect at AWS. He specializes in Amazon Redshift and works with customers to implement scalable solutions using Amazon Redshift and other AWS Analytic services. He has worked to deliver on-premises and cloud-based analytic solutions for customers in banking and finance and hospitality industry verticals.
This post is written by Andy Hall, Senior Solutions Architect.
AWS Lambda layers and extensions are used by third-party software providers for monitoring Lambda functions. A monitoring solution needs environmental variables to provide configuration information to send metric information to an endpoint.
Managing this information as environmental variables across thousands of Lambda functions creates operational overhead. Instead, you can use the approach in this blog post to create environmental variables dynamically from information hosted in AWS Secrets Manager.
This can help avoid managing secret rotation for individual functions. It ensures that values stay encrypted until runtime, and abstracts away the management of the environmental variables.
Overview
This post shows how to create a Lambda layer for Node.js, Python, Ruby, Java, and .NET Core runtimes. It retrieves values from Secrets Manager and converts the secret into an environmental variable that can be used by other layers and functions. The Lambda layer uses a wrapper script to fetch information from Secrets Manager and create environmental variables.
The steps in the process are as follows:
The Lambda service responds to an event and initializes the Lambda context.
The wrapper script is called as part of the Lambda init phase.
The wrapper script calls a Golang executable passing in the ARN for the secret to retrieve.
The Golang executable uses the Secrets Manager API to retrieve the decrypted secret.
The wrapper script converts the information into environmental variables and calls the next step in processing.
All of the code for this post is available from this GitHub repo.
The wrapper script
The wrapper script is the main entry-point for the extension and is called by the Lambda service as part of the init phase. During this phase, the wrapper script will read in basic information from the environment and call the Golang executable. If there was an issue with the Golang executable, the wrapper script will log a statement and exit with an error.
# Get the secret value by calling the Go executable
values=$(${fullPath}/go-retrieve-secret -r "${region}" -s "${secretArn}" -a "${roleName}" -t ${timeout})
last_cmd=$?

# Verify that the last command was successful
if [[ ${last_cmd} -ne 0 ]]; then
    echo "Failed to setup environment for Secret ${secretArn}"
    exit 1
fi
Golang executable
This uses Golang to invoke the AWS APIs since the Lambda execution environment does natively provide the AWS Command Line Interface. The Golang executable can be included in a layer so that the layer works with a number of Lambda runtimes.
The Golang executable captures and validates the command line arguments to ensure that required parameters are supplied. If Lambda does not have permissions to read and decrypt the secret, you can supply an ARN for a role to assume.
The following code example shows how the Golang executable retrieves the necessary information to assume a role using the AWS Security Token Service:
After obtaining the necessary permissions, the secret can be retrieved using the Secrets Manager API. The following code example uses the new credentials to create a client connection to Secrets Manager and the secret:
After retrieving the secret, the contents must be converted into a format that the wrapper script can use. The following sample code covers the conversion from a secret string to JSON by storing the data in a map. Once the data is in a map, a loop is used to output the information as key-value pairs.
// Convert the secret into JSON
var dat map[string]interface{}

// Convert the secret to JSON
if err := json.Unmarshal([]byte(*result.SecretString), &dat); err != nil {
    fmt.Println("Failed to convert Secret to JSON")
    fmt.Println(err)
    panic(err)
}

// Get the secret value and dump the output in a manner that a shell script can read the
// data from the output
for key, value := range dat {
    fmt.Printf("%s|%s\n", key, value)
}
Conversion to environmental variables
After the secret information is retrieved by using Golang, the wrapper script can now loop over the output, populate a temporary file with export statements, and execute the temporary file. The following code covers these steps:
# Read the data line by line and export the data as key value pairs
# and environmental variables
echo "${values}" | while read -r line; do

    # Split the line into a key and value
    ARRY=(${line//|/ })

    # Capture the kay value
    key="${ARRY[0]}"

    # Since the key had been captured, no need to keep it in the array
    unset ARRY[0]

    # Join the other parts of the array into a single value.  There is a chance that
    # The split man have broken the data into multiple values.  This will force the
    # data to be rejoined.
    value="${ARRY[@]}"

    # Save as an env var to the temp file for later processing
    echo "export ${key}=\"${value}\"" >> ${tempFile}
done

# Source the temp file to read in the env vars
. ${tempFile}
At this point, the information stored in the secret is now available as environmental variables to layers and the Lambda function.
Deployment
To deploy this solution, you must build on an instance that is running an Amazon Linux 2 AMI. This ensures that the compiled Golang executable is compatible with the Lambda execution environment.
The easiest way to deploy this solution is from an AWS Cloud9 environment but you can also use an Amazon EC2 instance. To build and deploy the solution into your environment, you need the ARN of the secret that you want to use. A build script is provided to ease deployment and perform compilation, archival, and AWS CDK execution.
To deploy, run:
./build.sh <ARN of the secret to use>
Once the build is complete, the following resources are deployed into your AWS account:
A Lambda layer (called get-secrets-layer)
A second Lambda layer for testing (called second-example-layer)
A Lambda function (called example-get-secrets-lambda)
Testing
To test the deployment, create a test event to send to the new example-get-secrets-lambda Lambda function using the AWS Management Console. The test Lambda function uses both the get-secrets-layer and second-example-layer Lambda layers, and the secret specified from the build. This function logs the values of environmental variables that were created by the get-secrets-layer and second-example-layer layers:
When the secret changes, there is a delay before those changes are available to the Lambda layers and function. This is because the layer only executes in the init phase of the Lambda lifecycle. After the Lambda execution environment is recreated and initialized, the layer executes and creates environmental variables with the new secret information.
Conclusion
This solution provides a way to convert information from Secrets Manager into Lambda environment variables. By following this approach, you can centralize the management of information through Secrets Manager, instead of at the function level.
The code for this post is available from this GitHub repo.
For more serverless learning resources, visit Serverless Land.
The collective thoughts of the interwebz
Manage Consent
To provide the best experiences, we use technologies like cookies to store and/or access device information. Consenting to these technologies will allow us to process data such as browsing behavior or unique IDs on this site. Not consenting or withdrawing consent, may adversely affect certain features and functions.
Functional
Always active
The technical storage or access is strictly necessary for the legitimate purpose of enabling the use of a specific service explicitly requested by the subscriber or user, or for the sole purpose of carrying out the transmission of a communication over an electronic communications network.
Preferences
The technical storage or access is necessary for the legitimate purpose of storing preferences that are not requested by the subscriber or user.
Statistics
The technical storage or access that is used exclusively for statistical purposes.The technical storage or access that is used exclusively for anonymous statistical purposes. Without a subpoena, voluntary compliance on the part of your Internet Service Provider, or additional records from a third party, information stored or retrieved for this purpose alone cannot usually be used to identify you.
Marketing
The technical storage or access is required to create user profiles to send advertising, or to track the user on a website or across several websites for similar marketing purposes.


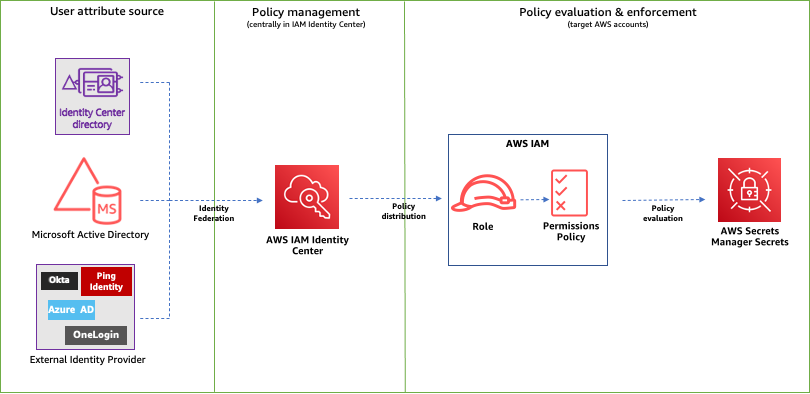
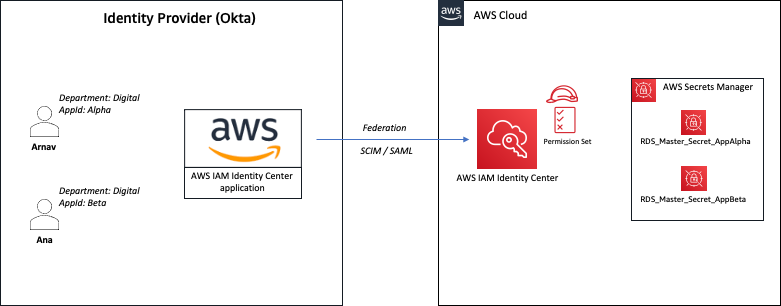


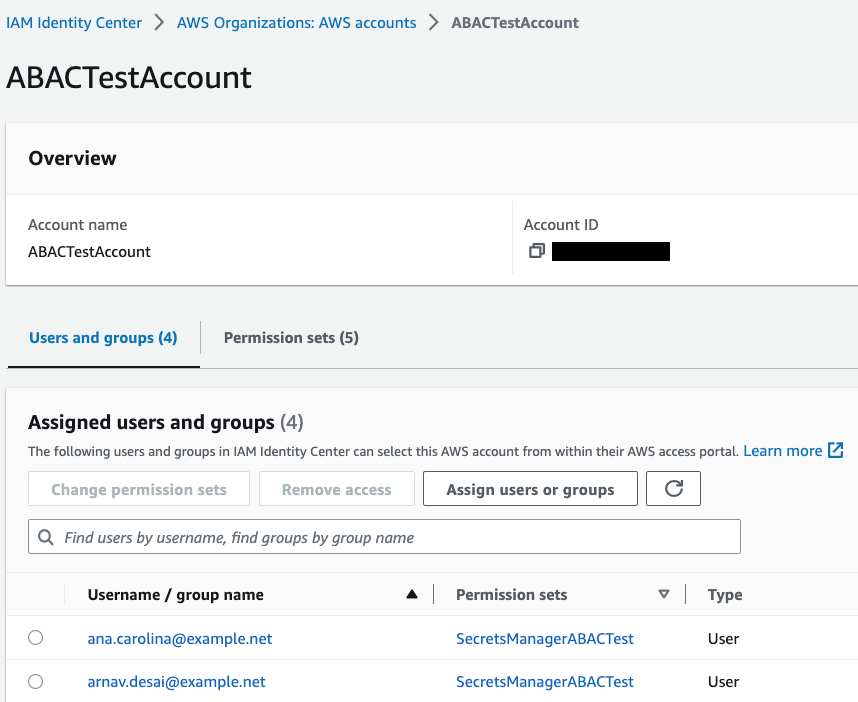


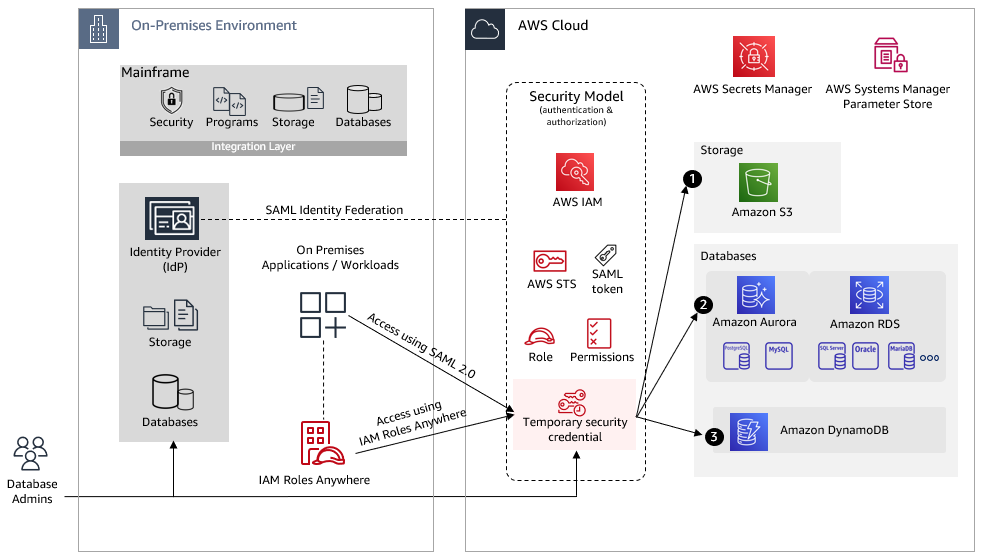


 Srikanth Baheti is a Specialized World Wide Sr. Solution Architect for Amazon QuickSight. He started his career as a consultant and worked for multiple private and government organizations. Later he worked for PerkinElmer Health and Sciences & eResearch Technology Inc, where he was responsible for designing and developing high traffic web applications, highly scalable and maintainable data pipelines for reporting platforms using AWS services and Serverless computing.
 Raji Sivasubramaniam is a Sr. Solutions Architect at AWS, focusing on Analytics. Raji is specialized in architecting end-to-end Enterprise Data Management, Business Intelligence and Analytics solutions for Fortune 500 and Fortune 100 companies across the globe. She has in-depth experience in integrated healthcare data and analytics with wide variety of healthcare datasets including managed market, physician targeting and patient analytics.