Post Syndicated from Bruno Giorgini original https://aws.amazon.com/blogs/messaging-and-targeting/understanding-google-postmaster-tools-spam-complaints-for-amazon-ses-email-senders/
Introduction
Amazon Simple Email Service (SES) includes a robust set of built-in tools, such as the Virtual Deliverability Manager (VDM), to help senders ensure optimal email deliverability. Additionally, deliverability data from email service providers like Postmaster Tools by Google can provide invaluable insights for all sending domain owners, including those using SES for bulk or transactional email. Postmaster Tools offers detailed metrics on factors like delivery errors, spam rates, domain reputation, and recipient feedback for Gmail-hosted inboxes. Combining this external data with SES email sending events is critical for maintaining a healthy sender reputation. By leveraging both SES-native tools and resources like Postmaster Tools, senders can identify and address deliverability issues, ensuring their SES-powered emails reach intended recipients across providers.
Many, but not all, mailbox providers will send recipient feedback in the form of “complaints” that can each be attributed directly to the message that the recipient found to be objectionable. These complaints are available in the SES email sending event type “Complaint”. Gmail does not send spam complaint events because their priority is to protect the privacy of their users from the tracking techniques employed by spammers and data brokers. Gmail requires bulk senders to adopt “easy unsubscribe” mechanisms to reduce the need for their users to report messages as spam, and they will show spam complaint metrics in Postmaster Tools. This blog will show you how to maximize value in the spam complaint metric provided by Postmaster Tools.
Amazon SES now supports custom values in the Feedback-ID header in messages sent through SES. This feature provides additional details to help customers identify deliverability trends. Together with Postmaster Tools, customers can group complaints by identifiers of their choice, such as sender business unit or campaign ID. This makes it easier to track deliverability performance associated with independent workloads and campaigns, and accelerates troubleshooting when diagnosing complaint rates.
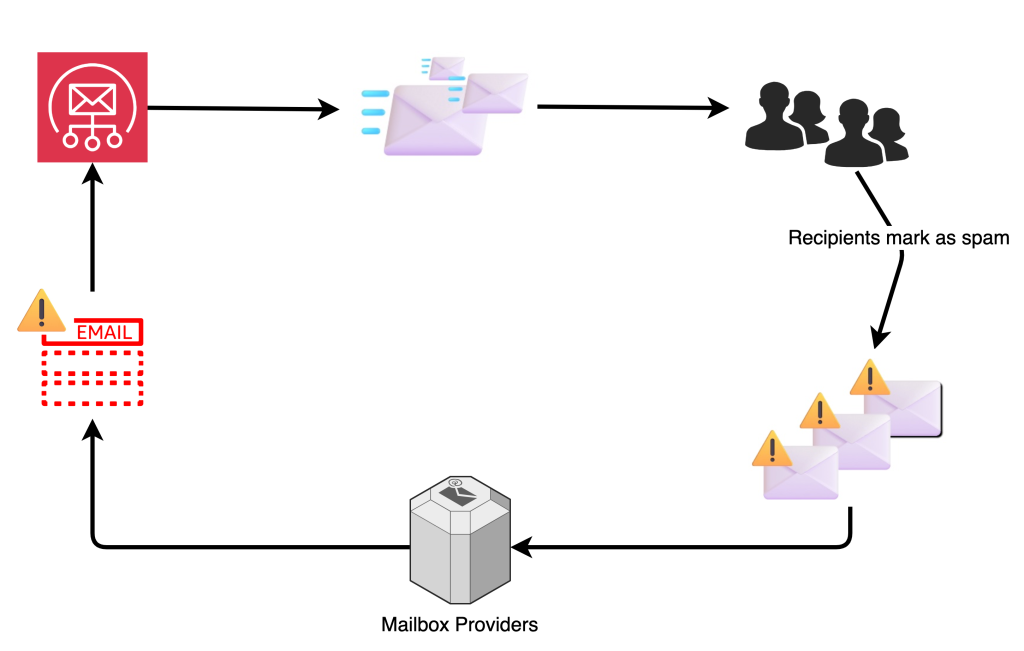
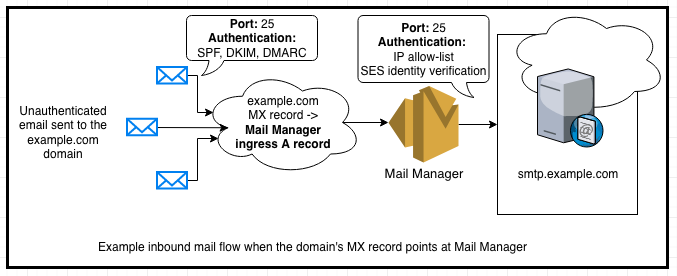
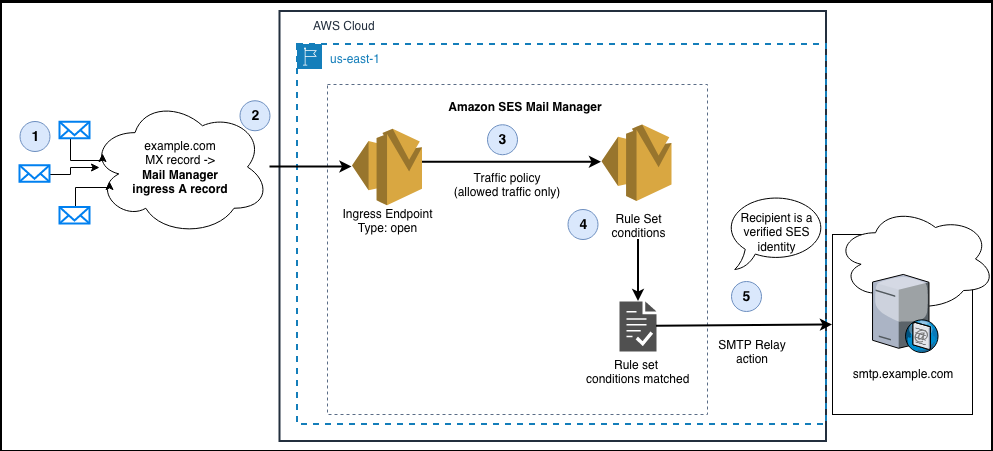
Figure 1: Email Feedback Loop
This blog will guide you through implementing and using Feedback Loops within Postmaster Tools to identify email campaigns receiving high complaint volumes from Gmail users. It covers the history and background of feedback loops, the specific requirements for implementing them with Postmaster Tools, and practical examples using AWS CLI and Boto3 to send SES emails with the necessary Feedback-ID header. By the end, you’ll understand how to effectively set up and use Postmaster Tools to monitor and improve your SES email deliverability.
History and Background of FBLs
Traditional Feedback Loops (herein “FBLs”) have been a cornerstone of email deliverability for many years. Initially developed by Internet Service Providers (ISPs), FBLs serve as a mechanism for recipients to report spam complaints to the sender. This feedback is crucial for email service providers and senders to identify problematic email campaigns, take corrective actions, and maintain a healthy sender reputation.
FBLs operate by allowing recipients to mark emails as spam, which then sends a report to the sender’s email service provider. This report typically includes details about the email that triggered the complaint, enabling the sender to investigate and address any issues. By analyzing these reports, senders can refine their email lists, improve content, and ensure that their emails comply with best practices and regulatory requirements. Senders who receive a higher volume of spam complaints are more likely to be blocked or have their emails routed to the spam folder. While high spam complaints are not the sole reason for deliverability issues, they are often the underlying cause.
Postmaster Tools by Gmail is not a traditional FBL. Postmaster Tools will show complaint feedback metrics, but the complaints are not attributable to any individual recipient.
Requirements for using Postmaster Tools FBL with SES
The FBL helps identify campaigns with high complaint rates from Gmail users, specifically useful for email service providers to detect potential abuse of their services.
Note: Data in Postmaster Tools only applies to messages sent to personal Gmail accounts. A personal Gmail account is an account that ends in @gmail.comor @googlemail.com.
- Implementation of FBL:
- Feedback-ID Header: SES embeds a header called Feedback-ID containing parameters (Identifiers) uniquely identifying the account and SenderID (AmazonSES)
- Header Format: The Feedback-ID header consists of four parameters, separated by colons:
a:b:c:SenderIdWhere:
-
-
- SenderId is a mandatory parameter that uniquely identifies the sender.
- In the case of Amazon SES (Simple Email Service), the SenderId is always “AmazonSES” and cannot be overridden.
-
| Header Parameter | Description |
| a | First parameter in the Feedback-ID header. SES users can customize through ses:feedback-id-a EmailTag |
| b | Second parameter in the Feedback-ID header. SES users can customize through ses:feedback-id-b EmailTag. |
| c | Third parameter in the Feedback-ID header. SES uses this to identify the sender account |
| SenderID | Fourth parameter in the Feedback-ID header. Mandatory parameter that uniquely identifies the sender. For Amazon SES, this is always “AmazonSES” and cannot be overridden. |
- Sender Data Handling:
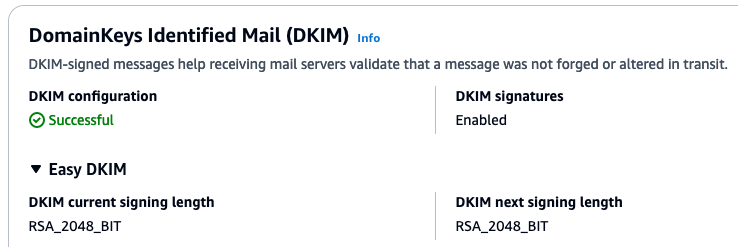
- DKIM signing by a sender-owned domain is required to prevent spoofing.
- Proper DKIM alignment is essential for showing Spam Rate and Feedback Loop data in the Postmaster Tools dashboard. Check our blog for recommendations choosing the right domain for optimal deliverability with SES.
- The domain must be added and verified in Postmaster Tools.
- Complaint data is aggregated by distinct values on each of the 4 fields of Feedback-ID.
- DKIM signing by a sender-owned domain is required to prevent spoofing.
- Feedback-ID header Requirements:
- When sending emails through Amazon SES, users are limited to a single verified header value per traffic stream.
- This means that the Feedback-ID header cannot contain an individualized value for each destination email address.
- Instead, the Feedback-ID header needs to contain an identifier that can be used to match a larger campaign or batch of emails, rather than a unique value per recipient.
- This constraint helps maintain a consistent sender reputation, improves deliverability monitoring and troubleshooting within tools like Postmaster Tools. The Feedback-ID acts as a grouping mechanism, rather than a per-message identifier
- Identifiers must be unique and non-repetitive across fields.
- When sending emails through Amazon SES, users are limited to a single verified header value per traffic stream.
- Feedback-ID Example:
CampaignIDX:CustomerID2:1.us-west-2.TDQeKqHkSNfQztk25wIeVIGTuNmGDud4r1l7dUlxOio=:AmazonSES- Each Identifier is used to report spam percentages independently if unusual rates occur.
- Amazon SES lets customers set the part
aand partbof the Feedback-ID header using the EmailTagses:feedback-id-aandses:feedback-id-b - Amazon SES will combine these tags into a single Feedback-ID header with the format:
Feedback-ID=a:b:region.accountId:AmazonSES
The next steps will cover what’s needed to leverage FBLs with SES.
Step 1 – Add Your Domain(s) To Google’s Postmaster Tools
- In order to verify with Postmaster Tools that you’re authorized to track the feedback from your domain, you first need to register your ownership of the domain with Postmaster Tools by visiting https://gmail.com/postmaster/.
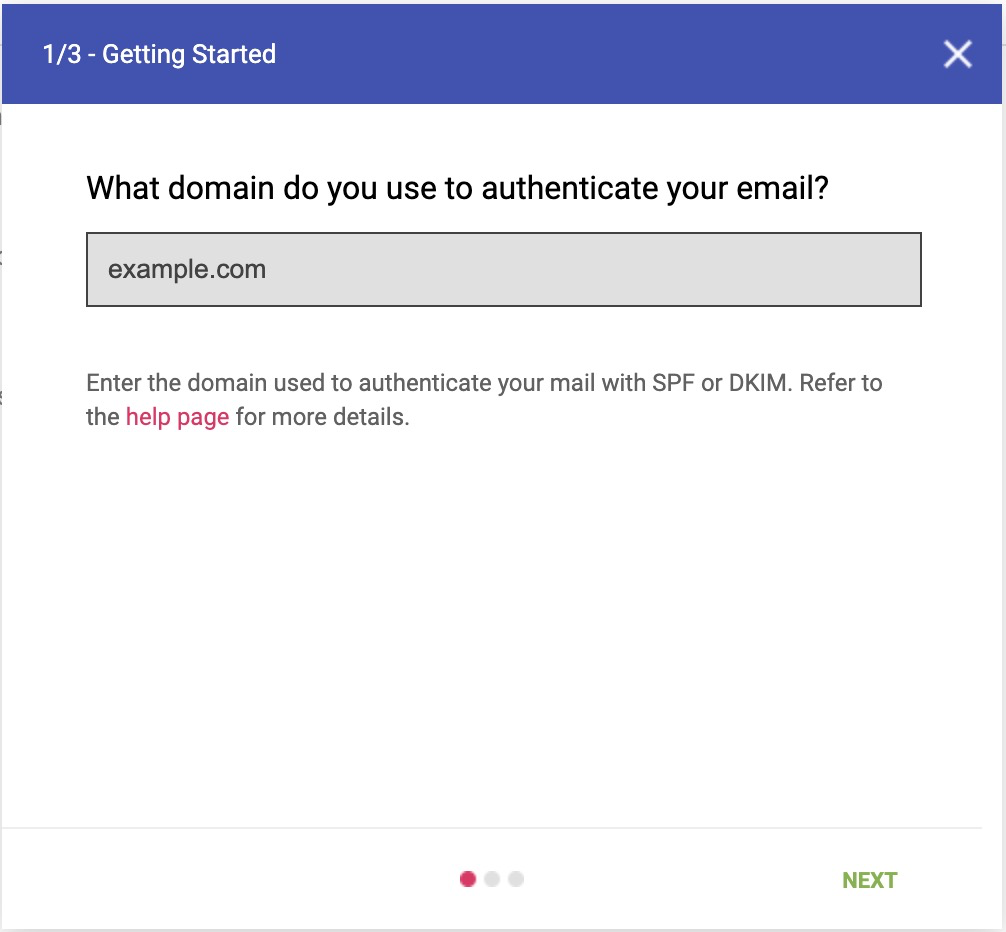
Figure 2: Step 1 to verify a domain in Google Postmaster Tools
- After entering in your domain, you’d be prompted to add a TXT record into your DNS configuration.
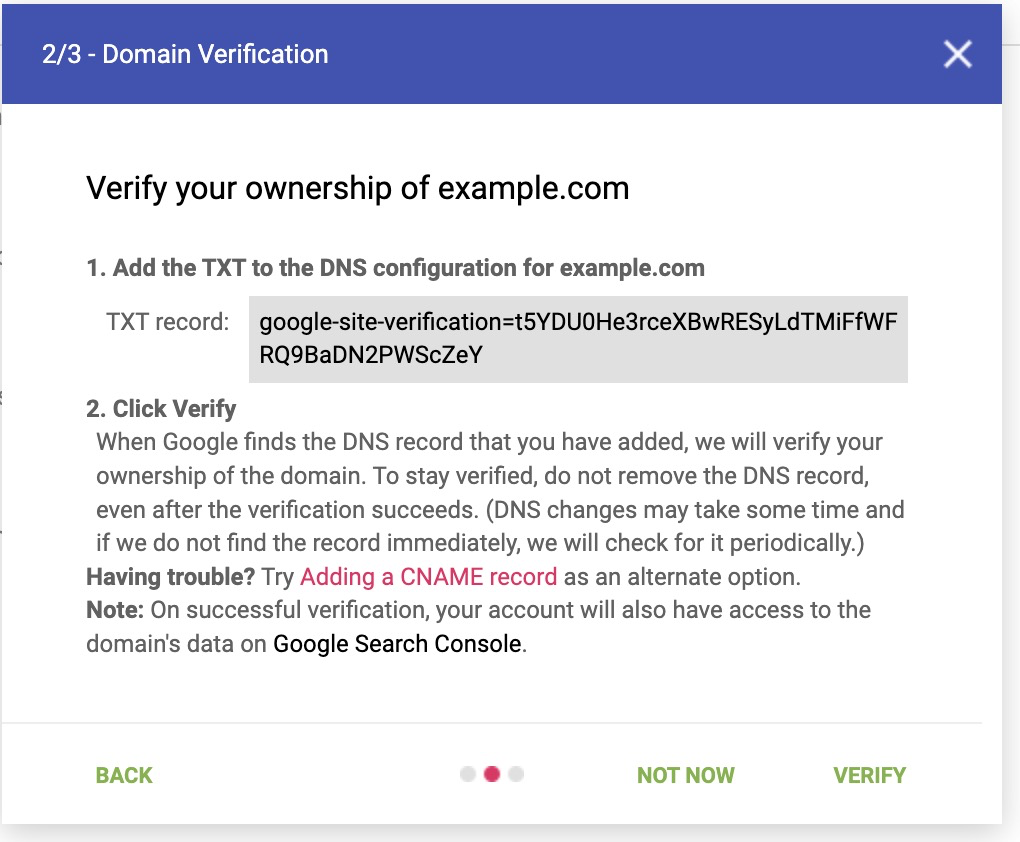
Figure 3: Step 2 to verify a domain in Google Postmaster Tools
- Update your sending domain(s) DNS records accordingly.
- The example below specifies how to create the TXT record in Route53. If you’re using another DNS service provider, please refer to their documentation.
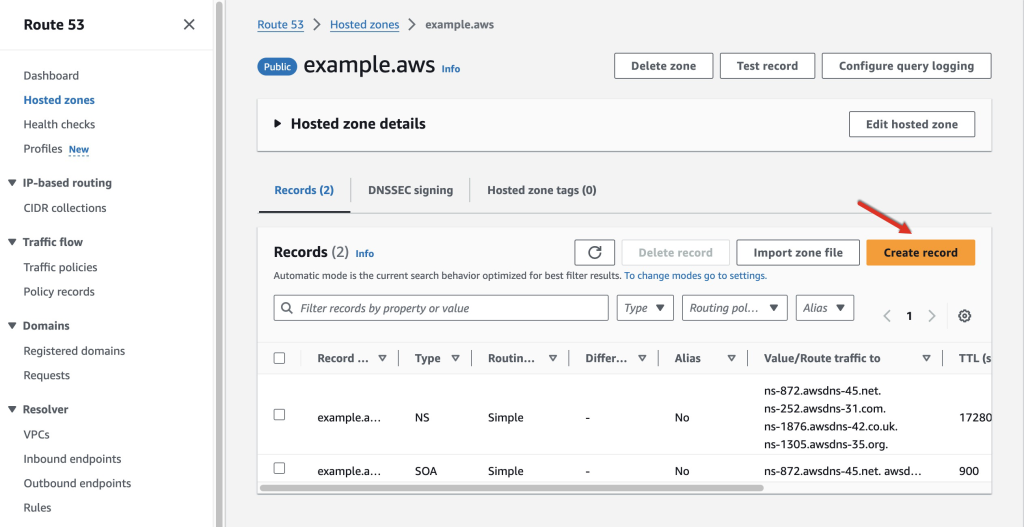
Figure 4: Create a new record in Route53
-
- Navigate to the Route53 Console and click on
Hosted zones, specify the hosted zone that contains the domain you want to verify and thenCreate record.
- Navigate to the Route53 Console and click on
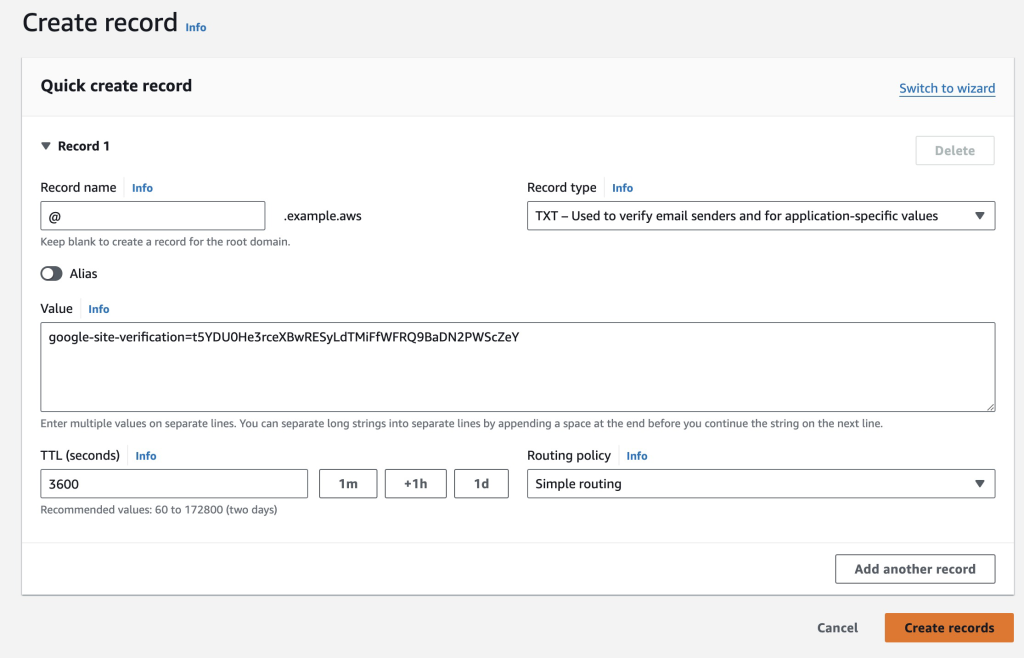
Figure 5: Add a TXT record with the provided value for verification
-
- Following the screenshot, create a
TXTrecord type and paste the value assigned by Google for verification in step 2 here.
- Following the screenshot, create a
- Go to Postmaster Tools and click on
Verify. After successful verification of your domain in Postmaster Tools, you should see the Status column changed fromNot VerifiedtoVerified. You can verify your compliance status with the requirements in the Dashboard (2) link.
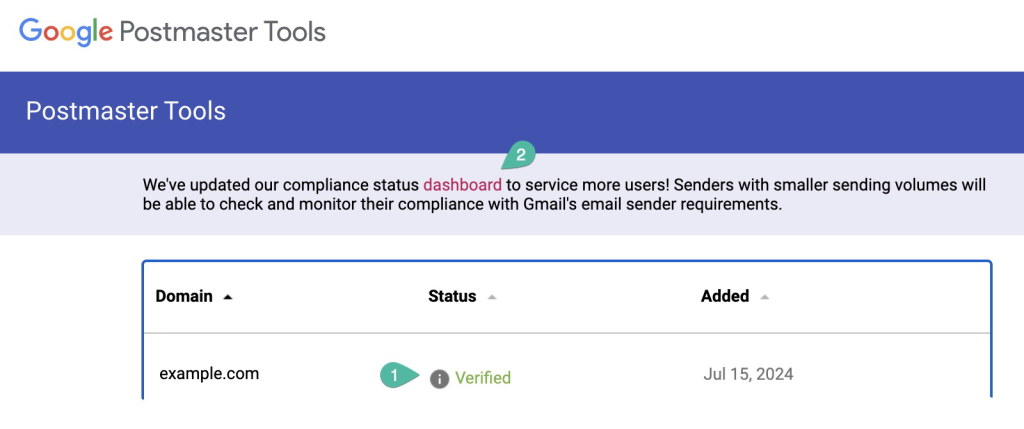
Figure 6: Domain verified
- Follow the recommendations provided in the Postmaster Tools dashboard to fully comply with the requirements (example below):
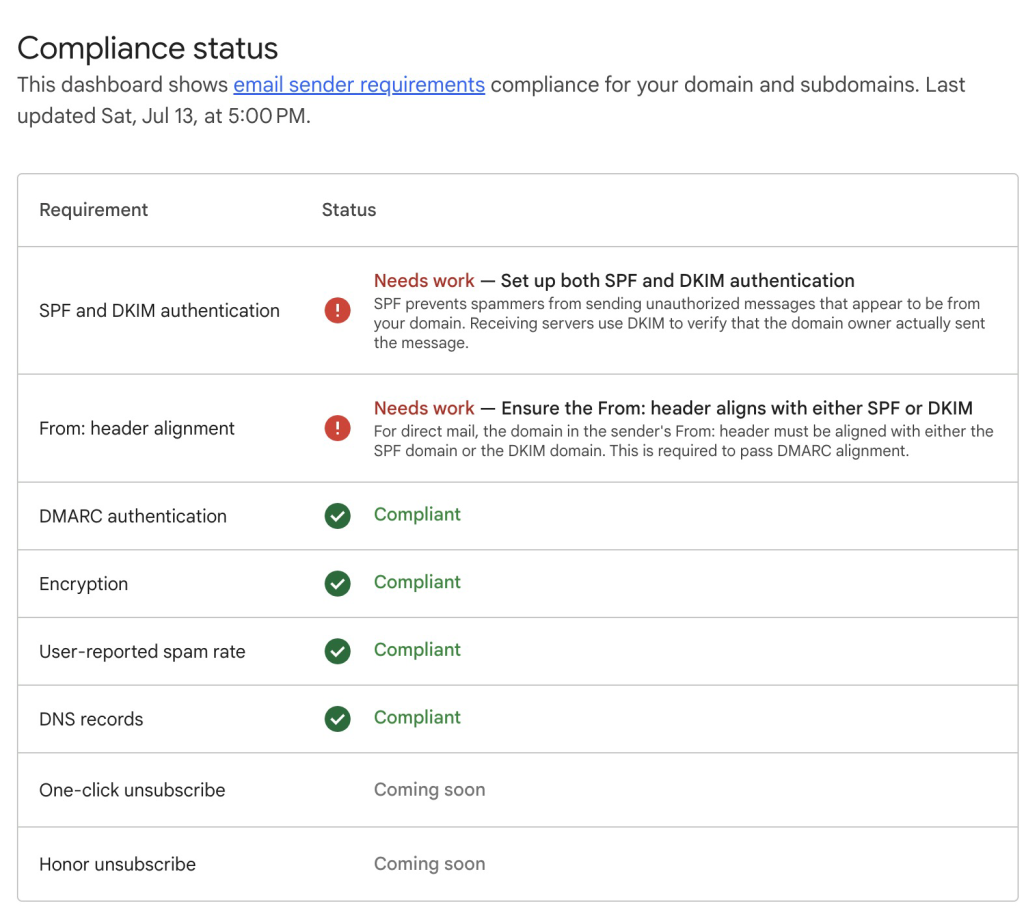
Figure 7: Email sender requirements compliance status recommendations
- Once you have completed all the verification and configuration steps, you should see compliant checkmarks next to all available requirements (see example below):
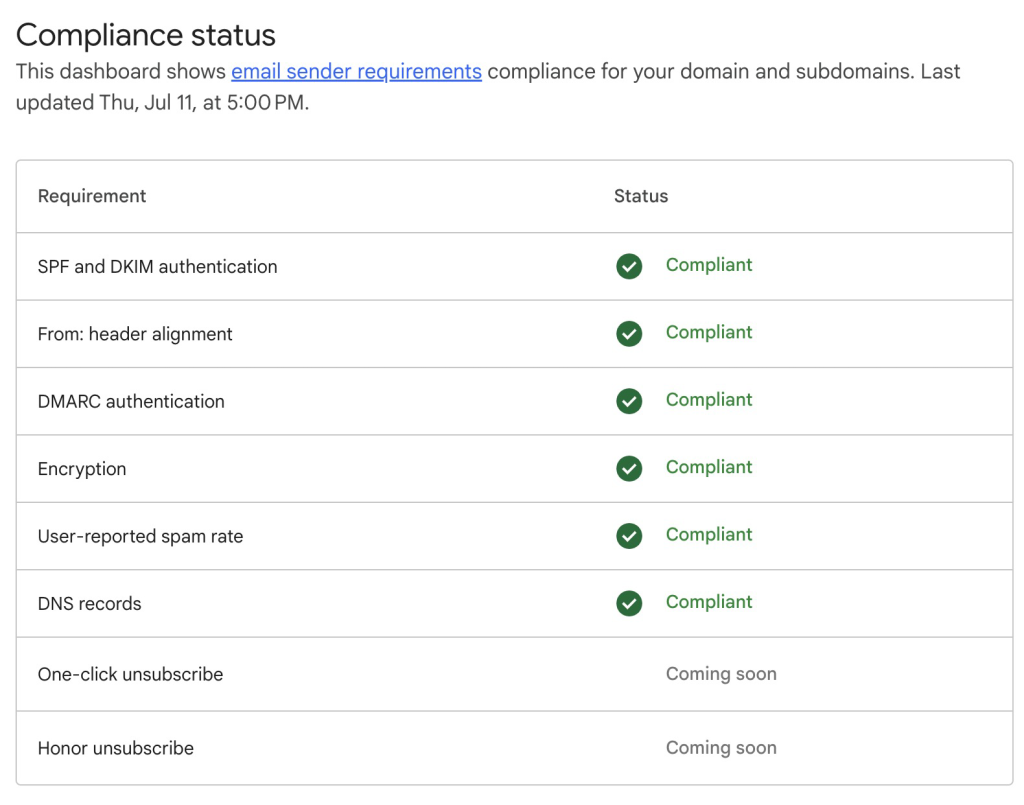
Figure 8: Email sender requirements compliant status
Step 2 – Add Feedback-ID headers to your SES emails
- Use this command line to send an email with
Feedback-IDusing the AWS CLI:
aws sesv2 send-email --from-email-address [email protected] \
   --destination '{"ToAddresses":["[email protected]"]}' \
   --content '{"Simple":{"Subject":{"Data":"Test Subject","Charset":"UTF-8"},"Body":{"Text":{"Data":"Test Data","Charset":"UTF-8"}}}}' \
   --email-tags '[{"Name": "ses:feedback-id-a","Value":"feedback-id-part-a-value"}]'
The values of ses:feedback-id-a and ses:feedback-id-b are specified using the --email-tags option.
- Alternatively, use Boto3 to send an email with
Feedback-IDwith the following Python script:
import boto3
from botocore.exceptions import ClientError

def send_email(region_name):
    # Create a new SES client
    ses = boto3.client('sesv2', region_name=region_name)

    # Replace sender and recipient values
    SENDER = "Sender Name <[email protected]>"
    RECIPIENT = "[email protected]"
    CONFIGURATION_SET = "SES_Config_Set"
    SUBJECT = "Amazon SES Test (SDK for Python)"
    BODY_TEXT = "Amazon SES Test (Python)\r\nThis email was sent with Amazon SES using the AWS SDK for Python (Boto)."
    BODY_HTML = """<html>
    <head></head>
    <body>
      <h1>Amazon SES Test (SDK for Python)</h1>
      <p>This email was sent with
        <a href='https://aws.amazon.com/ses/'>Amazon SES</a> using the
        <a href='https://aws.amazon.com/sdk-for-python/'>
          AWS SDK for Python (Boto)</a>.</p>
    </body>
    </html>"""
    CHARSET = "UTF-8"

    try:
        # Send email
        response = ses.send_email(
            FromEmailAddress=SENDER,
            Destination={'ToAddresses': [RECIPIENT]},
            ConfigurationSetName=CONFIGURATION_SET,
            Content={
                "Simple": {
                    "Subject": {
                        "Charset": CHARSET,
                        "Data": SUBJECT
                    },
                    "Body": {
                        "Text": {
                            "Charset": CHARSET,
                            "Data": BODY_TEXT
                        },
                        "Html": {
                            "Charset": CHARSET,
                            "Data": BODY_HTML
                        }
                    },
                    "Headers": [
                        {
                            "Name": "List-Unsubscribe",
                            "Value": "<https://unsubscribe.example.email/[email protected]&topic=topic1>"
                        },
                        {
                            "Name": "List-Unsubscribe-Post",
                            "Value": "One-Click"
                        }
                    ]
                }
            },
            EmailTags=[
                {
                    'Name': 'ses:feedback-id-a',
                    'Value': 'campaign1'
                },
                {
                    'Name': 'ses:feedback-id-b',
                    'Value': 'line-of-business'
                }
            ] #the ses:feedback-id-a and ses:feedback-id-b are specified as a list using EmailTags
        )
        print("Email sent! Response:", response)
        print("Message ID:", response['MessageId'])

    except ClientError as e:
        print(e.response['Error']['Message'])

# Call the function to send the email
send_email(region_name='us-west-2')  # Specify the region here
Step 3 – Viewing FBL results in Postmaster Tools
In order to see any results in the Postmaster Tool dashboard (see examples below), you must send a substantial daily volume of email through the domain(s) you’ve registered. If you see the message “No Data to Display”, your reputation may already be too low, more likely the volume of email traffic sent since you configured the Postmaster tool is insufficient (return to the dashboard in later, after you’ve sent 1,000s of emails).

Figure 9: Feedback loop example image
The image shows a section of the Postmaster Tools dashboard, specifically the Feedback Loop section. This dashboard provides insights into the spam complaint rates and the number of feedback loop identifiers flagged across a given time period, in this case, the last 120 days.
Conclusion
High-volume email senders should look to the combination of Amazon SES’ powerful framework for monitoring in concert with Postmaster Tools to improve and ensure email deliverability. Implementing the Feedback-ID header in your SES emails can significantly enhance your ability to track and troubleshoot deliverability issues. Use Postmaster Tools and the Feedback Loop via Feedback-ID headers in SES emails to gain detailed insights into complaint rates and other key metrics, enabling you to maintain a healthy sender reputation and ensure their emails reach the intended recipients.
Call to Action:
- Set Up Postmaster Tools for your sending domain(s)
- Verify Your Domain: Register and verify your domain with Postmaster Tools to access valuable insights and track your compliance status.
- Set Up Feedback-ID: Start embedding the Feedback-ID header in your emails sent via Amazon SES to take advantage of detailed complaint data and improve your email campaigns.
- Monitor and Adjust: Regularly check the Postmaster Tools dashboard to monitor your spam rates and feedback loop identifiers. Use this data to refine your email content and sending practices.
- Leverage AWS CLI and Boto3: Utilize the provided AWS CLI commands and Boto3 scripts to automate the process of sending emails with Feedback-ID headers, ensuring consistent and accurate tracking.
By following these steps, you can enhance your email deliverability, reduce spam complaints, and maintain a strong sender reputation. For more information on using Amazon SES and Google’s Postmaster Tools, refer to the Amazon SES Documentation and the Postmaster Tools Guide.


 ” width=”1252″ height=”889″>
 ” width=”1280″ height=”720″>
 ” width=”863″ height=”521″>
 ” width=”865″ height=”582″>
 ” width=”1497″ height=”1173″>
 ” width=”1336″ height=”1313″>
 ” width=”1333″ height=”1364″>
 ” width=”1611″ height=”680″>
 ” width=”964″ height=”732″>
 ” width=”661″ height=”341″>
 ” width=”1800″ height=”563″>


 Figure 1 – DMARC Flow


Response:
3) Send test message
Response:
Response – (ConflictException):
Conclusion
As SMS messaging continues to play a crucial role in customer engagement and authentication, protecting your communications from AIT is more important than ever. Amazon Pinpoint Protect provides a powerful and user-friendly solution to help you mitigate the impact of SMS pumping, ensuring the integrity of your SMS channels and preserving your business’ reputation and resources. Whether you’re a small business or a large enterprise, Pinpoint Protect is a valuable tool to have in your arsenal as you navigate the evolving landscape of SMS messaging.
To get started with Pinpoint SMS Protect, visit the Amazon Pinpoint SMS documentation or reach out to your AWS account team. And don’t forget to let us know in the comments how Protect configurations has helped you combat AIT and strengthen your SMS communications.
A few resources to help you plan for your SMS program:
About the Author
Brett Ezell is your friendly neighborhood Solutions Architect at AWS, where he specializes in helping customers optimize their SMS and email campaigns using Amazon Pinpoint and Amazon Simple Email Service. As a former US Navy veteran, Brett brings a unique perspective to his work, ensuring customers receive tailored solutions to meet their needs. In his free time, Brett enjoys live music, collecting vinyl, and the challenges of a good workout. And, as a self-proclaimed comic book aficionado, he can often be found combing through his local shop for new books to add to his collection.