Post Syndicated from Bruno Giorgini original https://aws.amazon.com/blogs/messaging-and-targeting/automate-us-tfn-registrations/
Introduction:
AWS End User Messaging enables customers to send SMS messages to recipients located across the globe.
If you are planning on rolling out SMS across multiple countries, we recommend reviewing this blog. When you send SMS or MMS messages using AWS End User Messaging SMS, you must use a specific origination identity that supports the sending of SMS. In the US the originators that are supported are Toll-Free(TFN), 10DLC, and short codes and each of these has its own registration process.
This blog discusses the process of programmatically registering Toll-Free numbers (TFNs), which can be used exclusively within the United States. TFNs have a max throughput of 3 Messages Per Second(MPS) and are typically used for low-volume/throughput use cases. You can learn more about TFNs here.
TFNs have a relatively simple registration process, however, for Independent Software Vendors (ISVs), SaaS providers, or large organizations with many teams or use cases, completing dozens, or hundreds of TFN registrations manually can be time-consuming, tedious, and error-prone. AWS End User Messaging APIs can be used to streamline the TFN registration process by enabling AWS customers to programmatically register TFNs in the USA. You can learn more about the TFN registration requirements and process here.
In this post, we will discuss the AWS End User Messaging APIs required for programmatically registering TFNs. We’ll explore a simple Bash script you can use to automate the registration of a single TFN, as well as a Python script that you can use to bulk register multiple TFNs. Both of these scripts help simplify the TFN registration process and can save both time and effort for businesses looking to leverage AWS End User Messaging for their communication needs.
Outline of the APIs used in the scripts:
There are seven actions that need to be taken in order for a TFN registration to be created and submitted. The two scripts in this post automate these actions:
- create-registration
- Creates a new registration
- The “RegistrationType” field controls whether this is a registration for a Toll-Free, or 10DLC or a SenderID.
- describe-registration-field-definitions
- Retrieves the specified RegistrationType field definitions.
- You can use
DescribeRegistrationFieldDefinitions to view the requirements for creating, filling out, and submitting each registration type. In this post we have chosen Toll-Free and provided the values.
- create-registration-attachment
- The carriers require you to provide a mockup that closely resemble the opt-in experience that your customers will complete to ensure end-users have consented to receiving SMS messages from this toll-free number. This should be a screenshot of your website or mobile application’s opt-in workflow.
- The maximum file size is 500kb, and valid file extensions are PDF, JPEG, or PNG.
- You need to wait until the attachment is uploaded before moving to step 4.
- put-registration-field-value
- This action needs to be repeated for all required fields (retrieved in step 2)
- request-phone-number
- Request an origination phone number for use in your account (needed for step 6)
- create-registration-association
- This associates the registration with the origination identity (phone number) you requested in step 5.
- You will need the PhoneNumberId for the origination identity.
- submit-registration-version
- This will submit the specified registration for review and approval
- IMPORTANT:
- Make sure that all of your data is correct, especially before attempting to submit multiple registrations using the second script option below.
- Once your script has submitted the registration, it’s initial status will be “CREATED” and should change to “REVIEWING” within 24 hours.
- Once submitted, you will be unable to edit or delete this registration until it is approved or rejected by the third-party registrar that controls the registration process for the type of registration you are submitting (in this blog we’re registering TFNs).
- You begin incurring costs for the TFNs as soon as you successfully submit the registration.
No matter which script you decide to use, it’s important to keep a these things in mind:
- The registration information you provide will be reviewed by a third-party company. This is standard, no matter which provider you use for SMS
- While AWS submits the registration on your behalf, we do not participate in the actual review process, nor can we influence the third-party.
- The review process for TFNs can take up to 15 business days and if the information provided in the registration process is incomplete, inaccurate, or the use case falls into a forbidden category (Guidelines for using toll-free numbers) , the application can be rejected.
- If your toll-free number registration is rejected, the status of your registration will change to “Requires Updates“. We recommend monitoring your registration status frequently to ensure that you do not miss an update and extend the time it takes to complete.
Prerequisites for either approach:
Before running either script, you’ll need:
- An AWS account with permission to use/provision the AWS End User Messaging service (link) in the target region.
The following information for each TFN you wish to register/request (you can retrieve this list with describe-registration-field-definitions API):
Company Info
- Company Name
- Website
- Address 1
- Address 2 (optional)
- City
- State / Province
- Zip Code / Postal Code
- Country Code
Contact Info
- First Name
- Last Name
- Support Email
- Support Phone Number
Messaging Use Case
- Monthly Message Volume (you must use one of the options below)
- “10”
- “100”
- “1,000”
- “10,000”
- “100,000”
- “250,000”
- “500,000”
- “750,000”
- “1,000,000”
- “5,000,000”
- “10,000,000+”
- Use Case Category (you must use one of the options below)
- “Two-factor authentication”
- “One-time passcodes”
- “Notifications”
- “Polling and surveys”
- “Info on demand”
- “Promotions & marketing”
- “Other”
- Use Case Details
- Opt-In Description – The primary purpose of the Opt-in Description is to demonstrate that the end user explicitly consents to receive text messages and understands the nature of the program. Your application is being reviewed by a 3rd party reviewer, so make sure to provide clear and thorough information about how your end-users opt-in to your SMS service and any associated fees or charges. If the reviewer cannot determine how your opt-in process works then your application will be denied and returned. If your Opt-in process requires a log-in, is not yet published publicly, is a verbal opt-in, or if it occurs on printed sources such as fliers and paper forms then make sure to thoroughly document how this process is completed by the end-user receiving messages. Provide a screenshot and host the screenshot on a publicly accessible website (like OneDrive or Google Drive) and provide the URL in the text as well as in the Opt-In Image below.
- Opt-In Image – This is optional, but highly recommended, even if you provide a description above:
- If your experience is not publicly available, the carriers will require you to provide one to ensure end-users have consented to receiving SMS messages from this toll-free number.
- You are encouraged to provide a screenshot (PDF, JPEG, or PNG) of your website or mobile application’s opt-in workflow. This could also be a screenshot of a paper form, a verbal opt-in script, or an as yet published website experience in development.
- The maximum file size is 500Kb.
Message Samples
- Message Sample 1
- Message Sample 2 (optional)
- Message Sample 3 (optional)
Option 1 – Execute a script to register a single TFN
The script requires the additional prerequisites (if you use AWS CloudShell to run the script, the AWS CLI and jq are already installed).
AWS CLI installed and configured with appropriate AWS account credentials and region (link)jq (a lightweight and flexible command-line JSON processor) installed (link)
- Set environment variables for each of the required fields.
Before running the registration script, you must first set the necessary variables, replacing the placeholder values with your company actual data (these values are listed as a prerequisite above). Ensure that the opt-in screenshot image file optInImage.png is in the same directory as the script, or provide the correct path to the image file in the attachment_body variable. Note – the allowed file types for the opt-in screenshot are PNG, JPG, and PDF with a max file size of 500 kb.
Run the environment variable exports:
export AWS_REGION="us-west-2"
export COMPANY_NAME="Your Company Name"
export COMPANY_WEBSITE="www.yourcompany.com"
export COMPANY_ADDRESS1="123 Main Street"
export COMPANY_ADDRESS2="Suite 200"
export COMPANY_CITY="Your City"
export COMPANY_STATE="Your State"
export COMPANY_ZIPCODE="12345"
export COMPANY_COUNTRY_CODE="US"
export CONTACT_FIRSTNAME="John"
export CONTACT_LASTNAME="Doe"
export CONTACT_EMAIL="[email protected]"
export CONTACT_PHONE="+1234567890"
export USECASE_DETAILS="Details about your use case"
export OPTIN_DESCRIPTION="Description of opt-in process"
export MONTHLY_MESSAGE_VOLUME="10"
export USECASE_CATEGORY="Other"
export MESSAGE_SAMPLE1="Sample message"
export ATTACHMENT_BODY="fileb://optInImage.png"
- Copy and save the below script as
register_us_toll_free_number.sh into your current directory. Adjust the region variable in the script to the one you’re using to register the US TFN.
#!/bin/bash
set -euo pipefail

# Check dependencies
command -v aws >/dev/null 2>&1 || { echo "AWS CLI is required but it's not installed. Aborting."; exit 1; }
command -v jq >/dev/null 2>&1 || { echo "jq is required but it's not installed. Aborting."; exit 1; }

# Initialize variables from environment or use default values
region="${AWS_REGION:-'us-west-2'}"
companyInfo_companyName="${COMPANY_NAME:-"Default Company Name"}"
companyInfo_website="${COMPANY_WEBSITE:-"https://defaultcompany.com"}"
companyInfo_address1="${COMPANY_ADDRESS1:-"123 Default St."}"
companyInfo_address2="${COMPANY_ADDRESS2:-""}"  # Optional
companyInfo_city="${COMPANY_CITY:-"Default City"}"
companyInfo_state="${COMPANY_STATE:-"Default State"}"
companyInfo_zipCode="${COMPANY_ZIPCODE:-"00000"}"
companyInfo_isoCountryCode="${COMPANY_COUNTRY_CODE:-"US"}"
contactInfo_firstName="${CONTACT_FIRSTNAME:-"John"}"
contactInfo_lastName="${CONTACT_LASTNAME:-"Doe"}"
contactInfo_supportEmail="${CONTACT_EMAIL:-"[email protected]"}"
contactInfo_supportPhoneNumber="${CONTACT_PHONE:-"+10000000000"}"
messagingUseCase_useCaseDetails="${USECASE_DETAILS:-"Default use case details"}"
messagingUseCase_optInDescription="${OPTIN_DESCRIPTION:-"Default opt-in process description"}"
messagingUseCase_monthlyMessageVolume="${MONTHLY_MESSAGE_VOLUME:-"10"}"
messagingUseCase_useCaseCategory="${USECASE_CATEGORY:-"Other"}"
messageSamples_messageSample1="${MESSAGE_SAMPLE1:-"This is a sample message."}"
attachment_body="${ATTACHMENT_BODY:-"fileb://optInImage.png"}"  # Path to the image, can be overridden

# Log to file
log_file="registration.log"
echo "Logging to $log_file"
exec > >(tee -a "$log_file") 2>&1

# Retry configuration
max_retries=10
retry_interval=2
retry_count=0
upload_complete=false

# Helper function to put registration field values
put_registration_field_value() {
    local field_path="$1"
    local value="$2"
    aws pinpoint-sms-voice-v2 --region "$region" put-registration-field-value \
         --registration-id "$registration_id" \
         --field-path "$field_path" \
         --text-value "$value" || { echo "Failed to update $field_path"; exit 1; }
}

# Helper function to validate registration field values
validate_input() {
    local required_vars=(
        "AWS_REGION"
        "COMPANY_NAME"
        "COMPANY_WEBSITE"
        "COMPANY_ADDRESS1"
        "COMPANY_CITY"
        "COMPANY_STATE"
        "COMPANY_ZIPCODE"
        "COMPANY_COUNTRY_CODE"
        "CONTACT_FIRSTNAME"
        "CONTACT_LASTNAME"
        "CONTACT_EMAIL"
        "CONTACT_PHONE"
        "USECASE_DETAILS"
        "OPTIN_DESCRIPTION"
        "MONTHLY_MESSAGE_VOLUME"
        "USECASE_CATEGORY"
        "MESSAGE_SAMPLE1"
        "ATTACHMENT_BODY"
    )

    for var in "${required_vars[@]}"; do
        if [ -z "${!var}" ]; then
            echo "Error: $var is missing or empty" >&2
            return 1
        fi
    done

    # Validate zip code
    if [[ ! "$COMPANY_ZIPCODE" =~ ^[0-9]+$ ]]; then
        echo "Error: Invalid or missing zip code" >&2
        return 1
    fi

    # Validate monthly message volume
    local valid_volumes=("10" "100" "1,000" "10,000" "100,000" "250,000" "500,000" "750,000" "1,000,000" "5,000,000" "10,000,000+")
    local volume_valid=false
    for volume in "${valid_volumes[@]}"; do
        if [ "$MONTHLY_MESSAGE_VOLUME" = "$volume" ]; then
            volume_valid=true
            break
        fi
    done
    if [ "$volume_valid" = false ]; then
        echo "Error: Invalid or missing monthly_message_volume" >&2
        return 1
    fi

    # Validate use case category
    local valid_categories=("Two-factor authentication" "One-time passcodes" "Notifications" "Polling and surveys" "Info on demand" "Promotions & marketing" "Other")
    local category_valid=false
    for category in "${valid_categories[@]}"; do
        if [ "$USECASE_CATEGORY" = "$category" ]; then
            category_valid=true
            break
        fi
    done
    if [ "$category_valid" = false ]; then
        echo "Error: Invalid or missing use_case_category" >&2
        return 1
    fi

    # Additional validations (you can add more as needed)
    if [[ ! "$COMPANY_WEBSITE" =~ ^https?:// ]]; then
        echo "Error: COMPANY_WEBSITE must start with http:// or https://" >&2
        return 1
    fi

    if [[ ! "$CONTACT_EMAIL" =~ ^[a-zA-Z0-9._%+-]+@[a-zA-Z0-9.-]+\.[a-zA-Z]{2,}$ ]]; then
        echo "Error: CONTACT_EMAIL is not a valid email address" >&2
        return 1
    fi

    if [[ ! "$CONTACT_PHONE" =~ ^\+[1-9][0-9]{10,14}$ ]]; then
        echo "Error: CONTACT_PHONE must be in E.164 format (e.g., +10000000000)" >&2
        return 1
    fi

    echo "All required variables are set and valid"
    return 0
}


# Step 1: Create registration
echo "Creating registration..."
create_registration_output=$(aws pinpoint-sms-voice-v2 --region "$region" create-registration \
      --registration-type 'US_TOLL_FREE_REGISTRATION' \
      --tags Key=Name,Value='Registration friendly name') || { echo "Failed to create registration"; exit 1; }

# Extract RegistrationId
registration_id=$(echo "$create_registration_output" | jq -r '.RegistrationId')
if [ -z "$registration_id" ]; then
    echo "Error: Registration ID not found!"
    exit 1
fi
echo "Registration ID: $registration_id"

# Step 2: Create registration attachment
echo "Creating registration attachment..."
create_attachment_output=$(aws pinpoint-sms-voice-v2 --region "$region" create-registration-attachment \
      --attachment-body "$attachment_body") || { echo "Failed to create registration attachment"; exit 1; }

# Extract RegistrationAttachmentId
attachment_id=$(echo "$create_attachment_output" | jq -r '.RegistrationAttachmentId')
if [ -z "$attachment_id" ]; then
    echo "Error: Attachment ID not found!"
    exit 1
fi
echo "Attachment ID: $attachment_id"

# Step 3: Wait for the attachment to be fully uploaded
echo "Waiting for attachment upload to complete..."
while [ "$upload_complete" = false ] && [ $retry_count -lt $max_retries ]; do
    # Describe the registration attachment
    describe_attachment_output=$(aws pinpoint-sms-voice-v2 --region "$region" describe-registration-attachments \
        --registration-attachment-ids "$attachment_id")

    # Extract the attachment status
    attachment_status=$(echo "$describe_attachment_output" | jq -r '.RegistrationAttachments[0].AttachmentStatus')

    # Check if the status is 'UPLOAD_COMPLETE'
    if [ "$attachment_status" == "UPLOAD_COMPLETE" ]; then
        echo "Attachment upload complete."
        upload_complete=true
    else
        echo "Attachment status: $attachment_status. Retrying in $retry_interval seconds... (attempt $((retry_count + 1))/$max_retries)"
        sleep "$retry_interval"
        retry_count=$((retry_count + 1))
    fi
done
if [ "$upload_complete" = false ]; then
    echo "Attachment upload did not complete within the retry limit."
    exit 1
fi
echo "Attachment upload complete."

# Step 4a: Put registration field values from environment variables
text_field_paths=(
    "companyInfo_companyName"
    "companyInfo_website"
    "companyInfo_address1"
    "companyInfo_address2"
    "companyInfo_city"
    "companyInfo_state"
    "companyInfo_zipCode"
    "companyInfo_isoCountryCode"
    "contactInfo_firstName"
    "contactInfo_lastName"
    "contactInfo_supportEmail"
    "contactInfo_supportPhoneNumber"
    "messagingUseCase_useCaseDetails"
    "messagingUseCase_optInDescription"
    "messageSamples_messageSample1"
)

for text_field_path in "${text_field_paths[@]}"; do
    echo "Putting registration field value for: $text_field_path"
    value=$(eval "echo \$$text_field_path")
    if [ -z "$value" ]; then
        echo "Error: $text_field_path is empty or not set. Skipping."
        continue
    fi
    echo "Value for $text_field_path is: '$value'"
    put_registration_field_value "${text_field_path//_/.}" "$value"
done

# Step 4b: Put other registration field values (Choice fields)
choice_field_paths=(
    "messagingUseCase_monthlyMessageVolume"
    "messagingUseCase_useCaseCategory"
)

for choice_field_path in "${choice_field_paths[@]}"; do
    echo "Putting registration field value for: $choice_field_path"
    value=$(eval "echo \$$choice_field_path")
    if [ -z "$value" ]; then
        echo "Error: $choice_field_path is empty or not set. Skipping."
        continue
    fi
    echo "Value for $choice_field_path is: '$value'"
    aws pinpoint-sms-voice-v2 --region "$region" put-registration-field-value \
        --registration-id "$registration_id" \
        --field-path "${choice_field_path//_/.}" \
        --select-choices "$value" || { echo "Failed to update $choice_field_path"; exit 1; }
done

# Step 5: Associate registration attachment with registration
echo "Associating registration attachment with registration..."
aws pinpoint-sms-voice-v2 --region "$region" put-registration-field-value \
      --registration-id "$registration_id" \
      --field-path 'messagingUseCase.optInImage' \
      --registration-attachment-id "$attachment_id" || { echo "Failed to associate registration attachment"; exit 1; }

# Step 6: Request phone number
echo "Requesting phone number..."
request_phone_number_output=$(aws pinpoint-sms-voice-v2 --region "$region" request-phone-number \
      --iso-country-code 'US' \
      --number-type 'TOLL_FREE' \
      --number-capabilities 'SMS' 'MMS' 'VOICE' \
      --message-type 'TRANSACTIONAL') || { echo "Failed to request phone number"; exit 1; }

# Extract PhoneNumberId
phone_number_id=$(echo "$request_phone_number_output" | jq -r '.PhoneNumberId')
if [ -z "$phone_number_id" ]; then
    echo "Error: Phone number ID not found!"
    exit 1
fi
echo "Phone Number ID: $phone_number_id"

# Step 7: Associate phone number with registration
echo "Associating phone number with registration..."
aws pinpoint-sms-voice-v2 --region "$region" create-registration-association \
      --registration-id "$registration_id" \
      --resource-id "$phone_number_id" || { echo "Failed to associate phone number with registration"; exit 1; }

# Step 8: Submit registration
echo "Submitting registration..."
aws pinpoint-sms-voice-v2 --region "$region" submit-registration-version \
     --registration-id "$registration_id" || { echo "Failed to submit registration"; exit 1; }

echo "Registration submitted successfully!"
- Run
chmod command to make it executable. Run the script with the environment variable values you provided in Step 1 above.
chmod u+x register_us_toll_free_number.sh
./register_us_toll_free_number.sh
- The script completes with the following lines:
Submitting registration...
{
    "RegistrationArn": "arn:aws:sms-voice:us-west-2:637400000000:registration/registration-244aa3f91fcc49b598bdf1234569",
    "RegistrationId": "registration-244aa3f91fcc49b598bdf1234569",
    "VersionNumber": 1,
    "RegistrationVersionStatus": "SUBMITTED",
    "RegistrationVersionStatusHistory": {
        "DraftTimestamp": "2024-09-11T19:44:41+00:00",
        "SubmittedTimestamp": "2024-09-11T19:45:16+00:00"
    }
}
Registration submitted successfully!
Option 2 – Execute a Python script to register more than one Toll-Free number
For ISVs, SaaS providers, or large organizations registering multiple phone numbers on behalf of customers or business units, automating the process can save time and reduce errors. We’ve chosen to use Python because it’s CSV library handles file parsing complexities, and its boto3 library enables seamless interaction with AWS services, making it well-suited for programmatically managing these registrations.
- Below is a sample CSV file with the variables for 5 registrations, copy it and replace the sample data with your actual data (these data were listed in the prerequisites above). Save your file as
data.csv:
companyInfo_companyName,companyInfo_website,companyInfo_address1,companyInfo_address2,companyInfo_city,companyInfo_state,companyInfo_zipCode,companyInfo_isoCountryCode,contactInfo_firstName,contactInfo_lastName,contactInfo_supportEmail,contactInfo_supportPhoneNumber,messagingUseCase_monthlyMessageVolume,messagingUseCase_useCaseCategory,messagingUseCase_useCaseDetails,messagingUseCase_optInDescription,messageSamples_messageSample1,attachmentFilePath
AnyCompany,https://example.com/example1,123 Any Street,Suite 200,Anytown,WA,98109,US,FirstName,LastName,[email protected],15553331234,10,One-time passcodes,Dev/Demo - Internal testing only,Internal testing only,Your AWS End User Messaging internal testing one time passcode is 123456,./companyA.png
Example Corp,https://example.net/example2,123 Main Street,,Anywhere,WA,98765,US,FirstName2,LastName2,[email protected],15553332222,10,Notifications,Dev/Demo - Internal testing only,Internal testing only,Your AWS End User Messaging internal testing one time passcode is 654321,./companyB.png
AnyDepartment,https://example.org/example3,123 Oak Avenue,Apt B,Nowhere,WA,54321,US,FirstName3,LastName3,[email protected],15553333333,10,Two-factor authentication,Dev/Demo - Internal testing only,Internal testing only,Your AWS End User Messaging internal testing one time passcode is 987654,./companyC.png
AnyOrganization,https://example.com/example4,123 Pine Blvd,,Anywhere Else,WA,12345,US,FirstName4,LastName4,[email protected],15553334444,100,One-time passcodes,Dev/Demo - Internal testing only,Internal testing only,Your AWS End User Messaging internal testing one time passcode is 654789,./companyD.png
AnyGovernment,https://example.org/example5,123 Oak St,,Nowhere Town,WA,67890,US,FirstName5,LastName5,[email protected],15553335555,"100",One-time passcodes,Dev/Demo - Internal testing only,Internal testing only,Your AWS End User Messaging internal testing one time passcode is 987654,./companyE.png
- Prepare opt-in screenshot image files for each registration, and upload them in the same directory as you will use for the
data.csv and script files. Note: the allowed file types for the opt-in screenshot are PNG, JPG, and PDF with a max file size of 500 kb.
- Below is a Python script to create registrations using the
data.csv file (above). Save this file as register_phone_numbers_bulk.py into your current directory.
import csv
import boto3
import sys
import argparse
import time

# Parse command line arguments
parser = argparse.ArgumentParser(description="AWS End User Messaging SMS Registration Script")
parser.add_argument("-r", "--region", default="us-west-2", help="AWS region")
parser.add_argument("-c", "--csv_file", default="data.csv", help="Path to the Comma-Separated Values file")
args = parser.parse_args()

# Initialize AWS End User Messaging SMS client
client = boto3.client('pinpoint-sms-voice-v2', region_name=args.region)

def process_csv(csv_file):
    with open(csv_file, newline='', encoding='utf-8') as f:
        reader = csv.DictReader(f)

        # Strip BOM from the first key (header) if it exists
        if '\ufeff' in reader.fieldnames[0]:
            reader.fieldnames[0] = reader.fieldnames[0].replace('\ufeff', '')

        for row in reader:
            process_row(row)

def process_row(row):
    print(f"================================================================================================")

    if 'companyInfo_companyName' not in row:
        print(f"Error: 'companyInfo_companyName' field is missing in the CSV file.")
        return

    print(f"Processing entry for: {row['companyInfo_companyName']}")
    print(f"================================================================================================")

    # Validate required fields
    required_fields = [
        'companyInfo_companyName', 'companyInfo_website', 'companyInfo_isoCountryCode',
        'attachmentFilePath'
    ]
    for field in required_fields:
        if field not in row or not row[field]:
            print(f"Error: Required field '{field}' is missing or empty for entry: {row.get('companyInfo_companyName', 'Unknown Company')}")
            return

    # Validate field values
    if 'companyInfo_zipCode' not in row or not row['companyInfo_zipCode'].isdigit():
        print(f"Error: Invalid or missing zip code for entry: {row['companyInfo_companyName']}")
        return

    valid_volumes = ["10", "100", "1,000", "10,000", "100,000", "250,000", "500,000", "750,000", "1,000,000", "5,000,000", "10,000,000+"]
    if 'messagingUseCase_monthlyMessageVolume' not in row or row['messagingUseCase_monthlyMessageVolume'] not in valid_volumes:
        print(f"Error: Invalid or missing monthly_message_volume for entry: {row['companyInfo_companyName']}")
        return

    valid_categories = ["Two-factor authentication", "One-time passcodes", "Notifications", "Polling and surveys", "Info on demand", "Promotions & marketing", "Other"]
    if 'messagingUseCase_useCaseCategory' not in row or row['messagingUseCase_useCaseCategory'] not in valid_categories:
        print(f"Error: Invalid or missing use_case_category for entry: {row['companyInfo_companyName']}")
        return

    try:
        # Step 1: Create registration
        print("Creating registration...")
        create_registration_output = client.create_registration(
            RegistrationType='US_TOLL_FREE_REGISTRATION'
        )
        registration_id = create_registration_output['RegistrationId']

        # Step 2: Put registration field values from CSV
        print("Putting registration field values...")
        field_mappings = {
            "companyInfo.companyName": {"value": row['companyInfo_companyName'], "type": "text"},
            "companyInfo.website": {"value": row['companyInfo_website'], "type": "text"},
            "companyInfo.address1": {"value": row['companyInfo_address1'], "type": "text"},
            "companyInfo.address2": {"value": row['companyInfo_address2'], "type": "text"},
            "companyInfo.city": {"value": row['companyInfo_city'], "type": "text"},
            "companyInfo.state": {"value": row['companyInfo_state'], "type": "text"},
            "companyInfo.zipCode": {"value": row['companyInfo_zipCode'], "type": "text"},
            "companyInfo.isoCountryCode": {"value": row['companyInfo_isoCountryCode'], "type": "text"},
            "contactInfo.firstName": {"value": row['contactInfo_firstName'], "type": "text"},
            "contactInfo.lastName": {"value": row['contactInfo_lastName'], "type": "text"},
            "contactInfo.supportEmail": {"value": row['contactInfo_supportEmail'], "type": "text"},
            "contactInfo.supportPhoneNumber": {"value": row['contactInfo_supportPhoneNumber'], "type": "text"},
            "messagingUseCase.useCaseDetails": {"value": row['messagingUseCase_useCaseDetails'], "type": "text"},
            "messagingUseCase.optInDescription": {"value": row['messagingUseCase_optInDescription'], "type": "text"},
            "messageSamples.messageSample1": {"value": row['messageSamples_messageSample1'], "type": "text"},
            "messagingUseCase.monthlyMessageVolume": {"value": row['messagingUseCase_monthlyMessageVolume'], "type": "select"},
            "messagingUseCase.useCaseCategory": {"value": row['messagingUseCase_useCaseCategory'], "type": "select"},
        }

        for field, field_data in field_mappings.items():
            if field_data['type'] == 'text' and field_data['value']:
                client.put_registration_field_value(
                    RegistrationId=registration_id,
                    FieldPath=field,
                    TextValue=field_data['value']
                )
            elif field_data['type'] == 'select' and field_data['value']:
                client.put_registration_field_value(
                    RegistrationId=registration_id,
                    FieldPath=field,
                    SelectChoices=[field_data['value']]
                )

        # Step 3: Create registration attachment
        print("Creating registration attachment...")
        with open(row['attachmentFilePath'], 'rb') as attachment_file:
            create_attachment_output = client.create_registration_attachment(
                AttachmentBody=attachment_file.read()
            )
            attachment_id = create_attachment_output['RegistrationAttachmentId']

        # Step 4: Wait for the attachment upload to finish
        print("Verifying attachment upload complete...")
        attachment_id = create_attachment_output['RegistrationAttachmentId']
        upload_complete = False
        max_retries = 10
        retry_count = 0

        while not upload_complete and retry_count < max_retries:
            try:
                describe_attachment_output = client.describe_registration_attachments(
                    RegistrationAttachmentIds=[attachment_id]
                )
                attachment_status = describe_attachment_output['RegistrationAttachments'][0]['AttachmentStatus']
                if attachment_status == 'UPLOAD_COMPLETE':
                    upload_complete = True
                else:
                    print(f"Attachment status: {attachment_status}. Waiting 2 seconds before retrying... (max {max_retries} retries)")
                    time.sleep(2)
                    retry_count += 1
            except Exception as e:
                print(f"Error occurred while checking attachment status: {str(e)}")
                time.sleep(10)
                retry_count += 1

        if not upload_complete:
            print(f"Error: Attachment upload did not complete for {row['companyInfo_companyName']}")
            return

        # Step 5: Associate registration attachment with registration
        print("Associating registration attachment with registration...")
        client.put_registration_field_value(
            RegistrationId=registration_id,
            FieldPath='messagingUseCase.optInImage',
            RegistrationAttachmentId=attachment_id
        )

        # Step 6: Request phone number
        print("Requesting phone number...")
        request_phone_number_output = client.request_phone_number(
            IsoCountryCode='US',
            NumberType='TOLL_FREE',
            NumberCapabilities=['SMS', 'MMS', 'VOICE'],
            MessageType='TRANSACTIONAL'
        )
        phone_number_id = request_phone_number_output['PhoneNumberId']

        # Step 7: Associate phone number with registration
        print("Associating phone number with registration...")
        client.create_registration_association(
            RegistrationId=registration_id,
            ResourceId=phone_number_id
        )

        # Step 8: Submit registration
        print("Submitting registration...")
        client.submit_registration_version(
            RegistrationId=registration_id
        )
        print(f"Processing completed for: {row['companyInfo_companyName']}\n")

    except Exception as e:
        print(f"Error occurred while processing {row['companyInfo_companyName']}: {str(e)}")

if __name__ == "__main__":
    process_csv(args.csv_file)
- Run the script:
python register_phone_numbers_bulk.py -c data.csv -r us-west-2
The 2 parameters are the name of the CSV file containing your data (shown here as data.csv) and specify the target AWS region (shown here as us-west-2) as parameters. Adjust these parameters as needed to match your environment and data location.
Check status:
Once you have successfully ran the script, you can check the status of your registration requests via AWS End User Messaging Console or with the API using the DescribeRegistrations API. If you want to use the console log in to the AWS End User Messaging Console in the target region and choose Configurations > Registrations from the left navigation. The registration status for each request will initially display “CREATED” and it will change to “REVIEWING” within 24 hours. As noted in the introduction, the actual registration review process is conducted by a third-party company and it can take up to 15 days to receive an acceptance (“COMPLETE”) or request for additional information or corrections (“Requires Update“) for each request.
Registration Status:

Phone Number Status:

Conclusion:
In this post you have learned how to automate the registration process for Toll-Free numbers with a Bash script or Python script and the AWS End User Messaging APIs. Using the API can significantly improve efficiency and reduce manual errors, but keep in mind that you will still need to wait up to 15 business days for the registrations to be approved (or not), and for the numbers to be set to “ACTIVE” status before you can begin sending messages with your TFN(s).
The AWS End User Messaging V2 API for SMS and Voice has other useful actions, and we encourage you to explore how it can further help you simplify and automate your applications.
Resources to help you plan for your SMS program:
Use this spreadsheet to plan for the countries you need to send SMS/MMS
To restrict your sending to only certain countries read this blog
Confirm the origination IDs you will need here
Check out the support tiers comparison


 a su mensaje


 Figure 2. Security controls applied by Proofpoint SER before routing emails back to Amazon SES for distribution.


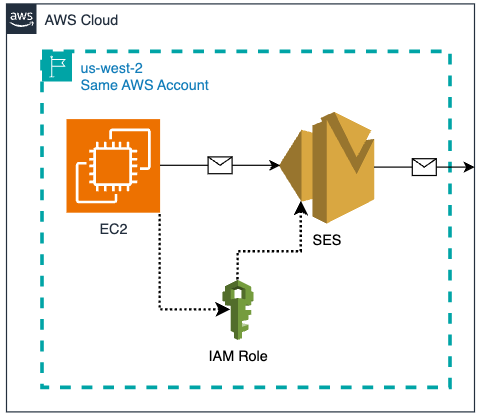


 Figure 8: Amazon Comprehend – Endpoint settings


