Web Analytics is Cloudflare’s privacy-focused real user measurement solution. It leverages a lightweight JavaScript beacon and does not use any client-side state, such as cookies or localStorage, to collect usage metrics. Nor does it “fingerprint” individuals via their IP address, User Agent string, or any other data.
Cloudflare Web Analytics makes essential web analytics, such as the top-performing pages on your website and top referrers, available to everyone for free, and it’s becoming more powerful than ever.
Focusing on Performance
Earlier this year we merged Web Analytics with our Browser Insights product, which enabled customers proxying their websites through Cloudflare to evaluate visitors’ experience on their web properties through Core Web Vitals such as Largest Contentful Paint (LCP) and First Input Delay (FID).
It was important to bring the Core Web Vitals performance measurements into Web Analytics given the outsized impact that page load times have on bounce rates. A page load time increase from 1s to 3s increases bounce rates by 32% and from 1s to 6s increases it by 106% (source).
Now that you know the impact a slow-loading web page can have on your visitors, it’s time for us to make it a no-brainer to take action. Read on.
Becoming Action-Oriented
We believe that, to deliver the most value to our users, the product should facilitate the following process:
Measure the real user experience
Grade this experience — is it satisfactory or in need of improvement?
Provide actionable insights — what part of the web page should be tweaked to improve the user experience?
Repeat
And it all starts with Web Analytics Vitals Explorer, which started rolling out today.
Introducing Web Analytics Vitals Explorer
Vitals Explorer enables you to easily pinpoint which elements on your pages are affecting users the most, with accurate measurements from the visitors perspective and an easy-to-read impact grading.
To do that, we have automatically updated the Web Analytics JavaScript beacon so that it collects the relevant vital measurements from the browser. As always, we are not collecting any information that would invade your visitors’ privacy.
Usage
Once this new beacon is updated on your sites — and again the update will happen transparently to you — you can then navigate to the Core Web Vitals page on Web Analytics. When entering that page, you will see three graphs grading the user experience for Largest Contentful Paint (LCP), First Input Delay (FID), and Cumulative Layout Shift (CLS). Below each graph you can see the debug section with the top five elements with a negative impact on the metric. Lastly, when clicking on either of these elements shown in the data table, you will be presented with its impact and exact paths so that you can easily decide whether this is worth keeping on your website in its current format.
In addition to this new Core Web Vitals content, we have also added First Paint and First Contentful Paint to the Page Load Time page. When you navigate to this page you will now see the page load summary and a graph representing page load timing. These will allow you to quickly identify any regressions to these important performance metrics.
Measurement details
This additional debugging information for Core Web Vitals is measured during the lifespan of the page (until the user leaves the tab or closes the browser window, which updates visibilityState to a hidden state).
Here’s what we collect:
Common for all Core Web Vitals
Element is a CSS selector representing the DOM node. With this string, the developer can use `document.querySelector(<element_name>)` in their browser’s dev console to find out which DOM node has a negative impact on your scores/values.
Path is the URL path at the time the Core Web Vitals are captured.
Value is the metric value for each Core Web Vitals. This value is in milliseconds for LCP or FID and a score for CLS (Cumulative Layout Shift).
Largest Contentful Paint
URL is the source URL (such as image, text, web fonts).
Size is the source object’s size in bytes.
First Input Delay
Name is the type of event (such as mousedown, keydown, pointerdown).
Cumulative Layout Shift
Layout information is a JSON value that includes width, height, x axis position, y axis position, left, right, top, and bottom. You are able to observe layout shifts that happen on the page by observing these values.
CurrentRect is the largest source element’s layout information after the shift. This JSON value is shown as Current under Layout Shifts section in the Web Analytics UI.
PreviousRect is the largest source element’s layout information before the shift. This JSON value is shown as Previous under Layout Shifts section in the Web Analytics UI.
Paint Timings
Additionally, we have added two important paint timings
First Paint is the time between navigation and when the browser renders the first pixels to the screen.
First Contentful Paint is the time when the browser renders the first bit of content from the DOM.
A lot of this is based on standard browser measurements, which you can read about in detail on this blog post from Google.
Moving forward
And we are by no means done. Moving forward, we will bring this structured approach with grading and actionable insights into as Web Analytics measurements as possible, and keep guiding you through how to improve your visitors’ experience. So stay tuned. And in the meantime, do let us know what you think about this feature and ask questions on the community forums.
Images are a massive part of the Internet. On the median web page, images account for 51% of the bytes loaded, so any improvement made to their speed or their size has a significant impact on performance.
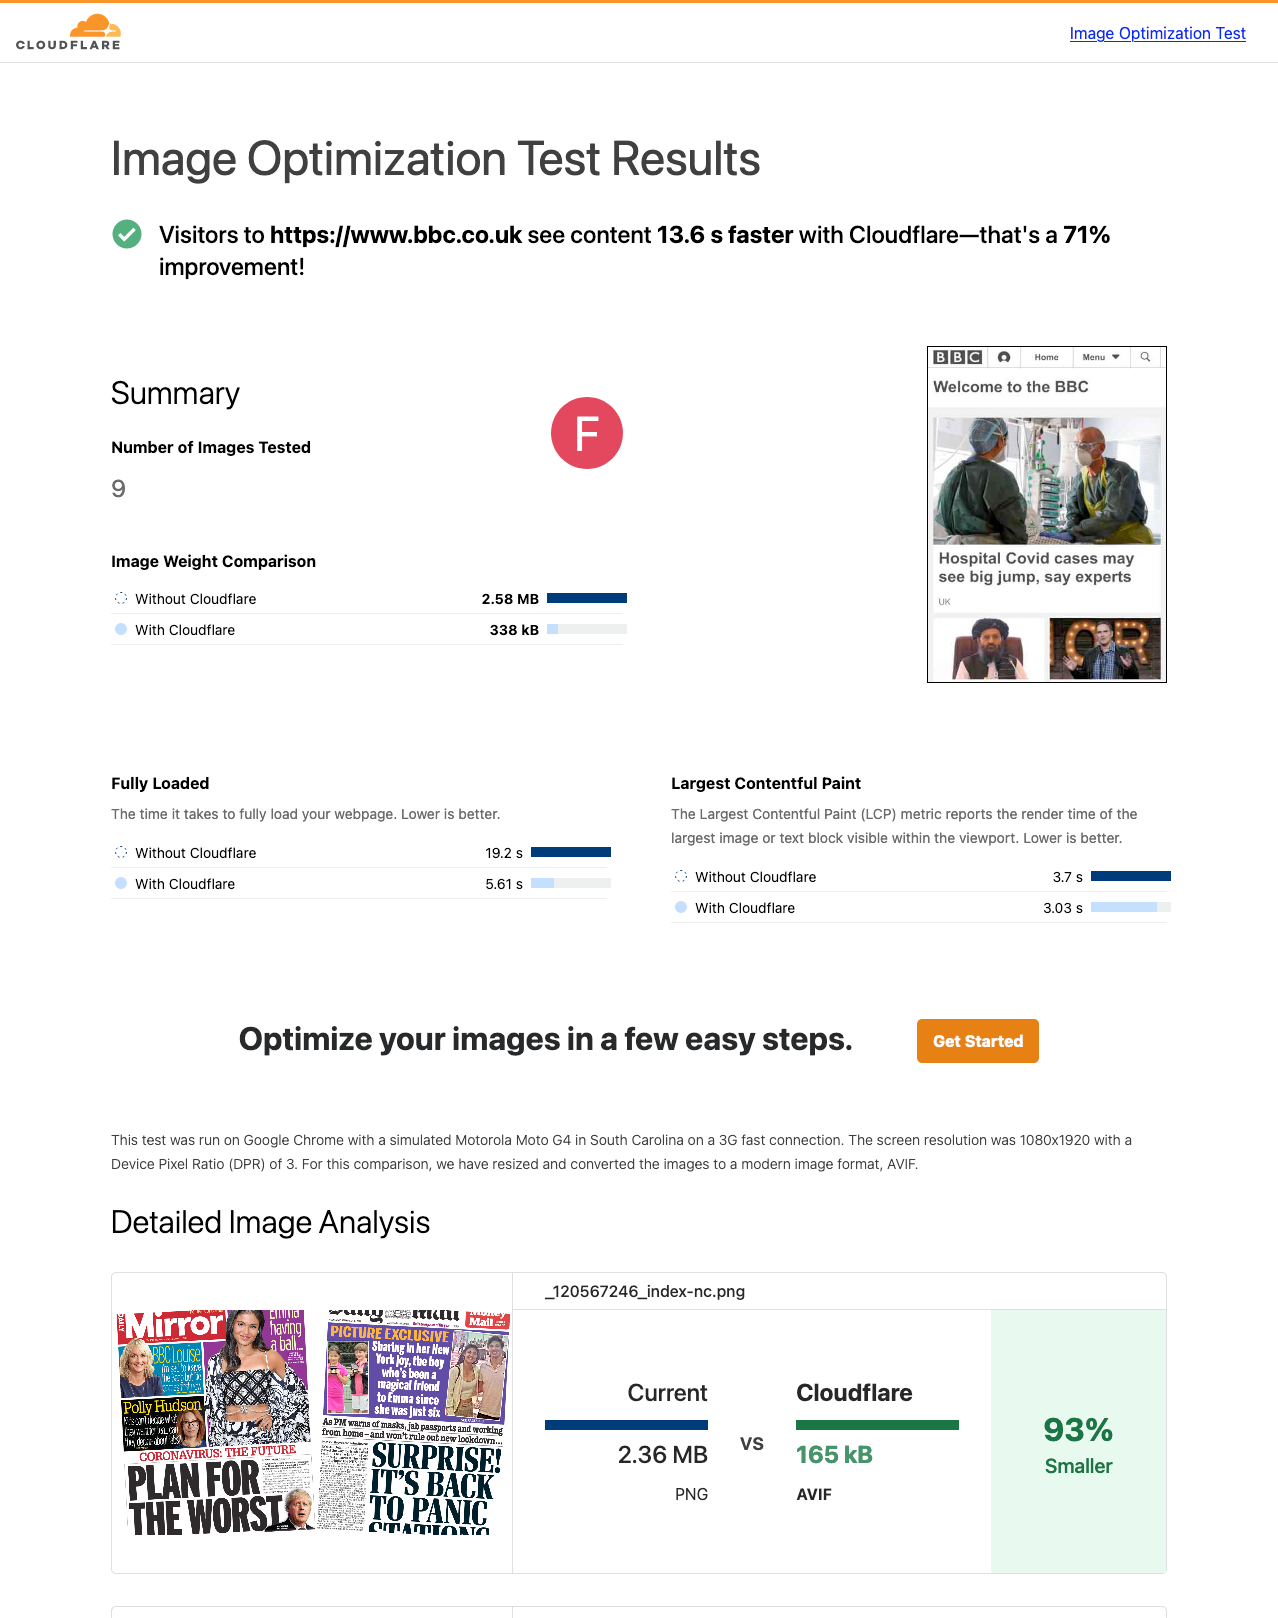
Today, we are excited to announce Cloudflare’s Image Optimization Testing Tool. Simply enter your website’s URL, and we’ll run a series of automated tests to determine if there are any possible improvements you could make in delivering optimal images to visitors.
How users experience speed
Everyone who has ever browsed the web has experienced a website that was slow to load. Often, this is a result of poorly optimized images on that webpage that are either too large for purpose or that were embedded on the page with insufficient information.
Images on a page might take painfully long to load as pixels agonizingly fill in from top-to-bottom; or worse still, they might cause massive shifts of the page layout as the browser learns about their dimensions. These problems are a serious annoyance to users and as of August 2021, search engines punish pages accordingly.
Understandably, slow page loads have an adverse effect on a page’s “bounce rate” which is the percentage of visitors which quickly move off of the page. On e-commerce sites in particular, the bounce rate typically has a direct monetary impact and pages are usually very image-heavy. It is critically important to optimize all the images on your webpages to reduce load on and egress from your origin, to improve your performance in search engine rankings and, ultimately, to provide a great experience for your users.
CLS and LCP are the two metrics we can improve by optimizing images. When CLS is high, this indicates that large amounts of the page layout is shifting as it loads. LCP measures the time it takes for the single largest image or text block in the viewport to render.
One of the most impactful performance improvements a website author can make is ensuring they deliver images with appropriate dimensions. Images taken on a modern camera can be truly massive, and some recent flagship phones have gigantic sensors. The Samsung Galaxy S21 Ultra, for example, has a 108 MP sensor which captures a 12,000 by 9,000 pixel image. That same phone has a screen width of only 1440 pixels. It is physically impossible to show every pixel of the photo on that device: for a landscape photo, only 12% of pixel columns can be displayed.
Embedding this image on a webpage presents the same problem, but this time, that image and all of its unused pixels are sent over the Internet. Ultimately, this creates unnecessary load on the server, higher egress costs, and longer loading times for visitors.. This is exacerbated even further for visitors on mobile since they are often using a slower connection and have limits on their data usage. On a fast 3G connection, that 108 MP photo might consume 26 MB of both the visitor’s data plan and the website’s egress bandwidth, and take more than two minutes to load!
It might be tempting to always deliver images with the highest possible resolution to avoid “blocky” or pixelated images, but when resizing is done correctly, this is not a problem. “Blocky” artifacts typically occur when an image is processed multiple times (for example, an image is repeatedly uploaded and downloaded by users on a platform which compresses that image). Pixelated images occur when an image has been shrunk to a size smaller than the screen it is rendered on.
So, how can website authors avoid these pitfalls and ensure a correctly sized image is delivered to visitors’ devices? There are two main approaches:
Media conditions with srcset and sizes
When embedding an image on a webpage, traditionally the author would simply pass a src attribute on an img tag:
Here, with the srcset attribute, we’re informing the browser that there are three variants of the image, each with a different intrinsic width: 1,500 pixels, 2,000 pixels and the original 12,000 pixels. The browser then evaluates the media conditions in the sizes attribute ( (max-width: 1500px) and (max-width: 2000px)) in order to select the appropriate image variant from the srcset attribute. If the browser’s viewport width is less than 1500px, the hello_world_1500.jpg image variant will be loaded; if the browser’s viewport width is between 1500px and 2000px, the hello_world_2000.jpg image variant will be loaded; and finally, if the browser’s viewport width is larger than 2000px, the browser will fallback to loading the hello_world_12000.jpg image variant.
Similar behavior is also possible with a picture element, using the source child element which supports a variety of other selectors.
Client Hints
Client Hints are a standard that some browsers are choosing to implement, and some not. They are a set of HTTP request headers which tell the server about the client’s device. For example, the browser can attach a Viewport-Width header when requesting an image which informs the server of the width of that particular browser’s viewport (note this header is currently in the process of being renamed to Sec-CH-Viewport-Width).
This simplifies the markup in the previous example greatly — in fact, no changes are required from the original simple HTML:
If Client Hints are supported, when the browser makes a request for hello_world_12000.jpg, it might attach the following header:
Viewport-Width: 1440
The server could then automatically serve a smaller image variant (e.g. hello_world_1500.jpg), despite the request originally asking for hello_world_12000.jpg image.
By enabling browsers to request an image with appropriate dimensions, we save bandwidth and time for both your server and for your visitors.
Format
JPEG, PNG, GIF, WebP, and now, AVIF. AVIF is the latest image format with widespread industry support, and it often outperforms its preceding formats. AVIF supports transparency with an alpha channel, it supports animations, and it is typically 50% smaller than comparable JPEGs (vs. WebP’s reduction of only 30%).
We added the AVIF format to Cloudflare’s Image Resizing product last year as soon as Google Chrome added support. Firefox 93 (scheduled for release on October 5, 2021) will be Firefox’s first stable release, and with both Microsoft and Apple as members of AVIF’s Alliance for Open Media, we hope to see support in Edge and Safari soon. Before these modern formats, we also saw innovative approaches to improving how an image loads on a webpage. BlurHash is a technique of embedding a very small representation of the image inside the HTML markup which can be immediately rendered and acts as a placeholder until the final image loads. This small representation (hash) produced a blurry mix of colors similar to that of the final image and so eased the loading experience for users.
Progressive JPEGs are similar in effect, but are a built-in feature of the image format itself. Instead of encoding the image bytes from top-to-bottom, bytes are ordered in increasing levels of image detail. This again produces a more subtle loading experience, where the user first sees a low quality image which progressively “enhances” as more bytes are loaded.
Quality
The newer image formats (WebP and AVIF) support lossless compression, unlike their predecessor, JPEG. For some uses, lossless compression might be appropriate, but for the majority of websites, speed is prioritized and this minor loss in quality is worth the time and bytes saved.
Optimizing where to set the quality is a balancing act: too aggressive and artifacts become visible on your image; too little and the image is unnecessarily large. Butteraugli and SSIM are examples of algorithms which approximate our perception of image quality, but this is currently difficult to automate and is therefore best set manually. In general, however, we find that around 85% in most compression libraries is a sensible default.
Markup
All of the previous techniques reduce the number of bytes an image uses. This is great for improving the loading speed of those images and the Largest Contentful Paint (LCP) metric. However, to improve the Cumulative Layout Shift (CLS) metric, we must minimize changes to the page layout. This can be done by informing the browser of the image size ahead of time.
On a poorly optimized webpage, images will be embedded without their dimensions in the markup. The browser fetches those images, and only once it has received the header bytes of the image can it know about the dimensions of that image. The effect is that the browser first renders the page where the image takes up zero pixels, and then suddenly redraws with the dimensions of that image before actually loading the image pixels themselves. This is jarring to users and has a serious impact on usability.
It is important to include dimensions of the image inside HTML markup to allow the browser to allocate space for that image before it even begins loading. This prevents unnecessary redraws and reduces layout shift. It is even possible to set dimensions when dynamically loading responsive images: by informing the browser of the height and width of the original image, assuming the aspect ratio is constant, it will automatically calculate the correct height, even when using a width selector.
Finally, lazy-loading is a technique which reduces the work that the browser has to perform right at the onset of page loading. By deferring image loads to only just before they’re needed, the browser can prioritize more critical assets such as fonts, styles and JavaScript. By setting the loading property on an image to lazy, you instruct the browser to only load the image as it enters the viewport. For example, on an e-commerce site which renders a grid of products, this would mean that the page loads faster for visitors, and seamlessly fetches images below the fold, as a user scrolls down. This is supported by all major browsers except Safari which currently has this feature hidden behind an experimental flag.
<img loading="lazy" … />
Hosting
Finally, you can improve image loading by hosting all of a page’s images together on the same first-party domain. If each image was hosted on a different domain, the browser would have to perform a DNS lookup, create a TCP connection and perform the TLS handshake for every single image. When they are all co-located on a single domain (especially so if that is the same domain as the page itself), the browser can re-use the connection which improves the speed it can load those images.
Test your website
Today, we’re excited to announce the launch of Cloudflare’s Image Optimization Testing Tool. Simply enter your website URL, and we’ll run a series of automated tests to determine if there are any possible improvements you could make in delivering optimal images to visitors.
We use WebPageTest and Lighthouse to calculate the Core Web Vitals on two versions of your page: one as the original, and one with Cloudflare’s best-effort automatic optimizations. These optimizations are performed using a Cloudflare Worker in combination with our Image Resizing product, and will transform an image’s format, quality, and dimensions.
We report key summary metrics about your webpage’s performance, including the aforementioned Cumulative Layout Shift (CLS) and Largest Contentful Page (LCP), as well as a detailed breakdown of each image on your page and the optimizations that can be made.
Cloudflare Images
Cloudflare Images can help you to solve a number of the problems outlined in this post. By storing your images with Cloudflare and configuring a set of variants, we can deliver optimized images from our edge to your website or app. We automatically set the optimal image format and allow you to customize the dimensions and fit for your use-cases.
We’re excited to see what you build with Cloudflare Images, and you can expect additional features and integrations in the near future. Get started with Images today from $6/month.
This post explains how we implemented the Cloudflare Images product with reusable Rust libraries and Cloudflare Workers. It covers the technical design of Cloudflare Image Resizing and Cloudflare Images. Using Rust and Cloudflare Workers helps us quickly iterate and deliver product improvements over the coming weeks and months.
Reuse of code in Rusty image projects
We developed Image Resizing in Rust. It’s a web server that receives HTTP requests for images along with resizing options, fetches the full-size images from the origin, applies resizing and other image processing operations, compresses, and returns the HTTP response with the optimized image.
Rust makes it easy to split projects into libraries (called crates). The image processing and compression parts of Image Resizing are usable as libraries.
We also have a product called Polish, which is a Golang-based service that recompresses images in our cache. Polish was initially designed to run command-line programs like jpegtran and pngcrush. We took the core of Image Resizing and wrapped it in a command-line executable. This way, when Polish needs to apply lossy compression or generate WebP images or animations, it can use Image Resizing via a command-line tool instead of a third-party tool.
Reusing libraries has allowed us to easily unify processing between Image Resizing and Polish (for example, to ensure that both handle metadata and color profiles in the same way).
Cloudflare Images is another product we’ve built in Rust. It added support for a custom storage back-end, variants (size presets), support for signing URLs and more. We made it as a collection of Rust crates, so we can reuse pieces of it in other services running anywhere in our network. Image Resizing provides image processing for Cloudflare Images and shares libraries with Images to understand the new URL scheme, access the storage back-end, and database for variants.
How Image Resizing works
The Image Resizing service runs at the edge and is deployed on every server of the Cloudflare global network. Thanks to Cloudflare’s global Anycast network, the closest Cloudflare data center will handle eyeball image resizing requests. Image Resizing is tightly integrated with the Cloudflare cache and handles eyeball requests only on a cache miss.
There are two ways to use Image Resizing. The default URL scheme provides an easy, declarative way of specifying image dimensions and other options. The other way is to use a JavaScript API in a Worker. Cloudflare Workers give powerful programmatic control over every image resizing request.
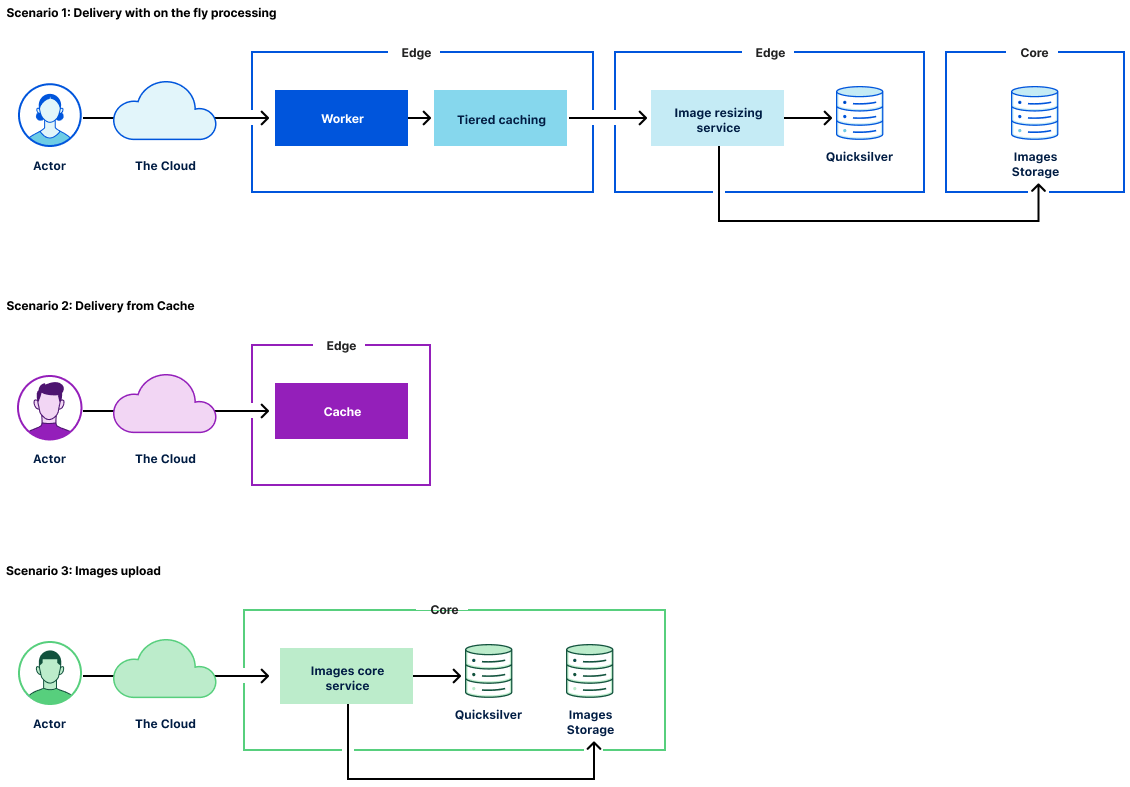
How Cloudflare Images work
Cloudflare Images consists of the following components:
The Images core service that powers the public API to manage images assets.
The Image Resizing service responsible for image transformations and caching.
The Image delivery Cloudflare Worker responsible for serving images and passing corresponding parameters through to the Imaging Resizing service.
Image storage that provides access and storage for original image assets.
To support Cloudflare Images scenarios for image transformations, we made several changes to the Image Resizing service:
Added access to Cloudflare storage with original image assets.
Added access to variant definitions (size presets).
Added support for signing URLs.
Image delivery
The primary use case for Cloudflare Images is to provide a simple and easy-to-use way of managing images assets. To cover egress costs, we provide image delivery through the Cloudflare managed imagedelivery.net domain. It is configured with Tiered Caching to maximize the cache hit ratio for image assets. imagedelivery.net provides image hosting without a need to configure a custom domain to proxy through Cloudflare.
A Cloudflare Worker powers image delivery. It parses image URLs and passes the corresponding parameters to the image resizing service.
How we store Cloudflare Images
There are several places we store information on Cloudflare Images:
image metadata in Cloudflare’s core data centers
variant definitions in Cloudflare’s edge data centers
original images in core data centers
optimized images in Cloudflare cache, physically close to eyeballs.
Image variant definitions are stored and delivered to the edge using Cloudflare’s distributed key-value store called Quicksilver. We use a single source of truth for variants. The Images core service makes calls to Quicksilver to read and update variant definitions.
The rest of the information about the image is stored in the image URL itself: https://imagedelivery.net/<encoded account id>/<image id>/<variant name>
<image id> contains a flag, whether it’s publicly available or requires access verification. It’s not feasible to store any image metadata in Quicksilver as the data volume would increase linearly with the number of images we host. Instead, we only allow a finite number of variants per account, so we responsibly utilize available disk space on the edge. The downside of storing image metadata as part of <image id> is that <image id> will change on access change.
How we keep Cloudflare Images up to date
The only way to access images is through the use of variants. Each variant is a named image resizing configuration. Once the image asset is fetched, we cache the transformed image in the Cloudflare cache. The critical question is how we keep processed images up to date. The answer is by purging the Cloudflare cache when necessary. There are two use cases:
access to the image is changed
the variant definition is updated
In the first instance, we purge the cache by calling a URL: https://imagedelivery.net/<encoded account id>/<image id>
Then, the customer updates the variant we issue a cache purge request by tag: account-id/variant-name
To support cache purge by tag, the image resizing service adds the necessary tags for all transformed images.
How we restrict access to Cloudflare Images
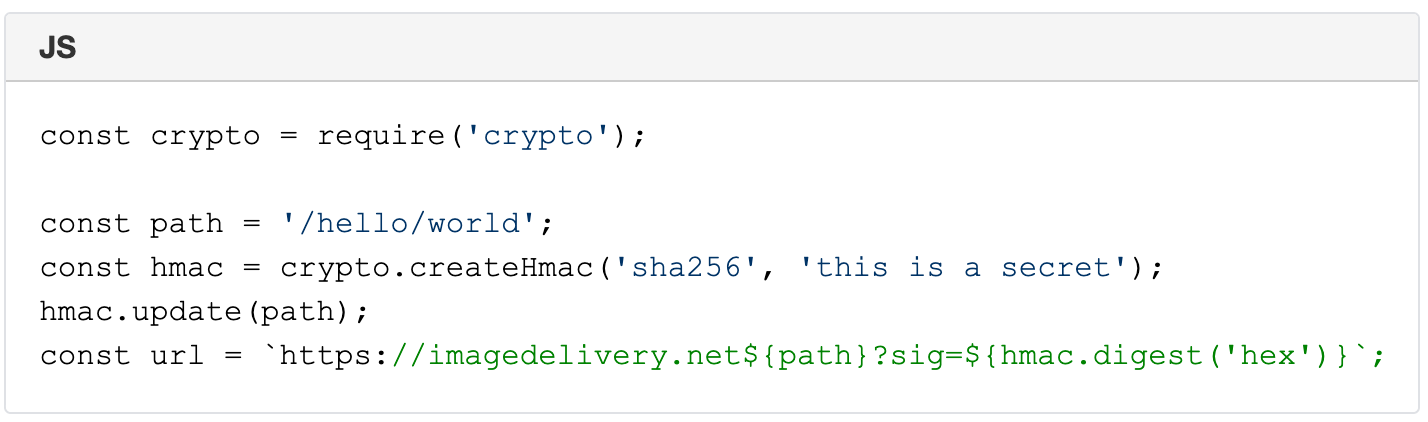
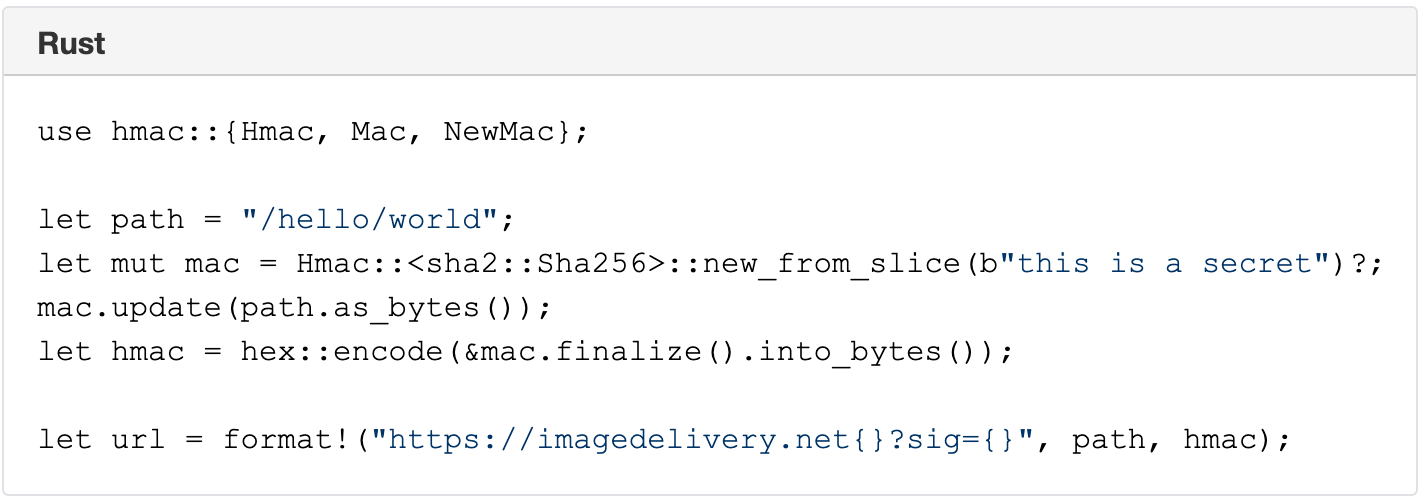
The Image resizing service supports restricted access to images by using URL signatures with expiration. URLs are signed with an SHA-256 HMAC key. The steps to produce valid signatures are:
Take the path and query string (the path starts with /).
Compute the path’s SHA-256 HMAC with the query string, using the Images’ URL signing key as the secret. The key is configured in the Dashboard.
If the URL is meant to expire, compute the Unix timestamp (number of seconds since 1970) of the expiration time, and append ?exp= and the timestamp as an integer to the URL.
Append ? or & to the URL as appropriate (? if it had no query string; & if it had a query string).
Append sig= and the HMAC as hex-encoded 64 characters.
A signed URL looks like this:
A signed URL with an expiration timestamp looks like this:
Signature of /hello/world URL with a secret ‘this is a secret’ is 6293f9144b4e9adc83416d1b059abcac750bf05b2c5c99ea72fd47cc9c2ace34.
Direct creator uploads with Cloudflare Worker and KV
Similar to Cloudflare Stream, Images supports direct creator uploads. That allow users to upload images without API tokens. Everyday use of direct creator uploads is by web apps, client-side applications, or mobile apps where users upload content directly to Cloudflare Images.
Once again, we used our serverless platform to support direct creator uploads. The successful API call stores the account’s information in Workers KV with the specified expiration date. A simple Cloudflare Worker handles the upload URL, which reads the KV value and grants upload access only on a successful call to KV.
Future Work
Cloudflare Images product has an exciting product roadmap. Let’s review what’s possible with the current architecture of Cloudflare Images.
Resizing hints on upload
At the moment, no image transformations happen on upload. That means we can serve the image globally once it is uploaded to Image storage. We are considering adding resizing hints on image upload. That won’t necessarily schedule image processing in all cases but could provide a valuable signal to resize the most critical image variants. An example could be to generate an AVIF variant for the most vital image assets.
Serving images from custom domains
We think serving images from a domain we manage (with Tiered Caching) is a great default option for many customers. The downside is that loading Cloudflare images requires additional TLS negotiations on the client-side, adding latency and impacting loading performance. On the other hand, serving Cloudflare Images from custom domains will be a viable option for customers who set up a website through Cloudflare. The good news is that we can support such functionality with the current architecture without radical changes in the architecture.
Conclusion
The Cloudflare Images product runs on top of the Cloudflare global network. We built Cloudflare Images in Rust and Cloudflare Workers. This way, we use Rust reusable libraries in several products such as Cloudflare Images, Image Resizing, and Polish. Cloudflare’s serverless platform is an indispensable tool to build Cloudflare products internally. If you are interested in building innovative products in Rust and Cloudflare Workers, we’re hiring.
Imagine how a customer would feel if they get to your website, and it takes forever to load all the images you serve. This would become a negative user experience that might lead to lower overall site traffic and high bounce rates.
The good news is that regardless of whether you need to store and serve 100,000 or one million images, Cloudflare Images gives you the tools you need to build an entire image pipeline from scratch.
Customer pains
After speaking with many of Cloudflare customers, we quickly understood that whether you are an e-commerce retailer, a blogger or have a platform for creators, everyone shares the same problems:
Egress fees. Each time an image needs to go from Product A (storage) to Product B (optimize) and to Product C (delivery) there’s a fee. If you multiply this by the millions of images clients serve per day it’s easy to understand why their bills are so high.
Buckets everywhere. Our customers’ current pipelines involve uploading images to and from services like AWS, then using open source products to optimize images, and finally to serve the images they need to store them in another cloud bucket since CDN don’t have long-term storage. This means that there is a dependency on buckets at each step of the pipeline.
Load times. When an image is not correctly optimized the image can be much larger than needed resulting in an unnecessarily long download time. This can lead to a bad end user experience that might result in loss of overall site traffic.
High Maintenance. To maintain an image pipeline companies need to rely on several AWS and open source products, plus an engineering team to build and maintain that pipeline. This takes the focus away from engineering on the product itself.
How can Cloudflare Images help?
Zero Egress Costs
The majority of cloud providers allow you to store images for a small price, but the bill starts to grow every time you need to retrieve that image to optimize and deliver. The good news is that with Cloudflare Images customers don’t need to worry about egress costs, since all storage, optimization and delivery are part of the same tool.
The buckets stop with Cloudflare Images
One small step for humankind, one giant leap for image enthusiasts!
With Cloudflare Images the bucket pain stops now, and customers have two options:
One image upload can generate up to 100 variants, which allows developers to stop placing image sizes in URLs. This way, if a site gets redesigned there isn’t a need to change all the image sizes because you already have all the variants you need stored in Cloudflare Images.
Give your users a one-time permission to upload one file to your server. This way developers don’t need to write additional code to move files from users into a bucket — they will be automatically uploaded into your Cloudflare storage.
Minimal engineering effort
Have you ever dreamed about your team focusing entirely on product development instead of maintaining infrastructure? We understand, and this is why we created a straightforward set of APIs as well as a UI in the Cloudflare Dashboard. This allows your team to serve and optimize images without the need to set up and maintain a pipeline from scratch.
Once you get access to Cloudflare Images your team can start:
Uploading, deleting and updating images via API.
Setting up preferred variants.
Editing with Image Resizing both with the UI and API.
Serving an image with one click.
Process images on the fly
We all know that Google and many other search engines use the loading speed as one of their ranking factors; Cloudflare Images helps you be on the top of that list. We automatically detect what browser your clients are using and serve the most optimized version of the image, so that you don’t need to worry about file extensions, configuring origins for your image sets or even cache hit rates.
Curious to have a sneak peek at Cloudflare Images? Sign up now!
This is the story of how we decided to work with Google to build Signed Exchanges support at Cloudflare. But, more generally, it’s also a story of how Cloudflare thinks about building disruptive new products and how we’ve built an organization designed around continuous innovation and long-term thinking.
A Threat to the Open Web?
The story starts with me pretty freaked out. In May 2015, Facebook had announced a new format for the web called Instant Articles. The format allowed publishers to package up their pages and serve them directly from Facebook’s infrastructure. This was a threat to Google, so the company responded in October with Accelerated Mobile Pages (AMP). The idea was generally the same as Facebook’s but using Google’s infrastructure.
As a general Internet user, if these initiatives were successful they were pretty scary. The end game was that the entirety of the web would effectively be slurped into Facebook and Google’s infrastructure.
But as the cofounder and CEO of Cloudflare, this presented an even more immediate risk. If everyone moved their infrastructure to Facebook and Google, there wasn’t much left for us to do. Our mission is to help build a better Internet, but we’ve always assumed there would be an Internet. If Facebook and Google were successful, there was real risk there would just be Facebook and Google.
That said, the rationale behind these initiatives was compelling. While they ended with giving Facebook and Google much more control, they started by trying to solve a real problem. The web was designed with the assumption that the devices connecting to it would be on a fixed, wired connection. As more of the web moved to being accessed over wireless, battery-powered, relatively low-power devices, many of the assumptions of the web were holding back its performance.
This is particularly true in the developing world. While a failed connection can happen anywhere, the further you get from where content is hosted, the more likely it is to happen. Facebook and Google both reasoned that if they could package up the web and serve complete copies of pages from their infrastructure, which spanned the developing world, they could significantly increase the usability of the web in areas where there was still an opportunity for Internet usage to grow. Again, this is a laudable goal. But, if successful, the results would have been dreadful for the Internet as we know it.
Seeds of Disruption
So that’s why I was freaked out. In our management meetings at Cloudflare I’d walk through how this was a risk to the Internet and our business, and we needed to come up with a strategy to address it. Everyone on our team listened and agreed but ultimately and reasonably said: that’s in the future, and we have immediate priorities of things our customers need, so we’ll need to wait until next quarter to prioritize it.
That’s all correct, and probably the right decision if you are forced to make one, but it’s also how companies end up getting disrupted. So, in 2016, we decided to fund a small team led by Dane Knecht, Cloudflare’s founding product manager, to set up a sort of skunkworks team in Austin, TX. The idea was to give the team space away from headquarters, so it could work on strategic projects with a long payoff time horizon.
Today, Dane’s team is known as the Emerging Technologies & Incubation (ETI) team. It was where products like Cloudflare for Teams, 1.1.1.1, and Workers were first dreamed up and prototyped. And it remains critical to how Cloudflare continues to be so innovative. Austin, since 2016, has also grown from a small skunkworks outpost to what will, before the end of this year, be our largest office. That office now houses members from every Cloudflare team, not just ETI. But, in some ways, it all started with trying to figure out how we should respond to Instant Articles and AMP.
We met with both Facebook and Google. Facebook’s view of the world was entirely centered around their app, and didn’t leave much room for partners. Google, on the other hand, was born out of the open web and still ultimately wanted to foster it. While there has been a lot of criticism of AMP, much of which we discussed with them directly, it’s important to acknowledge that it started from a noble goal: to make the web faster and easier to use for those with limited Internet resources.
We built a number of products to extend the AMP ecosystem and make it more open. Viewed on their own, those products have not been successes. But they catalyzed a number of other innovations. For instance, building a third party AMP cache on Cloudflare required a more programmable network. That directly resulted in us prototyping a number of different serverless computing strategies and finally settling on Workers. In fact, many of the AMP products we built were the first products built using Workers.
Part of the magic of our ETI team is that they are constantly trying new things. They’re set up differently, in order to take lots of “shots on goal.” Some won’t work, in which case we want them to fail fast. And, even for those that don’t, we are always learning, collaborating, and innovating. That’s how you create a culture of innovation that produces products at the rate we do at Cloudflare.
Signed Exchanges: Helping Build a Better Internet
Importantly also, working with the AMP team at Google helped us better collaborate on ideas around Internet performance. Cloudflare’s mission is to “help build a better Internet.” It’s not to “build a better Internet.” The word “help” is essential and something I’ll always correct if I hear someone leave it out. The Internet is inherently a collection of networks, and also a collection of work from a number of people and organizations. Innovation doesn’t happen in a vacuum but is catalyzed by collaboration and open standards. Working with other great companies who are aligned with democratizing performance optimization technology and speeding up the Internet is how we believe we can make significant and meaningful leaps in terms of performance.
And that’s what Signed Exchanges have the opportunity to be. They take the best parts of AMP — in terms of allowing pages to be preloaded to render almost instantly — but give back control over the content to the individual publishers. They don’t require you to exclusively use Google’s infrastructure and are extensible well beyond just traffic originating from search results. And they make the web incredibly fast and more accessible even in those areas where Internet access is slow or expensive.
We’re proud of the part we played in bringing this new technology to the Internet. We’re excited to see how people use it to build faster services available more broadly. And the ETI team is back at work looking over the innovation horizon and continuously asking the question: what’s next?
Cloudflare’s mission is to help build a better Internet for everyone. Building a better Internet means helping build more reliable and efficient services that everyone can use. To help realize this vision, we’re announcing the free distribution of two products, one old and one new:
Tiered Caching is now available to all customers for free. Tiered Caching reduces origin data transfer and improves performance, making web properties cheaper and faster to operate. Tiered Cache was previously a paid addition to Free, Pro, and Business plans as part of Argo.
Orpheus is now available to all customers for free. Orpheus routes around problems on the Internet to ensure that customer origin servers are reachable from everywhere, reducing the number of errors your visitors see.
Tiered Caching: improving website performance and economics for everyone
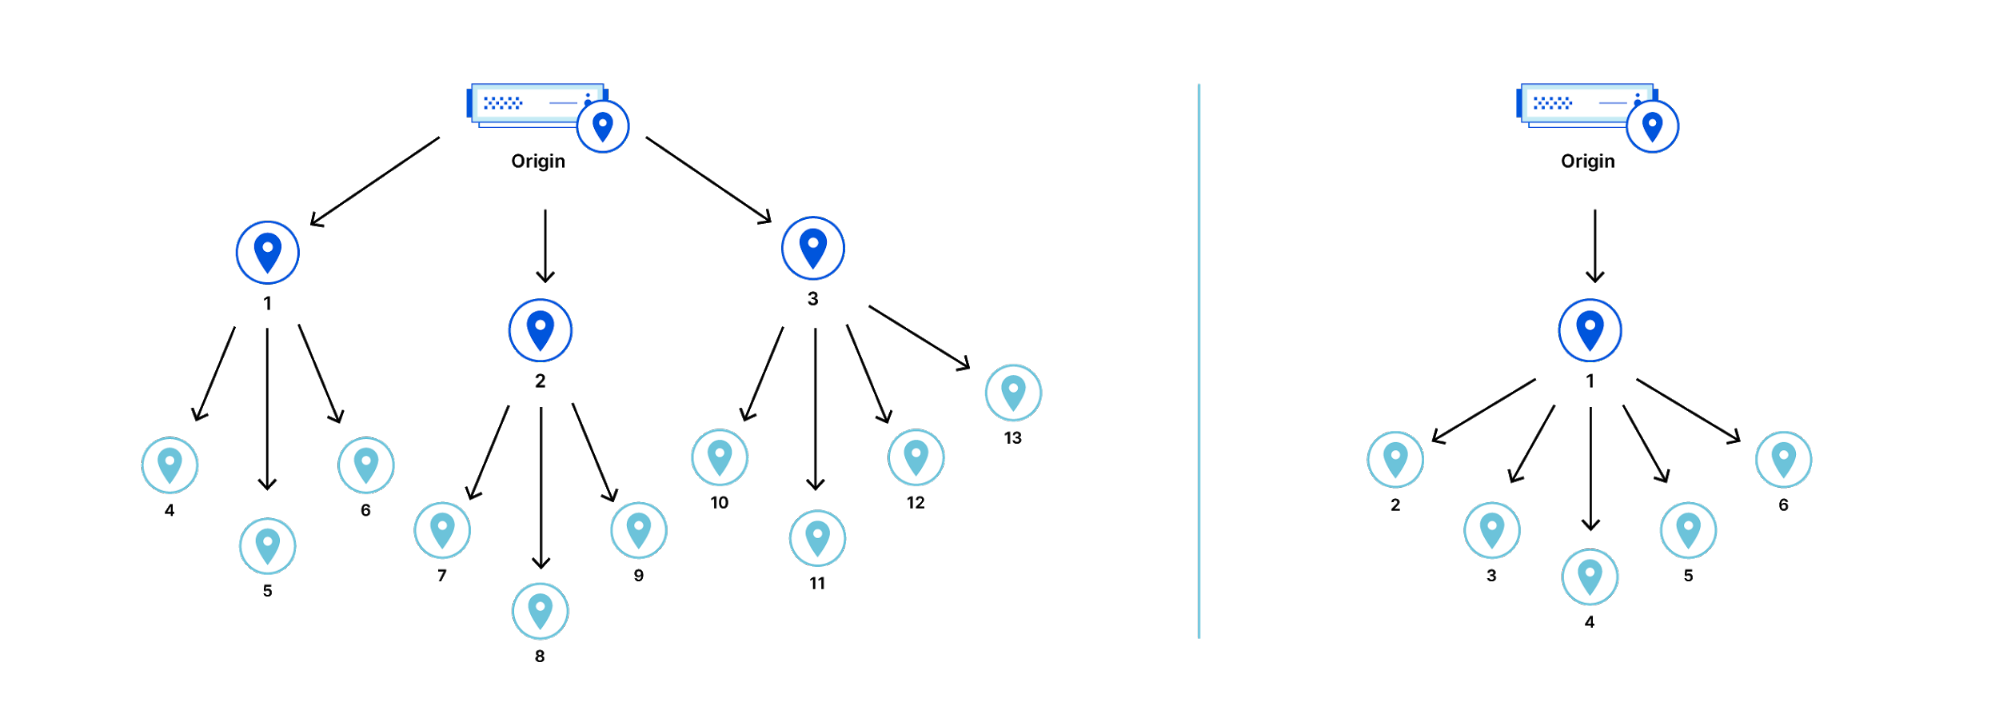
Tiered Cache uses the size of our network to reduce requests to customer origins by dramatically increasing cache hit ratios. With data centers around the world, Cloudflare caches content very close to end users, but if a piece of content is not in cache, the Cloudflare edge data centers must contact the origin server to receive the cacheable content. This can be slow and places load on an origin server compared to serving directly from cache.
Tiered Cache works by dividing Cloudflare’s data centers into a hierarchy of lower-tiers and upper-tiers. If content is not cached in lower-tier data centers (generally the ones closest to a visitor), the lower-tier must ask an upper-tier to see if it has the content. If the upper-tier does not have it, only the upper-tier can ask the origin for content. This practice improves bandwidth efficiency by limiting the number of data centers that can ask the origin for content, reduces origin load, and makes websites more cost-effective to operate.
Dividing data centers like this results in improved performance for visitors because distances and links traversed between Cloudflare data centers are generally shorter and faster than the links between data centers and origins. It also reduces load on origins, making web properties more economical to operate. Customers enabling Tiered Cache can achieve a 60% or greater reduction in their cache miss rate as compared to Cloudflare’s traditional CDN service.
Additionally, Tiered Cache concentrates connections to origin servers so they come from a small number of data centers rather than the full set of network locations. This results in fewer open connections using server resources.
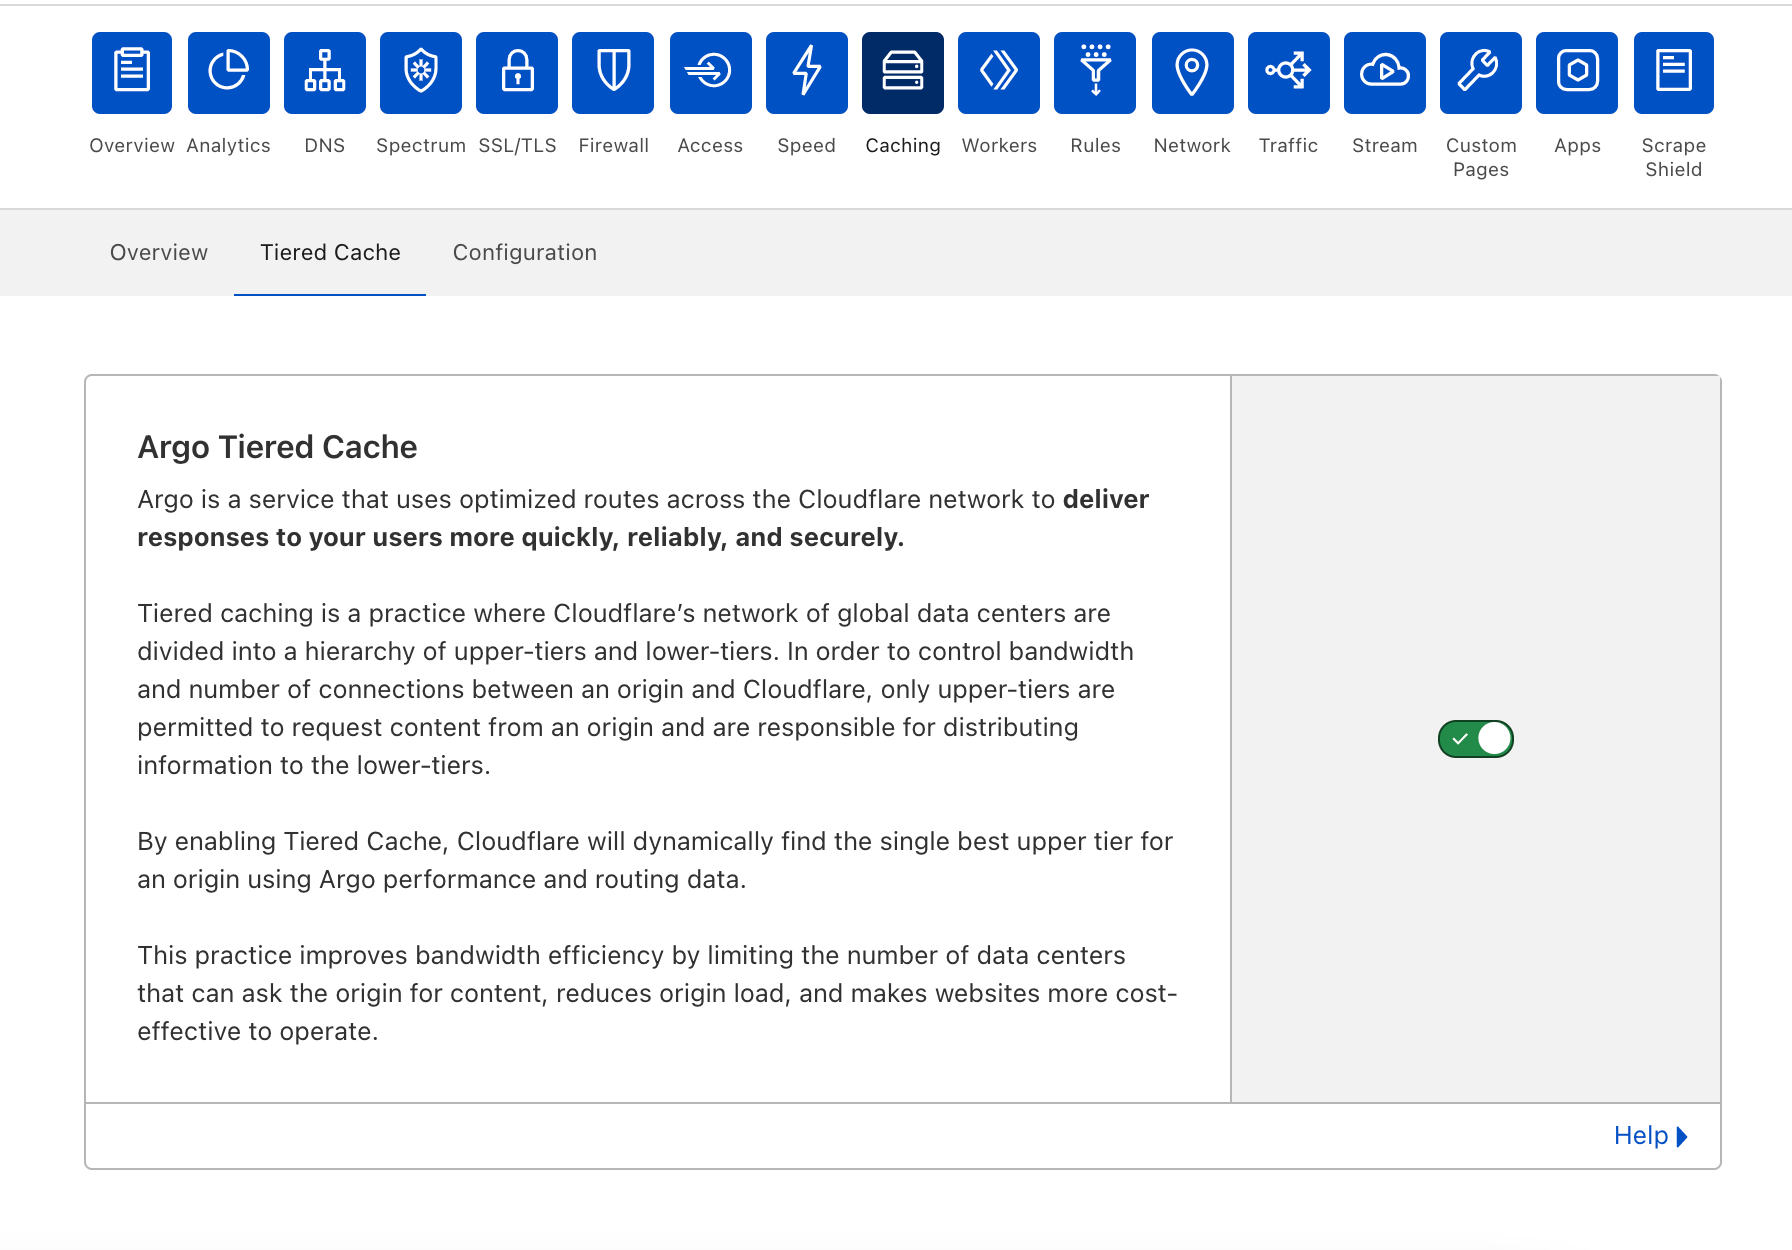
Tiered Cache is simple to enable:
Log into your Cloudflare account.
Navigate to the Caching in the dashboard.
Under Caching, select Tiered Cache.
Enable Tiered Cache.
From there, customers will automatically be enrolled in Smart Tiered Cache Topology without needing to make any additional changes. Enterprise Customers can select from different prefab topologies or have a custom topology created for their unique needs.
Smart Tiered Cache dynamically selects the single best upper tier for each of your website’s origins with no configuration required. We will dynamically find the single best upper tier for an origin by using Cloudflare’s performance and routing data. Cloudflare collects latency data for each request to an origin. Using this latency data, we can determine how well any upper-tier data center is connected with an origin and can empirically select the best data center with the lowest latency to be the upper-tier for an origin.
Today, Smart Tiered Cache is being offered to ALL Cloudflare customers for free, in contrast to other CDNs who may charge exorbitant fees for similar or worse functionality. Current Argo customers will get additional benefits described here. We think that this is a foundational improvement to the performance and economics of running a website.
But what happens if an upper-tier can’t reach an origin?
Orpheus: solving origin reachability problems for everyone
Cloudflare is a reverse proxy that receives traffic from end users and proxies requests back to customer servers or origins. To be successful, Cloudflare needs to be reachable by end users while simultaneously being able to reach origins. With end users around the world, Cloudflare needs to be able to reach origins from multiple points around the world at the same time. This is easier said than done! The Internet is not homogenous, and diverse Cloudflare network locations do not necessarily take the same paths to a given customer origin at any given time. A customer origin may be reachable from some networks but not from others.
Cloudflare developed Argo to be the Waze of the Internet, allowing our network to react to changes in Internet traffic conditions and route around congestion and breakages in real-time, ensuring end users always have a good experience. Argo Smart Routing provides amazing performance and reliability improvements to our customers.
Enter Orpheus. Orpheus provides reachability benefits for customers by finding unreachable paths on the Internet in real time, and guiding traffic away from those paths, ensuring that Cloudflare will always be able to reach an origin no matter what is happening on the Internet.
Today, we’re excited to announce that Orpheus is available to and being used by all our customers.
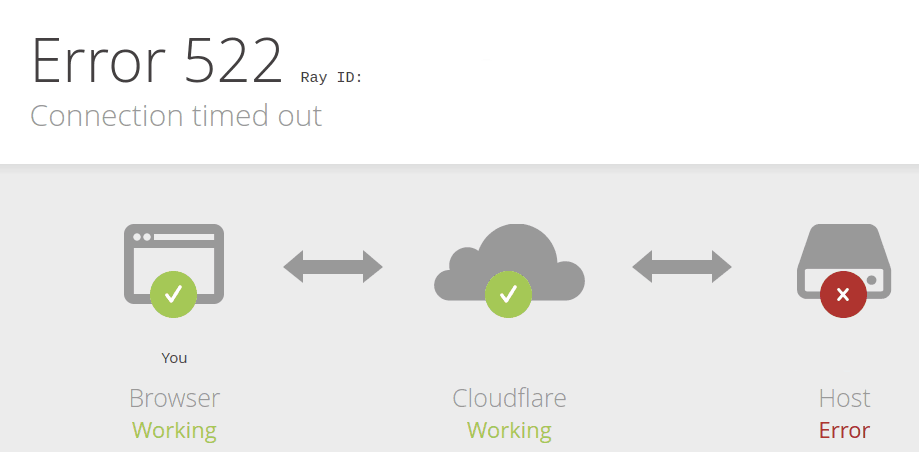
Fewer 522s
You may have seen this error before at one time or another.
This error indicates that a user was unable to reach content because Cloudflare couldn’t reach the origin. Because of the unpredictability of the Internet described above, users may see this error even when an origin is up and able to receive traffic.
So why do you see this error? The 522 error occurs when network instability causes traffic sent by Cloudflare to fail either before it reaches the origin, or on the way back from the origin to Cloudflare. This is the equivalent of either Cloudflare or your origin sending a request and never getting a response. Both sides think that they’re fine, but the network path between them is not reachable at all. This causes customer pain.
Orpheus solves that pain, ensuring that no matter where users are or where the origin is, an Internet application will always be reachable from Cloudflare.
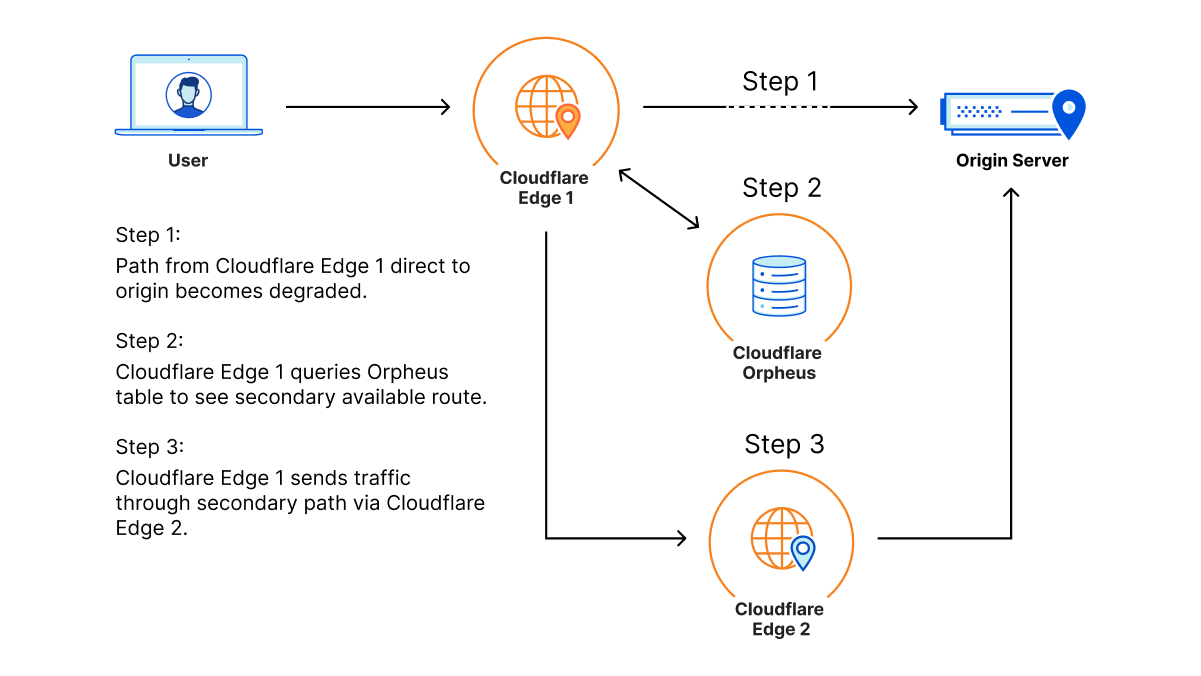
How it works
Orpheus builds and provisions routes from Cloudflare to origins by analyzing data from users on every path from Cloudflare and ordering them on a per-data center level with the goal of eliminating connection errors and minimizing packet loss. If Orpheus detects errors on the current path from Cloudflare back to a customer origin, Orpheus will steer subsequent traffic from the impacted network path to the healthiest path available.
This is similar to how Argo works but with some key differences: Argo is always steering traffic down the fastest path, whereas Orpheus is reactionary and steers traffic down healthy (and not necessarily the fastest) paths when needed.
Improving origin reachability for customers
Let’s look at an example.
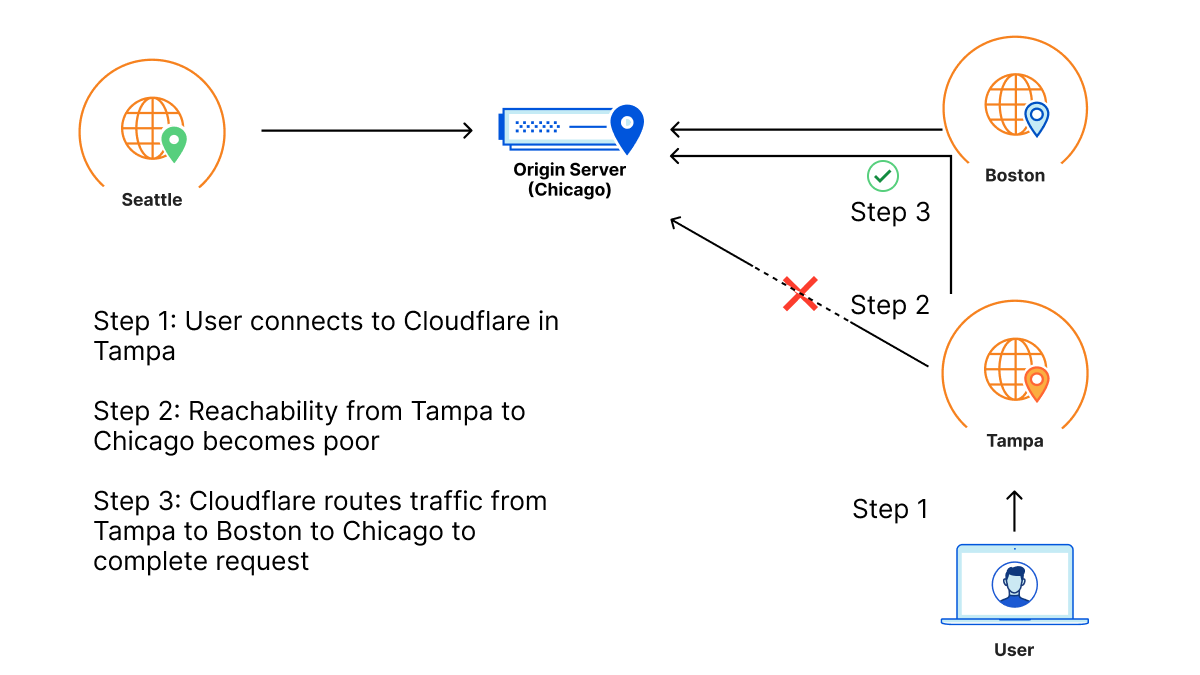
Barry has an origin hosted in WordPress in Chicago for his daughter’s band. This zone primarily sees traffic from three locations: the location closest to his daughter in Seattle, the location closest to him in Boston, and the location closest to his parents in Tampa, who check in on their granddaughter’s site daily for updates.
One day, a link between Tampa and the Chicago origin gets cut by a wandering backhoe. This means that Tampa loses some connectivity back to the Chicago origin. As a result, Barry’s parents start to see failures when connecting back to origin when connecting to the site. This reflects in origin reachability decreasing. Orpheus helps here by finding alternate paths for Barry’s parents, whether it’s through Boston, Seattle, or any location in between that isn’t impacted by the fiber cut seen in Tampa.
So even though there is packet loss between one of Cloudflare’s data centers and Barry’s origin, because there is a path through a different Cloudflare data center that doesn’t have loss, the traffic will still succeed because the traffic will go down the non-lossy path.
How much does Orpheus help my origin reachability?
In our rollout of Orpheus for customers, we observed that Orpheus improved Origin reachability by 23%, from 99.87% to 99.90%. Here is a chart showing the improvement Orpheus provides (lower is better):
We measure this reachability improvement by measuring 522 rates for every data center-origin pair and then comparing traffic that traversed Orpheus routes with traffic that went directly back to origin. Orpheus was especially helpful at improving reachability for slightly lossy paths that could present small amounts of failure over a long period of time, whereas direct to origin would see those failures.
Note that we’ll never get this number to 0% because, with or without Orpheus, some origins really are unreachable because they are down!
Orpheus makes Cloudflare products better
Orpheus pairs well with some of our products that are already designed to provide highly available services on an uncertain Internet. Let’s go over the interactions between Orpheus and three of our products: Load Balancing, Cloudflare Network Interconnect, and Tiered Cache.
Load Balancing
Orpheus and Load Balancing go together to provide high reachability for every origin endpoint. Load balancing allows for automatic selection of endpoints based on health probes, ensuring that if an origin isn’t working, customers will still be available and operational. Orpheus finds reachable paths from Cloudflare to every origin. These two products in tandem provide a highly available and reachable experience for customers.
Cloudflare Network Interconnect
Orpheus and Cloudflare Network Interconnect (CNI) combine to always provide a highly reachable path, no matter where in the world you are. Consider Acme, a company who is connected to the Internet by only one provider that has a lot of outages. Orpheus will do its best to steer traffic around the lossy paths, but if there’s only one path back to the customer, Orpheus won’t be able to find a less-lossy path. Cloudflare Network Interconnect solves this problem by providing a path that is separate from the transit provider that any Cloudflare data center can access. CNI provides a viable path back to Acme’s origin that will allow Orpheus to engage from any data center in the world if loss occurs.
Shields for All
Orpheus and Tiered Cache can combine to build an adaptive shield around an origin that caches as much as possible while improving traffic back to origin. Tiered Cache topologies allow for customers to deflect much of their static traffic away from their origin to reduce load, and Orpheus helps ensure that any traffic that has to go back to the origin traverses over highly available links.
Improving origin performance for everyone
The Internet is a growing, ever-changing ecosystem. With the release of Orpheus and Tiered Cache for everyone, we’ve given you the ability to navigate whatever the Internet has in store to provide the best possible experience to your customers.
We launched Argo in 2017 to improve performance on the Internet. Argo uses real-time global network information to route around brownouts, cable cuts, packet loss, and other problems on the Internet. Argo makes the network that Cloudflare relies on—the Internet—faster, more reliable, and more secure on every hop around the world.
Without any complicated configuration, Argo is able to use real-time traffic data to pick the fastest path across the Internet, improving performance and delivering more satisfying experiences to your customers and users.
Today, Cloudflare is announcing several upgrades to Argo’s intelligent routing:
When it launched, Argo was entirely focused on the “middle mile,” speeding up connections from Cloudflare to our customers’ servers. Argo now delivers optimal routes from clients and users to Cloudflare, further reducing end-to-end latency while still providing the impressive edge to origin performance that Argo is known for. These last-mile improvements reduce end user round trip times by up to 40%.
We’re also adding support for accelerating pure IP workloads, allowing Magic Transit and Magic WAN customers to build IP networks to enjoy the performance benefits of Argo.
Starting today, all Free, Pro, and Business plan Argo customers will see improved performance with no additional configuration or charge. Enterprise customers have already enjoyed the last mile performance improvements described here for some time. Magic Transit and WAN customers can contact their account team to request Early Access to Argo Smart Routing for Packets.
What’s Argo?
Argo finds the best and fastest possible path for your traffic on the Internet. Every day, Cloudflare carries hundreds of billions of requests across our network and the Internet. Because our network, our customers, and their end users are well distributed globally, all of these requests flowing across our infrastructure paint a great picture of how different parts of the Internet are performing at any given time.
Just like Waze examines real data from real drivers to give you accurate, uncongested — and sometimes unorthodox — routes across town, Argo Smart Routing uses the timing data Cloudflare collects from each request to pick faster, more efficient routes across the Internet.
In practical terms, Cloudflare’s network is expansive in its reach. Some Internet links in a given region may be congested and cause poor performance (a literal traffic jam). By understanding this is happening and using alternative network locations and providers, Argo can put traffic on a less direct, but faster, route from its origin to its destination.
These benefits are not theoretical: enabling Argo Smart Routing shaves an average of 33% off HTTP time to first byte (TTFB).
One other thing we’re proud of: we’ve stayed super focused on making it easy to use. One click in the dashboard enables better, smarter routing, bringing the full weight of Cloudflare’s network, data, and engineering expertise to bear on making your traffic faster. Advanced analytics allow you to understand exactly how Argo is performing for you around the world.
We’ve continuously improved Argo since the day it was launched, making it faster, quicker to respond to changes on the Internet, and allowing more types of traffic to flow over smart routes.
Argo’s new performance optimizations improve last mile latencies and reduce time to first byte even further. Argo’s last mile optimizations can save up to 40% on last mile round trip time (RTT) with commensurate improvements to end-to-end latency.
Running benchmarks against an origin server in the central United States, with visitors coming from around the world, Argo delivered the following results:
The Argo improvements on the last mile reduced overall time to first byte by 39%, and reduced end-to-end latencies by 5% overall:
Faster, better caching
Argo customers don’t just see benefits to their dynamic traffic. Argo’s new found skills provide benefits for static traffic as well. Because Argo now finds the best path to Cloudflare, client TTFB for cache hits sees the same last mile benefit as dynamic traffic.
Getting access to faster Argo
The best part about all these improvements? They’re already deployed and enabled for all Argo customers! These optimizations have been live for Enterprise customers for some time and were enabled for Free, Pro, and Business plans this week.
Moving Down the Stack: Argo Smart Routing for Packets
Customers use Magic Transit and Magic WAN to create their own IP networks on top of Cloudflare’s network, with access to a full suite of network functions (firewalls, DDoS mitigation, and more) delivered as a service. This allows customers to build secure, private, global networks without the need to purchase specialized hardware. Now, Argo Smart Routing for Packets allows these customers to create these IP networks with the performance benefits of Argo.
Consider a fictional gaming company, Golden Fleece Games. Golden Fleece deployed Magic Transit to mitigate attacks by malicious actors on the Internet. They want to be able to provide a quality game to their users while staying up. However, they also need their service to be as fast as possible. If their game sees additional latency, then users won’t play it, and even if their service is technically up, the increased latency will show a decrease in users. For Golden Fleece, being slow is just as bad as being down.
Finance customers also have similar requirements for low latency, high security scenarios. Consider Jason Financial, a fictional Magic Transit customer using Packet Smart Routing. Jason Financial employees connect to Cloudflare in New York, and their requests are routed to their data center which is connected to Cloudflare through a Cloudflare Network Interconnect attached to Cloudflare in Singapore. For Jason Financial, reducing latency is extraordinarily important: if their network is slow, then the latency penalties they incur can literally cost them millions of dollars due to how fast the stock market moves. Jason wants Magic Transit and other Cloudflare One products to secure their network and prevent attacks, but improving performance is important for them as well.
Argo’s Smart Routing for Packets provides these customers with the security they need at speeds faster than before. Now, customers can get the best of both worlds: security and performance. Now, let’s talk a bit about how it works.
A bird’s eye view of the Internet
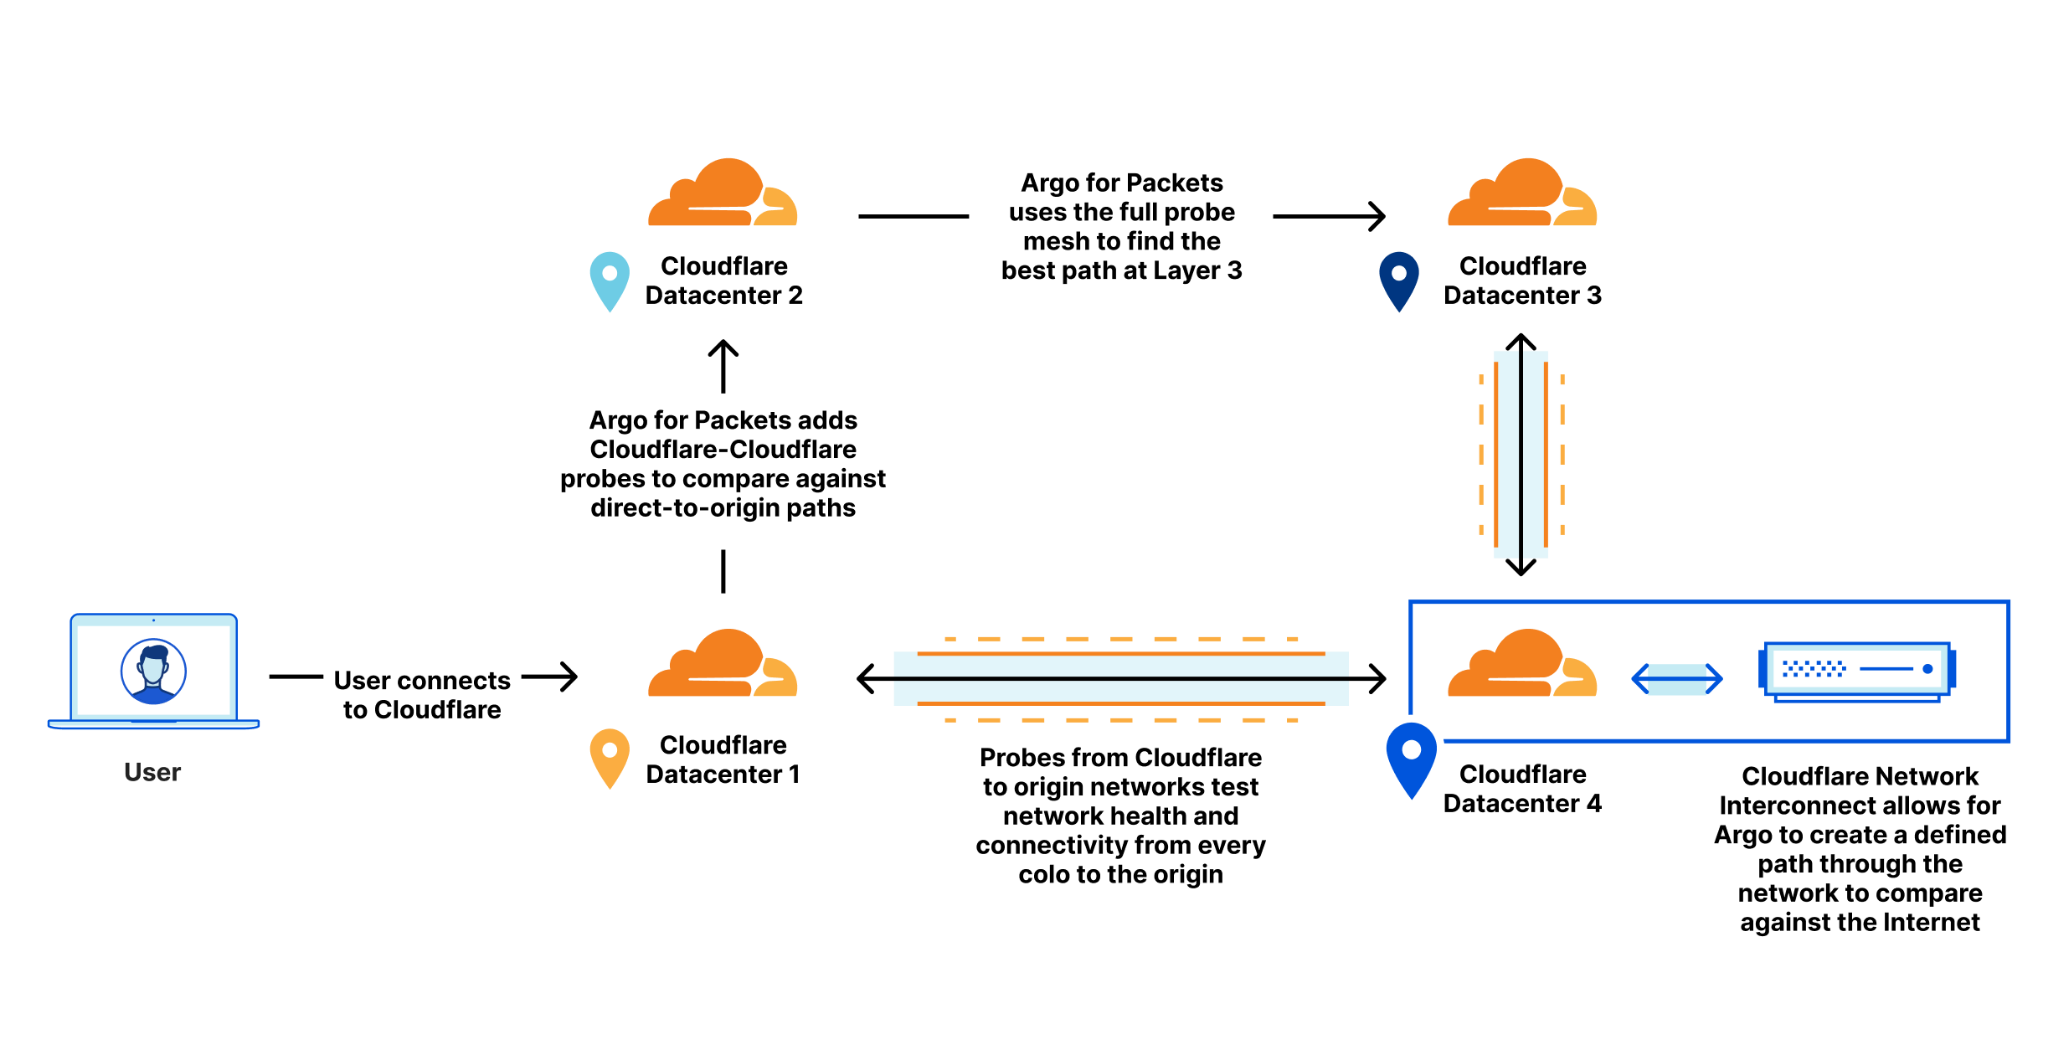
Argo Smart Routing for Packets picks the fastest possible path between two points. But how does Argo know that the chosen route is the fastest? As with all Argo products, the answer comes by analyzing a wealth of network data already available on the Cloudflare edge. In Argo for HTTP or Argo for TCP, Cloudflare is able to use existing timing data from traffic that’s already being sent over our edge to optimize routes. This allows us to improve which paths are taken as traffic changes and congestion on the Internet happens. However, to build Smart Routing for Packets, the game changed, and we needed to develop a new approach to collect latency data at the IP layer.
Let’s go back to the Jason Financial case. Before, Argo would understand that the number of paths that are available from Cloudflare’s data centers back to Jason’s data center is proportional to the number of data centers Cloudflare has multiplied by the number of distinct interconnections between each data center. By looking at the traffic to Singapore, Cloudflare can use existing Layer 4 traffic and network analytics to determine the best path. But Layer 4 is not Layer 3, and when you move down the stack, you lose some insight into things like round trip time (RTT), and other metrics that compose time to first byte because that data is only produced at higher levels of the application stack. It can become harder to figure out what the best path actually is.
Optimizing performance at the IP layer can be more difficult than at higher layers. This is because protocol and application layers have additional headers and stateful protocols that allow for further optimization. For example, connection reuse is a performance improvement that can only be realized at higher layers of the stack because HTTP requests can reuse existing TCP connections. IP layers don’t have the concept of connections or requests at all: it’s just packets flowing over the wire.
To help bridge the gap, Cloudflare makes use of an existing data source that already exists for every Magic Transit customer today: health check probes. Every Magic Transit customer leverages existing health check probes from every single Cloudflare data center back to the customer origin. These probes are used to determine tunnel health for Magic Transit, so that Cloudflare knows which paths back to origin are healthy. These probes contain a variety of information that can also be used to improve performance as well. By examining health check probes and adding them to existing Layer 4 data, Cloudflare can get a better understanding of one-way latencies and can construct a map that allows us to see all the interconnected data centers and how fast they are to each other. Once this customer gets a Cloudflare Network Interconnect, Argo can use the data center-to-data center probes to create an alternate path for the customer that’s different from the public Internet.
Using this map, Cloudflare can construct dynamic routes for each customer based on where their traffic enters Cloudflare’s network and where they need to go. This allows us to find the optimal route for Jason Financial and allows us to always pick the fastest path.
Packet-Level Latency Reductions
We’ve kind of buried the lede here! We’ve talked about how hard it is to optimize performance for IP traffic. The important bit: despite all these difficulties, Argo Smart Routing for Packets is able to provide a 10% average latency improvement worldwide in our internal testing!
Depending on your network topology, you may see latency reductions that are even higher!
How do I get Argo Smart Routing for Packets?
Argo Smart Routing for Packets is in closed beta and is available only for Magic Transit customers who have a Cloudflare Network Interconnect provisioned. If you are a Magic Transit customer interested in seeing the improved performance of Argo Smart Routing for Packets for yourself, reach out to your account team today! If you don’t have Magic Transit but want to take advantage of bigger performance gains while acquiring uncompromised levels of network security, begin your Magic Transit onboarding process today!
What’s next for Argo
Argo’s roadmap is simple: get ever faster, for any type of traffic.
Argo’s recent optimizations will help customers move data across the Internet at as close to the speed of light as possible. Internally, “how fast are we compared to the speed of light” is one of our engineering team’s key success metrics. We’re not done until we’re even.
Today, we’re excited to introduce Live-updating Analytics and Instant Logs. For Pro, Business, and Enterprise customers, our analytics dashboards now update live to show you data as it arrives. In addition to this, Enterprise customers can now view their HTTP request logs instantly in the Cloudflare dashboard.
Cloudflare’s data products are essential for our customers’ visibility into their network and applications. Having this data in real time makes it even more powerful — could you imagine trying to navigate using a GPS that showed your location a minute ago? That’s the power of real time data!
Real time data unlocks entirely new use cases for our customers. They can respond to threats and resolve errors as soon as possible, keeping their applications secure and minimising disruption to their end users.
Lightning fast, in-depth analytics
Cloudflare products generate petabytes of log data daily and are designed for scale. To make sense of all this data, we summarize it using analytics — the ability to see time series data, tops Ns, and slices and dices of the data generated by Cloudflare products. This allows customers to identify trends and anomalies and drill deep into problems.
We take it a step further from just showing you high-level metrics. With Cloudflare Analytics you have the ability to quickly drill down into the most important data — narrow in on a specific time period and add a chain of filters to slice your data further and see all the reflecting analytics.
Video of Cloudflare analytics showing live updating and drill down capabilities
Let’s say you’re a developer who’s made some recent changes to your website, you’ve deleted some old content and created new web pages. You want to know as soon as possible if these changes have led to any broken links, so you can quickly identify them and make fixes. With live-updating analytics, you can monitor your traffic by status code. If you notice an uptick in 404 errors add a filter to get details on all 404s and view the top referrers causing the errors. From there, take steps to resolve the problem whether by creating a redirect page rule or fixing broken links on your own site.
Instant Logs at your fingertips
While Analytics are a great way to see data at an aggregate level, sometimes you need event level information, too. Logs are powerful because they record every single event that flows through a network, so you can figure out what occurred on a granular level.
Our Logpush system is already able to get logs from our global edge network to a customer’s storage destination or analytics provider within seconds. However, setting this up has a lot of overhead and often customers incur long processing times at their destination. We wanted logs to be instant — instant to set up, deliver and take action on.
It’s that easy.
With Instant Logs, customers can actively monitor the traffic that’s flowing through their network and make key decisions that affect their applications now. Real time data unlocks totally new use cases:
For Security Engineers: Stop an attack as it’s developing. For example, apply a Firewall rule and see it’s impact — get answers within seconds. If it’s not what you were intending, try another rule and check again.
For Developers: Roll out a config change — to Cloudflare, or to your origin — and have piece of mind to watch as your error rates stay flat (we hope!).
(By the way, if you’re a fan of Workers and want to see real time Workers logging, check out the recently released dashboard for Workers logs.)
Logs at the speed of sight
“Real time” or “instant” can mean different things to different people in different contexts. At Cloudflare, we’re striving to make it as close to the speed of sight as possible. For us, this means we wanted the “glass-to-glass” time — from when you hit “enter” in your browser until when the logs appear — to be under one second.
How did we do?
Today, Cloudflare’s Instant Logs have an average delay of two seconds, and we’re continuing to make improvements to drive that down.
“Real-time” is a very fuzzy term. Looking at other services we see Akamai talking about real-time data as “within minutes” or “latency of 10 minutes”, Amazon talks about “near real-time” for CloudWatch, Google Cloud Logging provides log tailing with a configurable buffer “up to 60 seconds” to deal with potential out-of-order log delivery, and we benchmarked Fastly logs at 25 seconds.
Our goal is to drive down the delay as much as possible (within the laws of physics). We’re happy to have shipped Instant Logs that arrive in two seconds, but we’re not satisfied and will continue to bring that number down.
In time sensitive scenarios such as an attack or an outage, a few minutes or even 30 seconds of delay can have a big impact on customers. At Cloudflare, our goal is to get our customer’s data into their hands as fast as possible — and we’re just getting started.
How to get access?
Live-updating Analytics is available now on all Pro, Business, and Enterprise plans. Select the “Last 30 minutes” view of your traffic in the Analytics tab to start monitoring your analytics live.
We’ll be starting our Beta for Instant Logs in a couple of weeks. Join the waitlist to get notified about when you can get access!
If you’re eager for details on the inner workings of Instant Logs, check out our blog post about how we built Instant Logs.
What’s next
We’re hard at work to make Instant Logs available for all Enterprise customers — stay tuned after joining our waitlist. We’re also planning to bring all of our datasets to Instant Logs, including Firewall Events. In addition, we’re working on the next set of features like the ability to download logs from your session and compute running aggregates from logs.
For a peek into what we have our sights on next, we know how important it is to perform analysis on not only up-to-date data, but also historical data. We want to give customers the ability to analyze logs, draw insights and perform forensics straight from the Cloudflare platform.
If this sounds cool, we’re hiring engineers for our data team in Lisbon, London and San Francisco — would love to have you help us build the future of data at Cloudflare.
Just about four years ago, we announced Cloudflare Workers, a serverless platform that runs directly on the edge.
Throughout this week, we will talk about the many ways Cloudflare is helping make applications that already exist on the web faster. But if today is the day you decide to make your idea come to life, building your project on the Cloudflare edge, and deploying it directly to the tubes of the Internet is the best way to guarantee your application will always be fast, for every user, regardless of their location.
It’s been a few years since we talked about how Cloudflare Workers compares to other serverless platforms when it comes to performance, so we decided it was time for an update. While most of our work on the Workers platform over the past few years has gone into making the platform more powerful: introducing new features, APIs, storage, debugging and observability tools, performance has not been neglected.
Today, Workers is 30% faster than it was three years ago at P90. And it is 210% faster than Lambda@Edge, and 298% faster than Lambda.
How do you measure the performance of serverless platforms?
I’ve run hundreds of performance benchmarks between CDNs in the past — the formula is simple: we use a tool called Catchpoint, which makes requests from nodes all over the world to the same asset, and reports back on the time it took for each location to return a response.
Measuring serverless performance is a bit different — since the thing you’re comparing is the performance of compute, rather than a static asset, we wanted to make sure all functions performed the same operation.
In our 2018 blog on speed testing, we had each function simply return the current time. For the purposes of this test, “serverless” products that were not able to meet the minimum criteria of being able to perform this task were disqualified. Serverless products used in this round of testing executed the same function, of identical computational complexity, to ensure accurate and fair results.
It’s also important to note what it is that we’re measuring. The reason performance matters, is because it impacts the experience of actual end customers. It doesn’t matter what the source of latency is: DNS, network congestion, cold starts… the customer doesn’t care what the source is, they care about wasting time waiting for their application to load.
It is therefore important to measure performance in terms of the end user experience — end to end, which is why we use global benchmarks to measure performance.
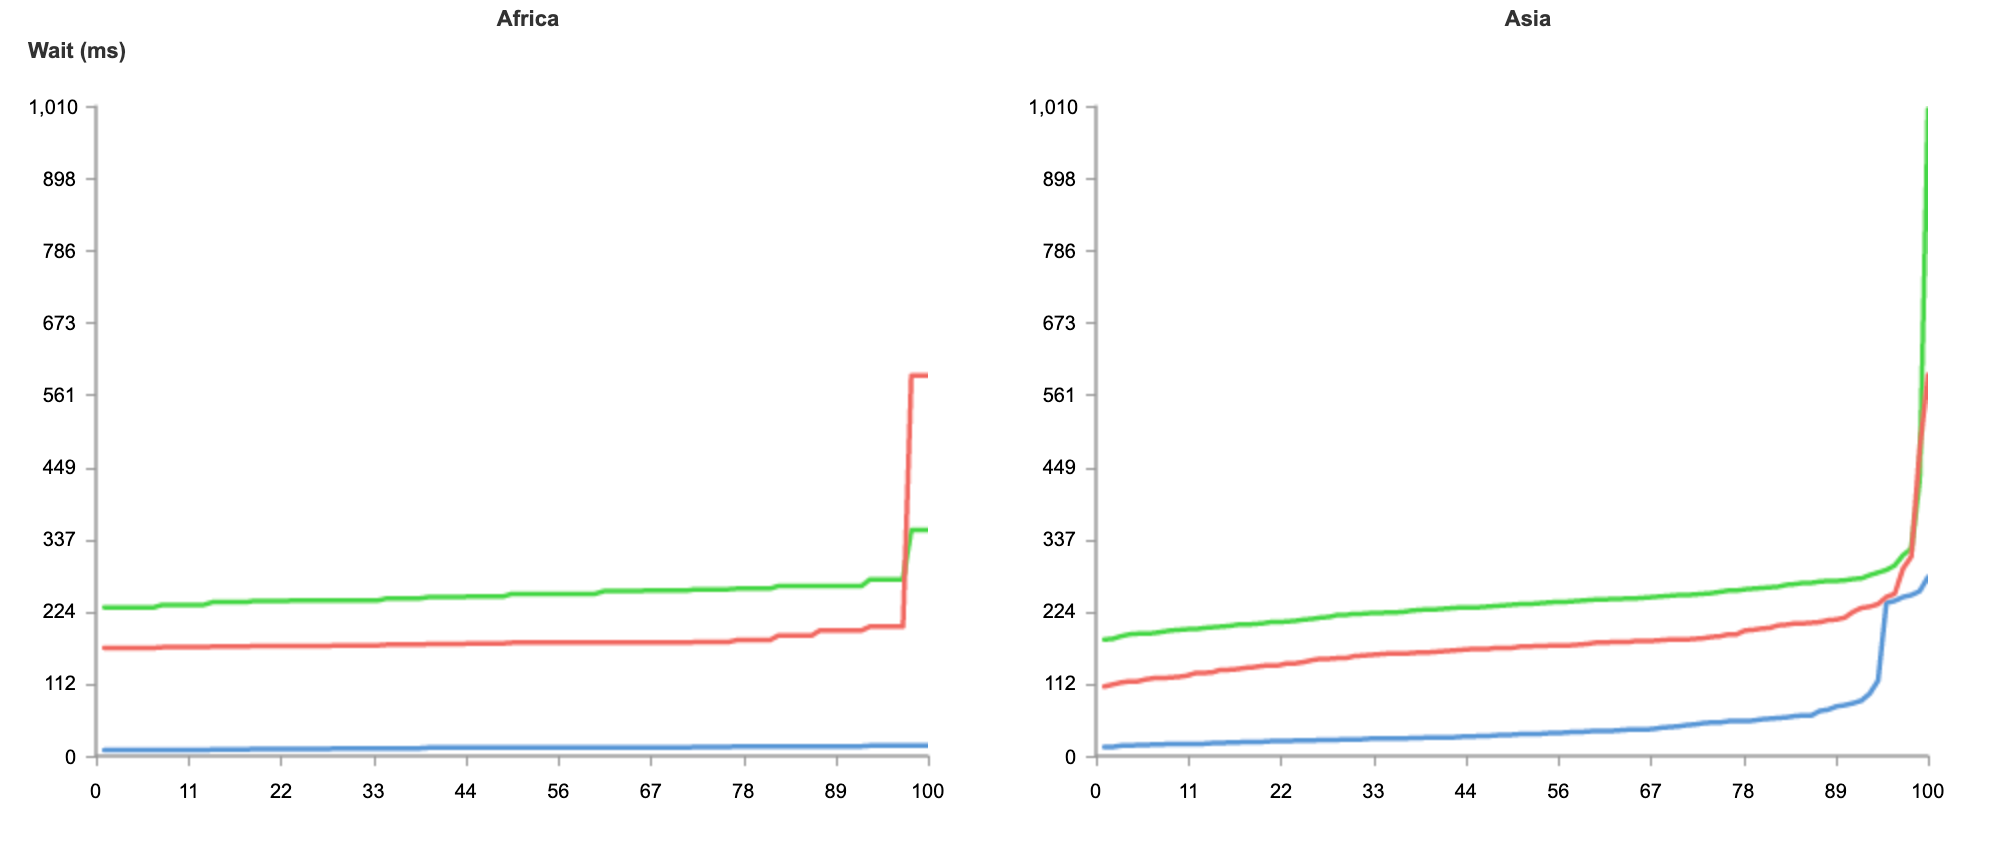
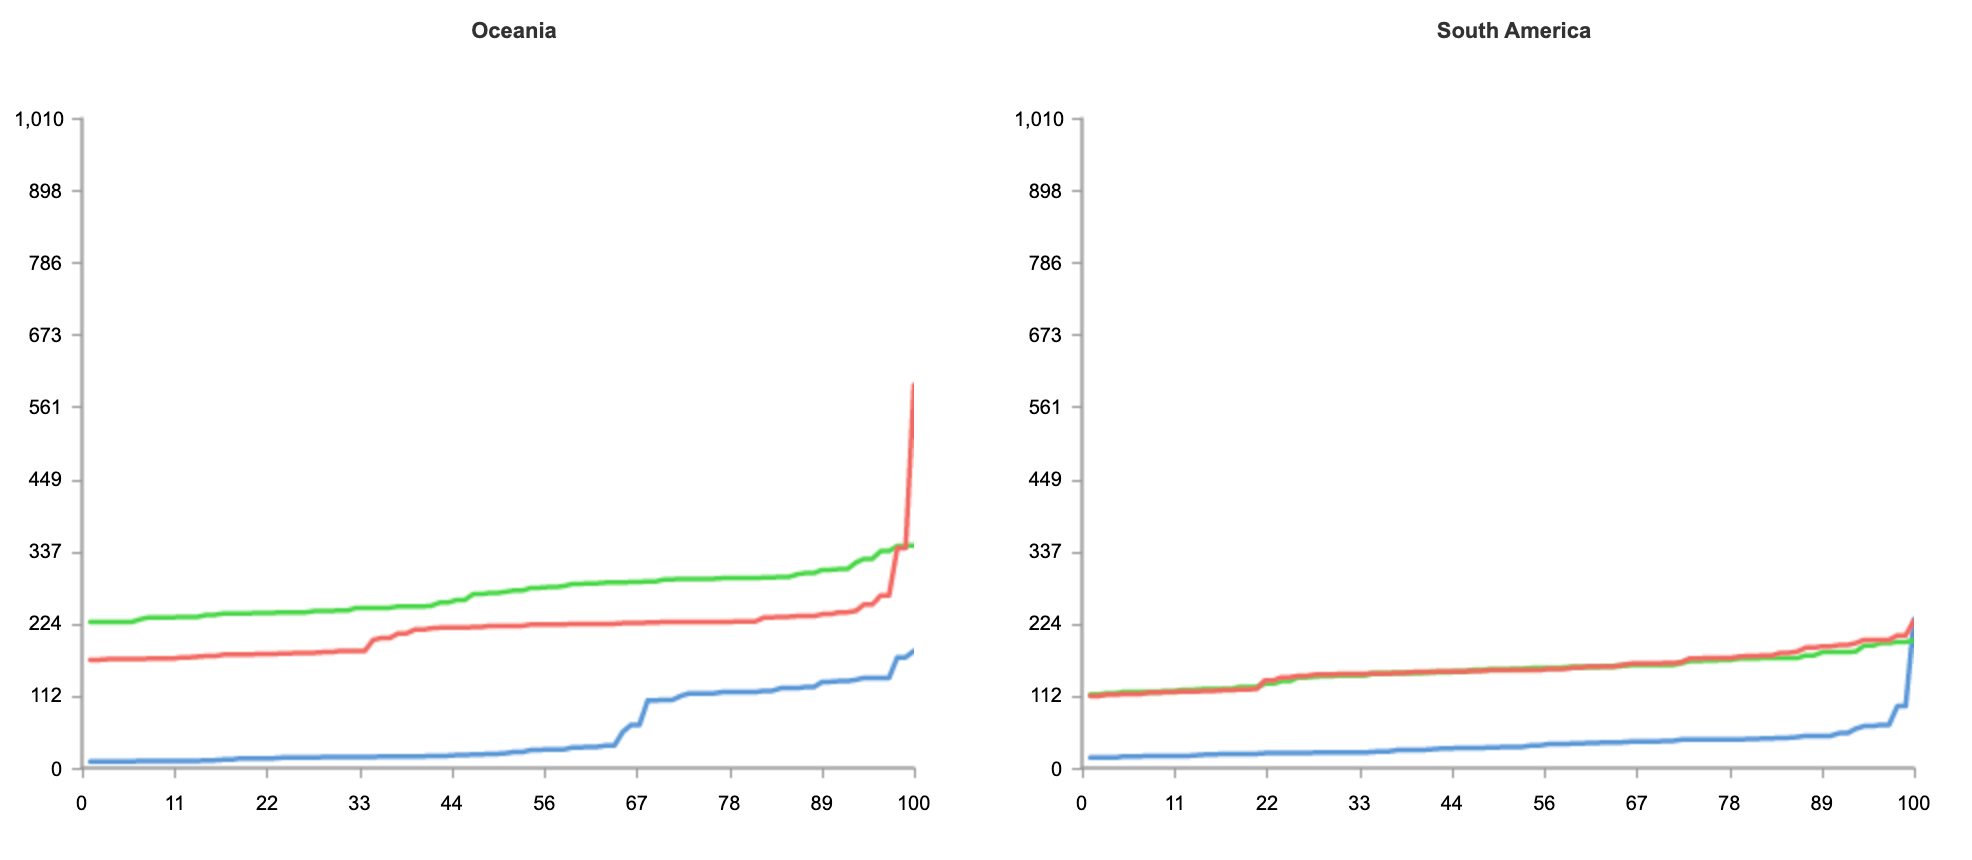
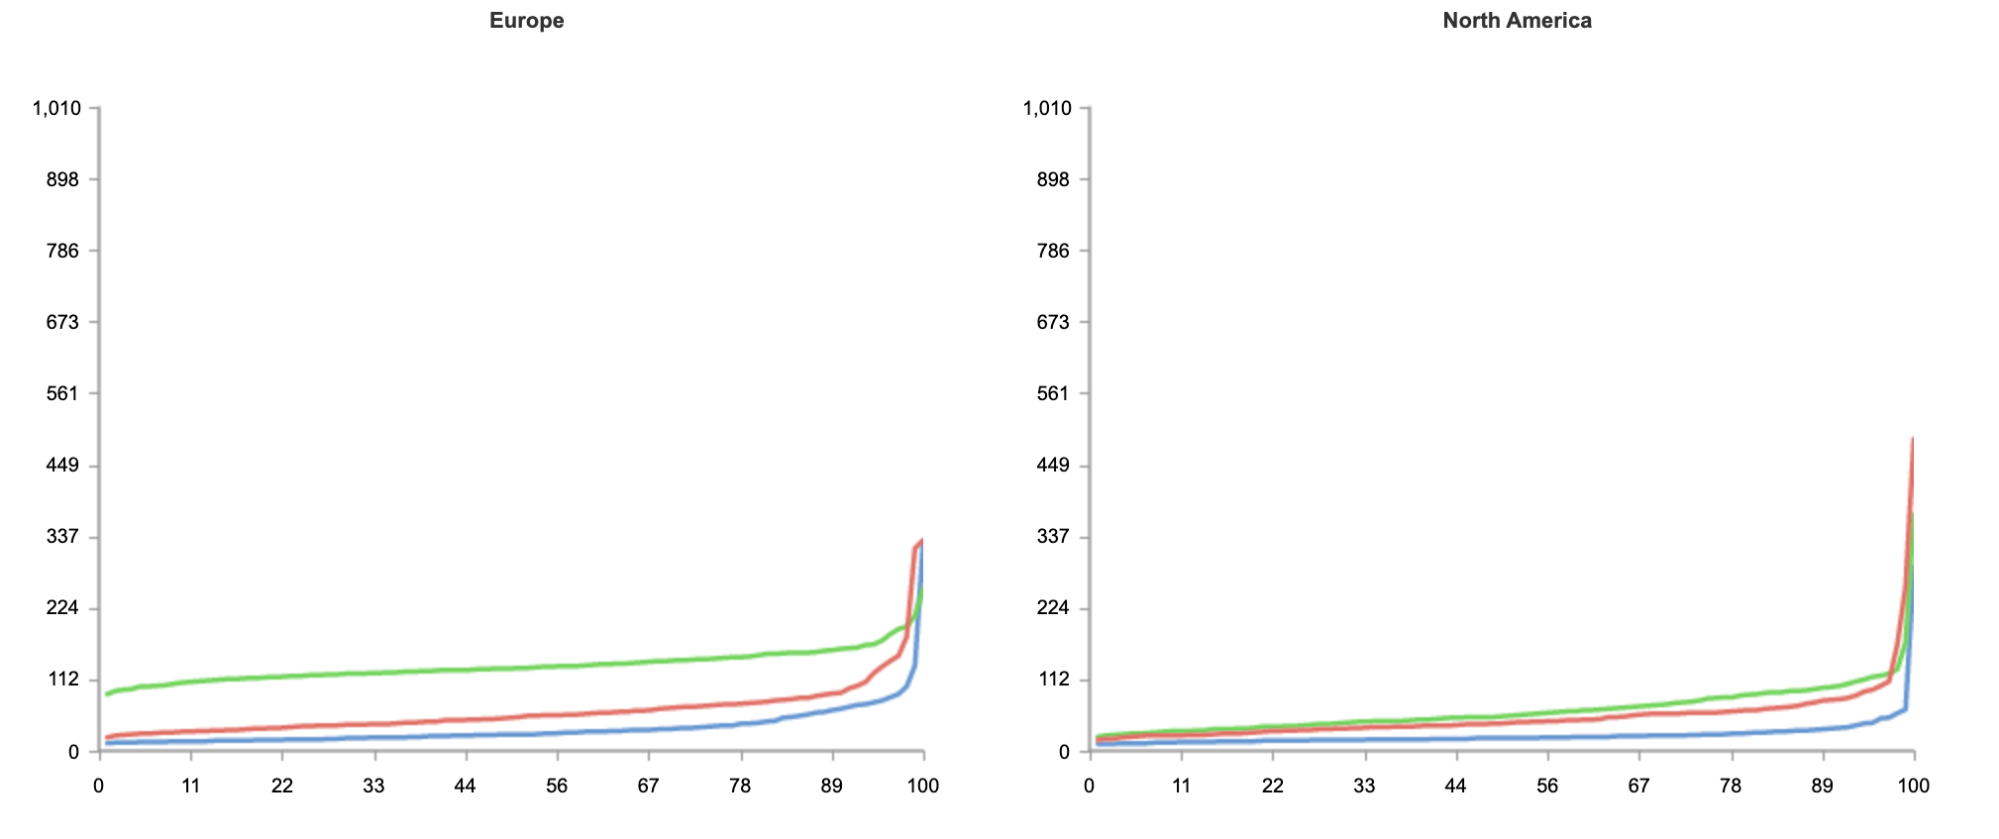
The result below shows tests run from 50 nodes all over the world, across North America, South America, Europe, Asia and Oceania.
As you can see from the results, no matter where users are in the world, when it comes to speed, Workers can guarantee the best experience for customers.
In the case of Workers, getting the best performance globally requires no additional effort on the developers’ part. Developers do not need to do any additional load balancing, or configuration of regions. Every deployment is instantly live on Cloudflare’s extensive edge network.
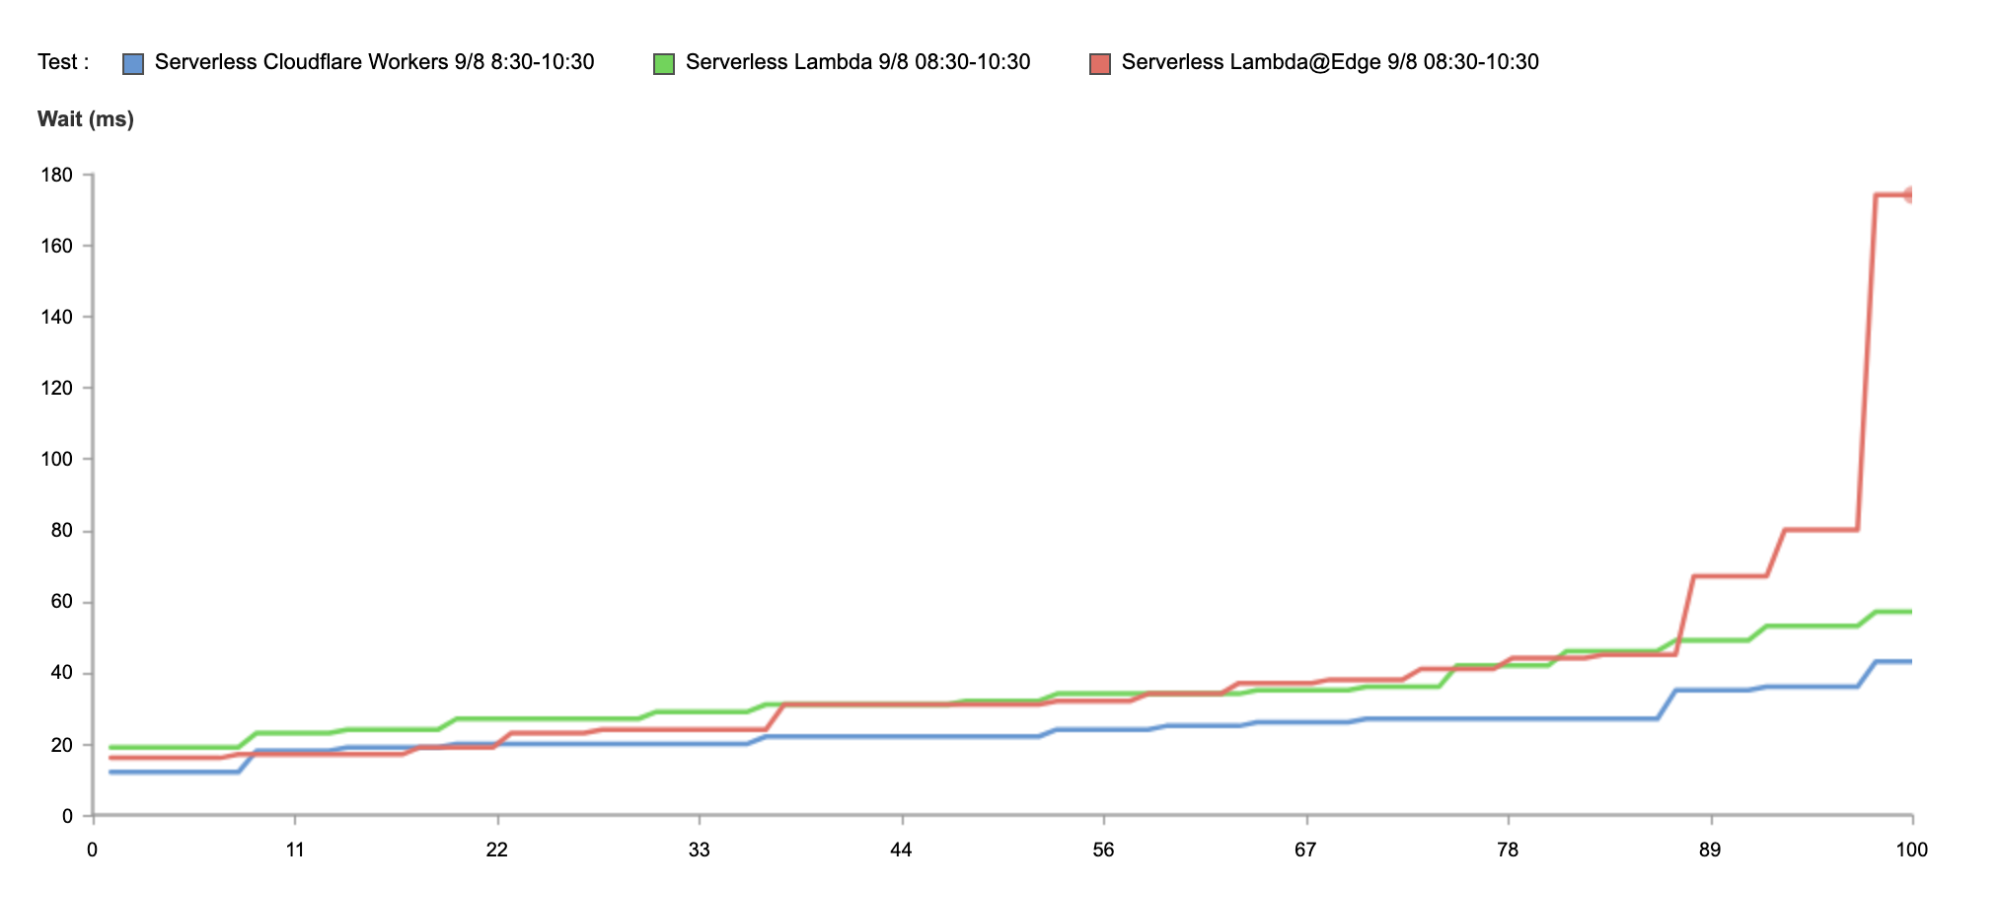
Even if you’re not seeking to address a global audience, and your customer base is conveniently located on the East coast of the United States, Workers is able to guarantee the fastest response on all requests.
Above, we have the results just from Washington, DC, as close as we could get to us-east-1. And again, without any optimization, Workers is 34% faster.
Why is that?
What defines the performance of a serverless platform?
Other than the performance of the code itself, from the perspective of the end user, serverless application performance is fundamentally a function of two variables: distance an application executes from the user, and the time it takes the runtime itself to spin up. The realization that distance from the user is becoming a greater and greater bottleneck on application performance is causing many serverless vendors to push deeper and deeper into the edge. Running applications on the edge — closer to the end user — increases performance. As 5G comes online, this trend will only continue to accelerate.
However, many cloud vendors in the serverless space run into a critical problem when addressing the issue when competing for faster performance. And that is: the legacy architecture they’re using to build out their offerings doesn’t work well with the inherent limitations of the edge.
Since the goal behind the serverless model is to intentionally abstract away the underlying architecture, not everyone is clear on how legacy cloud providers like AWS have created serverless offerings like Lambda. Legacy cloud providers deliver serverless offerings by spinning up a containerized process for your code. The provider auto-scales all the different processes in the background. Every time a container is spun up, the entire language runtime is spun up with it, not just your code.
To help address the first graph, measuring global performance, vendors are attempting to move away from their large, centralized architecture (a few, big data centers) to a distributed, edge-based world (a greater number of smaller data centers all over the world) to close the distance between applications and end users. But there’s a problem with their approach: smaller data centers mean fewer machines, and less memory. Each time vendors pursue a small but many data centers strategy to operate closer to the edge, the likelihood of a cold start occurring on any individual process goes up.
This effectively creates a performance ceiling for serverless applications on container-based architectures. If legacy vendors with small data centers move your application closer to the edge (and the users), there will be fewer servers, less memory, and more likely that an application will need a cold start. To reduce the likelihood of that, they’re back to a more centralized model; but that means running your applications from one of a few big centralized data centers. These larger centralized data centers, by definition, are almost always going to be further away from your users.
You can see this at play in the graph above by looking at the results of the tests when running in Lambda@Edge — despite the reduced proximity to the end user, p90 performance is slower than that of Lambda’s, as containers have to spin up more frequently.
Serverless architectures built on containers can move up and down the frontier, but ultimately, there’s not much they can do to shift that frontier curve.
What makes Workers so fast?
Workers was designed from the ground up for an edge-first serverless model. Since Cloudflare started with a distributed edge network, rather than trying to push compute from large centralized data centers out into the edge, working under those constraints forced us to innovate.
In one of our previous blog posts, we’ve discussed how this innovation translated to a new paradigm shift with Workers’ architecture being built on lightweight V8 isolates that can spin up quickly, without introducing a cold start on every request.
Not only has running isolates given us advantage out of the box, but as V8 gets better, so does our platform. For example, when V8 announced Liftoff, a compiler for WASM, all WASM Workers instantly got faster.
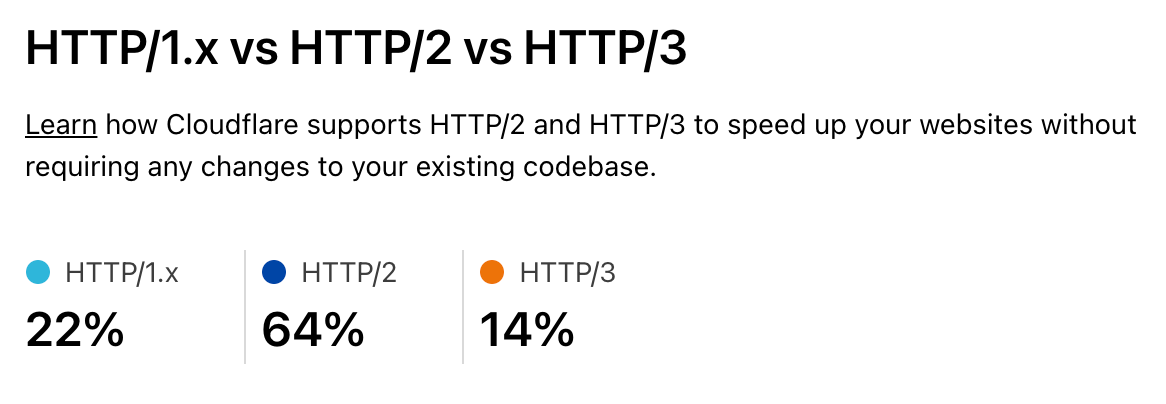
Similarly, whenever improvements are made to Cloudflare’s network (for example, when we add new data centers) or stack (e.g., supporting new, faster protocols like HTTP/3), Workers instantly benefits from it.
Additionally, we’re always seeking to make improvements to Workers itself to make the platform even faster. For example, last year, we released an improvement that helped eliminate cold starts for our customers.
One key advantage that helps Workers identify and address performance gaps is the scale at which it operates. Today, Workers services hundreds of thousands of developers, ranging from hobbyists to enterprises all over the world, serving millions of requests per second. Whenever we make improvements for a single customer, the entire platform gets faster.
Performance that matters
The ultimate goal of the serverless model is to enable developers to focus on what they do best — build experiences for their users. Choosing a serverless platform that can offer the best performance out of the box means one less thing developers have to worry about. If you’re spending your time optimizing for cold starts, you’re not spending your time building the best feature for your customers.
Just like developers want to create the best experience for their users by improving the performance of their application, we’re constantly striving to improve the experience for developers building on Workers as well.
In the same way customers don’t want to wait for slow responses, developers don’t want to wait on slow deployment cycles.
This is where the Workers platform excels yet again.
Any deployment on Cloudflare Workers takes less than a second to propagate globally, so you don’t want to spend time waiting on your code deploy, and users can see changes as quickly as possible.
Of course, it’s not just the deployment time itself that’s important, but the efficiency of the full development cycle, which is why we’re always seeking to improve it at every step: from sign up to debugging.
Don’t just take our word for it!
Needless to say, much as we try to remain neutral, we’re always going to be just a little biased. Luckily, you don’t have to take our word for it.
We invite you to sign up and deploy your first Worker today — it’ll just take a few minutes!
Today, we’re excited to announce support for Vary, an HTTP header that ensures different content types can be served to user-agents with differing capabilities.
At Cloudflare, we’re obsessed with performance. Our job is to ensure that content gets from our network to visitors quickly, and also that the correct content is served. Serving incompatible or unoptimized content burdens website visitors with a poor experience while needlessly stressing a website’s infrastructure. Lots of traffic served from our edge consists of image files, and for these requests and responses, serving optimized image formats often results in significant performance gains. However, as browser technology has advanced, so too has the complexity required to serve optimized image content to browsers all with differing capabilities — not all browsers support all image formats! Providing features to ensure that the correct images are served to the correct requesting browser, device, or screen is important!
Serving images on the modern web
In the web’s early days, if you wanted to serve a full color image, JPEGs reigned supreme and were universally supported. Since then, the state of the art in image encoding has advanced by leaps and bounds, and there are now increasingly more advanced and efficient codecs like WebP and AVIF that promise reduced file sizes and improved quality.
This sort of innovation is exciting, and delivers real improvements to user experience. However, it makes the job of web servers and edge networks more complicated. As an example, until very recently, WebP image files were not universally supported by commonly used browsers. A specific browser not supporting an image file becomes a problem when “intermediate caches”, like Cloudflare, are involved in delivering content.
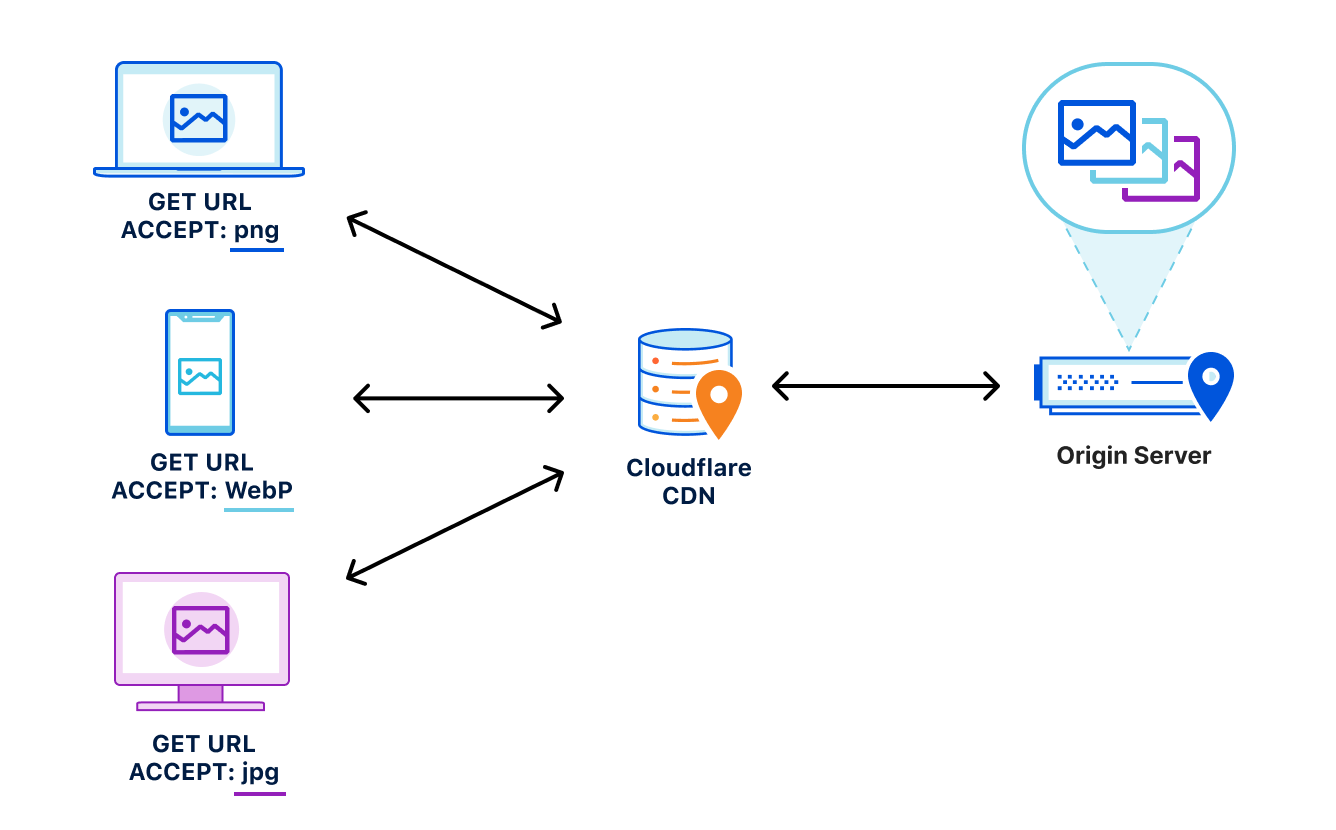
Let’s say, for example, that a website wants to provide the best experience to whatever browser requests the site. A desktop browser sends a request to the website and the origin server responds with the website’s content including images. This response is cached by a CDN prior to getting sent back to the requesting browser.
Now let’s say a mobile browser comes along and requests that same website with those images. In the situation where a cached image is a WebP file, and WebP is not supported by the mobile browser, the website will not load properly because the content returned from cache is not supported by the mobile browser. That’s a problem.
To help solve this issue, today we’re excited to announce our support of the Vary header for images.
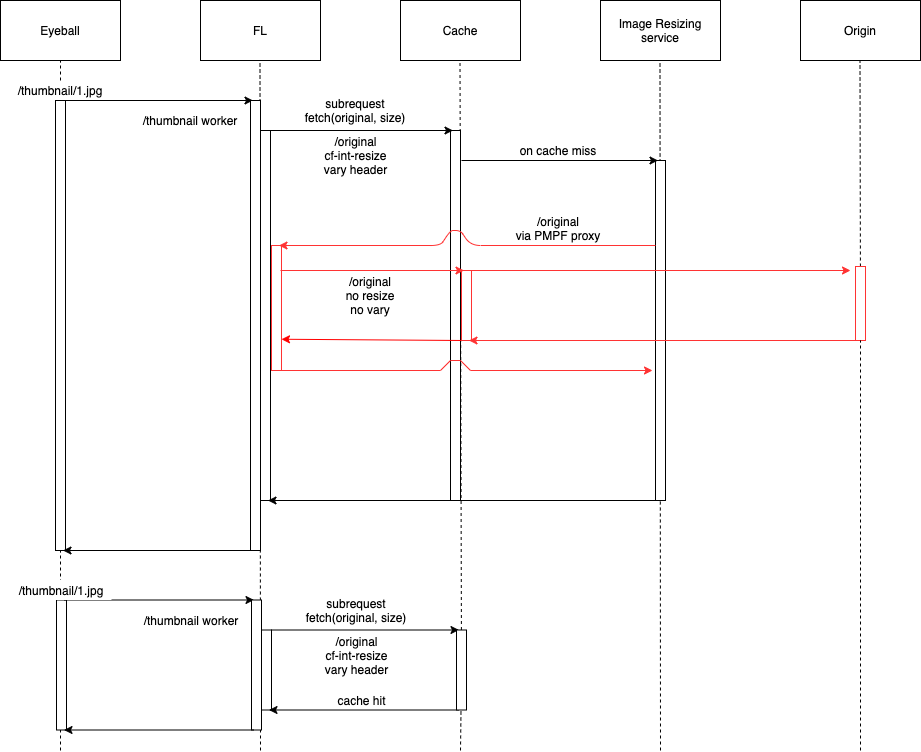
How Vary works
Vary is an HTTP response header that allows origins to serve variants of the same content from a single URL, and have intermediate caches serve the correct variant to each user-agent that comes along.
Smashing Magazine has an excellent deep dive on how Vary negotiation works here.
When browsers send a request for a website, they include a variety of request headers. A fairly common example might look something like:
GET /page.html HTTP/1.1
Host: example.com
Connection: keep-alive
Accept:
text/html,application/xhtml+xml,application/xml;q=0.9,image/avif,image/webp,image/apng,*/*;q=0.8,application/signed-exchange;v=b3;q=0.9
User-Agent: Mozilla/5.0 (Macintosh; Intel Mac OS X 10_15_7) AppleWebKit/537.36 (KHTML, like Gecko) Chrome/91.0.4472.164 Safari/537.36
Accept-Encoding: gzip, deflate, br
As we can see above, the browser sends a lot of information in these headers along with the GET request for the URL. What’s important for Vary for Images is the Accept header. The Accept header tells the origin what sort of content the browser is capable of handling (file types, etc.) and provides a list of content preferences.
When the origin gets the request, it sees the Accept header which details the content preference for the browser’s request. In the origin’s response, Vary tells the browser that content returned was different depending on the value of the Accept header in the request. Thus if a different browser comes along and sends a request with different Accept header values, this new browser can get a different response from the origin. An example origin response may look something like:
HTTP/1.1 200 OK
Content-Length: 123456
Vary: Accept
How Vary works with Cloudflare’s cache
Now, let’s add Cloudflare to the mix. Cloudflare sits in between the browser and the origin in the above example. When Cloudflare receives the origin’s response, we cache the specific image variant so that subsequent requests from browsers with the same image preferences can be served from cache. This also means that serving multiple image variants for the same asset will create distinct cache entries.
Accept header normalization
Caching variants in intermediate caches can be difficult to get right. Naive caching of variants can cause problems by serving incorrect or unsupported image variants to browsers. Some solutions that reduce the potential for caching incorrect variants generally provide those safeguards at the expense of performance.
For example, through a process known as content-negotiation, the correct variant is directed to the requesting browser through a process of multiple requests and responses. The browser could send a request to the origin asking for a list of available resource variants. When the origin responds with the list, the browser can make an additional request for the desired resources from that list, which the server would then respond to. These redundant calls to narrow down which type of content that the browser accepts and the server has available can cause performance delays.
Vary for Images reduces the need for these redundant negotiations to an origin by parsing the request’s Accept header and sending that on to the origin to ensure that the origin knows exactly what content it needs to deliver to the browser. Additionally because the expected variant values can be set in Cloudflare’s API (see below), we make an end-run around the negotiation process because we are sure what to ask for and expect from the origin. This reduces the needless back-and-forth between browsers and servers.
How to Enable Vary for Images
You can enable Vary for Images from Cloudflare’s API for Pro, Business, and Enterprise Customers.
Things to keep in mind when using Vary:
Vary for Images enables varying on the following file extensions: avif, bmp, gif, jpg, jpeg, jp2, jpg2, png, tif, tiff, webp. These extensions can have multiple variants served so long as the origin server sends the Vary: Accept response header.
If the origin server sends Vary: Accept but does not serve the expected variant, the response will not be cached. This will be indicated with the BYPASS cache status in the response headers.
The list of variant types the origin serves for each extension must be configured so that Cloudflare can decide which variant to serve without having to contact the origin server.
Enabling Vary in action
Enabling Vary functionality currently requires the use of the Cloudflare API. Here’s an example of how to enable variant support for a zone that wants to serve JPEGs in addition to WebP and AVIF variants for jpeg and jpg extensions.
Any purge of varied images will purge all content variants for that URL. That way, if the image changes, you can easily update the cache with a single purge versus chasing down how many potential out-of-date variants may exist. This behavior is true regardless of purge type (single file, tag, or hostname) used.
Other image optimization tools available at Cloudflare
Providing an additional option for customers to optimize the delivery of images also allows Cloudflare to support more customer configurations. For other ways Cloudflare can help you serve images to visitors quickly and efficiently, you can check out:
Polish — Cloudflare’s automatic product that strips image metadata and applies compression. Polish accelerates image downloads by reducing image size.
Image Resizing — Cloudflare’s image resizing product works as a proxy on top of the Cloudflare edge cache to apply the adjustments to an image’s size and quality.
Cloudflare for Images — Cloudflare’s all-in-one service to host, resize, optimize, and deliver all of your website’s images.
Try Vary for Images Out
Vary for Images provides options that ensure the best images are served to the browser based on the browser’s capabilities and preferences. If you’re looking for more control over how your images are delivered to browsers, we encourage you to try this new feature out.
No one likes to wait. Internet impatience is something we all suffer from.
Waiting for an app to update to show when your lunch is arriving; a website that loads slowly on your phone; a movie that hasn’t started to play… yet.
But building a waitless Internet is hard. And that’s where Cloudflare comes in. We’ve built the global network for Internet applications, be they websites, IoT devices or mobile apps. And we’ve optimized it to cut the wait.
If you believe ISP advertising then you’d think that bandwidth (100Mbps! 1Gbps! 2Gbps!) is the be all and end all of Internet speed. That’s a small component of what it takes to deliver the always on, instant experience we want and need.
The reality is you need three things: ample bandwidth, to have content and applications close to the end user, and to make the software as fast as possible. Simple really. Except not, because all three things require a lot of work at different layers.
In this blog post I’ll look at the factors that go into building our fast global network: bandwidth, latency, reliability, caching, cryptography, DNS, preloading, cold starts, and more; and how Cloudflare zeroes in on the most powerful number there is: zero.
I will focus on what happens when you visit a website but most of what I say below applies to the fitness tracker on your wrist sending information up to the cloud, your smart doorbell alerting you to a visitor, or an app getting you the weather forecast.
Faster than the speed of sight
Imagine for a moment you are about to type in the name of a website on your phone or computer. You’ve heard about an exciting new game “Silent Space Marine” and type in silentspacemarine.com.
The very first thing your computer does is translate that name into an IP address. Since computers do absolutely everything with numbers under the hood this “DNS lookup” is the first necessary step.
It involves your computer asking a recursive DNS resolver for the IP address of silentspacemarine.com. That’s the first opportunity for slowness. If the lookup is slow everything else will be slowed down because nothing can start until the IP address is known.
The DNS resolver you use might be one provided by your ISP, or you might have changed it to one of the free public resolvers like Google’s 8.8.8.8. Cloudflare runs the world’s fastest DNS resolver, 1.1.1.1, and you can use it too. Instructions are here.
With fast DNS name resolution set up your computer can move on to the next step in getting the web page you asked for.
Aside: how fast is fast? One way to think about that is to ask yourself how fast you are able to perceive something change. Research says that the eye can make sense of an image in 13ms. High quality video shows at 60 frames per second (about 16ms per image). So the eye is fast!
What that means for the web is that we need to be working in tens of milliseconds not seconds otherwise users will start to see the slowness.
Slowly, desperately slowly it seemed to us as we watched
Why is Cloudflare’s 1.1.1.1 so fast? Not to downplay the work of the engineering team who wrote the DNS resolver software and made it fast, but two things help make it zoom: caching and closeness.
Caching means keeping a copy of data that hasn’t changed, so you don’t have to go ask for it. If lots of people are playing Silent Space Marine then a DNS resolver can keep its IP address in cache so that when a computer asks for the IP address the software can reply instantly. All good DNS resolvers cache information for speed.
But what happens if the IP address isn’t in the resolver’s cache. This happens the first time someone asks for it, or after a timeout period where the resolver needs to check that the IP address hasn’t changed. In order to get the IP address the resolver asks an authoritative DNS server for the information. That server is ‘authoritative’ for a specific domain (like silentspacemarine.com) and knows the correct IP address.
Since DNS resolvers sometimes have to ask authoritative servers for IP addresses it’s also important that those servers are fast too. That’s one reason why Cloudflare runs one of the world’s largest and fastest authoritative DNS services. Slow authoritative DNS could be another reason an end user has to wait.
So much for caching, what about ‘closeness’. Here’s the problem: the speed of light is really slow. Yes, I know everyone tells you that the speed of light is really fast, but that’s because us sentient water-filled carbon lifeforms can’t move very fast.
But electrons shooting through wires, and lasers blasting data down fiber optic cables, send data at or close to light speed. And sadly light speed is slow. And this slowness shows up because in order to get anything on the Internet you need to go back and forth to a server (many, many times).
In the best case of asking for silentspacemarine.com and getting its IP address there’s one roundtrip:
“Hello, can you tell me the address of silentspacemarine.com?” “Yes, it’s…”
Even if you made the DNS resolver software instantaneous you’d pay the price of the speed of light. Sounds crazy, right? Here’s a quick calculation. Let’s imagine at home I have fiber optic Internet and the nearest DNS resolver to me is the city 100 km’s away. And somehow my ISP has laid the straightest fiber cable from me to the DNS resolver.
The speed of light in fiber is roughly 200,000,000 meters per second. Round trip would be 200,000 meters and so in the best possible case a whole one ms has been eaten up by the speed of light. Now imagine any worse case and the speed of light starts eating into the speed of sight.
The solution is quite simple: move the DNS resolver as close to the end user as possible. That’s partly why Cloudflare has built out (and continues to grow) our network. Today it stands at 250 cities worldwide.
Aside: actually it’s not “quite simple” because there’s another wrinkle. You can put servers all over the globe, but you also have to hook them up to the Internet. The beauty of the Internet is that it’s a network of networks. That also means that you don’t just plug into the Internet and get the lowest latency, you need to connect to multiple ISPs, transit networks and more so that end users, whatever network they use, get the best waitless experience they want.
That’s one reason why Cloudflare’s network isn’t simply all over the world, it’s also one of the most interconnected networks.
So far, in building the waitless Internet, we’ve identified fast DNS resolvers and fast authoritative DNS as two needs. What’s next?
Hello. Hello. OK.
So your web browser knows the IP address of Silent Space Marine and got it quickly. Great. Next step is for it to ask the web server at that IP address for the web page. Not so fast! The first step is to establish a connection to that server.
This is almost always done using a protocol called TCP that was invented in the 1970s. The very first step is for your computer and the server to agree they want to communicate. This is done with something called a three-way handshake.
Your computer sends a message saying, essentially, “Hello”, the server replies “I heard you say Hello” (that’s one round trip) and then your computer replies “I heard you say you heard me say Hello, so now we can chat” (actually it’s SYN then SYN-ACK and then ACK).
So, at least one speed-of-light troubled round trip has occurred. How do we fight the speed of light? We bring the server (in this case, web server) close to the end user. Yet another reason for Cloudflare’s massive global network and high interconnectedness.
Now the web browser can ask the web server for the web page of Silent Space Marine, right? Actually, no. The problem is we don’t just need a fast Internet we also need one that’s secure and so pretty much everything on the Internet uses an encryption protocol called TLS (which some old-timers will call SSL) and so next a secure connection has to be established.
Aside: astute readers might be wondering why I didn’t mention security in the DNS section above. Yep, you’re right, that’s a whole other wrinkle. DNS also needs to be secure (and fast) and resolvers like 1.1.1.1 support the encrypted DNS standards DoH and DoT. Those are built on top of… TLS. So in order to have fast, secure DNS you need the same thing as fast, secure web, and that’s fast TLS.
Oh, and by the way, you don’t want to get into some silly trade off between security and speed. You need both, which is why it’s helpful to use a service provider, like Cloudflare, that does everything.
Is this line secure?
TLS is quite a complicated protocol involving a web browser and a server establishing encryption keys and at least one of them (typically the web server) providing that they are who they purport to be (you wouldn’t want a secure connection to your bank’s website if you couldn’t be sure it was actually your bank).
The back and forth of establishing the secure connection incurs more hits on the speed of light. And so, once again, having servers close to end users is vital. And having really fast encryption software is vital too. Especially since encryption will need to happen on a variety of devices (think an old phone vs. a brand new laptop).
So, staying on top of the latest TLS standard is vital (we’re currently on TLS 1.3), and implementing all the tricks that speed TLS up is important (such as session resumption and 0-RTT resumption), and making sure your software is highly optimized.
So far getting to a waitless Internet has involved fast DNS resolvers, fast authoritative DNS, being close to end users to fast TCP handshakes, optimized TLS using the latest protocols. And we haven’t even asked the web server for the page yet.
If you’ve been counting round trips we’re currently standing at four: one for DNS, one for TCP, two for TLS. Lots of opportunity for the speed of light to be a problem, but also lots of opportunity for wider Internet problems to cause a slow-down.
Skybird, this is Dropkick with a red dash alpha message in two parts
Actually, before we let the web browser finally ask for the web page there are two things we need to worry about. And both are to do with when things go wrong. You may have noticed that sometimes the Internet doesn’t work right. Sometimes it’s slow.
The slowness is usually caused by two things: congestion and packet loss. Dealing with those is also vital to giving the end user the fastest experience possible.
In ancient times, long before the dawn of history, people used to use telephones that had physical wires connected to them. Those wires connected to exchanges and literal electrical connections were made between two phones over long distances. That scaled pretty well for a long time until a bunch of packet heads came along in the 1960s and said “you know you could create a giant shared network and break all communication up into packets and share the network”. The Internet.
But when you share something you can also get congestion and congestion control is a huge part of ensuring that the Internet is shared equitably amongst users. It’s one of the miracles of the Internet that theory done in the 1970s and implemented in the 1980s has allowed the network to support real time gaming and streaming video while allowing simultaneous chat and web browsing.
The flip side of congestion control is that in order to prevent a user from overwhelming the network you have to slow them down. And we’re trying to be as fast as possible! Actually, we need to be as fast as possible while remaining fair.
And congestion control is closely related to packet loss because one way that servers and browsers and computers know that there’s congestion is when their packets get lost.
We stay on top of the latest congestion control algorithms (such as BBR) so that users get the fastest, fairest possible experience. And we do something else: we actively try to work around packet loss.
Technologies like Argo and our private fiber backbone help us route around bad Internet weather that’s causing packet loss and send connections over dedicated fiber optic links that span the globe.
More on that in the coming week.
It’s happening!
And so, finally your web browser asks the web server for the web page with an innocent looking GET / command. And the web server responds with a big blob of HTML and just when you thought things were going to be simple, they are super complicated.
The complexity comes from two places: the HTTP protocol is now on its third major version, and the content of web pages is under the control of the designer.
First, protocols. HTTP/2 and HTTP/3 both provide significant speedups for web sites by introducing parallel request/response handling, better compression and ways to work around congestion and packet loss. Although HTTP/1.1 is still widely used, these newer protocols are the majority of traffic.
Cloudflare Radar shows HTTP/1.1 has dropped into the 20% range globally.
As people upgrade to recent browsers on their computers and devices the new protocols become more and more important. Staying on top of these, and optimizing them is vital as part of the waitless Internet.
And then comes the content of web pages. Images are a vital part of the web and delivering optimized images right-sized and right-formatted for the end user device plays a big part in a fast web.
But before the web browser can start loading the images it has to get and understand the HTML of the web page. This is wasteful as the browser could be downloading images (and other assets like fonts of JavaScript) while still processing the HTML if it knew about them in advance. The solution to that is for the web server to send a hint about what’s needed along with the HTML.
More on that in the coming week.
Imagical
One of the largest categories of content we deliver for our customers consists of static and animated images. And they are also a ripe target for optimization. Images tend to be large and take a while to download and there are a vast variety of end user devices. So getting the right size and format image to the end user really helps with performance.
Getting it there at the right time also means that images can be loaded lazily and only when the user scrolls them into visibility.
But, traditionally, handling different image formats (especially as new ones like WebP and AVIF get invented), different device types (think of all the different screen sizes out there), and different compression schemes has been a mess of services.
And chained services for different aspects of the image pipeline can be slow and expensive. What you really want is simple storage and an integrated way to deliver the right image to the end user tailored just for them.
More on that in the coming week.
Cache me if you can
As I mentioned in the section about DNS, a few thousand words ago, caching is really powerful and caching content near the end user is super powerful. Cloudflare makes extensive use of caching (particularly of images but also things like GraphQL) on its servers. This makes our customers’ websites fast as images can be delivered quickly from servers near the end user.
But it introduces a problem. If you have a lot of servers around the world then the caches need to be filled with content in order for it to be ready for end users. And the more servers you add the harder it gets to keep them all filled. You want the ‘cache hit ratio’ (how often content is served from cache without having to go back to the customer’s server) to be as high as possible.
But if you’ve got the content cached in Casablanca, and a user visits your website in Chennai they won’t have the fastest content delivery. To solve this some service providers make a deliberate decision not to have lots of servers near end users.
Sounds a bit crazy but their logic is “it’s hard to keep all those caches filled in lots of cities, let’s have only a few cities”. Sad. We think smart software can solve that problem and allow you to have your cache and eat it. We’ve used smart software to solve global load balancing problems and are doing the same for global cache. That way we get high cache hit ratios, super low latency to end users and low load on customer web servers.
More on that in the coming week.
Zero Cool
You know what’s cooler than a millisecond? Zero milliseconds.
But people were often concerned about cold start times because they were thinking about other serverless platforms that had significant spool up times for code that wasn’t ready to run.
Last year we announced that we eliminated cold starts from Workers. You don’t have to worry. And we’ll go deeper into why Cloudflare Workers is the fastest serverless platform out there.
More on that in the coming week.
And finally…
If you run a large global network and want to know if it’s really the fastest there is, and where you need to do work to keep it fast, the only way is to measure. Although there are third-party measurement tools available they can suffer from biases and their methodology is sometimes unclear.
We decided the only way we could understand our performance vs. other networks was to build our own like-for-like testing tool and measure performance across the Internet’s 70,000+ networks.
We’ll also talk about how we keep everything fast, from lightning quick configuration updates and code deploys to logs you don’t have to wait for to ludicrously fast cache purges to real time analytics.
More on that in the coming week.
Welcome to Speed Week*
*Can’t wait for tomorrow? Go play Silent Space Marine. It uses the technologies mentioned above.
This past April, we announced the Cloudflare for SaaS Beta which makes our SSL for SaaS product available to everyone. This allows any customer — from first-time developers to large enterprises — to use Cloudflare for SaaS to extend our full product suite to their own customers. SSL for SaaS is the subset of Cloudflare for SaaS features that focus on a customer’s Public Key Infrastructure (PKI) needs.
Today, we’re excited to announce all the customizations that our team has been working on for our Enterprise customers — for both Cloudflare for SaaS and SSL for SaaS.
Let’s start with the basics — the common SaaS setup
If you’re running a SaaS company, your solution might exist as a subdomain of your SaaS website, e.g. template.<mysaas>.com, but ideally, your solution would allow the customer to use their own vanity hostname for it, such as example.com.
The most common way to begin using a SaaS company’s service is to point a CNAME DNS record to the subdomain that the SaaS provider has created for your application. This ensures traffic gets to the right place, and it allows the SaaS provider to make infrastructure changes without involving your end customers.
We kept this in mind when we built our SSL for SaaS a few years ago. SSL for SaaS takes away the burden of certificate issuance and management from the SaaS provider by proxying traffic through Cloudflare’s edge. All the SaaS provider needs to do is onboard their zone to Cloudflare and ask their end customers to create a CNAME to the SaaS zone — something they were already doing.
The big benefit of giving your customers a CNAME record (instead of a fixed IP address) is that it gives you, the SaaS provider, more flexibility and control. It allows you to seamlessly change the IP address of your server in the background. For example, if your IP gets blocked by ISP providers, you can update that address on your customers’ behalf with a CNAME record. With a fixed A record, you rely on each of your customers to make a change.
While the CNAME record works great for most customers, some came back and wanted to bypass the limitation that CNAME records present. RFC 1912 states that CNAME records cannot coexist with other DNS records, so in most cases, you cannot have a CNAME at the root of your domain, e.g. example.com. Instead, the CNAME needs to exist at the subdomain level, i.e. www.example.com. Some DNS providers (including Cloudflare) bypass this restriction through a method called CNAME flattening.
Since SaaS providers have no control over the DNS provider that their customers are using, the feedback they got from their customers was that they wanted to use the apex of their zone and not the subdomain. So when our SaaS customers came back asking us for a solution, we delivered. We call it Apex Proxying.
Apex Proxying
For our SaaS customers who want to allow their customers to proxy their apex to their zone, regardless of which DNS provider they are using, we give them the option of Apex Proxying. Apex Proxying is an SSL for SaaS feature that gives SaaS providers a pair of IP addresses to provide to their customers when CNAME records do not work for them.
Cloudflare starts by allocating a dedicated set of IPs for the SaaS provider. The SaaS provider then gives their customers these IPs that they can add as A or AAAA DNS records, allowing them to proxy traffic directly from the apex of their zone.
While this works for most, some of our customers want more flexibility. They want to have multiple IPs that they can change, or they want to assign different sets of customers to different buckets of IPs. For those customers, we give them the option to bring their own IP range, so they control the IP allocation for their application.
Bring Your Own IPs
Last year, we announced Bring Your Own IP (BYOIP), which allows customers to bring their own IP range for Cloudflare to announce at our edge. One of the benefits of BYOIP is that it allows SaaS customers to allocate that range to their account and then, instead of having a few IPs that their customers can point to, they can distribute all the IPs in their range.
SaaS customers often require granular control of how their IPs are allocated to different zones that belong to different customers. With 256 IPs to use, you have the flexibility to either group customers together or to give them dedicated IPs. It’s up to you!
While we’re on the topic of grouping customers, let’s talk about how you might want to do this when sending traffic to your origin.
Custom Origin Support
When setting up Cloudflare for SaaS, you indicate your fallback origin, which defines the origin that all of your Custom Hostnames are routed to. This origin can be defined by an IP address or point to a load balancer defined in the zone. However, you might not want to route all customers to the same origin. Instead, you want to route different customers (or custom hostnames) to different origins — either because you want to group customers together or to help you scale the origins supporting your application.
Our Enterprise customers can now choose a custom origin that is not the default fallback origin for any of their Custom Hostnames. Traditionally, this has been done by emailing your account manager and requesting custom logic at Cloudflare’s edge, a very cumbersome and outdated practice. But now, customers can easily indicate this in the UI or in their API requests.
Wildcard Support
Oftentimes, SaaS providers have customers that don’t just want their domain to stay protected and encrypted, but also the subdomains that fall under it.
We wanted to give our Enterprise customers the flexibility to extend this benefit to their end customers by offering wildcard support for Custom Hostnames.
Wildcard Custom Hostnames extend the Custom Hostname’s configuration from a specific hostname — e.g. “blog.example.com” — to the next level of subdomains of that hostname, e.g. “*.blog.example.com”.
To create a Custom Hostname with a wildcard, you can either indicate Enable wildcard support when creating a Custom Hostname in the Cloudflare dashboard or when you’re creating a Custom Hostname through the API, indicate wildcard: “true”.
Now let’s switch gears to TLS certificate management and the improvements our team has been working on.
TLS Management for All
SSL for SaaS was built to reduce the burden of certificate management for SaaS providers. The initial functionality was meant to serve most customers and their need to issue, maintain, and renew certificates on their customers’ behalf. But one size does not fit all, and some of our customers have more specific needs for their certificate management — and we want to make sure we accommodate them.
CSR Support/Custom certs
One of the superpowers of SSL for SaaS is that it allows Cloudflare to manage all the certificate issuance and renewals on behalf of our customers and their customers. However, some customers want to allow their end customers to upload their own certificates.
For example, a bank may only trust certain certificate authorities (CAs) for their certificate issuance. Alternatively, the SaaS provider may have initially built out TLS support for their customers and now their customers expect that functionality to be available. Regardless of the reasoning, we have given our customers a few options that satisfy these requirements.
For customers who want to maintain control over their TLS private keys or give their customers the flexibility to use their certification authority (CA) of choice, we allow the SaaS provider to upload their customer’s certificate.
If you are a SaaS provider and one of your customers does not allow third parties to generate keys on their behalf, then you want to allow that customer to upload their own certificate. Cloudflare allows SaaS providers to upload their customers’ certificates to any of their custom hostnames — in just one API call!
Some SaaS providers never want a person to see private key material, but want to be able to use the CA of their choice. They can do so by generating a Certificate Signing Request (CSR) for their Custom Hostnames, and then either use those CSRs themselves to order certificates for their customers or relay the CSRs to their customers so that they can provision their own certificates. In either case, the SaaS provider is able to then upload the certificate for the Custom Hostname after the certificate has been issued from their customer’s CA for use at Cloudflare’s edge.
Custom Metadata
For our customers who need to customize their configuration to handle specific rules for their customer’s domains, they can do so by using Custom Metadata and Workers.
By adding metadata to an individual custom hostname and then deploying a Worker to read the data, you can use the Worker to customize per-hostname behavior.
Some customers use this functionality to add a customer_id field to each custom hostname that they then send in a request header to their origin. Another way to use this is to set headers like HTTP Strict Transport Security (HSTS) on a per-customer basis.
Saving the best for last: Analytics!
Tomorrow, we have a very special announcement about how you can now get more visibility into your customers’ traffic and — more importantly — how you can share this information back to them.
Interested? Reach out!
If you’re an Enterprise customer, and you’re interested in any of these features, reach out to your account team to get access today!
My name is Rishabh Bector, and this summer, I worked as a software engineering intern on the Cloudflare Tunnel team. One of the things I built was quick Tunnels and before departing for the summer, I wanted to write a blog post on how I developed this feature.
Over the years, our engineering team has worked hard to continually improve the underlying architecture through which we serve our Tunnels. However, the core use case has stayed largely the same. Users can implement Tunnel to establish an encrypted connection between their origin server and Cloudflare’s edge.
This connection is initiated by installing a lightweight daemon on your origin, to serve your traffic to the Internet without the need to poke holes in your firewall or create intricate access control lists. Though we’ve always centered around the idea of being a connector to Cloudflare, we’ve also made many enhancements behind the scenes to the way in which our connector operates.
Typically, users run into a few speed bumps before being able to use Cloudflare Tunnel. Before they can create or route a tunnel, users need to authenticate their unique token against a zone on their account. This means in order to simply spin up a Tunnel testing environment, users need to first create an account, add a website, change their nameservers, and wait for DNS propagation.
Starting today, we’re excited to fix that. Cloudflare Tunnel now supports a free version that includes all the latest features and does not require any onboarding to Cloudflare. With today’s change, you can begin experimenting with Tunnel in five minutes or less.
Introducing Quick Tunnels
When administrators start using Cloudflare Tunnel, they need to perform four specific steps:
Create the Tunnel
Configure the Tunnel and what services it will represent
Route traffic to the Tunnel
And finally… run the Tunnel!
These steps give you control over how your services connect to Cloudflare, but they are also a chore. Today’s change, which we are calling quick Tunnels, not only removes some onboarding requirements, we’re also condensing these into a single step.
If you have a service running locally that you want to share with teammates or an audience, you can use this single command to connect your service to Cloudflare’s edge. First, you need to install the Cloudflare connector, a lightweight daemon called cloudflared. Once installed, you can run the command below.
cloudflared tunnel
When run, cloudflared will generate a URL that consists of a random subdomain of the website trycloudflare.com and point traffic to localhost port 8080. If you have a web service running at that address, users who visit the subdomain generated will be able to visit your web service through Cloudflare’s network.
Configuring Quick Tunnels
We built this feature with the single command in mind, but if you have services that are running at different default locations, you can optionally configure your quick Tunnel to support that.
One example is if you’re building a multiplayer game that you want to share with friends. If that game is available locally on your origin, or even your laptop, at localhost:3000, you can run the command below.
cloudflared tunnel ---url localhost:3000
You can do this with IP addresses or URLs, as well. Anything that cloudflared can reach can be made available through this service.
How does it work?
Cloudflare quick Tunnels is powered by Cloudflare Workers, giving us a serverless compute deployment that puts Tunnel management in a Cloudflare data center closer to you instead of a centralized location.
When you run the command cloudflared tunnel, your instance of cloudflared initiates an outbound-only connection to Cloudflare. Since that connection was initiated without any account details, we treat it as a quick Tunnel.
A Cloudflare Worker, which we call the quick Tunnel Worker, receives a request that a new quick Tunnel should be created. The Worker generates the random subdomain and returns that to the instance of cloudflared. That instance of cloudflared can now establish a connection for that subdomain.
Meanwhile, a complementary service running on Cloudflare’s edge receives that subdomain and the identification number of the instance of cloudflared. That service uses that information to create a DNS record in Cloudflare’s authoritative DNS which maps the randomly-generated hostname to the specific Tunnel you created.
The deployment also relies on the Workers Cron Trigger feature to perform clean up operations. On a regular interval, the Worker looks for quick Tunnels which have been disconnected for more than five minutes. Our Worker classifies these Tunnels as abandoned and proceeds to delete them and their associated DNS records.
What about Zero Trust policies?
By default, all the quick Tunnels that you create are available on the public Internet at the randomly generated URL. While this might be fine for some projects and tests, other use cases require more security.
If you need to add additional Zero Trust rules to control who can reach your services, you can use Cloudflare Access alongside Cloudflare Tunnel. That use case does require creating a Cloudflare account and adding a zone to Cloudflare, but we’re working on ideas to make that easier too.
Where should I notice improvements?
We first launched a version of Cloudflare Tunnel that did not require accounts over two years ago. While we’ve been thrilled that customers have used this for their projects, Cloudflare Tunnel evolved significantly since then. Specifically, Cloudflare Tunnel relies on a new architecture that is more redundant and stable than the one used by that older launch. While all Tunnels that migrated to this new architecture, which we call Named Tunnels, enjoyed those benefits, the users on this option that did not require an account were left behind.
Today’s announcement brings that stability to quick Tunnels. Tunnels are now designed to be long-lived, persistent objects. Unless you delete them, Tunnels can live for months, an improvement over the average lifespan measured in hours before connectivity issues disrupted a Tunnel in the older architecture.
These quick Tunnels run on this same, resilient architecture not only expediting time-to-value, but also improving the overall tunnel quality of life.
What’s next?
Today’s quick Tunnels add a powerful feature to Cloudflare Tunnels: the ability to create a reliable, resilient tunnel in a single command, without the hassle of creating an account first. We’re excited to help your team build and connect services to Cloudflare’s network and on to your audience or teammates. If you have additional questions, please share them in this community post here.
If you’re writing code: what can go wrong, will go wrong.
Many developers know the feeling: “It worked in the local testing suite, it worked in our staging environment, but… it’s broken in production?” Testing can reduce mistakes and debugging can help find them, but logs give us the tools to understand and improve what we are creating.
if (this === undefined) {
  console.log("there’s no way… right?") // Narrator: there was.
}
While logging can help you understand when the seemingly impossible is actually possible, it’s something that no developer really wants to set up or maintain on their own. That’s why we’re excited to launch a new addition to the Cloudflare Workers platform: logs and exceptions from the dashboard.
Starting today, you can view and filter the console.log output and exceptions from a Worker… at no additional cost with no configuration needed!
View logs, just a click away
When you view a Worker in the dashboard, you’ll now see a “Logs” tab which you can click on to view a detailed stream of logs and exceptions. Here’s what it looks like in action:
Each log entry contains an event with a list of logs, exceptions, and request headers if it was triggered by an HTTP request. We also automatically redact sensitive URLs and headers such as Authorization, Cookie, or anything else that appears to have a sensitive name.
If you are in the Durable Objects open beta, you will also be able to view the logs and requests sent to each Durable Object. This is a great tool to help you understand and debug the interactions between your Worker and a Durable Object.
For now, we support filtering by event status and type. Though, you can expect more filters to be added to the dashboard very soon! Today, we support advanced filtering with the wrangler CLI, which will be discussed later in this blog.
console.log(), and you’re all set
It’s really simple to get started with logging for Workers. Simply invoke one of the standard console APIs, such as console.log(), and we handle the rest. That’s it! There’s no extra setup, no configuration needed, and no hidden logging fees.
function logRequest (request) {
  const { cf, headers } = request
  const { city, region, country, colo, clientTcpRtt  } = cf

  console.log("Detected location:", [city, region, country].filter(Boolean).join(", "))
  if (clientTcpRtt) {
     console.debug("Round-trip time from client to", colo, "is", clientTcpRtt, "ms")
  }

  // You can also pass an object, which will be interpreted as JSON.
  // This is great if you want to define your own structured log schema.
  console.log({ headers })
}
In fact, you don’t even need to use console.log to view an event from the dashboard. If your Worker doesn’t generate any logs or exceptions, you will still be able to see the request headers from the event.
Advanced filters, from your terminal
If you need more advanced filters you can use wrangler, our command-line tool for deploying Workers. We’ve updated the wrangler tail command to support sampling and a new set of advanced filters. You also no longer need to install or configure cloudflared to use the command. Not to mention it’s much faster, no more waiting around for logs to appear. Here are a few examples:
# Filter by your own IP address, and if there was an uncaught exception.
wrangler tail --format=pretty --ip-address=self --status=error

# Filter by HTTP method, then apply a 10% sampling rate.
wrangler tail --format=pretty --method=GET --sampling-rate=0.1

# Filter using a generic search query.
wrangler tail --format=pretty --search="TypeError"
We recommend using the “pretty” format, since wrangler will output your logs in a colored, human-readable format. (We’re also working on a similar display for the dashboard.)
However, if you want to access structured logs, you can use the “json” format. This is great if you want to pipe your logs to another tool, such as jq, or save them to a file. Here are a few more examples:
# Parses each log event, but only outputs the url.
wrangler tail --format=json | jq .event.request?.url

# You can also specify --once to disconnect the tail after receiving the first log.
# This is useful if you want to run tests in a CI/CD environment.
wrangler tail --format=json --once > event.json
Try it out!
Both logs from the dashboard and wrangler tail are available and free for existing Workers customers. If you would like more information or a step-by-step guide, check out any of the resources below.
Starting today, your team can use Cloudflare’s Browser Isolation service to protect sensitive data inside the web browser. Administrators can define Zero Trust policies to control who can copy, paste, and print data in any web based application.
In March 2021, for Security Week, we announced the general availability of Cloudflare Browser Isolation as an add-on within the Cloudflare for Teams suite of Zero Trust application access and browsing services. Browser Isolation protects users from browser-borne malware and zero-day threats by shifting the risk of executing untrusted website code from their local browser to a secure browser hosted on our edge.
And currently, we’re democratizing browser isolation for any business by including it with our Teams Enterprise Plan at no additional charge.1
A different approach to zero trust browsing
Web browsers, the same tool that connects users to critical business applications, is one of the most common attack vectors and hardest to control.
Browsers started as simple tools intended to share academic documents over the Internet and over time have become sophisticated platforms that replaced virtually every desktop application in the workplace. The dominance of web-based applications in the workplace has created a challenge for security teams who race to stay patch zero-day vulnerabilities and protect sensitive data stored in self-hosted and SaaS based applications.
In an attempt to protect users and applications from web based attacks, administrators have historically relied on DNS or HTTP inspection to prevent threats from reaching the browser. These tools, while useful for protecting against known threats, are difficult to tune without false-positives (negatively impacting user productivity and increasing IT support burden) and ineffective against zero day vulnerabilities.
Browser isolation technologies mitigate risk by shifting the risk of executing foreign code from the endpoint to a secure environment. Historically administrators have had to make a compromise between performance and security when adopting such a solution. They could either:
Prioritizesecurity by choosing a solution that relies on pixel pushing techniques to serve a visual representation to users. This comes at the cost of performance by introducing latency, graphical artifacts and heavy bandwidth usage.
OR
Prioritize performance by choosing a solution that relies on code scrubbing techniques to unpack, inspect and repack the webpage. This model is fragile (often failing to repack leading to a broken webpage) and insecure by allowing undetected threats to compromise users.
At Cloudflare, we know that security products do not need to come at the expense of performance. We developed a third option that delivers a remote browsing experience without needing to compromise on performance and security for users.
Prioritize security by never sending foreign code to the endpoint and executing it in a secure remote environment.
Prioritizeperformance sending light-weight vector instructions (rather than pixels) over the wire and minimize remote latency on our global edge network.
This unique approach delivers an isolated browser without the security or performance challenges faced by legacy solutions.
Data control through the browser
Malware and zero-day threats are not the only security challenges administrators face with web browsers. The mass adoption of SaaS products has made the web browser the primary tool used to access data. Lack of control over both the application and the browser has left administrators little control over their data once it is delivered to an endpoint.
Data loss prevention tools typically rely on pattern recognition to partially or completely redact the transmission of sensitive data values. This model is useful for protecting against an unexpected breach of PII and PCI data, such as locations and financial information but comes at the loss of visibility.
The redaction model falls short when sensitive data does not fit into easily recognizable patterns, and the end-users require visibility to do their job. In industries such as health care, redacting sensitive data is not feasible as medical professions require visibility of patient notes and appointment data.
Once data lands in the web browser it is trivial for a user to copy-paste and print sensitive data into another website, application, or physical location. These seemingly innocent actions can lead to data being misplaced by naive users leading to a data breach. Administrators have had limited options to protect data in the browser, some even going so far as to deploy virtual desktop services to control access to a SaaS based customer relationship management (CRM) tool. This increased operating costs, and frustrated users who had to learn how to use computer-in-a-computer just to use a website.
One-click to isolate data in the browser
Cloudflare Browser Isolation executes all website code (including HTML) in the remote browser. Since page content remains on the remote browser and draw instructions are only sent to the browser, Cloudflare Browser Isolation is in a powerful position to protect sensitive data on any website or SaaS application.
Administrators can now control copy-paste, and printing functionality with per-rule granularity with one click in the Cloudflare for Teams Dashboard. For example, now administrators can build rules that prevent users from copying information from your CRM or that stop team members from printing data from your ERP—without blocking their attempts to print from external websites where printing does not present a data loss risk.
From the user’s perspective websites look and behave normally until the user performs a restricted action.
Copy-paste and printing control can be configured for both new and existing HTTP policies in the Teams Dashboard.
Navigate to the Cloudflare for Teams dashboard.
Navigate to Gateway → Policies → HTTP.
Create/update an HTTP policy with an Isolate action (docs).
Configure policy settings.
Administrators have flexibility with data protection controls and can enable/disable browser behaviours based on application, hostname, user identity and security risk.
What’s next?
We’re just getting started with zero trust browsing controls. We’re hard at work building controls to protect against phishing attacks, further protect data by controlling file uploading and downloading without needing to craft complex network policies as well as support for a fully clientless browser isolation experience.
Democratizing browser isolation for any business
Historically, only large enterprises had justified the cost to add on remote browser isolation to their existing security deployments. And the resulting loosely-integrated solution fell short of achieving Zero Trust due to poor end-user experiences. Cloudflare has already solved these challenges, so businesses achieve full Zero Trust security including browser-based data protection controls without performance tradeoffs.
Yet it’s not always enough to democratize Zero Trust browser isolation for any business, so we’re currently including it with our Teams Enterprise Plan at no additional charge.1Get started here.
The digital world often takes its cues from the real world. For example, there’s a standard question every guard or agent asks when you cross a border—whether it’s a building, a neighborhood, or a country: “What’s the purpose of your visit?” It’s a logical question: sure, the guard knows some information—like who you are (thanks to your ID) and when you’ve arrived—but the context of “why” is equally important. It can set expectations around behavior during your visit, as well as what spaces you should or should not have access to.
The purpose justification prompt appears upon login, asking users to specify their use case before hitting submit and proceeding.
Digital access follows suit. Recent data protection regulations, such as the GDPR, have formalized concepts of purpose limitation and data proportionality: people should only access data necessary for a specific stated reason. System owners know people need access to do their job, but especially for particularly sensitive applications, knowing why a login was needed is just as vital as knowing who, when, and how.
Starting today, Cloudflare for Teams administrators can prompt users to enter a justification for accessing an application prior to login. Administrators can add this prompt to any existing or new Access application with just two clicks, giving them the ability to:
Log and review employee justifications for accessing sensitive applications
Add additional layers of security to applications they deem sensitive
Customize modal text to communicate data use & sharing principles
Help meet regulatory requirements for data access control (such as GDPR)
Starting with Zero Trust access control
Cloudflare Access has been built with access management at its core: rather than trusting anyone on a private network, Access checks for identity, context and device posture every time someone attempts to reach an application or resource.
Behind the scenes, administrators build rules to decide who should be able to reach the tools protected by Access. When users need to connect to those tools, they are prompted to authenticate with one of the identity provider options. Cloudflare Access checks their login against the list of allowed users and, if permitted, allows the request to proceed.
Some applications and workflows contain data so sensitive that the user should have to prove who they are and why they need to reach that service. In this next phase of Zero Trust security, access to data should be limited to specific business use cases or needs, rather than generic all-or-nothing access.
Deploying Zero Trust purpose justification
We created this functionality because we, too, wanted to make sure we had these provisions in place at Cloudflare. We have sensitive internal tools that help our team members serve our customers, and we’ve written before about how we use Cloudflare Access to lock down those tools in a Zero Trust manner.
However, we were not satisfied with just restricting access in the least privileged model. We are accountable to the trust our customers put in our services, and we feel it is important to always have an explicit business reason when connecting to some data sets or tools.
We built purpose justification capture in Cloudflare Access to solve that problem. When team members connect to certain resources, Access prompts them to justify why. Cloudflare’s network logs that rationale and allows the user to proceed.
Purpose justification capture in Access helps fulfill policy requirements, but even for enterprises who don’t need to comply with specific regulations, it also enables a thoughtful privacy and security framework for access controls. Prompting employees to justify their use case helps solve the data management challenge of balancing transparency with security — helping to ensure that sensitive data is used the right way.
Purpose justification capture adds an additional layer of context for enterprise administrators.
Distinguishing Sensitive Domains
So how do you distinguish if something is sensitive? There are two main categories of applications that may be considered “sensitive.” First: does it contain personally identifiable information or sensitive financials? Second, do all the employees who have access actually need access? The flexibility of the configuration of Access policies helps effectively distinguish sensitive domains for specific user groups.
Purpose justification in Cloudflare Access enables Teams administrators to configure the language of the prompt itself by domain. This is a helpful place to remind employees of the sensitivity of the data, such as, “This application contains PII. Please be mindful of company policies and provide a justification for access,” or “Please enter the case number corresponding to your need for access.” The language can proactively ensure that employees with access to an internal tool are using it as intended.
Additionally, Access identity management allows Teams customers to configure purpose capture for only specific, more sensitive employee groups. For example, some employees need daily access to an application and should be considered “trusted.” But other employees may still have access, but should only rarely need to use the tool— security teams or data protection officers may view their access as higher risk. The policies enable flexible logical constructions that equate to actions such as “ask everyone but the following employees for a purpose.”
This distinction of sensitive applications and “trusted” employees enables friction to the benefit of data protection, rather than a loss of efficiency for employees.
Purpose justification is configurable as an Access policy, allowing for maximum flexibility in configuring and layering rules to protect sensitive applications.
Auditing justification records
As a Teams administrator, enterprise data protection officer, or security analyst, you can view purpose justification logs for a specific application to better understand how it has been accessed and used. Auditing the logs can reveal insights about security threats, the need for improved data classification training, or even potential application development to more appropriately address employees’ use cases.
The justifications are seamlessly integrated with other Access audit logs — they are viewable in the Teams dashboard as an additional column in the table of login events, and exportable to a SIEM for further data analysis.
Teams administrators can review the purpose justifications submitted upon application login by their employees.
Getting started
You can start adding purpose justification prompts to your application access policies in Cloudflare Access today. The purpose justification feature is available in all plans, and with the Cloudflare for Teams free plan, you can use it for up to 50 users at no cost.
We’re excited to continue adding new features that give you more flexibility over purpose justification in Access… Have feedback for us? Let us know in this community post.
Cloudflare for Teams gives your organization the ability to build rules that determine who can reach specified resources. When we first launched, those rules primarily relied on identity. This helped our customers replace their private networks with a model that evaluated every request for who was connecting, but this lacked consideration for how they were connecting.
In March, we began to change that. We announced new integrations that give you the ability to create rules that consider the device as well. Starting today, we’re excited to share that you can now build additional rules that consider several different factors about the device, like its OS, patch status, and domain join or disk encryption status. This has become increasingly important over the last year as more and more people began connecting from home. Powered by the Cloudflare WARP agent, your team now has control over more health factors about the devices that connect to your applications.
Zero Trust is more than just identity
With Cloudflare for Teams, administrators can replace their Virtual Private Networks (VPNs), where users on the network were trusted, with an alternative that does not trust any connection by default—also known as a Zero Trust model.
Customers start by connecting the resources they previously hosted on a private network to Cloudflare’s network using Cloudflare Tunnel. Cloudflare Tunnel uses a lightweight connector that creates an outbound-only connection to Cloudflare’s edge, removing the need to poke holes in your existing firewall.
Once connected, administrators can build rules that apply to each and every resource and application, or even a part of an application. Cloudflare’s Zero Trust network evaluates every request and connection against the rules that an administrator created before the user is ever allowed to reach that resource.
For example, an administrator can create a rule that limits who can reach an internal reporting tool to users in a specific Okta group, connecting from an approved country, and only when they log in with a hardkey as their second factor. Cloudflare’s global network enforces those rules close to the user, in over 200 cities around the world, to make a comprehensive rule like the outlined above feel seamless to the end-user.
Today’s launch adds new types of signals your team can use to define these rules. By definition, a Zero Trust model considers every request or connection to be “untrusted.” Only the rules that you create determine what is considered trusted and allowed. Now, we’re excited to let users take this a step further and create rules that not only focus on trusting the user, but also the security posture of the device they are connecting from.
More (and different) factors are better
Building rules based on device posture covers a blind spot for your applications and data. If I’m allowed to reach a particular resource, without any consideration for the device I’m using, then I could log in with my corporate credentials from a personal device running an unpatched or vulnerable version of an operating system. I might do that because it is convenient, but I am creating a much bigger problem for my team if I then download data that could be compromised because of that device.
That posture can also change based on the destination. For example, maybe you are comfortable if a team member uses any device to review a new splash page for your marketing campaign. However, if a user is connecting to an administrative tool that manages customer accounts, you want to make sure that device complies with your security policies for customer data that include factors like disk encryption status. With Cloudflare for Teams, you can apply rules that contain multiple and different factors with that level of per-resource granularity.
Today, we are thrilled to announce six additional posture types on top of the ones you can already set:
Endpoint Protection Partners — Verify that your users are running one of our Endpoint Protection Platform providers (Carbon Black, CrowdStrike, SentinelOne, Tanium)
Serial Number — Allow devices only from your known inventory pool
Cloudflare WARP’s proxy — Determine if your users are connected via our encrypted WARP tunnel (Free, Paid or any Teams account)
Cloudflare’s secure web gateway — Determine if your users are connecting from a device managed by your HTTP FIltering policies
(NEW) Application Check — Verify any program of your choice is running on the device
(NEW) File Check — Ensure a particular file is present on the device (such as an updated signature, OS patch, etc.)
(NEW) Disk Encryption — Ensure all physical disks on the device are encrypted
(NEW) OS Version — Confirm users have upgraded to a specific operating system version
(NEW) Firewall — Check that a firewall is configured on the device
(NEW) Domain Joined — Verify that your Windows devices must be joined to the corporate directory
Device rules should be as simple as identity rules
Cloudflare for Teams device rules can be configured in the same place that you control identity-based rules. Let’s use the Disk Encryption posture check as an example. You may want to create a rule that enforces the Disk Encryption check when your users need to download and store files on their devices locally.
To build that rule, first visit the Cloudflare for Teams dashboard and navigate to the Devices section of the “My Team” page. Then, choose “Disk Encryption” as a new attribute to add.
You can enter a descriptive name for this attribute. For example, this rule should require Windows disk encryption, while others might require encryption on other platforms.
To save time, you can also create reusable rules, called Groups, to include multiple types of device posture check for reference in new policies later on.
Now that you’ve created your group, you can create a Zero Trust Require rule to apply your Disk Encryption checks. To do that, navigate to Access > Applications and create a new application. If you already have your application in place, simply edit your application to add a new rule. In the Assign a group section you will see the group you just created—select it and choose a Require rule type. And finally, save the rule to begin enforcing granular, zero trust device posture checks on every request in your environment.
What’s next
Get started with exploring all device posture attributes in our developer docs. Note that not all posture types are currently available on operating systems and some operating systems don’t support them.
Is there a posture type we’re missing that you’d love to have? We’d love to hear from you in the Community.
Your team likely uses more SaaS applications than you realize. The time your administrators spend vetting and approving applications sanctioned for use can suddenly be wasted when users sign up for alternative services and store data in new places. Starting today, you can use Cloudflare for Teams to detect and block unapproved SaaS applications with just two clicks.
Increasing Shadow IT usage
SaaS applications save time and budget for IT departments. Instead of paying for servers to host tools — and having staff ready to monitor, upgrade, and troubleshoot those tools — organizations can sign up for a SaaS equivalent with just a credit card and never worry about hosting or maintenance again.
That same convenience causes a data control problem. Those SaaS applications sit outside any environment that you control; the same reason they are easy for your team is also a potential liability now that your sensitive data is kept by third parties. Most organizations keep this in check through careful audits of the SaaS applications being used. Depending on industry and regulatory impact, IT departments evaluate, approve, and catalog the applications they use.
However, users can intentionally or accidentally bypass those approvals. For example, if your organization relies on OneDrive but a user is more comfortable with Google Drive, that user might decide to store work files in Google Drive instead. IT has no visibility into this happening and the user might think it’s fine. That user begins sharing files with other users in your organization, who also sign up with Google Drive, and suddenly an unsanctioned application holds sensitive information. This is “Shadow IT” and these applications inherently obfuscate the controls put in place by your organization.
Detecting Shadow IT
Cloudflare Gateway routes all Internet bound traffic to Cloudflare’s network to enforce granular controls for your users to block them from unknown security threats. Now, it also provides your team added assurance with a low-effort, high-visibility overview into the SaaS applications being used in your environment.
By simply turning on Gateway, all HTTP requests for your organization are aggregated in your Gateway Activity Log for audit and security purposes. Within the activity log, we surface pertinent information about the user, action, and request. These records include data about the application and application type. In the example above, the application type would be Collaboration and Online Meeting and the application would be Google Drive.
From there, Gateway analyzes your HTTP request in the Activity Log and surfaces your Shadow IT, by categorizing and sorting these seemingly miscellaneous applications into actionable insights without any additional lift from your team.
Introducing Shadow IT Discovery
With Shadow IT Discovery, Cloudflare for Teams first catalogs all applications used in your organization. The feature runs in an “observation” mode first – all applications are analyzed, but default to “unreviewed.”
Your team can then review the applications found and, with just a couple clicks, designate applications approved or unapproved — either for a single application or in bulk.
This allows administrators to easily track the top approved and unapproved applications their users are accessing to better profile their security posture. When drilling down into a more detailed view, administrators can take bulk actions to move multiple newly discovered applications at once. In this view, users can also filter on application type to easily identify redundancies in their organization.
Another feature we wanted to add was the ability to quickly highlight if an application being used by your organization has already been secured by Cloudflare Access. You can find this information in the column titled Secured. If an application is not Secured by Access, you can start that process today as well with Access for SaaS. (We added two new tutorials this week!)
When you mark an application unapproved, Cloudflare for Teams does not block it outright. We know some organizations need to label an application unapproved and check in with the users before they block access to it altogether. If your team is ready, you can then apply a Gateway rule to block access to it going forward.
Saving IT cost
While we’re excited to help IT teams stop worrying about unapproved apps, we also talked to teams who feared they were overspending for certain approved applications.
We want to help here too. Today’s launch counts the number of unique users who access any one application over different time intervals. IT teams can use this data to check usage against licenses and right size as needed.
Without this feature, many administrators and our own internal IT department were losing sleep each night wondering if their users were circumventing their controls and putting them at risk of attack. Additionally, many administrators are financially impacted as they procure software licenses for their entire organization. With Shadow IT Discovery, we empower your team to anticipate popular applications and begin the assessment process earlier in the procurement lifecycle.
What’s next
We’re excited to announce Shadow IT and can’t wait to see what you’ll do with it. To get started, deploy HTTP filtering for your organization with the Cloudflare for Teams client. In the future, we’ll also be adding automation to block unapproved applications in Gateway, but we can’t wait to hear what else you’d like to see out of this feature.
Earlier this year we announced that we are committed to making online human verification easier for more users, all around the globe. We want to end the endless loops of selecting buses, traffic lights, and convoluted word diagrams. Not just because humanity wastes 500 years per day on solving other people’s machine learning problems, but because we are dedicated to making an Internet that is fast, transparent, and private for everyone. CAPTCHAs are not very human-friendly, being hard to solve for even the most dedicated Internet users. They are extremely difficult to solve for people who don’t speak certain languages, and people who are on mobile devices (which is most users!).
Today, we are taking another step in helping to reduce the Internet’s reliance on CAPTCHAs to prove that you are not a robot. We are expanding the reach of our Cryptographic Attestation of Personhood experiment by adding support for a much wider range of devices. This includes biometric authenticators — like Apple’s Face ID, Microsoft Hello, and Android Biometric Authentication. This will let you solve challenges in under five seconds with just a touch of your finger or a view of your face — without sending this private biometric data to anyone.
In addition to support for hardware biometric authenticators, we are also announcing support for many more hardware tokens today in the Cryptographic Attestation of Personhood experiment. We support all USB and NFC keys that are both certified by the FIDO alliance and have no known security issues according to the FIDO Alliance Metadata service (MDS 3.0).
Privacy First
Privacy is at the center of Cryptographic Attestation of Personhood. Information about your biometric data is never shared with, transmitted to, or processed by Cloudflare. We simply never see it, at all. All of your sensitive biometric data is processed on your device. While each operating system manufacturer has a slightly different process, they all rely on the idea of a Trusted Execution Environment (TEE) or Trusted Platform Module (TPM). TEEs and TPMs allow only your device to store and use your encrypted biometric information. Any apps or software running on the device never have access to your data, and can’t transmit it back to their systems. If you are interested in digging deeper into how each major operating system implements their biometric security, read the articles we have linked below:
Our commitment to privacy doesn’t just end at the device. The WebAuthn API also prevents the transmission of biometric information. If a user interacts with a biometric key (like Apple TouchID or Windows Hello), no third party — such as Cloudflare — can receive any of that biometric data: it remains on your device and is never transmitted by your browser. To get an even deeper understanding of how the Cryptographic Attestation of Personhood protects your private information, we encourage you to read our initial announcement blog post.
Making a Great Privacy Story Even Better
While building out this technology, we have always been committed to providing the best possible privacy guarantees. The existing assurances are already quite strong: as described in our previous post, when using CAP, you may disclose a small amount of information about your authentication hardware — at most, its make and model. By design, this information is not unique to you: the underlying standard requires that this be indistinguishable from thousands of others, which hides you in a crowd of identical hardware.
Even though this is a great start, we wanted to see if we could push things even farther. Could we learn just the one fact that we need — that you have a valid security key — without learning anything else?
We are excited to announce that we have made great strides on answering that question by using a form of the next generation of cryptography called Zero Knowledge Proofs (ZKP). ZKP prevents us from discovering anything from you, other than the fact that you have a device that can generate an approved certificate that proves that you are human.
If you are interested in learning more about Zero Knowledge Proofs, we highly recommend reading about it here.
Driven by Speed, Ease of Use, and Bot Defense
At the start of this project we set out three goals:
How can we dramatically improve the user experience of proving that you are a human?
How can we make sure that any solution that we develop centers around ease of use, and increases global accessibility on the Internet?
How do we make a solution that does not harm our existing bot management system?
Before we deployed this new evolution of our CAPTCHA solution, we did a proof of concept test with some real users, to confirm whether this approach was worth pursuing (just because something sounds great in theory doesn’t mean it will work out in practice!). Our testing group tried our Cryptographic Attestation of Personhood solution using Face ID and told us what they thought. We learned that solving times with Face ID and Touch ID were significantly faster than selecting pictures, with almost no errors. People vastly preferred this alternative, and provided suggestions for improvements in the user experience that we incorporated into our deployment.
This was even more evident in our production usage data. While we did not enable attestation with biometrics providers during our first phase of the CAP roll out, we did record when people attempted to use a biometric authentication service. The highest recorded attempt solve rate besides YubiKeys was Face ID on iOS, and Android Biometric Authentication. We are excited to offer those mobile users their first choice of challenge for proving their humanity.
One of the things we heard about in testing was — not surprisingly — concerns around privacy. As we explained in our initial launch, the WebAuthn technology underpinning our solution provides a high level of privacy protection. Cloudflare is able to view an identifier shared by thousands of similar devices, which provides general make and model information. This cannot be used to uniquely identify or track you — and that’s exactly how we like it.
Now that we have opened up our solution to more device types, you’re able to use biometric readers as well. Rest assured that the same privacy protections apply — we never see your biometric data: that remains on your device. Once your device confirms a match, it sends only a basic attestation message, just as it would for any security key. In effect, your device sends a message proving that “yes, someone correctly entered a fingerprint on this trustworthy device”, and never sends the fingerprint itself.
We have also been reviewing feedback from people who have been testing out CAP on either our demo site or through routine browsing. We appreciate the helpful comments you’ve been sending, and we’d love to hear more, so we can continue to make improvements. We’ve set up a survey at our demo site. Your input is key to ensuring that we get usability right, so please let us know what you think.
With Cloudflare Pages, deploying your Jamstack applications is easier than ever — integrate with GitHub and a simple git push deploys your site within minutes. However, one of the limitations of Pages was that triggering deployments to your site only happens within the confines of committing to GitHub. We started thinking about how users who author content consistently on their site — our bloggers and writers — may not always be editing their copy directly via the code but perhaps through a different service. Headless content management systems (CMSs) are a simple solution to solve this problem, allowing users to store their backend content through an editing interface as a service for an application like Pages.
It made us wonder: what if we could trigger deployments based on updates made in other places rather than just via GitHub? Today, we are proud to announce a new way to connect your Pages application with your headless CMSs and databases: introducing Deploy Hooks for Pages.
What’s a headless CMS?
Headless CMSs such as Contentful, Ghost and Sanity.io allow optimization of content formatting for any type of interface. With tools like these, you can leverage a “decoupled” content management model where all you need to focus on is writing your content within the CMS editing interface and let its API handle the rest!
Sounds great! What’s the catch?
We started thinking about the implications for those of you who integrate with these headless tools and what your workflow might look like as it relates to Pages. You would build, for example, your blog application on Pages but update all of your content directly on your headless CMS and may make changes to your content three to four times a day. So how exactly does the data from your CMS show up on your Pages site and stay in sync? Enter Deploy Hooks!
What are Deploy Hooks?
Deploy Hooks are URLs created on Pages that accept an HTTP POST request to trigger new deployments outside the realm of a git command. Instead of manually redeploying your site via another git push, any time you update the content within your chosen headless CMS, the Deploy Hook will automatically send a real-time update to Pages. On the Pages side, once these updates are received, a new site build will be triggered to include any new data or content detected. It’s that easy!
How can I create a Deploy Hook?
To set up your deploy hook, navigate to the Deploy Hooks section in your Pages project’s settings. In this section there are two input parameters needed to properly configure your deploy hook and obtain your URL:
Deploy Hook Name: You can name your deploy hook something like “Contentful” or “My Blog” to identify which source the Deploy Hook is monitoring. A unique name for each deploy hook will also help you to differentiate hooks in the event that you create multiple Deploy Hooks for your Pages site.
Branch to Build: You can specify which branch will be built and deployed when the URL is requested with the Deploy Hook. This is especially helpful if you’d like to stage your changes first instead of pushing directly to your production branch.
How can I use a Deploy Hook with my headless CMS?
You can put the unique URL provided in the dashboard into just about any service that accepts a Deploy Hook URL. In a headless CMS, you can create and configure a new webhook and, depending on the tool, you can sometimes choose which events you’d like to trigger deployments. Once you’ve configured this webhook, you can paste the Deploy Hook URL provided by Pages to connect your chosen CMS with your Pages project. After that, you’re all set to update content in your headless tool.
What else can I do with a Deploy Hook?
After creating your Deploy Hook, Pages also provides you with the HTTP POST request snippet with your URL that looks something like this:
curl -X POST "https://api.cloudflare.com/client/v4/pages/webhooks/deploy_hooks/ 66c5dd3a-989f-4ba7-a6e2-6d2695524d7”
Every time you execute the snippet, you will trigger a new build to your Pages site. In addition to utilizing this snippet for a forced deployment within your command line, you can also customize your CI/CD pipeline and trigger deployments only under certain conditions. For example, you only want to deploy if there were changes within specific directories and only after an extensive test suite passes. Additionally, this snippet is useful for scheduling a CRON trigger to initiate builds on a specific timeline or cadence. Read more about how to use Pages deploy hooks in our docs.
Want to help us shape the future of development on the web? Join our team!
The collective thoughts of the interwebz
Manage Consent
To provide the best experiences, we use technologies like cookies to store and/or access device information. Consenting to these technologies will allow us to process data such as browsing behavior or unique IDs on this site. Not consenting or withdrawing consent, may adversely affect certain features and functions.
Functional
Always active
The technical storage or access is strictly necessary for the legitimate purpose of enabling the use of a specific service explicitly requested by the subscriber or user, or for the sole purpose of carrying out the transmission of a communication over an electronic communications network.
Preferences
The technical storage or access is necessary for the legitimate purpose of storing preferences that are not requested by the subscriber or user.
Statistics
The technical storage or access that is used exclusively for statistical purposes.The technical storage or access that is used exclusively for anonymous statistical purposes. Without a subpoena, voluntary compliance on the part of your Internet Service Provider, or additional records from a third party, information stored or retrieved for this purpose alone cannot usually be used to identify you.
Marketing
The technical storage or access is required to create user profiles to send advertising, or to track the user on a website or across several websites for similar marketing purposes.