During Developer Week a few months ago, we opened up the Beta for Cloudflare for SaaS: a one-stop shop for SaaS providers looking to provide fast load times, unparalleled redundancy, and the strongest security to their customers.
Since then, we’ve seen numerous developers integrate with our technology, allowing them to spend their time building out their solution instead of focusing on the burdens of running a fast, secure, and scalable infrastructure — after all, that’s what we’re here for.
Today, we are very excited to announce that Cloudflare for SaaS is generally available, so that every customer, big and small, can use Cloudflare for SaaS to continue scaling and building their SaaS business.
What is Cloudflare for SaaS?
If you’re running a SaaS company, you have customers that are fully reliant on you for your service. That means you’re responsible for keeping their domain fast, secure, and protected. But this isn’t simple. There’s a long checklist you need to get through to put a solution in your customers’ hands:
Set up an origin server
Encrypt your customers’ traffic
Keep your customers online
Boost the performance of global customers
Support vanity domains
Protect against attacks and bots
Scale for growth
Provide insights and analytics
And on top of that, you need to also focus on building out your solution and your business. As a developer or startup with limited resources, this can delay your product launch by weeks or months.
That’s what we’re here to help with! We have numerous engineering teams whose sole focus is to work on products that take care of each one of these tasks, so you don’t have to!
The Cloudflare solution:
Set up an origin server → Workers
Encrypt your customers’ traffic → SSL for SaaS
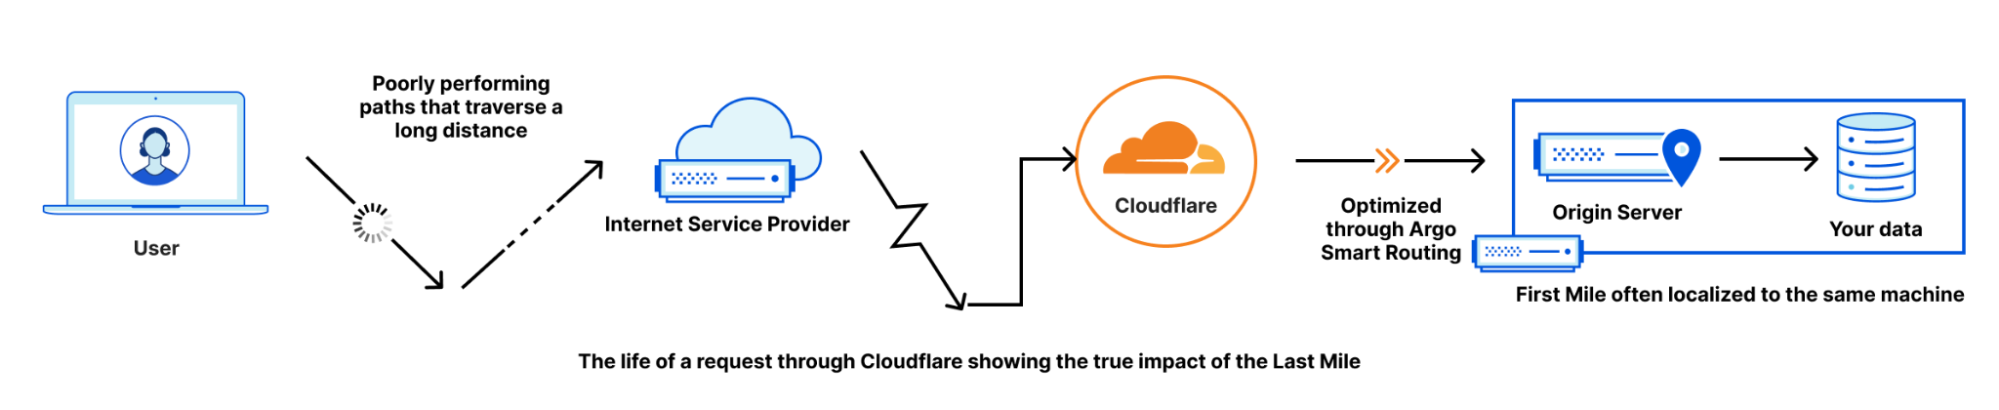
Keep your customers online → Cloudflare’s global Anycast network
Boost the performance of global customers → Argo Smart Routing/Cache
Support vanity domains → Custom Hostnames
Protect against attacks and bots → WAF and Bot Management
Scale for growth → Workers
Provide insights and analytics → Custom Hostname Analytics
Pricing, Made for Developers
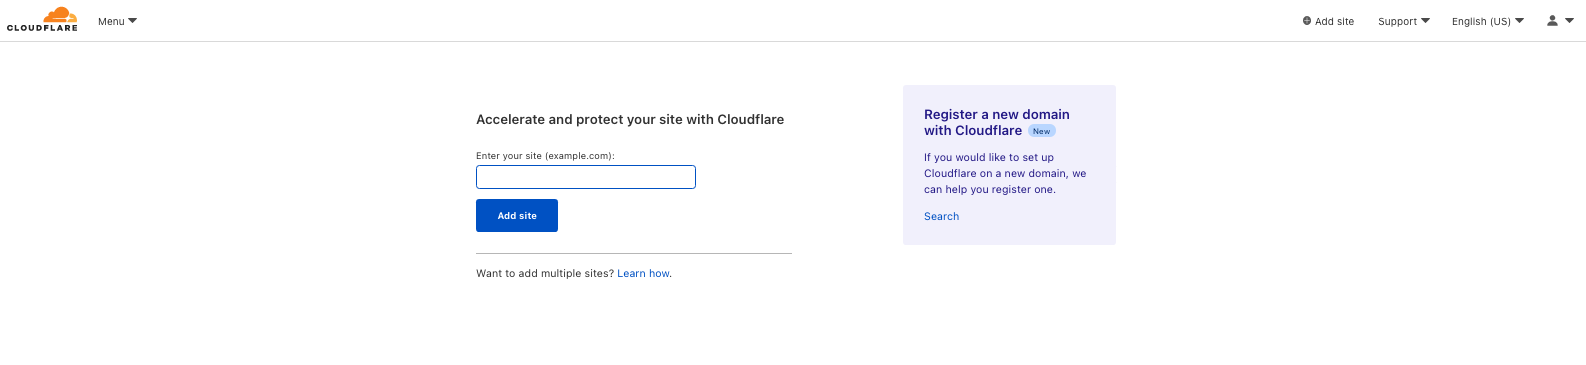
Starting today, Cloudflare for SaaS is available to purchase on Free, Pro, and Business plans. We wanted to make sure that the pricing made sense for developers. At the time of building, you don’t know how many customers you’ll have, so we wanted to offer flexibility by keeping the pricing as simple as possible: only pay for the customers you use.
Each customer domain using the service is called a Custom Hostname. For each Custom Hostname, we automatically provision a TLS certificate. But not just that! Beyond the TLS certificate, each of your Custom Hostnames inherits the full suite of Cloudflare products that you set up on your SaaS zone. From Bot Management to Argo Smart Routing, you can extend these add-ons that protect and accelerate your domain to your customers.
Custom Hostnames cost two dollars per month. We will only charge you after each Custom Hostname has been onboarded, adjusted according to when you created it. That means that if you created 10 Custom Hostnames at the start of the month and 10 Custom Hostnames halfway through, at the end of the month you will be billed $30.
This way, you’re only charged for the Custom Hostnames that you provision. It’s also a great incentive to make sure you clean up after your churned customers.
If you’re an Enterprise customer and want to learn more about the benefits that you can from Cloudflare for SaaS, make sure you check out our blog post about the latest developments.
Show us what you’re building!
During the beta alone, we’ve seen incredible projects built out on the platform. We wanted to showcase these developers to show you what’s possible. And even better, some of these have been built on our Workers platform! We’d love to see what you’re working on. Join our Discord channel and showcase your work! Have feature requests for us? Let us know!
mmm.page: Simple Personal Websites
mmm.page is a drag-and-drop website builder that makes it dead simple to create auto-responsive, collage-like websites: websites with overlapping text, images, GIFs, YouTube videos, Spotify embeds, and (a lot) more. To make it easier, all the standard website tedium — uptime, usability, performance, reliability, responsiveness, SEO, etc. — are handled under the hood so all you have to worry about is adding content and arranging it how you want.
Under their hood is Cloudflare. Cloudflare’s CDN allows both the flexibility of server-side pages as well as the instant loading times of static pages — not to mention an 80% reduction in server costs. Custom Hostnames alone saved months of development time by handling domain names and SSL management (which are otherwise tricky to get perfect and reliable).
They’ve used Workers for increasingly more tasks that would’ve otherwise taken an order of magnitude more time if implemented with their current backend monolith — the ease of deployment and comparatively low cost of Workers is something that keeps them coming back.
The longer-term hope is for pages to be used as a sort of beacon signal, an easy-to-make yet unbounded way to express to others the things you’re interested in, especially for things that aren’t so easily describable or captured in words. They look forward to a world of a ton more DIY micro-sites. Cloudflare has been crucial in taking care of much of the difficult technical plumbing and giving them more time to work on designs and features that get them closer to this hope.
Lightfunnels
Lightfunnels is a performance driven e-commerce and lead generation platform. It focuses on delivering fast, reliable, and highly converting sales funnels to its users and their customers.
With Cloudflare for SaaS, Lightfunnels allows users to preserve their brand by easily connecting their own domain names with SSL to use on their funnels.
The platform handles large e-commerce traffic volume through Cloudflare Workers. This helps Lightfunnels serve pages from the closest edge to the customer, wherever they are in the world, allowing for blazing fast page load speeds.
Workers also come with a powerful caching API that eliminates a great percentage of back-end trips and reduces the stress on their servers.
“Our aim is to build the best performing e-commerce and lead generation platform on the market. Page load speeds play a significant role in performance. Using Cloudflare for SaaS along with Cloudflare Workers made building a reliable, secure, and fast infrastructure a breeze.” – Yassir Ennazk, Co-founder & CEO at Lightfunnels
Ventrata
Ventrata is a SaaS multi-channel booking platform for large attractions and tour operators.They power booking sites and B2B booking portals for clients that run on other domains. Cloudflare for SaaS has allowed them to leverage all of Cloudflare’s tools, including Firewall, image caching, Workers, and free TLS certificates on Custom Hostnames, while allowing their clients to keep full control of their brand. Their implementation involved just 4 lines of code without any infrastructure/DevOps help required, which would have been impossible before.
Currently a part of the Beta?
If you were accepted as a part of the Cloudflare for SaaS Beta, you will get a notice next week about migrating to the paid version.
Help build a better Internet
Want to be a part of the Cloudflare team and work on the products that power Cloudflare for SaaS? We’re hiring!
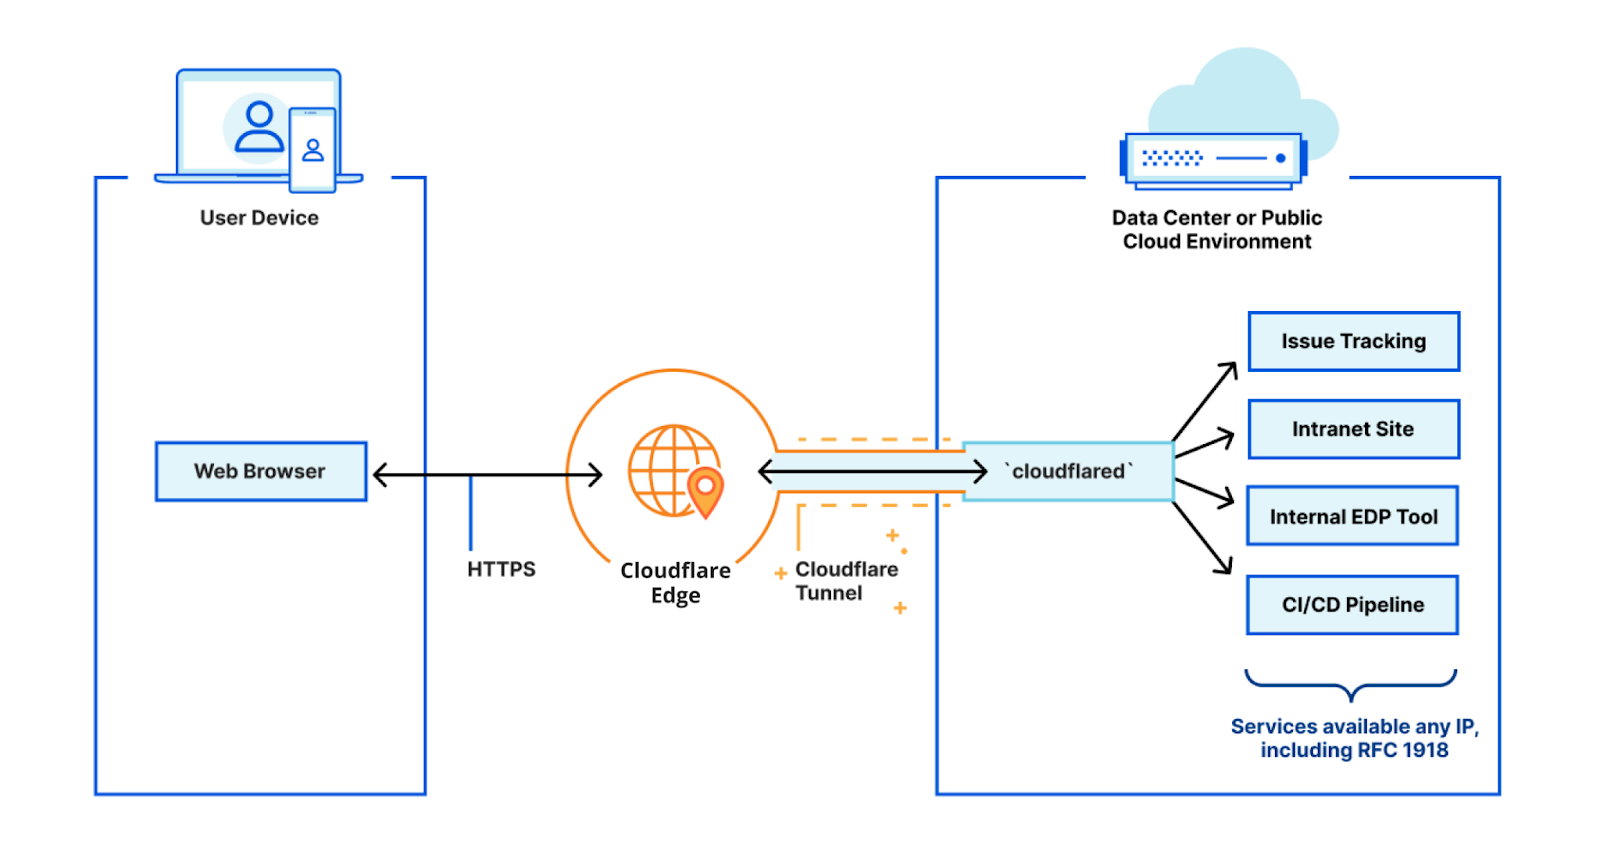
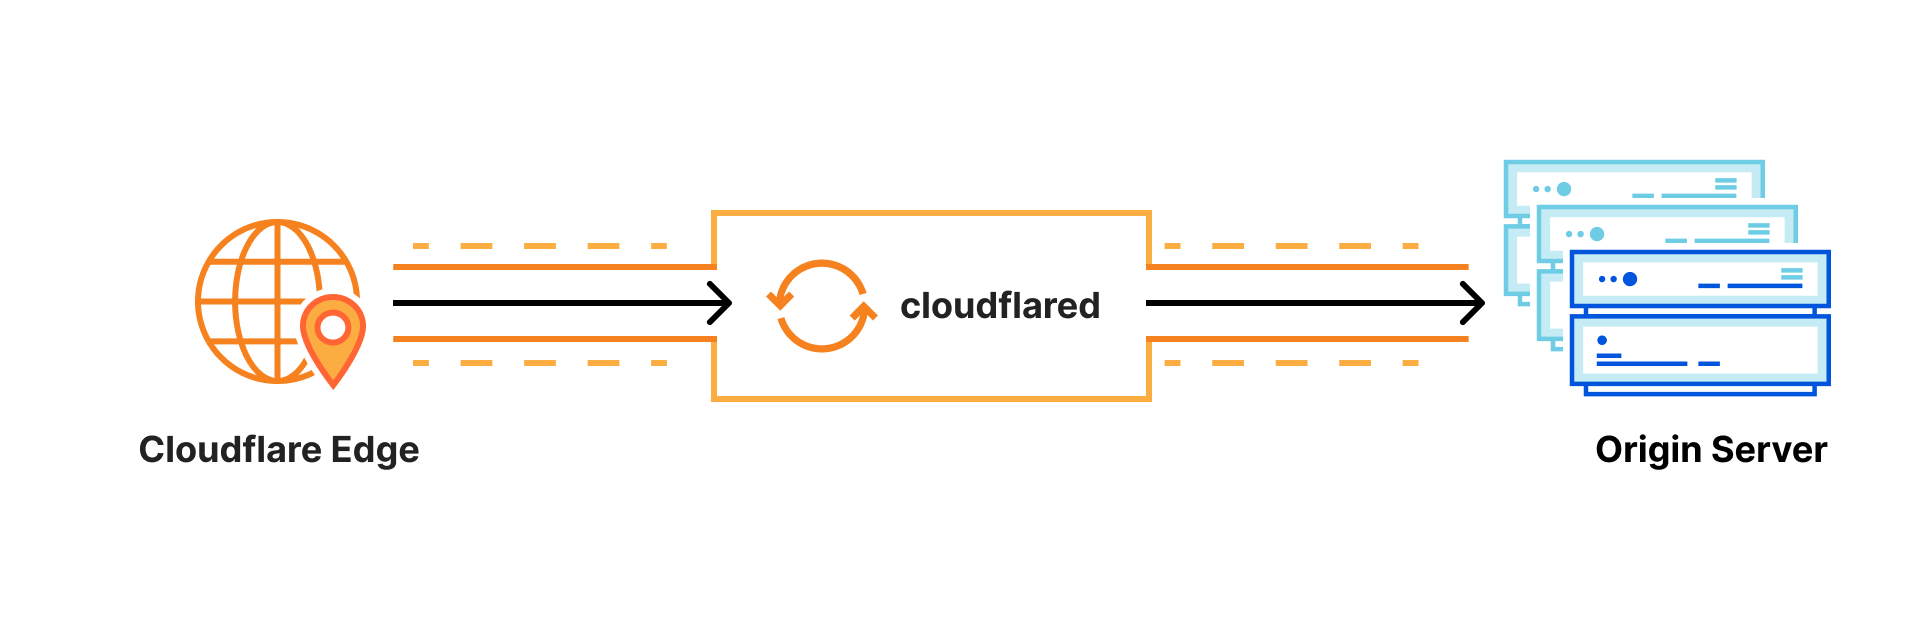
I work on Cloudflare Tunnel, which lets customers quickly connect their private services and networks through the Cloudflare network without having to expose their public IPs or ports through their firewall. Tunnel is managed for users by cloudflared, a tool that runs on the same network as the private services. It proxies traffic for these services via Cloudflare, and users can then access these services securely through the Cloudflare network.
Recently, I was trying to get Cloudflare Tunnel to connect to the Cloudflare network using a UDP protocol, QUIC. While doing this, I ran into an interesting connectivity problem unique to UDP. In this post I will talk about how I went about debugging this connectivity issue beyond the land of firewalls, and how some interesting differences between UDP and TCP came into play when sending network packets.
How does Cloudflare Tunnel work?
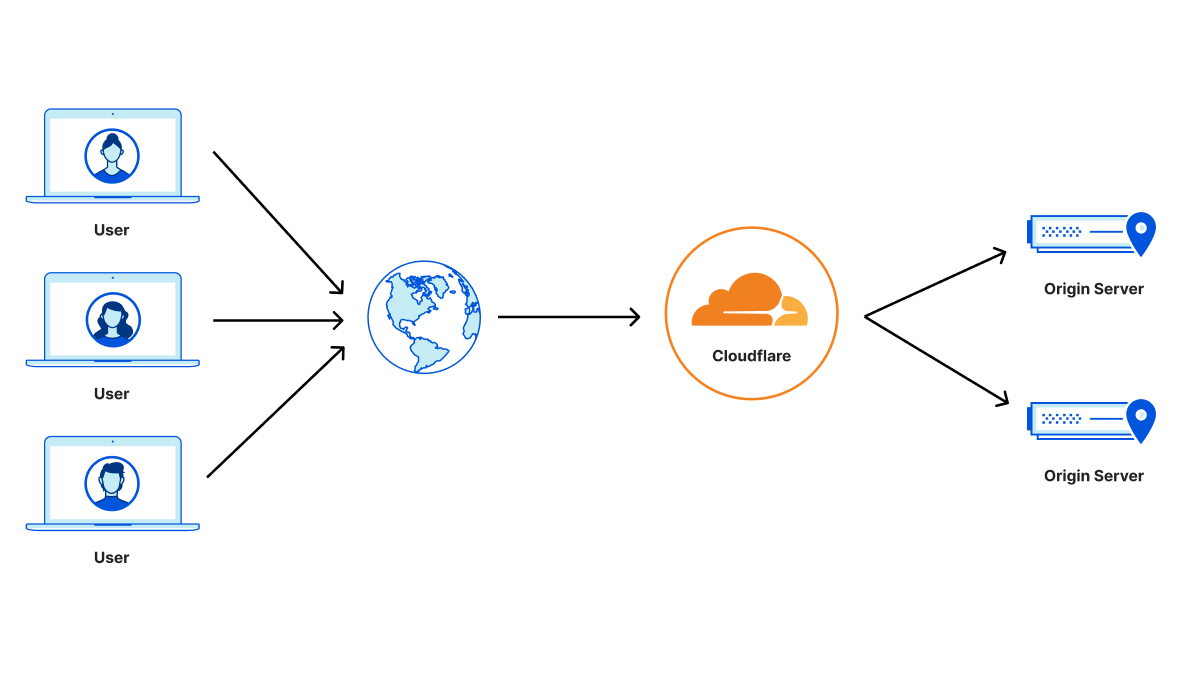
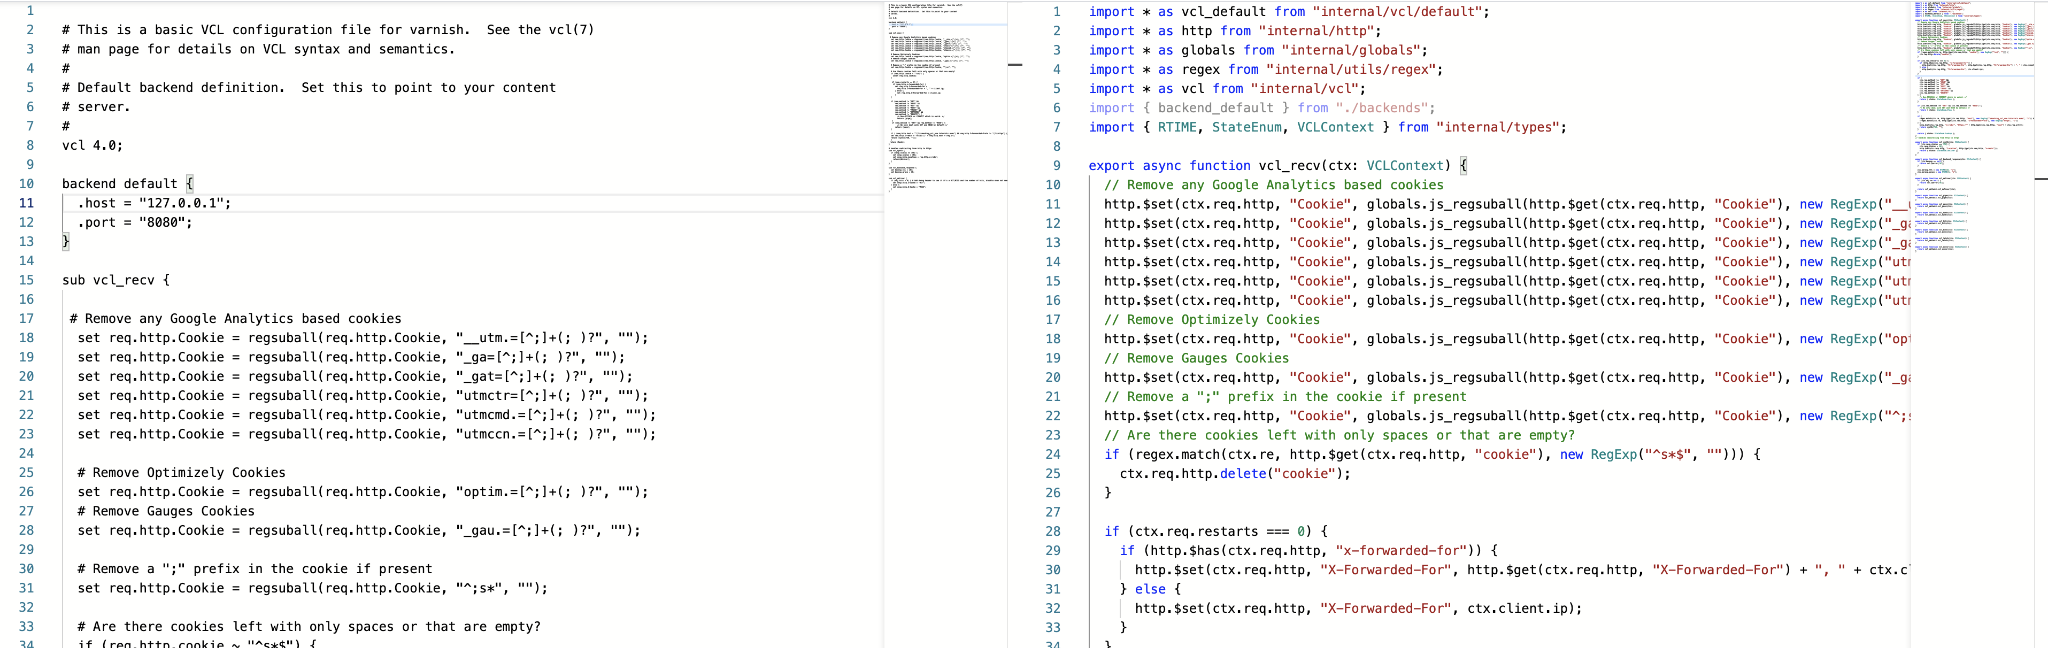
cloudflared works by opening several connections to different servers on the Cloudflare edge. Currently, these are long-lived TCP-based connections proxied over HTTP/2 frames. When Cloudflare receives a request to a hostname, it is proxied through these connections to the local service behind cloudflared.
While our HTTP/2 protocol mode works great, we’d like to improve a few things. First, TCP traffic sent over HTTP/2 is susceptible to Head of Line (HoL) blocking — this affects both HTTP traffic and traffic from WARP routing. Additionally, it is currently not possible to initiate communication from cloudflared’s HTTP/2 server in an efficient way. With the current Go implementation of HTTP/2, we could use Server-Sent Events, but this is not very useful in the scheme of proxying L4 traffic.
The upgrade to QUIC solves possible HoL blocking issues and opens up avenues that allow us to initiate communication from cloudflared to a different cloudflared in the future.
Naturally, QUIC required a UDP-based listener on our edge servers which cloudflared could connect to. We already connect to a TCP-based listener for the existing protocols, so this should be nice and easy, right?
Failed to dial to the edge
Things weren’t as straightforward as they first looked. I added a QUIC listener on the edge, and the ability for cloudflared to connect to this new UDP-based listener. I tried to run my brand new QUIC tunnel and this happened.
$  cloudflared tunnel run --protocol quic my-tunnel
2021-09-17T18:44:11Z ERR Failed to create new quic connection, err: failed to dial to edge: timeout: no recent network activity
cloudflared wasn’t even establishing a connection to the edge. I started looking at the obvious places first. Did I add a firewall rule allowing traffic to this port? Check. Did I have iptables rules ACCEPTing or DROPping appropriate traffic for this port? Check. They seemed to be in order. So what else could I do?
tcpdump all the packets
I started by logging for UDP traffic on the machine my server was running on to see what could be happening.
$  sudo tcpdump -n -i eth0 port 7844 and udp
tcpdump: verbose output suppressed, use -v or -vv for full protocol decode
listening on eth0, link-type EN10MB (Ethernet), capture size 262144 bytes
14:44:27.742629 IP 173.13.13.10.50152 > 198.41.200.200.7844: UDP, length 1252
14:44:27.743298 IP 203.0.113.0.7844 > 173.13.13.10.50152: UDP, length 37
Looking at this tcpdump helped me understand why I had no connectivity! Not only was this port getting UDP traffic but I was also seeing traffic flow out. But there seemed to be something strange afoot. Incoming packets were being sent to 198.41.200.200:7844 while responses were being sent back from 203.0.113.0:7844 (this is an example IP used for illustration purposes) instead.
Why is this a problem? If a host (in this case, the server) chooses an address from a network unable to communicate with a public Internet host, it is likely that the return half of the communication will never arrive. But wait a minute. Why is some other IP getting prioritized over a source address my packets were already being sent to? Let’s take a deeper look at some IP addresses. (Note that I’ve deliberately oversimplified and scrambled results to minimally illustrate the problem)
$  ip addr list
eth0: <BROADCAST,MULTICAST,UP,LOWER_UP> mtu 1600 qdisc noqueue state UP group default qlen 1000
inet 203.0.113.0/32 scope global eth0
inet 198.41.200.200/32 scope global eth0
$ ip route show
default via 203.0.113.0 dev eth0
So this was clearly why the server was working fine on my machine but not on the Cloudflare edge servers. It looks like I have multiple IPs on the interface my service is bound to. The IP that is the default route is being sent back as the source address of the packet.
Why does this work for TCP but not UDP?
Connection-oriented protocols, like TCP, initiate a connection (connect()) with a three-way handshake. The kernel therefore maintains a state about ongoing connections and uses this to determine the source IP address at the time of a response.
Because UDP (unless SOCK_SEQPACKET is involved) is connectionless, the kernel cannot maintain state like TCP does. The recvfrom system call is invoked from the server side and tells who the data comes from. Unfortunately, recvfrom does not tell us which IP this data is addressed for. Therefore, when the UDP server invokes the sendto system call to respond to the client, we can only tell it which address to send the data to. The responsibility of determining the source-address IP then falls to the kernel. The kernel has certain heuristics that it uses to determine the source address. This may or may not work, and in the ip routes example above, these heuristics did not work. The kernel naturally (and wrongly) picks the address of the default route to respond with.
Telling the kernel what to do
I had to rely on my application to set the source address explicitly and therefore not rely on kernel heuristics.
Linux has some generic I/O system calls, namely recvmsg and sendmsg. Their function signatures allow us to both read or write additional out-of-band data we can pass the source address to. This control information is passed via the msghdr struct’s msg_control field.
ssize_t sendmsg(int socket, const struct msghdr *message, int flags)
ssize_t recvmsg(int socket, struct msghdr *message, int flags);

struct msghdr {
     void    *   msg_name;   /* Socket name          */
     int     msg_namelen;    /* Length of name       */
     struct iovec *  msg_iov;    /* Data blocks          */
     __kernel_size_t msg_iovlen; /* Number of blocks     */
     void    *   msg_control;    /* Per protocol magic (eg BSD file descriptor passing) */
    __kernel_size_t msg_controllen; /* Length of cmsg list */
     unsigned int    msg_flags;
};
We can now copy the control information we’ve gotten from recvmsg back when calling sendmsg, providing the kernel with information about the source address.The library I used (https://github.com/lucas-clemente/quic-go) had a recent update that did exactly this! I pulled the changes into my service and gave it a spin.
But alas. It did not work! A quick tcpdump showed that the same source address was being sent back. It seemed clear from reading the source code that the recvmsg and sendmsg were being called with the right values. It did not make sense.
So I had to see for myself if these system calls were being made.
strace all the system calls
strace is an extremely useful tool that tracks all system calls and signals sent/received by a process. Here’s what it had to say. I’ve removed all the information not relevant to this specific issue.
Let’s start with recvmsg . We can clearly see that the ipi_addr for the source is being passed correctly: ipi_addr=inet_addr(“172.16.90.131”). This part works as expected. Looking at sendmsg almost instantly tells us where the problem is. The field we want, ip_spec_dst is not being set as we make this system call. So the kernel continues to make wrong guesses as to what the source address may be.
This turned out to be a bug where the library was using IPROTO_TCP instead of IPPROTO_IPV4 as the control message level while making the sendmsg call. Was that it? Seemed a little anticlimactic. I submitted a slightly more typesafe fix and sure enough, straces now showed me what I was expecting to see.
While the programmatic bug causing this issue was a trivial one, the journey into systematically discovering the issue and understanding how Linux internals worked for UDP along the way turned out to be very rewarding for me. It also reiterated my belief that tcpdump and strace are indeed invaluable tools in anybody’s arsenal when debugging network problems.
What’s next?
You can give this a try with the latest cloudflared release at https://github.com/cloudflare/cloudflared/releases/latest. Just remember to set the protocol flag to quic. We plan to leverage this new mode to roll out some exciting new features for Cloudflare Tunnel. So upgrade away and keep watching this space for more information on how you can take advantage of this.
In the midst of the hottest summer on record, Cloudflare held its first ever Impact Week. We announced a variety of products and initiatives that aim to make the Internet and our planet a better place, with a focus on environmental, social, and governance projects. Today, we’re excited to share an update on Crawler Hints, an initiative announced during Impact Week. Crawler Hints is a service that improves the operating efficiency of the approximately 45% of Internet traffic that comes from web crawlers and bots.
Crawler Hints achieves this efficiency improvement by ensuring that crawlers get information about what they’ve crawled previously and if it makes sense to crawl a website again.
Today we are excited to announce two updates for Crawler Hints:
The first: Crawler Hints now supports IndexNow, a new protocol that allows websites to notify search engines whenever content on their website content is created, updated, or deleted. By collaborating with Microsoft and Yandex, Cloudflare can help improve the efficiency of their search engine infrastructure, customer origin servers, and the Internet at large.
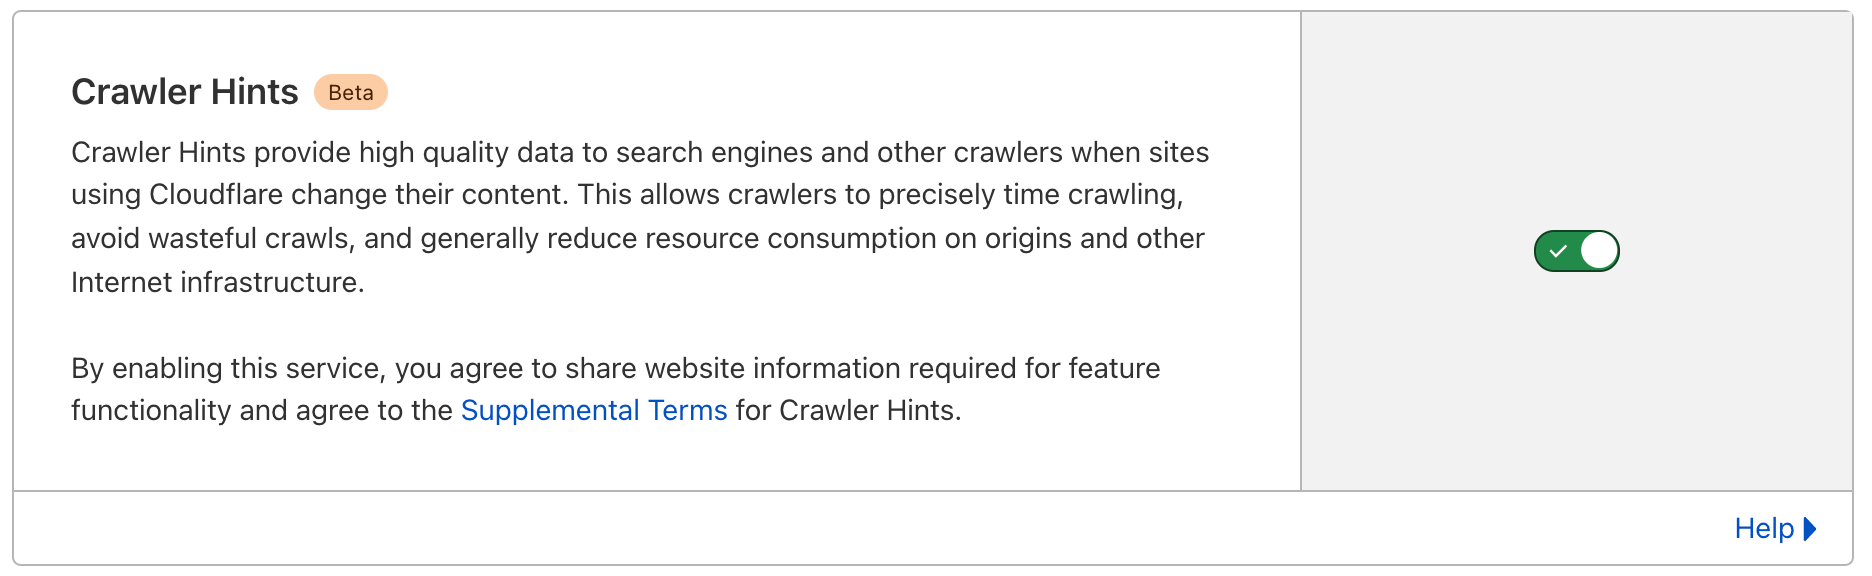
The second: Crawler Hints is now generally available to all Cloudflare customers for free. Customers can benefit from these more efficient crawls with a single button click. If you want to enable Crawler Hints, you can do so in the Cache Tab of the Dashboard.
What problem does Crawler Hints solve?
Crawlers help make the Internet work. Crawlers are automated services that travel the Internet looking for… well, whatever they are programmed to look for. To power experiences that rely on indexing content from across the web, search engines and similar services operate massive networks of bots that crawl the Internet to identify the content most relevant to a user query. But because content on the web is always changing, and there is no central clearinghouse for when these changes happen on websites, search engine crawlers have a Sisyphean task. They must continuously wander the Internet, making guesses on how frequently they should check a given site for updates to its content.
Companies that run search engines have worked hard to make the process as efficient as possible, pushing the state-of-the-art for crawl cadence and infrastructure efficiency. But there remains one clear area of waste: excessive crawl.
At Cloudflare, we see traffic from all the major search crawlers, and have spent the last year studying how often these bots revisit a page that hasn’t changed since they last saw it. Every one of these visits is a waste. And, unfortunately, our observation suggests that 53% of this crawler traffic is wasted.
With Crawler Hints, we expect to make this task a bit more tractable by providing an additional heuristic to the people who run these crawlers. This will allow them to know when content has been changed or added to a site instead of relying on preferences or previous changes that might not reflect the true change cadence for a site. Crawler Hints aims to increase the proportion of relevant crawls and limit crawls that don’t find fresh content, improving customer experience and reducing the need for repeated crawls.
Cloudflare sits in a unique position on the Internet to help give crawlers hints about when they should recrawl a site. Don’t knock on a website’s door every 30 seconds to see if anything is new when Cloudflare can proactively tell your crawler when it’s the best time to index new or changed content. That’s Crawler Hints in a nutshell!
If you want to learn more about Crawler Hints, see the original blog.
What is IndexNow?
IndexNow is a standard that was written by Microsoft and Yandex search engines. The standard aims to provide an efficient manner of signaling to search engines and other crawlers for when they should crawl content. Cloudflare’s Crawler Hints now supports IndexNow.
In its simplest form, IndexNow is a simple ping so that search engines know that a URL and its content has been added, updated, or deleted, allowing search engines to quickly reflect this change in their search results. – www.indexnow.org
By enabling Crawler Hints on your website, with the simple click of a button, Cloudflare will take care of signaling to these search engines when your content has changed via the IndexNow protocol. You don’t need to do anything else!
What does this mean for search engine operators? With Crawler Hints you’ll receive a near real-time, pushed feed of change events of Cloudflare websites (that have opted in). This, in turn, will dramatically improve not just the quality of your results, but also the energy efficiency of running your bots.
Collaborating with Industry leaders
Cloudflare is in a unique position to have a sizable portion of the Internet proxied behind us. As a result, we are able to see trends in the way bots access web resources. That visibility allows us to be proactive about signaling which crawls are required vs. not. We are excited to work with partners to make these insights useful to our customers. Search engines are key constituents in this equation. We are happy to collaborate and share this vision of a more efficient Internet with Microsoft Bing, and Yandex. We have been testing our interaction via IndexNow with Bing and Yandex for months with some early successes.
This is just the beginning. Crawler Hints is a continuous process that will require working with more and more partners to improve Internet efficiency more generally. While this may take time and participation from other key parts of the industry, we are open to collaborate with any interested participant who relies on crawling to power user experiences.
“The cache data from CDNs is a really valuable signal for content freshness. Cloudflare, as one of the top CDNs, is key in the adoption of IndexNow to become an industry-wide standard with a large portion of the internet actually using it. Cloudflare has built a really easy 1-click button for their users to start using it right away. Cloudflare’s mission of helping build a better Internet resonates well with why I started IndexNow i.e. to build a more efficient and effective Search.” – Fabrice Canel, Principal Program Manager
“Yandex is excited to join IndexNow as part of our long-term focus on sustainability. We have been working with the Cloudflare team in early testing to incorporate their caching signals in our crawling mechanism via the IndexNow API. The results are great so far.” – Maxim Zagrebin, Head of Yandex Search
“DuckDuckGo is supportive of anything that makes search more environmentally friendly and better for end users without harming privacy. We’re looking forward to working with Cloudflare on this proposal.” – Gabriel Weinberg, CEO and Founder
How do Cloudflare customers benefit?
Crawler Hints doesn’t just benefit search engines. For our customers and origin owners, Crawler Hints will ensure that search engines and other bot-powered experiences will always have the freshest version of your content, translating into happier users and ultimately influencing search rankings. Crawler Hints will also mean less traffic hitting your origin, improving resource consumption. Moreover, your site performance will be improved as well: your human customers will not be competing with bots!
And for Internet users? When you interact with bot-fed experiences — which we all do every day, whether we realize it or not, like search engines or pricing tools — these will now deliver more useful results from crawled data, because Cloudflare has signaled to the owners of the bots the moment they need to update their results.
How can I enable Crawler Hints for my website?
Crawler Hints is free to use for all Cloudflare customers and promises to revolutionize web efficiency. If you’d like to see how Crawler Hints can benefit how your website is indexed by the worlds biggest search engines, please feel free to opt-into the service:
Sign in to your Cloudflare Account.
In the dashboard, navigate to the Cache tab.
Click on the Configuration section.
Locate the Crawler Hints sign up card and enable. It’s that easy.
Once you’ve enabled it, we will begin sending hints to search engines about when they should crawl particular parts of your website. Crawler Hints holds tremendous promise to improve the efficiency of the Internet.
What’s next?
We’re thrilled to collaborate with industry leaders Microsoft Bing, and Yandex to bring IndexNow to Crawler Hints, and to bring Crawler Hints to a wide audience in general availability. We look forward to working with additional companies who run crawlers to help make this process more efficient for the whole Internet.
Cloudflare Tunnel connects your infrastructure to Cloudflare. Your team runs a lightweight connector in your environment, cloudflared, and services can reach Cloudflare and your audience through an outbound-only connection without the need for opening up holes in your firewall.
Whether the services are internal apps protected with Zero Trust policies, websites running in Kubernetes clusters in a public cloud environment, or a hobbyist project on a Raspberry Pi — Cloudflare Tunnel provides a stable, secure, and highly performant way to serve traffic.
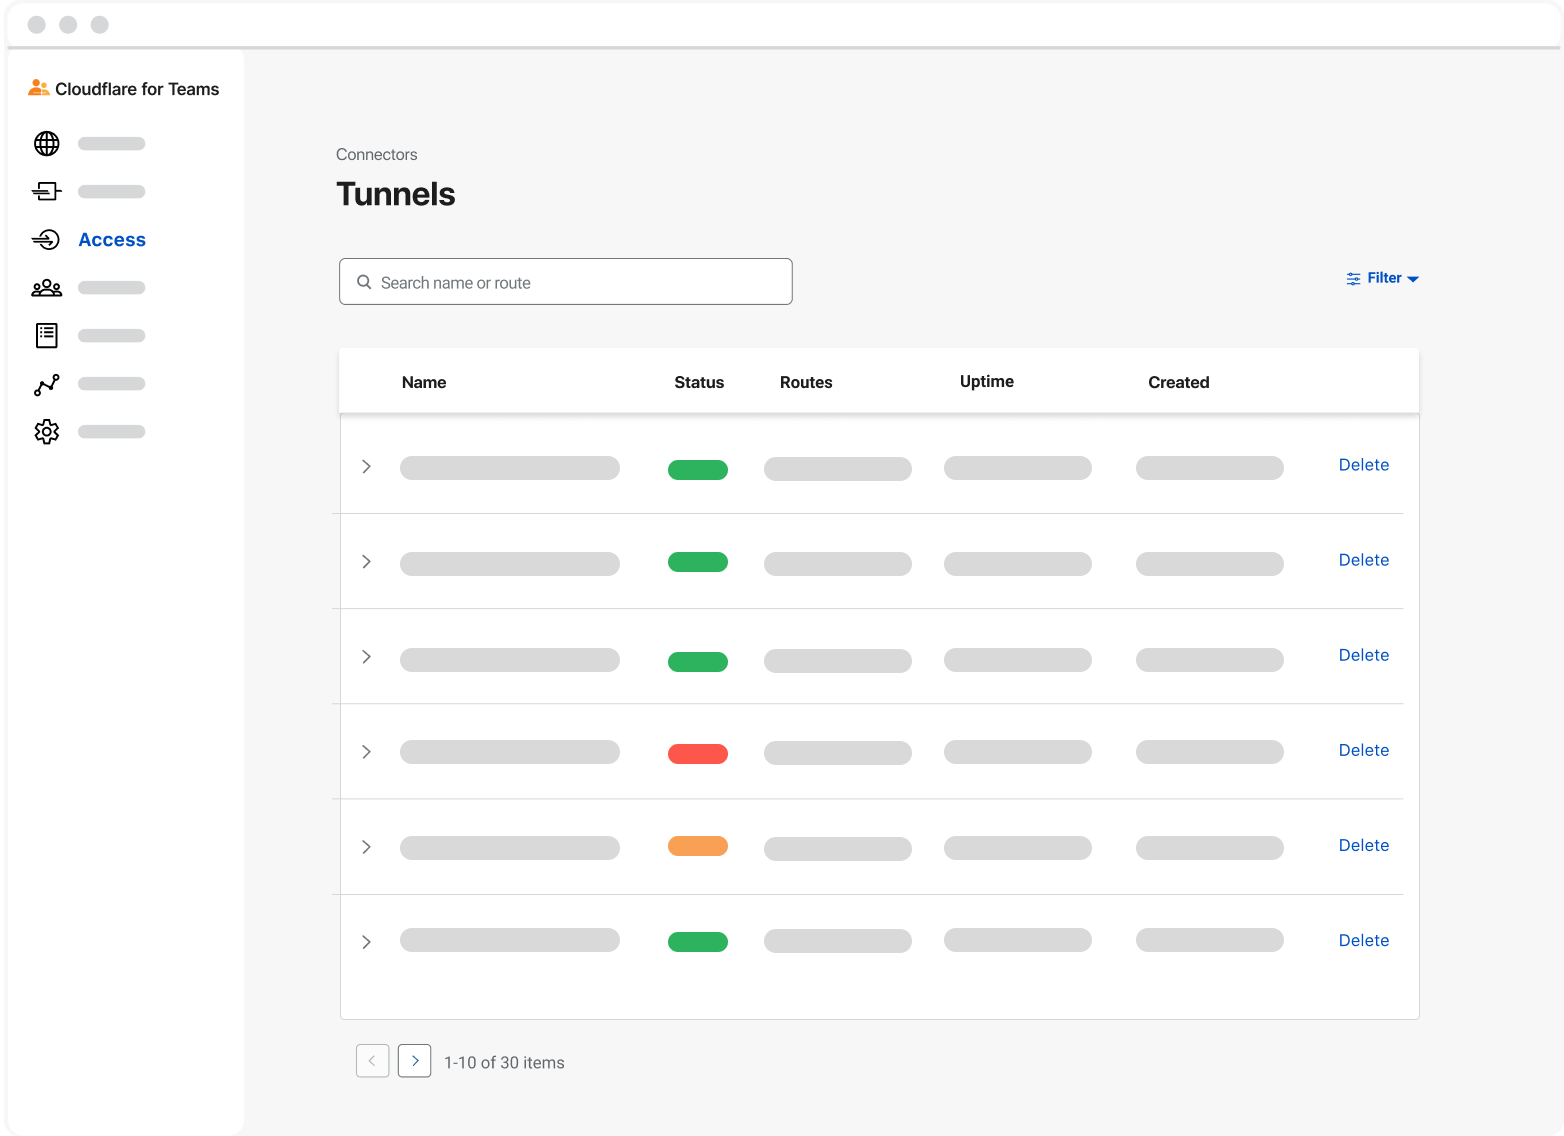
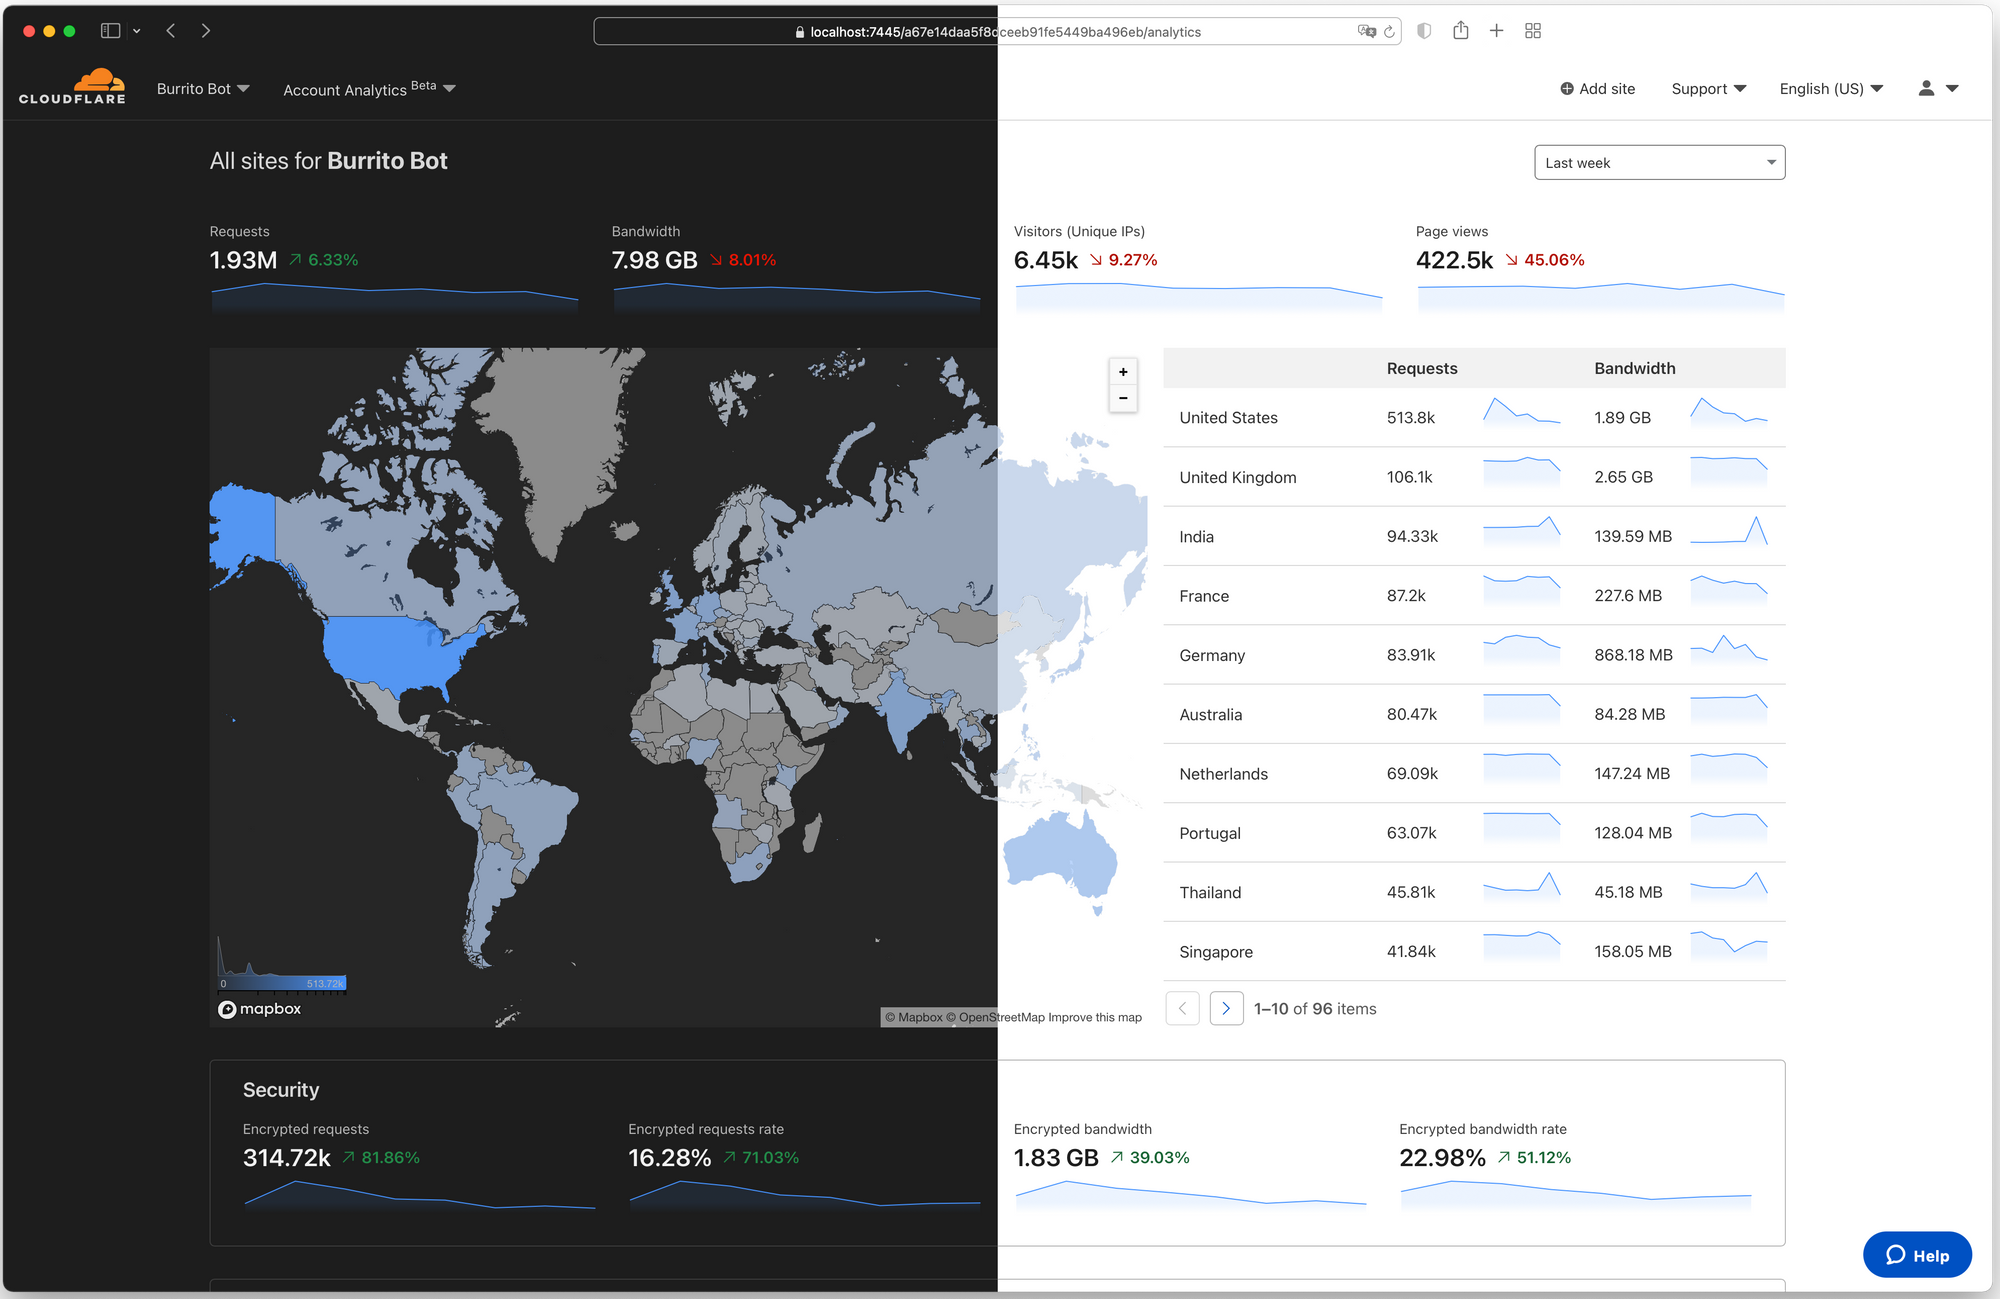
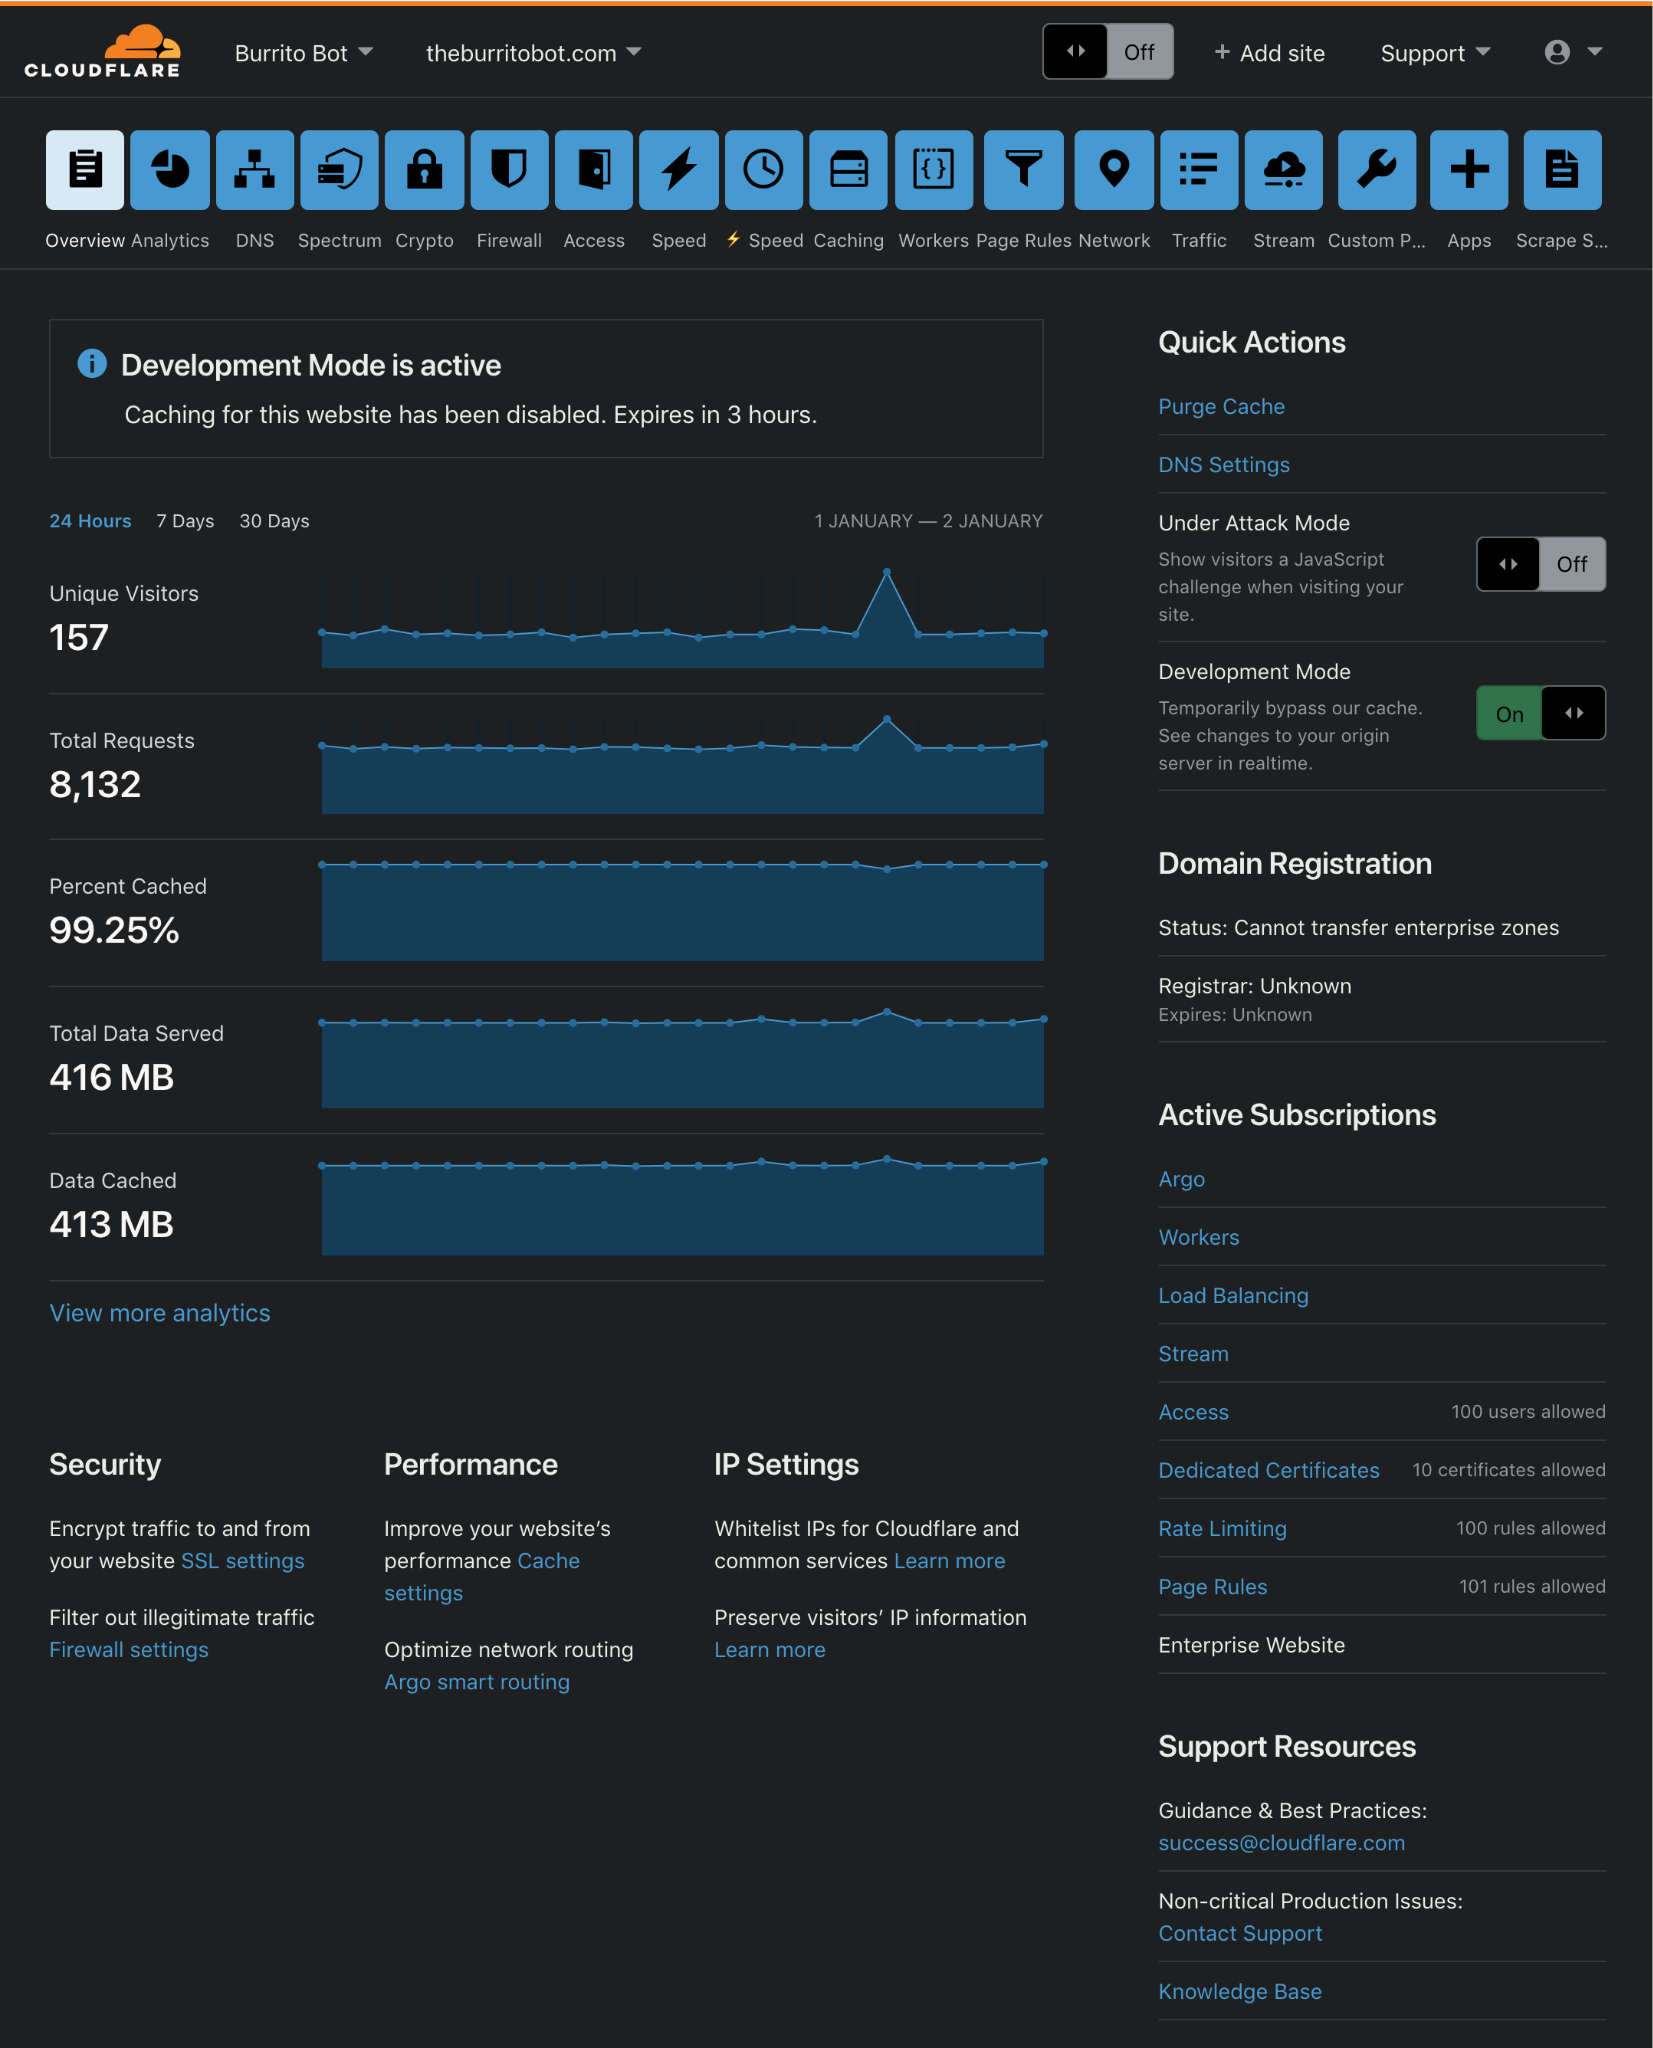
Starting today, with our new UI in the Cloudflare for Teams Dashboard, users who deploy and manage Cloudflare Tunnel at scale now have easier visibility into their tunnels’ status, routes, uptime, connectors, cloudflared version, and much more. On the Teams Dashboard you will also find an interactive guide that walks you through setting up your first tunnel.
Getting Started with Tunnel
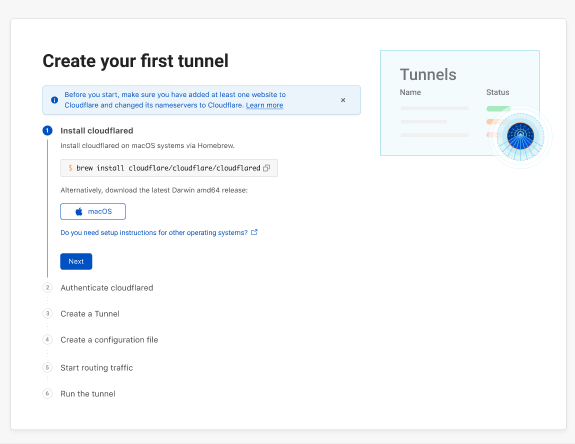
We wanted to start by making the tunnel onboarding process more transparent for users. We understand that not all users are intimately familiar with the command line nor are they deploying tunnel in an environment or OS they’re most comfortable with. To alleviate that burden, we designed a comprehensive onboarding guide with pathways for MacOS, Windows, and Linux for our two primary onboarding flows:
Our new onboarding guide walks through each command required to create, route, and run your tunnel successfully while also highlighting relevant validation commands to serve as guardrails along the way. Once completed, you’ll be able to view and manage your newly established tunnels.
Managing your tunnels
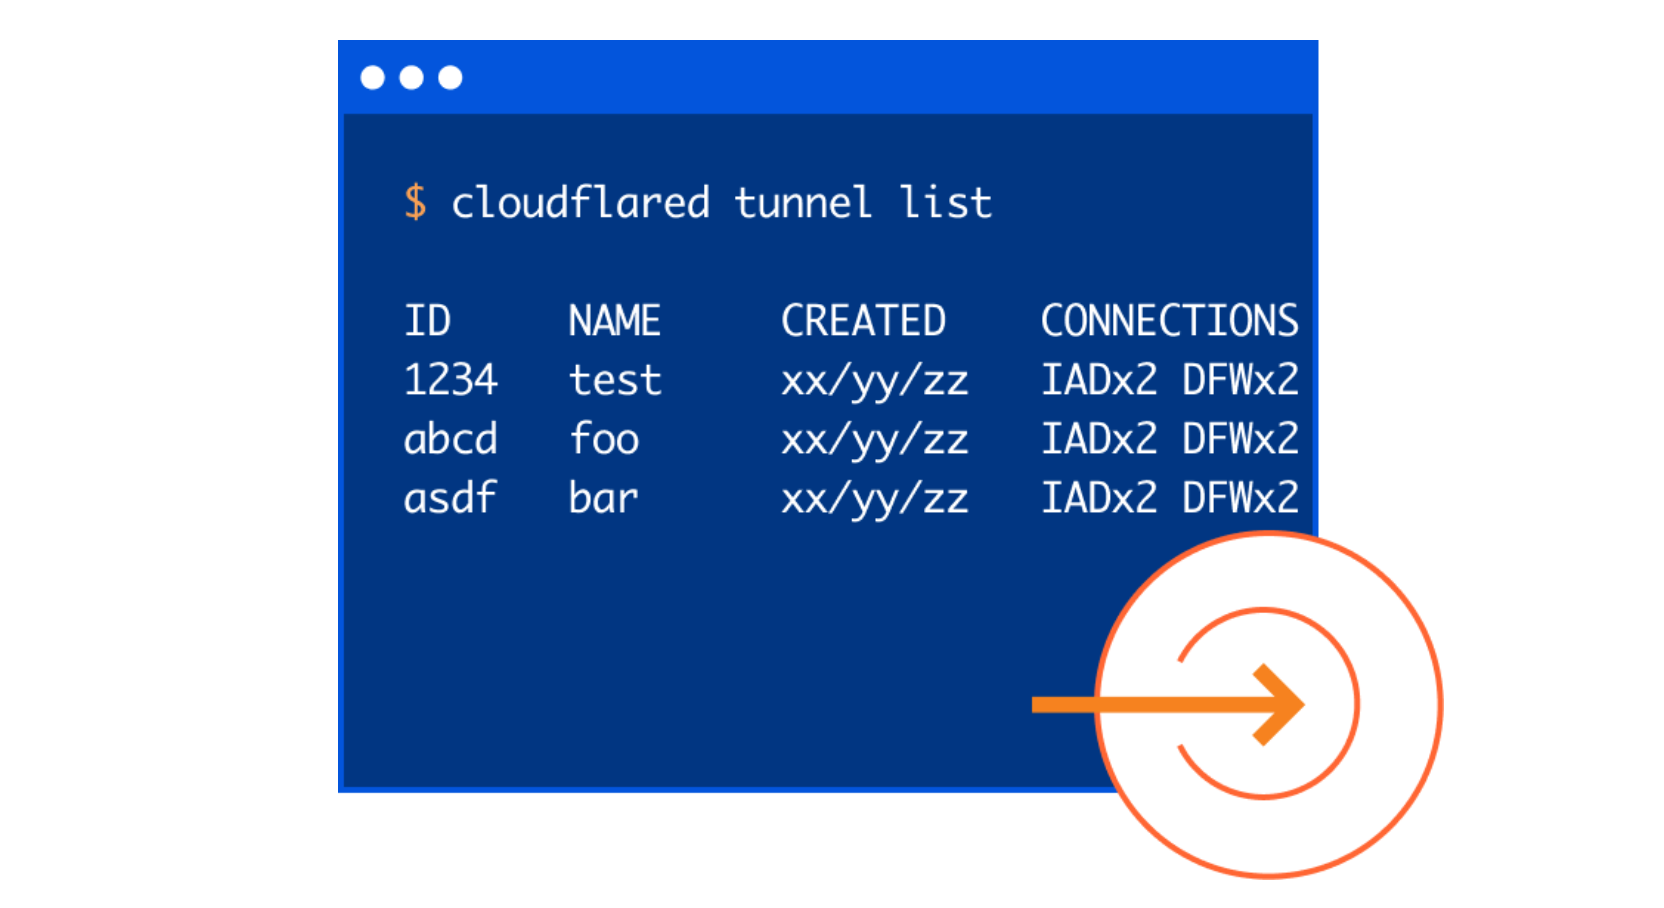
When thinking about the new user interface for tunnel we wanted to concentrate our efforts on how users gain visibility into their tunnels today. It was important that we provide the same level of observability, but through the lens of a visual, interactive dashboard. Specifically, we strove to build a familiar experience like the one a user may see if they were to run cloudflared tunnel list to show all of their tunnels, or cloudflared tunnel info if they wanted to better understand the connection status of a specific tunnel.
In the interface, you can quickly search by name or filter by name, status, uptime, or creation date. This allows users to easily identify and manage the tunnels they need, when they need them. We also included other key metrics such as Status and Uptime.
A tunnel’s status depends on the health of its connections:
Active: This means your tunnel is running and has a healthy connection to the Cloudflare network.
Inactive: This means your tunnel is not running and is not connected to Cloudflare.
Degraded: This means one or more of your four long-lived TCP connections to Cloudflare have been disconnected, but traffic is still being served to your origin.
A tunnel’s uptime is also calculated by the health of its connections. We perform this calculation by determining the UTC timestamp of when the first (of four) long-lived TCP connections is established with the Cloudflare Edge. In the event this single connection is terminated, we will continue tracking uptime as long as one of the other three connections continues to serve traffic. If no connections are active, Uptime will reset to zero.
Tunnel Routes and Connectors
Last year, shortly after the announcement of Named Tunnels, we released a new feature that allowed users to utilize the same Named Tunnel to serve traffic to many different services through the use of Ingress Rules. In the new UI, if you’re running your tunnels in this manner, you’ll be able to see these various services reflected by hovering over the route’s value in the dashboard. Today, this includes routes for DNS records, Load Balancers, and Private IP ranges.
Even more recently, we announced highly available and highly scalable instances of cloudflared, known more commonly as “cloudflared replicas.” To view your cloudflared replicas, select and expand a tunnel. Then you will identify how many cloudflared replicas you’re running for a given tunnel, as well as the corresponding connection status, data center, IP address, and version. And ultimately, when you’re ready to delete a tunnel, you can do so directly from the dashboard as well.
What’s next
Moving forward, we’re excited to begin incorporating more Cloudflare Tunnel analytics into our dashboard. We also want to continue making Cloudflare Tunnel the easiest way to connect to Cloudflare. In order to do that, we will focus on improving our onboarding experience for new users and look forward to bringing more of that functionality into the Teams Dashboard. If you have things you’re interested in having more visibility around in the future, let us know below!
Cloudflare provides our customers with security tools that help them protect their Internet applications against malicious or undesired traffic. Malicious traffic can include scraping content from a website, spamming form submissions, and a variety of other cyberattacks. To protect themselves from these types of threats while minimizing the blocking of legitimate site visitors, Cloudflare’s customers need to be able to identify traffic that might be malicious.
We know some of our customers rely on IP addresses to distinguish between traffic from legitimate users and potentially malicious users. However, in many cases the IP address of a request does not correspond to a particular user or even device. Furthermore, Cloudflare believes that in the long term, the IP address will be an even more unreliable signal for identifying the origin of a request. We envision a day where IP will be completely unassociated with identity. With that vision in mind, multi-user IP address detection represents our first step: pointing out situations where the IP address of a request cannot be assumed to be a single user. This gives our customers the ability to make more judicious decisions when responding to traffic from an IP address, instead of indiscriminately treating that traffic as though it was coming from a single user.
Historically, companies commonly treated IP addresses like mobile phone numbers: each phone number in theory corresponds to a single person. If you get several spam calls within an hour from the same phone number, you might safely assume that phone number represents a single person and ignore future calls or even block that number. Similarly, many Internet security detection engines rely on IP addresses to discern which requests are legitimate and which are malicious.
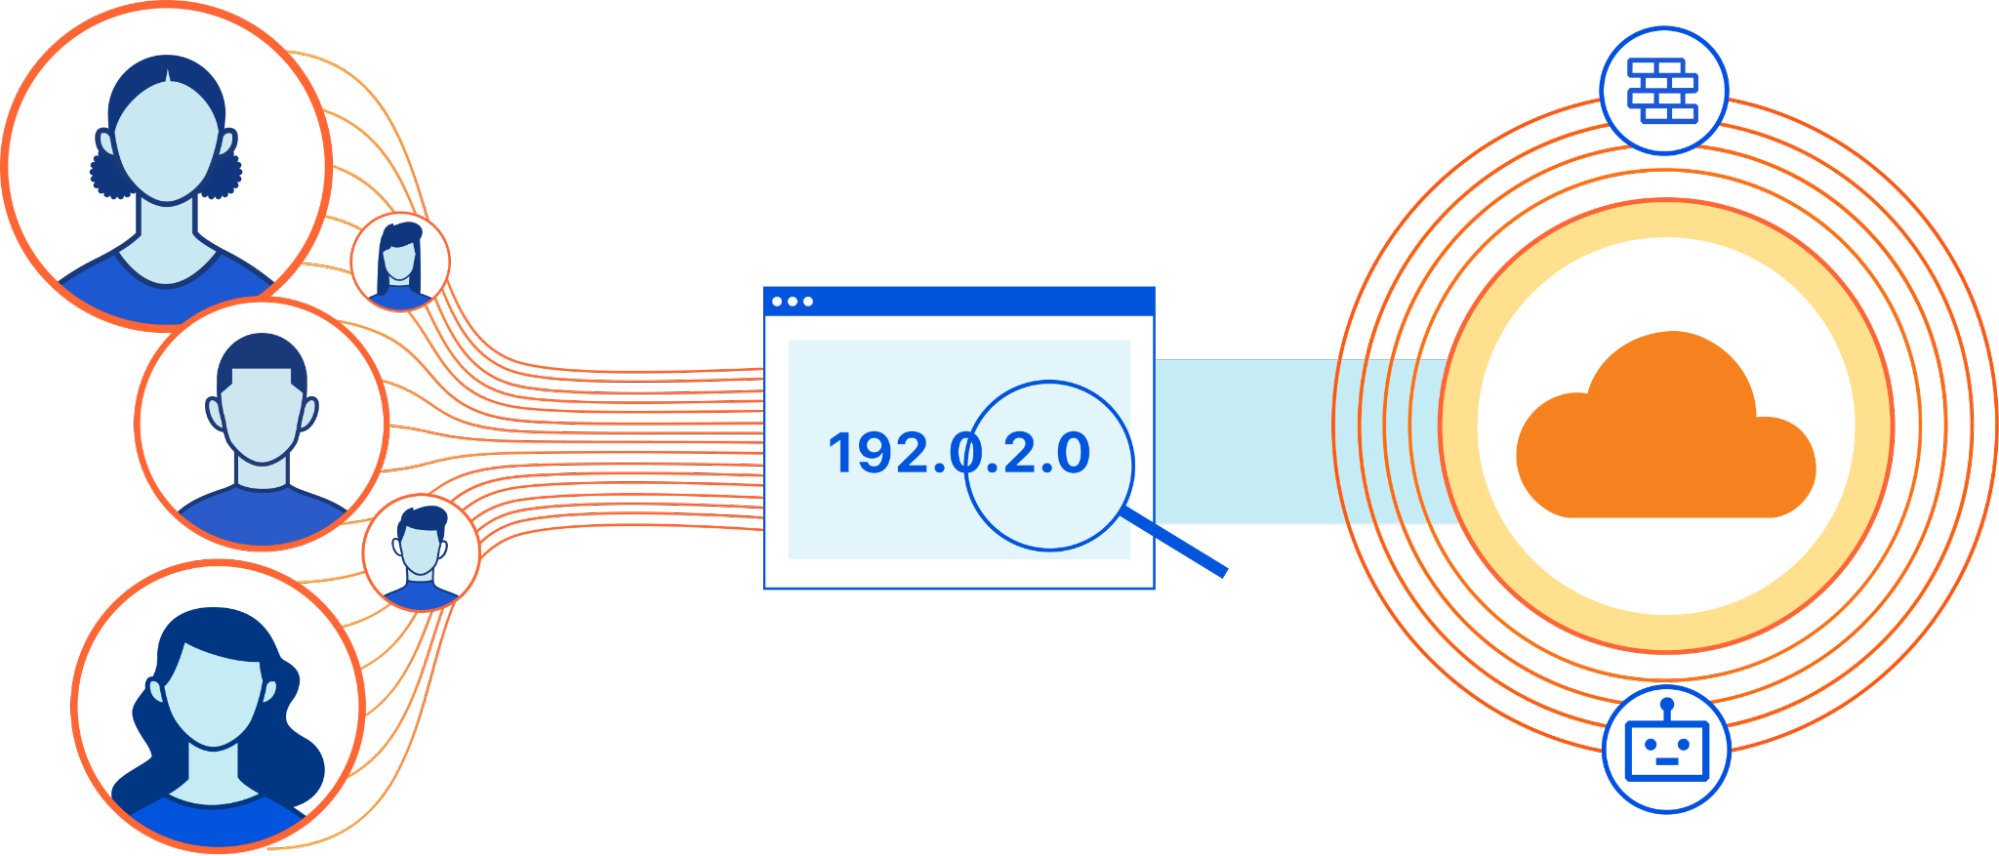
However, this analogy is flawed and can present a problem for security. In practice, IP addresses are more like postal addresses because they can be shared by more than one person at a time (and because of NAT and CG-NAT the number of people sharing an IP can be very large!). Many existing Internet security tools accept IP addresses as a reliable way to distinguish between site visitors. However, if multiple visitors share the same IP address, security products cannot rely on the IP address as a unique identifying signal. Thousands of requests from thousands of different users need to be treated differently from thousands of requests from the same user. The former is likely normal traffic, while the latter is almost certainly automated, malicious traffic.
For example, if several people in the same apartment building accessed the same site, it’s possible all of their requests would be routed through a middlebox operated by their Internet service provider that has only one IP address. But this sudden series of requests from the same IP address could closely resemble the behavior of a bot. In this case, IP addresses can’t be used by our customers to distinguish this activity from a real threat, leading them to mistakenly block or challenge their legitimate site visitors.
By adding multi-user IP address detection to Cloudflare products, we’re improving the quality of our detection techniques and reducing false positives for our customers.
Examples of Multi-User IP Addresses
Multi-user IP addresses take on many forms. When your company uses an enterprise VPN, for example, employees may share the same IP address when accessing external websites. Other types of VPNs and proxies also place multiple users behind a single IP address.
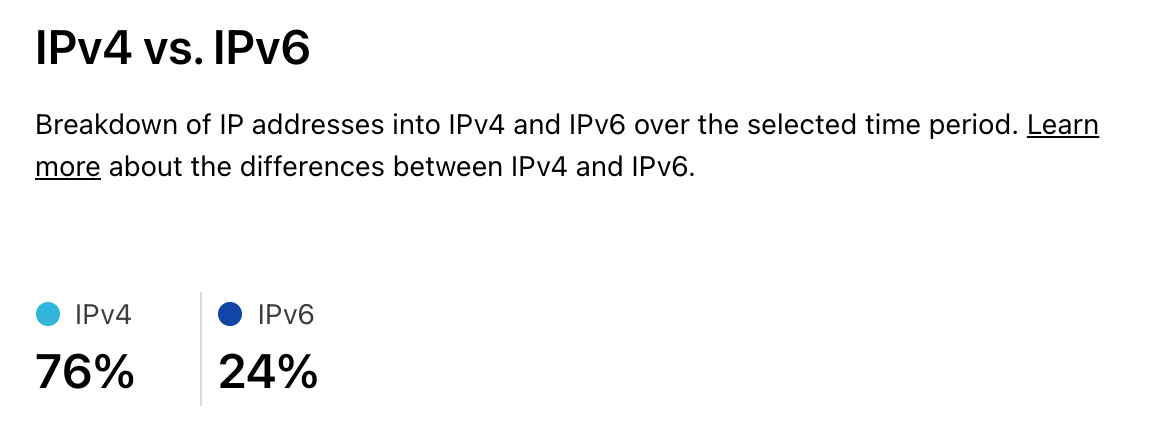
Another type of multi-user IP address originated from the core communications protocol of the Internet. IPv4 was developed in the 1980s. The protocol uses a 32-bit address space, allowing for over four billion unique addresses. Today, however, there are many times more devices than IPv4 addresses, meaning that not every device can have a unique IP address. Though IPv6 (IPv4’s successor protocol) solves the problem with 128-bit addresses (supporting 2128 unique addresses), IPv4 still routes the majority of Internet traffic (76% of human-only traffic is IPv4, as shown on Cloudflare Radar).
To solve this issue, many devices in the same Local Area Network (LAN) can share a single Internet-addressable IP address to communicate with the public Internet, while using private Internet addresses to communicate within the LAN. Since private addresses are to be used only within a LAN, different LANs can number their hosts using the same private IP address space. The Internet gateway of the LAN does the Network Address Translation (NAT), namely takes messages which arrive on that single public IP and forwards them to the private IP of the appropriate device on their local network. In effect it’s similar to how everyone in an office building shares the same street address, and the front desk worker is responsible for sorting out what mail was meant for which person.
While NAT allows multiple devices behind the same Internet gateway to share the same public IP address, the explosive growth of the Internet population necessitated further reuse of the limited IPv4 address space. Internet Service Providers (ISPs) required users in different LANs to share the same IP address for their service to scale. Carrier-Grade Network Address Translation (CG-NAT) emerged as another solution for address space reuse. Network operators can use CG-NAT middleboxes to translate hundreds or thousands of private IPv4 addresses into a single (or pool of) public IPv4 address. However, this sharing is not without side-effects. CG-NAT results in IP addresses that cannot be tied to single devices, users, or broadband subscriptions, creating issues for security products that rely on the IP address as a way to distinguish between requests from different users.
What We Built
We built a tool to help our customers detect when a /24 IP prefix (set of IP addresses that have the same first 24 bits) is likely to contain multi-user IP addresses, so they can more finely tune the security rules that protect their websites. In order to identify multi-user IP prefixes, we leverage both internal data and public data sources. Within this data, we look at a few key parameters.
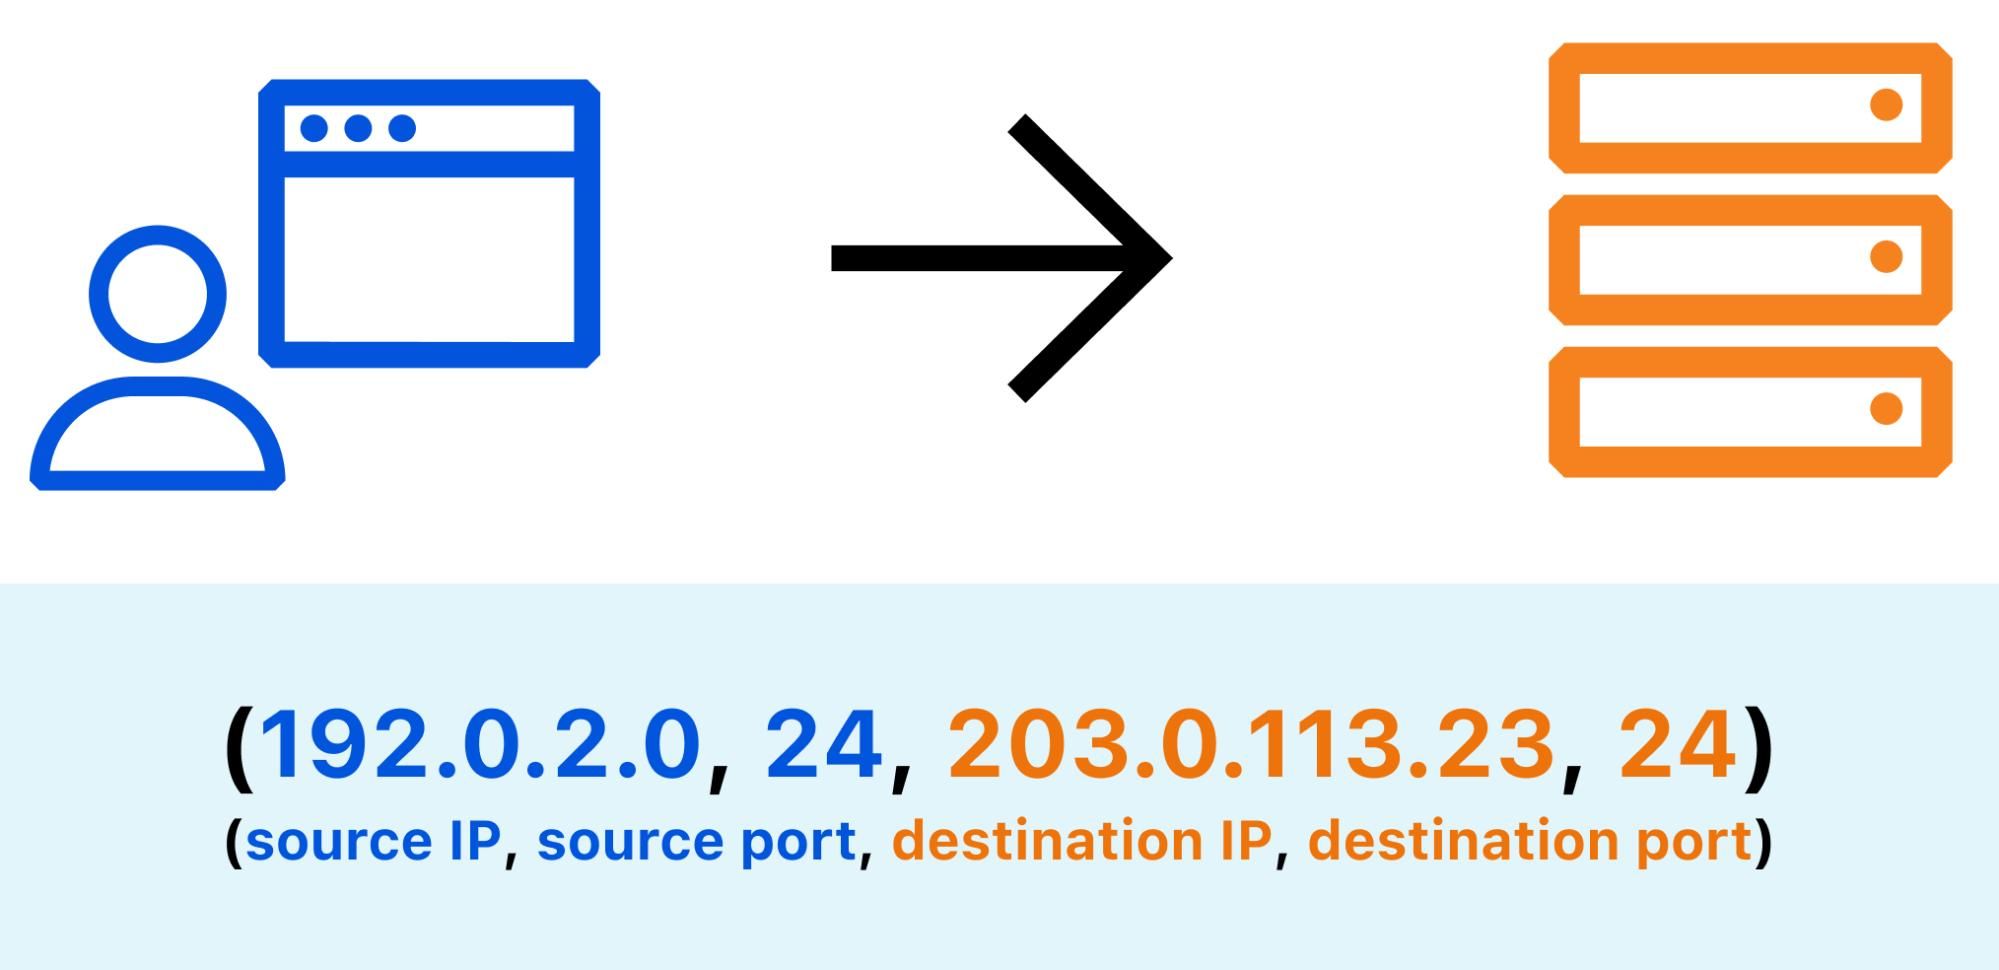
Each TCP connection between a source (client) and a destination (server) is identified by 4 identifiers (source IP, source port, destination IP, destination port)
When an Internet user visits a website, the underlying TCP stack opens a number of connections in order to send and receive data from remote servers. Each connection is identified by a 4-tuple (source IP, source port, destination IP, destination port). Repeating requests from the same web client will likely be mapped to the same source port, so the number of distinct source ports can serve as a good indication of the number of distinct client applications. By counting the number of open source ports for a given IP address, you can estimate whether this address is shared by multiple users.
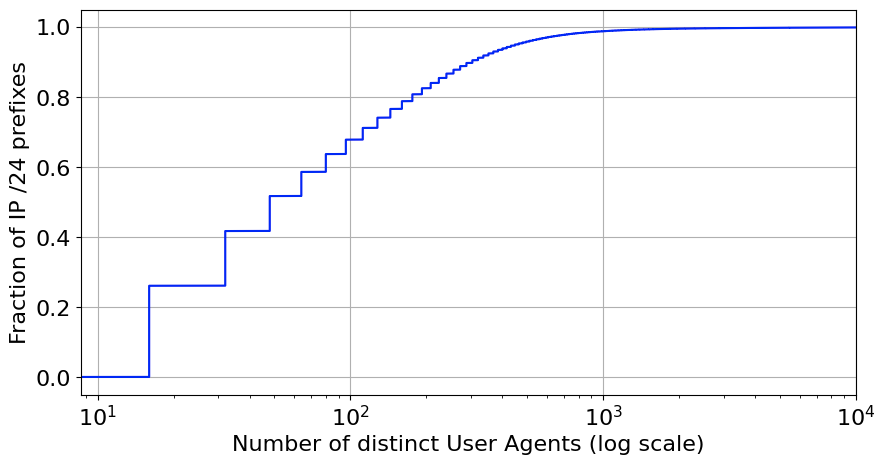
User agents provide device-reported information about themselves such as browser and operating system versions. For multi-user IP detection, you can count the number of distinct user agents in requests from a given IP. To avoid overcounting web clients per device, you can exclude requests that are identified as triggered by bots and we only count requests from user agents that are used by web browsers. There are some tradeoffs to this approach: some users may use multiple web browsers and some other users may have exactly the same user agent. Nevertheless, past research has shown that the number of unique web browser user agents is the best tradeoff to most accurately determine CG-NAT usage.
Mozilla/5.0 (X11; Linux x86_64; rv:92.0) Gecko/20100101 Firefox/92.0
For our inferences, we group IP addresses to their corresponding /24 IP prefix. The figure below shows the distribution of browser User Agents per /24 IP prefix, based on data accumulated over the period of a day. About 35% of the prefixes have more than 100 different browser clients behind them.
Our service also uses other publicly available data sources to further refine the accuracy of our identification and to classify the type of multi-user IP address. For example, we collect data from PeeringDB, which is a database where network operators self-identify their network type, traffic levels, interconnection points, and peering policy. This data only covers a fraction of the Internet’s autonomous systems (ASes). To overcome this limitation, we use this data and our own data (number of requests per AS, number of websites in each AS) to infer AS type. We also use external data sources such as IRR to identify requests from VPNs and proxy servers.
These details (especially AS type) can provide more information on the type of multi-user IP address. For instance, CG-NAT systems are almost exclusively deployed by broadband providers, so by inferring the AS type (ISP, CDN, Enterprise, etc.), we can more confidently infer the type of each multi-user IP address. A scheduled job periodically executes code to pull data from these sources, process it, and write the list of multi-user IP addresses to a database. That IP info data is then ingested by another system that deploys it to Cloudflare’s edge, enabling our security products to detect potential threats with minimal latency.
To validate our inferences for which IP addresses are multi-user, we created a dataset relying on separate data and measurements which we believe are more reliable indicators. One method we used was running traceroute queries through RIPE Atlas, from each RIPE Atlas probe to the probe’s public IP address. By examining the traceroute hops, we can determine if an IP is behind a CG-NAT or another middlebox. For example, if an IP is not behind a CG-NAT, the traceroute should terminate immediately or just have one hop (likely a home NAT). On the other hand, if a traceroute path includes addresses within the RFC 6598 CGNAT prefix or other hops in the private or shared address space, it is likely the corresponding probe is behind CG-NAT.
To further improve our validation datasets, we’re also reaching out to our ISP partners to confirm the known IP addresses of CG-NATs. As we refine our validation data, we can more accurately tune our multi-user IP address inference parameters and provide a better experience to ISP customers on sites protected by Cloudflare security products.
The multi-user IP detection service currently recognizes approximately 500,000 unique multi-user IP addresses and is being tuned to further improve detection accuracy. Be on the lookout for an upcoming technical blog post, where we will take a deeper look at the system we built and the metrics collected after running this service for a longer period of time.
How Will This Impact Bot Management and Rate Limiting Customers?
Our initial launch will integrate multi-user IP address detection into our Bot Management and Rate Limiting products.
The three modules that comprise the bot detection system.
The Cloudflare Bot Management product has five detection mechanisms. The integration will improve three of the five: the machine learning (ML) detection mechanism, the heuristics engine, and the behavioral analysis models. Multi-user IP addresses and their types will serve as additional features to train our ML model. Furthermore, logic will be added to ensure multi-user IP addresses are treated differently in our other detection mechanisms. For instance, our behavioral analysis detection mechanism shouldn’t treat a series of requests from a multi-user IP the same as a series of requests from a single-user IP. There won’t be any new ways to see or interact with this feature, but you should expect to see a decrease in false positive bot detections involving multi-user IP addresses.
The integration with Rate Limiting will allow us to increase the set rate limiting threshold when receiving requests coming from multi-user IP addresses. The factor by which we increase the threshold will be conservative so as not to completely bypass the rate limit. However, the increased threshold should greatly reduce cases where legitimate users behind multi-user IP addresses are blocked or challenged.
We will also continue to make improvements to our multi-user IP address detection system to incorporate additional data sources and improve accuracy. One data source would allow us to get a fraction for the estimated number of subscribers over the total number of IPs advertised (owned) by an AS. ASes that have more estimated subscribers than available IPs would have to rely on CG-NAT to provide service to all subscribers.
As mentioned above, with the help of our ISP partners we hope to improve the validation datasets we use to test and refine the accuracy of our inferences. Additionally, our integration with Bot Management will also unlock an opportunity to create a feedback loop that further validates our datasets. The challenge solve rate (CSR) is a metric generated by Bot Management that indicates the proportion of requests that were challenged and solved (and thus assumed to be human). Examining requests with both high and low CSRs will allow us to check if the multi-user IP addresses we have initially identified indeed represent mostly legitimate human traffic that our customers should not block.
The continued adoption of IPv6 might someday make CG-NATs and other IPv4 sharing technologies irrelevant, as the address space will no longer be limited. This could reduce the prevalence of multi-user IP addresses. However, with the development of new networking technologies that obfuscate IP addresses for user privacy (for example, IPv6 randomized address assignment), it seems unlikely it will become any easier to tie an IP address to a single user. Cloudflare firmly believes that eventually, IP will be completely unassociated with identity.
Yet in the short term, we recognize that IP addresses still play a pivotal role for the security of our customers. By integrating this multi-user IP address detection capability into our products, we aim to deliver a more free and fluid experience for everyone using the Internet.
Today we’re announcing a public demo and an open-sourced Go implementation of a next-generation, privacy-preserving compromised credential checking protocol called MIGP (“Might I Get Pwned”, a nod to Troy Hunt’s “Have I Been Pwned”). Compromised credential checking services are used to alert users when their credentials might have been exposed in data breaches. Critically, the ‘privacy-preserving’ property of the MIGP protocol means that clients can check for leaked credentials without leaking any information to the service about the queried password, and only a small amount of information about the queried username. Thus, not only can the service inform you when one of your usernames and passwords may have become compromised, but it does so without exposing any unnecessary information, keeping credential checking from becoming a vulnerability itself. The ‘next-generation’ property comes from the fact that MIGP advances upon the current state of the art in credential checking services by allowing clients to not only check if their exact password is present in a data breach, but to check if similar passwords have been exposed as well.
For example, suppose your password last year was amazon20\$, and you change your password each year (so your current password is amazon21\$). If last year’s password got leaked, MIGP could tell you that your current password is weak and guessable as it is a simple variant of the leaked password.
The MIGP protocol was designed by researchers at Cornell Tech and the University of Wisconsin-Madison, and we encourage you to read the paper for more details. In this blog post, we provide motivation for why compromised credential checking is important for security hygiene, and how the MIGP protocol improves upon the current generation of credential checking services. We then describe our implementation and the deployment of MIGP within Cloudflare’s infrastructure.
Our MIGP demo and public API are not meant to replace existing credential checking services today, but rather demonstrate what is possible in the space. We aim to push the envelope in terms of privacy and are excited to employ some cutting-edge cryptographic primitives along the way.
The threat of data breaches
Data breaches are rampant. The regularity of news articles detailing how tens or hundreds of millions of customer records have been compromised have made us almost numb to the details. Perhaps we all hope to stay safe just by being a small fish in the middle of a very large school of similar fish that is being predated upon. But we can do better than just hope that our particular authentication credentials are safe. We can actually check those credentials against known databases of the very same compromised user information we learn about from the news.
Many of the security breaches we read about involve leaked databases containing user details. In the worst cases, user data entered during account registration on a particular website is made available (often offered for sale) after a data breach. Think of the addresses, password hints, credit card numbers, and other private details you have submitted via an online form. We rely on the care taken by the online services in question to protect those details. On top of this, consider that the same (or quite similar) usernames and passwords are commonly used on more than one site. Our information across all of those sites may be as vulnerable as the site with the weakest security practices. Attackers take advantage of this fact to actively compromise accounts and exploit users every day.
Credential stuffing is an attack in which malicious parties use leaked credentials from an account on one service to attempt to log in to a variety of other services. These attacks are effective because of the prevalence of reused credentials across services and domains. After all, who hasn’t at some point had a favorite password they used for everything? (Quick plug: please use a password manager like LastPass to generate unique and complex passwords for each service you use.)
Website operators have (or should have) a vested interest in making sure that users of their service are using secure and non-compromised credentials. Given the sophistication of techniques employed by malevolent actors, the standard requirement to “include uppercase, lowercase, digit, and special characters” really is not enough (and can be actively harmful according to NIST’s latest guidance). We need to offer better options to users that keep them safe and preserve the privacy of vulnerable information. Dealing with account compromise and recovery is an expensive process for all parties involved.
Users and organizations need a way to know if their credentials have been compromised, but how can they do it? One approach is to scour dark web forums for data breach torrent links, download and parse gigabytes or terabytes of archives to your laptop, and then search the dataset to see if their credentials have been exposed. This approach is not workable for the majority of Internet users and website operators, but fortunately there’s a better way — have someone with terabytes to spare do it for you!
Making compromise checking fast and easy
This is exactly what compromised credential checking services do: they aggregate breach datasets and make it possible for a client to determine whether a username and password are present in the breached data. Have I Been Pwned (HIBP), launched by Troy Hunt in 2013, was the first major public breach alerting site. It provides a service, Pwned Passwords, where users can efficiently check if their passwords have been compromised. The initial version of Pwned Passwords required users to send the full password hash to the service to check if it appears in a data breach. In a 2018 collaboration with Cloudflare, the service was upgraded to allow users to run range queries over the password dataset, leaking only the salted hash prefix rather than the entire hash. Cloudflare continues to support the HIBP project by providing CDN and security support for organizations to download the raw Pwned Password datasets.
The HIBP approach was replicated by Google Password Checkup (GPC) in 2019, with the primary difference that GPC alerts are based on username-password pairs instead of passwords alone, which limits the rate of false positives. Enzoic and Microsoft Password Monitor are two other similar services. This year, Cloudflare also released Exposed Credential Checks as part of our Web Application Firewall (WAF) to help inform opted-in website owners when login attempts to their sites use compromised credentials. In fact, we use MIGP on the backend for this service to ensure that plaintext credentials never leave the edge server on which they are being processed.
Most standalone credential checking services work by having a user submit a query containing their password’s or username-password pair’s hash prefix. However, this leaks some information to the service, which could be problematic if the service turns out to be malicious or is compromised. In a collaboration with researchers at Cornell Tech published at CCS’19, we showed just how damaging this leaked information can be. Malevolent actors with access to the data shared with most credential checking services can drastically improve the effectiveness of password-guessing attacks. This left open the question: how can you do compromised credential checking without sharing (leaking!) vulnerable credentials to the service provider itself?
What does a privacy-preserving credential checking service look like?
In the aforementioned CCS’19 paper, we proposed an alternative system in which only the hash prefix of the username is exposed to the MIGP server (independent work out of Google and Stanford proposed a similar system). No information about the password leaves the user device, alleviating the risk of password-guessing attacks. These credential checking services help to preserve password secrecy, but still have a limitation: they can only alert users if the exact queried password appears in the breach.
The present evolution of this work, Might I Get Pwned (MIGP), proposes a next-generation similarity-aware compromised credential checking service that supports checking if a password similar to the one queried has been exposed in the data breach. This approach supports the detection of credential tweaking attacks, an advanced version of credential stuffing.
Credential tweaking takes advantage of the fact that many users, when forced to change their password, use simple variants of their original password. Rather than just attempting to log in using an exact leaked password, say ‘password123’, a credential tweaking attacker might also attempt to log in with easily-predictable variants of the password such as ‘password124’ and ‘password123!’.
There are two main mechanisms described in the MIGP paper to add password variant support: client-side generation and server-side precomputation. With client-side generation, the client simply applies a series of transform rules to the password to derive the set of variants (e.g., truncating the last letter or adding a ‘!’ at the end), and runs multiple queries to the MIGP service with each username and password variant pair. The second approach is server-side precomputation, where the server applies the transform rules to generate the password variants when encrypting the dataset, essentially treating the password variants as additional entries in the breach dataset. The MIGP paper describes tradeoffs between the two approaches and techniques for generating variants in more detail. Our demo service includes variant support via server-side precomputation.
Breach extraction attacks and countermeasures
One challenge for credential checking services are breach extraction attacks, in which an adversary attempts to learn username-password pairs that are present in the breach dataset (which might not be publicly available) so that they can attempt to use them in future credential stuffing or tweaking attacks. Similarity-aware credential checking services like MIGP can make these attacks more effective, since adversaries can potentially check for more breached credentials per API query. Fortunately, additional measures can be incorporated into the protocol to help counteract these attacks. For example, if it is problematic to leak the number of ciphertexts in a given bucket, dummy entries and padding can be employed, or an alternative length-hiding bucket format can be used. Slow hashing and API rate limiting are other common countermeasures that credential checking services can deploy to slow down breach extraction attacks. For instance, our demo service applies the memory-hard slow hash algorithm scrypt to credentials as part of the key derivation function to slow down these attacks.
Let’s now get into the nitty-gritty of how the MIGP protocol works. For readers not interested in the cryptographic details, feel free to skip to the demo below!
MIGP protocol
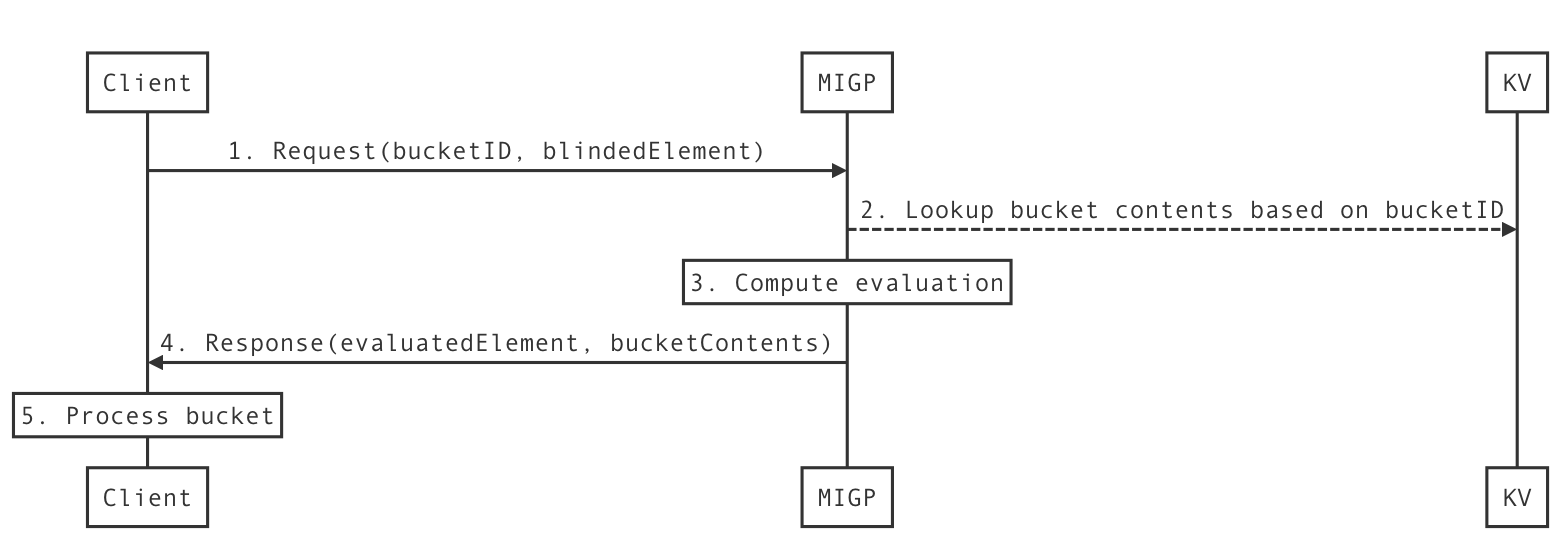
There are two parties involved in the MIGP protocol: the client and the server. The server has access to a dataset of plaintext breach entries (username-password pairs), and a secret key used for both the precomputation and the online portions of the protocol. In brief, the client performs some computation over the username and password and sends the result to the server; the server then returns a response that allows the client to determine if their password (or a similar password) is present in the breach dataset.
Full protocol description from the MIGP paper: clients learn if their credentials are in the breach dataset, leaking only the hash prefix of the queried username to the server
Precomputation
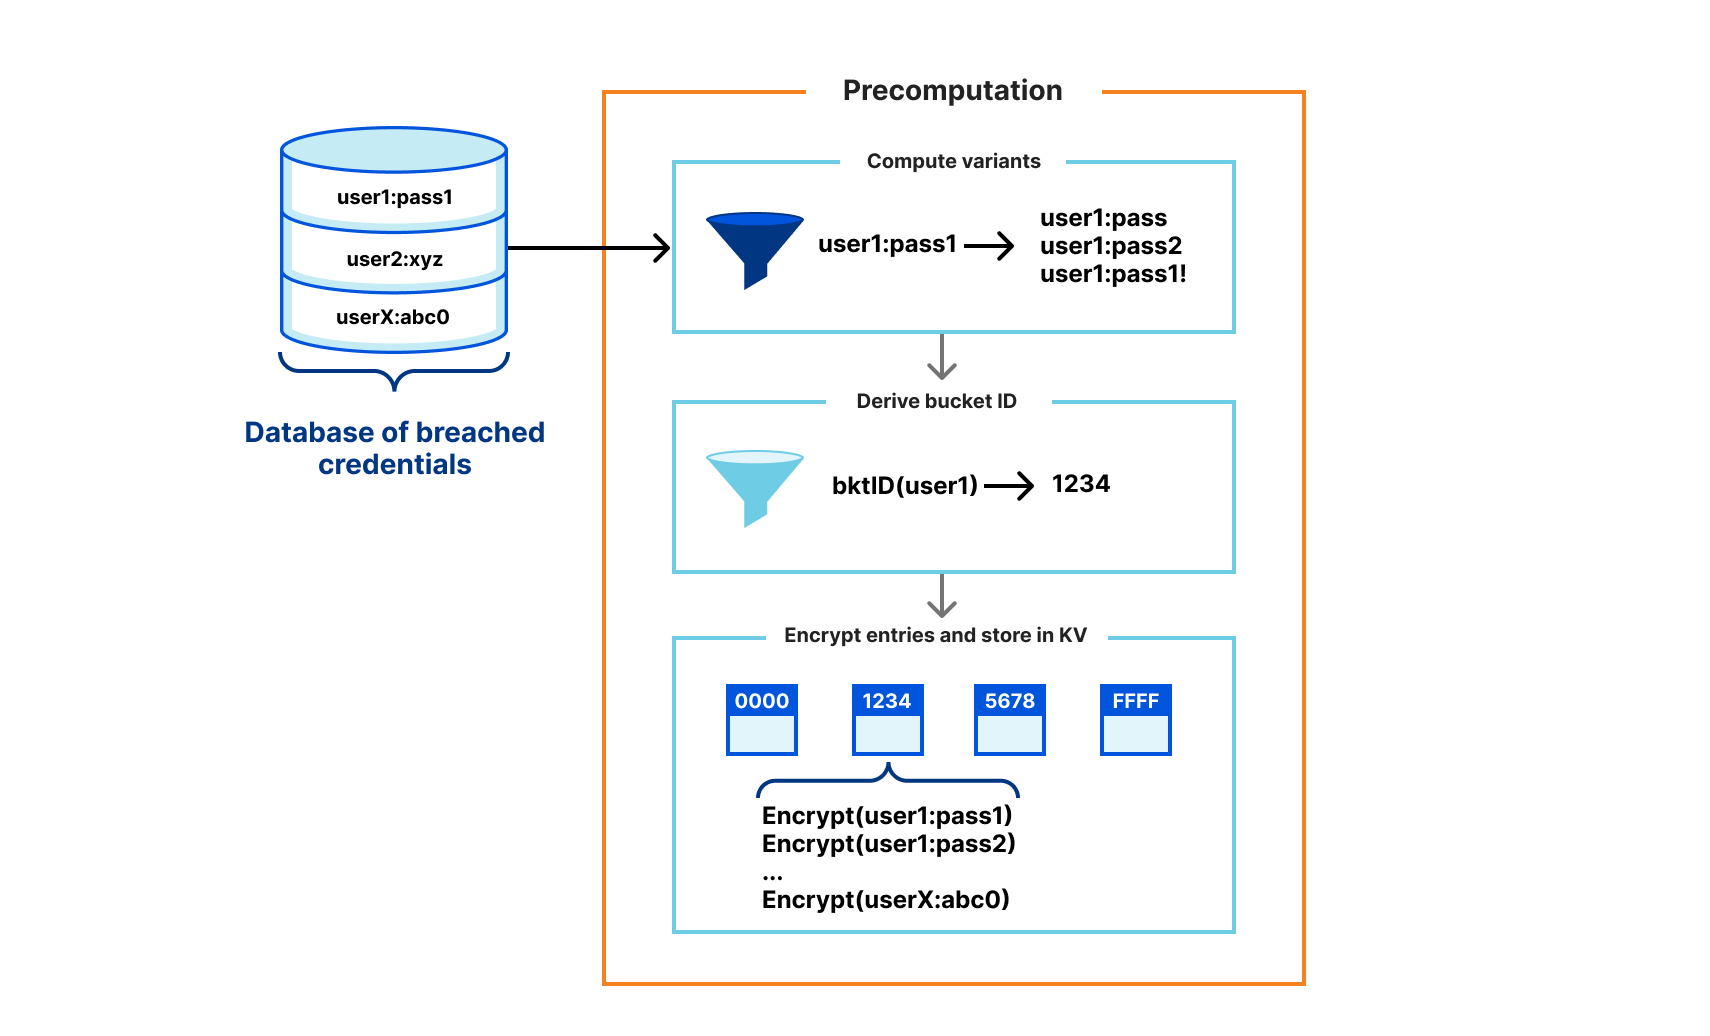
At a high level, the MIGP server partitions the breach dataset into buckets based on the hash prefix of the username (the bucket identifier), which is usually 16-20 bits in length.
During the precomputation phase of the MIGP protocol, the server derives password variants, encrypts entries, and stores them in buckets based on the hash prefix of the username
We use server-side precomputation as the variant generation mechanism in our implementation. The server derives one ciphertext for each exact username-password pair in the dataset, and an additional ciphertext per password variant. A bucket consists of the set ciphertexts for all breach entries and variants with the same username hash prefix. For instance, suppose there are n breach entries assigned to a particular bucket. If we compute m variants per entry, counting the original entry as one of the variants, there will be n*m ciphertexts stored in the bucket. This introduces a large expansion in the size of the processed dataset, so in practice it is necessary to limit the number of variants computed per entry. Our demo server stores 10 ciphertexts per breach entry in the input: the exact entry, eight variants (see Appendix A of the MIGP paper), and a special variant for allowing username-only checks.
Each ciphertext is the encryption of a username-password (or password variant) pair along with some associated metadata. The metadata describes whether the entry corresponds to an exact password appearing in the breach, or a variant of a breached password. The server derives a per-entry secret key pad using a key derivation function (KDF) with the username-password pair and server secret as inputs, and uses XOR encryption to derive the entry ciphertext. The bucket format also supports storing optional encrypted metadata, such as the date the breach was discovered.
Input:
  Secret sk       // Server secret key
  String u        // Username
  String w        // Password (or password variant)
  Byte mdFlag     // Metadata flag
  String mdString // Optional metadata string

Output:
  String C        // Ciphertext

function Encrypt(sk, u, w, mdFlag, mdString):
  padHdr=KDF1(u, w, sk)
  padBody=KDF2(u, w, sk)
  zeros=[0] * KEY_CHECK_LEN
  C=XOR(padHdr, zeros || mdFlag) || mdString.length || XOR(padBody, mdString)
The precomputation phase only needs to be done rarely, such as when the MIGP parameters are changed (in which case the entire dataset must be re-processed), or when new breach datasets are added (in which case the new data can be appended to the existing buckets).
Online phase
During the online phase of the MIGP protocol, the client requests a bucket of encrypted breach entries corresponding to the queried username, and with the server’s help derives a key that allows it to decrypt an entry corresponding to the queried credentials
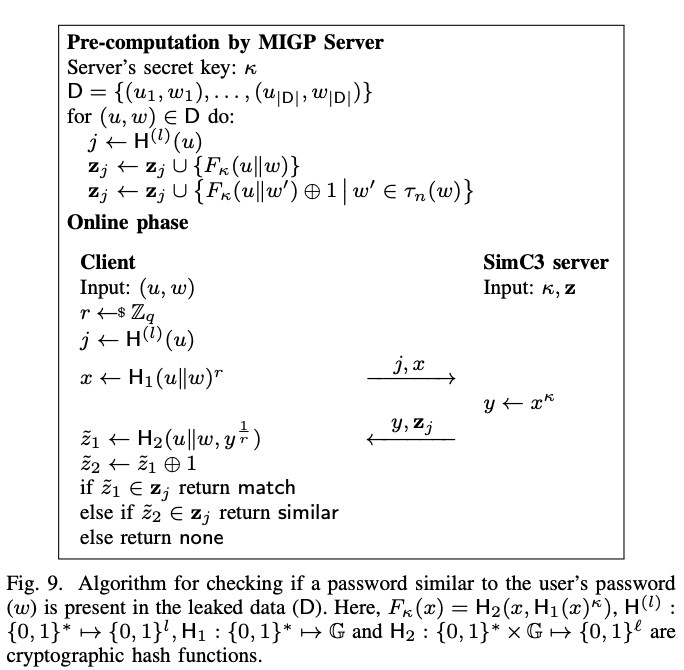
The online phase of the MIGP protocol allows a client to check if a username-password pair (or variant) appears in the server’s breach dataset, while only leaking the hash prefix of the username to the server. The client and server engage in an OPRF protocol message exchange to allow the client to derive the per-entry decryption key, without leaking the username and password to the server, or the server’s secret key to the client. The client then computes the bucket identifier from the queried username and downloads the corresponding bucket of entries from the server. Using the decryption key derived in the previous step, the client scans through the entries in the bucket attempting to decrypt each one. If the decryption succeeds, this signals to the client that their queried credentials (or a variant thereof) are in the server’s dataset. The decrypted metadata flag indicates whether the entry corresponds to the exact password or a password variant.
The MIGP protocol solves many of the shortcomings of existing credential checking services with its solution that avoids leaking any information about the client’s queried password to the server, while also providing a mechanism for checking for similar password compromise. Read on to see the protocol in action!
MIGP demo
As the state of the art in attack methodologies evolve with new techniques such as credential tweaking, so must the defenses. To that end, we’ve collaborated with the designers of the MIGP protocol to prototype and deploy the MIGP protocol within Cloudflare’s infrastructure.
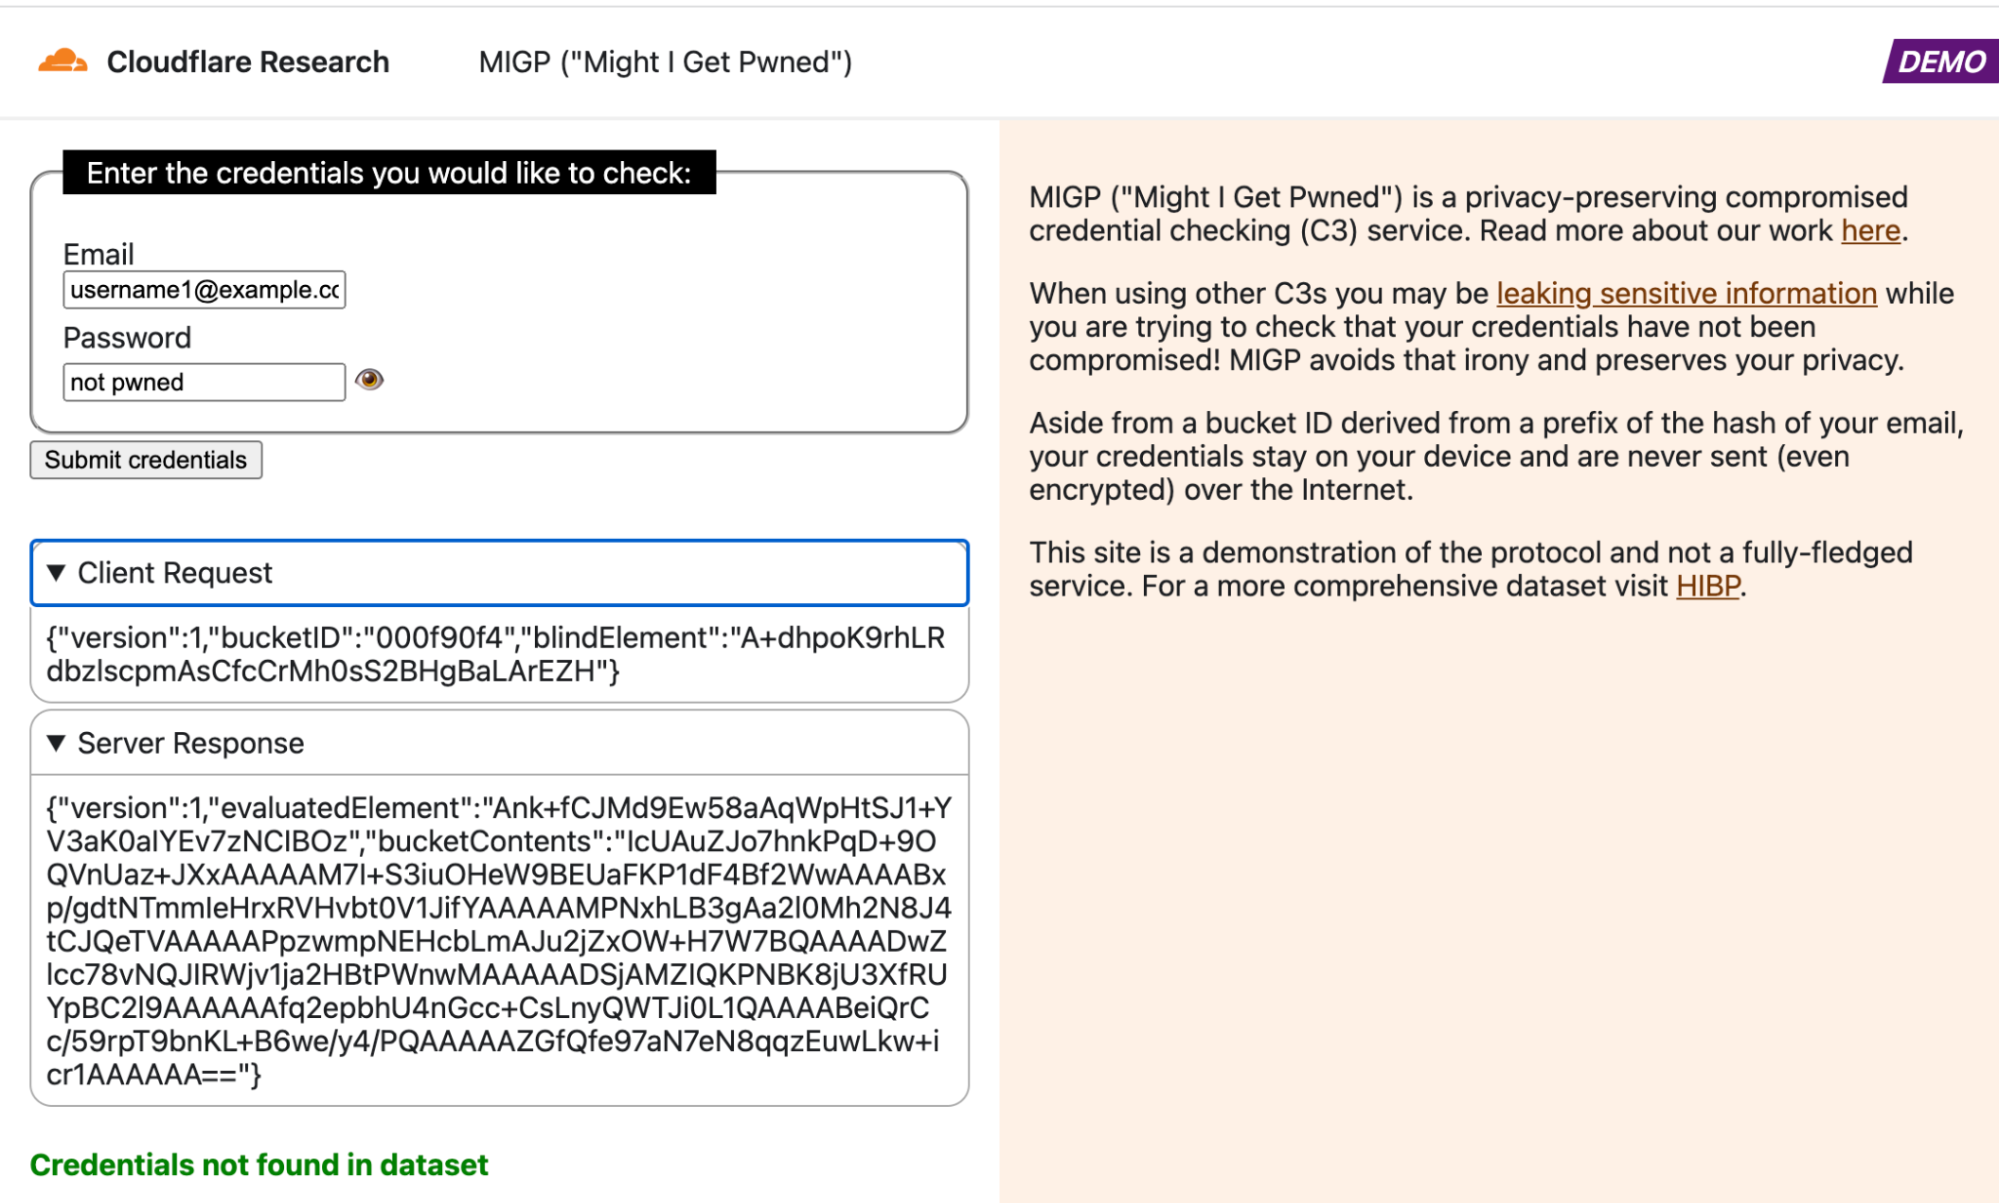
Our MIGP demo server is deployed at migp.cloudflare.com, and runs entirely on top of Cloudflare Workers. We use Workers KV for efficient storage and retrieval of buckets of encrypted breach entries, capping out each bucket size at the current KV value limit of 25MB. In our instantiation, we set the username hash prefix length to 20 bits, so that there are a total of 2^20 (or just over 1 million) buckets.
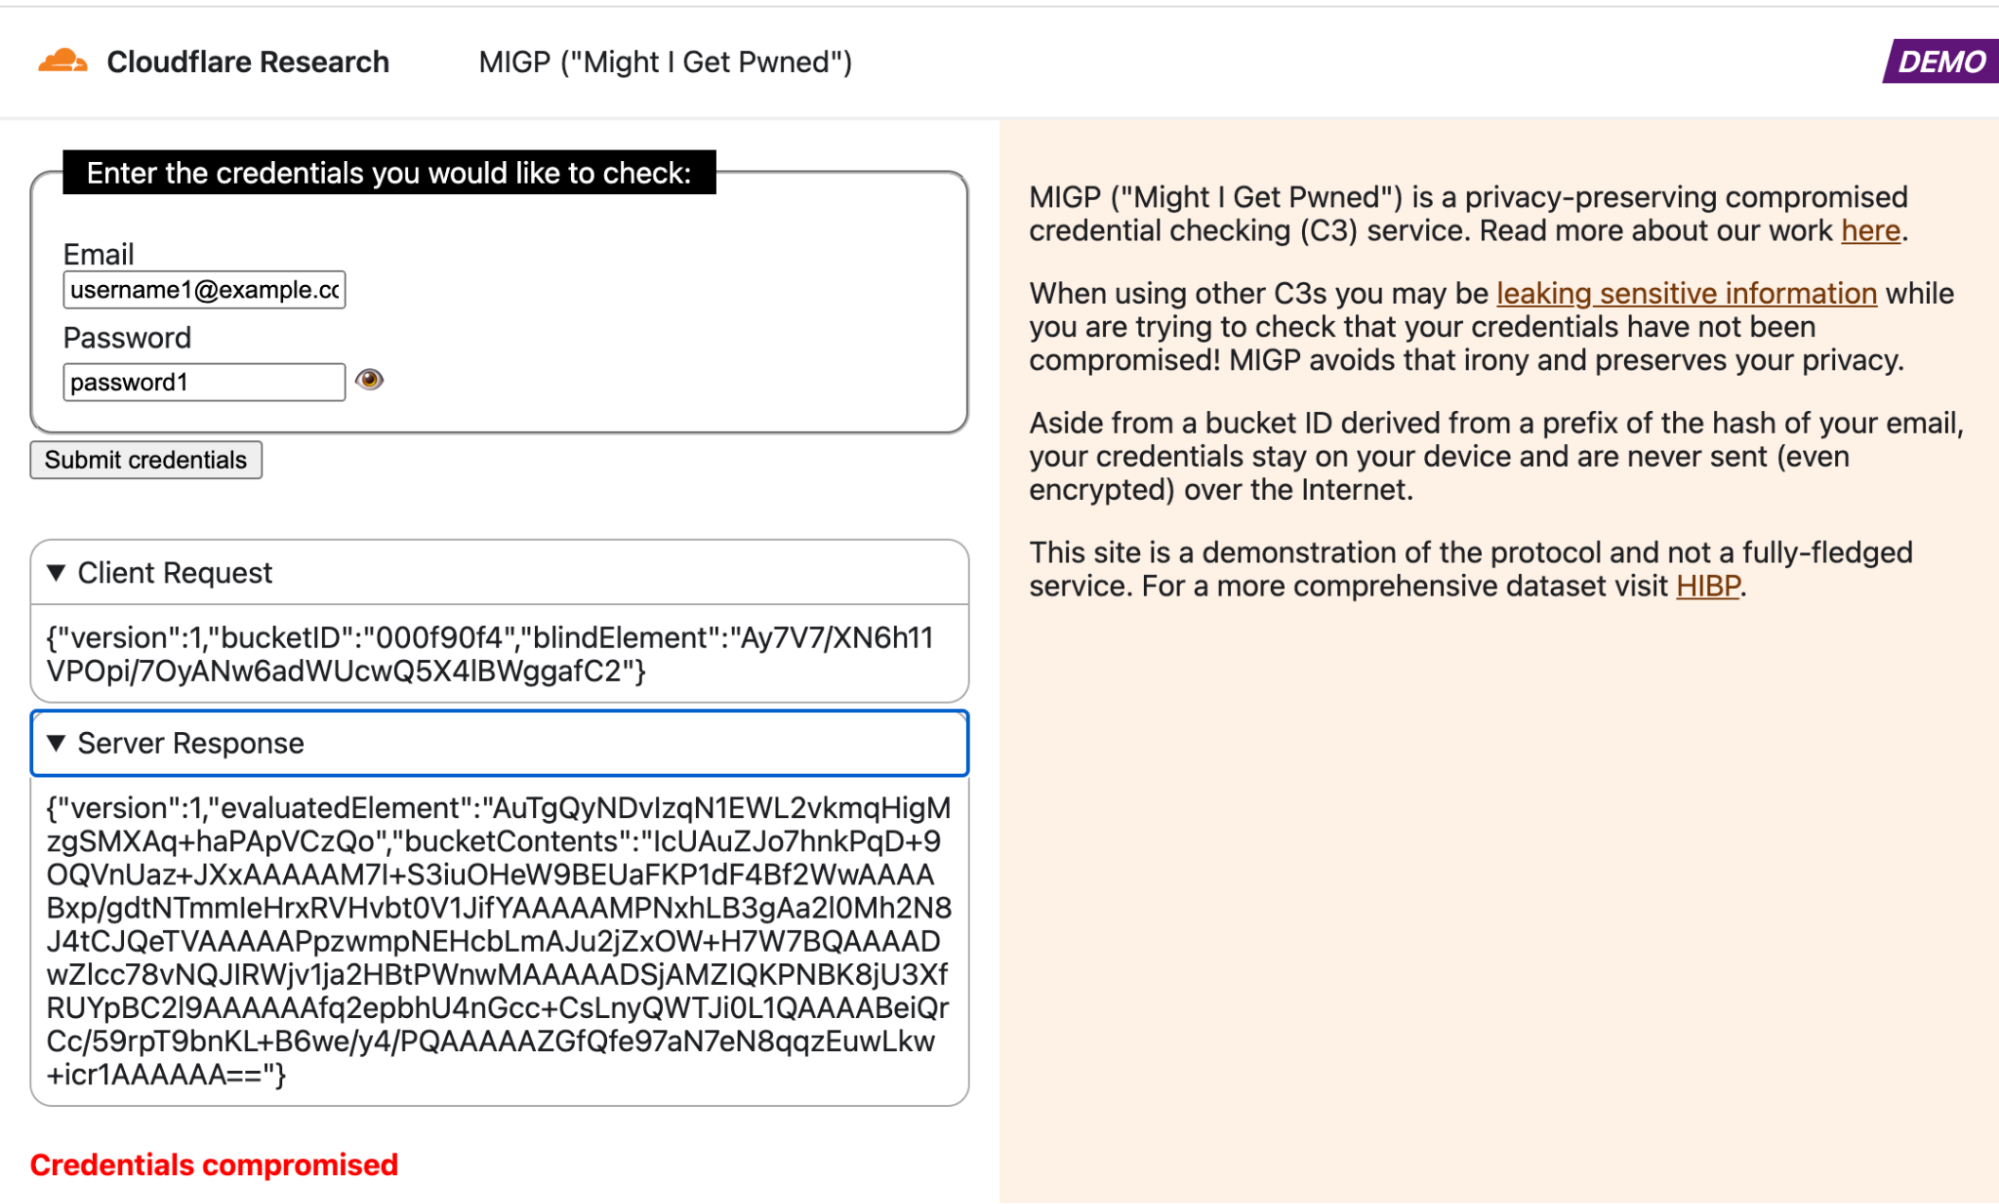
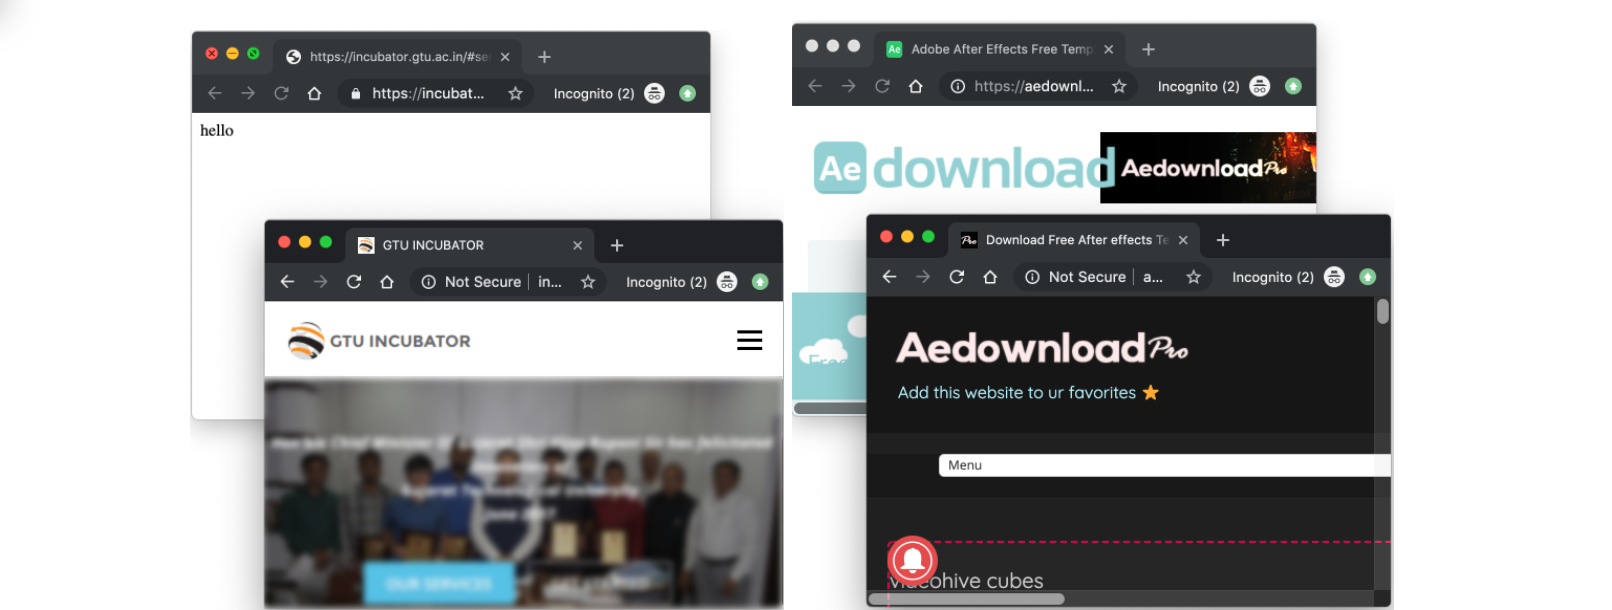
There are currently two ways to interact with the demo MIGP service: via the browser client at migp.cloudflare.com, or via the Go client included in our open-sourced MIGP library. As shown in the screenshots below, the browser client displays the request from your device and the response from the MIGP service. You should take caution to not input any sensitive credentials in a third-party service (feel free to use the test credentials [email protected] and password1 for the demo).
Keep in mind that “absence of evidence is not evidence of absence”, especially in the context of data breaches. We intend to periodically update the breach datasets used by the service as new public breaches become available, but no breach alerting service will be able to provide 100% accuracy in assuring that your credentials are safe.
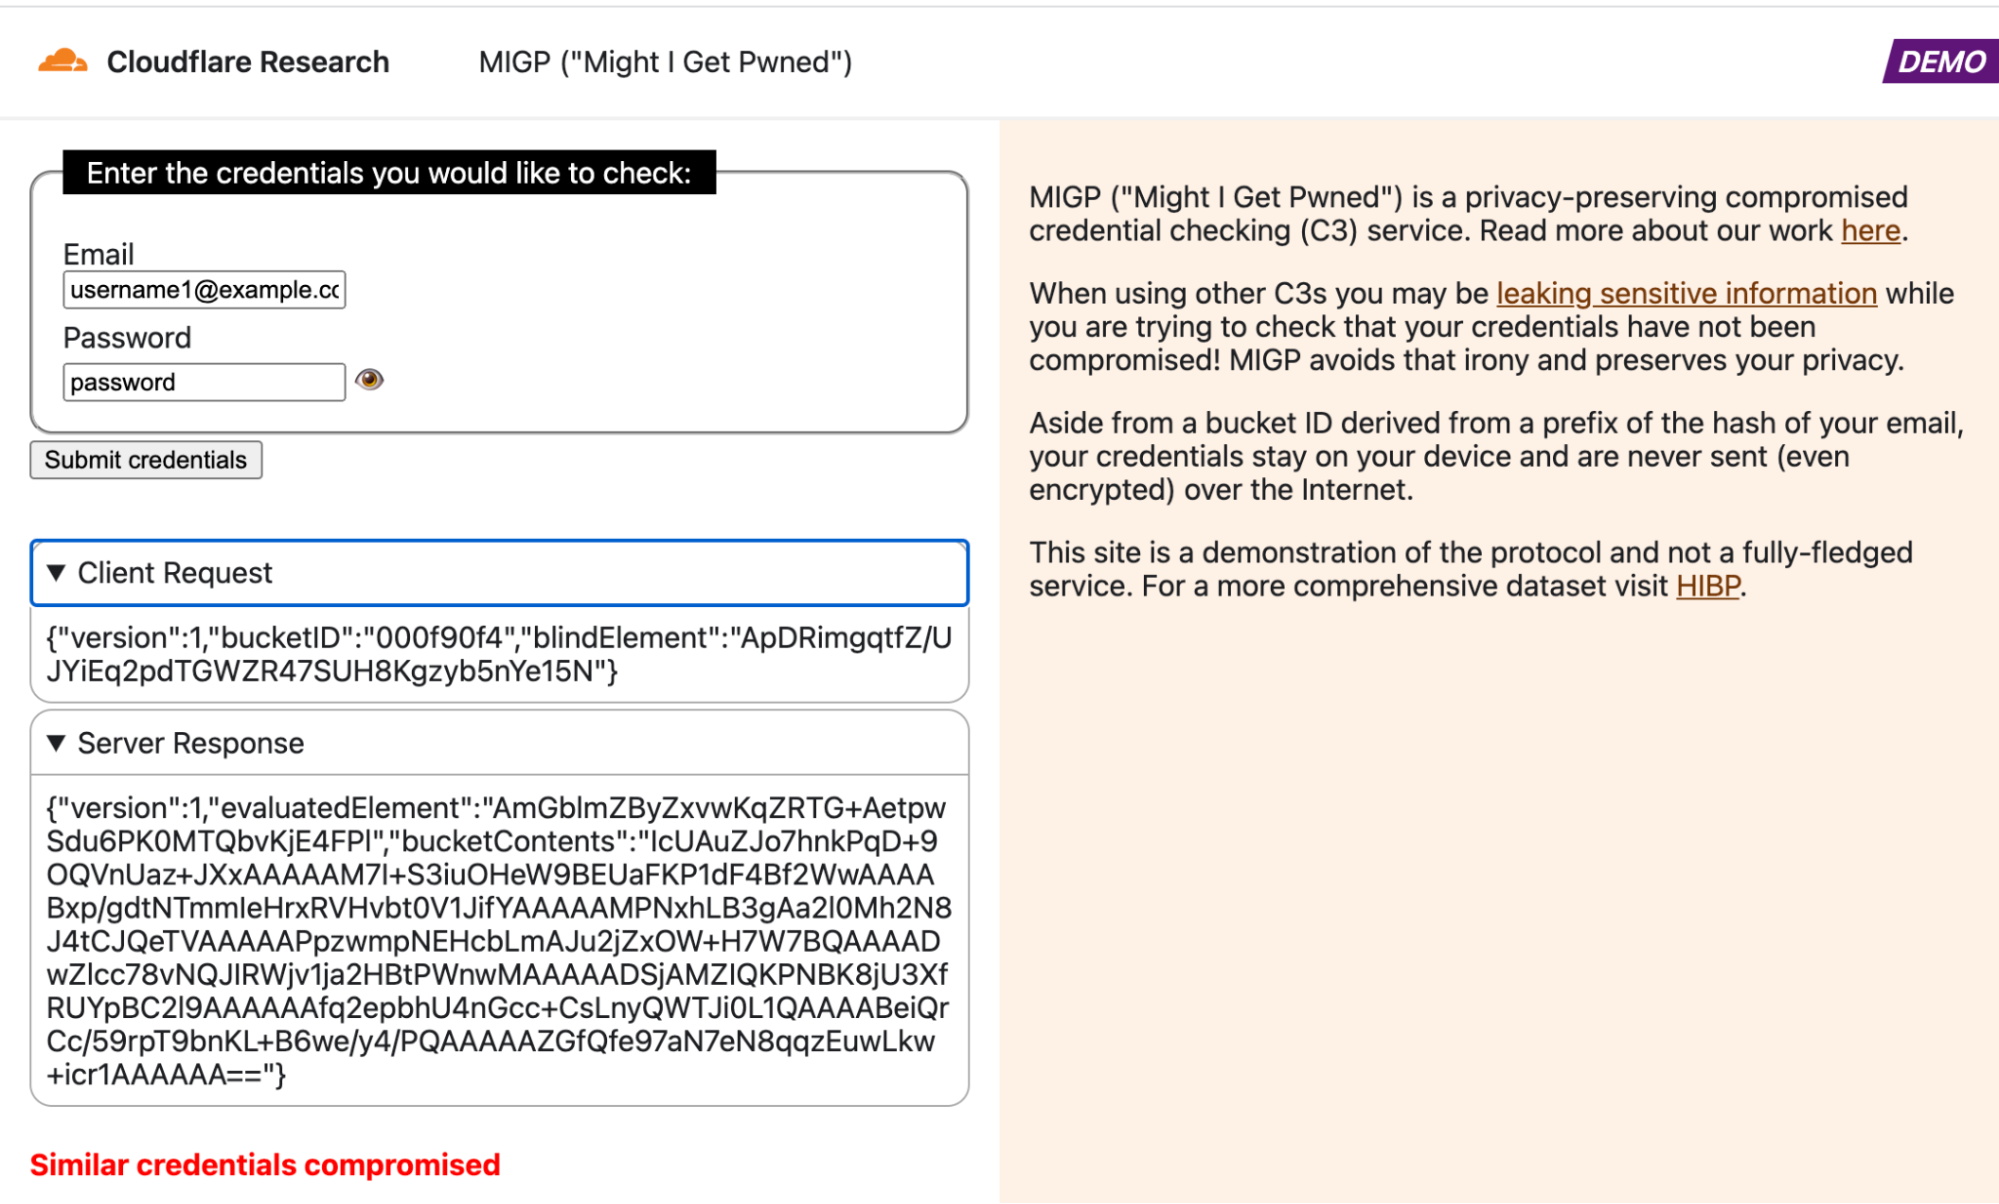
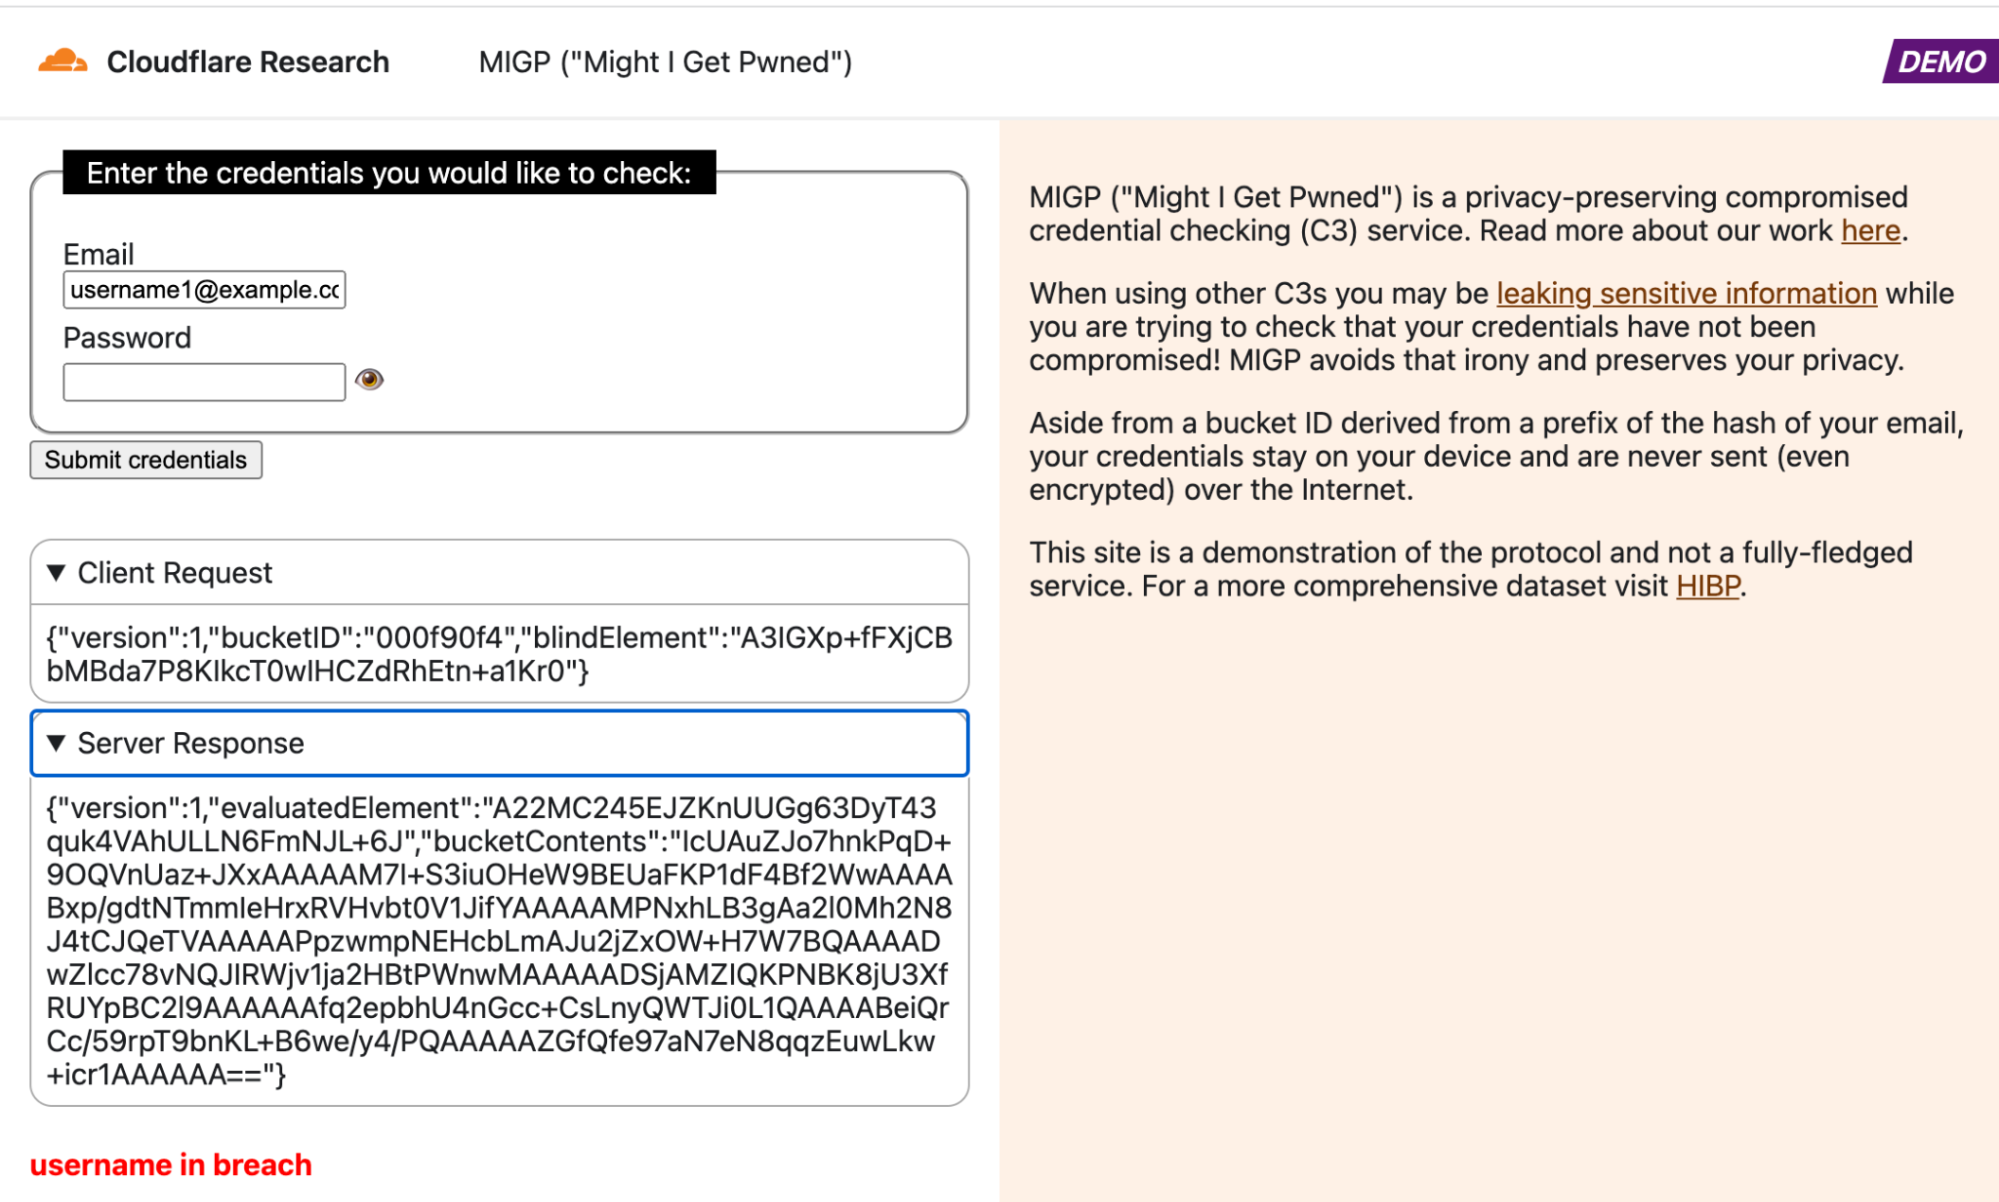
See the MIGP demo in action in the attached screenshots. Note that in all cases, the username ([email protected]) and corresponding username prefix hash (000f90f4) remain the same, so the client retrieves the exact same bucket contents from the server each time. However, the blindElement parameter in the client request differs per request, allowing the client to decrypt different bucket elements depending on the queried credentials.
Example query in which the credentials are exposed in the breach datasetExample query in which similar credentials were exposed in the breach datasetExample query in which the username is present in the breach datasetExample query in which the credentials are not found in the dataset
Open-sourced MIGP library
We are open-sourcing our implementation of the MIGP library under the BSD-3 License. The code is written in Go and is available at https://github.com/cloudflare/migp-go. Under the hood, we use Cloudflare’s CIRCL library for OPRF support and Go’s supplementary cryptography library for scrypt support. Check out the repository for instructions on setting up the MIGP client to connect to Cloudflare’s demo MIGP service. Community contributions and feedback are welcome!
Future directions
In this post, we announced our open-sourced implementation and demo deployment of MIGP, a next-generation breach alerting service. Our deployment is intended to lead the way for other credential compromise checking services to migrate to a more privacy-friendly model, but is not itself currently meant for production use. However, we identify several concrete steps that can be taken to improve our service in the future:
Add more breach datasets to the database of precomputed entries
Increase the number of variants in server-side precomputation
Add library support in more programming languages to reach a broader developer base
Hide the number of ciphertexts per bucket by padding with dummy entries
Add support for efficient client-side variant checking by batching API calls to the server
We are excited to share and build upon these ideas with the wider Internet community, and hope that our efforts impact positive change in the password security ecosystem. We are particularly interested in collaborating with stakeholders in the space to develop, test, and deploy next-generation protocols to improve user security and privacy. You can reach us with questions, comments, and research ideas at [email protected]. For those interested in joining our team, please visit our Careers Page.
As Internet users, we all deal with passwords every day. With so many different services, each with their own login systems, we have to somehow keep track of the credentials we use with each of these services. This situation leads some users to delegate credential storage to password managers like LastPass or a browser-based password manager, but this is far from universal. Instead, many people still rely on old-fashioned human memory, which has its limitations — leading to reused passwords and to security problems. This blog post discusses how Cloudflare Research is exploring how to minimize password exposure and thwart password attacks.
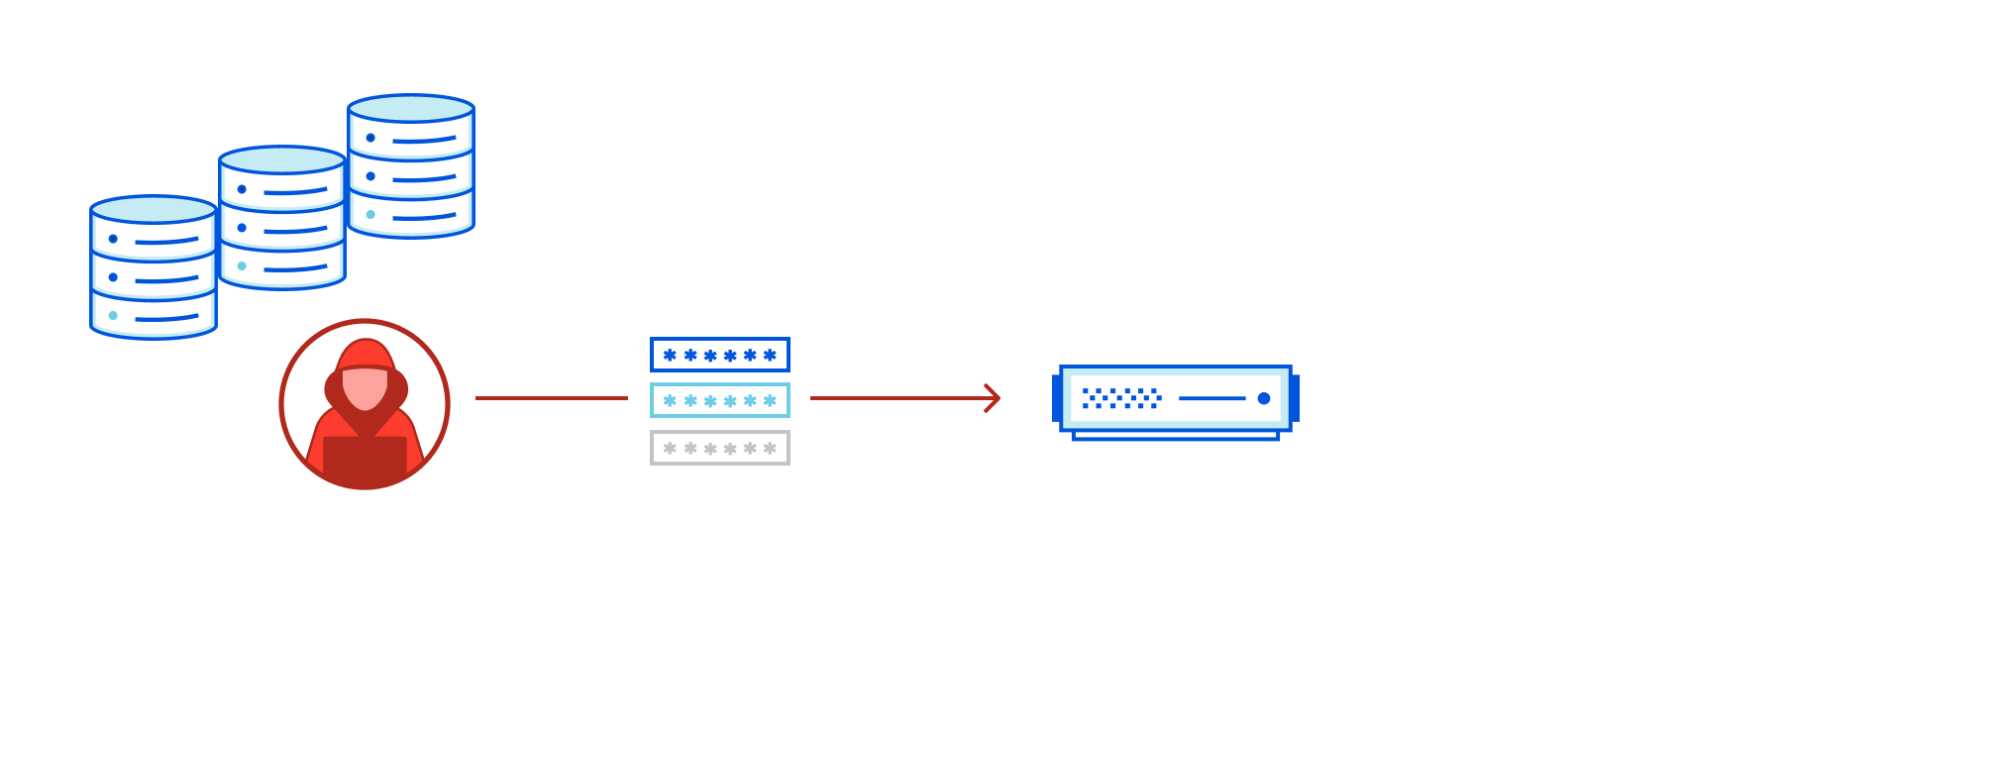
The Problem of Password Reuse
Because it’s too difficult to remember many distinct passwords, people often reuse them across different online services. When breached password datasets are leaked online, attackers can take advantage of these to conduct “credential stuffing attacks”. In a credential stuffing attack, an attacker tests breached credentials against multiple online login systems in an attempt to hijack user accounts. These attacks are highly effective because users tend to reuse the same credentials across different websites, and they have quickly become one of the most prevalent types of online guessing attacks. Automated attacks can be run at a large scale, testing out exposed passwords across multiple systems, under the assumption that some of these passwords will unlock accounts somewhere else (if they have been reused). When a data breach is detected, users of that service will likely receive a security notification and will reset that account password. However, if this password was reused elsewhere, they may easily forget that it needs to be changed for those accounts as well.
How can we protect against credential stuffing attacks? There are a number of methods that have been deployed — with varying degrees of success. Password managers address the problem of remembering a strong, unique password for every account, but many users have yet to adopt them. Multi-factor authentication is another potential solution — that is, using another form of authentication in addition to the username/password pair. This can work well, but has limits: for example, such solutions may rely on specialized hardware that not all clients have. Consumer systems are often reluctant to mandate multi-factor authentication, given concerns that people may find it too complicated to use; companies do not want to deploy something that risks impeding the growth of their user base.
Since there is no perfect solution, security researchers continue to try to find improvements. Two different approaches we will discuss in this blog post are hardening password systems using cryptographically secure keys, and detecting the reuse of compromised credentials, so they don’t leave an account open to guessing attacks.
Improved Authentication with PAKEs
Investigating how to securely authenticate a user just using what they can remember has been an important area in secure communication. To this end, the subarea of cryptography known as Password Authenticated Key Exchange (PAKE) came about. PAKEs deal with protocols for establishing cryptographically secure keys where the only source of authentication is a human memorizable (low-entropy, attacker-guessable) password — that is, the “what you know” side of authentication.
Before diving into the details, we’ll provide a high-level overview of the basic problem. Although passwords are typically protected in transit by being sent over HTTPS, servers handle them in plaintext to verify them once they arrive. Handling plaintext passwords increases security risk — for instance, they might get inadvertently logged and exposed. Ideally, the user’s password never gets sent to the server in the first place. This is where PAKEs come in — a means of verifying that the user and server share a password, ideally without revealing information about the password that could help attackers to discover or crack it.
A few words on PAKEs
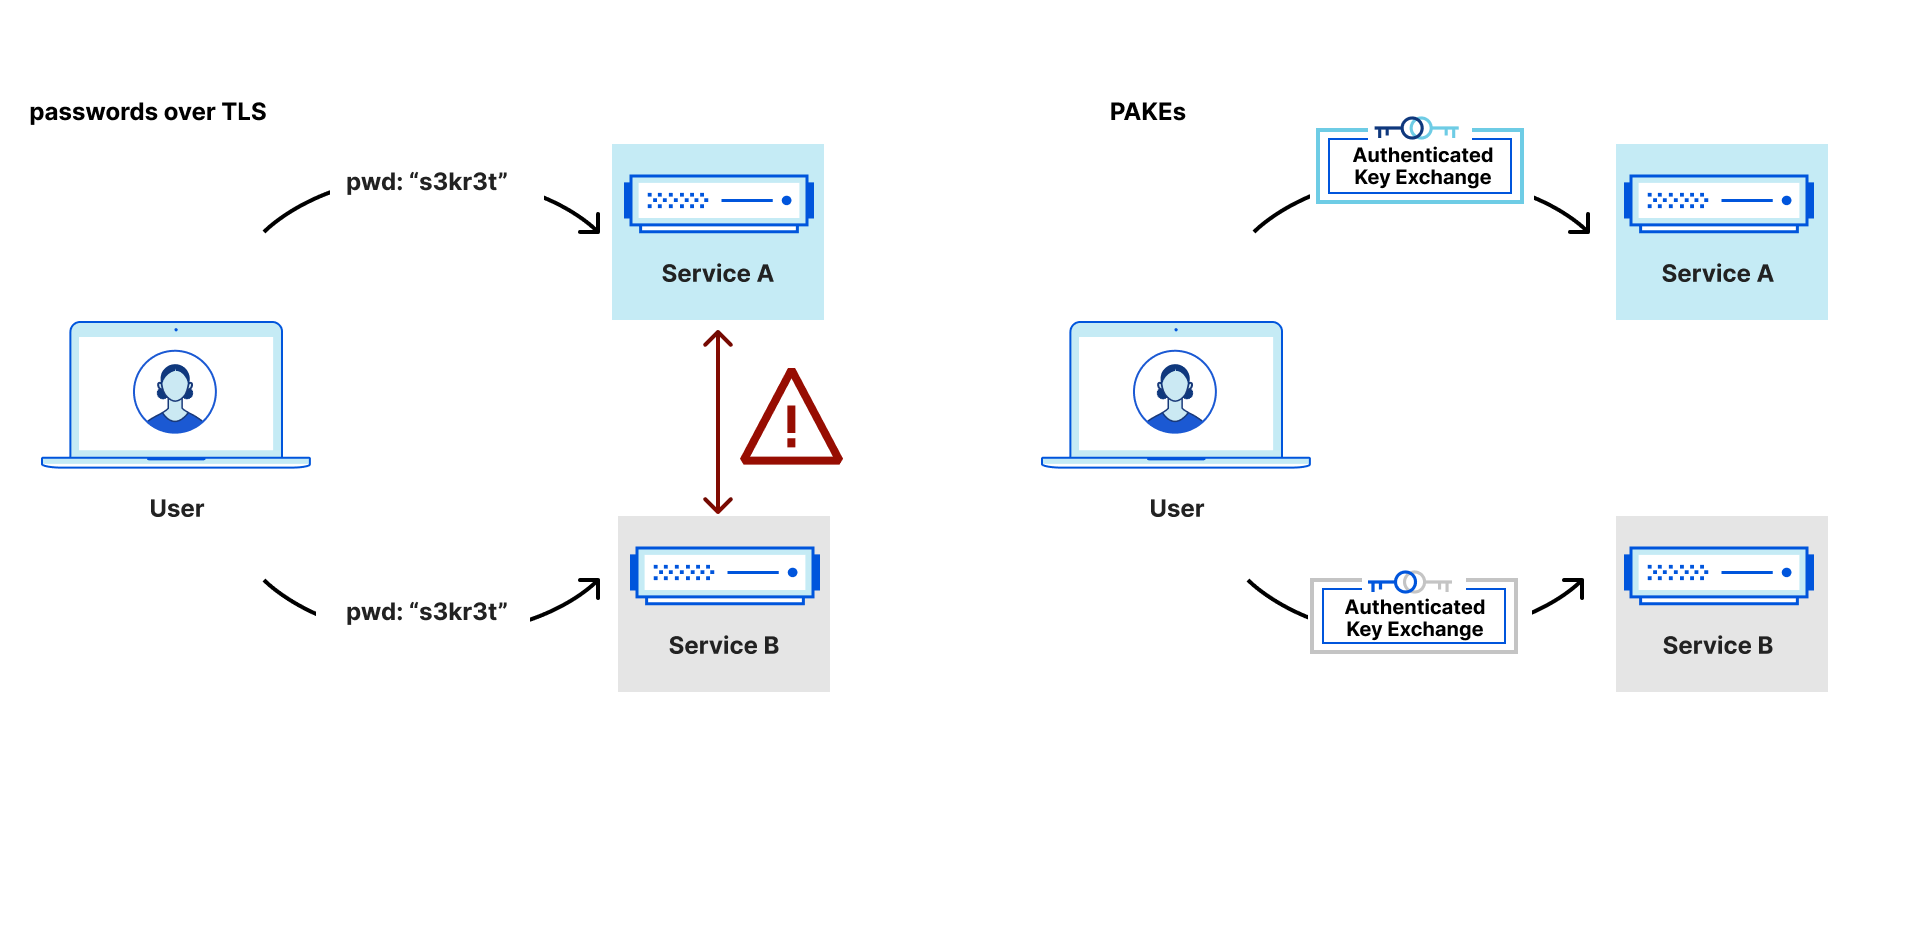
PAKE protocols let two parties turn a password into a shared key. Each party only gets one guess at the password the other holds. If a user tries to log in to the wrong server with a PAKE, that server will not be able to turn around and impersonate the user. As such, PAKEs guarantee that communication with one of the parties is the only way for an attacker to test their (single) password guess. This may seem like an unneeded level of complexity when we could use already available tools like a key distribution mechanism along with password-over-TLS, but this puts a lot of trust in the service. You may trust a service with learning your password on that service, but what about if you accidentally use a password for a different service when trying to log in? Note the particular risks of a reused password: it is no longer just a secret shared between a user and a single service, but is now a secret shared between a user and multiple services. This therefore increases the password’s privacy sensitivity — a service should not know users’ account login information for other services.
A comparison of shared secrets between passwords over TLS versus PAKEs.With passwords over TLS, a service might learn passwords used on another service. This problem does not arise with PAKEs.
PAKE protocols are built with the assumption that the server isn’t always working in the best interest of the client and, even more, cannot use any kind of public-key infrastructure during login (although it doesn’t hurt to have both!). This precludes the user from sending their plaintext password (or any information that could be used to derive it — in a computational sense) to the server during login.
PAKE protocols have expanded into new territory since the seminal EKE paper of Bellovin and Merritt, where the client and server both remembered a plaintext version of the password. As mentioned above, when the server stores the plaintext password, the client risks having the password logged or leaked. To address this, new protocols were developed, referred to as augmented, verifier-based, or asymmetric PAKEs (aPAKEs), where the server stored a modified version (similar to a hash) of the password instead of the plaintext password. This mirrors the way many of us were taught to store passwords in a database, specifically as a hash of the password with accompanying salt and pepper. However, in these cases, attackers can still use traditional methods of attack such as targeted rainbow tables. To avoid these kinds of attacks, a new kind of PAKE was born, the strong asymmetric PAKE (saPAKE).
OPAQUE was the first saPAKE and it guarantees defense against precomputation by hiding the password dictionary itself! It does this by replacing the noninteractive hash function with an interactive protocol referred to as an Oblivious Pseudorandom Function (OPRF) where one party inputs their “salt”, another inputs their “password”, and only the password-providing party learns the output of the function. The fact that the password-providing party learns nothing (computationally) about the salt prevents offline precomputation by disallowing an attacker from evaluating the function in their head.
Another way to think about the three PAKE paradigms has to do with how each of them treats the password dictionary:
PAKE type
Password Dictionary
Threat Model
PAKE
The password dictionary is public and common to every user.
Without any guessing, the attacker learns the user’s password upon compromise of the server.
aPAKE
Each user gets their own password dictionary; a description of the dictionary (e.g., the “salt”) is leaked to the client when they attempt to log in.
The attacker must perform an independent precomputation for each client they want to attack.
saPAKE (e.g., OPAQUE)
Each user gets their own password dictionary; the server only provides an online interface (the OPRF) to the dictionary.
The adversary must wait until after they compromise the server to run an offline attack on the user’s password1.
OPAQUE also goes one step further and allows the user to perform the password transformation on their own device so that the server doesn’t see the plaintext password during registration either. Cloudflare Research has been involved with OPAQUE for a while now — for instance, you can read about our previous implementation work and demo if you want to learn more.
But OPAQUE is not a panacea: in the event of server compromise, the attacker can learn the salt that the server uses to evaluate the OPRF and can still run the same offline attack that was available in the aPAKE world, although this is now considerably more time-consuming and can be made increasingly difficult through the use of memory-hard hash functions like scrypt. This means that despite our best efforts, when a server is breached, the attacker can eventually come out with a list of plaintext passwords. Indeed, this attack is always inevitable as the attacker can always run the (sa)PAKE protocol in their head acting as both parties to test each password. With this being the case, we still need to take steps to defend against automated password attacks such as credential stuffing attacks and have ways of mitigating them.
Are You Overexposed?
To help detect and respond to credential stuffing, Cloudflare recently rolled out the Exposed Credential Checks feature on the Web Application Firewall (WAF), which can alert the origin if a user’s login credentials have appeared in a recent breach. Historically, compromised credential checking services have allowed users to be proactive against credential stuffing attacks when their username and password appear together in a breach. However, they do not account for recently proposed credential tweaking attacks, in which an attacker tries variants of a breached password, under the assumption that users often use slight modifications of the same password for different accounts, such as “sunshineFB”, “sunshineIG”, and so on. Therefore, compromised credential check services should incorporate methods of checking for credential tweaks.
Under the hood, Cloudflare’s Exposed Credential Checks feature relies on an underlying protocol deemed Might I Get Pwned (MIGP). MIGP uses the bucketization method proposed in Li et al. to avoid sending the plaintext username or password to the server while handling a large breach dataset. After receiving a user’s credentials, MIGP hashes the username and sends a portion of that hash as a “bucket identifier” to the server. The client and server can then perform a private membership test protocol to verify whether the user’s username/password pair appeared in that bucket, without ever having to send plaintext credentials to the server.
Unlike previous compromised credential check services, MIGP also enables credential tweaking checks by augmenting the original breach dataset with a set of password “variants”. For each leaked password, it generates a list of password variants, which are labeled as such to differentiate them from the original leaked password and added to the original dataset. For more information, you can check out the Cloudflare Research blog post detailing our open-source implementation and deployment of the MIGP protocol.
Measuring Credential Compromises
The question remains, just how important are these exposed credential checks for detecting and preventing credential stuffing attacks in practice? To answer this question, the Research Team has initiated a study investigating login requests to our own Cloudflare dashboard. For this study, we are collecting the data logged by Cloudflare’s Exposed Credential Check feature (described above), designed to be privacy-preserving: this check does not reveal a password, but provides a “yes/no” response on whether the submitted credentials appear in our breach dataset. Along with this signal, we are looking at other fields that may be indicative of malicious behavior such as bot score and IP reputation. As this project develops, we plan to cluster the data to find patterns of different types of credential stuffing attacks that we can generalize to form attack fingerprints. We can then feed these fingerprints into the alert logs for the Cloudflare Detection & Response team to see if they provide useful information for the security analysts.
Additionally, we hope to investigate potential post-compromise behavior as it relates to these compromise check fields. After an attacker successfully hijacks an account, they may take a number of actions such as changing the password, revoking all valid access tokens, or setting up a malicious script. By analyzing compromised credential checks along with these signals, we may be able to better differentiate benign from malicious behavior.
Future directions: OPAQUE and MIGP combined
This post has discussed how we’re approaching the problem of preventing credential stuffing attacks from two different angles. Through the deployment and analysis of compromised credential checks, we aim to prevent server compromise by detecting and preventing credential stuffing attacks before they happen. In addition, in the case that a server does get compromised, the wider use of OPAQUE would help address the problem of leaking passwords to an attacker by avoiding the reception and storage of plaintext passwords on the server as well as preventing precomputation attacks.
However, there are still remaining research challenges to address. Notably, the current method for interfacing with MIGP still requires the server to either pass along a plaintext version of the client’s password, or trust the client to honestly communicate with the MIGP service on behalf of the server. If we want to leverage the security guarantees of OPAQUE (or generally an saPAKE) with the analytics and alert system provided by MIGP in a privacy-preserving way, we need additional mechanisms.
At first glance, the privacy-preserving goals of both protocols seem to be perfect matches for each other. Both OPAQUE and MIGP are built upon the idea of replacing the traditional salted password hashes with an OPRF as a way of keeping the client’s plaintext passwords from ever leaving their device. However, both the interfaces for these protocols rely on user-provided inputs which aren’t cryptographically tied to each other. This allows an attacker to provide a false password to MIGP while providing their actual password to the OPAQUE server. Further, the security analysis of both protocols assume that their idealized building blocks are separated in an important way. This isn’t to say that the two protocols are incompatible, and indeed, much of these protocols may be salvaged.
The next stages for password privacy will be an integration of these two protocols such that a server can be made aware of credential stuffing attacks and the patterns of compromised account usage that can protect a server against the compromise of other servers while providing the same privacy guarantees OPAQUE does. Our goal is to allow you to protect yourself from other compromised servers while protecting your clients from compromise of your server. Stay tuned for updates!
We’re always keen to collaborate with others to build more secure systems, and would love to hear from those interested in password research. You can reach us with questions, comments, and research ideas at [email protected]. For those interested in joining our team, please visit our Careers Page.
… 1There are other ways of constructing saPAKE protocols. The curious reader can see this CRYPTO 2019 paper for details.
Seven years ago, Cloudflare made HTTPS availability for any Internet property easy and free with Universal SSL. At the time, few websites — other than those that processed sensitive data like passwords and credit card information — were using HTTPS because of how difficult it was to set up.
However, as we all started using the Internet for more and more private purposes (communication with loved ones, financial transactions, shopping, healthcare, etc.) the need for encryption became apparent. Tools like Firesheep demonstrated how easily attackers could snoop on people using public Wi-Fi networks at coffee shops and airports. The Snowden revelations showed the ease with which governments could listen in on unencrypted communications at scale. We have seen attempts by browser vendors to increase HTTPS adoption such as the recent announcement by Chromium for loading websites on HTTPS by default. Encryption has become a vital part of the modern Internet, not just to keep your information safe, but to keep you safe.
When it was launched, Universal SSL doubled the number of sites on the Internet using HTTPS. We are building on that with SSL/TLS Recommender, a tool that guides you to stronger configurations for the backend connection from Cloudflare to origin servers. Recommender has been available in the SSL/TLS tab of the Cloudflare dashboard since August 2020 for self-serve customers. Over 500,000 zones are currently signed up. As of today, it is available for all customers!
How Cloudflare connects to origin servers
Cloudflare operates as a reverse proxy between clients (“visitors”) and customers’ web servers (“origins”), so that Cloudflare can protect origin sites from attacks and improve site performance. This happens, in part, because visitor requests to websites proxied by Cloudflare are processed by an “edge” server located in a data center close to the client. The edge server either responds directly back to the visitor, if the requested content is cached, or creates a new request to the origin server to retrieve the content.
The backend connection to the origin can be made with an unencrypted HTTP connection or with an HTTPS connection where requests and responses are encrypted using the TLS protocol (historically known as SSL). HTTPS is the secured form of HTTP and should be used whenever possible to avoid leaking information or allowing content tampering by third-party entities. The origin server can further authenticate itself by presenting a valid TLS certificate to prevent active monster-in-the-middle attacks. Such a certificate can be obtained from a certificate authority such as Let’s Encrypt or Cloudflare’s Origin CA. Origins can also set up authenticated origin pull, which ensures that any HTTPS requests outside of Cloudflare will not receive a response from your origin.
Cloudflare Tunnel provides an even more secure option for the connection between Cloudflare and origins. With Tunnel, users run a lightweight daemon on their origin servers that proactively establishes secure and private tunnels to the nearest Cloudflare data centers. With this configuration, users can completely lock down their origin servers to only receive requests routed through Cloudflare. While we encourage customers to set up tunnels if feasible, it’s important to encourage origins with more traditional configurations to adopt the strongest possible security posture.
Detecting HTTPS support
You might wonder, why doesn’t Cloudflare always connect to origin servers with a secure TLS connection? To start, some origin servers have no TLS support at all (for example, certain shared hosting providers and even government sites have been slow adopters) and rely on Cloudflare to ensure that the client request is at least encrypted over the Internet from the browser to Cloudflare’s edge.
Then why don’t we simply probe the origin to determine if TLS is supported? It turns out that many sites only partially support HTTPS, making the problem non-trivial. A single customer site can be served from multiple separate origin servers with differing levels of TLS support. For instance, some sites support HTTPS on their landing page but serve certain resources only over unencrypted HTTP. Further, site content can differ when accessed over HTTP versus HTTPS (for example, http://example.com and https://example.com can return different results).
Such content differences can arise due to misconfiguration on the origin server, accidental mistakes by developers when migrating their servers to HTTPS, or can even be intentional depending on the use case.
A study by researchers at Northeastern University, the Max Planck Institute for Informatics, and the University of Maryland highlights reasons for some of these inconsistencies. They found that 1.5% of surveyed sites had at least one page that was unavailable over HTTPS — despite the protocol being supported on other pages — and 3.7% of sites served different content over HTTP versus HTTPS for at least one page. Thus, always using the most secure TLS setting detected on a particular resource could result in unforeseen side effects and usability issues for the entire site.
We wanted to tackle all such issues and maximize the number of TLS connections to origin servers, but without compromising a website’s functionality and performance.
Cloudflare relies on customers to indicate the level of TLS support at their origins via the zone’s SSL/TLS encryption mode. The following SSL/TLS encryption modes can be configured from the Cloudflare dashboard:
Off indicates that client requests reaching Cloudflare as well as Cloudflare’s requests to the origin server should only use unencrypted HTTP. This option is never recommended, but is still in use by a handful of customers for legacy reasons or testing.
Flexible allows clients to connect to Cloudflare’s edge via HTTPS, but requests to the origin are over HTTP only. This is the most common option for origins that do not support TLS. However, we encourage customers to upgrade their origins to support TLS whenever possible and only use Flexible as a last resort.
Full enables encryption for requests to the origin when clients connect via HTTPS, but Cloudflare does not attempt to validate the certificate. This is useful for origins that have a self-signed or otherwise invalid certificate at the origin, but leaves open the possibility for an active attacker to impersonate the origin server with a fake certificate. Client HTTP requests result in HTTP requests to the origin.
Full (strict) indicates that Cloudflare should validate the origin certificate to fully secure the connection. The origin certificate can either be issued by a public CA or by Cloudflare Origin CA. HTTP requests from clients result in HTTP requests to the origin, exactly the same as in Full mode. We strongly recommend Full (strict) over weaker options if supported by the origin.
Strict (SSL-Only Origin Pull)causes all traffic to the origin to go over HTTPS, even if the client request was HTTP. This differs fromFull (strict)in that HTTP client requests will result in an HTTPS request to the origin, not HTTP. Most customers do not need to use this option, and it is available only to Enterprise customers. The preferred way to ensure that no HTTP requests reach your origin is to enable Always Use HTTPS in conjunction with Full or Full (strict) to redirect visitor HTTP requests to the HTTPS version of the content.
SSL/TLS encryption modes determine how Cloudflare connects to origins
The SSL/TLS encryption mode is a zone-wide setting, meaning that Cloudflare applies the same policy to all subdomains and resources. If required, you can configure this setting more granularly via Page Rules. Misconfiguring this setting can make site resources unavailable. For instance, suppose your website loads certain assets from an HTTP-only subdomain. If you set your zone to Full or Full (strict), you might make these assets unavailable for visitors that request the content over HTTPS, since the HTTP-only subdomain lacks HTTPS support.
Importance of secure origin connections
When an end-user visits a site proxied by Cloudflare, there are two connections to consider: the front-end connection between the visitor and Cloudflare and the back-end connection between Cloudflare and the customer origin server. The front-end connection typically presents the largest attack surface (for example, think of the classic example of an attacker snooping on a coffee shop’s Wi-Fi network), but securing the back-end connection is equally important. While all SSL/TLS encryption modes (except Off) secure the front-end connection, less secure modes leave open the possibility of malicious activity on the backend.
Consider a zone set to Flexible where the origin is connected to the Internet via an untrustworthy ISP. In this case, spyware deployed by the customer’s ISP in an on-path middlebox could inspect the plaintext traffic from Cloudflare to the origin server, potentially resulting in privacy violations or leaks of confidential information. Upgrading the zone to Full or a stronger mode to encrypt traffic to the ISP would help prevent this basic form of snooping.
Similarly, consider a zone set to Full where the origin server is hosted in a shared hosting provider facility. An attacker colocated in the same facility could generate a fake certificate for the origin (since the certificate isn’t validated for Full) and deploy an attack technique such as ARP spoofing to direct traffic intended for the origin server to an attacker-owned machine instead. The attacker could then leverage this setup to inspect and filter traffic intended for the origin, resulting in site breakage or content unavailability. The attacker could even inject malicious JavaScript into the response served to the visitor to carry out other nefarious goals. Deploying a valid Cloudflare-trusted certificate on the origin and configuring the zone to use Full (strict) would prevent Cloudflare from trusting the attacker’s fake certificate in this scenario, preventing the hijack.
Since a secure backend only improves your website security, we strongly encourage setting your zone to the highest possible SSL/TLS encryption mode whenever possible.
Balancing functionality and security
When Universal SSL was launched, Cloudflare’s goal was to get as many sites away from the status quo of HTTP as possible. To accomplish this, Cloudflare provisioned TLS certificates for all customer domains to secure the connection between the browser and the edge. Customer sites that did not already have TLS support were defaulted to Flexible, to preserve existing site functionality. Although Flexible is not recommended for most zones, we continue to support this option as some Cloudflare customers still rely on it for origins that do not yet support TLS. Disabling this option would make these sites unavailable. Currently, the default option for newly onboarded zones is Full if we detect a TLS certificate on the origin zone, and Flexible otherwise.
Further, the SSL/TLS encryption mode configured at the time of zone sign-up can become suboptimal as a site evolves. For example, a zone might switch to a hosting provider that supports origin certificate installation. An origin server that is able to serve all content over TLS should at least be on Full. An origin server that has a valid TLS certificate installed should use Full (strict) to ensure that communication between Cloudflare and the origin server is not susceptible to monster-in-the-middle attacks.
The Research team combined lessons from academia and our engineering efforts to make encryption easy, while ensuring the highest level of security possible for our customers. Because of that goal, we’re proud to introduce SSL/TLS Recommender.
SSL/TLS Recommender
Cloudflare’s mission is to help build a better Internet, and that includes ensuring that requests from visitors to our customers’ sites are as secure as possible. To that end, we began by asking ourselves the following question: how can we detect when a customer is able to use a more secure SSL/TLS encryption mode without impacting site functionality?
To answer this question, we built the SSL/TLS Recommender. Customers can enable Recommender for a zone via the SSL/TLS tab of the Cloudflare dashboard. Using a zone’s currently configured SSL/TLS option as the baseline for expected site functionality, the Recommender performs a series of checks to determine if an upgrade is possible. If so, we email the zone owner with the recommendation. If a zone is currently misconfigured — for example, an HTTP-only origin configured on Full — Recommender will not recommend a downgrade.
The checks that Recommender runs are determined by the site’s currently configured SSL/TLS option.
The simplest check is to determine if a customer can upgrade from Full to Full (strict). In this case, all site resources are already served over HTTPS, so the check comprises a few simple tests of the validity of the TLS certificate for the domain and all subdomains (which can be on separate origin servers).
The check to determine if a customer can upgrade from Off or Flexible to Full is more complex. A site can be upgraded if all resources on the site are available over HTTPS and the content matches when served over HTTP versus HTTPS. Recommender carries out this check as follows:
Crawl customer sites to collect links. For large sites where it is impractical to scan every link, Recommender tests only a subset of links (up to some threshold), leading to a trade-off between performance and potential false positives. Similarly, for sites where the crawl turns up an insufficient number of links, we augment our results with a sample of links from recent visitors requests to the zone to provide a high-confidence recommendation. The crawler uses the user agent Cloudflare-SSLDetector and has been added to Cloudflare’s list of known good bots. Similar to other Cloudflare crawlers, Recommender ignores robots.txt (except for rules explicitly targeting the crawler’s user agent) to avoid negatively impacting the accuracy of the recommendation.
Download the content of each link over both HTTP and HTTPS. Recommender makes only idempotent GET requests when scanning origin servers to avoid modifying server resource state.
Run a content similarity algorithm to determine if the content matches. The algorithm is adapted from a research paper called “A Deeper Look at Web Content Availability and Consistency over HTTP/S” (TMA Conference 2020) and is designed to provide an accurate similarity score even for sites with dynamic content.
Recommender is conservative with recommendations, erring on the side of maintaining current site functionality rather than risking breakage and usability issues. If a zone is non-functional, the zone owner blocks all types of bots, or if misconfigured SSL-specific Page Rules are applied to the zone, then Recommender will not be able to complete its scans and provide a recommendation. Therefore, it is not intended to resolve issues with website or domain functionality, but rather maximize your zone’s security when possible.
Please send questions and feedback to [email protected]. We’re excited to continue this line of work to improve the security of customer origins!
Mentions
While this work is led by the Research team, we have been extremely privileged to get support from all across the company!
Special thanks to the incredible team of interns that contributed to SSL/TLS Recommender. Suleman Ahmad (now full-time), Talha Paracha, and Ananya Ghose built the current iteration of the project and Matthew Bernhard helped to lay the groundwork in a previous iteration of the project.
Today, we are announcing the general availability of Cloudflare Waiting Room to customers on our Enterprise plans, making it easier than ever to protect your website against traffic spikes. We are also excited to present several new features that have user experience in mind — an alternative queueing method and support for custom web/mobile applications.
First-In-First-Out (FIFO) Queueing
Whether you’ve waited to check out at a supermarket or stood in line at a bank, you’ve undoubtedly experienced FIFO queueing. FIFO stands for First-In-First-Out, which simply means that people are seen in the order they arrive — i.e., those who arrive first are processed before those who arrive later.
When Waiting Room was introduced earlier this year, it was first deployed to protect COVID-19 vaccine distributors from overwhelming demand — a service we offer free of charge under Project Fair Shot. At the time, FIFO queueing was the natural option due to its wide acceptance in day-to-day life and accurate estimated wait times. One problem with FIFO is that users who arrive later could see long estimated wait times and decide to abandon the website.
We take customer feedback seriously and improve products based on it. A frequent request was to handle users irrespective of the time they arrive in the Waiting Room. In response, we developed an additional approach: random queueing.
A New Approach to Fairness: Random Queueing
You can think of random queueing as participating in a raffle for a prize. In a raffle, people obtain tickets and put them into a big container. Later, tickets are drawn at random to determine the winners. The more time you spend in the raffle, the better your chances of winning at least once, since there will be fewer tickets in the container. No matter what, everyone participating in the raffle has an opportunity to win.
Similarly, in a random queue, users are selected from the Waiting Room at random, regardless of their initial arrival time. This means that you could be let into the application before someone who arrived earlier than you, or vice versa. Just like how you can buy more tickets in a raffle, joining a random queue earlier than someone else will give you more attempts to be accepted, but does not guarantee you will be let in. However, at any particular time, you will have the same chance to be let into the website as anyone else. This is different from a raffle, where you could have more tickets than someone else at a given time, providing you with an advantage.
Random queueing is designed to give everyone a fair chance. Imagine waking up excited to purchase new limited-edition sneakers only to find that the FIFO queue is five hours long and full of users that either woke up in the middle of the night to get in line or joined from earlier time zones. Even if you waited five hours, those sneakers would likely be sold out by the time you reach the website. In this case, you’d probably abandon the Waiting Room completely and do something else. On the other hand, if you were aware that the queue was random, you’d likely stick around. After all, you have a chance to be accepted and make a purchase!
As a result, random queueing is perfect for short-lived scenarios with lots of hype, such as product launches, holiday traffic, special events, and limited-time sales.
By contrast, when the event ends and traffic returns to normal, a FIFO queue is likely more suitable, since its widely accepted structure and accurate estimated wait times provide a consistent user experience.
How Does Random Queueing Work?
Perhaps the best part about random queueing is that it maintains the same internal structure that powers FIFO. As a result, if you change the queueing method in the dashboard — even when you may be actively queueing users — the transition to the new method is seamless. Imagine you have users 1, 2, 3, 4, and 5 waiting in a FIFO queue in the order 5 → 4 → 3 → 2 → 1, where user 1 will be the next user to access the application. Let’s assume you switch to random queueing. Now, any user can be accepted next. Let’s assume user 4 is accepted. If you decide to immediately switch back to FIFO queueing, the queue will reflect the order 5 → 3 → 2 → 1. In other words, transitioning from FIFO to random and back to FIFO will respect the initial queue positions of the users! But how does this work? To understand, we first need to remember how we built Waiting Room for FIFO.
Recall the Waiting Room configurations:
Total Active Users. The total number of active users that can be using the application at any given time.
New Users Per Minute.The maximum number of new users per minute that can be accepted to the application.
Next, remember that Waiting Room is powered by cookies. When you join the Waiting Room for the first time, you are assigned an encrypted cookie. You bring this cookie back to the Waiting Room and update it with every request, using it to prove your initial arrival time and status.
Properties in the Waiting Room cookie include:
bucketId. The timestamp rounded down to the nearest minute of the user’s first request to the Waiting Room. If you arrive at 10:23:45, you will be grouped into a bucket for 10:23:00.
acceptedAt. The timestamp when the user got accepted to the origin website for the first time.
refreshIntervalSeconds. When queueing, this is the number of seconds the user must wait before sending another request to the Waiting Room.
lastCheckInTime. The last time each user checked into the Waiting Room or origin website. When queueing, this is only updated for requests every refreshIntervalSeconds.
For any given minute, we can calculate the number of users we can let into the origin website. Let’s say we deploy a Waiting Room on “https://example.com/waitingroom” that can support 10,000 Total Active Users, and we allow up to 2,000 New Users Per Minute. If there are currently 7,000 active users on the website, we have 10,000 – 7,000 = 3,000 open slots. However, we need to take the minimum (3,000, 2,000) = 2,000 since we need to respect the New Users Per Minute limit. Thus, we have 2,000 available slots we can give out.
Let’s assume there are 2,500 queued users that joined over the last three minutes in groups of 500, 1,000, and 1,000, respectively for the timestamps 15:54, 15:55, and 15:56. To respect FIFO queueing, we will take our 2,000 available slots and try to reserve them for users who joined first. Thus, we will reserve 500 available slots for the users who joined at 15:54 and then reserve 1000 available slots for the users who joined at 15:55. When we get to the users for 15:56, we see that we only have 500 slots left, which is not enough for the 1,000 queued users for this minute:
Since we have reserved slots for all users with bucketIds of 15:54 and 15:55, they can be let into the origin website from any data center. However, we can only let in a subset of the users who initially arrived at 15:56.
Timestamp (bucketId)
Queued Users
Reserved Slots
Strategy
15:54
500
500
Accept all users
15:55
1,000
1,000
Accept all users
15:56
1,000
500
Accept subset of users
These 500 slots for 15:56 are allocated to each Cloudflare edge data center based on its respective historical traffic data, and further divided for each Cloudflare Worker within the data center. For example, let’s assume there are two data centers — Nairobi and Dublin — which share 60% and 40% of the traffic, respectively, for this minute. In this case, we will allocate 500 * .6 = 300 slots for Nairobi and 500 * .4 = 200 slots for Dublin. In Nairobi, let’s say there are 3 active workers, so we will grant each of them 300 / 3 = 100 slots. If you make a request to a worker in Nairobi and your bucketId is 15:56, you will be allowed in and consume a slot if the worker still has at least one of its 100 slots available. Since we have reserved all 2,000 available slots, users with bucketIds after 15:56 will have to continue queueing.
Let’s modify this case and assume we only have 200 queued users, all of which are in the 15:54 bucket. First, we reserve 200 slots for these queued users, leaving us 2,000 – 200 = 1,800 remaining slots. Since we have reserved slots for all queued users, we can use the remaining 1,800 slots on new users — people who have just made their first request to the Waiting Room and don’t have a cookie or bucketId yet. Similar to how we handle buckets with fewer slots than queued users, we will distribute these 1,800 slots to each data center, allocating 1,800 * .6 = 1,080 to Nairobi and 1,800 * .4 = 720 to Dublin. In Nairobi, we will split these equally across the 3 workers, giving them 1,080 / 3 = 360 slots each. If you are a new user making a request to a worker in Nairobi, you will be accepted and take a slot if the worker has at least one of its 360 slots available, otherwise you will be marked as a queued user and enter the Waiting Room.
Now that we have outlined the concepts for FIFO, we can understand how random queueing operates. Simply put, random queueing functions the same way as FIFO, except we pretend that every user is new. In other words, we will not look at reserved slots when making the decision if the user should be let in. Let’s revisit the last case with 200 queued users in the 15:54 bucket and 2,000 available slots. When random queueing, we allocate the full 2,000 slots to new users, meaning Nairobi gets 2,000 * .6 = 1,200 slots and each of its 3 workers gets 1,200 / 3 = 400 slots. No matter how many users are queued or freshly joining the Waiting Room, all of them will have a chance at taking these slots.
Finally, let’s reiterate that we are only pretending that all users are new — we still assign them to bucketIds and reserve slots as if we were FIFO queueing, but simply don’t make any use of this logic while random queueing is active. That way, we can maintain the same FIFO structure while we are random queueing so that if necessary, we can smoothly transition back to FIFO queueing and respect initial user arrival times.
How “Random” is Random Queueing?
Since random queueing is basically a race for available slots, we were concerned that it could be exploited if the available user slots and the queued user check-ins did not occur randomly.
To ensure all queued users can attempt to get into the website at the same rate, we store (in the encrypted cookie) the last time each user checked into the Waiting Room (lastCheckInTime) to prevent them from attempting to gain access to the website until a number of seconds have passed (refreshIntervalSeconds). This means that spamming the page refresh button will not give you an advantage over other queued users! Be patient — the browser will refresh automatically the moment you are eligible for another chance.
Next, let’s imagine five queued users checking into the Waiting Room every refreshIntervalSeconds=30 at approximately the :00 and :30 minute marks. A new queued user joins the Waiting Room and checks in at approximately :15 and :45. If new slots are randomly released, this new user will have about a 50% chance of being selected next, since it monopolizes over the :00-15 and :30-45 ranges. On the other hand, the other five queued users share the :15-30 and :45-00 ranges, giving them about a 50% / 5 = 10% chance each. Let’s consider that new slots are not randomly released and assume they are always released at :59. In this case, the new queued user will have virtually no chance to be selected before the other five queued users because these users will always check in one second later at :00, immediately consuming any newly released slots.
To address this vulnerability, we changed our implementation to ensure that slots are released randomly and encouraged users to check in at random offsets from each other. To help split up users that are checking in at similar times, we vary each user’s refreshIntervalSeconds by a small, pseudo-randomly generated offset for each check-in and store this new refresh interval in the encrypted Waiting Room cookie for validation on the next request. Thus, a user who previously checked in every 30 seconds might now check in after 29 seconds, then 31 seconds, then 27 seconds, and so on — but still averaging a 30-second refresh interval. Over time, these slight check-in variations become significant, spreading out user check-in times and strengthening the randomness of the queue. If you are curious to learn more about the apparent “randomness” behind mixing user check-in intervals, you can think of it as a chaotic system subjected to the butterfly effect.
Nevertheless, we weren’t convinced our efforts were enough and wanted to test random queueing empirically to validate its integrity. We conducted a simulation of 10,000 users joining a Waiting Room uniformly across 30 minutes. When let into the application, users spent approximately 1 minute “browsing” before they stopped checking in. We ran this experiment for both FIFO and random queueing and graphed each user’s observed wait time in seconds in the Waiting Room against the minute they initially arrived (starting from 0). Recall that users are grouped by minute using bucketIds, so each user’s arrival minute is truncated down to the current minute.
Based on our data, we can see immediately for FIFO queueing that, as the arrival minute increases, the observed wait time increases linearly. This makes sense for a FIFO queue, since the “line” will just get longer if there are more users entering the queue than leaving it. For each arrival minute, there is very little variation among user wait times, meaning that if you and your friend join a Waiting Room at approximately the same time, you will both be accepted around the same time. If you join a couple of minutes before your friend, you will almost always be accepted first.
When looking at the results for random queueing, we observe users experiencing varied wait times regardless of the arrival minute. This is expected, and helps prove the “randomness” of the random queue! We can see that, if you join five minutes after your friend, although your friend will have more chances to get in, you may still be accepted first! However, there are so many data points overlapping with each other in the plot that it is hard to tell how they are distributed. For instance, it could be possible that most of these data points experience extreme wait times, but as humans we aren’t able to tell.
import json
import numpy as np
import matplotlib.pyplot as plt
import sys

filename = sys.argv[1]

with open(filename) as file:
   data = json.load(file)

   x = data["ArrivalMinutes"]
   y = data["WaitTimeSeconds"]

   heatmap, _, _ = np.histogram2d(x, y, bins=(30, 30))

   plt.clf()
   plt.title(filename)
   plt.xlabel('Arrival Minute Buckets')
   plt.ylabel('WaitTime Buckets')
   plt.imshow(heatmap.T, origin='lower')
   plt.show()
The heatmaps display where the data points are concentrated in the original plot, using brighter (hotter) colors to represent areas containing more points:
By inspecting the generated heatmaps, we can conclude that FIFO and random queueing are working properly. For FIFO queueing, users are being accepted in the order they arrive. For random queueing, we can see that users are accepted to the origin regardless of arrival time. Overall, we can see the heatmap for random queueing is well distributed, indicating it is sufficiently random!
If you are curious why random queueing has very hot colors along the lowest wait times followed by very dark colors afterward, it is actually because of how we are simulating the queue. For the simulation, we spoofed the bucketIds of the users and let them all join the Waiting Room at once to see who would be let in first. In the random queueing heatmap, the bright colors along the lowest wait time buckets indicate that many users were accepted quickly after joining the queue across all bucketIds. This is expected, demonstrating that random queueing does not give an edge to users who join earlier, giving each user a fair chance regardless of its bucketId. The reason why these users were almost immediately accepted in WaitTime Bucket 0 is because this simulation started with no users on the origin, meaning new users would be accepted until the Waiting Room limits were reached. Since this first wave of accepted users “browsed” on the origin for a minute before leaving, no additional users during this time were let in. Thus, the colors are very dark for WaitTime Buckets 1 and 2. Similarly, the second wave of users is randomly selected afterward, followed by another period of time when no users were accepted in WaitTime Bucket 5. As the wait time increases, the more attempts a particular user will have to be let in, meaning it is unlikely for users to have extreme wait times. We can see this by observing the colors grow darker as the WaitTime Bucket approaches 29.
How Is Estimated Time Calculated for Random Queueing?
In a random queue, you can be accepted at any moment… so how can you display an estimated wait time? For a particular user, this is an impossible task, but when you observe all the users together, you can accurately account for most user experiences using a probabilistic estimated wait time range.
At any given moment, we know:
letInPerMinute. The current average users per minute being let into the origin.
currentlyWaiting. The current number of users waiting in the queue.
Therefore, we can calculate the probability of a user being let into the origin in the next minute:
If there are 100 users waiting in the queue, and we are currently letting in 10 users per minute, the probability a user will be let in over the next minute is 10 / 100 = .1 (10%).
Using P(LetInOverMinute), we can determine the n minutes needed for a p chance of being let into the origin:
p = 1 – (1 – P(LetInOverMinute))n
Recall that the probability of getting in at least once is the complement of not getting in at all. The probability of not being let into the origin over n minutes is (1 – P(LetInOverMinutes))n. Therefore, the probability of getting in at least once is 1 – (1 – P(LetInOverMinute))n. This equation can be simplified further:
n = log(1 – p) / log(1 – P(LetInOverMinute))
Thus, if we want to calculate the estimated wait time to have a p = .5 (50%) chance of getting into the origin with the probability of getting let in during a particular minute P(LetInOverMinute) = .1 (10%), we calculate:
n = log(1 – .5) / log(1 – .1) ≈ 6.58 minutes or 6 minutes and 35 seconds
In this case, we estimate that 50% of users will wait less than 6 minutes and 35 seconds and the remaining 50% of users will wait longer than this.
So, which estimated wait times are displayed to the user? It is up to you! If you create a Mustache HTML template for a Waiting Room, you will now be able to use the variables waitTime25Percentile, waitTime50Percentile, and waitTime75Percentile to display the estimated wait times in minutes when p = .25, p = .5, and p = .75, respectively. There are also new variables that are used to display and determine the queueing method, such as queueingMethod, isFIFOQueue, and isRandomQueue. If you want to display something more dynamic like a custom view in a mobile app, keep reading to learn about our new JSON response, which provides a REST API for the same set of variables.
Supporting Dynamic Applications with a JSON Response
Before, customers could only deploy static Mustache HTML templates to customize the style of their Waiting Rooms. These templates work well for most use cases, but fall short if you want to display anything that requires state. Let’s imagine you’re queueing to buy concert tickets on your mobile device, and you see an embedded video of your favorite song. Naturally, you click on it and start singing along! A couple seconds later, the browser refreshes the page automatically to update your status in the Waiting Room, resetting your video to the start.
The purpose of the new JSON response is to give full control to a custom application, allowing it to determine what to display to the user and when to refresh. As a result, the application can maintain state and make sure your videos are never interrupted again!
Once the JSON response is enabled for a Waiting Room, any request to the Waiting Room with the header Accept: application/json will receive a JSON object with all the fields from the Mustache template.
An example request when the queueing method is FIFO:
Don’t forget that Waiting Room uses a cookie to maintain a user’s status! Without a cookie in the request, the Waiting Room will think the user has just joined the queue.
Don’t forget to refresh! Inspect the ‘Refresh’ HTTP response header or the refreshIntervalSeconds property and send another request to the Waiting Room after that number of seconds.
Keep in mind that if the user’s request is let into the origin, JSON may not necessarily be returned. To gracefully parse all responses, send JSON from the origin website if the header Accept: application/json is present. For example, the origin could return:
SameSite and Secure are attributes in the HTTP response Set-Cookie header. SameSite is used to determine when cookies are sent to a website while Secure indicates if there must be a secure context (HTTPS).
There are three different values of SameSite:
SameSite=Lax.This is the default value when the SameSite attribute is not present. Cookies are not sent on cross-site sub-requests unless the user is following a link to the third-party site. If you are on example1.com, cookies will not be sent to example2.com unless you click a link that navigates to example2.com.
SameSite=Strict. Cookies are sent only in first-party contexts. If you are on example1.com, cookies will never be sent to example2.com even if you click a link that navigates to example2.com.
SameSite=None. Cookies are sent for all contexts, but the Secure attribute must be set. If you are on example1.com, cookies will be sent to example2.com for all sub-requests. If Secure is not set, the browser will block the cookie.
IFrames (Inline Frames) allow HTML documents to embed other HTML documents, such as an advertisement, video, or webpage. When an application from a third-party website is rendered inside an IFrame, cookies will only be sent to it if SameSite=None is set.
Why is this all important? In the past, we did not set SameSite, meaning it defaulted to SameSite=Lax for all responses. As a result, a user queueing through an IFrame would never have its cookie updated and appear to the Waiting Room as joining for the first time on every request. Today, we are introducing customization for both the SameSite and Secure attributes, which will allow Waiting Rooms to be displayed in IFrames!
At the moment, this is only configurable through the Cloudflare API. By default, the configuration for SameSite and Secure will be set to “auto”, automatically selecting the most flexible option. In this case, SameSite will be set to None if Always Use HTTPS is enabled, otherwise it will be set to Lax. Similarly, Secure will only be set if Always Use HTTPS is enabled. In other words, Waiting Room IFrames will work properly by default as long as Always Use HTTPS is toggled. If you are wondering why Always Use HTTPS is used here, remember that SameSite=None requires that Secure is also set, or else the browser will block the Waiting Room cookie.
If you decide to manually configure the behavior of SameSite and Secure through the API, be careful! We do guard against setting SameSite=None without Secure, but if you decide to set Secure on every request (secure=”always”) and don’t have Always Use HTTPS enabled, this means that a user who sends an insecure (HTTP) request to the Waiting Room will have its cookie blocked by its browser!
If you want to explore using IFrames with Waiting Room yourself, here is a simple example of a Cloudflare Worker that renders the Waiting Room on “https://example.com/waitingroom” in an IFrame:
Waiting Room still has plenty of room to grow! Every day, we are seeing more Waiting Rooms deployed to protect websites from traffic spikes. As Waiting Room continues to be used for new purposes, we will keep adding features to make it as customizable and user-friendly as possible.
Stay tuned — what we have announced today is just the tip of the iceberg of what we have planned for Waiting Room!
For every successful technology, there is a moment where its time comes. Something happens, usually external, to catalyze it — shifting it from being a good idea with promise, to a reality that we can’t imagine living without. Perhaps the best recent example was what happened to the cloud as a result of the introduction of the iPhone in 2007. Smartphones created a huge addressable market for small developers; and even big developers found their customer base could explode in a way that they couldn’t handle without access to public cloud infrastructure. Both wanted to be able to focus on building amazing applications, without having to worry about what lay underneath.
Last year, during the outbreak of COVID-19, a similar moment happened to real time communication. Being able to communicate is the lifeblood of any organization. Before 2020, much of it happened in meeting rooms in offices all around the world. But in March last year — that changed dramatically. Those meeting rooms suddenly were emptied. Fast-forward 18 months, and that massive shift in how we work has persisted.
While, undoubtedly, many organizations would not have been able to get by without the likes of Slack, Zoom and Teams as real time collaboration tools, we think today’s iteration of communication tools is just the tip of the iceberg. Looking around, it’s hard to escape the feeling there is going to be an explosion in innovation that is about to take place to enable organizations to communicate in a remote, or at least hybrid, world.
With this in mind, today we’re excited to be introducing Cloudflare’s Real Time Communications platform. This is a new suite of products designed to help you build the next generation of real-time, interactive applications. Whether it’s one-to-one video calling, group audio or video-conferencing, the demand for real-time communications only continues to grow.
Running a reliable and scalable real-time communications platform requires building out a large-scale network. You need to get your network edge within milliseconds of your users in multiple geographies to make sure everyone can always connect with low latency, low packet loss and low jitter. A backbone to route around Internet traffic jams. Infrastructure that can efficiently scale to serve thousands of participants at once. And then you need to deploy media servers, write business logic, manage multiple client platforms, and keep it all running smoothly. We think we can help with this.
Launching today, you will be able to leverage Cloudflare’s global edge network to improve connectivity for any existing WebRTC-based video and audio application, with what we’re calling “WebRTC Components”. This includes scaling to (tens of) thousands of participants, leveraging our DDoS mitigation to protect your services from attacks, and enforce IP and ASN-based access policies in just a few clicks.
How Real Time is “Real Time”?
Real-time typically refers to communication that happens in under 500ms: that is, as fast as packets can traverse the fibre optic networks that connect the world together. In 2021, most real-time audio and video applications use WebRTC, a set of open standards and browser APIs that define how to connect, secure, and transfer both media and data over UDP. It was designed to bring better, more flexible bi-directional communication when compared to the primary browser-based communication protocol we rely on today, HTTP. And because WebRTC is supported in the browser, it means that users don’t need custom clients, nor do developers need to build them: all they need is a browser.
Importantly, we’ve seen the need for reliable, real-time communication across time-zones and geographies increase dramatically, as organizations change the way they work (yes, including us).
So where is real-time important in practice?
One-to-one calls (think FaceTime). We’re used to almost instantaneous communication over traditional telephone lines, and there’s no reason for us to head backwards.
Group calling and conferencing (Zoom or Google Meet), where even just a few seconds of delay results in everyone talking over each other.
Social video, gaming and sports. You don’t want to be 10 seconds behind the action or miss that key moment in a game because the stream dropped a few frames or decided to buffer.
Interactive applications: from 3D modeling in the browser, Augmented Reality on your phone, and even game streaming need to be in real-time.
We believe that we’ve only collectively scratched the surface when it comes to real-time applications — and part of that is because scaling real-time applications to even thousands of users requires new infrastructure paradigms and demands more from the network than traditional HTTP-based communication.
Enter: WebRTC Components
Today, we’re launching our closed beta WebRTC Components, allowing teams running centralized WebRTC TURN servers to offload it to Cloudflare’s distributed, global network and improve reliability, scale to more users, and spend less time managing infrastructure.
TURN, or Traversal Using Relays Around NAT (Network Address Translation), was designed to navigate the practical shortcomings of WebRTC’s peer-to-peer origins. WebRTC was (and is!) a peer-to-peer technology, but in practice, establishing reliable peer-to-peer connections remains hard due to Carrier-Grade NAT, corporate NATs and firewalls. Further, each peer is limited by its own network connectivity — in a traditional peer-to-peer mesh, participants can quickly find their network connections saturated because they have to receive data from every other peer. In a mixed environment with different devices (mobile, desktops), networks (high-latency 3G through to fast fiber), scaling to more than a handful of peers becomes extremely challenging.
Running a TURN service at the edge instead of your own infrastructure gets you a better connection. Cloudflare operates an anycast network spanning 250+ cities, meaning we’re very close to wherever your users are. This means that when users connect to Cloudflare’s TURN service, they get a really good connection to the Cloudflare network. Once it’s on there, we leverage our network and private backbone to get you superior connectivity, all the way back to the other user on the call.
But even better: stop worrying about scale. WebRTC infrastructure is notoriously difficult to scale: you need to make sure you have the right capacity in the right location. Cloudflare’s TURN service scales automatically and if you want more endpoints they’re just an API call away.
Of course WebRTC Components is built on the Cloudflare network, benefiting from the DDoS protection that it’s 100 Tbps network offers. From now on deploying scalable, secure, production-grade WebRTC relays globally is only a couple of API calls away.
A Developer First Real-Time Platform
But, as we like to say at Cloudflare: we’re just getting started. Managed, scalable TURN infrastructure is a critical building block to building real-time services for one-to-one and small group calling, especially for teams who have been managing their own infrastructure, but things become rapidly more complex when you start adding more participants.
Whether that’s managing the quality of the streams (“tracks”, in WebRTC parlance) each client is sending and receiving to keep call quality up, permissions systems to determine who can speak or broadcast in large-scale events, and/or building signalling infrastructure with support chat and interactivity on top of the media experience, one thing is clear: it there’s a lot to bite off.
With that in mind, here’s a sneak peek at where we’re headed:
Developer-first APIs that abstract the need to manage and configure low-level infrastructure, authentication, authorization and participant permissions. Think in terms of your participants, rooms and channels, without having to learn the intricacies of ICE, peer connections and media tracks.
Integration with Cloudflare for Teams to support organizational access policies: great for when your company town hall meetings are now conducted remotely.
Making it easy to connect any input and output source, including broadcasting to traditional HTTP streaming clients and recording for on-demand playback with Stream Live, and ingesting from RTMP sources with Stream Connect, or future protocols such as WHIP.
Embedded serverless capabilities via Cloudflare Workers, from triggering Workers on participant events (e.g. join, leave) through to building stateful chat and collaboration tools with Durable Objects and WebSockets.
… and this is just the beginning.
We’re also looking for ambitious engineers who want to play a role in building our RTC platform. If you’re an engineer interested in building the next generation of real-time, interactive applications, joinus!
If you’re interested in working with us to help connect more of the world together, and are struggling with scaling your existing 1-to-1 real-time video & audio platform beyond a few hundred or thousand concurrent users, sign up for the closed beta of WebRTC Components. We’re especially interested in partnering with teams at the beginning of their real-time journeys and who are keen to iterate closely with us.
We’re excited to introduce the open beta of Stream Live, an end-to-end scalable live-streaming platform that allows you to focus on growing your live video apps, not your codebase.
With Stream Live, you can painlessly grow your streaming app to scale to millions of concurrent broadcasters and millions of concurrent users. Start sending live video from mobile or desktop using the industry standard RTMPS protocol to millions of viewers instantly. Stream Live works with the most popular live video broadcasting software you already use, including ffmpeg, OBS or Zoom. Your broadcasts are automatically recorded, optimized and delivered using the Stream player.
When you are building your live infrastructure from scratch, you have to answer a few critical questions:
“Which codec(s) are we going to use to encode the videos?”
“Which protocols are we going to use to ingest and deliver videos?”
“How are the different components going to impact latency?”
We built Stream Live, so you don’t have to think about these questions and spend considerable engineering effort answering them. Stream Live abstracts these pesky yet important implementation details by automatically choosing the most compatible codec and streaming protocol for the client device. There is no limit to the number of live broadcasts you can start and viewers you can have on Stream Live. Whether you want to make the next viral video sharing app or securely broadcast all-hands meetings to your company, Stream will scale with you without having to spend months building and maintaining video infrastructure.
Built-in Player and Access Control
Every live video gets an embed code that can be placed inside your app, enabling your users to watch the live stream. You can also use your own player with included support for the two major HTTP streaming formats — HLS and DASH — for a granular control over the user experience.
You can limit who can view your live videos with self-expiring tokenized links for each viewer. When generating the tokenized links, you can define constraints including time-based expiration, geo-fencing and IP restrictions. When building an online learning site or a video sharing app, you can put videos behind authentication, so only logged-in users can view your videos. Or if you are building a live concert platform, you may have agreements to only allow viewers from specific countries or regions. Stream’s signed tokens help you comply with complex and custom rulesets.
Instant Recordings
With Stream Live, you don’t have to wait for a recording to be available after the live broadcast ends. Live videos automatically get converted to recordings in less than a second. Viewers get access to the recording instantly, allowing them to catch up on what they missed.
Instant Scale
Whether your platform has one active broadcaster or ten thousand, Stream Live scales with your use case. You don’t have to worry about adding new compute instances, setting up availability zones or negotiating additional software licenses.
Legacy live video pipelines built in-house typically ingest and encode the live stream continents away in a single location. Video that is ingested far away makes video streaming unreliable, especially for global audiences. All Cloudflare locations run the necessary software to ingest live video in and deliver video out. Once your video broadcast is in the Cloudflare network, Stream Live uses the Cloudflare backbone and Argo to transmit your live video with increased reliability.
Broadcast with 15 second latency
Depending on your video encoder settings, the time between you broadcasting and the video displaying on your viewer’s screens can be as low as fifteen seconds with Stream Live. Low latency allows you to build interactive features such as chat and Q&A into your application. This latency is good for broadcasting meetings, sports, concerts, and worship, but we know it doesn’t cover all uses for live video.
We’re on a mission to reduce the latency Stream Live adds to near-zero. The Cloudflare network is now within 50ms for 95% of the world’s population. We believe we can significantly reduce the delay from the broadcaster to the viewer in the coming months. Finally, in the world of live-streaming, latency is only meaningful once you can assume reliability. By using the Cloudflare network spanning over 250 locations, you get unparalleled reliability that is critical for live events.
Simple and predictable pricing
Stream Live is available as a pay-as-you-go service based on the duration of videos recorded and duration of video viewed.
It costs $5 per 1,000 minutes of video storage capacity per month. Live-streamed videos are automatically recorded. There is no additional cost for ingesting the live stream.
It costs $1 per 1,000 minutes of video viewed.
There are no surprises. You never have to pay hidden costs for video ingest, compute (encoding), egress or storage found in legacy video pipelines.
You can control how much you spend with Stream using billing alerts and restrict viewing by creating signed tokens that only work for authorized viewers.
Cloudflare Stream encodes the live stream in multiple quality levels at no additional cost. This ensures smooth playback for your viewers with varying Internet speed. As your viewers move from Wi-Fi to mobile networks, videos continue playing without interruption. Other platforms that offer live-streaming infrastructure tend to add extra fees for adding quality levels that caters to a global audience.
If your use case consists of thousands of concurrent broadcasters or millions of concurrent viewers, reach out to us for volume pricing.
Go live with Stream
Stream works independent of any domain on Cloudflare. If you already have a Cloudflare account with a Stream subscription, you can begin using Stream Live by clicking on the “Live Input” tab on the Stream Dashboard and creating a new input:
In June 2020, Cloudflare TV made its debut: a 24/7 streaming video channel, focused on topics related to building a better Internet (and the people working toward that goal). Today, over 1,000 live shows later, we’re excited to announce that we’re making the technology we used to build Cloudflare TV available to any other business that wants to run their own 24×7 streaming network. But, before we get to that, it’s worth reflecting on what it’s been like for us to run one ourselves.
Let’s take it from the top.
Cloudflare TV began as an experiment in every way you could think of, one we hoped would help capture the serendipity of in-person events in a world where those were few and far between. It didn’t take long before we realized we had something special on our hands. Not only was the Cloudflare team thriving on-screen, showcasing an amazing array of talent and expertise — they were having a great time doing it. Cloudflare TV became a virtual watercooler, spiked with the adrenaline rush of live TV.
One of the amazing things about Cloudflare TV has been the breadth of content it’s inspired. Since launching, CFTV has hosted over 1,000 live sessions, featuring everything from marquee customer events with VIP speakers to game shows and DJ sets. Cloudflare’s employee resource groups have hosted hundreds of sessions speaking to their unique experiences, sharing a wealth of advice with the next generation of technology leaders. All told, we’ve welcomed over 650 Cloudflare employees and interns — and over 500 external guests, including the likes of Intel CEO Pat Gelsinger, Gradient Ventures board partner Bonita Stewart, Broadcom CTO Andy Nallappan, and Zendesk SVP Christina Liu.
Tune In, Geek Out: A CFTV Montage
This is Cloudflare TV, so of course we put an emphasis on technical content for viewers of all stripes. When we announce a new product or protocol on the Cloudflare Blog, we often host live sessions on CFTV the same day, featuring the engineers who wrote the code that just shipped. Every week, we broadcast episodes on cryptography, on learning how to code, and on the hardware that powers Cloudflare’s network in over 250 cities around the world.
Whether you’re new to Cloudflare TV or a longtime viewer, we encourage you to pay a visit to the just-launched Discover page, where you’ll find many of our most-loved shows on demand, ranging from Latest from Product and Engineering, to perennial favorite Silicon Valley Squares, to Yes We Can, featuring women leaders from across the tech industry. You can also browse upcoming Live segments and easily add them to your calendar.
One of the most promising indicators that we’re on the right track has been the feedback we’ve gotten, not just from viewers — but from companies eager to know which platform we were using to power CFTV. To date we haven’t had much to offer them other than our sincere thanks, but as of today we’re able to share something much more exciting.
But first: a look behind the scenes.
The Production Stack
We didn’t initially set out to build Cloudflare TV from scratch. But as we explored our available options, we quickly realized that few solutions were designed for 24/7 linear streaming, and fewer still were optimized to be managed by a globally-distributed team. Thankfully, at Cloudflare, we like to build.
Our engineers worked at a blazing pace to build our own homegrown system, tapping open-source projects where we could, and inventing the things that didn’t yet exist. Among the starring components:
Brave (BBC)— Brave is an open-source project named for a highly descriptive acronym: Basic Real-Time Audio Video Editor. It serves as the Cloudflare TV switchboard, allowing us to jump from live content to commercial to a pre-recorded session and back automatically, based on our broadcast schedule. The only issue with Brave is that, as the BBC put it: it’s a prototype. One that hasn’t been updated since 2018…
The CFTV Switchboard (Now streaming: Latest from Product & Engineering)
Zoom — When we first designed Cloudflare TV, there was one directive that stood above the others: it had to be easy. If presenters had to deal with installing a browser plugin or unfamiliar app, we knew we’d lose many of them — especially external guests. Zoom emerged as the clear answer, and thanks to its RTMP broadcast feature, it’s worked seamlessly to facilitate live content on Cloudflare TV. In most cases, participating in a CFTV session is as simple as joining a Zoom meeting.
Cloudflare Workers — Put simply, Cloudflare TV wouldn’t exist were it not for Cloudflare Workers. Workers is the glue that brings together each of the disparate components of the platform — handling authentication, application logic, securely relaying data from our backend to our frontend, and sprinkling SEO optimizations across the site. It’s the first tool we reach for, and often the only one we need.
Cloudflare Stream — With over 1,000 episodes in our content library, we have a lot of assets to manage. Thankfully Stream makes it easy: episodes are uploaded and automatically transcoded to the appropriate bitrate, and we use Stream embeds to power Video on Demand across the entire platform. We also use the Stream API to deliver recordings to our backend switchboard so that they can be seamlessly rebroadcast alongside our Live sessions.
Cloudflare for Teams— Cloudflare TV is obviously public-facing, but there are an array of dashboards and admin interfaces that are only accessible to select members of the Cloudflare team. Thankfully the Cloudflare for Teams suite, including Cloudflare Access, makes it easy for us to set up custom rulesets that keep everything secure, without any cumbersome VPNs or authentication hurdles.
We Get By With a Little Help from Our Engs
We knew from the beginning that it wasn’t enough for Cloudflare TV to be easy for presenters — we needed to be able to run it with a relatively small team, working remotely, most of whom were juggling other responsibilities.
A special shoutout goes to the members of Cloudflare’s office and executive admin teams, whose roles were dramatically impacted by the pandemic. Each of them has stepped up and taken on the mantle of Cloudflare TV Producer, providing technical support, calming nerves, and facilitating each one of our live sessions. We couldn’t do it without them, nor would we want to.
Even so, running a TV station is a lot of work, and we had little choice but to make the platform as efficient as possible — automating away our pain points, and developing intuitive admin tools to empower our team. Here are some of the key contributors to the system’s efficiency:
The Auto-Switcher — CFTV’s schedule features hundreds of sessions every week, including weekends, which would be prohibitive if any manual switching were involved. Thankfully the system operates essentially on auto-pilot. This is no simple playlist: every minute, a program running on Cloudflare Workers syncs with the CFTV backend to queue up recordings and inputs for upcoming sessions, deleting those belonging to sessions that have already aired. If we take a week off over the holidays, Cloudflare TV will keep on humming.
The Auto-Scheduler — Scheduling CFTV content by hand (well over 250 segments per week) quickly went from a meaningful exercise to a perverse task. By week two we knew we had to figure something else out. And so the auto-scheduler was born, allowing us to select an arbitrary window of time and populate it with recordings from our content library, filling in any time slots between live segments.
Segments can be dragged, dropped, added, and removed in a couple of clicks; one person can schedule the entire week in less than an hour. The auto-scheduler intelligently rotates through each episode in the catalog to ensure they all get airtime — and we see plenty of opportunities for it to get smarter.
The Broadcasting Center — The lifeblood of Cloudflare TV is our live segments, so we naturally spend a lot of time trying to improve the experience for presenters. The Broadcasting Center is their home base: a page that loads automatically for each session’s host, providing them a countdown timer and other essentials. And because viewer engagement is a crucial part of what makes live programming special, it features a section for viewer questions — including a call-in feature, which records and automatically transcribes questions phoned in by viewers.
Broadcasting Center — Presenter View
Meanwhile, our CFTV Producers use an administrative view of the same tool, where they check to make sure the stream is coming through clearly before each session begins. A set of admin controls allow them to troubleshoot if needed, and they can moderate viewer questions as well.
For both producers and presenters, the Broadcasting Center provides a single control plane to manage a live session. This ease-of-use goes a long way toward keeping the system running smoothly with a lean team.
Broadcasting Center — Admin View
There’s a sequel? There’s a sequel.
One reason we’ve invested in Cloudflare TV is that it serves as fantastic platform for dogfooding — not only are we leveraging a broad array of Cloudflare’s media products, but our 24/7 linear content makes us a particularly demanding customer, with no appetite for arbitrary constraints like time limits or maintenance downtime.
With that in mind, we’re excited to integrate many of the new technologies Cloudflare is introducing this week, which will combine to power an overhauled version of the CFTV platform that we’re calling Cloudflare TV 2.0. Namely:
Real Time Communications Platform — Today, Cloudflare announced its new Real Time Communications Platform, powered by WebRTC. In the near future, Cloudflare TV will leverage this platform to handle many of our live sessions. CFTV will continue to support Zoom, OBS, and any other application capable of outputting a RTMP stream, because convenience is one of the essential pillars in helping our presenters engage with the platform. But we see opportunities to push our creativity to new heights with custom, programmatically-controlled media streams — powered by Cloudflare’s Real-Time Communications Platform.
Stream Live— CFTV’s backend server currently handles video encoding for our live broadcast, generating a stream that is relayed to a video.js embed. Replacing this setup with Stream Live will yield several key benefits: first, we will offload video encoding to Cloudflare’s global network, resulting in improved speed, reliability, and redundancy. It also means we’ll be able to generate multiple renditions of the broadcast at different bitrates, allowing us to offer streams that are optimized for mobile devices with limited bandwidth, and to dynamically switch between bitrates as a user’s network conditions change.
Stream Connect— Today, the only way to watch Cloudflare TV is from the platform’s homepage — but there’s no reason we can’t syndicate it to other popular video platforms like YouTube. Stream Connect will become the primary endpoint for our backend mixer, and will in turn generate multiple copies of that stream, outputting to YouTube, the main broadcast, and any number of additional platforms.
We’re also actively working on a fresh implementation of our switchboard — one that is designed to be more reliable, scalable, and customizable. This switchboard will power the core of Cloudflare TV 2.0.
It’s not TV. It’s Cloudflare TV.
Cloudflare TV 2.0 will represent a major step forward for the platform, one that leverages over a year of insights as we rearchitect the system from its core to take full advantage of the Cloudflare network. And we’re doing it with you in mind: the same technology will be used to power Cloudflare TV as a Service.
Most products at Cloudflare are designed to scale from individuals up to the largest businesses. This is not one of those. Running a 24×7 streaming network takes a lot of time and effort. While we’ve made it easier than ever before, this is a product really designed for businesses that are willing to make a commitment similar to what we have at Cloudflare. But, if you are, we’re here to tell you that running a streaming service is incredibly rewarding, and we want to enable more companies to do it.
Interested? Fill out this form and, if it looks like you’d be a good fit, we’ll reach out and work with you to help build your own streaming service.
Today, dark mode is available for the Cloudflare Dashboard in beta! From your user profile, you can configure the Cloudflare Dashboard in light mode, dark mode, or match it to your system settings.
For those unfamiliar, dark mode, or light on dark color schemes, uses light text on dark backgrounds instead of the typical dark text on light (usually white) backgrounds. In low-light environments, this can help reduce eyestrain and actually reduce power consumption on OLED screens. For many though, dark mode is simply a preference supported widely by applications and devices.
Side by side comparing the Cloudflare dashboard in dark mode and in light mode
Under Appearance, select an option: Light, Dark, or Use system setting. For the time being, your choice is saved into local storage.
The appearance card in the dashboard for modifying color themes
There are many primers and how-tos on implementing dark mode, and you can find articles talking about the general complications of implementing a dark mode including this straightforward explanation. Instead, we will talk about what enabled us to be able to implement dark mode in only a matter of weeks.
Cloudflare’s Design System – Our Secret Weapon
Before getting into the specifics of how we implemented dark mode, it helps to understand the system that underpins all product design and UI work at Cloudflare – the Cloudflare Design System.
The six pillars of the design system: logo, typography, color, layout, icons, videos
Cloudflare’s Design System defines and documents the interface elements and patterns used to build products at Cloudflare. The system can be used to efficiently build consistent experiences for Cloudflare customers. In practice, the Design System defines primitives like typography, color, layout, and icons in a clear and standard fashion. What this means is that anytime a new interface is designed, or new UI code is written, an easily referenceable, highly detailed set of documentation is available to ensure that the work matches previous work. This increases productivity, especially for new employees, and prevents repetitious discussions about style choices and interaction design.
Built on top of these design primitives, we also have our own component library. This is a set of ready to use components that designers and engineers can combine to form the products our customers use every day. They adhere to the design system, are battle tested in terms of code quality, and enhance the user experience by providing consistent implementations of common UI components. Any button, table, or chart you see looks and works the same because it is the same underlying code with the relevant data changed for the specific use case.
So, what does all of this have to do with dark mode? Everything, it turns out. Due to the widespread adoption of the design system across the dashboard, changing a set of variables like background color and text color in a specific way and seeing the change applied nearly everywhere at once becomes much easier. Let’s take a closer look at how we did that.
Turning Out the Lights
The use of color at Cloudflare has a well documented history. When we originally set out to build our color system, the tools we built and the extensive research we performed resulted in a ten-hue, ten-luminosity set of colors that can be used to build digital products. These colors were built to be accessible — not just in terms of internal use, but for our customers. Take our blue hue scale, for example.
Our blue color scale, as used on the Cloudflare Dashboard. This shows color-contrast accessible text and background pairings for each step in the scale.
Each hue in our color scale contains ten colors, ordered by luminosity in ten increasing increments from low luminosity to high luminosity. This color scale allows us to filter down the choice of color from the 16,777,216 hex codes available on the web to a much simpler choice of just hue and brightness. As a result, we now have a methodology where designers know the first five steps in a scale have sufficient color contrast with white or lighter text, and the last five steps in a scale have sufficient contrast with black or darker text.
Color scales also allow us to make changes while designing in a far more fluid fashion. If a piece of text is too bright relative to its surroundings, drop down a step on the scale. If an element is too visually heavy, take a step-up. With the Design System and these color scales in place, we’ve been able to design and ship products at a rapid rate.
So, with this color system in place, how do we begin to ship a dark mode? It turns out there’s a simple solution to this, and it’s built into the JS standard library. We call reverse() and flip the luminosity scales.
Our blue color scale after calling reverse on it. High luminosity colors are now at the start of the scale, making them contrast accessible with darker backgrounds (and vice-versa).
By performing this small change within our dashboard’s React codebase and shipping a production preview deploy, we were able to see the Cloudflare Dashboard in dark mode with a whole new set of colors in a matter of minutes.
An early preview of the Cloudflare Dashboard after flipping our color scales.
While not perfect, this brief prototype gave us an incredibly solid baseline and validated the approach with a number of benefits.
Every product built using the Cloudflare Design System now had a dark mode theme built in for free, with no additional work required by teams.
Our color contrast principles remain sound — just as the first five colors in a scale would be accessible with light text, when flipped, the first five colors in the scale are accessible with dark text. Our scales aren’t perfectly symmetrical, but when using white and black, the principle still holds.
In a traditional approach of “inverting” colors, we face the issue of a color’s hue being changed too. When a color is broken down into its constituent hue, saturation, and luminosity values, inverting it would mean a vibrant light blue would become a dull dark orange. Our approach of just inverting the luminosity of a color means that we retain the saturation and hue of a color, meaning we retain Cloudflare’s brand aesthetic and the associated meaning of each hue (blue buttons as calls-to-action, and so on).
Of course, shipping a dark mode for a product as complex as the Cloudflare Dashboard can’t just be done in a matter of minutes.
Not Quite Just Turning the Lights Off
Although our prototype did meet our initial requirements of facilitating the dashboard in a dark theme, some details just weren’t quite right. The data visualization and mapping libraries we use, our icons, text, and various button and link states all had to be audited and required further iterations. One of the most obvious and prominent examples was the page background color. Our prototype had simply changed the background color from white (#FFFFFF) to black (#000000). It quickly became apparent that black wasn’t appropriate. We received feedback that it was “too intense” and “harsh.” We instead opted for off black, specifically what we refer to as “gray.0” or #1D1D1D. The difference may not seem noticeable, but at larger dimensions, the gray background is much less distracting.
Here is what it looks like in our design system:
Black background color contrast for white textGray background color contrast for white text
And here is a more realistic example:
lorem ipsum sample text on black background and on gray background
The numbers at the end of each row represent the contrast of the text color on the background. According to the Web Content Accessibility Guidelines (WCAG), the standard contrast ratio for text should be at least 4.5:1. In our case, while both of the above examples exceed the standard, the gray background ends up being less harsh to use across an entire application. This is not the case with light mode as dark text on white (#FFFFFF) background works well.
Our technique during the prototyping stage involved flipping our color scale; however, we additionally created a tool to let us replace any color within the scale arbitrarily. As the dashboard is made up of charts, icons, links, shadows, buttons and certainly other components, we needed to be able to see how they reacted in their various possible states. Importantly, we also wanted to improve the accessibility of these components and pay particular attention to color contrast.
Color picker tool screenshot showing a color scale
For example, a button is made up of four distinct states:
1) Default 2) Focus 3) Hover 4) Active
Example showing the various colors for states of buttons in light and dark mode
We wanted to ensure that each of these states would be at least compliant with the AA accessibility standards according to the WCAG. Using a combination of our design systems documentation and a prioritized list of components and pages based on occurrence and visits, we meticulously reviewed each state of our components to ensure their compliance.
Side by side comparison of the navbar in light and dark modes
The navigation bar used to select between the different applications was a component we wanted to treat differently compared to light mode. In light mode, the app icons are a solid blue with an outline of the icon; it’s a distinct look and certainly one that grabs your attention. However, for dark mode, the consensus was that it was too bright and distracting for the overall desired experience. We wanted the overall aesthetic of dark mode to be subtle, but it’s important to not conflate aesthetic with poor usability. With that in mind, we made the decision for the navigation bar to use outlines around each icon, instead of being filled in. Only the selected application has a filled state. By using outlines, we are able to create sufficient contrast between the current active application and the rest. Additionally, this provided a visually distinct way to present hover states, by displaying a filled state.
After applying the same methodology as described to other components like charts, icons, and links, we end up with a nicely tailored experience without requiring a substantial overhaul of our codebase. For any new UI that teams at Cloudflare build going forward, they will not have to worry about extra work to support dark mode. This means we get an improved customer experience without any impact to our long term ability to keep delivering amazing new capabilities — that’s a win-win!
Welcome to the Dark Side
We know many of you have been asking for this, and we are excited to bring dark mode to all. Without the investment into our design system by many folks at Cloudflare, dark mode would not have seen the light of day. You can enable dark mode on the Appearance card in your user profile. You can give feedback to shape the future of the dark theme with the feedback form in the card.
If you find these types of problems interesting, come help us tackle them! We are hiring across product, design, and engineering!
We’re excited to announce Cloudflare R2 Storage! By giving developers the ability to store large amounts of unstructured data, we’re expanding what’s possible with Cloudflare while slashing the egress bandwidth fees associated with typical cloud storage services to zero.
Cloudflare R2 Storage includes full S3 API compatibility, working with existing tools and applications as built.
Let’s get into the R2 details.
R2 means “Really Requestable”
Object Storage, sometimes referred to as blob storage, stores arbitrarily large, unstructured files. Object storage is well suited to storing everything from media files or log files to application-specific metadata, all retrievable with consistent latency, high durability, and limitless capacity.
The most familiar API for Object Storage, and the API R2 implements, is Amazon’s Simple Storage Service (S3). When S3 launched in 2006, cloud storage services were a godsend for developers. It didn’t happen overnight, but over the last fifteen years, developers have embraced cloud storage and its promise of infinite storage space.
As transformative as cloud storage has been, a downside emerged: actually getting your data back. Over time, companies have amassed massive amounts of data on cloud provider networks. When they go to retrieve that data, they’re hit with massive egress fees that don’t correspond to any customer value — just a tax developers have grown accustomed to paying.
Enter R2.
Traditional object storage charges developers for three things: bandwidth, storage size and storage operations.
R2 builds on Cloudflare’s commitment to the Bandwidth Alliance, providing zero-cost egress for stored objects — no matter your request rate. Egress bandwidth is often the largest charge for developers utilizing object storage and is also the hardest charge to predict. Eliminating it is a huge win for open-access to data stored in the cloud.
That doesn’t mean we are shifting bandwidth costs elsewhere. Cloudflare R2 will be priced at $0.015 per GB of data stored per month — significantly cheaper than major incumbent providers.
Infrequent access to objects is often trivial for providers to support yet incurs the same per-operation charges. We don’t think it’s fair that typical object storage bills a developer making one request a second the same rate as an enterprise making thousands of requests a second — or frequently a higher rate when considering negotiated volume discounts.
On the flip side, providers designed for infrequent access typically can’t scale to heavy usage.
R2 will zero-rate infrequent storage operations under a threshold — currently planned to be in the single digit requests per second range. Above this range, R2 will charge significantly less per-operation than the major providers. Our object storage will be extremely inexpensive for infrequent access and yet capable of and cheaper than major incumbent providers at scale.
This cheaper price doesn’t come with reduced scalability. Behind the scenes, R2 automatically and intelligently manages the tiering of data to drive both performance at peak load and low-cost for infrequently requested objects. We’ve gotten rid of complex, manual tiering policies in favor of what developers have always wanted out of object storage: limitless scale at the lowest possible cost.
R2 means “Repositioning Records”
Zero egress means you can get objects out easily, but what about putting objects in? Migrating data across cloud providers, even if they both support the complete S3 API, is error-prone and costly.
To make this easy for you, without requiring you to change any of your tooling, Cloudflare R2 will include automatic migration from other S3-compatible cloud storage services. Migrations are designed to be dead simple. After specifying an existing storage bucket, R2 will serve requests for objects from the existing bucket, egressing the object only once before copying and serving from R2. Our easy-to-use migrator will reduce egress costs from the second you turn it on in the Cloudflare dashboard.
Our vision for R2 includes multi-region storage that automatically replicates objects to the locations they’re frequently requested from. As with Durable Objects, we plan on introducing jurisdictional restrictions that allow developers to comply with complex data sovereignty requirements via a simple API.
R2 means “Ridiculously Reliable”
The core of what makes Object Storage great is reliability — we designed R2 for data durability and resilience at its core. R2 will provide 99.999999999% (eleven 9’s) of annual durability, which describes the likelihood of data loss. If you store 1,000,000 objects on R2, you can expect to lose one once every 100,000 years — the same level of durability as other major providers. R2 will be resistant to regional failures, replicating objects multiple times for high availability.
R2 is designed with redundancy across a large number of regions for reliability. We plan on starting from automatic global distribution and adding back region-specific controls for when data has to be stored locally, as described above.
R2 means “Radically Reprogrammable”
R2 is fully integrated with the Cloudflare Workers serverless runtime. You can bind a Worker to a specific bucket, dynamically transforming objects as they are written to or read from storage buckets. The deep integration between Workers and R2 makes building data pipelines and manipulating objects incredibly easy.
Cloudflare R2 is designed to easily integrate with the rest of Cloudflare’s products. As a few examples, our plan is to allow Durable Objects to be configured with R2 as a backup target, and provide automatic integration between R2 and Cloudflare cache to greatly extend cache lifetimes for infrequently changing objects.
What will you be able to build with Cloudflare R2?
There’s a lot you can do with long-term storage, especially with access to the Workers compute platform just alongside it.
For example, streaming data from a large number of IoT devices becomes a breeze with R2. Starting with a Worker to transform and manipulate the data, R2 can ingest large volumes of sensor data and store it at low cost. With no egress fees, it becomes simple to migrate volumes of data to multiple databases and analytics solutions as needed, dramatically reducing storage costs. With the ability to run a Worker on the outgoing data as well, the data pipeline itself is more flexible.
R2 is also a great place for CDN assets and large media files. For large files, R2 can significantly extend cache lifetimes while dramatically slashing egress bills. Combined with the Cache API and Workers, content can be dynamically cached for low-latency access around the globe.
More than anything, R2’s lack of egress bandwidth charges makes it ideal for storing content that’s accessed frequently. Today, R2 scales well to handle heavy request loads, dynamically tiering your objects to provide the best performance at the lowest cost. This dynamic tiering allows us to offer the lowest prices while supporting peak performance — with no user configuration required.
Accessing Cloudflare R2
R2 is currently under development — you can sign up here to join the waitlist for access. We’re excited to work with a number of earlier users to refine and test the product. We’ll be announcing an open beta where any user will be able to sign up for the service soon.
We’re excited to continue to build the product and push towards open beta, and we have big ideas for what the future of storage at Cloudflare’s edge could look like. If you’re a distributed systems engineer who wants to help us build the future of state at the edge, come work with us!
Today, we are excited to announce that all Cloudflare customers now have full Registrar access, including the ability to register new domains.
Second, starting today — and over the course of the next few weeks — we will be introducing over 40 new top-level domains (TLDs). We’re starting with .uk, our most requested country code extension. Initially, customers will only be able to transfer in existing .uk domains from other registrars, but support for new registrations will become available within the next few weeks. In keeping with our at-cost model, .uk domains will be priced at the wholesale registry fee.
A short registrar primer
In the domain name world, there are two key players: registrars and registries. Understandably, the two are often confused. One way to look at it is that registries are the wholesalers and registrars are the retailers. Registries host the centralized database of registered domains within a TLD. They are responsible for establishing the policies and business rules for the TLD. They also set the wholesale price. Registrars sell domains to end users and manage those registrations on an ongoing basis. They set the retail fee, collect payment, provide customer support, and ensure registrations are renewed and kept up to date. They often provide complementary services such as DNS, web hosting, and email.
There are various “types” of registrars. Retail registrars primarily sell to SMBs and individuals. Corporate registrars typically provide services to large enterprises, and often offer brand protection and monitoring services. There are also registrars that focus on the reseller market, essentially enabling other companies to act as domain resellers.
Registrars typically interact with registries using a standard protocol called the Extensible Provisioning Protocol (EPP). While EPP is well-defined in various RFCs, each registry often has its own flavor and uses protocol extensions in support of their specific policies.
Where we started
Cloudflare has operated a registrar for many years. Initially, we became a registrar solely to manage and protect our own mission-critical domains. Over time, we began offering highly secure registration services to some of our customers as well. This evolved into our Custom Domain Protection service. This was a high-end niche service for customers with very specific needs. As we learned more about the registrar space, however, we wanted to expand this service to everyone. We believed that we could provide a highly secure, privacy-focused, and cost-effective registrar for everyone. So, in 2018 we announced the launch of Cloudflare Registrar.
There are two ways to have Cloudflare handle your domain registration: through the registration of a brand-new domain or through the transfer of an existing domain from another registrar. Unlike many new registrars starting from scratch, we had a large and sophisticated customer base. Our customers were already using our DNS services for domains they had registered through other registrars. So, we initially focused on helping them transfer existing domains to Cloudflare. At the time, we estimated that if our customers transferred all of their domains to us, they would collectively save over $50 million per year in registration fees.
And we’ve done just that. Since our launch in 2018, we have transferred in hundreds of thousands of domains. Collectively, it’s saved our customers millions of dollars in annual registration fees.
In 2020, new registrations were launched in beta. Access was first provided to our Biz, Pro, and Enterprise customers by default, and then over the following months we enabled several thousand additional customers who had previously expressed interest.
Transfers are not enough
Part of the reason why we launched our beta for new registrations was the excitement we saw around new domain registrations. Though we intentionally started only with domain transfers, folks began asking for new domain functionality almost immediately. We heard this initially from customers who hadn’t yet purchased a domain. Since they didn’t have anything to transfer in, they would have to go through the somewhat cumbersome process of registering a new domain with another provider and only then transfer their domain to Cloudflare.
As time went by, however, we began to hear requests from our existing Registrar customers.
After all, domain portfolios are not static. Companies, large and small, are continually updating their domain assets. Whether through the development of new products, expansion into new markets, M&A activities, or brand protection, the ability to register new domain names is vitally important. In Q2 of this year, there were 11.7 million new registrations in .com and .net alone. Cloudflare customers have registered over 2 million new domains through other registrars in the first half of this year alone. And these are just the ones we know about!
Today, we’re excited to open up new registrations to all of our customers.r. You no longer need to register new domains at another registrar and then transfer those domains to Cloudflare.
Registering a new domain
Registering a new domain is simple. Log into the Cloudflare dashboard and click Add a Site. In addition to adding an existing domain, you can now register a new one.
Start the registration process by entering the domain name or keyword into the search box, and we’ll provide a suggested list of available domains. After making your selection, you’ll need to select one of the plans (FREE is an option) and provide some basic information. Once you check out, we’ll create the zone and add the domain to your account. The entire process can be completed in less than a minute.
What about pricing? It’s important to note that our registrar pricing is “at-cost.” That means we charge our customers exactly what we pay the registry, plus any applicable ICANN transaction fees. In certain cases, the registry fees are in a currency other than US dollars. In those situations, we convert the price we charge our customer to USD based on the current exchange rate. As the exchange rate changes, we periodically update the USD price — but never more often than once per month.
It’s a big world
Beyond registering new domains, we’ve also recognized the need to expand the list of supported TLDs. Our customer base is already highly diverse and becoming even more so all the time. While .com is often considered the “king” of TLDs — especially within the U.S. — that’s not necessarily the case in other countries. Today, there are over 1,500 top-level domains. There are the legacy TLDs like .com, .net, and .org. There are also over 1,000 “new” TLDs such as .online, .live, and .cloud. There’s even .horse! And there are the country code TLDs, such as .uk, .in, and .au. In many areas of the world, the local country code TLD is much more popular than .com.
We believe we owe it to our customers to provide them with domains in the TLDs that work best for them. We have spent much of our effort in support of legacy and new TLDs. Now, we will be turning our focus towards supporting more country code TLDs.
What’s next
In the coming weeks, you can expect to see us add over 40 new extensions, including .us, .co, .me, and .tv. You can also check out the full list of TLDs we currently support and dates for upcoming launches here.
In the coming months we will be adding even more new extensions, with a focus on country-codes such as .de, .in, .ca, and .au to name just a few. We’re also planning to support premium (non-standard) priced domains, as well as Internationalized Domain Names (IDNs).
It’s just another step on the road to building a better — and more inclusive — Internet. To learn more about Cloudflare Registrar and how to use it, visit our developer documentation.
We’re excited to announce the availability of the HTTP DDoS Managed Ruleset. This new feature allows Cloudflare customers to independently tailor their HTTP DDoS protection settings. Whether you’re on the Free plan or the Enterprise plan, you can now tweak and optimize the settings directly from within the Cloudflare dashboard or via API.
We expect that in most cases, Cloudflare customers won’t need to customize any settings. Our mission is to make DDoS disruptions a thing of the past, with no customer overhead. To achieve this mission we’re constantly investing in our automated detection and mitigation systems. In some rare cases, there is a need to make some configuration changes, and so now, Cloudflare customers can customize those protection mechanisms independently. The next evolutionary step is to make those settings learn and auto-tune themselves for our customers, based on their unique traffic patterns. Zero-touch DDoS protection at scale.
Unmetered DDoS Protection
Back in 2017, we announced that we will never kick a customer off of our network because they face large attacks, even if they are not paying us at all (i.e., using the Free plan). Furthermore, we committed to never charge a customer for DDoS attack traffic — no matter the size and duration of the attack. Just this summer, our systems automatically detected and mitigated one of the largest DDoS attacks of all time. As opposed to other vendors, Cloudflare customers don’t need to request a service credit for the attack traffic: we simply exclude DDoS traffic from our billing systems. This is done automatically, just like our attack detection and mitigation mechanisms.
Autonomous DDoS Protection
Our unmetered DDoS protection commitment is possible due to our ongoing investment in our network and technology stack. The global coverage and capacity of our network allows us to absorb the largest attacks ever recorded, without manual intervention. Using BGP Anycast, traffic is routed to the closest Cloudflare edge data center as a form of global inter-data center load balancing. Traffic is then load balanced efficiently inside the data center between servers with the help of Unimog, our home-grown L4 load balancer, to ensure that traffic arrives at the least loaded server. Then, each server scans for malicious traffic and, if detected, applies mitigations in the most optimal location in the tech stack. Each server detects and mitigates attacks completely autonomously without requiring any centralized consensus, and shares details with each other using multicast. This is done using our proprietary autonomous edge detection and mitigation system, and this is how we’re able to continue offering unmetered DDoS protection for free at the scale we operate at.
Configurable DDoS Protection
Our autonomous systems use a set of dynamic rules that scan for attack patterns, known attack tools, suspicious patterns, protocol violations, requests causing large amounts of origin errors, excessive traffic hitting the origin/cache, and additional attack vectors. Each rule has a predefined sensitivity level and default action that varies based on the rule’s confidence that the traffic is indeed part of an attack.
But how do we determine those confidence levels? The answer to that depends on each specific rule and what that rule is looking for. Some rules look for the patterns in HTTP attributes that are generated by known attack tools and botnets, known protocol violations and other general suspicious patterns andtraffic abnormalities. If a given rule is searching for the HTTP patterns of known attack tools, then once found, the likelihood (i.e., confidence) that this traffic is part of an attack is high, and we can therefore safely block all the traffic that matches that rule. However, in other cases, the detected patterns or abnormal activity might resemble an attack but can actually be caused by faulty applications that generate abnormal HTTP calls, misbehaving API clients that flood their origin server, and even legitimate traffic that naively violates protocol standards. In those cases, we might want to rate-limit the traffic that matches the rule or serve a challenge action to verify and allow legitimate users in while blocking bad bots and attackers.
Configuring the DDoS Protection Settings
In the past, you’d have to go through our support channels to customize any of the default actions and sensitivity levels. In some cases, this may have taken longer to resolve than desired. With today’s release, you can tailor and fine-tune the settings of our autonomous edge system by yourself to quickly improve the accuracy of the protection for your specific application needs.
If you previously contacted Cloudflare Support to apply customizations, the DDoS Ruleset has been set to Essentially off or Low for your zone, based on your existing customization. You can visit the dashboard to view the settings and change them if you need.
If you’ve requested to exclude or bypass the mitigations for specific HTTP attributes or IPs, or if you’ve requested a significantly high threshold that requires Cloudflare approval, then those customizations are still active but may not yet be visible in the dashboard.
If you haven’t experienced this issue previously, there is no action required on your end. However, if you would like to customize your DDoS protection settings, go directly to the DDoS tab or follow these steps:
Next to HTTP DDoS attack protection, click Configure.
In Ruleset configuration, select the action and sensitivity values for all the rules in the HTTP DDoS Managed Ruleset.
Alternatively, follow the API documentation to programmatically configure the DDoS protection settings.
In the configuration page, you can select a different Action and Sensitivity Level to override all the DDoS protection rules as a group of rules (i.e., the “ruleset”).
Alternatively, you can click Browse Rules to override specific rules, rather than all of them as a set of rules.
Mitigation Action
The mitigation action defines what action to take when the mitigation rule is applied. Our systems constantly analyze traffic and track potentially malicious activity. When certain request-per-second thresholds exceed the configured sensitivity level, a mitigation rule with a dynamically generated signature will be applied to mitigate the attack. The default mitigation action can vary according to the specific rule. A rule with less confidence may apply a Challenge action as a form of soft mitigation, and a rule with a Block action is applied when there is higher confidence that the traffic is part of an attack — as a form of a stricter mitigation action.
The available values for the action are:
Block
Challenge (CAPTCHA)
Log
Use Rule Defaults
Some examples of when you may want to change the mitigation action include:
Safer onboarding: You’re onboarding a new HTTP application which has odd traffic patterns, naively violates protocol violations or causes spiky behavior. In this case, you can set the action to Log and see what traffic our systems flag. Afterwards, you can make the necessary changes to the sensitivity levels as required and switch the mitigation action back to the default.
Stricter mitigation: A DDoS attack has been detected but a Rate-limit or Challenge action have been applied due to the rule’s default logic. However, in this specific case, you’re sure that this is malicious traffic, so you can change the action to Block for a more complete mitigation.
Mitigation Sensitivity
The sensitivity level defines when the mitigation rule is applied. Our systems constantly analyze traffic and track potentially malicious activity. When certain request-per-second thresholds are crossed, a mitigation rule with a dynamically generated signature will be applied to mitigate the attack. Toggling the sensitivity levels allows you to define when the mitigation is applied. The higher the sensitivity, the faster the mitigation is applied. The available values for sensitivity are:
High (default)
Medium
Low
Essentially Off
Essentially Off means that we’ve set an exceptionally low sensitivity level so in most cases traffic won’t be mitigated for you. However, attack traffic will be mitigated at exceptional levels to ensure the safety and stability of the Cloudflare network.
Some examples of when you may want to change the sensitivity action include:
Avoid impact to legitimate traffic: One of the rules has applied mitigation to your legitimate traffic due to a suspicious pattern. In this case, you may want to reduce the rule sensitivity to avoid recurrence of the issue and negative impact to your traffic.
Legacy applications: One of your legacy HTTP applications is violating protocol standards, or you may have mistakenly introduced a bug into your mobile application/API client. These cases may result in abnormal traffic activity that may be flagged by our systems. In such a case, you can select the Essentially Off sensitivity level until you’ve resolved the issue on your end, to avoid false positives.
Overriding Specific Rules
As mentioned above, you can also select a specific rule to override its action and sensitivity levels. The per-rule override takes priority over the ruleset override.
When configuring per-rule overrides, you’ll see that some rules have a DDoS Dynamic action. This means that the mitigation is multi-staged and will apply different mitigation actions depending on various factors including attack type, request characteristics, and various other factors. This dynamic action can also be overridden if you choose to do so.
DDoS Attack Analytics
When a DDoS attack is detected and mitigated, you’ll receive a real-time DDoS alert (if you’ve configured one) and you’ll be able to view the attack in the Firewall analytics dashboard. The attack details and the rule ID that was triggered will also be displayed in the Activity log as part of each HTTP request log that was mitigated.
Helping Build a Better Internet
At Cloudflare, everything we do is guided by our mission to help build a better Internet. A significant part of that mission is to make DDoS downtime and service disruptions a thing of the past. By giving our users the visibility and tools they need in order to understand and improve their DDoS protection, we’re hoping to make another step towards a better Internet.
Do you have feedback about the user interface or anything else? In the new DDoS tab, we’ve added a link to provide feedback, so you too can help shape the future of Cloudflare’s DDoS protection Managed Rules.
When Varnish and the Varnish Configuration Language (VCL) were first introduced 15 years ago, they were an incredibly powerful combination to configure caching on servers (and your networks). It seemed a logical choice for a language to configure CDNs — caching in the cloud.
A lot has changed on the Internet since then.
In particular, caching is just one of many things that “CDNs” are expected to do: load balancing, DDoS protection, rate limiting, transformations, synthetic responses, routing and more. But above all what “CDNs” need to be is programmable, not just configurable.
Configuration went from a niche activity to a much more common — and often involved — requirement. We’ve heard from a lot of teams that want to remove critical dependencies on the one person they have who knows how to make configuration changes — because they’re the only one on the team who knows how to write in VCL.
But it’s not just about who can write VCL — it’s what VCL is increasingly being asked to do. A lot of our customers have told us that they have much greater expectations for what they expect the network to do: they don’t just want to configure anymore… they want to be able to program it! VCL is being pushed and stretched into things it was never envisaged to do.
These are often the frustrations we hear from customers about the use of VCL. And yet, at the same time, migrations are always hard. Taking thousands of lines of code that have been built up over the years for a mission critical service, and rewriting it from scratch? Nobody wants to do that.
Today, we are excited to announce a solution to all these problems: Turpentine. Turpentine is a true VCL-to-TypeScript converter: it is the easiest and most effective way for you to migrate your legacy Varnish to a modern, Turing-complete programming language and onto the edge. But don’t think that because you’re moving up in terms of language abstraction that you’re giving up performance — it’s the opposite. Turpentine enables porting your VCL-based configuration to Cloudflare Workers — which is known for its speed. Beyond being able to eliminate the use of VCL, Turpentine enables you to take full advantage of Cloudflare: including proxies, firewall, load balancers, tiered caching/shielding and everything else Cloudflare offers.
And you’ll be able to configure it using one of the most widely used languages in the world. Whether you’re using standard configurations, or have a heavily customized VCL file, Turpentine will generate human-readable and well commented TypeScript code and deploy it to our serverless platform that is… fast.
How It Works
To turn a VCL into TypeScript code that is well optimized, human-readable, and commented, Turpentine takes a three-phase approach:
The VCL is parsed, its meaning is understood, and TypeScript code that preserves its intentions is generated. This is more than transpiling. All the functionality configured in the VCL is rewritten to the best solution available. For example, rate limiting might be custom code on your VCL — but have native functionality on Cloudflare.
The code is cleaned and optimized. During this phase, Turpentine looks for redundancies and inefficiencies, and removes them. Your code will be running on Cloudflare Workers, the fastest serverless platform in the world, and we definitely don’t want to leave behind inefficiencies that would prevent you from enjoying its benefits to the full extent.
The final step is pretty printing. The whole point of this exercise is to make the code easy to understand by as many people as possible on your team — so that virtually any engineer on your team, not just infrastructure experts, can program your network moving forward.
Turpentine in Action
We’ve been perfecting Turpentine in a private beta with some very large customers who have some very complicated VCL files.
Here’s a demo of a VCL file being converted to a Worker:
Legacy to Modern
Happily, this all occurs without the pains of the usual legacy migration. There’s no project plan. No engineers and IT teams trying to replicate each bit of configuration or investigating whether a specific feature even existed.
If you’re interested in finding out more, please register your interest in the sign-up form here — we’d love to explore with you. For now, we’re staying in private beta, so we can walk every new customer through the process. A Cloudflare engineer will help your team get up to speed and comfortable with the new infrastructure.
Want to know a secret about Internet performance? Browsers spend an inordinate amount of time twiddling their thumbs waiting to be told what to do. This waiting impacts page load performance. Today, we’re excited to announce support for Early Hints, which dramatically improves browser page load performance and reduces thumb-twiddling time.
In initial tests using Early Hints, we have observed more than 30% improvement to page load time for browsers visiting a website for the first time.
Early Hints is available in beta today — Cloudflare customers can request access to Early Hints in the dashboard’s Speed tab. It’s free for all customers because we think the web should be fast!
Early Hints in a nutshell
Browsers need instructions for what to render and what resources need to be fetched to complete “painting” a given web page. These instructions come from a server response. But the servers sending these responses often need time to compile these resources — this is known as “server think time.” While the servers are busy during this time… browsers sit idle and wait.
Early Hints takes advantage of “server think time” to asynchronously send instructions to the browser to begin loading resources while the origin server is compiling the full response. By sending these hints to a browser before the full response is prepared, the browser can figure out what it needs to do to load the webpage faster for the end user. Faster page loads and lower user-perceived latency means happier users!
More formally, Early Hints is a web standard that defines a new HTTP status code (103 Early Hints) that defines new interactions between a client and server. 103s are served to clients while a 200 OK (or error) response is being prepared (the so-called “server think time”), and contain hints on which assets will likely be needed to fully render the web page. This hinting speeds up page loads and generally reduces user-perceived latency.
Sending hints on which assets to expect before the entire response is compiled allows the browser to use think time (when it would otherwise have been waiting) to fetch needed assets, prepare parts of the displayed page, and otherwise get ready for the full response to be returned.
Cloudflare, as an edge network that sits in between client and server, is well positioned to issue these hints to clients on servers’ behalf. This is true for a few reasons:
103 is an experimental status code that origins may not be able to emit on their own, mostly for legacy reasons. Much of the machinery that powers the web incorrectly assumes that HTTP requests always correspond 1:1 with HTTP responses. This mistaken premise is baked into most HTTP server software, making it difficult for origin servers to emit Early Hints 103 responses prior to a “final” 200 OK response.
Cloudflare edge servers handling this complexity on behalf of our customers neatly sidesteps these technical challenges and gets the adoption flywheel spinning faster on this exciting new technology (more on this flywheel later).
Cloudflare’s edge is very close to end users. This means we can serve hints very quickly, filling even the smallest of server think blocks with useful information the client can use to get a jump start on loading assets.
Cloudflare already sees request and response flow from our customers. We use this data to generate hints automatically, without a customer needing to make any origin changes at all.
How can we speed up “slow” dynamic page loads?
The typical request/response cycle between browsers and servers leaves a lot of room for optimization. When you type an address into the search bar of your browser and press Enter, a series of things happen to get you the content you need, as quickly as possible. Your browser first converts the hostname in the URL into an IP address, then establishes an initial connection to the server where the content is stored.
After the connection is established, the actual request is sent. This is often a GET request with a bunch of information about what the browser can and cannot display to the end user. Following the request, the browser must wait for the origin server to send the first bytes of the response before it begins to render the page. In this time, the server is busy executing all sorts of business logic (looking things up in databases, personalizing the page, detecting fraud, etc.) before spitting a response out to the browser.
Once the response for the original HTML page is received, the browser then needs to parse the page, generate a Document Object Model (DOM), and begin loading subresources specified on the page, like images, scripts, and additional stylesheets.
Let’s take a look at this in action. Below is the performance waterfall for a checkout page on pinecoffeesupply.com, a coffee shop with a storefront on Shopify:
Page rendering cannot complete (and the shopper can’t get their coffee fix, and the coffee shop can’t get paid!) until key assets are loaded. Information on subresources needed for the browser to load the page aren’t available until the server has thought about and returned the initial response (the first document in the above table). In the above example, the page load could have been accelerated had the browser known, prior to receiving the full response, that the stylesheet and the four subsequent scripts will be needed to render the page.
Attempting to parallelize this dependency is what Early Hints is all about — productively using that “server think time” to help get the browser going on critical steps to render the page before the full server response arrives. The green “thinking” bar overlaps with the blue “content download” bar, allowing both the browser and server to be preparing the page at the same time. No more waiting. This is what Early Hints is all about!
“Entrepreneurs know that first impressions matter. Shopify’s own data shows that on average, when a store improves the speed of the first page in the buyer journey by 10%, there is a 7% increase in conversion. We see great promise in Early Hints being another tool to help improve the performance and experience for all merchants and customers.” — Colin Bendell, Director Performance Engineering at Shopify
How does Early Hints speed things up?
Early Hints is a status code used in non-final HTTP responses. It is designed to speed up overall page load times by giving the browser an early signal about what certain linked assets might appear in the final response. The browser takes those hints and begins preparing the page for when the final 200 OK response from the server arrives.
The RFC provides this example of how the request/response cycle will look with Early Hints:
Seems simple enough. We’ve neatly communicated information to the browser on what resources it should consider preloading while the server is computing a full response.
This isn’t a new idea though!
Didn’t server push try to solve this problem?
There have been previous attempts at solving this problem, notably HTTP/2 “server push”. However, server push suffered from two major problems:
Server push sent the wrong bytes at the wrong time
The server pushed assets to the client, without great awareness of what was already present in browser caches, without knowing how much “server think time” would elapse and how best to spend it. Web performance guru Pat Meenan summarized server push’s gotchas in a mail thread discussing Chrome’s intent to deprecate and remove server push support:
Push sounds like a great solution, particularly when it can be done intelligently to not push resources already in cache and if it can exactly only fill the wait time while a CDN edge goes back to an origin for the HTML but getting those conditions right in practice is extremely rare. In virtually every case I have seen, the pushed resources end up delaying the HTML itself, the CSS and other render-blocking resources. Delaying the HTML is particularly bad because it delays the browser’s discovery of all of the other resources on the page. Preload works with the normal document parsing and resource discovery, letting preloaded resources intermix with other important resources and giving the dev, browsers and origins more control over prioritization.
Early Hints avoids these issues by “hinting” (vs. push being dictatorial) to clients which assets they should load, allowing them to prioritize resource loads with more complete information about what they will likely need to render a page, what they have cached, and other heuristics.
Using Early Hints with “rel=preload” solves the unsolicited bytes problem, but can still suffer from the ordering issue (forcing clients to load the wrong bytes at the wrong time). Early Hints’ superpower may actually be its use in conjunction with “rel=preconnect”. Many pages load hundreds of third party resources, and setting up connections and TLS sessions with each outside origin is time (but not bandwidth) intensive. Setting up these third party origin connections early, during think time, has practical advantages for page loading experience without the potential collateral damage of using “rel=preload”.
Server push wasn’t broadly implemented
The other notable issue with Server Push was that browsers supported it, and some origin servers implemented the feature, but no major CDN products (Cloudflare’s included) deemed the feature promising enough to implement and support at scale. Support for standards like server push or Early Hints in each key piece of the web content supply chain is critical for mass adoption.
Cracking the chicken and egg problem
Standards like Early Hints often don’t get off the ground because of this chicken and egg problem: clients have no reason to support new standards without server support and servers have no reason to implement support without clients speaking their language. As previously discussed, Early Hints is particularly complicated for origins to directly support, because 103 is an unfamiliar status code and multiple responses to a single request may not be a well-supported pattern in common HTTP server and application stacks.
We’ve tackled this in a few ways:
Close partnership with Google Chrome and other browser teams to build support for the same standard at the same time, ensuring a critical mass of adoption for Early Hints from day one.
Developing ways for hints to be emitted by our edge to clients with support for the standard without requiring support for the standard from the origin. We’ve been fortunate to have a ready, willing, and able design partner in Shopify, whose performance engineering team has been instrumental in shaping our implementation and testing our production deployment.
We plan to support Early Hints in two ways: one enabled now, and the other coming soon.
Now: Turning 200 OK Link: headers into 103 Early Hints
To avoid requiring origins to emit 103 responses from their origins directly, we settled on an approach that takes advantage of something many customers already used to indicate which assets an HTML page depends on, the Link: response header.
When Cloudflare gets a response from the origin, we will parse it for Link headers with preload or preconnect rel types. These rel types indicate to the browser that the asset should be loaded as soon as possible (preload), or that a connection should be established to the specified origin but no bytes should be transferred (preconnect).
Cloudflare takes these headers and caches them at our edge, ready to be served as a 103 Early Hints payload.
When subsequent requests come for that asset, we immediately send the browser the cached Early Hints response while proxying the request to the origin server to generate the full response.
Cloudflare then proxies the full response from origin to the browser when it’s available.
When the full response is available, it will contain Link headers (that’s how we started this whole story). We will compare the Link headers in the 200 response with the cached version to make sure that they are the most up to date. If they have changed since they’ve been cached, we will automatically purge the out-of-date Early Hints and re-cache the new ones.
Coming soon: Smart Early Hints generation at the edge
We’re working hard on the next version of Early Hints. Smart Early Hints will use machine learning to generate Early Hints even when there isn’t a Link header present in the response from which we can harvest a 103. By analyzing historical request/response cycles for our customers, we can infer what assets being preloaded would help browsers load a webpage more quickly.
Look for Smart Early Hints in the next few months.
Browser support
As previously mentioned, we’ve partnered closely with Google Chrome and other browser vendors to ensure that their implementations of Early Hints interoperate well with Cloudflare’s. Google Chrome, Microsoft Edge, and Mozilla Firefox have announced their intention to support Early Hints. Progress for this support can be tracked here and here. We expect more browsers to announce support soon.
Benchmarking the impact of Early Hints
Once you get accepted into the beta and enable the feature, you can see Early Hints in action using Google Chrome, version 94 or higher. As of Sept 16th 2021, the Chrome Dev channel is at version 94.
Testing Early Hints with Chrome version 94 or higher
Early Hints support is available in Chrome by running (assuming a Mac, but the same flag works on Windows or Linux):
open /Applications/Google\ Chrome\ Dev.app --args --enable-features=EarlyHintsPreloadForNavigation
Specify the desired test URL. It should have the necessary preload/preconnect rel types in the Link header of the response.
Choose Chrome Canary (or any Chrome version higher than 94) for the browser
Under advanced settings, select Chromium.
At the bottom of the Chromium section there’s a command-line section where you should paste Chrome’s Early Hints flag: --enable-features=EarlyHintsPreloadForNavigation.
To see the page load comparison, you can remove this flag and Early Hints won’t be enabled.
Using Web Page Test, we’ve been able to observe greater than 30% improvement to a page’s content loading in the browser as measured by Largest Contentful Paint (LCP). An example test filmstrip:
A few other considerations when testing…
Chrome will not support Early Hints on HTTP/1.1 (or earlier protocols).
Chrome will not support Early Hints on subresource requests.
We encourage testers to see how different rel types improve performance along with other Cloudflare performance enhancements like Argo.
It can be hard to see which resources are actually being loaded early as a result of Early Hints. Interrogating the ResourceTiming API will return initiator=EarlyHints for those assets.
Signing up for the Early Hints beta
Early Hints promises to revolutionize web performance. Support for the standard is live at our edge globally and is being tested by customers hungry for speed.
Locate the Early Hints beta sign up card and request access. We’re enabling access for users on the beta list in batches.
Early Hints holds tremendous promise to speed up everyone’s experience on the web. It’s exactly the kind of product we like working on at Cloudflare and exactly the kind of feature we think should be free, for everyone. Be sure to check out the beta and let us know what you think.
You can explore our beta implementation in the Speed tab. And if you’re an engineer interested in improving the performance of the web for all, come join us!
The Internet is an amazing place. It’s a communication superhighway, allowing people and machines to exchange exabytes of information every day. But it’s not without its share of issues: whether it’s DDoS attacks, route leaks, cable cuts, or packet loss, the components of the Internet do not always work as intended.
The reason Cloudflare exists is to help solve these problems. As we continue to grow our rapidly expanding global network in more than 250 cities, while directly connecting with more than 9,800 networks, it’s important that our network continues to help bring improved performance and resiliency to the Internet. To accomplish this, we built our own backbone. Other than improving redundancy, the immediate advantage to you as a Cloudflare user? It can reduce your website loading times by up to 45% — and you don’t have to do a thing.
The Cloudflare Backbone
We began building out our global backbone in 2018. It comprises a network of long-distance fiber optic cables connecting various Cloudflare data centers across North America, South America, Europe, and Asia. This also includes Cloudflare’s metro fiber network, directly connecting data centers within a metropolitan area.
Our backbone is a dedicated network, providing guaranteed network capacity and consistent latency between various locations. It gives us the ability to securely, reliably, and quickly route packets between our data centers, without having to rely on other networks.
This dedicated network can be thought of as a fast lane on a busy highway. When traffic in the normal lanes of the highway encounter slowdowns from congestion and accidents, vehicles can make use of a fast lane to bypass the traffic and get to their destination on time.
Our software-defined network is like a smart GPS device, as we’re always calculating the performance of routes between various networks. If a route on the public Internet becomes congested or unavailable, our network automatically adjusts routing preferences in real-time to make use of all routes we have available, including our dedicated backbone, helping to deliver your network packets to the destination as fast as we can.
Measuring backbone improvements
As we grow our global infrastructure, it’s important that we analyze our network to quantify the impact we’re having on performance.
Here’s a simple, real-world test we’ve used to validate that our backbone helps speed up our global network. We deployed a simple API service hosted on a public cloud provider, located in Chicago, Illinois. Once placed behind Cloudflare, we performed benchmarks from various geographic locations with the backbone disabled and enabled to measure the change in performance.
Instead of comparing the difference in latency our backbone creates, it is important that our experiment captures a real-world performance gain that an API service or website would experience. To validate this, our primary metric is measuring the average request time when accessing an API service from Miami, Seattle, San Jose, São Paulo, and Tokyo. To capture the response of the network itself, we disabled caching on the Cloudflare dashboard and sent 100 requests from each testing location, both while forcing traffic through our backbone, and through the public Internet.
Now, before we claim our backbone solves all Internet problems, you can probably notice that for some tests (Seattle, WA and San Jose, CA), there was actually an increase in response time when we forced traffic through the backbone. Since latency is directly proportional to the distance of fiber optic cables, and since we have over 9,800 direct connections with other Internet networks, there is a possibility that an uncongested path on the public Internet might be geographically shorter, causing this speedup compared to our backbone.
Luckily for us, we have technologies like Argo Smart Routing, Argo Tiered Caching, WARP+, and most recently announced Orpheus, which dynamically calculates the performance of each route at our data centers, choosing the fastest healthy route at that time. What might be the fastest path during this test may not be the fastest at the time you are reading this.
With that disclaimer out of the way, now onto the test.
With the backbone disabled, if a visitor from São Paulo performed a request to our service, they would be routed to our São Paulo data center via BGP Anycast. With caching disabled, our São Paulo data center forwarded the request over the public Internet to the origin server in Chicago. On average, the entire process to fetch data from the origin server and return to the response to the requesting user took 335.8 milliseconds.
Once the backbone was enabled and requests were created, our software performed tests to determine the fastest healthy route to the origin, whether it was a route on the public Internet or through our private backbone. For this test the backbone was faster, resulting in an average total request time of 230.2 milliseconds. Just by routing the request through our private backbone, we improved the average response time by 31%.
We saw even better improvement when testing from Tokyo. When routing the request over the public Internet, the request took an average of 424 milliseconds. By enabling our backbone which created a faster path, the request took an average of 234 milliseconds, creating an average response time improvement of 44%.
Visitor Location
Distance to Chicago
Avg. response time using public Internet (ms)
Avg. response using backbone (ms)
Change in response time
Miami, FL, US
1917 km
84
75
10.7% decrease
Seattle, WA, US
2785 km
118
124
5.1% increase
San Jose, CA, US
2856 km
122
132
8.2% increase
São Paulo, BR
8403 km
336
230
31.5% decrease
Tokyo JP
10129 km
424
234
44.8% decrease
We also observed a smaller deviation in the response time of packets routed through our backbone over larger distances.
Our next generation network
Cloudflare is built on top of lossy, unreliable networks that we do not have control over. It’s our software that turns these traditional tubes of the Internet into a smart, high performing, and reliable network Cloudflare customers get to use today. Coupled with our new, but rapidly expanding backbone, it is this software that produces significant performance gains over traditional Internet networks.
Whether you visit a website powered by Cloudflare’s Argo Smart Routing, Argo Tiered Caching, Orpheus, or use our 1.1.1.1 service with WARP+ to access the Internet, you get direct access to the Internet fast lane we call the Cloudflare backbone.
For Cloudflare, a better Internet means improving Internet security, reliability, and performance. The backbone gives us the ability to build out our network in areas that have typically lacked infrastructure investments by other networks. Even with issues on the public Internet, these initiatives allow us to be located within 50 milliseconds of 95% of the Internet connected population.
In addition to our growing global infrastructure providing 1.1.1.1, WARP, Roughtime, NTP, IPFS Gateway, Drand, and F-Root to the greater Internet, it’s important that we extend our services to those who are most vulnerable. This is why we extend all our infrastructure benefits directly to the community, through projects like Galileo, Athenian, Fair Shot, and Pangea.
And while these thousands of fiber optic connections are already fixing today’s Internet issues, we truly are just getting started.
Want to help build the future Internet? Networks that are faster, safer, and more reliable than they are today? The Cloudflare Infrastructure team is currently hiring!
If you operate an ISP or transit network and would like to bring your users faster and more reliable access to websites and services powered by Cloudflare’s rapidly expanding network, please reach out to our Edge Partnerships team at [email protected].
“The last 20% of the work requires 80% of the effort.” The Pareto Principle applies in many domains — nowhere more so on the Internet, however, than on the Last Mile. Last Mile networks are heterogeneous and independent of each other, but all of them need to be running to allow for everyone to use the Internet. They’re typically the responsibility of Internet Service Providers (ISPs). However, if you’re an organization running a mission-critical service on the Internet, not paying attention to Last Mile networks is in effect handing off responsibility for the uptime and performance of your service over to those ISPs.
Probably not the best idea.
When a customer puts a service on Cloudflare, part of our job is to offer a good experience across the whole Internet. We couldn’t do that without focusing on Last Mile networks. In particular, we’re focused on two things:
Cloudflare needs to have strong connectivity to Last Mile ISPs and needs to be as close as possible to every Internet-connected person on the planet.
Cloudflare needs good observability tools to know when something goes wrong, and needs to be able to surface that data to you so that you can be informed.
Today, we’re excited to announce Last Mile Insights, to help with this last problem in particular. Last Mile Insights allows customers to see where their end-users are having trouble connecting to their Cloudflare properties. Cloudflare can now show customers the traffic that failed to connect to Cloudflare, where it failed to connect, and why. If you’re an enterprise Cloudflare customer, you can sign up to join the beta in the Cloudflare Dashboard starting today: in the Analytics tab under Edge Reachability.
The Last Mile is historically the most complicated, least understood, and in some ways the most important part of operating a reliable network. We’re here to make it easier.
What is the Last Mile?
The Last Mile is the connection between your home and your ISP. When we talk about how users connect to content on the Internet, we typically do it like this:
This is useful, but in reality, there are lots of things in the path between a user and anything on the Internet. Say that a user is connecting to a resource hosted behind Cloudflare. The path would look like this:
Cloudflare is a global Anycast network that takes traffic from the Internet and proxies it to your origin. Because we function as a proxy, we think of the life of a request in two legs: before it reaches Cloudflare (end users to Cloudflare), and after it reaches Cloudflare (Cloudflare to origin). However, in Internet parlance, there are generally three legs: the First Mile tends to represent the path from an origin server to the data that you are requesting. The Middle Mile represents the path from an origin server to any proxies or other network hops. And finally, there is the final hop from the ISP to the user, which is known as the Last Mile.
Issues with the Last Mile are difficult to detect. If users are unable to reach something on the Internet, it is difficult for the resource to report that there was a problem. This is because if a user never reaches the resource, then the resource will never know something is wrong. Multiply that one problem across hundreds of thousands of Last Mile ISPs coming from a diverse set of regions, and it can be really hard for services to keep track of all the possible things that can go wrong on the Internet. The above graphic actually doesn’t really reflect the scope of the problem, so let’s revise it a bit more:
It’s not an easy problem to keep on top of.
Brand New Last Mile Insights
Cloudflare is launching a closed beta of a brand new Last Mile reporting tool, Last Mile Insights. Last Mile Insights allows for customers to see where their end-users are having trouble connecting to their Cloudflare properties. Cloudflare can now show customers the traffic that failed to connect to Cloudflare, where it failed to connect, and why.
Access to this data is useful to our customers because when things break, knowing what is broken and why — and then communicating with your end users — is vital. During issues, users and employees may create support/helpdesk tickets and social media posts to understand what’s going on. Knowing what is going on, and then communicating effectively about what the problem is and where it’s happening, can give end users confidence that issues are identified and being investigated… even if the issues are occurring on a third party network. Beyond that, understanding the root of the problem can help with mitigations and speed time to resolution.
How do Last Mile Insights work?
Our Last Mile monitoring tools use a combination of signals and machine learning to detect errors and performance regressions on the Last Mile.
Among the signals: Network Error Logging (NEL) is a browser-based reporting system that allows users’ browsers to report connection failures to an endpoint specified by the webpage that failed to load. When a user is able to connect to Cloudflare on a site with NEL enabled, Cloudflare will pass back two headers that indicate to the browser that they should report any network failures to an endpoint specified in the headers. The browser will then operate as usual, and if something happens that prevents the browser from being able to connect to the site, it will log the failure as a report and send it to the endpoint. This all happens in real time; the endpoint receives failure reports instantly after the browser experiences them.
The browser can send failure reports for many reasons: it could send reports because the TLS certificate was incorrect, the ISP or an upstream transit was having issues on the request path, the terminating server was overloaded and dropping requests, or a data center was unreachable. The W3C specification outlines specific buckets that the browser should break reports into and uploads those as reasons the browser could not connect. So the browser is literally telling the reporting endpoint why it was unable to reach the desired site. Here’s an example of a sample report a browser gives to Cloudflare’s endpoint:
The report itself is a JSON blob that contains a lot of things, but the things we care about are when in the request the failure occurred (phase), why the request failed (tcp.timed_out), the ASN the request came over, and the metro area where the request came from. This information allows anyone looking at the reports to see where things are failing and why. Personal Identifiable Information is not captured in NEL reports. For more information, please see our KB article on NEL.
Many services can operate their own reporting endpoints and set their own headers indicating that users who connect to their site should upload these reports to the endpoint they specify. Cloudflare is also an operator of one such endpoint, and we’re excited to open up the data collected by us for customer use and visibility. Let’s talk about a customer who used Last Mile Insights to help make a bad day on the Internet a little better.
Case Study: Canva
Canva is a Cloudflare customer that provides a design and collaboration platform hosted in the cloud. With more than 60 million users around the world, having constant access to Canva’s platform is critical. Last year, Canva users connecting through Cox Communications in San Diego started to experience connectivity difficulties. Around 50% of Canva’s users connecting via Cox Communications saw disconnects during that time period, and these users weren’t able to access Canva or Cloudflare at all. This wasn’t a Canva or Cloudflare outage, but rather, was caused by Cox routing traffic destined for Canva incorrectly, and causing errors for mutual Cox/Canva customers as a result.
Normally, this scenario would have taken hours to diagnose and even longer to mitigate. Canva would’ve seen a slight drop in traffic, but as the outage wasn’t on Canva’s side, it wouldn’t have flagged any alerts based on traffic drops. Canva engineers, in this case, would be notified by the users which would then be followed by a lengthy investigation to diagnose the problem.
Fortunately, Cloudflare has invested in monitoring systems to proactively identify issues exactly like these. Within minutes of the routing anomaly being introduced on Cox’s network, Canva was made aware of the issue via our monitoring, and a conversation with Cox was started to remediate the issue. Meanwhile, Canva could advise their users on the steps to fix it.
Cloudflare is excited to be offering our internal monitoring solution to our customers so that they can see what we see.
But providing insights into seeing where problems happen on the Last Mile is only part of the solution. In order to truly deliver a reliable, fast network, we also need to be as close to end users as possible.
Getting close to users
Getting close to end users is important for one reason: it minimizes the time spent on the Last Mile. These networks can be unreliable and slow. The best way to improve performance is to spend as little time on them as possible. And the only way to do that is to get close to our users. In order to get close to our users, Cloudflare is constantly expanding our presence into new cities and markets. We’ve just announced expansion into new markets and are adding even more new markets all the time to get as close to every network and every user as we can.
This is because not every network is the same. Some users may be clustered very close together in cities with high bandwidth, in others, this may not be the case. Because user populations are not homogeneous, each ISP operates their network differently to meet the needs of their users. Physical distance from where servers are matters a great deal, because nobody can outrun the speed of light. If you’re farther away from the content you want, it will take longer to reach it. But distance is not the only variable; bandwidth and speed will also vary, because networks are operated differently all over the world. But one thing we do know is that your network performance will also be impacted by how healthy your Last Mile network is.
Healthier networks perform better
A healthy network has no downtime, minimal congestion, and low packet loss. These things all add latency. If you’re driving somewhere, street closures, traffic, and bad roads will prevent you from going as fast as possible to where you need to be. Healthy networks provide the best possible conditions for you to connect, and Last Mile performance is better because of it. Consider three networks in the same country: ISP A, ISP B, and ISP C. These ISPs have similar distribution among their users. ISP A is healthy and is directly connected with Cloudflare. ISP B is healthy but is not directly connected to Cloudflare. ISP C is an unhealthy network. Our data shows that Last Mile latencies for ISP C are significantly slower than Network A or B because the network quality of ISP C is worse.
This box plot shows that the latencies to Cloudflare for ISP C are 360% higher than ISPs A or B.
We want all networks to be like Network A, but that’s not always the case, and it’s something Cloudflare can’t control. The only thing Cloudflare can do to mitigate performance problems like these is to limit how much time you spend on these networks.
Shrinking the Last Mile gives better performance
By placing data centers close to our users, we reduce the amount of time spent on these Last Mile networks, and the latency between end users and Cloudflare goes down. A great example of this is how bringing up new locations in Africa affected the latency for the Internet-connected population there. Blue shows the latency before these locations were added, and red shows after:
Our efforts globally have brought 95% of the Internet-connected population within 50ms of us:
You will also notice that 80% of the Internet is within 30ms of us. The tail for Last Mile latencies is very long, and every data center we add helps bring that tail closer to great performance. As we expand into more locations and countries, more of the Internet will be even better connected.
But even when the Last Mile is shrunken down by our infrastructure expansions, networks can still have issues that are difficult to detect. Existing logging and monitoring solutions don’t provide a good way to see what the problem is. Cloudflare has built a sophisticated set of tools to identify issues with Last Mile networks outside our control, and help reduce time to resolution for this purpose, and it has already found problems on the Last Mile for our customers.
Cloudflare has unique performance and insight into Last Mile networking
Running an application on the Internet requires customers to look at the whole Internet. Many cloud services optimize latency starting at the first mile and work their way out, because it’s easier to optimize for things they can control. Because the Last Mile is controlled by hundreds or thousands of ISPs, it is difficult to influence how the Last Mile behaves.
Cloudflare is focused on closing performance gaps everywhere, including close to your users and employees. Last mile performance and reliability is critically important to delivering content, keeping employees productive, and all the other things the world depends on the Internet to do. If a Last Mile provider is having a problem, then users connecting to the Internet through them will have a bad day.
Cloudflare’s efforts to provide better Last Mile performance and visibility allow customers to rely on Cloudflare to optimize the Last Mile, making it one less thing they have to think about. Through Last Mile Insights and network expansion efforts — available today in the Cloudflare Dashboard, in the Analytics tab under Edge Reachability — we want to provide you the ability to see what’s really happening on the Internet while knowing that Cloudflare is working on giving your users the best possible Internet experience.
The collective thoughts of the interwebz
Manage Consent
To provide the best experiences, we use technologies like cookies to store and/or access device information. Consenting to these technologies will allow us to process data such as browsing behavior or unique IDs on this site. Not consenting or withdrawing consent, may adversely affect certain features and functions.
Functional
Always active
The technical storage or access is strictly necessary for the legitimate purpose of enabling the use of a specific service explicitly requested by the subscriber or user, or for the sole purpose of carrying out the transmission of a communication over an electronic communications network.
Preferences
The technical storage or access is necessary for the legitimate purpose of storing preferences that are not requested by the subscriber or user.
Statistics
The technical storage or access that is used exclusively for statistical purposes.The technical storage or access that is used exclusively for anonymous statistical purposes. Without a subpoena, voluntary compliance on the part of your Internet Service Provider, or additional records from a third party, information stored or retrieved for this purpose alone cannot usually be used to identify you.
Marketing
The technical storage or access is required to create user profiles to send advertising, or to track the user on a website or across several websites for similar marketing purposes.