An increasing number of frameworks describe the possible contents of a K–12 artificial intelligence (AI) curriculum and suggest possible learning activities (for example, see the UNESCO competency framework for students, 2024). In our March seminar, Lukas Höper and Carsten Schulte from the Department of Computing Education at Paderborn University in Germany shared with us a unit of work they’ve developed that could inform such a curriculum. At its core, the unit enhances young people’s awareness of how their personal data is used in the data-driven technologies that form part of their everyday lives.
Lukas HöperCarsten Schulte
Lukas Höper and Carsten Schulte are part of a larger team who are investigating how to teach school students about data science and Big Data.
Carsten explained that Germany’s informatics (computing) curriculum includes a competency area known as Informatics, People and Society (IPS), which explores the interrelationships between technology, individuals, and society, and how computation influences and is influenced by social, ethical, and cultural factors. However, research has suggested that teachers face several problems in delivering this topic, including:
Lack of subject knowledge
Lack of teaching material
Lack of integration with other topics in informatics lessons
A perception that IPS is the responsibility of other subjects
Some of the findings of that 2007 research were mirrored in a more recent local study in 2025, which found that although there have been some gains in subject knowledge in the interval period, the problems of a lack of teaching material and integration with other computer science (CS) topics persist, with IPS increasingly perceived as the responsibility of the informatics subject area alone. Despite this, within the informatics curriculum, IPS is often the first topic to be dropped when educators face time constraints — and concerns with what and how to assess the topic remain.
In this context, and as part of a larger, longitudinal project to promote data science teaching in schools called ProDaBi, Carsten and Lukas have been developing, implementing, and evaluating concepts and materials on the topics of data science and AI. Lukas explained the importance of students developing data awareness in the context of the digital systems they use in their everyday lives, such as search engines, streaming services, social media apps, digital assistants, and chatbots, and emphasised the difference between being a user of these systems and a data-aware user. Using the example of image recognition and ‘I am not a robot’ Captcha services, Lukas explained how young people need to develop a data-aware perspective of the secondary purposes of the data collected by these (and other) systems, as well as the more obvious, primary purposes.
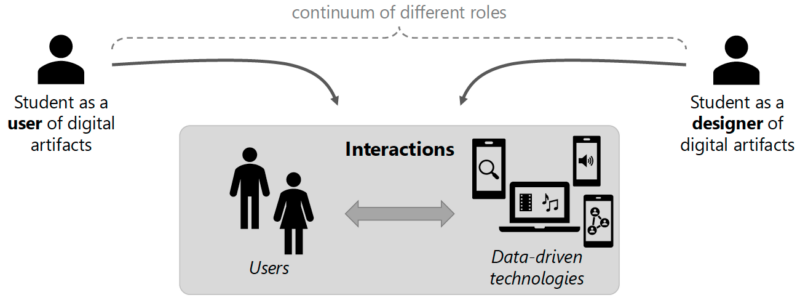
Lukas went on to illustrate the human interaction system model, which presents a continuum of possible different roles, from the student as the user of digital artefacts to the student as the designer of digital artefacts.
Figure 1. Different roles in interactions with data-driven technologies
To become data-aware users of digital artefacts, students need to be able to understand and reflect on those digital artefacts. Only then can they proceed to become responsible designers of digital artefacts. However, when surveyed, some students were only moderately interested in engaging with the inner workings of the digital technologies they use in their everyday lives. Many students prefer to use the systems and are less interested in how they process data.
The explanatory model approach in computing education
Lukas explained how students often become more interested in data-driven technologies when learning about them with explanatory models. Such models can foster data awareness, giving students a different perspective of data-driven technologies and helping them become more empowered users of them.
To illustrate, Lukas gave the example of an explanatory model about the role of data in digital systems. Such a model can be used to introduce the idea that data is explicitly and implicitly collected in the interaction between the user and the technology, and used for primary and secondary purposes.
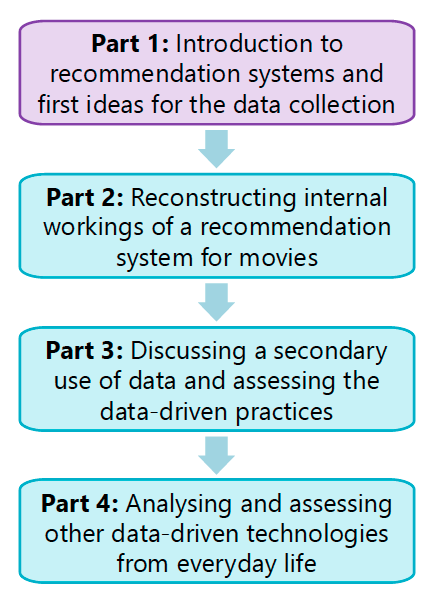
Figure 2. The four parts of the explanatory model
Lukas then introduced two teaching units that were developed for use with middle school children to evaluate the success of the explanatory model approach in computing education. The first unit explores location data collected by mobile phone networks and the second features recommendation systems used by movie streaming services such as Netflix and Amazon Prime.
Taking the second unit as their focus, Lukas and Carsten outlined the four parts of the explanatory model approach:
Part 1
The teaching unit begins by introducing recommendation systems and asking students to think about what a streaming service is, how a personalised start page is constructed, and how personal recommendations might be generated. Students then complete an unplugged activity to simulate the process of making movie recommendations for a peer:
Task 1: Students write down movie recommendations for another student.
Task 2: They then ask each other questions (they collect data).
Task 3: They write down revised movie recommendations.
Task 4: They share and evaluate their recommendations.
Task 5: Together they reflect on which collected data was helpful in this exercise and what kind of data a recommendation system might collect. This reflection introduces the concepts of explicit and implicit data collection.
Part 2
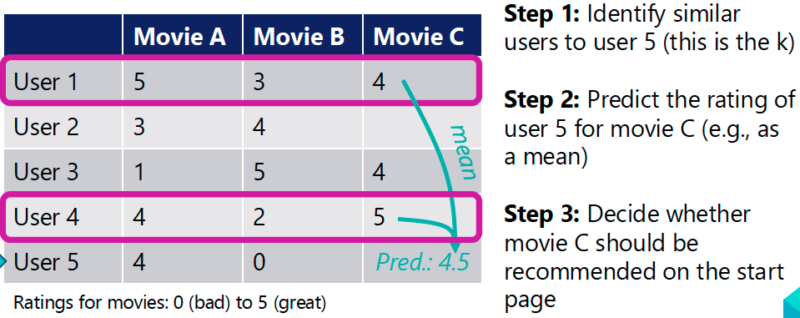
In part 2, students are given a prepared Jupyter Notebook, which allows them to explore a simulation of a recommendation system. Students rate movies and receive personal recommendations. They reconstruct a data model about users, using the idea of collaborative filtering with the k-nearest neighbours algorithm (see Figure 3).
Figure 3. Data model of movie ratings
Part 3
In part 3, the concepts of primary and secondary purposes for data collection are introduced. Students discuss examples of secondary purposes such as personalised paywalls for movies that can be purchased, and subscriptions based on the predictions of future behaviour. The discussion includes various topics about individual and societal issues (e.g. filter bubbles, behaviour engineering, information asymmetry, and responsible development of data-driven technologies).
Part 4
Finally, students use the explanatory model as an ‘analytical lens’. They choose other examples from their everyday lives of technologies that implement recommendation systems and analyse these examples, assessing the data practices involved. Students present their results in class and discuss their role in these situations and possible actions they can take to become more empowered, data-aware users.
Uses of explanatory models
Using the explanatory model is one approach to make the Informatics, People and Society strand of the German informatics curriculum more engaging for students, and addresses some of the problems teachers identify with delivering this competency area.
In presenting the idea of the explanatory model, Carsten and Lukas emphasised that the model in use delivers content as well as functioning as a tool to design teaching content. In the example above, we see how the explanatory model introduces the concepts of:
Explicit and implicit data collection
Primary and secondary purposes of that data
Data models
The explanatory model framework can also be used as a focus for academic research in computing education. For example, further research is needed to evaluate if explanatory models are appropriate or ‘correct’ models and to determine the extent to which they are useful in computing education.
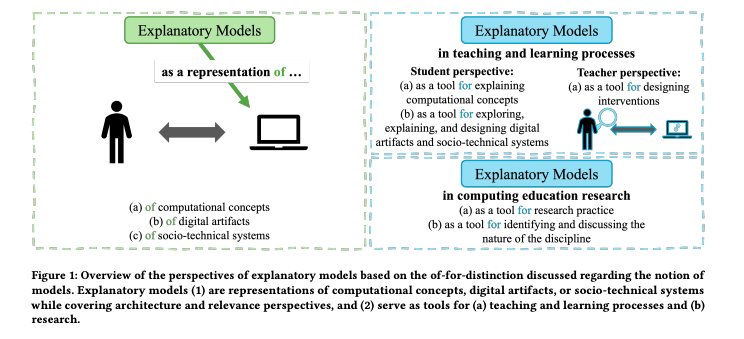
In summary, an explanatory model provides a specific perspective on and explanation of particular computing concepts and digital artefacts. In the example given here, the model focuses on the role of data in a recommender system. Explanatory models are representations of concepts, artefacts, and socio-technical systems, but can also serve as tools to support teaching and learning processes and research in computing education.
Figure 4. Overview of the perspectives of explanatory models. Click to enlarge.
The teaching units referred to above are published on www.prodabi.de (in German and English).
See the background paper to the seminar, called ‘Learning an explanatory model of data-driven technologies can lead to empowered behaviour: A mixed-methods study in K-12 Computing education’.
In our current seminar series, we’re exploring teaching about AI and data science. Join us at our next seminar on Tuesday 13 May at 17:00–18:30 BST to hear Henriikka Vartiainen and Matti Tedre (University of Eastern Finland) discuss how to empower students by teaching them how to develop AI and machine learning (ML) apps without code in the classroom.
To sign up and take part in our research seminars, click below:
Any public certification authority (CA) can issue a certificate for any website on the Internet to allow a webserver to authenticate itself to connecting clients. Take a moment to scroll through the list of trusted CAs for your web browser (e.g., Chrome). You may recognize (and even trust) some of the names on that list, but it should make you uncomfortable that any CA on that list could issue a certificate for any website, and your browser would trust it. It’s a castle with 150 doors.
Certificate Transparency (CT) plays a vital role in the Web Public Key Infrastructure (WebPKI), the set of systems, policies, and procedures that help to establish trust on the Internet. CT ensures that all website certificates are publicly visible and auditable, helping to protect website operators from certificate mis-issuance by dishonest CAs, and helping honest CAs to detect key compromise and other failures.
In this post, we’ll discuss the history, evolution, and future of the CT ecosystem. We’ll cover some of the challenges we and others have faced in operating CT logs, and how the new static CT API log design lowers the bar for operators, helping to ensure that this critical infrastructure keeps up with the fast growth and changing landscape of the Internet and WebPKI. We’re excited to open source our Rust implementation of the new log design, built for deployment on Cloudflare’s Developer Platform, and to announce test logs deployed using this infrastructure.
What is Certificate Transparency?
In 2011, the Dutch CA DigiNotar was hacked, allowing attackers to forge a certificate for *.google.com and use it to impersonate Gmail to targeted Iranian users in an attempt to compromise personal information. Google caught this because they used certificate pinning, but that technique doesn’t scale well for the web. This, among other similar attacks, led a team at Google in 2013 to develop Certificate Transparency (CT) as a mechanism to catch mis-issued certificates. CT creates a public audit trail of all certificates issued by public CAs, helping to protect users and website owners by holding CAs accountable for the certificates they issue (even unwittingly, in the event of key compromise or software bugs). CT has been a great success: since 2013, over 17 billion certificates have been logged, and CT was awarded the prestigious Levchin Prize in 2024 for its role as a critical safety mechanism for the Internet.
Let’s take a brief look at the entities involved in the CT ecosystem. Cloudflare itself operates the Nimbus CT logs and the CT monitor powering the Merkle Towndashboard.
Certification Authorities (CAs) are organizations entrusted to issue certificates on behalf of website operators, which in turn can use those certificates to authenticate themselves to connecting clients.
CT-enforcing clients like the Chrome, Safari, and Firefox browsers are web clients that only accept certificates compliant with their CT policies. For example, a policy might require that a certificate includes proof that it has been submitted to at least two independently-operated public CT logs.
Log operators run CT logs, which are public, append-only lists of certificates. CAs and other clients can submit a certificate to a CT log to obtain a “promise” from the CT log that it will incorporate the entry into the append-only log within some grace period. CT logs periodically (every few seconds, typically) update their log state to incorporate batches of new entries, and publish a signed checkpoint that attests to the new state.
Monitors are third parties that continuously crawl CT logs and check that their behavior is correct. For instance, they verify that a log is self-consistent and append-only by ensuring that when new entries are added to the log, no previous entries are deleted or modified. Monitors may also examine logged certificates to help website operators detect mis-issuance.
Challenges in operating a CT log
Despite the success of CT, it is a less than perfect system. Eric Rescorla has an excellent writeup on the many compromises made to make CT deployable on the Internet of 2013. We’ll focus on the operational complexities of running a CT log.
Let’s look at the requirements for running a CT log from Chrome’s CT log policy (which are more or less mirrored by those of Safari and Firefox), and what can go wrong. The requirements center around integrity and availability.
To be considered a trusted auditing source, CT logs necessarily have stringent integrity requirements. Anything the log produces must be correct and self-consistent, meaning that a CT log cannot present two different views of the log to different clients, and must present a consistent history for its entire lifetime. Similarly, when a CT log accepts a certificate and promises to incorporate it by returning a Signed Certificate Timestamp (SCT) to the client, it must eventually incorporate that certificate into its append-only log.
The integrity requirements are unforgiving. A single bit-flip due to a hardware failure or cosmic ray can (andhas) caused logs to produce incorrect results and thus be disqualified by CT programs. Even software updates to running logs can be fatal, as a change that causes a correctness violation cannot simply be rolled back. Perhaps the greatest risk to individual log integrity is failing to incorporate certificates for which they issued SCTs, for example if they fail to commit those pending certificates to durable storage. See Andrew Ayer’s great synopsis for more examples of CT log failures (up to 2021).
A CT log must also meet certain availability requirements to effectively provide its core functionality as a publicly auditable log. Clients must be able to reliably retrieve log data — Chrome’s policy requires a minimum of 99% average uptime over a 90-day rolling period for each API endpoint — and any entries for which an SCT has been issued must be incorporated into the log within the grace period, called the Maximum Merge Delay (MMD), 24 hours in Chrome’s policy.
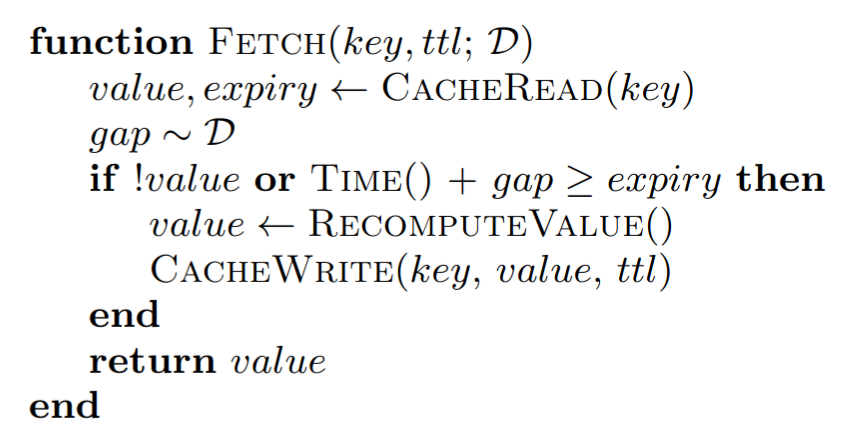
The design of the current CT log read APIs puts strain on the ability of log operators to meet uptime requirements. The API endpoints are dynamic and not easily cacheable without bespoke caching rules that are aware of the CT API. For instance, the get-entries endpoint allows a client to request arbitrary ranges of entries from a log, and the get-proof-by-hash requires the server to construct inclusion proofs for any certificate requested by the client. To serve these requests, CT log servers need to be backed by databases easily 5-10TB in size capable of serving tens of millions of requests per day. This increases operator complexity and expense, not to mention the high cost of bandwidth of serving these requests.
MMD violations are unfortunately not uncommon. Cloudflare’s own Nimbus logs have experienced prolonged outages in the past, most recently in November 2023 due to complete power loss in the datacenter running the logs. During normal log operation, if the log accepts entries more quickly than it incorporates them, the backlog can grow to exceed the MMD. Log operators can remedy this by rate-limiting or temporarily disabling the write APIs, but this can in turn contribute to violations of the uptime requirements.
The high bar for log operation has limited the organizations operating CT logs to only Cloudflare and five others! Losing one or two logs is enough to compromise the stability of the CT ecosystem. Clearly, a change is needed.
A next-generation CT log design
In May 2024, Let’s Encrypt announcedSunlight, an implementation of a next-generation CT log designed for the modern WebPKI, incorporating a decade of lessons learned from running CT and similar transparency systems. The new CT log design, called the static CT API, is partially based on the Go checksum database, and organizes log data as a series of tiles that are easy to cache and serve. The new design provides efficiency improvements that cut operation costs, help logs to meet availability requirements, and reduce the risk of integrity violations.
The static CT API is split into two parts, the monitoring APIs (so named because CT monitors are the primary clients), and the submission APIs for adding new certificates to the log.
The monitoring APIs replace the dynamic read APIs of RFC 6962, and organize log data into static, cacheable tiles. (See Russ Cox’s blog post for an in-depth explanation of tiled logs.) CT log operators can efficiently serve static tiles from S3-compatible object storage buckets and cache them using CDN infrastructure, without needing dedicated API servers. Clients can then download the necessary tiles to retrieve specific log entries or reconstruct arbitrary proofs.
The static CT API introduces another efficiency by deduplicating intermediate and root “issuer” certificates in a log entry’s certificate chain. The number of publicly-trusted issuer certificates is small (in the low thousands), so instead of storing them repeatedly for each log entry, only the issuer hash is stored. Clients can look up issuer certificates by hash from a separate endpoint.
The submission APIs remain backwards-compatible with RFC 6962, meaning that TLS clients and CAs can submit to them without any changes. However, there is one notable addition: the static CT specification requires logs to hold on to requests as it batches and sequences them, and responds with an SCT only after entries have been incorporated into the log. The specification defines a required SCT extension indicating the entry’s index in the log. At the cost of slightly delayed SCT issuance (on the order of seconds), this change eliminates one of the major pain points of operating a CT log (the Merge Delay).
Having the log index of a certificate available in an SCT enables further efficiencies. SCT auditing refers to the process by which TLS clients or monitors can check if a log has fulfilled its promise to incorporate a certificate for which it has issued an SCT. In the RFC 6962 API, checking if a certificate is present in a log when you don’t already know the index requires using the get-proof-by-hash endpoint to look up the entry by the certificate hash (and the server needs to maintain a mapping from hash to index to efficiently serve these requests). Instead, with the index immediately available in the SCT, clients can directly retrieve the specific log data tile covering that index, even with efficient privacy-preserving techniques.
Since it was announced, the static CT API has taken the CT ecosystem by storm. Aside from Sunlight and our brand new Azul (discussed below), there are at least two other independent implementations, Itko and Trillian Tessera. Several CT monitors (including crt.sh, certspotter, Censys, and our own Merkle Town) have added support for the new log format, and as of April 1, 2025, Chrome has begun accepting submissions for static CT API logs into their CT log program.
A static CT API implementation on Workers
This section discusses how we designed and built our static CT log implementation, Azul (short for azulejos, the colorful Portuguese and Spanish ceramic tiles). For curious readers and prospective CT log operators, we encourage you to follow the instructions in the repo to quickly set up your own static CT log. Questions and feedback in the form of GitHub issues are welcome!
The advent of the static CT API gave us the perfect opportunity to rethink how we run our CT logs. There were a few design decisions we made early on to shape the project.
First and foremost, we wanted to run our CT logs on our distributed global network. Especially after the painful November 2023 control plane outage, there’s been a push to deploy services on our highly available and resilient network instead of running in centralized datacenters.
Second, with Cloudflare’s deeply engrained culture of dogfooding (building Cloudflare on top of Cloudflare), we decided to implement the CT log on top of Cloudflare’s Developer Platform and Workers.
Dogfooding gives us an opportunity to find pain points in our product offerings, and to provide feedback to our development teams to improve the developer experience for everyone. We restricted ourselves to only features and default limits generally available to customers, so that we could have the same experience as an external Cloudflare developer, and would produce an implementation that anyone could deploy.
Another major design decision was to implement the CT log in Rust, a modern systems programming language with static typing and built-in memory safety that is heavily used across Cloudflare, and which already has mature (if sometimes lacking full feature parity) Workers bindings that we have used to build several production services. This also provided us with an opportunity to produce Rust crates porting Go implementations of various C2SP specifications that can be reused across other projects.
For the new logs to be deployable, they needed to be at least as performant as existing CT logs. As a point of reference, the Nimbus2025 log currently handles just over 33 million requests per day (~380/s) across the read APIs, and about 6 million per day (~70/s) across the write APIs.
Implementation
We based Azul heavily on Sunlight, a Go application built for deployment as a standalone server. As such, this section serves as a reference for translating a traditional server to Cloudflare’s serverless platform.
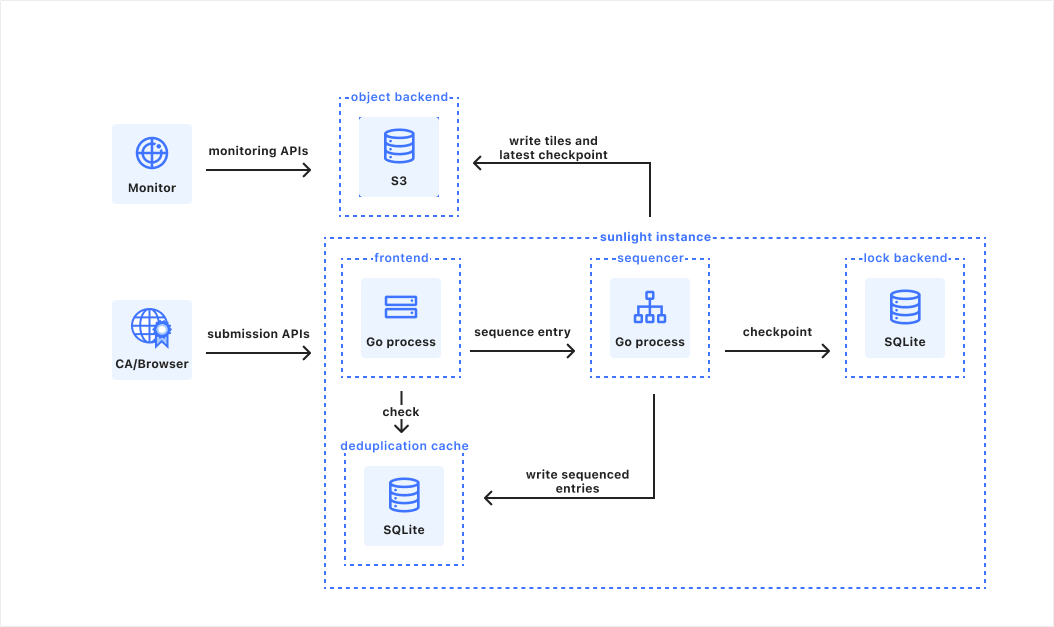
To start, let’s briefly review the Sunlight architecture (described in more detail in the README and original design doc). A Sunlight instance is a single Go process, serving one or multiple CT logs. It is backed by three different storage locations with different properties:
A “lock backend” which stores the current checkpoint for each log. This datastore needs to be strongly consistent, but only stores trivial amounts of data.
A per-log object storage bucket from which to serve tiles, checkpoints, and issuers to CT clients. This datastore needs to be strongly consistent, and to handle multiple terabytes of data.
A per-log deduplication cache, to return SCTs for previously-submitted (pre-)certificates. This datastore is best-effort (as duplicate entries are not fatal to log operation), and stores tens to hundreds of gigabytes of data.
Two major components handle the bulk of the CT log application logic:
A frontend HTTP server handles incoming requests to the submission APIs to add new certificates to the log, validates them, checks the deduplication cache, adds the certificate to a pool of entries to be sequenced, and waits for sequencing to complete before responding to the client.
The sequencer periodically (every 1s, by default) sequences the pool of pending entries, writes new tiles to the object backend, persists the latest checkpoint covering the new log state to the lock and object backends, and signals to waiting requests that the pool has been sequenced.
A static CT API log running on a traditional server using the Sunlight implementation.
Next, let’s look at how we can translate these components into ones suitable for deployment on Workers.
Making it work
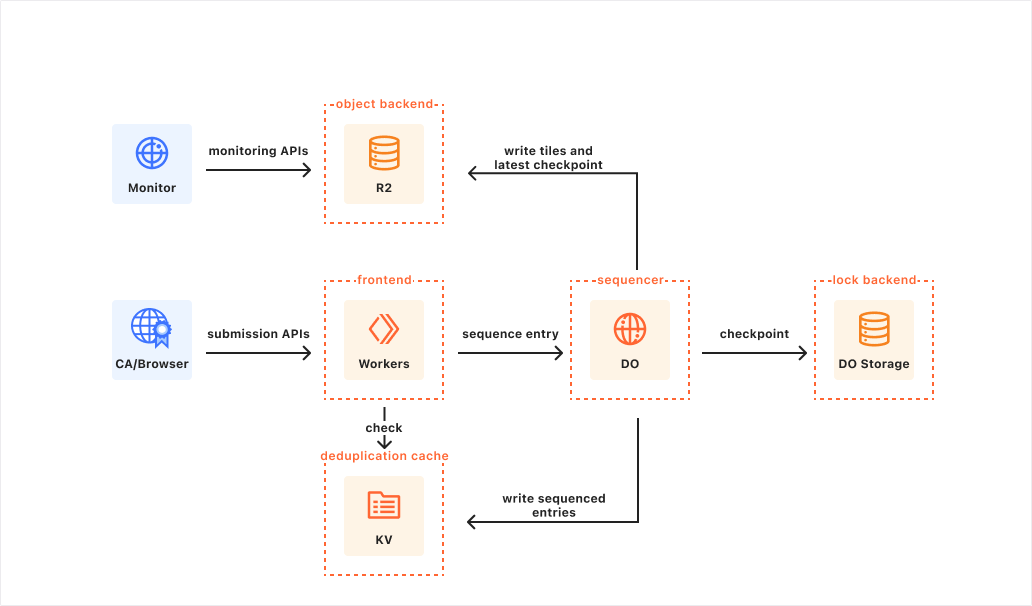
Let’s start with the easy choices. The static CT monitoring APIs are designed to serve static, cacheable, compressible assets from object storage. The API should be highly available and have the capacity to serve any number of CT clients. The natural choice is Cloudflare R2, which provides globally consistent storage with capacity for large data volumes, customizability to configure caching and compression, and unbounded read operations.
A static CT API log running on Workers using a preliminary version of the Azul implementation which ran into performance limitations.
The static CT submission APIs are where the real challenge lies. In particular, they allow CT clients to submit certificate chains to be incorporated into the append-only log. We used Workers as the frontend for the CT log application. Workers run in data centers close to the client, scaling on demand to handle request load, making them the ideal place to run the majority of the heavyweight request handling logic, including validating requests, checking the deduplication cache (discussed below), and submitting the entry to be sequenced.
The next question was where and how we’d run the backend to handle the CT log sequencing logic, which needs to be stateful and tightly coordinated. We chose Durable Objects (DOs), a special type of stateful Cloudflare Worker where each instance has persistent storage and a unique name which can be used to route requests to it from anywhere in the world. DOs are designed to scale effortlessly for applications that can be easily broken up into self-contained units that do not need a lot of coordination across units. For example, a chat application can use one DO to control each chat room. In our model, then, each CT log is controlled by a single DO. This architecture allows us to easily run multiple CT logs within a single Workers application, but as we’ll see, the limitations of individual single-threaded DOs can easily become a bottleneck. More on this later.
With the CT log backend as a Durable Object, several other components fell into place: Durable Objects’ strongly-consistent transactional storage neatly fit the requirements for the “lock backend” to persist the log’s latest checkpoint, and we can use an alarm to trigger the log sequencing every second. We can also use location hints to place CT logs in locations geographically close to clients for reduced latency, similar to Google’s Argon and Xenon logs.
The choice of datastore for the deduplication cache proved to be non-obvious. The cache is best-effort, and intended to avoid re-sequencing entries that are already present in the log. The cache key is computed by hashing certain fields of the add-[pre-]chain request, and the cache value consists of the entry’s index in the log and the timestamp at which it was sequenced. At current log submission rates, the deduplication cache could grow in excess of 50 GB for 6 months of log data. In the Sunlight implementation, the deduplication cache is implemented as a local SQLite database, where checks against it are tightly coupled with sequencing, which ensures that duplicates from in-flight requests are correctly accounted for. However, this architecture did not translate well to Cloudflare’s architecture. The data size doesn’t comfortably fit within Durable Object Storage or single-database D1 limits, and it was too slow to directly read and write to remote storage from within the sequencing loop. Ultimately, we split the deduplication cache into two components: a local fixed-size in-memory cache for fast deduplication over short periods of time (on the order of minutes), and the other a long-term deduplication cache built on Cloudflare Workers KV a global, low-latency, eventually-consistent key-value store without storage limitations.
With this architecture, it was relatively straightforward to port the Go code to Rust, and to bring up a functional static CT log up on Workers. We’re done then, right? Not quite. Performance tests showed that the log was only capable of sequencing 20-30 new entries per second, well under the 70 per second target of existing logs. We could work around this by simply running more logs, but that puts strain on other parts of the CT ecosystem — namely on TLS clients and monitors, which need to keep state for each log. Additionally, the alarm used to trigger sequencing would often be delayed by multiple seconds, meaning that the log was failing to produce new tree heads at consistent intervals. Time to go back to the drawing board.
Making it fast
In the design thus far, we’re asking a single-threaded Durable Object instance to do a lot of multi-tasking. The DO processes incoming requests from the Frontend Worker to add entries to the sequencing pool, and must periodically sequence the pool and write state to the various storage backends. A log handling 100 requests per second needs to switch between 101 running tasks (the extra one for the sequencing), plus any async tasks like writing to remote storage — usually 10+ writes to object storage and one write to the long-term deduplication cache per sequenced entry. No wonder the sequencing task was getting delayed!
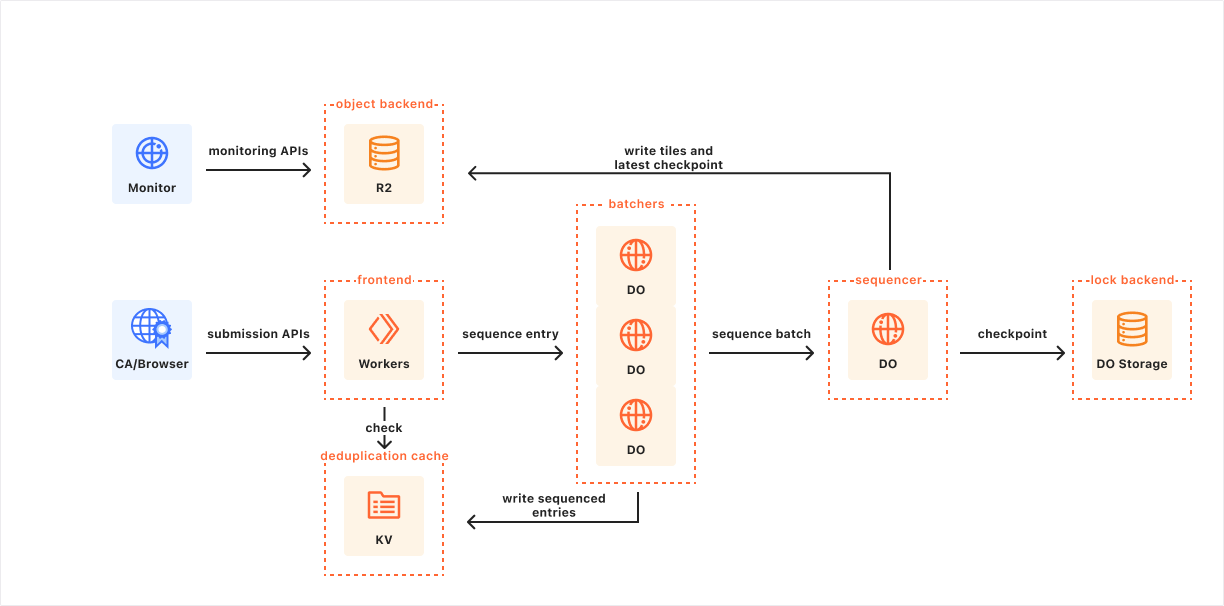
A static CT API log running on Workers using the Azul implementation with batching to improve performance.
We were able to work around these issues by adding an additional layer of DOs between the Frontend Worker and the Sequencer, which we call Batchers. The Frontend Worker uses consistent hashing on the cache key to determine which of several Batchers to submit the entry to, and the Batcher helps to reduce the number of requests to the Sequencer by buffering requests and sending them together in batches. When the batch is sequenced, the Batcher distributes the responses back to the Frontend Workers that submitted the request. The Batcher also handles writing updates to the deduplication cache, further freeing up resources for the Sequencer.
By limiting the scope of the critical block of code that needed to be run synchronously in a single DO, and leaning on the strengths of DOs by scaling horizontally where the workload allows it, we were able to drastically improve application performance. With this new architecture, the CT log application can handle upwards of 500 requests per second to the submission APIs to add new log entries, while maintaining a consistent sequencing tempo to keep per-request latency low (typically 1-2 seconds).
Developing a Workers application in Rust
One of the reasons I was excited to work on this project is that it gave me an opportunity to implement a Workers application in Rust, which I’d never done from scratch before. Not everything was smooth, but overall I would recommend the experience.
To be clear, these rough edges are expected! The Workers platform is continuously gaining new features, and it’s natural that the Rust bindings would fall behind. As more developers rely on (and contribute to, hint hint) the Rust bindings, the developer experience will continue to improve.
What is next for Certificate Transparency
The WebPKI is constantly evolving and growing, and upcoming changes, in particular shorter certificate lifetimes and larger post-quantum certificates, are going to place significantly more load on the CT ecosystem.
The CA/Browser Forum defines a set of Baseline Requirements for publicly-trusted TLS server certificates. As of 2020, the maximum certificate lifetime for publicly-trusted certificates is 398 days. However, there is a ballot measure to reduce that period to as low as 47 days by March 2029. Let’s Encrypt is going even further, and at the end of 2024 announced that they will be offering short-lived certificates with a lifetime of only six days by the end of 2025. Based on some back-of-the-envelope calculations using statistics from Merkle Town, these changes could increase the number of logged entries in the CT ecosystem by 16-20x.
If you’ve been keeping up with this blog, you’ll also know that post-quantum certificates are on the horizon, bringing with them larger signature and public key sizes. Today, a certificate with an P-256 ECDSA public key and issuer signature can be less than 1kB. Dropping in a ML-DSA44 public key and signature brings the same certificate size to 4.6 kB, assuming the SCTs use 96-byte UOVls-pkc signatures. With these choices, post-quantum certificates could require CT logs to store 4x the amount of data per log entry.
The static CT API design helps to ensure that CT logs are much better equipped to handle this increased load, especially if the load is distributed across multiple logs per operator. Our new implementation makes it easy for log operators to run CT logs on top of Cloudflare’s infrastructure, adding more operational diversity and robustness to the CT ecosystem. We welcome feedback on the design and implementation as GitHub issues, and encourage CAs and other interested parties to start submitting to and consuming from our test logs.
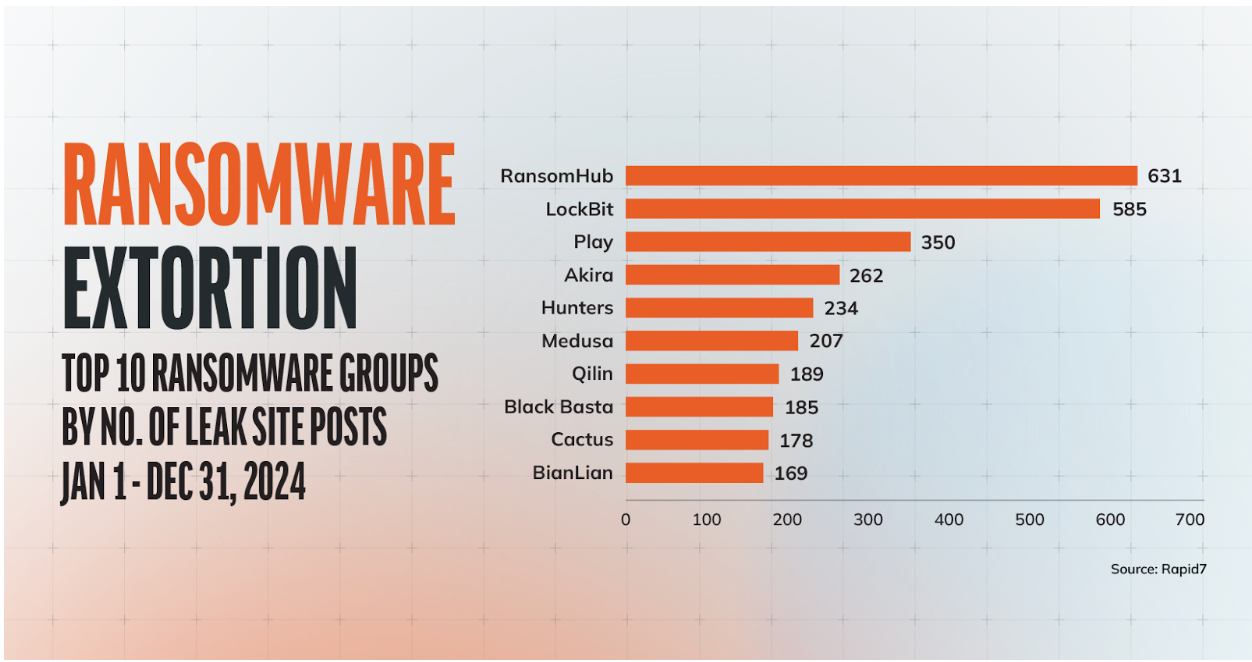
Getting an edge on your adversaries involves understanding their behaviors and their mindset. Rapid7 Labs took a look at internal and publicly-available ransomware data for Q1 2025 and added our own insights to provide a picture of the year thus far—and what you can do now to reduce your attack surface against ransomware.
The data highlights that businesses can’t afford to take their foot off the gas pedal when it comes to proactively tackling ransomware. Established threat actors and relative newcomers are taking an “if it ain’t broke, don’t fix it” approach, shunning unpredictability for proven revenue generation techniques. And, in almost all cases, the name of the game is data exfiltration and blackmail via leak site posts.
At a glance
The heavy hitters of the current ransomware landscape are a mixture of new and familiar faces, largely leaning into the affiliate model or announcing partnerships with well-known groups for a visibility boost. There were 80 active groups in Q1, 16 of them new since January 1. There are also 13 groups that were active in Q4, 2024, but have thus far been silent in 2025.
New ransomware groups active since the start of 2025 include (but are not limited to): Ailock, Belsen Group, CrazyHunter, Cs-137, D0Glun, GD LockerSec, Linkc, NightSpire, Ox Thief, Run Some Wares, SECP0, Sonshi, and VanHelsing.
Popular targets in Q1:
Manufacturing, business services, healthcare, and construction were the top industries under siege by a variety of established and newly emerging threat actors. Of the 618 leak site posts we reviewed containing victims’ industry information, 22% were manufacturing organizations. Business services was a distant second at 11%, followed by healthcare services and construction, both at 10%.
Top regional targets included traditional favorites such as the U.S., Canada, the UK, Germany, and Australia, as well as a fair share of victims in Taiwan, Singapore, and Japan. We also saw an increase of victims in unusual locations such as Colombia and Thailand.
Notable trends
Reinvested ransoms
The Black Basta chat leaks that occurred in February provided an insightful look into not only the group’s infighting, but also its inner workings. And while the group’s activity stopped dead in its tracks (the last leak site post was on January 11, 2025), we would be remiss if we didn’t give mention to a significant trend we have suspected was happening, but were only able to verify with these chat logs: Ransomware groups are reinvesting the ransoms they’re paid to purchase zero days.
Within the Black Basta chat logs, we observed that on November 23, 2023, the group was offered a zero-day exploit targeting Ivanti Connect Secure for their purchase. The exploit came with an asking price of $200,000, and is described by the seller as an unauthenticated RCE exploit, leveraging an unknown memory corruption vulnerability.
While it’s unclear if a purchase was ever made, we can speculate as to what this vulnerability may or may not have been, based on recently published Ivanti Connect Secure CVEs. There were three notable CVEs exploited in the wild as zero days circa late 2023: CVE-2023-46805, CVE-2024-21887, and CVE-2024-21893. However, the seller describes the zero day as a memory corruption vulnerability, which none of those three were. It was also not CVE-2024-21893, which was an SSRF vulnerability. A more recent CVE affecting Ivanti Connect Secure, which was both a memory corruption vulnerability, and exploited in the wild as a zero day, was CVE-2025-0282; however, the affected version ranges of this CVE don’t line up with the zero day being offered in the Black Basta logs. It is possible the zero day being offered for sale to the Black Basta group remains a zero day, as there is no evidence to suggest that it has been patched.
Separate from the Ivanti discussion, however, we observed that Black Basta did indeed buy a Juniper firewall exploit. This followed a comparison between a public, authenticated remote code execution (RCE) exploit (which only gives user-mode access) and the purchased one that provides full root access.
Repackaged offerings
Several groups are making a name for themselves by simply dragging out the classics. Most recently, a supposedly resurrected Babuk ransomware group was not all it seemed, with old data taken from RansomHub, FunkSec and LockBit repurposed as their own. Rapid7 analysis highlights the challenges of groups reforming or collaborating under new identities, such as “Babuk 2.0” just being LockBit 3.0 / LockBit Black with a different name applied.
Elsewhere, FunkSec is not above repurposing old leak data, and LockBit was found to be posting a mixture of old data and faked attacks after global arrests of suspected LockBit developers and affiliates. Visibly weakened by the trilateral law enforcement action, what was left of LockBit turned to fakery as a way of making it seem as though things were still business as usual.
Restructured groups
When ransomware groups go silent, others are there to take their place. Part of this dynamic is a continuously circulating affiliate network that keeps defenders and cybersecurity analysts on their toes. Rebrands aside, Rapid7 observed what appears to be a “changing of the guard” within the Akira ransomware group.
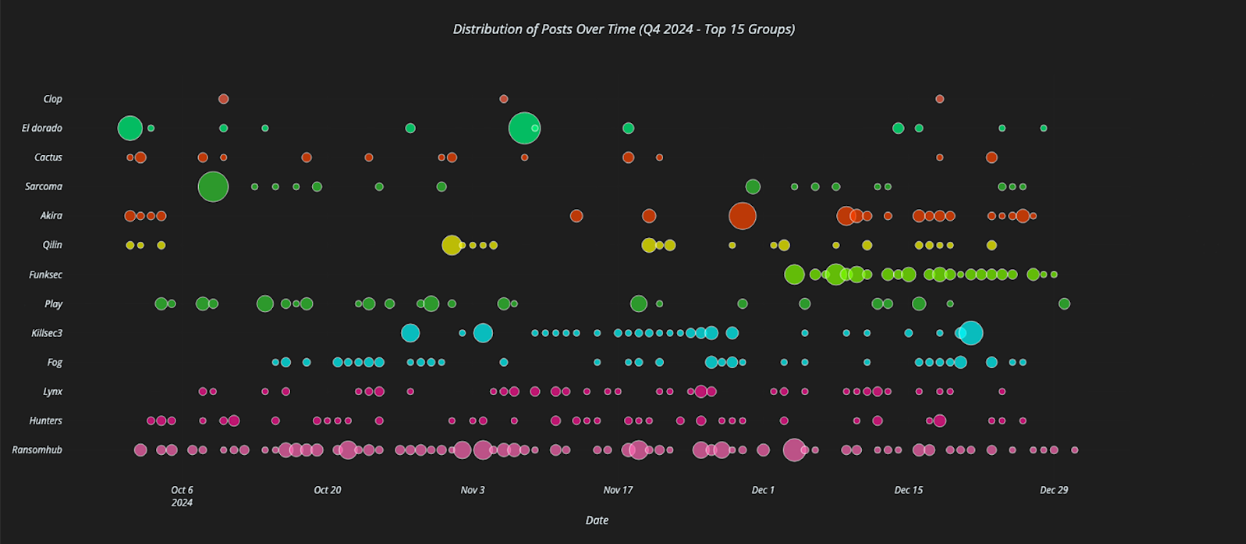
In the scatterplot below, we see Q4 2024 leak site post activity for the top 15 ransomware groups, where the dots indicate individual posts and the dot sizes indicate the amount of data being posted. Looking at Akira’s (5th from top) posting distribution, we can see that it is sporadic but its pace begins to increase around mid December. By way of comparison, RansomHub’s (bottom line) posting distribution is consistent and strong throughout the quarter.
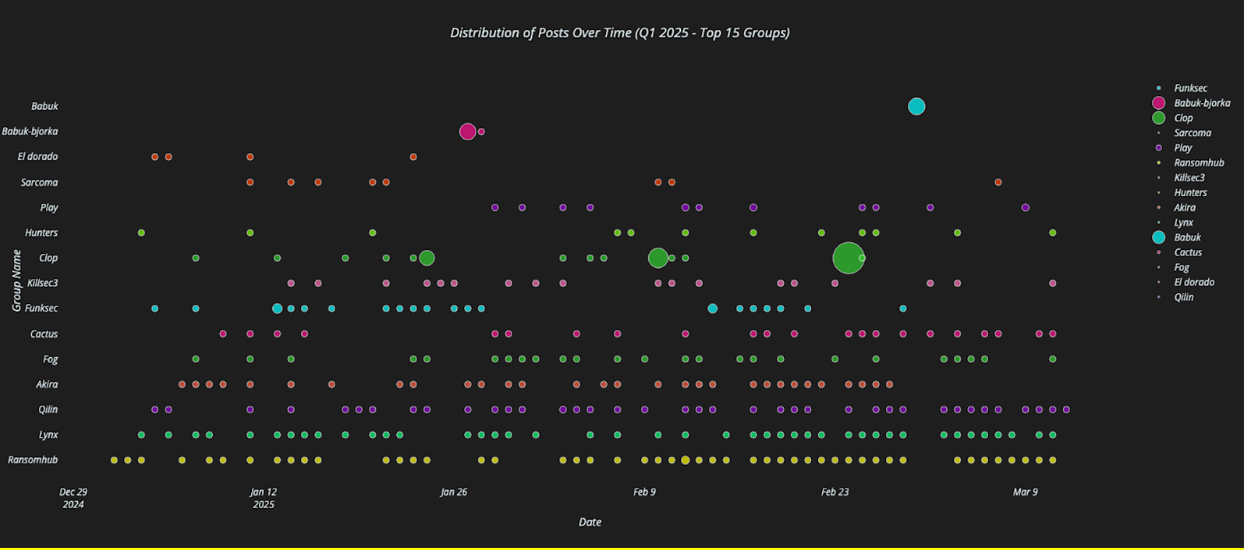
In the following scatterplot, which is Q1 2025, we see Akira (4th from bottom) operating much more in line with other leading players (Qilin, Lynx, etc.). Rather than sporadic, often large data dumps, Akira has begun to make regular postings of similar size. Further trends analysis shows that Akira’s postings shifted from happening primarily on Fridays to being anytime throughout the week.
Ones to watch
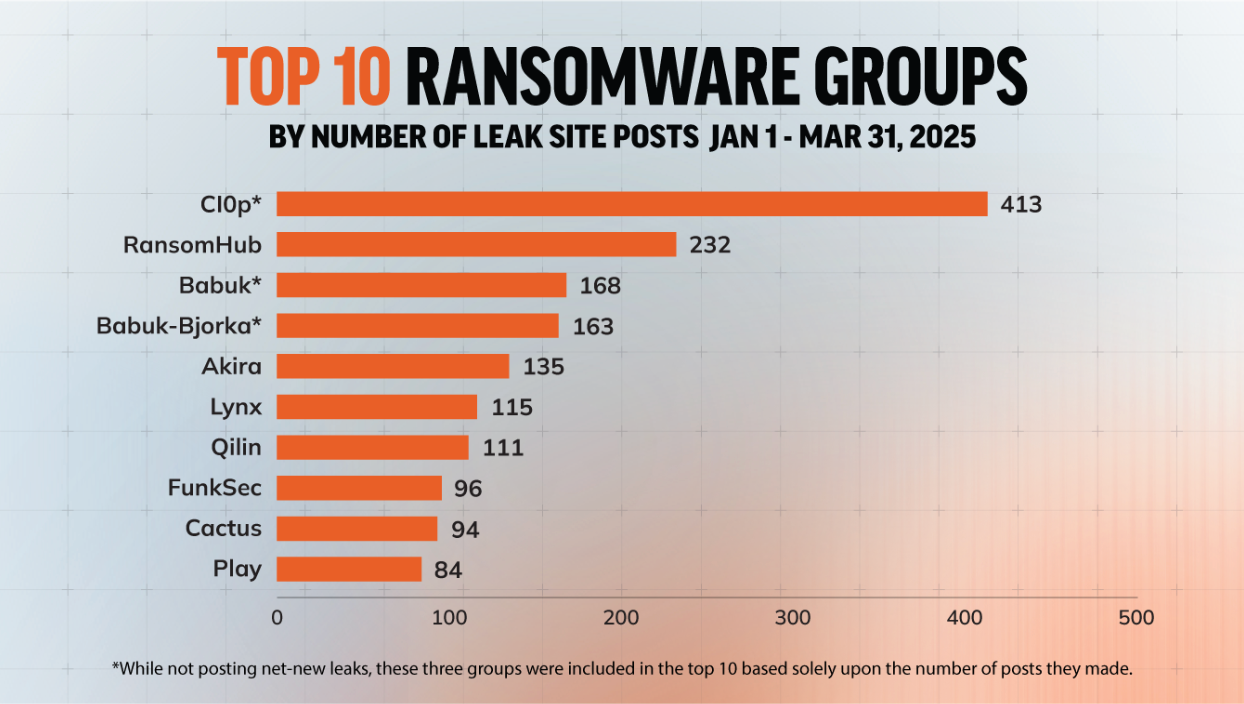
As noted above, the most prolific ransomware groups for Q1 2025, ranked by the number of posts on their dedicated leak sites, are Cl0p and RansomHub by a considerable margin. Along with these two groups, several others are disrupting businesses of varying sizes and industries. In this section we’ll discuss groups of particular concern due to their reach and/or negative organizational impacts.
RansomHub
RansomHub burst onto the scene in February 2024, combining data encryption and exfiltration from a minimum of 210 organizations across a 6-month period. Affiliates are known to use vulnerability exploitation and phishing for initial access, along with double extortion to force victims into paying a ransom or face leaked data and reputational damage. RansomHub was the most prolific leak group operator we saw in 2024, and based on current trends displays no sign of slowing down.
Cl0p
Cl0p is one of the most well known Ransomware-as-a-Service (RaaS) groups. First seen in 2019, Cl0p has a long history of using exploits to propagate ransomware and leans heavily into double extortion. Cl0p is also known for its involvement in devastating supply-chain incidents, most notably claiming to have stolen data from hundreds of MOVEit Transfer customers. Initial access vectors include phishing emails, social engineering, and malicious attachments.
The group has made a torrent of leak site posts since the start of the year, with an astonishing 345 leak site posts in February alone and 413 for Q1 overall. While some of these posts represent fresh attacks, the majority are drip-fed leaks related to their exploitation of an older vulnerability in Cleo’s file transfer software.
Anubis
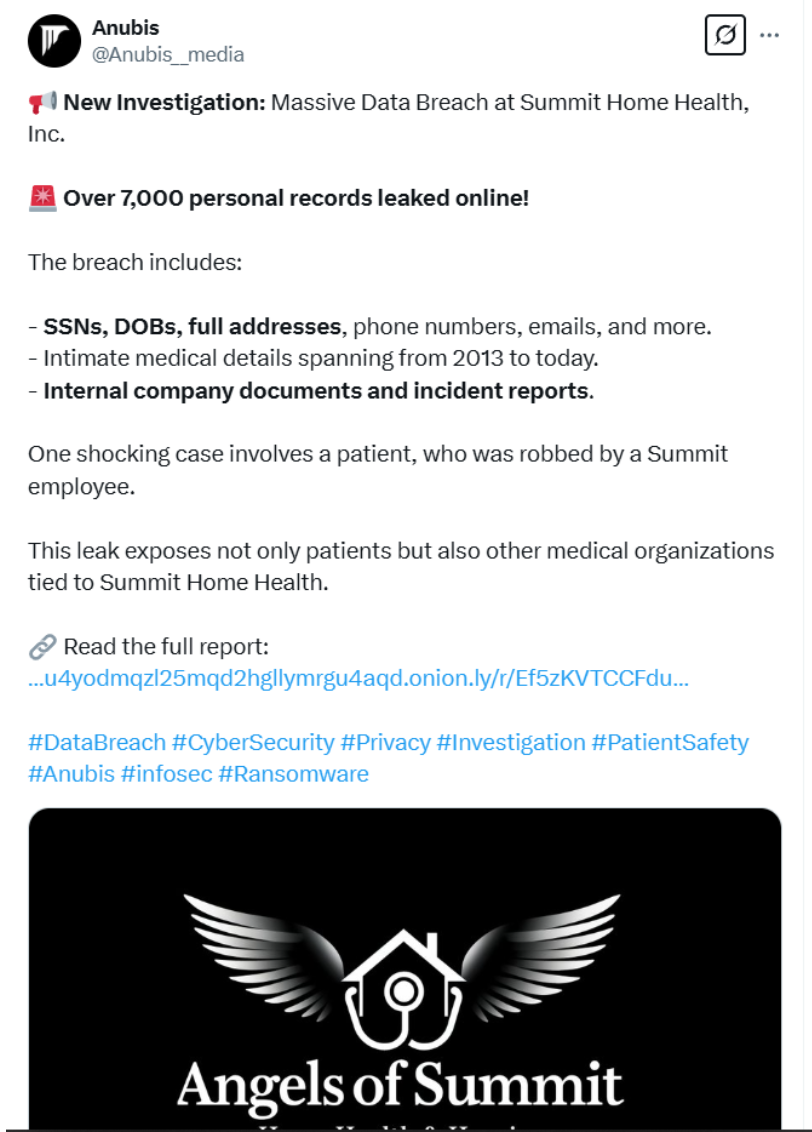
A new RaaS group active since at least November 2024 with a strong focus on data extortion, Anubis has possibly redefined the double extortion approach into something best described as malevolence as a service. It’s not enough to exfiltrate and then leak victim data; Anubis presents findings in a format resembling citizen journalism, exposing the alleged wrongdoings of those they target. The Robin Hood approach, hoping to curry favor with the public, is a well-worn one.
All of this, wrapped up in a slick format of nice graphics and hype-generating announcements on social media.
It feels more like buying into membership of an airline loyalty program, as opposed to some kind of ruthless extortion. Already well into the “Watch out for our next exciting leak” promotional activity stage, this is a group making waves and has claimed at least five public victims so far, mainly in the healthcare and engineering sectors. Of note is that Anubis itself has stated it is looking to exclude education, government and non-profit sectors from its list of potential targets. Thus far, targeted regions appear to be the U.S., Canada, Europe, and Australia.
Lynx
First observed in July 2024, this now-established RaaS group combines phishing and malicious downloads alongside double extortion tactics. Lynx targets a variety of sectors including utilities, construction, and manufacturing, with victims located in a wide variety of locations including the U.S., Australia, and Romania.
Lynx offers a slick and professional affiliate panel, allowing affiliates to micromanage almost all aspects of a campaign and its unfortunate targets. The panel includes victim profile pages, news and updates, and an “all-in-one” archive of executables targeting multiple architectures. It’s the kind of setup which lowers the bar to entry for newcomers, and only becomes more popular over time.
Qilin
Although not as visible as some other ransomware groups in Q1 2025, RaaS operator Qilin has achieved some notable success. First observed in 2022, Qilin ransomware has been used to target a wide variety of industries which includes the healthcare, financial, and manufacturing sectors. Known for spear phishing and making use of compromised credentials, Qilin attacks tend to specialize in double extortion and data exfiltration on a large scale—their leaks can range from a few hundred gigabytes to their most recently publicized attack, which is allegedly a haul of 1.1 terabytes of data. Alarmingly, Microsoft has observed North Korean group Moonstone Sleet deploying Qilin ransomware at “a limited number of organizations”, the first time this group has been known to make use of ransomware developed by a RaaS threat actor.
Tactics
Ransomware groups tend to follow a specific pattern: Initial access, reconnaissance, credential theft and lateral movement, exfiltration, and finally encryption. There are divergences, however. Some groups avoid ransomware deployment and file encryption, instead choosing to compromise the network via unsecured VPNs and Remote Desktop Protocol (RDP). From there, they move straight to data exfiltration. This is known as “extortionware.”
Other threat actors, notably LockBit, use Living off the Land (LOTL) tactics to infiltrate networks with legitimate tools and management software already in place. As no malware files are deployed, it becomes increasingly difficult to detect these attacks in motion and threat actors can sit undetected for weeks or even months.
Here are some of the key elements of ransomware tactics across this first quarter of 2025:
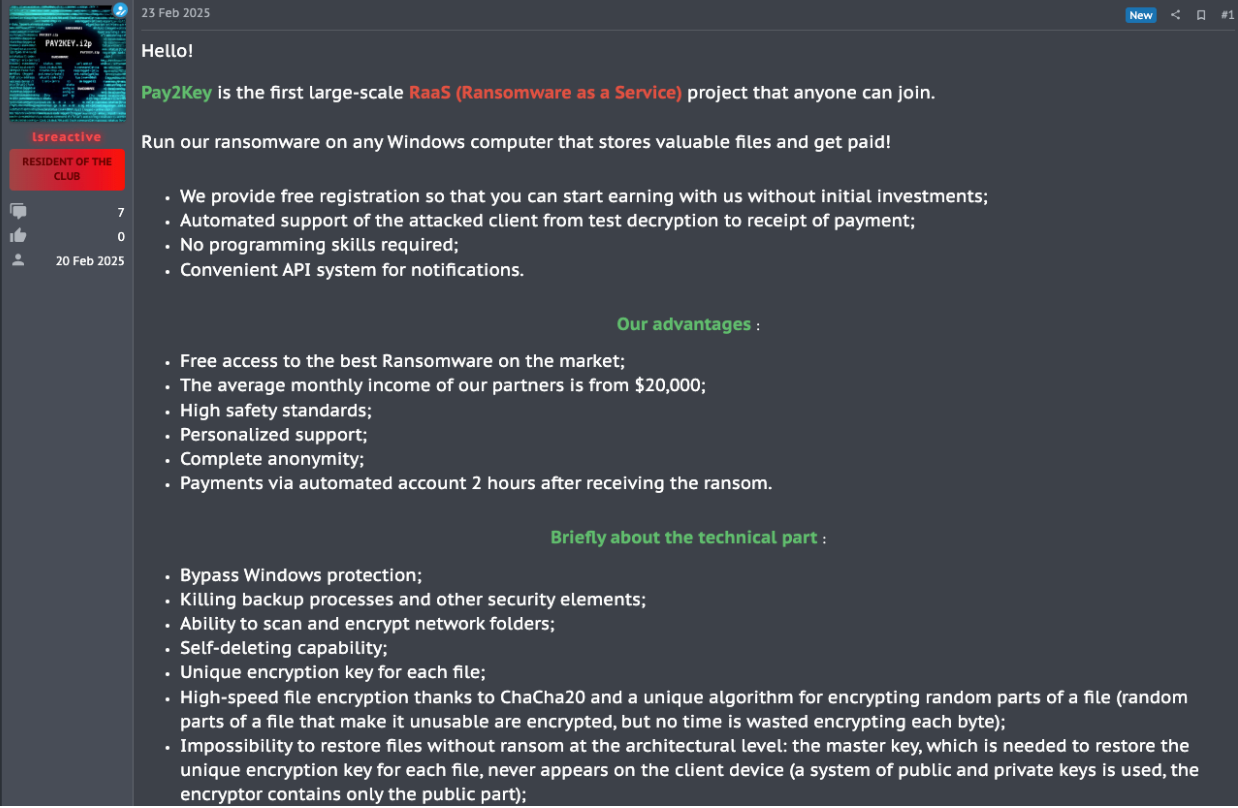
RaaS is firmly established as a key tactic for prominent ransomware groups. The ease with which affiliates can buy into a ransomware group of choice and immediately begin attacks (see example below) ensures a steady flow of profit for the criminals at the top of the food chain.
Double extortion is also a firm favorite. FunkSec made inroads into this realm with ransoms as low as $10,000, perhaps designed to be more enticing to victims than the often unreachable demands for totals ranging from $600,000 to a cool million plus.
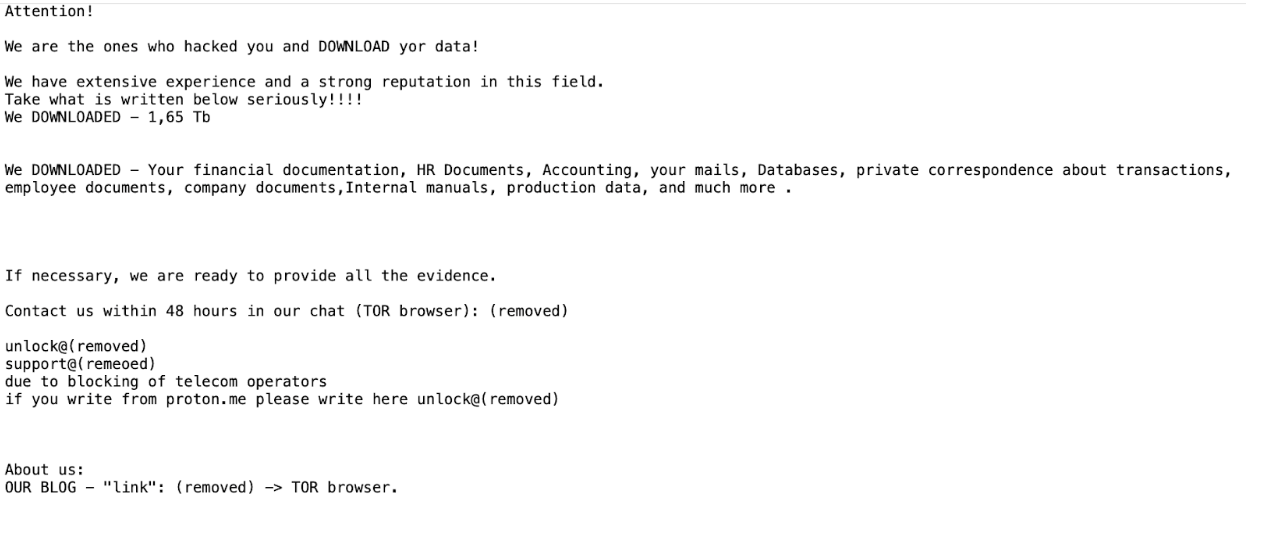
The deadline to pay a ransom, or just make initial contact with the threat actor, varies greatly between groups. RansomHub has previously handed out ransoms with deadlines ranging between 72 hours and 90 days. Cl0p has been known to apply varying degrees of pressure to encourage targets to get in touch. In December 2024, the group gave uncommunicative victims 48 hours to make contact or risk having their organization’s names disclosed publicly. Other Cl0p notes, such as the one below, reuse the 48-hour tactic but exclude mention of public exposure. Regardless of the tactics used, there’s no guarantee files will be unencrypted or stolen documents deleted from leak sites should the victims pay up. These supposed deadlines create a sense of urgency while potentially offering victims little beyond false hope.
Five things you can do now
Unfortunately, there is no escaping the business reality of ransomware; it is a pervasive problem and it impacts every business at some level sooner or later. A solid defense plan can help to lower risk and prevent a disastrous outcome.
Here are five things you can do now that will make an immediate impact on reducing your attack surface:
Take a fresh look at your MFA — If your organization has deployed multi-factor authentication (MFA), take the time now to review any policy exceptions that have been made over time and remove as many as possible. In addition, ensure that your MFA settings are properly configured (this is critical!). If your organization has not yet deployed MFA, see number 2.
Deploy and configure MFA the right way — Multi-factor authentication is a must to avoid giving attackers an easy win from unsecured VPNs and RDP. Combine with geolocational restrictions, strong, unique passwords, and number matching in MFA applications to help ward off additional threats like MFA fatigue.
Practice continuous patch management, especially for edge devices — Over the last couple of years, network edge devices have become a favorite way for attackers to gain initial access and then pivot elsewhere in the victim’s network. It’s critical that your patch management program accounts for this by prioritizing fixes to these devices as they are released. Prioritization of fixes should also be based on known exploits, their potential impacts to your business, and how these align with your business’s risk tolerance.
Hold a ransomware attack simulation — Activate your incident response plan as if the organization has just been made aware of a breach. Who in the organization is involved and what are their immediate tasks? Are payment policies and outside resources pre-determined so there are no panic-driven mistakes and critical time isn’t lost? Note your learnings and schedule regular simulations every 6 months thereafter.
Investigate your attack surface — Threat actors and their tools are poking and prodding your attack surface in search of vulnerabilities, and you must be proactive in doing the same. Resolve to speak with us regularly about Rapid7’s latest innovations in attack surface management.
Conclusion
Ransomware groups large and small have ushered in 2025 with a clear statement of intent: business as usual, and business is booming. The significant volume of leak posts and the heavy lean toward double extortion would indicate we can expect more of the same as the year progresses. In addition, the first glimmer of reportage-style commentary on their victim’s alleged failings suggests a bumpy road ahead for organizations unlucky enough to end up in the ransomware spotlight.
Newer groups hungry for publicity and affiliate network building will potentially look to emulate the Anubis approach, and do a little reportage style journalism of their own. Gimmicks sell and grab publicity, and reputational damage from data leaks may well go hand in hand with regulatory embarrassment and bad publicity. If that wasn’t bad enough, ransomware groups stand revealed through exposed chat logs as being in the market for purchasing zero days.
Businesses need to do everything they can to minimize the risk of easy network access and data exfiltration. Victims continue to pay the price for poor MFA coverage and inadequate patch management, which is why we heavily stressed these basics in our recommendations section above.
If there is a brave new world of ransomware to speak of, it largely resembles the old one with a few streamlined tweaks to a very well-oiled machine.
Teaching about artificial intelligence (AI) is a growing challenge for educators around the world. In our current seminar series, we are gaining insights from international computing education researchers on how to teach about AI and data science in the classroom. In our second seminar, Franz Jetzinger from the Technical University of Munich, Germany, presented his work on supporting teachers to integrate AI into their classrooms. Franz brings a wealth of relevant experience to his research as an accomplished textbook author and K–12 computer science teacher.
Franz started by demonstrating how widespread AI systems and technologies are becoming. He argued that embedding lessons about AI in the classroom presents three challenges:
What to teach (defining AI and learning content)
How to teach (i.e. appropriate pedagogies)
How to prepare teachers (i.e. effective professional development)
As various models and frameworks for teaching about AI already exist, Franz’s research aims to address the second and third challenges — there is a notable lack of empirical evidence integrating AI in K–12 settings or teacher professional development (PD) to support teachers.
Using professional development to help prepare teachers
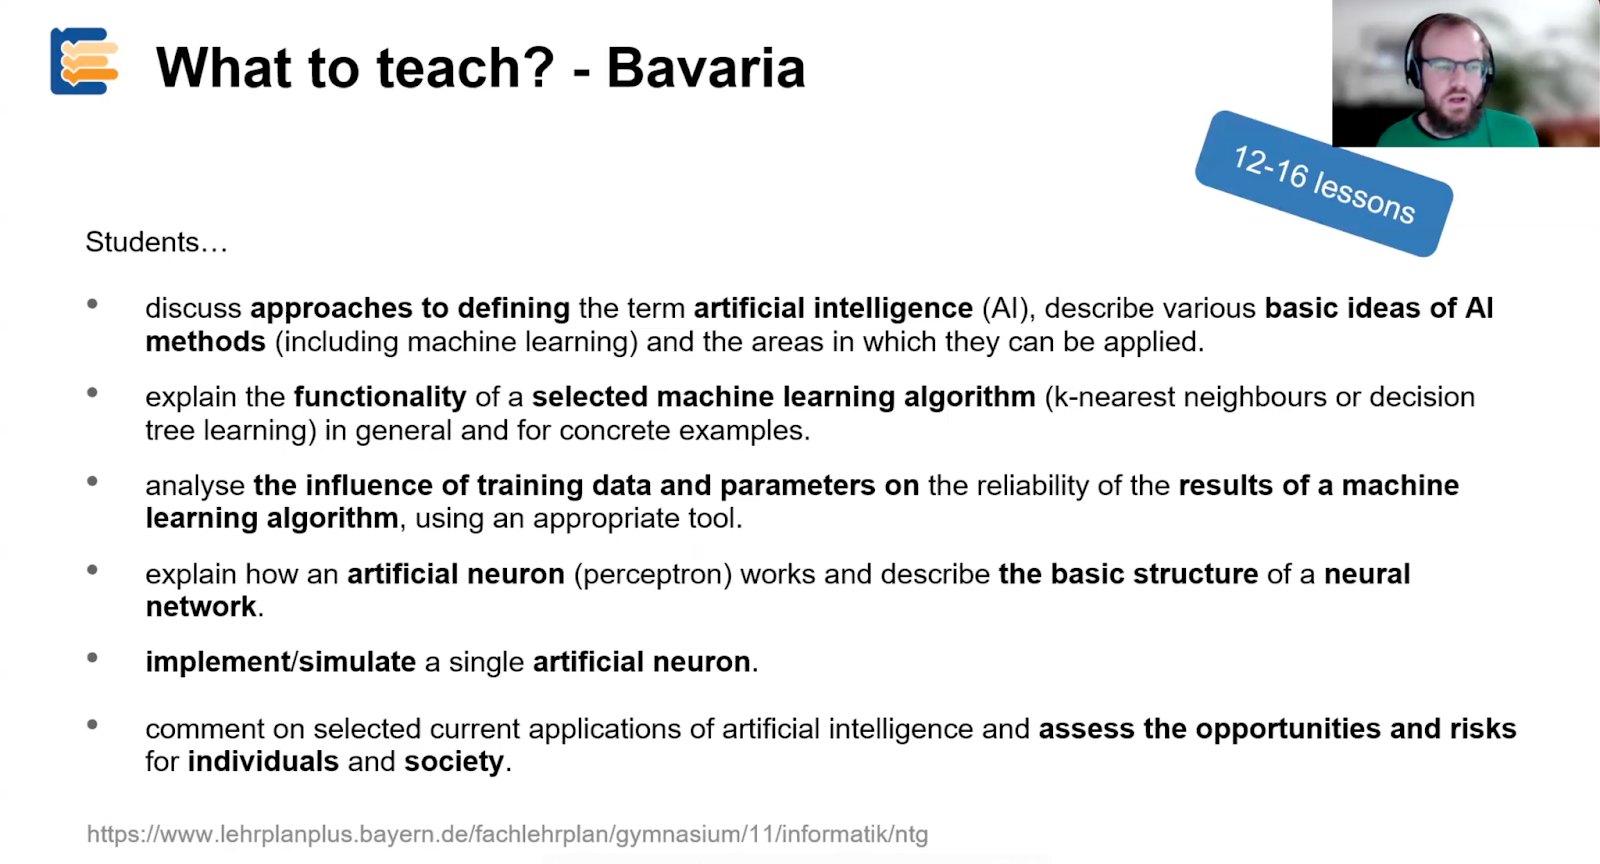
In Bavaria, computer science (CS) has been a compulsory high school subject for over 20 years. However, a recent update has brought compulsory CS lessons (including AI) to Year 11 students (15–16 years old). Competencies targeted in the new curriculum include defining AI, explaining the functionality of different machine learning algorithms, and understanding how artificial neurons work.
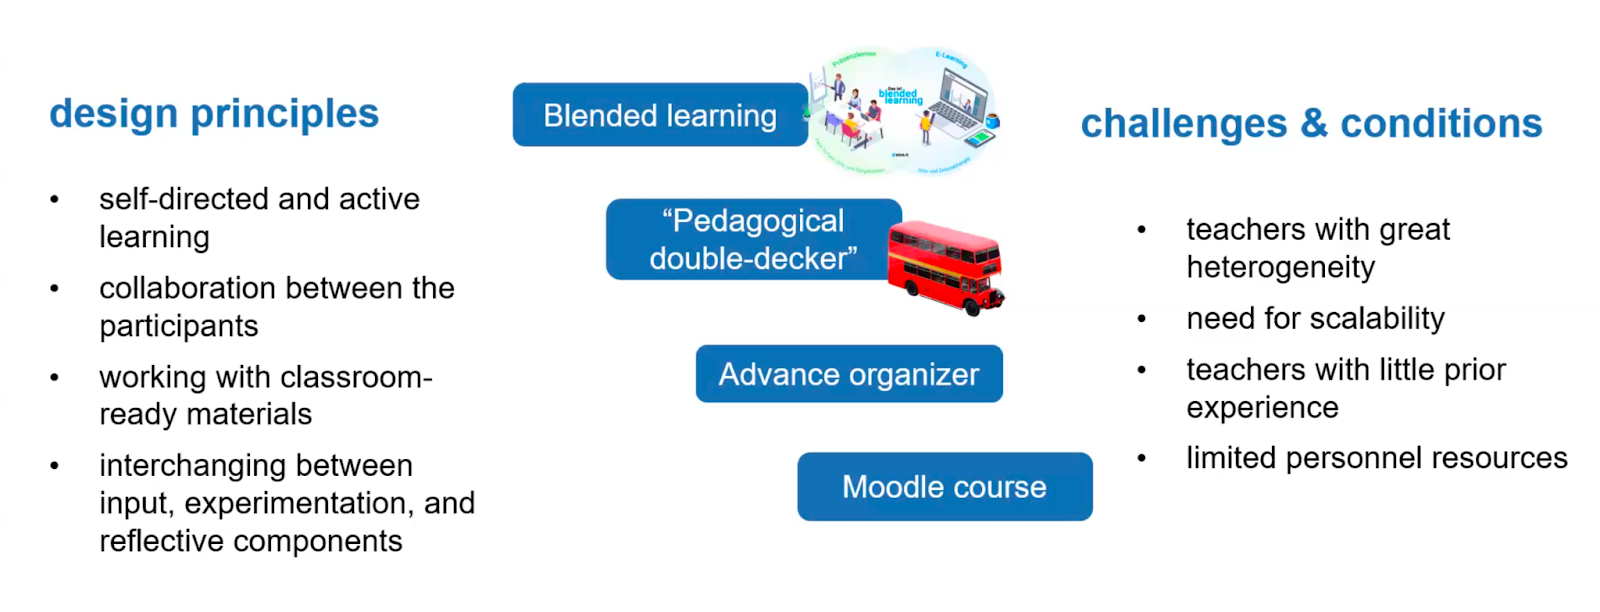
To help prepare teachers to effectively teach this new curriculum and about AI, Franz and colleagues derived a set of core competencies to be used along with existing frameworks (e.g. the Five Big Ideas of AI) and the Bavarian curriculum. The PD programme Franz and colleagues developed was shaped by a set of key design principles:
Blended learning: A blended format was chosen to address the need for scalability and limited resources and to enable self-directed and active learning
Dual-level pedagogy (or ‘pedagogical double-decker’): Teachers were taught with the same materials to be used in the classroom to aid familiarity
Advanced organiser: A broad overview document was created to support teachers learning new topics
Moodle: An online learning platform was used to enable collaboration and communication via a MOOC (massive open online course)
Analysing the effectiveness of the PD programme
Over 300 teachers attended the MOOC, which had an introductory session beforehand and a follow-up workshop. The programme’s effectiveness was evaluated with a pre/post assessment where teachers completed a survey of 15 closed, multiple-choice questions on their AI competencies and knowledge. Pre/post comparisons showed teachers’ scores improved significantly having taken part in the PD. This is surprising as a large proportion of participants achieved high pre-scores, indicating a highly motivated cohort with notable prior experience teaching about AI.
Additionally, a group of teachers (n=9) were invited to give feedback on which aspects of the PD programme they felt contributed to the success of implementing the curriculum in the classroom. They reported that the PD programme supported content knowledge and pedagogical content knowledge well, but they required additional support to design suitable learning assessments.
The design of the professional development programme
Using action research to aid AI teaching
A separate strand of Franz’s research focuses on the other key challenge of how to effectively teach about AI. Franz engaged teachers (n=14) in action research, a method whereby teachers engage in classroom-based research projects. The project explored what topic-specific difficulties students faced during the lessons and how teachers adapted their teaching to overcome these challenges.
The AI curriculum in Bavaria
Findings revealed that students struggled with determining whether AI would benefit certain tasks (e.g. object recognition, text-to-speech) or not (e.g. GPS positioning, sorting data). Franz and colleagues reasoned that students were largely not aware of how AI systems deal with uncertainty and overestimated their capabilities. Therefore, an important step in teaching students about AI is defining ‘what an AI problem is’.
Similarly, students struggled with distinguishing between rule-based and data-driven approaches, believing in some cases that a trained model becomes ‘rule-based’ or that all data models are data-driven. Students also struggled with certain data science concepts, such as hyperparameter, overfitting and underfitting, and information gain. Franz’s team argue that the chosen tool, Orange Data Mining, did not provide an appropriate scaffold for encountering these concepts.
Finally, teachers found challenges in bringing real-world examples into the classroom, including the use of reinforcement learning and neural networks. Franz and colleagues reasoned that focusing on the function of neural networks, as opposed to their structure, would aid student understanding. The use of high-quality (i.e. well-prepared) real-world data sets was also suggested as a strategy for bridging theoretical ideas with practical examples.
Addressing the challenges of teaching AI
Franz’s research provides important insights into the discipline-specific challenges educators face when introducing AI into the classroom. It also underscores the importance of appropriate professional development and age-appropriate and research-informed materials and tools to support students engaging with ideas about AI, data science, and machine learning.
In our current seminar series, we are exploring teaching about AI and data science. Join us at our next seminar on Tuesday 8 April at 17:00–18:30 BST to hear David Weintrop, Rotem Israel-Fishelson, and Peter F. Moon from the University of Maryland introduce ‘API Can Code’, an interest-driven data science curriculum for high-school students.
To sign up and take part in the seminar, click the button below; we will then send you information about joining. We hope to see you there.
A Rebirth of a Cursed Existence? Examining ‘Babuk Locker 2.0’ Ransomware
Introduction
Ransomware remains a major threat, causing significant disruption and financial losses to organizations across various sectors. Cybercriminal groups behind these attacks constantly adapt their methods to maximize damage and profit.
At Rapid7, we actively monitor new cyber threats, keeping an eye on ransomware groups and their changing tactics. In early 2025, we came across a channel promoting itself as Babuk Locker. Since the original group had shut down in 2021, we decided to investigate whether this was a rebrand or a new threat. Several underground forums and Telegram channels started mentioning ‘Babuk Locker 2.0,’ with some actors taking credit for recent attacks. Since Babuk’s leaked source code in 2021 had led to many spin-off ransomware strains, we wanted to find out whether this was a real comeback or just another group using Babuk’s name.
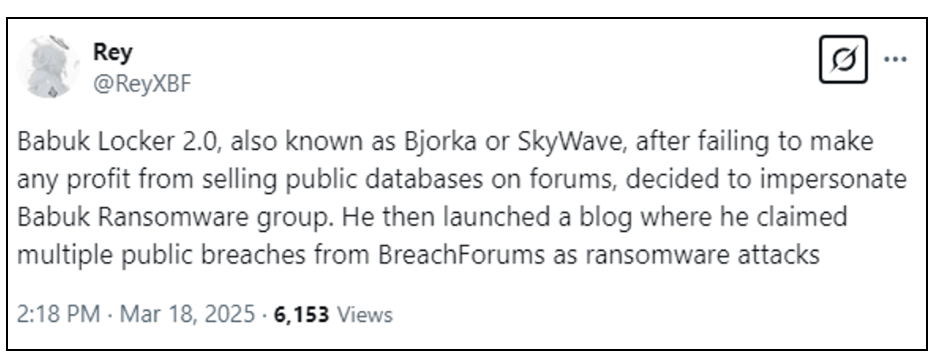
Figure 1 – Online discourse against Bjorka as a scammerFigure 2 – Online discourse against Bjorka and SkyWave as scammers
We started by gathering intelligence from dark web marketplaces, hacker forums, and private Telegram groups. We saw a rise in discussions about Babuk’s return, often linked to two groups, ‘Skywave’ and ‘Bjorka.’ These actors claimed responsibility for major attacks, and their leak sites suggested they might be working with other cybercriminal groups.
This blog delves into the potential revival of Babuk Locker 2.0, its alleged operators, and their activities. We analyze the involvement of ‘Skywave’ and ‘Bjorka,’ their claimed victims, and the evolution of Babuk’s Ransomware-as-a-Service (RaaS) model. Our findings include technical analysis, victimology, and the broader risks posed by this campaign.
Operators: Skywave and Bjorka
While monitoring Babuk Locker 2.0 activity, we identified two key groups linked to its operations—Skywave and Bjorka. These groups frequently appeared in discussions on underground forums and Telegram channels, claiming responsibility for attacks and promoting Babuk-related leaks. Our analysis suggests that these groups play a significant role in Babuk Locker 2.0’s activities, either as affiliates or key operators.
Skywave
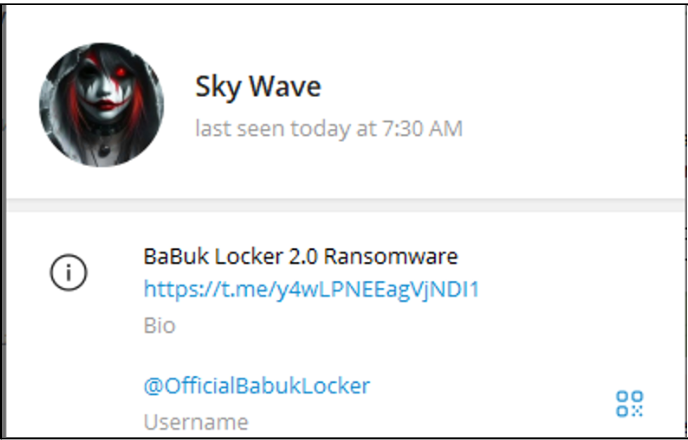
Skywave is a recently identified threat actor known for allegedly executing cyberattacks against various high-profile organizations and government agencies. Their operations have raised concerns within the cybersecurity community due to the sensitivity and volume of the data reportedly compromised, as well as the anonymity of the operator. Skywave is suspected of operating multiple Telegram channels under different aliases, some of which have been flagged as scams and removed by Telegram.
The specific TTPs employed by Skywave remain undisclosed, leaving room for speculation regarding their infiltration and data exfiltration methods. Since late 2024, Skywave has maintained its presence on various platforms, such as Telegram, DarkForums, and the dedicated Babuk Locker 2.0 DLS, where they have been sharing leaked data from their allegedly recent attacks. Victim lists indicate a focus on high-profile organizations with sensitive data.
Figure 3 – The Telegram user of Skywave
Bjorka
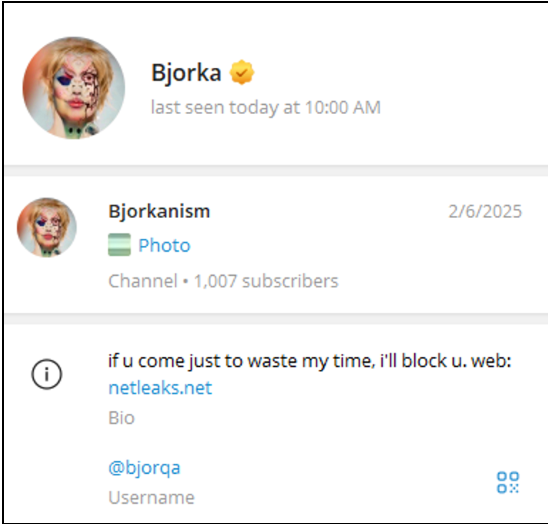
Bjorka is a threat actor mainly known for allegedly breaching Indonesian government and citizen data, often leaking sensitive information as a form of hacktivism. The alias gained prominence in 2022 with a series of high-profile data leaks, first making headlines in March by exposing over 105 million Indonesian voter records. Throughout 2022, Bjorka targeted multiple institutions, leaking personal data to highlight security flaws and criticize policies. By August 2022, Bjorka joined BreachForums, where they are sharing large databases from breached telecom services. Authorities attempted to identify the hacker, even arresting an individual, but Bjorka mocked the effort, claiming the wrong person was caught. The threat actor is active on BreachForums and Telegram and owns a personal leak site (netleaks[.]net) to distribute stolen data and engage followers.
Figure 4 – The Telegram user of Bjorka
Babuk Locker 2.0/Babuk-Bjorka
Since February 2025, Skywave has claimed ownership on at least 5 different Telegram channels and posts daily about their previous and current victims. Throughout the research, we found dozens of newly created Telegram channels with the names ‘Babuk Locker 2.0’, ‘Babuk 2.0 Ransomware Affiliates’, etc. Some of which overlapped with one another. Additionally, several channels were labeled as scams by Telegram itself and were unavailable a couple of days after they were created.
Figure 5 – A Babuk Locker Telegram channel labeled as a scam by the platform
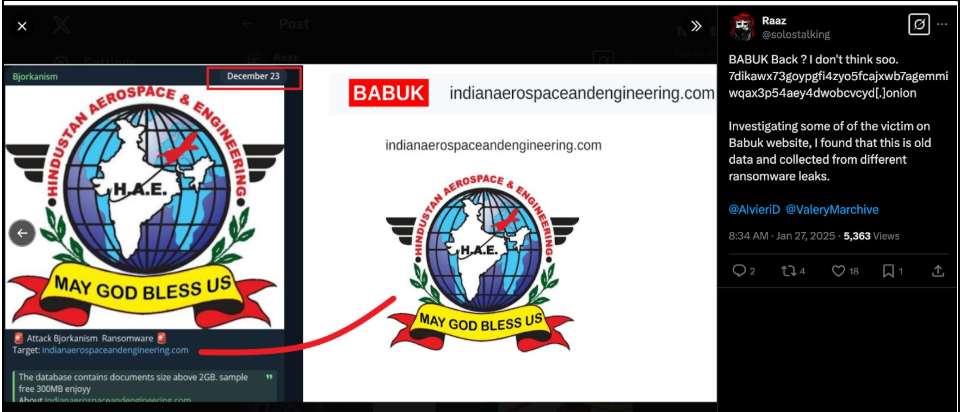
During our research, we noticed the consistent amplification of the Babuk 2.0 content by Bjorka on their Telegram channel. Speculation about the possible affiliation between Babuk and Bjorka rose due to the overlap of victims, such as the case of ‘Hindustan Aerospace & Engineering’ from India. The organization was initially reported as a victim of Bjorka in December 2023, and again as a victim of Babuk as of March 2025.
Figure 6 – Overlap of victimology between Bjorka and Babuk 2.0
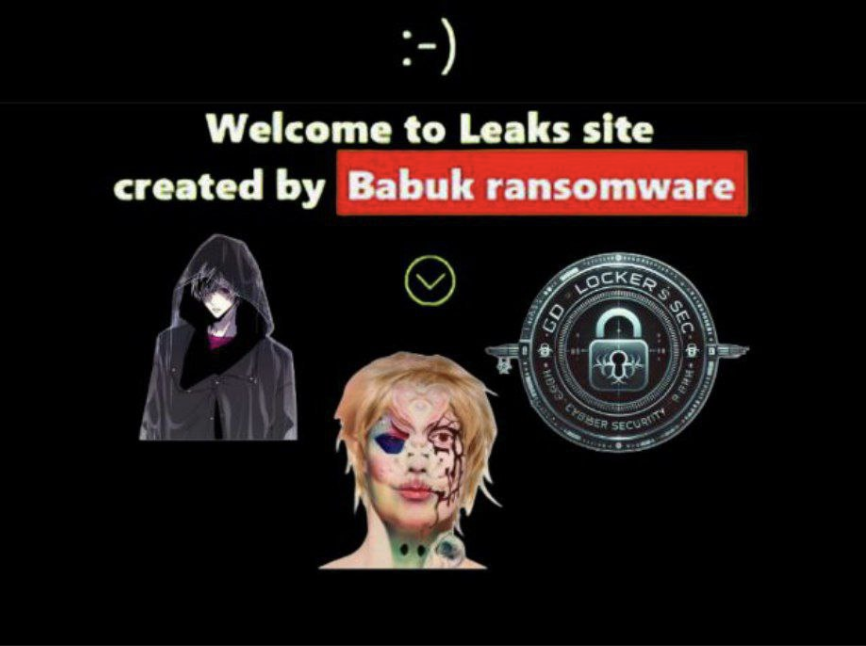
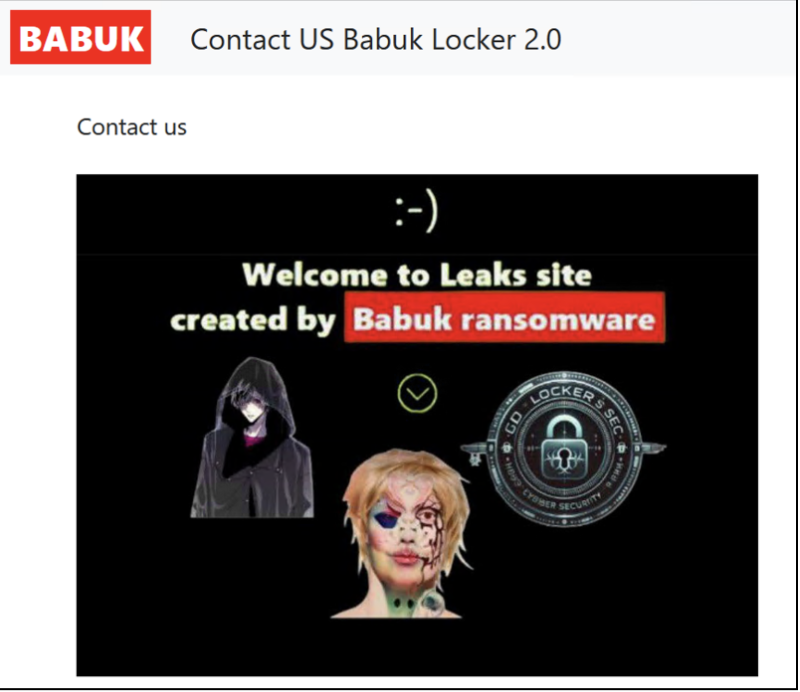
Further evidence of a possible collaboration between the threat actors emerges from the ‘Contact Us’ tab on Babuk’s DLS, where the logos of Skywave and Bjorka appear next to each other, as well as another possible affiliate named GD Locker Sec.
Figure 7 – The ‘Contact US’ tab on the DLS of Babuk, showing the logos of Bjorka and Skywave
Technical Analysis
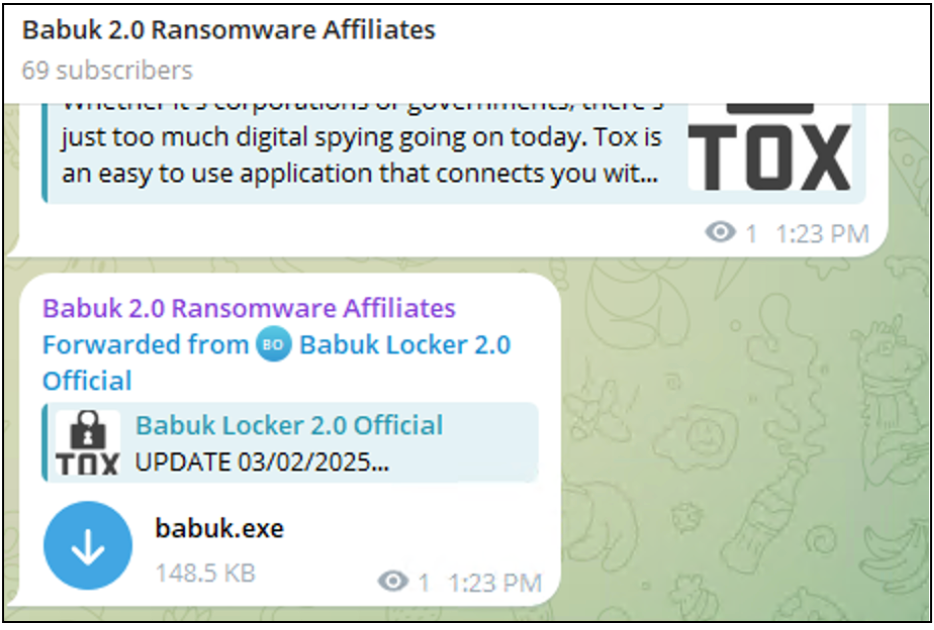
A sample named babuk.exe SHA-256 3facc153ed82a72695ee2718084db91f85e2560407899e1c7f6938fd4ea011e9 was initially shared on the Telegram channel “Babuk 2.0 Ransomware Affiliates”, before being forwarded to another operational account. Upon analysis, it turned out not to be Babuk Locker at all, but rather LockBit 3.0 also known as LockBit Black. This case is yet another example of the well-established trend: threat actors rebranding ransomware strains, whether to confuse researchers, lure affiliates, or just keep the marketing fresh. Either way, babuk.exe is just LockBit 3.0/Black wearing a fake name.
Figure 8 – “Babuk” sample shared on Babuk 2.0 Affiliate Group Telegram channel
LockBit 3.0 Overview
LockBit 3.0/Black, is a ransomware variant that shares similarities with BlackMatter ransomware. On September 21, 2022, a user named @ali_qushji leaked the LockBit 3.0 builder on Twitter. The leak code made it easy for the least skilled attackers to join the game.
Encryption Methods
An analyzed sample of LockBit 3.0 uses a combination of AES-256 and RSA-2048 encryption. AES-256 is used to encrypt victim files and RSA-2048 encryption used to encrypt the AES key, ensuring decryption is impossible without the attacker’s private key.
Terminated Processes and services
LockBit 3.0 terminates various applications and system processes (the full list is in the table below) most likely to maximize encryption efficiency and prevent file access conflicts. It also disables key security and backup services to limit recovery possibilities and increase impact.
Terminated Processes
Terminated Services
sql
vss
oracle
sql
ocssd
svc
dbsnmp
memtas
synctime
mepocs
agntsvc
msexchange
isqlplussvc
sophos
xfssvccon
veeam
mydesktopservice
backup
ocautoupds
GxVss
encsvc
GxBlr
firefox
GxFWD
tbirdconfig
GxCVD
mydesktopqos
GxCIMgr
ocomm
dbeng50
sqbcoreservice
excel
infopath
msaccess
mspu
onenote
outlook
powerpnt
steam
thebat
thunderbird
visio
winword
wordpad
notepad
calc
wuauclt
onedrive
Active Directory Enumeration
LockBit 3.0 uses logoncli_DsGetDcNameW API function used for Active Directory (AD) enumeration. To brute-force AD accounts, analyzed LockBit 3.0 sample came preloaded with Base64-encoded username and password combinations decoded and listed below.
Username
Password
bad.lab
Qwerty
Administrator
123QWEqwe
@#Admin2
P@ssw0rd
Administrator
P@ssw0rd
Administrator
Qwerty
Administrator
123QWEqwe
Administrator
123QWEqweqwe
Babuk or LockBit 3.0? Rebranding Won’t Change the Code.
Analysis confirms that babuk.exe, advertised in the Babuk 2.0 Ransomware Affiliates Telegram channel, is actually based entirely on LockBit 3.0 source code—not Babuk. The sample shows key techniques identical to previous LockBit 3.0 variants, reinforcing that this is yet another case of threat actors rebranding existing ransomware rather than introducing anything genuinely new.
Key Overlapping Techniques
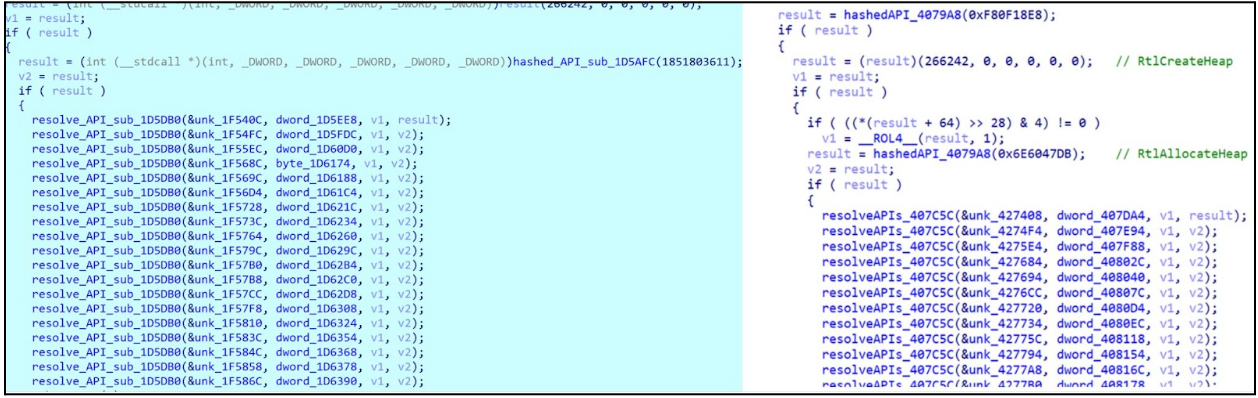
The analyzed sample uses API harvesting by hashing API names from DLLs and comparing them against a predefined list of required APIs (Figure 7). This technique, likely to obfuscate API calls and evade detection, mirrors the approach seen in Lockbit3.0/Black and aligns with previous findings by Trend Micro.
Figure 9 – LockBit 3.0’s routine for API harvesting function comparison—our analyzed sample (left) vs. TrendMicro’s reported sample (right).
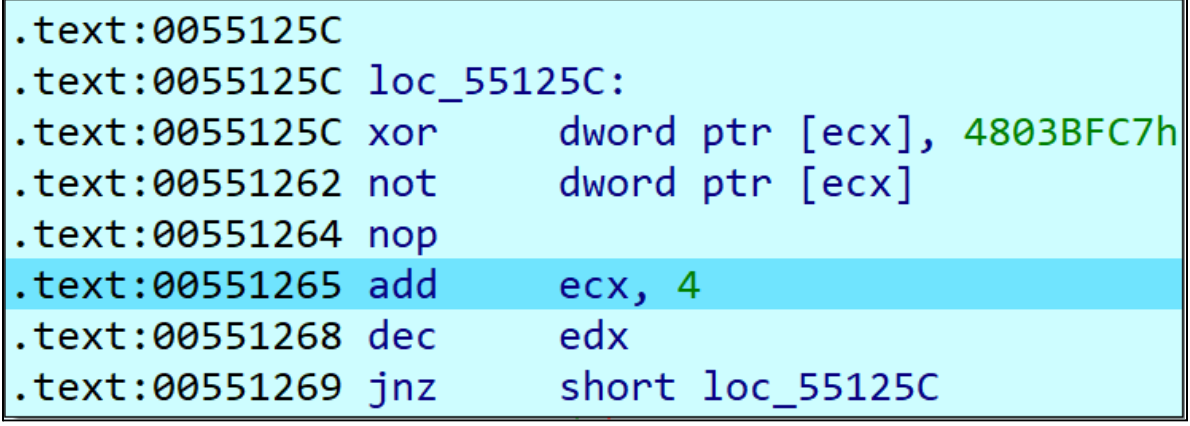
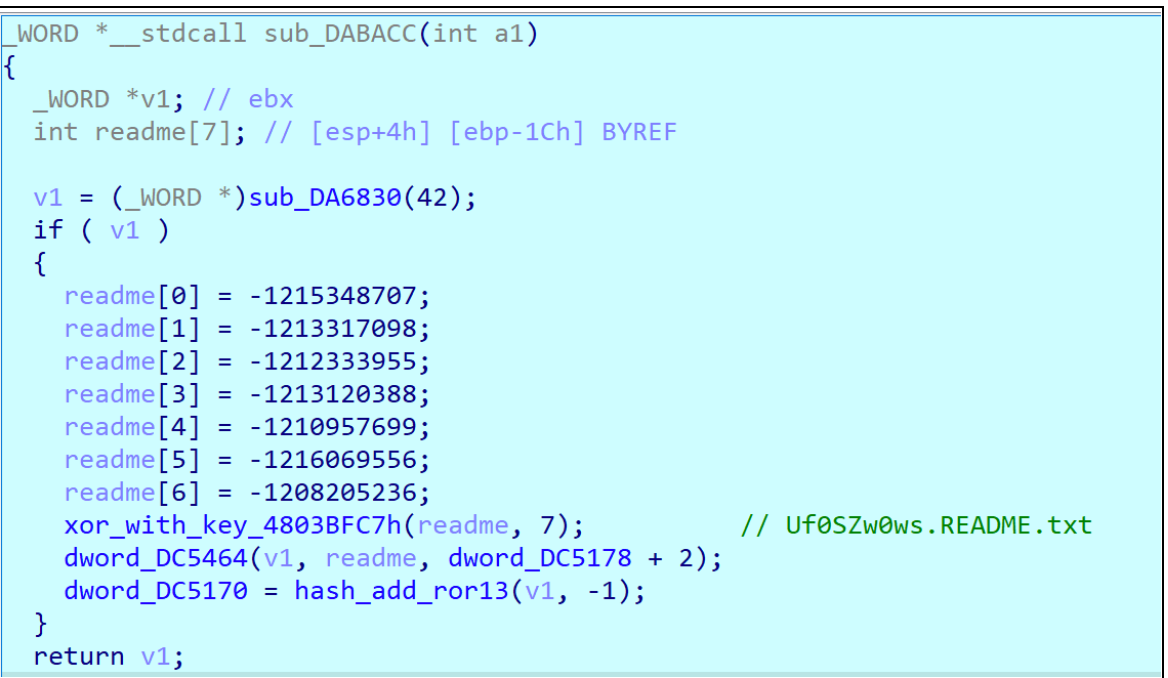
Likewise, The XOR key 0x4803BFC7 LockBit 3.0 used for renaming APIs is the same as it was reported before. The xor key is re-used multiple times in the code.
Figure 10 – 0x4803BFC7 xor key observed in analyzed sample
Additionally, the ransom note creating routine is identical as in previous Lockbit3.0/Black samples.
Figure 11 – readme creation routine
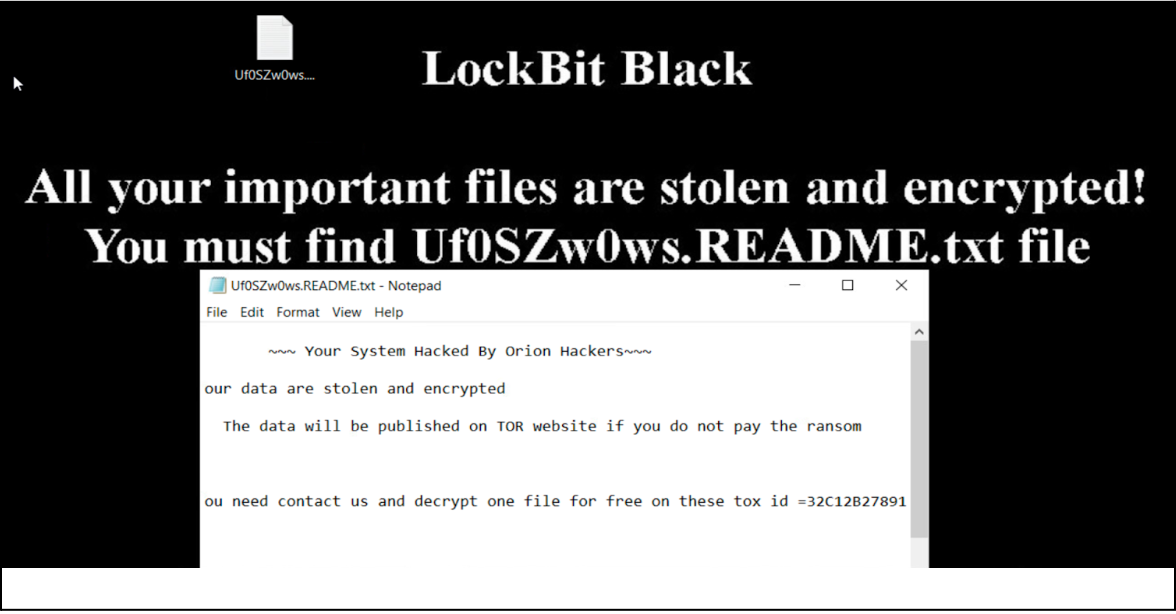
Like previous LockBit 3.0/ Black samples, the analyzed variant modifies the desktop wallpaper to display a ransom note—branded, unsurprisingly, as “LockBit Black” (not Babuk, in case anyone was still confused). It also appends specific extensions to encrypted files, changes their icons, and drops a .ico file in the %PROGRAMDATA% directory, staying true to the LockBit playbook.
Figure 12 – Lockbit3.0 wallpaper and ransom note
The ransom note referenced “Orion Hackers” and the tox ID 32C12B278912E26E5EAC57AEBB3F4FF16F0E31603C7B9D46AC02E9D993EE14351CEC3AB5945C. A search on this TOX ID linked the ransom demands to the `Babuk 2.0 Affiliate Group` on Telegram. Additionally, we discovered that messages from this channel were being reposted by an actor named Bjorkanism, who is actively sharing content from Affiliate Group Babuk 2.0 which is actually leaked Lockbit3.0.
Victimology
The new Babuk Locker 2.0 has recently been making waves within the cybersecurity and intelligence scene, claiming dozens of high-profile cyberattacks in a short time of less than two months of operation. Since January 2025, the group has listed at least 100 organizations as their alleged victims. Among their alleged victims are Amazon, the Israeli Knesset, Sodexo, and other high-profile organizations. Victims are from multiple sectors including energy, manufacturing, IT, government, etc.
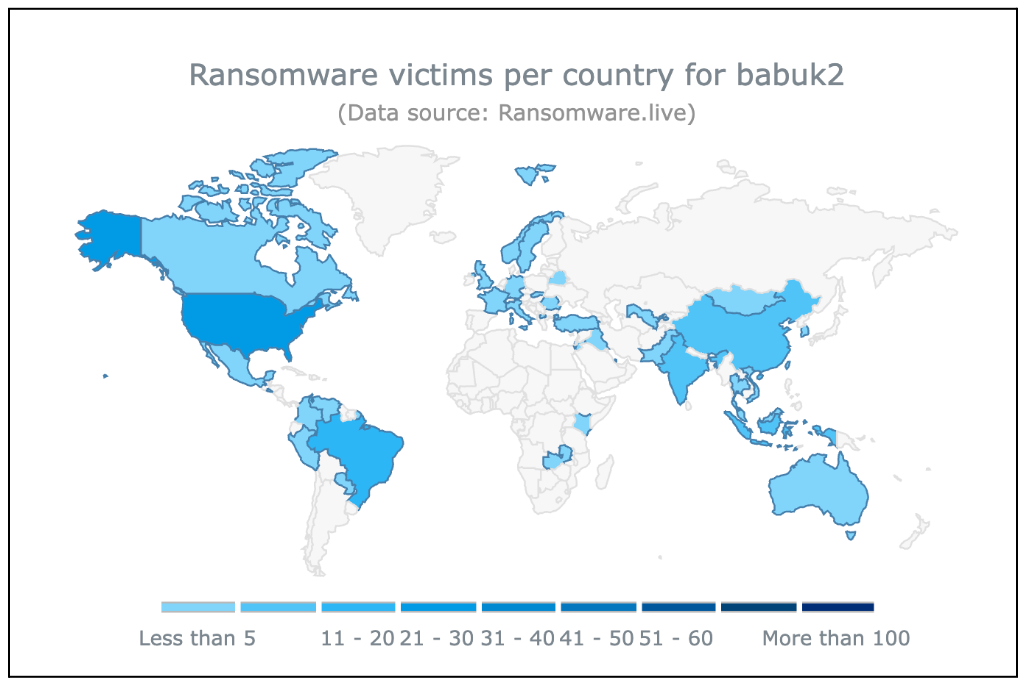
Figure 13 – Victims listed on the Babuk Locker 2.0 DLSFigure 14 – Babuk Locker 2.0 victims per country
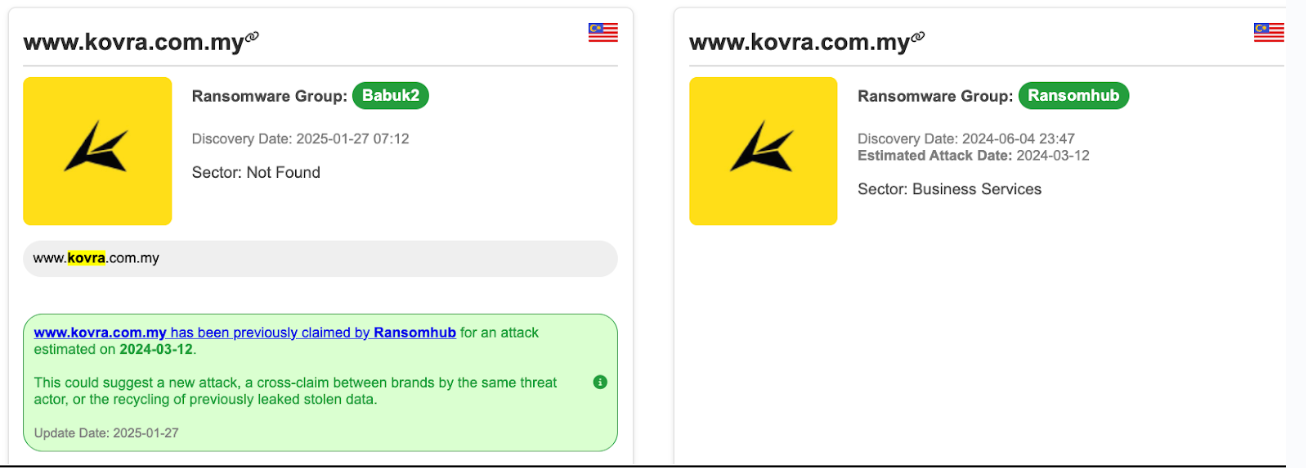
There have been growing claims of overlaps between Babuk Locker 2.0 and other ransomware groups, as some of their alleged victims were already attacked by other groups, such as HellCat, RansomHub, FunkSec, and others. These overlaps in victimology reinforce concerns about the authenticity of the new Babuk group entity and its operations.
Figure 15 – Babuk Locker 2.0 victims overlap with another ransomware group
Conclusion
Babuk Locker 2.0 is not a true revival of the original Babuk group—it’s just LockBit 3.0 with a new label. Our analysis strongly suggests that Skywave and Bjorka are behind this operation, either as collaborators or opportunistic actors riding the same wave.
Despite its bold claims, Babuk 2.0’s victim list overlaps heavily with other ransomware groups, raising doubts about the legitimacy of its attacks. Rather than a sophisticated new threat, this looks more like a rebranding stunt—a common tactic among ransomware operators to confuse defenders, attract affiliates, and inflate their reputation.
This case reinforces a familiar pattern: ransomware groups don’t disappear—they just change names, recycle code, and keep cashing in. Whether Skywave and Bjorka are working together or simply using Babuk’s name for credibility, one thing is clear: Babuk 2.0 is just LockBit 3.0 in a different costume.
The cryptography that secures the Internet is evolving, and it’s time to catch up. This post is a tutorial on lattice cryptography, the paradigm at the heart of the post-quantum (PQ) transition.
Twelve years ago (in 2013), the revelation of mass surveillance in the US kicked off the widespread adoption of TLS for encryption and authentication on the web. This transition was buoyed by the standardization and implementation of new, more efficient public-key cryptography based on elliptic curves. Elliptic curve cryptography was both faster and required less communication than its predecessors, including RSA and Diffie-Hellman over finite fields.
Today’s transition to PQ cryptography addresses a looming threat for TLS and beyond: once built, a sufficiently large quantum computer can be used to break all public-key cryptography in use today. And we continue to see advancements in quantum-computer engineering that bring us closer to this threat becoming a reality.
Fortunately, this transition is well underway. The research and standards communities have spent the last several years developing alternatives that resist quantum cryptanalysis. For its part, Cloudflare has contributed to this process and is an early adopter of newly developed schemes. In fact, PQ encryption has been available at our edge since 2022 and is used in over 35% of non-automated HTTPS traffic today (2025). And this year we’re beginning a major push towards PQ authentication for the TLS ecosystem.
Lattice-based cryptography is the first paradigm that will replace elliptic curves. Apart from being PQ secure, lattices are often as fast, and sometimes faster, in terms of CPU time. However, this new paradigm for public key crypto has one major cost: lattices require much more communication than elliptic curves. For example, establishing an encryption key using lattices requires 2272 bytes of communication between the client and the server (ML-KEM-768), compared to just 64 bytes for a key exchange using a modern elliptic-curve-based scheme (X25519). Accommodating such costs requires a significant amount of engineering, from dealing with TCP packet fragmentation, to reworking TLS and its public key infrastructure. Thus, the PQ transition is going to require the participation of a large number of people with a variety of backgrounds, not just cryptographers.
The primary audience for this blog post is those who find themselves involved in the PQ transition and want to better understand what’s going on under the hood. However, more fundamentally, we think it’s important for everyone to understand lattice cryptography on some level, especially if we’re going to trust it for our security and privacy.
We’ll assume you have a software-engineering background and some familiarity with concepts like TLS, encryption, and authentication. We’ll see that the math behind lattice cryptography is, at least at the highest level, not difficult to grasp. Readers with a crypto-engineering background who want to go deeper might want to start with the excellent tutorial by Vadim Lyubashevsky on which this blog post is based. We also recommend Sophie Schmieg’s blog on this subject.
While the transition to lattice cryptography incurs costs, it also creates opportunities. Many things we can build with elliptic curves we can also build with lattices, though not always as efficiently; but there are also things we can do with lattices that we don’t know how to do efficiently with anything else. We’ll touch on some of these applications at the very end.
We’re going to cover a lot of ground in this post. If you stick with it, we hope you’ll come away feeling empowered, not only to tackle the engineering challenges the PQ transition entails, but to solve problems you didn’t know how to solve before.
Strap in — let’s have some fun!
Encryption
The most pressing problem for the PQ transition is to ensure that tomorrow’s quantum computers don’t break today’s encryption. An attacker today can store the packets exchanged between your laptop and a website you visit, and then, some time in the future, decrypt those packets with the help of a quantum computer. This means that much of the sensitive information transiting the Internet today — everything from API tokens and passwords to database encryption keys — may one day be unlocked by a quantum computer.
In fact, today’s encryption in TLS is mostly PQ secure: what’s at risk is the process by which your browser and a server establish an encryption key. Today this is usually done with elliptic-curve-based schemes, which are not PQ secure; our goal for this section is to understand how to do key exchange with lattices-based schemes, which are.
We will work through and implement a simplified version of ML-KEM, a.k.a. Kyber, the most widely deployed PQ key exchange in use today. Our code will be less efficient and secure than a spec-compliant, production-quality implementation, but will be good enough to grasp the main ideas.
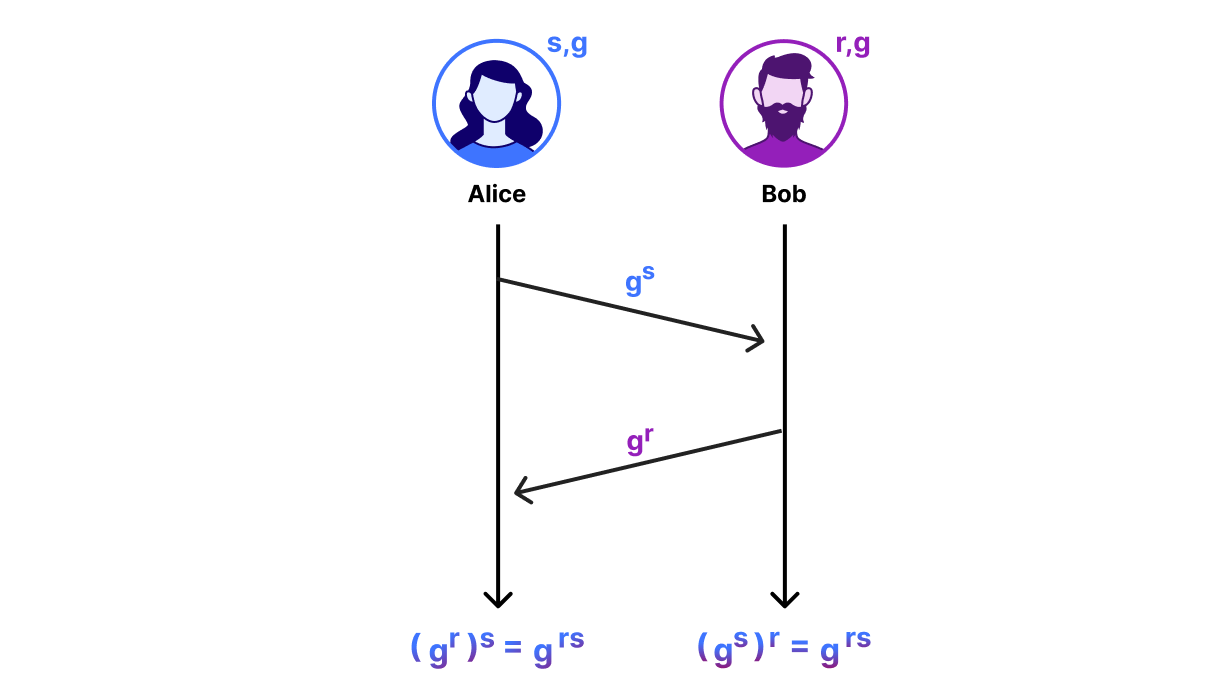
Our starting point is a protocol that looks an awful lot like Diffie-Hellman (DH) key exchange. For those readers unacquainted with DH, the goal is for Alice and Bob to establish a shared secret over an insecure network. To do so, each picks a random secret number, computes the corresponding “key share”, and sends the key share to the other:
Alice’s secret number is $s$ and her key share is $g^s$; Bob’s secret number is $r$ and his key share is $g^r$. Then given their secret and their peer’s key share, each can compute $g^{rs}$. The security of this protocol comes from how we choose $g$, $s$, and $r$ and how we do arithmetic. The most efficient instantiation of DH uses elliptic curves.
In ML-KEM we replace operations on elliptic curves with matrix operations. It’s not quite a drop-in replacement, so we’ll need a little linear algebra to make sense of it. But don’t worry: we’re going to work with Python so we have running code to play with, and we’ll use NumPy to keep things high level.
All the math we’ll need
A matrix is just a two-dimensional array of numbers. In NumPy, we can create a matrix as follows (importing numpy as np):
A = np.matrix([[1, 2, 3],
               [4, 5, 6],
               [7, 8, 9]])
This defines A to be the 3-by-3 matrix with entries A[0,0]==1, A[0,1]==2, A[0,2]==3, A[1,0]==4, and so on.
For the purposes of this post, the entries of our matrices will always be integers. Furthermore, whenever we add, subtract, or multiply two integers, we then reduce the result, just like we do with hours on a clock, so that we end up with a number in range(Q) for some positive number Q, called the modulus. The exact value doesn’t really matter now, but for ML-KEM it’s Q=3329, so let’s go with that for now. (The modulus for a clock would be Q=12.)
In Python, we write multiplication of integers a and b modulo Q as c = a*b % Q. Here we compute a*b, divide the result by Q, then set c to the remainder. For example, 42*1337% Q is equal to 2890 rather than 56154. Modular addition and subtraction are done analogously. For the rest of this blog, we will sometimes omit “% Q” when it’s clear in context that we mean modular arithmetic.
Next, we’ll need three operations on matrices.
The first is matrix transpose, written A.T in NumPy. This operation flips the matrix along its diagonal so that A.T[j,i] == A[i,j] for all rows i and columns j:
print(A.T)
# [[1 4 7]
#  [2 5 8]
#  [3 6 9]]
To visualize this, imagine writing down a matrix on a translucent piece of paper. Draw a line from the top left corner to the bottom right corner of that paper, then rotate the paper 180° around that line:
The second operation we’ll need is matrix multiplication. Normally, we will multiply a matrix by a column vector, which is just a matrix with one column. For example, the following 3-by-1 matrix is a column vector:
s = np.matrix([[0],
               [1],
               [0]])
We can also write s more concisely as np.matrix([[0,1,0]]).T. To multiply a square matrix A by a column vector s, we compute the dot product of each row of A with s. That is, if t = A*s % Q, then t[i] == (A[i,0]*s[0,0] + A[i,1]*s[1,0] + A[i,2]*s[2,0]) % Q for each row i. The output will always be a column vector:
print(A*s % Q)
# [[2]
#  [5]
#  [8]]
The number of rows of this column vector is equal to the number of rows of the matrix on the left hand side. In particular, if we take our column vector s, transpose it into a 1-by-3 matrix, and multiply it by a 3-by-1 matrix r, then we end up with a 1-by-1 matrix:
r = np.matrix([[1,2,3]]).T
print(s.T*r % Q)
# [[2]]
The final matrix operation we’ll need is matrix addition. If A and B are both N-by-M matrices, then C = (A+B) % Q is the N-by-M matrix for which C[i,j] == (A[i,j]+B[i,j]) % Q. Of course, this only works if the matrices we’re adding have the same dimensions.
Warm up
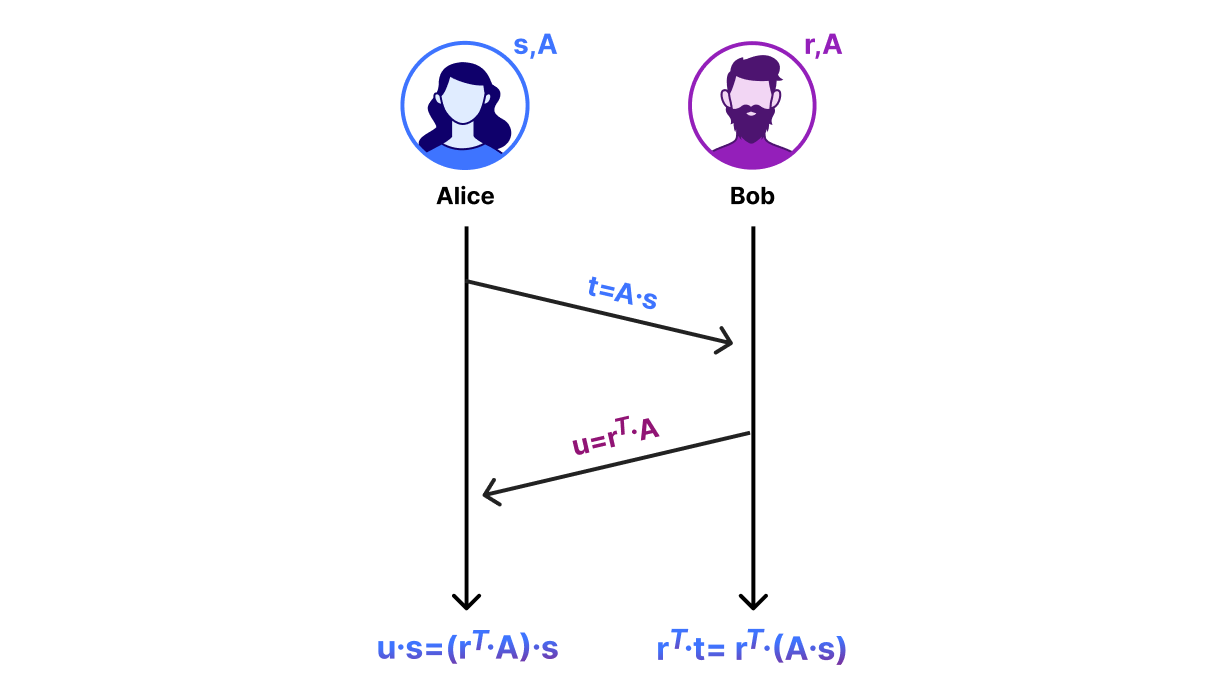
Enough maths — let’s get to exchanging some keys. We start with the DH diagram from before and swap out the computations with matrix operations. Note that this protocol is not secure, but will be the basis of a secure key exchange mechanism we’ll develop in the next section:
Alice and Bob agree on a public, N-by-N matrix A. This is analogous to the number $g$ that Alice and Bob agree on in the DH diagram.
Alice chooses a random length-N vector s and sends t = A*s % Q to Bob.
Bob chooses a random length-N vector r and sends u = r.T*A % Q to Alice. You can also compute this as (A.T*r).T % Q.
The vectors t and u are analogous to DH key shares. After the exchange of these key shares, Alice and Bob can compute a shared secret. Alice computes the shared secret as u*s % Q and Bob computes the shared secret as r.T*t % Q. To see why they compute the same key, notice that u*s == (r.T*A)*s == r.T*(A*s) == r.T*t.
In fact, this key exchange is essentially what happens in ML-KEM. However, we don’t use this directly, but rather as part of a public key encryption scheme. Public key encryption involves three algorithms:
key_gen(): The key generation algorithm that outputs a public encryption key pk and the corresponding secret decryption key sk.
encrypt(): The encryption algorithm that takes the public key and a plaintext and outputs a ciphertext.
decrypt(): The decryption algorithm that takes the secret key and a ciphertext and outputs the underlying plaintext. That is, decrypt(sk, encrypt(pk, ptxt)) == ptxt for any plaintext ptxt.
We’ll say the scheme is secure if, given a ciphertext and the public key used to encrypt it, no attacker can discern any information about the underlying plaintext without knowledge of the secret key. Once we have this encryption scheme, we then transform it into a key-encapsulation mechanism (the “KEM” in “ML-KEM”) in the last step. A KEM is very similar to encryption except that the plaintext is always a randomly generated key.
Our encryption scheme is as follows:
key_gen(): To generate a key pair, we choose a random, square matrix A and a random column vector s. We set our public key to (A,t=A*s % Q) and our secret key to s. Notice that t is Alice’s key share from the key exchange protocol above.
encrypt(): Suppose our plaintext ptxt is an integer in range(Q). To encrypt ptxt, Bob generates his key share u. He then derives the shared secret and adds it to ptxt. The ciphertext has two components:
u = r.T*A % Q
v = (r.T*t + m) % Q
Here m is a 1-by-1 matrix containing the plaintext, i.e., m = np.matrix([[ptxt]]), and r is a random column vector.
decrypt(): To decrypt, Alice computes the shared secret and subtracts it from v:
m = (v - u*s) % Q
Some readers will notice that this looks an awful lot like El Gamal encryption. This isn’t a coincidence. Good cryptographers roll their own crypto; great cryptographers steal from good cryptographers.
Let’s now put this together into code. The last thing we’ll need is a method of generating random matrices and column vectors. We call this function gen_mat() below. Take a crack at implementing this yourself. Our scheme has two parameters: the modulus Q; and the dimension of N of the matrix and column vectors. The choice of N matters for security, but for now feel free to pick whatever value you want.
def key_gen():
    # Here `gen_mat()` returns an N-by-N matrix with entries
    # randomly chosen from `range(0, Q)`.
    A = gen_mat(N, N, 0, Q)
    # Like above except the matrix is N-by-1.
    s = gen_mat(N, 1, 0, Q)
    t = A*s % Q
    return ((A, t), s)

def encrypt(pk, ptxt):
    (A, t) = pk
    m = np.matrix([[ptxt]])
    r = gen_mat(N, 1, 0, Q)
    u = r.T*A % Q
    v = (r.T*t + m) % Q
    return (u, v)

def decrypt(sk, ctxt):
    s = sk
    (u, v) = ctxt
    m = (v - u*s) % Q
    return m[0,0]

# Test
assert decrypt(sk, encrypt(pk, 1)) == 1
Making the scheme secure (or “What is a lattice?”)
By now, you might be wondering what on Earth a lattice even is. We promise we’ll define it, but before we do, it’ll help to understand why our warm-up scheme is insecure and what it’ll take to fix it.
Readers familiar with linear algebra may already see the problem: in order for this scheme to be secure, it should be impossible for the attacker to recover the secret key s; but given the public (A,t), we can immediately solve for s using Gaussian elimination.
In more detail, if A is invertible, we can write the secret key as A-1*t == A-1*(A*s) == (A-1*A)*s == s, where A-1 is the inverse of A. (When you multiply a matrix by its inverse, you get the identity matrix I, which simply takes a column vector to itself, i.e., I*s == s.) We can use Gaussian elimination to compute this matrix. Intuitively, all we’re doing is solving a set of linear equations, where the entries of s are the unknown variables. (Note that this is possible even if A is not invertible.)
In order to make this encryption scheme secure, we need to make it a little… “messier”.
Let’s get messy
For starters, we need to make it hard to recover the secret key from the public key. Let’s try the following: generate another random vector e and add it into A*s. Our key generation algorithm becomes:
def key_gen():
    A = gen_mat(N, N, 0, Q)
    s = gen_mat(N, 1, 0, Q)
    e = gen_mat(N, 1, 0, Q)
    t = (A*s + e) % Q
    return ((A, t), s)
Our formula for the column vector component of the public key, t, now includes an additive term e, which we’ll call the error. Like the secret key, the error is just a random vector.
Notice that the previous attack no longer works: since A-1*t == A-1*(A*s + e) == A-1*(A*s) + A-1*e == s + A-1*e, we need to know e in order to compute s.
Great, but this patch creates another problem. Take a second to plug in this new key generation algorithm into your implementation and test it out. What happens?
You should see that decrypt() now outputs garbage. We can see why using a little algebra:
(v - u*s) == (r.T*t + m) - (r.T*A)*s
== r.T*(A*s + e) + m - (r.T*A)*s
== r.T*(A*s) + r.T*e + m - r.T*(A*s)
== r.T*e + m
The entries of r and e are sampled randomly, so r.T*e is also uniformly random. It’s as if we encrypted m with a one-time pad, then threw away the one-time pad!
Handling decryption errors
What can we do about this? First, it would help if r.T*e were small so that decryption yields something that’s close to the plaintext. Imagine we could generate r and e in such a way that r.T*e were in range(-epsilon, epsilon+1) for some small epsilon. Then decrypt would output a number in range(ptxt-epsilon, ptxt+epsilon+1), which would be pretty close to the actual plaintext.
However, we need to do better than get close. Imagine your browser failing to load your favorite website one-third of the time because of a decryption error. Nobody has time for that.
ML-KEM reduces the probability of decryption errors by being clever about how we encode the plaintext. Suppose all we want to do is encrypt a single bit, i.e., ptxt is either 0 or 1. Consider the numbers in range(Q), and split the number line into four chunks of roughly equal length:
Here we’ve labeled the region around zero (-Q/4 to Q/4 modulo Q) with ptxt=0 and the region far away from zero with ptxt=1. To encode the bit, we set it to the integer corresponding to the middle of its range, i.e., m = np.matrix([[ptxt * Q//2]]). (Note the double “//” — this denotes integer division in Python.) To decode, we choose the ptxt corresponding to whatever range m[0,0] is in. That way if the decryption error is small, then we’re highly likely to end up in the correct range.
Now all that’s left is to ensure the decryption error, r.T*e, is small. We do this by sampling short vectors r and e. By “short” we mean the entries of these vectors are sampled from a range that is much smaller than range(Q). In particular, we’ll pick some small positive integer beta and sample entries range(-beta,beta+1).
How do we choose beta? Well, it should be small enough that decryption succeeds with overwhelming probability, but not so small that r and e are easy to guess and our scheme is broken. Take a minute or two to play with this. The parameters we can vary are:
the modulus Q
the dimension of the column vectors N
the shortness parameter beta
For what ranges of these parameters is the decryption error low but the secret vectors are hard to guess? For what ranges is our scheme most efficient, in terms of runtime and communication cost (size of the public key plus the ciphertext)? We’ll give a concrete answer at the end of this section, but in the meantime, we encourage you to play with this a bit.
Gauss strikes back
At this point, we have a working encryption scheme that mitigates at least one key-recovery attack. We’ve come pretty far, but we have at least one more problem.
Take another look at our formula for the ciphertext ctxt = (u,v). What would happen if we managed to recover the random vector r? That would be catastrophic, since v == r.T*t + m, and we already know t (part of the public key) and v (part of the ciphertext).
Just as we were able to compute the secret key from the public key in our initial scheme, we can recover the encryption randomness r from the ciphertext component u using Gaussian elimination. Again, this is just because r is the solution to a system of linear equations.
We can mitigate this plaintext-recovery attack just as before, by adding some noise. In particular, we’ll generate a short vector according to gen_mat(N,1,-beta,beta+1) and add it into u. We also need to add noise to v in the same way, for reasons that we’ll discuss in the next section.
Once again, adding noise increases the probability of a decryption error, but this time the magnitude of the error also depends on the secret key s. To see this, recall that during decryption, we multiply u by s (to compute the shared secret), and the error vector is an additive term. We’ll therefore need s to be a short vector as well.
Let’s now put together everything we’ve learned into an updated encryption scheme. Our scheme now has three parameters, Q, N, and beta, and can be used to encrypt a single bit:
def key_gen():
    A = gen_mat(N, N, 0, Q)
    s = gen_mat(N, 1, -beta, beta+1)
    e1 = gen_mat(N, 1, -beta, beta+1)
    t = (A*s + e1) % Q
    return ((A, t), s)

def encrypt(pk, ptxt):
    (A, t) = pk
    m = np.matrix([[ptxt*(Q//2) % Q]])
    r = gen_mat(N, 1, -beta, beta+1)
    e2 = gen_mat(N, 1, -beta, beta+1)
    e3 = gen_mat(1, 1, -beta, beta+1)
    u = (r.T*A + e2) % Q
    v = (r.T*t + e3 + m) % Q
    return (u, v)

def decrypt(sk, ctxt):
    s = sk
    (u, v) = ctxt
    m = (v - u*s) % Q
    if m[0,0] in range(Q//4, 3*Q//4):
        return 1
    return 0

# Test
assert decrypt(sk, encrypt(pk, 0)) == 0
assert decrypt(sk, encrypt(pk, 1)) == 1
Before moving on, try to find parameters for which the scheme works and for which the secret and error vectors seem hard to guess.
Learning with errors
So far we have a functioning encryption scheme for which we’ve mitigated two attacks, one a key-recovery attack and the other a plaintext-recovery attack. There seems to be no other obvious way of breaking our scheme, unless we choose parameters that are so weak that an attacker can easily guess the secret key s or ciphertext randomness r. Again, these vectors need to be short in order to prevent decryption errors, but not so short that they are easy to guess. (Likewise for the error terms.)
Still, there may be other attacks that require a little more sophistication to pull off. For instance, there might be some mathematical analysis we can do to recover, or at least make a good guess of, a portion of the ciphertext randomness. This raises a more fundamental question: in general, how do we establish that cryptosystems like this are actually secure?
As a first step, cryptographers like to try and reduce the attack surface. Modern cryptosystems are designed so that the problem of attacking the scheme reduces to solving some other problem that is easier to reason about.
Our public key encryption scheme is an excellent illustration of this idea. Think back to the key- and plaintext-recovery attacks from the previous section. What do these attacks have in common?
In both instances, the attacker knows some public vector that allowed it to recover a secret vector:
In the key-recovery attack, the attacker knew t for which A*s == t.
In the plaintext-recovery attack, the attacker knew u for which r.T*A == u (or, equivalently, A.T*r == u.T).
The fix in both cases was to construct the public vector in such a manner that it is hard to solve for the secret, namely, by adding an error term. However, ideally the public vector would reveal no information about the secret whatsoever. This ideal is formalized by the Learning With Errors (LWE) problem.
The LWE problem asks the attacker to distinguish between two distributions. Concretely, imagine we flip a coin, and if it comes up heads, we sample from the first distribution and give the sample to the attacker; and if the coin comes up tails, we sample from the second distribution and give the sample to the attacker. The distributions are as follows:
(A,t=A*s + e) where A is a random matrix generated with gen_mat(N,N,0,Q) and s and e are short vectors generated with gen_mat(N,1,-beta,beta+1).
(A,t) where A is a random matrix generated with gen_mat(N,N,0,Q) and t is a random vector generated with gen_mat(N,1,0,Q).
The first distribution corresponds to what we actually do in the encryption scheme; in the second, t is just a random vector, and no longer a secret vector at all. We say that the LWE problem is “hard” if no attacker is able to guess the coin flip with probability significantly better than one-half.
Our encryption is passively secure — meaning the ciphertext doesn’t leak any information about the plaintext — if the LWE problem is hard for the parameters we chose. To see why, notice that both the public key and ciphertext look like LWE instances; if we can replace each instance with an instance of the random distribution, then the ciphertext would be completely independent of the plaintext and therefore leak no information about it at all. Note that, for this argument to go through, we also have to add the error term e3 to the ciphertext component v.
Choosing the parameters
We’ve established that if solving the LWE problem is hard for parameters N, Q, and beta, then so is breaking our public key encryption scheme. What’s left for us to do is tune the parameters so that solving LWE is beyond the reach of any attacker we can think of. This is where lattices come in.
Lattices
A lattice is an infinite grid of points in high-dimensional space. A two-dimensional lattice might look something like this:
The points always follow a clear pattern that resembles “lattice work” you might see in a garden:
For cryptography, we care about a special class of lattices, those defined by a matrix P that “recognizes” points in the lattice. That is, the lattice recognized by P is the set of vectors v for which P*v == 0, where “0” denotes the all-zero vector. The all-zero vector is np.zeros((N,1), dtype=int) in NumPy.
Readers familiar with linear algebra may have a different definition of lattices in mind: in general, a lattice is the set of points obtained by taking linear combinations of some basis. Our lattices can also be formulated in this way, i.e., for a matrix P that recognizes a lattice, we can compute the basis vectors that generate the lattice. However, we don’t much care about this representation here.
The LWE problem boils down to distinguishing a set of points that are “close to” the lattice from a set of points that are “far away from” the lattice. We construct these points from an LWE instance and a random (A,t) respectively. Here we have an LWE sample (left) and a sample from the random distribution (right):
What this shows is that the points of the LWE instance are much closer to the lattice than the random instance. This is indeed the case on average. However, while distinguishing LWE instances from random is easy in two dimensions, it gets harder in higher dimensions.
Let’s take a look at how we construct these points. First, let’s take an LWE instance (A,t=(A*s + e) % Q) and consider the lattice recognized by the matrix P we get by concatenating A with the identity matrix I. This might look something like this (N=3):
Let z denote this vector and consider the set of points v for which P*v == t. By definition, we say this set of points is “close to” the lattice because z is a short vector. (Remember: by “short” we mean its entries are bounded around 0 by beta.)
Now consider a random (A,t) and consider the set of points v for which P*v == t. We won’t prove it, but it is a fact that this set of points is likely to be “far away from” the lattice in the sense that there is no short vector z for which P*z == t.
Intuitively, solving LWE gets harder as z gets longer. Indeed, increasing the average length of z (by making beta larger) increases the average distance to the lattice, making it look more like a random instance:
On the other hand, making z too long creates another problem.
Breaking lattice cryptography by finding short vectors
Given a random matrix A, the Short Integer Solution (SIS) problem is to find short vectors (i.e., whose entries are bounded by beta) z1 and z2 for which (A*z1 + z2) % Q is zero. Notice that this is equivalent to finding a short vector z in the lattice recognized by P:
z = np.concatenate((z1, z2))
assert np.array_equal((A*z1 + z2) % Q, P*z % Q)
If we had a (quantum) computer program for solving SIS, then we could use this program to solve LWE as well: if (A,t) is an LWE instance, then z1.T*t will be small; otherwise, if (A,t) is random, then z1.T*t will be uniformly random. (You can convince yourself of this using a little algebra.) Therefore, in order for our encryption scheme to be secure, it must be hard to find short vectors in the lattice defined by those parameters.
Intuitively, finding long vectors in the lattice is easier than finding short ones, which means that solving the SIS problem gets easier as beta gets closer to Q. On the other hand, as beta gets closer to 0, it gets easier to distinguish LWE instances from random!
This suggests a kind of Goldilocks zone for LWE-based encryption: if the secret and noise vectors are too short, then LWE is easy; but if the secret and noise vectors are too long, then SIS is easy. The optimal choice is somewhere in the middle.
Enough math, just give me my parameters!
To tune our encryption scheme, we want to choose parameters for which the most efficient known algorithms (quantum or classical) for solving LWE are out of reach for any attacker with as many resources as we can imagine (and then some, in case new algorithms are discovered). But how do we know which attacks to look out for?
Fortunately, the community of expert lattice cryptographers and cryptanalysts maintains a tool called lattice-estimator that estimates the complexity of the best known (quantum) algorithms for lattice problems relevant to cryptography. Here’s what we get when we run this tool for ML-KEM (this requires Sage to run):
The number that we’re most interested in is “rop“, which estimates the amount of computation the attack would consume. Playing with this tool a bit, we eventually find some parameters for our scheme for which the “usvp” and “dual_hybrid” attacks have comparable complexity. However, lattice-estimator identifies an attack it calls “arora-gb” that applies to our scheme, but not to ML-KEM, that has much lower complexity. (N=600, Q=3329, and beta=4):
We’d have to bump the parameters even further to the scheme to a regime that has comparable security to ML-KEM.
Finally, a word of warning: when designing lattice cryptography, determining whether our scheme is secure requires a lot more than estimating the cost of generic attacks on our LWE parameters. In the absence of a mathematical proof of security in a realistic adversarial model, we can’t rule out other ways of breaking our scheme. Tread lightly, fair traveler, and bring a friend along for the journey.
Making the scheme efficient
Now that we understand how to encrypt with LWE, let’s take a quick look at how to make our scheme efficient.
The main problem with our scheme is that we can only encrypt a bit at a time. This is because we had to split the range(Q) into two chunks, one that encodes 1 and another that encodes 0. We could improve the bit rate by splitting the range into more chunks, but this would make decryption errors more likely.
Another problem with our scheme is that the runtime depends heavily on our security parameters. Encryption requires O(N2) multiplications (multiplication is the most expensive part of a secure implementation of modular arithmetic), and in order for our scheme to be secure, we need to make N quite large.
ML-KEM solves both of these problems by replacing modular arithmetic with arithmetic over a polynomial ring. This means the entries of our matrices will be polynomials rather than integers. We need to define what it means to add, subtract, and multiply polynomials, but once we’ve done that, everything else about the encryption scheme is the same.
In fact, you probably learned polynomial arithmetic in grade school. The only thing you might not be familiar with is polynomial modular reduction. To multiply two polynomials $f(X)$ and $g(X)$, we start by multiplying $f(X)\cdot g(X)$ as usual. Then we’re going to divide $f(X)\cdot g(X)$ by some special polynomial — ML-KEM uses $X^{256}+1$ — and take the remainder. We won’t try to explain this algorithm, but the takeaway is that the result is a polynomial with $256$ coefficients, each of which is an integer in range(Q).
The main advantage of using a polynomial ring for arithmetic is that we can pack more bits into the ciphertext. Our formula for the ciphertext is exactly the same (u=r.T*A + e2, v=r.T*t + e3 + m), but this time the plaintext m encodes a polynomial. Each coefficient of the polynomial encodes a bit, and we’ll handle decryption errors just as we did before, by splitting range(Q) into two chunks, one that encodes 1 and another that encodes 0. This allows us to reliably encrypt 256 bits (32 bytes) per ciphertext.
Another advantage of using polynomials is that it significantly reduces the dimension of the matrix without impacting security. Concretely, the most widely used variant of ML-KEM, ML-KEM-768, uses a 3-by-3 matrix A, so just 9 polynomials in total. (Note that $256 \cdot 3 = 768$, hence the name “ML-KEM-768”.) However, note that we have to be careful in how we choose the modulus: $X^{256}+1$ is special in that it does not exhibit any algebraic structure that is known to permit attacks.
The choices of Q=3329 for the coefficient modulus and $X^{256}+1$ for the polynomial modulus have one more benefit. They allow polynomial multiplication to be carried out using the NTT algorithm, which massively reduces the number of multiplications and additions we have to perform. In fact, this optimization is a major reason why ML-KEM is sometimes faster in terms of CPU time than key exchange with elliptic curves.
We won’t get into how NTT works here, except to say that the algorithm will look familiar to you if you’ve ever implemented RSA. In both cases we use the Chinese Remainder Theorem to split multiplication up into multiple, cheaper multiplications with smaller moduli.
From public key encryption to ML-KEM
The last step to build ML-KEM is to make the scheme secure against chosen ciphertext attacks (CCA). Currently, it’s only secure against chosen plaintext attacks (CPA), which basically means that the ciphertext leaks no information about the plaintext, regardless of the distribution of plaintexts. CCA security is stronger in that it gives the attacker access to decryptions of ciphertexts of its choosing. (Of course, it’s not allowed to decrypt the target ciphertext itself.) The specific transform used in ML-KEM results in a CCA-secure KEM (“Key-Encapsulation Mechanism”).
Chosen ciphertext attacks might seem a bit abstract, but in fact they formalize a realistic threat model for many applications of KEMs (and public key encryption for that matter). For example, suppose we use the scheme in a protocol in which the server authenticates itself to a client by proving it was able to decrypt a ciphertext generated by the client. In this kind of protocol, the server acts as a sort of “decryption oracle” in which its responses to clients depend on the secret key. Unless the scheme is CCA secure, this oracle can be abused by an attacker to leak information about the secret key over time, allowing it to eventually impersonate the server.
ML-KEM incorporates several more optimizations to make it as fast and as compact as possible. For example, instead of generating a random matrix A, we can derive it from a random, 32-byte string (called a “seed”) using a hash-based primitive called a XOF (“eXtendable Output Function”), in the case of ML-KEM this XOF is SHAKE128. This significantly reduces the size of the public key.
Another interesting optimization is that the polynomial coefficients (integers in range(Q)) in the ciphertext are compressed by rounding off the least significant bits of each coefficient, thereby reducing the overall size of the ciphertext.
All told, for the most widely deployed parameters (ML-KEM-768), the public key is 1184 bytes and the ciphertext is 1088 bytes. There’s no obvious way to reduce this, except by reducing the size of the encapsulated key or the size of the public matrix A. The former would make ML-KEM useful for fewer applications, and the latter would reduce the security margin.
Note that there are other lattice schemes that are smaller, but they are based on different hardness assumptions and are still undergoing analysis.
Authentication
In the previous section, we learned about ML-KEM, the algorithm already in use to make encryption PQ-secure. However, encryption is only one piece of the puzzle: establishing a secure connection also requires authenticating the server — and sometimes the client, depending on the application.
Authentication is usually provided by a digital signature scheme, which uses a secret key to sign a message and a public key to verify the signature. The signature schemes used today aren’t PQ-secure: a quantum computer can be used to compute the secret key corresponding to a server’s public key, then use this key to impersonate the server.
While this threat is less urgent than the threat to encryption, mitigating it is going to be more complicated. Over the years, we’ve bolted a number of signatures onto the TLS handshake in order to meet the evolving requirements of the web PKI. We have PQ alternatives for these signatures, one of which we’ll study in this section, but so far these signatures and their public keys are too large (i.e., take up too many bytes) to make comfortable replacements for today’s schemes. Barring some breakthrough in NIST’s ongoing standardization effort, we will have to re-engineer TLS and the web PKI to use fewer signatures.
For now, let’s dive into the PQ signature scheme we’re likely to see deployed first: ML-DSA, a.k.a. Dillithium. The design of ML-DSA follows a similar template as ML-KEM. We start by building some intermediate primitive, then we transform that primitive into the primitive we want, in this case a signature scheme.
ML-DSA is quite a bit more involved than ML-KEM, so we’re going to try to boil it down even further and just try to get across the main ideas.
Warm up
Whereas ML-KEM is basically El Gamal encryption with elliptic curves replaced with lattices, ML-DSA is basically the Schnorr identification protocol with elliptic curves replaced with lattices. Schnorr’s protocol is used by a prover to convince a verifier that it knows the secret key associated with its public key without revealing the secret key itself. The protocol has three moves and is executed with four algorithms:
initialize(): The prover initializes the protocol and sends a commitment to the verifier
challenge(): The verifier receives the commitment and sends the prover a challenge
finish(): The prover receives the challenge and sends the verifier the proof
verify(): Finally, the verifier uses the proof to decide whether the prover knows the secret key
We get the high-level structure of ML-DSA by making this protocol non-interactive. In particular, the prover derives the challenge itself by hashing the commitment together with the message to be signed. The signature consists of the commitment and proof: to verify the signature, the verifier recomputes the challenge from the commitment and message and runs verify()as usual.
Let’s jump right in to building Schnorr’s identification protocol from lattices. If you’ve never seen this protocol before, then this will look a little like black magic at first. We’ll go through it slowly enough to see how and why it works.
Just like for ML-KEM, our public key is an LWE instance (A,t=A*s1 + s2). However, this time our secret key is the pair of short vectors (s1,s2), i.e., it includes the error term. Otherwise, key generation is exactly the same:
To initialize the protocol, the prover generates another LWE instance (A,w=A*y1 + y2). You’ll see why in just a moment. The prover sends the hash of w as its commitment:
Here H is some cryptographic hash function, like SHA-3. The prover stores the secret vectors (y1,y2) for use in its next move.
Now it’s time for the verifier’s challenge. The challenge is just an integer, but we need to be careful about how we choose it. For now let’s just pick it at random:
def challenge():
    return random.randrange(0, Q)
Remember: when we turn this protocol into a digital signature, the challenge is derived from the commitment, H(w), and the message. The range of this hash function must be the same as the set of outputs of challenge().
Now comes the fun part. The proof is a pair of vectors (z1,z2) satisfying A*z1 + z2 == c*t + w. We can easily produce this proof if we know the secret key:
z1 = (c*s1 + y1) % Q
z2 = (c*s2 + y2) % Q
Then A*z1 + z2 == A*(c*s1 + y1) + (c*s2 + y2) == c*(A*s1 + s2) + (A*y1 + y2) == c*t + w. Our goal is to design the protocol such that it’s hard to come up with (z1,z2) without knowing (s1,s2), even after observing many executions of the protocol.
Here are the finish() and verify() algorithms for completeness:
Notice that the verifier doesn’t actually check A*z1 + z2 == c*t + w directly; we have to rearrange the equation so that we can set the commitment to H(w) rather than w. We’ll explain the need for hashing in the next section.
Making this scheme secure
The question of whether this protocol is secure boils down to whether it’s possible to impersonate the prover without knowledge of the secret key. Let’s put our attacker hat on and poke around.
Perhaps there’s a way to compute the secret key, either from the public key directly or by eavesdropping on executions of the protocol with the honest prover. If LWE is hard, then clearly there’s no way we’re going to extract the secret key from the public key t. Likewise, the commitment H(w)doesn’t leak any information that would help us extract the secret key from the proof (z1,z2).
Let’s take a closer look at the proof. Notice that the vectors (y1,y2) “mask” the secret key vectors, sort of how the shared secret masks the plaintext in ML-KEM. However, there’s one big exception: we also scale the secret key vectors by the challenge c.
What’s the effect of scaling these vectors? If we squint at a few proofs, we start to see a pattern emerge. Let’s look at z1 first (N=3, Q=3329, beta=4):
Indeed, with enough proof samples, we should be able to make a pretty good guess of the value of s1. In fact, for these parameters, there is a simple statistical analysis we can do to compute s1 exactly. (Hint: Q is a prime number, which means c*pow(c,-1,Q)==1 whenever c>0.) We can also apply this analysis to s2, or compute it directly from t, s1, and A.
The main flaw in our protocol is that, although our secret vectors are short, scaling them makes them so long that they’re not completely masked by (y1,y2). Since c spans the entire range(Q), so do the entries of c*s1. and c*s2, which means in order to mask these entries, we need the entries of (y1,y2) to span range(Q) as well. However, doing this would make solving LWE for (A,w) easy, by solving SIS. We somehow need to strike a balance between the length of the vectors of our LWE instances and the leakage induced by the challenge.
Here’s where things get tricky. Let’s refer to the set of possible outputs of challenge() as the challenge space. We need the challenge space to be fairly large, large enough that the probability of outputting the same challenge twice is negligible.
Why would such a collision be a problem? It’s a little easier to see in the context of digital signatures. Let’s say an attacker knows a valid signature for a message m. The signature includes the commitment H(m), so the attacker also knows the challenge is c == H(H(w),m). Suppose it manages to find a different message m* for which c == H(H(w),m*). Then the signature is also valid for m! And this attack is easy to pull off if the challenge space, that is, the set of possible outputs of H, is too small.
Unfortunately, we can’t make the challenge space larger simply by increasing the size of the modulus Q: the larger the challenge might be, the more information we’d leak about the secret key. We need a new idea.
The best of both worlds
Remember that the hardness of LWE depends on the ratio between beta and Q. This means that y1 and y2 don’t need to be short in absolute terms, but short relative to random vectors.
With that in mind, consider the following idea. Let’s take a larger modulus, say Q=2**31 - 1, and we’ll continue to sample from the same challenge space, range(2**16).
First, notice that z1 is now “relatively” short, since its entries are now in range(-gamma, gamma+1), where gamma = beta*(2**16-1), rather than uniform over range(Q). Let’s also modify initialize() to sample the entries of (y1,y2) from the same range and see what happens:
This is definitely going in the right direction, since there are no obvious correlations between z1 and s1. (Likewise for z2 and s2.) However, we’re not quite there.
One problem is that the challenge space is still quite small. With only 2**16 challenges to choose from, we’re likely to see a collision even after only a handful of protocol executions. We need the challenge space to be much, much larger, say around 2**256. But then Q has to be an insanely large number in order for the beta to Q ratio to be secure.
ML-DSA is able to side step this problem due to its use of arithmetic over polynomial rings. It uses the same modulus polynomial as ML-KEM, so the challenge is a polynomial with 256 coefficients. The coefficients are chosen carefully so that the challenge space is large, but multiplication by the challenge scales the secret vector by a small amount. Note that we still end up using a slightly larger modulus (Q=8380417) for ML-DSA than for ML-KEM, but only by about twelve bits.
However, there is a more fundamental problem here, which is that we haven’t completely ruled out that signatures may leak information about the secret key.
Cause and effect
Suppose we run the protocol a number of times, and in each run, we happen to choose a relatively small value for some entry of y1. After enough runs, this would eventually allow us to reconstruct the corresponding entry of s1. To rule this out as a possibility, we need to make y1 even longer. (Likewise for y2.) But how long?
Suppose we know that the entries of z1 and z2 are always in range(-beta_loose,beta_loose+1) for some beta_loose > beta. Then we can simulate an honest run of the protocol as follows:
This procedure perfectly simulates honest runs of the protocol, in the sense that the output of simulate() is indistinguishable from the transcript of a real run of the protocol with the honest prover. To see this, notice that the w, c, z1, and z2 all have the same mathematical relationship (the verification equation still holds) and have the same distribution.
And here’s the punch line: since this procedure doesn’t use the secret key, it follows that the attacker learns nothing from eavesdropping on the honest prover that it can’t compute from the public key itself. Pretty neat!
What’s left to do is arrange for z1 and z2 to fall in this range. First, we modify initialize() by increasing the range of y1 and y2 by beta_loose:
This ensures the proof vectors z1 and z2 are roughly uniform over range(-beta_loose, beta_loose+1). However, they may fall slightly outside of this range, so need to modify finalize() to abort if not. Correspondingly, verify() should reject proof vectors that are out of range:
def finish(s1, s2, y1, y2, c):
    z1 = (c*s1 + y1) % Q
    z2 = (c*s2 + y2) % Q
    if not in_range(z1, beta_loose) or not in_range(z2, beta_loose):
        return (None, None)
    return (z1, z2)

def verify(A, t, hw, c, z1, z2):
    if not in_range(z1, beta_loose) or not in_range(z2, beta_loose):
        return False
    return H((A*z1 + z2 - c*t) % Q) == hw
If finish() returns (None,None), then the prover and verifier are meant to abort the protocol and retry until the protocol succeeds:
((A, t), (s1, s2)) = key_gen()
while True:
    (hw, (y1, y2)) = initialize(A)        # hw: prover -> verifier
    c = challenge()                       # c: verifier -> prover
    (z1, z2) = finish(s1, s2, y1, y2, c)  # (z1, z2): prover -> verifier
    if z1 is not None and z2 is not None:
        break
assert verify(A, t, hw, c, z1, z2)
Interestingly, we should expect aborts to be quite common. The parameters of ML-DSA are tuned so that the protocol runs five times on average before it succeeds.
Another interesting point is that the security proof requires us to simulate not only successful protocol runs, but aborted protocol runs as well. More specifically, the protocol simulator must abort with the same probability as the real protocol, which implies that the rejection probability is independent of the secret key.
The simulator also needs to be able to produce realistic looking commitments for aborted transcripts. This is exactly why the prover commits to the hash of w rather than w itself: in the security proof, we can easily simulate hashes of random inputs.
Making this scheme efficient
ML-DSA benefits from many of the same optimizations as ML-KEM, including using polynomial rings, NTT for polynomial multiplication, and encoding polynomials with a fixed number of bits. However, ML-DSA has a few more tricks to make things smaller.
First, in ML-DSA, instead of the pair of short vectors z1 and z2, the proof consists of a single vector z=c*s1 + y, where y was committed to in the previous step. In turn, we only end up with a single proof vector z rather than two as before. Getting this to work requires a special encoding of the commitment so that we can’t compute y from it. ML-DSA uses a related trick to reduce the size of the t vector of the public key, but the details are more complicated.
For the parameters we expect to deploy first (ML-DSA-44), the public key is 1312 bytes long and the signature is a whopping 2420 bytes. In contrast to ML-KEM, it is possible to shave off some more bytes. This does not come for free and requires complicating the scheme. An example is HAETAE, which changes the distributions used. Falcon takes it a step further with even smaller signatures, using a completely different approach, which although elegant is also more complex to implement.
Wrap up
Lattice cryptography underpins the first generation of PQ algorithms to get widely deployed on the Internet. ML-KEM is already widely used today to protect encryption from quantum computers, and in the coming years we expect to see ML-DSA deployed to get ahead of the threat of quantum computers to authentication.
Lattices are also the basis of a new frontier for cryptography: computing on encrypted data.
Suppose you wanted to aggregate some metrics submitted by clients without learning the metrics themselves. With LWE-based encryption, you can arrange for each client to encrypt their metrics before submission, aggregate the ciphertexts, then decrypt to get the aggregate.
Suppose instead that a server has a database that it wants to provide clients access to without revealing to the server which rows of the database the client wants to query. LWE-based encryption allows the database to be encoded in a manner that permits encrypted queries.
These applications are special cases of a paradigm known as FHE (“Fully Homomorphic Encryption”), which allows for arbitrary computations on encrypted data. FHE is an extremely powerful primitive, and the only way we know how to build it today is with lattices. However, for most applications, FHE is far less practical than a special-purpose protocol would be (lattice-based or not). Still, over the years we’ve seen FHE get better and better, and for many applications it is already a decent option. Perhaps we’ll dig into this and other lattice schemes in a future blog post.
We hope you enjoyed this whirlwind tour of lattices. Thanks for reading!
Connections made over cleartext HTTP ports risk exposing sensitive information because the data is transmitted unencrypted and can be intercepted by network intermediaries, such as ISPs, Wi-Fi hotspot providers, or malicious actors on the same network. It’s common for servers to either redirect or return a 403 (Forbidden) response to close the HTTP connection and enforce the use of HTTPS by clients. However, by the time this occurs, it may be too late, because sensitive information, such as an API token, may have already been transmitted in cleartext in the initial client request. This data is exposed before the server has a chance to redirect the client or reject the connection.
A better approach is to refuse the underlying cleartext connection by closing the network ports used for plaintext HTTP, and that’s exactly what we’re going to do for our customers.
Today we’re announcing that we’re closing all of the HTTP ports on api.cloudflare.com. We’re also making changes so that api.cloudflare.com can change IP addresses dynamically, in line with on-going efforts to decouple names from IP addresses, and reliably managing addresses in our authoritative DNS. This will enhance the agility and flexibility of our API endpoint management. Customers relying on static IP addresses for our API endpoints will be notified in advance to prevent any potential availability issues.
In addition to taking this first step to secure Cloudflare API traffic, we’ll release the ability for customers to opt-in to safely disabling all HTTP port traffic for their websites on Cloudflare. We expect to make this free security feature available in the last quarter of 2025.
We have consistentlyadvocated for strong encryption standards to safeguard users’ data and privacy online. As part of our ongoing commitment to enhancing Internet security, this blog post details our efforts to enforce HTTPS-only connections across our global network.
Understanding the problem
We already provide an “Always Use HTTPS” setting that can be used to redirect all visitor traffic on our customers’ domains (and subdomains) from HTTP (plaintext) to HTTPS (encrypted). For instance, when a user clicks on an HTTP version of the URL on the site (http://www.example.com), we issue an HTTP 3XX redirection status code to immediately redirect the request to the corresponding HTTPS version (https://www.example.com) of the page. While this works well for most scenarios, there’s a subtle but important risk factor: What happens if the initial plaintext HTTP request (before the redirection) contains sensitive user information?
Initial plaintext HTTP request is exposed to the network before the server can redirect to the secure HTTPS connection.
Third parties or intermediaries on shared networks could intercept sensitive data from the first plaintext HTTP request, or even carry out a Monster-in-the-Middle (MITM) attack by impersonating the web server.
One may ask if HTTP Strict Transport Security (HSTS) would partially alleviate this concern by ensuring that, after the first request, visitors can only access the website over HTTPS without needing a redirect. While this does reduce the window of opportunity for an adversary, the first request still remains exposed. Additionally, HSTS is not applicable by default for most non-user-facing use cases, such as API traffic from stateless clients. Many API clients don’t retain browser-like state or remember HSTS headers they’ve encountered. It is quite common practice for API calls to be redirected from HTTP to HTTPS, and hence have their initial request exposed to the network.
Therefore, in line with our culture of dogfooding, we evaluated the accessibility of the Cloudflare API (api.cloudflare.com) over HTTP ports (80, and others). In that regard, imagine a client making an initial request to our API endpoint that includes their secret API key. While we outright reject all plaintext connections with a 403 Forbidden response instead of redirecting for API traffic — clearly indicating that “Cloudflare API is only accessible over TLS” — this rejection still happens at the application layer. By that point, the API key may have already been exposed over the network before we can even reject the request. We do have a notification mechanism in place to alert customers and rotate their API keys accordingly, but a stronger approach would be to eliminate the exposure entirely. We have an opportunity to improve!
A better approach to API security
Any API key or token exposed in plaintext on the public Internet should be considered compromised. We can either address exposure after it occurs or prevent it entirely. The reactive approach involves continuously tracking and revoking compromised credentials, requiring active management to rotate each one. For example, when a plaintext HTTP request is made to our API endpoints, we detect exposed tokens by scanning for ‘Authorization’ header values.
In contrast, a preventive approach is stronger and more effective, stopping exposure before it happens. Instead of relying on the API service application to react after receiving potentially sensitive cleartext data, we can preemptively refuse the underlying connection at the transport layer, before any HTTP or application-layer data is exchanged. The preventative approach can be achieved by closing all plaintext HTTP ports for API traffic on our global network. The added benefit is that this is operationally much simpler: by eliminating cleartext traffic, there’s no need for key rotation.
The transport layer carries the application layer data on top.
To explain why this works: an application-layer request requires an underlying transport connection, like TCP or QUIC, to be established first. The combination of a port number and an IP address serves as a transport layer identifier for creating the underlying transport channel. Ports direct network traffic to the correct application-layer process — for example, port 80 is designated for plaintext HTTP, while port 443 is used for encrypted HTTPS. By disabling the HTTP cleartext server-side port, we prevent that transport channel from being established during the initial “handshake” phase of the connection — before any application data, such as a secret API key, leaves the client’s machine.
Both TCP and QUIC transport layer handshakes are a pre-requisite for HTTPS application data exchange on the web.
Therefore, closing the HTTP interface entirely for API traffic gives a strong and visible fast-failure signal to developers that might be mistakenly accessing http://… instead of https://… with their secret API keys in the first request — a simple one-letter omission, but one with serious implications.
In theory, this is a simple change, but at Cloudflare’s global scale, implementing it required careful planning and execution. We’d like to share the steps we took to make this transition.
Understanding the scope
In an ideal scenario, we could simply close all cleartext HTTP ports on our network. However, two key challenges prevent this. First, as shown in the Cloudflare Radar figure below, about 2-3% of requests from “likely human” clients to our global network are over plaintext HTTP. While modern browsers prominently warn users about insecure HTTP connections and offer features to silently upgrade to HTTPS, this protection doesn’t extend to the broader ecosystem of connected devices. IoT devices with limited processing power, automated API clients, or legacy software stacks often lack such safeguards entirely. In fact, when filtering on plaintext HTTP traffic that is “likely automated”, the share rises to over 16%! We continue to see a wide variety of legacy clients accessing resources over plaintext connections. This trend is not confined to specific networks, but is observable globally.
Closing HTTP ports, like port 80, across our entire IP address space would block such clients entirely, causing a major disruption in services. While we plan to cautiously start by implementing the change on Cloudflare’s API IP addresses, it’s not enough. Therefore, our goal is to ensure all of our customers’ API traffic benefits from this change as well.
Breakdown of HTTP and HTTPS for ‘human’ connections
The second challenge relates to limitations posed by the longstanding BSD Sockets API at the server-side, which we have addressed using Tubular, a tool that inspects every connection terminated by a server and decides which application should receive it. Operators historically have faced a challenging dilemma: either listen to the same ports across many IP addresses using a single socket (scalable but inflexible), or maintain individual sockets for each IP address (flexible but unscalable). Luckily, Tubular has allowed us to resolve this using ‘bindings’, which decouples sockets from specific IP:port pairs. This creates efficient pathways for managing endpoints throughout our systems at scale, enabling us to handle both HTTP and HTTPS traffic intelligently without the traditional limitations of socket architecture.
Step 0, then, is about provisioning both IPv4 and IPv6 address space on our network that by default has all HTTP ports closed. Tubular enables us to configure and manage these IP addresses differently than others for our endpoints. Additionally, Addressing Agility and Topaz enable us to assign these addresses dynamically, and safely, for opted-in domains.
Moving from strategy to execution
In the past, our legacy stack would have made this transition challenging, but today’s Cloudflare possesses the appropriate tools to deliver a scalable solution, rather than addressing it on a domain-by-domain basis.
Using Tubular, we were able to bind our new set of anycast IP prefixes to our TLS-terminating proxies across the globe. To ensure that no plaintext HTTP traffic is served on these IP addresses, we extended our global iptables firewall configuration to reject any inbound packets on HTTP ports.
As a result, any connections to these IP addresses on HTTP ports are filtered and rejected at the transport layer, eliminating the need for state management at the application layer by our web proxies.
The next logical step is to update the DNS assignments so that API traffic is routed over the correct IP addresses. In our case, we encoded a new DNS policy for API traffic for the HTTPS-only interface as a declarative Topaz program in our authoritative DNS server:
The above policy encodes that for any DNS query targeting the ‘API traffic’ class, we return the respective HTTPS-only interface IP addresses. Topaz’s safety guarantees ensure exclusivity, preventing other DNS policies from inadvertently matching the same queries and misrouting plaintext HTTP expected domains to HTTPS-only IPs
api.cloudflare.com is the first domain to be added to our HTTPS-only API traffic class, with other applicable endpoints to follow.
Opting-in your API endpoints
As we said above, we’ve started with api.cloudflare.com and our internal API endpoints to thoroughly monitor any side effects on our own systems before extending this feature to customer domains. We have deployed these changes gradually across all data centers, leveraging Topaz’s flexibility to target subsets of traffic, minimizing disruptions, and ensuring a smooth transition.
To monitor unencrypted connections for your domains, before blocking access using the feature, you can review the relevant analytics on the Cloudflare dashboard. Log in, select your account and domain, and navigate to the “Analytics & Logs” section. There, under the “Traffic Served Over SSL” subsection, you will find a breakdown of encrypted and unencrypted traffic for your site. That data can help provide a baseline for assessing the volume of plaintext HTTP connections for your site that will be blocked when you opt in. After opting in, you would expect no traffic for your site will be served over plaintext HTTP, and therefore that number should go down to zero.
Snapshot of ‘Traffic Served Over SSL’ section on Cloudflare dashboard
Towards the last quarter of 2025, we will provide customers the ability to opt in their domains using the dashboard or API (similar to enabling the Always Use HTTPS feature). Stay tuned!
Wrapping up
Starting today, any unencrypted connection to api.cloudflare.com will be completely rejected. Developers should not expect a 403 Forbidden response any longer for HTTP connections, as we will prevent the underlying connection to be established by closing the HTTP interface entirely. Only secure HTTPS connections will be allowed to be established.
We are also making updates to transition api.cloudflare.com away from its static IP addresses in the future. As part of that change, we will be discontinuing support for non-SNI legacy clients for Cloudflare API specifically — currently, an average of just 0.55% of TLS connections to the Cloudflare API do not include an SNI value. These non-SNI connections are initiated by a small number of accounts. We are committed to coordinating this transition and will work closely with the affected customers before implementing the change. This initiative aligns with our goal of enhancing the agility and reliability of our API endpoints.
Beyond the Cloudflare API use case, we’re also exploring other areas where it’s safe to close plaintext traffic ports. While the long tail of unencrypted traffic may persist for a while, it shouldn’t be forced on every site.
In the meantime, a small step like this can allow us to have a big impact in helping make a better Internet, and we are working hard to reliably bring this feature to your domains. We believe security should be free for all!
The FBI is warning of a mail-based fraud involving letters sent to businesses in the U.S. These letters resemble online ransomware notes demanding payment via Bitcoin.
Rapid7 examined a mail-based ransom demand sent to a customer from a local postcode.
There is no evidence that any of the recipients have been compromised by BianLian.
From BianLian: “Time Sensitive, Read Immediately”
On March 5, the FBI issued an alert regarding a mail scam targeting U.S. business executives with extortion. The letters claim to be from noted ransomware group BianLian, demanding a payment in Bitcoin ranging from $250,000 to $500,000 within ten days of receipt.
The FBI alert reads as follows:
“Stamped “Time Sensitive Read Immediately”, the letter claims the “BianLian Group” gained access into the organization’s network and stole thousands of sensitive data files. The letter then goes on to threaten that the victim’s data will be published to BianLian’s data leak sites if recipients do not use an included QR code linked to a Bitcoin wallet to pay between $250,000 and $500,000 within ten days from receipt of the letter, claiming the group will not negotiate further with victims.”
The ransom note also warns recipients not to contact law enforcement, stressing that the FBI “does not care” about victims and will not help in the event of a lawsuit — a classic social engineering pressure tactic.
Rapid7 has observed that these letters are still in circulation, with one such letter received by a Rapid7 customer highlighted below. While we have redacted parts of the letter to protect the customer’s identity and other sensitive information, you can see that it follows the pattern of others seen in the wild, falsely claiming to be from BianLian:
It reads:
“I regret to inform you that we have gained access to [redacted] systems and over the past several weeks have exported thousands of data files, including detailed [redacted] information with DOBs, SSNs, insurance records, and other sensitive data, employee information with IDs, SSNs, payroll reports, and other sensitive HR documents, company financial documents, legal documents, invoices, and tax documents.
How did this happen?
Your network is insecure and we were able to gain access and intercept your network traffic, leverage your personal email address, passwords, online accounts and other information to social engineer our way into [redacted] systems via your home network with the help of another employee. If you follow our instructions below, we will provide you with the exact details of how we gained access, and how to protect your home network and company from falling prey to this kind of attack in the future.
What do we want?
We require [redacted] in Bitcoin paid to the address below within 10 days of receipt of this letter. If you do as we say, we will permanently destroy all data in our possession and will send you a follow-up letter detailing exactly how we were able to access your system, after which you will never hear from us again.
If you do not comply, all of [redacted] sensitive data will be published to our TOR darknet sites, sent to all interested supervisory organizations and the media, distributed via email to all your investors, partners, customers, employees, and other relevant parties, and you can expect collective lawsuits as we will invite various law firms to take up a group case.”
The above letter is a match for those received by multiple businesses. Similarly, the Bitcoin payment address does not appear to be connected to the genuine BianLian group—just like several other examples highlighted online.
What you need to do
The FBI has issued the following advice, which is still applicable to this example of mail-based fraud:
Notify corporate executives and the organization of the scam for awareness.
Ensure employees are educated on what to do if they receive a ransom threat.
If you or your organization receive one of these letters, ensure your network defenses are up to date and that there are no active alerts regarding malicious activity.
If you discover you are a victim of BianLian ransomware, please visit [the FBI’s] Joint Cybersecurity Awareness Bulletin for recent tactics, techniques, and procedures and indicators of compromise to help organizations protect against ransomware.The FBI also requests that victims report any incident to their local FBI Field Office or the Internet Crime Complaint Center (IC3).
Additionally, Rapid7 recommends the following:
Do not scan any QR codes or go to any web links within the letter.
Do not pay any ransom.
Secure both the letter and envelope in a chain of custody evidence bag, or a ziplock if unavailable.
While ransomware actually was sent through the mail via infected USB sticks in 2022 by threat actor FIN7, that is not the case here. Recipients have not been compromised by BianLian despite what said letters claim. While your business is unlikely to receive one of these letters, other fraudsters may follow suit so a few moments spent warning of the dangers of this tactic may help to prevent an avoidable financial loss.
Generative AI (GenAI) tools like GitHub Copilot and ChatGPT are rapidly changing how programming is taught and learnt. These tools can solve assignments with remarkable accuracy. GPT-4, for example, scored an impressive 99.5% on an undergraduate computer science exam, compared to Codex’s 78% just two years earlier. With such capabilities, researchers are shifting from asking, “Should we teach with AI?” to “How do we teach with AI?”
Leo Porter from UC San Diego
Daniel Zingaro from the University of Toronto
Leo Porter and Daniel Zingaro have spearheaded this transformation through their groundbreaking undergraduate programming course. Their innovative curriculum integrates GenAI tools to help students tackle complex programming tasks while developing critical thinking and problem-solving skills.
Leo and Daniel presented their work at the Raspberry Pi Foundation research seminar in December 2024. During the seminar, it became clear that much could be learnt from their work, with their insights having particular relevance for teachers in secondary education thinking about using GenAI in their programming classes
Practical applications in the classroom
In 2023, Leo and Daniel introduced GitHub Copilot in their introductory programming CS1-LLM course at UC San Diego with 550 students. The course included creative, open-ended projects that allowed students to explore their interests while applying the skills they’d learnt. The projects covered the following areas:
Data science: Students used Kaggle datasets to explore questions related to their fields of study — for example, neuroscience majors analysed stroke data. The projects encouraged interdisciplinary thinking and practical applications of programming.
Image manipulation: Students worked with the Python Imaging Library (PIL) to create collages and apply filters to images, showcasing their creativity and technical skills.
Game development: A project focused on designing text-based games encouraged students to break down problems into manageable components while using AI tools to generate and debug code.
Students consistently reported that these projects were not only enjoyable but also responsible for deepening their understanding of programming concepts. A majority (74%) found the projects helpful or extremely helpful for their learning. One student noted that.
“Programming projects were fun and the amount of freedom that was given added to that. The projects also helped me understand how to put everything that we have learned so far into a project that I could be proud of.“
Core skills for programming with Generative AI
Leo and Daniel emphasised that teaching programming with GenAI involves fostering a mix of traditional and AI-specific skills.
Writing software with GenAI applications, such as Copilot, needs to be approached differently to traditional programming tasks
Their approach centres on six core competencies:
Prompting and function design: Students learn to articulate precise prompts for AI tools, honing their ability to describe a function’s purpose, inputs, and outputs, for instance. This clarity improves the output from the AI tool and reinforces students’ understanding of task requirements.
Code reading and selection: AI tools can produce any number of solutions, and each will be different, requiring students to evaluate the options critically. Students are taught to identify which solution is most likely to solve their problem effectively.
Code testing and debugging: Students practise open- and closed-box testing, learning to identify edge cases and debug code using tools like doctest and the VS Code debugger.
Problem decomposition: Breaking down large projects into smaller functions is essential. For instance, when designing a text-based game, students might separate tasks into input handling, game state updates, and rendering functions.
Leveraging modules: Students explore new programming domains and identify useful libraries through interactions with Copilot. This prepares them to solve problems efficiently and creatively.
Ethical and metacognitive skills: Students engage in discussions about responsible AI use and reflect on the decisions they make when collaborating with AI tools.
Adapting assessments for the AI era
The rise of GenAI has prompted educators to rethink how they assess programming skills. In the CS1-LLM course, traditional take-home assignments were de-emphasised in favour of assessments that focused on process and understanding.
Leo and Daniel chose several types of assessments — some involved having to complete programming tasks with the help of GenAI tools, while others had to be completed without.
Quizzes and exams: Students were evaluated on their ability to read, test, and debug code — skills critical for working effectively with AI tools. Final exams included both tasks that required independent coding and tasks that required use of Copilot.
Creative projects: Students submitted projects alongside a video explanation of their process, emphasising problem decomposition and testing. This approach highlighted the importance of critical thinking over rote memorisation.
Challenges and lessons learnt
While Leo and Daniel reported that the integration of AI tools into their course has been largely successful, it has also introduced challenges. Surveys revealed that some students felt overly dependent on AI tools, expressing concerns about their ability to code independently. Addressing this will require striking a balance between leveraging AI tools and reinforcing foundational skills.
Additionally, ethical concerns around AI use, such as plagiarism and intellectual property, must be addressed. Leo and Daniel incorporated discussions about these issues into their curriculum to ensure students understand the broader implications of working with AI technologies.
A future-oriented approach
Leo and Daniel’s work demonstrates that GenAI can transform programming education, making it more inclusive, engaging, and relevant. Their course attracted a diverse cohort of students, as well as students traditionally underrepresented in computer science — 52% of the students were female and 66% were not majoring in computer science — highlighting the potential of AI-powered learning to broaden participation in computer science.
By embracing this shift, educators can prepare students not just to write code but to also think critically, solve real-world problems, and effectively harness the AI innovations shaping the future of technology.
If you’re an educator interested in using GenAI in your teaching, we recommend checking out Leo and Daniel’s book, Learn AI-Assisted Python Programming, as well as their course resources on GitHub. You may also be interested in our own Experience AI resources, which are designed to help educators navigate the fast-moving world of AI and machine learning technologies.
Join us at our next online seminar on 11 March
Our 2025 seminar series is exploring how we can teach young people about AI technologies and data science. At our next seminar on Tuesday, 11 March at 17:00–18:00 GMT, we’ll hear from Lukas Höper and Carsten Schulte from Paderborn University. They’ll be discussing how to teach school students about data-driven technologies and how to increase students’ awareness of how data is used in their daily lives.
To sign up and take part in the seminar, click the button below — we’ll then send you information about joining. We hope to see you there.
AI has become a pervasive term that is heard with trepidation, excitement, and often a furrowed brow in school staffrooms. For educators, there is pressure to use AI applications for productivity — to save time, to help create lesson plans, to write reports, to answer emails, etc. There is also a lot of interest in using AI tools in the classroom, for example, to personalise or augment teaching and learning. However, without understanding AI technology, neither productivity nor personalisation are likely to be successful as teachers and students alike must be critical consumers of these new ways of working to be able to use them productively.
Fifty teachers and researchers share knowledge about teaching about AI.
In both England and globally, there are few new AI-based curricula being introduced and the drive for teachers and students to learn about AI in schools is lagging, with limited initiatives supporting teachers in what to teach and how to teach it. At the Raspberry Pi Foundation and Raspberry Pi Computing Education Research Centre, we decided it was time to investigate this missing link of teaching about AI, and specifically to discover what the teachers who are leading the way in this topic are doing in their classrooms.
A day of sharing and activities in Cambridge
We organised a day-long, face-to-face symposium with educators who have already started to think deeply about teaching about AI, have started to create teaching resources, and are starting to teach about AI in their classrooms. The event was held in Cambridge, England, on 1 February 2025, at the head office of the Raspberry Pi Foundation.
Teachers collaborated and shared their knowledge about teaching about AI.
Over 150 educators and researchers applied to take part in the symposium. With only 50 places available, we followed a detailed protocol, whereby those who had the most experience teaching about AI in schools were selected. We also made sure that educators and researchers from different teaching contexts were selected so that there was a good mix of primary to further education phases represented. Educators and researchers from England, Scotland, and the Republic of Ireland were invited and gathered to share about their experiences. One of our main aims was to build a community of early adopters who have started along the road of classroom-based AI curriculum design and delivery.
Inspiration, examples, and expertise
To inspire the attendees with an international perspective of the topics being discussed, Professor Matti Tedre, a visiting academic from Finland, gave a brief overview of the approach to teaching about AI and resources that his research team have developed. In Finland, there is no compulsory distinct computing topic taught, so AI is taught about in other subjects, such as history. Matti showcased tools and approaches developed from the Generation AI research programme in Finland. You can read about the Finnish research programme and Matti’s two month visit to the Raspberry Pi Computing Education Research Centre in our blog.
A Finnish perspective to teaching about AI.
Attendees were asked to talk about, share, and analyse their teaching materials. To model how to analyse resources, Ben Garside from the Raspberry Pi Foundation modelled how to complete the activities using the Experience AI resources as an example. The Experience AI materials have been co-created with Google DeepMind and are a suite of free classroom resources, teacher professional development, and hands-on activities designed to help teachers confidently deliver AI lessons. Aimed at learners aged 11 to 14, the materials are informed by the AI education framework developed at the Raspberry Pi Computing Education Research Centre and are grounded in real-world contexts. We’ve recently released new lessons on AI safety, and we’ve localised the resources for use in many countries including Africa, Asia, Europe, and North America.
In the morning session, Ben exemplified how to talk about and share learning objectives, concepts, and research underpinning materials using the Experience AI resources and in the afternoon he discussed how he had mapped the Experience AI materials to the UNESCO AI competency framework for students.
UNESCO provide important expertise.
Kelly Shiohira, from UNESCO, kindly attended our session, and gave an invaluable insight into the UNESCO AI competency framework for students. Kelly is one of the framework’s authors and her presentation helped teachers understand how the materials had been developed. The attendees then used the framework to analyse their resources, to identify gaps and to explore what progression might look like in the teaching of AI.
Teachers shared their knowledge about teaching about AI.
Throughout the day, the teachers worked together to share their experience of teaching about AI. They considered the concepts and learning objectives taught, what progression might look like, what the challenges and opportunities were of teaching about AI, what research informed the resources and what research needs to be done to help improve the teaching and learning of AI.
What next?
We are now analysing the vast amount of data that we gathered from the day and we will share this with the symposium participants before we share it with a wider audience. What is clear from our symposium is that teachers have crucial insights into what should be taught to students about AI, and how, and we are greatly looking forward to continuing this journey with them.
As well as the symposium, we are also conducting academic research in this area, you can read more about this in our Annual Report and on our research webpages. We will also be consulting with teachers and AI experts. If you’d like to ensure you are sent links to these blog posts, then sign up to our newsletter. If you’d like to take part in our research and potentially be interviewed about your perspectives on curriculum in AI, then contact us at: [email protected]
We also are sharing the research being done by ourselves and other researchers in the field at our research seminars. This year, our seminar series is on teaching about AI and data science in schools. Please do sign up and come along, or watch some of the presentations that have already been delivered by the amazing research teams who are endeavouring to discover what we should be teaching about AI and how in schools
Rapid7 discovered a high-severity SQL injection vulnerability, CVE-2025-1094, affecting the PostgreSQL interactive tool psql. This discovery was made while Rapid7 was performing research into the recent exploitation of CVE-2024-12356 — an unauthenticated remote code execution (RCE) vulnerability that affects both BeyondTrust Privileged Remote Access (PRA) and BeyondTrust Remote Support (RS). Rapid7 discovered that in every scenario we tested, a successful exploit for CVE-2024-12356 had to include exploitation of CVE-2025-1094 in order to achieve remote code execution. While CVE-2024-12356 was patched by BeyondTrust in December 2024, and this patch successfully blocks exploitation of both CVE-2024-12356 and CVE-2025-1094, the patch did not address the root cause of CVE-2025-1094, which remained a zero-day until Rapid7 discovered and reported it to PostgreSQL.
All supported versions before PostgreSQL 17.3, 16.7, 15.11, 14.16, and 13.19 are affected. CVE-2025-1094 has a CVSS 3.1 base score of 8.1 (High). More information is available in the PostgreSQL advisory.
Impact
CVE-2025-1094 arises from an incorrect assumption that when attacker-controlled untrusted input has been safely escaped via PostgreSQL’s string escaping routines, it cannot be leveraged to generate a successful SQL injection attack. Rapid7 found that SQL injection is, in fact, still possible in a certain scenario when escaped untrusted input is included as part of a SQL statement executed by the interactive psql tool.
Because of how PostgreSQL string escaping routines handle invalid UTF-8 characters, in combination with how invalid byte sequences within the invalid UTF-8 characters are processed by psql, an attacker can leverage CVE-2025-1094 to generate a SQL injection.
An attacker who can generate a SQL injection via CVE-2025-1094 can then achieve arbitrary code execution (ACE) by leveraging the interactive tool’s ability to run meta-commands. Meta-commands extend the interactive tools functionality, by providing a wide variety of additional operations that the interactive tool can perform. The meta-command, identified by the exclamation mark symbol, allows for an operating system shell command to be executed. An attacker can leverage CVE-2025-1094 to perform this meta-command, thus controlling the operating system shell command that is executed.
Alternatively, an attacker who can generate a SQL injection via CVE-2025-1094 can execute arbitrary attacker-controlled SQL statements.
Credit
This vulnerability was discovered by Stephen Fewer, Principal Security Researcher at Rapid7 and is being disclosed in accordance with Rapid7’s vulnerability disclosure policy.
Analysis
A technical analysis of CVE-2025-1094, as it relates to the exploitation of the BeyondTrust vulnerability CVE-2024-12356, is available in AttackerKB.
A Metasploit exploit module that exploits CVE-2025-1094 against a vulnerable BeyondTrust Privileged Remote Access (PRA) and Remote Support (RS) target is available here.
Vendor Statement
The PostgreSQL Global Development Group provides information on security vulnerability reporting, releases processes, and known vulnerability fixes at https://www.postgresql.org/support/security/.
Remediation
To remediate CVE-2025-1094, PostgreSQL users should upgrade to PostgreSQL 17.3, 16.7, 15.11, 14.16, or 13.19. For additional details, please see the PostgreSQL advisory.
Rapid7 customers
InsightVM and Nexpose customers will be able to assess their exposure to CVE-2025-1094 with an authenticated vulnerability check expected to be available in today’s (February 13) content release.
For CVE-2024-12356 affecting BeyondTrust Privileged Remote Access (PRA) and Remote Support (RS) products, InsightVM and Nexpose customers have been able to assess exposure with authenticated checks for Windows systems (Scan Engine only checks) as of the February 10, 2025 content release.
Disclosure timeline
January 27, 2025: Rapid7 makes initial contact with the PostgreSQL security team and discloses vulnerability details.
January 29, 2025: The PostgreSQL development group confirms the finding; Rapid7 and PostgreSQL developers agree on a coordinated disclosure date.
February 11, 2025: The PostgreSQL development group provides a CVE ID and affected versions.
As artificial intelligence continues to shape our world, understanding how to teach about AI has never been more important. Our new research seminar series brings together educators and researchers to explore approaches to AI and data science education. In the first seminar, we welcomed Shuchi Grover, Director of AI and Education Research at Looking Glass Ventures. Shuchi began by exploring the theme of teaching using AI, then moved on to discussing teaching about AI in K–12 (primary and secondary) education. She emphasised that it is crucial to teach about AI before using it in the classroom, and this blog post will focus on her insights in this area.
Shuchi Grover gave an insightful talk discussing how to teach about AI in K–12 education.
An AI literacy framework
From her research, Shuchi has developed a framework for teaching about AI that is structured as four interlocking components, each representing a key area of understanding:
Basic understanding of AI, which refers to foundational knowledge such as what AI is, types of AI systems, and the capabilities of AI technologies
Ethics and human–AI relationship, which includes the role of humans in regard to AI, ethical considerations, and public perceptions of AI
Computational thinking/literacy, which relates to how AI works, including building AI applications and training machine learning models
Data literacy, which addresses the importance of data, including examining data features, data visualisation, and biases
This framework shows the multifaceted nature of AI literacy, which involves an understanding of both technical aspects and ethical and societal considerations.
Shuchi’s framework for teaching about AI includes four broad areas.
Shuchi emphasised the importance of learning about AI ethics, highlighting the topic of bias. There are many ways that bias can be embedded in applications of AI and machine learning, including through the data sets that are used and the design of machine learning models. Shuchi discussed supporting learners to engage with the topic through exploring bias in facial recognition software, sharing activities and resources to use in the classroom that can prompt meaningful discussion, such as this talk by Joy Buolamwini. She also highlighted the Kapor Foundation’s Responsible AI and Tech Justice: A Guide for K–12 Education, which contains questions that educators can use with learners to help them to carefully consider the ethical implications of AI for themselves and for society.
Computational thinking and AI
In computer science education, computational thinking is generally associated with traditional rule-based programming — it has often been used to describe the problem-solving approaches and processes associated with writing computer programs following rule-based principles in a structured and logical way. However, with the emergence of machine learning, Shuchi described a need for computational thinking frameworks to be expanded to also encompass data-driven, probabilistic approaches, which are foundational for machine learning. This would support learners’ understanding and ability to work with the models that increasingly influence modern technology.
Example activities from research studies
Shuchi shared that a variety of pedagogies have been used in recent research projects on AI education, ranging from hands-on experiences, such as using APIs for classification, to discussions focusing on ethical aspects. You can find out more about these pedagogies in her award-winning paper Teaching AI to K-12 Learners: Lessons, Issues and Guidance. This plurality of approaches ensures that learners can engage with AI and machine learning in ways that are both accessible and meaningful to them.
Research projects exploring teaching about AI and machine learning have involved a range of different approaches.
Shuchi shared examples of activities from two research projects that she has led:
CS Frontiers engaged high school students in a number of activities involving using NetsBlox and accessing real-world data sets. For example, in one activity, students participated in data science activities such as creating data visualisations to answer questions about climate change.
AI & Cybersecurity for Teens explored approaches to teaching AI and machine learning to 13- to 15-year-olds through the use of cybersecurity scenarios. The project aimed to provide learners with insights into how machine learning models are designed, how they work, and how human decisions influence their development. An example activity guided students through building a classification model to analyse social media accounts to determine whether they may be bot accounts or accounts run by a human.
A screenshot from an activity to classify social media accounts
Closing thoughts
At the end of her talk, Shuchi shared some final thoughts addressing teaching about AI to K–12 learners:
AI learning requires contextualisation: Think about the data sets, ethical issues, and examples of AI tools and systems you use to ensure that they are relatable to learners in your context.
AI should not be a solution in search of a problem: Both teachers and learners need to be educated about AI before they start to use it in the classroom, so that they are informed consumers.
Join our next seminar
In our current seminar series, we are exploring teaching about AI and data science. Join us at our next seminar on Tuesday 11 March at 17:00–18:30 GMT to hear Lukas Höper and Carsten Schulte from Paderborn University discuss supporting middle school students to develop their data awareness.
To sign up and take part in the seminar, click the button below — we will then send you information about joining. We hope to see you there.
When a new platform suddenly becomes popular, it’s not uncommon to see it stress tested by malware authors and fraudsters. Many organizations are making the leap to Bluesky without necessarily understanding the potential threats to an account and the business should a compromise take place.
This blog explains how to secure your Bluesky account from security threats such as malware and phishing, as well as establishing your identity to help prevent fraud and impersonation.
We will discuss:
What is Bluesky: How it works, what you can do with your data, and why you can keep using it when it’s time to move on.
Security and privacy settings: How you can keep your corporate account safe from harm.
Using your domain for identity verification: Setting your organization’s domain as the username for both the main account and employees.
Content and moderation: Steering your corporate account away from dubious content.
If you’ve recently been tasked with guiding your organization to social media breakout Bluesky, read on to see how you can get your team set up securely.
What is Bluesky?
Bluesky is a social network platform built on the Authenticated Transfer Protocol (ATProto), an “open, decentralized network for building social applications.” One of the desired intentions of using this is that you own your own data. It can be moved to different services thanks to Decentralized Identifiers (DIDs), which keep your services and user identity clearly separated. In theory, should Bluesky go away, you’ll be able to port your data elsewhere and keep your social graph intact.
Security and privacy settings
Bluesky’s security options may appear to be on the modest side, with 3 settings available in the “Privacy and Security” tab:
2-factor authentication (2FA).
App passwords.
Logged-out visibility.
2FA: At time of writing, email is the only form of 2FA available. Enabling this option will result in email codes sent to your registered email address. These codes are required to be able to log into your account. To disable 2FA, you would need to approve a verification email sent to the same registered address.
This is not as robust an approach as using an authentication app or hardware key verification. If someone compromises your registered email address via phishing or malware, they’ll be able to disable email verification without you knowing and potentially hijack your account.
As a result, Rapid7 recommends you secure your registered email account with multi-factor authentication (MFA) alongside Single Sign-On (SSO).
2FA is still better than having no protection in place at all. In 2024, the US Securities and Exchange Commission (SEC) had its X account compromised because of a SIM swap attack, and the account was confirmed as having no 2FA enabled. Before the account could be recovered, a rogue post caused the price of Bitcoin to jump and then plummet in the space of a few minutes.
App passwords: These are codes generated by Bluesky which you can use for third-party apps, without having to give said apps your Bluesky password. The code can be deleted from your account at any time, and you can also specify whether or not the code grants access to your direct messages. Valid codes are 19 characters long, including 4 dashes, and can only be viewed at time of generation; if you don’t copy it, you’ll have to create a new one.
Logged-out visibility: Bluesky currently has no private account option — everything is public by default. This option requests that users be logged in before being able to access your content. A note of caution: Bluesky warns that “other apps may not honor this request.” It’s trivial to see content while not logged in, so if this is a deal breaker for your business, you may be better off waiting for more granular privacy controls.
Using your domain for identity verification
One of Bluesky’s core features is using DNS management to present the same user identity across the (eventually) federated Bluesky landscape. It makes use of ATProto to offer this functionality, so if you want to verify your on Bluesky account you’ll need to do it via one of your domains. The end result is that your username will be your organization’s web address, like so:
You can also offer subdomains to all of your employees, who will display as “@theirname.yourbusinessname.com” or similar.
This is useful in relation to verification and identity because closing a social media account often requires an exit plan. You can’t just abandon an account; it could end up being hijacked or forgotten about, with sensitive information lurking in direct messages. You can’t just delete it either, because anyone could grab your old username and use it for nefarious purposes.
Bluesky’s approach enables you to retain the same official username across multiple eligible platforms, and neatly sidesteps any issues arising from platform-specific verification schemes which may be changed, abandoned, or replaced entirely.
There are still some potential issues to consider here. Once the domain-centric username is enabled, your old account will be released back into the wild. This means someone else could register it, and pretend to be your organization. They could then mount phishing campaigns under your brand, or send out malware links under the guise of business-centric activities. You’ll need to be ready to register the old username via another secure email address, and then park it safely to one side while not forgetting to enable 2FA.
This is still largely an improvement on the fate of other more well-known verification programs. When X changed the blue check system to paid premium access, the social media platform endured a wave of “verified” fakes. Elsewhere in 2022, a fake (but verified) pharmaceutical company account claimed that insulin was now “free.” This incident caused the real company’s stock to fall by 4.37%, and even arguably caused multiple advertisers to leave the platform itself.
Content and moderation
Bluesky has a variety of moderation features to steer your account away from scams, phishing, and malware. In addition to being able to mute specific words and tags, Bluesky also makes use of moderation lists, i.e., packs containing multiple users related to specific topics. You’ll find lists for cryptocurrency spammers, pornography bots, content scrapers, and even imitation accounts.
Under the Content Filters setting (found under “Settings > Moderation”), you can select “show”, “warn”, or “hide” for a variety of content including adult content and graphic media. With the recent introduction of video, there’s also the option to not automatically play said content. Additionally, you can enable or disable external media players for services like YouTube, Vimeo, and SoundCloud.
You can take this one step further via “Moderation > Advanced”, where controls allow you to use an “Off, Warn, Hide” setting for a variety of topics such as threats, security concerns, misinformation, scams, and spam, as well as the possibility of many others outside of Bluesky’s pruning defaults. This is done via stackable “labels” through third-party labelling moderation services, designed to work on top of default Bluesky moderation settings. If you select the hide setting for “malware spammers”, then all third-party labelled malware spammer accounts will be hidden from view thus limiting your exposure to multiple security threats.
In 2021, Cardiff University researchers highlighted that a large number of drive-by malware links posted to social media tended to include negative and fear-laden messaging. Said messages were 114% times more likely to be reposted than more benign content. Bluesky’s moderation tools also allow you to filter out posts labelled as containing intolerance, rudeness, and threats. Enabling these moderation options will reduce the possibility of similar rogue posting strategies leading to compromise by malware, social engineering, or system exploits.
Go forth and be social
Security threats propagated through social media date back to the early days of MySpace and Orkut. Even back then, techniques had shifted away from trolling and pranks to data theft via banking trojans and the spread of phishing links via direct messaging. Today’s newer platforms have employed many lessons learned from the mistakes of their forefathers; however, they are not impenetrable.
By making use of the various security and identity settings highlighted above, you’ll be ensuring your business has a more robust approach to tackling data theft, malware infections, and wider network infiltration via the frequently vulnerable underbelly of social network platforms.
The ransomware landscape in 2024 continued to evolve at a rapid pace, outgrowing many of the trends we saw in 2023. Threat actors remained relentless and innovative, targeting organizations of all sizes and sectors. In this post, we’ll examine the latest data points, discuss notable groups, and estimate the potential impact on victims — helping security teams plan their defenses for the months ahead.
2024 by the Numbers
Mid last year, Rapid7 Labs released our Ransomware Radar Report highlighting key stats for the first half of 2024. Here is how 2024 played out as a whole:
Total number of leak site posts: 5,939
Number of active ransomware groups: 75
Average number of active groups per month: 45
Average ransom payment in Q3 2024: $479,237 (Source: Coveware)
Median ransom payment in Q3 2024: $200,000 (Source: Coveware)
Median percentage of companies that pay: 32% (Source: Coveware)
These numbers offer insight into just how expansive ransomware activity has become. While the overall figures are alarming, it’s the variety of actors and their ability to adapt that pose the greatest challenge for defenders.
Top 10 Ransomware Groups
Below are the 10 most prolific ransomware groups in 2024, ranked by the number of posts on leak sites:
While these numbers reflect public disclosures, many victims choose to negotiate privately, meaning the true scope could be significantly higher.
The Cl0p group recently disclosed exploiting a vulnerability in Cleo file transfer software, further illustrating how threat actors pivot between high-profile platform vulnerabilities with minimal downtime. While the group avoids using conventional ransomware payloads, they still rely on a leak site to extort payment from victims. Because Cl0p’s business model isn’t driven by fully encrypting victims’ data, the ransom amounts they demand — and ultimately receive — remain opaque, making it difficult to quantify their financial impact within the broader ransomware ecosystem.
Estimated Financial Impact
Based on the median payment amount of $200,000 cited above and the stat that about 32% of companies choose to pay, we can make **rough** estimates of total potential revenue generated by these groups.
Note that this calculation assumes:
Each post represents one victim.
32% of those victims pay.
Ransom is always $200,000.
These assumptions likely understate the actual impact, as some victims pay more (the average is $479,237). Even so, the total in 2024 could easily exceed $380 million in ransom paid.
Group
Posts
32% of Posts (Paying Victims)
Hypothetical Revenue (USD)
RansomHub
631
201.92
$40,384,000
LockBit
585
187.20
$37,440,000
Play
350
112
$22,400,000
Akira
262
83.84
$16,768,000
Hunters
234
74.88
$14,976,000
Medusa
207
66.24
$13,248,000
Qilin
189
60.48
$12,096,000
Black Basta
185
59.20
$11,840,000
Cactus
178
56.96
$11,392,000
BianLian
169
54.08
$10,816,000
Table Note: These calculations are illustrative only; actual outcomes will differ.
Trends and Observations
Following are four trends we’re seeing in Rapid7 Labs, based on the global threat intelligence we gather as well as input from our internal research and open source communities.
1. Proliferation of Groups: With over 75 active groups, it’s clear that the barrier to entry for launching ransomware campaigns remains relatively low. In addition, fragmented groups are splintering and rebranding, making it more difficult to track and mitigate.
2. Persistent Dominance: Teams like RansomHub, Akira, and Fog continue to reign at the top, demonstrating sophisticated extortion strategies and steady affiliate growth.
3. Increased Transparency on the Victim Side: More organizations are disclosing breaches to comply with emerging regulations as well as to maintain customer trust. These self-reports, combined with the data ransomware actors post as a form of extortion, can give us a view of the threat. Still, not all attacks become public, obfuscating the true scale of the ransomware problem.
4. Rise of Double and Triple Extortion: Threat actors often demand multiple payments for data release, encryption keys, and in some cases, to prevent DDoS attacks or direct contact with partners and clients.
An additional observation: LockBit remained active throughout 2024, even as it became the focus of significant law enforcement attention. In a recent case, a dual Russian-Israeli national was charged for allegedly serving as a LockBit developer — an accusation that centers on crafting malicious code, overseeing affiliate activities, and orchestrating ransomware attacks worldwide. The indictments underscore intensified global cooperation, with agencies from the United States and the United Kingdom coordinating to disrupt LockBit’s infrastructure and hold key figures accountable. While LockBit continues to operate, these collective enforcement actions have highlighted the value of cross-border partnerships in mitigating ransomware threats
Building Resilience
Now that we’ve looked at some numbers and trends, let’s examine how we can use these learnings to inform decision-making and enable conversations at the executive level:
– Prepare for Multiple Vectors: Ransomware attacks often begin with credential compromise, phishing campaigns, or exploitation of unpatched vulnerabilities. Build layered security defenses accordingly.
– Secure Collaborations: Ensure robust security protocols with third parties, given the reliance on supply chains and outsourced IT services.
– Incident Response Readiness: Create clear IR plans that include legal and public relations strategies. In addition, we highly recommend that companies hold twice-annual tabletop exercises to test the efficacy of their ransomware IR plans. Rapid containment and a well-managed response can help minimize financial and reputational damage.
– Ongoing Risk Assessment: Regularly revisit threat models, especially as top-tier groups (like RansomHub or Cl0p) adopt new tactics and expand their affiliate networks.
Planning Ahead
Looking at the big picture, the financial incentives for cybercriminals are undeniable. Even if only one-third of victims pay a median of $200,000, the potential revenue surpasses $380 million — and that’s likely just the tip of the iceberg. This underscores three critical points for defenders:
1. Defense in Depth: Organizations must invest in proactive measures, from user awareness training and robust patching to strict access control and secure backups.
2. Threat Intelligence: Regularly monitor emerging ransomware groups and tactics to tailor defenses. Knowing who is targeting your industry and their methods is essential.
3. Commanding Your Attack Surface:
In line with Rapid7’s emphasis on complete visibility and proactive security, it’s essential that organizations maintain a continuous view of their external footprint. This includes:
– Regular Scanning: With automated tools that identify internet-facing assets and highlight newly exposed services or vulnerabilities.
– Real-time Monitoring: For detecting changes in cloud environments, development pipelines, and system deployments.
– Holistic Patch Management: To prioritize fixes based on known exploits and potential impact to reduce windows of opportunity for attackers.
By commanding your attack surface, you can reduce the likelihood of unpatched systems and publicly exposed services becoming easy entry points for ransomware groups.
Conclusion
The 2024 ransomware landscape signals an ongoing escalation in the volume, variety, and financial impact of attacks. Groups like RansomHub, Akira, and Cl0p demonstrate how quickly affiliates can scale, while many new entrants take advantage of commoditized ransomware-as-a-service models. For organizations of all sizes, building resilience, staying informed, and preparing a strong response plan are critical steps in countering this persistent and evolving threat.
Disclaimer: The statistics and financial estimates shared in this blog are based on public data and should be considered general indicators rather than exact figures. Real-world incidents often involve factors that deviate from these simplified calculations.
Rogue employees present significant financial and cybersecurity risks to organizations. Rapid7 threat researchers and penetration testers are actively observing how malicious actors exploit hiring pipelines to infiltrate businesses. This blog highlights real-world tactics, including:
Insider Reconnaissance: Rogue applicants leveraging interviews to map office layouts, identify vulnerable devices, and even plant malware during site visits.
Tech Tricks: The use of deepfake technology, AI-generated photos, and VoIP to fake identities, bypass background checks, and mask locations.
North Korean Operations: State-sponsored actors posing as remote IT workers with fake resumes and stolen identities to fund illicit activities like missile development.
Hiring Weaknesses: Gaps in hiring processes—such as 43% of organizations skipping background checks—leaving businesses vulnerable to exploitation.
Read on to discover how to fortify your hiring and onboarding practices against this business risk.
Understanding the threat
Rogue employees have long been an issue for hiring departments. The Occupational Fraud 2024: A Report to the Nations study reported worldwide losses of more than $3.1 billion from 1,921 fraud cases. Other studies suggest that a typical business may lose as much as 5% of their annual revenue due to this problem. Sadly, the days of “only” having to worry about employees who show up late every day, or tell a few small tales on their work history record, are but a distant memory.
While organizations have been aware of the broad risk from bogus hires for some years, many are playing catch-up with hitherto unknown cybersecurity implications, particularly when state-sponsored actors are at the helm. For example, the FBI issued warnings about remote North Korean workers sending funds to the regime back in 2022, and estimated the number of fake North Korean workers to be in the thousands. These workers generate revenue for ballistic missile development, and according to a 2022 advisory “…may share access to virtual infrastructure, facilitate sales of data stolen by DPRK cyber actors, or assist with the DPRK’s money laundering and virtual currency transfers.”
Multiple examples of other DPRK-centric malicious employment fraud have gone public over the past year. Security education firm KnowBe4 highlighted the detection and removal of a North Korean worker, who’d bypassed various checks at the hiring stage and attempted to deploy malware. In October 2024, an unnamed firm revealed a similar ploy where a remote IT worker faked employment history, downloaded data, and issued a ransom demand. A few months prior to this, a Tennessee resident was arrested for his alleged involvement in a DPRK-centric laptop farm involving stolen identities and software installed without permission.
Even without North Korean involvement, there are many other ways rogue hires can cause security issues across a business. What else lies in wait for the unwary hiring department? More importantly, how can your organization combat these threats?
Rogue hire archetypes
Rogue hires fall into certain categories. Some are potentially more damaging to a business than others, with some overlap in terms of tactics and objectives. If you run into any of the below, then this is what you can expect them to be doing.
Malicious applicants: They may be working alone, or as part of a team to steal financial or customer data. The incentive may be financial or tied to data exfiltration, but the attack’s starting point could involve phishing, malware deployment, or BEC (business email compromise). They may intend to continue as a rogue employee if hired, or plan to compromise a business at the physical interview stage and never be seen again.
State-sponsored threat actors: These are commonly encountered as freelance workers from North Korea (albeit not exclusively), targeting positions in general IT support, mobile development, virtual currency exchanges, and firmware development across the US, Europe, and East Asia. They often present themselves as being Chinese, South Korean, and Japanese, while making use of forged or stolen identity documents. The FBI believes that most engage in non-malicious IT work, though some make use of privileged systems access to enable malicious cyber intrusions.
Proxy employees: They receive one-off or continued payments from a real would-be employee in return for fielding the interviews. The proxy may also take on work-related tasks on behalf of the employee assuming the latter is ultimately hired. The FBI has previously warned that deepfake technology is often used for multiple remote work scams, with available positions granting access to “…customer PII (personal identifying information), financial data, corporate IT databases and/or proprietary information.”
The malicious applicant game plan
Malicious applicants may operate alone, but have the potential to be backed by groups or nations with access to a wide range of resources denied to more common fraudsters. These resources could include fake or stolen identity documents, or unknown malware and vulnerabilities. Their interests are frequently financial, but may veer into data exfiltration should the opportunity arise.
Some rogue hires may not intend to take on employment; instead, the interview is used as a pretext for more direct reconnaissance and malware deployment. To illustrate how a typical malicious applicant could exploit an interview process, a Rapid7 penetration tester shared their experience of a workplace infiltration assignment that they participated in:
“Standard OSINT techniques revealed several open interviews available while I was going to be on location. I typically review job postings for technology stacks the organization uses, in case I want to fall back on phishing campaigns. I also vet for potentially vulnerable endpoint software which may be in use. They did at least have a sign-in sheet and a guard to lead me to the interview.”
It’s worth noting that a penetration tester’s objectives and methods will differ from more targeted, state-sponsored attempts to compromise organizations for specific espionage or other goals. However, there will be some overlap across different groups and individuals.
“I was taken through a variety of rooms and offices, granting me a handy mental map of layout, equipment, possible locations of important devices like servers or network access. During the interview, I asked if I could visit the bathroom and was permitted to walk freely in the office. An unattended logged-in device could be susceptible to malware on a USB stick; I might find physical employee directories, or post-it note passwords. I’m wearing office clothes. If there’s no lanyard requirement enforced, who would suspect anything?”
A networked printer could be a launchpad for malware outbreaks or firmware manipulation. An unguarded stack of expense paper could help to pave the way for BEC once the interviewee has left the premises.
Seemingly innocent interview questions about standard business operations can lead to password reset phishing campaigns, designed to resemble familiar email login pages and MFA (multi-factor authentication) systems. From here, the attacker can use compromised accounts to perform social engineering, or gain deeper access into the network.
Fictitious HR workers can be deployed to send malware-laden hiring or policy documents via email domains imitating the real thing. There is a very real possibility in this scenario of long-term compromise and data exfiltration. Should the attacker decide to escalate further, they may turn to ransomware and double extortion, leading to blackmail and public data exposure.
Now that we’ve highlighted some of the worst-case scenarios from an interview gone wrong, we’ll explore in detail where the hiring pipeline is at its most exposed.
The riskiest stages of hiring
Assuming you’ve posted your job description, the key stages of ingress for bogus hires are now exposed to the wild. The three main areas of interaction are:
Screening and shortlisting.
The interview(s).
Onboarding of successful hires.
Providing barriers to entry at each stage will increase the likelihood of catching rogue personnel.
This piecemeal approach to hiring gives opportunists a direct line to your organization’s most valuable assets. Those fake HR workers mentioned earlier could just as easily have been bogus IT administrators, responsible for rolling your patches out to users of your software. Now you’re a compromised third-party vendor, enabling the flow of a supply chain attack to multiple customers. They, too, could be at risk from further network ingress, malware, and data exfiltration—all because you failed to perform any background checks on a potential hire.
Beyond this, most businesses do not generally vet staff once employed. This is why precautions are still advisable during initial hire or onboarding. KnowBe4 issuing a limited access laptop to the North Korean IT hire is one reason for the would-be attacker’s lack of success.
Screening and shortlisting
What they want to do:
Present a convincing and comprehensive overview of experience and work history.
Spread a veneer of credibility on the resume that dissuades further investigation.
What you need to do:
Use an applicant tracking system (ATS). An ATS is invaluable for weeding out potential fakes. They’re very good at finding reused names, emails, or even phone numbers across multiple profiles. This is especially useful considering a typical job post can receive hundreds of applications an hour on LinkedIn alone.
Third-party background checks. Many services offer to take on the responsibility of background checks from the employer, with some all-in-one solutions offering 100+ types of background check.
Explore LinkedIn data. If you suspect the candidate’s photograph is a stock image or AI generated, reverse image search and AI checking tools can help. In the KnowBe4 incident, the fake employee used AI to alter a stock photograph. Note that many other tricks exist to bypass checks, such as flipping the photograph horizontally or altering the colors.
You should also consider the authenticity of the profile. Has it been created very recently but boasts many years of work? Does the candidate claim 5 to 10 years of experience despite having few or no reputable contacts in the industry you work in? Are recommendations from co-workers entirely absent?
The interview
In an ideal situation for fraud, fake employees want to:
Stay off camera.
Answer your questions via a third-party through headset or offscreen.
Use VoIP to mask their real location.
Avoid discussing anything related to their background.
The interview: what you need to do
Create phone and video rules. Insist on a VoIP-free phone call during the hiring process, whether landline or mobile. This, alongside other data gathered, can help you to decide if a candidate really is located in France, Belgium, or Scotland. For web calls, make camera interaction mandatory. Ask for blurred backgrounds (or similar features) to be disabled so you can see where the candidate really is.
Build a consistent picture. Are you permitted to use conferencing tools which allow you to view/log IP addresses or other relevant system information? Fraudsters (particularly proxy hires) use multiple people at different stages of the interview often separated by large distances. These small digital pointers could build up a very different picture of who you think you’re dealing with.
Dig into background details. Select 2 or 3 pieces of information from a resume. This could be their hometown, a previous employer, or perhaps their area of expertise. Ask about what it was like growing up in the city they mention, or places of interest they enjoy in their hometown. Faltering answers may be a big clue.
If multiple interviews are planned, record these answers and have subsequent interviewers reuse a few questions. If the candidate is making it up as they go, then the story will quickly fall to pieces.
Onboarding
Even if a rogue has bypassed screening and interviews, you still have a chance to catch them in the act. Here’s what you can do at this stage:
Ensure the device is running all required security tools, does not grant admin permissions, and provides access only to work-essential tools such as email, comms, and day-to-day necessities. The device should be “bare-bones” and not come with company data stored locally on the system.
Do not allow the new hire any facility to upload files outside of necessities such as old payslips, ID, proof of address/utility bills, and tax details.
If you use tools like Slack or Microsoft Teams, ensure the new hire is restricted from accessing channels they don’t need.
Someone who successfully passes the 3 interview steps above has a wealth of options at their disposal. They might immediately try to compromise systems or data before being discovered. Alternatively, they may spend weeks or months exfiltrating data and social engineering other employees. Initial knowledge of common business practices for laptops and remote security, system updates, and authentication can potentially make it easier for them to try and bypass measures in place. It’s a much better idea to not let them get anywhere near this stage in the first place.
Hire with confidence
Rogue workers of all types are a very real threat to your data security and business revenue. From security organizations to blockchain firms, anyone is potentially at risk from a bad hire. Adapting the above hiring practices and combining them with a defense-in-depth approach will help you proactively and confidently deal with these threats to your network, and the people using it.
As botnets continue to evolve, so do the techniques required to detect them. While Transport Layer Security (TLS) encryption is widely adopted for secure communications, botnets leverage TLS to obscure command-and-control (C2) traffic. These malicious actors often have identifiable characteristics embedded within their TLS certificates, opening a potential pathway for advanced detection techniques.
In first-of-its-kind research, Rapid7’s Dr. Stuart Millar, in collaboration with Kumar Shashwat, Francis Hahn and Prof. Xinming Ou, at the University of South Florida, studied the use of AI large language models (LLMs) to detect botnets’ use of TLS encryption by analyzing embedding similarities to weed out botnets within a sea of benign TLS certificates. The work was presented at AISec 2024 in Salt Lake City as part of the leading ACM CCS conference toward the end of last year, where previously Rapid7 collected the best paper award.
Botnets — networks of hacked devices that attackers control remotely — often use TLS encryption to hide their activity. This encryption keeps the traffic secure, making it challenging for traditional security tools to detect whether a device is part of a botnet. Millar and company found they could detect botnets by analyzing the unique characteristics in the TLS certificates that each server uses to identify itself, dramatically reducing the time and human effort required.
Large language models can represent text as embeddings, or numerical vectors that capture the meaning and structure of the text. These embeddings were used to create vector representations of the text in TLS certificates, such as the organization names and country codes listed on them. By projecting these representations into a vector space and then using a similarity search, any new certificate can first be compared to a known set of botnet and benign certificates, and then a decision made as to whether or not it is malicious.
They found that in using an open-source LLM called C-BERT, the model achieved an accuracy rate of 0.994, surpassing proprietary alternatives in accuracy, speed, and cost-efficiency. This means it could reliably distinguish between botnet and benign certificates far more effectively and efficiently than standard practices, which was confirmed through random sampling.
In order to simulate a real world scenario, the researchers tested the model on 150,000 TLS certificates. They found 13 certificates as potential botnets which, when verified against a malware detection service, yielded one certificate that was found to be malicious. This approach eliminated the time intensive and costly process of identifying malicious botnets manually.
The model was also able to identify zero-day botnets, or those that had not yet been documented before. By omitting certain known botnets during training and then testing with these omitted samples, they demonstrated that the model could still detect them, even without prior exposure.
Deploying this AI solution in a real-world environment offers cybersecurity teams a substantial advantage in botnet detection by reducing false positives and minimizing manual inspection. Future research aims to expand the range of certificate attributes used in embeddings, improve real-time processing capabilities, and integrate additional datasets for a broader scope. Explore the full research paper for an in-depth look at the methodology and results of an LLM-based approach to botnet TLS certificate detection.
Hopefully you received some cool smart technology, or maybe you just upgraded your smart camera or voice assistant to a newer model or version. If you upgraded to a new model or version, what is your plan for the old device? Is it still working or is it broken?
Either way, you will need to figure out what to do with it: Donate it, sell it online, or maybe dispose of it as electronic waste. Before you make up your mind, let’s think through a few things.
Have you done a factory reset?
The key reason you want to do a factory reset is to make sure the device is no longer customized according to your environment and that personal information such as WiFi passwords, email addresses, username and account passwords, and your name and home address are properly removed from the device prior to it leaving your hands.
Factory resets are accomplished in different ways, depending upon the device. For example, some devices have a button you press and hold, while others may use a mobile or web application to trigger the reset. I have also seen devices where you just cycle the power multiple times in sequence to reset the devices. Regardless of what the manufacturer’s recommended process is, it is very important that you follow it.
But what if the device appears to be broken? Well, if your old device truly is 100% dead, then there’s not much you can do about that. But the truth is, an IoT device may not be completely functioning yet it may still allow a factory reset to be done. For example, if the device appears to power up but doesn’t communicate correctly, you can try pushing and holding the reset button and see if the device resets (often indicated by the lights).
Now, let’s say the device has a web application online or a mobile application and it shows the device is online — such as a smart light bulb or an Amazon Echo — but you cannot get it to work correctly. For example, the LED lights on a smart bulb don’t light up or the Echo doesn’t respond to your voice. If the application is still showing the device is online, then chances are the network communication is still working, and the application may allow you to remote reset the device.
Again, if you can find a way to accomplish a factory reset, then you should do it.
What could go wrong?
What could happen if you don’t properly reset a device and then dispose of it by selling it or giving it to someone else, who may in turn sell the device?
Out of curiosity and an attempt to answer this question, I purchased a box full of previously owned Amazon Echos online. Many of them were supposed to be broken, with most of them marked “dead speakers.” With that said, I had an important question to answer. Did the owner use the Amazon Alexa online application to factory reset and remove the Echo device before selling or giving the device to the person who sold it to me? I proceeded to disassemble 10 of these devices and dumped their memory so that I could evaluate the results to see if any of them were still provisioned and contained any user data.
Out of the 10 devices I examined, 4 were found to still be provisioned. As a small example of the potential data accessible on these 4 devices, I conducted further examination and found these devices still containing the WiFi SSID and Pre-shared Key (PSK) for the user’s home networks. Having the PSK in hand can give a malicious actor access to the user’s home network.
To make matters worse, in one of the 4 provisioned devices, the user used his last name for the SSID and his home phone number for PSK. Using personally identifiable information in an SSID, such as a name and/or phone number, greatly increases the ease in tracing a device back to a specific person and physical location. In other words, I highly recommend you not do this.
In the case of the Amazon Echo specifically, critical data such as personal Amazon authentication account information is currently stored in encrypted storage on the devices; therefore, it would take more work for someone to gain access to that, but I would not say it is impossible. Also, it’s important to note that although Echo devices may be encrypting the user account information they store, not all smart products on the market follow those recommendations. So — once again — to reduce the risk of your data being compromised, it is important that you factory reset your devices prior to disposal.
The proliferation of consumer-grade IoT devices in business.
It’s important to point out that the issue I’ve been discussing here doesn’t just apply to general consumers but also to businesses. Often, we assume that consumer-grade IoT technologies are only used by home users when in fact businesses of all sizes can and do leverage consumer-based IoT technology in the workplace environment.
It’s common to see WiFi access points, smart TVs, smart cameras, TV streaming boxes, smart exercise equipment, consumer-grade printers, and yes, even smart voice assistants, being used within a number of organizations. For example, every year I build out exercises for DEF CON IoT Village to help expose people to, and train them on, various aspects of hardware hacking. I purchase devices on the secondary market for this training and every year at least 40-50% of the devices I’ve purchased have not been factory reset. On more than one occasion, I have even purchased blocks of devices from a single reseller to find that those devices were not factory reset and were still configured with data from an operational business.
Start the year off securely.
To summarize, here are the key takeaways from my experiment and the bigger conversation around disposing of old smart devices:
Business IT and security leaders should have clear, cradle-to-grave processes governing the IoT technologies purchased, so that the organization is not exposed to unnecessary risk. Cradle to grave covers initial installation and provisioning, ongoing maintenance, and, in the end, safe and secure disposal of the technology.
Consumers should make sure to do a proper factory reset prior to the disposal or resale of any smart devices. Keep in mind that even if the device appears to be broken, a factory reset is still often possible — see my guidance earlier in this blog.
If you cannot factory reset your device and you’re concerned about the data on the device, you can always change your SSID, PSK, and account password.
Finally, always remember to never dispose of your IoT technology in the trash, as landfills are not the proper place to send them. Instead, these devices should be sent to an electronic waste disposal option in your local area.
HTTP caching is conceptually simple: if the response to a request is in the cache, serve it, and if not, pull it from your origin, put it in the cache, and return it. When the response is old, you repeat the process. If you are worried about too many requests going to your origin at once, you protect it with a cache lock: a small program, possibly distinct from your cache, that indicates if a request is already going to your origin. This is called cache revalidation.
In this blog post, we dive into how cache revalidation works, and present a new approach based on probability. For every request going to the origin, we simulate a die roll. If it’s 6, the request can go to the origin. Otherwise, it stays stale to protect our origin from being overloaded. To see how this is built and optimised, read on.
Background
Let’s take the example of an online image library. When a client requests an image, the service first checks its cache to see if the resource is present. If it is, it returns it. If it is not, the image server processes the request, places the response into the cache for a day, and returns it. When the cache expires, the process is repeated.
Figure 1: Uncached request goes to the origin
Figure 2: Cached request stops at the cache
And this is where things get complex. The image of a cat might be quite popular. Let’s say it’s requested 10 times per second. Let’s also assume the image server cannot handle more than 1 request per second. After a day, the cache expires. 10 requests hit the service. Given there are no up-to-date items in cache, these 10 requests are going to go directly to the image server. This problem is known as cache stampede. When the image server sees these 10 requests all happening at the same time, it gets overloaded.
Figure 3: Image server overloaded upon cache expiration. This can happen to one or multiple users, across locations.
This all stops if the cache gets populated, as it can handle a lot more requests than the origin.
Figure 4: Cache is populated and can handle the load. The image server is healthy again.
In the following sections, we build this image service, see how it can prevent cache stampede with a cache lock, then dive into probabilistic cache revalidation, and its optimisation.
Setup
Let’s write this image service. We need an image, a server, and a cache. For the image we’re going to use a picture of my cat, Cloudflare Workers for the server, and the Cloudflare Cache API for caching.
Note to the reader: On purpose, we aren’t using Cloudflare KV or Cloudflare CDN Cache, because they already solve our cache validation problem by using a cache lock.
let cache = caches.default
const CACHE_KEY = new Request('https://cache.local/')
const CACHE_AGE_IN_S = 86_400 // 1 day

function cacheExpirationDate() {
  return new Date(Date.now() + 1000*CACHE_AGE_IN_S)
}

function fetchAndCache(ctx) {
  let response = await fetch('https://files.research.cloudflare.com/images/cat.jpg')
  response = new Response(
	await response.arrayBuffer(),
	{
  	  headers: {
  	    'Content-Type': response.headers.get('Content-Type'),
  	    'Expires': cacheExpirationDate().toUTCString(),
  	  },
	},
  )
  ctx.waitUntil(cache.put(CACHE_KEY, response.clone()))
  return response
}

export default {
  async fetch(request, env, ctx) {
	let cachedResponse = await cache.match(CACHE_KEY)
	if (cachedResponse) {
  	  return cachedResponse
	}
	return fetchAndCache(ctx)
  }
}
Codeblock 1: Image server with a non-collapsing cache
Expectation about cache revalidation
The image service is receiving 10 requests per second, and it caches images for a day. It’s reasonable to assume we would like to start revalidating the cache 5 minutes before it expires. The code evolves as follows:
let cache = caches.default
const CACHE_KEY = new Request('https://cache.local/')
const CACHE_AGE_IN_S = 86_400 // 1 day
const CACHE_REVALIDATION_INTERVAL_IN_S = 300

function cacheExpirationDate() {
  // Date constructor in workers takes Unix time in milliseconds
  // Date.now() returns time in milliseconds as well
  return new Date(Date.now() + 1000*CACHE_AGE_IN_S)
}

async function fetchAndCache(ctx) {
  let response = await fetch('https://files.research.cloudflare.com/images/cat.jpg')
  response = new Response(
	await response.arrayBuffer(),
	{
  	  headers: {
  	    'Content-Type': response.headers.get('Content-Type'),
  	    'Expires': cacheExpirationDate().toUTCString(),
  	  },
	},
  )
  ctx.waitUntil(cache.put(CACHE_KEY, response.clone()))
  return response
}

// Revalidation function added here
// This is were we are going to focus our effort: should the request be revalidated ?
function shouldRevalidate(expirationDate) {
  let remainingCacheTimeInS = (expirationDate.getTime() - Date.now()) / 1000

  return remainingCacheTimeInS <= CACHE_REVALIDATION_INTERVAL_IN_S
}

export default {
  async fetch(request, env, ctx) {
	let cachedResponse = await cache.match(CACHE_KEY)
	if (cachedResponse) {
       // revalidation happens only if the request was cached. Otherwise, the resource is fetched anyway
  	  if (shouldRevalidate()) {
    	    ctx.waitUntil(fetchAndCache(ctx))
  	  }
  	  return cachedResponse
	}
	return fetchAndCache(ctx)
  }
}
Codeblock 2: Image server with early-revalidation and a non-collapsing cache
That code works, and we can now revalidate 5 minutes in advance of cache expiration. However, instead of fetching the image from the origin server at expiration time, all requests are going to be made 5 minutes in advance, and that does not solve our cache stampede problem. This happens no matter if requests are coming to a single location or not, given the code above does not collapse requests.
To solve our cache stampede problem, we need the revalidation process to not send too many requests at the same time. Ideally, we would like only one request to be sent between expiration - 5min and expiration.
The usual solution: a cache lock
To make sure there is only one request at a time going to the origin server, the solution that’s usually deployed is a cache lock. The idea is that for a specific item, a cat picture in our case, requests to the origin try to obtain a lock. The request obtaining the lock can go to the origin, the others will serve stale content.
The lock has two methods: try_lock() and unlock.
* try_lock if the lock is free, take it and return true. If not, return false.
* unlock releases the lock.
import { WorkerEntrypoint } from 'cloudflare:workers'

class Lock extends WorkerEntryPoint {
  async try_lock(key) {
	let value = await this.ctx.storage.get(key)
	if (!value) {
  	  await this.ctx.storage.put(key, true)
  	  return true
	}
	return false
  }

  unlock() {
	return this.ctx.storage.delete(key)
  }
}
Codeblock 3: Lock service implemented with a Durable Object
That service can then be used as a cache lock.
// CACHE_LOCK is an instantiation of the above binding
// Assuming the above is deployed as a worker with name `lock`
// It can be bound in wrangler.toml as follows
// services = [ { binding = "CACHE_LOCK", service = "lock" } ]

const LOCK_KEY = "cat_image_service"

async function fetchAndCache(env, ctx) {
  let response = await fetch('...')
  ctx.waitUntil(env.CACHE_LOCK.unlock(LOCK_KEY))
  ...
}

function shouldRevalidate(env, expirationDate) {
  let remainingCacheTimeInS = (expirationDate.getTime() - Date.now()) / 1000

  // check if the expiry window is now, and then if the revalidation lock is available. if it is, take it
  return remainingCacheTimeInS <= CACHE_REVALIDATION_INTERVAL_IN_S && env.CACHE_LOCK.try_lock(LOCK_KEY)
}
Codeblock 4: Image server with early-revalidation and a cache using a cache-lock
Now you might say “Et voilà. No need for probabilities and mathematics. Peak engineering has triumphed.” And you might be right, in most cases. That’s why cache locks are so predominant: they are conceptually simple, deterministic for the same key, and scale well with predictable resource usage.
On the other hand, cache locks add latency and fallibility. To take ownership of a lock, cache revalidation has to contact the lock service. This service is shared across different processes, possibly different machines in different locations. Requests therefore take time. In addition, this service might be unavailable. Probabilistic cache revalidation does not suffer from these, given it does not reach out to an external service but rolls a die with the local randomness generator. It does so at the cost of not guaranteeing the number of requests going to the origin server: maybe zero for an extended period, maybe more than one. On average, this is going to be fine. But there can be border cases, similar to how one can roll a die 10 times and get 10 sixes. It’s unlikely, but not unrealistic, and certain services need that certainty. In the following sections, we dissect this approach.
First dive into probabilities given a stable request rate
A first approach is to reduce the number of requests going to the origin server. Instead of always sending a request to revalidate, we are going to send 1 out of 10. This means that instead of sending 10 requests per second when the cache is invalidated, we send 1 per second.
Because we don’t have a lock, we do that with probabilities. We set the probability of sending a request to the origin to be $p=\frac{1}{10}$. With a rate of 10 requests per second, after 1 second, the expectancy of a request being sent to the origin is $1-(1-p)^10=65\%$. We draw the evolution of the function $E(r, t)=1-(1-p)^{r \times t}$ representing the expectancy of a request being sent to the server over time. $r = 10$ and is the request rate.
Figure 5: Revalidation time $E(t)$ with $r=10$ and $p=\frac{1}{10}$. At time $t$, $E(t)$ is the probability that an early revalidation occurred.
The graph moves very quickly towards $1$. This means we might still have space to reduce the number of requests going to our origin server. We can set a lower probability, such as $p_2=\frac{1}{500}$ (1 request every 5 seconds on average). The graph looks as follows:
Figure 6: Revalidation time $E(t)$ with $r=10$ and $p=\frac{1}{500}$.
This looks great. Let’s implement it.
const CACHE_REVALIDATION_INTERVAL_IN_S = 300
const CACHE_REVALIDATION_PROBABILITY = 1/500

function shouldRevalidate(expirationDate) {
  let remainingCacheTimeInS = (expirationDate.getTime() - Date.now()) / 1000

  if (remainingCacheTimeInS > CACHE_REVALIDATION_INTERVAL_IN_S) {
	return false
  }
  if (remainingCacheTimeInS <= 0) {
	return true
  }
  return Math.random() < CACHE_REVALIDATION_PROBABILITY
}
Codeblock 5: Image server with early-revalidation and a probabilistic cache using uniform distribution
That’s it. If the cache is not close to expiration, we don’t revalidate. If the cache is expired, we revalidate. Otherwise, we revalidate based on a probability.
Adaptive cache revalidation
Until now, we assumed the picture of the cat received a stable request rate. However, for a real service, this does not necessarily hold. For instance, if instead of 10 requests per second, imagine the service receives only 1. The expectancy function does not look as good. After 5 minutes (300s), $E(r=1, t=300)=45\%$. On the other hand, if the image service is receiving 10,000 requests per second, $E(r=10000, t = 300) \approx 100\%$, but our server receives on average $10000 \times \frac{1}{500} = 20$ requests per second. It would be ideal to design a probability function that would adapt to the request rate.
That function would return a low probability when expiration time is far in the future, and increase over time such that the cache is revalidated before it expires. It would cap the request rate going to the origin server.
Let’s design the variation of probability $p$ over 5 minutes. When far from the expiration, the probability to revalidate should be low. This should help match the high request rate. For example, with a request rate of 10k requests per second, we would like the revalidation probability $p$ to be $\frac{1}{100000}$. This ensures the request rates seen by our server are going to be low on average, at about 1 request every 10 seconds. As time passes, we increase this probability to allow for revalidation even at a lower request rate.
Time to expiration $t$ (in s)
Revalidation probability $p$
Target request rate $r$ (in rps)
300
1/100000
10000
240
1/10000
1000
180
1/1000
100
120
1/100
10
60
1/10
1
0
1
–
Table 1: Variation of revalidation probability over time
For each of these intervals, there is a high likelihood that a request rate $r$ will trigger a cache revalidation, and low likelihood that a lower request rate will trigger it. If it does, it’s ok.
We can update our revalidation function as follows:
const CACHE_REVALIDATION_INTERVAL_IN_S = 300
const CACHE_REVALIDATION_PROBABILITY_PER_MIN = [1/100_000, 1/10_000, 1/1000, 1/100, 1/10, 1]

function shouldRevalidate(expirationDate) {
  let remainingCacheTimeInS = (expirationDate.getTime() - Date.now()) / 1000

  if (remainingCacheTimeInS > CACHE_REVALIDATION_INTERVAL_IN_S) {
	return false
  }
  if (remainingCacheTimeInS <= 0) {
	return true
  }
  let currentMinute = Math.floor(remainingCacheTimeInS/60)
  return Math.random() < CACHE_REVALIDATION_PROBABILITY_PER_MIN[currentMinute]
}
Codeblock 6: Image server with early-revalidation and a probabilistic cache using piecewise uniform distribution
Optimal cache stampede solution
There seems to be a lot of decisions going on here. To solve this, we can reference an academic paper written by A Vattani, T Chierichetti, and K Lowenstein in 2015 called Optimal Probabilistic Cache Stampede Prevention. If you read it, you’ll recognise that what we have been discussing until now is close to what the paper presents. For instance, both the cache revalidation algorithm structure and the early revalidation function look similar.
Figure 7: Probabilistic early expiration of a cache item as defined by Figure 2 of Optimal Probabilistic Cache Stampede Prevention paper. In our case, $\mathcal{D}=300$
One takeaway from the paper is that instead of discretization, with a probability from 0 to 60s, then from 60s to 120s, …, the probability function can be continuous. Instead of a fixed $p$, there is a function $p(t)$ of time $t$.
$p(t)=e^{-\lambda (expiry-t)}, \text{ with } expiry=300, \text{ and } t \in [0, 300]$
We call $\lambda$ the steepness parameter, and set it to $\frac{1}{300}$, $300$ being our early expiration gap.
The expectancy over time is $E(r, t)=1-e^{-rλt}$. This leads to the expectancy below for various request rates. You can note that when $r=1$, there is not a $100%$ chance that the request will be revalidated before expiry.
Figure 8: Revalidation time $E(t)$ for multiple $r$ with an exponential distribution.
This leads to the final code snippet:
const CACHE_REVALIDATION_INTERVAL_IN_S = 300
const REVALIDATION_STEEPNESS = 1/300

function shouldRevalidate(expirationDate) {
  let remainingCacheTimeInS = (expirationDate.getTime() - Date.now()) / 1000

  if (remainingCacheTimeInS > CACHE_REVALIDATION_INTERVAL_IN_S) {
	return false
  }
  if (remainingCacheTimeInS <= 0) {
	return true
  }
  // p(t) is evaluated here
  return Math.random() < Math.exp(-REVALIDATION_STEEPNESS*(CACHE_REVALIDATION_INTERVAL_IN_S-remainingCacheTimeInS)
}
Codeblock 7: Image server with early-revalidation and a probabilistic cache using exponential distribution
And that’s it. Given Date.now() has a granularity, and is not continuous, it would also be possible to discretise these functions, even though the gains are minimal. This is what we have done in a production worker implementation, where the number of requests is important. It is a service that benefits from caching for performance consideration, and that cannot use built-in stale-while-revalidate from within Cloudflare workers. Probabilistic cache stampede prevention is well-suited here, as no new component has to be built, and it performs well at different request rates.
Conclusion
We have seen how to solve cache stampede without a lock, its implementation, and why it is optimal. In the real world, you likely will not encounter this issue: either because it’s good enough to optimize your origin service to serve more requests, or because you can leverage a CDN cache. In fact, most HTTP caches provide an API that follows Cache Control, and likely have all the tools you need. This primitive is also built into certain products, such as Cloudflare KV.
If you have not done so, you can go and experiment with all the code snippets presented in this blog on the Cloudflare Workers Playground at cloudflareworkers.com.
AI, machine learning (ML), and data science infuse our daily lives, from the recommendation functionality on music apps to technologies that influence our healthcare, transport, education, defence, and more.
What jobs will be affected by AL, ML, and data science remains to be seen, but it is increasingly clear that students will need to learn something about these topics. There will be new concepts to be taught, new instructional approaches and assessment techniques to be used, new learning activities to be delivered, and we must not neglect the professional development required to help educators master all of this.
As AI and data science are incorporated into school curricula and teaching and learning materials worldwide, we ask: What’s the research basis for these curricula, pedagogy, and resource choices?
In 2024, we showcased researchers who are investigating how AI can be leveraged to support the teaching and learning of programming. But in 2025, we look at what should be taught about AI, ML, and data science in schools and how we should teach this.
Our 2025 seminar speakers — so far!
We are very excited that we have already secured several key researchers in the field.
On 21 January, Shuchi Grover will kick off the seminar series by giving an important overview of AI in the K–12 landscape, including developing both AI literacy and AI ethics. Shuchi will provide concrete examples and recently developed frameworks to give educators practical insights on the topic.
Our second session will focus on a teacher professional development (PD) programme to support the introduction of AI in Upper Bavarian schools. Franz Jetzinger from the Technical University of Munich will summarise the PD programme and share how teachers implemented the topic in their classroom, including the difficulties they encountered.
Again from Germany, Lukas Höper from Paderborn University, with Carsten Schulte will describe important research on data awareness and introduce a framework that is likely to be key for learning about data-driven technology. The pair will talk about the Data Awareness Framework and how it has been used to help learners explore, evaluate, and be empowered in looking at the role of data in everyday applications.
Our April seminar will see David Weintrop from the University of Maryland introduce, with his colleagues, a data science curriculum called API Can Code, aimed at high-school students. The group will highlight the strategies needed for integrating data science learning within students’ lived experiences and fostering authentic engagement.
Later in the year, Jesús Moreno-Leon from the University of Seville will help us consider the thorny but essential question of how we measure AI literacy. Jesús will present an assessment instrument that has been successfully implemented in several research studies involving thousands of primary and secondary education students across Spain, discussing both its strengths and limitations.
What to expect from the seminars
Our seminars are designed to be accessible to anyone interested in the latest research about AI education — whether you’re a teacher, educator, researcher, or simply curious. Each session begins with a presentation from our guest speaker about their latest research findings. We then move into small groups for a short discussion and exchange of ideas before coming back together for a Q&A session with the presenter.
Attendees of our 2024 series told us that they valued that the talks “explore a relevant topic in an informative way“, the “enthusiasm and inspiration”, and particularly the small-group discussions because they “are always filled with interesting and varied ideas and help to spark my own thoughts”.
The seminars usually take place on Zoom on the first Tuesday of each month at 17:00–18:30 GMT / 12:00–13:30 ET / 9:00–10:30 PT / 18:00–19:30 CET.
You can find out more about each seminar and the speakers on our upcoming seminar page. And if you are unable to attend one of our talks, you can watch them from our previous seminar page, where you will also find an archive of all of our previous seminars dating back to 2020.
How to sign up
To attend the seminars, please register here. You will receive an email with the link to join our next Zoom call. Once signed up, you will automatically be notified of upcoming seminars. You can unsubscribe from our seminar notifications at any time.
Artificial intelligence (AI) is transforming industries, and education is no exception. AI-driven development environments (AIDEs), like GitHub Copilot, are opening up new possibilities, and educators and researchers are keen to understand how these tools impact students learning to code.
In our 50th research seminar, Nicholas Gardella, a PhD candidate at the University of Virginia, shared insights from his research on the effects of AIDEs on beginner programmers’ skills.
Nicholas Gardella focuses his research on understanding human interactions with artificial intelligence-based code generators to inform responsible adoption in computer science education.
Measuring AI’s impact on students
AI tools are becoming a big part of software development, but what does that mean for students learning to code? As tools like GitHub Copilot become more common, it’s crucial to ask: Do these tools help students to learn better and work more effectively, especially when time is tight?
This is precisely what Nicholas’s research aims to identify by examining the impact of AIDEs on four key areas:
Performance (how well students completed the tasks)
Workload (the effort required)
Emotion (their emotional state during the task)
Self-efficacy (their belief in their own abilities to succeed)
Nicholas conducted his study with 17 undergraduate students from an introductory computer science course, who were mostly first-time programmers, with different genders and backgrounds.
By luckybusiness
The students completed programming tasks both with and without the assistance of GitHub Copilot. Nicholas selected the tasks from OpenAI’s human evaluation data set, ensuring they represented a range of difficulty levels. He also used a repeated measures design for the study, meaning that each student had the opportunity to program both independently and with AI assistance multiple times. This design helped him to compare individual progress and attitudes towards using AI in programming.
Less workload, more performance and self-efficacy in learning
The results were promising for those advocating AI’s role in education. Nicholas’s research found that participants who used GitHub Copilot performed better overall, completing tasks with less mental workload and effort compared to solo programming.
Nicholas used several measures to find out whether AIDEs affected students’ emotional states.
However, the immediate impact on students’ emotional state and self-confidence was less pronounced. Initially, participants did not report feeling more confident while coding with AI. Over time, though, as they became more familiar with the tool, their confidence in their abilities improved slightly. This indicates that students need time and practice to fully integrate AI into their learning process. Students increasingly attributed their progress not to the AI doing the work for them, but to their own growing proficiency in using the tool effectively. This suggests that with sustained practice, students can gain confidence in their abilities to work with AI, rather than becoming overly reliant on it.
Students who used AI tools seemed to improve more quickly than students who worked on the exercises themselves.
A particularly important takeaway from the talk was the reduction in workload when using AI tools. Novice programmers, who often find programming challenging, reported that AI assistance lightened the workload. This reduced effort could create a more relaxed learning environment, where students feel less overwhelmed and more capable of tackling challenging tasks.
However, while workload decreased, use of the AI tool did not significantly boost emotional satisfaction or happiness during the coding process. Nicholas explained that although students worked more efficiently, using the AI tool did not necessarily make coding a more enjoyable experience. This highlights a key challenge for educators: finding ways to make learning both effective and engaging, even when using advanced tools like AI.
AI as a tool for collaboration, not replacement
Nicholas’s findings raise interesting questions about how AI should be introduced in computer science education. While tools like GitHub Copilot can enhance performance, they should not be seen as shortcuts for learning. Students still need guidance in how to use these tools responsibly. Importantly, the study showed that students did not take credit for the AI tool’s work — instead, they felt responsible for their own progress, especially as they improved their interactions with the tool over time.
Rick Payne and team / Better Images of AI / Ai is… Banner / CC-BY 4.0
Students might become better programmers when they learn how to work alongside AI systems, using them to enhance their problem-solving skills rather than relying on them for answers. This suggests that educators should focus on teaching students how to collaborate with AI, rather than fearing that these tools will undermine the learning process.
Bridging research and classroom realities
Moreover, the study touched on an important point about the limits of its findings. Since the experiment was conducted in a controlled environment with only 17 participants, researchers need to conduct further studies to explore how AI tools perform in real-world classroom settings. For example, the role of internet usage plays a fundamental role. It will be relevant to understand how factors such as class size, prior varying experience, and the age of students affect their ability to integrate AI into their learning.
In the follow-up discussion, Nicholas also demonstrated how AI tools are becoming more accessible within browsers and how teachers can integrate AI-driven development environments more easily into their courses. By making AI technology more readily available, these tools are democratising access to advanced programming aids, enabling students to build applications directly in their web browsers with minimal setup.
The path ahead
Nicholas’s talk provided an insightful look into the evolving relationship between AI tools and novice programmers. While AI can improve performance and reduce workload, it is not a magic solution to all the challenges of learning to code.
Based on the discussion after the talk, educators should support students in developing the skills to use these tools effectively, shaping an environment where they can feel confident working with AI systems. The researchers and educators agreed that more research is needed to expand on these findings, particularly in more diverse and larger-scale educational settings.
As AI continues to shape the future of programming education, the role of educators will remain crucial in guiding students towards responsible and effective use of these technologies, as we are only at the beginning.
Join our next seminar
In our current seminar series, we are exploring how to teach programming with and without AI technology. Join us at our next seminar on Tuesday, 10 December at 17:00–18:30 GMT to hear Leo Porter (UC San Diego) and Daniel Zingaro (University of Toronto) discuss how they are working to create an introductory programming course for majors and non-majors that fully incorporates generative AI into the learning goals of the course.
To sign up and take part in the seminar, click the button below — we’ll then send you information about joining. We hope to see you there.
To provide the best experiences, we use technologies like cookies to store and/or access device information. Consenting to these technologies will allow us to process data such as browsing behavior or unique IDs on this site. Not consenting or withdrawing consent, may adversely affect certain features and functions.
Functional
Always active
The technical storage or access is strictly necessary for the legitimate purpose of enabling the use of a specific service explicitly requested by the subscriber or user, or for the sole purpose of carrying out the transmission of a communication over an electronic communications network.
Preferences
The technical storage or access is necessary for the legitimate purpose of storing preferences that are not requested by the subscriber or user.
Statistics
The technical storage or access that is used exclusively for statistical purposes.The technical storage or access that is used exclusively for anonymous statistical purposes. Without a subpoena, voluntary compliance on the part of your Internet Service Provider, or additional records from a third party, information stored or retrieved for this purpose alone cannot usually be used to identify you.
Marketing
The technical storage or access is required to create user profiles to send advertising, or to track the user on a website or across several websites for similar marketing purposes.