Tag Archives: Uncategorized

Align with best practices while creating infrastructure using CDK Aspects

Post Syndicated from Om Prakash Jha original https://aws.amazon.com/blogs/devops/align-with-best-practices-while-creating-infrastructure-using-cdk-aspects/

Organizations implement compliance rules for cloud infrastructure to ensure that they run the applications according to their best practices. They utilize AWS Config to determine overall compliance against the configurations specified in their internal guidelines. This is determined after the creation of cloud resources in their AWS account. This post will demonstrate how to use AWS CDK Aspects to check and align with best practices before the creation of cloud resources in your AWS account.

The AWS Cloud Development Kit (CDK) is an open-source software development framework that lets you define your cloud application resources using familiar programming languages, such as TypeScript, Python, Java, and .NET. The expressive power of programming languages to define infrastructure accelerates the development process and improves the developer experience.

AWS Config is a service that enables you to assess, audit, and evaluate your AWS resource configurations. Config continuously monitors and records your AWS resource configurations, as well as lets you automate the evaluation of recorded configurations against desired configurations. React to non-compliant resources and change their state either automatically or manually.

AWS Config helps customers run their workloads on AWS in a compliant manner. Some customers want to detect it up front, and then only provision compliant resources. Some configurations are important for the customers, so they might not provision resources without having them compliant from the beginning. The following are examples of such configurations:

  • Amazon S3 bucket must not be created with public access
  • Amazon S3 bucket encryption must be enabled
  • Database deletion protection must be enabled

CDK Aspects

CDK Aspects are a way to apply an operation to every construct in a given scope. The aspect could verify something about the state of the constructs, such as ensuring that all buckets are encrypted, or it could modify the constructs, such as by adding tags.

An aspect is a class that implements the IAspect interface shown below. Aspects employ visitor patter, which allows them to add a new operation to existing object structures without modifying the structures. In object-oriented programming and software engineering, the visitor design pattern is a method for separating an algorithm from an object structure on which it operates.

interface IAspect {
   visit(node: IConstruct): void;
}

An AWS CDK app goes through the following lifecycle phases when you call cdk deploy. These phases are also shown in the diagram below. Learn more about the CDK application lifecycle at this page.

  1. Construction
  2. Preparation
  3. Validation
  4. Synthesis
  5. Deployment

Understanding the CDK Deploy

CDK Aspects become relevant during the Prepare phase, where it makes the final modifications round in the constructs to setup their final state. This Prepare phase happens automatically. All constructs have their internal list of Aspects which are called and applied during the Prepare phase. Add your custom aspects in a scope by calling the following method:

Aspects.of(myConstruct).add(new SomeAspect(...));

When you call the method above, constructs add the custom aspects to the list of internal aspects. When CDK application goes through the Prepare phase, then AWS CDK calls the visit method of the object for the constructs and all of its children in top-down order. The visit method is free to change anything in the construct.

How to align with or check configuration compliance using CDK Aspects

In the following sections, you will see how to implement CDK Aspects for some common use cases when provisioning the cloud resources. CDK Aspects are extensible, and you can extend it for any suitable use cases in order to implement additional rules. Apply CDK Aspects not only to verify against the best practices, but also to update the state before resource creation.

The code below creates the cloud resources to be verified against the best practices or to be updated using Aspects in the following sections.

export class AwsCdkAspectsStack extends cdk.Stack {
  constructor(scope: cdk.Construct, id: string, props?: cdk.StackProps) {
    super(scope, id, props);

    //Create a VPC with 3 availability zones
    const vpc = new ec2.Vpc(this, 'MyVpc', {
      maxAzs: 3,
    });

    //Create a security group
    const sg = new ec2.SecurityGroup(this, 'mySG', {
      vpc: vpc,
      allowAllOutbound: true
    })

    //Add ingress rule for SSH from the public internet
    sg.addIngressRule(ec2.Peer.anyIpv4(), ec2.Port.tcp(22), 'SSH access from anywhere')

    //Launch an EC2 instance in private subnet
    const instance = new ec2.Instance(this, 'MyInstance', {
      vpc: vpc,
      machineImage: ec2.MachineImage.latestAmazonLinux(),
      instanceType: new ec2.InstanceType('t3.small'),
      vpcSubnets: {subnetType: ec2.SubnetType.PRIVATE},
      securityGroup: sg
    })

    //Launch MySQL rds database instance in private subnet
    const database = new rds.DatabaseInstance(this, 'MyDatabase', {
      engine: rds.DatabaseInstanceEngine.mysql({
        version: rds.MysqlEngineVersion.VER_5_7
      }),
      vpc: vpc,
      vpcSubnets: {subnetType: ec2.SubnetType.PRIVATE},
      deletionProtection: false
    })

    //Create an s3 bucket
    const bucket = new s3.Bucket(this, 'MyBucket')
  }
}

In the first section, you will see the use cases and code where Aspects are used to verify the resources against the best practices.

  1. VPC CIDR range must start with specific CIDR IP
  2. Security Group must not have public ingress rule
  3. EC2 instance must use approved AMI
//Verify VPC CIDR range
export class VPCCIDRAspect implements IAspect {
    public visit(node: IConstruct): void {
        if (node instanceof ec2.CfnVPC) {
            if (!node.cidrBlock.startsWith('192.168.')) {
                Annotations.of(node).addError('VPC does not use standard CIDR range starting with "192.168."');
            }
        }
    }
}

//Verify public ingress rule of security group
export class SecurityGroupNoPublicIngressAspect implements IAspect {
    public visit(node: IConstruct) {
        if (node instanceof ec2.CfnSecurityGroup) {
            checkRules(Stack.of(node).resolve(node.securityGroupIngress));
        }

        function checkRules (rules :Array<IngressProperty>) {
            if(rules) {
                for (const rule of rules.values()) {
                    if (!Tokenization.isResolvable(rule) && (rule.cidrIp == '0.0.0.0/0' || rule.cidrIp == '::/0')) {
                        Annotations.of(node).addError('Security Group allows ingress from public internet.');
                    }
                }
            }
        }
    }
}

//Verify AMI of EC2 instance
export class EC2ApprovedAMIAspect implements IAspect {
    public visit(node: IConstruct) {
        if (node instanceof ec2.CfnInstance) {
            if (node.imageId != 'approved-image-id') {
                Annotations.of(node).addError('EC2 Instance is not using approved AMI.');
            }
        }
    }
}

In the second section, you will see the use cases and code where Aspects are used to update the resources in order to make them compliant before creation.

  1. S3 bucket encryption must be enabled. If not, then enable
  2. S3 bucket versioning must be enabled. If not, then enable
  3. RDS instance must have deletion protection enabled. If not, then enable
//Enable versioning of bucket if not enabled
export class BucketVersioningAspect implements IAspect {
    public visit(node: IConstruct): void {
        if (node instanceof s3.CfnBucket) {
            if (!node.versioningConfiguration
                || (!Tokenization.isResolvable(node.versioningConfiguration)
                    && node.versioningConfiguration.status !== 'Enabled')) {
                Annotations.of(node).addInfo('Enabling bucket versioning configuration.');
                node.addPropertyOverride('VersioningConfiguration', {'Status': 'Enabled'})
            }
        }
    }
}

//Enable server side encryption for the bucket if no encryption is enabled
export class BucketEncryptionAspect implements IAspect {
    public visit(node: IConstruct): void {
        if (node instanceof s3.CfnBucket) {
            if (!node.bucketEncryption) {
                Annotations.of(node).addInfo('Enabling default S3 server side encryption.');
                node.addPropertyOverride('BucketEncryption', {
                        "ServerSideEncryptionConfiguration": [
                            {
                                "ServerSideEncryptionByDefault": {
                                    "SSEAlgorithm": "AES256"
                                }
                            }
                        ]
                    }
                )
            }
        }
    }
}

//Enable deletion protection of DB instance if not already enabled
export class RDSDeletionProtectionAspect implements IAspect {
    public visit(node: IConstruct) {
        if (node instanceof rds.CfnDBInstance) {
            if (! node.deletionProtection) {
                Annotations.of(node).addInfo('Enabling deletion protection of DB instance.');
                node.addPropertyOverride('DeletionProtection', true);
            }
        }
    }
}

Once you create the aspects, add them in a particular scope. That scope can be App, Stack, or Construct. In the example below, all aspects are added in the scope of Stack.

const app = new cdk.App();

const stack = new AwsCdkAspectsStack(app, 'MyApplicationStack');

Aspects.of(stack).add(new VPCCIDRAspect());
Aspects.of(stack).add(new SecurityGroupNoPublicIngressAspect());
Aspects.of(stack).add(new EC2ApprovedAMIAspect());
Aspects.of(stack).add(new RDSDeletionProtectionAspect());
Aspects.of(stack).add(new BucketEncryptionAspect());
Aspects.of(stack).add(new BucketVersioningAspect());

app.synth();

Once you call cdk deploy for the above code with aspects added, you will see the output below. The deployment will not continue until you resolve the errors and modifications conducted to make some of the resources compliant.

Screenshot displaying CDK errors.

Also utilize Aspects to make general modifications to the resources regardless of any compliance checks. For example, use it apply mandatory tags to every taggable resource. Tags is an example of implementing CDK Aspects in order to achieve this functionality. Utilizing the code below, add or remove a tag from all taggable resources and their children in the scope of a Construct.

Tags.of(myConstruct).add('key', 'value');
Tags.of(myConstruct).remove('key');

Below is an example of adding the Department tag to every resource created in the scope of Stack.

Tags.of(stack).add('Department', 'Finance');

CDK Aspects are ways for developers to align with and check best practices in their infrastructure configurations using the programming language of choice. AWS CloudFormation Guard (cfn-guard) provides compliance administrators with a simple, policy-as-code language to author policies and apply them to enforce best practices. Aspects are applied before generation of the CloudFormation template in Prepare phase, but cfn-guard is applied after generation of the CloudFormation template and before the Deploy phase. Developers can use Aspects or cfn-guard or both as part of a CI/CD pipeline to stop deployment of non-compliant resources, but CloudFormation Guard is the way to go when you want to enforce compliances and prevent deployment of non-compliant resources.

Conclusion

If you are utilizing AWS CDK to provision your infrastructure, then you can start using Aspects to align with best practices before resources are created. If you are utilizing CloudFormation template to manage your infrastructure, then you can read this blog to learn how to migrate the CloudFormation template to AWS CDK. After the migration, utilize CDK Aspects not only to evaluate compliance of your resources against the best practices, but also modify their state to make them compliant before they are created.

About the Authors

Om Prakash Jha

Om Prakash Jha is a Solutions Architect at AWS. He helps customers build well-architected applications on AWS in the retail industry vertical. He has more than a decade of experience in developing, designing, and architecting mission critical applications. His passion is DevOps and application modernization. Outside of his work, he likes to read books, watch movies, and explore part of the world with his family.

Target cross-platform Go builds with AWS CodeBuild Batch builds

Post Syndicated from Russell Sayers original https://aws.amazon.com/blogs/devops/target-cross-platform-go-builds-with-aws-codebuild-batch-builds/

Many different operating systems and architectures could end up as the destination for our applications. By using a AWS CodeBuild batch build, we can run builds for a Go application targeted at multiple platforms concurrently.

Cross-compiling Go binaries for different platforms is as simple as setting two environment variables $GOOS and $GOARCH, regardless of the build’s host platform. For this post we will build all of the binaries on Linux/x86 containers. You can run the command go tool dist list to see the Go list of supported platforms. We will build binaries for six platforms: Windows+ARM, Windows+AMD64, Linux+ARM64, Linux+AMD64, MacOS+ARM64, and Mac+AMD64. Note that AMD64 is a 64-bit architecture based on the Intel x86 instruction set utilized on both AMD and Intel hardware.

This post demonstrates how to create a single AWS CodeBuild project by using a batch build and a single build spec to create concurrent builds for the six targeted platforms. Learn more about batch builds in AWS CodeBuild in the documentation: Batch builds in AWS CodeBuild

Solution Overview

AWS CodeBuild is a fully managed continuous integration service that compiles source code, runs tests, and produces ready-to-deploy software packages. A batch build is utilized to run concurrent and coordinated builds. Let’s summarize the 3 different batch builds:

  • Build graph: defines dependencies between builds. CodeBuild utilizes the dependencies graph to run builds in an order that satisfies the dependencies.
  • Build list: utilizes a list of settings for concurrently run builds.
  • Build matrix: utilizes a matrix of settings to create a build for every combination.

The requirements for this project are simple – run multiple builds with a platform pair of $GOOS and $GOARCH environment variables. For this, a build list can be utilized. The buildspec for the project contains a batch/build-list setting containing every environment variable for the six builds.

batch:
  build-list:
    - identifier: build1
      env:
        variables:
          GOOS: darwin
          GOARCH: amd64
    - identifier: build2
      env:
        variables:
          GOOS: darwin
          GOARCH: arm64
    - ...

The batch build project will launch seven builds. See the build sequence in the diagram below.

  • Step 1 – A build downloads the source.
  • Step 2 – Six concurrent builds configured with six sets of environment variables from the batch/build-list setting.
  • Step 3 – Concurrent builds package a zip file and deliver to the artifacts Amazon Simple Storage Service (Amazon S3) bucket.

build sequence

The supplied buildspec file includes commands for the install and build phases. The install phase utilizes the phases/install/runtime-versions phase to set the version of Go is used in the build container.

The build phase contains commands to replace source code placeholders with environment variables set by CodeBuild. The entire list of environment variables is documented at Environment variables in build environments. This is followed by a simple go build to build the binaries. The application getting built is an AWS SDK for Go sample that will list the contents of an S3 bucket.

  build:
    commands:
      - mv listObjects.go listObjects.go.tmp
      - cat listObjects.go.tmp | envsubst | tee listObjects.go
      - go build listObjects.go

The artifacts sequence specifies the build outputs that we want packaged and delivered to the artifacts S3 bucket. The name setting creates a name for ZIP artifact. And the name combines the operating system, architecture environment variables, as well as the git commit hash. We use Shell command language to expand the environment variables, as well as command substitution to take the first seven characters of the git hash.

artifacts:
  files:
    - 'listObjects'
    - 'listObjects.exe'
    - 'README.md'
  name: listObjects_${GOOS}_${GOARCH}_$(echo $CODEBUILD_RESOLVED_SOURCE_VERSION | cut -c 1-7).zip 

Let’s walk through the CodeBuild project setup process. When the builds complete, we’ll see zip files containing the builds for each platform in an artifacts bucket.

Here is what we will create:

  • Create an S3 bucket to host the built artifacts.
  • Create the CodeBuild project, which needs to know:
    • Where the source is
    • The environment – a docker image and a service role
    • The location of the build spec
    • Batch configuration, a service role used to launch batch build groups
    • The artifact S3 bucket location

The code that is built is available on github here: https://github.com/aws-samples/cross-platform-go-builds-with-aws-codebuild. For an alternative to the manual walkthrough steps, a CloudFormation template that will build all of the resources is available in the git repository.

Prerequisites

For this walkthrough, you must have the following prerequisites:

Create the Artifacts S3 Bucket

An S3 bucket will be the destination of the build artifacts.

  • In the Amazon S3 console, create a bucket with a unique name. This will be the destination of your build artifacts.
    creating an s3 bucket

Create the AWS CodeBuild Project

  • In the AWS CodeBuild console, create a project named multi-arch-build.
    codebuild project name
  • For Source Provider, choose GitHub. Choose the Connect to GitHub button and follow the authorization screens. For repository, enter https://github.com/aws-samples/cross-platform-go-builds-with-aws-codebuild
    coldbuild select source
  • For Environment image, choose Managed Image. Choose the most recent Ubuntu image. This image contains every tool needed for the build. If you are interested in the contents of the image, then you can see the Dockerfile used to build the image in the GitHub repository here: https://github.com/aws/aws-codebuild-docker-images/tree/master/ubuntu
    Select environment
  • For Service Role, keep the suggested role name.
    Service role
  • For Build specifications, leave Buildspec name empty. This will use the default location buildspec.yml in the source root.
  • Under Batch configuration, enable Define batch configuration. For the Role Name, enter a name for the role: batch-multi-arch-build-service-role. There is an option here to combine artifacts. CodeBuild can combine the artifacts from batch builds into a single location. This isn’t needed for this build, as we want a zip to be created for each platform.
    Batch configuration
  • Under Artifacts, for Type, choose Amazon S3. For Bucket name, select the S3 bucket created earlier. This is where we want the build artifacts delivered. Choose the checkbox for Enable semantic versioning. This will tell CodeBuild to use the artifact name that was specified in the buildspec file.
    Artifacts
  • For Artifacts Packaging, choose Zip for CodeBuild to create a compressed zip from the build artifacts.
    Artifacts packaging
  • Create the build project, and start a build. You will see the DOWNLOAD_SOURCE build complete, followed by the six concurrent builds for each combination of OS and architecture.
    Builds in batch

Run the Artifacts

The builds have completed, and each packaged artifact has been delivered to the S3 bucket. Remember the name of the ZIP archive that was built using the buildspec file setting. This incorporated a combination of the operating system, architecture, and git commit hash.

Run the artifacts

Below, I have tested the artifact by downloading the zip for the operating system and architecture combination on three different platforms: MacOS/AMD64, an AWS Graviton2 instance, and a Microsoft Windows instance. Note the system information, unzipping the platform artifact, and the build specific information substituted into the Go source code.

Window1 Window2 Window3

Cleaning up

To avoid incurring future charges, delete the resources:

  • On the Amazon S3 console, choose the artifacts bucket created, and choose Empty. Confirm the deletion by typing ‘permanently delete’. Choose Empty.
  • Choose the artifacts bucket created, and Delete.
  • On the IAM console, choose Roles.
  • Search for batch-multi-arch-build-service-role and Delete. Search for codebuild-multi-arch-build-service-role and Delete.
  • Go to the CodeBuild console. From Build projects, choose multi-arch-build, and choose Delete build project.

Conclusion

This post utilized CodeBuild batch builds to build and package binaries for multiple platforms concurrently. The build phase used a small amount of scripting to replace placeholders in the code with build information CodeBuild makes available in environment variables. By overriding the artifact name using the buildspec setting, we created zip files built from information about the build. The zip artifacts were downloaded and tested on three platforms: Intel MacOS, a Graviton ARM based EC2 instance, and Microsoft Windows.

Features like this let you build on CodeBuild, a fully managed build service – and not have to worry about maintaining your own build servers.

Syniverse Hack

Post Syndicated from Bruce Schneier original https://www.schneier.com/blog/archives/2021/10/synaverse-hack.html

This is interesting:

A company that is a critical part of the global telecommunications infrastructure used by AT&T, T-Mobile, Verizon and several others around the world such as Vodafone and China Mobile, quietly disclosed that hackers were inside its systems for years, impacting more than 200 of its clients and potentially millions of cellphone users worldwide.

I’ve never heard of the company.

No details about the hack. It could be nothing. It could be a national intelligence service looking for information.

Growing Raspberry Pi’s presence in Africa

Post Syndicated from Ken Okolo original https://www.raspberrypi.org/blog/growing-raspberry-pis-presence-in-africa/

Raspberry Pi is growing our presence in Africa, and we’re keen to talk to businesses and educational organisations in the region to learn and to build partnerships.

Developing partnerships

As part of our investments in the region, I am delighted to join Raspberry Pi as Strategic Partnerships Manager, and initially I will be focusing on Nigeria, Kenya, Ghana, Tanzania, Rwanda, Cameroon, and Uganda. We will prioritise building a network of Raspberry Pi Approved Resellers and developing the right partnerships across industry and the education sector.

Uber's First Hackathon in Lagos
Uber’s First Hackathon in Lagos, Nigeria

Ensuring affordability with Raspberry Pi Approved Resellers

Over the last decade, Raspberry Pi has established a strong presence in the European and North American markets through partnership with our network of excellent Raspberry Pi Approved Resellers, providing access to affordable technology for the home, for business, and for education. Customers in many areas across Asia and the Pacific, too, have a choice of Approved Resellers offering Raspberry Pi products.

So far, our presence in Africa has been through our approved reseller PiShop in South Africa, which also has some commercial operations into other countries in southern Africa. Much of West, East, and North Africa has been underserved, and consumers in these regions have often obtained Raspberry Pi products via e-commerce websites in Europe, North America, and sometimes China. This has meant high costs of shipping products into Africa, which undermines our goal of ensuring affordability and availability across the continent. To address this, we have begun work to provide African customers with easy and reliable access to Raspberry Pi products at an affordable price point.

Supporting technological innovation

Africa has seen an explosion of technological advances in recent years, with investors funding innovative businesses built around technology. The continent is facing challenges ranging from accessibility to uninterrupted energy supplies, climate change, enabling agricultural potential, and building smart cities, and Africa’s mainly young population is meeting them head on.

Random Hacks of Kindness, a two-day hackathon. “RHoK Nairobi, Kenya” by Erik (HASH) Hersman / CC BY

While there is no shortage of innovative ideas, there is a real need for the right equipment and tools to support this ecosystem of makers, hobbyists, innovators, and entrepreneurs. Raspberry Pi is poised to close this gap.

Get in touch

Over the next couple of months, we will be planning a tour of our focus countries to visit the leadership of engineering associations and bodies, engaging with engineering student communities and maker spaces on the continent and building strategic alliances to deepen our inroads in the region. As Covid restrictions are eased, we will be visiting several countries on the continent to help us discover how we can best provide products and services that directly impact the region by ensuring access to low-cost, high-quality technology.

ken okolo crop
Ken Okolo

Could your African retail business meet our high standards for Raspberry Pi Approved Resellers, or could your educational organisation or your enterprise benefit from affordable desktop computers? Do your products require embedded computing power, or could your business grow with low-cost, low-power process monitoring or control? Get in touch with us by emailing: [email protected]. We’re looking forward to hearing from you.

The post Growing Raspberry Pi’s presence in Africa appeared first on Raspberry Pi.

Facebook Is Down

Post Syndicated from Bruce Schneier original https://www.schneier.com/blog/archives/2021/10/facebook-is-down.html

Facebook — along with Instagram and WhatsApp — went down globally today. Basically, someone deleted their BGP records, which made their DNS fall apart.

…at approximately 11:39 a.m. ET today (15:39 UTC), someone at Facebook caused an update to be made to the company’s Border Gateway Protocol (BGP) records. BGP is a mechanism by which Internet service providers of the world share information about which providers are responsible for routing Internet traffic to which specific groups of Internet addresses.

In simpler terms, sometime this morning Facebook took away the map telling the world’s computers how to find its various online properties. As a result, when one types Facebook.com into a web browser, the browser has no idea where to find Facebook.com, and so returns an error page.

In addition to stranding billions of users, the Facebook outage also has stranded its employees from communicating with one another using their internal Facebook tools. That’s because Facebook’s email and tools are all managed in house and via the same domains that are now stranded.

What I heard is that none of the employee keycards work, since they have to ping a now-unreachable server. So people can’t get into buildings and offices.

And every third-party site that relies on “log in with Facebook” is stuck as well.

The fix won’t be quick:

As a former network admin who worked on the internet at this level, I anticipate Facebook will be down for hours more. I suspect it will end up being Facebook’s longest and most severe failure to date before it’s fixed.

We all know the security risks of monocultures.

EDITED TO ADD (10/6): Good explanation of what happened. Shorter from Jonathan Zittrain: “Facebook basically locked its keys in the car.”

Cheating on Tests

Post Syndicated from Bruce Schneier original https://www.schneier.com/blog/archives/2021/10/cheating-on-tests.html

Interesting story of test-takers in India using Bluetooth-connected flip-flops to communicate with accomplices while taking a test.

What’s interesting is how this cheating was discovered. It’s not that someone noticed the communication devices. It’s that the proctors noticed that cheating test takers were acting hinky.

Friday Squid Blogging: Squid Game

Post Syndicated from Bruce Schneier original https://www.schneier.com/blog/archives/2021/10/friday-squid-blogging-squid-game.html

Netflix has a new series called Squid Game, about people competing in a deadly game for money. It has nothing to do with actual squid.

As usual, you can also use this squid post to talk about the security stories in the news that I haven’t covered.

Read my blog posting guidelines here.

A Death Due to Ransomware

Post Syndicated from Bruce Schneier original https://www.schneier.com/blog/archives/2021/10/a-death-due-to-ransomware.html

The Wall Street Journal is reporting on a baby’s death at an Alabama hospital in 2019, which they argue was a direct result of the ransomware attack the hospital was undergoing.

Amid the hack, fewer eyes were on the heart monitors — normally tracked on a large screen at the nurses’ station, in addition to inside the delivery room. Attending obstetrician Katelyn Parnell texted the nurse manager that she would have delivered the baby by caesarean section had she seen the monitor readout. “I need u to help me understand why I was not notified.” In another text, Dr. Parnell wrote: “This was preventable.”

[The mother] Ms. Kidd has sued Springhill [Medical Center], alleging information about the baby’s condition never made it to Dr. Parnell because the hack wiped away the extra layer of scrutiny the heart rate monitor would have received at the nurses’ station. If proven in court, the case will mark the first confirmed death from a ransomware attack.

What will be interesting to see is whether the courts rule that the hospital was negligent in its security, contributing to the success of the ransomware and by extension the death of the infant.

Springhill declined to name the hackers, but Allan Liska, a senior intelligence analyst at Recorded Future, said it was likely the Russianbased Ryuk gang, which was singling out hospitals at the time.

They’re certainly never going to be held accountable.

Another article.

I Am Not Satoshi Nakamoto

Post Syndicated from Bruce Schneier original https://www.schneier.com/blog/archives/2021/09/i-am-not-satoshi-nakamoto.html

This isn’t the first time I’ve received an e-mail like this:

Hey! I’ve done my research and looked at a lot of facts and old forgotten archives. I know that you are Satoshi, I do not want to tell anyone about this. I just wanted to say that you created weapons of mass destruction where niches remained poor and the rich got richer! When bitcoin first appeared, I was small, and alas, my family lost everything on this, you won’t find an apple in the winter garden, people only need strength and money. Sorry for the English, I am from Russia, I can write with errors. You are an amazingly intelligent person, very intelligent, but the road to hell is paved with good intentions. Once I dreamed of a better life for myself and my children, but this will never come …

I like the bit about “old forgotten archives,” by which I assume he’s referring to the sci.crypt Usenet group and the Cypherpunks mailing list. (I posted to the latter a lot, and the former rarely.)

For the record, I am not Satoshi Nakamoto. I suppose I could have invented the bitcoin protocols, but I wouldn’t have done it in secret. I would have drafted a paper, showed it to a lot of smart people, and improved it based on their comments. And then I would have published it under my own name. Maybe I would have realized how dumb the whole idea is. I doubt I would have predicted that it would become so popular and contribute materially to global climate change. In any case, I did nothing of the sort.

Read the paper. It doesn’t even sound like me.

Of course, this will convince no one who doesn’t already believe. Such is the nature of conspiracy theories.

The Proliferation of Zero-days

Post Syndicated from Bruce Schneier original https://www.schneier.com/blog/archives/2021/09/the-proliferation-of-zero-days.html

The MIT Technology Review is reporting that 2021 is a blockbuster year for zero-day exploits:

One contributing factor in the higher rate of reported zero-days is the rapid global proliferation of hacking tools.

Powerful groups are all pouring heaps of cash into zero-days to use for themselves — and they’re reaping the rewards.

At the top of the food chain are the government-sponsored hackers. China alone is suspected to be responsible for nine zero-days this year, says Jared Semrau, a director of vulnerability and exploitation at the American cybersecurity firm FireEye Mandiant. The US and its allies clearly possess some of the most sophisticated hacking capabilities, and there is rising talk of using those tools more aggressively.

[…]

Few who want zero-days have the capabilities of Beijing and Washington. Most countries seeking powerful exploits don’t have the talent or infrastructure to develop them domestically, and so they purchase them instead.

[…]

It’s easier than ever to buy zero-days from the growing exploit industry. What was once prohibitively expensive and high-end is now more widely accessible.

[…]

And cybercriminals, too, have used zero-day attacks to make money in recent years, finding flaws in software that allow them to run valuable ransomware schemes.

“Financially motivated actors are more sophisticated than ever,” Semrau says. “One-third of the zero-days we’ve tracked recently can be traced directly back to financially motivated actors. So they’re playing a significant role in this increase which I don’t think many people are giving credit for.”

[…]

No one we spoke to believes that the total number of zero-day attacks more than doubled in such a short period of time — just the number that have been caught. That suggests defenders are becoming better at catching hackers in the act.

You can look at the data, such as Google’s zero-day spreadsheet, which tracks nearly a decade of significant hacks that were caught in the wild.

One change the trend may reflect is that there’s more money available for defense, not least from larger bug bounties and rewards put forward by tech companies for the discovery of new zero-day vulnerabilities. But there are also better tools.

FBI Had the REvil Decryption Key

Post Syndicated from Bruce Schneier original https://www.schneier.com/blog/archives/2021/09/fbi-had-the-revil-decryption-key.html

The Washington Post reports that the FBI had a decryption key for the REvil ransomware, but didn’t pass it along to victims because it would have disrupted an ongoing operation.

The key was obtained through access to the servers of the Russia-based criminal gang behind the July attack. Deploying it immediately could have helped the victims, including schools and hospitals, avoid what analysts estimate was millions of dollars in recovery costs.

But the FBI held on to the key, with the agreement of other agencies, in part because it was planning to carry out an operation to disrupt the hackers, a group known as REvil, and the bureau did not want to tip them off. Also, a government assessment found the harm was not as severe as initially feared.

Fighting ransomware is filled with security trade-offs. This is one I had not previously considered.

Another news story.

Alaska’s Department of Health and Social Services Hack

Post Syndicated from Bruce Schneier original https://www.schneier.com/blog/archives/2021/09/alaskas-department-of-health-and-social-services-hack.html

Apparently, a nation-state hacked Alaska’s Department of Health and Social Services.

Not sure why Alaska’s Department of Health and Social Services is of any interest to a nation-state, but that’s probably just my failure of imagination.

Reduce costs and increase resource utilization of Apache Spark jobs on Kubernetes with Amazon EMR on Amazon EKS

Post Syndicated from Saurabh Bhutyani original https://aws.amazon.com/blogs/big-data/reduce-costs-and-increase-resource-utilization-of-apache-spark-jobs-on-kubernetes-with-amazon-emr-on-amazon-eks/

Amazon EMR on Amazon EKS is a deployment option for Amazon EMR that allows you to run Apache Spark on Amazon Elastic Kubernetes Service (Amazon EKS). If you run open-source Apache Spark on Amazon EKS, you can now use Amazon EMR to automate provisioning and management, and run Apache Spark up to three times faster. If you already use Amazon EMR, you can run Amazon EMR-based Apache Spark applications with other types of applications on the same Amazon EKS cluster to improve resource utilization and simplify infrastructure management.

Earlier this year, we launched support for pod templates in Amazon EMR on Amazon EKS to make it simpler to run Spark jobs on shared Amazon EKS clusters. A pod is a group of one or more containers, with shared storage and network resources, and a specification for how to run the containers. Pod templates are specifications that determine how each pod runs.

When you submit analytics jobs to a virtual cluster on Amazon EMR on EKS, Amazon EKS schedules the pods to execute the jobs. Your Amazon EKS cluster may have multiple node groups and instance types attached to it, and these pods could get scheduled on any of those Amazon Elastic Compute Cloud (Amazon EC2) instances. Organizations today have requirements to have better resource utilization, running jobs on specific instances based on instance type, amount of disk, disk IOPS, and more, and also control costs when jobs are submitted by multiple teams to a virtual cluster on Amazon EMR on EKS.

In this post, we look at support in Amazon EMR on EKS for Spark’s pod template feature and how to use that for resource isolation and controlling costs.

Pod templates have many uses cases:

  • Cost reduction – To reduce costs, you can schedule Spark driver pods to run on EC2 On-Demand Instances while scheduling Spark executor pods to run on EC2 Spot Instances.
  • Resource utilization – To increase resource utilization, you can support multiple teams running their workloads on the same Amazon EKS cluster. Each team gets a designated Amazon EC2 node group to run their workloads on. You can use pod templates to enforce scheduling on the relevant node groups.
  • Logging and monitoring – To improve monitoring, you can run a separate sidecar container to forward logs to your existing monitoring application.
  • Initialization – To run initialization steps, you can run a separate init container that is run before the Spark main container starts. You can have your init container run initialization steps, such as downloading dependencies or generating input data. Then the Spark main container consumes the data.

Prerequisites

To follow along with the walkthrough, ensure that you have the following resources created:

Solution overview

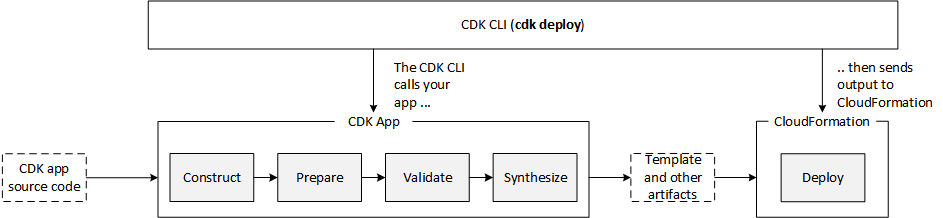
We look at a common use in organizations where multiple teams want to submit jobs and need resource isolation and cost reduction. In this post, we simulate two teams trying to submit jobs to the Amazon EMR on EKS cluster and see how to isolate the resources between them when running jobs. We also look at cost reduction by having the Spark driver run on EC2 On-Demand Instances while using Spark executors to run on EC2 Spot Instances. The following diagram illustrates this architecture.

To implement the solution, we complete the following high-level steps:

  1. Create an Amazon EKS cluster.
  2. Create an Amazon EMR virtual cluster.
  3. Set up IAM roles.
  4. Create pod templates.
  5. Submit Spark jobs.

Create an Amazon EKS cluster

To create your Amazon EKS cluster, complete the following steps:

  1. Create a new file (create-cluster.yaml) with the following contents:
apiVersion: eksctl.io/v1alpha5
kind: ClusterConfig

metadata:
  name: blog-eks-cluster
  region: us-east-1

managedNodeGroups:
  # On-Demand nodegroup for job submitter/controller
 - name:controller
   instanceTypes: ["m5.xlarge", "m5a.xlarge","m5d.xlarge"]
   desiredCapacity: 1

  # On-Demand nodegroup for team-1 Spark driver
 - name: team-1-driver
   labels: { team: team-1-spark-driver }
   taints: [{ key: team-1, value: general-purpose, effect: NoSchedule }]
   instanceTypes: ["m5.xlarge", "m5a.xlarge","m5d.xlarge"]
   desiredCapacity: 3

  # Spot nodegroup for team-1 Spark executors
 - name: team-1-executor
   labels: { team: team-1-spark-executor }
   taints: [{ key: team-1, value: general-purpose, effect: NoSchedule }]
   instanceTypes: ["m5.2xlarge", "m5a.2xlarge", "m5d.2xlarge"]
   desiredCapacity: 5
   spot: true

  # On-Demand nodegroup for team-2 Spark driver
 - name: team-2-driver
   labels: { team: team-2-spark-driver }
   taints: [{ key: team-2, value: compute-intensive , effect: NoSchedule }]
   instanceTypes: ["c5.xlarge", "c5a.xlarge", "c5d.xlarge"]
   desiredCapacity: 3

  # Spot nodegroup for team-2 Spark executors
 - name: team-2-executor
   labels: { team: team-2-spark-executor }
   taints: [{ key: team-2, value: compute-intensive , effect: NoSchedule }]
   instanceTypes: ["c5.2xlarge","c5a.2xlarge","c5d.2xlarge"]
   spot: true
   desiredCapacity: 5
  1. Install the AWS CLI.

You can use version 1.18.157 or later, or version 2.0.56 or later. The following command is for Linux OS:

curl "https://awscli.amazonaws.com/awscli-exe-linux-x86_64.zip" -o "awscliv2.zip"
unzip awscliv2.zip
sudo ./aws/install

For other operating systems, see Installing, updating, and uninstalling the AWS CLI version.

  1. Install eksctl (you must have eksctl 0.34.0 version or later):
curl --silent --location "https://github.com/weaveworks/eksctl/releases/latest/download/eksctl_$(uname -s)_amd64.tar.gz" | tar xz -C /tmp
sudo mv /tmp/eksctl /usr/local/bin
eksctl version
  1. Install kubectl:
curl -o kubectl https://amazon-eks.s3.us-west-2.amazonaws.com/1.18.8/2020-09-18/bin/linux/amd64/kubectl
chmod +x ./kubectl
sudo mv ./kubectl /usr/local/bin
  1. Create the Amazon EKS cluster using the create-cluster.yaml config file created in earlier steps:
eksctl create cluster -f create-cluster.yaml

This step launches an Amazon EKS cluster with five managed node groups: two node groups each for team-1 and team-2, one node group for Spark drivers using EC2 On-Demand capacity, while another one for Spark executors using EC2 Spot capacity.

After the Amazon EKS cluster is created, run the following command to check the node groups:

eksctl get nodegroups --cluster blog-eks-cluster

You should see a response similar to the following screenshot.

Create an Amazon EMR virtual cluster

We launch the EMR virtual cluster in the default namespace:

eksctl create iamidentitymapping \
    --cluster blog-eks-cluster \
    --namespace default \
    --service-name "emr-containers"
aws emr-containers create-virtual-cluster \
--name blog-emr-on-eks-cluster \
--container-provider '{"id": "blog-eks-cluster","type": "EKS","info": {"eksInfo": {"namespace": "default"}} }'

The command creates an EMR virtual cluster in the Amazon EKS default namespace and outputs the virtual cluster ID:

{
    "id": "me9zfn2lbt241wxhxg81gjlxb",
    "name": "blog-emr-on-eks-cluster",
    "arn": "arn:aws:emr-containers:us-east-1:xxxx:/virtualclusters/me9zfn2lbt241wxhxg81gjlxb"
}

Note the ID of the EMR virtual cluster to use to run the jobs.

Set up an IAM role

In this step, we create an Amazon EMR Spark job execution role with the following IAM policy:

{
    "Version": "2012-10-17",
    "Statement": [
        {
            "Effect": "Allow",
            "Action": [
                "s3:PutObject",
                "s3:GetObject",
                "s3:ListBucket"
            ],
            "Resource": "*"
        },
        {
            "Effect": "Allow",
            "Action": [
                "logs:PutLogEvents",
                "logs:CreateLogStream",
                "logs:DescribeLogGroups",
                "logs:DescribeLogStreams",
               "logs:CreateLogGroup"
            ],
            "Resource": [
                "arn:aws:logs:*:*:*"
            ]
        }
    ]
} 

Navigate to the IAM console to create the role. Let’s call the role EMR_EKS_Job_Execution_Role. For more information, see Creating IAM roles and Creating IAM Policies.

Set up the trust policy for the role with the following command:

aws emr-containers update-role-trust-policy \
       --cluster-name blog-eks-cluster \
       --namespace default \
       --role-name EMR_EKS_Job_Execution_Role

Enable IAM roles for service accounts (IRSA) on the Amazon EKS cluster:

eksctl utils associate-iam-oidc-provider --cluster blog-eks-cluster --approve

Create pod templates with node selectors and taints

In this step, we create pod templates for the Team-1 Spark driver pods and Spark executor pods, and templates for the Team-2 Spark driver pods and Spark executor pods.

Run the following commands to view the nodes corresponding to team-1 for the label team=team-1-spark-driver:

$ kubectl get nodes --selector team=team-1-spark-driver
NAME                              STATUS   ROLES    AGE    VERSION
ip-192-168-123-197.ec2.internal   Ready    <none>   107m   v1.20.4-eks-6b7464
ip-192-168-25-114.ec2.internal    Ready    <none>   107m   v1.20.4-eks-6b7464
ip-192-168-91-201.ec2.internal    Ready    <none>   107m   v1.20.4-eks-6b7464

Similarly, you can view the nodes corresponding to team-1 for the label team=team-1-spark-executor. You can repeat the same commands to view the nodes corresponding to team-2 by changing the role labels:

$ kubectl get nodes --selector team=team-1-spark-executor
NAME                             STATUS   ROLES    AGE    VERSION
ip-192-168-100-76.ec2.internal   Ready    <none>   107m   v1.20.4-eks-6b7464
ip-192-168-5-196.ec2.internal    Ready    <none>   67m    v1.20.4-eks-6b7464
ip-192-168-52-131.ec2.internal   Ready    <none>   78m    v1.20.4-eks-6b7464
ip-192-168-58-137.ec2.internal   Ready    <none>   107m   v1.20.4-eks-6b7464
ip-192-168-70-68.ec2.internal    Ready    <none>   107m   v1.20.4-eks-6b7464

You can constrain a pod so that it can only run on particular set of nodes. There are several ways to do this and the recommended approaches all use label selectors to facilitate the selection. In some circumstances, you may want to control which node the pod deploys to; for example, to ensure that a pod ends up on a machine with an SSD attached to it, or to co-locate pods from two different services that communicate a lot into the same availability zone.

nodeSelector is the simplest recommended form of node selection constraint. nodeSelector is a field of PodSpec. It specifies a map of key-value pairs. For the pod to be eligible to run on a node, the node must have each of the indicated key-value pairs as labels.

Taints are used to repel pods from specific nodes. Taints and tolerations work together to ensure that pods aren’t scheduled onto inappropriate nodes. One or more taints are applied to a node; this marks that the node shouldn’t accept any pods that don’t tolerate the taints. Amazon EKS supports configuring Kubernetes taints through managed node groups. Taints and tolerations are a flexible way to steer pods away from nodes or evict pods that shouldn’t be running. A few of the use cases are dedicated nodes: If you want to dedicate a set of nodes, such as GPU instances for exclusive use by a particular group of users, you can add a taint to those nodes, and then add a corresponding toleration to their pods.

nodeSelector provides a very simple way to attract pods to nodes with particular labels. Taints on the other hand are used to repel pods from specific nodes. You can apply taints to a team’s node group and use pod templates to apply a corresponding toleration to their workload. This ensures that only the designated team can schedule jobs to their node group. The label, using affinity, directs the application to the team’s designated node group and a toleration enables it to schedule over the taint. During the Amazon EKS cluster creation, we provided taints for each of the managed node groups. We create pod templates to specify both nodeSelector and tolerations to schedule work to a team’s node group.

  1. Create a new file team-1-driver-pod-template.yaml with the following contents:
apiVersion: v1
kind: Pod
spec:
  nodeSelector:
    team: team-1-spark-driver
  tolerations:
  - key: "team-1"
    operator: "Equal"
    value: "general-purpose"
    effect: "NoSchedule"
  containers:
  - name: spark-kubernetes-driver

Here, we specify nodeSelector as team: team-1-spark-driver. This makes sure that Spark driver pods are running on nodes created as part of node group team-1-spark-driver, which we created for Team-1. At the same time, we have a toleration for nodes tainted as team-1.

  1. Create a new file team-1-executor-pod-template.yaml with the following contents:
apiVersion: v1
kind: Pod
spec:
  nodeSelector:
    team: team-1-spark-executor
  tolerations:
  - key: "team-1"
    operator: "Equal"
    value: "general-purpose"
    effect: "NoSchedule"
  containers:
  - name: spark-kubernetes-executor

Here, we specify nodeSelector as team: team-1-spark-executor. This makes sure that Spark executor pods are running on nodes created as part of node group team-1-spark-executor, which we created for Team-1. At the same time, we have a toleration for nodes tainted as team-1.

  1. Create a new file team-2-driver-pod-template.yaml with the following contents:
apiVersion: v1
kind: Pod
spec:
  nodeSelector:
    team: team-2-spark-driver
  tolerations:
  - key: "team-2"
    operator: "Equal"
    value: "compute-intensive"
    effect: "NoSchedule"
  containers:
  - name: spark-kubernetes-driver

Here, we specify nodeSelector as team: team-2-spark-driver. This makes sure that Spark driver pods are running on nodes created as part of node group team-2-spark-driver, which we created for Team-2. At the same time, we have a toleration for nodes tainted as team-2.

  1. Create a new file team-2-executor-pod-template.yaml with the following contents.
apiVersion: v1
kind: Pod
spec:
nodeSelector:
team: team-2-spark-executor
tolerations:
- key: "team-2"
operator: "Equal"
value: "compute-intensive"
effect: "NoSchedule"
containers:
- name: spark-kubernetes-executor

Here, we specify nodeSelector as team: team-2-spark-executor. This makes sure that Spark executor pods are running on nodes created as part of node group team-2-spark-executor, which we created for Team-2. At the same time, we have a toleration for nodes tainted as team-2.

Save the preceding pod template files to your S3 bucket or refer to them using the following links:

  • s3://aws-data-analytics-workshops/emr-eks-workshop/scripts/team-1-driver-template.yaml
  • s3://aws-data-analytics-workshops/emr-eks-workshop/scripts/team-1-executor-template.yaml
  • s3://aws-data-analytics-workshops/emr-eks-workshop/scripts/team-2-driver-template.yaml
  • s3://aws-data-analytics-workshops/emr-eks-workshop/scripts/team-2-executor-template.yaml

Submit Spark jobs

In this step, we submit the Spark jobs and observe the output.

Substitute the values of the EMR virtual cluster ID, EMR_EKS_Job_Execution_Role ARN, and S3_Bucket:

export EMR_EKS_CLUSTER_ID=<<EMR virtual cluster id>>
export EMR_EKS_EXECUTION_ARN=<<EMR_EKS_Job_Execution_Role ARN>>
export S3_BUCKET=<<S3_Bucket>>

Submit the Spark job:

aws emr-containers start-job-run \
--virtual-cluster-id ${EMR_EKS_CLUSTER_ID} \
--name spark-pi-pod-template \
--execution-role-arn ${EMR_EKS_EXECUTION_ARN} \
--release-label emr-5.33.0-latest \
--job-driver '{
    "sparkSubmitJobDriver": {
        "entryPoint": "s3://aws-data-analytics-workshops/emr-eks-workshop/scripts/pi.py",
        "sparkSubmitParameters": "--conf spark.executor.instances=6 --conf spark.executor.memory=2G --conf spark.executor.cores=2 --conf spark.driver.cores=1"
        }
    }' \
--configuration-overrides '{
    "applicationConfiguration": [
      {
        "classification": "spark-defaults", 
        "properties": {
          "spark.driver.memory":"2G",
          "spark.kubernetes.driver.podTemplateFile":"s3://aws-data-analytics-workshops/emr-eks-workshop/scripts/team-1-driver-template.yaml",
          "spark.kubernetes.executor.podTemplateFile":"s3://aws-data-analytics-workshops/emr-eks-workshop/scripts/team-1-executor-template.yaml"
         }
      }
    ],
    "monitoringConfiguration": {
      "cloudWatchMonitoringConfiguration": {
        "logGroupName": "/emr-containers/jobs", 
        "logStreamNamePrefix": "blog-emr-eks"
      }, 
      "s3MonitoringConfiguration": {
        "logUri": "'"$S3_BUCKET"'/logs/"
      }
    }   
}'

After submitting the job, run the following command to check if the Spark driver and executor pods are created and running:

kubectl get pods

You should see output similar to the following:

$ kubectl get pods
NAME READY STATUS RESTARTS AGE
00000002uf8fut3g6o6-m4nfz 3/3 Running 0 25s
spark-00000002uf8fut3g6o6-driver 2/2 Running 0 14s

Let’s check the pods deployed on team-1’s On-Demand Instances:

$ for n in $(kubectl get nodes -l team=team-1-spark-driver --no-headers | cut -d " " -f1); do echo "Pods on instance ${n}:";kubectl get pods -n default --no-headers --field-selector spec.nodeName=${n} ; echo ; done

Pods on instance ip-192-168-27-110.ec2.internal:
No resources found in default namespace.

Pods on instance ip-192-168-59-167.ec2.internal:
spark-00000002uf8fut3g6o6-driver 2/2 Running 0 29s

Pods on instance ip-192-168-73-223.ec2.internal:
No resources found in default namespace.

Let’s check the pods deployed on team-1’s Spot Instances:

$ for n in $(kubectl get nodes -l team=team-1-spark-executor --no-headers | cut -d " " -f1); do echo "Pods on instance ${n}:";kubectl get pods -n default --no-headers --field-selector spec.nodeName=${n} ; echo ; done

Pods on instance ip-192-168-108-90.ec2.internal:
No resources found in default namespace.

Pods on instance ip-192-168-39-31.ec2.internal:
No resources found in default namespace.

Pods on instance ip-192-168-87-75.ec2.internal:
pythonpi-1623711779860-exec-3 0/2 Running 0 27s
pythonpi-1623711779937-exec-4 0/2 Running 0 26s

Pods on instance ip-192-168-88-145.ec2.internal:
pythonpi-1623711779748-exec-2 0/2 Running 0 27s

Pods on instance ip-192-168-92-149.ec2.internal:
pythonpi-1623711779097-exec-1 0/2 Running 0 28s
pythonpi-1623711780071-exec-5 0/2 Running 0 27s

When the executor pods are running, you should see output similar to the following:

$ kubectl get pods
NAME READY STATUS RESTARTS AGE
00000002uf8fut3g6o6-m4nfz 3/3 Running 0 56s
pythonpi-1623712009087-exec-1 0/2 Running 0 2s
pythonpi-1623712009603-exec-2 0/2 Running 0 2s
pythonpi-1623712009735-exec-3 0/2 Running 0 2s
pythonpi-1623712009833-exec-4 0/2 Running 0 2s
pythonpi-1623712009945-exec-5 0/2 Running 0 1s
spark-00000002uf8fut3g6o6-driver 2/2 Running 0 45s

To check the status of the jobs on Amazon EMR console, choose the cluster on the Virtual Clusters page. You can also check the Spark History Server by choosing View logs.

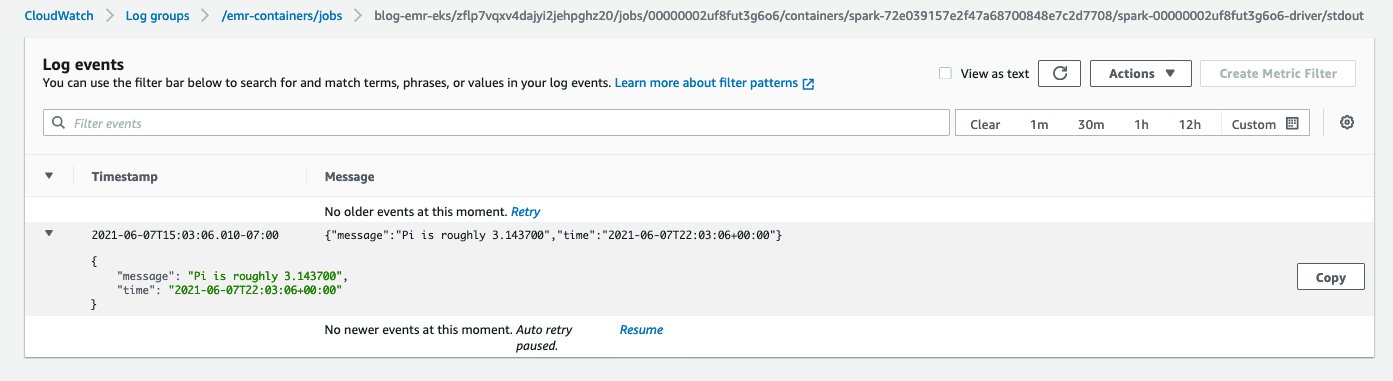
When the job is complete, go to Amazon CloudWatch Logs and check the output by choosing the log (/emr-containers/jobs/<<xxx-driver>>/stdout) on the Log groups page. You should see output similar to the following screenshot.

Now submit the Spark job as team-2 and specify the pod template files pointing to team-2’s driver and executor pod specifications and observe where the pods are created:

aws emr-containers start-job-run \
--virtual-cluster-id ${EMR_EKS_CLUSTER_ID} \
--name spark-pi-pod-template \
--execution-role-arn ${EMR_EKS_EXECUTION_ARN} \
--release-label emr-5.33.0-latest \
--job-driver '{
    "sparkSubmitJobDriver": {
        "entryPoint": "s3://aws-data-analytics-workshops/emr-eks-workshop/scripts/pi.py",
        "sparkSubmitParameters": "--conf spark.executor.instances=6 --conf spark.executor.memory=2G --conf spark.executor.cores=2 --conf spark.driver.cores=1"
        }
    }' \
--configuration-overrides '{
    "applicationConfiguration": [
      {
        "classification": "spark-defaults", 
        "properties": {
          "spark.driver.memory":"2G",
          "spark.kubernetes.driver.podTemplateFile":"s3://aws-data-analytics-workshops/emr-eks-workshop/scripts/team-2-driver-template.yaml",
          "spark.kubernetes.executor.podTemplateFile":"s3://aws-data-analytics-workshops/emr-eks-workshop/scripts/team-2-executor-template.yaml"
         }
      }
    ],
    "monitoringConfiguration": {
      "cloudWatchMonitoringConfiguration": {
        "logGroupName": "/emr-containers/jobs", 
        "logStreamNamePrefix": "blog-emr-eks"
      }, 
      "s3MonitoringConfiguration": {
        "logUri": "'"$S3_BUCKET"'/logs/"
      }
    }   
}'

We can check the status of the job on the Amazon EMR console and also by checking the CloudWatch logs.

Now, let’s run a use case where Team-1 doesn’t specify the correct toleration in the Spark driver’s pod template. We use the following pod template. As per the toleration specification, Team-1 is trying to schedule a Spark driver pod on nodes with label team-1-spark-driver and also wants it to get scheduled over nodes tainted as team-2. Because team-1 doesn’t have any nodes with that specification, we should see an error.

apiVersion: v1
kind: Pod
spec:
  nodeSelector:
    team: team-1-spark-driver
  tolerations:
  - key: "team-2"
    operator: "Equal"
    value: "compute-intensive"
    effect: "NoSchedule"
  containers:
  - name: spark-kubernetes-driver

Submit the Spark job using this new pod template:

aws emr-containers start-job-run \
--virtual-cluster-id ${EMR_EKS_CLUSTER_ID} \
--name spark-pi-pod-template \
--execution-role-arn ${EMR_EKS_EXECUTION_ARN} \
--release-label emr-5.33.0-latest \
--job-driver '{
    "sparkSubmitJobDriver": {
        "entryPoint": "s3://aws-data-analytics-workshops/emr-eks-workshop/scripts/pi.py",
        "sparkSubmitParameters": "--conf spark.executor.instances=6 --conf spark.executor.memory=2G --conf spark.executor.cores=2 --conf spark.driver.cores=1"
        }
    }' \
--configuration-overrides '{
    "applicationConfiguration": [
      {
        "classification": "spark-defaults", 
        "properties": {
          "spark.driver.memory":"2G",
          "spark.kubernetes.driver.podTemplateFile":"s3://aws-data-analytics-workshops/emr-eks-workshop/scripts/team-1-driver-template-negative.yaml",
          "spark.kubernetes.executor.podTemplateFile":"s3://aws-data-analytics-workshops/emr-eks-workshop/scripts/team-1-executor-template.yaml"
         }
      }
    ],
    "monitoringConfiguration": {
      "cloudWatchMonitoringConfiguration": {
        "logGroupName": "/emr-containers/jobs", 
        "logStreamNamePrefix": "blog-emr-eks"
      }, 
      "s3MonitoringConfiguration": {
        "logUri": "'"$S3_BUCKET"'/logs/"
      }
    }   
}'

Run the following command to check the status of the Spark driver pod:

$ kubectl get pods
NAME READY STATUS RESTARTS AGE
00000002uott6onmu8p-7t64m 3/3 Running 0 36s
spark-00000002uott6onmu8p-driver 0/2 Pending 0 25s

Let’s describe the driver pod to check the details. You should notice a failed event similar to Warning FailedScheduling 28s (x3 over 31s) default-scheduler 0/17 nodes are available: 8 node(s) had taint {team-1: general-purpose}, that the pod didn't tolerate, 9 node(s) didn't match Pod's node affinity

$ kubectl describe pod <<driver-pod-name>>
Name:           spark-00000002uott6onmu8p-driver
Namespace:      default
......
QoS Class:       Burstable
Node-Selectors:  team=team-1-spark-driver
Tolerations:     node.kubernetes.io/not-ready:NoExecute op=Exists for 300s
                 node.kubernetes.io/unreachable:NoExecute op=Exists for 300s
                 team-2=compute-intensive:NoSchedule
Events:
  Type     Reason            Age                From               Message
  ----     ------            ----               ----               -------
  Warning  FailedScheduling  28s (x3 over 31s)  default-scheduler  0/17 nodes are available: 8 node(s) had taint {team-1: general-purpose}, that the pod didn't tolerate, 9 node(s) didn't match Pod's node affinity..

This shows that if the pod template doesn’t have the right tolerations, the tainted nodes don’t tolerate the pod and don’t schedule over those nodes.

Clean up

Don’t forget to clean up the resources you created to avoid any unnecessary charges.

  1. Delete all the virtual clusters that you created:
#List all the virtual cluster ids
aws emr-containers list-virtual-clusters
#Delete virtual cluster by passing virtual cluster id
aws emr-containers delete-virtual-cluster —id <virtual-cluster-id>
  1. Delete the Amazon EKS cluster:
eksctl delete cluster blog-eks-cluster
  1. Delete the EMR_EKS_Job_Execution_Role role and policies.

Summary

In this post, we saw how to create an Amazon EKS cluster, configure Amazon EKS managed node groups, create an EMR virtual cluster on Amazon EKS, and submit Spark jobs. With pod templates, we saw how to manage resource isolation between various teams when submitting jobs and also learned how to reduce cost by running Spark driver pods on EC2 On-Demand Instances and Spark executor pods on EC2 Spot Instances.

To get started with pod templates, try out the Amazon EMR on EKS workshop or see the following resources:


About the Author

Saurabh Bhutyani is a Senior Big Data specialist solutions architect at Amazon Web Services. He is an early adopter of open source Big Data technologies. At AWS, he works with customers to provide architectural guidance for running analytics solutions on Amazon EMR, Amazon Athena, AWS Glue, and AWS Lake Formation