Tag Archives: Uncategorized

Security Vulnerabilities in Covert CIA Websites

Post Syndicated from Bruce Schneier original https://www.schneier.com/blog/archives/2022/09/security-vulnerabilities-in-covert-cia-websites.html

Back in 2018, we learned that covert system of websites that the CIA used for communications was compromised by—at least—China and Iran, and that the blunder caused a bunch of arrests, imprisonments, and executions. We’re now learning that the CIA is still “using an irresponsibly secured system for asset communication.”

Citizen Lab did the research:

Using only a single website, as well as publicly available material such as historical internet scanning results and the Internet Archive’s Wayback Machine, we identified a network of 885 websites and have high confidence that the United States (US) Central Intelligence Agency (CIA) used these sites for covert communication.

The websites included similar Java, JavaScript, Adobe Flash, and CGI artifacts that implemented or apparently loaded covert communications apps. In addition, blocks of sequential IP addresses registered to apparently fictitious US companies were used to host some of the websites. All of these flaws would have facilitated discovery by hostile parties.

[…]

The bulk of the websites that we discovered were active at various periods between 2004 and 2013. We do not believe that the CIA has recently used this communications infrastructure. Nevertheless, a subset of the websites are linked to individuals who may be former and possibly still active intelligence community employees or assets:

  • Several are currently abroad
  • Another left mainland China in the timeframe of the Chinese crackdown
  • Another was subsequently employed by the US State Department
  • Another now works at a foreign intelligence contractor

Citizen Lab is not publishing details, of course.

When I was a kid, I thought a lot about being a spy. And this, right here, was the one thing I worried about. It didn’t matter how clever and resourceful I was. If my handlers were incompetent, I was dead.

Another news article.

EDITED TO ADD (10/2): Slashdot thread.

Differences in App Security/Privacy Based on Country

Post Syndicated from Bruce Schneier original https://www.schneier.com/blog/archives/2022/09/differences-in-app-security-privacy-based-on-country.html

Depending on where you are when you download your Android apps, it might collect more or less data about you.

The apps we downloaded from Google Play also showed differences based on country in their security and privacy capabilities. One hundred twenty-seven apps varied in what the apps were allowed to access on users’ mobile phones, 49 of which had additional permissions deemed “dangerous” by Google. Apps in Bahrain, Tunisia and Canada requested the most additional dangerous permissions.

Three VPN apps enable clear text communication in some countries, which allows unauthorized access to users’ communications. One hundred and eighteen apps varied in the number of ad trackers included in an app in some countries, with the categories Games, Entertainment and Social, with Iran and Ukraine having the most increases in the number of ad trackers compared to the baseline number common to all countries.

One hundred and three apps have differences based on country in their privacy policies. Users in countries not covered by data protection regulations, such as GDPR in the EU and the California Consumer Privacy Act in the U.S., are at higher privacy risk. For instance, 71 apps available from Google Play have clauses to comply with GDPR only in the EU and CCPA only in the U.S. Twenty-eight apps that use dangerous permissions make no mention of it, despite Google’s policy requiring them to do so.

Research paper: “A Large-scale Investigation into Geodifferences in Mobile Apps“:

Abstract: Recent studies on the web ecosystem have been raising alarms on the increasing geodifferences in access to Internet content and services due to Internet censorship and geoblocking. However, geodifferences in the mobile app ecosystem have received limited attention, even though apps are central to how mobile users communicate and consume Internet content. We present the first large-scale measurement study of geodifferences in the mobile app ecosystem. We design a semi-automatic, parallel measurement testbed that we use to collect 5,684 popular apps from Google Play in 26 countries. In all, we collected 117,233 apk files and 112,607 privacy policies for those apps. Our results show high amounts of geoblocking with 3,672 apps geoblocked in at least one of our countries. While our data corroborates anecdotal evidence of takedowns due to government requests, unlike common perception, we find that blocking by developers is significantly higher than takedowns in all our countries, and has the most influence on geoblocking in the mobile app ecosystem. We also find instances of developers releasing different app versions to different countries, some with weaker security settings or privacy disclosures that expose users to higher security and privacy risks. We provide recommendations for app market proprietors to address the issues discovered.

Cold War Bugging of Soviet Facilities

Post Syndicated from Bruce Schneier original https://www.schneier.com/blog/archives/2022/09/cold-war-bugging-of-soviet-facilities.html

Found documents in Poland detail US spying operations against the former Soviet Union.

The file details a number of bugs found at Soviet diplomatic facilities in Washington, D.C., New York, and San Francisco, as well as in a Russian government-owned vacation compound, apartments used by Russia personnel, and even Russian diplomats’ cars. And the bugs were everywhere: encased in plaster in an apartment closet; behind electrical and television outlets; bored into concrete bricks and threaded into window frames; inside wooden beams and baseboards and stashed within a building’s foundation itself; surreptitiously attached to security cameras; wired into ceiling panels and walls; and secretly implanted into the backseat of cars and in their window panels, instrument panels, and dashboards. It’s an impressive—­ and impressively thorough—­ effort by U.S. counterspies.

We have long read about sophisticated Russian spying operations—bugging the Moscow embassy, bugging Selectric typewriters in the Moscow embassy, bugging the new Moscow embassy. These are the first details I’ve read about the US bugging the Russians’ embassy.

New Report on IoT Security

Post Syndicated from Bruce Schneier original https://www.schneier.com/blog/archives/2022/09/new-report-on-iot-security.html

The Atlantic Council has published a report on securing the Internet of Things: “Security in the Billions: Toward a Multinational Strategy to Better Secure the IoT Ecosystem.” The report examines the regulatory approaches taken by four countries—the US, the UK, Australia, and Singapore—to secure home, medical, and networking/telecommunications devices. The report recommends that regulators should 1) enforce minimum security standards for manufacturers of IoT devices, 2) incentivize higher levels of security through public contracting, and 3) try to align IoT standards internationally (for example, international guidance on handling connected devices that stop receiving security updates).

This report looks to existing security initiatives as much as possible—both to leverage existing work and to avoid counterproductively suggesting an entirely new approach to IoT security—while recommending changes and introducing more cohesion and coordination to regulatory approaches to IoT cybersecurity. It walks through the current state of risk in the ecosystem, analyzes challenges with the current policy model, and describes a synthesized IoT security framework. The report then lays out nine recommendations for government and industry actors to enhance IoT security, broken into three recommendation sets: setting a baseline of minimally acceptable security (or “Tier 1”), incentivizing above the baseline (or “Tier 2” and above), and pursuing international alignment on standards and implementation across the entire IoT product lifecycle (from design to sunsetting). It also includes implementation guidance for the United States, Australia, UK, and Singapore, providing a clearer roadmap for countries to operationalize the recommendations in their specific jurisdictions—and push towards a stronger, more cohesive multinational approach to securing the IoT worldwide.

Note: One of the authors of this report was a student of mine at Harvard Kennedy School, and did this work with the Atlantic Council under my supervision.

Leaking Passwords through the Spellchecker

Post Syndicated from Bruce Schneier original https://www.schneier.com/blog/archives/2022/09/leaking-passwords-through-the-spellchecker.html

Sometimes browser spellcheckers leak passwords:

When using major web browsers like Chrome and Edge, your form data is transmitted to Google and Microsoft, respectively, should enhanced spellcheck features be enabled.

Depending on the website you visit, the form data may itself include PII­—including but not limited to Social Security Numbers (SSNs)/Social Insurance Numbers (SINs), name, address, email, date of birth (DOB), contact information, bank and payment information, and so on.

The solution is to only use the spellchecker options that keep the data on your computer—and don’t send it into the cloud.

Friday Squid Blogging: Another Giant Squid Washes Up on New Zealand Beach

Post Syndicated from Bruce Schneier original https://www.schneier.com/blog/archives/2022/09/friday-squid-blogging-another-giant-squid-washes-up-on-new-zealand-beach.html

This one has chewed-up tentacles.

(Note that this is a different squid than the one that recently washed up on a South African beach.)

As usual, you can also use this squid post to talk about the security stories in the news that I haven’t covered.

Read my blog posting guidelines here.

Leaking Screen Information on Zoom Calls through Reflections in Eyeglasses

Post Syndicated from Bruce Schneier original https://www.schneier.com/blog/archives/2022/09/leaking-screen-information-on-zoom-calls-through-reflections-in-eyeglasses.html

Okay, it’s an obscure threat. But people are researching it:

Our models and experimental results in a controlled lab setting show it is possible to reconstruct and recognize with over 75 percent accuracy on-screen texts that have heights as small as 10 mm with a 720p webcam.” That corresponds to 28 pt, a font size commonly used for headings and small headlines.

[…]

Being able to read reflected headline-size text isn’t quite the privacy and security problem of being able to read smaller 9 to 12 pt fonts. But this technique is expected to provide access to smaller font sizes as high-resolution webcams become more common.

“We found future 4k cameras will be able to peek at most header texts on almost all websites and some text documents,” said Long.

[…]

A variety of factors can affect the legibility of text reflected in a video conference participant’s glasses. These include reflectance based on the meeting participant’s skin color, environmental light intensity, screen brightness, the contrast of the text with the webpage or application background, and the characteristics of eyeglass lenses. Consequently, not every glasses-wearing person will necessarily provide adversaries with reflected screen sharing.

With regard to potential mitigations, the boffins say that Zoom already provides a video filter in its Background and Effects settings menu that consists of reflection-blocking opaque cartoon glasses. Skype and Google Meet lack that defense.

Research paper.

Integrating Amazon MemoryDB for Redis with Java-based AWS Lambda

Post Syndicated from Benjamin Smith original https://aws.amazon.com/blogs/compute/integrating-amazon-memorydb-for-redis-with-java-based-aws-lambda/

This post is written by Mansi Y Doshi, Consultant and Aditya Goteti, Sr. Lead Consultant.

Enterprises are modernizing and migrating their applications to the AWS Cloud to improve scalability, reduce cost, innovate, and reduce time to market new features. Legacy applications are often built with RDBMS as the only backend solution.

Modernizing legacy Java applications with microservices requires breaking down a single monolithic application into multiple independent services. Each microservice does a specific job and requires its own database to persist data, but one database does not fit all use cases. Modern applications require purpose-built databases catering to their specific needs and data models.

This post discusses some of the common use cases for one such data store, Amazon MemoryDB for Redis, which is built to provide durability and faster reads and writes.

Use cases

Modern tech stacks often begin with a backend that interacts with a durable database like MongoDB, Amazon Aurora, or Amazon DynamoDB for their data persistence needs.

But, as traffic volume increases, it often makes sense to introduce a caching layer like ElastiCache. This is populated with data by service logic each time a database read happens, such that the subsequent reads of the same data become faster. While ElastiCache is effective, you must manage and pay for two separate data sources for the same data. You must also write custom logic to handle the cache reads/writes besides the existing read/write logic used for durable databases.

While traditional databases like MySQL, Postgres and DynamoDB provide data durability at the cost of speed, transient data stores like ElastiCache trade durability for faster reads/writes (usually within microseconds). ElastiCache provides writes and strongly consistent reads on the primary node of each shard and eventually consistent reads from read replicas. There is a possibility that the latest data written to the primary node is lost during a failover, which makes ElastiCache fast but not durable.

MemoryDB addresses both these issues. It provides strong consistency on the primary node and eventual consistency reads on replica nodes. The consistency model of MemoryDB is like ElastiCache for Redis. However, in MemoryDB, data is not lost across failovers, allowing clients to read their writes from primaries regardless of node failures. Only data that is successfully persisted in the Multi-AZ transaction log is visible. Replica nodes are still eventually consistent. Because of its distributed transaction model, MemoryDB can provide both durability and microsecond response time.

MemoryDB is most ideal for services that are read-heavy and sensitive to latency, like configuration, search, authentication and leaderboard services. These must operate at microsecond read latency and still be able to persist the data for high availability and durability. Services like leaderboards, having millions of records, often break down the data into smaller chunks/batches and process them in parallel. This needs a data store that can perform calculations on the fly and also store results temporarily. Redis can process millions of operations per second and store temporary calculations for fast retrieval and also run other operations (like aggregations). Since Redis is single-threaded, from the command’s execution point of view, it also helps to avoid dirty writes and reads.

Another use case is a configuration service, where users store, change, and retrieve their configuration data. In large distributed systems, there are often hundreds of independent services interacting with each other using well-defined REST APIs. These services depend on the configuration data to perform specific actions. The configuration service must serve the required information at a low latency to avoid being a bottleneck for the other dependent services.

MemoryDB can read at microsecond latencies durably. It also persists data across multiple Availability Zones. It uses multi- Availability Zone transaction logs to enable fast failover, database recovery, and node restarts. You can use it as a primary database without the need to maintain another cache to lower the data access latency. This also reduces the need to maintain additional caching service, which further reduces cost.

These use cases are a good fit for using MemoryDB. Next, you see how to access, store, and retrieve data in MemoryDB from your Java-based AWS Lambda function.

Overview

This blog shows how to build an Amazon MemoryDB cluster and integrate it with AWS Lambda. Amazon API Gateway and Lambda can be paired together to create a client-facing application, which can be easier to maintain, highly scalable, and secure. Both are fully managed services with no need to provision or manage servers. They can be cost effective when compared to running the application on servers for workloads with long idle periods. Using Lambda authorizers you can also write custom code to control access to your API.

Walkthrough

The following steps show how to provision an Amazon MemoryDB cluster along with Amazon VPC, subnets, security groups and integrate it with a Lambda function using Redis/Jedis Java client. Here, the Lambda function is configured to connect to the same VPC where MemoryDB is provisioned. The steps include provisioning through an AWS SAM template.

Prerequisites

  1. Create an AWS account if you do not already have one and login.
  2. Configure your account and set up permissions to access MemoryDB.
  3. Java 8 or above
  4. Install Maven
  5. Java Client for Redis
  6. Install AWS SAM if you do not already have one

Creating the MemoryDB cluster

Refer to the serverless pattern for a quick setup and customize as required. The AWS SAM template creates VPC, subnets, security groups, the MemoryDB cluster, API Gateway, and Lambda.

To access the MemoryDB cluster from the Lambda function, the security group of the Lambda function is added to the security group of the cluster. The MemoryDB cluster is always launched in a VPC. If the subnet is not specified, the cluster is launched into your default Amazon VPC.

You can also use your existing VPC and subnets and customize the template accordingly. If you are creating a new VPC, you can change the CIDR block and other configuration values as needed. Make sure the DNS hostname and DNS Support of the VPC is enabled. Use the optional parameters section to customize your templates. Parameters enable you to input custom values to your template each time you create or update a stack.

Recommendations

As your workload requirements change, you might want to increase the performance of your cluster or reduce costs by scaling in/out the cluster. To improve the read/write performance, you can scale your cluster horizontally by increasing the number of read replicas or shards for read and write throughout, respectively.

To reduce cost in case the instances are over-provisioned, you can perform vertical scale-in by reducing the size of your cluster, or scale-out by increasing the size to overcome CPU bottlenecks/ memory pressure. Both vertical scaling and horizontal scaling are applied with no downtime and cluster restarts are not required. You can customize the following parameters in the memoryDBCluster as required.

NodeType: db.t4g.small
NumReplicasPerShard: 2
NumShards: 2

In MemoryDB, all the writes are carried on a primary node in a shard and all the reads are performed on the standby nodes. Identifying the right number of read replicas, type of nodes and shards in a cluster is crucial to get the optimal performance and to avoid any additional cost because of over-provisioning the resources. It’s recommended to always start with a minimal number of required resources and scale out as needed.

Replicas improve read scalability, and it is recommended to have at least two read replicas per shard but depending upon the size of the payload and for read heavy workloads, it might be more than two. Adding more read replicas than required does not give any performance improvement, and it attracts additional cost. The following benchmarking is performed using the tool Redis benchmark. The benchmarking is done only on GET requests to simulate a read heavy workload.

The metrics on both the clusters are almost the same with 10 million requests with 1kb of data payload per request. Increasing the size of the payload to 5kb and number of GET requests to 20 million, the cluster with two primary and two replicas could not process, whereas the second cluster processed successfully. To achieve the right sizing, load testing is recommended on the staging/pre-production environment with a similar load as production.

Creating a Lambda function and allow access to the MemoryDB cluster

In the lambda-redis/HelloWorldFunction/pom.xml file, add the following dependency. This adds the Java Jedis client to connect the MemoryDB cluster:

<dependency>
    <groupId>redis.clients</groupId>
    <artifactId>jedis</artifactId>
    <version>4.2.0</version>
</dependency>

The simplest way to connect the Lambda function to the MemoryDB cluster is by configuring it within the same VPC where the MemoryDB cluster was launched.

To create a Lambda function, add the following code in the template.yaml file in the Resources section:

HelloWorldFunction:
    Type: AWS::Serverless::Function
    Properties:
      CodeUri: HelloWorldFunction
      Handler: helloworld.App::handleRequest
      Runtime: java8
      MemorySize: 512
      Timeout: 900 #seconds
      Events:
        HelloWorld:
          Type: Api
          Properties:
            Path: /hello
            Method: get
      VpcConfig:
        SecurityGroupIds:
          - !GetAtt lambdaSG.GroupId
        SubnetIds:
          - !GetAtt privateSubnetA.SubnetId
          - !GetAtt privateSubnetB.SubnetId
      Environment:
        Variables:
          ClusterAddress: !GetAtt memoryDBCluster.ClusterEndpoint.Address

Java code to access MemoryDB

  1. In your Java class, connect to Redis using Jedis client:
    HostAndPort hostAndPort = new HostAndPort(System.getenv("ClusterAddress"), 6379);
    JedisCluster jedisCluster = new JedisCluster(Collections.singleton(hostAndPort), 5000, 5000, 2, null, null, new GenericObjectPoolConfig (), true);
  2. You can now perform set and get operations on Redis as follows
    jedisCluster.set(“test”, “value”)
    jedisCluster.get(“test”)

JedisCluster maintains its own pool of connections and takes care of connection teardown. But you can also customize the configuration for closing idle connections using the GenericObjectPoolConfig object.

Clean Up

To delete the entire stack, run the command “sam delete”.

Conclusion

In this post, you learn how to provision a MemoryDB cluster and access it using Lambda. MemoryDB is suitable for applications requiring microsecond reads and single-digit millisecond writes along with durable storage. Accessing MemoryDB through Lambda using API Gateway reduces the further need for provisioning and maintaining servers.

For more serverless learning resources, visit Serverless Land.

Automatic Cheating Detection in Human Racing

Post Syndicated from Bruce Schneier original https://www.schneier.com/blog/archives/2022/09/automatic-cheating-detection-in-human-racing.html

This is a fascinating glimpse of the future of automatic cheating detection in sports:

Maybe you heard about the truly insane false-start controversy in track and field? Devon Allen—a wide receiver for the Philadelphia Eagles—was disqualified from the 110-meter hurdles at the World Athletics Championships a few weeks ago for a false start.

Here’s the problem: You can’t see the false start. Nobody can see the false start. By sight, Allen most definitely does not leave before the gun.

But here’s the thing: World Athletics has determined that it is not possible for someone to push off the block within a tenth of a second of the gun without false starting. They have science that shows it is beyond human capabilities to react that fast. Of course there are those (I’m among them) who would tell you that’s nonsense, that’s pseudoscience, there’s no way that they can limit human capabilities like that. There is science that shows it is humanly impossible to hit a fastball. There was once science that showed human beings could not run a four-minute mile.

Besides, do you know what Devon Allen’s reaction time was? It was 0.99 seconds. One thousandth of a second too fast, according to World Athletics’ science. They’re THAT sure that .01 seconds—and EXACTLY .01 seconds—is the limit of human possibilities that they will disqualify an athlete who has trained his whole life for this moment because he reacted one thousandth of a second faster than they think possible?

We in the computer world are used to this sort of thing. “The computer is always right,” even when it’s obviously wrong. But now computers are leaving the world of keyboards and screens, and this sort of thing will become more pervasive. In sports, computer systems are used to detect when a ball is out of bounds in tennis and other games and when a pitch is a strike in baseball. I’m sure there’s more—are computers detecting first downs in football?—but I’m not enough of a sports person to know them.

Credit Card Fraud That Bypasses 2FA

Post Syndicated from Bruce Schneier original https://www.schneier.com/blog/archives/2022/09/credit-card-fraud-that-bypasses-2fa.html

Someone in the UK is stealing smartphones and credit cards from people who have stored them in gym lockers, and is using the two items in combination to commit fraud:

Phones, of course, can be made inaccessible with the use of passwords and face or fingerprint unlocking. And bank cards can be stopped.

But the thief has a method which circumnavigates those basic safety protocols.

Once they have the phone and the card, they register the card on the relevant bank’s app on their own phone or computer. Since it is the first time that card will have been used on the new device, a one-off security passcode is demanded.

That verification passcode is sent by the bank to the stolen phone. The code flashes up on the locked screen of the stolen phone, leaving the thief to tap it into their own device. Once accepted, they have control of the bank account. They can transfer money or buy goods, or change access to the account.

Large-Scale Collection of Cell Phone Data at US Borders

Post Syndicated from Bruce Schneier original https://www.schneier.com/blog/archives/2022/09/large-scale-collection-of-cell-phone-data-at-us-borders.html

The Washington Post is reporting that the US Customs and Border Protection agency is seizing and copying cell phone, tablet, and computer data from “as many as” 10,000 phones per year, including an unspecified number of American citizens. This is done without a warrant, because “…courts have long granted an exception to border authorities, allowing them to search people’s devices without a warrant or suspicion of a crime.”

CBP’s inspection of people’s phones, laptops, tablets and other electronic devices as they enter the country has long been a controversial practice that the agency has defended as a low-impact way to pursue possible security threats and determine an individual’s “intentions upon entry” into the U.S. But the revelation that thousands of agents have access to a searchable database without public oversight is a new development in what privacy advocates and some lawmakers warn could be an infringement of Americans’ Fourth Amendment rights against unreasonable searches and seizures.

[…]

CBP conducted roughly 37,000 searches of travelers’ devices in the 12 months ending in October 2021, according to agency data, and more than 179 million people traveled that year through U.S. ports of entry.

More articles. Slashdot thread.

Implementing long running deployments with AWS CloudFormation Custom Resources using AWS Step Functions

Post Syndicated from DAMODAR SHENVI WAGLE original https://aws.amazon.com/blogs/devops/implementing-long-running-deployments-with-aws-cloudformation-custom-resources-using-aws-step-functions/

AWS CloudFormation custom resource provides mechanisms to provision AWS resources that don’t have built-in support from CloudFormation. It lets us write custom provisioning logic for resources that aren’t supported as resource types under CloudFormation. This post focusses on the use cases where CloudFormation custom resource is used to implement a long running task/job. With custom resources, you can manage these custom tasks (which are one-off in nature) as deployment stack resources.

The routine pattern used for implementing custom resources is via AWS Lambda function. However, when using the Lambda function as the custom resource provider, you must consider its trade-offs, such as its 15 minute timeout. Tasks involved in the provisioning of certain AWS resources can be long running and could span beyond the Lambda timeout. In these scenarios, you must look beyond the conventional Lambda function-based approach for custom resources.

In this post, I’ll demonstrate how to use AWS Step Functions to implement custom resources using AWS Cloud Development Kit (AWS CDK). Step Functions allow complex deployment tasks to be orchestrated as a step-by-step workflow. It also offers direct integration with any AWS service via AWS SDK integrations. By default the CloudFormation stack waits for 1 hour before timing out. The timeout can be increased to maximum 12 hours using wait conditions. In this post, you’ll also see how to use wait conditions with custom resource to run long running deployment tasks as part of a CloudFormation stack.

Prerequisites

Before proceeding any further, you must identify and designate an AWS account required for the solution to work. You must also create an AWS account profile in ~/.aws/credentials for the designated AWS account, if you don’t already have one. The profile must have sufficient permissions to run an AWS CDK stack. It should be your private profile and only be used during the course of this post. Therefore, it should be fine if you want to use admin privileges. Don’t share the profile details, especially if it has admin privileges. I recommend removing the profile when you’re finished with this walkthrough. For more information about creating an AWS account profile, see Configuring the AWS CLI.

Services and frameworks used in the post include CloudFormation, Step Functions, Lambda, DynamoDB, Amazon S3, and AWS CDK.

Solution overview

The following architecture diagram shows the application of Step Functions to implement custom resources.

Architecture diagram

Figure 1. Architecture diagram

  1. The user deploys a CloudFormation stack that includes a custom resource implementation.
  2. The CloudFormation custom resource triggers a Lambda function with the appropriate event which can be CREATE/UPDATE/DELETE.
  3. The custom resource Lambda function invokes Step Functions workflow and offloads the event handling responsibility. The CloudFormation event and context are wrapped inside the Step Function input at the time of invocation.
  4. The custom resource Lambda function returns SUCCESS back to CloudFormation stack indicating that the custom resource provisioning has begun. CloudFormation stack then goes into waiting mode where it waits for a SUCCESS or FAILURE signal to continue.
  5. In the interim, Step Functions workflow handles the custom resource event through one or more steps.
  6. Step Functions workflow prepares the response to be sent back to CloudFormation stack.
  7. Send Response Lambda function sends a success/failure response back to CloudFormation stack. This propels CloudFormation stack out of the waiting mode and into completion.

Solution deep dive

In this section I will get into the details of several key aspects of the solution

Custom Resource Definition

Following code snippet shows the custom resource definition which can be found here. Please note that we also define AWS::CloudFormation::WaitCondition and AWS::CloudFormation::WaitConditionHandle alongside the custom resource. AWS::CloudFormation::WaitConditionHandle resource sets up a pre-signed URL which is passed into the CallbackUrl property of the Custom Resource.

The final completion signal for the custom resource i.e. SUCCESS/FAILURE is received over this CallbackUrl. To learn more about wait conditions please refer to its user guide here. Note that, when updating the custom resource, you cannot use the existing WaitCondition-WaitConditionHandle resource pair. You need to create a new pair for tracking each update/delete operation on the custom resource.

/************************** Custom Resource Definition *****************************/
// When you intend to update CustomResource make sure that a new WaitCondition and 
// a new WaitConditionHandle resource is created to track CustomResource update.
// The strategy we are using here is to create a hash of Custom Resource properties.
// The resource names for WaitCondition and WaitConditionHandle carry this hash.
// Anytime there is an update to the custom resource properties, a new hash is generated,
// which automatically leads to new WaitCondition and WaitConditionHandle resources.
const resourceName: string = getNormalizedResourceName('DemoCustomResource');
const demoData = {
    pk: 'demo-sfn',
    sk: resourceName,
    ts: Date.now().toString()
};
const dataHash = hash(demoData);
const wcHandle = new CfnWaitConditionHandle(
    this, 
    'WCHandle'.concat(dataHash)
)
const customResource = new CustomResource(this, resourceName, {
    serviceToken: customResourceLambda.functionArn,
    properties: {
        DDBTable: String(demoTable.tableName),
        Data: JSON.stringify(demoData),
        CallbackUrl: wcHandle.ref
    }
});
        
// Note: AWS::CloudFormation::WaitCondition resource type does not support updates.
new CfnWaitCondition(
    this,
    'WC'.concat(dataHash),
    {
        count: 1,
        timeout: '300',
        handle: wcHandle.ref
    }
).node.addDependency(customResource)
/**************************************************************************************/

Custom Resource Lambda

Following code snippet shows how the custom resource lambda function passes the CloudFormation event as an input into the StepFunction at the time of invocation. CloudFormation event contains the CallbackUrl resource property I discussed in the previous section.

private async startExecution() {
    const input = {
        cfnEvent: this.event,
        cfnContext: this.context
    };
    const params: StartExecutionInput = {
        stateMachineArn: String(process.env.SFN_ARN),
        input: JSON.stringify(input)
    };
    let attempt = 0;
    let retry = false;
    do {
        try {
            const response = await this.sfnClient.startExecution(params).promise();
            console.debug('Response: ' + JSON.stringify(response));
            retry = false;

Custom Resource StepFunction

The StepFunction handles the CloudFormation event based on the event type. The CloudFormation event containing CallbackUrl is passed down the stages of StepFunction all the way to the final step. The last step of the StepFunction sends back the response over CallbackUrl via send-cfn-response lambda function as shown in the following code snippet.

/**
 * Send response back to cloudformation
 * @param event
 * @param context
 * @param response
 */
export async function sendResponse(event: any, context: any, response: any) {
    const responseBody = JSON.stringify({
        Status: response.Status,
        Reason: "Success",
        UniqueId: response.PhysicalResourceId,
        Data: JSON.stringify(response.Data)
    });
    console.debug("Response body:\n", responseBody);
    const parsedUrl = url.parse(event.ResourceProperties.CallbackUrl);
    const options = {
        hostname: parsedUrl.hostname,
        port: 443,
        path: parsedUrl.path,
        method: "PUT",
        headers: {
            "content-type": "",
            "content-length": responseBody.length
        }
    };
    await new Promise(() => {
        const request = https.request(options, function(response: any) {
	    console.debug("Status code: " + response.statusCode);
	    console.debug("Status message: " + response.statusMessage);
	    context.done();
    	})
	request.on("error", function(error) {
	    console.debug("send(..) failed executing https.request(..): " + error);
	    context.done();
	});
	request.write(responseBody);
	request.end();
    });
    return;
}

Demo

Clone the GitHub repo cfn-custom-resource-using-step-functions and navigate to the folder cfn-custom-resource-using-step-functions. Now, execute the script script-deploy.sh by passing the name of the AWS profile that you created in the prerequisites section above. This should deploy the solution. The commands are shown as follows for your reference. Note that if you don’t pass the AWS profile name ‘default’ the profile will be used for deployment.

git clone 
cd cfn-custom-resource-using-step-functions
./script-deploy.sh "<AWS- ACCOUNT-PROFILE-NAME>"

The deployed solution consists of 2 stacks as shown in the following screenshot

  1. cfn-custom-resource-common-lib: Deploys common components
    • DynamoDB table that custom resources write to during their lifecycle events
    • Lambda layer used across the rest of the stacks
  2. cfn-custom-resource-sfn: Deploys Step Functions backed custom resource implementation
CloudFormation stacks deployed

Figure 2. CloudFormation stacks deployed

For demo purposes, I implemented a custom resource that inserts data into the DynamoDB table. When you deploy the solution for the first time, like you just did in the previous step, it initiates a CREATE event resulting in the creation of a new custom resource using Step Functions. You should see a new record with unix epoch timestamp in the DynamoDB table, indicating that the resource was created as shown in the following screenshot. You can find the DynamoDB table name/arn from the SSM Parameter Store /CUSTOM_RESOURCE_PATTERNS/DYNAMODB/ARN

DynamoDB record indicating custom resource creation

Figure 3. DynamoDB record indicating custom resource creation

Now, execute the script script-deploy.sh again. This should initiate an UPDATE event, resulting in the update of custom resources. The code also automatically creates new WaitConditionHandle and WaitCondition resources required to wait for the update event to finish. Now you should see that the records in the DynamoDb table have been updated with new values for lastOperation and ts attributes as follows.

DynamoDB record indicating custom resource update

Figure 4. DynamoDB record indicating custom resource update

Cleaning up

To remove all of the stacks, run the script script-undeploy.sh as follows.

./script-undeploy.sh "<AWS- ACCOUNT-PROFILE-NAME>"

Conclusion

In this post I showed how to look beyond the conventional approach of building CloudFormation custom resources using a Lambda function. I discussed implementing custom resources using Step Functions and CloudFormation wait conditions. Try this solution in scenarios where you must execute a long running deployment task/job as part of your CloudFormation stack deployment.


About the author:

Damodar Shenvi

Damodar Shenvi Wagle is a Cloud Application Architect at AWS Professional Services. His areas of expertise include architecting serverless solutions, CI/CD and automation.

Massive Data Breach at Uber

Post Syndicated from Bruce Schneier original https://www.schneier.com/blog/archives/2022/09/massive-data-breach-at-uber.html

It’s big:

The breach appeared to have compromised many of Uber’s internal systems, and a person claiming responsibility for the hack sent images of email, cloud storage and code repositories to cybersecurity researchers and The New York Times.

“They pretty much have full access to Uber,” said Sam Curry, a security engineer at Yuga Labs who corresponded with the person who claimed to be responsible for the breach. “This is a total compromise, from what it looks like.”

It looks like a pretty basic phishing attack; someone gave the hacker their login credentials. And because Uber has lousy internal security, lots of people have access to everything. So once a hacker gains a foothold, they have access to everything.

This is the same thing that Mudge accuses Twitter of: too many employees have broad access within the company’s network.

More details. Slashdot thread.

EDITED TO ADD (9/20): More details.

Relay Attack against Teslas

Post Syndicated from Bruce Schneier original https://www.schneier.com/blog/archives/2022/09/relay-attack-against-teslas.html

Nice work:

Radio relay attacks are technically complicated to execute, but conceptually easy to understand: attackers simply extend the range of your existing key using what is essentially a high-tech walkie-talkie. One thief stands near you while you’re in the grocery store, intercepting your key’s transmitted signal with a radio transceiver. Another stands near your car, with another transceiver, taking the signal from their friend and passing it on to the car. Since the car and the key can now talk, through the thieves’ range extenders, the car has no reason to suspect the key isn’t inside—and fires right up.

But Tesla’s credit card keys, like many digital keys stored in cell phones, don’t work via radio. Instead, they rely on a different protocol called Near Field Communication or NFC. Those keys had previously been seen as more secure, since their range is so limited and their handshakes with cars are more complex.

Now, researchers seem to have cracked the code. By reverse-engineering the communications between a Tesla Model Y and its credit card key, they were able to properly execute a range-extending relay attack against the crossover. While this specific use case focuses on Tesla, it’s a proof of concept—NFC handshakes can, and eventually will, be reverse-engineered.

Upcoming Speaking Engagements

Post Syndicated from Schneier.com Webmaster original https://www.schneier.com/blog/archives/2022/09/upcoming-speaking-engagements-23.html

This is a current list of where and when I am scheduled to speak:

The list is maintained on this page.

Lifting and shifting a web application to AWS Serverless: Part 1

Post Syndicated from Marcia Villalba original https://aws.amazon.com/blogs/compute/lifting-and-shifting-a-web-application-to-aws-serverless-part-1/

Customers migrating to the cloud often want to get the benefits of serverless architecture. But what is the best approach and is it possible? There are many strategies to do a migration, but lift and shift is often the fastest way to get to production with the migrated workload.

You might also wonder if it’s possible to lift and shift an existing application that runs in a traditional environment to serverless. This blog post shows how to do this for a Mongo, Express, React, and Node.js (MERN) stack web app. However, the discussions presented in this post apply to other stacks too.

Why do a lift and shift migration?

Lift and shift, or sometimes referred to as rehosting the application, is moving the application with as few changes as possible. Lift and shift migrations often allow you to get the new workload in production as fast as possible. When migrating to serverless, lift and shift can bring a workload that is not yet in the cloud or in a serverless environment to use managed and serverless services quickly.

Migrating a non-serverless workload to serverless with lift and shift might not bring all the serverless benefits right away, but it enables the development team to refactor, using the strangler pattern, the parts of the application that might benefit from what serverless technologies offer.

Why migrate a web app to serverless?

Web apps hosted in a serverless environment benefit most from the capability of serverless applications to scale automatically and for paying for what you use.

Imagine that you have a personal web app with little traffic. If you are hosting in a serverless environment, you don’t pay a fixed price to have the servers up and running. Your web app has only a few requests and the rest of the time is idle.

This benefit applies to the opposite case. For an owner of a small ecommerce site running on a server, imagine if a social media influencer with millions of followers recommends one of their products. Suddenly, thousands of requests arrive and make the site unavailable. If the site is hosted on a serverless platform, the application will scale to the traffic that it receives.

Requirements for migration

Before starting a migration, it is important to define the nonfunctional requirements that you need the new application to have. These requirements help when you must make architectural decisions during the migration process.

These are the nonfunctional requirements of this migration:

  • Environment that scales to zero and scales up automatically.
  • Pay as little as possible for idle time.
  • Configure as little infrastructure as possible.
  • Automatic high availability of the application.
  • Minimal changes to the original code.

Application overview

This blog post guides you on how to migrate a MERN application. The original application is hosted in two different servers: One contains the Mongo database and another contains the Node/js/Express and ReactJS applications.

Application overview

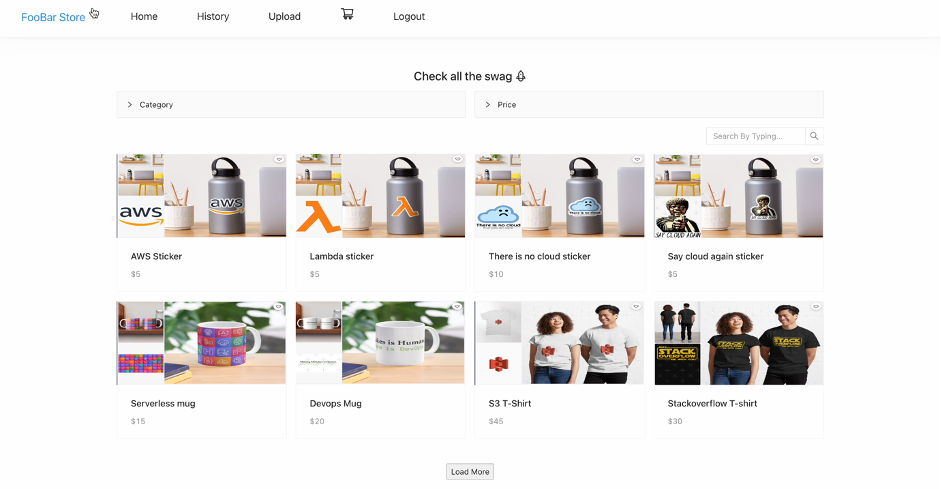
This demo application simulates a swag ecommerce site. The database layer stores the products, users, and the purchases history. The server layer takes care of the ecommerce business logic, hosting the product images, and user authentication and authorization. The web layer takes care of all the user interaction and communicates with the server layer using REST APIs.

How the application looks like

These are the changes that you must make to migrate to a serverless environment:

  • Database migration: Migrate the database from on-premises to MongoDB Atlas.
  • Backend migration: Migrate the NodeJS/Express application from on-premises to an AWS Lambda function.
  • Web app migration: Migrate the React web app from on-premises to AWS Amplify.
  • Authentication migration: Migrate the custom-built authentication to use Amazon Cognito.
  • Storage migration: Migrate the local storage of images to use Amazon S3 and Amazon CloudFront.

The following image shows the proposed solution for the migrated application:

Proposed architecture

Database migration

The database is already in a MongoDB vanilla container that has all the data for this application. As MongoDB is the database engine for our stack, their recommended solution to migrate to serverless is to use MongoDB Atlas. Atlas provides a database cluster in the cloud that scales automatically and you pay for what you use.

To get started, create a new Atlas cluster, then migrate the data from the existing database to the serverless one. To migrate the data, you can first dump all the content of the database to a dump folder and then restore it to the cloud:

mongodump --uri="mongodb://<localuser>:<localpassword>@localhost:27017"

mongorestore --uri="mongodb+srv://<user>:<password>@<clustername>.debkm.mongodb.net" .

After doing that, your data is now in the cloud. The next step is to change the configuration string in the server to point to the new database. To see this in action, check this video that shows a walkthrough of the migration.

Backend migration

Migrating the Node.js/Express backend is the most challenging of the layers to migrate to a serverless environment, as the server layer is a Node.js application that runs in a server.

One option for this migration is to use AWS Fargate. Fargate is a serverless container service that allows you to scale automatically and you pay as you go. Another option is to use AWS AppRunner, a container service that auto scales and you also pay as you go. However, neither of these options align with our migration requirements, as they don’t scale to zero.

Another option for the lift and shift migration of this Node.js application is to use Lambda with the AWS Lambda Web Adapter. The AWS Lambda Web Adapter is an open-source project that allows you to build web applications with familiar frameworks, like Express.js, Flask, SpringBoot, and run it on Lambda. You can learn more about this project in its GitHub repository.

Lambda Web Adapter

Using this project, you can create a new Lambda function that has the Express/NodeJS application as the function code. You can lift and shift all the code into the function. If you want a step-by-step tutorial on how to do this, check out this video.

const lambdaAdapterFunction = new Function(this,`${props.stage}-LambdaAdapterFunction`,
            {
                runtime: Runtime.NODEJS_16_X,
                code: Code.fromAsset('backend-app'),
                handler: 'run.sh',
                environment: {
                    AWS_LAMBDA_EXEC_WRAPPER: '/opt/bootstrap',
                    REGION: this.region,
                    ASYNC_INIT: 'true',
                },
                memorySize: 1024,
                layers: [layerLambdaAdapter],
                timeout: Duration.seconds(2),
                tracing: Tracing.ACTIVE,
            }
        );

The next step is to create an HTTP endpoint for the server application. There are three options for doing this: API Gateway, Application Load Balancer (ALB) , or to use Lambda Function URLs. All the options are compatible with Lambda Web Adapter and can solve the challenge for you.

For this demo, choose function URLs, as they are simple to configure and one function URL forwards all routes to the Express server. API Gateway and ALB require more configuration and have separate costs, while the cost of function URLs is included in the Lambda function.

Web app migration

The final layer to migrate is the React application. The best way to migrate the web layer and to adhere to the migration requirements is to use AWS Amplify to host it. AWS Amplify is a fully managed service that provides many features like hosting web applications and managing the CICD process for the web app. It provides client libraries to connect to different AWS resources, and many other features.

Migrating the React application is as simple as creating a new Amplify application in your AWS account and uploading the React application to a code repository like GitHub. This AWS Amplify application is connected to a GitHub branch, and when there is a new commit in this branch, AWS Amplify redeploys the code.

The Amplify application receives configuration parameters like the function URL endpoint (the server URL) using environmental variables.

const amplifyApp = new App(this, `${props.stage}-AmplifyReactShopApp`, {
            sourceCodeProvider: new GitHubSourceCodeProvider({
                owner: config.frontend.owner,
                repository: config.frontend.repository_name,
                oauthToken: SecretValue.secretsManager('github-token'),
            }),
            environmentVariables: {
                REGION: this.region,
                SERVER_URL: props.serverURL,
            },
        });

If you want to see a step-by-step guide on how to make your web layer serverless, you can check this video.

Next steps

However, if you test this migrated app, you will find two issues. The first one is that the user session is not sticky. Every time you log in, you are logged out unexpectedly from the application. The second one is that when you create a new product, you cannot upload new images of that product.

In part two, I analyze each of the problems in detail and find solutions. These issues arise because of the stateless and immutable characteristics of this solution. The next part of this article explains how to solve these issues, also it analyzes costs and performance of the solution.

Conclusion

In this article, you learn if it is possible to migrate a non-serverless web application to a serverless environment without changing much code. You learn different tools that can help you in this process, like the AWS Lambda Web Adaptor and AWS Amplify.

If you want to see the migration in action and learn all the steps for this, there is a playlist that contains all the tutorials for you to follow and learn how this is possible.

For more serverless learning resources, visit Serverless Land.

FBI Seizes Stolen Cryptocurrencies

Post Syndicated from Bruce Schneier original https://www.schneier.com/blog/archives/2022/09/fbi-seizes-stolen-cryptocurrencies.html

The Wall Street Journal is reporting that the FBI has recovered over $30 million in cryptocurrency stolen by North Korean hackers earlier this year. It’s only a fraction of the $540 million stolen, but it’s something.

The Axie Infinity recovery represents a shift in law enforcement’s ability to trace funds through a web of so-called crypto addresses, the virtual accounts where cryptocurrencies are stored. These addresses can be created quickly without them being linked to a cryptocurrency company that could freeze the funds.

In its effort to mask the stolen crypto, Lazarus Group used more than 12,000 different addresses, according to Chainalysis. Unlike bank transactions that happen through private networks, movement between crypto accounts is visible to the world on the blockchain.

Advanced blockchain-monitoring tools and cooperation from centralized crypto exchanges enabled the FBI to trace the crypto to where Lazarus Group tried to cash out, investigators said.

The money was laundered through the Tornado Cash mixer.