Tag Archives: Uncategorized

Friday Squid Blogging: Underwater Robot Uses Squid-Like Propulsion

Post Syndicated from Bruce Schneier original https://www.schneier.com/blog/archives/2020/11/friday-squid-blogging-underwater-robot-uses-squid-like-propulsion.html

This is neat:

By generating powerful streams of water, UCSD’s squid-like robot can swim untethered. The “squidbot” carries its own power source, and has the room to hold more, including a sensor or camera for underwater exploration.

As usual, you can also use this squid post to talk about the security stories in the news that I haven’t covered.

Read my blog posting guidelines here.

Inrupt’s Solid Announcement

Post Syndicated from Bruce Schneier original https://www.schneier.com/blog/archives/2020/11/inrupts-solid-announcement.html

Earlier this year, I announced that I had joined Inrupt, the company commercializing Tim Berners-Lee’s Solid specification:

The idea behind Solid is both simple and extraordinarily powerful. Your data lives in a pod that is controlled by you. Data generated by your things — your computer, your phone, your IoT whatever — is written to your pod. You authorize granular access to that pod to whoever you want for whatever reason you want. Your data is no longer in a bazillion places on the Internet, controlled by you-have-no-idea-who. It’s yours. If you want your insurance company to have access to your fitness data, you grant it through your pod. If you want your friends to have access to your vacation photos, you grant it through your pod. If you want your thermostat to share data with your air conditioner, you give both of them access through your pod.

This week, Inrupt announced the availability of the commercial-grade Enterprise Solid Server, along with a small but impressive list of initial customers of the product and the specification (like the UK National Health Service). This is a significant step forward to realizing Tim’s vision:

The technologies we’re releasing today are a component of a much-needed course correction for the web. It’s exciting to see organizations using Solid to improve the lives of everyday people — through better healthcare, more efficient government services and much more.

These first major deployments of the technology will kick off the network effect necessary to ensure the benefits of Solid will be appreciated on a massive scale. Once users have a Solid Pod, the data there can be extended, linked, and repurposed in valuable new ways. And Solid’s growing community of developers can be rest assured that their apps will benefit from the widespread adoption of reliable Solid Pods, already populated with valuable data that users are empowered to share.

A few news articles. Slashdot thread.

New Zealand Election Fraud

Post Syndicated from Bruce Schneier original https://www.schneier.com/blog/archives/2020/11/new-zealand-election-fraud.html

It seems that this election season has not gone without fraud. In New Zealand, a vote for “Bird of the Year” has been marred by fraudulent votes:

More than 1,500 fraudulent votes were cast in the early hours of Monday in the country’s annual bird election, briefly pushing the Little-Spotted Kiwi to the top of the leaderboard, organizers and environmental organization Forest & Bird announced Tuesday.

Those votes — which were discovered by the election’s official scrutineers — have since been removed. According to election spokesperson Laura Keown, the votes were cast using fake email addresses that were all traced back to the same IP address in Auckland, New Zealand’s most populous city.

It feels like writing this story was a welcome distraction from writing about the US election:

“No one has to worry about the integrity of our bird election,” she told Radio New Zealand, adding that every vote would be counted.

Asked whether Russia had been involved, she denied any “overseas interference” in the vote.

I’m sure that’s a relief to everyone involved.

“Privacy Nutrition Labels” in Apple’s App Store

Post Syndicated from Bruce Schneier original https://www.schneier.com/blog/archives/2020/11/privacy-nutrition-labels-in-apples-app-store.html

Apple will start requiring standardized privacy labels for apps in its app store, starting in December:

Apple allows data disclosure to be optional if all of the following conditions apply: if it’s not used for tracking, advertising or marketing; if it’s not shared with a data broker; if collection is infrequent, unrelated to the app’s primary function, and optional; and if the user chooses to provide the data in conjunction with clear disclosure, the user’s name or account name is prominently displayed with the submission.

Otherwise, the privacy labeling is mandatory and requires a fair amount of detail. Developers must disclose the use of contact information, health and financial data, location data, user content, browsing history, search history, identifiers, usage data, diagnostics, and more. If a software maker is collecting the user’s data to display first or third-party adverts, this has to be disclosed.

These disclosures then get translated to a card-style interface displayed with app product pages in the platform-appropriate App Store.

The concept of a privacy nutrition label isn’t new, and has been well-explored at CyLab at Carnegie Mellon University.

The Security Failures of Online Exam Proctoring

Post Syndicated from Bruce Schneier original https://www.schneier.com/blog/archives/2020/11/the-security-failures-of-online-exam-proctoring.html

Proctoring an online exam is hard. It’s hard to be sure that the student isn’t cheating, maybe by having reference materials at hand, or maybe by substituting someone else to take the exam for them. There are a variety of companies that provide online proctoring services, but they’re uniformly mediocre:

The remote proctoring industry offers a range of services, from basic video links that allow another human to observe students as they take exams to algorithmic tools that use artificial intelligence (AI) to detect cheating.

But asking students to install software to monitor them during a test raises a host of fairness issues, experts say.

“There’s a big gulf between what this technology promises, and what it actually does on the ground,” said Audrey Watters, a researcher on the edtech industry who runs the website Hack Education.

“(They) assume everyone looks the same, takes tests the same way, and responds to stressful situations in the same way.”

The article discusses the usual failure modes: facial recognition systems that are more likely to fail on students with darker faces, suspicious-movement-detection systems that fail on students with disabilities, and overly intrusive systems that collect all sorts of data from student computers.

I teach cybersecurity policy at the Harvard Kennedy School. My solution, which seems like the obvious one, is not to give timed closed-book exams in the first place. This doesn’t work for things like the legal bar exam, which can’t modify itself so quickly. But this feels like an arms race where the cheater has a large advantage, and any remote proctoring system will be plagued with false positives.

Building Serverless Land: Part 2 – An auto-building static site

Post Syndicated from Benjamin Smith original https://aws.amazon.com/blogs/compute/building-serverless-land-part-2-an-auto-building-static-site/

In this two-part blog series, I show how serverlessland.com is built. This is a static website that brings together all the latest blogs, videos, and training for AWS serverless. It automatically aggregates content from a number of sources. The content exists in a static JSON file, which generates a new static site each time it is updated. The result is a low-maintenance, low-latency serverless website, with almost limitless scalability.

A companion blog post explains how to build an automated content aggregation workflow to create and update the site’s content. In this post, you learn how to build a static website with an automated deployment pipeline that re-builds on each GitHub commit. The site content is stored in JSON files in the same repository as the code base. The example code can be found in this GitHub repository.

The growing adoption of serverless technologies generates increasing amounts of helpful and insightful content from the developer community. This content can be difficult to discover. Serverless Land helps channel this into a single searchable location. By collating this into a static website, users can enjoy a browsing experience with fast page load speeds.

The serverless nature of the site means that developers don’t need to manage infrastructure or scalability. The use of AWS Amplify Console to automatically deploy directly from GitHub enables a regular release cadence with a fast transition from prototype to production.

Static websites

A static site is served to the user’s web browser exactly as stored. This contrasts to dynamic webpages, which are generated by a web application. Static websites often provide improved performance for end users and have fewer or no dependant systems, such as databases or application servers. They may also be more cost-effective and secure than dynamic websites by using cloud storage, instead of a hosted environment.

A static site generator is a tool that generates a static website from a website’s configuration and content. Content can come from a headless content management system, through a REST API, or from data referenced within the website’s file system. The output of a static site generator is a set of static files that form the website.

Serverless Land uses a static site generator for Vue.js called Nuxt.js. Each time content is updated, Nuxt.js regenerates the static site, building the HTML for each page route and storing it in a file.

The architecture

Serverless Land static website architecture

When the content.json file is committed to GitHub, a new build process is triggered in AWS Amplify Console.

Deploying AWS Amplify

AWS Amplify helps developers to build secure and scalable full stack cloud applications. AWS Amplify Console is a tool within Amplify that provides a user interface with a git-based workflow for hosting static sites. Deploy applications by connecting to an existing repository (GitHub, BitBucket Cloud, GitLab, and AWS CodeCommit) to set up a fully managed, nearly continuous deployment pipeline.

This means that any changes committed to the repository trigger the pipeline to build, test, and deploy the changes to the target environment. It also provides instant content delivery network (CDN) cache invalidation, atomic deploys, password protection, and redirects without the need to manage any servers.

Building the static website

  1. To get started, use the Nuxt.js scaffolding tool to deploy a boiler plate application. Make sure you have npx installed (npx is shipped by default with npm version 5.2.0 and above).
    $ npx create-nuxt-app content-aggregator

    The scaffolding tool asks some questions, answer as follows:Nuxt.js scaffolding tool inputs

  2. Navigate to the project directory and launch it with:
    $ cd content-aggregator
    $ npm run dev

    The application is now running on http://localhost:3000.The pages directory contains your application views and routes. Nuxt.js reads the .vue files inside this directory and automatically creates the router configuration.

  3. Create a new file in the /pages directory named blogs.vue:$ touch pages/blogs.vue
  4. Copy the contents of this file into pages/blogs.vue.
  5. Create a new file in /components directory named Post.vue :$ touch components/Post.vue
  6. Copy the contents of this file into components/Post.vue.
  7. Create a new file in /assets named content.json and copy the contents of this file into it.$ touch /assets/content.json

The blogs Vue component

The blogs page is a Vue component with some special attributes and functions added to make development of your application easier. The following code imports the content.json file into the variable blogPosts. This file stores the static website’s array of aggregated blog post content.

import blogPosts from '../assets/content.json'

An array named blogPosts is initialized:

data(){
    return{
      blogPosts: []
    }
  },

The array is then loaded with the contents of content.json.

 mounted(){
    this.blogPosts = blogPosts
  },

In the component template, the v-for directive renders a list of post items based on the blogPosts array. It requires a special syntax in the form of blog in blogPosts, where blogPosts is the source data array and blog is an alias for the array element being iterated on. The Post component is rendered for each iteration. Since components have isolated scopes of their own, a :post prop is used to pass the iterated data into the Post component:

<ul>
  <li v-for="blog in blogPosts" :key="blog">
     <Post :post="blog" />
  </li>
</ul>

The post data is then displayed by the following template in components/Post.vue.

<template>
    <div class="hello">
      <h3>{{ post.title }} </h3>
      <div class="img-holder">
          <img :src="post.image" />
      </div>
      <p>{{ post.intro }} </p>
      <p>Published on {{post.date}}, by {{ post.author }} p>
      <a :href="post.link"> Read article</a>
    </div>
</template>

This forms the framework for the static website. The /blogs page displays content from /assets/content.json via the Post component. To view this, go to http://localhost:3000/blogs in your browser:

The /blogs page

Add a new item to the content.json file and rebuild the static website to display new posts on the blogs page. The previous content was generated using the aggregation workflow explained in this companion blog post.

Connect to Amplify Console

Clone the web application to a GitHub repository and connect it to Amplify Console to automate the rebuild and deployment process:

  1. Upload the code to a new GitHub repository named ‘content-aggregator’.
  2. In the AWS Management Console, go to the Amplify Console and choose Connect app.
  3. Choose GitHub then Continue.
  4. Authorize to your GitHub account, then in the Recently updated repositories drop-down select the ‘content-aggregator’ repository.
  5. In the Branch field, leave the default as master and choose Next.
  6. In the Build and test settings choose edit.
  7. Replace - npm run build with – npm run generate.
  8. Replace baseDirectory: / with baseDirectory: dist

    This runs the nuxt generate command each time an application build process is triggered. The nuxt.config.js file has a target property with the value of static set. This generates the web application into static files. Nuxt.js creates a dist directory with everything inside ready to be deployed on a static hosting service.
  9. Choose Save then Next.
  10. Review the Repository details and App settings are correct. Choose Save and deploy.

    Amplify Console deployment

Once the deployment process has completed and is verified, choose the URL generated by Amplify Console. Append /blogs to the URL, to see the static website blogs page.

Any edits pushed to the repository’s content.json file trigger a new deployment in Amplify Console that regenerates the static website. This companion blog post explains how to set up an automated content aggregator to add new items to the content.json file from an RSS feed.

Conclusion

This blog post shows how to create a static website with vue.js using the nuxt.js static site generator. The site’s content is generated from a single JSON file, stored in the site’s assets directory. It is automatically deployed and re-generated by Amplify Console each time a new commit is pushed to the GitHub repository. By automating updates to the content.json file you can create low-maintenance, low-latency static websites with almost limitless scalability.

This application framework is used together with this automated content aggregator to pull together articles for http://serverlessland.com. Serverless Land brings together all the latest blogs, videos, and training for AWS Serverless. Download the code from this GitHub repository to start building your own automated content aggregation platform.

2020 Was a Secure Election

Post Syndicated from Bruce Schneier original https://www.schneier.com/blog/archives/2020/11/2020-was-a-secure-election.html

Over at Lawfare: “2020 Is An Election Security Success Story (So Far).”

What’s more, the voting itself was remarkably smooth. It was only a few months ago that professionals and analysts who monitor election administration were alarmed at how badly unprepared the country was for voting during a pandemic. Some of the primaries were disasters. There were not clear rules in many states for voting by mail or sufficient opportunities for voting early. There was an acute shortage of poll workers. Yet the United States saw unprecedented turnout over the last few weeks. Many states handled voting by mail and early voting impressively and huge numbers of volunteers turned up to work the polls. Large amounts of litigation before the election clarified the rules in every state. And for all the president’s griping about the counting of votes, it has been orderly and apparently without significant incident. The result was that, in the midst of a pandemic that has killed 230,000 Americans, record numbers of Americans voted­ — and voted by mail — ­and those votes are almost all counted at this stage.

On the cybersecurity front, there is even more good news. Most significantly, there was no serious effort to target voting infrastructure. After voting concluded, the director of the Cybersecurity and Infrastructure Security Agency (CISA), Chris Krebs, released a statement, saying that “after millions of Americans voted, we have no evidence any foreign adversary was capable of preventing Americans from voting or changing vote tallies.” Krebs pledged to “remain vigilant for any attempts by foreign actors to target or disrupt the ongoing vote counting and final certification of results,” and no reports have emerged of threats to tabulation and certification processes.

A good summary.

Detecting Phishing Emails

Post Syndicated from Bruce Schneier original https://www.schneier.com/blog/archives/2020/11/detecting-phishing-emails.html

Research paper: Rick Wash, “How Experts Detect Phishing Scam Emails“:

Abstract: Phishing scam emails are emails that pretend to be something they are not in order to get the recipient of the email to undertake some action they normally would not. While technical protections against phishing reduce the number of phishing emails received, they are not perfect and phishing remains one of the largest sources of security risk in technology and communication systems. To better understand the cognitive process that end users can use to identify phishing messages, I interviewed 21 IT experts about instances where they successfully identified emails as phishing in their own inboxes. IT experts naturally follow a three-stage process for identifying phishing emails. In the first stage, the email recipient tries to make sense of the email, and understand how it relates to other things in their life. As they do this, they notice discrepancies: little things that are “off” about the email. As the recipient notices more discrepancies, they feel a need for an alternative explanation for the email. At some point, some feature of the email — usually, the presence of a link requesting an action — triggers them to recognize that phishing is a possible alternative explanation. At this point, they become suspicious (stage two) and investigate the email by looking for technical details that can conclusively identify the email as phishing. Once they find such information, then they move to stage three and deal with the email by deleting it or reporting it. I discuss ways this process can fail, and implications for improving training of end users about phishing.

Integrating AWS Outposts with existing security zones

Post Syndicated from Shubha Kumbadakone original https://aws.amazon.com/blogs/compute/integrating-aws-outposts-with-existing-security-zones/

This post is contributed by Santiago Freitas and Matt Lehwess.

AWS Outposts is a fully managed service that extends AWS infrastructure, services, APIs, and tools to your on-premises facility. This blog post explains how the resources created on an Outpost can be integrated with security zones of an existing infrastructure. Integrating Outposts with existing security zones is important for customers that segment their environment into multiple domains based on their security policy.

Background

It’s common for customers to have different security zones within their infrastructure. For example, a customer might have a DMZ security zone where internet facing systems are located, an extra-net security zone where systems used to communicate with business partners are hosted, and an internal security zone where the systems accessible only by employees operate.

As illustrated in the following figure, customers often use firewalls and network ACLs to perform packet inspection and filtering for traffic that flows between security zones. Customers also usually use similar security controls for traffic flowing between different application tiers.


Example of firewall being used for security zone segmentation

Enabling connectivity from an Outposts VPC to your on-premises network

During your Outpost deployment, AWS works with you to establish connectivity to your local network. During this installation process, AWS creates an address pool based on an IP range you assign to the Outpost out of your local network’s IP ranges. This address pool is known as a customer-owned IP address pool or CoIP pool.

When resources running on Outposts (like an EC2 instance) need to communicate with existing on-premises systems, you must assign an Elastic IP address to them. This Elastic IP address comes from the CoIP pool. The resources in your local area network (LAN), including firewalls and network ACLs, see the Elastic IP address as the source IP of the packets sent from the resources running on Outposts. This Elastic IP address is also used as the destination IP for traffic from your on-premises systems to the instance on the Outpost.

How to enable connectivity from an Outposts VPC to your on-premises network

With a typical Outpost deployment, as shown in the following diagram, the following items are required to enable connectivity from the Outpost’s VPC to your on-premises network:

  1. VPC routing: Routes to your on-premises network in the route table of the VPC’s Outpost subnet.
  2. CoIP pool: Assigned by you, the customer, and created by AWS at time of install, for example, 192.168.1.0/26 in the diagram. It’s used to allocate Elastic IP addresses that can then be associated with instances or other resources on the Outpost.
  3. Elastic IP address association: Customer configured, association of Elastic IP addresses from the CoIP pool with EC2 instances and other resources on the Outpost. For example, VPC IP 10.0.3.112 from instance Y has Elastic IP address 192.168.1.15 associated with it.
  4. Routing advertisement: The Outpost advertises the assigned CoIP range to the local devices within your on-premises network via Border Gateway Protocol (BGP). This is configured by AWS during installation and based on the CoIP pool IP range you provide.


AWS Outposts – typical network topology

Integrating Outposts with existing security zones

CoIP pools, and AWS Resource Access Manager (RAM) are used to facilitate the integration of Outposts with your existing security zones. AWS RAM lets you share your resources with AWS account or through AWS Organizations.

When AWS deploys your Outposts, you can ask AWS to create multiple CoIP pools. Each CoIP pool is configured with an IP range assigned by you during initial installation. If after the initial installation you need AWS to create additional CoIP pools for an existing Outpost, you can open a case with AWS Support and request the creation of additional pools.

CoIP pools are owned initially by the AWS account that owns the Outpost. In a multi-account Outpost deployment, you can share your customer-owned IP pool(s) with other AWS accounts in your AWS Organization using AWS RAM.

VPCs that have subnets on the Outpost must be created in the same account that owns the Outpost. After creation of these subnets within the Outpost account, AWS RAM can then be used to share these subnets with other accounts or organizational units that are in the same organization from AWS Organizations.

After you’ve shared the CoIP pool with the account where you’d like to run your workloads, and you’ve shared an Outpost subnet with that same account, users of that account can deploy resources in the shared Outpost subnet. For the Outposts resources that must communicate with resources in your existing infrastructure, users can assign Elastic IP addresses from one or more of the shared CoIP pools to those Outposts resources.

Multiple CoIP pools and the ability to share them and Outpost subnets with a particular account, gives you granular control over the IP range used by Outpost resources requiring connectivity to your on-premises LAN.

The following figure illustrates the sharing of a subnet and CoIP pool from Account 1, which is the account where the Outpost was initially deployed, with Account 2. As the CoIP pool was shared with Account 2, the users in Account 2 are able to assign an Elastic IP address to the EC2 instance running within Account 2.

AWS Outposts and VPC Sharing

Creating an AWS RAM resource share

The following screenshots demonstrate how to use AWS RAM to share a CoIP pool and a subnet with another account in the same organization from AWS Organizations.

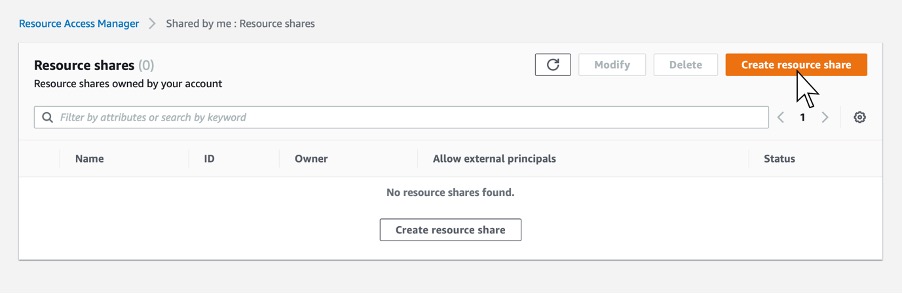
Step 1. Navigate to the AWS RAM service page within the AWS Management Console, and click Create Resource Share. This step is done within the AWS account that owns the Outpost.

Step 2. Next, give the share an appropriate name.

Step 3. Select one or more subnets you’d like to share with your application owner’s account. In this case, select a subnet that exists in your VPC on the Outpost.

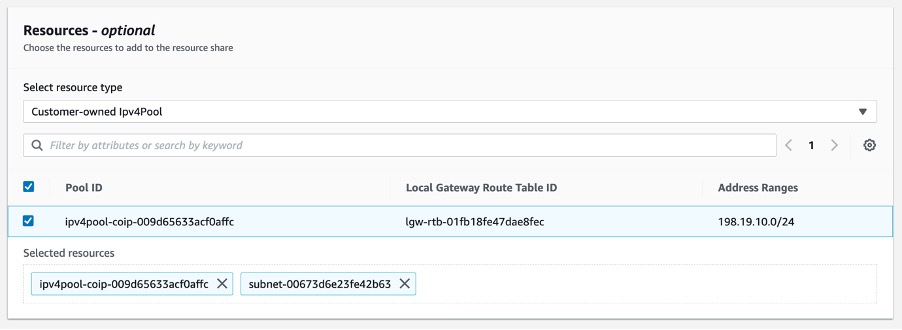
Step 4. In this case, share the CoIP range. You can find that in the resources type list.

Step 5. Select the Customer-owned Ipv4Pool resource type, and then select the CoIP to be shared. Selecting the the CoIP adds it to the list of shared resources along with the subnet selected earlier.

Step 6. Add the account number for the account you’d like to share the Outposts subnet and CoIP pool with.

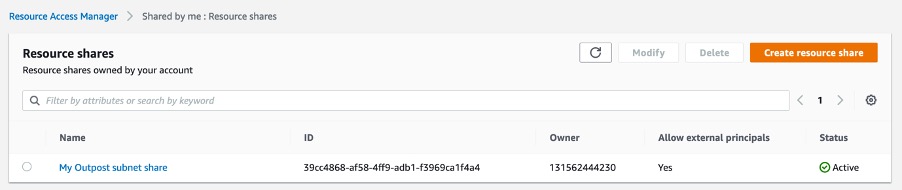
Step 7. Click Create Resource. After clicking the Create Resource share button, you should see the resource share listed and be in the state “active.”

Now that you’ve successfully shared the subnet and CoIP pool with your application account (that’s in the same organization), you can now go in to that account and allocate an Elastic IP address from the CoIP pool. You can then assign the Elastic IP address to an instance launched in the subnet previously shared, which is on the Outpost.

Allocating and associating the Elastic IP address from your CoIP pool

Step 1. From within the application account, allocate an Elastic IP address from the CoIP pool. This is done by navigating to the VPC console, then to Elastic IP addresses, and then click Allocate Elastic IP address.

Step 2. Select Customer owned pool of IPv4 addresses, select the CoIP pool that’s been shared with this account previously, then click Allocate. You can see this step in the following image.

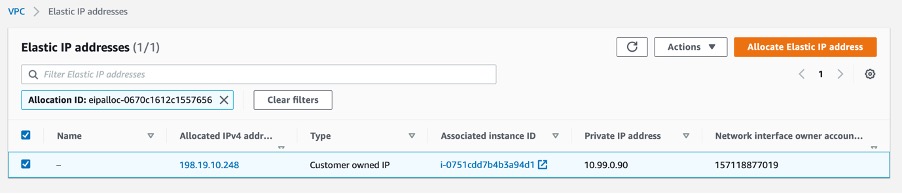
Step 3. You can now see the new Elastic IP address that has been allocated from the shared CoIP pool. You can now associate that Elastic IP address with an instance in our shared subnet.

Note: When using the AWS Management Console to allocate an Elastic IP address, the ElasticIP address is automatically allocated from the CoIPpool. If you’re using the AWS CLI, you have the option to select a specific Elastic IP address from the CoIP pool by using the --customer-owned-ipv4-pool <value> option.

Step 4. You can now associate the Elastic IP address of type CoIP with an instance. Click Associate after selecting the instance that is running on your Outpost in the shared subnet. This step is represented in the following image.

Step 5 – Once the operation is complete, you can see the CoIP Elastic IP address in the Elastic IP address console, and that it’s assigned to the instance that’s running in your shared subnet.

The steps preceding demonstrated how to share the Outpost with other accounts through the use of AWS Resource Access Manager, subnet sharing, and CoIP sharing.

Use case

Let’s apply the capabilities described prior into a design. A customer is running a 3-tier web application and would like to host the web and application tiers on Outposts. The database tier is hosted on the existing infrastructure. The application’s user traffic comes from the internet, through an external firewall towards the web tier hosted on the Outpost. Traffic between web and application tiers is secured with security groups and remains within the Outpost. Application servers connect to the database servers via the existing internal firewalls. The customer uses independent external and internal firewalls.

During the Outposts installation, the customer asks AWS to create two CoIP pools. The first CoIP pool, referenced in the following image as CoIP Web, is assigned the IP range 172.0.1.0/24. The second CoIP pool, referenced in the following image as CoIP App, is assigned the IP range 172.0.2.0/24. The customer then creates two additional AWS accounts, one for the web tier and another for the app tier. Within the account that owns the Outpost, the customer creates two VPCs and within each of those VPCs a subnet is created.

The subnet with IP address 10.0.1.0/24 is shared with the web tier account and the subnet with IP address 10.1.2.0/24 is shared with the app tier account. The customer then configures VPC peering between the VPCs to enable communication between the web and app tiers. VPC peering configuration is performed within the account that owns the Outposts.

Note: With VPC peering traffic between the VPCs remains within the Outpost. However, data transfer charges for VPC peering applies. This use-case could also be built with the web tier and app tier using different subnets within the same VPC to save on data transfer costs over VPC peering.

The following image shows initial setup with two CoIP pools, two accounts, and two VPCs.


Initial setup with two CoIP pools, two accounts and two VPCs

After the initial setup the customer then shares each CoIP pool with the appropriate account using AWS RAM. The customer can then create their web and application servers within the respective accounts. As shown in the prior image, the web server is assigned IP address 10.0.1.5 and the application server is assigned IP address 10.1.2.10. Each IP address is part of their respective VPC IP range and are reachable only within the Outpost at this point.

To enable the integration of the web and application servers with the existing infrastructure, the customer assigns an Elastic IP address from the CoIP pool shared with each account to their respective Amazon EC2 instances.

With this configuration, the customer can integrate the web and application servers into the existing security zones. To integrate the web servers, path “A” in the following image, the customer creates a rule in their external firewall that allows communication from any source (internet) to Elastic IP address 172.0.1.5 on port 443 (HTTPS) which has been assigned to the web server.

For the communication between the web and application servers, path “B” in the following image, the customer has configured VPC peering between the two VPCs and created the required security groups.

To integrate the application servers into the Internal Security Zone, path “C” in the following image, the customer has assigned Elastic IP address 172.0.2.10 to the application server and has configured a rule on the Internal Firewall allowing the IP range 172.0.2.0/24 that is assigned to the app CoIP pool to communicate with the database server.


End to end traffic flow from users to web tier and from app tier to database tier

In addition to setting up their Outposts as covered in the preceding details, to enable the communication between the Outposts hosted resources and the existing infrastructure you must create a custom route table and associate it with an Outpost subnet.

Conclusion

AWS Outposts extends AWS infrastructure, services, APIs, and tools to your on-premises facility. During deployment of your Outposts, AWS works with you to establish connectivity to your local network. This blog post builds upon this initial deployment of an Outpost to allow the Outpost’s resources to integrate into your existing security zones. The design is applicable for customers that segment their environment into multiple security zones.


Santiago Freitas is AWS Head of Technology for Central Eastern Europe (CEE), Middle East, North Africa (MENA), Sub Saharan Africa (SSA), Turkey (TUR), and Russia and Commonwealth of Independent States (RUS-CIS). Previously he was an AWS Global Solutions Architect for financial services. Before joining AWS, Santiago was a Distinguished Engineer at Cisco. He is based in Dubai, United Arab Emirates.

Matt is a Principal Developer Advocate for Amazon Web Services where he has spent the last 7 years working with AWS customers and partners, helping them to build best-in-class AWS networking solutions. He is co-author of the AWS Certified Advanced Networking Official Study Guide, as well as an Amazon Re:Invent speaker extraordinaire (5 years and counting!). His primary focus at AWS is to help evangelize AWS networking solutions and more recently, AWS Outposts.

California Proposition 24 Passes

Post Syndicated from Bruce Schneier original https://www.schneier.com/blog/archives/2020/11/california-proposition-24-passes.html

California’s Proposition 24, aimed at improving the California Consumer Privacy Act, passed this week. Analyses are very mixed. I was very mixed on the proposition, but on the whole I supported it. The proposition has some serious flaws, and was watered down by industry, but voting for privacy feels like it’s generally a good thing.

Determining What Video Conference Participants Are Typing from Watching Shoulder Movements

Post Syndicated from Bruce Schneier original https://www.schneier.com/blog/archives/2020/11/determining-what-video-conference-participants-are-typing-from-watching-shoulder-movements.html

Accuracy isn’t great, but that it can be done at all is impressive.

Murtuza Jadiwala, a computer science professor heading the research project, said his team was able to identify the contents of texts by examining body movement of the participants. Specifically, they focused on the movement of their shoulders and arms to extrapolate the actions of their fingers as they typed.

Given the widespread use of high-resolution web cams during conference calls, Jadiwala was able to record and analyze slight pixel shifts around users’ shoulders to determine if they were moving left or right, forward or backward. He then created a software program that linked the movements to a list of commonly used words. He says the “text inference framework that uses the keystrokes detected from the video … predict[s] words that were most likely typed by the target user. We then comprehensively evaluate[d] both the keystroke/typing detection and text inference frameworks using data collected from a large number of participants.”

In a controlled setting, with specific chairs, keyboards and webcam, Jadiwala said he achieved an accuracy rate of 75 percent. However, in uncontrolled environments, accuracy dropped to only one out of every five words being correctly identified.

Other factors contribute to lower accuracy levels, he said, including whether long sleeve or short sleeve shirts were worn, and the length of a user’s hair. With long hair obstructing a clear view of the shoulders, accuracy plummeted.

Building Serverless Land: Part 1 – Automating content aggregation

Post Syndicated from Benjamin Smith original https://aws.amazon.com/blogs/compute/building-serverless-land-part-1-automating-content-aggregation/

In this two part blog series, I show how serverlessland.com is built. This is a static website that brings together all the latest blogs, videos, and training for AWS Serverless. It automatically aggregates content from a number of sources. The content exists in static JSON files, which generate a new site build each time they are updated. The result is a low-maintenance, low-latency serverless website, with almost limitless scalability.

This blog post explains how to automate the aggregation of content from multiple RSS feeds into a JSON file stored in GitHub. This workflow uses AWS Lambda and AWS Step Functions, triggered by Amazon EventBridge. The application can be downloaded and deployed from this GitHub repository.

The growing adoption of serverless technologies generates increasing amounts of helpful and insightful content from the developer community. This content can be difficult to discover. Serverless Land helps channel this into a single searchable location. By automating the collection of this content with scheduled serverless workflows, the process robustly scales to near infinite numbers. The Step Functions MAP state allows for dynamic parallel processing of multiple content sources, without the need to alter code. On-boarding a new content source is as fast and simple as making a single CLI command.

The architecture

Automating content aggregation with AWS Step Functions

The application consists of six Lambda functions orchestrated by a Step Functions workflow:

  1. The workflow is triggered every 2 hours by an EventBridge scheduler. The schedule event passes an RSS feed URL to the workflow.
  2. The first task invokes a Lambda function that runs an HTTP GET request to the RSS feed. It returns an array of recent blog URLs. The array of blog URLs is provided as the input to a MAP state. The MAP state type makes it possible to run a set of steps for each element of an input array in parallel. The number of items in the array can be different for each execution. This is referred to as dynamic parallelism.
  3. The next task invokes a Lambda function that uses the GitHub REST API to retrieve the static website’s JSON content file.
  4. The first Lambda function in the MAP state runs an HTTP GET request to the blog post URL provided in the payload. The URL is scraped for content and an object containing detailed metadata about the blog post is returned in the response.
  5. The blog post metadata is compared against the website’s JSON content file in GitHub.
  6. A CHOICE state determines if the blog post metadata has already been committed to the repository.
  7. If the blog post is new, it is added to an array of “content to commit”.
  8. As the workflow exits the MAP state, the results are passed to the final Lambda function. This uses a single git commit to add each blog post object to the website’s JSON content file in GitHub. This triggers an event that rebuilds the static site.

Using Secrets in AWS Lambda

Two of the Lambda functions require a GitHub personal access token to commit files to a repository. Sensitive credentials or secrets such as this should be stored separate to the function code. Use AWS Systems Manager Parameter Store to store the personal access token as an encrypted string. The AWS Serverless Application Model (AWS SAM) template grants each Lambda function permission to access and decrypt the string in order to use it.

  1. Follow these steps to create a personal access token that grants permission to update files to repositories in your GitHub account.
  2. Use the AWS Command Line Interface (AWS CLI) to create a new parameter named GitHubAPIKey:
aws ssm put-parameter \
--name /GitHubAPIKey \
--value ReplaceThisWithYourGitHubAPIKey \
--type SecureString

{
    "Version": 1,
    "Tier": "Standard"
}

Deploying the application

  1. Fork this GitHub repository to your GitHub Account.
  2. Clone the forked repository to your local machine and deploy the application using AWS SAM.
  3. In a terminal, enter:
    git clone https://github.com/aws-samples/content-aggregator-example
    sam deploy -g
  4. Enter the required parameters when prompted.

This deploys the application defined in the AWS SAM template file (template.yaml).

The business logic

Each Lambda function is written in Node.js and is stored inside a directory that contains the package dependencies in a `node_modules` folder. These are defined for each function by its relative package.json file. The function dependencies are bundled and deployed using the sam build && deploy -g command.

The GetRepoContents and WriteToGitHub Lambda functions use the octokit/rest.js library to communicate with GitHub. The library authenticates to GitHub by using the GitHub API key held in Parameter Store. The AWS SDK for Node.js is used to obtain the API key from Parameter Store. With a single synchronous call, it retrieves and decrypts the parameter value. This is then used to authenticate to GitHub.

const AWS = require('aws-sdk');
const SSM = new AWS.SSM();


//get Github API Key and Authenticate
    const singleParam = { Name: '/GitHubAPIKey ',WithDecryption: true };
    const GITHUB_ACCESS_TOKEN = await SSM.getParameter(singleParam).promise();
    const octokit = await  new Octokit({
      auth: GITHUB_ACCESS_TOKEN.Parameter.Value,
    })

Lambda environment variables are used to store non-sensitive key value data such as the repository name and JSON file location. These can be entered when deploying with AWS SAM guided deploy command.

Environment:
        Variables:
          GitHubRepo: !Ref GitHubRepo
          JSONFile: !Ref JSONFile

The GetRepoContents function makes a synchronous HTTP request to the GitHub repository to retrieve the contents of the website’s JSON file. The response SHA and file contents are returned from the Lambda function and acts as the input to the next task in the Step Functions workflow. This SHA is used in final step of the workflow to save all new blog posts in a single commit.

Map state iterations

The MAP state runs concurrently for each element in the input array (each blog post URL).

Each iteration must compare a blog post URL to the existing JSON content file and decide whether to ignore the post. To do this, the MAP state requires both the input array of blog post URLs and the existing JSON file contents. The ItemsPath, ResultPath, and Parameters are used to achieve this:

  • The ItemsPath sets input array path to $.RSSBlogs.body.
  • The ResultPath states that the output of the branches is placed in $.mapResults.
  • The Parameters block replaces the input to the iterations with a JSON node. This contains both the current item data from the context object ($$.Map.Item.Value) and the contents of the GitHub JSON file ($.RepoBlogs).
"Type":"Map",
    "InputPath": "$",
    "ItemsPath": "$.RSSBlogs.body",
    "ResultPath": "$.mapResults",
    "Parameters": {
        "BlogUrl.$": "$$.Map.Item.Value",
        "RepoBlogs.$": "$.RepoBlogs"
     },
    "MaxConcurrency": 0,
    "Iterator": {
       "StartAt": "getMeta",

The Step Functions resource

The AWS SAM template uses the following Step Functions resource definition to create a Step Functions state machine:

  MyStateMachine:
    Type: AWS::Serverless::StateMachine
    Properties:
      DefinitionUri: statemachine/my_state_machine.asl.JSON
      DefinitionSubstitutions:
        GetBlogPostArn: !GetAtt GetBlogPost.Arn
        GetUrlsArn: !GetAtt GetUrls.Arn
        WriteToGitHubArn: !GetAtt WriteToGitHub.Arn
        CompareAgainstRepoArn: !GetAtt CompareAgainstRepo.Arn
        GetRepoContentsArn: !GetAtt GetRepoContents.Arn
        AddToListArn: !GetAtt AddToList.Arn
      Role: !GetAtt StateMachineRole.Arn

The actual workflow definition is defined in a separate file (statemachine/my_state_machine.asl.JSON). The DefinitionSubstitutions property specifies mappings for placeholder variables. This enables the template to inject Lambda function ARNs obtained by the GetAtt intrinsic function during template translation:

Step Functions mappings with placeholder variables

A state machine execution role is defined within the AWS SAM template. It grants the `Lambda invoke function` action. This is tightly scoped to the six Lambda functions that are used in the workflow. It is the minimum set of permissions required for the Step Functions to carry out its task. Additional permissions can be granted as necessary, which follows the zero-trust security model.

Action: lambda:InvokeFunction
Resource:
- !GetAtt GetBlogPost.Arn
- !GetAtt GetUrls.Arn
- !GetAtt CompareAgainstRepo.Arn
- !GetAtt WriteToGitHub.Arn
- !GetAtt AddToList.Arn
- !GetAtt GetRepoContents.Arn

The Step Functions workflow definition is authored using the AWS Toolkit for Visual Studio Code. The Step Functions support allows developers to quickly generate workflow definitions from selectable examples. The render tool and automatic linting can help you debug and understand the workflow during development. Read more about the toolkit in this launch post.

Scheduling events and adding new feeds

The AWS SAM template creates a new EventBridge rule on the default event bus. This rule is scheduled to invoke the Step Functions workflow every 2 hours. A valid JSON string containing an RSS feed URL is sent as the input payload. The feed URL is obtained from a template parameter and can be set on deployment. The AWS Compute Blog is set as the default feed URL. To aggregate additional blog feeds, create a new rule to invoke the Step Functions workflow. Provide the RSS feed URL as valid JSON input string in the following format:

{“feedUrl”:”replace-this-with-your-rss-url”}

ScheduledEventRule:
    Type: "AWS::Events::Rule"
    Properties:
      Description: "Scheduled event to trigger Step Functions state machine"
      ScheduleExpression: rate(2 hours)
      State: "ENABLED"
      Targets:
        -
          Arn: !Ref MyStateMachine
          Id: !GetAtt MyStateMachine.Name
          RoleArn: !GetAtt ScheduledEventIAMRole.Arn
          Input: !Sub
            - >
              {
                "feedUrl" : "${RssFeedUrl}"
              }
            - RssFeedUrl: !Ref RSSFeed

A completed workflow with step output

Conclusion

This blog post shows how to automate the aggregation of content from multiple RSS feeds into a single JSON file using serverless workflows.

The Step Functions MAP state allows for dynamic parallel processing of each item. The recent increase in state payload size limit means that the contents of the static JSON file can be held within the workflow context. The application decision logic is separated from the business logic and events.

Lambda functions are scoped to finite business logic with Step Functions states managing decision logic and iterations. EventBridge is used to manage the inbound business events. The zero-trust security model is followed with minimum permissions granted to each service and Parameter Store used to hold encrypted secrets.

This application is used to pull together articles for http://serverlessland.com. Serverless land brings together all the latest blogs, videos, and training for AWS Serverless. Download the code from this GitHub repository to start building your own automated content aggregation platform.

New Windows Zero-Day

Post Syndicated from Bruce Schneier original https://www.schneier.com/blog/archives/2020/11/new-windows-zero-day.html

Google’s Project Zero has discovered and published a buffer overflow vulnerability in the Windows Kernel Cryptography Driver. The exploit doesn’t affect the cryptography, but allows attackers to escalate system privileges:

Attackers were combining an exploit for it with a separate one targeting a recently fixed flaw in Chrome. The former allowed the latter to escape a security sandbox so the latter could execute code on vulnerable machines.

The vulnerability is being exploited in the wild, although Microsoft says it’s not being exploited widely. Everyone expects a fix in the next Patch Tuesday cycle.

Friday Squid Blogging: Interview with a Squid Researcher

Post Syndicated from Bruce Schneier original https://www.schneier.com/blog/archives/2020/10/friday-squid-blogging-interview-with-a-squid-researcher.html

Interview with Mike Vecchione, Curator of Cephalopoda — now that’s a job title — at the Smithsonian Museum of National History.

One reason they’re so interesting is they are intelligent invertebrates. Almost everything that we think of as being intelligent — parrots, dolphins, etc. — are vertebrates, so their brains are built on the same basic structure. Whereas cephalopod brains have evolved from a ring of nerves around the esophagus. It’s a form of intelligence that’s completely independent from ours.

As usual, you can also use this squid post to talk about the security stories in the news that I haven’t covered.

Read my blog posting guidelines here.

The Legal Risks of Security Research

Post Syndicated from Bruce Schneier original https://www.schneier.com/blog/archives/2020/10/the-legal-risks-of-security-research.html

Sunoo Park and Kendra Albert have published “A Researcher’s Guide to Some Legal Risks of Security Research.”

From a summary:

Such risk extends beyond anti-hacking laws, implicating copyright law and anti-circumvention provisions (DMCA §1201), electronic privacy law (ECPA), and cryptography export controls, as well as broader legal areas such as contract and trade secret law.

Our Guide gives the most comprehensive presentation to date of this landscape of legal risks, with an eye to both legal and technical nuance. Aimed at researchers, the public, and technology lawyers alike, its aims both to provide pragmatic guidance to those navigating today’s uncertain legal landscape, and to provoke public debate towards future reform.

Comprehensive, and well worth reading.

Here’s a Twitter thread by Kendra.

Tracking Users on Waze

Post Syndicated from Bruce Schneier original https://www.schneier.com/blog/archives/2020/10/tracking-users-on-waze.html

A security researcher discovered a wulnerability in Waze that breaks the anonymity of users:

I found out that I can visit Waze from any web browser at waze.com/livemap so I decided to check how are those driver icons implemented. What I found is that I can ask Waze API for data on a location by sending my latitude and longitude coordinates. Except the essential traffic information, Waze also sends me coordinates of other drivers who are nearby. What caught my eyes was that identification numbers (ID) associated with the icons were not changing over time. I decided to track one driver and after some time she really appeared in a different place on the same road.

The vulnerability has been fixed. More interesting is that the researcher was able to de-anonymize some of the Waze users, proving yet again that anonymity is hard when we’re all so different.

The NSA is Refusing to Disclose its Policy on Backdooring Commercial Products

Post Syndicated from Bruce Schneier original https://www.schneier.com/blog/archives/2020/10/the-nsa-is-refusing-to-disclose-its-policy-on-backdooring-commercial-products.html

Senator Ron Wyden asked, and the NSA didn’t answer:

The NSA has long sought agreements with technology companies under which they would build special access for the spy agency into their products, according to disclosures by former NSA contractor Edward Snowden and reporting by Reuters and others.

These so-called back doors enable the NSA and other agencies to scan large amounts of traffic without a warrant. Agency advocates say the practice has eased collection of vital intelligence in other countries, including interception of terrorist communications.

The agency developed new rules for such practices after the Snowden leaks in order to reduce the chances of exposure and compromise, three former intelligence officials told Reuters. But aides to Senator Ron Wyden, a leading Democrat on the Senate Intelligence Committee, say the NSA has stonewalled on providing even the gist of the new guidelines.

[…]

The agency declined to say how it had updated its policies on obtaining special access to commercial products. NSA officials said the agency has been rebuilding trust with the private sector through such measures as offering warnings about software flaws.

“At NSA, it’s common practice to constantly assess processes to identify and determine best practices,” said Anne Neuberger, who heads NSA’s year-old Cybersecurity Directorate. “We don’t share specific processes and procedures.”

Three former senior intelligence agency figures told Reuters that the NSA now requires that before a back door is sought, the agency must weigh the potential fallout and arrange for some kind of warning if the back door gets discovered and manipulated by adversaries.

The article goes on to talk about Juniper Networks equipment, which had the NSA-created DUAL_EC PRNG backdoor in its products. That backdoor was taken advantage of by an unnamed foreign adversary.

Juniper Networks got into hot water over Dual EC two years later. At the end of 2015, the maker of internet switches disclosed that it had detected malicious code in some firewall products. Researchers later determined that hackers had turned the firewalls into their own spy tool here by altering Juniper’s version of Dual EC.

Juniper said little about the incident. But the company acknowledged to security researcher Andy Isaacson in 2016 that it had installed Dual EC as part of a “customer requirement,” according to a previously undisclosed contemporaneous message seen by Reuters. Isaacson and other researchers believe that customer was a U.S. government agency, since only the U.S. is known to have insisted on Dual EC elsewhere.

Juniper has never identified the customer, and declined to comment for this story.

Likewise, the company never identified the hackers. But two people familiar with the case told Reuters that investigators concluded the Chinese government was behind it. They declined to detail the evidence they used.

Okay, lots of unsubstantiated claims and innuendo here. And Neuberger is right; the NSA shouldn’t share specific processes and procedures. But as long as this is a democratic country, the NSA has an obligation to disclose its general processes and procedures so we all know what they’re doing in our name. And if it’s still putting surveillance ahead of security.

Reverse-Engineering the Redactions in the Ghislaine Maxwell Deposition

Post Syndicated from Bruce Schneier original https://www.schneier.com/blog/archives/2020/10/reverse-engineering-the-redactions-in-the-ghislaine-maxwell-deposition.html

Slate magazine was able to cleverly read the Ghislaine Maxwell deposition and reverse-engineer many of the redacted names.

We’ve long known that redacting is hard in the modern age, but most of the failures to date have been a result of not realizing that covering digital text with a black bar doesn’t always remove the text from the underlying digital file. As far as I know, this reverse-engineering technique is new.

EDITED TO ADD: A similar technique was used in 1991 to recover the Dead Sea Scrolls.

Introducing retry strategies for AWS Batch

Post Syndicated from Emma White original https://aws.amazon.com/blogs/compute/introducing-retry-strategies-for-aws-batch/

This post is contributed by Christian Kniep, Sr. Developer Advocate, HPC and AWS Batch.

Scientists, researchers, and engineers are using AWS Batch to run workloads reliably at scale, and to offload the undifferentiated heavy lifting in their day-to-day work. But even with a slight chance of failure in the stack, the act of mitigating these failures reminds customers that infrastructure, middleware and software are not error proof.

Many customers use Amazon EC2 Spot Instances to save up to 90% on their computing cost by leveraging unused EC2 capacity. If unused EC2 capacity is unavailable, an EC2 Spot Instance can be reclaimed by EC2. While AWS Batch takes care of rescheduling the job on a different instance, this rescheduling should not be handled differently depending on whether it is an application failure or some infrastructure event interrupting the job.

Starting today, customers can define how many retries are performed in cases where a task does not finish correctly. AWS Batch now allows customers define custom retry conditions, so that failures like an interruption of an instance or an infrastructure agent are handled differently, and do not just exhaust the number of retries attempted.

In this blog, I show the benefits of custom retry with AWS Batch by using different error codes from a job to control whether it should be retried. I will also demonstrate how to handle infrastructure events like a failing container image download, or an EC2 Spot interruption.

Example setup

To showcase this new feature, I use the AWS Command Line Interface (AWS CLI) to set up the following:

  1. IAMroles, policies, and profiles to grant access and permissions
  2. A compute environment (CE) to provide the compute resources to run jobs
  3. A job queue, which supervises the job execution and schedules jobs on the CE
  4. Job definitions with different retry strategies,which use a simple job to demonstrate how the new configuration can be applied

Once those tasks are completed, I submit jobs to show how you can handle different scenarios, such as infrastructure failure, application handling via error code or a middleware event.

Prerequisite

To make things easier, I first set up a couple of environment variables to have the information available for later use. I use the following code to set up the environment variables:

# in case it is not already installed
sudo yum install -y jq 
export MD_URL=http://169.254.169.254/latest/meta-data
export IFACE=$(curl -s ${MD_URL}/network/interfaces/macs/)
export SUBNET_ID=$(curl -s ${MD_URL}/network/interfaces/macs/${IFACE}/subnet-id)
export VPC_ID=$(curl -s ${MD_URL}/network/interfaces/macs/${IFACE}/vpc-id)
export AWS_REGION=$(curl -s ${MD_URL}/placement/availability-zone | sed 's/[a-z]$//')
export AWS_ACCT_ID=$(curl -s ${MD_URL}/identity-credentials/ec2/info |jq -r .AccountId)
export AWS_SG_DEFAULT=$(aws ec2 describe-security-groups \
--filters Name=group-name,Values=default \
|jq -r '.SecurityGroups[0].GroupId')

IAM

When using the AWS Management Console, I must create IAM roles manually.

Trust policies

IAM roles are defined to be used by an individual service. In the simplest case, I want a role to be used by Amazon EC2 – the service that provides the compute capacity in the cloud. The definition of which entity is able to use an IAM role is called a Trust Policy. To set up a Trust Policy for an IAM role, I use the following code snippet:

cat > ec2-trust-policy.json << EOF
{
  "Version": "2012-10-17",
  "Statement": [{
    "Effect": "Allow",
    "Principal": {
      "Service": "ec2.amazonaws.com"
    },
    "Action": "sts:AssumeRole"
  }]
}
EOF

Instance role

With the IAM trust policy, I can now create an ecsInstanceRole and attach the pre-defined policy AmazonEC2ContainerServiceforEC2Role. This allows an instance to interact with Amazon ECS.

aws iam create-role --role-name ecsInstanceRole \
 --assume-role-policy-document file://ec2-trust-policy.json
aws iam create-instance-profile --instance-profile-name ecsInstanceProfile
aws iam add-role-to-instance-profile \
    --instance-profile-name ecsInstanceProfile \
    --role-name ecsInstanceRole
aws iam attach-role-policy --role-name ecsInstanceRole \
 --policy-arn arn:aws:iam::aws:policy/service-role/AmazonEC2ContainerServiceforEC2Role

Service role

The AWS Batch service uses a role to interact with different services. The trust relationship reflects that the AWS Batch service is going to assume this role. I can set up this role with the following logic:

cat > svc-trust-policy.json << EOF
{
  "Version": "2012-10-17",
  "Statement": [{
    "Effect": "Allow",
    "Principal": {
      "Service": "batch.amazonaws.com"
    },
    "Action": "sts:AssumeRole"
  }]
}
EOF
aws iam create-role --role-name AWSBatchServiceRole \
--assume-role-policy-document file://svc-trust-policy.json
aws iam attach-role-policy --role-name AWSBatchServiceRole \
--policy-arn arn:aws:iam::aws:policy/service-role/AWSBatchServiceRole

At this point, I have created the IAM roles and policies so that the instances and services are able to interact with the AWS API operations, including trust policies to define which services are meant to use them. EC2 for the ecsInstanceRole and the AWSBatchServiceRole for the AWS Batch service itself.

Compute environment

Now, I am going to create a CE, which will launch instances to run the example jobs.

cat > compute-environment.json << EOF
{
  "computeEnvironmentName": "compute-0",
  "type": "MANAGED",
  "state": "ENABLED",
  "computeResources": {
    "type": "SPOT",
    "allocationStrategy": "SPOT_CAPACITY_OPTIMIZED",
    "minvCpus": 2,
    "maxvCpus": 32,
    "desiredvCpus": 4,
    "instanceTypes": [ "m5.xlarge","m5.2xlarge","m4.xlarge","m4.2xlarge","m5a.xlarge","m5a.2xlarge"],
    "subnets": ["${SUBNET_ID}"],
    "securityGroupIds": ["${AWS_SG_DEFAULT}"],
    "instanceRole": "arn:aws:iam::${AWS_ACCT_ID}:instance-profile/ecsInstanceRole",
    "tags": {"Name": "aws-batch-instances"},
    "ec2KeyPair": "batch-ssh-key",
    "bidPercentage": 0
  },
  "serviceRole": "arn:aws:iam::${AWS_ACCT_ID}:role/AWSBatchServiceRole"
}
EOF
aws batch create-compute-environment --cli-input-json file:// compute-environment.json 

Once this is complete, my compute environment begins to launch instances. This takes a few minutes. I can use the following command to check on the status of the compute environment whenever I want:

aws batch describe-compute-environments |jq '.computeEnvironments[] |select(.computeEnvironmentName=="compute-0")'

The command uses jq to filter the output to only show the compute environment I just created.

Job queue

Now that I have my compute environment up and running, I can create a job queue, which accepts job submissions and schedules the jobs to the compute environment.

cat > job-queue.json << EOF
{
  "jobQueueName": "queue-0",
  "state": "ENABLED",
  "priority": 1,
  "computeEnvironmentOrder": [{
    "order": 0,
    "computeEnvironment": "compute-0"
  }]
}
EOF
aws batch create-job-queue --cli-input-json file://job-queue.json

Job definition

The job definition is used as a template for jobs. It is referenced in a job submission to specify the defaults of a job configuration, while some of the parameters can be overwritten when you submit.

Within the job definition, different retry strategies can be configured along with a maximum number of attempts for the job.
Three possible conditions can be used:

  • onExitCode will evaluate non-zero exit codes
  • onReason matched against middleware errors
  • onStatusReason can be used to react to infrastructure events such as an instance termination

Different conditions are assigned an action to either EXIT or RETRY the job. Important to note, that a job finishing with an exit code of zero will EXIT the job and not evaluate the retry condition. The default behavior for all non-zero exit code is the following:

{
  "onExitCode" : ""
  "onStatusReason" : ""
  "onReason" : "*"
  "action": retry
}

This condition retries every job that does not succeed (exit code 0) until the attempts are exhausted.

Spot Instance interruptions

AWS Batch works great with Spot Instances and customers are using this to reduce their compute cost. If Spot Instances become unavailable, instances are reclaimed by EC2, which can lead to one or more of my hosts being shut down. When this happens, the jobs running on those hosts are shut down due to an infrastructure event, not an application failure. Previously, separating these kinds of events from one another was only possible by catching the notification on the instance itself or through CloudWatch Events. Now with customer retry, you don’t have to rely on instance notifications or CloudWatch Events.

Using the job definition below, the job is restarted if the instance running the job gets shut down, which includes the termination due to a Spot Instance reclaim. The additional condition makes sure that the job exits whenever the exit code is not zero, otherwise the job would be rescheduled until the attempts are exhausted (see default behavior above).

cat > jdef-spot..json << EOF
{
    "jobDefinitionName": "spot",
    "type": "container",
    "containerProperties": {
        "image": "alpine:latest",
        "vcpus": 2,
        "memory": 256,
        "command":  ["sleep","600"],
        "readonlyRootFilesystem": false
    },
    "retryStrategy": { 
        "attempts": 5,
        "evaluateOnExit": 
        [{
            "onStatusReason" :"Host EC2*",
            "action": "RETRY"
        },{
  		  "onReason" : "*"
            "action": "EXIT"
        }]
    }
}
EOF
aws batch register-job-definition --cli-input-json file://jdef-spot.json

To simulate a Spot Instances reclaim, I submit a job, and manually shut down the host the job is running on. This triggers my condition to ask AWS Batch to make 5 attempts to finish the job before it marks the job a failure.

When I use the AWS CLI to describe my job, it displays the number of attempts to retry.

By shutting down my instance, the job returns to the status RUNNABLE and will be scheduled again until it succeeds or reaches the maximum attempts defined.

Exit code mitigation

I can also use the exit code to decide which mitigation I want to use based on the exit code of the job script or application itself.

To illustrate this, I can create a new job definition that uses a container image that exits on a random exit code between 0 and 3. Traditionally, an exit code of 0 means success, and won’t trigger this retry strategy. For all other (nonzero) exit codes the retry strategy is evaluated. In my example, 1 or 2 reflect situations where a retry is needed, but an exit code of 3 means that AWS Batch should let the job fail.

cat > jdef-randomEC.json << EOF
{
    "jobDefinitionName": "randomEC",
    "type": "container",
    "containerProperties": {
        "image": "qnib/random-ec:2020-10-13.3",
        "vcpus": 2,
        "memory": 256,
        "readonlyRootFilesystem": false
    },
    "retryStrategy": { 
        "attempts": 10,
        "evaluateOnExit": 
        [{
            "onExitCode": "1",
            "action": "RETRY"
        },{
            "onExitCode": "2",
            "action": "RETRY"
        },{
            "onExitCode": "3",
            "action": "EXIT"
        }]
    }
}
EOF
aws batch register-job-definition --cli-input-json file://jdef-randomEC.json

A submitted job retries until the exit code 0 is successful, 3 for a failure or the attempts are exhausted (in this case, 10 of them).

aws batch submit-job  --job-name randomEC-$(date +"%F_%H-%M-%S") --job-queue queue-0   --job-definition randomEC:1

The output of a job submission shows the job name and the job id.

In case the exit code is 1, and the job will be requeued.

Container image pull failure

The first example showed an error on the infrastructure layer and the second showed how to handle errors on the application layer. In this last example, I show how to handle errors that are introduced in the middleware layer, in this case: the container daemon.

It might happen if your Docker registry is down or having issues. To demonstrate this, I used an image name that is not present in the registry. In that case, the job should not get rescheduled to fail again immediately.

The following job definition again defines 10 attempts for a job, except when the container cannot be pulled. This leads to a direct failure of the job.

cat > jdef-noContainer.json << EOF
{
    "jobDefinitionName": "noContainer",
    "type": "container",
    "containerProperties": {
        "image": "no-container-image",
        "vcpus": 2,
        "memory": 256,
        "readonlyRootFilesystem": false
    },
    "retryStrategy": { 
        "attempts": 10,
        "evaluateOnExit": 
        [{
            "onReason": "CannotPullContainerError:*",
            "action": "EXIT"
        }]
    }
}
EOF
aws batch register-job-definition --cli-input-json file://jdef-noContainer.json

Note that the job defines an image name (“no-container-image”) which is not present in the registry. The job is set up to fail when trying to download the image, and will do so repeatedly, if AWS Batch keeps trying.

Even though the job definition has 10 attempts configured for this job, it fell straight through to FAILED as the retry strategy sets the action exit when a CannotPullContainerError occurs. Many of the error codes I can create conditions for are documented in the Amazon ECS user guide (e.g. task error codes / container pull error).

Conclusion

In this blog post, I showed three different scenarios that leverage the new custom retry features in AWS Batch to control when a job should exit or get rescheduled.

By defining retry strategies you can react to an infrastructure event (like an EC2 Spot interruption), an application signal (via the exit code), or an event within the middleware (like a container image not being available).

This new feature allows you to have fine grained control over how your jobs react to different error scenarios.