Силата на Пеевски е слабостта на Борисов – това е парадоксът, в който се намираме. Това заяви в интервю за „Биволъ“ бившият министър-председател Николай Денков (ПП „Продължаваме промяната“), който наред…
Това е нещо, което определено трябва да се отбележи, защото е някаква стъпка напред. Снощи Министерство на външните работи е публикувала карта на секциите в чужбина. Намерих я случайно, защото по няколко пъти на ден преглеждам мястото, където публикуват таблица с адресите на секциите. Когато има промяна я отразявам директно на моята карта. Същият процес следвам последните няколко вота, докато преди това се налагаше да преглеждам индивидуалните сканирани на PDF заповеди на всяко консулство и да сверявам с доброволци на място.
Вчера сутринта са започнали картата съдейки по метаданните. Публикувана е след 18:00 снощи, тъй като тогава последно проверих сайта им. Съдържа практически същите данни като моята. Тъй като са първоизточника и за пръв път публикуват не само адреси, но и географски координати, ще сравня отново данните с моите. Ще е добро упражнение да проверя с колко метра е отклонението на моята карта. Ще пусна резултатите в близките дни.
Вярно е, че публикуват картата около два дни и половина преди началото на изборния ден и закъсняха малко с адресите този път, но все пак е стъпка напред, за която трябва да ги поздравим. Дава ни надежда, че ще стане практика от доста по-рано за следващия вот. Преди години на поне един вот използваха версия на моята карта като официална след като изрично ме питаха за това. Предоставих я с удоволствие.
Винаги съм казвал, че целта на всяка инициатива следва да бъде да стане излишна. Същото целях с Lipsva, с отворените данни и GovAlert. Картата за изборите в чужбина се налага вече 12 години да я поддържам дори да не живея вече зад граница. Може би този експеримент на Външно да е знак, че това, което правя ще се разпознае като полезно и официален процес на администрацията. От друга страна, постоянството и приемствеността не са силните черти на по-голямата част от публичната сфера, както видяхме с нещо просто като акаунтите @GovBulgaria и @MIBulgaria, които се използваха като официални от Министерски съвет и МВР известно време. Та ще трябва да мине време и няколко вота, за да видим.
Customers not using Amazon SES Mail Manager, or those leveraging the authenticated SMTP functionality, are not at risk of EchoSpoofing. In such cases, no further action is required.
However, customers currently using or evaluating the unauthenticated SMTP relay feature of Amazon SES Mail Manager are strongly advised to review and implement the guidance provided in this blog post.
A new type of email spoofing attack
In July 2024, the researchers at Guardio Labs disclosed a new type of email spoofing (authentication bypass) attack they called “EchoSpoofing”. The attackers successfully sent spoofed emails by redirecting them through a virtual SMTP server, Office365 Exchange Online server, and a trusted third-party SMTP relay service. This path provided the fraudulent messages a means to pass standard authentication checks. Fortunately, the Guardio Labs researchers responsibly disclosed the issue to the targeted email security provider, leading to a speedy and effective remedy.
Unfortunately, before addressing the vulnerability completely, cybercriminals executed a series of sophisticated phishing campaigns. These campaigns involved sending millions of fraudulent emails that had valid Sender Policy Framework (SPF) and DomainKeys Identified Mail (DKIM) from well-known consumer brands.
The EchoSpoofing incident reminds both providers and customers to adopt a “trust-but-verify” approach to email security. This is especially true when mail routing functions have been, or are, in the process of being decoupled from single-tenant, on-premise (or cloud) email infrastructures.
As a leading provider of global managed email infrastructure, the Amazon SES service team went to work immediately after the Guardio Labs announcement. The Amazon SES team scrutinized the announcement and remediations undertaken by both Microsoft and the third-party SMTP relay service to fully understand the EchoSpoofing exploits and devised methods to swiftly safeguard Amazon SES customers.
Although we won’t delve into Guardio Labs’ in-depth analysis, it is crucial to grasp the attack’s main elements and examine how malicious individuals could exploit supposedly “secure” email relay systems. Amazon SES has taken steps to safeguard against EchoSpoofing and similar attacks, urging its customers to do the same.
Understanding the EchoSpoofing attack
The bad actors who implemented EchoSpoofing were able to send millions of well camouflaged malicious messages through the trusted delivery path of targeted organizations by preserving the SPF and DKIM attributes of the targeted sender’s domain. This greatly increased the likelihood of recipients trusting and acting upon the fake messages.
The attacker first set up a tenant in Microsoft Office365 and then delivered a spoofed email to that tenant, falsifying the from email headers. The attacker-controlled tenant was configured to relay the email to a security relay point linked to the forged sending identity. As the forged email came from trusted IP addresses belonging to Microsoft, the security relay point signed the message and relayed to the final recipients.
The attackers had amassed a large inventory of high-profile domains, and spread the EchoSpoof campaigns out across them to smooth the traffic and avoid sending spikes from any single domain. They carried out this attack for several months undetected, sending as many as 14 million messages per day, targeting the users of the compromised domains’ email services. This made the attack easy to automate at scale, difficult to detect via automated means, and highly successful in delivering malicious emails to unsuspecting recipients.
Guardio Labs’ discovery highlights the risks associated with an insecure SMTP relay model in a trusted domain configuration. This is of particular concern when permissive security policies allow fraudulent emails to be injected into the email flow without raising alarms.
The AWS shared security model for SES
As an email sender, Amazon SES is one of the largest on the internet, operating a worldwide fleet of trusted mail relays. Amazon SES maintains high IP reputations for this large fleet by maintaining a tight focus on robust, evolving security practices.
At AWS we operate under the shared security model. For Amazon SES, this means AWS takes responsibility for securing the underlying email delivery infrastructure, including the email servers, networks, and physical data centers. Customers take responsibility for securing their configurations, email content, sender authentication, and email lists they use with Amazon SES.
To ensure we meet our obligations in the shared security model, Amazon SES has recently added new features to Mail Manager SMTP relays that provide an increased level of protection to help guard against exploits like EchoSpoofing. Theses features are live in every AWS Region where Mail Manager is accessible.
We have outlined our recommendations and updated Amazon SES Mail Manager configurations in this blog to help customers meet their obligations and strengthen their Amazon SES email infrastructure against EchoSpoofing. As noted above, authenticated SMTP relays are not subject to this exploit.
Prevent EchoSpoofing when relaying email out of MailManager
If you need to relay email to a third party system that cannot enforce SMTP authentication, our recommendation is to limit access to the IP addresses used by Mail Manager in your region.
As of this writing, Mail Manager is generally available, and has its own IP range, in six commercial regions (below). As Amazon expands SES Mail Manager availability into more regions the IP ranges will be updated in the Amazon SES documentation .
SES Mail Manager IP ranges as of 10/23/2024
When unable to enforce SMTP authentication, we recommend configuring your SMTP servers, or third party software for the new MIME header"X-MAIL-MANAGER-ORIGINATOR-ORG". This new Mail Manager header is now automatically inserted into messages relayed by Mail Manager. The X-MAIL-MANAGER-ORIGINATOR-ORG will be set to the customer’s unique SMTP relay ID, which can be found via the Mail Manager console or the ListSmtpRelays API.
In addition to added security, the MIME header feature can also be used in message search and filtering behaviors for a wide range of MIME header name:value pairs.
If the original email already contains an X-MAIL-MANAGER-ORIGINATOR-ORG header, it will be replaced with the last MailManager SMTP relay ID to relay the email. Here is an example of an email relayed by MailManager with the header:
MIME-Version: 1.0
From: [email protected]
To: [email protected]
Subject: Test
X-SES-REDIRECT-MESSAGE-ID: <[email protected]>
X-MAIL-MANAGER-ORIGINATOR-ORG: rl-usmoots8mgmfgfaeijckxhqx
X-SES-Outgoing: 2024.08.26-76.223.191.14

--===============1760803815732220490==
Content-Type: text/plain; charset="us-ascii"
MIME-Version: 1.0
Content-Transfer-Encoding: 7bit

This is a sample message. Have a nice day.
--===============1760803815732220490==--
This approach elevates your security posture because the IP access control lists on your third party system ensures only mail from Amazon SES is accepted, and the MIME header check can be trusted and checked.
Prevent EchoSpoofing when relaying into MailManager
When relaying email from a third party into Amazon SES Mail Manager, you will similarly need to configure an IP allowlisting, and if the email comes from a shared or cloud environment, you will need an additional header check to disambiguate among the multiple tenants it hosts. Those IPs and headers are provider specific, for example, emails coming from Office365 will have a header called X-OriginatorOrg.
You can use the rule editor screen in MailManager to configure the check in Mail Manager for the IPs and 3rd party headers before executing any action.
The verification of a MIME header is not necessary if the third party relaying into MailManager uses an IP dedicated for your tenant. In that case, there is no possibility that an attacker tenant injects email into MailManager using your IP.
Conclusion
While the conditions that made the EchoSpoofing exploit were highly specific, they reminded us all of the importance of taking a proactive approach to email security.
The chances of your Amazon SES Mail Manager unauthenticated SMTP relay being compromised are low, but we highly advise you follow the recommendations in this blog post promptly. You’ll find more information in the Amazon SES documentation ( here ).
If you need help with securing your Amazon SES Mail Manager SMTP relay actions against EchoSpoofing, contact AWS support, or leave us a comment in community section of the blog post.
Call to Action:
If you are using SES Mail Manager’s unauthenticated SMTP relay today, follow the guidance in this blog to secure your email infrastructure today by configuring the recommended ACLs and MIME header verification in AWS SES Mail Manager.“
Stay ahead of emerging threats by subscribing to this AWS blog where we post the latest security updates as well as new features and interesting use cases for SES.
Join the conversation and share your best practices for email security with the AWS community.
Explore the new MIME header evaluation feature in AWS SES Mail Manager and share your creative use cases with us and the SES community via the community comments section of the blog.
About the Authors
Toby Weir-Jones
Toby is a Principal Product Manager for Amazon SES and WorkMail. He joined AWS in January 2021 and has significant experience in both business and consumer information security products and services. His focus on email solutions at SES is all about tackling a product that everyone uses and finding ways to bring innovation and improved performance to one of the most ubiquitous IT tools.
Zip
Zip is a Sr. Specialist Solutions Architect at AWS, working with Amazon Pinpoint and Simple Email Service and WorkMail. Outside of work he enjoys time with his family, cooking, mountain biking, boating, learning and beach plogging.
APT29 aka Midnight Blizzard recently attempted to phish thousands of people.
Building on work by CERT-UA, Amazon recently identified internet domains abused by APT29, a group widely attributed to Russia’s Foreign Intelligence Service (SVR). In this instance, their targets were associated with government agencies, enterprises, and militaries, and the phishing campaign was apparently aimed at stealing credentials from Russian adversaries. APT29 sent the Ukrainian language phishing emails to significantly more targets than their typical, narrowly targeted approach. Some of the domain names they used tried to trick the targets into believing the domains were AWS domains (they were not), but Amazon wasn’t the target, nor was the group after AWS customer credentials. Rather, APT29 sought its targets’ Windows credentials through Microsoft Remote Desktop. Upon learning of this activity, we immediately initiated the process of seizing the domains APT29 was abusing which impersonated AWS in order to interrupt the operation. CERT-UA has issued an advisory with additional details on their work.
I’d like to thank the cyber threat intelligence teams at Amazon and CERT-UA for all their efforts to make the internet more secure.
This was originally shared on LinkedIn by Chief Information Security Officer and Amazon VP of Security Engineering CJ Moses.
If you have feedback about this post, submit comments in the Comments section below. If you have questions about this post, contact AWS Support.
В изненадваща процедура през април т.г. 50-тото Народно събрание гласува и прие оставката на действащия управител на Националната здравноосигурителна каса (НЗОК) Станимир Михайлов, въпреки че той я беше оттеглил. Почти шест месеца по-късно Конституционният съд (КС) обяви това решение на парламента за противоконституционно и Михайлов се върна в Здравната каса.
В междинния период институцията беше управлявана временно от подуправителя проф. Момчил Мавров. В пика на скандала народната представителка Лена Бориславова обяви, че в прокуратурата и в ДАНС има преписки относно Мавров, а той от своя страна отговори, че ще я съди заради това твърдение. След това скандалът затихна.
Как се управляват публичните разходи за здраве, които се очаква да надхвърлят 8 млрд. лв. през 2025 г.? Надежда Цекулова разговаря за това с управителя на НЗОК Станимир Михайлов.
Г-н Михайлов, уговаряме това интервю, откакто НС гласува оставката Ви в една процедура, за чиято законност имаше дълбоки съмнения. Сега КС потвърди тези съмнения, като отмени отстраняването Ви. Наясно ли сте вече на какво пречехте?
Добър въпрос. Много неща ми станаха ясни, но когато се убедя в тяхната достоверност, тогава ще ги кажа.
По дефиниция Националната здравноосигурителна каса би следвало да бъде политически независима институция. Предвид опита Ви в последните месеци, смятате ли, че тази дефиниция се изпълва със смисъл?
Политически ли да Ви отговоря, или искрено?
Бих предпочела да е искрено, но преценката е Ваша.
Аз не съм член на никоя партия. Опитвам се да бъда политически независим в решенията си. Със сигурност някой ще каже, че не е така. Още когато ме избираха, заявих, че съм готов да работя с всички парламентарно представени партии и всичко, което те адресират до мен като въпрос и проблем, да се опитвам в диалог да го решавам. Не мога да кажа, че всички са се обърнали към мен еднакво или за да поставят някакви въпроси. Някои въобще не са се обръщали, други – повече или по-малко. Дали е независима НЗОК? Очевидно нещо трябва да се промени, за да бъде тя една наистина самостоятелна институция.
По случай 25-тата годишнина на НЗОК организирахме кръгла маса, на която присъстваха от първия директор и основател д-р Илко Семерджиев до проф. Петко Салчев, почти всички управители. Много хора се изказаха и тогава тези теми бяха поставени: дали Здравната каса трябва да бъде регулатор, доколко е самостоятелна, има ли достатъчно инструменти. И предишните управители отчетоха, че има един регрес на институцията в това отношение.
Тоест през годините е станала по-податлива на политическо влияние?
Да, за съжаление. Може би защото прекалено голям ресурс се управлява през НЗОК.
В хода на Вашето отстраняване подуправителят проф. Мавров беше спряган политически като проводник на такова влияние. Сега отново работите заедно. Как се сработвате?
Залагаме на професионализъм. Не бива да се търси конфликт. Ако влезем в конфликт, това ще попречи на работата на институцията. Нямаме конфликт. Имаме различни виждания по някои въпроси, но ги коментираме и ги решаваме.
Имало ли е нещо конкретно за вършене, което само той е можел да свърши?
Не знам, трябва да питате него. Не искам да влизам в спекулации.
Какво заварихте в НЗОК, след като съдът Ви възстанови на поста? В първото си интервю казахте, че за някои неща е твърде късно, а за други имате твърде малко време за реакция. Може ли да уточните?
Все още се запознавам с това, което съм заварил. Например по отношение на бюджетната процедура има много малко време да прегледам това, което е подготвено, и да нанеса корекции, тъй като срокът е до 28 октомври да внесем проектобюджета за 2025 г. за съгласуване с Министерството на здравеопазването, а преди това той трябва да е одобрен и от Надзорния съвет. Но една от главните функции на управителя е да упражнява контрол. Аз се появявам отново сега, когато остават само три месеца до края на годината, в които мога да контролирам, като вече имаме формиран очакван преразход. Изисква се и внимателен баланс при разпределението на средствата от резерва на Касата.
Преразход в дадени пера се отчита почти всяка година, темата за разпределянето на резерва – също. Открихте ли нещо неочаквано?
Тази година е малко по-различна. Първо, с принудителния ми „отпуск“. Второ, имаме решение на Конституционния съд, а впоследствие и на Върховния административен съд, след които един от основните механизми на Касата за контрол върху разходите в болничната помощ е отменен.
Имате предвид решенията, с които бяха отменени т.нар. лимити – опита на НЗОК да ограничава обема на дейността на болниците.
Да. Точно след влизането в сила на решението на КС през април, в следващите месеци има рязък скок на отчетената надлимитна дейност – 10% средномесечно за периода от април досега.
В интервюто си пред БНР казвате, че има конкретни районни здравноосигурителни каси, в които ръстът е значителен. Кои са те?
София, Бургас, Пловдив, Плевен, Русе, Благоевград. Може би изпускам някои, но това са местата, където са съсредоточени най-много болници – и държавни, и частни, – и е логично там да има и в повече т.нар. надлимитна дейност.
Аз изчетох всички септемврийски доклади на директорите на районни каси, които отчитат дейността за месец август. И там има посочени причини. Някои звучат логично, други – по-малко, а някъде даже не се посочват причини за този ръст. В момента проследяваме и анализираме ръста по отделни клинични пътеки, по лечебни заведения. Дали това е свързано с допълнително разрешена дейност, дали с прехвърлянето на някакъв екип от медицински специалисти в тези лечебни заведения – не става ясно в пълнота от докладите на директорите.
Ще разширя въпроса. Българското население намалява. Вярно, и застарява, но все пак намалява. Въпреки това през последните 10–15 години имаме само ръст на броя на хоспитализациите и на болничните легла. Ако всички логични причини наистина отговаряха на действителността, не трябваше ли потоците пациенти да се местят между различни болници, но да остават с относително константен общ обем?
Да, принципно да. И затова аз се учудвам на този голям ръст, който констатирам след влизането в сила на решението на КС, и търся причините за това. Но Вие говорите за период от 15 години. Сложен въпрос. Тук може да има различни отговори. При положение че населението намалява, би трябвало да няма такова увеличение. Може би анализът трябва да стане много подробен, да се направи по клинични пътеки и това да бъде съпоставено с медицински стандарти и с усреднени стойности, които са отчетени в други европейски страни по отношение на заболеваемостта по определени диагнози.
Смятате ли, че е време Националната здравноосигурителна каса, може би с активната подкрепа на Министерството на здравеопазването, да предприеме стъпки в посока реализиране на този анализ и подреждане на картината?
Да, така смятам. От това следва какви политики ще се провеждат по-нататък. Другото е, че това е много важен анализ по отношение на контролната дейност, тъй като една от най-важните функции на НЗОК е да контролира правилното изразходване на средствата. И след като констатира дадени тенденции, да иска залагане на допълнителни контролни механизми в Националния рамков договор.
Ще инициирате ли такъв анализ?
Аналитичното звено вече действа в тази посока, макар и не с такъв обхват. На базата на справките, които то подготви, се извършват проверки на здравноосигурени лица с голям брой хоспитализации, включително чрез лични анкети, за да установим какво се случва.
Вие споменавате в интервю, че сте открили здравноосигурени лица с по над 30 хоспитализации…
Да, от началото на годината досега. Това е обезпокоително.
Колко такива случая проверявате?
Над 200 000 здравноосигурени лица с множество хоспитализации.
Има ли концентрация на такива хоспитализации в определени райони или лечебни заведения?
В момента го обобщаваме по лечебни заведения и по районни каси. Но чакам да видя доклада.
Кога?
Скоро.
Въвеждането на контролни механизми ще изисква и работа с договорните партньори. Вие успяхте ли вече да се видите с представителите на съсловните организации?
Да, проведох кратки срещи. Но не сме коментирали такива теми, бяха свързани с проектобюджета за 2025 г. Обсъдихме изпълнението на някои политики досега. Не искам да влизам в конкретика, но се надявам, че по отношение на профилактиката и превенцията ще можем да продължим в позитивна посока. Конкретни числа не сме обсъждали.
Декларираните на този етап намерения предвиждат увеличение на бюджета за здравеопазване…
Да, имаме макрорамка, която за момента – подчертавам, за момента – е 13% увеличение на бюджета на НЗОК. Предстои да подготвим и разпределението им по отделните пера.
Ще предложите ли да продължат инвестициите в извънболничната помощ и през 2025 г.?
През тази година българското здравеопазване получи един стратегически документ – Националната здравна стратегия 2030 г. В него много ясно са посочени стратегическите цели и политиките, които трябва да се изпълняват за постигането на тези цели. Една от тях е превенцията, профилактиката и извънболничната помощ. Според мен това е документът, върху който всеки един управител, когато готви проектобюджета за следващата година, трябва да стъпи.
Планира ли се да има нови дейности в извънболничната помощ?
Това още не сме го коментирали.
А Вие имате ли предложения в тази посока, които бихте отправил?
Щеимаме, предстои да ги конкретизираме.
Бих искала да сменим малко посоката на разговора, тъй като имам специфичен интерес към лечението на деца в България и чужбина по реда на Наредба 2. Това е дейността, която НЗОК наследи от закрития през 2019 г. Фонд за лечение на деца. През последните пет години разходите за лечение в България по този механизъм нараснаха драстично, а разходите за лечение в чужбина се свиха в сравнение с периода, когато се отпускаха от Фонда. Паралелно наблюдаваме ръст на дарителски кампании за лечение на деца. Миналата година най-популярната частна дарителска платформа изнесе данни, че е събрала над 10 млн. лв. само за лечение на деца с онкологични заболявания в чужбина. В този контекст имате ли наблюдение върху тази дейност?
В отчетите забелязах тази тенденция, която се оформя – ръстът в разходите за лечение на лица до 18 години по реда на Наредба 2 в България е сериозен поради значително разширяване на възможностите за заплащане на лекарствени продукти за лечение в страната, а отклонението е сигнал, че трябва да се анализират причините за това.
Това е тенденция от няколко години, да разбирам ли, че до момента не е анализирана?
Със сигурност е имало анализи, тези средства се планират от Министерството на здравеопазването и ни се предоставят за включване в бюджета.
Малкото средства за лечение в чужбина достатъчни ли са, за да плаща НЗОК регулярно задълженията си към чужди каси и лечебни заведения?
Тук става въпрос за различни фондове, от които се разплаща лечението на български граждани в чужбина. Единият е от трансфер на Министерството на здравеопазването за лечение на деца и възрастни по условията на Наредба №2/2019 г. за организационно и финансово осигуряване в страната и чужбина, а другият е за възстановяване на разходи за извършено лечение на български граждани в страни от ЕС, който е от бюджета на НЗОК.
По отношение на втория – категорично да. НЗОК има изградени много добри контакти по линия на изпълнението на Регламентите в ЕС за плащане на лечението на българските здравноосигурени лица в чужбина. Исковете от другите държави се планират и съгласно тези регламенти се заплащат в рамките на средствата, заложени в бюджета за съответната година. Знам, че е имало проблем преди няколко години, но за момента се разплащаме регулярно.
По отношение на плащанията за лечение на деца по реда на Наредба 2 – те се извършват обичайно преди или непосредствено след началото на лечението на детето и Касата няма натрупани задължения.
Как си обяснявате честите призиви за събиране на средства за лечение в чужбина, в частност на деца, на които държавата осигурява по-широк достъп поне по наредба?
Много често семействата търсят лечение в страни, с които ние нямаме взаимоотношения и сключени договори. Всеки път, когато забележим в националните медии, че има кампания за набиране на средства, колегите търсят възможност да се свържат с родителите и да попитат за какво става дума. Но много често се оказва, че парите се събират за лечение на деца в държави, в които ние не можем да помогнем. Тъй като се разплащаме с публични средства, трябва да спазваме строги изисквания и те да бъдат съобразени с нормативната уредба и с възможностите.
Има много случаи, в които не можем да финансираме лечението. Но се опитваме, ако можем, да помогнем дори със съвет. Когато има заявления към нас, съдействаме за по-бързо придвижване на документите. Знам, че има натрупано недоверие, но се опитваме да променим тази нагласа. Апелирам към всички да подават сигнал, когато има забавяне. Ще проверяваме всички възможности да съдействаме за осигуряването на лечение там, където можем.
С една от последните промени на наредбата, регулираща тази дейност на НЗОК, се удължиха сроковете, в които администрацията трябва да придвижи заявленията за лечение. Имате ли данни в момента в какви срокове усреднено се придвижва едно заявление от подаването му до заповед за финансиране или отказ?
Има издадена вътрешна заповед при подадени документи да не следваме бавния административен ред на общуване само с писма, а да се обаждаме на родителите по телефона, за да ги информираме какво е необходимо, с цел да бъде максимално съкратено времето за придвижване на документацията. В края на миналата година въведохме и услуга за електронно проследяване на движението на заявленията на интернет страницата на Касата. Опитваме се да бъдем по-ефективни, защото когато става въпрос за лечение, времето е лукс.
В рубриката „Разговори за здравеопазването“ Надежда Цекулова кани своите събеседници да поговорят без клишета и празнодумие за проблемите и решенията, болката и оздравяването, медицината и политиката.
Were you the person who stayed up until 2 a.m. to finish the group project? If you, like me, burned the midnight oil to save the team from utter failure, you suffered from a breakdown of shared responsibility. No one knew who was supposed to do what.
The same breakdown applies when you don’t fully understand the “shared responsibility model” that most software as a service (SaaS) platforms use when it comes to your data. You might assume that, because it’s in the cloud, your SaaS data is protected automatically. In reality, SaaS companies are only responsible for maintaining their uptime, not for retaining your files and critical information in case you need to get back online—and this has big implications for how you protect your data, ensure compliance, and optimize system performance.
Today, I’m diving into what this model means and how it affects how you use SaaS platforms.
What is the shared responsibility model?
The shared responsibility model defines the division of duties between a SaaS provider and its customers. It delineates which aspects of the system the provider manages and what tasks remain under the customer’s control. The primary goal is to clarify roles and reduce any ambiguity about who is responsible for certain aspects of security, data integrity, and system maintenance.
Defined roles, reduced ambiguity. That all sounds great to me, but what do SaaS providers actually take responsibility for? And what are you responsible for?
SaaS provider responsibilities
First and foremost, SaaS providers are responsible for ensuring that the application and its underlying infrastructure (servers, networking, data centers) are secure. This includes physical security, network protection, patching the platform, and overall system integrity. They typically guarantee a certain level of service availability, often formalized in a service level agreement (SLA). Downtime, system performance, and platform updates fall within the vendor’s scope.
Practically speaking, that means that they may not back up your data as often as you would like or archive it for as long as you need. SaaS vendors do not concern themselves with fully protecting your files. Most importantly, they may not offer a timely recovery option if you lose the data, which is critical to getting your business back online in the event of an outage.
Customer responsibilities
SaaS providers and cloud drives typically take responsibility for the security “of” the cloud, including the infrastructure that runs all of the services offered in the cloud. On the other hand, the customers are responsible for security “in” the cloud. This means customers must manage the security of their own data.
What’s the difference? Let’s use an example I’ve come across many times. If a user inadvertently uploads a ransomware-infected file to a cloud drive like Google Drive or OneDrive, the service might protect the integrity of the cloud infrastructure, ensuring the malware doesn’t spread to other users. However, the responsibility to prevent the upload of the infected file in the first place, and managing its consequences, falls directly on the user. In essence, while cloud drives provide a platform for storing your data, relying solely on them without understanding the nuances of the shared responsibility model could leave gaps in your data protection strategy.
Customer responsibilities include, among others:
Data protection: While the provider secures the infrastructure, you are responsible for securing the data you upload, manage, and store within the platform. SaaS platforms may replicate data and have redundancy safeguards in place to ensure you can access your data through the platform reliably, but they do not assume responsibility for their users’ data. It’s up to you to ensure your data is backed up according to your needs and policies.
Access management: You are responsible for controlling who has access to the SaaS environment. This involves creating strong user authentication processes, managing roles and permissions, and ensuring that the right people have access to the right information.
Compliance: Even if the SaaS vendor is compliant with say HIPAA or GDPR standards, you are also responsible for ensuring that you’re using the platform in accordance with those standards.
Here’s a graph that shows how shared responsibility breaks down for Microsoft 365 as just one example:
When the shared responsibility model matters
Unfortunately, I’ve found the shared responsibility model can create a false sense of security because understanding your responsibilities as a customer is often a process of elimination. SaaS responsibilities may be hard to track down, and when you can find them, they won’t say “you need to handle backups.” They’ll list what the provider handles, and all the rest is up to you.
When does this become important for you?
Security breaches: Many security incidents occur because of a misunderstanding of this model. For example, if a company assumes their SaaS provider is responsible for data encryption and user access control when, in fact, the company is, this can lead to critical vulnerabilities. A lack of clarity can expose businesses to data breaches, financial losses, and reputational damage.
Compliance issues: Regulatory compliance is another area that hinges on understanding shared responsibilities. Organizations that fail to implement required security measures or back up data properly can face fines, penalties, or legal consequences—even if the SaaS provider adheres to all necessary certifications.
Operational efficiency: Knowing where your responsibility starts and ends helps optimize how you use the platform. You can improve operational efficiency by focusing on the areas you control.
And, this gets even more complicated the larger your business and the more complicated your processes. So, if you have a business running on Google Workspace or M365, you can take something like emails and understand that Google is responsible for the email platform, but you should backup the individual emails themselves. But what about when you’re a media management company using best-of-breed tools for editing and collaboration, transcoding, asset management, and maybe even content delivery? All of those platforms have some responsibility in a shared responsibility model, and your job as a business is to understand where you are vulnerable—and then plug the gaps.
Navigating the shared responsibility model
So, what should you do with all of this information? In my experience, these are the biggest takeaways businesses can put into practice to successfully navigate the shared responsibility model:
Know your provider’s SLAs and security measures. Before adopting a SaaS solution, ensure you have a clear understanding of the vendor’s SLA and their security protocols. Understand the terms of their compliance with data privacy regulations, system availability, and disaster recovery.
What are Backblaze’s security and compliance protocols?
…is a question that would absolutely make sense for you to be asking. And I’m glad you did. Check out our Security and Compliance pages to learn more.
Educate your teams. Make sure that your internal teams are aware of their responsibilities in the shared model. Provide training on access control, data management, and security best practices to prevent accidental data exposure or misconfigurations.
Monitor and audit your usage. Set up regular audits to ensure that your organization is meeting its obligations under the shared responsibility model. Use tools to monitor access, detect unusual activity, and ensure data is being properly managed.
Make sure your backups are comprehensive. If you’re here, you’re probably well aware of this, but I can’t stress enough how important it is to back up your data, including data stored in cloud services like Microsoft 365, Google Drive, and OneDrive. Even if these services offer backups as part of the service, they may not meet your recovery needs.
How to approach the shared responsibility model
All this to say, you are ultimately responsible for backing up your data and files stored in SaaS clouds or cloud drives. The bottom line is that SaaS platforms’ top priority is to keep their own services running. By clearly understanding your role and responsibilities in this model, you can not only protect your data and ensure compliance, but also maximize the value of your SaaS investments.
This post is co-written with Matt Vogt from Immuta.
Organizations are looking for products that let them spend less time managing data and more time on core business functions. Data security is one of the key functions in managing a data warehouse. With Immuta integration with Amazon Redshift, user and data security operations are managed using an intuitive user interface. This blog post describes how to set up the integration, access control, governance, and user and data policies.
Amazon Redshift is a fully managed, petabyte-scale, massively parallel data warehouse that makes it fast and cost-effective to analyze all your data using standard SQL and your existing business intelligence (BI) tools. Today, tens of thousands of customers run business-critical workloads on Amazon Redshift. Amazon Redshift natively supports coarse-grained and fine-grained access control with features such as role-based access control, scoped permissions, row-level security, column-level access control and dynamic data masking.
Immuta enables organizations to break down the silos that exist between data engineering teams, business users, and security by providing a centralized platform for creating and managing policy. Access and security policies are inherently technical, forcing data engineering teams to take responsibility for creating and managing these policies. Immuta empowers business users to effectively manage access to their own datasets and it enables business users to create tag and attribute-based policies. Through Immuta’s natural language policy builder, users can create and deploy data access policies without needing help from data engineers. This distribution of policies to the business enables organizations to rapidly access their data while ensuring that the right people use it for the right reasons.
Solution overview
In this blog, we describe how data in Redshift can be protected by defining the right level of access using Immuta. Let’s consider the following example datasets and user personas. These datasets, groups, and access policies are for illustration only and have been simplified to illustrate the implementation approach.
Datasets:
patients: Contains patients’ personal information such as name, address, date of birth (DOB), phone number, gender, and doctor ID
conditions: Contains the history of patients’ medical conditions
immunization: Contains patients’ immunization records
encounters: Contains patients’ medical visits and the associated payment and coverage costs
Groups:
Doctor: Groups users who are doctors
Nurse: Groups users who are nurses
Admin: Groups the administrative users
Following are the four permission policies to enforce.
Doctor should have access to all four datasets. However, each doctor should see only the data for their own patients. They should not be able to see all the patients
Nurse can access only the patients and immunization And can see all patients data.
Admin can access only the patients and encounters And can see all patients data.
Patients’ social security numbers and passport information should be masked for all users.
Pre-requisites
Complete the following steps before starting the solution implementation.
Download the SQL commands and replace the Amazon S3 file path in the COPY command with the file path of the uploaded files in your account.
Implementation
The following diagram describes the high-level steps in the following sections, which you will use to build the solution.
1. Map users
In the Immuta portal, navigate to People and choose Users. Select a user name to map to an Amazon Redshift user name.
Choose Edit for the Amazon Redshift user name and enter the corresponding Redshift username.
Repeat the steps for the other users.
2. Set up native integration
To use Immuta, you must configure Immuta native integration, which requires privileged access to administer policies in your Redshift data warehouse. See the Immuta documentation for detailed requirements.
Use the following steps to create native integration between Amazon Redshift and Immuta.
In Immuta, choose App Settings from the navigation pane.
Click on Integrations.
Click on Add Native Integration.
Enter the Redshift data warehouse endpoint name, port number, and a database name where Immuta will create policies.
Enter privileged user credentials to connect with administrative privileges. These credentials aren’t stored on the Immuta platform and are used for one-time setup.
You should see a successful integration with a status of Enabled.
3. Create a connection
The next step is to create a connection to the Redshift data warehouse and select specific data sources to import.
In Immuta, choose Data Sources and then New Data sources in the navigation pane and choose New Data Source.
Select Redshift as the Data Platform.
Enter the Redshift data warehouse endpoint as the Server and the credentials to connect. Ensure the Redshift security group has inbound rules created to open access from Immuta IP addresses.
Immuta will show the schemas available on the connected database.
Choose Edit under Schema/Table section.
Select pschema from the list of schemas displayed.
Leave the values for the remaining options as the default and choose Create. This will import the metadata of the datasets and run default data discovery. In 2 to 5 minutes, you should see the table imported with status as Healthy.
4. Tag the data fields
Immuta automatically tags the data members using a default framework. It’s a starter framework that contains all the built-in and custom defined identifiers. However, you might want to add custom tags to the data fields to fit your use case. In this section, you will create custom tags and attach them to data fields. Optionally, you can also integrate with an external data catalog such as Alation, or Colibra. For this post, you will use custom tags.
Create tags
In Immuta, choose Governance from the navigation pane, and then choose Tags.
Choose Add Tags to open the Tag Builder dialog box
Enter Sensitive as a custom tag and choose Save.
Repeat steps 1–3 to create the following tags.
Doctor ID: Tag to mark the doctor ID field. It will be used for defining an attribute bases access policy (ABAC).
Doctor Datasets: Tag to mark data sources accessible to Doctors.
Admin Datasets: Tag to mark data sources accessible to Admins.
Nurse Datasets: Tag to mark data sources accessible to Nurses.
Add tags
Now add the Sensitive tag to the ssn and passport fields in the Pschema Patient data source.
In Immuta, choose Data and then Data Sources in the navigation pane and select Pschema Patient as the data source.
Choose the Data Dictionary tab
Find ssn in the list and choose Add Tags.
Search for Sensitive tag and choose Add.
Repeat the same step for the passport
You should see tags applied to the fields.
Using the same procedure, add the Doctor ID tag to the drid (doctor ID) field in the Pschema Patients data source.
Now tag the data sources as required by the access policy you’re building.
Choose Data and then Data Sources and select Pschema Patients as the data source.
Scroll down to Tags and choose Add Tags
Add Doctor Datasets, Nurse Datasets, and Admin Datasets tags to the patients data source (because this data source should be accessible by the Doctors, Nurses, and Admins groups).
Data Source
Tags
Patients
Doctor Datasets, Nurse Datasets, Admin Datasets
Conditions
Doctor Datasets
Immunizations
Doctor Datasets, Nurse Datasets
Encounters
Doctor Datasets, Admin Datasets
You can create more tags and tag fields as required by your organization’s data classification rules. The Immuta data source page is where stewards and governors will spend a lot of time.
5. Create groups and add users
You must create user groups before you define policies.
In Immuta, choose People and then Groups from the navigation pane and then choose New Group.
Provide doctor as the group name and select Save.
Repeat step1 and step2 to create the following groups:
nurse
admin
You should see three groups created.
Next, you need to add users to these groups.
Choose People and then Groups in the navigation pane.
Select the doctor
Choose Settings and choose Add Members in the Members
Search for Dr Jon King in the search bar and select the user from the results. Choose close to add the user and exit the screen.
You should see Dr Jon King added to the doctor.
Repeat to add additional users as shown in the following table.
Group
Users
Doctor
Dr Jon King, Dr Chris
Nurse
Jane D
admin
David Mill, Ema Joseph
6. Add attributes to users
One of the security requirements is that doctors can only see the data of their patients. They shouldn’t be able to see other doctors’ patient data. To implement this requirement, you must define attributes for users who are doctors.
Choose People and then Users in the navigation pane, and then select Dr Chris.
Choose Settings and scroll down to the Attributes
Choose Add Attributes. Enter drid as the Attribute and d1001 as the Attribute value.
This will assign the attribute value of d1001 to Dr Chris. In Step 8 Define data policies, you will define a policy to show data with the matching drid attribute value.
Repeat steps 1–4; selecting Dr Jon King and entering d1002 as the Attribute value
7. Create subscription policy
In this section, you will provide data sources access to groups as required by the permission policy.
Doctors can access all four datasets: Patients, Conditions, Immunizations, and Encounters.
Nurses can access only Patients and Immunizations.
Admins can access only Patients and Encounters.
In 4.Tag the data fields, you added tags to the datasets as shown in the following table. You will now use the tags to define subscription policies.
Data source
Tags
Patients
Doctor Datasets, Nurse Datasets, Admin Datasets
Conditions
Doctor Datasets
Immunizations
Doctor Datasets, Nurse Datasets
Encounters
Doctor Datasets, Admin Datasets
In Immuta, choose Policies and then Subscription Policies from the navigation pane, and then choose Add Subscription Policy.
Enter Doctor Access as the policy name.
For the Subscription level, select Allow users with specific groups/attributes.
Under Allow users to subscribe when user, select doctor. This allows only users who are members of the doctor group to access data sources accessible by doctor group.
Scroll down and select Share Responsibility. This will ensure users aren’t blocked from accessing datasets even if they don’t meet all the subscription policies, which isn’t required.
Scroll further down and under Where should this policy be applied, choose On data sources, tagged and Doctor Dataset as options. It selects the datasets tagged as Doctor Dataset. You can notice that this policy applies all 4 data sources as all four data sources are tagged as Doctor Datasets.
Next, create the policy by choose Activate This will create the view and policies in Redshift and enforce the permission policy.
Repeat the same steps to define Nurse Access and Admin Access
For the Nurse Access policy, select users who are a member of the Nurse group and data sources that are tagged as Nurse Datasets.
For the Admin Access policy, select users who are member of the Admin group and data sources that are tagged as Admin Datasets.
In Subscription policies, you should see all three policies in Active Notice the Data Sources count for how many data sources the policy is applied to.
8. Define data policies
So far, you have defined permission policies at the data sources level. Now, you will define row and column level access using data policies. The fine-grained permission policy that you should define to restrict rows and columns is:
Doctors can see only the data of their own patients. In other words, when a doctor queries the patients table, then they should see only patients that match their doctor ID (drid).
Sensitive fields, such as ssn or passport, should be masked for everyone.
In Immuta, Choose Policies and then Data Policies in the navigation pane and then choose Add Data Policy.
Enter Filter by Doctor ID as the Policy name.
Under How should this policy protect the data?, choose options as Only show rows , where, user possesses an attribute in drid that matches the value in column tagged Doctor ID. These settings will enforce that a doctor can see only the data of patients that have a matching Doctor ID. All other users (members of the nurse and admin groups) can see all of the patients
Scroll down and under Where should this policy be applied?, choose On data sources, with columns tagged, Doctor ID as options. It selects the data sources that have columns tagged as Doctor ID. Notice the number of data sources it selected. It applied the policy to one data source out of the four available. Remember that you added the Doctor ID tag to the drid field for the Patients data source. So, this policy identified the Patients data source as a match and applied the policy.
Choose Activate Policy to create the policy.
Similarly, create another policy to mask sensitive data for everyone.
Provide Mask Sensitive Data as policy name.
Under How should this policy protect the data?, choose Mask, columns tagged, Sensitive, using hashtag, for, everyone.
Under Where should this policy be applied?, choose on data sources, with columns tagged, Sensitive.
In the Data Policies screen, you should now see both data policies in Active
9. Query the data to validate policies
The required permission policies are now in place. Sign in to the Redshift Query Editor as different users to see the permission policies in effect.
For example,
Sign in as Dr. Jon King using the Redshift user ID jon. You should see all four tables, and if you query the patients table, you should see only the patients of Dr. Jon King; that is, patients with the Doctor ID d10002.
Sign in as Ema Joseph using the Redshift user ID ema. You should see only two tables, Patients and Encounters, which are Admin datasets.
You will also notice that ssn and passport are masked for both users.
Audit
Immuta’s comprehensive auditing capabilities provide organizations with detailed visibility and control over data access and usage within their environment. The platform generates rich audit logs that capture a wealth of information about user activities, including:
Who’s subscribing to each data source and the reasons behind their access
When users are accessing the data
The specific SQL queries and blob fetches they are executing
The individual files they are accessing
The following is an example screenshot.
Industry use cases
The following are example industry use cases where Immuta and Amazon Redshift integration adds value to customer business objectives. Consider enabling the following use cases on Amazon Redshift and using Immuta.
Patient records management
In the healthcare and life sciences (HCLS) industry, efficient access to quality data is mission critical. Disjointed tools can hinder the delivery of real-time insights that are critical for healthcare decisions. These delays negatively impact patient care, as well as the production and delivery of pharmaceuticals. Streamlining access in a secure and scalable manner is vital for timely and accurate decision-making.
Data from disparate sources can easily become siloed, lost, or neglected if not stored in an accessible manner. This makes data sharing and collaboration difficult, if not impossible, for teams who rely on this data to make important treatment or research decisions. Fragmentation issues lead to incomplete or inaccurate patient records, unreliable research results, and ultimately slow down operational efficiency.
Maintaining regulatory compliance
HCLS organizations are subject to a range of industry-specific regulations and standards, such as Good Practices (GxP) and HIPAA, that ensure data quality, security, and privacy. Maintaining data integrity and traceability is fundamental, and requires robust policies and continuous monitoring to secure data throughout its lifecycle. With diverse data sets and large amounts of sensitive personal health information (PHI), balancing regulatory compliance with innovation is a significant challenge.
Complex advanced health analytics
Limited machine learning and artificial intelligence capabilities—hindered by legitimate privacy and security concerns—restrict HCLS organizations from using more advanced health analytics. This constraint affects the development of next-generation, data-driven tactics, including patient care models and predictive analytics for drug research and development. Enhancing these capabilities in a secure and compliant manner is key to unlocking the potential of health data.
Conclusion
In this post, you learned how to apply security policies on Redshift datasets using Immuta with an example use case. That includes enforcing data-set level access, attribute-level access and data masking policies. We also covered implementation step by step. Consider adopting simplified Redshift access management using Immuta and let us know your feedback.
About the Authors
Satesh Sonti is a Sr. Analytics Specialist Solutions Architect based out of Atlanta, specialized in building enterprise data platforms, data warehousing, and analytics solutions. He has over 19 years of experience in building data assets and leading complex data platform programs for banking and insurance clients across the globe.
Matt Vogt is a seasoned technology professional with over two decades of diverse experience in the tech industry, currently serving as the Vice President of Global Solution Architecture at Immuta. His expertise lies in bridging business objectives with technical requirements, focusing on data privacy, governance, and data access within Data Science, AI, ML, and advanced analytics.
Navneet Srivastava is a Principal Specialist and Analytics Strategy Leader, and develops strategic plans for building an end-to-end analytical strategy for large biopharma, healthcare, and life sciences organizations. His expertise spans across data analytics, data governance, AI, ML, big data, and healthcare-related technologies.
Somdeb Bhattacharjee is a Senior Solutions Architect specializing on data and analytics. He is part of the global Healthcare and Life sciences industry at AWS, helping his customer modernize their data platform solutions to achieve their business outcomes.
Ashok Mahajan is a Senior Solutions Architect at Amazon Web Services. Based in NYC Metropolitan area, Ashok is a part of Global Startup team focusing on Security ISV and helps them design and develop secure, scalable, and innovative solutions and architecture using the breadth and depth of AWS services and their features to deliver measurable business outcomes. Ashok has over 17 years of experience in information security, is CISSP and Access Management and AWS Certified Solutions Architect, and have diverse experience across finance, health care and media domains.
Small objects can lead to large email threads. In this
case, the GNU C Library (glibc) community has been having an extensive
debate over the handling of zero-byte allocations. Specifically, what
should happen when a program calls realloc()
specifying a size of zero? This is, it seems, a topic about which some
people, at least, have strong feelings.
Amazon OpenSearch Service is a fully managed service for search and analytics. It allows organizations to secure data, perform searches, analyze logs, monitor applications in real time, and explore interactive log analytics. With its scalability, reliability, and ease of use, Amazon OpenSearch Service helps businesses optimize data-driven decisions and improve operational efficiency. AWS handles the heavy lifting of managing the underlying infrastructure, including service installation, configuration, replication, and backups, so you can focus on the business side of your application.
OpenSearch Service stores different types of stored objects, such as dashboards, visualizations, alerts, security roles, index templates, and more, within the domain. As your user base and number of Amazon OpenSearch Service domains grow, tracking activities and changes to those saved objects becomes increasingly difficult. It is advised to discourage contributors from making changes directly to the production OpenSearch Service domain and instead implement a gatekeeper process to validate and test the changes before moving them to OpenSearch Service.
In this post, we present a solution to deploy stored objects using GitHub and Jenkins while preventing users making direct changes into OpenSearch Service domain.
Solution overview
The solution consists of three personas:
Contributor – The contributor creates, updates, or deletes stored objects like alerts or dashboards
User – This persona uses the dashboard without changing any stored objects
Approver – The approver reviews and approves the stored object changes in GitHub pull requests
The following diagram illustrates the architecture of making stored object changes directly in the OpenSearch Service domain. As organizations scale their OpenSearch service domain usage, managing and tracking changes to stored objects across multiple domains become increasingly challenging.
The following diagram illustrates solution architecture, which manages stored objects using a continuous integration and delivery (CI/CD) pipeline.
Proposed Solution
The workflow to deploy stored object changes consists of the following steps:
Contributor commits changes as JSON files to GitHub repositories.
OpenSearch Service admin (approver) reviews the change, approves the pull request and merges changes to the repository.
A new commit invokes a build job in Jenkins.
Jenkins retrieves JSON files from the GitHub repository and performs validation.
Jenkins runs an OpenSearch Service API to deploy changes.
CI/CD automates code integration, testing, and deployment: CI focuses on frequent code merges and automated testing, and CD makes sure code is always deployment-ready, often pushing updates directly to production. This leads to faster, more reliable software releases.
In the following sections, we demonstrate how to build a CI/CD pipeline for deploying OpenSearch Service security roles using GitHub and Jenkins. By using a multi-branch pipeline in Jenkins, you can create pipelines for different types of stored objects. You can adapt the proposed architecture with the tools of your choice.
Prerequisites
To implement this solution, you need an AWS account. If you don’t have one, you can create an account. You also need an Amazon OpenSearch Service domain. You can use an existing domain or create a new domain.
It is recommended to deploy the OpenSearch Service domain in a VPC to make it secure.
Create an IAM role
In this step, you create an AWS Identity and Access Management (IAM) role in AWS for Jenkins to use when connecting to Amazon OpenSearch Service for push changes. Then you map this role to Amazon OpenSearch Service domain security roles.
Complete the following steps:
On the IAM console, create a policy called CodeCommitPolicy with the following permissions (replace the account ID and Amazon OpenSearch Service domain name):
Jenkins should now be running on port 8080 of the EC2 instance. You can access it using a web browser by connecting to the public IPv4 DNS of the EC2 instance, which can be found on the EC2 instance details page on the Amazon EC2 console. By default, the Jenkins server runs on the HTTP protocol. To make it secure, you can run it behind Application Load Balancer or behind the NGINX proxy.
Open the Jenkins web console in your browser using the URL below, and replace the EC2 IP address. http://EC2 IPv4 DNS:8080
When Jenkins opens for the first time , it will ask for the administrator password. Use the admin password found at the following location on the Ec2 instance to unlock it
Then you can create an admin user name and password.
Create GitHub repository
In this step, you create a GitHub repository to store Amazon OpenSearch Service security roles in JSON format. Complete the following steps:
Go to github.com and log in or create an account. Note : If you’re deploying the Jenkins server inside a VPC, you can connect the repository accessible within the VPC. To connect to a public GitHub repository, use an Internet Gateway.
Choose New repository.
Provide the repository name as openSearch2 and create it as a private repository.
On the Settings menu, choose Developer Settings, Personal Access Token, Tokens (classic), and create a token, which will be used by Jenkins to fetch files from the GitHub repository.
Create a Jenkins job
In this step, you create a Jenkins job that will pick up new changes committed to the GitHub repository and validate and deploy the changes to Amazon OpenSearch Service.
Open Jenkins from a web browser using the user name and password created earlier, then complete the following steps on the Jenkins web interface:
On the Jenkins home page, choose New Item.
Enter the name of the pipeline and select Freestyle Project.
Choose OK to continue.
Provide a description of the Jenkins job.
In the General section, choose Advanced.
Set a custom workspace for Jenkins to store files from the GitHub repository:
/var/lib/jenkins/workspace/opensearch
In the source code management, choose Git.
Enter the URL of the GitHub repository you created (https://github.com/<accountowner>/opensearch.git).
In the Credential section, choose Add to add the access token created for the GitHub repository.
Leave the settings as default.
In the Build Triggers section, set Poll SCM as H/05 * * * *.
A real-life delivery pipeline will have more than one stage: one each for build, test, and deploy, where you can put your custom logic to validate the syntax of JSON files and business logic, and take a series of actions before deploying files into an OpenSearch Service domain. In this post, we concentrate on the deployment stage only.
Enter the following command in the build steps and click on save to save Jenkins job.
/usr/bin/python3 /opensearch/roles.py
Place the Python script on the Jenkins server and install dependencies
In this step, you install Python packages and create the Python file on the Jenkins server. These files will read stored object JSON files, connect to Amazon OpenSearch Service domain, and call the create_role API of OpenSearch Service.
Create a new file called users.py in the /opensearch location of the Jenkins server and enter the following code into it:
from opensearchpy import OpenSearch, RequestsHttpConnection
from requests_aws4auth import AWS4Auth
import boto3
import os
import glob

host = 'search-XXXXXXX-XXXXXXXXXXXXX.us-east-1.es.amazonaws.com' # e.g. my-test-domain.us-east-1.es.amazonaws.com, this will be different for VPC hosted domain
region = 'us-east-1' # e.g. us-west-1
service = 'es'
credentials = boto3.Session().get_credentials()
awsauth = AWS4Auth(credentials.access_key, credentials.secret_key, region, service, session_token=credentials.token)

# Create the client.
search = OpenSearch(
    hosts = [{'host': host, 'port': 443}],
    http_auth = awsauth,
    use_ssl = True,
    verify_certs = True,
    http_compress = True, # enables gzip compression for request bodies
    connection_class = RequestsHttpConnection
)

pythonFiles = [file for dirs in os.walk('/var/lib/jenkins/workspace/opensearch2/', topdown=True)
                     for file in dirs[2] if file.endswith(".json")]
for r in pythonFiles:
    path = "/var/lib/jenkins/workspace/opensearch2/" + r
    print(path)
    role_name = r.rsplit('.', 1)[0]
    data = open(path, 'r').read()
    response = search.security.create_role(role_name, body=data)
    print(response)
Test the solution
To test the solution, push the new role file itadminrole.json into the GitHub repository and build a job that will create the role itadminrole in the Amazon OpenSearch service domain.
Jenkins will fetch the changes and run the job in the next scan. You can also run a build job manually from the Jenkins website, which will create the role itadminrole in an OpenSearch Service domain.
We have observed how to automate the build cycle, starting with pushing changes to security roles, followed by the OpenSearch admin’s approval and PR merge. This action invokes a Jenkins build job that handles validation, testing, and deployment.
Clean up
To avoid incurring future charges, delete the resources created while building this solution:
In this post, we demonstrated how to build a CI/CD pipeline for deploying Amazon OpenSearch Service security roles using GitHub and Jenkins. With this approach, you can help prevent users from directly committing changes to the production OpenSearch Service domain. The solution tracks changes made by each user, performs additional validation checks according to business rules, and conducts testing, before finally pushing the changes into the OpenSearch Service domain. Another advantage of this method is the ability to migrate or reuse the same stored objects across multiple Amazon OpenSearch Service domains by changing the endpoint of the domain, eliminating the need for manual export and import.
If you are struggling to manage frequent stored object changes in your OpenSearch Service domain—such as dashboards, roles, and alerts etc. Consider this solution to streamline changes and easily replicate stored objects across other OpenSearch Service domains. Give it a try and share your feedback or questions in the comment.
About the Author
Bharav Patel is a Specialist Solution Architect with Amazon OpenSearch service. He primarily works on Amazon OpenSearch Service and helps customers with key concepts and design principles of running OpenSearch workload on the cloud. Bharav likes to explore new places and try out different cuisines.
AWS re:Invent 2024, a learning conference hosted by Amazon Web Services (AWS) for the global cloud computing community, will take place December 2–6, 2024, in Las Vegas, Nevada, across multiple venues. At re:Invent, you can join cloud enthusiasts from around the world to hear the latest cloud industry innovations, meet with AWS experts, and build connections. Whether you want to build deep technical expertise, understand how to prioritize your investments, learn more about the infrastructure offerings of the sovereign-by-design AWS Cloud, or see how the AWS Nitro System enables enhanced security for your workloads, re:Invent is a great opportunity to explore our digital sovereignty solutions.
This year, there will be many ways that you can learn about our advanced sovereignty controls, security features, and infrastructure options that can help meet your unique digital sovereignty needs, including sessions and hands-on activities with AWS hybrid and edge services including AWS Local Zones, AWS Dedicated Local Zones, and AWS Outposts. In the Expo, you can visit the Digital Sovereignty & Data Protection kiosk in the AWS Village to watch demos, learn about the upcoming AWS European Sovereign Cloud, and get your questions answered by AWS team members. To see AWS designed chips and Outposts devices, check out the AWS Next Gen Infrastructure Hub in the AWS Village. You can also visit the AWS Partner Network (APN) booth to connect with AWS Digital Sovereignty Partners to learn about the benefits of partner programs.
Breakout sessions and lightning talks
To add sessions to your AWS re:Invent agenda and find time and location information, choose the session title link.
SEC229 | Breakout | Digital sovereignty: overcome complexity and enable future-readiness Max Peterson, VP, Sovereign Cloud, AWS Organizations are facing increasing complexity in an evolving sovereignty landscape. Building a strong digital foundation can help simplify efforts to meet requirements today and prepare your organization for the future, without slowing innovation. Join this session to learn how AWS sovereign cloud offerings, ranging from encryption services to the announced AWS European Sovereign Cloud, provides more control and choice to help meet your unique needs. Discover how customers are keeping critical workloads secure and protected when leveraging new technologies on AWS, including generative AI, and learn about new digital sovereignty solutions offered by AWS Partners.
HYB201 | Breakout | AWS wherever you need it: From the cloud to the edge Jan Hofmeyr, VP, EC2 Networking and Hybrid Edge, AWS, and Jeff Feist, Executive Director – Hosting Solutions, Merck & Co., Inc. While most workloads can be migrated to the cloud, some remain on premises or at the edge due to low latency, local data processing, or digital sovereignty needs. In this session, learn how AWS services like AWS Outposts, AWS Local Zones, AWS Dedicated Local Zones, and AWS IoT Core support hybrid cloud and edge computing workloads such as multiplayer gaming, high-frequency trading, medical imaging, smart manufacturing, and generative AI applications with data residency requirements.
HYB309 | Breakout | Well-architected for data residency with hybrid cloud services Sherry Lin, Principal Product Manager, AWS; Lakshmi VP, Specialist SA – Hybrid Edge, AWS; and Kevin Ng, Senior Director, Core Engineering Products, GovTech With concerns over data privacy, security, and digital sovereignty, many countries across the world are strengthening data residency laws to keep personal and sensitive data within their borders. For organizations operating across multiple geographies, it can be challenging to meet the evolving data residency laws. In this session, following the AWS Well-Architected Framework, explore the best practices around data residency when using hybrid cloud services, including AWS Local Zones, AWS Dedicated Local Zones, and AWS Outposts.
IOT202 | Breakout | AWS IoT for edge LLM deployment and execution Nikit Pednekar, Principal Product Manager, AWS, and Stefano Marzani, WW Tech Leader, SDX, AWS With the advent of generative AI and large language models (LLMs), you must be wondering, how can these technologies be applied at the IoT edge? After all, there are many benefits of running LLMs at the edge—from network bandwidth efficiencies, offline processing, lower latency, and data sovereignty to cost savings, security, and differentiation. In this session, learn how using AWS IoT services and LLMs at the edge can uplift your solutions with actionable outcomes and innovative capabilities, such as gesture recognition, natural language processing for voice control, real-time predictive maintenance, energy optimization, anomaly detection, and more.
KUB310 | Breakout | Amazon EKS for edge and hybrid use cases Chris Splinter, Product Manager, AWS, and Gokul Chandra Purnachandra Reddy, Senior Solutions Architect, AWS There are some workloads that may need to run on-premises, at the edge, or in a hybrid scenario due to low-latency, data dependencies, data sovereignty, or other regulatory reasons, especially in industries such as manufacturing, healthcare, telco, and financial services. Data dependent workloads may have to wait for the data to be on AWS services before fully migrating. In this session, we will share production-ready architectures leveraging services like Amazon EKS Anywhere to run container workloads on-premises and support modernizing VMware-based workloads. Also learn best practices on migration of on-premises Kubernetes deployments to AWS Cloud.
PEX110 | Lightening Talk | Supercharge your growth and capabilities with partner programs Mike Cannady, Director, Partner Core Public Sector, AWS Discover the latest AWS Partner program updates that propel your public sector business forward. Join this lightning talk to explore innovations tailored to partners: generative AI programs, digital sovereignty, solution building, and managed services. Whether you’re starting out or seasoned, glean insights and use cases to elevate your journey. Don’t miss this opportunity to supercharge your development and stay ahead in this ever-evolving landscape.
Interactive sessions (chalk talks and workshops)
HYB304 | Workshop | Implement RAG without compromising on digital sovereignty Aditya Lolla, Senior Solutions Architect, Hybrid Edge, AWS, and Robert Belson, Senior Developer Advocate, AWS As governments and standards bodies develop data protection and privacy regulations, organizations increasingly need to combine the use of generative AI tooling in the cloud with regulated data that need to remain on premises to meet data sovereignty requirements. In this workshop, learn how to extend Agents for Amazon Bedrock to hybrid and edge services like AWS Outposts and AWS Local Zones to build distributed Retrieval Augmented Generation (RAG) applications with on-premises data for improved model outcomes. Get hands-on with Amazon Bedrock, AWS Lambda, and AWS hybrid and edge services, and build Amazon Simple Storage Service (Amazon S3) compliant workflows using a hybrid S3 compatible solution. You must bring your laptop to participate.
WPS207 | Chalk Talk | How AWS can help you meet your digital sovereignty requirements Mehmet Bakkaloglu, Principal Solutions Architect, AWS, and Addy Upreti, Principal Technical Product Manager – Digital Sovereignty, AWS Customers in the public sector and regulated industries such as healthcare, financial services and telecom have shared how they face digital sovereignty concerns in their cloud journey. In this talk, you can learn about how AWS is sovereign-by-design and the range of capabilities that can enable you to meet your digital sovereignty needs. Plus, discover how the AWS European Sovereign Cloud is being built to provide further choice to meet these needs. We’ll talk through how AWS can help accelerate your cloud journey while meeting your requirements.
HYB310 | Chalk Talk | Addressing data residency requirements with hybrid and edge services Sedji Gaouaou, Senior Solutions Architect, AWS, and Fabio Rodriguez, Head of Hybrid Cloud Solutions Architect, AWS Data residency is a critical consideration for organizations that collect and store sensitive information, including personal identifiable information (PII), financial data, healthcare data, or information pertaining to national security. To help organizations operating across multiple geographies drive innovation while meeting data residency requirements, AWS offers multiple global infrastructure offerings like AWS Regions, AWS Dedicated Local Zones, AWS Local Zones, and AWS Outposts. In this interactive chalk talk, learn how these infrastructure offerings can help you accelerate digital transformation while meeting data residency needs.
For a full view of digital sovereignty content, including sessions with partners, explore the AWS re:Invent catalog and filter on the Digital Sovereignty area of interest. Not able to attend in-person? Register for free for the virtual-only pass to livestream keynotes and innovation talks, and access on-demand breakout sessions today. See you in Las Vegas or on the livestream!
If you have feedback about this post, submit comments in the Comments section below.
Workflows, Cloudflare’s durable execution engine that allows you to build reliable, repeatable multi-step applications that scale for you, is now in open beta. Any developer with a free or paid Workers plan can build and deploy a Workflow right now: no waitlist, no sign-up form, no fake line around-the-block.
Open the src/index.ts file, poke around, start extending it, and deploy it with a quick wrangler deploy.
If you want to learn more about how Workflows works, how you can use it to build applications, and how we built it, read on.
Workflows? Durable Execution?
Workflows—which we announced back during Developer Week earlier this year—is our take on the concept of “Durable Execution”: the ability to build and execute applications that are durable in the face of errors, network issues, upstream API outages, rate limits, and (most importantly) infrastructure failure.
As over 2.4 million developers continue to build applications on top of Cloudflare Workers, R2, and Workers AI, we’ve noticed more developers building multi-step applications and workflows that process user data, transform unstructured data into structured, export metrics, persist state as they progress, and automatically retry & restart. But writing any non-trivial application and making it durable in the face of failure is hard: this is where Workflows comes in. Workflows manages the retries, emitting the metrics, and durably storing the state (without you having to stand up your own database) as the Workflow progresses.
What makes Workflows different from other takes on “Durable Execution” is that we manage the underlying compute and storage infrastructure for you. You’re not left managing a compute cluster and hoping it scales both up (on a Monday morning) and down (during quieter periods) to manage costs, or ensuring that you have compute running in the right locations. Workflows is built on Cloudflare Workers — our job is to run your code and operate the infrastructure for you.
As an example of how Workflows can help you build durable applications, assume you want to post-process file uploads from your users that were uploaded to an R2 bucket directly via a pre-signed URL. That post-processing could involve multiple actions: text extraction via a Workers AI model, calls to a third-party API to validate data, updating or querying rows in a database once the file has been processed… the list goes on.
But what each of these actions has in common is that it could fail. Maybe that upstream API is unavailable, maybe you get rate-limited, maybe your database is down. Having to write extensive retry logic around each action, manage backoffs, and (importantly) ensure your application doesn’t have to start from scratch when a later step fails is more boilerplate to write and more code to test and debug.
What’s a step, you ask? The core building block of every Workflow is the step: an individually retriable component of your application that can optionally emit state. That state is then persisted, even if subsequent steps were to fail. This means that your application doesn’t have to restart, allowing it to not only recover more quickly from failure scenarios, but it can also avoid doing redundant work. You don’t want your application hammering an expensive third-party API (or getting you rate limited) because it’s naively retrying an API call that you don’t have to.
Notably, a Workflow can have hundreds of steps: one of the Rules of Workflows is to encapsulate every API call or stateful action within your application into its own step. Each step can also define its own retry strategy, automatically backing off, adding a delay and/or (eventually) giving up after a set number of attempts.
await step.do(
	'make a call to write that could maybe, just might, fail',
	// Define a retry strategy
	{
		retries: {
			limit: 5,
			delay: '5 seconds',
			backoff: 'exponential',
		},
		timeout: '15 minutes',
	},
	async () => {
		// Do stuff here, with access to the state from our previous steps
		if (Math.random() > 0.5) {
			throw new Error('API call to $STORAGE_SYSTEM failed');
		}
	},
);
To illustrate this further, imagine you have an application that reads text files from an R2 storage bucket, pre-processes the text into chunks, generates text embeddings using Workers AI, and then inserts those into a vector database (like Vectorize) for semantic search.
In the Workflows programming model, each of those is a discrete step, and each can emit state. For example, each of the four actions below can be a discrete step.do call in a Workflow:
Reading the files from storage and emitting the list of filenames
Chunking the text and emitting the results
Generating text embeddings
Upserting them into Vectorize and capturing the result of a test query
You can also start to imagine that some steps, such as chunking text or generating text embeddings, can be broken down into even more steps — a step per file that we chunk, or a step per API call to our text embedding model, so that our application is even more resilient to failure.
Steps can be created programmatically or conditionally based on input, allowing you to dynamically create steps based on the number of inputs your application needs to process. You do not need to define all steps ahead of time, and each instance of a Workflow may choose to conditionally create steps on the fly.
Building Cloudflare on Cloudflare
As the Cloudflare Developer platform continues to grow, almost all of our own products are built on top of it. Workflows is yet another example of how we built a new product from scratch using nothing but Workers and its vast catalog of features and APIs. This section of the blog has two goals: to explain how we built it, and to demonstrate that anyone can create a complex application or platform with demanding requirements and multiple architectural layers on our stack, too.
To understand how Workflows uses Workers & Durable Objects, here’s the high-level overview of our architecture:
There are three main blocks in this diagram:
The user-facing APIs are where the user interacts with the platform, creating and deploying new workflows or instances, controlling them, and accessing their state and activity logs. These operations can be executed through our public API gateway using REST calls, a Worker script using bindings, Wrangler (Cloudflare’s developer platform command line tool), or via the Dashboard user interface.
The managed platform holds the internal configuration APIs running on a Worker implementing a catalog of REST endpoints, the binding shim, which is supported by another dedicated Worker, every account controller, and their correspondent workflow engines, all powered by SQLite-backed Durable Objects. This is where all the magic happens and what we are sharing more details about in this technical blog.
Finally, there are the workflow instances, essentially independent clones of the workflow application. Instances are user account-owned and have a one-to-one relationship with a managed engine that powers them. You can run as many instances and engines as you want concurrently.
Let’s get into more detail…
Configuration API and Binding Shim
The Configuration API and the Binding Shim are two stateless Workers; one receives REST API calls from clients calling our API Gateway directly, using Wrangler, or navigating the Dashboard UI, and the other is the endpoint for the Workflows binding, an efficient and authenticated interface to interact with the Cloudflare Developer Platform resources from a Workers script.
The configuration API worker uses HonoJS and Zod to implement the REST endpoints, which are declared in an OpenAPI schema and exported to our API Gateway, thus adding our methods to the Cloudflare API catalog.
import { swaggerUI } from '@hono/swagger-ui';
import { createRoute, OpenAPIHono, z } from '@hono/zod-openapi';
import { Hono } from 'hono';
...
api.openapi(
createRoute({
method: 'get',
path: '/',
request: {
query: PaginationParams,
},
responses: {
200: {
content: {
'application/json': {
schema: APISchemaSuccess(z.array(WorkflowWithInstancesCountSchema)),
},
},
description: 'List of all Workflows belonging to a account.',
},
},
}),
async (ctx) => {
...
},
);
...
api.route('/:workflow_name', routes.workflows);
api.route('/:workflow_name/instances', routes.instances);
api.route('/:workflow_name/versions', routes.versions);
These Workers perform two different functions, but they share a large portion of their code and implement similar logic; once the request is authenticated and ready to travel to the next stage, they use the account ID to delegate the operation to a Durable Object called Account Controller.
// env.ACCOUNTS is the Account Controllers Durable Objects namespace
const accountStubId = c.env.ACCOUNTS.idFromName(accountId.toString());
const accountStub = c.env.ACCOUNTS.get(accountStubId);
As you can see, every account has its own Account Controller Durable Object.
Account Controllers
The Account Controller is a dedicated persisted database that stores the list of all the account’s workflows, versions, and instances. We scale to millions of account controllers, one per every Cloudflare account using Workflows, by leveraging the power of Durable Objects with SQLite backend.
Durable Objects (DOs) are single-threaded singletons that run in our data centers and are bound to a stateful storage API, in this case, SQLite. They are also Workers, just a special kind, and have access to all of our other APIs. This makes it easy to build consistent, highly available distributed applications with them.
Here’s what we get for free by using one Durable Object per Workflows account:
Sharding based on account boundaries aligns perfectly with the way we manage resources at Cloudflare internally. Also, due to the nature of DOs, there are other things that this model gets us for free: Not that we expect them, but eventual bugs or state inconsistencies during beta are confined to the affected account, and don’t impact everyone.
DO instances run close to the end user; Alice is in London and will call the config API through our LHR data center, while Bob is in Lisbon and will connect to LIS.
Because every account is a Worker, we can gradually upgrade them to new versions, starting with the internal users, thus derisking real customers.
Before SQLite, our only option was to use the Durable Object’s key-value storage API, but having a relational database at our fingertips and being able to create tables and do complex queries is a significant enabler. For example, take a look at how we implement the internal method getWorkflow():
async function getWorkflow(accountId: number, workflowName: string) {
  try {
    const res = this.ctx.storage.transactionSync(() => {
      const cursor = Array.from(
        this.ctx.storage.sql.exec(
          `
                    SELECT *,
                    (SELECT class_name
                        FROM   versions
                        WHERE  workflow_id = w.id
                        ORDER  BY created_on DESC
                        LIMIT  1) AS class_name
                    FROM   workflows w
                    WHERE  w.name = ?
                    `,
          workflowName
        )
      )[0] as Workflow;

      return cursor;
    });

    this.sendAnalytics(accountId, begin, "getWorkflow");
    return res as Workflow | undefined;
  } catch (err) {
    this.sendErrorAnalytics(accountId, begin, "getWorkflow");
    throw err;
  }
}
The other thing we take advantage of in Workflows is using the recently announced JavaScript-native RPC feature when communicating between components.
Before RPC, we had to fetch() between components, make HTTP requests, and serialize and deserialize the parameters and the payload. Now, we can async call the remote object’s method as if it was local. Not only does this feel more natural and simplify our logic, but it’s also more efficient, and we can take advantage of TypeScript type-checking when writing code.
This is how the Configuration API would call the Account Controller’s countWorkflows() method before:
The other powerful feature of our RPC system is that it supports passing not only Structured Cloneable objects back and forth but also entire classes. More on this later.
Let’s move on to Engine.
Engine and instance
Every instance of a workflow runs alongside an Engine instance. The Engine is responsible for starting up the user’s workflow entry point, executing the steps on behalf of the user, handling their results, and tracking the workflow state until completion.
When we started thinking about the Engine, we thought about modeling it after a state machine, and that was what our initial prototypes looked like. However, state machines require an ahead-of-time understanding of the userland code, which implies having a build step before running them. This is costly at scale and introduces additional complexity.
A few iterations later, we had another idea. What if we could model the engine as a game loop?
Unlike other computer programs, games operate regardless of a user’s input. The game loop is essentially a sequence of tasks that implement the game’s logic and update the display, typically one loop per video frame. Here’s an example of a game loop in pseudo-code:
while (game in running)
    check for user input
    move graphics
    play sounds
end while
Well, an oversimplified version of our Workflow engine would look like this:
while (last step not completed)
    iterate every step
       use memoized cache as response if the step has run already
       continue running step or timer if it hasn't finished yet
end while
A workflow is indeed a loop that keeps on going, performing the same sequence of logical tasks until the last step completes.
The Engine and the instance run hand-in-hand in a one-to-one relationship. The first is managed, and part of the platform. It uses SQLite and other platform APIs internally, and we can constantly add new features, fix bugs, and deploy new versions, while keeping everything transparent to the end user. The second is the actual account-owned Worker script that declares the Workflow steps.
For example, when someone passes a callback into step.do():
We switch execution over to the Engine. Again, this is possible because of the power of JS RPC. Besides passing Structured Cloneable objects back and forth, JS RPC allows us to create and pass entire application-defined classes that extend the built-in RpcTarget. So this is what happens behind the scenes when your Instance calls step.do() (simplified):
export class Context extends RpcTarget {

  async do<T>(name: string, callback: () => Promise<T>): Promise<T> {

    // First we check we have a cache of this step.do() already
    const maybeResult = await this.#state.storage.get(name);

    // We return the cache if it exists
    if (maybeValue) { return maybeValue; }

    // Else we run the user callback
    return doWrapper(callback);
  }

}
Here’s a more complete diagram of the Engine’s step.do() lifecycle:
Again, this diagram only partially represents everything we do in the Engine; things like logging for observability or handling exceptions are missing, and we don’t get into the details of how queuing is implemented. However, it gives you a good idea of how the Engine abstracts and handles all the complexities of completing a step under the hood, allowing us to expose a simple-to-use API to end users.
Also, it’s worth reiterating that every workflow instance is an Engine behind the scenes, and every Engine is an SQLite-backed Durable Object. This ensures that every instance runtime and state are isolated and independent of each other and that we can effortlessly scale to run billions of workflow instances, a solved problem for Durable Objects.
Durability
Durable Execution is all the rage now when we talk about workflow engines, and ours is no exception. Workflows are typically long-lived processes that run multiple functions in sequence where anything can happen. Those functions can time out or fail because of a remote server error or a network issue and need to be retried. A workflow engine ensures that your application runs smoothly and completes regardless of the problems it encounters.
Durability means that if and when a workflow fails, the Engine can re-run it, resume from the last recorded step, and deterministically re-calculate the state from all the successful steps’ cached responses. This is possible because steps are stateful and idempotent; they produce the same result no matter how many times we run them, thus not causing unintended duplicate effects like sending the same invoice to a customer multiple times.
We ensure durability and handle failures and retries by sharing the same technique we use for a step.sleep() that requires sleeping for days or months: a combination of using scheduler.wait(), a method of the upcoming WICG Scheduling API that we already support, and Durable Objects alarms, which allow you to schedule the Durable Object to be woken up at a time in the future.
These two APIs allow us to overcome the lack of guarantees that a Durable Object runs forever, giving us complete control of its lifecycle. Since every state transition through userland code persists in the Engine’s strongly consistent SQLite, we track timestamps when a step begins execution, its attempts (if it needs retries), and its completion.
This means that steps pending if a Durable Object is evicted — perhaps due to a two-month-long timer — get rerun on the next lifetime of the Engine (with its cache from the previous lifetime hydrated) that is triggered by an alarm set with the timestamp of the next expected state transition.
Real-life workflow, step by step
Let’s walk through an example of a real-life application. You run an e-commerce website and would like to send email reminders to your customers for forgotten carts that haven’t been checked out in a few days.
What would typically have to be a combination of a queue, a cron job, and querying a database table periodically can now simply be a Workflow that we start on every new cart:
import {
  WorkflowEntrypoint,
  WorkflowEvent,
  WorkflowStep,
} from "cloudflare:workers";
import { sendEmail } from "./legacy-email-provider";

type Params = {
  cartId: string;
};

type Env = {
  DB: D1Database;
};

export class Purchase extends WorkflowEntrypoint<Env, Params> {
  async run(
    event: WorkflowEvent<Params>,
    step: WorkflowStep
  ): Promise<unknown> {
    await step.sleep("wait for three days", "3 days");

    // Retrieve cart from D1
    const cart = await step.do("retrieve cart from database", async () => {
      const { results } = await this.env.DB.prepare(`SELECT * FROM cart WHERE id = ?`)
        .bind(event.payload.cartId)
        .all();
      return results[0];
    });

    if (!cart.checkedOut) {
      await step.do("send an email", async () => {
        await sendEmail("reminder", cart);
      });
    }
  }
}
This works great. However, sometimes the sendEmail function fails due to an upstream provider erroring out. While step.do automatically retries with a reasonable default configuration, we can define our settings:
The HTTP API makes it easy to trigger new instances of workflows from any system, even if it isn’t on Cloudflare, or from the command line. For example:
Wrangler goes one step further and gives us a friendlier set of commands to interact with workflows with fancy formatted outputs without needing to authenticate with tokens. Type npx wrangler workflows for help, or:
Furthermore, Workflows has first-party support in wrangler, and you can test your instances locally. A Workflow is similar to a regular WorkerEntrypoint in your Worker, which means that wrangler dev just naturally works.
❯ npx wrangler dev

 ⛅️ wrangler 3.82.0
----------------------------

Your worker has access to the following bindings:
- Workflows:
  - CART_WORKFLOW: EcommerceCartWorkflow
⎔ Starting local server...
[wrangler:inf] Ready on http://localhost:8787
╭───────────────────────────────────────────────╮
│  [b] open a browser, [d] open devtools        │
╰───────────────────────────────────────────────╯
Workflow APIs are also available as a Worker binding. You can interact with the platform programmatically from another Worker script in the same account without worrying about permissions or authentication. You can even have workflows that call and interact with other workflows.
import { WorkerEntrypoint } from "cloudflare:workers";

type Env = { DEMO_WORKFLOW: Workflow };
export default class extends WorkerEntrypoint<Env> {
  async fetch() {
    // Pass in a user defined name for this instance
    // In this case, we use the same as the cartId
    const instance = await this.env.DEMO_WORKFLOW.create({
      id: "f3bcc11b-2833-41fb-847f-1b19469139d1",
      params: {
          cartId: "f3bcc11b-2833-41fb-847f-1b19469139d1",
      }
    });
  }
  async scheduled() {
    // Restart errored out instances in a cron
    const instance = await this.env.DEMO_WORKFLOW.get(
      "f3bcc11b-2833-41fb-847f-1b19469139d1"
    );
    const status = await instance.status();
    if (status.error) {
      await instance.restart();
    }
  }
}
Observability
Having good observability and data on often long-lived asynchronous tasks is crucial to understanding how we’re doing under normal operation and, more importantly, when things go south, and we need to troubleshoot problems or when we are iterating on code changes.
We designed Workflows around the philosophy that there is no such thing as too much logging. You can get all the SQLite data for your workflow and its instances by calling the REST APIs. Here is the output of an instance:
As you can see, this is essentially a dump of the instance engine SQLite in JSON. You have the errors, messages, current status, and what happened with every step, all time stamped to the millisecond.
It’s one thing to get data about a specific workflow instance, but it’s another to zoom out and look at aggregated statistics of all your workflows and instances over time. Workflows data is available through our GraphQL Analytics API, so you can query it in aggregate and generate valuable insights and reports. In this example we ask for aggregated analytics about the wall time of all the instances of the “e-commerce-carts” workflow:
For convenience, you can evidently also use Wrangler to describe a workflow or an instance and get an instant and beautifully formatted response:
sid ~ npx wrangler workflows instances describe purchase-workflow latest

 ⛅️ wrangler 3.80.4

Workflow Name:         purchase-workflow
Instance Id:           d4280218-7756-41d2-bccd-8d647b82d7ce
Version Id:            0c07dbc4-aaf3-44a9-9fd0-29437ed11ff6
Status:                ✅ Completed
Trigger:               🌎 API
Queued:                14/10/2024, 16:25:17
Success:               ✅ Yes
Start:                 14/10/2024, 16:25:17
End:                   14/10/2024, 16:26:17
Duration:              1 minute
Last Successful Step:  wait for three days
Output:                false
Steps:

  Name:      wait for three days
  Type:      💤 Sleeping
  Start:     14/10/2024, 16:25:17
  End:       17/10/2024, 16:25:17
  Duration:  3 day
And finally, we worked really hard to get you the best dashboard UI experience when navigating Workflows data.
So, how much does it cost?
It’d be painful if we introduced a powerful new way to build Workers applications but made it cost prohibitive.
Workflows is priced just like Cloudflare Workers, where we introduced CPU-based pricing: only on active CPU time and requests, not duration (aka: wall time).
Workers Standard pricing model
This is especially advantageous when building the long-running, multi-step applications that Workflows enables: if you had to pay while your Workflow was sleeping, waiting on an event, or making a network call to an API, writing the “right” code would be at odds with writing affordable code.
There’s also no need to keep a Kubernetes cluster or a group of virtual machines running (and burning a hole in your wallet): we manage the infrastructure, and you only pay for the compute your Workflows consume.
What’s next?
Today, after months of developing the platform, we are announcing the open beta program, and we couldn’t be more excited to see how you will be using Workflows. Looking forward, we want to do things like triggering instances from queue messages and have other ideas, but at the same time, we are certain that your feedback will help us shape the roadmap ahead.
We hope that this blog post gets you thinking about how to use Workflows for your next application, but also that it inspires you on what you can build on top of Workers. Workflows as a platform is entirely built on top of Workers, its resources, and APIs. Anyone can do it, too.
With the rapid advancements occurring in the AI space, developers face significant challenges in keeping up with the ever-changing landscape. New models and providers are continuously emerging, and understandably, developers want to experiment and test these options to find the best fit for their use cases. This creates the need for a streamlined approach to managing multiple models and providers, as well as a centralized platform to efficiently monitor usage, implement controls, and gather data for optimization.
AI Gateway is specifically designed to address these pain points. Since its launch in September 2023, AI Gateway has empowered developers and organizations by successfully proxying over 2 billion requests in just one year, as we highlighted during September’s Birthday Week. With AI Gateway, developers can easily store, analyze, and optimize their AI inference requests and responses in real time.
With our initial architecture, AI Gateway faced a significant challenge: the logs, those critical trails of data interactions between applications and AI models, could only be retained for 30 minutes. This limitation was not just a minor inconvenience; it posed a substantial barrier for developers and businesses needing to analyze long-term patterns, ensure compliance, or simply debug over more extended periods.
In this post, we’ll explore the technical challenges and strategic decisions behind extending our log storage capabilities from 30 minutes to being able to store billions of logs indefinitely. We’ll discuss the challenges of scale, the intricacies of data management, and how we’ve engineered a system that not only meets the demands of today, but is also scalable for the future of AI development.
Background
AI Gateway is built on Cloudflare Workers, a serverless platform that runs on the Cloudflare network, allowing developers to write small JavaScript functions that can execute at the point of need, near the user, on Cloudflare’s vast network of data centers, without worrying about platform scalability.
Our customers use multiple providers and models and are always looking to optimize the way they do inference. And, of course, in order to evaluate their prompts, performance, cost, and to troubleshoot what’s going on, AI Gateway’s customers need to store requests and responses. New requests show up within 15 seconds and customers can check a request’s cost, duration, number of tokens, and provide their feedback (thumbs up or down).
This scales in a way where an account can have multiple gateways and each gateway has its own settings. In our first implementation, a backend worker was responsible for storing Real Time Logs and other background tasks. However, in the rapidly evolving domain of artificial intelligence, where real-time data is as precious as the insights it provides, managing log data efficiently becomes paramount. We recognized that to truly empower our users, we needed to offer a solution where logs weren’t just transient records but could be stored permanently. Permanent log storage means developers can now track the performance, security, and operational insights of their AI applications over time, enabling not only immediate troubleshooting but also longitudinal studies of AI behavior, usage trends, and system health.
The diagram above describes our old architecture, which could only store 30 minutes of data.
Tracing the path of a request through the AI Gateway, as depicted in the sequence above:
A developer sends a new inference request, which is first received by our Gateway Worker.
The Gateway Worker then performs several checks: it looks for cached results, enforces rate limits, and verifies any other configurations set by the user for their gateway. Provided all conditions are met, it forwards the request to the selected inference provider (in this diagram, OpenAI).
The inference provider processes the request and sends back the response.
Simultaneously, as the response is relayed back to the developer, the request and response details are also dispatched to our Backend Worker. This worker’s role is to manage and store the log of this transaction.
The challenge: Store two billion logs
First step: real-time logs
Initially, the AI Gateway project stored both request metadata and the actual request bodies in a D1 database. This approach facilitated rapid development in the project’s infancy. However, as customer engagement grew, the D1 database began to fill at an accelerating rate, eventually retaining logs for only 30 minutes at a time.
To mitigate this, we first optimized the database schema, which extended the log retention to one hour. However, we soon encountered diminishing returns due to the sheer volume of byte data from the request bodies. Post-launch, it became clear that a more scalable solution was necessary. We decided to migrate the request bodies to R2 storage, significantly alleviating the data load on D1. This adjustment allowed us to incrementally extend log retention to 24 hours.
Consequently, D1 functioned primarily as a log index, enabling users to search and filter logs efficiently. When users needed to view details or download a log, these actions were seamlessly proxied through to R2.
This dual-system approach provided us with the breathing room to contemplate and develop more sophisticated storage solutions for the future.
Second step: persistent logs and Durable Object transactional storage
As our traffic surged, we encountered a growing number of requests from customers wanting to access and compare older logs.
Upon learning that the Durable Objects team was seeking beta testers for their new Durable Objects with SQLite, we eagerly signed up.
Originally, we considered Durable Objects as the ideal solution for expanding our log storage capacity, which required us to shard the logs by a unique string. Initially, this string was the account ID, but during a mid-development load test, we hit a cap at 10 million logs per Durable Object. This limitation meant that each account could only support up to this number of logs.
Given our commitment to the DO migration, we saw an opportunity rather than a constraint. To overcome the 10 million log limit per account, we refined our approach to shard by both account ID and gateway name. This adjustment effectively raised the storage ceiling from 10 million logs per account to 10 million per gateway. With the default setting allowing each account up to 10 gateways, the potential storage for each account skyrocketed to 100 million logs.
This strategic pivot not only enabled us to store a significantly larger number of logs. But also enhanced our flexibility in gateway management. Now, when a gateway is deleted, we can simply remove the corresponding Durable Object.
Additionally, this sharding method isolates high-volume request scenarios. If one customer’s heavy usage slows down log insertion, it only impacts their specific Durable Object, thereby preserving performance for other customers.
Taking a glance at the revised architecture diagram, we replaced the Backend Worker with our newly integrated Durable Object. The rest of the request flow remains unchanged, including the concurrent response to the user and the interaction with the Durable Object, which occurs in the fourth step.
Leveraging Cloudflare’s network, our Gateway Worker operates near the user’s location, which in turn positions the user’s Durable Object close by. This proximity significantly enhances the speed of log insertion and query operations.
Third step: managing thousands of Durable Objects
As the number of users and requests on AI Gateway grows, managing each unique Durable Object (DO) becomes increasingly complex. New customers join continuously, and we needed an efficient method to track each DO, ensure users stay within their 10 gateway limit, and manage the storage capacity for free users.
To address these challenges, we introduced another layer of control with a new Durable Object we’ve named the Account Manager. The primary function of the Account Manager is straightforward yet crucial: it keeps user activities in check.
Here’s how it works: before any Gateway commits a new log to permanent storage, it consults the Account Manager. This check determines whether the gateway is allowed to insert the log based on the user’s current usage and entitlements. The Account Manager uses its own SQLite database to verify the total number of rows a user has and their service level. If all checks pass, it signals the Gateway that the log can be inserted. It was paramount to guarantee that this entire validation process occurred in the background, ensuring that the user experience remains seamless and uninterrupted.
The Account Manager stays updated by periodically receiving data from each Gateway’s Durable Object. Specifically, after every 1000 inference requests, the Gateway sends an update on its total rows to the Account Manager, which then updates its local records. This system ensures that the Account Manager has the most current data when making its decisions.
Additionally, the Account Manager is responsible for monitoring customer entitlements. It tracks whether an account is on a free or paid plan, how many gateways a user is permitted to create, and the log storage capacity allocated to each gateway.
Through these mechanisms, the Account Manager not only helps in maintaining system integrity but also ensures fair usage across all users of AI Gateway.
AI evaluations and Durable Objects sharding
As we continue to develop evaluations to fully automatic and, in the future, use Large Language Models (LLMs), we are now taking the first step towards this goal and launching the open beta phase of comprehensive AI evaluations, centered on Human-in-the-Loop feedback.
This feature empowers users to create bespoke datasets from their application logs, thereby enabling them to score and evaluate the performance, speed, and cost-effectiveness of their models, with a primary focus on LLMs and automated scoring, analyzing the performance of LLMs, providing developers with objective, data-driven insights to refine their models.
To do this, developers require a reliable logging mechanism that persists logs from multiple gateways, storing up to 100 million logs in total (10 million logs per gateway, across 10 gateways). This represents a significant volume of data, as each request made through the AI Gateway generates a log entry, with some log entries potentially exceeding 50 MB in size.
This necessity leads us to work on the expansion of log storage capabilities. Since log storage is limited to 10 million logs per gateway, in future iterations, we aim to scale this capacity by implementing sharded Durable Objects (DO), allowing multiple Durable Objects per gateway to handle and store logs. This scaling strategy will enable us to store significantly larger volumes of logs, providing richer data for evaluations (using LLMs as a judge or from user input), all through AI Gateway.
Coming Soon
We are working on improving our existing Universal Endpoint, the next step on an enhanced solution that builds on existing fallback mechanisms to offer greater resilience, flexibility, and intelligence in request management.
Currently, when a provider encounters an error or is unavailable, our system falls back to an alternative provider to ensure continuity. The improved Universal Endpoint takes this a step further by introducing automatic retry capabilities, allowing failed requests to be reattempted before fallback is triggered. This significantly improves reliability by handling transient errors and increasing the likelihood of successful request fulfillment. It will look something like this:
The request to the improved Universal Endpoint system demonstrates how it handles multiple providers with integrated retry mechanisms and fallback logic. In this example, the first request is sent to a provider like OpenAI, asking it to generate a text-to-image prompt. The “retry” option ensures that transient issues don’t result in immediate failure.
The system’s ability to seamlessly switch between providers while applying retry strategies ensures higher reliability and robustness in managing requests. By leveraging fallback logic, the Improved Universal Endpoint can dynamically adapt to provider failures, ensuring that tasks are completed successfully even in complex, multi-step workflows.
In addition to retry logic, we will have the ability to inspect requests and responses and make dynamic decisions based on the content of the result. This enables developers to create conditional workflows where the system can adapt its behavior depending on the nature of the response, creating a highly flexible and intelligent decision-making process.
If you haven’t yet used AI Gateway, check out our developer documentation on how to get started. If you have any questions, reach out on our Discord channel.
The collective thoughts of the interwebz
Manage Consent
To provide the best experiences, we use technologies like cookies to store and/or access device information. Consenting to these technologies will allow us to process data such as browsing behavior or unique IDs on this site. Not consenting or withdrawing consent, may adversely affect certain features and functions.
Functional
Always active
The technical storage or access is strictly necessary for the legitimate purpose of enabling the use of a specific service explicitly requested by the subscriber or user, or for the sole purpose of carrying out the transmission of a communication over an electronic communications network.
Preferences
The technical storage or access is necessary for the legitimate purpose of storing preferences that are not requested by the subscriber or user.
Statistics
The technical storage or access that is used exclusively for statistical purposes.The technical storage or access that is used exclusively for anonymous statistical purposes. Without a subpoena, voluntary compliance on the part of your Internet Service Provider, or additional records from a third party, information stored or retrieved for this purpose alone cannot usually be used to identify you.
Marketing
The technical storage or access is required to create user profiles to send advertising, or to track the user on a website or across several websites for similar marketing purposes.


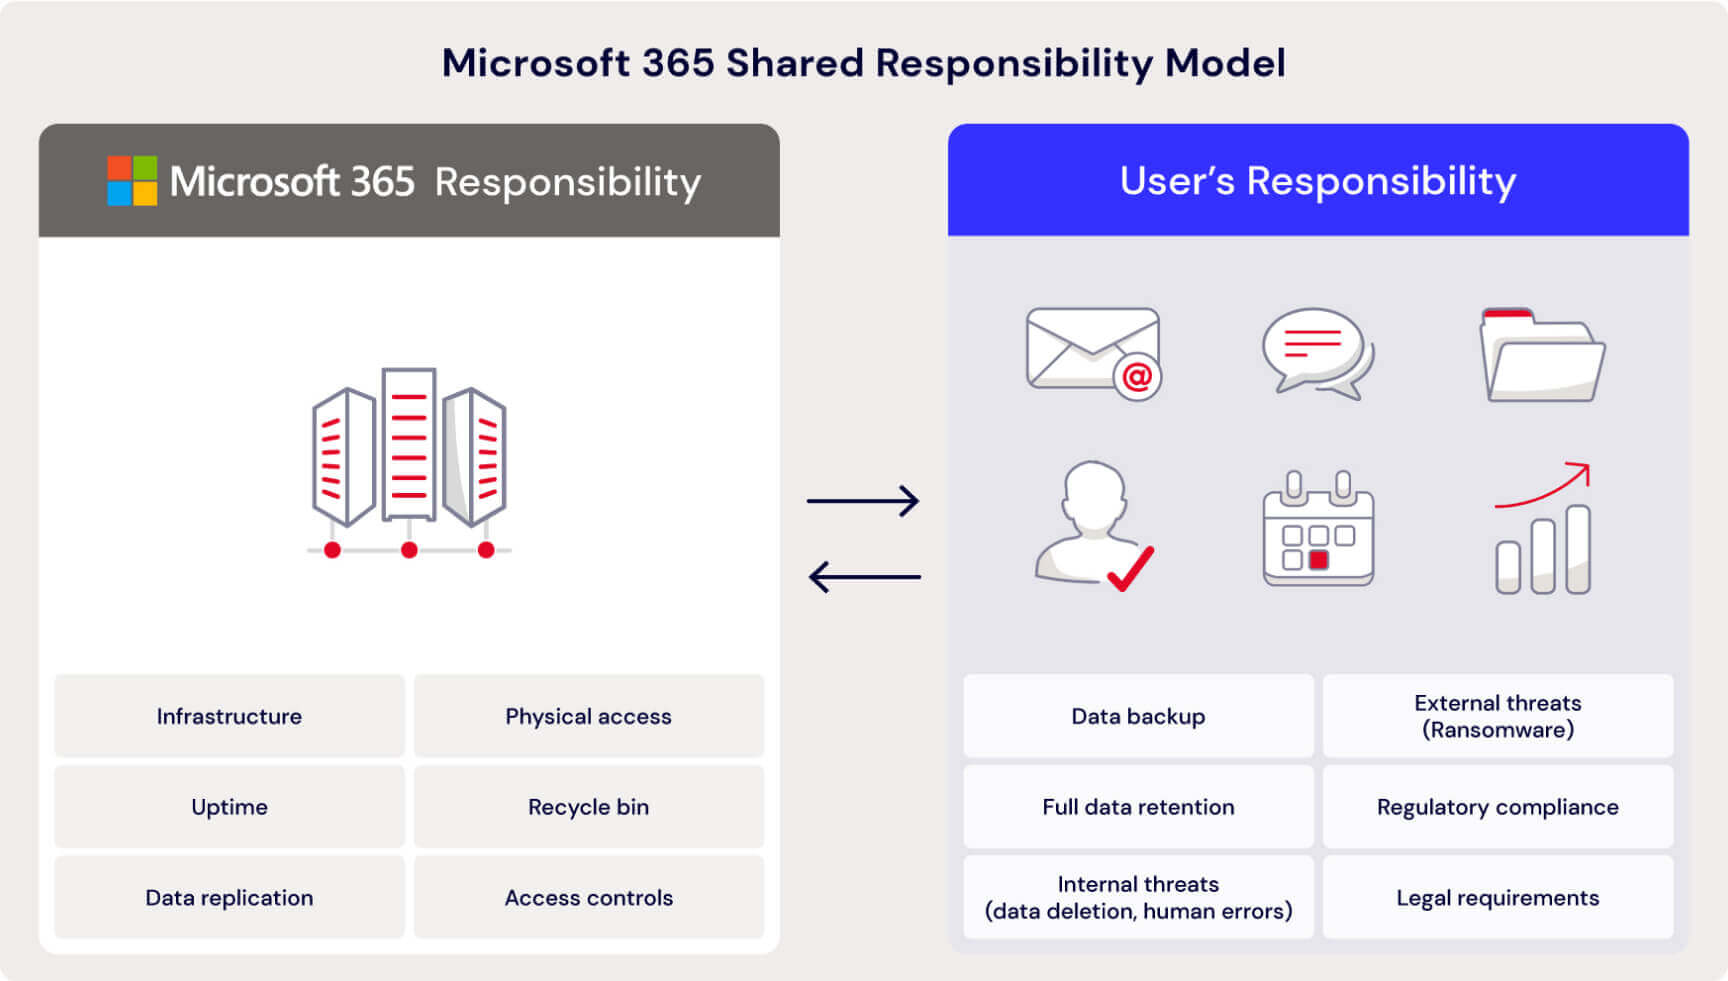


 Satesh Sonti is a Sr. Analytics Specialist Solutions Architect based out of Atlanta, specialized in building enterprise data platforms, data warehousing, and analytics solutions. He has over 19 years of experience in building data assets and leading complex data platform programs for banking and insurance clients across the globe.
 Matt Vogt is a seasoned technology professional with over two decades of diverse experience in the tech industry, currently serving as the Vice President of Global Solution Architecture at Immuta. His expertise lies in bridging business objectives with technical requirements, focusing on data privacy, governance, and data access within Data Science, AI, ML, and advanced analytics.
 Navneet Srivastava is a Principal Specialist and Analytics Strategy Leader, and develops strategic plans for building an end-to-end analytical strategy for large biopharma, healthcare, and life sciences organizations. His expertise spans across data analytics, data governance, AI, ML, big data, and healthcare-related technologies.
 Somdeb Bhattacharjee is a Senior Solutions Architect specializing on data and analytics. He is part of the global Healthcare and Life sciences industry at AWS, helping his customer modernize their data platform solutions to achieve their business outcomes.
 Ashok Mahajan is a Senior Solutions Architect at Amazon Web Services. Based in NYC Metropolitan area, Ashok is a part of Global Startup team focusing on Security ISV and helps them design and develop secure, scalable, and innovative solutions and architecture using the breadth and depth of AWS services and their features to deliver measurable business outcomes. Ashok has over 17 years of experience in information security, is CISSP and Access Management and AWS Certified Solutions Architect, and have diverse experience across finance, health care and media domains.


