Easy analytics and cost-optimization with Amazon Redshift Serverless

Post Syndicated from Ahmed Shehata original https://aws.amazon.com/blogs/big-data/easy-analytics-and-cost-optimization-with-amazon-redshift-serverless/

Amazon Redshift Serverless makes it easy to run and scale analytics in seconds without the need to setup and manage data warehouse clusters. With Redshift Serverless, users such as data analysts, developers, business professionals, and data scientists can get insights from data by simply loading and querying data in the data warehouse.

With Redshift Serverless, you can benefit from the following features:

  • Access and analyze data without the need to set up, tune, and manage Amazon Redshift clusters
  • Use Amazon Redshift’s SQL capabilities, industry-leading performance, and data lake integration to seamlessly query data across a data warehouse, data lake, and databases
  • Deliver consistently high performance and simplified operations for even the most demanding and volatile workloads with intelligent and automatic scaling, without under-provisioning or over-provisioning the compute resources
  • Pay for the compute only when the data warehouse is in use

In this post, we discuss four different use cases of Redshift Serverless:

  • Easy analytics – A startup company needs to create a new data warehouse and reports for marketing analytics. They have very limited IT resources, and need to get started quickly and easily with minimal infrastructure or administrative overhead.
  • Self-service analytics – An existing Amazon Redshift customer has a provisioned Amazon Redshift cluster that is right-sized for their current workload. A new team needs quick self-service access to the Amazon Redshift data to create forecasting and predictive models for the business.
  • Optimize workload performance – An existing Amazon Redshift customer is looking to optimize the performance of their variable reporting workloads during peak time.
  • Cost-optimization of sporadic workloads – An existing customer is looking to optimize the cost of their Amazon Redshift producer cluster with sporadic batch ingestion workloads.

Easy analytics

In our first use case, a startup company with limited resources needs to create a new data warehouse and reports for marketing analytics. The customer doesn’t have any IT administrators, and their staff is comprised of data analysts, a data scientist, and business analysts. They want to create new marketing analytics quickly and easily, to determine the ROI and effectiveness of their marketing efforts. Given their limited resources, they want minimal infrastructure and administrative overhead.

In this case, they can use Redshift Serverless to satisfy their needs. They can create a new Redshift Serverless endpoint in a few minutes and load their initial few TBs of marketing dataset into Redshift Serverless quickly. Their data analysts, data scientists, and business analysts can start querying and analyzing the data with ease and derive business insights quickly without worrying about infrastructure, tuning, and administrative tasks.

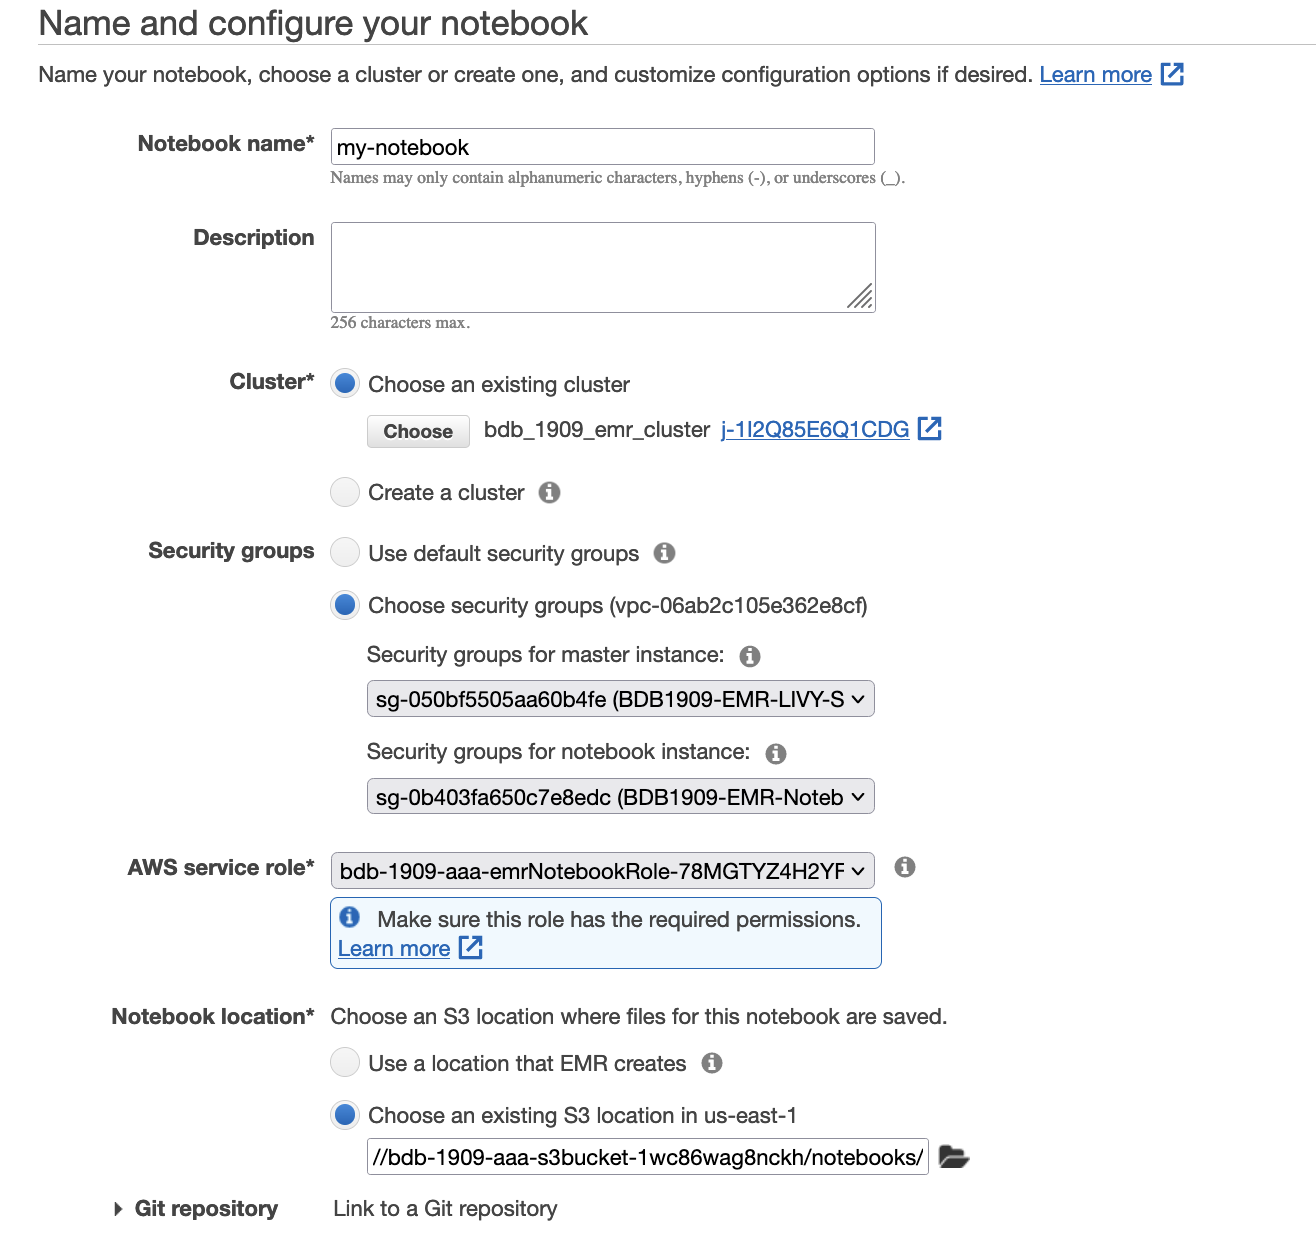
Getting started with Redshift Serverless is easy and quick. On the Get started with Amazon Redshift Serverless page, you can select the Use default settings option, which will create a default namespace and workgroup with the default settings, as shown in the following screenshots.

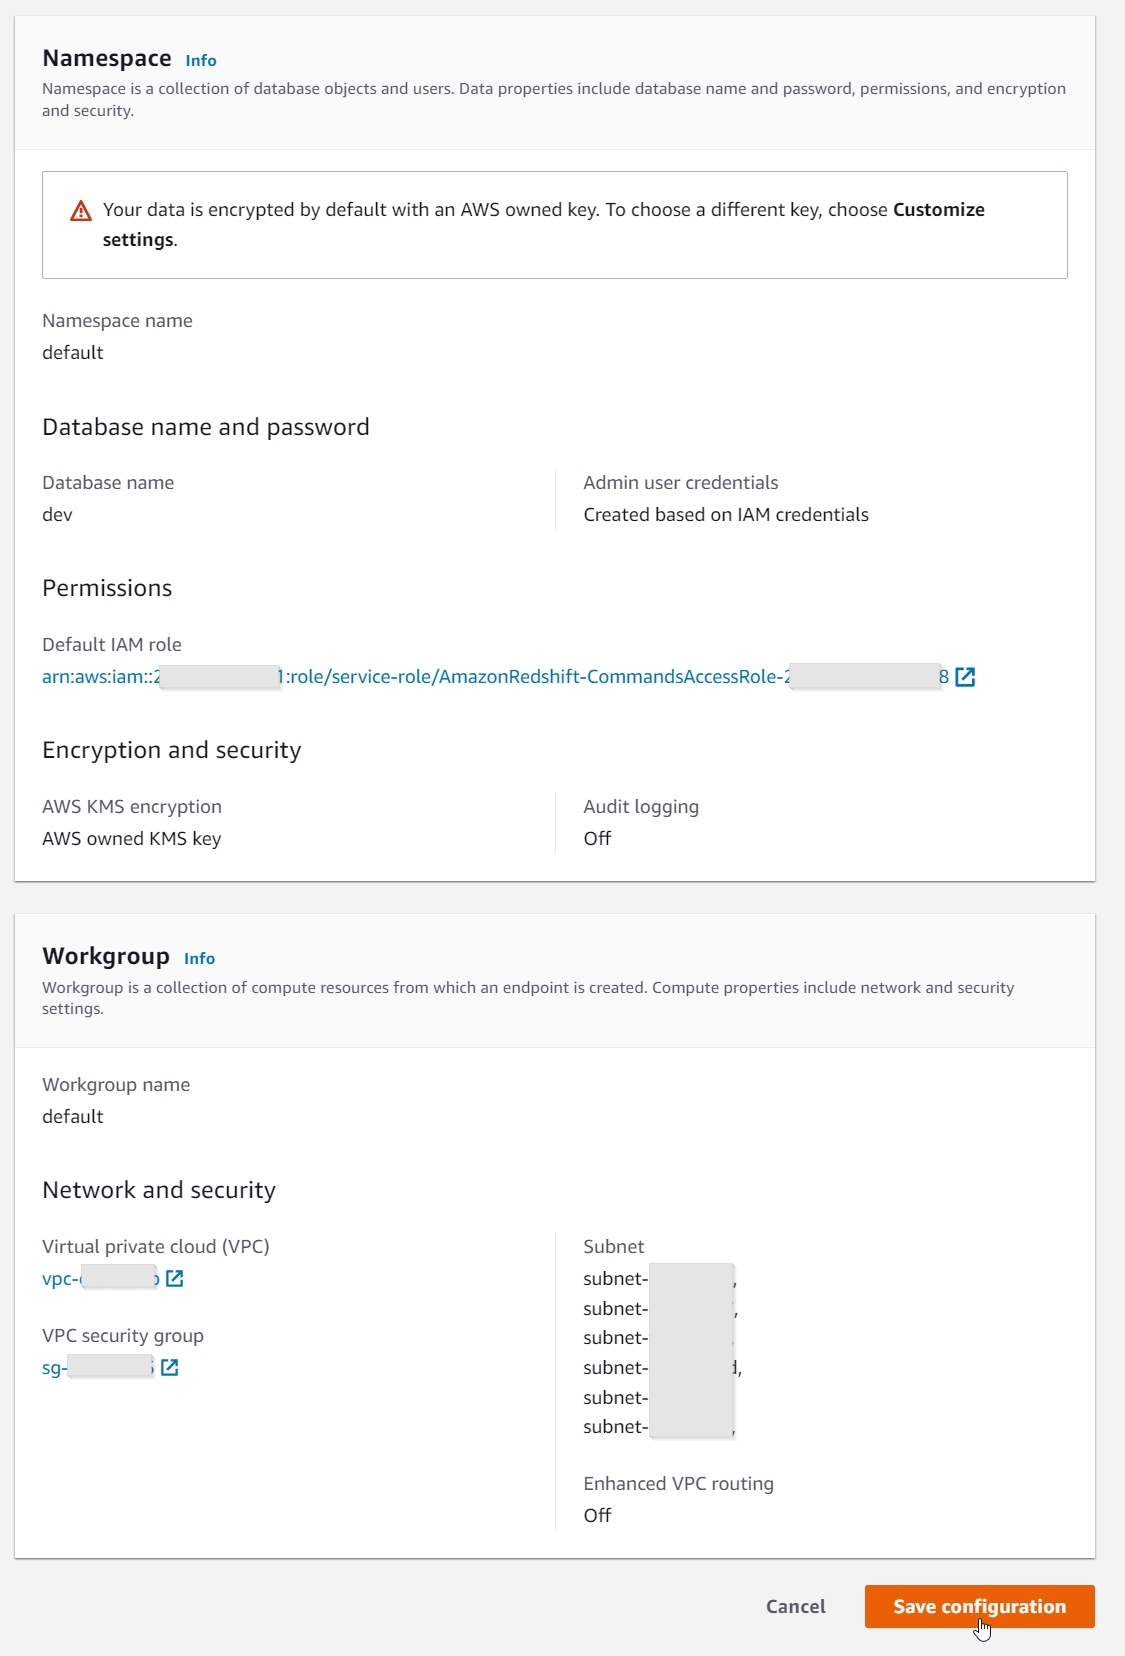
With just a single click, you can create a new Redshift Serverless endpoint in minutes with data encryption enabled, and a default AWS Identity and Access Management (IAM) role, VPC, and security group attached. You can also use the Customize settings option to override these settings, if desired.

When the Redshift Serverless endpoint is available, choose Query data to launch the Amazon Redshift Query Editor v2.
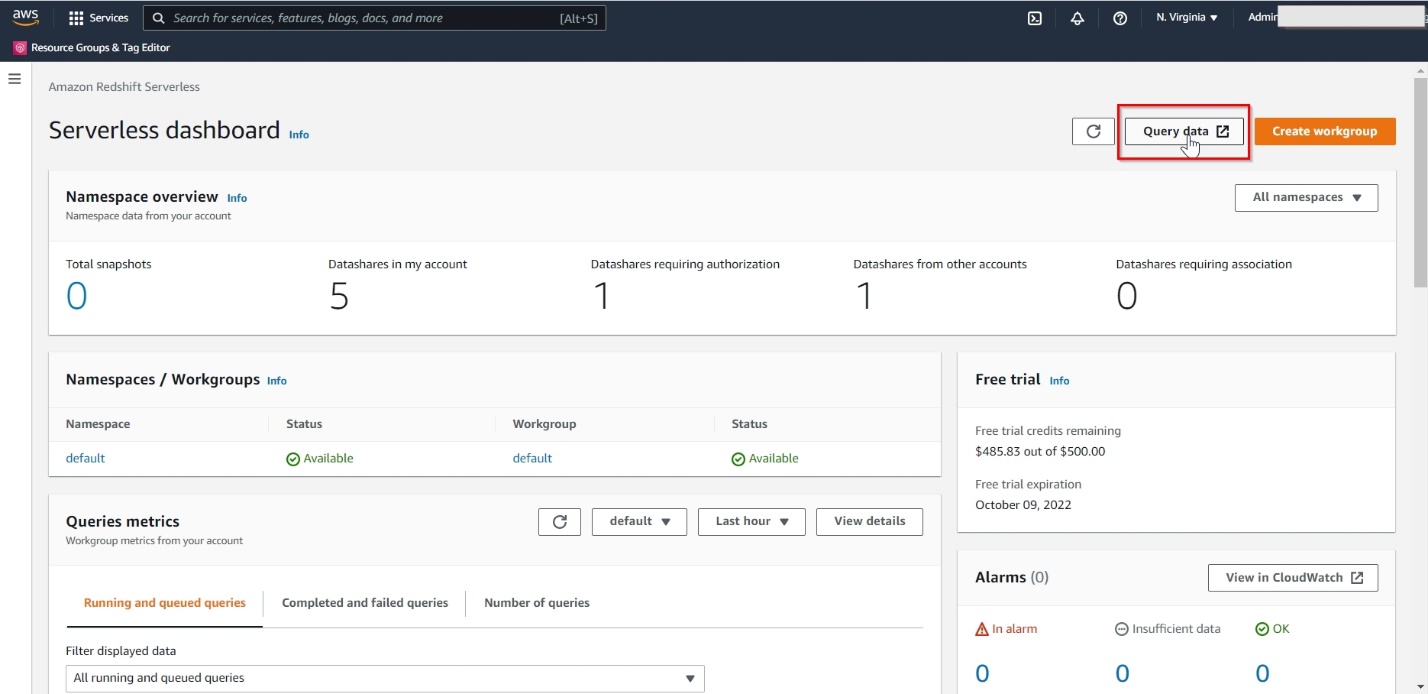
Query Editor v2 makes it easy to create database objects, load data, analyze and visualize data, and share and collaborate with your teams.

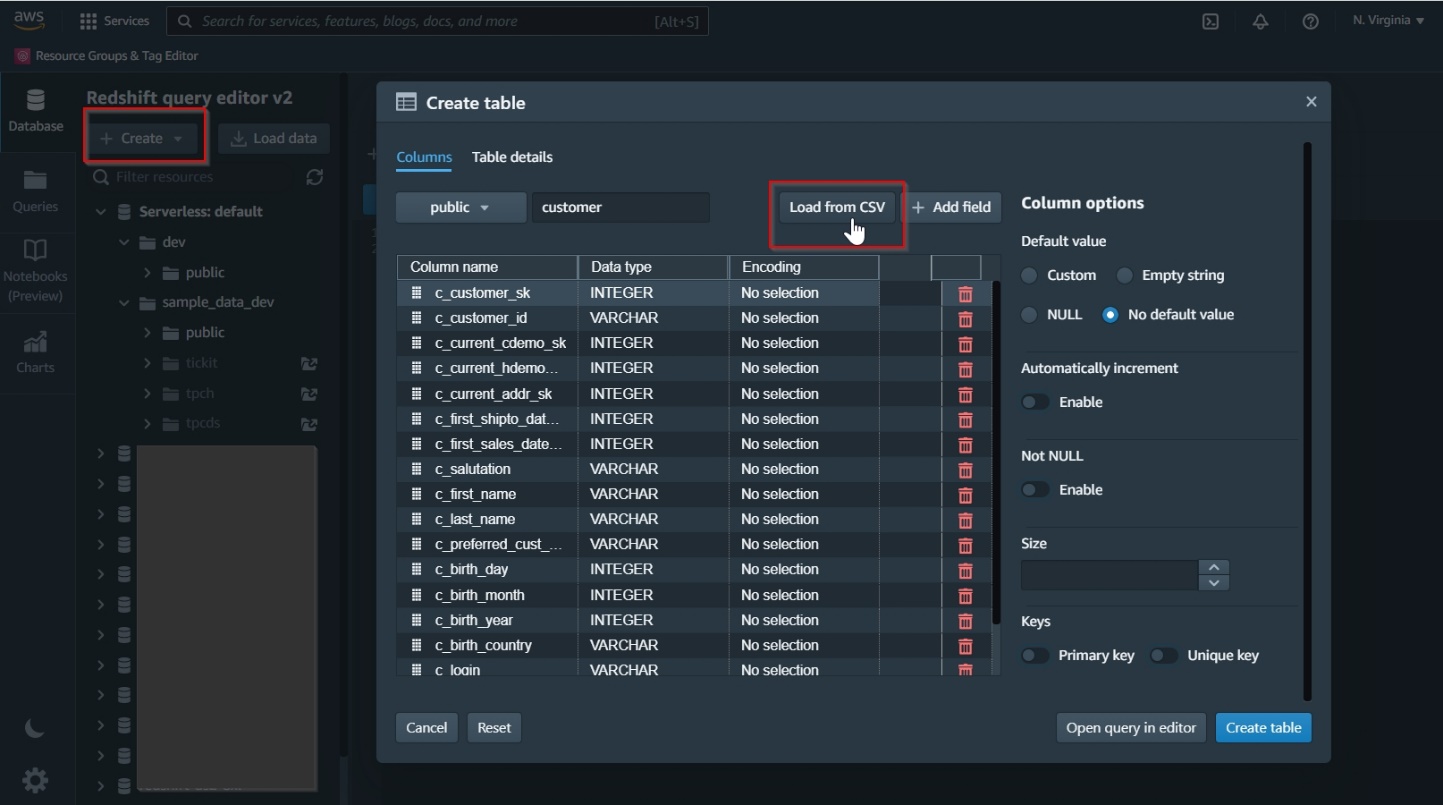
The following screenshot illustrates creating new database tables using the UI.
The following screenshot demonstrates loading data from Amazon Simple Storage Service (Amazon S3) using the UI.

The following screenshot shows an example of analyzing and visualizing data.

Refer to the video Get Started with Amazon Redshift Serverless to learn how to set up a new Redshift Serverless endpoint and start analyzing your data in minutes.

Self-service analytics

In another use case, a customer is currently using an Amazon Redshift provisioned cluster that is right-sized for their current workloads. A new data science team wants quick access to the Amazon Redshift cluster data for a new workload that will build predictive models for forecasting. The new team members don’t know yet how long they will need access and how complex their queries will be.

Adding the new data science group to the current cluster presented the following challenges:

  • The additional compute capacity needs of the new team are unknown and hard to estimate
  • Because the current cluster resources are optimally utilized, they need to ensure workload isolation to support the needs of the new team without impacting existing workloads
  • A chargeback or cost allocation model is desired for the various teams consuming data

To address these issues, they decide to let the data science team create their own new Redshift Serverless instance and grant them data share access to the data they need from the existing Amazon Redshift provisioned cluster. The following diagram illustrates the new architecture.
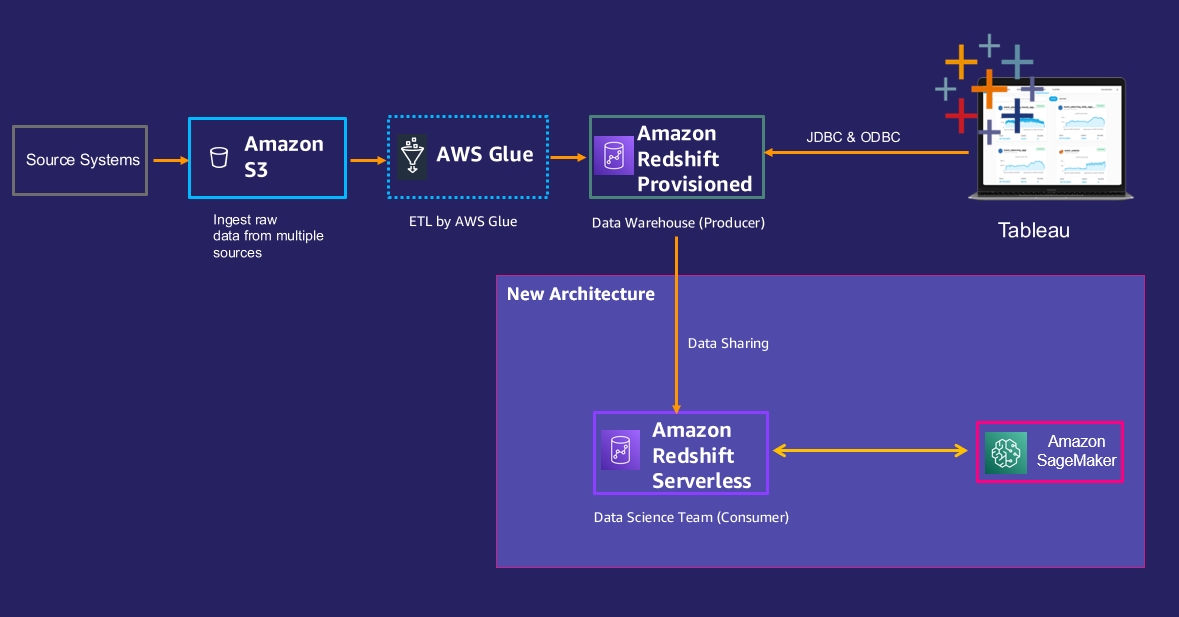
The following steps need to be performed to implement this architecture:

  1. The data science team can create a new Redshift Serverless endpoint, as described in the previous use case.
  2. Enable data sharing between the Amazon Redshift provisioned cluster (producer) and the data science Redshift Serverless endpoint (consumer) using these high-level steps:
    1. Create a new data share.
    2. Add a schema to the data share.
    3. Add objects you want to share to the data share.
    4. Grant usage on this data share to the Redshift Serverless consumer namespace, using the Redshift Serverless endpoint’s namespace ID.
    5. Note that the Redshift Serverless endpoint is encrypted by default; the provisioned Redshift producer cluster also needs to be encrypted for data sharing to work between them.

The following screenshot shows sample SQL commands to enable data sharing on the Amazon Redshift provisioned producer cluster.

On the Amazon Redshift Serverless consumer, create a database from the data share and then query the shared objects.
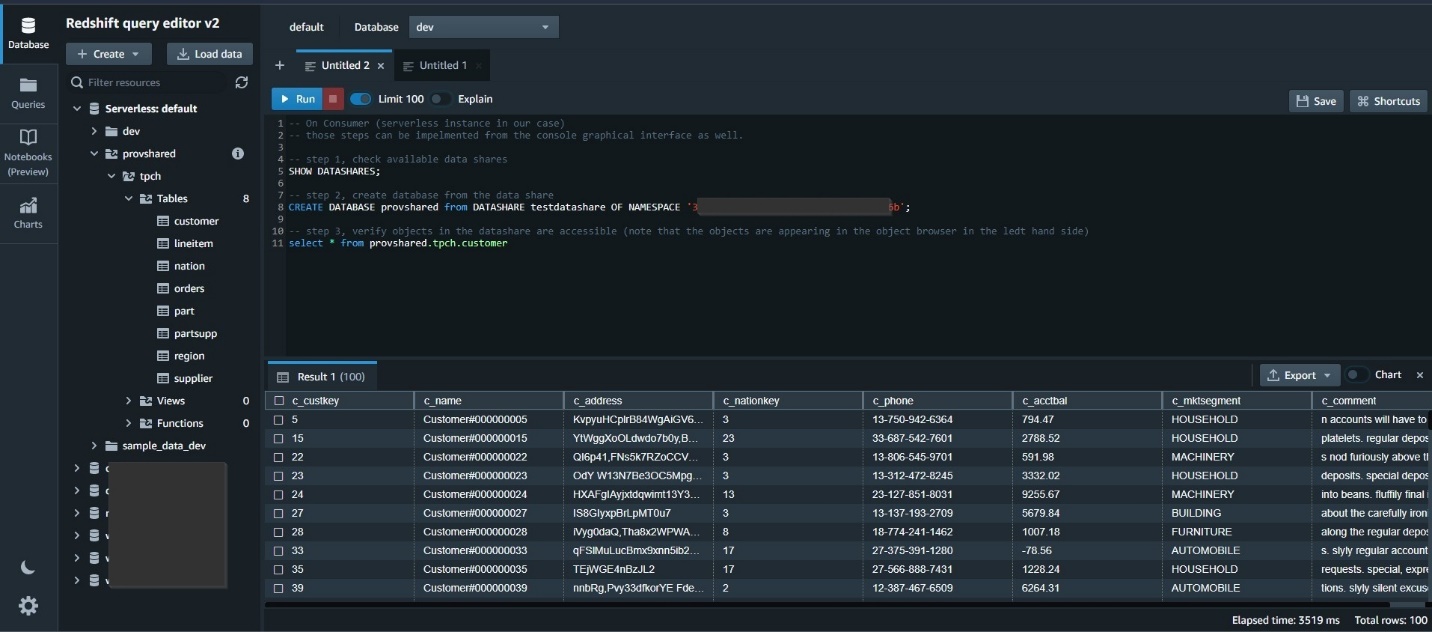
For more details about configuring Amazon Redshift data sharing, refer to Sharing Amazon Redshift data securely across Amazon Redshift clusters for workload isolation.

With this architecture, we can resolve the three challenges mentioned earlier:

  • Redshift Serverless allows the data science team to create a new Amazon Redshift database without worrying about capacity needs, and set up data sharing with the Amazon Redshift provisioned producer cluster within 30 minutes. This tackles the first challenge.
  • Amazon Redshift data sharing allows you to share live, transactionally consistent data across provisioned and Serverless Redshift databases, and data sharing can even happen when the producer is paused. The new workload is isolated and runs on its own compute resources, without impacting the performance of the Amazon Redshift provisioned producer cluster. This addresses the second challenge.
  • Redshift Serverless isolates the cost of the new workload to the new team and enables an easy chargeback model. This tackles the third challenge.

Optimized workload performance

For our third use case, an Amazon Redshift customer using an Amazon Redshift provisioned cluster is looking for performance optimization during peak times for their workload. They need a solution to manage dynamic workloads without over-provisioning or under-provisioning resources and build a scalable architecture.

An analysis of the workload on the cluster shows that the cluster has two different workloads:

  • The first workload is streaming ingestion, which runs steadily during the day.
  • The second workload is reporting, which runs on an ad hoc basis during the day with some scheduled jobs during the night. It was noted that the reporting jobs run anywhere between 8–12 hours daily.

The provisioned cluster was sized as 12 nodes of ra3.4xlarge to handle both workloads running in parallel.

To optimize these workloads, the following architecture was proposed and implemented:

  • Configure an Amazon Redshift provisioned cluster with just 4 nodes of ra3.4xlarge, to handle the streaming ingestion workload only. The following screenshots illustrate how to do this on the Amazon Redshift console, via an elastic resize operation of the existing Amazon Redshift provisioned cluster by reducing number of nodes from 12 to 4:
  • Create a new Redshift Serverless endpoint to be utilized by the reporting workload with 128 RPU (Redshift Processing Units) in lieu of 8 nodes ra3.4xlarge. For more details about setting up Redshift Serverless, refer to the first use case regarding easy analytics.
  • Enable data sharing between the Amazon Redshift provisioned cluster as the producer and Redshift Serverless as the consumer using the serverless namespace ID, similar to how it was configured earlier in the self-service analytics use case. For more information about how to configure Amazon Redshift data sharing, refer to Sharing Amazon Redshift data securely across Amazon Redshift clusters for workload isolation.

The following diagram compares the current architecture and the new architecture using Redshift Serverless.
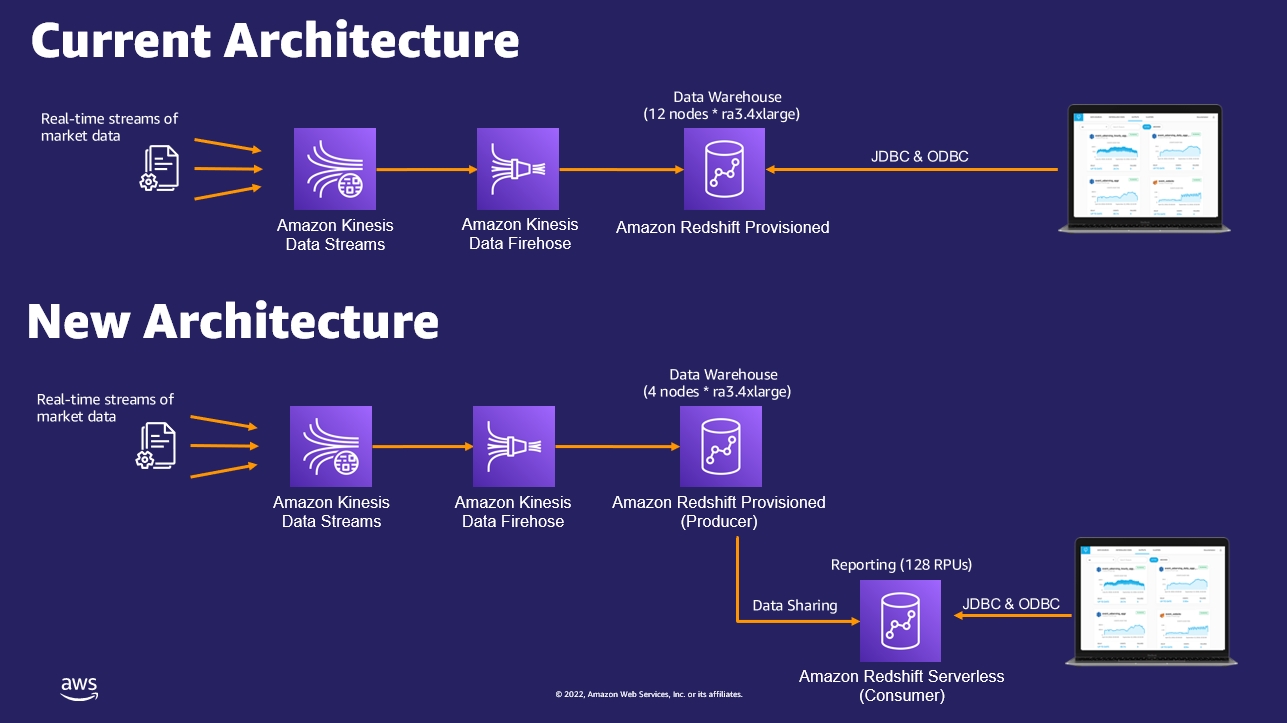
After completing this setup, the customer ran the streaming ingestion workload on the Amazon Redshift provisioned instance (producer) and reporting workloads on Redshift Serverless (consumer) based on the recommended architecture. The following improvements were observed:

  • The streaming ingestion workload performed the same as it did on the former 12-node Amazon Redshift provisioned cluster.
  • Reporting users saw a performance improvement of 30% by using Redshift Serverless. It was able to scale compute resources dynamically within seconds, as additional ad hoc users ran reports and queries without impacting the streaming ingestion workload.
  • This architecture pattern is expandable to add more consumers like data scientists, by setting up another Redshift Serverless instance as a new consumer.

Cost-optimization

In our final use case, a customer is using an Amazon Redshift provisioned cluster as a producer to ingest data from different sources. The data is then shared with other Amazon Redshift provisioned consumer clusters for data science modeling and reporting purposes.

Their current Amazon Redshift provisioned producer cluster has 8 nodes of ra3.4xlarge and is located in the us-east-1 Region. The data delivery from the different data sources is scattered between midnight to 8:00 AM, and the data ingestion jobs take around 3 hours to run in total every day. The customer is currently on the on-demand cost model and has scheduled daily jobs to pause and resume the cluster to minimize costs. The cluster resumes every day at midnight and pauses at 8:00 AM, with a total runtime of 8 hours a day.

The current annual cost of this cluster is 365 days * 8 hours * 8 nodes * $3.26 (node cost per hour) = $76,153.6 per year.

To optimize the cost of this workload, the following architecture was proposed and implemented:

  • Set up a new Redshift Serverless endpoint with 64 RPU as the base configuration to be utilized by the data ingestion producer team. For more information about setting up Redshift Serverless, refer to the first use case regarding easy analytics.
  • Restore the latest snapshot from the existing Amazon Redshift provisioned producer cluster into Redshift Serverless by choosing the Restore to serverless namespace option, as shown in the following screenshot.
  • Enable data sharing between Redshift Serverless as the producer and the Amazon Redshift provisioned cluster as the consumer, similar to how it was configured earlier in the self-service analytics use case.
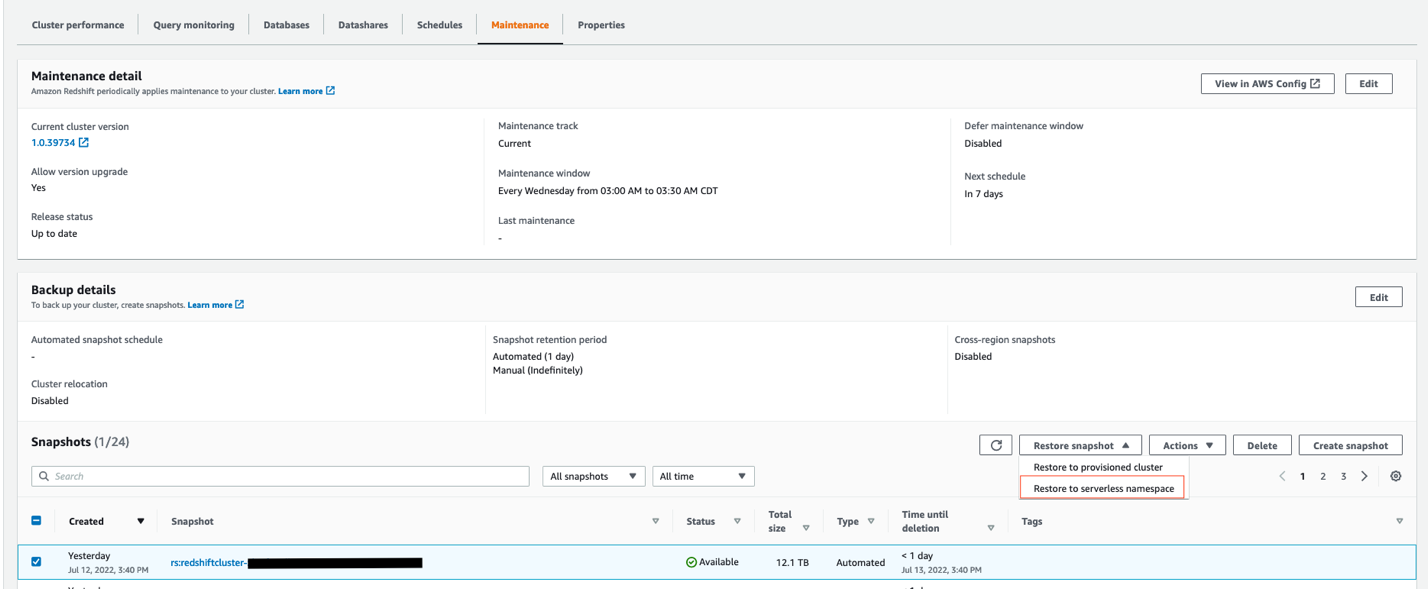
The following diagram compares the current architecture to the new architecture.
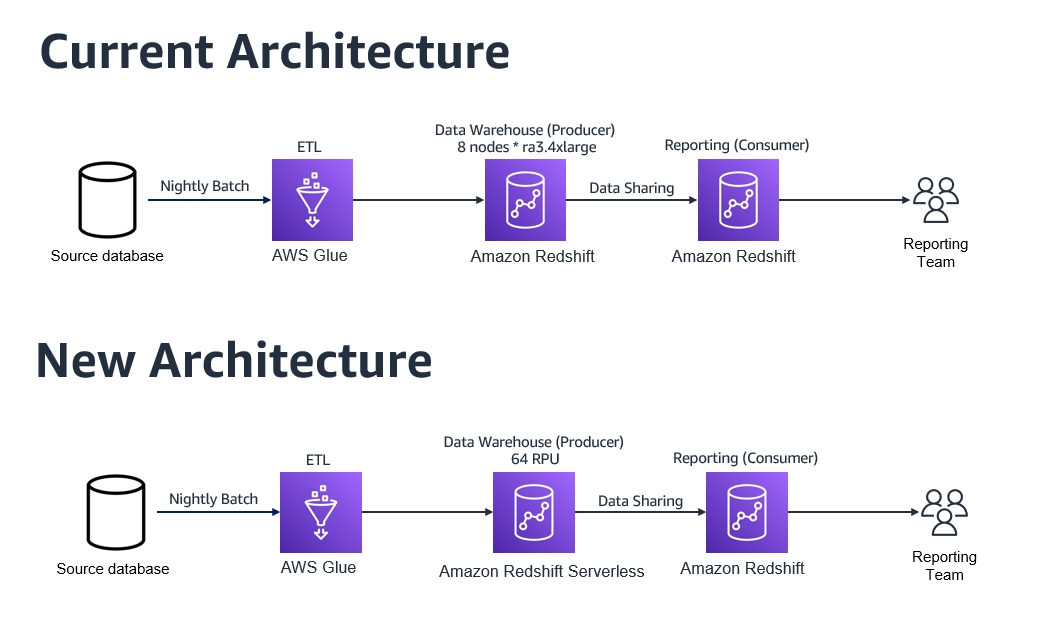
By moving to Redshift Serverless, the customer realized the following benefits:

  • Cost savings – With Redshift Serverless, the customer pays for compute only when the data warehouse is in use. In this scenario, the customer observed a savings of up to 65% on their annual costs by using Redshift Serverless as the producer, while still getting better performance on their workloads. The Redshift Serverless annual cost in this case equals 365 days * 3 hours * 64 RPUs * $0.375 (RPU cost per hour) = $26,280, compared to $76,153.6 for their former provisioned producer cluster. Also, the Redshift Serverless 64 RPU baseline configuration offers the customer more compute resources than their former 8 nodes of ra3.4xlarge cluster, resulting in better performance overall.
  • Less administration overhead – Because the customer doesn’t need to worry about pausing and resuming their Amazon Redshift cluster any more, the administration of their data warehouse is simplified by moving their producer Amazon Redshift cluster to Redshift Serverless.

Conclusion

In this post, we discussed four different use cases, demonstrating the benefits of Amazon Redshift Serverless—from its easy analytics, ease of use, superior performance, and cost savings that can be realized from the pay-per-use pricing model.

Amazon Redshift provides flexibility and choice in data warehousing. Amazon Redshift Provisioned is a great choice for customers who need a custom provisioning environment with more granular controls; and with Redshift Serverless, you can start new data warehousing workloads in minutes with dynamic auto scaling, no infrastructure management, and a pay-per-use pricing model.

We encourage you to start using Amazon Redshift Serverless today and enjoy the many benefits it offers.


About the Authors

Ahmed Shehata is a Data Warehouse Specialist Solutions Architect with Amazon Web Services, based out of Toronto.

Manish Vazirani is an Analytics Platform Specialist at AWS. He is part of the Data-Driven Everything (D2E) program, where he helps customers become more data-driven.

Rohit Bansal is an Analytics Specialist Solutions Architect at AWS. He has nearly two decades of experience helping customers modernize their data platforms. He is passionate about helping customers build scalable, cost-effective data and analytics solutions in the cloud. In his spare time, he enjoys spending time with his family, travel, and road cycling.


Introducing thresholds in Security Event Alerting: a z-score love story

Post Syndicated from Kristina Galicova original https://blog.cloudflare.com/introducing-thresholds-in-security-event-alerting-a-z-score-love-story/

Introducing thresholds in Security Event Alerting: a z-score love story

Introducing thresholds in Security Event Alerting: a z-score love story

Today we are excited to announce thresholds for our Security Event Alerts: a new and improved way of detecting anomalous spikes of security events on your Internet properties. Previously, our calculations were based on z-score methodology alone, which was able to determine most of the significant spikes. By introducing a threshold, we are able to make alerts more accurate and only notify you when it truly matters. One can think of it as a romance between the two strategies. This is the story of how they met.

Author’s note: as an intern at Cloudflare I got to work on this project from start to finish from investigation all the way to the final product.

Once upon a time

In the beginning, there were Security Event Alerts. Security Event Alerts are notifications that are sent whenever we detect a threat to your Internet property. As the name suggests, they track the number of security events, which are requests to your application that match security rules. For example, you can configure a security rule that blocks access from certain countries. Every time a user from that country tries to access your Internet property, it will log as a security event. While a security event may be harmless and fired as a result of the natural flow of traffic, it is important to alert on instances when a rule is fired more times than usual. Anomalous spikes of too many security events in a short period of time can indicate an attack. To find these anomalies and distinguish between the natural number of security events and that which poses a threat, we need a good strategy.

The lonely life of a z-score

Before a threshold entered the picture, our strategy worked only on the basis of a z-score. Z-score is a methodology that looks at the number of standard deviations a certain data point is from the mean. In our current configuration, if a spike crosses the z-score value of 3.5, we send you an alert. This value was decided on after careful analysis of our customers’ data, finding it the most effective in determining a legitimate alert. Any lower and notifications will get noisy for smaller spikes. Any higher and we may miss out on significant events. You can read more about our z-score methodology in this blog post.

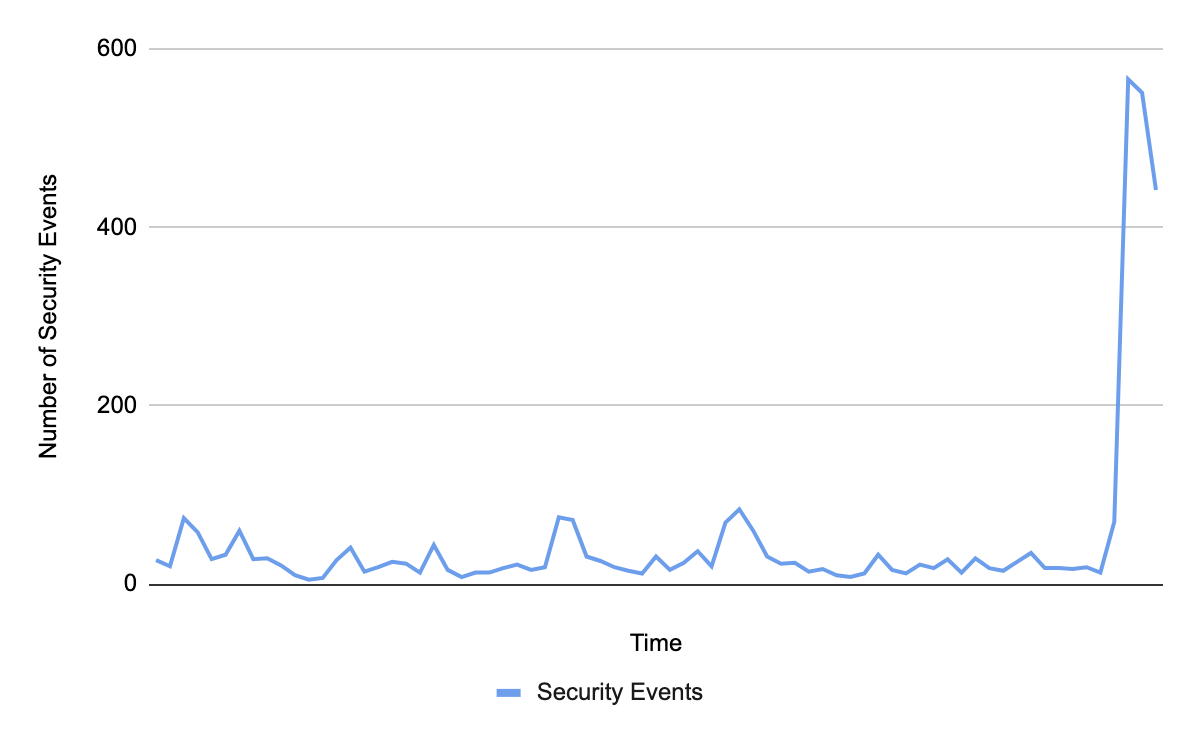
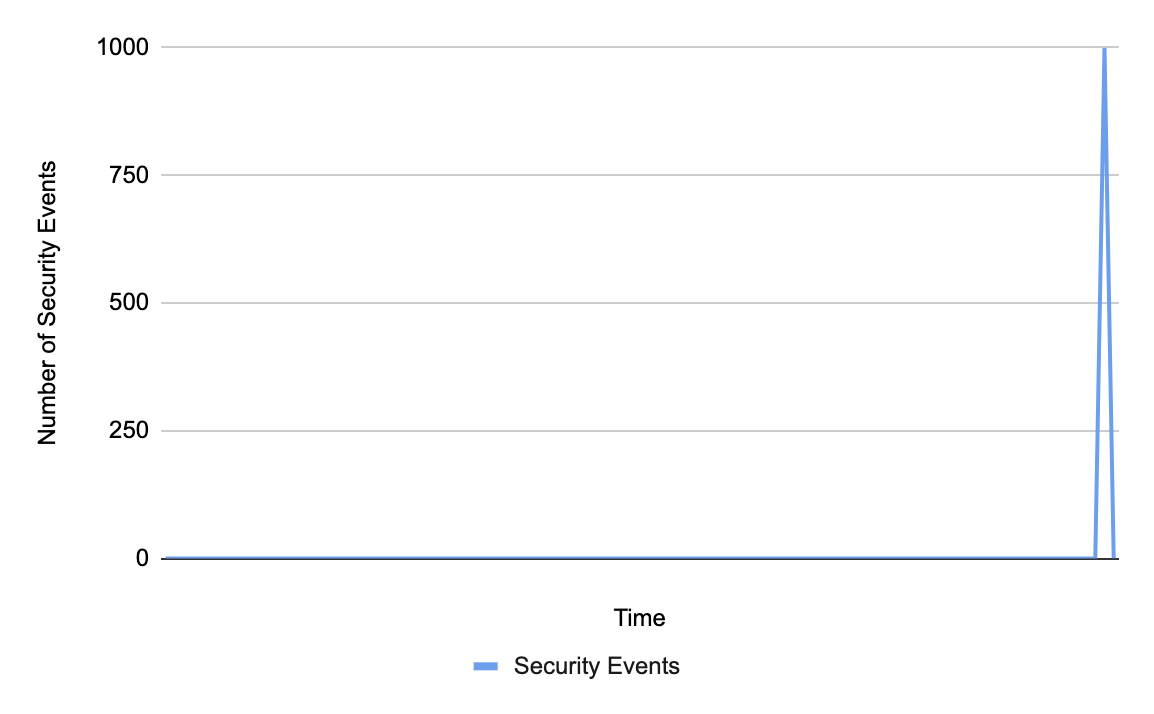
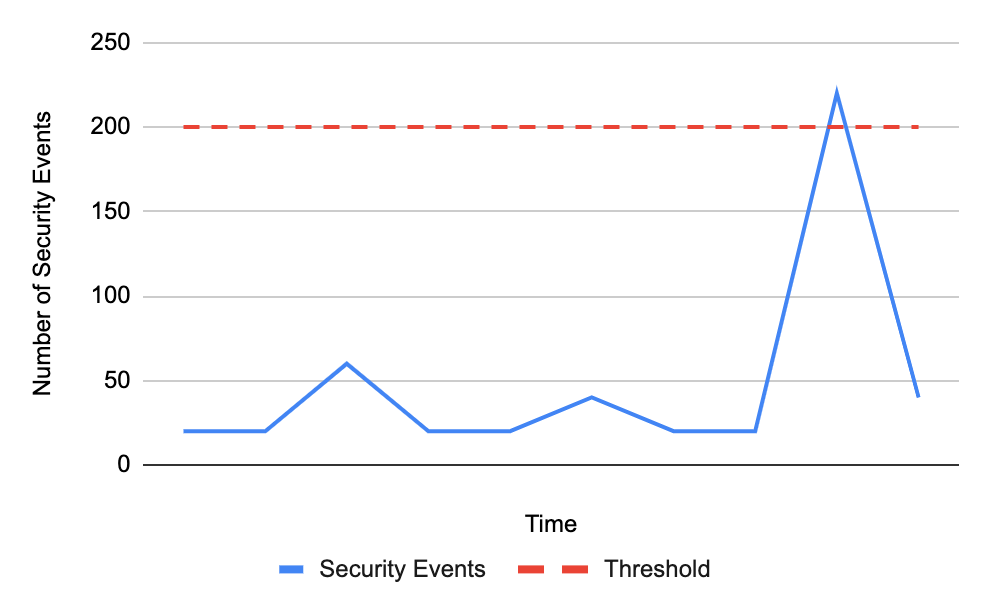
The following graphs are an example of how the z-score method works. The first graph shows the number of security events over time, with a recent spike.

Introducing thresholds in Security Event Alerting: a z-score love story

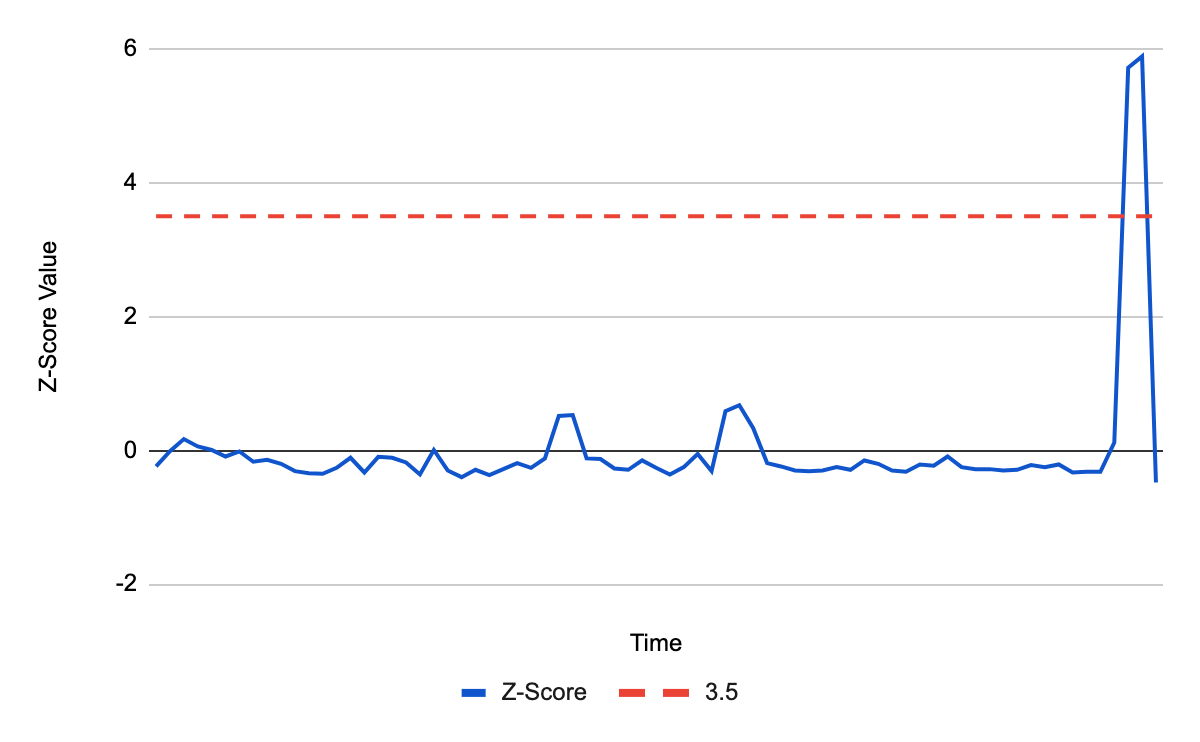
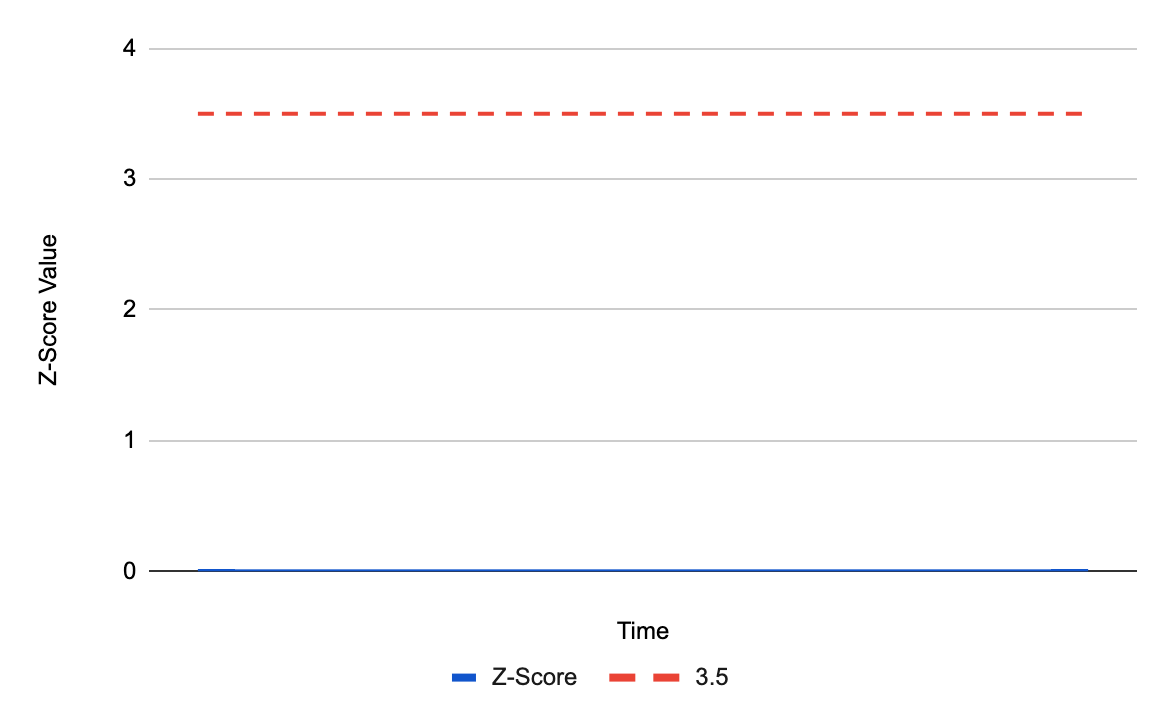
To determine whether this spike is significant, we calculate the z-score and check if the value is above 3.5:

Introducing thresholds in Security Event Alerting: a z-score love story

As the graph shows, the deviation is above 3.5 and so an alert is triggered.

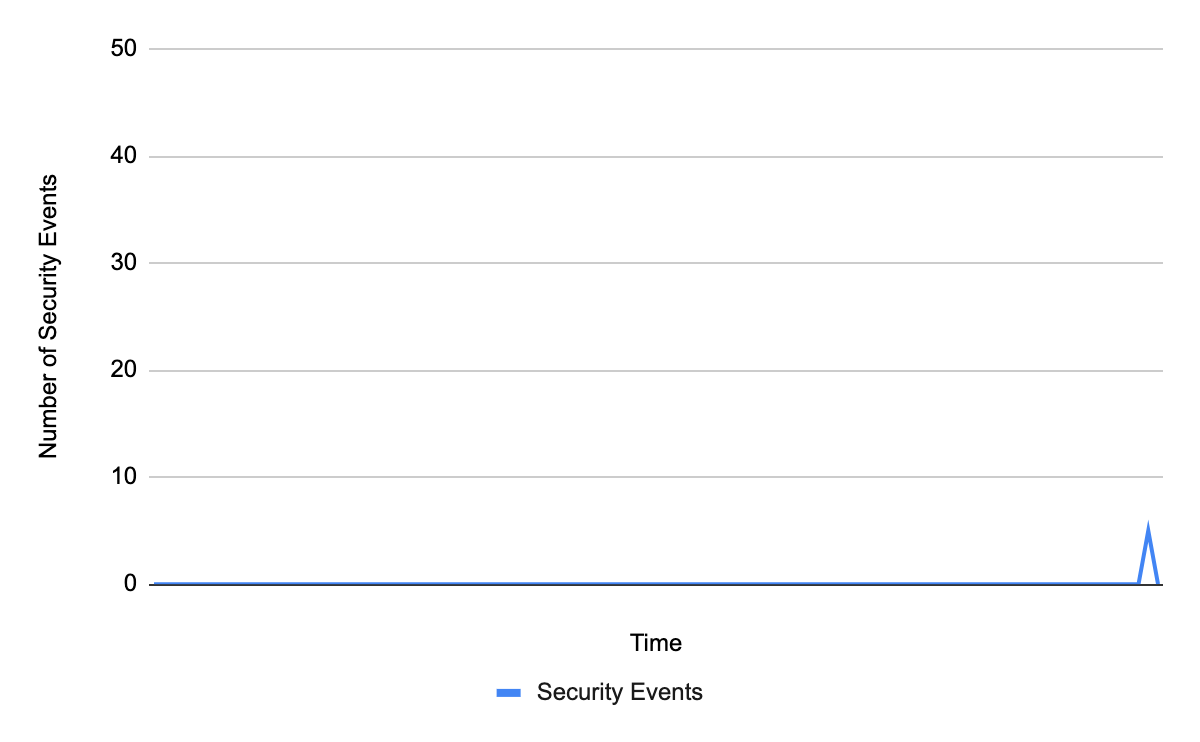
However, relying on z-score becomes tricky for domains that experience no security events for a long period of time. With many security events at zero, the mean and standard deviation depress to zero as well. When a non-zero value finally appears, it will always be infinite standard deviations away from the mean. As a result, it will always trigger an alert even on spikes that do not pose any threat to your domain, such as the below:

Introducing thresholds in Security Event Alerting: a z-score love story

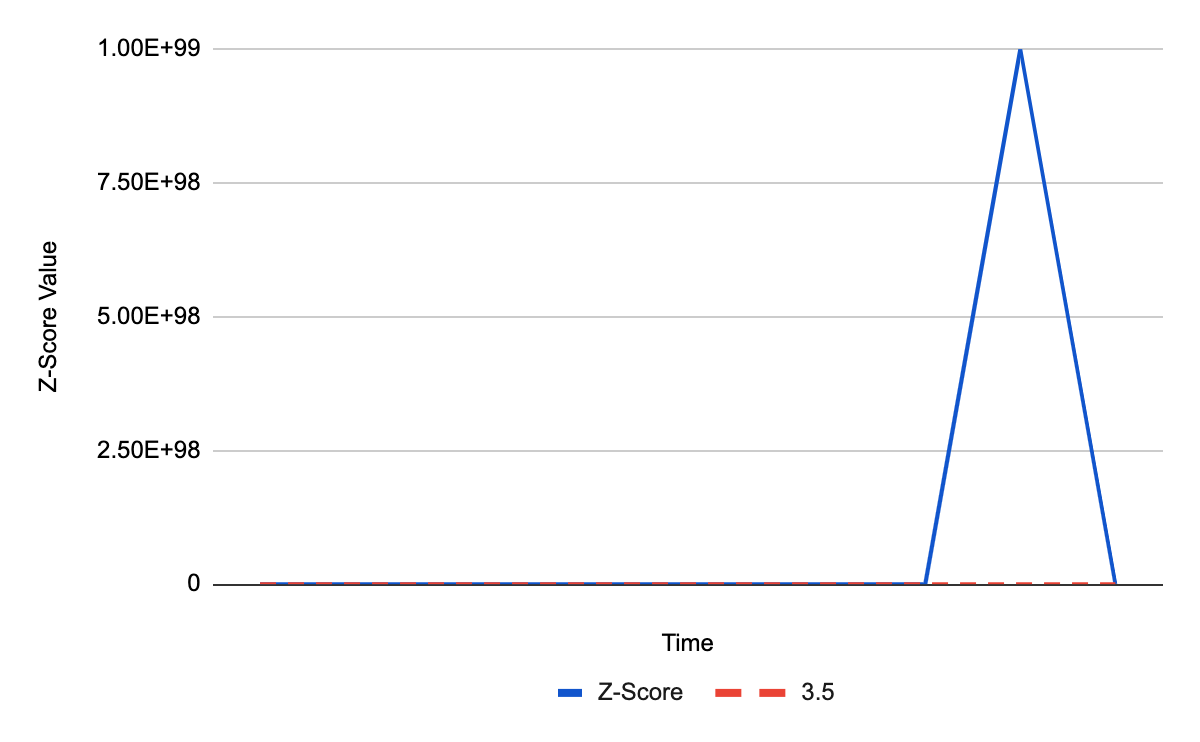
With five security events, you are likely going to ignore this spike, as it is too low to indicate a meaningful threat. However, the z-score in this instance will be infinite:

Introducing thresholds in Security Event Alerting: a z-score love story

Since a z-score of infinity is greater than 3.5, an alert will be triggered. This means that customers with few security events would often be overwhelmed by event alerts that are not worth worrying about.

Letting go of zeros

To avoid the mean and standard deviation becoming zero and thus alerting on every non-zero spike, zero values can be ignored in the calculation. In other words, to calculate the mean and standard deviation, only data points that are higher than zero will be considered.

With those conditions, the same spike to five security events will now generate a different z-score:

Introducing thresholds in Security Event Alerting: a z-score love story

Great! With the z-score at zero, it will no longer trigger an alert on the harmless spike!

But what about spikes that could be harmful? When calculations ignore zeros, we need enough non-zero data points to accurately determine the mean and standard deviation. If only one non-zero value is present, that data point determines the mean and standard deviation. As such, the mean will always be equal to the spike, z-score will always be zero and an alert will never be triggered:

Introducing thresholds in Security Event Alerting: a z-score love story

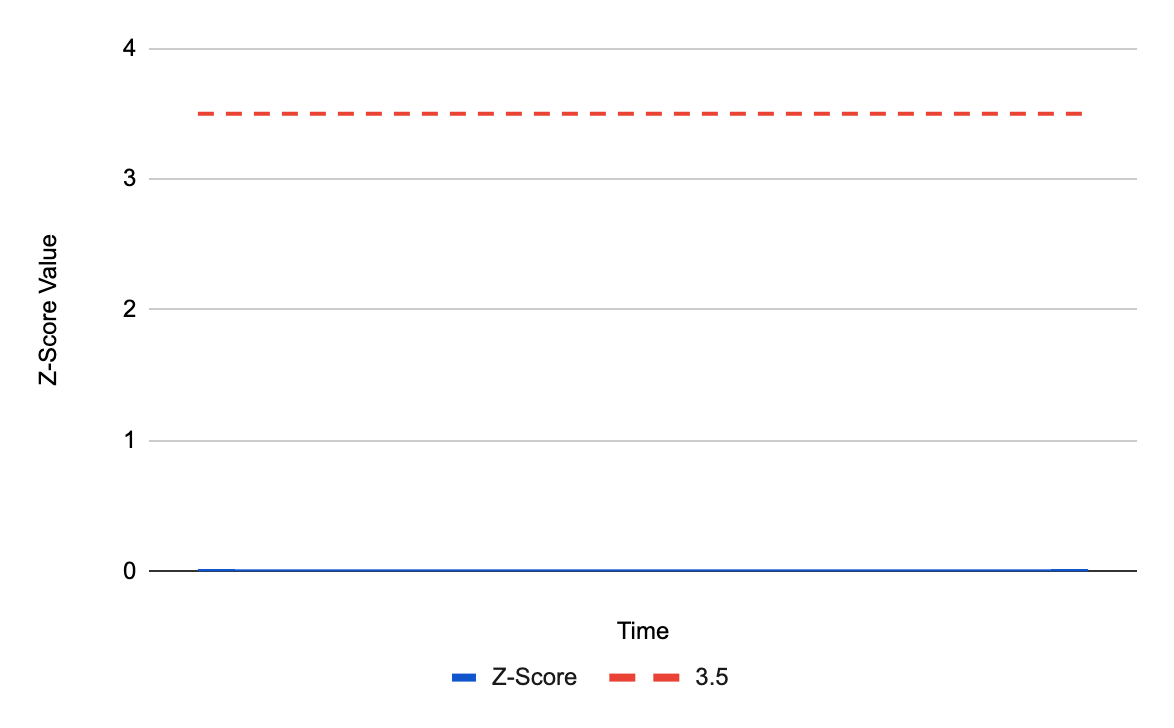
For a spike of 1000 events, we can tell that there is something wrong and we should trigger an alert. However, because there is only one non-zero data point, the z-score will remain zero:

Introducing thresholds in Security Event Alerting: a z-score love story

The z-score does not cross the value 3.5 and an alert will not be triggered.

So what’s better? Including zeros in our calculations can skew the results for domains with too many zero events and alert them every time a spike appears. Not including zeros is mathematically wrong and will never alert on these spikes.

Threshold, the prince charming

Clearly, a z-score is not enough on its own.

Instead, we paired up the z-score with a threshold. The threshold represents the raw number of security events an Internet property can have, below which an alert will not be sent. While z-score checks whether the spike is at least 3.5 standard deviations above the mean, the threshold makes sure it is above a certain static value. If both of these conditions are met, we will send you an alert:

Introducing thresholds in Security Event Alerting: a z-score love story

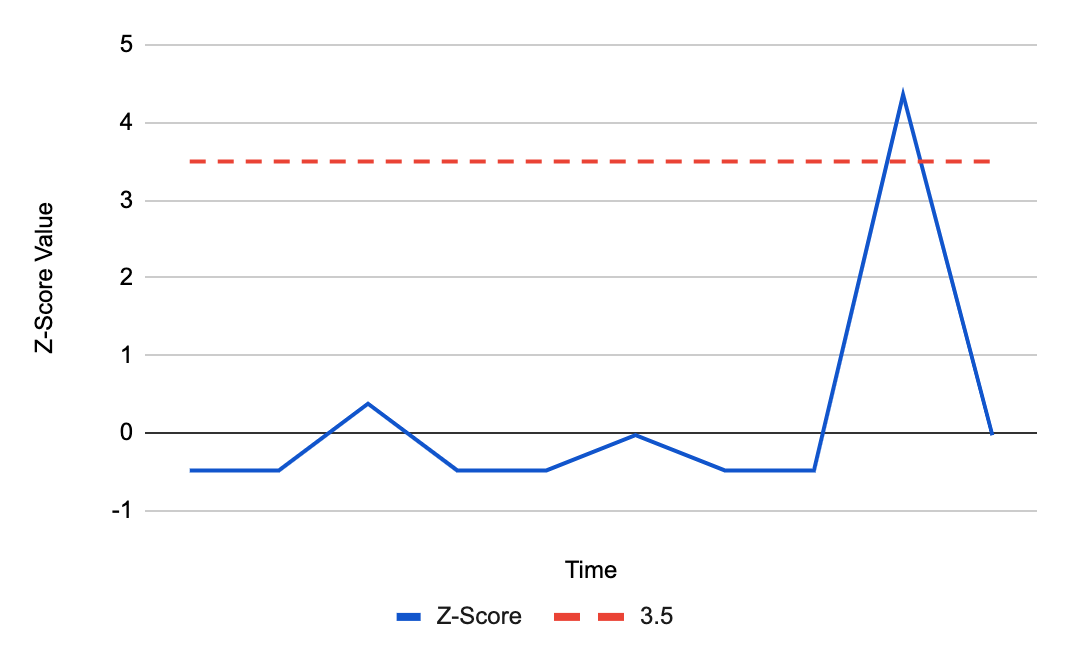
The above spike crosses the threshold of 200 security events. We now have to check that the z-score is above 3.5:

Introducing thresholds in Security Event Alerting: a z-score love story

The z-score value crosses 3.5 and an alert will be sent.

A threshold for the number of security events comes as the perfect complement. By itself, the threshold cannot determine whether something is a spike, and would simply alert on any value crossing it. This blog post describes in more detail why thresholds alone do not work. However, when paired with z-score, they are able to share their strengths and cover for each other’s weaknesses. If the z-score falsely detects an insignificant spike, the threshold will stop the alert from triggering. Conversely, if a value does cross the security events threshold, the z-score ensures there is a reasonable variance from the data average before allowing an alert to be sent.

The invaluable value

To foster a successful relationship between the z-score and security events threshold, we needed to determine the most effective threshold value. After careful analysis of our previous attacks on customers, we set the value to 200. This number is high enough to filter out the smaller, noisier spikes, but low enough to expose any threats.

Am I invited to the wedding?

Yes, you are! The z-score and threshold relationship is already enabled for all WAF customers, so all you need to do is sit back and relax. For enterprise customers, the threshold will be applied to each type of alert enabled on your domain.

Happily ever after

The story certainly does not end here. We are constantly iterating on our alerts, so keep an eye out for future updates on the road to make our algorithms even more personalized for your Internet properties!

Rapid7 Makes Security Compliance Complexity a Thing of the Past With InsightIDR

Post Syndicated from KJ McCann original https://blog.rapid7.com/2022/08/30/rapid7-makes-security-compliance-complexity-a-thing-of-the-past-with-insightidr/

Rapid7 Makes Security Compliance Complexity a Thing of the Past With InsightIDR

As a unified SIEM and XDR solution, InsightIDR gives organizations the tools they need to drive an elevated and efficient compliance program.

Cybersecurity standards and compliance are mission-critical for every organization, regardless of size. Apart from the direct losses resulting from a data breach, non-compliant companies could face hefty fees, loss of business, and even jail time under growing regulations. However, managing and maintaining compliance, preparing for audits, and building necessary reports can be a full-time job, which might not be in the budget. For already-lean teams, compliance can also distract from more critical security priorities like monitoring threats, early threat detection, and accelerated response – exposing organizations to greater risk.

An efficient compliance strategy reduces risk, ensures that your team is always audit-ready, and – most importantly – drives focus on more critical security work. With InsightIDR, security practitioners can quickly meet their compliance and regulatory requirements while accelerating their overall detection and response program.

Here are three ways InsightIDR has been built to elevate and simplify your compliance processes.

1. Powerful log management capabilities for full environment visibility and compliance readiness

Complete environment visibility and security log collection are critical for compliance purposes, as well as for providing a foundation of effective monitoring and threat detection. Enterprises need to monitor user activity, behavior, and application access across their entire environment — from the cloud to on-premises services. The adoption of cloud services continues to increase, creating even more potential access points for teams to keep up with.

InsightIDR’s strong log management capabilities provide full visibility into these potential threats, as well as enable robust compliance reporting by:

  • Centralizing and aggregating all security-relevant events, making them available for use in monitoring, alerting, investigation, ad hoc searching
  • Providing the ability to search for data quickly, create data models and pivots, save searches and pivots as reports, configure alerts, and create dashboards
  • Retaining all log data for 13 months for all InsightIDR customers, enabling the correlation of data over time and meeting compliance mandates.
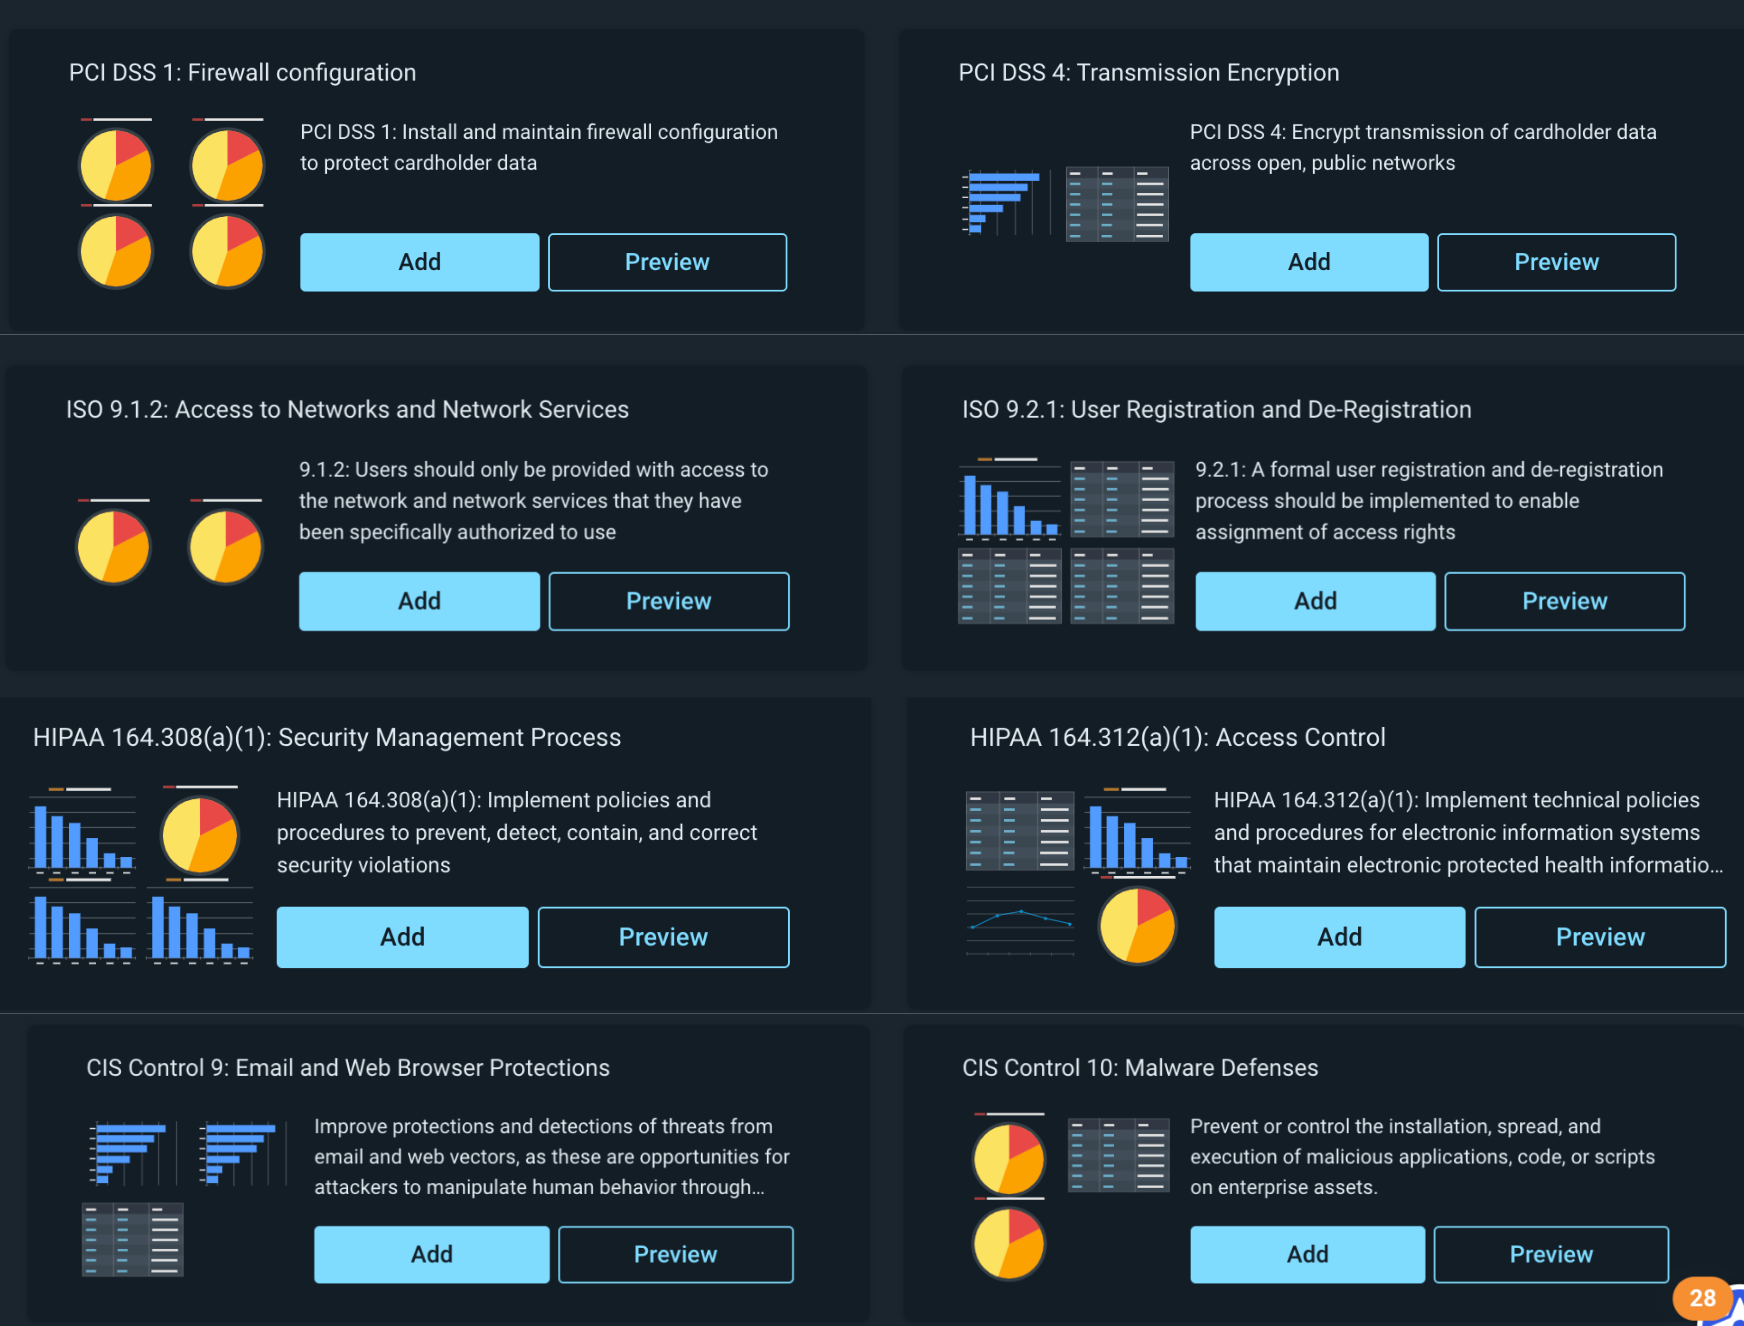
  • Automatically mapping data to compliance controls, allowing analysts to create comprehensive dashboards and reports with just a few clicks

To take it a step further, InsightIDR’s intuitive user interface streamlines searches while eliminating the need for IT administrators to master a search language. The out-of-the-box correlation searches can be invoked in real time or scheduled to run regularly at a specific time should the need arise for compliance audits and reporting, updated dashboards, and more.

2. Predefined compliance reports and dashboards to keep you organized and consistent

Pre-built compliance content in InsightIDR enables teams to create robust reports without investing countless hours manually building and correlating data to provide information on the organization’s compliance posture. With the pre-built reports and dashboards, you can:

  • Automatically map data to compliance controls
  • Save filters and searches, then duplicate them across dashboards
  • Create, share, and customize reports right from the dashboard
  • Make reports available in multiple formats like PDF or interactive HTML files

InsightIDR’s library of pre-built dashboards makes it easier than ever to visualize your data within the context of common frameworks. Entire dashboards created by our Rapid7 experts can be set up in just a few clicks. Our dashboards cover a variety of key compliance frameworks like PCI, ISO 27001, HIPAA, and more.

Rapid7 Makes Security Compliance Complexity a Thing of the Past With InsightIDR

3. Unified and correlated data points to provide meaningful insights

With strong log management capabilities providing a foundation for your security posture, the ability to correlate the resulting data and look for unusual behavior, system anomalies, and other indicators of a security incident is key. This information is used not only for real-time event notification but also for compliance audits and reporting, performance dashboards, historical trend analysis, and post-hoc incident forensics.

Privileged users are often the targets of attacks, and when compromised, they typically do the most damage. That’s why it’s critical to extend monitoring to these users. In fact, because of the risk involved, privileged user monitoring is a common requirement for compliance reporting in many regulated industries.

InsightIDR provides a constantly curated library of detections that span user behavior analytics, endpoints, file integrity monitoring, network traffic analysis, and cloud threat detection and response – supported by our own native endpoint agent, network sensor, and collection software. User authentications, locational data, and asset activity are baselined to identify anomalous privilege escalations, lateral movement, and compromised credentials. Customers can also connect their existing Privileged Access Management tools (like CyberArk Vault or Varonis DatAdvantage) to get a more unified view of privileged user monitoring with a single interface.

Meet compliance standards while accelerating your detection and response

We know compliance is not the only thing a security operations center (SOC) has to worry about. InsightIDR can ensure that your most critical compliance requirements are met quickly and confidently. Once you have an efficient compliance process, the team will be able to focus their time and effort on staying ahead of emergent threats and remediating attacks quickly, reducing risk to the business.

What could you do with the time back?

Additional reading:

NEVER MISS A BLOG

Get the latest stories, expertise, and news about security today.

FTC Sues Data Broker

Post Syndicated from Bruce Schneier original https://www.schneier.com/blog/archives/2022/08/ftc-sues-data-broker.html

This is good news:

The Federal Trade Commission (FTC) has sued Kochava, a large location data provider, for allegedly selling data that the FTC says can track people at reproductive health clinics and places of worship, according to an announcement from the agency.

“Defendant’s violations are in connection with acquiring consumers’ precise geolocation data and selling the data in a format that allows entities to track the consumers’ movements to and from sensitive locations, including, among others, locations associated with medical care, reproductive health, religious worship, mental health temporary shelters, such as shelters for the homeless, domestic violence survivors, or other at risk populations, and addiction recovery,” the lawsuit reads.

Building cost-effective AWS Step Functions workflows

Post Syndicated from Benjamin Smith original https://aws.amazon.com/blogs/compute/building-cost-effective-aws-step-functions-workflows/

Builders create AWS Step Functions workflows to orchestrate multiple services into business-critical applications with minimal code. Customers are looking for best practices and guidelines to build cost-effective workflows with Step Functions.

This blog post explains the difference between Standard and Express Workflows. It shows the cost of running the same workload as Express or Standard Workflows. Then it covers how to migrate from Standard to Express, how to combine workflow types to optimize for cost, and how to modularize and nest one workflow inside another.

Step Functions Express Workflows

Express Workflows orchestrate AWS services at a higher throughput of up to 100,000 state transitions per second. It also provides a lower cost of $1.00 per million invocations versus $25 per million for Standard Workflows.

Express Workflows can run for a maximum duration of 5 minutes and do not support the .waitForTaskToken or .sync integration pattern. Most Step Functions workflows that do not use these integrations patterns and complete within the 5-minute duration limit see both cost and throughput optimizations by converting the workflow type from Standard to Express.

Consider the following example, a naïve implementation of an ecommerce workflow:

When started, it emits a message onto an Amazon SQS queue. An AWS Lambda function processes and approves this asynchronously (not shown). Once processed, the Lambda function persists the state to an Amazon DynamoDB table. The workflow polls the table to check when the action is completed. It then moves on to process the payment, where it repeats the pattern. Finally, the workflow runs a series of update tasks in sequence before completing.

I run this workflow 1,000 times as a Standard workflow. I then convert this to an Express Workflow and run another 1,000 times. I create an Amazon CloudWatch dashboard to display the average execution times. The Express Workflow runs on average 0.5 seconds faster than the Standard Workflow and also shows improvements in cost:

Workflow Execution times

Running the Standard Workflow 1,000 times costs approximately $0.42. This excludes the 4,000 state transitions included in the AWS Free Tier every month, and the additional services that are being used. In contrast to this, running the Express Workflow 1000 times costs $0.01. How is this calculated?

Standard Workflow cost calculation formula:

Standard Workflows are charged based on the number of state transitions required to run a workload. Step Functions count a state transition each time a step of your workflow runs. You are charged for the total number of state transitions across all your state machines, including retries. The cost is $0.025 per 1,000 state transitions.

A happy path through the workflow comprises 17 transitions (including start and finish).

Total cost = (number of transitions per execution x number of executions) x $0.000025
Total cost = (17 X 1000) X 0.000025 = $0.42*

*Excluding the 4,000 state transitions included in the AWS Free Tier every month.

Express Workflow cost calculation formula:

Express Workflows are charged based on the number of requests and its duration. Duration is calculated from the time that your workflow begins running until it completes or otherwise finishes, rounded up to the nearest 100 ms, and the amount of memory used in running your workflow, billed in 64-MB chunks.

Total cost = (Execution cost + Duration cost) x Number of Requests
Duration cost = (Avg billed duration ms / 100) * price per 100 ms
Execution cost = $0.000001 per request

Total cost = ($0.000001 + $0.0000117746) x 1000 = $0.01
Duration cost = (11300 MS /100) * $ 0.0000001042 = $0.0000117746
Execution cost = $0.000001 per request

This cost changes depending on the number of GB-hours and memory sizes used. The memory usage for this State machine is less than 64 MB.
See the Step Functions pricing page for full more information.

Converting a Standard Workflow to an Express Workflow

Given the cost benefits shown in the previous section, converting existing Standard Workflows to Express Workflows is often a good idea. However, some considerations should be made before doing this. The workflow must finish in less than 5 minutes and not use .WaitForTaskToken or .sync integration patterns. Express Workflows send logging history to CloudWatch Logs at an additional cost.

An additional consideration is idempotency, and exactly once versus at least once execution requirements. If a workload requires a guaranteed once execution model, then a Standard Workflow is preferred. Here, tasks and states are never run more than once unless you have specified retry behavior in Amazon States Language (ASL). This makes them suited to orchestrating non-idempotent actions, such as starting an Amazon EMR cluster or processing payments. Express Workflows use an at-least-once model, where there is a possibility that an execution might be run more than once. This makes them ideal for orchestrating idempotent actions. Idempotence refers to an operation that produces the same result (for a given input) irrespective of how many times it is applied.

To convert a Standard Workflow to an Express Workflow directly from within the Step Functions console:

  1. Go to the Step Functions workflow you want to convert, and choose Actions, Copy to new.

  2. Choose Design your workflow visually.
  3. Choose Express then choose Next.
  4. The next two steps allow you to make changes to your workflow design. Choose Next twice.
  5. Name the workflow, assign permissions, logging and tracing configurations, then choose Create state machine.

If converting a Standard Workflow defined in a templating language such as AWS CDK or AWS SAM, you must change both the Type value and the Resource name. The following example shows how to do this in AWS SAM:

StateMachinetoDDBStandard:
    Type: AWS::Serverless::StateMachine
    Properties:
      Type: STANDARD

Becomes:

StateMachinetoDDBExpress:
    Type: AWS::Serverless::StateMachine
    Properties:
      Type: EXPRESS

This does not overwrite the existing workflow, but creates a new workflow with a new name and type.

Better together

Some workloads may require a combination of both long-running and high-event-rate workflows. By using Step Functions workflows, you can build larger, more complex workflows out of smaller, simpler workflows.

For example, the initial step in the previous workflow may require a pause for human interaction that takes more than 5 minutes, followed by running a series of idempotent actions. These types of workloads can be ideal for using both Standard and Express workflow types together. This can be achieved by nesting a “child” Express Workflow within a “parent” Standard Workflow. The previous workflow example has been refactored as a parent-child nested workflow.

Deploy this nested workflow solution from the Serverless Workflows Collection.

Nesting workflows

Parent Standard Workflow

Child Express Workflow


Nested workflow metrics

This new blended workflow has a number of advantages. First the polling pattern is replaced by .WaitForTaskToken. This pauses the workflow until a response is received indicating success or failure. In this case, the response is sent by a Lambda function (not shown). This pause can last for up to 1 year, and the wait time is not billable.

This not only simplifies the workflow but also reduces the number of state transitions. Next, the idempotent steps are moved into an Express Workflow, this reduces the number of state transitions from the Standard Workflow, and benefits from the high throughput provided by Express Workflows. The child workflow is invoked by using the StartExecution StepFunctions API call from the parent workflow.

This new workflow combination runs 1,000 times, costing a total cost of 20 cents. There is no additional charge for starting a nested workflow: It is treated as another state transition. The nested workflow itself is billed the same way as all Step Functions workflows.

Here’s how the cost is calculated:

Parent Standard Workflow:

Total cost = (number of transitions per execution x number of executions) x $0.000025
Total cost =(8*1000) *0.000025 = $0.20

Child Express Workflow:

Total cost = (Execution cost + Duration cost) x No Requests
Duration cost = (Avg billed duration ms / 100) * price per 100ms
Execution cost = $0.000001 per request

Total cost = ($0.000001 + $0.0000013546) x 1000 = $0.0002
Duration cost = (1300 ms /100) * $ 0.0000001042 = $0.0000013546
Execution cost = $0.000001 per request

Total cost for nested workflow = (cost of Parent Standard Workflow) + (cost of Child Express Workflow)
Total cost for nested workflow = 0.20 cents  / 1000 executions.

Conclusion

This blog post explains the difference between Standard and Express Workflows. It describes the exactly once and at-least-one execution models and how this relates to idempotency. It compares the cost of running the same workload as an Express and Standard Workflow, showing how to migrate from one to the other and the considerations to make before doing so.

Finally, it explains how to combine workflow types to optimize for cost. Nesting state machines between types enables teams to work on individual workflows, turning them into modular reusable building blocks.

Visit the Serverless Workflows Collection to browse the many deployable workflows to help build your serverless applications.

Now Open–AWS Region in the United Arab Emirates (UAE)

Post Syndicated from Marcia Villalba original https://aws.amazon.com/blogs/aws/now-open-aws-region-in-the-united-arab-emirates-uae/

View of Abu Dhabi in the United Arab EmiratesThe AWS Region in the United Arab Emirates is now open. The official name is Middle East (UAE), and the API name is me-central-1. You can start using it today to deploy workloads and store your data in the United Arab Emirates. The AWS Middle East (UAE) Region is the second Region in the Middle East, joining the AWS Middle East (Bahrain) Region.

The Middle East (UAE) Region has three Availability Zones that you can use to reliably spread your applications across multiple data centers. Each Availability Zone is a fully isolated partition of AWS infrastructure that contains one or more data centers.

Availability Zones are in separate and distinct geographic locations with enough distance to reduce the risk of a single event affecting the availability of the Region but near enough for business continuity for applications that require rapid failover and synchronous replication. This gives you the ability to operate production applications that are more highly available, more fault-tolerant, and more scalable than would be possible from a single data center.

Instances and Services
Applications running in this three-AZ Region can use C5, C5d, C6g, M5, M5d, M6g, M6gd, R5, R5d, R6g, I3, I3en, T3, and T4g instances, and can use a long list of AWS services including: Amazon API Gateway, Amazon Aurora, AWS AppConfig, Amazon CloudWatch, Amazon CloudWatch Logs, Amazon DynamoDB, Amazon EC2 Auto Scaling, Amazon ElastiCache, Amazon Elastic Block Store (Amazon EBS), Elastic Load Balancing, Amazon Elastic Compute Cloud (Amazon EC2), Amazon Elastic Container Registry (Amazon ECR), Amazon Elastic Container Service (Amazon ECS), Amazon EMR, Amazon OpenSearch Service, Amazon EventBridge, Amazon Kinesis Data Streams, Amazon Redshift, Amazon Relational Database Service (Amazon RDS), Amazon Route 53, Amazon Simple Notification Service (Amazon SNS), Amazon Simple Queue Service (Amazon SQS), Amazon Simple Storage Service (Amazon S3), Amazon Simple Workflow Service (Amazon SWF), Amazon Virtual Private Cloud (Amazon VPC), AWS Application Auto Scaling, AWS Certificate Manager, AWS CloudFormation, AWS CloudTrail, AWS CodeDeploy, AWS Config, AWS Database Migration Service, AWS Direct Connect, AWS Identity and Access Management (IAM), AWS Key Management Service (AWS KMS), AWS Lambda, AWS Marketplace, AWS Health Dashboard, AWS Secrets Manager, AWS Step Functions, AWS Support API, AWS Systems Manager, AWS Trusted Advisor, VM Import/Export, AWS VPN, and AWS X-Ray.

AWS in the Middle East
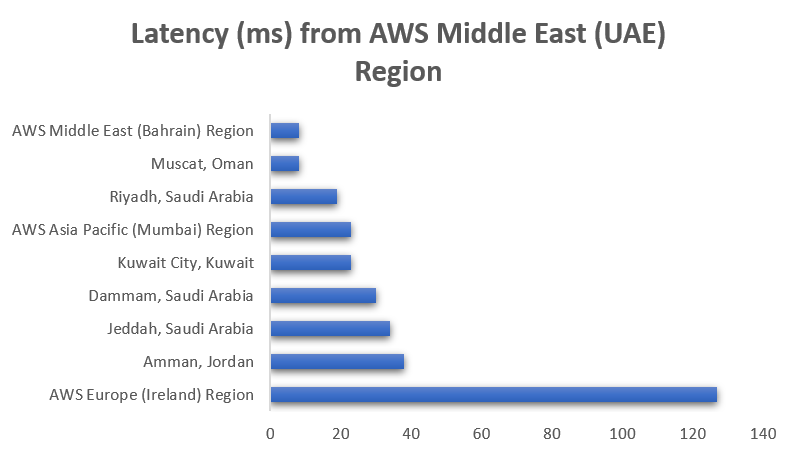
In addition to the two Regions—Bahrain and UAE—the Middle East has two AWS Direct Connect locations, allowing customers to establish private connectivity between AWS and their data centers and offices, as well as two Amazon CloudFront edge locations, one in Dubai and another in Fujairah. The UAE Region also offers low-latency connections to other AWS Regions in the area, as shown in the following chart:

Chart showing Latency (ms) from AWS Middle East UAE Region. To AWS Europe (Ireland) Region 127 ms. To Amman, Jordan 38 ms. To Jeddah, Saudi Arabia 34 ms. To Dammam, Saudi Arabia 30 ms. To Kuwait City, Kuwait 23 ms. To AWS Asia Pacific (Mumbai) Region 23 ms. To Riyadh, Saudi Arabia 19 ms. To Muscat, Oman 8 ms. To AWS Middle East (Bahrain) Region 8 ms.

Since 2017, AWS has established offices in Dubai and Bahrain along with a broad network of partners. We continue to build our teams in the Middle East by adding account managers, solutions architects, business developers, and professional services consultants to help customers of all sizes build or move their workloads to the cloud. Visit the Amazon career page to check out the roles we are hiring for.

In addition to Infrastructure, AWS continues to make investments in education initiatives, training, and start-up enablement to support UAE’s digital transformation and economic development plans.

  • AWS Activate – This global program provides start-ups with credits, training, and support so they can build their business on AWS.
  • AWS Training and Certification – This program helps developers build cloud skills using digital or classroom training and to validate those skills by earning an industry-recognized credential.
  • AWS Educate and AWS Academy – These programs provide higher education institutions, educators, and students with cloud computing courses and certifications.

AWS Customers in the Middle East
We have many amazing customers in the Middle East that are doing incredible things with AWS, for example:

The Ministry of Health and Prevention (MoHAP) implements the health care policy in the UAE. MoHAP is working with AWS to modernize their patient experience. With AWS, MoHAP can connect 100 percent of care providers—public and private—to further enhance their data strategy to support predictive and population health programs.

GEMS Education is one of the largest private K–12 operators in the world. Using AWS services like artificial intelligence and machine learning, GEMS developed an all-in-one integrated ED Tech platform called LearnOS. This platform supports teachers and creates personalized learning experiences. For example, with the use of Amazon Rekognition, they reduced 93 percent of the time spent in marking attendance. They also developed an automated quiz generation and assessment platform using Amazon EC2 and Amazon SageMaker. In addition, the algorithms can predict student year-end performance with up to 95 percent accuracy and recommend personalized reading materials.

YAP is a fast-growing regional financial super app that focuses on improving the digital banking experience. It functions as an independent app with no physical branches, making it the first of its kind in the UAE. AWS has helped fuel YAP’s growth and enabled them to scale to become a leading regional FinTech, giving them the elasticity to control costs as their user base has grown to over 130,000 users. With AWS, YAP can scale fast as they launch new markets, reducing the time to build and deploy complete infrastructure from months to weeks.

Available Now
The new Middle East (UAE) Region is ready to support your business. You can find a detailed list of the services available in this Region on the AWS Regional Service List.

With this launch, AWS now spans 87 Availability Zones within 27 geographic Regions around the world. We also have announced plans for 21 more Availability Zones and seven more AWS Regions in Australia, Canada, India, Israel, New Zealand, Spain, and Switzerland.

For more information on our global infrastructure, upcoming Regions, and the custom hardware we use, visit the Global Infrastructure page.

— Marcia

AWS achieves FedRAMP P-ATO for 20 services in the AWS US East/West Regions and AWS GovCloud (US) Regions

Post Syndicated from Steve Earley original https://aws.amazon.com/blogs/security/aws-achieves-fedramp-p-ato-for-20-services-in-the-aws-us-east-west-regions-and-aws-govcloud-us-regions/

Amazon Web Services (AWS) is pleased to announce that 20 additional AWS services have achieved Provisional Authority to Operate (P-ATO) from the Federal Risk and Authorization Management Program (FedRAMP) Joint Authorization Board (JAB). The following are the 20 AWS services with FedRAMP authorization for the U.S. federal government and organizations with regulated workloads:

  • AWS App Mesh provides application-level networking to help your services communicate with each other across multiple types of compute infrastructure.
  • AWS Audit Manager helps you to continuously audit your AWS usage to simplify how risk and compliance are assessed with regulations and industry standards.
  • AWS Chatbot is an interactive agent that helps you monitor, operate, and troubleshoot AWS workloads in your chat channels.
  • Amazon Chime SDK is a collection of client software development kits that use resources in your AWS account to add collaborative audio calling, video calling, and screen share features to your web or mobile applications.
  • AWS Cloud9 is a cloud-based integrated development environment (IDE) that helps you write, run, and debug your code with just a browser.
  • Amazon Detective helps you analyze, investigate, and quickly identify the root cause of potential security issues or suspicious activities.
  • EC2 Image Builder simplifies the building, testing, and deployment of virtual machine and container images for use on AWS or on-premises.
  • Amazon FinSpace is a data management and analytics service that is purpose built for the financial services industry (FSI).
  • AWS Firewall Manager is a security management service that allows you to centrally configure and manage firewall rules across your accounts and applications in AWS Organizations.
  • Amazon Forecast is a fully managed service that uses machine learning to deliver highly accurate forecasts.
  • Amazon Keyspaces (for Apache Cassandra) is a scalable, highly available, and managed Apache Cassandra–compatible database service.
  • Amazon Kinesis Data Analytics is a fully managed service that you can use to process and analyze streaming data using Java, SQL, or Scala.
  • Amazon Lex is an AWS service for building conversational interfaces into applications using voice and text.
  • Amazon Managed Streaming for Apache Kafka (Amazon MSK) is an AWS streaming data service that manages Apache Kafka infrastructure and operations.
  • Amazon MQ is a managed message broker service for Apache ActiveMQ and RabbitMQ to help you set up and operate message brokers on AWS.
  • Amazon Neptune is a fast, reliable, fully managed graph database service that helps you build and run applications that work with highly connected datasets.
  • AWS Network Firewall is a managed service that helps you to deploy essential network protections for your Amazon Virtual Private Cloud (Amazon VPC).
  • Amazon Quantum Ledger Database (Amazon QLDB) is a purpose-built ledger database that provides a complete and cryptographically verifiable history of changes made to your application data.
  • AWS Resource Access Manager (AWS RAM) is designed to help you securely share resources across AWS accounts, within your organization or organizational units (OUs) in AWS Organizations, and with AWS Identity and Access Management (IAM) roles and users for supported resource types.
  • Amazon Timestream is a fast, scalable, and serverless time series database service for AWS IoT Core and operational applications that can help you to store and analyze trillions of events per day up to 1,000 times faster and at as little as 1/10th the cost of relational databases.

These 20 services are now listed on the FedRAMP Marketplace and the AWS Services in Scope by Compliance Program page.

Service authorizations by AWS Region

The following table shows our most recent FedRAMP service authorizations by Region and authorization level:

Service FedRAMP Moderate in the AWS US East/West Region FedRAMP High in the AWS GovCloud (US) Region
AWS App Mesh ✓  
AWS Audit Manager ✓  
AWS Chatbot ✓  
Amazon Chime SDK   ✓
AWS Cloud9 ✓  
Amazon Detective   ✓
EC2 Image Builder ✓ ✓
Amazon FinSpace ✓  
AWS Firewall Manager ✓ ✓
Amazon Forecast ✓  
Amazon Keyspaces (for Apache Cassandra)   ✓
Amazon Kinesis Data Analytics ✓ ✓
Amazon Lex   ✓
Amazon Managed Streaming for Apache Kafka (Amazon MSK) ✓ ✓
Amazon MQ   ✓
Amazon Neptune ✓ ✓
AWS Network Firewall ✓ ✓
Amazon Quantum Ledger Database (Amazon QLDB) ✓  
AWS Resource Access Manager (AWS RAM) ✓ ✓
Amazon Timestream ✓  

AWS is continually expanding the scope of our compliance programs to help customers use authorized services for sensitive and regulated workloads. AWS now offers 123 AWS services authorized in the AWS US East/West Regions under FedRAMP Moderate Authorization, and 105 services authorized in the AWS GovCloud (US) Regions under FedRAMP High Authorization.

To learn what other public sector customers are doing on AWS, see our Government, Education, and Nonprofits Case Studies and Customer Success Stories. Stay tuned for future updates on our Services in Scope by Compliance Program page. Let us know how this post will help your mission by reaching out to your AWS Account Team. Lastly, if you have feedback about this blog post, let us know in the Comments section.

 
If you have feedback about this post, submit comments in the Comments section below. If you have questions about this post, contact AWS Support.

Want more AWS Security news? Follow us on Twitter.

Steve Earley

Steve Earley

Steve leads the Government Audits Team and the commercial Customer Audit Program for AWS. For over 20 years, he has led security organizations and assessed control environments in both public and private sectors as a security executive with multiple organizations. At AWS, he provides direction for AWS services and features seeking adherence to federal compliance requirements while championing for customer-centric innovation.

Whitney Peters

Whitney Peters

Whitney is a part of the U.S. Government Audits Team for AWS. For the past six years, she has guided services internally and externally through various federal compliance frameworks to achieve their Authority to Operate (ATO).

James Mueller

James Mueller

James is a Security Assurance Manager for AWS. For over 20 years, he has served customers in the private, public, and non-profit sectors delivering innovative information technology solutions. He currently leads security compliance efforts to drive adoption of AWS services.

Фоторепортаж на Биволъ Блокадата на Министерския съвет заради преговорите с Газпром

Post Syndicated from Николай Марченко original https://bivol.bg/%D0%B1%D0%BB%D0%BE%D0%BA%D0%B0%D0%B4%D0%B0%D1%82%D0%B0-%D0%BD%D0%B0-%D0%BC%D0%B8%D0%BD%D0%B8%D1%81%D1%82%D0%B5%D1%80%D1%81%D0%BA%D0%B8%D1%8F-%D1%81%D1%8A%D0%B2%D0%B5%D1%82-%D0%B7%D0%B0%D1%80%D0%B0.html

четвъртък 1 септември 2022


Както и бе обявено предварително, гражданското движение „България Обединена с Една Цел“ (ГД „БОЕЦ“) организира тотална блокада на Министерския съвет (МС) заради плановете на служебния кабинет да възобнови преговорите с…

How to subscribe to the new Security Hub Announcements topic for Amazon SNS

Post Syndicated from Mike Saintcross original https://aws.amazon.com/blogs/security/how-to-subscribe-to-the-new-security-hub-announcements-topic-for-amazon-sns/

With AWS Security Hub you are able to manage your security posture in AWS, perform security best practice checks, aggregate alerts, and automate remediation. Now you are able to use Amazon Simple Notification Service (Amazon SNS) to subscribe to the new Security Hub Announcements topic to receive updates about new Security Hub services and features, newly supported standards and controls, and other Security Hub changes.

Introducing the Security Hub Announcements topic

Amazon SNS follows the publish/subscribe (pub/sub) messaging model, in which notifications are delivered to you by using a push mechanism that eliminates the need for you to periodically check or poll for new information and updates. You can now use this push mechanism to receive notifications about Security Hub by subscribing to the dedicated Security Hub Announcements topic.

The Security Hub Announcements topic publishes the following types of notifications:

  • General notifications
  • Upcoming standards and controls
  • New AWS Regions supported
  • New standards and controls
  • Updated standards and controls
  • Retired standards and controls
  • Updates to the AWS Security Finding Format (ASFF)
  • New integrations
  • New features
  • Changes to existing features

How to use the Security Hub Announcements topic

You can subscribe to the SNS topic for Security Hub Announcements to receive notification messages about newly released finding types, updates to the existing finding types, and other functionality changes. By subscribing to the SNS topic, you will receive Security Hub Announcements messages as soon as they are published. The notifications are available in all protocols that Amazon SNS supports, such as email and SMS. For more information about supported protocols in Amazon SNS, see Subscribing to an Amazon SNS topic.

The Security Hub Announcements topic is available in all AWS Regions in the aws and aws-cn partitions, but is not yet available in the AWS GovCloud (US) Regions (the aws-us-gov partition). Later in this post, we’ll show you how to subscribe to the Security Hub Announcements topic in a specific AWS Region by using the topic Amazon Resource Name (ARN) for that Region. The SNS topic messages are the same across Regions in a partition, so you can choose to subscribe to only one Region in a partition to avoid receiving duplicate information.

However, if you want to invoke an AWS Lambda function in reaction to a Security Hub Announcements message, you must subscribe to the topic ARN that is in the same Region as the Lambda function. The Lambda function can receive the SNS topic message payload as an input parameter and manipulate the information in the message, publish the message to other SNS topics, or send the message to other AWS services. For more information, see Subscribing a function to a topic in the Amazon SNS Developer Guide.

The same is true if you want to subscribe an Amazon Simple Queue Service (Amazon SQS) queue to the Security Hub Announcements topic, you must use a topic ARN that is in the same Region as the SQS queue. The SQS queue can be used to persist announcement SNS topic messages in the queue for other applications to process at a later time. For more information, see Subscribing an Amazon SQS queue to an Amazon SNS topic in the Amazon SQS Developer Guide.

IAM permissions

Your user account must have sns::subscribe AWS Identity and Access Management (IAM) permissions to subscribe to an SNS topic. For more information on IAM permissions for Amazon SNS, see Using identity-based policies with Amazon SNS.

Subscribe to the Security Hub Announcements topic

The following is the list of Security Hub Announcements topic ARNs for each currently supported Region. The examples in this post use the US West (Oregon) Region (us-west-2), but you can update the procedures with one of the following ARNs to use a different supported Region.

Security Hub Announcements topic ARNs by Region

arn:aws:sns:us-east-1:088139225913:SecurityHubAnnouncements
arn:aws:sns:us-east-2:291342846459:SecurityHubAnnouncements
arn:aws:sns:us-west-1:137690824926:SecurityHubAnnouncements
arn:aws:sns:us-west-2:393883065485:SecurityHubAnnouncements
arn:aws:sns:eu-central-1:871975303681:SecurityHubAnnouncements
arn:aws:sns:eu-north-1:191971010772:SecurityHubAnnouncements
arn:aws:sns:eu-south-1:151363035580:SecurityHubAnnouncements
arn:aws:sns:eu-west-1:705756202095:SecurityHubAnnouncements
arn:aws:sns:eu-west-2:883600840440:SecurityHubAnnouncements
arn:aws:sns:eu-west-3:313420042571:SecurityHubAnnouncements
arn:aws:sns:ca-central-1:137749997395:SecurityHubAnnouncements
arn:aws:sns:sa-east-1:359811883282:SecurityHubAnnouncements
arn:aws:sns:me-south-1:585146626860:SecurityHubAnnouncements
arn:aws:sns:af-south-1:463142546776:SecurityHubAnnouncements
arn:aws:sns:ap-northeast-1:592469075483:SecurityHubAnnouncements
arn:aws:sns:ap-northeast-2:374299265323:SecurityHubAnnouncements
arn:aws:sns:ap-northeast-3:633550238216:SecurityHubAnnouncements
arn:aws:sns:ap-southeast-1:512267288502:SecurityHubAnnouncements
arn:aws:sns:ap-southeast-2:475730049140:SecurityHubAnnouncements
arn:aws:sns:ap-southeast-3:627843640627:SecurityHubAnnouncements
arn:aws:sns:ap-east-1:464812404305:SecurityHubAnnouncements
arn:aws:sns:ap-south-1:707356269775:SecurityHubAnnouncements
arn:aws-cn:sns:cn-north-1:672341567257:SecurityHubAnnouncements
arn:aws-cn:sns:cn-northwest-1:672534482217:SecurityHubAnnouncements

The two procedures that follow show you how to subscribe an email address to the Security Hub Announcements topic by using the AWS Management Console and the AWS CLI.

To subscribe an email address to the Security Hub Announcements topic (console)

  1. Sign in to the Amazon SNS console.
  2. In the Region list, choose the same Region as the topic ARN to which you want to subscribe. This example uses the us-west-2 Region.
  3. In the left navigation pane, choose Subscriptions, then choose Create subscription.
  4. In the Create subscription dialog box, do the following:
    • For Topic ARN, paste the following topic ARN for the us-west-2 Region, or use one of the ARNs listed above for a different supported Region:

      arn:aws:sns:us-west-2:393883065485:SecurityHubAnnouncements

    • For Protocol, choose Email.
    • For Endpoint, enter an email address that you can use to receive the notification.
  5. Choose Create subscription.
  6. In your email application, open the message from AWS Notifications and open the link to confirm your subscription. Your web browser displays a confirmation response from Amazon SNS, similar to that shown in Figure 1.

    Figure 1: SNS notification subscription confirmation

    Figure 1: SNS notification subscription confirmation

The following steps show you how to subscribe an email address to the Security Hub Announcements topic by using the AWS Command Line Interface (AWS CLI).

To subscribe an email address to the Security Hub Announcements topic (AWS CLI)

  1. Run the following command in the AWS CLI, replacing <[email protected]> with your email address, and optionally replacing the ARN and reference to us-west-2 if you want to use a different Region:
    aws sns --region us-west-2 subscribe --topic-arn arn:aws:sns:us-west-2:393883065485:SecurityHubAnnouncements --protocol email --notification-endpoint <[email protected]>
  2. In your email application, open the message from AWS Notifications and open the link to confirm your subscription.
  3. Your web browser displays a confirmation response from Amazon SNS, similar to that shown in Figure 1.

Example subscription responses

The following sections contain examples of a message announcing new standard controls supported by Security Hub in email and sqs protocol types.

Example message from an email subscription (protocol type: email)

{"AnnouncementType":"NEW_STANDARDS_CONTROLS", “Title”:”[New Controls] 36 new Security Hub controls added to the AWS Foundational Security Best Practices standard”, "Description":"We have added 36 new controls to the AWS Foundational Security Best Practices standard. These include controls for Amazon Auto Scaling (AutoScaling.3, AutoScaling.4, AutoScaling.6), AWS CloudFormation (CloudFormation.1), Amazon CloudFront (CloudFront.10), Amazon Elastic Compute Cloud (Amazon EC2) (EC2.23, EC2.24, EC2.27), Amazon Elastic Container Registry (Amazon ECR) (ECR.1, ECR.2), Amazon Elastic Container Service (Amazon ECS) (ECS.3, ECS.4, ECS.5, ECS.8, ECS.10, ECS.12), Amazon Elastic File System (Amazon EFS) (EFS.3, EFS.4), Amazon Elastic Kubernetes Service (Amazon EKS) (EKS.2), Elastic Load Balancing (ELB.12, ELB.13, ELB.14), Amazon Kinesis (Kinesis.1), AWS Network Firewall (NetworkFirewall.3, NetworkFirewall.4, NetworkFirewall.5), Amazon OpenSearch Service (Opensearch.7), Amazon Redshift (Redshift.9), Amazon Simple Storage Service (Amazon S3) (S3.13), Amazon Simple Notification Service (SNS.2), AWF WAF (WAF.2, WAF.3, WAF.4, WAF.6, WAF.7, WAF.8). If you enabled the AWS Foundational Security Best Practices standard in an account and configured Security Hub to automatically enable new controls, these controls are enabled by default. Availability of controls can vary by Region."}

Example message from an SQS queue subscription (protocol type: sqs)

The following message shows the additional metadata included with an SQS subscription to the Security Hub Announcements topic. For more information about the metadata included in an SNS topic message delivered to an SQS queue, see Fanout to Amazon SQS Queues.

{
  "Type" : "Notification",
  "MessageId" : "c9c03e46-69df-5c3c-84e9-6520708ac394",
  "TopicArn" : "arn:aws:sns:us-west-2:393883065485:SecurityHubAnnouncements",
  "Message" : "{\"AnnouncementType\":\"NEW_STANDARDS_CONTROLS\",\"Title\":\"[New Controls] 36 new Security Hub controls added to the AWS Foundational Security Best Practices standard\",\"Description\":\"We have added 36 new controls to the AWS Foundational Security Best Practices standard. These include controls for Amazon Auto Scaling (AutoScaling.3, AutoScaling.4, AutoScaling.6), AWS CloudFormation (CloudFormation.1), Amazon CloudFront (CloudFront.10), Amazon Elastic Compute Cloud (Amazon EC2) (EC2.23, EC2.24, EC2.27), Amazon Elastic Container Registry (Amazon ECR) (ECR.1, ECR.2), Amazon Elastic Container Service (Amazon ECS) (ECS.3, ECS.4, ECS.5, ECS.8, ECS.10, ECS.12), Amazon Elastic File System (Amazon EFS) (EFS.3, EFS.4), Amazon Elastic Kubernetes Service (Amazon EKS) (EKS.2), Elastic Load Balancing (ELB.12, ELB.13, ELB.14), Amazon Kinesis (Kinesis.1), AWS Network Firewall (NetworkFirewall.3, NetworkFirewall.4, NetworkFirewall.5), Amazon OpenSearch Service (Opensearch.7), Amazon Redshift (Redshift.9), Amazon Simple Storage Service (Amazon S3) (S3.13), Amazon Simple Notification Service (SNS.2), AWF WAF (WAF.2, WAF.3, WAF.4, WAF.6, WAF.7, WAF.8). If you enabled the AWS Foundational Security Best Practices standard in an account and configured Security Hub to automatically enable new controls, these controls are enabled by default. Availability of controls can vary by Region. \"}",
  "Timestamp" : "2022-08-04T18:59:33.319Z",
  "SignatureVersion" : "1",
  "Signature" : "GdKokPEUexpKZn5da5u/p5eZF1cE3JUyL0uPVKmPnDzd3orkk5jJ211VsOflUFi6V9lSXF/V6RBpQN/9f3+JBFBprng7BRQwT9I4jSa1xOn1L3xKXEVGvWI6nl1oDqBl21Pj3owV+NZ+Exd2W0dpgg8B1LG4bYq5T73MjHjWGtelcBa15TpIz/+rynqanXCKCvc/50V/XZLjA5M7gU6Dzs9CULIjkdEpCsw5FvSxbtkEd6Ktx4LH7Zq6FlPKNli3EaEHRKh9uYPo6sR/yvF4RWg3E9O4dVsK7A8uTdR+pwVCU1M601KMRxO1OWF8VIdvyPINJND8Nu/70GRA2L+MRA==",
  "SigningCertURL" : "https://sns.us-west-2.amazonaws.com/SimpleNotificationService-56e67fcb41f6fec09b0196692625d385.pem",
  "UnsubscribeURL" : "https://sns.us-west-2.amazonaws.com/?Action=Unsubscribe&SubscriptionArn=arn:aws:sns:us-west-2:393883065485:SecurityHubAnnouncements:1eb29a83-8726-4366-891c-293ad5e35a53"
}

Note: You need to set up the SQS access policy in order for SNS to push message to the SNS queue. For more information, see Basic examples of Amazon SQS policies.

Available now

The SNS topic for Security Hub Announcements is available today in the Regions described in this post. Subscribe now to stay informed of Security Hub updates. With Amazon SNS, there is no minimum fee, and you pay only for what you use. For more information, see the Amazon SNS pricing page.

If you have feedback about this post, submit comments in the Comments section below. If you have questions about this post, contact AWS Support. You can also start a new thread on AWS Security Hub re:Post to get answers from the community.

Want more AWS Security news? Follow us on Twitter.

Mike Saintcross

Mike Saintcross

Mike Saintcross is a Security Consultant at AWS helping enterprise customers achieve their cloud security goals in an ever-changing threat landscape. His background is in Security Engineering with a focus on deep packet inspection, incident response, security orchestration, and automation.

Neha Joshi

Neha Joshi

Neha Joshi is a Senior Solutions Architect at AWS. She loves to brainstorm and develop solutions to help customers be successful on AWS. Outside of work, she enjoys hiking and audio books.

AWS Week in Review – August 29, 2022

Post Syndicated from Antje Barth original https://aws.amazon.com/blogs/aws/aws-week-in-review-august-29-2022/

I’ve just returned from data and machine learning (ML) conferences in Los Angeles and San Francisco, California. It’s been great to chat with customers and developers about the latest technology trends and use cases. This past week has also been packed with launches at AWS.

Last Week’s Launches
Here are some launches that got my attention during the previous week:

Amazon QuickSight announces fine-grained visual embedding. You can now embed individual visuals from QuickSight dashboards in applications and portals to provide key insights to users where they’re needed most. Check out Donnie’s blog post to learn more, and tune into this week’s The Official AWS Podcast episode.

Sample Web App with a Visual

Sample Web App with a Visual

Amazon SageMaker Automatic Model Tuning is now available in the Europe (Milan), Africa (Cape Town), Asia Pacific (Osaka), and Asia Pacific (Jakarta) Regions. In addition, SageMaker Automatic Model Tuning now reuses SageMaker Training instances to reduce start-up overheads by 20x. In scenarios where you have a large number of hyperparameter evaluations, the reuse of training instances can cumulatively save 2 hours for every 50 sequential evaluations.

Amazon RDS now supports setting up connectivity between your RDS database and EC2 compute instance in one click. Amazon RDS automatically sets up your VPC and related network settings during database creation to enable a secure connection between the EC2 instance and the RDS database.

In addition, Amazon RDS for Oracle now supports managed Oracle Data Guard Switchover and Automated Backups for replicas. With the Oracle Data Guard Switchover feature, you can reverse the roles between the primary database and one of its standby databases (replicas) with no data loss and a brief outage. You can also now create Automated Backups and manual DB snapshots of an RDS for Oracle replica, which reduces the time spent taking backups following a role transition.

Amazon Forecast now supports what-if analyses. Amazon Forecast is a fully managed service that uses ML algorithms to deliver highly accurate time series forecasts.  You can now use what-if analyses to quantify the potential impact of business scenarios on your demand forecasts.

AWS Asia Pacific (Jakarta) Region now supports additional AWS services and EC2 instance types – Amazon SageMaker, AWS Application Migration Service, AWS Glue, Red Hat OpenShift Service on AWS (ROSA), and Amazon EC2 X2idn and X2iedn instances are now available in the Asia Pacific (Jakarta) Region.

For a full list of AWS announcements, be sure to keep an eye on the What’s New at AWS page.

Other AWS News
Here are some additional news, blog posts, and fun code competitions you may find interesting:

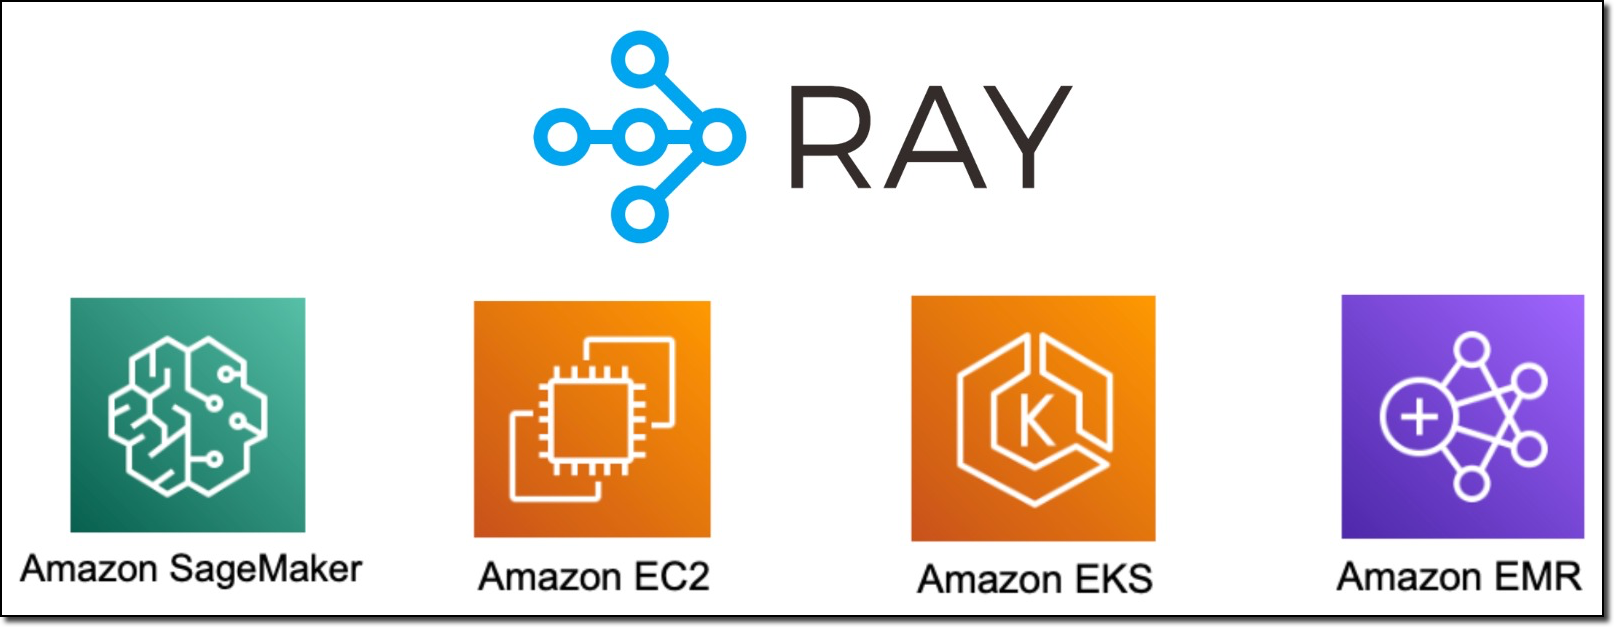
Scaling AI and Machine Learning Workloads with Ray on AWS – This past week, I attended Ray Summit in San Francisco, California, and had great conversations with the community. Check out this blog post to learn more about AWS contributions to the scalability and operational efficiency of Ray on AWS.

Ray on AWS

New AWS Heroes – It’s great to see both new and familiar faces joining the AWS Heroes program, a worldwide initiative that acknowledges individuals who have truly gone above and beyond to share knowledge in technical communities. Get to know them in the blog post!

DFL Bundesliga Data Shootout – DFL Deutsche Fußball Liga launched a code competition, powered by AWS: the Bundesliga Data Shootout. The task: Develop a computer vision model to classify events on the pitch. Join the competition as an individual or in a team and win prizes.

Become an AWS GameDay World Champion – AWS GameDay is an interactive, team-based learning experience designed to put your AWS skills to the test by solving real-world problems in a gamified, risk-free environment. Developers of all skill levels can get in on the action, to compete for worldwide glory, as well as a chance to claim the top prize: an all-expenses-paid trip to AWS re:Invent Las Vegas 2022!

Learn more about the AWS Impact Accelerator for Black Founders from one of the inaugural members of the program in this blog post. The AWS Impact Accelerator is a series of programs designed to help high-potential, pre-seed start-ups led by underrepresented founders succeed.

Upcoming AWS Events
Check your calendars and sign up for these AWS events:

AWS SummitAWS Global Summits – AWS Global Summits are free events that bring the cloud computing community together to connect, collaborate, and learn about AWS.

Registration is open for the following in-person AWS Summits that might be close to you in August and September: Canberra (August 31), Ottawa (September 8), New Delhi (September 9), and Mexico City (September 21–22), Bogotá (October 4), and Singapore (October 6).

AWS Community DayAWS Community Days – AWS Community Day events are community-led conferences that deliver a peer-to-peer learning experience, providing developers with a venue for them to acquire AWS knowledge in their preferred way: from one another.

In September, the AWS community will host events in the Bay Area, California (September 9) and in Arlington, Virginia (September 30). In October, you can join Community Days in Amersfoort, Netherlands (October 3), in Warsaw, Poland (October 14), and in Dresden, Germany (October 19).

That’s all for this week. Check back next Monday for another Week in Review! And maybe I’ll see you at the AWS Community Day here in the Bay Area!

– Antje

This post is part of our Week in Review series. Check back each week for a quick roundup of interesting news and announcements from AWS!

AWS announces migration plans for NIST 800-53 Revision 5

Post Syndicated from James Mueller original https://aws.amazon.com/blogs/security/aws-announces-migration-plans-for-nist-800-53-revision-5/

Amazon Web Services (AWS) is excited to begin migration plans for National Institute of Standards and Technology (NIST) 800-53 Revision 5.

The NIST 800-53 framework is a regulatory standard that defines the minimum baseline of security controls for U.S. federal information systems. In 2020, NIST released Revision 5 of the framework to improve security standards for industry partners and government agencies. The set of NIST 800-53 controls provides a foundation for additional laws and regulations within the U.S. government.

The Federal Information Security Modernization Act (FISMA) of 2014 is a law that requires federal agencies and contractors to meet information security standards. The Federal Risk and Authorization Management Program (FedRAMP) is a federal government program that provides a standardized approach to security assessment, authorization, and continuous monitoring of cloud services. Both FISMA and FedRAMP rely on the NIST 800-53 framework.

NIST 800-53 Revision 5

AWS meets the NIST 800-53 Revision 4 regulatory standards mandated by government authorities. NIST added numerous security enhancements, such as privacy and supply chain management, to Revision 5 to keep abreast of emerging threats to federal information systems.

In preparation for federal regulators to accept NIST 800-53 Revision 5 as the new requirement standard, AWS has begun efforts to adapt to the new security controls, processes, and procedures. AWS security compliance teams have analyzed the new requirements and launched a project to implement the updates. Although AWS is not required to migrate to the new Revision 5 standard until NIST announces the official regulatory compliance deadline, we are already taking steps to meet the deadline.

To learn more about AWS compliance programs, see the AWS Compliance Programs page.

 
If you have feedback about this post, submit comments in the Comments section below. If you have questions about this post, contact AWS Support.

Want more AWS Security news? Follow us on Twitter.

James Mueller

James Mueller

James is a Security Assurance Manager for AWS. For over 20 years, he has served customers in the private, public, and non-profit sectors delivering innovative information technology solutions. He currently leads security compliance efforts to drive adoption of AWS services.

Convert Oracle XML BLOB data to JSON using Amazon EMR and load to Amazon Redshift

Post Syndicated from Abhilash Nagilla original https://aws.amazon.com/blogs/big-data/convert-oracle-xml-blob-data-to-json-using-amazon-emr-and-load-to-amazon-redshift/

In legacy relational database management systems, data is stored in several complex data types, such XML, JSON, BLOB, or CLOB. This data might contain valuable information that is often difficult to transform into insights, so you might be looking for ways to load and use this data in a modern cloud data warehouse such as Amazon Redshift. One such example is migrating data from a legacy Oracle database with XML BLOB fields to Amazon Redshift, by performing preprocessing and conversion of XML to JSON using Amazon EMR. In this post, we describe a solution architecture for this use case, and show you how to implement the code to handle the XML conversion.

Solution overview

The first step in any data migration project is to capture and ingest the data from the source database. For this task, we use AWS Database Migration Service (AWS DMS), a service that helps you migrate databases to AWS quickly and securely. In this example, we use AWS DMS to extract data from an Oracle database with XML BLOB fields and stage the same data in Amazon Simple Storage Service (Amazon S3) in Apache Parquet format. Amazon S3 is an object storage service offering industry-leading scalability, data availability, security, and performance, and is the storage of choice for setting up data lakes on AWS.

After the data is ingested into an S3 staging bucket, we used Amazon EMR to run a Spark job to perform the conversion of XML fields to JSON fields, and the results are loaded in a curated S3 bucket. Amazon EMR runtime for Apache Spark can be over three times faster than clusters without EMR runtime, and has 100% API compatibility with standard Apache Spark. This improved performance means your workloads run faster and it saves you compute costs, without making any changes to your application.

Finally, transformed and curated data is loaded into Amazon Redshift tables using the COPY command. The Amazon Redshift table structure should match the number of columns and the column data types in the source file. Because we stored the data as a Parquet file, we specify the SERIALIZETOJSON option in the COPY command. This allows us to load complex types, such as structure and array, in a column defined as SUPER data type in the table.

The following architecture diagram shows the end-to-end workflow.

In detail, AWS DMS migrates data from the source database tables into Amazon S3, in Parquet format. Apache Spark on Amazon EMR reads the raw data, transforms the XML data type into JSON, and saves the data to the curated S3 bucket. In our code, we used an open-source library, called spark-xml, to parse and query the XML data.

In the rest of this post, we assume that the AWS DMS tasks have already run and created the source Parquet files in the S3 staging bucket. If you want to set up AWS DMS to read from an Oracle database with LOB fields, refer to Effectively migrating LOB data to Amazon S3 from Amazon RDS for Oracle with AWS DMS or watch the video Migrate Oracle to S3 Data lake via AWS DMS.

Prerequisites

If you want to follow along with the examples in this post using your AWS account, we provide an AWS CloudFormation template you can launch by choosing Launch Stack:

BDB-2063-launch-cloudformation-stack

Provide a stack name and leave the default settings for everything else. Wait for the stack to display Create Complete (this should only take a few minutes) before moving on to the other sections.

The template creates the following resources:

  • A virtual private cloud (VPC) with two private subnets that have routes to an Amazon S3 VPC endpoint
  • The S3 bucket {stackname}-s3bucket-{xxx}, which contains the following folders:
    • libs – Contains the JAR file to add to the notebook
    • notebooks – Contains the notebook to interactively test the code
    • data – Contains the sample data
  • An Amazon Redshift cluster, in one of the two private subnets, with a database named rs_xml_db and a schema named rs_xml
  • A secret (rs_xml_db) in AWS Secrets Manager
  • An EMR cluster

The CloudFormation template shared in this post is purely for demonstration purposes only. Please conduct your own security review and incorporate best practices prior to any production deployment using artifacts from the post.

Finally, some basic knowledge of Python and Spark DataFrames can help you review the transformation code, but isn’t mandatory to complete the example.

Understanding the sample data

In this post, we use college students’ course and subjects sample data that we created. In the source system, data consists of flat structure fields, like course_id and course_name, and an XML field that includes all the course material and subjects involved in the respective course. The following screenshot is an example of the source data, which is staged in an S3 bucket as a prerequisite step.

We can observe that the column study_material_info is an XML type field and contains nested XML tags in it. Let’s see how to convert this nested XML field to JSON in the subsequent steps.

Run a Spark job in Amazon EMR to transform the XML fields in the raw data to JSON

In this step, we use an Amazon EMR notebook, which is a managed environment to create and open Jupyter Notebook and JupyterLab interfaces. It enables you to interactively analyze and visualize data, collaborate with peers, and build applications using Apache Spark on EMR clusters. To open the notebook, follow these steps:

  1. On the Amazon S3 console, navigate to the bucket you created as a prerequisite step.
  2. Download the file in the notebooks folder.
  3. On the Amazon EMR console, choose Notebooks in the navigation pane.
  4. Choose Create notebook.
  5. For Notebook name, enter a name.
  6. For Cluster, select Choose an existing cluster.
  7. Select the cluster you created as a prerequisite.
  8. For Security Groups, choose BDB1909-EMR-LIVY-SG and BDB1909-EMR-Notebook-SG
  9. For AWS Service Role, choose the role bdb1909-emrNotebookRole-{xxx}.
  10. For Notebook location, specify the S3 path in the notebooks folder (s3://{stackname}-s3bucket-xxx}/notebooks/).
  11. Choose Create notebook.
  12. When the notebook is created, choose Open in JupyterLab.
  13. Upload the file you downloaded earlier.
  14. Open the new notebook.

    The notebook should look as shown in the following screenshot, and it contains a script written in Scala.
  15. Run the first two cells to configure Apache Spark with the open-source spark-xml library and import the needed modules.The spark-xml package allows reading XML files in local or distributed file systems as Spark DataFrames. Although primarily used to convert (portions of) large XML documents into a DataFrame, spark-xml can also parse XML in a string-valued column in an existing DataFrame with the from_xml function, in order to add it as a new column with parsed results as a struct.
  16. To do so, in the third cell, we load the data from the Parquet file generated by AWS DMS into a DataFrame, then we extract the attribute that contains the XML code (STUDY_MATERIAL_INFO) and map it to a string variable name payloadSchema.
  17. We can now use the payloadSchema in the from_xml function to convert the field STUDY_MATERIAL_INFO into a struct data type and added it as a column named course_material in a new DataFrame parsed.
  18. Finally, we can drop the original field and write the parsed DataFrame to our curated zone in Amazon S3.

Due to the structure differences between DataFrame and XML, there are some conversion rules from XML data to DataFrame and from DataFrame to XML data. More details and documentation are available XML Data Source for Apache Spark.

When we convert from XML to DataFrame, attributes are converted as fields with the heading prefix attributePrefix (underscore (_) is the default). For example, see the following code:

  <book category="undergraduate">
    <title lang="en">Introduction to Biology</title>
    <author>Demo Author 1</author>
    <year>2005</year>
    <price>30.00</price>
  </book>

It produces the following schema:

root
 |-- category: string (nullable = true)
 |-- title: struct (nullable = true)
 |    |-- _VALUE: string (nullable = true)
 |    |-- _lang: string (nullable = true)
 |-- author: string (nullable = true)
 |-- year: string (nullable = true)
 |-- price: string (nullable = true)

Next, we have a value in an element that has no child elements but attributes. The value is put in a separate field, valueTag. See the following code:

<title lang="en">Introduction to Biology</title>

It produces the following schema, and the tag lang is converted into the _lang field inside the DataFrame:

|-- title: struct (nullable = true)
 |    |-- _VALUE: string (nullable = true)
 |    |-- _lang: string (nullable = true)

Copy curated data into Amazon Redshift and query tables seamlessly

Because our semi-structured nested dataset is already written in the S3 bucket as Apache Parquet formatted files, we can use the COPY command with the SERIALIZETOJSON option to ingest data into Amazon Redshift. The Amazon Redshift table structure should match the metadata of the Parquet files. Amazon Redshift can replace any Parquet columns, including structure and array types, with SUPER data columns.

The following code demonstrates CREATE TABLE example to create a staging table.

create table rs_xml_db.public.stg_edw_course_catalog 
(
course_id bigint,
course_name character varying(5000),
course_material super
);

The following code uses the COPY example to load from Parquet format:

COPY rs_xml_db.public.stg_edw_course_catalog FROM 's3://<<your Amazon S3 Bucket for curated data>>/data/target/<<your output parquet file>>' 
IAM_ROLE '<<your IAM role>>' 
FORMAT PARQUET SERIALIZETOJSON; 

By using semistructured data support in Amazon Redshift, you can ingest and store semistructured data in your Amazon Redshift data warehouses. With the SUPER data type and PartiQL language, Amazon Redshift expands the data warehouse capability to integrate with both SQL and NoSQL data sources. The SUPER data type only supports up to 1 MB of data for an individual SUPER field or object. Note, the JSON object may be stored in a SUPER data type, but reading this data using JSON functions currently has a VARCHAR (65535 byte) limit. See Limitations for more details.

The following example shows how nested JSON can be easily accessed using SELECT statements:

SELECT DISTINCT bk._category
	,bk.author
	,bk.price
	,bk.year
	,bk.title._lang
FROM rs_xml_db.public.stg_edw_course_catalog main
INNER JOIN main.course_material.book bk ON true;

The following screenshot shows our results.

Clean up

To avoid incurring future charges, first delete the notebook and the related files on Amazon S3 bucket as explained in this EMR documentation page then the CloudFormation stack.

Conclusion

This post demonstrated how to use AWS services like AWS DMS, Amazon S3, Amazon EMR, and Amazon Redshift to seamlessly work with complex data types like XML and perform historical migrations when building a cloud data lake house on AWS. We encourage you to try this solution and take advantage of all the benefits of these purpose-built services.

If you have questions or suggestions, please leave a comment.


About the authors

Abhilash Nagilla is a Sr. Specialist Solutions Architect at AWS, helping public sector customers on their cloud journey with a focus on AWS analytics services. Outside of work, Abhilash enjoys learning new technologies, watching movies, and visiting new places.

Avinash Makey is a Specialist Solutions Architect at AWS. He helps customers with data and analytics solutions in AWS. Outside of work he plays cricket, tennis and volleyball in free time.

Fabrizio Napolitano is a Senior Specialist SA for DB and Analytics. He has worked in the analytics space for the last 20 years, and has recently and quite by surprise become a Hockey Dad after moving to Canada.

Enable federation to Amazon QuickSight accounts with Ping One

Post Syndicated from Srikanth Baheti original https://aws.amazon.com/blogs/big-data/enable-federation-to-amazon-quicksight-accounts-with-ping-one/

Amazon QuickSight is a scalable, serverless, embeddable, machine learning (ML)-powered business intelligence (BI) service built for the cloud that supports identity federation in both Standard and Enterprise editions. Organizations are working towards centralizing their identity and access strategy across all of their applications, including on-premises, third-party, and applications on AWS. Many organizations use Ping One to control and manage user authentication and authorization centrally. If your organization uses Ping One for cloud applications, you can enable federation to all of your QuickSight accounts without needing to create and manage users in QuickSight. This authorizes users to access QuickSight assets—analyses, dashboards, folders, and datasets—through centrally managed Ping One.

In this post, we go through the steps to configure federated single sign-on (SSO) between a Ping One instance and a QuickSight account. We demonstrate registering an SSO application in Ping One, creating groups, and mapping to an AWS Identity and Access Management (IAM) role that translates to QuickSight user license types (admin, author, and reader). These QuickSight roles represent three different personas supported in QuickSight. Administrators can publish the QuickSight app in Ping One to enable users to perform SSO to QuickSight using their Ping credentials.

Prerequisites

To complete this walkthrough, you must have the following prerequisites:

  • A Ping One subscription
  • One or more QuickSight account subscriptions

Solution overview

The walkthrough includes the following steps:

  1. Create groups in Ping One for each of the QuickSight user license types.
  2. Register an AWS application in Ping One.
  3. Add Ping One as your SAML identity provider (IdP) in AWS.
  4. Configure an IAM policy.
  5. Configure an IAM role.
  6. Configure your AWS application in Ping One.
  7. Test the application from Ping One.

Create groups in Ping One for each of the QuickSight roles

To create groups in Ping One, complete the following steps:

  1. Sign in to the Ping One portal using an administrator account.
  2. Under Identities, choose Groups.
  3. Choose the plus sign to add a group.
    BDB-2210-Ping-Groups
  4. For Group Name, enter QuickSightReaders.
  5. Choose Save.
    BDB-2210-Ping-Groups-Save
  6. Repeat these steps to create the groups QuickSightAdmins and QuickSightAuthors.

Register an AWS application in Ping One

To configure the integration of an AWS application in Ping One, you need to add AWS to your list of managed software as a service (SaaS) apps.

  1. Sign in to the Ping One portal using an administrator account.
  2. Under Connections, choose Application Catalog.
  3. In the search box, enter amazon web services.
  4. Choose Amazon Web Services – AWS from the results to add the application.  BDB-2210-Ping-AWS-APP
  5. For Name, enter Amazon QuickSight.
  6. Choose Next.
    BDB-2210-Ping-AWS-SAVEUnder Map Attributes, there should be four attributes.
  7. Delete the attribute related to SessionDuration.
  8. Choose Username as the value for all the remaining attributes for now.
    We update these values in later steps.
  9. Choose Next.
    BDB-2210-Ping-AWS-Attributes
  10. In the Select Groups section, add the QuickSightAdmins, QuickSightAuthors, and QuickSightReaders groups you created.
  11. Choose Save.
    BDB-2210-Ping-AWS-Attributes-Save
  12. After the application is created, choose the application again and download the federation metadata XML.

You use this in the next step.
BDB-2210-Ping-AWS-Metadata

Add Ping One as your SAML IdP in AWS

To configure Ping One as your SAML IdP, complete the following steps:

  1. Open a new tab in your browser.
  2. Sign in to the IAM console in your AWS account with admin permissions.
  3. On the IAM console, under Access Management in the navigation pane, choose Identity providers.
  4. Choose Add provider.
    BDB-2210-Ping-AWS-IAM
  5. For Provider name, enter PingOne.
  6. Choose file to upload the metadata document you downloaded earlier.
  7. Choose Add provider.
  8. In the banner message that appears, choose View provider.
  9. Copy the IdP ARN to use in a later step.
    BDB-2210-Ping-AWS-IAM_ARN

Configure an IAM policy

In this step, you create an IAM policy to map three different roles with permissions in QuickSight.

Use the following steps to set up QuickSightUserCreationPolicy. This policy grants privileges in QuickSight to the federated user based on the assigned groups in Ping One.

  1. On the IAM console, choose Policies.
  2. Choose Create policy.
  3. On the JSON tab, replace the existing text with the following code:
    {
       "Version": "2012-10-17",
        "Statement": [ 
             {  
                "Sid": "VisualEditor0", 
                 "Effect": "Allow", 
                 "Action": "quicksight:CreateAdmin", 
                 "Resource": "*", 
                 "Condition": { 
                     "StringEquals": { 
                         "aws:PrincipalTag/user-role": "QuickSightAdmins" 
     
                    } 
                 } 
             }, 
             { 
                 "Sid": "VisualEditor1", 
                 "Effect": "Allow", 
                 "Action": "quicksight:CreateUser", 
                 "Resource": "*", 
                 "Condition": { 
                     "StringEquals": { 
                         "aws:PrincipalTag/user-role": "QuickSightAuthors" 
                     } 
                 } 
             }, 
             { 
                 "Sid": "VisualEditor2", 
                 "Effect": "Allow", 
                 "Action": "quicksight:CreateReader", 
                 "Resource": "*", 
                 "Condition": { 
                     "StringEquals": { 
                         "aws:PrincipalTag/user-role": "QuickSightReaders" 
                     } 
                 } 
             } 
         ] 
     } 
  4. Choose Review policy.
    BDB-2210-AWS-IAM-Policy
  5. For Name, enter QuickSightUserCreationPolicy.
    BDB-2210-AWS-IAM-Policy-Save
  6. Choose Create policy.

Configure an IAM role

Next, create the role that Ping One users assume when federating into QuickSight. Use the following steps to set up the federated role:

  1. On the IAM console, choose Roles.
  2. Choose Create role.
  3. For Trusted entity type, select SAML 2.0 federation.
  4. For SAML 2.0-based provider, choose the provider you created earlier (PingOne).
  5. Select Allow programmatic and AWS Management Console access.
  6. For Attribute, choose SAML:aud.
  7. For Value, enter https://signin.aws.amazon.com/saml.
  8. Choose Next.
    BDB-2210-Ping-IAM-Role
  9. Under Permissions policies, select the QuickSightUserCreationPolicy IAM policy you created in the previous step.
  10. Choose Next.
    BDB-2210-Ping-IAM-Role_Permissions
  11. For Role name, enter QSPingOneFederationRole.
    DBD-2210-PingOne-IAM-Role-Name
  12. Choose Create role.
  13. On the IAM console, in the navigation pane, choose Roles.
  14. Choose the QSPingOneFederationRole role you created to open the role’s properties.
  15. Copy the role ARN to use in later steps.
  16. On the Trust relationships tab, under Trusted entities, verify that the IdP you created is listed.
  17. Under Condition in the policy code, verify that SAML:aud with a value of https://signin.aws.amazon.com/saml is present.
  18. Choose Edit trust policy to add an additional condition.
    DBD-2210-PingOne-IAM-TrustPolicy
  19. Under Condition, add the following code:
    "StringLike": {
    "aws:RequestTag/user-role": "*"
    }

  20. Under Action, add the following code:
      "sts:TagSession"

    BDB-2210-PingOne-Role-Save

  21. Choose Update policy to save changes.

Configure an AWS application in Ping One

To configure your AWS application, complete the following steps:

  1. Sign in to the Ping One portal using a Ping One administrator account.
  2. Under Connections, choose Application.
  3. Choose the Amazon QuickSight application you created earlier.
  4. On the Profile tab, choose Enable Advanced Configuration.  BDB-2210-Ping-AdvancedConfig
  5. Choose Enable in the pop-up window.
    BDB-2210-Ping-AdvancedConfig1
  6. On the Configuration tab, choose the pencil icon to edit the configuration.
    BDB-2210-Ping-AdvancedConfig2
  7. Under SIGNING KEY, select Sign Assertion & Response.
    BDB-2210-Ping-AdvancedConfig4
  8. Under SLO BINDING, for Assertion Validity Duration In Seconds, enter a duration, such as 900.
  9. For Target Application URL, enter https://quicksight.aws.amazon.com/.
  10. Choose Save.
    BDB-2210-Ping-AdvancedConfig5On the Attribute Mappings tab, you now add or update the attributes as in the following table.

Attribute Name Value
saml_subject Username
https://aws.amazon.com/SAML/Attributes/RoleSessionName Username
https://aws.amazon.com/SAML/Attributes/Role ‘arn:aws:iam::xxxxxxxxxx:role/QSPingOneFederationRole,
arn:aws:iam::xxxxxxxxxx:saml-provider/PingOne’
https://aws.amazon.com/SAML/Attributes/PrincipalTag:user-role user.memberOfGroupNames[0]
  1. Enter https://aws.amazon.com/SAML/Attributes/PrincipalTag:user-role for the attribute name and use the corresponding value from the table for the expression.
  2. Choose Save.
  3. If you have more than one QuickSight user role (for this post, QuickSightAdmins, QuicksightAuthors, and QuickSightReaders), you can add all the appropriate role names as follows:
    #data.containsAny(user.memberOfGroupNames,{'QuickSightAdmins'})? 'QuickSightAdmins' : 
    
    #data.containsAny(user.memberOfGroupNames,{'QuickSightAuthorss'}) ? 'QuickSightAuthors' : 
    
    #data.containsAny(user.memberOfGroupNames,{'QuickSightReaders'}) ?'QuickSightReaders' : null

  4. To edit the role attribute, choose the gear icon next to the role.
  5. Populate the corresponding expression from the table and choose Save.

The format of the expression is the role ARN (copied in the role creation step) followed by the IdP ARN (copied in the IdP creation step) separated by a comma.

Test the application

In this section, you test your Ping One SSO configuration by using a Microsoft application.

  1. In the Ping One portal, under Identities, choose Groups.
  2. Choose a group and choose Add Users Individually.
  3. From the list of users, add the appropriate users to the group by choosing the plus sign.
  4. Choose Save.
  5. To test the connectivity, under Environment, choose Properties, then copy the URL under APPLICATION PORTAL URL.
  6. Browse to the URL in a private browsing window.
  7. Enter your user credentials and choose Sign On.
    Upon a successful sign-in, you’re redirected to the All Applications page with a new application called Amazon QuickSight.
  8. Choose the Amazon QuickSight application to be redirected to the QuickSight console.

Note in the following screenshot that the user name at the top of the page shows as the Ping One federated user.

Summary

This post provided step-by-step instructions to configure federated SSO between Ping One and the QuickSight console. We also discussed how to create policies and roles in IAM and map groups in Ping One to IAM roles for secure access to the QuickSight console.

For additional discussions and help getting answers to your questions, check out the QuickSight Community.


About the authors

Srikanth Baheti is a Specialized World Wide Sr. Solution Architect for Amazon QuickSight. He started his career as a consultant and worked for multiple private and government organizations. Later he worked for PerkinElmer Health and Sciences & eResearch Technology Inc, where he was responsible for designing and developing high traffic web applications, highly scalable and maintainable data pipelines for reporting platforms using AWS services and Serverless computing.

Raji Sivasubramaniam is a Sr. Solutions Architect at AWS, focusing on Analytics. Raji is specialized in architecting end-to-end Enterprise Data Management, Business Intelligence and Analytics solutions for Fortune 500 and Fortune 100 companies across the globe. She has in-depth experience in integrated healthcare data and analytics with wide variety of healthcare datasets including managed market, physician targeting and patient analytics.

Raj Jayaraman is a Senior Specialist Solutions Architect for Amazon QuickSight. Raj focuses on helping customers develop sample dashboards, embed analytics and adopt BI design patterns and best practices.

Deploying AWS Lambda functions using AWS Controllers for Kubernetes (ACK)

Post Syndicated from James Beswick original https://aws.amazon.com/blogs/compute/deploying-aws-lambda-functions-using-aws-controllers-for-kubernetes-ack/

This post is written by Rajdeep Saha, Sr. SSA, Containers/Serverless.

AWS Controllers for Kubernetes (ACK) allows you to manage AWS services directly from Kubernetes. With the ACK service controller for AWS Lambda, you can provision and manage Lambda functions with kubectl and custom resources. With ACK, you can have a single consolidated approach to managing container workloads and other AWS services, such as Lambda, directly from Kubernetes without needing additional infrastructure automation tools.

This post walks you through deploying a sample Lambda function from a Kubernetes cluster provided by Amazon EKS.

Use cases

Some of the use cases for provisioning Lambda functions from ACK include:

  • Your organization already has a DevOps process to deploy resources into the Amazon EKS cluster using Kubernetes declarative YAMLs (known as manifest files). With ACK for AWS Lambda, you can now use manifest files to provision Lambda functions without creating separate infrastructure as a code template.
  • Your project has implemented GitOps with Kubernetes. With GitOps, git becomes the single source of truth, and all the changes are done via git repo. In this model, Kubernetes continuously reconciles the git repo (desired state) with the resources running inside the cluster (current state). If any differences are found, the GitOps process automatically implements changes to the cluster from the git repo. Using ACK for AWS Lambda, since you are creating the Lambda function using Kubernetes custom resource, the GitOps model is applied for Lambda.
  • Your organization has established permissions boundaries for different users and groups using role-based access control (RBAC) and IAM roles for service accounts (IRSA). You can reuse this security model for Lambda without having to create new users and policies.

How ACK for AWS Lambda works

  1. The ‘Ops’ team deploys the ACK service controller for Lambda. This controller runs as a pod within the Amazon EKS cluster.
  2. The controller pod needs permission to read the Lambda function code and create the Lambda function. The Lambda function code is stored as a zip file in an S3 bucket for this example. The permissions are granted to the pod using IRSA.
  3. Each AWS service has separate ACK service controllers. This specific controller for AWS Lambda can act on the custom resource type ‘Function’.
  4. The ‘Dev’ team deploys Kubernetes manifest file with custom resource type ‘Function’. This manifest file defines the necessary fields required to create the function, such as S3 bucket name, zip file name, Lambda function IAM role, etc.
  5. The ACK service controller creates the Lambda function using the values from the manifest file.

Prerequisites

You need a few tools before deploying the sample application. Ensure that you have each of the following in your working environment:

This post uses shell variables to make it easier to substitute the actual names for your deployment. When you see placeholders like NAME=<your xyz name>, substitute in the name for your environment.

Setting up the Amazon EKS cluster

  1. Run the following to create an Amazon EKS cluster. The following single command creates a two-node Amazon EKS cluster with a unique name.
    eksctl create cluster
  2. It may take 15–30 minutes to provision the Amazon EKS cluster. When the cluster is ready, run:
    kubectl get nodes
  3. The output shows the following:
    Output
  4. To get the Amazon EKS cluster name to use throughout the walkthrough, run:
    eksctl get cluster
    
    export EKS_CLUSTER_NAME=<provide the name from the previous command>

Setting up the ACK Controller for Lambda

To set up the ACK Controller for Lambda:

  1. Install an ACK Controller with Helm by following these instructions:
    – Change ‘export SERVICE=s3’ to ‘export SERVICE=lambda’.
    – Change ‘export AWS_REGION=us-west-2’ to reflect your Region appropriately.
  2. To configure IAM permissions for the pod running the Lambda ACK Controller to permit it to create Lambda functions, follow these instructions.
    – Replace ‘SERVICE=”s3”’ with ‘SERVICE=”lambda”’.
  3. Validate that the ACK Lambda controller is running:
    kubectl get pods -n ack-system
  4. The output shows the running ACK Lambda controller pod:
    Output

Provisioning a Lambda function from the Kubernetes cluster

In this section, you write a sample “Hello world” Lambda function. You zip up the code and upload the zip file to an S3 bucket. Finally, you deploy that zip file to a Lambda function using the ACK Controller from the EKS cluster you created earlier. For this example, use Python3.9 as your language runtime.

To provision the Lambda function:

  1. Run the following to create the sample “Hello world” Lambda function code, and then zip it up:
    mkdir my-helloworld-function
    cd my-helloworld-function
    cat << EOF > lambda_function.py 
    import json
    
    def lambda_handler(event, context):
        # TODO implement
        return {
            'statusCode': 200,
            'body': json.dumps('Hello from Lambda!')
        }
    EOF
    zip my-deployment-package.zip lambda_function.py
    
  2. Create an S3 bucket following the instructions here. Alternatively, you can use an existing S3 bucket in the same Region of the Amazon EKS cluster.
  3. Run the following to upload the zip file into the S3 bucket from the previous step:
    export BUCKET_NAME=<provide the bucket name from step 2>
    aws s3 cp  my-deployment-package.zip s3://${BUCKET_NAME}
  4. The output shows:
    upload: ./my-deployment-package.zip to s3://<BUCKET_NAME>/my-deployment-package.zip
  5. Create your Lambda function using the ACK Controller. The full spec with all the available fields is listed here. First, provide a name for the function:
    export FUNCTION_NAME=hello-world-s3-ack
  6. Create and deploy the Kubernetes manifest file. The command at the end, kubectl create -f function.yaml submits the manifest file, with kind as ‘Function’. The ACK Controller for Lambda identifies this custom ‘Function’ object and deploys the Lambda function based on the manifest file.
    export AWS_ACCOUNT_ID=$(aws sts get-caller-identity --query "Account" --output text)
    export LAMBDA_ROLE="arn:aws:iam::${AWS_ACCOUNT_ID}:role/lambda_basic_execution"
    
    cat << EOF > lambdamanifest.yaml 
    apiVersion: lambda.services.k8s.aws/v1alpha1
    kind: Function
    metadata:
     name: $FUNCTION_NAME
     annotations:
       services.k8s.aws/region: $AWS_REGION
    spec:
     name: $FUNCTION_NAME
     code:
       s3Bucket: $BUCKET_NAME
       s3Key: my-deployment-package.zip
     role: $LAMBDA_ROLE
     runtime: python3.9
     handler: lambda_function.lambda_handler
     description: function created by ACK lambda-controller e2e tests
    EOF
    kubectl create -f lambdamanifest.yaml
    
  7. The output shows:
    function.lambda.services.k8s.aws/< FUNCTION_NAME> created
  8. To retrieve the details of the function using a Kubernetes command, run:
    kubectl describe function/$FUNCTION_NAME
  9. This Lambda function returns a “Hello world” message. To invoke the function, run:
    aws lambda invoke --function-name $FUNCTION_NAME  response.json
    cat response.json
    
  10. The Lambda function returns the following output:
    {"statusCode": 200, "body": "\"Hello from Lambda!\""}

Congratulations! You created a Lambda function from your Kubernetes cluster.

To learn how to provision the Lambda function using the ACK controller from an OCI container image instead of a zip file in an S3 bucket, follow these instructions.

Cleaning up

This section cleans up all the resources that you have created. To clean up:

  1. Delete the Lambda function:
    kubectl delete function $FUNCTION_NAME
  2. If you have created a new S3 bucket, delete it by running:
    aws s3 rm s3://${BUCKET_NAME} --recursive
    aws s3api delete-bucket --bucket ${BUCKET_NAME}
  3. Delete the EKS cluster:
    eksctl delete cluster --name $EKS_CLUSTER_NAME
  4. Delete the IAM role created for the ACK Controller. Get the IAM role name by running the following command, then delete the role from the IAM console:
    echo $ACK_CONTROLLER_IAM_ROLE

Conclusion

This blog post shows how AWS Controllers for Kubernetes enables you to deploy a Lambda function directly from your Amazon EKS environment. AWS Controllers for Kubernetes provides a convenient way to connect your Kubernetes applications to AWS services directly from Kubernetes.

ACK is open source: you can request new features and report issues on the ACK community GitHub repository.

For more serverless learning resources, visit Serverless Land.

[$] Crash recovery for user-space block drivers

Post Syndicated from original https://lwn.net/Articles/906097/

A new user-space block driver mechanism
entered the kernel during the 6.0 merge window. This subsystem, called
“ublk”, uses io_uring to communicate with
user-space drivers, resulting in some impressive performance numbers. Ublk
has a lot of interesting potential, but the current use cases for it are
not entirely clear. The recently posted crash-recovery
mechanism
for ublk makes it clear, though, that those use cases do
exist.

Levels of Assurance for DoD Microelectronics

Post Syndicated from Bruce Schneier original https://www.schneier.com/blog/archives/2022/08/levels-of-assurance-for-dod-microelectronics.html

The NSA has has published criteria for evaluating levels of assurance required for DoD microelectronics.

The introductory report in a DoD microelectronics series outlines the process for determining levels of hardware assurance for systems and custom microelectronic components, which include application-specific integrated circuits (ASICs), field programmable gate arrays (FPGAs) and other devices containing reprogrammable digital logic.

The levels of hardware assurance are determined by the national impact caused by failure or subversion of the top-level system and the criticality of the component to that top-level system. The guidance helps programs acquire a better understanding of their system and components so that they can effectively mitigate against threats.

The report was published last month, but I only just noticed it.

The collective thoughts of the interwebz