Few, if any, web sites or web-based services have gone unscathed by
the locust-like hordes of AI crawlers looking to consume (and then re-consume) all of the world’s content. The Anubis project is designed to
provide a first line of defense that blocks mindless bots—while
granting real users access to sites without too much hassle. Anubis is
a young project, not even a year old. However, its development is
moving quickly, and the project seems to be enjoying rapid
adoption. The most recent release of Anubis, version
1.20.0, includes a feature that many users have been interested in
since the project launched: support for challenging clients without
requiring users to have JavaScript turned on.
„Лаш насам, лаш натам, сега има, сега няма, тука памет, тука забрава – коментира Стефан Русинов в разказа си за гостуването на Ю Хуа в България, – политическата обстановка е като природна стихия, която завихря безпомощните хорица и тласка умовете им в какви ли не посоки.“ Темата на литературните срещи с Ю Хуа, Мария Степанова и прочее… беше паметта. И тази тема продължава да ме човърка, искам да видя какво се случва с паметта тук, у нас.
Паметта е свързана с идентичността (страдащият от амнезия не знае кой е), с доброто и злото (без памет няма отговорност), дори с желанието за живот.
Затова ме вълнуват книгите, които насочват окото на читателя към слепите петна на паметта, опитват се да поправят изличеното от забравата, да го възстановят. Това обаче не е лесна задача – изисква пренареждане на цялостния наратив на историята, тоест иска от читателя не просто да научи нещо ново, а да се отучи да разказва нещата, както е свикнал. Да видим.
„И леглото ни е зеленина“ от Виолета Радкова говори за две малко засягани теми в нашата литература – обикновените българи в земите, останали извън Княжество България, че и Източна Румелия, и българската емиграция в началото на XX век. Първата е предмет донякъде и на „Рана“ на Захари Карабашлиев, но там детството на героя в Беломорска Тракия е еднозначно идилично, като в народна песен – по дваж на година жнеме и вършеме, по триж на година гюл-трендафил цъфти. В „И леглото ни е зеленина“ този гюл си има бодли. На Виолета Радкова ѝ стиска да напише, че децата в някогашните големи семейства са заменими – едно умряло, не го мисли толкова, карай нататък, гледай живите. Стиска ѝ и несигурността на жените да не е етнически обусловена, ей ги на – лошите ни застрашават, добрите ни бранят честта. И изобщо да не задълбава в травмата на етническия конфликт, в който българите са жертви, да ги види не само като носители на трагична съдба, а като хора.
Второто, което ми е много интересно, е връзката бежанци–мигранти. Трябва да призная, че аз самата съм пристрастна, изследвам тази връзка от няколко години покрай собствена родова история, която искам да придобие книжна плът; впрочем в „Кой е Сава Попов?“ Свобода Цекова и Антон Стайков също отбелязват как тази траектория не е била никак рядка. Огромният бежански проблем след Балканската война е карал много младежи от Тракия и Македония да търсят късмета си зад океана.
В литературен план това е доста рязка смяна на контекста – в нашата литературна традиция разказът за селския бит и разказът за Америка, пък и изобщо за далечния свят почти не се допират, и толкоз. Любопитно е как подхожда Радкова към това: с бавното отваряне на героя си към обитавания от него град, с ритуала за четене на вестникарски заглавия, през който скицира и контекста, задава важна разлика – жените тук, жените там – и добавя щипка хумор с вметката, че жените там са свободни да се самоубиватот любов на воля.
Впрочем такива „емигрантски романи“, които преминават от селското към космополитно-урбанистичното, не са рядкост в съвременната световна литература – ей на, „Мидълсекс“ на Юдженидис тръгва от съседна Гърция, и то пак в контекста на етническите трагедии. На тях си им отива и щипка магически реализъм, в този смисъл историята с ръцете на героя, а и раздвояването на неговата траектория биха се приели добре от англоезичната публика. Би било хубаво да предизвика дискусия и тук, в половината ни родови истории има едно такова „ами ако“ – „ами ако прадядо не се беше върнал“, или „ако чичо си беше дошъл“. Не знам дали за нашата публика това усложняване на сюжета ще работи (в комбинация с тематичната новост); надявам се, а и авторката е сторила възможното да направи фабулата увлекателна и четивна, със
семейна сага, тайни, любови, чувство за мярка в разкриването на характерите, богат език.
Чух оплакване, че на моменти е прекалено умел – че бързото отгръщане на страници те кара да го довършиш, преди да си успял да се стъписаш и замислиш – но това да ни е проблемът. Чудесна книга.
Книгата на Людмила Миндова за Прехода и за нейната майка Свобода Стефанова поема друг курс към паметта. Не търси линейния разказ, сюжета, не се опитва да намести всичко в единна обяснителна фабула, да го навърже на една нишка… Защото това значи да изпуснеш някакви важни неща, а други да посмачкаш, за да се вместят в картинката. В тази книга е осезаемо важно това да не се случва, осезаемо важна е верността към събитията, верността и пълнотата на разказа.
Залозите са големи: думите трябва да уловят и запазят на този свят същината на любим човек; и заедно с това трябва да уловят и осмислят същината на времето, което е изтекло. Припряността може да е подмяна, дори на историята с литературата, а
за Людмила Миндова ролята на литературата не е да разказва приказки, фикции, а да уплътни достъпа до истината.
Да добави сетивността. Да извади до факта нещата, с които той е в емоционална връзка, за да може читателят да види назад в емоционалната си история какво се е случило, какво е преживял, какво го е разтърсило, натъжило, изпълнило с надежда, защо е реагирал така. И какво е станало с онези, които е срещнал по пътя си.
Спомняте ли си Кашпировски например? Телевизионния хипнотизатор, дето подканяше зрителите да сложат чаша вода пред телевизора, та той дистанционно да ѝ придаде лечебни свойства? Какво стана с него – но и какво стана с нас, когато времето, дето трябваше да ни лекува от травмите на комунизма, всъщност ни даде да пием студена вода, простете елементарната аналогия. Как е свързано едното с другото – доносничеството с унищожението на паметта, поезията с въздуха, отровеният въздух с отровеното куче, вчера с днес?
Всякак. Поетическият усет на Людмила Миндова ѝ е подсказал отлична метафора: мемъри картите, с които играят децата – търсенето на съответствия насред един пасианс, който се реди на сляпо, с гръб към теб. В рамките на една глава-карта виждаме събрани Свети Стефан, Сан Стефано и Свобода Стефанова; в друга – дядо Торбалан и Луис Корвалан (Марин също разказваше как в детството си ги е бъркал тези двамата); в трета – мемъри пяната и „Човешкият отпечатък“ на Цветан Тодоров, хазарта и the hazard, опасността; в четвърта – четвъртъкът на атентата в „Света Неделя“ и четвъртъкът на Народния съд, повтарящите се имена в нашите лични истории. И така нататък.
Това са римите на реалността. Възможните, неочевидни връзки, които могат да звучат случайно, повърхностно – тази стъпва върху алюзията, тази върху фонетиката, какво следва, миризми? Текстура, допир? Но именно те удържат паметта, когато централният разказ е строшен като предно стъкло на автомобил. Потъването в книгата на Людмила Миндова е като потъване във времето – но има какво да те задържи. И покрай цялата тъга и мрак има и памет за музика, за поезия, за дух. За свобода. За Свобода.
Свобода, страст, смях, усет за лекотата и дълбочините, езикова находчивост, характер – какъв разкош са Шекспировите героини, а? Ако имате дъщери, дайте им да четат колкото може повече Шекспир, обградете ги с тези великолепни жени, които бърборят, отстояват своето, преобличат се, пътуват, шегуват се, влюбват се, не остават никому длъжни и само в краен случай полудяват или се обявяват за умрели, за да избегнат обществения скандал!
Джуди Денч е била всяка от тях и нейните интервюта за Шекспировите ѝ роли са като сбирка на женската компания – не на благонравен чай (въпреки че „Чай с дамите“ за Джуди Денч и нейните колежки от „Чай с Мусолини“ Маги Смит и Джоун Плоурайт беше чудесен). По-скоро в кръчмата „Дърти Дък“ или зад кулисите на „Олд Вик“.
Спомените за театъра са нещо друго, защото те са спомен за различните хора, които даден актьор е бил, в случая – за лейди Макбет, за Титания, за Беатриче, Виола, Мария, Гертруда, Офелия, Регана, Хермиона, Пердита, Изабела, Жулиета…
Спомен „отвътре“ – какво движи лейди Макбет? Властолюбие или както мисли актрисата, силната връзка със съпруга ѝ, желанието ѝ да му помогне да постигне неговата си мечта, ако и да е твърде мекушав за нея? Защо Беатриче и Бенедикт се нападат така, предишна връзка ли е това и как е свършила? Знае ли Гертруда за престъплението на Клавдий, на колко години следва да е Титания… Трябва ли всички тези отговори да се изиграят? Не. Но според Джуди Денч все пак трябва да знаеш – за себе си.
За читателя на интервютата усещането е като сам да изпробваш роля подир роля. Бих ли могла да съм, примерно, мистрис Скокли? Ще ми писне ли от Бертрам на мястото на Елена? И т.н. Интересен тип история – този, който те приканва да си припомниш възможните свои алтернативи, възможните пътища. Но и реална история на едно славно време, на Олд Вик и Кралския Шекспиров театър, на Джон Гилгуд и Иън Маккелън, и Ванеса Редгрейв, и т.н. И другото славно време, разбира се, елизабетинското. И цялата утопична идея, че сме способни на приемственост, че сме способни да запазим смисъла на миналото и да го направим свой.
Джуди Денч говори за роли, но самата тя е чудесен ролеви модел. Дори когато отказва да дава съвети.
Чудесен превод на Иглика Василева, отлично оформление на Емил Марков. Да бяха направили още една стъпка от Locus и да бяха наели коректор, който да оправи очевидните пропуски при набирането, разменените или пропуснатите букви и пр. Същото при „Изток-Запад“, макар че там освен липсата на коректор буди недоумение и корицата. Защо?! При такива хубави книги.
В емблематичната си колонка, започната още през 2008 г. във в-к „Култура“, Марин Бодаков ни представяше нови литературни заглавия и питаше с какво точно тези книги ни променят. Вярваме, че е важно тази рубрика да продължи. От човек до човек, с нова книга в ръка.
Greg Kroah-Hartman has released the 6.15.6, 6.12.37, 6.6.97, 6.1.144, and 5.15.187 stable kernels. As is the usual
case, each contains important fixes all over the kernel tree.
Last month, we announced new sovereign controls and governance structure for the AWS European Sovereign Cloud. The AWS European Sovereign Cloud is a new, independent cloud for Europe, designed to help customers meet their evolving sovereignty needs, including stringent data residency, operational autonomy, and resiliency requirements. Launching by the end of 2025, the AWS European Sovereign Cloud will be entirely located within the European Union (EU) and operate as an independent cloud for Europe. Last month, we announced plans to launch a dedicated European certificate authority (CA), or trust service provider, to support autonomous trust service operations within the AWS European Sovereign Cloud.
We are actively building out the first AWS Region of the AWS European Sovereign Cloud in the state of Brandenburg, Germany. We are on track for launch and AWS services are being deployed, configured, and tested for autonomous operations in the AWS European Sovereign Cloud. The AWS European Sovereign Cloud infrastructure will be physically and logically separate from other Regions. We designed the AWS European Sovereign Cloud to have no critical dependencies on non-EU infrastructure. Everything needed to operate the AWS European Sovereign Cloud is in the EU: the talent, the technology, the infrastructure, and the leadership. In addition to independent infrastructure, there will be zero operational control outside of EU borders. Only AWS employees, residing in the EU, will control day-to-day operations, including access to data centers, technical support, and customer service for the AWS European Sovereign Cloud.
For the first time, we will provide a dedicated sovereign European trust service provider (EU-TSP). This EU-TSP will autonomously operate its own CA key materials and perform certificate issuance functions within the AWS European Sovereign Cloud. A trust service provider is an entity that manages the policies and operations for a set of root and subordinate certificate authorities. A root CA is a cryptographic building block and root of trust upon which end entity certificates can be issued. It represents a private key for signing (issuing) certificates and a root certificate that identifies the root CA and binds the private key to the name of the CA. In short, the EU-TSP is an autonomous trust service provider in Europe, for Europe.
The EU-TSP will be the public root of trust for the AWS European Sovereign Cloud, helping to maintain the confidentiality and integrity of network communications. The EU-TSP will provide the default CA used by AWS service endpoints, AWS Certificate Manager (ACM), and ACM integrated services. For AWS European Sovereign Cloud customers, this means that even in the event of a material loss of connectivity outside of the EU, the EU-TSP will continue to provide trust services autonomously.
We recently completed the cryptographic key signing ceremony for our EU-TSP at a secure EU location, witnessed by external, third-party auditors. The resulting root CAs have been submitted for inclusion to popular web browsers used by AWS customers. This EU-TSP will be operated in accordance with the requirements of the Certificate Authority/Browser Forum. All the key material for the EU-TSP is located within EU borders, and only EU residents have the ability to operate, control, or reconfigure the EU-TSP.
To maintain verifiable trust, we will engage independent EU-based auditors to assure the EU-TSP controls are designed appropriately, operate effectively, and can help customers satisfy their compliance obligations. We will make the audit reports publicly available.
The EU-TSP will be active and providing autonomous trust services when the AWS European Sovereign Cloud launches at the end of 2025. To learn more, visit AWS European Sovereign Cloud.
If you have feedback about this post, submit comments in the Comments section below. If you have questions about this post, contact AWS Support.
Quicksilver is a key-value store developed internally by Cloudflare to enable fast global replication and low-latency access on a planet scale. It was initially designed to be a global distribution system for configurations, but over time it gained popularity and became the foundational storage system for many products in Cloudflare.
A previous post described how we moved Quicksilver to production and started replicating on all machines across our global network. That is what we called Quicksilver v1: each server has a full copy of the data and updates it through asynchronous replication. The design served us well for some time. However, as our business grew with an ever-expanding data center footprint and a growing dataset, it became more and more expensive to store everything everywhere.
We realized that storing the full dataset on every server is inefficient. Due to the uniform design, data accessed in one region or data center is replicated globally, even if it’s never accessed elsewhere. This leads to wasted disk space. We decided to introduce a more efficient system with two new server roles: replica, which stores the full dataset and proxy, which acts as a persistent cache, evicting unused key-value pairs to free up some disk space. We call this design Quicksilver v1.5 – an interim step towards a more sophisticated and scalable system.
To understand how those two roles helped us reduce disk space usage, we first need to share some background on our setup and introduce some terminology. Cloudflare is architected in a way where we have a few hyperscale core data centers that form our control plane, and many smaller data centers distributed across the globe where resources are more constrained. Quicksilver has dozens of servers in the core data centers with terabytes of storage called root nodes. In the smaller data centers, though, things are different. A typical data center has two types of nodes: intermediate nodes and leaf nodes. Intermediate servers replicate data either from the other intermediate nodes or directly from the root nodes. Leaf nodes serve end user traffic, and receive updates from intermediate servers, effectively being leaves of a replication tree. Disk capacity varies significantly between node types. While root nodes aren’t facing an imminent disk space bottleneck, it’s a definite concern for leaf nodes.
Every server – whether it’s a root, intermediate, or leaf – hosts 10 Quicksilver instances. These are independent databases, each used by specific Cloudflare services or products such as the DNS, CDN or WAF.
Figure 1. Global Quicksilver
Let’s consider the role distribution. Instead of hosting ten full datasets on every machine within a data center, what if we deploy only a few replicas in each? The remaining servers would be proxies, maintaining a persistent cache of hot keys and querying replicas for any cache misses.
Figure 2. Role allocation for different Quicksilver instances
Data centers across our network are very different in size, ranging from hundreds of servers to a single rack with just a few servers. To ensure every data center has at least one replica, the simplest initial step is an even split: on each server, place five replicas of some instances and five proxies for others. The change immediately frees up disk space, as the cached hot dataset on a proxy should be smaller than a full replica. While it doesn’t remove the bottleneck entirely, it could, in theory, lead to an up to 50% reduction in disk space usage. More importantly, it lays the foundation for a new distributed design of Quicksilver, where queries can be served by multiple machines in a data center, paving the way for further horizontal scaling. Additionally, an iterative approach helps to battle-proof the code changes earlier.
Can it even work?
Before committing to building Quicksilver v1.5, we wanted to be sure that the proxy/replica design would actually work for our workload. If proxies needed to cache the entire dataset for good performance, then it would be a dead end, offering no potential disk space benefits. To assess this, we built a data pipeline which pushes accessed keys from all across our network to ClickHouse. This allowed us to estimate typical sizes of working sets. Our analysis revealed that:
in large data centers approximately, 20% of the keyspace was in use
in small data centers this number dropped to just about 1%
These findings gave us confidence that the caching approach should work, though it wouldn’t be without its challenges.
Persistent caching
When talking about caches, the first thing that comes to mind is an in-memory cache. However, this cannot work for Quicksilver for two main reasons: memory usage and the “cold cache” problem.
Indeed, with billions of stored keys, even a fraction of them would lead to an unmanageable increase in memory usage. System restarts should not affect performance, which means that cache data must be preserved somewhere anyway. So we decided to make the cache persistent and store it in the same way as full datasets: in our embedded RocksDB. Thus, cached keys normally sit on disk and can be retrieved on-demand with low memory footprint.
When a key cannot be found in the proxy’s cache, we request it from a replica using our internal distributed key-value protocol, and put it into a local cache after processing.
Evictions are based on RocksDB compaction filters. Compaction filters allow defining custom logic executed in background RocksDB threads responsible for compacting files on disk. Each key-value pair is processed with a filter on a regular basis, evicting least recently used data from the disk when available disk space drops below a certain threshold called a soft limit. To track keys accessed on disk, we have an LRU-like in-memory data structure, which is passed to the compaction filter to set last access date in key metadata and inform potential evictions.
However, with some specific workloads there is still a chance that evictions will not keep up with disk space growth, and for this scenario we have a hard limit: when available disk space drops below a critical threshold, we temporarily stop adding new keys to the cache. This hurts performance, but it acts as a safeguard, ensuring our proxies remain stable and don’t overflow under a massive surge of requests.
Consistency and asynchronous replication
Quicksilver has, from the start, provided sequential consistency to clients: if key A was written before B, it’s not possible to read B and not A. We are committed to maintaining this guarantee in the new design. We have experienced Hyrum’s Law first hand, with Quicksilver being so widely adopted across the company that every property we introduced in earlier versions is now relied upon by other teams. This means that changing behaviour would inevitably break existing functionality and introduce bugs.
However, there is one thing standing in our way: asynchronous replication. Quicksilver replication is asynchronous mainly because machines in different parts of the world replicate at different speeds, and we don’t want a single server to slow down the entire tree. But it turns out in a proxy-replica design, independent replication progress can result in non-monotonic reads!
Consider the following scenario: a client sequentially writes keys A, B, C, .. K one after another to the Quicksilver root node. These keys are asynchronously replicated through data centers across our network with varying latency. Imagine we have a proxy on index 5, which has observed keys from A to E, and two replicas:
replica_1 is at index 2 (slightly behind the proxy), having only received A and B
replica_2 at index 9, which is slightly ahead due to a faster replication path and has received all keys from A to I
Figure 3. Asynchronous replication in QSv1.5
Now, a client performs two successive requests on a proxy, each time reading the keys E, F, G, H and I. For simplicity, we assume these keys are not cacheable (for example, due to low disk space). The proxy’s first remote request is routed to replica_2, which already has all keys and responds back with values. To prevent hot spots in a data center, we load balance requests from proxies, and the next one lands on replica_1, which hasn’t received any of the requested keys yet, and responds with a “not found” error.
So, which result is correct?
The correct behavior here is that of Quicksilver v1, which we aim to preserve. If the server on replication index 5 were a replica instead of a proxy, it would have seen updates for keys A through E inclusive, resulting in E being the only key in both replies, while all other keys cannot be found yet. Which means responses from both replica_1 and replica_2 are wrong!
Therefore, to maintain previous guarantees and API backwards compatibility, Quicksilver v1.5 must address two crucial consistency problems: cases where the replica is ahead of the proxy, and conversely, where it lags behind. For now let’s focus on the case where a proxy lags behind a replica.
Multiversion concurrency control
In our example, replica_2 responds to a request from a proxy “from the past”. We cannot use any locks for synchronizing two servers, as it would introduce undesirable delays to the replication tree, defeating the purpose of asynchronous replication. The only option is for replicas to maintain a history of recent updates. This naturally leads us to implementing multiversion concurrency control (MVCC), a popular database mechanism for tracking changes in a non-blocking fashion, where for any key we can keep multiple versions of its values for different points in time.
With MVCC, we no longer overwrite the latest value of a key in the default column family for every update. Instead, we introduced a new MVCC column family in RocksDB, where all updates are stored with a corresponding replication index. Lookup for a key at some index in the past goes as follows:
First we search in the default column family. If a key is found and the write timestamp is not greater than the index of a requesting proxy, we can use it straight away.
Otherwise, we begin scanning the MVCC column family, where keys have unique suffixes based on latest timestamps for which they are still valid.
In the example above, replica_2 has MVCC enabled and has keys A@1 .. K@11 in its default column family. The MVCC is initially empty, because no keys have been overwritten yet. When it receives a request for, say, key H with target index 5, it first makes a lookup in a default column family and finds the given key, but its timestamp is 8, which means this version should not be visible to the proxy yet. It then scans the MVCC, finds no matching previous versions and responds with “not found” to the proxy. Should key H be updated twice at indexes 4 and 8, we would have placed the initial version into MVCC before overwriting it in the default column family, and the proxy would receive the first version in response.
If a key E is requested at index 5, replica_2 can find it quickly in the default column family and return it back to the proxy. There is no need to read from MVCC, as the timestamp of the latest version (5) satisfies the request.
Another corner case to consider is deletions. When a key is deleted and then re-written, we need to explicitly mark the period of removal in MVCC. For that we’ve implemented tombstones – a special value format for absent keys.
Finally, we need to make sure that key history is not growing uncontrollably, using up all of the disk space available. Luckily we don’t actually need to record history for a long period of time, it just needs to cover the maximum replication index difference between any two machines. And in practice, a two-hour interval turned out to be way more than enough, while adding only about 500 MB of extra disk space usage. All records in the MVCC column family older than two hours are garbage collected, and for that again we use custom RocksDB compaction filters.
Sliding window
Now we know how to deal with proxies lagging behind replicas. But what about the opposite case, when a proxy is ahead of replicas?
The simplest solution is for replicas to not serve requests with a target index higher than its own. After all, it cannot know about keys from the future, whether they will be added, updated, or removed. In fact, our first implementation just returned an error when the proxy was ahead, as we expected it to happen quite infrequently. But after rolling out gradually to a few data centers, our metrics made it clear that the approach was not going to work.
This led us to analyze which keys are affected by this kind of replication asymmetry. It’s definitely not keys added or updated a long time ago, because replicas would already have the changes replicated. The only problematic keys are those updated very recently, which the proxy already knows about, but the replica does not.
With this insight, we realized that the issue should be solved on the proxies rather than on the replica side. By preserving all recent updates locally, the proxy can avoid querying the replica. This became known as the sliding window approach.
The sliding window retains all recent updates written in a short, rolling timeframe. Unlike cached keys, items in the window cannot be evicted until they move outside of the window. Internally, the sliding window is defined by lower and upper boundary pointers. These are kept in memory, and can easily be restored after a reload from the current database index and the pre-configured window size.
Figure 4. The sliding window shifts when replication updates arrive
When a new update event arrives from the replication layer we add it to the sliding window by moving both the upper and lower boundary one position higher. Thereby, we maintain the fixed size of the window. Keys written before the lower bound can be evicted by the compaction filter, which is aware of current sliding window boundaries.
Negative lookups
Another problem arising with our distributed replica-proxy design is negative lookups – requests for keys which don’t exist in the database. Interestingly, in our workloads we see about ten times more negative lookups than positive ones!
But why is it a problem? Unfortunately, each negative lookup will be a cache miss on a proxy, requiring a request to a replica. Given the volume of requests and proportion of such lookups, it would be a disaster for performance, with overloaded replicas, overused data center networks, and massive latency degradation. We needed a fast and efficient approach to identifying non-existing keys directly at the proxy level.
In v1, negative lookups are the quickest type of requests. We rely on a special probabilistic data structure – Bloom filters – used in RocksDB to determine if the requested key might belong to a certain data file containing a range of sorted keys (called Sorted Sequence Table or SST) or definitely not. 99% of the time, negative lookups are served using only this in-memory data structure, avoiding the need for disk I/O.
One approach we considered for proxies was to cache negative lookups. Two problems immediately arise:
How big is the keyspace of negative lookups? In theory, it’s infinite, but the real size was unclear. We can store it in our cache only if it is small enough.
Cached negative lookups would no longer be served by the fast Bloom filters. We have row and block caches in RocksDB, but the hit rate is nowhere near the filters for SSTs, which means negative lookups would end up going to disk more often.
These turned out to be dealbreakers: not only was the negative keyspace vast, greatly exceeding the actual keyspace (by a thousand times for some instances!), but clients also need lookups to be really fast, ideally served from memory.
In pursuit of probabilistic data structures which could give us a dynamic compact representation of a full keyspace on proxies, we spent some time exploring Cuckoo filters. Unfortunately, with 5 billion keys it takes about 18 GB to have a false positive rate similar to Bloom filters (which only require 6 GB). And this is not only about wasted disk space — to be fast we have to keep it all in memory too!
Clearly some other solution was needed.
Finally, we decided to implement key and value separation, storing all keys on proxies, but persisting values only for cached keys. Evicting a key from the cache actually results in the removal of its value.
But wait, don’t the keys, even stripped of values, take a lot of space? Well, yes and no.
The total size of pure keys in Quicksilver is approximately 11 times smaller than the full dataset. Of course, it’s larger than any representation by probabilistic data structure, but there are some very desirable properties to such a solution. Firstly, we continue to enjoy fast Bloom filter lookups in RocksDB. Another benefit is that it unlocks some cool optimizations for range queries in a distributed context.
We may revisit it one day, but so far it has worked great for us.
Discovery mechanism
Having solved all of the above challenges, one bit remained to be sorted out to make distributed query execution work: how can proxies discover replicas?
Within the local data center it is fairly easy. Each one runs its own consul cluster, where machines are registered as services. Consul is well integrated with our internal DNS resolvers, and with a single DNS request, we can get the names of all replicas running in a data center, which proxies can directly connect to.
However, data centers vary in size, servers are constantly added and removed, and having only local discovery would not be enough for the system to work reliably. Proxies also need to find replicas in other nearby data centers.
We had previously encountered a similar problem with our replication layer. Initially, the replication topology was statically defined in a configuration and distributed to all servers, such that they know from which sources they should replicate. While simple, this approach was quite fragile and tedious to operate. It led to a rigid replication tree with suboptimal overall performance, unable to adapt to network changes.
Our solution to this problem was the Network Oracle – a special overlay network based on a gossip protocol and consisting of intermediate nodes in our data centers. Each member of this overlay constantly exchanges status and metainformation with other nodes, which helps us see active members in near-real time. Each member runs network probes measuring round-trip time to its peers, making it easy to find closest (in terms of RTT) active intermediate nodes to form a low-latency replication tree. Introducing the Network Oracle was a major improvement: we no longer needed to reconfigure the topology, watch intermediate nodes or entire data centers go down, or investigate frequent replication issues. Replication is now a completely self-organized and self-healing dynamic system.
Naturally, we decided to reuse the Network Oracle for our discovery mechanism. It consists of two subproblems: data center discovery and specific service lookup. We use the Network Oracle to find the closest data centers. Adding all machines running Quicksilver to the same overlay would be inefficient because of significant increase of network traffic and message delivery times. Instead, we use intermediate nodes as sources of network proximity information for the leaf nodes. Knowing which data centers are nearby, we can directly send DNS queries there to resolve specific services – Quicksilver replicas in this case.
Proxies maintain a pool of connections to active replicas and distribute requests among them to smooth out the load and avoid hotspots in a data center. Proxies also have a health-tracking mechanism, monitoring the state of connections and errors coming from replicas, and temporarily deprioritizing or isolating potentially faulty ones.
Figure 5. Internal replica request errors
To demonstrate its efficiency, we graphed errors coming from replica requests, which showed that such errors almost disappeared after introducing the new discovery system.
Results
Our objective with Quicksilver v1.5 was simple: gain some disk space without losing request latency, because clients rely heavily on us being fast. While the replica-proxy design delivered significant space savings, what about latencies?
Proxy
Replica
Figure 6. Proxy-replica latency comparison
Above, we have the 99.9% percentile of request latency on both a replica and proxy during a 24-hour window. One can hardly find a difference between the two. Surprisingly, proxies can even be slightly faster than replicas sometimes, likely because of smaller datasets on disk!
Quicksilver v1.5 is released but our journey to a highly scalable and efficient solution is not over. In the next post we’ll share what challenges we faced with the following iteration. Stay tuned!
Thank you
This project was a big team effort, so we’d like to thank everyone on the Quicksilver team – it would not have come true without you all.
The Hello World podcast is back, accompanying the latest issue of Hello World magazine. This new three-part miniseries explores some of the topics from issue 27 of Hello World, which focuses on integrating computing education across the curriculum.
Whether you’re a seasoned educator or just starting your journey with computing education, this podcast audio and video series is full of insights, inspiration, and practical tips from educators and experts around the world.
If you’re already subscribed, the new episodes will appear automatically in your favourite podcast app every Tuesday.
Episode 1: Why kids still need to learn to code in the age of AI
Next week, we’ll bring you the buzz from the Computer Science Teachers Association’s annual conference in Cleveland, USA. We’re speaking with educators at the conference to hear how they’re integrating computer science across subjects, and you’ll hear their top classroom tips for teaching CS in context.
Episode 3: Global perspectives on AI education
Released Tuesday 22 July
The miniseries wraps up with an in-depth discussion about AI education around the world. Hosted by Ben Garside, Senior Learning Manager for Experience AI, the conversation features Leonida Soi, Learning Manager in Kenya; Monika Katkute-Gelzine, CEO of Vedliai in Lithuania; and Aimy Lee, COO of Penang Science Cluster in Malaysia. Monika and Aimy work with us in our global Experience AI partner programme.
Listen, read, learn, subscribe, and share
Each of these three podcast episode builds on the themes in the latest Hello World issue, where you’ll find inspiration and practical tips from educators who are integrating CS across a variety of subjects and for all school ages.
Subscribe to the Hello World podcast wherever you get your podcasts to never miss an episode, and to help us reach more teachers. If you’re subscribe to Hello World magazine (it’s free), we’ll also let you know when new podcast episodes are available.
And, don’t forget to share this new podcast series with your fellow educators.
Кога България е загрижена за малцинствата, техните права, дискриминацията и насилието срещу представителите на малцинствени групи? Когато става дума за българи. И то не по гражданство, а по етнос. Пример за това е отношението към българите в Северна Македония. Българските евродепутати внасят стотина предложения за промени в тази посока в доклада за напредъка на югозападната ни съседка по пътя ѝ към ЕС. Нашите медии следят под лупа всеки случай на насилие върху някой идентифициращ се като българин в Северна Македония.
Същевременно отношението към собствените ни малцинства е, меко казано, проблематично. България не само не признава наличието им на конституционно равнище, а системно третира представителите им като граждани втора ръка. И не се трогва особено, когато техните права се нарушават или когато върху тях се упражнява насилие.
Бързо позабравен случай
Помните ли имената на Катя, Кънчо, Галия и Емили Жилови? Това е четиричленното българско семейство от турски етнически произход, загинало при пожар в германския град Золинген (наричан на български и Солинген) на 25 март 2024 г. – майка, баща и двете им деца. Родителите така и не навършват 30 години, Галия остава завинаги на три, а Емили – едва на няколко месеца. Ранените при пожара са десетки. А някои от оцелелите, като Айше и Нихат К., скочили от прозореца с малкия си син, получават сериозни и дълготрайни здравословни проблеми. Нихат е в кома седмици наред след трагедията, Айше и до днес трябва да се подлага на операции. Детето също не остава без поражения.
Първоначално в България се наблюдава известен интерес към случая. Има дори репортажи от мястото на събитието, например на bTV. В онзи период водещата версия е, че заподозреният за палежа германец Даниел Чала е нямал расистки мотив, а е извършил престъплението за отмъщение, защото е изгонен от сградата поради неплащане на наем. Имигранти в Золинген обаче излизат на протест с настояване причините за трагедията да се разследват по-сериозно. На него се веят български, турски и германски знамена. Случаят събужда травматичния спомен за палежа в същия град през 1993 г., извършен от четирима десни екстремисти, чийто жертви са пет турски жени и момичета.
Когато разкритията излязат, как ехото заглъхва
През 2025 г. започва делото срещу Даниел Чала и постепенно излизат все повече данни, които са пренебрегнати от разследващите в началото и сочат към престъпление от омраза. В дома на обвиняемия е намерена доста нацистка литература, включително „Моята борба“ на Адолф Хитлер. Към Чала сочи и дълго неразследван пожар в близкия до Золинген град Вупертал. Той е възникнал скоро след като приятелката на Чала се е изнесла от същата сграда във Вупертал.
Въпреки смущаващите разкрития обаче, в България новините по случая не стават водещи. Отразяват го рехаво, преобладаващо протоколно и резюмират информацията от германската преса. С едно изключение.
Публикацията на Борис Митов в „Свободна Европа“
На 3 юли в „Свободна Европа“ излиза статията на съдебно-криминалния журналист Борис Митов – „Кошмарът в Солинген. Как полицията в Германия пропусна расистки мотив за палеж, убил българско семейство“. За изготвянето ѝ не просто се обобщават известните по случая данни, а и се вземат интервюта от адвокати, ангажирани по делото: представляващия роднините на загиналата Катя Жилова – Радослав Радославов, както и Фатих Зингал и Седа Башай-Йълдъз. Башай-Йълдъз коментира:
Моят дългогодишен професионален опит, за съжаление, се потвърди – обвиняемият е действал от ксенофобски подбуди. Всеки път, когато е влизал в конфликт с чужденци, си е отмъщавал чрез палежи и е предизвиквал смъртта на невинни хора.
Какъв медиен и институционален отзвук предизвиква в България статията на Митов? Засега – никакъв, макар в нея да става дума за български граждани, вероятни жертви на престъпление от омраза.
Омраза от българи към български граждани
В социалните мрежи статията също не се радва на особен интерес. Към редакционното приключване на настоящата публикация материалът на Митов е споделен във Facebook едва седем пъти. Затова пък някои от коментарите под него са пример за реч на омразата. Те внушават, че жертвите не са българи, а турци и/или роми и затова не заслужават нито институционално, нито медийно внимание. Камо ли справедливост. Важното е не дали са писани от тролове, или не (някои от авторите им имат съмнително малко контакти), а че не срещат особен отпор. Ето няколко примера:
В Instagram се намират повече хуманни коментари върху статията на Борис Митов, но има и обвинения към жертвите, че всъщност са роми, които се правят на турци:
Избирателно отношение към омразата
Традегията в Золинген е поредният пример, че Германия не е имунизирана срещу избирателно отношение към престъпленията от омраза. Освен общо трите пожара (в Золинген от 2024 г. и 1993 г.) и Вупертал (от 2022 г.) си струва да припомним и историята с Беате Чепе и партньорите ѝ в любовта и престъпленията Уве Мундлос и Уве Бьонхарт, които между 2000 и 2007 г. убиват десет души. Жертвите им са осем турци, една гъркиня и германска полицайка. Деянията им години наред остават неразкрити, защото разследващите не правят връзка между членовете на групичката и не допускат, че може да става дума за престъпления от омраза.
След разкриването на групата на Чепе Германия дава вид, че си е взела поука. Делото срещу Чепе е обект на силен медиен и обществен интерес, а животът на адвокатите ѝ се обръща с главата надолу. От една страна, клиентката им ги разиграва, както си поиска, от друга, те са възприемани като злодеи, защото я защитават. На едната адвокатка дори се налага да се пресели в друг град, за да избегне част от тормоза и да има работа.
Въпреки това обаче немските разследващи продължават да допускат същите грешки, което позволява на радикализирани германци като Даниел Чала да убиват нееднократно. Когато едно масово убийство се извършва от чужденец, особено мюсюлманин, обикновено първата хипотеза е тероризъм, дори да става дума за психически проблем. А ако то е дело на етнически германец, се търси психически или битов проблем.
За разлика от Германия обаче, България не дава вид, че се опитва да си вземе поука.
Представителите на етническите малцинства се възприемат – и третират – не само като не-българи, а и като непритежаващи основни човешки права, включително правото на живот, и незаслужаващи справедливост. Това не се променя, колкото и пъти Европейският съд за правата на човека да осъжда България за етническа дискриминация.
Затова хора като кмета на столичния район „Илинден“ Емил Бранчевски ще нарушават международното законодателство и ще продължават да трупат имидж с цената на оставянето на десетки ромски семейства без дом. Затова след края на ерата на Ахмед Доган българските турци ще продължават да гласуват под натиск и от страх от нов Възродителен процес.
Но ако питате нашите патриоти, най-важно е Северна Македония да спазва човешките права на представителите на малцинствата и да не ги дискриминира. Нашите си малцинства са си наша работа и никой не трябва да ни се меси в отношението към тях.
Today, we’re announcing the general availability of Amazon Elastic Compute Cloud (Amazon EC2)P6e-GB200 UltraServers, accelerated by NVIDIA GB200 NVL72 to offer the highest GPU performance for AI training and inference. Amazon EC2 UltraServers connect multiple EC2 instances using a dedicated, high-bandwidth, and low-latency accelerator interconnect across these instances.
The NVIDIA Grace Blackwell Superchips connect two high-performance NVIDIA Blackwell tensor core GPUs and an NVIDIA Grace CPU based on Arm architecture using the NVIDIA NVLink-C2C interconnect. Each Grace Blackwell Superchip delivers 10 petaflops of FP8 compute (without sparsity) and up to 372 GB HBM3e memory. With the superchip architecture, GPU and CPU are colocated within one compute module, increasing bandwidth between GPU and CPU significantly compared to current generation EC2 P5en instances.
With EC2 P6e-GB200 UltraServers, you can access up to 72 NVIDIA Blackwell GPUs within one NVLink domain to use 360 petaflops of FP8 compute (without sparsity) and 13.4 TB of total high bandwidth memory (HBM3e). Powered by the AWS Nitro System, P6e-GB200 UltraServers are deployed in EC2 UltraClusters to securely and reliably scale to tens of thousands of GPUs.
EC2 P6e-GB200 UltraServers deliver up to 28.8 Tbps of total Elastic Fabric Adapter (EFAv4) networking. EFA is also coupled with NVIDIA GPUDirect RDMA to enable low-latency GPU-to-GPU communication between servers with operating system bypass.
EC2 P6e-GB200 UltraServers specifications EC2 P6e-GB200 UltraServers are available in sizes ranging from 36 to 72 GPUs under NVLink. Here are the specs for EC2 P6e-GB200 UltraServers:
UltraServer type
GPUs
GPU memory (GB)
vCPUs
Instance memory (GiB)
Instance storage (TB)
Aggregate EFA Network Bandwidth (Gbps)
EBS bandwidth (Gbps)
u-p6e-gb200x36
36
6660
1296
8640
202.5
14400
540
u-p6e-gb200x72
72
13320
2592
17280
405
28800
1080
P6e-GB200 UltraServers are ideal for the most compute and memory intensive AI workloads, such as training and inference of frontier models, including mixture of experts models and reasoning models, at the trillion-parameter scale.
You can build agentic and generative AI applications, including question answering, code generation, video and image generation, speech recognition, and more.
P6e-GB200 UltraServers in action You can use EC2 P6e-GB200 UltraServers in the Dallas Local Zone through EC2 Capacity Blocks for ML. The Dallas Local Zone (us-east-1-dfw-2a) is an extension of the US East (N. Virginia) Region.
To reserve your EC2 Capacity Blocks, choose Capacity Reservations on the Amazon EC2 console. You can select Purchase Capacity Blocks for ML and then choose your total capacity and specify how long you need the EC2 Capacity Block for u-p6e-gb200x36 or u-p6e-gb200x72 UltraServers.
Once Capacity Block is successfully scheduled, it is charged up front and its price doesn’t change after purchase. The payment will be billed to your account within 12 hours after you purchase the EC2 Capacity Blocks. To learn more, visit Capacity Blocks for ML in the Amazon EC2 User Guide.
You can also integrate EC2 P6e-GB200 UltraServers seamlessly with various AWS managed services. For example:
Amazon SageMaker Hyperpod provides managed, resilient infrastructure that automatically handles the provisioning and management of P6e-GB200 UltraServers, replacing faulty instances with preconfigured spare capacity within the same NVLink domain to maintain performance.
Amazon Elastic Kubernetes Services (Amazon EKS) allows one managed node group to span across multiple P6e-GB200 UltraServers as nodes, automating their provisioning and lifecycle management within Kubernetes clusters. You can use EKS topology-aware routing for P6e-GB200 UltraServers, enabling optimal placement of tightly coupled components of distributed workloads within a single UltraServer’s NVLink-connected instances.
Amazon FSx for Lustre file systems provide data access for P6e-GB200 UltraServers at the hundreds of GB/s of throughput and millions of input/output operations per second (IOPS) required for large-scale HPC and AI workloads. For fast access to large datasets, you can use up to 405 TB of local NVMe SSD storage or virtually unlimited cost-effective storage with Amazon Simple Storage Service (Amazon S3).
Now available Amazon EC2 P6e-GB200 UltraServers are available today in the Dallas Local Zone (us-east-1-dfw-2a) through EC2 Capacity Blocks for ML. For more information, visit the Amazon EC2 pricing page.
Organizations face significant challenges managing their big data analytics workloads. Data teams struggle with fragmented development environments, complex resource management, inconsistent monitoring, and cumbersome manual scheduling processes. These issues lead to lengthy development cycles, inefficient resource utilization, reactive troubleshooting, and difficult-to-maintain data pipelines.These challenges are especially critical for enterprises processing terabytes of data daily for business intelligence (BI), reporting, and machine learning (ML). Such organizations need unified solutions that streamline their entire analytics workflow.
The next generation of Amazon SageMaker with Amazon EMR in Amazon SageMaker Unified Studio addresses these pain points through an integrated development environment (IDE) where data workers can develop, test, and refine Spark applications in one consistent environment. Amazon EMR Serverless alleviates cluster management overhead by dynamically allocating resources based on workload requirements, and built-in monitoring tools help teams quickly identify performance bottlenecks. Integration with Apache Airflow through Amazon Managed Workflows for Apache Airflow (Amazon MWAA) provides robust scheduling capabilities, and the pay-only-for-resources-used model delivers significant cost savings.
In this post, we demonstrate how to develop and monitor a Spark application using existing data in Amazon Simple Storage Service (Amazon S3) using SageMaker Unified Studio.
Solution overview
This solution uses SageMaker Unified Studio to execute and oversee a Spark application, highlighting its integrated capabilities. We cover the following key steps:
Create an EMR Serverless compute environment for interactive applications using SageMaker Unified Studio.
Create and configure a Spark application.
Use TPC-DS data to build and run the Spark application using a Jupyter notebook in SageMaker Unified Studio.
Monitor application performance and schedule recurring runs with Amazon MWAA integrated.
Analyze results in SageMaker Unified Studio to optimize workflows.
Prerequisites
For this walkthrough, you must have the following prerequisites:
An AWS account – If you don’t have an account, you can create one.
A demo project – Create a demo project in your SageMaker Unified Studio domain. For instructions, see Create a project. For this example, we choose All capabilities in the project profile section.
Add EMR Serverless as compute
Complete the following steps to create an EMR Serverless compute environment to build your Spark application:
In SageMaker Unified Studio, open the project you created as a prerequisite and choose Compute.
Choose Data processing, then choose Add compute.
Choose Create new compute resources, then choose Next.
Choose EMR Serverless, then choose Next.
For Compute name, enter a name.
For Release label, choose emr-7.5.0.
For Permission mode, choose Compatibility.
Choose Add compute.
It takes a few minutes to spin up the EMR Serverless application. After it’s created, you can view the compute in SageMaker Unified Studio.
The preceding steps demonstrate how you can set up an Amazon EMR Serverless application in SageMaker Unified Studio to run interactive PySpark workloads. In subsequent steps, we build and monitor Spark applications in an interactive JupyterLab workspace.
Develop, monitor, and debug a Spark application in a Jupyter notebook within SageMaker Unified Studio
In this section, we build a Spark application using the TPC-DS dataset within SageMaker Unified Studio. With Amazon SageMaker Data Processing, you can focus on transforming and analyzing your data without managing compute capacity or open source applications, saving you time and reducing costs. SageMaker Data Processing provides a unified developer experience from Amazon EMR, AWS Glue, Amazon Redshift, Amazon Athena, and Amazon MWAA in a single notebook and query interface. You can automatically provision your capacity on Amazon EMR on Amazon Elastic Compute Cloud (Amazon EC2) or EMR Serverless. Scaling rules manage changes to your compute demand to optimize performance and runtimes. Integration with Amazon MWAA simplifies workflow orchestration by alleviating infrastructure management needs. For this post, we use EMR Serverless to read and query the TPC-DS dataset within a notebook and run it using Amazon MWAA.
Complete the following steps:
Upon completion of the previous steps and prerequisites, navigate to SageMaker Studio and open your project.
Choose Build and then JupyterLab.
The notebook takes about 30 seconds to initialize and connect to the space.
Under Notebook, choose Python 3 (ipykernel).
In the first cell, next to Local Python, choose the dropdown menu and choose PySpark.
Choose the dropdown menu next to Project.Spark and choose EMR-S Compute.
Run the following code to develop your Spark application. This example reads a 3 TB TPC-DS dataset in Parquet format from a publicly accessible S3 bucket:
After the Spark session starts and execution logs start to populate, you can explore the Spark UI and driver logs to further debug and troubleshoot Spark progra The following screenshot shows an example of the Spark UI. The following screenshot shows an example of the driver logs. The following screenshot shows the Executors tab, which provides access to the driver and executor logs.
Use the following code to read some more TPC-DS datasets. You can create temporary views and use the Spark UI to see the files being read. Refer to the appendix at the end of this for details on using the TPC-DS dataset within your buckets.
In each cell of your notebook, you can expand Spark Job Progress to view the stages of the job submitted to EMR Serverless for a specific cell. You can see the time taken to complete each stage. In addition, if a failure occurs, you can examine the logs, making troubleshooting a seamless experience.
Because the files are partitioned based on date key column, you can observe that Spark runs parallel tasks for reads.
Next, get the count across the date time keys on data that is partitioned based on the time key using the following code:
select count(1), ss_sold_date_sk from store_sales group by ss_sold_date_sk order by ss_sold_date_sk
Monitor jobs in the Spark UI
On the Jobs tab of the Spark UI, you can see a list of complete or actively running jobs, with the following details:
The action that triggered the job
The time it took (for this example, 41 seconds, but timing will vary)
The number of stages (2) and tasks (3,428); these are for reference and specific to this specific example
You can choose the job to view more details, particularly around the stages. Our job has two stages; a new stage is created whenever there is a shuffle. We have one stage for the initial reading of each dataset, and one for the aggregation. In the following example, we run some TPC-DS SQL statements that are used for performance and benchmarks:
 with frequent_ss_items as
 (select substr(i_item_desc,1,30) itemdesc,i_item_sk item_sk,d_date solddate,count(*) cnt
  from store_sales, date_dim, item
  where ss_sold_date_sk = d_date_sk
    and ss_item_sk = i_item_sk
    and d_year in (2000, 2000+1, 2000+2,2000+3)
  group by substr(i_item_desc,1,30),i_item_sk,d_date
  having count(*) >4),
 max_store_sales as
 (select max(csales) tpcds_cmax
  from (select c_customer_sk,sum(ss_quantity*ss_sales_price) csales
        from store_sales, customer, date_dim
        where ss_customer_sk = c_customer_sk
         and ss_sold_date_sk = d_date_sk
         and d_year in (2000, 2000+1, 2000+2,2000+3)
        group by c_customer_sk) x),
 best_ss_customer as
 (select c_customer_sk,sum(ss_quantity*ss_sales_price) ssales
  from store_sales, customer
  where ss_customer_sk = c_customer_sk
  group by c_customer_sk
  having sum(ss_quantity*ss_sales_price) > (95/100.0) *
    (select * from max_store_sales))
 select sum(sales)
 from (select cs_quantity*cs_list_price sales
       from catalog_sales, date_dim
       where d_year = 2000
         and d_moy = 2
         and cs_sold_date_sk = d_date_sk
         and cs_item_sk in (select item_sk from frequent_ss_items)
         and cs_bill_customer_sk in (select c_customer_sk from best_ss_customer)
      union all
      (select ws_quantity*ws_list_price sales
       from web_sales, date_dim
       where d_year = 2000
         and d_moy = 2
         and ws_sold_date_sk = d_date_sk
         and ws_item_sk in (select item_sk from frequent_ss_items)
         and ws_bill_customer_sk in (select c_customer_sk from best_ss_customer))) x
You can monitor your Spark job in SageMaker Unified Studio using two methods. Jupyter notebooks provide basic monitoring, showing real-time job status and execution progress. For more detailed analysis, use the Spark UI. You can examine specific stages, tasks, and execution plans. The Spark UI is particularly useful for troubleshooting performance issues and optimizing queries. You can track estimated stages, running tasks, and task timing details. This comprehensive view helps you understand resource utilization and track job progress in depth.
In this section, we explained how you can EMR Serverless compute in SageMaker Unified Studio to build an interactive Spark application. Through the Spark UI, the interactive application provides fine-grained task-level status, I/O, and shuffle details, as well as links to corresponding logs of the task for this stage directly from your notebook, enabling a seamless troubleshooting experience.
Clean up
To avoid ongoing charges in your AWS account, delete the resources you created during this tutorial:
Delete the connection.
Delete the EMR job.
Delete the EMR output S3 buckets.
Delete the Amazon MWAA resources, such as workflows and environments.
Conclusion
In this post, we demonstrated how the next generation of SageMaker, combined with EMR Serverless, provides a powerful solution for developing, monitoring, and scheduling Spark applications using data in Amazon S3. The integrated experience significantly reduces complexity by offering a unified development environment, automatic resource management, and comprehensive monitoring capabilities through Spark UI, while maintaining cost-efficiency through a pay-as-you-go model. For businesses, this means faster time-to-insight, improved team collaboration, and reduced operational overhead, so data teams can focus on analytics rather than infrastructure management.
To get started, explore the Amazon SageMaker Unified Studio User Guide, set up a project in your AWS environment, and discover how this solution can transform your organization’s data analytics capabilities.
Appendix
In the following sections, we discuss how to run a workload on a schedule and provide details about the TPC-DS dataset for building the Spark application using EMR Serverless.
Run a workload on a schedule
In this section, we deploy a JupyterLab notebook and create a workflow using Amazon MWAA. You can use workflows to orchestrate notebooks, querybooks, and more in your project repositories. With workflows, you can define a collection of tasks organized as a directed acyclic graph (DAG) that can run on a user-defined schedule.Complete the following steps:
In SageMaker Unified Studio, choose Build, and under Orchestration, choose Workflows.
Choose Create Workflow in Editor.
You will be redirected to the JupyterLab notebook with a new DAG called untitled.py created under the /src/workflows/dag folder.
We rename this notebook to tpcds_data_queries.py.
You can reuse the existing template with the following updates:
Update line 17 with the schedule you want your code to run.
Update line 26 with your NOTEBOOK_PATH. This should be in src/<notebook_name>.ipynb. Note the name of the automatically generated dag_id; you can name it based on your requirements.
Choose File and Save notebook.
To test, you can trigger a manual run of your workload.
In SageMaker Unified Studio, choose Build, and under Orchestration, choose Workflows.
Choose your workflow, then choose Run.
You can monitor the success of your job on the Runs tab.
To debug your notebook job by accessing the Spark UI within your Airflow job console, you must use EMR Serverless Airflow Operators to submit your job. The link is available on the Details tab of your query.
This option has the following key limitations: it’s not available for Amazon EMR on EC2, and SageMaker notebook job operators don’t work.
You can configure the operator to generate one-time links to the application UIs and Spark stdout logs by passing enable_application_ui_links=True as a parameter. After the job starts running, these links are available on the Details tab of the relevant task. If enable_application_ui_links=False, then the links will be present but grayed out.
Make sure you have the emr-serverless:GetDashboardForJobRunAWS Identity and Access Management (IAM) permissions to generate the dashboard link.
Open the Airflow UI for your job. The Spark UI and history server dashboard options are visible on the Details tab, as shown in the following screenshot.
The following screenshot shows the Jobs tab of the Spark UI.
Use the TPC-DS dataset to build the Spark application using EMR Serverless
To use the TPC-DS dataset to run the Spark application against a dataset in an S3 bucket, you need to copy the TPC-DS dataset into your S3 bucket:
Create a new S3 bucket in your test account if needed. In the following code, replace $YOUR_S3_BUCKET with your S3 bucket name. We suggest you export YOUR_S3_BUCKET as an environment variable:
<Your bucket name>
Copy the TPC-DS source data as input to your S3 bucket. If it’s not exported as an environment variable, replace $YOUR_S3_BUCKET with your S3 bucket name:
Amit Maindola is a Senior Data Architect focused on data engineering, analytics, and AI/ML at Amazon Web Services. He helps customers in their digital transformation journey and enables them to build highly scalable, robust, and secure cloud-based analytical solutions on AWS to gain timely insights and make critical business decisions.
Abhilash is a senior specialist solutions architect at Amazon Web Services (AWS), helping public sector customers on their cloud journey with a focus on AWS Data and AI services. Outside of work, Abhilash enjoys learning new technologies, watching movies, and visiting new places.
We really love builders at AWS. We’re constantly thinking of new ways to help technical communities thrive and create spaces like AWS Developer Center and community.aws where people can connect and share their knowledge and experiences.
Today, we’re announcing AWS Builder Center, a new home for builders to access all builder resources, engage with the AWS community, and provide feedback or product suggestions to AWS product teams. This new experience also integrates the previous AWS Developer Center and community.aws.
There are a variety of exciting features so let us discover some of them.
Your voice matters: Introducing Wishlist One of the most exciting new features, in my opinion, is Wishlist. You can now submit your wishes for new features or improvements you’d like to see in AWS services. Others can discover and vote on these wishes while also creating their own.
You can influence product roadmap collectively as a community and help us shape the future of AWS services. You can share ideas, suggestions, feature proposals, or challenges while operating AWS services, with the ability for the AWS community to upvote ideas and highlight the most sought-after improvements. Our internal teams will keep an eye on these and bring the most popular wishes to the attention of our service teams, making your voice an integral part of our product development process.
On top of that, you can bookmark this page as your centralized hub for finding upcoming community events, making it easy to find opportunities to learn and network in your local area and meet like-minded builders who share your interests.
Speaking of following people, AWS Builder Center makes it really straightforward to connect and engage with others, serving as the central hub for the AWS technical community. It brings together all the different ways that you can connect with fellow builders. For example, the Who to Follow section introduces you to AWS Heroes, Community Builders, and active community members who are sharing their knowledge and expertise in your areas of interest.
Explore our AWS hands-on resources On the Build page, you’ll discover ways to get familiar with AWS with hands-on experience such as interactive learning resources designed for every skill level such as AWS Tutorials and AWS Workshops. You can explore generative AI and agentic AI services playground and find the AWS Free Tier to try out AWS services free of charge up to specified limits for each service.
Choose the Toolbox page and discover the latest tools, programming language resources, and Open Source projects for AWS. The Toolbox has everything you need to get your project scaffolded and up and running.
To improve the build experience for builders, we plan to expand Builder Center’s built-in offerings such as creating dedicated groups and forums for collaborating on a particular topic, run workshops for hands-on labs, and various service playgrounds where builders can freely experiment with AWS services.
Supporting your builder journey The new Learn section serves as your gateway to skill development, bringing together everything you need to expand your AWS expertise. Here, you can explore learning and training resources, workshops, gamified experiences, and more to make your journey of building on AWS both educational and engaging.
Choose the Topics page, where you can explore and discover more content. You can explore content by topics and tags. There is a featured and trending topics section that helps you to stay connected with what’s capturing the community’s attention right now.
Built-in localization for your spoken language AWS Builder Center breaks down language barriers with comprehensive localization support. All content published in the Builder Center is automatically available in 16 languages, and user-generated content, such as posts, comments, or wishes, can be machine-translated on demand using Translate. So, you can collaborate with builders worldwide, sharing knowledge and experiences across language boundaries.
By default, all content will be displayed in based on the language that your browser is set to. But, you can override this by visiting the settings page and choosing the language that you want AWS Builder Center to use by default.
Sign up and build your profile now AWS Builder Center gives you a more personalized and comprehensive way to showcase your AWS journey. Your unique profile comes with a custom URL and shareable QR code, making it straightforward to connect with others and share your presence in the AWS community.
All your posts, wishes, and meaningful interactions are organized within a centralized view so you can easily check them. In the Manage profile page, you can customize your profile, add specific interests and areas of expertise, helping you connect with builders who share your passions. Profile management is seamless: it synchronizes across all AWS services using AWS Builder ID, ensuring your identity remains consistent wherever you engage with AWS offerings.
Visit builder.aws.com, sign up with AWS Builder ID, and claim your unique alias to access all features, including content creation, Wishlist, and community engagement tools.
AWS Builder Center was designed to help you connect, learn, and build with fellow AWS builders, so enjoy your journey together!
Many organizations implement intelligent document processing pipelines in order to extract meaningful insights from an increasing volume of unstructured content (such as insurance claims, loan applications and more). Traditionally, these pipelines require significant engineering efforts, as the implementation often involves using several machine learning (ML) models and orchestrating complex workflows.
As organizations integrate these pipelines to customer facing applications (such as web applications for customers to upload documents such as insurance claims, loan approval documents and more), they set goals to provide insights in real time to increase the end customer experience. These organizations also aim to run and scale these workloads with minimal operational overhead and optimizing on costs. In addition, these organizations require the implementation of common security practices such as identity and access management, to make sure that only authorized and authenticated users are allowed to perform specific actions or access specific resources.
In this post, we show you a solution to simplify the creation of an intelligent document processing pipeline, with a web application for customers to upload their files (documents and images) and derive insights from it (summarization, fields extraction and classification). The solution primarily use serverless technologies, it includes a web socket to receive insights in real time and offers several benefits, such as automatic scaling, built-in high availability, and a pay-per-use billing model to optimize on costs. The solution also includes an authentication layer and an authorization layer to manage identities and permissions.
Solution overview
In this post, we provide an operational overview of the solution, and then describe how to set it up with the following services:
Amazon Cognito to implement an identity platform (user directory and authorization management) for the web application.
Amazon Simple Storage Service (Amazon S3) to store uploaded files (to be processed by the processing pipeline) and web application-related assets.
The solution architecture is illustrated in the following diagram:
Step 1: The user authenticates to the web application (hosted in AWS Amplify). Step 2: Amazon Cognito validates the authentication details. After this, the user is now logged in the web application. Steps 3aand 3b:
Step 3a: The web application (AWS Amplify) subscribes to an AWS AppSync Events web socket.
Step 3b: The AWS AppSync Events web socket calls an AWS Lambda authorizer to confirm that the user is authorized to subscribe to the web socket.
Step 4: The user uploads a file (document or image) using the web application. Step 5: The web application (hosted in AWS Amplify) calls Amazon Cognito (identity pool) to confirm that the user is authorized to upload a file. Step 6: The file is uploaded in an Amazon S3 bucket. Steps 7a and 7b: Upon reception of an Amazon S3 upload event (which notifies that the file was uploaded in the Amazon S3 bucket) in the default Amazon Event Bridge bus, an Amazon Event Bridge bus rule triggers the execution of an AWS Step Functions state machine to start the orchestration workflow. Step 8 (Step to extract fields from a file and classify it):
Step 8a: The first AWS Lambda function starts a new Amazon Bedrock Automation job (this job extracts specific fields from the uploaded file and classify it)
Step 8b: Once the job is completed, the results are stored in an Amazon S3 bucket.
Step 8c and 8d: Upon reception of an Amazon S3 event (which notifies that the results were stored in the Amazon S3 bucket) in the default Amazon Event Bridge, an Amazon Event Bridge bus rule triggers the execution of an AWS Lambda function
Step 8e: An AWS Lambda function publishes the results to the web socket.
Steps 9a and 9b: The second AWS Lambda function submits a prompt to an Amazon Bedrock foundation model (Sonnet 3), to request a summarization in streaming of the uploaded file. The AWS Lambda function publishes the streaming data to the web socket.
After Step 8e and Step 9b, the user can now consult the summarization result and extraction insights of the uploaded file in the web application.
Pre-requisites
To follow along and set up this solution, you must have the following:
An AWS account
A device with access to your AWS account with the following:
Enable Model Access to the Claude 3 Sonnet model in Amazon Bedrock
Note: Deploying this solution will incur costs. Review the pricing page of each AWS service used in this post for details on costs. The cost of running this solution will primarily depend on:
The number of documents (and the size of each document)
A project contains a list of blueprints, and each blueprint defines the fields to extract from different types of files (such as documents or images). In this post, we define a blueprint for a driving license.
Complete the following steps to create an Amazon Bedrock Data Automation project and a driving license blueprint:
Go to the sample-create-idp-with-appsyncevents-and-amazonbedrock folder
cd sample-create-idp-with-appsyncevents-and-amazonbedrock
Initialize the environment (make the shell script files, from the GitHub repository, ready to be used)
chmod +x ./init-env.sh && source ./init-env.sh
Run the script setup-bda-project.sh to create an Amazon Bedrock Data Automation project and a sample driving license blueprint:
./setup-bda-project.sh
Create the web socket and orchestration backend
In this section, we create the following resources:
A user directory for web authentication and authorization, created with an Amazon Cognito user pool. An Amazon Cognito identity pool is also created to validate that users are authorized to upload files via the web application.
A web socket using AWS AppSync Events. This allows our web application to receive real time updates for summarization and extraction results. An authorization layer is also created to protect the web socket from unauthorized users. This is implemented with a Lambda authorizer function to validate that incoming requests include valid authorization details.
A state machine using AWS Step Functions and AWS Lambda to orchestrate the summarization and extraction operations from the unstructured content
Amazon S3 buckets to store files for document processing, and code files for AWS Lambda functions
Complete the following steps to create the web socket and the orchestration backend of the solution, using AWS CloudFormation templates:
Create Amazon S3 buckets used by the solution by running the following script. These buckets will store the files uploaded by users and code files of the AWS Lambda functions used in this solution.
cd $CURRENT_DIR/s3; ./create-s3-buckets.sh
Create the Amazon Cognito user pool and identity pool by running the create-cognito-userpool.sh script:
cd $CURRENT_DIR/cognito; ./create-cognito-userpool.sh
Create the AWS AppSync Events web socket by running the following script:
cd $CURRENT_DIR/appsync/; ./create-appsync-api.sh
Create the AWS Step Functions state machine (including AWS Lambda functions) by running the following scripts:
cd $CURRENT_DIR/orchestration/; ./create-orchestration.sh
Configure the Amazon Cognito user pool
In this section, we create a user in our Amazon Cognito user pool. This user will log in to our web application.
Run the script create-cognito-testuser.sh to create the user (make sure to provide your email address):
cd $CURRENT_DIR/cognito; ./create-cognito-testuser.sh #your-email-address#
After you create the user, you should receive an email with a temporary password in this format: “Your username is #your-email-address# and temporary password is #temporary-password#.”
Keep note of these login details (email address and temporary password) to use later when testing the web application.
Create the web application
In this section, we build a web application using AWS Amplify and publish it to make it accessible through an endpoint URL.
Complete the following steps to create the web application:
Run the script create-webapp.sh to create the web application with AWS Amplify:
cd $CURRENT_DIR/amplify/; ./create-webapp.sh
Run the script deploy.sh to deploy the web application
cd $CURRENT_DIR/amplify/amplify-idp; ./deploy.sh
The web application is now available for testing and a URL should be displayed, as shown in the following screenshot. Take note of the URL to use in the following section.
Test the web application
In this section, we test the web application and upload a file to be processed:
Open the URL of the AWS Amplify application in your web browser.
Enter your login information (your email and the temporary password you received earlier while configuring the user pool in Amazon Cognito) and choose Sign in.
When prompted, enter a new password and choose Change Password.
You should now be able to see a web interface.
Download the sample driving license at this location and upload it via the web application using either your camera or a file in your local device, as illustrated
Once the file is uploaded, you should start receiving responses in the web application. When all the operations are completed, you should see a result equivalent to what is shown in the following screenshot:
To make sure that no additional cost is incurred, remove the resources provisioned in your account. Make sure you’re in the correct AWS account before deleting the following resources.
Important note: You should exercise caution when performing the preceding steps. Make sure you are deleting the resources in the correct AWS account.
You can either navigate to the AWS CloudFormation console to delete the CloudFormation stacks associated to the resources provisioned or use the cleanup helper script cleanup.sh available at the root of the sample-create-idp-with-appsyncevents-and-amazonbedrock folder:
./cleanup.sh #region#
Conclusion
In this post, we walked through a solution to create a document processing pipeline, with a web application using serverless services. Via the web application, we were able to upload a file and receive responses in real time for different types of operations (summarization, extraction of specific fields and classification). First, we created an Amazon Bedrock Data Automation project (with a driving license blueprint). Then we created a web socket along with an orchestration solution using a state machine (AWS Step Functions and AWS Lambda functions). We also configured a user pool to grant a user access to the web application. Finally, we created the frontend of the web application in AWS Amplify.
To provide the best experiences, we use technologies like cookies to store and/or access device information. Consenting to these technologies will allow us to process data such as browsing behavior or unique IDs on this site. Not consenting or withdrawing consent, may adversely affect certain features and functions.
Functional
Always active
The technical storage or access is strictly necessary for the legitimate purpose of enabling the use of a specific service explicitly requested by the subscriber or user, or for the sole purpose of carrying out the transmission of a communication over an electronic communications network.
Preferences
The technical storage or access is necessary for the legitimate purpose of storing preferences that are not requested by the subscriber or user.
Statistics
The technical storage or access that is used exclusively for statistical purposes.The technical storage or access that is used exclusively for anonymous statistical purposes. Without a subpoena, voluntary compliance on the part of your Internet Service Provider, or additional records from a third party, information stored or retrieved for this purpose alone cannot usually be used to identify you.
Marketing
The technical storage or access is required to create user profiles to send advertising, or to track the user on a website or across several websites for similar marketing purposes.


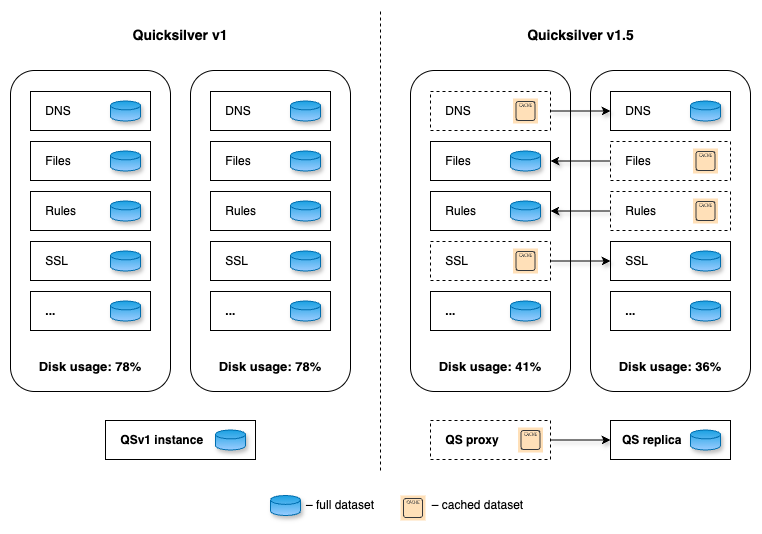
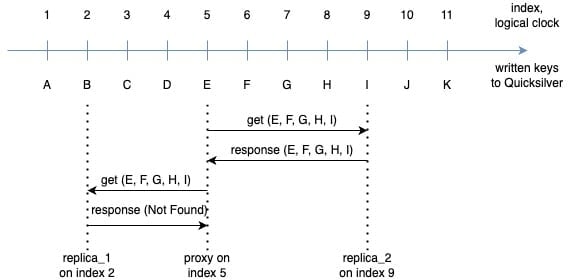
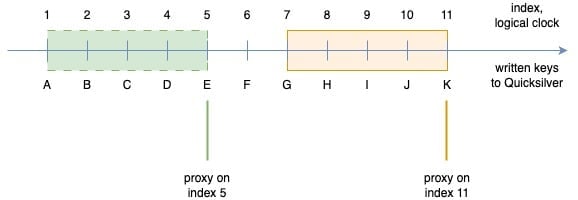
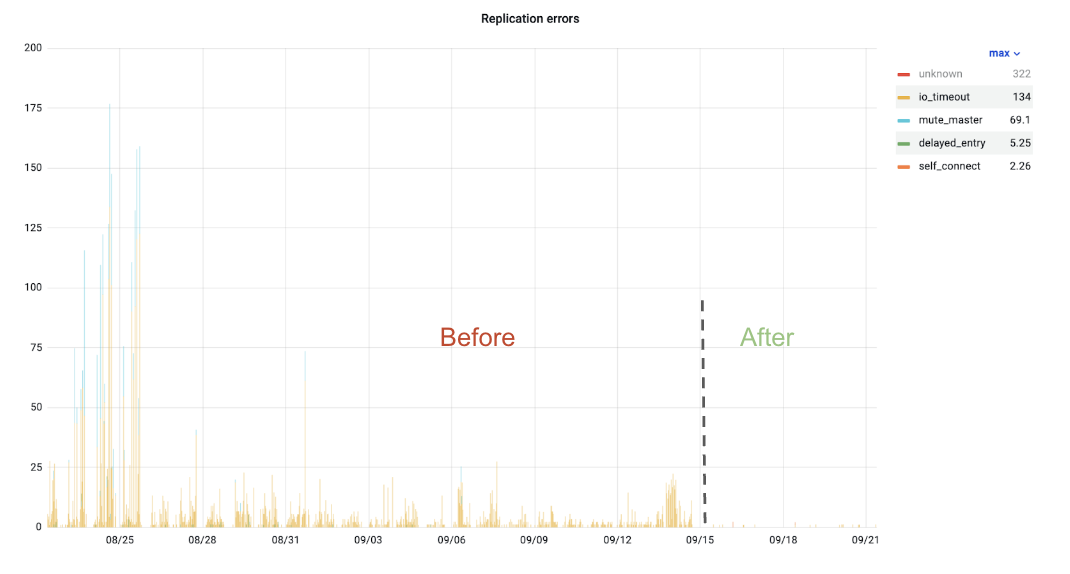
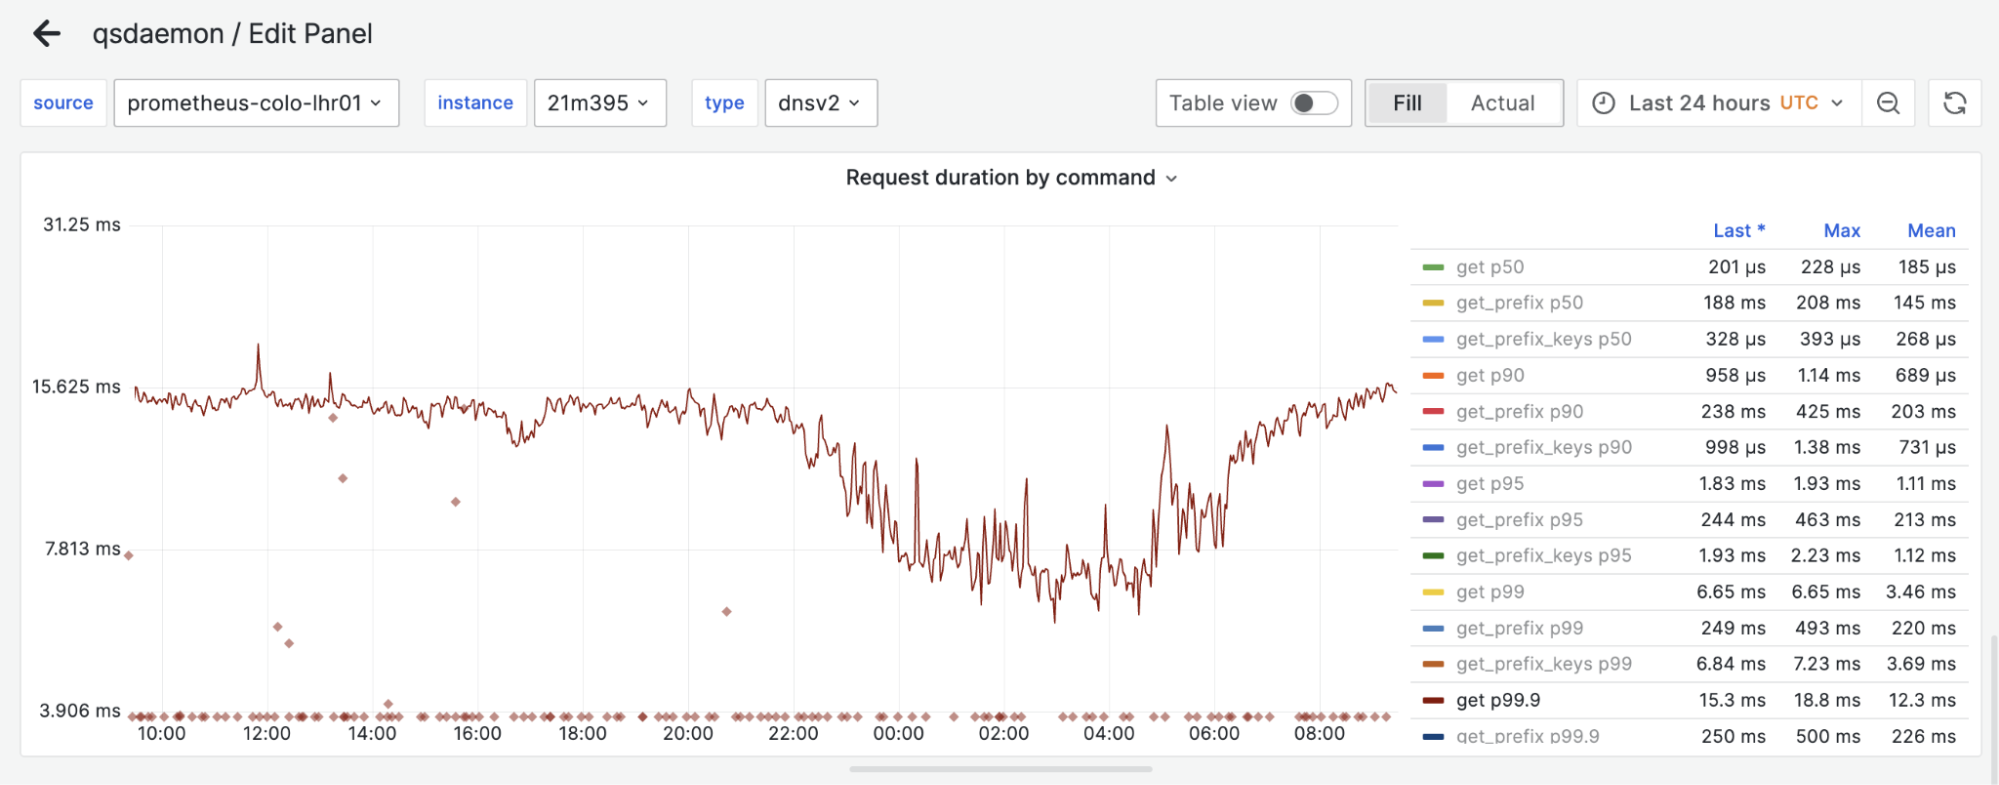
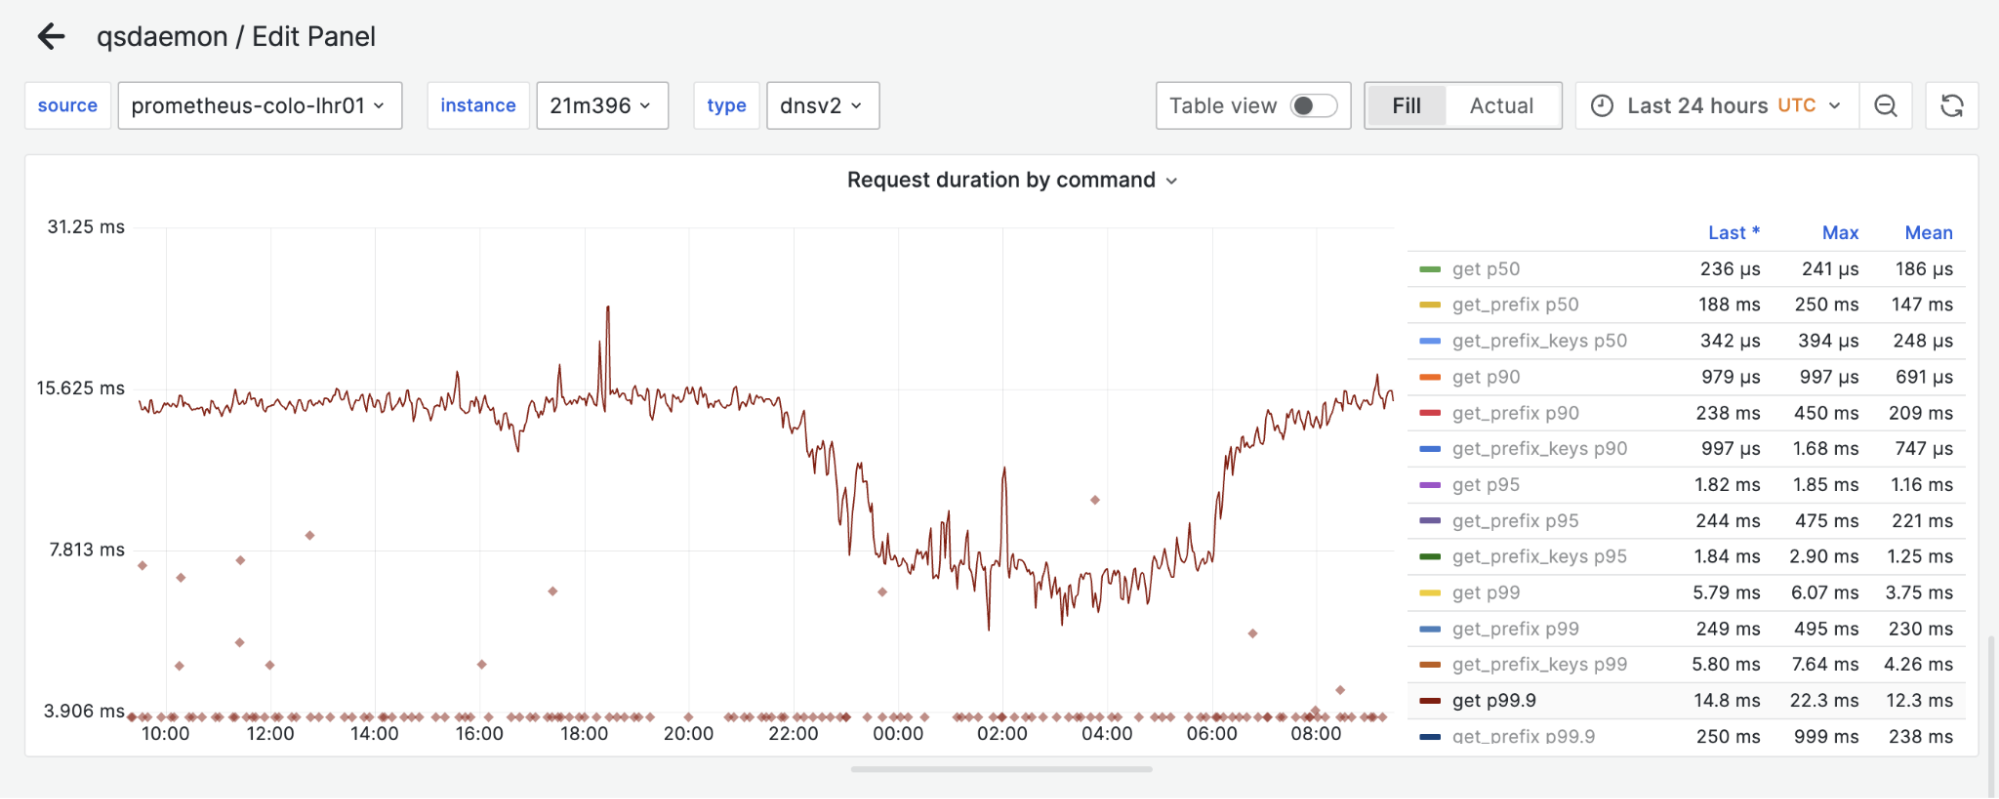


 The following screenshot shows an example of the Spark UI.
  The following screenshot shows an example of the driver logs.
  The following screenshot shows the Executors tab, which provides access to the driver and executor logs.


 In the following example, we run some TPC-DS SQL statements that are used for performance and benchmarks:


 Amit Maindola is a Senior Data Architect focused on data engineering, analytics, and AI/ML at Amazon Web Services. He helps customers in their digital transformation journey and enables them to build highly scalable, robust, and secure cloud-based analytical solutions on AWS to gain timely insights and make critical business decisions.
 Abhilash is a senior specialist solutions architect at Amazon Web Services (AWS), helping public sector customers on their cloud journey with a focus on AWS Data and AI services. Outside of work, Abhilash enjoys learning new technologies, watching movies, and visiting new places.


 Speaking of following people, AWS Builder Center makes it really straightforward to connect and engage with others, serving as the central hub for the AWS technical community. It brings together all the different ways that you can connect with fellow builders. For example, the Who to Follow section introduces you to AWS Heroes, Community Builders, and active community members who are sharing their knowledge and expertise in your areas of interest.


 AWS Builder Center gives you a more personalized and comprehensive way to showcase your AWS journey. Your unique profile comes with a custom URL and shareable QR code, making it straightforward to connect with others and share your presence in the AWS community.
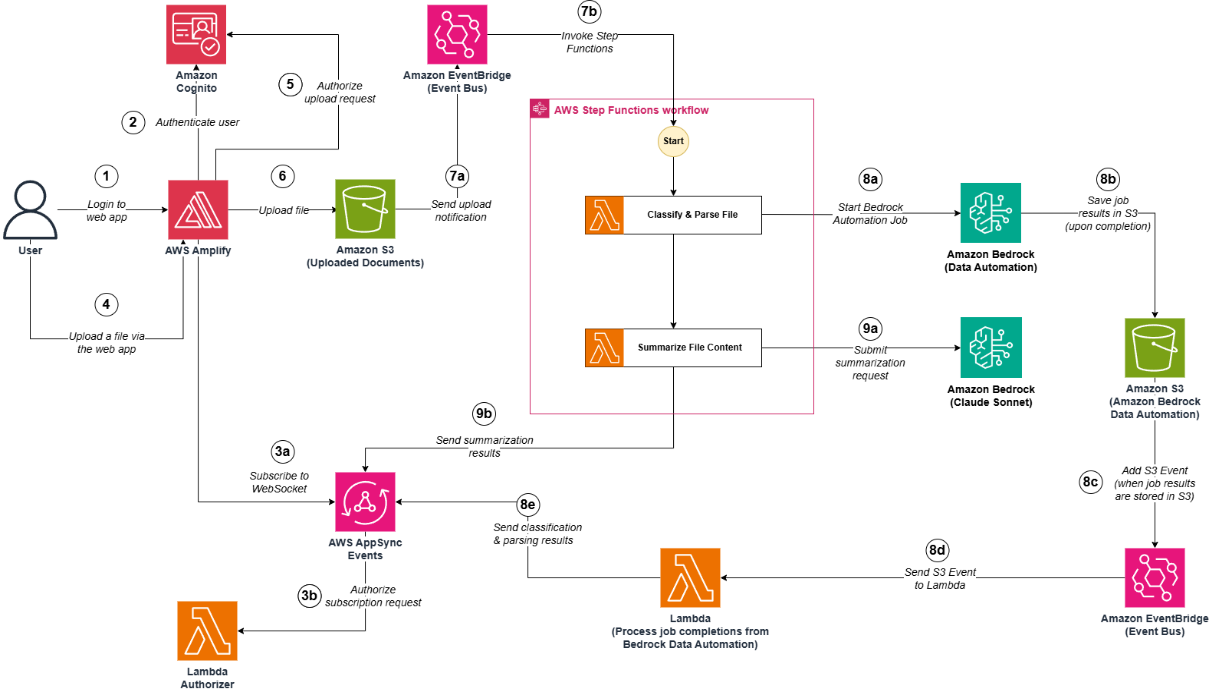
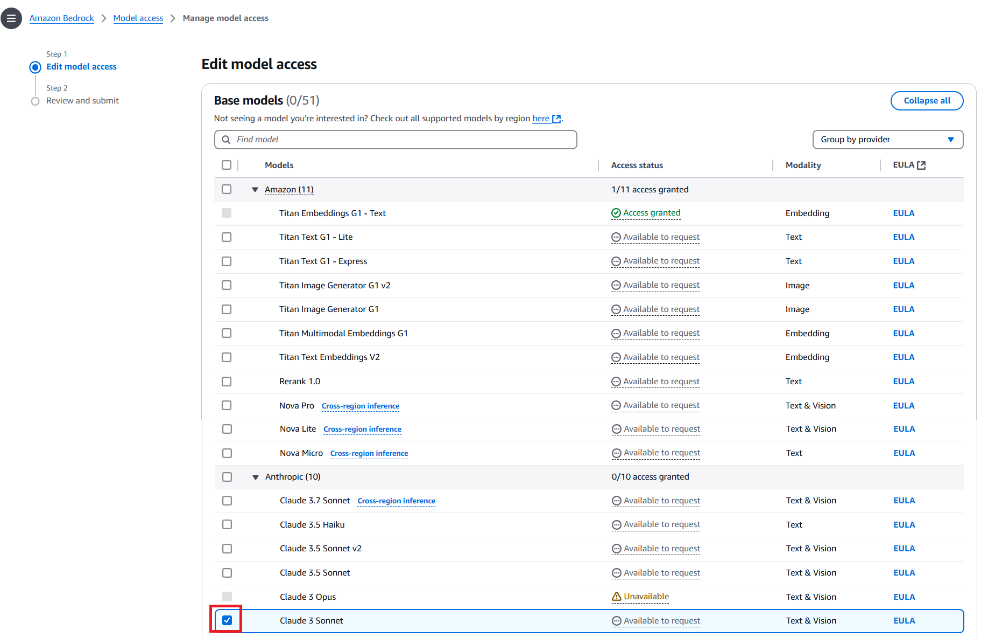
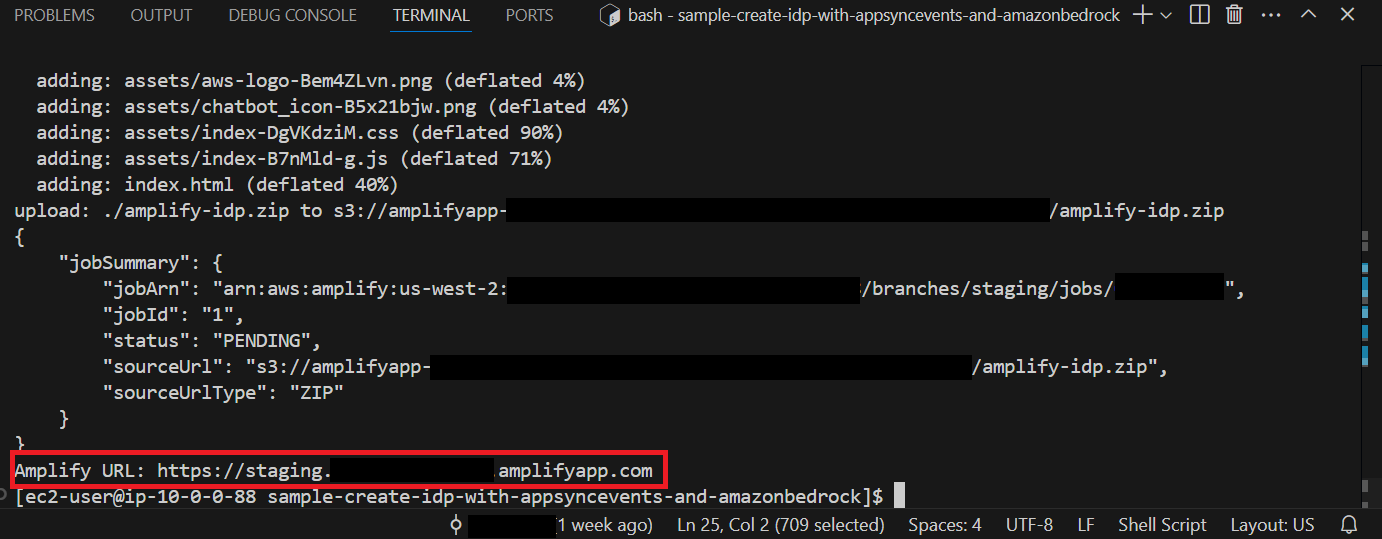
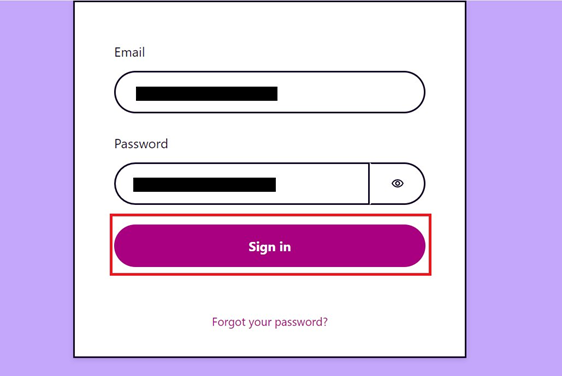
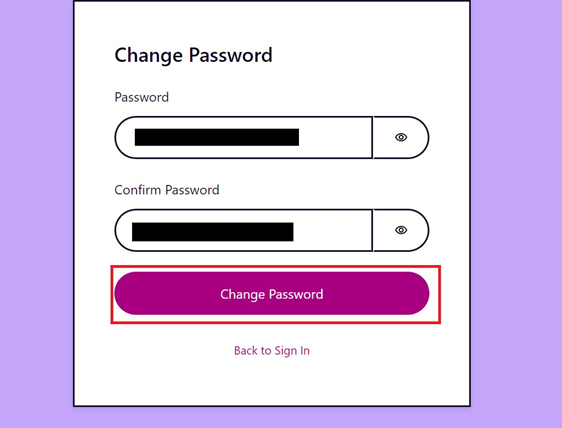
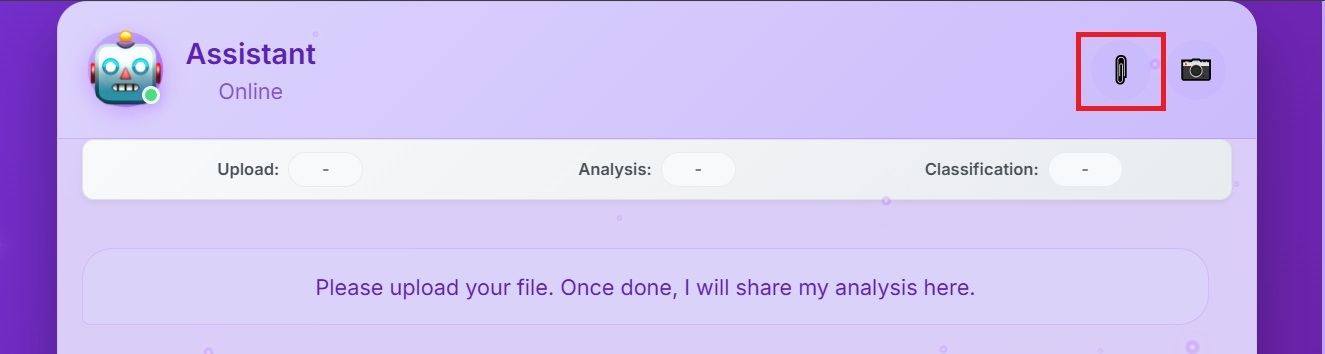
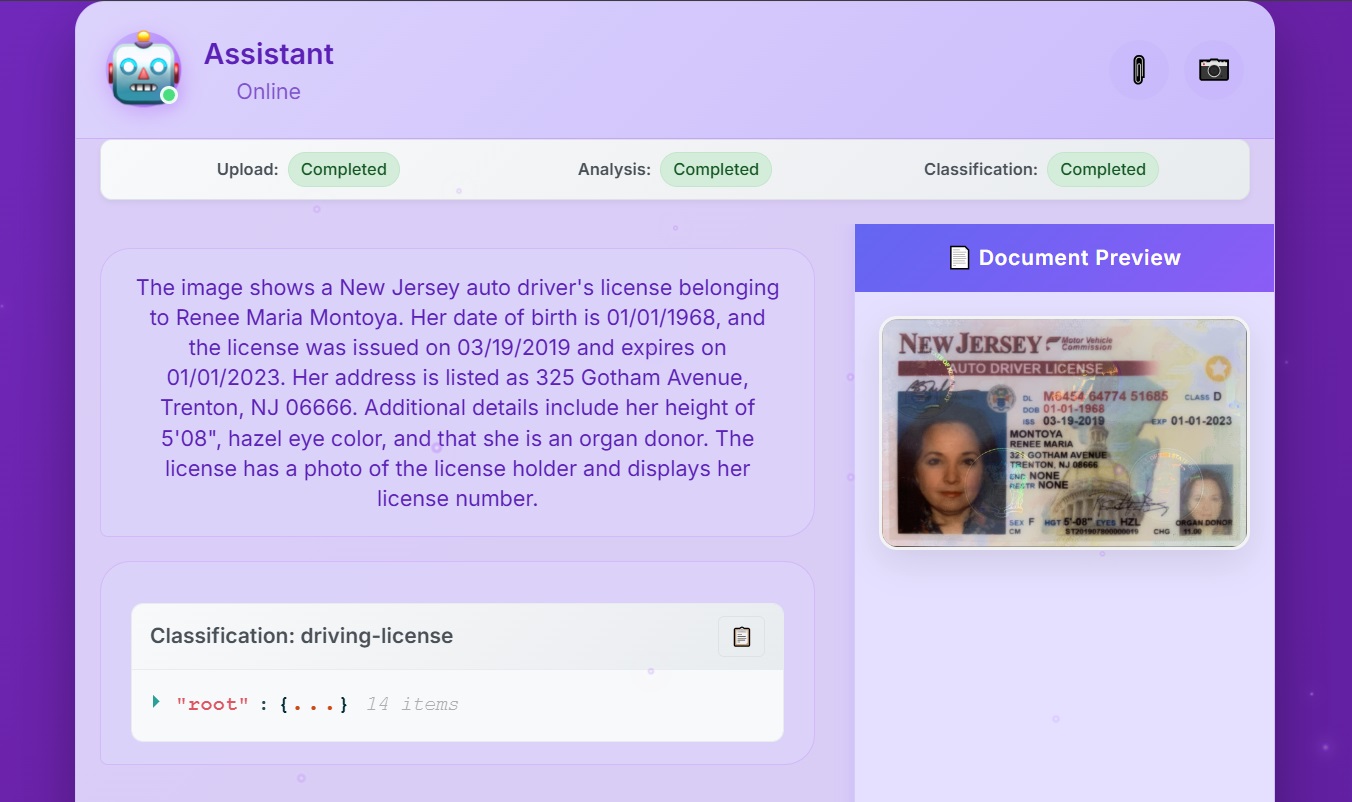