PipeWire: A year in review & a look ahead (Collabora blog)

Post Syndicated from original https://lwn.net/Articles/887212/

The Collabora blog looks
at recent developments
in the PipeWire media system and looks forward
to what is yet to come:

Now in 2022, we are looking to the future. We already have designs
to improve WirePlumber and experiment with new things. On the
short-term horizon, we have plans to rework some parts of
WirePlumber in order to make its configuration more user-friendly
and the scripts easier to work with. We are also planning to
revisit the policy logic and try to go a step beyond what
PulseAudio has ever offered. In addition, we are looking forward to
experimenting with complex cameras to improve how PipeWire and
libcamera work together for an optimal user experience.

How to Run VFX Workflows in the Cloud

Post Syndicated from Molly Clancy original https://www.backblaze.com/blog/how-to-run-vfx-workflows-in-the-cloud/

An hour from Queens. An hour from Jersey. Two hours from Staten Island. That’s how long it would take Molecule VFX IT staff to travel from their homes to the closet in Manhattan that housed the team’s LTO device. All those hours, just to spend five minutes switching out one tape.

It was a huge waste of time, not to mention subway fares. The hassle of tape wasn’t the only reason Molecule decided to make their production workflows fully cloud-based, but the IT team certainly doesn’t mind skipping that trip these days.

Moving production entirely to the cloud allowed Molecule to unlock the value of their artists’ time as well as the IT staff to support them, and save money in the process. If your media team has been contemplating a fully cloud-based workflow, read on to learn how Molecule did it—including how they managed to maintain the ability to move data from the cloud back to tape on demand without maintaining on-premises tape infrastructure.

About Molecule VFX

Molecule VFX is a visual effects studio based in New York and Los Angeles that provides the elemental building blocks to tell a customer’s story. They have been servicing episodic television and feature films, like the Apple TV series, “Dickinson,” and the Hulu series, “Only Murders in the Building,” since 2005.

Molecule’s Case for the Cloud

Visual effects artists want to be able to hop into a new script, work on it, render it, review it, QC it, and call it done. Their work is the most valuable element of the business. Anything that gets in the way of that or slows down the workflow directly impacts the company’s success, and an on-premises system was doing exactly that.

  • With IT staff working from home, LTO maintenance tied them up for hours—time that could have been spent helping Molecule’s visual effects artists create.
  • Beyond tape, the team managed a whole system of machines, networks, and switches. Day-to-day issues could knock out the company’s ability to get work done for entire days.

They knew moving to the cloud would optimize staff time and mitigate those outages, but it didn’t happen overnight. Because much of their business already happens in the digital workspace, Molecule had been slowly moving to the cloud over the past few years. The shift to remote work due to the COVID-19 pandemic accelerated their transition.

Work from the Amazon Original Movie, “Bliss,” featuring Owen Wilson.

Strategies for Moving VFX Workflows to the Cloud

Molecule’s Full Stack Software Architect, Ben Zenker, explained their approach. Through the process, he identified a few key strategies that made the transition a success, including:

  • Taking a phased approach while deciding between hybrid and fully cloud-based workflows.
  • Reading the fine print when comparing providers.
  • Rolling their own solutions where possible.
  • Thoroughly testing workflows.
  • Repurposing on-premises infrastructure.

1. Take a Phased Approach

Early in the transition, the Molecule team was still using the tape system and an on-premises Isilon server for some workloads. Because they were still deciding if they were going to have a hybrid system or go fully cloud, they took an ad hoc approach to identifying what data was going to be in Backblaze B2 Cloud Storage and what production infrastructure was going to be in CoreWeave, a cloud compute partner that specializes in VFX workloads. Ben explained, “Once we decided definitively we wanted to be fully in the cloud, connecting CoreWeave and Backblaze was simple—if it was on CoreWeave, it was getting backed up in Backblaze B2 nightly.”

2. Read the Fine Print

The team planned to sync incremental backups to the cloud every night. That meant their data would change every day as staff deleted or updated files. They figured out early on that retention minimums were a non-starter. Some cloud providers charge for deleted data for 30, 60, or even 90 days, meaning Molecule would be forced to pay for storage on data they had deleted months ago. But not all cloud providers are transparent about their retention policies. Molecule took the time to track down these policies and compare costs.

“Backblaze was the only service that met our business requirements without a retention minimum.”
—Ben Zenker, Full Stack Software Architect, Molecule VFX

3. Roll Your Own Solutions Where Possible

The team creates a lot of their own web tools to interact with other technology, so it was a relatively easy lift to set up rclone commands to run syncs of their production data nightly to Backblaze B2. Using rclone, they also built a variable price reporting tool so that higher ups could easily price out different projects and catch potential problems like a runaway render.

“There are hundreds of options that you can pass into rclone, so configuring it involved some trial and error. Thankfully it’s open-source, and Backblaze has documentation. I made some small tweaks and additions to the tool myself to make it work better for us.”
—Ben Zenker, Full Stack Software Architect, Molecule VFX

4. Test and Test Again

In reflecting on the testing phase they went through, Ben acknowledges he could have been more liberal. He noted, “I went into it a little cautious because I didn’t want to end up incurring big charges for a test, but Backblaze has all sorts of safeguards in place. You can set price limits and caps, which was great for the testing period.”

5. Repurpose On-premises Infrastructure

The on-premises Isilon server and the physical tape system are no longer part of the active project workflow. They still utilized those devices to host some core services for a time—a firewall, authentication, and a VPN that some members used. In the end, they decided to fully retire all on-premises infrastructure, but repurposing the on-premises infrastructure allowed them to maximize its useful life.

But What If Clients Demand Tape?

While Molecule is more than happy to have modernized their workflows in the cloud, there are still some clients—and major clients at that—who require that contractors save final projects on tape for long-term storage. It no longer made sense to have staff trained on how to use the LTO system, so when a customer asked for a tape copy, they reached out to Backblaze for advice.

They needed a turnkey solution that they didn’t have to manage, and they definitely didn’t want to have to resort to reinvesting and managing tape hardware. Backblaze partner, TapeArk, fit the bill. TapeArk typically helps clients get data off of tape and into the cloud, but in this case they reversed the process. Molecule sent them a secure token to the exact piece of data they needed. TapeArk managed the download, put it on tape, and shipped it to the client.

If Molecule needs to send tape copies to clients in the future, they have an easy, hands-off solution and they don’t have to maintain an LTO system for infrequent use. Ben was grateful for the partnership and easy solution.

Work from the Apple TV series, “Dickinson,” featuring Hailee Steinfeld.

Cloud Workflows Free Up a Month of Time

Now that the staff no longer has to manage an LTO tape system, the team has recouped at least 30 payroll days a year that can be dedicated to supporting artists. Ben noted that with the workflows in the cloud, the nature of the IT workload has changed, and the team definitely appreciates having that time back to respond to changing demands.

Ready to move your VFX workflows to the cloud? Start testing today with 10GB of data storage free from Backblaze B2.

The post How to Run VFX Workflows in the Cloud appeared first on Backblaze Blog | Cloud Storage & Cloud Backup.

Building a serverless image catalog with AWS Step Functions Workflow Studio

Post Syndicated from James Beswick original https://aws.amazon.com/blogs/compute/building-a-serverless-image-catalog-with-aws-step-functions-workflow-studio/

This post is written by Pascal Vogel, Associate Solutions Architect, and Benjamin Meyer, Sr. Solutions Architect.

Workflow Studio is a low-code visual workflow designer for AWS Step Functions that enables the orchestration of serverless workflows through a guided interactive interface. With the integration of Step Functions and the AWS SDK, you can now access more than 200 AWS services and over 9,000 API actions in your state machines.

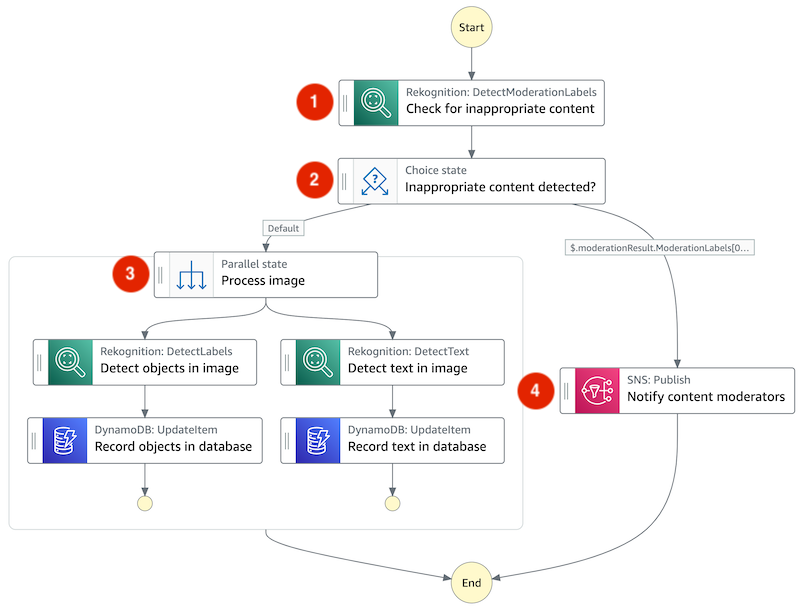
This walkthrough uses Workflow Studio to implement a serverless image cataloging pipeline. It includes content moderation, automated tagging, and parallel image processing. Workflow Studio allows you to set up API integrations to other AWS services quickly with drag and drop actions, without writing custom application code.

Solution overview

Photo sharing websites often allow users to publish user-generated content such as text, images, or videos. Manual content review and categorization can be challenging. This solution enables the automation of these tasks.

Workflow overview

In this workflow:

  1. An image stored in Amazon S3 is checked for inappropriate content using the Amazon Rekognition DetectModerationLabels API.
  2. Based on the result of (1), appropriate images are forwarded to image processing while inappropriate ones trigger an email notification.
  3. Appropriate images undergo two processing steps in parallel: the detection of objects and text in the image via Amazon Rekognition’s DetectLabels and DetectText APIs. The results of both processing steps are saved in an Amazon DynamoDB table.
  4. An inappropriate image triggers an email notification for manual content moderation via the Amazon Simple Notification Service (SNS).

Prerequisites

To follow this walkthrough, you need:

  1. An AWS account.
  2. An AWS user with AdministratorAccess (see the instructions on the AWS Identity and Access Management (IAM) console).
  3. AWS CLI using the instructions here.
  4. AWS Serverless Application Model (AWS SAM) CLI using the instructions here.

Initial project setup

Get started by cloning the project repository from GitHub:

git clone https://github.com/aws-samples/aws-step-functions-image-catalog-blog.git

The cloned repository contains two AWS SAM templates.

  1. The starter directory contains a template. It deploys AWS resources and permissions that you use later for building the image cataloging workflow.
  2. The solution directory contains a template that deploys the finished image cataloging pipeline. Use this template if you want to skip ahead to the finished solution.

Both templates deploy the following resources to your AWS account:

  • An Amazon S3 bucket that holds the image files for the catalog.
  • A DynamoDB table as the data store of the image catalog.
  • An SNS topic and subscription that allow you to send an email notification.
  • A Step Functions state machine that defines the processing steps in the cataloging pipeline.

To follow the walkthrough, deploy the AWS SAM template in the starter directory using the AWS SAM CLI:

cd aws-step-functions-image-catalog-blog/starter
sam build
sam deploy --guided

Configure the AWS SAM deployment as follows. Input your email address for the parameter ModeratorEmailAddress:

Configuring SAM deploy

During deployment, you receive an email asking you to confirm the subscription to notifications generated by the Step Functions workflow. In the email, choose Confirm subscription to receive these notifications.

Subscription message

Confirm successful resource creation by going to the AWS CloudFormation console. Open the serverless-image-catalog-starter stack and choose the Stack info tab:

CloudFormation stack

View the Outputs tab of the CloudFormation stack. You reference these items later in the walkthrough:

Outputs tab

Implementing the image cataloging pipeline

Accessing Step Functions Workflow Studio

To access Step Functions in Workflow Studio:

  1. Access the Step Functions console.
  2. In the list of State machines, select image-catalog-workflow-starter.
  3. Choose the Edit button.
  4. Choose Workflow Studio.

Workflow Studio

Workflow Studio consists of three main areas:

  1. The Canvas lets you modify the state machine graph via drag and drop.
  2. The States Browser lets you browse and search more than 9,000 API Actions from over 200 AWS services.
  3. The Inspector panel lets you configure the properties of state machine states and displays the Step Functions definition in the Amazon States Language (ASL).

For the purpose of this walkthrough, you can delete the Pass state present in the state machine graph. Right click on it and choose Delete state.

Auto-moderating content with Amazon Rekognition and the Choice State

Use Amazon Rekognition’s DetectModerationLabels API to detect inappropriate content in the images processed by the workflow:

  1. In the States browser, search for the DetectModerationLabels API action.
  2. Drag and drop the API action on the state machine graph on the canvas.

Drag and drop

In the Inspector panel, select the Configuration tab and add the following API Parameters:

{
  "Image": {
    "S3Object": {
      "Bucket.$": "$.bucket",
      "Name.$": "$.key"
    }
  }
}

Switch to the Output tab and check the box next to Add original input to output using ResultPath. This allows you to pass both the original input and the task’s output on to the next state on the state machine graph.

Input the following ResultPath:

$.moderationResult

Step Functions enables you to make decisions based on the output of previous task states via the choice state. Use the result of the DetectModerationLabels API action to decide how to proceed with the image:

  1. Access the Flow tab in the States browser. Drag and drop a Choice state to the state machine graph below the DetectModerationLabels API action.
  2. In the States browser, choose Flow.
  3. Select a Choice state and place it after the DetectModerationLabels state on the graph.
  4. Select the added Choice state.
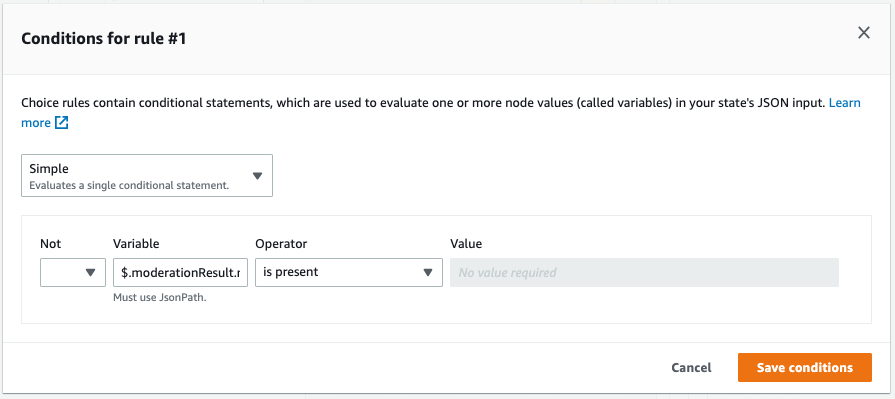
  5. In the Inspector panel, choose Rule #1 and select Edit.
  6. Choose Add conditions.
  7. For Variable, enter $.moderationResult.ModerationLabels[0].
  8. For Operator, choose is present.
  9. Choose Save conditions.
    Conditions for rule #1

If Amazon Rekognition detects inappropriate content, the workflow notifies content moderators to inspect the image manually:

  1. In the States browser, find the SNS Publish API Action.
  2. Drag the Action into the Rule #1 branch of the Choice state.
  3. For API Parameters, select the SNS topic that is visible in the Outputs of the serverless-image-catalog-starter stack in the CloudFormation console.

SNS topic in Workflow Studio

Speeding up image cataloging with the Parallel state

Appropriate images should be processed and included in the image catalog. In this example, processing includes the automated generation of tags based on objects and text identified in the image.

To accelerate this, instruct Step Functions to perform these tasks concurrently via a Parallel state:

  1. In the States browser, select the Flow tab.
  2. Drag and drop a Parallel state onto the Default branch of the previously added Choice state.
  3. Search the Amazon Rekognition DetectLabels API action in the States browser
  4. Drag and drop it inside the parallel state.
  5. Configure the following API parameters:
    {
      "Image": {
        "S3Object": {
          "Bucket.$": "$.bucket",
          "Name.$": "$.key"
        }
      }
    }
    
  6. Switch to the Output tab and check the box next to Add original input to output using ResultPath. Set the ResultPath to $.output.

Record the results of the Amazon Rekognition DetectLabels API Action to the DynamoDB database:

  1. Place a DynamoDB UpdateItem API Action inside the Parallel state below the Amazon Rekognition DetectLabels API action.
  2. Configure the following API Parameters to save the tags to the DynamoDB table. Input the name of the DynamoDB table visible in the Outputs of the serverless-image-catalog-starter stack in the CloudFormation console:
{
  "TableName": "<DynamoDB table name>",
  "Key": {
    "Id": {
      "S.$": "$.key"
    }
  },
  "UpdateExpression": "set detectedObjects=:o",
  "ExpressionAttributeValues": {
    ":o": {
      "S.$": "States.JsonToString($.output.Labels)"
    }
  }
}

This API parameter definition makes use of an intrinsic function to convert the list of objects identified by Amazon Rekognition from JSON to String.

Intrinsic functions

In addition to objects, you also want to identify text in images and store it in the database. To do so:

  1. Drag and drop an Amazon Rekognition DetectText API action into the Parallel state next to the DetectLabels Action.
  2. Configure the API Parameters and ResultPath identical to the DetectLabels API Action.
  3. Place another DynamoDB UpdateItem API Action inside the Parallel state below the Amazon Rekognition DetectText API Action. Set the following API Parameters and input the same DynamoDB table name as before.
{
  "TableName": "<DynamoDB table name>",
  "Key": {
    "Id": {
      "S.$": "$.key"
    }
  },
  "UpdateExpression": "set detectedText=:t",
  "ExpressionAttributeValues": {
    ":t": {
      "S.$": "States.JsonToString($.output.TextDetections)"
    }
  }
}

To save the state machine:

  1. Choose Apply and exit.
  2. Choose Save.
  3. Choose Save anyway.

Finishing up and testing the image cataloging workflow

To test the image cataloging workflow, upload an image to the S3 bucket created as part of the initial project setup. Find the name of the bucket in the Outputs of the serverless-image-catalog-starter stack in the CloudFormation console.

  1. Select the image-catalog-workflow-starter state machine in the Step Functions console.
  2. Choose Start execution.
  3. Paste the following test event (use your S3 bucket name):
    {
        "bucket": "<S3-bucket-name>",
        "key": "<Image-name>.jpeg"
    }
    
  4. Choose Start execution.

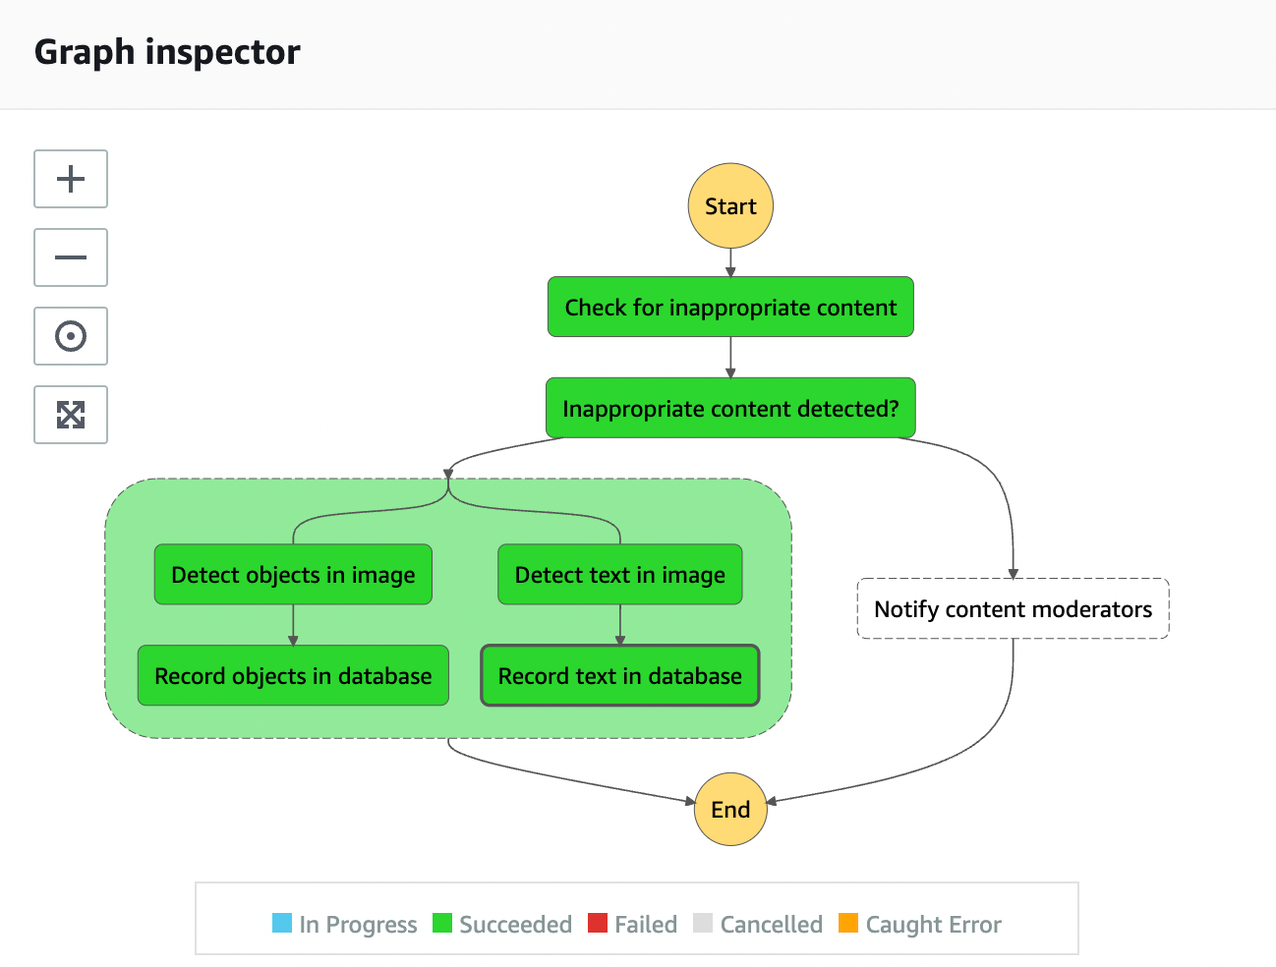
Once the execution has started, you can follow the state of the state machine live in the Graph inspector. For an appropriate image, the result will look as follows:

Graph inspector

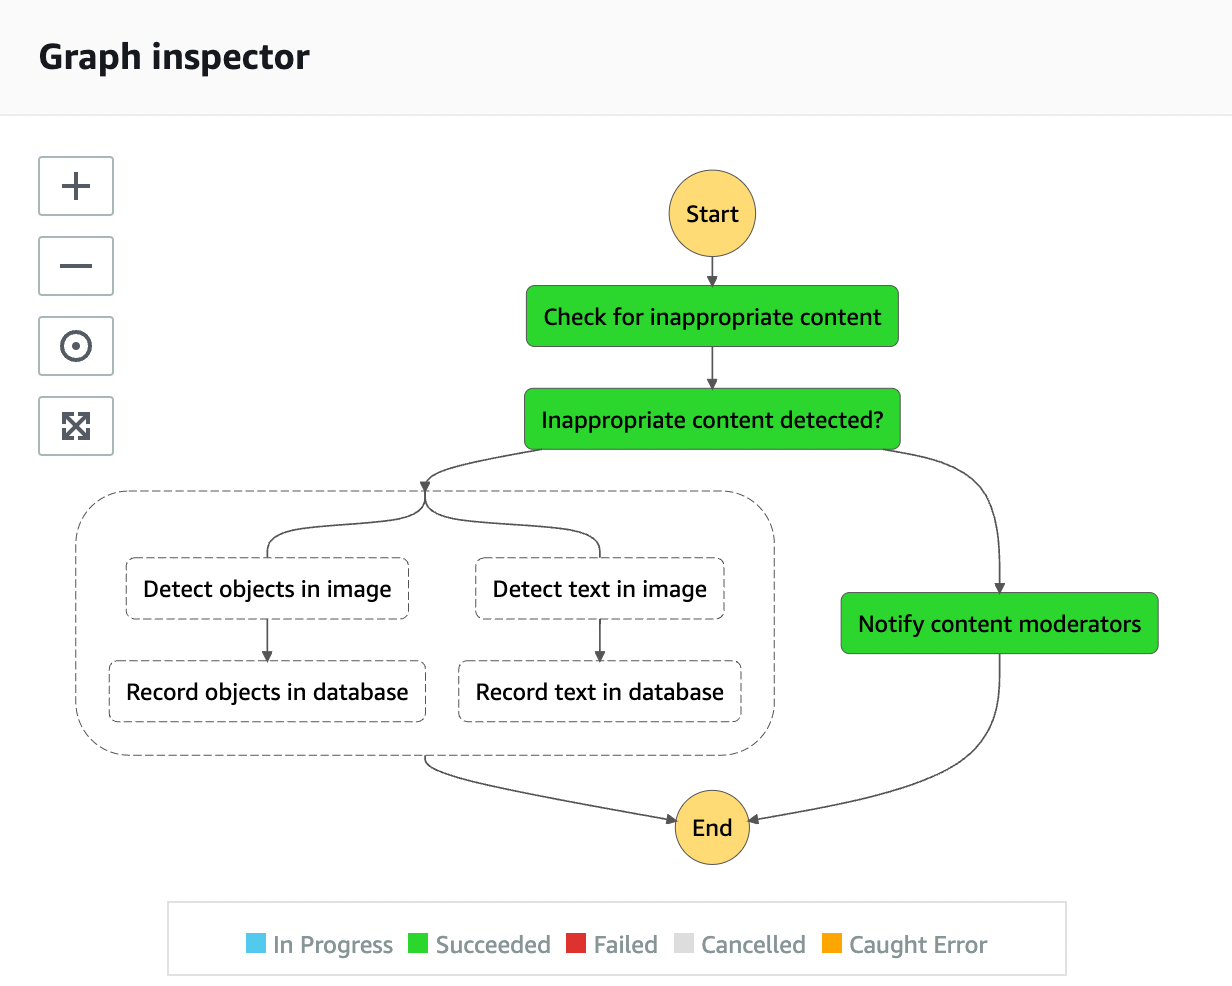
Next, repeat the test process with an image that Amazon Rekognition classifies as inappropriate. Find out more about inappropriate content categories here. This produces the following result:

Graph inspector

You receive an email notifying you regarding the inappropriate image and its properties.

Cleaning up

To clean up the resources provisioned as part of the solution run the following command in the aws-step-functions-image-catalog-blog/starter directory:

sam delete

Conclusion

This blog post demonstrates how to implement a serverless image cataloging pipeline using Step Functions Workflow Studio. By orchestrating AWS API actions and flow states via drag and drop, you can process user-generated images. This example checks images for appropriateness and generates tags based on their content without custom application code.

You can now expand and improve this workflow by triggering it automatically each time an image is uploaded to the Amazon S3 bucket or by adding a manual approval step for submitted content. To find out more about Workflow Studio, visit the AWS Step Functions Developer Guide.

For more serverless learning resources, visit Serverless Land.

Breaking the Bias – Women at AWS Developer Relations

Post Syndicated from Rashmi Nambiar original https://aws.amazon.com/blogs/aws/breaking-the-bias-women-at-aws-developer-relations/

Today for International Women’s Day we’re joined by a special guest writer, Rashmi Nambiar. She’s here to share her conversations with a few other members of the AWS Developer Relations team, talking about their work and experience as women in tech. Enjoy!

– The AWS News Blog Team


When I was contemplating joining AWS, many warned me about boarding the “rocket ship.” But I took the leap of faith. It has been four years since then. Now when I look back, the growth trajectory is something that I am proud of, from starting my AWS journey with a regional role in India to going global and now driving the Worldwide Developer Marketing Strategy. #HereatAWS, I get to choose the direction of my career and prioritize my time between family and work.

At AWS, we believe that the future of technology is accessible, flexible, and inclusive. So we take it very seriously when we say, “All Builders Welcome.” As a woman in tech, I have felt that strong sense of belonging with the team and acceptance for who I am.

Being part of the AWS Developer Relations (DevRel) team, I get to meet and work with awesome builders within and outside of the organization who are changing the status quo and pushing technological boundaries. This International Women’s Day, I took the opportunity to talk to some of the women at AWS DevRel about their role as tech/dev advocates.

Veliswa Boya

Headshot of Veliswa Boya

Veliswa Boya, Senior Developer Advocate

What is it that you like about being a developer advocate at AWS?
“Becoming a developer advocate is something I didn’t even dare to dream about. Some of us go through life and at some point admit that some dreams are just not meant for us. That today I am a developer advocate at AWS working with the builder community of sub-Saharan Africa and beyond is one of the most fulfilling and exciting roles I can recall throughout my entire tech career. I especially enjoy working with those new to AWS and new to tech in general, so my role spans technical content creation and delivery all the way to the mentoring of community members. I enjoy working for an organization that’s at the forefront of innovation, but at the same time not innovating for the sake of innovating, but always being customer obsessed and innovating on behalf of the customer.”

You are an icon of possibilities with many titles. How did the transition from AWS Hero to AWS employee work out for you?
“I became an AWS Hero in May 2020, and with that, I became the first woman out of Africa to ever be named an AWS Hero. I have always enjoyed sharing knowledge. Every little bit I learn, I always make sure to share. I believe that this—and more—led to my nomination. Joining AWS as a developer advocate is awesome. I continue to live the passion that led to me being a Hero, sharing knowledge with others and at the same time learning from both the community and my wonderful peers.”

Antje Barth

Headshot photo of Antje Barth

Antje Barth, Principal Developer Advocate – AI/ML

What do you like about your role as an AI/ML specialist on the AWS Developer Relations Team?
“I’ve always been excited about technology and the speed of innovation in this field. What I like most about my role as a principal developer advocate for AI/ML is that I get to share this passion and enable customers, developers, and students to build amazing things. I recently organized a hackathon asking participants to think about creative ways of using machine learning to improve disaster response. And I was simply blown away by all the ideas the teams came up with.”

You have authored books like Data Science on AWS. What is your guidance for someone planning to get on the publishing path?
“The piece of advice I would give anyone interested in becoming a book author: Find the topic you are really passionate about, dive into the topic, and start developing content—whether it’s blog posts, code samples, or videos. Become a subject matter expert and make yourself visible. Speak at meetups, submit a talk to a conference. Grow your network. Find peers, discuss your ideas, ask for feedback, make sure the topic is relevant for a large audience group. And eventually, reach out to publishers, share your content ideas and collected feedback, and put together a book proposal.”

Lena Hall

Headshot photo of Lena Hall

Lena Hall, Head of Developer Relations – North America

What excites you about AWS Developer Relations?
“I love it because AWS culture empowers anyone at AWS, including developer advocates, to always advocate for the customer and the community. While doing that, no matter how hard it is or how much friction you run into, you can be confident in doing the right thing for our customers and community. This translates to our ability to influence internally across the company, using strong data and logical narratives to support our improvement proposals.”

You have recently joined the team as the DevRel Head for North America. What does it take to lead a team of builders?
“It is important to recognize that people on your team have unique strengths and superpowers. I found it valuable to identify those early on and offer paths to develop them even more. In many cases, it leads to a bigger impact and improved motivation. It is also crucial to listen to your team, be supportive and welcoming of ideas, and protective of their time.”

Rohini Gaonkar

Headshot photo of Rohini Gaonkar

Rohini Gaonkar, Senior Developer Advocate

You have been with AWS for over eight years. What attracted you to developer advocacy?
“As a developer advocate, I love being autonomous, and I have the freedom to pick the tech of my choice. The other fun part is to work closely with the community—my efforts, however small, help someone in their career, and that is the most satisfying part of my work.”

You have worked in customer support, solutions architect, and technical evangelist roles. What’s your tip on developing multiple technical skills?
“Skills are like flowers in your bouquet; you should keep adding beautiful colors to it. Sometimes it takes months to years to develop a skill, so keep an eye on your next thing and start adding the skills for it today. Interestingly, at AWS, the ‘Learn and be curious’ leadership principle encourages us to always find ways to improve ourselves, to explore new possibilities and act on them.”

Jenna Pederson

Headshot photo of Jenna Pederson

Jenna Pederson, Senior Developer Advocate

What is your reason for taking up a developer advocate role at AWS?
“I like being a developer advocate at AWS because it lets me scale my impact. I get to work with and help so many more builders gain knowledge, level up their skills, and bring their ideas to life through technology.”

It is such a delight to watch your presentations and demo at events and other programs. What is your advice to people who want to get into public speaking?
“If you’re a new speaker, talk about what you’re learning, even if you think everyone is talking about the same thing. You will have a fresh perspective on whatever it is.”

Kris Howard

Headshot photo of Kris Howard

Kris Howard, DevRel Manager

Why did you join the Developer Relations Team?
“I joined DevRel because I love being on stage and sharing my creativity and passion for tech with others. The most rewarding part is when someone tells you that you inspired them to learn a new skill, or change their career, or stretch themselves to reach a new goal.”

Since you have worked in different geographies, what would you say to someone who is exploring working in different countries?
“The last two years have really emphasized that if you want to see the world, you should take advantage of every opportunity you get. That’s one of the benefits of Amazon: that there are so many career paths available to you in lots of different places! As a hiring manager, I was always excited to get applications from internal transfers, and in 2020 I got the chance to experience it from the other side when I moved with my partner from Sydney to Munich. It was a challenging time to relocate, but in retrospect, I’m so glad we did.”

Join Us!

Interested in working with DevRel Team? Here are some of the available opportunities.

Deploying service-mesh-based architectures using AWS App Mesh and Amazon ECS

Post Syndicated from Kesha Williams original https://aws.amazon.com/blogs/architecture/deploying-service-mesh-based-architectures-using-aws-app-mesh-and-amazon-ecs/

This International Women’s Day, we’re featuring more than a week’s worth of posts that highlight female builders and leaders. We’re showcasing women in the industry who are building, creating, and, above all, inspiring, empowering, and encouraging everyone—especially women and girls—in tech.


Service-mesh-based architectures provide visibility and control for microservices (a group of loosely coupled services that function together to make an application operate) by providing a consistent way to route and monitor traffic between them. They often appear in concert with containers and microservices in modern, cloud-native development. Containers help simplify the build, test, and deploy phases of the code pipeline for a given microservice. Microservices also offer many benefits over monoliths: faster speed-to-market; better resiliency; increased scalability; and independent, reusable components.

Despite these benefits, not all organizations use containers and microservices. Why? Because refactoring monoliths can be architecturally challenging. It increases the complexity of your workload by adding many, sometimes thousands, of services. These services must then be monitored. The services also have to communicate with each other, so you need to properly route and monitor traffic. Adding services also means there are more APIs and databases that need protection.

If this sounds like an issue you’ve encountered or one you might need help with in the future, you’ll benefit from using a service mesh, a dedicated infrastructure layer for governing microservices and facilitating service-to-service communications. In this post, we’ll explain how to use AWS App Mesh to provide visibility and control for microservices by providing a consistent way to route and monitor traffic between them.

How will a service mesh help me govern my workload?

A service mesh helps you run a fast, reliable, and secure network of microservices, and it can help alleviate many of the pain points encountered when running microservices:

  1. Decouples governance from business logic
  2. Adds service discovery
  3. Maintains load balancing
  4. Provides traffic control
  5. Provides additional observability and monitoring capabilities
  6. Adds resiliency and health checks
  7. Increases security

How does a service mesh work?

A service mesh consists of two high-level components: a control plane and a data plane.

The control plane manages all of the individual microservices in the data plane and provides processes to manipulate and observe the entire application.

The data plane intercepts and processes calls between the different microservices. The data plane is typically implemented as a proxy, which runs alongside each microservice as a sidecar. A sidecar is a container that is automatically injected into the microservice at run time.

Architecture walkthrough

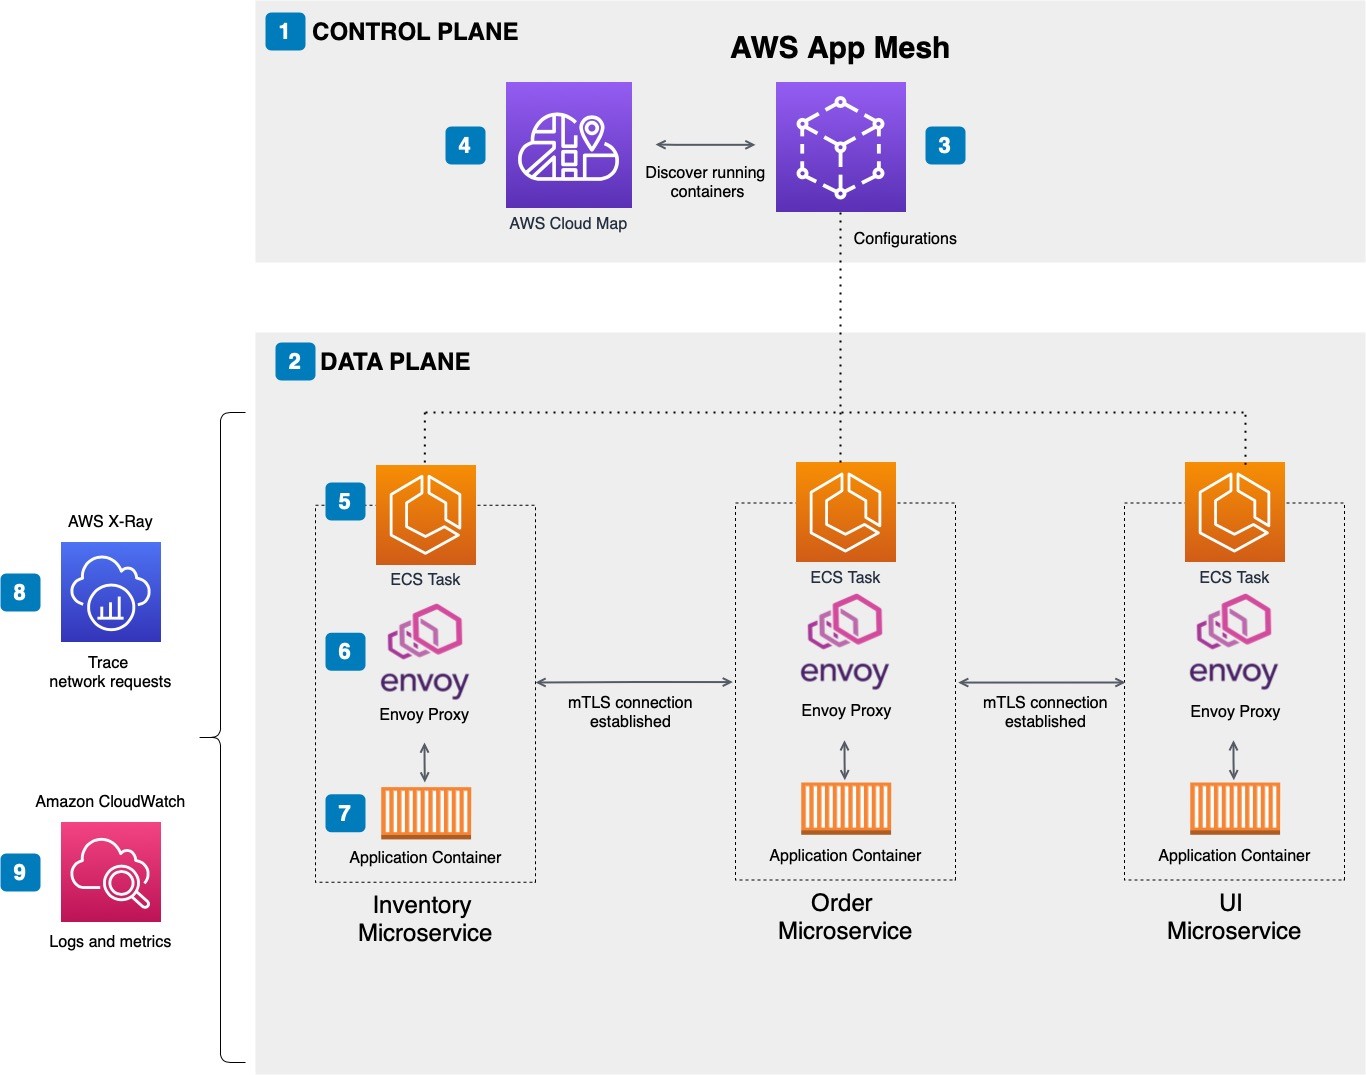
The example architecture in Figure 1 shows a microservices architecture for an Ordering application. It contains four microservices: Inventory, Order, and UI.

This example is a deliberately small and simple example to explore the concepts. Here’s how it works:

  1. The control plane is the central component that manages all the individual microservices in the data plane.
  2. The data plane intercepts and processes calls between the different microservices.
  3. App Mesh forms the service mesh and supports the services registered with AWS Cloud Map.
  4. AWS Cloud Map provides service discovery.
  5. Containers are defined in an ECS task definition.
  6. Envoy is the service mesh proxy that is deployed alongside the microservice container.
  7. The application container represents the application components that run in a Docker container.
  8. Service communication traces are made available to AWS X-Ray.
  9. Service-level logs and metrics are made available to Amazon CloudWatch.
Microservices architecture for an Ordering application managed by App Mesh

Figure 1. Microservices architecture for an Ordering application managed by App Mesh

Implementing the service mesh with App Mesh

To use App Mesh, you’ll need to have an existing service running on Amazon Elastic Container Service (Amazon ECS) and be registered with AWS Cloud Map.

App Mesh forms a service mesh for your application by providing an AWS-managed control plane. The control plane helps you run microservices by providing consistent visibility and network traffic controls for each microservice in your application.

App Mesh separates the logic needed for monitoring and controlling communications into a proxy that runs sideloaded to every microservice. App Mesh works with an open-source, high-performing network proxy called Envoy. After implementing your service mesh, you’ll update your services to use Envoy, which requires the services to communicate with each other through the proxy instead of directly with each other. All service-to-service traffic goes through the Envoy proxy allowing traffic routes to be configured and metrics, logs, and traces exported.

Components

There are several components needed to support the service mesh:

  • Virtual services – Virtual services are abstractions of actual microservices provided by a virtual node through a virtual router.
  • Virtual nodes – Virtual nodes are logical pointers to a particular task group, like an Amazon ECS service. You’ll need to provide the service discovery name found in AWS Cloud Map to connect your microservice.
  • Envoy proxy – The Envoy proxy configures your microservice task group to use App Mesh’s virtual routers and nodes.
  • Virtual routers – Virtual routers route traffic for one or more virtual services within your mesh.
  • Routes – Routes are used by the virtual router to match requests and direct traffic to one or more virtual nodes.

Integrating App Mesh with Amazon ECS

App Mesh integrates with your containerized microservices running on Amazon ECS (and other compute services). Amazon ECS is a container orchestration service that helps you deploy, manage, and scale containerized applications.

With Amazon ECS, your containers are defined in a task definition; you’ll need to add an Envoy proxy Docker container image to the task definition and register the microservices for discovery through AWS Cloud Map.

Conclusion

This post shows how App Mesh helps you solve some of the most common pitfalls of managing microservice architectures. It also shows you how to use App Mesh to provide visibility and control for microservices on AWS by providing a consistent way to route and monitor traffic between them.

App Mesh works as the control plane and uses the open-source Envoy proxy to provide the data plane that intercepts and processes calls between the different microservices. Through integrations with CloudWatch and X-Ray, you’re able to capture application-level metrics, logs, and traces.

Ready to get started? Check out the Learning AWS App Mesh post on the Database blog, the Using Service Meshes in AWS whitepaper, and Introduction to AWS App Mesh AWS Online Tech Talk to learn more. You can connect with Kesha on LinkedIn if you have questions.

Looking for more architecture content? AWS Architecture Center provides reference architecture diagrams, vetted architecture solutions, Well-Architected best practices, patterns, icons, and more!

CVE-2022-26143: A Zero-Day vulnerability for launching UDP amplification DDoS attacks

Post Syndicated from Omer Yoachimik original https://blog.cloudflare.com/cve-2022-26143-amplification-attack/

CVE-2022-26143: A Zero-Day vulnerability for launching UDP amplification DDoS attacks

CVE-2022-26143: A Zero-Day vulnerability for launching UDP amplification DDoS attacks

A zero-day vulnerability in the Mitel MiCollab business phone system has recently been discovered (CVE-2022-26143). This vulnerability, called TP240PhoneHome, which Cloudflare customers are already protected against, can be used to launch UDP amplification attacks. This type of attack reflects traffic off vulnerable servers to victims, amplifying the amount of traffic sent in the process by an amplification factor of 220 billion percent in this specific case.

Cloudflare has been actively involved in investigating the TP240PhoneHome exploit, along with other members of the InfoSec community. Read our joint disclosure here for more details. As far as we can tell, the vulnerability has been exploited as early as February 18, 2022. We have deployed emergency mitigation rules to protect Cloudflare customers against the amplification DDoS attacks.

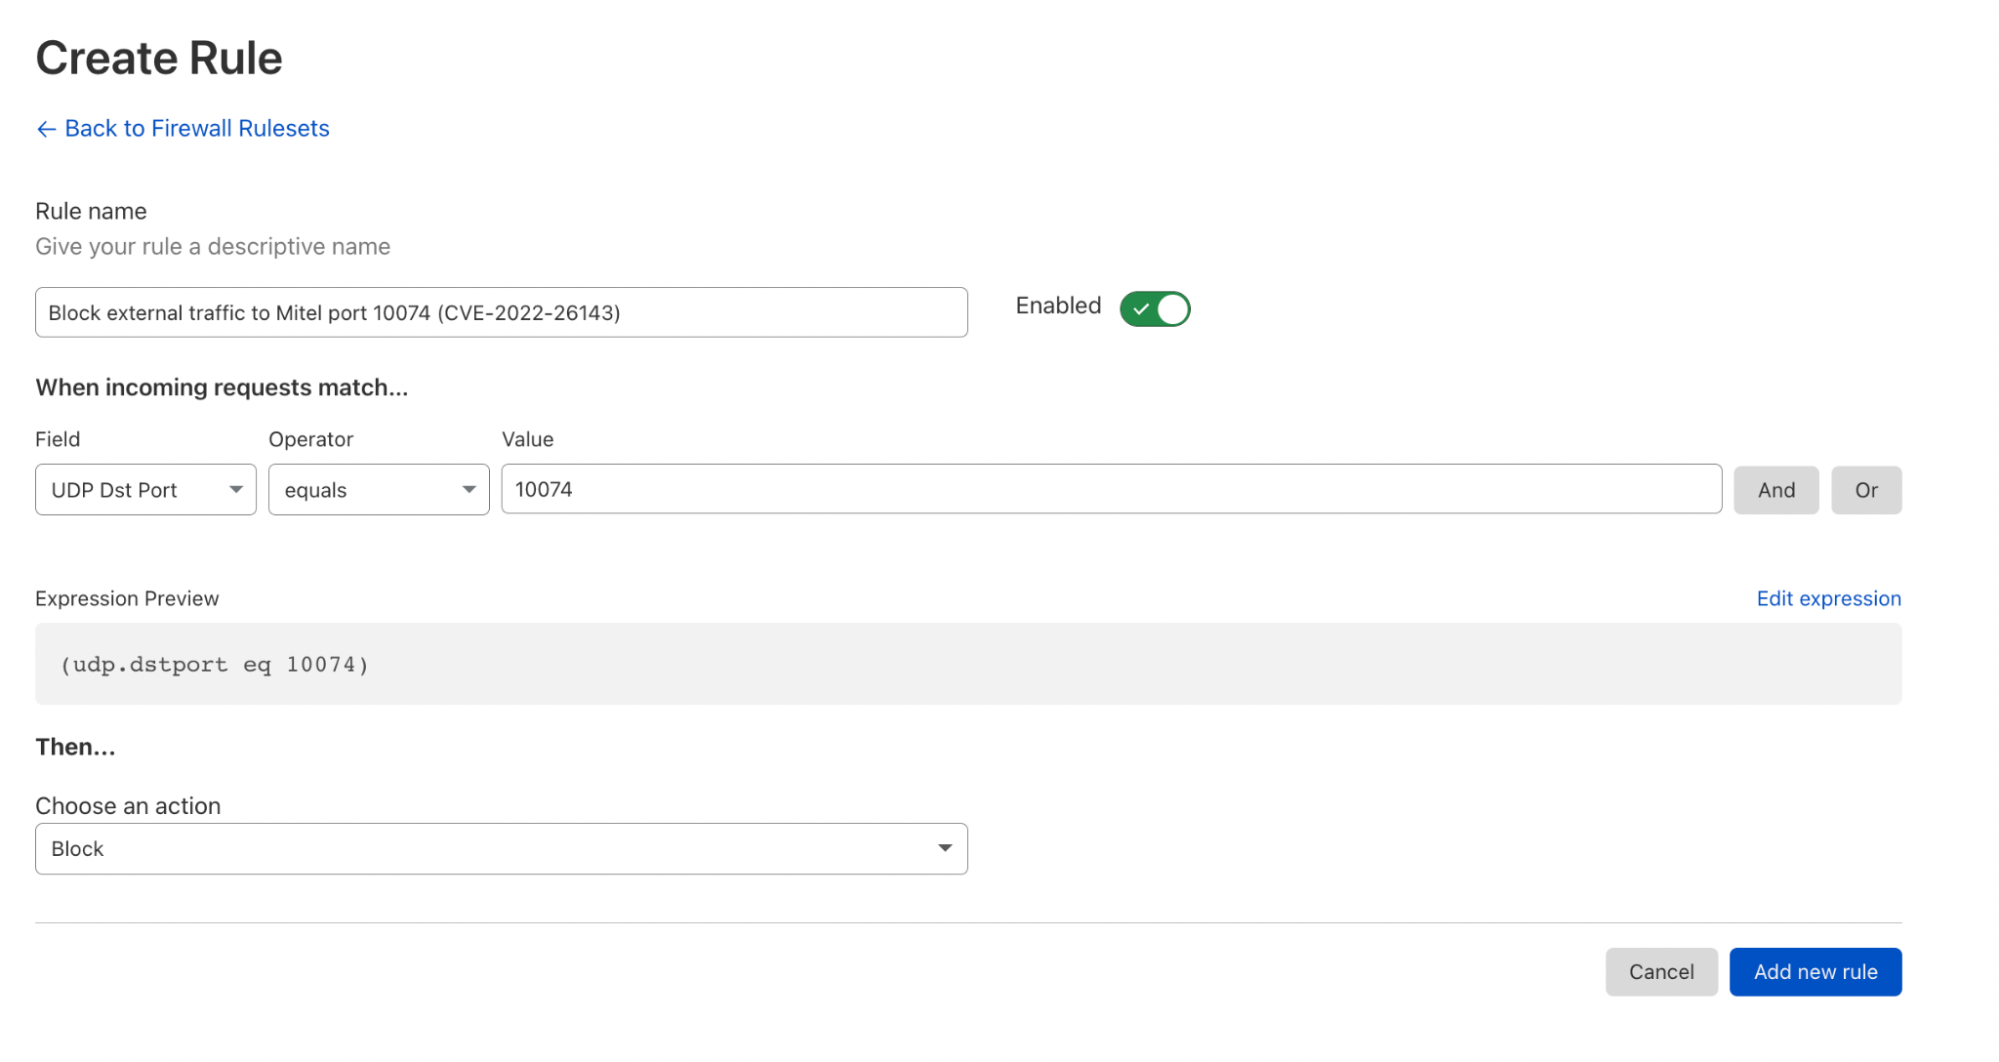
Mitel has been informed of the vulnerability. As of February 22, they have issued a high severity security advisory advising their customers to block exploitation attempts using a firewall, until a software patch is made available. Cloudflare Magic Transit customers can use the Magic Firewall to block external traffic to the exposed Mitel UDP port 10074 by following the example in the screenshot below, or by pasting the following expression into their Magic Firewall rule editor and selecting the Block action:

(udp.dstport eq 10074).

CVE-2022-26143: A Zero-Day vulnerability for launching UDP amplification DDoS attacks
Creating a Magic Firewall rule to block traffic to port 10074

To learn more, register for our webinar on March 23rd, 2022.

Exploiting the vulnerability to launch DDoS attacks

Mitel Networks is based in Canada and provides business communications and collaboration products to over 70 million business users around the world. Amongst their enterprise collaboration products is the aforementioned Mitel MiCollab platform, known to be used in critical infrastructure such as municipal governments, schools, and emergency services. The vulnerability was discovered in the Mitel MiCollab platform.

The vulnerability manifests as an unauthenticated UDP port that is incorrectly exposed to the public Internet. The call control protocol running on this port can be used to, amongst other things, issue the debugging command startblast. This command does not place real telephone calls; rather, it simulates a “blast” of calls in order to test the system. For each test call that is made, two UDP packets are emitted in response to the issuer of the command.

According to the security advisory, the exploit can “allow a malicious actor to gain unauthorized access to sensitive information and services, cause performance degradations or a denial of service condition on the affected system. If exploited with a denial of service attack, the impacted system may cause significant outbound traffic impacting availability of other services.”

Since this is an unauthenticated and connectionless UDP-based protocol, you can use spoofing to direct the response traffic toward any IP and port number — and by doing so, reflect and amplify a DDoS attack to the victim.

We’ve mainly focused on the amplification vector because it can be used to hurt the whole Internet, but the phone systems themselves can likely be hurt in other ways with this vulnerability. This UDP call control port offers many other commands. With some work, it’s likely that you could use this UDP port to commit toll fraud, or to simply render the phone system inoperable. We haven’t assessed these other possibilities, because we do not have access to a device that we can safely test with.

The good news

Fortunately, only a few thousand of these devices are improperly exposed to the public Internet, meaning that this vector can “only” achieve several hundred million packets per second total. This volume of traffic can cause major outages if you’re not protected by an always-on automated DDoS protection service, but it’s nothing to be concerned with if you are.

Furthermore, an attacker can’t run multiple commands at the same time. Instead, the server queues up commands and executes them serially. The fact that you can only launch one attack at a time from these devices, mixed with the fact that you can make that attack for many hours, has fascinating implications. If an attacker chooses to start an attack by specifying a very large number of packets, then that box is “burned” – it can’t be used to attack anyone else until the attack completes.

How Cloudflare detects and mitigates DDoS attacks

To defend organizations against DDoS attacks, we built and operate software-defined systems that run autonomously. They automatically detect and mitigate DDoS attacks across our entire network.

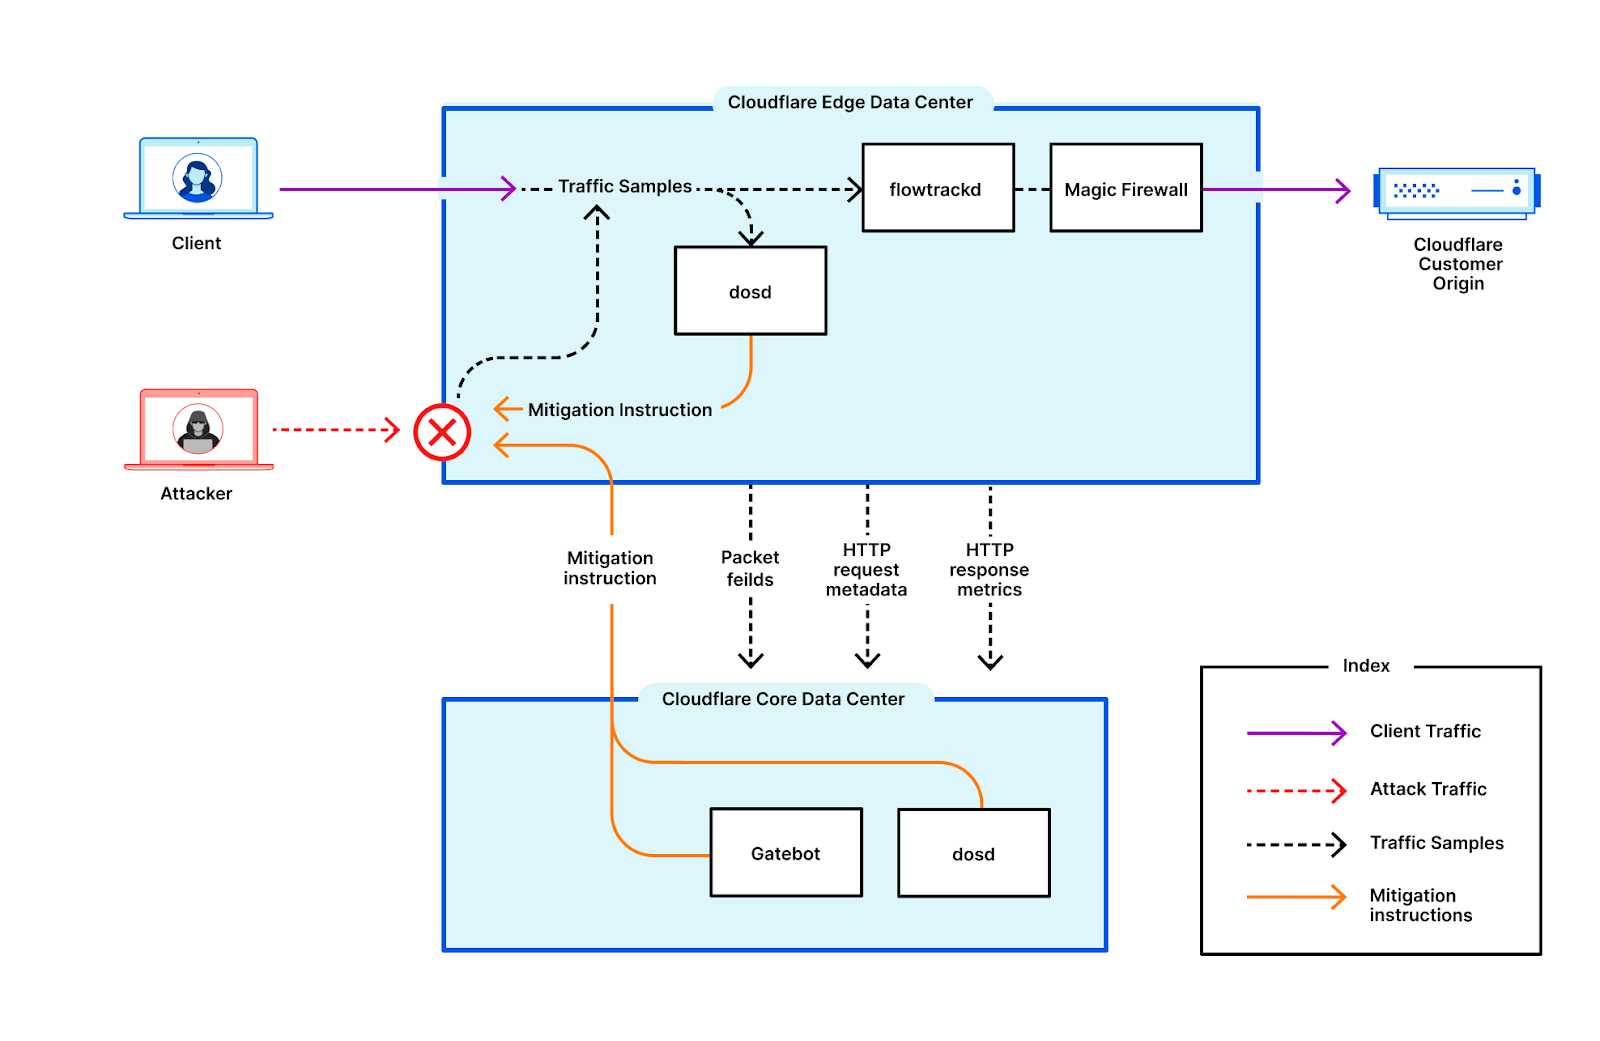
Initially, traffic is routed through the Internet via BGP Anycast to the nearest Cloudflare edge data center. Once the traffic reaches our data center, our DDoS systems sample it asynchronously allowing for out-of-path analysis of traffic without introducing latency penalties.

The analysis is done using data streaming algorithms. Packet samples are compared to the fingerprints and multiple real-time signatures are created based on the dynamic masking of various fingerprint attributes. Each time another packet matches one of the signatures, a counter is increased. When the system qualifies an attack, i.e., the activation threshold is reached for a given signature, a mitigation rule is compiled and pushed inline. The mitigation rule includes the real-time signature and the mitigation action, e.g., drop.

CVE-2022-26143: A Zero-Day vulnerability for launching UDP amplification DDoS attacks

You can read more about our autonomous DDoS protection systems and how they work in our joint-disclosure technical blog post.

Helping build a better Internet

Cloudflare’s mission is to help build a better Internet. A better Internet is one that is more secure, faster, and reliable for everyone — even in the face of DDoS attacks and emerging zero-day threats. As part of our mission, since 2017, we’ve been providing unmetered and unlimited DDoS protection for free to all of our customers. Over the years, it has become increasingly easier for attackers to launch DDoS attacks. To counter the attacker’s advantage, we want to make sure that it is also easy and free for organizations of all sizes to protect themselves against DDoS attacks of all types.

Not using Cloudflare yet? Start now.

CVE-2022-26143: TP240PhoneHome reflection/amplification DDoS attack vector

Post Syndicated from Alex Forster original https://blog.cloudflare.com/cve-2022-26143/

CVE-2022-26143: TP240PhoneHome reflection/amplification DDoS attack vector

Beginning in mid-February 2022, security researchers, network operators, and security vendors observed a spike in DDoS attacks sourced from UDP port 10074 targeting broadband access ISPs, financial institutions, logistics companies, and organizations in other vertical markets.

Upon further investigation, it was determined that the devices abused to launch these attacks are MiCollab and MiVoice Business Express collaboration systems produced by Mitel, which incorporate TP-240 VoIP- processing interface cards and supporting software; their primary function is to provide Internet-based site-to-site voice connectivity for PBX systems.

Approximately 2600 of these systems have been incorrectly provisioned so that an unauthenticated system test facility has been inadvertently exposed to the public Internet, allowing attackers to leverage these PBX VoIP gateways as DDoS reflectors/amplifiers.

Mitel is aware that these systems are being abused to facilitate high-pps (packets-per-second) DDoS attacks, and have been actively working with customers to remediate abusable devices with patched software that disables public access to the system test facility.

In this blog, we will further explore the observed activity, explain how the driver has been abused, and share recommended mitigation steps. This research was created cooperatively among a team of researchers from Akamai SIRT, Cloudflare, Lumen Black Lotus Labs, NETSCOUT ASERT, TELUS, Team Cymru, and The Shadowserver Foundation.

DDoS attacks in the wild

While spikes of network traffic associated with the vulnerable service were observed on January 8th and February 7,th 2022, we believe the first actual attacks leveraging the exploit began on February 18th.

Observed attacks were primarily predicated on packets-per-second, or throughput, and appeared to be UDP reflection/amplification attacks sourced from UDP/10074 that were mainly directed towards destination ports UDP/80 and UDP/443. The single largest observed attack of this type preceding this one was approximately 53 Mpps and 23 Gbps. The average packet size for that attack was approximately 60 bytes, with an attack duration of approximately 5 minutes. The amplified attack packets are not fragmented.

This particular attack vector differs from most UDP reflection/amplification attack methodologies in that the exposed system test facility can be abused to launch a sustained DDoS attack of up to 14 hours in duration by means of a single spoofed attack initiation packet, resulting in a record-setting packet amplification ratio of 4,294,967,296:1. A controlled test of this DDoS attack vector yielded more than 400 Mmpps of sustained DDoS attack traffic.

It should be noted that this single-packet attack initiation capability has the effect of precluding network operator traceback of the spoofed attack initiator traffic. This helps mask the attack traffic generation infrastructure, making it less likely that the attack origin can be traced compared with other UDP reflection/amplification DDoS attack vectors.

Abusing the tp240dvr driver

The abused service on affected Mitel systems is called tp240dvr (“TP-240 driver”) and appears to run as a software bridge to facilitate interactions with TDM/VoIP PCI interface cards. The service listens for commands on UDP/10074 and is not meant to be exposed to the Internet, as confirmed by the manufacturer of these devices. It is this exposure to the Internet that ultimately allows it to be abused.

The tp240dvr service exposes an unusual command that is designed to stress-test its clients in order to facilitate debugging and performance testing. This command can be abused to cause the tp240dvr service to send this stress-test to attack victims. The traffic consists of a high rate of short informative status update packets that can potentially overwhelm victims and cause the DDoS scenario.

This command can also be abused by attackers to launch very high-throughput attacks. Attackers can use specially-crafted commands to cause the tp240dvr service to send larger informative status update packets, significantly increasing the amplification ratio.

By extensively testing isolated virtual TP-240-based systems in a lab setting, researchers were able to cause these devices to generate massive amounts of traffic in response to comparatively small request payloads. We will cover this attack scenario in greater technical depth in the following sections.

Calculating the potential attack impact

As previously mentioned, amplification via this abusable test facility differs substantially from how it is accomplished with most other UDP reflection/amplification DDoS vectors. Typically, reflection/amplification attacks require the attacker to continuously transmit malicious payloads to abusable nodes for as long as they wish to attack the victim. In the case of TP-240 reflection/amplification, this continuous transmission is not necessary to launch high-impact DDoS attacks.

Instead, an attacker leveraging TP-240 reflection/amplification can launch a high-impact DDoS attack using a single packet. Examination of the tp240dvr binary reveals that, due to its design, an attacker can theoretically cause the service to emit 2,147,483,647 responses to a single malicious command. Each response generates two packets on the wire, leading to approximately 4,294,967,294 amplified attack packets being directed toward the attack victim.

For each response to a command, the first packet contains a counter that increments with each sent response. As the counter value increments, the size of this first packet will grow from 36 bytes to 45 bytes. The second packet contains diagnostic output from the function, which can be influenced by the attacker. By optimizing each initiator packet to maximize the size of the second packet, every command will result in amplified packets that are up to 1,184 bytes in length.

In theory, a single abusable node generating the upper limit of 4,294,967,294 packets at a rate of 80kpps would result in an attack duration of roughly 14 hours. Over the course of the attack, the “counter” packets alone would generate roughly 95.5GB of amplified attack traffic destined for the targeted network. The maximally-padded “diagnostic output” packets would account for an additional 2.5TB of attack traffic directed towards the target.

This would yield a sustained flood of just under 393mb/sec of attack traffic from a single reflector/amplifier, all resulting from a single spoofed attack initiator packet of only 1,119 bytes in length. This results in a nearly unimaginable amplification ratio of 2,200,288,816:1 — a multiplier of 220 billion percent, triggered by a single packet.

Upper boundaries of attack volume and simultaneity

The tp240dvr service processes commands using a single thread. This means they can only process a single command at a time, and thus can only be used to launch one attack at a time. In the example scenario presented above, during the 14 hours that the abused device would be attacking the target, it cannot be leveraged to attack any other target. This is somewhat unique in the context of DDoS reflection/amplification vectors.

Although this characteristic also causes the tp240dvr service to be unavailable to legitimate users, it is much preferable to having these devices be leveraged in parallel by multiple attackers — and leaving legitimate operators of these systems to wonder why their outbound Internet data capacity is being consumed at much higher rates.

Additionally, it appears these devices are on relatively low-powered hardware, in terms of their traffic-generation capabilities. On an Internet where 100/Gbps links, dozens of CPU cores, and multi-threading capabilities have become commonplace, we can all be thankful this abusable service is not found on top-of-the-line hardware platforms capable of individually generating millions of packets per second, and running with thousands of parallelized threads.

Lastly, it is also good news that of the tens of thousands of these devices, which have been purchased and deployed historically by governments, commercial enterprises, and other organizations worldwide, a relatively small number of them have been configured in a manner that leaves them in this abusable state, and of those, many have been properly secured and taken offline from an attacker’s perspective.

Collateral impact

The collateral impact of TP-240 reflection/amplification attacks is potentially significant for organizations with Internet-exposed Mitel MiCollab and MiVoice Business Express collaboration systems that are abused as DDoS reflectors/amplifiers.

This may include partial or full interruption of voice communications through these systems, as well as additional service disruption due to transit capacity consumption, state-table exhaustion of NATs, and stateful firewalls, etc.

Wholesale filtering of all UDP/10074-sourced traffic by network operators may potentially overblock legitimate Internet traffic, and is therefore contraindicated.

TP-240 reflection/amplification DDoS attacks are sourced from UDP/10074 and destined for the UDP port of the attacker’s choice. This amplified attack traffic can be detected, classified, traced back, and safely mitigated using standard DDoS defense tools and techniques.

Flow telemetry and packet capture via open-source and commercial analysis systems can alert network operators and end customers of TP-240 reflection/amplification attacks.

Network access control lists (ACLs), flowspec, destination-based remotely triggered blackhole (D/RTBH), source-based remotely triggered blackhole (S/RTBH), and intelligent DDoS mitigation systems can be used to mitigate these attacks.

Network operators should perform reconnaissance to identify and facilitate remediation of abusable TP-240 reflectors/amplifiers on their networks and/or the networks of their customers.  Operators of Mitel MiCollab and MiVoice Business Express collaboration systems should proactively contact Mitel in order to receive specific remediation instructions from the vendor.

Organizations with business-critical public-facing Internet properties should ensure that all relevant network infrastructure, architectural, and operational Best Current Practices (BCPs) have been implemented, including situationally specific network access policies that only permit Internet traffic via required IP protocols and ports. Internet access network traffic to/from internal organizational personnel should be isolated from Internet traffic to/from public-facing Internet properties, and served via separate upstream Internet transit links.

DDoS defenses for all public-facing Internet properties and supporting infrastructure should be implemented in a situationally appropriate manner, including periodic testing to ensure that any changes to the organization’s servers/services/applications are incorporated into its DDoS defense plan.

It is imperative that organizations operating mission-critical public-facing Internet properties and/or infrastructure ensure that all servers/services/application/datastores/infrastructure elements are protected against DDoS attack, and are included in periodic, realistic tests of the organization’s DDoS mitigation plan. Critical ancillary supporting services such as authoritative and recursive DNS servers must be included in this plan.

Network operators should implement ingress and egress source address validation in order to prevent attackers from initiating reflection/amplification DDoS attacks.

All potential DDoS attack mitigation measures described in this document MUST be tested and customized in a situationally appropriate manner prior to deployment on production networks.

Mitigating factors

Operators of Internet-exposed TP-240-based Mitel MiCollab and MiVoice Business Express collaboration systems can prevent abuse of their systems to launch DDoS attacks by blocking incoming Internet traffic destined for UDP/10074 via access control lists (ACLs), firewall rules, and other standard network access control policy enforcement mechanisms.

Mitel have provided patched software versions that prevent TP-240-equipped MiCollab and MiVoice Business Express collaboration systems from being abused as DDoS reflectors/amplifiers by preventing exposure of the service to the Internet. Mitel customers should contact the vendor for remediation instructions.

Collateral impact to abusable TP-240 reflectors/amplifiers can alert network operators and/or end-customers to remove affected systems from “demilitarized zone” (DMZ) networks or Internet Data Centers (IDCs), or to disable relevant UDP port-forwarding rules that allow specific UDP/10074 traffic sourced from the public Internet to reach these devices, thereby preventing them from being abused to launch reflection/amplification DDoS attacks.

The amplified attack traffic is not fragmented, so there is no additional attack component consisting of non-initial fragments, as is the case with many other UDP reflection/amplification DDoS vectors.

Implementation of ingress and egress source-address validation (SAV; also known as anti-spoofing) can prevent attackers from launching reflection/amplification DDoS attacks.

Conclusion

Unfortunately, many abusable services that should not be exposed to the public Internet are nevertheless left open for attackers to exploit. This scenario is yet another example of real-world deployments not adhering to vendor guidance. Vendors can prevent this situation by adopting “safe by default” postures on devices before shipping.

Reflection/amplification DDoS attacks would be impossible to launch if all network operators implemented ingress and egress source-address validation (SAV, also known as anti-spoofing).  The ability to spoof the IP address(es) of the intended attack target(s) is required to launch such attacks. Service providers must continue to implement SAV in their own networks, and require that their downstream customers do so.

As is routinely the case with newer DDoS attack vectors, it appears that after an initial period of employment by advanced attackers with access to bespoke DDoS attack infrastructure, TP-240 reflection/amplification has been weaponized and added to the arsenals of so-called “booter/stresser” DDoS-for-hire services, placing it within the reach of the general attacker population.

Collaboration across the operational, research, and vendor communities is central to the continued viability of the Internet. The quick response to and ongoing remediation of this high-impact DDoS attack vector has only been possible as a result of such collaboration. Organizations with a vested interest in the stability and resiliency of the Internet should embrace and support cross-industry cooperative efforts as a core principle.

The combined efforts of the research and mitigation task force demonstrates that successful collaboration across industry peers to quickly remediate threats to availability and resiliency is not only possible, but is also increasingly critical for the continued viability of the global Internet.

Sources

https://cve.mitre.org/cgi-bin/cvename.cgi?name=CVE-2022-26143/
https://www.mitel.com/en-ca/support/security-advisories/mitel-product-security-advisory-22-0001
https://www.cisa.gov/uscert/ncas/alerts/TA14-017A
https://www.senki.org/ddos-attack-preparation-workbook/
https://www.manrs.org/resources/
https://www.rfc-editor.org/info/bcp38
https://www.rfc-editor.org/info/bcp84
https://datatracker.ietf.org/doc/html/rfc7039

Research and mitigation task force contributors

Researchers from the following organizations have contributed to the findings and recommendations described in this document:

In particular, the Mitigation Task Force would like to cite Mitel for their exemplary cooperation, rapid response, and ongoing participation in remediation efforts. Mitel quickly created and disseminated patched software, worked with their customers and partners to update affected systems, and supplied valuable expertise as the Task Force worked to formulate this document.


Security updates for Tuesday

Post Syndicated from original https://lwn.net/Articles/887159/

Security updates have been issued by Debian (gif2apng and twisted), Mageia (golang, kernel, and webmin), openSUSE (chromium, cyrus-sasl, and opera), Red Hat (virt:rhel and virt-devel:rhel), Slackware (mozilla), SUSE (cyrus-sasl), and Ubuntu (glibc and redis).

International Women’s Day 2022

Post Syndicated from Sofía Celi original https://blog.cloudflare.com/international-womens-day-2022/

International Women’s Day 2022

“I would venture to guess that Anon,
who wrote so many poems without signing them,
was often a woman.” – Virginia Woolf

International Women’s Day 2022

Welcome to International Women’s Day 2022! Here at Cloudflare, we are happy to celebrate it with you! Our celebration is not only this blog post, but many events prepared for the month of March: our way of honoring Women’s History Month by showcasing women’s empowerment. We want to celebrate the achievements, ideas, passion and work that women bring to the world. We want to advocate for equality and to achieve gender parity. And we want to highlight the brilliant work that our women colleagues do every day. Welcome!

This is a time of celebration but also one to reflect on the current state. The global gender gap is not expected to close for another 136 years. This gap has also worsened due to the COVID-19 pandemic, which has negatively impacted the lives of women and girls by deepening pre-existing inequalities. Improving this state is a collective effort—we all need to get involved!

Who are we? Womenflare!

First, let’s introduce ourselves. We are Womenflare—Cloudflare’s Employee Resource Group (ERG) for all who identify as and advocate for women. We’re an employee-led group that is here to empower, represent, and support.

Our purpose is not only to celebrate women’s achievements but also to shed a light on inequalities. That is why for International Women’s Day 2022, we’re joining in focusing on the theme of #BreakTheBias throughout our month of events and activities:

We can break the bias in our communities.
We can break the bias in our workplaces.
We can break the bias in our schools, colleges, and universities.
Together, we can all break the bias –
on International Women’s Day (IWD) and beyond

What are some of our internal activities for this month?

Celebrating International Women’s Day

Internally, we are kicking off our celebration on March 8. We will be joined by several women from North Coast hip hop improv comedy group. We hope this fun and freestyle event will encourage participants to think about unconscious biases, breaking them down, and how they can get more involved in empowering the women around them.

Intersectionality and Allyship at Cloudflare

Following our kick-off celebrations, we’re hosting open discussions about intersectionality and allyship alongside some of our fellow Employee Resource Groups including Afroflare, Asianflare, Flarability, and Nativeflare. It’s important to us to include other ERGs in these conversations since the goal of empowerment, representation, and support is shared among us and can’t be done alone. And we want to play closer attention to the layers that form a person’s social identity, creating compounding experiences of discrimination. “All inequality is not created equal,” says Kimberlé Crenshaw, the law professor who coined “intersectional feminism” term in 1989. Understanding the way different inequalities play a role in a person’s life means understanding the history, systematic discrimination, and the non-uniformity of it.

Internal Leadership Panel

Last year, we brought together an internal panel of women leaders at Cloudflare to share their journeys and lessons learned. It was extremely well received, so we decided to build upon its success by inviting another group of internal women leaders to discuss their experiences and insights with us. Some important takeaways from these panel discussions have been the realization that most backgrounds and journeys are vastly different, paths to success are often rocky but rewarding, and perseverance, tenacity, and an open mind, often rule the day. What better way to learn from others and encourage more women to lead!

What can we all do?

Allyship is integral to systemic change. An ally is someone who recognizes unearned privileges in their lives and takes responsibility to end patterns of injustice. At Cloudflare, we’re working hard to build more diverse and equitable teams, as well as create and maintain an environment that is inclusive and welcoming. There are many actions you can take as an ally; some include:

  • Educating yourself: listen to the experiences of your women colleagues and work with them to understand their perspectives.
  • Amplifying women’s opinions and advocating for them: speak up for others and champion them when they need support and encouragement.

  • Taking action in the workplace: if you see inequality or discrimination happening, reach out to discuss further and understand what can be done.
  • Advocating for diversity: talk with your peers and leaders about the ways you can get involved with improving diversity, equity, and inclusion.

Celebrate International Women’s Day and Women’s Empowerment Month in your own creative ways! And all throughout the year, remember to empower women and to recognize them in such a way that their work is no longer anonymous. Join the #IWD2022 movement — #BreakTheBias this month and beyond!

International Women’s Day 2022

Using Radar to Read Body Language

Post Syndicated from Bruce Schneier original https://www.schneier.com/blog/archives/2022/03/using-radar-to-read-body-language.html

Yet another method of surveillance:

Radar can detect you moving closer to a computer and entering its personal space. This might mean the computer can then choose to perform certain actions, like booting up the screen without requiring you to press a button. This kind of interaction already exists in current Google Nest smart displays, though instead of radar, Google employs ultrasonic sound waves to measure a person’s distance from the device. When a Nest Hub notices you’re moving closer, it highlights current reminders, calendar events, or other important notifications.

Proximity alone isn’t enough. What if you just ended up walking past the machine and looking in a different direction? To solve this, Soli can capture greater subtleties in movements and gestures, such as body orientation, the pathway you might be taking, and the direction your head is facing — ­aided by machine learning algorithms that further refine the data. All this rich radar information helps it better guess if you are indeed about to start an interaction with the device, and what the type of engagement might be.

[…]

The ATAP team chose to use radar because it’s one of the more privacy-friendly methods of gathering rich spatial data. (It also has really low latency, works in the dark, and external factors like sound or temperature don’t affect it.) Unlike a camera, radar doesn’t capture and store distinguishable images of your body, your face, or other means of identification. “It’s more like an advanced motion sensor,” Giusti says. Soli has a detectable range of around 9 feet­ — less than most cameras­ — but multiple gadgets in your home with the Soli sensor could effectively blanket your space and create an effective mesh network for tracking your whereabouts in a home.

“Privacy-friendly” is a relative term.

These technologies are coming. They’re going to be an essential part of the Internet of Things.

Bias in the machine: How can we address gender bias in AI?

Post Syndicated from Sue Sentance original https://www.raspberrypi.org/blog/gender-bias-in-ai-machine-learning-biased-data/

At the Raspberry Pi Foundation, we’ve been thinking about questions relating to artificial intelligence (AI) education and data science education for several months now, inviting experts to share their perspectives in a series of very well-attended seminars. At the same time, we’ve been running a programme of research trials to find out what interventions in school might successfully improve gender balance in computing. We’re learning a lot, and one primary lesson is that these topics are not discrete: there are relationships between them.

We can’t talk about AI education — or computer science education more generally — without considering the context in which we deliver it, and the societal issues surrounding computing, AI, and data. For this International Women’s Day, I’m writing about the intersection of AI and gender, particularly with respect to gender bias in machine learning.

The quest for gender equality

Gender inequality is everywhere, and researchers, activists, and initiatives, and governments themselves, have struggled since the 1960s to tackle it. As women and girls around the world continue to suffer from discrimination, the United Nations has pledged, in its Sustainable Development Goals, to achieve gender equality and to empower all women and girls.

While progress has been made, new developments in technology may be threatening to undo this. As Susan Leahy, a machine learning researcher from the Insight Centre for Data Analytics, puts it:

Artificial intelligence is increasingly influencing the opinions and behaviour of people in everyday life. However, the over-representation of men in the design of these technologies could quietly undo decades of advances in gender equality.

Susan Leavy, 2018 [1]

Gender-biased data

In her 2019 award-winning book Invisible Women: Exploring Data Bias in a World Designed for Men [2], Caroline Ceriado Perez discusses the effects of gender-biased data. She describes, for example, how the designs of cities, workplaces, smartphones, and even crash test dummies are all based on data gathered from men. She also discusses that medical research has historically been conducted by men, on male bodies.

Looking at this problem from a different angle, researcher Mayra Buvinic and her colleagues highlight that in most countries of the world, there are no sources of data that capture the differences between male and female participation in civil society organisations, or in local advisory or decision making bodies [3]. A lack of data about girls and women will surely impact decision making negatively. 

Bias in machine learning

Machine learning (ML) is a type of artificial intelligence technology that relies on vast datasets for training. ML is currently being use in various systems for automated decision making. Bias in datasets for training ML models can be caused in several ways. For example, datasets can be biased because they are incomplete or skewed (as is the case in datasets which lack data about women). Another example is that datasets can be biased because of the use of incorrect labels by people who annotate the data. Annotating data is necessary for supervised learning, where machine learning models are trained to categorise data into categories decided upon by people (e.g. pineapples and mangoes).

A banana, a glass flask, and a potted plant on a white surface. Each object is surrounded by a white rectangular frame with a label identifying the object.
Max Gruber / Better Images of AI / Banana / Plant / Flask / CC-BY 4.0

In order for a machine learning model to categorise new data appropriately, it needs to be trained with data that is gathered from everyone, and is, in the case of supervised learning, annotated without bias. Failing to do this creates a biased ML model. Bias has been demonstrated in different types of AI systems that have been released as products. For example:

Facial recognition: AI researcher Joy Buolamwini discovered that existing AI facial recognition systems do not identify dark-skinned and female faces accurately. Her discovery, and her work to push for the first-ever piece of legislation in the USA to govern against bias in the algorithms that impact our lives, is narrated in the 2020 documentary Coded Bias. 

Natural language processing: Imagine an AI system that is tasked with filling in the missing word in “Man is to king as woman is to X” comes up with “queen”. But what if the system completes “Man is to software developer as woman is to X” with “secretary” or some other word that reflects stereotypical views of gender and careers? AI models called word embeddings learn by identifying patterns in huge collections of texts. In addition to the structural patterns of the text language, word embeddings learn human biases expressed in the texts. You can read more about this issue in this Brookings Institute report. 

Not noticing

There is much debate about the level of bias in systems using artificial intelligence, and some AI researchers worry that this will cause distrust in machine learning systems. Thus, some scientists are keen to emphasise the breadth of their training data across the genders. However, other researchers point out that despite all good intentions, gender disparities are so entrenched in society that we literally are not aware of all of them. White and male dominance in our society may be so unconsciously prevalent that we don’t notice all its effects.

Three women discuss something while looking at a laptop screen.

As sociologist Pierre Bourdieu famously asserted in 1977: “What is essential goes without saying because it comes without saying: the tradition is silent, not least about itself as a tradition.” [4]. This view holds that people’s experiences are deeply, or completely, shaped by social conventions, even those conventions that are biased. That means we cannot be sure we have accounted for all disparities when collecting data.

What is being done in the AI sector to address bias?

Developers and researchers of AI systems have been trying to establish rules for how to avoid bias in AI models. An example rule set is given in an article in the Harvard Business Review, which describes the fact that speech recognition systems originally performed poorly for female speakers as opposed to male ones, because systems analysed and modelled speech for taller speakers with longer vocal cords and lower-pitched voices (typically men).

A women looks at a computer screen.

The article recommends four ways for people who work in machine learning to try to avoid gender bias:

  • Ensure diversity in the training data (in the example from the article, including as many female audio samples as male ones)
  • Ensure that a diverse group of people labels the training data
  • Measure the accuracy of a ML model separately for different demographic categories to check whether the model is biased against some demographic categories
  • Establish techniques to encourage ML models towards unbiased results

What can everybody else do?

The above points can help people in the AI industry, which is of course important — but what about the rest of us? It’s important to raise awareness of the issues around gender data bias and AI lest we find out too late that we are reintroducing gender inequalities we have fought so hard to remove. Awareness is a good start, and some other suggestions, drawn out from others’ work in this area are:

Improve the gender balance in the AI workforce

Having more women in AI and data science, particularly in both technical and leadership roles, will help to reduce gender bias. A 2020 report by the World Economic Forum (WEF) on gender parity found that women account for only 26% of data and AI positions in the workforce. The WEF suggests five ways in which the AI workforce gender balance could be addressed:

  1. Support STEM education
  2. Showcase female AI trailblazers
  3. Mentor women for leadership roles
  4. Create equal opportunities
  5. Ensure a gender-equal reward system

Ensure the collection of and access to high-quality and up-to-date gender data

We need high-quality dataset on women and girls, with good coverage, including country coverage. Data needs to be comparable across countries in terms of concepts, definitions, and measures. Data should have both complexity and granularity, so it can be cross-tabulated and disaggregated, following the recommendations from the Data2x project on mapping gender data gaps.

A woman works at a multi-screen computer setup on a desk.

Educate young people about AI

At the Raspberry Pi Foundation we believe that introducing some of the potential (positive and negative) impacts of AI systems to young people through their school education may help to build awareness and understanding at a young age. The jury is out on what exactly to teach in AI education, and how to teach it. But we think educating young people about new and future technologies can help them to see AI-related work opportunities as being open to all, and to develop critical and ethical thinking.

Three teenage girls at a laptop

In our AI education seminars we heard a number of perspectives on this topic, and you can revisit the videos, presentation slides, and blog posts. We’ve also been curating a list of resources that can help to further AI education — although there is a long way to go until we understand this area fully. 

We’d love to hear your thoughts on this topic.


References

[1] Leavy, S. (2018). Gender bias in artificial intelligence: The need for diversity and gender theory in machine learning. Proceedings of the 1st International Workshop on Gender Equality in Software Engineering, 14–16.

[2] Perez, C. C. (2019). Invisible Women: Exploring Data Bias in a World Designed for Men. Random House.

[3] Buvinic M., Levine R. (2016). Closing the gender data gap. Significance 13(2):34–37 

[4] Bourdieu, P. (1977). Outline of a Theory of Practice (No. 16). Cambridge University Press. (p.167)

The post Bias in the machine: How can we address gender bias in AI? appeared first on Raspberry Pi.

Customers can now request the AWS CyberGRX report for their third-party supplier due diligence

Post Syndicated from Niyaz Noor original https://aws.amazon.com/blogs/security/customers-can-now-request-the-aws-cybergrx-report-for-their-third-party-supplier-due-diligence/

CyberGRX

Gaining and maintaining customer trust is an ongoing commitment at Amazon Web Services (AWS). We are continuously expanding our compliance programs to provide customers with more tools and resources to be able to perform effective due diligence on AWS. We are excited to announce the availability of the AWS CyberGRX report for our customers.

With the increase in adoption of cloud platforms and services across multiple sectors and industries, AWS has become one of the most critical components of customers’ third-party ecosystems. Regulated customers, such as those in the financial services sector, are held to higher standards by their regulators and auditors when it comes to exercising effective due diligence on their third parties. Customers are using third-party cyber risk management (TPCRM) platforms such as CyberGRX to better manage risks from their evolving third-party ecosystems and drive operational efficiencies. To help customers in such efforts, AWS has completed CyberGRX assessment of its security posture. The assessment is performed annually and is validated by independent CyberGRX partners.

CyberGRX assessment applies a dynamic approach to third-party risk assessment, which is updated in line with changes in risk level of cloud service providers, or as AWS updates its security posture and controls. This approach eliminates outdated static spreadsheets for third-party risk assessments, in which the risk matrices are not updated in near real time. CyberGRX assessment provides advanced capabilities by integrating AWS responses with analytics, threat intelligence, and sophisticated risk models to provide an in-depth view of the AWS security posture. In addition, AWS customers can use CyberGRX’s Framework Mapper feature to map AWS assessment controls and responses to well-known industry standards and frameworks (such as NIST 800-53, NIST Cybersecurity Framework (CSF), ISO 27001, PCI DSS, HIPAA) which can significantly reduce customers’ third-party supplier due-diligence burden.

The AWS CyberGRX report is available to all customers free of cost. Customers can request access to the report by completing an access request form, available on the AWS CyberGRX page.

As always, we value your feedback and questions. Reach out to the AWS Compliance team through the Contact Us page, or if you have feedback about this post, submit comments in the Comments section below. To learn more about our other compliance and security programs, see AWS Compliance Programs.

If you have feedback about this post, submit comments in the Comments section below. If you have questions about this post, contact AWS Support.

Want more AWS Security news? Follow us on Twitter.

Author

Niyaz Noor

Niyaz is the Security Audit Program Manager at AWS. Niyaz leads multiple security certification programs across Europe and other regions. During his professional career, he has helped multiple cloud service providers in obtaining global and regional security certification. He is passionate about delivering programs that build customers’ trust and provide them assurance on cloud security.

Naranjan Goklani

Naranjan Goklani

Naranjan is a Security Audit Manager at AWS, based in Toronto. He leads audits, attestations, certifications, and assessments across North America and Europe. Naranjan has previously worked in risk management, security assurance, and technology audits for the past 12 years.

AWS Week in Review – March 7, 2022

Post Syndicated from Jeff Barr original https://aws.amazon.com/blogs/aws/aws-week-in-review-march-7-2022/

This post is part of our Week in Review series. Check back each week for a quick round up of interesting news and announcements from AWS!

Hello Again
The AWS Week in Review is back! Many years ago, I tried to write a weekly post that captured the most significant AWS activity. This was easy at first but quickly grew to consume a good fraction of a working day. After a lot of thought and planning, we are making a fresh start with the goal of focusing on some of the most significant AWS launches of the previous week. Each week, one member of the AWS News Blog team will write and publish a post similar to this one. We will do our best to make sure that our effort is scalable and sustainable.

Last Week’s Launches
Here are some launches that caught my eye last week:

AWS Health Dashboard – This new destination brings together the AWS Service Health Dashboard and the Personal Health Dashboard into a single connected experience. You get a more responsive and accurate view, better usability, and greater operational resilience. The new page is mobile-friendly and follows the latest AWS design standard. It includes a searchable history of events, fast page-load times, and automatic in-line refresh. It also provides a more responsive view when multiple AWS services are affected by a common underlying root cause. To learn more, read the blog post or just visit the AWS Health Dashboard.

AWS DeepRacer Student Virtual League – High school and undergraduate students 16 and older can now compete in the DeepRacer Student Virtual League for the chance to win prizes, glory, and a trip to AWS re:Invent 2022 in Las Vegas. The student league provides access to dozens of hours of free machine learning model training, along with educational materials that cover the theoretical and practical aspects of machine learning. Competitions run monthly until September 30; the top participants each month qualify for the Global AWS DeepRacer Student League Championships in October. To learn more, read the What’s New or visit AWS DeepRacer Student.

Customer Carbon Footprint Tool – This tool will help you to learn more about the carbon footprint of your cloud infrastructure, and will help you to meet your goals for sustainability. It is part of the AWS Billing console, and is available to all AWS customers at no cost. When you open the tool, you will see your carbon emissions in several forms, all with month-level granularity. You can also see your carbon emission statistics on a monthly, quarterly, or annual basis. To learn more, read my blog post.


RDS Multi-AZ Deployment Option – You can now take advantage of a new Amazon RDS deployment option that has a footprint in three AWS Availability Zones and gives you up to 2x faster transaction commit latency, automated failovers that typically take 35 seconds or less, and readable standby instances. This new option takes advantage of Graviton2 processors and fast NVME SSD storage; to learn more, read Seb’s blog post.

For a full list of AWS announcements, be sure to keep an eye on the What’s New at AWS page.

Other AWS News
Serverless Architecture Book – The second edition of Serverless Architectures on AWS is now available.

AWS Cookbook – AWS Cookbook: Recipes for Success on AWS is now available.

Upcoming AWS Events
Check your calendars and sign up for these AWS events:

AWS Pi Day (March 14) – We have an entire day of online content to celebrate 16 years of innovation with Amazon S3. Sessions will cover data protection, security, compliance, archiving, data lakes, backup, and more. Sign up today, and I will see you there!

.NET Application Modernization Webinar (March 23) – Learn about .NET modernization, what it is, and why you might want to modernize. See a deep dive that focuses on the AWS Microservice Extractor for .NET. Sign up today.

And that’s all for this week. Leave me a comment and let me know if this was helpful to you!

— Jeff;

2022-03-07 война

Post Syndicated from original https://vasil.ludost.net/blog/?p=3453

От няколко дни си мисля колко много не искам да пиша тоя post.

За всички, които са живели под камък – преди 12 дни Русия нападна Украйна. Последиците от това безумие ще ги усещаме дълго време…

Да започна с краткото описание на руската пропаганда – мисля, че обяснява повечето лъжи, разпространявани по темата. Особено много ме дразни обяснението, че Путолини (някои хора ползват “Путлер”, ама определено се справя по-зле с blitzkrieg-а) нямал избор. Винаги има избор, и можеше вместо 30 години да си крадат усилено страната, да направят нещо смислено…

А вместо това някаква част от окрадените пари отидоха за информационна война. Която, да не се лъжем, в общи линии губехме. Достатъчно е да видим огромното одобрение за Путолини в България, всякаквото плюене против LGBT и ваксините и крайния ефект от това (най-слабо ваксинираната държава, най-голяма смъртност на глава от населението от COVID-19).
Колкото до свързаността на по-горните, много добре си личи кой започна да се изказва в подкрепа на войната, след като започнаха да режат различните източници на пропаганда. Дори и в нашите медии си личи, въпреки че доста от тях сериозно се уплашиха и леко промениха линията.
(няма да коментирам “националистите” предатели в парламента като Копейкин)

… а нас ни чака още една Северна Корея, само че по-близо до нас, и в която има наши близки. В момента самата Русия се опитва да се изолира от света, като се кани да се отреже от глобалния интернет (малко информация по темата), не могат да се случват разплащания (което се спира и от двете страни) и със спирането на полетите пък самите руснаци, които искат да се махнат от там, не могат. И докато там хората ще страдат заради изперкалия си “водач”, Европа (и в това число България) ще трябва да преосмисли зависимостите си и кой ни ги насади, и да направи нещо по въпроса.
(поне има сериозен шанс да намалее много влиянието на Русия в нашата политика и като цяло тяхната пропаганда, като не могат да плащат)

Но, в крайна сметка има значение какво правим, не какво говорим. Супер се радвам как доброволците от OpenFest почти моментално се навиха/захванаха да помагат за бежанците, и как се задвижиха организациите по темата. Не настигаме Полша, и не сме толкова желана дестинация (най-вече заради високия рейтинг на Путолини и като цяло голямото руско влияние тук), но все пак до преди няколко дни са пристигнали 20000 бежанци, и ще идват още. Можем да им помогнем, можем да помогнем на организациите, можем да спрем да купуваме руски газ най-накрая, и да измъкнем и хората от Русия/Беларус, останали там под управлението на малоумници.

Можем още неща, давайте предложения.

А аз ще се опитам да не си представям всеки път като си играя с децата какво ли се случва с децата в Украйна.

(защото може да не сме в списъка на следващите за нападане, но определено сме в списъка на по-следващите)

Automate Amazon Redshift load testing with the AWS Analytics Automation Toolkit

Post Syndicated from Samir Kakli original https://aws.amazon.com/blogs/big-data/automate-amazon-redshift-load-testing-with-the-aws-analytics-automation-toolkit/

Amazon Redshift is a fast, fully managed, widely popular cloud data warehouse that powers the modern data architecture that empowers you with fast and deep insights and machine learning (ML) predictions using SQL across your data warehouse, data lake, and operational databases. A key differentiating factor of Amazon Redshift is its native integration with other AWS services, which makes it easy to build complete, comprehensive, and enterprise-level analytics applications. The AWS Analytics Automation Toolkit enables automatic provisioning and integration of not only Amazon Redshift, but database migration services like AWS Database Migration Service (AWS DMS) and the AWS Schema Conversion Tool (AWS SCT).

This post discusses new additions to the AWS Analytics Automation Toolkit, which enable you to perform advanced load testing on Amazon Redshift. This is accomplished by provisioning Apache JMeter as part of the analytics stack.

Solution overview

Apache JMeter is an open-source load testing application written in Java that you can use to load test web applications, backend server applications, databases, and more. In the database context, it’s an extremely valuable tool for repeating benchmark tests in a consistent manner, simulating concurrency workloads, and scalability testing on different database configurations.

For example, you can use JMeter to simulate a single business intelligence (BI) user or hundreds of BI users simultaneously running various SQL queries on an Amazon Redshift cluster for performance benchmarking, scalability, and throughput testing. Furthermore, you can rerun the same exact simulation on a different Amazon Redshift cluster that perhaps has twice as many nodes as the original cluster, to compare the price/performance ratio of each cluster.

Similarly, you can use JMeter to load test and assess the performance and throughput achieved for mixed extract, transform, and load (ETL) and BI workloads running on different Amazon Redshift cluster configurations.

For a deeper discussion of JMeter and its use for benchmarking Amazon Redshift, refer to Building high-quality benchmark tests for Amazon Redshift using Apache JMeter.

Although JMeter installation is a relatively straightforward process, consisting mainly of downloading and installing a Java virtual machine and JMeter, the thought of having to download, install, and set up any tool for benchmarking purposes can sometimes serve as a detractor for many. Starting from scratch for a test setup could also be intimidating.

The AWS Analytics Automation Toolkit now includes the option to automatically deploy JMeter on Amazon Elastic Compute Cloud (Amazon EC2) in the same virtual private cloud (Amazon VPC) as Amazon Redshift. This includes a dedicated Windows instance, with all required JMeter dependencies, such as JVM and a sample test plan, thereby easily enabling powerful load testing capabilities on Amazon Redshift. In this post, we demonstrate the use of the AWS Analytics Automation Toolkit for JMeter load tests on cloud benchmark data, using Amazon Redshift as a target environment.

This solution has the following features:

  • It deploys resources automatically, including JMeter
  • You can point JMeter to an existing Amazon Redshift cluster, or automatically create a new cluster
  • You can bring your own data and queries, or use a sample TPC dataset
  • You can easily customize the test plan into separate threads, each with different workloads and concurrency as needed

To use the AWS Analytics Automation Toolkit to run a JMeter load test, deploy the toolkit with the JMeter option, load data into your Amazon Redshift cluster, and customize the default test plan as you see fit.

The following diagram illustrates the solution architecture:

Prerequisites

Prior to deploying the AWS Analytics Automation Toolkit, complete the prerequisites and prepare the config file, user-config.json. For instructions, refer to Automate building an integrated analytics solution with AWS Analytics Automation Toolkit.

The config file has a new parameter called JMETER, at the top section. To provision a JMeter instance, enter the value CREATE for this parameter.

To provision a new Amazon Redshift cluster, enter the value CREATE for the REDSHIFT_ENDPOINT parameter. Then fill in values for the fields in the redshift section of the config file. You can use the sizing calculator on the Amazon Redshift console to recommend the correct cluster configuration based on your data size.

If you want load an industry-standard sample TPC-DS data (3TB) into your cluster, enter the value “Y” for the “loadTPCdata” parameter, under the redshift section.

To use an existing cluster, enter the endpoint of your cluster for the REDSHIFT_ENDPOINT parameter in the top section of the user-config.json file.

Deploy resources using the AWS Analytics Automation Toolkit

To deploy your resources, complete the following steps:

  1. Launch the toolkit as described in Automate building an integrated analytics solution with AWS Analytics Automation Toolkit.
  2. Create tables and ingest your test data into your Amazon Redshift cluster.
    • If you chose to load the sample TPC-DS 3TB data, this will take some time to load, so please allow for this. If you are loading your own data then you may do that at this point.

Launch JMeter

To launch JMeter, complete the following steps:

  1. Using RDP, log in to the JMeter EC2 Windows instance created by the AWS Analytics Automation Toolkit.
  2. Launch the JMeter GUI by choosing (double-clicking) the shortcut JMETER on the Windows Desktop.

In our experience, changing the JMeter Look and Feel option to Windows (instead of dark mode) results in increased JMeter stability, so we highly recommend making that change and choosing Yes to restart the GUI.

Customize the JMeter test plan

To customize the JMeter test plan, we modify the JDBC connection, and optionally modify the thread ramp-up schedule and optimize the SQL.

  1. Using the JMeter GUI, open the AWS Analytics Automation Toolkit’s default test plan file c:\JMETER\apache-jmeter-5.4.1\Redshift Load Test.jmx.
  2. Choose the test plan name and edit the JdbcUser value to the correct user name for your Amazon Redshift cluster.

If you used the CREATE cluster option, this value is the same as the master_user_name value in your user-config.json file.

  1. In JDBC connection, edit the DatabaseURL value and password with the correct values for your cluster.

If you used the CREATE cluster option, the password is kept in a secret named <stackname>-RedshiftPassword. You can find the endpoint by choosing the new Amazon Redshift cluster and copying the endpoint value on the upper right.

This test plan already has a initialization command set to turn off the result cache feature of Amazon Redshift: set enable_result_cache_for_session to off. No action is needed to configure this.

  1. Optionally, modify the thread ramp-up schedule.

This test plan uses the Ultimate Thread Group, which is automatically installed when you open the test plan. Each thread group contains a ramp-up schedule, as well as a query or set of queries. Modify these to according to your testing preferences and dataset. If you loaded the TPCDS dataset, the queries included by default in the three thread groups will work.

In the following example, Smallthread Group has four rows, each of which launches the specific number of sessions at staggered timings. The ramp-up time to achieve the maximum session count is 45 seconds, because the last thread doesn’t start until 15 seconds into the test, and has a 30-second start time. You can adjust the ramp-up schedule, as well as the hold duration and shutdown time, by editing, adding, or deleting rows in the Thread Schedule section. The graph is then automatically adjusted.

  1. Optionally, you can customize the SQL.

In the following example, we choose the JDBC request item under the same SmallThread Group, called SmallSQL, and review the query run by this thread group. If you added your own data, insert the query or queries you want to run for this thread group. Do the same for the medium and large thread groups, or delete or add thread groups as needed.

Run the test

Run the test plan by choosing the green arrow in the GUI.

Alternatively, enter the following command in a Windows command prompt to run JMeter in command line mode:

C:\JMETER\apache-jmeter-5.4.1\bin\jmeter -n -t RedshiftTPCDWTest.jmx -e -l test.out

Use case example: Evaluating concurrency scaling benefits

For our example use case, we want to determine how Amazon Redshift concurrency scaling benefits our workload performance. We can use the JMeter setup outlined in this post to quickly answer this question.

In the following example, we ran the sample test plan as is against the sample TPC-DS data, with 80 concurrent users across three thread groups. We ran the test first with concurrency scaling enabled, then reran it after disabling concurrency scaling on the Amazon Redshift cluster.

To monitor the results, open the Amazon Redshift console, choose Clusters in the navigation pane, and choose the cluster you’re using for the performance test. On the Cluster performance tab, you can monitor the CPU utilization of all the nodes in your cluster, as shown in the following screenshot.

On the Query monitoring tab, you can monitor the queue activity, as well as concurrency scaling activity of your cluster.

The preceding graphs cover two different tests with a 4-node ra3.16xlarge cluster. On the left side, concurrency scaling was enabled for the cluster, and on the right side it was disabled. In the test with concurrency scaling enabled, the queueing is less, and test completion duration is shorter.

Note that the test duration is the time to run the workload on Amazon Redshift, not to download query results.

Lastly, to review the actual test result query performance, you can download the file C:\JMETER\apache-jmeter-5.4.1\SummaryReportIndividualRecords.csv from the EC2 instance, and review the query performance for each thread. The following screenshot is a summary plot of the test results for this example, with and without concurrency scaling.

As the chart illustrates, concurrency scaling can significantly reduce the latency for your workloads, and is particularly useful for short bursts of activity on your application.

Conclusion

JMeter allows you to create a flexible and powerful load test for your Amazon Redshift clusters to assess the performance of the cluster. With the new capability in the AWS Analytics Automation Toolkit, you can provision and configure JMeter, along with a test plan, in a fraction of the time it would normally take.


About the Authors

Samir Kakli is an Analytics POC Specialist Solutions Architect based out of Florida. He is focused on helping customers quickly and effectively align Amazon Redshift’s capabilities to their business needs.

Asser Moustafa is an Analytics Specialist Solutions Architect at AWS based out of Dallas, Texas. He advises customers in the Americas on their Amazon Redshift and data lake architectures and migrations, starting from the POC stage to actual production deployment and maintenance.

What’s the Diff: Full, Incremental, Differential, and Synthetic Full Backups

Post Syndicated from Kari Rivas original https://www.backblaze.com/blog/whats-the-diff-full-incremental-differential-and-synthetic-full-backups/

What's the Diff: Full, Incremental, Differential, Synthetic

If you made your way here to the Backblaze blog, you probably understand the value of backing up your data. Data disasters, like ransomware attacks, floods, and fires, can easily cost a business thousands of dollars in recovery expenses. But whether you’re an IT professional or a small or medium-sized business owner, what you may not realize is that knowing you need to back up is just the first step.

Next, you have to think about what kind of backup strategy you should have in place. Specifically, there are four different types of backups that you need to consider:

  • Full backups.
  • Incremental backups.
  • Synthetic full backups.
  • Differential backups.

Some of our integration tools, like MSP360 and Veeam, let you configure the type of backup you want to perform, so it’s important to understand the difference. Choosing the right backup type also means maximizing efficiency, as simply performing a full backup of your data on a daily basis would take up too much bandwidth and storage, resulting in unnecessary extra costs.

Not sure what kind of backup you need to do? In this post, learn the differences and when each should be used.

First Things First: Full Backups

A full backup is the very first backup you create of your data. You start with nothing—no backup—and then you make a complete copy of your data. It will probably take a while, because you’re starting from nothing, making this your longest backup job.

Full Backup Pros and Cons

You can see how it would be time-consuming to do a full backup each time, right? Who has time for that? In the time you’re taking to do a full backup each day, you could be balancing your bank account, reorganizing your closet, or let’s be honest here, playing Wordle (guilty). Plus, you would likely need a lot of extra bandwidth and storage to be able to run a full backup everyday.

However, full backups are also the best option for recovery, because they contain all the files you need. Because your full backup is a clone of your data, it’s super important to encrypt them. Backblaze B2 Cloud Storage stores the data you put in it. You can choose to upload only encrypted data or use a third-party integration to encrypt data before transmission to Backblaze B2 Cloud Storage. We also support server-side encryption (SSE) using the 256-bit Advanced Encryption Standard (AES-256), with multiple key management options. Don’t forget this essential step!

You should think about how often to do your full backups, given that they are the safest recovery option but also the most time-consuming and expensive to complete. Some people do full backups daily; some do them weekly; and some complete them monthly, or even less often. It all depends on your backup strategy plan and how you balance your needs for data security vs. your resources, like time, funds, etc. For example, in the image below, this person has decided to do their full backup on a Sunday. Their source data is copied exactly as-is into the cloud. This provides them the security of a 100% true copy of their data.

Click to expand.

TLDR Version:

  • ✅ 100% true copy of data.
  • ✅ Best for file restoration in terms of data fidelity.
  • ❌ Expensive.
  • ❌ Slow.

Now, Just the Changes: Incremental Backups

Once you have your full backup, you have a baseline for any subsequent backups. For reasons already explained, it’s probably not efficient for you to do a full backup each time. That’s where incremental backups come in.

Incremental backups copy the data that has changed or has been added since your last full backup and then, any newly changed or added data since the previous incremental backup. Now, there are two different types of incremental backups: file-level and block-level, but let’s keep things simple here and save that topic for a future blog post, shall we?

Let’s take a look at the image below. This person performs their full backups on Sundays and Wednesdays so that they always have a fairly recent complete copy of their data. Then, on the other days of the week, they perform incremental backups. (To be clear, we’re not recommending this cadence—it’s just for demonstration purposes.) Here’s a step-by-step overview of the process:

  • Sunday: A full backup is created.
  • Monday: After the full backup on Sunday, one file is changed (the purple triangle) and one new file is added (the red square). Both of these changes are uploaded to the backup repository in the cloud.
  • Tuesday: An additional new file is created (the second red square). This one piece of new data is sent to the cloud. You can see how incremental backups are backing up only new or changed data one piece at a time.
  • Wednesday: A new full backup is run, which creates a complete copy of the source data (including all your previously changed and added data) and stores that in the cloud. This starts the cycle of full backups to incremental backups over again.
Click to expand.

Note that there is another consideration here—whether you want your full backups to overwrite your existing backup repository or whether you would like to keep the previous versions of your files for extra security. Keeping an archive of your previous versions takes up more space (and therefore costs more) but it can be helpful to have an archive for some length of time (called your “retention period”). On the other hand, some backup providers charge retention minimums where they continue to bill you for data deleted before a certain time frame—make sure to read the terms and conditions carefully so you’re not stuck paying for deleted backups. Again, this all differs according to your data security needs. Some people keep archives going back a month. Some may keep an archive for a full year’s worth of previous versions. It’s all up to you.

Incremental Backup Pros and Cons

In a disaster recovery scenario, your restore will consist of your full backup and all of the incremental backups you’ve made. If you’ve made a lot of changes to your data since your last full backup, your restore could take some time, as it progresses through this “chain” of incremental changes. In other words, if you are only doing full backups monthly or less often and you add or change a lot of data in between, your recovery will take a long time because the restore will first process your last full backup and then each piece of incrementally changed or added data.

Another downside is that your recovery could be compromised by any missing or damaged files, which would break your “chain” of backups and would make recovery of those files impossible. For this reason (and because having a fairly recent full backup is always a good idea), it’s important to do full backups regularly so you have a “fresh” full copy of your data to work from.

Determining how often and when to do your full backups, as well as deciding how many previous versions of your backups you want to keep, is a strategic decision that should take into consideration your typical operating conditions, your risk factors, your budget, and your time. For instance, you could perform a full backup on Sundays and incremental backups Monday-Saturday. Or, you may not even perform full backups as often as that; it’s important to think about your data and how often it changes.

TLDR Version:

  • ✅ Takes up little space.
  • ✅ Cost-saving.
  • ❌ Slower recoveries.
  • ❌ Corrupted files compromise the backup.

A Better Way: Synthetic Full Backups

We’ve already talked about the need to perform regular full backups, even if (and especially if) you’re using incremental backups. We’ve also discussed how regular full backups can be time-consuming. Synthetic full backups may give you the best of all worlds. They make use of incremental backups to create a more efficient full backup experience.

In a synthetic full backup, your backup software takes your previous full backup and all the incremental backups you’ve created over a set period of time and combines them into a new full, synthesized backup. Your new synthetic backup contains the same data as an active full backup. The only difference is how the new backup is created. Instead of copying your source data to create a new, full backup, the synthetic full backup includes the unchanged data from the source plus all the incremental backups of changed data.

In the diagram below, our hypothetical Backblaze customer performed a full backup on Sunday and an incremental backup on Monday and Tuesday. On Wednesday, their backup software performed a synthetic full backup by taking the previous backups from the backup repository and forging them into a new data set that is also a faithful copy of the source data. In other words, the synthetic full backup is completed in the cloud by merging the backups in the cloud, rather than referring to the source data.

Click to expand.

Synthetic Full Backup Pros and Cons

Synthetic full backups are much faster than normal, active full backups. And because they contain a 100% copy of your data, they serve as the starting point for any subsequent incremental backups, thus resetting your backup chain.

Your backup software may have an option in your settings that needs to be turned on to enable synthetic full backups, so be sure to check out your tool’s help resources to locate this option. You will also be able to define when that synthetic full backup should be created. Put some thought into this, considering when and how often your data gets changed. Because your synthetic full backup is based on the interim incremental backups, it’s still somewhat at risk of being corrupted if one of the incremental backups is damaged.

However, since synthetic backups are much faster to create, you can regularly create new synthetic full backups to reduce that risk. For instance, let’s say you create your first full backup on Sunday. Then, Monday-Saturday you create incremental backups of your changed data. On the next Sunday, your system creates a synthetic full backup by combining the unchanged data from the first full backup plus all of the incremental backups completed during the week.

Ultimately, synthetic full backups allow you to create full backups more often, without hogging up precious bandwidth or storage space. And, having a full backup of your data is always the best way to protect your business from a data disaster.

Some of Backblaze’s integration partners support synthetic full backups, including MSP360 and Veeam, so be sure to check your backup tool’s help articles to see if this option is available to you.

TLDR Version:

  • ✅ Less time-consuming.
  • ✅ Saves on storage costs.
  • ❌ Not as effective if lots of changes are made.
  • ❌ Still relies on incremental backups.

A Specialized Solution: Differential Backups

There’s another kind of backup to be aware of. Differential backups are popular for database applications like Microsoft SQL but not used frequently otherwise. Differential backups look at the last full backup only, and they collect the changes from the full backup. As you make changes to your original data set (the one in the full backup), your differential backup grows.

In our visual below, the full backup takes place on a Sunday. Each time the differential backup runs, it “looks back” to the full backup to see what has changed from the original source data. Again, changes can be modified files (like our purple triangle) or new files (like our red squares). It adds these changes to the backup repository in a cumulative way, which means differential backups can grow to be quite large.

Click to expand.

Differential Backup Pros and Cons

Like incremental backups, differential backups are much faster to perform than a full backup. To perform a recovery from a differential backup, you just need the full backup and the latest differential backup. So differential backup restores can be quite fast. But the overall differential backup can take up a large amount of storage space, as the changed files are uploaded to the backup repository until a new full backup is done. Hence, they don’t necessarily offer cost savings in the way of storage.

Lastly, differential backups are used so infrequently that they almost don’t merit mention here, but we wanted to include them to present a full picture of the different kinds of backups out there.

TLDR Version:

  • ✅ Good solution for database applications like SQL.
  • ✅ Faster recoveries.
  • ❌ Not cost-effective.
  • ❌ Requires regular full backups as a base.

As you can see, there is a lot to think about when developing your backup strategy. Backblaze is here to help and demystify the process. Learn more about our backup and archive solutions and get started with our free 10GB offer today.

The post What’s the Diff: Full, Incremental, Differential, and Synthetic Full Backups appeared first on Backblaze Blog | Cloud Storage & Cloud Backup.

InsightVM Scan Engine: Understanding MAC Address Discovery

Post Syndicated from Emmett Kelly original https://blog.rapid7.com/2022/03/07/insightvm-scan-engine-understanding-mac-address-discovery-2/

InsightVM Scan Engine: Understanding MAC Address Discovery

Written in collaboration with Jimmy Cancilla

When scanning an asset, one key piece of data that the InsightVM Scan Engine collects is the MAC address of the network interface used during the connection. The MAC address is one of several attributes used by the Security Console to perform asset correlation. As a result of the volatile nature of IP addresses, identifying assets using the MAC address can provide increased reliability when integrating scan results. In some cases, the MAC address can be used as a rudimentary means of fingerprinting an asset. Several manufacturers will use the same first 3 bytes when assigning a MAC address to a device (for example, several CISCO SYSTEMS, INC devices use 00000C as the MAC address prefix).

When performing an authenticated scan (a scan whereby the engine has the necessary credentials to authenticate to the target), collecting the MAC address is relatively straightforward, as all operating systems provide tooling to gather this information. However, collecting the MAC address with an unauthenticated scan (a scan where no credentials are provided) is less reliable. This is due to limitations of network protocols and modern network topologies.

Breaking down IP protocols

In order to understand these limitations, it is important to first understand the fundamentals of the IP protocol suite.

The IP protocol suite can be thought of in 4 layers:

InsightVM Scan Engine: Understanding MAC Address Discovery

The MAC address is part of the bottom layer called the Link Layer. The MAC address is used by the hardware when communicating with other devices on the same network equipment. Any devices communicating at the Link layer do so without the use of routers.

On the other hand, IP addresses are part of the Network layer. IP addresses are used to communicate with devices across different networks, traversing through routers.

MAC address discovery with unauthenticated scans

This leads to the limitation in unauthenticated scans. When performing an unauthenticated scan against assets that are accessed via a router, the scan engine is only able to communicate with that asset via the Network layer. The implications of this are that the MAC address is not included in the network packets received by the scan engine. This is not a limitation or defect of the scan engine, but rather a reality of the IP protocol suite and modern network infrastructure.

To work around these limitations in the IP protocol suite, the InsightVM scan engine uses several alternative methods to attempt to collect the MAC address of assets being scanned. In general, these alternative methods attempt to authenticate to an asset over various protocols using known default credentials. As a result of this capability in the scan engine, asset results from unauthenticated scans may include the MAC address despite being scanned over a router. However, it is important to note that the success rate is dependent on whether assets are configured to allow authentication using default credentials.

Note: SNMPv1 and SNMPv2 are more likely than most protocols to be configured with known default credentials.

Summary

The following tables outline the different methods that the scan engine will use to collect MAC addresses from targets, and whether or not authentication is required.

Windows

Method Authenticated or unauthenticated scan
via SMB protocol Authenticated
via WMI protocol Authenticated
Scan Assistant Authenticated
SNMPv1 or SNMPv2 Authenticated or unauthenticated

Note: Collecting the MAC address via SNMPv1 or SNMPv2 with an unauthenticated scan is only possible if the scan engine can authenticate using the default credentials for these protocols. However, it is not recommended that default credentials be left enabled as this poses a serious security risk.

Linux

Method Authenticated or unauthenticated scan
Via SSH protocol Authenticated
Via an insecure Telnet protocol Authenticated

Note: Running an insecure Telnet server on an asset is a serious security risk and is not recommended.

SNMPv1 or SNMPv2 Authenticated or unauthenticated

Note: Collecting the MAC address via SNMPv1 or SNMPv2 with an unauthenticated scan is only possible if the scan engine can authenticate using the default credentials for these protocols. However, it is not recommended that default credentials be left enabled as this poses a serious security risk.

Over the years, the engineering team here at Rapid7 has partnered with dozens of security teams to identify pain points and develop solutions. The importance of collecting the MAC address for targets being scanned is well understood. As a result, the InsightVM Scan Engine has been designed to utilize a multi-pronged approach to collecting MAC addresses from assets.

Additional reading:

NEVER MISS A BLOG

Get the latest stories, expertise, and news about security today.

The collective thoughts of the interwebz