Interpreting A/B test results: false negatives and power

Post Syndicated from Netflix Technology Blog original https://netflixtechblog.com/interpreting-a-b-test-results-false-negatives-and-power-6943995cf3a8

Martin Tingley with Wenjing Zheng, Simon Ejdemyr, Stephanie Lane, and Colin McFarland

This is the fourth post in a multi-part series on how Netflix uses A/B tests to inform decisions and continuously innovate on our products. Need to catch up? Have a look at Part 1 (Decision Making at Netflix), Part 2 (What is an A/B Test?), Part 3 (False positives and statistical significance). Subsequent posts will go into more details on experimentation across Netflix, how Netflix has invested in infrastructure to support and scale experimentation, and the importance of the culture of experimentation within Netflix.

In Part 3: False positives and statistical significance, we defined the two types of mistakes that can occur when interpreting test results: false positives and false negatives. We then used simple thought exercises based on flipping coins to build intuition around false positives and related concepts such as statistical significance, p-values, and confidence intervals. In this post, we’ll do the same for false negatives and the related concept of statistical power.

Figure 1: As in Part 3, we’ll use thought exercises based on flipping coins, such as this one displaying Caesar Augustus, to build up intuition about core statistical concepts.

False negatives and power

A false negative occurs when the data do not indicate a meaningful difference between treatment and control, but in truth there is a difference. Continuing on an example from Part 3, a false negative corresponds to labeling the photo of the cat as a “not cat.” False negatives are closely related to the statistical concept of power, which gives the probability of a true positive given the experimental design and a true effect of a specific size. In fact, power is simply one minus the false negative rate.

Power involves thinking about possible outcomes given a specific assumption about the actual state of the world — similar to how in Part 3 we defined significance by first assuming the null hypothesis is true. To build intuition about power, let’s go back to the same coin example from Part 3, where the goal is to decide if the coin is unfair using an experiment that calculates the fraction of heads in 100 flips. The distribution of outcomes under the null hypothesis that the coin is fair is shown in black in Figure 2. To make the diagram easier to interpret, we’ve smoothed over the tops of the histograms.

What would happen in this experiment if the coin is not fair? To make the thought exercise more specific, let’s work through what happens when we have a coin where heads occurs, on average, 64% of the time (the choice of that peculiar number will become clear later on). Because there is uncertainty or noise in our experiment, we don’t expect to see exactly 64 heads in 100 flips. But as with the null hypothesis that the coin is fair, we can calculate all the possible outcomes if this specific alternative hypothesis is true. This distribution is shown with the red curve in Figure 2.
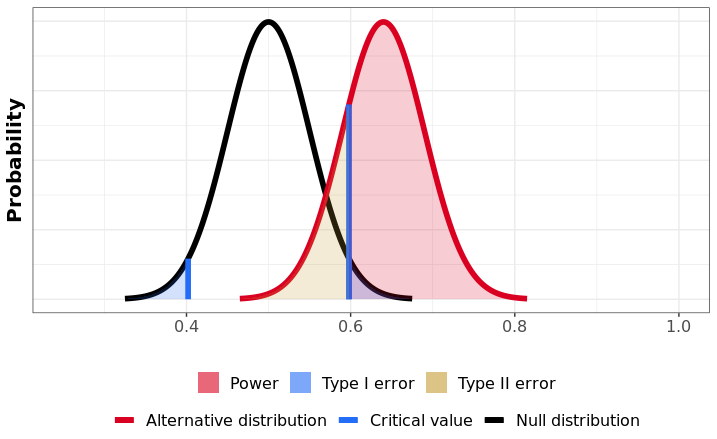
Figure 2: Illustrating power using the example of flipping a coin 100 times and calculating the fraction of heads. The black and red dashed lines show, respectively, the distribution of outcomes assuming the probability of heads is 50% (null hypothesis) and 64% (specific value of the alternative hypothesis). Here, the power against this alternative is 80% (red shading).

Visually, power is the fraction of this alternative (red) distribution that lies beyond the critical values under the null hypothesis (the blue lines and black curve; see Part 3). Here, 80% of the alternative distribution (red) falls to the right of the taller blue line that demarcates the critical value of the upper rejection region. Assuming that the truth about the coin is that the probability of heads is 64%, then the power of this test is 80%. To be complete, there is also a negligibly small part of the alternative (red) distribution that falls within the lower rejection region (to the left of the short blue line).

The power of a test corresponds to a specific, postulated effect size. In our example, the test has 80% power to detect that a coin is unfair, if that unfair coin in truth has a probability of heads equal to 64%. The interpretation is as follows: if the coin has probability of heads equal to 64%, and we repeatedly run the experiment of flipping 100 times and making a decision at the 5% significance level, then we will correctly reject the null hypothesis that the coin is fair in about 4 out of every 5 experiments. And 20% of those repeated experiments will result in a false negative: we’ll not reject the null hypothesis that the coin is fair, even though it is unfair.

Ways to increase power

In designing an A/B test, we first fix the significance level (the convention is 5%: if there is no difference between treatment and control, we’ll see false positives 5% of the time), and then design the experiment to control false negatives. There are three primary levers we can pull to increase power and reduce the probability of false negatives:

  1. Effect size. Simply put, the larger the effect size — the difference in metric values between Groups A and B — the higher the probability that we’ll be able to correctly detect that difference. To build intuition, think about running an experiment to determine if a coin is unfair, where the data we collect is the fraction of heads in 100 flips. Now think of two scenarios. In the first scenario, the true probability of heads is 55%, and in the second it is 75%. Intuitively (and mathematically!) it is more likely that our experiment identifies the coin as unfair in the second scenario. The true probability of heads is further from the null value of 50%, so it’s more likely that an experiment will produce an outcome that falls in the rejection region. In the product development context, we can increase the expected magnitude of metric movements by being bold vs incremental with the hypotheses we test. Another strategy to increase effect sizes is to test in new areas of the product, where there may be room for larger improvements in member satisfaction. That said, one of the joys of learning through experimentation is the element of surprise: at times, seemingly small changes can have a major impact on top-line metrics.
  2. Sample size. The more units in the experiment, the higher the power and the easier it is to correctly identify smaller effects. To build intuition, think again about running an experiment to determine if a coin is unfair, where the data we collect is the fraction of heads in a fixed number of flips and the true probability of heads is 64%. Consider two scenarios: in the first, we flip the coin 20 times, and in the second, we flip the coin 100 times. Intuitively (and mathematically!), it is more likely that our experiment identifies the coin as unfair in the second scenario. With more data, the result from the experiment is going to be closer to the true rate of 64% heads, while the outcomes under the assumption of a fair coin concentrate around 0.50, causing the rejection region to encroach on the 50% value. These effects combine, so that with more data there is a greater probability that the result from the experiment with the unfair coin will fall in that rejection region, resulting in a true positive. In the product development context, we can increase the power by allocating more members (or other units) to the test or by reducing the number of test groups, though there is a tradeoff between the sample size in each test and the number of non-overlapping tests that can be run at the same time.
  3. The variability of the metric in the underlying population. The more homogenous the metric within the population we are testing on, the easier it is to correctly identify true effects. The intuition for this one is a bit trickier, and our simple coin examples finally break down. Say at Netflix that we run a test that aims to reduce some measure of latency, such as the delay between a member pressing play and video playback commencing. Given the variety of devices and internet connections that people use to access Netflix, there is a lot of natural variability in this metric across our users. As a result, if the test treatment results in a small reduction in the latency metric, it’s hard to successfully identify — the “noise” from the variability across members overwhelms the small signal. In contrast, if we ran the test on a set of members that used similar devices with similar web connections, then the small signal is easier to identify — there is less noise that might drown out the signal. We spend a lot of time at Netflix building statistical analysis models that exploit this intuition, and increase power by effectively lowering the variability; see here for a technical description of our approach.

Powering for reasonable and meaningful effects

Power and the false negative rate are functions of a postulated effect size. Much like how the 5% false positive rate is a widely-accepted convention, the rule of thumb with power is to aim for 80% power for a reasonable and meaningful effect size (we’ll get to each of those below). That is, we postulate an effect size and then design the experiment, primarily through setting the sample size, such that, if the true impact of the treatment experience is as we’ve postulated, the test will correctly identify that there is an effect 80% of the time. And 20% of the time the result from the test will be a false negative: in truth, there is an effect, but our observation from the test does not lie in the rejection region and we fail to conclude that there is an effect. That’s why the examples above used a 64% probability of heads: an experiment with 100 flips then has 80% power.

What constitutes a reasonable effect size can be tricky, as tests can surprise us. But a mix of domain knowledge and common sense can generally provide solid estimates. In an area where testing has a long history, such as optimizing the recommendation systems that help Netflix members choose content that’s great for them, we have a solid idea about the effect sizes that our tests tend to produce (be they positive or negative). Given an understanding of past effect sizes, as well as the analysis strategy, we can set the sample size to ensure the test has 80% power for a reasonable metric movement.

The second consideration, both in this experimental design phase and in deciding where to invest efforts, is to determine what constitutes a meaningful impact to the primary metrics used to decide the test. What is meaningful will depend on the impact area of the experiment (member satisfaction, playback latency, technical performance of back end systems, etc.), and potentially the effort or costs associated with the new product experience. As a hypothetical, say that, for effect sizes smaller than a 0.1% change in the primary metric, the cost of supporting the new product feature outweighs the benefits. In this case, there’s little point in powering a test to detect a 0.01% change in the metric, as successfully identifying an effect of that size won’t result in a meaningful change in decisions. Likewise, if the effect sizes seen in tests in a given innovation area are consistently immaterial to the user experience or the business, that’s a sign that experimentation resources can be more efficiently deployed elsewhere.

Summary

Parts 3 and 4 of this series have focussed on defining and building intuition around the core concepts used to analyze test results: false positives and negatives, statistical significance, p-values, and power.

An uncomfortable truth about experimentation is that we can’t simultaneously minimize both false positives and false negatives. In fact, false positives and negatives trade off with one another. If we used a more stringent false positive rate, such as 0.01%, we’d reduce the number of false positives for tests where there is no difference between A and B — but we’d also reduce the power of the test, increasing the rate of false negatives, for those tests where there is a meaningful difference. Using a 5% false positive rate and targeting 80% power are well-established conventions that balance between limiting false discovery and enabling true discovery. However, in instances where a false positive (or false negative) poses a larger risk, researchers may deviate from these rules of thumb to minimize one type of uncertainty over another.

Our goal is not to eliminate uncertainty, but to understand and quantify the uncertainty in order to make sound decisions. In many cases, results from A/B tests require nuanced interpretation, and in fact the test result itself is only one input into a business decision. In the next post, we’ll cover how to build confidence in a decision using test results. Follow the Netflix Tech Blog to stay up to date.


Interpreting A/B test results: false negatives and power was originally published in Netflix TechBlog on Medium, where people are continuing the conversation by highlighting and responding to this story.


Monitoring and tuning federated GraphQL performance on AWS Lambda

Post Syndicated from James Beswick original https://aws.amazon.com/blogs/compute/monitoring-and-tuning-federated-graphql-performance-on-aws-lambda/

This post is written by Krzysztof Lis, Senior Software Development Engineer, IMDb.

Our federated GraphQL at IMDb distributes requests across 19 subgraphs (graphlets). To ensure reliability for customers, IMDb monitors availability and performance across the whole stack. This article focuses on this challenge and concludes a 3-part federated GraphQL series:

  • Part 1 presents the migration from a monolithic REST API to a federated GraphQL (GQL) endpoint running on AWS Lambda.
  • Part 2 describes schema management in federated GQL systems.

This presents an approach towards performance tuning. It compares graphlets with the same logic and different runtime (for example, Java and Node.js) and shows best practices for AWS Lambda tuning.

The post describes IMDb’s test strategy that emphasizes the areas of ownership for the Gateway and Graphlet teams. In contrast to the legacy monolithic system described in part 1, the federated GQL gateway does not own any business logic. Consequently, the gateway integration tests focus solely on platform features, leaving the resolver logic entirely up to the graphlets.

Monitoring and alarming

Efficient monitoring of a distributed system requires you to track requests across all components. To correlate service issues with issues in the gateway or other services, you must pass and log the common request ID.

Capture both error and latency metrics for every network call. In Lambda, you cannot send a response to the client until all work for that request is complete. As a result, this can add latency to a request.

The recommended way to capture metrics is Amazon CloudWatch embedded metric format (EMF). This scales with Lambda and helps avoid throttling by the Amazon CloudWatch PutMetrics API. You can also search and analyze your metrics and logs more easily using CloudWatch Logs Insights.

Lambda configured timeouts emit a Lambda invocation error metric, which can make it harder to separate timeouts from errors thrown during invocation. By specifying a timeout in-code, you can emit a custom metric to alarm on to treat timeouts differently from unexpected errors. With EMF, you can flush metrics before timing out in code, unlike the Lambda-configured timeout.

Running out of memory in a Lambda function also appears as a timeout. Use CloudWatch Insights to see if there are Lambda invocations that are exceeding the memory limits.

You can enable AWS X-Ray tracing for Lambda with a small configuration change to enable tracing. You can also trace components like SDK calls or custom sub segments.

Gateway integration tests

The Gateway team wants tests to be independent from the underlying data served by the graphlets. At the same time, they must test platform features provided by the Gateway – such as graphlet caching.

To simulate the real gateway-graphlet integration, IMDb uses a synthetic test graphlet that serves mock data. Given the graphlet’s simplicity, this reduces the risk of unreliable graphlet data. We can run tests asserting only platform features with the assumption of stable and functional, improving confidence that failing tests indicate issues with the platform itself.

This approach helps to reduce false positives in pipeline blockages and improves the continuous delivery rate. The gateway integration tests are run against the exposed endpoint (for example, a content delivery network) or by invoking the gateway Lambda function directly and passing the appropriate payload.

The former approach allows you to detect potential issues with the infrastructure setup. This is useful when you use infrastructure as code (IaC) tools like AWS CDK. The latter further narrows down the target of the tests to the gateway logic, which may be appropriate if you have extensive infrastructure monitoring and testing already in place.

Graphlet integration tests

The Graphlet team focuses only on graphlet-specific features. This usually means the resolver logic for the graph fields they own in the overall graph. All the platform features – including query federation and graphlet response caching – are already tested by the Gateway Team.

The best way to test the specific graphlet is to run the test suite by directly invoking the Lambda function. If there is any issue with the gateway itself, it does cause a false-positive failure for the graphlet team.

Load tests

It’s important to determine the maximum traffic volume your system can handle before releasing to production. Before the initial launch and before any high traffic events (for example, the Oscars or Golden Globes), IMDb conducts thorough load testing of our systems.

To perform meaningful load testing, the workload captures traffic logs to IMDb pages. We later replay the real customer traffic at the desired transaction-per-second (TPS) volume. This ensures that our tests approximate real-life usage. It reduces the risk of skewing test results due to over-caching and disproportionate graphlet usage. Vegeta is an example of a tool you can use to run the load test against your endpoint.

Canary tests

Canary testing can also help ensure high availability of an endpoint. The canary produces the traffic. This is a configurable script that runs on a schedule. You configure the canary script to follow the same routes and perform the same actions as a user, which allows you to continually verify the user experience even without live traffic.

Canaries should emit success and failure metrics that you can alarm on. For example, if a canary runs 100 times per minute and the success rate drops below 90% in three consecutive data points, you may choose to notify a technician about a potential issue.

Compared with integration tests, canary tests run continuously and do not require any code changes to trigger. They can be a useful tool to detect issues that are introduced outside the code change. For example, through manual resource modification in the AWS Management Console or an upstream service outage.

Performance tuning

There is a per-account limit on the number of concurrent Lambda invocations shared across all Lambda functions in a single account. You can help to manage concurrency by separating high-volume Lambda functions into different AWS accounts. If there is a traffic surge to any one of the Lambda functions, this isolates the concurrency used to a single AWS account.

Lambda compute power is controlled by the memory setting. With more memory comes more CPU. Even if a function does not require much memory, you can adjust this parameter to get more CPU power and improve processing time.

When serving real-time traffic, Provisioned Concurrency in Lambda functions can help to avoid cold start latency. (Note that you should use max, not average for your auto scaling metric to keep it more responsive for traffic increases.) For Java functions, code in static blocks is run before the function is invoked. Provisioned Concurrency is different to reserved concurrency, which sets a concurrency limit on the function and throttles invocations above the hard limit.

Use the maximum number of concurrent executions in a load test to determine the account concurrency limit for high-volume Lambda functions. Also, configure a CloudWatch alarm for when you are nearing the concurrency limit for the AWS account.

There are concurrency limits and burst limits for Lambda function scaling. Both are per-account limits. When there is a traffic surge, Lambda creates new instances to handle the traffic. “Burst limit = 3000” means that the first 3000 instances can be obtained at a much faster rate (invocations increase exponentially). The remaining instances are obtained at a linear rate of 500 per minute until reaching the concurrency limit.

An alternative way of thinking this is that the rate at which concurrency can increase is 500 per minute with a burst pool of 3000. The burst limit is fixed, but the concurrency limit can be increased by requesting a quota increase.

You can further reduce cold start latency by removing unused dependencies, selecting lightweight libraries for your project, and favoring compile-time over runtime dependency injection.

Impact of Lambda runtime on performance

Choice of runtime impacts the overall function performance. We migrated a graphlet from Java to Node.js with complete feature parity. The following graph shows the performance comparison between the two:

Performance graph

To illustrate the performance difference, the graph compares the slowest latencies for Node.js and Java – the P80 latency for Node.js was lower than the minimal latency we recorded for Java.

Conclusion

There are multiple factors to consider when tuning a federated GQL system. You must be aware of trade-offs when deciding on factors like the runtime environment of Lambda functions.

An extensive testing strategy can help you scale systems and narrow down issues quickly. Well-defined testing can also keep pipelines clean of false-positive blockages.

Using CloudWatch EMF helps to avoid PutMetrics API throttling and allows you to run CloudWatch Logs Insights queries against metric data.

For more serverless learning resources, visit Serverless Land.

Securely Advancing in the Sunshine State: Rapid7 Announces Tampa Office Opening

Post Syndicated from Rapid7 original https://blog.rapid7.com/2021/10/26/securely-advancing-in-the-sunshine-state-rapid7-announces-tampa-office-opening/

Securely Advancing in the Sunshine State: Rapid7 Announces Tampa Office Opening

In our quest to create a safer digital world for all, Rapid7 is also on a mission to reimagine the future of work, culture, and talent — admittedly, we’ve set the bar pretty high for ourselves. But that’s part of the spirit of Never Done, one of our core values. We’re always striving to do better, be bolder, and think bigger as we help organizations across the globe securely advance.

That’s why we’re thrilled to announce that we’re expanding our US office footprint by opening our newest location in Tampa, Florida. With its fast-growing community of professionals — supported by a diverse population, great universities, and a strong veteran community — Tampa represents the next step in our quest to build the workplace of the future.

Building the next tech hub

We want to do something unprecedented in Tampa by taking an emerging center of tech activity to new heights as the next national hub of technology and innovation.

Tampa is fertile ground for this bold vision. The city recently ranked as one of the top 10 US metro areas for tech industry growth, and technology jobs have been increasing steadily here since 2015, with another 2% growth slated for 2021. This high concentration of tech jobs — and the talent to fill them — should come as little surprise, given the wealth of higher-learning institutions nearby, with 23 colleges and universities in the Tampa metro area. Tampa is also home to a strong military and veteran community centered around MacDill Air Force Base.

We want to take the seeds of potential in Tampa and grow them into a full-fledged tech ecosystem. To do that, we’re not just building an office and creating jobs — we’re putting a stake in the ground to help shape the future of Tampa.

To bring this vision to life, Rapid7 is partnering with Tampa-area colleges and universities to keep fueling the growth of local talent and build a stronger security community in the city than ever before. Our goal is to have 30% or more of our Tampa team be local college graduates and/or recently retired military. We’re also planning to partner with inclusion-focused STEM programs to help create a more diverse and supportive tech community through leadership and service.

Walking the walk on diversity

Rapid7 believes everyone deserves an equal opportunity to build the career they want — and that diversity of experience and viewpoints helps drive the innovation on which a healthy technology culture thrives. By boosting creativity and bringing a wider range of insights to inform better decision-making, diverse teams help drive business outcomes. In Tampa, we’re excited to walk the walk in our commitment to diversity and continue to bring this vision to life.

We believe a diverse workforce is integral to the success of our organization and the culture we want to build. That’s why we’re building something truly unique and putting diversity first in our hiring plan in order to build a team that reflects the rich, diverse character of Tampa.

We have ambitious goals to hire, retain, and develop talent with diverse backgrounds and experiences, with targets set for Black, Latinx, and female hires that we intend not only to meet, but to exceed. We’re aiming for a team that is 50% or more from diverse backgrounds.

With a diverse team that is empowered to be their one-of-a-kind, authentic selves in their day-to-day work — in keeping with our core value of Bring You — the Rapid7 Tampa office will truly help push the city forward as a hub of tech growth.

Build the workplace of the future with us

The task of securing the digital world is more complex and challenging than ever before. At a time when data breaches are increasing in frequency and severity, people need best-in-class security tools that are easy to use and deliver results. But as the challenge increases, so does the opportunity — and having the right people on board is all the more critical.

Our vision of the workplace of the future is not only diverse and rooted in the community, but also flexible, with a hybrid model that accommodates work-life balance while providing a collaborative in-office experience to promote teaming. In our effort to build the workplace of the future, we want to think ahead of the curve — taking the best of what we’ve learned from remote work in 2020 and 2021 while allowing talented team members to collaborate in person. We think the future of work involves flexible in-office policies while also allowing teams to spend time face-to-face. This makes room for serendipitous collaboration, fosters stronger relationships, and helps us support employees in developing their careers through learning and mentorship, which are enhanced by the in-office experience.

In Tampa, we have an exciting opportunity to build a model for the workplace of the future, blazing the trail rather than playing catch-up. This involves bringing a flexible, hybrid work model together with a diverse, dynamic culture that makes building a safer digital world rewarding and fun, while giving back to the community and setting the pace of growth and innovation in emerging centers of tech talent.

At our new location at Water Street Tampa, we’re adding more than 100 positions in data and software engineering, business development, customer support, IT, and people strategy.

Ready to help us meet today’s security needs, reimagine the future of work, and pave a path for the future of tech in Tampa? Check out our open roles.

Engaging Black students in computing at UK schools — interview with Joe Arday

Post Syndicated from Janina Ander original https://www.raspberrypi.org/blog/engaging-black-students-in-computing-uk-schools-joe-arday/

Joe Arday.

On the occasion of Black History Month UK, we speak to Joe Arday, Computer Science teacher at Woodbridge High School in Essex, UK, about his experiences in computing education, his thoughts about underrepresentation of Black students in the subject, and his ideas about what needs to be done to engage more Black students.

To start us off, can you share some of your thoughts about Black History Month as an occasion?

For me personally it’s an opportunity to celebrate our culture, but my view is it shouldn’t be a month — it should be celebrated every day. I am of Ghanaian descent, so Black History Month is an opportunity to share my culture in my school and my community. Black History Month is also an opportunity to educate yourself about what happened to the generations before you. For example, my parents lived through the Brixton riots. I was born in 1984, and I got to secondary school before I heard about the Brixton riots from a teacher. But my mother made sure that, during Black History Month, we went to a lot of extracurricular activities to learn about our culture.

For me it’s about embracing the culture I come from, being proud to be Black, and sharing that culture with the next generation, including my two kids, who are of mixed heritage. They need to know where they come from, and know their two cultures.

Tell us a bit about your own history: how did you come to computing education?

So I was a tech professional in the finance sector, and I was made redundant when the 2008 recession hit. I did a couple of consulting jobs, but I thought to myself, “I love tech, but in five years from now, do I really want to be going from job to job? There must be something else I can do.”

At that time there was a huge drive to recruit more teachers to teach what was called ICT back then and is now Computing. As a result, I started my career as a teacher in 2010. As a former software consultant, I had useful skills for teaching ICT. When Computing was introduced instead, I was fortunate to be at a school that could bring in external CPD (continued professional development) providers to teach us about programming and build our understanding and skills to deliver the new curriculum. I also did a lot of self-study and spoke to lots of teachers at other schools about how to teach the subject.

What barriers or support did you encounter in your teaching career? Did you have role models when you went into teaching?

Not really — I had to seek them out. In my environment, there are very few Black teachers, and I was often the only Black Computer Science teacher. A parent once said to me, “I hope you’re not planning to leave, because my son needs a role model in Computer Science.” And I understood exactly what she meant by that, but I’m not even a role model, I’m just someone who’s contributing to society the best way I can. I just want to pave the way for the next generation, including my children.

My current school is supporting me to lead all the STEM engagement for students, and in that role, some of the things I do are running a STEM club that focuses a lot on computing, and running new programmes to encourage girls into tech roles. I’ve also become a CAS Master Teacher and been part of a careers panel at Queen Mary University London about the tech sector, for hundreds of school students from across London. And I was selected by the National Centre for Computing Education as one of their facilitators in the Computer Science Accelerator CPD programme.

But there’s been a lack of leadership opportunities for me in schools. I’ve applied for middle-leadership roles and have been told my face doesn’t fit in an interview in a previous school. And I’m just as skilled and experienced as other candidates: I’ve been acting Head of Department, acting Head of Year — what more do I need to do? But I’ve not had access to middle-leadership roles. I’ve been told I’m an average teacher, but then I’ve been put onto dealing with “difficult” students if they’re Black, because a few of my previous schools have told me that I was “good at dealing with behaviour”. So that tells you about the role I was pigeonholed into.

It is very important for Black students to have role models, and to have a curriculum that reflects them.

Joe Arday

I’ve never worked for a Black Headteacher, and the proportion of Black teachers in senior leadership positions is very low, only 1%. So I am considering moving into a different area of computing education, such as edtech or academia, because in schools I don’t have the opportunities to progress because of my ethnicity.

Do you think this lack of leadership opportunities is an experience other Black teachers share?

I think it is, that’s why the number of Black teachers is so low. And as a Black student of Computer Science considering a teaching role, I would look around my school and think, if I go into teaching, where are the opportunities going to come from?

Black students are underrepresented in computing. Could you share your thoughts about why that’s the case?

There’s a lack of role models across the board: in schools, but also in tech leadership roles, CEOs and company directors. And the interest of Black students isn’t fostered early on, in Year 8, Year 9 (ages 12–14). If they don’t have a teacher who is able to take them to career fairs or to tech companies, they’re not going to get exposure, they’re not going to think, “Oh, I can see myself doing that.” So unless they have a lot of interest already, they’re not going to pick Computer Science when it comes to choosing their GCSEs, because it doesn’t look like it’s for them.

But we need diverse people in computing and STEM, especially girls. As the father of a boy and a girl of mixed heritage, that’s very important to me. Some schools I’ve worked in, they pushed computer science into the background, and it’s such a shame. They don’t have the money or the time for their teachers to do the CPD to teach it properly. And if attitudes at the top are negative, that’s going to filter down. But even if students don’t go into the tech industry, they still need digital skills to go into any number of sectors. Every young person needs them.

It is very important for Black students to have role models, and to have a curriculum that reflects them. Students need to see themselves in their lessons and not feel ignored by what is being taught. I was very fortunate to be selected for the working group for the Raspberry Pi Foundation’s culturally relevant teaching guidelines, and I’m currently running some CPD for teachers around this. I bet in the future Ofsted will look at how diverse the curriculum of schools is.

What do you think tech organisations can do in order to engage more Black students in computing?

I think tech organisations need to work with schools and offer work experience placements. When I was a student, 20 years ago, I went on a placement, and that set me on the right path. Nowadays, many students don’t do work experience, they are school leavers before they do an internship. So why do so many schools and organisations not help 14- or 15-year-olds spend a week or two doing a placement and learning some real-life skills?

A mentor explains Scratch code using a projector in a coding club session.

And I think it’s very important for teachers to be able to keep up to date with the latest technologies so they can support their students with what they need to know when they start their own careers, and can be convincing doing it. I encourage my GCSE Computer Science students to learn about things like cloud computing and cybersecurity, about the newest types of technologies that are being used in the tech sector now. That way they’re preparing themselves. And if I was a Headteacher, I would help my students gain professional certifications that they can use when they apply for jobs.

What is a key thing that people in computing education can do to engage more Black students?

Teachers could run a STEM or computing club with a Black History Month theme to get Black students interested — and it doesn’t have to stop at Black History Month. And you can make computing cross-curricular, so there could be a project with all teachers, where each one runs a lesson that involves a bit of coding, so that all students can see that computing really is for everyone.

What would you say to teachers to encourage them to take up Computer Science as a subject?

Because of my role working for the NCCE, I always encourage teachers to join the NCCE’s Computer Science Accelerator programme and to retrain to teach Computer Science. It’s a beautiful subject, all you need to do is give it a chance.

Thank you, Joe, for sharing your thoughts with us!

Joe was part of the group of teachers we worked with to create our practical guide on culturally relevant teaching in the computing classroom. You can download it as a free PDF now to help you think about how to reflect all your students in your lessons.

The post Engaging Black students in computing at UK schools — interview with Joe Arday appeared first on Raspberry Pi.

Разследване на Валя Ахчиева: Плуване без касов бон

Post Syndicated from Екип на Биволъ original https://bivol.bg/%D0%BF%D0%BB%D1%83%D0%B2%D0%B0%D0%BD%D0%B5-%D0%B1%D0%B5%D0%B7-%D0%BA%D0%B0%D1%81%D0%BE%D0%B2-%D0%B1%D0%BE%D0%BD.html

вторник 26 октомври 2021


Град Пловдив е известен като „градът на плувните шампиони”. Но, си нямат истински басейн. Два плувни басейна в Пловдив предизвикаха доста вълнения сред родители и деца през последните месеци. Единият…

Help Make BugBusting History at AWS re:Invent 2021

Post Syndicated from Sean M. Tracey original https://aws.amazon.com/blogs/aws/help-make-bugbusting-history-at-aws-reinvent-2021/

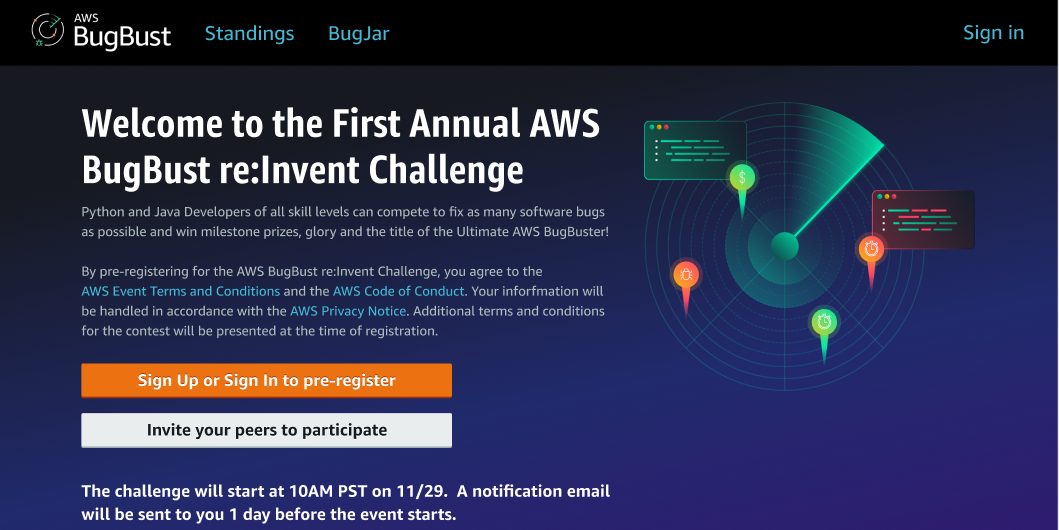
Earlier this year, we launched the AWS BugBust Challenge, the world’s first global competition to fix one million code bugs and reduce technical debt by over $100 million. As part of this endeavor, we are launching the first AWS BugBust re:Invent Challenge at this year’s AWS re:Invent conference, from 10 a.m. (PST) November 29 to 2 p.m (PST) December 2, and in doing so, hope to create a new World Record for “Largest Bug Fixing Competition” as recognized by Guinness World Records.

To date, AWS BugBust events have been run internally by organizations that want to reduce the number of code bugs and the impact they have on their external customers. At these events, an event administrator from within the organization invites internal developers to collaborate in a shared AWS account via a unique link allowing them to participate in the challenge. While this benefits the organizations, it limits the reach of the event, as it focuses only on their internal bugs. To increase the impact that the AWS BugBust events have, at this year’s re:Invent we will open up the challenge to anybody with Java or Python knowledge to help fix open-source code bases.

Historically, finding bugs has been a labor-intensive challenge. 620 million developer hours are wasted each year searching for potential bugs in a code base and patching them before they can cause any trouble in production – or worse yet, fix them on-the-fly when they’re already causing issues. The AWS BugBust re:Invent Challenge uses Amazon CodeGuru, an ML-powered developer tool that provides intelligent recommendations to improve code quality and identify an application’s most expensive lines of code. Rather than reacting to security and operational events caused by bugs, Amazon CodeGuru proactively highlights any potential issues in defined code bases as they’re being written and before they can make it into production. Using CodeGuru, developers can immediately begin picking off bugs and earning points for the challenge.

As part of this challenge, AWS will be including a myriad of open source projects that developers will be able to patch and contribute to throughout the event. Bugs can range from security issues, to duplicate code, to resource leaks and more. Once each bug has been submitted and CodeGuru determines that the issue is resolved, all of the patched software will be released back to the open source projects so that everyone can benefit from the combined efforts to squash software bugs.

The AWS BugBust re:Invent Challenge is open to all developers who have Python or Java knowledge regardless of whether or not they’re attending re:Invent. There will be an array of prizes, from hoodies and fly swatters to Amazon Echo Dots, available to all who participate and meet certain milestones in the challenge. There’s also the coveted title of “Ultimate AWS BugBuster” accompanied by a cash prize of $1500 for whomever earns the most points by squashing bugs during the event.

A screenshot of the AWS BugBust re:Invent challenge registration page

For those attending in-person, we have created the AWS BugBust Hub, a 500 square-foot space in the main exhibition hall. This space will give developers a place to join in with the challenge and track their progress on the AWS BugBust leadership board while maintaining appropriate social-distancing. In addition to the AWS BugBust Hub, there will be an AWS BugBust kiosk located within the event space where developers will be able to sign up to contribute toward the Largest Bug Fixing Challenge World Record attempt. Attendees will also be able to speak with Amazonians from the AWS BugBust SWAT team who will be able to answer questions about the event and provide product demos.

To take part in the AWS BugBust re:Invent Challenge, developers must have an AWS BugBust player account and a GitHub account. Pre-registration for the competition can be done online, or if you’re at re:Invent 2021 in-person you can register to participate at our AWS BugBust Hub or kiosk. If you’re not planning on joining us in person at re:Invent, you can still join us online, fix bugs and earn points to win prizes.

New Strategy Recommendations Service Helps Streamline AWS Cloud Migration and Modernization

Post Syndicated from Steve Roberts original https://aws.amazon.com/blogs/aws/new-strategy-recommendations-service-helps-streamline-aws-cloud-migration-and-modernization/

Determining viable strategies for successful application migration and modernization to the cloud takes time. It can also require significant effort, depending on the size and complexity of the application portfolio to analyze. To date, the analysis process has been largely manual and nonstandard in nature, making it difficult to apply at scale on large portfolios. Limited time to make decisions, a lack of domain knowledge and cloud expertise, and low awareness of the available modernization tools and services can compound the effort and complexity.

Today, I’m pleased to announce AWS Migration Hub Strategy Recommendations to help automate the analysis of your application portfolios. Strategy Recommendations analyzes your running applications to determine runtime environments and process dependencies, optionally analyzes source code and databases, and more. The data collected from analysis is assessed against a set of business objectives that you prioritize, such as license cost reduction, speed of migration, reducing operational overhead from using managed services, or modernizing infrastructure using cloud-native technologies. Then, it produces recommendations of viable paths to migrate and modernize your applications.

Any given application could have multiple paths for migration and modernization, including rehosting, replatforming, or refactoring. You’ll get recommendations on all viable paths, and you can elect to override the recommendations as you see fit. Everyone can use Strategy Recommendations, regardless of experience, to lower the effort and time required and complexity involved in assessing application portfolios, whether they’re on premises awaiting migration or already in the AWS Cloud pending further modernization.

Taking as an example a typical N-tier application, an ASP.NET web application with a Microsoft SQL Server database, Strategy Recommendations helps you analyze the various components such as the servers hosting the web front end, the backend servers, and the database itself to determine viable paths and tools you can use to migrate and modernize onto the AWS Cloud. For instance, if your goal is to reduce licensing costs for the application, Strategy Recommendations may recommend you to refactor your application to .NET on Linux using the Porting Assistant for .NET.

Registering your Application Servers for Strategy Recommendations
Registration of the servers hosting your application portfolio with AWS Application Discovery Service is a prerequisite for Strategy Recommendations. The servers to register can be running on-premises as physical servers or virtual machines (VMs), or they can be Amazon Elastic Compute Cloud (Amazon EC2) instances for applications you’ve already migrated with a “lift-and-shift” process. You can find details on the different options for registering your application servers in the AWS Application Discovery Service User Guide.

Automated Data Collection for Analysis
With your servers registered in AWS Application Discovery Service, you can set up automated collection of the process level analysis of your application portfolio using an agentless data collector provided by Strategy Recommendations. The agentless collector can be downloaded as an Open Virtualization Appliance (OVA) for VMWare vCenter environments. If you’ve already migrated some or all of your applications to EC2, there’s also an EC2 Amazon Machine Image (AMI), which includes the collector, to help further analyze these applications for modernization opportunities.

If you don’t want, or cannot use, automated collection methods, or you’ve already collected this data using another tool or service, then you can instead manually import the data for analysis. However, the recommendations you obtain for manually imported data won’t be as in-depth as those originating from automated data collection. One additional benefit of automated collection is that it’s much easier to refresh the data as you progress, too.

Application and process discovery on your servers is language-agnostic. For .NET and Java applications in GitHub and GitHub Enterprise repositories and Microsoft SQL Server databases, you can optionally include detection of cloud anti-patterns. It’s important to note that if you elect to have source code or database analysis performed, no actual code or data is uploaded to Strategy Recommendations; only the results of the analysis are sent. By the way, if you elect to manually import your data for analysis, the option to perform deeper source code and database analysis is not supported.

Analyzing your Application Portfolio
Full details on how to set up automated data collection, the analysis options, and other important prerequisites can be found in the Strategy Recommendations User Guide, so I won’t go into further detail here. Instead, I want to look at how you can start analyzing an application portfolio that’s already been migrated to EC2, with an intent to modernize further, using the agentless collector. As mentioned earlier, Strategy Recommendations supports analysis of application portfolios hosted on physical on-premises servers or virtual machines, or (as shown in this post) on EC2 instances.

To start collection of data for analysis, I need to follow a small number of steps:

  1. Start and configure the Strategy Recommendations agentless collector, using either the downloadable OVA or the provided EC2 AMI.
  2. Configure each of the Windows and Linux instances hosting my applications to allow access from the collector.
  3. Configure my initial business priorities and other application and database preferences to get my initial recommendations. I can fine-tune these options later.

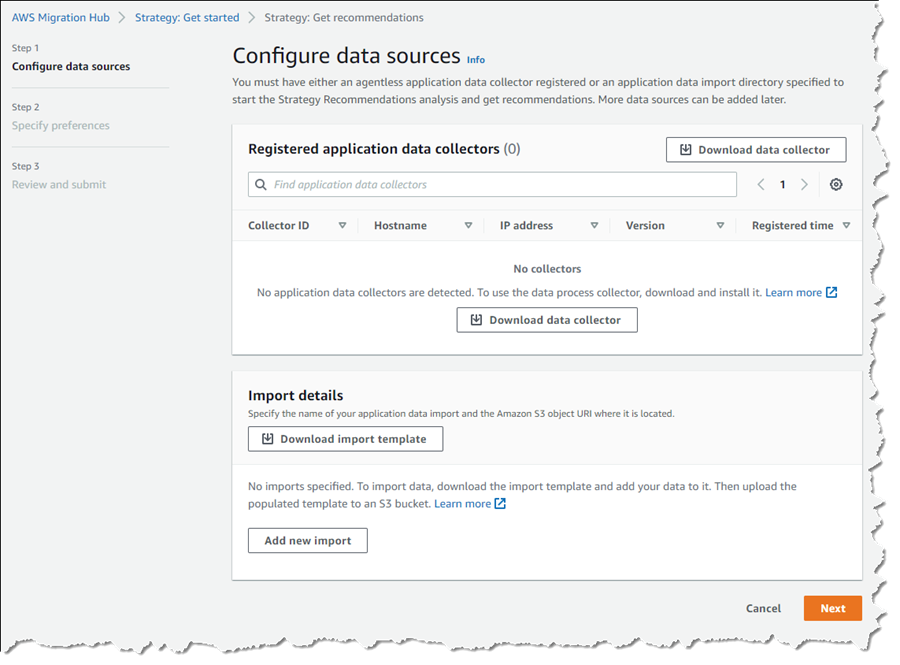
My first stop is at the Migration Hub console, where I click Strategy in the navigation panel to take me to the Get started page. On clicking any of the Download data collector, Download import template, or Get recommendations buttons, I’m first asked to agree to the creation of a service-linked role, granting Strategy Recommendations the necessary permissions to access other services on my behalf. Once I agree, I start at the Configure data sources page of a short wizard. Here, I can view a list of any previously registered collectors. I can also download the OVA version of the data collector and an import template for any application data I want to import manually, outside of automated collection.

Initial data source configuration page

I’m going to use the EC2 AMI-based collector so, before proceeding with this wizard, I open the EC2 console in a new browser tab to launch it. To find the image for the Strategy Recommendations data collector I can either go to the AMIs page, select Public images, and filter by owner 703163444405, or, from the Launch Instances wizard, enter the name AWSMHubApplicationDataCollector in the Search field. Once I’ve found the image, I proceed through the launch wizard as I would for any other AMI.

Configuration of the collector is a simple process, and I’m guided using a series of questions. As I mentioned earlier, full information is in the user guide that I linked to, so I won’t go into every detail here. To start the configuration process, I first use SSH to connect to my collector instance and then run a Docker container, using the command docker exec -it application-data-collector bash. In the running container, I start the configuration Q&A with the command collector setup. During the process, you’re asked to supply data for the following items of information:

  1. Usage agreement and confirmation that all required roles have been set up, followed by a set of AWS access and secret keys.
  2. For on-premises Windows application servers that are not managed by vCenter, or EC2 Windows instances, I need to provide a user ID and password that will allow the collector to connect to my servers using WinRM.
  3. If I have any Linux application servers, I can choose whether the collector connects using SSH or certificate-based authentication.
  4. Finally, I can configure source code analysis for .NET and Java applications in repositories on GitHub or GitHub Enterprise. These require a Git username and personal access token (PAT). I can also configure additional, deeper, source code analysis for C# applications. This does, however, require a separate server running Windows, on which I’ve installed the Porting Assistant for .NET.

Once I have completed these steps, my data collector is registered and ready to start inspecting my servers. Back on the Strategy Recommendations Configure data sources page, I refresh the page and can now see my collector listed.

Registered data collector

The second step is to enable access from the collector to my application servers, details for which can be found in the Step 4: Set up the Strategy Recommendations collector topic of the user guide. For my Windows Server, I used RDP to connect and then downloaded and ran two PowerShell scripts from links provided in the guide to configure WinRM. For larger server fleets, you might consider using AWS Systems Manager Automation to perform this task. For my Linux servers, having chosen to use SSH authentication for the collector, I needed to copy public key material generated during collector configuration process to each server.

At this point, the servers to be analyzed are known to AWS Application Discovery Service, the Strategy Recommendations data collector is configured, and each server is configured to allow access from the collector. It’s now time for my third and final step; namely, to set my business and other priorities for the analysis and let the service get to work to generate my recommendations.

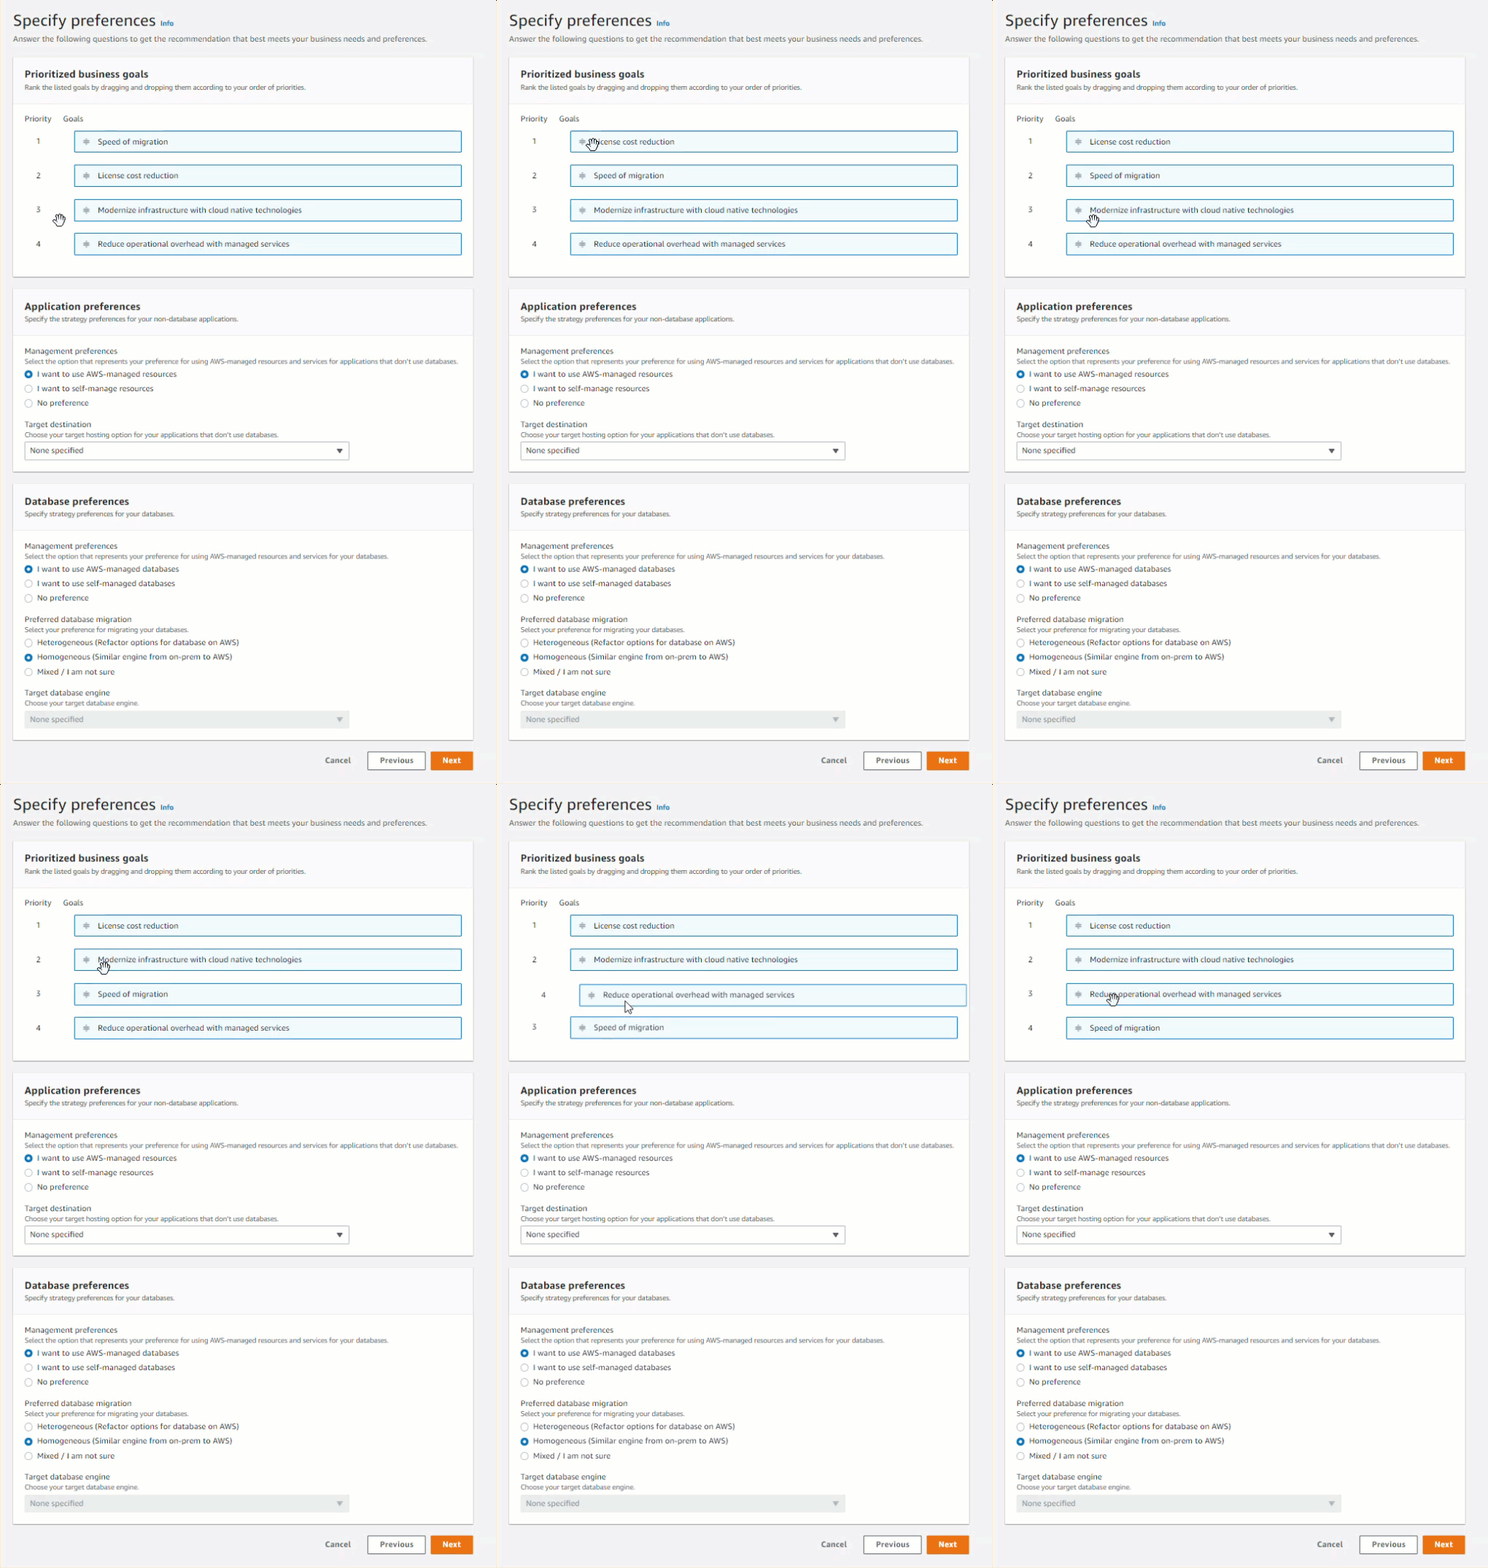
Back in the Get started page in Strategy Recommendations, since my collector is registered and I have no manual application data to import, I just choose Next. This takes me to the Specify Preferences page, where I set my business priorities and other preferences. I can revise these and reanalyze at any time, but for now, I use drag and drop to set License cost reduction, Modernizing infrastructure using cloud-native technologies, and Reduce operational overhead with managed services as my highest priorities. I leave the remaining options, for application and database preferences, unchanged.

Configuring my business priorities and other settings for the analysis recommendations

Choosing Next, I reach the Review page, summarizing my choices, then choose Start data analysis. One item of note, the analysis runs against all servers that you’ve configured in Application Discovery Service, so you may see more servers being processed than you imported in the earlier step (servers not configured to allow access by the collector show up in results with a collection status of “data collection failed”).

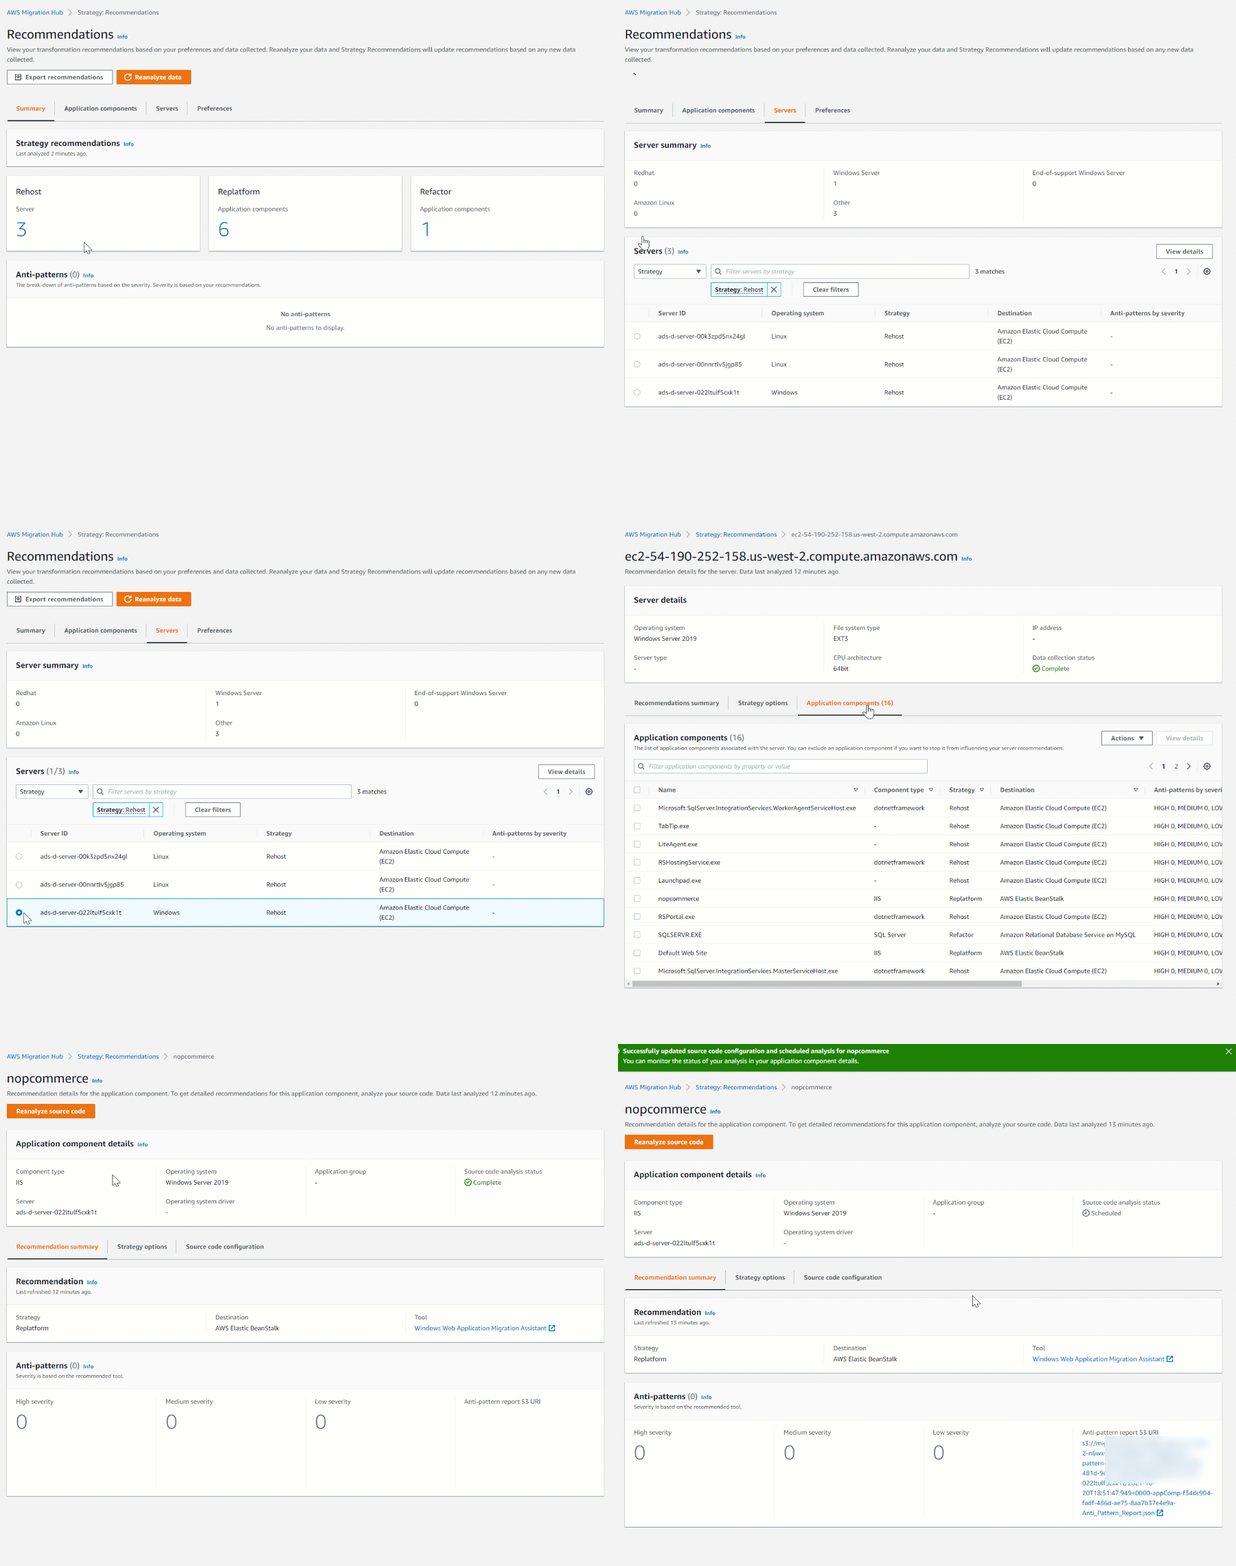
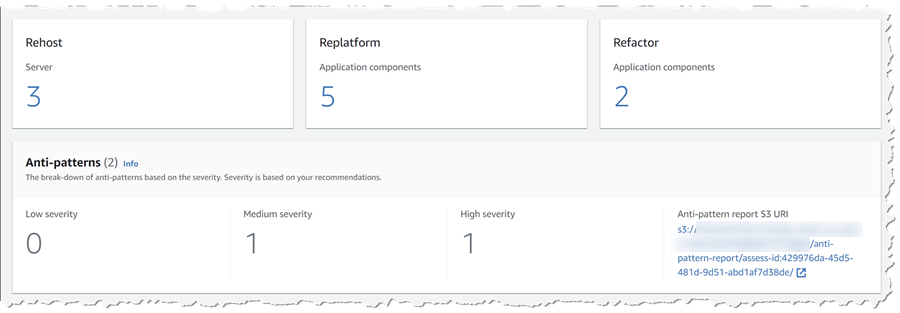
With analysis complete, my recommendations are summarized (no anti-pattern analysis has been run yet).

Initial recommendations from server analysis

One of my servers is running Windows and hosts an older version of nopCommerce, originally a .NET Framework-based application, and a related SQL Server database. As my highest business priority was license cost reduction, I start my inspection at that server. The recommendations available so far are based on inspection of just the server itself. Analysis of the source code and components comprising the application may likely influence those recommendations, so I request further analysis of the application source code by drilling down to the server and application of interest.

Adding source code analysis for the server application

Code analysis creates a JSON-format report file in Amazon Simple Storage Service (Amazon S3), which when I open it, shows anti-patterns such as accessing log files using Windows file system paths instead of a cloud-based service such as Amazon CloudWatch, fixed IP addresses, a server-specific database connection, and more.

Following code analysis, the suggested recommendations update slightly from those based on just inspection of the servers. One application component that was originally recommended for a replatforming approach is now a candidate for refactoring.

Revised recommendations

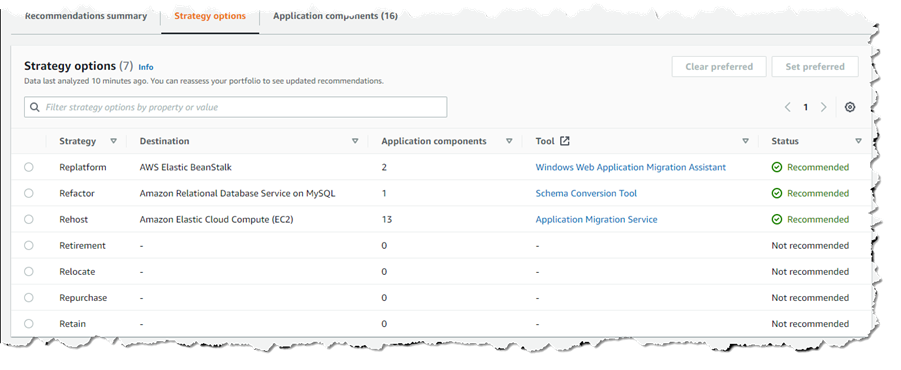
Returning to my server of interest, clicking the Strategy options tab shows me the recommendations. The results of the code analysis have played a part in the weightings, along with my business priorities. The image below shows the initial recommendations, which are based on just analysis of the server itself.

The initial recommendations

Below are the revised recommendations for the server, following source code analysis.

Revised recommendations following source code analysis

The recommendations for the server also include replatforming the application’s SQL Server database to MySQL on Amazon Relational Database Service (RDS). This is suggested because in my priorities, I requested consideration of managed services. Before following this recommendation I may want to perform an additional anti-pattern analysis of the database, which I can do after creating a secret in AWS Secrets Manager to hold the database credentials (check the user guide topic on database analysis for more details). Analysis of databases, which is currently only available for SQL Server, identifies migration incompatibilities such as unsupported data types.

In the screenshots, you’ll notice additional viable paths for migration and modernization. This applies to both servers and application components. I can choose a viable path over the recommended strategy if I so want by selecting the viable strategy option and clicking Set preferred. In the screenshot below, for the nopCommerce application component, I’ve chosen to prefer the replatform route to containers for the application, using AWS App2Container. And of course, I can always rewind to the start and adjust my business priorities and other options and reanalyze my data.

Setting a preferred approach for a recommendation

Taking the initial recommendations, then using code and database analysis, or revising your priorities for analysis and the suggested recommendations, provides scope to experiment with multiple “what if” options to discover the optimal strategy for migrating and modernizing application portfolios to the cloud. Once that optimal strategy is determined, you can communicate it to downstream teams to begin the migration and modernization process for your application portfolio.

Get Recommendations for Migration and Modernization Today
You can get started analyzing your servers and application portfolios today with AWS Migration Hub Strategy Recommendations, at no extra charge, in the US East (N. Virginia), US West (Oregon), Asia Pacific (Sydney), Asia Pacific (Tokyo), Europe (Frankfurt), Europe (Ireland), and Europe (London) Regions. You can, of course, deploy the applications you choose to migrate and modernize based on recommendations from the tool to all Regions. As I noted earlier, you can find more details on prerequisites, getting started with the collector, and working with recommendations in the user guide.

— Steve

NPM Library (ua-parser-js) Hijacked: What You Need to Know

Post Syndicated from Glenn Thorpe original https://blog.rapid7.com/2021/10/25/npm-library-ua-parser-js-hijacked-what-you-need-to-know/

NPM Library (ua-parser-js) Hijacked: What You Need to Know

For approximately 4 hours on Friday, October 22, 2021, a widely utilized NPM package, ua-parser-js, was embedded with a malicious script intended to install a coinminer and harvest user/credential information. This package is used “to detect Browser, Engine, OS, CPU, and Device type/model from User-Agent data,” with nearly 8 million weekly downloads and 1,200 dependencies.

The malicious package was available for download starting on October 22, 2021, at 12:15 PM GMT, and ending October 22, 2021, between 4:16 PM and 4:26 PM GMT. During that time, 3 versions of the package were compromised with a script that would execute on Windows and Linux machines:

Affected Version Patched Version
0.7.29 0.7.30
0.8.0 0.8.1
1.0.0 1.0.1

Both GitHub and CISA issued advisories urging users to upgrade right away and review systems for suspicious or malicious activity.

Due to the quick reporting of issues by GitHub users and action by the developer, development exposure will be limited to teams who had a pull/build during that (roughly) 4-hour timeframe.

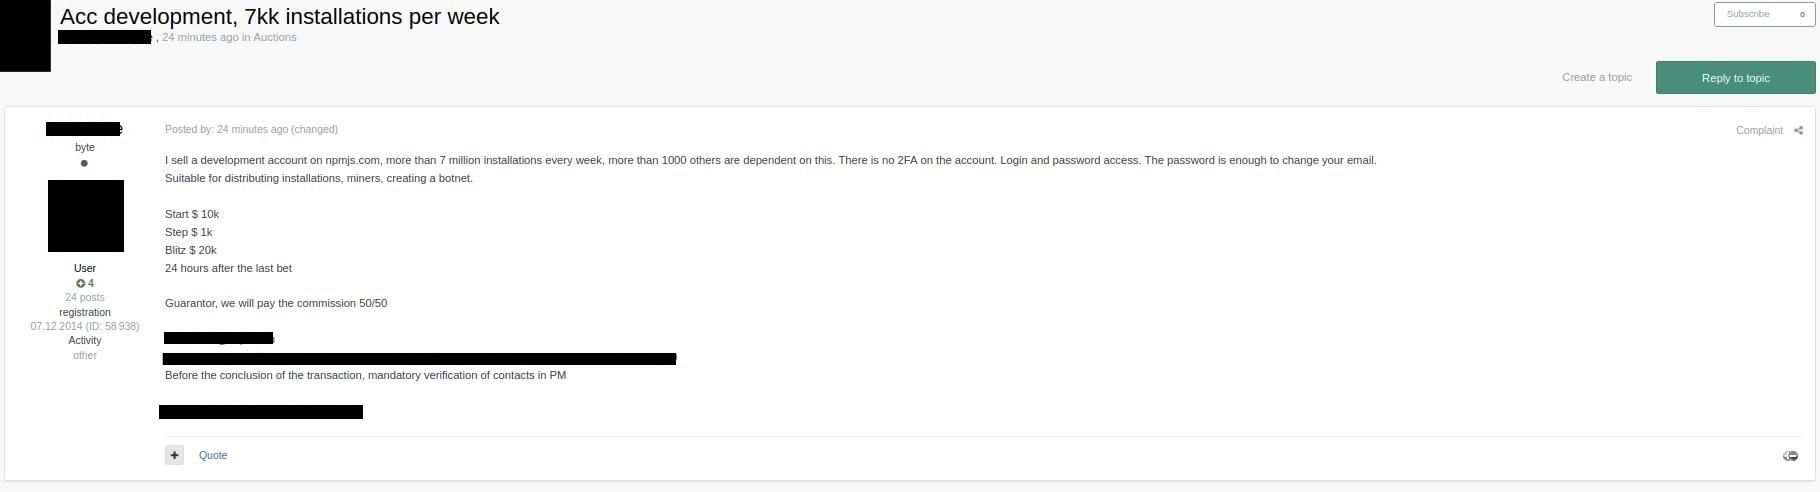
At this time, the source of the attack is unconfirmed. However, with the use of IntSights, recently acquired by Rapid7, a suspicious thread has been identified, created on October 5, 2021, in a prominent Russian hacking forum. There, a threat actor offered access to a developer account of an undisclosed package on npmjs.com, indicating that the package has “more than 7 million installations every week, more than 1,000 others are dependent on this.” With the requested price of $20,000 dollars, the threat actor stated that the account does not have 2-factor authentication.

NPM Library (ua-parser-js) Hijacked: What You Need to Know

While there is no definitive evidence that the compromise of ua-parser-js is related to the above-mentioned dark-web activity, the weekly installs and dependency numbers appear to match and align with the developers’ post of an account hijack.

Rapid7 guidance

Rapid7 recommends development teams immediately heed the advice for organizations to review for the use of these versions and remediate accordingly. Additionally, organizations’ security teams need to be on the lookout for users who visited a site infected with the malicious script. Several anti-malware programs have (or have since added) detections for this, and organizations should keep an eye open for network traffic that is hitting domains/IPs associated with coin mining.

Rapid7 customers

InsightVM

InsightVM users will be able to assess their exposure to malicious versions of the ua-parser-js package via Container Security functionality in an upcoming release. No Scan Engine or Insight Agent-based checks are currently planned.

InsightIDR

InsightIDR customers, including Managed Detection & Response customers, were already equipped with detections that may be indicative of related malicious activity:

  • Cryptocurrency Miner – XMRig
  • Suspicious Process – Curl to External IP Address
  • Wget to External IP Address

Additionally, Rapid7 has updated the following rule to provide additional coverage:

  • Cryptocurrency Miner – Mining Pool URL in Command Line

NEVER MISS A BLOG

Get the latest stories, expertise, and news about security today.

Sudan woke up without Internet

Post Syndicated from Celso Martinho original https://blog.cloudflare.com/sudan-woke-up-without-internet/

Sudan woke up without Internet

Sudan woke up without Internet

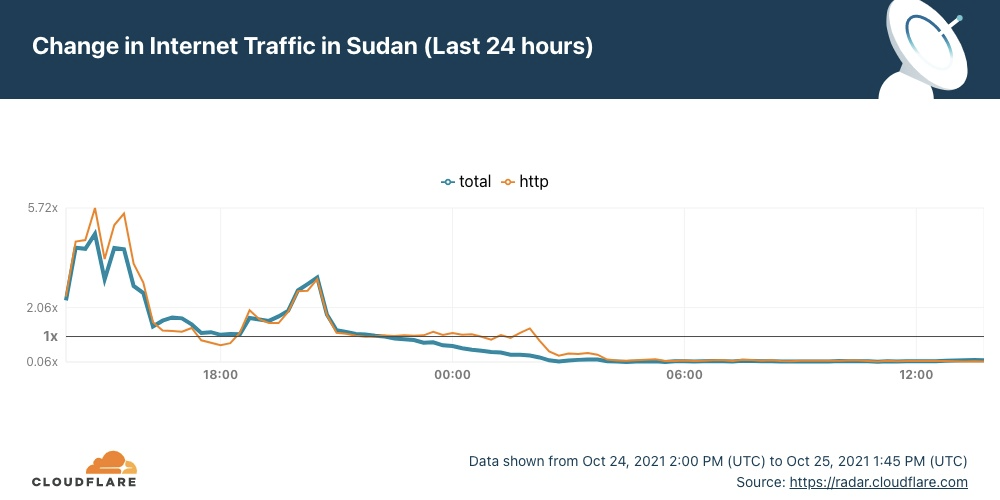
Today, October 25, following political turmoil, Sudan woke up without Internet access.

In our June blog, we talked about Sudan when the country decided to shut down the Internet to prevent cheating in exams.

Now, the disruption seems to be for other reasons. AP is reporting that “military forces … detained at least five senior Sudanese government figures.”. This afternoon (UTC) several media outlets confirmed that Sudan’s military dissolved the transitional government in a coup that shut down mobile phone networks and Internet access.

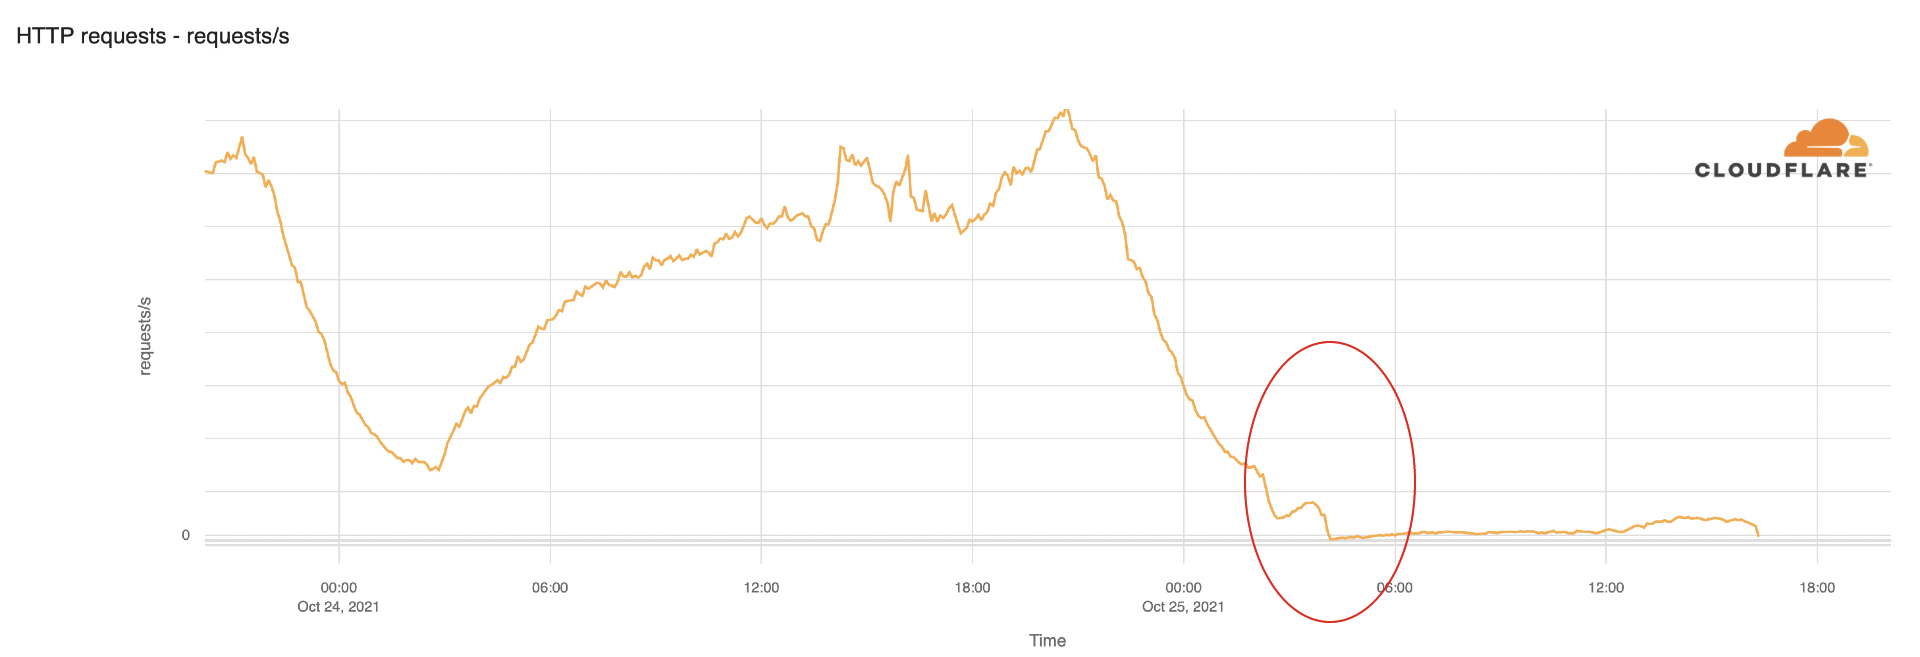
Cloudflare Radar allows anyone to track Internet traffic patterns around the world. The dedicated page for Sudan clearly shows that this Monday, when the country was waking up, the Internet traffic went down and continued that trend through the afternoon (16:00 local time, 14:00 UTC).

Sudan woke up without Internet

We dug in a little more on the HTTP traffic data. It usually starts increasing after 06:00 local time (04:00 UTC). But this Monday morning, traffic was flat, and the trend continued in the afternoon (there were no signs of the Internet coming back at 18:00 local time).

Sudan woke up without Internet

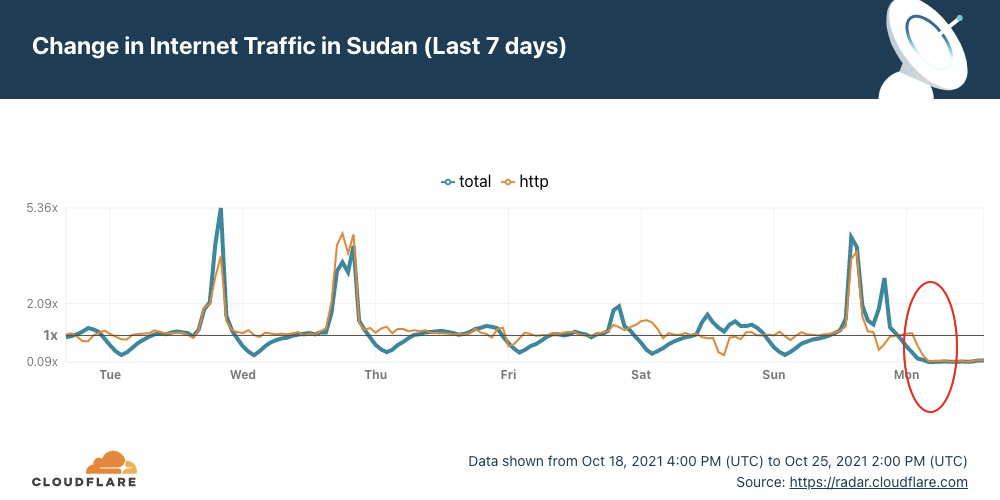
When comparing today with the last seven days’ pattern, we see that today’s drop is abrupt and unusual.

Sudan woke up without Internet

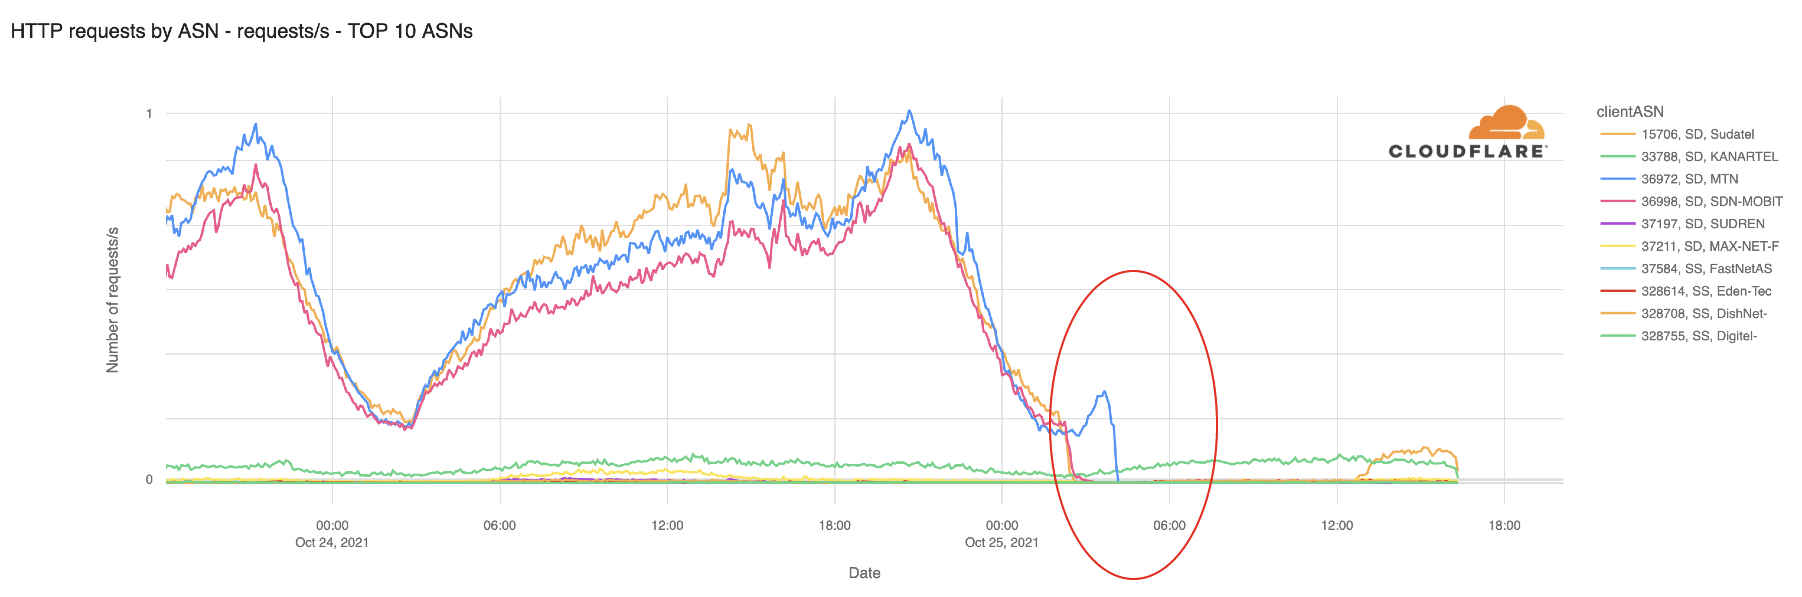
We can see the same pattern when looking at HTTP traffic by ASN (Autonomous Systems Number). The shutdown affects all the major ISPs from Sudan.

Sudan woke up without Internet

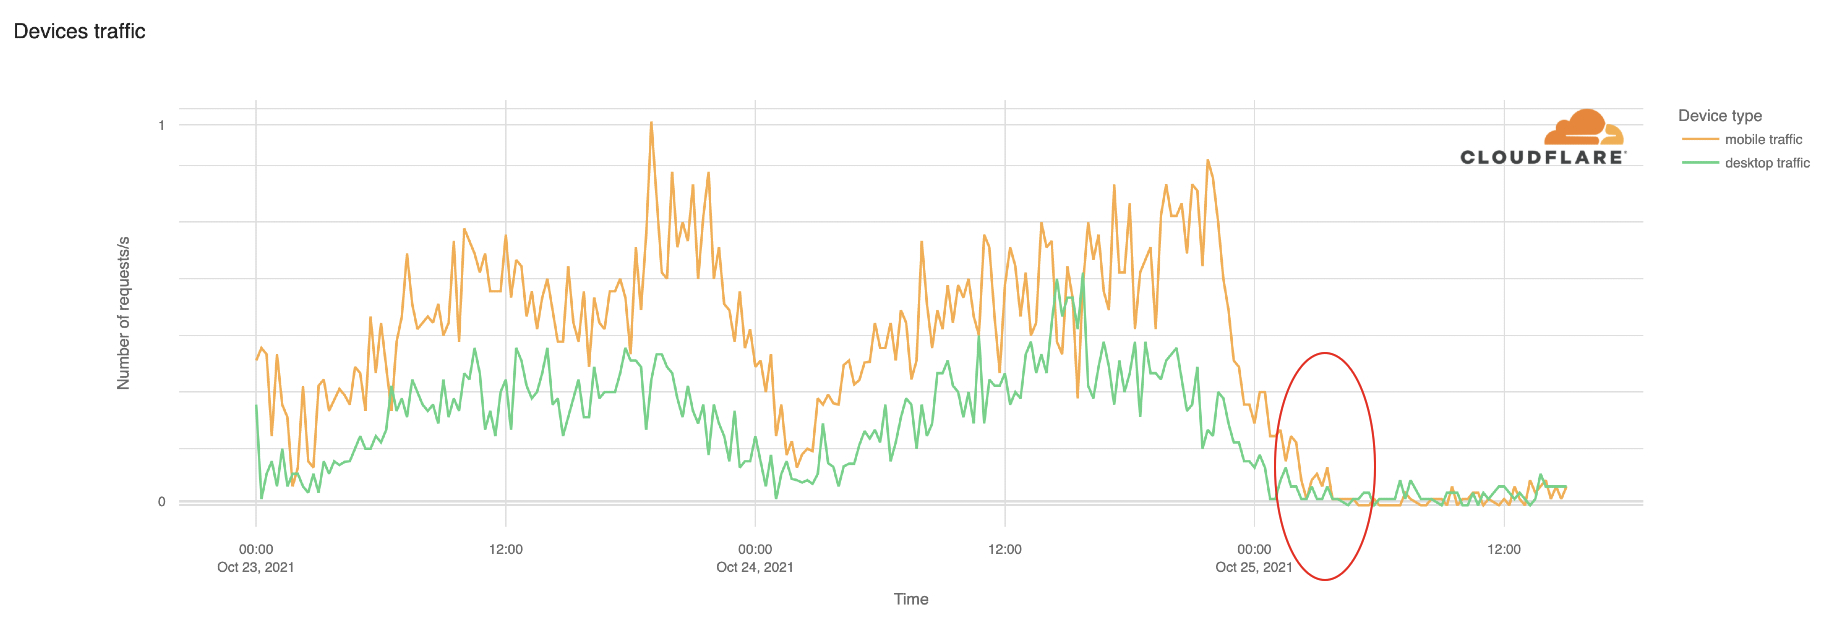
Two weeks ago, we compared mobile traffic worldwide using Cloudflare Radar, and Sudan was one of the most mobile-friendly countries on the planet, with 83% of Internet traffic coming from mobile devices. Today, both mobile and desktop traffic was disrupted.

Sudan woke up without Internet

Using Cloudflare Radar, we can also see a change in Layer 3&4 DDoS attacks because of the lack of data.

Sudan woke up without Internet

You can keep an eye on Cloudflare Radar to monitor how we see the Internet traffic globally and in every country.

Kernel prepatch 5.15-rc7

Post Syndicated from original https://lwn.net/Articles/873984/rss

The 5.15-rc7 kernel prepatch is out, rather
later than would have normally been expected due to Linus’s travel schedule.

But please do give it a good testing to make sure we’ve shaken out
any issues. I have yet more travel coming up next week, so it would
be very convenient for me to delay the merge window if I get the
excuse to do so, but right now that looks unlikely.

New York Times Journalist Hacked with NSO Spyware

Post Syndicated from Bruce Schneier original https://www.schneier.com/blog/archives/2021/10/new-york-times-journalist-hacked-with-nso-spyware.html

Citizen Lab is reporting that a New York Times journalist was hacked with the NSO Group’s spyware Pegasus, probably by the Saudis.

The world needs to do something about these cyberweapons arms manufacturers. This kind of thing isn’t enough; NSO Group is an Israeli company.

Building a difference checker with Amazon S3 and AWS Lambda

Post Syndicated from James Beswick original https://aws.amazon.com/blogs/compute/building-a-difference-checker-with-amazon-s3-and-aws-lambda/

When saving different versions of files or objects, it can be useful to detect and log the differences between the versions automatically. A difference checker tool can detect changes in JSON files for configuration changes, or log changes in documents made by users.

This blog post shows how to build and deploy a scalable difference checker service using Amazon S3 and AWS Lambda. The example application uses the AWS Serverless Application Model (AWS SAM), enabling you to deploy the application more easily in your own AWS account.

This walkthrough creates resources covered in the AWS Free Tier but usage beyond the Free Tier allowance may incur cost. To set up the example, visit the GitHub repo and follow the instructions in the README.md file.

Overview

By default in S3, when you upload an object with the same name as an existing object, the new object overwrites the existing one. However, when you enable versioning in a S3 bucket, the service stores every version of an object. Versioning provides an effective way to recover objects in the event of accidental deletion or overwriting. It also provides a way to detect changes in objects, since you can compare the latest version to previous versions.

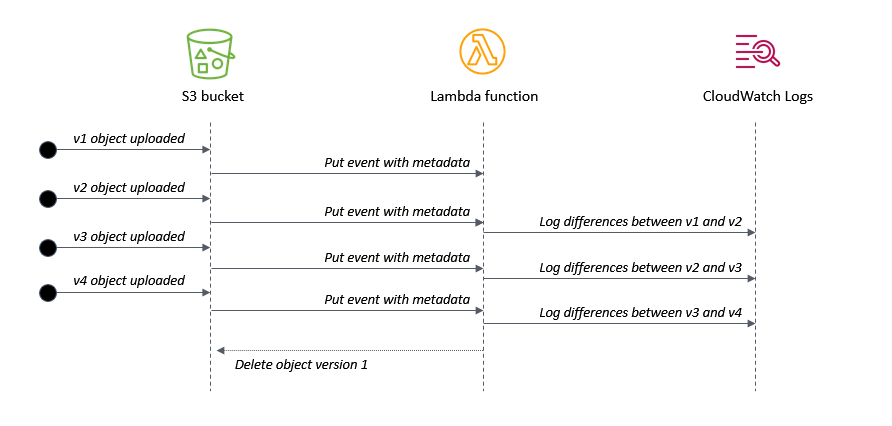
In the example application, the S3 bucket triggers a Lambda function every time an object version is unloaded. The Lambda function compares the latest version with the last version and then writes the differences to Amazon CloudWatch Logs.

Additionally, the application uses a configurable environment variable to determine how many versions of the object to retain. By default, it keeps the latest three versions. The Lambda function deletes versions that are earlier than the configuration allows, providing an effective way to implement object life cycling.

This shows the application flow when multiple versions of an object are uploaded:

Application flow

  1. When v1 is uploaded, there is no previous version to compare against.
  2. When v2 is uploaded, the Lambda function logs the differences compared with v1.
  3. When v3 is uploaded, the Lambda function logs the differences compared with v2.
  4. When v4 is uploaded, the Lambda function logs the differences compared with v3. It then deletes v1 of the object, since it is earlier than the configured setting.

Understanding the AWS SAM template

The application’s AWS SAM template configures the bucket with versioning enabled using the VersioningConfiguration attribute:

  SourceBucket:
    Type: AWS::S3::Bucket
    Properties:
      BucketName: !Ref BucketName
      VersioningConfiguration:
        Status: Enabled      

It defines the Lambda function with an environment variable KEEP_VERSIONS, which determines how many versions of an object to retain:

  S3ProcessorFunction:
    Type: AWS::Serverless::Function 
    Properties:
      CodeUri: src/
      Handler: app.handler
      Runtime: nodejs14.x
      MemorySize: 128
      Environment:
        Variables:
          KEEP_VERSIONS: 3

The template uses an AWS SAM policy template to provide the Lambda function with an S3ReadPolicy to the objects in the bucket. The version handling logic requires s3:ListBucketVersions permission on the bucket and s3:DeleteObjectVersion permission on the objects in the bucket. It’s important to note which permissions apply to the bucket and which apply to the objects within the bucket. The template defines these three permission types in the function’s policy:

      Policies:
        - S3ReadPolicy:
            BucketName: !Ref BucketName      
        - Statement:
          - Sid: VersionsPermission
            Effect: Allow
            Action:
            - s3:ListBucketVersions
            Resource: !Sub "arn:${AWS::Partition}:s3:::${BucketName}" 
        - Statement:
          - Sid: DeletePermission
            Effect: Allow
            Action:
            - s3:DeleteObject
            - s3:DeleteObjectVersion
            Resource: !Sub "arn:${AWS::Partition}:s3:::${BucketName}/*" 

The example application only works for text files but you can use the same logic to process other file types. The event definition ensures that only objects ending in ‘.txt’ invoke the Lambda function:

      Events:
        FileUpload:
          Type: S3
          Properties:
            Bucket: !Ref SourceBucket
            Events: s3:ObjectCreated:*
            Filter: 
              S3Key:
                Rules:
                  - Name: suffix
                    Value: '.txt'     

Processing events from the S3 bucket

S3 sends events to the Lambda function when objects are created. The event contains metadata about the objects but not the contents of the object. It’s good practice to separate the business logic of the function from the Lambda handler, so the generic handler in app.js iterates through the event’s records and calls the custom logic for each record:

const { processS3 } = require('./processS3')

exports.handler = async (event) => {
  console.log (JSON.stringify(event, null, 2))

  await Promise.all(
    event.Records.map(async (record) => {
      try {
        await processS3(record)
      } catch (err) {
        console.error(err)
      }
    })
  )
}

The processS3.js file contains a function that fetches the object versions in the bucket and sorts the event data received. The listObjectVersions method of the S3 API requires the s3:ListBucketVersions permission, as provided in the AWS SAM template:

    // Decode URL-encoded key
    const Key = decodeURIComponent(record.s3.object.key.replace(/\+/g, " "))

    // Get the list of object versions
    const data = await s3.listObjectVersions({
      Bucket: record.s3.bucket.name,
      Prefix: Key
    }).promise()

   // Sort versions by date (ascending by LastModified)
    const versions = data.Versions
    const sortedVersions = versions.sort((a,b) => new Date(a.LastModified) - new Date(b.LastModified))

Finally, the compareS3.js file contains a function that loads the latest two versions of the S3 object and uses the Diff npm library to compare:

const compareS3 = async (oldVersion, newVersion) => {
  try {
    console.log ({oldVersion, newVersion})

    // Get original text from objects 
    const oldObject = await s3.getObject({ Bucket: oldVersion.BucketName, Key: oldVersion.Key }).promise()
    const newObject = await s3.getObject({ Bucket: newVersion.BucketName, Key: newVersion.Key }).promise()

    // Convert buffers to strings
    const oldFile = oldObject.Body.toString()
    const newFile = newObject.Body.toString()

    // Use diff library to compare files (https://www.npmjs.com/package/diff)
    return Diff.diffWords(oldFile, newFile)

  } catch (err) {
    console.error('compareS3: ', err)
  }
}

Life-cycling earlier versions of an S3 object

You can use an S3 Lifecycle configuration to apply rules automatically based on object transition actions. Using this approach, you can expire objects based upon age and the S3 service processes the deletion asynchronously. Lifecyling with rules is entirely managed by S3 and does not require any custom code. This implementation uses a different approach, using code to delete objects based on number of retained versions instead of age.

When versioning is enabled on a bucket, S3 adds a VersionId attribute to an object when it is created. This identifier is a random string instead of a sequential identifier. Listing the versions of an object also returns a LastModified attribute, which can be used to determine the order of the versions. The length of the response array also indicates the number of versions available for an object:

[
  {
    Key: 'test.txt',
    VersionId: 'IX_tyuQrgKpMFfq5YmLOlrtaleRBQRE',
    IsLatest: false,
    LastModified: 2021-08-01T18:48:50.000Z,
  },
  {
    Key: 'test.txt',
    VersionId: 'XNpxNgUYhcZDcI9Q9gXCO9_VRLlx1i.',
    IsLatest: false,
    LastModified: 2021-08-01T18:52:58.000Z,
  },
  {
    Key: 'test.txt',
    VersionId: 'RBk2BUIKcYYt4hNA5hrTVdNit.MDNMZ',
    IsLatest: true,
    LastModified: 2021-08-01T18:53:26.000Z,
  }
]

For convenience, this code adds a sequential version number attribute, determined by sorting the array by date. The deleteS3 function uses the deleteObjects method in the S3 API to delete multiple objects in one action. It builds a params object containing the list of keys for deletion, using the sequential version ID to flag versions for deletion:

const deleteS3 = async (versions) => {

  const params = {
    Bucket: versions[0].BucketName, 
    Delete: {
     Objects: [ ]
    }
  }

  try {
    // Add keys/versions from objects that are process.env.KEEP_VERSIONS behind
    versions.map((version) => {
      if ((versions.length - version.VersionNumber) >= process.env.KEEP_VERSIONS ) {
        console.log(`Delete version ${version.VersionNumber}: versionId = ${version.VersionId}`)
        params.Delete.Objects.push({ 
          Key: version.Key,
          VersionId: version.VersionId
        })
      }
    })

    // Delete versions
    const result = await s3.deleteObjects(params).promise()
    console.log('Delete object result: ', result)

  } catch (err) {
    console.error('deleteS3: ', err)
  }
}

Testing the application

To test this example, upload a sample text file to the S3 bucket by using the AWS Management Console or with the AWS CLI:

aws s3 cp sample.txt s3://myS3bucketname

Modify the test file and then upload again using the same command. This creates a second version in the bucket. Repeat this process multiple times to create more versions of the object. The Lambda function’s log file shows the differences between versions and any deletion activity for earlier versions:

Log activity

You can also test the object locally using the test.js function and supplying a test event. This can be useful for local debugging and testing.

Conclusion

This blog post shows how to create a scalable difference checking tool for objects stored in S3 buckets. The Lambda function is invoked when S3 writes new versions of an object to the bucket. This example also shows how to remove earlier versions of object and define a set number of versions to retain.

I walk through the AWS SAM template for deploying this example application and highlight important S3 API methods in the SDK used in the implementation. I explain how version IDs work in S3 and how to use this in combination with the LastModified date attribute to implement sequential versioning.

To learn more about best practices when using S3 to Lambda, see the Lambda Operator Guide. For more serverless learning resources, visit Serverless Land.

Optimizing your AWS Infrastructure for Sustainability, Part III: Networking

Post Syndicated from Katja Philipp original https://aws.amazon.com/blogs/architecture/optimizing-your-aws-infrastructure-for-sustainability-part-iii-networking/

In Part I: Compute and Part II: Storage of this series, we introduced strategies to optimize the compute and storage layer of your AWS architecture for sustainability.

This blog post focuses on the network layer of your AWS infrastructure and proposes concepts to optimize your network utilization.

Optimizing the networking layer of your AWS infrastructure

When you make your applications available to more customers, the packets that travel across the network will increase. Similarly, the larger the size of data, as well as the more distance a packet has to travel, the more resources are required to transmit it. With growing number of application users, optimizing network traffic can ensure that network resource consumption is not growing linearly.

The recommendations in the following sections will help you use your resources more efficiently for the network layer of your workload.

Reducing the network traveled per request

Reducing the data sent over the network and optimizing the path a packet takes will result in a more efficient data transfer. The following table provides metrics related to some AWS services that can help you find potential network optimization opportunities.

Service Metric/Check Source
Amazon CloudFront Cache hit rate Viewing CloudFront and Lambda@Edge metrics
AWS Trusted Advisor check reference
Amazon Simple Storage Service (Amazon S3) Data transferred in/out of a bucket Metrics and dimensions
AWS Trusted Advisor check reference
Amazon Elastic Compute Cloud (Amazon EC2) NetworkPacketsIn/NetworkPacketsOut List the available CloudWatch metrics for your instances
AWS Trusted Advisor CloudFront Content Delivery Optimization AWS Trusted Advisor check reference

We recommend the following concepts to optimize your network utilization.

Read local, write global

The following strategies allow users to read the data from the source closest to them; thus, fewer requests travel longer distances.

  • If you are operating within a single AWS Region, you should choose a Region that is near the majority of your users. The further your users are away from the Region, the further data needs to travel through the global network.
  • If your users are spread over multiple Regions, set up multiple copies of the data to reside in each Region. Amazon Relational Database Service (Amazon RDS) and Amazon Aurora let you set up cross-Region read replicas. Amazon DynamoDB global tables allow for fast performance and alleviate network load.

Use a content delivery network

Content delivery networks (CDNs) bring your data closer to the end user. When requested, they cache static content from the original server and deliver it to the user. This shortens the distance each packet has to travel.

  • CloudFront optimizes network utilization and delivers traffic over CloudFront’s globally distributed edge network. Figure 1 shows a global user base that accesses an S3 bucket directly versus serving cached data from edge locations.
  • Trusted Advisor includes a check that recommends whether you should use a CDN for your S3 buckets. It analyzes the data transferred out of your S3 bucket and flags the buckets that could benefit from a CloudFront distribution.
Comparison of accessing an S3 bucket directly versus via a CloudFront distribution/edge locations

Figure 1. Comparison of accessing an S3 bucket directly versus via a CloudFront distribution/edge locations

Optimize CloudFront cache hit ratio

CloudFront caches different versions of an object depending upon the request headers (for example, language, date, or user-agent). You can further optimize your CDN distribution’s cache hit ratio (the number of times an object is served from the CDN versus from the origin) with a Trusted Advisor check. It automatically checks for headers that do not affect the object and then recommends a configuration to ignore those headers and not forward the request to the origin.

Use edge-oriented services

Edge computing brings data storage and computation closer to users. By implementing this approach, you can perform data preprocessing or run machine learning algorithms on the edge.

  • Edge-oriented services applied on gateways or directly onto user devices reduce network traffic because data does not need to be sent back to the cloud server.
  • One-time, low-latency tasks are a good fit for edge use cases, like when an autonomous vehicle needs to detect objects nearby. You should generally archive data that needs to be accessed by multiple parties in the cloud, but consider factors such as device hardware and privacy regulations first.
  • CloudFront Functions can run compute on edge locations and Lambda@Edge can generate Regional edge caches. AWS IoT Greengrass provides edge computing for Internet of Things (IoT) devices.

Reducing the size of data transmitted

Serve compressed files

In addition to caching static assets, you can further optimize network utilization by serving compressed files to your users. You can configure CloudFront to automatically compress objects, which results in faster downloads, leading to faster rendering of webpages.

Enhance Amazon EC2 network performance

Network packets consist of data that you are sending (frame) and the processing overhead information. If you use larger packets, you can pass more data in a single packet and decrease processing overhead.

Jumbo frames use the largest permissible packet that can be passed over the connection. Keep in mind that outside a single virtual private cloud (VPC), over virtual private network (VPN) or internet gateway, traffic is limited to a lower frame regardless of using jumbo frames.

Optimize APIs

If your payloads are large, consider reducing their size to reduce network traffic by compressing your messages for your REST API payloads. Use the right endpoint for your use case. Edge-optimized API endpoints are best suited for geographically distributed clients. Regional API endpoints are best suited for when you have a few clients with higher demands, because they can help reduce connection overhead. Caching your API responses will reduce network traffic and enhance responsiveness.

Conclusion

As your organization’s cloud adoption grows, knowing how efficient your resources are is crucial when optimizing your AWS infrastructure for environmental sustainability. Using the fewest number of resources possible and using them to their fullest will have the lowest impact on the environment.

Throughout this three-part blog post series, we introduced you to the following architectural concepts and metrics for the compute, storage, and network layers of your AWS infrastructure.

  • Reducing idle resources and maximizing utilization
  • Shaping demand to existing supply
  • Managing your data’s lifecycle
  • Using different storage tiers
  • Optimizing the path data travels through a network
  • Reducing the size of data transmitted

This is not an exhaustive list. We hope it is a starting point for you to consider the environmental impact of your resources and how you can build your AWS infrastructure to be more efficient and sustainable. Figure 2 shows an overview of how you can monitor related metrics with CloudWatch and Trusted Advisor.

Overview of services that integrate with CloudWatch and Trusted Advisor for monitoring metrics

Figure 2. Overview of services that integrate with CloudWatch and Trusted Advisor for monitoring metrics

Ready to get started? Check out the AWS Sustainability page to find out more about our commitment to sustainability. It provides information about renewable energy usage, case studies on sustainability through the cloud, and more.

Other blog posts in this series

Related information

Correlate security findings with AWS Security Hub and Amazon EventBridge

Post Syndicated from Marshall Jones original https://aws.amazon.com/blogs/security/correlate-security-findings-with-aws-security-hub-and-amazon-eventbridge/

In this blog post, we’ll walk you through deploying a solution to correlate specific AWS Security Hub findings from multiple AWS services that are related to a single AWS resource, which indicates an increased possibility that a security incident has happened.

AWS Security Hub ingests findings from multiple AWS services, including Amazon GuardDuty, Amazon Inspector, Amazon Macie, AWS Firewall Manager, AWS Identity and Access Management (IAM) Access Analyzer, and AWS Systems Manager Patch Manager. Findings from each service are normalized into the AWS Security Finding Format (ASFF), so that you can review findings in a standardized format and take action quickly. You can use AWS Security Hub to provide a single view of all security-related findings, where you can set up alerting, automatic remediation, and ingestion into third-party incident management systems for specific findings.

Although Security Hub can ingest a vast number of integrations and findings, it cannot create correlation rules like a Security Information and Event Management (SIEM) tool can. However, you can create such rules using EventBridge. It’s important to take a closer look when multiple AWS security services generate findings for a single resource, because this potentially indicates elevated risk. Depending on your environment, the initial number of findings in AWS Security Hub findings may be high, so you may need to prioritize which findings require immediate action. AWS Security Hub natively gives you the ability to filter findings by resource, account, and many other details. With the solution in this post, when one of these correlated sets of findings is detected, a new finding is created and pushed to AWS Security Hub by using the Security Hub BatchImportFindings API operation. You can then respond to these new security incident-oriented findings through ticketing, chat, or incident management systems.

Prerequisites

This solution requires that you have AWS Security Hub enabled in your AWS account. In addition to AWS Security Hub, the following services must be enabled and integrated to AWS Security Hub:

Solution overview

In this solution, you will use a combination of AWS Security Hub, Amazon EventBridge, AWS Lambda, and Amazon DynamoDB to ingest and correlate specific findings that indicate a higher likelihood of a security incident. Each correlation is focused on multiple specific AWS security service findings for a single AWS resource.

The following list shows the correlated findings that are detected by this solution. The Description section for each finding correlation provides context for that correlation, the Remediation section provides general recommendations for remediation, and the Prevention/Detection section provides guidance to either prevent or detect one or more findings within the correlation. With the code provided, you can also add more correlations than those listed here by modifying the Cloud Development Kit (CDK) code and AWS Lambda code. The Solution workflow section breaks down the flow of the solution. If you choose to implement automatic remediation, each finding correlation will be created with the following AWS Security Hub Finding Format (ASFF) fields:

- Severity: CRITICAL
- ProductArn: arn:aws:securityhub:<REGION>:<AWS_ACCOUNT_ID>:product/<AWS_ACCOUNT_ID>/default

These correlated findings are created as part of this solution:

  1. Any Amazon GuardDuty Backdoor findings and three critical common vulnerabilities and exposures (CVEs) from Amazon Inspector that are associated with the same Amazon Elastic Compute Cloud (Amazon EC2) instance.
    • Description: Amazon Inspector has found at least three critical CVEs on the EC2 instance. CVEs indicate that the EC2 instance is currently vulnerable or exposed. The EC2 instance is also performing backdoor activities. The combination of these two findings is a stronger indication of an elevated security incident.
    • Remediation: It’s recommended that you isolate the EC2 instance and follow standard protocol to triage the EC2 instance to verify if the instance has been compromised. If the instance has been compromised, follow your standard Incident Response process for post-instance compromise and forensics. Redeploy a backup of the EC2 instance by using an up-to-date hardened Amazon Machine Image (AMI) or apply all security-related patches to the redeployed EC2 instance.
    • Prevention/Detection: To mitigate or prevent an Amazon EC2 instance from missing critical security updates, consider using Amazon Systems Manager Patch Manager to automate installing security-related patching for managed instances. Alternatively, you can provide developers up-to-date hardened Amazon Machine Images (AMI) by using Amazon EC2 Image Builder. For detection, you can set the AMI property called ‘DeprecationTime’ to indicate when the AMI will become outdated and respond accordingly.
  2. An Amazon Macie sensitive data finding and an Amazon GuardDuty S3 exfiltration finding for the same Amazon Simple Storage Service (Amazon S3) bucket.
    • Description: Amazon Macie has scanned an Amazon S3 bucket and found a possible match for sensitive data. Amazon GuardDuty has detected a possible exfiltration finding for the same Amazon S3 bucket. The combination of these findings indicates a higher risk security incident.
    • Remediation: It’s recommended that you review the source IP and/or IAM principal that is making the S3 object reads against the S3 bucket. If the source IP and/or IAM principal is not authorized to access sensitive data within the S3 bucket, follow your standard Incident Response process for post-compromise plan for S3 exfiltration. For example, you can restrict an IAM principal’s permissions, revoke existing credentials or unauthorized sessions, restricting access via the Amazon S3 bucket policy, or using the Amazon S3 Block Public Access feature.
    • Prevention/Detection: To mitigate or prevent exposure of sensitive data within Amazon S3, ensure the Amazon S3 buckets are using least-privilege bucket policies and are not publicly accessible. Alternatively, you can use the Amazon S3 Block Public Access feature. Review your AWS environment to make sure you are following Amazon S3 security best practices. For detection, you can use Amazon Config to track and auto-remediate Amazon S3 buckets that do not have logging and encryption enabled or publicly accessible.
  3. AWS Security Hub detects an EC2 instance with a public IP and unrestricted VPC Security Group; Amazon GuardDuty unusual network traffic behavior finding; and Amazon GuardDuty brute force finding.
    • Description: AWS Security Hub has detected an EC2 instance that has a public IP address attached and a VPC Security Group that allows traffic for ports outside of ports 80 and 443. Amazon GuardDuty has also determined that the EC2 instance has multiple brute force attempts and is communicating with a remote host on an unusual port that the EC2 instance has not previously used for network communication. The correlation of these lower-severity findings indicates a higher-severity security incident.
    • Remediation: It’s recommended that you isolate the EC2 instance and follow standard protocol to triage the EC2 instance to verify if the instance has been compromised. If the instance has been compromised, follow your standard Incident Response process for post-instance compromise and forensics.
    • Prevention/Detection: To mitigate or prevent these events from occurring within your AWS environment, determine whether the EC2 instance requires a public-facing IP address and review the VPC Security Group(s) has only the required rules configured. Review your AWS environment to make sure you are following Amazon EC2 best practices. For detection, consider implementing AWS Firewall Manager to continuously audit and limit VPC Security Groups.

The solution workflow, shown in Figure 1, is as follows:

  1. Security Hub ingests findings from integrated AWS security services.
  2. An EventBridge rule is invoked based on Security Hub findings in GuardDuty, Macie, Amazon Inspector, and Security Hub security standards.
  3. The EventBridge rule invokes a Lambda function to store the Security Hub finding, which is passed via EventBridge, in a DynamoDB table for further analysis.
  4. After the new findings are stored in DynamoDB, another Lambda function is invoked by using Dynamo StreamSets and a time-to-live (TTL) set to delete finding entries that are older than 30 days.
  5. The second Lambda function looks at the resource associated with the new finding entry in the DynamoDB table. The Lambda function checks for specific Security Hub findings that are associated with the same resource.
Figure 1: Architecture diagram describing the flow of the solution

Figure 1: Architecture diagram describing the flow of the solution

Solution deployment

You can deploy the solution through either the AWS Management Console or the AWS Cloud Development Kit (AWS CDK).

To deploy the solution by using the AWS Management Console

In your account, launch the AWS CloudFormation template by choosing the following Launch Stack button. It will take approximately 10 minutes for the CloudFormation stack to complete.
Select the Launch Stack button to launch the template

To deploy the solution by using the AWS CDK

You can find the latest code in the aws-security GitHub repository where you can also contribute to the sample code. The following commands show how to deploy the solution by using the AWS CDK. First, the CDK initializes your environment and uploads the AWS Lambda assets to Amazon S3. Then, you can deploy the solution to your account. For <INSERT_AWS_ACCOUNT>, specify the account number, and for <INSERT_REGION>, specify the AWS Region that you want the solution deployed to.

cdk bootstrap aws://<INSERT_AWS_ACCOUNT>/<INSERT_REGION>

cdk deploy

Conclusion

In this blog post, we walked through a solution to use AWS services, including Amazon EventBridge, AWS Lambda, and Amazon DynamoDB, to correlate AWS Security Hub findings from multiple different AWS security services. The solution provides a framework to prioritize specific sets of findings that indicate a higher likelihood that a security incident has occurred, so that you can prioritize and improve your security response.

If you have feedback about this post, submit comments in the Comments section below. If you have any questions about this post, start a thread on the AWS Security Hub forum.

Want more AWS Security how-to content, news, and feature announcements? Follow us on Twitter.

Author

Marshall Jones

Marshall is a worldwide security specialist solutions architect at AWS. His background is in AWS consulting and security architecture, focused on a variety of security domains including edge, threat detection, and compliance. Today, he is focused on helping enterprise AWS customers adopt and operationalize AWS security services to increase security effectiveness and reduce risk.

Author

Jonathan Nguyen

Jonathan is a shared delivery team senior security consultant at AWS. His background is in AWS security, with a focus on threat detection and incident response. He helps enterprise customers develop a comprehensive AWS security strategy, deploy security solutions at scale, and train customers on AWS security best practices.

[$] Replacing congestion_wait()

Post Syndicated from original https://lwn.net/Articles/873672/rss

Memory management is a balancing act in a number of ways. The kernel must
balance the needs of current users of memory with anticipated future needs,
for example. The kernel must
also balance the act of reclaiming memory for other uses, which can involve
writing data to permanent storage, with the rate of data that the
underlying storage devices are able to accept. For years, the
memory-management subsystem has used storage-device congestion as a signal
that it should slow down reclaim. Unfortunately, that mechanism, which was
a bit questionable from the beginning, has not worked in a long time. Mel
Gorman is now trying to fix this problem with a
patch set
that moves the kernel away from the idea of waiting on congestion.

The collective thoughts of the interwebz