Post Syndicated from Raffaele Garofalo original https://aws.amazon.com/blogs/architecture/how-zurich-insurance-group-built-their-scalable-account-vending-process-using-aws-account-factory-for-terraform/
Introduction
Zurich Insurance Group is a leading multi-line global insurer operating in more than 200 territories. Headquartered in Zurich, Switzerland, their main business is life and property and casualty (P&C) insurance. In 2022, Zurich began a multi-year program to accelerate their digital transformation and innovation through migration of 1,000 workloads to AWS, including core insurance and SAP workloads.
During 2022, Zurich built out their Global Cloud Foundation – a set of foundational global AWS capabilities required to begin migrating workloads to the AWS Cloud, including the Scalable Account Vending (SAV) solution that is the subject of this article.
The goal of the Global Cloud Foundation was to address common questions workload teams had when moving to the AWS Cloud:
- Am I compliant with security and compliance policies?
- How do I establish the connectivity I need?
- Has my AWS environment been structured properly?
- How do I make sure I am safe when using the cloud?
- Are the AWS services I need certified and available for use in Zurich’s AWS Cloud environment?
- Am I ready to deploy production workloads in the cloud?
This investment in a solid foundation is already enabling their migration program in 2023 and beyond.
Why Zurich needed Scalable Account Vending (SAV)
As a federated global organization, Zurich Insurance Group had pockets of AWS usage in different business units in multiple geographies managed by separate regional Cloud Center of Excellence (CCOE) teams. However, there was no consistency. One of the migration program’s goals was to establish a standard set of re-usable patterns and curated services, pre-built using Terraform to minimize migration and modernization effort and maximize re-use. This required the AWS environment to be built in a consistent way.
Additionally, Zurich was moving from a managed service to self-service DevSecOps provisioning for infrastructure, and many of the workloads did not have an existing DevSecOps environment for their infrastructure, and so they needed one provisioned for them in Azure DevOps and Terraform Cloud (their DevOps toolchain), further accelerating adoption.
Therefore, the cloud workload environment needed to consist of:
- Multiple AWS accounts (Development, UAT and Production) each baselined with Zurich’s standard IAM Roles, controls, AWS Config rules, services such as AWS Backup plans and vaults, and AWS Instance Scheduler
- An AWS VPC aligned to their workload requirements with centralized networking connectivity
- Terraform Cloud workspaces/teams for each account
- An integrated Azure DevOps project for the workload (optional)
- A new Azure DevOps repository for the workload infrastructure (optional)
Historically, these environments were created by each CCOE team through a combination of manual and semi-automated processes. The need for a scalable and automated solution came from the increase in demand for AWS Cloud workload environments. It took the CCOE up to three days to provision a single AWS account, involved manual processes by multiple employees, and meant that each workload owner needed to raise up to eight support tickets to establish their environment. In addition, pipelines often failed, and the solution did not provide the speed or flexibility required in order to scale Zurich’s cloud adoption strategy.
To address this, SAV was conceived with three main goals:
- Identify and implement a streamlined, fully-automated mechanism to request the provisioning of a new AWS environment.
- Improve the scalability and performance of account vending and baselining by using AWS Account Factory for Terraform.
- Create a mechanism that was consistent across the multiple different business-unit CCOEs to minimize support and maintenance overhead and share best practice.
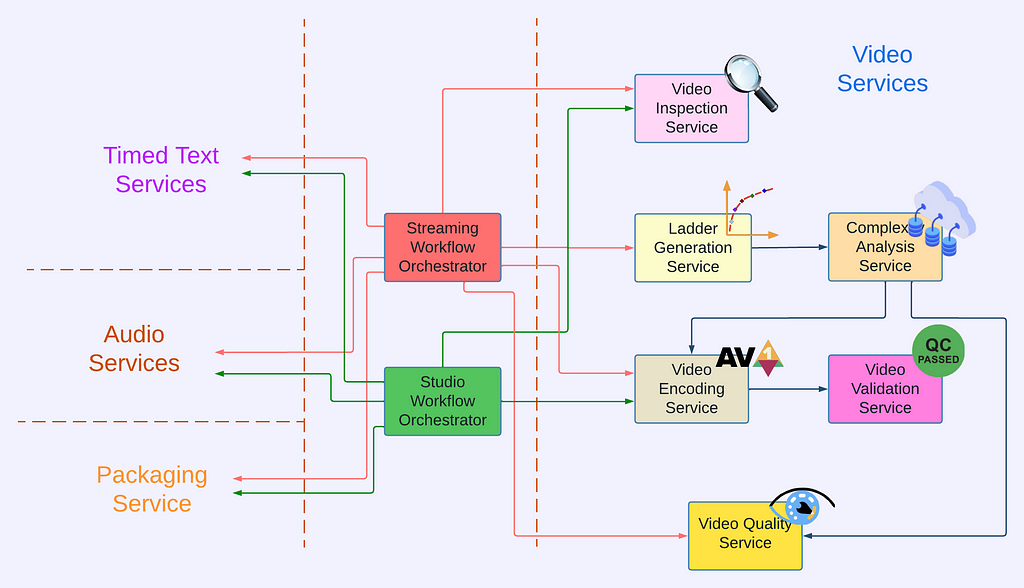
High-level architecture
The end-to-end solution shown here was fully-implemented as infrastructure-as-code orchestrated using Zurich’s corporate-standard Azure DevOps CI/CD tooling.

Figure 1. End-to-end solution using Zurich’s tooling
A single Jira Service Management request submitted by the workload owner provisions the entire cloud workload environment, which provides all the basic resources required to start migrating a workload into AWS.
Deep dive on the solution
In this section we will explore two key components of the SAV architecture: Environment vending using AWS Control Tower Account Factory for Terraform, and the AFT Code promotion process.
Environment vending pipeline overview

Figure 2. Environment vending pipeline overview
The environment vending workflow is structured as follows: a request for an AWS account is entered into JIRA Service Management ITSM tool. This triggers the environment vend pipeline in Azure DevOps.
AWS account vending
AWS Control Tower Account Factory for Terraform (AFT) works by provisioning a new AWS account in response to a request in the form of an account request Terraform configuration committed to its account request GIT repository. Each account request configuration contains all information and metadata required to classify the AWS account into the proper organization structure and cost center.
The environment vend pipeline begins provisioning multiple accounts by taking the data entered on the submission form and generating a series of AFT account request Terraform configurations using Jinja templates, and committing each request to the AFT repository. The commit triggers AFT to provision the AWS accounts and to execute the Terraform modules that will deploy the account baseline and the required customizations in each vended account.
Resource provisioning
Subsequent stages of the pipeline provision the other resources using Terraform Cloud by following the same pattern as shown here:

Figure 3. Resource provisioning using Terraform Cloud
A pipeline task executes a Python script which applies a Jinja template to generate an HCL file, which is then committed to Azure DevOps git repository. This was essential in order to support ‘day-two’ management of the resources by the CCOE or workload teams that may want to use GitOps in the future. The commit triggers a run in the corresponding Terraform Cloud workspace, which provisions the resources into the linked account.
Terraform Cloud code promotion
AWS Control Tower Account Factory for Terraform (AFT) uses a GitOps approach to vending and baselining of new AWS accounts using Terraform. It has workflows for creating new accounts and for deploying resources into vended accounts through its global and account customizations, which are implemented as Terraform modules. However, when applying changes to these Terraform modules there is a risk that an erroneous change can impact many, if not all, vended accounts.
Zurich Insurance Group mitigated the risk by implementing GitFlow. To modify a production configuration a process of pull request, review, and merge is triggered to ensure no breaking changes are introduced. The changes are tested in lower environments before deployment into production.
This process is illustrated here:

Figure 4. Terraform Cloud code promotion using GitFlow
Conclusion
By adopting AWS Control Tower Account Factory for Terraform, Zurich were able to achieve the scalability, resilience and performance to support provisioning of a projected 3000+ accounts. By compressing the process to a single ITSM request Zurich Insurance Group CCOE have been able to improve their SLA and customer satisfaction, reduce CCOE support time and effort, and secure their AWS environment with automated DevSecOps activities.
According to Eamonn Carey, Head of Cloud Engineering at Zurich Insurance Group:
“For Zurich and its journey to public cloud, scalability and compliance are crucial aspects of building and managing our cloud environments. Day-2 management plays a pivotal role in achieving both. Our scalable account vending processes and pre-created repos for day-2 management brings numerous benefits. It enables rapid delivery of our AWS accounts, enhances scalability, and promotes standardization. It ensures efficient resource provisioning, while standardized configurations ensure compliance with regulations and best practices. By combining these elements, Zurich can streamline our operations, reduce risks, and achieve optimal scalability and compliance in our cloud environments.”