Post Syndicated from Techmoan original https://www.youtube.com/watch?v=SNG8Qy782Iw
Седмицата (8–13 януари)
Post Syndicated from Светла Енчева original https://www.toest.bg/sedmitsata-8-13-yanuari/

За много години! Това е втората седмица за годината, но през първата „Тоест“ беше в заслужена почивка. Така че сега е времето да пожелаем на прекрасните си, критични и ангажирани читатели новата година да е по-добра от старата. Макар в политически план номинацията на Десислава Атанасова от ГЕРБ за конституционен съдия да пречупва в зародиш надеждата, че лелеяната правосъдна реформа, заради която ПП и ДБ „ручат жабетата“, ще има някакъв смислен ефект. Защото ако в най-висшето съдилище се назначи лице с дълъг стаж в политиката и с професионален опит, включващ основно работа като юрисконсулт в психодиспансер и в русенската болница, не може да се очаква, че на новия си пост това лице ще върши друго, освен да изпълнява политически поръчки.
Добрата новина е, че понякога съдебната ни система все пак проявява някакви признаци на живот. На първа инстанция „Лев Инс“ загуби знаковото SLAPP дело срещу Mediapool за 1 млн. лв. То е заради статията на Цветелина Соколова от 2022 г. „България пак е заплашена да бъде изключена от системата „Зелена карта“. SLAPP делата, или т.нар. дела шамари, са срещу журналисти и граждани заради това, че са осветлили една или друга нередност. Последното такова дело е на АЕЦ „Козлодуй“, която съди за 500 000 лв. медицинска сестра и майка ѝ, изисквали информация за незаконна поликлиника в атомната централа.
Затова пък ротацията на правителството ще се състои, освен ако някой черен лебед не ѝ попречи, убедена е Емилия Милчева в тазседмичния си политически анализ „Джентълмените с късмет. Ротацията продължава“. Ала черните лебеди като че ли са само за отвличане на вниманието от задкулисните договорки за нови членове на регулаторите. Налага се да преглъщаме и ДПС, което уж не е във властта, но в лицето на Пеевски се държи, сякаш е. А всичко можеше да е по-честно и приемливо за обществото, ако имаше коалиционно споразумение, както му е редът, в което да фигурира механизмът на ротацията.
Междувременно Румен Радев използва дори Нова година, за да провежда собствена политика в противоречие с тази на правителството и парламента. В статията си „Румен Радев и неговите семейства“ разсъждавам върху новогодишното изявление в защита на семейството, подписано от президентите на Унгария, България и Сърбия. Заставайки отново на страната на пропутинските диктатури и не зачитайки семейните специфики на българското население, Радев за пореден път не олицетворява единството на нацията. Но какво ли се учудваме – с лицемерната си позиция той не олицетворява дори себе си.
Александър Нуцов обръща поглед от върховете на държавата към невидимата децентрализация в България. Най-голям властови ресурс е съсредоточен в националната държава, но процеси на децентрализация текат навсякъде по света още от времето на Студената война. С падането на желязната завеса децентрализацията включва все повече и частния сектор в публичните дела. Впоследствие роля във вземането на политически решения започват да играят гражданите и техните организации. За разлика от други страни обаче, в България все още липсват стратегия и целенасочена държавна политика за децентрализация на властта.
Новата тема на Атанас Шиников в неговото „Ориент кафе“ звучи на пръв поглед чудато – „Изкуственият интелект на Аллах“. Авторът се интересува от въпроса дали изкуственият интелект може да бъде мюсюлманският андроид, който сънува шериатски пасбища за електрически правоверни овце. С други думи, може ли ислямът да се предаде с нули и единици? Затова Шиников влиза в ролята на любопитен мюсюлманин и задава въпрос на ChatGPT, постъпвайки като много други мюсюлмани, които задават въпроси в интернет дали едно или друго действие е съвместимо с шериата.
Докато още сме на тази вълна, статията на Анастасия Орманджиева отново е посветена на ролята на изкуствения интелект, но този път – в медицината. Той може да се учи и да стига до определени изводи, които са от полза на лекарите при вземане на решения. В момента изкуственият интелект намира приложение в медицинските среди основно за анализ на изображения от изследвания. Но той може да се използва и за наблюдение на жизнените показатели на пациенти, за откриване на симптоми на заболявания като рак или за намаляване на разходите при синтезирането на нови лекарства. Стандартите за употребата му в медицината тепърва се изработват, защото са налице куп етични въпроси.
Връщаме се към естествения интелект, по точно – към отказа от употребата му. Като всичко, което Анета Василева пише, статията ѝ „Каузата на кучето. Архитектурната критика днес“ не е просто за архитектура. Защото дефицит на качествена критика има в много други области. И не само в България – кризата на архитектурната критика е глобална. Причините са много: променена медийна среда, комерсиални пресгрупи, финансови проблеми, опасения за професионалното бъдеще на ресорните автори, привикването към бързата информация в интернет… Безкритичността обаче води до упадък в самата архитектура. Като се замислим, всъщност всяка безкритичност води до упадък.
Знаете си, че няма да ви оставя без лични препоръки. На 18 януари на основната сцена на театър „Сфумато“ ще се състои представянето на едно ново издателство – „Кота 0“. Зад издателството стоят петима автори: Иван Димитров, Светослав Тодоров, Стефан Иванов, Стефан Икога и Захари Захариев. Те ще разкажат повече за идеята на начинанието си, ще прочетат свои неща, а модератор ще бъде не кой да е, а Николай Колев.
На 18 юни пък вокалистът на Radiohead Том Йорк ще пее в София със супергрупата The Smile. Направо не е за вярване, но е истина. Може отсега да започнете да подгрявате с The Smile. Аз обаче не мога да се въздържа да не ви поздравя с едно рейдиохедско парче. По-точно, с онзи на пръв поглед безумен, но всъщност гениален танц на Том Йорк от клипа на Lotus Flower, който съм гледала може би стотици пъти:
Приятно четене, слушане и гледане!
Comic for 2024.01.13 – Eternal Torment
Post Syndicated from Explosm.net original https://explosm.net/comics/eternal-torment
New Cyanide and Happiness Comic
How to Migrate Your SMS Program to Amazon Pinpoint
Post Syndicated from Tyler Holmes original https://aws.amazon.com/blogs/messaging-and-targeting/how-to-migrate-your-sms-program-to-amazon-pinpoint/
How to Migrate Your SMS Program to Amazon Pinpoint
In the fast-paced realm of communication, where every second counts and attention spans are shorter than ever, the choice of channels that you use to deliver your message to your recipients is critical. While we often find ourselves swept away by the allure of flashy social media platforms and sleek email interfaces, it’s the unassuming text message, or SMS, that continually proves to be one of the most effective options. According to Statista, there over 5 billion mobile internet users globally, amounting to over 60% of the earth’s population of ~8 billion. SMS obviously provides an expansive reach that can help businesses connect with a diverse audience but in order to do that at scale, you need to use a service like Amazon Pinpoint that facilitates the ability to send SMS to over 240 countries and/or regions around the world. If you have a current SMS provider and are considering Pinpoint SMS for its global reach, scalability, cost effective pricing, and demonstrably high deliverability, this guide will walk you through how to migrate from your current provider.
There are several common reasons our customers give us when considering a migration. Don’t worry if your situation doesn’t fit into a neat box, we help customers navigate the dynamic landscape of SMS that is constantly evolving. Let’s dive deep into each of the below to highlight some common things we hear from our customers.
- My current provider doesn’t deliver to countries I want to send to
- We send to over 240 countries and/or regions so if there is a country you want to send SMS to, it’s very likely we can deliver. Please review this post on global sending for a strategy on how to prepare.
- My current provider is more expensive than Pinpoint pricing
- Our pricing is available on the public pricing page here. Each country has it’s own cost associated with it so enter in the countries you would like to see pricing for. These prices are per message sent so if you are planning on sending to multiple countries factor in the types of messages that you will want to send as well as the countries. If your use case includes 2 way communication make sure to factor the number of inbound messages you expect into your calculations.
- NOTE: Depending on the language the available characters per message varies, which can affect your calculations on cost. See here for an explanation
- Our pricing is available on the public pricing page here. Each country has it’s own cost associated with it so enter in the countries you would like to see pricing for. These prices are per message sent so if you are planning on sending to multiple countries factor in the types of messages that you will want to send as well as the countries. If your use case includes 2 way communication make sure to factor the number of inbound messages you expect into your calculations.
- My current provider doesn’t have features that Pinpoint has
- Among many other features Pinpoint has the ability to send over multiple channels, including: SMS, Email, Push/In-App, Voice, Over the Top (OTT) services such as WhatsApp, as well as interact with third-party APIs giving you the flexibility to send to many other channels.
- My current provider is not native to AWS
- Pinpoint, being native to the AWS Cloud, boasts the capability to seamlessly integrate with a wide array of services, including AI/ML offerings such as Amazon Personalize, Amazon Bedrock, and Amazon SageMaker, among others. This means you can leverage various AWS services to create innovative solutions that enhance and optimize the communications sent through Pinpoint.
- My current provider does not have good deliverability
- Price is not the only factor to consider when looking at SMS providers. If you find another provider with lower pricing make sure to ask about their deliverability to the countries you are wanting to send to. There is a big difference between sending an SMS at a low price, and actually delivering that SMS. We are happy to discuss deliverability with you, just reach out to your Account Manager if you have one or contact us to start a conversation about your migration.
- I’m not happy with the customer support of my current provider
- The SMS landscape is constantly changing and our SMS experts are here to help guide you through the process. Whether it’s regulatory changes, pricing changes, or creating complex architectures to support your needs. Reach out to your Account Manager if you have one or contact us to start a conversation about your migration and get your questions answered.
Regardless of your reason for considering migrating there are four scenarios that most of our customers find themselves in when beginning to plan for an SMS migration.
I have not sent SMS before but I would like to start sending through Pinpoint
Skip ahead to the section on “Checklist for Planning an SMS Migration” to start planning for sending SMS
I have number(s) (Also known as Originators, Origination Identities (OIDs), Toll-Free, 10DLC, Long Code, Short Code, and/or SenderID) with a different provider and I would like to move those to Pinpoint
The ability to “port” numbers from other providers is dependent on the type of originator, the vendor you procured them from, and the country that they support. You may need to get new originators so factor that into your timeline and reach out to your Account Manager to determine whether your originators are able to be ported over. Once you have done that, pull the reports for how much volume you are sending to each country with your current provider and then skip ahead to the section on “Checklist for Planning an SMS Migration” to start planning for sending SMS
I have a current provider but I would like to procure new numbers from Pinpoint
Pull the reports for how much volume you are sending to each country with your current provider and then skip ahead to the section on “Checklist for Planning an SMS Migration” to start planning for sending SMS
I have a current provider but would like to split traffic between them and Pinpoint
Pull the reports for how much volume you are sending to the countries you plan on migrating to AWS and then skip ahead to the section on “Checklist for Planning an SMS Migration” to start planning for sending SMS. Make sure that you consider how you will be managing opt-outs across two providers. Pinpoint offers centrally managed opt-outs but self-management is also an option. All Delivery Receipts/Reporting (DLRs) and inbound/outbound events can be streamed through Amazon Kinesis, Amazon CloudWatch, and/or Amazon Simple Notification Service (SNS) if you need to send those events to another location inside or outside of the AWS Cloud.
Checklist for Planning an SMS Migration
- Setup a spreadsheet similar to the one outlined in this post
- Identify your use case(s)
- Note whether your use case is one-way or two-way
- NOTE: Not all countries support 2-way communications, which is the ability to have the recipient send a message back to the OID.
- NOTE: Sender ID also does not support 2-way communication so if you are planning on using Sender ID you will need to account for how to opt recipients out of future communications.
- Note whether your use case is one-way or two-way
- Identify your countries
- Take note of which countries require registration as this will affect your timeline
- Identify your volume per country
- If you are already sending SMS with another provider pull a report over a representative time period.
- Identify your throughput needs (Also referred to as Messages per Second, MPS, Transactions per Second, or TPS) for each country
- Most origination identities are chosen for their ability to support a certain level of MPS, not volume, so if you have seasonality make sure to account for burst rates. There are quotas for the APIs that govern sending as well as quotas for the different types of originators.
- Identify which origination identities you will need for each country using this guide
- Make note of any countries/OIDs that require registration
- Reach out to your Account Manager if you have one or contact us to start a conversation about your migration.
- If you have OIDs you would like to migrate make sure you determine whether that is possible ASAP since your timelines could be affected by the outcome.
Make sure you give ample time for your migration. There are many entities involved in delivering SMS, from governments, to mobile carriers, to third-party registrars, and more, which means that timelines are not always within your control. Ask questions, take advantage of the expert resources we have at AWS, and the content we have produced around these topics.
Content to read
- Review the countries and regions we support here
- Use the format for aggregating information on your use cases outlined in this post here
- Decide what origination IDs you will need here
- Review the documentation for the V2 SMS and Voice API here
- Review the Pinpoint API and SendMessage here
- Check out the support tiers comparison here
How to Change Proxmox VE Primary NIC When a New Interface is Installed
Post Syndicated from John Lee original https://www.servethehome.com/how-to-change-proxmox-ve-primary-nic-when-a-new-interface-is-installed/
We have a quick guide to changing the primary NIC in Proxmox VE if an interface gets renamed due to hardware changes
The post How to Change Proxmox VE Primary NIC When a New Interface is Installed appeared first on ServeTheHome.
Friday Squid Blogging: Giant Squid from Newfoundland in the 1800s
Post Syndicated from Bruce Schneier original https://www.schneier.com/blog/archives/2024/01/friday-squid-blogging-giant-squid-from-newfoundland-in-the-1800s.html
Interesting article, with photographs.
As usual, you can also use this squid post to talk about the security stories in the news that I haven’t covered.
Read my blog posting guidelines here.
Stable kernel 5.10.207
Post Syndicated from corbet original https://lwn.net/Articles/958174/
The 5.10.207 stable kernel update has been
released; it consists entirely of a handful of reverts of SCSI patches.
Metasploit Weekly Wrap-Up 01/12/24
Post Syndicated from Christopher Granleese original https://blog.rapid7.com/2024/01/12/metasploit-weekly-wrap-up-01-12-24/
New module content (1)
Windows Gather Mikrotik Winbox "Keep Password" Credentials Extractor

Author: Pasquale ‘sid’ Fiorillo
Type: Post
Pull request: #18604 contributed by siddolo
Path: windows/gather/credentials/winbox_settings
Description: This pull request introduces a new post module to extract the Mikrotik Winbox credentials, which are saved in the settings.cfg.viw file when the "Keep Password" option is selected in Winbox.
Enhancements and features (7)
- #18515 from errorxyz – This PR adds a Java target for the ManageEngine ServiceDesk Plus exploit CVE-2022-47966 using the payload mentioned in this blogpost and deletes the log file that records the error due to the exploit to make it more stealthy.
- #18672 from h00die – Fix spelling mistakes in Metasploit’s library folder.
- #18673 from h00die – Fix spelling mistakes in Metasploit’s scripts folder.
- #18674 from h00die – Fix spelling mistakes in Metasploit’s plugins folder.
- #18675 from h00die – Fix spelling mistakes in Metasploit’s tools folder.
- #18679 from h00die – Fix spelling mistakes in Metasploit’s auxiliary modules.
- #18691 from zeroSteiner – Metasploit console now requires an installed version of apktool greater than or equal to v2.9.2.
Bugs fixed (5)
- #18656 from dwelch-r7 – Enforces all modules to be loaded as part of reload_all when the
defer_module_loadsfeature is enabled. - #18666 from zeroSteiner – Fixes a crash when running the
savecommand to save Metasploit’s configuration. - #18667 from zeroSteiner – Re-adds the
#sysinfoinstance method for sessions. - #18669 from sjanusz-r7 – Updates the favorites command to no longer output an empty message when a chosen module does not have custom datastore values available.
- #18690 from sjanusz-r7 – Ensures that a target’s default payload is correctly chosen when selecting a module from the search command.
Documentation
You can find the latest Metasploit documentation on our docsite at docs.metasploit.com.
Get it
As always, you can update to the latest Metasploit Framework with msfupdate
and you can get more details on the changes since the last blog post from
GitHub:
If you are a git user, you can clone the Metasploit Framework repo (master branch) for the latest.
To install fresh without using git, you can use the open-source-only Nightly Installers or the
commercial edition Metasploit Pro
Linux Mint 21.3 “Virginia” released
Post Syndicated from jake original https://lwn.net/Articles/958162/
The Linux Mint distribution has announced the release of Linux Mint 21.3, which is codenamed “Virginia”. It has the Cinnamon 6.0 desktop, “comes with full support for SecureBoot and compatibility with a wider variety of BIOS and EFI implementation
“, has added new features to the Hypnotix TV-viewer application, and more. See the release notes for even more information about it.
Comic for 2024.01.12 – Nipple Ring
Post Syndicated from Explosm.net original https://explosm.net/comics/nipple-ring
New Cyanide and Happiness Comic
Highlights: Indra Nooyi | My Life in Full: Work, Family, and Our Future | Talks at Google
Post Syndicated from Talks at Google original https://www.youtube.com/watch?v=lNCsbGO2kCU
Изкуственият интелект и персонализираната медицина
Post Syndicated from original https://www.toest.bg/izkustveniyat-intelekt-i-personaliziranata-meditsina/

Изкуственият интелект (ИИ) използва сложни изчисления, позволяващи на системата да разсъждава, да се учи и да стига до определени изводи, които са от полза на лекарите при вземане на решения. Служейки си с информация като медицински изображения, биомаркери, медицински данни на пациенти и използвайки инструменти като конволюционни невронни мрежи* и регресионни модели, той има за цел да създаде персонализации, адаптирани към всеки пациент, с приложение в реалната клинична практика.
Въпреки че ИИ има голям потенциал в областта на медицината, етичната сложност на приложението му изисква допълнителни анализи и доказателства за медицинската му ефикасност и икономическата му стойност, както и създаването на мултидисциплинарни методи за по-широкото му внедряване в клиничната практика.
Персонализирана медицина
Персонализираната медицина е медицински модел, който има за цел да предостави специално разработени стратегии за превенция и лечение. Съветът на здравните министри на ЕС дефинира персонализираната медицина като
медицински модел, използващ характеризиране на фенотипове и генотипове на индивиди (чрез молекулярно профилиране, медицински изображения, информация за начина на живот и др.) за избор на терапевтична стратегия при конкретен пациент в определен период от живота му, за определяне на предразположеност към дадено заболяване, за навременна и целенасочена профилактика.
Персонализираната медицина все още се развива и пред нея стоят много предизвикателства преди пълното ѝ приложение в системите за здравеопазване. Новите генетични технологии, обобщавани с термина „омик“ технологии, позволяват на учените да използват генетичната информация на пациентите, за да определят по-добре правилното лекарство, доза и период на прием. Използването на тези технологии ни доближава по-близо до персонализираната медицина.
Изкуствен интелект
През 1956 г. Джон Маккарти въвежда термина „изкуствен интелект“ на конференция, посветена на компютърните науки в колежа „Дартмут“. По-късно същата година Алън Нюел, Дж. К. Шоу и Хърбърт Саймън създават Logic Theorist, първата работеща софтуерна програма за ИИ.
В най-простата си форма ИИ е област, която съчетава компютърни науки и огромен набор от данни, за да даде възможност за решаване на проблеми. Той също така обхваща част от машинното обучение и дълбокото обучение (machine learning, deep learning), споменавани често, когато става въпрос за ИИ. Тези дисциплини са изградени от ИИ алгоритми, които създават системи, правещи прогнози или класификации въз основа на входирани данни.
Приложение на изкуствения интелект в медицината
В момента ИИ в медицинските среди се използва основно за анализ на изображения от медицински изследвания. Стандартите за използването на ИИ в медицината все още са в процес на дефиниране. Възможността ИИ да бъде от по-значима полза за лекарите, изследователите и пациентите нараства експоненциално. В бъдеще той ще е основна част от цифровите здравни системи, които ще формират и поддържат съвременната медицина.
Моделите на машинно обучение може да се използват за наблюдение на жизнените показатели на пациенти. Докато медицинските устройства от типа на сърдечните монитори проследяват жизнените показатели, ИИ може да събира данните от тези устройства и да извършва анализ с цел търсене на заболявания. Изследванията показват, че ИИ, захранван от изкуствени невронни мрежи, може да бъде също толкова ефективен, колкото лекарите при откриване на симптоми например на рак на гърдата.
Първоначалното синтезиране на лекарства често е един от най-дългите и най-скъпи етапи при разработването на лекарствени продукти. Тук ИИ може да помогне за намаляване на разходите основно по два начина: създаване на по-добър дизайн на лекарства и откриване на нови комбинации от лекарствени препарати.
Къде се срещат ИИ и персонализираната медицина?
Геномиката, биотехнологиите и ИИ поставят отделния пациент в центъра на избора на лечение, създават големи бази данни за анализ и са основата на прецизната медицина.
Падането на цената на секвениране на генома, усъвършенстването на биотехнологиите и навлизането на приложенията за смартфони, които проследяват здравето ни, водят до редица предизвикателства в съвременната медицина, свързани с необходимост от допълнително обучение на медицинския персонал и невъзможност за обработване на огромното количество данни. В ролята на помощници влизат алгоритмите за задълбочено обучение, които за кратко време анализират и интерпретират т.нар. big data.
През последните години няколко компании работят по въвеждането на ИИ в медицината. Google има изследователски клон, свързан с ИИ, който работи по проекта DeepMind Health. Идеята е да се събират и анализират данни от медицински досиета, за да се подобрят медицинските услуги. Google участва и в съвместен проект с фондацията на клиниката по очни болести Moorfields NHS Foundation Trust. Moorfields споделят с DeepMind един милион анонимни резултата от изследвания с очен скенер, придружени с информация за здравословното състояние на очите на пациентите и наличието на очни заболявания.
IBM работят по програмата Medical Sieve, насочена към радиологията и кардиологията. Идеята им е в бъдеще радиолозите да разглеждат само най-комплексните случаи, при които е необходимо човешко наблюдение. Компанията Deep Genomics работи върху търсенето на модели в големи бази данни от генетична информация и медицински досиета. Целта е установяване на мутации и връзката им с определени заболявания.
Въпреки ползите от внедряването на ИИ в персонализираната медицина, алгоритмите може да не са достатъчно ефективни при поява на нови, неописани странични ефекти от лекарства или новоустановена резистентност към дадено лечение. Изкуственият интелект трябва да е средство за помощ на лекаря, а не е предназначен да замени традиционната връзка лекар–пациент. Отменяйки лекаря в някои рутинни, повтарящи се моменти от работата, ИИ би могъл да предостави възможност на медиците да обръщат по-задълбочено внимание на пациентите си, което безспорно ще подобри връзката помежду им. Подобни задачи може да се делегират на ИИ само при условие че остане безопасен, регулиран и достатъчно ефикасен като средство за усъвършенстване на здравеопазването.
Етична рамка при използването на ИИ в медицината
Повдигат се редица етични въпроси, свързани със събирането и обработката на данни на пациентите в една система на здравеопазване, която теоретично би могла да се управлява от ИИ. Как ще се гарантират поверителността и сигурността на информацията? Пациентите трябва да са информирани как ще бъдат използвани техните данни от ИИ приложения, и е редно да им се предостави възможност за отказ.
От друга страна, нужно е работещите в здравеопазването да са добре запознати с новите отговорности, които биха носили при възникване на грешки в процесите на съхраняване и споделяне на данни, получени чрез ИИ. Освен това здравните специалисти трябва да оценяват критично препоръките, дадени от инструментите с ИИ. И не на последно място, медиците следва да бъдат откровени с пациентите си относно използването му в здравеопазването.
В САЩ съществува закон за преносимост и отчетност на здравното осигуряване, който определя стандарти за поверителност и сигурност на здравните данни на пациентите. Американската администрация по храните и лекарствата също има свой набор от разпоредби, осигуряващи регулация на начина, по който софтуер, включително приложения с ИИ, се използва в здравеопазването. Европейският съюз е въвел Общ регламент за защита на данните (GDPR), включващ правила за обработката на данни на пациенти с инструментите на ИИ.
Индивидуален vs. популационен подход
Напредъкът на персонализираната медицина заедно с навлизането на ИИ в здравеопазването цели внедряване на индивидуален подход за контрол на заболявания в замяна на настоящия популационен подход. Персонализираната медицина, ИИ и подробната информация за болестните състояния представляват значителен шанс за намаляване на разходите при използването на универсален подход в общественото здраве.
Предимствата, които са предоставени от ИИ моделите за анализиране на обширна, сложна биомедицинска информация, имат огромен потенциал за ускоряване на израстването и развитието на генетичната медицина. Въпреки това трябва да бъдат преодолени многобройни препятствия, в случай че ИИ оправдае високите очаквания за революция в геномната медицина.
* Конволюционна невронна мрежа – мрежова архитектура за deep learning, която се учи директно от данни, като се премахва необходимостта от ръчно извличане на функции.
[$] The first half of the 6.8 merge window
Post Syndicated from corbet original https://lwn.net/Articles/957188/
The 6.8 merge window has gotten off to a relatively slow start; reasons for
that include a significant scheduler performance regression that Linus
Torvalds stumbled
into and has spent time tracking down. Even so, 4,282 non-merge
changesets have found their way into the mainline repository for the 6.8
release as of this writing. These commits have brought a number of
significant changes and new features.
Detect, mask, and redact PII data using AWS Glue before loading into Amazon OpenSearch Service
Post Syndicated from Michael Hamilton original https://aws.amazon.com/blogs/big-data/detect-mask-and-redact-pii-data-using-aws-glue-before-loading-into-amazon-opensearch-service/
Many organizations, small and large, are working to migrate and modernize their analytics workloads on Amazon Web Services (AWS). There are many reasons for customers to migrate to AWS, but one of the main reasons is the ability to use fully managed services rather than spending time maintaining infrastructure, patching, monitoring, backups, and more. Leadership and development teams can spend more time optimizing current solutions and even experimenting with new use cases, rather than maintaining the current infrastructure.
With the ability to move fast on AWS, you also need to be responsible with the data you’re receiving and processing as you continue to scale. These responsibilities include being compliant with data privacy laws and regulations and not storing or exposing sensitive data like personally identifiable information (PII) or protected health information (PHI) from upstream sources.
In this post, we walk through a high-level architecture and a specific use case that demonstrates how you can continue to scale your organization’s data platform without needing to spend large amounts of development time to address data privacy concerns. We use AWS Glue to detect, mask, and redact PII data before loading it into Amazon OpenSearch Service.
Solution overview
The following diagram illustrates the high-level solution architecture. We have defined all layers and components of our design in line with the AWS Well-Architected Framework Data Analytics Lens.

The architecture is comprised of a number of components:
Source data
Data may be coming from many tens to hundreds of sources, including databases, file transfers, logs, software as a service (SaaS) applications, and more. Organizations may not always have control over what data comes through these channels and into their downstream storage and applications.
Ingestion: Data lake batch, micro-batch, and streaming
Many organizations land their source data into their data lake in various ways, including batch, micro-batch, and streaming jobs. For example, Amazon EMR, AWS Glue, and AWS Database Migration Service (AWS DMS) can all be used to perform batch and or streaming operations that sink to a data lake on Amazon Simple Storage Service (Amazon S3). Amazon AppFlow can be used to transfer data from different SaaS applications to a data lake. AWS DataSync and AWS Transfer Family can help with moving files to and from a data lake over a number of different protocols. Amazon Kinesis and Amazon MSK also have capabilities to stream data directly to a data lake on Amazon S3.
S3 data lake
Using Amazon S3 for your data lake is in line with the modern data strategy. It provides low-cost storage without sacrificing performance, reliability, or availability. With this approach, you can bring compute to your data as needed and only pay for capacity it needs to run.
In this architecture, raw data can come from a variety of sources (internal and external), which may contain sensitive data.
Using AWS Glue crawlers, we can discover and catalog the data, which will build the table schemas for us, and ultimately make it straightforward to use AWS Glue ETL with the PII transform to detect and mask or and redact any sensitive data that may have landed in the data lake.
Business context and datasets
To demonstrate the value of our approach, let’s imagine you’re part of a data engineering team for a financial services organization. Your requirements are to detect and mask sensitive data as it is ingested into your organization’s cloud environment. The data will be consumed by downstream analytical processes. In the future, your users will be able to safely search historical payment transactions based on data streams collected from internal banking systems. Search results from operation teams, customers, and interfacing applications must be masked in sensitive fields.
The following table shows the data structure used for the solution. For clarity, we have mapped raw to curated column names. You’ll notice that multiple fields within this schema are considered sensitive data, such as first name, last name, Social Security number (SSN), address, credit card number, phone number, email, and IPv4 address.
| Raw Column Name | Curated Column Name | Type |
| c0 | first_name | string |
| c1 | last_name | string |
| c2 | ssn | string |
| c3 | address | string |
| c4 | postcode | string |
| c5 | country | string |
| c6 | purchase_site | string |
| c7 | credit_card_number | string |
| c8 | credit_card_provider | string |
| c9 | currency | string |
| c10 | purchase_value | integer |
| c11 | transaction_date | date |
| c12 | phone_number | string |
| c13 | string | |
| c14 | ipv4 | string |
Use case: PII batch detection before loading to OpenSearch Service
Customers who implement the following architecture have built their data lake on Amazon S3 to run different types of analytics at scale. This solution is suitable for customers who don’t require real-time ingestion to OpenSearch Service and plan to use data integration tools that run on a schedule or are triggered through events.

Before data records land on Amazon S3, we implement an ingestion layer to bring all data streams reliably and securely to the data lake. Kinesis Data Streams is deployed as an ingestion layer for accelerated intake of structured and semi-structured data streams. Examples of these are relational database changes, applications, system logs, or clickstreams. For change data capture (CDC) use cases, you can use Kinesis Data Streams as a target for AWS DMS. Applications or systems generating streams containing sensitive data are sent to the Kinesis data stream via one of the three supported methods: the Amazon Kinesis Agent, the AWS SDK for Java, or the Kinesis Producer Library. As a last step, Amazon Kinesis Data Firehose helps us reliably load near-real-time batches of data into our S3 data lake destination.
The following screenshot shows how data flows through Kinesis Data Streams via the Data Viewer and retrieves sample data that lands on the raw S3 prefix. For this architecture, we followed the data lifecycle for S3 prefixes as recommended in Data lake foundation.

As you can see from the details of the first record in the following screenshot, the JSON payload follows the same schema as in the previous section. You can see the unredacted data flowing into the Kinesis data stream, which will be obfuscated later in subsequent stages.

After the data is collected and ingested into Kinesis Data Streams and delivered to the S3 bucket using Kinesis Data Firehose, the processing layer of the architecture takes over. We use the AWS Glue PII transform to automate detection and masking of sensitive data in our pipeline. As shown in the following workflow diagram, we took a no-code, visual ETL approach to implement our transformation job in AWS Glue Studio.

First, we access the source Data Catalog table raw from the pii_data_db database. The table has the schema structure presented in the previous section. To keep track of the raw processed data, we used job bookmarks.

We use the AWS Glue DataBrew recipes in the AWS Glue Studio visual ETL job to transform two date attributes to be compatible with OpenSearch expected formats. This allows us to have a full no-code experience.

We use the Detect PII action to identify sensitive columns. We let AWS Glue determine this based on selected patterns, detection threshold, and sample portion of rows from the dataset. In our example, we used patterns that apply specifically to the United States (such as SSNs) and may not detect sensitive data from other countries. You may look for available categories and locations applicable to your use case or use regular expressions (regex) in AWS Glue to create detection entities for sensitive data from other countries.
It’s important to select the correct sampling method that AWS Glue offers. In this example, it’s known that the data coming in from the stream has sensitive data in every row, so it’s not necessary to sample 100% of the rows in the dataset. If you have a requirement where no sensitive data is allowed to downstream sources, consider sampling 100% of the data for the patterns you chose, or scan the entire dataset and act on each individual cell to ensure all sensitive data is detected. The benefit you get from sampling is reduced costs because you don’t have to scan as much data.

The Detect PII action allows you to select a default string when masking sensitive data. In our example, we use the string **********.

We use the apply mapping operation to rename and remove unnecessary columns such as ingestion_year, ingestion_month, and ingestion_day. This step also allows us to change the data type of one of the columns (purchase_value) from string to integer.

From this point on, the job splits into two output destinations: OpenSearch Service and Amazon S3.
Our provisioned OpenSearch Service cluster is connected via the OpenSearch built-in connector for Glue. We specify the OpenSearch Index we’d like to write to and the connector handles the credentials, domain and port. In the screen shot below, we write to the specified index index_os_pii.

We store the masked dataset in the curated S3 prefix. There, we have data normalized to a specific use case and safe consumption by data scientists or for ad hoc reporting needs.

For unified governance, access control, and audit trails of all datasets and Data Catalog tables, you can use AWS Lake Formation. This helps you restrict access to the AWS Glue Data Catalog tables and underlying data to only those users and roles who have been granted necessary permissions to do so.
After the batch job runs successfully, you can use OpenSearch Service to run search queries or reports. As shown in the following screenshot, the pipeline masked sensitive fields automatically with no code development efforts.

You can identify trends from the operational data, such as the amount of transactions per day filtered by credit card provider, as shown in the preceding screenshot. You can also determine the locations and domains where users make purchases. The transaction_date attribute helps us see these trends over time. The following screenshot shows a record with all of the transaction’s information redacted appropriately.

For alternate methods on how to load data into Amazon OpenSearch, refer to Loading streaming data into Amazon OpenSearch Service.
Furthermore, sensitive data can also be discovered and masked using other AWS solutions. For example, you could use Amazon Macie to detect sensitive data inside an S3 bucket, and then use Amazon Comprehend to redact the sensitive data that was detected. For more information, refer to Common techniques to detect PHI and PII data using AWS Services.
Conclusion
This post discussed the importance of handling sensitive data within your environment and various methods and architectures to remain compliant while also allowing your organization to scale quickly. You should now have a good understanding of how to detect, mask, or redact and load your data into Amazon OpenSearch Service.
About the authors
 Michael Hamilton is a Sr Analytics Solutions Architect focusing on helping enterprise customers modernize and simplify their analytics workloads on AWS. He enjoys mountain biking and spending time with his wife and three children when not working.
 Daniel Rozo is a Senior Solutions Architect with AWS supporting customers in the Netherlands. His passion is engineering simple data and analytics solutions and helping customers move to modern data architectures. Outside of work, he enjoys playing tennis and biking.
Omnibot 2000: The $500 Drink Serving Robot from 1985!
Post Syndicated from LGR original https://www.youtube.com/watch?v=tK6sqxT0ttQ
Information on the SourceHut outage
Post Syndicated from corbet original https://lwn.net/Articles/958125/
Users of SourceHut will have noticed that the site has been unreachable;
Drew DeVault has now posted a report on
what is happening (it’s a distributed denial-of-service attack) and
what is being done to recover.
We deal with ordinary DDoS attacks in the normal course of
operations, and we are generally able to mitigate them on our
end. However, this is not an ordinary DDoS attack; the attacker
posesses considerable resources and is operating at a scale beyond
that which we have the means to mitigate ourselves. In response,
before we could do much ourselves to understand or mitigate the
problem, our upstream network provider null routed SourceHut
entirely, rendering both the internet at large, and SourceHut
staff, unable to reach our servers.
Security updates for Friday
Post Syndicated from jake original https://lwn.net/Articles/958124/
Security updates have been issued by Debian (kernel, linux-5.10, php-phpseclib, php-phpseclib3, and phpseclib), Fedora (openssh and tinyxml), Gentoo (FreeRDP and Prometheus SNMP Exporter), Mageia (packages), Red Hat (openssl), SUSE (gstreamer-plugins-rs and python-django-grappelli), and Ubuntu (dotnet6, dotnet7, dotnet8, openssh, and xerces-c).
2023 Ransomware Stats: A Look Back To Plan Ahead
Post Syndicated from Christiaan Beek original https://blog.rapid7.com/2024/01/12/2023-ransomware-stats-a-look-back-to-plan-ahead/

Last year was not a year for the faint of heart. Organizations of every size found themselves faced with ransomware attacks at varying levels of sophistication, yet every one of them was damaging. And as we step into 2024, the first victims of ransomware attacks are already being reported. What can the 2023 ransomware stats tell us about the year that was, and how can we use them to plan for the year ahead?
In this blog we will dissect the multifaceted dimensions of ransomware attacks observed in 2023, providing insights and looking a bit forward to what 2024 might bring. For our data analytics, we make use of publicly available data (like posts from the ransomware groups themselves) and 2023 ransomware incident data from our MDR team, both of which we’ve enriched with context from the data gathered in Rapid7 Labs.
The 2023 Ransomware Landscape
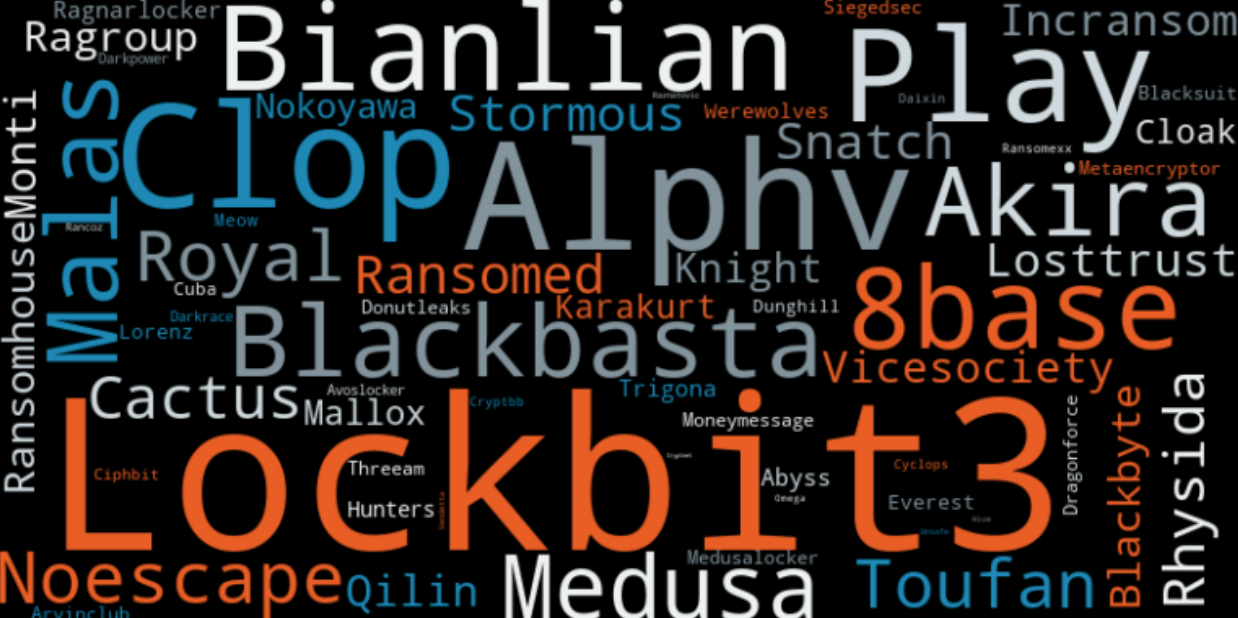
Most ransomware groups have leak sites where they announce victims of their campaigns. These leak sites are a tactic to put more pressure on their victims to pay the ransom; if the ransom is not paid, they will leak the compromised data via that site. The frequency of posts is a good indicator of how often and which groups are active, but the ransomware landscape is larger than that.
The number of unique ransomware families these groups utilized in 2023 decreased by more than half, from 95 new families in 2022 to 43 in 2023. This tells us that the “current” ransomware families and models are working/profitable and there’s no need to develop something brand new.
Our combined sources uncovered nearly 5200 reported ransomware cases throughout the course of 2023. In reality, we believe that number was actually higher because it doesn’t account for the many attacks that likely went unreported.
Coveware, a security consulting firm, found that the average ransom payment for Q3 2023 was $850,700 USD. That is only the amount paid for the ransom; the real costs for recovering of a ransomware incident are based on a range of factors that include:
- Downtime
- Damage to reputation
- Lost business
- Labour hours
- Increased insurance coverage costs
- Legal counseling and settlement fees
The same report mentioned a staggering 41% of victims opted to pay the ransom.
The below scatter plot shows the number of ransomware incidents attributed to the top 20 ransomware groups for 2023, based on leak site communications, public disclosures, and Rapid7 incident response data.
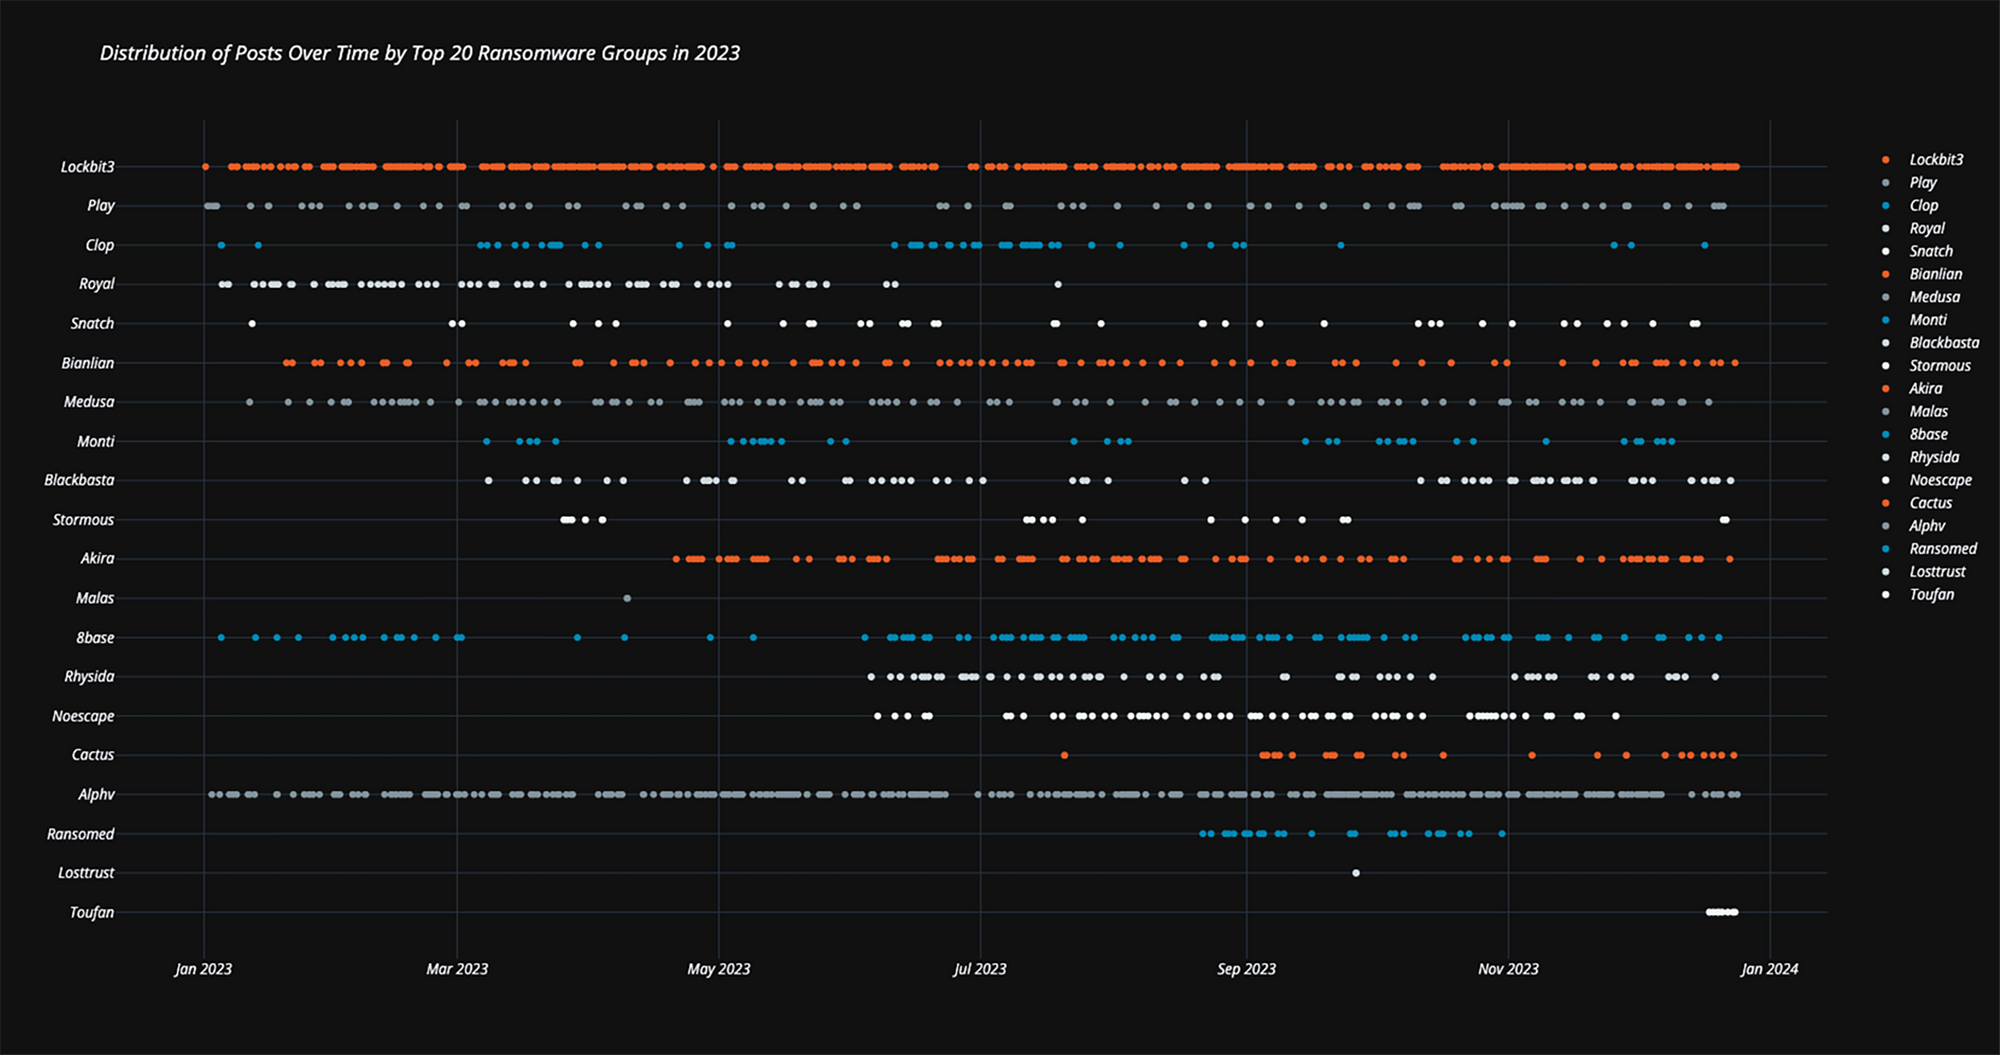
Zooming in on the most active groups (supported by a large ecosystem of initial access brokers), the top 5 groups we identified are:
- Alphv aka BlackCat ransomware
- BianLian
- Cl0P
- Lockbit(3)
- Play
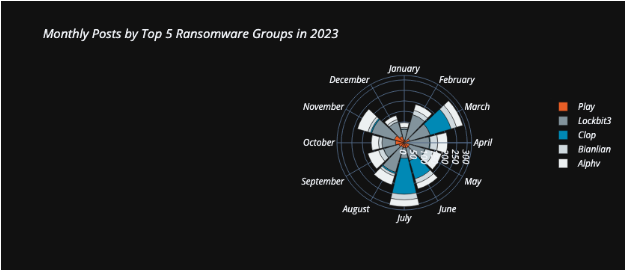
The below polar-bar chart visualizes these groups’ frequency of postings per month on their leak sites:
2023 Ransomware Attacks
Rapid7 Labs conducted an analysis of the 2023 ransomware attacks using data sourced from both external and internal reports. We compared the modus operandi of these attacks and mapped them out against the MITRE ATT&CK model. The results are visualized in the following diagram:
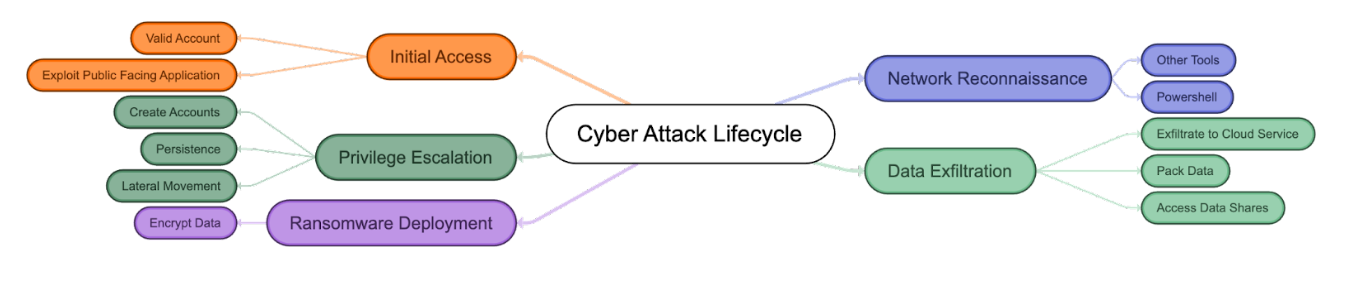
This diagram effectively encapsulates the common patterns and methodologies observed in the majority of ransomware attacks. It serves as a visual representation, outlining the sequence of steps typically followed by attackers from initial breach to final ransom demand. In our statistics, exploiting a public facing application and having a valid account are the top initial attack vectors we observed in ransomware-focused attacks in 2023.
Ransomware Groups That Came and Went
In 2023, several ransomware groups ceased their operations or underwent significant transformations. Hive ransomware marked the year’s start with its disruption in January. BlackByte, after briefly reappearing with a new white logo, went offline for the last two months of 2023.
Royal ransomware rebranded itself as Black Suit, as evidenced by the matching binaries.They took down their victim portal and started posting more on their Black Suit leak site.
Vice Society, another group, became inactive for over three months, taking down their main and backup leak sites.
NoEscape, previously known as Avaddon, executed an exit scam, further indicating the volatile and shifting landscape of ransomware groups in 2023. An “exit scam” is a fraudulent scheme where a business or individual collects funds or assets from customers or investors and then suddenly ceases operations, disappearing with the collected funds.
Who To Watch For in 2024
We anticipate that the top 5 groups mentioned will still be active in 2024; however, during the course of 2023, new groups surfaced that are interesting to watch. In random order: Cactus, Rhysida, 8base, Hunters International, Akira, and the recently surfaced Werewolves group are those to keep an eye out for.
Mystery of Flying Tiger Line Flight 739, March 16, 1962
Post Syndicated from The History Guy: History Deserves to Be Remembered original https://www.youtube.com/watch?v=YfqtNznCCFs